

Page 1
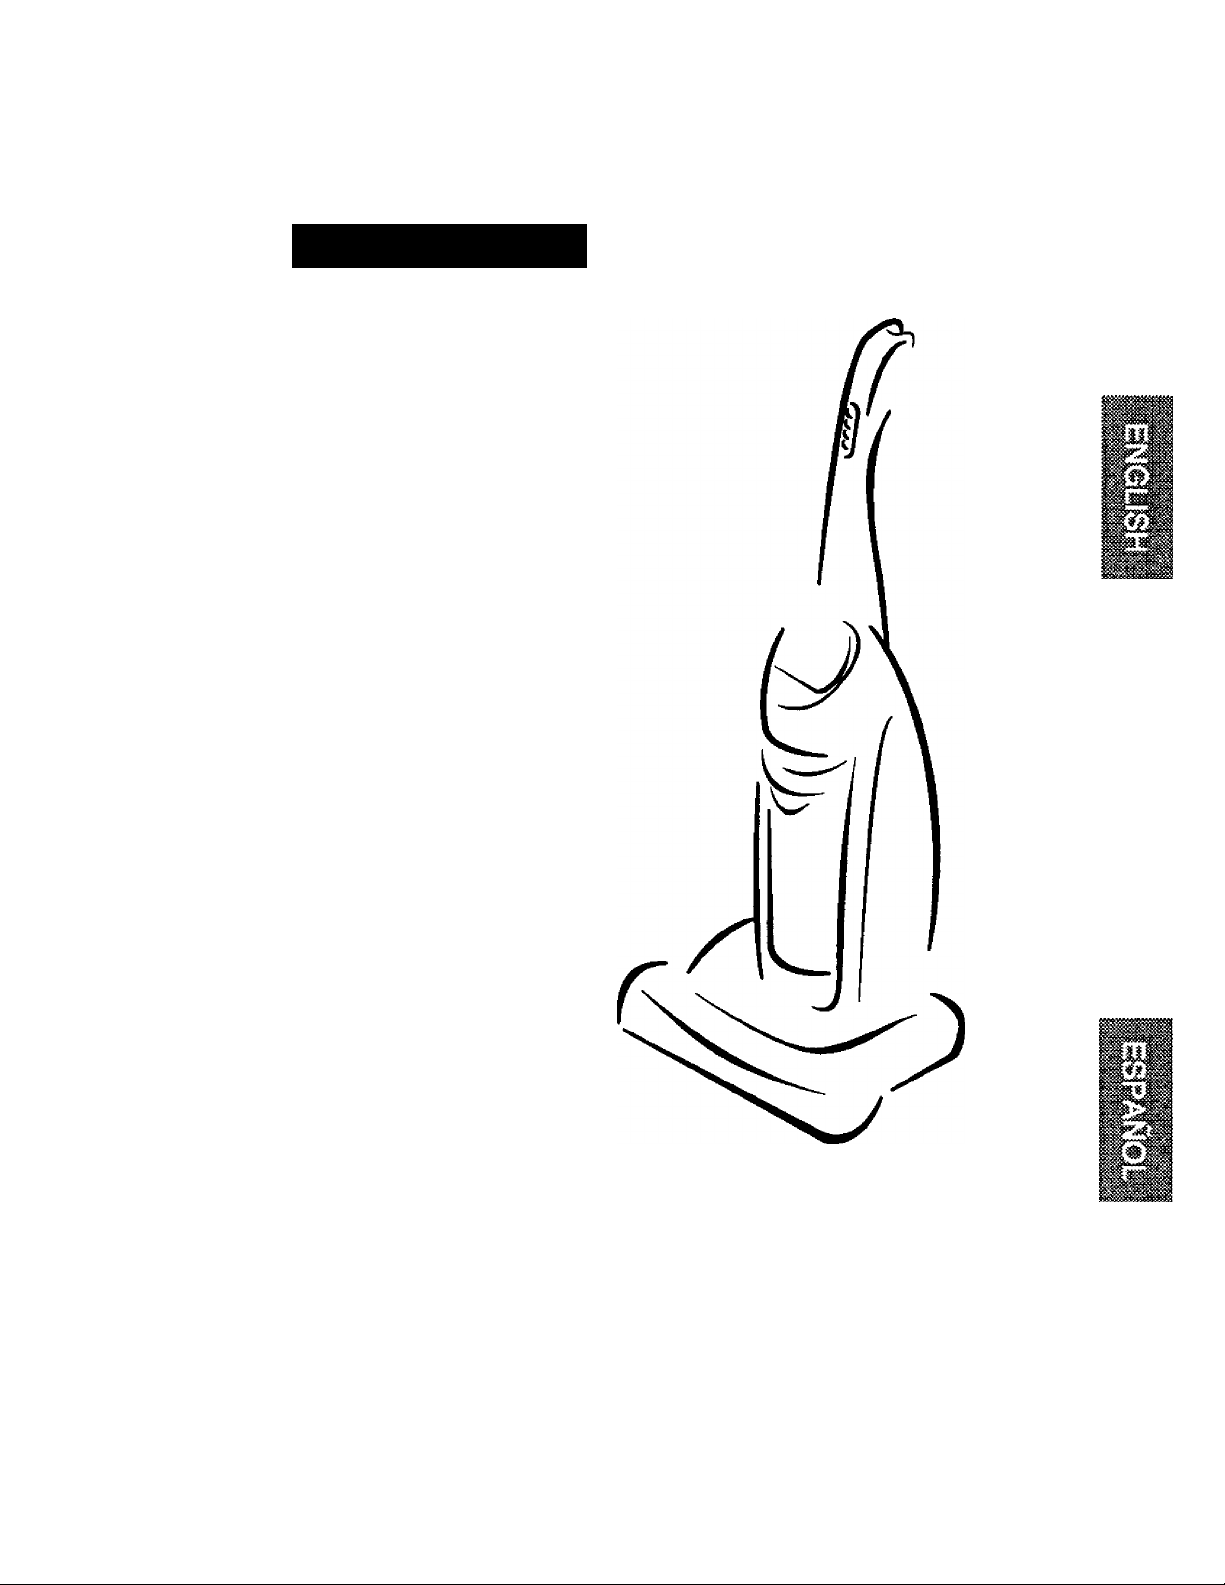
Owner's Manual
Manual Del PmpleUuio
Kenmore
Vacuum (leaner
Aspiradora
Model, Modelo 116.35912
116.35913
CAUTION:
Read and follow ail
safety and operating
instructions before first
use of this product.
CUIDADO:
Lea y sigue todas las
instrucciones de operación
V seguridad antes del uso de
este producto.
Sears, Roebuck and Co., Hoffman Estates, IL 60179 U.S.A.
www.sears.com
Part No. C012CHE00U00-KC01ZCHEZ0U0
Printed in Mexico
Impreso en Mexico
Page 2

ТАВШОРСШТШТВ
Before Using Your New
Vacuum Cleaner
Kenmore Vacuum Cleaner Warranty —
..........................................
2
Important Safety Instructions..........................3
Parts and Features
.......................................
Assembly Instructions ................................5-6
Operating Insbuctions
Cord Release
Releasing the Handle ................................7
Touch Control ............................................7
Gentle Sweep Function
Pile Height Selection and Setting.............8
Attachments
Attachment Use Table ............................11
...................................
..............................................
............................
..........................................
9-10
Vacuuming Tips
2
Performance/Safety Features.................12
Vacuum Cleaner Care ................................13
4
6
6
.7
Vacuum Cleaner Storage
Cleaning Exterior and Attachments
Dust Bin Cleaning ...................................14
Primary Filter Removal and Cleaning . 15,16
Motor Safety Filter Cleaning ..................16
Exhaust Filter Replacement
Light Bulb Replacement
Agitator Cleaning.....................................19
ClogRemo\«i ............................................19
Troutrfeshooting..........................................
Requesfr^ Assistance Or Seivioe,.. back page
......................................
........................
......
...................
.........................
11
13
13
17
18
20
Please read this guide. It will help you assemble and operate your new Kenmore vacuum
cleaner in the safest and most effective way.
For more information about vacuum cleaner care and operation, call your nearest Sears store.
You wifi need the complete model and serial numbers when requesting information. Your vacu
um cleaner's model and serial numbers are located on the Model and Serial Number Plate,
Use the space below to record the model number and serial number of your new Kenmore
vacuum cleaner.
Model No.
Serial No.
Date of Purchase
Keep this book and your sales check (receipt) in a safe place for future reference.
■ ' ■ ■ : ' ■
____________________________________________________________________
LIMITED ONE YEAR FULL WARRANTY ON KENMORE VACUUM CLEANER
This warranty is for one year from the date of purchase, and includes only private household
vacuum cleaner use. During the warranty year, when this vacuum cleaner is operated and
maintained according to the owner's manual instructions, Sears will repair any defects in
material or workmanship free of charge.
This warranty excludes vacuum cleaner bags, belts, light bulbs, and filters, which are
expendable parts and become worn during normal use.
For warranty servioe, return this vacuum deaner to the nearest Sears Service Center in the
United States.
This warranty applies only while this product is in use in the United States. This warranty gives
you specific legal rights, and you may also have other rights which vary from state to state.
Sears, Roebuck and Co., D/817 WA, Ho№nan Estates, IL 60179
Page 3

IMPORTANT SAFETY INSTRUCTIONS
Your safety Is important to us. To reduce the risk of
A
WARNING:
fire, electrical shock, injury to persons or damage
when using your vacuum cleaner, follow basic safe
ty precautions including the following:
Read all instructions in this manual before
assembling or using your vacuum cleaner.
Use your cleaner only as described in this
manual. Use only with Sears recommend
ed attachments.
Disconnect eiectrical supply before servic
ing or cleaning out the brush area. Failure
to do so could result in electrical shock or
the brush suddenly starting.
Do not leave cleaner when plugged in.
Unplug from outlet when not in use and
before performing maintenance.
To reduce the risk of electrical shock - Do
not use outdoors or on wet surfaces.
Do not allow to be used as a toy. Close
attention is necessary when used by or
near children.
Do not use with a damaged cord or plug. If
cleaner is not working as it should, has
been dropped, damaged, left outdoors, or
dropped in water, return it to a Sears
Service Center.
Do not puli or carry by cord, use cord as a
handle, close a door on cord, or pull cord
around sharp edges or corners. Do not run
cleaner over cord. Keep cord away from
heated surfaces.
Do not unplug by pulling on cord. To
unplug, grasp the plug, not the cord.
Do not handle plug or cleaner with wet
hands.
Do not put any objects into openings.
Do not use with any opening blocked; keep
free of dust, lint, hair, and anything that
may reduce air flow.
Keep hair, loose clothing, fingers, and all
parts of body away from openings and
moving parts.
Turn off all controls before unplugging.
Use extra care when cleaning on stairs.
Do not put on chairs, tables, etc. Keep on
floor.
Do not use cleaner to pick up flammable
or combustible liquids (gasoline, cleaning
fluid, perfumes, etc.), or use in areas
where they may be present. The fumes
from these substances can create a fire
hazard or explosion.
Do not pick up anything that is burning or
smoking, such as cigarettes, matches, or
hot ashes.
Do not use cleaner without dust bin and/or
filters in place.
Always clean the dust bin after vacuuming
carpet cleaners or freshener, powders, and
fine dust. These products clog the filters,
reduce airflow and can cause damage to
the cleaner. Failure to clean the dust bin
could cause permanent damage to the
cleaner.
Do not use the cleaner to pick up sharp
hard objects, small toys, pins, paper clips,
etc. They may damage the cleaner or dust
bin.
Unplug before connecting Handi-mate Jr.®
You are responsible for making sure that
your vacuum cleaner is not used by any
one unable to operate it properly.
SAVE THESE INSTRUCTIONS
Proper assembly and safe use of your vacuum cleaner are your responsibilities. Your
cleaner is intended for Household use. Read fois Owner's Manual carefully for important
use and safety information. This guide contains safety statemente under warning and
caution symbols.
Page 4
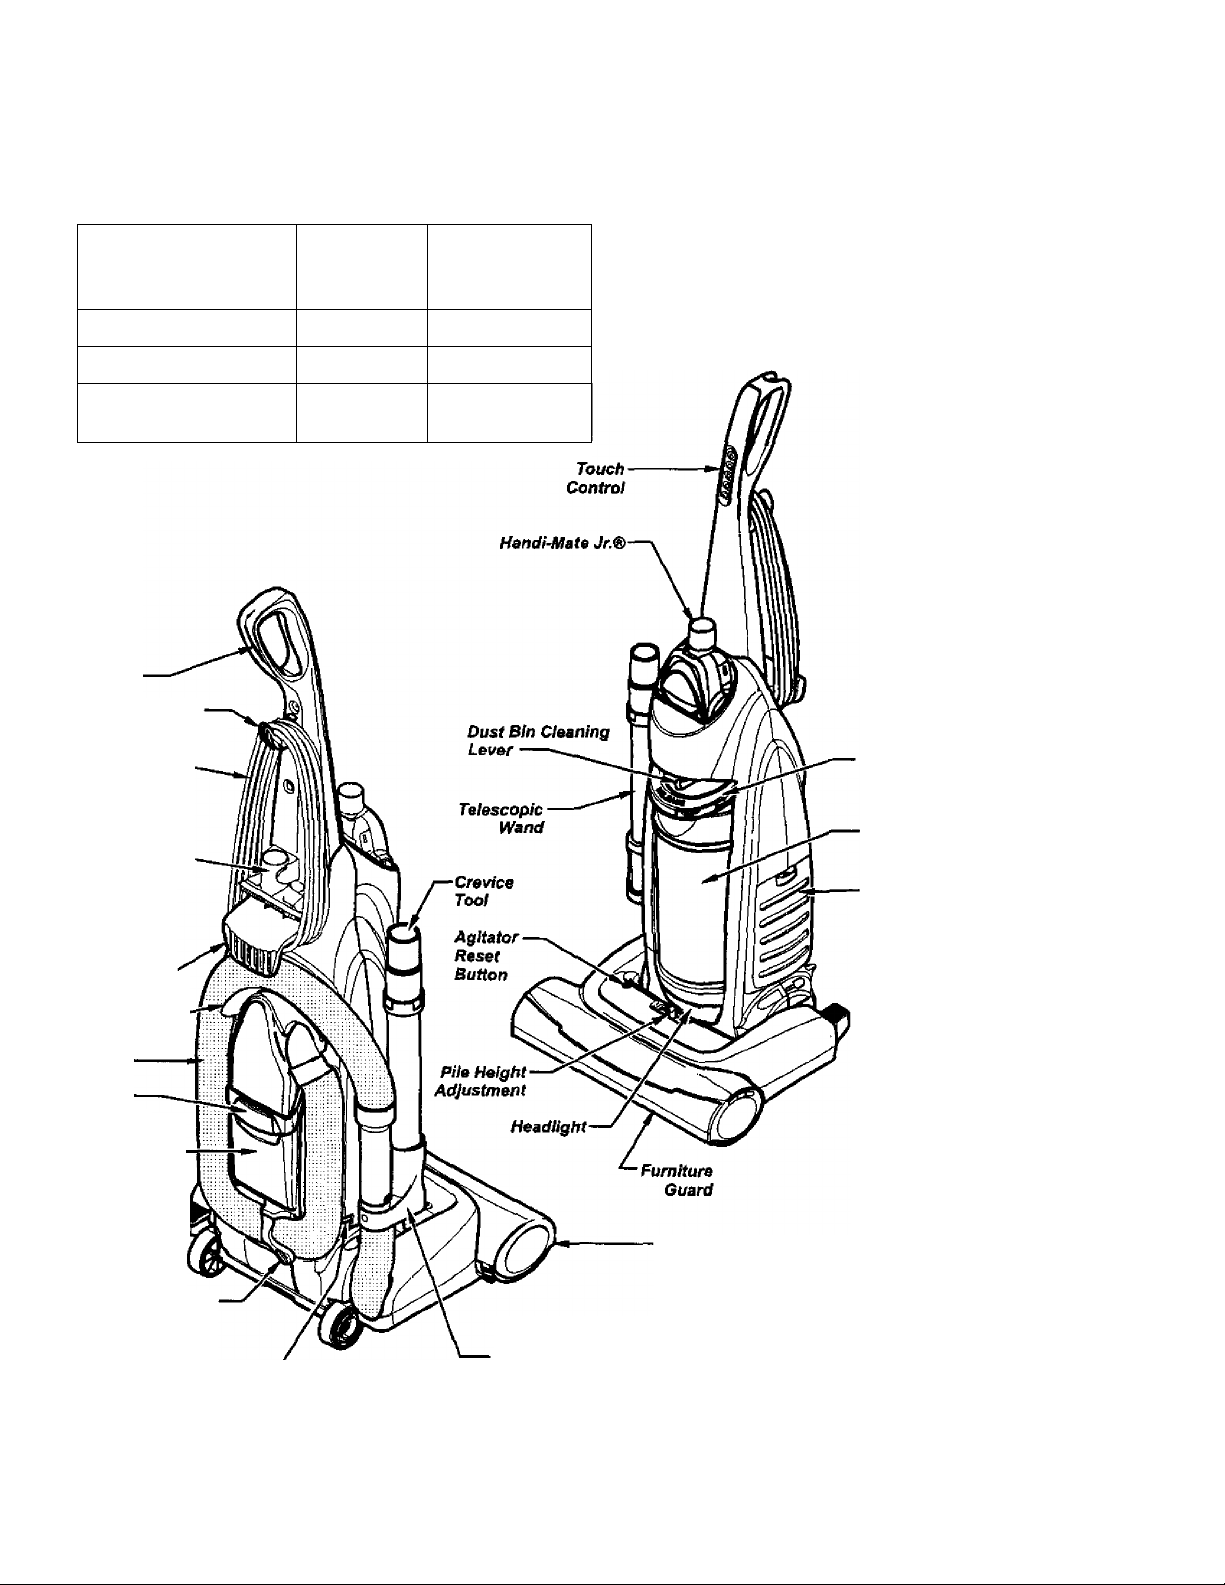
PARìBANDreATURES
It is important to know your vacuum cleaner’s parts and features to assure its proper and safe use. Review these before using your vacuum cleaner.
Item Part No.
In U.S.
Part No.
In Canada
Headiight Bulb 20-5248 20-5248
Exhaust Filter
Primary Filter
Handle
Quick Release
Upper Cord Hook
Power Cord
Combination
Brush
Carrying
Handle
Upper Hose
Hook
Extension
Hose
20-86889 20-86889C
20-82912
Dust Bin
Release
Handle
Dust Bln
Exhaust
Filter Cover
(Filter Inside)
Filter
Release
niter Cover
(Motor Safety
niter Inside)
Handle-'*^
Release
Pedal
Extension Hose
Release Lever
Nozzle
Wand Holder
Motor Protector
(Behind Hose)
Page 5
A
Please pay special attention to these hazard alert boxes, and follow any instructions
given. WARNING statements alert you to such dangers as fire, electric shock, burns
and personal injury. CAUTION statements alert you to such dangerous personal
injury and/or property damage.
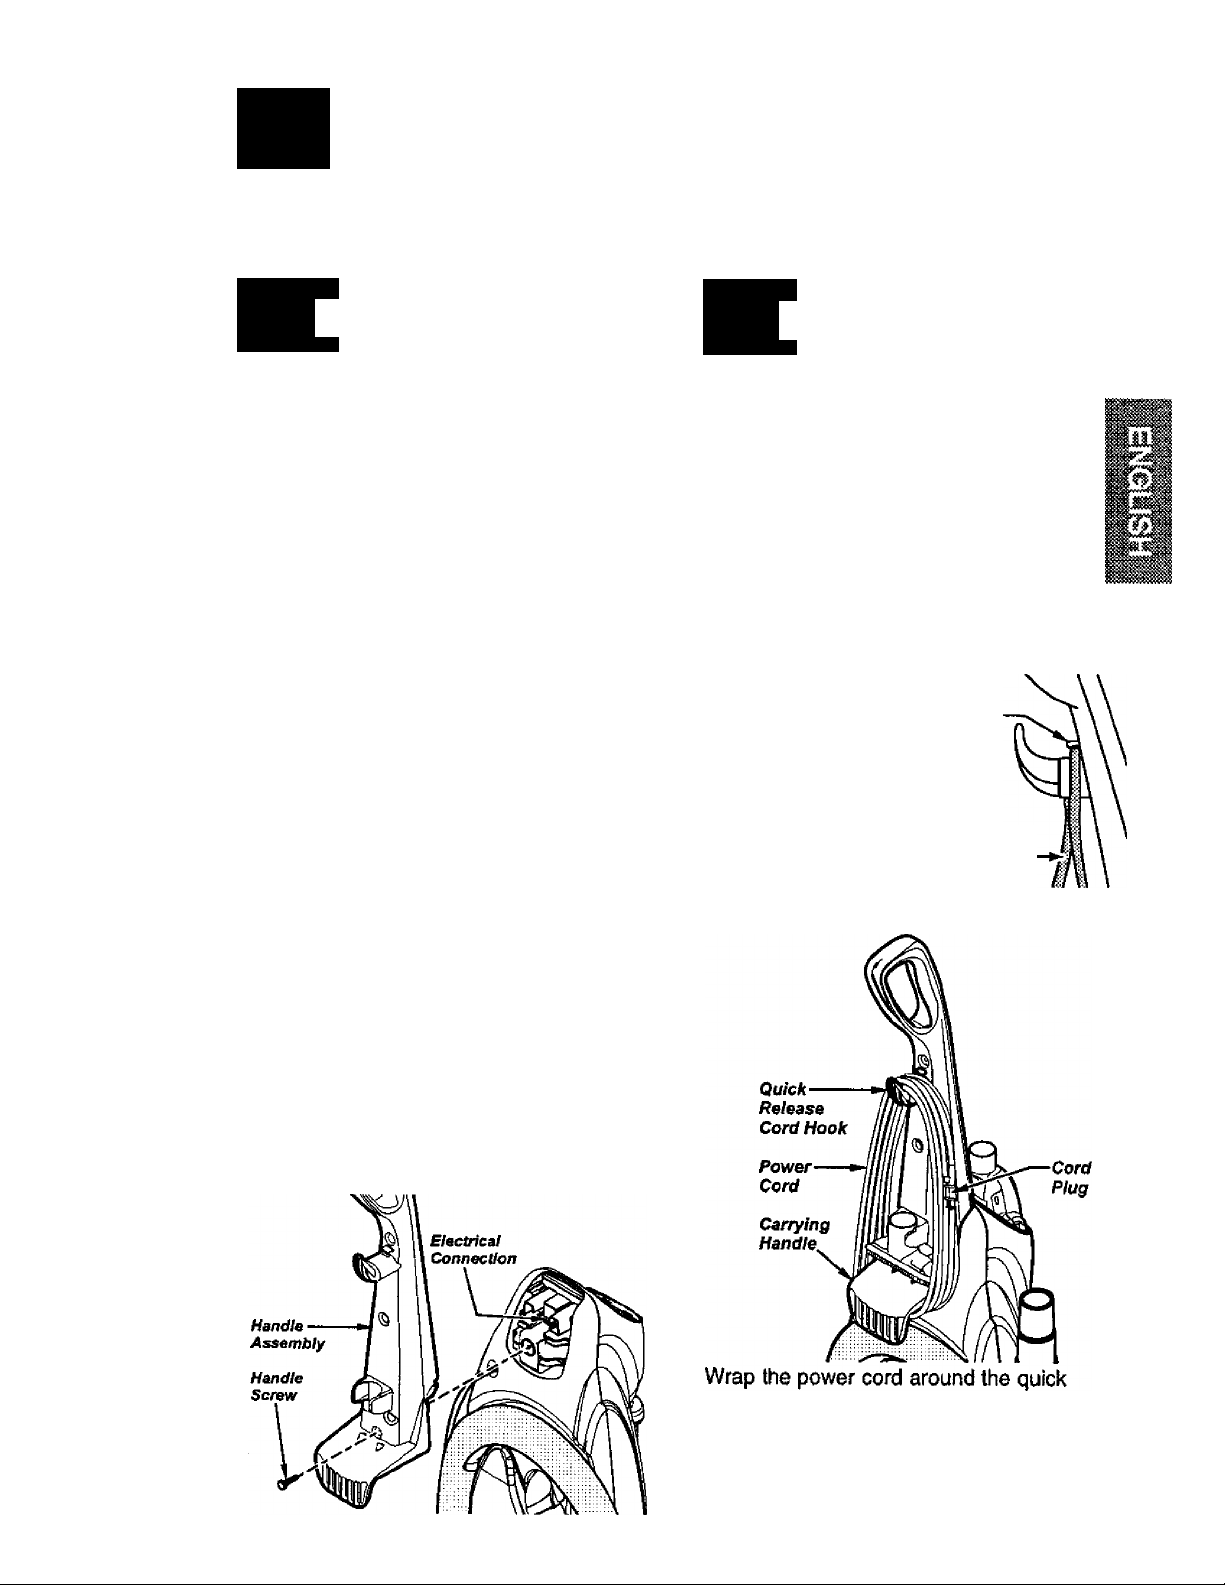
ASSEMBLY INSmUCnONS
A
Before assembling the vacuum cleaner,
check the PACKING LIST on the cover of
the separate REPAIR PARTS LIST. Use
this list to verify that you have received all
the components of your new Kenmore
vacuum cleaner.
WARNING
Electrical Shock Hazard
Do not plug into the electrical suf^ly
until the assembly is complete. Failure
to do so could result in electrical shock
or injury.
HANDLE ASSEMBLY
Remove the handle screw from the body
of the vacuum.
Remove the combination brush from the
handle to expose the handle mounting hole.
Position the handle assembly as shown in
the illustration below.
mmmmà
A
CAUTION
Do not over tighten.
Overtightening could strip the han
dle screw hole.
Do not operate the vacuum cleaner
without the screw in place.
CORD ASSEMBLY
Make sure the quick release upper cord
hook is in the upright position. Remove
the wire tie from the power cord.
Make sure the
power cord is
placed into the lock
ing notch on the
body as shown. This
helps keep the
power cord out from
under the vacuum
cleaner agitator.
Locking
Notch
Power
Cord -
When installing the handle, firmly press
the handle onto the body. Secure with
handle screw provided.
Begin to tighten the screw with your fin
gers. It may be necessary to adjust the
handle slightly.
Using a screwdriver, tighten handle screw.
Reinstall combination brush.
release cord hook and the carrying handle.
Lodi the power cord plug onto the power
cord.
Page 6
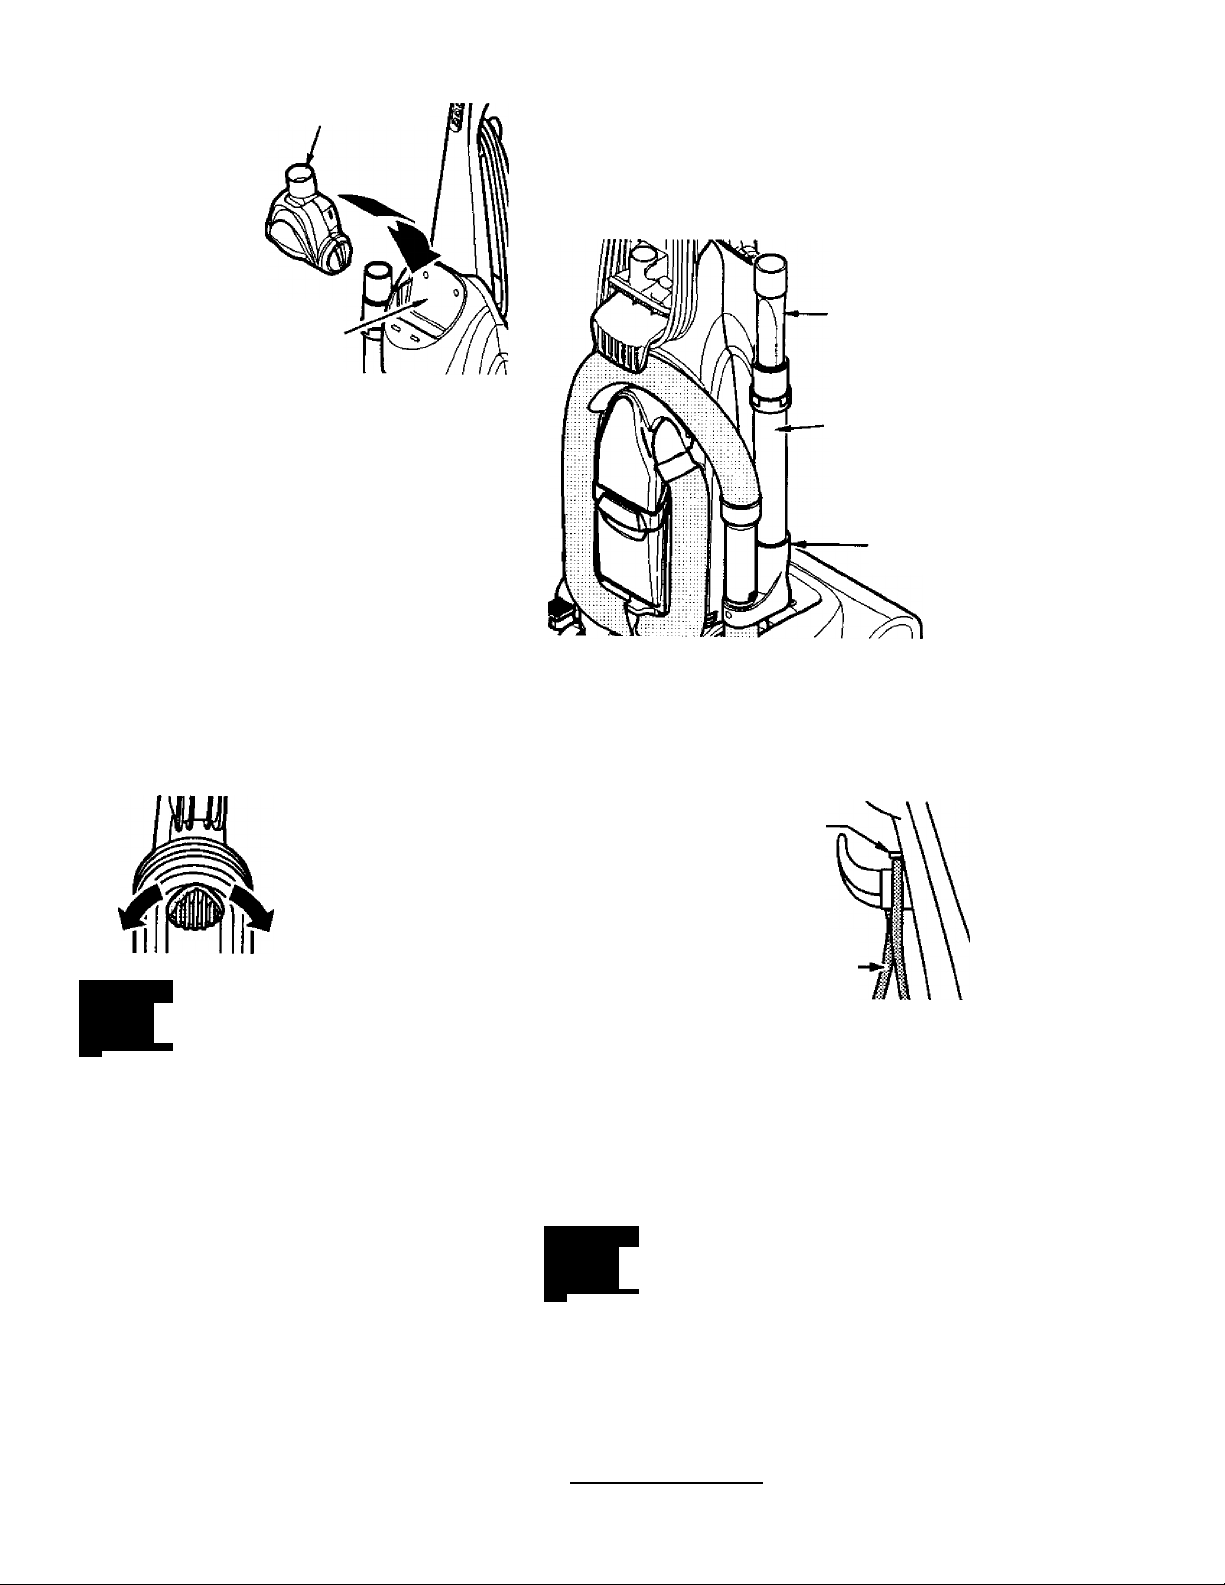
HANDI-MATE JR.®
For operation of
Handi-Mate Jr.®
see separate
Owner’s Manual.
TO INSERT HANDI-MATE JR®
Place Handi-Mate Jr.® into the storage
compartment.
Rotate the Handi-Mate Jr.® back until it
snaps into place.
TO REMOVE HANDI-MATE JR.®
Rotate Handi-Mate Jr.® out of the storage
compartment.
Handi-Mate Jr.®
Handl-Mate Jr.®
Storage
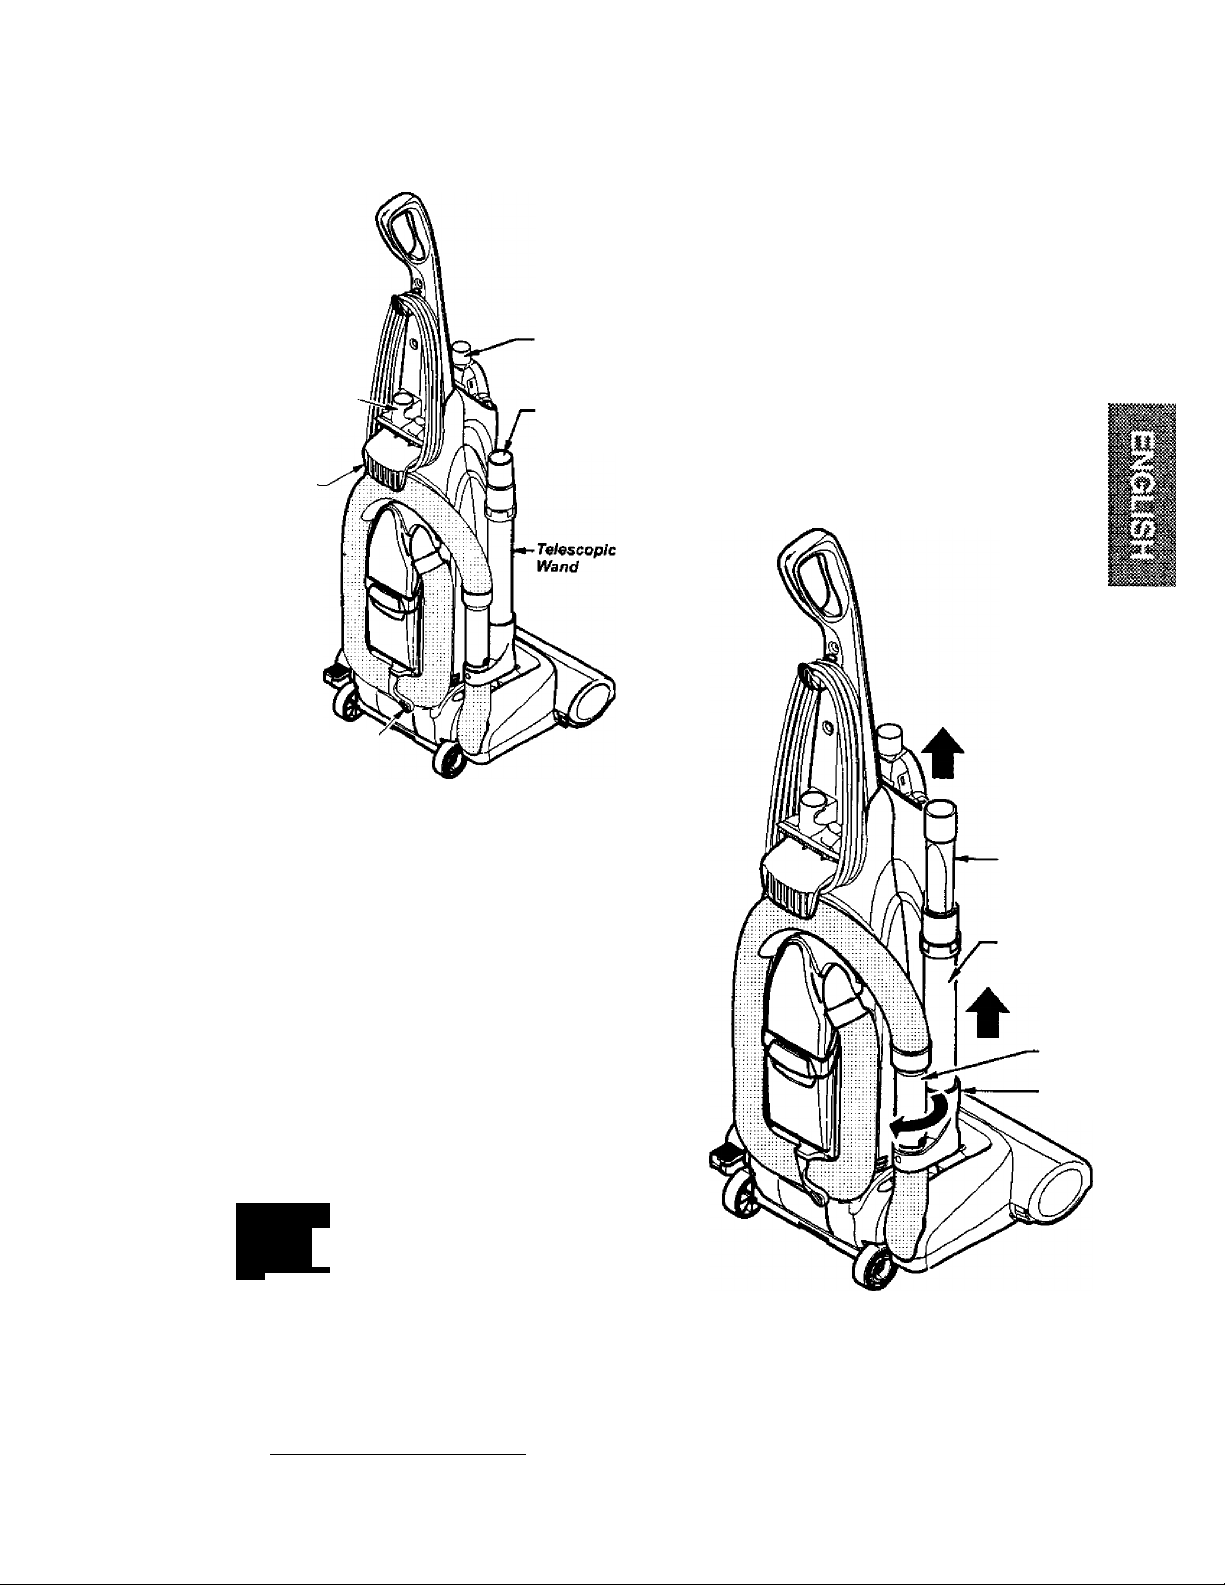
TELESCOPIC WAND
PUCEMENT
Place the telescopic wand in the wand
holder. Place the crevice tool in the top of
the telescopic wand.
Ctwice
Toot
Te/escop/c
Wand
Wand
Holder
OPERATING INSTRUCTIONS
1. Turn the quick
release upper
cord hook to
either side and
down to release
the power cord.
A
WARNING
• To reduce the risk of electric shock,
this vacuum cleaner has a polarized
plug (one blade is wider than №e
other).
• The jiMug wilt fit in a polarized outlet
only one way. If the plug does not fit
fully in the outlet, reverse the plug. If it
still does not fit, contact a qualified
technician to install the proper outlet.
Do not change the plug in any way.
2. Detach the
power cord plug
from the power cord
and pull the cord off
the quick release
upper cord hook.
Be sure the power
cord is still locked
into the locking notch of the upper cord
hook.
3. Plug the polarized power cord into a 120
Voit outlet located near the floor.
4. To replace cord, turn upper cord hook to
the up position, then wrap cord.
A
WARNING
Personal Injury and Product Damage
Hazard
* DO NOT |:^ace hands or feet under
^e unit at any time.
• DO NOT use outlets above coun
ters. Damage from cord to items in
surrounding area could occur.
Locking
Notch
Power
Card -
Page 7
НаВйШ THE НАЫИ£
Release the handle by pressing down on
the handle release pedal with your foot and
pulling back and down on the handle with
your hand.
Note; The agitator does not rotate when the
vacuum cleaner is in the upright position.
TOUCH CONTBOL
OFF - Turns OFF the vacuum cleaner
(suction) motor.
CARPET - Turns ON the vacuum cleaner
motor to HIGH suction level and the agita
tor motor to HIGH speed level for cleaning
of most carpets and rugs.
GENTLE - Turns ON the vacuum cleaner
motor to HIGH suction level and the agita
tor motor to LOW speed level for gentle
cleaning of most delicate carpets.
FLOOR - Turns ON the vacuum cleaner
motor to HIGH suction level and turns OFF
the agitator motor for cleaning of bare
floors.
Your Kenmore Vacuum features a two (2)
speed, direct drive agitator for cleaning a
variety of floor surfaces. Please review the
table below before using your vacuum.
1, Do not use the CARPET setting (high
speed) for cieaning berber style carpet.
The high agitator speed could damage
the carpet or cause excessive carpet
wear.
-OFF
-CARPET
— GENTLE
— FLOOR
li
MOTOR FUNCTION
Touch
Control
Button
OFF
CARPET
GENTLE
FLOOR
Vacuum Cleaner
(Suction) Motor
OFF
HIGH
HIGH
HIGH
Use the GENTLE setting (low speed)
ONLY for berber or delicate pile carpet
ing. The agitator may slow down or stop
on thick carpeting, area rugs or throw
rugs, if agitator stops and does not
restart, See page 12, AGITATOR
MOTOR OVERLOAD PROTECTOR of
the owners manual.
3.
The FLOOR setting may be used for ail
indoor bare floors including wood, tile,
linoleum, slate etc.
Agitator
Motor
OFF
HIGH
LOW
OFF
Touch Control
Setting
Gentle (2)
Floor (3)
Agitator
Speed
High
Low
Off
Bare
Floor
✓
Commercial
or Low Pile
✓
Berber
or Delicate
Carpet
Plush Shag
✓ ✓
Area
Rug
✓
Page 8
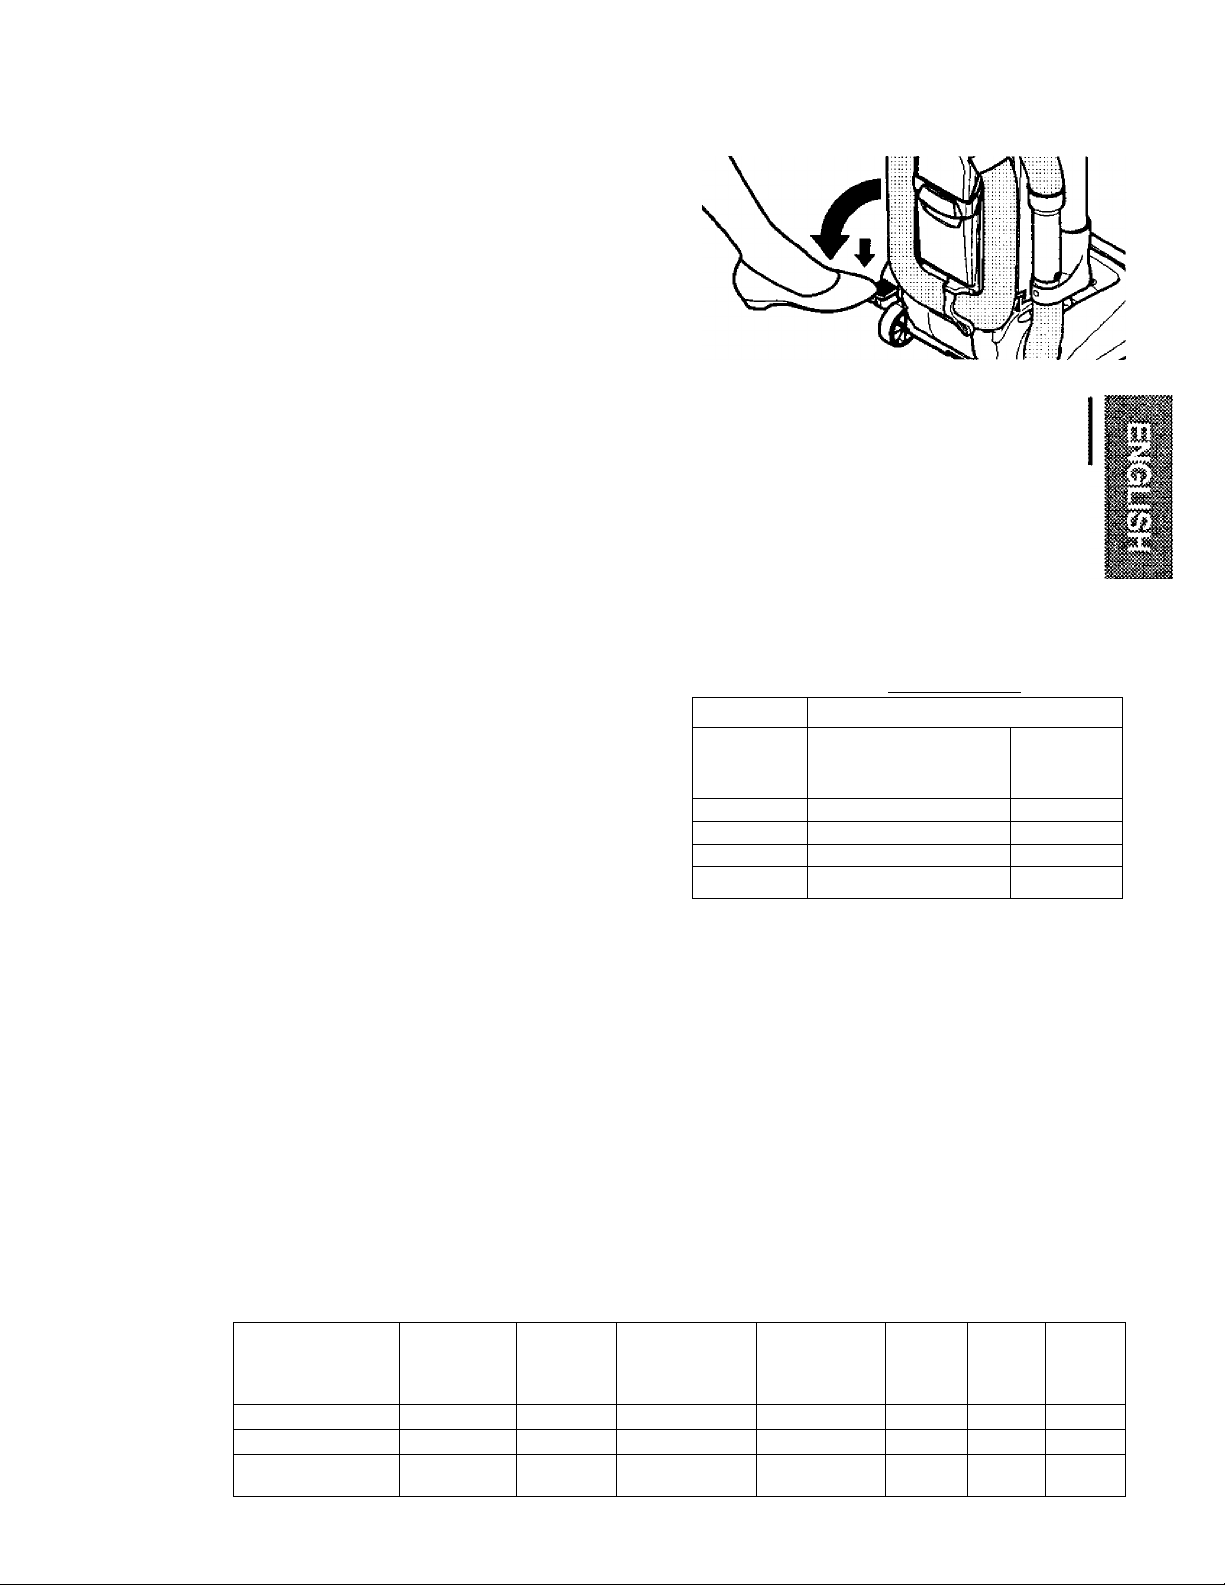
To sefect a pile height setting:
Turn off vacuum cleaner. Select a pile height
setting by tilting the cleaner back until front
wheels are lifted slightly off the floor.
Slide the adjustment lever to the correct
setting.
There are four (4) pile height settings on the
vacuum cleaner. Use the LOW setting for
most )ow*pile carpets and bare floor
cleaning (with agitator OFF), and the HIGH
setting for high-pile carpets like shag carpet,
scatter rugs, etc. Use the other settings as
needed for carpet heights in between.
A
CAUTION
Do not ^low vacuum cleaner to remain
in one spot for any lengtii of time when
the agitator is turning. Damage to car
pet may occur.
Page 9
Combination
Brush
Carrying
Handh
Extansian
Hose
------
^
ATTAOftJENTS
Handi-Mate Jr.®
Crevice
Tool
BBSS
TELESCOPIC WAND WITH SUCTION CONTROL SLIDE
1. Remove the lower end of the extension
hose from the wand holder by grasping
the hose collar, twisting, and pulling
straight up,
2. Remove the telescopic wand from the
wand holder.
3. Remove the crevice tool from its stor
age position in the wand. Turn the lock
ing ring to the UNLOCK position.
Extension Hose
Release Lever
TO USE ATTACHMENTS
Remove the lower end of the extension
hose from the wand holder by grasping the
hose collar, twisting, and pulling straight up.
Rotate the extension hose release lever
down if maximum reach is needed.
Note: The motor protector may open when
using attachments or when cleaning new
carpet, due to reduced airflow caused by the
attachments themselves or caused by new
carpet lint filling the dust bin quickly. See
the TROUBLESHOOTING section.
A
WARNING
Electrical Shock And Personal Injury
Hazard
3. Crevice
Tool
2. Telescopic
Wand
1. Hose
Collar
Wand
Holder
Disconnect electrical supply befc^e
pe^rming maintenance to the unit.
Failure to do so could result in electri
cal shock or personal injury from vac
uum cleaner suddenly starting.
Page 10
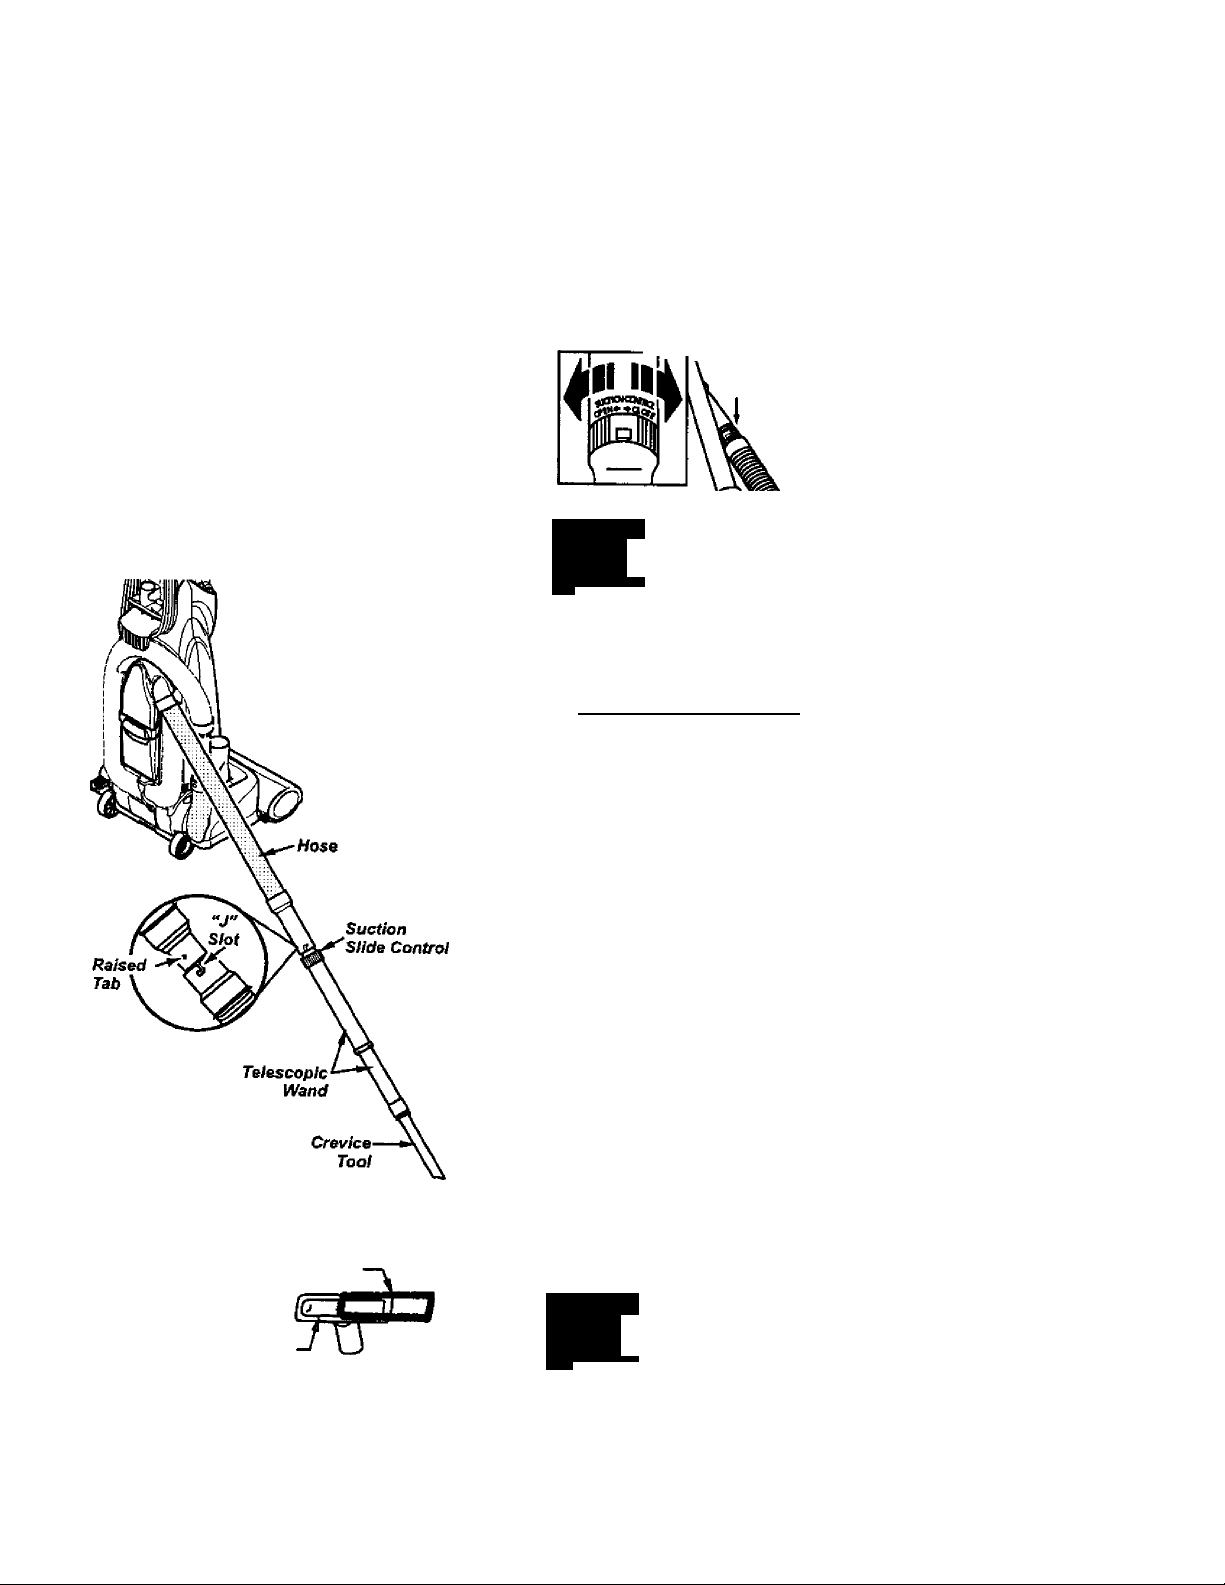
Extend the wand to its full iength. Turn the
locking ring to the LOCK position. Attach the
extension wand onto the open end of the
hose.
Low«r
Wand-
^Loek
> .
Wend
Locking Ring
Jnloek
Align the tabs on the extension wand with
the “J” slots in the hose. Push the wand into
the hose and twist to the right to lock.
To achieve maximum reach with the attach
ments, add the crevice tool to the end of the
wand by inserting and twisting slightly.
-------------------
SueOon
Confro/ Slide
Upper
Wand
TO OPERATE SUCTION CONTROL SLIDE
Telescopic Wand
When using attachments for cleaning
draperies, small rugs with low pile and other
delicate items, twist the suction control slide
to the open position. This slide is located on
the telescopic wand, close to the hose.
This will reduce suction for ease of cleaning.
Sucdon
Suction Note; Return
Control
SBde
A
CAUTION
When using attachments, be careftjl not
to overextend the streU^ hose when
reat^Ing. Trying to re^h beyond the
hose stretch capability coutd cause the
vacuum deaner to tip over.
suction control
slide to the dosed
position for normal
cleaning.
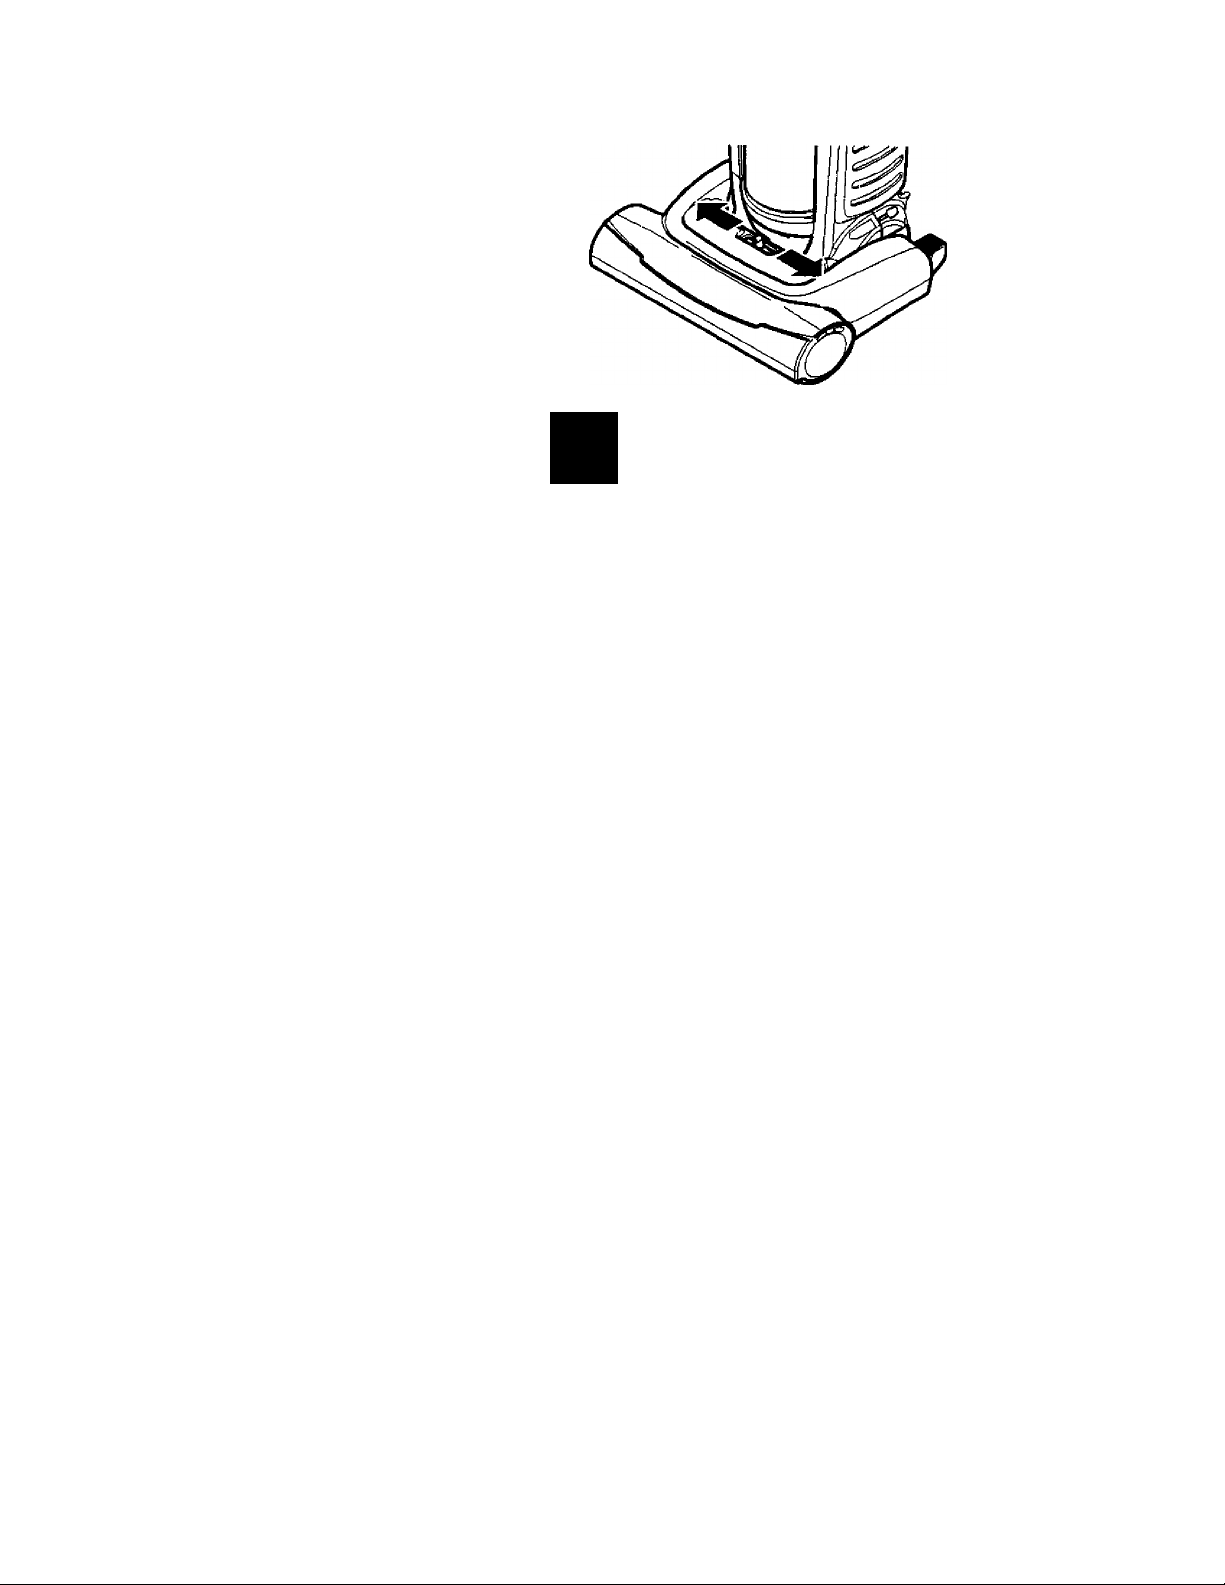
Attach combination brush directly to the wand.
Brush
Combination
Brush
See ATTACHMENT USE TABLE for combi
nation brush usage.
Brush
Holder
TO STORE ATTACHMENTS
Remove the combination brush. Snap into
appropriate storage location.
Remove crevice tool from the wand by twist
ing. Lay aside.
Remove the telescopic wand from the hose.
Twist the wand to the left and pull from the
hose end.
Unlock the wand by turning the wand locking
ring to the UNLOCH< position.
Slide the lower wand into the upper wand.
Turn the wand locking ring to the LOCK posi
tion.
Place the crevice tool down into the com
pressed wand. Place the telescopic wand in
the wand holder
A
CAUTION
DO NOT pull the vaojum cleaner
around №e room by the hose. Prc^erty
damage or personal injury could result.
10
Page 11
CLEANING AREA
Paredes
iplicabie
la escalera,
eraonal o
de limpieza,
;tos de flujo de
5 antes de exa-
ATTACHMENT
CREVICE TOOL
COMBINATION BRUSH \
Handi-Mate Jr.® ^
’Always clean attachments before using on fabrics.
Furniture*
✓
✓
✓
VACUUMINe TIPS
Carpet edges
Guide either side or the front of the noz
zle along a baseboard.
Stairs
Set handle in full upright position. Agitator
stops rotating. Use the crevice tool, com
bination brush or Handi-Mate Jr.®.
Unit Tipping
When using the attachments keep the
extension hose release lever in the locked
position when possible. This helps to keep
the vacuum cleaner from tipping over
when stretching the hose. If additional
hose is needed then unlock the release
lever and pull out additional hose. Use
caution not to tip over vacuum cleaner.
Between
Cushions*
✓
A
Personal Injury Hazard
DO NOT set the vacuum cleaner on
stairs. It may fall, causing personal injury
or property damage.
For best cleaning results, keep the airflow
passage clear.
Unplug the vacuum cleaner from the outlet
before checking.
Drapes*
✓
wmmmi
WARNING
Stairs Walls
✓
✓
✓
✓ = Applicable
11
Page 12
PERFCmMANCBSAreTY TCATURES
MOTOR PROTECTION SYSTEM
Motor Protector
This vacuum cleaner has a motor protector
by-pass valve which automatically opens to
provide cooling air to the vacuum cleaner
motor when a clog prevents the normal
flow of air to the motor. If the by-pass valve
opens to prevent motor overheating and
possible damage to the vacuum cleaner,
you will notice a change of sound as air
rushes through the valve opening.
To correct problem; See the TROUBLE
SHOOTING section.
NOTE: The motor
protector may open
when using
attachments or
when cleaning new
carpet, due to
reduced airflow
caused by the
attachments
themselves or by
new carpet lint filling
the dust bin quickly.
See the TROUBLESHOOTING section.
Note: Do not block motor protector.
Motor Protector
(Behind Hose)
To correct problem; Turn the vacuum
cleaner off and unplug the power cord from
the outlet to allow the vacuum cleaner to
cool and the thermal protector to reset.
Check for and remove dogs, if necessary.
See page 19, CLOG REMOVE section.
Also check «md replace any dogged filters.
Wait approximatety tttirty (30) minutes and
plug the vacuum cleamer In and turn back
on to see if the motor protector has reset.
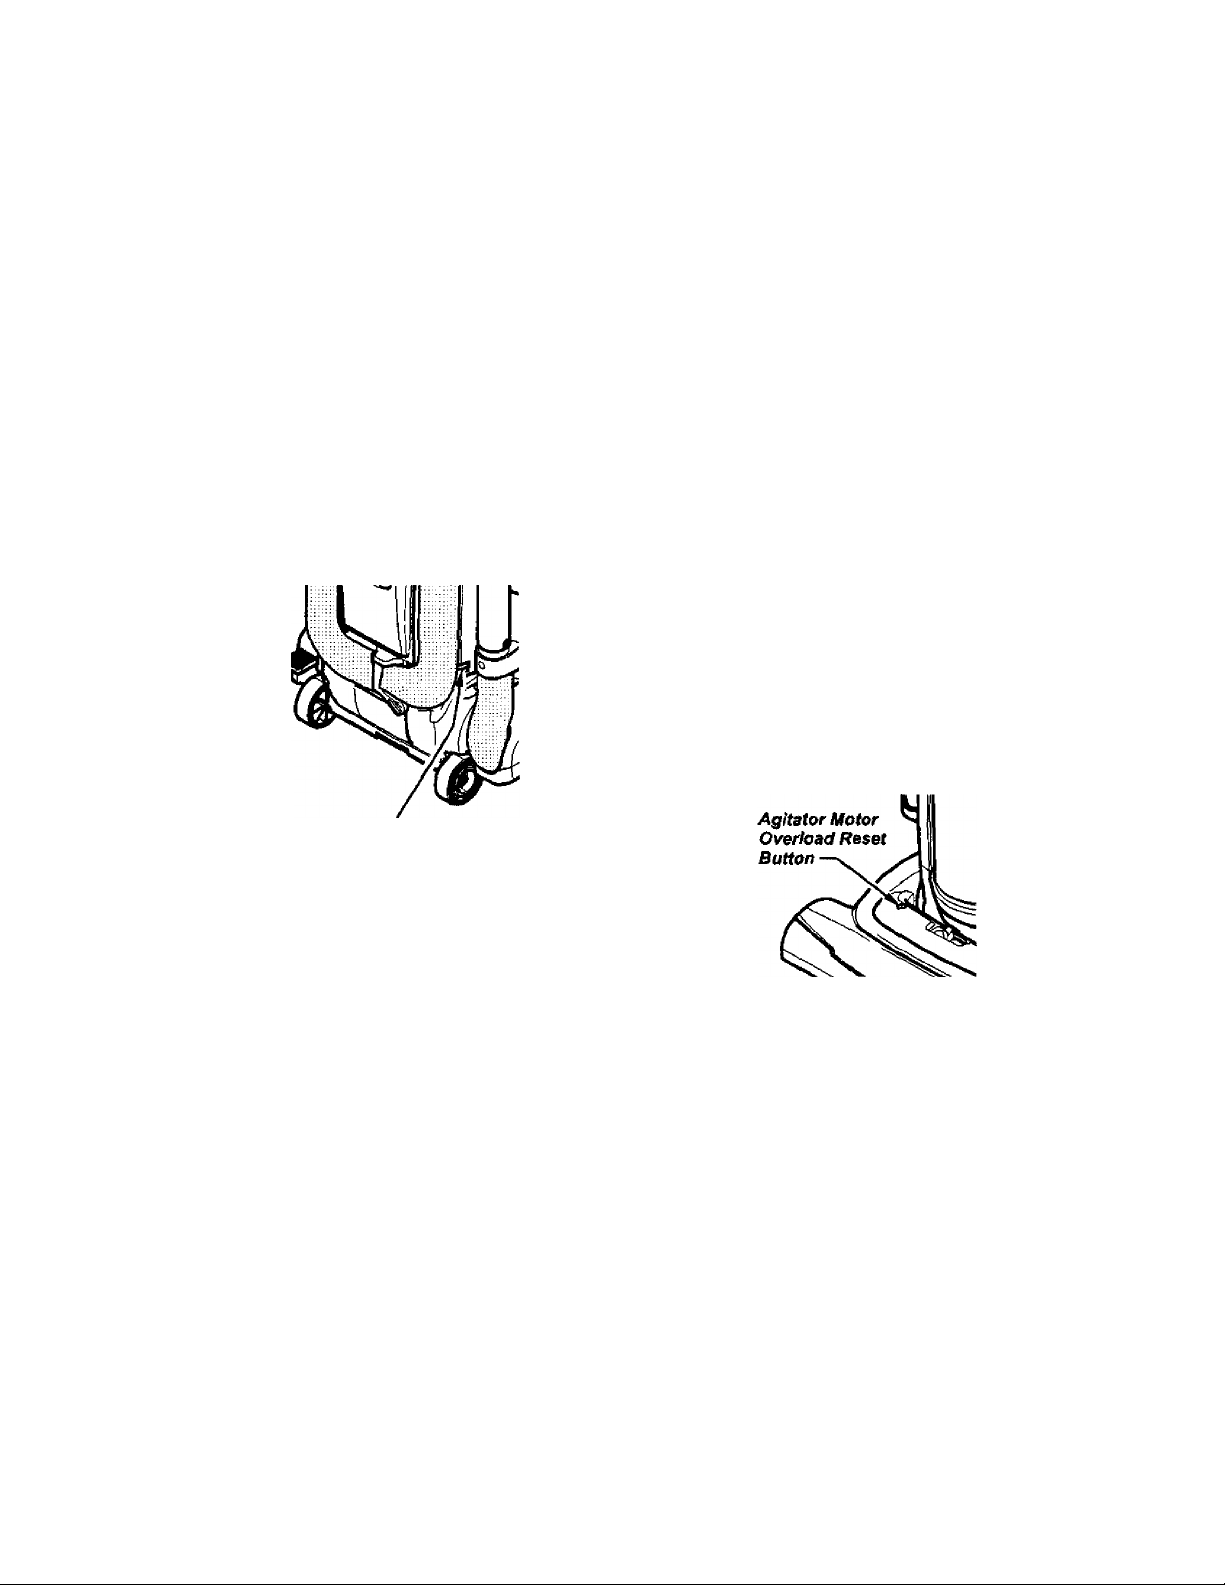
AGITATOR MOTOR
OVERLOAD PROTECTOR
The agitator motor has built-in protection
against motor damage should the agitator
jam. If the agitator slows down or stops, the
agitator overload protector shuts off the
agitator motor. The vacuum cleaner motor
will continue to run.
To correct prd>lem: Turn off and unplug
vacuum cleaner, remove obstruction, then
press reset button.
To reset: Push in
the agitator
overload protector
button.
Thermal Protector
This vacuum cleaner has a thermal
protector, which automatically trips to
protect both the vacuum cleaner and the
agitator motor from overheating. If a clog
prevents the normal flow of air to tfie motor,
the thermal protector turns the motor off
automatically. This allows the motor to cool
in order to prevent possible damage to the
vacuum cleaner.
If the pr<d>Iem persists, have the vacuum
deaner serviced by a Sears or other
qualified technidan.
12
Page 13

VACUUM CLEANER CARE
Always follow all safety precautions when
performing maintenance to the vacuum
cleaner.
VACUUM aEANBi STOFWQE
Gather the cord and wrap it loosely around
the upper and lower cord hooks. Lock power
cord plug onto the power cord.
Store the vacuum
cleaner in a dry,
indoor area, on
the floor with the
handle lodged in
the upright posi
tion.
A
A
WARNING
Electrical Shock Artd Personal Injury
Hazard
Disconnect electrical supply before
performing m^ntenance to the unit.
Failure to do so could result In electri
cal shock or persons^ injury from vacu
urn cleaner suddenly starSng.
WARNING
EiectrIcaJ Shock And Personal Injury
Hazard
Wrapping die cord too tightly puts
stress on the cord and can cause cord
damage. A damaged cord is an electri
cal shock hazard ^d could cause per
sonal injury or damage.
CLEANING EXTERIOR A№) ATTAC»ttENTS
Unplug cord from wall outlet. DO NOT drip
water on vacuum cleaner.
Clean exterior using a clean, soft cloth that
has been dipped in a solution of mild liquid
detergent and water, then wrung dry. Wipe
dry after cleaning.
To reduce static electricity and dust build
up, wipe outer surface of vacuum cleaner
and attachments.
Wash attachments in warm soapy water,
rinse and air dry. Do not dean in dishwasher.
A
CAUTION
Do not use attachments if they are
wet. Attachments used in dirty areas,
such as under a refrigerator, should
not be used on otfier surfaces until
they are washed. They could leave
marks.
13
Page 14

A
WARNING
Always unplug power cord from electri
cal oufiet before performing any ser-
^rice on vacuum.
TO REMOVE DUST BIN
Lift dust bin handle located at the top of
the dust bin.
Pull the handle up
Dust Bin
Handls
and lift dust bin up
and out of the vac
uum cleaner.
Dust
Bin
Hold dust bin
over a trash con
Dust Bin
Handle
tainer.
Press the dust
bin door release
button down
ward to release
the door.
Dust Bin
Door
Release
Button
The door wilt
swing open and
the debris will
fall into the trash
container.
Shake the dust
Dust Bin
Emptying
Door
bin to release
and debris that might hang in the filter ele
ment.
Remove any clogs that might be located in
the suction port or filter port area.
Sucfion Port
Filter Port
TO EMPTY DUST BIN
Before remowng debris from dust bin it is a
good idea to move the dust bin filter clean
ing lever back and forth several times.
Moving the lever
back and forth
loosens the dust
and debris that
Dust Bin
Filter
Cleaning
Lever
has attached
itself to the filter
element inside
the dust bin.
Rotate dust bin handle to the vertical posi
tion.
Note; See PRIMARY FILTER REMOVAL
AND CLEANING section.
After the dust bin is
empty of debris,
firmly close the
door. Make sure
you hear a “click”
sound to indicate
that the door is fully
latched.
Door Door
Latch
TO REPLACE
DUST BIN
Place dust bin back
into vacuum cleaner
by inserting the bot
tom first and tilting
back with the dust bin
handle raised.
Lower the dust
bin handle to
lock dust bin in
Dust Bin
Handle
place.
A noticeable
“click” should
be heard.
14
Page 15

A
WARNING
Electiica) Shock And Personal Injury
Hazard
Unplug power cord from electrical out
let Do not operate the vacuum cleaner
without the primary or exhaust filters.
Be sure the filters are properly installed
to prevent motor failure and or eiectri-
ced shock.
Remove primary
filter by turning
it counterclock
wise and pulling
out (See arrows
on bottom of fil
ter). Rinse with
water only as
needed, do not
use any deter
gent or soap.
Dust Bin
Lid
Cleaning
Cam
Filter
PRIMARY FILTER
Check primary filler frequently and clean
when dirty.
TO REMOVE PRIMARY FILTER
Remove the dust bin assembly as outlined
in the DUST BIN CLEANING section.
Make sure dust bin is free of debris before
removing lid and filter. Rotate dust bin lid
assembly counterclockwise as indicated on
the lid and lift off.
Turn This Direction
To Open For Emptying
Closed
Allow the filter to dry for 24 hours
before putting it back into the vacuum.
When cleaning the filter no longer
restores vacuum suction to full power you
need to replace the filter.
Note: See PARTS AND FEATURES
for the filter number.
TO REPLACE PRIMARY FILTER
To replace filter, insert it over cleaning
cams as far as it will go. Make sure rubber
seal at top of filter is flush against filter sup
porter, turn fitter clockwise to secure into
place.
Note: Under normal use and care, your fil
ter can be expected to last up to 5 years.
, Rubber
Cleaning sealCams
While holding dust bin lid over a trash con
tainer grasp primary filter, rotate counter
clockwise and lift off.
Clean primary filter by gently tapping over a
trash container. Tap on several sides to
ensure best cleaning.
Filter
Supporter
Dust Bin
Lid
Re-assemble dust bin lid to dust bin. Insert
into cleaner and secure with dust bin han
dle.
15
Page 16

TO REPLACE DUST BIN LID
Replace dust bin lid assembly by placing
back on dust bin with marks on the lid
aligned as shown under 0|pen (For
Erupting) on the back of the dust bin.
Turn This Direction
To Close For Use
Open
Rotate clockwise while pressing downward
so marks align as shown above dosed
(For Use).
Insert dust bin
into cleaner.
Lower the dust
bin handle to
lock dust bin in
place.
A noticeable
“click" should
be heard.
Dust Bin
Handle
wm
A
WARNING
Electrical Shock Hazard
Unplug power cord from electrical out
let. Do not operate the vacuum clean
er without №e motor safety filter. Be
sure the filter Is diy and properly
installed to prevent motor failure and/or
electrical shock.
MOTOR SAFETY FILTER
Check motor safety filter frequently and clean
when dirty.
M
5Ssa®;iSii:Sias5i№»si
1. To remove motor safety filter lift filter
release handle upward and rotate the filter
cover out.
2. Remove filter by pressing on the sides of
the filter frame and pulling out at the same
time.
niter
Frame
Bottom
Tabs
3. Clean filter if necessary by placing it under
running water wait until dry before replacing.
11*11
Filter
Cover
4. When putting the filter back into the filter
cover, listen for the filter assembly to snap
into place.
•Filter
Release
Handle
Note; Push only on frame, not filter itself.
5. Replace cover by fitting bottom tabs into
slots and rotating into compartment. Push
filter release handle down until you hear a
noticeable “click".
16
Page 17

EXHAUST RLTER RBíLACaffiNT
The HEPA exhaust filter must be replaced
when dirty. It should be replaced regularly
depending on use conditions.
The filter CANNOT be washed as it will
lose its dust tr^ping ability.
Note: See PARTS AND FEATURES
for the exhaust filter number.
Remove exhaust filter cover by pressing
the release tab on the cover and rotating
out from vacuum.
Press
Here
Exhaust
Filler ,
Cover
Place new filter cartridge into cover making
sure that airflow arrow on side of cartridge
points into cover.
The foam seaJ of the filter should be
placed against №e vacuum cleaner body.
Seal Against
Vacuum Cleaner ™®''
Body Cover-
-Exhaust
Filter
Replace the exhaust filter cover by placing
bottom tabs in slots and rotating in until
cover snaps into place.
Remove the filter cartridge from cover.
17
Page 18

A
WARNING
Electrical Shock Or Personal Injury
Hazarxl
Disconnect electrical supply before
performing maintenance to the unit
Failure to do so could result in
electrical shodc or personal injury
from the vacuum cleaner suddenly
starting.
TO REMOVE LIGHT BULB
1. Disconnect power cord from electrical
outlet.
4. Remove the light
bulb by pulling
straight out.
5. To replace the
light bulb carefully
insert fully into slot.
Flat
Screwdriver
Slots
Headlight
Lens
A
CAUTION
Do not use a bulb rated over 9W (13V).
During extended use, heat tiom the bulb
could overheat surrounding plastic
parts.
2. Press han
dle release
pedal and lay
vacuum clean
er back.
3. Pry light
lens out at slot
in rear as
shown on both
sides. Rotate
lens up and lift
off.
Note: See PARTS AND FEATURES for
bulb number.
A
6. To replace light
lens, place tab at
front of lens into
slot. Rotate lens
down and firmly
snap into place.
CAUTION
Do not plug in or turn on until the vacu
um cleaner is completely reassem
bled.
18
Page 19

AQITATOR OEANINQ
To maintain efficient cleaning, the agitator
must be kept free of carpet fiber, string, or
hair build-up. After every 7 to 10 uses,
unplug and turn vacuum cleaner over and
check agitator for fiber and hair build-up.
Use scissors to remove any build-up enlangied around the agitator.
iii^^
, . OOe REMOVAL 1
Always follow all safely precautions when
performing maintenance to the vacuum
cleaner.
A
if the vacuum cleaner does not seem to have
adequate suction, first check if the dust bin is
full or if a filter is clogged. See DUST BIN
CLEANING and FILTER REPUCEMENT.
If the dust bin and filter areas are free of
ciogs, check the extension hose. Rotate the
extension hose release lever counterclock
wise to release extension hose.
WARNING
Electrical Shock Or Personal injury
Hazard
Disconnect electrical supply before
performing maintenance to the unit.
Failure to do so could result in elec
trical shock or peisonal injury from
vacuum cleaner suddenly starting.
Extension
Hose
Plug in the vacuum cleaner and turn it on,
Stretch the extension hose to maximum
length and then allow the hose to return to
its natural length.
Re-insert the hose into the opening on the
body from which it was removed. Press firmly
to assure connection. Rotate hose release
lever clockwise to the locked position.
If the dust bin and filter areas and the hose
areas are free of clogs, disconnect the noz
zle hose from the wand holder and check the
nozzle for clogging.
Hose
Collar
Extension Hose
Release Lever
Nozzle
Hose
Remove the lower end of the extension hose
from the wand holder by grasping the hose
collar, twisting, and pulling straight up.
Wand
Holder
A
Clean the agitator according to the instruc
tions in the AGITATOR CLEANING section.
Return the vacuum cleaner to the upright
position before plugging into an electrical
outlet.
19
WARNING
Personal Injury Hazard
DO NOT place hands or feet under
neath the unit at any time.
Page 20

Review this table to find do-it-yourself solutions for minor performance problems. Any service needed, other than maintenance described in this Owner's Manual, should be performed by a Sears or other qualified service agent.
A
WARNING:
Disconnect electrical supply before performing maintenance to the unit. Failure
to do so could result in electiicaJ shock or personal Injuiy.
pwmm
Vacuum cleaner
won't run.
Poor job of dirt
ptdc-up.
Vacuum Cleaner picks up
moveable rugs or
pushes too hard.
1. Unplugged at wall outlet.
2. Tripped circuit breaker/blown fuse
at household service panel.
3. Thermal protector tripped.
4. Defective wall outlet.
1. Full or clogged dust bin.
2. Wrong pile height setting.
3. Worn agitator.
4. Clogged nozzle.
5. Clogged hose,
a Hole in hose.
7. Hose not inserted fully.
8. Motor protection system activated,
(change of sound)
9. Dirty filters.
1. Wrong pile height setting.
>0^iBLE$0ml10N
1. Plug in firmly, select the desired set
ting on the touch control.
2. Reset circuit breaker or replace fuse.
3. Allow vacuum cleaner to cool, then
reset thermal protector.
4. Check with a good appiiance/lamp,
have property serviced.
1. Empty dust bin.
2. Adjust setting.
3. Take to your nearest Sears
Service Center,
4. Check CLOG REMOVAL.
5. Check lor clogs.
8. Take to your nearest Sears
Service Center.
7. insert hose fully.
8. Check for clogs.
8. Change filters.
1. Adjust setting.
U^t wont work. 1. Burned out light bulb.
Agitator does not turn. 1. Handle in full upright position.
2. Agitator Overload tripped.
3. Thermal protector tripped.
Mrfkw restricted
w№ attadimant use.
Sound changes.
Difficulty ac^ustlng pile
height setting
1. Attachment use restricts air flow.
2. New carpet fuzz clogged air path.
1. Vacuum cleaner not in proper upright
position.
20
1. Change light bulb.
1. Move handle from upright position.
2. Reset Agitator Overload.
3. Allow vacuum to cool, then reset
thermal protector.
1. Check ATTACHMENTS for fuzz, tint,
pet hair or other debris.
2. Check CLOG REMOVAL and clean
hose.
1, Place vacuum cleaner in the locked
upright position, tilt the vacuum back
sfightly and adjust pile height.
Page 21

TABLA DE CONTENtIX)
S?#^^^¥^¥?ÍKÍíáí??:íííí^5Jí'
Г\^ч
f-^li I
Шшй
Antes de usar su aspiradora nueva ..
Garantia de ia aspiradora de Kenmore
Instrucciones importantes de
seguridad ............................................
Piezas y características de aspiradora
verticai.......................................................3
Instrucciones de ensamblamiento
Instrucciones de operación
Liberación del cordón eléctrico
Desprendimiento del mango..................
Pulsador de Control...............................
Gentle Sweep Function
Ajuste y selección de nivel de pelo de la
alfombra
Accesorios
Cuadro de uso de los accesorios
Sugerencias para aspirar
Por favor lea esta guia que le ayudara a assemblar y operar su aspiradora nueva de Kenmore en una manera
más segura y efectiva.
...............................................
...........................................
.........................
...............
.....................
.............
...........
.......................
4-5
. .7
8-9
. 10
. 10
Carecteríisticas de
rendimiento/seguridad..........................
Cuidado de la aspiradora
Almacenamiento de la aspiradora
Limpieza del exterior y de los accesorios
Limpiando el cubo de la basura
Primary filter removal and cleaning
Motor safety filter cleaning......................
Filtro de escape
Cambio de ia bombilla
Limpieza del agitador.............................
Cómo eliminar los residuos de basura
en los conductos
Reconocimiento de problemas
........................
.............
.....................................
...........................
..................................
................
Información de assistanda
o servicio
..............................................
.
.........
,, .12
... 13
__ _
... 14
back page
11-12
... 12
. 12
.15
...16
...17
...18
18
19
Para mas información acerca dei cuidado y operación de esta aspirador, llame a su tienda Sears mas cercana.
Cuando pregunte por información usted necisitará el número completo de serie y modelo de la aspiradora que
están en la placa de los números de modelo y serie.
Use el espacio de abajo para registrar el número de modelo y serie de su nueva aspiradora de Kenmore.
Número de Modelo
Número de Serie,
Fecha de Compra.
Matenga este libro y su recibo en un lugar seguro para referencias futuras.
___________
QARANTIA DE U ASPIRADORA DE KENMORE
GARANTÍA LIMITADA DE UN AÑO DE LA ASPIRADORA KENMORE
Esta gararitía es por un año desde la lecha de compra, e incluye solamente el uso de la aspiradora en
hogares privados. Durante el año de garantia, cuando la aspiradora es operada y mantenida de acuerdo al
manual de instrucciones del dueño, Sears reparará cualquier defecto en materiales o fabricación libre de cargo.
Esta garantía excluye las bolsas de colección, correas, lamparillas, y filtros, las cuales son partes qastables que
se detenoran con el uso normal. r ^
Para el servido de garantía, retome esta aspiradora al Centro de Servicio Sears más cercano en los Estados
Unidos.
Esta garantía se aplica solamente mientras este producto está en uso en los Estados Unidos. Esta garantía le
da a usted derechos legales específicos, y usted puede tener también otros derechos los cuales varían de
estado a estado.
Sears, Roebuck and Co., D/817 WA Hoffman Estates. IL 60179
Page 22

NSTRUC CION ES IM PORT ANTE S DE SEG URI DAD
I
A
Lea todas las instrucciones en este manual antes
de armar o usar su aspiradora.
Use su aspiradora solamente como se describe
en este manual. Use solamente con los
accesorios Sears recomendados.
Desconecte la fuente de electricidad antes de
hacer el servicio o limpiar el área del cepillo. La
falla de hacer esto puede resultar en choque
eléctrico o en el súbito arranque del cepillo.
Desenchufe del tomacorriente cuando no está
en uso y antes de hacer el servicio.
ADVERTENCIA
No deje la aspiradora cuando está enchufada.
Para reducir el riesgo de choque eléctrico - No la
use afuera o sobre superficies mojadas.
No permita que se ia use como un juguete. Gran
atención es necesaria cuando es usada por o
cerca de niños.
Ñola use con un cordón o ficha dañados. Si la
aspiradora no está trabajando como debe, se la
ha dejado caer, dañado, dejada afuera, o
volteada en ei agua, retórneia a un Centro de
Servicio Sears.
No la tire o arrastre del cordón, use el cordón
como una manija, cierre una puerta sobre e!
cordón, o tire del cordón alrededor de bordes
afilados o esquinas. No pase la aspiradora sobre
el cordón. Mantenga el cordón lejos de
superficies calientes.
No desenchufe tirando del cordón. Para
desenchufar, tome !a ficha, no el cordón.
No teMTie la ficha o la aspiradora con las manos
mojadas.
No ponga ningún objeto en las aberturas.
No la use con ninguna abertura bloqueada;
manténgaia libre de polvo, hilachas, pelo, y
cualquier cosa que pueda reducir la circuiación
del aire.
Mantenga los cabellos, ropas sueltas, dedos, y
todas las partes del cuerpo lejos de aberturas y
partes movibles.
Su seguid es muy importaritB para nosotras. Рага rsducr el
riesgo de Hoencio, choque elécirioo. lesión ootporal o daños al
ufizar su aspiradora, acáúe de acuerdo con precauctones básí-
Apague todos los controles antes de desenchufar.
Use cuidado extra cuando limpie escaleras. No
la ponga sobre sillas, mesas, etc. Manténgala
sobre el piso.
No úsela aspiradora para levantar liquides
inflamables o combustibles (gasolina, fluido de
limpiar, perfumes, etc.), o la use en áreas donde
puedan estar presentes. Los vapores de estas
substancias pueden crear un peligro de
incendio o explosión.
No levante nada que esté ardiendo o echando
humo, tal como cigarrilios, fósforos, o cenizas
calientes.
No use la aspiradora sin el canasto del polvo
y/o filtros en su lugar.
Siempre limpie el canasto del polvo después
de limpiar la alfombra, limpiadores o
refrescantes, polvos, y polvo fino. Estos
productos obstruyen los filtros, reducen la
circulación del aire y pueden causar daño á la
aspiradora. La falta en limpiar el canasto de la
basura puede causar daño permanente a la
aspiradora.
No use ia aspiradora para levantar objetos
duros afilados, pequeños juguetes, alfiíeres,
sujetapapeles, etc. Ellos pueden dañar la
aspiradora o ef canasto de la basura.
Desenchufé antes de conectar el Mandi-mate
Jr,®
Usted es responsable de estar seguro de que su
aspiradora no es usada por alguien incapaz de
operarla correctamente.
GUARDE ESTAS
El armado y uso seguro de su aspiradora son su responsabilidad. Esta aspiradora ha sido diseñada
exclusivamente para uso doméstico. La aspiradora deberá almacenarse en un lugar seco y en el interior.
Lea este Manual del propietario detenidamente, pues contiene información importante sobre seguridad y
uso. Esta guia contiene información sobre seguridad debajo de símbolos de advertiencia o cuidado.
INSTRUCCIONES
Page 23

PIEZ/« Y CWWyrERÍSTICAS DE A^IRADORA VERTIO«.
Es importante concer las piezas y características de su aspiradora para asegurar su uso adecuado y seguro.
Examínelas antes de usar su aspiradora.
Objeto
Bolsa para polvo
Bombilla de farol
Filtro de escape
Mango
Sujetador superior
de liberación rápida
dei cordón
Cordón
eléctrico
Cepillo para
sacudir
Mango para
transportar
Pieza №
enEUA
20-50690
20-5248
20-86889
Pieza №
en Canadá
20-50690C
20-5248C
HandPMate
Palanca limpieza
canasto del polvo
Tubo
telescópico
i—Herramienta
^ para tapices
Botón para
ajustar la
altura
Pulsador
de control
Manija canasto
del polvo
Cubo de la
basura
(futro adentro)
Filtro de
escape
(dentro)
Manguera expansible
Escape
Ftldo
Cubierta
detfíiro
(adentro)
Pedal de
liberación
del mango
Palanca escape
manguera
extensión
'Protector de
meubles
BoquiUa
PortO’tubo
Protector de motor
(Behind Hose)
Page 24

A
Рог lavor ponga atención especial a estas instrucciones dadas. Advertencia: Este información le
alertará con el peligros de fuego, choques eléctricos, quemadas y lesiones. Cuidado: Este
información le alertara a peligros corno lesiones y daños de propiedad.
A
Antes de armar la aspiradora, cheque la
LISTA DE EMBALAJE en la cubierta separa
da de la Lista de Partes para Reparación.
Use esta lista para verificar que ha recibido
todos las componentes de su nueva aspiradora
Kenmore,
ADVERTENCIA
Peligro de choque eléctrico
No conecte la aspiradora hasta que ter
mine de armarla. De io contrario podría
causar un choque eléctrico o lesión cor
poral.
MONTAJE DEL MANGO
Quite el tornillo del mango localizado justo
debajo del borde superior de la parte posterior
de la aspiradora, ver ilustración de arriba.
Saque el cepillo combinación de la manija para
exponer el agujero de montaje de la manija.
Coloque el mango como se ve en el diagrama
abajo.
A
CUIDADO
No apriete demasiado el tomillo.
Si lo aprieta demasiado podría arruinar
los orificios para el tomillo.
No c^re ia aspiradora tener instalado
el tomillo.
COLOCACIÓN DEL
CORDÓN
Asegúrese de que el sujetador superior del cor
dón de liberadón rápida se encuentre en posi
ción vertical. Quite el alambre con el que está
atado el cordón eléctrico.
Asegure el cordón
eléctrico en la ranura
de ia base
presionándolo en el
gancho superior de
liberación rápida para
el cordón eléctrico
como se muestra.
Cuando instale la manija, apriete firmemente la
manija sobre el cuerpo. Asegure con el tornillo
para la manija provista.
Empiece a apretar el tomillo con los dedos. Quizá
sea necesario ajustar un poco el mango.
Apriete el tornillo con un destornillador.
Reinstale el cepillo combinación.
Arrolle el cordón de poder alrededor del gancho
de soltar rápido el cordón y la manija de llevar.
Page 25

HANDI-MATE JR.®
PARA INSERTAR EL
HANDI-MATE ®
Ponga el Handi-Mate Jr.® adentro de! compar
timiento de depòsito.
Rote el Handi-Mate Jr. ® hacia atrás hasta que
calce en su lugar,
PARA SACAR EL HANDI-MATE ®
Rote el Handi-Mate Jr. ® afuera de! compar
timiento de depòsito.
COLOCACIÓN DEL TUBO
TELESCÓPICO
Ponga el tubo telescòpico en ei soporte dei
tubo. Ponga la herramienta de hendiduras en el
ápice dei tubo telescópico.
Herramienta
para tapices
Tubo
tiescópíco
Porte-tubo
INSTRUCCIONES DE OPERACIÓN
U
1. Gire el sujetador
del cordón de lado
a lado y hacia abajo
para liberar el cor
dón eléctrico.
A
ADVERTENCIA
P^igro de lesión personal y dafío al producto
• Para reducir el riesgo de choque eléctrico,
esta aspiradora cuenta con una clavija polariza
da (uno de los contactos es más ancho que ei
otro).
• La cla>rija s^o puede introducirse de una
manera en el enchufe. Si ia clavija no cabe bien
en el enchufe, Inviért^. Si aún no cabe, llame
a un electricista para que instale un enchufe
correcto. No altere la davija de ninguna man
era.
2. Desprenda el
enchufe del cordón
eléctrico y quite el
cordón del sujetador
superior. Esté seguro
de que el cable de
poder está todavía
fijado en la muesca
de traba del gancho
de arriba del cordón.
3. Verifique que la aspiradora tenga instalada
una bolsa. Consulte CAMBIO DE LA BOLSA
PARA POLVO.
4. Conecte el cordón eléctrico polarizado en
un enchufe de 120 voltios que se encuentre
cerca del piso.
A
Hendidura
de fíjación
Cordón
eiectrico
ADVERTENCIA
Peligro de lesk^ personal y daño al producto
• NO PONGA manos ni pies d^)ajo de la unidad
en ningún momwito.
• NO use los enchufes localizados sobre los
muebles. Los otéelos cercanos podrían resultar
dañados.
Page 26

Desprenda el mango pisando et pedal de lib
eración y tiranda del mango hacia abajo con la
mano.
Nota; El agitador no girará si la aspiradora está
en posición vertical.
OFF - Apaga el motor de succión de la aspi
radora.
ALFOMBRA - Prende (ON) el motor de la aspi
radora al nivel de ALTA succión y el motor agi
tador al nivel de ALTA velocidad para limpiar la
mayoría de ías alfombras.
MODERADO - Prende (ON) el motor de la aspi
radora a un nivel de succión ALTO y el motor
del agitador a un nivel de velocidad BAJO para
una limpieza suave de las alfombras y tapetes
más delicados,
PISO - Prende (ON) el motor de la aspiradora a
un nivel ALTO de succión y apaga (OFF) el
motor de! agitador para limpiar el piso descu
bierto.
FUNCION MOTOR
Pulsador
de
Control
OFF
CARPET
GENTLE ALTO
FLOOR ALTO OFF
Motor (Succión)
Aspiradora
APAGA
ALTO
Motor
^itador
APAGA
ALTO
BAJO
Su Aspiradora nueva Kenmore esta equipada
con un agitador de acción directa con 2 veloci
dades para limpiar una variedad de pisos.
Revise por favor la gráfica de abajo antes de
utilizar su Aspiradora.
1. No utilice la función CARPET (alta velocidad)
para limpiar su alfombra tipo Beréberes. La
velocidad alta del agitador puede dañar o
causar un desgaste excesivo a su alfombra.
VebxMad
Plúsadorde
СШгЫ
Carnet (1) Alta ✓
Gerdie (2)
Fhor(3)
de
ag^dof
Baja
Apagado ✓
Piso
descut^erío
2. Utilíce la función GENTLE (velocidad baja)
únicamente para alfombras Beréberes o de
cerdas delicadas. El agitador puede ir más
despacio o detenerse en áreas de cerdas
largas o tapetes. (Vea página 12 en el Manual
del Propietario "Protector de Sobrecarga del
Agitador ’ si el agitador se detiene y no
comienza nuevamente.)
3. La función FLOOR puede ser usada en interi
ores con pisos descubiertos, incluyendo
madera, mosaico, linóleo, pizarra, etc.
Conmdaí
ocerdas
cortos
✓
Barberas
odeBcadas
✓ ✓
✓
Meipada Gruesa
Areas
con
topeto
Page 27

AJUSTE Y LECCIÓN DE №VEL DE PELO DE U AITOMBRA
Para seleccionar un ajuste de nivel de pelo de
la alfombra:
Apague la aspiradora. Seleccione un nivel de
ajuste inclinando la aspiradora hacia atrás
hasta que las ruedas delanteras estén un poco
despegadas del piso.
Deslice la palanca de ajuste de nivel de pelo
de la alfombra a la posición deseada.
Hay cuatro (4) posiciones de ajuste de altura
en la aspiradora. Use la posición LOW para la
mayoría de alfombras y suelos lisos (con el
agitador OFF), y la posición HIGH para alfom
bras de fibras largas o abundosas, tapetes
pequeños, etc. Utilice los otros ajustes como
sea necesario para las diferentes alturas de la
alfombra.
A
CUIDADO
No deje permanecer la aspiradla en un solo
lugar durante ningún tiempo cuando ^ agita
dor está rotando. Se puede dañar la alfotTú)ra.
Page 28

Copino para
sacudir
Mango para
transportar
Manguera -• í
expansible
Palanca escape
manguera extensión
Handì~Mate Jr.®
•Herramienta
para tapices
TUBO TELESCÓPICO CON
CONTROL DE ASPIRACIÓN
1. Remueva el extremo inferior de la manguera
de extensión del soporte del tubo tomando
dei cuello de la manguera, rotando y tirando
derecho hacía arriba.
2. Saque ei tubo telescópico de su lugar de alma
cenamiento.
3. Remueva la herramienta de hendiduras de
su posición de depósito ene) tubo. Rote el
anillocierre a la posición ABRIR
(UNLOCK).
PARA USAR ACCESORIOS
Saque el extremo inferior de la manguera de
extensión del soporte de! tubo tomando el cuello
de la manguera, haciéndola girar, y tirando Per
cho hacia arriba.
Rote hacia abajo la palanca de soltar la
manguera de extensión si necesita máximo
alcance.
Nota: La válvula de desviación puede estar abierta
mientras se usan los accesorios o para limpiar una
alfombra nueva a causa de un flujo reducido de aire
por los accesorios mismos o por la pelusa de la
alfombra que llene la bolsa rápidamente. Consulte el
cuadro RECONOCIMIENTO DE PROBLEMAS,
A
ADVERTENCIA
Peligro de choque eláctrlco o lesión corporal
Desconecte la unidad antes de llnrpiarla o
darle servido. De lo contrario podría produdrse un choque eléctrico o causar lesión
corporal si la aspiradora annanca de manera
Imprevista.
3. Herramienta
para tapices
2. Tubo
telescópico
1. Cuello
manguera
Porta-tubo
Page 29

Despliegue el tubo completamente. Gire el aro de
bloqueo del tubo hasta la posición LOCK.
Instale el tubo de extensión en e! extremo abierto de
la manguera.
Tubo
inferior
Cerrar
~^lAró de
Deslizador
de control
aspiración
b/oqueo
\ del tubo
íAbh
Mr
Alinee las pestañas del tubo de extensión con las
ranuras en forma de “J" de la manguera. Empuje el
tubo dentro de la manguera y gire hacia ia derecha
para bloquearlo.
Para obtener la máxima longitud con los accesorios,
instale la herramienta para hendiduras en el extremo
del tubo. Para hacerlo, introdúzcala en el tubo y gírela
un poco.
Tubo
superior
PARA OPERAR EL DESUZADOR
DE CONTROL DE ASPIRACIÓN
Tubo telescópico
Cuando use accesorios para limpiar cortinas,
tapetes pequeños de pelo corto y otros artículos
delicados, gire et deslizador de control de aspiración
a la posición abierta. Esto reducirá la potencia de
aspiración para facilitar la limpieza.
Este selector se encuentra en el tubo telescópico,
cerca de la manguera.
Deslizador
de control
\de aspiración
A
CUIDADO
Cuando use ios accesorios, tenga cuidado de
no estirar d^nasiado la manguera etxpansible
para tratar da alcanzar más lejos. Si ^ta de
estirar la manguera más de lo debido, podría
causar que la aspiradora se venga abajo.
Nota: Coloque el
deslizador de
control de
aspiración a la
posición cerrada
para la limpieza
normal.
Ajuste el cepillo combinación directamente a la
vara.
Cepillo-
ALMACENAJE DE LOS
ACCESORIOS
Retire el cepillo para sacudir o el cepillo para
combinación. Colóquelos firmemente en su lugar de
aimacenamiento correspondiente.
Retire la herramienta para hendiduras del tubo
girándola. Póngala a un lado.
Retire el tubo de extensión de la manguera. Gire el
tubo hacia ia izquierda y tire del extremo de la
manguera.
Desbloquee el tubo girando el aro de bloqueo
hasta la posición UNLOCK.
Deslice ei tubo inferior dentro del tubo superior.
Gire el aro de bloqueo del tubo a la posición
LOCK.
Introduzca la herramienta para hendiduras dentro
del tubo comprimido. Instale bien en su posición de
almacenamiento.
Asegúrese de que la unidad esté apagada. Inserte
nuevamente la manguera completamente dentro de
ia abertura ubicada en la parte inferior de la
aspiradora, de donde la sacó inicialmente.
Cepillo para
sacudir
Vea la TABLA USO ACCESORIO para uso del
cepillo combinación.
Cepilla
para combinación
9
A
CUIDADO
NO tire de ta aspiradora por ia manguera en
la habítao'ón. Podrían ocurrir daños a sus per-
tenendas.
Page 30

Areaaumpiar
ACCESORIO
HÉRftAMlENtAPAftÁ ^
HENDIDURAS
CEPILLO PARA ^
COMBINACION
Handi-Mate Jr.®
Siempre limpie los accesorios antes de usar sobre teias.
Orillas de alfombras
Guíe uno de tos costados o la parte anterior de la
boquilla a lo largo del borde de la pared.
Escaleras
Ponga la manija en la posición vertical comple
ta. El agitador para de rotar. Use la her
ramienta para hendiduras, cepillo combinación
o Handi-Mate Jr. ®
Muetdes*
✓
✓ ✓ ✓
✓ ✓
Entre
coíines*
✓
A
Peligro de lesión personal
NO COLOQUE la aspiradora en la escara.
^ se cae, podría causar lesión personal o
dafio a la prc^edad.
Cortinas* Escalones
✓
✓ = Aplicable
ADVERTENCIA
Paredes
Voicando la Unidad
Cuando use los accesorios mantenga la palan
ca de soltar la manguera de extensión en la
posición cerrada cuando sea posible. Esto
ayuda a mantener la aspiradora sin caerse
cuando se estira la manguera. Sí se necesita
manguera adicional entonces abra la palanca
de soltar y saque manguera adicional. Use
precaución para no voltear la aspiradora.
Para obtener los mejores resultados de limpieza,
mantenga desbloqueados los conductos de flujo de
aire.
Desconecte la aspiradora del enchufe antes de exa
minaría..
10
Page 31

SISTEMA DE PROTECTIÓN
DE MOTOR
Protector de motor
Esía aspiradora tiene una válvula de desviación
que sirve como protector de motor y se abre
automáticamente para proveer un flujo de aire al
motor cuando un ¿loqueo impida que circule el
aire al motor. Si se abre la válvula bypass para
impedir que se recalienle el motor y que se dañe
a la aspiradora, se notara un cambio de sonido
mientras el aire pasa por la abertura de la
válvula.
Para corregir ei problema: Consulte el cuadro
RECONOCIMIENTO DE PROBLEMAS.
Nota: La válvula de
desviación puede estar
abierta mientras se
usan los accesorios o
para limpiar una
alfombra nueva a
causa de un flujo
reducido de aire por
los accesorios mismos
o por la pelusa de la
alfombra que llene la
bolsa rápidamente.
Consulte el cuadro
RECONOCIMIENTO DE PROBLEMAS
Protector de motor
(Behind Hose)
Para corregir el problema: Si esto ocurre,
apague la aspiradora y desenchufe el cordón del
tomacorriente para permitir que la aspiradora se
enfríe y que el protector termal se reajuste.
Busque y saque las obstrucciones, si es
necesario. Examíne también y reemplace
cualquier filtro c^struido. Espere
aproximadamente treinta (30) minutos y enchufe
la aspiradora y voltéela para ver si el protector
del motor se ha reajustado.
PROTECTOR DE SOBRE
CARGA DEL AGITADOR
El motor del agitador tiene una protección
incorporada contra daño del motor en caso de que el
agitador se tranque. Si el agitador se pone lento o se
detiene, el protector de sobrecarga del agitador
apaga el motor del agitador. El motor de succión
continuará funcionando.
Para ctxregir el
problema: Apagué y
desconecté la
aspiradora, limpie la
c^strucdón, y después
presione el bot№ det
protector de
sobrecarga.
Para reajustan Empuje el botón de protección de
sobrecarga del agitador.
Botón para reajustar ^ |
ei protector se
sobrecarga del^
agitador. '
Nota: No obstruye el protector de motor.
Protector Termal
Esta aspiradora tiene un protector termal que se
ajusta automáticamente para proteger a la
aspiradora del sobrecalentamiento. Si una
obstrucción impide el flujo normal de aire al
motor, el protector termal apaga el motor
automáticamente para permitir que ei motor se
enfríe a fin de evitar posibles daños a la
aspiradora.
Si el problema persiste, busque un
calificado que haga el servicio de
11
técnico
la aspiradora.
Page 32

CUIDADO DE LA ASPIRADORA
Siga siempre todas las instrucciones de seguridad
antes de efectuar el mantenimiento a su aspiradora.
A
ADVERTENCIA
Peligro de choque ^éctrico o lesión corporal
Desconecte la unidad antes de efectuar ^
mantenimiento a su aspiradora. De lo contra
rio podrfá producirse un choque elóctrioo o
causar lesiórt corpor^ si la ^oiradora arranca
de manera imprevista.
ÉmmW'
Recoja el cordón y enrróllelo en los sujetadores su
perior e inferior, sin que quede muy apretado.
Asegure la ficha de poder del cordón sobre el
cordón de poder.
Desconecte el cordón eléctrico de la clavija de la
pared. NO rocíe agua sobre la aspiradora.
Limpie el exterior con un trapo suave y limpio, que
ha sido exprimido después de remojar en una solu
ción de agua y detergente líquido ligero. Seque el
exterior con un trapo seco después de limpiar.
Limpie la superficie exterior del receptáculo y de los
accesorios para reducir la electricidad estática y la
acumulación de polvo.
»
Guarde la aspiradora
bajo techo en un lu
gar seco, con el
mango en posición
vertical.
A
A
ADVERTENCIA
Peligro de choque déctrico o lesiti corporal
Si entoiia el cordón muy apretado [Aieda ten
sado mucho y causarle daños. De dañarse, et
cordón podría causar descargas eléctricas y le
siones o daños personales.
CUIDADO
No use los accesorios si están mojados.
Lc№ accesorios que se utiScen m áreas
sucias, debajo del rehigerador, no deben
usarse &n otras superñdes sin wtes ser
lavados. Podrían dejar marcas.
Lave los accesorios en agua tibia jabonosa,
enjuague y deje secar ai aire. No los lavs en lava
dora de platos.
12
Page 33

UMPiANDO a CUBO DE U BASURA
A
ADVERTENCIA
Siempre desconecte el cordón électrico antes
de reparar alguna parte de la aspiradora.
PARA SACAR EL CUBO DE LA BASURA
Levante ia manija del cubo de la basura ubicada al
tope del cubo de la basura.
Tire la manija hacia
canasto de basura y
afuera de la
aspiradora.
Remueva cualquier obstáculo que pudiera estar
ubicado en la entrada de succión o área de
entrada a) filtro.
Sostenga el
canasto de polvo
sobre un recipi
ente de basura.
Apriete el botón
de soltar la puer
ta del canasto
del polvo hacia
abajo para soltar
la puerta.
La puerta girará
abierta y el dese
cho caerá adentro
del recipiente de
basura.
Manija canasto
dei polvo
Puerta vaciar
canasto dei
polvo
Botón soltar
puerta canasto
del polvo
Sacuda el canasto
del polvo para soltar
cualquier desecho
que pueda colgar en
el elemento del filtro.
Nota: Ver la sección
REMOCIÓN Y
UMPIE2A DEL FIL
TRO PRIMARIO.
Puerta de
succión
Puerta deifiltro
PARA VACIAR EL CUBO DE U BASURA
Antes vaciar los escombros del cubo de la
basura es recomendable el usar la palanca de
limpieza moviéndola de un lado a otro varias
veces.
Mover la palanca
de un lado a otro
desprende el polvo
y tos escombros
que se haya
depositado en el
filtro dentro del
cubo de la basura.
Gire la manija del cubo de la basura a la posi
ción vertical.
Palanca limpiar
fíltro canasto
polvo
Puerta Picaporte
Después que el canasto del polvo esté vacío
de desecho, cierre la puerta firmemente. Esté
seguro de escuchar un ‘clic" indicando que la
puerta está completamente cerrada.
puerta
PARA REEMPLAZAR EL CUBO DE LA BASURA
Ponga el canasto del
polvo de vuelta en la
aspiradora insertando
primero el fondo é incli
nando hacía atrás con ia
manija del canasto del
polvo levantada.
Manija
canasto
del polovo
Baje la manija
del canasto del
polvo para trabar
el canasto en su
lugar.
Un "clic" fácil
de notar será
escuchado.
13
Page 34

Y LWEZA DEL тЛШ PF»íütf«0
А
ADVERTENCIA
Peligro de choque eléctrico
Desenchufe el cable de poder d^ tomacorri-
ente. No opere la limpiadora sin ^ filtro pri
mario o el filtro de eecape. Esté seguro que él
filtros esté insudado propiamente para pre
venir falla dei motor y/o sacudida eléctrica.
FILTRO PRIli/IARIO
Chequee el filtro primario frecuentement y limpíelo
cuando esté sucio.
PARA SACAR EL FILTRO PRIMARIO
Remueva el canasto de basura y el montaje de la
tapa del canasto de basura como se explica en la
sección LIMPIEZA DEL CANASTO DE BASURA.
Esté seguro de que el canasto del polvo está
libre de desecho antes de sacar la tapa y filtro.
Tome en esta dirección
para abrir y vaciar
Cerrado
Remueva el fil
tro primario
rotando con
trario a las
agujas del reloj
y tirando hacia
afuera (Ver fle
chas al fondo del filtro).
Enjuague con agua
solamente como sea
necesario, no use ningún
detergente o jabón.
Deje secar el filtro por 24 horas antes de colo
carlo nuevamente en la aspiradora,
Cuando la limpieza del filtro ya no restaura la
succión al vacío a su poder total, usted nece
sita reemplazar el filtro.
Nota: Ver PARTES Y CARACTERÍSTICAS
para el número del filtro.
Tapa del
cubo de
basura
Leva
limpiadora
Filtro
PARA REEMPLAZAR EL FILTRO PRIMARIO
Para reemplazar ei filtro, insértelo sobre las levas
de limpieza tan lejos como vaya, Esté seguro
que el sello de goma al tope del filtro esté nive
lado contra el soporte del filtro, torne el filtro
como las agujas del reloj para asegurarlo en su
lugar.
Rote el montaje de la tapa del canasto del polvo
en sOTtido contrario a las agujas dei reloj como
indicado en la tapa y levántela.
Mienbas sostiene la tapa del canasto del polvo
sobre un recipiente de basura tome el filtro pri
mario, rételo en sentido contrario a las agujas
del reloj y levántelo.
Limpie el filtro primario golpeándolo suavemente
sobre el recipiente de basura. Golpee sobre var
ios lados para asegurar la mejor limpieza.
Soporte
fíifro
Tapa del
filtro
Nota: Bajo uso y cuidado normal, su filtro
puede llegar a durar hasta 5 años.
Vuelva a montar la tapa del compartimiento
del polvo para sacar el polvo del compar
timiento. Inserte en más limpio y seguro con el
cierre del compartimiento del polvo.
14
Page 35

REMPLAZO DEL BOTE DE POLVO
Coloque la tapa del canasto de basura sobre el
canasto de basura. Alinee las marcas como se mues
tra bajo Abierto (Para Vacar).
dirección para cerrar y usar
Torne en esta
Abierta
Rote la tapa en sentido de tas agujas del reloj presio
nando hacia abajo hasta alinear las marcas como se
muestra arriba de Csmado (Para Usar).
Inserte el canasto
del polvo en la
aspiradora.
A
ADVERTENCIA
Peligro de choque eléctrico
De$№chufe el cable de poder del tomaconl-
ente. No opere la limpiadora sin ei filtro pri
mario o el filtro de escape. Esté seguro que el
filtros esté instalado projpiamente pata pre
venir falla del motor y/o sacudida ^éctrtca.
Baje la manija
del canasto del
polvo para trabar
el canasto del
polvo en su
lugar.
Un "clic" perceptible será escuchado.
2. Remueva el filtro apretando sobre los costados
del marco del filtro y tirando hacia afuera al
mismo tiempo.
3. Limpie el filtro si es necesario poniéndolo
debajo de agua corriente y espere a que esté
seco antes de reemplazar.
Macro
filtro
Manija
canasto
del potavo
;
FILTRO DE SEGURIDAD DEL
MOTOR
Chequee el filtro de seguridad del motor fre
cuentemente y limpíelo cuando esté sucio.
11
/
Escape
futro
t. Para sacar el filtro de seguridad del motor
suelte la manija hacia arriba y rote la cubierta del
filtro.
Cubierta
del filtro
Lengüetas
fondo
4. Cuando ponga el filtro de vuelta adentro de la
cubierta del filtro, escuche que el montaje del filtro
calce en su lugar.
Nota: Empuje solamente sobre el marco, no
sobre el filtro mismo.
6. Reemplace la cubierta calzando lengüetas ai
fondo adentro de ranuras y rotando hasta que la
cubierta calce en su lugar. Empuje la manija de
liberación del filtro hacia abajo hasta que escuche
claramente un “clic”.
15
Page 36

El filtro del escape HEPA se debe reemplazar
cuando este sucio. Se debe reemplazar regular
mente dependiendo de las condiciones uso.
Ponga el nuevo cartucho adentro de la cubierta
estando seguro de que la flecha de flujo de aire
al costado del cartucho apunta hacia la cubierta.
El filtro no se puede lavar pues perdería su capaci
dad para atrapar polvo.
Nota: Ver PARTES Y CARACTERÍSTICAS
para el número del filtro de escape.
Apriete hacia adentro en cada lado de la cubierta
del filtro de escape y tírela hacia afuera para
remover de la aspiradora.
Hale
aquí
Cubierta
del nitro
Remueva el cartucho del filtro de escape.
El sello gris del filtro debe ser puesto contra el
cuerpo de la aspiradora.
Sello contra
cuerpo aspiradora
-Filtro de
Cubierta del
escape
Empuje solamente sobre el marco del cartucho
del filtro, no sobre el material del filtro mismo.
Reemplace la cubierta del filtro de escape
poniendo las lengüetas en las hendiduras y
empujando hasta que la cubierta calza en su
lugar.
16
Page 37

CAMBIO DE LA BOMBILLA
A
PARA QUITAR LA BOMBILLA
1. Desconecte el cable de poder del tomacorri-
ente.
ADVERTENCIA
Peligro de choque eléctrico o lesión cor*
poral
Desconecte la unidad antes de limpiarla o
darle servicio. De lo contrario podría pro>
ducirse un choque eléctrico o causar
lesión corporal si la aspiradora tranca de
manera Imprevista.
Z Baje la manija
para poner la
aspiradora plana.
5 -■ ■ ■•
■5 O ■
■5
4. Remueva la bombilla
tirando derecho hacia
afuera.
5. Para reemplazar la
bombilla cuidadosa
mente insértela segura
mente en la ranura.
Reemplace la cubierta
de la lente.
Nota: Mire PIEZAS Y CARACTERISTICAS para el
numero de la bombilla.
3. Extraiga el lente de la hendidura insertando
el desarmador en la rendija, empuje hacia abajo
el lente y gireio con el desa mador en diracción
hacia la unidad.
A
CUIDADO
No use una bombilla de más de 9 vatios (13
volts). Cuando se use la aspiradora ptx* un
largo periodo de tiempo, el cetor de la bwnbjlla puede calentar las partes de plástico cerca.
Á
6. Substituya la
cubierta de la lente
insertando la parte
inferior de ia lente en
la ranura, entonces
apliqué presión en la
parte superior con un
destornillador. Un
sonido “pop” indica
que la lente está colo
cada correctamente
en su lugar.
CUIDADO
No conecte o encende la aspiradora antes de
armarla completamente.
17
Page 38

Para un aspirado eficiente, el agitador deber ser
mantenido libre de fibras de alfombra, hilos, o acu
mulación de pelo. Luego de 7 a 10 usos, des
enchufe y dé vuelta a la aspiradora y revise el agita
dor para ver si tiene acumulación de hilos, fibras o
peio.
Use tijeras para sacar cualquier acumulación atora
da alrededor del agitador.
Proceda siempre con precauciones de seguri
dad antes de efectuar el mantenimiento a su
aspiradora.
A
Si la aspiradora no parece tener suficiente suc
ción, primero chequee si el canasto del polvo
está lleno o si el filtro está tapado. Ver
LIMPIEZA DEL CANASTO DEL POLVO y
REEMPLAZO DEL FILTRO.
Si el canasto del polvo y áreas del filtro están
libres de trabas, chequee la manguera de
extensión. Rote ia palanca de soltar la
manguera de extensión contra las agujas del
reloj para soltar la manguera de extensión.
Manguera —» -
expansible
Cuello
manguera
ADVERTENCIA
Peligro de choque eléctrico o iesi^ corporal
Desconecte la unidad antes de efectuar el
mantenimiento a su aspiradora. De b contrario
podría produtíise un choque eléctrico o cau
sar lesión corp^ siia aspiradora anwtca de
manera impre^nsta.
Enchufe la aspiradora y enciéndala. Estire al
máximo la manguera y luego permita que se
encoja hasta su tamaño normal de alma
cenamiento.
Posición
original depósito
manguera
Manguera
expansible
Cuelle
manguera
Reinserte la manguera adentro de !a abertura
en el cuerpo de la cual fue sacada. Apriete
firmemente para asegurar la conexión,
Si el canaasto de! polvo y áreas del filtro están
libres de trabas, desconecte la boquilla de la
manguera del soporte de la vara y chequee la
boquilla por obstáculos. Gire la palanca de lib
eración de la manguera hacia la derecha a la posi
ción cerrada.
A
ADVERTENCIA
Palanca escape
manguera
extensión
Manguera
Remueva el extremo inferior de la manguera de
extensión del soporte de la vara tomando del
cuello de la manguera, rotando, y tirando dere
cho hacia arriba.
Porte-tubo
PeligiD de lesión personal
NO coloque nunca las manos ni los píes
debájo de la unidad.
Limpie el agitador de acuerdo a ias instruciones
en la sección LIMPIEZA DEL AGITADOR.
Retorne la aspiradora a la posición vertical
antes de enchufarla en un tomacoriente.
18
Page 39

Revise este recuadro para encontrar soluciones a problemas que puede corregir usted mismo. Cualquier otro
servicio debe ser realizado por SEARS u otro agente de servicio calificado.
ADVERTENCIA Peligro de choque eléctrico
Oesconetáe la aspiradora antes de efectuar el manteriimiento a su aspiridora. De lo contra
rio podría producirse un choque eléctrico o causar lesién corporal.
F^OBIEMA
La aspiradora no enciende
Nd aspira
seUslacloriainente.
La aspiradora levanta
(apatas o as dHlcV empu|ar.
La luz no funciona.
El ensambto tM agitador
no funciona
1. Está desconectada.
2. Cortacircuitos bolado o fusible
quetnado en el ladero de setvidQ
de la residencia.
3. Protector termal activado.
4. Toma-corriente defectuoso.
1. Bolsa para polvo Sena o atascacta.
2. Ajuste incorrecto de rrivet de pelo de
la alfombra.
1 Agitador desgastado.
4. Boquilla, o sujetador de la bolsa, atascada.
5. Manguera atascado.
B. Manguera rola.
7. La manguera no está bien Insertada.
& Activación del sistema de protectián
del motor.
a Filtros de seguridad.
1. Ajuste incorrecto de nivel de pelo
de la alfombra.
1. Bombilla undida.
1. Mango asta en posición vertical.
Z Sobrecarga del agitador activada.
3 Protector térmioo desactivado.
soLuaóN posiae
1. Conecte bien, seleccione la función deseada
en el control manual.
Z Restablezca el cortacircuitos o
cambie ai fusible.
3 Desconecte la aspiradora y permita que se
enfrió, el protector térmico se activara por si solo.
4. Pruébelo con otro aparato / lámpara, hágalo
reparar apropiadamente.
1. Cambie la bolsa.
Z Ajuste el nivel.
3 Acuda el Centro de Servicio de Sears
más cercano.
4. Revise GOMÓ ELIMINAR LOS RESIDUOS
DE BASURA EN LOS CC^fDUCTOS.
3 Limpie la manguera de obstrucciones.
3 Acuda el Centro de Servicio de Sears
más cercano.
7. Inserte bien la rrrangoera.
3 Determine si eidslen bloqueos.
9. Cambie el fltiro de protección al motor y el filtro
del escape.
1. Ajuste el nivel.
1. Cambíe la boiráiilla
1. Mueva el mango de la posidón vertical. ^
Z Reajuste la sobrecarga del agitador. ^
3 Desconecte la aspiradora y permita que se №
enfrié, el protector térmico se M
actívala por sí solo. H
Rastfiodón del Hujo
con al uso da toa accaaorios.
Cambio de sonido.
Dificultad para ajustar la
altura da palo de la affombra.
1. El uso de los accesorios limita ^ ^
flujo de aire.
3 La peiusa de una alfombra nueva
obstruye el paso de aire.
1. La aspiradora no esta en completamente
inclínela ligeramente y ajuste la altura de pelo.
19
1. Revise USO DE LOS H
ACCESORIOS m
Z Revise CÓMO ELIMINAR LOS RES- H
iDUOS DE BASURA EN LOS CON
DUCTOS y limpie la manguera. I
1. Coloque la aspiradora en la posición vertical lija. 1
en posición vertical. |
Page 40

Get it fixed, at your home or oursi
Your Home
For repair - in your home - of all major brand appliances,
lawn and garden equipment, or heating and cooling systems,
no matter who made it, no matter who sold it!
For the replacement parts, accessories and
owner’s manuals that you need to do-it-yourself.
For Sears professional installation of home ^pliances
and items like garage door openers and water heaters.
1-800-4-MY-HOME® Anytime, day or night
(1 -800-469-4663) {U.S.A. and Canada)
www.sears.comwww.sears.ca
Our Home
For repair of carry-in products like vacuums, lawn equipment,
and electronics, call or go on-line for the nearest
Sears Parts and Repair Center
1 -800-488-1222 Anytime, day or night (U.S.A. only)
www.sears.com
To purchase a protection agreement (U.S.A.)
or maintenance agreement (Canada) on a product serviced by Sears:
1-800-827-6655 {U.S.A. ) 1-800-361-6665 (Canada )
Рага pedir servicio de reparación
a domicilio, у para ordenar piezas:
1-888-SU-HOGAR®'^
(1-888-784-6427)
@ Sears, Roebuck arxJ Co.
® Registered Trademark / Trademark / Service Mark of Sears, Roebuck and Co.
® Marca Registrada / ™ Marca de Fábrica / Marca de Servicio de Sears, Roebuck and Co.
“^Marque de commerce / Marque déposée de Sears, Roebuck and Co.
Au Canada pour service en français;
1-800-LE^OYER'^
(1-800-533-6937)
www.sears.ca
 Loading...