

Kenmore 11122062910 Owner’s Manual

Use & Care Guide
®
Manual de Uso y Cuidado
Kenmore
®
Upright Freezer
Congelador vertical
Model/Modelo: 111.22062 – White – 6 cu. ft.
Transform SR Brands Management
Hoffman Estates, IL 60179 U.S.A.
www.kenmore.com
Record Model/
Serial Numbers
Please read and save
these instructions
This Use & Care Guide provides specific
operating instructions for your model. Use
your unit only as instructed in this guide.
These instructions are not meant to cover
every possible condition and situation that
may occur. Common sense and caution must
be practiced when installing, operating, and
maintaining any appliance.
Please record your model and serial
numbers below for future reference. This
information is found on the upper left inside
wall.
Model Number:
Number: Purchase
Date:
111.
or
Serial
IMPORTANT
Use only soap and water to clean
serial plate.
Table of Contents
Record Model/Serial Numbers...................2
Important Safety Instructions.......................2
Appliance Setup.............................................5
Appliance Use.................................................6
Temperature Control......................................6
Care & Cleaning.............................................7
Power or Appliance Failure..........................8
Door Removal/Reversal................................8
Before You Call..............................................10
Warranty.........................................................12
Service.............................................Back Cover
Important Safety
Instructions
Safety Precautions
Do not attempt to install or operate your unit
until you have read the safety precautions
in this Use & Care Guide. Safety items
throughout this manual are labeled with a
Danger, Warning, or Caution based on the
risk type.
Definitions
This is the safety alert symbol. It is
used to alert you to potential personal injury
hazards. Obey all safety messages that
follow this symbol to avoid possible injury
or death.
DANGER
DANGER indicates an imminently
hazardous situation which, if not
avoided, will result in death or serious
injury.
W
ARNING
WARNING indicates a potentially
hazardous situation which, if not
avoided, could result in death or serious
injury.
CAUTION
CAUTION indicates a potentially
hazardous situation which, if not avoided,
may result in minor or moderate injury.
IMPORTANT
Indicates installation, operation, or
maintenance informationwhich is
important but not hazard-related.
2
I
mpo
r
tant Safe
ty I
nstructions
D
ANGER
DANGER Risk of fire or explosion.
Flammable refrigerant used. Do not use
mechanical devices to defrost refrigerator.
Do not puncture refrigerant tubing.
DANGER Risk of fire or explosion.
Flammable refrigerant used.To be repaired
only by trained service personnel. Do not
puncture refrigerant tubing.
CAUTION
CAUTION Risk of fire or explosion.
Flammable refrigerant used. Consult
repair manual/owner’s guide before
attempting to service this product. All
safety precautions must be followed.
CAUTION Risk of fire or explosion.
Dispose of properly in accordance with
federal or local regulations. Flammable
refrigerant used.
CAUTION Risk of fire or explosion
due to puncture of refrigerant tubing.
Follow handling instructions carefully.
Flammable refrigerant used.
WARNING
Read all safety instructions before using
your new appliance.
objects are a choke hazard to children.
• Remove all staples from the carton. Staples
can cause severe cuts and also destroy
finishes if they come in contact with other
appliances or furniture.
Child Safety
Destroy or recycle the carton, plastic bags,
and any exterior wrapping material
immediately after the unit is unpacked.
Children should never use these items to
play. Cartons covered with rugs, bedspreads,
plastic sheets or stretch wrap may become
airtight chambers and can quickly cause
suffocation.
Proper disposal of your appliance
DANGER: Risk of child entrapment!
Child entrapment and suffocation are not
problems of the past. Junked or abandoned
appliances are still dangerous – even if they
will sit for “just a few days.” If you are
getting rid of your appliance, please follow
the instructions below to help prevent
accidents.
Before you throw away your old unit:
• Remove door.
• Leave shelves in place within freezer so
children may not easily climb inside.
• Have refrigerant removed by a qualified
service technician.
For Your Safety
• Do not store or use gasoline or other
flammable liquids in the vicinity of this or
any other appliance. Read product labels
for warnings regarding flammability and
other hazards.
• Do not operate the unit in the presence
of explosive fumes.
• Remove and discard any spacers used to
secure the basket during shipping. Small
3
I
mpo
r
tant Safe
ty I
nstructions
IMPORTANT
Your old unit may have a cooling system
that used CFCs or HCFCs (chlorofluorocarbons or hydrochlorofluorocarbons).
CFCs and HCFCs are believed to harm
stratospheric ozone if released to the
atmosphere. Other refrigerants may cause
harm to the environment if released to the
atmosphere. If you are throwing away
your old unit, make sure the refrigerant is
removed for proper disposal by a
qualified technician. If you intentionally
release refrigerant, you may be subject to
fines and imprisonment under the
provisions of environmental legislation.
• Performance may be affected if the
voltage varies by 10% or more.
Operating the unit with insufficient
power can damage the motor. Such
damage is not covered under the
warranty.
• Do not plug the unit into an outlet
controlled by a wall switch or pull cord
to prevent the appliance from being
turned off accidentally.
• Avoid connecting unit to a Ground
Fault Circuit Interruptor (GFCI).
WARNING
These guidelines must be followed to
ensure that safety mechanisms in this
unit will operate properly.
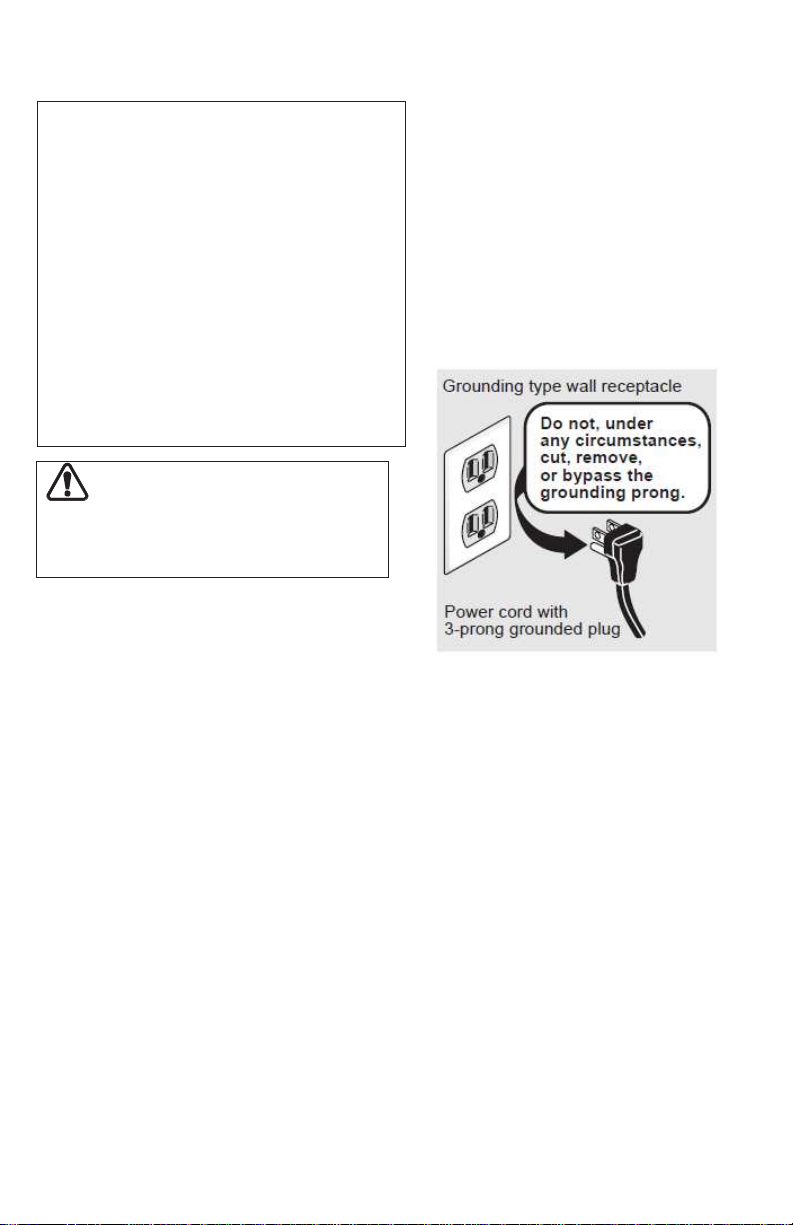
Electrical Information
• The unit must be plugged into its own
dedicated 10 amp, 115 Volt, 60 Hz. AC
only electric outlet. The power cord of the
appliance is equipped with a three-prong
grounding plug for your protection against
shock hazards. It must be plugged directly
into a properly grounded three-prong
receptacle. The receptacle must be
installed in accordance with local codes
and ordinances. Consult a qualified
electrician. Do not use an extension cord
or adapter plug.
• Immediately repair or replace any power
cord that becomes frayed or damaged.
• Never unplug the appliance by pulling
on the power cord. Always grip the plug
firmly, and pull straight out from the
receptacle to prevent damaging the
power cord.
• Unplug the appliance before cleaning
and before defrosting to avoid
electrical shock.
4
Appliance Setup
This Use & Care Guide provides specific
operating instructions for your model. Use
the unit only as instructed in this Use &
Care Guide. Before starting the appliance,
follow these important setup steps.
Installation
• Choose a place that is near a grounded
electrical outlet. Do Not use an
extension cord or an adapter plug.
• For the most efficient operation, the
freezer should be located where
surrounding temperatures will not exceed
110°F (43°C). Temperatures of 32°F (0°C)
and below will NOT affect freezer
operation. Additional compressor heaters
are not recommended.
• Allow space around the unit for good
air circulation. Leave a 1-inch (25.4 mm)
space at the back and on top and a
3/8-inch (9.5 mm) space on the sides of
the appliance for adequate circulation.
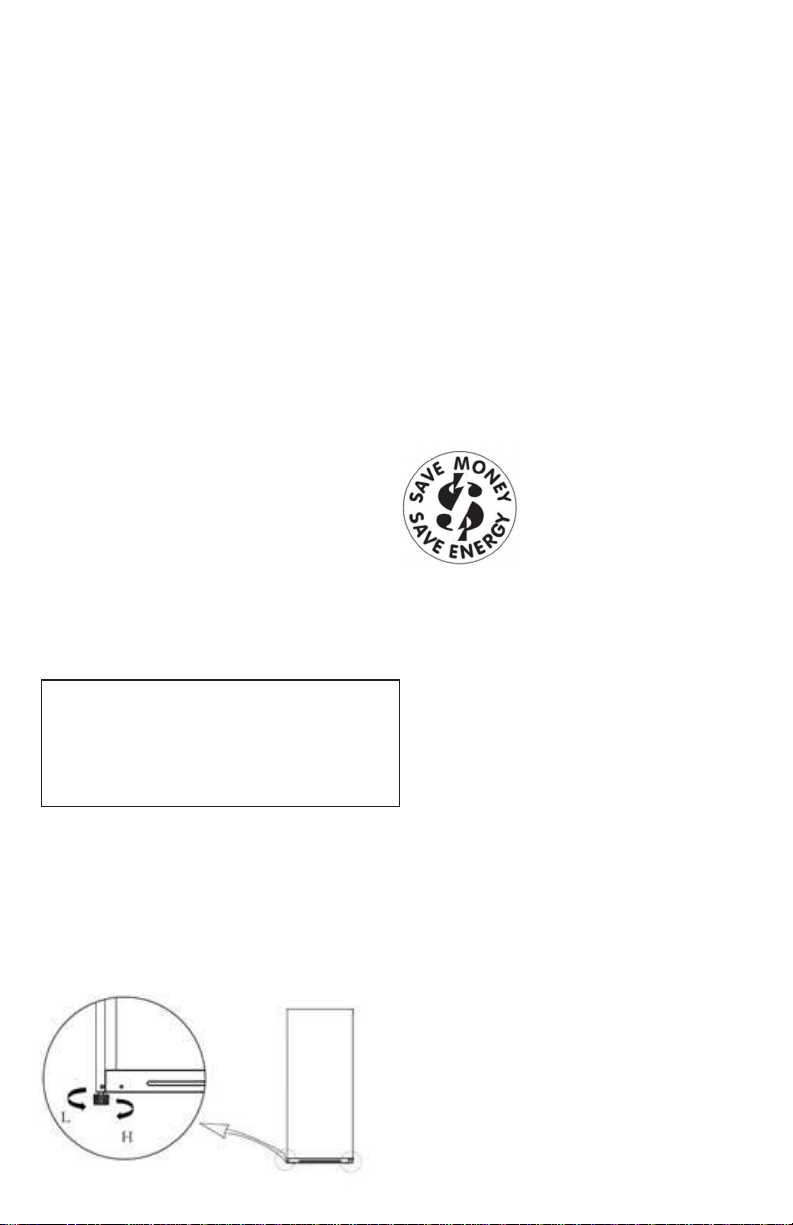
Leveling
The freezer must have all bottom corners
resting firmly on a solid floor that is strong
enough to support a fully loaded freezer.
It is Very Important for the appliance to
be level in order to function properly. If
not level, the door may be misaligned and
not close or seal properly, causing
cooling, frost, or moisture problems.
The appliance is equipped with adjustable
front leveling feet. Turn the foot clockwise
to heighten (H) the side of the unit. Turn
counterclockwise to lower (L) the side.
Adjust each side as needed until front of
unit is level. Also adjust so that front of unit
is 1/4˝ higher than back, so that door stays
closed.
Cleaning
• Wash any removable parts, the freezer
interior, and exterior with mild
detergent and warm water. Wipe dry.
Do not use harsh cleaners on these
surfaces.
• Do not use razor blades or other sharp
instruments, which can scratch the appliance surface when removing adhesive
labels. Any glue left from the tape can be
removed with a mixture of warm water
and mild detergent, or touch the residue
with the sticky side of tape already removed. Do not remove the serial plate.
Energy Saving Ideas
• The freezer should be
located in the coolest
area of the room, away
from heat producing
appliances or heating
ducts, and out of direct
sunlight.
• Let hot foods cool to room temperature
before placing in freezer. Overloading
the freezer forces the compressor to run
longer. Foods that freeze too slowly
may lose quality or spoil.
• Be sure to wrap foods properly, and
wipe containers dry before placing
them in the freezer. This cuts down on
frost build-up inside the freezer.
• Do not line freezer shelves and bins
with aluminum foil, wax paper, or paper
toweling. Liners interfere with cold air
circulation, reducing freezer efficiency.
• Organize and label food to reduce lid
openings and extended searches.
• Remove as many items as needed at one
time, and close door as soon as possible.
5
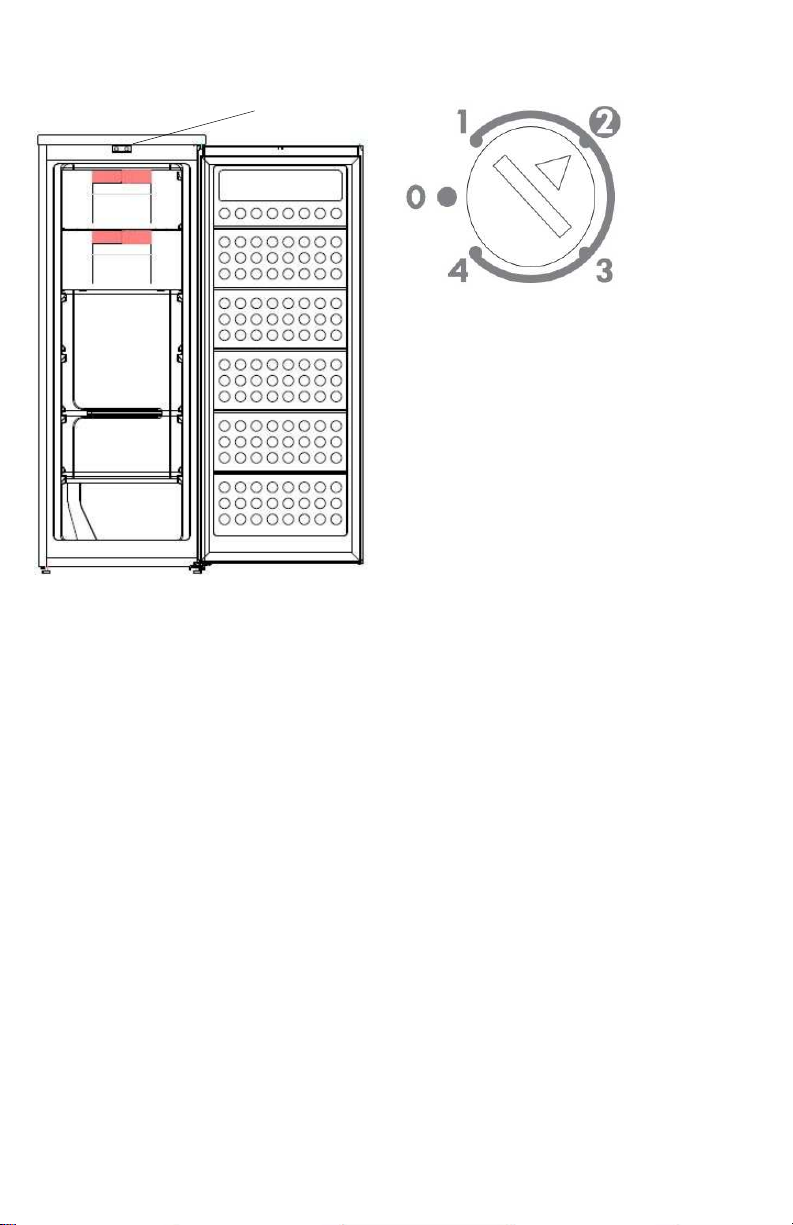
1
2
1
3
2
Appliance Use
Key Components
Temperature Control
1. Downswing door wire shelf
2. Open wire shelf
3. Temperature Control
• To turn the appliance on, plug the power
cord into a properly grounded 3 prong
electrical outlet.
• For safe food storage, after plugging in
allow four hours for the appliance to cool
down completely to the set temperature.
The compressor will run continuously for
the first several hours.
• Foods that are already frozen may be
placed in the freezer after the first few
hours of operation. Unfrozen foods should
NOT be loaded into the freezer until the
freezer has operated for four hours.
• When loading the freezer, freeze only
three pounds of fresh food per cubic
foot of freezer space at one time.
Distribute packages to be frozen evenly
throughout the freezer.
The temperature control is located on the
upper edge of the door frame. Insert a flat
blade screwdriver or thin coin into the slot
and rotate the dial pointer toward 4 to
increase coldness. After making an
adjustment, allow several hours for the
internal temperature to stabilize at the
new setting.
Numeral 2 is within a circle to indicate the
recommended coldness setting for most
situations of use. Turning the dial to zero will
eliminate cooling but will not shut off power
to the appliance.
Automatic Defrost
The appliance is equipped with automatic
defrost capability so that you do not have
to manually defrost. The cooling element
of the unit is regularly heated to melt
the frost that forms on it. The resulting
water drains through a duct at the back
of the unit and into a concealed pan at
the base of the unit where it evaporates.
Should any frost form on the unit interior
walls, remove food and store it elsewhere.
Then unplug the unit, wait long enough for
the frost to melt, and wipe up the
moisture with a dry towel.
Downswing Door Wire Shelf
The top two wire shelves are fronted with
clear plastic downswing doors for convenient
storage of smaller or often accessed items.
6
Care & Cleaning
CAUTION
Damp objects stick to cold metal
surfaces. Do not touch inferior metal
surfaces with wet or damp hands.
Cleaning the Inside
Wash inside surfaces of the appliance
with a solution of two tablespoons of
baking soda in one quart (1.1 liters) warm
water. Rinse and dry. Wring excess
water out of the sponge or cloth when
cleaning in the area of the controls, or
any electrical parts.
Wash the removable parts and baskets
with the baking soda solution mentioned
above, or mild detergent and warm
water.
Never use metallic scouring pads, brushes,
abrasive cleaners, or alkaline solutions on
any interior surface. Do not wash
removable parts in a dishwasher.
Cleaning the Outside
Wash the cabinet with warm water and
mild liquid detergent. Rinse well and wipe
dry
with a clean soft cloth.
scouring pads, brushes, abrasive cleaners,
or alkaline solutions on any exterior
surface.
Never use metallic
Vacation and Moving Tips
W
ARNING
If leaving the appliance door open while
on vacation, make certain that children
cannot get into the freezer and become
entrapped.
Short Vacations: Leave the appliance
operating during vacations of less than
three weeks.
Long Vacations: If the appliance will not
be used for several months:
• Remove all food and unplug the
power cord.
• Clean and dry the interior thoroughly.
• Leave the appliance door open slightly,
blocking it open if necessary, to prevent
odor and mold growth.
Moving: When moving the appliance,
follow
• Disconnect the power cord plug from
the wall outlet.
• Remove foods and clean the
appliance interior.
• Secure all loose items such as bins
and shelves by taping them securely
in place to prevent damage.
• In a moving vehicle, secure freezer in an
upright position to prevent movement.
Also protect outside of freezer with a
blanket, or similar item.
these guidelines to prevent damage:
NOTE
If unit is turned off or unplugged for
several hours, do not open appliance
door unnecessarily. This will maintain the
coldest temperature inside and reduce
the recovery time to desired temperature
once the unit is turned back on.
7
Power or Appliance Failure
If a power failure occurs, frozen foods will
stay frozen for at least 24 hours if the
appliance door is kept closed. If the power
failure continues, pack seven or eight
pounds of dry ice into the appliance every
24 hours. Look in the Yellow Pages under
Dry Ice, Dairies, or Ice Cream manufacturers for local dry ice suppliers. Always
wear gloves and use caution when
handling dry ice.
If the appliance has stopped operating,
see Appliance does not run in the
Troubleshooting Guide. If you cannot
solve the problem, call an authorized
servicer immediately. If the appliance
remains off for several hours, follow the
directions above for the use of dry ice
during a power failure. If necessary, take
the food to a local locker plant until the
appliance is ready to operate. Look in the
Yellow Pages under Frozen Food Locker
Plants.
Door Reversal
The appliance is shipped with the hinge on
the right so that the door swings open from
left to right. Perform the following
procedure to reverse the door swing.
WARNING: Unplug the refrigerator before
performing the door reversal procedure.
Failure to unplug may result in serious injury
or death from electrical shock.
CAUTION: To avoid personal injury or
property damage, obtain assistance from
another person to perform this procedure.
IMPORTANT: After the appliance is placed
on its back, it must be allowed to remain
upright for 6 hours before plugging in to
avoid damage to internal components.
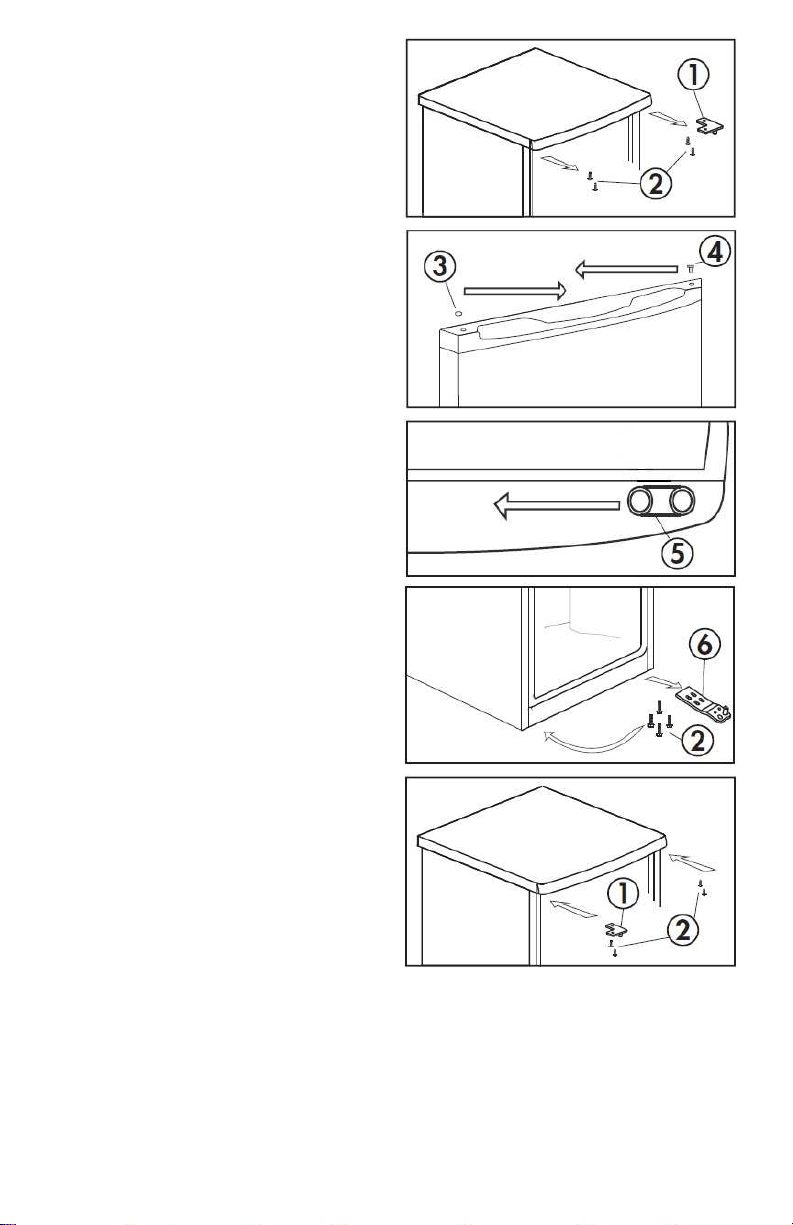
1. Open the door and remove the two
screws (2) from the upper hinge (1) on the
right side of the cabinet top. Push up
slightly on top and carefully remove the
hinge and door from the cabinet.
Remove the hinge from the door. Remove
the two screws from the upper hinge
recess on the left side of cabinet top.
These will be used later to secure upper
hinge to left side.
1. Upper hinge
2. Screws
3. Upper hinge hole plug
4. Upper hinge pin bushing
5. Door stop
6. Lower hinge
Door Reversal instructions
are continued on next page.
8

2. Remove the upper hinge hole plug (3)
from the top left side of the door and
the upper hinge pin bushing (4) from
the door top right side and swap their
positions.
3. Remove the door stop (5) from the
bottom right side of door and install on
the door bottom left side. Although
there is a hole for the plug side of the
stop, there is only an indentation for the
screw side of the stop. You will have to
apply some force to turn the screw into
the door surface.
4. Lay the appliance on its back. Remove
the leveling feet from the bottom of the
cabinet by turning the feet counterclockwise. Use a 10 mm box end or
socket wrench to remove the hinge pin
bolt and washer from the bottom hinge
bracket (6). Also remove the screw and
washer next to the hinge pin bolt from
the bracket. Reinstall the bolt, screw
and washers on the other side of the
hinge bracket.
5. Remove the four hinge bracket bottom
screws and single front screw and
remove hinge bracket from cabinet.
Remove the plug and screw from the
left side of cabinet and insert on right
side. Remove single screw on bottom
left corner and install on bottom right
corner. Use the 5 previously removed
screws to install the hinge bracket on
the left side of the cabinet.
6. Reinstall the leveling feet into cabinet
base. Raise the cabinet to upright
position. Insert the upper hinge pin into
the bushing on top of door. Reinstall
door onto cabinet. Use the 2 previously
removed screws to tighten upper hinge
to its recess in the cabinet top.
NOTE: After the door is reinstalled,
make sure that the top of the door is
level with the top of the cabinet. If the
door is not level, the rubber gasket will
not make a good seal with the cabinet.
Remove cover plate and use the screws
to reattach it to the cabinet right corner.
9
 Loading...