


 Loading...
Use & Care Guide
English
Table of Contents...2
Models: 106.5004*, 5175*
Kenmore®
Side by Side Refrigerator
* = color number
P/N W11366706A
Sears Brands Management Corporation
Hoffman Estates, IL, U.S.A. 60179
www.kenmore.com

TABLE OF CONTENTS
TABLE OF CONTENTS................................................................ |
2 |
KENMORE MAJOR APPLIANCE WARRANTY............................. |
3 |
REFRIGERATOR SAFETY........................................................... |
4 |
Proper Disposal of Your Old Refrigerator.................................. |
5 |
INSTALLATION INSTRUCTIONS................................................. |
5 |
Unpack the Refrigerator............................................................... |
5 |
Door Removal, Leveling, and Alignment..................................... |
6 |
Handle Installation and Removal................................................. |
8 |
Location Requirements.................................................................. |
9 |
Electrical Requirements................................................................. |
9 |
Water Supply Requirements......................................................... |
9 |
Connect Water Supply................................................................. |
10 |
Prepare the Water System........................................................... |
12 |
REFRIGERATOR USE................................................................ |
12 |
Ensuring Proper Air Circulation................................................... |
12 |
Using the Controls......................................................................... |
12 |
Water and Ice Dispensers........................................................... |
13 |
Water Filtration System............................................................... |
14 |
Ice Maker and Storage Bin.......................................................... |
16 |
REFRIGERATOR FEATURES...................................................... |
17 |
Refrigerator Shelves...................................................................... |
17 |
Deli Drawer.................................................................................... |
17 |
Convertible Vegetable/Meat Drawer, |
|
Crisper and Covers....................................................................... |
17 |
Crisper Humidity Control............................................................. |
17 |
FREEZER FEATURES................................................................. |
18 |
Freezer Shelf.................................................................................. |
18 |
Freezer Bin...................................................................................... |
18 |
DOOR FEATURES..................................................................... |
18 |
Door Bins........................................................................................ |
18 |
Door Rails or Bins.......................................................................... |
18 |
REFRIGERATOR CARE.............................................................. |
19 |
Cleaning......................................................................................... |
19 |
Lights.............................................................................................. |
20 |
Power Interruptions...................................................................... |
20 |
Vacation and Moving Care........................................................ |
20 |
TROUBLESHOOTING............................................................... |
21 |
ACCESSORIES.......................................................................... |
25 |
PERFORMANCE DATA SHEET.................................................. |
26 |
SERVICE NUMBERS................................................ |
BACK COVER |
2

WARRANTY
KENMORE LIMITED WARRANTY
WITH PROOF OF SALE the following warranty coverage applies when this appliance is correctly installed, operated and maintained according to all supplied instructions.
One Year on Appliance
FOR ONE YEAR from the date of sale this appliance is warranted against defects in material or workmanship. A defective appliance will receive free repair or replacement at option of seller.
Lifetime on Storage Bins
FOR AS LONG AS IT IS USED from the date of sale, a free replacement will be supplied for a defective refrigerator or freezer compartment storage bin. If the defect appears within the first year, a new bin will be installed at no charge. If the defect appears after the first year, a new bin will be supplied but not installed at no charge. This Lifetime warranty covers only storage bins, and does not apply to any other related component or mechanism. You are responsible for the labor cost of bin installation after the first year from the date of sale. This warranty coverage applies for only 90 days from the date of sale if the appliance is ever used for other than private household purposes.
For warranty coverage details to obtain free repair or replacement, visit the web page: www.kenmore.com/warranty
All warranty coverage applies for only 90 DAYS from the sale date if this appliance is ever used for other than private household purposes.
This warranty covers ONLY defects in material and workmanship, and will NOT pay for:
1.Expendable items that can wear out from normal use, including but not limited to filters, belts, bags or screw-in base light bulbs.
2.A service technician to clean or maintain this appliance, or to instruct the user in correct appliance installation, operation and maintenance.
3.Service calls to correct appliance installation not performed by Sears authorized service agents, or to repair problems with house fuses, circuit breakers, house wiring, and plumbing or gas supply systems resulting from such installation.
4.Damage to or failure of this appliance resulting from installation not performed by Sears authorized service agents, including installation that was not in accord with electrical, gas or plumbing codes.
5.Damage to or failure of this appliance, including discoloration or surface rust, if it is not correctly operated and maintained according to all supplied instructions.
6.Damage to or failure of this appliance, including discoloration or surface rust, resulting from accident, alteration, abuse, misuse or use for other than its intended purpose.
7.Damage to or failure of this appliance, including discoloration or surface rust, caused by the use of detergents, cleaners, chemicals or utensils other than those recommended in all instructions supplied with the product.
8.Damage to or failure of parts or systems resulting from unauthorized modifications made to this appliance.
9.Service to an appliance if the model and serial plate is missing, altered, or cannot easily be determined to have the appropriate certification logo.
Disclaimer of implied warranties; limitation of remedies
Customer’s sole and exclusive remedy under this limited warranty shall be product repair or replacement as provided herein. Implied warranties, including warranties of merchantability or fitness for a particular purpose, are limited to one year on the appliance and for as long as used on the storage bins, or the shortest
period allowed by law. Seller shall not be liable for incidental or consequential damages. Some states and provinces do not allow the exclusion or limitation of incidental or consequential damages, or limitation on the duration of implied warranties of merchantability or fitness, so these exclusions or limitations may not apply to you.
This warranty applies only while this appliance is used in the United States.
This warranty gives you specific legal rights, and you may also have other rights which vary from state to state.
Sears Brands Management Corporation,
Hoffman Estates, IL 60179
2/18
3

REFRIGERATOR SAFETY
Your safety and the safety of others are very important.
many important safety messages in this manual and on your appliance. Always read and obey all
.
safety alert symbol.
alerts you to potential hazards that can kill or hurt you and others.
messages will follow the safety alert symbol and either the word “DANGER” or
.” These words mean:
You can be killed or seriously injured if you don't immediately follow instructions.
You can be killed or seriously injured if you don't follow instructions.
All safety messages will tell you what the potential hazard is, tell you how to reduce the chance of injury, and tell you what can happen if the instructions are not followed.
IMPORTANT SAFETY INSTRUCTIONS
WARNING: To reduce the risk of fire, electric shock or injury to persons when using the refrigerator, follow basic precautions, including the following:
Plug into a grounded 3-prong outlet.
Do not remove the ground prong.
Do not use an adapter.
Do not use an extension cord.
Disconnect power before servicing.
Replace all parts and panels before operating.
Remove doors from your old refrigerator.
Connect only to the potable water supply.
Use non-flammable cleaner.
Keep flammable materials and vapors, such as gasoline, well away from the refrigerator.
Use two or more people to move and install the refrigerator.
Disconnect the power before installing the ice maker (on ice maker kit-ready models only).
Use a sturdy glass when dispensing ice (on some models).
Do not hit the refrigerator glass doors (on some models).
This appliance is not intended for use by persons (including children) with reduced physical, sensory or mental capabilities, or lack of experience and knowledge, unless they have been given supervision or instruction concerning use of the appliance by a person responsible for their safety.
Children should be supervised to ensure that they do not play with the appliance.
If the supply cord is damaged, it must be replaced by the manufacturer, its service agent or similarly qualified person in order to avoid a hazard.
Do not store explosive substances such as aerosol cans with a flammable propellant in this appliance.
This appliance is intended to be used in household and similar applications such as:
-Staff kitchen areas in shops, offices and other working environments;
-Farm houses and by clients in hotels, motels and other residential type environments;
-Bed and breakfast type environments;
-Catering and similar non-retail applications.
PLEASE KEEP THESE INSTRUCTIONS
4
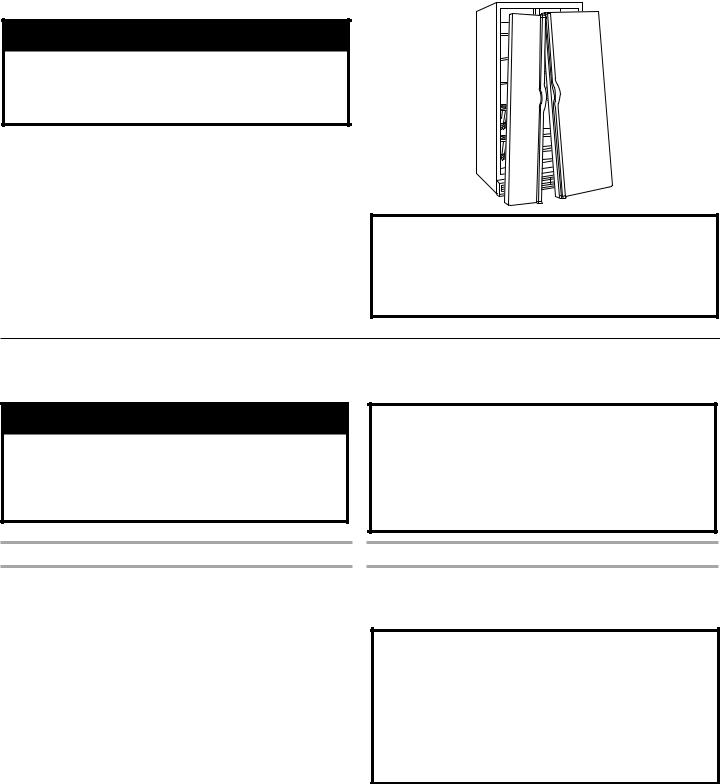
PROPER DISPOSAL OF YOUR OLD REFRIGERATOR
 WARNING
Suffocation Hazard Remove doors from your old refrigerator.
Failure to do so can result in death or brain damage.
IMPORTANT: Child entrapment and suffocation are not problems of the past. Junked or abandoned refrigerators are still dangerous, even if they will sit for “just a few days.” If you are getting rid of your old refrigerator, please follow these instructions to help prevent accidents.
Before You Throw Away Your Old Refrigerator or Freezer:
■■Take off the doors.
■■Leave the shelves in place so that children may not easily climb inside.
Important information to know about disposal of refrigerants:
Dispose of refrigerator in accordance with Federal and Local regulations. Refrigerants must be evacuated by a licensed, EPA certified refrigerant technician in accordance with established procedures.
INSTALLATION INSTRUCTIONS
UNPACK THE REFRIGERATOR
 WARNING
Excessive Weight Hazard
Use two or more people to move and install refrigerator.
Failure to do so can result in back or other injury.
When Moving Your Refrigerator:
Your refrigerator is heavy. When moving the refrigerator for cleaning or service, be sure to cover the floor with cardboard or hardboard to avoid floor damage. Always pull the refrigerator straight out when moving it. Do not wiggle or “walk” the refrigerator when trying to move it, as floor damage could occur.
Remove the Packaging
■■ Remove tape and glue residue from surfaces before turning on the refrigerator. Rub a small amount of liquid dish soap over the adhesive with your fingers. Wipe with warm water and dry.
■■ Do not use sharp instruments, rubbing alcohol, flammable fluids, or abrasive cleaners to remove tape or glue. These products can damage the surface of your refrigerator. For more information see the “Refrigerator Safety” section.
Clean Before Using
■■ After you remove all of the packaging materials, clean the inside of your refrigerator before using it. See the cleaning instructions in the “Refrigerator Care” section.
Important information to know about glass shelves and covers:
Do not clean glass shelves or covers with warm water when they are cold. Shelves and covers may break if exposed to sudden temperature changes or impact, such as bumping. Tempered glass is designed to shatter into many small, pebble-size pieces. This is normal. Glass shelves and covers are heavy. Use both hands when removing them to avoid dropping.
5

DOOR REMOVAL, LEVELING, AND ALIGNMENT
Gather the required tools and parts and read all instructions before starting installation. Save these instructions for future reference.
NOTE: Before moving your product into your home, measure the doorway of your home to see whether you need to remove the refrigerator and freezer doors. If door removal is necessary, see the instructions below.
IMPORTANT: Before you begin, unplug refrigerator or disconnect power. Remove food, the ice storage bin (on some models), and any adjustable door or utility bins from doors.
TOOLS NEEDED: Bubble level; flat-blade screwdriver; 5/16" and 11/16" wrench; 1/4", 3/8", and 5/16" hex-head socket wrenches, TORX T30† screwdriver, Phillips screwdriver tip #2 with 4" long as minimum.
 WARNING
Electrical Shock Hazard
Disconnect power before removing doors.
Failure to do so can result in death or electrical shock.
6 |
Top Left Hinge |
7 |
Door Removal |
8 Top Right Hinge |
|||
|
|
|
|
|
|
A |
|
A |
|
|
|
|
|
|
|
Do not remove A screws. |
|
|
|
|
|
||
5 |
Wiring |
|
|
|
|
Do not remove A screws. |
|
|
|
|
|
|
|
||
|
|
|
|
1 |
Full Refrigerator |
Cabinet |
|
|
A |
B |
C |
|
|
|
|
A. Wiring plugs |
|
|
|
|
|
|
|
B. Wiring clip |
|
|
|
|
|
|
|
C. Grommets |
|
|
|
|
|
|
|
4 |
Water Dispenser |
|
|
|
|
|
|
|
Tubing |
|
|
|
|
|
|
|
A |
|
|
|
|
|
|
|
|
|
|
Freezer |
Water |
Base |
Refrigerator |
|
|
|
|
door |
filter door |
grille |
door |
A. Face of fitting. |
A |
|
Adjustable front wheels |
|
|||
3 |
Base Grille |
|
|
2 |
Water Filter Door and |
|
|
|
|
|
|
|
Base Grille |
|
|
|
|
|
|
(B) |
|
(B) |
|
|
|
|
|
|
|
|
|
|
|
|
|
|
(A) |
|
|
|
|
|
|
(C) |
|
|
(C) |
9 Left and Right Bottom Hinges
B
Do not remove B screws.
10 |
Leveling screws |
|
|
Lower |
Raise |
Raise |
Lower |
11 Locking Nut |
|
|
11/16" |
|
wrench |
|
Tighten |
Loosen |
|
12 Alignment Screw |
|
|
Raise |
Lower |
5/16" |
|
wrench |
†TORX and T30 are trademarks of Acument Intellectual Properties, LLC.
6

Remove the Doors
If your new refrigerator passes through the doorway, refer to the “Cabinet Leveling & Door closing” section in this manual.
If your refrigerator does not fit through the doorway or you are getting rid of your old refrigerator, follow the steps below for door removal.
 WARNING
Electrical Shock Hazard Disconnect power before removing doors.
Failure to do so can result in death or electrical shock.
Doors & Hinges Removal
1.Unplug your refrigerator or disconnect power.
2.Fully open both doors. See graphic 1.
3.If your model has water dispensing, please open the water filter door by pulling it toward you (A). See graphic 2.
4.Use a Phillips screwdriver tip #2 to remove the screws of the base grille (B). See graphic 2.
5.To dislodge the base grille pull it up strongly toward you from one side then from other side (C). See graphic 2.
6.To remove the base grille completely, pass it underneath the refrigerator door. See graphic 3.
7.If your model has water dispensing in the door, disconnect the water dispenser tubing located below the freezer door.
■■ Press the blue outer ring against the face of fitting and pull the dispenser tubing free. See graphic 4.
NOTE: Keep the water tubing connector attached to the tube that runs underneath the freezer. The door cannot be removed if the connector is still attached to the tube that runs through the door hinge.
8.If your model has water dispensing in the door, disconnect the wiring located below the freezer door. See graphic 5.
■■ Remove the wiring clip and the bracket wire using a 1/4" hexagonal head socket wrench.
■■ Disconnect the wiring plugs from the bracket wire.
9.Close the freezer door and use a TORX T30 screwdriver to remove the top hinge completely. See graphic 6.
IMPORTANT: Do not remove either screw A. Hold the door while hinge is being removed.
10.Lift the freezer door straight up off from the bottom hinge. See graphic 7. The water dispenser tubing and wiring will remain attached to the freezer door.
NOTE: This may require two people, one to lift the door and another to feed the water tubing and wiring into the bottom hinge pin.
IMPORTANT: Rest the door on its side on a soft, clean surface, such as a towel, blanket, or piece of cardboard. This will help to avoid scratching or damaging the door, water tubing, and wiring.
11.Close the refrigerator door and use a TORX T30 screwdriver to remove completely the top hinge. See graphic 8.
IMPORTANT: Do not remove either screw A. Hold the door while the hinge is being removed.
12.Lift the refrigerator door straight up off from the bottom hinge.
See graphic 7.
IMPORTANT: Rest the door on its side on a soft, clean surface, such as a towel, blanket, or piece of cardboard. This will help to avoid scratching or damaging the door.
If your refrigerator passes through the doorway now, then go directly to the “Reinstalling Doors & Hinges” section located in this manual.
If your refrigerator without doors does not pass through the doorway, follow the instruction below:
13.Remove one or both hinges using a 5/16" nut driver tool. See graphic 9.
IMPORTANT: Do not remove either screw B.
Reinstalling Door and Hinges
1.Reinstall both bottom hinges using a 5/16" nut driver to tighten screws. See graphic 9.
2.If your model has water dispensing in the door:
■■ Lift the freezer door enough to feed the water dispenser tubing and wiring through the bottom hinge pin. See graphic 7.
NOTE: This may require two people, one to lift the door and the other to feed the water tubing and wiring into the bottom hinge pin.
■■ Insert the freezer door into the bottom hinge pin.
IMPORTANT: Hold the door while hinge is being installed.
3.Close the freezer door to align and reinstall the top hinge. Use a TORX T30 screwdriver to tighten the screws. See graphic 8.
IMPORTANT: Provide additional support for the door while top hinge is being re installed. Do not depend on the door magnets to secure the door to the cabinet.
4.If your model has water dispensing in the door, connect the water dispenser tubing. For the connection, push the tubing into the dispenser tubing until black mark touches the face of fitting. See graphic 4.
5.Reinstall the wiring clip & bracket wire to the cabinet using a
1/4" hexagonal head socket wrench. See graphic 5.
6.Connect the wiring plugs from the bracket wire. See graphic 5.
7.Lift the refrigerator door enough to insert the door into the bottom hinge pin. See graphic 7.
IMPORTANT: Hold the door while hinge is being installed.
8.Close the refrigerator door to align and reinstall the top hinge. Use a TORX T30 screwdriver to tighten the screws.
See graphic 6.
IMPORTANT: Provide additional support for the door while top hinge is being reinstalled. Do not depend on the door
magnets to secure the door to the cabinet.
Leveling and Door Closing
Your refrigerator has two front adjustable wheels. See graphic 1.
These are used to level the refrigerator under uneven floor conditions or allow the doors to close more easily. Please follow the instructions below:
1.Use a Bubble level to check levelness of floor where the rear side of the refrigerator will rest. If the refrigerator is not
leveled, adjust or add the shim on flooring to create a leveled floor for the rear side wheels. A leveled rear side prevents the refrigerator cabinet from forming a twist.
2.Place the refrigerator into its final location in the kitchen and open both doors.
3.Fully open both doors. See graphic 1.
4.If your model has water dispensing in the door, please open the water filter door by pulling it toward you (A). See graphic 2.
7
5.Using a Phillips screwdriver tip #2, remove the screws of the base grille(B). See graphic 2.
6.To dislodge the base grille pull it up strongly toward you from one side then from other side (C). See graphic 2.
7.To remove the base grille completely, pass it underneath the refrigerator door. See graphic 3.
8.Use a 3/8" hex-head socket to turn the leveling screws located in both sides of the refrigerator. See graphic 10.
9.Raise the wheels while one person pushes on the refrigerator to lift from front side. Use the bubble level on top of the
refrigerator or on its side to level the refrigerator. Check bubble level and at the same time observe the gaps and squareness to the adjacent cabinets, furniture or trim. If adjacent furnishings are not level, it may not be possible to achieve even gaps when refrigerator is level.
NOTE: Depending on uneven floor conditions, you must turn one or both screws to the right or left several times to raise or lower the refrigerator. Continue adjusting until all four corners are steady without rock.
10.Close both doors and check that they close as easily as you like. If not, turn both screws to the right to raise the refrigerator by tilting it more to the back until the doors close as easily as you like.
11.Check and make sure that the technician sheet is placed in the base grille cavity before assembling the base grille into the cabinet.
12.Reinstall the left side of the base grille first, and then the right side. See graphic 3. You may insert the water dispenser tubing and wiring into base grille cavity below the left bottom hinge.
13.Attach the base grille by pushing it into the cabinet clips. See graphic 2.
14.Using Phillips screwdriver, reinstall the screw to fix the base grill.
Door Alignment
The refrigerator doors are designed to be slightly misaligned vertically when the refrigerator is empty. Please follow the next steps to align the refrigerator doors.
1.Close both doors.
2.Use an 11/16" open-ended wrench tool to loosen the locking nut located below the refrigerator door. See graphic 11.
Accommodate the wrench tool so that it fits in the space.
3.Use a 5/16" open-ended wrench tool to turn the alignment screw. See graphic 12. Depending on how the refrigerator door is misaligned in relation to the freezer door, you must turn the screw to the right to raise or to the left to lower the refrigerator door until both doors have been aligned vertically.
NOTE: Several turns may be required.
4.Tighten the 11/16" locking nut with the wrench tool.
5.Reattach the base grille if it was dislodged.
HANDLE INSTALLATION AND REMOVAL
PARTS INCLUDED: Door handles (2), 1/8" hex key, spare setscrew(s).
To Install the Handles:
NOTE: The handle mounting setscrews are preinstalled in the handle.
1.Remove the handles, which are packed inside the refrigerator.
NOTE: To avoid scratching the finish, place the handles on a towel or other soft surface.
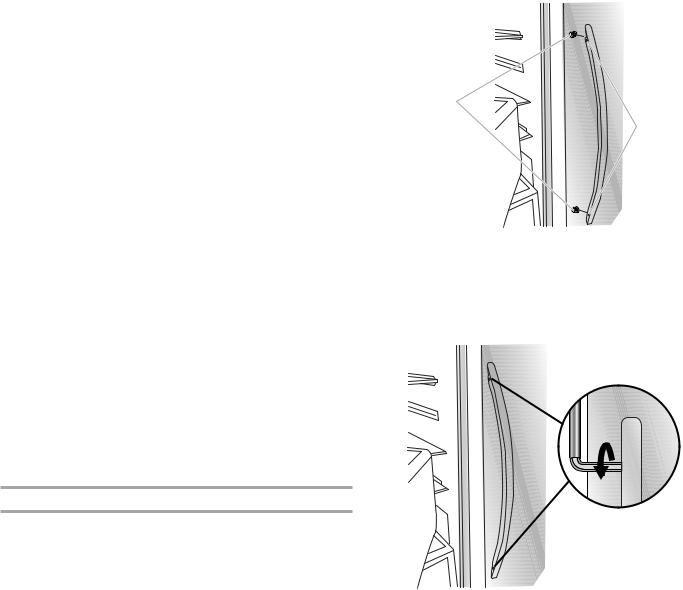
2.Open the freezer door. On the refrigerator door, place the handle on the shoulder screws with the setscrews facing the freezer.
A
B
A.Shoulder screws
B.Setscrews inside the handle
3.Firmly push the handle toward the door until the handle base is flush against the door.
4.While holding the handle, insert the short end of the hex key into the upper hole and slightly rotate the hex key until it is engaged in the setscrew.
5.Using a clockwise motion, tighten the setscrew until it begins to contact the shoulder screw.
6.Repeat steps 4 and 5 to begin fastening the lower setscrew.
7.Once both setscrews have been partially tightened as outlined in the previous steps, fully tighten both the upper and lower setscrews.
IMPORTANT: When the screws feel tight, tighten them an additional quarter-turn. The handle is not properly installed without this extra tightening.
8.Open the refrigerator door and close the freezer door. Repeat steps 2 through 7 to install the other handle onto the freezer door with the setscrews facing the refrigerator.
9.Save the hex key and all instructions.
To Remove the Handles:
1.While holding the handle, insert the short end of the hex key into the lower setscrew hole and slightly rotate the hex key until it is engaged in the setscrew.
2.Using a counterclockwise motion, loosen the setscrew a quarter turn at a time.
3.Repeat steps 1 and 2 for the upper setscrew. Gently pull the handle away from the door.
4.If necessary, use a Phillips screwdriver to remove the shoulder screws from the door.
8
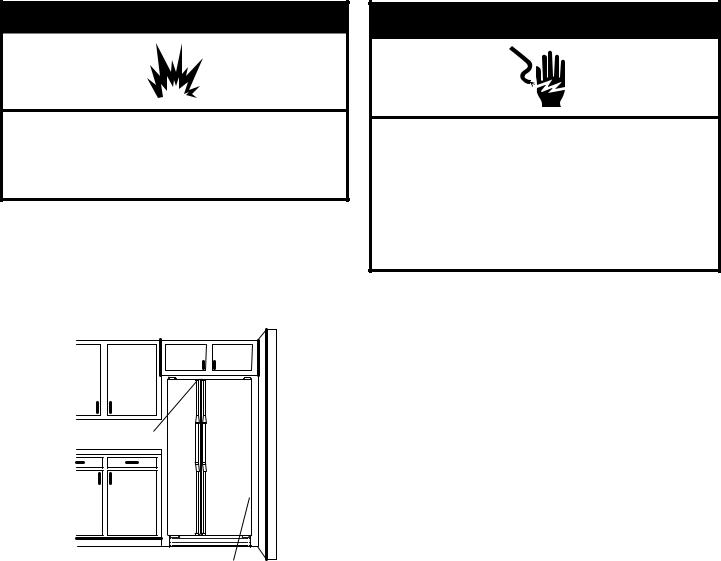
LOCATION REQUIREMENTS
 WARNING
Explosion Hazard
Keep flammable materials and vapors, such as gasoline, away from refrigerator.
Failure to do so can result in death, explosion, or fire.
IMPORTANT: This refrigerator is designed for indoor household use only.
To ensure proper ventilation for your refrigerator, allow for
1/2" (1.27 cm) of space on each side and at the top. Allow for 2" (5.08 cm) of space behind the refrigerator. If your refrigerator has an ice maker, allow extra space at the back for the water line connections. When installing your refrigerator next to a fixed wall, leave a 2" (5.08 cm) minimum space on each side (depending on your model) to allow the doors to swing open.
1/2" (1.27 cm)
2" (5.08 cm)
NOTES:
■■ This refrigerator is intended for use in a location where the temperature ranges from a minimum of 55°F (13°C) to a maximum of 110°F (43°C). The preferred room temperature range for optimum performance, which reduces electricity usage and provides superior cooling, is between 60°F (15°C) and 90°F (32°C). It is recommended that you do not install the refrigerator near a heat source, such as an oven or radiator.
■■ Normal minimum cabinet cut-out width required for product installation is 36" (91.44 cm). However, if the product is placed against an extended wall and the ability to remove the crisper pans is desired, an additional 18" (45.72 cm) of cabinet width is required, so a total cabinet opening width of 54" (137.16 cm) is recommended.
ELECTRICAL REQUIREMENTS
 WARNING
Electrical Shock Hazard Plug into a grounded 3 prong outlet. Do not remove ground prong.
Do not use an adapter.
Do not use an extension cord.
Failure to follow these instructions can result in death, fire, or electrical shock.
Before you move your refrigerator into its final location, it is important to make sure you have the proper electrical connection.
Recommended Grounding Method
A 115 V, 60 Hz, AC only, 15 or 20 A fused, grounded electrical supply is required. It is recommended that a separate circuit serving only your refrigerator be provided. Use an outlet that cannot be turned off by a switch. Do not use an extension cord.
NOTE: Before performing any type of installation or cleaning, or removing a light bulb, disconnect the refrigerator from the
electrical source. When you are finished, reconnect the refrigerator to the electrical source and reset the control (Thermostat, Refrigerator or Freezer Control depending on the model) to the desired setting. See the “Using the Controls” section.
WATER SUPPLY REQUIREMENTS
Gather the required tools and parts before starting installation. Read and follow the instructions provided with any tools listed here.
TOOLS NEEDED:
■■ |
Flat-blade screwdriver |
■■ |
1/4" nut driver |
■■ |
7/16" and 1/2" open-end or |
■■ |
1/4" drill bit |
|
two adjustable wrenches |
■■ |
Cordless drill |
|
|
NOTE: Your refrigerator dealer has a kit available with a
1/4" (6.35 mm) saddle-type shutoff valve, a union, and copper tubing. Before purchasing, make sure a saddle-type valve complies with your local plumbing codes. Do not use a piercing-type or 3/16" (4.76 mm) saddle valve which reduces water flow and clogs more easily.
IMPORTANT:
■■ All installations must meet local plumbing code requirements.
■■ Use copper tubing and check for leaks. Install copper tubing only in areas where the household temperatures will remain above freezing.
9
Loading...