

Kawasaki KLX110L 2014 Owner's manual
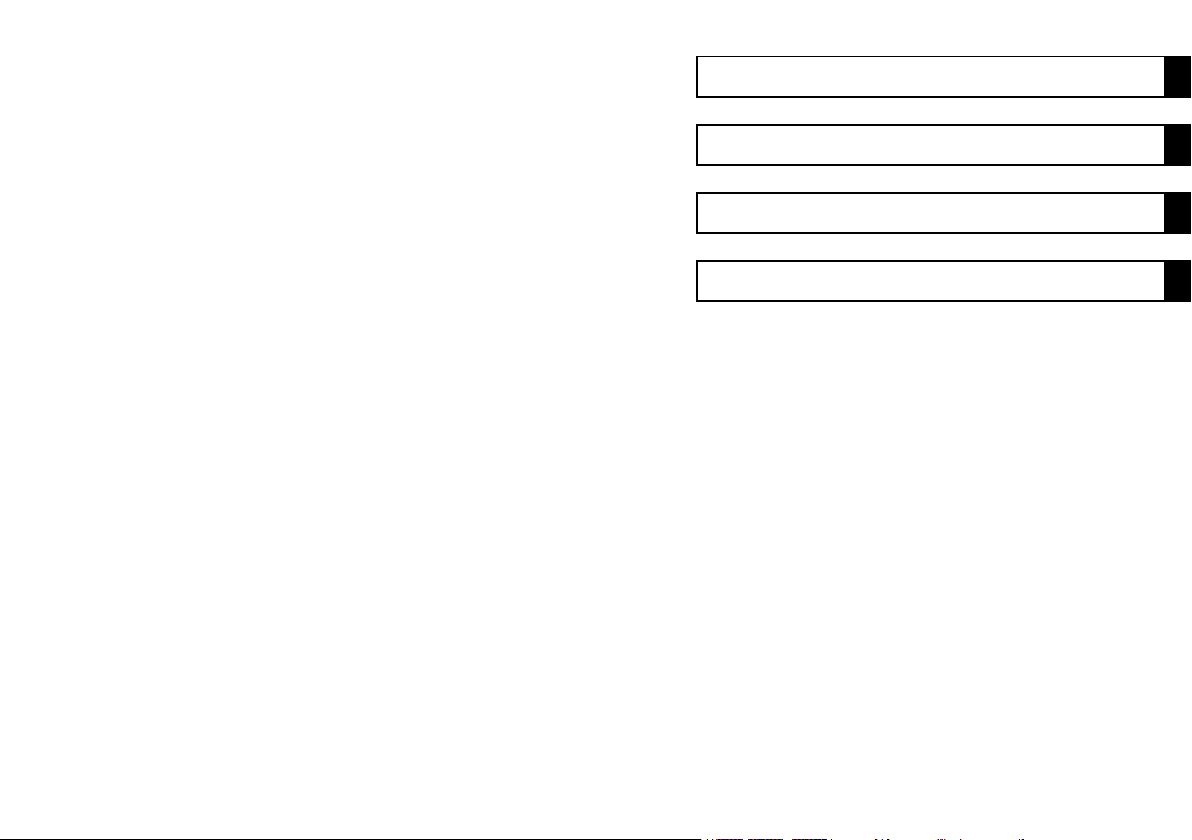
Quick Reference Guide
GENERAL INFORMATION j
This Quick Reference Guide will assist you in
finding the in
A Table of Contents is included after the
Foreword.
formation you’re looking for.
MAINTENANCE AND ADJUSTMENT j
TROUBLESHOOTING GUIDE j
STORAGE j
IMPORTANT INFORMATION
This vehicle is designed for the operator only, no passengers.
•
This vehicle is an off-road motorcycle only and was not manufactured for use on public streets, roads or
•
highways.
Respect the environment and the rights of other people.
•
Read owner’s manual.
•


Whenever you see the symbols shown below,
heed their instructions! Always follow safe operating and maintenance
practices.
NOTICE
NOTICE is used to address practices not relatedtopersonalin
jury.
DANGER
DANGER indicates a hazardous situation
which, if not avoided, will result in death or
serious injury.
WARNING
WARNING indicates a hazardous situation
which, if not avoided, could result in death
or serious injury.
NOTE
NOTE indicates information that may help or guide
○
you in the operation or service of the vehicle.
IMPORTANT
Off-road motorcycling is a wonderful sport,
and we hope you will en
ever, if improperly conducted, this sport has the
potential to cause environmental problems as
well as conflicts wi
Responsible use of your off-road motorcycle
will ensure that these problems and conflicts do
not occur. TO PROTE
SPORT, MAKE SURE YOU USE YOUR MOTORCYCLE LEGALLY, SHOW CONCERN FOR THE
ENVIRONMENT, AND
OF OTHER PEOPLE.
joy it to the fullest. How-
th other people.
CT THE FUTURE OF YOUR
RESPECT THE RIGHTS
WARNING
THISVEHICLEISANOFF-ROADVEHICLE
•
ONLY AND WAS NOT MANUFACTURED
FOR USE ON PUBLIC STREETS, ROADS,
OR HIGHWAYS.
USE YOUR MOTORCYCLE LEGALLY.
•
RESPECT THE EN VIRONMENT AND THE
•
RIGHTS OF OTHER PEOPLE.

IMPORTANT NOTE TO PAR
Your youngster’s saf
a properly maintained vehicle. As w ith any moving vehicle there are possible safety risks; be sure to
heed these precautions.
1. Always equip your youngster with suitable protective gear and riding apparel. Be sure he or she
always wears a helmet, over-the-ankle footwear or sturdy boots, eye protection, groves, long pants,
and a lo ng -sleeved shirt while riding.
2.
Never allow your youngster to carry a passenger. This motorcycle is designed for an OPERATOR ONLY.
3.
This motorcycle is designed for off-road riding and should never be operated on public roads or
paved surfaces.
4.
This motorcycle was not designed for hard riding such as motocross.
5.
Always obey local off-road riding laws and regulations. Obtain permission to ride on private property.
6.
You, the parent (and most likely “riding instru cto r/m echanic” as well), must be familiar with motorcycle
controls and maintenance requirements plus riding techniques. Read and understand the owner’s
manual provided with the motorcycle. Review all instructions and warnings with your youngster.
7.
You must determine your youngster’s readiness to ride this off-road motorcycle. Your youngster should
already be familiar with motorcycle co ntrols (location and function) and basic riding techniques. Your
youngster should also be physically large enough, and strong enough to be able to straddle the
motorcycle and hold it up , plus be ab le to pick up it up if it is on its side.
8.
Your youngster’s safety depends in part on the good mechanical condition of the motorcycle. Be sure to
follow the maintenance and adjustment requirements contained in the Periodic Maintenance Chart,
Daily Pre-ride Inspection, and After-Race Check Points. Be sure your youngster understands the
importance of che cking all item s thoroughly before riding the motorcycle. Also, familiarity with the
motorcycle is important should a problem occur far from help.
9.
Do not allow your youngster to ride unsupervised. He or she should always ride in the company of
an experienced adult.
ety will depend on your commitment to always provide a safe riding environment and
ENTS ABOUT SAFE RIDING
10.
Encourage your young
Have them practice advanced riding maneuvers under controlled conditions.
11. Tell someone where you and your youngster are planning to ride and when you intend to return.
Discuss the ride wit
techniques may b e necessary to negotiate the terrain safely. If you are not familiar with the area ,
lead the way and reduce your speed.
ster not to ride beyond his or her skill level or faster than conditions safely allow.
h your youngster before you leave so he or she will know in advance what riding
NOTICE
This motorcycle is designed for a rider weighting less than 70 kg (154 lb). Exceeding this limit could
damage the motorcycle.
WARNING
Engine exhaust, some of its constituents, and certain vehicle components contain or emit chemicals known to the State of California to cause cancer and birth defects or other reproductive harm.

FOREWORD
We wish to thank you for choosing this Kawasaki motorcycle. It is the end product of Kawasaki’s advanced
engineering, exhaustive testing, and continuous striving for super ior reliability, and performance. By giving your
motorcycle the proper care and maintenance outlined in this manual, you will be helping to ensure it a long,
trouble-free life.
Before starting to ride your motorcycle, please read this manual thoroughly in order to know your motorcycle’s
capabilities, its lim itations, and above all, how to operate it safety.
Due to improvements in design and performance m ade during production, in some cases there may be minor discrepancies between
the actual vehicle and the illustrations and text in this manual.
KAWASAKI HEAVY I NDUSTRIES, LTD.
Motorcycle & Engine Company
© 2014 Kawasaki Hea
vy Industries, Ltd.
Mar. 15, 2014. (1)

TABLE OF CONTENTS
SPECIFICATIONS.................. .......................... 11
GENERAL INFORMATION.............................. 15
LOCATION OF LABELS................................ 15
Location of Parts ........................................... 18
Side Stand ..................................................... 21
Fuel Tap......................................................... 21
Fuel ............................................................... 22
Throttle Limi ting Screw.................................. 25
Engine Stop Switch ....................................... 26
Starter Button ................................................ 27
Kick Pedal ..................................................... 28
Starting the Engine ........................................ 28
Moving Off ..................................................... 32
Shifting Gears................................................ 32
Stopping the Motorcycle ................................ 34
Stopping the Engi
Break-In........................................... .............. 35
Daily Pre-Ride Checks .................................. 36
MAINTENANCE AND
EMISSION CONTROL INFORMATION ........ 38
Periodic Maintenance Chart .......................... 41
Engine Oil ...................................................... 45
Spark Plug ..................................................... 50
Air Cleaner ......................................... ........... 52
Throttle Cabl
ne ..................... .................
ADJUSTMENT.............
e................................................
34
38
57
Carburetor ........................................ ............. 59
Clutch ............................................................ 60
Valve Clearan ce ............................................ 62
Spark Arrester ................... ............................ 63
Drive Chain.................. .................................. 65
Handlebar ........ .................................... .......... 71
Brakes .............................................. ............. 72
Steering ................. .................................... .... 77
Front Suspension .......................................... 80
Rear Suspension .................. ......................... 81
Wheels ............... .................................... ....... 81
Hoses Inspect ion ........................................... 84
Battery ................... .................................... .... 84
Fuse .............................................................. 88
Tightening Torques of Nuts and Bolts............ 89
Cleaning Your Mot
Lubrication ....... .................................... .......... 95
TROUBLESHOOTING GUIDE......................... 99
STORAGE................... .................................... . 107
Before Storage .............................................. 107
After Storage ................................................. 108
ENVIRONMENTAL
WIRING DIAGRAM .......................................... 110
YOUR WARRANTY/OWNER SATISFACTION 112
MAINTENANCE R
orcycle..............................
PROTECTION..................
ECORD ..............................
93
109
116

SPECIFICATIONS
DIMENSIONS
Overall Length 1 560 mm (61.4 in.)
Overall Width 650 mm (25.6 in.)
Overall Height:
KLX110C 955 mm (37.6 in.)
KLX110D
Wheelbase
Road Clearance:
KLX110C 215 mm (8.5 in.)
KLX110D
Curb Mass 76 kg (168 lb)
Fuel Tank Capacity 3.6 L (1.0 US gal)
ENGINE
Type
Bore × Stroke 53.0 × 50 .6 mm (2.1 × 2.0 in.)
Displacement
Compression Ratio
Fuel System Carburetor KEIHIN PB18
Starting System
Ignition System Digital DC-CDI
Ignition Timing
990 mm (39.0 in.)
1 075 mm (42.3 in.)
265 mm (10.4 in.)
4-stroke, SOHC, single-cylinder, air-cooled
112 cm³ (6.8 cu in.)
9.5:1
Electric starter and kick starter
10° BTDC @1 300 r/min (rpm) ∼ 31° BTDC @4 000 r/min (rpm)
SPECIFICATIONS 11

12 SPECIFICATIONS
Lubrication System Forced lubrication (wet sump)
Spark Plug NGK CR6HSA
TRANSMISSION
Transmission Type
Clutch Type:
KLX110C Centrifugal and wet, multi disc
KLX110D Wet, multi disc
Driving System Chain drive
Gear Ratio:
1st
2nd
3rd
4th
Primary Reduction Ratio
Final Reduction Ratio
Overall Drive Rat
Engine Oil:
Type
Viscosity
Capacity 1.1 L (1.2 US qt)
FRAME
Type Backbone
Steering Angle 45° to either side
io 10.832 at Top gear
4-speed, constant mesh, return shift
3.000 (36/12)
1.938 (31/16)
1.350 (27/20)
1.087 (25/23)
3.409 (75/22)
2.923 (38/13)
API SG, SH, SJ, SL
SAE 10W-40
, SM with JASO MA, MA1 or MA2

Caster:
KLX110C 24.8°
KLX110D
Trail:
KLX110C 50 mm (2.0 in.)
KLX110D
Tire Size/Type:
Front
Rear
Rim Size:
Front 14 × 1.40
Rear 12 × 1.60
Suspension:
Front
Rear
Front Suspension Travel:
KLX110C 110 mm (4.3 in.)
KLX110D
Rear Wheel Travel
KLX110C 110 mm (4.3 in.)
KLX110D
Front Fork Oil:
Type
:
24.2°
47 mm (1.9 in.)
2.50-14 4P.R./IRC
3.00-12 4P.R./IRC
Telescopic fork
Swingarm (mono-shock)
140 mm (5.5 in.)
132 mm (5.2 in.)
Kawasaki Fork Oi
SPECIFICATIONS 13
GS-45F
GS-45F
l SS8

14 SPECIFICATIONS
Amount (Per One Unit):
KLX110C 165 mL (5.6 US oz.)
KLX110D
BRAKES
Type:
Front Drum brake
Rear Drum brake
ELECTRICAL EQUIPMENT
Battery 12 V 3 Ah
Specifications are subject to change without notice.
182mL(6.2USoz.)
GENERAL INFORMATION
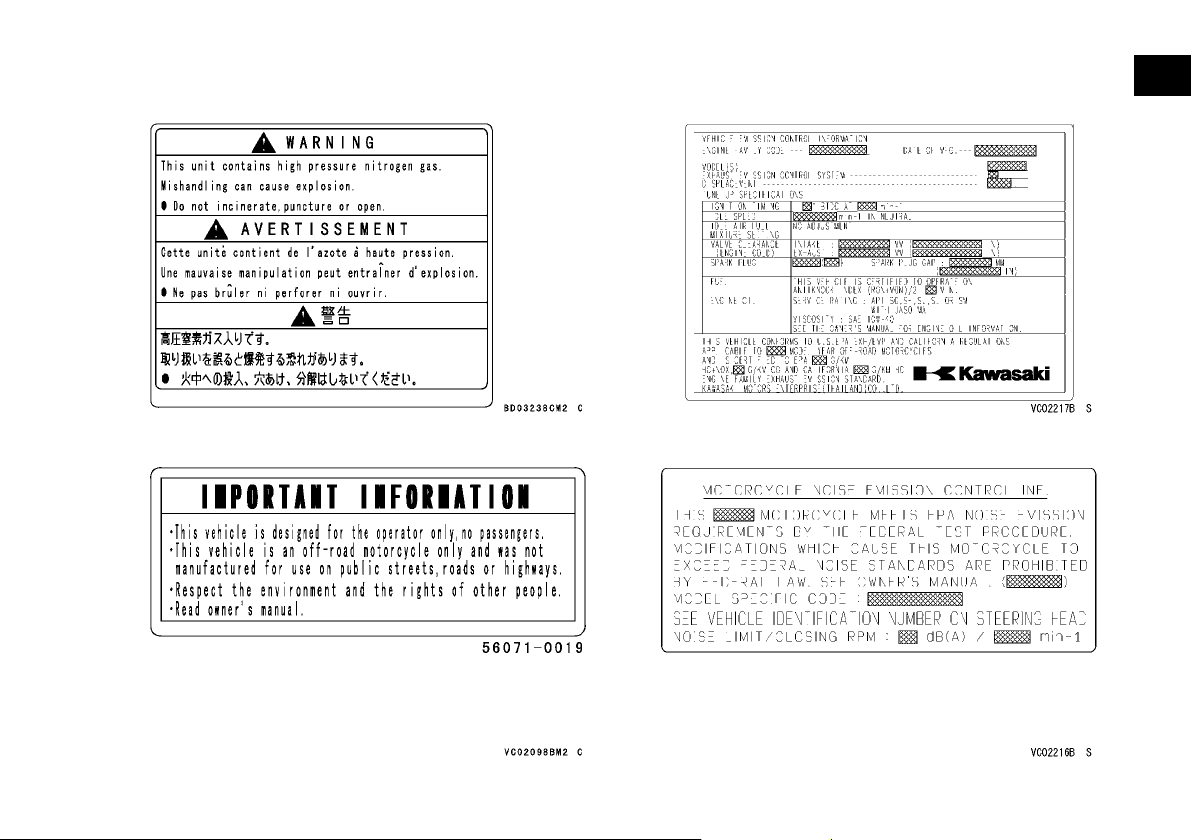
LOCATION OF LABELS
All warning labels which are on your vehicle are
repeated here. Read lab
derstand them thoroughly. They contain information
which is important for your safety and the safety of
anyone else who may ope
fore, it is very important that all warning labels be on
your vehicle in the locations shown. If any label is
missing, damaged, or
your Kawasaki dealer and install it in the correct position.
The sample warning labels in this section have
○
part numbers to help
the correct replacement.
Refer to the actual vehicle label for model specific
○
datagrayedoutint
els on your vehicle and un-
rate your vehicle. There-
worn, get a replacement from
NOTE
you and your dealer obtain
he illustration.
GENERAL INFORMATION 15
j
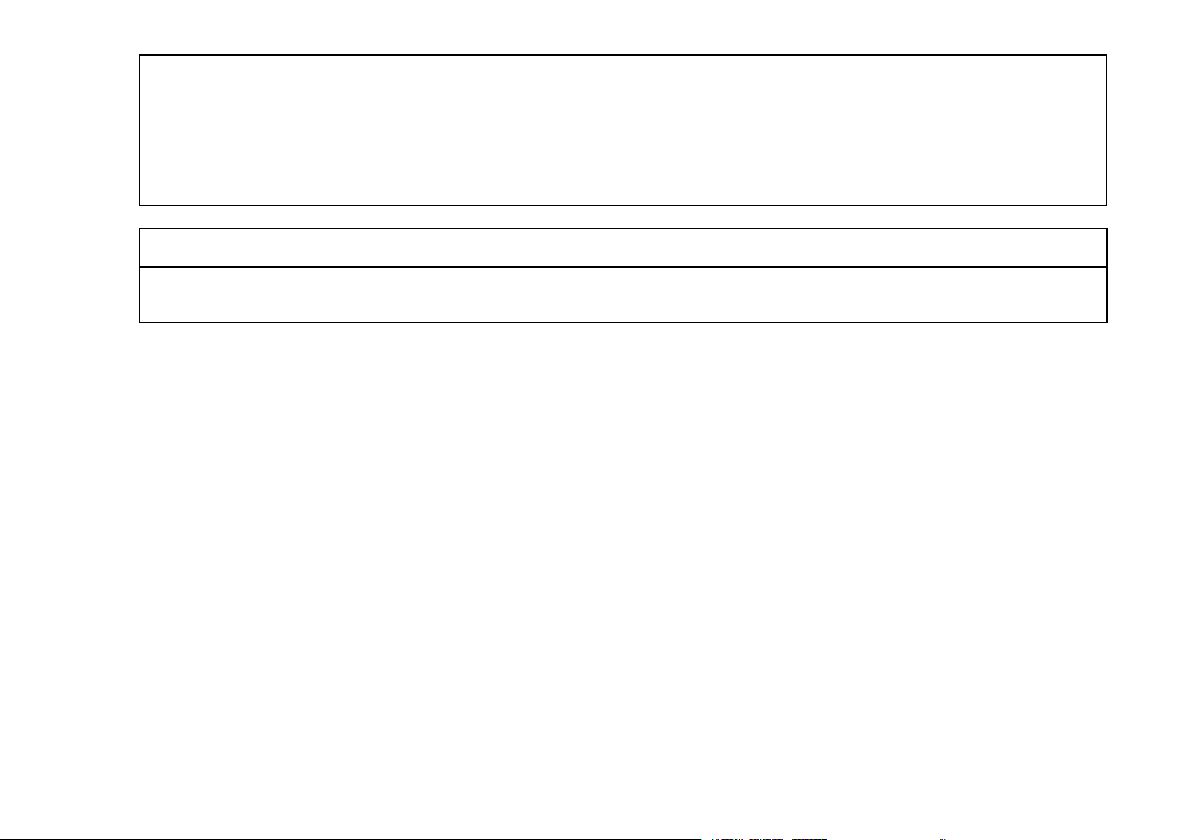
1. Rear Shock Absorber Warning
16 GENERAL INFORMATION
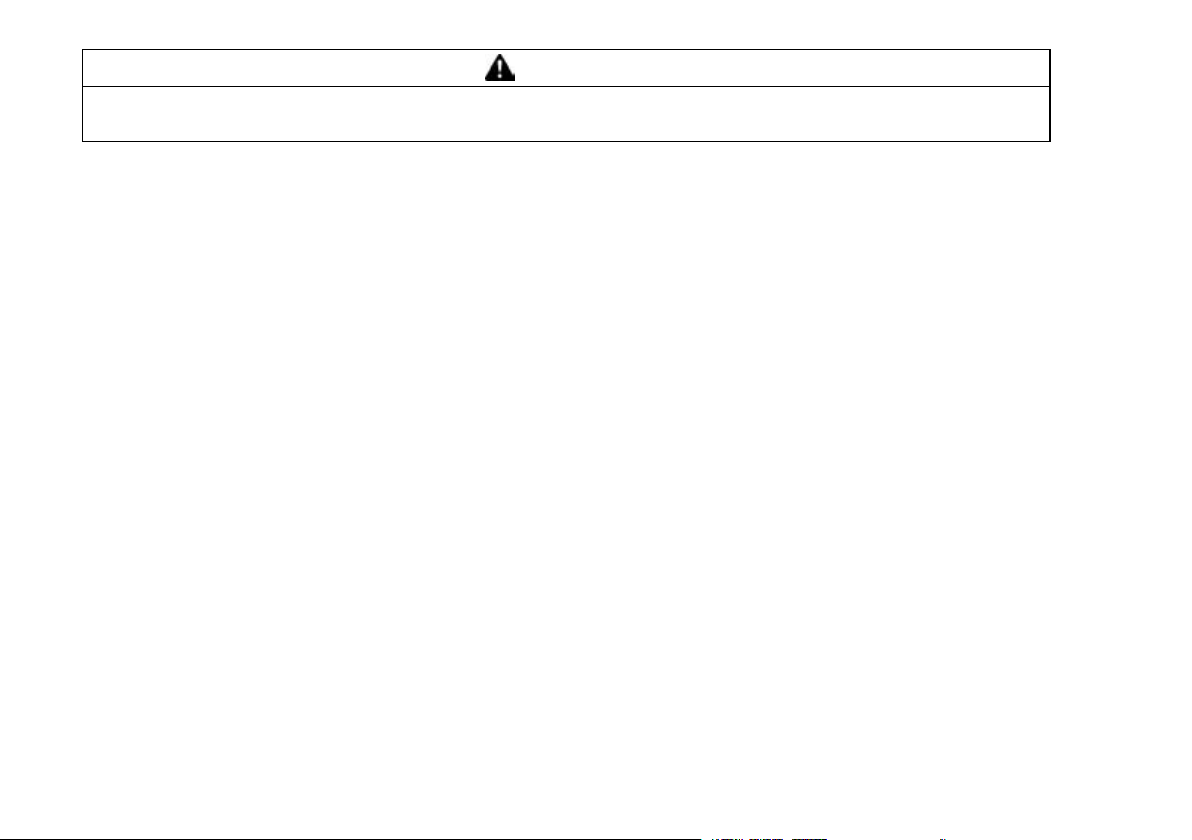
2. Important Informati
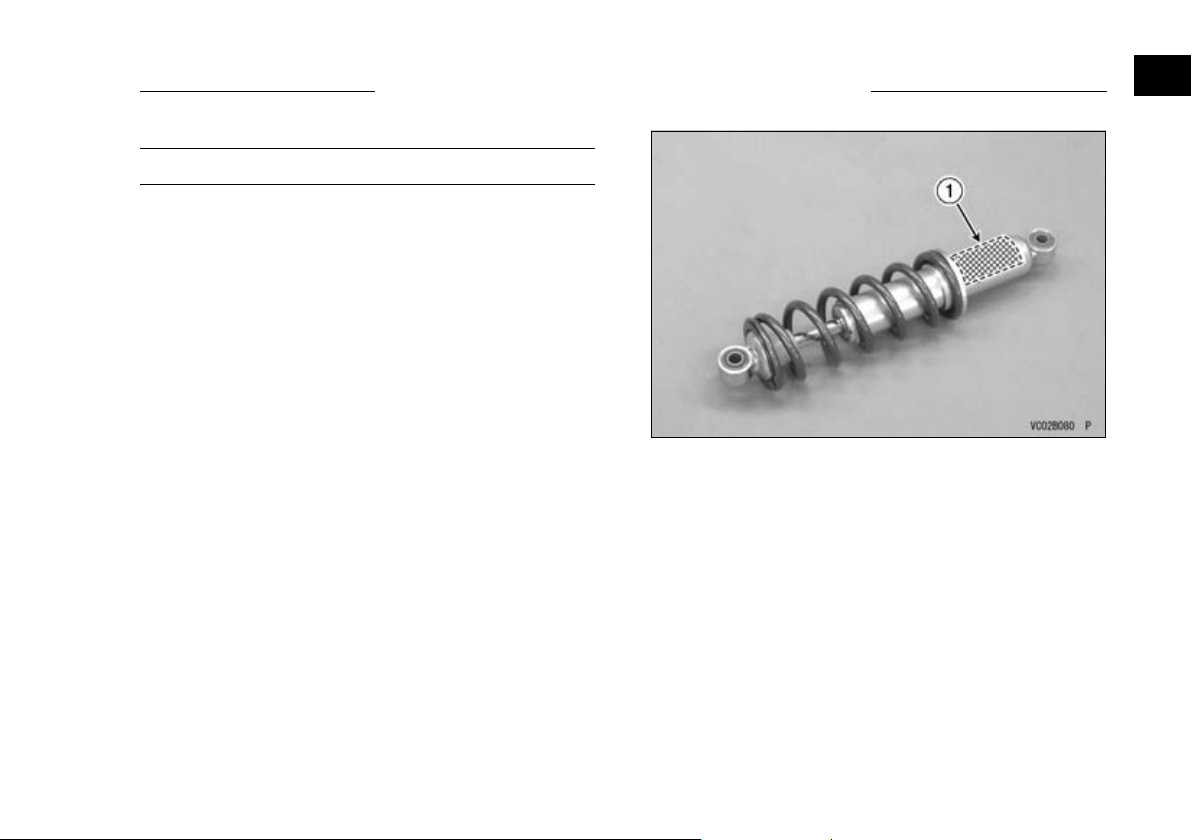
3. Vehicle Emission Co
4. Noise Emission Cont
on
ntrol Information
rol Information
1)
3)
GENERAL INFORMATION 17
j
2)
4)
18 GENERAL INFORMATION
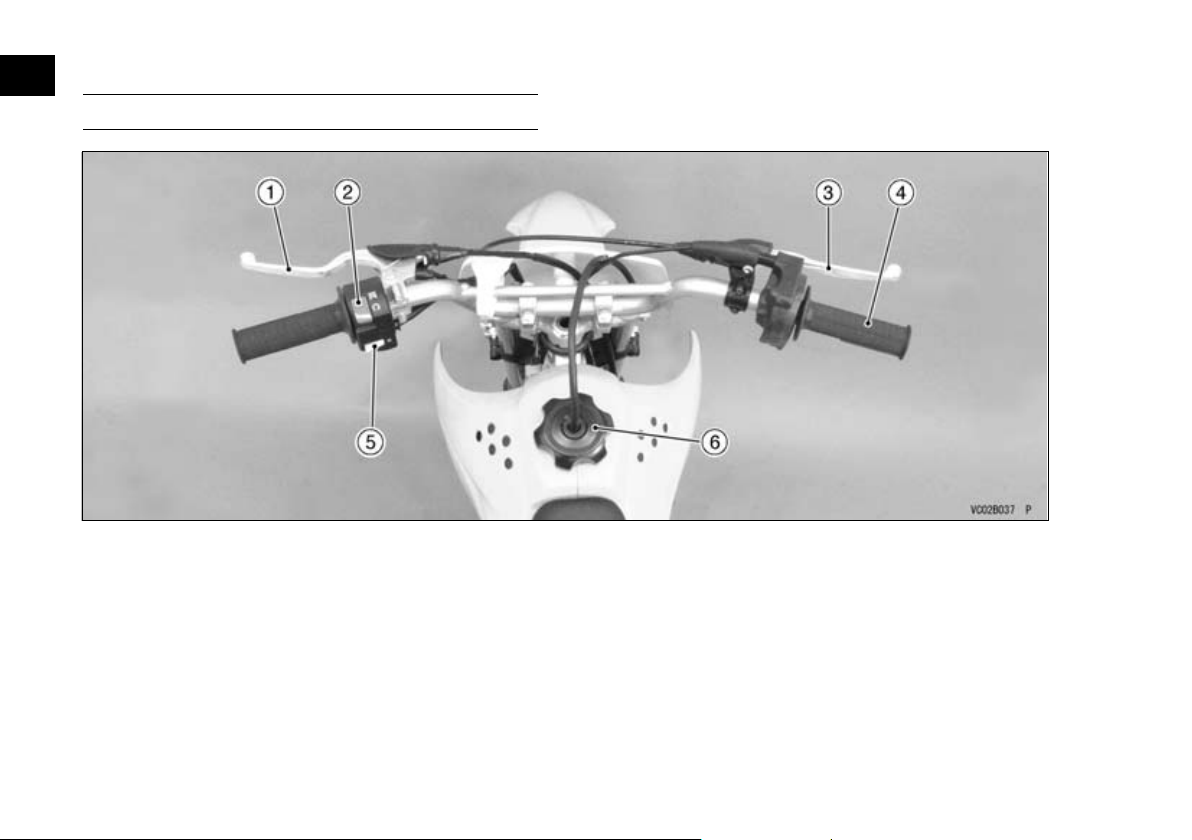
Location of Parts
1. Clutch Lever (KLX110D
Model)
2. Engine Stop Switch
3. Front Brake Lever
4. Throttle Grip
5. Starter Button
6. Fuel Tank Cap

GENERAL INFORMATION 19
j
7. Front For
8. Brake Cable
9. Choke Knob
10. Fuel Tap
11. Brake Cam Lever
k
12. Air Clean
13. Oil Filter Cap
14. Engine Oil Drain Bolt
15. Shift Pe
16. Chain Slipper
er
dal
17. Side Stan
18. Swingarm
19. Drive Chain
d
20 GENERAL INFORMATION
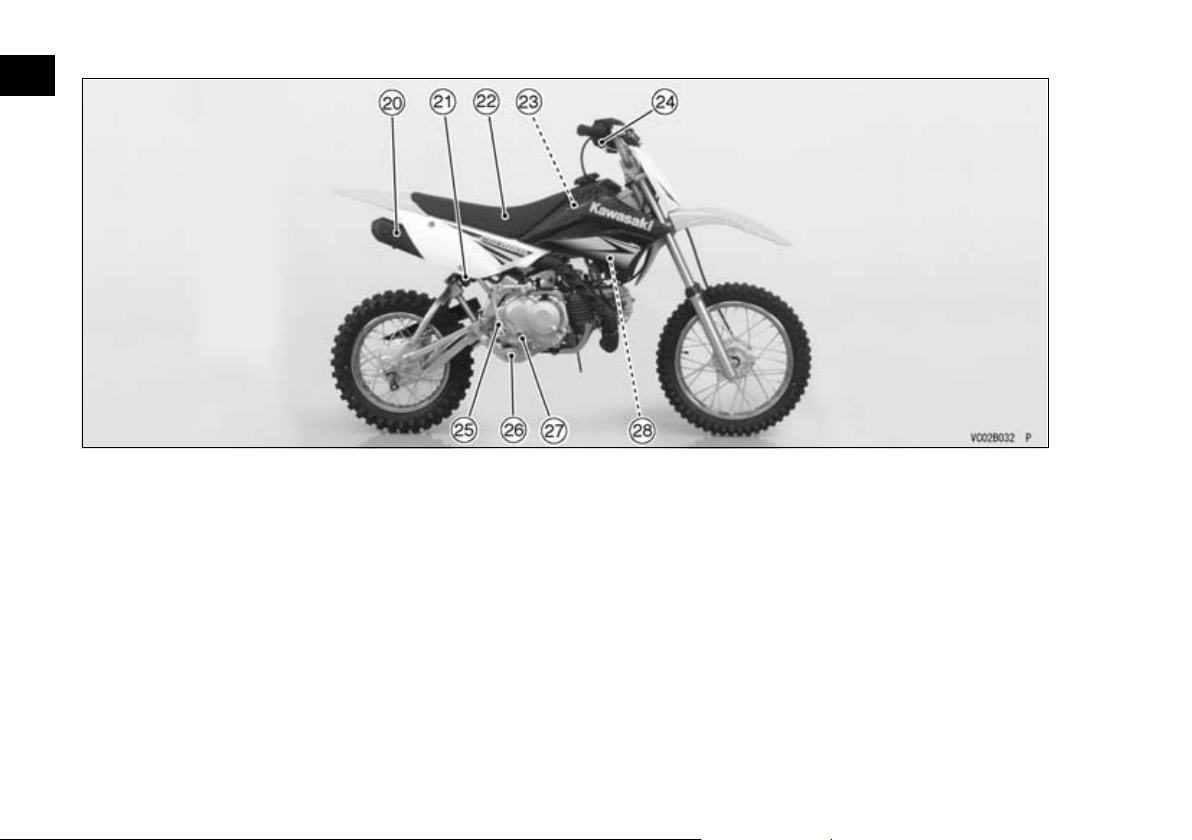
20. Muffler
21. Rear Shock Absorber
22. Seat
23. Fuel Tan
k
24. Throttle
25. Kick Pedal
26. Rear Brake Pedal
Limiting Screw
27. Oil Level
Window
28. Carburetor
Inspection
GENERAL INFORMATION 21
j
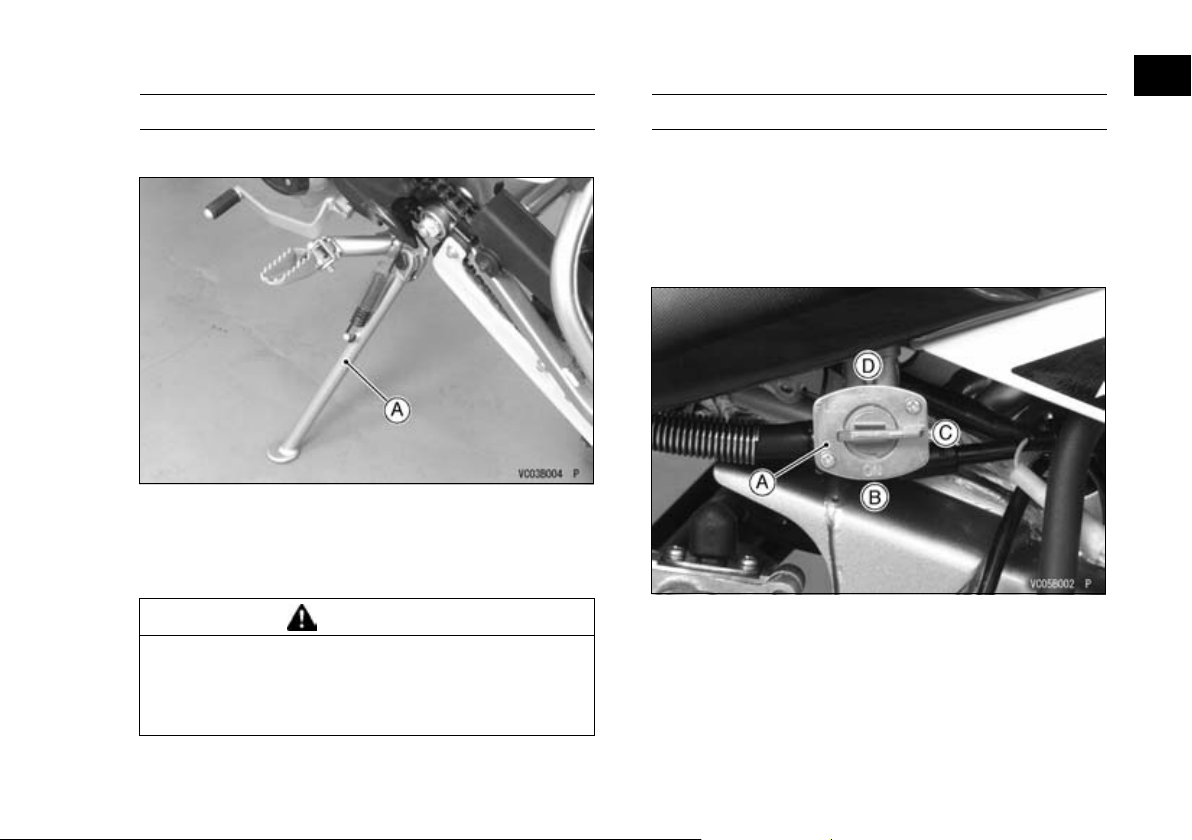
Side Stand
The motorcycle is equ
A. Side Stand
Do not sit on the motorcycle while it is on its side
stand. Always kic
on the motorcycle.
ipped with a side stand.
k the stand fully up before sitting
WARNING
Riding with the side stand down could cause
an accident resulting in serious injury or
death. Always be sure the side stand is fully
raised before riding.
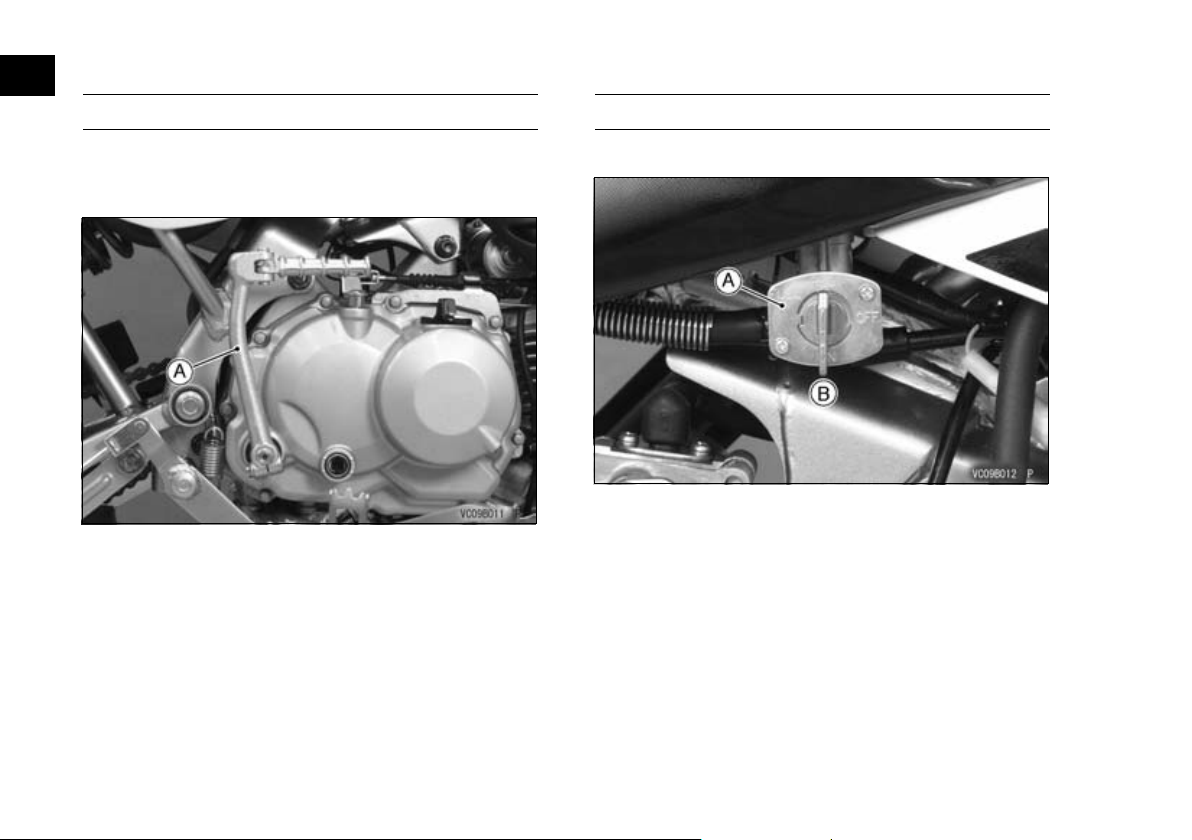
Fuel Tap
The fuel tap has three
(reserve). For normal operation, turn the fuel tap
lever to t he ON position. If the fuel runs out with the
tap in the ON position
(0.11 US gal) of usable fuel remains can be used by
turning the tap lever to the RES position.
A. Fuel Tap
B. ON Position
C. OFF Position
D. RES Position
Turn the fuel tap lever to OFF position when the
fuel tank is removed for maintenance and adjustments or the mot
position; OFF, ON, and RES
, the last approximately 0.4 L
orcycleisstoredforalongtime.
22 GENERAL INFORMATION
NOTE
Since riding dista n ce is limited when on RES, re-
○
fuel at the earliest opportunity.
Make certain that the fuel tap lever is turned to ON
○
(not RES), after filling up the fuel tank.
WARNING
Practice operating the fuel tap with the motorcycle stopped. To prevent an accident you
should be able to operate the fuel tap while
riding without taking your eyes off the road.
Be careful not to touch the hot engine while
operating the fuel tap.
Fuel
The required of fuel i
quirement”.
The capacity of the fuel tank is 3.6 L (1.0 US gal).
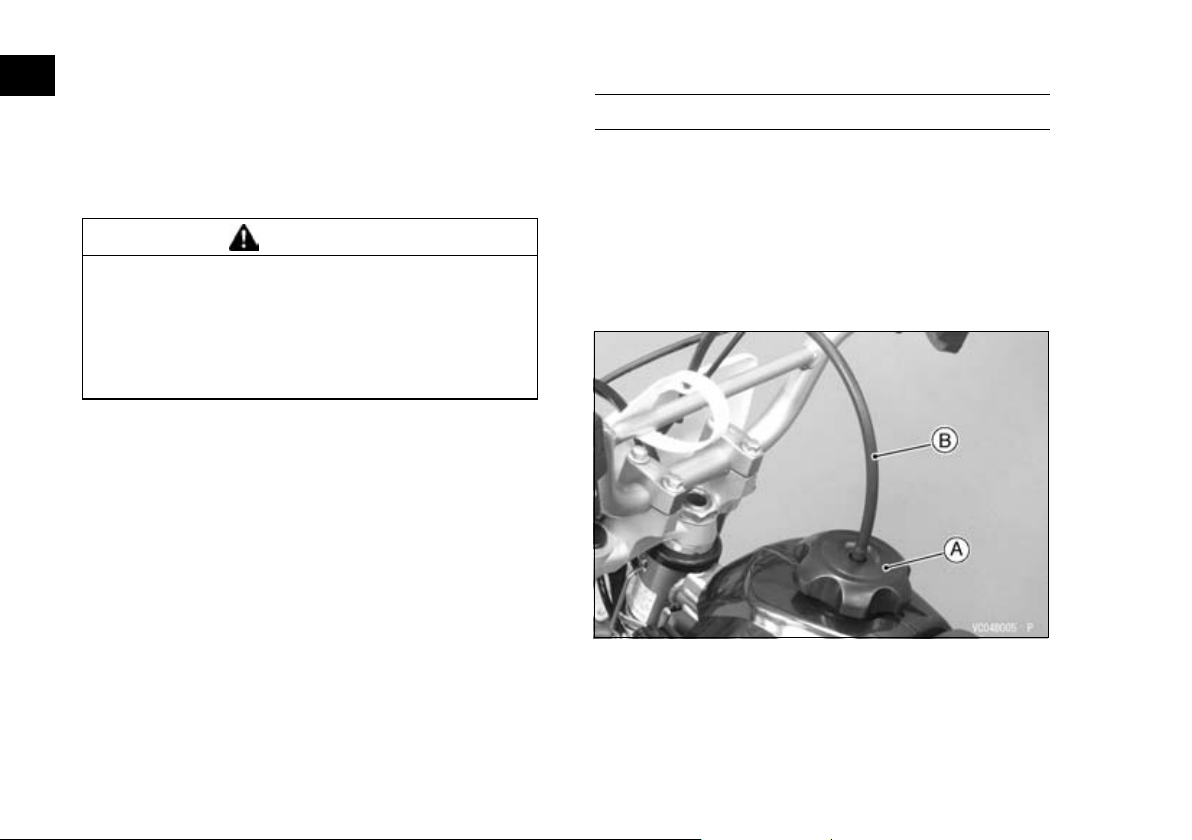
To open the fuel tank c
from the hole in the number plate and turn the tank
cap counterclockwise.
Avoid filling the ta
is blowing so that the fuel does not get contaminated.
s specified under “Fuel Re-
ap, pull out the breather hose
nk in the rain or where heavy dust
A. Fuel Tank Cap
B. Breather Hose
WARNING
Gasoline is extremely flammable and can be
explosive under certain conditions, creating
the potential for serious burns. Move the en-
gine stop switch to the
smoke. Make sure the area is well-ventilated
and free from any source of flame or sparks;
this includes any appliance with a pilot light.
Never fill the tank completely to the top. If
the tank is filled completely to the top, heat
may cause the fuel to expand and overflow
through the vents in the tank cap. After refueling, make sure the tank cap is closed securely.
If gasoline is spilled on the fuel tank, wipe it
off immediately.
Fuel Requireme
nt -
Fuel Type
Use clean, fresh unleaded gasoline with a minimum Antiknock Index of 87. The Antiknock Index is
posted on service station pumps in the U.S.A. The
octane rating of a gasoline is a measure of its resistance to detonation or “knocking”. The Antiknock
Index is an average of the Research Octane Number (RON) and the Motor Octane Number (MON) as
shown in the table below.
position. Do not
GENERAL INFORMATION 23
Octane Rating Method
Antiknock Index
(RON + MON)
2
Minimum
Rating
87
NOTICE
If engine “knocking” or “pinging” occurs,
use a different brand of gasoline of a higher
octane rating.
If this condition is allowed to continue it can
lead to severe engine damage.
Gasoline quality is important. Fuels of low
quality or not meeting standard industry
specifications may result in unsatisfactory
performance. Operating problems that result
from the use of poor quality or nonrecommended fuel may not be covered under your
warranty.
Fuels Containing Oxygenates
Gasoline frequently contains oxygenates (alco-
ls and ethers) especially in areas of the U.S. and
ho
Canada which are required to sell such reformulated fuels as part of a strategy to reduce exhaust
issions.
em
The types and volume of fuel oxygenates ap-
proved for use in unleaded gasoline by the U.S.
nvironmental Protection Agency include a broad
E
j
24 GENERAL INFORMATION
range of alcohols and
nents have seen any significant level of commercial
use.
Gasoline/Alcohol B
to 10% ethanol (alcohol produced from agricultural
products such as corn), also known as “gasohol” is
approved for use.
ethers, but only two compo-
lends - Gasoline containing up
NOTICE
Avoid using blends of unleaded gasoline and
methanol (wood alcohol) whenever possible,
and never use “gasohol” containing more
than 5% methanol. Fuel system damage and
performance problems m ay result.
Gasoline/Ether Blends - The most common ether
is methyl tertiary butyl ether (MTB E). You may use
gasolinecontainingupto15%MTBE.
NOTE
Other oxygenates approved for use in unleaded
○
gasoline include TAME (up to 16.7%) and ETBE
(up to 17.2%). Fuel containing these oxygenates
canalsobeusedinyourKawasaki.
NOTICE
Never use gasoline with an octane rating lower than the mini mum specified by
Kawasaki.
Never use “gasohol” with more than 10%
ethanol, or more than 5% methanol. Gasoline containing met
blended with cosolvents and corrosion
inhibitors.
Certain ingredien
paint fading or damage. Be extra careful
not to spill gasoline or gasoline oxygenate
blends during ref
When not operating your Kawasaki for 30
to 60 days, mix a fuel stabilizer (such as
STA-BIL) with th
Fuel stabilizer additives inhibit oxidation of
the fuel which minimizes gummy deposits.
Never store this
the fuel system. Before storage it is recommended that you drain all fuel from the fuel
system. See the
ual.
hanol must also be
ts of gasoline may cause
ueling.
e gasoline in the fuel tank.
product with “gasohol” in
Storage section in this man-
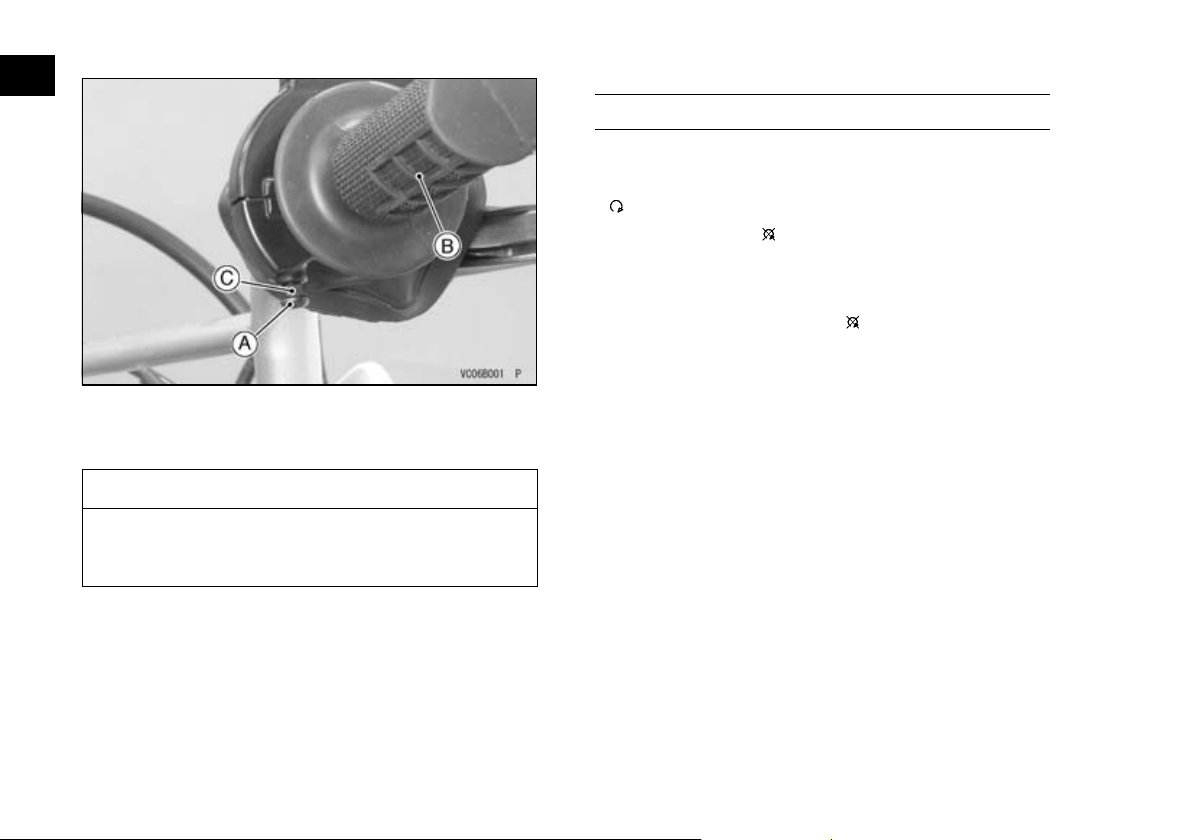
Throttle Limiting S crew
GENERAL INFORMATION 25
j
A screw-type throttl
equipped to this motorcycle to decrease the maximum engine power for a novice rider. The limiting
screws function by re
the throttle grip so that it opens to either 3/8 or 1/2
of full throttle.
Kawasaki recommend
throttle limiting screw step-by-step as follows; The
3/8degreescrewcanbeusedforthebeginning
rider, 1/2 degree s
and no throttle limiting screw for riders with more
advanced skills.
Changing the position of the throttle limiting screw
○
should only be don
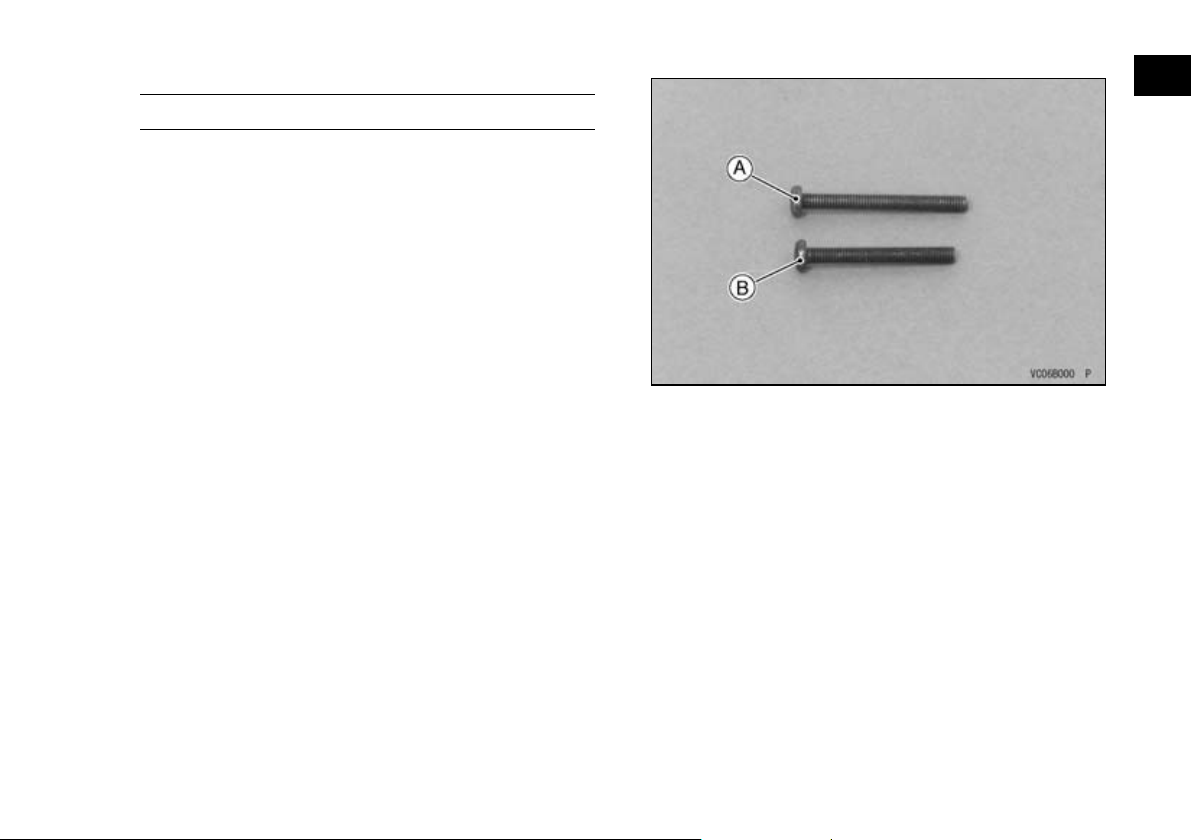
The longer screw is the 3/8 degree limiter, the
•
short screw is th
e limiting screw can be
stricting the turning degree of
s raising the level of the
crew for the semi-skilled rider,
NOTE
e at the parents’ discretion.
e 1/2 degree limiter.
A. 3/8 Degree Screw 47 mm (1.9 in.)
B. 1/2 Degree Screw 42 mm (1.7 in.)
Check that the throttle grip has 2 ~ 3 mm (0.08 ~
•
0.12 in.) of play and turns smoothly.
Remove the blank screw and locknut installed to
•
the housing.
Install the locknut of the blank screw to the throttle
•
limiting screw.
Screw the th
•
tle housing and tighten the locknut.
rottle limiting screw fully into the throt-
26 GENERAL INFORMATION
Engine Stop Switch
A. Throttle Limiting Screw
B. Throttle Grip
C. Locknut
NOTICE
Use only the Kawasaki screws supplied with
the motorcycle. Substituting non standard
screws can damage the throttle housing.
NOTE
Store the uninstalled throttle limiting screw in a
○
location where they will not be lost.
Do not operate the motorcycle without inserting
○
the throttle limiting screw or blank screw into the
throttle housing. This is to keep dirt or water from
entering the throttle housing.
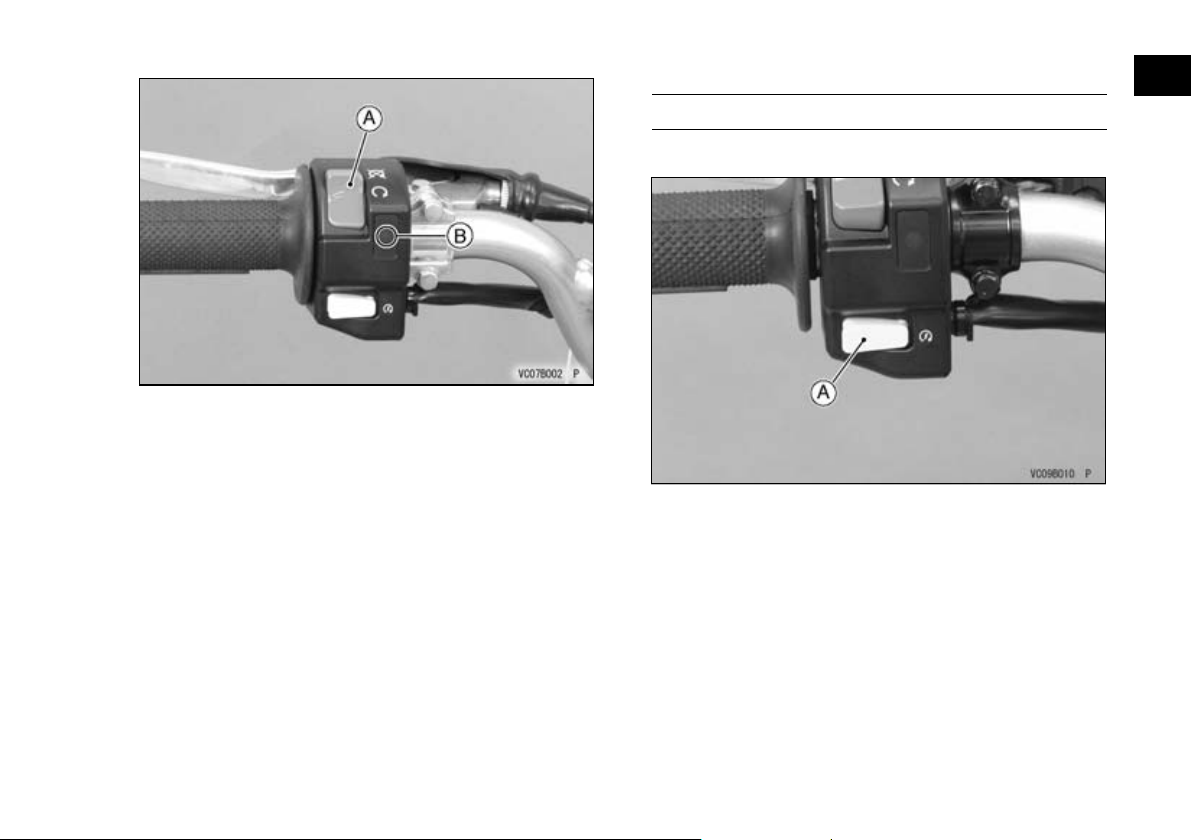
Theenginestopswitc
thehandlebar. Theenginestopswitchmustbeinthe
position for the moto
the switch to the
h is located on the left side of
rcycle to operate. Move
position to stop the engine.
NOTE
To avoid battery discharging, check that the en-
○
gine stop switch is in the
ange indicator light (LED) goes off, when the motorcycle is not us
ed.
position and the or-
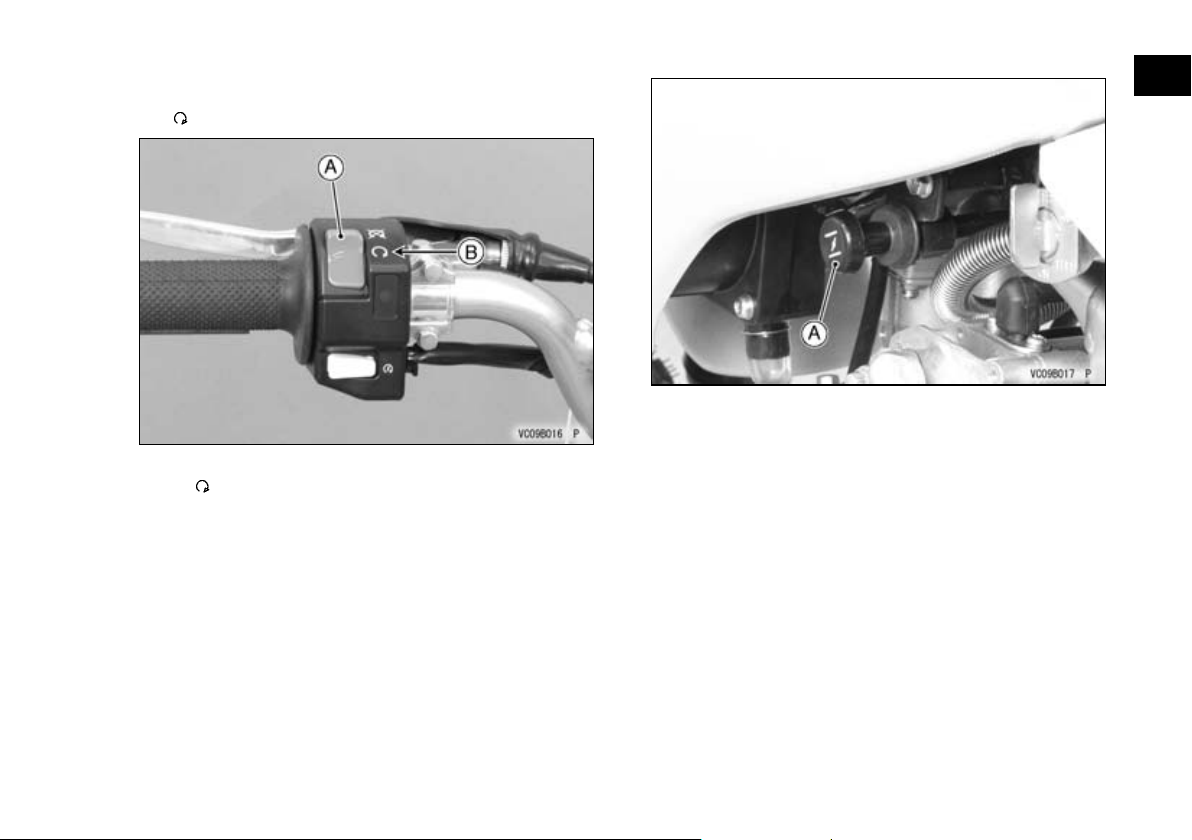
Starter Button
GENERAL INFORMATION 27
j
A. Engine Stop Switch
B. Indicator Light (LED)
This motorcycle has t
A. Starter Button
he starter button.
28 GENERAL INFORMATION
Kick Pedal
This motorcycle is eq
system. When using the kick pedal, make sure that
thetransmissionisinneutral.
A. Kick Pedal
uipped with a kick starting
Starting the Engine
Turn the fuel tap leve
•
A. Fuel Tap
B. ON Position
Shift the transmission into neutral.
•
This motorcycle is equipped with a gear position
○
switch that pre
the transmission is not in neutral.
vents the engine from starting when
r to the ON position.
NOTE
Check that the engine
•
position.
stop switch is in the
GENERAL INFORMATION 29
j
A. Choke Knob
A. Engine Stop Switch
B.
If the engine is cold, pull out the choke knob.
•
Position
NOTE
When the engine is already warm or on hot days,
○
open the throttle part way instead of using the
choke, and then start the engine.
Leaving the throttle completely closed, push the
•
starter button until the engine starts.
NOTE
For KLX110D model; when the clutch lever is
○
pulled, the motorcycle can be started with the
transmission in any gear.
 Loading...