

Page 1
OVERVIEW
OF CONTROLS
1
Quick Start Guide
2
SOUNDS
3
STYLES
4
RECORDER
5
USB USAGE
Page 2

Page 3

WELCOME!
Welcome to the KAWAI CP139 Quick Start Guide.
This guide attempts to provide new CP users with a selection of step-by-step instructions to some of these instruments’
most useful features. With so many buttons, menus, and functions, the CP139 can appear rather daunting at first,
however by following a few basic steps we’ll soon be learning how to select sounds and accompaniment styles, record
our own songs, and even save pieces to USB memory.
Below is a list of topics that we’ll be covering in this guide:
Overview of controls
Selecting instrument sounds
Selecting accompaniment styles
Recording a song
Deleting, saving, and loading a song
Saving and loading a song to/from USB memory
Playing MP3 audio files from USB memory
Saving MP3 audio files to USB memory
Page
OVERVIEW
3
1
OF CONTROLS
TABLE OF CONTENTS
1. OVERVIEW OF CONTROLS.................................................4
PANEL BUTTONS .................................................................................. 4
TEMPO/VALUE DIAL, VOLUME SLIDERS ............................................4
TOUCH SCREEN DISPLAY ................................................................... 5
2. SOUNDS ...............................................................................6
THE ‘RIGHT 1’ PART ..............................................................................6
THE ‘RIGHT 2’ PART, COMBINING WITH ‘RIGHT 1’.............................. 8
THE ‘LEFT/SPLIT’ PART....................................................................... 10
ADJUSTING THE SPLIT POINT .......................................................... 11
THE ‘SOLO’ PART ................................................................................ 12
3. STYLES...............................................................................13
SELECTING A STYLE.......................................................................... 13
ADDING ACCOMPANIMENT TO THE DRUMS.................................... 15
SONG STYLIST.................................................................................... 17
4. RECORDER........................................................................19
RECORDING A SONG......................................................................... 19
PLAYING A SONG................................................................................ 21
RE-RECORDING PARTS OF A SONG ................................................21
SAVING A SONG TO INTERNAL MEMORY........................................22
DELETING A SONG FROM RECORDER MEMORY...........................23
LOADING A SONG FROM INTERNAL MEMORY ...............................25
5. USB USAGE .......................................................................27
SAVING A SONG TO USB MEMORY ..................................................27
LOADING A SONG FROM USB MEMORY.......................................... 29
PLAYING MP3 AUDIO FILES FROM USB MEMORY ..........................31
RECORDING MP3 AUDIO FILES TO USB MEMORY ......................... 34
2
SOUNDS
3
STYLES
4
RECORDER
5
USB USAGE
Page 4
Page
4
1. OVERVIEW OF CONTROLS
Aside from the standard 88-key piano keyboard, there are a number of different ways to control the various functions of
the CP139 instrument. Below is a brief explanation of the panel buttons, tempo/value dial, volume sliders, and touch
screen LCD display which will be used throughout this Quick Start guide.
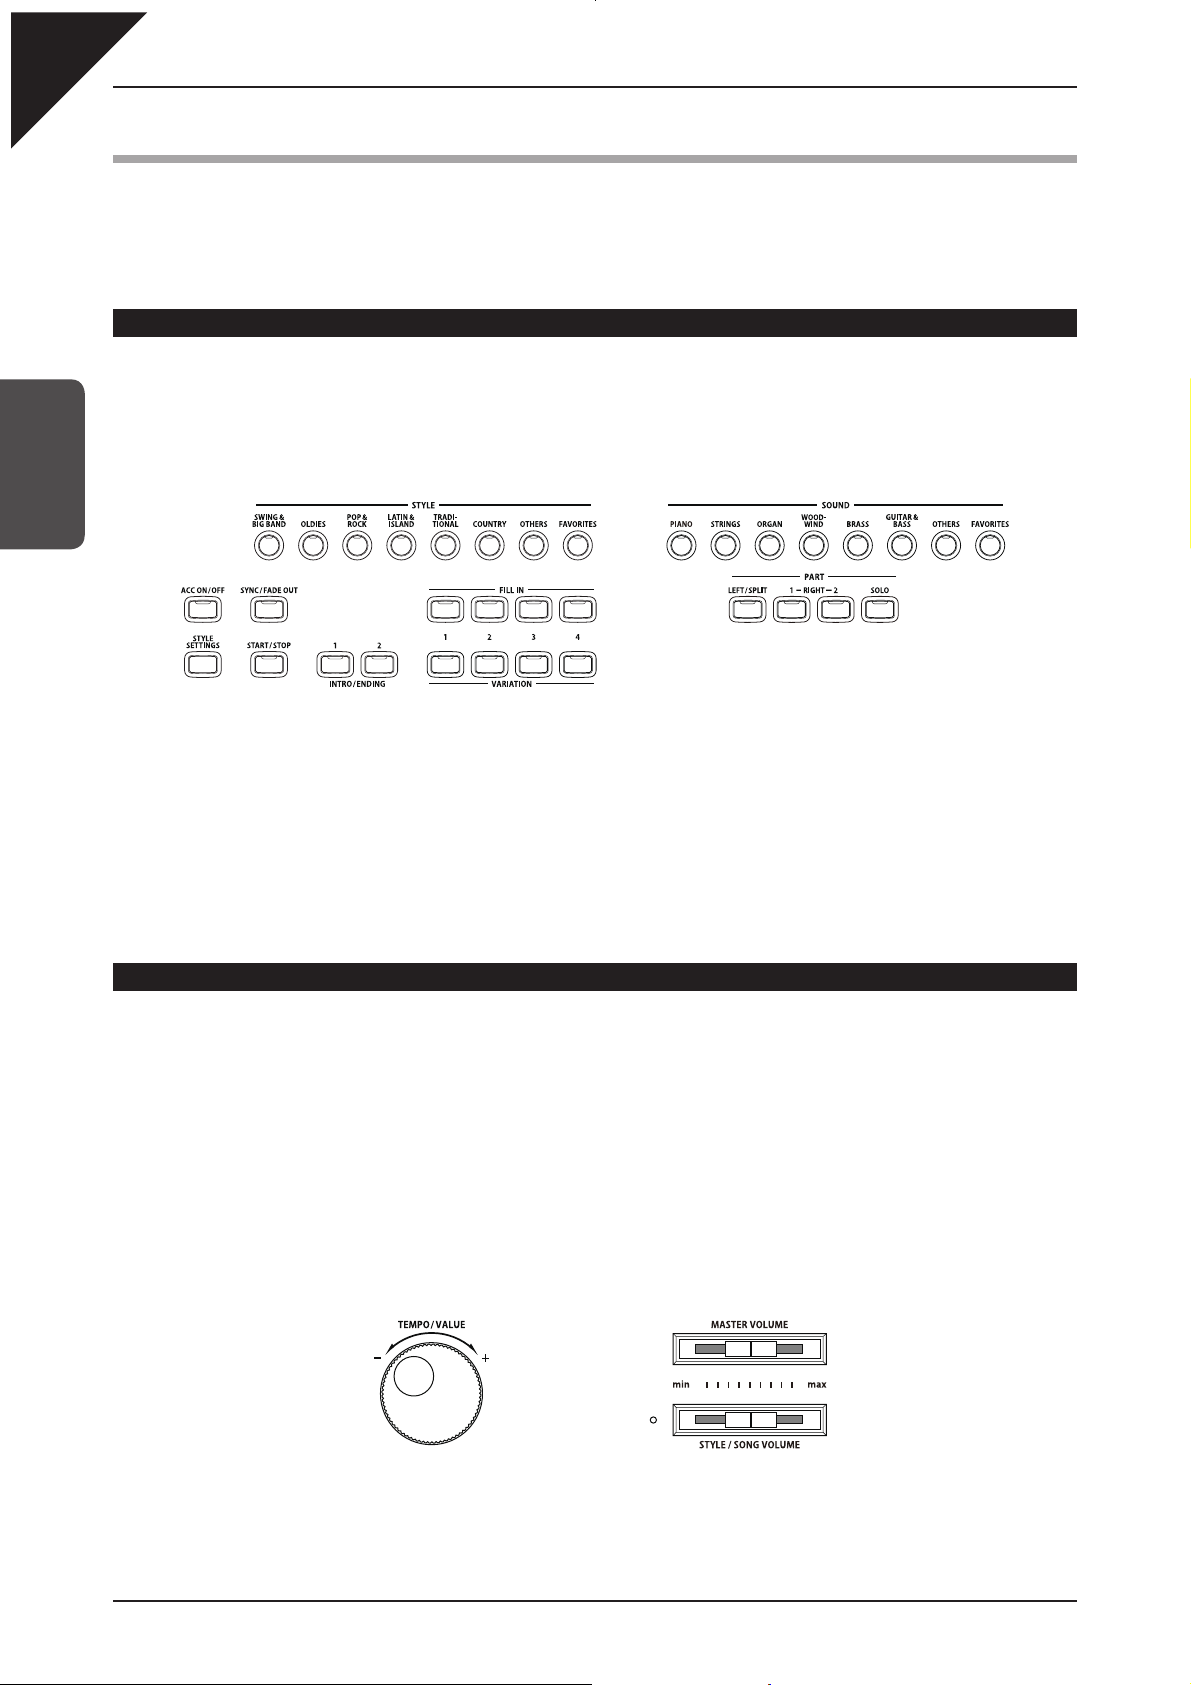
PANEL BUTTONS
The panel buttons are responsible for controlling the majority of functions on the CP139, with buttons to the left of the
display associated with selecting and adjusting accompaniment styles, and buttons to the right of the display used to
select and adjust instrument sounds.
1
OVERVIEW
OF CONTROLS
In addition, the top row of circular shaped buttons control the main functions of the CP139, while the square shaped buttons
on the middle and bottom rows are typical used to adjust parameters and settings within these main functions. Finally,
many of the buttons also contain an LED indicator which will turn on or off when a function is activated or deactivated.
The position and grouping of the panel buttons should become familiar reasonably quickly, allowing you to navigate
around the CP139 almost instinctively, and concentrate on making truly great music.
Style buttons: to the left of the display Sound buttons: to the right of the display
TEMPO/VALUE DIAL, VOLUME SLIDERS
The Tempo/Value dial is used to increase or decrease the tempo of accompaniment styles and songs, scroll through
menu screens, and also to adjust values quickly and efficiently.
The Style/Song Volume slider is used to increase or decrease the volume of accompaniment styles, and songs played
back from the built-in recorder or USB memory. This slider does not control the volume of the keyboard or external inputs
such as the microphone.
The Master Volume slider, meanwhile, controls the overall volume of the instrument, including accompaniment styles
and songs, the keyboard, and external inputs.
Tempo/Value dial Volume sliders
Page 5
1
OVERVIEW
OF CONTROLS
Page
5
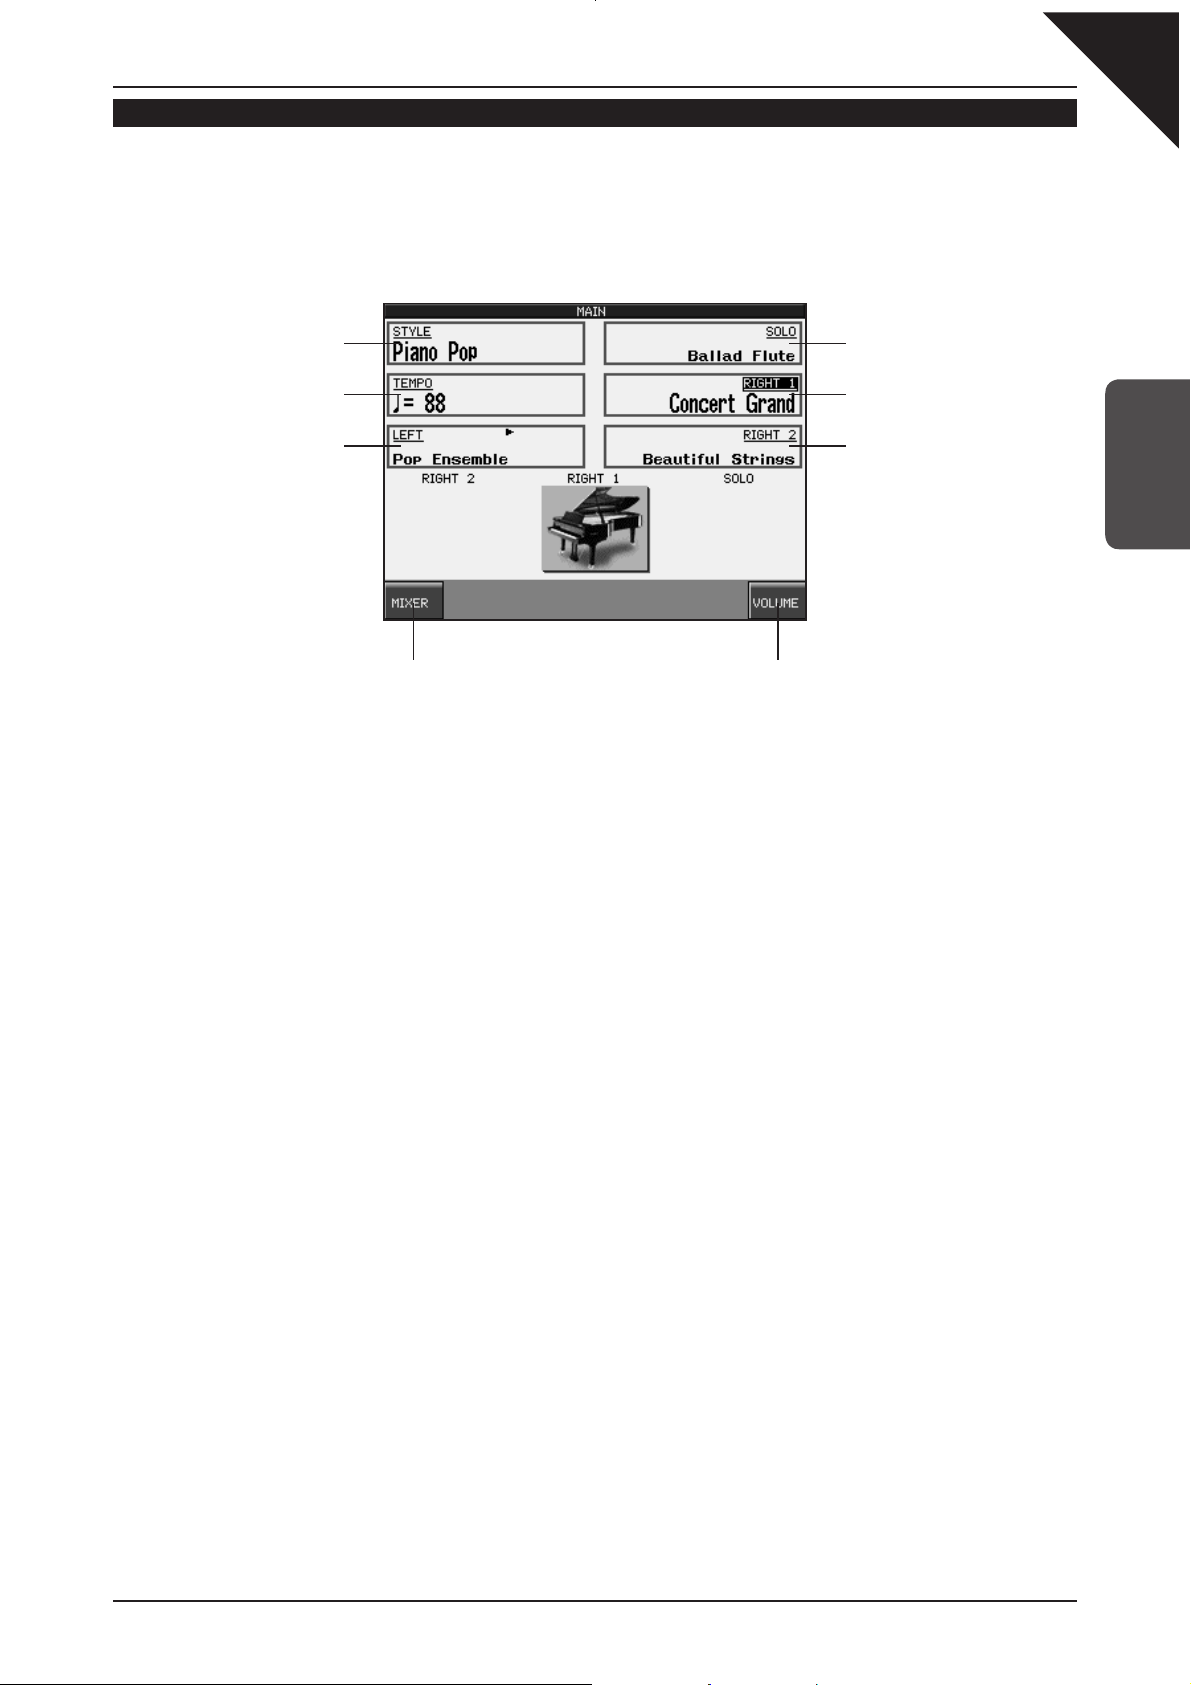
TOUCH SCREEN DISPLAY
As well as providing information about the current sound and style selections, and other important settings, the LCD
display can also be used to control numerous functions of the CP139. Simply touch the part of the screen that corresponds
to the function you wish to control or adjust. Below is an example of the default MAIN screen that appears when the
instrument is first turned on.
Touch screen display: default MAIN screen
STYLE: Pops Piano
TEMPO: Tempo of selected style
in beats per minute (BPM)
LEFT part: Pop Ensemble
selected, but currently inactive
MIXER: Show mixer screen VOLUME: Adjust volume of
currently selected part
Note that in order to avoid possible confusion within this quick-start guide, operating instructions related to the touch
screen will use the verb
E.g.:
touch
, while instructions related to the button panel will use the verb
SOLO part: Ballad Flute selected
but currently inactive
RIGHT1 part: Concert Grand
selected and currently active
RIGHT2 part: Beautiful Strings
selected but currently inactive
press
.
Touch
the PAGE X button on the LCD display.
Press
the RIGHT 1 panel button.
If no panel buttons are pressed, and the LCD display is not touched while showing different screen menus (such as the
sound or style category lists), the LCD display will automatically return to the MAIN screen after a period of 20 seconds.
To adjust this waiting period, or to prevent the MAIN screen from returning automatically, please refer to the Display
Control instructions in the main CP139 owner's manual.
Page 6
Page
6
2. SOUNDS
There are over 900 different instrument sounds built into the CP139, providing an almost limitless range of possible
musical playing styles. However, with such a large selection of instrument voices available, it is important to understand
the various methods of selecting and adjusting the sounds. After following the steps in this topic, you should become
confident at navigating around different screen menus, and be able to select multiple sounds within a few seconds.
THE ‘RIGHT 1’ PART
The panel buttons are responsible for controlling the majority of functions on the CP139, with buttons to the left of the
display associated with selecting and adjusting accompaniment styles, and buttons to the right of the display used to
select and adjust instrument sounds.
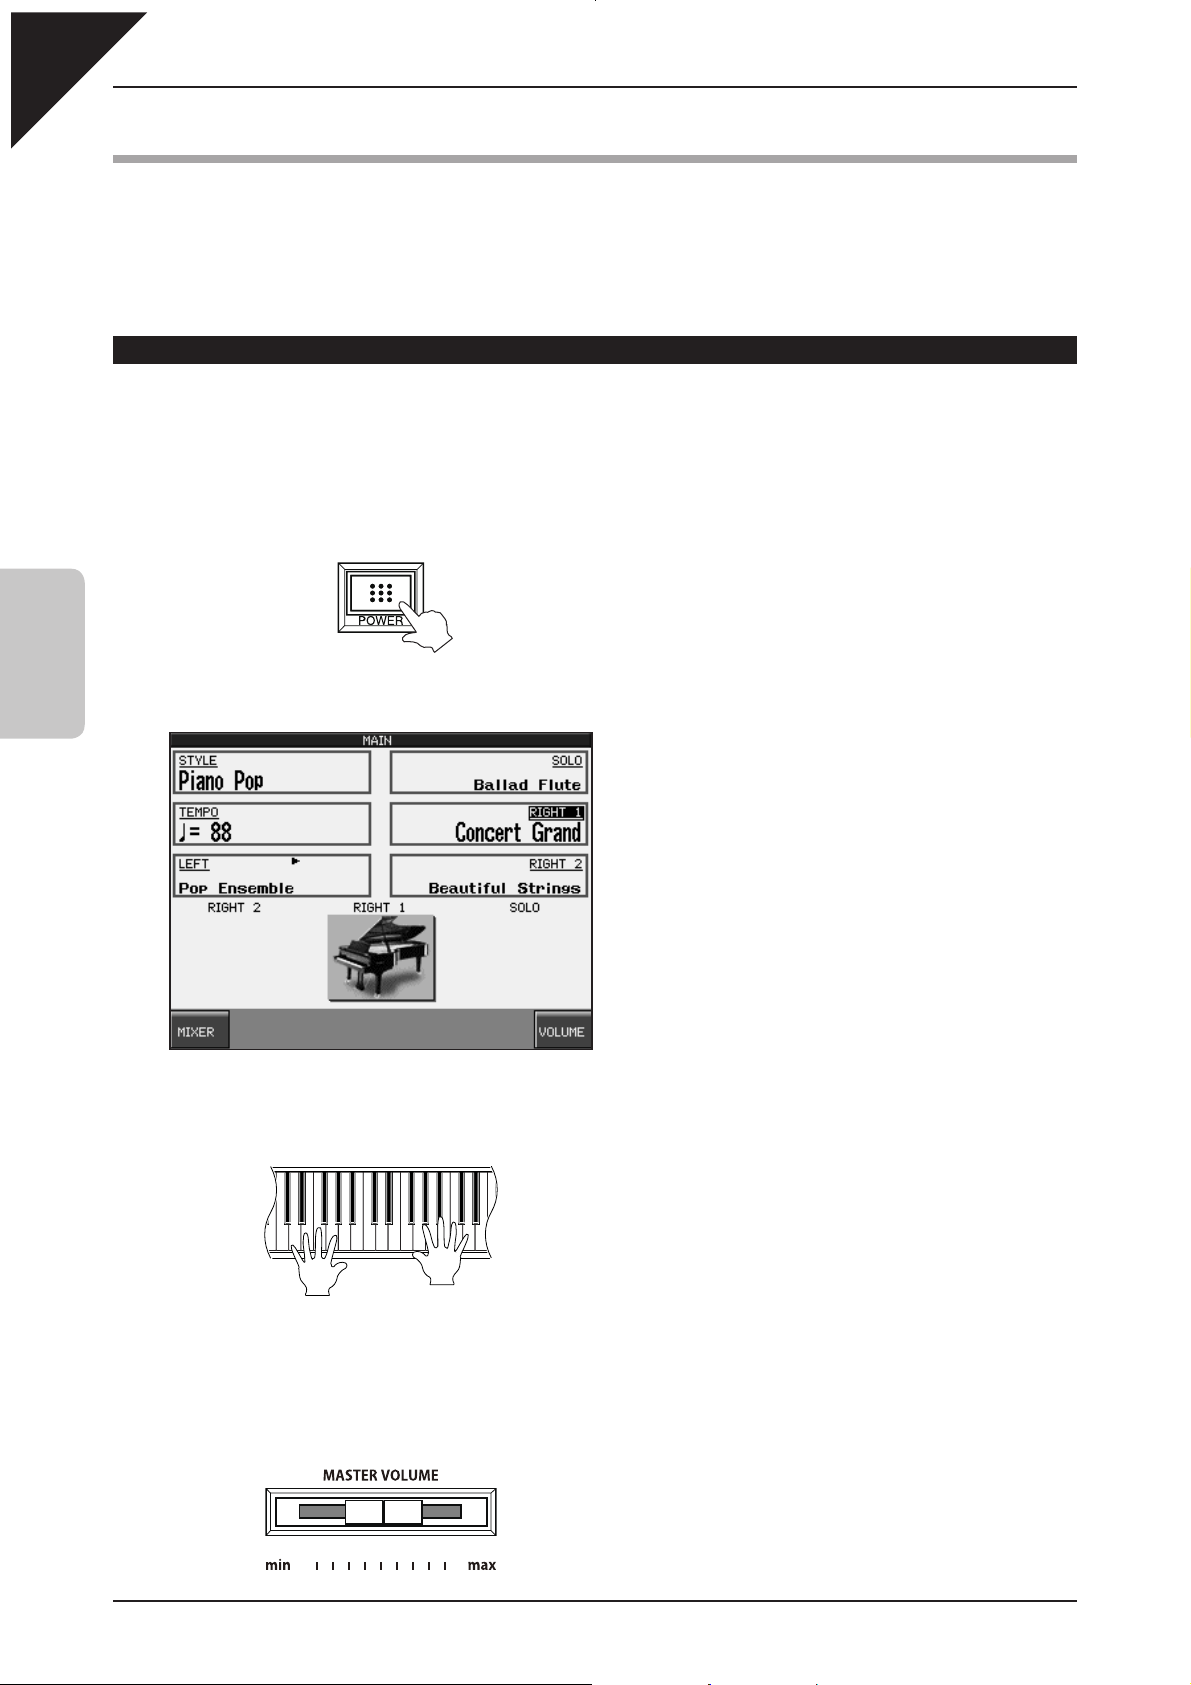
Step 1
Turn on the instrument.
2
SOUNDS
After a brief wait the MAIN screen will appear, as seen below.
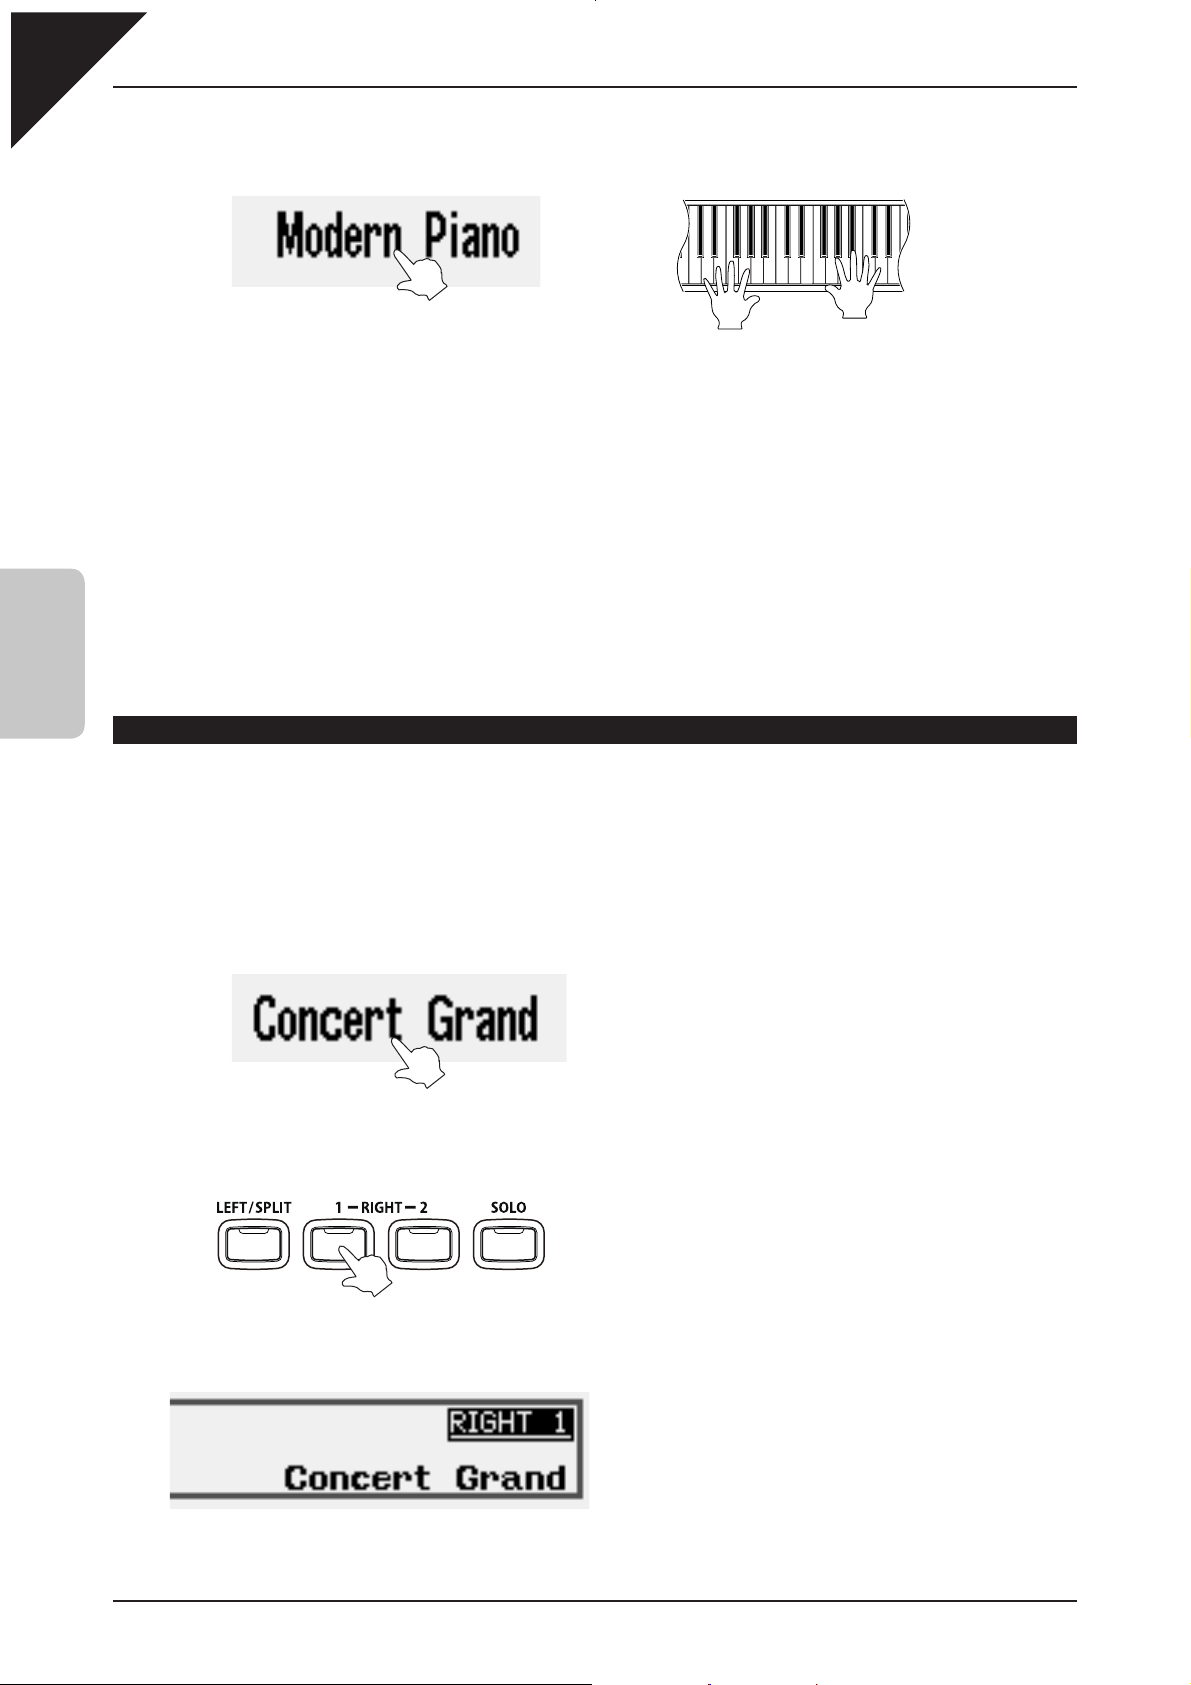
Step 2
Play the keyboard.
The RIGHT 1 box is highlighted, with Concert Grand
written in large letters to indicate that the Concert
Grand sound is selected, and that the part is active.
The LED indicator for the RIGHT 1 panel button will
also turn on.
The sound of a full bodied KAWAI EX Concert Grand will be heard.
Step 3
Adjust the volume level using the MASTER VOLUME slider.
Move the slider to the right or left to increase or
decrease the volume of the sound. The middle position
is often a good starting point.
Page 7
Page
7
2
SOUNDS
The Concert Grand is a beautiful sound, possessing the distinctive warmth and character or KAWAI's finest acoustic
pianos. However, what if we wish to play a piano with a slightly brighter, more modern tone? Let's experiment with some
alternative piano sounds.
Step 4
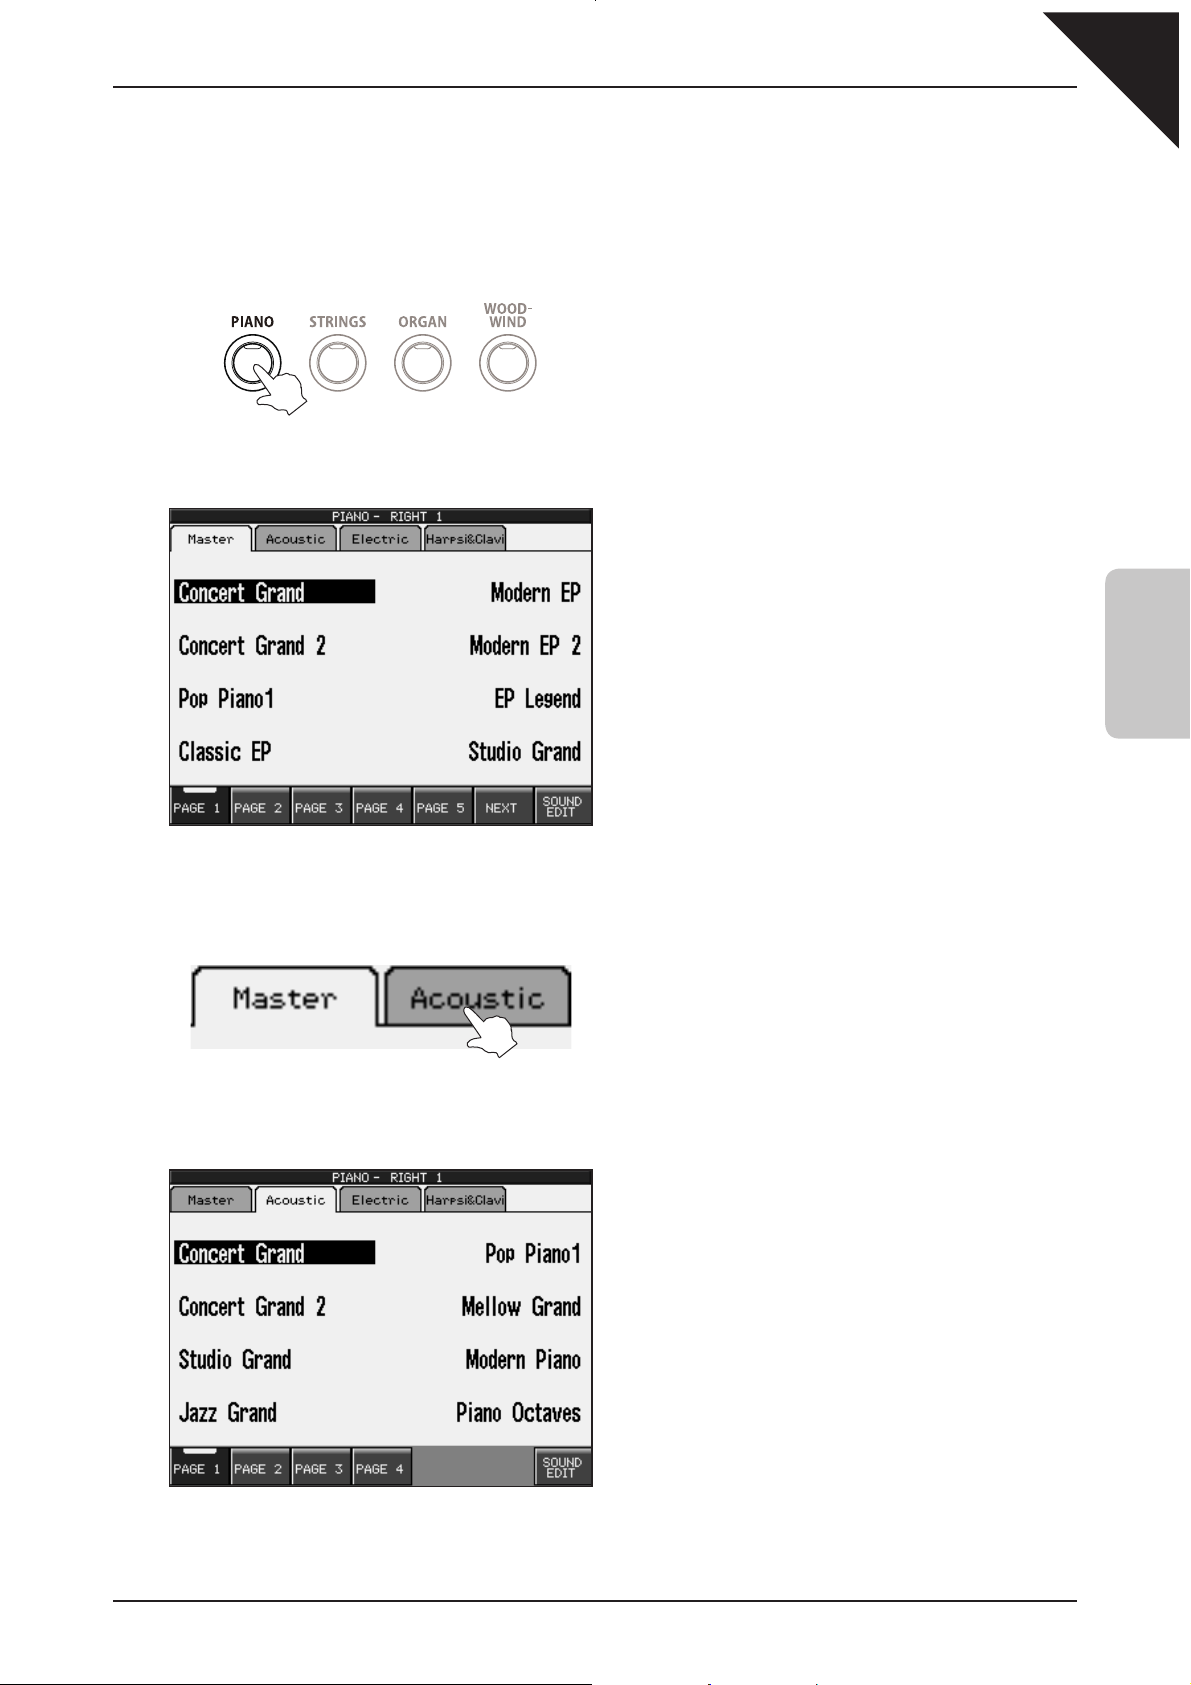
Press the PIANO panel button.
A selection of acoustic piano, electric piano, and keyboard instrument sounds will be shown in the LCD display.
Initially, all sounds within a category will be available for
selection - the full list will often span several pages.
To display a particular type of sound, such as just the
available acoustic pianos, touch the corresponding
sub-category.
Step 5
Touch the Acoustic sub-category.
The list of sounds will be filtered to show only the acoustic piano sounds.
Page 8
Page
8
Step 6
Touch Modern Piano, then play the keyboard.
¨
The sound will have changed to a brighter, more modern piano sound.
Press the EXIT panel button, or wait for a few seconds, to return to the MAIN screen.
Repeat the steps above, and experiment with selecting the various acoustic piano, electric piano, and other keyboard
instrument sounds. Next, try selecting sounds from a different category, such as Strings, Brass, or Woodwind, until you
become familiar at selecting sounds from each category button and sub-category.
If no panel buttons are pressed, and the display is not touched while showing different screen menus (such as
the sound category list), the display will automatically return to the MAIN screen after a period of 20 seconds.
2
SOUNDS
To adjust this waiting period, or to prevent the MAIN screen from returning automatically, please refer to the
Display Control instructions in the main CP139 owner's manual.
THE ‘RIGHT 2’ PART, COMBINING WITH ‘RIGHT 1’
The CP139 allows four different sound parts to be defined to the keyboard at any one time. The RIGHT 1 and RIGHT 2
parts are used most frequently, and can either be played separately, or together. In the following steps we shall select
sounds for RIGHT 1 and RIGHT 2, practice activating and deactivating each part individually, before combining the two
parts simultaneously.
Step 1
Select the Concert Grand sound for RIGHT 1.
Step 2
Press the RIGHT 1 panel button.
The LED indicator for the RIGHT 1 panel button will
turn off to indicate that the part is inactive.
Press the EXIT panel button, or wait for a few seconds, to return to the MAIN screen.
Concert Grand will be written in small letters to
indicate that the Concert Grand sound is still selected,
but that the part is now inactive.
Page 9

Page
9
2
SOUNDS
Step 3
Play the keyboard.
No sound will be heard. This is because the RIGHT 1 part is now inactive.
Let's activate the RIGHT 2 part and assign a sound to it.
Step 4
Press the RIGHT 2 panel button.
The RIGHT 2 box will become highlighted to indicate
that the part is active.
The LED indicator for the RIGHT 2 panel button will
also turn on.
Step 5
Select the Warm Strings sound for RIGHT 2.
¨
Press the EXIT panel button, or wait for a few seconds, to return to the MAIN screen.
The RIGHT 2 box will be highlighted and Warm
Strings will be written in large letters to indicate that
the Warm Strings sound is selected, and that the
part is active.
Step 6
Play the keyboard.
The beautiful sound of Warm Strings will be heard.
The procedure above allows us to assign different sounds to the RIGHT 1 and RIGHT 2 parts, activating and deactivating each
part as desired, without having to reselect the same sounds multiple times. As noted previously, it is also possible to combine
both the RIGHT 1 and RIGHT 2 parts (often referred to as 'DUAL MODE'), allowing sounds to be layered together.
Page 10
Page
10
Step 7
Press the RIGHT 1 panel button.
Step 8
Play the keyboard.
The RIGHT 1 box will become highlighted, with
Concert Grand written in large letters to indicate
that the Concert Grand sound is selected, and that
the part is active.
The LED indicator for the RIGHT 1 panel button will
also turn on.
2
SOUNDS
The sound of both the Concert Grand and Warm Strings will be heard simultaneously.
Once again, repeat the steps above, experimenting with different sounds for the RIGHT 1 and RIGHT 2 parts.
Continue to activate and deactivate the two parts until you become familiar with this important control system.
THE ‘LEFT/SPLIT’ PART
Having familiarized ourselves with the RIGHT 1 and RIGHT 2 parts, let's continue this introduction of the part controls
by experimenting with the LEFT/SPLIT part. The LEFT/SPLIT part allows a third instrument sound to be assigned to
the left side of the keyboard. This is often used to play bass parts within the lower two octaves of the keyboard, however
the exact length (i.e. number of keys) can be freely altered by adjusting the SPLIT POINT.
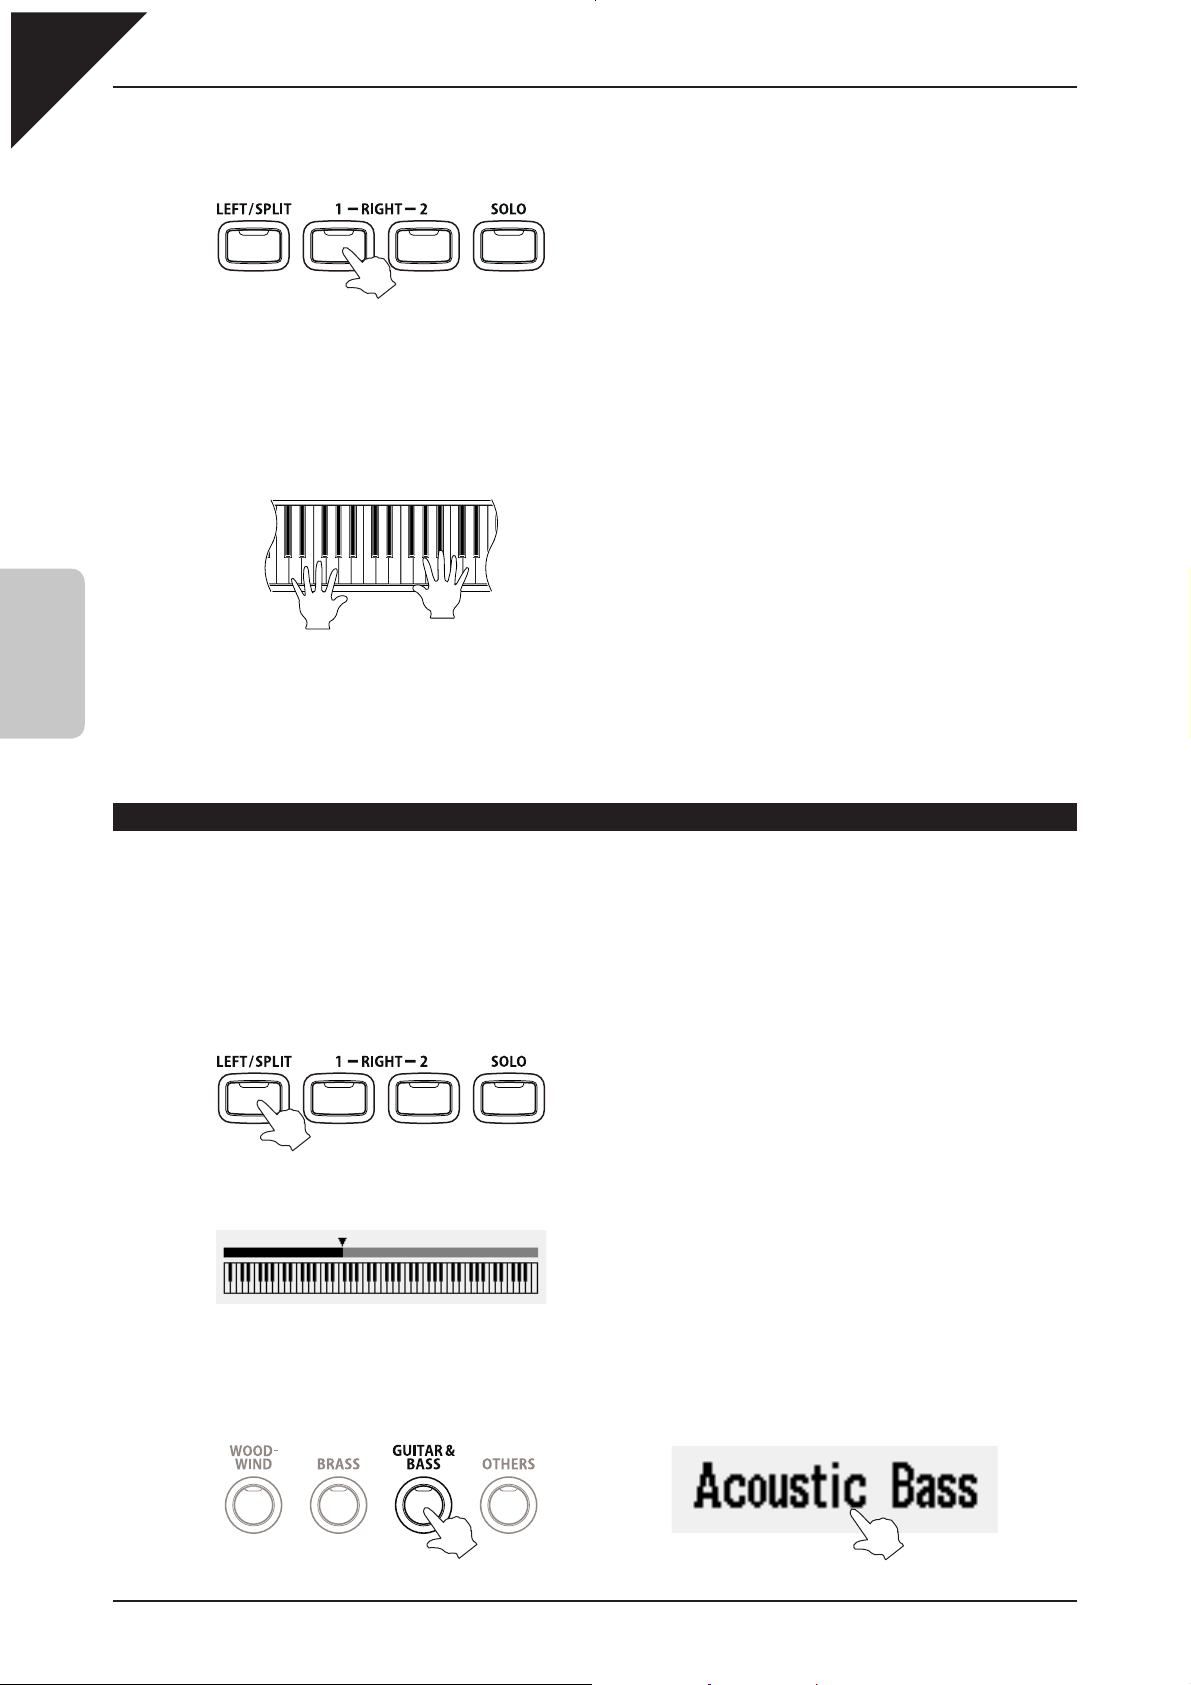
Step 1
Press the LEFT/SPLIT panel button.
The LEFT/SPLIT box will become highlighted to
indicate that the part is active.
The LED indicator for the LEFT/SPLIT panel button
will also turn on.
Step 2
Select the Acoustic Bass sound for the LEFT/SPLIT part.
¨
A keyboard image will appear in the bottom area of
the display.
Page 11
Page
11
2
SOUNDS
Step 3
Play the keyboard.
The Acoustic Bass sound will be heard in the lower notes, while the Concert Grand and Warm Strings sounds will
continue to be heard simultaneously in the middle and upper notes.
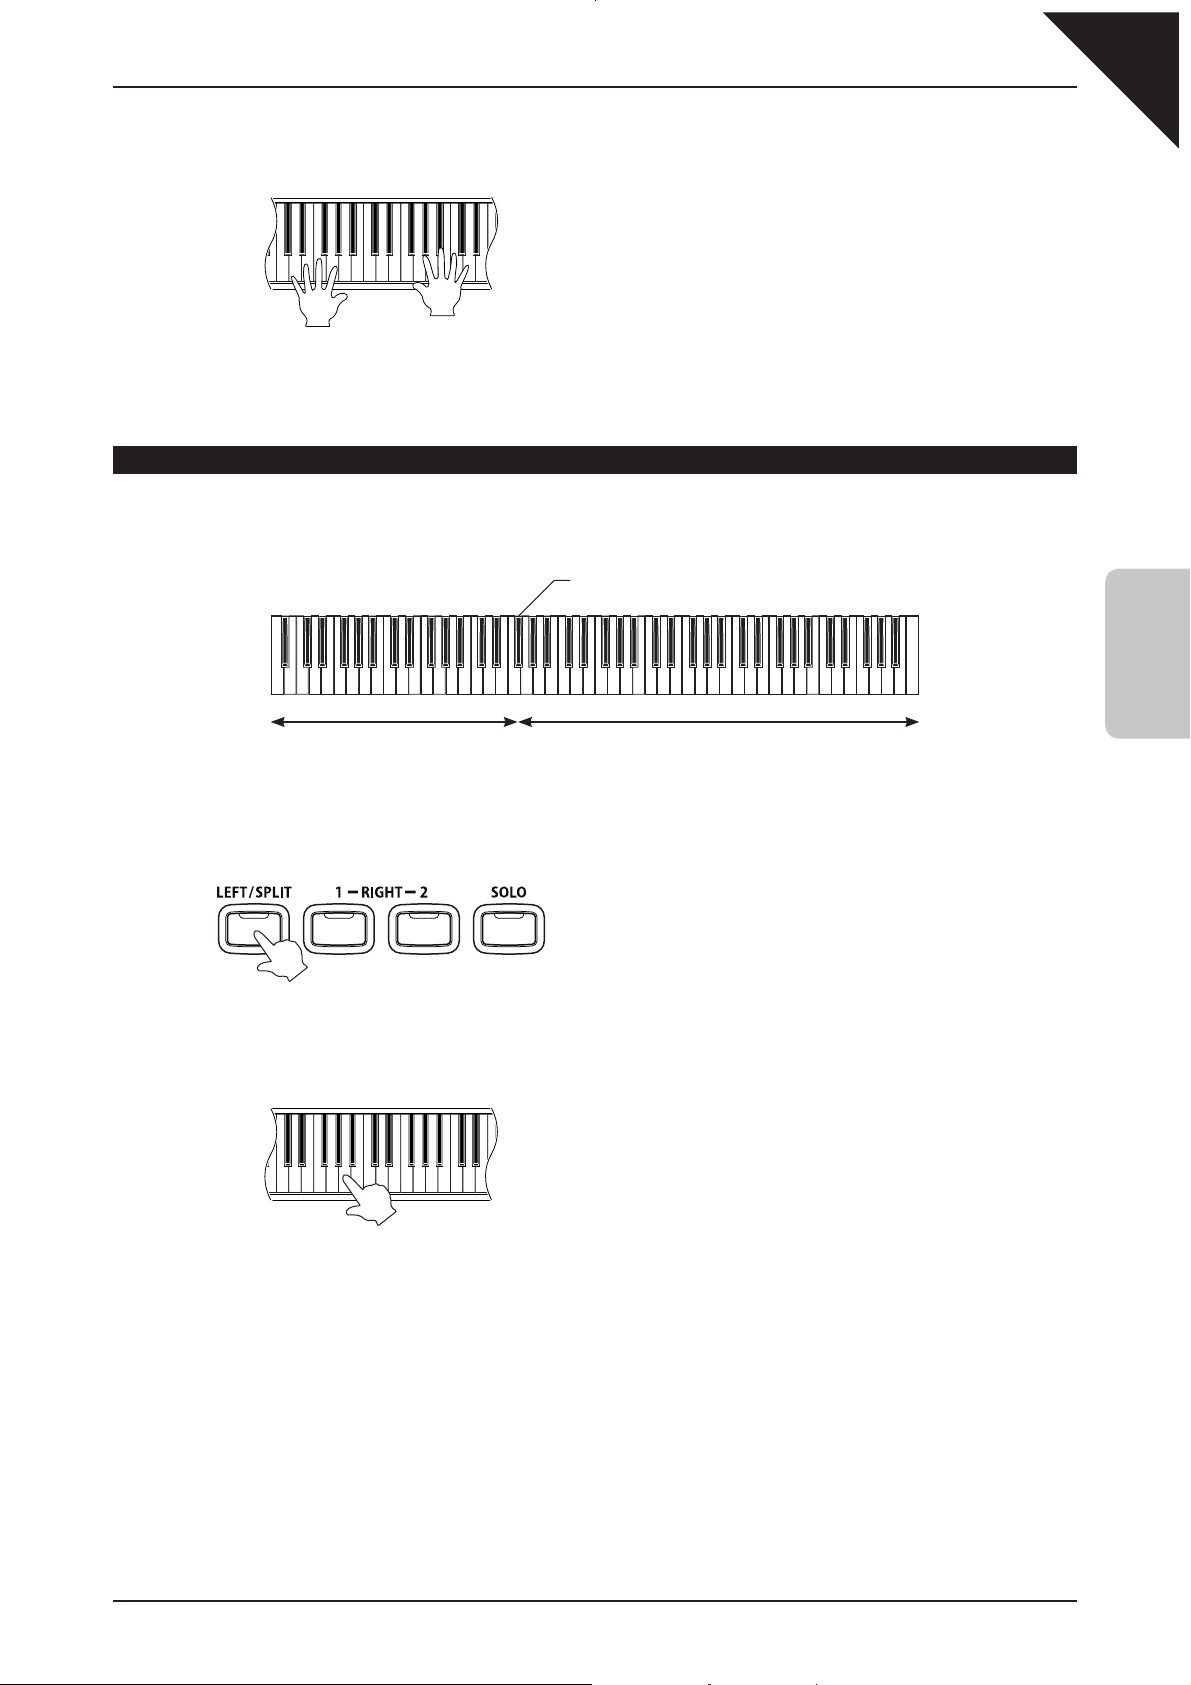
ADJUSTING THE SPLIT POINT
The SPLIT POINT is used to set the length of the keyboard split by defining the position where the LEFT/SPLIT part
ends and where the RIGHT 1 and RIGHT 2 parts begin. The default SPLIT POINT is between keys F-2 and F#2.
Default SPLIT POINT
LEFT/SPLIT section RIGHT 1 & RIGHT 2 section
Step 1
Press and hold the LEFT/SPLIT panel button.
hold
Step 2
Press a key on the keyboard.
This key will be used as the new SPLIT POINT, defining the length of the LEFT/SPLIT part, and the RIGHT 1 and
RIGHT 2 parts.
It is also possible to increase or decrease the SPLIT POINT incrementally by touching the W and X symbols
on either side of the keyboard image shown in the bottom area of the display.
Page 12

Page
12
THE ‘SOLO’ PART
The SOLO part allows a fourth instrument sound to be combined with the existing RIGHT 1 and/or RIGHT 2 parts.
Step 1
Press the SOLO panel button.
The SOLO box will become highlighted to indicate
that the part is active.
The LED indicator for the SOLO panel button will
also turn on.
Step 2
Select the Exp Jazz Clarinet sound for the SOLO part.
¨
2
SOUNDS
Step 3
Play the keyboard.
The sound of the Concert Grand, Strings, and Clarinet will all be heard simultaneously.
You may wish to deactivate the RIGHT 1 and/or RIGHT 2 parts in order to hear the SOLO instrument more clearly.
The SOLO part is intended for playing monophonic voices, such as flute, saxophone, and other woodwind
instruments. When two or more keys are pressed simultaneously, only the highest note will be played, however
this behavior can be adjusted if necessary. For more information, please refer to the Solo Settings instructions
in the main CP139 owner's manual.
It is also possible to define an additional SPLIT POINT for the right side of the keyboard, specifically for the SOLO
part. For more information, please refer to the Solo Settings instructions in the main CP139 owner's manual.
As we have seen, assigning instrument sounds to each part is a relatively simple process. Yet by activating and
deactivating the parts it is possible to create rich, complex voices, allowing up to four different instrument sounds to be
played simultaneously, across the keyboard.
Page 13
3. STYLES
There are nearly 300 different accompaniment styles built into the CP139, covering various categories of popular music
to offer a rich playing experience. After following the steps in this topic, you should become confident at selecting different
styles, starting and stopping the accompaniment with introduction and ending phrases, adding fill-in patterns, and also
adjusting the tempo.
SELECTING A STYLE
Step 1
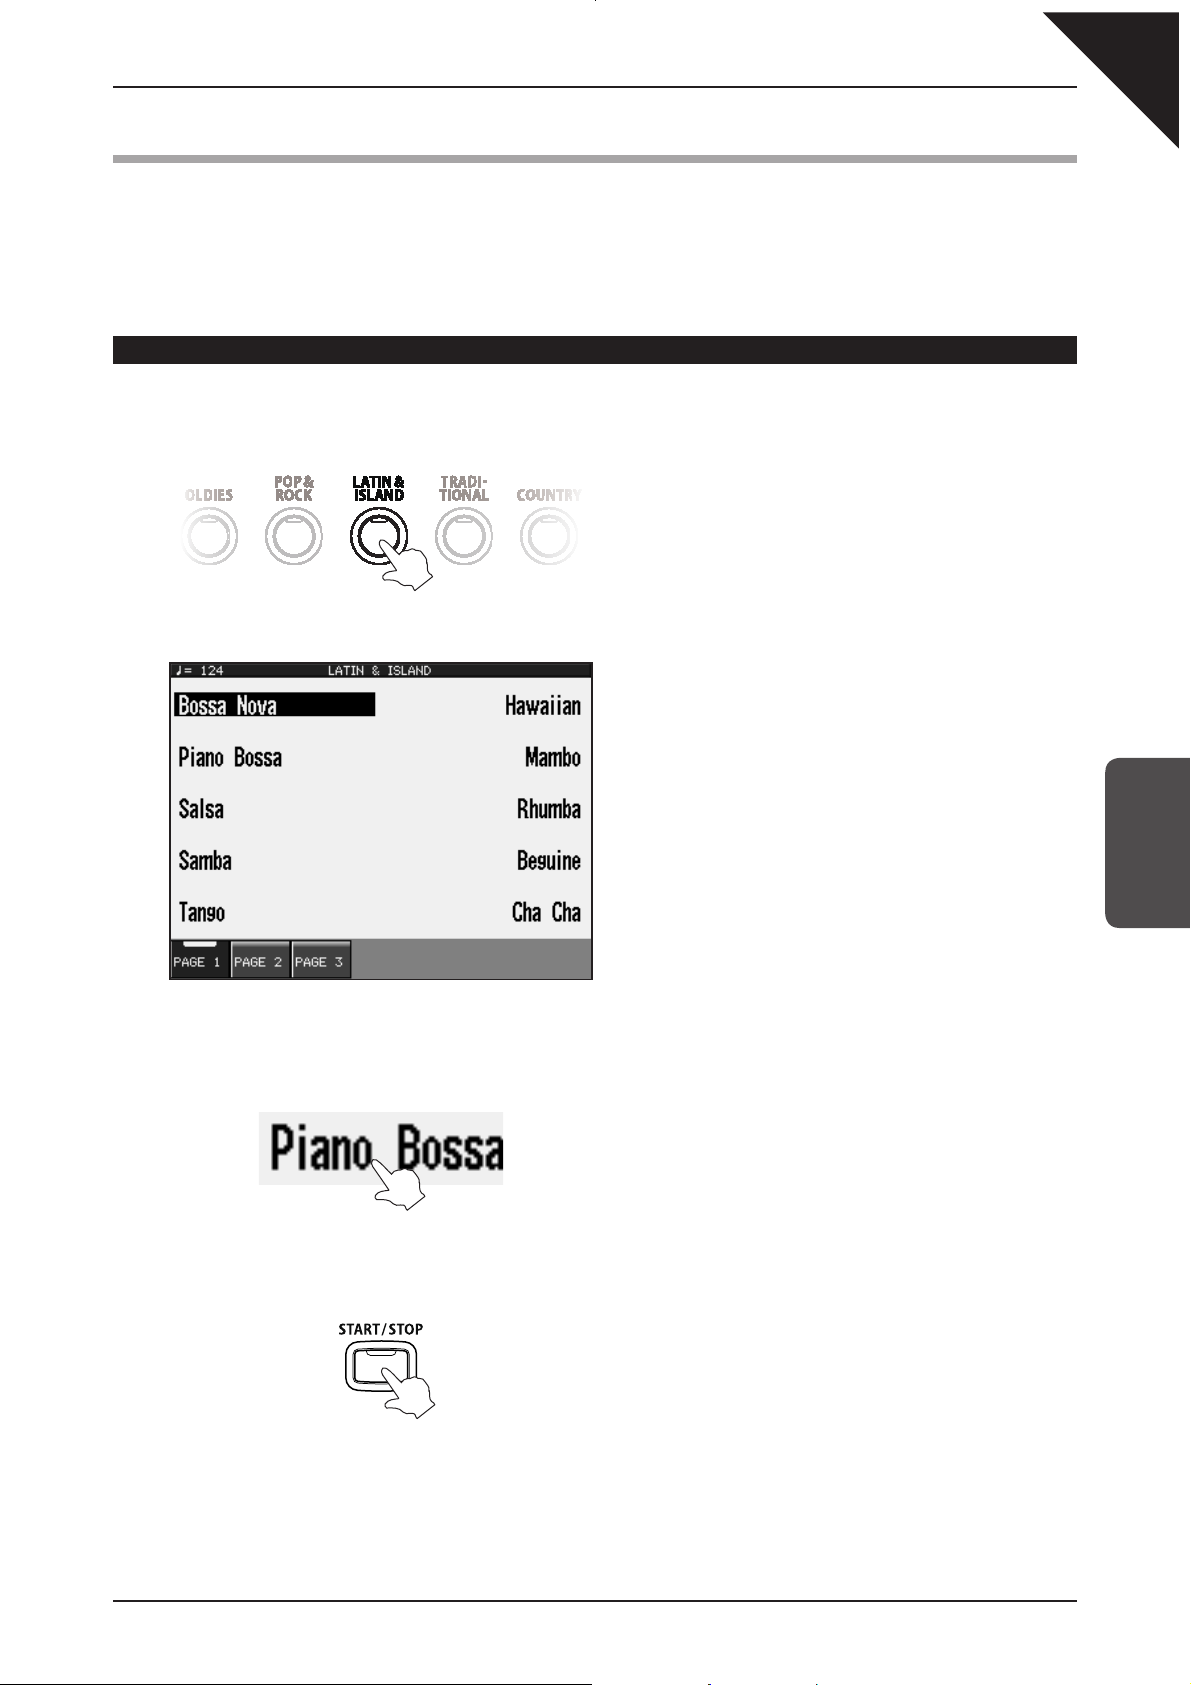
Press the LATIN & ISLAND panel button.
Page
13
A selection of popular accompaniment styles from the Latin & Island category will be shown in the LCD display.
Step 2
Touch Piano Bossa.
3
STYLES
Step 3
Press the START/STOP panel button.
The LED indicator for the START/STOP panel button
will turn on.
The drum rhythm of the Piano Bossa accompaniment style will start to play.
Page 14

Page
14
Step 4
Adjust the volume level of the drum rhythm using the SONG/STYLE VOLUME slider.
The volume level of the instrument sounds played
using the keyboard will not change.
Step 5
Press one of the four VARIATION panel buttons.
The LED indicator for the pressed VARIATION panel
button will turn on.
The drum rhythm will change slightly, with additional percussion beats added to each phrase.
Step 6
Press one of the four FILL IN panel buttons.
The LED indicator for the pressed FILL IN panel
button will turn on briefly.
3
STYLES
Additional patterns will be added to the drum rhythm, helping to punctuate the end of each phrase.
Step 7
Touch the TEMPO box in the LCD display.
The TEMPO box will become highlighted to indicate
that the tempo function has been selected.
Step 8
Rotate the TEMPO/VALUE dial.
The tempo of the drum rhythm accompaniment will
gradually increase or decrease.
Set the tempo to 100 BPM (beats per minute).
It is also possible to adjust the tempo by touching the TEMPO - / + buttons shown at the bottom of the screen.
Page 15
3
STYLES
Page
15
Step 9
Press one of the four INTRO/ENDING panel buttons.
A short ending pattern will be played and the drum rhythm accompaniment will stop.
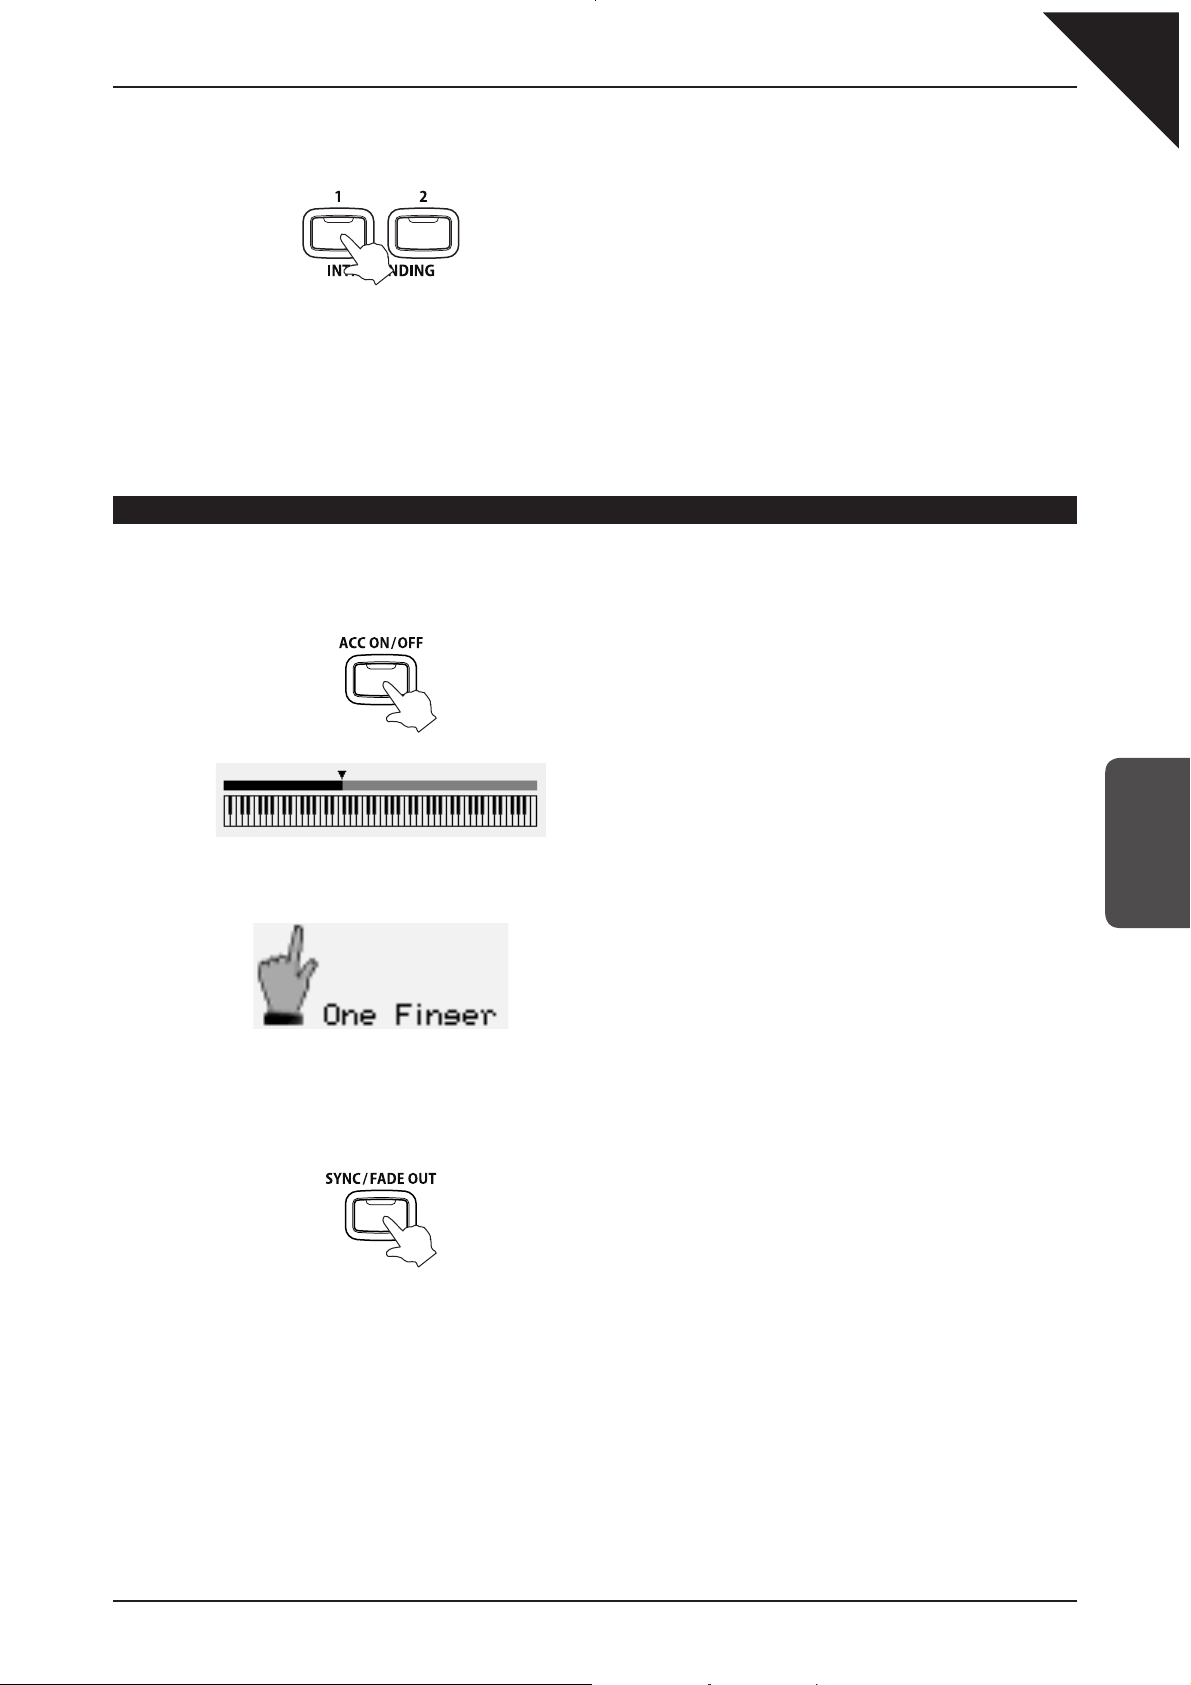
ADDING ACCOMPANIMENT TO THE DRUMS
Step 1
Press the ACC ON/OFF panel button.
Step 2
Press the SYNC/FADE OUT panel button.
The LED indicator for the ACC ON/OFF panel button
will turn on.
A keyboard image will appear in the bottom area of
the display with an arrow marking the keyboard split
point. As with the LEFT/SPLIT keyboard part, this
accompaniment split point can also be changed.
The One Finger icon will also appear, indicating that
the chord sequence of the accompaniment style can
be controlled by pressing single keys within the bass
split region.
The LED indicator for the SYNC/FADE OUT panel
button will turn on, indicating that the SYNC/FADE
OUT function is activated.
If, as in this case, the button is pressed before the accompaniment style has started, the SYNC function will be
used, allowing the accompaniment to start automatically when a key within the bass split region is pressed.
If the button is pressed while the accompaniment is playing, the FADE OUT function will be used, gradually
fading both the accompaniment and keyboard sound to a silent ending.
Page 16
Page
16
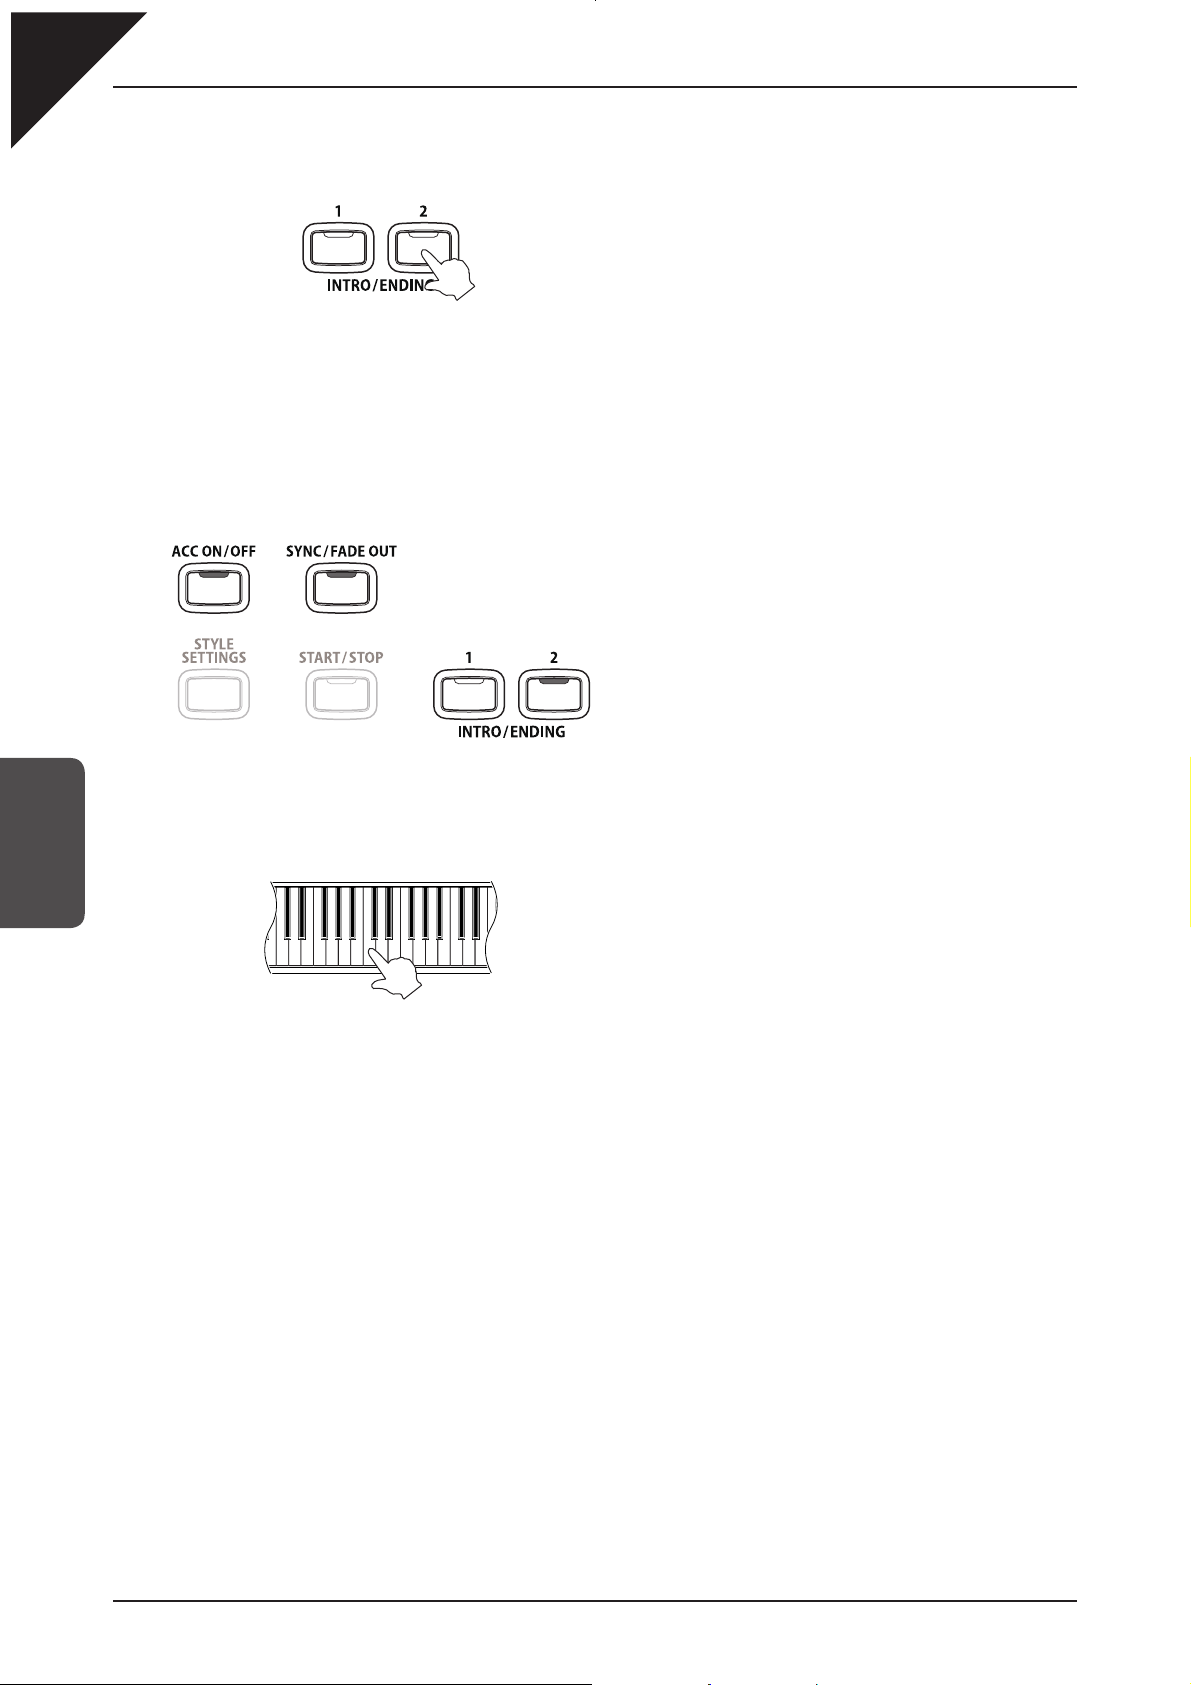
Step 3
Press the INTRO/ENDING 2 panel button.
The LED indicator for the INTRO/ENDING 2
panel button will turn on, indicating that an
introduction passage will play automatically when
the accompaniment starts.
Before we continue, let's confirm the previous three steps by checking that the LED indicators for the ACC ON/OFF,
SYNC/FADE OUT, and INTRO/ENDING 2 panel buttons are turned on.
Step 4
Press the second top-most C key in the bass split region of the keyboard.
3
STYLES
The Piano Bossa accompaniment will start to play in the key of C, with a 2 bar introduction passage.
When One Finger mode is active, it is possible to change the key of the accompaniment backing simply by pressing
one or two keys. For more information on the the various key recognition modes, and a complete explanation
of how to play different chords using the One Finger mode, please refer to the Auto Accompaniment System
instructions in the main CP139 owner's manual.
Repeat the steps above, and experiment with the various introduction, variation, fill-in, and ending passages of the Piano
Bossa accompaniment style. Then try selecting alternative accompaniment styles.
Page 17
3
STYLES
Page
17
SONG STYLIST
The Song Stylist is an incredibly useful function that automatically sets up the CP139 instrument to perform popular
song arrangements. Simply select the song that you wish to play - the CP will automatically chose the correct instrument
sounds and tempo, allowing you to play the piece immediately. In the follow steps we will use the Song Stylist to select
and play the John Denver song
of your choosing if preferred.
Step 1
'Take Me Home, Country Roads'
, however please feel free to select an alternative song
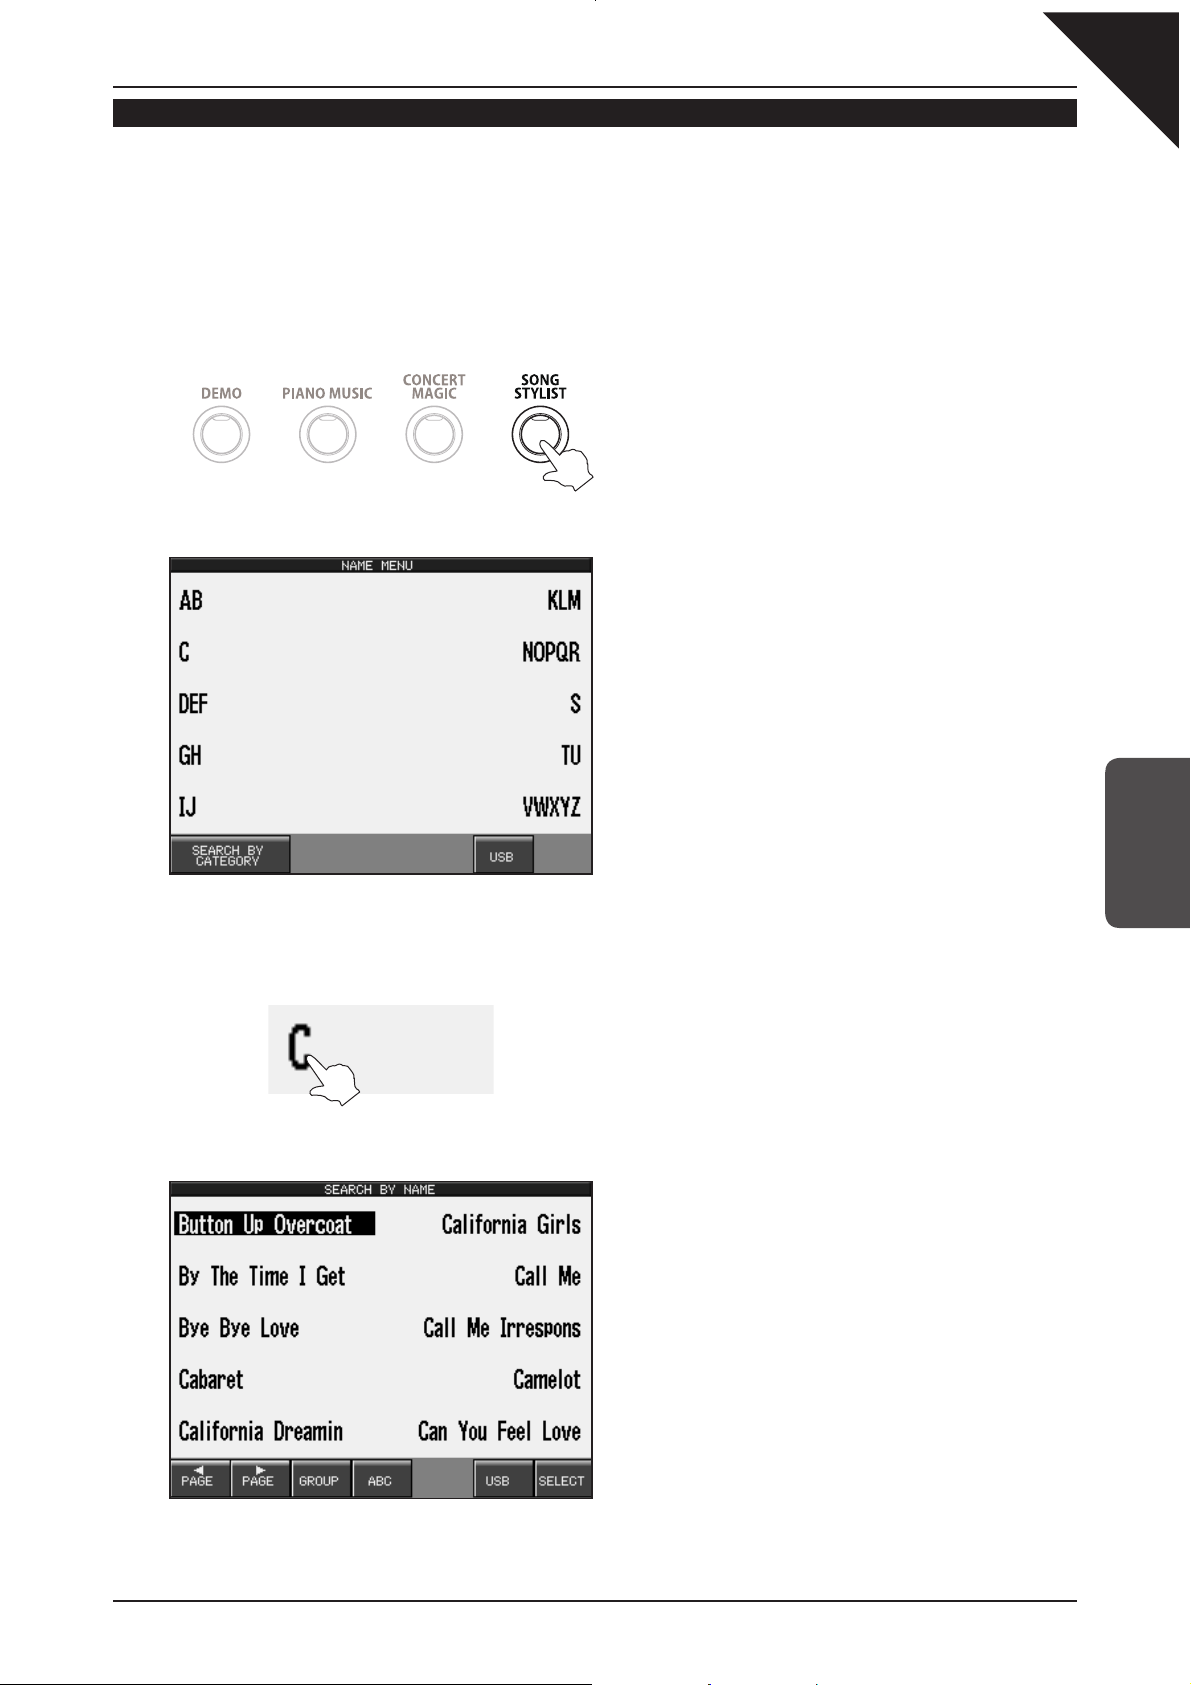
Press the SONG STYLIST panel button.
An alphabetical list of letters will be shown in the LCD display.
Step 2
Touch the C category.
A list of songs beginning with the letter 'C' will be shown in the LCD display.
Page 18
Page
18
Step 3
Touch the PAG E X button.
Navigate through six pages of songs, then touch 'County Roads'.
The display will return to the MAIN screen, with the name of the selected song style, 'Country Roads', now shown
in the bottom left area. Note that the LED indicators for the ACC ON/OFF and SYNC/FADE OUT panel buttons will
be turned on, indicating that these functions have been activated automatically.
Step 4
Press the INTRO/ENDING 1 panel button.
The LED indicator for the INTRO/ENDING 1
panel button will turn on, indicating that an
introduction passage will play automatically when
the accompaniment starts.
3
STYLES
Step 5
Press the second top-most C key in the bass split region of the keyboard.
The backing accompaniment to
backing accompaniment by playing chords with the left hand, while playing the song melody with the right hand.
'Take Me Home, Country Roads'
will begin with an introduction passage. Control the
Step 6
Press the SYNC/FADE OUT panel button.
The backing accompaniment and the main keyboard
sound will both gradually fade out to a silent ending.
Continue selecting different Song Stylist accompaniment presets to familiarize yourself with the various Style functions
of the CP139.
If you are unable to remember the title of the particular song that you wish to play, it is also possible to list Song
Stylist accompaniment presets by category, simply by touching the GROUP button in the Song Stylist list.
Page 19
4. RECORDER
The CP139 recorder function allows you to record your performances, play them back at the touch of a button, and then
save each piece to USB memory stick for posterity. Indeed, the recorder can also perform a variety of more complicated
functions, however for the purpose of this topic we will be focusing on the most frequently used operations – namely:
record, play back, delete, load, and save.
RECORDING A SONG
Let's try to record the 'Country Roads' song that we played earlier.
Step 1
Select 'Country Roads' from the Song Stylist.
Step 2
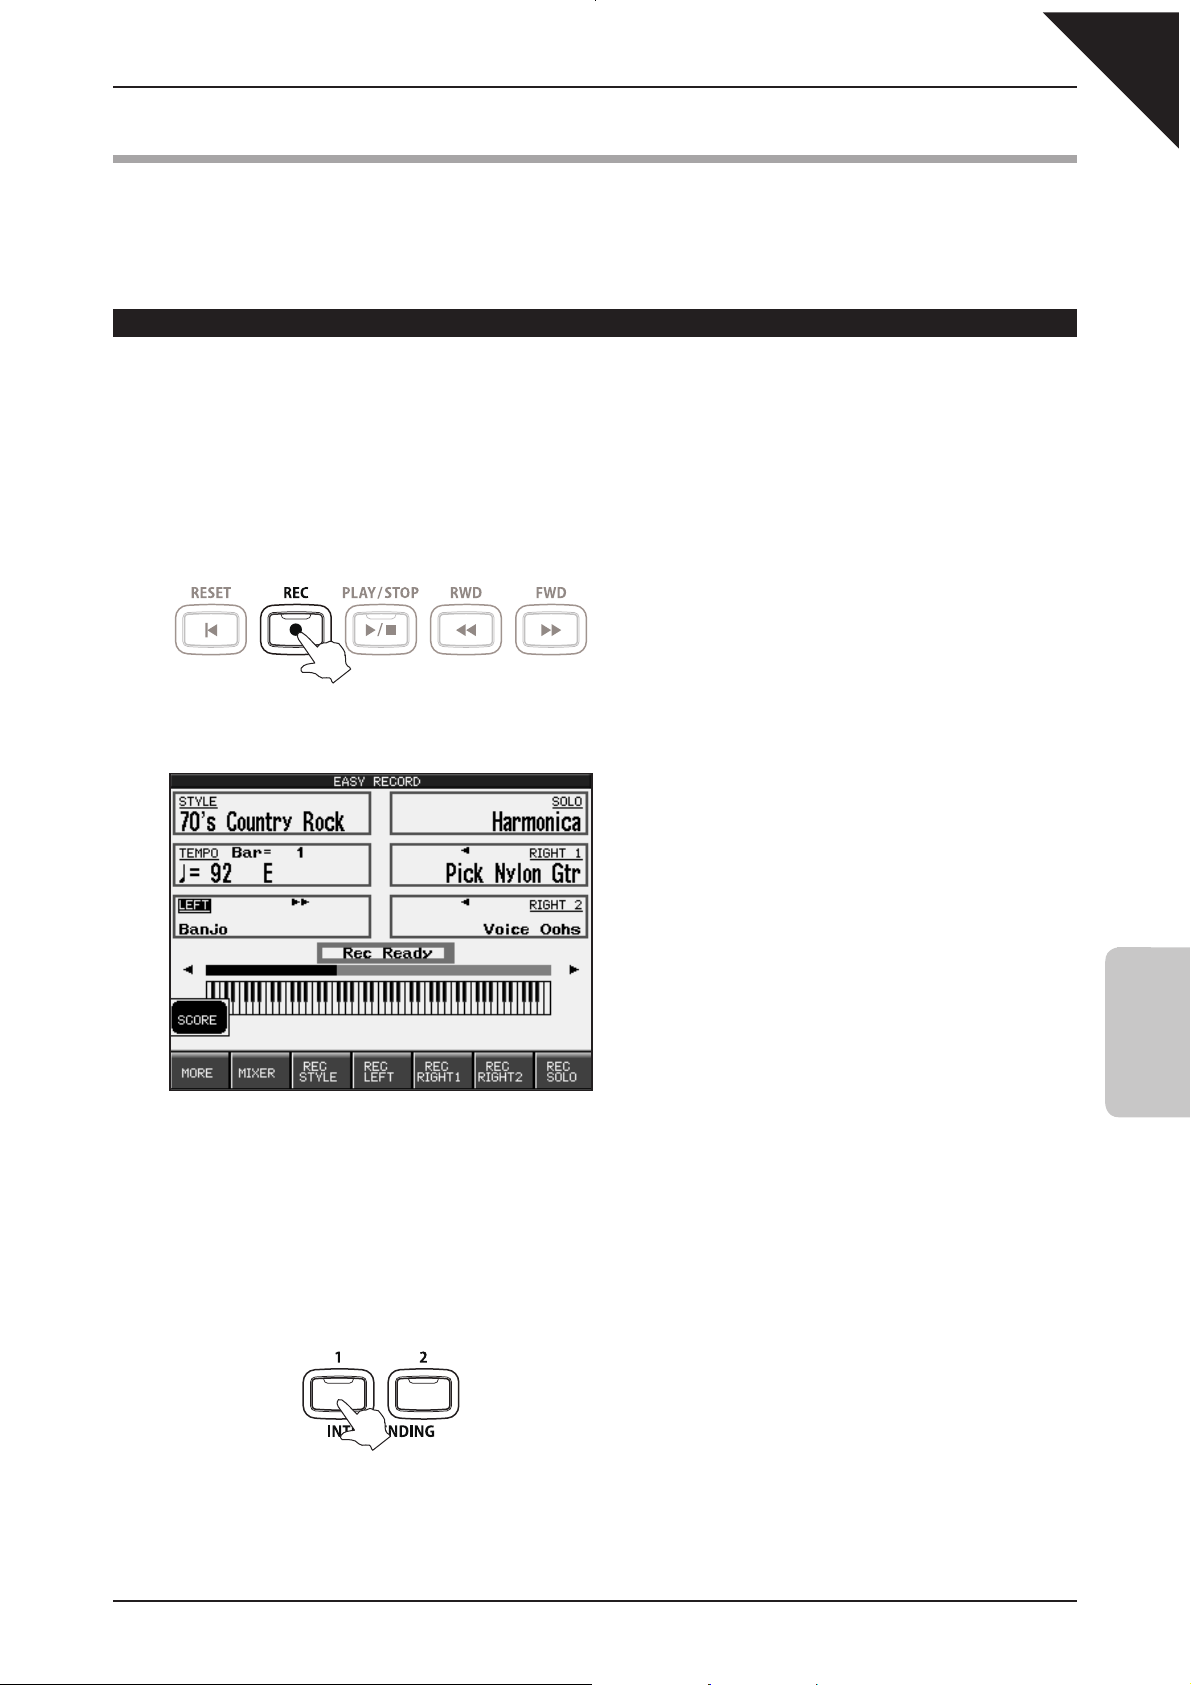
Press the REC panel button.
The LED indicator for the REC panel button will start
to flash, indicating that the recorder function is in
'Ready' mode.
Page
19
The EASY RECORD screen will be shown in the LCD display.
When the recorder function is active, buttons to control the style and individual keyboard parts will appear at the
bottom of the screen. Using these buttons it is possible to record, play, or mute each part.
Initially, all parts will be set to REC mode.
Step 3
Press the INTRO/ENDING 1 panel button.
4
RECORDER
The LED indicator for the INTRO/ENDING 1 panel
button will turn on, indicating that an introduction
passage will pl a y automatically when the
accompaniment starts.
Double check that the LED indicators for the ACC
ON/OFF and SYNC/FADE OUT panel buttons are
also turned on, indicating that the two functions are
both active.
Page 20
Page
20
Step 4
Press the second top-most C key in the bass split region of the keyboard.
The backing accompaniment to
backing accompaniment by playing chords with the left hand, while playing the song melody with the right hand.
Step 5
'Take Me Home, Country Roads'
will begin with an introduction passage. Control the
Press the INTRO/ENDING 1 panel button.
The LED indicator for the INTRO/ENDING 1 panel
button will turn on.
An ending passage will be played and the backing
accompaniment will stop.
Note that even though the backing accompaniment has stopped, the recorder will continue to capture notes from
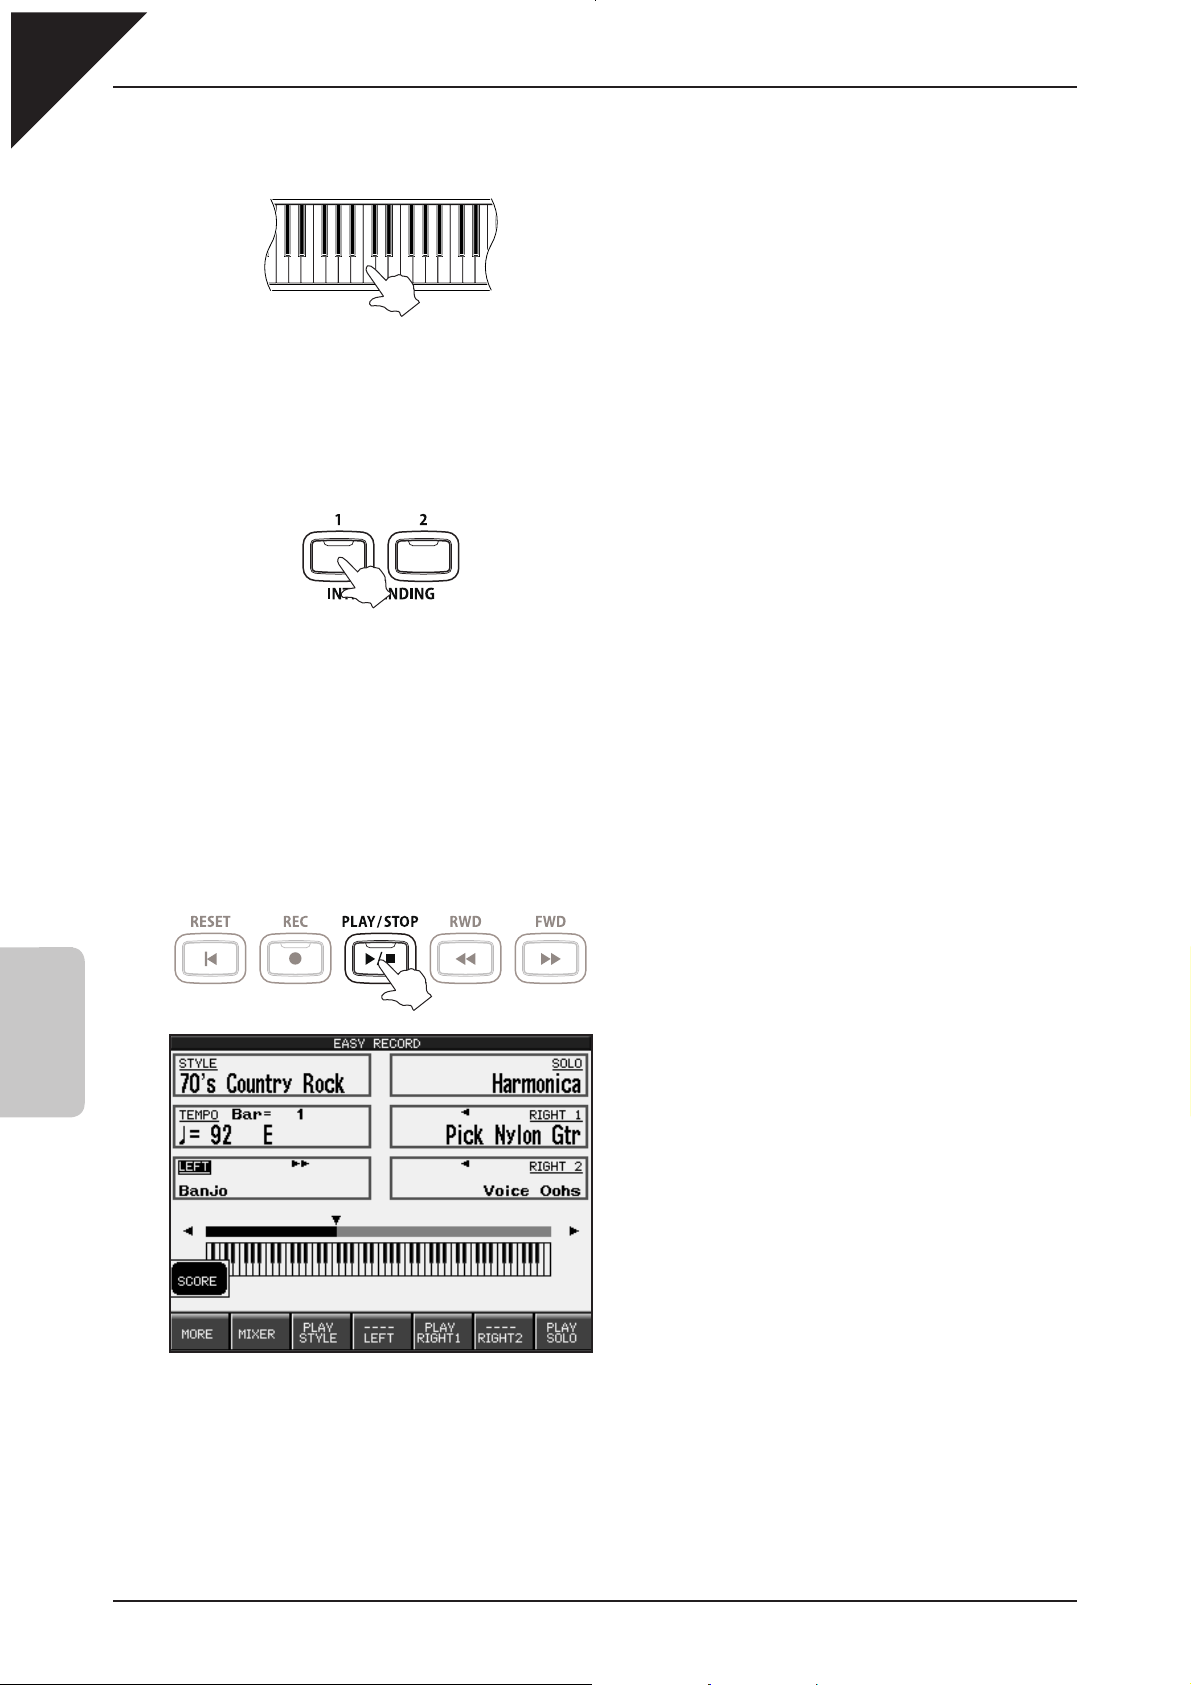
the keyboard. In order to stop the recording, we must also press the PLAY/STOP panel button.
Step 6
Press the PLAY/STOP panel button.
The LED indicator for the PLAY/STOP panel button
will turn off, indicating that recording has stopped.
4
RECORDER
The STYLE, RIGHT 1, and SOLO part buttons shown at the bottom of the screen will now be set to PLAY mode,
indicating that these parts have been recorded.
Congratulations! You have successfully recorded your first song on the CP139.
Note that, while the explanation above demonstrates recording a song with an accompaniment backing style, it is
of course possible to record alternative arrangements, such as a simple piano piece, using the same process.
Page 21
4
RECORDER
Page
21
PLAYING A SONG
Having recorded a song to the internal memory of the CP139 recorder, we can now play back the performance.
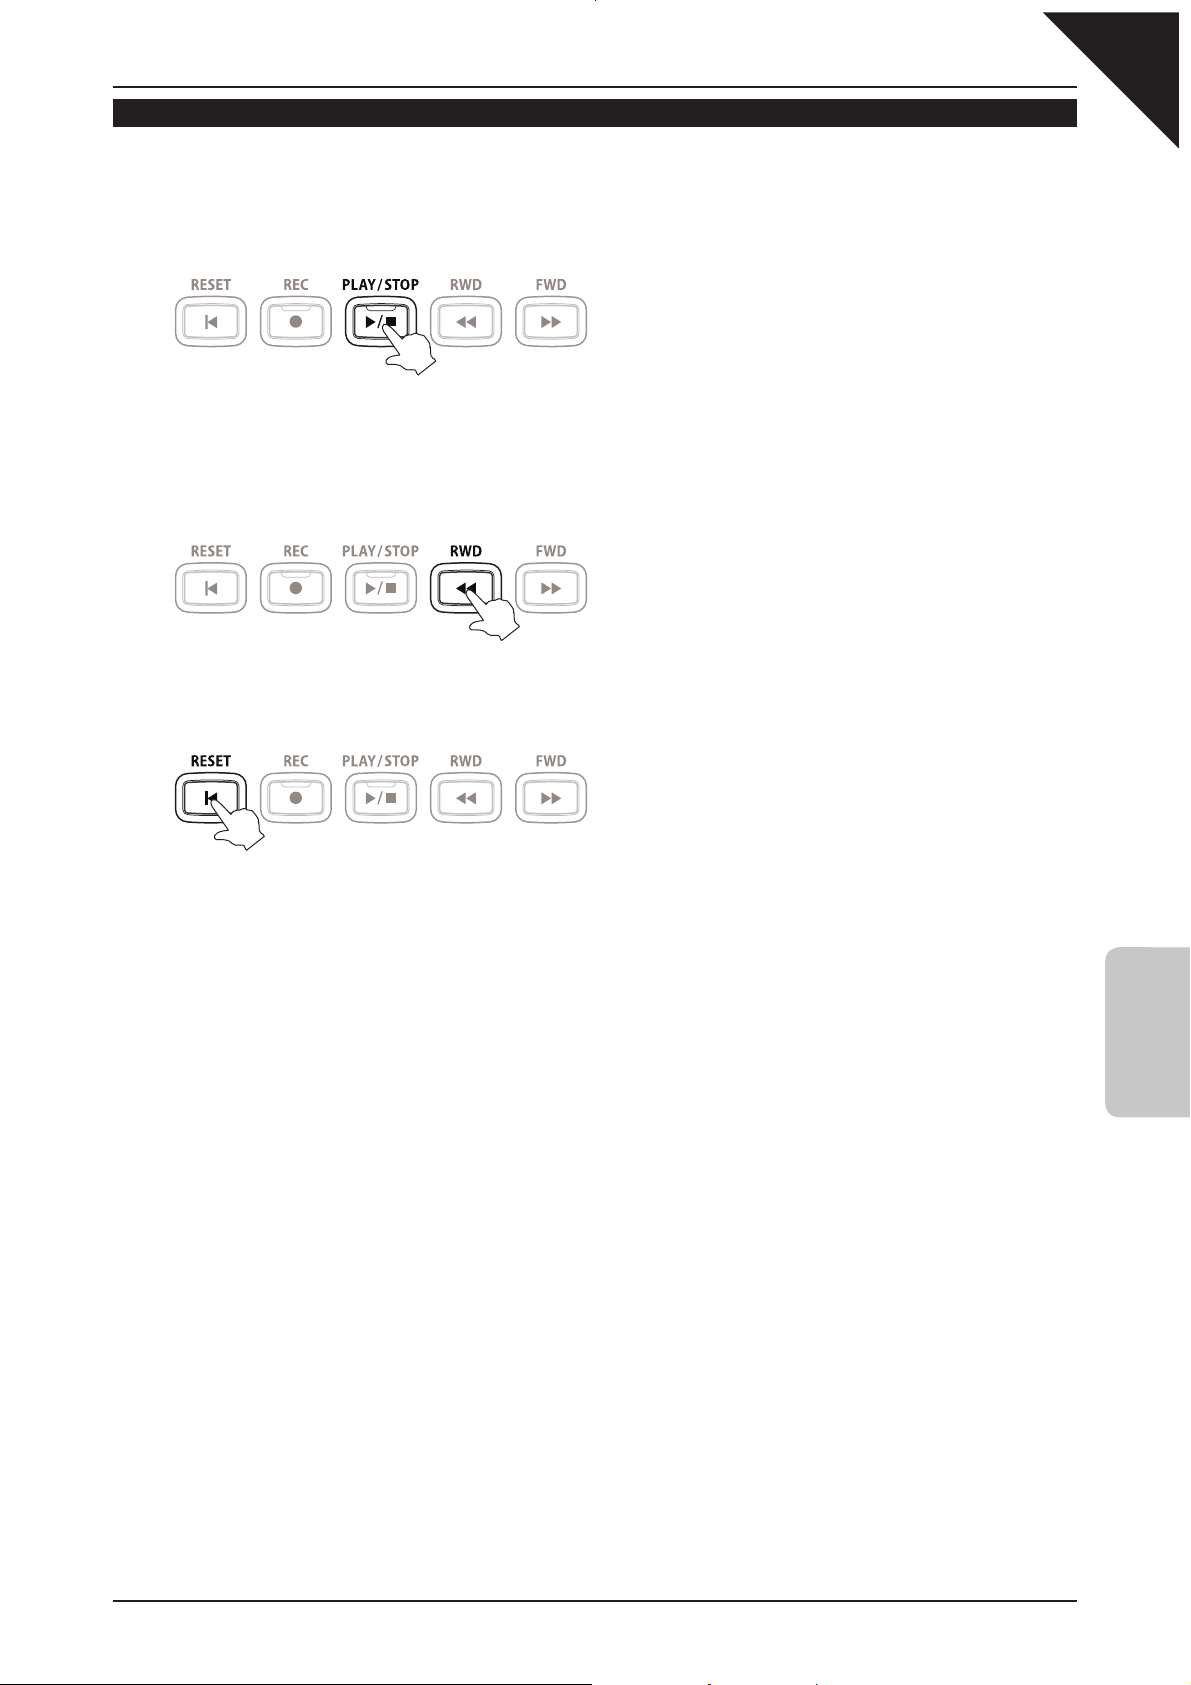
Step 1
Press the PLAY/STOP panel button.
LED indicator for the PLAY/STOP panel button will
turn on, indicating that a song is currently playing.
The recorded song will start to play.
Step 2
Press the RWD and/or FWD panel buttons to rewind or fast-forward the song.
Step 3
Press the RESET panel button.
The song will stop playing and the playing/recording position of the song will reset to the beginning.
Page 22
Page
22
SAVING A SONG TO INTERNAL MEMORY
Once recorded, a song is temporarily stored in the recorder memory. However, this memory will be cleared when the
CP139 instrument is turned off, meaning that the recorded song will be lost. In order for the song to remain available
after the instrument is turned off, it must be saved to the internal song memory.
Step 1
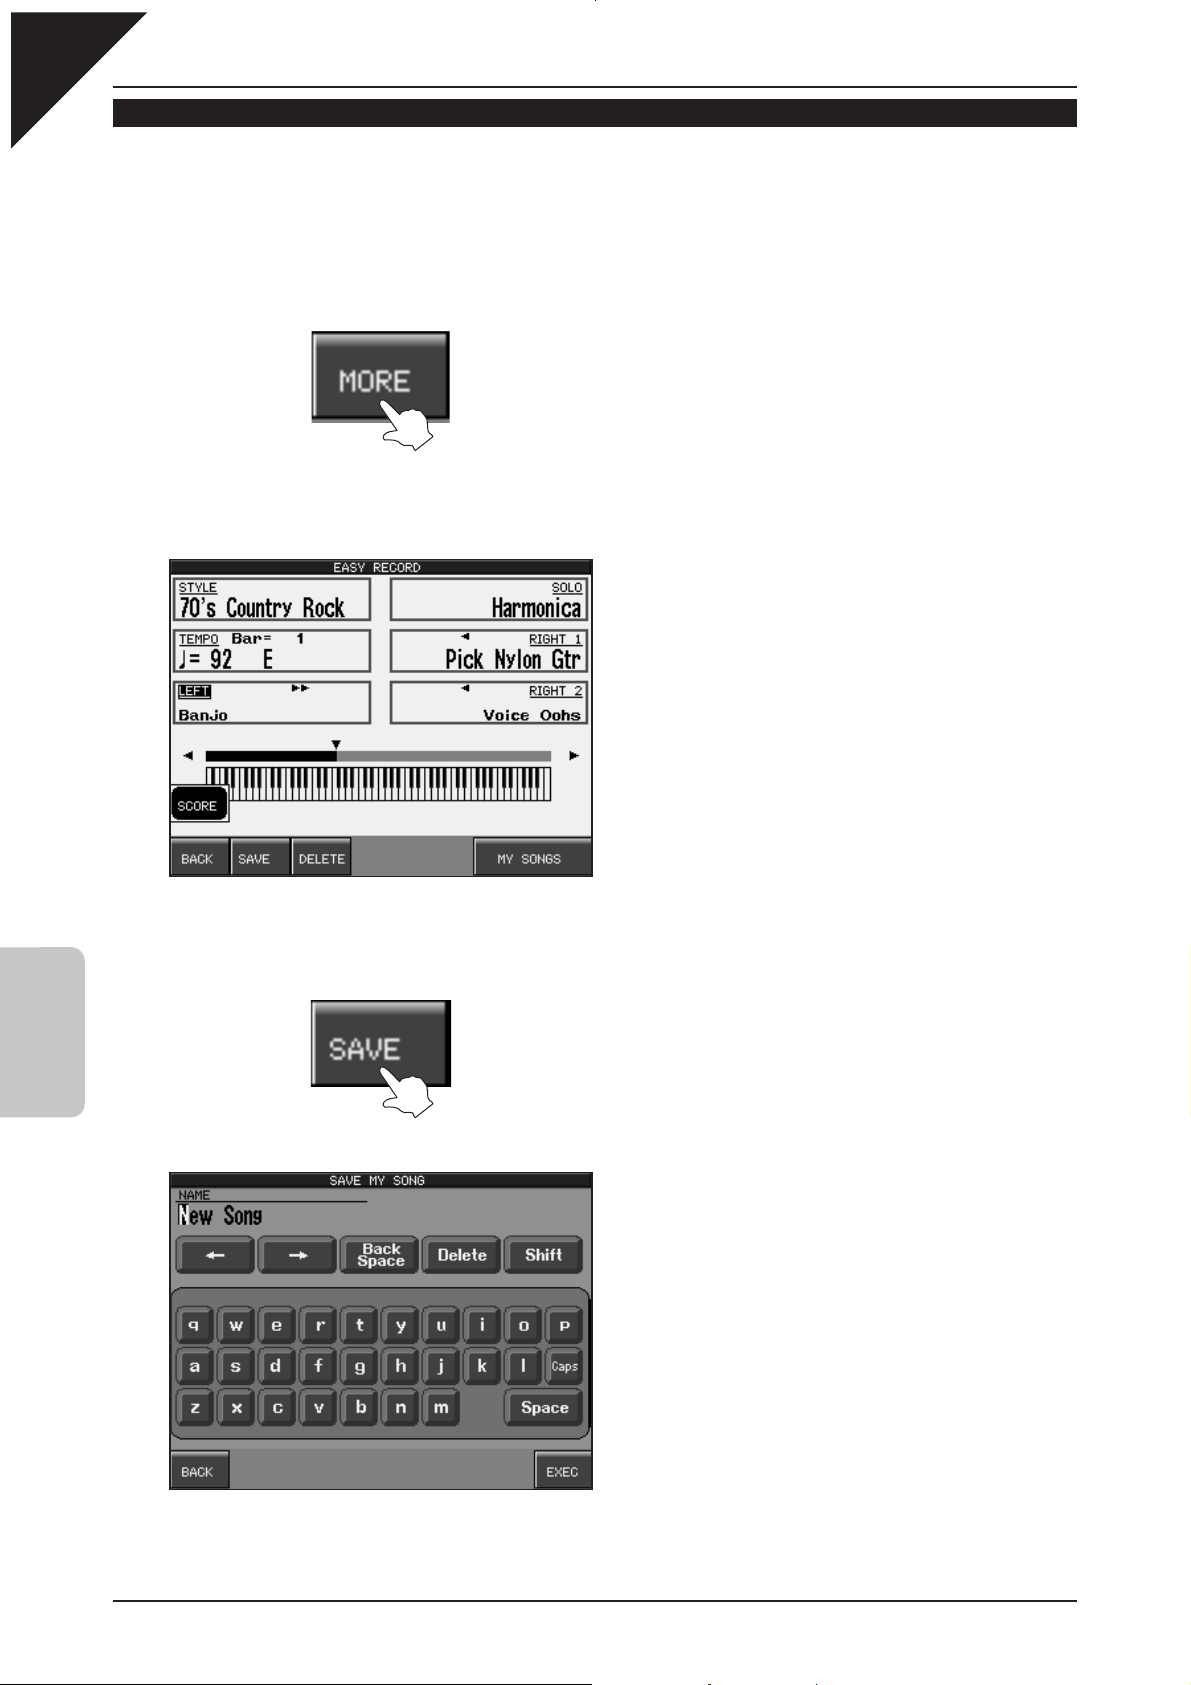
Touch the MORE button in the bottom left corner of the LCD display.
The part buttons shown at the bottom of the screen will be replaced by BACK, SAVE, DELETE, and MY SONGS
buttons.
4
RECORDER
Step 2
Touch the SAVE button.
The SAVE MY SONG screen will be shown in the LCD display.
This screen functions as a virtual computer keyboard, allowing you to enter a name for the song.
Page 23
4
RECORDER
Page
23
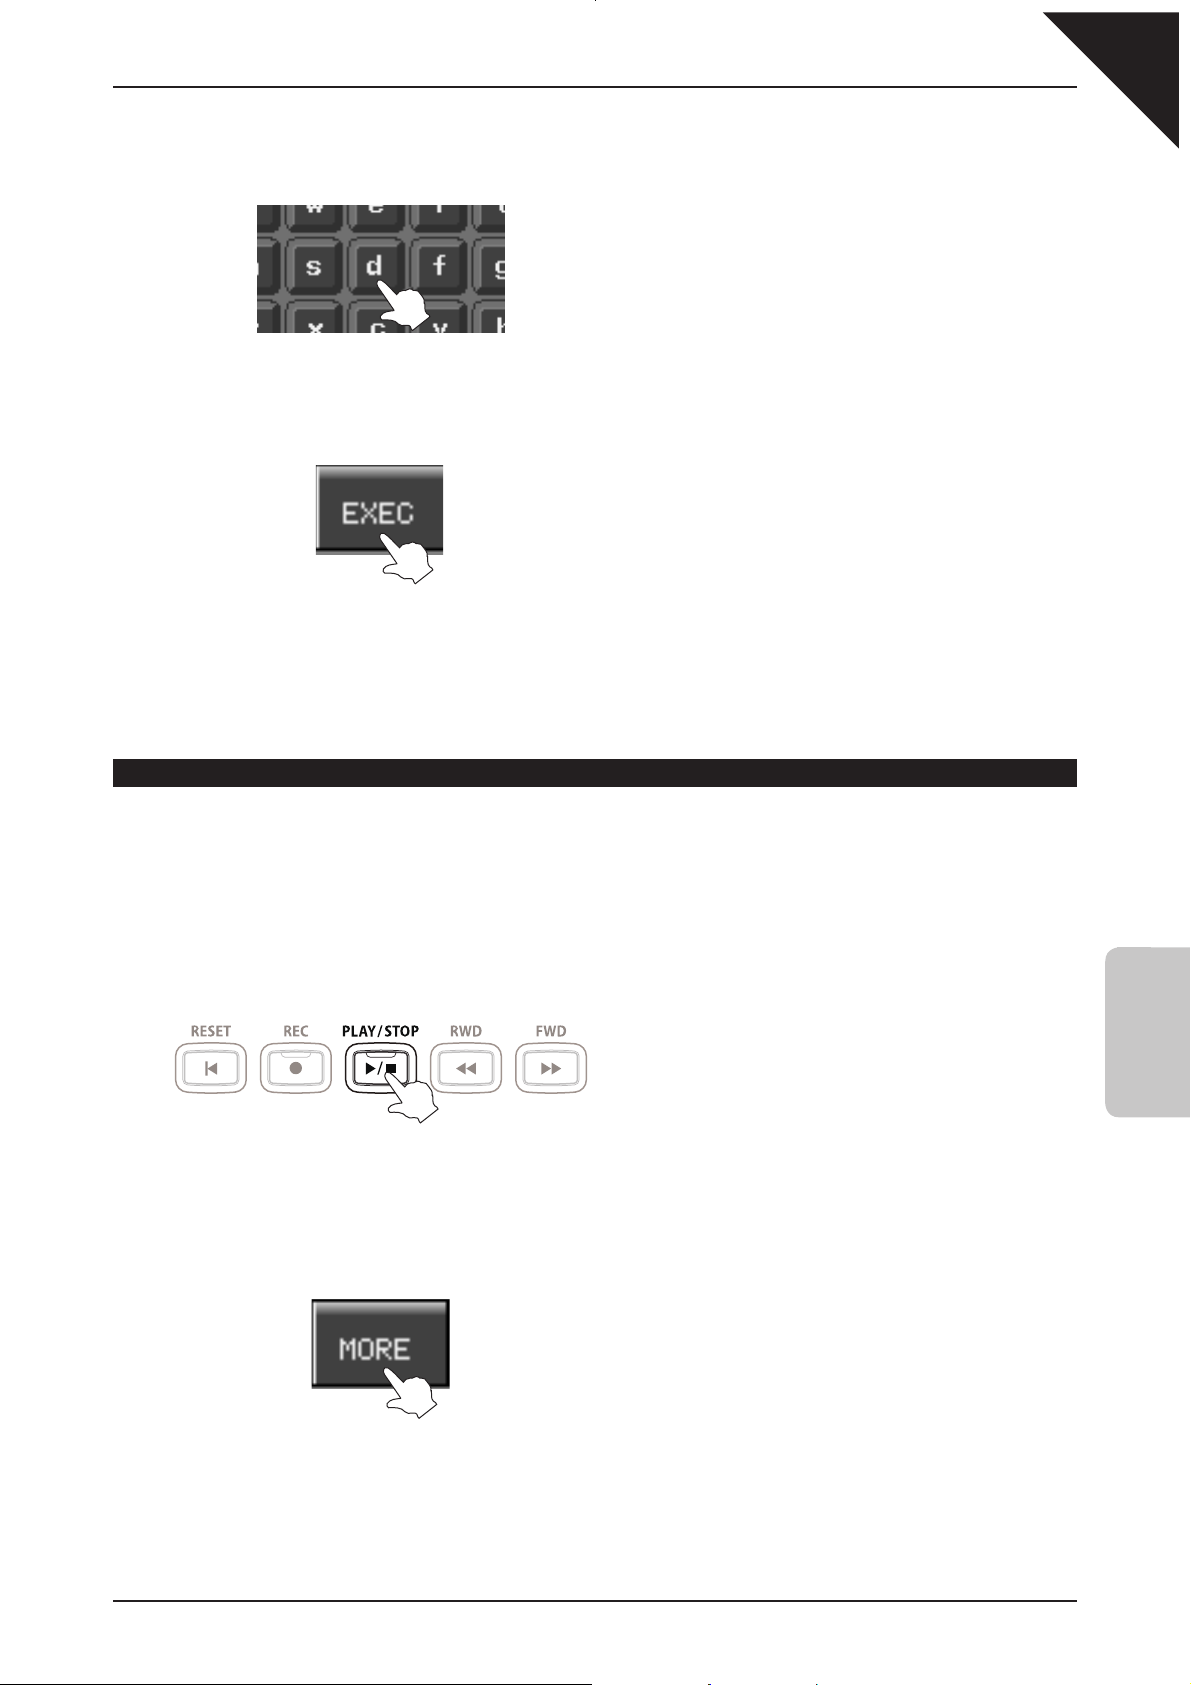
Step 3
Touch the letter buttons to enter a name for the song.
Step 4
Finally, touch the EXEC button to save the song.
Touch the Shift button to show numbers and additional
characters and the Caps button to show capital
letters.
The song will be saved to the CP instrument's internal song memory.
Songs saved to the CP’s internal song memory will be retained when the instrument is turned off.
DELETING A SONG FROM RECORDER MEMORY
This function clears the temporary recorder memory of all song data, allowing a new song to be recorded from scratch.
Note that this is not the same as deleting a song from the internal song memory - the two memories operate independently
of one another. As mentioned previously, the recorder memory is to be used temporarily, and will be cleared automatically
when the instrument is turned off.
Step 1
Press the PLAY/STOP panel button.
The LED indicator for the PLAY/STOP panel button will
turn on, indicating that a song is currently playing.
The recorded song will start to play.
Step 2
Touch the MORE button in the bottom left corner of the LCD display.
The part buttons shown at the bottom of the screen will be replaced by BACK, SAVE, DELETE, and MY SONGS
buttons.
Page 24
Page
24
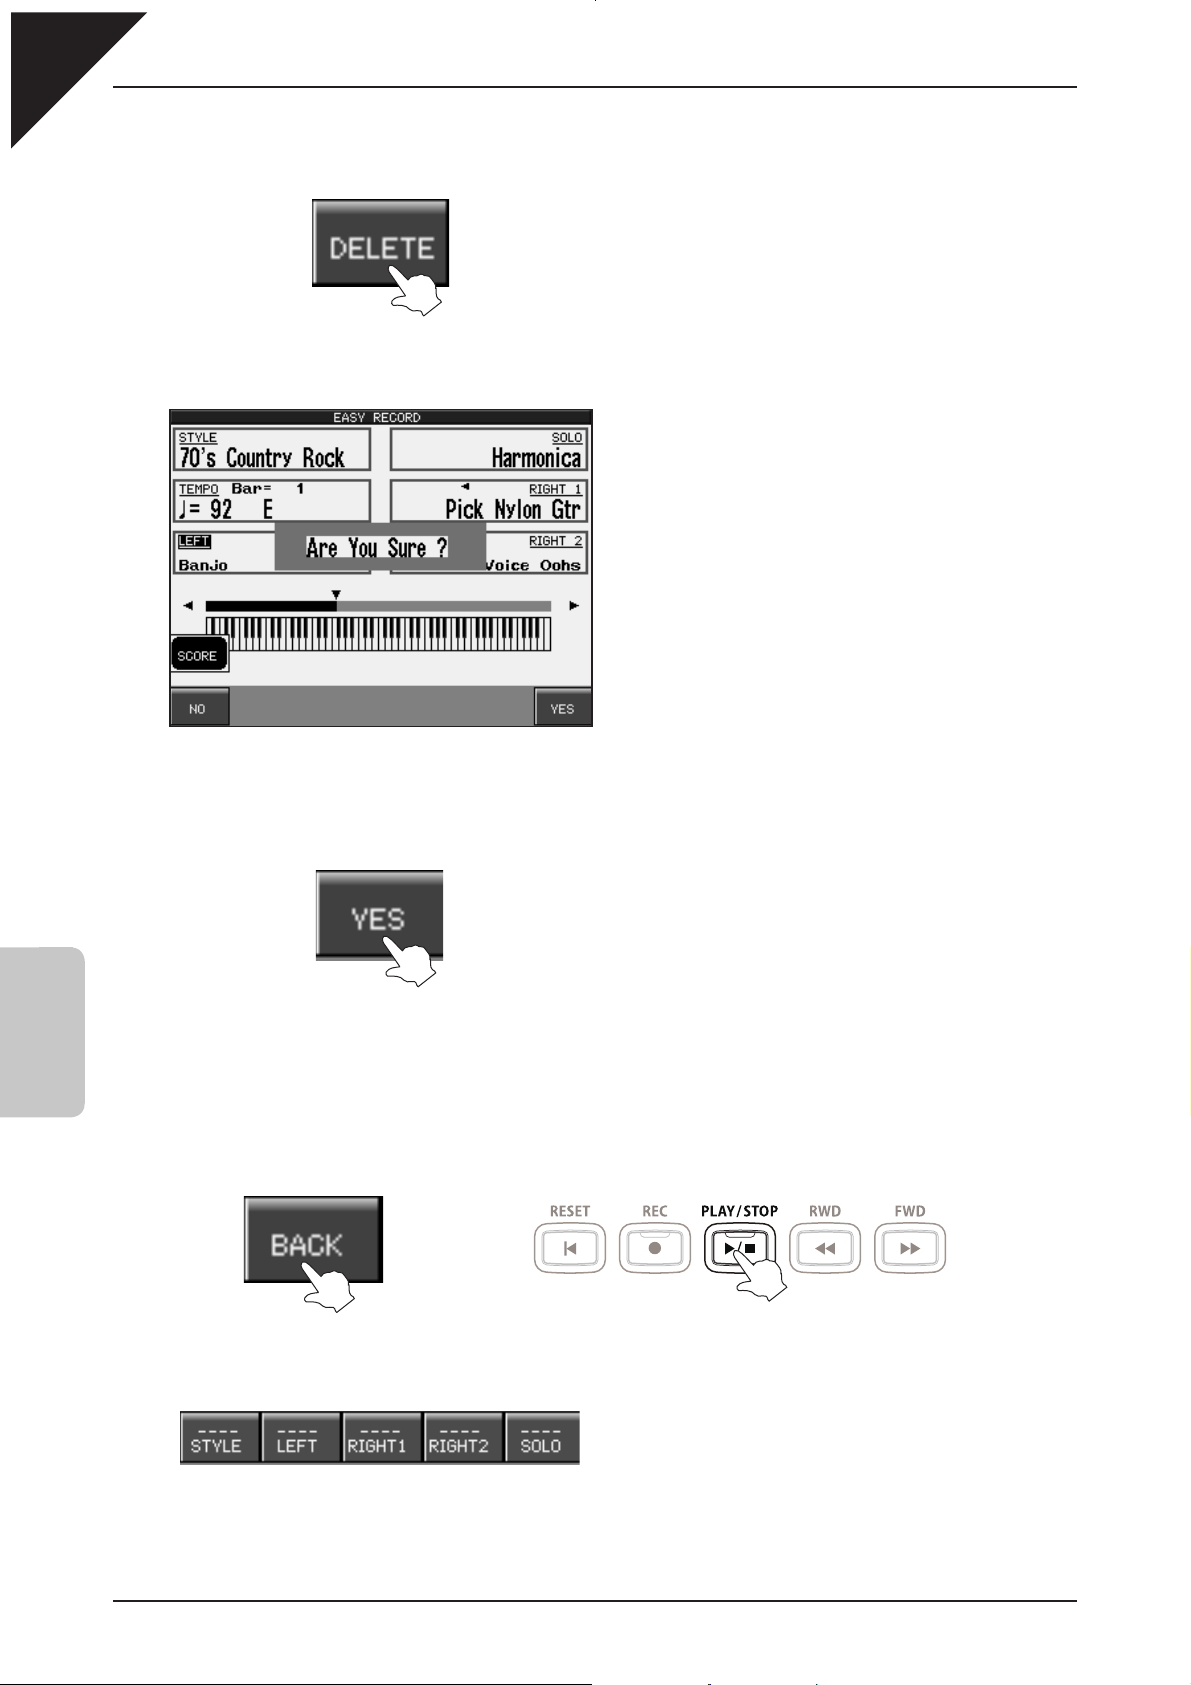
Step 3
Touch the DELETE button.
The recorder song will stop playing and a confirmation message will be shown in the middle of the screen.
4
RECORDER
Step 4
Touch the YES button.
The recorder memory will be cleared.
Let’s confirm this point by once again by attempting to play the recorder song.
Step 5
Touch the BACK button, then press the PLAY/STOP panel button.
¨
No song will be heard, thus confirming that the recorder memory has been cleared.
In addition, the part buttons shown at the bottom of the screen will all show empty lines.
Page 25
4
RECORDER
Page
25
LOADING A SONG FROM INTERNAL MEMORY
We have successfully learned how to record and save a song to the internal memory, and also how to clear the temporary
recorder memory. Now let’s conclude this topic by familiarizing ourselves with loading songs from the internal memory
back into the recorder memory.
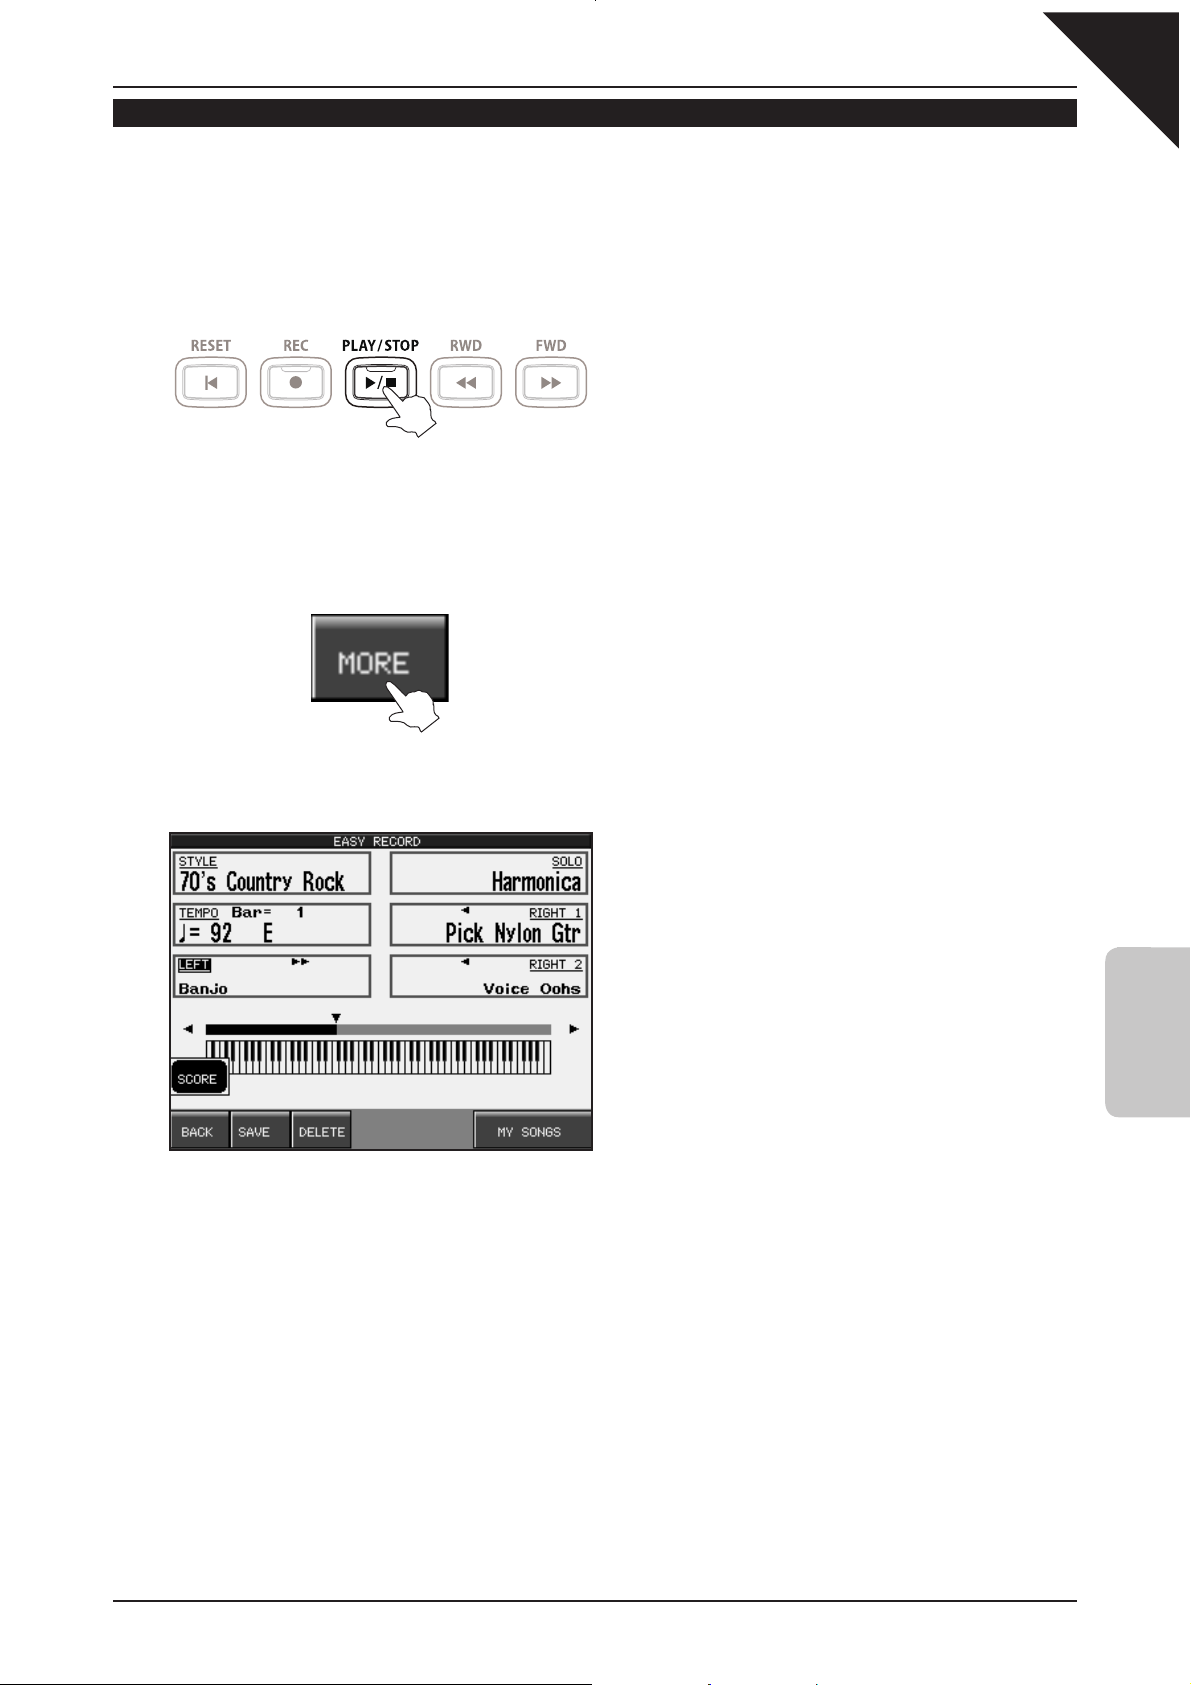
Step 1
Press the PLAY/STOP panel button.
No song will be heard, however the EASY RECORDER screen will be shown in the LCD display.
Step 2
Touch the MORE button in the bottom left corner of the LCD display.
The part buttons shown at the bottom of the screen will be replaced by BACK, SAVE, DELETE, and MY SONGS
buttons.
Page 26
Page
26
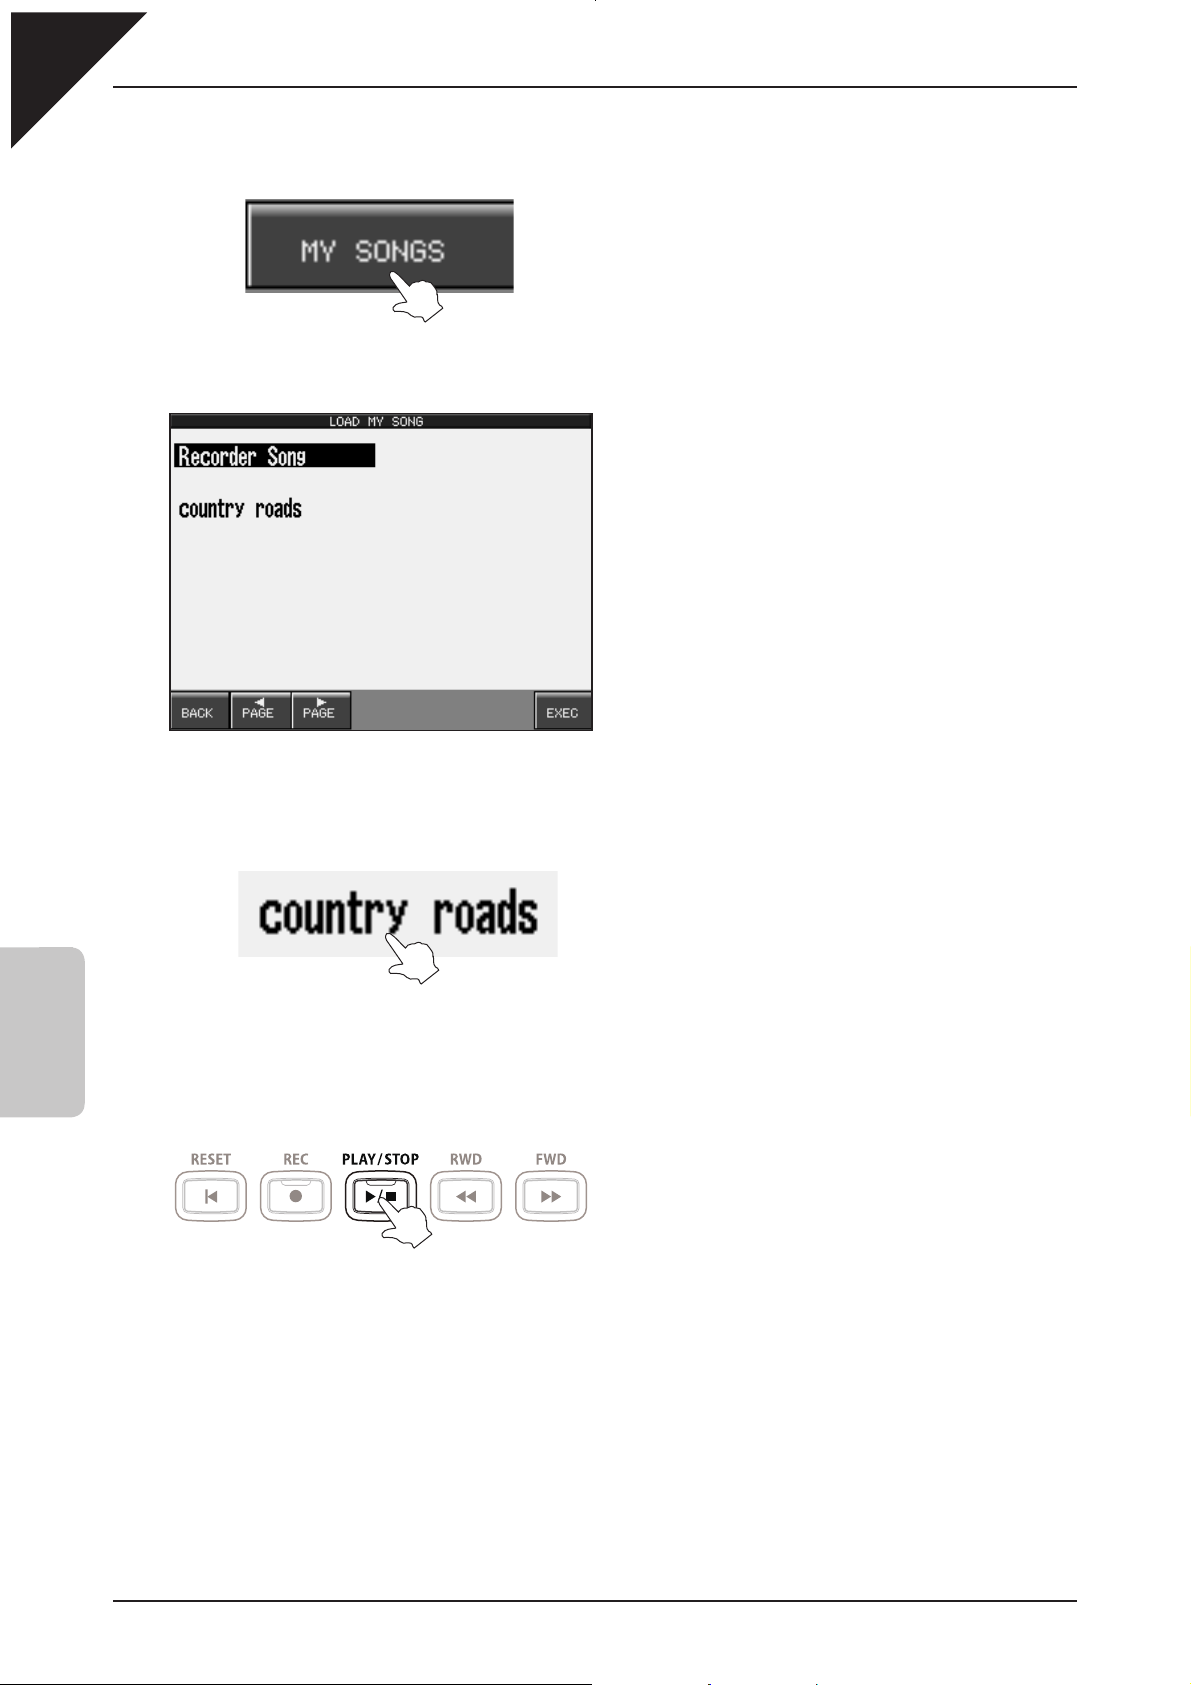
Step 3
Touch the MY SONGS button.
A list of songs saved in the internal memory will be shown in the LCD display.
4
RECORDER
Continue recording, deleting, saving, and loading songs to familiarize yourself with the basic operation of the instrument’s
Easy Recorder function.
Step 4
Touch the country roads song saved earlier.
The country road song will be loaded from the internal song memory into the recorder memory.
Step 5
Press the PLAY/STOP panel button.
LED indicator for the PLAY/STOP panel button will
turn on, indicating that a song is currently playing.
The recorded song will start to play, confirming that the load operation was successful.
Page 27
5. USB USAGE
Page
27
The CP139 USB connectors perform a variety of useful functions. The
send and receive MIDI data to and from other MIDI instruments, or a computer. The
allows the instrument to load and save data stored on a USB memory device directly.
In this topic, we will learn how to load and save recorded song data to USB memory, play along with MP3 files, and even
save our recordings as MP3 files for emailing to friends and family, or listening to on an iPod etc.
SAVING A SONG TO USB MEMORY
While we have already learned how to save and load songs to and from the CP’s internal memory, the following steps will
explain how to save your performances to USB memory, allowing songs to be played on other instruments, or imported
into computer sequencing software. First, let’s save the ‘Country Roads’ song to USB memory.
Step 1
USB to Host
USB to Device
connector allows the instrument to
connector, meanwhile,
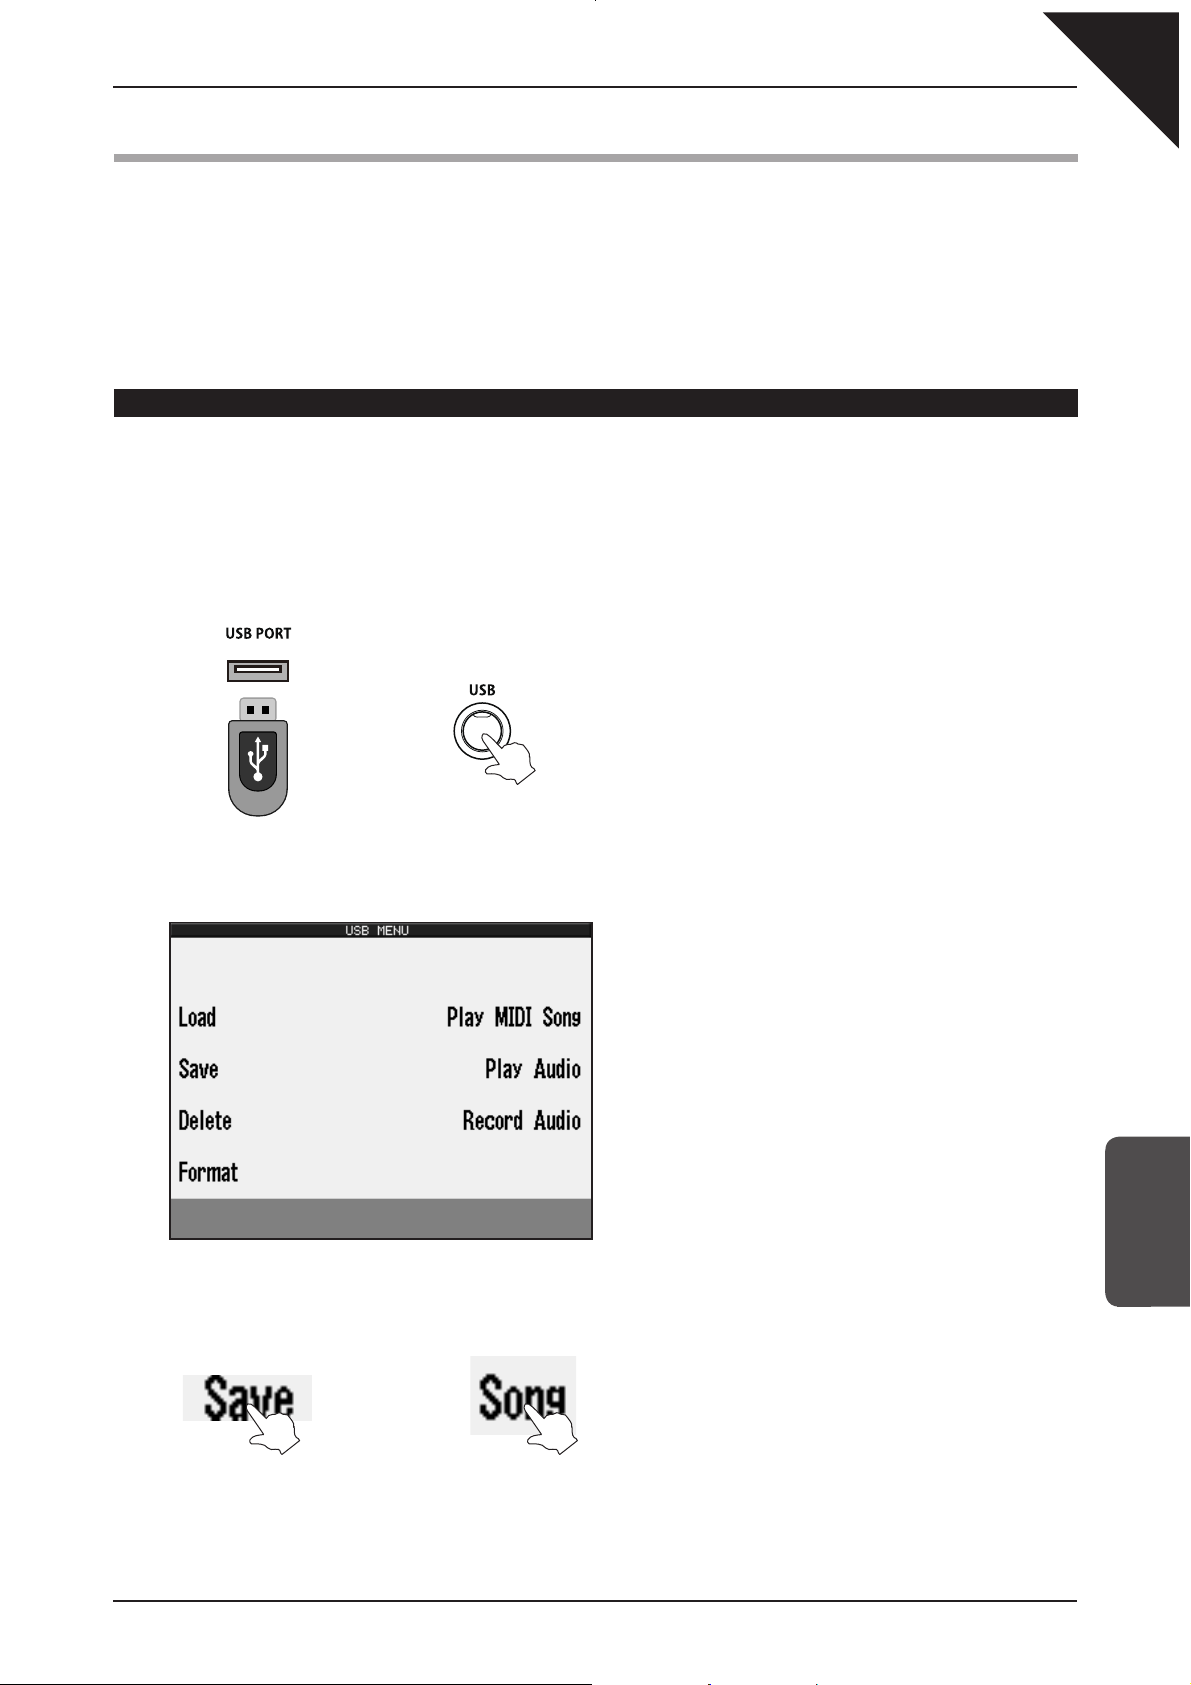
Connect a USB memory device to the USB port, then press the USB panel button.
The LED indicator for the USB panel button will turn on.
¨
The USB MENU screen will be shown in the LCD display.
Step 2
Touch Save, then touch Song.
¨
5
USB USAGE
Page 28
Page
28
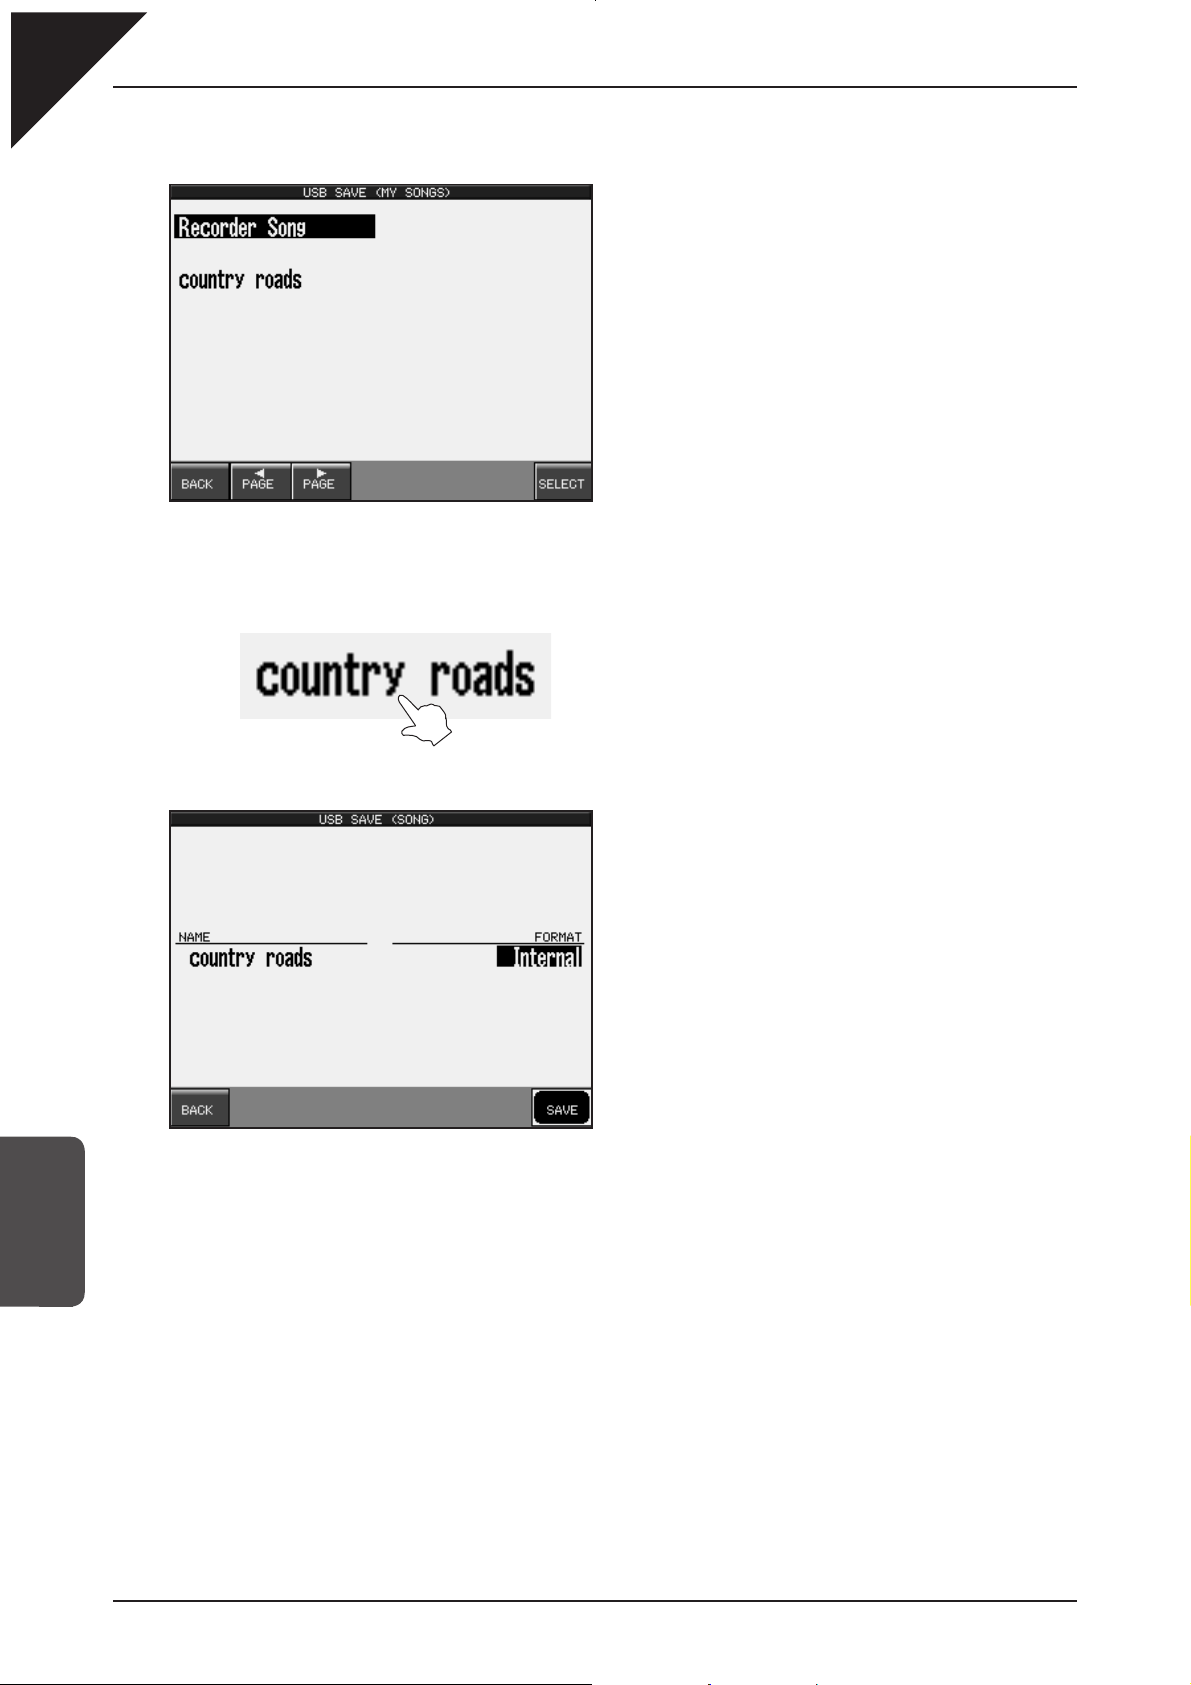
The USB SAVE (MY SONGS) screen will be shown in the LCD display, listing songs currently stored in the instrument’s
internal memory.
Step 3
Touch the country roads song saved earlier.
The USB SAVE (SONG) screen will be shown in the LCD display.
Songs can be saved to USB memory in three formats:
5
USB USAGE
Select the desired song format by rotating the TEMPO/VALUE dial.
Internal The native song format used by KAWAI Concert Performer instruments.
SMF The Standard MIDI File format, compatible with most MIDI instruments.
Stylist The Internal format plus additional Registration settings.
When SMF format is selected, data in the STYLE part will automatically be copied to tracks 9-16 of the SMF,
thus erasing any existing data that may be stored in these tracks,
When Stylist format is selected, the song can by accessed using the Song Stylist function only.
Page 29
5
USB USAGE
Page
29
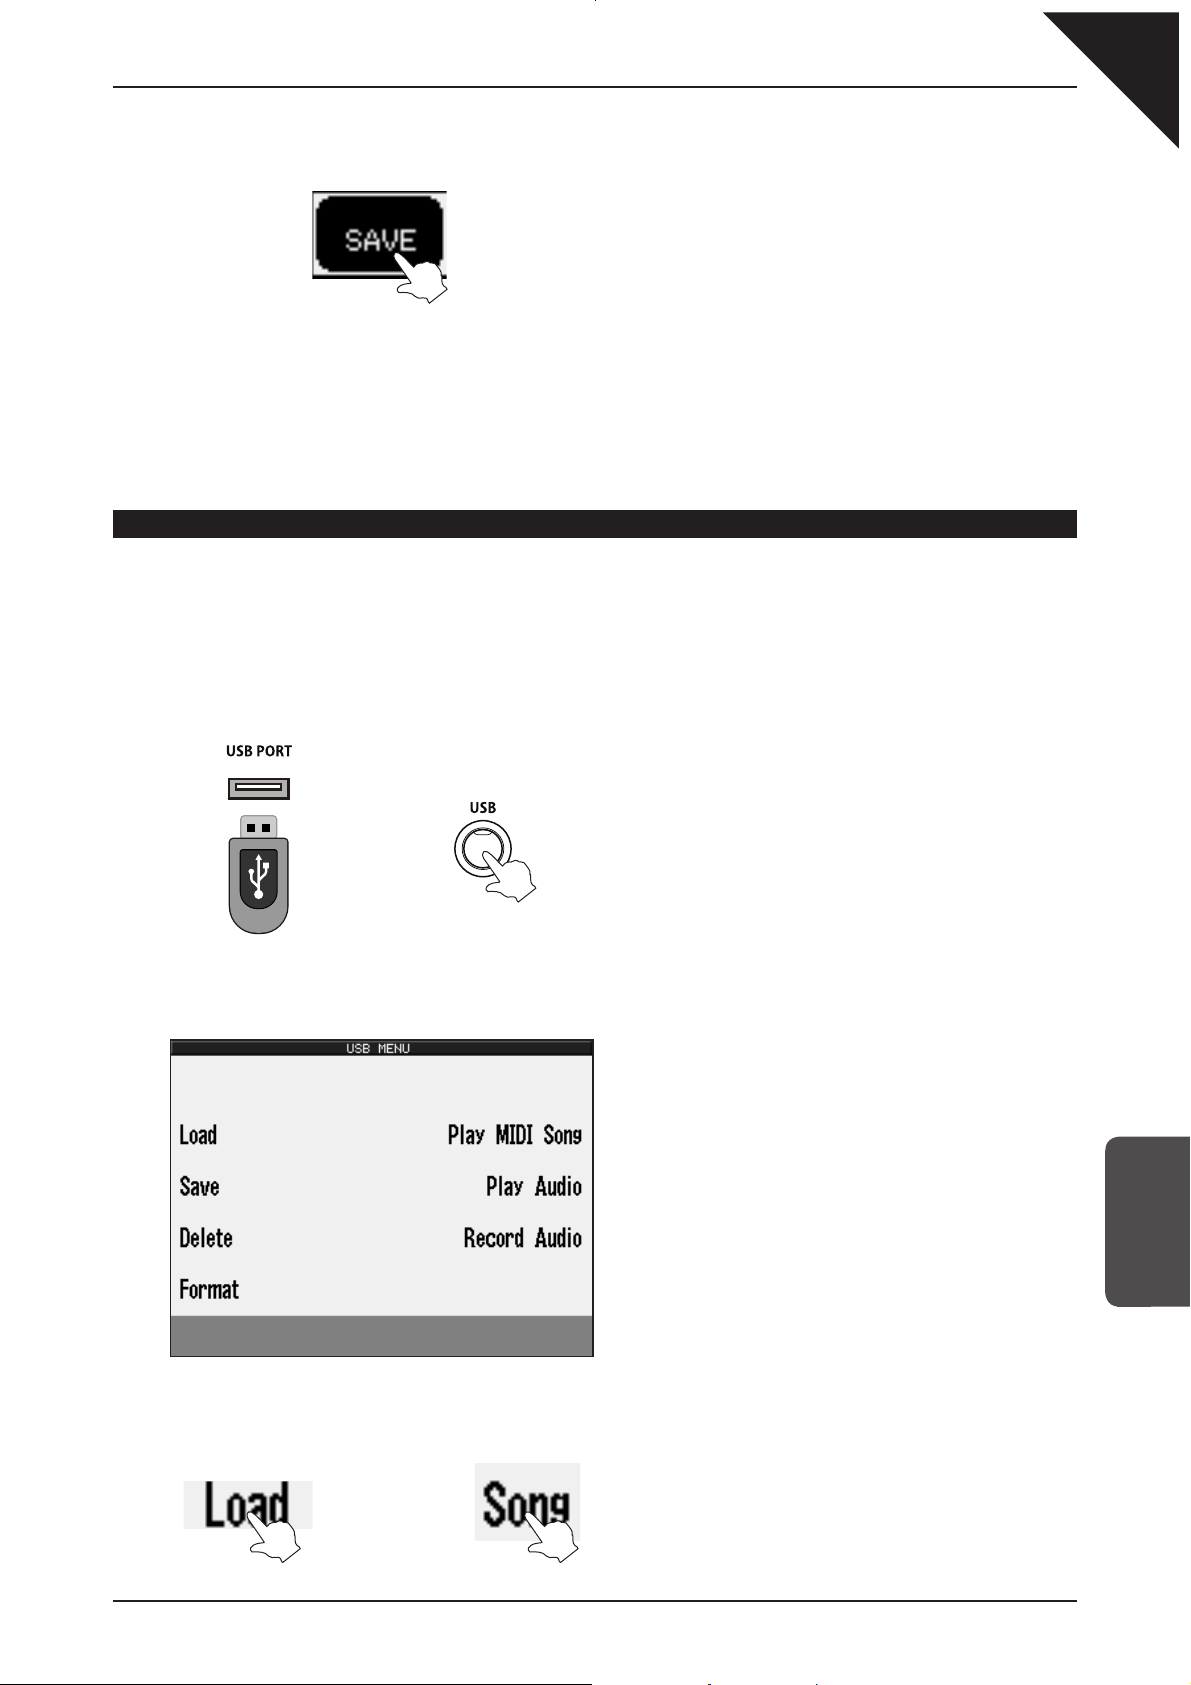
Step 4
Touch the SAVE button.
The song will be saved to the USB memory device using the name and format specified.
To save a song to USB memory directly from the recorder (i.e. not from the instrument’s internal memory), select
the Recorder Song song in Step 3.
LOADING A SONG FROM USB MEMORY
The following steps will explain how to load your performances from USB memory. In order to properly test this function,
please clear the temporary recorder memory by repeating the
explained on page 23.
DELETING A SONG FROM RECORDER MEMORY
steps
Step 1
Connect a USB memory device to the USB port, then press the USB panel button.
The LED indicator for the USB panel button will turn on.
¨
The USB MENU screen will be shown in the LCD display.
Step 2
Touch Load, then touch Song.
¨
Page 30
Page
30
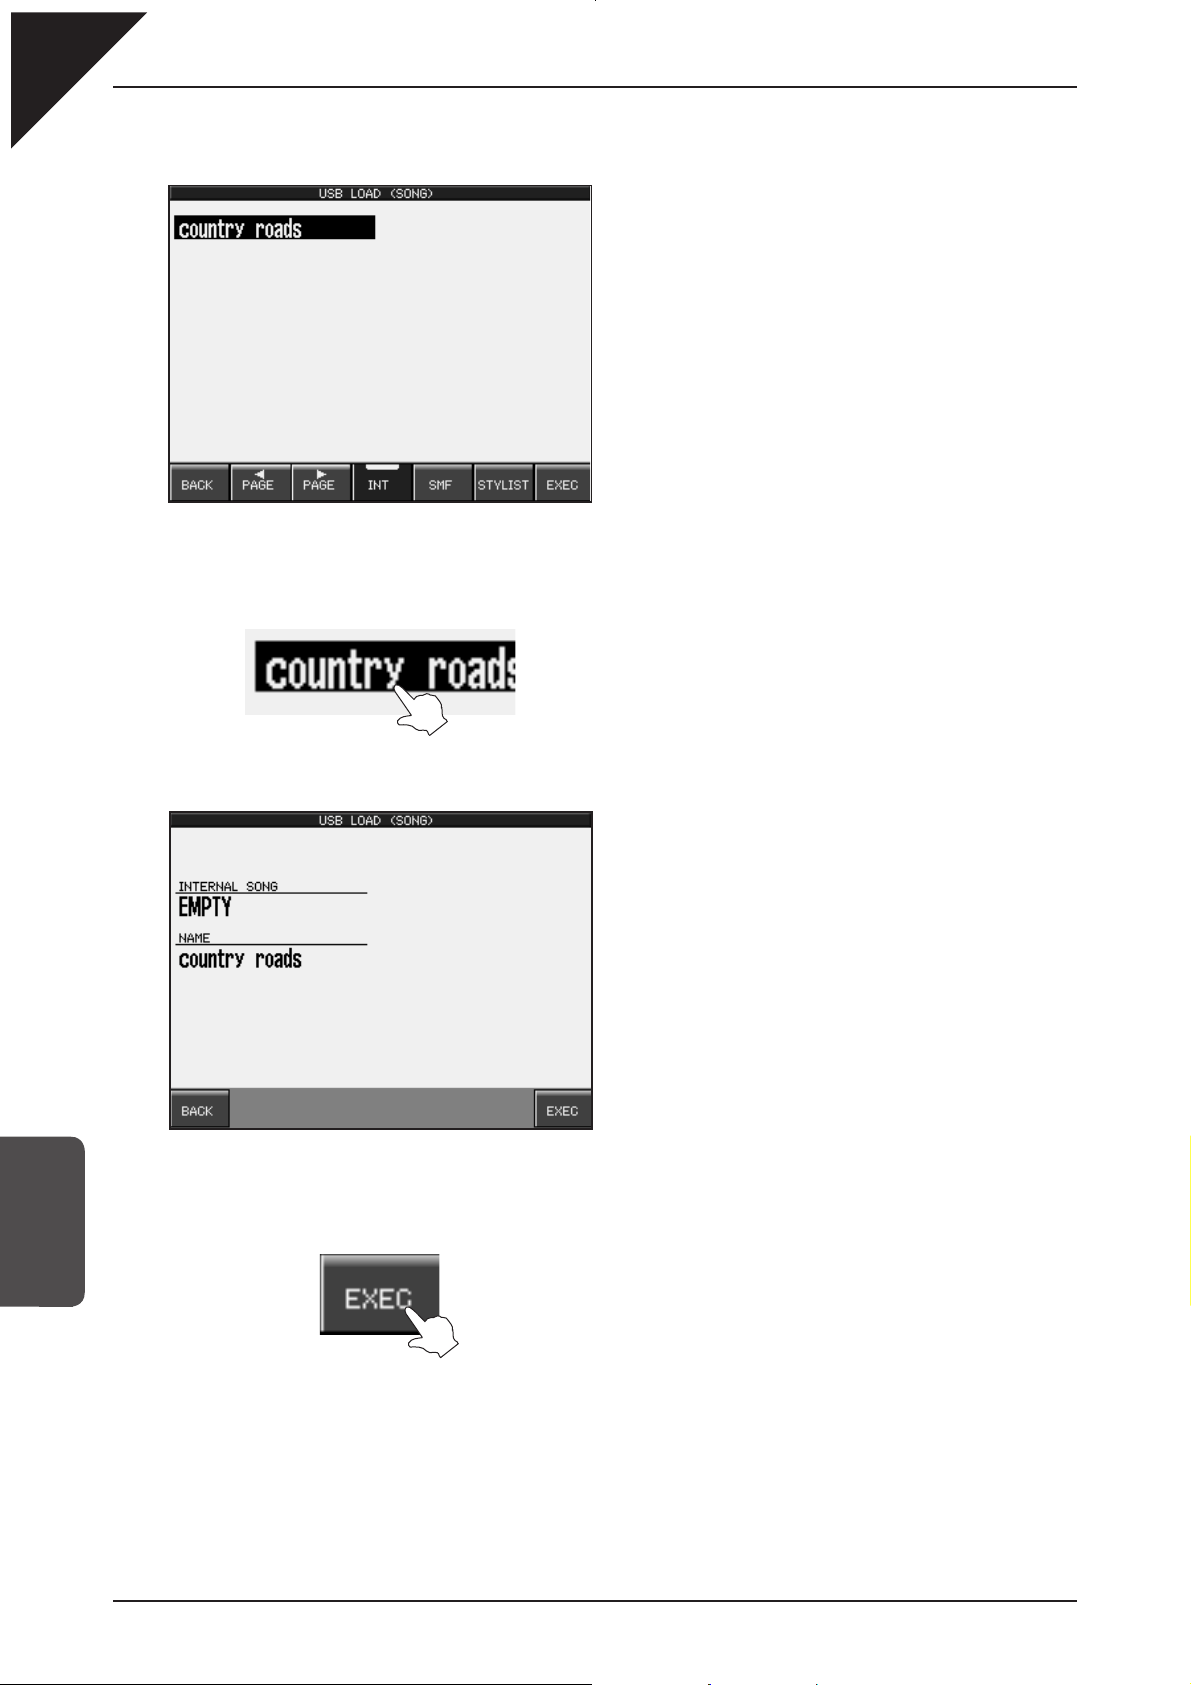
The USB LOAD (SONG) screen will be shown in the LCD display, listing songs currently stored on the connected
USB memory device.
Step 3
Touch the country roads song saved in the previous topic.
The USB LOAD (SONG) screen will be shown in the LCD display.
Step 4
5
USB USAGE
Touch the EXEC button.
The country roads song will be loaded from the USB memory device into the recorder memory.
Page 31

5
USB USAGE
Page
31
Step 5
Press the PLAY/STOP panel button.
LED indicator for the PLAY/STOP panel button will
turn on, indicating that a song is currently playing.
The recorded song will start to play, confirming that the load operation was successful.
PLAYING MP3 AUDIO FILES FROM USB MEMORY
The CP’s Play Audio function allows MP3 audio files stored on USB memory to be played back directly through the
instrument’s speaker system. This feature is particularly useful when attempting to learn the chords or melody to a new
piece, or when you simply wish to play along with your favorite song.
First prepare a selection of MP3 audio files and copy them to a USB memory device.
Step 1
Connect a USB memory device to the USB port, then press the USB panel button.
The LED indicator for the USB panel button will turn on.
¨
The USB MENU screen will be shown in the LCD display.
Page 32

Page
32
Step 2
Touch the Play Audio text.
The AUDIO PLAY LIST screen will be shown in the LCD display, listing MP3 files currently stored on the connected
USB memory device.
Step 3
Touch the desired MP3 audio file.
The AUDIO PLAY screen will be shown in the LCD display.
5
USB USAGE
Step 4
Touch the button.
The MP3 audio file will begin to play.
Page 33

5
USB USAGE
Page
33
Step 5
Touch the volume slider to adjust the volume.
The volume level of the instrument sounds played
using the keyboard will not change.
The TEMPO/VALUE dial can also be used to adjust
the volume of the MP3 audio.
Step 6
Touch the MAIN SCREEN button.
The MP3 audio will continue to play.
The MAIN screen will be shown in the LCD display, allowing instruments sounds to be changed etc.
To return to the AUDIO PLAY screen, press the USB button once again.
Playback of the MP3 audio file can be controlled by touching the transport buttons at the bottom of the screen.
Skip backward
Stop song Previous song
For more information about the Play Audio functions, please refer to the Playing MP3/WAV Audio instructions
in the main CP139 owner's manual.
Skip forward
Next songPlay song
Page 34

Page
34
RECORDING MP3 AUDIO FILES TO USB MEMORY
The CP’s Record Audio function allows you to create digital audio files from your performances in just a few steps. The
recordings are saved to USB memory in either MP3 (or WAV) format, allowing them to be emailed to friends and family,
or played back on other devices such as an iPod.
Step 1
Connect a USB memory device to the USB port, then press the USB panel button.
The LED indicator for the USB panel button will turn on.
¨
The USB MENU screen will be shown in the LCD display.
Step 2
Touch the Record Audio text.
The AUDIO RECORD TYPE screen will be shown in the LCD display, allowing the name and format (type) of the
5
USB USAGE
audio file to be specified.
Page 35

5
USB USAGE
Page
35
Step 3
Touch the EXEC button.
The AUDIO RECORD screen will be shown in the LCD display. This screen is similar to the MAIN screen, and allows
sounds and styles to be adjusted before creating the recording.
Step 4
Touch the button.
The audio recorder will enter ‘Ready’ mode.
Step 5
Touch the button.
Page 36

Page
36
The audio recorder will enter ‘Recording’ mode, recording all sounds created by the instrument.
Step 6
Play the keyboard.
All sounds created by the instrument will be recorded as a digital audio file and saved to the USB memory device.
Step 7
Touch the button.
The audio recorder will stop recording, and a new digital audio file will be saved to the USB memory device.
Exit the Audio Recorder and return to the Audio Player to check that the new digital audio file has been created.
If successful, the new MP3 audio file should appear in the AUDIO PLAY LIST screen, and will play when selected.
5
USB USAGE
For more information about the Record Audio functions, please refer to the Recording MP3/WAV Audio
instructions in the main CP139 owner's manual.
Page 37

CONGRATULATIONS!
You have successfully completed the KAWAI CP139 Quick Start Guide.
Thank you for reading. We hope that this introductory step-by-step guide has allowed you to familiarize yourself with
some important features of the instrument, while also providing a glimpse of the power of this incredible instrument.
On behalf of everyone at KAWAI, may your new instrument bring you many years of musical enjoyment!
The CP139 Team.
Page
37
Page 38

Page
38
USER NOTES
Page 39

Page
39
Page 40

CP139 Quick Start Guide
KPSZ-0318 : 816763
OW1037E-I0911
Version 1
Printed in Indonesia
Copyright © 2009 KAWAI Musical Instruments Mfg. Co.,Ltd. All Rights Reserved
Page 41

1
Part Names
& Functions
2
the Piano
Listening to
3
(Basic Controls)
Playing the Piano
4
Owner’s Manual
Recording a Song
5
Using a Style
6
Concert Magic
7
System Menu
8
& Mic Effects
Vocal Harmony
9
Using USB Memory
10
CD Operations
11
Appendices
Page 42

All descriptions and specifications in this manual are subject to change without notice.
Page 43

Page
3
Thank you for purchasing this KAWAI Concert Performer (CP) Series Ensemble Digital Piano.
The CP Series piano has been designed to provide you with the ultimate musical experience, no matter your skill level.
Featuring superbly realistic instrument tones and the most finely crafted keyboard in its class, the CP is a unique musical
instrument resulting from the combination of KAWAI’s eighty-plus years experience in making acoustic pianos, along with
cutting-edge digital music technologies.
With over 900 different instrument and drum sounds at your disposal, you will have the flexibility to perform any kind of
music ranging from traditional to contemporary. The Auto-Accompaniment Styles provide the enjoyment of playing rich, fully
orchestrated music in hundreds of musical genres. Thanks to the Song Stylist feature, you will never have to worry about
finding the best sounds and style to perform a particular song.
The Concert Performer incorporates many professional features, such as a 16-track Recorder, Microphone Input, USB to
Device functionality and MP3 recording/playback. For the non-player, KAWAI’s unique Concert Magic feature creates the
thrill of being a performing musician simply by tapping any key on the keyboard.
Finally, the CP also features a CD-R drive, allowing anyone to make their own audio CD recordings right on the instrument.
The Concert Performer offers tremendous opportunities for anyone who is interested in learning, playing, and listening
to music. Please read this manual thoroughly and keep it handy as a reference so that you can get the most out of this
incredible instrument.
We hope you enjoy every moment that you spend with your Concert Performer.
Page 44

Page
4
Table of Contents
Important Safety Instructions..............6
¡
1. Part Names and Functions ...............10
1) Parts and Names............................................................ 10
Pedals ........................................................................ 12
Front Terminals........................................................... 12
Rear Terminals ........................................................... 12
2) Overview of Controls ...................................................... 13
2. Listening to the Piano .......................15
1) Getting Assistance: Using Help and Demo..................... 15
2) Using the Help................................................................ 15
3) Using the Demonstrations .............................................. 17
4) Playing Piano Music ....................................................... 19
Making your Favorites list........................................... 20
My Piano Music.......................................................... 21
3. Playing the Piano (Basic Controls) ...........22
1) Selecting a Part to Play .................................................. 22
Splitting the keyboard................................................. 23
2) Selecting Sounds............................................................ 24
Favorite Sounds. ........................................................ 25
3) Mixer............................................................................... 26
4) Effects............................................................................. 28
Adding Reverb ........................................................... 28
Adding Chorus ........................................................... 29
Adding an Effect......................................................... 30
Effect Priority Guidelines............................................ 31
5) Transpose and Octave Shift............................................ 33
6) Metronome ..................................................................... 34
7) Piano Only...................................................................... 35
8) Performance Button........................................................ 36
LEFT PEDAL and CENTER PEDAL Override ........... 36
PERFORMANCE BUTTON ASSIGN (Solo Portamento, Panel Lock)
LEFT MODE .............................................................. 38
SOLO SETTINGS ...................................................... 38
SOLO MODE ............................................................. 39
... 37
4. Recording a Song .............................40
1) Easy Recording .............................................................. 40
Re-recording or adding another Part ......................... 42
Storing the song in Internal Memory .......................... 43
Erasing the song ........................................................ 43
Easy Loop .................................................................. 44
Display of a Score...................................................... 44
2) Advanced Recording ...................................................... 46
Real-time Recording ..................................................46
Mixer .......................................................................... 48
Track Settings............................................................. 49
Loop Settings ............................................................. 50
Style Paste................................................................. 51
Punch-In Recording ................................................... 51
Step Recording .......................................................... 53
Song Edit ................................................................... 55
Bar Editing ................................................................. 56
Event Edit................................................................... 62
Style Maker ................................................................ 63
My Songs ................................................................... 63
Piano Music Maker..................................................... 64
5. Using a Style.....................................66
1) Selecting and Playing a Style......................................... 66
Intro/Ending................................................................ 67
Fill-In and Variation .................................................... 68
2) Auto Accompaniment System ........................................ 69
3) 1-2 Play .......................................................................... 71
4) Registration .................................................................... 72
5) Song Stylist..................................................................... 75
6) Keyboard Harmony......................................................... 78
7) Creating Your Own Styles ............................................... 79
8) Conductor....................................................................... 80
Easy Edit:................................................................... 80
Advanced Edit:........................................................... 81
User Conductor Styles ............................................... 83
9) Making a Style with Get Phrase from Recorder ............. 84
Auto-accompaniment System .................................... 86
10) Making a Style with Phrase Combination............................. 88
11) Editing Sounds ............................................................. 90
Editing the Preset Effect Settings............................... 90
Making a User Sound ................................................ 91
6. Concert Magic...................................93
1) Selecting a Concert Magic Song .................................... 93
2) Performing a Concert Magic Song ................................. 95
Concert Magic Song Arrangements........................... 97
Steady Beat Play........................................................ 98
3) Creating a Concert Magic Song ..................................... 98
7. System Menu....................................99
1) Tuning ........................................................................... 100
2) Touch Curve.................................................................. 101
User Touch Curve .................................................... 101
3) System EQ ................................................................... 103
4) Virtual Voicing............................................................... 104
5) Resonance ................................................................... 105
6) Concert Magic Sound................................................... 106
7) Pedal Assign................................................................. 107
8) Fill-in Mode................................................................... 109
9) Solo Settings ................................................................ 110
10) Video Out.................................................................... 111
11) Effect for Sound.......................................................... 112
12) Temperament .............................................................. 113
13) Sound Select Mode .................................................... 115
14) Style Select Mode....................................................... 116
15) MIDI Menu.................................................................. 117
MIDI Settings ........................................................... 117
Transmit MIDI Data .................................................. 118
Channel Receive On/Off .......................................... 118
MIDI Accordion ........................................................ 119
MIDI Sound Settings ................................................ 119
16) Power Up Settings...................................................... 120
17) Registration Filter ....................................................... 121
18) Soft Reset................................................................... 122
19) Software Version......................................................... 123
20) Display Control ........................................................... 124
Page 45

8. Vocal Harmony & Effects ................125
1) Vocal Harmony ............................................................. 125
About Vocal Harmonies............................................ 126
2) Mic Effects.................................................................... 128
9. Using USB Memory ........................130
USB Menu ........................................................................ 130
Saving Data to USB Memory............................................ 130
Loading Data from USB Memory...................................... 132
Erasing Data from USB Memory ...................................... 134
Formatting a USB Memory Device ................................... 135
Play MIDI Song................................................................. 136
Controlling Song Playback................................................ 137
Playing MP3/WAV Audio................................................... 139
Recording MP3/WAV Audio .............................................. 141
Recording with additional sound sources ......................... 142
Page
5
10. CD Operations ..............................144
1) CD-R Operations.......................................................... 144
2) Playing an Audio CD..................................................... 145
3) Recording to CD........................................................... 146
Recording Concert Magic Songs to CD ................... 147
Recording to CD with additional sound sources ......148
4) Closing (Finalizing) Your CD ......................................... 149
5) Advanced Options ........................................................ 150
Delete Last Track (CD-RW only) .............................. 150
Formatting a CD-RW................................................ 151
11. Appendices ...................................152
1) Connection Examples................................................... 152
2) Assembly Instructions................................................... 154
3) USB MIDI Information................................................... 157
Notes on USB MIDI Usage ......................................158
4) Preset Styles ................................................................ 159
5) Song Stylists................................................................. 158
6) Concert Magic Songs ................................................... 165
7) Accompaniment Chord Types....................................... 167
8) Program Change Numbers........................................... 168
9) Drum & SFX Kit Mapping ............................................. 172
10) MIDI Implementation Chart ........................................ 175
11) Specifications ............................................................. 176
User Notes........................................................................ 177
Page 46

Page
6
Important Safety Instructions
SAVE THESE INSTRUCTIONS
INSTRUCTIONS PERTAINING TO A RISK OF FIRE, ELECTRIC SHOCK, OR INJURY TO PERSONS
WARNING
CAUTION
RISK OF ELECTRIC SHOCK
DO NOT OPEN
AVIS : RISQUE DE CHOC ELECTRIQUE - NE PAS OUVRIR.
TO REDUCE THE RISK OF ELECTRIC SHOCK, DO NOT REMOVE COVER (OR BACK).
NO USER-SERVICEABLE PARTS INSIDE. REFER SERVICING TO QUALIFIED SERVICE PERSONNEL.
The lighting flash with arrowhead symbol, within an
equilateral triangle, is intended to alert the user to
the presence of uninsulated "dangerous voltage"
within the product's enclosure that may be of
sufficient magnitude to constitute a risk of electric
shock to persons.
TO REDUCE THE RISK OF
FIRE OR ELECTRIC
SHOCK, DO NOT EXPOSE
THIS PRODUCT TO RAIN
OR MOISTURE.
The exclamation point within an equilateral triangle
is intended to alert the user to the presence of
important operating and maintenance (servicing)
instructions in the leterature accompanying the
product.
Examples of Picture Symbols
denotes that care should be taken.
The example instructs the user to take care not to allow fingers to be trapped.
denotes a prohibited operation.
The example instructs that disassembly of the product is prohibited.
denotes an operation that should be carried out.
The example instructs the user to remove the power cord plug from the AC outlet.
Read all the instructions before using the product.
1) Read these instructions.
2) Keep these instructions.
3) Heed all warnings.
4) Follow all instructions.
5) Do not use this apparatus near water.
6) Clean only with dry cloth.
7) Do not block any ventilation openings. Install in
accordance with the manufacturer's
instructions.
8) Do not install near any heat sources such as
radiators, heat registers, stoves, or other
apparatus (including amplifiers) that produce
heat.
9) Do not defeat the safety purpose of the
polarized or grounding-type plug. A polarized
plug has two blades with one wider than the
other. A grounding type plug has two blades
and a third grounding prong. The wide blade or
the third prongs are provided for your safety. If
the provided plug does not fit into your outlet,
consult an electrician for replacement of the
obsolete outlet.
10) Protect the power cord from being walked on
or pinched particularly at plugs, convenience
receptacles, and the point where they exit from
the apparatus.
11) Only use attachments/accessories specified by
the manufacturer.
12) Use only with the cart, stand, tripod, bracket, or
table specified by the manufacturer, or
sold with the apparatus. When a cart is used,
use caution when moving the cart/apparatus
combination to avoid injury from tip-over.
13) Unplug this apparatus during lightning storms
or when unused for long periods of time.
14) Refer all servicing to qualified service
personnel. Servicing is required when the
apparatus has been damaged in any way, such
as power-supply cord or plug is damaged,
liquid has been spilled or object have fallen
into the apparatus, the apparatus has been
exposed to rain or moisture, does not operate
normally, or has been dropped.
Page 47

WARNING - When using electric products, basic precautions should always be followed,
including the following.
Page
7
WARNING
The product should be connected to
an AC outlet of the specied voltage.
Do not insert or disconnect the power
cord plug with wet hands.
The chair must be used properly (it must be
used only when playing the product).
Do not play with it or stand on it.
Only one person is allowed to sit on it.
Do not sit on it when opening the lid.
Re-tighten the bolts occasionally.
When using the headphones, do not
listen for long periods of
time at high volume levels.
Do not lean against the keyboard.
&#)##
$#&#
""&(
%###&"#&
#&&('"
"#%
"##'
"!&&"$
"#"&!
"#&'
"$
Do not disassemble, repair or modify
the product.
When disconnecting the AC power cord's
plug, always hold the plug
and pull it to remove it.
The product is not completely disconnected from the
power supply even when the power switch is turned
o. If the product will not be used for a long time,
unplug the AC power cord from the AC outlet.
!
"#&("
#"#%
#
This product may be equipped with a polarized line plug (one blade wider
than the other). This is a safety feature.
If you are unable to insert the plug into the outlet, contact an electrician to
replace your obsolete outlet.
Do not defeat the safety purpose of the plug.
It is a good practice to have the instrument near the AC outlet and the power cord plug in a position
so that it can readily be disconnected in an emergency because electricity is always charging
while the plug is in the AC outlet even in a power switch o condition.
Page 48

Page
8
CAUTION
Indicates a potential hazard that could result in injury or
damage to the product or other property if the product
is handled incorrectly.
Do not use the product in the following areas.
Areas, such as those near windows, where the product is
exposed to direct sunlight
Extremely hot areas, such as near a heater
Extremely cold areas, such as outside
Extremely humid areas
Areas where a large amount of sand or dust is present
Areas where the product is exposed to excessive
vibrations
When you close the keyboard cover,
close it gently.
Before connecting cords, make sure
that the power to this product
and other devices is turned
OFF.
Take care not to allow any foreign
matter to enter the product.
Do not drag the product on the oor.
Take care not to drop the product.
OFF
Using the product in such areas may result in
product breakdown.
Use the product only in moderate climates (not
in tropical climates).
Closing it roughly may trap your ngers,
resulting in injury.
Failure to do so may cause breakdown of this
product and other devices.
Entry of water, needles or hair pins may result
in breakdown or short-circuit.
The product shall not be exposed to dripping or
splashing. No objects lled with liquids, such as
vases, shall be placed on the product.
Please lift up the product when moving it.
Please note that the product is heavy and must
be carried by more than two persons.
Dropping the product may result in breakdown.
Do not place the product near electrical
appliances such as TVs and radios.
When connecting the AC power cord
and other cords, take care
not to get them tangled.
Do not wipe the product with benzene
or thinner.
Do not stand on the product or exert
excessive force.
Do not place naked ame, such as lighted
candles on the product.
Doing so may cause the product to generate
noise.
If the product generates noise, move the
product suciently away from the electrical
appliance or connect it to another AC outlet.
Failure to do so may damage them, resulting in
re, electric shock or short-circuit.
Doing so may result in discoloration or deformation
of the product.
When cleaning the product, put a soft cloth in
lukewarm water, squeeze it well, then wipe the
product.
Doing so may cause the product to become
deformed or fall over, resulting in breakdown
or injury.
Doing so may cause the illumination to fall over,
resulting in re.
Ensure that the ventilation is not
impeded by covering the ventilation
openings with items, such as newspaper,
table-cloths, curtains, etc.
The product should be located so that its location or position does not interfere with its proper ventilation. Ensure a
minimum distance of 5cm around the product for sucient ventilation.
Failure to do so may over-heat the product,
resulting in re.
Page 49

),)
$*(
-
,-,+)(,
,)
#%
Should an abnormality occur in the product, immediately turn the power OFF, disconnect the power cord plug,
and then contact the shop from which the product was purchased.
'!$#
To prevent electric shock, match wide blade of plug to wide slot, fully insert.
#!$#
Pour éviter les chocs électriques, introduire la lame la plus large de la che dans la borne correspondante de la
prise et pousser jusqu'au fond.
!('"
Do not plug either terminal of the power cord to the ground of the AC outlet on the wall.
%!(%)
This instrument complies with the limits for a class B digital apparatus, pursuant to the Radio Interference
Regulations, C.R.C., c. 1374.
(,(
If your product is marked with this recycling symbol it means that, at the end of its life, you must dispose
of it separately by taking it to an appropriate collection point.
You should not mix it with general household waste. Disposing of this product correctly will prevent
potential negative eects on the environment and human health which could otherwise arise due to
inappropriate waste handling.
For further details, please contact your local authority.
(European Union only)
Page
9
!(,'&
'!$# Changes or modications not expressly approved by the party responsible for compliance could void the
user’s authority to operate the equipment.
#$ This equipment has been tested and found to comply with the limits for a Class B digital device, pursuant to
Part 15 of the FCC Rules. These limits are designed to provide reasonable protection against harmful interference in a
residential installation. This equipment generates, uses and can radiate radio frequency energy and, if not installed and
used in accordance with the instructions, may cause harmful interference to radio communications. However, there is
no guarantee that interference will not occur in a particular installation. If this equipment does cause harmful
interference to radio or television reception, which can be determined by turning the equipment o and on, the user is
encouraged to try to correct the interference by one or more of the following measures:
• Reorient or relocate the receiving antenna.
• Increase the separation between the equipment and receiver.
• Connect the equipment into an outlet on a circuit dierent from that to which the receiver is connected.
• Consult the dealer or an experienced radio/TV technician for help.
Declaration of Conformity
Products : Electronic Piano
Model Number : CP139
Responsible Party Name : Kawai America Corporation
Address : 2055 East University Drive Rancho
Dominguez, CA 90220
Telephone 310-631-1771
This device complies with Part 15 of the FCC Rules. Operation is subject to the
following two conditions:
(1) this device may not cause harmful interference, and
(2) this device must accept any interference received, including interference
that may cause undesired operation.
This applies only to products distributed by Kawai America Corporation.
Page 50

Page
10
1
Part Names
& Functions
1.
Part Names & Functions
1) Parts and Names
Control Panel
b
a
a POWER
Turns the instrument on/off.
b MUSIC PLAYER INPUT
This jack is used to connect an iPod or similar MP3
player to the CP’s amplifier and speaker system.
c MASTER VOLUME
This slider is used to adjust the overall volume level of
the instrument.
efgh ij k
c n p r
s
o q
mld
k STYLE (page 66)
These buttons are used to select an Accompaniment
Style to play along with.
l TAP TEMPO (page 34, 67)
This button is used to tap in the desired tempo for a
song or Style.
m METRONOME (page 34)
This button is used to turn the Metronome on/off.
t
u
d STYLE / SONG VOLUME
This slider is used to adjust the volume level of the Auto
Accompaniment Styles. Also used to adjust the volume
level of a song played from the CP Recorder or directly
from USB memory. This slider does not affect the Master
Volume Slider setting.
e DEMO (page 17)
This button is used to select the built-in demo songs
and function demos which explain important features
of the CP piano.
f PIANO MUSIC (page 19)
This button is used to select the built-in piano music.
g CONCERT MAGIC (page 93)
This button is used to select the built-in Concert Magic
songs.
h SONG STYLIST (page 75)
This button is used to select the Song Stylist
Registrations.
i CONDUCTOR (page 80)
This button is used to modify or create your own
Accompaniment Styles.
j 1-2 PLAY (page 71)
This button is used to automatically choose an
appropriate sound and setup for the selected style.
n ACC ON/OFF (page 69)
This button is used to turn the Auto-Accompaniment
function on/off.
o STYLE SETTINGS (page 69)
This button is used to select the Auto-Accompaniment
mode.
p SYNC / FADE OUT (page 67)
When active, the accompaniment style will start as soon as
you play a note or chord on the keyboard. Press this button
while a Style is playing to fade in or out of the Style.
q START / STOP (page 67)
This button is used to start and stop the accompaniment
style.
r INTRO / ENDING (page 67)
These buttons are used to play an intro section that
leads into the style. If you press this button while the
stye is playing an ending section will be played before
stopping.
s FILL IN (page 68)
These buttons are used to select one of the four short
fill-in sections that embellish the style and lead into the
different variation sections of the Style.
t VARIATION (page 68)
These buttons are used to select one of the four
variation sections within the chosen Style.
Page 51

Page
11
u LCD TOUCH SCREEN
Displays information about the CP’s current sound
selections, options, and settings, etc., while also
controlling many aspects of the CP.
v TEMPO / VALUE DIAL
This dial is used to adjust tempo, scroll through different
selections, and adjust data values for items on the
LCD screen.
v
u
OCTAVE SHIFT (page 33)
y
x
yw
z
B
C D
These buttons are used to change the pitch of the
selected part in octave steps.
SOUND (page 24)
z
These buttons are used to select the desired sound
category. Use the SELECT buttons or the DIAL to
select a sound within the category.
PIANO ONLY (page 35)
A
This button is used to automatically assign the
Concert Grand sound to the Right 1 part.
PART (page 22)
B
Selects which of the four parts (Left/Split, Right 1,
Right 2, Solo) are active and ready to be played with
the sounds assigned to them.
w EXIT
x TRANSPOSE (page 33)
A
E F G H
VOCAL HARMONY (page 125)
I
This button turns on/off the Vocal Harmony function
for the Microphone jack. Press and hold the button to
select the Vocal Harmony/Effect settings menu.
MIC EFFECTS (page 128)
J
This button turns on/off additional effects for the
Microphone jack. Press and hold the button to select
the MIC Effects settings menu.
ADVANCED RECORDER (page 46)
K
This button is used to access the Advanced Recorder
functions.
SYSTEM (page 99)
L
This button is used to access the system settings
menu.
This button is used to back up to the next-higher screen
level. Keep pressing the Exit button from any screen
on the CP will bring you back to the CP’s main play
screen.
These buttons are used to change the overall pitch of
the CP in half-note steps.
I J K L M N
O P
Q R
1
Part Names
& Functions
REGISTRATIONS (page 72)
C
These buttons are used to recall one of the eight
panel settings available in the currently selected
Registration group.
REGISTRATION GROUPS (page 72)
D
This button is used to select one of the 20 groups of
preset and user registrations.
PERFORMANCE (page 36)
E
This button provides quick access to performance
settings for Solo and Left/Split parts as well as left pedal.
KBD HARMONY (page 78)
F
This button turns on/off the Harmony for instrument
sounds. Press and hold the button to select the
Harmony settings menu.
EFFECTS (page 30)
G
This button is used to select the Effects and Chorus
settings menu.
REVERB (page 28)
H
This button turns on/off the Reverb. Press and hold
the button to select the Reverb settings menu.
CD (page 144)
M
This button is used to access the CD-RW drive
functions.
USB (page 130)
N
This button is used to access the USB memory and
MP3/WAV play back/record functions.
HELP
These b
(page 15)
uttons are used to access Help menus which
O
contain explanations of the CP piano’s features.
DISPLAY CONTRAST
P
Adjusts the contrast of the LCD screen for easier
viewing.
RECORDER (page 40)
Q
Used to record and play back a song.
USB PORT (page 130)
R
This jack is used to connect a standard USB memory
device to read and write user data and MP3/WAV
audio files etc.
Page 52

1
Page
12
Part Names
& Functions
Pedals
Front Terminals
S Soft Pedal
Depressing this pedal softens the sound and reduces its volume.
This pedal can also be assigned to control other functions.
(See page 36)
T Sostenuto Pedal
TSUTSU
Depressing this pedal after playing the keyboard and before
releasing the keys sustains the sound of only the keys just
played. This pedal can also be assigned to control other
functions. (See page 36)
U Sustain Pedal
Sustains the sound after lifting your hands from the keyboard.
The sustain pedal is capable of responding to half pedaling.
V Headphone Jacks
These jacks are used to connect up to two headphones to the
CP piano.
VWX
Rear Terminals
YZ
Y EXP Pedal
This jack is used to connect an optional expression pedal.
Z Video Out
This jack is used to connect the CP to a TV set or external
monitor display.
Line Out Jacks
These jacks are used to provide stereo output of the
CP’s sound to amplifiers, tape recorders or similar
equipment. The audio signal coming through the LINE
IN jacks is also routed to these jacks.
W Mic In Volume
This knob adjusts volume level of the microphone input.
X Microphone Jack
This jack is used to connect a microphone or other comparable
mic-level sound
Line In Volume
This knob is used to adjust the volume level of audio
signal.
MIDI Jacks
These jacks are used to connect external MIDI devices
to the CP.
USB Jack
This jack is used to connect a personal computer to
the CP.
Line In Jacks
These jacks are used to connect stereo outputs from
other audio equipment or electronic instruments to the
CP’s speakers. The audio signal coming through these
jacks bypasses the CP’s volume control.
Page 53

Page
13
1
Part Names
& Functions
2) Overview of Controls
This manual provides you with all the information you will need in order to take full advantage of the Concert
Performer’s potential. Before you begin learning how to use the specific features, it is important to understand
some of the basic ideas behind the instrument’s design.
The Concert Performer has been designed to have an easy and intuitive user interface. However, the instrument
has so many features that it is simply impractical to have a dedicated button for every single one. As a result, many
features and functions are selected by choosing them from lists, or “menus”, that are presented to you on the CP’s
large display screen. Often times selecting an item from a menu may access another “sub-menu” of options specific
to that item. This system of menus and sub-menus keeps everything logical and straightforward and becoming
familiar with how to make your way through them is very easy.
Panel Buttons
¡
Most of the buttons on the front panel are used to directly select a function on the CP that you would like to work
with. In most cases, the specific function name is printed on the front panel directly above the button. For example,
there are buttons labeled 1-2 PLAY, FILL-IN, and so on. In this manual, references to these buttons are always
printed in capital letters for clarity. Most of these buttons have an LED Indicator (small light) on them. This Indicator
will be turned ON when a function is in use so that you can quickly see if that function is active.
¡
LCD Touch Screen
The LCD Touch Screen is the window through which the Concert Performer communicates with you. The large
display size allows many items to be clearly displayed at the same time, allowing for not only words but graphics
to be shown as well.
As well as providing information about the current sound and style selections, and other important settings, the
LCD display can also be used to control numerous functions of the CP139. Simply touch the part of the screen
that corresponds to the function you wish to control or adjust. Below is an example of the default MAIN screen that
appears when the instrument is first turned on.
Default MAIN screen
STYLE: Piano Pop
TEMPO: Tempo of selected style
in beats per minute (BPM)
LEFT part: Pop Ensemble selected,
but currently inactive
SOLO part: Ballad Flute selected
but currently inactive
RIGHT1 part: Concert Grand
selected and currently active
RIGHT2 part: Beautiful Strings
selected but currently inactive
MIXER: Show mixer screen VOLUME: Adjust volume of
currently selected part
In some cases when you touch an item displayed on the screen, that item will become highlighted (shown in
reverse color) to indicate you it has been selected. However, in other cases a submenu screen relating to that
item will be displayed, presenting you with further options.
Page 54

1
Page
14
Part Names
& Functions
Note that in order to avoid possible confusion within this owner’s manual, operating instructions related to the touch
screen will use the verb
E.g.:
Touch
If no panel buttons are pressed, and the LCD display is not touched while showing different screen menus (such
as the sound or style category lists), the LCD display will automatically return to the MAIN screen after a period
of 20 seconds. To adjust this waiting period, or to prevent the MAIN screen from returning automatically, please
refer to the Display Control instructions on page 124 of this owner's manual.
Dial
¡
the PAGE X button on the LCD display.
Press
the RIGHT 1 panel button.
touch
, while instructions related to the button panel will use the verb
The Dial is used to change data values and scroll through options that are displayed on the
LCD screen.
When you turn the Dial, you will notice that whatever item on the LCD screen is currently selected
(highlighted) will be affected. For example, when a Part is selected, turning the dial will adjust
the volume of that Part. Alternatively, when the screen presents you with a list of choices, turning
the Dial will allow you to quickly scroll through the list until you arrive at your choice.
press
.
Page 55

Page
15
2. Listening to the Piano
1)
Getting Assistance: Using Help and Demo
The first time you sit at the Concert Performer, you may feel overwhelmed by the wealth of features and options
that it offers. You will find, though, that if you keep this Owner’s Manual handy you can learn to use the different
functions as you need them, at your own pace. And, there is certainly nothing wrong with only using a few basic
features, and thoroughly enjoying them. After all, the Concert Performer is first and foremost a musical instrument,
and its whole purpose is to provide you with the tools for musical expression and fun no matter your skill level.
There are times when you might not have the Owner’s Manual at your side, and you need an explanation of a
button or feature. Fortunately, there are built-in Help guides to give you a hand. The Help function provides a basic
introduction and overview of most of the features found in the CP.
There are also many built-in Demonstration songs that really show off the musical potential of the Concert Performer.
These songs were composed by some of the top musicians in the music industry, and will undoubtedly impress
and inspire you.
2) Using the Help
To get Help, simply press the HELP button to the left of the display. The display will show an explanation on the
function or feature that you are presently working on. Help is available at any time, except when the CP is busy
recording your performance or accessing the USB device.
2
the Piano
Listening to
To use the Help
Step 1
Press the HELP button.
The Help text will be displayed in the LCD screen.
Step 2
If the text displayed is not what you are looking for, touch the INDEX button to list the available HELP topics,
then touch the PAGE buttons to cycle through each page.
Step 3
Touch the appropriate Help title and the selected topic will be displayed.
Touch the title to select a Help topic.
PAGE : Display help topics on the other pages.
Page 56

Page
16
2
the Piano
Listening to
Step 4
If desired, touch the screen to change the language of the HELP text.
English, German, French, and Spanish are available.
INDEX : Takes you to the Help menu.
LANGUAGE : Selects the language.
Step 5
To leave Help, press the EXIT button.
Use the L and R buttons to selct a Help topic.
Page 57

3) Using the Demonstrations
There are four types of Demonstrations programmed in the CP piano.
Key Feature Demos
Songs, Text, and Graphics that help explain the most important features and functions of the Concert Performer.
Sound Category Demos
Each Sound category has a song, or songs, that demonstrate the sound choices and capabilities found in the category.
Style Category Demos
Each Style category has a song, or songs, that demonstrate how the Auto-Accompaniment Styles can be used.
Piano Music
The initial DEMO menu screen will play Classical and Contemporary piano music as long as you remain in that screen. The
songs are randomly selected from the Piano Music feature.
To listen to a Sound/Style Demo
Step 1
Press the DEMO button.
Page
17
the Piano
Listening to
2
The Demonstration menu will be displayed.
Step 2
Select your preferred Demo.
Touch KEY FEATURES to select the Key Features demo.
Press a SOUND category button to select a SOUND category demo.
Press a STYLE category button to select a STYLE category demo.
SOUND or STYLE categories may play more than one demo song in sequence.
Press the same SOUND or STYLE button repeatedly to skip to the next demo song.
KEY FEATURES: Enters the Key Features Demo menu.
The SOUND category buttons are used to select
the demo for that Sound category.
The STYLE category buttons are used to select
the demo for that Style category.
Page 58

Page
18
2
the Piano
Listening to
Step 3
To exit, press the EXIT, PLAY/STOP or the DEMO button.
When a selected Demo song ends, another song of the same type will be randomly chosen from another category and
played. You can select another demo song at any time by pressing the appropriate button.
¡ To select to a Key Features Demo:
Step 1
Press the DEMO button.
The Demonstration menu will be displayed.
Step 2
Touch KEY FEATURES to enter the Key Features Demo menu.
Step 3
Touch the desired Key Features topic.
The selected topic’s text and graphics are displayed in the LCD screen.
GUIDED TOUR: Plays the Guided Tour Demo.
Touch the Key Features topic that you would
like to read about.
Step 4
To exit, press the EXIT, PLAY/STOP or the DEMO button.
Page 59

4) Playing Piano Music
The Concert Performer has over five hours of prerecorded Piano Music available for your listening pleasure. The
Piano Music is divided into four categories: Classical, Contemporary and Holiday music. You can listen to all
selections in a category, or you can program a list of your favorite ten selections from each category.
It is also possible to create your own My Piano Music library using recorded or imported songs stored in the
internal memory.
Page
19
¡ To listen to the Piano Music:
Step 1
Press the PIANO MUSIC button.
The Piano Music menu will be displayed.
Step 2
Touch your preferred Piano Music category.
2
the Piano
Listening to
Step 3
Touch the song that you wish to listen to..
PAGE : Display additional songs on the other pages.
CATEGORIES : Takes you back to the category selection menu.
FAVORITES : Enters the Favorites menu.
PLAY : Plays the selected song.
Step 4
Touch the PAGE buttons to display additional songs on the other pages.
Page 60

Page
20
2
the Piano
Listening to
Step 5
Touch the PLAY button to start the song.
When the song is finished, another song from the same category will be played at random. Songs from the category
will continue to play randomly until you exit the screen.
SKIP : Skips randomly to the next song.
SONG LIST : Displays the song list.
PAUSE : Pauses the playback.
Step 6
Touch the PAUSE button to pause the song, then touch the SONG LIST buttons to return to the category’s
song list.
Step 7
Touch the SKIP button to skip randomly to another song.
Step 8
To exit, press the EXIT, PLAY/STOP, or PIANO MUSIC buttons.
Making your Favorites list
You can make your Favorites list for each Piano Music category. Ten songs can be programmed in the order of
playback.
NOTE:
You cannot select between songs in different categories.
¡ To make your Favorites list:
Step 1
Select one of the four Piano Music categories, then touch the FAVORITES button in the Category song
screen.
A default list is displayed in the LCD screen.
Page 61

Page
21
Step 2
Touch the song name to highlight one of the ten locations, then turn the Dial or touch the SELECT SONG
buttons to select a new song for that location.
Touch the screen to select a location to
edit/
the Piano
Listening to
SAVE : Saves the edited list.
SELECT SONG : Selects a song.
SONG LIST : Returns to the song list in the selected category.
PLAY : Plays the song.
Step 3
Repeat step #2 to program your ten favorite songs in any order you wish.
2
Step 4
Touch the SAVE button to save the edited list to internal memory.
The Favorites list function is not available when using My Piano Music.
My Piano Music
It is also possible to create your own My Piano Music collection using recorded or imported songs stored in the
internal memory.
Please refer to the My Piano Music instructions in he Advanced Recorder section of this owner's manual for
more information regarding how to create custom Piano Music songs.
¡
To load your My Piano Muisic collection:
Step 1
Select MY PIANO MUSIC on the PIANO MUSIC screen.
A list of the available My Piano Music songs stored in internal memory will be displayed in the LCD screen.
Step 2
Touch the My Piano Music song that you wish to listen to.
Step 3
Touch the PLAY button to start the song.
The custom My Piano Music collection will begin to play..
Page 62

Page
22
3
Playing the Piano
3.
(Basic Controls)
Playing the Piano (Basic Controls)
This chapter discusses the basic operations that are used to play the Concert Performer, such as sound selection,
Part configuration and effect settings.
1) Selecting a Part to Play
When the CP’s main play screen is displayed (For example, when the CP is first turned on), you are presented with
four sound Parts that can be played from the keyboard. These four Parts are named LEFT/SPLIT, RIGHT 1, RIGHT
2, and SOLO, and each one has an instrument sound assigned to it. You can selectively turn on/off any combination
of these four Parts, allowing you to have up to four different sounds at the same time across the keyboard.
Sound assigned to Parts RIGHT 1 and RIGHT 2 will be layered on top of each other when both parts are active
at the same time. When the SOLO part is activated, the sound assigned to the Solo Part will be layered with the
RIGHT 1 and RIGHT 2 Parts. The SOLO part can also be set to split the keyboard so that the sound assigned to
the SOLO Part is only heard when you play above a specified key (split point) on the keyboard. See “Solo Settings”
on page 110 for details.
Activating the LEFT/SPLIT Part automatically splits the keyboard so that the sound assigned to the LEFT/SPLIT Part
is only heard when you play below a specified key (split point). Each Part has a dedicated button on the front panel
that selects and turns on/off that Part. You can Also select a Part by touching the appropriate area of the screen.
¡ Selecting a Part is easy:
Step 1
Press the PART button for the Part you wish to activate.
The PART button LED will light.
Step 2
Press the PART button again to turn that Part off.
If the LCD screen is currently showing the main play screen, you can tell which Parts are active by looking at the name
of the sound assigned to it. If the name of a sound is in a large typeface, then the Part it is assigned to is active. If the
sound name is displayed in a small typeface, then the Part is not active.
This example indicates:
RIGHT 1 is currently active
SOLO, RIGHT 2, LEFT are inactive.
Page 63

Splitting the keyboard
When the LEFT/SPLIT Part is activated, the CP automatically splits the keyboard and only the sound assigned to
the LEFT/SPLIT Part will be heard when you play below a specified key (split point) on the keyboard. The default
split point is between F2 and F#2 but you can freely change the split point to any key on the keyboard.
To change the split point:
Step 1
Press the LEFT/SPLIT button to activate the LEFT/SPLIT Part.
The LEFT/SPLIT button LED will light and the LCD screen will display a diagram of the CP’s 88 note keyboard.
Step 2
Press and hold the LEFT/SPLIT button, then press the desired key on the keyboard that you want to serve
as the split point.
The key you press will become the lowest note the Right hand Parts will play (RIGHT1, RIGHT2, and SOLO). The
LEFT/SPLIT sound will be heard when keys below the split point are played.
Step 3
The split point for the LEFT/SPLIT part can also be set from the PERFORMANCE button menu. You may
also touch the W and X arrows either side of the keyboard diagram to move the split point.
On the LCD screen the split point marker will move across the 88 note keyboard diagram as you press these
buttons.
Page
23
3
(Basic Controls)
Playing the Piano
arrow: Raises the split point.
e arrow: Lowers the split point.
Moving the split point completely to the LEFT end of the keyboard will allow the LEFT/SPLIT Part to function as a layer
with the three right hand Parts. In this manner you can create a four part layer across the entire keyboard.
The split-point for the SOLO part cannot be raised or lowered by touching the onscreen
f
and X arrows.
W
Page 64

Page
24
2) Selecting Sounds
The Concert Performer has over 900 instrument and drum sounds available from the front panel. You can freely
assign any of these sounds to the four Parts. Remember that there is always a sound assigned to each of the
Parts, even if some of the Parts are not currently active.
The sounds span a tremendous variety of instruments, ranging from traditional acoustic sounds to modern electronic
tones. To help you quickly find the sound that you want, the sounds have been organized into 8 categories, each
with a dedicated Sound Selection button on the front panel.
Pressing the OTHERS button will display a separate menu, with an extra 9 sub-categories of additional sounds to be
selected. Within the OTHERS display, the USER category provides convenient access to User edited sounds.
3
Playing the Piano
(Basic Controls)
Finally, the FAVORITES button allows up to 20 of your favorites sounds to be stored and recalled simply and
conveniently.
¡ To select a Sound:
Step 1
In the main play screen, select the touch the Part to which you wish to assign a new sound.
The selected Part will become highlighted.
Step 2
Press the SOUND button for the sound category that you are interested in.
Sounds from the first page of the Master tab will be displayed. The Master tab lists all available instruments from the
chosen category, and typically spans several pages. It is also possible to display only the instruments of a particular
sub-category by touching the relevant tab. For example to display drawbar organ sounds only, first press the ORGAN
button, then touch the Drawbar tab. Remember that each tab can list several pages of instrument sounds.
Step 3
Select a sound by touching the displayed name.
PAGE : Selects the different pages of Sounds within a
category.
SOUND EDIT : Takes you to the Sound Edit menu. (See
"Editing Sounds" on page 90.)
Step 4
Touch the PAGE buttons to show the Sounds on the other pages for the same category.
Step 5
You can also use the Dial to scroll through all of the categories and sounds one by one.
Page 65

Favorite Sounds
Because of the sheer number of sounds available, it can take a while to scroll through the various categories,
sub-category tabs, and pages in order to find a particular sound. Fortunately, the Favorites category allows you
to store your favorite sounds on a separate button menu for easy selection.
¡
To create a Favorite sound:
Step 1
Press the FAVORITES sound button.
The FAVORITES screen will be shown, with a list of predefined Favorite sounds.
Page
25
3
(Basic Controls)
Playing the Piano
PAGE: Selects the different pages
SOUND SELECT: Chose the sound for the selected
Step 2
Touch one of the Favorite sound names.
That entry will become selected.
Step 3
Touch the SOUND SELECT button.
The Favorites screen will enter EDIT mode.
Step 4
Press one of the SOUND category buttons.
Step 5
Select the desired sound.
The selected sound will become a Favorite sound.
Step 6
Favorite position.
Press one EXIT buttons.
Step 7
Touch the SAVE button.
The Favorites list will be saved to the internal memory.
If the Favorites list is not saved, the list will return to the default setting when the power is turned off, and any stored
Favorites will be lost.
Page 66

Page
26
3
Playing the Piano
(Basic Controls)
3) Mixer
This Mixer screen allows you to change the volume, panning, reverb and chorus levels, as well as turn the effect
on/off for each Part.
¡ To use the Mixer:
Step 1
Touch the MIXER button while on the main play screen.
The Mixer screen will be shown.
STYLE MIXER : Show the Style Mixer screen.
PART BUTTONS : Selects the part to adjust.
HARMONY : Show the Harmony screen.
Step 2
Touch the buttons at the bottom of the screen to select the Part to be adjusted.
Step 3
Touch the slider that you wish to adjust.
A larger version of the selected slider will be shown.
BACK : Return to the main Mixer screen.
PART BUTTONS : Selects the part to adjust.
HARMONY : Show the Harmony screen.
Step 4
Use the Dial or touch and drag the slider to adjust the value.
Volume level can be also adjusted from the main play screen, using the VOLUME buttons, then using the Dial.
Page 67

¡ To adjust the individual Section level:
The Mixer not only lets you set the overall volume level for the Style, but set individual volume levels for the 6
Sections within a Style.
Step 1
On the Mixer screen, touch the STYLE MIXER button.
The Style Mixer screen will be shown.
Page
27
3
(Basic Controls)
Playing the Piano
BACK : Return to the main Mixer screen.
PART BUTTONS : Selects the Section to adjust.
Step 2
Touch the buttons at the bottom of the screen to select the Part to be adjusted.
Step 3
Use the Dial, or touch and drag the slider to adjust the value.
Step 4
Touch the the BACK button to go back the previous Mixer screen, or press the EXIT button to go back to
the main play screen.
Page 68

Page
28
3
Playing the Piano
(Basic Controls)
4) Effects
You might have noticed that when you select some of the sounds, the LED indicator for the REVERB button is
turned on. The reason for this is some of the sounds are automatically set up to use reverb with one or more
additional effect on as part of their initial setting.
Adding an effect to the sound enhances tonal quality and improves acoustical realism. The CP piano is provided
with three separate groups of effects. The first is REVERB, the second is CHORUS, and third group EFFECTS
contains other useful effects such as Delay, Phaser, Rotary Speaker etc. The Concert Performer has a selection of
27 different Reverb, Chorus, and Effect types that can be used to enhance or even dramatically alter the instrument
sounds. Each of the over 1000 instrument and drum sounds has already been assigned a REVERB and CHORUS
setting and an additional EFFECT that suits that particular type of instrument. For example, a moderate Delay
effect is used on the Church Organ to recreate the sense of being in a large church, and a Rotary speaker effect
is used on the Drawbar organ to give it an authentic, vintage feel.
If you wish, you can change any of these effect settings separately for each sound, then save them as the new
Preset effect settings for that Sound. In addition, by setting the Effect For Sound function in the System Menu to
“Panel” the CP will ignore the preset effects settings for each Sound (see Effect For Sound on page 112).
(The CP piano can also remember your Effect settings as part of a Registration. See Registration on page 72.)
Adding Reverb
Step 1
Press the REVERB button.
The REVERB button LED will light.
Step 2
If you wish to edit the settings, hold down the REVERB button for a moment until the Reverb Settings
screen is displayed.
PART BUTTONS : Selects the part to adjust.
Step 3
Use the dial to select the Reverb type.
Step 4
Touch the buttons above each slider to turn the reverb effect on or off.
Step 5
Touch the slider/Part that you wish to adjust.
Step 6
Use the Dial or touch and drag the slider to adjust the value.
Page 69

Step 7
Press the EXIT button to leave the Reverb Settings menu.
Step 8
If you wish to turn the reverb effect off, press the REVERB button again.
¡ Type of Reverb
Hall 1, Hall 2 Simulates the ambiance of a concert hall or theater.
Stage 1, Stage 2 Simulates the ambiance of a small hall or live house.
Room 1, Room 2 Simulates the ambiance of a living room or small rehearsal room.
Plate Simulates the sound of a metallic plate reverb.
The LED Indicator on the REVERB button will be lit whenever Reverb is turned on for the any Part except ACC (regardless
of each part’s Effect Priority). See “Effect Priority Guidelines” later in this chapter for an explanation of Effect Priority.
Adding Chorus
Step 1
Press the EFFECTS button.
Page
29
3
(Basic Controls)
Playing the Piano
The EFFECT/CHORUS select screen will be displayed.
EFFECT EDIT : Show the Effect Edit screen.
CHORUS EDIT : Show the Chorus Edit screen.
Step 2
Touch the CHORUS EDIT button.
The CHORUS settings screen will be displayed.
Step 3
Use the dial to select the Chorus type.
PART BUTTONS : Selects the part to adjust.
Page 70

Page
30
Step 4
Touch the buttons above each slider to turn the Chorus effect on or off.
Step 5
Touch the slider/Part that you wish to adjust.
Step 6
Use the Dial or touch and drag the slider to adjust the value.
Step 7
Press the EXIT button to leave the Chorus settings screen.
3
Playing the Piano
(Basic Controls)
You can select from four chorus types when in the Chorus Settings menu. There is a fifth chorus type which is assigned
as an Effect from the Effect Settings menu. In this way, you can actually have two chorus effects active if so desired.
Adding an Effect
Step 1
Press the EFFECTS button.
The EFFECT/CHORUS screen will be displayed.
EFFECT EDIT : Show the Effect Edit screen.
CHORUS EDIT : Show the Chorus Edit screen.
Step 2
Touch the EFFECTS EDIT button.
The EFFECTS settings screen will be displayed.
PART BUTTONS : Selects the part to adjust.
Step 3
Use the dial to select the Effect type.
Page 71

Step 4
Touch the buttons to turn the Effect on or off.
Step 5
Touch the Effect paramaters that you wish to adjust.
Step 6
Turn the Dial to adjust the value.
Step 7
Press the EXIT button to leave the Effect settings screen.
Effect Types
Chorus Simulates the rich character of a vocal choir or string ensemble, by layering a slightly detuned version of the
sound over the original to enrich it.
Flanger Creates a shifting comb-filter, which adds motion and a “hollow” tone to the sound.
Celeste A three-phase chorus without modulation.
Ensemble A three-phase chorus with a slight modulation to each phase.
Delay 1-3 Adds echoes to the sound. The three types differ in the length of time between the echoes.
Auto Pan Moves the sound left and right across the stereo field at a variable rate.
Tremolo Modulates the volume of the sound. This is a vibrato type effect.
Tremulant A combination of Tremolo and Vibrato. It simulates the tremulant pipes of a church organ.
Phaser Creates a phase change, adding motion to the sound.
Rotary 1-2 This effect simulates the sound of the Rotary Speaker cabinet commonly used with electric organs. Rotary 2
adds distortion. The soft pedal is used to change the speed of the rotor between SLOW and FAST.
Auto Wah Sweeps a tone filter up and down at the beginning of a note, recreating the popular vintage wah wah pedal
sound.
Enhancer Emphasizes high frequencies to make a sound more easily discernible in a mix.
Distortion Adds frequencies that were not present in the original sound, resulting in a “fuzzy” or warmer tone.
Page
31
3
(Basic Controls)
Playing the Piano
Effect Priority Guidelines
Reverb and Chorus are global effects. In other words, all of the Parts and the Accompaniment Style must share the
same Reverb and Chorus type. However each of these Parts can have a different amount of Reverb and Chorus
applied to them. In addition Reverb and Chorus can be independently turned on/off for each part. However, since
the CP’s EFFECT section can only have one Effect turned on at a time (in addition to the REVERB and CHORUS),
what happens if you have two (or more) Parts active, with entirely different sounds, each with a different Effect
setting? In these cases, the CP’s Effects section can only use the Effect settings for one of the Parts. The EFFECT
section chooses which Effect settings to use based upon a predetermined priority order for each of the Parts. The
Priority order is SOLO > RIGHT 1> RIGHT 2 > LEFT/SPLIT. The preset effect settings for the Priority Part will be
used and the other Parts will either share these settings or may have their Effects automatically turned off.
This “Priority Part” depends on the current situation. If you only have one Part active, regardless of which Part it
is, the preset effect settings for that sound will be used. If you have two or more Parts active, then the CP will treat
one of them as the Priority Part, and ignore the settings of the other(s).
If the the Effect For Sound is set to “Panel” in the System then the Preset effect settings for each Sound will be
ignored and the Part Priority will be ignored. (See Effect For Sound on page 112).
Page 72

Page
32
3
Playing the Piano
(Basic Controls)
Here are some guidelines for Effect Priority:
Priority is given to the Parts in the following order: SOLO>RIGHT1>RIGHT2>LEFT. This means that anytime the SOLO
Part is active, its Effect settings will be used, not only for its sound but for any sound in any other Part, that you want to
add effects to. Likewise, the only time an active LEFT Part’s settings will be applied is if the other 3 Parts are inactive.
Unlees you change them, the Effect settings will only change in response to a change in the Priority Part being activated/
deactivated, or a new sound is assigned to an active Priority Part. In the latter case, the new Effect settings will reflect
the Preset effect settings for the new sound.
When the Effect settings change for the Piority Part, the Effects will be automatically turned off for the other Parts. (This
is so that your Flute sound on RIGHT2 doesn’t suddenly get effected by the Distortion settings of the Electric Guitar that
you’ve just assigned to the SOLO Part!)
You can, however, turn the effect on for any Part by adjusting the Effect On/Off option in the display for that Part.
Example
Assume that your CP is set up according to the following chart:
Part Inactive Active Inactive Active
Effect On On Off On
SOLO RIGHT1 RIGHT 2 LEFT
If you then select a different sound for RIGHT1, the Effect setting for the SOLO, RIGHT2, LEFT will be turned
off automatically. This is because RIGHT1 is the Priority Part (note that the SOLO Part is NOT the Priority Part
because it was inactive).
The chart would now look like this:
SOLO RIGHT1 RIGHT 2 LEFT
Part Inactive Active Inactive Active
Effect Off On Off Off
Even if you now assign a new sound to the SOLO Part, the Effect settings for the other Parts won’t change, because
SOLO is still inactive, so therefore would not have priority.
Once you make the SOLO Part active, however, it would now be considered the Priority Part. The Effect settings
for the other Parts will again be turned off.
Part Active Active Inactive Active
Effect Off
SOLO RIGHT1 RIGHT 2 LEFT
Off Off Off
At this point, if the Effect that has been called up along with the SOLO sound is one that you’d like to use for the
other Parts, simply select Effect On in the LCD display for those Parts.
Page 73

5) Transpose and Octave Shift
Transpose raises or lowers the CP’s pitch in half-step increments. Octave Shift does the same but in octave
increments.
Transpose can be especially useful when you have learned a song in one key and have to play it in another key.
The transpose feature allows you to play the song in the original key, but hear it in another key. You can transpose
the Concert Magic songs, the Accompaniment Styles, any songs played back by the Easy/Advanced Recorder
and any of the over 1000 instrument and drum sounds available in the CP. Songs recorded to the CD-R Drive and
MP3s saved to USB memory cannot be transposed once they have been recorded.
Octave shift can be very useful when you are playing multiple sounds across the keyboard. You may want to use
the octave shift to adjust a bass sound assigned to the LEFT/SPLIT Part to play in the proper pitch range, or to set
one sound in a layer to play in a different octave so that it mixes well with other sounds in the layer. Octave shift is
only available for the four Parts: LEFT/SPLIT, RIGHT1, RIGHT 2, and SOLO.
Page
33
¡ To Transpose:
Step 1
Press either the W or X TRANSPOSE buttons.
The transpose amount will be displayed in the top right corner of the LCD screen. The LCD screen
shows you a number telling you how many half steps up or down you have transposed the piano.
-5, for example, represents a transposition that is 5 half steps lower.
Step 2
To cancel the Transpose setting, press both the W and X buttons at the same time.
The transpose amount will disappear from the LCD screen, indicating that the CP is now back to its original setting.
¡ To use the Octave Shift:
Step 1
Select the Part that you would like to apply the shift to.
Step 2
Press either the W or X OCTAVE SHIFT buttons.
The number of shifted octaves (up or down) will be displayed with an W in the LCD screen.
3
(Basic Controls)
Playing the Piano
Step 3
To cancel the octave shift setting, press both the W and X buttons at the same time.
The symbols will disappear from the screen, indicating that the selected Part is back to its normal octave range.
The Transpose amount is displayed in the top
right corner of the LCD screen.
The Octave Shift amount is represented by the
number and direction of triangles shown beside
The Octave Shift has a range of four octaves in each direction. However, some on board sounds may have a limited
range in which they play properly. If you shift too far out of this range, the instrument may sound strange or may not play
at all. This has no affect on the CP’s proper function though, and you should feel encouraged to use this feature as a
means of getting interesting tonal variations out of the preset Sounds.
the relevant Part name.
Page 74

Page
34
6) Metronome
Rhythm is one of the most important elements when learning music. It is important to practice playing the piano
at the correct tempo and with a steady rhythm. The CP piano’s metronome is a tool that helps you to achieve this
by providing a steady beat for you play along with.
¡ To use the Metronome:
Step 1
Press the METRONOME button.
The CP piano will start counting with an audible steady beat.
A metronome icon and the beat (time signature) will appear next to the Tempo value.
3
Playing the Piano
(Basic Controls)
Step 2
Touch the screen to select either TEMPO or BEAT.
Step 3
Use the dial to change the TEMPO or BEAT value.
You can also adjust the tempo by tapping on the TAP TEMPO button. Simply tap on the button with
your finger three or more times at the desired tempo, and the CP will automatically translate that
into a tempo value on the screen.
Step 4
Touch the VOLUME button.
Step 5
Use the dial or touch the VOLUME - and VOLUME + buttons to adjust the metronome volume.
Step 6
To stop the metronome, press the METRONOME button again.
MIXER : Takes you to the Mixer menu.
METRONOME TONE : Alternates the metronome tone
between a bell chime and a spoken voice count.
TEMPO : Adjusts the tempo of the metronome.
VOLUME : Adjusts the volume level of the metronome.
It is also possible to change the sound of the metronome from a standard bell chime to a spoken voice count by
touching the METRONOME TONE button.
Page 75

7) Piano Only
The Piano Only button provides a way to quickly set the Concert Performer up to play the Concert Grand piano
sound. Pressing the Piano Only button immediately turns off all Parts except the Right 1 part and sets the Right
1 sound to Concert Grand.
The Piano Only button also turns off all auto-accompaniment functions and stops the Easy/Advanced Recorder.
Additionally, pressing the Piano Only button will cause the CP to exit any function or editing screen (except for
Concert Magic) and immediately return to the Main Screen.
When you are using Concert Magic, pressing the Piano Only button will change the Concert Magic song’s preset
sounds to Concert Grand piano.
Page
35
Pressing and holding the PIANO ONLY button will revert the panel settings to their original factory settings.
You can also use the Piano Only button as a “panic button” to immediately stop any unintended accompaniment style
or recording, or to quickly exit any confusing situation and return to a familiar piano sound.
¡ To use Piano Only:
Press the PIANO ONLY button.
The Main Screen is displayed and the Concert Grand sound is assigned to RIGHT1.
3
(Basic Controls)
Playing the Piano
Page 76

Page
36
3
Playing the Piano
8) Performance Button
The Performance button puts several useful performance functions conveniently at your fingertips by grouping
them under one button. You can customize settings and access them via the Performance button for the following
functions:
• Left and Center pedal override
• Performance button
• Left/Split Part
• Solo Part
(Basic Controls)
LEFT PEDAL and CENTER PEDAL Override
You can assign the following four functions to the left pedal and center pedal. Settings made in the Performance
button menu will override the settings made in the system.
Glide Bends the pitch up and down as programmed by you.
Modulation Applies programmable vibrato to the sound.
Registration Increment Switches from one Registration to another 1 to 8.
Registration Decrement Switches from one Registration to another 8 to 1.
¡ To set the pedals:
Step 1
Press and hold the PERFORMANCE button.
The Performance screen will be displayed.
Step 2
Touch LEFT PEDAL OVERRIDE or CENTER PEDAL OVERRIDE and use the dial to select the function
to be assigned to the pedals.
When Glide or Modulation is selected, additional settings can be adjusted using the edit button:
Step 3
Press the PERFORMANCE button to exit this screen.
Step 4
Press the PERFORMANCE button again.
The PERFORMANCE button LED will turn on and the settings for the pedals will override the system settings. If
the LEFT or CENTER pedal is set to None, the system settings for that pedal will be used. The words LP or CP
will be displayed in the upper left on the main screen to indicate the LEFT or CENTER pedal override is active.
Step 5
Press the PERFORMANCE button.
The LED will turn off and the system settings for the pedals will be used. The words LP or CP will disappear from
the main screen
Page 77

PERFORMANCE BUTTON ASSIGN (Solo Portamento, Panel Lock)
You can assign Solo Portamento or Panel Lock to the PERFORMANCE button.
Portamento for the Solo Part
The Solo Part is monophonic (only plays one note at a time) regardless of which sound is assigned to it. You can use
Portamento on this Part. Portamento is a gradual slide in pitch from one note to the next, and is useful for adding very
expressive qualities to many instruments. You can adjust the Portamento Time, which determines how quickly the pitch
will slide from one note to the next.
Panel Lock
Locks all buttons on the panel to prevent them from being tampered with or pressed accidentally while you are playing.
When the Performance Button is turned On the panel buttons will be locked. Turn the Performance button Off to unlock
the panel buttons.
Page
37
¡ To assign Solo Portamento or Panel Lock:
Step 1
Press and hold the PERFORMANCE button.
The Performance screen will be displayed.
Step 2
Touch PERFORMANCE BUTTON ASSIGN and use the dial to assign a function.
Step 3
Press the PERFORMANCE button to exit.
Step 4
Press the PERFORMANCE button.
The LED will light and the function assigned to the button will be activated. If Portamento is assigned the word
"BUTTON" will be displayed in the upper left on the main screen to indicate that Portamento is active. If Panel
Lock is assigned, the words “PANEL LOCKED !” will appear at the top of the screen, and the CP will not respond
to button pushes until the panel is unlocked.
Step 5
Press the PERFORMANCE button.
The LED will turn off and the function will be deactivated. The word "BUTTON" will disappear from the main screen
and the Portamento or Panel Lock function will be deactivated.
3
(Basic Controls)
Playing the Piano
Step 6
When Solo Portamento is selected, you can adjust the Portamento time on the edit menu.
Touch the EDIT button to go to the Edit menu.
If the LEFT and CENTER PEDAL OVERRIDE and PERFORMANCE BUTTON ASSIGN are all set to None, the LED will
not light when you press the PERFORMANCE button.
Page 78

Page
38
3
Playing the Piano
(Basic Controls)
LEFT MODE
When using the Left part, you can select between two Modes, Split or Layer.
Split
When the LEFT/SPLIT Part is activated, the CP automatically splits the keyboard and only the sound assigned to the
LEFT/SPLIT Part will be heard when you play below a specified key (split point) on the keyboard. The default split point is
between F2 and F#2 but you can freely change the split point to any key on the keyboard.
Layer
When the LEFT/SPLIT Part is activated, the LEFT/SPLIT Part will function as a layer with the three right hand Parts. In this
manner you can create a four part layer across the entire keyboard.
¡ To set the Left Mode and Split point:
Step 1
Press and hold the PERFORMANCE button.
The Performance screen will be displayed.
Step 2
Touch LEFT MODE and use the dial to select the mode.
Step 3
If Left Mode is set to Split, touch LEFT SPLIT POINT and use the dial or press a key to set the split point.
Step 4
Press the PERFORMANCE button to exit.
SOLO SETTINGS
This configures the special settings for the Solo part. Changing these settings will also change these settings in
the System menu.
¡ Solo Priority
Since the Solo part allows you to play only one note at a time (monophonic), it is important to select which note
will be played by the Solo part when more than one key is played at a time.
There are three options:
Top Note The Solo part plays only the highest note among the notes played at one time.
Bottom Note The Solo part plays only the lowest note among the notes played at one time.
Last Note The Solo part plays only the last key played among the notes played at one time.
¡ Trigger Mode
The trigger mode determines whether or not the note played by the Solo part will be re-triggered when certain
notes are released. There are two options:
Retrigger
When the note played by the Solo part is released, depending on the Solo priority setting the next available priority note will
be played automatically by the Solo part. For example: when the Solo Priority is set to Top Note and you release the highest
note the next note below the note you released becomes the highest note and will now be played by the Solo part.
No Retrigger
When the note played by the Solo part is released, The Solo part will not automatically play the next available priority note.
The Solo part will only play a new note based upon the Solo priority setting. For example, when the Solo priority is set to
Top Note and you release the highest note the Solo part will only play a note when you press a key that is higher than the
currently held notes.
Page 79

¡ To set the Solo Priority and Trigger Mode:
Step 1
Press and hold the PERFORMANCE button.
The Performance screen will be displayed.
Step 2
Touch SOLO PRIORITY or TRIGGER MODE and use the dial to assign a setting.
Step 3
Press the PERFORMANCE button to exit.
SOLO MODE
When using Solo part, you can select between two Solo Modes.
Layer
The sound assigned to the SOLO part will be layered on top of the RIGHT 1 and RIGHT 2 Parts.
Page
39
3
(Basic Controls)
Playing the Piano
Split
Only the sound assigned to the SOLO part will be heard when you play above a specified key (split point) on the keyboard.
The default split point is C5 but you can freely change the split point to any key on the keyboard. When the SOLO Part
is activated in Split mode the split point will be displayed in the LCD screen using the same 88 note diagram that is used
to display the Left/Split split point. The keys assigned to the Solo part above the specified split point will be shown with a
black bar above them. There is no arrow to indicate the Solo split point because the split point for the Solo Part cannot be
changed on the main screen.
¡ To set the Solo Mode and Solo Split point:
Step 1
Press and hold the PERFORMANCE button.
The Performance screen will be displayed.
Step 2
Touch SOLO MODE and use the dial to select the mode.
Step 3
If the Solo Mode is set to Split, then touch SOLO SPLIT POINT and use the dial or keyboard to set the
split point.
Step 4
Press the PERFORMANCE button to exit.
Left and Center pedal override and Performance button assign settings are not memorized by the registrations.
Registrations do memorize the system settings for these functions. This is so the Performance Button settings can
operate as an override to the Registration settings for these functions.
The Performance button settings will remain as long as the power is turned. Once the power is turned Off the performance
button settings will return to the factory defaults. If you would like to have the CP remember your Performance button
settings you can save your settings by selecting “Save Current Settings” from the Power Up Settings screen (See Power
Up settings on page 120).
Page 80

Page
40
4. Recording a Song
The CP has built-in recording capabilities that allow you to record and play back your performances. Since the CP
records your performances as digital data, not audio data, you can easily edit your performances after recording
them. There are two ways to use the CP’s recording feature:
Easy Recorder records your playing much like a tape recorder and is just as easy to use. The CP will record all of
your playing as well as any changes you make to the front panel settings during the recording.
Advanced Recorder is useful for creating more complex recordings. Advanced Recorder gives you the ability to
record on up to 16 independent tracks separately. In addition, with Advanced Recorder you can edit your recorded
data one measure or even one note at a time. There is also a step recording mode in which you can enter notes
or other MIDI data events one step at a time for even more accurate control.
4
Recording a Song
Song data created on other instruments in the Standard MIDI File format (SMF) can also be loaded into the CP’s
recorder to be played or edited. The CP’s recorder can read both Type 1 and 0 SMF files.
Please read the following sections carefully to learn more about the capabilities of the Easy and Advanced
recorder.
1) Easy Recording
The Easy Recorder will record all of your playing as well as any settings you have made on the front panel or in
the mixer screen at the touch of a button. Simply press the REC button and the CP will begin recording with the
first note you play. You can also record a Style along with your playing if you like. Before you begin recording its a
good idea to select your desired sound(s) and make any panel settings you would like to record.
¡ To record:
Step 1
Press the REC button.
The REC button LED will blink and the LCD screen will show Rec Ready. If you want to, you can still change sounds
or panel settings before proceeding.
Step 2
Start recording in one of the following ways:
A. Play the keys and the CP will automatically start recording with the first note you play.
B. If you are recording with a Style, press the START/STOP button to start the recorder with the Style.
Pressing the INTRO/ENDING button will include an Intro phrase at the beginning of the recording.
C. You can also press the SYNC button to begin recording the Style and your own playing together.
D. Press the PLAY/STOP button to start with a 2-bar countdown to help you get ready.
Page 81

Step 3
When you are finished recording, press the PLAY/STOP button.
You may resume recording from the point where you stopped by repeating these steps from step 2.
Page
41
The current bar number is displayed beside
the tempo.
MORE : Display additional menu options (Delete etc.)
MIXER : Show the Mixer screen.
PART BUTTONS : Changes the part status.
You may resume recording from the bar where you stopped by repeating these steps. You can also change sounds,
tempo, and make other changes to the panel settings before you continue recording.
To Re-record or make other changes to a previously recorded section of a song, please read the section titled “Re-
recording or adding another Part” on page 42.
You can make changes to the panel settings
before and during recording.
¡ To play back the recorded song:
Step 1
Press the RESET button in the RECORDER section of the front panel to return to the first bar of the
song.
4
Recording a Song
Step 2
Press the PLAY/STOP button to play back the song.
Step 3
Press the PLAY/STOP button again to stop at any time.
Step 4
Pressing the PLAY/STOP button again resumes the playback from the bar where you stopped.
Step 5
Use the RWD or FWD buttons to rewind or fast-forward through the recording.
Page 82

Page
42
4
Recording a Song
¡ Part Status
The playback and record status for the RIGHT/LEFT/SOLO Parts and the Style are displayed at the bottom of
the LCD screen. Whether you are in the process of recording or playing back your song it is helpful to know the
status for each of these Parts.
The LCD screen will show the following Part status messages at the bottom of the screen:
REC This Part is ready to be recorded. This message is only displayed after the REC button has been pressed.
PLAY This Part has been recorded and will be heard both on playback and while recording.
MUTE This Part has been recorded but will be silent both on playback and while recording.
– – – This part has not been recorded.
After you have recorded a song you can change the status for a Part by touching the appropriate Part button, at
the bottom of the LCD screen. Touching these Part buttons during playback will select PLAY or MUTE. REC can
only be selected after you press the REC button but before you begin recording.
During recording you can however set any Part to PLAY or MUTE by touching the appropriate Part button.
You can record all RIGHT/LEFT/SOLO Parts as well as the Style simultaneously or only certain Parts as you
choose. When you first record a song all Parts and the Style will be automatically set to REC but only the active
Parts and the Style will be recorded. When you are finished recording the status for any active Parts and the Style
will automatically change from REC to PLAY. After recording, the status for any RIGHT/LEFT/SOLO Parts that were
not active during recording will be automatically changed to - - - to show they have not been recorded yet.
When you press the PLAY/STOP button to listen to your song any Parts set to PLAY status will be heard.
Re-recording or adding another Part
After you have recorded a song you can Re-record a Part or add (overdub) other Parts if you like with the following
procedure. Re-recording a Part completely erases the previous performance for that Part automatically.
¡ To Re-record or add a Part:
Step 1
Make sure the Part(s) you wish to Re-record are active, then select any sounds or change panel settings
as desired.
Step 2
Press the REC button.
Step 3
Touch the appropriate Part button(s) at the bottom of the LCD screen to set the desired Part(s) to REC.
Step 4
Begin recording by following step 2 in the “To Record” section on page 40.
Remember Re-Recording a Part completely erases the previously recorded performance for that Part. You can
Re-record or add any of the RIGHT/LEFT/SOLO Parts as many times as you like but you can only have one
performance/sound for each RIGHT/LEFT/SOLO Part.
Page 83

Storing the song in Internal Memory
Once you finish recording a song you should store it in the internal memory before you turn the power OFF. Once
the power is turned OFF your song data will be lost.
If you press the EXIT button to get out of the Easy Recorder, the CP will automatically prompt you to save your work.
¡
To Store a song to the internal memory:
Step 1
Touch the MORE button.
Additional buttons will be displayed at the bottom of the screen.
Step 2
Touch the SAVE button.
The Save My Song screen will be shown, with a virtual keyboard used for entering a name of the song.
Step 3
Touch the screen to enter a name for the song.
Page
43
4
Recording a Song
Step 4
Touch the EXEC button to store the song.
Erasing the song
Whenever a Part is selected for recording, the new performance is written right over any existing one that may be
there for that Part. In this sense, the Easy Recorder is just like a tape machine. A new song will simply erase the
old song during the recording process.
However, if you wish to simply erase all the Parts and the Style in a song at once you can use the Delete function.
¡ To delete a song:
Step 1
Touch the MORE button.
Additional buttons will be displayed at the bottom of the screen.
Step 2
Touch the DELETE button
The CP will ask if you are sure
NO : Cancels erasing the song.
.
YES : Proceeds with erasing the song.
Page 84

Page
44
Step 2
Touch the YES button to proceed, or the NO button to cancel.
DELETE erases all of the performance data for all Parts and the Style in the song. The panel setup, such as Style, Tempo,
and Sound settings are not erased by the DELETE function.
Easy Loop
You can set the loop on Playback.
¡ To set the Loop:
Step 1
Assign Easy Loop to the Left pedal or Center pedal in the Pedal Assign screen of the System menu.
Step 2
In the Easy Recorder screen press the PLAY/STOP button to start the playback.
4
Recording a Song
Step 3
Depress the pedal you assigned the Easy Loop.
Loop top will be selected and the Loop will be displayed.
Step 4
Depress the pedal again.
Loop end will be selected and the bars between Loop top and Loop end will be repeated.
Step 5
To clear the loop, depress the pedal again or stop the playback by pressing the PLAY/STOP button.
Display of a Score
In the Easy Recorder screen, a score can be displayed. Touch the SCORE button to display the current song as
a notated score.
PRINT : Saves a snapshot of the current screen to USB
memory.
PART1 : Turns Part 1 on/off.
PART2 : Turns Part 2 on/off.
< PAGE > : Move through the pages of the score.
MORE : Takes you to the next screen.
Touch MORE - You can select the channel of Part1 and Part 2 to be displayed in the screen.
Page 85

PART1 : Selects a channel of Part 1.
PART2 : Selects a channel of Part 2.
BACK : Takes you to the previous screen.
MORE : Takes you to the next screen.
Touch MORE - You can display the chord name, and also the channel to use for chord recognition.
Page
45
CHORD : Show hide the name of the chord.
CHORD CH : Select the channel to be used for chord
recognition.
BACK : Takes you to the previous screen.
MORE : Takes you to the next screen.
Transpose
Allows the key signature of the notated score to be changed.
Quantize
Allows the length and timing of recorded notes to be corrected automatically.
4
Recording a Song
< C > : Adjusts the transpose amount.
QUANTIZE : Quantize the notes.
BACK : Takes you to the previous screen.
MORE : Takes you to the next screen.
Page 86

Page
46
4
Recording a Song
2) Advanced Recording
The Advanced Recorder is a full featured sixteen track MIDI recorder that includes many of the same professional
features found on dedicated MIDI sequencing (recording) devices. In addition to sixteen MIDI tracks the CP
Advanced recorder provides a separate Style, chord, and tempo track for even more flexibility.
Even though you can create recordings of great musical complexity using the Advanced recorder you will find that
it is still very straightforward and easy to use.
Using the Advanced Recorder allows you much greater control over the recording and compositional process than
that offered by the Easy Recorder. However, songs created using the Easy Recorder can also be edited using the
Advanced Recorder by simply pressing the ADVANCED RECORDER button.
¡ To go to the Advanced Recorder Menu:
Press the ADVANCED RECORDER button.
The recording options will be displayed on the screen.
MIXER : Change the Reverb, Effect, Panning,
Volume level and Chorus for each of the
16 tracks.
Real Time Rec : Prepares the track for real-time
recording.
Punch In/Out : Re-record specific measures
within your song.
Step Recording : Record by entering data
note by note.
Track Settings : Select the sound to be assigned
to each of the 16 tracks, and change the
track's recording and play back status.
PAGE : Shows additional recording options.
Loop Settings : Edit loop settings for the song.
Song Edit : Edit the general settings for the
song.
Bar Edit : Edit the song by bars.
Event Edit : Edit the song by MIDI events.
Style Maker : Create your own new user Style.
Real-time Recording
With Real-time record, the CP records your performance as you are playing it, in real-time. You can select any
of the sixteen instrument tracks or the Style and tempo tracks to record, but you can only record on one track at
a time. Since the Advanced Recorder only records on one track at a time, only the RIGHT 1 Part is active in the
Advanced Recorder. Any other active Parts are automatically turned OFF when the ADVANCED RECORDER
button is pressed. In addition to selecting the desired track to record, the Real-time recording screen provides
many other useful Real-time recording functions.
¡ To use Real-time recording:
Step 1
From the Advanced Recorder menu, touch Real Time REC, or simply press the REC button.
The REC button LED will blink and the LCD screen will display the “Real Time REC” screen.
Step 2
Touch the screen to select a function to edit. Use the Dial to change the values.
Step 3
If necessary, you can go to the Mixer and Track Settings screens by touching the appropriate buttons.
Page 87

Step 4
Start recording by pressing the PLAY/STOP button while the REC button LED is blinking. There is an
automatic two bar count in before the CP begins recording. If you are recording on the Style track you must
press the START/STOP or INTRO buttons instead of the PLAY/STOP button.
When recording a Style there is no two bar count in, recording begins immediately.
You can cancel recording at anytime by pressing the REC button again or by touching the MENU button to
return to the Advanced Recorder menu.
REC TRACK : Selects the track on which you
want to record. There are 16 Instrument
tracks, 1 Tempo track, and 1 Style track.
REC SOUND: Selects the sound or Style that
you want to record with.
BAR : Shows the current bar and beat
number.
START BAR : Selects the starting bar for the
Loop feature. This function is a available only
when Loop is turned ON.
B/M : Changes the time signature.
TEMPO : Changes the tempo.
REC MODE : Selects the recording mode.
REPLACE erases the previous data and
records the new data in its place. OVERDUB
mixes the new data with the previous data
so that both are heard together. Repeatedly
touching REC MODE switches between the
REPLACE and OVERDUB.
Page
47
MENU : Cancels the real-time recording setup and returns
you to the Advanced Recorder menu.
MIXER : Takes you to the Mixer menu.
TRACK SETTINGS : Shows the Track Settings menu.
LOOP : Turns the Loop feature on/off.
When you select a Style to record the default tempo for that Style is ignored. The Style will use the current tempo setting
for the song instead. You can set the desired tempo on the Real-time record screen before recording or change the tempo
after you have recorded in Song Edit or on the tempo track in Event Edit.
When you are recording on the Style track only the Style will be recorded. The style track will record any chords (to the
chord track) you play but the actual notes you are playing will not be recorded.
When the recording is done, the Mixer screen will automatically be displayed.
¡ To play back the recorded song:
Step 1
Press the RESET button in the RECORDER section of the front panel to return to the first bar of the
song.
Step 2
Press the PLAY/STOP button to play back the song.
Step 3
Press the PLAY/STOP button again to stop at any time.
4
Recording a Song
Step 4
Pressing the PLAY/STOP button again resumes the playback from the bar where you stopped.
Step 5
Press the RWD or FWD buttons to rewind or fast-forward through the recording.
Page 88

Page
48
Mixer
On the Mixer screen, you can change the following settings for each of the 16 tracks: Reverb level, Chorus level,
Effect on/off, Panning, Track mute, Volume level.
¡ To use the Mixer:
Step 1
Touch the number of the track or the e TRACK f buttons to select the track you wish to make changes to.
4
Recording a Song
BACK : Returns you to the Advanced Recorder menu.
TRACK : Selects the track that you wish to edit.
TRACK SETTINGS : Shows the Track Settings menu.
LOOP : Turns Loop ON/OFF.
SAVE : Saves the Mixer settings as part of the song.
Step 2
Touch the buttons along the side of the screen to choose the setting that you wish to change.
Step 3
Use the Dial to change the value.
Step 4
Alternatively, touch the setting for the track that you wish to change.
A zoomed version of the selected area will be shown, allowing adjustments to be made more easily.
BACK : Returns you to the Advanced Recorder menu.
Step 5
At this point, you can start recording or go to another menu to continue setting up.
You can make changes on the Mixer screen at any time except while the CP is busy recording. The Mixer screen is
accessible from the Advanced Recorder menu, Track Settings screen and Real-time Rec screen.
You can save any changes you have made to the settings on the Mixer screen at any bar or beat in your song. Simply
play back the song or press the FWD/RWD buttons until you reach the exact bar and beat where you want to make
changes to the Mixer settings and stop the song. Make any changes on the Mixer screen, then touch the SAVE button.
You can do this as many times and in as many places within your song as you wish.
Note: “Saving” here only means any changes you made on the Mixer screen were saved as part of the song.
Page 89

Track Settings
The Track Settings screen shows you the Play, Record, and Mute status for each track. In addition it shows you
what sound is assigned for the sixteen instrument tracks. You can change the track status or select a different
sound for each track.
The Track Status screen will show the following Status messages.
Rec This track is ready to be recorded.
Play This track has been recorded and will be heard both on playback and while recording.
MIDI Rec MIDI Rec enables the CP to record incoming MIDI data from an external MIDI instrument connected
to the MIDI jacks. You can set more than one track to MIDI Rec, enabling the CP to record on several
tracks simultaneously over MIDI.
Mute This track has been recorded but will be silent both on playback and while recording.
Empty This track has not been recorded.
After you have recorded a song you can change the status for a track by touching the STATUS button at the bottom
of the LCD screen. Touching the STATUS button during playback will select Play or Mute. Touching the STATUS
button after entering Real-time record but before recording begins, will select Play, MIDI Rec, or Mute. Rec can only
be selected from the Real-time Record screen. The Track settings screen cannot be accessed during recording.
Page
49
¡ To use the Track Settings screen:
Step 1
Touch TRACK SETTINGS in the Advanced Recorder menu.
Step 2
Touch the arrows at the side of the screen to select the track that you wish to edit.
TEMPO : Changes the tempo. Use the Dial to
change the value.
Jumps to tracks 1-9.
Selects the tracks one at a time.
Jumps to tracks 10-16, Tempo, and Style.
MENU : Returns you to the Advanced Recorder menu.
MIXER : Takes you to the Mixer.
STATUS : Changes the track’s status.
SOUND : Selects a different sound for the track.
SAVE : Saves the Track settings as part of the song.
4
Recording a Song
Step 3
Touch the STATUS button to change the status to PLAY, MUTE or MIDI REC.
Step 4
If you wish to change the sound assigned to the track, touch the < SOUND > buttons. You can also select
sounds by pressing any of the SOUND buttons, or using the Dial.
Step 5
When you are finished, touch the MENU button to return to the Advanced Recorder menu or touch the
MIXER button to go to the Mixer menu.
Page 90

Page
50
As discussed in the above section, MIDI Rec enables the CP to record incoming MIDI data from an external MIDI
instrument connected to the MIDI jacks. You can set more than one track to MIDI REC, enabling the CP to record on
several tracks simultaneously over MIDI. Each MIDI Rec track will record on the incoming MIDI channel that corresponds
to its track number. Track 1 records MIDI channel 1 and so on.
Loop Settings
The Loop function lets you specify certain bars or your entire song to repeat over and over. Loop is a global function
and all tracks will be looped equally. You cannot have different loop settings for each track.
¡ To set the Loop:
Step 1
Touch Loop Settings on the Advanced Recorder menu.
Step 2
Touch the screen to select the different loop settings, then use the Dial to change the values.
4
Recording a Song
LOOP : Turns the Loop ON/OFF.]
START BAR : Specifies the starting bar.
END BAR : Specifies the ending bar.
MENU : Takes you back to the Advanced Recorder menu.
Step 3
Touch LOOP to turn the Loop ON/OFF.
Step 4
Touch START BAR to specify the bar where you want the Loop to start.
Step 5
Touch END BAR to specify the bar where you want the Loop to end.
Step 6
Touch the MENU button to return to the Advanced Recorder menu when you are finished.
You can turn looping on and off in the Mixer menu. However, you still have to set the Start and End Bar from the Loop
Settings menu.
You can set up looping for recording in the Real-time REC menu as well. In the Real-time REC menu, when you turn on
the looping, the Start Bar and End Bar information will be automatically copied from the Loop Settings menu.
Page 91

Style Paste
When you record a Style as part of your song, the Style data is automatically recorded on the Style track. This data
is unique to the CP, and cannot be used with any other musical instruments. Additionally the instrument tracks that
are part of the Style cannot be edited individually.
Style Paste converts any Style data recorded on the Style track into MIDI note and event data and places it on
separate tracks (Trks 9-16). Once the Style data is converted into actual note data, you can view and edit the
individual Style tracks as if you had recorded the data yourself. Also your song including the Style can now be
played back by any other MIDI instrument that reads Standard MIDI File (SMF) format song data.
Before you use Style Paste, you need to make sure Tracks 9-16 are empty or don’t contain important data. When the
Style is pasted, the data from the Style track will be pasted into these tracks and will replace any existing data.
¡ To use Style Paste:
Step 1
Touch STYLE PASTE while you are in the Advanced Recorder menu.
The LCD screen will prompt you for confirmation.
Page
51
NO : Cancels the Style Paste.
YES : Proceeds with Style Paste.
Step 2
If you would like to proceed, touch the YES button, or touch the NO button to cancel.
Punch-In Recording
Punching In means being able to automatically start recording right in the middle of a track that is playing back,
continue recording new data on that track for a specified number of measures, and then automatically stop recording
at a specific measure and hear the rest of the track play to the end. This tool is very valuable if you wish to record
over some misplayed notes in the middle of a track, but would like to preserve the music in the measures leading
up to, and following, the trouble spot.
4
Recording a Song
¡ To use Punch-in recording:
Step 1
Select Punch In/Out in the Advanced Recorder menu.
Step 2
Touch the screen to select the options and change their values using the Dial.
Touch AUTO to have the CP automatically handle the punching in/out while you play.
Step 3
Touch the REHEARSAL button to listen to the song for rehearsal. If you need to adjust mixing or if you
would like to loop the song, touch the MIXER or LOOP ON/OFF buttons.
Page 92

Page
52
Step 4
When you are ready to record, press the REC button and then the PLAY button.
The music will start immediately from the Start Bar that you have chosen. Once the song reaches the Punch In
Bar, any notes that you play on the keyboard will be recorded.
Recording will stop when the song reaches the Punch-Out Bar, but the CP will keep playing back the song to the
end unless you press the STOP button.
You can repeat the punch-in/out section by turning the looping on with the LOOP button.
Step 5
Listen to what you have recorded and re-record if necessary.
4
Recording a Song
REC TRACK : Selects the track to Punch
in on.
START BAR : Selects the measure in the
song from where you want the CP to start
playing.
PUNCH IN BAR : Selects the measure where
the CP will punch-in and start recording.
PUNCH OUT BAR : Selects the measure where
the CP will punchout and stop recording.
MENU : Takes you to the Advanced Recorder menu.
MIXER : Takes you to the Mixer Settings menu.
REHEARSAL : Plays the song for rehearsal.
LOOP : Turns Loop on/off.
If you set the CP to Punch-In at the very first measure of the song, the metronome will automatically play a two-measure
B/M : Changes the time signature.
TEMPO : Changes the tempo.
REC MODE : Selects the recording mode.
REPLACE erases the previous data and
records the new data in its place. OVERDUB
mixes the new data with the previous data
so that both are heard together. Repeatedly
pressing REC MODE switches between the
REPLACE and OVERDUB.
AUTO/PEDAL : Selects the Punch-in method,
Auto or Pedal. Repeatedly pressing AUTO/
PEDAL switches between the Auto and
Pedal.
intro to assist you with the timing. These “ticks” will not be recorded as part of the track.
¡ Punch-In recording using the pedal (To use the pedal to Punch-In/Out:)
Instead of specifically setting an automatic Punch-In and Punch-Out Bar, you can use the center pedal to manually
Punch In and Out.
You can punch in and out with pedal one time for each pass over the track that you make.
Step 1
Touch AUTO/PEDAL to select Pedal in the Punch In/Out menu.
Step 2
Touch the screen to set up other recording options.
REC TRACK : Selects the track to Punch in
on.
START BAR : Selects the measure in the
song from where you want the CP to start
playing.
MENU : Takes you to the Advanced Recorder menu.
MIXER : Takes you to the Mixer Settings menu.
REHEARSAL : Plays the song for rehearsal.
LOOP : Turns Loop on/off.
B/M : Changes the time signature.
TEMPO : Changes the tempo.
REC MODE : Selects the recording mode.
REPLACE erases the previous data
and records the new data in its place.
OVERDUB mixes the new data with the
previous data so that both are heard
together. Repeatedly pressing REC
MODE switches between the REPLACE
and OVERDUB.
AUTO/PEDAL : Selects the Punch-in method,
Auto or Pedal.
Page 93

Page
53
Step 3
Press the REC button to start.
The song will start playing.
Step 4
When the song reaches the bar where you wish to punch in, press the center pedal and play the
keyboard.
Step 5
When you reach the bar where you wish to punch out, press the pedal again to stop recording.
The song will continue to play until the end (i.e. it is no longer recording) or until you press STOP.
Step Recording
Step Recording is a method of recording a song by manually entering notes one after another as data, instead of
playing the keyboard in real-time. This method may be useful when trying to create a phrase with a precise rhythm,
or when recording a phrase that is beyond your playing skill level.
¡ To set up Step recording:
Step 1
Recording a Song
In the Advanced Recorder menu select Step Rec.
The Step Record Stand-By menu will be displayed.
4
Step 2
Touch the screen to select options and use the Dial to adjust values.
REC TRACK : Selects the recording track.
REC SOUND : Selects which sound is assigned
to the track.
START BAR : Selects which measure you’d like
to start recording at.
MENU : Cancels Step recording and takes you to the
Advanced Recorder menu.
START : Proceeds to the data entry screen of the Step
Record menu.
Step 3
Touch the START button.
You will be presented with the data entry screen.
¡ To use the Step Recorder:
B/M : Changes the time signature.
REC MODE : Selects the recording mode.
REPLACE erases the previous data
and records the new data in its place.
OVERDUB mixes the new data with the
previous data so that both are heard
together. Repeatedly pressing REC
MODE switches between the REPLACE
and OVERDUB.
Step 1
Touch the buttons and the bottom of the screen to select Note value, Note length, and Velocity, then use
the Dial to change its value.
The value will be displayed above the buttons at the bottom of the screen.
Velocity value can be entered by actually hitting a key on the keyboard. To enable this, select “Key” for the
Velocity value instead of a number.
Page 94

Page
54
Step 2
To enter a note event, play the note using the keyboard.
The note data will be displayed on the screen. Continue entering as many notes as you wish; notice how previously
entered notes continue to be displayed as a list, screen room permitting. The graphic navigator near the bottom
of the screen gives you feedback as to what bar you are in.
DELETE : Deletes the last note entered in
ARROWS : Moves the cursor up and down
the list of entered notes in OVERDUB
mode.
NOTE VALUE : Selects the note value.
NOTE LENGTH : Adjusts the note length.
VELO : Selects the velocity value. Values are from 1–127 or Key.
TIE : Enters Tied note values.
REST : Enters a rest.
4
NEXT BAR : Takes you to the beginning of the next measure.
STOP : Stops recording.
OVERDUB mode.
Recording a Song
Step 3
If you enter a wrong note and wish to delete it, touch the DELETE button. When you are using the REPLACE
mode for recording, every time you press DELETE the list of your entered notes on the screen scrolls back
one event, and that event is erased immediately. Therefore, if you scroll back to the first beat of bar 5 of a
10-bar list of notes, everything from bar 5 on will be erased. In OVERDUB mode, however, you can delete only
the most recently added note, and scrolling back over the list using the arrow buttons will not automatically
erase events. When using OVERDUB, you need to touch the Delete button to erase the event.
Note Rest Clock value
384
192
96
64
48
32
24
16
12
8
Step 4
If you would like to enter a rest, touch the REST button. This moves the cursor to the next beat without
entering any data. The rest value is the same as the note value.
If you would like to enter a rest for the remainder of the measure, touch the NEXT BAR button. This will
bring the cursor to the top of the next measure.
Step 5
When you like to tie notes, touch the TIE button while holding down the key. This doubles the length of the
note. If you touch the TIE button twice while holding down the key, the length of the note is tripled.
Page 95

Step 6
In OVERDUB mode, if you go back to certain point to enter a note, use the arrow buttons to move the cursor
up and down to get to the event time where you want to insert the new data.
Step 7
Touch the STOP button or the PLAY/STOP button to stop recording.
Transpose and Octave Shift can be in effect as you are entering notes. The transposed pitches are the note values that
are recorded.
The navigator graphic represents the current bar that you are recording. The partitions represent each beat, and thus
the number of partitions matches the time signature of the music. For example, there would be 4 partitions if the time
signature is 4/4, and 6 partitions if it is 6/8. Each partition consists of a number of spaces where dots (•) will be displayed
to mark time. Each space represents 24 clock pulses. Therefore the number of displayed spaces per partition represents
the duration of the beat.
For example, if you choose the 4/4 time signature in the Step Recording settings, the navigator should look as illustrated
below.
Measure
BAR
3
Beat
The dots do not represent the duration of the notes. They just tell you where they are.
For a further explanation of the CP’s Clock, and what is meant by “clock pulses” see the Clock Move description in the
Bar Edit section.
4 partitions : 4 beat rhythm
4 dot spaces : 4 x 24 = 96 clock pulses = a quarter note rhythm
Page
55
4
Recording a Song
Song Edit
Song Edit lets you name, transpose, and change initial tempo settings for your song.
¡ To edit the song:
Step 1
Select Song Edit from the Advanced Recorder menu.
The Song Edit screen is displayed.
Step 2
Touch the screen to select the setting that you wish to change, then use the Dial to adjust the value.
Step 3
Touch NAME, then enter a name for the song using the virtual keyboard screen.
Page 96

Page
56
Step 4
Touch INITIAL TEMPO and adjust the initial tempo of the song.
Step 5
Touch TRANSPOSE and set the transpose amount.
You can transpose your song +/- 24 in half step increments.
Step 6
When you are finished, touch the MENU button to return to the Advanced Recorder menu.
4
Recording a Song
NAME : Names the song.
MENU : Takes you to the Advanced Recorder menu.
DELETE : Deletes the song.
Bar Editing
Bar Edit contains many useful editing functions. You can edit your song one bar or any number of bars at a time.
INITIAL TEMPO : Sets the initial tempo of
the song.
TRANSPOSE : Adjusts transposition.
¡ To use Bar Edit:
Step 1
Select Bar Edit in the Advanced Recorder menu select Bar Edit.
The Bar Edit screen will be displayed.
Step 2
Use the touch screen to select the desired editing function.
The editing screen for that function will be displayed.
MENU : Takes you to the Advanced Recorder menu.
Page 97

¡ Quantize
Quantize automatically shifts the timing of a note. This can be used to correct imperfect timing in a performance by
shifting notes that were played either too early or too late so they will fall exactly on the correct beat. For example,
you can accurately align any out of time notes to the nearest 8th or 16th-note beat depending on the type of song
you are quantizing. Sometimes quantizing all of your notes to exactly the same beat can make your playing sound
too stiff. The Advanced Recorder quantize function allows you to set a quantize “Range” so only the notes that
were very early or late are quantized. Notes that were almost perfect are not quantized thus keeping more of the
original feeling in your music.
TRACK : Selects the track that you wish to
quantize.
RESOLUTION : Selects the note Resolution
START BAR/END BAR : Selects the bar range
that you want to quantize.
NOTE LOW : Selects the lowest note that you
want to quantize.
NOTE HIGH : Selects the highest note that you
want to quantize. Use the Dial to change
the note value.
for quantization
RANGE LOW/RANGE HIGH : Sets the Low and
High Range for quantization.
Page
57
BACK : Returns you to the Advanced Recorder menu.
UNDO : Undoes the quantization which was just applied.
EXEC : Applies the quantization to your recording.
Resolution determines the timing value the quantize function will use to shift the notes you want to quantize. For example,
setting a quarter note resolution will shift all of the quantized notes to the nearest quarter beat. Setting an eighth note
resolution will shift all of the quantized notes to the nearest eighth beat and so on. In the Advanced Recorder, quantize
values are expressed in note values and as a number that indicates how many clock beats each note value contains. The
Advanced Recorder divides each beat in a bar into 96 smaller clock beats. A Quarter note is 96 clock beats, an eighth
note is 48 clock beats, and a sixteenth note is 24 clock beats and so on. The quantize resolution range is from quarter
notes (96 clocks), to 64th note triplets (4 clocks).
Range sets up timing “borders” around the Resolution value you specify. Notes within these borders will not be quantized
and notes outside the borders will be moved to the nearest beat specified by the resolution value (Quarter note, Eighth note,
etc.). The negative value represents the placement of the “border” before the beat, and the positive value represents the
placement the “border” after the beat. Together, these two “borders” form a timing “range” around the specified beat.
Selecting zero Range results in no
“range”, and all notes are shifted to the
precise beat.
The notes that fall beyond the Range
are moved to the closest “border” of
the Range.
4
Recording a Song
The notes that fall inside the Range are
not shifted at all.
By experimenting with Resolution and Range settings, you can correct the timing
of the notes in your recording while still allowing for a natural, human feel.
Page 98

Page
58
¡ Copy
The Copy function allows you to copy a section or all of the data on a track to another location.
The destination may be on the same track, or it can be on another track.
The destination of the copied data must either be:
1) A location that already has data in it.
2) The first blank bar after the end of a track (Bar 1 if the destination track is empty).
For example, if a track only has 10 bars in it, you cannot copy data onto bar 20. You can, however, copy data to bars 1
through 11.
Copied data replaces any current data that may be at the destination.
4
Recording a Song
TO TRACK : Selects the destination track. Use
the Dial to select the track number 1-16,
Tempo, or Chord.
BAR : Selects the bar in the destination track
where the copied data will be placed.
BACK : Returns you to the Advanced Recorder menu.
UNDO : Undoes the copying. This option is not always available.
EXEC : Proceed with copying.
¡ Delete
Delete completely erases and removes the bars that you specify.
TRACK : Selects the track to be deleted. Use the
Dial to choose 1-16, Tempo, Chord or All.
START BAR : Selects the first bar that has the
data you want to delete. Use the Dial to
change bars.
END BAR : Selects the last bar that contains
the data that you want to delete. Use the
Dial to change bars.
FROM TRACK : Selects the track to be copied.
Use the Dial to select the track numbers
1-16, Tempo, or Chord.
START BAR : Selects the bar where the data
that you are copying starts. Use the Dial to
change the bar number.
END BAR : Selects the bar where the data
that you are copying ends. Use the Dial to
change the bar number.
BACK : Returns you to the Advanced Recorder menu.
UNDO : Undoes the copying. This option is not always available.
EXEC : Proceed with copying.
Page 99

¡ Insert
The Insert function duplicates data from specified bars and copies it to a certain location. However, the current
data at the destination is not erased, but instead is pushed back to make room for the copied data.
Page
59
TO TRACK : Selects the destination track where
you want this data inserted. Choose from
1-16, Tempo, Chord or All.
BAR : Selects the bar in the destination track
where you want this data inserted.
BACK : Returns you to the Advanced Recorder menu.
UNDO : Undoes the insert. This option is not always available.
INSERT BAR : Tales you to the Insert Bar menu.
EXEC : Proceed with the insert.
If you just wish to insert empty bars into a track, select INSERT BAR, and a sub-menu will be displayed. You can insert
FROM TRACK : Selects the track that contains
the data you wish to duplicate. Choose from
1-16, Tempo, Chord or All.
START BAR : Selects the first bar that has the
data you want to duplicate.
END BAR : Selects the last bar that has the data
you want to duplicate.
empty bars into a track between bars that have data, or at the first blank bar at the end of the track.
TO TRACK : Selects the track where the empty
bars are going to be inserted. Choose 1-16,
Tempo, Chord or All.
BAR : Selects the location in the destination
track where you want the empty bars
inserted.
Use the Dial to choose the location.
BAR : Selects the number of empty bars you
wish to insert. Use the Dial to change the
value.
B/M : Selects the time signature for the bars
that are going to be inserted. Use the Dial
to change the value.
4
Recording a Song
BACK : Returns you to the Advanced Recorder menu.
UNDO : Undoes the insert. This option is not always available.
EXEC : Proceed with the insert.
¡ Erase
Erases data in the bars that you specify, and leaves them as empty bars.
TRACK : Selects the track that has the bars
you want to erase. Choose 1-16, Tempo
or Chord.
START BAR : Selects the first bar to be erased.
Use the Dial to change the bar.
END BAR : Selects the last bar to be erased.
Use the Dial to change the bar.
BACK : Returns you to the Advanced Recorder menu.
UNDO : Undoes the erase. This option is not always available.
EXEC : Proceed with the erase..
Page 100

Page
60
¡ Merge
Merge combines data from two tracks. You can make complex musical phrases using several tracks, then combine
them together on one track. Remember that there can only be one instrument sound assigned to each track, so the
resulting merged track will play all the combined data using one instrument sound. Merge can be useful for making
rhythm patterns by first recording different drum/ percussion parts using the same drum kit on several tracks for
easy editing of each instrument, or recording the right and left hand parts of a piano piece and combining them
later on one track to free up extra tracks for more recording.
Merge does not automatically erase the track from where you copied the data.
4
Recording a Song
TO TRACK : Select the track where you want
this data merged to. Choose 1-16.
BACK : Returns you to the Advanced Recorder menu.
UNDO : Undoes the merge. This option is not always available.
EXEC : Proceed with the merge..
FROM TRACK : Selects the track from where
you want to copy data. Choose 1-16.
¡ Gate Time Modify
Gate time refers to the length of a note as a percentage. Whatever the length of a note is when it is first recorded,
this value is considered as its Gate time of 100%. By editing the length of the note, you can shorten it to 10% or
lengthen it to 300% of the original value.
TRACK : Selects the track in which you want to
modify Gate times. Use the Dial to choose
the track.
START BAR : Selects the first bar of the data
that you want to modify Gate times for. Use
the Dial to change bars.
END BAR : Selects the last bar of the data that
you want to modify Gate times for. Use the
Dial to change bars.
MODIFY : Adjusts the Gate time in 10%
increments.
Use the Dial to select a value from 10%300%.
BACK : Takes you to the Advanced Recorder menu.
UNDO : Undoes the Gate time adjustment. This option is not always available.
EXEC : Proceeds with applying the Gate time adjustment.
 Loading...