

Page 1
Register and win!
www.kaercher.com
IV 100/40
IV 100/55
IV 100/75
Deutsch 3
English 13
Français 22
Italiano 32
Nederlands 42
Español 52
Português 62
Dansk 72
Norsk 81
Svenska 90
Suomi 99
Ελληνικά 108
Türkçe 118
Русский 128
Magyar 138
Čeština 147
Slovenščina 156
Polski 165
Româneşte 175
Slovenčina 185
Hrvatski 195
Srpski 204
Български 213
Eesti 223
Latviešu 232
Lietuviškai 241
Українська 250
59617480 01/10
Page 2

2
Page 3
Lesen Sie vor der ersten Benut-
zung Ihres Gerätes diese Originalbetriebsanleitung, handeln Sie danach
und bewahren Sie diese für späteren Gebrauch oder für Nachbesitzer auf.
Vor erster Inbetriebnahme Sicherheitshinweise Nr. 5.956-249 unbedingt lesen!
Bei Nichtbeachtung der Betriebsanleitung
und der Sicherheitshinweise können Schäden am Gerät und Gefahren für den Bediener und andere Personen entstehen.
Bei Transportschaden sofort Händler informieren.
Inhaltsverzeichnis
Umweltschutz DE - 1
Symbole in der Betriebsan-
leitung
Garantie DE - 1
Bestimmungsgemäße Ver-
wendung
Geräteelemente DE - 2
Sicherheitshinweise DE - 4
Inbetriebnahme DE - 4
Bedienung DE - 4
Außerbetriebnahme DE - 5
Transport DE - 6
Lagerung des Gerätes DE - 6
Pflege und Wartung DE - 6
Hilfe bei Störungen DE - 7
Zubehör und Ersatzteile DE - 8
Technische Daten DE - 9
CE-Erklärung DE - 10
DE - 1
DE - 2
Umweltschutz
Die Verpackungsmaterialien
sind recyclebar. Bitte werfen Sie
die Verpackungen nicht in den
Hausmüll, sondern führen Sie
diese einer Wiederverwertung
zu.
Altgeräte enthalten wertvolle recyclingfähige Materialien, die einer Verwertung zugeführt
werden sollten. Batterien, Öl und
ähnliche Stoffe dürfen nicht in
die Umwelt gelangen. Bitte entsorgen Sie Altgeräte deshalb
über geeignete Sammelsysteme.
Hinweise zu Inhaltsstoffen (REACH)
Aktuelle Informationen zu Inhaltsstoffen finden Sie unter:
http://www.karcher.de/de/unternehmen/
umweltschutz/REACH.htm
Symbole in der Betriebsanlei-
tung
Gefahr
Für eine unmittelbar drohende Gefahr, die
zu schweren Körperverletzungen oder zum
Tod führt.
몇 Warnung
Für eine möglicherweise gefährliche Situation, die zu schweren Körperverletzungen
oder zum Tod führen könnte.
Vorsicht
Für eine möglicherweise gefährliche Situation, die zu leichten Verletzungen oder zu
Sachschäden führen kann.
Garantie
In jedem Land gelten die von unserer zuständigen Vertriebsgesellschaft herausgegebenen Garantiebedingungen. Etwaige
Störungen an Ihrem Gerät beseitigen wir
innerhalb der Garantiefrist kostenlos, sofern ein Material- oder Herstellungsfehler
die Ursache sein sollte. Im Garantiefall
wenden Sie sich bitte mit Kaufbeleg an Ihren Händler oder die nächste autorisierte
Kundendienststelle.
– 1
3DE
Page 4
Bestimmungsgemäße Ver-
wendung
Dieses Gerät ist nicht zur Aufnahme
gefährlichen Staubs geeignet.
Dieses Gerät ist für den industriellen
Gebrauch geeignet.
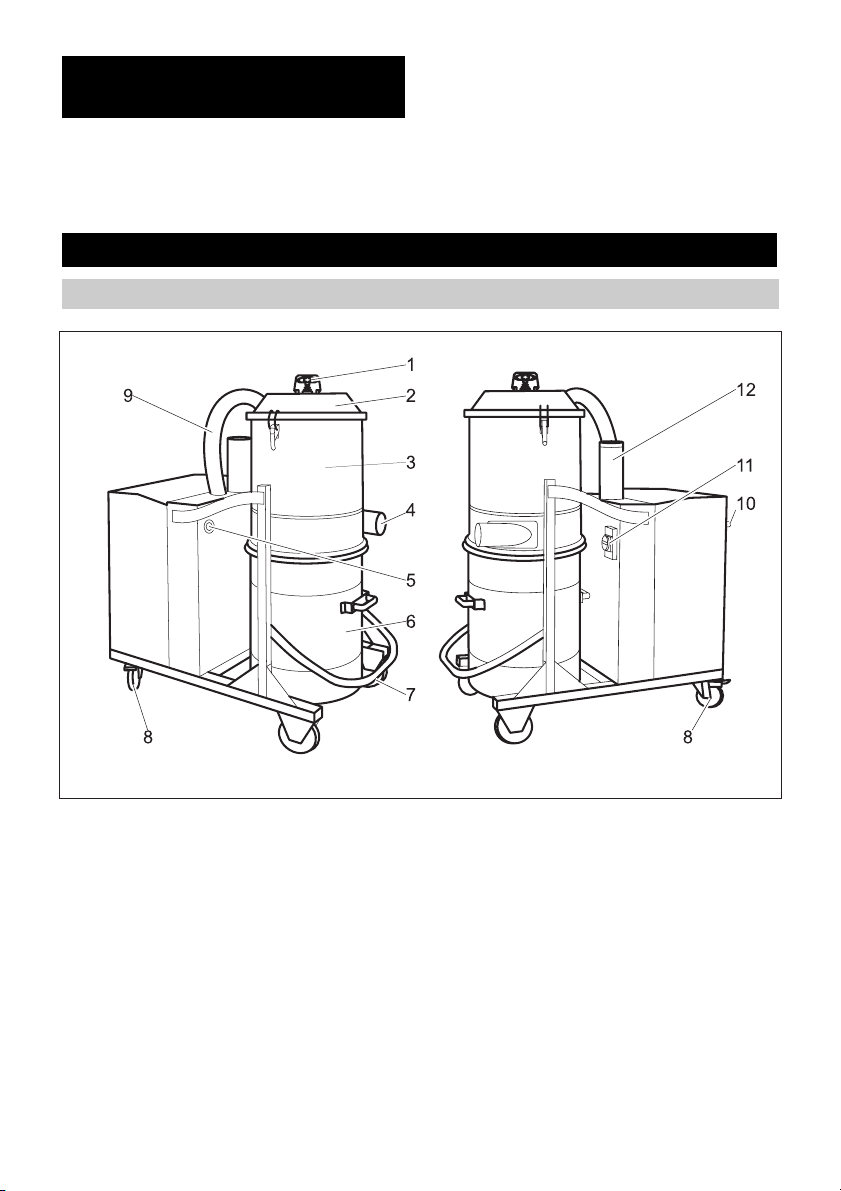
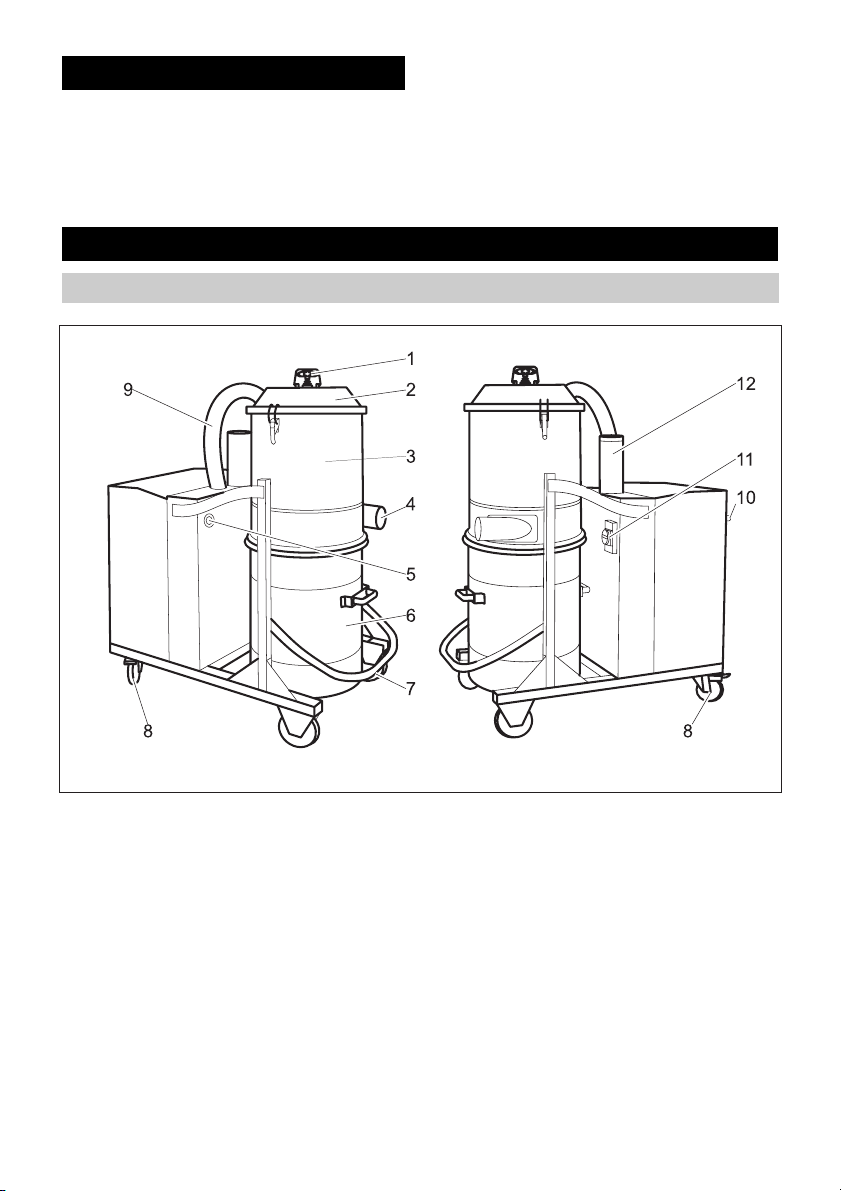
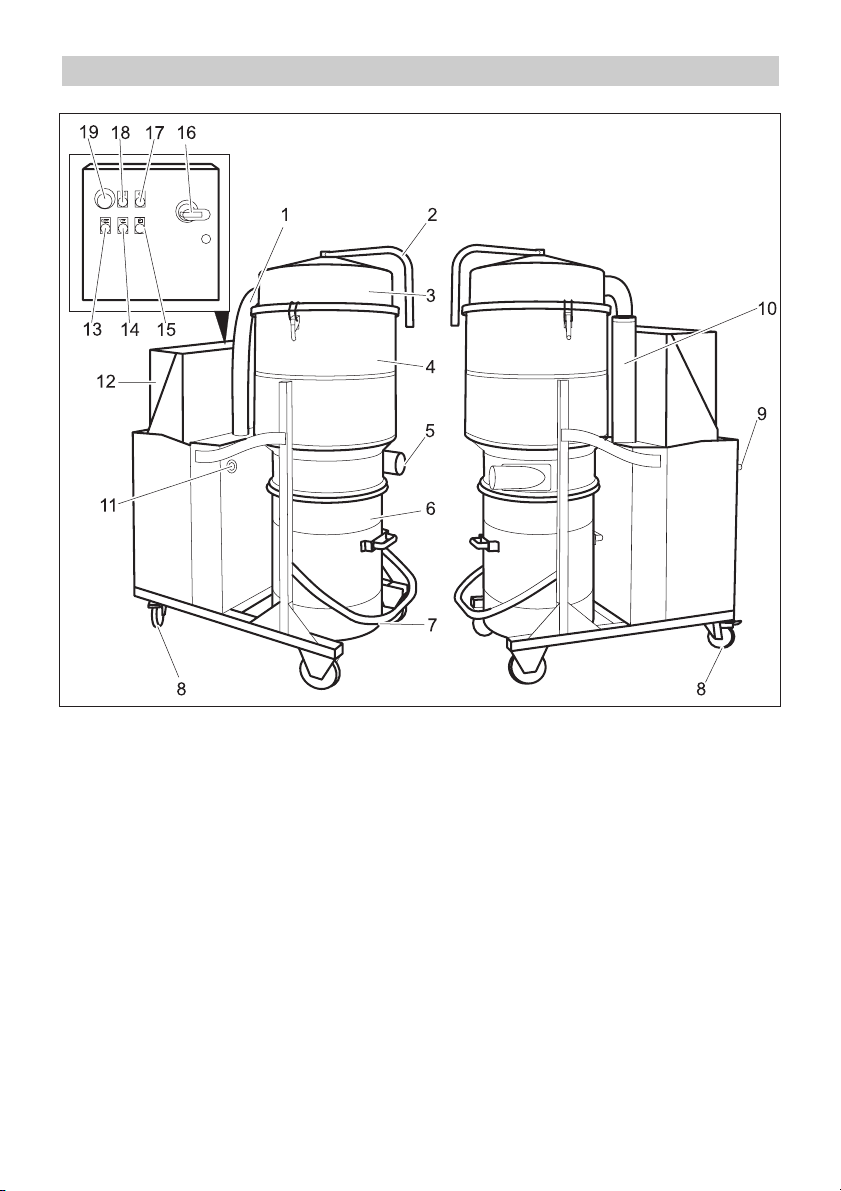
Geräteelemente
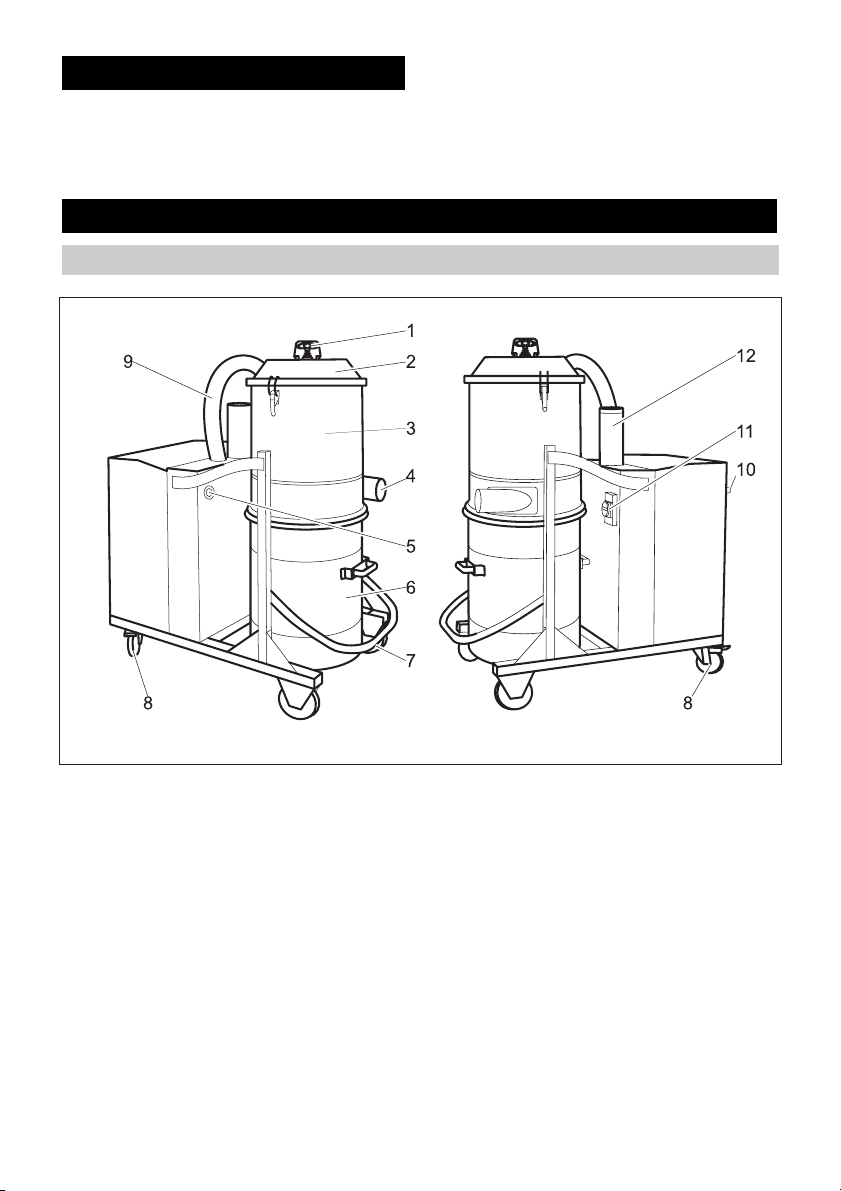
Bedienelemente IV 100/40, IV 100/55
Zum Nasssaugen muss der serienmäßige
Sauggutbehälter gegen den als Zubehör
erhältlichen „Behälter für Nass- und
Trockensaugen“ ersetzt werden.
Jeglicher anderer Gebrauch wird als
unsachgemäß angesehen.
1 Griff Filterreinigung
2 Deckel Filterkammer
3 Filterkammer
4 Anschlussstutzen für Zubehör
5 Manometer
6 Sauggutbehälter
7 Hebel für Entriegelung Sauggutbehälter
8 Lenkrollen mit Feststellbremse
9 Schlauch zur Saugturbine
10 Schiebegriff
11 Ein-/Aus Schalter
12 Schalldämpfer
4 DE
– 2
Page 5

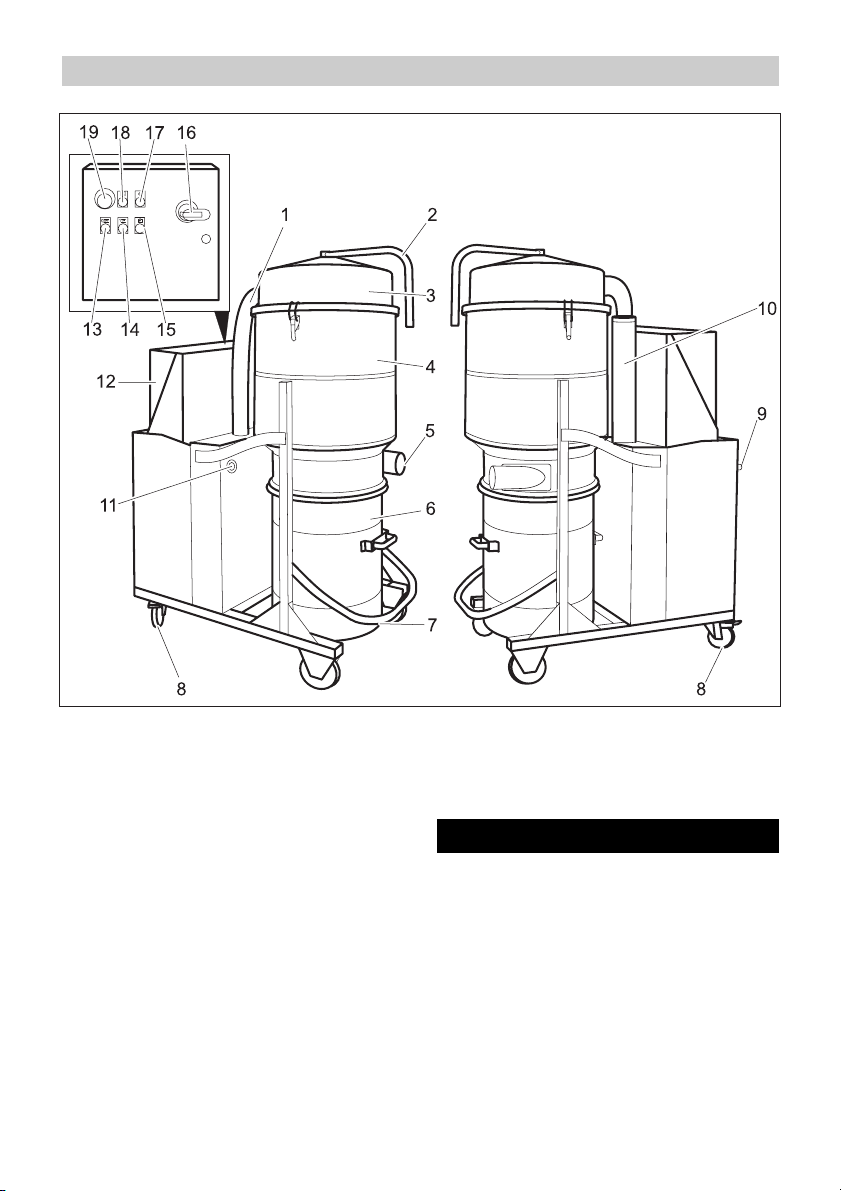
Bedienelemente IV 100/75
1 Schlauch zur Saugturbine
2 Griff Filterreinigung
3 Deckel Filterkammer
4 Filterkammer
5 Anschlussstutzen für Zubehör
6 Sauggutbehälter
7 Hebel für Entriegelung Sauggutbehälter
8 Lenkrollen mit Feststellbremse
9 Schiebegriff
10 Schalldämpfer
11 Manometer
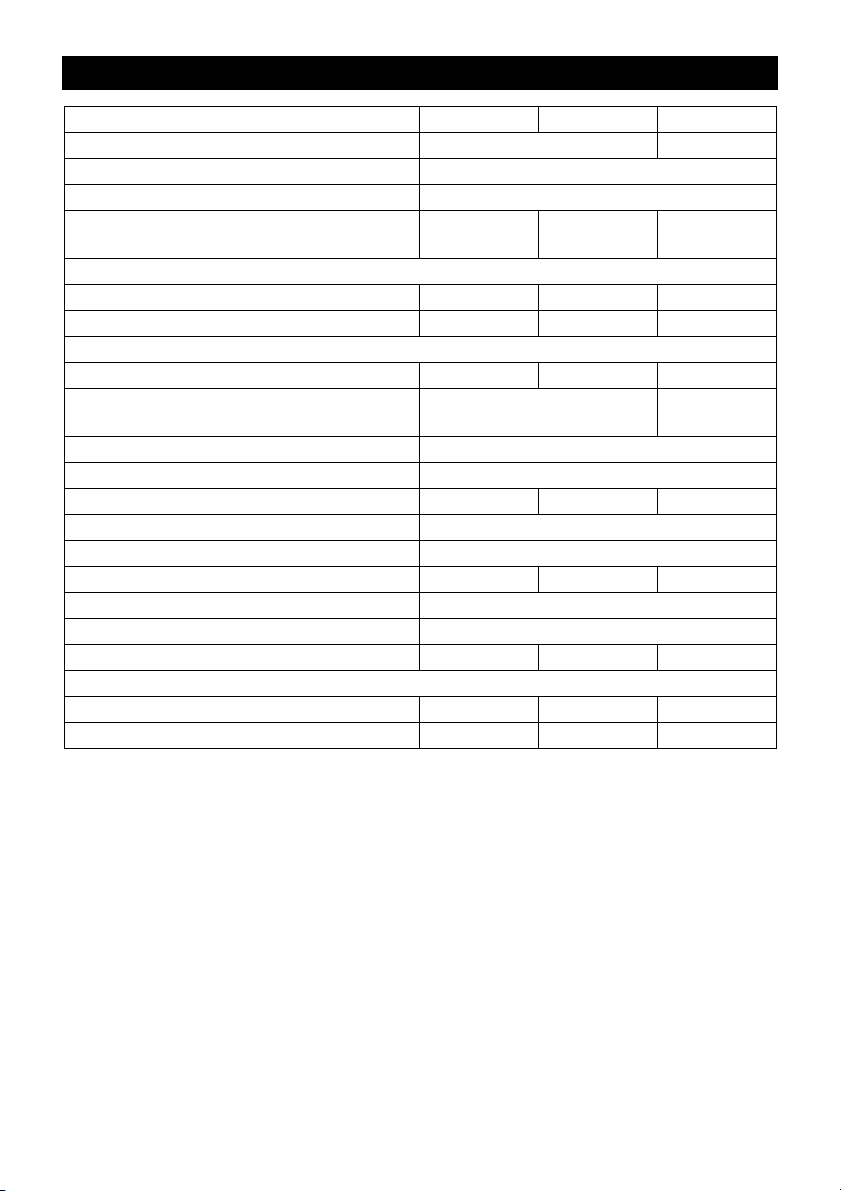
12 Schaltschrank
13 Taster „Gerät ausschalten“
14 Leuchttaster „Gerät einschalten“
15 Kontrollleuchte Motorstörung
16 Ein-/Aus Schalter
17 Kontrollleuchte „Netzspannung“
18 Kontrollleuchte „Not-Aus-Taster betätigt“
19 Not-Aus-Taster
– 3
5DE
Page 6
Sicherheitshinweise
몇 Warnung
Dieses Gerät ist nicht zur Aufnahme gefährlichen Staubs geeignet.
Dieses Gerät darf nicht im Freien unter
nassen Bedingungen verwendet oder
aufbewahrt werden.
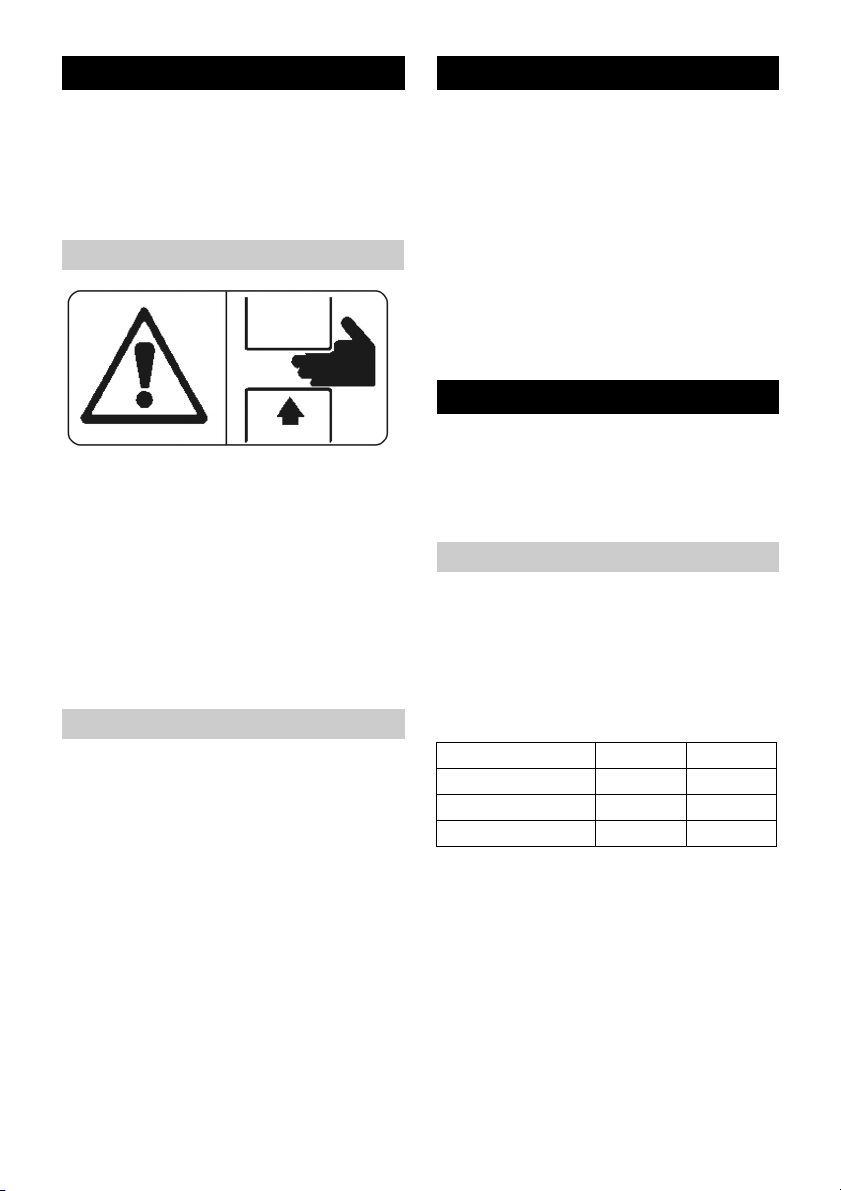
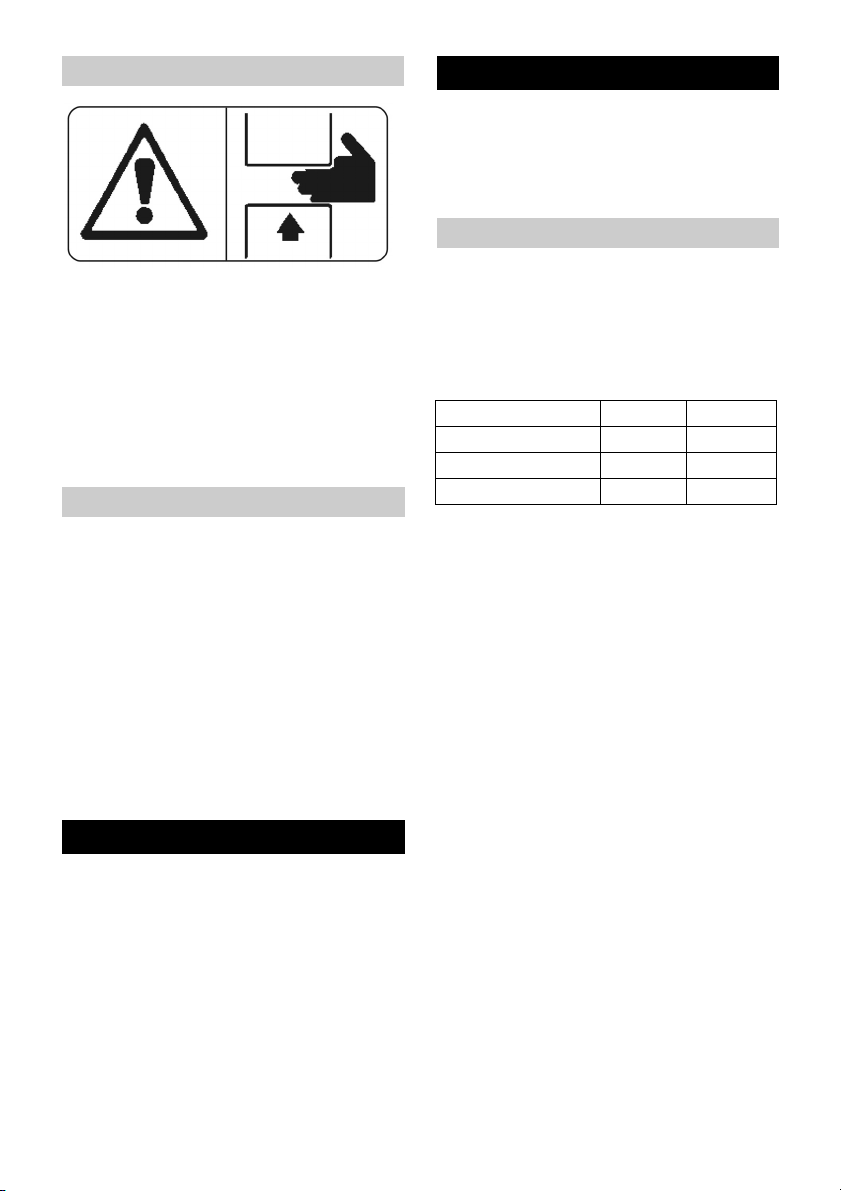
Symbole auf dem Gerät
몇 Achtung
Quetschgefahr beim Einsetzen und Verriegeln des Sauggutbehälters
Während der Verriegelung keinesfalls die
Hände zwischen Sauggutbehälter und
Sauger halten oder in die Nähe der Führungsbolzen hineinstecken.
Den Sauggutbehälter durch Betätigung des
entsprechenden Hebels mit beiden Händen verriegeln!
Sicherheitsvorschriften
Gerät bei Beendigung der Arbeit ausschalten und Netzstecker ziehen.
Sicherheitsbestimmungen für die auf-
zusaugenden Materialien beachten. In
sachgemäßem/unsachgemäßem Betrieb können Teile (z.B. Ausblasöffnung) des Industriestaubsaugers bis zu
95°C annehmen.
Im Notfall
Im Notfall (z.B. beim Einsaugen brennbarer
Materialien, bei Kurzschluss oder anderen
elektrischen Fehlern) Gerät ausschalten
und Netzstecker ziehen.
Inbetriebnahme
Das Gerät in Arbeitsposition bringen,
Î
wenn nötig mit Feststellbremsen sichern.
Î Saugschlauch in den Saugschlauchan-
schluss einstecken.
Î Gewünschtes Zubehör auf den Saug-
schlauch aufstecken.
Î Sicherstellen, dass der Sauggutbehäl-
ter ordnungsgemäß eingesetzt ist.
몇 Warnung
Die maximal zulässige Netzimpedanz am
elektrischen Anschlusspunkt (sieheTechnische Daten) darf nicht überschritten werden.
Bedienung
Î Gerätestecker in Netzsteckdose
einstecken.
Î Ein-/Aus Schalter auf „1“ drehen.
Î Bei IV 100/75 Taster „Gerät einschalten
drücken.
Filter reinigen
An der Frontseite des Gerätes ist ein Manometer vorhanden, das den Saugunterdruck
innerhalb des Gerätes anzeigt. Sinkt der
Saugunterdruck unter den in der unten stehenden Tabelle angegebenen Wert, muss
das Gerät ausgeschaltet und der Filter gereinigt werden.
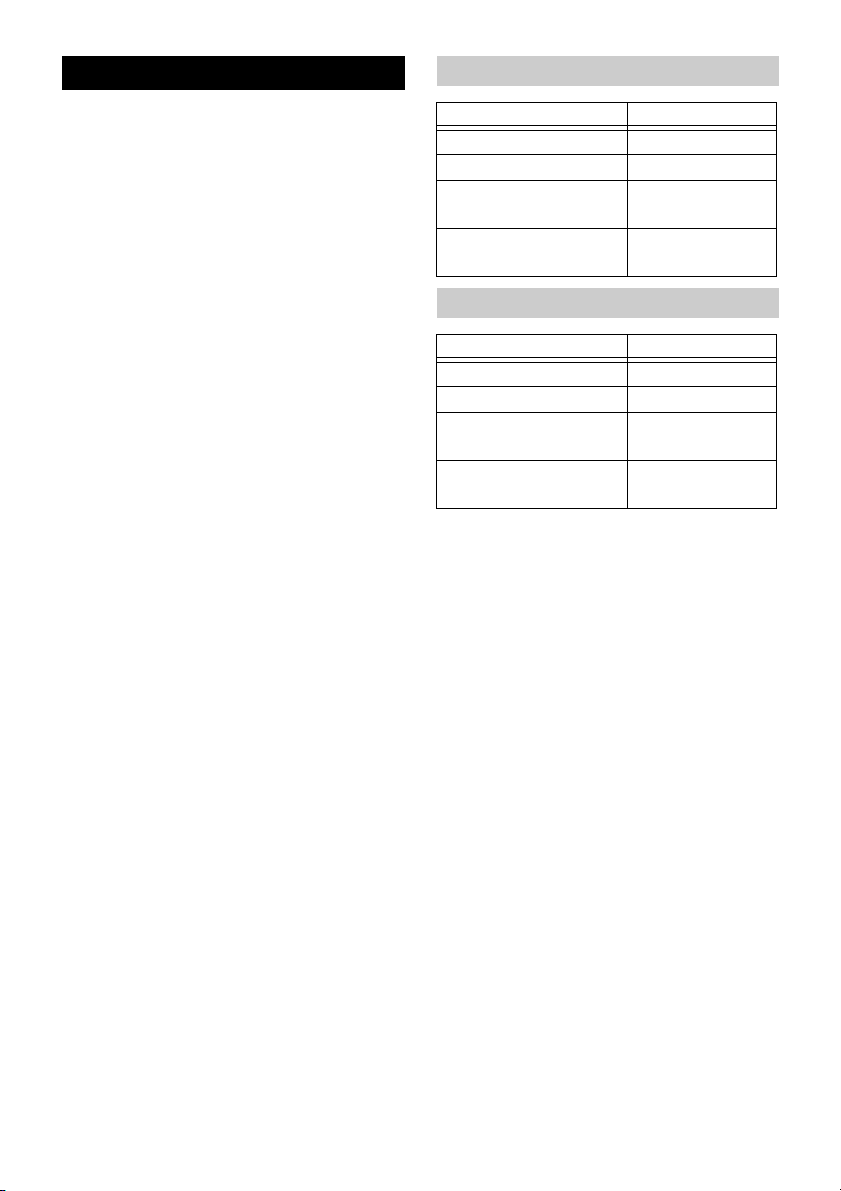
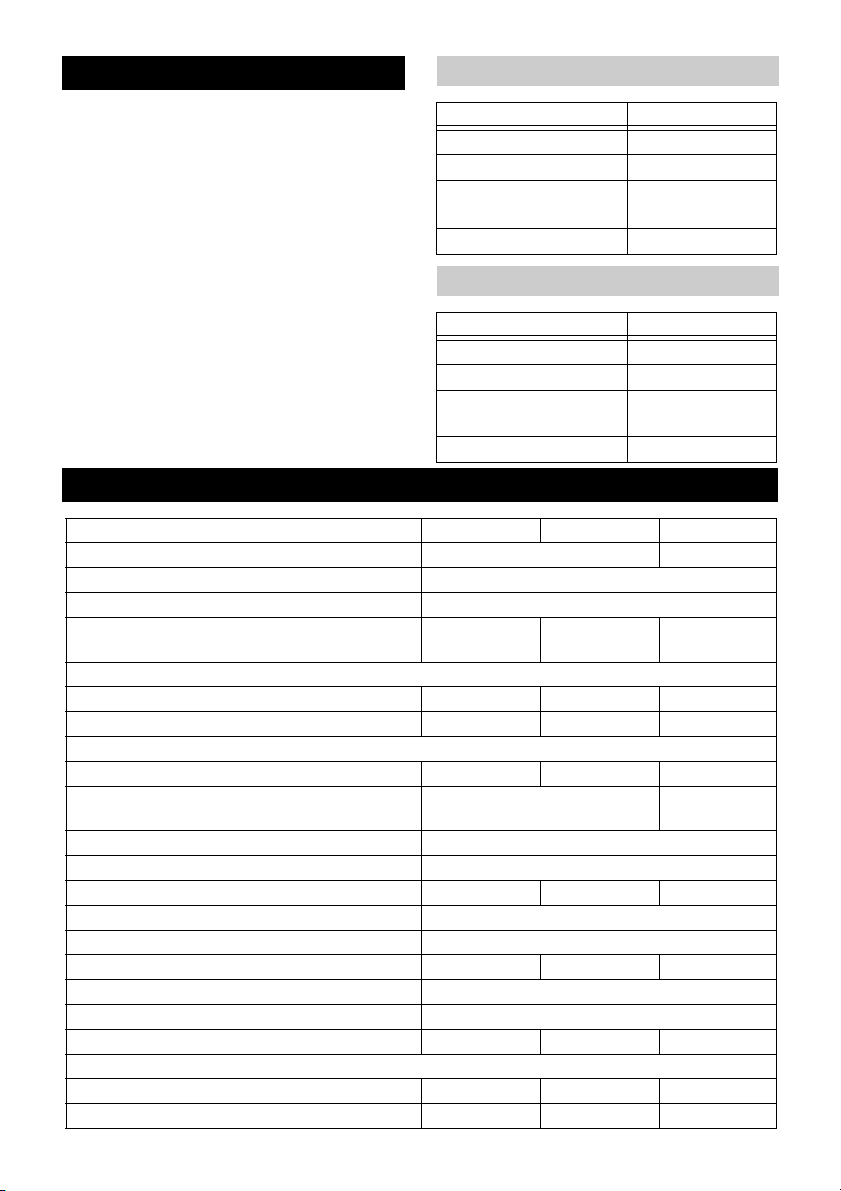
NW 50 NW 60
IV 100/40 13,0 kPa 12,0 kPa
IV 100/55 19,5 kPa 15,5 kPa
IV 100/75 25,5 kPa 20,5 kPa
IV 100/40, IV 100/55
Gerät am EIN/AUS-Schalter ausschalten.
Î
Î Sicherungsbügel Filterabreinigung zur
Seite schwenken.
Î Griff Filterabreinigung mehrmals kräftig
auf- und abbewegen.
Î Sicherungsbügel Filterabreinigung
senkrecht stellen.
6 DE
– 4
Page 7
IV 100/75
Î Taster „Gerät ausschalten“ drücken.
Î Hebel Filterreinigung mehrmals hin-
und herbewegen.
Bringt diese Reinigung keine Verbesserung,
kann der Filter entnommen und gewaschen
oder ersetzt werden (siehe Kapitel „Filter
wechseln“).
Trockensaugen
Vorsicht
Beim Wechsel von Nass- auf Trockensaugen beachten:
Saugen von trockenem Staub bei nassem
Filterelement setzt den Filter zu und kann
ihn unbrauchbar machen.
Nassen Filter vor Benutzung gut trocknen
Î
oder durch trockenen ersetzen.
Î
Bei Bedarf Filter wechseln, wird unter
Punkt "Pflege und Wartung" beschrieben.
Nasssaugen (Option)
Hinweis
Zum Nasssaugen muss der serienmäßige
Sauggutbehälter gegen den als Zubehör
erhältlichen „Behälter für Nass- und Trockensaugen“ ersetzt werden.
Der im Behälter für Nass- und Trockensaugen vorhandene Schwimmer unterbricht
den Saugstrom, wenn der maximale Füllstand erreicht ist.
Wird der Saugstrom durch den Schwimmer
unterbrochen:
Î IV 100/40 oder IV 100/55 am EIN/AUS-
Schalter ausschalten.
Bei IV 100/75 Taster „Gerät ausschalten“
drücken.
Î Flüssigkeit durch Öffnen des Ablass-
ventils am Behälterboden ablassen.
Außerbetriebnahme
Bei IV 100/75 Taster „Gerät ausschalten“
Î
drücken.
Î
Gerät am EIN/AUS-Schalter ausschalten.
Î Zubehör abmontieren und bei Bedarf
mit Wasser ausspülen und trocknen.
Î Sauggutbehälter entleeren (siehe Kapi-
tel „Sauggutbehälter entleeren“).
Î Gerät innen und außen durch Absau-
gen und Abwischen reinigen.
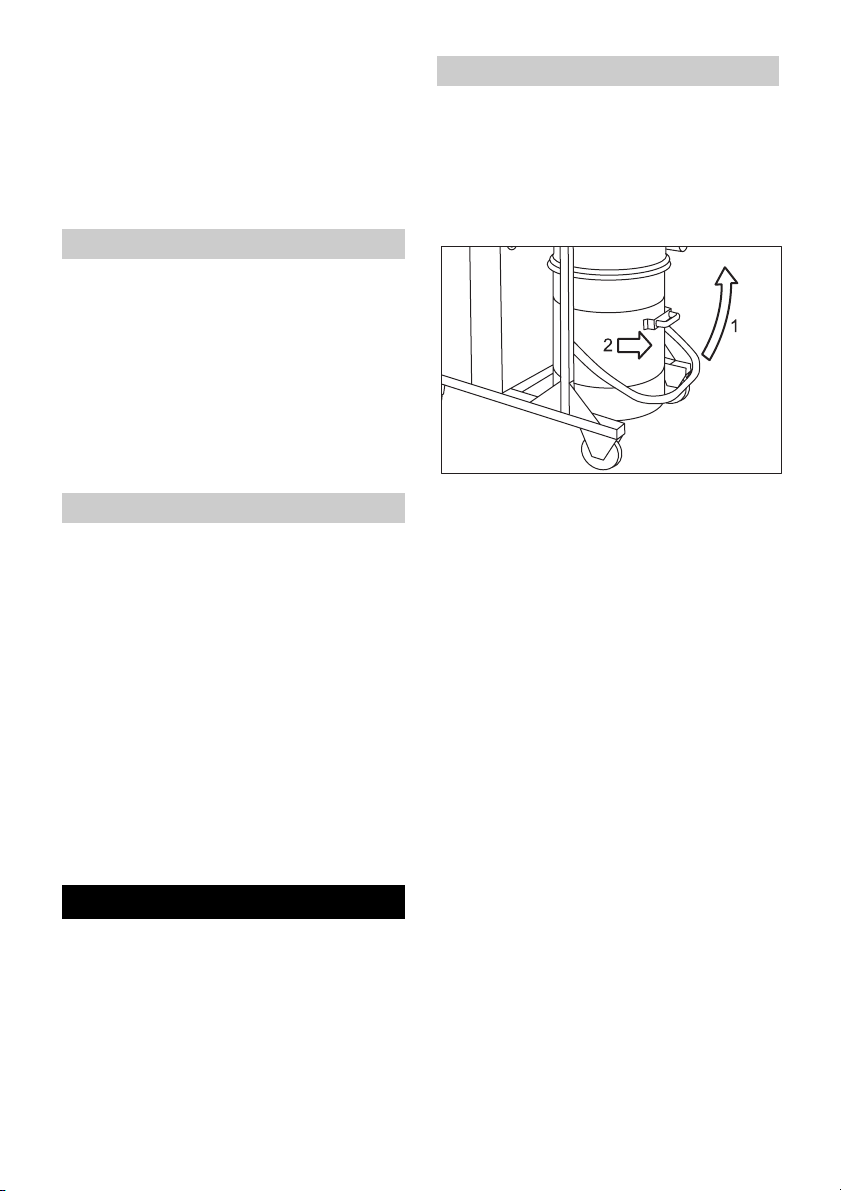
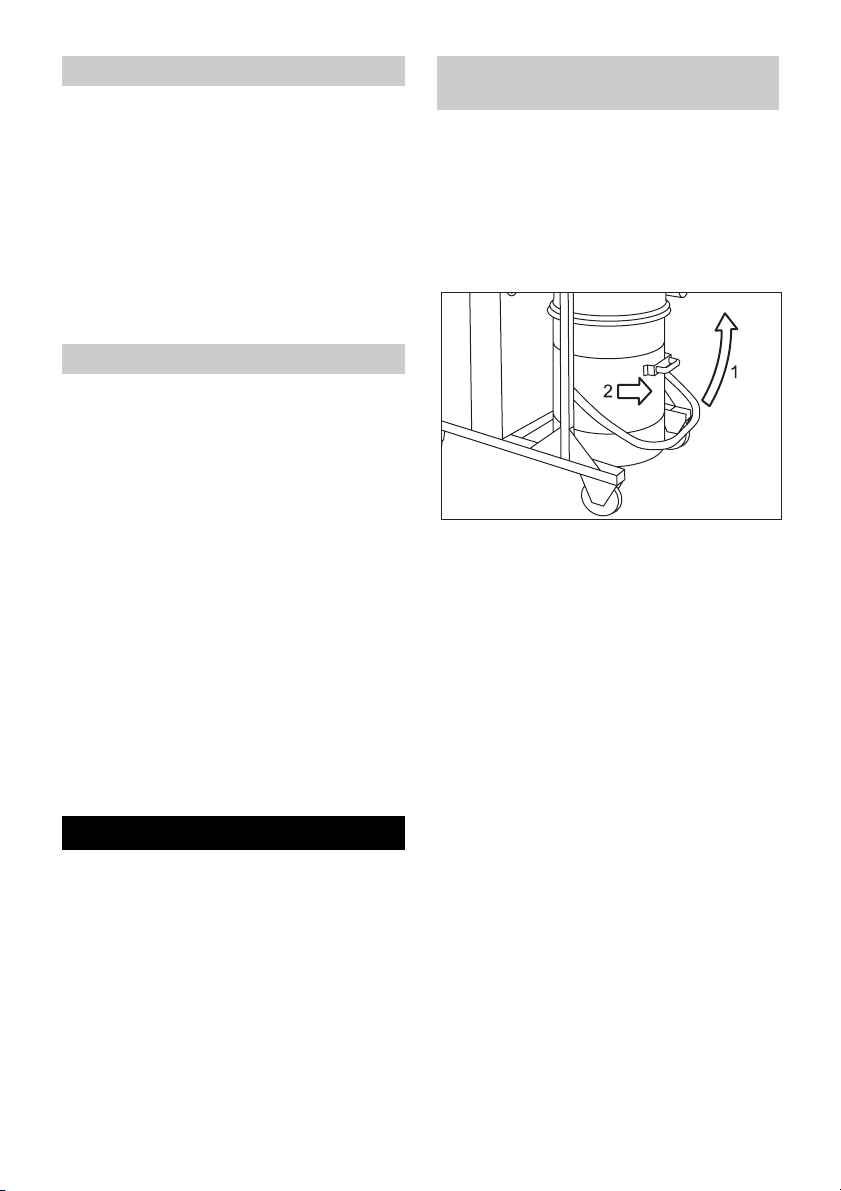
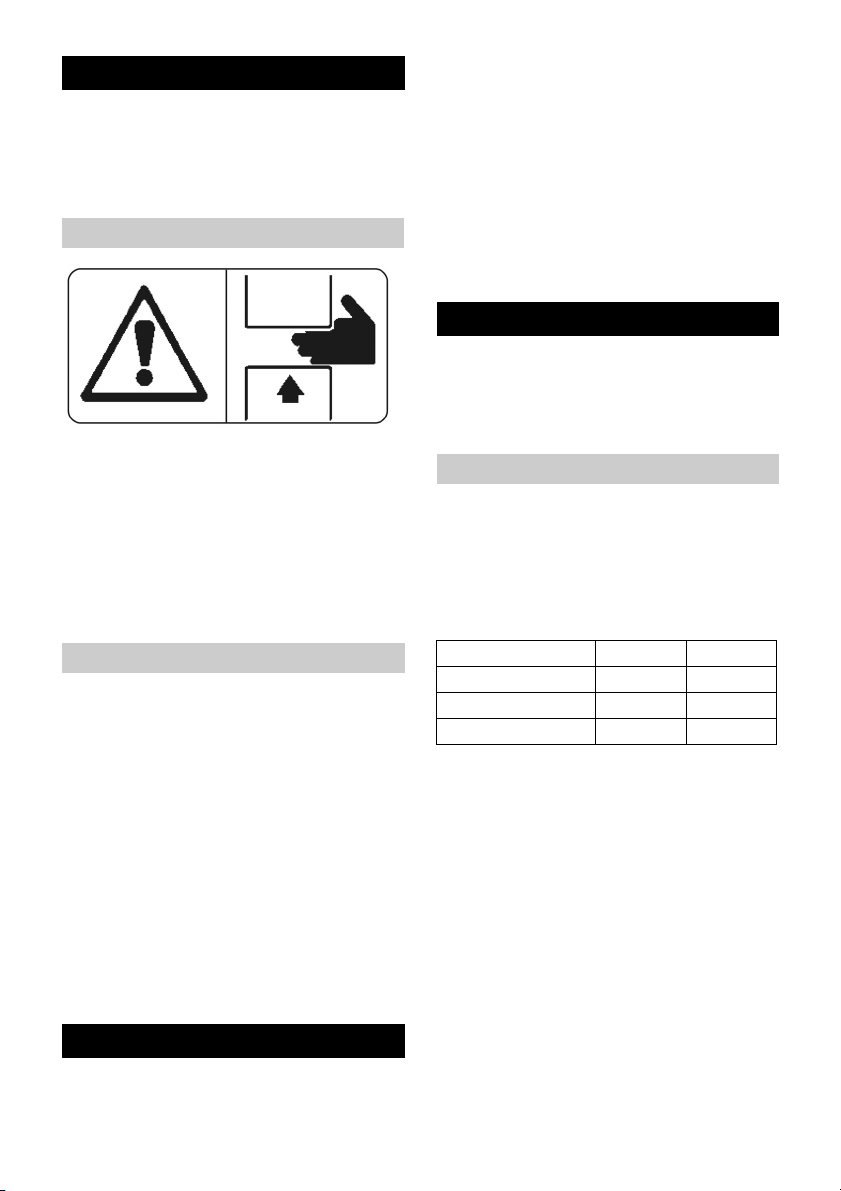
Sauggutbehälter entleeren
Hinweis
Der Sauggutbehälter muss entleert werden,
wenn er bis ca. 3 cm unter dem oberen Rand
gefüllt ist.
Î
Gerät ausschalten und mittels der Feststellbremsen an den Lenkrollen sichern.
Î Sauggutbehälter an der Entriegelung
nach oben öffnen (siehe Grafik).
Î Den Sauggutbehälter aus dem Gerät
an dem hierfür vorgesehenen Griff
herausziehen.
Î Den Sauggutbehälter entleeren und in
umgekehrter Reihenfolge wieder in das
Gerät einsetzen.
Staubsammelbeutel
Zur staubfreien Entleerung des Gerätes
kann in den Sauggutbehälter ein Staubsammelbeutel eingelegt werden:
Î Staubsammelbeutel in den Behälter
einsetzen sorgfältig an die Behälterwand anlegen.
Î Beutelrand über den Rand des Saug-
gutbehälters nach außen stülpen.
Î Sauggutbehälter in das Gerät einset-
zen.
Î Nach Betriebsende Staubsammelbeu-
tel verschließen und aus dem Sauggutbehälter herausnehmen.
Î
Staubsammelbeutel samt Inhalt gemäß
den geltenden gesetzlichen Vorschriften
entsorgen.
– 5
7DE
Page 8
Transport
Vorsicht
Verletzungs- und Beschädigungsgefahr!
Gewicht des Gerätes beim Transport beachten.
Beim Transport in Fahrzeugen Gerät nach
den jeweils gültigen Richtlinien gegen Rutschen und Kippen sichern.
Lagerung des Gerätes
Vorsicht
Verletzungs- und Beschädigungsgefahr!
Gewicht des Gerätes bei Lagerung beachten.
Dieses Gerät darf nur in Innenräumen gelagert werden.
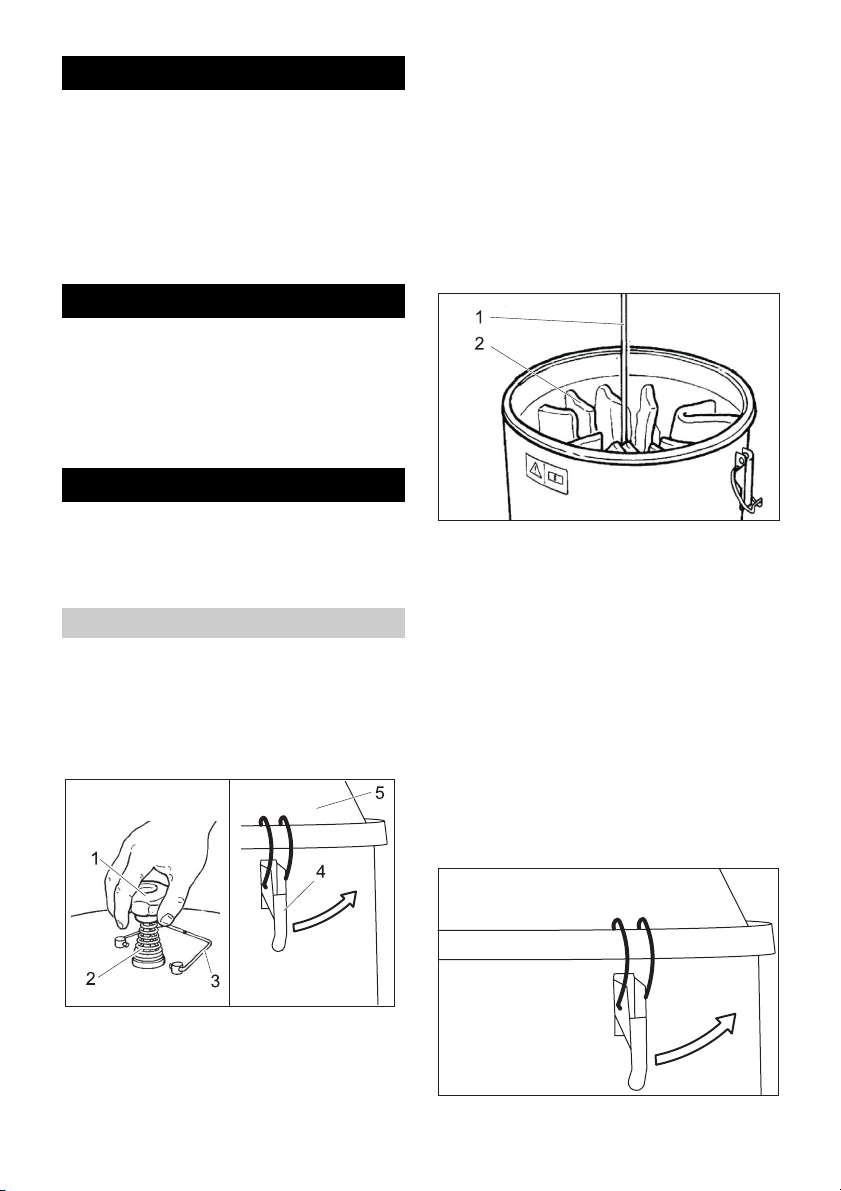
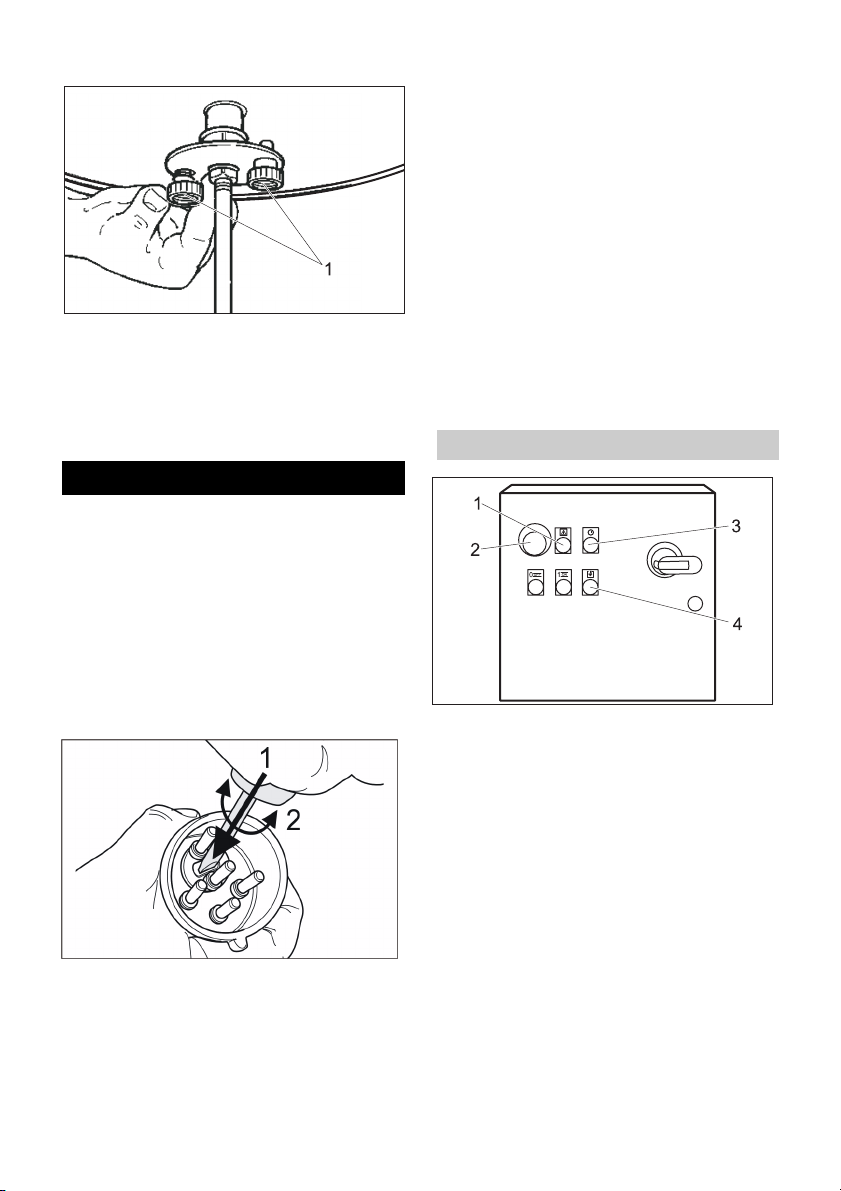
Pflege und Wartung
Î Sicherungsbügel Filterabreinigung zur
Seite schwenken.
Î Griff Filterreinigung abschrauben.
Î Feder abnehmen.
Î Mutter unterhalb der Feder abschrau-
ben (Gabelschlüssel Schüsselweite 27
mm erforderlich).
Î Verschlüsse öffnen.
Î Deckel Filterkammer abnehmen.
몇 Warnung
Bei Arbeiten am Sauger immer zuerst den
Netzstecker ziehen.
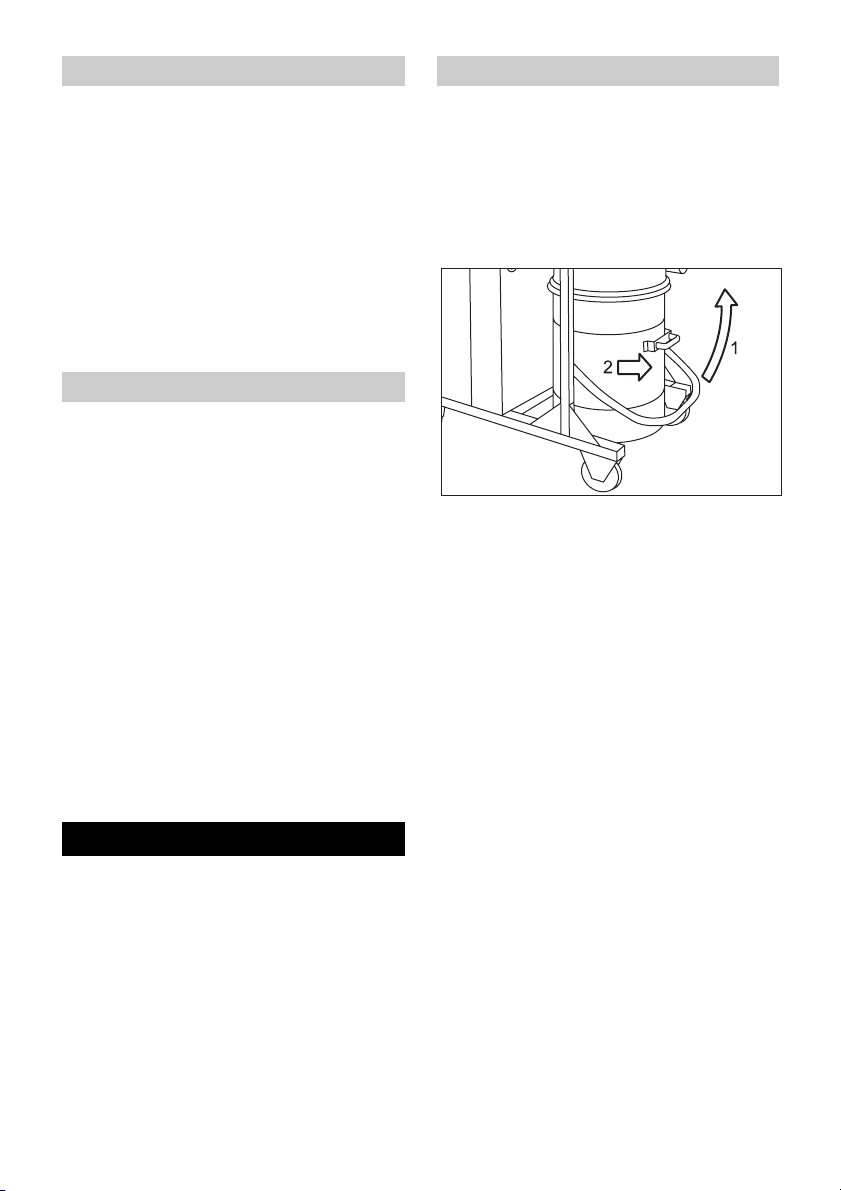
Filter wechseln/ersetzen
IV 100/40, IV 100/55
Î Das Gerät am EIN/AUS-Schalter aus-
schalten und vom Netz trennen.
Î Schlauch zur Saugturbine am unteren
Ende lösen und abziehen.
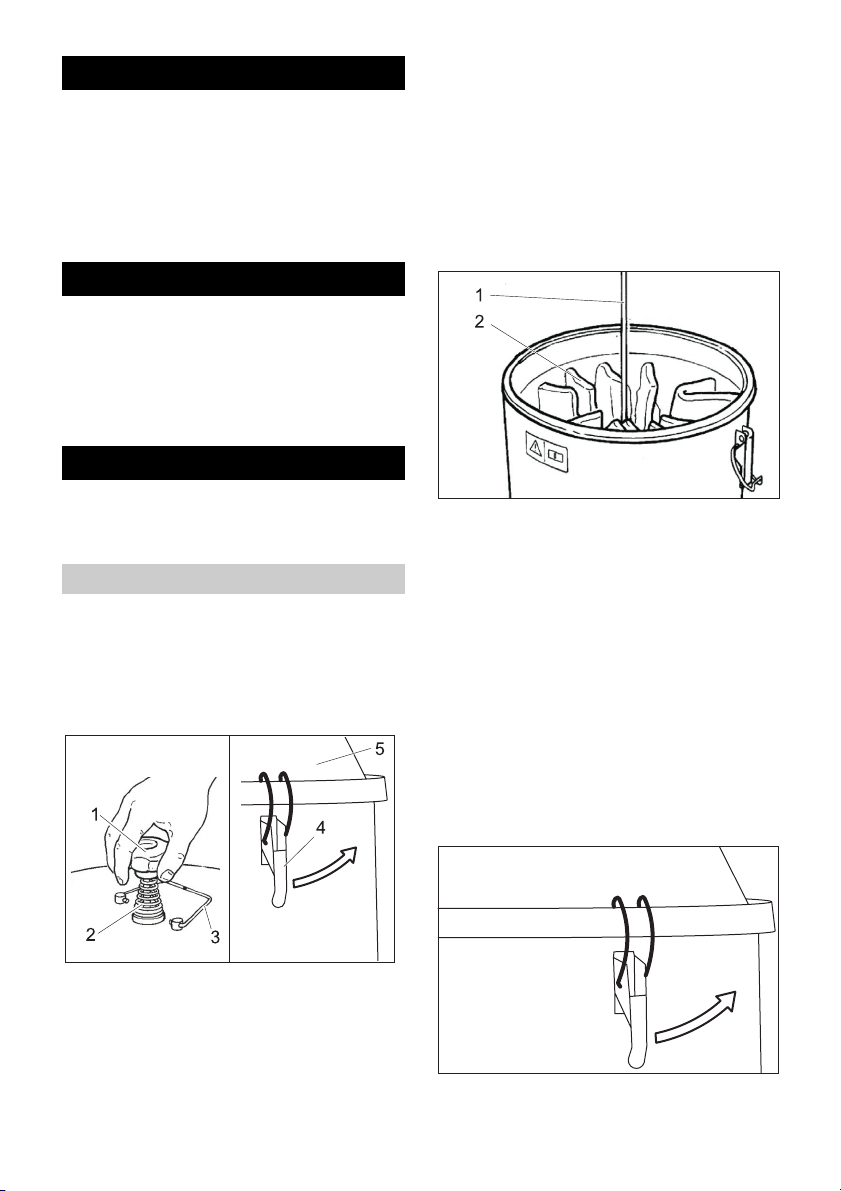
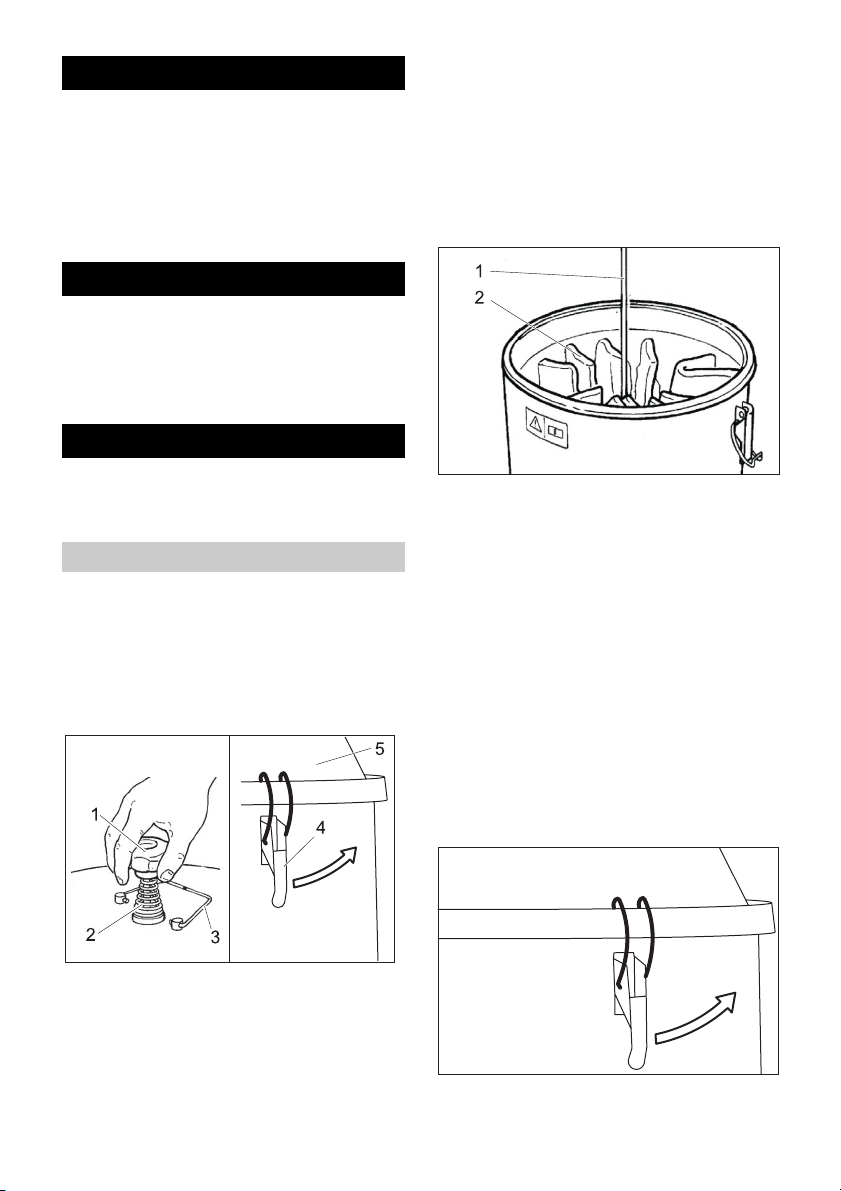
1 Griff Filterreinigung
2 Feder
3 Sicherungsbügel Filterabreinigung
4 Verschluss
5 Deckel Filterkammer
1Gestell
2Filter
Î Knoten der Bänder am Filter öffnen und
Gestell abnehmen.
Î Filter herausnehmen.
Î Den neuen Filter in umgekehrter Rei-
henfolge einsetzen und sichern.
IV 100/75
Î Taster „Gerät ausschalten“ drücken.
Î Das Gerät am EIN/AUS-Schalter aus-
schalten und vom Netz trennen.
Î Schlauch zur Saugturbine am unteren
Ende lösen und abziehen.
Î Verschlüsse öffnen.
Î Deckel Filterkammer abnehmen.
8 DE
– 6
Page 9
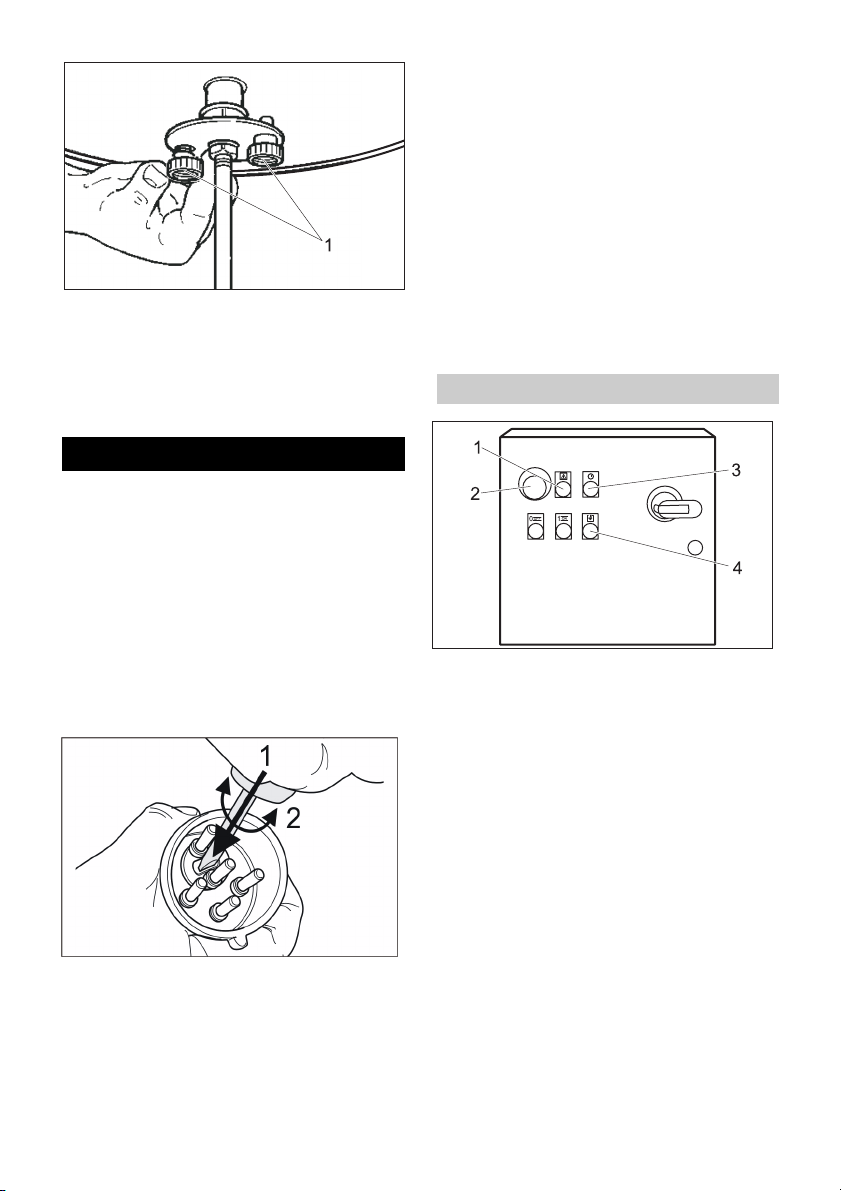
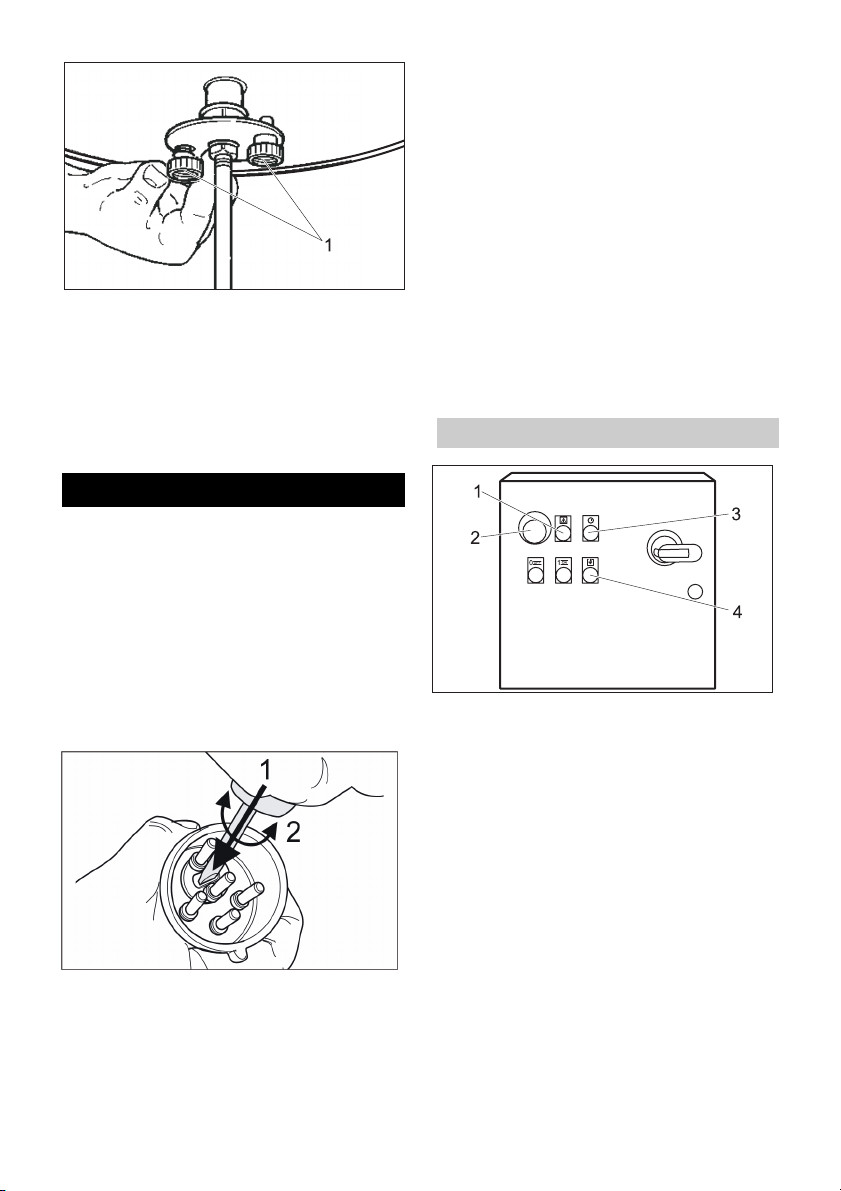
1 Rändelschraube
Î Beide Rändelschrauben herausdrehen
und Filter aus dem Gerät nehmen.
Î Den neuen Filter in umgekehrter Rei-
henfolge einsetzen und sichern.
Hilfe bei Störungen
Motor (Saugturbine) läuft nicht an
Keine elektrische Spannung.
Î Sicherung, Kabel, Stecker und Steck-
dose überprüfen.
Motorschutzschalter hat ausgelöst.
Î Schalter zurückstellen.
Staubaustritt beim Saugen
Filter nicht richtig befestigt oder defekt.
Î Filtersitz überprüfen bzw. austauschen.
Manometer zeigt einen nicht ordnungsgemäßen Druck an
Filter verstopft.
Î Gerät ausschalten, Filter reinigen oder
neuen Filter einsetzen.
몇 Warnung
Alle Prüfungen und Arbeiten an elektrischen Teilen vom Fachmann ausführen
lassen. Bei weiterführenden Störungen bitte den Kärcher-Kundendienst einschalten.
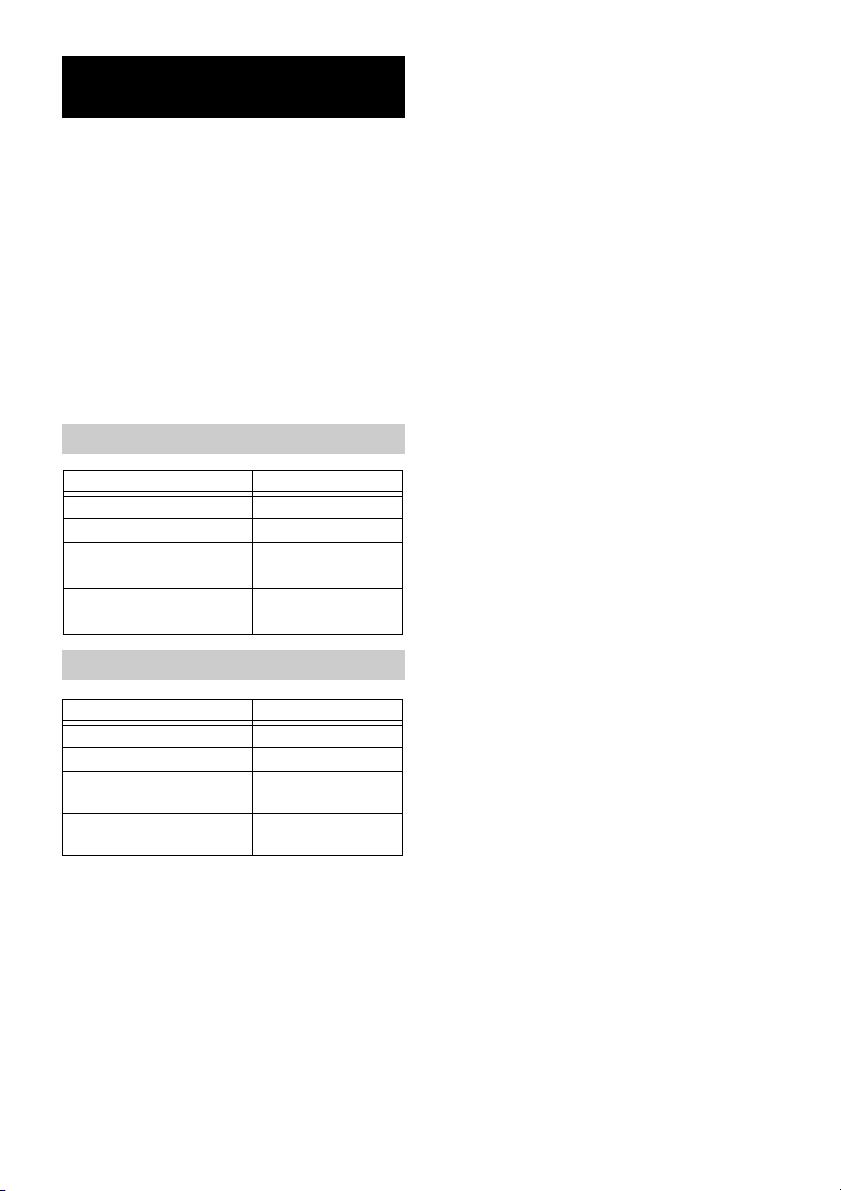
Störungsanzeige IV 100/75
Kein Saugbetrieb, Luftstrom tritt aus
Saugschlauch aus
Î Falsche Drehrichtung der Saugturbine,
Pole am Stecker tauschen.
Saugkraft lässt allmählich nach
Filter, Düse, Saugschlauch oder Saugrohr
verstopft.
Î Überprüfen, Zubehör reinigen. Evtl. Fil-
ter austauschen.
1 Kontrollleuchte „Not-Aus-Taster betä-
tigt“
Leuchtet bei gedrücktem Not-Aus-Taster.
Not-Aus-Taster durch Drehen entrie-
geln.
2 Not-Aus-Taster
3 Kontrollleuchte „Netzspannung“
Leuchtet bei eingestecktem Netzste-
cker und anliegender Netzspannung.
4 Kontrollleuchte Motorstörung
Leuchtet wenn der Motorschutzschalter
durch erhöhte Stromaufnahme oder
Überhitzung ausgelöst hat.
Ein-/Aus Schalter auf 0 drehen, ca. 10
Minuten warten, Ein-/Aus Schalter auf 1
drehen.
– 7
9DE
Page 10
Zubehör und Ersatzteile
– Es dürfen nur Zubehör und Ersatzteile
verwendet werden, die vom Hersteller
freigegeben sind. Original-Zubehör und
Original-Ersatzteile bieten die Gewähr
dafür, dass das Gerät sicher und störungsfrei betrieben werden kann.
– Eine Auswahl der am häufigsten benö-
tigten Ersatzteile finden Sie am Ende
der Betriebsanleitung.
– Weitere Informationen über Ersatzteile
erhalten Sie unter www.kaercher.com
im Bereich Service.
Zubehör IV 100/40, IV 100/55
Zubehör Bestellnummer
Filter 6.904-341.0
Filter, M 6.904-342.0
Staubsammelbeutel
Papier
Staubsammelbeutel PE6.904-348.0
6.904-347.0
Zubehör IV 100/75
Zubehör Bestellnummer
Filter 6.904-343.0
Filter, M 6.904-344.0
Staubsammelbeutel
Papier
Staubsammelbeutel PE6.904-348.0
6.904-347.0
10 DE
– 8
Page 11
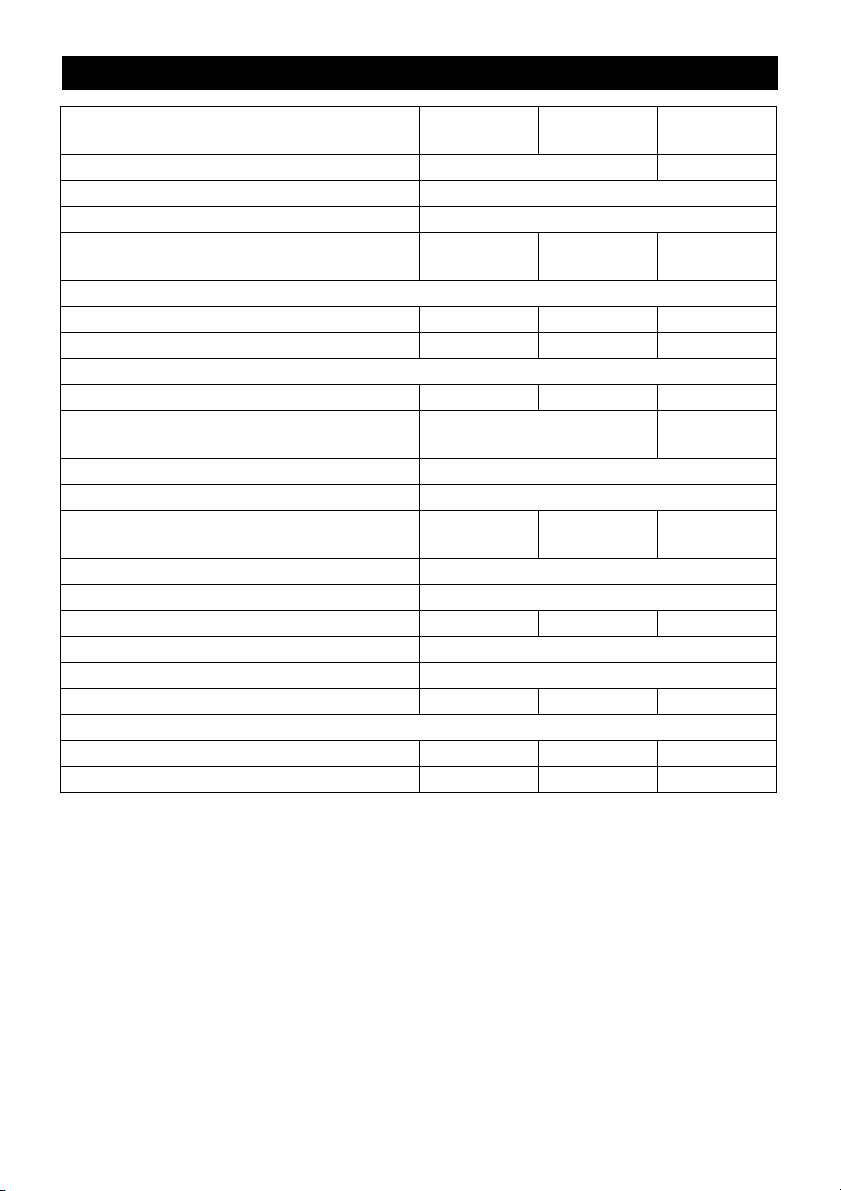
Technische Daten
Geräte-
IV 100/40 IV 100/55 IV 100/75
bezeichnung
Schutzart IP X4 IP 54
Behälterinhalt 90 l
Spannung 400 V, 3~, 50 Hz
Maximal zulässige Netzimpedanz 0.154+j0.096
Ohm
0.128+j0.080
Ohm
0.204+j0.127
Ohm
Gebläsedaten
Leistung 5000 W 6000 W 7500 W
Vakuum* 15,5 kPa 24 kPa 30 kPa
* mit Druckbegrenzungsventil
Luftmenge 92 l/s 88 l/s 105 l/s
Länge x Breite x Höhe 1220x670x1530 mm 1280x690
x1820 mm
Kabellänge 8 m
Schutzklasse I
Netzkabel:
6.649-367.0 6.649-363.0 6.649-364.0
Bestell-Nr.
Netzkabel:Typ: H07RN-F
Saugschlauch NW 61 / 5 m
Gewicht 141 kg 155 kg 256 kg
Lagertemperatur -10...+40 °C
Luftfeuchtigkeit 30...90 %
Filterfläche 2,2 m
2
2,2 m
2
3,0 m
2
Ermittelte Werte gemäß EN 60335-2-69
Schalldruckpegel L
Unsicherheit K
pA
pA
65 dB(A) 79 dB(A) 72 dB(A)
1 db (A) 1 db (A) 1 db (A)
– 9
11DE
Page 12

CE-Erklärung
Hiermit erklären wir, dass die nachfolgend
bezeichnete Maschine aufgrund ihrer Konzipierung und Bauart sowie in der von uns
in Verkehr gebrachten Ausführung den einschlägigen grundlegenden Sicherheitsund Gesundheitsanforderungen der EGRichtlinien entspricht. Bei einer nicht mit
uns abgestimmten Änderung der Maschine
verliert diese Erklärung ihre Gültigkeit.
Produkt: Nass- und Trockensauger
Typ: 1.573-xxx
Einschlägige EG-Richtlinien
2006/42/EG (+2009/127/EG)
2004/108/EG
Angewandte harmonisierte Normen
EN 55014–1: 2006
EN 55014–2: 1997 + A1: 2001
EN 60335–1
EN 60335–2–69
EN 61000–3–2: 2006
EN 61000–3–3: 2008
EN 62233: 2008
Angewandte nationale Normen
-
Die Unterzeichnenden handeln im Auftrag
und mit Vollmacht der Geschäftsführung.
CEO
Head of Approbation
Alfred Kärcher GmbH & Co. KG
Alfred-Kärcher-Str. 28 - 40
71364 Winnenden (Germany)
Tel.: +49 7195 14-0
Fax: +49 7195 14-2212
12 DE
– 10
Page 13
Please read and comply with
these original instructions prior
to the initial operation of your appliance and
store them for later use or subsequent owners.
Before first start-up it is definitely necessary
to read the safety indications Nr. 5.956249!
The non-compliance of the operating and
safety instructions may lead to damages of
the appliance and to dangers for the operator and other persons.
In case of transport damage inform vendor
immediately
Contents
Environmental protection EN - 1
Symbols in the operating
instructions
Warranty EN - 1
Proper use EN - 2
Device elements EN - 2
Safety instructions EN - 3
Start up EN - 4
Operation EN - 4
Shutting down EN - 5
Transport EN - 6
Storing the device EN - 6
Maintenance and care EN - 6
EN - 1
Environmental protection
The packaging material can be
recycled. Please do not place
the packaging into the ordinary
refuse for disposal, but arrange for the proper recycling.
Old appliances contain valuable materials that can be recycled. Please arrange for the
proper recycling of old appliances. Batteries, oil, and similar substances must not enter
the environment. Please dispose of your old appliances
using appropriate collection
systems.
Notes about the ingredients (REACH)
You will find current information about the
ingredients at:
http://www.karcher.de/de/unternehmen/
umweltschutz/REACH.htm
Symbols in the operating
instructions
Danger
Immediate danger that can cause severe
injury or even death.
몇 Warning
Possible hazardous situation that could
lead to severe injury or even death.
Caution
Possible hazardous situation that could
lead to mild injury to persons or damage to
property.
Troubleshooting EN - 7
Accessories and Spare
Parts
Specifications EN - 8
CE Declaration EN - 9
EN - 8
Warranty
The warranty terms published by the relevant sales company are applicable in each
country. We will repair potential failures of
your appliance within the warranty period
free of charge, provided that such failure is
caused by faulty material or defects in manufacturing. In the event of a warranty claim
please contact your dealer or the nearest
authorized Customer Service centre.
Please submit the proof of purchase.
– 1
13EN
Page 14
Proper use
This appliance is not suitable for sucking in
hazardous dust particles.
This appliance is suitable for industrial use.
For sucking in wet substances, the vacuuming material container available in the
Device elements
Operator control elements IV 100/40, IV 100/55
standard model must be replaced with a
"container for wet and dry vacuuming" that
is available as an accessory.
Any other use other than the specified one
will be treated as improper use of the appliance.
1 Handle for filter cleaning
2 Lid of filter chamber
3 Filter chamber
4 Connection neck for accessories
5 Manometer
6 Container for vaccuming material
7 Lever for unlocking the vacuuming ma-
terial container
8 Guiding rolls with fixed position brake
9 Hose to the suction turbine
10 Sliding handle
11 ON/OFF switch
12 Silencer
14 EN
– 2
Page 15
Operator control elements IV 100/75
1 Hose to the suction turbine
2 Handle for filter cleaning
3 Lid of filter chamber
4 Filter chamber
5 Connection neck for accessories
6 Container for vaccuming material
7 Lever for unlocking the vacuuming ma-
terial container
8 Guiding rolls with fixed position brake
9 Sliding handle
10 Silencer
11 Manometer
12 Control board
13 Switch "Switch off appliance"
14 Glow switch "Switch on appliance"
15 Indicator lamp Motor fault
16 ON/OFF switch
17 Indicator lamp "Mains voltage present"
18 Indicator lamp "Emergency-stop button
activated"
19 Emergency-stop button
Safety instructions
몇 Warning
This appliance is not suitable for sucking in
hazardous dust particles.
This appliance should not be used or stored
in the open under wet conditions.
– 3
15EN
Page 16
Symbols on the machine
몇 Caution
Danger of crushing while inserting and
locking the vacuuming material container.
Never hold your hands between the vacuuming material container and the vacuum cleaner or put them near the guide bolts while
locking . Lock the vacuuming material container by pressing the respective lever with
both the hands!
Safety instructions
Switch off the appliance after completing the
work and pull out the mains plug.
Please follow the safety regulations appli-
cable to the materials to be sucked in.
During proper/ improper use, the parts
(such as exhaust opening) of the industri-
al vacuum cleaner can tolerate a maxi-
mum of 95°C.
In Emergency
In case of emergency (while sucking in combustible materials, when there is a short-circuit or some other electrical defect), switch off
the appliance and remove the plug from the
socket.
Start up
Î
Bring the appliance to working position -
secure it, if required, with parking brakes.
Î
Insert the suction hose into the suction
hose connection.
Î
Attach the desired accessoried to the suc-
tion hose.
Î
Ensure that the vacuum material contain-
er has been inserted properly.
몇 Warning
The highest allowed net impedance at the
electrical connection point (refer to technical data) is not to be exceeded.
Operation
Î Insert the appliance plug into the mains
socket.
Î Turn the On/Off switch to "1".
Î For IV 100/75, press "Switch-on appli-
ance" switch.
Cleaning the filter
There is a manometer on the front side of
the appliance; this indicates the suction under-pressure in the device. If the suction
pressure fall below the value given in the
table below you need to switch off the machine and clean the filter.
NW 50 NW 60
IV 100/40 13,0 kPa 12,0 kPa
IV 100/55 19,5 kPa 15,5 kPa
IV 100/75 25,5 kPa 20,5 kPa
IV 100/40, IV 100/55
Î Switch off the appliance using the On/
Off switch.
Î Tilt the fastener for filter dedusting to-
wards the side.
Î Move forcefully the handle for filter
dedusting in an upward and downward
direction.
Î Place the fastener for filter dedusting in
a vertical position.
IV 100/75
Î Press the "Switch off appliance" switch.
Î Move the lever for cleaning the filter
back and forth a couple of tomes.
If this cleaning does not bring about any improvement, then remove the filter and wash
it or replace it (see chapter "Replacing the
filter").
16 EN
– 4
Page 17
Dry vacuum cleaning
Caution
Please note the following when switching from wet to dry vacuum cleaning:
If you vacuum dry dust while the filter element is still wet the filter will become obstructed and may be damaged beyond
repair.
Î Dry the wet filter properly before use or
replace it with a dry one.
Î Change the filter, if required, according
to instructions under the section "Maintenance and Care".
Wet suction (optional)
Note
For sucking in wet substances, the vacuuming material container available in the
standard model must be replaced with a
"container for wet and dry vacuuming" that
is available as an accessory.
The floater switch in the container for wet
and dry vacuuming interrupts the suction
flow when the maximum filling level is
reached.
When the suction flow is interrupted by the
floater switch:
Î Switch off IV 100/40 or IV 100/55 at the
ON/OFF switch.
For IV 100/75, press "Switch-off appli-
ance" switch.
Î Drain off the liquids by opening the
drain valve located at the base of the
container.
Shutting down
Î For IV 100/75, press "Switch-off appli-
ance" switch.
Î Switch off the appliance using the On/
Off switch.
Î If necessary, dismantle the accessory
and rinse it with water and let dry.
Î Empty the vacuuming material contain-
er (refer chapter "Emptying vacuuming
material container").
Î Vacuum and wipe the appliance inside
and outside.
Emptying the vacuuming material
container
Note
The vacuuming material container needs to
be emptied if it is full until about 3 cm below
the upper rim.
Î Switch off the appliance and secure it
using the parking brakes at the guide
rollers.
Î Open the vacuuming material container
upward at the lock (see figure).
Î Pull out the vacuuming material con-
tainer from the appliance using the handle that has been provided for the
purpose.
Î Empty the vacuuming material contain-
er and insert it back into the appliance
using the reverse sequence.
Dust collection bag
You can insert a dust collector in the vacuuming material container to empty the appliance without causing dust.
Î Insert the dust collection bag into the
container and attach it carefully to the
container wall.
Î Put over the edge of the bag over the
rim of the vacuuming material container.
Î Insert the vacuuming material container
back into the appliance.
Î After finishing use, close the dust col-
lection bag and remove it from the vacuuming material container.
Î Dispose off the dust collection bag with
its contents according to the applicable
regulations.
– 5
17EN
Page 18
Transport
Caution
Risk of injury and damage! Observe the
weight of the appliance when you transport
it.
When transporting in vehicles, secure the
appliance according to the guidelines from
slipping and tipping over.
Storing the device
Caution
Risk of injury and damage! Note the weight
of the appliance in case of storage.
This appliance must only be stored in interior rooms.
Maintenance and care
Î Tilt the fastener for filter dedusting to-
wards the side.
Î
Unscrew the handle for cleaning the filter.
Î Remove the spring.
Î Unscrew the nut below the spring (you
will need a spanner with width 27 mm).
Î Open locks.
Î Remove the lid of the filter chamber.
몇 Warning
First remove the mains plug before doing
any job on the vacuum cleaner.
Changing/ replacing filter
IV 100/40, IV 100/55
Î Switch off the appliance using the ON/
OFF switch and separate it from the
mains.
Î At the lower end, loosen and pull out the
hose to the suction turbine.
1 Handle for filter cleaning
2Spring
3 Fastener for filter dedusting
4 Lock
5 Lid of filter chamber
18 EN
1Frame
2Filter
Î Open the knot of the tapes on the filter
and remove the frame.
Î Take out the filter.
Î Insert and secure the new filter in the re-
verse sequence of steps.
IV 100/75
Î Press the "Switch off appliance" switch.
Î Switch off the appliance using the ON/
OFF switch and separate it from the
mains.
Î At the lower end, loosen and pull out the
hose to the suction turbine.
Î Open locks.
Î Remove the lid of the filter chamber.
– 6
Page 19
1 Knurled head screw
Î Turn out both the knurled head screws
and remove the filter from the appliance.
Î Insert and secure the new filter in the re-
verse sequence of steps.
Troubleshooting
Motor (suction turbine) does not start
No electrical voltage.
Î Check cables, plugs and socket.
Protective motor switch was triggered.
Î Reset switch.
Dust comes out during the vacuuming
Filter has not been fastened correctly or is
defective.
Î Check to see if filter is sitting properly;
replace if required.
Manometer shows a pressure level that
is not correct
Filter is blocked.
Î Switch off the appliance, clean the filter
or insert a new filter.
몇 Warning
All checking and work on electrical parts
must be performed by an authorized electrician. In the event of continuing faults,
contact Kärcher customer service.
Fault display IV 100/75
No suction, air current flows out of the
suction hose
Î Suction turbine rotates in the wrong di-
rection; interchange poles at the plug.
Suction capacity decreases slowly
Filter, nozzle, suction hose or suction pipe
may be blocked.
Î Check, clean the accessories, replace
the filter, if required.
1 Indicator lamp "Emergency-stop button
activated"
Glows when the emergency-off switch
is pressed.
Release emergency-stop button by
turning.
2 Emergency-stop button
3 Indicator lamp "Mains voltage present"
Glows when the mains plug is inserted
and when there is mains voltage.
4 Indicator lamp Motor fault
Glows when the motor protection switch
gets activated due to increased power
consumption or overheating.
Turn On/Off switch to 0, wait for approx.
10 minutes, turn the on/off switch to 1.
– 7
19EN
Page 20
Accessories and Spare Parts
–
Only use accessories and spare parts
which have been approved by the manufacturer. The exclusive use of original accessories and original spare parts
ensures that the appliance can be operated safely and troublefree.
–
At the end of the operating instructions
you will find a selected list of spare parts
that are often required.
–
For additional information about spare
parts, please go to the Service section at
www.kaercher.com.
Specifications
Attachments IV 100/40, IV 100/55
Accessories Order number
Filter 6.904-341.0
Filter, M 6.904-342.0
Paper dust collection
6.904-347.0
bag
PE dust collection bag 6.904-348.0
Attachments IV 100/75
Accessories Order number
Filter 6.904-343.0
Filter, M 6.904-344.0
Paper dust collection
bag
PE dust collection bag 6.904-348.0
6.904-347.0
Appliance description
IV 100/40 IV 100/55 IV 100/75
Type of protection IP X4 IP 54
Container capacity 90 l
Voltage 400 V, 3~, 50 Hz
Maximum allowed net impedance 0.154+j0.096
Ohm
0.128+j0.080
Ohm
0.204+j0.127
Blower data
Power 5000 W 6000 W 7500 W
Vacuum* 15,5 kPa 24 kPa 30 kPa
* with pressure limiting valve
Air quantity 92 l/s 88 l/s 105 l/s
Length x width x height 1220x670x1530 mm 1280x690
x1820 mm
Cable length 8 m
Protective class I
Power cord: Order No. 6.649-367.0 6.649-363.0 6.649-364.0
Mains cable: Type: H07RN-F
Suction hose NW 61 / 5 m
Weight 141 kg 155 kg 256 kg
Storage temperature -10...+40 °C
Humidity 30...90 %
Filter area 2,2 m
2
2,2 m
2
Values determined to EN 60335-2-69
Sound pressure level L
Uncertainty K
pA
pA
20 EN
65 dB(A) 79 dB(A) 72 dB(A)
1 db (A) 1 db (A) 1 db (A)
– 8
Ohm
3,0 m
2
Page 21
CE Declaration
We hereby declare that the machine described below complies with the relevant
basic safety and health requirements of the
EU Directives, both in its basic design and
construction as well as in the version put
into circulation by us. This declaration shall
cease to be valid if the machine is modified
without our prior approval.
Product: Wet and dry vacuum cleaner
Type: 1.573-xxx
Relevant EU Directives
2006/42/EC (+2009/127/EC)
2004/108/EC
Applied harmonized standards
EN 55014–1: 2006
EN 55014–2: 1997 + A1: 2001
EN 60335–1
EN 60335–2–69
EN 61000–3–2: 2006
EN 61000–3–3: 2008
EN 62233: 2008
Applied national standards
-
The undersigned act on behalf and under
the power of attorney of the company management.
CEO
Head of Approbation
Alfred Kärcher GmbH Co. KG
Alfred-Kärcher-Str. 28 - 40
71364 Winnenden (Germany)
Phone: +49 7195 14-0
Fax: +49 7195 14-2212
– 9
21EN
Page 22
Lire ces notice originale avant la
première utilisation de votre appareil, se comporter selon ce qu'elles requièrent et les conserver pour une
utilisation ultérieure ou pour le propriétaire
futur.
Avant la première mise en service, vous
devez impérativement avoir lu les consignes de sécurité N° 5.956-249 !
En cas de non-respect des instructions de
service et des consignes de sécurité, l'appareil risque de subir des dommages matériel et l'utilisateur ainsi que toute tierce
personne sont exposés à des dangers potentiels.
Contactez immédiatement le revendeur en
cas d'avarie de transport.
Table des matières
Protection de l’environnement
Symboles utilisés dans le
mode d'emploi
Garantie FR - 1
Utilisation conforme FR - 2
Éléments de l'appareil FR - 2
Consignes de sécurité FR - 4
Mise en service FR - 4
Utilisation FR - 4
Mise hors service FR - 5
Transport FR - 6
Entreposage de l'appareil FR - 6
Entretien et maintenance FR - 6
Assistance en cas de pan-neFR - 7
Accessoires et pièces de
rechange
Données techniques FR - 9
Déclaration CE FR - 10
22 FR
FR - 1
FR - 1
FR - 8
Protection de
l’environnement
Les matériaux constitutifs de l’emballage sont recyclables. Ne pas
jeter les emballages dans les ordures ménagères, mais les remettre à un système de recyclage.
Les appareils usés contiennent
des matériaux précieux recyclables lesquels doivent être apportés à un système de recyclage. Il
est interdit de jeter les batteries,
l'huile et les substances similaires
dans l'environnement. Pour cette
raison, utiliser des systèmes de
collecte adéquats afin d'éliminer
les appareils usés.
Instructions relatives aux ingrédients
(REACH)
Les informations actuelles relatives aux ingrédients se trouvent sous :
http://www.karcher.de/de/unternehmen/
umweltschutz/REACH.htm
Symboles utilisés dans le
mode d'emploi
Danger
Pour un danger immédiat qui peut avoir
pour conséquence la mort ou des blessures corporelles graves.
몇 Avertissement
Pour une situation potentiellement dangereuse qui peut avoir pour conséquence des blessures corporelles graves ou la mort.
Attention
Pour une situation potentiellement dangereuse qui peut avoir pour conséquence des blessures légères ou des dommages matériels.
Garantie
Dans chaque pays, les conditions de garantie
en vigueur sont celles publiées par notre société de distribution responsable. Les éventuelles pannes sur l’appareil sont réparées
gratuitement dans le délai de validité de la garantie, dans la mesure où celles-ci relèvent
d'un défaut matériel ou d'un vice de fabrication. En cas de recours en garantie, adressez-vous à votre revendeur ou au service
après-vente agréé le plus proche munis de
votre preuve d'achat.
– 1
Page 23
Utilisation conforme
Cet appareil n’est pas approprié pour la réception de poussières dangereuses.
Cet appareil est approprié pour l'utilisation
industrielle.
Éléments de l'appareil
Eléments de service IV 100/40, IV 100/55
Pour l'aspiration de liquides, le réservoir à
poussières monté de série doit être remplacé par le "réservoir pour aspiration de liquides et de poussières".
Chaque autre utilisation est considéré comme incorrecte.
1 Poignée de nettoyage de filtre.
2 Couvercle du récipient du filtre
3 Chambre de filtre
4 Bouche de raccordement pour les ac-
cessoires
5 Manomètre
6 Poubelle
7 Levier pour déverrouiller la poubelle
8 Roulettes pivotantes et frein de station-
nement
9 Tuyau vers la turbine d'aspiration
10 Poignée de déplacement
11 Interrupteur - Marche/Arrêt
12 Silencieux
– 2
23FR
Page 24
Eléments de service IV 100/75
1 Tuyau vers la turbine d'aspiration
2 Poignée de nettoyage de filtre.
3 Couvercle du récipient du filtre
4 Chambre de filtre
5 Bouche de raccordement pour les ac-
cessoires
6 Poubelle
7 Levier pour déverrouiller la poubelle
8 Roulettes pivotantes et frein de station-
nement
9 Poignée de déplacement
10 Silencieux
11 Manomètre
12 Armoire de commande
13 Touche "Arrêt de l'appareil"
14 Touche lumineuse de "Mise en marche
de l'appareil"
24 FR
15 Voyant de contrôle panne du moteur
16 Interrupteur - Marche/Arrêt
17 Voyant de contrôle "il y a tension du
secteur"
18 Lampe de contrôle "Touche d'arrêt d'ur-
gence enfoncée"
19 Touche d'arrêt d’urgence
– 3
Page 25
Consignes de sécurité
몇 Avertissement
Cet appareil n’est pas approprié pour la réception de poussières dangereuses.
Cet appareil ne peut être utilisé ou conservé à l'air libre ni dans les endroits humides.
Des symboles sur l'appareil
몇 Attention
Risque d'écrasement en posant et déverrouillant la poubelle
Ne pas mettre les mains entre la poubelle
et l'aspirateur ou à la proximité du boulonguide pendant le déverrouillage. Déverrouiller la poubelle avec les deux mains en
actionnant le levier correspondant!
Consignes de sécurité
Mettre l'appareil hors de service en terminant le travail et tirer la fiche secteur.
Respecter les directives de sécurité
pour les matériaux devant être aspirés.
Durant l'utilisation correcte/incorrecte,
certaines pièces de l'aspirateur indus-
triel, telles que l'orifice de purge, peu-
vent atteindre des températures de
95°C.
En cas d'urgence
En cas d'urgence (par exemple aspiration
de matériaux inflammables, court-circuit ou
autres défauts électriques), il faut mettre
l'appareil hors marche et débrancher la fiche de secteur.
Mise en service
Î Amener l'appareil en position de travail,
si nécessaire le bloquer au moyen des
freins d'immobilisation.
Î Brancher le flexible d'aspiration dans
un raccord de flexible d'aspiration.
Î Monter l'accessoire souhaité sur le
flexible d'aspiration.
Î S'assurer que le réservoir à poussières
est positionné correctement.
몇 Avertissement
L'impédance de réseau maximale admissible au niveau du point de raccordement ne
doit en aucun cas être dépassée (voir Caractéristiques techniques).
Utilisation
Î Introduire la fiche de l'appareil dans la
prise de courant.
Tourner l'interrupteur Marche/Arrêt sur "1".
Î
Î Avec le IV 100/75, presser la touche
"Mettre l'appareil en marche".
Nettoyer le filtre
La face avant de l'appareil intègre un manomètre qui affiche la dépression d'aspiration générée à l'intérieur de l'appareil. Si la
sous-pression d'aspiration tombe en dessous de la valeur figurant dans le tableau
ci-dessous, l'appareil doit être mis hors service et le filtre nettoyé.
NW 50 NW 60
IV 100/40 13,0 kPa 12,0 kPa
IV 100/55 19,5 kPa 15,5 kPa
IV 100/75 25,5 kPa 20,5 kPa
IV 100/40, IV 100/55
Î Eteindre l'appareil à l'interrupteur Mar-
che/Arrêt.
Î Pivoter le guidon de sûreté de nettoya-
ge de filtre vers la côté.
Î Bouger fortement la poignée du net-
toyage de filtre plusieurs fois vers le
haut et vers le bas.
Î Mettre le guidon de sûreté de nettoyage
de filtre en position verticale.
IV 100/75
Î Presser le touche "Arrêt de l'appareil"
Î Agiter plusieurs fois le levier de nettoya-
ge du filtre.
Si ce nettoyage n'amène aucune amélioration, le filtre peut être retirer et laver ou
changer (cf. chapitre "changer le filtre").
– 4
25FR
Page 26
Aspiration de poussières
Vider la poubelle
Attention
Avant de passer de l’aspiration humide
à l’aspiration à sec, il faut noter que :
Aspirer de la poussière sèche avec une
cartouche de filtre mouillée peut boucher le
filtre et le rendre inutilisable.
Î Il faut donc bien sécher un filtre mouillé
avant de l'utiliser ou bien le remplacer
par un filtre sec.
Î Le cas échéant, remplacer le filtre (se
référer au point 'Entretien et maintenance').
Aspiration de liquides (en option)
Remarque
Pour l'aspiration de liquides, le réservoir à
poussières monté de série doit être remplacé par le "réservoir pour aspiration de liquides et de poussières".
Le flotteur placé dans le réservoir pour aspiration de liquides et de poussières permet de couper le débit d'aspiration lorsque
le niveau de remplissage maximal est atteint.
Lorsque le débit d'aspiration est stoppé par
le flotteur :
Î Déclencher IV 100/40 ou IV 100/55
avec l'interrupteur MARCHE/ARRET.
Avec le IV 100/75, presser la touche
"Arrêtre l'appareil".
Î Evacuer le liquide en ouvrant le purgeur
situé sur la face inférieure du réservoir.
Mise hors service
Î Avec le IV 100/75, presser la touche
"Arrêtre l'appareil".
Î Eteindre l'appareil à l'interrupteur Mar-
che/Arrêt.
Î Démonter l'accessoire et en cas de be-
soin, rincer le à l’eau et sécher.
Î Vider la poubelle (cf. le chapitre "Vider
la poubelle").
Î Nettoyer l'appareil en l'aspirant et en
l'essuyant à l'intérieur et à l'extérieur.
Remarque
La poubelle doit être vidée, lorsqu'elle est
pleine jusqu'à env. 3 m sous le bout supérieur.
Î Mettre l'appareil hors tension et le blo-
quer en serrant les freins d'immobilisa-
tion des roulettes.
Î Ouvrir la poubelle au déverrouillage
vers le haut (cf. le graphique).
Î Retirer la poubelle de l'appareil à la poi-
gnée prévue pour cet effet.
Î Vider la poubelle et placer de nouveau
dans l'appareil dans l'ordre inverse.
Sac à poussière
Pour vider l'appareil sans laisser la poussière s'échapper, il est possible de placer
un sac collecteur de poussières dans le réservoir.
Î Placer le sac collecteur dans le réser-
voir à poussières et le positionner avec
précaution contre les parois de ce der-
nier.
Î Replier les bords du sac sur les bords
du réservoir.
Î Introduire le réservoir à poussières
dans l'appareil.
Î Après utilisation, fermez le sac collec-
teur de poussières et l'extraire du réser-
voir.
Î Eliminer le sac à poussière et son con-
tenu selon les dispositifs en vigueur.
26 FR
– 5
Page 27
Transport
Attention
Risque de blessure et d'endommagement !
Respecter le poids de l'appareil lors du
transport.
Sécuriser l'appareil contre les glissements
ou les basculements selon les directives en
vigueur lors du transport dans des véhicules.
Entreposage de l'appareil
Attention
Risque de blessure et d'endommagement !
Prendre en compte le poids de l'appareil à
l'entreposage.
Cet appareil doit uniquement être entreposé en intérieur.
Entretien et maintenance
Î Pivoter le guidon de sûreté de nettoya-
ge de filtre vers la côté.
Î Dévisser la poignée de nettoyage de fil-
tre.
Î Retirer le ressort.
Î Dévisser l'écrous sous le ressort (une
clé à fourche de la taille 27 mm est né-
cessaire).
Î Ouvrir les orifices.
Î Retirer le couvercle du récipient du filtre
몇 Avertissement
Il convient de toujours débrancher la fiche
réseau avant d'effectuer des travaux sur
l'aspirateur.
Changer/remplacer le filtre
IV 100/40, IV 100/55
Î Eteindre l'appareil à l'interrupteur Mar-
che/Arrêt.
Î Détachez et tirer le tuyau vers la turbine
d'aspiration dans la partie inférieure.
1 Poignée de nettoyage de filtre.
2 Ressort
3 Guidon de sûreté de nettoyage du filtre
4 Fermeture
5 Couvercle du récipient du filtre
1Baie
2Filtre
Î Ouvrir les noeuds des bandes au filtre
et retirer le baie.
Î Extraire le filtre.
Î Placer le nouveau filtre dans l'ordre in-
verse.
IV 100/75
Î Presser le touche "Arrêt de l'appareil"
Î Eteindre l'appareil à l'interrupteur Mar-
che/Arrêt.
Î Détachez et tirer le tuyau vers la turbine
d'aspiration dans la partie inférieure.
Î Ouvrir les orifices.
– 6
27FR
Page 28
Î Retirer le couvercle du récipient du filtre
1 Vis latérale
Î Dévisser les deux vis latérales et retirer
le filtre de l'appareil.
Î Placer le nouveau filtre dans l'ordre in-
verse.
Assistance en cas de panne
Moteur (turbine d'aspiration) ne démarre pas
Aspirateur hors tension.
Î Vérifier le câble, la fiche, le fusible et la
prise
Le disjoncteur-protecteur a déclenché.
Î Reposer l'interrupteur.
De la poussière s'échappe lors de l'aspiration
Filtre n'est pas bien fixé ou défectueux.
Î Contrôler la fixation du filtre, le cas
échéant remplacer.
Le manomètre affiche une pression pas
correcte
Filtre obturé.
Î Mettre d'appareil hors tension, nettoyer
le filtre ou le remplacer.
몇 Avertissement
Tous les contrôles et travaux sur des équipements électriques doivent être effectués
par un spécialiste. En cas d'erreurs persistantes, contacter le service après-vente
Kärcher.
Affichage de panne IV 100/75
Pas d'aspiration, le flux d'air sort du tuyau
Î Mauvais sens de rotation de la turbine,
changer les bornes de la prise.
La force d'aspiration diminue petit à petit
Filtre, suceur, flexible ou tuyau d'aspiration
colmatés.
Î Contrôler, nettoyer les accessoires. Le
cas échéant, remplacer le filtre.
28 FR
1 Lampe de contrôle "Touche d'arrêt d'ur-
gence enfoncée"
S'allume lorsque la touche d'arrêt d'ur-
gence est enfoncée.
Tourner la touche d'arrêt d'urgence
pour la déverrouiller.
2 Touche d'arrêt d’urgence
3 Voyant de contrôle "il y a tension du
secteur"
S'allume lorsque la prise réseau est
branchée et en présence de tension
électrique du réseau.
4 Voyant de contrôle panne du moteur
S'allume lorsque l'interrupteur de pro-
tection du moteur est déclenché par
suite d'une tension accrue ou d'une sur-
chauffe.
Placer l'interrupteur Marche/Arrêt sur 0,
attendre env. 10 minutes, remettre l'in-
terrupteur Marche/Arrêt sur 1.
– 7
Page 29
Accessoires et pièces de
rechange
– Utiliser uniquement des accessoires et
des pièces de rechange autorisés par le
fabricant. Des accessoires et des pièces de rechange d’origine garantissent
un fonctionnement sûr et parfait de l’appareil.
– Une sélection des pièces de rechange
utilisées le plus se trouve à la fin du
mode d'emploi.
–
Plus information sur les pièces de rechange vous les trouverez sous www.kaercher.com sous le menu Service.
Accessoire IV 100/40, IV 100/55
Accessoires N° de commande
Filtre 6.904-341.0
Filtre, M 6.904-342.0
Sac collecteur de poussières en papier
Sac collecteur de pous-
sières PE
6.904-347.0
6.904-348.0
Accessoire IV 100/75
Accessoires N° de commande
Filtre 6.904-343.0
Filtre, M 6.904-344.0
Sac collecteur de pous-
sières en papier
Sac collecteur de pous-
sières PE
6.904-347.0
6.904-348.0
– 8
29FR
Page 30
Données techniques
Désignation de l'appareil IV 100/40 IV 100/55 IV 100/75
Type de protection IP X4 IP 54
Capacité de la cuve 90 l
Tension 400 V, 3~, 50 Hz
Impédance du circuit maximale admissible 0.154+j0.096
Ohm
Données de la soufflante
Performances 5000 W 6000 W 7500 W
Vide* 15,5 kPa 24 kPa 30 kPa
* avec limiteur de pression
Quantité d'air 92 l/s 88 l/s 105 l/s
Longueur x largeur x hauteur 1220x670x1530 mm 1280x690
Longueur de câble 8 m
Classe de protection I
Câble d’alimentation : N° de commande 6.649-367.0 6.649-363.0 6.649-364.0
Câble d'alimentation : type : H07RN-F
Flexible d’aspiration NW 61 / 5 m
Poids 141 kg 155 kg 256 kg
Température d'entreposage -10...+40 °C
Humidité de l'air 30...90 %
Surface du filtre 2,2 m
Valeurs définies selon EN 60335-2-69
Niveau de pression sonore L
Incertitude K
pA
pA
65 dB(A) 79 dB(A) 72 dB(A)
1 db (A) 1 db (A) 1 db (A)
2
0.128+j0.080
Ohm
2
2,2 m
0.204+j0.127
Ohm
x1820 mm
2
3,0 m
30 FR
– 9
Page 31

Déclaration CE
Nous certifions par la présente que la machine spécifiée ci-après répond de par sa
conception et son type de construction ainsi que de par la version que nous avons
mise sur le marché aux prescriptions fondamentales stipulées en matière de sécurité et d’hygiène par les directives
européennes en vigueur. Toute modification apportée à la machine sans notre accord rend cette déclaration invalide.
Produit: Aspirateur à sec et par voie
humide
Type: 1.573-xxx
Directives européennes en vigueur :
2006/42/CE (+2009/127/CE)
2004/108/CE
Normes harmonisées appliquées :
EN 55014–1: 2006
EN 55014–2: 1997 + A1: 2001
EN 60335–1
EN 60335–2–69
EN 61000–3–2: 2006
EN 61000–3–3: 2008
EN 62233: 2008
Normes nationales appliquées :
-
Les soussignés agissent sur ordre et sur
procuration de la Direction commerciale.
CEO
Head of Approbation
Alfred Kärcher GmbH Co. KG
Alfred-Kärcher-Str. 28 - 40
71364 Winnenden (Germany)
Téléphone : +49 7195 14-0
Télécopieur : +49 7195 14-2212
– 10
31FR
Page 32

Prima di utilizzare l'apparecchio
per la prima volta, leggere le
presenti istruzioni originali, seguirle e conservarle per un uso futuro o in caso di rivendita dell'apparecchio.
Prima di procedere alla prima messa in funzione leggere tassativamente le norma di
sicurezza n. 5.956-249!
La mancata osservanza delle istruzioni
d'uso e delle norme di sicurezza può causare danni all'apparecchio e presentare pericoli per l'utilizzatore e le altre persone.
Eventuali danni da trasporto vanno comunicati immediatamente al proprio rivenditore.
Indice
Protezione dell’ambiente IT - 1
Simboli riportati nel manua-
le d'uso
Garanzia IT - 1
Uso conforme a destinazio-neIT - 2
Parti dell'apparecchio IT - 2
Norme di sicurezza IT - 4
Messa in funzione IT - 4
Uso IT - 4
Messa fuori servizio IT - 5
Trasporto IT - 6
Conservazione dell'appa-
recchio
Cura e manutenzione IT - 6
Guida alla risoluzione dei
guasti
Accessori e ricambi IT - 8
Dati tecnici IT - 9
Dichiarazione CE IT - 10
IT - 1
IT - 6
IT - 7
Protezione dell’ambiente
Tutti gli imballaggi sono riciclabili. Gli imballaggi non vanno gettati nei rifiuti domestici, ma
consegnati ai relativi centri di
raccolta.
Gli apparecchi dismessi contengono materiali riciclabili preziosi
e vanno perciò consegnati ai relativi centri di raccolta. Batterie,
olio e sostanze simili non devono essere dispersi nell’ambiente. Si prega quindi di smaltire gli
apparecchi dismessi mediante i
sistemi di raccolta differenziata.
Avvertenze sui contenuti (REACH)
Informazioni aggiornate sui contenuti sono
disponibili all'indirizzo:
http://www.karcher.de/de/unternehmen/
umweltschutz/REACH.htm
Simboli riportati nel manuale
d'uso
Pericolo
Per un rischio imminente che determina lesioni gravi o la morte.
몇 Attenzione
Per una situazione di rischio possibile che potrebbe determinare lesioni gravi o la morte.
Attenzione
Per una situazione di rischio possibile che potrebbe determinare danni leggeri a persone o
cose.
Garanzia
Le condizioni di garanzia valgono nel rispettivo paese di pubblicazione da parte
della nostra società di vendita competente.
Entro il termine di garanzia eliminiamo gratuitamente eventuali guasti all’apparecchio,
se causati da difetto di materiale o di produzione. Nei casi previsti dalla garanzia si
prega di rivolgersi al proprio rivenditore, oppure al più vicino centro di assistenza autorizzato, esibendo lo scontrino di acquisto.
32 IT
– 1
Page 33

Uso conforme a destinazione
Questo apparecchio non è indicato per la
raccolta di polvere pericolosa.
Questo apparecchio è idoneo per l'impiego
industriale.
Parti dell'apparecchio
Attuatori IV 100/40, IV 100/55
Per l'aspirazione di liquidi sostituire il contenitore materiale aspirato fornito di serie con
il contenitore per aspirazione di solidi e liquidi disponibile come accessorio.
Qualsiasi altro utilizzo viene considerato
come non conforme alla destinazione d'uso.
1 Maniglia pulizia filtro
2 Coperchio camera filtro
3 Camera filtro
4 Raccordo per accessori
5 Manometro
6 Contenitore materiale aspirato
7 Leva per sblocco contenitore materiale
aspirato
8 Ruote pivottanti con freno di staziona-
mento
9 Tubo flessibile della turbina di aspira-
zione
10 Impugnatura scorrevole
11 Interruttore on/off
12 Sistema di scarico
– 2
33IT
Page 34

Attuatori IV 100/75
1 Tubo flessibile della turbina di aspira-
zione
2 Maniglia pulizia filtro
3 Coperchio camera filtro
4 Camera filtro
5 Raccordo per accessori
6 Contenitore materiale aspirato
7 Leva per sblocco contenitore materiale
aspirato
8 Ruote pivottanti con freno di staziona-
mento
9 Impugnatura scorrevole
10 Sistema di scarico
11 Manometro
12 Quadro elettrico ad armadio
13 Tasto "Spegnere l'apparecchio"
34 IT
14 Tasto luminoso "Accendere l'apparec-
chio"
15 Spia luminosa "guasto motore"
16 Interruttore on/off
17 Spia luminosa "Corrente collegata“
18 Spia luminosa "Pulsante arresto
d'emergenza azionato"
19 Pulsante d'arresto d'emergenza
– 3
Page 35

Norme di sicurezza
몇 Attenzione
Questo apparecchio non è indicato per
l'aspirazione di polvere nociva.
Non è consentito utilizzare né conservare
questo apparecchio all'aperto in presenza
di umidità.
Simboli riportati sull’apparecchio
몇 Attenzione
Pericolo di schiacciamento durante l'inserimento e il blocco del contenitore
materiale aspirato
Durante il bloccaggio, non tenere le mani in
nessun caso tra il contenitore materiale
aspirato e non avvicinarle ai perni di guida.
Bloccare il contenitore materiale aspirato
azionando la rispettiva leva con entrambe
le mani.
Norme di sicurezza
Spegnere l'apparecchio al termine della lavorazione e staccare la spina.
Osservare le disposizioni di sicurezza
per i materiali da aspirare. In caso di
uso proprio/improprio la temperatura di
alcune parti (per es. l’apertura di scarico) dell'aspirapolvere industriale può
raggiungere i 95°C.
In caso d'emergenza
In caso d'emergenza (p.es. in caso di aspirazione di materiali infiammabili, di cortocircuito o di altri guasti di tipo elettrico)
spegnere l'apparecchio e staccare la spina.
Messa in funzione
Î Collocare l’apparecchio in posizione di
lavoro, se necessario bloccarlo median-
te i freni.
Î Inserire il tubo di aspirare nell'apposito
attacco.
Î Applicare gli accessori desiderati sul
tubo flessibile di aspirazione.
Î Accertarsi che il contenitore del mate-
riale aspirato sia inserito correttamente.
몇 Attenzione
Non superare il valore massimo d'impedenza di rete consentito per il punto d'allacciamento elettrico (vedi Dati tecnici).
Uso
Î Inserire la spina dell’apparecchio nella
presa di rete.
Î Girare l'interruttore On/Off su "1".
Î Nel IV 100/75, premere il tasto "Accen-
dere l'apparecchio".
Pulizia del filtro
Sul lato frontale dell'apparecchio si trova un
manometro che indica la depressione di
aspirazione all'interno dell'apparecchio.
Sinkt der Saugunterdruck unter den in der
unten stehenden Tabelle angegebenen
Wert, muss das Gerät ausgeschaltet und
der Filter gereinigt werden.
NW 50 NW 60
IV 100/40 13,0 kPa 12,0 kPa
IV 100/55 19,5 kPa 15,5 kPa
IV 100/75 25,5 kPa 20,5 kPa
IV 100/40, IV 100/55
Î Spegnere l'apparecchio tramite l'inter-
ruttore ON/OFF.
Î Orientare di lato la staffa di sicurezza
pulizia filtro.
Î Muovere in alto e in basso vigorosa-
mente e più volte la maniglia pulizia filtro.
Î Posizionare verticalmente la staffa di si-
curezza pulizia filtro.
– 4
35IT
Page 36

IV 100/75
Î Premere il tasto "Spegnere l'apparec-
chio".
Î Spostare più volte la leva di pulizia del
filtro.
Se non si ottengono miglioramenti con questa pulizia, rimuovere il filtro e lavarlo o sostituirlo (vedi capitolo "Sostituzione del
filtro“).
Aspirazione a secco
Attenzione
Al cambio da aspirazione di liquidi ad
aspirazione a secco tenere presente
quanto segue:
L'aspirazione di polvere secca quando la
cartuccia del filtro è bagnata ottura il filtro e
può renderlo inutilizzabile.
Î Far asciugare bene il filtro bagnato pri-
ma dell'uso oppure sostituirlo con uno
asciutto.
Î Sostituire il filtro quando necessario se-
guendo le istruzioni riportate al punto
"Cura e manutenzione".
Aspirazione di liquidi (opzione)
Messa fuori servizio
Î Nel IV 100/75, premere il tasto "Spe-
gnere l'apparecchio".
Î Spegnere l'apparecchio tramite l'inter-
ruttore ON/OFF.
Î Smontare l'accessorio e se necessario,
sciacquare gli accessori con acqua e
asciugarli.
Î Svuotare il contenitore materiale aspi-
rato (vedi capitolo "Svuotare il contenitore materiale aspirato“).
Î Pulire l’apparecchio all’interno e
all’esterno aspirando e passando la superficie con un panno umido.
Svuotare il contenitore materiale
aspirato
Avvertenza
Svuotare il contenitore materiale aspirato
quando è pieno fino a circa 3 cm sotto il
bordo superiore.
Î spegnere l'apparecchio e bloccarlo con
i freni delle ruote pivottanti.
Avvertenza
Per l'aspirazione di liquidi sostituire il contenitore materiale aspirato fornito di serie con
il contenitore per aspirazione di solidi e liquidi disponibile come accessorio.
Il galleggiante presente nel contenitore per
l'aspirazione di solidi e liquidi interrompe la
corrente di aspirazione quando si raggiunge il livello di riempimento max.
Se la corrente di aspirazione viene interrotta dal galleggiante:
Î Spegnere il IV 100/40 o il IV 100/55 con
l'interruttore ON/OFF.
Nel IV 100/75, premere il tasto "Spe-
gnere l'apparecchio".
Î scaricare il liquido aprendo la valvola di
scarico sul fondo del contenitore,
36 IT
Î Aprire verso l'alto il contenitore materia-
le aspirato dallo sbloccaggio (vedi grafico).
Î Estrarre il contenitore materiale aspira-
to dall'apparecchio dalla apposita maniglia.
Î Svuotare il contenitore materiale aspi-
rato e reinserirlo nell'apparecchio nella
sequenza inversa.
– 5
Page 37

Sacchetto raccolta polvere
Per svuotare l'apparecchio senza creare
polvere, è possibile inserire nel contenitore
del materiale aspirato un sacchetto di raccolta della polvere:
Î inserire il sacchetto per la raccolta della
polvere nel contenitore e appoggiarlo
con cautela alla parete del contenitore,
Î ripiegare verso l'esterno il bordo del
sacchetto sul contenitore del materiale
aspirato,
Î inserire il contenitore del materiale aspi-
rato nell'apparecchio.
Î Al termine delle operazioni chiudere il
sacchetto di raccolta della polvere ed
estrarlo dal contenitore del materiale
aspirato.
Î Smaltire il sacchetto di raccolta della
polvere e il relativo contenuto in conformità alle norme vigenti.
Trasporto
Attenzione
Pericolo di lesioni e di danneggiamento! Rispettare il peso dell'apparecchio durante il
trasporto.
Per il trasporto in veicoli, assicurare l'apparecchio secondo le direttive in vigore affinché non possa scivolare e ribaltarsi.
Conservazione dell'apparec-
chio
Attenzione
Pericolo di lesioni e di danneggiamento! Rispettare il peso dell'apparecchio durante la
conservazione.
Questo apparecchio può essere conservato solo in ambienti interni.
Cura e manutenzione
Sostituire il filtro
IV 100/40, IV 100/55
Î Spegnere l'apparecchio dall'interruttore
ON/OFF e staccare la spina.
Î Allentare il tubo della turbina di aspira-
zione dall'estremità inferiore e staccarlo.
1 Maniglia pulizia filtro
2 Molla
3 Staffa di sicurezza pulizia filtro
4 Chiusura
5 Coperchio camera filtro
Î Orientare di lato la staffa di sicurezza
pulizia filtro.
Î Svitare la maniglia pulizia filtro.
Î Togliere la molla.
Î Svitare il dado al di sotto della molla
(necessaria chiave a bocca apertura 27
mm).
Î Aprire le chiusure.
Î Togliere il coperchio della camera filtro.
몇 Attenzione
Tutte le operazioni sull'aspiratore vanno effettuate a spina staccata.
1Telaio
2Filtro
– 6
37IT
Page 38

Î Rimuovere i nodi dei nastri dal filtro e ri-
muovere il telaio.
Î Estrarre il filtro.
Î Inserire e fissare il nuovo filtro nella se-
quenza inversa.
IV 100/75
Premere il tasto "Spegnere l'apparecchio".
Î
Î Spegnere l'apparecchio dall'interruttore
ON/OFF e staccare la spina.
Î Allentare il tubo della turbina di aspira-
zione dall'estremità inferiore e staccarlo.
Î Aprire le chiusure.
Î Togliere il coperchio della camera filtro.
Guida alla risoluzione dei
guasti
Il motore (turbina di aspirazione) non
parte
Manca tensione elettrica.
Î Controllare il cavo, la spina, il fusibile e
la presa.
Il salvamotore è scattato.
Î Ripristinare l'interruttore.
Nessuna funzione di aspirazione, il getto
d'aria fuoriesce dal tubo flessibile di aspirazione
Î Senso di rotazione della turbina di aspi-
razione errato, scambiare i poli nella
spina.
1 Vite a testa zigrinata
Î Svitare le due viti a testa zigrinata ed
estrarre il filtro dall'apparecchio.
Î Inserire e fissare il nuovo filtro nella se-
quenza inversa.
38 IT
La forza aspirante diminuisce
Filtro, bocchetta, tubo flessibile o rigido di
aspirazione otturati.
Î Controllare e pulire gli accessori. Se ne-
cessario, sostituire il filtro.
Fuoriuscita di polvere durante l'aspirazione
Filtro fissato male o difettoso.
Î Controllare come è fissato il filtro ovve-
ro sostituirlo.
Il manometro indica una pressione errata.
Filtro intasato.
Î Spegnere l'apparecchio, pulire il filtro o
montare un nuovo filtro.
몇 Attenzione
Far eseguire tutti i controlli ed interventi ai
componenti elettrici da personale specializzato. In caso di altri guasti si prega di contattare il servizio assistenza Kärcher.
– 7
Page 39

Visualizzazione guasti IV 100/75
Accessori IV 100/40, IV 100/55
Accessori Codice d’ordina-
zione
Filtro 6.904-341.0
Filtro, M 6.904-342.0
Sacchetto di raccolta
della polvere in carta
Sacchetto di raccolta
della polvere in PE
6.904-347.0
6.904-348.0
1 Spia luminosa "Pulsante arresto
d'emergenza azionato"
Si accende quando il pulsante d'arresto
d'emergenza è premuto.
Sbloccare il pulsante d'arresto d'emer-
genza girandolo.
2 Pulsante d'arresto d'emergenza
3 Spia luminosa "Corrente collegata“
Si accende quando la spina è inserita e
vi è tensione di rete.
4 Spia luminosa "guasto motore"
Si accende quando il salvamotore è
scattato a causa dell'aumento della po-
tenza assorbita o del surriscaldamento.
Girare l'interruttore On/Off su 0, atten-
dere circa 10 minuti, quindi girare l'inter-
ruttore On/Off su 1.
Accessori e ricambi
– Impiegare esclusivamente accessori e
ricambi autorizzati dal produttore. Ac-
cessori e ricambi originali garantiscono
che l’apparecchio possa essere impie-
gato in modo sicuro e senza disfunzio-
ni.
– La lista dei pezzi di ricambio più comuni
è riportata alla fine del presente manua-
le d'uso.
– Maggiori informazioni sulle parti di ri-
cambio sono reperibili al sito www.kaer-
cher.com alla voce “Service”.
Accessori IV 100/75
Accessori Codice d’ordina-
zione
Filtro 6.904-343.0
Filtro, M 6.904-344.0
Sacchetto di raccolta
della polvere in carta
Sacchetto di raccolta
della polvere in PE
6.904-347.0
6.904-348.0
– 8
39IT
Page 40

Dati tecnici
Descrizione apparecchio IV 100/40 IV 100/55 IV 100/75
Grado di protezione IP X4 IP 54
Capacità serbatoio 90 l
Tensione 400 V, 3~, 50 Hz
Massima impedenza di rete consentita 0.154+j0.096
Ohm
Dati ventilatore
Potenza 5000 W 6000 W 7500 W
Depressione* 15,5 kPa 24 kPa 30 kPa
* con valvola di limitazione della pressione
Portata aria 92 l/s 88 l/s 105 l/s
Lunghezza x larghezza x Altezza 1220x670x1530 mm 1280x690
Lunghezza cavo 8 m
Grado di protezione I
Cavo di alimentazione: Codice N° 6.649-367.0 6.649-363.0 6.649-364.0
Cavo di alimentazione:Tipo: H07RN-F
Tubo flessibile di aspirazione NW 61 / 5 m
Peso 141 kg 155 kg 256 kg
Temperatura di immagazzinaggio -10...+40 °C
Umidità 30...90 %
Superficie attiva del filtro 2,2 m
Valori rilevati secondo EN 60335-2-69
Pressione acustica L
Dubbio K
pA
pA
65 dB(A) 79 dB(A) 72 dB(A)
1 db (A) 1 db (A) 1 db (A)
2
0.128+j0.080
Ohm
2
2,2 m
0.204+j0.127
Ohm
x1820 mm
2
3,0 m
40 IT
– 9
Page 41

Dichiarazione CE
Con la presente si dichiara che la macchina
qui di seguito indicata, in base alla sua concezione, al tipo di costruzione e nella versione da noi introdotta sul mercato, è
conforme ai requisiti fondamentali di sicurezza e di sanità delle direttive CE. In caso
di modifiche apportate alla macchina senza
il nostro consenso, la presente dichiarazione perde ogni validità.
Prodotto: Aspiratore solidi-liquidi
Modelo: 1.573-xxx
Direttive CE pertinenti
2006/42/CE (+2009/127/CE)
2004/108/CE
Norme armonizzate applicate
EN 55014–1: 2006
EN 55014–2: 1997 + A1: 2001
EN 60335–1
EN 60335–2–69
EN 61000–3–2: 2006
EN 61000–3–3: 2008
EN 62233: 2008
Norme nazionali applicate
-
I firmatari agiscono su incarico e con la procura dell’amministrazione.
CEO
Head of Approbation
Alfred Kärcher GmbH & Co. KG
Alfred-Kärcher-Str. 28 - 40
71364 Winnenden (Germany)
Tel.: +49 7195 14-0
Fax: +49 7195 14-2212
– 10
41IT
Page 42

Lees vóór het eerste gebruik
van uw apparaat deze originele
gebruiksaanwijzing, ga navenant te werk
en bewaar hem voor later gebruik of voor
een latere eigenaar.
Voor de eerste inbedrijfstelling veiligheidsinstructies nr. 5.956-249 in elk geval lezen!
Bij veronachtzaming van de gebruiksaanwijzing en de veiligheidsaanwijzingen kan
schade aan het apparaat ontstaan, en gevaar voor gebruikers en andere personen.
Bij transportschade onmiddellijk de handelaar op de hoogte brengen.
Inhoud
Zorg voor het milieu NL - 1
Symbolen in de gebruiks-
aanwijzing
Garantie NL - 1
Reglementair gebruik NL - 2
Apparaat-elementen NL - 2
Veiligheidsinstructies NL - 4
Inbedrijfstelling NL - 4
Bediening NL - 4
Buitenwerkingstelling NL - 5
Vervoer NL - 6
Opslag van het apparaat NL - 6
Onderhoud NL - 6
Hulp bij storingen NL - 7
Toebehoren en reserveon-
derdelen
Technische gegevens NL - 9
CE-verklaring NL - 10
NL - 1
NL - 8
Zorg voor het milieu
Het verpakkingsmateriaal is herbruikbaar. Deponeer het verpakkingsmateriaal niet bij het
huishoudelijk afval, maar bied het
aan voor hergebruik.
Onbruikbaar geworden apparaten
bevatten waardevolle materialen die
geschikt zijn voor hergebruik. Lever
de apparaten daarom in bij een inzamelpunt voor herbruikbare materialen. Batterijen, olie en dergelijke
stoffen mogen niet in het milieu belanden. Verwijder overbodig geworden apparatuur daarom via
geschikte inzamelpunten.
Aanwijzingen betreffende de inhoudsstoffen (REACH)
Huidige informatie over de inhoudsstoffen
vindt u onder:
http://www.karcher.de/de/unternehmen/
umweltschutz/REACH.htm
Symbolen in de gebruiksaan-
wijzing
Gevaar
Voor een onmiddellijk dreigend gevaar dat
leidt tot ernstige en zelfs dodelijke lichamelijke letsels.
몇
Waarschuwing
Voor een mogelijks gevaarlijke situatie die
zou kunnen leiden tot ernstige en zelfs dodelijke lichamelijke letsels.
Voorzichtig
Voor een mogelijks gevaarlijke situatie die
kan leiden tot lichte lichamelijke letsels of materiële schade.
Garantie
42 NL
In ieder land zijn de door ons bevoegde verkoopkantoor uitgegeven garantiebepalingen
van toepassing. Eventuele storingen aan het
apparaat verhelpen wij zonder kosten binnen
de garantietermijn, mits een materiaal of fabrieksfout de oorzaak van deze storing is.
Neem bij klachten binnen de garantietermijn
contact op met uw leverancier of de dichtstbijzijnde klantenservicewerkplaats en neem uw
aankoopbewijs mee.
– 1
Page 43

Reglementair gebruik
Dit apparaat is niet geschikt voor het opnemen van gevaarlijk stof.
Dit apparaat is alleen geschikt voor industrieel gebruik.
Apparaat-elementen
Bedieningselementen IV 100/40, IV 100/55
Voor het natzuigen moet het standaard
zuigmateriaalreservoir vervangen worden
door het als toebehoren verkrijgbare „reservoir voor nat- en droogzuigen“.
Ieder ander gebruik is onjuist.
1 Handgreep filterreiniging
2 Deksel filterkamer
3 Filterkamer
4 Aansluitsteun voor accessoires
5 Manometer
6 Zuigmateriaalreservoir
7 Hendel voor ontgrendelen zuigmate-
riaalreservoir
8 Zwenkwieltjes met parkeerrem
9 Slang naar de zuigturbine
10 Schuifhandgreep
11 Schakelaar -Aan/Uit
12 Geluiddemper
– 2
43NL
Page 44

Bedieningselementen IV 100/75
1 Slang naar de zuigturbine
2 Handgreep filterreiniging
3 Deksel filterkamer
4 Filterkamer
5 Aansluitsteun voor accessoires
6 Zuigmateriaalreservoir
7 Hendel voor ontgrendelen zuigmate-
riaalreservoir
8 Zwenkwieltjes met parkeerrem
9 Schuifhandgreep
10 Geluiddemper
11 Manometer
12 schakelkast
13 Knop „Apparaat uitschakelen“
14 Verlichte knop „Apparaat inschakelen“
15 Controlelampje storing motor
16 Schakelaar -Aan/Uit
44 NL
17 Controlelampje "Er is netspanning"
18 Controlelampje "Noodstopknop be-
diend"
19 Noodstopknop
– 3
Page 45

Veiligheidsinstructies
몇 Waarschuwing
Dit apparaat is niet geschikt voor het opnemen van gevaarlijk stof.
Dit apparaat mag in vochtige omstandigheden niet in open lucht gebruikt of opgeborgen worden.
Symbolen op het apparaat
몇 Let op
Er bestaat gevaar voor verwondingen
bij het inzetten en vergrendelen van het
zuigmateriaalreservoir.
Bij het vergrendelen in ieder geval niet de
handen tussen het zuigmateriaalreservoir
en de stofzuiger houden of in de buurt van
de pasbouten steken. Het zuigmateriaalreservoir vergrendelen door het hanteren van
de betreffende hendel met beide handen!
Veiligheidsvoorschriften
Het apparaat bij het beëindigen van het
werk uitschakelen en de stekker uit het
contact halen.
Neem de veiligheidsbepalingen voor
het opgezogen materiaal in acht. Bij re-
glementair / onreglementair gebruik
kunnen onderdelen (bijv. uitblaasope-
ning) van de industriële stofzuiger tem-
peraturen bereiken tot 95°C.
In noodgevallen
In noodgevallen (bijv. bij het opzuigen van
brandbare materialen, bij kortsluiting of andere elektrische fouten) het apparaat uitschakelen en de stekker uittrekken.
Inbedrijfstelling
Î Het apparaat in de werkpositie bren-
gen, indien nodig met parkeerrem zekeren.
Î Zuigslang in de zuigslangaansluiting
stoppen.
Î Gewenste toebehoren op de zuigslang
steken.
Î Verzeker u ervan, dat het zuigmate-
riaalreservoir volgens de regels aangebracht is.
몇 Waarschuwing
De maximum toegelaten impedantie aan
het elektrische aansluitpunt (zie Technische gegevens) mag niet overschreden
worden.
Bediening
Apparaatstekker in de contactdoos steken.
Î
Î In-/uit-schakelaar op „1“ draaien.
Î Bij IV 100/75 knop „Apparaat inschake-
len" indrukken.
Filter reinigen
Aan de voorzijde van het apparaat bevindt
zich een manometer, die de zuigonderdruk
binnen het apparaat aanduidt. Indien de
zuigonderdruk onder de in onderstaande
tabel vermelde waarde daalt, moet het apparaat uitgeschakeld en de filter gereinigd
worden.
NW 50 NW 60
IV 100/40 13,0 kPa 12,0 kPa
IV 100/55 19,5 kPa 15,5 kPa
IV 100/75 25,5 kPa 20,5 kPa
IV 100/40, IV 100/55
Î Apparaat met de AAN/UIT-schakelaar
uitschakelen.
Î Veiligheidsbeugel filterreiniging zij-
waarts zwenken.
Î Handgreep filterreiniging meerdere ma-
len krachtig omhoog en omlaag bewegen.
Î Veiligheidsbeugel filterreiniging verti-
caal zetten.
– 4
45NL
Page 46

IV 100/75
Î
Knop „Apparaat uitschakelen“ indrukken.
Î Hendel filterreiniging meermaals heen
en weer bewegen.
Wanneer deze reiniging geen verbetering
inhoudt, kan men het filter eraf nemen en
wassen of vervangen (zie hoofdstuk "Filter
wisselen").
Droogzuigen
Voorzichtig
Bij wisselen van nat- naar droogzuigen
letten op:
zuigen van droog stof met nat filterelement
verstopt de filter en kan deze onbruikbaar
maken.
Î Nat filter vóór gebruik goed drogen of
door een droge vervangen.
Î Indien nodig de filter vervangen zoals
beschreven in punt "Instandhouding en
onderhoud".
Natzuigen (optie)
Waarschuwing
Voor het natzuigen moet het standaard
zuigmateriaalreservoir vervangen worden
door het als toebehoren verkrijgbare „reservoir voor nat- en droogzuigen“.
De in het reservoir voor nat- en droogzuigen voorhanden vlotter onderbreekt de
zuigstroom indien het maximale vulniveau
bereikt is.
Indien de zuigstroom door de vlotter onderbroken wordt:
Î IV 100/40 of IV 100/55 met de IN/UIT-
schakelaar uitschakelen.
Bij IV 100/75 knop „Apparaat uitschake-
len" indrukken.
Î vloeistof aflaten door het openen van
de aflaatklep op de bodem van het re-
servoir.
Buitenwerkingstelling
Î Bij IV 100/75 knop „Apparaat uitschake-
len" indrukken.
Î Apparaat met de AAN/UIT-schakelaar
uitschakelen.
Î Toebehoren demonteren en indien no-
dig met water afspoelen en drogen.
Î Zuigmateriaalreservoir leegmaken (zie
hoofdstuk "Zuigmateriaalreservoir leegmaken").
Î Apparaat aan de binnen- en buitenkant
reinigen door afzuigen en afvegen.
Zuigmateriaalreservoir leegmaken
Wenk
Het zuigmateriaalreservoir dient leeggemaakt te worden, wanneer het tot ca. 3 cm.
onder de bovenrand gevuld is.
Apparaat uitschakelen en d.m.v. de par-
Î
keerrem aan de zwenkwieltjes zekeren.
Î Zuigmateriaalreservoir bij de ontgren-
deling naar boven openen (zie de afbeelding).
Î Het zuigmateriaalreservoir uit het appa-
raat trekken met behulp van de hiervoor
bestemde handgreep.
Î Het zuigmateriaalreservoir leegmaken
en in omgekeerd volgorde weer in de
apparaat aanbrengen.
Stofverzamelzak
Voor een stofvrije lediging van het apparaat
kan in het afvalreservoir een stofverzamelzak gelegd worden:
46 NL
– 5
Page 47

Î Stofverzamelzak in het reservoir plaat-
sen en zorgvuldig tegen de wand van
het reservoir leggen.
Î De rand van de zak over de rand van
het zuigmateriaalreservoir naar buiten
laten hangen.
Î Zuigmateriaalreservoir in het apparaat
plaatsen.
Î Na de werking de stofverzamelzak slui-
ten en uit het afvalreservoir nemen.
Î Stofverzamelzak met inhoud verwijde-
ren volgens de geldende wettelijke be-
palingen.
Vervoer
Voorzichtig
Gevaar voor letsels en beschadigingen!
Houd bij het transport rekening met het gewicht van het apparaat.
Bij het transport in voertuigen moet het apparaat conform de geldige richtlijnen beveiligd worden tegen verschuiven en kantelen.
Opslag van het apparaat
Voorzichtig
Gevaar voor letsel en beschadiging! Het
gewicht van het apparaat bij opbergen in
acht nemen.
Het apparaat mag alleen binnen worden
opgeborgen.
Onderhoud
1 Handgreep filterreiniging
2 Veer
3 Veiligheidsbeugel filterreiniging
4 Sluiting
5 Deksel filterkamer
Î Veiligheidsbeugel filterreiniging zij-
waarts zwenken.
Î Handgreep filterreiniging afschroeven.
Î Veer afnemen.
Î Moer onder de veer afschroeven
(Steeksleutel 27 mm. nodig).
Î Sluitingen openen.
Î Deksel filterkamer afnemen.
몇 Waarschuwing
Bij het werken aan de stofzuiger altijd eerst
de stekker uit het contact halen.
Filter verwisselen/vervangen
IV 100/40, IV 100/55
Î Het apparaat met de AAN/UIT-schake-
laar uitschakelen en van het stroomnet
afkoppelen.
Î Slang naar de zuigturbine aan het on-
derste uiteinde losmaken en uittrekken.
1Stang
2Filter
Î Knoop van de banden op het filter los-
maken en stang afnemen.
Î Filter eruitnemen.
Î Het nieuwe filter in omgekeerde volgor-
de aanbrengen en zekeren.
– 6
47NL
Page 48

IV 100/75
Î Knop „Apparaat uitschakelen“ indruk-
ken.
Î Het apparaat met de AAN/UIT-schake-
laar uitschakelen en van het stroomnet
afkoppelen.
Î Slang naar de zuigturbine aan het on-
derste uiteinde losmaken en uittrekken.
Î Sluitingen openen.
Î Deksel filterkamer afnemen.
Geen zuigwerking, luchtstroom ontsnapt uit de zuigslang
Î Verkeerde draairichting van de zuigtur-
bine, polen aan de stekker verwisselen.
Zuigkracht wordt minder
Filter, sproeier, zuigslang of zuigbuis verstopt.
Î Controleren, toebehoren reinigen,
eventueel filter vervangen.
Er ontsnapt stof bij het zuigen
Filter niet goed aangebracht of defect.
Î Kijken of het filter goed zit resp. verwis-
selen.
1 Kartelschroef
Î Beide kartelschroeven uitdraaien en fil-
ter uit het apparaat nemen.
Î Het nieuwe filter in omgekeerde volgor-
de aanbrengen en zekeren.
Hulp bij storingen
Motor (zuigturbine) start niet
Geen stroom.
Î Zekering, snoer, stekker en contact-
doos testen.
Motorveiligheidsschakelaar is geactiveerd.
Î Schakelaar terugstellen.
48 NL
Manomenter duidt een onreglementaire
druk aan
Filter verstopt.
Î Apparaat uitschakelen, filter reinigen of
een nieuw filter aanbrengen.
몇 Waarschuwing
Alle controles en werkzaamheden aan
elektrische delen moeten door een vakman
worden uitgevoerd. Bij verdergaande storingen dient u de klantendienst in te schakelen.
– 7
Page 49

Storingsindicatie IV 100/75
1 Controlelampje "Noodstopknop be-
diend"
Brandt bij een ingedrukt noodstopknop.
Nood-stop-knop door draaien ontgren-
delen.
2 Noodstopknop
3 Controlelampje "Er is netspanning"
Brandt bij een ingestoken stekker en
voorhanden netspanning.
4 Controlelampje storing motor
Brandt indien de motorveiligheidsscha-
kelaar door een verhoogde stroomop-
name of oververhitting werd
geactiveerd.
In-/uit-schakelaar op 0 draaien, ca. 10
minuten wachten, in-/uit-schakelaar op
1 draaien.
Toebehoren IV 100/40, IV 100/55
Toebehoren Bestelnummer
Filter 6.904-341.0
Filter, M 6.904-342.0
Stofverzamelzak pa-
pier
Stofverzamelzak PE 6.904-348.0
6.904-347.0
Toebehoren IV 100/75
Toebehoren Bestelnummer
Filter 6.904-343.0
Filter, M 6.904-344.0
Stofverzamelzak pa-
pier
Stofverzamelzak PE 6.904-348.0
6.904-347.0
Toebehoren en reserveonder-
delen
– Er mogen uitsluitend toebehoren en re-
serveonderdelen gebruikt worden die
door de fabrikant zijn vrijgegeven. Origi-
nele toebehoren en reserveonderdelen
bieden de garantie van een veilig en
storingsvrije werking van het apparaat.
– Een selectie van de meest frequent be-
nodigde reserveonderdelen vindt u ach-
teraan in de gebruiksaanwijzing.
– Verdere informatie over reserveonder-
delen vindt u op www.kaercher.com bij
Service.
– 8
49NL
Page 50

Technische gegevens
Apparaatnaam IV 100/40 IV 100/55 IV 100/75
Beveiligingsklasse IP X4 IP 54
Inhoud reservoir 90 l
Spanning 400 V, 3~, 50 Hz
Maximum toegelaten netimpedantie 0.154+j0.096
Ohm
Compressorgegevens
Vermogen 5000 W 6000 W 7500 W
Vacuüm* 15,5 kPa 24 kPa 30 kPa
* met drukbegrenzingsventiel
Luchthoeveelheid 92 l/s 88 l/s 105 l/s
Lengte x breedte x hoogte 1220x670x1530 mm 1280x690
Lengte snoer 8 m
Beschermingsklasse I
Netsnoer: Bestelnr. 6.649-367.0 6.649-363.0 6.649-364.0
Elektriciteitskabel:type: H07RN-F
Zuigslang NW 61 / 5 m
Gewicht 141 kg 155 kg 256 kg
Opslagtemperatuur -10...+40 °C
Luchtvochtigheid 30...90 %
Filteroppervlak 2,2 m
Bepaalde waarden conform EN 60335-2-69
Geluidsdrukniveau L
Onzekerheid K
pA
pA
65 dB(A) 79 dB(A) 72 dB(A)
1 db (A) 1 db (A) 1 db (A)
2
0.128+j0.080
Ohm
2
2,2 m
0.204+j0.127
Ohm
x1820 mm
2
3,0 m
50 NL
– 9
Page 51

CE-verklaring
Hierbij verklaren wij dat de hierna vermelde
machine door haar ontwerp en bouwwijze
en in de door ons in de handel gebrachte
uitvoering voldoet aan de betreffende fundamentele veiligheids- en gezondheidseisen, zoals vermeld in de desbetreffende
EG-richtlijnen. Deze verklaring verliest
haar geldigheid wanneer zonder overleg
met ons veranderingen aan de machine
worden aangebracht.
Product: Droog- / natzuiger
Type: 1.573-xxx
Van toepassing zijnde EG-richtlijnen
2006/42/EG (+2009/127/EG)
2004/108//EG
Toegepaste geharmoniseerde normen
EN 55014–1: 2006
EN 55014–2: 1997 + A1: 2001
EN 60335–1
EN 60335–2–69
EN 61000–3–2: 2006
EN 61000–3–3: 2008
EN 62233: 2008
Toegepaste landelijke normen
-
De ondergetekenden handelen in opdracht
en met volmacht van de bedrijfsleiding.
CEO
Head of Approbation
Alfred Kärcher GmbH & Co. KG
Alfred Kärcher-Str. 28 - 40
71364 Winnenden (Germany)
Tel.: +49 7195 14-0
Fax: +49 7195 14-2212
– 10
51NL
Page 52

Antes del primer uso de su apa-
rato, lea este manual original,
actúe de acuerdo a sus indicaciones y
guárdelo para un uso posterior o para otro
propietario posterior.
¡Antes de la primera puesta en marcha lea
sin falta las instrucciones de uso y las instrucciones de seguridad n.° 5.956-249!
El incumplimiento de las instrucciones de
uso y de las indicaciones de seguridad
puede provocar daños en el aparato y poner en peligro al usuario y a otras personas.
En caso de daños de transporte informe inmediatamente al fabricante.
Índice de contenidos
Protección del medio ambiente
Símbolos del manual de
instrucciones
Garantía ES - 1
Uso previsto ES - 2
Elementos del aparato ES - 2
Indicaciones de seguridad ES - 4
Puesta en marcha ES - 4
Manejo ES - 4
Puesta fuera de servicio ES - 5
Transporte ES - 6
Almacenamiento del apara-toES - 6
Cuidados y mantenimiento ES - 6
Ayuda en caso de avería ES - 7
Accesorios y piezas de re-
puesto
Datos técnicos ES - 9
Declaración CE ES - 10
ES - 1
ES - 1
ES - 8
Protección del medio
ambiente
Los materiales de embalaje son
reciclables. Po favor, no tire el
embalaje a la basura doméstica;
en vez de ello, entréguelo en los
puntos oficiales de recogida
para su reciclaje o recuperación.
Los aparatos viejos contienen
materiales valiosos reciclables
que deberían ser entregados
para su aprovechamiento posterior. Evite el contacto de baterías, aceites y materias
semejantes con el medioambiente. Por este motivo, entregue los aparatos usados en los
puntos de recogida previstos
para su reciclaje.
Indicaciones sobre ingredientes (REACH)
Encontrará información actual sobre los ingredientes en:
http://www.karcher.de/de/unternehmen/
umweltschutz/REACH.htm
Símbolos del manual de ins-
trucciones
Peligro
Para un peligro inminente que acarrea lesiones de gravedad o la muerte.
몇 Advertencia
Para una situación que puede ser peligrosa, que puede acarrear lesiones de gravedad o la muerte.
Precaución
Para una situación que puede ser peligrosa, que puede acarrear lesiones leves o
daños materiales.
Garantía
En todos los países rigen las condiciones
de garantía establecidas por nuestra empresa distribuidora. Las averías del aparato
serán subsanadas gratuitamente dentro
del periodo de garantía, siempre que se deban a defectos de material o de fabricación.
En un caso de garantía, le rogamos que se
dirija con el comprobante de compra al distribuidor donde adquirió el aparato o al servicio al cliente autorizado más próximo a su
domicilio.
52 ES
– 1
Page 53

Uso previsto
Este aparato no es apto para aspirar polvo
peligroso.
Este es apto para el uso en aplicaciones industriales.
Elementos del aparato
Elementos de mando IV 100/40, IV 100/55
Para absorción en húmedo de debe sustituir
el depósito de residuos de serie por el "Depósito para absorción en húmedo y en seco"
que se puede adquirir como accesorio.
Cualquier otro uso será considerado incorrecto.
1 Empuñadura limpieza de filtro
2 Tapa cámara de filtro
3 Cámara del filtro
4 Manguito de empalme para accesorios
5 Manómetro
6 Depósito de residuos
7 Palanca para desbloquear el depósito
de residuos
8 Rodillos-guía con freno de estaciona-
miento
9 Tubo de la turbina de absorción
10 Empuñadura deslizante
11 Interruptor de conexión y desconexión
12 Amortiguador del sonido
– 2
53ES
Page 54

Elementos de mando IV 100/75
1 Tubo de la turbina de absorción
2 Empuñadura limpieza de filtro
3 Tapa cámara de filtro
4 Cámara del filtro
5 Manguito de empalme para accesorios
6 Depósito de residuos
7 Palanca para desbloquear el depósito
de residuos
8 Rodillos-guía con freno de estaciona-
miento
9 Empuñadura deslizante
10 Amortiguador del sonido
11 Manómetro
12 armario de distribución
13 Botón "Desconexión del aparato"
14 Botón luminoso "Conexión del aparato"
15 Piloto de control avería en el motor
54 ES
16 Interruptor de conexión y desconexión
17 Piloto de control "Tensión de red dispo-
nible"
18 Piloto de control "Tecla de desconexión
de emergencia activada"
19 Tecla de desconexión de emergencia
– 3
Page 55

Indicaciones de seguridad
몇 Advertencia
Este aparato no es apto para aspirar polvo
peligroso.
No se puede usar ni guardar el aparato al
aire libre ni con humedad.
Símbolos en el aparato
몇 Atención:
Peligro de aplastamiento al insertar y
bloquear el depósito de residuos
No colocar las manos entre el depósito de
residuos y el el aspirador durante el bloqueo bajo ningún concepto ni introducirlas
cerca del perno guía. ¡Bloquear el depósito
de residuos pulsando la palanca correspondiente con ambas manos!
Normativas de seguridad
Apagar y desenchufar el aparato una vez
haya terminado el trabajo.
Observe las disposiciones de seguri-
dad en lo que concierne a las sustan-
cias que hay que aspirar. Tanto durante
un servicio correcto como durante uno
incorrecto, algunas piezas (p. ej., orifi-
cio de salida) del aspirador industrial
pueden alcanzar hasta 95°C.
En caso de emergencia
En caso de emergencia (p.ej. al aspirar materiales inflamables o si se produce un cortocircuito u otro fallo eléctrico), apague el
aparato y desenchúfelo de la red.
Puesta en marcha
Î Coloque el aparato en la posición de
trabajo; si fuera necesario, fíjelo mediante el freno de estacionamiento.
Î Insertar la manguera de aspiración en
su orificio de conexión.
Î Conectar los accesorios deseados en
la manguera de absorción.
Î Asegúrese de insertar correctamente el
depósito de residuos.
몇 Advertencia
La impedancia de red máxima permitida en
el punto de conexión eléctrica (véanse los
datos técnicos) no debe ser excedida.
Manejo
Î Introducir la clavija del aparato en la
toma de corriente.
Î Girar el interruptor conectar/desconec-
tar a "1".
Î En el caso del IV 100/75 pulsar el botón
„Conectar aparato".
Limpiar el filtro.
En la parte frontal del aparato existe un manómetro que indica la depresión de absorción dentro del aparato de absorción. Si la
depresión de absorción baja del valor indicado en la siguiente tabla, se debe apagar
el aparato y limpiar el filtro.
NW 50 NW 60
IV 100/40 13,0 kPa 12,0 kPa
IV 100/55 19,5 kPa 15,5 kPa
IV 100/75 25,5 kPa 20,5 kPa
IV 100/40, IV 100/55
Î Apagar el aparato con el interruptor de
CONEXIÓN/DESCONEXIÓN.
Î Girar hacia el lateral el estribo de segu-
ridad de la limpieza del filtro.
Î Mover la empuñadura de la limpieza del
filtro fuertemente hacia arriba y hacia
abajo.
Î Colocar verticalmente el estribo de se-
guridad de la limpieza del filtro.
– 4
55ES
Page 56

IV 100/75
Î Pulsar botón "Desconexión del apara-
to".
Î Mover la palanca de limpieza de filtro
varias veces de un lado a otro.
Si no mejora la limpieza, se puede extraer
y lavar el filtro o sustituirlo (véase el capítulo "Cambiar filtro").
Aspiración en seco
Precaución
Cuando cambie de la aspiración de líquidos a la aspiración en seco, tenga en
cuenta lo siguiente:
La aspiración de polvo seco con un elemento filtrante húmedo puede dañar el filtro haciendo que quede inservible.
Î Secar bien el filtro húmedo antes de uti-
lizarlo o sustituirlo por una seco.
Î Si es necesario cambiar el filtro, se des-
cribe en el punto "Cuidados y mantenimiento".
Absorción en húmedo (opcional)
Nota
Para absorción en húmedo de debe sustituir el depósito de residuos de serie por el
"Depósito para absorción en húmedo y en
seco" que se puede adquirir como accesorio.
El flotador disponible en el depósito para
absorción en húmedo y en seco interrumpe
la corriente de absorción cuando se alcanza el nivel máximo.
Si el flotador interrumpe la corriente de absorción:
Î Apagar el IV 100/40 o el IV 100/55 en el
interruptor CONEXIÓN/DESCONEXIÓN.
En el caso del IV 100/75 pulsar el botón
„Desconectar aparato".
Î Purgue el líquido abriendo la válvula de
derivación situada en la parte inferior
del depósito.
Puesta fuera de servicio
En el caso del IV 100/75 pulsar el botón
Î
„Desconectar aparato".
Î
Apagar el aparato con el interruptor de CONEXIÓN/DESCONEXIÓN.
Î
Desmontar los accesorios y si es necesario
aclarar y secar.
Î
Vaciar el depósito de residuos (véase el capítulo "Vaciar el depósito de residuos").
Î Limpie el aparato por dentro y por fuera
aspirándolo y enjuagándolo.
Vaciar el depósito de residuos
Nota
Se debe vaciar el depósito de residuos cuando
este lleno hasta aprox. 3 cm por debajo del borde superior.
Î
Apagar el aparato y asegurar con el freno
de estacionamiento al rodillo-guía.
Î
Abrir hacia arriba el depósito de residuos
por el desbloqueo (véase el gráfico).
Î
Extraer el depósito de residuos del aparato
por el asa prevista para ello.
Î
Vaciar el depósito de residuos y volver a introducir en el aparato en el orden inverso.
Bolsa para polvo
Para vaciar el aparato sin generar polvo se
puede colocar una bolsa para polvo en el
depósito de residuos:
Î
Colocar con cuidado la bolsa para polvo
en el depósito en la pared del depósito.
Î Doblar hacia afuera el borde de la bolsa
sobre el borde del depósito de residuos.
Î Colocar el depósito de residuos en el
aparato.
Î Una vez finalizado el uso, cerrar la bol-
sa recolectora de polvo y extraer del
depósito de residuos.
Î Eliminar la bolsa y el contenido de
acuerdo con las normativas vigentes.
56 ES
– 5
Page 57

Transporte
Precaución
¡Peligro de lesiones y daños! Respetar el
peso del aparato para el transporte.
Al transportar en vehículos, asegurar el
aparato para evitar que resbale y vuelque
conforme a las directrices vigentes.
Almacenamiento del aparato
Precaución
¡Peligro de lesiones y daños! Respetar el
peso del aparato en el almacenamiento.
Este aparato sólo se puede almacenar en
interiores.
Cuidados y mantenimiento
몇 Advertencia
Para efectuar trabajos en el aspirador, desenchúfelo siempre antes.
Cambiar/sustituir el filtro
IV 100/40, IV 100/55
Î Apagar el aparato con el interruptor de
CONEXIÓN/DESCONEXIÓN y desenchufar.
Î Soltar el tubo que va a la turbina de ab-
sorción en el extremo inferior y retirar.
Î Desenroscar el mango de la limpieza
del filtro.
Î Quitar el resorte.
Î Enroscar la tuerca por debajo del resor-
te (se necesita una llave de boca de 27
mm).
Î Abra las tapas.
Î Extraiga la tapa de la cámara del filtro.
1 bastidor
2 filtro
Î Abrir los nudos de las cintas y extraer el
bastidor.
Î Extraer el filtro.
Î Colocar el nuevo filtro en orden inverso
y asegurar.
IV 100/75
Î Pulsar botón "Desconexión del apara-
to".
Î Apagar el aparato con el interruptor de
CONEXIÓN/DESCONEXIÓN y desenchufar.
Î Soltar el tubo que va a la turbina de ab-
sorción en el extremo inferior y retirar.
1 Empuñadura limpieza de filtro
2 resorte
3 Estribo de seguridad limpieza de filtro
4 Cierre
5 Tapa cámara de filtro
Î Girar hacia el lateral el estribo de segu-
ridad de la limpieza del filtro.
Î Abra las tapas.
Î Extraiga la tapa de la cámara del filtro.
– 6
57ES
Page 58

1 Tornillo de cabeza moleteada
La capacidad de aspiración se va reduciendo poco a poco
El filtro, la boquilla, la manguera de aspiración o
el tubo de aspiración están atascados.
Î Comprobar, limpiar los accesorios,
cambiar el filtro si es necesario.
Pérdida de polvo durante la aspiración
El filtro no está bien colocado o está defectuoso.
Î Comprobar la colocación del filtro o
cambiar.
Î Desenroscar ambos tornillos de cabeza
moleteada y extraer el filtro del aparato.
Î Colocar el nuevo filtro en orden inverso
y asegurar.
Ayuda en caso de avería
El motor (turbina de aspiración) no
arranca
No hay tensión eléctrica.
Î Compruebe el fusible, el cable, la clavi-
ja de enchufe y la toma de corriente.
El interruptor protector del motor se ha activado.
Î Reestablecer el interruptor.
No funciona la absorción, sale flujo de
aire por la manguera de absorción
Î Dirección de giro de la turbina de absor-
ción incorrecta, cambiar los polos del
enchufe.
El manómetro indica la presión incorrecta
Filtro atascado.
Î Apagar el aparato, limpiar el filtro o co-
locar un filtro nuevo.
몇 Advertencia
Todas las comprobaciones y trabajos en
componentes eléctricos los tiene que realizar un electricista especializado. En caso
de averías más graves, contacte con el
Servicio postventa de Kärcher.
Indicador de averías IV 100/75
1 Piloto de control "Tecla de desconexión
de emergencia activada"
Se ilumina con el botón de desconexión
de emergencia pulsado.
El pulsador de parada de emergencia,
se desbloquea girándolo.
2 Tecla de desconexión de emergencia
3 Piloto de control "Tensión de red disponible"
Se ilumina con la clavija de alimenta-
ción enchufada y la tensión de red cer-
cana.
58 ES
– 7
Page 59

4 Piloto de control avería en el motor
Se ilumina cuando el guardamotor se
activa por una absorción de corriente
elevada o sobrecalentamiento.
Girar el interruptor de conexión/desconexión a 0, esperar aprox. 10 minutos,
girar el interruptor de conexión/desconexión a 1.
Accesorios y piezas de
repuesto
– Sólo deben emplearse accesorios y
piezas de repuesto originales o autorizados por el fabricante. Los accesorios
y piezas de repuesto originales garantizan el funcionamiento seguro y sin averías del aparato.
– Podrá encontrar una selección de las
piezas de repuesto usadas con más
frecuencia al final de las instrucciones
de uso.
– En el área de servicios de www.kaer-
cher.com encontrará más información
sobre piezas de repuesto.
Accesorios IV 100/40, IV 100/55
Accesorios Nº referencia
filtro 6.904-341.0
Filtro, M 6.904-342.0
Bolsa para polvo de
papel
Bolsa para polvo de PE 6.904-348.0
6.904-347.0
Accesorios IV 100/75
Accesorios Nº referencia
filtro 6.904-343.0
Filtro, M 6.904-344.0
Bolsa para polvo de
papel
Bolsa para polvo de PE6.904-348.0
6.904-347.0
– 8
59ES
Page 60

Datos técnicos
Descripción de los aparatos IV 100/40 IV 100/55 IV 100/75
Categoria de protección IP X4 IP 54
Capacidad del depósito 90 l
Tensión 400 V, 3~, 50 Hz
Impedancia de red máxima permitida 0.154+j0.096
Ohm
Datos del ventilador
Potencia 5000 W 6000 W 7500 W
Vacío* 15,5 kPa 24 kPa 30 kPa
* con válvula limitadora de presión
Caudal de aire 92 l/s 88 l/s 105 l/s
Longitud x anchura x altura 1220x670x1530 mm 1280x690
Longitud del cable 8 m
Clase de protección I
Cable de red: Nº referencia 6.649-367.0 6.649-363.0 6.649-364.0
Tipo de cable de alimentación: H07RN-F
Manguera de aspiración NW 61 / 5 m
Peso 141 kg 155 kg 256 kg
Temperatura de almacenamiento -10...+40 °C
Humedad atmosférica 30...90 %
Superficie activa del filtro 2,2 m
Valores calculados conforme a la norma EN 60335-2-69
Nivel de presión acústica L
Inseguridad K
pA
pA
65 dB(A) 79 dB(A) 72 dB(A)
1 db (A) 1 db (A) 1 db (A)
2
0.128+j0.080
Ohm
2
2,2 m
0.204+j0.127
Ohm
x1820 mm
2
3,0 m
60 ES
– 9
Page 61

Declaración CE
Por la presente declaramos que la máquina designada a continuación cumple, tanto
en lo que respecta a su diseño y tipo constructivo como a la versión puesta a la venta
por nosotros, las normas básicas de seguridad y sobre la salud que figuran en las directivas comunitarias correspondientes. La
presente declaración perderá su validez en
caso de que se realicen modificaciones en
la máquina sin nuestro consentimiento explícito.
Producto: aspirador en húmedo/seco
Modelo: 1.573-xxx
Directivas comunitarias aplicables
2006/42/CE (+2009/127/CE)
2004/108/CE
Normas armonizadas aplicadas
EN 55014–1: 2006
EN 55014–2: 1997 + A1: 2001
EN 60335–1
EN 60335–2–69
EN 61000–3–2: 2006
EN 61000–3–3: 2008
EN 62233: 2008
Normas nacionales aplicadas
-
Los abajo firmantes actúan con plenos poderes y con la debida autorización de la dirección de la empresa.
CEO
Head of Approbation
Alfred Kärcher GmbH & Co. KG
Alfred-Kärcher-Str. 28 - 40
71364 Winnenden (Germany)
Tfno.: +49 7195 14-0
Fax: +49 7195 14-2212
– 10
61ES
Page 62

Leia o manual de manual origi-
nal antes de utilizar o seu aparelho. Proceda conforme as indicações no
manual e guarde o manual para uma consulta posterior ou para terceiros a quem
possa vir a vender o aparelho.
Antes de colocar em funcionamento pela
primeira vez é imprescindível ler atentamente as indicações de segurança n.º
5.956-249!
A não-observância deste Manual de Instruções e dos avisos de segurança poderá levar a danos no aparelho e perigos tanto
para o utilizador como para terceiros.
No caso de danos provocados pelo transporte, informe imediatamente o revendedor.
Índice
Protecção do meioambien-tePT - 1
Símbolos no Manual de
Instruções
Garantia PT - 1
Utilização conforme o fim a
que se destina a máquina
Elementos do aparelho PT - 2
Avisos de segurança PT - 4
Colocação em funciona-
mento
Manuseamento PT - 4
Colocar fora de serviço PT - 5
Transporte PT - 6
Armazenamento do apare-
lho
Conservação e manuten-
ção
Ajuda em caso de avarias PT - 7
Acessórios e peças sobres-
salentes
Dados técnicos PT - 9
Declaração CE PT - 10
PT - 1
PT - 2
PT - 4
PT - 6
PT - 6
PT - 8
Protecção do meioambiente
Os materiais de embalagem são
recicláveis. Não coloque as embalagens no lixo doméstico, envie-as para uma unidade de
reciclagem.
Os aparelhos velhos contêm
materiais preciosos e recicláveis
e deverão ser reutilizados. Baterias, óleo e produtos similares
não podem ser deitados fora ao
meio ambiente. Por isso, elimine
os aparelhos usados através de
sistemas de recolha de lixo adequados.
Avisos sobre os ingredientes (REACH)
Informações actuais sobre os ingredientes
podem ser encontradas em:
http://www.karcher.de/de/unternehmen/
umweltschutz/REACH.htm
Símbolos no Manual de Ins-
truções
Perigo
Para um perigo eminente que pode conduzir a graves ferimentos ou à morte.
몇 Advertência
Para uma possível situação perigosa que
pode conduzir a graves ferimentos ou à
morte.
Atenção
Para uma possível situação perigosa que
pode conduzir a ferimentos leves ou danos
materiais.
Garantia
Em cada país vigem as respectivas condições de garantia estabelecidas pelas nossas Empresas de Comercialização.
Eventuais avarias no aparelho durante o
período de garantia serão reparadas, sem
encargos para o cliente, desde que se trate
dum defeito de material ou de fabricação.
Em caso de garantia, dirija-se, munido do
documento de compra, ao seu revendedor
ou ao Serviço Técnico mais próximo.
62 PT
– 1
Page 63

Utilização conforme o fim a
que se destina a máquina
Este aparelho não é adequado para a captura e recolha de pó perigoso.
Este aparelho é apropriado para a utilização industrial.
Elementos do aparelho
Elementos de manuseamento IV 100/40, IV 100/55
Para a aspiração a húmido é necessário substituir o recipiente de série dos detritos aspirados
pelo "recipiente para aspiração a húmido e a seco" disponível como acessório.
Qualquer outro tipo de utilização é considerado inadequado.
1 Punho da limpeza do filtro
2 Tampa da câmara do filtro
3 Compartimento do filtro
4 Bocal de ligação para acessórios
5 Manómetro
6 Recipiente dos detritos aspirados
7 Alavanca para destravamento do reci-
piente dos detritos aspirados
8 Rolos de guia com travão de imobilização
9 Mangueira para a turbina de aspiração
10 Manípulo de deslize
11 Interruptor Lig/Desl
12 Silenciador
– 2
63PT
Page 64

Elemento de manuseamento IV 100/75
1 Mangueira para a turbina de aspiração
2 Punho da limpeza do filtro
3 Tampa da câmara do filtro
4 Compartimento do filtro
5 Bocal de ligação para acessórios
6 Recipiente dos detritos aspirados
7 Alavanca para destravamento do reci-
piente dos detritos aspirados
8 Rolos de guia com travão de imobiliza-
ção
9 Manípulo de deslize
10 Silenciador
11 Manómetro
12 Armário de distribuição
13 Botão "Desligar aparelho"
14 Botão luminoso "Ligar aparelho"
15 Lâmpada de controlo de avaria do motor
64 PT
16 Interruptor Lig/Desl
17 Lâmpada de controlo "Tensão de rede
existente"
18 Luz de controlo "Botão de paragem de
emergência accionado"
19 Botão de paragem de emergência
– 3
Page 65

Avisos de segurança
몇 Advertência
Este aparelho não é adequado para a captura e recolha de pó perigoso.
Este aparelho não pode ser utilizado nem
armazenado ao ar livre sob condições adversas (humidade).
Símbolos no aparelho
몇 Atenção
Perigo de esmagamento durante o encaixe e travamento do recipiente dos detritos aspirados
Durante o travamento não se deve manter
as mãos entre o recipiente dos detritos aspirados e o aspirador ou colocá-las na proximidade do pino guia. Travar o recipiente
dos detritos de aspiração através do accionamento da respectiva alavanca, com as
duas mãos!
Prescrições de segurança
Desligar o aparelho e retirar a ficha da tomada, assim que os trabalhos estiverem
concluídos.
Observar as prescrições de segurança
para os materiais que devem ser aspi-
rados. Durante o funcionamento cor-
recto/incorrecto, partes do aspirador
industrial (p.ex. abertura de escape)
podem alcançar uma temperatura de
até 95°C.
Em caso de emergência
Em caso de emergência (p.ex. depois da
aspiração de materiais inflamáveis, curtocircuito ou outras falhas eléctricas) desligar
o aparelho e retirar a ficha de rede.
Colocação em funcionamento
Î Colocar o aparelho em posição de tra-
balho; quando necessário, proteger
com o travão de imobilização.
Î Inserir o tubo flexível de aspiração na
respectiva conexão do tubo de aspiração.
Î Posicionar os acessórios desejados na
mangueira de aspiração.
Î Assegurar que o recipiente dos detritos
aspirados está correctamente instalado.
몇 Advertência
A impedância de rede máx. permitida no
ponto de conexão eléctrica (vide dados
técnicos) não pode ser excedida.
Manuseamento
Î Encaixar a ficha do aparelho na tomada
da rede eléctrica.
Î Colocar o interruptor para ligar/desligar
na posição ”1”
Î
Premir o botão IV 100/75 "Ligar aparelho".
Limpar o filtro
Na parte frontal do aparelho situa-se um
manómetro, que indica a pressão de aspiração dentro do aparelho. Se a subpressão
de aspiração for inferior ao valor indicado
na tabela que segue, o aparelho tem de ser
desligado e o filtro limpo.
NW 50 NW 60
IV 100/40 13,0 kPa 12,0 kPa
IV 100/55 19,5 kPa 15,5 kPa
IV 100/75 25,5 kPa 20,5 kPa
IV 100/40, IV 100/55
Î Desligar o aparelho no interruptor Ligar/
Desligar.
Î Girar o estribo de segurança da limpe-
za do filtro para o lado.
Î Deslocar o punho da limpeza do filtro
várias vezes fortemente para cima e
para baixo.
Î Posicionar o estribo de segurança da
limpeza do filtro numa posição vertical.
– 4
65PT
Page 66

IV 100/75
Î Premir o botão "Desligar aparelho".
Î Accionar várias vezes a alavanca da
limpeza do filtro.
Se esta limpeza não resultar em melhorias,
pode-se retirar o filtro e lavá-lo ou substituí-
lo (ver capítulo "Substituir o filtro").
Aspirar a seco
Atenção
Observar antes de mudar da aspiração
em húmido para a aspiração em seco:
A aspiração de poeiras secas com o elemento de filtro húmido danifica o filtro e
pode torná-lo inútil.
Î
Deixe secar bem o filtro húmido antes da
utilização ou substitua-o por um seco.
Î
Caso necessário, mudar o filtro como des-
crito em "Conservação e manutenção".
Aspiração a húmido (opção)
Aviso
Para a aspiração a húmido é necessário
substituir o recipiente de série dos detritos
aspirados pelo "recipiente para aspiração a
húmido e a seco" disponível como acessório.
O flutuador situado no recipiente para a aspiração a húmido e a seco, interrompe a
corrente de aspiração, sempre que o nível
máximo de enchimento for atingido.
Se a corrente de aspiração for interrompida
pelo flutuador:
Î Desligar IV 100/40 ou IV 100/55 no in-
terruptor de Ligar/Desligar.
Premir o botão IV 100/75 "Desligar apa-
relho".
Î purgar o líquido através da abertura da
válvula de descarga no fundo do recipi-
ente.
Colocar fora de serviço
Î Premir o botão IV 100/75 "Desligar apa-
relho".
Î Desligar o aparelho no interruptor Ligar/
Desligar.
Î Desmontar os acessórios e caso ne-
cessário, lavar com água e secar.
Î Esvaziar o recipiente dos detritos de
aspiração (ver capítulo "Esvaziar o reci-
piente dos detritos de aspiração").
66 PT
Î Aspirar e esfregar o aparelho por den-
tro e por fora para limpá-lo.
Esvaziar o recipiente dos detritos
de aspiração
Aviso
O recipiente deve ser esvaziado se o nível
de detritos estiver aprox. 3 cm abaixo da
margem superior.
Desligar o aparelho e imobilizá-lo com o tra-
Î
vão de imobilização no rolo de guia.
Î Abrir o recipiente dos detritos aspirados
no desbloqueio, para cima (ver gráfico).
Î Puxar o recipiente para fora, com o au-
xílio do respectivo manípulo.
Î Esvaziar o recipiente e montá-lo na or-
dem inversa no aparelho.
Saco colector do pó
Para permitir o esvaziamento do aparelho
sem a libertação de pó é possível incorporar no recipiente dos detritos aspirados um
saco colector do pó:
Î Posicionar o saco colector do pó no re-
cipiente e encostar correctamente na
parede interna do recipiente.
Î Dobrar a margem do saco sobre o reci-
piente dos detritos aspirados.
Î Encaixar o recipiente dos detritos aspi-
rados no aparelho.
Î Fechar o saco colector do pó após a
conclusão dos trabalhos e retirá-lo do
recipiente dos detritos aspirados.
Î Eliminar o recipiente colector do pó jun-
tamente com o respectico conteúdo,
em conformidade com os regulamentos
e prescrições em vigor.
– 5
Page 67

Transporte
Atenção
Perigo de ferimentos e de danos! Ter atenção ao peso do aparelho durante o transporte.
Durante o transporte em veículos, proteger
o aparelho contra deslizes e tombamentos,
de acordo com as directivas em vigor.
Armazenamento do aparelho
Atenção
Perigo de ferimentos e de danos! Ter atenção ao peso do aparelho durante o armazenamento.
Este aparelho só pode ser armazenado em
espaços fechados e cobertos.
Conservação e manutenção
몇 Advertência
Antes de proceder a quaisquer trabalhos no
aspirador, desligar sempre a ficha de rede.
Substituir/trocar filtro
IV 100/40, IV 100/55
Î Desligar o aparelho no interruptor LI-
GAR/DESLIGAR e separá-lo da rede.
Î Soltar e retirar a mangueira que acede
à turbina de aspiração na extremidade
inferior.
Î
Girar o estribo de segurança da limpeza
do filtro para o lado.
Î Desaparafusar o punho da limpeza do
filtro.
Î Retirar mola.
Î
Desaparafusar a porca situada por baixo da
mola (chave de bocas, com abertura de
chave de 27 mm).
Î Abrir fechos.
Î Retirar a tampa da câmara do filtro.
1Armação
2Filtro
Î Abrir os nós das fitas no filtro e retirar a
armação.
Î Retirar o filtro.
Î
Inserir o filtro na ordem inversa e fixá-lo.
IV 100/75
Î Premir o botão "Desligar aparelho".
Î Desligar o aparelho no interruptor LI-
GAR/DESLIGAR e separá-lo da rede.
Î Soltar e retirar a mangueira que acede
à turbina de aspiração na extremidade
inferior.
1 Punho da limpeza do filtro
2Mola
3 Estribo de segurança da limpeza de filtro
4Fecho
5 Tampa da câmara do filtro
– 6
67PT
Page 68

Î Abrir fechos.
Î Retirar a tampa da câmara do filtro.
1 Parafuso serrilhado
Î Desenroscar os dois parafusos serri-
lhados e retirar o filtro do aparelho.
Î
Inserir o filtro na ordem inversa e fixá-lo.
Ajuda em caso de avarias
O motor (turbina de aspiração) não funciona
Falta de corrente eléctrica.
Î Verificar fusível, cabo, ficha e tomada.
Disparo do disjuntor do motor.
Î Repor interruptor.
Durante a aspiração sai pó
O filtro não está bem colocado ou está defeituoso.
Î Verificar a colocação do filtro, caso ne-
cessário, substituir.
Manómetro indica um valor fora dos valores permitidos
Filtro entupido.
Î Desligar o aparelho, limpar filtro ou in-
serir um filtro novo.
몇 Advertência
Todos os trabalhos e verificações nos componentes eléctricos só devem ser efectuados por pessoal qualificado. Em caso de
avarias que não possam ser resolvidas
contactar a assistência técnica de Kärcher.
Indicação de avarias IV 100/75
Sem funcionamento da aspiração, corrente de ar sai do tubo de aspiração
Î Sentido de rotação errado da turbina de
aspiração, trocar os pólos na ficha.
A força de aspiração diminui
Filtro, bocal, tubo flexível de aspiração ou
tubo de aspiração entupidos.
Î Controlar, limpar os acessórios. Event.
substituir o filtro.
68 PT
1 Luz de controlo "Botão de paragem de
emergência accionado"
Brilha com o botão de desactivação de
emergência premido.
Destravar o botão de parada de emer-
gência, rodando-o.
2 Botão de paragem de emergência
3 Lâmpada de controlo "Tensão de rede
existente"
Brilha com a ficha de rede inserida e
com tensão de rede.
4 Lâmpada de controlo de avaria do motor
Brilha sempre que o disjuntor do motor
disparar devido ao elevado consumo
de energia ou em caso de sobreaqueci-
mento.
Rodar o botão Ligar/Desligar para 0,
aguardar cerca de 10 minutos, rodar o
botão de Ligar/Desligar para 1.
– 7
Page 69

Acessórios e peças sobres-
salentes
–
Só devem ser utilizados acessórios e peças de
reposição autorizados pelo fabricante do aparelho. Acessórios e Peças de Reposição Originais - fornecem a garantia para que o aparelho
possa ser operado em segurança e isento de
falhas.
–
No final das Instruções de Serviço encontra
uma lista das peças de substituição mais necessárias.
–
Para mais informações sobre peças sobressalentes, consulte na página www.kaercher.com
o ponto dos serviços.
Acessórios IV 100/40, IV 100/55
Acessórios
Filtro 6.904-341.0
Filtro, M 6.904-342.0
Saco colector de pó em
papel
Saco colector de pó em PE6.904-348.0
Nº de encomenda
6.904-347.0
Acessórios IV 100/75
Acessórios
Filtro 6.904-343.0
Filtro, M 6.904-344.0
Saco colector de pó em
papel
Saco colector de pó em PE6.904-348.0
Nº de encomenda
6.904-347.0
– 8
69PT
Page 70

Dados técnicos
Designação do aparelho IV 100/40 IV 100/55 IV 100/75
Tipo de protecção IP X4 IP 54
Conteúdo do recipiente 90 l
Tensão 400 V, 3~, 50 Hz
Impedância da rede máx. permitida 0.154+j0.096
Ohm
Dados do ventilador
Potência 5000 W 6000 W 7500 W
Vácuo* 15,5 kPa 24 kPa 30 kPa
* com válvula de delimitação da pressão
Volume de ar 92 l/s 88 l/s 105 l/s
Comprimento x Largura x Altura 1220x670x1530 mm 1280x690
Comprimento do cabo 8 m
Classe de protecção I
Cabo de rede: N.º de encomenda 6.649-367.0 6.649-363.0 6.649-364.0
Cabo de rede:Tipo: H07RN-F
Tubo flexível de aspiração NW 61 / 5 m
Peso 141 kg 155 kg 256 kg
Temperatura de armazenamento -10...+40 °C
Humidade relativa do ar 30...90 %
Superfície filtrante 2,2 m
Valores obtidos segundo EN 60335-2-69
Nível de pressão acústica L
Insegurança K
pA
pA
65 dB(A) 79 dB(A) 72 dB(A)
1 db (A) 1 db (A) 1 db (A)
2
0.128+j0.080
Ohm
2
2,2 m
0.204+j0.127
Ohm
x1820 mm
2
3,0 m
70 PT
– 9
Page 71

Declaração CE
Declaramos que a máquina a seguir designada corresponde às exigências de segurança e de saúde básicas estabelecidas
nas Directivas CE por quanto concerne à
sua concepção e ao tipo de construção assim como na versão lançada no mercado.
Se houver qualquer modificação na máquina sem o nosso consentimento prévio, a
presente declaração perderá a validade.
Produto: Aspirador húmido e seco
Tipo: 1.573-xxx
Respectivas Directrizes da CE
2006/42/CE (+2009/127/CE)
2004/108/CE
Normas harmonizadas aplicadas
EN 55014–1: 2006
EN 55014–2: 1997 + A1: 2001
EN 60335–1
EN 60335–2–69
EN 61000–3–2: 2006
EN 61000–3–3: 2008
EN 62233: 2008
Normas nacionais aplicadas
-
Os abaixo assinados têm procuração para
agirem e representarem a gerência.
CEO
Head of Approbation
Alfred Kärcher GmbH & Co. KG
Alfred-Kärcher-Str. 28 - 40
71364 Winnenden (Germany)
Tel.: +49 7195 14-0
Fax: +49 7195 14-2212
– 10
71PT
Page 72

Læs original brugsanvisning in-
den første brug, følg anvisningerne og opbevar vejledningen til senere
efterlæsning eller til den næste ejer.
Inden første ibrugtagelse skal betjeningsvejledningen og sikkerhedshenvisningerne
nr. 5.956-249 læses!
Hvis driftsvejledningen og sikkerhedsanvisningerne ikke overholdes, kan der opstå
skader på apparatet og risici for brugeren
og andre personer.
Ved transportskader skal forhandleren informeres omgående.
Indholdsfortegnelse
Miljøbeskyttelse DA - 1
Symbolerne i driftsvejled-
ningen
Garanti DA - 1
Bestemmelsesmæssig an-
vendelse
Maskinelementer DA - 2
Sikkerhedsanvisninger DA - 4
Ibrugtagning DA - 4
Betjening DA - 4
Ud-af-drifttagning DA - 5
Transport DA - 5
Opbevaring af maskinen DA - 6
Pleje og vedligeholdelse DA - 6
Hjælp ved fejl DA - 7
Tilbehør og reservedele DA - 7
Tekniske data DA - 8
Overensstemmelseserklæ-
ring
DA - 1
DA - 2
DA - 9
Miljøbeskyttelse
Emballagen kan genbruges.
Smid ikke emballagen ud sammen med det almindelige husholdningsaffald, men aflever
den til genbrug.
Udtjente apparater indeholder
værdifulde materialer, der kan
og bør afleveres til genbrug.
Batterier, olie og lignende stoffer er ødelæggende for miljøet.
Aflever derfor udtjente apparater på en genbrugsstation eller
lignende.
Henvisninger til indholdsstoffer
(REACH)
Aktuelle oplysninger til indholdsstoffer finder
du på:
http://www.karcher.de/de/unternehmen/
umweltschutz/REACH.htm
Symbolerne i driftsvejledningen
Risiko
En umiddelbar truende fare, som kan føre
til alvorlige personskader eller død.
몇 Advarsel
En muligvis farlig situation, som kan føre til
alvorlige personskader eller til død.
Forsigtig
En muligvis farlig situation, som kan føre til
personskader eller til materialeskader.
Garanti
I de enkelte lande gælder de af vore forhandlere fastlagte garantibetingelser.
Eventuelle fejl på apparatet afhjælpes gratis inden for garantien, såfremt fejlen kan tilskrives en materiale- eller produktionsfejl.
Hvis De ønsker at gøre garantien gældende, bedes De henvende Dem til Deres forhandler eller nærmeste kundeservice
medbringende kvittering for købet.
72 DA
– 1
Page 73

Bestemmelsesmæssig
anvendelse
Apparatet er ikke egnet til optagelse af farligt støv.
Dette apparat er beregnet til erhvervsmæssig brug.
Maskinelementer
Betjeningselementer IV 100/40, IV 100/55
Til vådsugning skal den seriemæssige snavsbeholder erstattes med "Beholderen til vådog tørsugning", som kan fås som tilbehør.
Hver anden brug anses for at være uhensigtsmæssig.
1 Holder filterrensning
2 Låg filterkammer
3 Filterkammer
4 Tilslutningsstykke til tilbehør
5 Manometer
6 Snavsbeholder
7 Arm til åbning af snavsbeholderen
8 Styringshjul med stopbremse
9 Slange til sugeturbinen
10 Skydegreb
11 Tænd/sluk-kontakt
12 Lyddæmper
– 2
73DA
Page 74

Betjeningselementer IV 100/75
1 Slange til sugeturbinen
2 Holder filterrensning
3 Låg filterkammer
4 Filterkammer
5 Tilslutningsstykke til tilbehør
6 Snavsbeholder
7 Arm til åbning af snavsbeholderen
8 Styringshjul med stopbremse
9 Skydegreb
10 Lyddæmper
11 Manometer
12 Styringsskab
13 Trykknap "Sluk apparatet"
14 Lysknap "Tænd apparatet"
15 Kontrollampe motorfejl
16 Tænd/sluk-kontakt
17 Kontrollampe "Netspænding eksisterer"
74 DA
18 Kontrollampe "Nødstop-knap trykt"
19 Nødstop-knap
– 3
Page 75

Sikkerhedsanvisninger
몇 Advarsel
Dette apparat er ikke egnet til opsugning af
farligt støv.
Apparatet må ikke bruges eller opbevares
udendørs under våde betingelser.
Symboler på apparatet
Ibrugtagning
Î Stil apparatet i arbejdspositionen, sørg
for at sikre med stopbremsen om nødvendigt.
Î Sæt sugeslangen ind i sugeslangens til-
slutning.
Sæt det ønskede tilbehør på sugeslangen.
Î
Î Sørg for, at snavsbeholderen sættes
korrekt i.
몇 Advarsel
Den maksimal tilladelige netimpedans ved
el-tilslutningspunktet (se tekniske data) må
ikke overskrides.
Betjening
몇 OBS
Kvæstelsesfare ved at isætte og låse
snavsbeholderen
Grib aldrig ind imellem snavsbeholderen og
suger eller i nærheden af styringsboltene
medens du låser beholderen. Lås snavsbeholderen med det tilsvarende håndtag og
med begge hænder samtidigt!
Sikkerhedsforskrifter
Sluk for apparatet efter afslutning af arbejdet og træk stikket ud.
Overhold sikkerhedsbestemmelserne
for de materialer, der skal suges. Ved
formålstjenlig/ikke-formålstjenlig brug
kan dele (f.eks. udblæsningsåbningen)
på industristøvsugeren komme op på
95°C.
I nødstilfælde
I nødstilfælde (f.eks. ved indsugning af
brændbare materialer, ved kortslutning eller andre elektriske fejl) skal der slukkes for
sugeren og netstikket trækkes ud.
Î Stik apparatets stik ind i stikdåsen.
Î Stil Tænd/Sluk knappen på "1".
Î
Ved IV 100/75 tryk knap „Tænd apparatet".
Rengøring af filter
På apparatets forside sidder et manometer,
som viser sugetrykket indenfor sugeapparatet. Hvis sugeundertrykket falder under
de værdier, som angives i tabellen forneden, skal apparatet afbrydes og filteret renses.
NW 50 NW 60
IV 100/40 13,0 kPa 12,0 kPa
IV 100/55 19,5 kPa 15,5 kPa
IV 100/75 25,5 kPa 20,5 kPa
IV 100/40, IV 100/55
Sluk apparatet med tænd/slukkontakten.
Î
Î
Drej sikringsbøjlen fra filterrensningen til side.
Î Bevæg filterrensningens håndtag kraf-
tigt op og ned.
Î Stil filterrensningen sikringsbøjle i lodret
position.
IV 100/75
Î Tryk trykknap "Sluk apparatet"
Î Bevæg håndtaget til filterrensningen
flere gange frem og tilbage.
Hvis denne rensning ikke forbedrer kapaciteten, kan filteret tages ud og rengøres eller
erstattes (se kapitel "Skifte filter").
– 4
75DA
Page 76

Tørsugning
Tømme snavsbeholderen
Forsigtig
Vær opmærksom på følgende ved skift
fra våd- til tørsugning:
Sugning af tørt støv med vådt filterelementet stopper filteret til og kan gøre det ubrugeligt.
Î Et vådt filter skal tørres godt før brugen
eller udskiftes med et tørt filter.
Î Udskift filteret efter behov, beskrives
under punkt "Pleje og vedligeholdelse".
vådsugning (option)
OBS
Til vådsugning skal den seriemæssige
snavsbeholder erstattes med "Beholderen
til våd- og tørsugning", som kan fås som tilbehør.
Svømmeren, som sidder i beholderen til
våd- og tørsugning, afbryder sugestrømmen hvis den maksimale påfyldningsstand
opnås.
Hvis sugestrømmen afbrydes af svømmeren:
Î Sluk IV 100/40 eller IV 100/55 med
TÆND/SLUK-knappen.
Ved IV 100/75 tryk knap „Sluk apparatet".
Î Afled væsken ved at åbne aflednings-
ventilen på beholderens bund.
Ud-af-drifttagning
Ved IV 100/75 tryk knap „Sluk apparatet".
Î
Î
Sluk apparatet med tænd/slukkontakten.
Î
Fjern tilbehøret og skyl det igennem med
vand ved behov, og tør det bagefter.
Î Tøm den opfyldte snavsbeholder (se
kapitel "Tøm snavsbeholderen").
Î
Maskinen rengøres indvendigt og udvendigt ved at støvsuge den og tørre den af.
OBS
Snavsbeholderen skal tømmes hvis den er
fyldt til ca. 3 cm under den øverste kant.
Î Sluk for apparatet og sikre styringsrul-
lerne med stopbremsen.
Î Åben snavsbeholderen opad med låset
(se figuren).
Î Træk snavsbeholderen ud af apparatet
med det tilsvarende håndtag.
Î Tøm snavsbeholderen og sæt den ind i
apparatet igen i omvendt rækkefølge.
Støvsamlingspose
Til støvfri udtømning af apparatet, kan der
lægges en støvesamlingsbeholder ind i
snavsbeholderen:
Î Sæt støvsamlingsbeholderen ind i be-
holderen og læg den tæt på beholde-
rens væg.
Î Smøg posens kant over snavsbeholde-
ren kant udadtil.
Î Sæt snavsbeholderen ind i apparatet.
Î Luk støvsamlingsposen efter driften og
tag den ud af snavsbeholderen.
Î Støvsamlingsbeholderen med indhold
skal bortskaffes ifølge lovens forskrifter.
Transport
76 DA
Forsigtig
Fare for person- og materialeskader! Hold
øje med maskinens vægt ved transporten.
Ved transport i biler skal renseren fastspændes i.h.t. gældende love.
– 5
Page 77

Opbevaring af maskinen
Forsigtig
Fare for person- og materialeskader! Hold øje
med maskinens vægt ved opbevaring.
Denne maskine må kun opbevares indendørs.
Pleje og vedligeholdelse
몇 Advarsel
Før der arbejdes på sugeren skal netstikken altid trækkes ud.
Udskifte/erstatte filteret
IV 100/40, IV 100/55
Î Sluk apparatet med tænd-/slukkontak-
ten og træk stikket ud.
Î Løsn og fjern slangen til sugeturbinen
på det nederste ende.
1 Holder filterrensning
2 Fjeder
3 Sikringsbøjle filterrensning
4 Lås
5 Låg filterkammer
Î
Drej sikringsbøjlen fra filterrensningen til
side.
Î
Skru grebet til filterensningen af.
Î
Fjern fjedret.
Î
Skru møtrikken neden for fjedret af
(gaffelnøgle nøglebredde 27 mm
nødvendigt).
Î
Åbn låset.
Î
Fjern filterkammerets dæksel.
1Stel
2Filter
Î
Åbn båndenes knuder ved filteret og fjern
stellet.
Î
Tag filteret ud.
Î
Sæt det nye filter ind i omvendt rækkeføl-
ge og sikr det.
IV 100/75
Î
Tryk trykknap "Sluk apparatet"
Î
Sluk apparatet med tænd-/slukkontakten
og træk stikket ud.
Î
Løsn og fjern slangen til sugeturbinen på
det nederste ende.
Î Åbn låset.
Î Fjern filterkammerets dæksel.
1 Rouletskrue
Î Skru begge rouletskruer ud og tag filte-
ret ud af apparatet.
Î Sæt det nye filter ind i omvendt række-
følge og sikr det.
– 6
77DA
Page 78

Hjælp ved fejl
Motoren (sugeturbine) starter ikke
Ingen elektrisk spænding.
Î Kontroller sikring, kabel, stik og stikdå-
se.
Motorbeskyttelseskontakt blev frigivet.
Î Sæt kontakten tilbage.
Ingen sugedrift, luft trænger ud af sugeslangen
Î Sugeturbinen har en forkert drejeret-
ning, udskift pol på stikket.
Sugekraften bliver gradvist mindre
Filter, mundstykke, sugeslange eller sugerør tilstoppet.
Î Kontroller, rens tilbehør, udskift evt. fil-
teret.
Der strømmer støv ud under sugning
Filter ikke monteret korrekt eller defekt.
Î Kontroller filterets position, respektive
udskift filteret.
Manometeret viser ikke det korrekte tryk
Filter tilstoppet.
Î Sluk for apparatet, rens filteret eller sæt
et nyt filter i.
몇 Advarsel
Lad altid en fagmand stå for kontroller og arbejder på elektriske dele. Kontakt Kärchers
kundeservice ved mere komplicerede fejl.
Fejlvisning IV 100/75
1 Kontrollampe "Nødstop-knap trykt"
Lyser ved trykt Nødstop-knap.
Frigiv nødstop-knappen ved at dreje den.
2 Nødstop-knap
3 Kontrollampe "Netspænding eksisterer"
Lyser ved isat netstik og foreliggende
netspænding.
4 Kontrollampe motorfejl
Lyser hvis motorværnkontakten blev
udløst på grund af for høj strømoptagel-
se eller overophedning.
Stil Tænd/Sluk kontakten på 0, vendt
ca. 10 minutter, stil Tænd/Sluk kontak-
ten på 1.
Tilbehør og reservedele
– Der må kun anvendes tilbehør og reser-
vedele, der er godkendt af producen-
ten. Originaltilbehør og -reservedele er
en garanti for, at maskinen kan fungere
sikkert og uden fejl.
– Et udvalg over de reservedele som bru-
ges meget ofte finder De i slutningen af
betjeningsvejledningen
–
Yderligere informationen om reservedele
finder De under www.kaercher.com i afsni
"Service".
Tilbehør IV 100/40, IV 100/55
Tilbehør Bestillingsnum-
mer
Filter 6.904-341.0
Filter, M 6.904-342.0
Støvsamlingsbehol-
der papir
Støvsamlingsbehol-
der PE
6.904-347.0
6.904-348.0
78 DA
– 7
Page 79

Tilbehør IV 100/75
Tilbehør Bestillingsnum-
mer
Tilbehør Bestillingsnum-
mer
Filter 6.904-343.0
Støvsamlingsbeholder
6.904-347.0
papir
Støvsamlingsbeholder PE6.904-348.0
Filter, M 6.904-344.0
Tekniske data
Apparatets betegnelse IV 100/40 IV 100/55 IV 100/75
Kapslingsklasse IP X4 IP 54
Beholderindhold 90 l
Spænding 400 V, 3~, 50 Hz
Maksimalt tilladelig netimpedans 0.154+j0.096
Ohm
Blæserdata
Effekt 5000 W 6000 W 7500 W
Vakuum* 15,5 kPa 24 kPa 30 kPa
* med trykreguleringsventil
Luftkapacitet 92 l/s 88 l/s 105 l/s
Længde x bredde x højde 1220x670x1530 mm 1280x690
Kabellængde 8 m
Beskyttelsesklasse I
Netledning: Bestillingsnr. 6.649-367.0 6.649-363.0 6.649-364.0
Netkabel:type: H07RN-F
Sugeslange NW 61 / 5 m
Vægt 141 kg 155 kg 256 kg
Opbevaringstemperatur -10...+40 °C
Luftfugtighed 30...90 %
Filterflade 2,2 m
Oplyste værdier ifølge EN 60335-2-69
Lydtryksniveau L
Usikkerhed K
pA
pA
65 dB(A) 79 dB(A) 72 dB(A)
1 db (A) 1 db (A) 1 db (A)
2
0.128+j0.080
Ohm
2
2,2 m
0.204+j0.127
Ohm
x1820 mm
2
3,0 m
– 8
79DA
Page 80

Overensstemmelseserklæ-
ring
Hermed erklærer vi, at den nedenfor nævnte maskine i design og konstruktion og i den
af os i handlen bragte udgave overholder
de gældende grundlæggende sikkerhedsog sundhedskrav i EF-direktiverne. Ved
ændringer af maskinen, der foretages uden
forudgående aftale med os, mister denne
erklæring sin gyldighed.
Produkt: Våd- og tørsuger
Type: 1.573-xxx
Gældende EF-direktiver
2006/42/EF (+2009/127/EF)
2004/108/EF
Anvendte harmoniserede standarder
EN 55014–1: 2006
EN 55014–2: 1997 + A1: 2001
EN 60335–1
EN 60335–2–69
EN 61000–3–2: 2006
EN 61000–3–3: 2008
EN 62233: 2008
Anvendte tyske standarder
-
Undertegnede agerer på vegne af og med
fuldmagt fra ledelsen.
CEO
Alfred Kärcher GmbH & Co. KG
Alfred-Kärcher-Str. 28 - 40
71364 Winnenden (Germany)
Tlf.: +49 7195 14-0
Fax: +49 7195 14-2212
80 DA
Head of Approbation
– 9
Page 81

Før første gangs bruk av appa-
ratet, les denne originale bruksanvisningen , følg den og oppbevar den for
senere bruk eller fo overlevering til neste eier.
Det er tvingende nødvendig å lese sikkerhetsinstruksene nr. 5.956-249 før maskinen settes i drift!
Hvis bruksanvisningen og sikkerhetsanvisningene ikke følges, kan dette medføre
skader på apparatet og fare for brukeren og
andre personer.
Informer straks forhandleren ved transportskader.
Innholdsfortegnelse
Miljøvern NO - 1
Symboler i bruksanvisnin-
gen
Garanti NO - 1
Forskriftsmessig bruk NO - 2
Maskinorganer NO - 2
Sikkerhetsanvisninger NO - 4
Ta i bruk NO - 4
Betjening NO - 4
Stans av driften NO - 5
Transport NO - 5
Lagring av maskinen NO - 5
Pleie og vedlikehold NO - 6
Feilretting NO - 7
Tilbehør og reservedeler NO - 7
Tekniske data NO - 8
CE-erklæring NO - 9
NO - 1
Miljøvern
Materialet i emballasjen kan resirkuleres. Ikke kast emballasjen i husholdningsavfallet,
men lever den inn til resirkulering.
Gamle maskiner inneholder
verdifulle materialer som kan
resirkuleres. Disse bør leveres
inn til gjenvinning. Batterier,
olje og lignende stoffer må ikke
komme ut i miljøet. Gamle maskiner skal derfor avhendes i egnede innsamlingssystemer.
Anvisninger om innhold (REACH)
Aktuell informasjon om stoffene i innholdet
finner du under:
http://www.karcher.de/de/unternehmen/
umweltschutz/REACH.htm
Symboler i bruksanvisningen
Fare
For en umiddelbar truende fare som kan
føre til store personskader eller til død.
몇 Advarsel
For en mulig farlig situasjon som kan føre til
store personskader eller til død.
Forsiktig!
For en mulig farlig situasjon som kan føre til
mindre personskader eller til materielle
skader.
Garanti
Vår ansvarlige salgsorganisasjon for det
enkelte land har utgitt garantibetingelsene
som gjelder i det aktuelle landet. Eventuelle
feil på maskinen blir reparert gratis i garantitiden dersom disse kan føres tilbake til
material- eller produksjonsfeil. Ved behov
for garantireparasjoner, vennligst henvend
deg med kjøpskvitteringen til din forhandler
eller nærmeste autoriserte kundeservice.
– 1
81NO
Page 82

Forskriftsmessig bruk
Dette apparatet er ikke ment for oppsamling av farlig støv.
Dette apparatet er egnet for industriell virksomhet.
Maskinorganer
Betjeningselementer IV 100/40, IV 100/55
For våtsuging må standard sugemasse beholder skiftes ut med "Beholder for våt- og
tørr suging" som kan kjøpes som tilbehør.
En hver annen bruk regnes som ikke-forskriftsmessig bruk.
1 Håndtak filterrengjøring
2 Deksel filterkammer
3 Filterkammer
4 Tilkoblingsstuss for tilbehør
5 Manometer
6 Sugemassebeholder
7 Hendel for lås på sugemassebeholder
8 Styrerulle med holdebremse
9 Slange for sugeturbin
10 Skyvehåndtak
11 Av/på-bryter
12 Lyddemper
82 NO
– 2
Page 83

Betjeningselementer IV 100/75
1 Slange for sugeturbin
2 Håndtak filterrengjøring
3 Deksel filterkammer
4 Filterkammer
5 Tilkoblingsstuss for tilbehør
6 Sugemassebeholder
7 Hendel for lås på sugemassebeholder
8 Styrerulle med holdebremse
9 Skyvehåndtak
10 Lyddemper
11 Manometer
12 Koblingsskap
13 Bryter "Slå av apparat"
14 Lystaster "Slå på apparat"
15 Kontrollampe motorfeil
16 Av/på-bryter
17 Kontrollampe "Strøm på"
18 Kontrollampe "Nødstopp trykket"
19 Nødstoppknapp
– 3
83NO
Page 84

Sikkerhetsanvisninger
몇 Advarsel
Dette apparatet er ikke ment for oppsamling av farlig støv.
Dette apparatet skal ikke brukes eller oppbevares utendørs eller under våte forhold.
Symboler på maskinen
몇 Forsiktig
Fare for klemming ved innsetting og låsing av sugemasebeholderen
Ved låsing må du ikke holde hånden mellom sugemassebeholderen og sugemasjinen, heller ikke stikkes inn i nærheten av
føringsboltene. Sugemassebeholderen låses med begge hender ved hjelp av den relevante hendel!
Sikkerhetsforskrifter
Ved avsluttet arbeide skal apparatet slås
av og støpdelet trekkes ut.
Følg sikkerhetsbestemmelsene for ma-
terialet som skal suges opp. Ved korrekt/feilaktig bruk kan enkelte deler på
industristøvsugeren (f. eks. utblåsningsåpningen) nå en temperatur på
opp til 95 °C.
I nødstilfelle
I nødstilfeller (f. eks. hvis man har sugd opp
brennbare materialer, ved kortslutning eller
andre elektriske feil) må apparatet slås av
og nettstøpselet trekkes ut.
Ta i bruk
Î Sett maskinen i arbeidsstilling, og sett
om nødvendig på parkeringsbremsen.
Î Sett sugeslangen inn i sugeslangetil-
koblingen.
Î Sett på ønsket tilbehør på sugeslangen.
Î Pass på at sugemassebeholderen er
satt inn korrekt..
몇 Advarsel
Maksimalt tillatt nettimpedans på det elektriske tilkoblingspunktet (se tekniske data)
skal ikke overskrides.
Betjening
Î Sett pluggen i en stikkontakt.
Î Av/på-bryter dreies til "1"
Î Ved IV 100/75 trykk "Slå på apparat"
Rengjør filtrene
På forsiden av apparatet er det et manometer som viser suge-undertrykket inne i maskinen. Dersom sugeundertrykket synker
under verdien angitt i følgende tabell, må
apparatet slås av og filteret skiftes.
NW 50 NW 60
IV 100/40 13,0 kPa 12,0 kPa
IV 100/55 19,5 kPa 15,5 kPa
IV 100/75 25,5 kPa 20,5 kPa
IV 100/40, IV 100/55
Î Slå av maslkinen ved hjelp av PÅ/AV
bryteren.
Î Sving sikringsbøylen fro filterrengjøring
til siden.
Î Trekk håndtaket for filterrengjøring kraf-
tig frem og tilbake.
Î Sett sikringsbøylen for filterrengjøring i
vertikal stilling.
IV 100/75
Î Bryter "Slå av apparat" trykkes
Î Hendel for filterrensing beveges flere
ganger frem og tilbake.
Dersom denne rengjøringen ikke gir noen
bedring kan filteret tas ut og vaskes, eller
det kan skiftes ( se kapittel "Skifte filter).
84 NO
– 4
Page 85

Støvsuging
Forsiktig!
Ta hensyn til følgende ved skifting fra
vann- til støvsuging:
Oppsuging av tørt støv når filterinnsatsen
er fuktig, vil føre til at filteret tetter seg og
ikke er brukbart lenger.
Î La et fuktig filter tørke helt før bruk, eller
bytt det ut med et tørt filter.
Î Bytt filter etter behov. Se "Service og
vedlikehold".
Våtsuging (valgfritt)
Anvisning
For våtsuging må standard sugemasse beholder skiftes ut med "Beholder for våt- og
tørr suging" som kan kjøpes som tilbehør.
Flottøren inne i beholderen for våt- og tørr
suging vil avbryte strømmen når maksimal
fyllingsgrad er nådd.
Dersom strømmen avbrytes av flottøren:
Î IV 100/40 eller IV 100/55 slås av med
PÅ/AV tast.
Ved IV 100/75 trykk "Slå av apparat".
Î Tapp av væske ved å åpne avtappings-
ventilen i bunnen av beholderen.
Stans av driften
Î Ved IV 100/75 trykk "Slå av apparat".
Î Slå av maslkinen ved hjelp av PÅ/AV
bryteren.
Î Demonter tilbehør og om nødvendig
skyll det med vann og tørk det.
Î Tøm smussbeholder (se kapittel "Tøm-
me smussbeholder").
Î Rengjør maskinen innvendig og utven-
dig ved å tørke av den og bruke sugefunksjonen.
Tømme smussbeholder
Anvisning
Smussbeholderen må tømmes når den er
fylt til ca 3 cm under øvre kant.
Î Slå av apparatet og lås det ved hjelp av
bremsen på styrehjulene.
Î Åpne smussbeholderen på opsiden ved
hjelp av låsen (se figur).
Î Smussbeholderen tas ut av apparatete
ved hjelp av det egnede håndtaket.
Smussbeholderen tømmes og monteres i
Î
apparatet igjen i omvendt rekkefølge.
Støvsamlepose
For støvfri tømming av apparatet kan det legges en støvpose i sugemassebeholderen.
Î Støvposen settes inn i beholderen og
legges nøyaktig mot beholderveggen.
Î Kanten av posen brettes ut over kanten
av sugemassebeholderen.
Î
Sett inn sugemassebeholderen i maskinen.
Î Etter endt bruk lukkes støvposen og tas
ut av sugemassebeholderen.
Î Støvsamleposen med innhold kastes i
henhold til gjeldende forskrifter.
Transport
Forsiktig!
Fare for personskader og materielle skader!
Pass på vekten av apparatet ved transport.
Ved transport i kjøretøyer skal apparatet
sikres mot å skli eller velte etter de til enhver tid gjeldende regler.
Lagring av maskinen
Forsiktig!
Fare for personskader og materielle skader!
Pass på vekten av apparatet ved lagring.
Dette apparatet skal kun lagres innendørs.
– 5
85NO
Page 86

Pleie og vedlikehold
몇 Advarsel
Trekk alltid ut støpselet ved arbeid på sugeren.
Skifte/sette inn filter
IV 100/40, IV 100/55
Î Slå av apparatet ved hjelp av PÅ/AV
bryteren og koble det fra strømnettet.
Î Løsne slange for sugeturbin på nedre
ende, og trekk av.
Î Åpne knutene på båndet på filteret og ta
av stativ.
Î Ta ut filteret.
Î Det nye filteret settes inn i omvendt rek-
kefølge og låses på plass.
IV 100/75
Î Bryter "Slå av apparat" trykkes
Î Slå av apparatet ved hjelp av PÅ/AV
bryteren og koble det fra strømnettet.
Î Løsne slange for sugeturbin på nedre
ende, og trekk av.
1 Håndtak filterrengjøring
2Fjær
3 Sikringsbøyle filterrengjøring
4 Lås
5 Deksel filterkammer
Î Sving sikringsbøylen fro filterrengjøring
til siden.
Î Skru av håndtak for filterrengjøring
Î Ta av fjær.
Î Skru av mutter under fjæren (fastnøkkel
bredde 27 mm passer).
Î Åpne lås.
Î Ta av deksel på filterkammer.
1 Stativ
2Filter
Î Åpne lås.
Î Ta av deksel på filterkammer.
1 Rilleskrue
Î Skru ut begge rilleskruer og ta filteret ut
av apparatet.
Î Det nye filteret settes inn i omvendt rek-
kefølge og låses på plass.
86 NO
– 6
Page 87

Feilretting
Motoren (sugeturbinen) starter ikke
Får ikke strøm.
Î Kontroller sikring, kabel, plugg og stikk-
kontakt.
Motorvernbryter er utløst.
Î Tilbakestill bryteren.
Ingen suging, luftstrøm kommer ut av
sugeslangen
Î Feil rotasjonsretning på sugeturbin,
skift faser på ledning.
Sugekraften avtar gradvis
Filter, munnstykke, sugeslange eller forlengelsesrør tilstoppet.
Î Kontroller og rengjør tilbehør, skift
eventuelt ut filter.
Støvutslipp ved suging
Filteret er defekt eller ikke festet ordentlig.
Î Kontroller at filteret sitter ordentlig på
plass, eller skift det ut.
Manomenter viser ikke korrekt trykk
Filter tilstoppet.
Î Slå av apparat, rengjør filter eller sett
inn nytt filter.
몇 Advarsel
Alle kontroller og arbeider på elektriske deler må utføres av en fagperson. Dersom det
ikke lar seg gjøre å løse det aktuelle problemet, ber vi deg ta kontakt med Kärchers
kundeservice.
Feilindikator IV 100/75
1 Kontrollampe "Nødstopp trykket"
Lyser ved inntrykket nødstopp-tast
Tilbakestill NØD-STOPP-tasten ved å
dreie den.
2 Nødstoppknapp
3 Kontrollampe "Strøm på"
Lyser ved innsatt strømkabel og nett-
spenning på.
4 Kontrollampe motorfeil
Lyser når motorvernebryter er utløst
pga. for høyt strømforbruk eller over-
oppvarming.
På/av bryter settes til 0, vent ca. 10 mi-
nutter. Sett på/av bryteren til 1.
Tilbehør og reservedeler
– Det er kun tillatt å anvende tilbehør og
reservedeler som er godkjent av produ-
senten. Originalt tilbehør og originale
reservedeler garanterer for sikker og
problemfri drift av apparatet.
– Et utvalg av de vanligste reservedelene
finner du bak i denne bruksanvisningen.
– Mer informasjon om reservedeler finner
du under www.kaercher.com i området
Service.
– 7
87NO
Page 88

Tilbehør IV 100/40, IV 100/55
Tilbehør IV 100/75
Tilbehør Bestillingsnum-
mer
Filter 6.904-341.0
Filter, M 6.904-342.0
Støvpose papir 6.904-347.0
Støvpose PE 6.904-348.0
Tilbehør Bestillingsnum-
mer
Filter 6.904-343.0
Filter, M 6.904-344.0
Støvpose papir 6.904-347.0
Støvpose PE 6.904-348.0
Tekniske data
Apparatbetegnelse IV 100/40 IV 100/55 IV 100/75
Beskyttelsestype IP X4 IP 54
Beholderinnhold 90 l
Spenning 400 V, 3~, 50 Hz
Maks. tillatt nettimpedanse 0.154+j0.096
Ohm
Viftedata
Effekt 5000 W 6000 W 7500 W
Vakuum* 15,5 kPa 24 kPa 30 kPa
* med trykkbegrensningsventil
Luftmengde 92 l/s 88 l/s 105 l/s
Lengde x bredde x høyde 1220x670x1530 mm 1280x690
Kabellengde 8 m
Beskyttelsesklasse I
Strømledning: Bestillingsnr. 6.649-367.0 6.649-363.0 6.649-364.0
Nettkabel, type: H07RN-F
Sugeslange NW 61 / 5 m
Vekt 141 kg 155 kg 256 kg
Lagringstemperatur -10...+40 °C
Luftfuktighet 30...90 %
Filterflate 2,2 m
Registrerte verdier etter EN 60335-2-69
Støytrykksnivå L
Usikkerhet K
pA
pA
65 dB(A) 79 dB(A) 72 dB(A)
1 db (A) 1 db (A) 1 db (A)
2
0.128+j0.080
Ohm
2
2,2 m
0.204+j0.127
Ohm
x1820 mm
2
3,0 m
88 NO
– 8
Page 89

CE-erklæring
Vi erklærer hermed at maskinen angitt nedenfor oppfyller de grunnleggende sikkerhets- og helsekravene i de relevante EFdirektivene, med hensyn til både design,
konstruksjon og type markedsført av oss.
Ved endringer på maskinen som er utført
uten vårt samtykke, mister denne erklæringen sin gyldighet.
Produkt: Våt- og tørrsuger
Type: 1.573-xxx
Relevante EU-direktiver
2006/42/EF (+2009/127/EF)
2004/108/EF
Anvendte overensstemmende normer
EN 55014–1: 2006
EN 55014–2: 1997 + A1: 2001
EN 60335–1
EN 60335–2–69
EN 61000–3–2: 2006
EN 61000–3–3: 2008
EN 62233: 2008
Anvendte nasjonale normer
-
De undertegnede handler på oppdrag fra,
og med fullmakt fra selskapsledelsen.
CEO
Head of Approbation
Alfred Kärcher GmbH & Co. KG
Alfred-Kärcher-Str. 28 - 40
71364 Winnenden (Germany)
Tlf: +49 7195 14-0
Faks: +49 7195 14-2212
– 9
89NO
Page 90

Läs bruksanvisning i original
innan aggregatet används första
gången, följ anvisningarna och spara
driftsanvisningen för framtida behov, eller
för nästa ägare.
Före första ibruktagning måste Säkerhetsanvisningar nr. 5.956-249 läsas!
Om bruksanvisningen och säkerhetsanvisningarna inte följs kan apparaten skadas
och faror uppstå för användaren och andra
personer.
Informera inköpsstället omgående vid
transportskador.
Innehållsförteckning
Miljöskydd SV - 1
Symboler i bruksanvisning-enSV - 1
Garanti SV - 1
Ändamålsenlig användning SV - 2
Aggregatelement SV - 2
Säkerhetsanvisningar SV - 4
Idrifttagning SV - 4
Handhavande SV - 4
Ta ur drift SV - 5
Transport SV - 5
Lagring av maskinen SV - 5
Skötsel och underhåll SV - 6
Åtgärder vid störningar SV - 7
Tillbehör och reservdelar SV - 7
Tekniska data SV - 8
CE-försäkran SV - 9
Miljöskydd
Emballagematerialen kan återvinnas. Kasta inte emballaget i
hushållssoporna utan för dem
till återvinning.
Skrotade aggregat innehåller
återvinningsbara material som
bör gå till återvinning. Batterier,
olja och liknande ämnen får
inte komma ut i miljön. Överlämna skrotade aggregat till ett
lämpligt återvinningssystem.
Upplysningar om ingredienser (REACH)
Aktuell information om ingredienser finns
på:
http://www.karcher.de/de/unternehmen/
umweltschutz/REACH.htm
Symboler i bruksanvisningen
Fara
För en omedelbart överhängande fara som
kan leda till svåra skador eller döden.
몇 Varning
För en möjlig farlig situation som kan leda
till svåra skador eller döden.
Varning
För en möjlig farlig situation som kan leda
till lätta skador eller materiella skador.
Garanti
I respektive land gäller de garantivillkor
som publicerats av våra auktoriserade distributörer. Eventuella fel på aggregatet repareras utan kostnad under förutsättning
att det orsakats av ett material- eller tillverkningsfel. I frågor som gäller garantin ska du
vända dig med kvitto till inköpsstället eller
närmaste auktoriserade serviceverkstad.
90 SV
– 1
Page 91

Ändamålsenlig användning
Aggregatet är ej avsett för borttagning av farligt damm.
Detta aggregat är avsett för industriell användning.
Aggregatelement
Manöverelement IV 100/40, IV 100/55
För våtsugning måste den seriemässiga sugbehållaren bytas ut mot tillbehöret "Behållare
för våt- och torrsugning".
All annan användning betraktas som otillåten.
1 Handtag filterrengöring
2 Lock filterkammare
3 Filterkammare
4 Anslutningsfäste för tillbehör
5 Manometer
6 Smutsbehållare
7 Spak för att lossa smutsbehållare
8 Styrhjul med parkeringsbroms
9 Slang till sugturbinen
10 Skjuthandtag
11 Strömbrytare
12 Ljuddämpare
– 2
91SV
Page 92

Manöverelement IV 100/75
1 Slang till sugturbinen
2 Handtag filterrengöring
3 Lock filterkammare
4 Filterkammare
5 Anslutningsfäste för tillbehör
6 Smutsbehållare
7 Spak för att lossa smutsbehållare
8 Styrhjul med parkeringsbroms
9 Skjuthandtag
10 Ljuddämpare
11 Manometer
12 Kopplingsskåp
13 Knapp "Koppla från aggregatet"
14 Knapp med inbyggd lampa "Koppla till
aggregatet"
15 Kontrollampa motorfel
16 Strömbrytare
92 SV
17 Kontrollampa "Nätspänning finns“
18 Kontrollampa "Nödstopp aktiverat"
19 Nödstoppsknapp
– 3
Page 93

Säkerhetsanvisningar
몇 Varning
Apparaten är ej lämplig för att suga upp farligt damm.
Aggregatet får ej användas eller förvaras
utomhus under fuktiga förhållanden.
Symboler på apparaten
몇 Observera
Klämrisk vid isättning och spärrning av
smutsbehållaren.
Håll aldrig händerna mellan smutsbehållare och sug, eller i närheten av styrskruven,
när behållaren ska spärras. Hantera aktuell
spak med båda händerna för att spärra
smutsbehållaren!
Säkerhetsföreskrifter
Stäng av aggregatet efter avslutat arbete och
drag ur kontakten.
Följ säkerhetsbestämmelserna för det
material som ska sugas upp. I sakkunnig/
osakkunnig drift kan delar (t. ex. utblås-
ningsöppningen) i industridammsugaren
upphettas till 95°C.
I nödfall
Koppla från apparaten och dra ut nätkontakten i nödfall (t.ex. vid uppsugning av
brännbart material, vid kortslutning eller andra elektriska fel).
Idrifttagning
Î Ställ apparaten i arbetsläge och säkra
den vid behov med parkeringsbromsar.
Î Anslut sugslangen till sugslangsfästet.
Montera önskat tillbehör på sugslangen.
Î
Î Säkerställ att smutsbehållaren sitter på
rätt plats.
몇 Varning
Maximal tillåten nätimpedans på den elektriska anslutningen (se Tekniska data) får ej
överskridas.
Handhavande
Î Sätt aggregatkontakten i nätuttag.
Î Ställ på/av-omkopplaren till "1".
Î På IV 100/75 tryck knappen "Koppla till
apparaten.
Rengör filter
På aggregatets framsida finns en manometer som visar sugundertrycket i sugaggregatet. Sjunker sugundertrycket under det
värde som anges i nedanstående tabell
måste aggregatet stängas av och filtret rengöras.
NW 50 NW 60
IV 100/40 13,0 kPa 12,0 kPa
IV 100/55 19,5 kPa 15,5 kPa
IV 100/75 25,5 kPa 20,5 kPa
IV 100/40, IV 100/55
Î Stäng av apparaten med TILL/FRÅN
reglaget.
Î Sväng säkerhetsbygeln för filterrengö-
ring åt sidan.
Î Höj och sänk handtaget på filterrengö-
ringen kraftigt flera gånger.
Î Ställ säkringsbygeln för filterrengöring
lodrätt.
IV 100/75
Î Tryck "Koppla från aggregatet".
Î Flytta spaken filterrengöring fram- och
tillbaka flera gånger.
Ger denna rengöring inget resultat kan filtret tas ur och tvättas eller bytas ut (se kapitlet "Filterbyte").
– 4
93SV
Page 94

Torrsugning
Varning
Observera följande vid växel från våt- till
torrsugning :
Sugning av torrt damm när filterelementet
är fuktigt gör att filtret blir tillstoppat vilket
gör det obrukbart.
Våta filter ska torkas ordentligt före använd-
Î
ning eller bytas ut mot nya.
Î Byt filter vid behov, beskrivs i avsnitt
"Underhåll och service".
Våtsugning (tillval)
Anvisning
För våtsugning måste den seriemässiga
sugbehållaren bytas ut mot tillbehöret "Behållare för våt- och torrsugning".
Flottören i våt- och torrsugarens behållare
avbryter sugströmmen när maximalt fyllnadstillstånd uppnåtts.
Avbryts strömmen via flottören:
Î Koppla från IV 100/40 eller IV 100/55
med PÅ/AV-omkopplaren.
På IV 100/75 tryck knappen "Koppla
från apparaten".
Î Öppna tömningsventilen i behållarens
botten och släpp ut vätska.
Ta ur drift
Î På IV 100/75 tryck knappen "Koppla
från apparaten".
Î Stäng av apparaten med TILL/FRÅN
reglaget.
Avmontera tillbehör, skölj och torka vid
Î
behov.
Î Töm den fulla smutsbehållaren (se av-
snitt "Töm smutsbehållare").
Î Rengör apparaten invändigt och utvän-
digt genom uppsugning och avtorkning.
Tömma smutsbehållare
Anvisning
Smutsbehållaren måste tömmas när den är
fylld upp till ca. 3 cm under övre kanten.
Î Stäng av aggregatet och säkra styrhju-
len med hjälp av parkeringsbromsen.
Î Öppna smutsbehållaren uppåt vid spär-
ren (se bild).
Î Håll i handtaget och drag smutsbehålla-
ren ur aggregatet.
Î
Töm smutsbehållaren och sätt tillbaka den i
aggregatet i omvänd ordningsföljd.
Dammpåse
För dammfri tömning av aggregatet måste
en dammpåse läggas in i avfallsbehållaren:
Î Sätt noggrant i en dammpåse mot väg-
gen i behållaren.
Î Vik påsens överkant över sugbehålla-
rens kant.
Î Sätt i sugbehållaren i apparaten.
Î Förslut och ta ur dammpåsen ur sugbe-
hållaren efter avslutat arbete.
Î Dammpåsar och dess innehåll skall av-
fallshanteras enligt gällande lagliga föreskrifter.
Transport
Varning
Risk för person och egendomsskada! Observera vid transport maskinens vikt.
Vid transport i fordon ska maskinen säkras
enligt respektive gällande bestämmelser så
den inte kan tippa eller glida.
Lagring av maskinen
Varning
Risk för person och egendomsskada! Observera maskinens vikt vid lagring.
Denna maskin får endast lagras inomhus.
94 SV
– 5
Page 95

Skötsel och underhåll
몇 Varning
Dra alltid ur nätkontakten före arbeten på
dammsugaren.
Byta/ersätta filter
IV 100/40, IV 100/55
Stäng av aggregatet på TILL/FRÅN reglaget
Î
och skilj det från nätet.
Î
Lossa och dra av slangen till sugturbinen.
Î Öppna bandknutarna på filtret och tag
bort ramen.
Î Lyft ur filtret.
Î Sätt i nytt filter i omvänd ordningsföljd
och säkra.
IV 100/75
Î Tryck "Koppla från aggregatet".
Î Stäng av aggregatet på TILL/FRÅN
reglaget och skilj det från nätet.
Î Lossa och dra av slangen till sugturbi-
nen.
1 Handtag filterrengöring
2 Fjäder
3 Säkerhetsbygel filterrengöring
4 Tillslutning
5 Lock filterkammare
Î
Sväng säkerhetsbygeln för filterrengöring åt
sidan.
Î
Skruva av handtag filterrengöring
Î
Tag bort fjäder.
Î
Skruva bort mutter under fjädern (u-nyckel,
storlek 27 mm, krävs).
Î
Öppna tillslutningarna.
Î
Ta av locket på filterkammaren.
1Ram
2Filter
Î Öppna tillslutningarna.
Î Ta av locket på filterkammaren.
1 Räfflad skruv
Î Skruva ur båda räfflade skruvar och ta
ur filtret ur apparaten.
Î Sätt i nytt filter i omvänd ordningsföljd
och säkra.
– 6
95SV
Page 96

Åtgärder vid störningar
Motorn (sugturbin) startar inte
Ingen elektrisk spänning.
Î Kontrollera säkring, kabel, kontakt och
vägguttag.
Motorskyddsbrytaren har löst ut.
Î Återställ brytaren.
Ingen sugdrift, luftströmmen kommer ut
ur sugslangen
Î Sugturbinen har fel rotationsriktning,
byt polerna på kontakten.
Sugkraften är för låg
Filter, munstycke, sugslang eller sugrör
igensatta.
Î Kontrollera, rengör tillbehör, byt eventu-
ellt ut filter.
Damm tränger ut under sugning
Filter ej korrekt isatt eller defekt.
Î Kontrollera filterfäste alt. byt ut.
Manometern visar ett tillåtet tryck
Filter tätt.
Î Stäng av aggregatet, rengör filter eller
sätt i nytt filter.
몇 Varning
Låt alla kontroller och arbeten på elektriska
delar utföras av en fackman. Vid fortsatta
störningar vänligen koppla in Kärchers
kundtjänst.
Felindikering IV 100/75
1 Kontrollampa "Nödstopp aktiverat"
Lyser när nödstopp trycks.
Frigör nöd-stopp-knappen genom att
vrida den.
2 Nödstoppsknapp
3 Kontrollampa "Nätspänning finns“
Lyser när nätkontakten är ansluten till
nätspänningen.
4 Kontrollampa motorfel
Lyser när motorskyddet har utlösts på
grund av ökan strömförbrukning eller
överhettning.
Ställ på/av-reglaget till 0, vänta 10 mi-
nuter, ställ på/av-reglaget till 1.
Tillbehör och reservdelar
–
Endast av tillverkaren godkända tillbehör
och reservdelar får användas. Original-
tillbehör och original-reservdelar garante-
rar att apparaten kan användas säkert
och utan störning.
–
I slutet av bruksanvisningen finns ett urval
av de reservdelar som oftast behövs.
–
Ytterligare information om reservdelar hit-
tas under service på www.kaercher.com.
96 SV
– 7
Page 97

Tillbehör IV 100/40, IV 100/55
Tillbehör IV 100/75
Tillbehör Beställnings-
nummer
Filter 6.904-341.0
Filter, M 6.904-342.0
Dammpåse av papper 6.904-347.0
Dammpåse av PE 6.904-348.0
Tillbehör Beställnings-
nummer
Filter 6.904-343.0
Filter, M 6.904-344.0
Dammpåse av papper 6.904-347.0
Dammpåse av PE 6.904-348.0
Tekniska data
Aggregatbeteckning IV 100/40 IV 100/55 IV 100/75
Skyddsklass IP X4 IP 54
Behållarvolym 90 l
Spänning 400 V, 3~, 50 Hz
Maximalt tillåten nätimpedans 0.154+j0.096
Ohm
Fläktdata
Effekt 5000 W 6000 W 7500 W
Vakuum* 15,5 kPa 24 kPa 30 kPa
* med tryckbegränsningsventil
Luftmängd 92 l/s 88 l/s 105 l/s
Längd x Bredd x Höjd 1220x670x1530 mm 1280x690
Kabellängd 8 m
Skyddsklass I
Nätkabel: Beställnr. 6.649-367.0 6.649-363.0 6.649-364.0
Nätkabel:modell: H07RN-F
Sugslang NW 61 / 5 m
Vikt 141 kg 155 kg 256 kg
Lagringstemperatur -10...+40 °C
Luftfuktighet 30...90 %
Filteryta 2,2 m
Beräknade värden enligt EN 60335-2-69
Ljudtrycksnivå L
Osäkerhet K
pA
pA
65 dB(A) 79 dB(A) 72 dB(A)
1 db (A) 1 db (A) 1 db (A)
2
0.128+j0.080
Ohm
2
2,2 m
0.204+j0.127
Ohm
x1820 mm
2
3,0 m
– 8
97SV
Page 98

CE-försäkran
Härmed försäkrar vi att nedanstående betecknade maskin i ändamål och konstruktion samt i den av oss levererade versionen
motsvarar EU-direktivens tillämpliga grundläggande säkerhets- och hälsokrav. Vid
ändringar på maskinen som inte har godkänts av oss blir denna överensstämmelseförklaring ogiltig.
Produkt: Våt- och torrdammsugare
Typ: 1.573-xxx
Tillämpliga EU-direktiv
2006/42/EG (+2009/127/EG)
2004/108/EG
Tillämpade harmoniserade normer
EN 55014–1: 2006
EN 55014–2: 1997 + A1: 2001
EN 60335–1
EN 60335–2–69
EN 61000–3–2: 2006
EN 61000–3–3: 2008
EN 62233: 2008
Tillämpade nationella normer
-
Undertecknade agerar på order av och
med fullmakt från företagsledningen.
CEO
Head of Approbation
Alfred Kärcher GmbH & Co. KG
Alfred-Kärcher-Str. 28 - 40
71364 Winnenden (Germany)
Tel.: +49 7195 14-0
Fax: +49 7195 14-2212
98 SV
– 9
Page 99

Lue tämä alkuperäisiä ohjeita
ennen laitteesi käyttämistä, säilytä käyttöohje myöhempää käyttöä tai
mahdollista myöhempää omistajaa varten.
Turvaohje nro 5.956-249 on ehdottomasti
luettava ennen laitteen ensimmäistä käyttökertaa!
Käyttöohjeen ja turvaohjeiden huomiotta
jättäminen voi aiheuttaa vaurioita laitteeseen ja vaaroja käyttäjälle ja muille henkilöille.
Jos havaitset kuljetusvaurioita, ota välittömästi yhteys jälleenmyyjään.
Sisällysluettelo
Ympäristönsuojelu FI - 1
Käyttöohjeessa esiintyvät
symbolit
Takuu FI - 1
Käyttötarkoitus FI - 2
Laitteen osat FI - 2
Turvaohjeet FI - 3
Käyttöönotto FI - 4
Käyttö FI - 4
Käytön lopettaminen FI - 5
Kuljetus FI - 5
Koneen säilytys FI - 5
Hoito ja huolto FI - 5
Häiriöapu FI - 7
Varusteet ja varaosat FI - 7
Tekniset tiedot FI - 8
CE-todistus FI - 9
FI - 1
Ympäristönsuojelu
Pakkausmateriaalit ovat kierrätettäviä. Älä käsittelee pakkauksia kotitalousjätteenä, vaan
toimita ne jätteiden kierrätykseen.
Käytetyt laitteet sisältävät arvokkaita kierrätettäviä materiaaleja, jotka tulisi toimittaa
kierrätykseen. Paristoja, öljyjä ja
muita samankaltaisia aineita ei
saa päästää ympäristöön. Tästä
syystä toimita kuluneet laitteet
vastaaviin keräilylaitoksiin.
Huomautuksia materiaaleista (REACH)
Ajantasaisia tietoja ainesosista löytyy osoitteesta:
http://www.karcher.de/de/unternehmen/
umweltschutz/REACH.htm
Käyttöohjeessa esiintyvät
symbolit
Vaara
Välittömästi uhkaava vaara, joka aiheuttaa
vakavan ruumiinvamman tai johtaa kuolemaan.
몇 Varoitus
Mahdollisesti vaarallinen tilanne, joka voi
aiheuttaa vakavan ruumiinvamman tai voi
johtaa kuolemaan.
Varo
Mahdollisesti vaarallinen tilanne, joka voi
aiheuttaa lievän ruumiinvamman tai aineellisia vahinkoja.
Takuu
Kussakin maassa ovat voimassa valtuuttamamme myyntiorganisaation julkaisemat
takuuehdot. Materiaali- ja valmistusvirheistä aiheutuvat virheet laitteessa korjaamme
takuuaikana maksutta. Takuutapauksessa
ota yhteys ostotositteen kanssa jälleenmyyjään tai lähimpään valtuutettuun huoltoon.
– 1
99FI
Page 100

Käyttötarkoitus
Tämä laite ei ole tarkoitettu vaarallisten pölyjen imurointiin.
Tämä laite soveltuu teollisuuskäyttöön.
Laitteen osat
Käyttölaitteet IV 100/40, IV 100/55
Kun suoritetaan märkäimurointia, on vakio
roskasäiliö vaihdettava lisävarusteena saatavaan „Roskasäiliö märkä- ja kuivaimurointia varten“.
Kaikenlainen muu käyttö on epäasianmukaista.
1 Suodattimen puhdistuskahva
2 Suodatinkotelon kansi
3 Suodatinkammio
4 Lisävarusteliittimet
5 Painemittari
6 Imusäiliö
7 Imusäiliön vapautusvipu
8 Ohjausrullat ja seisontajarru
9 Imuturbiinin letku
10 Työntökahva
11 Kytkin Päälle/Pois
12 Äänenvaimennin
100 FI
– 2
 Loading...