

Page 1

Kambrook 461 Plummer Street, Port Melbourne 3207, Australia
GG
OO
OO
DD
NN
AA
MM
EE
GG
OO
OO
DD
VV
AA
LL
UU
EE
GG
OO
OO
DD
NN
AA
MM
EE
GG
OO
OO
DD
VV
AA
LL
UU
EE
Customer Service Line (free call) 1800 800 634 Customer Service Fax 1800 621 337
Kambrook New Zealand, Private Bag 94411, Greenmount, Auckland, New Zealand
Customer Service Line/Spare Parts 09 271 3980 Customer Service Fax 0800 288 513
Electronic Blender
Due to continual improvement in design or otherwise
the product you purchase may differ slightly from the one illustrated in this book. Issue 1/05
,
KB600 Issue 1/05
Page 2

Kambrook Safety
Welcome to Kambrook and your new
Kambrook Electronic Blender. At
Kambrook, we believe that safe
performance is the first priority in any
consumer product so that you, our
valued customer, can confidently use and
trust our appliances.We ask that any
electrical appliance you use be operated
in a sensible fashion with due care and
attention placed on the following
important operating instructions:
IMPORTANT SAFEGUARDS FOR
YOUR KAMBROOK ELECTRONIC
BLENDER
Carefully read all instructions
before operating the Kambrook
Electronic Blender and save for
future reference.
Remove any packaging material and
promotional stickers before using the
Kambrook Electronic Blender for the
first time.
Do not place the Kambrook Electronic
Blender near the edge of a bench or
table during operation. Ensure the
surface is dry, level and free of water or
other substances, as the vibration during
operation may cause the appliance to
move.
Do not place the Kambrook Electronic
Blender on or near a hot gas or electric
burner, or where it could touch a heated
oven.
Do not use the Kambrook Electronic
Blender on a metal surface, for example,
a sink drain board.
Do not leave the Kambrook Electronic
Blender unattended when in use. Always
ensure the blender is turned off by
depressing the ‘ON/OFF’ button. Then
switch the appliance off at the power
outlet and unplug the cord before
attempting to move the appliance, when
not in use, if left unattended and before
disassembling, cleaning or storing.
Always make sure the Kambrook
Electronic Blender is completely and
properly assembled before operating.
Always ensure the blender jug, blender
lid and removable inner lid are firmly
locked into positioned before operating.
Always keep hands, hair, clothing, as well
as spatulas and other utensils away from
the blender jug during operation
Do not place your fingers or utensils
inside the blender jug without unplugging
the appliance from the power outlet.
Do not blend hard food items such as
nutmeg or lump sugar in the Kambrook
Electronic Blender.
Do not operate the Kambrook
Electronic Blender continuously with
heavy loads for more than 1 minute.
Allow the motor to rest for 1 minute
None of the recipes
between each use
in this book ar
.
e consider
ed a heavy load.
CAUTION The chopping blade is
extremely sharp. Use caution when
handling and storing these parts as
mishandling may cause injury.
Do not remove the blender jug from the
motor base whilst in operation.
Do not use the Kambrook Electronic
Blender for anything other than food
and/or beverage preparation.
Do not process hot or boiling liquids.
Allow to cool before placing into the
blender jug.
Always keep the appliance clean. Follow
the cleaning instructions provided in this
book.
IMPORTANT SAFEGUARDS FOR
ALL ELECTRICAL APPLIANCES
Unwind the cord before use.
To protect against electric shock do not
immerse the motor base, cord or power
plug in water or any other liquid.
Do not let the cord hang over the edge of
a table or counter, touch hot surfaces or
become knotted.
This appliance is not intended for use by
young children or infirm persons unless
they have been adequately supervised by a
responsible person to ensure they can use
the appliance safely.
Young children should be supervised to
ensure that they do not play with the
appliance.
This appliance is for household use only.
Do not use this appliance for anything
other than its intended use. Do not use in
moving vehicles or boats. Do not use
outdoors.
It is recommended to regularly inspect
the appliance. Do not use the appliance if
the power supply cord, plug or actual
appliance becomes damaged in any way.
Return the entire appliance to the nearest
authorised Kambrook Service Centre for
examination, replacement and/or repair.
Any maintenance other than cleaning
should be performed at an authorised
Kambrook Service Centre.
The installation of a residual current
device (safety switch) is recommended to
provide additional safety protection when
using electrical appliances. It is advisable
that a safety switch with a rated residual
operating current not exceeding 30mA be
installed in the electrical circuit supplying
the appliance. See your electrician for
professional advice.
2 3
Page 3
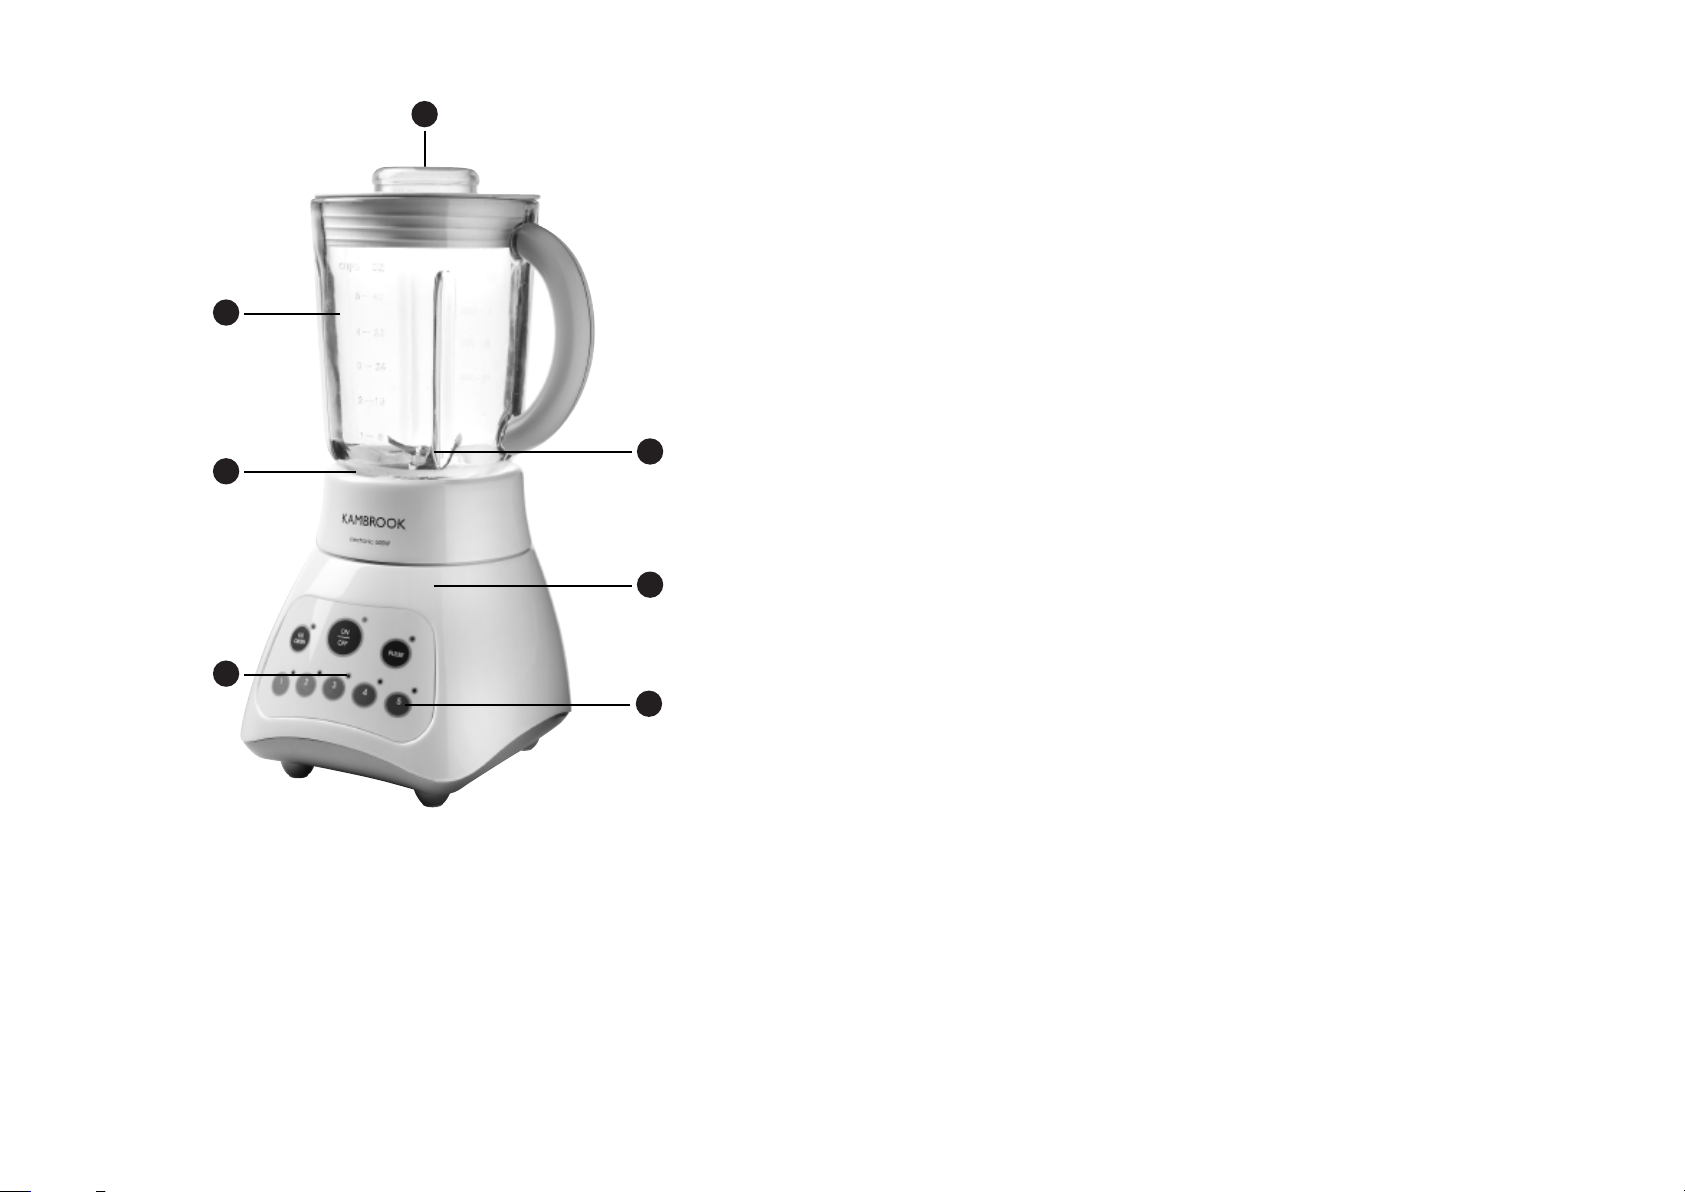
FEATURES OF YOUR KAMBROOK ELECTRONIC BLENDER
1
2
3
7
1. Removable inner lid
for measuring and adding ingredients whilst
blending
2. Large 1.25 litre capacity jug
ideal for blending smoothies, cocktails,
soups and sauces
3. Safety locking system
ensures the appliance will not operate
unless the jug is locked correctly into
position
5. Removable stainless steel
blades
crush ice in seconds and blend and puree
a variety of ingredients with ease
6. Electronic 5 speed control plus
pulse and ice crush functions
for complete control and versatility when
blending
7. Illuminated buttons
or ease of r
f
eading
5
4
6
4. Powerful 600 watt motor
for quick and efficient blending
OPERATING YOUR
KAMBROOK ELECTRONIC
BLENDER
Before first use remove any packaging
material and promotional labels. Ensure
the blender is switched off at the power
outlet and the power cord is unplugged.
Wash the inner lid, lid, blender jug and
blade assembly in warm, soapy water and
dry thoroughly.
Place the motor base on a flat, dry
surface. Ensure that the motor base is
switched off at the power outlet and the
power cord is unplugged.
1. Place the blender jug in an upright
position onto the motor base. The
blender jug can be positioned on the
motor base in different positions
depending on your preferred handle
position.
NOTE:
The blender will not operate unless the
blender jug is locked firmly into the
correct position on the motor base.
2. Add food or liquid into the blender jug.
Do not fill the blender jug above the
1.25L line.
3. Place the blender lid onto the blender
jug. Insert the clear inner lid into the
blender lid.
4. Plug the power cord into a 240v power
outlet and switch on.
5. Depress the ‘ON/OFF’ button. The
indictor light will illuminate when the
appliance has been switched on.This
light will remain illuminated until the
button has been depressed a second
time which will switch the appliance off.
6. Select the desired speed (1-5) or
function (ice crush or pulse) by
depressing the corresponding button.
The indictor light will illuminate and
remain illuminated until the button is
depressed a second time, another
setting is selected or the appliance is
switched off.The speed can be changed
at any time during the blending process.
Once blending has commenced, the
inner lid may be removed to add
additional ingredients.
7. When blending is complete, turn the
blender off by depressing the ‘ON/OFF’
button.Wait until the blades have
stopped rotating before removing the
lid or the blender jug from the motor
base.
PULSE SETTING
For ingredients that require short bursts
of power, select the ‘PULSE’ function.
Depress the ‘PULSE’ button. The indicator
light will illuminate and flash. Select the
desired speed by depressing the
corresponding speed button in short
bursts until the desired result is achieved.
Depress the ‘PULSE’ button a second time
to switch the pulse function off. This
setting is ideal for chopping herbs, nuts
and small vegetables.
4
Page 4

ICE CRUSH SETTING
For ice crushing, select the ‘ICE CRUSH’
function. Depress and hold down the ‘ICE
CRUSH’ button in short bursts until the
desired result is achieved. The maximum
amount of ice cubes the blender can blend
at any one time is 1 standard ice tray or
250g.
NOTE:
During the blending process, ingredients
may stick to the sides of the blender jug.
To push the food back onto the blades,
ensure the blender is switched off by
depressing the ‘ON/OFF’ button, then
switch off at the power outlet and remove
the plug. Remove the lid and use a plastic
spatula to scrape down the sides of the
jug. Replace the lid before recommencing
blending.
If any moisture or liquid appears on top of
the motor base, ensure the blender is
switched off by depressing the ‘ON/OFF’
button, then switch the appliance off at the
power outlet and unplug the cord.
Remove the blender jug.Wipe the motor
base immediately with paper towelling and
check the blender jug is correctly
assembled.
When blending liquids, a small amount of
liquid may escape from the inner lid. This
is normal.
DISASSEMBLING THE
BLENDER FOR CARE AND
CLEANING
Always ensure the Kambrook Electronic
Blender is switched off by depressing the
‘ON/OFF’ button, then switch the
appliance off at the power outlet and
unplug the cord before cleaning.
To remove the blade, grip the blade
assembly located underneath the blender
jug and turn in an anti-clockwise direction.
Wash the inner lid, lid, blender jug, blade
assembly and rubber seal in warm, soapy
water after each use. Rinse and dry
thoroughly.
Wipe the motor base with a soft, damp
cloth.
To reassemble the blender jug,
Place the rubber seal into the blade
assembly.Then place the blade assembly
into the jug base. Screw the blade
assembly in a clockwise direction until
firmly locked into position.
Do not use chemical, steel wool, or
abrasive cleaners to clean any parts of the
blender.
Do not place the blade assembly in the
dishwasher.
The blender jug (without the blade
assembly), inner lid and lid can be placed
in the dishwasher
Do not immerse the motor base in water
or any other liquid.
STORAGE
Ensure the appliance is switched off and
unplugged from the power outlet. Ensure
all parts are clean and completely dry
before reassembling. Store assembled
blender upright on a level surface. Do not
place any heavy objects on top of the
blender during storage.
RECIPES
Dips and Starters
GUACAMOLE
1 large avocado, peeled, de-stoned and
chopped
40ml lemon juice
1
/
cup sour cream
2
1 teaspoons minced garlic
1 teaspoon chilli
1. Place avocado, lemon juice, sour cream,
garlic and chilli sauce in blender jug.
2. Use Speed 2 and blend until smooth.
Serve with crustini or crudités
PESTO DIP
1 cup fresh basil leaves
1 clove garlic peeled and chopped
40ml lemon juice
60g pine nuts
1
/
cup olive oil
4
1
/
cup cottage cheese
2
60g grated fresh Parmesan cheese
1. Place basil leaves, garlic, lemon juice and
pine nuts in blender jug.
2. Use Speed 2 and blend until finely
chopped.
3. With motor running, pour in oil and
blend until smooth.Add cheeses and
mix to combine.
4. Chill until ready to use.
Serve with toasted Turkish bread.
Soups
TOMATO SOUP
1 tablespoon oil
2 cloves garlic, crushed
1 brown onion, peeled and diced
2 x 410g cans diced tomatoes
1 tablespoon tomato paste
2 teaspoons brown sugar
3 cups (750ml) vegetable stock or water
1. Heat oil in a large saucepan, add garlic
and onions, cook over a medium heat
for 2-3 minutes or until onion is soft.
2. Combine tomatoes, tomato paste, and
brown sugar.
3. Pour into pan with onion mixture, add
stock or water and bring to the boil,
then reduce heat and simmer,
uncovered for 20 minutes or until liquid
has reduced by one third.
4. Allow the mixture to cool, then
transfer mixture into three batches into
blender jug.
5. Use Speed 4 and puree until smooth.
Return each pureed batch to saucepan
and gently heat through before serving.
PUMPKIN SOUP
2 tablespoons cooking oil
1 brown onion diced
2 cloves garlic, crushed
400g Buttern
4 cups (1litr
ut pumpkin, peeled and diced
e) chick
en stock
1. Heat oil in a hot saucepan, add onions
and garlic and sauté for 5 minutes.
5
6
Page 5

thickness
until desired consistency
2. Add the pumpkin and toss to coat with
the onion mixture, then add the stock
and bring the mixture to the boil.
3. Reduce heat to simmer for 20 minutes
and cook with the lid on until the
5. Carefully turn the pancake over and
cook until golden brown.
6. Remove from pan. Continue cooking
with remaining batter.
Serve with maple syrup and ice cream.
pumpkin is cooked.
CREPES
4. Allow mixture to cool and transfer in
batches to the blender jug
5. Use Speed 4 and puree until smooth.
6. Return each pureed batch to saucepan
and gently heat through, check for
ensuring even texture
crumbed
process until crumbed
seasoning before serving.
PANCAKES
Makes approximately 8-10 pancakes
1
/
1
cups milk
4
1 x 60g egg
2 tablespoons butter, softened
Makes 10 – 12 crepes
3 x 60g eggs, lightly beaten
1
/
1
cups milk
4
2 tablespoons butter, melted
1 teaspoon vanilla essence
1
/
1
cups plain flour
2
1
/
teaspoon salt
4
Extra butter, for greasing
1. Add eggs, milk, butter, essence, flour and
salt to the blender jug
food type and procedure
Smoothies flavouring. Blend until desired
SUGGESTED USES FOR YOUR KAMBROOK ELECTRONIC BLENDER
Action Speed Time Suggested Preparation
Aerate 3-5 35 secs - 1 minute Thickshakes, Place milk in jug followed by
35 secs - 1 minute Cream Blend a maximum of 500ml
Chopping 1-2 30 - 40 secs Vegetables Use only 3/4 cup quantity at one time,
Garlic, Ginger, Chillies
30 - 40 secs Herbs
Marinades, Dressings lid with motor running
30 - 40 secs Biscuit crumbs Break into medium sized pieces and
Crumbing 1-2 30 - 40 secs Breadcrumbs Tear into pieces and process until
Emulsions 1-2 2 - 3 mins Mayonnaise, Pour oil into jug, through opening in
Mixing 1-3 30 - 40 secs Batters Blend until just combined
Drinks, Baby Food remain and mixture is smooth
Pureeing 3-5 35 secs - 1 minute Soups, Sauces, Process well until no visible solids
1 cup plain flour
1
/
teaspoon salt
4
Extra butter, for greasing
1. Place milk, egg, butter, flour and salt in
the blender jug.
2. Use Speed 3 and mix to a smooth
batter. Pour batter into a plastic jug.
3. Heat a small greased frying pan over a
moderate heat. Pour a small quantity of
batter into frying pan then move batter
around to cover base of pan.
4. Cook until bubbles come to the surface
eak.
and br
2. Use Speed 3 and mix to a smooth
batter.
3. Lightly grease crepe pan and heat over
a moderate heat.
4. Pour sufficient batter into the pan to
cover thinly and evenly.
5. Crepes will cook quickly in 1-2 minutes;
overcooking causes crepes to toughen.
6. Carefully turn crepes over and cook
until golden.
Serve with raspberry sauce
87
Page 6

RASPBERRY SAUCE
250g fresh or frozen raspberries
1
/
cup icing sugar
4
2 tablespoons Grand Marnier or orange
liqueur
2 tablespoons water
1. Place raspberries, icing sugar, Grand
Marnier and water into blender jug.
2. Use Speed 3 and mix until smooth.
Spoon over crepes and serve.
Cocktails
MARGARITA
60ml Tequila
60ml Cointreau
80ml lime juice
12 ice cubes
1. Place Tequila, Cointreau, lime juice and
ice cubes into blender jug.
2. Use Speed 5 or ice crush button and
blend until well combined and ice is
crushed.
Serve in salt rimmed glasses
DAIQUIRIS
Basic recipe
Fruit (approximately 1 cup)
120ml white spirits (white rum, vodka or
kirsch)
1. Place all ingredients into the blender jug
2. Use Speed 5 or ice crush button and
puree until smooth.
Most fresh fruit and berries can be used, if
using frozen fruit defrost before use. Fruit
with hard skins or stones must have them
removed before pureeing. Large fruit must
be diced first.
Non-alcoholic drinks
FRUIT COCKTAIL
250ml pineapple juice
1 banana, peeled and chopped
1 orange, skin and pith removed then
quartered
250ml soda water
2 tablespoons passionfruit pulp
1. Place pineapple juice, banana, and
orange into blender jug.
2. Use Speed 5 and blend until well
combined.
3. Stir in passionfruit pulp and soda water
and serve.
ROCKMELON and PINEAPPLE
FRAPPÉ
1 cup chopped rockmelon
1 cup canned pineapple pieces
1 cup ice
Mint leaves, to serve
2. Use Speed 5 or ice crush button and
blend until all ingredients are crushed
and mixture is smooth and thick.
3. Serve with chopped mint leaves.
Smoothies and Milkshakes
MANGO SMOOTHIE
1 mango, peeled and sliced
3
/
cup unflavoured yoghurt
4
120ml orange juice
1. Place mango, yoghurt and orange juice
into blender jug.
2. Use Speed 5 and blend until smooth.
Serve immediately.
STRAWBERRY SMOOTHIE
150g strawberries
250ml milk
2 scoops vanilla ice cream
Strawberry topping, to serve
1. Place strawberries, milk and ice cream
into the blender jug
2. Use Speed 5 and blend until smooth
and combined.
3. Serve with strawberry topping drizzled
over top.
60ml sugar syrup
1 cup ice
Place rockmelon, pineapple and ice into
1.
the blender jug.
9
10
Page 7

Notes Notes
1211
Page 8

Notes
KAMBROOK
12 MONTH WARRANTY
KAMBROOK warrants the purchaser
against defects in workmanship and
material, for a period of 12 months from
the date of purchase (3 months
commercial use).
Guarantee and purchase receipt for this
product are to be retained as proof of
purchase and must be presented if making
a claim under the terms of the
KAMBROOK guarantee.
KAMBROOK reserves the right to
replace or repair the appliance within
the warranty period.
Warranty does not apply to any defect,
deterioration, loss or injury or damage
occasioned by, or as a result of the misuse
or abuse, negligent handling or if the product
has not been used in accordance with the
instructions.The guarantee excludes
breakages and consumable.
This warranty is void if there is evidence
of the product being tampered with by
unauthorised persons.
If the product includes one or a number
of accessories only the defective accessory
or product will be replaced.
In Australia, this KAMBROOK Guarantee
is additional to the conditions and
guarantees which are mandatory as
implied by the Trade Practices Act 1974
and State Territory legislation.
For service, spare parts or product
information in Australia, please call
KAMBROOK on the customer Service
Line (free call) 1800 800 634.
For service, spare parts or product
information in New Zealand,
please call KAMBROOK New Zealand,
Greenmount, Auckland Phone 09 271 3980
Fax 0800 288 513. For spare parts phone
09 271 3980.
If claiming under this guarantee the product
must be returned to freight prepaid.
YOUR PURCHASE RECORD (Please complete)
DATE OF PURCHASE______________________________________________________
MODEL NUMBER
SERIAL NUMBER (If applicable) ______________________________________________
PURCHASED FR
________________________________________________________
OM ______________________________________________________
1413
Attach a copy of purchase
receipt here.
Please don’t return purchase record
unless you are making a claim
 Loading...