


Kambrook - Australia
Building 2, Port Air Industrial Estate 1A Hale Street
Botany NSW 2019 Australia
Customer Service Line 1300 139 798 Customer Service Fax 1800 621 337
www.kambrook.com.au
Kambrook - New Zealand
Private Bag 94411
Botany, Manukau
Auckland 2163 New Zealand
Customer Service Line/ Spare Parts 0800 273 845
Customer Service Fax 0800 288 513 www.kambrook.co.nz
Due to continual improvement in design or otherwise, the product you purchase may differ slightly from the illustration in this book. Issue D11
Size Select |
|
|
|
Bread Maker |
Instruction Booklet |
KBM300 |
|
Important
Please retain your instruction book for future use.
In the event that you need some assistance with your Kambrook appliance, please contact our Customer Service Department on 1300 139 798 (Australia) or 0800 2738 45 (New Zealand). Alternatively, visit us on our website at www.kambrook.com.au or www.kambrook.co.nz
Contents
Kambrook Recommends |
p4 |
Safety First |
|
Know Your Bread Maker |
p6 |
Operating Your Bread Maker |
p7 |
Beginner’s Guide To |
p10 |
Baking Your First Loaf |
|
Weighing and Measuring with |
p14 |
Your Bread Maker |
|
The Vital Ingredients |
p15 |
Hints and Tips for Better |
p19 |
Bread Making |
|
Questions and Answers |
p21 |
Control Panel Messages |
p23 |
Care, Cleaning and Storage |
p24 |
Troubleshooting Guide |
p26 |
Recipes |
p30 |

Kambrook Recommends Safety First
IMPORTANT: Please retain your instruction book for future use.
At Kambrook, we believe that safe performance is the first priority in any consumer product, so that you, our valued customer can confidently use and trust our products. We ask that any electrical appliance that you use be operated in a sensible fashion with due care and attention placed on the following important operating instructions.
Important Safeguards For Your Kambrook
Bread Maker
•Carefully read all instructions
before operating the Kambrook Bread Maker for the first time and save for future reference.
•Remove and safely discard any packaging material and promotional labels before using the bread maker for the first time.
•To eliminate a choking hazard for young children, remove and safely discard the protective cover fitted to the power plug of this appliance.
•Do not place the bread maker near the edge of a bench or table during operation. Ensure the surface is level, clean and free of water, flour and other substances. Vibration during the kneading cycles may cause the appliance to move slightly.
•Do not use the bread maker on a sink drain board.
•Do not place the bread maker on or near a hot gas or electric burner, or where it could touch a heated oven. Position the appliance at a minimum distance of 20cm away from walls. This will help prevent the possibility of discolouration due to radiated heat.
•Always operate the bread maker on a stable and heat-resistant surface. Do not use on a cloth-covered surface, near curtains or other flammable materials.
•Always ensure the bread maker is properly assembled before connecting to a power outlet and operating. Follow the instructions provided in this book.
•The bread maker is not intended to be operated by means of an external timer or separate remote control system.
•The lid and outer surface may get hot when the appliance is operating.
•The temperature of accessible
surfaces may be high when the appliance is operating.
•Do not touch hot surfaces. Allow the bread maker to cool down before cleaning any parts.
•Steam vents are very hot during baking. Do not place anything on top of the bread maker.
•Do not cover the air vents when the bread maker is in use.
•Use oven mitts when removing the hot bread pan and the bread or jam from the pan.
•Take care when pouring jam from the bread pan as the jam is extremely hot.
•Do not place any ingredients directly into the baking chamber. Place ingredients into the bread pan only.
•Do not place fingers or hands inside the bread maker while in operation. Avoid contact with moving parts.
•Ensure that the bread maker is switched off and then unplugged from the power outlet when not in use and before cleaning or storing.
• Do not immerse the bread pan in water. |
• Always ensure the kneading blade is |
|
Doing so may interfere with the free |
removed from the base of the baked loaf |
|
movement of the shaft. Wash only the interior |
prior to slicing. |
|
of the bread pan. |
• Keep the bread maker clean. Follow the |
|
• Do not leave the lid standing open for |
||
cleaning instructions provided in this book. |
||
extended periods of time. |
|
Important Safeguards For All
Electrical Appliances
•Carefully read all instructions before operating the appliance and save for future reference.
•Remove and safely discard all packaging material and promotional labels before using the appliance for the first time.
•Fully unwind the power cord before use.
•Do not let the power cord hang over the edge of a bench or table, touch hot surfaces or become knotted.
•To protect against electric shock, do not immerse the power cord, power plug or appliance in water or any other liquid, unless it is recommended in the cleaning instructions.
•The appliance is not intended for use by persons (including children) with reduced physical, sensory or mental capabilities, or lack of experience and knowledge, unless they have been given supervision or
instruction concerning use of the appliance, by a person responsible for their safety.
•Children should be supervised to ensure that they do not play with the appliance.
•It is recommended to inspect the appliance regularly. Do not use the appliance if the power supply cord, plug, connector or appliance becomes damaged in anyway. Return the entire appliance to the nearest authorised Kambrook Service Centre for examination and/or repair.
•Any maintenance other than cleaning should be performed at an authorised Kambrook Service Centre.
•This appliance is for household use only. Do not use this appliance for other than its
intended use. Do not use in moving vehicles or boats. Do not use outdoors. Misuse may cause injury.
•The installation of a residual current device (safety switch) is recommended to provide additional safety protection when using electrical appliances. It is advisable
that a safety switch with a rated residual operating current not exceeding 30mA be installed in the electrical circuit supplying the appliance. See your electrician for professional advice
•Always turn the appliance to the OFF position, switch off at the power outlet and unplug at the power outlet when the appliance is not in use.
•Before cleaning, always turn the appliance to the OFF position, switch off at the power outlet, unplug at the power outlet and remove the power cord, if detachable, from the appliance and allow all parts to cool.
•Do not place this appliance on or near a heat source, such as hot plate, oven or heaters.
•Position the appliance at a minimum distance of 20cm away from walls, curtains and other heat or steam sensitive materials and provide adequate space above and on all sides for air circulation.
4 |
5 |
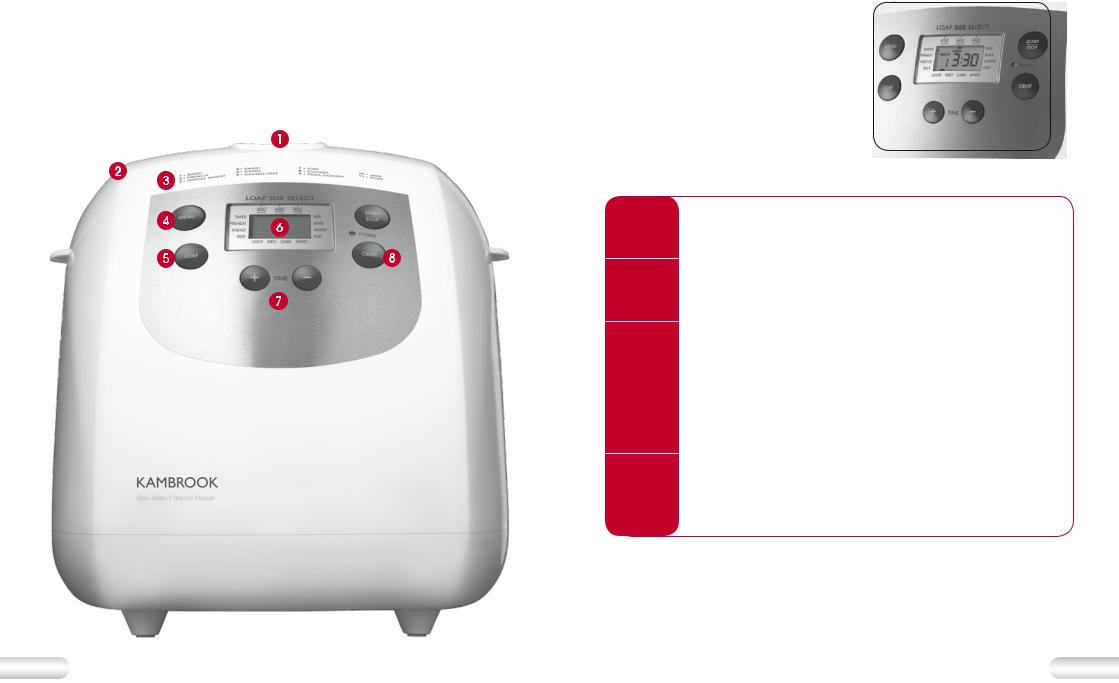
Know Your Bread Maker
1.Easy view window
2.Cool touch housing
3.11 easy touch programs
4.Easy touch programming
5.Loaf weight 450g/680g/900g
6.LCD display
6
7.Preset timer
8.Crust selection: Light, Medium and Dark
Not Shown
•Automatic keep warm for 1 hour
•Non-stick baking pan and kneading blade
Operating Your Bread Maker
The Control Panel
The Control Panel is designed to perform several functions and is activated by switching the Bread Maker on at the power outlet. The LCD Screen indicates the setting and crust colour selection then the completion time for the setting. The various buttons are used to set the
functions and to start or stop the Fig. 1 bread maker. The buttons should be
pressed firmly. A soft beep sound is made as each button is pressed.
LCD |
The LCD Screen shows firstly a setting (1-11) and crust colour (light, medium |
or dark) selected, then automatically changes to show the total time for the |
|
Screen |
setting. When the START/STOP button is pressed to commence operation, the |
|
time displayed (in hours and minutes) is the time remaining until the selected |
|
setting is completed. |
Menu |
|
Press this button to select one of the 11 automatic settings available. These |
|
|
settings are listed on page 8 under “Bread, Loaf and Dough Settings”. Each |
|
time the menu button is pressed, the setting is changed and the number |
|
of the Preset Setting will be displayed on the LCD screen along with the |
|
corresponding time to complete the setting. |
Crust |
|
Press the CRUST button to select the 3 crust colours available for the bread |
|
|
settings only. The colour selected is indicated on the LCD Screen with a ‘-‘ over |
|
the crust colour. |
|
LIGHT crust colour |
|
MEDIUM crust colour |
|
DARK crust colour |
|
Rapid – This is not a colour setting but a rapid version of the Preset Setting. This is |
|
only available for Preset Settings 1-3. |
|
Please note the colon [ : ] will begin to flash to indicate that the Setting has |
|
commenced. |
Start/Stop |
|
The Bread Maker features a combined START/STOP button. To START: Press the |
|
|
START/STOP button to commence the selected program. To STOP: To stop and |
|
cancel the program in mid-cycle the START/STOP button must be pressed down |
|
and held for approx. 2 seconds until the beep sounds and the LCD Screen |
|
is reset. DO NOT PRESS THE START/STOP BUTTON when checking the bread as |
|
this will cancel the program. The machine will not continue to operate in the |
|
selected program. |
15 hour Preset Timer
The Bread Maker has a preset timer control up to 15 hours on Basic (Preset Setting 1), French (Preset Setting 2), Whole Wheat (Preset Setting 3) and Sweet (Preset Setting 4). After selecting a Preset Setting press the [ + ] or [ – ] buttons to increase or decrease the countdown time. For example if you press the [ – ] button it will indicate 15 hours, each time the button is pressed it will decrease in increments of 10 minutes. If you press the [ + ] button it will add 10 minute increments up to 15 hours. Please not that the Time displayed
on the LCD screen will include the Preset Setting Cooking time and the delay i.e 4:00 |
|
(Setting Time) + 11:00 (Delay) = 15:00 (total). |
7 |
|

Operating Your Bread Maker continued
Bread and Dough Settings
Setting 1:
Basic
Setting 2:
French
Setting 3:
Whole
Wheat
Setting 4:
Sweet
Setting 5:
Rapid
Setting 6:
Gluten Free
Setting 7:
Loaf
Setting 8:
Dough
Setting 9:
Pizza Dough
Setting 10:
Jam
MORE
When the bread maker is switched on the LCD Screen will show 1 BASIC bread, MEDIUM crust colour. For a DARK or LIGHT Crust colour, press the CRUST button once for DARK, three times for LIGHT. For rapid setting, press the CRUST button twice. The [  ] symbol will be displayed above RAPID on the LCD screen. For the RAPID function, use a 680g loaf recipe for the specified Preset Setting.
Press the MENU button once and the LCD Screen will show 2 FRENCH Bread, MEDIUM crust colour. For a DARK or LIGHT Crust colour, press the CRUST button once for DARK, three times for LIGHT. For rapid setting, press the CRUST button twice. The [  ] symbol will be displayed above RAPID on the LCD screen. For the RAPID function, use a 680g loaf recipe for the specified Preset Setting.
Press the MENU button twice and the LCD Screen will show 3 WHOLE WHEAT bread, MEDIUM crust colour. For a DARK or LIGHT crust colour, press CRUST button once for DARK, three times for LIGHT. For rapid setting, press the CRUST button twice. The [  ] symbol will be displayed above RAPID on the LCD screen. For the RAPID function, use a 680g loaf recipe for the specified Preset Setting.
Press the MENU button three times and the LCD Screen will show 4 SWEET bread, MEDIUM crust colour. For a DARK or LIGHT crust colour, press CRUST button once for DARK, three times for LIGHT.
Press the MENU button four times and the LCD Screen will show 5 SUPER RAPID.
Press the MENU button five times and the LCD Screen will show 6 GLUTEN FREE.
Press the MENU button six times and the LCD Screen will show 7 LOAF, MEDIUM crust colour For a DARK or LIGHT crust colour, press CRUST button once for DARK, three times for LIGHT.
Press the MENU button seven times and the LCD Screen will show 8 DOUGH. Crust selection is not available on this setting.
This setting takes 1 hour 30 minutes to complete. Remove the dough from the bread maker, hand shape, allow to rise again in a warm area then bake in a conventional oven.
Press the MENU button eight times and the LCD Screen will show 9 PIZZA DOUGH Crust selection is not available on this setting.
Press the MENU button nine times and the LCD Screen will show 10 JAM Crust selection is not available on this setting.
Press the MENU button ten times and the LCD Screen will show 11 MORE Crust selection is not available on this setting.
This setting is designed to allow extra baking of up to 1 hour if required.
Power Interruption Protection
The Bread Maker has a in-built Power Interruption Protection system. If the power is interrupted for 7 minutes or less (by a power failure or accidentally switching off at the power outlet),
the program will be automatically resumed when the power is restored.
Using the MORE Setting
The MORE setting of the Bread Maker gives more versatility to your bread making. MORE setting is useful when wishing to:
•Extend the baking time if a darker or crisper loaf crust is required.
•Crispen loaves already baked and cooled.
•Rewarm loaves already baked and cooled.
•Delay baking a finished dough.
•Melt or crispen toppings.
1.Place the dough or bread into the bread pan and insert into the bread maker.
2.Press the MENU button ten times and the LCD Screen will show 11 and then change automatically to 1:00.
3.Press START/STOP button to commence operation. The MORE setting will bake for 1 hour. This time cannot be altered. If the total hour is not required remove the bread after sufficient time had elapsed and press the START/STOP button to stop operation.
NOTE: Always ensure that there is enough dough or bread in the bread pan when it is inserted
in the Bread Maker during a baking cycle or when the MORE setting is selected.
8 |
9 |

Beginner’s Guide To Baking Your First Loaf
The following instructions are to be used when making Bread or Dough recipes from the recipe section of this book.
All recipes use local ingredients and Australian Standard Metric Measuring tools (cup, spoons and weighing scales) for accuracy in producing a 450g, 680g or 900g loaf of bread. The actual weight of the baked loaf will vary depending on the weight of raw ingredients used.
Remove and safely discard any packaging materials and promotional labels before using the Bread Maker for the first time.
Step 1: Open the Lid and Remove the Bread Pan
Open the lid and remove the bread pan from the Bread Maker by holding, twisting the bread pan and lifting straight up.
Always remove the bread pan from the Bread Maker before adding ingredients to ensure ingredients are not spilt into the baking chamber and the element.
Before using for the first time, we recommend that the inside of the bread pan and the kneading blades are washed with warm soapy water, rinsed and dried thoroughly. Do not immerse the bread pan in water.
10
Step 2: Insert the Kneading Blade
It is important that the kneading blade is properly inserted on the shaft in the base of the bread pan by aligning the flat edge on the inside of the kneading blade with the flat side of the shaft. If the blade is not inserted correctly the ingredients may not be mixed and kneaded properly.
Step 3: Add Ingredients Into the Bread Pan
It is IMPORTANT that the ingredients are added in the correct order listed in the recipe and that the ingredients are measured and weighed accurately or the dough may not mix correctly or rise sufficiently.
All ingredients should be at room temperature 20-25°C. Ingredients should be added in the following order:
1.Liquid ingredients
2.Fat/Oil
3.Dry ingredients: salt, sugar, flour
4.Yeast
NOTE: Mound the flour into the pan, make a small hollow in the centre and place the yeast there. If the yeast contacts the water before the kneading, the bread may not rise well.
Step 4: Return the Bread Pan to the Bread Maker
Insert the bread pan into the Bread Maker as follows:
1.Place the bread pan into the baking chamber and locate the drive mechanism of the pan
directly onto the drive mechanism in the baking chamber.
2.Push the bread pan down firmly and turn until it clicks in position.
Step 5: Close the Lid
It is not recommended to open the lid during operation except to check the consistency of the dough and add additional ingredients in the kneading cycle, or to glaze and add seeds to the top of the loaf in the baking cycle refer below.
Step 6: Plug in the Bread Maker
Insert the power plug into a 230V or 240V power outlet. Switch on at the power outlet.
The LCD Screen will display 1 (BASIC) then automatically change to show the total time 3:25 for the setting (BASIC bread, MEDIUM crust).A red light will illuminate beside the MENU panel.
Step 7: Select the Bread Setting and Crust Colour
Press the MENU button until the LCD Screen indicates the number of the required setting.
The symbol ‘-‘ will also show above the setting in the LCD Screen when a bread Setting is selected.
Press the CRUST button once to select DARK crust or three times to select LIGHT crust.
The crust selection is available on bread settings 1-4.
Step 8: Start the Bread Maker
Press the START/STOP button to commence operation. The total setting time will appear on the LCD screen. The setting time will count down in one minute increments. The colon between the hour and the minutes displayed will flash throughout the kneading, rising and baking cycles.
The kneading cycles commence. During the kneading cycles beeps will sound indicating the correct time to add other ingredients.
Add-In Ingredient Beeper
The Bread Maker features an ‘Add-In Ingredient Beeper’ which operates in the BASIC, RAPID, SWEET, FRENCH, WHOLE WHEAT and DOUGH settings. The Bread Maker will sound 10 beeps at approximately 8 minutes before the end of the second kneading cycle, indicating the time to add any
additional fruit, nuts, herbs, chocolate, etc. required or as specified in the recipes.
The addition of ingredients at this time assists with keeping fruits, etc. whole, rather than being mashed through the dough making it heavy.
Open the lid, gradually add the additional ingredients to the dough as it is kneading. Take care not to drop the ingredients over the side of the bread pan into the baking chamber, as these may burn and smoke during the baking cycle. Close the lid.
NOTE: Do not press the stop button to add ingredients as this will cancel the selected program.
The rising cycles begin when the kneading cycles end and the dough will start to rise. During the rising cycles, the dough will be degassed twice by the blade moving at the end of the first and second rising cycles. The dough rises fully in the third rising cycle.
The baking cycle commences when rising cycles end. The dough may rise a little more at this time due to the increasing heat expanding the gasses entrapped in the dough.
11
 Loading...