

Page 1
OPERATING INSTRUCTIONS
TV-13140
TV/VCR COMBO
USER'S GUIDE
For model :
TV-13140
4 HEAD
!n the sp^ce t)tícw)/fe^rthé^s|i^ i
lelj^sior|^i|ed^o tfie telef^^on cal5inet)l
itapit Ypur sal^l^éipt oí ínyolce insidi co^of'thls^guidé:'
Keep ;hisusc^%^de in gt;cpn\«rii^ place reference. -
*uJi ÓrtgínátfM^glrig ; '
Serial Numbe»-
<f4v € ■
I
Mar.1999No.51546
Page 2

ro
The itghlnin^ Hash with arrowhead symbol,
CAUTION
RiSK OF ELECTRtC SHOCK
A
CAUTION-. TO REDUCE THE RISK OF ELECTRIC
WARNING:
CAUTION: TO PREVENT ELECTRIC SHOCK DO NOT USE THIS POLARIZED PLUG WITH AN
WARNING; This squipment has bsen tested and found to comply with the limits for a Class B digital device,
' Reorient or relocate the receiving antenna.
- Increase the separation between the equipment and receiver.
- Connect the equipment into an outlet on a circuit different from that to which the receiver is connected.
- Consult the dealer or an experienced radicVTV technician for help.
CAUTION: Changes or modifications not expressly approved by the party responsible for compliance with the
DO r^OT OPEN
SHOCK, DO NOT REMOVE COVER (OR
BACK). NO USER-SERVICEABLE PARTS
INSIDE. REFER SERVICING TO QUALI
FIED SERVICE PERSONNEL.
TO PREVENT FIRE OR SHOCK HAZARD, DO NOT EXPOSE THIS APPLIANCE TO
RAIN OR MOISTURE.
E)CrENSION CORD, RECEPTACLE OR OTHER OUTLET UNLfSS THE BLADES CAN
BE FULLY INSERTCD TO PREVENT BLADE EXPOSURE.
pursuant to Part 15 of the FCC Rules. Thass limits are designed to provide reasonable protection
against harmful interference in a residential installation. This equipment generates, uses, and can
radiate radio frequency energy and, if not installed and used in accordance with the instructionB,
may cause hannful Interference to radio communicaliorts.
However, there is no guarantee that interference will not occur In a particular installation. If this
equipment does causa harmful interference to radio or television reception, which can be
determined by turning the equipment off and on, the user is encourag^ to try correcting the
interference by one or more of the following measures:
FCC Rules could void the user's authority to operate this equipment.
A
A
A
within an equilateral triangle is irrtertded to
alert the user to the presence ot
uninsulated dangerous voltage within the
product's enclosure that may be ot
sufficient magnitude to constitute a risk of
electric shock to persons.
The SKclamation point within an equilateral
triangle is intended to alert the user to №e
presence ot important operating artd
maintenance {servicing^ instructions in the
literature accompanying the appliance.
IMPORTANT SAFEGUARDS
1. READ INSTRUCTIONS
All the safety and operating instructions should be read before the unit is operated.
2. RETAIN INSTRUCTIONS
The safety and operating instorctlons should be retained for future reference.
3. HEED warnings
All warnings on the unit and in the operating instructions should be adhered to.
4. follow INSTRUCTIONS
All operating and use instructions should be followed.
5. cleaning
Unplug this unit from the wall outlet before cleaning. Do not use liquid cleaners or aerosol cleaners.
Use a damp cloth for cleaning.
6. ATTACHMENTS
Do not use attachments not recommended by the unit’s manufacturer as they may cause hazards.
7. WATER AND MaSTURE
Do not use this unit near water. For example, near a bathtub, washbowl, kitchen sink, or laundry tub, in a wet
basement, or near a swimming pool.
8. ACCESSORIES
Do not place this unit on an unstable cart, stand, tripod, bracket, or table.
The unit may fall, causing serious injury, and serious damage to the unit.
Use only with a cart, stand, tripod, bracket, or table recommended by the
manufacturer.
8A. An appliance and cart combination should be moved with care. Quick stops,
excessive force, and uneven surfaces may cause the appliance and cart
combination to overturn.
9. VENTILATION
Slots and openings in the cabinet and in the back or bottom ate provided for ventilation, and to ensure reliable
operation of the unit, and to protect it from overheating. These ^»nings must not be blocked or covered. The
openings should never be blocked by placing the unit on a bed, sofa, rug, or other similar surface. This unH
should never be placed near or over a radiator or heat source. This unit should not be placed in a built-in
Installations such as a bookcase or rack unless proper ventilation is provided or the manufacturer's instructions
have been adhered to.
10. POWER sources
This unit should be operated only from the type ol power source indicated on the rating plate. If you are not sure
of the type of power supply to your home, consult your appliance dealer or local power company. For units
intended to operate from battery power, or other sources, refer to the operating instructions.
11. GROUNDING OR POLARIZATION
This unit is equipped with a polarized alternating-current line plug (a plug having one blade wider than the other).
This plug will lit into the power outlet only one way. This is a safety feature. If you are unable to insert the plug
fully into the outlet, try reversing the plug. If the plug should slill fail to fit, contact your electrician to replace your
obsolete outlet. Do not defeat the safety purpose of the polarized plug, if your unit is equipped with a 3-wire
grounding-type plug, a plug having a third (grounding) pin. This plug will only lit Into a grounding-type power
outlet. This too, is a safety feature. If you are unable to insert the plug into ttte outlet, contact your electrician to
replace your obeolete outlet.
Do not defeat the safety purpose of the grounding-type plug.
I'ORTABLE CAItTWAflNirtG
(symbol pxbvidad by HETAC)
S3126A
Page 3
IMPORTANT SAFEGUARDS
(CONTINUED)
12. POWER-CORD protection
Power-supply cords should be routed so that they are not likely to be walked on or pinched by items placed
upon or against them, paying particular attention to cords at plugs, convenience receptacles, and the point
where they exit from the appliance.
13. UGHTNING
To protect your unit from a lightning storm, or when it is left unattended and unused lor long periods ol time,
unplug it from the wall outlet and disconnect the antenna or cable system. This will prevent damage to the unit
due to lightning and power line surges.
14. POWER UNES
An outside antenna system should not be located in the vicinity of overhead power lines or other electric light or
power circuits, or where it can fall into such power lines or circuits. When installing an outside antenna system,
extreme care should be taken to keep from touching such power lines or circuits, as contact with them tnight be
fatal.
15. OVERLOADING
Do not overload wall outlets and extension cords, as this can result in a risk of fire or electric shock.
16. OBJECTANDUQUID entry
Do not push objects through any openings in this unit, as they may touch dangerous voltage points or short out
parts that could result In fire or electric shock. Never spill or spray any type of liquid into the unit.
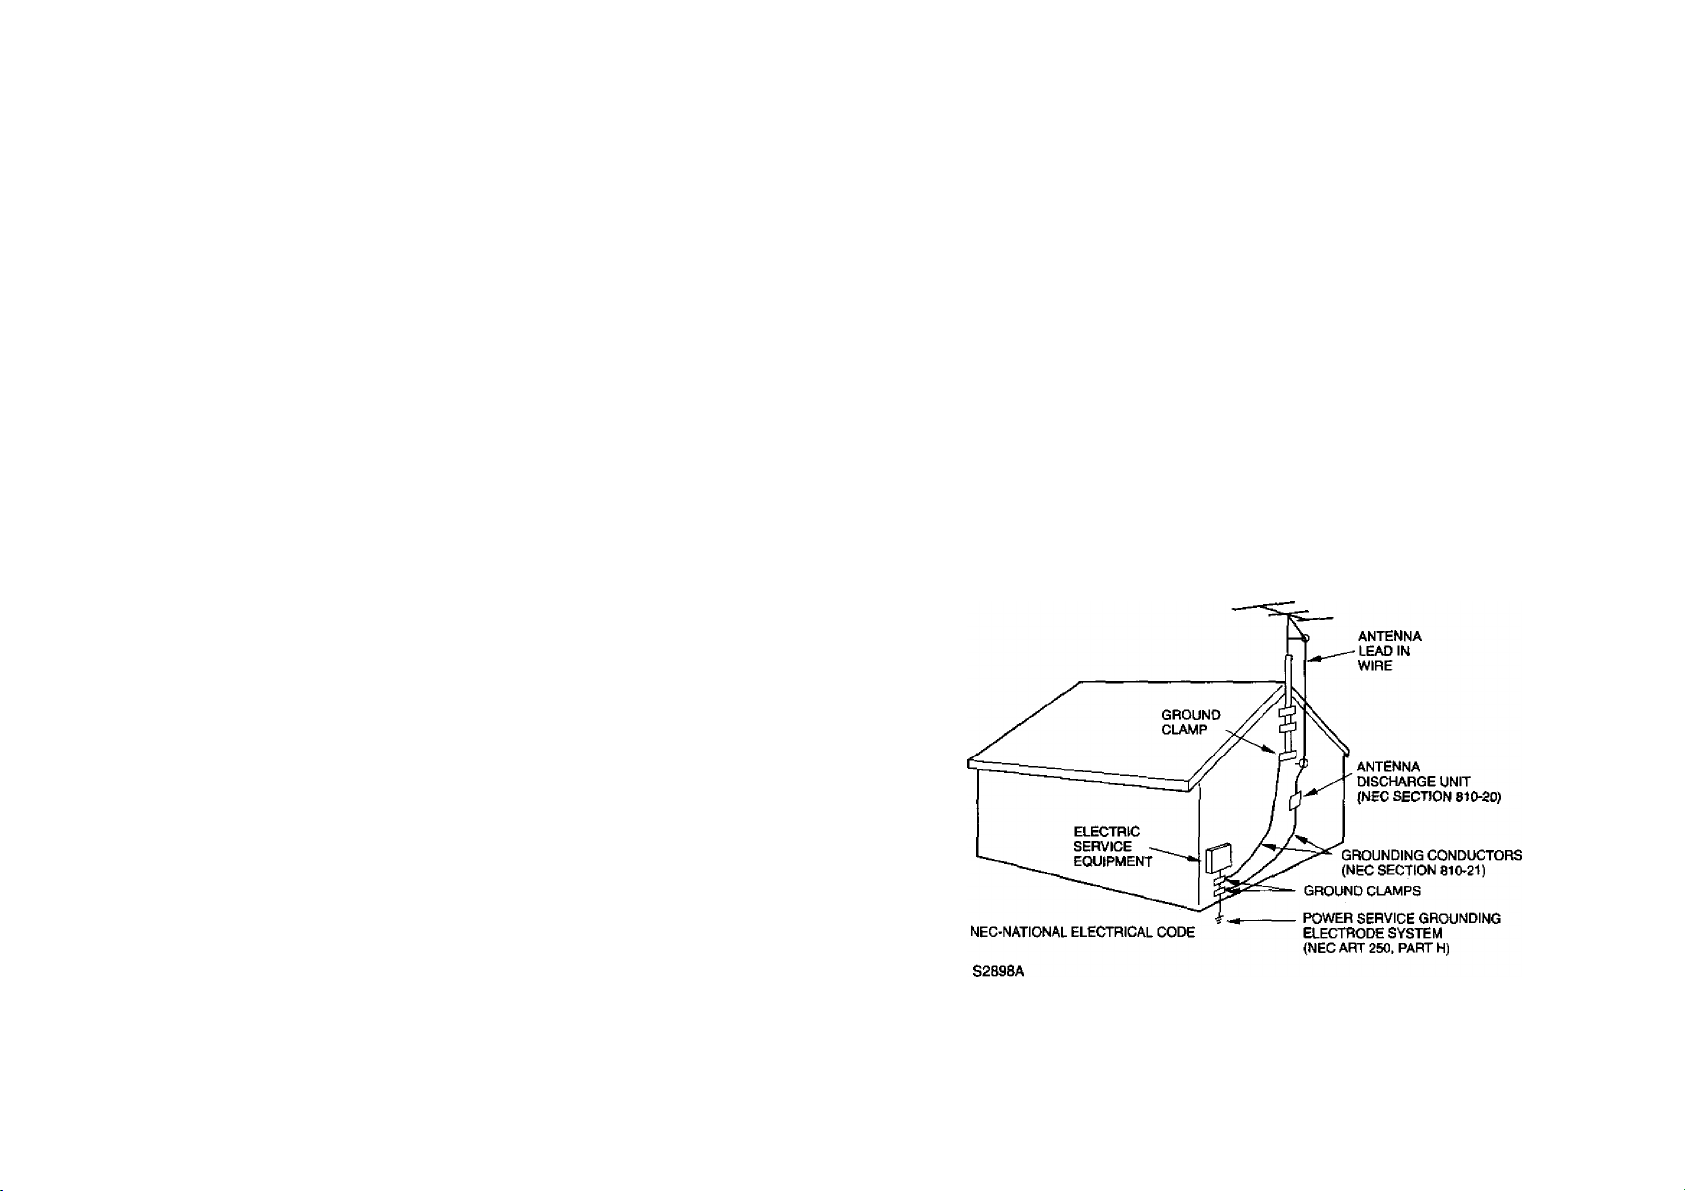
17. OUTDOOR ANTENNA GROUNDING
If an outside antenna or cable system is connected to the unit, be sure the antenna or cable system is grounded
so as to provide some protection against voltage surges and built-up static charges. Section 810 ol the National
Electrical Code, ANSI/NFPA 70, provides informalion with respect to proper grounding ol the mast and support
ing structure, grounding of the lead-in wire to an antenna discharge uniL size of grounding conductors, location
of antenna discharge unit, connection to grounding electrodes, and requirements for the grounding elecirode.
18. SERVICING
Do not attempt to service this unit yourself as opening or removing covers may expose you to dangerous voltage
or other hazards. Refer all servicing to qualified service personnel.
19. DAMAGE REQUIRING SERVICE
Unplug this unit from the wall outlet and refer servicing to qualified service personnel under the following
corxlitions:
a. When the power-supply cord or plug is damaged.
b. If liquid has been spilled, or objects have fallen into the unit
c. If the unit has been exposed to rain or water.
d. If the unit does not operate normally by following the operating instructkrrrs. Adjust only those controls
that are covered by the operating instrucliona, as an improper adjustment ot other controls may result in
riamage and will often require extensive work by a qualified technician to restore the unit to its normal
operation.
e. II the unit has been dropped or ttie cabinet has been damaged.
f. When the unit exhibits a distinct change in performance, this Indicates a need for senrice.
20. REPLACEMENT PARTS
When replacement parts are required, be sure the service technician uses replacement parts specified by the
manutacturer or those that have the same characteristics as the original part.
Unauthorized substitutions may result in fire, electric shock or other hazards.
21. SAFETY CHECK
Upon completion of any service or repairs to this unit, ask the sen/ice technician to perform safety checks to
determine that the unit is In proper operating condition.
22. WALL OR CEIUNG MOUNTING
The product should be mounted to a wall or ceiling only as recommended by the manufacturer.
23. HEAT
The product should be situated away from heat sources such as radiators, heat registers, stoves, or other
products (including amplifiets) that produce heat.
24. NOTE TO CATV SYSTEM INSTALLER
This reminder is provided to call the CATV system installer’s attention to Article 820-40 ol the NEC that provides
guidelines for proper grounding and, in particular, specifies that the cable ground shall be connected to the
grounding system of the building, as close to the point of cable entry as practical.
EXAMPLE OF «4TENNA GROUNDING AS PER THE
NATIONAL ELECTRICAL CODE
0>
Page 4
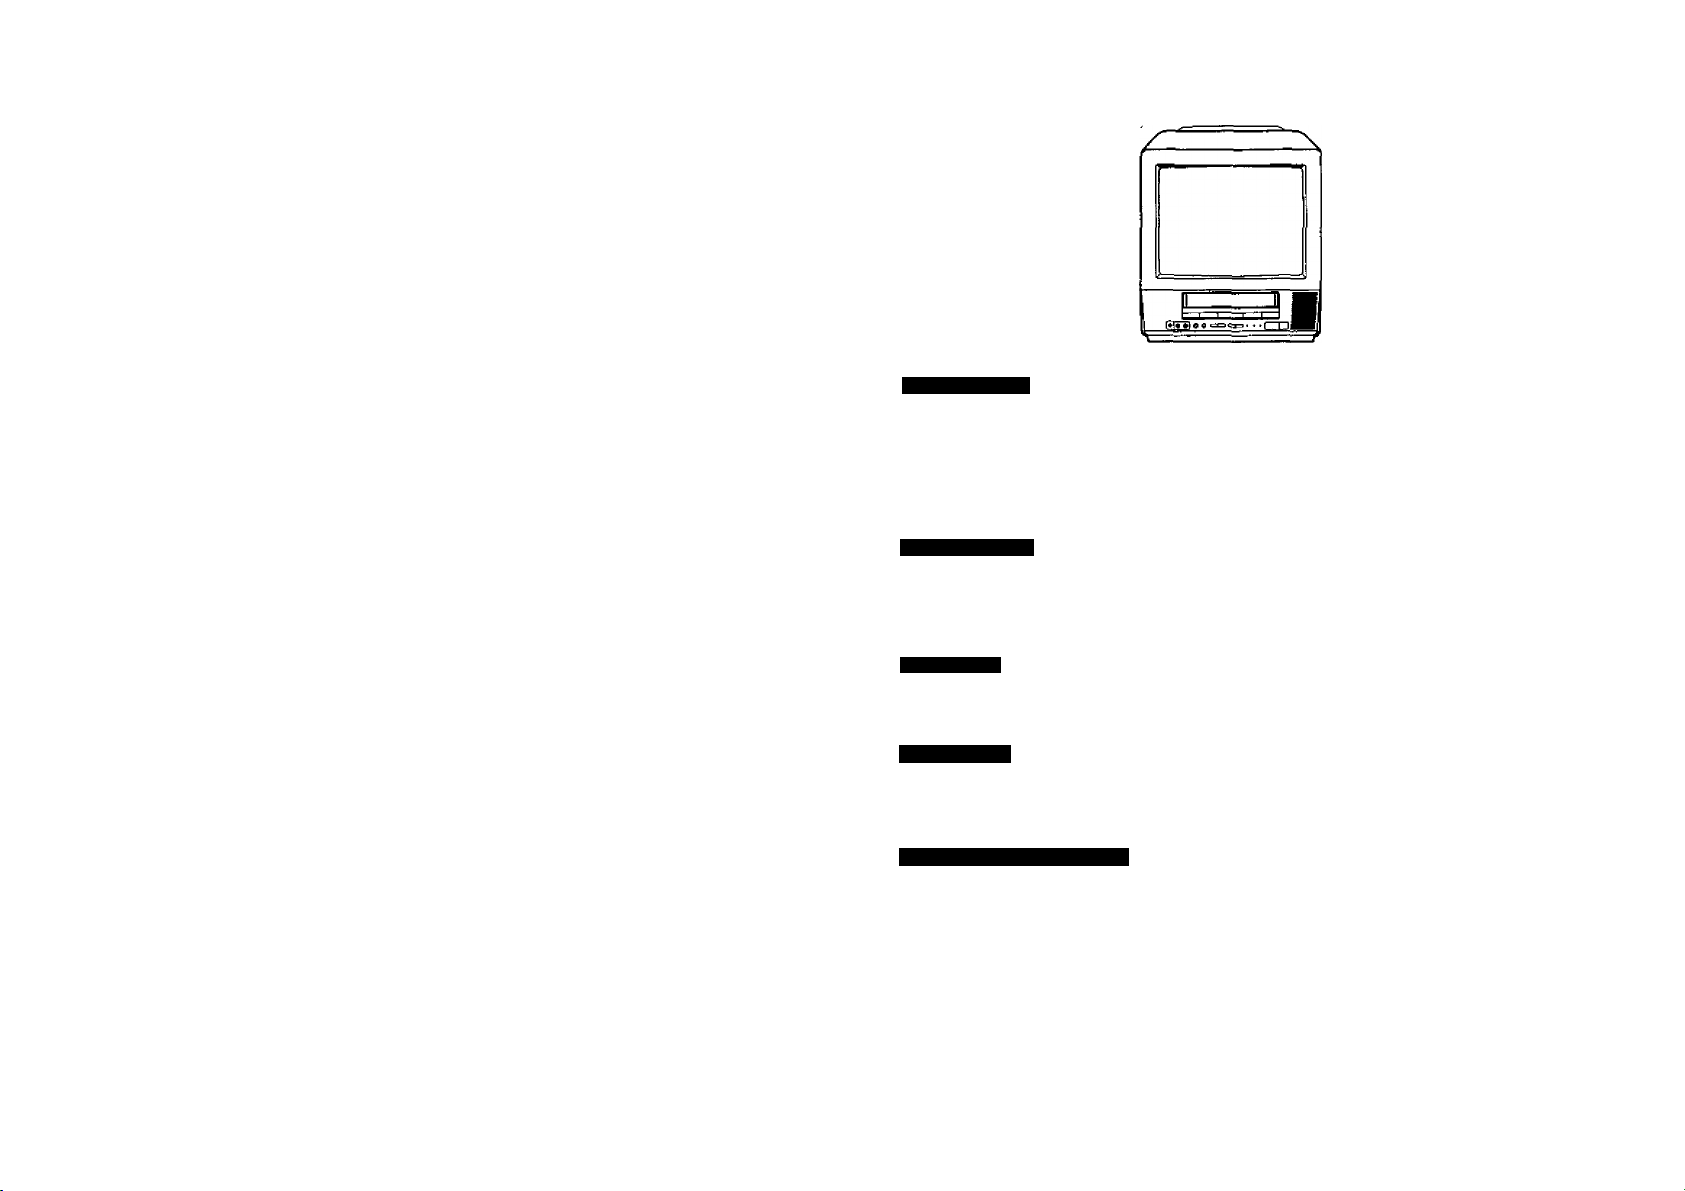
FEATURES TABLE OF CONTENTS
Color TV With Video Cassette Recorder • Unique space saving design combines a 13* color TV and a video
cassette recorder.
High Quality Picture Technoiogy - This TV/VCR equipped *HQ' incorporates VHS High Quality technology. A built-in
detail enhancer is used to boost the recorded signai and provide maximum picture quality during playback.
It is compatible with other VHS video cassette recorders.
SQPB • Tapes recorded in the S-VMS system can be played back simply on this TV/VCR.
4 Video Heads - Provides optimal picture quality for special effects playback.
Frequency Synthesized Ttiner - Electronically locks in and memorizes all available channels for perfect reception
with the touch of a button.
181 Channel Tuner - Receives standard VHP and UHF broadcast channels and up to 113 cable channels. The
actual number of channels received depends upon channel reception in your area or your cable system.
Unified TV/VCR Random Access Remote Control - This remote control allows operating various TV and VCR
functions from the comfort of your favorite viewing position.
Closed Caption Decoder With Full Text Mode - Displays text captions or full screen text on the screen for hearing
impaired viewers.
8-Programs/1-Month Programmable timer With Everyday/Every Week Capability - The built-in timer allows
automatic absentee recording of up to B TV programs within 1 month. It Is also possible to record a program which is
broadcast at the sarrte time everyday or every week.
Auto Clock Set - Once your TV/VCR is pluged into the AC outlet, it automatically sets the correct date and time.
On-Scieen TV Display And VCR Programming • When you select a channel or make other changes, the TV will show
an Indicator on the screen for a few seconds. Timer recording can be programmed and conflmied on the screen.
Picture Adjustments Using The Remote Control - The On-Screen display allows precise remote control adjustment
of BRIGHTNESS, CONTRAST, COLOR, TINT and SHARPNESS.
Automatic Playback/Rewind-Stop-EJect - When loading a cassette tape without the erase prevention tab, this TV/
VCR will automatically play back the cassette tape at the correct speed. When a tape teaches Its end during play
back, recording (except during ITR and Timer Record) and last fonvard, it will automatically stop, rewind, stop and
eject the tape.
Programmsbls ON/OFF Timer - Allows you to automatically turn on or off your TV/VCR at a set lime.
Programmable TV Sleep Timer - Operable from the remote control, the TV can be programmed up to 120 rninutes
to turn off autorriatically.
Full Load Tape Trensport - Permits rapid access between modes.
Automatic Repeat Play System - When Auto Repeat option is turned on, the TV/VCR will automaticalty play back
the same cassette tape repeatedly.
instant Timer Recording (fTR) • Simply by pressing the REC and PLAY buttons, the TV/VCR can be programmed
for up to 5 hours of recording with an immediale start.
Audlo/Vidso Input/Output Jacks - A VCR or other video device may be hooked up-lo this TV/VCR for dubbing or
playback purposes.
2 Speed Picture Search • 3 or 5 times nomal speed in SP mode (9X or 15X in EP).
2 Spssd Record/ Playback - Records and plays two tape speeds (SP, EP).
Real Time Tape Counter With Zero Return - The counter displays the real tape lime and the zero return can be
used to return the tape to a preselected position (00:00:00) while the counter can be used to locate programs.
Digital Auto Tracking • Automatically adjusts tracking during playback for the best possible picture.
On-Screen 3 Language Display - You can select one of 3 languages, English, Spanish or French for on-screen
programming.
It is recommended that you carefully read the descriptions and operating procedures contained In this
User’s Guide prior to operating your new TV/VCR.
PREPARATION
PRECAUTIONS...................................................................................................................................................6
location of controls..........................................................................................................................................8
REMOTE control...............................................................................................................................................9
ANTENNA connections.................................................................................................................................... 11
CABLE TV CONNECTIONS................................................................................................................................ 12
setting language...............................................................................................................................................13
AUTO CLOCK setting.......................................................................................................................................14
MANUAL CLOCK SETTING...............................................................................................................................16
TV OPERATION
TV OPERATION................................................................................................................................................ 17
TO MEMORIZE CHANNELS..............................................................................................................................21
PICTURE CONTROL ADJUSTMENTS............................................................................................................... 24
TO SET THE ON TIMER..................................................................................................................................... 26
TO SET THE OFF TIMER................................................................................................................................... 27
PLAYBACK
LOADING AND UNLOADING A VIDEO CASSEHE..............................................................................................28
PLAYBACK...................................................................................................................................................... 29
SPECIAL PLAYBACK.......................................................................................................................................31
RECORDING
RECORDING A TV PROGRAM.......................................................................................................................... 33
INSTANT TIMER RECORDING (ITR)...................................................................................................................35
TIMER RECORDiNQ..........................................................................................................................................36
other FUNCTIONS FOR THE TIMER RECORDING............................................................................................. 38
ADDITIONAL INFORMATION
USING THE REAL TIME TAPE COUNTER..........................................................................................................40
USING ZERO RETURN..................................................................................................................................... 41
DUPLICATING A VIDEO TAPE...........................................................................................................................42
RECEPTION DISTURBANCES...........................................................................................................................43
TROUBLESHOOTING GUIDE............................................................................................................................ 44
VIDEO HEAD CLEANING...................................................................................................................................46
SPECIFIC/iTIONS.............................................................................................................................................. 47
Page 5
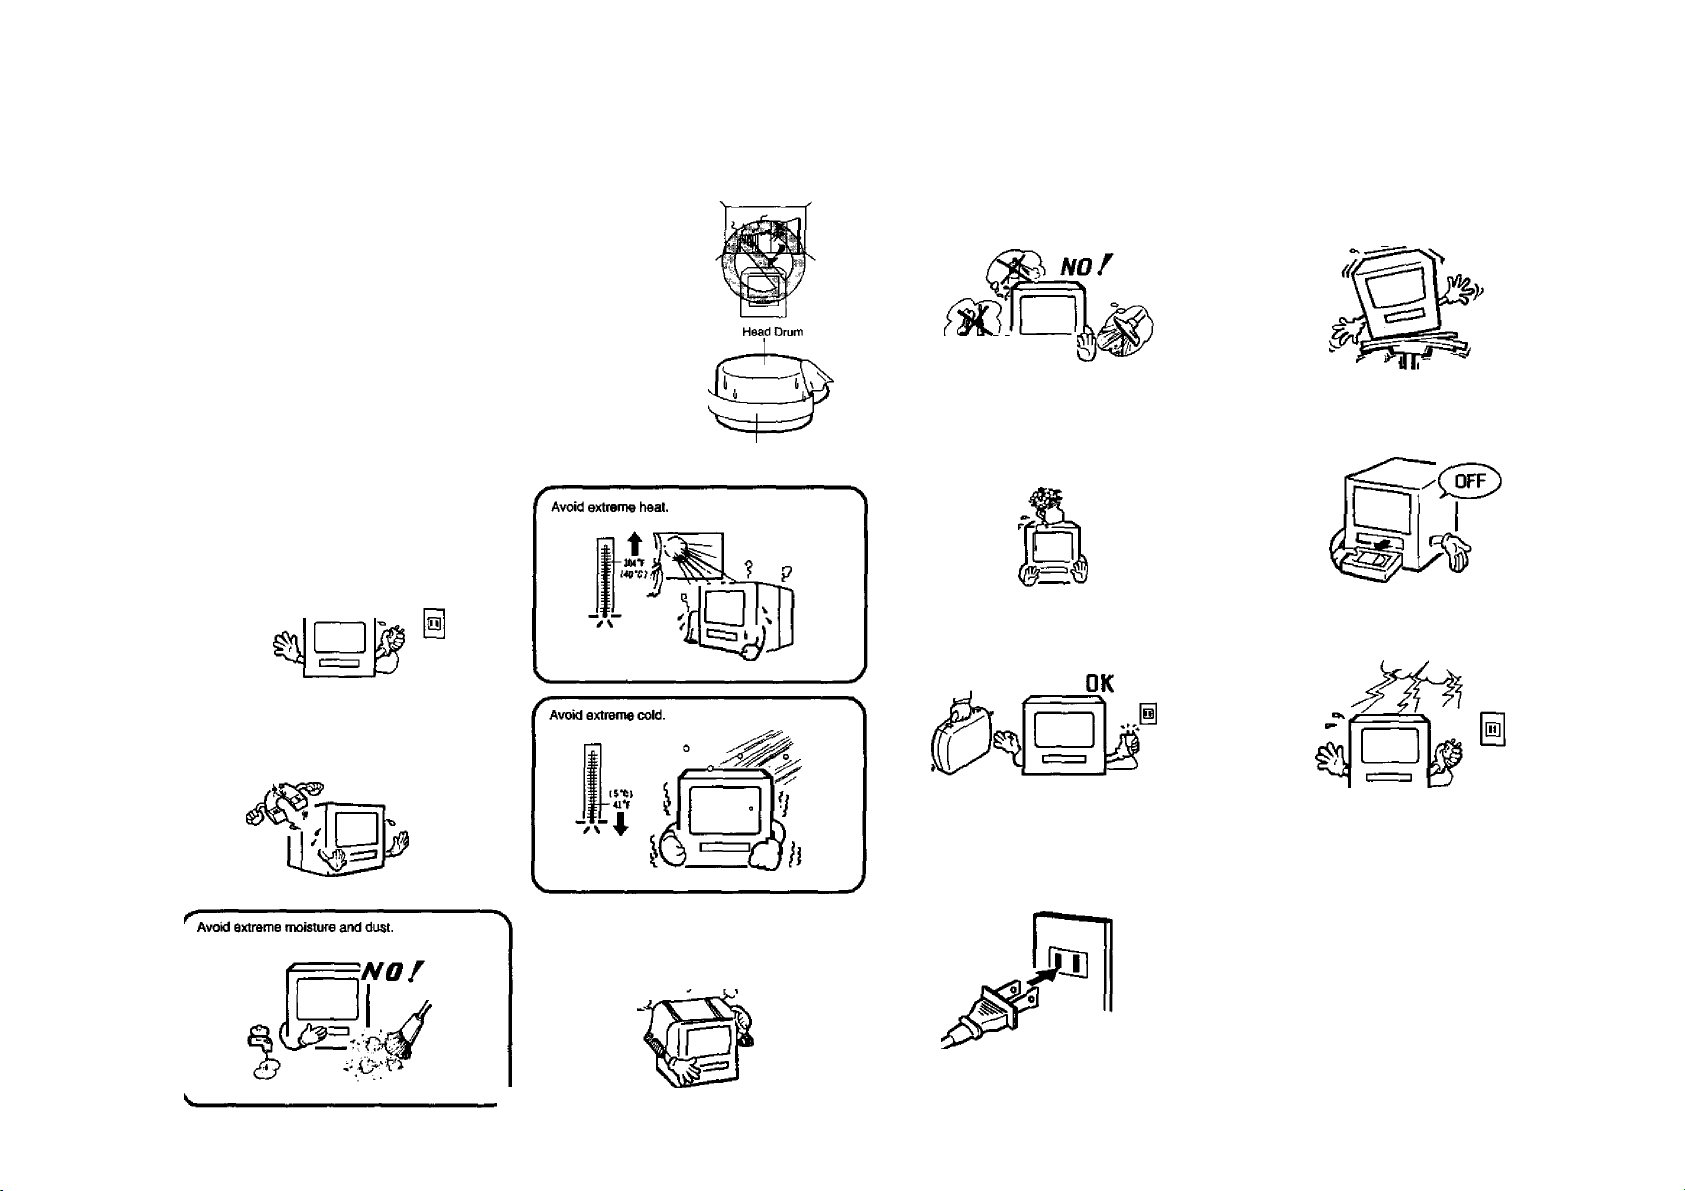
PRECAUTIONS
MOISTURE CONDENSATION
DO NOT OPERATE ANY FUNCTIONS ON THIS UNIT FOR AT LEAST TWO OR
THREE HOURS WHEN MOISTURE IN THE AIR CONDENSES ON IT. LET THE
UNIT STAND WITH POWER ON (SEE BELOW).
■ WHAT IS MOISTURE CONDENSATION?
Wven a cold liquid is poured into a giass, for example, water vapor in the air will
condense on the surface of the glass. This is called moisture condensation. .
■ MOISTURE WILL CONDENSE ON THE UNIT IN THE FOLLOWING CASES;
• When you move the unit from a cold to a wann place.
• After heating a coid room or under extremely humid conditions.
■ WHEN YOU EXPERIENCE THE ABOVE CONDITIONS,
Plug the power cord into an AC outlet, set the POWER switch to ON and leave the
unit at room tentpeiature until moislure condensation disappears,
Depending on the surrounding conditions, this may take two or three hours.
If you cause a static discharge when touching the
unit, and the unit fails to function, simply unplug the
unit from the wall outlet, wait a few minutes, and
plug it back in. The unit should return to normal
operation.
Do not place the unit on or near appliances which
may cause electromagnetic interference (e.g.
speakers, etc). Doing so may cause erratic operation
0# the unit irxdixjing picture and/or sound distortion or
noise.
Weo Tape
Do not insert fingers or any other objects into the
cassette loading slot Do not spray cleaner or wax
directly on the unit or use forc^ air to remove dust
Keep the unit away from flower vases, sinks, etc. If
liquids should be spilled info the unit, serious
damage will result, if you spill any liquids into №e
unit, unplug the AC power cord Immediately and
consult qualified service personnel before attempting
to use it again.
When you leave your home for a long time, unplug
the AC power cord.
Avoid places subject to strong vibration. Use in a
horizontal (flat) position only.
When you finish operating the unit, always unload
the cassette and turn off the power.
To protect the unit from a lightning storm, unplug the
AC power cord from the wall outlet and disconnect
the antenna.
СЛ
The ventilation holes prevent overheating. Do not
block or cover these holes. Especially avoid
covering the holes with soft rnaterials such as doth
or paper.
_
,
It’
I
У V,
WIDER HOLE
AND BLADE
Polarized AC Coid
{One blade is wider than the other.)
POWER SOURCE
TO USE AC POWER SOURCE
Use the AC polarized line cord provided for operation on AC. Insert
the AC cord plug into a standard 120V $0Hz polarized AC outlet.
NOTE:
1. Never connect the AC line cord plug to other than the specified
voltage (120V 60Hz). Use the attached power cord only.
2. If the polarized AC cord does not lit into a non~polarized AC
outlet, do not attempt to file or cut the blade. It is the user’s
responsibility to have an electrician replace the obsolete outlet
3. If you cause a static discharge when touching the unit, and the
unit fails to function, simply unplug the unit, from the AC outlet,
waH an hour, and plug it back in. The unit should return to normal
operation.
Page 6
ф
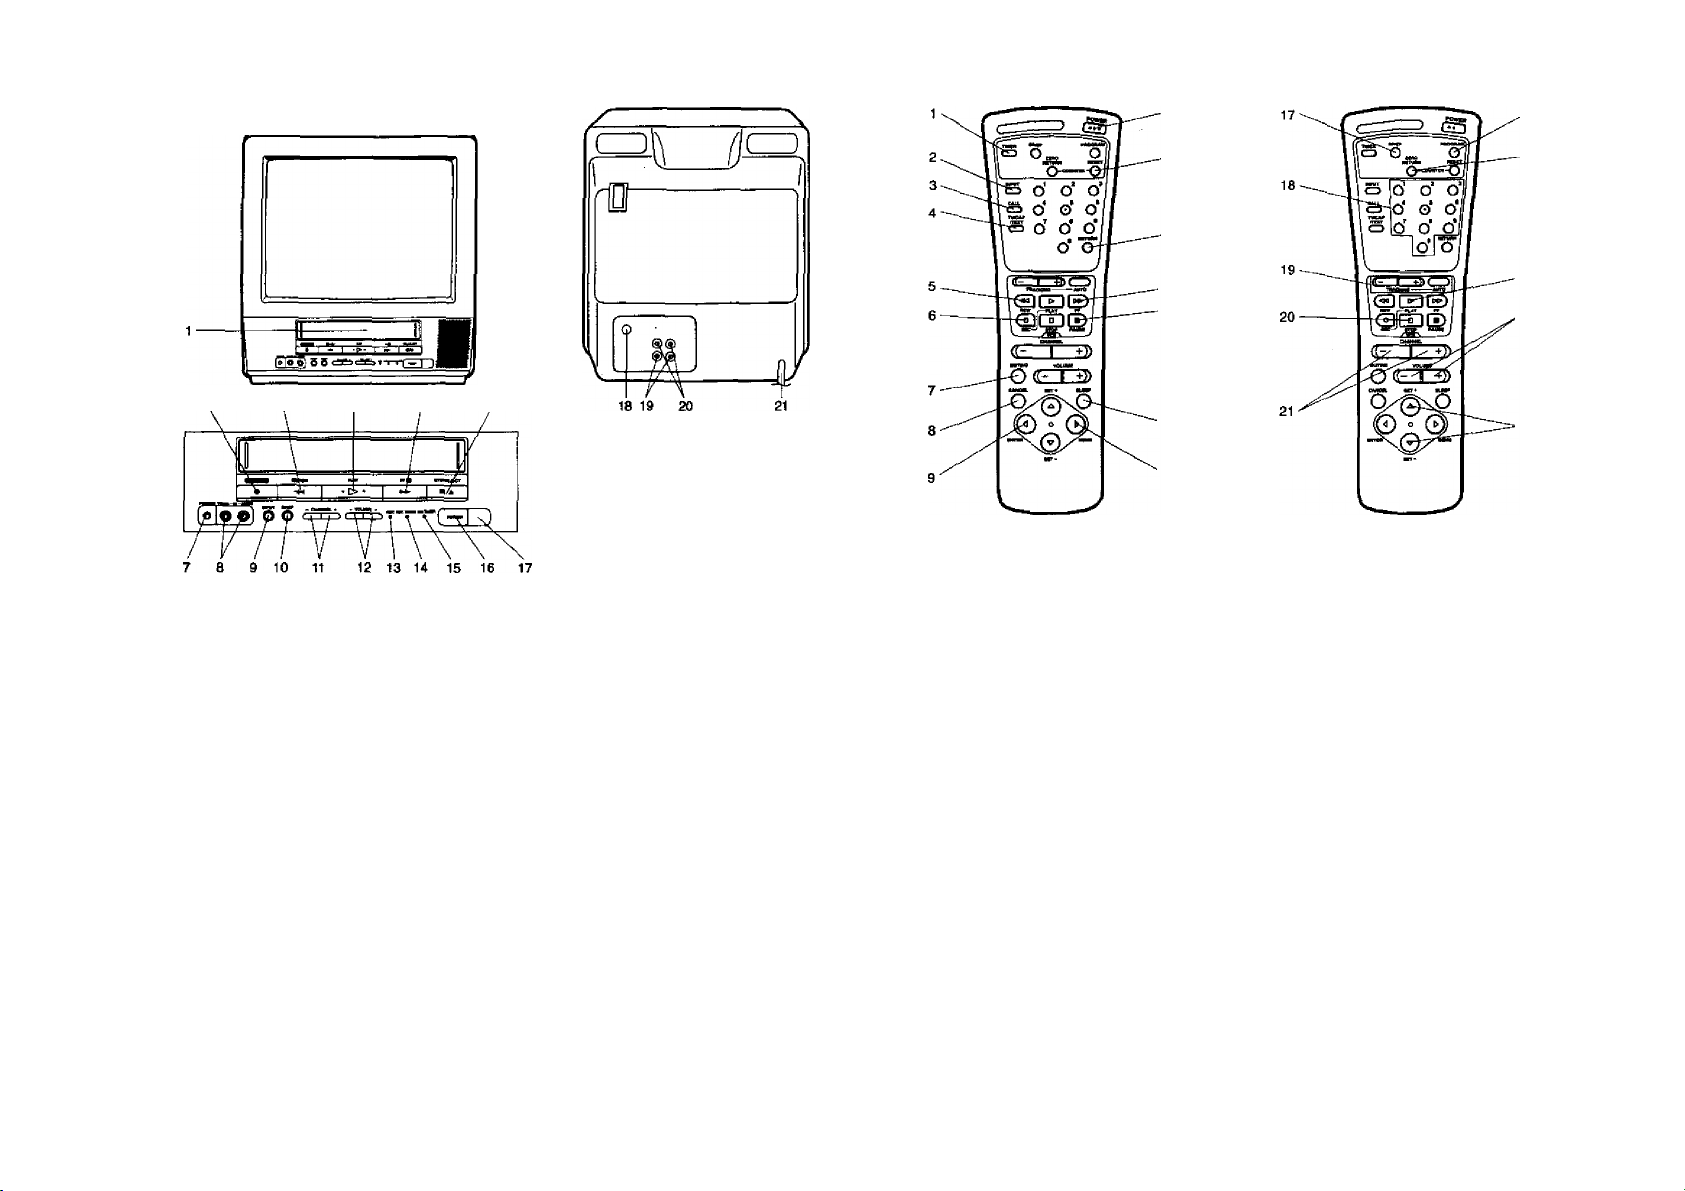
LOCATION OF CONTROLS REMOTE CONTROL
FRONT REAR
FRONT:
1. СамвПе Loading Slot - To insert or remove a
videotape.
2. ЯЕС / ITR Button - Press once to start normal
recording. Additional presses activate IttslanI Timer
Recording.
3. REW (Rewind) Button - In the Stop mode, this
button rapidly winds the tape backwards. In the Play
mode, this button activates reverse search.
4. PLAY Button • Press to play a prerecorded tape.
5. FF (Fast Forward) Button - in the Stop mode, this
button rapidly winds the tape forward. In the Play
mode, this button activates forwanj search.
6. STOP/EJECT Button - Press once to stop the tape
in any mode. Press again to eject the tape.
7. Headphone Jack ■ Plug monaural headphones or
an earphone with an 1 /8* miniplug into this jack for
private listening,
8. AUDIO/VIDEO IN Jacks • Audio and video signal
cables from an external source can be connected
here.
9. INPUT Selector Button - Switches the program for
viewing between the VCR and an external input
source.
10. SP/EP Selector Button - Sets the tape speed for
recording.
DESCRIPTION
OF CONTROLS
11. CHANNEL + /- Buttons - Press to select a channel
12. VOLUME + / - Buttons - Press to raise or lower the
13. REC Indicator - Lights when Ihe TVA/CR is reconjing.
14. REC TIMER Indlcalor - This lights when the TIMER
15. ON TIMER Indicator - This indicator lights up when
16. POWER Button - Press to turn the TV/VCR on or off,
17. Remote Sensor ■ Signals from the Remote Control
REAR:
18. VHFAJHF Antenna Jack-Connect the 75 ohm
19. VIDEO/AUDIO IN Jacks - Audio and video signal
20. VIDEOfAUDIO OUT Jacks - Used to output audio
21. AC Power Cord-Connect to a120V, 60Kz outlet.
8
for viewing or recording.
volume of the sound.
button is pressed.
the powered up. II also lights up when ON TIMER
program is turned ON while power is OFF.
are received here.
coaxial cable from the antenna or Cable TV sen/ice
to this jack.
cables from an external source can be connected
here.
and video signals to a TV, amplifier or VCR.
10
12
-13
-14
■15
'16
DESCRIPTION OP CONTROLS
1. TIMER Button - Used to set the TV/VCR to start
recording at a preset time.
2. INPUT Sector Button - Switches the program for
viewing between Ihe VCR and external input sources.
3. CALL Button - Displays the present kme/day of the
week, channel, counter, speed selection (and VCR
mode if VCR is playing) on the TV screen.
4. TV/CAP/TEXT Button - Switches between Caption,
Text and TV modes for Closed-Captioned programs.
5. REW (Rewind) Button - In the Slop mode, this
button raptdfy winds the tape backwards. In the Play
mcxle, this button activates reverse search.
6. REC Button - Press once together with the PLAY
button to start normal recording. Additional presses
activate Inslant Timer Recording.
7. MUT1NC Button - Press to turn off the sound, press
again to turn the sound back on.
8. CANCEL Button - Press to cancel existing setups or
to restore default values.
9. ENTER Button - Press to enter selected setup.
10. POWER Button - Press to turn Ihe TV/VCR on.
Press again to turn the TV/VCR oft,
11. COUNTER RESET Button - Used to reset the
counter to 00:00:00.
12. RETURN Buttron - Switches between the present
channel and the last channel selected.
13. FF (Fast Forward) Button - In the Stop mode, this
button rapidly winds the tape forward. In the Play
mode, this button activates forward search.
-24
,25
-26
14. PAUSE Button - During recording, this button
temporarily stops the tape. During playback, it stops
the tape and displays a still image on the TV screen.
15. SLEEP Button - Sets the TV to turn off automaticatly
alter up to 120 minutes,
16. MENU Button - Press to display the On-Screen menu
function.
17. SP/EP Selector Button - Sets the tape speed for
recording.
18. Direct Channel Selection Buttons (0-9) - Allows
direct access to any channel.
19. Digital AUTO TRACKING Buttons - Allows automatic
or manual adjustment of tracking to minimize piclure
noise during playback.
20. STOP Button - Press once to stop the tape.
21. CHANNEL *1- Buttons - Press the + button to
change to a higher numbered channel set into memory.
Press the - button to change to a lower numbered
channel set into memory.
22. PROGRAM Button - Press to confirm the programmed
timer recording and ON/OFF timer.
23. ZERO RETURN Button • Use to stop the tape when
the counter reaches 00:00:00.
24. PLAY Button - Press to play a prerecorded tape.
25. VOLUME *1- Buttons • Press the + button to
Increase, or the - button to decrease the volume level.
26. SET -r / - Buttons - Used to select the option in the
menu or set timer recording, ON/OFF timer, channel
set, picture adjustment, auto repeat, clock and
language.
Page 7
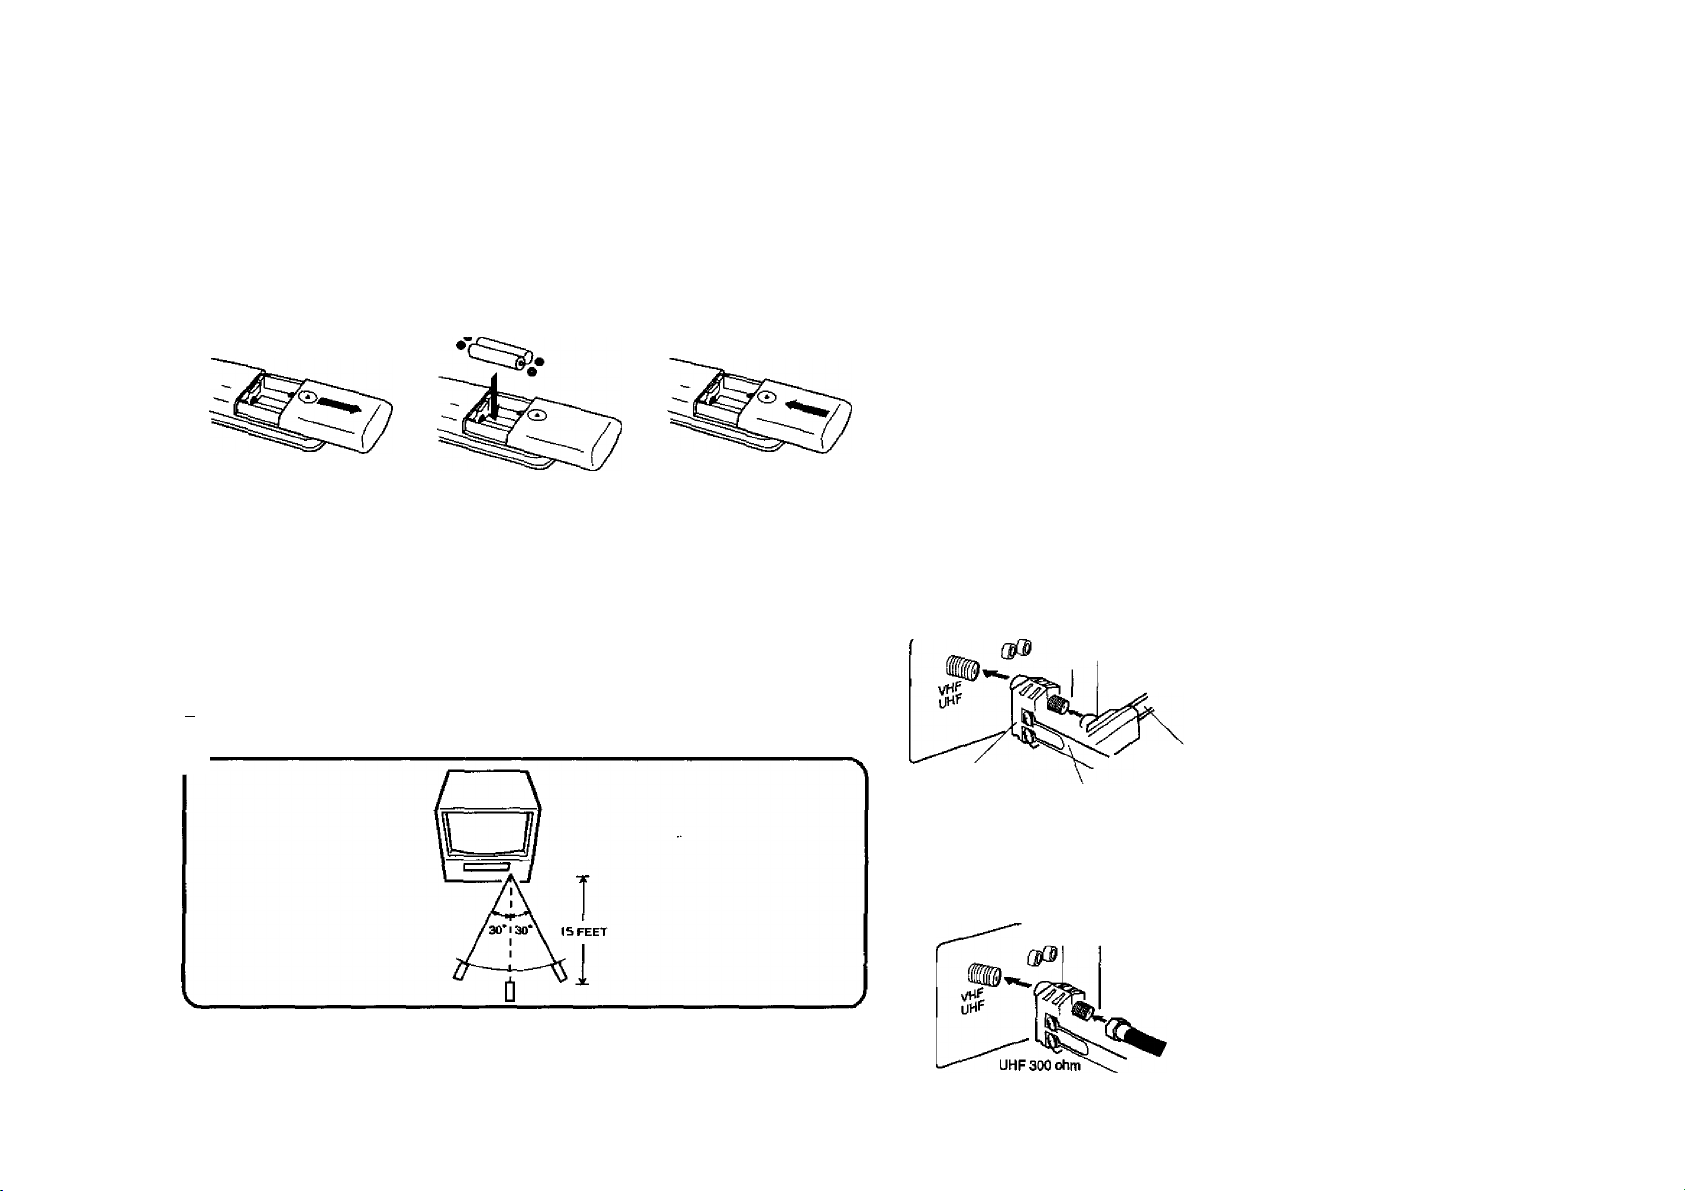
REMOTE CONTROL (CONTINUED) ANTENNA CONNECTIONS
If you are using outdoor antenna (outdoor antenna not included), follow the instructions below that
correspond to your antenna system. II you are using a cable TV service (CATV), see page 13 for Cable
BATTERY INSTALLATION
Slide the battery cotnpartmenl cover in the direction
of the arrow.
BATTERY PRECAUTIONS
install two “AA” (penlight
size) batteries, paying
attention to the poiarity
diagraro in the battery compartrrtenl
Replace the compartnnsrrt
cover.
TV connecUona.
Combination VHF/UHF Antenna (Singie 75 ohm cabie or 300 ohm twin-iead wire)
75 OHM
COAXIAL
CABLE
300-75 OHM
MATCHING
TRANSFORMER
(not included)
Connect the 75 ohm cable from the combination VHF/
UHF antenna to the antenna jack.
If your combination VHF/UHF antenna has a 300 ohm
twin-lead wire, the use of the 300-75 ohm matching
transformer may be necessary.
The precautions below should be followed when using batteries in this device:
1. Use only the size and type of batteries specified.
2. Be sure to follow the correct pdarity when installihg №e batteries as indicated in the battery compartment.
Reversed batteries may cause damage to the device.
3. Do not mix different types of batteries trrgedrer (e.g. Atkaline and Carbon-zinc) or old batteries witti fresh
ones.
4. If the device is not to be used for a long period of time, remove the batteries to prevent damage or injury
from possible battery leakage.
5. Do not try to recharge batteries not intended to be recharged: they can overheat and rupture. (Follow
battery manufacturer’s directions.)
V
EFFECTIVE DISTANCE OF THE REMOTE CONTROL TRANSMITTER
NOTE;
When there is an obstacle between the TV/VCR and the transmitter, the transmitter may not operate.
' When direct sunlight, an incandescent lamp, fluorescent tamp or any other strong light shines on the
Remote sensor of the TV/VCR, the remote operation may be unstable.
Combination VHF/UHF Antenna (Separate VHF and UHF 300 ohm twin-lead wires)
Connect the UHF 300 ohm twin-lead wire to the
combiner (not supplied). Connect the VHF 300 ohm
twin-lead wire to the 300-75 ohm matching trans
former. Attach the transformer to the combiner, then
attach the combiner to the antenna jack.
COMBINER
(not included)
300-75 OHM
MATCHING
TRANSFORMER
(not included)
UHF 300 ohm
VHF 300 ohm
Separate VHF/UHF Antennas (75 ohm VHF cable and 300 ohm UHF twin-lead wires)
Connect the VHF 75 ohm cabie and UHF 300 ohm
twin-lead wire to the combiner. Attach the combiner
COMBINER
(not Included)
VHF 75 ohm
to the antenna jack.
10
11
Page 8
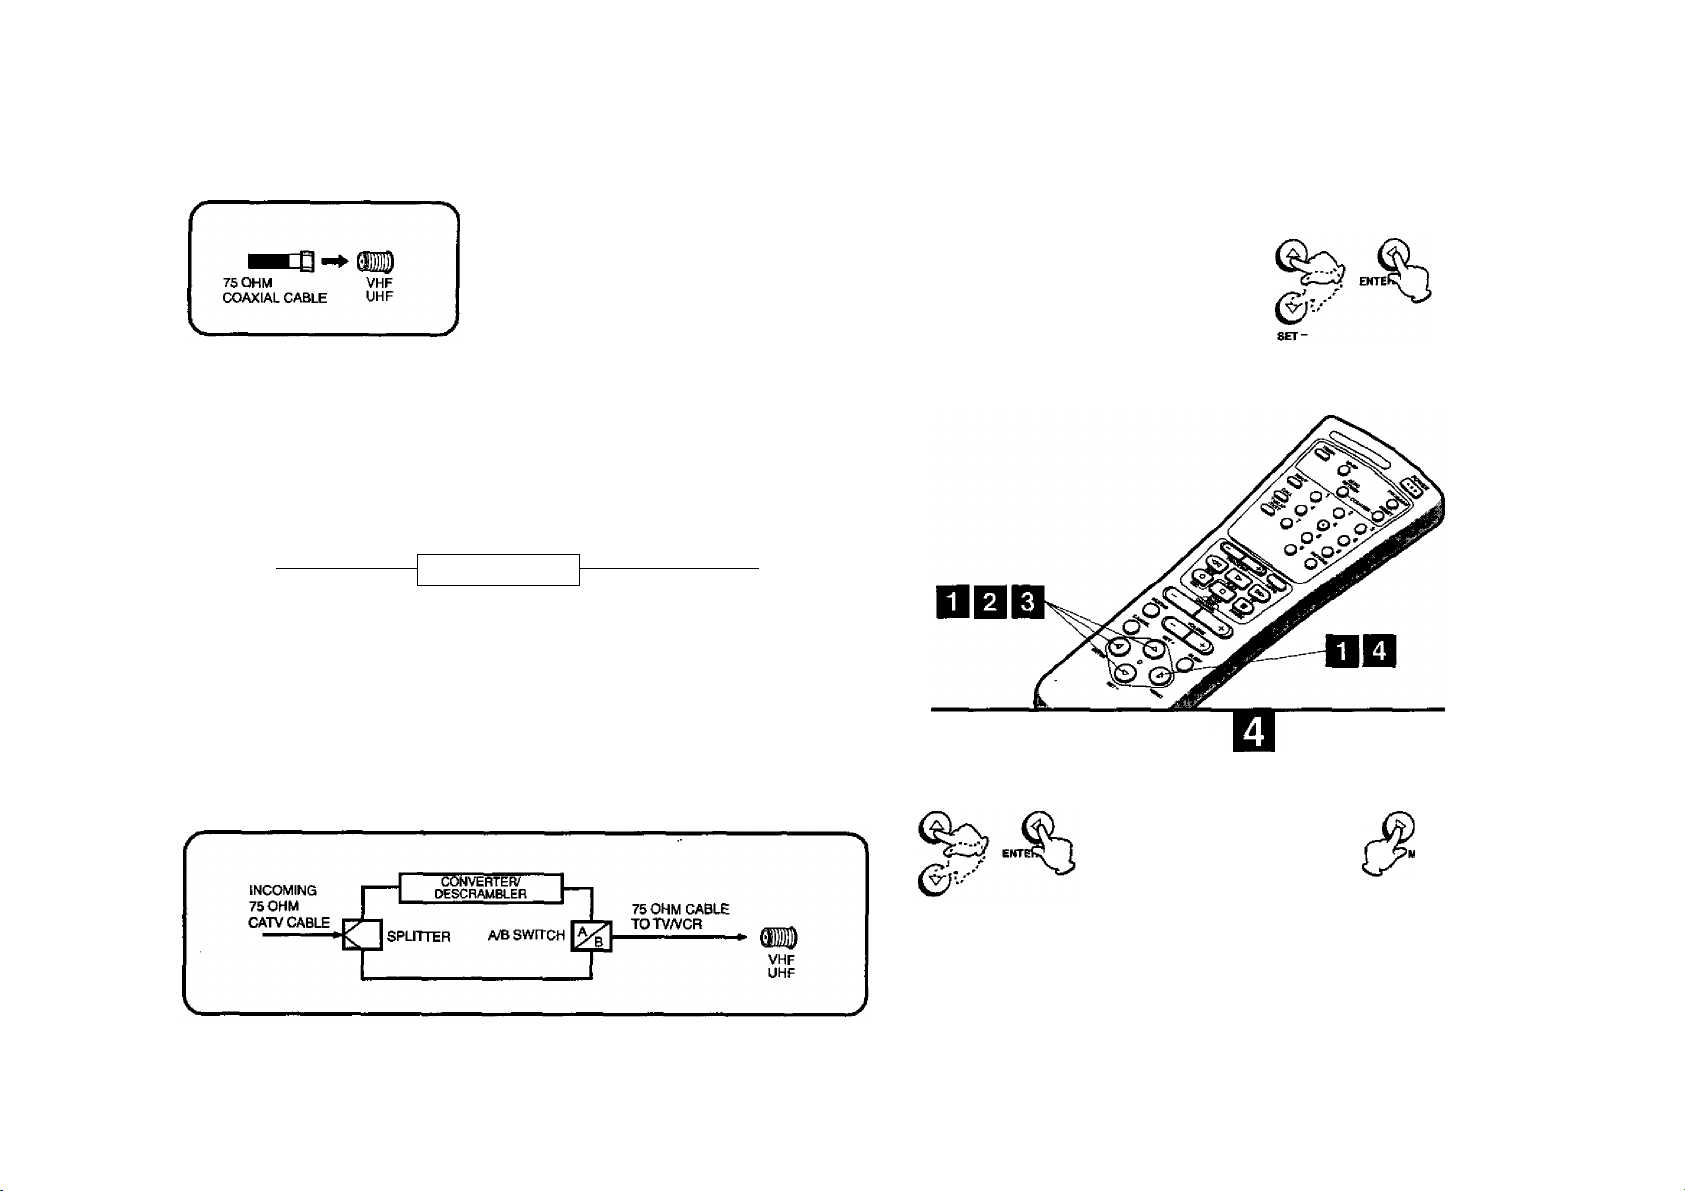
CABLE TV CONNECTIONS
This TV/VCR has an extended tuning range and can tune most cable channels without using a Cable TV converter
box. Some cable companies offer "premium pay channels" in which the signal is scrambled. Descrambling these
signals for normal viewing requires the use of a descrambler device which is generally provided by the cable company.
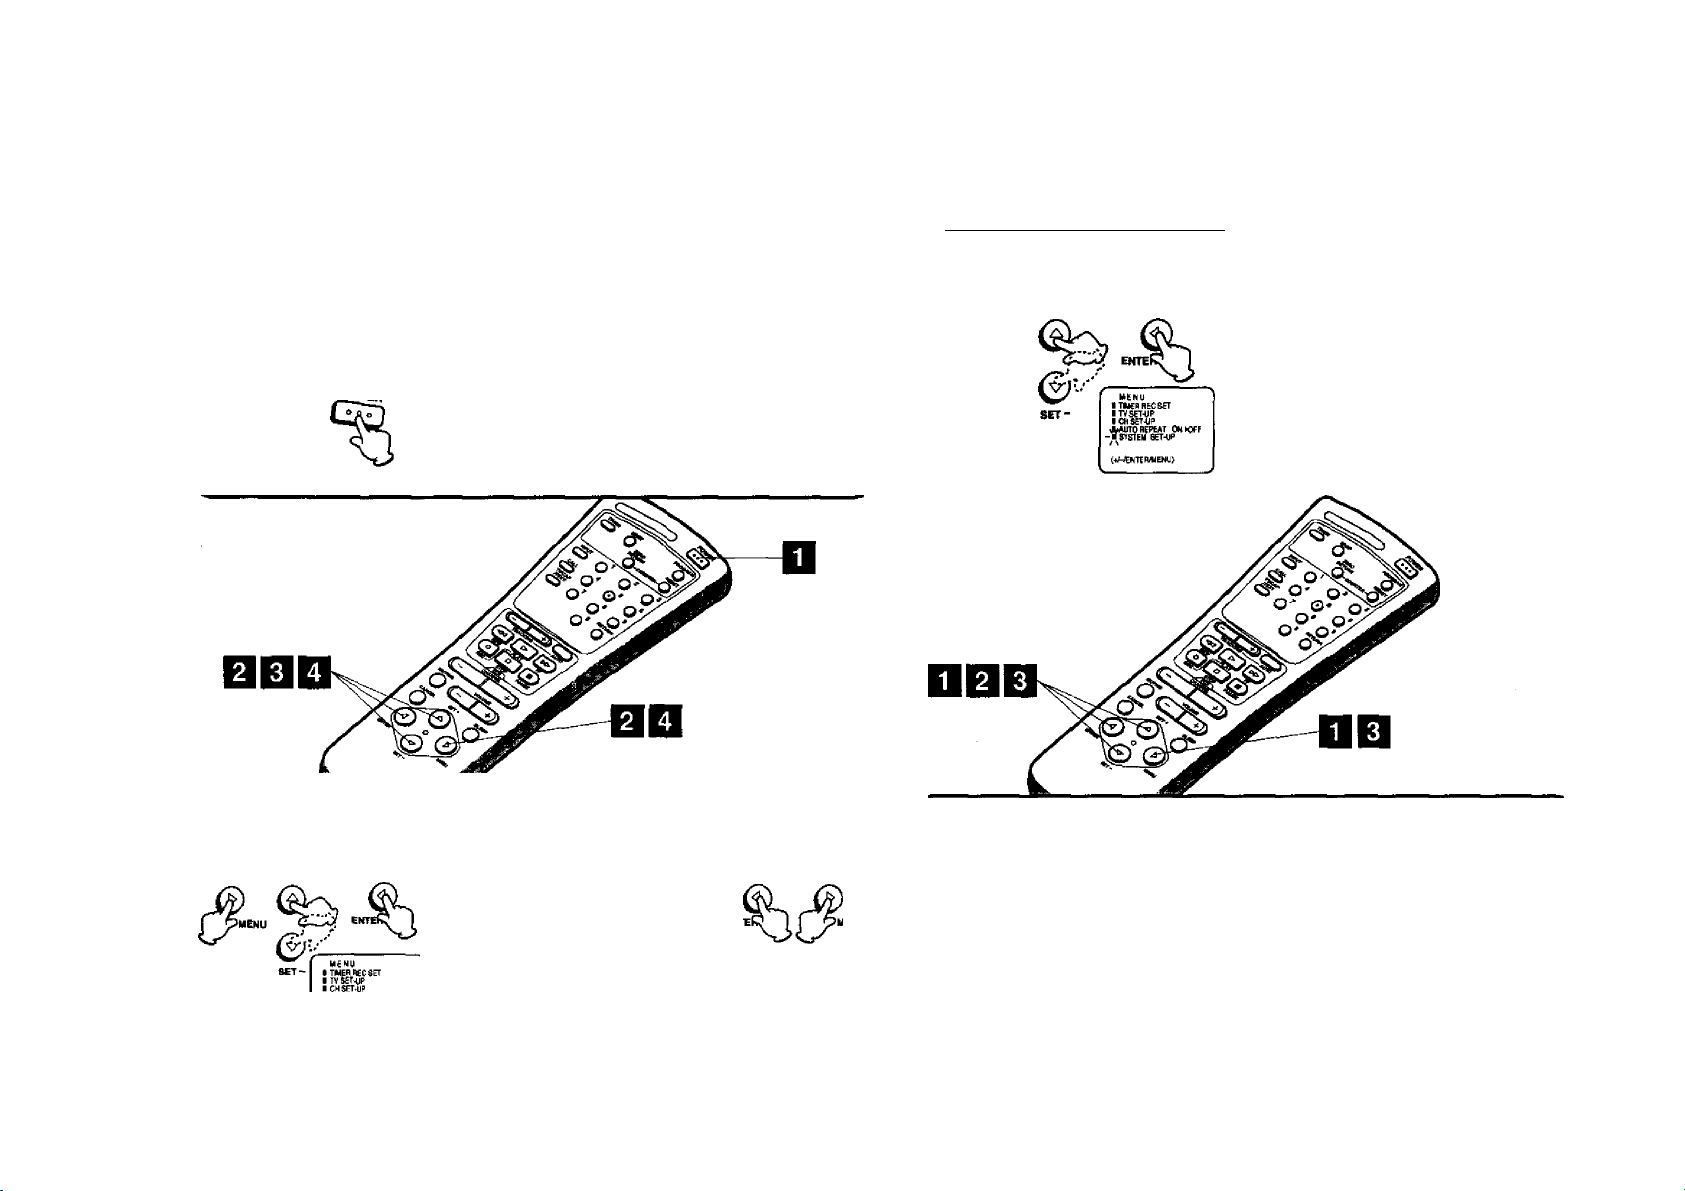
SETTING LANGUAGE
This TV/VCR can display the on screen language in English, Spanish or French.
Language selection {step 3) will automatically appear on the screen when you press the MENU button
initially. Select language to use the other menu options.
FOR SUBSCRIBERS TO BASIC CABLE TV SERVICE
For basic cable service not requiring a converter/descrambler box,
connect the CATV 75 ohm coaxial cable directly Ic the antenna jack
on the back of the TV/VCR.
FOR SUBSCRIBERS TO SCRAMBLED CABLE TV SERVICE
If you subscribe to a cable TV service which requires the use of a converter/descrambler box, connect the incoming
75 ohm coaxial cable to the converter/descrambler box. Using another 75 ohm coaxial cable, conned the output jack
of the converter/descrambler box to the antenna jack on the TV/VCR. Follow the connedions shown below. Set the
TV/VCR to the output channel of the converter/descrambler box (usually channel 3 or 4) and use die converter/
descrambler box to seled channels.
INCOMING
75 OHM
CATV CABLE
CONVERTER/
DESCH/U4BLER
75 OHM CABLE
VHP
UHF
FOR SUBSCRIBERS TO UNSCRAMBLED BASIC CABLE TV SERVICE WITH
SCRAMBLED PREMIUM CHANNELS
If you subscribe to a cable TV service in which basic channels are unscrambled and premium channels require the
use of a converter/descrambler box, you may wish to use a signal splitter and an A/6 switch box (available from the
Cable company or an electronics supply store). Follow the connections shown below. With the switch in the "B"
position, you can directly tune any nonscrambled channels on your TV/VCR. With the switch in the “A” position, tune
your TV/VCR to the output of the converter/descrambler box (usually channel 3 or 4) and use the converter/
descrambler box to tune scrambled channels.
Press the MENU button.
Press the SET + or - button to select the
SYSTEM SET-UP option, then press die
ENTER button.
SET*
MENU
ttiMERflECSET
ITVSET-gp
■ CHSET'UF'
UJTOREPEJt
SVSTEM
i
(eWENTEFWENU)
Press the SET '»-or - button to select the
desired language: English (ENGLISH), Spanish
(ESPAÑOL) or French (FRANÇAIS), then press
the ENTER button.
Press tti0 SET + or - button to select the
LANGUAGE option, then press the ENTER
button.
SET*
SYSTEM
■a OCX SET
<^1
LilNQUAOEVIOUAiLAMGUE
-ÏLM
<4i-^MTEfl«ENU)
Press the MENU button twice to return to
normal TV viewing.
12
LWGUAâE«l(MAiUMGUE
E$PAA0L
FRfMCtu;
<4l.ÆNTEFU|ie«J)
13
Page 9
AUTO CLOCK SETTING
The Auto Clock feature ettables the automatic dock setting and updating, and also to set the Time Zone and Daylight
Saving Time by receiving XDS (Extended Data Servics) information carried on №e channel signal.
You must set the antenna connection before №e AC cord plug is Inserted Into the AC outlet.
AUTO CLOCK SETTING
WAIT 30 MINUTES! when the power
switch is off, after the connections of the
antenna and the power plug. Because the Auto
Clock setting feature is activate.
After the dock is set automaticatly, you may have to set
the Time Zone and Daylight Saving Time.
Press the POWER button to turn on the TVA/CR alter
the Auto Clock operation compleated.
'■OWeb
> When shipped from factory, the AUTO CLOCK
option is set to AUTO position.
• If you turn the TVAfCR on in Auto Clock setting, the
clock is not set.
> With cable box connection, it the Auto Clock Setting
is unsuccessful, please select the PBS channel
carrying the XDS information, then turn the TVAfCR
off. After 30 minutes, turn the TVA/CR on, and if the
dock is not set automatically, sat the clock manually.
(See page 16.)
DAYLIGHT SAVING TIME SETTING
You can set the Daylight saving time automatically or manually.
Press the MENU button. Press the SET + or button to select the SYSTEM SET-UP option,
then press the ENTER button.
SET-»-
3"
Press the SET + or - button to select the
DAYLIGHT SAVING TIME option, then press the
ENTER button.
SET +
SV№ SET4JP
iCLdttSCT
SET
■ ичЩиЭЕ1СОНМАМ(ХЕ
iAUTOOOCK KIN OFF
АвТММЯО 7»£
>1CMYUQKT SiiVHG TIME
TIME ZONE SETTING (STANDARD TIME)
Press the MENU button.
Press the SET or - button to
select the SYSTEM SET-UP
option, then press the ENTER button.
Press the SET + or - button
to select the STANDARD
TIME Option, then press the
ENTER button.
Using tine SET+ or-bution!'
select yourTinrte Zone, then
press the ENTER button.
Press the MENU button until the
MENU screen is cleared.
SET«
SYST£« SETJJP
■ CLOCK ЗЕТ
• LMrЮIJ<UЗ&ФICIMUJ№QUE
JyMTlOCLOCK KM OFF
'•STaWARD TWE
«ФАТиОНТ SAVHQ TIME
(W-/tNTERiUENU}
NOTE: * After Auto Clock setting, in some case the clock may display the other time zone’s. You can correct the clock
by selecting your Time Zone setting above.
* When the clock is not set or you set the clock manually, Time Zone setting is not available.
14
CD
SCT-
STAMOMC THE
ATLANTIC EASTERN
CEMmU. UOUNTAH
APACFC ALASKA
HAWNI
А\Д0
<4HENTEBiMENU)
Press the SET -»-or - button to select one of the
options, then press the ENTER button. Press the
MENU button until the MENU screen is cleared,
SET +
for manual setting
ON:
(forward one hour)
tor manual setting
OFF:
(back one hour)
AUTO; for automatic setting
(read XDS in the signal)
DAVUOHT SAVMQ TtiE
KM
OFF
AUTO
{<A£NTEHMEN(J>
When you want to set the Daylight Saving Tinfte manually,
on the first Sunday in April you set to 'ON", and on the last
Sunday in October you set to "OFP.
NOTE: * When shipped from factory, the DAYLIGHT SAVING TIME option is set to AUTO position.
* When the clock is not set, Daylight Saving Time setting is not available.
• When there is no Daylight Saving Time In your area, ^ways select OFF position in step 3.
15
Page 10

MANUAL CLOCK SETTiNG
You must set the date and time manually for timer recordings, OWOFF Timer and Daylight Saving Tima if
the Auto Clock process did not set them correctty.
EXAMPLE: Setting the dock to *6:30 AM*, 23th (SAT) October, 1999.
Press the MENU button.
Press the SET + or- button to seled the SYSTEM
SET-UP option, then press the ENTER button.
SET*
Press the SET + or - button to select the CLOCK
SET option, then press the ENTER button.
SET +
0
iSYSliM SET^F*
I Un^oCCK KW OFF
(-AJENTERVEKur
TV OPERATION
To turn on the TVA/CH,
press the POWER button.
POWeb
Adjust the volume level by
presdng the VOLUME -r or button. The voluitte level will
be indicated on the screen by green
bar. As the volume level increases,
so do the number ol bar. If the
volume decreases, the number of
green bar also decreases.
VOLUME
Set the TV/CATV menu
option to the appropriate
position. (See page 21.)
TV - VHFrtJHF Channels
CATV - CABLE TV Channels
VHFAJHF/CATV CHANNELS
TV CATV
VHF
2-13
UHF
14-69 14-36
VHF
2-13
std /hrc/irc
(AKW)
37-59
(AAKWW)
60-85
<AAAMZ2Z)
M nj
(66) (94)
96-99
(A-5HA-1)
100-125
(100)(125)
01
(5A)
Press the SET + or- button
to set the month, then press
Set the day, year and flme
as in step 3.
After setting the dock, date and time^
Starts functioning automaticalty.
the ENTER button.
SET +
6'- r
{rfJEHTEBCBCHJVEIIU)
' After a power failure or disconnection of the power plug, the time di^lay will be lost. In this case, sel Ihe
NOTE:
present time again if the Auto Clock did not sel correctly.
' If you want to correct Ihe digits while setting, press the CANCEL button until the item you want to correct,
then press the SET+ or - button to correct the desired setting.
CLOCK SfT
UOnTH
(4MEKTE№CAACEL/U€NU>
16
ft:30AW $AT
flT'V Press the Direct Channel seJaction tHittons to select the channel.
Ef9 TV mode direct channel aetectlon -
When the TV/CATV menu option is in the TV position, all channels can be instantly selected by using two
buttons, (for example, to select chann^ 2, press ‘D", then “2". If you press only “2", channel selection will be delayed for
a few secondsO For channels 10 and above, press the 2 digits in order. n 1 2
CATV mode direct channel aelectton - ^ ^ ^
When the TV/CATV menu option is in the CATV position, channels can be selected as toliows:
TO SELECT CATV CHANNELS: ^ I 1 1
1 -9 Press *0" twice, then 1 -9 as needed. (Example, to select channel 2, press 002.)
13-99 Press the 2 digits in order. (Example, to select channel 36, press 36.)
100-125 Press the 3 digits in order. (Exarr^le, to select channel 120, press 120.)
NOTE FOR CHANNELS 1-12:
If only 1 or 2 buttons are pressed, the corresponding channel will be selected in 2 seconds.
' 'I
OHOI2
______________ /
NOTE: • If a channel with no broadcast is selected, the sound will automatically be muted.
• If a station being viewed stops broadcasting, the TV will automatically shut itself off alter 16 minutes.
17
Page 11

TV OPERATION
(CONTINUED)
MUTING
press this button to turn off the sound. The TVA/CR's
sound will be silenced and ‘‘Ml/TING" will briefly appear
on the screen. The sound can be turned back on by
pressing this button again or one of the VOLUME + or
- buttons.
CHANNEL + AND-
Press and release the CHANNEL + or - button. The
channel automatically stops at the next channel set
into memory. Press and hold the button down to
change channels more quickly.
For proper operation, before selecting channels, they
should be sat into the memory. See pages 21 and 22
To memorize channels'.
CALL
Press the CALL button. The clock, dale, channel number, real lime tape counter, tape speed ^d VCR
operation will be indicated.
Press CALL button again to disappear the call display.
Current time
CALL
NOTE: The Auto Repeat mark appears when Auto Repeat Is selected.
_
____
- - — -
To listen through the headphone, insert a headphone (not supplied) with a 1/S' mini plug into PHONES jack on the front.
The sound from the TV speaker is muted.
i:n*M jEu OIL S12 — Channel No.
- VCR operation
- Auto Repeat
- Cassette
, II: Recoreding pause
Tape counter and _ .
tape speed * ■ °*°P
VCR operation
' ► : Play
: Rewind
►► : Fast-forward
± ■■ Eject
# : Recoteding
18
SLEEP
To set the TVA/CR to turn oft after a preset amount of time, press the SLEEP button on the remote control.
The clock will count down 10 minutes for each press of the SLEEP button (120,110, ...10, 0). After the sleep
time is programmed, the display will appear briefly every ten minutes to remind you that the sleep timer is
operating. To confirm the sleep timer setting, press the SLEEP button and die remaining time will be momen
tarily displayed. To cancel the sieep timer, press the SLEEP button repeatedly until the display turns to 0,
SLEEP
Pre$s this button to switch between normal TV and
the two dosed caption modes (captions and fuil
screen text). Closed captioning will display text on the
screen for hearing impaired viewers.
TV/CAP
fTEXT
This button allows you to go back to the last channel
(or LINE F/R) selected by pressing the RETURN
button. Press this button again to return to the last
channel (or LINE F/R) you were watching.
RETURN
ti
NOTE: • If ths station being viewed stops broadcasting, the TV will shut off after IS minutes.
• If using an indoor antenna or if TV reception is very poor, the Closed Caption Decoder text may not appear.
In this case, adjust the antenna for better reception or use an outdoor antenna.
• When activating the Closed Captioned Decoder, there will be a short delay before the Closed Captioned
text appears on the screen.
• Closed Captioned TV programs can be recorded and played back on a VCR with the Closed Captioned text
intact. The Closed Captioning text wilt disappear during Cue, Rewind and Pause modes or if the VCR
tracking is not adjusted properly.
> Closed Captktoed text Is only displayed in locations where It is available.
19
Page 12

TV OPERATION
WHAT IS CLOSED CAPTIONING?
This television has the capability to decocte and display
Closed Captioned television progiams. Closed
Captioning will display text on the screen lor hearing
impaired viewers or it will translate and display text in
another language.
CLOSED captioning WITH A VCR
Closed Captioned programs can be recorded and played
back on a VCR with the Closed Captioned text intact.
The Closed Captioned text will disappear during Cue
(Fast Forward Search), Review (Rewind Search) and
Pause Modes or il the VCR tracldng is not adjusted
properly.
TO VIEW CLOSED CAPTIONS
Press the TV/CAP/TEXT button on the remote control to
switch between normal TV and the two Closed Caption
Modes (Captions and Full Screen Text).
Captions: This Closed Captiori Mode will display text
on the screen In English or another language (depend
ing on the setting of the Closed Captions CH. Channel 1
or Channel 2).
Generally, Closed Captions in English are transmitted
on Captions Channel 1 and Closed Captions in other
languages are transmitted on Captions Channel 2.
(CONTINUED) TO MEMORIZE CHANNELS
Text: The Text Closed Caption Mode will usually fill the
screen with a programming schedule or other information.
After selecting a Closed Caption Mode, il will stay in
effect until it is changed, even if the channel is changed.
II Ihe Captions signal is lost doe to a commercial or a
break in the signal, the Captions will reappear when the
signal is received agan.
If the channels are changed, the Captions will be
delayed
approximately 10 seconds.
The Captions will appear in places on the screen where
they will least interfere with the picture, usually on the
bottom of the screen. News programs will usually show
three-line Closed Captions which scroll onto the screen.
Most other shows provide two or three fined Captions
placed near the character who is speaking so the viewer
can follow the dialogue.
Words in italics or underlined describe titles, words in
foreign languages or words requiring emphasis. Words
that are sung usually appear enclosed by musics notes.
For television programs broadcasting with Closed Cap
tions, look in your TV guide ferthe Closed Captions
symbol (CC).
This TV/VCR is equipped with a channel memory feature which allows channels to skip up or down to the next
channel set into memory, skipping over unwanted channels. Before selecting channels, they must be programmed
into the TV/VCR's memory. In addition to nprmal VHF and UHF channels, this TVAfCR can receive up to 1T3 Cable
TV channels. To use this TV/VCR vdth an antenna, set the TV/CATV menu option to the TV mode. When shipped
from the laclory, this menu option is in the CATV mode.
TV/CATV SELECTION
Press the MENU button. Press Ihe SET + or - button to select the CH
SET-UP mode, then press the ENTER button.
SET*
MENU
■ TUERREC8ET
XTV SET-UP
SET-
-ICH SET-UP
-I^AUrg REPEAT 0W*QfF
• SYSTEM SET-UP
• When selecting Closed Captions, the captioning will be delayed approximately 10 seconds.
• If no caption signal is received, no captions will appear, but the television will remain in the Caption Moda.
* Misspellings or unusual characters may occasionally appear during Closed Captioning. This is normal with
Closed Captioning, especially with live programs. This is because during live programs, captions are also
entered live. These transmissions do not allow time for editing.
* When the on-screen indicator appears during volume adjustment operation, etc., Closed Caption text will not
be displayed.
• Some cable systems and copy protection systems may interfere with the Closed Captioned signal.
* If using an indoor antenna or if TV reception is very poor, the Closed Caption Decoder may not appear or
may appear with strange characters or misspelled words. In this case, adjust the antenna for better reception
or use an outdoor antenna. "
20
Press the SET + or - button
to select the TV/CATV mode,
v/CH SETHiP
-¥ TV »CATV
♦AUTO OJMEMORY
• ADDjDELETE
Press the ENTER button
to select the TV or CATV
mode. The arrow indicates
the selected mode.
TV -VHF/UHF channels
CATV ■ Cable TV r^annels
Press the MENU button until
the MENU screen is cleared.
21
Page 13

TO MEMORIZE CHANNELS
(CONTINUED)
AUTOMATIC MEMORY TUNING
Press the MENU buHon. Press the SET + or - button to select the CH
SET-UP mode, then press the ENTER button.
5ET +
3"
ser-
MENU
■ TIMER AECSCT
TV SET-UP
CHSET^P
t
TAUTO REPEAT ONKlFF
■ SYSTEM SET-UP
(■•ACNTEfVHENU)
TO ADD/DELETE CHANNELS
Press the MENU button.
J V-
Press the SET + or - button
to select the CH SET-UP
mode, then press the ENTER
button.
SET +
MENU
ITMEfl REC SET
i^TV SET-UP
-Tchsctha'
<V^0 REPEAT ORPOPF
A SYSTEM SET-UP
(«MNTERMEMU!
Press the SET + or - button
to select the ADD/DELETE
rr>ode, then press the
ENTER button.
I TV »CATV
SET-
gtAUTOCH MEMORY
->IAD(»)ELEn
i+WENTEFjMENU)
Press the SET or - button to select the
AUTO CH MEMORY mode, then press the
ENTER button. The TV will begin mernorfeing
ell the channels available in your area.
22
CH ser-op
•Ar TV»CATV
-t AUTO CH MEMORY
TMXWELETE
(4J-/ENTER.fM£NU>
Press the MENU button until the MENU
screen is cleared.
d-
Select the desired channel
to be memorized or deleted
using SET + or - button, or
using the Direct Channel Selection
buttorts (10 keys, 0^), orCHANNEL
+ or button.
S£T +
Press the ENTER button to
select the ADD or DELETE. If
you select an unmemorized
channel, the Channel indication will be
red. If you select the ADD mode, №e
Channd indc^n conges from red to
green arxl the channel wfll be mentorized.
if you select a menxNized channel, the
Channel indica^ will be green. If you
select the DELETE rrK)de, the Channel
indication changes from green to red
and the channel will be deleted from the
memory.
{D.|r--^^CNTEFVIi(EHU}
Press the MENU button untiP
the MENU screen is cleared.
23
Page 14

PICTURE CONTROL ADJUSTMENTS
Picture controls are factory preset but you can adjust them individually as follows:
To display the picture adjustment screen, press
the MENU button.
Press the SET + or - button to select the TV
SET-UP option, then press the ENTER button.
Press the ENTER button until "BRIGHTNESS"
appears on the screen, then press the SET + or button to adjust the brightness of the picture. When
the SET + button is pressed, the darker portions of
the picture become lighter.
) SET + or - button to select the
: option, then press the ENTER button.
Press the ENTER button until "CONTRAST appears
on the screen, then press the SET + or - button to adjust
the contrast of the picture. Pictures look sharpest in
the daytime (bright light) by increasing the contrast. At
night (dim light), the sharpest picture is obtained by
reducing the contrast.
COLOR
Press the ENTER button until “SHARPNESS"
appears on the screen, then press the SET + or -
button to adjust the sharpness of the picture.
TINT
Press the ENTER button untii "TINT" appears on the
screen, then press the SET + or - button to adjust the
tint of the picture. This delermines how accurately the
colors are reproduced by the TV. Adjusting the tint for
natural facial tone is the best method of obtaining
accurate color reproduction of the entire picture.
RESET PICTURES (CANCEL)
Pressing the CANCEL button white making picture
adjustments will return all adjustments to the factory
preset levels.
___________
CANCEL
24
NOTE: The CONTRAST default
setting is set to maximum
at the factory.
(«^ktemanceIaenu}
NOTE: The On-screen display will disappear 6 seconds after linishing an adjustment or by pressing the MENU
button three times. The settings can only be adjusted when they are displayed on the TV screen.
0
25
Page 15

то SET THE ON TIMER
This leature allows you to have the TV automatically turn “ON” at predetermined time. If you program the * *ON" timer
once the timer will turn “ON" the TV daily at the same time and to the sairte channel.
EXAMPLE: Turning on the TV to channel 12 at 7:00 AM, MONDAY-FRIDAY.
Press the MENU button.
Press the SET + or ~ button
to select the TV SET-UP
optioi, then press the ENTER button.
a
ser+
Press the SET + or - button
to select theON/OFFTIMER
option, then press the
ENTER button.
Press the SET + or-button
to select №e ON TIMER
option, then press the
ENTER button.
TO SET THE OFF TIMER
This feature allows you to have the TV turn "OFF" automatically at a predetermined time. If you program the OFF
TIMER once, the TV will be automatically turned oft at the same time daily.
EXAMPLE: Turning off the TV at 11 ;30 PM.
Press the MENU button.
Press the SET + or - button to
select the TV SET-UP option,
then press the ENTER button.
SET-»"
Press the SET+or - button
to select the ON/OFF
TIMER option, then press
the ENTER button.
Press the SET + or - button^
to select the OFF TIMER
option, then press the
ENTER button.
MENU
«тнЁййесвг
-¥TVSCT4IP
WISEKJP
■ AUTOREPEAT ON»OPF
i SYSTEM 5СТЧ1Р
Press the SET + or - button
to set the desired hour, then
press the ENTER button.
OCI ▼
Set the desired minute,
channel and day of the week
as in step 4, then press the
ENTER button.
$ET +
vyTV SET-UP
-rONiOFF TIMER
iPPCnjRE
the MENU screen is cleared.
S£T +
'îrl-.'
OWOFF ШЕЯ
■ OKWK
-7^ CHOOI
CWCEL
I0FF1UF
1ГИМ1 cANca
(«^ÆNTERCANŒLUENU)
NOTE: • The TV will automatically turn off approximately 1 hour later after the ON TIMER turns on the TV. If you
wish to continue watching ttie TV, press any button to cancel the one hour automatic shut off. This shut off
feature prevents the TV from playing continuously if no OFF TIMER is set.
• To cancel the ON TIMER function; To cancel ON timer, follow above steps 1 -6, then press the ENTER
button to select the CANCEL position. Press the MENU button to return to tho TV.
• After setting the ON TIMER." I" of the OFF TIMER will flash on and off. If you wish to set the OFF TIMER,
press the ENTER button then foUow the steps 4-6 on page 27.
/ъ M * If you want to correct the digits while setting, press the CANCEL button until the item you want to
CÍI
correct, then press the SET + or - button to correct the desired setting.
QH<0FF rMER
• OH TIMER
47dMM molí
-НОМЛЧ- OMiCe.
• OFF^ER
liiCDAM CAHCEl.
(W-ÆMTERiCANCELWNU>
.'jONiOFF TI4EA
iOMTUER
*' IStOMI CHCOl
8U»FSAT CANCEL
IZtOCMU CAHCa.
(W-/ENTERiCANCEL/MENU>
Press the SET + or - button'
to select the SET mode, then
press the MENU button until
0NCFFÎUEH
lOH DMBt
7.1№M CH01Í I /
MOrFFn -OET-
lOFF 1NB7
ItlSMI CANCa
(«iMEWTEWCANCEUUENU)
Ч /TV SCT-UP
ATWER REC SET
-■TV SET-UP
♦CH SET-UP
tUJTOR^EAT ONKIFF
I SYSTEM SET-UP
SET
<-f^VEMTERMENU>
Press ttie SET + or - button
to set the desired hour, then
press the ENTER button.
9Б1 ^
ONOFF TUER
SET
NOTE: • If a station being viewed stops broadcasting, the TV will automatically shut itself off after 15 minutes.
• To cancel the OFF TIMER function:
ICNTNER
T:0MU CHQI^
MON-fRI S
-^jbXPW CANCa
(47-ÆirrERCANCELWENU)
Press the SET + or - button
to set the desired minute, then
press the ENTER button.
фг
-'■ONiOFF TMCFt
-»PICTUftE
{+fWENTElWENU}
Press the SET or - button
to select the SET mode, then
press the MENU button until
the MENU screen is cleared.
SET +
0NCFF TUEA
■ ON TVER
ТШМ CHOt?
MOM-FRf SI
(éA,^MTERiCANCE1j1iieMU5
CANCEL
CMiQFF TitlEA
ION TUER
ТЛСМ1
U0N-FF1 $FT
-VoFF TUER
/ ' T2«Wi( САЛСа
«■.»-ÍNTEFICANCELAIENIJ}
ONiCFF TUER
■ ON THER
7ШМ CHOU
MOH.fR1 S
{.ehenterjcwceumenu)
To cancel OFF timer, follow above step 1 -5, then press the SET + or - button to select the CANCEL position.
Press the MENU button to return to the TV,
• To conflnn the OWOFF TIMER:
Press the PROGRAM button twice to Indicate the programes on the sccreen.
27
Page 16
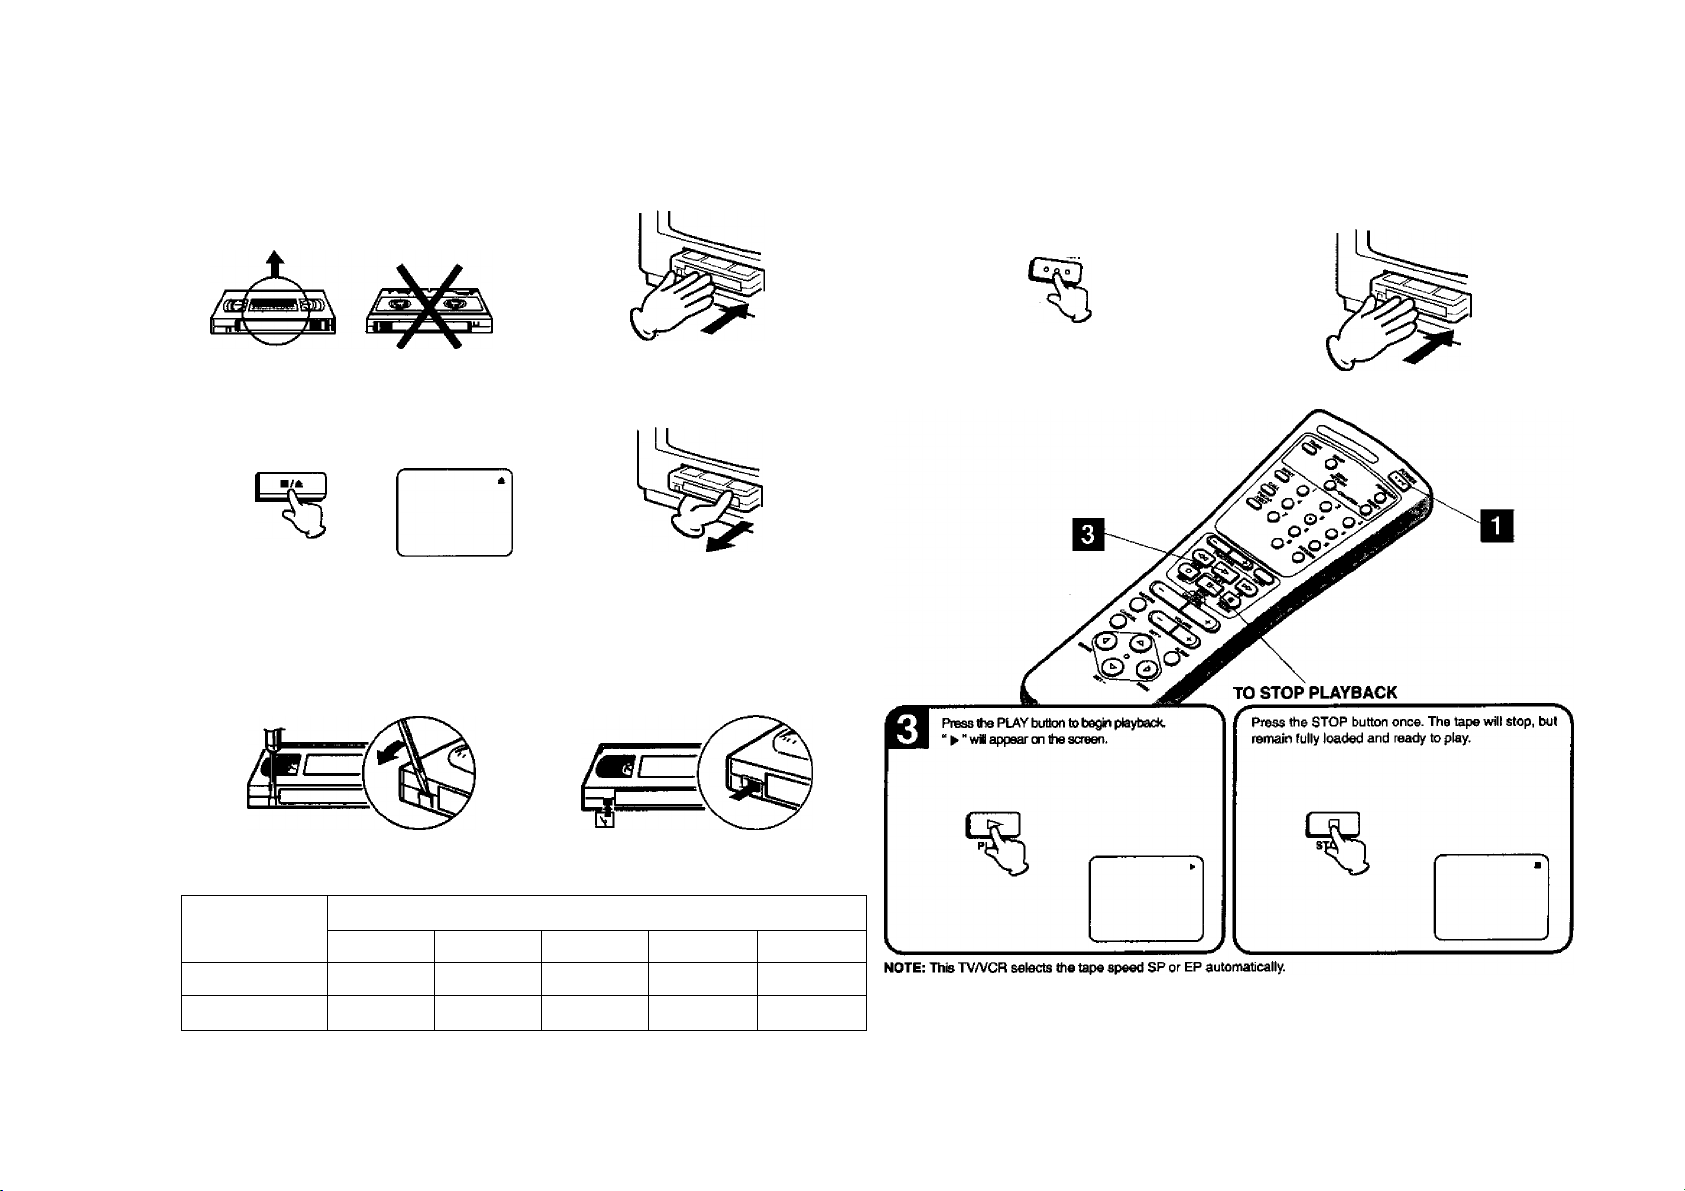
LOADING AND UNLOADING A VIDEO CASSETTE
Use onjy video caaeotte tape» marked
LOADING
Push the center of the tape until it is automatically retracted into the TV/VCR.
AUTOMATIC POWER ON AND PLAY
When loading a cassette tape without the erase prevention tab intact, the TV/VCR will turn on automatically
and playback will start immediately.
Insert the cassette with its labeled side facing you.
An inverted video cassette cannot be insert^.
UNLOADING
To unload a video cassette, press the STOP/
EJECT button on the TV/VCR twice. The first
press will stop the tape in any mode. The second
press will eject the tape.
STOnEJECT
andSmS.
Pull the cassette out.
PLAYBACK
To play a praracordad tape.
TO START PLAYBACK
To turn on the TV/VCR, press the POWER button.
POWEp
Load a prerecorded tape. (When loading a
cassette tape without die erase prevendon tab,
playback will start automaticaliy.)
AUTOMATIC EJECT
If №e TV/VCR automatically rewinds the tape to die
beginning (AUTO REWIND FEATURE), the tape will
be eject^ automatically. (See NOTE on page 34.)
TO PREVENT ACCIDENTAL ERASURE
After recording, break off the erase prevention tab if
you do not wish to record over the tape.
TAPE SPEED AND MAXIMUM RECORDING TIME
^ EP (Extended Play) e hours
—
TAPE SPEED
SP (Standard Play)
T-160 T-120
2-2/3 hours 2 hours
TO RECORD AGAIN
6 hours 4-1/2 hours 3 hours
28
NOTE: • Always eject the tape when not in use.
• The cassette tape can be ejected even if the
POWER Is -OFF.
Cover the hole with vinyl tape.
Be careful the tape dO№ not extend past the edges of
the video cassette housing.
VIDEO CASETTE TAPE ^
T-90
1-1/2 hours
T«) T-30
1 hour
30 minutes
1-1/2 hours ^
29
Page 17

PLAYBACK
(CONTINUED) SPECIAL PLAYBACK
TO REWIND OR FORWARD THE TAPE RAPIDLY
Press the REW (Rewind) button in the Stop inoda.
“ ■ wiH appear on the screen.
FORWARD/REVERSE PICTURE SEARCH
If you want to see the tape during REW (FF) mode, press and hold the REW (FF) button. The backwanj
(forward) visual search picture will be seen on the screen. Release to return to the REW (FF) mode.
Press the FF (Fast Fonward) button in the Stop mode.
“ " will appear on the screen.
TO VISUALLY SEARCH FOR DESIRED POINTS
When either the FF or REW button is pressed in the PLAYBACK mode, the speed search picture will appear. When
pressed twice, the search picture will increase speed. Speed search time depends upon the speed used (SP or EP)
during recording. See chart below.
To rewind or fast forward a tape, press the STOP button, and then press the REW or FF button.
To visually search backward, press the REW button
once or twice in the PLAYBACK rnode.
Press the PLAY button to resume normal viewing
^ speed.
To visually search forward, press the FF button once
or twice in the PLAYBACK mode.
Press the PLAY button to resume normal viewing
speed.
SPEED SEARCH TIMES
TAPE SPEED
SP (Standard Play) 3X 5X
^EP (Extended Play) 9X 16X j
PICTURE SEARCH SPEE^
PRESS
ONCE
PRESS
TWICE
DIGITAL TRACKING CONTROLS
When a tape Is played, the Digital Auto Tracking system automatically adjusts the tracking to obtain the best
possible picture. If noise bars appear during playback, adjust the traddng manually as follows:
• Press the TRACKING + or - button to obtain the best possible picture. "MANUAL TR." will appear for 4
seconds on the screen.
To resume automatic tracking, press the AUTO TFtACKING button. “AUTO TR." will appear lor 4 seconds on
the screen.
____________
5 30
—AUTO TRACKINQ
ii- II
-----------
TO WATCH STILL PICTURE
r Press the PAUSE button in the PLAYBACK mode.
Press the PLAY button or PAUSE button to resume
normal playback.
NOTE: • Best results during speed searcrh and still playback can be obtained with video cassettes recorded in the "EP* mode.
* The audio output is muted during Speed Search and Still.
* A tew гю1Бв bars wiH appear on the TV screen during Speed Search and StiJi.
* To prevent damage to the tape, Stiil and Speed Search mode is automatically changed to the Playback mode after
SQPB (S-VHS QUASI PLAYBACK)
^You can play back the video'cassettetaperecorde^
in the S-VHS system. However the piayed back
picture does not have the high resolution of S-VHS
system.
NOTE: You can not record in S-VHS system.
31
Page 18

SPECIAL PLAYBACK
(CONTINUED) RECORDING A TV PROGRAM
TO WATCH A TAPE REPEATEDLY
Press Ihe MENU button.
3“
Press the SET + or - button to select the
AUTO REPEAT option.
litEMU
• TIUSRREC5ET
■ TV SET-UP
SET-
*CH SET-UP
-iAL/IQ REPEAT ON HUFF
♦STSTEM SET-UP
(«A^NTERiMENU)
RECORDING AND VIEWING THE SAME TV PROGRAM
To lum on the TV/VCR, press Ihe POWER
button.
TOtVEB
iJ V,
Load a cassette tape with the erase prevention
tab intact.
Press the EhfTER button to select the ON
position.
Press the MENU buttor^. If you press the PLAY
button, the tape will play over and over until the
repeat mode is canceled.
MENU
■ TIMER RECSET
■ TV SET-UP
*CH SET-UP
-■AUTOflEPEATKM Off
SET-UP
<*AVENTERiN£NU)
NOTE: • To cancel repeat rrvode, follow above steps 1 and 2, then press the ENTER button to select the OFF position,
press the MENU button to return to the TV.
* The repeat function is canceled automatically wher) the unit is switched off or the tape is ejected.
32
NOTE: ■ If power is switched off during recording, the TV set goes off and the VCR continues to record. Press the
STOP button to haft the necotding and turn off the VCR.
• The TVAfCR Channel cannot be changed during recording.
CONTINUE NEXT PAGE
33
Page 19

RECORDING A TV PROGRAM
Press the Direct Channel Selection buttons to
select the channel to be recorded.
(Example: Channel 12)
Or press the CHANNEL + or - button to select
№e channel to be recorded.
(CONTINUED) INSTANT TIMER RECORDING (ITR)
Press the REC and the PLAY button
simultaneously.
The REC indicator will light.
REC
-o-
/ \
The Instant Timer Recording feature provides a simple and convenient way to make a timed recording.
EXAMPLE: Instant timer recording for 30 minutes.
Press the POWER button
to turn on the TV/VCR.
POWEB
»
.
Load a video cassette
with the erase prevention
lab intact.
Press the SP/EP button to
select the desired tape
speed (SP or EP). SP or EP
will appear on the screen for 4
seconds. (See page 28 for more
information on tape usage.)
SP/EP
TO STOP RECORDING TEMPORARILY
Press ths PAUSE button to avoid recording unwanted material.
“ ll’ will appear on the screen and the REC indicator will blink on and off.
Press the PAUSE button to continue the recording.
NOTE:
The PAUSE mode will be changed to STOP mode after five minutes to
prevent damage to the tape.
NOTE: • AUTO REWIND FEATURE
This TV/VCR will automatically rewind the video cassette when the tape has ended (except during ITR and
Timer Record). It will also eiect the video cassette.
* If the erase preventicxt tab is refttoved, the tape will eject when both the REC button and PLAY button are
pressed for recording.
to
34
--0-
/ \
/ \
TO STOP RECORDING
Press the STOP button to stop
recording.
Set the TV/CATV option
to the appropriate setting.
TV
VHF/UHF Channels
CATV
CABLE TV channels
NOTE: • Press both the REC button and the PLAY button to increase the time needed for recording. (See the chart
below.)
Press once I
RacoMii^ tiiYM
NORMAL REC |
' To cancel Instant Timer Recording, press the STOP buthxt.
’ The TV/VCR channel cannot be changed during recording.
twice 3 times 4 times 5 times 6 times 7 times 8 times
D;30
Press the Direct Channel
Selection buttons to select
the channel to be recorded.
(Example: Channel 12) Or press and
release the CHANNEL + or - button.
(See page 17.)
1:00 1:30
2:00 3:00
Press the REC and PLAY ’
buttons simultaneously to
begin recording. Press the
both buttons again to stop recording
after 30 minutes. Each additional
press of the both buttons will
Increase recording time as shown
below, up to a maximum of 5 hours.
‘ITR* will appear on the screen.
4:00 5:00
9 times
NORMAL REC
35
Page 20

ro
o
TIMER RECORDING
Tlimr raconilng can be pragnunmed on-screen writh the remote control. The buiJt-ln timer allows automatic
unattended recording of up to B programs within 1 month.
EXAMPLE: Program a timer recording for 23th day, channel 007 (CATV), 7:00 ■ 9:30 PM (Tape speed: EP)
• Load a video cassette with the erase prevention tab intact. The TV,VCR will automatically turn on.
• Set the TV/CATV selection to the appropriate positron, (see page 21.)
• See page 9 and 10, REMOTE CONTROL Operation.
____________________________________
Press the SET + or - button to select the
PROGRAM position, then press the ENTER
button.
SET+
ser-
NOTE:36If programming is performed without a tape in the TVATCR, or with a tape without an erase prevention
tab, the Timer Recording is not possible. If a tape without an erase prevention tab is in the TVATCR, the
tape will be ejerded.
To retard from the external equipment press the SET + or - button repeatedly until "L-F" (Line-Front) or
'L-R' (Line-Rear) appears when setting the channel in step 5.
t:
(4^VENTE№CANCELMEMU}
Ptess the SET + or - button to select the date,
then press the ENTER button.
See page 38 for the Daily/Weekly Timer.
SET*
SET-
[MTE -VflrVI
STMT T^;3oAr
<U.TEtrTEjtH;MCEUUENU)
To set the timer for another program, press the
SET + or - button until the prjsition of the
serxrnd program blinks, dien press the ENTER button.
Repeat steps 4 to 6 to set the second program.
NOTE: • The VCR section cannot be used while the REC TIMER indicator is lit. If you want to use the VCR
operation, press the TIMER button to deactivate the timer.
* After a power faflure or discannectiion of the power plug, all programmed recording setting and time
display will be lost uprvi resumption of power. In this case, reset the clock (see pages 14-16.) and
reprogram any timer recordings.
* If you want to correct the digits while setting, press the CANCEL button until the item you want to
correct, then press the SET + or - button to correct the desired setting.
Press the TIMER button. The REC TIMER
indicator will light. The Timer is programed, when
the programmed time is reached, the recording
is automatically started.
TIMER
To cancel timer recording, press the button again and
REC TIMER indicator will go out.
RECTIHER
-o-
/ \
37
Page 21
OTHER FUNCTIONS FOR THE TIMER RECORING
TO SET DAILY/WEEKLY TIMER
When setting the date in the step 4 on page 36, press the SET - button repeatedly when the current day is
displayed.
The setting changes as foiiows; -
Example The current day (Friday} —►
After setting, press the ENTER button.
Press the PROGRAM (PROGRAM CONFIRM) button once. The TV screen displays the timer program lls
Press the PROGRAM button again. The TV screen displays the ON/OFF timer setting.
t
One mortth later minus one day
t
WKL-WED (Weekiy Wednesday)
t
WKL-TUE (Weekly Tuesday)
t
WKL-MON (Weekly Monday)
t
WKL-SUN (Weekly Sunday) *
SUN-SAT (Sunday to Saturday)
MQN-SAT (Monday to Saturday)
MON-FRi (Monday to Friday)
I
WKL-THU (Weekly Thursday)
•|r
WKL'FRI (Weekly Friday)
4
WKL-$AT (Weekly Saturday)
TO CANCEL A PROGRAM
Press the SET •p or - button to select the TIMER REC SET option in the MENU, then press the ENTER button.
Press №e SET + or - button to select the unnecessary program, and press the CANCEL button to cancel the
program.
CANCEL
/‘•у f-í г H
(W-i/ENTER/CAHCELMENU)
IF THE PROGRAM OVERLAPS ANOTHER
NOTE: Do not overlap programs as portions of the conflicting programs will be lost. Hie first recording time has
priority over the next recording time as shown in the diagram.
WGRAM
Press the PROGRAM button 3 times. The screen returns to the normal screen.
NOTE; • The evetyday/every week lecording can be made continuously until the leconting is canceled or the tape
reaches the end.
• During timer recording, the automatic rewinding mechanism does not function.
• You can correct or cancel the programmed setting in program confimn morie.
ro
38
(once)
• 'hTV 7:OOW 9:Э1РМ OOTB^.
(+H7NTER/CANCEUNENU}
Itr'IlM''
(twice) (3 times)
fiHIOFf TMER
-I CM TIMER
'' 7IXAM <mi
UON#n S
<4mentem:mceumemj)
V
Program 1 ■
Program 2 ■
Program 3 •
Recording
Control Settings •
8:00 9:00 10:00 11 :00
Deleted Parts
Non Reoorded Poftion Pvti
Prog.i
Prog.2 Prog.3
39
Page 22

ro
K>
USING THE REAL TIME TAPE COUNTER
The On-Screen Real Time Tape Counter shows the tape running time in Hours, Minutes and Seconds.
You can easily determine how long the tape has been running or how much time is left on the tape.
TO VIEW THE COUNTER DISPLAY________
Press the CALL button to display the Real Time
Tape Counter.
USING ZERO RETURN
The zero retuie function provides a convenient method of rapidiy returning to the starting point of recording or
playback. The starting point can be indexed for any location on the tape by pressing the COUNTER RESET button
and COUNTER ZERO RETURN button. .
CALL
or
NOTE: • If you rewind the tape from "00:00:00", a minus sign will be displayed in front of the time.
• When you load a tape, the counter will reset to ‘00:00:00’.
• The counter does not function on nonrecorded {blank) sections of the tape. When you rewind,
fast forward or play tapes through blank sections, the counter stops.
40
J V.
Press the ZERO RETURN''
button. The tape will rewind
and automaticaily stop at
the "00:00:00" position.
ZERO
RETUm
THJ CH№
41
Page 23

DUPLICATING A VIDEO TAPE
If you connect the TVATCR to another VCR or CAMCORDER, you can duplicate a prevloualy recorded tape.
Make all connections before turning on the power.
Insert a blank cassette with the erase preven*
tton tab intact into the TV/VCR.
Insert a previously recorded cassette into the
playback VCR or Camcorder.
Press the INPUT button twice select AUDIO/
VIDEO input position, Th6 "LINE P will appear
on the screen.
INPUT
RECEPTION DISTURBANCES
Most types of television interfarance can be remedied by sdjusting the height and position of the VHFAJHF
antenna. Outdoor antennas are recommended for treat results. The most common types of television Interfer
ence are shown below. If one of these symptoms appear when the TV/VCR Is connected to a Cable TV system,
the disturbance may be cauaed by the local Cable TV company broadcast.
IGNITION
Black spots or horizontal streaks may appear, the picture may flutter or
drill. Usually caused by interference Irom automobile ignilion systems,
neon lamps or AC powered tools and appliances such as drills or hair
dryers.
CONNECTION TO ANOTHER VCR
flECORDING TV/VCR
PLAYBACK VCR
T
%
VIDEO OUT T АиОЮ OUT
AUDIOfl/IDEO CORD (NOT SUPPUED]
Press the REC bunon and the
PLAY button simultaneously
on the remote control or the
REC button on the TV/VCR, then
press the PAUSE button.
4
VIDEO IN Vy AUDIO IN
NOTE: You can also use the rear AUDIO/VIDEO IN
Jacks. Select "LINE R" by pressing the INPUT
button.
CONNECTION TO CAMCORDER
For duplicating a prewously recorded tape from a camcorder,
foltovr the camcorder manufacturer's instructions. A typical
camcorder dubbing hookup is shown below.
AUDKD/VIDEO CORO
(MOT SUPPLIED)
Press the PLAY Button on the
playback VCR.
A-
ToVlOEO^AUOJOJN
I
Press the PAUSE button
I
on the TV/VCR to begin
the duplicating process.
HECOROING TV/VCR
GHOSTS
Ghosts are caused by the television signal following two paths. One Is Ihe
direct path and the other is reflected by tall buildings, hills or other large
objects. Changing the direction or position of the antenna may improve the
reception.
SNOW
If the TV/VCR is located far from the TV station, in a fringe reception
area where the signal is weak, small dots may appear in the picture.
If the signal is extremely weak, the installation of a larger external
antenna may be nersessary.
RADIO FREQUENCY INTERFERENCE (RFI)
Caused by two-way radios, this type of interference produces moving
ripples or diagonal streaks in the picture. Some cases may cause a loss of
contrast in the picture. Changing the direction and position of the antenna
or installing an RFI filter may improve the picture.
PICTURE SIZE VARIATION
A slight picture size variation is normal when you adjust the CONTRAST or
BRIGHTNESS settings.
NOTE: • It is recommended &iat the tape speed be set to the SP mode on the TV/VCR for best results.
to
42
CO
• Unauthorized recording of copyrighted television programs, films, video cassettes and other materials may
infringe the rights of copyright owners and be contrary to copyright laws.
CARE AND MAINTENANCE
To prevent fire or shock hazard, disconnect the TV/VCR from the AC power source before cleaning.
The finish on tfie cabinet may be cleaned with mild soap and a soft, damp cloth and cared for as other furniture. Use
caution when cleaning or wiping the plastic parts.
43
Page 24

N3
TROUBLESHOOTING GUIDE
Check ihe following chart before requeating sarvice.
f SYMPTOMS I CAUSE
POWER
No power
Although the power is on.
the TVArCR does not
operate.
TV BROADCAST RECEPTION
Po<M' or no picture.
Poor or rw color
Picture wobbles or drifts.
No CATV reception.
No reception above
channel 13.
Poor or no sound.
The AC power cord is not connected.
Cassette is not inserted.
TIMER button is depressed. Press the TIMER button.
TV station experiencing problems. Tty another channel.
Picture control is not adjusted. Check picture control adjustments.
Possible local interference.
Antenna (CATV) connector is not
connected or possible local
interference.
TV station experiencing problems. Try another channel.
Picture control is not adjusted.
Possible local interference.
Antenna (CATV) connector is not
connected or possible local
interference.
TV station experiencing problems.
Antenna (CATV) connector is not
connected or possible local
interference.
Cable TV channel is scrambled.
CATV connector is not connected.
TV/CATV Mode menu option is set to
the TV mode.
Cable TV sen/ice interrupted. Contact your Cable TV company. 12
TV/CATV Mode menu option is not
set to the appropriate mode.
UHF antenna is not connected.
TV station experiencing problems. Try another channel.
Anienna (CATV) connector is not
connected or possible local
interference.
Possible local interference.
MUTING button is depressed.
I POSSIBLE SOLUTIONS
Connect the AC power cord to the
AC outlet.
Insert a video cassette.
Check for source of recaption
disturbance.
Check CATV connection or
VHF/UHF antenna, reposition
or rotate antenna.
Check picture control adjustments.
Check for source of reception
disturbance.
Check CATV connection or VHF/
UHF antenna, reposition or rotate
antenna.
Try another channel.
Check CATV connection or VHF/
UHF antenna, reposition or rotate
antenna.
Try another channel.
Check all CATV connections.
Set the TV/CATV Menu option
to the CATV mode.
Make sure TV/CATV menu option
is in the appropriate tnode.
Check UHF antenna.
Check CATV connection or VHF/
UHF antenna, reposition or rotate
antenna.
Check for source of reception
disturbance.
Check that MUTING button has
not been pressed. |
|PAGE\
7
2â
37
f7
24,25
43
11, 12
17
24. 25
43
11, f2
17
11, 12
17
12
21
21
11
17
11, 12
43
18
J
f SYMPTOMS CAUSE POSSIBLE SOLUTIONS pageN
TV shuts off.
Closed caption is not
activated.
RECORDING
TV recording does not
work.
Timer recording does not
work.
PLAYBACK
Noise bars appear on the
screen.
REMOTE CONTROL
Remote control does
not operate.
V
TV station stopped broadcasting.
Sleep timer is set.
TV station experiencing problems or
program tuned is not closed
captions.
TV signal is weak.
The TV/CAP/TEXT button is not
depressed.
The video cassette's erase
prevention tab is broken off.
The time is not set correctly.
The recording stari/end time is not
set correctly.
The TIMER button has not been
pressed (the REC TIMER indicator is
not lit).
Tape is old or worn. Replace the tape.
Tracking adjustment Is beyond range
of automatic tracking circuit.
Video heads are dirty.
The remote control is not aimed at
the sensor.
Distance is too far or too much light
in the room.
There is an obstacle in the path of
the beam.
The batteries are weak. Replace the batteries.
The batteries are not inserted
correctly.
Tune new channel.
Set Sleep Timer to "0".
Try another channel.
Check CATV connection of VHF/
UHF antenna, reposition or rotate
antenna.
Press the TV/CAP/TEXT button to
turn on the dosed caption.
Place a piece of vinyl tape over
the hole.
Reset the present time. 14-16
Reset the start/end time.
Press the TIMER button (the REC
TIMER indicator is lit.).
Adjust tracking manually using
the TRACKING + and - buttons
on the remote control.
Clean the video heads.
Aim the remote control at the
remote sensor.
Operate within 15 feet or reduce
the light of the room.
Clear the path of the beam.
Insert correctly. 10
17. 19
11, 12
19,20
36, 37
37
—
30
46
10
10
10
10
17
19
28
y
44
45
Page 25

VIDEO HEAD CLEANING
SPECIFICATIONS
VIDEO HEAD CLOGGING
The video heads are the means by which the TV/VCR reads the picture from the tape during playback, in the
unlikely event that the heads become dirty enough to be clogged, no picture will be played back. This can easily be
determined if, during playback of a known good tape, there is good sound, but no picture (picture is extremely
snowy). If this is the case, have the TV/VCR checked by qualified service personnel.
Good Picture
Snowy Picture
VIDEO HEAD CLEANING
AUTO HEAD CLEANING system cleans the video heads aulofrratically when a cassette is inserted or ejected to
prevent dirt from accumulating on the heads. However, manual head cleaning is nseded if the picture on playback is
still undear although the picture on program is normal. This failure signifies that the head is getting dirty and occurs
when playing poor quality or damaged tapes. If the heads require cleaning, use a high quality head cleaning system
or have them cleaned professionally.
NOTE: • DO NOT ATTEMPT TO CLEAN THE VIDEO HEADS OR SERVICE THE UNIT BY REMOVING THE REAR
COVER.
• Video heads may eventually wear out and should be replaced when they fail to produce clear pictures.
• To help prevent video head clogging, use only good quality VHS tapes. Discard worn out tapes.
TELEVISION
Picture Tube:
Tuner Type:
Receiving Channels:
Antenna Input:
Speaker
Audio Output Power:
VCR
Video System:
Video Signal:
Cassette Tape:
Audio Track:
Tape Speed:
F.FWD/REWTime:
Speed Search:
GENERAL
Power Source:
Power Consumption:
Dimensions:
Weight:
Inputs/Outputs:
Storage Temperature:
Operating Temperature:
13’ (measured diagonally)
Quartz PLL Frequency Synthesized
VHF 2-13
UHF 14-69
CATV 14-36 (A)-(W)
37-59 (AA)-(WW)
60-85 (AAA)-(ZZZ)
86-94 (86)-{94)
95-99 (A-5)-(A-1)
100-125 (100)-(125)
01 (5A)
VHF/UHF In 75 ohms coaxial
1.5" X 2.5", 8 ohms x 1
1.5W
VHS, 4 Rotary Heads Helical Scanning System.
NTSC Color
VHS
1 Track
SP: 33,35 mm/sec.
EP: 11.12 mm/sec.
F.FWD: Approx. 2 minutes and 15 seconds
REW: Approx. 1 minule and 48 seconds
(T-120 Cassette)
SP 3 & 5 X Normai Speed
EP 9 & IS X Normal Speed
AC 120V60HZ
70 Watts
W 14 1/4’X D 14 1/2’xH 15 1/16"
26 lbs
Video: In (RCA) 1 Vp-p 75 ohm
Out (RCA) 1 Vp-p 75 ohm
Audio: In (RCA) 300 mV/50K ohm
Out (RCA) 300 mV/IKohm
-20°C to 60°C (-4°Fto 140“F)
5“C to 40“C (41»Fto 104°F)
ho
CJ1
46
Accessories:
Remote Control
Batteries (AA) X 2
Specifications are subject to change without notice.
47
Page 26

LOCATION OF CONTROLS
FRONT REAR
DESCRIPTION
FRONT:
1. Cassette Loading Slot - To insert or remove a
video tape.
2. REC / ITR Button - Press once to start normal
recording. Additionai presses activate Instant Timer
Recording.
3. REW (Rewind) Button - In the Stop mode, this
button rapidly winds the tape backwards. In the Play
mode, this button activates reverse search.
4. PLAY Button - Press to play a prerecorded tape.
5. FF (Fast Forward) Button - In the Stop mode, this
button rapidly winds the tape forward. In the Play
mode, this button activates fonvard search.
6. STOP/EJECT Button - Press once to stop the tape
in any mode. Press again to eject the tape.
7. Headphone Jack - Plug monaural headphones or
an earphone with an 1/8" miniplug into this jack for
private listening.
8. AUDIO/VIDEO IN Jacks - Audio and video signal
cables from an external source can be connected
here.
9. INPUT Selector Button - Switches the program for
viewing between the VCR and an external input
source.
10. SP/EP Selector Button - Sets the tape speed for
recording.
OF CONTROLS
11. CHANNEL + / - Buttons - Press to select a channel
for viewing or recording.
12. VOLUME + !- Buttons - Press to raise or lower the
volume of the sound.
13. REC Indicator - Lights when the TV/VCR is recording.
14. REC TIMER indicator - This lights when the TIMER
button is pressed.
15. ON TIMER Indicator - This indicator lights up when
the powered up. It also lights up when ON TIMER
program is turned ON while power is OFF.
16. POWER Button - Press to turn the TV/VCR on or off.
17. Remote Sensor - Signals from the Remote Control
are received here.
REAR:
18. VHF/UHF Antenna Jack - Connect the 75 ohm
coaxial cable from the antenna or Cable TV service
to this jack.
19. VIDEO/AUDIO IN Jacks - Audio and video signal
cables from an external source can be connected
here.
20. VIDEO/AUDIO OUT Jacks • Used to output audio
and video signals to a TV, amplifier or VCR.
21. AC Power Cord - Connect to a 120V, 60Hz outlet.
26
Page 27

REMOTE CONTROL
10
11
12
13
14
15
16
22
23
24
25
26
DESCRtPTION OF CONTROLS
1. TIMER Button - Used to set the TV/VCR to start
recording at a preset time,
2. INPUT Selector Button - Switches the program for
viewing between the VCR and externai input sources.
3. CALL Button - Displays the present time/day of the
week, channel, counter, speed selection (and VCR
mode if VCR is playing) on the TV screen.
4. TV/CAP/TEXT Button - Switches between Caption,
Text and TV modes for Closed-Captioned programs.
5. REW (Rewind) Button • In the Stop mode, this
button rapidly winds the tape backwards. In the Play
mode, this button activates reverse search.
6. REC Button - Press once together with the PLAY
button to start normal recording. Additional presses
activate Instant Timer Recording,
7. MUTING Button - Press to turn off the sound. Press
again to turn the sound back on.
8. CANCEL Button - Press to cancel existing setups or
to restore default values.
9. ENTER Button - Press to enter selected setup.
10. POWER Button - Press to turn the TVA/CR on.
Press again to turn the TVA/CR off.
11. COUNTER RESET Button - Used to reset the
counter to 00:00:00.
12. RETURN Button - Switches between the present
channel and the last channel selected.
13. FF (Fast Forward) Button - In the Stop mode, this
button rapidly winds the tape fonward. In the Play
mode, this button activates forward search.
14. PAUSE Button - During recording, this button
temporarily stops the tape. During playback, it stops
the tape and displays a still image on the TV screen.
15. SLEEP Button - Sets the TV to turn off automatically
after up to 120 minutes.
16. MENU Button - Press to display the On-Screen menu
function.
17. SP/EP Selector Button - Sets the tape speed for
recording. ‘
18. Direct Channel Selection Buttons (0-9) - Allows
direct access to any channel.
19. Digital AUTO TRACKING Buttons - Allows automatic
or manual adjustment of tracking to minimize picture
noise during playback,
20. STOP Button - Press once to stop the tape.
21. CHANNEL + / - Buttons - Press the + button to
change to a higher numbered channel set into memory.
Press the - button to change to a lower numbered
channel set into memory.
22. PROGRAM Button - Press to confirm the programmed
timer recording and ON/OFF timer.
23. ZERO RETURN Button - Use to stop the tape when
the counter reaches 00:00:CX).
24. PLAY Button - Press to play a prerecorded tape.
25. VOLUME + !- Buttons - Press the + button to
increase, or the - button to decrease the volume level.
26. SET + / - Buttons - Used to select the option in the
menu or set timer recording, ON/OFF timer, channel
set, picture adjustment, auto repeat, clock and
language.
27
Page 28

JVC
JVC COMPANY OF AMERICA
Division of U S. JVC CORP,
1700 Valley Road
Wayne, New Jersey 07470
JVC CANADA, INC.
21 Finchdene Square
Scarborough, Ontario
Canada M1X1A7
5500101A E]
99/03
28
PRINTED IN THAILAND
 Loading...