

Page 1

JVC
TU-HD500A
HD DIGITAL TERRESTRIAL SET TOP BOX instructions
DJ3
Digital Video
Broadcasting
nniPOLBYl
DIGITAL
Page 2

Page 3

Safety Information
A
CAUTION: TO REDUCE THE RISK OF ELECTRIC SHOCK,
NO USER-SERVICEABLE PARTS INSIDE,
A
A
REFER SERVICING TO QUALIFIED SERVICE PERSONNEL ONLY.
The lightning flash with arrowhead symbol within an equiiateral triangle,
is intended to alert the user to the presence of uninsulated ' dangerous
voltage* within the product's enclosure that may be of sufficient
magnitude to constitute a risk of electric shock.
The exclamation point within an equilateral triangle is intended to alert
the user to the presence of important operating and servicing instructions
In the literature accompanying the appliance.
CAUTION
RISK OF ELECTRIC SHOCK
DO NOT OPEN
DO NOT OPEN.
A
WARNING: TO REDUCE THE RISK OE EIRE OR ELECTRIC SHOCK, DO NOT
CAUTION: CHANGE OR MODIFICATIONS NOT EXPRESSLY APPROVED BY
CAUTION: TO PREVENT PERMANENT DAMAGE OF FLAT PANEL DISPLAY
EXPOSE THIS APPLIANCE TO RAIN OR MOISTURE,
CAUTION; TO PREVENT ELECTRIC SHOCK, MATCH AC WALL MOUNTED
SOCKET AND PRODUCT'S PLUG, FULLY INSERT.
THE MANUFACTURER COULD VOID THE USER'S AUTHORITY
TO OPERATE THE EQUIPMENT
<PDP TV, PDP MONITOR, etc.), WHEN CHANNEL INFORMATION
DISPLAY WITH "Radio Broadcast* OR "Loss of Signal" LONG
TIME, PLEASE TURN OFF THE TV SET.
Page 4

Important Safeguard
This sheet lists important safeguard that will help to assure your enjoyment and
proper use of the HD STB and accessory. Please read them carefully before
operating and using your HD STB product.
1. Read and Retain these User's Guide
All the safety and User's Guide should be read before the HD STB is operated.
Follow all User's Guide. The safety and User's Guide should be retained for future
reference. Comply with all warnings on the HD STB and in the User's Guide.
2. Use Correct Power
This HD STB should be operated only from the type of power source indicated on
the rear panel. If you are not sure of the type of power supply to your home,
please consult your HD-STB dealer or local electric company.
3. Install to Stable Place
Do not place this HD STB an unstable cart, stand, tripod, bracket, or table. The
HDSTB may fall, causing serious injury to a child or adult as well as serious
damage to the HD-STB. Use this HD-STB product only with a cart, stand, tripod,
bracket, or table recommended by the manufacturer or sold with the HD-STB
product. Any mounting of the product should followed the manufacturer's
instruction and use a mounting accessory to recommended by the manufacturer.
HD-STB and cart combination should be moved with care. Quick stops, excessive
force, and uneven surfaces may cause the HD-STB and cart combination to
overturn.
4. Provide Antenna Ground
If an outside antenna or cable system is connected to the HD-STB, be sure the
antenna or cable system is grounded so as to provide some protection against
voltage surges and built-up static charges. An outside antenna system should not
be located in the vicinity or overhead power lines, other electric light or power
circuits, or where it can fall into such power lines or circuits. When installing an
outside antenna system, extreme care should be taken to keep from touching or
approaching such power lines or circuits as contact with them might be fatal.
Installing an outdoor antenna can be hazardous and should be left to a
professional antenna installer.
5. Provide Proper Ventilation
Slot and openings in the cabinet are provided for ventilation to ensure reliable
operation of the HD-STB and to protect it from overheating. These openings must
not be blocked or covered. This HD-STB should not be placed in a built-in
installation such as a bookcase or rack unless proper ventilation is provided. For
sufficient ventilation, there must be at least 10cm free air space above, behind
and on each side of the HD-STB.
6. Keep Away from Heat
Do not expose the HD-STB under the direct sunlight. The product should be
situated away from heat sources such as radiators, heat registers, stoves, or
other product (including amplifiers) that produce heat.
Page 5

Important Safeguard
7. Keep Away from Moisture
Do not use this HD-STB near water or wet place. For example, near a bathtub,
wash bowl, kitchen sink, laundry tub, in a wet basement, or near a swimming pool
and the like.
Caution: Maintain electrical safety. Power line operated equipment or
accessories connected to this unit should bear the CE listing mark or C lick
certification mark on the accessory itself and should not be modified so as to
defeat the safety features. This will help avoid any potential hazard from
electrical shock or fire. If the power is in doubt contact qualified service
personnel.
8. Do Not Open
Do not attempt to service this HD-STB yourself, as opening or removing cabinet
may expose you to dangerous voltage. To prevent of the risk of fire or electric
shock, do not open the cabinet. There are no user serviceable parts inside the
HD-STB. Refer servicing to qualified service personnel only.
9. Unplug before Cleaning
For the cleaning of the HD-STB, turn the HD-STB power off and unplug from the
wall AC outlet before cleaning. Do not use liquid cleaners or aerosol cleaners.
Use a damp cloth for cleaning.
10. Object and Liquid Entry
Never push objects of any kind into this HD-STB through openings as they may
touch dangerous voltage points or short-out parts that could result in a fire or
electric shock.
Never spill liquid of any kind on the HD-STB.
11. For Additional Protection
For added protection for this HD-STB during a lightning storm, or when it is left
unattended and unused for long periods of time, unplug it from the AC wall outlet
and disconnect the antenna or cable system. This will prevent damage to the HDSTB due to lightning and power line surges.
Page 6

CONTENTS
1. Overview of the equipment
Front Panel ..........................................................
Rear Panel ............................................................
Remote Controller ------------------------
TV CONTROL SECTION ....................................................
Installing the remote control batteries
Using the remote control
Accessories ..........................................................
2. Connecting your HD-STB
Antenna Connection
1)
Connecting an antenna with HD-STB, TV and VCR
Connecting an antenna with HD-STB and TV
Video Connection
2)
Connecting to a HDTV with HD YPbPr
Connecting to a HDTV with HD VGA
Connecting to a SDTV with SD YPbPr ........................................
Connecting to a SDTV with SD RGB
Connecting to a Conventional TV with S-Video
Connecting to a Conventional TV with Composite Video
Audio Connection
3)
Stereo Audio Connection
Digital Audio Connection
4} Settingup the Dispiay Mode
.....................................................................
-----------
..............................
-------------------------------------
......................................
.........................................
...........................................
....................
3
4
5
e
7
7
8
9
9
9
10
10
10
11
11
12
12
13
13
13
14
3. Getting Started
step 1. Check up the contents in the Carton box.
Step 2. Connect ANT Cable. ......................................................................................... 15
Step 3. Connecting the Video and Video Mode Setting. .................................. 15
Step 4. Connecting the Audio. .................................................................................... 15
Step 5. Connecting the Power. .................................................................................... 15
Step 6. Install Remote Control battery and TV Control
Step 7. Check up the On Screen Display. ........................................................... 16
step 8. Automatic Channel Search and Channel Change.
4.
INFO button and EPG Information Display
EPG information Dispiay 17
1)
Channel Information Display 18
2)
CH LIST Display 18
3)
Using menu system 19
5.
Audio/Video Setting
1)
TV Display 20
Screen H Position -------------------------------------------------------------- 20
Screen V Position
Audio Preference .................................................................................................................. 20
Section Code Setting
--------------------------------------------------------------
--------------------------------------------------------------
...............................................
------------------
15
15
16
17
19
20
Page 7

Contents
Audio Downmix .................................................................................................................. 21
MPEGAudioAdj. --------------------------------------------------------------- 21
Sub Title 21
2) Time Setting 22
Clock Setting 22
Time Zone 23
Wake Up Timer 23
Off Timer 24
SleepTimer 24
3) System Setup ......................................................................................................... 25
Power Restore 25
Auto Power Off 25
Menu Time Out 25
OSD Transparency 25
Display Dimmer 26
TV Remote Cnt'l Code List ............................................................................................... 26
Factory Reset 26
Software Version 26
4) Parental Guide ....................................................................................................... 27
Block Al I Rating/ Unblock Al I Rating ........................................................................ 27
Rating Setup ......................................................................................................................... 28
Change PIN Number .......................................................................................................... 28
5) Channel Setup 23
Automatic CH Tuning 29
Manual CH Search 29
Favorite CH ..................................................................................................
Edit Program ........................................................................................
Edit Program ■ Edit 31
Edit Program • Move 32
Edit Program ■ Delete ................................................................................................... 33
Program Preference 34
Aerial Signal Strength 35
6. Troubleshooting ---------------------- 36
7. Specifications 37
8. Universal Code Setting for remote control
------------------
39
Page 8
Overview of the equipment
This section summarizes the buttons, controls, and terminals that you will use with
your HD-STB.
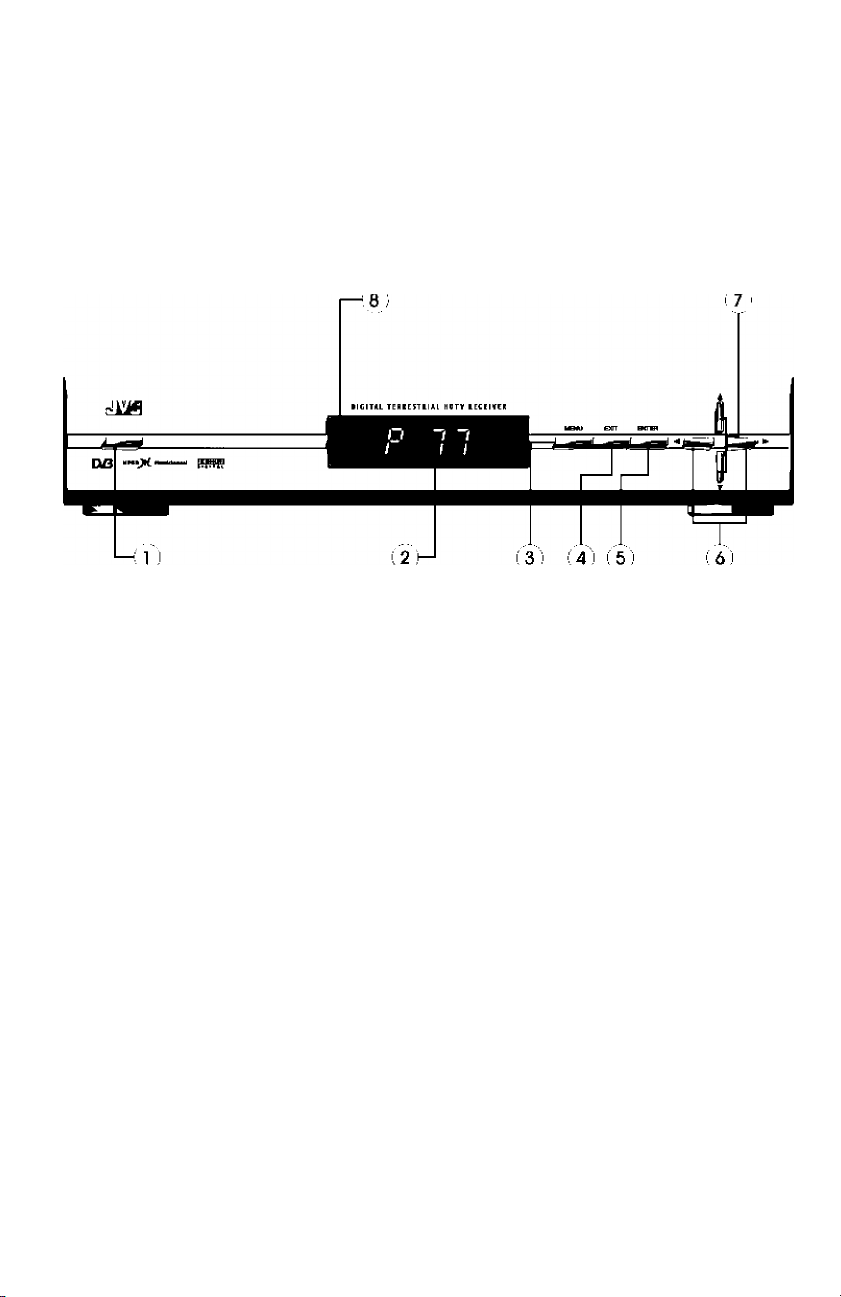
Front Panel
1. POWER
Press to turn the HD-STB on or off.
2. Display Panel
Display information to assist you in operating the HD-STB successfully.
3. MENU
Activate the menu system,
4. EXIT
Quit the menu system
5. ENTER
Select the items in the menu system.
6. PROGRAM Up/ Down
"Press to change the program (This action changes the programs stored in the favorite
channels memory blocks).'
'Left or Right movement in the menu system,'
7. CHANNEL Up/Down
'Press to change the channels (This action changes the memorized channels in sequence).'
'Up or Down movement in the menu system,'
8. Remote Sensor
This HD-STB receives infrared remote signal from your remote control. Do not block it.
Page 9
Ov er v ie wo f t h e e qu i pm e nt
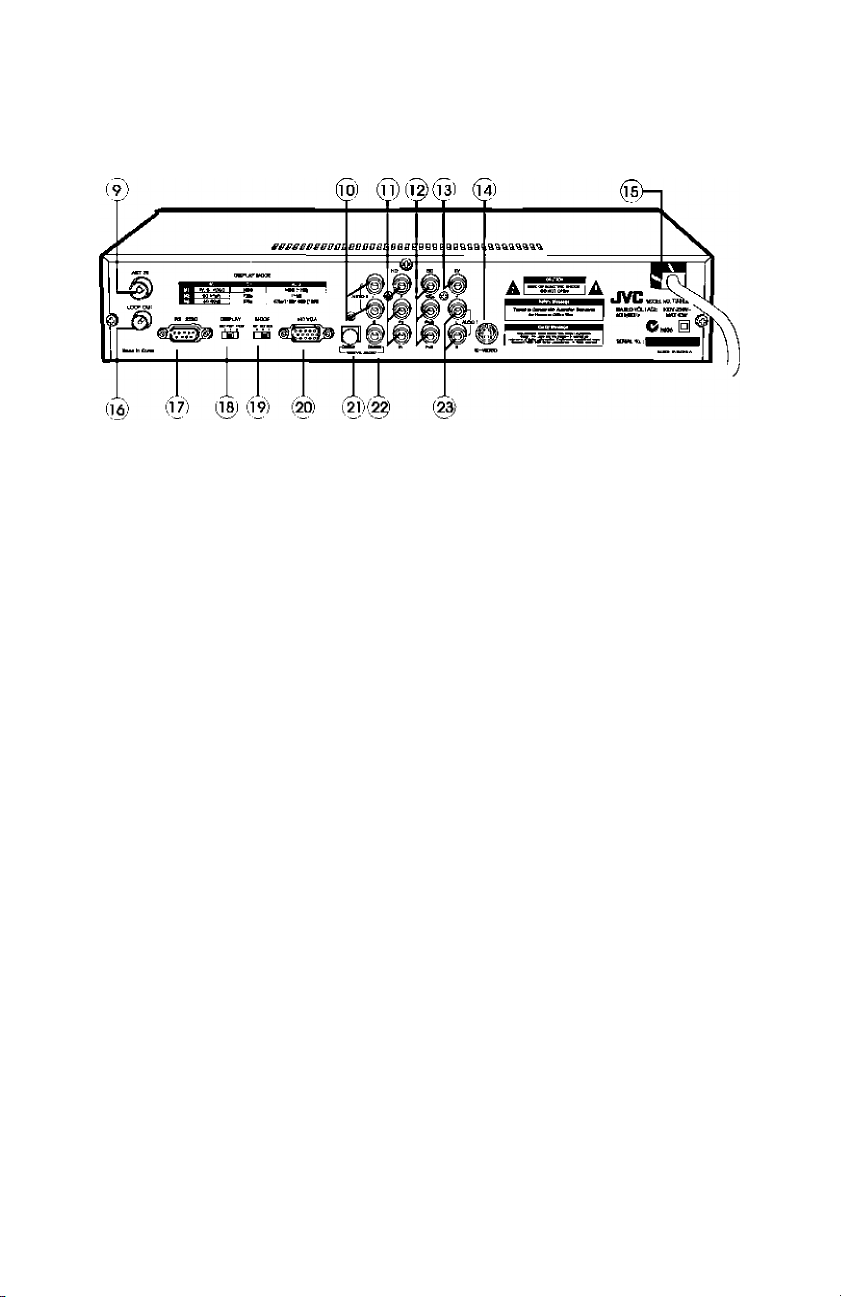
Rear Panel
9. ANT IN terminal
Attach an external Antenna to this terminal
10. AUDIO 2 Output terminal<L/R Analog Stereo)
This terminal can be used with your TV analog audio input. Refer to Audio Connection
Pages.
11. HD YPbPr (HD Component Video) Output terminal
Use this terminal with your TV HD Component Video input, <HDTV Only)
12. SD YPbPr or SD RGB (SD Component Video) Output terminal
Use this terminal with your TV equipped with Component Video input (SD or Normal
TV) For designated output type, please refer to DISPLAY MODE table.
13. TV Composite Video Output terminal (CVBS)
Use this terminal with your TV Video input.
14. S-Video Output terminal
Use this terminal with your TV S Video input.
15. Power Cord
Plug this Cord to the specified AC Power socket.
16. LOOP OUT terminal
Use this terminal to feed RF signal to your TV or VCR for analog reception.
17. RS-232C
For service use only.
18. DISPLAY select switch
Set this switch in conjunction with MODE switch according to your TV display
capability.
19. MODE select switch
Set this switch in conjunction with DISPLAY switch according to your TV display
capability.
20. HD VGA (HD Component RGBHV) Output terminal
Use this terminal with yeur TV HD VGA Video input. (Only HDTV equipped with VGA
input or Computer Monitor)
21. Optical Digital Audio (S/P DIF) Output terminal
Use this terminal with A/V device equipped with Optical Digital input for 5.1 Dolby
Digital.
22. Coaxial Digital Audio (S/P DIF) Output terminal
Use this terminal with A/V device equipped with Coaxial Digital input for 5.1 Dolby
Digital.
23. AUDIO 1 Output terminal (L/R Analog Stereo)
This terminal can be used with your TV analog audio input. Refer to Audio Connection
pages.
Page 10
Ov er v ie wo f t h e e qu i pm e nt
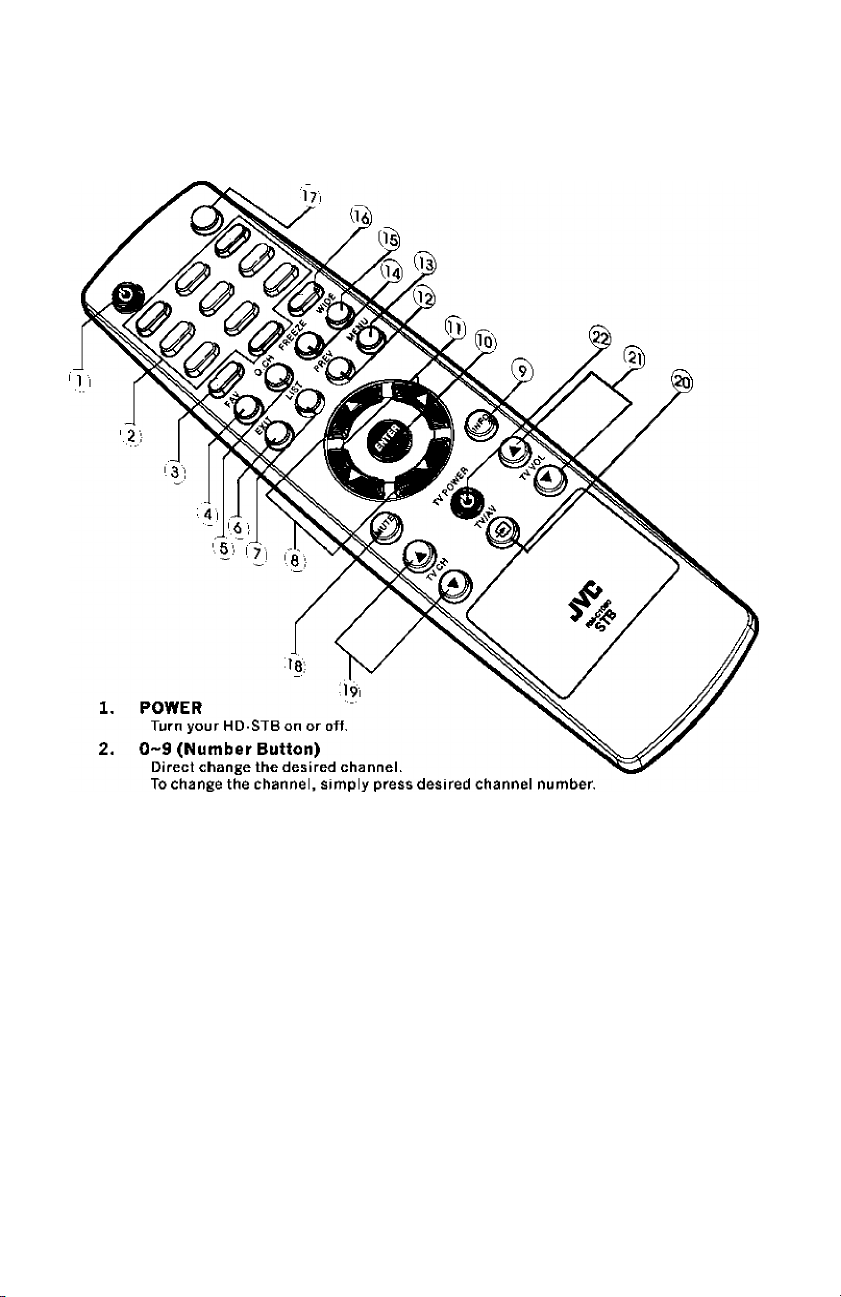
Remote Controller
The button operation should be less then 2 seconds between button pressing.
II it is over 2 seconds then this HD STB will discard the pressed number and go back to
current channel.
3. SLEEP
Press to adjustment the period of Off time. Each time you press SLEEP button, time
will change Off ♦ 15min # 30 min ♦ 45 min ♦ 60 min # 90 min
120 min ♦ 180 min ^ 240 min ♦ Off
If you want disable sleep timer mode, simply set up to ’Off.
4. FAV ( Favorite )
Direct change the Favorite CH in the menu.
It is activate the selected favorite memory block in the Program Preference.
Followed by press, selected favorite memory block will change below
All ^ Favl ♦ Fav2 ♦ Fav3 ♦ All
5. QUICK CH (Quick Channel)
To quick memorized channel change.
When the CH LIST is displayed then press QUICK CH button for quick channel memory.
Then, at any time, you press QUICK CH button, then you can direct change to the
memorized channel.
6. EXIT
Quit the menu system.
Page 11

7. LIST
Display the selected memorized channel list followed by Favorite CH select.
You can direct select desired channel usingCH ■</► , PR ▼/A button.
8. CH A/T (UP/DOWN)
Change the Channel Up or Down followed by memorized channel.
In the menu system, move up or down the cursor.
8. INFO ( Inlormation)
Display current channel EPG information. You can see the NOW and NEXT information.
It you press INFO button again, you can see the more detailed intormation.
For exit the EPG display, simply press EXIT button,
10. ENTER
Select the current setting in the menu system,
11. PR 4/^ (Left/ Right)
Change the program up or down.
In the menu system, move left or the cursor,
12. PREV( Previous Channel)
Direct go to the previous watched channel.
13. MENU
Activate the menu system.
14. FREEZE
Freezing the picture tor viewing with still image. Sound mute is alse activated,
15. WIDE
To picture aspect ratio change. It will change to 4:3PS A 4:3LB ♦ 16:9 ♦ 4:3PS
4:3 PS : 4:3 Pan and Scan
4:3 LB: 4:3 Letter Box
16. S TITLE (Sub Tille)
Activate Sub Title (Caption) display On/ Off,
17. MUTE
Activate audio output mute.
If user change channels, then the mute function will automatic release.
When mute is activated, the MUTE ON will appear on the display.
For release the mute tunotion, simply press MUTE button again.
Ov er v ie wo f t h e e qu i pm e nt
TV CONTROL SECTION
For correct TV Control Section operation, you should set up the TV Control Section
code.
Refer to the TV Control Section code Setting,
18. MUTE (TV mute)
18. TVCH A/T
20. TV/AV (External Video Input Select)
21. TVVOL A/T
22. TV POWER
Activate TV MUTE operation,
Change the TV analog channel Up or Down,
Select the TV external video input.
Change the TV Volume level Up or Down.
Turn On/Off the TV set.
Page 12
Ov er v ie wo f t h e e qu i pm e nt
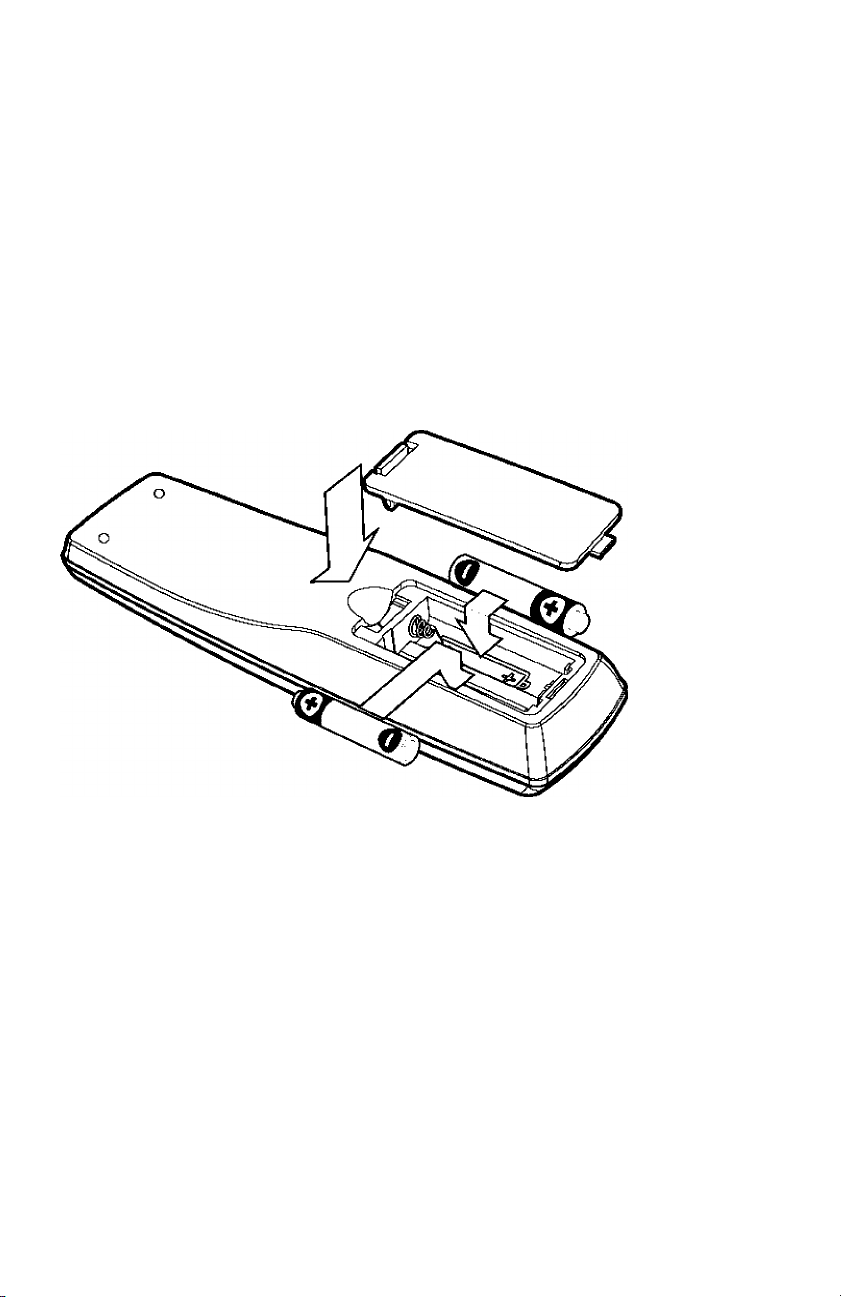
Installing the remote control batteries.
■ Do not mix different types of batteries, or mix an old and a new battery.
■ Remove and replace weak batteries, Weak batteries can leak and damage your
Remote controller.
■ Dispose of batteries properly, never throw them into a fire,
1. Open the battery compartment on the back of the remote control.
2, Install two AAA/R03 size batteries as shown.
Make sure the '+’ and terminals are oriented correctly.
3. Replace the cover.
4, After change the batteries, please reset the TV Control Section code.
Using the remote control.
1. Object between the remote control and HD STB will block the path of the
remote control beam.
2. Dark walls, direct sunshine or very bright light will reduce the remote
sensor's sensitivity.
3. The remote control will not work correctly if you press several buttons at the
same time.
4. Hold the remote control within an angle range of about 30 degree from
either side of the remote sensor.
The remote control range is about 23 feet (7 meters) from the HD-STB.
Page 13
Ov er v ie wo f t h e e qu i pm e nt
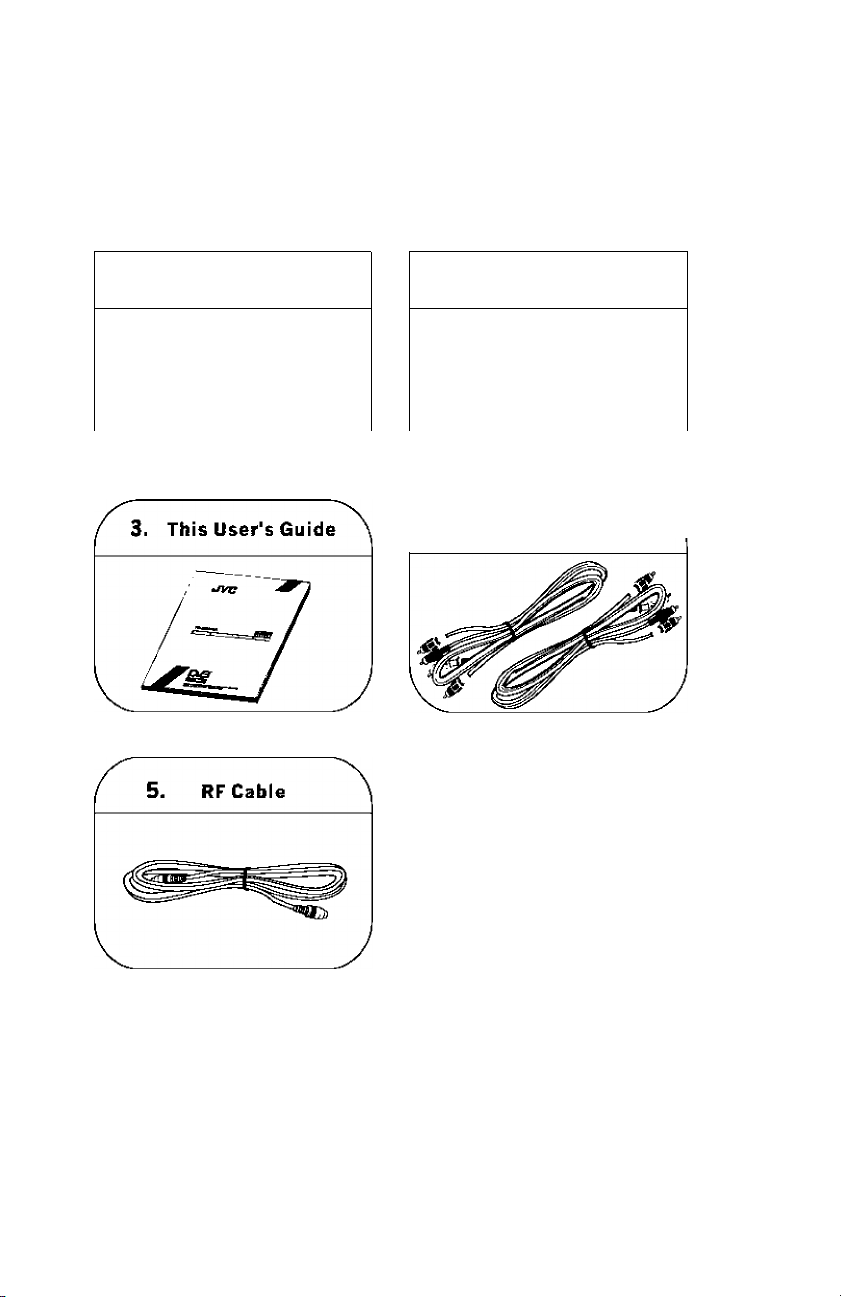
Accessories.
Carefully remove the HD STB from the carton. Check that the HD STB has not been
damaged.
The following accessories are included.
^ 1. Wireless Universal ^
\ RM-C1050 1
^ 2.Tvro AAA/R03 size
batteries. i
4. A/V Cable
5D A/V Cable (Yellow/White/Red)
HO Video Cable (Green/Blue/Red)
Page 14
Connecting your HD-STB
You should connect your HD-STB to an external antenna. Follow the direction Antenna
Connection,
Next you will connect the HD-STB to the TV, HDTV or HD Monitor. Follow the direction Video
Connection,
And you will connect the HD-STB to TV Audio or Home Theater Audio system.
Follow the direction Audio Connection,
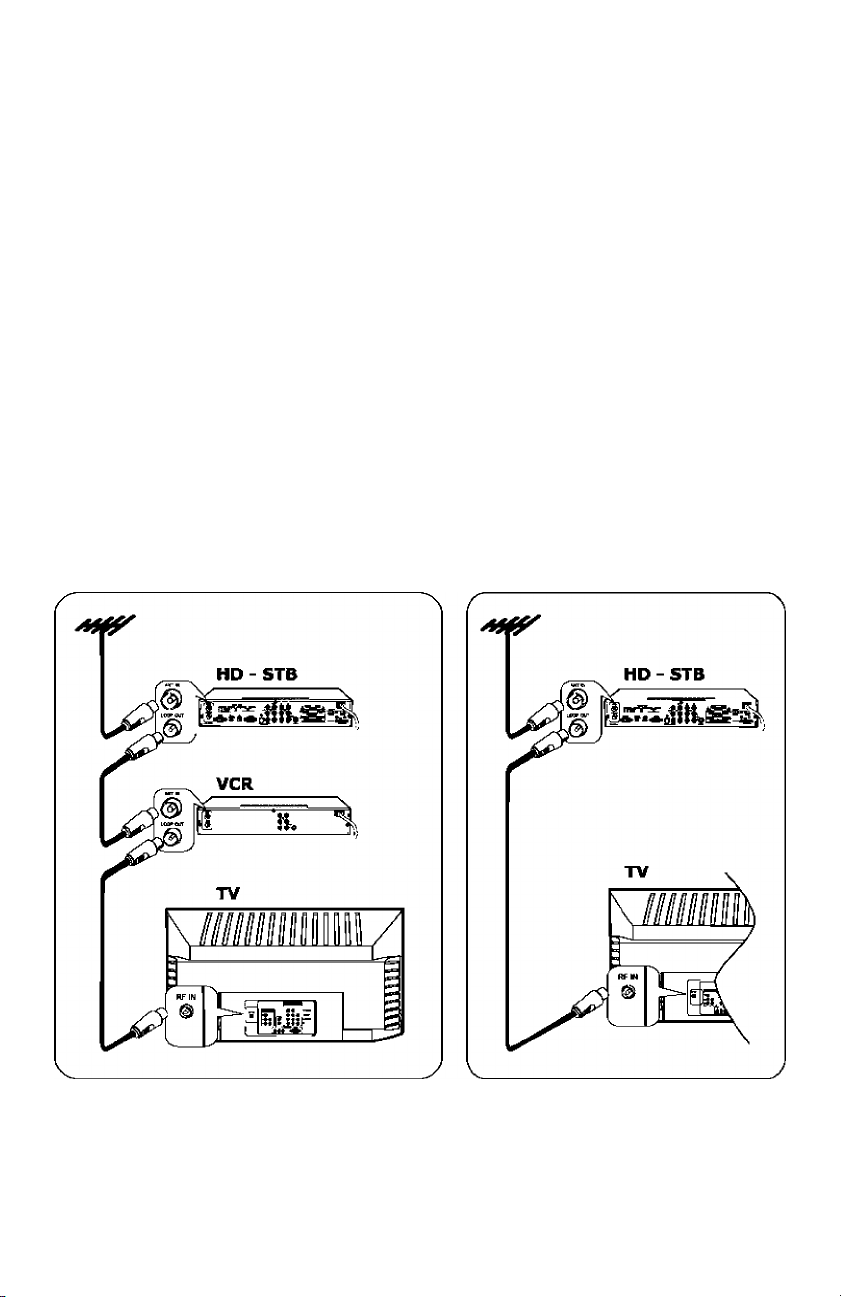
1. Antenna Connection
Connecting an antenna with HD-STB, TV and VCR
Connect the I EC Male antenna cable end onto the ANT IN terminal on the rear of
your HD STB.
Connect the antenna cable end between the LOOP OUT terminal on the rear of your
HD STB and ANT IN terminal on the rear of your VCR.
Connect another antenna cable end between the RF OUT terminal on the rear of your
VCR and RF IN terminal on your TV. { Refer to Fig.l )
Connecting an antenna with HD-STB and TV
Connect the I EC Male antenna cable end onto the ANT IN terminal on the rear of
your HD-STB.
Connect the antenna cable end between the LOOP OUT terminal on the rear of your
HD STB and RF IN terminal on your TV. ( Refer to Fig.2)
Fig.l HD-STB Antenna Connection
with TV and VCR
Fig.2 HD-STB Antenna Connection
with TV only
Page 15
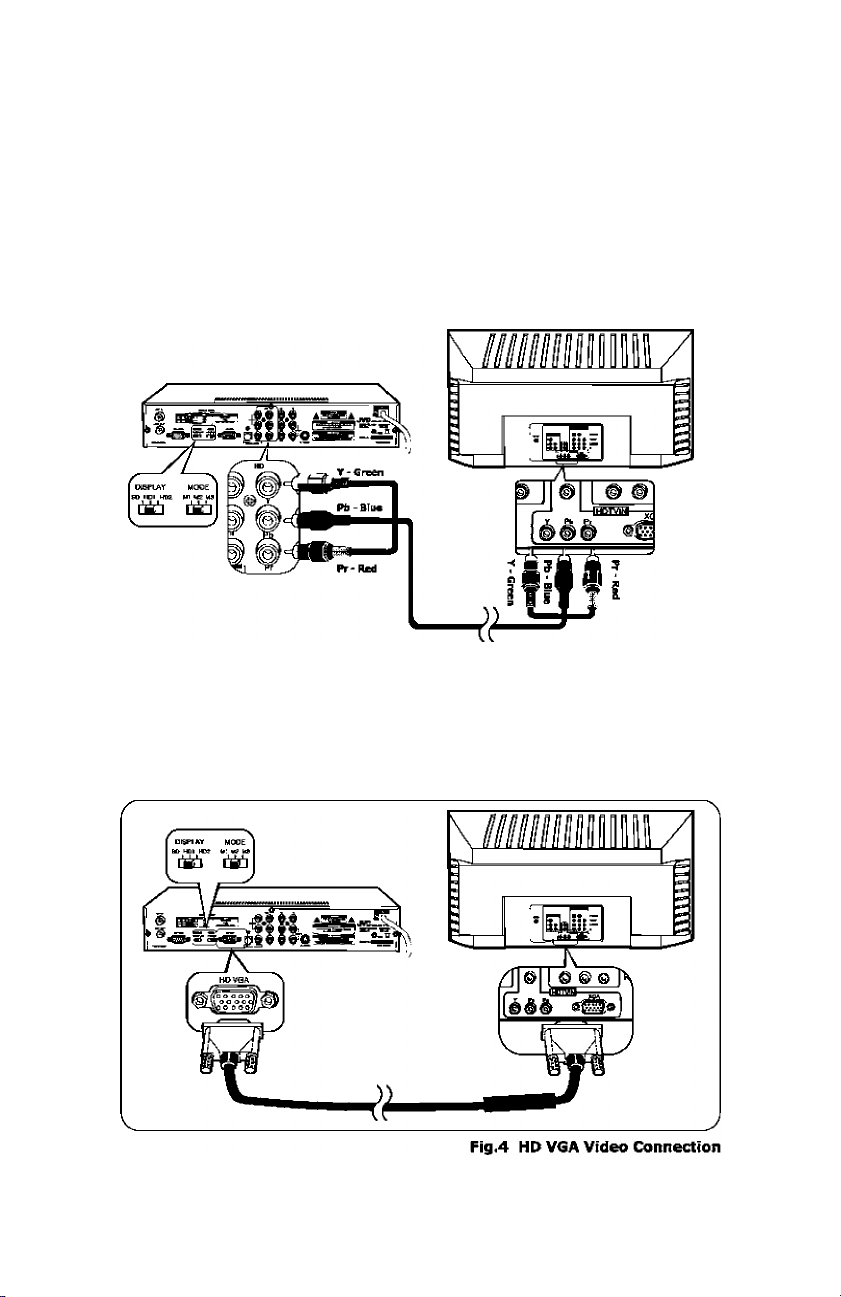
2. Video Connection
Connecting to a HDTV with HD YPbPr
Connect YPbPr Video cable to the HD terminal on the rear of HD-STB.
Connect the other end of YPbPr Video cable to the HD YPbPr Input terminal on the HDTV,
Usually, the Y is Green, Pb is Blue and Pr is Red color assigned.
Setting Up the Display Switch to HD 1 ( Native Mode) or HD 2 ( CRT Display) and
Mode Switch to desired resolutions. (Refer to Fig.3)
Connecting to a HDTV with HD VGA
Connect HD VGA Video cable to the HD VGA terminal on the rear of HD-STB,
Connect theother end of HD VGAVideocabletotheHD VGA Input terminal on the HDTV.
Setting Up the Display Switch to HD 1 ( Native Mode) or HD 2 ( CRT Display) and
Mode Switch to desired resolutions. (Refer to Fig.4)
Con n ec t in g y o ur HD - ST B
Ftg.3 HD YPbPr Video Connection
10
Page 16

Con n ec t in g y o ur HD - ST B
Connecting to a SDTV with SD YPbPr
Connect YPbPr Video cable to the SD terminal on the rear of HD STB.
Connect the other end of YPbPr Video cable to the SD YPbPr Input terminal on the TV.
Usually, the Y is Green, Pb is Blue and Pr is Red color assigned.
Setting Up the Display Switch to SD and Mode Switch to M2. (Refer to Fig.5)
Connecting to a SDTV with SD RGB
Connect RGB Video cable to the SD RGB terminal on the rear of HD-STB.
Connect the other end of RGB Video cable to the SD RGB Input terminal on the TV.
Setting Up the Display Switch to SD and Mode Switch to M3. (Refer to Fig.6)
Note: This HD-STB cannot support SCART type connector, so you cannot connector
SCART input TV,
Fig.6 SD RGB Video Connection
11
Page 17

Con n ec t in g y o ur HD - ST B
Connecting to a Conventional TV with S-Video
Connect a S Video cable to the S Video terminal on the rear of HD-STB.
Connect the other end of S-Video cable to the S-Video input terminal on the TV.
Setting up the Display Switch to SD and Mode Switch to Ml. ( Refer to Fig. 7 )
Fig.7 TV with S-VIdeo Connection
Connecting to a Conventional TV with Composite Video
Connect a Video Cable to the TV Video terminal on the rear of the HD STB.
Connect the other end of Video Cable to the Video In terminal on the TV. Setting up
the Display Switch to SD and Mode Switch to Ml. ( Refer to Fig. 8)
12
Page 18

Connecting your HD-STB
3. Audio Connection
This HD'STB can support tour different way of audio connection. Each of the audio
connection deliver the same audio sound. You can select desired audio connection
followed by below Audio Connection Diagram,
Stereo Audio Connection
The Audio 1 and Audio 2 are deliver analog stereo sound or Dolby Digital Downmixed
2 Channel analog stereo sound.
Connect Audio Cable to the Audio 1 or Audio 2 terminal on the rear of the HD STB.
Connect the other end of the Audio Cable to the conventional TV Audio Input or
Stereo Amplifier Audio Input. ( Refer to Fig. 9 )
The Optical Digital Audio and Coaxial Digital Audio are deliver Dolby Digital 5.1
digital sound or PCM digital sound.
If you have Home Theater System and it can received Digital Audio, then you can
connect Digital Audio.
For the Optical Digital Audio connection. Connect the Optical Digital Audio Cable
(Available in Local Store) to the Optical Audio terminal on the rear of the HD STB.
Connect the other end of the Optical Digital Audio Cable to the Optical Audio Input
terminal on the Home Theater System.
For the Coaxial Digital Audio connection. Connect the RCA Cable to the Coaxial
Audio terminal on the rear of the HD-STB. Connect the other end of the RCA Cable to
the Coaxial Audio Input terminal on the Home Theater System,
13
Fig. 10 Digital Audio Connection
Page 19

Con n ec t in g y o ur HD - ST B
4. Setting up the Display Mode.
This HD'STB support all High Definition / Standard Definition Video resolution of
Australian Standard, you can select correct one for your HDTV/TV’s reception ability.
For setting up the correct display resolution, adjustment two switches on the rear of the
HD-STB.
Follow the Display Mode table.
DISPLAY MODE
SD
HD 1
HD 2
TV, S-VIDEO 1080Ì 1080Ì (1250)
SD YPbPr 720p 1152Ì
SD RGsB 576p 576P/11521/1080i (1250)
For example, if you have HDTV, connect with YPbPr, and you want lOSOi resolution, then
DISPLAY Switch set to ‘HDl" and MODE Switch set to "Ml*
If you setting up one mode and your HDTV cannot display correct picture, then your HDTV
does not support that HD Video resolution. For example, if you select HDl and M2 (720p
mode) and your HDTV cannot display correct picture, then your HDTV does not support
720p resolution video mode.
At that time, simply try to other video mode. (lOSOi or 575p).
This HD STB's HDl is Native Mode display and HD2 is CRT Display setting. Usually, HDTV
supported the Native Mode and HD Monitor supported CRT Display.
When you select HDl or HD2 position, this HD STB supported HD YPbPr and HD VGA
simultaneously.
The HD2.M3 position is setting up Auto CRT Mode,
Auto CRT Mode is deliver best picture without scan converting.
If your HDTV support Auto CRT Mode, please feel free to try it.
Auto CRT Mode
Video Source Output Display
576i 576p
576p 576p
720p 11521
10801 10801(1250)
14
Page 20

Getting Started
Step 1. Check up the contents in the Corton box.
After open the gift box, you should check up and find the following items.
- Digital HD-STB
Universal Remote Control
User's Guide
- Batteries <2 AAA/R03)
SD A/V Cable (Yellow/White/Red) & HD Video Cable (Green/Blue/Red)
RFCable
If you find missing or broken part, then ask to supplier or contact to service center.
Step 2. Connect ANT Coble.
Connect external ANT cable to ANT IN.
Connect another ANT cable between LOOP OUT of HD STB and ANT IN of TV for analog
reception.
Step 3. Connecting the Video and Video Mode Setting.
Prepare HD STB and HDTV you want to connect.
There are several methods to connection video. You should find correct connection
method for your HDTV. Please refer Video Connection Diagram.
For the Video Mode Setting, you should check up the Display switch and Mode switch
as follow.
DISPLAY MODE
SD HD 1 HD 2
TV, S-VIDEO 1080i lOaOi (1250)
SD YPbPr 720p 1152i
SD RGsB 576p 576p/1152i/1080i (1250)
Step 4. Connecting the Audio.
Prepare HDTV or Audio equipment you want to connect.
There are tour different connection methods for Audio connection.
For general TV analog audio connection, it has AUDIO 1 and AUDIO 2.
It is quite same thing so you can select anything you want.
For digital audio connection, you should prepare Optical Audio cable for optical audio
connection for Home Theater System,
It your Home Theater Equipment system has coaxial digital input, you can use well
shielded RCA cable for coaxial audio connection.
Step 5. Connecting the Power.
Plug the Power Cord to wall AC outlet. The power source is AC 100 250V-/ 50/60Hz,
This unit is designed for continuous operation.
Switching it oft does not disconnect it from the AC outlet. To disconnect this HD STB
from AC outlet, you have to unplug the HD STB.
15
Page 21

Ge tt in g S tar t ed
Step 6. Install Remote Control battery and TV Control Section
Code Setting.
Install Remote Control battery. The battery has polarity so when insert the batteries,
make sure theandterminals are oriented correctly.
Setting up the TV Control Section Code, Alter tinished the TV Control Section Code
setting, the universal key of the HD STB can control for your TV,
For TV Control Section Code setting, follow the following process.
1. Press and Hold TV POWER button,
2. Enter three digits TV Control Section Code.
3. Release the TV POWER button.
You can find the 3 digits code for your TV at the end of this User’s Guide,
Please refer to the TV Control Section code setting.
Step 7. Check up the On Screen Display.
For verify correct setting ot Display Mode, you should check up the OSD trom HDTV's
display screen.
Turn on the HD STB and HDTV,
Press Menu button on the remote control, you should check up the OSD fer verify A/V
connection. If you cannot find any OSD in yourTV display, please check up again the
Display Mode switch position and A/V connection.
Step 8. Automatic Channel Search and Channel Change.
Please processing the Automatic Channel Search and find possible channels.
Please make sure, you should wait until fully searched.
You can change channel usingCHA or CHT butfon in your remote control.
Or you can direct select the channel using channel number.
Please make sure, the channel change operation is based on CH LIST in the internal
memory. If you edit, delete and move the memorized channel, you cannot access the
channel using CHA or CHT button or direct number enter. At that time, please perform
the Automatic CH Tuning or Manual CH Search tor re Scan the channel.
It you setting up the favorite Channel using Program Preference and Favorite CH in
the menu system, you can also change the channel using PR ^, PR '4 button for
Favorite Channel selection.
16
Page 22

INFO button and
EPG Information Display
This HD STB can display EPG information using iNFO buttons.
Press INFO button while watching TV you will get NOW and NEXT program information. By
pressing INFO button again, you will get the more detailed information of NOW. Press iNFO
button third time, you will get the more detailed information of NEXT,
Press EXIT button for quit the EPG Information display.
You can also move NOW and NEXT using PR '4/ ^ button.
For the detailed information display, you can scroll Up/ Down using CH A/T button.
1. EPG Information Display
o @
r. 25 12:00 am
NOW : NINE HD Derrro Program
"NEXT : NINE HD Demo program
Pnm INFO for nw«
NINE HD Demo Prooram
This is NINE HD Demo Program
1. Program Schedule
It shows Start Time, Stop Time and Duration Information.
2. NOW and NEXT Information
It shows NOW and NEXT Program Name
3. CurrentCH Number
It is display the Current CH Number
4. CurrentCH Name
It shows Current CH Name
5. Source Video Resolution
It is display the current program's video resolution information
6. Audio Information
It is display the current program's audio information
7. Date and Time
It display current date and time information from broadcaster.
Please make sure, this HD STB cannot generate the date and time information.
8. Rating Information
It is rating information o1 NOW and NEXT program,
9. Program Name
It shows the Program Name of EPG information
10. Information contents
It displayed the current program's event title information contents
11. Scroll Bar
If this scroll bar display, the contents has followed more.
Please use CH A / T button for access more contents.
17
Page 23

INFO button & EPG Display
2. Channel Information Display
Each time you change channels, the Channel Information will display right upper side
automatically.
It will display 5 seconds for your reference.
You can see the current channel number, name, video source resolution, digital audio
information and rating information.
1.
"X'
7 Digital
MPEG Rated
{5)
2.
3.
4.
5.
3. CH LIST Display
If you press CH LIST button on the remote control, you can see the CH LIST display for
your reference. In the CH LIST, you can select available digital channel with CH A /Т,
PR button.
If you press FAV button on the remote control, the CH LIST to change to Favl CH LIST as
favorite channel list which is set up in the Program Preference menu.
Each time press FAV button, it will change All A Favl A Fav2 A Fav3 A All
At the CH LIST display, if you can press QUICK CH button with CH selection bar, then you
can assign that channel to QUICK CH.
At any time, if you can press QUICK CH, then the HD STB will quick change the channel
you assigned QUICK CH.
If you want to change QUICK CH, then just re assign the QUICK CH at CH LIST display
Then it will re-assign the QUICK CH,
All CH List 71
A MorcCH
7
Seven Digital
70
Seven Orange
Seven Yellow
71
Seven Green
72
Seven Blue
73
Program Gul..
77
NINE DIGITA..
9
T More Cl I
-<i)
<D
<5)
1. Current Favorite Channel
2. Current Showing CH Number
3. CH selection bar
4. Scroll bar that show current position
of channel memory
5. Availablechannel list
18
Page 24

Using the MENU System
From here you can adjust whole setting and function of HD-STB.
If you press the MENU button, the menu screen will display.
You can move up and down using CH a (UP) / ▼ (DOWN) button, move left and right using
PR < (LEFT) / PR ►(RIGHT) button in the menu system.
To select the items, press ENTER. To quit the menu system, press EXIT.
Also, you can use RIGHT button for enter and LEFT button for go back to one step back.
1. Audio/Video Setting
From here you can adjust Audio/Video settings concerning your TV.
TV Display
Select best fitting mode for your TV screen.
Also you can set up this function using WIDE button on the remote control.
This function is available only TV, S Video, SD Video Output when the 16:9 source
is coming from Broadcaster,
1) Press MENU button to display the menu.
Press ENTER or DOWN to select the Audio/Video Setting menu.
2) Press ENTER or RIGHT to select the TV Display menu,
3) Press UP or DOWN to desired TV Display mode.
You can select 4:3 PS, 4:3 LB or 16:9 mode,
4) Press ENTER or RIGHT to complete TV Display setting.
□ф1
AUDIO/VIDEO SETTING
TV Display
Screen H Position
Screen V Poston
Audio Piefeience Dolby D
Stereo Ocwnmix
MPEGAudioAdj. Ort
Sub Title Off
4:3 PS t. 4:3 PS
Center 4:3 LB
Center 16:9
Lt/Rt
Pra» ENTER or N to *nt*r Praia A nr V
Pr«66 EXIT Io aalt. Pr«BB ^ ta fo back.
Select 4:3 PS when you want full screen on 4:3 display.
Select 4:3 LB when you want pre-scaled full original wide screen on 4:3 display.
Select 16:9 when you want wide screen on wide screen TV,
^ to mova.
Orginal 16:9 Source from Broadcaster
4:3 TV 16:9 SDTV
4:3 PS
{ Pan & Scan)
4:3 LB
(Letter Box)
16:9
19
Page 25

Usi n g lh eM E N US ys l em
Screen H Position
Select best titling Horizontal position tor your TV screen. The whole picture will
moved left or right. This function may not work on all TV's/displays.
Screen V Position
Select best fitting Vertical position for your TV screen. The whole picture will moved
up or down. This function may not work on all TV's/displays.
1) Press MENU button to display the menu.
Press ENTER or DOWN to select the Audio/Video Setting menu.
2) Press ENTER or RIGHT to select the Screen H Position/ Screen V Position Menu.
3) Press UP or DOWN to desired position.
4) Press ENTER or RIGHT to complete position adjustment.
_________________
AUDIO/VIDEO SETTING
TVDi^lay
Screen H Positkai Center +30
Screen V Position
Audio Preference
Stereo Downmix Lt/Rt i> Center
MPEQAudkiAdj.
Sub Title Off -20
PrMS CUTER Or P 1« вя1«г P*'««» A «Г *
Pr»»$ EXIT 1« *jit. Pr*«« 4 to D*«k.
Audio Preference
You can select desired audio signal from broadcaster.
If you select Dolby D ( Dolby Digital) and broadcaster send Dolby Digital and
MPEG audio at the same time, then your HD-STB will check up the Dolby Digital
audio first and decode Dolby Digital audio.
If you select Dolby D (Dolby Digital ) and broadcaster send MPEG audio only, then
your HD STB will check up the Dolby Digital audio first and next select MPEG
audio automatically.
1) Press MENU button to display the menu.
Press ENTER or DOWN to select the Audio/Video Setting menu.
2) Press ENTER or RIGHT to select the Audio Preference menu.
3) Press UP or DOWN to desired audio mode.
4) Press ENTER or RIGHT to complete Audio Preference select.
4:3 PS +40
Center +20
Dolby 0 +10
On -10
-30
-40
to ntPT«.
AUDIO/VIDEO SETTING
TV Di^lay
Screen H Positkai Center MPEG
Screen V Position
Audio Preference
Stereo Downmix
MPEGAudioAdj.
Sub Title Off
Proli CNTCR er P 1o ifllar, Рн» л or ^
Prill EXIT Id lilt. Proli Щ la ¿d buk.
ñ tri
4:3 PS Dolby D
Center
Dolby D
LtfRt
On
to man,
20
Page 26

№n g1 h eM EN U S ys l €n i
Audio Downmix
For the stereo analog audio output, you can select Lt/Rt or Lo/Ro output mode.
For the analog stereo connection, set the Lt/Rt for correct audio intormation.
For the digital audio connection, set the Lo/Ro for full 5.1 channel support.
1) Press MENU button to display the menu.
Press ENTER or DOWN to select the Audio/Video Setting menu.
2) Press ENTER or RIGFIT to select the Audio Downmix menu.
3) Press UP or DOWN to desired audio downmix mode.
4) Press ENTER or RIGHT to complete audio downmix mode select.
_________________
AUDIO/VIDEO SETTING
TV Display
Scrsen H Position
Screen VPositkjn Center
Audio Preference
Stereo Oownmtx Lt/Rt
MPEG Audio Acfj. On
Sub Title
4:3 PS Lo/Ro
Center f Lt/Rt
Dolby D
Off
PHÉt ENTER «r R tA *111«. Pr«t* A Dr 1
Prais EXIT to *ilt, Pr*at ^ te gs back,
la maw*.
MPEG Audio Adj.
If broadcaster simultaneous broadcast MPEG Audio and Dolby Digital Audio,
generally the MPEG Audio Level is louder than Dolby Digital Audio.
When user set MPEG Audio Adj. On then the HD STB will automatic decrease the
MPEG Audio Level and make a similar Audio Level with Dolby Digital.
When user set MPEG Audio Adj. Off then the HD STB will follow by original Audio
Level from broadcaster.
Eor the analog audio connection, set to On for making similaraudio level.
For the digital audio connection, set to Off for making similar audio level.
Sub Title
In the Digital Broadcasting, the broadcaster broadcast Sub Title information with
Audio and Video. You can see the Sub Title information using set up the Sub Title
ON. In generally. Sub Title also called simple teletext or caption.
Also you can set up this function using S.TITLE button on the remote control.
If Sub Title is On, the Sub Title information will display followed by picture.
This HD STB is not generated Sub Title, it is decode Sub Title information from
Aerial signal. If Sub Title is On but do not display the Sub Title, check Aerial signal
or consult your local broadcaster.
21
Page 27

Usi n g lh eM E N US ys l em
2. Time Setting
From here you can adjust time, timer and time related setting. For using timer related
function, you should setting up the clock.
Clock Setting
From here you can setup the current clock.
If you set the Clock Setting to Ott, the timer related function will disable and
current time information will not display.
If you setup to Auto, this FID-STB will receive clock information from Aerial
signal. The timer related tu net ion will work with Aerial signal clock intormation.
Even if clock is incorrect, it came from broadcaster not this FID STB, For the
complete Auto clock setting, you should watch the TV program and wait couple of
minutes to finish the Auto clock setting.
If you setup to Manual, you should enter the current clock and this FID STB will
setup the internal clock. The timer information will work with internal clock
Information. This FID STB does not support battery back up for AC power failure.
1) Press MENU button to display the menu.
Press LEFT or RIGHT to select TIME SETTING menu
ENTER or RIGHT to select the Time Setting menu.
2) Press ENTER or DOWN to select the Clock Setting menu.
3) Press UP or DOWN to select desired Clock Setting mode.
You can select Off, Auto or Manual,
Eor the Manual clock setting, you should input current time information.
4) Press ENTER or RIGHT to complete setting.
___
О
TIME SETTING
Clock Setting Off
Time Zone NSW/ACT
Wake Up Timer Off
Off Timer Off
Sleep Timer Off
_____
ti Off
Auto
Manual
Frali ENTER er F to gntor, Pr*Bi ▲ or ▼ ta mav«,
Praia CXIT ta ailt. Praia ^ to is back.
_____
©
TIME SETTING
Clock Settino M:^niiAl
Prai< CNTCR gr R tfl tntgr Pmi er ▼ to r
Pr*» CXIf to gill, Prai* ^ to g« Ьевк^
________
«nOr eurrani llm*.
[>12:00 AM
22
Off
Auto
Manual
Page 28

№in g 1h e ME N U Sy s l€ n i
Time Zone
From here you can setup the Time Zone.
You should enter the time zone information for correct time display when EPG
information is display.
1) Press MENU button to display the menu.
Press LEFT or RIGHT to select TIME SETTING menu
ENTER or DOWN to select the TIME SETTING menu,
2) Press UP or DOWN to select the Time Zone menu.
Press ENTER or RIGHT to select the Time Zone.
3) Press UP or DOWN to select desired Time Zone,
4) Press ENTER or RIGHT to complete TV Display setting.
_____
©
TIME SETTING
Clock Setting Off NSW
Tima Zone
Wake Up Timer
Off Timer
Sleep Timer
Wake Up Timer
From here you can setup the Wake Up Timer for automatic turn on the HD-STB.
When the setting time is reached, the HD-STB will automatic turn on.
You can enter the desired wake up time and channel. For correct Wake Up Timer
operation, you should set up the Clock Setting first.
1) Press MENU button to display the menu.
Press LEETorRIGHTto select TIME SETTING menu
ENTER or DOWN to select the TIME SETTING menu,
2) Press UP or DOWN to select the Wake Up Timer menu.
Press ENTER or RIGHT to select the Wake Up Timer.
3) Enter time, channel and activate setting.
4) After finished enter the informations, Press EXIT to completion of Wake Up
Timer setting.
________
NSW/ACT ACT
Off VIC
Off OLD
Off SA
WA
TAS
NT
©
TIME SETTING
WakeUp Timer Setting
i>Time
Channel
Activate
3
OFF
a
1 : 00 AM
23
Page 29

Usi n g lh eM E N US ys l em
Off Timer
From here you can setup the Off Timer for automatic turn off the HD STB. When
the setting time is reached, the HD STB will automatic turn off.
You should enter the desired off time.
For correct Off Timer operation, you should set up the Ciock Setting first.
1) Press MENU button to display the menu.
Press LEFT or RIGHT to select TIME SETTING menu
ENTER or DOWN to select the TIME SETTING menu.
2) Press UP or DOWN to select the Off Timer menu.
Press ENTER or RIGHT to select the Off Timer,
3) Enter desired off time and activate setting,
4) After finished enter the informations, Press EXIT to completion of Off Timer setting.
_____
©
________
TIME SETTING
Clock Setting Manual
Time Zona NSW/ACT
Wake Up Timer Off
Off Timer Setting
f OflTlme 12:00 AM
Activate OFF
Sleep Timer
From here you can setup the Sleep Timer. The HD-STB automatic turn off after
existed period of time later. You can also setup the Sleep Timer using SLEEP
button of remote control.
If you want disable Sleep Timer function, simply set up the Sleep Timer to 'Off.
1) Press MENU button to display the menu.
Press LEFT or RIGHT to select TIME SETTING menu
ENTER or DOWN to select the TIME SETTING menu.
2) Press UP or DOWN to select the Sleep Timer menu.
Press ENTER or RIGHT to select the Sleep Timer.
3) Press UP or DOWN to select desired sleep time,
4) Press EXIT to completion of Sleep Timer setting.
TIME
Clock Setting
Time Zone
Wake Up Timer
Off Timer
Sleep Timer
Pn» ENTER QT P tD *nttr. Pm* л or ▼ 1
Pm* EXIT (e *ilt. P?**i 4 to ge bielt,
Off
NSW/ACT 15m.
Off
Off 45m.
Off 60m.
24
l> Off
30m.
90m.
120m.
ISOm.
240m.
Page 30

1^1
ЬеМЕМи$у$
3. System Setup
From here you can setup the System Value o1 FID STB, Also, you can restore the Factory
Reset value. The PIN Code is not changed even factory value restored.
Power Restore
This FID STB has the Power Restore function. If you setup the Power Restore On
and when AC Power is applied, the HD-STB will automatic turn on and display
final memorized channel. It is useful for multiple display or exhibition for control
the HD STB. After setup the Power Restore On, then just turn on the AC Power for
HD STB On and Turn Off the AC Power for HD STB Off.
The factory default value is Power Restore Off.
1) Press MENU button to display the menu.
Press LEFT or RIGHT to select SYSTEM SETUP menu
ENTER or DOWN to select the SYSTEM SETUP menu,
2) Press UP or DOWN to select the Power Restore menu.
Press ENTER or RIGHT to select the Power Restore.
3) Press UP or DOWN to select desired one.
4) Press EXIT to completion of Power Restore setting.
1
ш
Q<ili ©
SYSTEM SETUP
Power Restore Off
Auto Power Off Off
Menu Time Out All
OSD Transparency 80 %
Display Dimmer Stepf
TV Remote CntT Code List
Factory Reset
Software Version:
PfMt ENTER « ^ t0 anttr Pnai A er ▼ ta nuv*.
Prwit EXIT Id Diltr Pt«*i 4 to fo bielt.
1.3.1.1
a в“
t> Off
On
Auto Power Off
This HD-STB has the Auto Power Off function. You can setup the Auto Power Off
function on or off. After setup this function to on, if there is no aerial signal more
than 90 minutes, then HD-STB will automatic turn off for prevent unwanted
operation. If you setup to off, then this function is disable.
Menu Time Out
You can adjust OSD (On Screen Display) display time. If you feel display time is too
long or short, you can select time out period using Menu Time Out setup. If you set
to All, then the menu will not disappear automatically. At that time, you can press
EXIT to disappear the menu OSD.
OSD Transparency
You can adjust OSD (On Screen Display) transparency.
If you feel the menu display is too thick or thin, you can adjust the transparency of
OSD using OSD Transparency setup.
25
Page 31

Us in g lh eM E NU S ys t e m
Display Dimmer
You can adjust Front seven segment display brightness.
If you feel the Front Display is too brighter or darker, you can adjust the brightness
of Display using Display Dimmer setup.
TV Remote Cnt'l Code List
This FID STB Remote Control can operate common functions on your TV.
For the correct operation, you should setup the TV Remote control code.
In this menu, you can find correct code for your TV. It might network on some
Model of TVs. ( Please refer to TV Remote Code Setting)
Factory Reset
This FID STB will change the factory default value after Factory Reset.
Even perform the Factory Reset the PIN (Personal Identification Number) is not
change. The FID-STB will ask to confirm to Factory Reset.
Software Version
You can review the Software Version for future software upgrade.
26
Page 32

1^1
ЬеМЕМи$у
4. Parental Guide
From here you can setup the PARENTAL GUIDE. You can block or unblock each
program followed by parental guide information.
For the PARENTAL GUIDE setup, you should enter the PIN code.
The default PIN code is ’ О О 0 О V
Once you enter the PIN code, it is validity until exit the menu system. Once the PI N
code setup, it cannot be changeable without original PIN code.
Block All Rating/Unblock All Rating
You can select block or unblock the whole ratings using Block All Rating/ Unblock
All Rating. For the access of the Parental Guide setting, you should enter default
PINcode'OOOO'
1) Press MENU button to display the menu.
Press LIFT or RIGHT to select PARENTAL GUIDE menu
ENTER or DOWN to enter the PARENTAL GUIDE menu.
2) Press UP or DOWN to select the Block All Rating/ Unblock All Rating menu.
Press ENTER or RIGHT to enter the Block All Rating/ Unblock All Rating,
3) Press EXIT to completion of Block All Rating/ Unblock All Rating setting.
51
ш
PARENTAL GUIDE
Block All Rating
Unblock All Rating
Rated G
Rated PG
Rated M
Rated MA
Rated AV
Rated R
Change PIN Number
Unblock
Unblock
Unblock
Unblock
Block
Unblock
27
Page 33

Us in g lh eM E NU S ys l e m
Rating Setup
You can select block/ unblock the each rating one by one. It user select block the
rating, that rating program will internal block and display violation of ratings message.
1) Press MENU button to display the menu.
Press LIFT or RIGHT to select PARENTAL GUIDE menu
ENTER or DOWN to enter the PARENTAL GUIDE menu,
2) Press UP or DOWN to select the desired rating menu.
Press ENTER or RIGHT to enter the block/ unblock tbe desired rating.
3) Press EXIT to completion of Rating setup.
0 ^
PARENTAL GUIDE
Block All Rating Unblock
Unblock All Rating
r Rated G
Rated PG
Rated M
Rated MA
Rated AV
Rated R
Change PIN Number
Pr«*i ENTER fl? P to «nttr. Rraii a or ч
Fr«ft EXIT (o «xltr Pr«*E 4 to ce bicit.
Unblock
Unblock
Unblock
Unblock
Block
Unblock
Change PIN Number
From here, you can change the PIN code using Change PIN Number, Even if you
want to change PIN number, you should input the old PIN number. The default PIN
number is * 0 0 0 0 ' for the first access the PARENTAL GUIDE menu,
1) Press MENU button to display the menu.
Press LIFT or RIGHT to select PARENTAL GUIDE menu
ENTER or DOWN to enter the PARENTAL GUIDE menu,
2) Press UP or DOWN to select the Change PIN Number menu.
Press ENTER or RIGHT to enter the Change PIN Number menu,
3) Please enter the 4 digits new PIN code using number button ot Remote Control.
4) Press EXIT to completion of change PIN number setting.
Block
' tg iTtBitr
0 Д
PARENTAL GUIDE
BlodcAII Rating
Unblock All Rating
Rated G Unblock
Please Enter Current PIN Ni
Rated R Unblock
Change PIN Number
Pnfk ENTER Of b to «nttr- Pr«t* A pr 1
Rr«*t EXIT to «lit. 4 to ^ bick,
28
imber
r to mpup.
Page 34

l^ lh eM EN US y sI cm
5. Channel Setup
From here you can do automatic and manual channel search, favorite channel setup,
edit program and setting program preference.
Automatic CH Tuning
From here the HD STB will automatic search the whole frequency for available
channels. It will take several minutes. Please wait to complete finished the
automatic channel tuning. In this process, the HD-STB will display the search
process for your review. If you quif fhe searching process, the HD STB will not
memorize found channels and it will discard.
1) Press MENU button to display the menu.
Press LIFT or RIGHT to select CHANNEL SETUP menu
ENTER or DOWN to select the CHANNEL SETUP menu,
2) Press ENTER or RIGHT to select the Automatic CH Tuning menu,
3) Press ENTER or RIGHT to start the Automatic CH Tuning.
Please wait to complete finished fhis process.
Usually, it will take several minutes.
'^#1 © Ю Й
CHANNEL SETUP
Automatic CH Tuning
Manual CH Search
Favorite CH All
Edit Program
Program Preference
Automatic CH Tuning in Progress...!
Press wait.
Scanning: CH:11
I
------
»
Manual CH Search
From here you can manual find the available channel. For the manual channel
search, you should enter the digital channel number of local broadcaster.
When you perform the manual channel search, the HD-STB will try to find
available digital program in the existed channel number. After finished manual
channel search, the HD STB will automatic memorized found channels,
1) Press MENU button to display the menu.
Press LIFT or RIGHT to select CHANNEL SETUP menu
ENTER or DOWN to select the CHANNEL SETUP menu,
2) Press ENTER or RIGHT to select the Manual CH Search menu.
3) Press ENTER or RIGHT to enter Manual CH Search menu.
4) Press UP or DOWN to select desired channel number.
Press ENTER or RIGHT to start Manual CH Search process.
29
Page 35

Us in g lh eM E NU S ys l e m
CHANNEL SETUP
Manual Channel Search
CH:10 Search
CH RF Search
Favorite CH
From here, you can select Favorite CH memory block. You can also select this
function from your remote control FAV button. After favorite channel assigned in the
Program Preference menu, you can select Favorite CH memory block for CH LIST
display.
If you select All, the whole memorized channels will display when CH LIST display.
So you can select desired channel from whole channel list. Also the PR / PR ►
button will surfing the whole channels.
If you select Favl, the Favl assigned channels in the Program Preference will
display when CH LIST display. So you can select desired channel from Favl
channel list. Also the PR -< / PR ► button will surfing the Favl channels.
Followed by above, you can assign Fav 2 and Fav3 memory block same method.
In the favorite channels movement, the CH A/CH ▼ button always surfing
the whole channels. The PR '4/ PR ^ button always surfing the favorite
channels.
'H'
1) Press MENU button to display the menu.
Press LIFT or RIGHT to select CHANNEL SETUP menu
ENTER or DOWN to enter the CHANNEL SETUP menu.
2) Press UP or DOWN to select the Favorite CH menu.
Press ENTER or RIGHT to enter the Favorite CH menu.
3) Please UP or DOWN to select the desired favorite memory block.
4) Press EXIT to completion of Favorite CH setting.
CHANNEL SETUP
Automatic CH Tuning
Manual CH Search
Favorite CH All
Edit Program
Program Preference
Ariel Signal Strength
Pnst ENTER e? P tD *nttr. Praia a or ▼ ta irbv*,
Praat EXIT le «11. Pra*i ^ t« go back.
▻ All
Fav1
Fav2
Fav3
30
Page 36

l^ lh eM EN US y sl ^n i
Edit Program
From here, you can Edit, Move and Delete the memorized channels.
After performed the Automatic or Manual Channel Search, the whole channels are
listed in the memory.
So, you can change the Channel name, sequence and delete from the memory.
After delete the channel, it can not appear in theCH LIST, at that time you should perform
Automatic or Manual Channel Searchfor re appear the channel In theCH LIST
Edit Program - Edit
In the digital broadcasting, the existed channel has there own names. But, if you
want change the channel name, then you can change the channel name as you want.
1) Press MENU button to display the menu.
Press LIFT or RIGHT to select CHANNEL SETUP menu
ENTER or DOWN to enter the CHANNEL SETUP menu.
2) Press UP or DOWN to select the Edit Program menu.
Press ENTER or RIGHT to enter the Edit Program menu.
3) Please UP or DOWN to select the program you want to change the name.
Press ENTER or RIGHT to select the program.
4) Press UP or DOWN to select Edit and Press ENTER,
Edit Program screen will display.
5) Press UP or DOWN to select alphabet for your desired channel name.
Press ENTER for Completion of Edit or Press EXIT to Cancel.
7 7 Digital
70 7 Orange
71 7 Yellow
72 7 Green
73 7 Blue
77 Program Guide
9
H Ptmi ENTEIt at ^ to antar Praia A or ▼ la mava. H
M Prai» EXIT to axil. Pr*** 4 ta ga back, M
CHANNEL SETUP
EDITPROGRAM
CH
Name
NINE DIGITAL
fi]
D Edit
Move
Delete
S'
1 CHANNEL SETUP
EDITPROGRAM
CH Name I
7 7 Digital '
70 7 Orange
CH7: Digital
Please enter the new name
NINE DIGITAL
31
© ^ ®
_l
Edit
Move
Delete
Page 37

Us in g lh eM E NU S ys l e m
Edit Program • Move
You can move the channel position in the memorized sequence, it is change the
order of the memorized channels. And it is affected for CH A / ▼, PR ■</►
operation using remote control.
1) Press MENU button to display the menu.
Press LIFT or RIGHT to select CHANNEL SETUP menu
ENTER or DOWN to enter the CHANNEL SETUP menu.
2) Press UP or DOWN to select the Edit Program menu.
Press ENTER or RIGHT to enter the Edit Program menu.
3) Please UP or DOWN to select the program you want to move.
Press ENTER or RIGHT to select the program.
4) Press UP or DOWN to select Move and Press ENTER.
It will appear the marking for selected channel.
5) Press UP or DOWN to select actual position of destination.
Press ENTER to move the channel.
CHANNEL SETUP
EDITPROGRAM
CH
Name
7 SEVEN
70 7 Orange
71 7Yfillow
72 7 Green
73 7 Blue
77 Program Guide
9 NINE DIGITAL
EDITPROGRAM
CH Name 1
[>7 SEVEN ■
70 7 Orange
71 7 Yellow
72 7 Green
73 7 Blue
77
Program Guide
9 NINE DIGITAL
32
Edit
Move
Delete
Page 38

^i ng lh e ME N US y st e m
Edit Program - Delete
You can delete the unwanted channel in the internal memory. Once you delete the
channel, you cannot access using CH A /▼, PR ■</►. For access
deleted channels, you should perform Automatic CH Tuning or Manual CH
Search operation to recover the memory.
1) Press MENU button to display the menu.
Press LIFT or RIGHT to select CHANNEL SETUP menu
ENTER or DOWN to enter the CHANNEL SETUP menu.
2) Press UP or DOWN to select the Edit Program menu.
Press ENTER or RIGHT to enter the Edit Program menu.
3) Please UP or DOWN to select the program you want to delete.
Press ENTER or RIGHT to select the program.
4) Press UP or DOWN to select Delete and Press ENTER.
It will appear the delete confirm message for selected channel.
5) Press ENTER to delete or Press EXIT to cancel.
CHANNEL SETUP
EDfT PROGRAM
CH
Name
70
7 Orange
71
7 Yellow
7 Green
72
7 Blue
73
7 Digital
7
Program Guide
77
NINE DIGITAL
__
Щ PrtAt ENTER W ^ tb Aittbr. Рг«йй A Ы ▼ Id iMw*. Щ
Щ Pn» EXIT Id dill. 4 tB ^ bick, Щ
© ffll i2i
Edit
Move
^ Delete
© Й5 a
1 CHANNEL SETUP
EDfTPROGRAM
CH Name I
70 7 Orange *
CH7: SEVEN
Press ENTER or "s" to delete.
Press EXIT or"-I'to cancel.
779Program Guide Г
NINE DIGITAL »
33
Edit
Move
Delete
1
Page 39

№in g 1h e ME N U Sy s l€ n i
Program Preference
In the Program Preference menu, you can assign the Favorite Memory block for
each channeis. And blocking the selected channels.
The favorite memory block has three kinds, Favl, Fav2 and Fav3.
Foiiowed by FAV button or Favorite CFI setting, you can access the Favorite Block
CH LIST with LIST button.
For example, setting up the Favl for CFI 7, 70 and 71 in the Program Preference
menu. Also, select the Favl tor Favorite CFI menu, then the CFI LIST will display for
Favl favorite memory block like a Favl CFI LIST, You can select the 7,70 and 71 in
the Favl CH LIST
Also you can block the channels with setting the Block. For block the channelsyou
should input the PIN code for access this menu. The default PIN code is “ 0 0 0 0 ‘
1) Press MENU button to display the menu.
Press LIFT or RIGHT to select CHANNEL SETUP menu
ENTER or DOWN to enter the CHANNEL SETUP menu,
2) Press UP or DOWN to select the Program Preference menu.
Press ENTER or RIGHT to enter the Program Preference menu.
3) Please UP, DOWN, LEFT and RIGHT to select the program you want to mark
Press ENTER to mark the program.
If you want un mark the program, press ENTER again.
4) If you select the Block, then this HD STB will ask PIN code. You should input
the PIN code tor activate the Block the channel.
5) After finished the setting. Press EXIT to finish the Program Preference
menu.
CHANNEL SETUP
CH Name Favl Fav2 Fav3 Block
7 7 Digital t-RT
70 7 Orange O o o o •
71 7 Yellow o o o a 11
72 7 Green □
73 7 Blue O o o
77 Program GuL O
PROGRAM PREFERENCE
O O
o o
o o
a 1
o 1
o 1
1 Pnsi ENTER fl? ^ 4» «nttr. Rraii a or ▼ tg nteitr I
H Prati EXIT to «It. Pratt 4 to ft bacii, ■
1 CHANNEL SETUP
CH Name Favl Fav2 Fav3 Block
7 7 Digital
70 7 Orange o O O
71 7Yfillow o o o o 11
72 7 Green o o O
73 7 Blue o o o
77 Program Gut..
PROGRAM PREFERENCE
er
o o o
Pr«i ENTER or P to anttr Pratt A or ▼ ta m»t.
Prait EXIT to axH. Pm* < tp gpbatk.
ef
1
° II
O 1
O 1
34
Page 40

Us in g lh eM E NU S ys t e m
Aerial Signal Strength
For the correct digital broadcasting reception, your signal level should be green
level. The yellow level is partly received the digital broadcasting, but it is possible
to unstable the picture quality.
The red level is unavailable digital broadcasting reception.
1) Press MENU button to display the menu.
Press LIFT or RIGHT to select CHANNEL SETUP menu
ENTER or DOWN to enter the CHANNEL SETUP menu,
2) Press UP or DOWN to select the Aerial Signal Strength menu.
Press ENTER or RIGHT to enter the Aerial Signal Strength menu.
3) Please UP or DOWN to change the channel you want to view the signal level.
If you change the channel number, the video will temporally stop to view,
4) After finished the review. Press EXIT to quit this menu.
□<gj. 0
CHANNEL SETUP
Aerial Signal Strength Meter
CH;06
Program Preterence
Arial Signal Strength
35
Page 41

Trouble Shooting
Your HD-STB is designed to give you troubie free performance for many years,
if you have a problem with your HD-STB, try the soiutions listed beiow.
^ Problem T Possible causes ^ '' What to do ''
The display on the front panei
does not light up.
No Sound or Picture,
but the frorrt
panei shows the time or "
Picture stop or squared picture
The Sound is OK, but the
Picture is coliapse
The Sound is OK, but the
Picture is Biank.
The Picture is OK, but the
Sound is Biank.
The remote controi is
not working
The universai TV key is
not working
You have forgotten your secret
PiN number.
The Parent Lock is
not Setting up.
Power cabie is not connected.
The HD STB is not powered ON
Signal to weak or No antenna
connect.
The HDTV does not support
selected Video Resoiution.
Audio or Video Connection is
not good.
Battery exhausted.
Remote control is incorrectly
aimed.
Blocked the HD STB front panel
Universai remote setting is
initiaiiaed.
Check up the Power cabie which
is plugged in to the AC wall
mounted socked.
Press the power button on the
front or remote corrtroller to
powered ON status.
Check the antenna or antenna
connection. Simply check the
analog reception of TV
Simply change the DISPLAY
switch and MODE switch to
different video resolution.
Check up the Audio/ Video
cable or connection.
Change the batteries.
Aim the remote corrtrol at HD STB.
Check that nothing blocks the
front panel
Resetting the Universal TV Code
followed by manual.
Contact Customer support,
dial 1300 728 225 .
They will help you set it up again.
Please make sure the default
code is " OOCM ’
36
Page 42

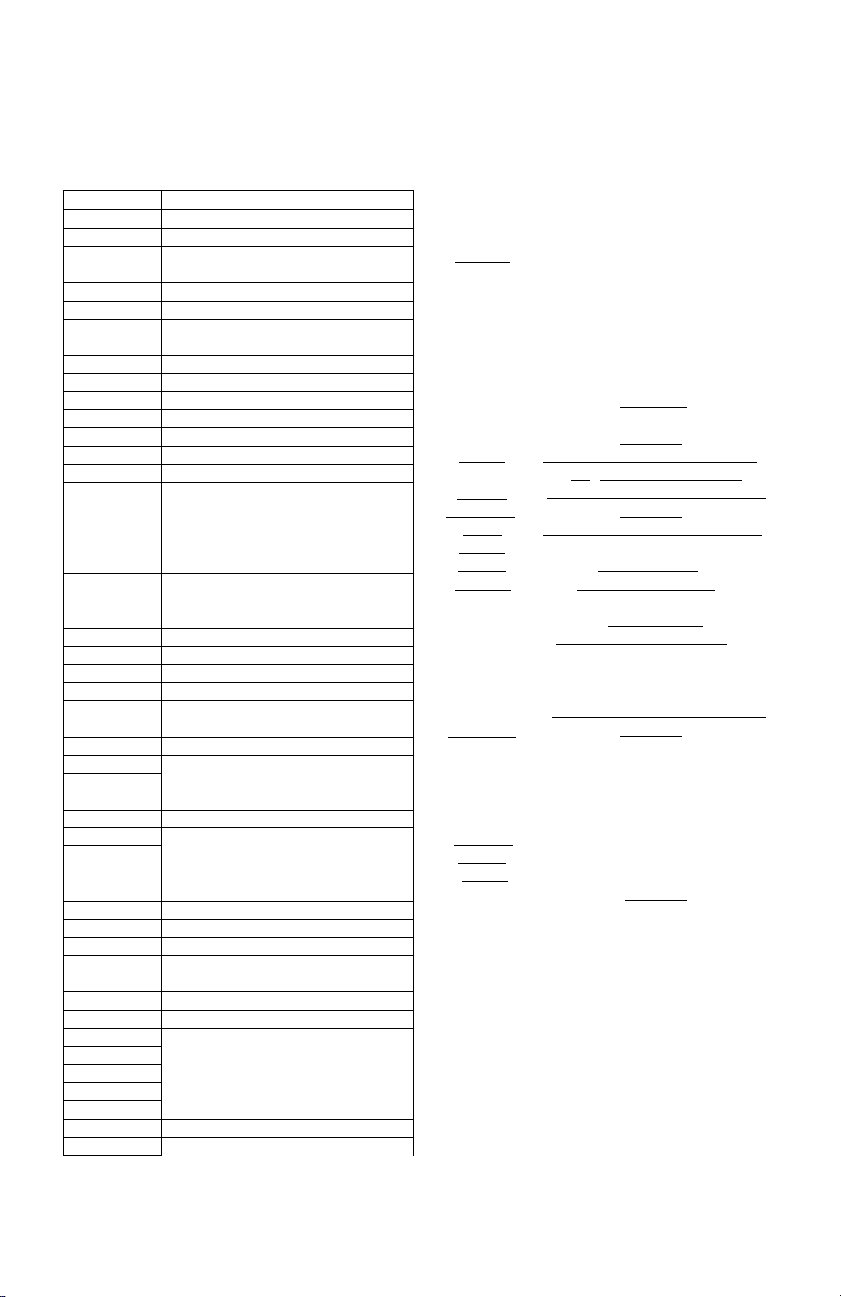
Specifications
Section Detailed section
Terrestrial Input Signal Input Frequency
Transmission System DVB T/OFDM
Channel Assignment Australian Channel Assignment
Channel Bandwidth 7MHz
Channel Cffset +/ 125KHZ
Input Signal Level
Antenna Input
Loop Output 75S Male lEC-Connector (PAL Type)
OFDM Spectrum Mode
Modulation Modes
Guard Irrtervai Modes
FEC Modes
Video
Algorithm
Decoding Format
Display Aspect Ratio
FID Video Output
Explanation
VHF: 174MHz to 230MHz
UHF: 520MHz to 820MHz
90dBm - -20dBm
75ffi Female lEC Connector (PAL Type)
2K and 8K Hierarchical
QPSK, 16QAM, 64QAM
1/32, 1/16, 1/8, 1/4 Active Symbol Duration
Rate 1/2, 2/3, 3/4, 5/6, 7/8
MPEG-2 compatible MP@ML, MP@HL
All of Australia Digital TV Standard
16:9 or 4:3
All of Australia Digital TV Standard
HD ypbPr/HD VGA Simultaneous Output
Native Mode : lOSOi, 720p, 576p
CFiT Display : (1250), 1152i, 576p
Audio
SD Video Output
Composite Video Output S video(Y/C), Composite Video(CVBS)
Algorithm
Frequency Response 20Hz~ 20 kHz, < ±2dB
Sampling Frequency
Analog Audio Output
Digital Audio Output S/PDIF opticalfTOS Link), S/PDIF coaxial(RCA)
Common use of YPbPr/ FiGB - 576i component
output
MPEG-1 layers 1 and 2, MPEG-2 layers 2
Dolby Digital (AC 3)
32, 44, land 48 kHz
Stereo (RCA phone jack), 2.0Vrms, >10K ohm
(2 Sets)
37
Page 43

Specifications
Detailed section
Controller Features Main CPU 32 bit RISC
Menu System
Channel Memory
Remote Controller
Power
Power
Erwironmental
Condition Storage Temperature
Note : Specifications arc subject to change without notice
Operating Frequency
Standby Power Consumption
Power Protection
Operating Temperature
Operating Humidity
Storage Humidity
Weight
Dimension
IR Remote Controller with Universal TV Key
AC 100 250V ~ ± 5%, 40W Max. 25W Nominal
Explanaiion
Graphic User Interface
Max. 256 Channel
50/60HZ ±5%
Less than 3 W
Slow Blow Fuse (250V, 2A)
0~40 C
10- +50 t;
5% ~ 90 % Noh condensed
5% ~ 90 % Non condensed
Approx. 2.6Kg
340mm X 70mm X 270mm (WxHxD)
38
Page 44

TV Control Section Code
Setting for remote control
You can use your HD STB remote control tor common tunction on your TV, ( might not
work on some model o1 TVs),
After change the remote control battery, you should reset the TV Control Section code for
your TV.
1) Look lor correct code from TV Control Section Code List in user manual or in on
screen display.
2) Press and Hold TV POWER button on HD STB remote control.
3) Enter three digits o1 TV Control Section Code,
4) Release TV POWER button,
5) Press TV POWER to confirm functionality on your TV
6) If the code fails to operate the TV, please choose another code for the same brand
and repeat 1) • 5)
Note: Please record the successful code for future reference.
TV Maker
Admiral
Aiko
AIWA
036,048, 030, 026,071,067,
089,093, 036, 092,035, 039,
Code
141, 136,072,040,
105, 040
048,078
020,030, 048,071,063,037,
Akai
044,038, 078,105,026,036,
067, 040, 143, 021,080
063,055, 036, 072,100,052,
Alba
030,048, 031, 038,034,093,
068,079
Amstrad
Anam
Audiosonic
Autovox
022,036, 040,088,063,030,
071, 064, 039,048,042
048,036, 041
048,117,100,075,040,063,
106
141,076
Веко 100,106,048, 078
Best 075,100
Bestar
Blaupunkt
Brother
048,100, 035
105,103,143
040
Bruns 141
068,063, 055, 036, 093, 062,
Bush
048,052, 030, 035, 045, 040,
031, 034, 020,038,054
Cascade
Casio
Cathav
036,048
048
048
Century 141
CGE
Clarivox
Concorde
Conic
Contee
Continental
Edison
072, 100
072,085
036
134
036,092,089, 093
117,113,110, 034
TV Maker Code
Crown
Cybertron
Daewoo
036,100, 106, 048, 079,072,
020, 034, 096
063
036, 048,035, 063, 047, 032
Denon 024
DIglllne
048
Elekta 040,062
Elite
Emerson
Ferguson
022, 141,021, 048, 056,030,
063,048
085, 062
115,114,065,160,117,
069,087
Fidelity 030,040,048
Fisher
Fujitsu
Galaxi
GE
104,093,098, 020,100,091,
025,141, 092, 150,067
056,076, 067, 066, 036
066,048, 100, 072
069,117,021, 062,160, 111
GEC 027,067, 048
General 117,159
General
Technic
GoldStar
048,100, 134, 151, 036,080,
036
021.028
093,067,048, 036,040,151,
Goodmans
056,035,034, 050,030,047,
044,111,055, 026,069,134,
032. 160
Granada
Grundiq
048,074, 161, 025, 067,137,
020.093.016. 077. 160.069
103, 105,034, 085, 048, 044
Hanimex 054
019,093,028, 027, 111, 010,
Hitachi
113,110,018,134, 082,014,
067,013,047, 048, 011, 024,
021, 044, 137
Imoerial
048, 100,072, 113
39
Page 45
TV Code Setting for remote control
TV Maker Code
ITT Nokia 147, 020, 056, 016, 078, 049
JEC 026
JVC
Konka
Lemalr 073
LG
Loewe 046,048,141, 101, 100
Magnadyne
Magnavox 093,056,048
Magnum 042
Manhattan 048,068
Marantz 048
Masuda 063,036, 030
Matsui
Mitsubishi
Morgan’s 048
Motorola 136
NAD
National 083
NEC
NIkko 021
Nokia
Nordmende
Omega
Onwa 030, 037, 063, 071,038
Orion
Palsonic
Panasonic
Philco
Philips
Phoenix 048,141,106,100,067
Pioneer 095,048. 094.100, 111, 117
Plonler 100, 106
Prlma
Proton
Pve
RadioShack
RankArena
RCA
096,065, 093,114,030,063,
078
063,030, 048
048, 100, 134, 151, 036, 080,
021, 028
141,066
055,022, 036, 052,089,090,
067,093, 048, 044,034,031,
088,054,030, 071,086,079,
070,026, 020, 025, 103, 105,
160
137, 046, 048,136,021,
088,141,090,093,077,
051
095,021
023,093, 070, 036,035, 048,
089
016,020,035, 078, 147
117, 113, 111, 110,069,103,
048, 160
040
056,055, 054,022,052,089,
048,036, 053,050,031,065,
086, 044,040,039
040,039,048, 080
166,057,083, 099,048
141,072,100, 048,024
048,044, 161,105,027,141,
094. 111,035
134,036,040
021
048, 035,044, 161, 141
048,134,021
001,002,003,004. 085
069,087, 160, 136
TV Maker
Saba
Sampo
Samsung
Sansui
Sanyo
Scott
SEG
Sharp
Siemens
Singer
Skysonic
Sony
Supra
Tandy
Tatung
Teac
TEC
Technics
Teknika
Telefun ken
Tempest
Thomson
Thorn
Toshiba
Tovoda
Vestel
Wega
Wharfedale
zanussi
087,141, 117, 111, 158,113,
029,048,044,043, 036,
165,020, 092,101, 093,
089,100,016,067, 104,
025^033,_036^048^091_
__________
040,036,093, 066, 048,
__________
136, 135,092, 093, 054, 096
105, 103,092,134, 048
141, 066, 074, 015, 036, 048
138, 156, 153, 089, 093, 066
048,046,070, 040, 036,
036,159,160, 075, 102
_____________
117,158, 159, 116,160;il2,
115, 111, 113, 048, 106,087
087, 159, 160, 113, 110, 111,
115,065, 114, 047, 048,104,
■ 026; 012,017, 093,' 085, 066
Code
110,160
134
021,143,100,040,151,
134,067,020
048,030
021, 056
068,034
002,048
035, 036,_
063,067, 136
067,048, 089, 139
064,039,021
036,048
048,069,117
160,046,035,026
______
'093, 141,'048'
048,045
__________
___________
057
______________
056
036
_______
_048
076
40
Page 46

Manufactured under license from Dolby Laboratories
Dolby, Pro Logic and the double-D symbol are trademarks of
Dolby Laboratories. Confidential unpublished works.
Copyright 1992 1997 Dolby Laboratories. All rights reserved
Page 47

JVC
© 2004 Víctor Company of Japan, Limilod 0904MKH-S5-SS
 Loading...