

Page 1

ENGLISH
VIDEO
OUT
Warnings, Cautions and Others
Getting started (continued)
HOME THEATER SOUND SYSTEM
TH-LB3-B/TH-LB3-W
CAUTION
The button in any position does not
disconnect the mains line.
Disconnect the mains plug to shut the power off
completely (the STANDBY lamp goes off). The
MAINS plug or an appliance coupler is used as the
disconnect device, the disconnect device shall
remain readily operable.
When the System is on standby, the STANDBY •
lamp lights red.
When the System is turned on, the STANDBY •
lamp goes off.
The power can be remote controlled.
CAUTION
To reduce the risk of electrical shocks, fire, etc.:
Do not remove screws, covers or cabinet.1.
Do not expose this appliance to rain or 2.
moisture.
CAUTION: Proper Ventilation
To avoid risk of electric shock and fire, and to
prevent damage, locate the apparatus as follows:
Front: No obstructions and open spacing.1.
Sides/Top/Back: No obstructions should be 2.
placed in the areas indicated by the dimensions
in the illustration.
Bottom: Place on the level surface. Maintain an 3.
adequate air path for ventilation by placing on
a stand with a height of 10 cm or more.
Front
15 cm
15 cm
15 cm
10 cm
CAUTION
Do not block the ventilation openings or holes. •
(If the ventilation openings or holes are blocked
by a newspaper or cloth, etc., the heat may not
be able to get out.)
Do not place any naked flame sources, such as •
lighted candles, on the apparatus.
When discarding batteries, environmental •
problems must be considered and local rules or
laws governing the disposal of these batteries
must be followed strictly.
Do not expose this apparatus to rain, moisture, •
dripping or splashing and that no objects filled
with liquids, such as vases, shall be placed on
the apparatus.
CAUTION
Battery shall not be exposed to excessive heat
such as sunshine, fire or the like.
[European Union only]
Rating label is placed on the exterior of the bottom.
Installing the unit
Install the unit on a flat and level surface to ensure
the best sound quality.
The sound may be affected depending on the •
location in which you install it. To avoid such
issues, change the location and orientation of the
unit.
For cathode-ray tube television (CRT):•
If you install the unit near the TV, color distortion –
may occur. To prevent this, turn off the TV’s main
power or unplug it before installing the unit. Wait
at least 30 minutes before turning on the TV’s
main power again.
If the TV is still affected, move the unit further –
away.
CAUTION
Do not drag or push the unit on the floor or table.
Otherwise, the foot spacers at the bottom may peel off
or drop from the unit.
Installing on the wall 7
You can install the unit on the wall.
Screw (not supplied)
Wall
A: 6 – 7 mm
B: Maximum 10 mm
C: Maximum 6 mm
D: φ 4 mm (screw diameter)
E: Minimum 15 mm
CAUTION
The unit weighs approximately 3.1 k• g. Sufficient
care must be taken when installing it on the wall to
prevent any accidents caused by its falling off.
Use screws, which are compatible with the strength •
and material of the pillar or wall to prevent the unit
from falling off.
Do not install the unit onto a plywood or •
plasterboard wall; otherwise, it will fall and sustain
damage.
When installing the unit on the wall;•
Be sure to have it installed on the wall by qualified –
personnel.
Care must be taken when selecting a location –
for installation on the wall. Injury to personnel or
damage to equipment may result if the installed
unit interferes with daily activities.
AC adaptor should not be hanging/placed above –
any other items. Place the AC adaptor on the flat
floor only.
Attaching the stand system 7
You can adjust the height of the unit by using the
stand system (supplied).
You can select two ways:
Attach the stands to the right and left side of the
unit, then stick the foot spacers under the stands.
Front of the unit
Stand
Screw for stand and
stand base (M2.6 ×
10 mm)
Foot spacer
Attach the stand, stand bases, then stick the foot
spacers.
Front of the unit
Connecting the TV remote pass through 7
cable
If you install the unit near the TV, the unit may block
the remote control signal of the TV, and it may
not be transmitted to the TV unit. Connect the TV
remote pass through cable (supplied) to the unit for
smooth signal transmission.
As illustrated below, connect the TV remote pass
through cable to the IR OUT terminal. Move the
cable to the remote sensor of your TV as closely as
possible.
CAUTION
Even if you connect the TV remote pass through cable
to the unit, some TVs may not receive the remote
control signal of the TV. Because some TVs use different
carrier frequency for the remote control.
Rear of the unit
Move it to the
remote sensor of
your TV as closely
TV remote
pass through
cable
(supplied)
as possible, then
stick it in any rear
position of the unit.
Back
Double-sided
adhesive tape
(supplied)
Thank you for purchasing a JVC product. Before operation, please read the instructions carefully.
INSTRUCTIONS
GVT0344-003A[U6]
0312WMKMDWJMM
© 2012 JVC KENWOOD Corporation
EN
Introduction Getting started
Auto power save function
When no operation is done in certain situations
for 29 minutes, the unit turns off automatically.
This function is on at the initial setting. For details,
refer to “Operations.”
In this manual, the remote control buttons
are used for explaining the operations unless
mentioned otherwise. However, if the System has
the same or similar button names, they can also
be used for the operations.
Playable iPod models
Compatible iPod:•
Made for Audio Video
iPod nano (6th generation)
iPod nano (5th generation)
iPod nano (4th generation)
iPod nano (3rd generation)
iPod nano (2nd generation) –
iPod touch (4th generation)
iPod touch (3rd generation)
iPod touch (2nd generation)
iPod touch
iPod classic
iPhone 4S
iPhone 4
iPhone 3GS
iPhone 3G
* Only for still picture
Also refer to the instruction manual for iPod.•
If incompatible iPod is connected, NOT SUPPORT is •
shown on the display.
If iPod does not play correctly, update iPod •
software to the latest version.
For details about updating iPod, check on the –
Apple web site <http://www.apple.com/>.
For the latest information on compatible iPod •
models, check on our web site.
In this manual, “iPod” refers to iPod, iPod touch
and iPhone devices. When iPod touch or iPhone
device is referred to directly, “iPod touch” or
“iPhone” is used.
Notes on handling
Important cautions 7
Installation of the System
Select a place which is level, dry, and neither too •
hot nor too cold; between 5°C and 35°C.
Leave sufficient distance between the System and •
the TV.
Do not use the System in a location near heat •
sources, or in a place subject to direct sunlight,
excessive dust, or vibration.
Install the System in a location with adequate •
ventilation to prevent internal heat buildup.
Power cord
Do not handle the power cord with wet hands.•
A small amount of power is always consumed •
*
while the power cord is connected to the wall
outlet.
Do not pull on the cord to unplug the power cord. •
When unplugging the power cord, always grasp
and pull the plug so as not to damage the cord.
To prevent malfunctions of the System
There are no user-serviceable parts inside. If •
anything goes wrong, unplug the power cord and
consult your dealer.
Do not insert any metallic objects or liquids into •
the System.
Safety precautions 7
Avoid moisture, water, and dust
Do not place the System in moist or dusty places.
Avoid high temperatures
Do not expose the System to direct sunlight and do
not place it near any heating devices.
When you are away
When away on holiday or for other reasons for an
extended period of time, disconnect the power cord
from the wall outlet.
Do not block the vents
Blocking the vents may damage the System.
Care of the cabinet
Stains on the System should be wiped off with a •
soft cloth. If the System is heavily stained, wipe
it with a cloth soaked in water diluted neutral
detergent and wrung well, then wipe clean with a
dry cloth.
Since the System may deteriorate in quality, •
become damaged or get its paint peeled off, be
careful about the following:
DO NOT wipe it forcefully. –
DO NOT wipe it with thinners, benzines or other –
organic solvents including disinfectants.
DO NOT apply any volatile substances such as –
insecticides to it.
DO NOT allow any rubber or plastic to remain in –
contact with it for a long time.
Do not place anything on top of the System. •
Doing so may cause the System to fall, causing
malfunctioning and/or injury.
The manufacturer accepts absolutely no liability •
for any accidents or damage resulting from
inadequate assembly or mounting, insufficient
strength of attachment, misuse or abuse, or natural
disasters.
If water gets inside the System
Turn the System off and disconnect the power cord
from the wall outlet, then call the store where you
purchased this System. Using the System in this
condition may cause a fire or electrical shock.
Supplied accessories
Check to make sure you have all of the supplied
accessories.
If anything is missing, contact your dealer
immediately.
Remote control RM-STHLB3E (× 1)•
AC adaptor (AA-R1904) (× 1)•
AC power cord (× 1)•
Lithium coin battery CR2025 (× 1)•
The battery has been installed in the remote –
control when shipped from the factory.
Core filter (× 3)•
TV remote pass through cable (× 1)•
Double-sided adhesive tape (× 1)•
Stand System•
Stand (× 2)* –
Stand base (× 2)* –
Foot spacer (× 2)* –
Screw for stand and stand base (M2.6 × 10 mm) –
(× 8)
* These have been binded together when shipped from
the factory. Remove the tape before installation.
DO NOT connect the power cord until all other
connections have been made.
Preparing the remote control
When you use the remote control for the first time,
pull out the insulation sheet.
If the range or effectiveness of the remote control
decreases, replace the battery.
To replace the battery in the remote 7
control
Insert the battery into
the remote control by
matching the polarities
(+ and –) correctly.
CAUTION
Danger of explosion if battery is incorrectly
replaced.
Replace only with the same or equivalent type.
NOTES
Store the battery in a place where children cannot •
reach. If a child accidentally swallows the battery,
consult a doctor immediately.
To prevent the battery from overheating, cracking, or •
starting a fire:
Do not recharge, short, disassemble or heat the –
battery, or dispose of it in a fire.
Do not leave the battery with other metallic –
materials.
Wrap the battery with tape and insulate when –
throwing away or saving it.
Do not poke the battery with tweezers or similar –
tools.
Dispose of the battery in the proper manner, •
according to federal, state, and local regulations.
Lithium coin battery
(product number: CR2025)
Using the core filter
To reduce interference, be sure to attach the
provided core filters to the power cord and the
external component cord.
Run the cable through the core filter, and wind it
firmly once inside. Close the core filter until it clicks
shut. (You can wind the cords together.)
DC power cord (to DC IN jack)
RCA pin plug cord (to SUBWOOFER PRE-OUT terminal)
TV remote pass
through cable (to
IR OUT terminal)
Digital coaxial cord (to DIGITAL IN 2 terminal)
Audio cord (to ANALOG IN terminal)
Composite video
cord (to VIDEO
OUT terminal)
CAUTION
Do not damage the cord by applying expressive force
when winding.
Connecting the TV – viewing
the video/picture from iPod on
your TV
You can view a video/picture from iPod connected
to the unit on your TV. Connect the video input
terminal on your TV, etc. to the VIDEO OUT terminal
with the video cord (not supplied).
Setting the video output 7
While the source is selected to IPOD and iPod is not
connected to the unit...
Press and hold iPod 6 (main unit).
Each time you press and hold the button, VIDEO OFF
and VIDEO ON scroll on the display.
VIDEO OFF : The video/picture from iPod is shown
on iPod itself.
VIDEO ON : The video/picture from iPod is shown
on the TV.
Rear of the unit
Composite
video cord
(not supplied)
TV, etc. (not supplied)
Stand base
The wider sides of the stands, stand bases, and •
foot spacers should be facing the front to fit in the
grooves on the bottom of the unit.
The stands, stand bases, and foot spacers do not •
have the difference between the left and right side.
Connecting external
components
You can connect an analog component to the
ANALOG IN terminal and digital components to the
(OPTICAL) DIGITAL IN 1 and (COAXIAL) DIGITAL IN 2
terminals.
You can also connect a subwoofer to the
SUBWOOFER PRE-OUT terminal.
Subwoofer
(not supplied)
(OPTICAL)
DIGITAL
IN 1
Digital
optical cord
(not
supplied)
TV, etc. (not supplied)
Rear of the unit
(COAXIAL)
DIGITAL
IN 2
Digital coaxial
cord
(not supplied)
DVD Player, etc.
(not supplied)
SUBWOOFER
PRE-OUT
RCA pin plug
cord
(not supplied)
RL
ANALOG
IN
WhiteRed
RCA pin
plug cord
(not
supplied)
Connecting external
component with HDMI cable
You can also connect digital components to the
HDMI 1 IN and HDMI 2 IN terminals and HDMI OUT
terminal.
This terminal is only for the use in
the factory or the service center.
HDMI cable
(not supplied)
HDMI cable
(not supplied)
DVD player, etc.
(not supplied)
Blu-ray player, etc.
(not supplied)
HDMI cable
(not supplied)
TV, etc. (not supplied)
Rear of the unit
Connecting the power cord
Connect the supplied AC adaptor to the DC IN jack
on the unit. Then connect the supplied AC power
cord to the AC adaptor, and plug it in a wall outlet.
CAUTION
Disconnect the power cord before cleaning or moving •
the unit.
To avoid the risk of fire and to prevent damage,•
Do not use any AC adaptors other than the one –
supplied.
Do not use the supplied AC adaptor for other –
equipment.
Page 2
Operations
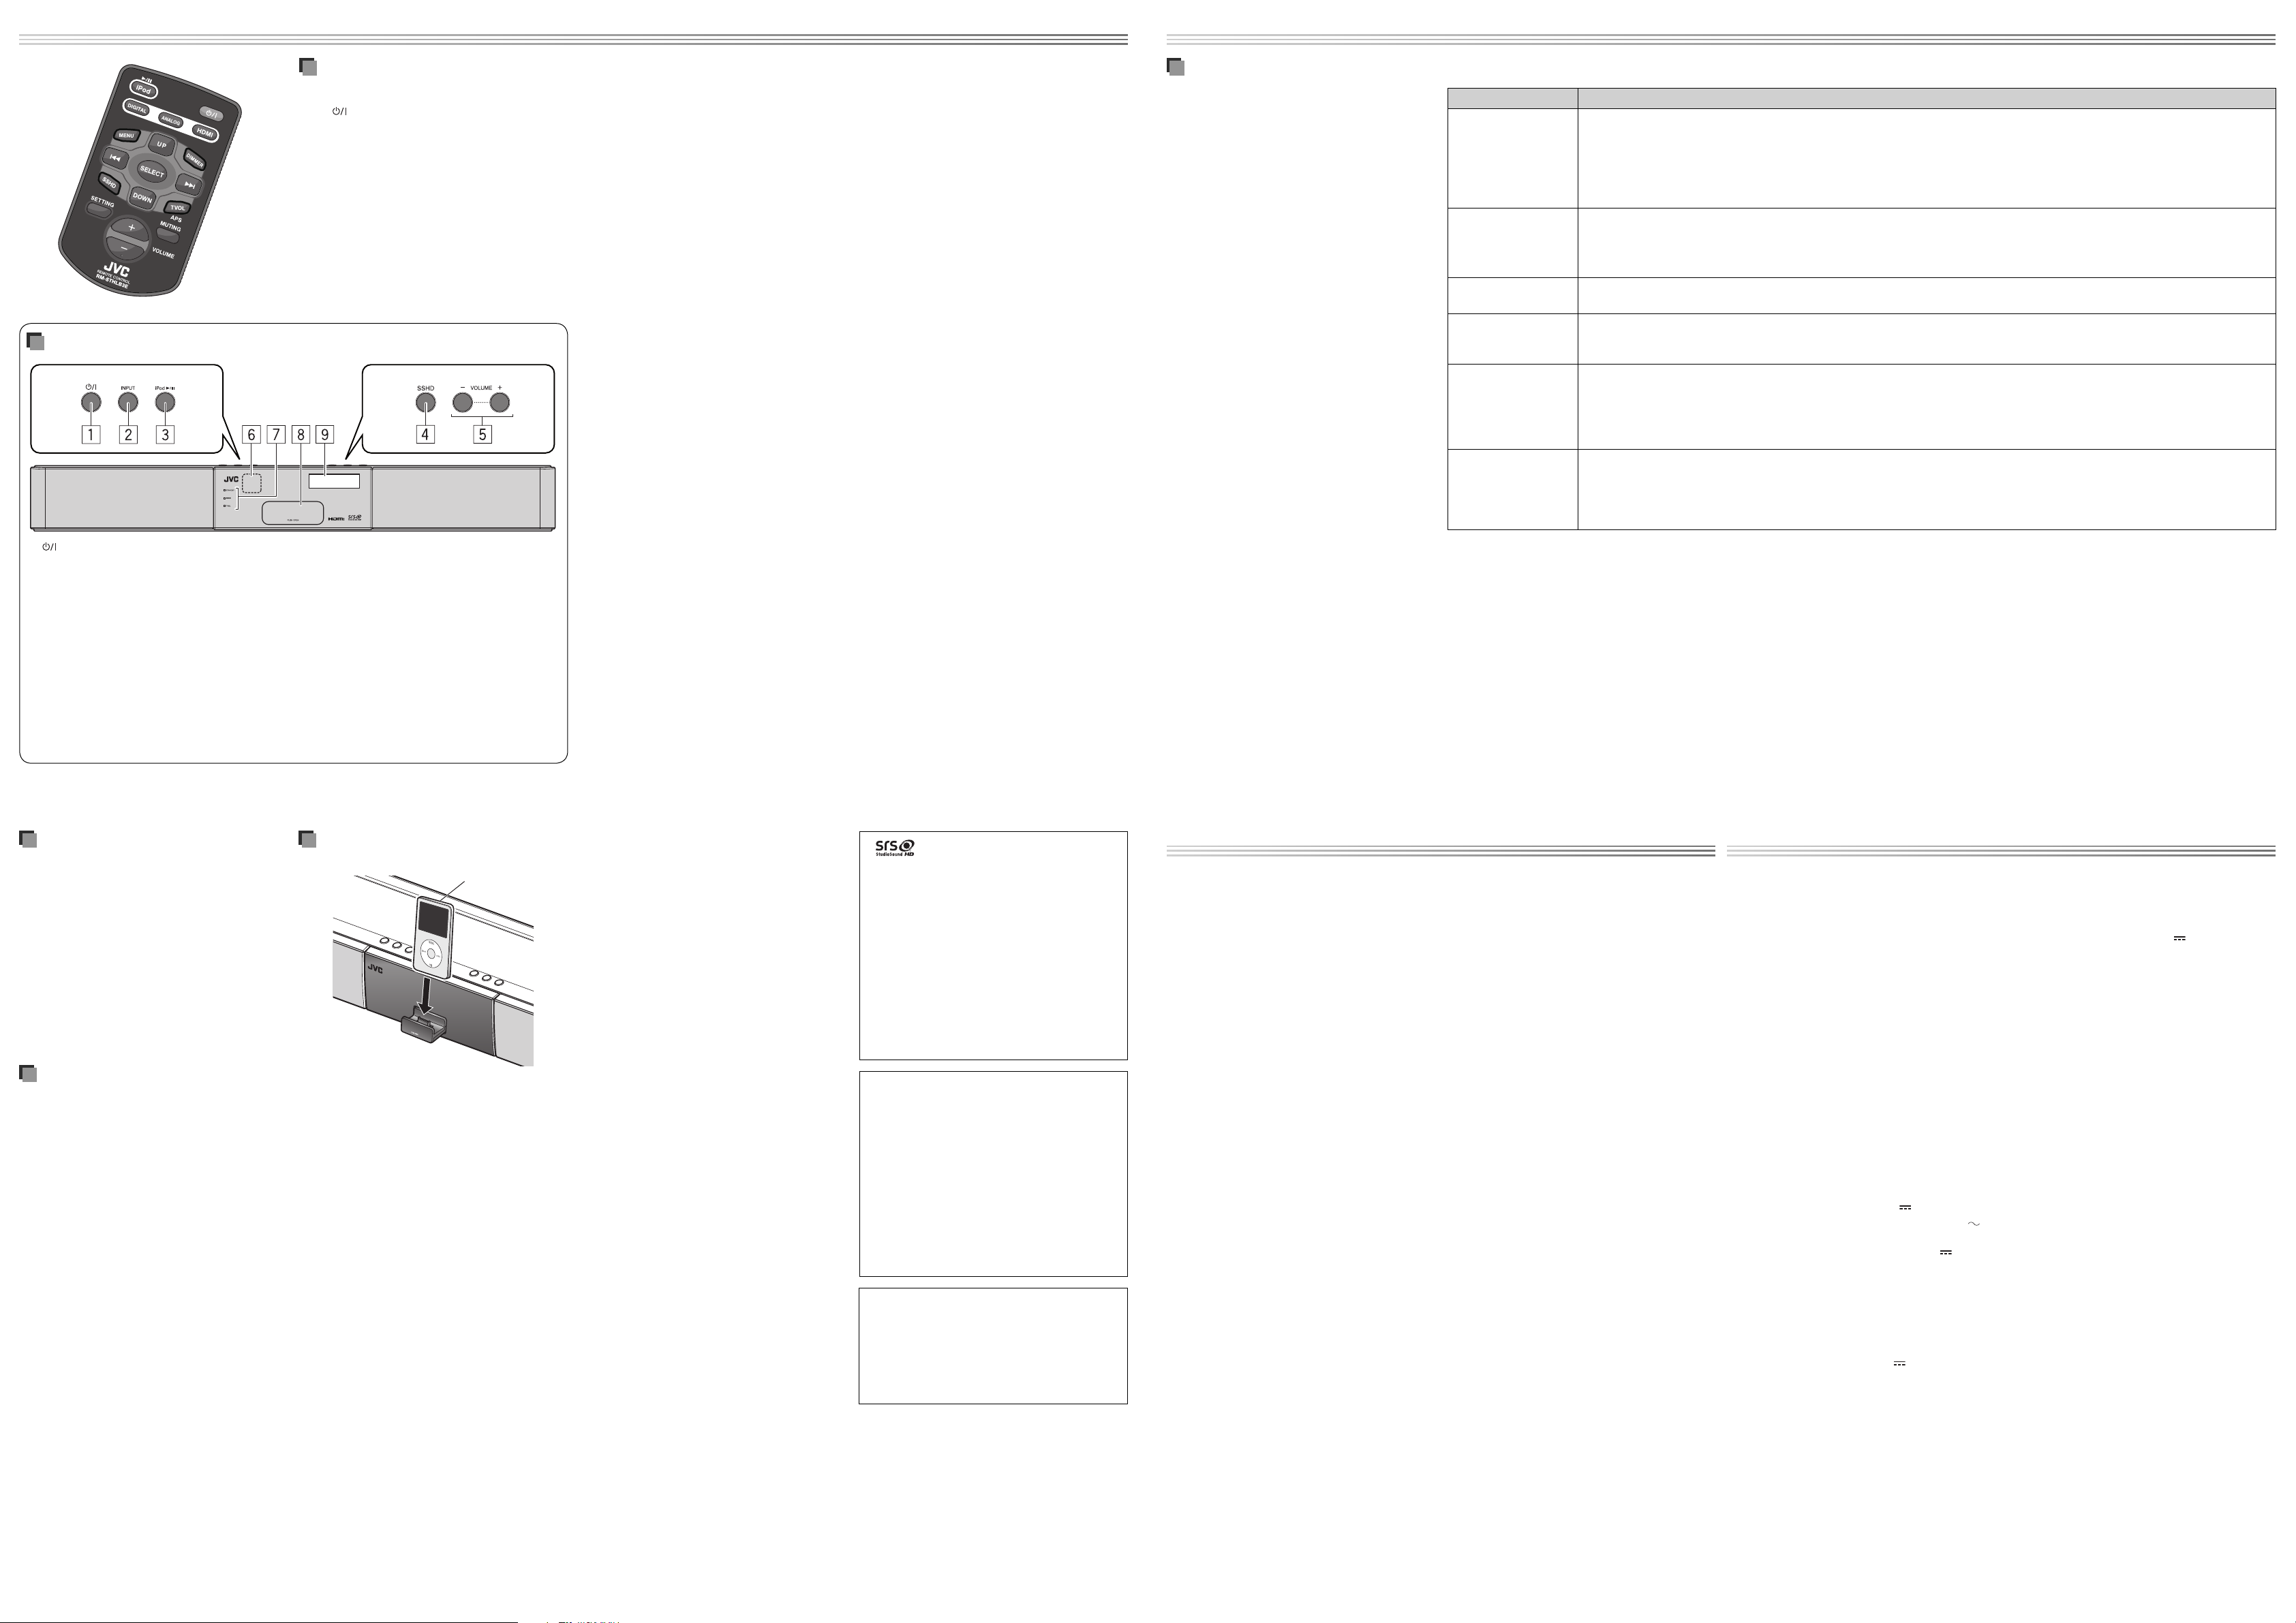
Buttons and lamps on the front panel
1 (power) button
2 INPUT button
Press the button repeatedly to select the input
source (DIGITAL 1 (DGTL1), DIGITAL 2 (DGTL2),
TV ARC, ANALOG, HDMI1, HDMI2).
3 iPod 6 button
Press the button to play back iPod.
4 SSHD button
Press to turn on/off StudioSound HD.
5 VOLUME +/– buttons
Adjusts the volume within the range of 0 (MIN)
to 40 (MAX).
Basic operation
Turning on/off the power 7
Press .
NOTES
A small amount of power is consumed even when the •
power is turned off (standby mode). During standby
mode, the STANDBY indicator lamp on the front
panel lights up. Unplug the power cord from the AC
outlet to turn the power off completely.
You can also turn on the power by pressing one of •
the input buttons (DIGITAL, ANALOG or HDMI) and
iPod 6.
6 Remote sensor
Receives the signal from the remote control.
7 STANDBY indicator lamp
Lights up while the power is turned off.
SSHD indicator lamp
Lights up while StudioSound HD is activated.
TVOL indicator lamp
Lights up while TruVolume is activated.
8 Tray for iPod dock
Push the tray to open the dock for iPod.
9 Display
Shows the volume level, the current source
and the settings.
Activating/deactivating APS (Auto Power 7
Save)
The System automatically turns off to save the
power.
Press and hold APS.
Each time you press and hold the button, Auto
Power Save is turn on and off (APS ON and APS OFF
scroll on the display).
The System automatically turns off to save the •
power when one of the following situations
continues for 29 minutes:
For all sources:
When the volume is set to 0. –
When muting is activated. –
For DIGITAL 1/DIGITAL 2:
When the optical cord or coaxial cord is not –
connected, or there is no signal.
For TV ARC (Audio Return Channel):
When HDMI OUT is not connected, or there is no –
signal.
For iPod:
When iPod is not connected to the unit. –
For HDMI 1/HDMI 2:
When HDMI 1 IN/HDMI 2 IN is not connected, or –
there is no signal.
When one of the situations occurs...
The APS indicator is shown for 1 second every
1 minute and starts flashing 30 seconds before the
System turns off.
Selecting the input source 7
Press one of the input buttons repeatedly to
select the input source.
Each time you press each button, the source
changes as follows:
DIGITAL:
DIGITAL 1 (for the optical connection) \ DIGITAL
2 (for the coaxial connection) \ TV ARC (for HDMI
OUT with ARC)*
ANALOG:
ANALOG IN (for the analog connection)
HDMI:
HDMI 1 IN (for HDMI 1)|\ HDMI 2 IN (for HDMI 2)
* To use TV ARC, set CEC to ON, and make sure your TV
supports this function and has the correct settings.
Adjusting the volume 7
Press VOLUME +/–.
Adjusts the volume within the range of 0 (MIN) to
40 (MAX).
CAUTION
Set the volume to the minimum level before starting
any source. If the volume is set to a high level, the
sudden blast of sound may damage your hearing and
blow out the speakers.
Turning off the sound temporarily 7
Press MUTING.
To restore the sound, press the button again or •
press VOLUME + to adjust the volume.
Maintaining steady volume level 7
You can set your desired volume level for different
input sources to avoid volume fluctuation when
changing from one source to the other—TruVolume
(TVOL).
Press TVOL.
Each time you press the button, TruVolume is turn
on and off (TVOL ON and TVOL OFF scroll on the
display).
Changing the display brightness 7
Press DIMMER.
Each time you press the button, the display
brightness changes with the following scrolling
message:
DIMMER OFF (normal) \ DIMMER 1 (darker) \
DIMMER 2 (darkest)
Setting up the HDMI functions
You can change the settings of HDMI functions with
the menu on the display.
HDMI function optionally includes the controlling •
signals employed for the High-Definition
Multimedia Interface (HDMI) standard—Consumer
Electronics Control (CEC).
When devices equipped with CEC are connected,
each device can control the others. This system is
compatible with some basic functions of CEC. For
example, when you start playback on a connected
DVD/BD player, the unit and connected TV
compatible with CEC automatically turns on.
For details about the CEC function, refer to the •
operation manuals of the connected CEC devices.
NOTES
The CEC function may not work on some CEC devices.•
The HDMI functions may not work depending on the •
setting or status of the unit or the connected devices.
1 Press SETTING to enter setting mode.
2 Press 4 or ¢ to select the item you want
to set.
The setting mode changes as follows:
BASS \ TREBLE \ HDMI PASSTHROUGH \
HDMI AUDIO OUT \ CEC CONTROL (\ POWER
CONTROL \ SYSTEM AUDIO \ TV IN)*
2
3 Press UP or DOWN to select the setting.
For TV IN, pressing UP or DOWN may cause the
setting to change as follows:
OFF \ D1 \ ARC
4 Repeat 2 and 3 to set up other items.
To exit from the menu, press SETTING.
Item Contents
HDMI PASSTHROUGH ON : The audio and video signal are transmitted to the TV connected to HDMI OUT terminal even if the unit is on standby.*
The STANDBY lamp lights orange while the unit is on standby.•
OFF : The audio and video signal are not transmitted to the TV connected to HDMI OUT terminal while the unit is on standby.
NOTES
To toggle between HDMI 1 IN and HDMI 2 IN during standby, press and hold the HDMI input button for 2 seconds.•
If HDMI 1 is selected, STANDBY indicator lamp blinks once. If HDMI 2 is selected, STANDBY indicator lamp blinks twice.•
HDMI AUDIO OUT TV : The audio signal is emitted from the TV connected to HDMI OUT terminal.
AMP : The audio signal is emitted from the speakers of the unit.
NOTE
If you select ON for System Audio*
CEC CONTROL ON : Activates the CEC function.
OFF : Deactivates the CEC function.
2
POWER CONTROL*
SYSTEM AUDIO*
2
TV IN*
1
*
The power consumption will be increased.
2
*
These are the settings for the CEC function which are selectable only when CEC CONTROL is ON.
2
ON : The unit automatically turns on when you start playback on a connected DVD/BD player, and turns off when you turn off the TV
connected to HDMI terminals.
OFF : Deactivates this function.
ON : The audio signal is emited from the speakers of the unit, and the volume control for this System can be operated by the TV
remote control.
OFF : Deactivates this function.
NOTE
Applicable only if the TV supports System Audio and correct setting have been made on the TV.
D1 : The input source of the unit is changed to “DIGITAL 1” automatically if you change the input source from HDMI to another on
the TV.
ARC : The input source of the unit is changed to “TV ARC” automatically if you change the input source from HDMI to another on the
TV.
OFF : Deactivates this function.
2
, you cannot change this setting (AUTO appears).
1
Adjusting the sound level
You can adjust the bass and treble sound level
within the range of –3 to +3.
1 Press SETTING to enter the setting mode.
– BASS: Adjusts the bass sound level.
– TREBLE: Adjusts the treble sound level.
2 Press 4 or ¢ to select the item you want
to set.
3 Press UP/DOWN to adjust the level.
NOTE
The change in the bass and treble sound level of the
speakers differ depending on the incoming signal of
the input source.
Using the surround mode
You can listen to a more realistic sound than stereo
sound using surround—StudioSound HD (SSHD).
Press SSHD.
Each time you press the button, surround mode is
turn on and off (SSHD ON and SSHD OFF scroll on
the display).
Playing back iPod
iPod (not supplied)
Connecting iPod 7
While the power is turned off...
1 Push the tray (8) to open the dock for iPod.
2 Connect iPod to the connector.
You cannot connect iPod to the unit if it is covered •
by something or with accessories attached.
Remove them before connecting.
Keep iPod in a straight position while connecting/•
disconnecting it.
Do not carry the unit with iPod connected. It might •
cause damage to the dock for iPod or you might
drop iPod.
Do not touch or hit the iPod terminal pins or •
connector pins in the dock for iPod directly. Doing
so might cause damage to the connector pins.
While the power is turned on, or during Standby •
with HDMI Pass Through ON, iPod can be charged.
Playing back 7
Press iPod 6.
While the power is turned off, simply pressing •
iPod 6 turns on the power and plays back iPod.
Pausing/resuming playback 7
Press iPod 6.
Skipping to the next track 7
Press ¢.
Skipping back to the previous track 7
Press 4 twice or more repeatedly.
Returning to the beginning of the track 7
Press 4 once.
Putting iPod in sleep mode 7
Press and hold iPod 6.
Displaying a menu/Returning to the 7
previous menu
Press MENU.
Selecting an item on the menu 7
Press UP or DOWN, then press SELECT.
NOTES
Operate iPhone or iPod touch itself in the following •
cases:
When operating the home button. –
When selecting application icons on the home –
screen.
When dragging the slider. –
Sound distortion may occur when playing back •
audio sources with high recording levels. If distortion
occurs, it is recommended to turn off the equalizer of
iPod.
You can select the video signal format (NTSC or PAL) •
in the setting menu on iPod.
• is a trademark of SRS Labs, Inc.
StudioSound HD technology is incorporated •
under license from SRS Labs, Inc.
SSHD: StudioSound HD by SRS Labs, Inc. SRS •
StudioSound HD™ provides an immersive and
engaging surround sound experience, while
maintaining steady volume and delivering rich
bass and clear dialog.
TVOL: TruVolume by SRS Labs, Inc. SRS •
TruVolume™ maintains a steady volume,
allowing listeners to set their desired volume
level once to enjoy television, music and all
other content without annoying volume
fluctuations.
“Made for iPod” and “Made for iPhone” •
mean that an electronic accessory has been
designed to connect specifically to iPod or
iPhone, respectively, and has been certified
by the developer to meet Apple performance
standards. Apple is not responsible for the
operation of this device or its compliance with
safety and regulatory standards. Please note
that the use of this accessory with iPod or
iPhone may affect wireless performance.
iPhone, iPod, iPod classic, iPod nano and iPod •
touch are trademarks of Apple Inc., registered
in the U.S. and other countries.
HDMI, the HDMI logo and High-Definition •
Multimedia Interface are trademarks or
registered trademarks of HDMI Licensing LLC.
HDCP is the abbreviation of “High-bandwidth •
Digital Content Protection,” and is the highreliable copy control technology licensed by
Digital Content Protection, LLC.
Troubleshooting
If you have a problem with this System, check this
list for a possible solution before calling for service.
POWER
Power does not come on.
The power cord is not inserted securely. Plug it in =
securely.
The unit suddenly turns off.
Auto power save function is on. Refer to =
“Activating/deactivating APS (Auto Power Save)”
in “Basic operation.”
REMOTE CONTROL
The remote control does not work.
Pull out the insulation sheet. =
Sunlight is shining directly on the remote sensor. =
Hide the remote sensor from direct sunlight.
The path between the remote control and the =
remote sensor on the front panel is blocked.
Point the remote control at the remote sensor on =
the front panel.
Signals cannot reach the remote sensor. Move =
closer to the unit.
The battery is exhausted. Replace the battery. =
The remote control of the TV does not work.
If you installed the unit in front of the TV, connect =
the TV remote pass through cable (supplied).
External components
No sound can be heard when DIGITAL 1 or
DIGITAL 2 is selected as a source.
Check the output setting of the connected =
digital components. Set the output setting to
PCM signal. (Refer to “Specifications” for more
information.)
iPod
iPod cannot be connected firmly.
Check to see whether the connector between =
iPod and the unit is not damaged, and connect it.
iPod does not provide sound.
iPod is not properly connected. Remove iPod =
from the unit, and then connect it again.
iPod cannot be charged.
iPod is not properly connected. Remove iPod =
from the unit, and then connect it again. After
connecting iPod, turn on the power again.
HDMI
No sound can be heard when HDMI 1 or HDMI 2
source is selected as a source.
Check the output settings on the HDMI =
connected devices. Set the audio output setting
to PCM signal and enable HDMI Audio Out.
No sound can be heard when TV ARC is selected as
a source.
Check if your TV supports this function and turn =
on the settings for ARC and set the digital audio
output setting to PCM signal on your TV.
Specifications
Output Power : 60 W (30 W + 30 W) at 4 Ω
(10% THD)
Audio section
Analog Input : ANALOG IN : 1 Vrms/50 kΩ
Digital Input* : DIGITAL IN 1 (OPTICAL) :
–21 dBm to –15 dBm
(660 nm ±30 nm)
DIGITAL IN 2 (COAXIAL) :
0.5 Vp-p/75 Ω
Subwoofer Output : SUBWOOFER PRE-OUT
Speaker section
Type : Bass-Reflex Type
Speaker : 6.5 cm cone × 4
Power Handling Capacity :
Impedance : 4 Ω
Frequency Range : 75 Hz to 23 kHz
Sound Pressure Level : 83 dB/W•m
General
Power Source (DC IN) : DC 19 V 3.37 A
AC Adaptor (AA-R1904) : Input : AC 100 – 240 V
Power Consumption 0.50 W or less
(in Standby mode) :
Dimensions (W × H × D) : 600 mm × 75 mm × 148 mm
Mass : 3.1 kg
iPod
Output Power : DC 5 V 1 A
Video Out (VIDEO OUT) : Composite
30 W
50 Hz/60 Hz, 1.5 A – 0.9 A
Output : DC19 V
,
3.37 A
HDMI
HDMI Input * : HDMI 1 IN, HDMI 2 IN
HDMI Output : HDMI OUT
Max. Capability : 1920 × 1080 at 60 Hz
Output Power : DC 5 V
* Corresponding to Linear PCM only (with sampling
frequency — 32 kHz, 44.1 kHz, 48 kHz)
When an audio signal other than Linear PCM comes –
in, NONPCM appears on the display.
Design and specifications are subject to change
without notice.
55 mA
Skipping forward/back 7
Press and hold ¢ or 4.
 Loading...