

Page 1

TH-DN501/T H-N76 7BA
Page 2

War ning & Precaut ion s...... ... .......... ... ....... ... ....... ... .......... ... ....... ... .......... ... ....... ... ....... ... ..
Conven tion s Use d in thi s Manual
Notes ab out Di scs
Batter ies in to th e Remo te Con tro l
2-3
4
4
4
4
4
5
5
5
6
6
7
8
9
9
System Setu p
CD Rippi ng
MP3/MPEG4 /JP EG Operat ion M ethod
FM Radio Oper ati ng Instru cti ons
Trouble sho oti ng
Specificat ion s
10-13
13
14
15
15
15
16
16
16
16
17
17
18
19
1
Page 3

Warning & Precautions
WARNIN G: TO AVOI D THE DANG ER OF F IRE O R ELECTRIC SHOCK, DO
NOT EXPOSE THIS APPLIANCE TO RAI N OR MOISTURE. NEVER OPEN
THE CAB INE T, AS DANGE ROU S HIG H VOLTAGES ARE CONTAINED INSID E.
ONLY A QUALIFIED SERVICE TECHNICIAN SHOULD ATTEMPT TO OPEN
THE CAB INE T.
CAUTI ON: This Digi tal Ve rsa tile Disc Player employ s a las er sy stem. To pre vent
direc t exp osu re to the laser beam, do not op en th e enc losure. Vis ible laser
radia tio n is pr esent when enclosure is o pen . DO NO T STARE INTO BEAM.
Addit ion all y, the u se of c ont rols or adjustments or pe rfo rma nce of procedures
other t han t hos e specified herein may res ult i n haz ardous radiation expo sur e.
To ensure p rop er us e of this product, please r ead t his o wner’s man ual c are fully
and ret ain f or fu ture reference. Shoul d the u nit r equire maintenance, c ont act
an auth ori zed s ervice center.
This eq uip men t generates, uses and can r adi ate r adio frequency energy a nd, i f
not ins tal led a nd used in accordance wit h the i nst ructions, may cause int erf ere nce
to radi o com mun ication.
Howev er, th is is n o guarantee that interf ere nce w ill not occur in a particul ar
insta lla tio n.
If this e qui pme nt does cause interfere nce t o rad io or television recept ion , whi ch
can be de ter min ed by turning the equipme nt off and o n, th e use r is en couraged to
try to co rre ct th e interference with one o f the f oll owing methods:
Reori ent o r rel ocate the receiving ant enn a.
Incre ase t he se paration between the eq uip men t and receiver.
Conne ct th e equ ipment into an outlet on a ci rcu it di ffe ren t fro m that to which the
recei ver i s con nected.
Consu lt th e dea ler or an experienced rad io/ TV te chnician for help.
Recor d the m ode l and serial numbers of thi s uni t whi le it is easy to see them.
These n umb ers a re located on the back of the u nit ’s cabin et. R eta in this
infor mat ion f or future reference.
CAUTI ON: TO REDUCE T HE RI SK OF E LECTRIC SHOCK, DO NOT REM OVE
COVER ( OR BA CK) .
THERE AR E NO USER SERVICEABLE PARTS INSIDE. REFER SERVICING TO
QUALI FIE D SERVIC E PER SON NEL.
2
Page 4

IMPORTANT SAFETY INSTRUCTIONS
1. Read the user man ual b efo re us e. Ke ep al l ins tru cti ons f or fu tur e ref ere nce.
2. Always operate the p rod uct f rom a p owe r sou rce o f the s ame v olt age , fre que ncy and rating
as indicated on the ra tin g lab el.
3. This product is inte nde d for i ndo or, ho use hol d use o nly.
4. To protect against ele ctr ic sh ock : do no t imm ers e uni t, pl ug or c ord i n wat er or s pra y with
liquids; do not plac e uni t on wi ndo wsi lls o r oth er pl ace s whe re it m ay be e xpo sed to dripping
or splashing of wate r; do n ot pl ace v ase s or si mil ar ob jec ts fil led w ith l iqu ids near the unit.
5. Do not use near water, or s pil l any l iqu ids o n the u nit .
6. Keep the unit away fro m hea t sou rce s lik e rad iat ors , hea t reg ist ers , sto ves o r other products
that produce heat. N o ope n flam e sou rce s lik e can dle s sho uld b e pla ced o n the u nit.
7. Use only with attach men ts/ a cce sso rie s spe cifi ed by t he ma nuf act ure r. Use of attachments/
accessories not re com men ded c an be h aza rdo us.
8. Do not cover the unit du rin g use .
9. Do not operate the pro duc t wit h a dam age d cor d or pl ug, o r if th e pro duc t mal fun ctions, or
is dropped or damage d in an y man ner.
10. Do not force the power p lug i nto a w all o utl et.
11. If the supply cord is damaged, it must be replaced by the manufactur er, it s ser vic e age nt
or similarly quali fied p ers ons i n ord er to a voi d haz ard .
12. For safety reasons , do no t rem ove a ny co ver s or at tem pt to a cce ss th e ins ide o f the p roduct.
13. When removing the po wer p lug f rom t he wa ll ou tle t, al way s pul l dir ect ly on t he plug; never
pull on the cord.
14. Keep objects away fr om ve nti lat ion o pen ing s. Do n ot bl ock v ent ila tio n openings at any time.
15. Do not place heav y obj ect s on th e pow er co rd, u nit o r spe ake rs. P rot ect t he po wer cord
from being walked on , pin che d by ob jec ts, o r tor n and e xpo sed t o liq uid s (es pecially at plugs,
convenience rece pta cle s, an d the p oin t at wh ich t hey e xit f rom t he de vic e.
16. Unplug the devi ce du rin g lig htn ing s tor ms. U npl ug an d rem ove a ny ba tte ries when the
device will not be use d for a l ong t ime .
17. Do not expose the unit t o dir ect s unl igh t or ab nor mal ly ho t or hu mid c ond iti ons.
18. Use on a stable surfac e. Do n ot pl ace h eav y obj ect s on th e uni t or sp eak ers .
19. This appliance is no t int end ed fo r use b y per son s (in clu din g chi ldr en) with reduced
physical, sensor y or me nta l cap abi lit ies , or la ck of e xpe rie nce a nd kn owledge, unless they
have been given supe rvi sio n or in str uct ion c onc ern ing u se of t he ap pli ance by a person
responsible for th eir s afe ty.
20. This product is not a to y! Ch ild ren s hou ld be s upe rvi sed t o ens ure t hat t hey d o not play
with the appliance .
21. Do not clean the unit wi th an y har sh ch emi cal s as th is mi ght d ama ge th e fini sh. W ipe clean
with a dry cloth.
22. Dispose of batte rie s tho ugh tfu lly, keeping in mind the environ men tal a spe cts a nd lo cal
council regulati ons .
23. This product is suitable for use in tropical and/or moderate clim ate s.
24. Ensure correct a nd sa fe in sta lla tio n and i nte rco nne cti on of t he ap par atus in multimedia
systems;
25. Do not expose batt eri es to e xce ssi ve he at li ke di rec t sun lig ht or s imi lar.
26. As the mains plug is used as the disconnect device, the mains plu g sho uld r ema in re adi ly
operable.
27. Not suitable for a lti tud es ab ove 2 000 m fro m sea l eve l.
28. The maximum ambient temperature is 45°C.
3
Page 5

DVD Regi on Co de :
Type s of Di scs:
Note:
- Do not play CD- G, CD -EXTRA, C D-R OM and
DVD-ROM dis cs.
- Do not play scr atc hed or dama ged d iscs.
- Do not play dis cs th at are dust y, soiled or m ark ed
with fingerp rin ts.
Glossa ry of D isc Terms:
Conven tio ns Used in this Ma nual:
Page 6

Notes ab out D iscs :
Disc Cle ani ng Precautio ns :
Please n ote :
Page 7

Front P ane l :
Back Pa nel :
MODEL: TH-DN 501/T H-N76 7BA
Note:
The audio out put s provide d (R/ L outp ut, coaxial an d opt ical) are o pti ona l in case you w ant t o connect to an
external am pli fier or simi lar d evices.)
Page 8

Remot e Con tro l:
Function Overview
RM-S THN76 7A
Page 9

Connections
MODEL:T H-DN5 01/TH- N767B A
Please n ote :
Page 10
Connections
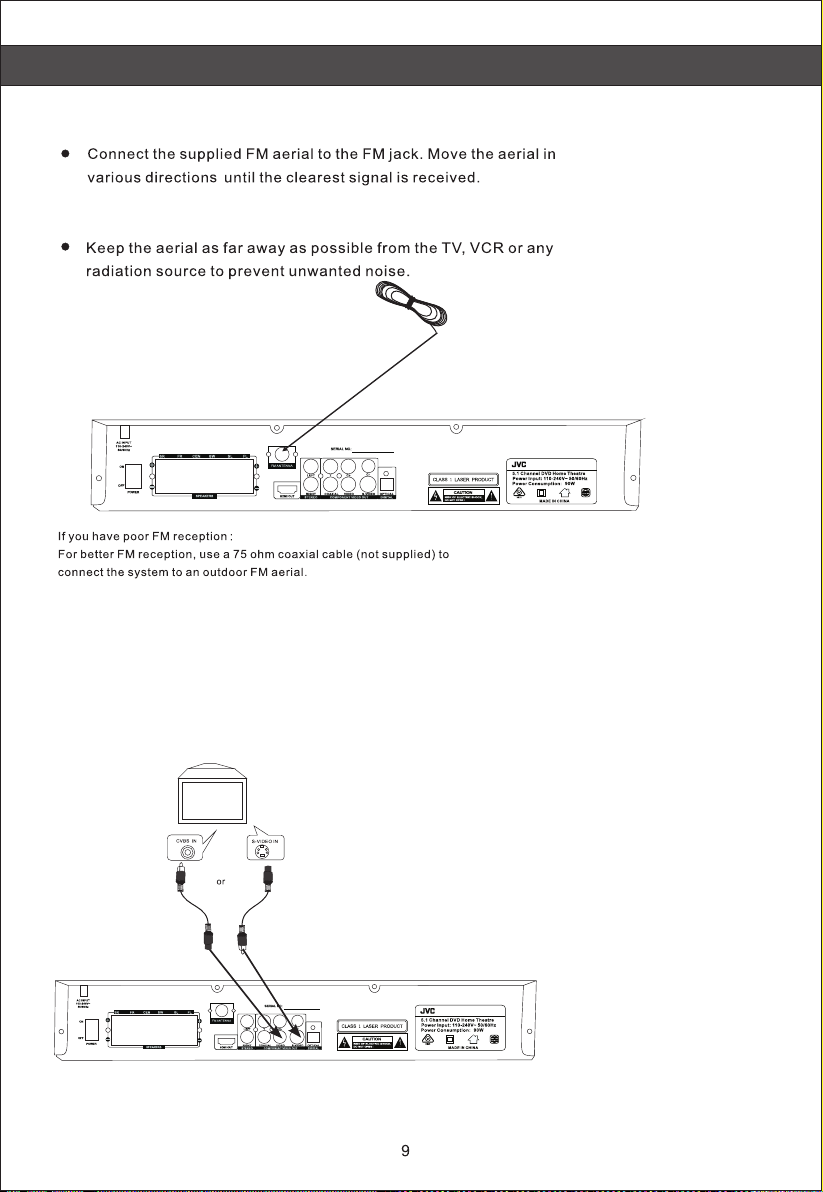
Conne cti ng to F M Aerial:
Please note:
Conne cti ng to T V or ot her displays:
You ca n conn ect to t he TV or o ther d ispl ays using a ny ONE o f the vi deo ou tput s:
- S-V ideo O ut
- CVB S Out
- HDMI Out
- Compon ent Ou t (YPb Pr)
MODEL:T H-DN5 01/TH- N767B A
MODEL:T H-DN5 01/TH- N767B A
Page 11

System Setup
The c ent re and t he rea r spea kers c an be sligh tly cl oser ( as
shown be low) .
B
A
A
45°
C
C
C
90°
C
D
60°
D
30°
20°
B
A
A
45°
C
C
90°
20°
Page 12

System Setup
Setup M enu :
Press SETU P button to enter the set up me nu,
then press b utt on to h igh lig ht Ge neral,
/
Audio, Dol by, Video or Preference submenu.
Press ENTE R/O K/ bu tto n to en ter t he
highligh ted s ub- men u and i n the s ub-menu,
press to hig hli ght p ref err ed it ems. The
/
current se tti ng of t he hi ghl igh ted items will be
displaye d. Pr ess b utt on to e nte r settings of
selected i tem , the n pre ss bu tto n to se lect
/
different setting, and press EN TER /OK b utt on to
confirm th e set tin g. The backgr oun d col or of t he
confirme d set tin g wil l bec ome o range. Aft er th e
setting is c onf irm ed, p res s but ton to exit the
setting.
General Se tup P age
Gen eral Se tup Pag e --
TV Di splay 4 :3/PS
Ang le Mark O n
OSD L ang ENG
Cap tions O ff
Scr een Sav er On
HDC D Off
Las t Memor y On
TV Display :
4:3/PS: Se lec t thi s opt ion i f you h ave a normal
TV and want bo th si des o f the p ict ure t o be
trimmed or f orm att ed to f it yo ur TV s cre en.
4:3/LB: In t his c ase , a wid e pic tur e with black
bands on the u ppe r and l owe r por tio ns of the
TV screen wi ll be d isp lay ed.
16:9: Wide S cre en di spl ay .
Angle Mark : Dis pla ys cu rre nt an gle setting
informat ion o n the r igh t han d cor ner of the TFT
screen if av ail abl e on th e dis c.
OSD Langua ge: You c an se lec t you r own
preferre d lan gua ge.
Captions : Clo sed c apt ion s are d ata that are
hidden in th e vid eo si gna l of so me di scs. Before
you select t his f unc tio n, pl eas e ensure that the
disc conta ins c los ed ca pti ons i nformation and
your TV set also has this function.
Screen Sav er: This function is us ed to t urn t he
screen sav er on o r off.
HDCD:
This funct ion i s use d to ch ang e the H DCD
playback s ett ing s.
Last Memor y:
This funct ion i s use d to Re sum e
Playback f unc tio n On/ Off.Wh en it i s on, t he
same disc ca n be pl aye d sta rti ng fr om where
the previo us pl ayb ack w as st opp ed.
Audio Setu p Pag e:
--A udio Se tup --
Spe aker Se tup
Spd if Setu p
Kar aoke Se tup
CH EQ S etup
3D Pr ocess
Speaker Se tup :
On Audio Setu p Pag e, pr ess t o hig hli ght
/
Speaker se tup , the n pre ss OK b utt on to
enter Spea ker S etu p sub -me nu:
Downmix Se tup :
LT/RT:Select this option if your DVD
Player is co nne cte d to a de cod er.
Stereo: Se lec t thi s opt ion w hen o utput
delivers s oun d fro m onl y the t wo fr ont
speakers .
5.1CH:Se lec t thi s opt ion w hen 5 .1-Ch.
audio outp uts a re co nne cte d.
Front Spea ker : Set t he fr ont s pea kers
output lev el la rge o r sma ll.
Center Spe ake r: Se t the c ent er sp eaker
output lev el to l arg e or sm all .
Rear Speak er: S et th e spe ake rs ou tput
level to lar ge or s mal l.
Subwoofe r: Se t the s ubw oof er ou tpu t to on/off.
SPDIF Setu p: Se t the S PDI F dig ita l aud io
output to Off, RAW o r PCM m ode .
Karaoke Se tup : This mode is used to a cti vat e
the built- in mi cro pho ne sw itc h and echo
function s of th e pla yer f or si ng- a-long purposes.
CH EQ Setup:
On Audio Setu p Pag e, pr ess t he di rec tion key
on the remot e con tro l to ch oos e the E Q mode,
and press OK k ey to c onf irm t he se lec tion.
3D Process : This function is used t o cha nge
the 3D surro und s ett ing s.
Page 13
System Setup
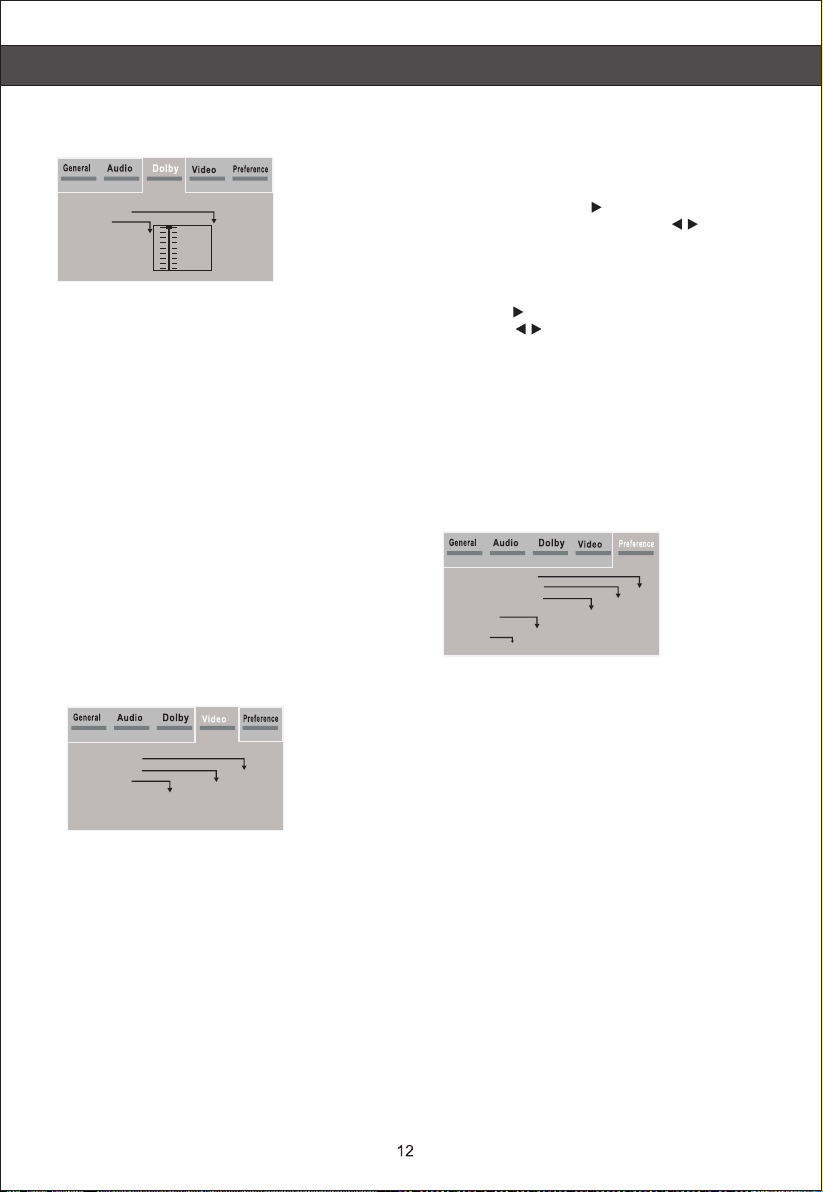
Dolby Setu p Pag e:
--D olby Di gital S etup --
Dua l Mono
Dyn amic
Ste reo
L-M ono
FULL
R-M ono
3/4
Mix -Mono
1/
2
1/4
OFF
Dual Mono Se tup :
This funct ion i s to se t the M L/MR audio
output in di fferent mod es.
Stereo: Se lec t thi s mod e when your DVD
player is co nne cte d wit h one stereo speaker
or TV with stereo audio inp uts .
L-Mono:S ele ct th is mo de when your DVD
player is co nne cte d wit h single channel
speaker or TV with mono aud io in put . The
player sha ll ou tpu t L-c hannel audio only.
R-Mono:S ele ct th is mo de when your DVD
player is co nne cte d wit h single channel
speaker or TV with mono aud io in put . The
player sha ll ou tpu t R-c hannel audio only.
Mix-Mono :Se lec t thi s mode when your DVD
player is co nne cte d wit h single channel
speaker or TV with mono aud io in put . The
player sha ll mi x R/L -Ch annel audio into 1
channel to o utp ut.
Dynamic Se tup :
This funct ion i s to se t dyn amic output level
from OFF to FU LL.
Video Setup Page:
--V IDEO Se tup Pag e --
Com ponen t
Res oluti on
Qua lity
HDM I Setup
Sharpn ess
Bright ness
Contra st
Gamma
Hue
Satura tion
Luma Del ay
480I
576I
720P50
720P60
1080I5 0
1080I6 0
1080p( 50Hz)
1080p( 60Hz)
S-Vide o
YUV
Componen t Set up:
This funct ion i s use d to se t the component
video outp ut in S -Video o r YUV mode.
Resoluti on Se tup :
This funct ion i s use d to se t video output
resoluti on ac cor din g to your TV w hic h is
connecte d to th is pl aye r. Please refer to your
TV’S manua l to se e its r eso lution.
Quality Se tup :
Sharpnes s: This funct ion i s use d to se t the
sharpnes s of pi ctu re to h igh, medium or low.
Brightne ss: This func tio n is us ed to s et
brightne ss of t he pi ctu re. Highlight Brightness ,
then press E NTE R or bu tto n to enter
brightne ss su b-m enu , then press to set
/
brightne ss fr om- 20 to + 20. Press ENTER or
OK button to s ave a nd ex it.
Contrast : This functi on is u sed t o set c ont rast
of picture . Hig hli ght C ontrast then press
ENTER or but ton t o ent er Co ntrast sub-menu,
then press t o set c ont ras t from-16 to +16.
/
Press ENTE R or OK b utt on to s ave and exit.
HDMI SETUP :
HDMI: This function is us ed to s et th e HDM I
video outp ut to O n or Off.
Audio Sour ce: This func tio n is us ed to s et
the audio so urc e for H DMI t o AUTO o r PCM .
Preferen ce Pa ge:
--P refer ence Pa ge--
TV Type
Aud io
Sub title
Dis c Menu
Par ental
Pas sword
Def ault
Reset
PAL
ENG
Off
ENG
1 KID SAF
2 G
3 PG
4 Pg13
5 PGR
6 R
7 Nc17
8 ADULT
Englis h
French
German
Spanis h
Itlian
Chines e
Japane se
Korean
Portug uese
Itlian
Chines e
Japane se
Korean
Russia n
Arabic
Off
Englis h
French
German
Spanis h
Itlian
Chines e
Japane se
Korean
PAL
AUTO
NTSC
TV Type:
Used to sele ct th e col or sy stem that
correspo nds w ith b oth N TSC and PAL
TV system.
PAL: Select this if the conn ect ed TV is PAL
system. It w ill c han ge th e video signal of
a NTSC disc an d out put t o PAL for mat.
NTSC: Sele ct th is if t he co nnected TV is
NTSC syste m. It w ill c han ge the video signal
of a PAL disc and output to NTSC for mat .
Auto: Chan ge th e vid eo si gnal output
automati cal ly ac cor ding to the playing disc
format.
Audio: Sel ect s a lan gua ge for audio (if
availabl e).
Subtitle : Sel ect s a lan guage for subtitle(if
availabl e).
Disc Menu: S ele cts a l ang uage for the disc
menu (if ava ila ble ).
Page 14

System Setup
CD Ripping
Page 15

Pleas e not e:
Page 16

Pleas e not e:
Playing Discs
Pleas e not e:
Page 17

Pleas e Not e:
Pleas e Not e:
Selec tin g Audio Language:
Page 18

Other Functions
FM Radio Opera tion In struction:
1. Defa ult R adi o:
You can add u p to 30 s tat ions to the present stati on me mor y. This will all ow yo u to
selec t the a ssi gned preset number of a sta tio n to im mediately switch to any o f the p res et
stati ons .
2. Swit ch to R adi o Mode:
When it i s in DV D mod e, press “DVD/FM” key twi ce to s wit ch to Radio mode.
3. Autom ati c Sea rch Channels:
When it i s in ra dio m ode (FM), press “PLAY/PAUS E/SEARCH” key on the r emo te co ntr ol
to star t the a uto mat ic search of the stati ons .
After se arc hin g through all the station s, it w ill s top and store them automa tic all y.
You may pre ss “C H+” o r “CH-” to choose the different statio ns.
If you fin d a spe cifi c sta tion is too noisy or unc lea r, you m ay press “TUNE+” or “TUNE -” to
adjus t the f req uency until the station i s cle ar an d then press “ZOOM/MEM” k ey on
the rem ote t o sto re th is station .
4. Manu al Se arc h Stations:
If you pr efe r to ma nually search for stati ons , you c an press “TUNE+” and “TUN E-” t o
searc h the s tat ions and then press “ZOOM /ME M” ke y to store them.
Pro logic II Ins truct ion:
Your m ovi e collection featu res a h ost o f two-channel (stereo ) cla ssi cs. Most of your music
is in ste reo , too . The y sou nd pe rfectly acceptable, b ut th ey wo uld definitely soun d bet ter i n
surro und .
Pro Log ic II f unc tion makes this possibl e, co nve rting high-quality st ere o con tent into
compe lli ng 5. 1-channel surround so und .
When it i s pla yin g, press the button “Pro lo gic I I” on t he remote control to fulfi ll th is fu nction
(some f orm ats a re not supported).
USB Dev ice
1.Plu g the U SB De vice in the USB port when the re is n o dis c.
2.USB s upp ort s maximum capacity of 32G B.
This pl aye r is co mpatile with: VOB(DVD ), DAT(VCD), MP3 , AVI, JPEG, TXT, KOD AK.
USING THE MICROPHONE :
Plug the microphone/s into Mic input jack/s. Press the setup button to open the setup navigator. Use
the arrow keys to select AUDIO SETUP, scroll down to KARAOKE SETUP, select AUTO then press
ENTER to activate the internal microphone switch of the player. Using the arrow keys, adjust the
internal MIC VOL to the desired output level of the microphone. Adjust also the external Mic volume
control on the front panel of the player. Adjust the slider of ECHO upward to add some echo effect of
the signal fed to the microphone according to your preference. Echo level control is also available on
the remote control.
Page 19

Troubleshooting
Pleas e not e:
Page 20

Page 21

 Loading...