

Page 1
CAUTION: TO REDUCE THE RISK OF ELECTRIC SHOCK.
DO NOT REMOVE COVER (OR BACK)
NO USER SERVICEABLE PARTS INSIDE.
REFER SERVICING TO QUALIFIED SERVICE PERSONNEL.
RISK OF ELECTRIC SHOCK
DO NOT OPEN
The lightning flash with arrowhead symbol,
within an equilateral triangle is intended to
alert the user to the presence of uninsulated
"dangerous voltage" within the product's
enclosure that may be of sufficient
magnitude to constitute a risk of electric
shock to persons.
The exclamation point within an equilateral
triangle is intended to alert the user to the
presence of important operating and
maintenance (servicing) instructions in the
literature accompanying the appliance.
CAUTION
WARNING: TO REDUCE THE RISK OF FIRE
OR ELECTRIC SHOCK, DO NOT EXPOSE
THIS APPLIANCE TO RAIN OR MOISTURE.
LVT0951-006A
For U.S.A
This equipment has been tested and found to comply with the limits
for a Class B digital device, pursuant to part 15 of the FCC Rules.
These limits are designed to provide reasonable protection against
harmful interference in a residential installation.
This equipment generates, uses and can radiate radio frequency
energy and, if not installed and used in accordance with the
instructions, may cause harmful interference to radio
communications. However, there is no guarantee that interference
will not occur in a particular installation. If this equipment does cause
harmful interference to radio or television reception, which can be
determined by turning the equipment off and on, the user is
encouraged to try to correct the interference by one or more of the
following measures:
Reorient or relocate the receiving antenna.
Increase the separation between the equipment and receiver.
Connect the equipment into an outlet on a circuit different from that
to which the receiver is connected.
Consult the dealer or an experienced radio/TV technician for help.
Changes or modifications not expressly approved by the
manufacturer for compliance could void the user’s authority to
operate the equipment.
For Canada/pour le Canada
CAUTION: TO PREVENT ELECTRIC SHOCK, MATCH WIDE
BLADE OF PLUG TO WIDE SLOT, FULLY INSERT
ATTENTION: POUR EVITER LES CHOCS ELECTRIQUES,
INTRODUIRE LA LAME LA PLUS LARGE DE LA FICHE DANS LA
BORNE CORRESPONDANTE DE LA PRISE ET POUSSER
JUSQUAU FOND
THIS DIGITAL APPARATUS DOES NOT EXCEED THE CLASS
B LIMITS FOR RADIO NOISE EMISSIONS FROM DIGITAL
APPARATUS AS SET OUT IN THE INTERFERENCE-CAUSING
EQUIPMENT STANDARD ENTITLED “DIGITAL APPARATUS,”
ICES-003 OF THE DEPARTMENT OF COMMUNICATIONS.
CET APPAREIL NUMERIQUE RESPECTE LES LIMITES DE
BRUITS RADIOELECTRIQUES APPLICABLES AUX
APPAREILS NUMERIQUES DE CLASSE B PRESCRITES
DANS LA NORME SUR LE MATERIEL BROUILLEUR;
“APPAREILS NUMERIQUES”, NMB-003 EDICTEE PAR LE
MINISTRE DES COMMUNICATIONS.
For Customer Use:
Enter below the Model No. and Serial
No. which are located either on the rear,
bottom or side of the cabinet. Retain this
information for future reference.
Model No.
Serial No.
[J]
SX-DW303
POWERED SUBWOOFER
CAISSON DE GRAVE ACTIF
CAUTION
To reduce the risk of electrical shocks, fire, etc.:
1. Do not remove screws, covers or cabinet.
2. Do not expose this appliance to rain or moisture.
ATTENTION
Afin d’éviter tout risque d’électrocution, d’incendie, etc.:
1. Ne pas enlever les vis ni les panneaux et ne pas ouvrir le coffret
de l’appareil.
2. Ne pas exposer l’appareil à la pluie ni à l’humidité.
ENGLISH
INSTRUCTIONS
MANUEL D’INSTRUCTIONS
Caution—POWER switch
This apparatus is provided with the POWER switch to
minimize power consumption for safe use. Therefore,
1. Before doing initial settings, complete all the connections
required, connect the mains plug into the wall outlet, then
set the POWER switch to ON [ ❙ ].
2. When not in use, set the POWER switch to OFF [ ‡ ].
This disconnects the mains line.
0403NSMMDWJSC
EN, FR
2003 VICTOR COMPANY OF JAPAN, LIMITED
Précaution—Interrupteur POWER
Cet appareil possède un interrupteur POWER permettant de
réduire la consommation électrique et d’assurer une utilisation
en toute sécurité. Par conséquent:
1. Avant de réaliser les réglages initiaux, effectuez toutes les
connexions nécessaires, connectez la fiche d’alimentation
sur une prise secteur murale, puis mettez l’interrupteur
POWER sur la position ON [ ❙ ].
2. Quand l’appareil n’est pas utilisé, mettez l’interrupteur
POWER sur la position OFF [ ‡ ].
De cette façon, l’appareil est déconnecté du secteur.
FRANÇAIS
Thank you for purchasing a JVC speaker.
Before you begin using it, please read the instructions carefully to be sure you get the best
possible performance. If you have any questions, consult your JVC dealer.
Warnings, Cautions and Others
Precautions for installation
• To prevent deformation or discoloration of the cabinet, do not install the unit
where it is exposed to direct sunlight or high humidity, and avoid installation near
air conditioning outlets.
• Speaker vibrations may cause howling. Place the unit as far away from the player
as possible.
• Take the occurrence of earthquakes or other physical shocks into consideration
when selecting the installation place, and secure the unit thoroughly.
• This unit is magnetically shielded to avoid color distortions on TVs. However, if not installed
properly, it may cause color distortions. So, pay attention to the following when installing the
unit.
– When placing this unit near a TV set, turn off the TV’s main power switch or unplug it before
installing this unit.
Then wait at least 30 minutes before turning on the TV’s main power switch again.
Some TVs may still be affected even though you have followed the above. If this happens,
move this unit away from the TV.
• Tuner reception may become noisy or hissing if this unit is installed nearby the tuner. In this
case, leave a more distance between the tuner and this unit or use an outdoor antenna for
better tuner reception without interference from this unit.
Merci pour avoir acheté une enceinte JVC.
Avant de l’utiliser, veuillez lire ces instructions avec précautions afin d’obtenir les meilleures
performances possibles. En cas de questions, consulter votre revendeur JVC.
Avertissements, précautions et autres
Précautions pour l’installation
• Afin d’éviter une déformation ou une décoloration du coffret, ne pas installer
l’appareil là où il serait exposé à la lumière directe du soleil ou à une forte
humidité. Eviter également de l’installer auprès des sorties d’air conditionné.
• Les vibrations de l’enceinte peuvent causer du bruit de fond. Placer l’appareil le
plus loin possible du reproducteur.
• Considérer la possibilité de tremblements de terre et autres mouvements
physiques au moment de choisir l’emplacement et mettre l’appareil dans un
endroit sûr.
• Cet appareil est blindé magnétiquement pour éviter toute distorsion des couleurs sur les
téléviseurs. Cependant, s’il n’est pas installé correctement, il peut causer une distorsion des
couleurs. Faites attention aux points suivant lors de l’installation de cet appareil.
–
Si l’appareil doit être installé près d’un téléviseur, mettez le téléviseur hors tension ou
débranchez-le du secteur avant d’installer cet appareil.
Attendez ensuite 30 minutes avant de remettre le téléviseur sous tension.
Certains téléviseurs peuvent quand même être perturbés, même si vous avez suivi la
procédure ci-dessus. Si cela se produit, éloignez cet appareil du téléviseur.
• La réception radio peut devenir parasitée ou être perturbée par un souffle si cet appareil est
installé près du tuner. Dans ce cas, éloignez le tuner de cet appareil ou utilisez une antenne
extérieure afin d’obtenir une meilleure réception sans interférences avec cet appareil.
Precautions for Daily Use
• To maintain the appearance of the unit
Wipe with a dry, soft cloth if the cabinet or control panel should become dirty.
If very dirty, apply a small amount of water or neutral detergent to the cloth and wipe clean.
Then wipe with a dry cloth.
• To improve the sound field
If the speakers are facing a solid wall or glass door, etc., it is recommended to
furnish the wall with materials that absorb sounds, for example by hanging up
thick curtains, to prevent reflections and standing waves.
Checking the Supplied Accessories
Check to be sure you have the following supplied accessories.
The number in parenthesis indicates the quantity of the piece supplied.
• Monaural audio cord (1)
If the item mentioned above is missing, contact your dealer immediately.
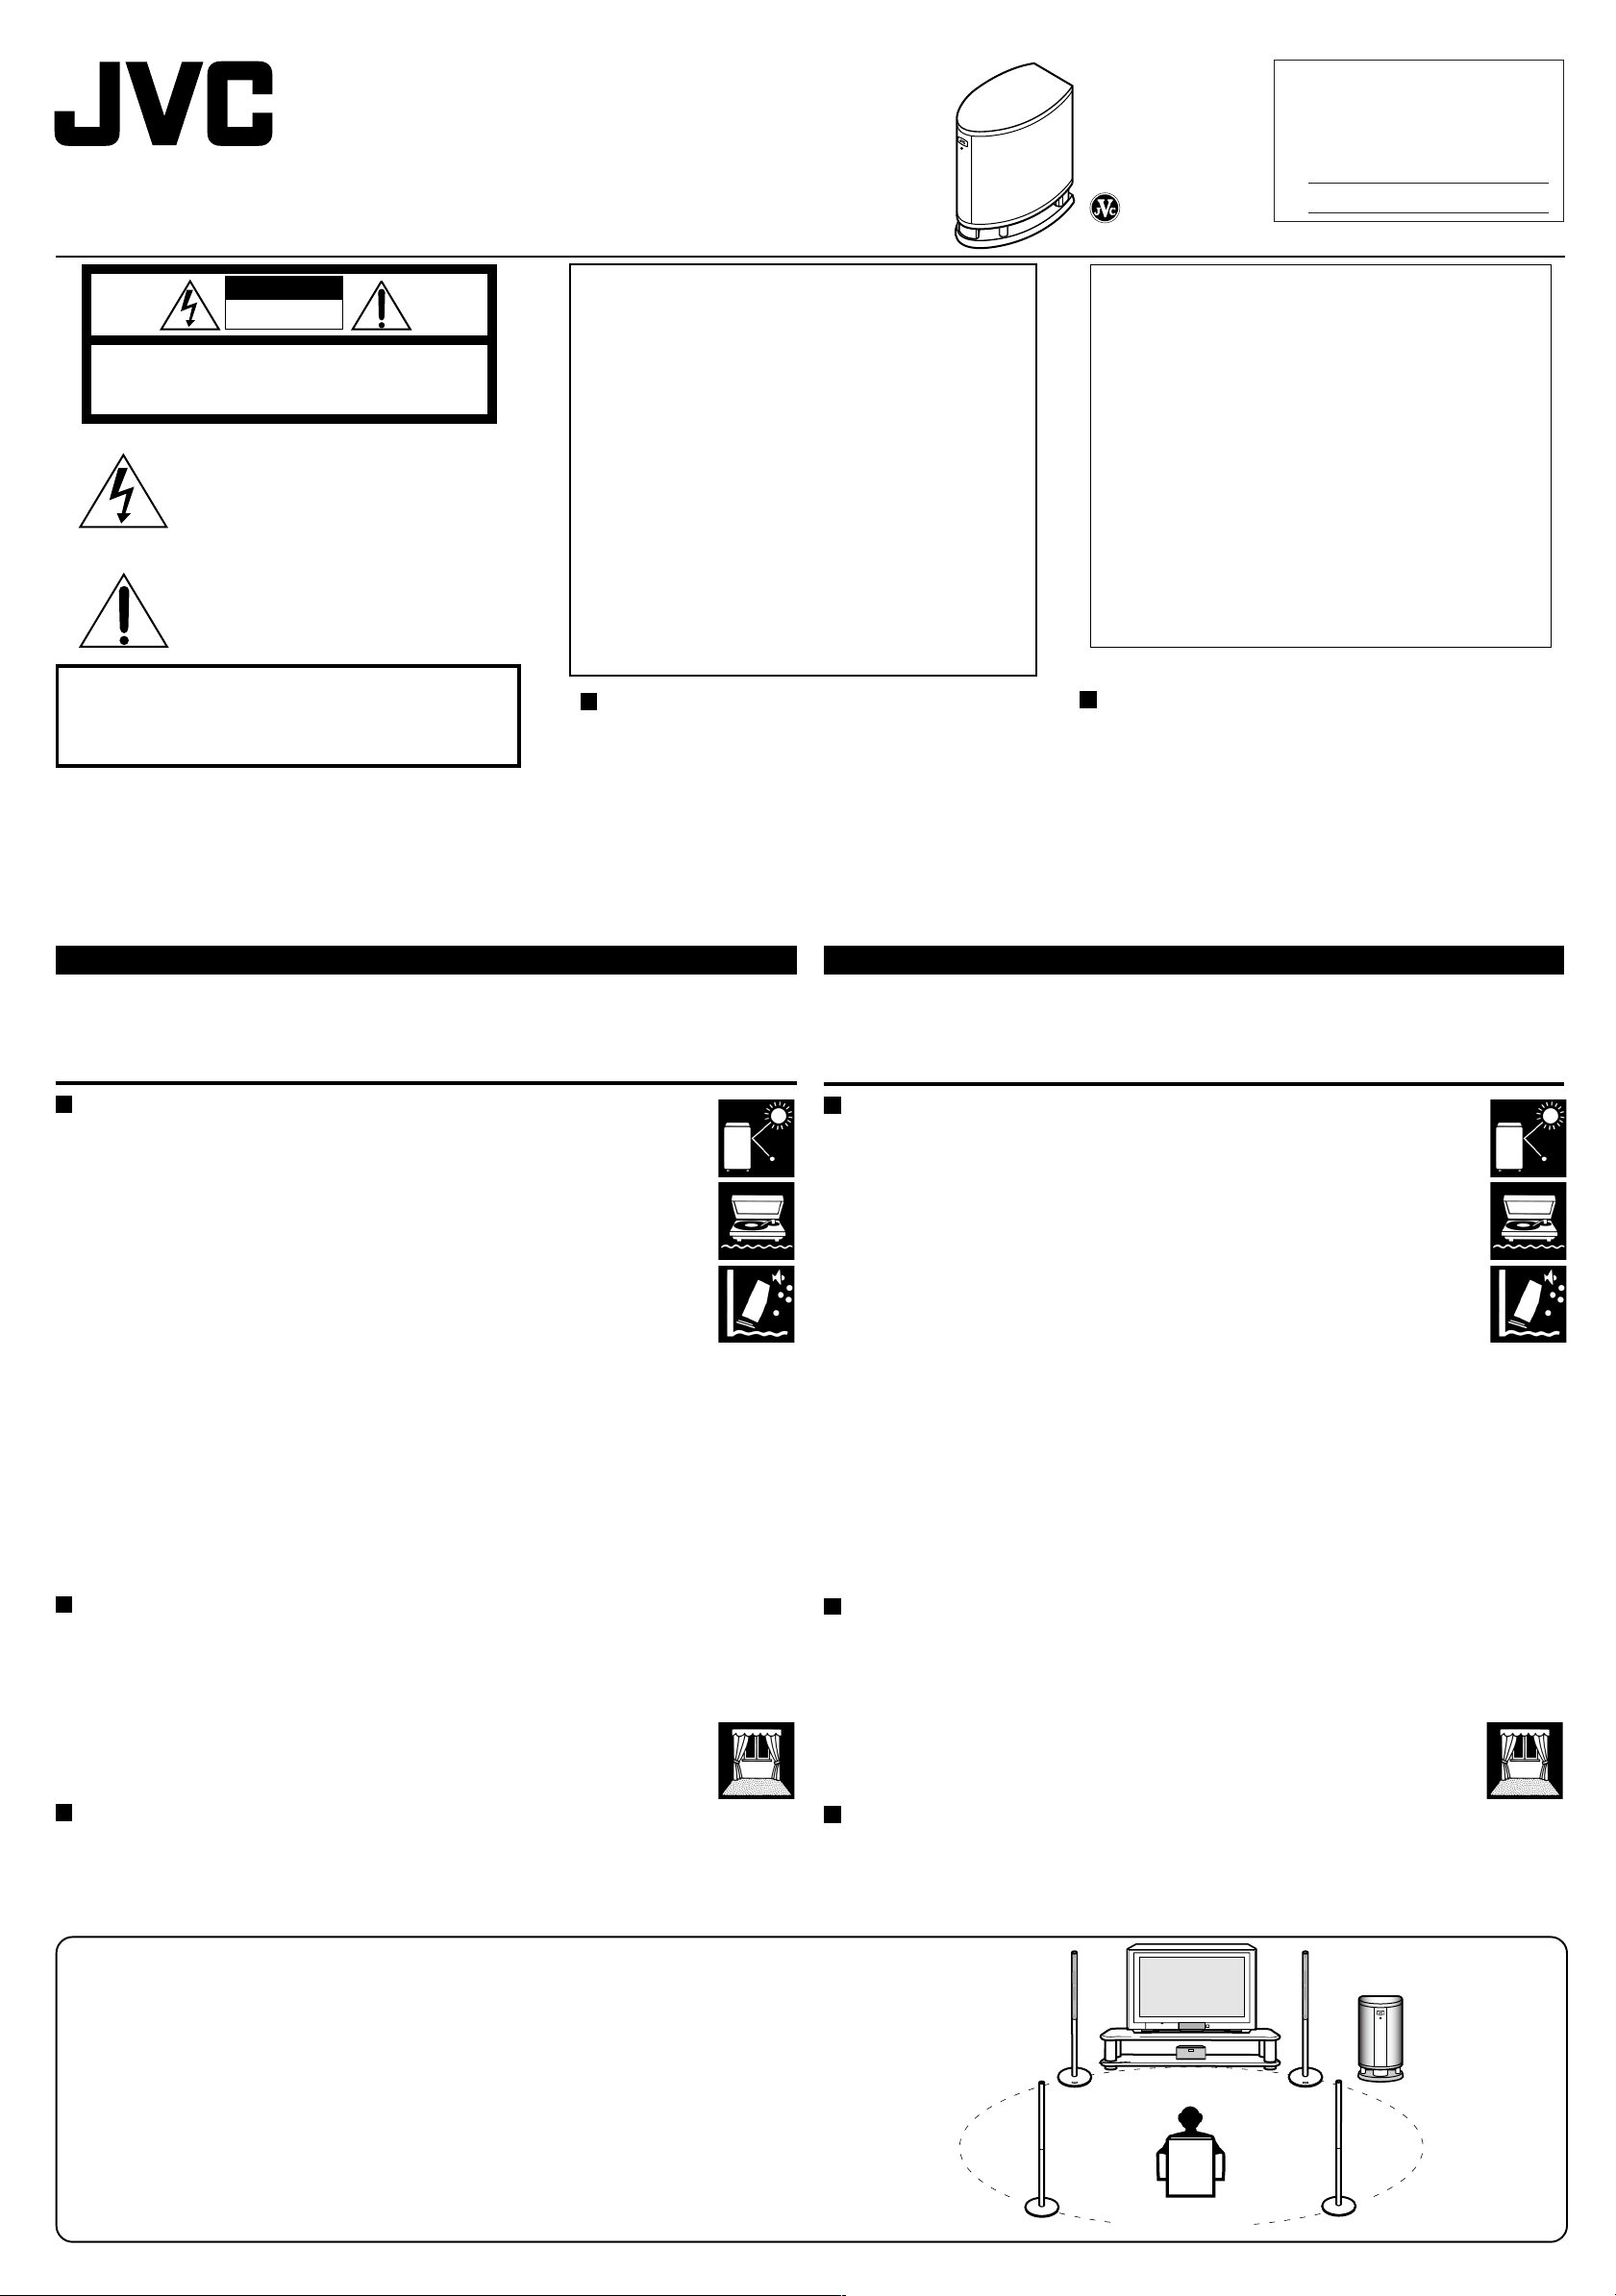
Speaker layout / Disposition des enceintes
To obtain the best possible sound from your unit:
—Place a subwoofer wherever you like since bass sound is non-directional. Normally
—Place all the main speakers at the same distance from the listening position.
Afin d’obtenir le meilleur son possible de votre appareil:
—Placez le caisson de grave à l’endroit que vous préférez, puisque les sons graves
—Placez toutes les enceintes principales à la même distance de la position d’écoute.
place it in front of you.
ne sont pas directionnels. Normalement, placez-le devant vous.
Précautions pour une utilisation quotidienne
• Pour conserver l’apparence de cet appareil
Nettoyer avec un chiffon sec et doux si le coffret ou le panneau de configuration se salissent.
S’ils sont très sales, humecter légèrement le chiffon avec de l’eau ou un détergent neutre et
nettoyer. Essuyer ensuite avec un chiffon sec.
• Amélioration du champ acoustique
Si les enceintes font face à un mur solide ou à une porte vitrée, etc., il est
recommandé de recouvrir le mur de matériaux absorbant le son, comme par exemple
en suspendant des rideaux épais, afin d’éviter les réflexions et les ondes stationnaires.
Vérification des accessoires fournis
Assurez-vous que vous avez bien tous les accessoires fournis suivants.
Le nombre entre parenthèses inique la quantité d’articles fournis.
• Cordon audio monaural (1)
Si l’article mentionné ci-dessus est manquant, contactez votre revendeur immédiatement.
Left front speaker
Enceinte avant gauche
Left surround speaker
Enceinte Surround gauche
– 1 –
Center speaker
Enceinte centrale
Listening position
Position d’écoute
Right front speaker
Enceinte avant droite
Subwoofer
Caisson de grave
Right surround speaker
Enceinte Surround droite
Page 2
ENGLISH
SUBWOOFER
OUT
LINE OUT
L
R
RIGHT
LEFT
FRONT SPEAKERS
SUBWOOFER
OUT
RIGHT LEFT/MONO
(LOW-LEVEL)
INPUT 1
TO MAIN
SPEAKERS
RIGHT
RIGHT LEFT
RIGHT LEFT
LEFT/MONO
MAX
VOLUME
50Hz
200Hz
MIN
ONOFF
FIXED
VARIABLE
POWER
FREQUENCY
CUT OFF FILTER
INPUT 2
(HIGH-LEVEL)
(LOW-LEVEL)
INPUT 1
AUTO POWER ON/STANDBY
PHASE
CANCEL
ON
REVERSE
NORMAL
TO MAIN
SPEAKERS
RIGHT
RIGHT LEFT
RIGHT LEFT
LEFT/MONO
MAX
VOLUME
50Hz
200Hz
MIN
ONOFF
FIXED
VARIABLE
POWER
FREQUENCY
CUT OFF FILTER
INPUT 2
(HIGH-LEVEL)
(LOW-LEVEL)
INPUT 1
AUTO POWER ON/STANDBY
PHASE
CANCEL
ON
REVERSE
NORMAL
LINE OUT
L
R
RIGHT LEFT/MONO
(LOW-LEVEL)
INPUT 1
FRANÇAIS
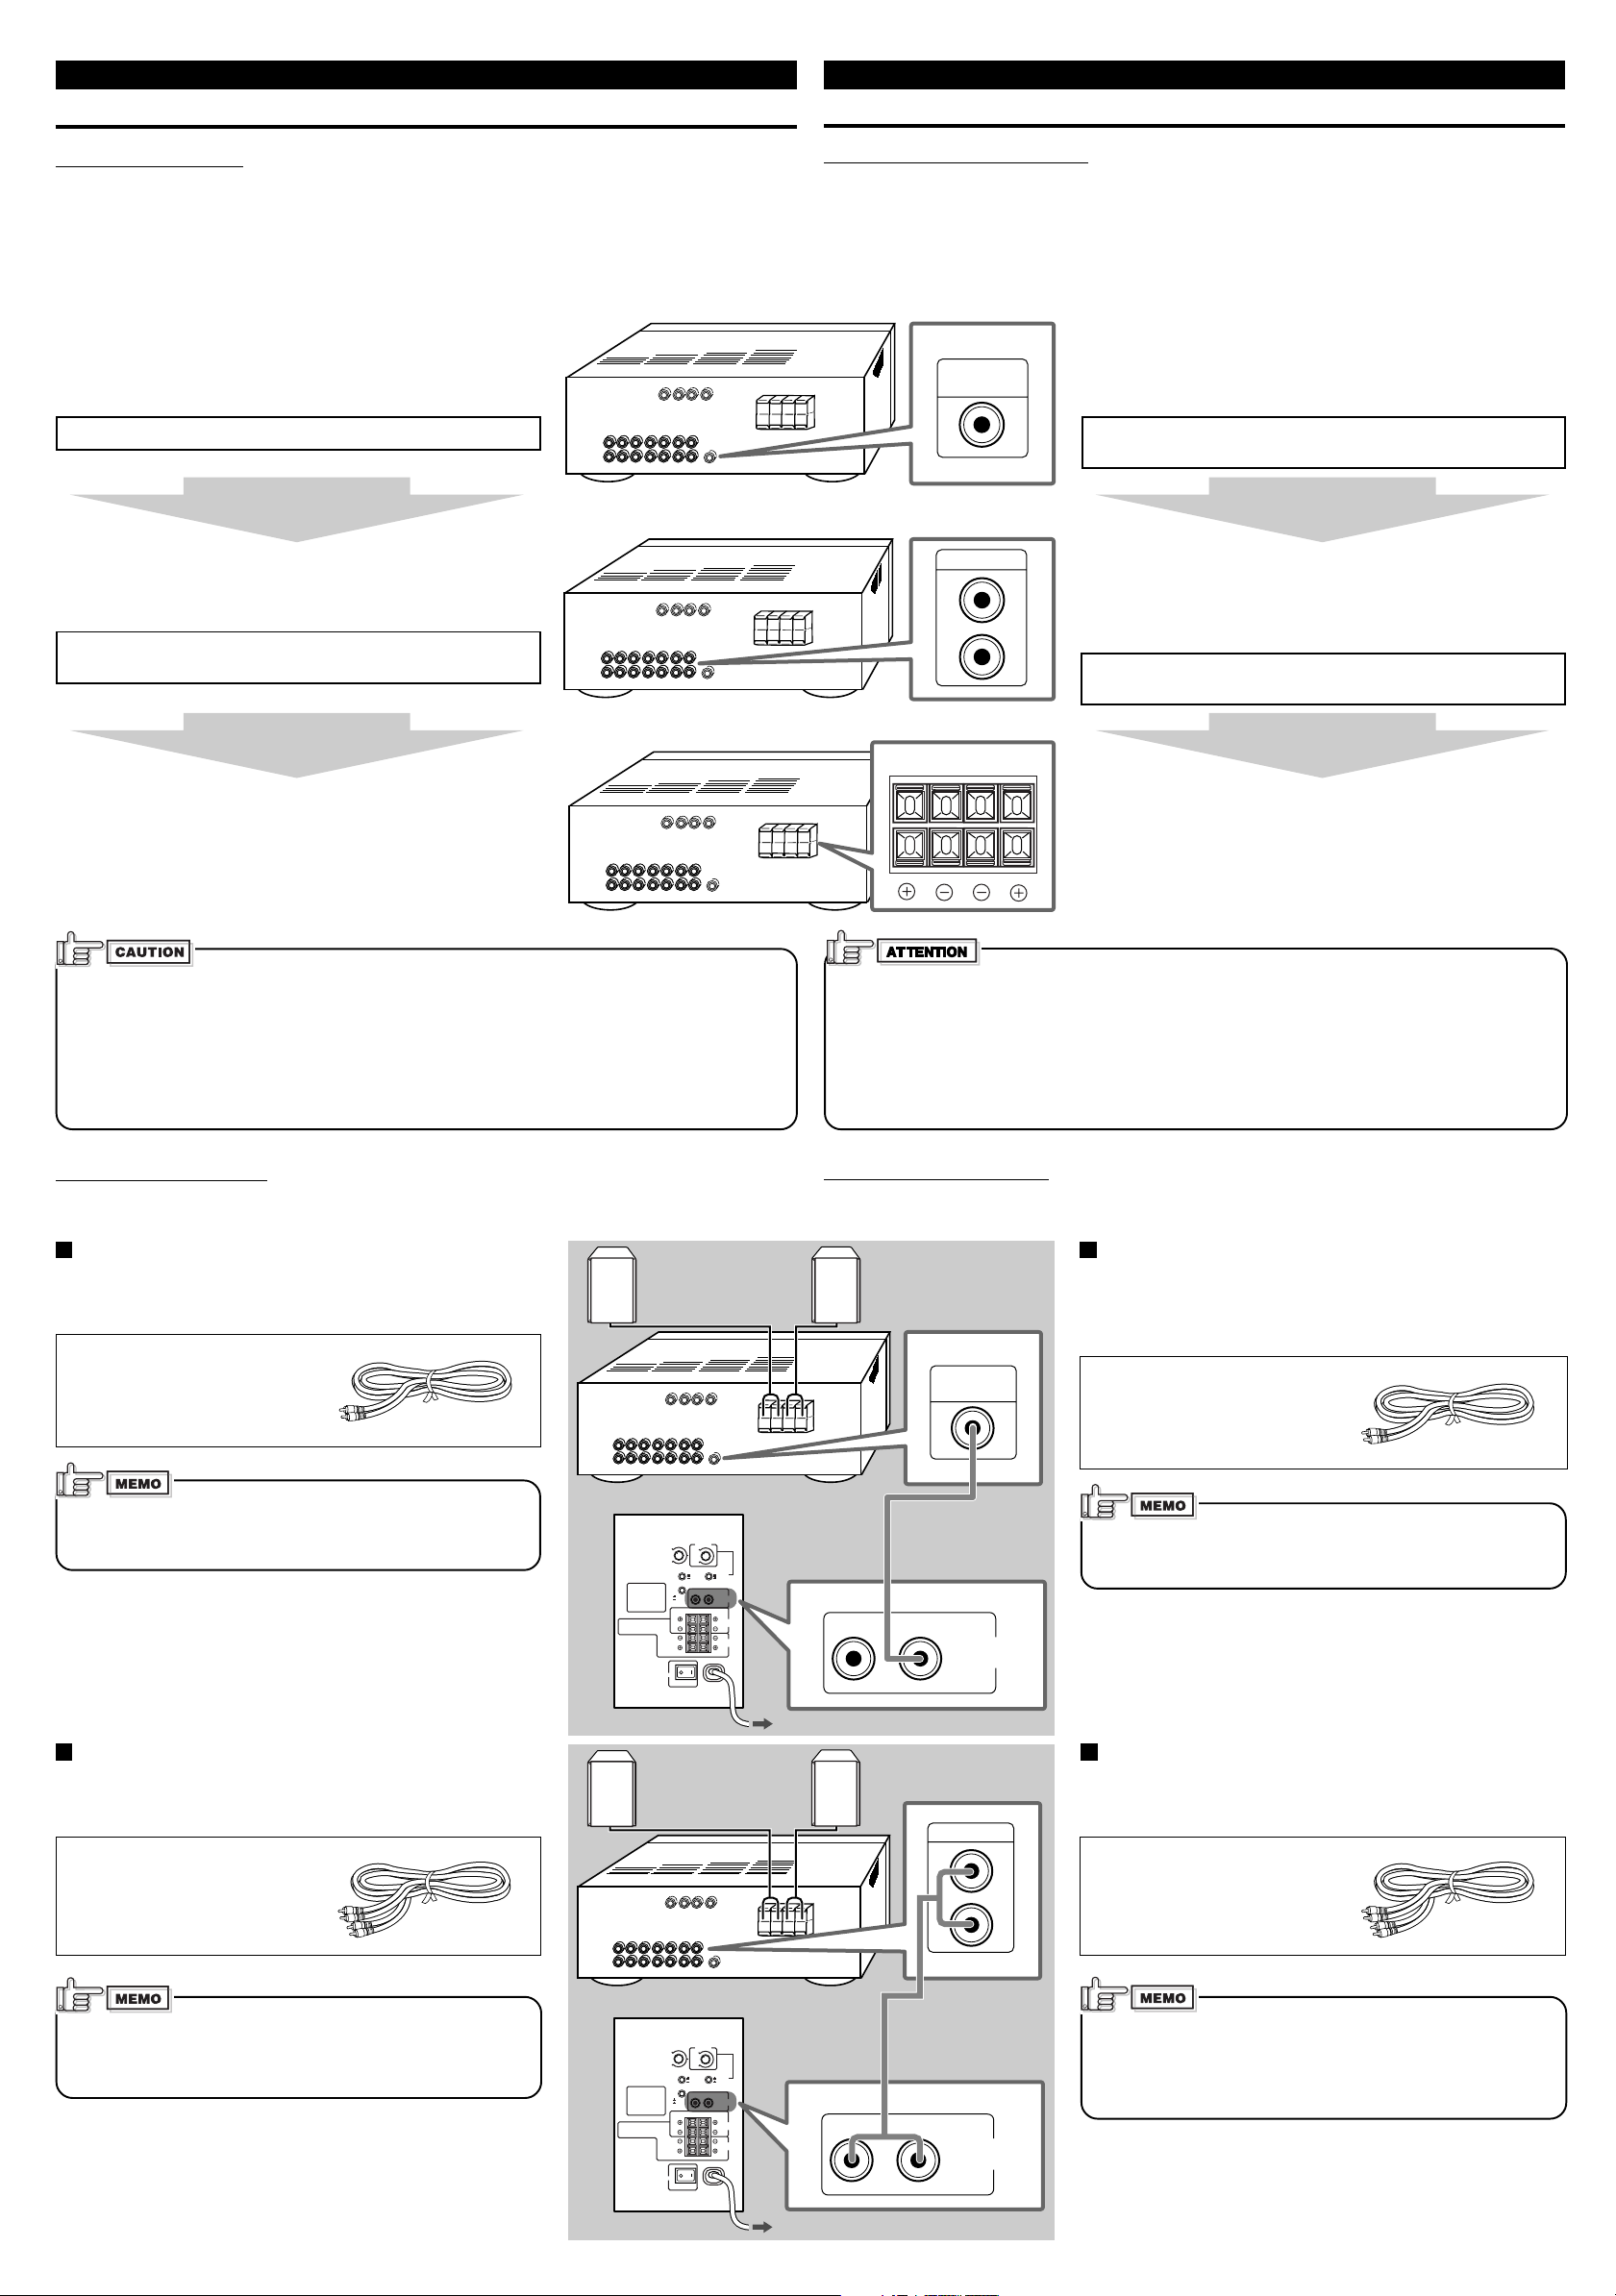
Connections
Checking Your Amplifier
Before connecting this unit to your amplifier (or receiver), check what types of connecting
terminals your amplifier has.
Follow the instructions below to find a proper connection method for your equipment.
• Illustrations of jacks and terminals in this manual may be different from the ones actually used
for your amplifier. The illustrations are of the most used type.
First check whether your amplifier has a subwoofer output
jack.
It is usually named and printed as the “SUBWOOFER OUT” or
“SUBWOOFER.”
If you find it on your amplifier, follow Connecting Method Å.
If you cannot
find any
Next check whether your amplifier has line output jacks.
They are usually named and printed as “LINE OUT” or “LINE
OUTPUT.”
If you find them on your amplifier, follow Connecting
Method ı.
Connexions
Vérification de votre amplificateur
Avant de connecter cet appareil à votre amplificateur (ou ampli-tuner), vérifiez quels types de
prises de connexion sont disponibles.
Suivez les instructions ci-dessous pour trouver la méthode de connexion qui convient le mieux à
votre matériel.
Les illustrations des fiches et des prises utilisées dans ce mode d’emploi peuvent avoir une
•
forme différente de celles de votre amplificateur. Les illustrations utilisent le type le plus courant.
Vérifiez d’abord si votre amplificateur possède une prise
de sortie de caisson de grave.
Elle est habituellement nommée
“SUBWOOFER”
.
Si vous trouvez une telle prise sur votre amplificateur,
suivez la
Méthode de connexion Å.
Si vous ne trouvez pas
une telle prise
Vérifiez ensuite si votre amplificateur possède des prises
de sortie de ligne.
Elles sont habituellement nommées
OUTPUT”
.
Si vous trouvez de telles prises sur votre amplificateur,
suivez la
Méthode de connexion ı.
“SUBWOOFER OUT”
“LINE OUT”
ou
“LINE
ou
If you cannot
find any
Follow Connecting Method Ç.
This connection can be used for any amplifier, by connecting
the front speaker terminals of the amplifier (usually named and
printed as “FRONT SPEAKERS” or “MAIN SPEAKERS”).
Before connecting this unit to the amplifier (or receiver), observe the following carefully.
• Before connecting this unit to an amplifier, turn off the amplifier first.
• Make all connections before plugging in this unit.
• DO NOT use the INPUT 1 (LOW-LEVEL) and INPUT 2 (HIGH-LEVEL) terminals on the
rear of this unit at the same time; otherwise, noise will be heard and may damage the
unit.
• DO NOT connect this unit to the REC OUT jacks of your amplifier.
Connecting to the Amplifier
When connecting to your amplifier (or receiver), refer also the manual supplied for your
equipment.
Connecting Method Å
Connect an amplifier having a subwoofer output jack to the
LEFT/MONO jack of the INPUT 1 (LOW-LEVEL) terminal.
Preparation:
Use the supplied monaural
audio cord.
Main (Front) Speakers
(not supplied)
Enceintes principales
(avant) (non fournies)
Si vous ne trouvez pas
une telle prise
Suivez la Méthode de connexion Ç.
Cette méthode peut être utilisée avec n’importe quel
amplificateur, en connectant les prises des enceintes avant de
l’amplificateur (habituellement nommées
ou
“MAIN SPEAKERS”).
“FRONT SPEAKERS”
Avant de connecter cet appareil à l’amplificateur (ou à l’ampli-tuner), respectez
attentivement les points suivants.
• Avant de connecter cet appareil à un amplificateur, mettez d’abord l’amplificateur hors tension.
• Réalisez toutes les connexions avant de brancher cet appareil.
N’UTILISEZ PAS les prises
•
INPUT 1 (LOW-LEVEL)
et
INPUT 2 (HIGH-LEVEL)
à l’arrière de
cet appareil en même temps; sinon, du bruit est entendu et l’appareil risque d’être endommagé.
• NE CONNECTEZ PAS cet appareil aux prises
REC OUT
de votre amplificateur.
Connexion de l’amplificateur
Lors de la connexion de votre amplificateur (ou ampli-tuner), référez-vous aussi au mode
d’emploi qui l’accompagne.
Méthode de connexion Å
Connectez un amplificateur muni d’une prise de sortie de
caisson de grave à la prise
(LOW-LEVEL)
.
Préparation:
Utilisez le cordon audio
monaural fourni.
LEFT/MONO
des prises
INPUT 1
When using Connecting Method Å, no signal comes out
of the TO MAIN SPEAKERS terminal.
Connecting Method ı
Connect an amplifier having line output jacks to the INPUT 1
(LOW-LEVEL) terminal.
Preparation:
Purchase a stereo audio cord at
an audio shop or electric shop.
If your amplifier has only a monaural line output (MONO)
jack, connect it to the LEFT/MONO jack of the INPUT 1
(LOW-LEVEL) terminal (see Connecting Method Å).
Your Amplifier /
SX-DW303
Main (Front) Speakers
(not supplied)
Enceintes principales
(avant) (non fournies)
Your Amplifier /
SX-DW303
Votre amplificateur
To an AC outlet
Votre amplificateur
To an AC outlet /
– 2 –
Monaural audio cord
(supplied)
Cordon audio
monaural (fourni)
/ A une prise secteur
Stereo audio cord
(not supplied)
Cordon audio stéréo
(non fourni)
A une prise secteur
Lors de l’utilisation de la
signal ne sort des prises
Méthode de connexion Å
TO MAIN SPEAKERS
.
, aucun
Méthode de connexion ı
Connectez un amplificateur muni de prises de sortie de ligne
aux prises
INPUT 1 (LOW-LEVEL)
Préparation:
Achetez un cordon audio stéréo
dans un magasin de produits
audio ou électriques.
Si votre amplificateur possède seulement une prise de
sortie de ligne monorale
LEFT/MONO
des prises
Méthode de connexion Å)
.
(MONO)
, connectez-la à la prise
INPUT 1 (LOW-LEVEL) (
.
voir
Page 3

ENGLISH
TO MAIN
SPEAKERS
RIGHT
RIGHT LEFT
RIGHT LEFT
LEFT/MONO
MAX
VOLUME
50Hz
200Hz
MIN
ONOFF
FIXED
VARIABLE
POWER
FREQUENCY
CUT OFF FILTER
RIGHT
LEFT
FRONT SPEAKERS
TO MAIN
SPEAKERS
INPUT 2
(HIGH-LEVEL)
RIGHT LEFT
RIGHT LEFT
INPUT 2
(HIGH-LEVEL)
(LOW-LEVEL)
INPUT 1
AUTO POWER ON/STANDBY
PHASE
CANCEL
ON
REVERSE
NORMAL
INPUT 2
TO MAIN
SPEAKERS
(HIGH-LEVEL)
(LOW-LEVEL)
RIGHT
RIGHT LEFT
RIGHT LEFT
LEFT/MONO
MAX
VOLUME
50Hz
200Hz
MIN
CANCEL
ON
ONOFF
REVERSE
NORMAL
FIXED
VARIABLE
INPUT 1
POWER
FREQUENCY
AUTO POWER ON/STANDBY
PHASE
CUT OFF FILTER
POWER
PHASE
AUTO POWER
ON/STANDBY
VOLUME
FREQUENCY
CUT OFF
FILTER
Å
Ç
ı
Ç
Î
‰
MAX
VOLUME
MIN
FIX
VARIABLE
CUT OFF FILTER
MAX
VOLUME
MIN
FRANÇAIS
Connections (continued)
Connecting Method Ç
Connect an amplifier without a subwoofer output jack and line
output jacks to the INPUT 2 (HIGH-LEVEL) terminal.
• When this method is used, connect your main (front) speakers
to the TO MAIN SPEAKERS terminal on the rear of this unit.
Preparation:
Purchase speaker cords at an
audio shop or electric shop.
How to connect the speaker cords:
1 Press and hold the clamp of the speaker terminal.
2 Insert the end of the speaker cord into the terminal.
• Match the polarity of the speaker terminals: ª to ª and
· to ·.
3 Release the finger from the clamp.
• When you connect main (front) speakers to the TO
MAIN SPEAKERS terminal, use the speakers within the
impedance range indicated by the amplifier connected
to the INPUT 2 (HIGH-LEVEL) terminal. If not, the
amplifier connected to the INPUT 2 (HIGH-LEVEL)
terminal may malfunction and be damaged.
• DO NOT connect more than one speaker to one
speaker terminal.
Your Amplifier
Votre amplificateur
SX-DW303
Right speaker /
Connexions (suite)
Speaker cords (not supplied)
Cordons d’enceinte (non fournis)
To an AC
outlet
A une prise
secteur
Main (Front) Speakers (not supplied)
Enceintes principales (avant) (non fournies)
Enceinte droite
Speaker cords
(not supplied)
Cordons d’enceinte
(non fournis)
Left speaker /
Enceinte gauche
Méthode de connexion Ç
Connectez un amplificateur sans prise de caisson de grave ni
prises de sortie de ligne aux prises
• Quand cette méthode est utilisée, connectez vos enceintes
principales (avant) aux prises
l’arrière de cet appareil.
Préparation:
Achetez des cordons d’enceinte
dans un magasin de produits
audio ou électriques.
Comment connecter les cordons d’enceinte:
Maintenez le serre-câble de la prise d’enceinte en position pressée.
1
2
Insérez l’extrémité du cordon d’enceinte dans la prise.
• Respectez la polarité des prises d’enceinte:
3
Relâchez le serre-câble.
• Quand vous connectez les enceintes principales (avant)
aux prises
TO MAIN SPEAKERS
dont l’impédance est comprise dans la plage indiquée
sur l’amplificateur connecté aux prises
LEVEL)
. Sinon, l’amplificateur connecté aux prises
INPUT 2 (HIGH-LEVEL)
correctement et être endommagé.
• NE CONNECTEZ PAS plus d’une enceinte à une prise
d’enceinte.
INPUT 2 (HIGH-LEVEL)
TO MAIN SPEAKERS
ª
à ª et · à ·.
, utilisez des enceintes
INPUT 2 (HIGH-
peut ne pas fonctionner
à
.
Operations
Front view
Vue avant
Power lamp
Témoin d’alimentation
Turning On the Power—POWER Å Mise sous tension—POWER Å
Press the ON [ ❙ ] portion of the POWER switch.
The main power turns on and the power lamp in the front panel lights in green.
• The power lamp lights in red when the AUTO POWER ON/STANDBY places the
unit into standby mode.
Rear view
Vue arrière
Fonctionnement
Appuyez sur la partie ON [ ❙ ] de l’interrupteur POWER.
L’appareil se met sous tension et le témoin d’alimentation sur le panneau avant s’allume en vert.
• Le témoin d’alimentation s’allume en rouge quand la fonction
STANDBY
AUTO POWER ON/
met l’appareil en mode d’attente.
To completely cut off the power to this unit
Press the OFF [ ‡ ] portion of the POWER switch.
This will disconnect the mains lead.
Adjusting the Volume—VOLUME ı Ajustement du volume—VOLUME ı
Adjust the volume output level through this unit while comparing with the sounds
coming out of the main (front) speakers.
• Once you have adjusted the volume output level of this unit, you do not need to
adjust it each time you use this unit. Adjusting the volume level on the connected
amplifier will also adjust the volume level through this unit.
1 Turn the VOLUME knob to the MIN position.
2 Turn on the connected amplifier and start playing a source.
Playback sounds come out of the main (front) speakers and this unit.
3 Adjust the VOLUME knob to obtain a well-balanced sound level with that of
the main (front) speakers.
If the volume is set at a high level before starting play, the sudden blast of
sound energy can permanently damage your hearing and/or ruin your
speakers.
You can adjust the crossover frequency to determine the bass sound level this unit handles.
• Once it is set, only the sounds below the frequency come out of the built-in speaker.
When the main speakers in use are JVC’s SX-XD33
Adjusting the Crossover Frequency —CUT OFF FILTER / FREQUENCY Ç Ajustement de la fréquence de transition—CUT OFF FILTER / FREQUENCY Ç
Press in the CUT OFF FILTER button to set it to the _ FIX position.
• The FREQUENCY knob is deactivated.
• When your amplifier is equipped with crossover frequency setting, set it within the
range of 100 Hz to 150 Hz.
• When your amplifier is equipped with speaker size setting, select “small.”
– 3 –
Pour mettre cet appareil complètement hors tension
Appuyez sur la partie
OFF [ ‡ ]
de l’interrupteur
POWER
.
L’appareil est déconnecté du secteur.
Ajustez le niveau de sortie du volume de cet appareil en le comparant au son
provenant des enceintes principales (avant).
• Une fois que vous avez ajusté le niveau de sortie de volume de cet appareil, vous
n’avez plus besoin de l’ajuster chaque fois que vous utilisez l’appareil. Ajuster le
volume sur l’amplificateur connecté modifie aussi le volume de cet appareil.
1 Tournez le réglage VOLUME sur la position MIN.
2 Mettez l’amplificateur connecté sous tension et démarrez la lecture d’une source.
Le son de lecture sort des enceintes principales (avant) et de cet appareil.
3 Ajustez le réglage VOLUME afin d’obtenir un niveau sonore bien équilibré par
rapport à celui des enceintes principales (avant).
Si le volume est réglé à un niveau élevé avant de démarrer la lecture, la
soudaine déflagration d’énergie sonore peut endommager de façon permanente
votre ouïe et/ou détruire vos enceintes.
Vous pouvez ajuster la fréquence de transition pour déterminer le niveau des sons
graves que cet appareil doit prendre en charge.
•
Une fois que ce réglage est fait, seuls les sons au-dessous de la fréquence de
transition sortent du haut-parleur intégré.
Si les enceintes principales utilisées sont les SX-XD33 de JVC
Appuyez sur la touche CUT OFF FILTER pour la mettre sur la position _ FIX.
• Le réglage
• Si votre amplificateur est muni d’un réglage de fréquence de transition, réglez-le
dans une plage de 100 Hz à 150 Hz.
Si votre amplificateur est muni d’un réglage de la taille des enceintes, choisissez
•
FREQUENCY
est mis hors service.
“small”
(petit).
Page 4

200Hz
FREQUENCY
50Hz
FIX
VARIABLE
CUT OFF FILTER
REVERSE
NORMAL
PHASE
CANCEL
ON
AUTO POWER ON / STANDBY
FRANÇAISENGLISH
If your amplifier is not provided with a crossover frequency setting:
1 Press out the CUT OFF FILTER button to set it to the — VARIABLE position.
Now the FREQUENCY knob is activated and you can adjust the crossover
frequency on this unit.
2 Turn the FREQUENCY knob to obtain the best matching crossover
frequency with your main speakers.
Adjust the frequency (50 Hz to 200 Hz) while listening to playback sound coming
out of both the main speakers and this unit.
• If your main speakers can reproduce the bass sound well, adjust the frequency
at a lower level.
• If you feel bass sounds are not sufficient, adjust the frequency at a higher level.
Changing the Phase—PHASE Î Modification de la phase—PHASE Î
You can change the sound phase to match your preference.
Select either “NORMAL” or “REVERSE” to obtain a better bass sound.
Press in or out the PHASE button to select either the NORMAL position or the
REVERSE position.
• NORMAL : Normally select this.
• REVERSE: Select this when you feel the bass sound is better with this mode
rather than with “NORMAL.”
Operating the Unit Automatically According to the Incoming Signals
—AUTO POWER ON/STANDBY ‰
By using this function, this unit automatically enters standby mode even though the
POWER switch is turned ON [ ❙ ].
Press the AUTO POWER ON/STANDBY button to the — ON position.
• If no sound comes in for about 10 minutes, the unit automatically enters standby
mode. The power lamp lights in red. Then if the unit detects incoming signals, this
unit starts operating automatically (the power lamp now lights in green).
If Auto Power On/Standby does not work correctly (see “MEMO” below), press
out the AUTO POWER ON/STANDBY button to set it to the _ CANCEL position.
Auto Power On/Standby is canceled.
When the volume level of the amplifier is so low or the incoming signals are so
weak that this unit cannot detect sounds, Auto Power On/Standby may not
work correctly.
• This unit may enter standby mode even though signals are coming in.
• This unit may not start operating after entering standby mode, even though
signals start coming in.
Si votre amplificateur ne possède pas de réglage de fréquence de transition:
1 Appuyez sur la touche CUT OFF FILTER pour la mettre sur la position — VARIABLE.
Maintenant, le réglage
FREQUENCY
est en service et vous pouvez ajuster la
fréquence de transition de l’appareil.
2 Tournez le réglage FREQUENCY pour obtenir la meilleure fréquence de
transition par rapport aux enceintes principale.
Ajustez la fréquence (
50 Hz
à
200 Hz
) tout en écoutant le son de lecture provenant
des enceintes avant et de cet appareil.
•
Si vos enceintes principales peuvent reproduire correctement les sons graves,
ajustez la fréquence sur un faible niveau.
•
Si vous sentez que les sons graves sont insuffisants, ajustez la fréquence sur un niveau élevé.
Vous pouvez changer la phase du son selon vos préférences.
Choisissez
Appuyez sur la touche PHASE pour la mettre sur la position NORMAL ou sur la
position REVERSE.
• NORMAL :
• REVERSE:
“NORMAL”
Normalement, choisissez ce réglage.
Choisissez ce réglage si vous sentez que les sons graves sont
meilleurs avec ce mode qu’avec le mode
ou
“REVERSE”
afin d’obtenir le meilleur son grave possible.
“NORMAL”.
Utilisation automatiquement de l’appareil en fonction des signaux d’entrée
—AUTO POWER ON/STANDBY ‰
En utilisant cette fonction, cet appareil entre automatiquement en mode d’attente bien
que l’interrupteur
Appuyez sur la touche AUTO POWER ON/STANDBY pour la mettre sur la position — ON.
POWER
• Si aucun son n’entre dans l’appareil pendant environ 10 minutes, l’appareil entre
automatiquement en mode d’attente. Le témoin d’alimentation s’allume en rouge.
Puis, si l’appareil détecte à nouveau un signal d’entrée, cet appareil se met en
service automatiquement (le témoin d’alimentation devient vert).
Si la fonction de mise sous tension/en attente automatique ne fonctionne pas
correctement (voir “MEMO” ci-dessous),
ON/STANDBY
pour la mettre sur la position _
tension/en attente automatique est annulée.
Si le niveau de volume de l’amplificateur est si bas ou si les signaux d’entrée
sont si faibles que cet appareil ne peut pas les détecter, la fonction de mise sous
tension/en attente automatique peut ne pas fonctionner correctement.
•
Cet appareil peut entrer en mode d’attente même si des signaux entrent dans l’appareil.
•
Cet appareil peut ne pas se remettre en service après être entré en mode
d’attente, même si un signal entre dans l’appareil.
soit sur la position ON [ ❙ ].
appuyez sur la touche
CANCEL
AUTO POWER
. La fonction de mise sous
Additional Information
Troubleshooting
Use this chart to help you solve daily operational problems. If there is any problem you cannot
solve, contact your dealer.
Power does not come on.
• Is the unit pugged in?
— Plug the AC power cord firmly into the AC outlet.
Auto Power On/Standby does not function correctly.
• Signals are too weak or volume level is too low.
—This is not a malfunction. If this happens, cancel Auto Power On/Standby.
No sound is heard.
• Is the VOLUME knob turned to the MIN position?
—Turn the VOLUME knob until a suitable volume is found.
• Connections are incorrect, or loose.
—Check the connections. If incorrect, redo the corrections.
• Audio signals through the amplifier are extremely weak.
—Increase the volume level on the amplifier.
Sounds fluctuate (suddenly become loud or soft).
• The built-in protective circuit is working.
—Lower the volume level on the amplifier so that the symptom will not occur.
Suddenly no sound comes out—the power lamp lights in red.
• The VOLUME knob on the rear is set to a very high level.
—Turn down the volume, then turn off and on this unit.
Suddenly no sound comes out—the power lamp still lights in green.
• The volume of the playback source is too high.
—Turn down the volume of the playback source, turn off and on the source, then adjust the
volume properly on the source.
Informations complémentaires
Guide de dépannage
Utilisez ce tableau pour vous aider à résoudre les problèmes quotidiens. S’il y a un problème
que vous ne pouvez pas résoudre, contactez votre revendeur.
L’appareil ne se met pas sous tension.
L’appareil est-il connecté au secteur?
•
—
Branchez le cordon d’alimentation solidement sur une prise secteur murale.
La fonction de mise sous tension/en attente automatique ne fonctionne pas correctement.
•
Les signaux sont trop faibles ou le niveau de volume est trop bas.
—
Ce n’est pas un mauvais fonctionnement. Si cela se produit, annulez la fonction de mise
sous tension/en attente automatique.
Aucun son n’est entendu.
Le réglage
•
—
Tournez le réglage
•
Les connexions sont incorrectes ou lâches.
—V
•
Les signaux audio venant de l’amplificateur sont extrêmement faibles.
—
Augmenter le niveau de volume sur l’amplificateur.
Il y a des variations de l’intensité du son (il devient soudainement fort ou faible).
Le circuit de protection intégré est en service.
•
—
Diminuez le niveau de volume sur l’amplificateur de façon que ce symtome ne se produise plus.
Le son est coupé soudainement—le témoin d’alimentation s’allume en rouge.
Le réglage
•
—
Réduisez le volume et mettez l’appareil hors puis sous tension.
Le son est coupé soudainement—le témoin d’alimentation reste allumé en vert.
Le volume de la source de lecture est trop élevé.
•
—
Réduisez le volume de la source de lecture, mettez la source hors puis sous tension, puis
ajuster correctement le volume de la source.
VOLUME
est-il tourné sur la position
VOLUME
jusqu’à ce que le volume correct soit trouvé.
MIN
?
érifiez les connexions. Si elles ne sont pas correctes, refaites-les.
VOLUME
à l’arrière de l’appareil est réglé sur un niveau très élevé.
Specifications
Type : Powered subwoofer
Bass-reflex type, (magnetically shielded type)
Speaker unit : 16.0 cm (6 5/16 in.) cone (× 1)
Frequency range : 30 Hz to 200 Hz
Input impedance : 50 kΩ (LOW-LEVEL)
470 Ω (HIGH-LEVEL)
Input terminals : INPUT 1 (LOW-LEVEL)
INPUT 2 (HIGH-LEVEL)
Power requirements : AC 120 V
Output power of built-in amp : 100 W (45 Hz, 4 Ω, 10 % THD)
Power consumption : 25 W
Dimensions (W × H × D) : 217 mm × 393 mm × 376 mm
Mass : 9.2 kg (20.3 lbs)
Accessories : Monaural audio cord (× 1)
9
/16 in. × 15 1/2 in. × 14 13/16 in.)
(8
, 60 Hz
Spécifications
Type :
Haut-parleur :
Plage des fréquences :
Impédance d’entrée:
Prises d’entrée:
Alimentation :
Puissance de sortie de
l’amplificateur intégré :
Consommation :
Dimensions (L × H ×P) :
Masse :
Accessoires :
– 4 –
Caisson de grave actif
Réflexion des basses (Type à protection magnétique)
1 cône de 16,0 cm (6 5/16 pouces)
30 Hz à 200 Hz
50 kΩ (LOW-LEVEL)
Ω
470
INPUT 1 (LOW-LEVEL)
INPUT 2 (HIGH-LEVEL)
Secteur 120 V , 60 Hz
100 W (45 Hz, 4 Ω, 10 % THD)
25 W
217 mm × 393 mm × 376 mm
9
(8
/16 × 15 1/2 × 14 13/16 pouces)
9,2 kg (20,3 livres)
Cordon audio monaural (× 1)
(HIGH-LEVEL)
 Loading...