

Page 1
JVC
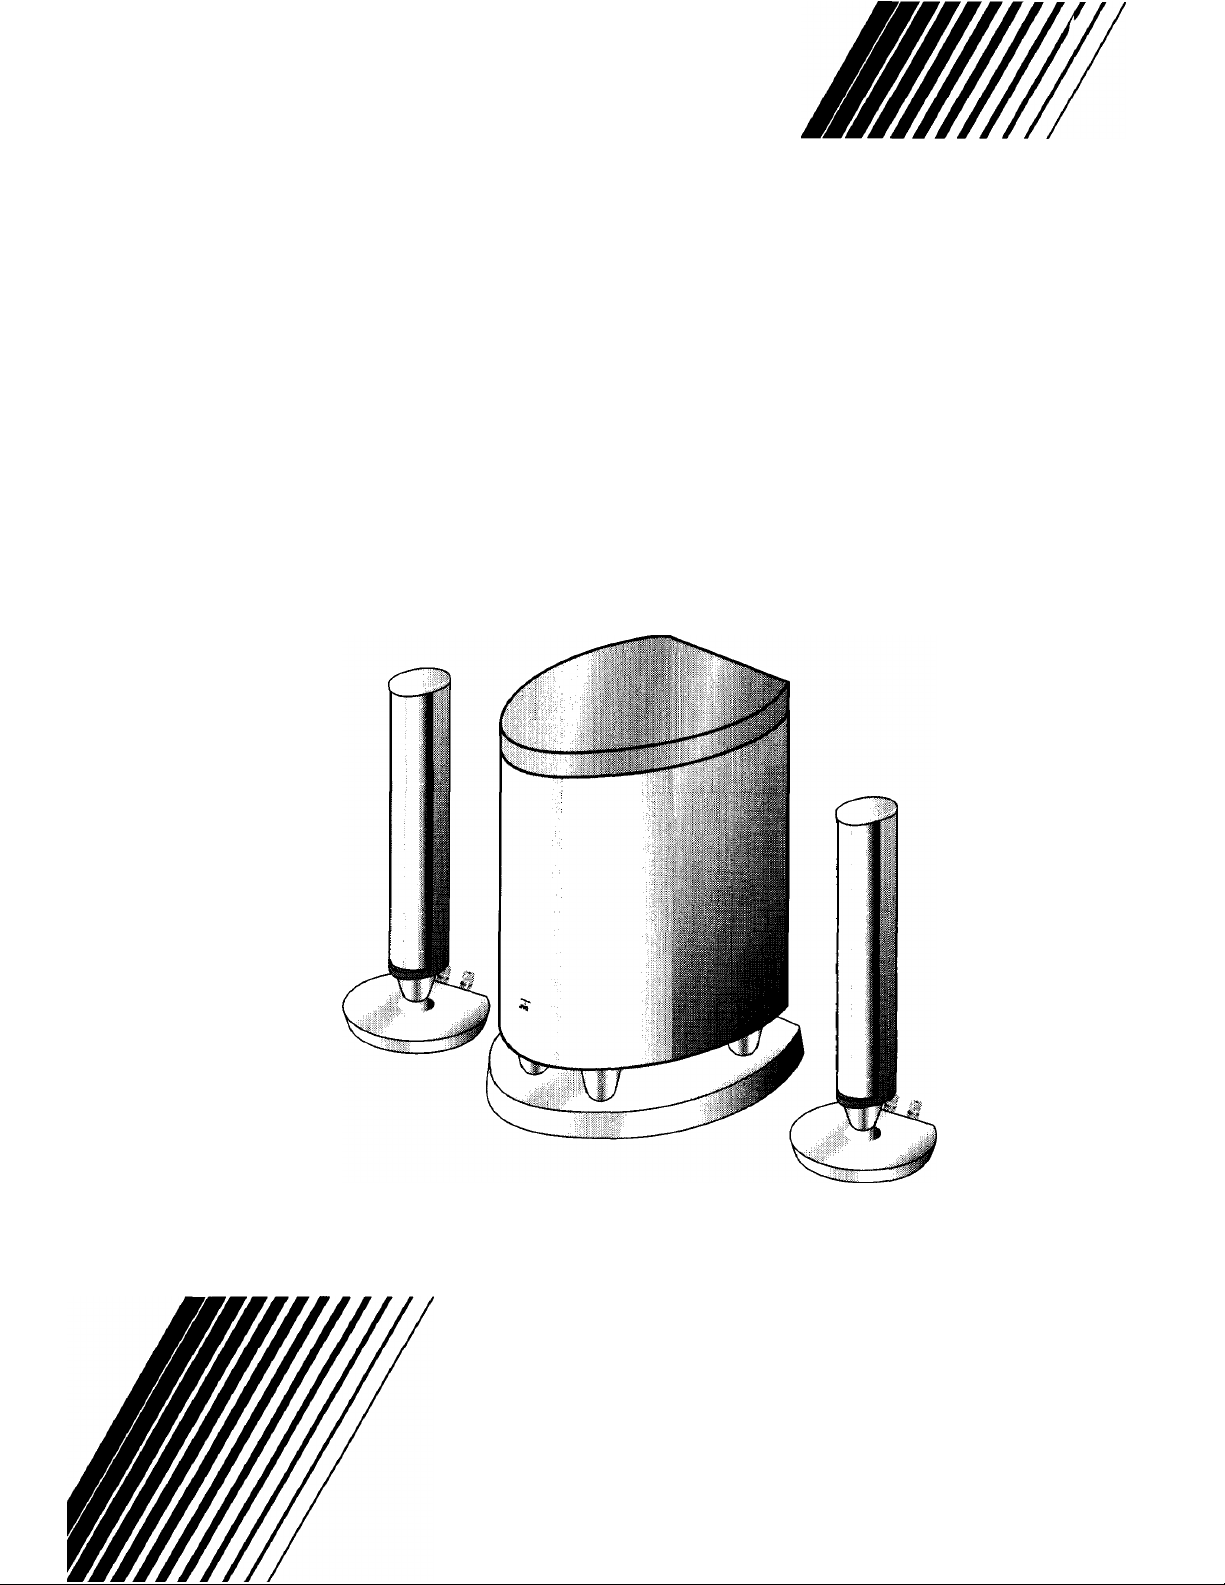
SPEAKER SYSTEM
LAUTSPRECHERSYSTEM
ENCEINTE ACOUSTIQUE
LUIDSPREKERS
SISTEMA DE ALTAVOCES
SX-DD3
SISTEMA Dl DIFFUSORI
HÖGTALARSYSTEM
H0JHALERSYSTEM
KAIUTINJÄRJESTELMÄ
INSTRUCTIONS
BEDIENUNGSANLEITUNG
INSTRUCTIONS
GEBRUIKSAANWIJZING
INSTRUCCIONES
ISTRUZIONI
BRUKSANVISNING
BRUGSANVISNING
KÄYTTÖOHJEET
LVT0911-001A
[E, EN]
Page 2

Warnings, Cautions and Others
Warnungen, Vorsichtshinweise usw.
■ CAUTION
To reduce the risk of electrical shocks, fire, etc,:
1. Do not remove screws, covers or cabinet.
2. Do not expose this appliance to rain or moisture.
■ Caution — POWER switch
This apparatus is provided with a POWER switch to be able to minimize
power consumption for safe use. Therefore,
1. When doing initial setting, complete all the connections required, connect
the mains plug into the wall outlet, and set the POWER switch
to ON.
2. When not in use, set the POWER switch to OFF.
.t. Disconnect the mains plug to shut the power off completely. The POWER
switch in any position do not disconnect the mains line.
Caution: Proper Ventilation
To avoid risk of electric shock and fire, and to prevent damage, locate the
apparatus as follows:
1 Front:
No obstructions and open spacing.
2 Sides/ Top/ Back:
No obstructions should be placed in the areas shown by the
dimensions below.
3 Bottom:
Place on the level surface. Maintain an adequate air path for
ventilation by placing on a stand with a height of 10 cm or more.
CAUTION
• Do not block the ventilation openings or holes.
(If the ventilation openings or holes are blocked by a
newspaper or cloth, etc., the heat may not be able to get out.)
• Do not place any naked flame sources, such as lighted candles, on the
apparatus.
• When discarding batteries, environmental problems must be considered
and local rules or laws governing the disposal of these batteries must be
followed strictly,
• Do not use this apparatus in a bathroom or places with water. Also do not
place any containers filled with water or liquids (such as cosmetics or
medicines, flower vases, potted plants, cups, etc.) on top of this apparatus.
■ Achtung
Zur Verringerung des Risikos von elektrischem Schlag, Feuer usw.:
1. Entfernen Sie nicht Schrauben, Abdeckungen oder das Gehäuse.
2. Setzen Sie dieses Gerät nicht Regen oder Feuchtigkeit aus.
■ Achtung - Einschaltknopf (POWER)
Dieser Apparat hat einen Einschaltknopf (POWER), um den Stromverbrauch
für sichere Verwendung auf einem Minimum zu halten. Beachten Sie deshalb
die folgenden Punkte:
1. Stellen Sie beim ersten Einrichten alle erforderlichen Anschlüsse her,
schließen Sie den Stecker des Netzkabels an eine Wandsteckdose an, und
stellen Sie dann den Einschaltknopf (POWER) auf ON (An).
2. Stellen Sie den Einschaltknopf (POWER) auf OFF (Aus), wenn das Gerät
nicht verwendet wird.
3. Ziehen Sie den Stecker aus der Steckdose, um die Stromversorgung
vollkommen auszuschalten. Der Einschaltknopf (POWER) führt in keiner
Stellung Trennung vom Netz durch.
Achtung: Angemessene Ventilation
Stellen Sie das Gerät wie folgt auf, um das Risiko von elektrischem Schlag und
Feuer zu vermeiden und Beschädigung zu verhüten:
1. Vorderseite:
Keine Hindernisse und offener Raum.
2. Seiten, Oberseite und Rückseite:
ln dem Bereich mit den folgenden Abmessungen sollten sich keine
Hindernisse befinden.
3. Unterseite:
Stellen Sie das Gerät auf eine ebene Oberfläche. Stellen Sie das Gerät
auf einen Stand mit einer Höhe von mindestens 10 cm, um einen
angemessenen Luftpfad für Ventilation zu erhalten.
ACHTUNG
• Blockieren Sie keine Belüftungsschlitze oder -bohrungen.
(Wenn die BelUftungsöffnungen oder -löcher durch eine Zeitung oder ein
Tuch etc. blockiert werden, kann die entstehende Hitze nicht abgeführt
werden.)
• Stellen Sic keine offenen Flammen, beispielsweise angezündete Kerzen,
auf das Gerät.
• Wenn Sie Batterien entsorgen, denken Sie an den Umweltschutz.
Batterien müssen entsprechend den geltenden örtlichen Vorschriften oder
Gesetzen entsorgt werden.
• Setzen Sie die Anlage nicht in einem Badezimmer oder an Orten ein, an
denen Wasser verwendet wird. Stellen Sie auch keine Behälter, die mit
Wasser oder anderen Flüssigkeiten gefüllt sind (beispielsweise
Kosmetik- oder Medikamentenbehälter, Blumenvasen, Topfpflanzen,
Tassen etc) auf diese Anlage.
Front View
Vorderansicht
Thank you for purchasing JVC speakers.
Before you begin using them, please read the Instructions carefully to be
sure you get the best possible performance. If you have any questions,
consult your JVC dealer.
Side view
Seitenansicht
Vielen Dank für den Kauf dieser JVC-Lautsprecher.
Lesen Sie bitte diese Bedienungsanleitung vor Ingebrauchnahme sorgfältig
durch, um stets optimale Ergebnisse zu erzielen. Wenden Sie sich bei
etwaigen Fragen bitte an Ihren JVC Händler.
-Gl -
Page 3
Avertissements, précautions et autres
Waarschuwingen en andere aandachtspunten
■ PRECAUTION
Pour réduire tout risque de choc électrique, feu, etc. :
1, Ne pas retirer les vis, les couvercles ni le coffret.
2. Ne pas exposer l’appareil à la pluie ni à l’humidité.
■ LET OP
Verminder het risico van elektrische schokken, brand enz.:
1. Verwijder geen schroeven, afdekkingen of andere onderdelen van de
behuizing.
2. Stel dit toestel niet bloot aan regen of vocht.
■ Précaution ' Interrupteur POWER
Cet appareil est doté d’un interrupteur POWER qui permet de réduire la
consommation d’énergie à des fins de sécurité. En conséquence,
1. Lors des réglages initiaux, effectuer tous les raccordements, brancher la
fiche secteur dans la prise secteur, puis mettre l’interrupteur POWER sur
ON.
2. Lorsqu’on ne se sert pas de l’appareil, mettre l’interrupteur POWER sur
OFF.
3. Débrancher l’appareil de la prise secteur pour couper complètement
l’alimentation. L’interrupteur POWER ne coupe pas l'appareil du secteur,
quelle que soit la position sur laquelle il est réglé.
Précaution : Ventilation adéquate
Pour réduire tout risque de choc électrique et de feu, et pour éviter
d’endommager l’appareil, le disposer comme suit :
1. Avant :
Pas d’obstacles, et espace dégagé.
2. Côté/dessus/dos :
Il ne devra pas y avoir d’obstacles dans les zones représentées par les
dimensions ci-dessous.
3. Dessous :
Le placer sur une surface de niveau. Garantir un trajet d’air adéquat pour
la ventilation en le plaçant sur un socle d’une hauteur de 10 cm
minimum.
ATTENTION
• Ne bloquez pas les orifices ou les trous de ventilation.
(Si les orifices ou les trous de ventilation sont bloqués par un journal un (Als de ventilatieopeningen en -gaten worden afgesloten door
tissu, etc., la chaleur peut ne pas être évacuée correctement de bijvoorbeeld papier of een doek, kan er bitte in het apparaat worden
l’appareil.)
• Ne placez aucune source de flamme nue, telle qu’une bougie, .sur • Zet geen bronnen met open vuur, zoals brandende kaarsen, op het
l’appareil.
• Lors de la mise au rebut des piles, veuillez prendre en considération les
problèmes de l’environnement et suivre strictement les règles et les lois afval. Lege batterijen dient u in te leveren met het KCA of bij een
locales sur la mise au rebut des piles.
• N’utilisez pas cet appareil dans une salle de bain ou un autre endroit avec
de l’eau. Ne placez aucun récipient contenant de l’eau (tel que des Zet ook geen voorwerpen op het apparaat die zijn gevuld met water of
cosmétiques ou des médicaments, un vase de fleurs, un pot de fleurs, une andere vloeistoffen (zoals cosmetica, medieijnen, bloemenvazen,
tasse, etc.) sur cet appareil. bloempotten, kopjes enz.).
■ Let op - Aan/uit (POWER) schakeiaar
Dit toestel is uitgerust met een aan/uit schakeiaar bedoeld om het
stroomverbruik te verminderen en het toestel veilig te kunnen gebruiken. Dus,
1. Bij het opstellen van het toestel dient u eerst alle vereiste aansluitingen te
maken, vervolgens de stekker in het stopcontact te steken en dan pas de
aan/uit schakeiaar op ON (aan) te zetten.
2. Zet de aan/uit schakeiaar uit (OFF) wanneer u het toestel niet gebruikt.
3. Haal de stekker uit het stopcontact om de stroomvoorziening volledig af te
sluiten. De aan/uit schakeiaar koppelt het toestel in geen enkele stand los
van het elektriciteitsncl.
Let op: Voldoende ventilatie
Om het risico van een elektrisehe schok of brand te vermijden en om schade te
voorkomen, dient u het toestel als volgt op te stellen:
1. Voorkant:
Geen belemmeringen en open ruimte.
2. Zijkanten/bovenkant/achlerkant:
Fj- mögen geen belemmeringen geplaatst worden binnen de hieronder
aangegeven grenzen.
3. Onderkant:
Zet het toestel op een horizontaal oppervlak. Zorg voor vrije
luchtcirculatie en voldoende ventilatie door het toestel op een standaard
van tenminste 10 cm hoogte te zetten.
VOORZICHTIG
• Zorg dat u de ventilatieopeningen en -gaten met afsluit.
opgebouwd.)
apparaat.
• Wees milieubewust en gooi lege batterijen niet bij het huishoudelijk
innamepuni voor batterijen.
• Gebruik dit apparaat niet in een badkamer of in andere natte ruimten.
Vue de face
Voor-aanzicht
Nous vous remercions pour l’achat de ces enceintes JVC.
Avant de les utiliser, lire ces instructions avec attention pour en obtenir les
meilleures performances possibles. En cas de questions, consulter votre
revendeur JVC.
-G2-
Vue de côté
Zij-aanzicht
Dank U voor de aanschaf van deze luidsprekers.
Lees alvorens over te gaan tot aansluiten, deze gebruiksaanwijzing door
zodat u de best mogeli/ke prestaties zult verkrijgen. Neem contact op met
de JVC dealer indien u vragen heeft.
Page 4

Advertencias, precauciones y notas
Avvertenze, Precauzioni e Aitro
■ PRECAUCION
Para reducir el riesgo de incendios, descargas eléctricas, etc.:
1. No retire los tornillos, las cubiertas o la caja.
2. No exponga este aparato a la lluvia o la humedad.
■ Precaución - Conmutador POWER
Este aparato está provisto de un conmutador POWER capaz de reducir el
consumo de energía al mínimo para un uso seguro. Por consiguiente,
1. Cuando realice los ajustes iniciales, efectúe todas las conexiones requeridas,
conecte el enchufe de la red en el tomacorriente de pared, y ajuste el
conmutador POWER a ON.
2. Cuando no esté en uso, ajuste el conmutador POWER a OFF.
3. Extraiga el enchufe del tomacorriente para desconectar la alimentación por
completo. La línea de la red no se desconecta en ninguna de las posiciones
del conmutador POWER.
Precaución: Ventilación apropiada
Para evitar riesgos de incendios o de descargas eléctricas u otros daños, coloque
el aparato de la siguiente manera:
1. Parte delantera:
Sin obstrucciones y con espacio abierto.
2. Laterales/parte superior/parte trasera:
No debe haber ninguna obstrucción dentro de las áreas indicadas por las
dimensiones de abajo.
3. Parte inferior:
Debe instalarse sobre una superficie nivelada. Para una ventilación
adecuada, colóquelo sobre un soporte de 10 cm o más de altura para
permitir el paso de aire.
PRECAUCION
• No obstruya las rendijas o los orificios de ventilación.
(Si las rendijas o los orificios de ventilación quedan tapados con un
periódico, un trozo de tela, etc., no se podrá disipar el calor).
• No ponga sobre el aparato ninguna llama al descubierto, como velas
encendidas.
• Cuando tenga que descartar las pilas, tenga en cuenta los problemas
ambientales y observe estrictamente los reglamentos o las leyes locales
sobre disposición de las pilas.
• No utilice este aparato en el cuarto de baño o en lugares donde hay agua.
Tampoco coloque ningún recipiente que contenga agua u otros líquidos
(frascos de cosméticos o medicinas, floreros, macetas, vasos, etc.) encima
de este aparato.
■ ATTENZIONE
Per ridurre il rischio di scosse elettriche, incendio, ecc.
1. Non rimuovere viti, coperchi o il mobiletto esterno.
2. Non esporre quest’apparecchio agli effetti deleteri di elementi quali pioggia
e umidità.
■ Attenzione - Interruttore POWER
Quest’apparecchio è dotato di un interruttore POWER che serve a ridurre il
consumo di energia elettrica e per sicurezza. Si raccomanda quindi di
osservare quanto sotto.
1. Per l’impostazione iniziale, completare tutti i collegamenti necessari,
inserire la spina del cavo di alimentazione nella presa a muro della rete
elettrica c mettere l’interruttore POWER in posizione ON (accensione).
2. Se l’apparecchio non deve essere usato, mettere l’interruttore POWER in
posizione OFF (spegnimento),
3. Per togliere completamente l’alimentazione di corrente, disinserire la spina
del cavo di alimentazione dalla presa a muro della rete elettrica. Altrimenti
l'alimentazione di corrente elettrica permane a prescindere
dall’impostazione dell’interruttore POWER.
Attenzione; Ventilazione appropriata
Per evitare i rischi di scosse elettriche e incendio, e prevenire eventuali
danneggiamenti, collocare l’apparecchio osservando quanto sotto.
1. Davanti:
Spazio libero e nessun ostacolo.
2. LatiAopra/dietro:
Nessun ostacolo entro i limiti indicati in figura.
3. Base:
Collocare su superficie a livello. Mantenere le condizioni idonee a un
buon flusso d’aria di ventilazione collocando l’apparecchio su una base
di appoggio di altezza non inferiore a 10 cm.
ATTENZIONE
• Evitare di ostruire le aperture o i fori di ventilazione con giornali,
indumenti etc., in quanto s’impedirebbe al calore di fuoriuscire.
• Non collocare fiamme libere (es. candele accese) sull’apparecchio.
• Le batterie devono essere smaltite nel rispetto dell’ambiente, attenendosi
ai regolamenti locali in materia.
• Non usare l’apparecchio in bagno o in locali dove sia presente l’acqua.
Evitare assolutamente di collocare contenitori contenenti acqua o liquidi
(flaconi di cosmetici o medicinali, vasi di fiori, piante in vaso , tazze etc.)
sull’apparecchio.
Vista delantera
Vista anteriore
Le estamos muy agradecidos por haber adquirido estos altavoces de JVC.
Antes de utilizarlos, sírvase leer las instrucciones detenidamente a fin de
obtener el mejor rendimiento posible. Si tiene alguna pregunta, acuda a su
agente de JVC.
Vista lateral
Vista laterale
Grazie per aver acquistato questi altoparlanti della JVC.
Prima di cominciare l’uso degli altoparlanti, leggete attentamente le istruzioni
per assicurare le migliori prestazioni. Qualora sorgessero dei dubbi,
rivolgetevi al vostro rivenditore JVC.
G3-
Page 5
Varningar, försiktighetsätgärder m.m.
Advarsler, forsigtighedsregler og andet
■ FORSIKTIGT!
For att minska risken for elektriska stotar, eldsvâda etc.:
1. Lösgör inga skruvar, skydd eller höljet.
2. Utsätt inte högtalaren for regn eller fukt.
■ Försiktigt! - Strömbrytaren POWER
Högtalaren är försedd med en strömbrytare (POWER). Följ nedanstäende räd
för att minimera strömförbrukningen och garantera säker användning.
1. Slutför först alia andra nödvändiga anslutningar, innan nätkabeln ansluts tili
ett nätuttag och strömbrytaren POWER stalls i tillslaget läge (ON). Päbörja
därefter de grundläggande inställningarna.
2. Stall strömbrytaren POWER i fränslaget läge (OFF), när högtalaren inte ska
användas.
3. Koppla loss nätkabeln frän nätuttaget för att stoppa strömtillförseln heit.
Strömtillförseln fortsätter oberoende av i vilket läge strötnbrytaren POWER
ställs.
Fôrsiktigt! -Tilibôrlig ventilation
Placera hSgtalaren enligt fôljande anvisningar for att undvika risken for
elektriska stotar eller eldsvâda och for att fôrebygga skador.
1. Framfbr hogtalaren:
Se till att inga hinder fôrekommer och ait ett ôppet utrymme lâmnas.
2. Ovanfôr, bakom och pâ sidorna om hdgtalaren:
Inga hinder fâr fôrekomma inom de avstând som anges pâ illustrationen
nedan.
3. Under hôgtalaren:
Placera hôgtalaren pâ ett plant underlag. Sbrj for tillrackligt god
ventilationsmojlighet genom att placera hôgtalaren pâ ett minst 10
centimeter hôgt stall.
VIKTIGT
• Blockera inte ventilationsöppningarna pâ apparaten.
(Om ventilationsöppningarna blockeras av en tidning, en duk cher
liknande kan värme i apparaten eventuellt inte komma ut.)
• Placera ingenting med öppen lâga, exempelvis ett tänt ljus, pâ apparaten.
• Använda batterier mâste handhas pâ ett miljömässigt korrekt satt och de
lagar och förordningar som gâller pâ platsen för begagnade batterier
mâste fôljas noga.
• Använd inte apparaten i badrum eller pâ annan plats med vatten. Placera
inte heller behâliare fyllda med vatten eller annan vätska (sâsom
kosmetika, mediciner, blomvaser, blomkrukor, koppar med mera) ovanpâ
apparaten.
■ FORSIGTIG
For at reducere risikoen for elektrisk st0d, brand, osv:
1. Fjern ikke skruer, afskærmninger eller kabinettet.
2. Udsæt ikke dette apparat for regn eller fugt.
■ Forsigtig! POWER afbryder
Dette apparat er forsynet med en POWER afbryder for at gpre det muligt at
minimere strpmforbruget og give sikker anvendelse. Derfor skal fplgende
overholdes:
1. Nâr den indledende opstilling skal foretages, skal aile tilslutninger f0rst
udf0res, f0r netledningen sættes i en vægstikkontakt, hvorefter POWER
afbryderen sættes til ON,
2. Nâr apparatei ikke er i anvendelse, sættes POWER afbryderen til OFF.
3. Tag netledningen ud af stikkontakten for at slukke helt for str0mmen.
Ligegyldigt hvad position POWER afbryderen er i, sâ afbryder den ikke
forbindelsen til lysnettet.
Forsigtig; Korrekt ventilation
For at undgà risikoen for elektrisk st0d og brand, og forebygge beskadigelse, skal
apparatet placeres som fpiger:
1. Front;
Ingen forhindringer og frit rum til stede.
2. Sider/top/bag:
Der ma ikke vaere nogen forhindringer piacerei i de omràdcr, der er
defineret af nedenstaende dimensioner.
3. Bund
Anbring pa cn plan overflade. S0rg for at der er tilstraekkelig luftpas.sage
til ventilationsformal, idei apparatet anbringes pa et underlag, der er 10
cm eller hpjere.
AOVARSEL
• Undgà at tilstoppe ventilationsäbningerne.
(Hvis de tilstoppes af avispapir, en klud el.lign., vii varmen muligvis ikke
kunne komme ud).
• Undlad at anbringe áben ild (f.eks. laendte stearinlys) oven pá apparatet.
• Ved bortskaffeise af batterier b0r de miljpmaessige konsekvenser tages i
betragtning, ligesom de relevante lokale bestemmelser n0je skal
overholdes.
• Apparatet mà ikke bruges i et badevaerelse eller i naerheden af vand. Der
b0r heller ikke anbringes beholdere med vand eller anden vaeske
(kosmetik, medicin, blomstervaser, potteplanter, kopper osv.) oven pà
apparatet.
Sett framifrân
Set forfra
Jack fòr ditt vai av dessa JVC-hògtalare.
Innan du kopplar In hógtalarna I din Ijudanlàggning bór du fòr att fà maximala
prestanda fràn hógtalarna làsa igenom bruksanvisningen noggrant. Kontakta
din JVC-àterfórsàljare om du har fràgor eller kànner dig osàker.
-G4
Sett frän sidan
Set fra siden
Tak for kobet af denne JVC-hojttaler.
Gennemlæs venligst vejledningen omhyggeligt far hojttaleren tages I brug,
sà De kan opná den bedst mulige ydelse. Forhor hos Deres JVC forhandler
hvIs De har nogen spargsmál.
Page 6

Varoituksia, huomautuksia ym.
■ Huomautus
Sahkoiskujen, tulipalon ym. vaaran valttamiseksi:
1. Ala irrota ruuveja, icansia tai koteloa.
2. Ala saata tata laitetta alttiiksi sateelle tai kosteudelle.
■ Huomautus - Virtapainike (POWER)
Tassa laitteessa on virtapainike, jotta virrankulutus saadaan vahennettya
minimiin. Siksi
1. Kun teet alkusaatbja, tee kaikki tarvittavat liitannat, liita verkkopistoke
verkkoulosottoon ja aseta virtapainike (POWER) kytkettyyn asentoon ON.
2. Kun laitetta ei kayteta, aseta virtapainike (POWER) katkaistuun asentoon
OFF.
3. Virta katkaistaan kokonaan irrottamalla verkkopistoke. Virtapainike
(POWER) ei katkaise missaan asennossa verkkolinjaa kokonaan.
Huomautus; Kunnollinen ilmanvaihto
Sahkoiskujen ja tulipalon syttymisvaaran valttamiseksi ja vaurioiden estamiseksi
laite on sijoitettava seuraavalla tavalla:
1. Edessa:
Ei esteita ja avoin tila
2. SivuillapaaHii/lakana:
Mitaan esteita ei saa asettaa alia nakyvien mittojen osoiltamaan tilaan.
3. Alapuolella:
Aseta tasaiselle pinnalle. Jotta ilma paasee vaihtumaan riittavasti, aseta
10 cm tai korkeamman tuen paalle.
VAROITUS
• Tuuletusrakoja tai -aukkoja ei saa tukkia.
(Jos tuuletusraot tai -aukot tukitaan sanomalehdelld tai vaatteella yms.,
lampo ei mahdollisesti paase ulos.)
• Laitteen paalle ei saa asettaa avotulen lahteita, kuten palavia kynttiloita.
• Paristoja havitcttaessa on huomioitava ymparistoongelmat. Naiden
paristqjen havitysta koskevia paikallisia maarayksia ja lakeja on
noudatettava ehdottomasti.
• Tata laitetta ei saa kayttaa kylpyhuoneessa tai kosteissa tiloissa. Taman
laitteen paalle ei saa asettaa mybskaan vedella tai ncsteilla taytettyja
astioita (kuten kosmetiikkaa tai laakkeita, kukkavaaseja, ruukkukukkia,
kuppeja yms.).
IMPORTANT for the U.K.
DO NOT cut off the mains plug from this equipment. If the plug fitted is
not suitable for the power points in your home or the cable is too short
to reach a power point, then obtain an appropriate safety approved
extension lead or consult your dealer.
BE SURE to replace the fuse only with an identical approved type, as
originally fitted.
If nontheless the mains plug is cut off ensure to remove the fuse and
dispose of the plug immediately, to avoid a possible shock hazard by
inadvertent connection to the mains supply.
If this product is not supplied fitted with a mains plug then follow the
instructions given below;
IMPORTANT:
DO NOT make any connection to the terminal which is marked with the
letter E or by the safety earth symbol or coloured green or green-andyellow.
The wires in the mains lead on this product are coloured in accordance
with the following code:
Blue: Neutral
Brown: Live
As these colours may not correspond with the coloured markings
identifying the terminals in your plug proceed as follows:
The wire which is coloured blue must be connected to the terminal which
is marked with the letter N or coloured black.
The wire which is coloured brown must be connected to the terminal
which is marked with the letter L or coloured red.
IF IN DOUBT - CONSULT A COMPETENT ELECTRICIAN.
Edestà katsottuna
Kiitos siita ettà pààdyit valinnassasi JVC-kaiuttimiin,
Ennen kuin alat kàyttàà niità, lue kàyttòohje huolellisesti, jotta ne toimisivat
parhaalla mahdollisella tavalla. Jos Sinulla on kysyttàvàà ota yhteys JVCedustajaan.
-G5-
Sivulta katsottuna
Page 7

— SAFETY INSTRUCTIONS —
“SOME DOS AND DON’TS ON THE SAFE USE OF EQUIPMENT”
This equipment has been designed and manufactured to meet
international safety standards but, like any electrical equipment, care
must be taken if you are to obtain the best results and safety is to be
assured.
Do read the operating instructions before you attempt to use the
equipment.
Do ensure that all electrical connections (including the mains plug,
extension leads and interconnections between pieces of equipment)
are properly made and in accordance with the manufacturer’s
instructions. Switch off and withdraw the mains plug when making or
changing connections.
Do consult your dealer if you are ever in doubt about the installation,
operation or safety of your equipment.
Do be careful with glass panels or doors on equipment.
DON’T continue to operate the equipment if you are in any doubt
about it working normally, or if it is damaged in any way — switch off,
withdraw the mains plug and consult your dealer.
DON’T remove any fixed cover as this may expose dangerous
voltages.
DON’T leave equipment switched on when it is unattended unless it is
specifically stated that it is designed for unattended operation or has a
standby mode.
Contents I3ÜISÎ1
Speaker Types.......................................................................................1
Standard arrangement.......................................................................... 1
Confirming Supplied Accessories
Precautions for Use............................................................................... 1
Precautions for Installation.....................................................................2
Names of Parts and Functions
Connections........................................................................................... 4
Operation................................................................................................5
Troubleshooting
Specifications......................................................................................... 7
..................................;...................................................
..........................................................
..............................................................
Inhalt BSWaSlil
Lautsprechertypen
Standard-Anordnung..............................................................................1
Überprüfen des mitgelieferten Zubehörs
Vorsichtsmaßnahmen für den Gebrauch
Vorsichtsmaßnahmen für die Installation
Namen von Teilen und Funktionen........................................................ 3
Verbindungen......................................................................................... 4
Bedienung...............................................................................................5
Störungsbehebung..................................................................................7
Spezifizierungen
.................................................................................
...............................................
..............................................
...............................................
.....................................................................................
Contenus
Types de haut-parleurs.......................................................................... 8
Disposition normale
Confirmation des accessoires fournis.....................................................8
Précautions pour l’emploi
Précautions pour l’installation................................................................ 9
Nomenclature des différents éléments et fonctions
Connexions...........................................................................................11
Fonctionnement....................................................................................12
Dépannage............................................................................................14
Spécifications........................................................................................14
................................................................................
......................................................................
.............................
10
Inhoud
Luidsprekertypen
Standaard opstelling.............................................................................. 8
Controlaren toebehoren......................................................................... 8
Voorzorgen voor het gebruik.................................................................. 8
Voorzorgen voor de installatie
Namen van onderdelen en functies......................................................10
Aansluitingen........................................................................................11
Bediening..............................................................................................12
Opiossen van Problemen......................................................................14
Technische gegevens...........................................................................14
...................................................................................
...............................................................
Contenido
Tipos de altavoces................................................................................15
Disposición estándar.............................................................................15
Confirmación de los accesorios suministrados.....................................15
Precauciones sobre el uso
Precauciones sobre la instalación
...................................................................
.......................................................
15
16
Switch off using the switch on the equipment and make sure that your
family know how to do this.
Special arrangements may need to be made for infirm of handicapped
people,
DON’T use equipment such as personal stereos or radios so that you
are distracted from the requirements of traffic safety. It is illegal to
watch television whilst driving.
DON’T listen to headphones at high volume as such use can
permanently damage your hearing.
DON’T obstruct the ventilation of the equipment, for example with
curtains or soft furnishing.
Overheating will cause damage and shorten the life of the equipment.
DON’T use makeshift stands and NEVER fix legs with wood screws —
to ensure complete safety always fit the manufacturer’s approved
stand or legs with the fixings provided according to the instructions.
DON’T allow electrical equipment to be exposed to rain or moisture
ABOVE ALL.
- NEVER let anyone, especially children, push anything into holes,
slots or any other opening in the case.
- this could result in a fatal electrical shock;
- NEVER guess or take chances with electrical equipment of any
kind.
- it is better to be safe than sorry!
Nombres de las partes y funciones......................................................17
Conexiones...........................................................................................18
Funcionamiento....................................................................................19
Solución de problemas.........................................................................21
1
Especificaciones..................................................................................21
3
Tipi di diffusore
Disposizione standard..........................................................................15
Verifica degli accessori in dotazione
7
Precauzioni per l’uso............................................................................15
Precauzioni per l’installazione............................................................. 16
Nome delle parti e funzioni.................................................................. 17
Collegamenti.........................................................................................18
1
Funzionamento.....................................................................................19
Guida e rimedi in caso di problemi di funzionamento
1
Dati caratteristici ..................................................................................21
1
2
Hògtalartyper........................................................................................22
Normal uppstàllning..............................................................................22
Kontroll av medfóljande tillbehór
Sàkerhetsfóreskrifter for anvàndning....................................................22
7
Sàkerhetsfòreskrifter for installation
Namn pà delar och funktioner
Anslutningar......................................................................................... 25
Drift...................................................................................................... 26
8
Felsòkning............................................................................................28
Tekniska data........................................................................................28
8
.....................................................................................
Indice
....................................................
..........................
Innehàll EUl^iLLU
..........................................................
....................................................
.............................................................
Indhold lìQg
Hejttalertyper
Normal opstilling...................................................................................22
Tjek af medfelgende tilbehor
Sikkerhedsregler for brug
Sikkerhedsregler for installation
Delenes navne og funktioner................................................................24
Tilslutninger...........................................................................................25
8
Betjening...............................................................................................26
Fejifinding..............................................................................................28
Specifikationer......................................................................................28
9
Kaiutintyypit...........................................................................................29
Tavallinen sijoitus..................................................................................29
Vakiovarusteiden tarkastaminen...........................................................29
Huomautuksia kàytòstà
Huomautuksia asennuksesta
Osien nimet ja toiminnot.......................................................................31
Liitànnàt................................................................................................ 32
Kàyttò....................................................................................................33
Vianmààritys.........................................................................................35
Tekniset tiedot.......................................................................................35
G6-
........................................................................................
................................................................
.....................................................................
...........................................................
Sisàltò
........................................................................
...............................................................
15
15
21
22
23
24
22
22
22
23
29
30
Page 8
Speaker Types Lautsprechertypen
Confirming Suppiied Accessories Überprüfen des mitgeiieferten Zubehörs
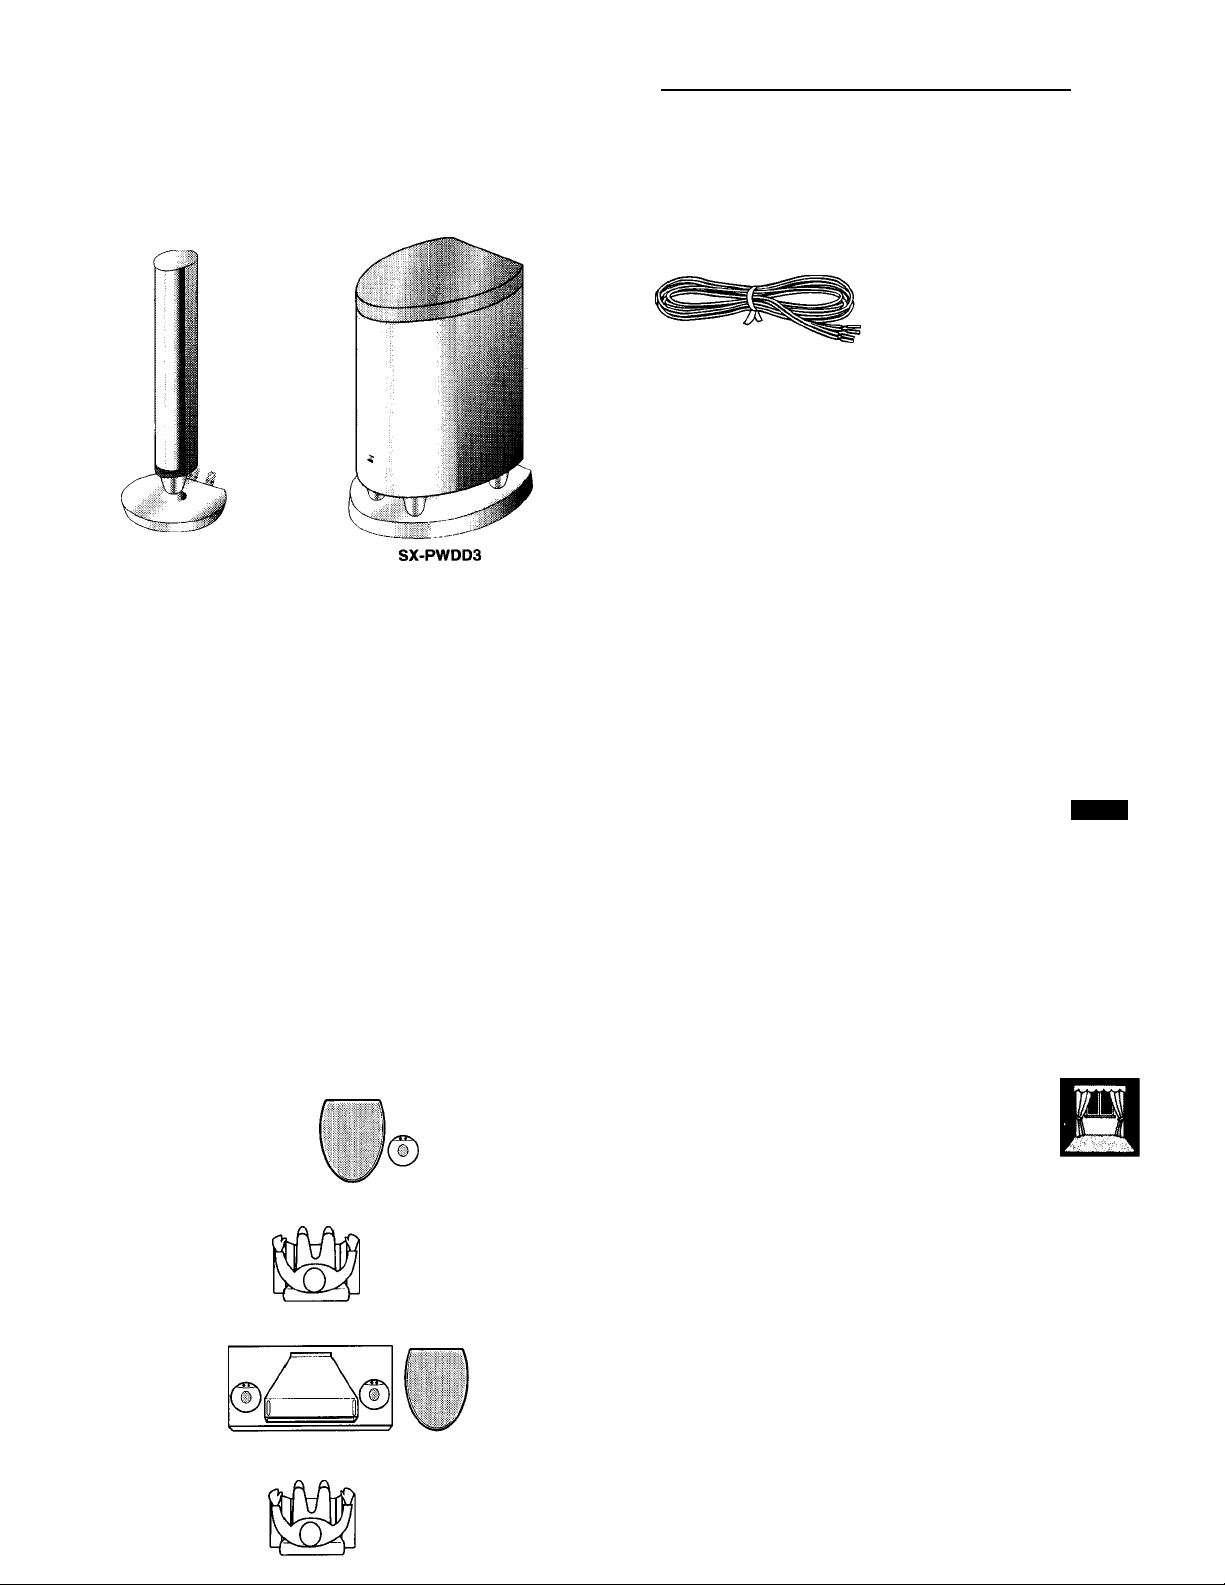
This set consists of two types of speakers. Dieser Satz besteht aus zwei Lautsprechertypen.
• Main speaker (x2)
• Hauptlautsprecher (x2)
e Subwoofer (x1 )
• Subwoofer (x1)
SX-XDD3
The cabinets of these spcakeis are made from natuidt wood so the gtdin
finish diffcis from that of anificiat wood The appearance of each cabinet
will differ slightly and has us own individual character. As molded plywood
has been used, the .surfaces may have a slight luughnessbut this dues not
have any influence upon the performance.
Das Gehäuse dieser Lautsprecher ist aus Naiurholr gefertigt, weshalb sich
die Maserung von Kunaholzmaserung unteischeidet. Jedes Gehäuse weist
geringfügige Unterschiede im Aussehen auf und besitzt einen eigenen
Chaiakier. Da Formspenholz verwendet wird, können die Oberfllichen eine
geringe Rauigkeit aufweisen, was jedoch keinen Fonfluss au( die Leistung
Standard arrangement Standard-Anordnung
The sound image becomes sharper the closer the subwoofer is placed to the main
speakers.
Das Klangbild wird umso deutlicher, je näher der Subwoofer an den
Hauptlautsprechern aufgestellt wird.
SX-XDD3 (§
Main Speaker
Left
Hauptlautsprecher
Links
Subwoofer
Subwoofer
SX-PWDD3
SX-XDD3
Main Speaker
Right
Hauptlautsprecher
Rechts
Before use, check that you have received all of the following items, which are
supplied with the unit.
Überprüfen Sie vor dem Gebrauch, dass Sie alle der folgenden Teile, die mit der
Anlage initgeliefert werden, erhalten haben.
• Speaker Cord (3 m) (x4)
• Laufsprecherkabet (3 m) (x4)
Precautions for Use Vorsiebtsmaßnabmen für den Gebraueb
■To maintain the iook of the unit
Wipe with a dry, soft cloth if the cabinet or control panel should become dirty.
If very dirty, apply a small amount of water or neutral detergent to the cloth and
wipe clean. Then wipe with a dry cloth.
■ Zum Erhaiten des Aussehens der Anlage
Wischen Sie die Box oder das Bedienungsfeld mit einem trockenen, weichen
Tuch ab, wenn sie schmutzig geworden sind.
Wenn sie sehr schmutzig geworden sind, dann geben Sie etwas Wasser oder eine
kleine Menge eines neutralen Reinigungsmittels auf das Tuch und reiben sie
sauber. Dann wischen Sie mit einem trockenen Tuch ab.
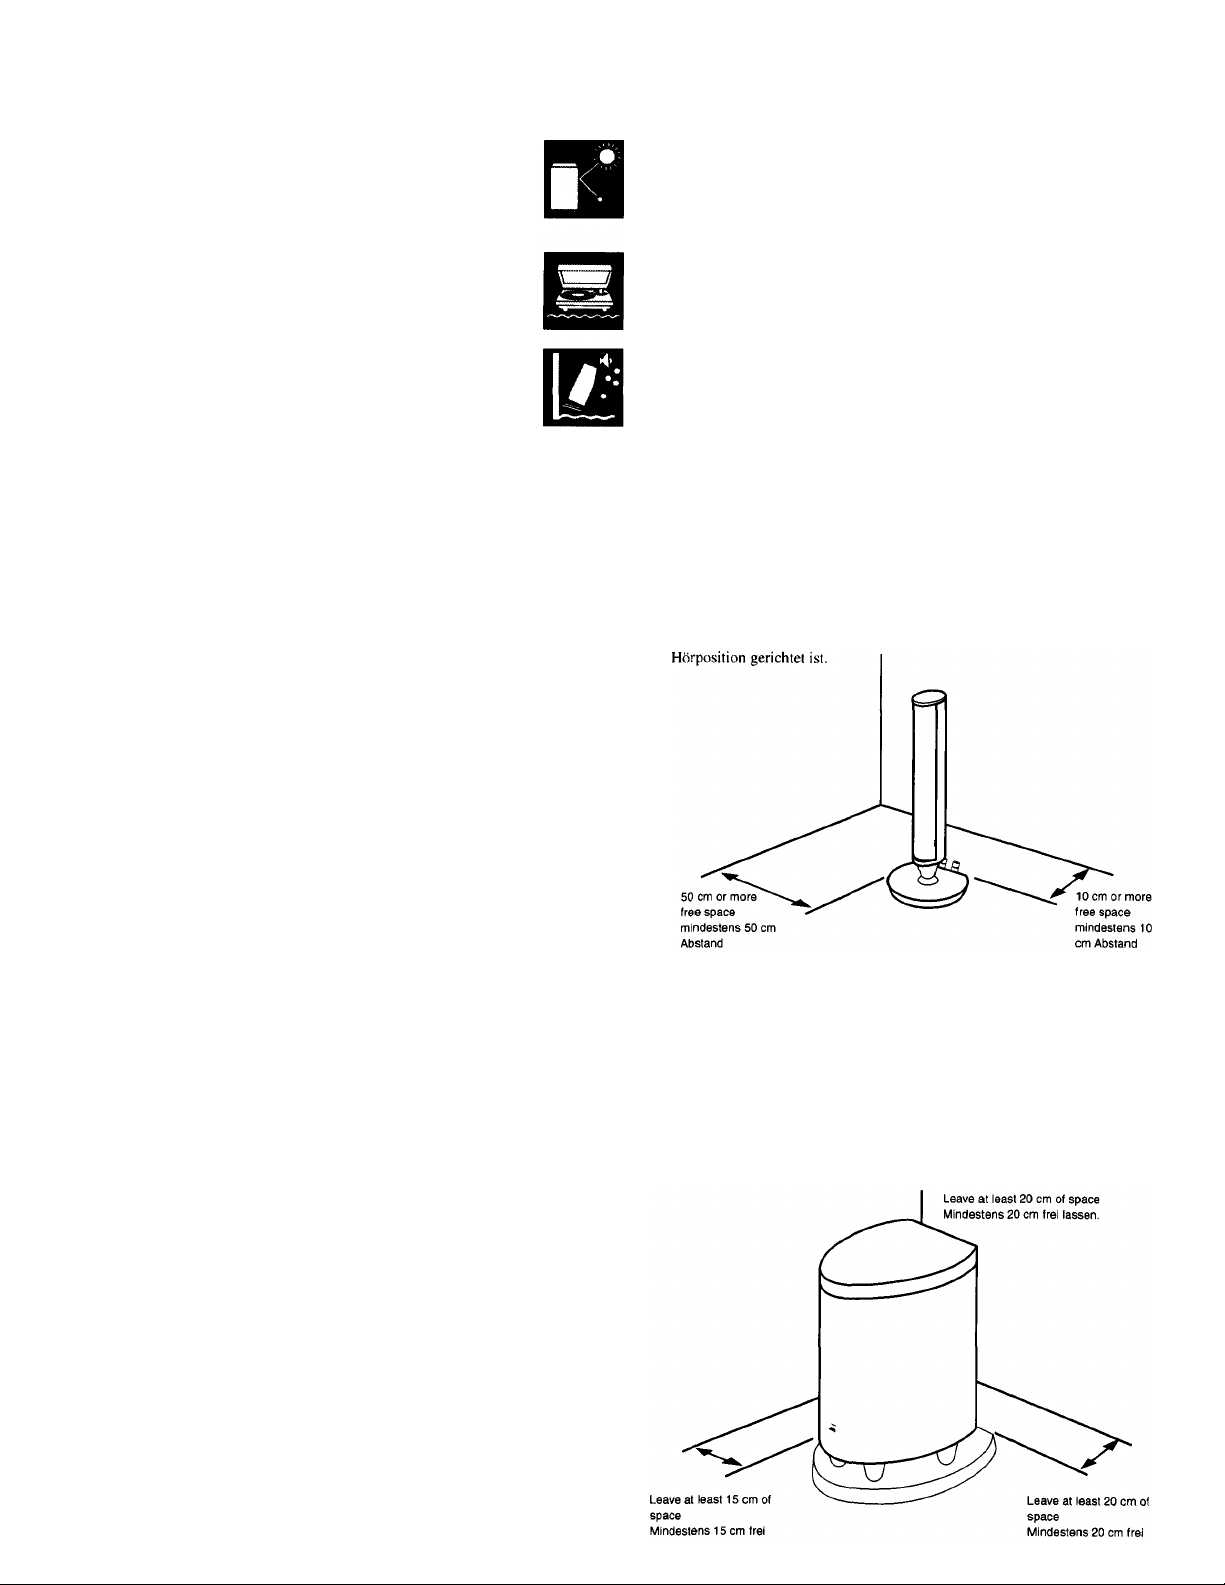
■ Good manners when listening to stereo
When you are listening to music on a stereo system, please
listen at volume that will not disturb your neighbors. At night,
in particular, even soft sounds spread easily to the surround
ings. Please .shown consideration and close windows, or listen
using headphones, etc. in order to maintain a pleasant living
environment.
The symbol shown here is the Sound Etiquette symbol mark.
■ Angepasstes Verhalten beim Hören in Stereo
Wenn Sie Musik auf einem Slereosystem hören, dann achten sie bitte bei der
Lautstärke darauf, dass die Nachbarn nicht gestört werden. Besonders nachts
verbreiten sich selbst leise Töne in der Umgebung. Bitte nehmen Sie Rücksicht
und schließen Sie die Fenster oder benutzen Kopfhörer usw., um eine angenehme
Wohnalniosphäre zu erhalten.
Das hier gezeigte Symbol ist das Symbolzeichen des Klangetikettes (Sound
Etiquette).
I Improving the sound field
If the speakers are facing a solid wall or glass door, etc., it is
recommended to furnish the wall with materials that absorb
sound, for example by hanging up heavy curtains, to prevent
generation of reflections and standing waves.
I Verbessern des Klangfeldes
Ein Wohnzimmer, in dem leicht Reflexionen und Resonanzen erzeugt werden
können, sollte mit schweren Vorhängen oder Teppichböden usw. ausgestattet
werden.
Wenn die Lautsprecher auf eine feste Wand oder eine Glastür usw. gerichtet
sind, ist es empfehlenswert, die Wand mit klangabsorbierenden Materialien
auszustatten, z. B. durch das Aufhängen von schweren Vorhängen, um die
Erzeugung von Reflexionen und stehenden Wellen zu verhindern.
SX-XDD3
SX-PWDD3
- 1 -
Page 9
Precautions for Installation
Vorsichtsmaßnahmen für die Installation
• To prevent deformation or discoloration of the cabinet, do not
install the unit where it is exposed to direct sunlight or high
humidity, and avoid installation near air conditioning outlets,
• Urn Deformierung oder Verfärbung der Box zu vermeiden, stellen
Sie die Anlage nicht an einem Ort auf, wo sie direktem Sonnenlicht
oder großer Feuchtigkeit ausgesetzt ist und vermeiden Sie die
Installation nahe an Ausgängen von Klimaanlagen.
• Speaker vibrations may cause howling. Place the unit as far
away from the player as possible.
• Lautsprechervibrationen können Rückkopplungen verursachen.
Stellen Sie die Anlage so weit wie möglich entfernt von dem
Spieler auf.
• Take the occurrence of earthquakes or other physical shocks into
consideration when selecting the installation place, and secure
the unit thoroughly.
• Ziehen Sie das Auftreten von Erdbeben oder anderen
physikalischen Erschütterungen in Betracht, wenn Sie den Ort für
die Installation auswählen und sichern Sie die Anlage sorgfältig.
• This unit is magnetically shielded so as not to cause color distortions on color
television sets. However, depending on the installation method, color distortions
may occur. Please pay attention to the following points when installing the unit.
1. When placing these speakers near a TV set, turn off the TV's main power
switch or unplug it before installing the speakers.
Wait at least 30 minutes after the system is installed before turning on the
TV’s power.
2. If another speaker system has been set up near the TV set, that system may
cause color distortions in the TV’s picture.
3. In spite of the shielded design of these speakers, some types of TV’s may
be affected by them. If this happens, move the speakers a short distance
form the TV set.
• Die Anlage ist magnetisch abgeschirmt, so dass sie keine Farbverzerrungcn
auf Farbfernsehern verursachen kann. Jedoch können in Abhängigkeit der
Installationsmethode Farbverzerrungen auftreten. Beachten Sie bitte die
folgenden Punkte bei der Installation der Anlage.
1. Bei Aufstellung dieser Boxen in der Nähe eines Fernsehers den
Netzschalter des Fernsehers ausschalten oder seinen Netzstecker aus der
Steckdose ziehen, bevor die Boxen installiert werden.
Mindestens 30 Minuten nach der Installation des Systems warten, bis der
Fernseher eingeschaltet wird.
2. Falls ein anderes Lautsprechersystem in der Nähe des Fernsehgerätes
aufgestellt worden ist, kann das System Farbverzerrungen des Fernsehbilds
verursachen.
3. Trotz der abgeschirmten Konstruktion dieser Boxen können manche
Fernseher von ihnen beeinflußt werden. Wenn dies der Fal ist, müssen die
Boxen etwas weiter entfernt vom Fernseher aufgestellt werden.
• When setting the speaker system, affixing the feet to the cabinet base is
recommended in order to cope with unsteadiness, etc.
The setting surface may slightly discolor depending on the material when
setting the unit on its attached feet for an extensive period.
• Beim Aufstellen des Lautsprechersystems wird empfohlen, die Füße an der
Gehäusebasis zu befestigen, um Herunterfallen usw. zu verhüten.
Die Aufstellfläche kann sich je nach dem Material leicht verfärben, wenn die
Einheit längere Zeit auf die Standfüße gestellt wird.
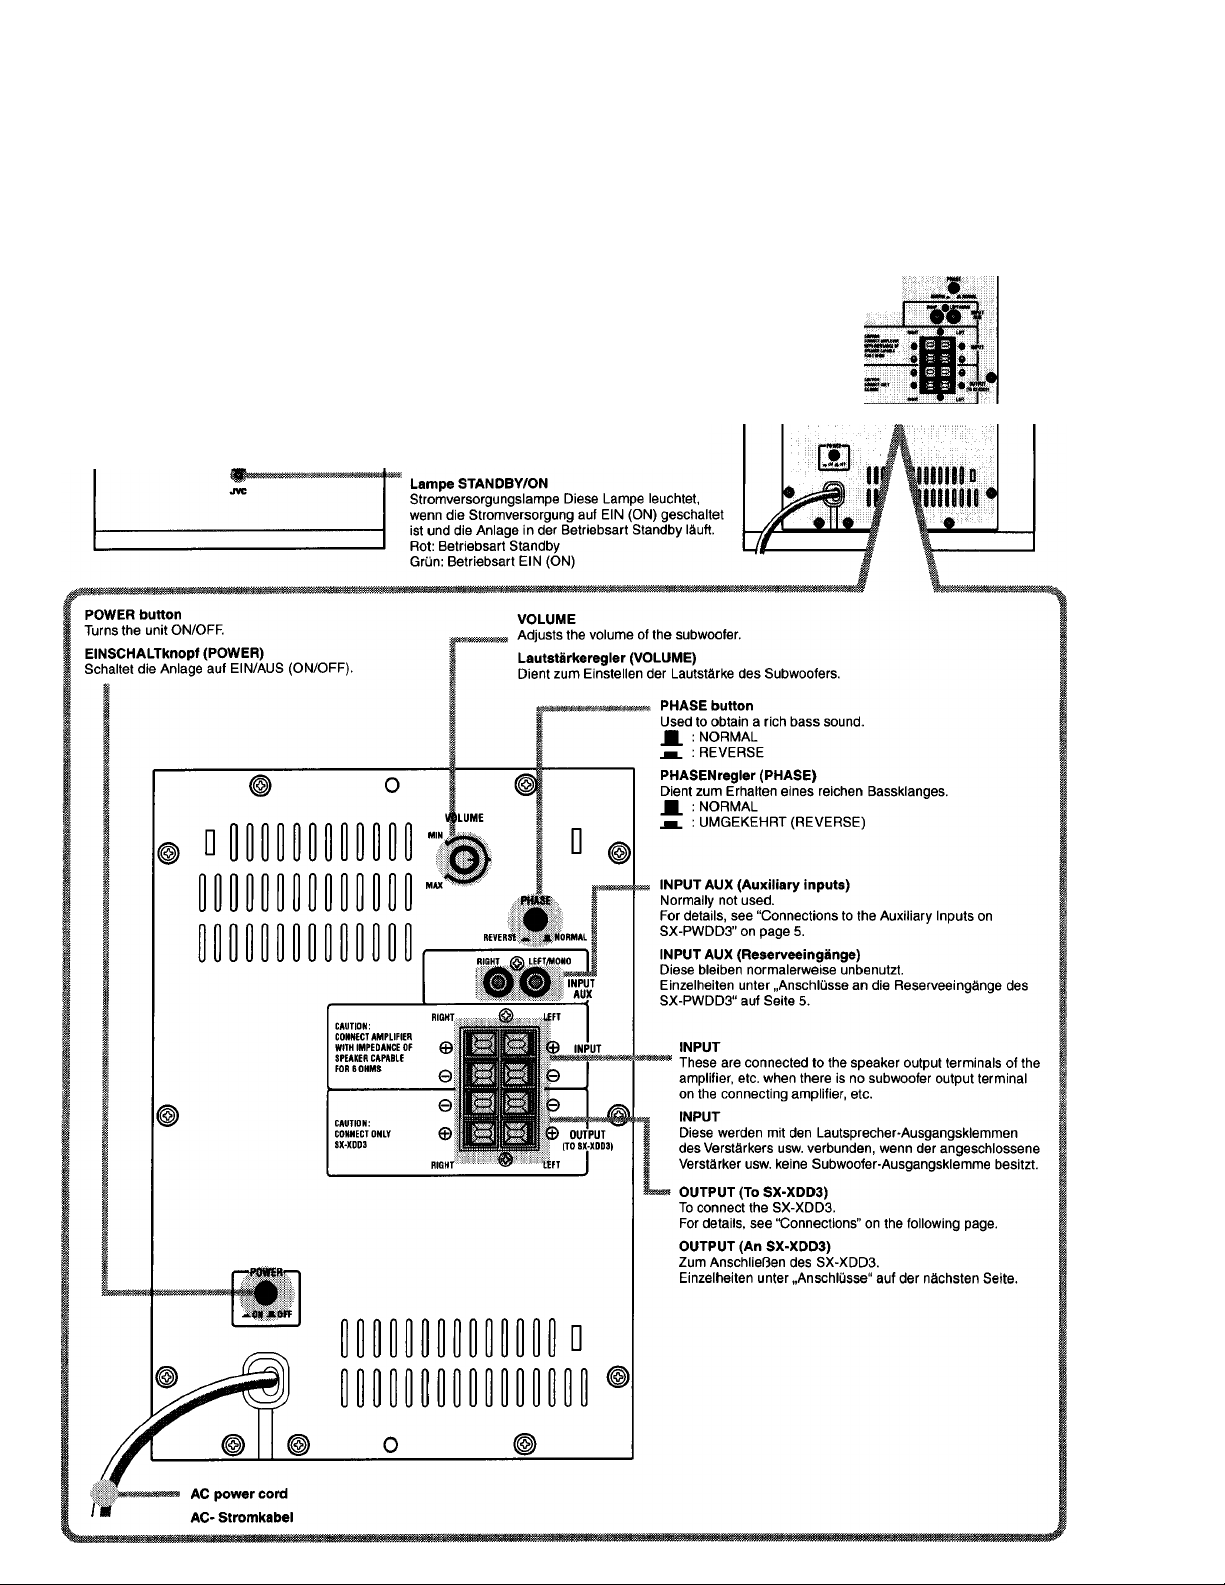
■To be considered when installing the speaker system
• The sound reproduced by the speaker system is subtly affected by the
conditions of the listening room. The arrangement of this system can be
changed to match the conditions of the listening room. We recommend that
you use the following guidelines to arrange the sy.stem to expand the sound
field and ensure a clearly pinpointed sound image.
• SX-XDD3 (Main Speaker)
• We recommend that there be at least about 50 cm free space between the
sides and a wall.
• We recommend that there be at least about 10 cm free space between the
rear side and a wall,
(Note that there is a risk that terminals may be short circuited if they contact
a wall, etc.)
We recommend that there be a distance of about 1.0 to 2.0 meters between
each speaker and the stereo system, and each speaker system should be placed
with the front facing forward towards the listening position.
n
VORSICHT
Um die Gefahr von Feuer oder Sachbeschädigung zu
vermeiden, halten Sie genügend Abstand für die Ventilation
um das Gerät ein, besonders zwischen der Rückseite und
einer Wand, einem Vorhang oder anderen Gegenständen hinter
dem Gerät.____________________________________________
IBei der Installation des Lautsprechersystems zu
beachtende Punkte
Der vom Lautsprechersystem reproduzierte Klang weist je nach den
Verhältnissen des Hörraums feine Unterschiede auf. Die Anordnung dieses
Systems kann den Verhältnissen des Hörraums angepasst werden. Wir
empfehlen die Beachtung der folgenden Richtlinien bei der Anordnung des
Systems, um das Klangfcld zu erweitern und ein klar definiertes Klangbild zu
gewährleisten.
SX-XDD3 (Hauptlautsprecher)
• Wir empfehlen, einen Abstand von mindestens 50 cm zwischen den Seiten
und einer Wand einzuhalten.
• Wir empfehlen, einen Abstand von mindestens 10 cm zwischen der
Rückseite und einer Wand einzuhalten.
(Beachten Sie, dass die Gefahr eines Kurzschlusses der Klemmen besteht,
falls sie eine Wand usw. berühren.)
Wir empfehlen, einen Abstand von etwa 1,0 bis 2,0 m zwischen den
Lautsprechern und der Stereoanlage einzuhalten und jedes
Lautsprechersystem so zu positionieren, dass die Vorderseite auf die
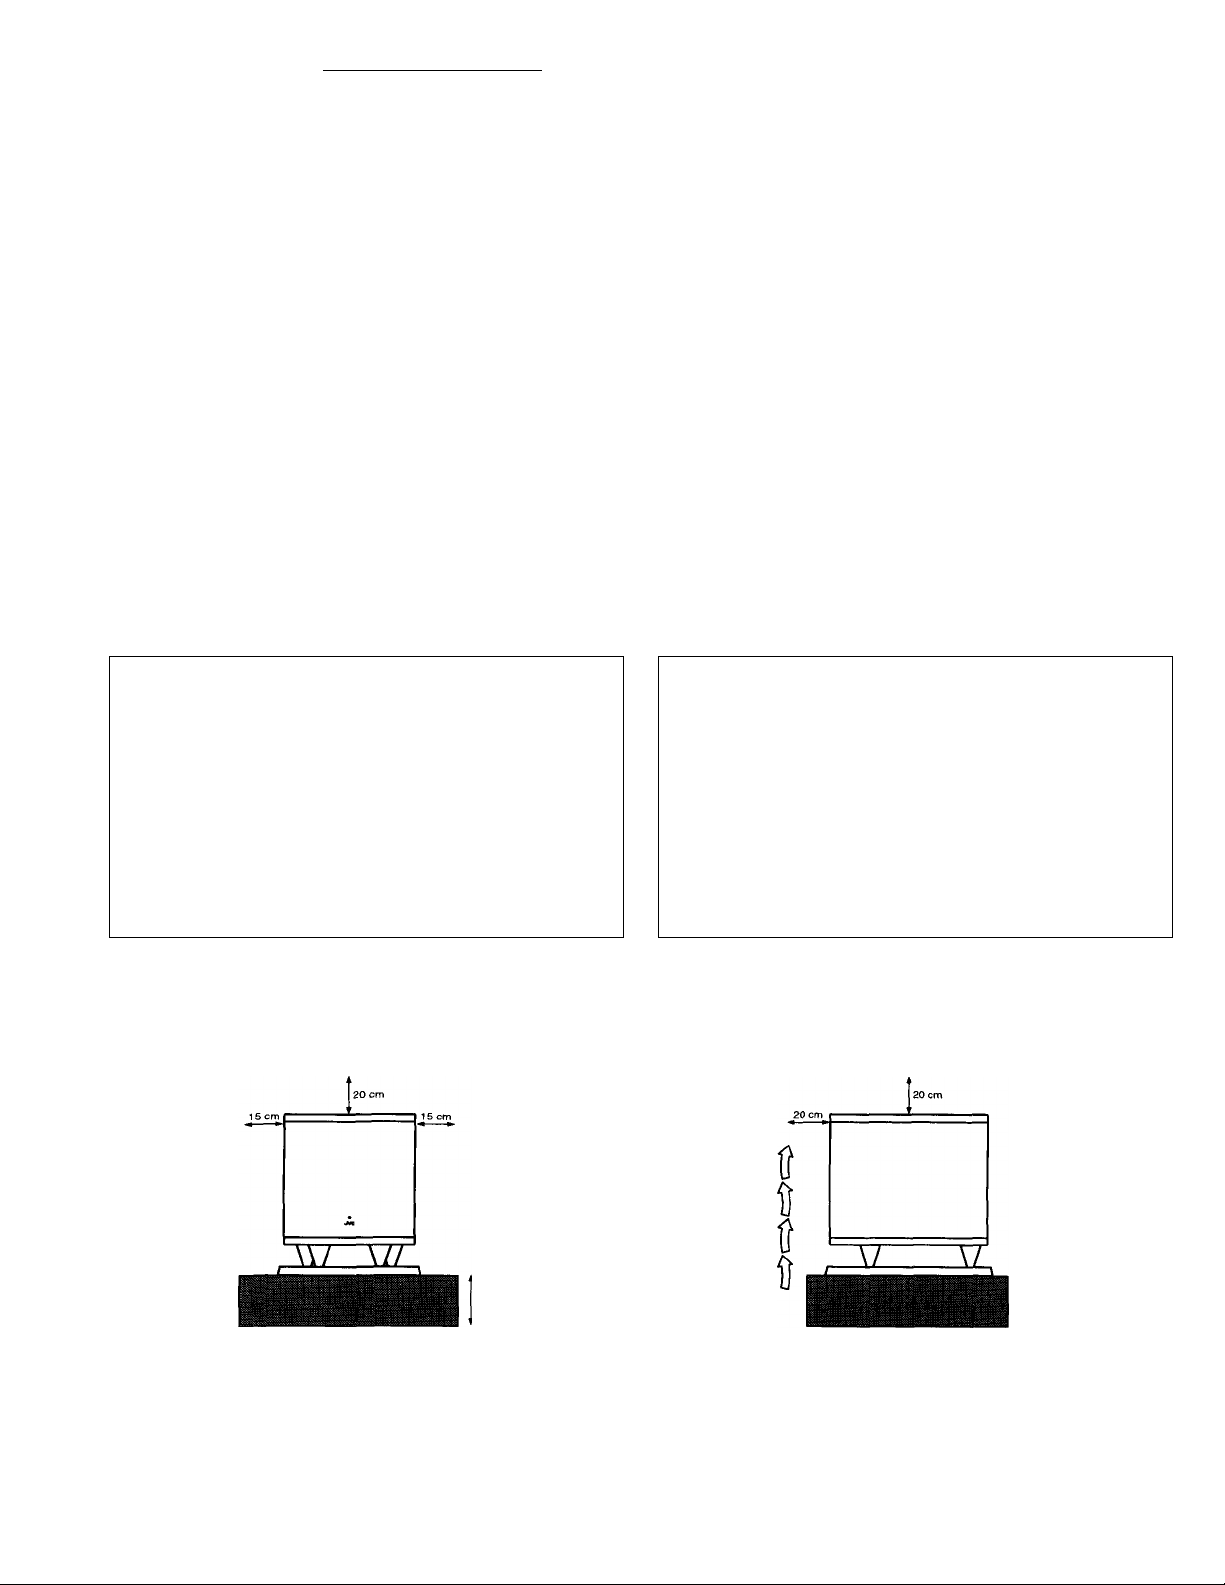
SX-PWDD3 (Subwoofer)
• Leave much space in the front.
• Leave at least 15 cm of space on the sides.
• Leave at least 20 cm of space on the top.
• Leave at least 20 cm of space in the rear.
SX-PWDD3 (Subwoofer)
• Vie Platz auf der Vorderseite frei lassen.
• Mindestens 15 cm an den Seiten frei lassen.
• Mindestens 20 cm an der Oberseite frei lassen.
• Mindestens 20 cm an der Rückseite frei lassen.
CAUTION
To avoid risk of fire or damage, keep enough spaces for
ventilation around the unit, especiaiiy between the back side
and the waii, curtain, or whatever behind the unit.
lassen.
lassen.
2-
Page 10
Names of Parts and Functions (sx-pwdds) Namen von Teilen und Funktionen (sx pwdds)
I Front Panel
i Vorderseitenteil
I Rear Panel
I Rückseitenteil
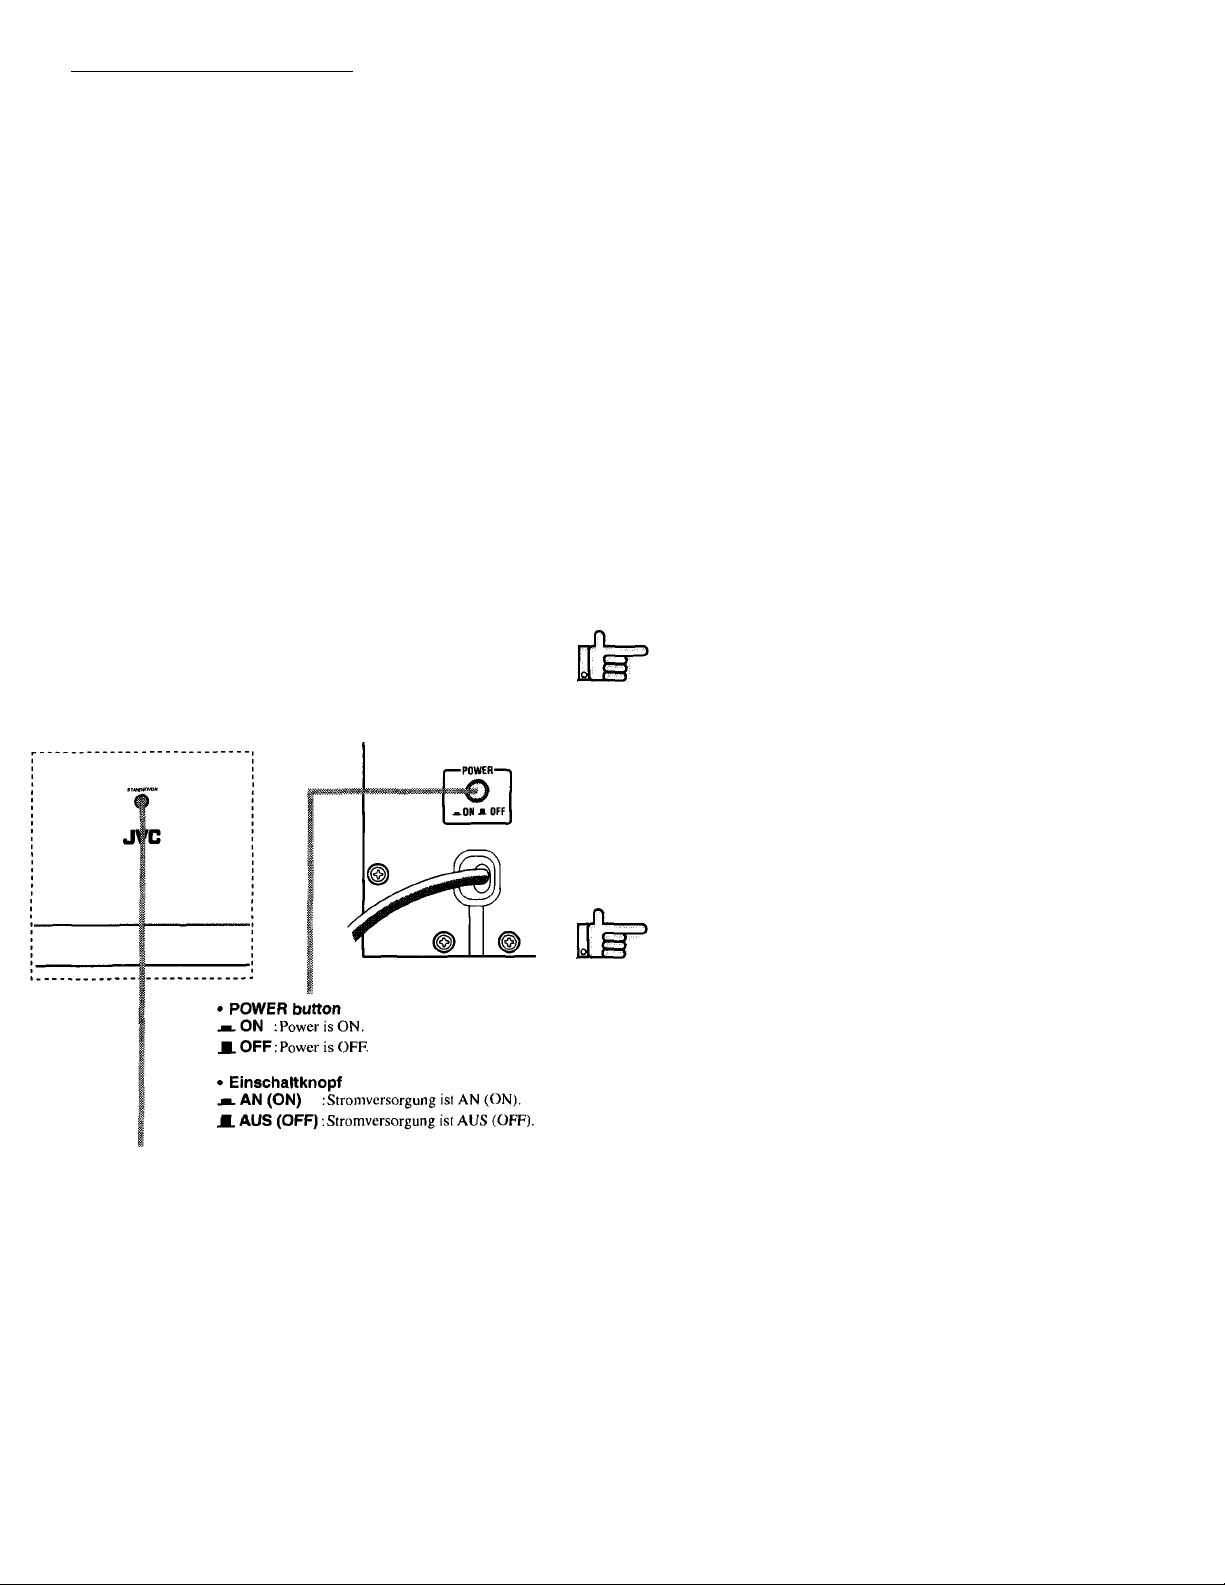
STANDBY/ON LAMP
This lights when the power is ON, and when the
unit is in the standby mode.
Red: Standby mode
Green: ON mode
^ miiminiiD
oiDiiiiiiiim
-3-
Page 11

Connections
Verbindungen
n
üs
CAUTION
> Always make sure that the amplifier and the speaker system
are turned OFF before connecting the system to the amplifier.
(Do not plug the power cords into an AC outlet before all the
connections have been completed.)
' Do not connect the main speakers (SX-XDD3) directly to your
amplifier. The speakers may be damaged. ALWAYS connect
them to the subwoofer (SX-PWDD3).
■ Before connecting
1. Turn OFF the amplifier before the speaker system is connected to the
amplifier. The amplifier may be damaged if the speaker cords are short
circuited while the amplifier is on.
2. The rated impedance of the speaker system is 6 ohms.
Use an amplifier that accepts a load impedance of 6 ohms.
3. The maximum input accepted by the system is 50 watts.
This is the value (rms) at which the music source can he input for a short
interval without the speaker suffering damage.
■ Normal connections
1. Connect the SX-XDD3 to the SX-PWDD3 as shown in figure
2. Connect the input terminals on the SX-PWDD3 to the speaker output
terminals on the amplifier as shown in figure (2) below.
Speaker output terminals
Lautsprecher-Ausgangsklemmen
0
) helow.
JL
VORSICHT
• Vergewissern Sie sich stets, dass Verstärker und
Lautsprechersystem ausgeschaltet sind, bevor Sie das System
an den Verstärker anschließen.
(Schließen Sie die Netzkabel erst dann an eine Netzsteckdose
an, nachdem alle Anschlüsse durchgeführt worden sind.)
• Schließen Sie die Hauptlautsprecher (SX-XDD3) nicht direkt an
Ihren Verstärker an. Die Lautsprecher könnten sonst
beschädigt werden. Schließen Sie die Lautsprecher IMMER an
den Subwoofer (SX-PWDD3) an.
■ Vor dem Anschließen
1. Schalten Sie den Verstärker aus, bevor Sie das Lautsprechersystem an den
Verstärker anschließen. Der Verstärker kann beschädigt werden, wenn die
Lautsprecherkabel bei eingeschaltetem Verstärker kurzgeschlossen werden.
2. Die Nennimpedanz des Lautsprechersystems beträgt 6 Ohm.
Verwenden Sie einen Verstärker, der eine Lastimpedanz von 6 Ohm akzeptiert.
3. Das System akzeptiert eine maximale Eingangsleistung von 50 Watt.
Dies ist der Effektivwert, der von der Musikquelle kurzzeitig eingegeben
werden kann, ohne dass die Lautsprecher Schaden erleiden.
■Normale Anschlüsse
1. Schließen Sie den SX-XDD3 an den SX-PWDD3 an, wie in der
nachstehenden Abbildung © gezeigt.
2. Verbinden Sie die Eingangsklemmen am SX-PWDD3 mit den LautsprecherAusgangsklemmen am Verstärker, wie in der nachstehenden Abbildung @
gezeigt.
■Cautions when connecting the speaker cords to the
speaker system
Connecting the polarities ( ® , 0 ) of the speaker cords incorrectly will
degrade the stereo effect and sound quality.
After connecting the cords, pull them lightly to check that they are securely
connected.
■Vorsichtsmaßnahmen beim Anschließen der
Lautsprecherkabel an das Lautsprechersystem
Werden die Polaritäten ( © , © ) der Lautsprecherkabel vertauscht, kommt es
zu einer Verschlechterung des Stereoeffektes und der Tonqualität.
Ziehen Sie nach dem Anschließen leicht an den Kabeln, um sicherzu.stellen, dass
sie einwandfrei angeschlossen sind.
Twist off the vinyl covering the tips of the
supplied speaker cords. Should the wires be
fluffy, twist them tight.
Drehen Sie die Kunststoffhüllen ab, mit denen
die Enden der mitgelieferten
Lautsprecherkabel geschützt sind. Falls die
Drahtenden ausgefranst sind, verdrillen Sie sie
einwandfrei.
The red INPUT terminal is the © terminai, and the black one is the ©
terminal. As shown in the figure, rotate the speaker terminai knob
counterciockwise ( © ) and insert the speaker cord into the groove. Then
rotate the knob ciockwise {© ) to secure the cord. Reversing the © and
0 poiarities will greatly degrade the stereo effect and sound quality.
Die rote INPUT-Kiemme ist die ©-Kiemme, und die schwarze ist die 0Kiemme. Drehen Sie den Lautsprecherkiemmenknopf entgegen dem
Uhrzeigersinn ( © ), wie in der Abbiidung gezeigt, und führen Sie das
Lautsprecherkabel in die Rille ein. Drehen Sie dann den Knopf im
Uhrzeigersinn (© ), um das Kabel zu sichern. Das Vertauschen der
Polaritäten © und © führt zu einer erheblichen Verschlechterung des
Stereoeffektes und der Tonqualität.
( 0 ) Terminal ^—
( © ) Klemme
Silver color (color of wire)
Silberfarbe (Drahtfarbe)
; ( © ) Terminal
{ © ) Klemme
Copper color (color of wire)
Kupferfarbe (Drahtfarbe)
y
-4-
Page 12
Connections (Continued) Make all Ihe connections before plugging the AC power cord into an AC outlet.
Verbindungen (Fortsetzung) Stellen Sie alle Verbindungen her, bevor Sie die AC- Stromkabel in einen AC- Ausgang stecken.
CAUTION
Do not connect the REC OUT terminals on your amplifier or
other component to the auxiliary input terminals on the
SX-PWDD3.
I Connections to the SX-PWDD3 INPUT AUX (auxiliary input)
terminais
• When the SX-PWDD3 is used as a stand-alone subwoofer.
• Connect these terminals to the amplifier’s subwoofer output terminal or the
MONO output terminal/line output terminal with the RCA pin cord (not
supplied).
• When this connection is made, no signal is output from the output
terminals.
• When the SX-PWDD.3 is used as a stand-alone subwoofer, the cross-over
frequency is fixed at 230 Hz.
• If the auxiliary inputs are also connected while the SX-DD3 systems used
in normal connections, the low range signal from the INPUT and the signal
from the auxiliary inputs will be output mixed from the subwoofer.
Operation
Betrieb
I Turning the Power ON I Einstellen der Stromversorgung auf AN (ON)
e Front panel
e Vorderseitenteil
Make all the connections before plugging the AC power cord into an AC outlet.
Stellen Sie alle Verbindungen her, bevor Sie die AC- Stromkabel in einen AC- Ausgang stecken.
e Rear panel
• Rückseitenteil
VORSICHT
Verbinden Sie die REC OUT-Buchsen an Ihrem Verstärker oder
einer anderen Komponente nicht mit den
Reserveeingangsbuchsen am SX-PWDD3.
■Anschlüsse an INPUT AUX (Reserveeingang) des
SX-PWDD3
• Wenn der SX-PWDD3 als unabhängiger Subwoofer verwendet wird.
• Verbinden Sie die.se Buchsen über das Cinch-Kabel (nicht mitgeliefert) mit
dem Subwoofer-Ausgang oder der MONO-Ausgangsbuchse/LineAusgangsbuchse des Verstärkers.
• Wenn diese Verbindung vorgenommen wird, erfolgt keine Signalausgabe
von den Ausgangsbuchsen.
• Wenn der SX-PWDD3 als unabhängiger Subwoofer verwendet wird, ist die
Übergangsfrequenz auf 230 Hz fixiert.
• Wird darüber hinaus ein Anschluss an die Reserveeingangsbuchsen
vorgenommen, wenn das System SX-DD3 mit normalen Anschlüssen
verwendet wird, werden das Niederfrequenzsignal von INPUT und das
Signal von den Reserveeingängen als gemischtes Signal vom Subwoofer
ausgegeben.
CAUTION
If the Volume knob on this unit is near MIN, the amplifier's
sound volume is 0, or the sound signals from the amplifier are
exceptionally low, the auto power on dose not function when it
receives audio signal, (the mode is not switched from the
standby mode to the ON mode).
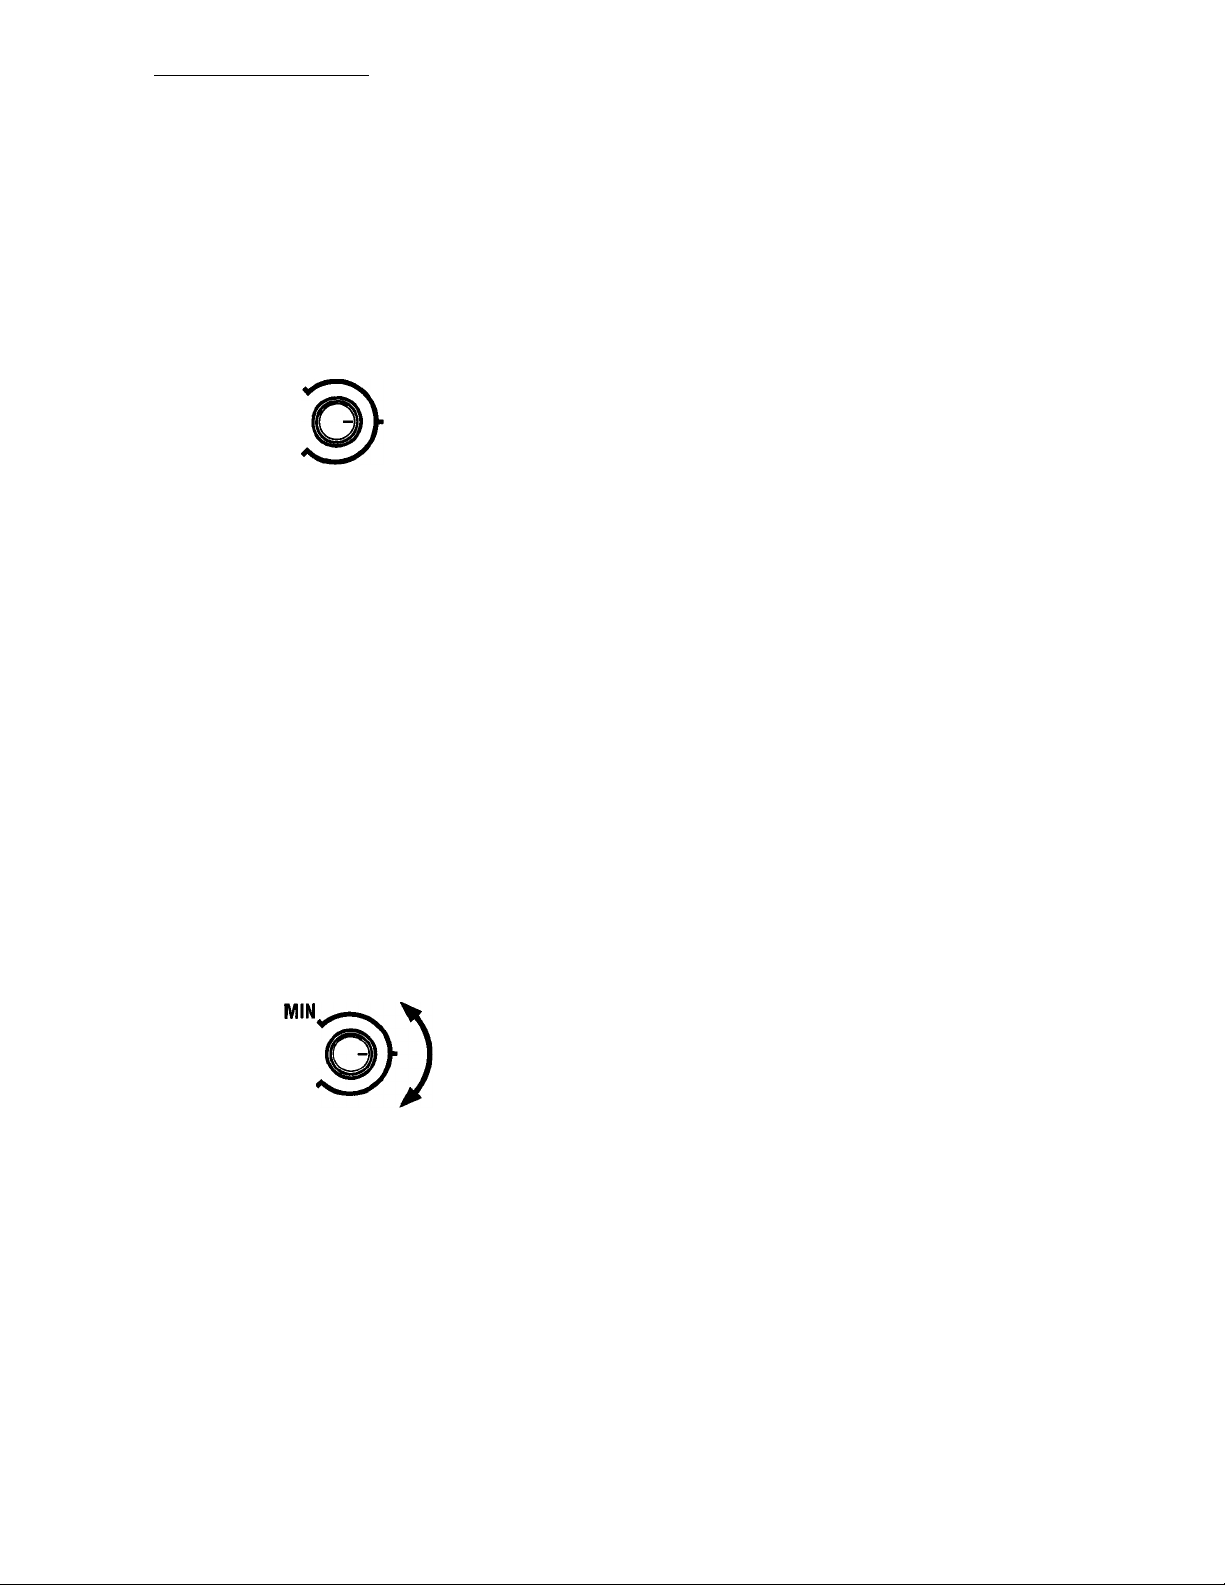
• STANDBY/ON lamp (with auto power on/off function)
When the POWER button is pressed to ON, the STANDBY/ON lamp lights
up green. If about 30 minutes elapse with no signals, the mode switches to the
standby mode, and the STANDBY/ON lamp lights red.
When audio signals are input, the mode automatically becomes the ON mode,
and the STANDBY/ON lamp lights green.
ON mode : STANDBY/ON lamp lights green.
Standby mode: STANDBY/ON lamp lights red.
> Lampe STANDBY/ON (mit Autofunktion An/Aus)
Wenn der Einschaltknopf (POWER) auf An (ON) gedrückt wird, leuchtet die
Lampe STANDBY/ON grün auf. Nach etwa 30 Minuten ohne Signaleingabe
schaltet das Gerät in den Bereitschaftsmodus, und die Lampe STANDBY/ON
leuchtet rot auf
Wenn Audiosignale eingehen, dann schaltet die Betriebsart automatisch auf
An (ON) und die Lampe STANDBY/ON leuchtet grün.
Betriebsart AN (ON): Die Lampe STANDBY/ON leuchtet grün.
Betriebsart Standby : Die Lampe STANDBY/ON leuchtet rot.
To completely cut off the power to this unit, press the POWER button on
the rear panel to the "OFF" position, and disconnect the power cord from
the AC outlet.
VORSICHT
Wenn der Lautstärkeregler dieser Anlage nahe bei MIN steht,
das Klangvolumen des Verstärkers 0 ist, oder die Klangsignale
vom Verstärker außergewöhnlich niedrig sind, funktioniert die
Einschaltautomatik trotz des Empfangs eines Audiosignals
nicht (der Modus wird nicht von Bereitschaft auf ON (EIN)
umgeschaltet).
Um die Stromversorgung der Anlage ganz abzuschalten, drücken Sie den
Elinschaltknopf auf dem Rückseitenteil in die Position „AUS" (OFF) und
ziehen Sie das Stromkabel aus dem AC- Ausgang.
-5-
Page 13
Operation (Continued)
Betrieb (Fortsetzung)
■Adjusting the volume
Adjust the volume level of this unit to match those of the main speakers.
■ Einstellen der Lautstärke
Stellen Sie die Lautstärke dieser Einheit entsprechend der der
Hauptlautsprecher ein.
1. Turn the VOLUME knob on this unit to the “Center” position.
1. Drehen Sie den LAUTSTÄRKEregler (VOLUME) an dieser
Anlage auf die Position „Center“.
VOLUME
MIN
MAX
This position normal yields the correct balance between the main speakers
and the subwoofer. However, adjust as described below if the balance
changes due to the conditions of the listening room or the location of the
subwoofer.
Diese Position liefert normalerweise die korrekte Balance zwischen den
Hauptlautsprechern und dem Subwoofer. Justieren Sie jedoch die Position,
wie unten beschrieben, wenn sich die Balance aufgrund der Verhältnisse des
Hörraums oder der Anordnung des Subwoofers ändert.
2. Adjust the volume of the amplifier to your normal listening level,
and play a music source. (Beware of over-input.)
■ Phase shift
It is possible to change the feeling of massiveness of the bass in accordance
with the conditions of the listening room and the location of the subwoofer.
• Set at a position where a rich bass is heard.
I Phasenverschiebung
Es ist möglich, die Bassintensität den Verhältnissen des Hörraums und der
Anordnung des Subwoofers anzupassen.
• Stellen Sie den Regler auf eine Position, bei der eine satte Basswiedergabe
erzielt wird.
PHASE
REVERSE ^ NORMAL
PHASE button
M. ■■ NORMAL
(Normally used in this position.)
: REVERSE
(Use in this position when the bass sound is otherwise insufficient.)
PHASENregler (PHASE)
A:NORMAL
(Wird normalerweise in die.ser Position benutzt.)
: UMGEKEHRT (REVERSE)
(Benutzen Sie ihn in die,ser Position, wenn der Bassklang in
irgendeiner Weise unzureichend ist.)
2. stellen Sie die Lautstärke an Ihrem Verstärker auf Ihre normale
Lautstärkenstufe und spielen Sie eine Musikquelle ab.
(Übersteuerung vermeiden.)
3. Rotate the subwoofer’s volume knob to find the position where
the sound is in balance with the sound from the main speakers.
3. Drehen Sie den Lautstärkeregler des Subwoofers, bis Sie die
Position gefunden haben, bei welcher dessen Klang mit dem
Klang von den Hauptlautsprechern ausbalanciert ist.
VOLUME
MAX
• After balancing the volume of this unit and the main speakers, use the
amplifier volume to adjust the volume of this system.
• Verwenden Sie nach dem Abgleichen der Lautstärke dieses Gerätes und
der Hauptlautsprecher den Lautstärkeregler am Verstärker, um die
Lautstärke dieses Systems einzuslellen.
■ Main speaker’s protective circuit
If the volume of the amplifier exceeds the allowable input of the speaker
system, the protective circuit activates and the volume is reduced. In this
event, lower the volume of you amplifier to a level at which the protective
circuit does not activate.
iSchutzschaitung der Hauptlautsprecher
Falls die Lautstärke des Verstärkers den zulässigen Eingangspegel des
Lautsprechersystems überschreitet, wird die Schutzschaltung aktiviert und die
Lautstärke reduziert. Reduzieren Sie in diesem Fall die Lautstärke Ihres
Verstärkers bis auf einen Pegel, bei dem die Schutzschaltung nicht aktiviert
wird.
-6-
Page 14

Troubleshooting
Störungsbehebung
Symptom
Symptom
Power does not come on.
Es wird keine Leistung erreicht.
Auto power-off does not function.
(Power) Standby status not engaged.
Abschallautomatik funktioniert nicht.
(Betriebs-)Bereitschaftszustand nicht
aktiviert.
No sound is heard.
Man hört keinen Ton.
The sound fluctuates between loud
and soft.
Die Lautstärke schwankt zwischen
laut und leise.
F^ssible Cause
Mögliche Ursache
Is cbe AC power cord disconnected from the AC outlet '.’
1st das AC- Stmmkabel nicht an den AC- Ausgang
an geschlossen?
Sound is being reproduced.
Right after repruductimi of sound.
Ton wild wiedergegehen.
Unnmietbar nach der Tonwiedergabe
Is the VOLUME knob turned to the “MIN" position'’
1st der LAUTST.ÄRKEregler (VOLUME! auf die Position
.,MIN“ eingestellt?
Connections are incorrect, or loose.
Die Verbindungen sind falsch oder locker
The audio signal from the amplifier is extremely weak.
Das Audio.signal vom Verstärker i.st äußerst schwach.
The protective cireuit is working.
Die Schutzschaitung i.st aktiviert.
Action
Maßnahme
Plug the AC power cord firmly into the AC outlet.
Stecken Sie das AC- Stromkabel fest in den AC- Ausgang.
See the procedures for operation. (See pages 5 and 6.)
Siehe die Bedienungsverfahren. (Siehe die Seiten 5 und 6.)
Turn the VOLUME knob to a suitable volume is found.
Drehen Sie den LAUTSTÄRKEregler (VOLUME) bis eine
geeignete Lautstärke erreicht ist.
Check the connections and make necessary corrections. (See
pages 4 and 5.)
Überprüfen Sie die Verbindungen und machen Sie die
notwendigen Korrekturen. (Siehe die Seiten 4 und 5.)
See the procedures for operation. (See pages 5 and 6.)
Siehe die Bedienungsverfahren. (Siehe die Seiten 5 und 6.)
Lower the volume of you amplifier to a level at which the
protective circuit does not activate. (See page 6.)
Reduzieren Sie die Lautstärke Ihres Verstärkers bis auf einen
Pegel, bei dem die Schutzschaltung nicht aktiviert wird.
(Siehe Seite 6.)
Specifications
Spezifizierungen
SX-XOD3
Type
Acoustic Suspension Type
(Magnetically Shield type)
Speaker unit
Frequency range
Sound pressure level
Impedance
Power Handling Capacity
Dimensions
Mass
Lautsprechereinheiten
Frequenzgang
Schaiidruckpegel
Eingangsimpedanz
Belastbarkeit
Abmessungen
Gewicht
Accessories/Zubehör
Speaker cord (3 m) : x4
Lautsprecherkabel (3 m) : x4
Design and specifications are subject to change without notice for product improvements.
Änderungen der äußeren Aufmachung und der technischen Daten zwecks Produktverbesserungen Vorbehalten.
9.5 cm X I cm Track-type dome
230 Hz ~ 50 kHz
80 dBAV*m
6Q
50 W (with SX-PWDD3)
125 mm (width) x 331 mm (height) x
123 mm (depth)
: 0.85 kg
: Acoustic-Suspension-Design
Typ
(Magncti.sch abgeschinnter Typ)
9.5 cm X 1 cm Track-Type-Kalotle
230 Hz bis 50 kHz
80 dBAV»m
6£i
50 W (with SX-PWDD3)
125 mm x 331 mm x 123 mm
(W/H/T)
: 0,85 kg
SX-XDD3 connection terminal
Max. output of built-in amp
Power consumption in standby mode
Reserveeingangsbuchsen
SX-XDD3-Anschlussklemme
Leistungsanforderungen
Max. Ausgangsleistung des
eingebauten Verstärkers
Leistungsanforderungen
Leistungsverbrauch in der Betriebsart Standby
-7-
SX-PWDD3
Type
Speaker unit
Frequency range
Input impedance
INPUT terminals
INPUT AUX terminals
Power requirements
Power consumption
Max. dimensions
Mass
Typ
Lautsprechereinheiten
Frequenzgang
Eingangsimpedanz
Eingangsanschlüsse
Abmessungen
Gewicht
Powered subwoofer
Bass-reflex type,
(magnetically shielded type)
16.0 cm cone (4£2)
30 Hz - 230 Hz
INPUT AUX terminals 50 k£2
INPUT AUX terminals 6 Q
(when SX-XDD3 is connected)
Speaker terminals L/R
RCA pin L (MONO)/R
Speaker terminals L/R for
exclusive use with SX-XDD3
AC 230V 50 Hz
60 W {10% THD/AT 100 Hz74 £2)
30 W
5.8 W
264 mm (width) x 372 mm
(height) X 340 mm (depth)
9.9 kg
Subwoofer mit Stromversorgung
Bassreflexbox,
(magnetisch abgeschirmt Typ)
16,0-cm-Konus ((4£2)
30 Hz bis 230 Hz
Buchsen INPUT AUX 50 kii
Eingangsbuchse 6 Q (wenn
SX-XDD3 angeschlossen ist)
Lautsprecherklemmen L/R
Cinch-Buchse L (MONO)/R
Lautsprecherklemmen L/R für
exklusiven Einsatz mit SX-XDD3
AC 230V 50 Hz
60 W (10% THD/AT 100 Hz/4 £2)
30 W
5.8 W
264 mm x 372 mm x 340 mm
(W/H/T)
9.9 kg
Page 15

Types de haut-parleurs
Confirmation des accessoires fournis
Luidsprekertypen
Cet ensemble comprend deux types de haut-parleurs.
Deze luldsprekerset bestaat uit twee typen luidsprekers.
• Haut-parleur principal (x2)
• Hoofdluidspreker (x2)
SX-XDD3
Le coiTret de ues haut-parleurs est fabriqué en bois naturel et le grainage de
la finition est donc difféient de celui du bois artificiel. Par conséquent,
chaque coffret a un aspect légèrement different et ses propte.s
caractéristiques. Comme elles sont réalisées en contreplaqué ntoulé, les
surfaces pmscntent une légère rugosité, mais ccci n'exerce aucune influence
.sur les performances
De hehuizing van deze luid.sprekers is gemaakt van echt bout, wat I
dal hct houtmoticf verschill van namaakhout Het uiterlijk van elke
luidspreker /.al ook cnigszins verschillen, waardoor ieüere luidspieker zijn
eigen imlividuele kaiakfer heeft. Aangezien geperste diplex is gebruikt. kan
hct npperviak «rat grof zijn inaar dit hccft geen invloed op de prestatie.
e Subwoofer (xl )
e Subwoofer (x1)
Disposition normale Standaard opstelling
Plus le subwoofer est placé près des haut-parleurs principaux, plus l’image
sonore sera nette.
Er wordt een duidelijker geluidsbeeld verkregen wanneer de subwoofer dichter
bij de hoofdluidsprekers Staat.
SX-XDD3
Haut-parleur
principa! (Gauche)
Linker
hoofdluidspreker
Subwoofer
Subwoofer
SX-PWDD3
SX-XDD3
Haut-parleur principal
(Droit)
Rechter hoofdluidspreker
Controleren toebehoren
Avant l’utilisation, vérifier que tous les éléments suivants, fournis avec l’appareil,
aient été reçus.
Voor gebruik moet u controleren of u al de volgende met het toestel
meegeleverde onderdelen ontvangen heeft.
• Cordon d’enceinte (3 m) (x4)
• Luidsprekersnoer (3 m) (x4)
Précautions pour l’emploi Voorzorgen voor het gebruik
■Afin de maintenir i’appareii en état neuf
Nettoyer avec un chiffon sec et doux si le coffret ou le panneau de configuration
,se salissent.
S’ils sont très sales, humecter légèrement le chiffon avec de f eau ou un détergent
neutre et nettoyer. Essuyer ensuite avec un chiffon sec.
■ Uiteriijk onderhoud van het toestei
Veeg de hehuizing of het bedieningspaneel af met een droge, zachte doek als
deze vuil geworden is.
Als het vuil hardnekkig is, kunt u een beetje water of sop op de doek doen om
het vuil le verwijderen. Wrijf na met een droge doek.
■Civilité pendant l’écoute
Quand on écoute de la musique avec une chaîne stéréo, SVP
régler le volume de façon à ce qu’il ne dérange pas les voisins.
Surtout le soir, même les plus légers sons se répandent vite
dans les alentours. Ainsi, montrer de la considération et fermer
les fenêtres ou utiliser des casques, etc., afin de préserver la
convivialité de l’environnement.
Voici la marque du symbole de la Polite.ssc Acoustique (Sound Etiquette).
■Goede manieren en luisteren naar uw stéréo
Wanneer u via uw stereosysteem naar muzick luistert, luistert u dan alstubiieft
met een geluidssterkte die niet störend is voor uw buren. Vooral ‘s avonds of
's nachts kunnen ook heel zachte geluiden gemakkelijk heel ver doordringcn.
Wees hierop bedacht en sluit de ramen, of gebruik een hoofdtelefoon, want u
weel, een goede buur is beler dan een verre vriend.
Het hier afgebeelde symbool is het Geluidsetiquette merk.
■Amélioration du champ acoustique
Un salon où peuvent facilement se produire beaucoup de
réflexions et de résonances doit être équipé avec des rideaux
lourds, des tapis, etc.
Si l’enceinte est face à un mur ou à une porte en verre, etc.,
il est vivement recommandé d’habiller le mur avec des
matériaux qui absorbent le son, comme par exemple en
suspendant des rideaux lourds, afin d’éviter la production de
réflexions et d’ondes stationnaires.
iVerbeteren van het geluidsveld
Fxn ruimte waar geluid gemakkeli jk weerkaatst en resoneert behoort
aangekleed te worden met zware gordijnen of tapijten cnz.
Als de luidsprekers naar een massieve muur of een glazen deur enz., gekeerd
staan verdient het aanbeveling geluidsabsorberend materiaal aan te brengen,
bijvoorbceld zware gordijnen, om te voorkomen dat er ongewenste
weerkaatsingen en staande geluidsgolven worden gegenereerd.
SX-XDD3
SX-PWDD3
-8-
Page 16

Précautions pour rinstallation
Voorzorgen voor de installatie
• Afin d’éviter une déformation ou une décoloration du coffret, ne
pas installer l’appareil là où il serait exposé à la lumière directe
du soleil ou à une forte humidité. Eviter également de l’installer
auprès des sorties d’air conditionné.
• Om vervorming of verkleuring van de behuizing te voorkomen,
mag U het toestel niet op een plek zetten waar het bloot Staat aan
direct zonlicht of hoge vochtigheid, of in de buurt van de
luchtuitstroom van een airconditioner.
• Les vibrations de l’enceinte peuvent causer du bruit de fond.
Placer l’appareil le plus loin possible du reproducteur.
• Het is mogelijk dat trillingen van de luidsprekers gaan
rondzingen. Zet het toestel zo ver mogelijk bij de speler
vandaan.
• Considérer la possibilité de tremblements de terre et autres
mouvements physiques au moment de choisir l’emplacement et
mettre l’appareil dans un endroit sûr.
• Let bij het plaatsen van dit product erop of dit zou kunnen
vallen als gevolg van aardschokken of andere heftige trillingen
en zet het goed vast.
• Cet appareil est doté d’un blindage magnétique afin de ne pas causer des
distorsions de couleurs dans les postes de télévision. Toutefois, selon le genre
d’installation effectuée, il peut y avoir des distorsions de couleurs. Veiller à
considérer les points suivants pendant l’installation de l’appareil.
1. Pour placer ces haut-parleurs près d’un téléviseur, couper l’alimentation
avec l’interrupteur principal du téléviseur, ou le débrancher avant
l’installation du système pour remettre l’alimentation du téléviseur. Une
fois le système installé attendre au moins .30 minutes avant de mettre le
téléviseur sous tension.
2. Si une enceinte est placée à proximité d'un téléviseur, elle entraînera une
distorsion des couleurs sur l'image télévisée.
3. En dépit de la conception blindée ces enceintes, certains télévi.scurs peuvent
être affectés par elles. Si cela arrive, éloigner légèrement les enceintes du
téléviseur.
• Dit toestel is magnetisch afgeschermd om verkleuring van het TV beeid te
voorkomen. Afhankelijk van de installatiemethode is het echter mogelijk dat
er toch vcrkleuringen opireden in het beeid van uw TV. Let op de volgende
punten wanneer u het toestel installeert.
1. Wanneer u deze luidsprekers in de huurt van een TV plaatst, moet u de
spanningsschakelaar van de TV in de uit-stand drukken of de stekker uit het
stopcontact Irekken alvorens u de luidsprekers installeert.
Wacht vervolgens tenminste 30 minuten nadat het systeem is geïnstalleerd
alvorens de spanning van de TV weer in te schakelen.
2. Indien er een andere luidspreker bij de TV wordt geplaatst, kan die
luidspreker kleurvervorming in het TV-beeld veroorzaken.
3. Het kan voorkomen dat deze magnetisch afgeschermde luidsprekers een
negatieve invioed op bepaalde typen TV’s hebben. In dat gcval moet u de
luid speakers verder van de TV vandaan plaatsen.
• Lors du réglage du système d’enceintes, il est recommandé de fixer les pieds à
la base de l’enceinte pour éviter toute irrégularité, etc.
La surface du matériau sur laquelle les pieds de l'appareil sont posés risque de
se décolorer légèrement après une longue période.
• Bij het opstellen van het luidsprekersysteem verdient het aanheveling de
voetjes aan de onderkant van de behuizing te bevestigen zodat deze nicl
wiebelen enz.
Afhankelijk van het materiaal is het mogelijk dat de ondergrond verkieurt
wanneer u de apparatuur er met de aangebrachte voetjes längere tijd op laat
staan.
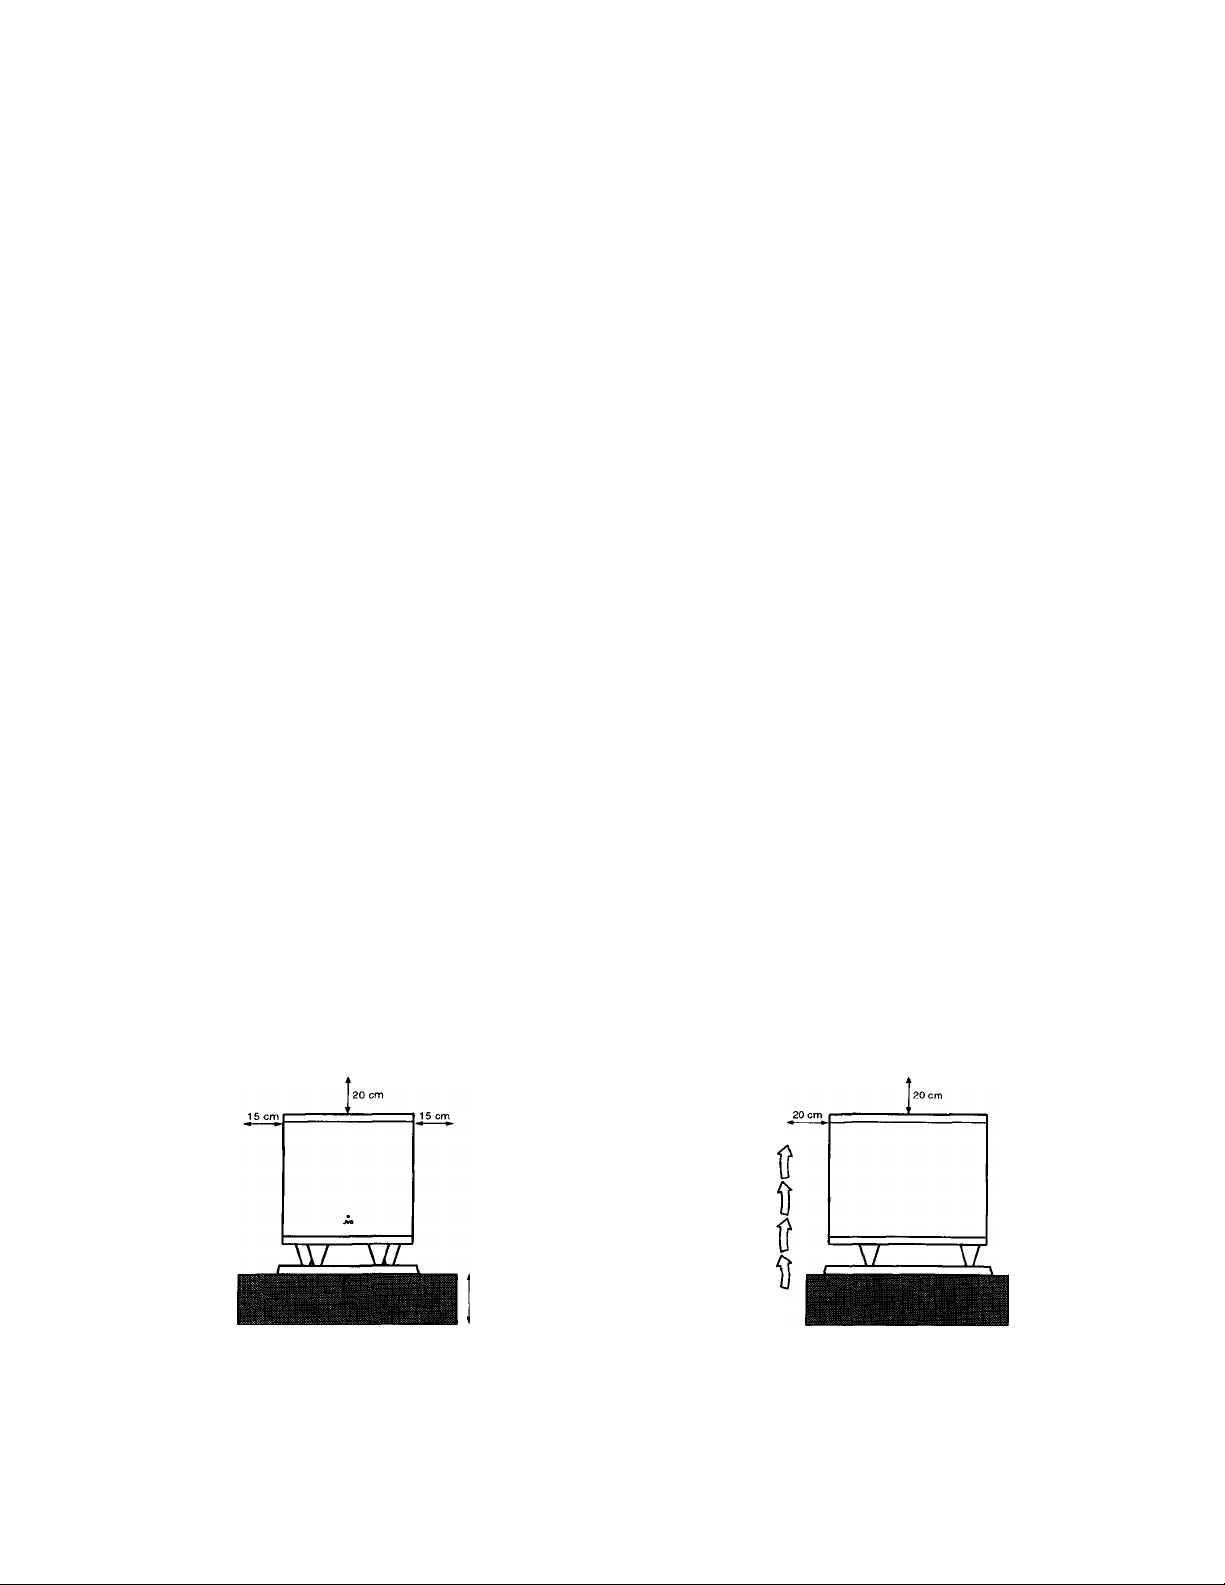
n
PRECAUTIONS
Pour éviter tout risque d’incendie et de dégâts éventueis,
iaissez un espace de ventiiation suffisant autour de i’appareii,
notamment entre sa face arrière et une paroi, un rideau ou
^ tout ce qui peut se trouver derrière i’appareii.
n
LET OP
Om brand of een beschadiging te voorkomen, moet u
voldoende ruimte voor ventilatie rondom de luidspreker
vrijhouden, vooral tussen de achterkant van de luidspreker en
de muur, wand of gordijn.
___________________________________________
INeem de volgende punten in acht bij de opstelling van de luidsprekers
De geluidsweergave van de luidsprekers wordt bei'nvloed door de
eigenschappen van de luisterruimte. U dient de luidsprekers zo te plaatsen dat
de opstelling optimaal overeenkomt met de condities in de luisterruimte. Wij
raden u aan de onderstaande richtlijnen op te volgen bij het uitkiezen van een
plaats voor de luidsprekers zodat een optimale ruimtelijke weergave en tevens
een duidelijk geluidsbeeld worden verkregen.
SX-XDD3 (hoofdiuidsprekers)
• Wij raden u aan een afstand van ten minste .30 cm aan te houden tussen de
zijkanl van de luidsprekers en de muur.
• Wij raden u aan afstand van (en minste 10 cm aan te houden tussen de
achterkant van de luidsprekers en de muur.
(Houd er rekening mee dat de aansluitingen kortsluiting kunnen maken
wanneer deze in contact zijn met de muur e.d.)
Plaats elke luidspreker ongeveer 1,0 tot 2,0 meter van de stereo-installatie
vandaan en rieht de luidsprekers met de voorkant naar de luisterposilie.
• SX-PWDD3 (Subwoofer)
• Laisser suffisamment d’espace devant.
• Laisser un espace d’au moins 13 cm de chaque côté.
• Laisser un espace d’au moins 20 cm au dessus.
• Laisser un espace d’au moins 20 cm derrière.
• SX-PWDD3 (subwoofer)
• Laat flink wat ruimte open aan de voorkant.
• Laat tenminste 13 cm ruimte open aan de zijkanten.
• Laat tenminste 20 cm ruimte open aan de bovenkant.
• Laat tenminste 20 cm ruimte open aan de achterkant.
/
■Conseils à rinstallation de l’enceinte acoustique
• La reproduction sonore par les haut-parleurs est influencée de façon subtile
par l’état de la salle d’écoute. C’est pourquoi la disposition du système peut
être changée pour mieux convenir à votre salle d’écoute. Nous conseillons de
tenir compte des principes suivants lors de la disposition des haut-parleurs, de
manière à élargir le champ sonore et garantir une image sonore clairement
localisée.
• SX-XDD3 (Haut-parleur principal)
• Il est conseillé de laisser au moins .30 cm environ d’espace libre entre ses
côtés et un mur.
• Il est conseillé de laisser au moins 10 cm environ d’espace libre entre la
face arrière et un mur.
(Noter qu’un court-circuit peut se produire si les bornes entrent en contact
avec un mur ou une autre surface.)
Il est conseillé de laisser au moins 1 à 2 mètres environ entre chaque hautparleur et la chaîne stéréo. La face avant de chaque haut-parleur doit être
orientée vers la position d’écoute.
-9-
Laat tenminste
16 cm ruimte open.
Laat tenminste
20 cm ruimte open.
Page 17

Nomenclature des différents éléments et fonctions (sx-pwdds) Namen van onderdelen en functies (sx-pwdds)
■ Panneau avant
iVoorpaneel
■Panneau arrière
■ Achterpaneel
- 10-
Page 18

Connexions
Aansluitingen
if
PRECAUTIONS
• S’assurer que l’amplificateur et les enceintes sont hors tension
avant de raccorder celles-ci à l’amplificateur.
(Ne pas brancher les cordons d’alimentation sur une prise
secteur avant d’avoir achevé toutes ies connexions.
• Ne pas brancher ies haut-parleurs principaux (SX-XDD3)
directement sur l’amplificateur, car iis en seraient
endommagés. Raccorder TOUJOURS ces haut-parieurs sur ie
subwoofer (SX-PWDD3).
■Avant les connexions
1. Mettre l’amplificateur hors tension avant d’y brancher les haut-parleurs.
L'amplificateur risque de subir des dégâts si les cordons de haut-parleurs sont
mis en court-circuit alors que l'amplificateur est sous tension.
2. L’impédance nominale du système est de 6 ohms.
Utiliser un amplificateur, acceptant une impédance de charge de 6 ohms.
L’entrée maximum acceptée par le système est de 50 watts.
3
Il s’agit de la valeur (efficace) à laquelle une source de musique peut être fournie
pendant un bref intervalle sans que les haut-parleurs n’en souffrent de dégâts.
■Connexions normales
1. Raccorder le SX-XDD3 sur le SX-PWDD3 comme indiqué sur la figure 0) cidessous.
2. Brancher les bornes d’entrée du SX-PWDD3 aux bornes de sortie de hautparleur de l’amplificateur comme illustré sur la figure ® ci-dessous.
_____
________________________
LET OP
• Zorg dat de versterker en de iuidsprekers zijn uitgeschakeld
voordat U de Iuidsprekers op de versterker aansiuit.
(Sluit de netsnoeren pas op een stopcontact aan nadat aile
aansluitingen zijn gemaakt.)
• Sluit de hoofdluidsprekers (SX-XDD3) niet rechtstreeks op de
versterker aan. De iuidsprekers kunnen hierdoor beschadigd
worden. Sluit deze Iuidsprekers ALTiJD op de subwoofer
(SX-PWD03) aan.
■ Voordat U begint met de aansluitingen
1. Schäkel de versterker uil voordat u de luidsprekers op de versterker aansiuit.
De versterker kan beschadigd worden als de luidsprekersnoeren kortsluiting
maken terwijl de versterker is Ingeschakeld.
2. De nominale impedantie van de luidsprekers is 6 ohm.
Gcbruik een versterker die geschikt is voor luidsprekers van 6 ohm.
3. Het maximale ingangsvermogen van deze luidsprekers is 50 watt.
Dit is de waarde (rms) die het ingangssignaal van de muziekbron kortstondig
mag hebben, zonder dat de luidsprekers beschadigd worden.
■ Normale aansluitingen
1. Sluit de SX-XDD3 op de SX-PWDD3 aan zoals aangegeven in afbeelding (i)
hieronder.
2. Verbind de ingangsaansluitingen van de SX-PWDD3 met de luidsprekeruitgangsaansluitingen van de versterker zoals aangegeven in afbeelding @
hieronder.
■ Précautions lors du branchement des cordons de haut-
parleurs
L’effet stéréo et la qualité sonore seront amoindris si les polarités ( © et 0 )
des cordons des haut-parleurs sont inversées.
Après le branchement des cordons, les tirer légèrement pour s’assurer qu’ils sont
solidement connectés.
■ Let op bij het aansluiten van de luidsprekersnoeren op de
luidsprekers
Wanneer de plus en min ( © en © ) luidsprekersnoeren niet met de
corresponderende aansluitingen zijn verbonden, zal de geluidskwaliteit minder
goed zijn en wordt een inferieur stereo-effect verkregen.
Trek na het aansluiten lichtjes aan de snoeren om te controleren of deze stevig
vastzitten.
Enlever le plastique qui recouvre le bout des
cordons de haut-parleurs fournis. Si les fils
dénudés sont épars, les torsader.
Draai de isolatie aan het uiteinde van de
luidsprekersnoeren rond om deze te
verwijderen. Draai daarna indien nodig de
kerndraadjes in elkaar.
y
-11
La borne INPUT rouge est la positive 0 et la noire est la négative 0.
Comme illustré sur la ligure, tourner la molette de la borne de hautparleur dans le sens anti-horaire ( © ) et insérer le cordon de hautparleur dans la rainure. Tourner ensuite le bouton dans le sens horaire
( ) pour immobiliser le cordon. Leffet stéréo et la qualité sonore seront
amoindries sur les polarités © et Q sont inversées.
De rode INPUT aansluiting is de © aansluiting en de zwarte INPUT
aansluiting is de © aansluiting. Draai het luidsprekerknopje linksom ( © )
zoals aangegeven in de afbeelding en steek het luldsprekersnoer In de
opening. Draai het knopje daarna rechtsom ( (^ ) om het snoer vast te
zetten. Wanneer u de © en © polen verwisselt, zal de geluidskwaliteit
minder goed zijn en wordt een inferieur stereo-effect verkregen.
Borne ( © ) . ^—
( © ) aansluiting
Couleur argentée (couleur du fil)
Zllverkieurlg (kleur van draad)
—, Borne ( © )
( © ) aansluiting
Couleur cuivrée
(couleur du fil)
Koperkieurig
(kleur van draad)
Page 19
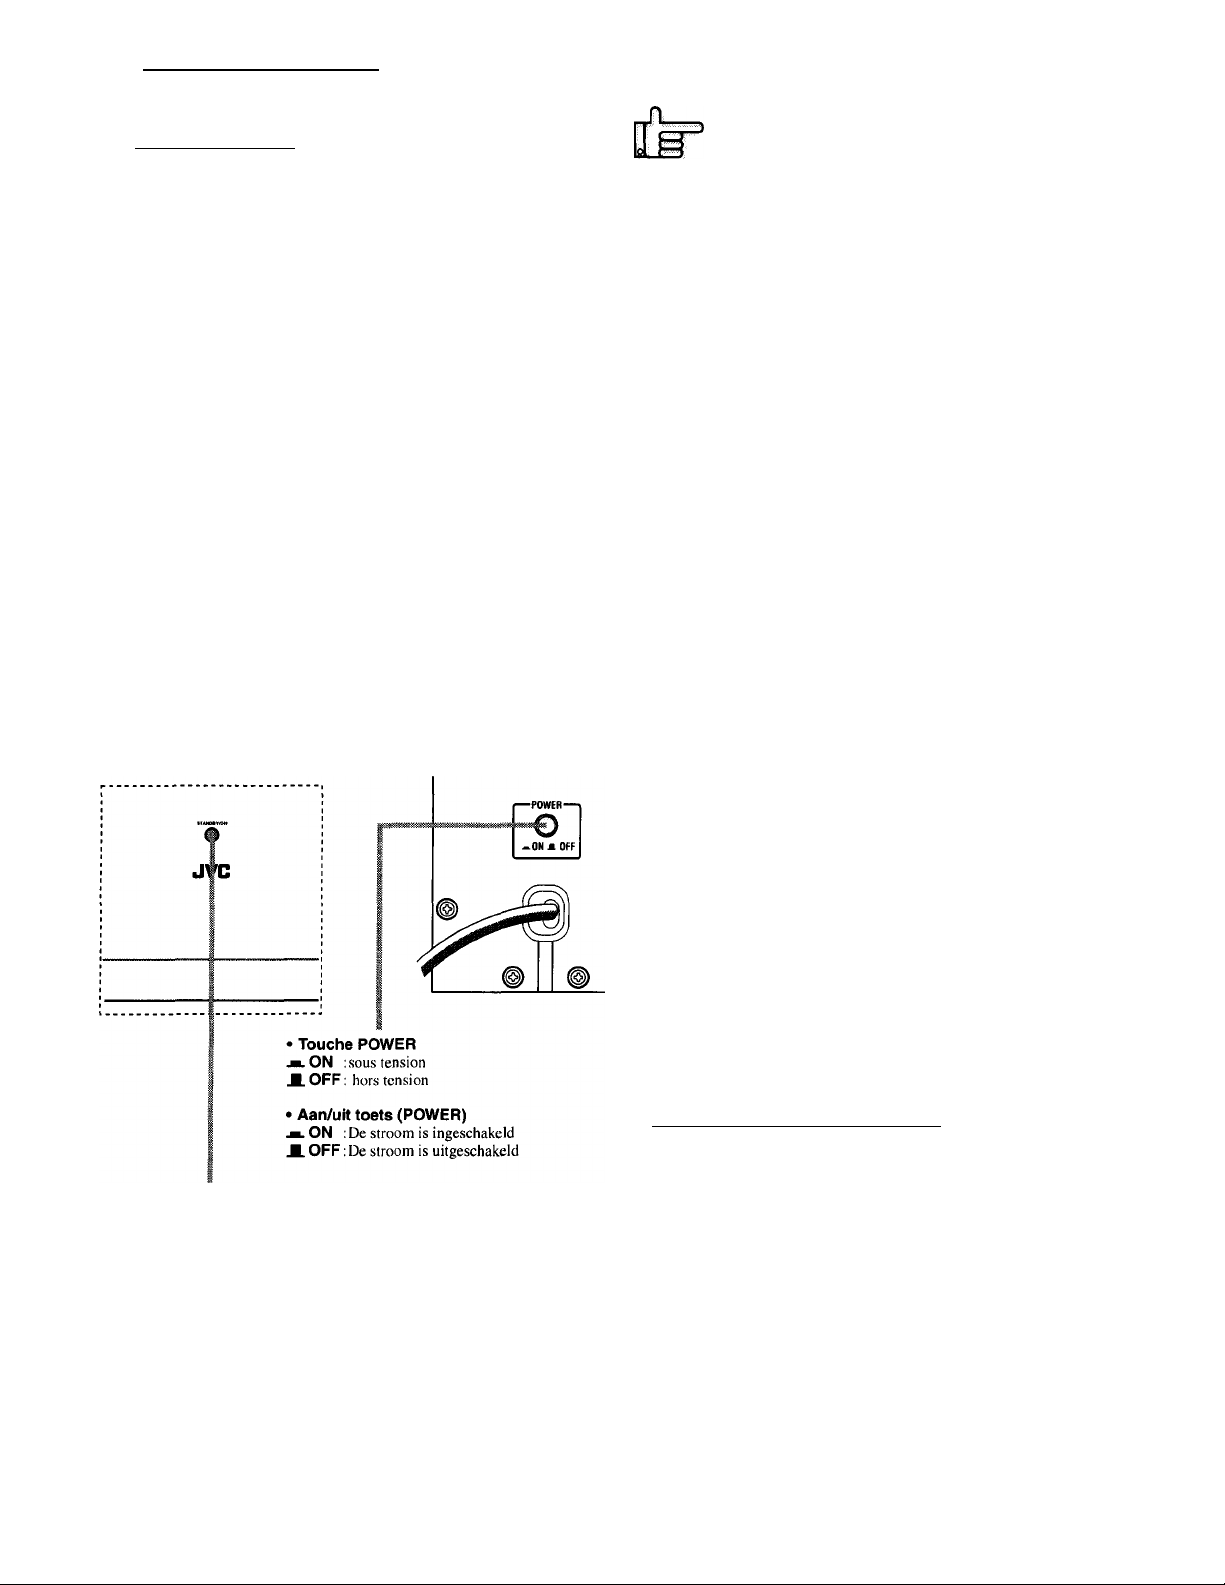
Connexions (continuation) Aansiuitingen (Vervoig)
■r
n_
J PRÉCAUTIONS
Faire toutes les connexions avant de brancher le cordon d'alimentation secteur à une prise secteur,
U moet aile aansiuitingen maken voordat u de stekker in het stopcontact steekt.
LET OP
Ne pas raccorder les bornes REC OUT de l’amplificateur ou d’un
autre composant sur ies bornes d’entrée auxiliaire du SXPWDD3.
IConnexions pour entrée auxiliaire (INPUT AUX) du SX-
PWDD3
• Lorsque le SX-PWDD3 est utilisé comme subwoofer autonome.
• Raccordez ces bornes à la borne de sortie de subwoofer sur l’amplificateur
ou sur la borne de sortie MONO/borne de sortie de ligne au moyen du
cordon à broches RCA (non fourni).
• Lorsque cette connexion est faite, aucun signal ne provient de la borne de
sortie B,
• Lorsque le SX-PWDD3 fonctionne comme subwoofer autonome, la
fréquence de recouvrement est fixée à 230 Hz,
• Si les entrées auxiliaires sont raccordées aussi alors que les systèmes SXDD3 sont utilisés avec des connexions normales, le signal de la plage grave
provenant de l’entrée INPUT et le signal provenant des entrées auxiliaires
sont mixés à la sortie par le subwoofer.
Fonctionnement
Bediening
I Mise sous tension
Faire toutes les connexions avant de brancher le cordon d’alimentation secteur à une prise secteur,
U moet aile aansiuitingen maken voordat u de stekker in het stopcontact steekt.
I Inschakelen van de stroom
•Panneau avant
•Voorpaneel
•Panneau arrière
•Achterpaneel
Verbind de REC OUT aansiuitingen van de versterker of de
andere component niet met de extra ingangsaansluitingen van
de SX-PWDD3.
lAansluiten van apparatuur op de extra ingang (INPUT AUX)
van de SX-PWDD3
• Wanneer de SX-PWDD3 als een afzonderlijke subwoofer wordt gebruikt.
• Verbind deze aansiuitingen met behulp van een tulpstekkersnoer (niet
bijgeleverd) met de subwoofer-uitgangsaansluiting of de MONO uitgang/
lijnuitgang van de versterker.
• Wanneer deze aansiuitingen worden gebruikt, zal er geen signaal worden
uitgestuurd via de uitgangsaansluitingen.
• Wanneer de SX-PWDD3 als een afzonderlijke subwoofer wordt gebruikt, is
de kantelfrequentie vast ingesteld op 230 Hz.
• Als de extra ingangsaansluitingen worden gebruikt terwiji de SX-DD3
tevens via de normale aansiuitingen is aangesloten, zal het
lagebereiksignaal van de INPUT aansiuitingen en het signaal van de extra
ingangen gemengd via de subwoofer worden weergegeven.
PRECAUTIONS
Si le bouton de volume de cet appareil est près de la position
MIN, si ie voiume sonore de l’amplificateur est «0» ou si ies
signaux sonores de i’amplificateur sont exceptionnellement
bas, la mise sous tension automatique ne fonctionne pas
lorsque l’appareil reçoit des signaux audio (ie mode ne passe
pas de Attente à Marche).
> Voyant STANDBY/ON (avec fonction automatique on/off)
Quand la touche POWER est sur ON, le voyant STANDBY/ON s’affiche vert.
Si aucun signal n’est fourni pendant 30 minutes environ, l’appareil passe en
mode Attente et le voyant STANDBY/ON s’allume en rouge. Le voyant
STANDBY/ON s’allume en rouge.
Lorsque les signaux audio sont fournis, le mode est automatiquement validé
(ON) et le voyant STANDBY/ON s’allume en vert.
Mode ON : Le voyant STANDBY/ON s’allume en vert.
Mode d’attente (mode standby) : Le voyant STANDBY/ON s’allume en rouge.
• STANDBY/ON lampje (bij de automatische aan/uit functie)
Wanneer de POWER toets op aan (ON) gezet wordt, zal dit STANDBY/ON
lampje groen oplichten. Als er ongeveer 30 minuten verstrijken zonder dat er
een signaal is, wordt er overgeschakeld naar de ruststand en licht het
STANDBY/ON lampje rood op.
Wanneer audiosignalen worden ontvangen, zal de luidspreker automatisch
worden ingeschakeld (ON) en licht het STANDBY/ON lampje groen op.
Aan : Het STANDBY/ON lampje licht groen op.
Standby Stand : Het STANDBY/ON lampje licht rood op.
' Pour enlever complètement l’alimentation à cet appareii, mettre ia touche
POWER du panneau arrière sur OFF et déconnecter le cordon
d’alimentation de la prise secteur.
LET OP
Als de volumeregelaar van deze luidspreker in de buurt van
MiN Staat, het geluidsvoiume van de versterker 0 is of de
geiuidssignalen van de versterker uiterst iaag zijn, zai de
automatische inschakelfunctie niet werken wanneer deze een
audiosignaai ontvangt (d.w.z. de luidspreker schakeit niet
^ vanuit de ruststand in de ON stand).
> Zct de POWER tocts op het achterpaneel uit (“OFF”) en haal de stekker
uit het stopcontact om de stroomvoorziening van dit toestcl volledig af te
breken.
______________________
^
-12-
Page 20

Fonctionnement (continuation) Bediening (Vervolg)
____________
■ Réglage du volume
Régler le volume de cette enceinte afin de faire coïncider avec ceux des autres
enceintes.
■ Regelen van het volume
Regel het volume van deze luidspreker zo af dat dit in overeenstemming is met
de weergave van de andere luidsprekers.
7. Tourner la commande VOLUME de cet appareil jusqu’à la
position MIN.
7. Zet de VOLUME knop van dit toestel op de “MIN” stand.
VOLUME
MIN
MAX
La position normale fournit un équilibre correct entre les haut-parleurs
principaux et le subwoofer. Toutefois, si l’équilibre change en raison des
conditions de la salle d’écoute ou de l’emplacement du subwoofer, ajuster
comme expliqué ci-dessous.
Bij deze instelling wordt gewoonlijk de juiste balans tussen de
hoofdluidsprekers en de subwoofer verkregen. Maak de onderstaande
bijregeling als de balans niet goed is als gevolg van de eigenschappen van
de luisterruimte of de plaats van de subwoofer.
I Décalage de phase
Il est possible de modifier l’impression de masse, procurée par les graves, en
fonction de l’état du local d’écoute et de l’emplacement du subwoofer.
• Régler à la position qui fournit des graves riches.
I Faseverschulving
Wanneer de bassen dreunen, moet u de basweergave instellen overeenkomstig
de eigenschappen van de luisterruimte en de plaats van de subwoofer.
• Kies de instelling waarbij een rijke basweergave wordt verkregen.
PHASE
REVERSE ... NORMAL
Touche PHASE
M. : NORMAL
(Ellle est normalement utilisée sur cette position.)
.H. : REVERSE
(Elle est utilisée sur cette position quand le son grave est insuffisant.)
PHASE toets
JL : NORMAL
(Normaal gesproken wordt deze stand gebruikt.)
.H. : REVERSE (omgekeerd)
(Gebruik deze stand wanneer de läge tonen anders onvoldoende
doorklinken.)
2, Régler le volume de l’amplificateur au niveau d’écoute habituel
et faire démarrer une source de musique. (Prendre garde à une
entrée excessive.)
2. Zet uw versterker op het niveau waarbi] u normaal gesproken
luistert en speel wat muziek af. (Wees voorzichtig dat u het
volume niet te hoog instelt.)
3, Tournez la molette de volume du subwoofer et recherchez la
position où les sons se trouvent en équilibre avec ceux des
haut-parleurs principaux.
3. Draai aan de subwoofer-volumeregelaar om de instelling te
vinden waarbi] het geluid in balans is met het geluid van de
hoofdluidsprekers.
VOLUME
MIN
MAX
• Après avoir équilibré le volume de cet appareil et des haut-parleurs
principaux, utilisez la commande de volume de l’amplificateur pour
ajuster l’intensité sonore de ce système.
• Nadat u het volume van deze luidspreker in evenwicht hebt gebracht met
dat van de hoofdluidsprekers, kunt u de volumeregeling van de versterker
gebruiken om het volume van het totale luidsprekersysteem in te stellen.
■Circuit de protection des haut-parleurs principaux
Si le volume de l’amplificateur dépasse le seuil admissible pour les hautparleurs, un circuit de protection entre en service et le volume est réduit. Dans
ce cas, abaisser le volume de l’amplificateur à un niveau auquel le circuit de
protection n’est pas activé.
iBeveiligingscircuit van de hoofdluidsprekers
Als het volume van de versterker het maximale ingangsvermogen van de
luidsprekers overschrijdt, treedt het beveiligingscircuit in werking en wordt
het volume van de geluidsweergave via de luidsprekers verlaagd. In dit geval
moet u het volume op de versterker lager instellen zodat het
beveiligingscircuit niet meer geactiveerd wordt.
-13-
Page 21

Dépannage
Opiossen van Problemen
Symptômes
Symptoom
Il n’y a pas de courant.
De stroom wordt niet ingeschakeld.
La mise hors tension automatique ne
fonctionne pas.
(Alimentation) État d’attente non activé.
De automatische uitschakelfunctie
werkt niet.
De ruststand (standby) wordt niet
ingeschakeld.
Il n’y a pas de son.
Er klinkt geen geluid.
Le son devient fort, puis faible.
Het geluid .schommelt tussen hard en
zacht.
Causes possibles
MogeHJke ooizaak
Le cordon d’alimemation secteur est-ii déconnecté de la
pri.se secteur?
Is de stekker uit het .stopcontact?
Un bruit est audible juste après la reproduction des sons.
Juste après la reproduction des sons.
F.r wordt nu geluid weergegeven.
F.r is zojuist geluid weergegeven.
La coiTiniande VOLUME est-elle tournée vers ia position
Staat de VOLUME knop op de ”MIK” stand''
Les connexions sont incorrectes ou perdues.
De aansluitingun zijn met coirect, of los.
Le signal audio de l'antplificateur est extrêmement faible.
Het audiosignaal van de versterker is erg zwak.
Le circuit de protection est en service.
Het heveitigingscirciiit is geactiveerd
Action
Opiossing
Brancher fermement le cordon d’alimentation secteur à la
prise secteur.
Doe de stekker stevig in het stopcontact.
Voir les démarches du fonctionnement (pages 12 et 13).
Raadpleeg de bedieningsaanwijzingen, (Zie blz. 12 en 13.)
Tourner la commande VOLUME jusqu’à trouver un volume
convenable.
7æ1 de VOLUME knop zo dat er met een geschikte
geluidssterkte wordt weergegeven.
Vérifier les connexions et faire les corrections nécessaires.
(Voir pages 11 et 12.)
Controleer de aansluitingen en maak zo nodig correcties.
(Zie blz. 11 en 12.)
Voir les démarches du fonctionnement (pages 12 et 13).
Raadpleeg de bedieningsaanwijzingen. (Zie blz. 12 en 13.)
Abaisser le volume de l’amplificateur à un niveau auquel le
circuit de protection n’est pas activé. (Voir page 13.)
Verlaag het volume op de versterker tôt een niveau waarbij het
beveiligingscircuit niet meer geactiveerd wordt. (Zie blz. 13)
Spécifications Technische gegevens
SX-X003
Type à suspension acoustique
Type
(blindage magnétique)
Enceintes
Gamme de fréquence
Niveau de pression sonore
impédance
Charge nominaie efficace
Dimensions
Masse
Type
Luidsprekers
Frequentiekarakteristiek
Geluidsdrukniveau
impedantie
Beiastbaarheid
Afmetingen
Gewicht
Accessories/Toebehoren
Cordon d’enceinte (3 m) : x 4
Luidsprekersnoer (3 m) : x 4
Design et spécifications sous réserve de changement sans préavis en raison d’améliorations éventuelles. Afmetingen
Wijzigingen in ontwerp en technische gegevens op grond van verbeteringen voorbehouden. Gewicht
9.5 cm X 1 cm Dôme de type piste
230 Hz à 50 kHz
80 dBAV*m
6 £2
50 W (avec SX-PWDD3)
125 mm x 331 mm x 123 mm
(L/H/P)
0,85 kg
Akoestische ophanging
(Type à blindage magnétique)
9.5 cm X 1 cm Spoor-type koepel
230 Hz t/m 50 kHz
80 dBAV*m
6 £2
50 W (met de SX-PWDD3)
125 mm x 331 mm x 123 mm
(b/h/d)
0,85 kg
Gamme de fréquence
Impédance d’entrée
Bornes d’entrée AUX
Bornes de connexion du SX-XDD3
Aiimentation nécessaire
Sortie maximum d’ampii intégré
Consommation électrique
Consommation électrique sur mode
d’attente (standby mode)
Frekwentiekarakteristiek
Ingangsimpedantie
Ingangsaansiuitingen (iNPUT)
Extra ingangsaansiuitingen (iNPUT AUX)
SX-XDD3 verbindingsaansluiting
Stroomvoorziening
Max. uitgangsvermogen van
ingebouwde versterker
Stroomverbruik in de standby stand
- 14-
SX-PWDD3
Type
Enceintes
Bornes d’entrée
Dimensions
Masse
Type
Luidsprekers
Stroomverbruik
Caisson de grave actif
Réflexion des basses (Type à
protection inagnétique)
Cône de 16,0 cm (4 ohms)
30 Hz à 230 Hz
Bornes d'entrée auxiliaire (INPUT
AUX): 50 kohms
Bornes d’entrée 6 ohms (lors du
branchement du SX-XDD3)
Bornes de haut-parleurs gauche/droit
Broche RCA en L (MONO)/D
Bornes de haut-parleur G/D pour
emploi exclusif avec le SX-XDD3
AC 230V 50 Hz
60 W ( 10% THD/AT 100 Hz74 £2)
30 W
5.8 W
264 mm x 372 mm x 340 mm (L/H/P)
9.9 kg
Subwoofer met ingebouwde
versterker
Basreflextype (magnetisch
afgeschermd)
16,0 cm conus (4 £2)
30 Hz t/m 230 Hz
Extra ingangsaansiuitingen
(INPUT AUX) .50 k£2
Ingangsaansiuitingen 6 £2 (wanneer
de SX-XDD3 is aanpsloten)
Luidspreker-aansluitingen L/R
Tulpstekkerbussen L (MONO)/R
Luidspreker-aansluitingen L/R
voor exclusief gebruik met de
SX-XDD3
AC 230V 50 Hz
60 W (10% THV/bij 100 Hz/4 £2)
30 W
5.8 W
264 mm x 372 mm x 340 mm
(b/h/d)
9.9 kg
Page 22
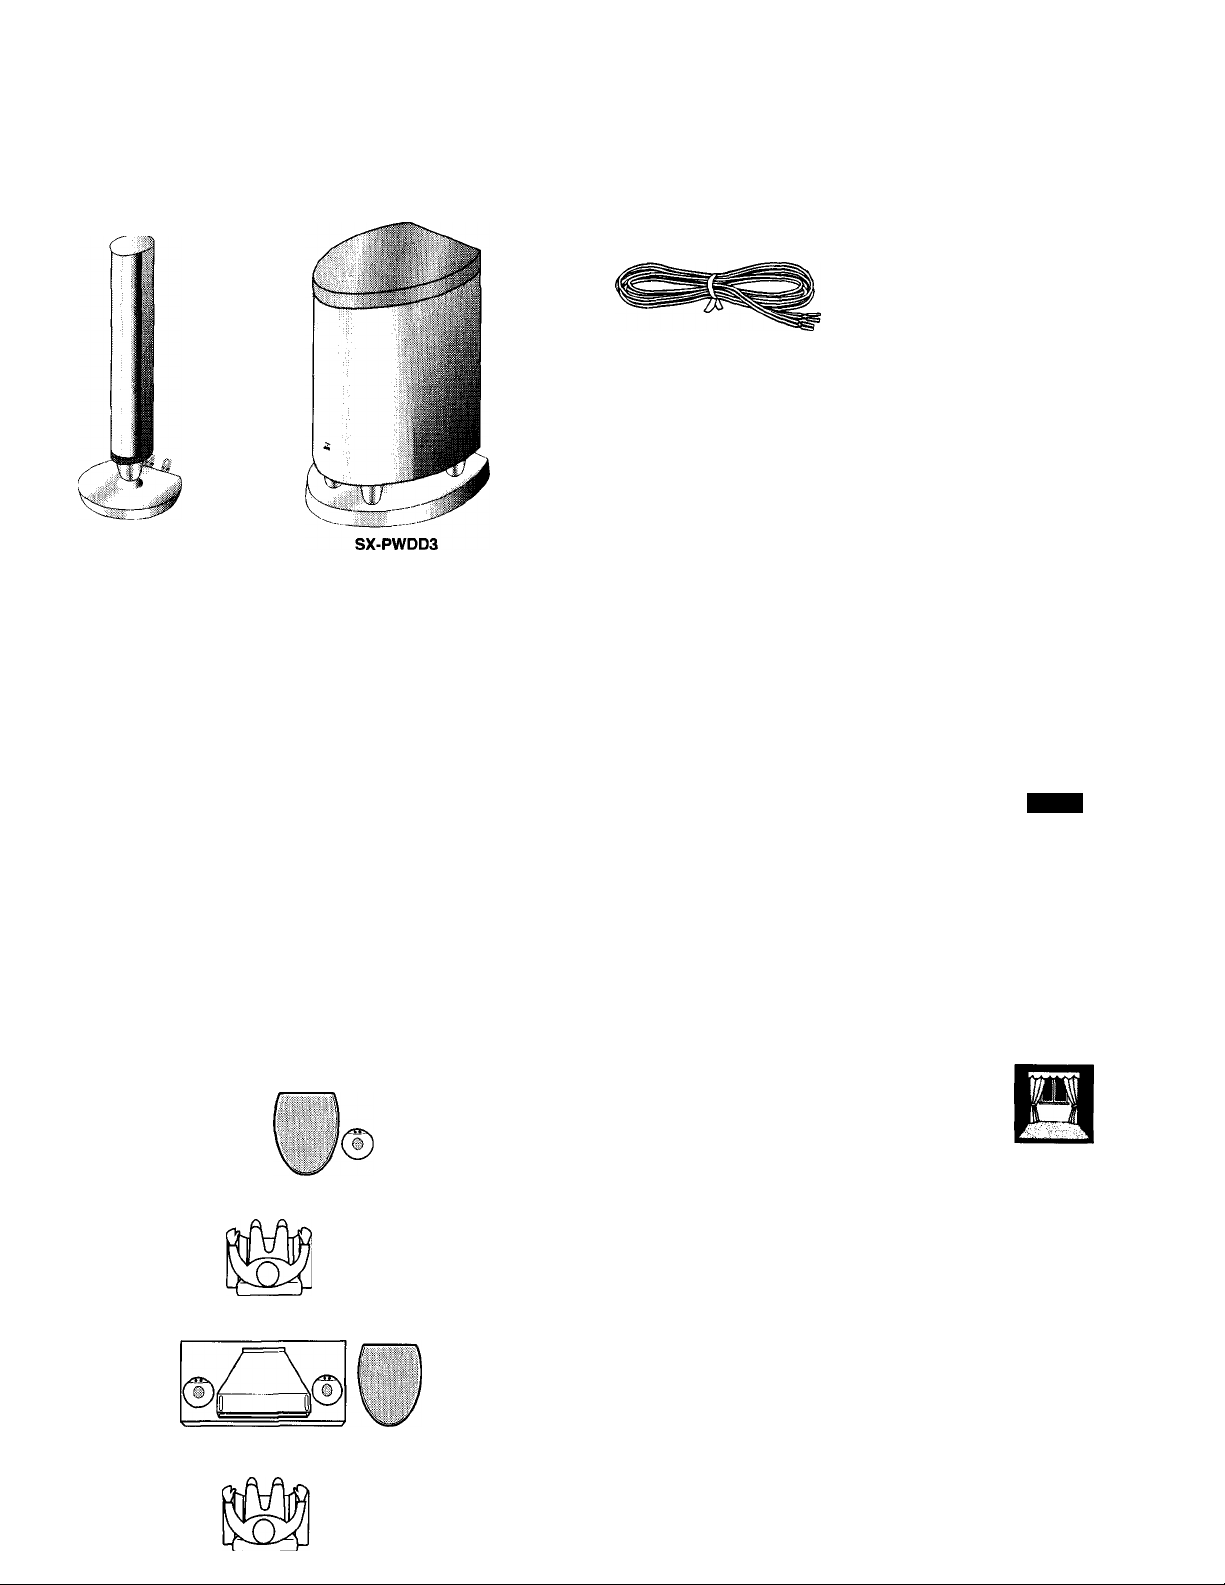
Tipos de altavoces
Confirmación de los accesorios suministrados
Tipi di diffusori
Este juego se compone de dos tipos de altavoces.
Questo set è composto da due tipi di diffusori.
• Altavoz principal (x2)
e Diffusore principaie (x2)
SX-XDD3
Las cajas de estos altavoces están hechas de madera natural y por lo tanto,
su acabada es diferente de la madera anifícial La apariencia de cada caja
sera ligeramente diferente entre una y otra. Como se ha imli/adn madera
contrachapada moldeada, la textura de la superficie puede ser ligeramente
áspera, pero no influye absolutamente en el rendimiento.
I cabinet di questi diffusori sono in legno naturale, pcicih la finitura dei pori
dillerisce da quella del legno artificiale L'aspuno di ogni cabinet è
leggermente diverso e ha la propria individualità. Poiché è stato utilizzato il
compensato sagomata, le superfìci possono essere leggermente ruvide, ma
cih non in influisce in alcun mudo sulle prestazioni.
• Subwoofer (x1 )
• Subwoofer (x1 )
Disposición estándar Disposizione standard
La imagen sonica será más nítida cuanto más cerca se encuentre el subwoofer de
los altavoces principales.
L’immagine sonora diventa più nitida avvicinando il subwoofer ai diffusori
principali.
SX-XDD3
Altavoz principa)
izquierdo
Diffusore
principale sinistro
Subwoofer
Subwoofer
SX-PWDD3
SX-XDD3
Altavoz principal derecho
Diffusore principale destro
Verifica degli accessori in dotazione
Como primer paso, compruebe que tiene todos los elementos siguientes, que se
suministran con la unidad.
Prima dell’uso, controllare di aver ricevuto tutti gli articoli indicati di seguito,
forniti in dotazione all’unità.
• Cable del altavoz (3 m) (x4)
• Cavo per altoparlante (3 m) (x4>
Precauciones sobre el uso Precauzioni per l’uso
■ Para mantener la apariencia externa de la unidad
Si se ensucia la caja o el panel de control, limpie con un paño suave y seco.
Si está muy sucio, limpie con un paño humedecido con agua o detergente neutro,
y seque con un paño seco.
■Cura deH’aspetto esterno dell’unità
Quando la cassa esterna o il pannello dei comandi sono sporchi, pulirli con un
panno a.sciutto e morbido.
Se lo sporco è molto, bagnare il panno con una piccola quantità di detergente
neutro e strofinare. Dopo, strofinare di nuovo con un panno asciutto.
■ Respete las reglas de convivencia cuando escucha música
estereofónica
Cuando escucha música estereofónica, ajuste el volumen de
manera tal que no moleste a sus vecinos. Especialmente, tenga
en cuenta que de noche, incluso los sonidos suaves tienden a
propagarse a los alrededores. Por favor .sea considerado con sus
vecinos y cierre las ventanas o escuche la música con los
auriculares, etc. y contribuya a mantener un entorno de vida
placentero.
El símbolo mostrado es la señal de “ética del sonido”.
■Ascolto stereo in buona educazione
Ascoltare la mu.sica da un sistema stereo ad un volume che non disturbi i vicini.
Di notte, in particolare, anche i .suoni più bassi si diffondono facilmente. Si
raccomanda di fare attenzione e chiudere le finestre, o ascoltare in cuffia, ecc. in
modo da mantenere un buon rapporto con l’ambiente in cui si vive.
Il simbolo mostrato qui richiama la Buona educazione nell’ascolto.
■ Mejoramiento del campo acústico
• Si los altavoces están frente a una pared sólida o una puerta
de vidrio, etc., se recomienda cubrir la pared con un material
que absorba el sonido, por ejemplo, con cortinas pesadas,
para evitar que se produzcan resonancia y ondas
estacionarias.
iCome migliorare il campo sonoro
Un salotto in cui facilmente si verificano fenomeni di riflessione e risonanza
dovrebbe contenere tendaggi pesanti o tappeti, ecc.
Inoltre, se gli altoparlanti sono rivolti verso una porla a vetri o una parete
rigida, ecc., si consiglia di collocare qualcosa fonoassorbente, ad esempio
appendere dei tendaggi pesanti che impediscano la riflessione dei suoni c onde
■Stazionarie.
SX-XDD3
SX-PWDD3
- 15-
Page 23
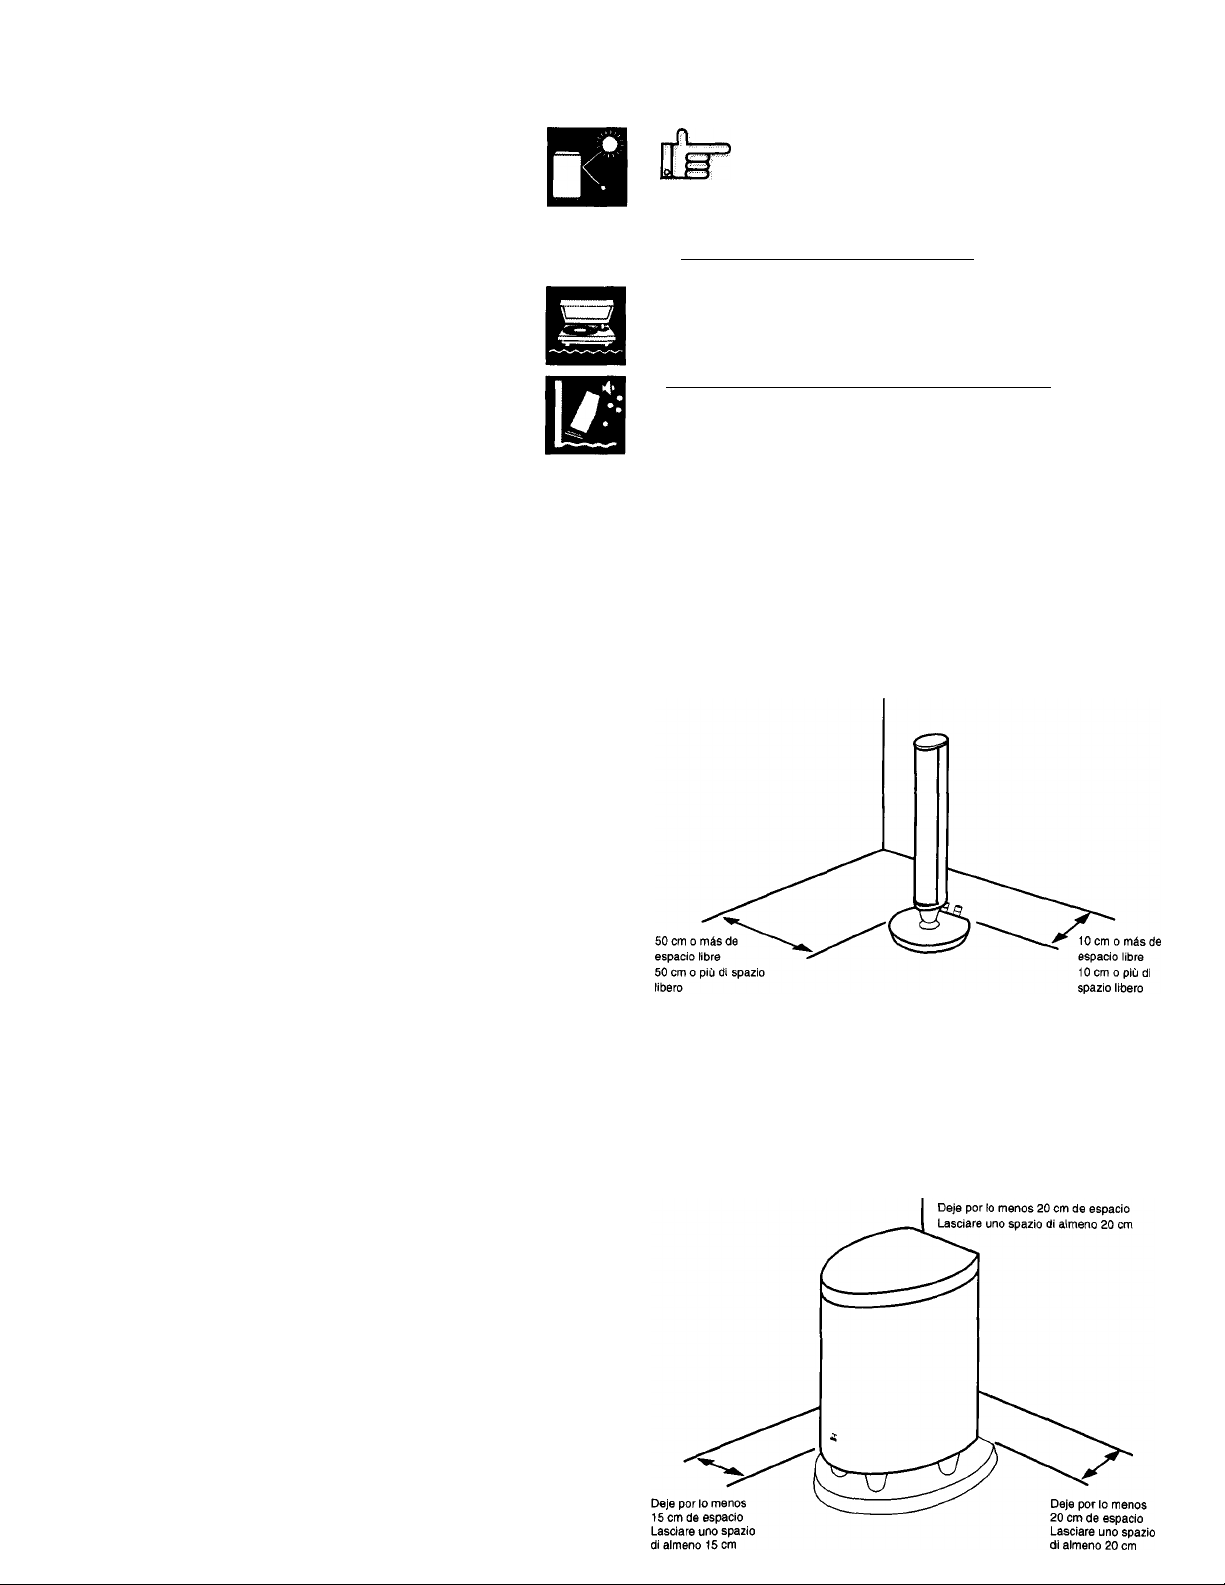
Precauciones sobre la instalación Precauzioni per l’installazione
• Para evitar la deformación o la alteración de color de la caja, no
instale la unidad en un sitio expuesto a la luz directa del sol o a
la alta humedad ni cerca de las bocas de salidas del aire
acondicionado,
• Per evitare deformazioni o perdita di colore della cassa esterna,
non istallare il sistema in posti in cui sia esposto alla luce diretta
del sole o ai rischi di alta umidità, o vicino alle prese di uscita
aria di un condizionatore d’aria.
• Las vibraciones del altavoz pueden producir aullido. Coloque la
unidad lo más lejos posible del tocadiscos.
• Le vibrazioni degli altoparlanti possono essere causa di sibilio.
Collocare l’unità il più lontano possibile dal riproduttore di suoni.
• Al decidir el sitio de instalación de la unidad, tenga en cuenta
las eventualidades tales como los terremotos y otros golpes
físicos y asegúrela firmemente para evitar que se voltee.
• Nella scelta del posto adatto all’installazione, considerare anche
eventi quali terremoti o urli fisici e fissare bene il sistema.
• Esta unidad está aislada magnéticamente para evitar la distorsión de color en
los televisor a color. Sin embargo, dependiendo del método de instalación,
puede producirse distorsión de color. Preste atención a los puntos siguientes
cuando instale la unidad.
1. Al colocar los altavoces cerca de un televisor, desactivar el interruptor de
alimentación principal del televisor o desconectarlo antes de instalar los
altavoces.
Esperar por lo menos 30 minutos después de instalar el sistema y antes de
activar la alimentación del televisor.
2. Si hay otro sistema de altavoz colocado cerca del televisor, tal sistema
podría producir distorsiones de color en la imagen de televisión.
3. A pesar de la protección de estos altavoces, algunos tipos de televisores
pueden ser afectados por ellos. En este caso, mover los altavoces a una
distancia corta de la unidad del televisor.
• Questa unità è schermata magneticamente in modo da evitare di causare
distorsioni del colore nelle immagini dai televisori. Ciononostante, a seconda
del metodo di installazione, a volte le distorsioni del colore possono
verificarsi. Si raccomanda di fare attenzione ai punti seguenti, quando si
procede aH’installazione del sistema.
1. Quando si mettono questi altoparlanti vicino ad un televisore, disattivare
l’interruttore dell’alimentazione principale del televisore oppure scollegarlo
prima di installare gli altoparlanti.
Aspettare almeno 30 minuti dopo che il sistema è installato e prima di
attivare l’alimentazione del televisore.
2. Se è stato installato un altro sistema di diffusori vicino al televisore, il
sistema può provocare distorsioni cromatiche nell’immagine televisiva.
3. Malgrado la protezione di questi altoparlanti, alcuni tipi di televisori
possono essere influenzati negativamente da loro. Se questo si produce,
spostare gli altoparlanti ad una distanza corta dal televisore.
> Cuando instale el sistema de altavoces, se recomienda colocar las patas en la
base de la caja para asegurar una mayor estabilidad, etc.
Dependiendo del material, la superficie de instalación podría sufrir una ligera
alteración de color cuando se instale la unidad sobre la pata suministrada
durante un período prolongado.
I All’installazione del sistema di altoparlanti si raccomanda di attaccare i
piedini alla base del mobiletto per evitare i rischi dovuti all’instabilità, ecc.
La superficie su cui viene installato l’impianto può scolorirsi leggermente a
seconda del materiale di cui è composta se si monta l’apparecchio sui piedi in
dotazione per lunghi periodi.
IPuntos a considerar cuando se instala el sistema de
altavoces
I El sonido reproducido por el sistema de altavoces puede ser ligeramente
afectado por las condiciones de la sala de audición. La disposición de este
sistema puede cambiarse según las diversas condiciones de la sala de audición.
Para una mayor expansión del campo de sonido y asegurar una itnagen sónica
precisa, tenga en cuenta las siguientes sugerencias.
SX-SDD3 (Altavoz principal)
• ,Se recomienda dejar un espacio libre de por lo menos 50 cm entre los
laterales y la pared.
• Se recomienda dejar un espacio libre de por lo menos 10 cm entre el lado
trasero y la pared.
(Tenga en cuenta que el contacto con la pared, etc., implica el riesgo de que
se produzca cortocircuito en los terminales).
Se recomienda dejar una distancia de aproximadamente 1,0 a 2,0 metros entre
cada altavoz y el sistema estéreo, e instalar cada sistema de altavoz con la
parte delantera hacia la posición de audición.
PRECAUCION
Para evitar riesgos de incendio o daños, provea un espacio de
ventilación suficiente alrededor de la unidad, especialmente
entre el lado trasero y la pared, la cortina, o cualquier objeto
que pudiera haber detrás de la unidad.
fL_
____________________
ATTENZIONE
Per evitare il rischio di incendi o danni, fare abbastanza spazio
attorno all’apparecchio, in particolare tra il retro e la parete,
^ tenda o qualunque cosa sia dietro l’apparecchio.
iTenere conto di quanto segue quando si instaiia ii sistema
di diffusori:
Il suono riprodotto dal sistema di diffusori viene leggermente influenzalo dalle
condizioni della stanza di ascolto. E’ possibile cambiare la disposizione del
sistema per adattarlo alle condizioni della stanza. Consigliamo di seguire
queste linee guida per disporre il sistema in modo tale da estendere il campo
sonoro e garantire un’immagine sonora chiara.
SX-XDD3 (Diffusore principale)
• Si raccomanda di mantenere almeno 50 cm di spazio libero tra i lati e una parete.
• Si raccomanda di mantenere almeno 10 cm di spazio libero tra il lato
posteriore e una parete.
(Notare che si rischia di provocare un cortocircuito dei connettori se
toccano una parete ecc.).
Si consiglia di mantenere una distanza di circa 1,0-2,0 metri tra ogni diffu.sore
e lo stereo, inoltre posizionare ogni sistema di diffusori con il lato anteriore
rivolto verso la posizione di ascolto.
• SX-PWDD3 (Subwoofer)
• Deje mucho espacio libre en la parte delantera
• Deje por lo menos 15 cm de espacio en los costados.
• Deje por lo menos 20 cm de espacio en la parte superior,
• Deje por lo menos 20 cm de espacio en la parte trasera.
• SX-PWDD3 (subwoofer)
• Lasciare più spazio sul davanti.
• La.sciare uno spazio di almeno 15 cm ai lati.
• Lasciare uno spazio di almeno 20 cm in alto.
• Lasciare uno spazio di almeno 20 cm sul retro.
___________
^
-16-
Page 24
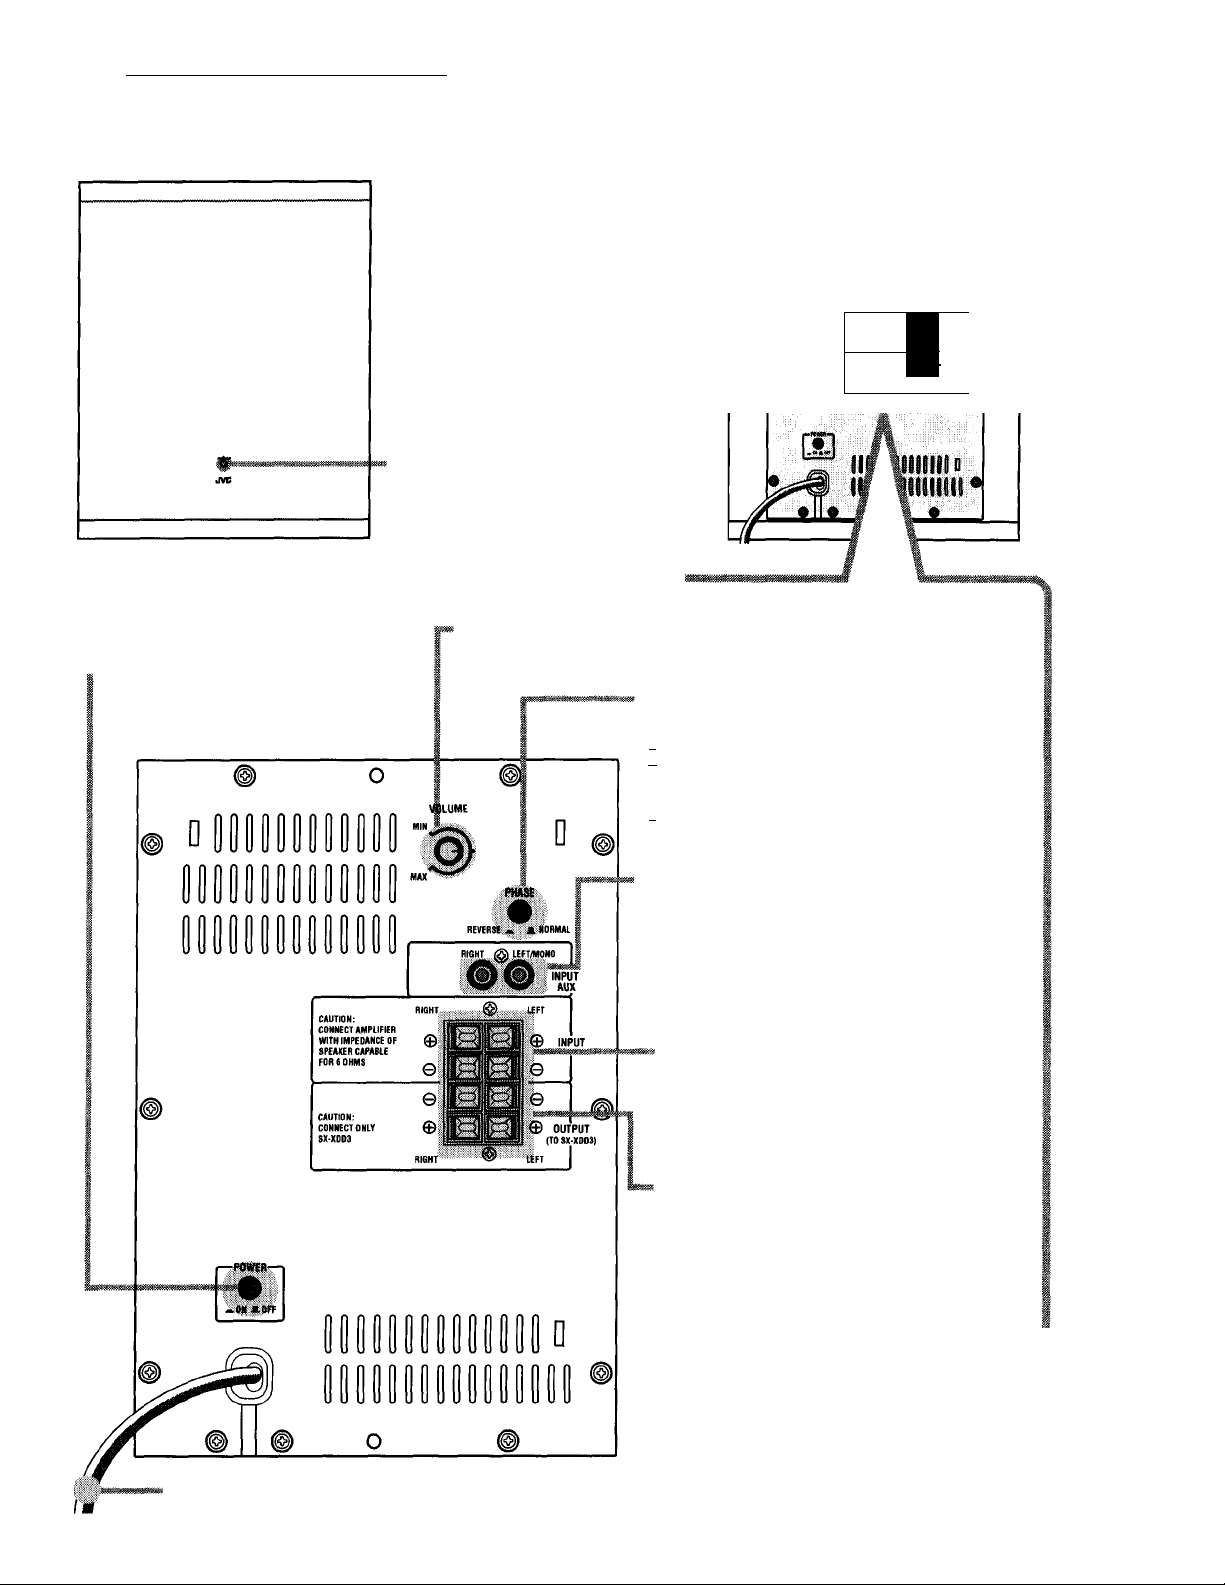
Nombres de las partes y funciones (sx pwdds) Nome delle partì e funzioni (sx-pwdd3)
I Panel delantero
■ Pannello anteriore
Botón de alimentación (POWER)
Se utiliza para encender/apagar la unidad.
Tasto di alimentazione (POWER)
Serve ad accendere e spegnere l’unità.
_________
■ Panel trasero
■ Pannello posteriore
LAMPARA STANDBY/ON
Se enciende cuando está activada (ON) la
alimentación, y cuando la unidad está en el modo
de espera.
Rojo: Modo de espera
Verde: Modo encendido (ON)
SPIA STANDBY/ACCESO
Si accende quando l’alimentazione è accesa (su
ON), e l’apparecchio è in modo "standby”.
Rosso: modo Standby
Verde: acceso (ON)
VOLUME
Ajusta el volumen del subwoofer
VOLUME
Regola il volume del subwoofer
Botón de fase (PHASE)
Se utiliza para obtener un sonido con mayor riqueza de
graves,
■ : NORMAL
— .REVERSE
Tasto PHASE
Serve a ottenere un suono intenso ai toni bassi.
■ : NORMAL
: REVERSE
mmiiiiiiii
miimmiii
temk ■*"
■■ '' ^
9
0
•
ШМ
Э в
¡г:
a в
s в
'iff!!!
• 1
ej
e|
•»a
ЛГ
INPUT AUX (Entradas auxiliares)
Normalmente no se utiliza.
Para los detalles, véase “Conexiones con las entradas
auxiliares del SX-PWDD3’’ en la página 19.
INPUT AUX (Ingresso ausiliario)
Normalmente non si utilizzano.
Per ulteriori informazioni, vedere “Collegamenti agli ingressi
ausiliari sull’SX-PWDD3’’a pag. 19.
INPUT
Estos se conectan a los terminales de salida de altavoz del
amplificador, etc., cuando no se dispone de terminal de
salida de subwoofer en el amplificador conectado, etc.
INPUT
Essi vengono collegati ai connettori uscita diffusori
dell'amplificatore ecc. quando non vi è alcun connettore
uscita subwoofer suH’amplificatore da collegare ecc,
OUTPUT (Al SX-SDD3)
Para conectar el SX-XDD3.
Para los detalles, véase “Conexiones" en la página siguiente.
USCITA (OUTPUT) (A SX-XDD3)
Per collegare l’SX-XDD3,
Per ulteriori informazioni, vedere “Collegamenfi" alla pagina
seguente.
Cable de alimentación de CA
Cavo di alimentazione in c.a.
- 17-
Page 25
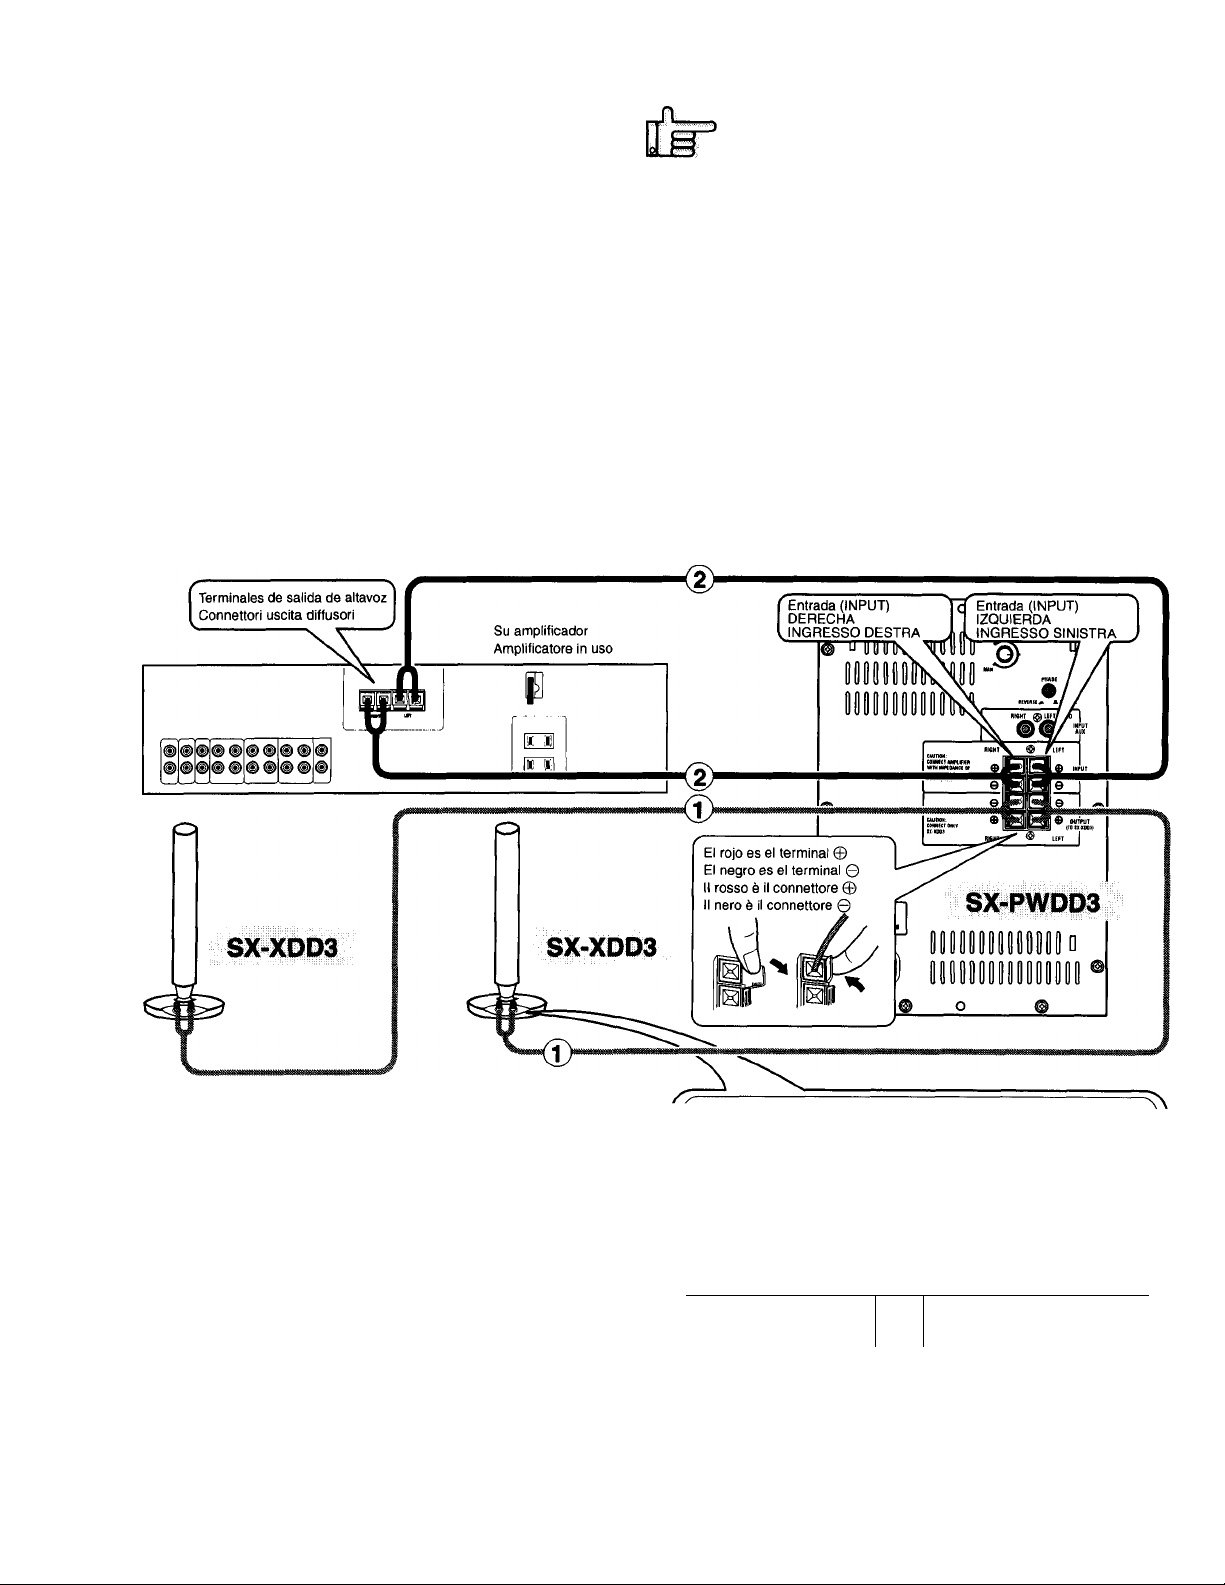
Conexiones
Collegamenti
PRECAUCION ATTENZIONE
• Antes de conectar el sistema al amplificador, siempre
asegúrese de que el amplificador y el sistema de altavoces se
encuentren apagados.
(No enchufe los cables de alimentación a una toma de CA
antes de haber finalizado todas ias conexiones).
• No conecte los altavoces principales (SX-XDD3) directamente a
su ampiificador, pues se podrían dañar los altavoces. SIEMPRE
conéctelos al subwoofer (SX-PWDD3).
■Antes de la conexión
1. Apague el amplificador antes de conectar el sistema de altavoces al
amplificador. El amplificador se podría dañar debido a un cortocircuito en los
cables de altavoz mientras el amplificador se encuentre activado.
2. La impedancia nominal del sistema de altavoces es de 6 ohms.
Utilice un amplificador que acepte una impedancia de carga de 6 ohms.
3. La entrada máxima aceptada por el sistema es de 50 watts.
Este valor (ms) corresponde a la entrada de la fuente musical por un intervalo
breve sin producir daños al altavoz.
■Conexiones normales
1. Conecte el SX-XDD3 al SX-PWDD3 tal como se muestra en la figura (i) de abajo.
2. Conecte los terminales de entrada del SX-PWDD3 a los terminales de salida
de altavoz en el amplificador, tai como se muestra en la figura @ de abajo.
• Assicurarsi sempre che l’amplificatore e il sistema di diffusori
sia spento (OFF) prima di collegare il sistema aH’amplificatore.
(Non inserire i cavi di alimentazione in una presa CA prima di
aver completato tutti i collegamenti.
• Non collegare i diffusori principali (SX-XDD3) direttamente
aH’amplificatore. Si possono danneggiare i diffusori. Collegarli
SEMPRE al subwoofer (SX-PWDD3).
■ Prima di collegare
1. Spegnere l’amplificatore prima di collegare il sistema di diffusori
all’amplificatore. E’ possibile danneggiare l’amplificatore se si verifica un
corto circuito sui cavi dei diffusori mentre l’amplificatore è acceso.
2. L’impedenza nominale del sistema di diffusori è pari a 6 ohm.
Usare un amplificatore che accetta un’impedenza di carico di 6 ohm.
3. L’ingresso massimo accettato dal sistema è 50 watt.
Questo è il valore (rms) a cui la sorgente di musica può es.sere immessa per un
breve intervallo di tempo senza danneggiare i diffusori.
■Connessioni normali
1. Collegare l’SX-XDD3 all’SX-PWDD3 come mostra la figura 0) qui sotto.
2. Collegare i connettori di ingresso dell’SX-PWDD3 ai connettori di uscita del
diffusore dell’amplificatore come mostra la figura (D qui sotto.
■ Precauciones cuando se conectan ios cabies de aitavoz ai
sistema de altavoces
La conexión incorrecta de las polaridades ( © y 0 ) de los cables de altavoz
reducirá el efecto estéreo y la calidad de sonido.
Después de conectar los cables, tire ligeramente de los mismos para comprobar
que se encuentran correctamente conectados.
■Attenzione quando si coiiegano i cavi dei diffusori al
sistema di diffusori
Collegando le polarità ( © , © ) dei cavi dei diffusori in modo errato, si riduce
l’effetto stereo e la qualità del suono.
Dopo aver collegato i cavi, tirarli leggermente per verificare che siano collegati
saldamente.
Quite el vinilo de las puntas de los cables de
altavoz retorciéndolo. Si los cables estuvieran
flojos, retuércelos de manera que queden
apretados.
Staccare il vinile che copre la punta dei cavi
diffusori in dotazione. Se i fili non sono saldi,
torcerli in modo da tenderli.
-18-
El terminal de entrada (INPUT) rojo es el terminal ©, y el negro es el
terminal ©.Tal como se muestra en la figura, gire la perilla del terminal
de altavoz en sentido contrario a las agujas del reloj ( © ) e inserte el
cable de altavoz en la ranura. Luego gire la perilla en el sentido de las
agujas del reloj ( C ) hasta asegurar el cable. La conexión invertida de las
polaridades © y © reducirá considerablemente el efecto estéreo y la
calidad de sonido.
II connettore di INGRESSO rosso è il connettore © e quello nero è il
connettore ©. Come mostrato in figura, ruotare la manopola del
connettore del diffusore in senso antiorario ( © ) e inserire il cavo del
connettore nella scanalatura. Quindi ruotare la manopola in senso orario
( © ) per fissare il cavo. Invertendo le polarità © e ©, si riduce
pesantemente l’effetto stereo e la qualità del suono.
Terminal (0 ) . ^—
Connettore ( 0
Color plateado (color del cable)
Colore argento (colore del filo)
—/ Terminal ( © )
V© Connettore ( © )
Color de cobre
(color del cable)
Colore rame (colore del filol
Page 26

Conexiones (Continuación) Efectúe todas las conexiones antes de desenchufar el cable de alimentación de CA de la toma de CA.
Coiiegamenti (Continua) Realizzare tutti i collegamenti prima di infilare la spina del cavo di alimentazione in c.a. in una presa di rete in c.a.
fL
N0 conecte los terminales REC OUT de su amplificador o de
otros componentes a los terminales de entrada auxiliar
del SX-PWDD3.
1 [ r ■ *
IsL
Non collegare i connettori REC OUT deii’ampiificatore o di un
altro componente ai connettori di ingresso ausiiiari
deii’SX-PWDD3.
ATTENZIONE” ; PHEwAUWIUN
IConexión al SX-PWDD3 IMPUT AUX (entrada auxiliar)
• Se utilizan cuando se usa el SX-PWDD3 como un subwoofer autónomo.
• Conecte estos terminales al terminal de salida del subwoofer o al terminal
de salida MONO/terminal de salida de línea con el cordón con clavija RCA
(no suministrado).
• Si se realiza esta conexión, la señal no será generada a través de los
terminales de salida.
• Cuando se utiliza el SX-PWDD3 como un subwoofer autónomo, la
frecuencia de corte se fija en 230 Hz.
• Si también se conectan las entradas auxiliares mientras se están utilizando
los sistemas SX-DD3 en conexiones normales, la señal de rango bajo
procedente de INPUT y la señal procedente de las entradas auxiliares se
generan de forma combinada desde el subwoofer.
Funcionamiento
Funzionamento
I Encendido I Accensione (ON)
•Panel delantero
•Pannello anteriore
Efectúe todas las conexiones antes de desenchufar el cable de alimentación de CA de la toma de CA.
Realizzare tutti i collegamenti prima di infilare la spina del cavo di alimentazione in c.a. in una presa di rete in c.a.
•Panel trasero
•Pannello posteriore
ICollegamenti all’Ingresso ausiliario SX-PWDD3 INPUT AUX
• Usati quando si utilizza l’SX-PWDD3 come subwoofer singolo.
• Collegare questi connettori al connettore di uscita subwoofer
dell’amplificatore o al connettore uscita MONO/line out con il cavo PINRCA (non in dotazione).
• Quando si esegue questo collegamento, dai connetter uscita non arriva
nessun segnale.
• Quando si usa l’SX-PWDD3 come subwoofer unico, la frequenza di cross
over è fissa a 230 Hz.
• Se si collegano anche gli ingressi ausiliari mentre si utilizzano i sistemi
SX-DD3 in condizioni normali, il segnale dei bassi proveniente dall’INPUT
(ingresso) e il segnale proveniente dagli ingressi ausiliari verranno emessi
mischiati tra loro dal subwoofer.
PRECAUCION
Si el botón VOLUME de esta unidad está cerca de MIN, el
volumen del amplificador será 0, o si las señales de sonido
procedentes del amplificador son excepcionalmente bajas, la
función de activación automática no funcionará cuando se
reciba la señal de audio (no se efectuará el cambio de modo
^ de standby a activado (ON).
Para desconectar completamente la alimentación de esta unidad, oprima
el botón de alimentación del lado trasero para ponerlo en “OFF” y
desenchufe el cable de alimentación de la toma de CA.
_____________________________
^
• Lámpara STANDBY/ON (con función de activado/desactivado
automàtico)
Al poner el botón POWER en la posición ON, la lampara STANDBY/ON se
enciende en verde. Tras unos 30 minutos en ausencia de señal, el modo
cambia al modo de espera, y la lámpara STANDBY/ON se enciende en rojo.
Al ingresar las señales de audio, la alimentación se conecta automáticamente,
y la lámpara STANDBY/ON se enciende en verde.
Modo de encendido (ON) : La lámpara STANDBY/ON se enciende en verde.
Modo en espera : La lámpara STANDBY/ON se enciende en rojo.
' Spia STANDBY/ON (con la funzione di accensione e spegnimento
automatici)
Quando il tasto POWER viene messo su ON, la spia STANDBY/ON
s’illumina verde. Se trascorrono circa 30 minuti senza segnali, l’apparecchio
entra in modo standby e la spia STANDBY/ACCESO si illumina rosso.
Quando in ingresso arrivano segnali audio, automaticamente la modalità
cambia in modalità di unità accesa (ON) e la spia STANDBY/ON s’illumina
verde.
Modalità di unità accesa (ON) : La spia STANDBY/ON s’illumina verde.
Modalità di attesa, unità pronta al funzionamento :
La spia STANDBY/ON s’illumina rosso.
ATTENZIONE
Se la manopola del volume di questo apparecchio è vicino a
MIN, il volume dell’amplificatore è 0, oppure i segnali audio
provenienti dall’amplificatore sono estremamente bassi,
i’accensione automatica non funziona quando riceve un
segnaie audio, (ii modo non è stato commutato da standby ad
ON (acceso)).
Per togliere completamente l’alimentazione di corrente a questa unità,
premere il tasto POWER sul pannello posteriore, in posizione “OFF’, e
scollegare il cavo di alimentazione dalla presa di rete in c.a.
-19-
Page 27

Funcionamiento (Continuación)
Funzionamento (Continua)
■Ajuste del volumen
Ajuste el nivel de volumen de este altavoz de manera que quede balanceado
con los otros altavoces.
■ Regolazione del volume
Regolare il livello del volume di questo altoparlante in modo che sia uguale a
quello degli altri altoparlanti.
7. Gire el mando VOLUME de esta unidad hacia la posición “MIN”.
7. Girare la manopola VOLUME di questa unità fin sulla posizione
“MIN”.
VOLUME
MIN
MAX
Después de equilibrar el volumen de esta unidad y de los altavoces
principales, utilice el volumen del amplificador para ajustar el volumen de
este sistema.
Dopo aver bilanciato il volume di questo apparecchio e i diffusori
principali, usare il volume dell’amplificatore per regolare il volume del
sistema.
2. Ajuste el volumen del amplificador al nivel de audición normal,
y reproduzca la fuente musical, (Tenga cuidado con la entrada
excesiva)
■ Desplazamiento de fase
Es posible cambiar la sensación de solidez de los graves de acuerdo con las
condiciones de la sala de audición y de la ubicación del subwoofer.
• Ajuste a una posición que permita obtener graves ricos.
¡Cambiamento di fase
E’ possibile cambiare la sensazione di corposità dei bassi in base alle
condizioni della stanza di ascolto e alla posizione del subwoofer.
• Impostare una posizione in cui si senta un basso “corposo”.
PHASE
REVERSE NORMAL
Botón PHASE
M. : NORMAL
(Normalmente utilice e.sta posición)
^ : REVERSE
(Utilice esta posición cuando los tonos graves sean insuficientes).
Tasto PHASE
M. : NORMAL
(Normalmente deve essere in questa posizione.)
. : REVERSE
(Impostare in questa posizione se si ritiene che il suono dei toni bassi
non sia adeguato.)
2. Regolare il volume dell’amplificatore sul livello di ascolto
normale che si preferisce, e avviare la riproduzione di una
sorgente di musica. (Fare attenzione a non fornire eccessiva
potenza in ingresso.)
3. Gire el botón de volumen del subwoofer hasta lograr la
posición de balance del sonido con el de los altavoces
principales.
3. Ruotare la manopola del volume del subwoofer per trovare la
posizione in cui il suono è bilanciato con il suono proveniente
dai diffusori principali.
VOLUME
MIN
MAX
• Después de equilibrar el volumen de està unidad y de los altavoces
principales, utilice el volumen del amplificador para ajustar el volumen
de esta unidad, de la misma manera que para los altavoces principales.
• Dopo aver bilanciato il volume di questa unità e quello degli altoparlanti
principali, utilizzare il comando di regolazione del volume
delPamplificatore per regolare il volume di questa unità come per gli
altoparlanti principali.
■Circuito de protección de altavoz principal
Si el volumen del amplificador excede la entrada admisible del sistema de
altavoces, el circuito de protección se activa y el volumen se reduce. En este
caso, baje el volumen de su amplificador hasta el nivel en que no se active el
circuito de protección.
■Circuito di protezione del diffusore principale
Se il volume dell’amplificatore supera la potenza in ingresso consentita dal
sistema di diffusori, il circuito di protezione si attiva e il volume si riduce. In
questo caso, abbassare il volume dell’amplificatore ad un livello a cui il
circuito di protezione non si attiva.
-20-
Page 28

Solución de problemas
Guida e rimedi in caso di problemi di funzionamento
Síntomas
Sintomo
La unidad no se enciende.
Mancata accensione.
La función de desactivado automático no
funciona.
El estado de espera (alimentación) no se
activa.
Lo spegnimento automatico non funziona.
(Potenza) Stato di standby non inserito.
No se escucha sonido.
Non si sente suono.
El sonido fluctúa entre fuertes y suaves.
11 suono fluttua tra alto e basso (come
volume).
Causa posible
Causa possibile
¿PT cable de alimentación está desenchufado de la toma de
li cavo di alimentazione in c.a. è scollegato dalla presa di
rete in c.a?
Se està efectuando la reproducción de sonido
Inmediatamente de.spués de la reproducción de sonido
Suono in fase di riproduzione
Subito dopo ta riproduzione dei suono
(.111 mando VOLUME està girado a la posición “MIN" ?
La manopola VOLUME si trova in posizione “MIN" ?
Las conexiones esun flojas n incorrectas.
1 collegamenti suno errati o lenti.
La señal de audio del amplificador cs extremadamente débil
11 segnale audio proveniente dall'amphficatore è
debolissimo.
Circuito de protección activado.
Il circuito di protezione funziona.
Acción correctiva
Rimedio
Enchufe correctamente el cable de alimentación de CA a la
toma de CA.
Collegare il cavo di alimentazione in c.a, saldamente nella
presa di rete in c.a.
Consulte el procedimiento de operación. (Véase páginas 19
y 20).
Vedere le procedure di utilizzo (pag, 19 e 20).
Gire el mando VOLUME y ajùslelo a un volumen adecuado.
Girare la manopola VOLUME su un livello di volume idoneo.
Verifique las conexiones y efectúe las correcciones
necesarias. (Consulte las páginas 18 y 19)
Controllare i collegamenti e correggerli laddove necessario.
(Vedere alle pagine 18 e 19.)
Consulte el procedimiento de operación. (Véase páginas 19
y 20).
Vedere le procedure di utilizzo (pag. 19 e 20).
Baje el volumen de su amplificador hasta un nivel en que el
circuito de protección no se active. (Véase la página 20.)
Abbassare il volume dell’amplificatore ad un livello che non
faccia scattare il circuito di protezione. (Vedere pag. 20)
Especificaciones Dati caratteristici
SX-XDD3
Blindado magnéticamente
Tipo
(Tipo blindado magnéticamente)
Unidades de aitavoces
Gama de frequencias
Nivel de presión de sonido
9.5 cm X 1 cm Domo tipo carril
230 Hz - 50 kHz
80 dBAV*m
salida
Impedancia
Potencia admisible
Dimensiones
Peso
Unità altopariante
Gamma di frequenza
Liveiio di pressione sonora
6Í2
50 W (con SX-PWDD3)
125 mm X 331 mm x 123 mm
(An/AI/F)
0,85 kg
Tipo
Tipo di sospensione acustica
(Tipo schermato magneticamente)
9.5 cm X I cm Traccia - tipo a cupola
230 Hz - 50 kHz
80 dBAV*m
Terminales de entrada AUX
Terminal de conexión SX-XDD3
Salida máx. de amplificador incorporado
Consumo de energía en ei modo de espera
uscita
impedenza
Potenza nominale
Dimensioni
Peso
Accesorios/Acceesori
Cabie de altavoz (3 m) : x 4
Cavo per altoparlante (3 m) : x 4
Debido a las continuas mejoras del producto, el diseño y las especificaciones se encuentran sujetos a cambios sin previo aviso.
11 disegno e le specifiche sono soggetti a modifiche senza preavviso per i miglioramenti al prodotto.
6Q
50 W (con SX-PWDD3)
125 mm x 331 mm x 123 mm
(L/A/P)
0,85 kg
Terminaii di ingresso AUX
Potenza massima in uscita
dell’amplificatore incorporato
Potenza assorbita in modalità di
attesa, unità pronta al funzionamento
-21 -
Unidad de altavoz
Gama de frequencias
impedancia de entrada
Terminales de entrada
Requisitos de potencia
Consumo de energía
Unità aitopariante
Gamma di frequenza
Impedenza di ingresso
Terminali di ingresso
Connettore SX-XDD3
Alimentazione richiesta
Potenza assorbita
SX-PWDD3
Dimensiones
Dimensioni
Tipo
Subwoofer motriz
Tipo bass-refiex, (Tipo blindado
magnéticamente)
Cono de 16,0 cm (4£2)
,30 Hz - 230 Hz
Terminales INPUT AUX 50 кП
Terminales de entrada 6Í2 (cuando
está conectado el SX-XDD3)
Terminales de altavoz L/R
Clavija RCA L (MONO)/R
Terminales de altavoz L/R para
uso exclusivo con SX-XDD3
AC 230V 50 Hz
60 W ( 10% TH D/AT 100 Hz/4 Í2)
.30 W
5.8 W
264 mm x 372 mm x 340 mm
Peso
Peso
(An/Al/F)
: 9,9 kg
Tipo
: Subwoofer (altoparlante per toni
bassi) alimentato
Tipo a riflessione dei toni bassi,
(Tipo schermato magneticamente)
Cono da 16,0 cm (4 Q)
; 30 Hz - 230 Hz
: Connettori INPUT AUX (ingressi
ausiliari) 50 kU
Connettori di ingresso 6 Í2
(quando è collegato l’SX-XDD3)
Connettori diffusori L/R (sinistra/destra)
pin RCA L (MONO)/R (sinistra
(MONO)/destra)
Connettori diffusori L/R
(sinistro/destro) esclusivamente
da usare con l’SX-XDD3
AC 230V 50 Hz
60 W ( 10% THD/AT 100 Hz/4 П)
30 W
5.8 W
264 mm x 372 mm x 340 mm
(L/A/P)
9.9 kg
Page 29

Högtalartyper
Kontroll av medföljande tillbehSr
Hajttalertyper
Högtalarsetet bestär av följande tvä typer av högtalare.
Dette sæt bestár af to typer af hojttalere.
• Huvudh6gtalare (x2)
e Hovedhajttaler (x2)
• Làgbashôgtalare (xl)
e Subwoofer (x1 )
SX-XDD3
Hiigtalarlàdoina ar utKerkade av naturligt tra, vilket goi an Sdrornas
ytbehandling skiljer &ig frän ytbehandlingen p£ kon&lgjort trk. Varje
hbgialarläda skiljer sig nigüt vad gallcr utseende och har <iiii eget
individuella karaktdrsdrag. Eftcrwm forinpressad ktyssfaner har anvhnts
kan det banda au ytoma är aningen grova, men detta pâverkar inte pä ndgot
satt hdgtalarcns piestanda.
Kahineuet pi disse hdjualere er fremsiillet af naturligt trse, hvorfur
overfladestrukturen adskiller sig ira kunstigt fremstillei træ Hven kabineis
udseenüe adskiller sig en smulc fra andre kabinetter, og hvert kabinet hat
sm egen individuelle karakter. Overflademc kan vsere en smule ru, da der er
anvcndt presset finer. men dette har ingen indflydelse pà ydelsen.
Normal uppställning
Normal opstilling
Ju närmare huvudhögtalarna iagbashögtalaren placeras, desto skarpare blir
ljudbilden.
Lydbilledet bliver tydeligere, jo tættere subwooferen placeres pâ
hovedh0jttalerne.
Lägbashögtalare
Subwoofer
SX-PWDD3
Tjek af medfalgende tilbehar
Kontrollera innan lägbashögtalaren tas i bruk att samtliga tillbehörenligt nedan
levererats tillsammans med lägbashögtalaren.
Kontroller at alle nedenstaende dele f0lger med enheden.
• Högtalarkablar (3 m) (x4)
• Hejttalerledning (3 m) (x4)
Säkerhetsföreskrifter für användning Sikkerhedsregler for brug
■Skötsel av lägbashögtalarens utsida
Torka rem med en torr, mjuk tygtrasa för att vid behov rengöra ytterhöljet eller
manöverpanelen.
Fukta lygtrasan i lite vatten eller i en neutral rengöringslösning för att fä bort
svarborttagna smutsfläckar. Eftertorka med en torr tygtrasa.
■Vedligeholdelse
Benyt en tdr, bl0d klud til at aftprre kabinettel eller betjeningspanelel, hvis
delene bliver snavsede.
Hvis delene er meget snavsede, fugtes kluden med lidt vand eller et neutral!
vaskemiddel. T0r efter med en t0r klud.
■ Hánsyn gàllande stereomusik
Tank pà att halla volymen pà en nivà som inte ar storande for
grannar, nar du lyssnar pà musik fràn en stereoanlaggning.
Tank pà att aven mjuka toner latt sprider sig till omgivningen,
sarskilt vid lyssning seni pà kvàlien eller pà natlen. Visa hansyn
genom att bàlia fonster stangda eller lyssna via horlurar och sà
vidare for att medverka till en trevlig livsmiljo.
Symbolen som visas har ar en màrkning som anger god Ijudetik.
■Gode manerer ved anvendelse af stereoanlæg
Nâr man lytter til musik pâ et stereoanlæg, b0r man lytte med en lydstyrke, der
ikke forstyrrer naboerne. Vis hensyn og luk vinduerne, eller benyt h0retelefoner,
for al opretholde et behageligi beboelsesmiljd.
Symbolet, der er visi her, er et mærke, der angiver gode manerer ved lytning.
■Förbättring av ljudfältet
• Om högtalarna är vända mot en hârd vägg, en glasdörr oeh
sä vidare rekommenderas nägot slags ljuduppfângande
rnedel, sâsom upphängning av Ijocka draperier, för att
förhindra uppkomsten av reflexioner och staende vägor.
SX-XDD3 (Ф
Vänster
huvudhögtaiare
Hovedhojttaler
Hojre
SX-XDD3
§ ) SX-XDD3
Höger huvudhögtalare
Hovedhejttaler
Venstre
■ Forbedring af lydfeltet
• Et rum, hvor der let opstâr refleksioner og resonans, bpr udstyres med lunge
gardiner, gulvtæppe eller lignende.
Hvis den væg, som h0jttalerne vende frem imod, er en fast vsg, g!asd0r eller
lignende, anbefales del at anbringe noget lydabsorberende materiale pä
væggen, eksempelvis ved ophængning af tunge gardiner, for at forhindre
frembringelse af refleksioner og släende bplger.
SX-PWOD3
-22-
Page 30

Säkerhetsföreskrifter for installation Sikkerhedsregler for installation
• Undvik deformation och missfärgning av ytterholjet genom att
inte installera lágbashogtalaren pá en plats där den utsätts för
direkt solljus eller hög luftfuktighet. Undvik dessutom
installation i närheten av varmluftsintag.
• For at undgä deformering eller misfarvning af kabinettet mä
enheden ikke installeres pá et sted, hvor den er udsal for direkte
sollys eller hpj fugtighed. Undgä ligeledes placering naer
udgange fra klimaanlaeg.
• Högtalarvibrationer kan orsaka tjut. Placera lägbashög-talaren
sä längt som möjligt frän stereokällan.
• Vibrationer fra hpjttaleren kan forärsag hylen. Anbring enheden
sä langt fra afspilleren som muligt.
• Tank pä risken för jordbävning eller andra fysiska skakningar
vid val av lägbashögtalarens placering. Fast högtalaren
ordentligt.
• Tag risikoen for jordskaelv og andre fysiske rystelser i
betragtning, när subwooferen skal placeres, og fastgpr den
forsvarligt.
» Lágbashogtalaren är magnetiskt avskärmad för att inte orsaka färgstörningar
pä färgteveapparater. Beroende pä installationsmiijön kan det dock ändä hända
att färgstörningar uppstär. Var god uppmärksamma följande punkter vid
installation av lágbashogtalaren.
1. Tryck pä huvudströmbrytaren pä TV:n för att slä av .strömmen, eller koppla
ur TV:ns nätkabel, innan högtalaren placeras nära en TV.
Vänta i minst 30 minuter efter att högtalaren monterats, innan strömmen tili
TV:n släs pä.
2. Om en annan högtalaranläggning Finns uppställd i närheten av TV:n kan det
hända att denna orsakar färgstörningar pä TV-bilden.
3. Trots att denna högtalare är magnetiskt avskärmad, kan det hända att vissa
typer av TV-apparater ändä päverkas av den. Flytla i sä fall högtalaran lite
längte bort frän TV:n.
» Denne subwoofer er magnetisk afskærmet for at forebygge forekomsi af
farveuregelmæssigheder pä farvefjernsyn. Afhængigt af den mâde enheden
placeres pä, kan der dog forekomme farveuregelmæssigheder. Tag fplgende
faktorer i betragtning ved installering af subwooferen.
1. Ved placering af hpjtlalerne i nærheden af et TV-apparat, skal der slukkes
for apparatet, eller det skal kobles fra nettet, fpr hpjttalerne installeres.
Vent sä i mindst 30 minulter efter höjttalerinstallationen fpr der tændes for
TV-apparatet igen.
2. Hvis et andet hpjttalersystem er opsat i nærheden af TV-apparatet, kan det
pâgældende system forârsage farveforstyrrelser pâ TV-billedel.
3. Selvom hpjttalerne er magnetisk afskærmet, kan farverne alligevel,
afhængig af TV-modellen, pävirkes. Hvis dette indtræffer, bpr hpjttalerne
placeres lidt længere væk fra TV-apparatet.
• Vi rekommenderar vid högtalaruppställning att fötterna monteras pä
högtalarlädans undersida, för att förhindra att högtalaren Stär ostadigt o.s.v.
Om högtalarna är placerade länge pä samma plats med fotkuddarna
pämonterade kan det hända att placeringsytan missfärgas en aning beroende pä
ytans material,
I När hpjttalersystemel placeres, anbefales det at sætte fpdderne pá
hpjttalerkabinettets underside for at modvirke ustabil op.sætning, etc.
Hpjttalerncs fddder kan medfpre en smule misfarvning af siedet, hvor de
anbringes, hvis de far lov at stâ det samme sted i længere lid.
FORSIGTIG
For at forebygge risiko for brand eller beskadigelse skal der
vaere rigellg plads til at luften kan cirkulere omkring enheden,
isaer meliem bagsiden og en vaeg, et gardin eller anden
genstand bag enheden.
I At observere ved installering af hojttalersystemet
Lydcn, der frembringes af hpjttalersystemet, pávirkes pá indviklet vis af
forholdene i lokalet. Systeme! kan opstilles sáledes, at det tilpasses forholdene
i lytterummel. Vi anbefaler, at man fplger nedenstáende retningslinier for at
arrangere systemel, sáledes at lydfeltet udvides, og der sikres et klart defineret
lydbillede.
SX-XDD3 (Hovedhpjitaler)
• Vi anbefaler, at der er mindst 50 cm frit rum meliem siderne og en vreg.
• Vi anbefaler, al der er mindst 10 cm frit rum meliem bagsiden og en vasg.
(Bemasrk, at der er en risiko for at terminalerne kortsluttcs, hvis de kommet
i kontakl med en vteg eller lignende.)
Vi anhefaler, al der sikres en afstand pä omkring 1,0 til 2,0 meter meliem hver
höjttaler og stereosystemet, og hvert hdjttalersystem skal anbringes med
forsiden vendt frem mod lytiepositionen.
frit rum
SX-PWDD3 (lägbasbögtalare)
• Lämna stört utrymme framför högtalaren.
• Lämna ett mellanrum pä minst 15 cm tili vänster och högcr om högtalaren,
• Lämna ett mellanrum pä minst 20 cm ovanför högtalaren.
• Lämna ett mellanrum pä minst 20 cm bakom högtalaren.
SX-PWDD3 (Subwoofer)
• S0rg for meget frit rum foran.
• S0rg for mindst 15 cm frit rum omkring siderne.
• S0rg for 20 cm frit rum over,
• Sorg for 20 cm frit rum bag.
frit rum
I Att tänka pá vid installation av högtalarsystemet
I Det ljud som äterges via högtalarna päverkas i viss grad av hur rummel dar
högtalarna är placerade ser ut, Högtalarnas placeringar kan ändras för att
anpassa högtalarsystemet tili lyssningsrummets utformning. Vi
rekommenderar att följande riktlinjer används vid högtalaruppställning för att
vidga ljudfältet och garantera en tydligt preciscrad ljudbild.
SX-XDD3 (huvudhögtalare)
• Vi rekommenderar ett mellanrum pä minst ca 50 cm frän sidan pä varje
högtalare tili närmaste vägg.
• Vi rekommenderar ett mellanrum pä minst ca 10 cm bakom varje högtalare.
(Observera att det Finns risk för att högtalarkablarna kortsluts, om
högtalarna placeras för nära en vägg e.dyl.)
Vi rekommenderar att varje högtalare placeras pä ca 1,0 tili 2,0 meters avständ
frän stereon. Se ocksä tili att varje högtalare placeras med framsidan vänd mot
lyssningsplatsen.
OBSERVERA
Se till att lämna ett tillräckligt stört ventilationsutrymme runt
om högtalarna, särskilt mellan baksidorna och väggen,
gardinen eller annat som finns bakom högtalarna.
-23-
frit rum.
cm frit rum.
Page 31

Namn pá delar och funktioner (sx-pwdds)
Delenes navne eg funktioner (sx-pwdds)
I Framsida
IForpanel
I Baksida
I Bagpanel
- 94 _
Page 32

Anslutnìngar
Tilsiutninger
n
m
> Kontrollera alltid att fdrstárkaren och hógtalarsystemet ar
> Anslut inte huvudhógtalarna (SX-XDD3) direkt till en fórstarkare,
OBSERVERA
avstángda (OFF), innan hógtalarsystemet ansluts till en fórstarkare.
(Anslut inte natkablarna till nágra natuttag forran alia andra
anslutningar ár klara.)
eftersom det kan leda till att hógtalarna skadas. Anslut ALLTIO
huvudhógtalarna till lágbashógtalaren (SX-PWDD3).
FORSIGTIG
' Sorg altid for at forstserkeren og hojttalersystemet er
SLUKKET, for systemet tilsluttes til forstserkeren.
(Säet ikke netledningerne I en stikkontakt, for alle tilsiutninger
er fuldfort.)
Tilslut ikke hovedhojttalerne (SX-XD03) direkte til
forstserkeren. Hojttalerne kan tage skade. Tilslut dem ALTID til
subwooferen (SX-PWDD3).
■ Före anslutningar
1. Slà av (OFF) förstärkaren, innan hógtalarsystemet ansluts tili en förstärkare.
Det finns risk for att förstärkaren skadas, om högtalarkablarna kortsluts medan
förstärkaren är pásiagen.
2. Hógtalarsystemet har en märkimpedans pa 6 ohm.
Använd en förstärkare som godtar en belastningsimpedans pá 6 ohm.
3. Högtalarsystemet godtar en maximal innivà pà 50 watt.
Detta värde (effektivvärde) anger den nivà pá vilken Ijudet fràn en källa kan
matas in under en kort intervall utan att högtalarna tar skada.
■ Nórmala anslutningar
1. Anslut huvudhögtalarna SX-XDD3 till lágbashógtalaren SX-PWDD3 enligt
® pá Illustrationen nedan.
2. Anslut ingángarna pá lagbashöglalaren SX-PWDD3 till lämpliga
hogtalarutgàngar pà en förstärkare enligt ® pá illustrationen nedan.
■ For dar foretages tilsiutninger
1. SLUK forstaerkeren, fpr hpjttalersystemel tilsluttes til forstaerkeren.
Forstaerkeren kan blive beskadiget, hvis hpjttalerledningerne kortsluttes, mens
forstatrkeren er taendt.
2. H0jttalersystemets nominelle impedans er 6 ohm.
Anvend en forstaerker, der accepterer en belastningsimpedans pà 6 ohm.
3. Maksimal indgang for systemet er 50 watt.
Dette er den vaerdi (rms), hvormed lydkilden kan ledes ind i et kort tidsrum,
uden at hpjtlaleren tager skade.
■ Normaie tiisiutninger
1. Tilslut SX-XDD3 til SX-PWDD3 som vist i figur C) herunder.
2. Tilslut indgangsterminalerne pà SZ-PWDD3 til hpjttalerudgangene pà
forstaerkeren som vist i figur (2) herunder.
Höger
INGÂNGAR
INPUT H0JRE
tnnm
1
"3 Vänster
jlfr^^STRE^
wnuMNtMCt« A IBVlIKaH A INI
i!SK«u aBNllB^e »nim
eoNNtcimiw IBta^AadEII (lan.innii
INGÂNGAR
eM
Mie
Od
® LIFT
®
fim
LIT
1
J
SX>XDD3
■ Attobserveravidansiutnin^vhögtaiarkablar
Omhôgtalarkablarnaanslutsmedpolerna(0och0)felaktigtanslutna,sà
lederdettillförsämradstereoeffektochljudkvalitet.
Dralättihögtalarkablarnaefteranslutningförattkontrolleraattdesitterfast
ordentligt.
■ Forsigtighedsreglervedtiisiutningaf
hojttaieriedningernetiihojttaiersystemet
Forkcrttilslutningafh0jttalerledningernespoler(0,©)vilforringe
stereoeffektenoglydkvaliteten.
Efteratledningererblevettilsluttet.traekkermanletidemforatkontrollere.at
deersikkertsati.
Vrid loss plastmantlarna som skyddar ändarna
pà de medföljande högtalarkablarna. Tvinna
ihop kabeltrádarna hàrt, om det skulle hända
att de spretar.
Vrid vinylet af spidserne pà de medfölgende
hpjttalerledninger. Stritter trädene, snos de
faste.
Den röda Ingängen motsvarar den positiva polen © och den svarta
ingängen den negativa polen ©. Vrid anslutningsskruvarna moturs ( © )
och skjut in högtalarkabeln enligt Illustrationen. Vrid sedan
anslutningsskruvarna medurs ( (^ ) för att fästa kabeln. Om anslutningen
av polerna © och 0 kastas om leder det tili märkbart försämrad
Stereoeffekt och ljudkvalitet.
Den rode INPUT terminal er © terminalen, og den sorte er 0 terminalen.
Som vist i figuren drejer man hojttalerterminalknappen mod uret ( ® ) og
stikker hojttalerledningen ind I rillen. Drej derefter knappen med uret ( )
for at fastgore ledningen. Byttes der rundt pä © og © poterne vil det
forringe Stereoeffekten og lydkvaliteten meget.
( © ) Pol
-------------------------------------------
( 0 ) Terminal
Silverfärgade kabeltràdar
Sdivfarvet (ledningens farve)
—/ ( © ) Poi
( © ) Terminal
Kopparfärgade kabeltràdar
Kobberfarvet (ledningens
, farve) ;
-25-
Page 33
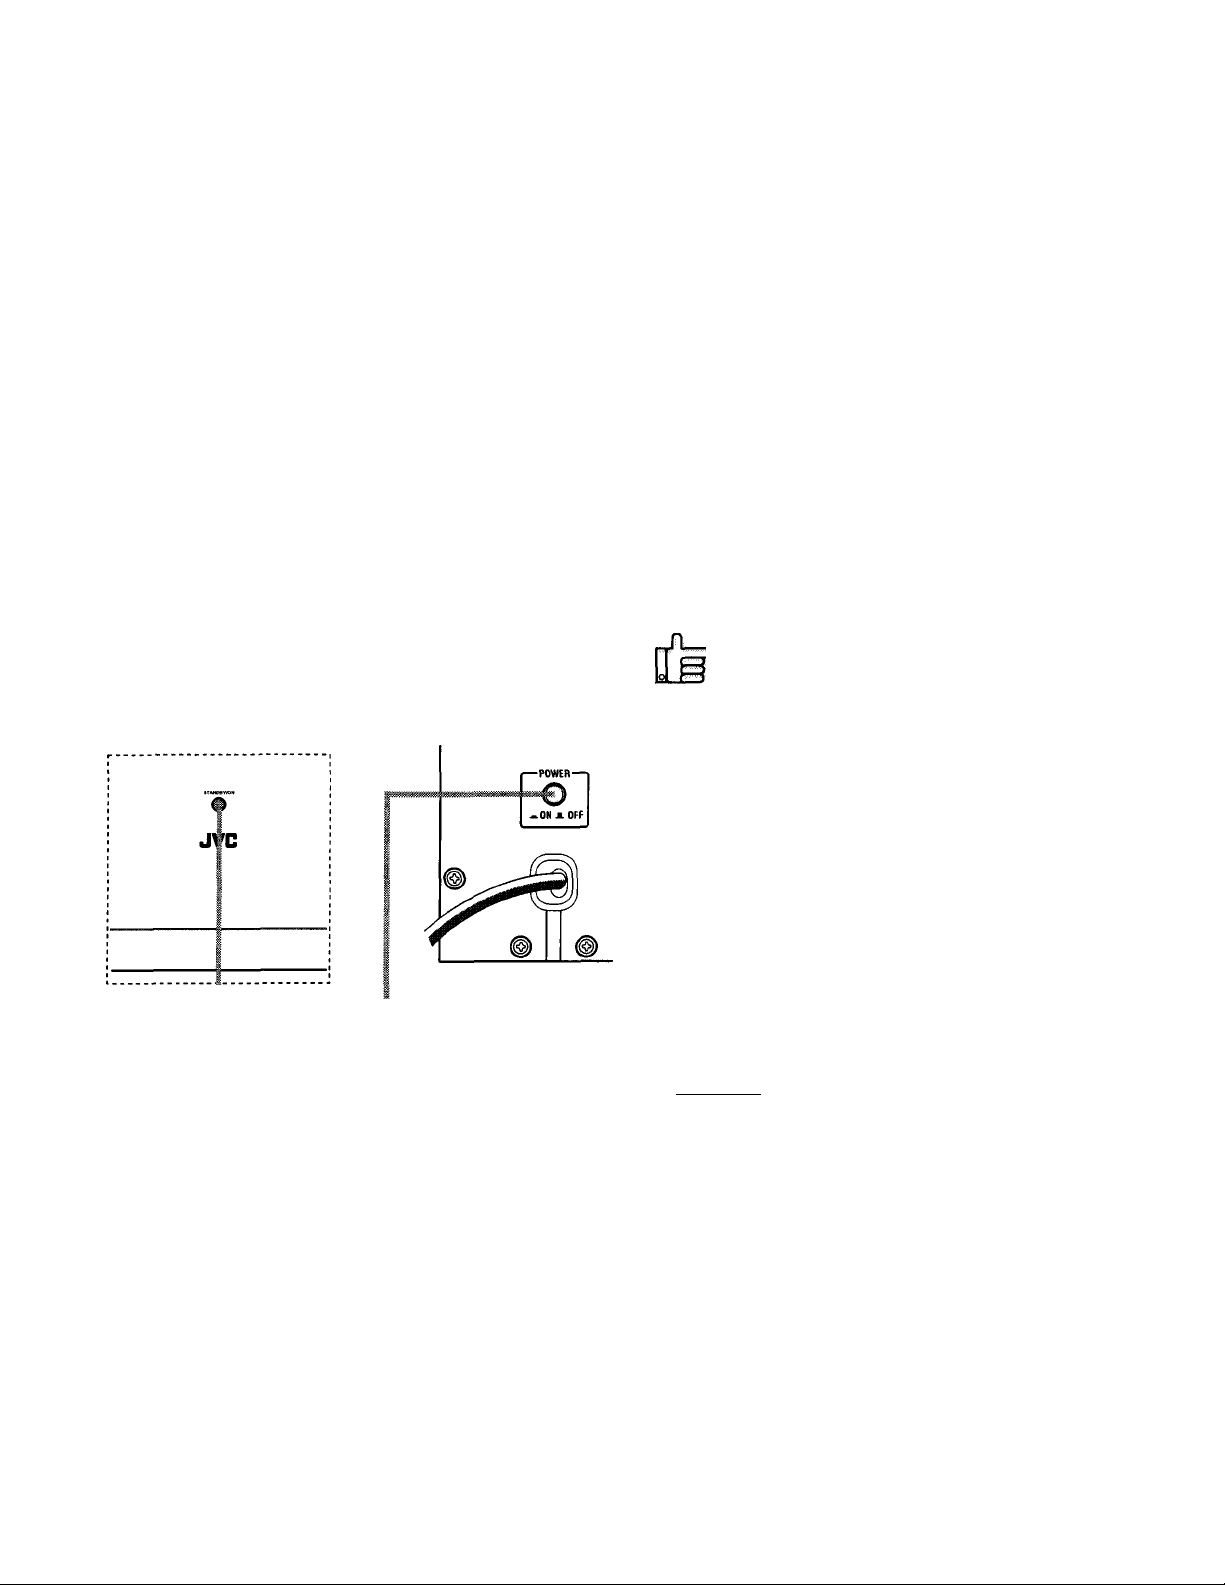
Anslutningar (forts.)
Tilslutninger (fortsat)
Anslul inte nätkabeln till ett nätuttag forran samtliga övriga anslutningar är klara.
Udf0r alle tilslutninger, f0r nctledningen sættes i en stikkontakt.
n
Is
Anslut aldrig utgângarna REC OUT pá en förstärkare eller nâgon
annan komponent till extraingängarna pä lägbashögtalaren
SX-PWDD3.
¡Anslutningar till extraingángarna INPUT AUX pá
SX-PWDD3
• Nar SX-PWDD3 anvands som en fristáende lágbashogtalarc.
• Anslut extraingángarna till lágbashógtalarutgángen, enkanalsutgángen
• Efter att denna anslutning bar gjorts matas inga signaler ut via utgángarna.
• Nár SX-PWDD3 anvánds som en fristáende lágbashogtalare ár
• Om extraingángarna ocksá bar anslutits samtidigt som hogtalarsystemet
I Tilislag av strömmen I Hvordan der tændes for strommen
• Framslda
eForpanel
OBSERVERA
MONO eller en linjeutgáng pá en fórstarkare med hjalp av en
anslutningskabel med RCA-kontakter (tillval).
overgángsfrekvensen fast vid 230 Hz.
SX-DD3 anvands med nórmala anslutningar, sá matas lágnivásignaler frán
ingángarna INPUT och signaler frán extraingángarna ut mixade via
lágbashbgtalaren.
Drift
Betjening
Anslut inte nätkabeln till ett nätuttag forran samtliga övriga anslutningar är klara.
Udf0r alle tilslutninger, f0r nctledningen sættes i en stikkontakt.
oBaksIda
•Bagpanel
n_
FORSIGTIG
= '
Tilslut ikke REC OUT terminalerne pä forstærkeren eller andre
komponenter til hjælpeindgangene pá SX-PWDD3.
■Tilslutninger til SX-PWDD3 INPUT AUX (hjaelpeindgang)
• Nàr SX-PWDD3 anvendes som selvst®ndig subwoofer.
• Tilslut disse terminaler til forstaerkerens subwoofer-udgangsterminal eller
MONO udgangsterminalen/linjeudgangterminalen med RCA stikkablet
(medfplger ikke).
• Nàr denne tilslutning udfpres, udsendes der ikke noget signal fra
udgangsb0sningerne.
• Nàr SX-PWDD3 benyttes som selvstaendig subwoofer, er delefrekvensen
last pa 230 Hz.
• Hvis hja;lpeudgangene og.sa er tilsluttede, mens SX-DD3 systemet ogsa er
tilsluttet pa normal vis, vii basomràdesignalet fra INPUT og signalet fra
hja;lpeindgangene blive udsendt blande! gennem subwooferen.
OBSERVERA
Om volymreglaget VOLUME pä lägbashögtalaren är inställt
nära minimiläget MIN, ljudnivän pä förstärkaren är instälid pä
0 eller ljudsignalerna frän förstärkaren är extremt läge, sä
fungerar inte automatiskt strömpäslag vid inmatning av
liudsignaler, d.v.s. läget för strömberedskap ändras inte tili
päslaget läge (ON).
• Strömbrytare (POWER)
ON : Strömmen är tillslagen,
i OFF:Strömmen är frânslagen.
• POWER afbryder
^ ON : Strömmen er sláet til.
JL OFF : Strömmen er slâct fra.
> Strömlndlkatorn STANDBY/ON (automatlsk In/urkoppllng av
ström beredskap)
När strömbrytaren POWER trycks in i lillslaget läge (ON) tänds
strömindikatorn STANDBY/ON grön. Om det gár ca 30 minuter utan att
nàgon signal matas in i högtalarna, sâ börjar strömindikatorn STANDBY/ON
lysa rod samtidigt som högtalarna ställs i strömberedskap.
Sá fort en ljudsignal matas in kopplas strömberedskapen automatiskt om tili
tillslaget läge samtidigt som strömindikatorn STANDBY/ON börjar lysa grön
igen.
Tillslaget läge : strömindikatorn STANDBY/ON lyser grön.
Strömberedskap: strömindikatorn STANDBY/ON lyser röd.
' STANDBY/ON lampe (med automatlsk tænd/sluk funktlon)
Nàr POWER afbryderen trykkes ind i ON stilling, lyser STANDBY/ON
lampen grönt. Hvis der gár cirka 30 minutter uden nogen signaler, skifter
indstillingen til standbyindstilling, og STANDBY/ON lampen lyser rödt.
Nár der f0res lydsignaler ind, skifter indstillingen automatisk til ON
indstilling, og STANDBY/ON lampen lyser grönt.
ON indstilling : STANDBY/ON Lampen lyser grpnt.
Standbyindstilling : STANDBY/ON Lampen lyser rpdt.
> För att heit och hállet bryta strömtillförseln tili lägbashögtalaren: tryck
pä strömbrytaren POWER pä baksidan, sä att den ställs i fränslaget läge
(OFF), ocb koppla loss nätkabeln frän nätuttaget.
FORSIGTIG
Hvis lydstyrkeknappen pd denne enhed er naer MIN,
forstaerkerens lydstyrke er 0, eller lydsignalerne fra
forstaerkeren er usaedvanlig svage, virker den automatisk
strom-til funktion ikke, nilr den modtager et lydsignal
(indstillingen skiftes ikke fra standby-indstilling til taendt
indstilling).
Strdmmen til denne enhed afbrydes fuldstsendigt ved at man trykker
POWFIR afbryderen pa bagpanelet til “OFF” position, og tager
netledningen ud af stikkontakten.
_______________
___________________________
-26-
Page 34

Drift (forts.) Betjening (fortsat)
■Volymreglering
Stall in volymnivän pä lägbashögtalaren sä att den anpassas tili övriga
högtalares volymniväer.
■ Indstilling af lydstyrken
Juster lydstyrkeniveauet pä denne hpjttaler, sä niveauet passer til niveauet pä
de andre hpjttalere.
7. Vrid volymreglaget VOLUME pä lägbashögtalaren till läget MIN.
7. Drej VOLUME knappen pä subwooferen tll “MIN” Positionen.
VOLUME
MIN.
MAX
Denna position ger normalt korrekt balans mellan huvudhögtalarna och
lägbashögtalaren. Baiansen bör dock justeras enligt följande, om den är
avvikande tili följd av lyssningsrummets utforrnning eller lägbashögtalarens
placering.
Denne position giver normalt den korrekte balance mellem hovedhpjttalerne
og subwooferen. Udfpr dog justering som beskrevet herunder, säfremt
balancen forskydes som fpige af forholdene i lytterummet eller
subwooferens placering.
2.. Ställ in volymen pä förstärkaren pä normal lyssningsnivä och
starta ljudätergivning frän en musikkälla. (Se upp för
överbelastningl)
Fasförskjutning
Det är möjligt att ändra känslan av tyngd i basljudet i enlighet med
lyssningsrummets utforrnning och lägbashögtalarens placering.
• Ställ in det läge som ger rikligast basljud.
Faseskift
Det er muligt at aendre den solide basfornemmelse i henhold til forholdene i
lytterummet og subwooferens placering.
• Saat til en stilling, hvor der opnäs en fyldig bas.
PHASE
REVERSE
Hasomkastare (PHASE)
i : normal fas (NORMAL)
(Onikopplaren ska normalt stä i detta läge.)
JB. : omkastad fas (REVERSE)
(Välj detta läge om basljudet annars är otillräckligt.)
PHASE knap
M. : NORMAL
(Normalt anvendt i denne position)
: REVERSE
(Anvend i denne position, när der ellers er for lidt bas.)
NORMAL
Z. Indstil lydstyrken pä forstaerkeren tll det niveau, som der
normalt lyttes ved, og afspil en musikkilde. (Undgä for kräftigt
input.)
3. Vrid pä volymreglaget VOLUME pä lägbashögtalaren tills ljudet
via lägbashögtalaren är I balans med ljudet via
huvudhögtalarna.
3. Drej subwooferen’s lydstyrkeknap for at finde den position, hvor
lyden er I balance med lyden fra hovedhejttalerne.
VOLUME
MIN
MAX
• Ställ först in balansen mellan lägbashögtalaren och huvudhögtalarna och
regiera därefter högtalarvolymen med hjälp av förstärkarens
volymreglage.
• Efter at have bragt lyden fra denne enhed i balance med lyden fra
hovedhpjttalerne, anvendes forstarrkerens lydregulering til at justere
lydstyrken pä dette system.
ISkyddskrets för huvudhögtalarna
Om nivän i ljudet frän förstärkaren överstiger den tillätna innivän för
högtalarsystemet, sä aktiveras skyddskretsen vilket gör att volymnivän sänks.
Sänk i sä fall volymen pä förstärkaren tili en nivä som inte fär skyddskretsen
att aktiveras.
I Hovedhojttalernes beskyttelseskredsleb
Hvis lydstyrken pä forstaerkeren overskrider det tilladte input for
hpjttalersystemet, aktiveres beskyttelseskredslpbet og lydstyrken reduccres.
Hvis dette sker, skal man saenke lydstyrken pä forstaerkeren til et niveau, hvor
beskyttelseskredsl0bet ikke aktiveres.
-27-
Page 35
Felsökning
Fejlfínding
Problem
Symptom
Strömmen släs inte tili. Niltkabeln dr inte ordentligt ansluten ull ett nStunag.
Der er ikke strpm pä apparatet. Br netledningen ikkc tilsiunet stikkontakten eller udiaget?
Automatiskt strömavslag fungerar inte.
Strömberedskap (viloläge) kopplas
Automatisk strpm-fra funktion t iikei
ikke.
(Strpm) Standby status aktiveres ikke.
Inget ljud hörs.
Der hpres ingen lyd.
Ljudet växlar mellan högt och mjukt.
Lyden svinger mellem kräftig og
daempet
MdlHg orsak
Mulig àrsag
Ljudàtergìvning pàgài.
Ljudàtergivning har jutit avbrutits.
ITer frembringes lyd
Lige efier, at der er frembragt lyd
VolymKglaget VOLUME atir i minimiliigei MIN.
hr VOLUME knappen drejel lil "MIN” position?
Felaktiga elici slarviga ansluiningar
Ttlslutningcme er udfpn furken, eller forhindekserne er lose.
Ljudsignalerna fran ft>rstdrkaren tir extreint svaga.
Lydsignalet fi a fivstankeren er megct svagt.
SkyddskrcLsen arbetar.
Reskyttehebkredsl0ber er aktìverer
Ätgärd
Afnjseipning
Anslut nätkabeln ordentligt till ett nätuttag.
Sa:t netledningen sikkert i en stikkontakt.
Vi hänvisar tili aktuella ätgärder för manövrering (se sidorna
26 och 27).
Se procedurerne for betjening. (Se side 26 og 27.)
Vrid volymreglaget VOLUME tili ett läge för lagom
volymnivä.
Drej VOLUME knappen, indtil en passende lydstyrke er
fundet.
Kontrollera anslutningarna och utför nödvändiga
korrigeringar. (Vi hänvisar tili sidorna 25 och 26.)
Kontroller tilslutningerne og udfpr npdvendige korrektioner.
(Se side 25 og 26.)
Vi hänvisar tili aktuella ätgärder för manövrering (se sidorna
26 och 27).
Se procedurerne for betjening. (Se side 26 og 27.)
Sänk volymen pä förstärkaren tili en nivä som inte fär
skyddskretsen att aktiveras. (Se sidan 27.)
Saenk lydstyrken pä forstasrkeren til et niveau, hvor
beskyttelseskredslpbet ikke aktiveres. (Se side 27.)
Tekniska data Specifikationer
SX-XDD3
Akustisk högtalare med upphängning
Typ
(Magnetiskt avskärmade högtalare)
Element
Frekvensomfäng
Ljudtrycksnivä
Impedans
Effekthanteringskapacitet
Yttermàtt
Hejttaler
Frekvensgang
Lydtryksnlveau
Indgangslmpedans
Effektkapacltet
Vaegt : 0,85 kg
M«dföijande tillbehör/Tilbehor
Högtalarkablar (3 m) : x 4
Hojttalerledning (3 m) : x4
Utformning och specifikationer är föremäl för ändringar tili följd av produktförbättringar.
Design og specifikationer kan aendres uden varsel i forbindelse med produktforbedringer.
9.5 cm X 1 cm Spärformat
kupolelement
frän 230 Hz tili 50 kHz
80 dBAV*m
6Í2
50W(withSX-PWDD3)
125 mm x 331 mm x 123 mm
(B/H/D)
Vikt : 0,85 kg
Type Akustisk ophaeng
{Magnetisk afskaermet type)
9,5 cm X 1 cm Track-type halvkugle
230 Hz til 50 kHz
80 dBAV*m
6ÍJ
50W(withSX-PWDD3)
Mäl
125 mm x 331 mm x 123 mm
(B/H/D)
-28-
SX-PWDD3
Typ
Frekvensomfäng
Utgängar för SX-XDD3
Max. uteffekt via inbyggd förstärkare
Effektförbrukning I strömberedskap
Strömförsörjning
Effektförbrukning
Indgangslmpedans
SX-XDD3tilslutnlngsterminal
Maks.udgangseffektpäindbygget
Stromforbrugistandbyindstilling
Element
Inimpedans
Ingängar
Yttermàtt
VIkt
Type
Hojttaler
Frekvensgang
Indgange
Strom krav
forstaerker
Stromforbrug
Mäl
Vaegt
nätdriven lägbashögtalare med
magnetiskt avsärmad
basreflexläda
16.0 cm koniskt element (4Q)
frän 30 Hz tili 230 Hz
Extraingängar (INPUT AUX), 50 kii
Ingängar: 6i2 (vid anslutning av
SX-XDD3)
Högtalaringängar (L/R)
RCA-jack (L (MONO)/R)
Högtalarutgängar (L/R) för
exklusiv anslutning av SX-XDD3
AC 230V 50 Hz
60 W (10% THD/AT 100 Hz/4 £i)
.30 W
5.8 W
264 mm x 372 mm x 340 mm
(B/H/D)
9.9 kg
Subwoofer med indbygget
forstaerker, basreflehs,
magnetisk afskaermet
16.0 cm kegle (4£2)
30 Hz til 230 Hz
INPUTAUX
hjaelpeindgangsterminaier 50 k£2
Indgangsterminaler 6 ohm (när
SX-XDD3 er tilsluttet)
Hdjttalerterminaler V/H
RCA ben V (MONO)/H
Hpjttalerterminaler V/H for
eksklusiv brug med SX-XDD3
AC 230V 50 Hz
60 W (10% THD/AT 100 Hz/4 Q)
30 W
5.8 W
264 mm x 372 mm x 340 mm
(B/H/D)
9.9 kg
Page 36
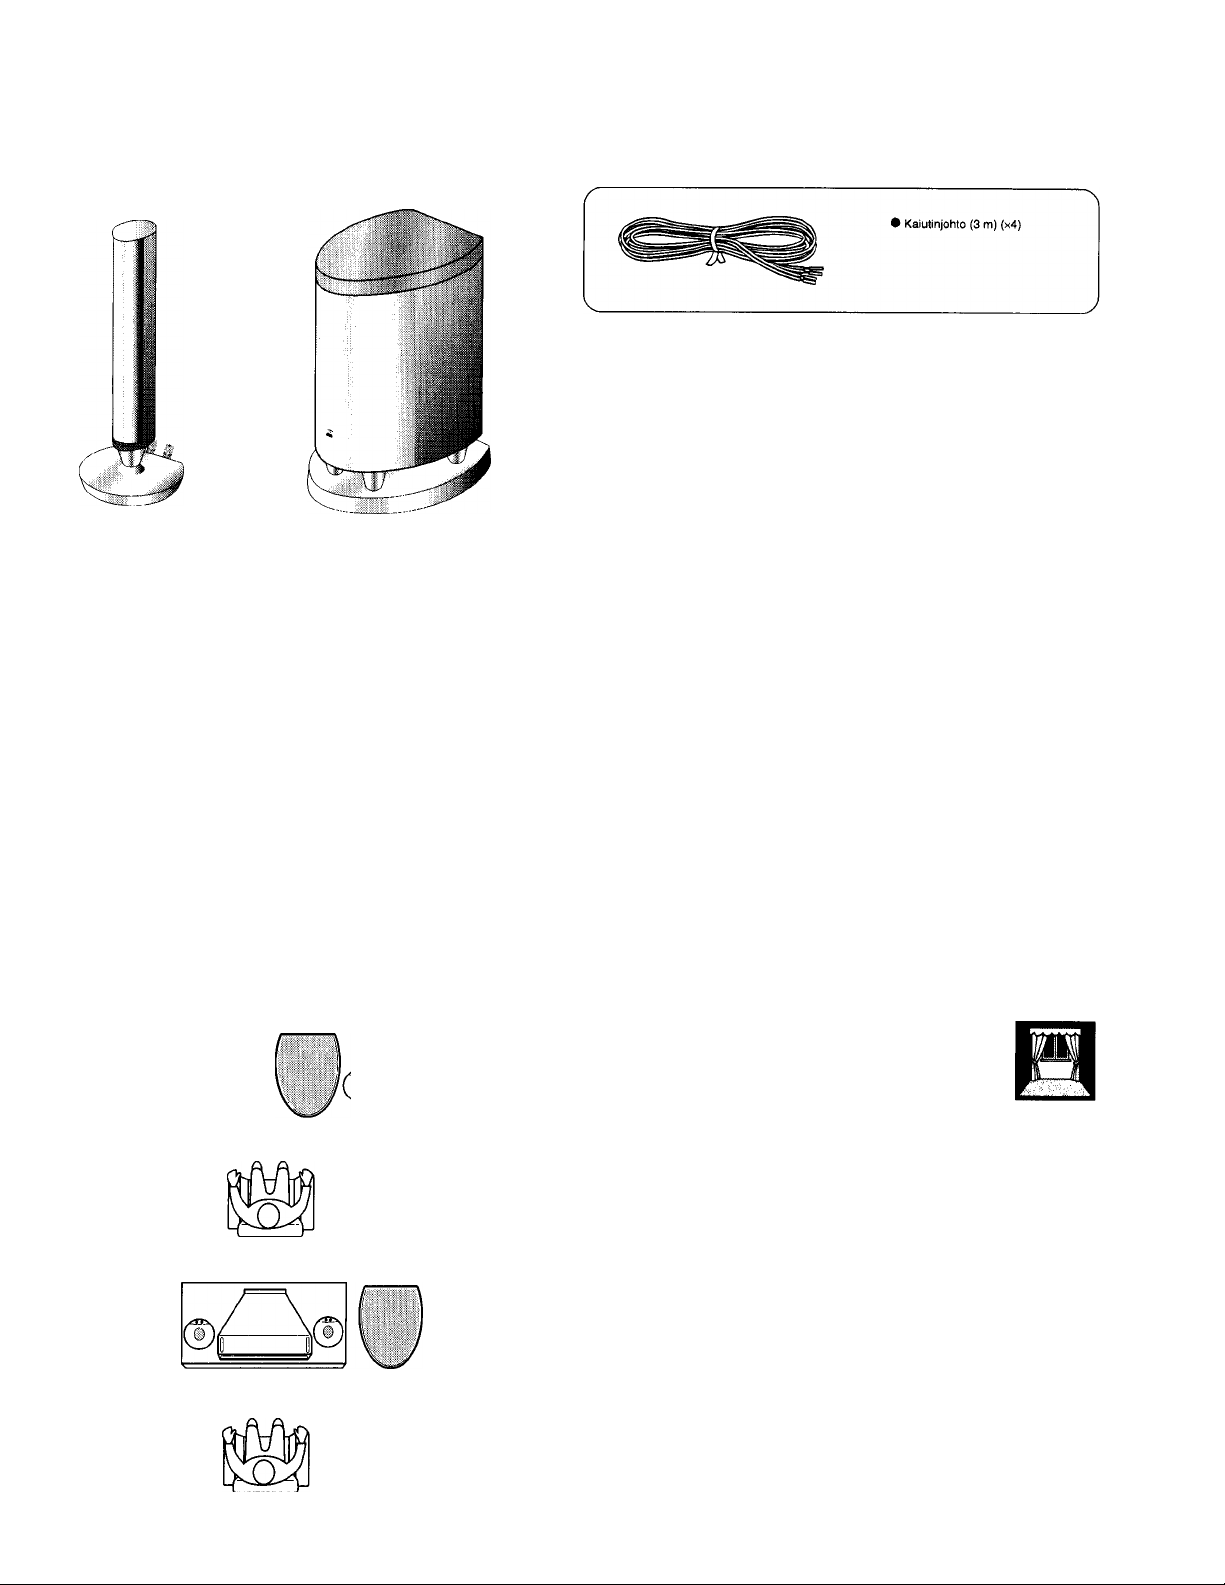
Kaiutintyypit
Vakiovarusteiden tarkastus
Tàmà sarja koostuu kahdenlaisista kaiuttimista.
• Pàakaiutin (x2)
SX-XDD3
Nàiden kaiuttimien kotelo on valinisteuu luonnon puuMa, ju№n kotelun
pintakuvio on erìiainen kuin tckopuun pinta. Kukin koteto on ulkonatiltaan
hieman enlainen. KotBloinaa on k<iytetiy muottim valeuua vanei ia, |oten
pinta saattaa olla hictnan karkea, mutia tirai et vaikuta auorituskykyyn
milliian tavalia.
• Apjbassokaiutin (x1 )
SX-PWDD3
Varmista ennen kayttòa, ettà pakkauksessa on kaikki seuraavat laitteen mukana
toimitettavat varusteet.
Huomautuksia kaytosta
■ Laitteen pintojen puhdistus
Jos pinnat ja saatopaneeli ovai likaiset, pyyhi ne kuivalla, pehmealla kankaalla.
Jos lika on vaikeasti lahtevaa, kastele kangasriepu vedella ja ncutraalilla
pesuaineella ja puhdista. Pyyhi lopuksi kuivaksi kuivalla kangasrievulla.
Tavallinen sijoitus
Àanikuva lulee sita teravammaksi mila lahemmas paakaiutlimia apubassokaiutin
asetetaan.
Apubassokaiutin
SX-PWDD3
SX-XDD3
Pààkaiutin (vasen)
® ) SX-XDD3
Paàkaiutin (oikea)
■ Hyvàt tavat kuunneltaessa stereota
Kun kuuntelet musiikkia stereojarjestelmalla, pida
aanenvoiniakkuus sellaisena, etta se ei hairitse naapureita.
Varsinkin yoaikaan pienikin aani kuuiuu helposti naapuriin.
Ole huomaavainen ja sulje ikkunat tai kuuntele kuulokkeilla
tms. ¡otta et riko ymparistòn rauhaa.
Tassa niiytetty tunnus on aanietikettimerkki.
lAànikentàn parantaminen
' Sellaiseen olohuoneeseen, jossa syntyy helposti aanen
heijastuksia ja rcsonanssia, tulisi asettaa paksut verhot
ikkunoihin ja laltialle matto Ims.
Jos kaiuttinieen kohdistuva scinii on paljas seina tai lasiovi
Ims., on .suositellavaa ripustaa seinalle jokin paksu kangas,
joka imee aanen, esimerkiksi paksukankainen verbo, jotta
saadaan e.steltya aanen heijastuminen ja paikalleen jaaminen.
SX-XDD3
SX-PWDD3
-29-
Page 37
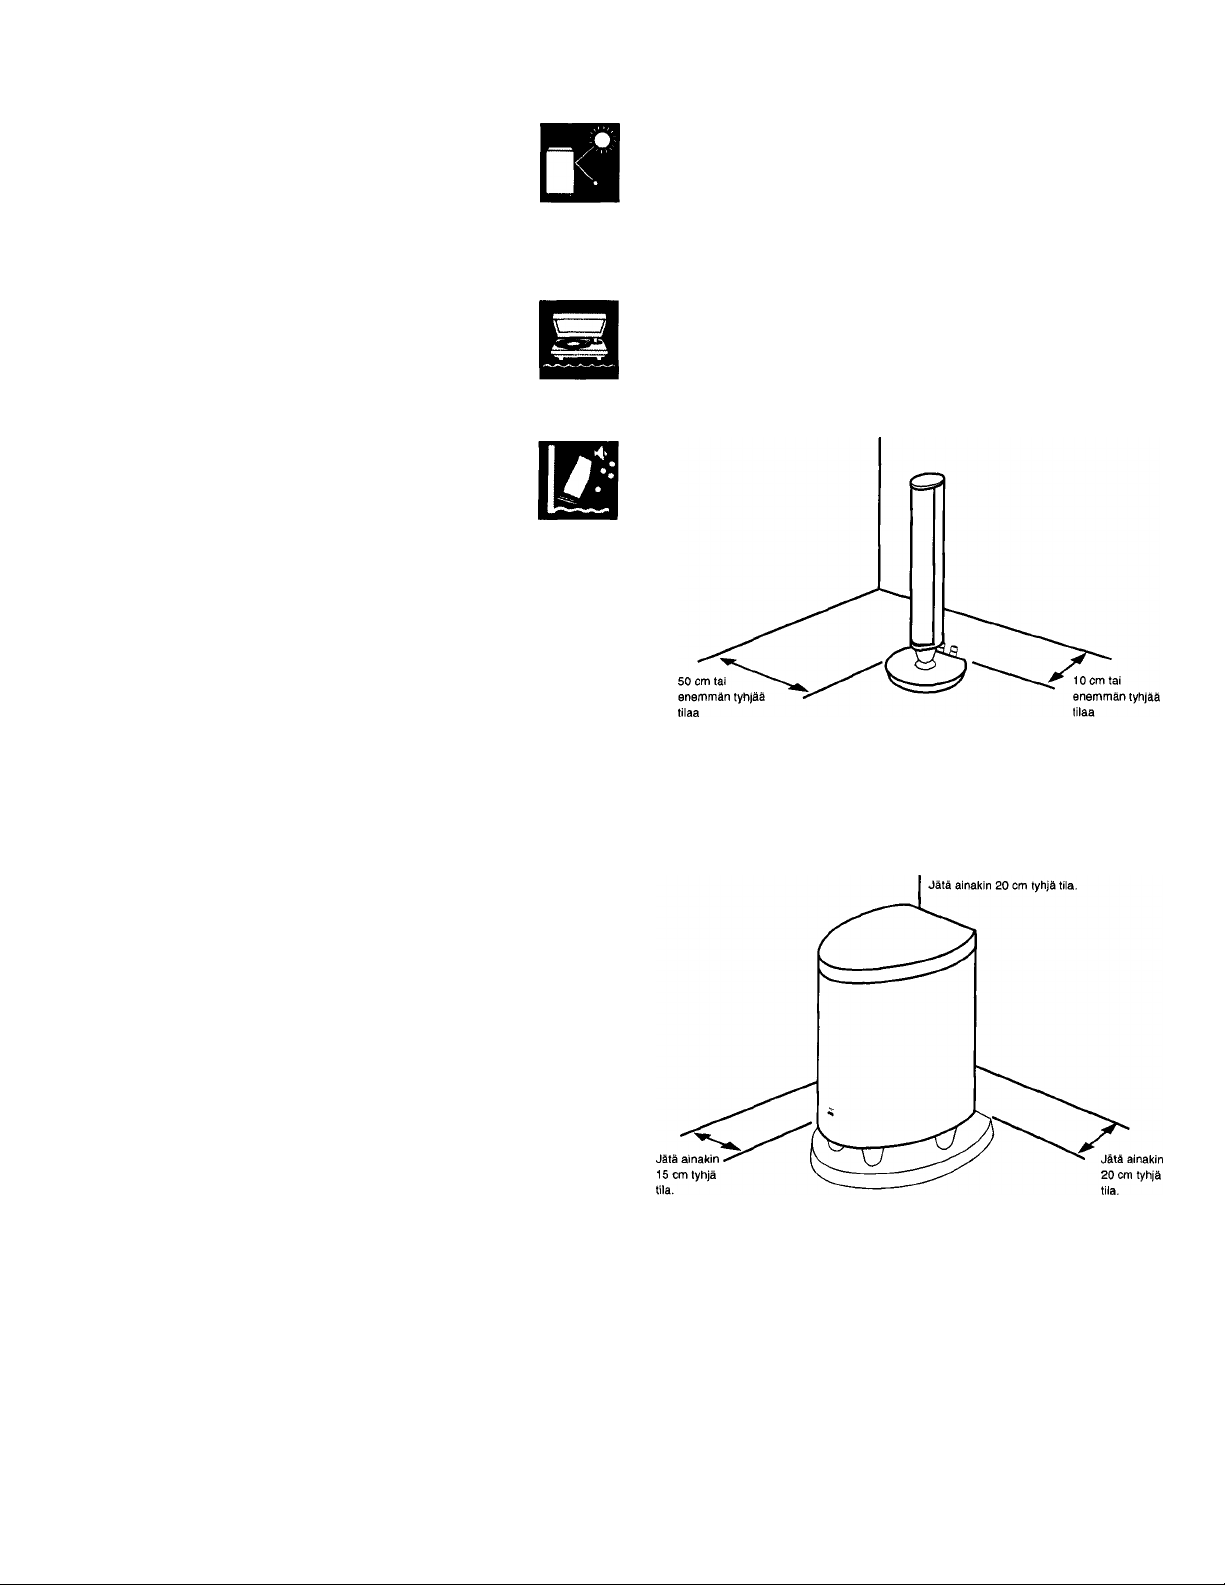
Huomautuksia asennuksesta
• Joua laitteen pinnat eivât vaâristy eika vari muutu, alâ aseta
laitetta sellaiseen paikkaan, johon aurinko paistaa suoraan tai
jossa on huomattavasti kosteutta ja vâltâ sijoittamista myos
ilmastointilaitteiden puhalluskanavien IShettyville.
Kaiuttimen vârina saattaa aiheuttaa ulvontaa. Sijoita laite
mahdollisimman kauas soittimesta.
• Kun suunnittelet laitteen sijoituspaikkaa, ota huomioon
mahdolliset maanjâristykset ja muu târinü ja kiinnitâ laite
lujasti, jotta se ei paâse putoamaan.
• Tâmâ laite on magneettisesti erisletty, jotta se ei aiheuta vârihâiriditâ vâri-TVlâhetyksiin. Sijoitustavasta riippuen vârihâiriôitâ .saattaa silti esiintyâ. Ota
laitteen sijoituksessa huomioon seuraavat seikat.
1. Kun asetat nâmâ kaiuttimet TV-vastaanottimen lahelle, katkaise
vastaanottimen pââvirtakytkin tai irrota se seinâkoskettimesla, ennen kuin
asennat kaiuttimet.
Asennettuasi jârjestelmân odota ainakin .30 minuuttia ennen kuin kytket
TV-vastaanottimen virran pââlle.
2. Jos toinen kaiutinjârjestelmâ on asetettu TV-vastaanottimen lâhellc, se
saattaa aiheuttaa vârihâiriditâ TV-kuvaan.
3. Vaikka nâmâ kaiuttimet on suojattu, ne saattavat aiheuttaa hâiriôitâ jonkin
lyyppisilleTV-vastaanottimille. Jos nâin kây, tulee kaiuttimet siirtââ picnen
etâisyyden pââhân TV-vastaanottimesta.
• Kaiutinjârjestelmââ koottaessa on suositeltavaa kiinnittââ jalat kotelon
pohjaan, jotta laite on vakaa.
Kosketuspinnan vâri saattaa lâhteâ riippuen materiaalista, jos laite asetetaan
kiinniletyillc jaloille pitkâksi aikaa.
lOtettava huomioon kaiutinjârjestelmân asentamisessa
Kuunteluhuoneen ominaisuudet vaikuttavat kaiutinjârjestelmâstâ toistuvaan
âaneen. Jârjestelmâ voidaan sijoittaa niin, etta aâni saadaan sopivaksi
kuunteluhuoneen ominaisuuksille. Suosittelemme, etta seuraavia yleisohjeita
kâytetâan viitteenâ kaiuttimia sijoitettaessa, jotla aânikentta laajenee ja
saadaan kirkas ja hyvin kohdistettu âânikuva.
SX-XDD3 (pàakaiutin)
• Suosittelemme, etta laitteen sivujen ja seinân valiin jâtetâân ainakin noin 50
cm tyhjâa tilaa.
• Suosittelemme, etta laitteen takaseinan ja seinan valiin jâtetâân ainakin noin
10 cm tyhjâa tilaa.
(Huomaa, ettâ liittimet saattavat menna oikosulkuun, jos ne koskettavat
seinââ tms.)
Suosittelemme, ettâ kunkin kaiuttimen ja stereojârjestelmân vàlillâ on 1,0-2,0
m ja kukin kaiutin on asetettava niin, etta etuosa osoittaa kuuntelupaikkaan
pâin.
• SX-PWDD3 (apubassokaiutin)
• Jâtâ paijon tyhjââ tilaa eteen.
• Jâtâ ainakin 15 cm tyhjâ tila sivuille.
• Jâtâ ainakin 20 cm tyhjâ tila ylâpinnalle.
• Jâtâ ainakin 20 cm tyhjâ tila taakse.
HUOMAUTUS
Palo-ja vaurioitumisvaaran vâlttâmiseksi jâtâ iimanvaihtoa
varten riittâvâsti tilaa laitteen ympârille, erityisesti laitteen
takaosan ja seinân, verhon tai muun laitteen takana olevan
esineen vâiiin.
-30-
Page 38
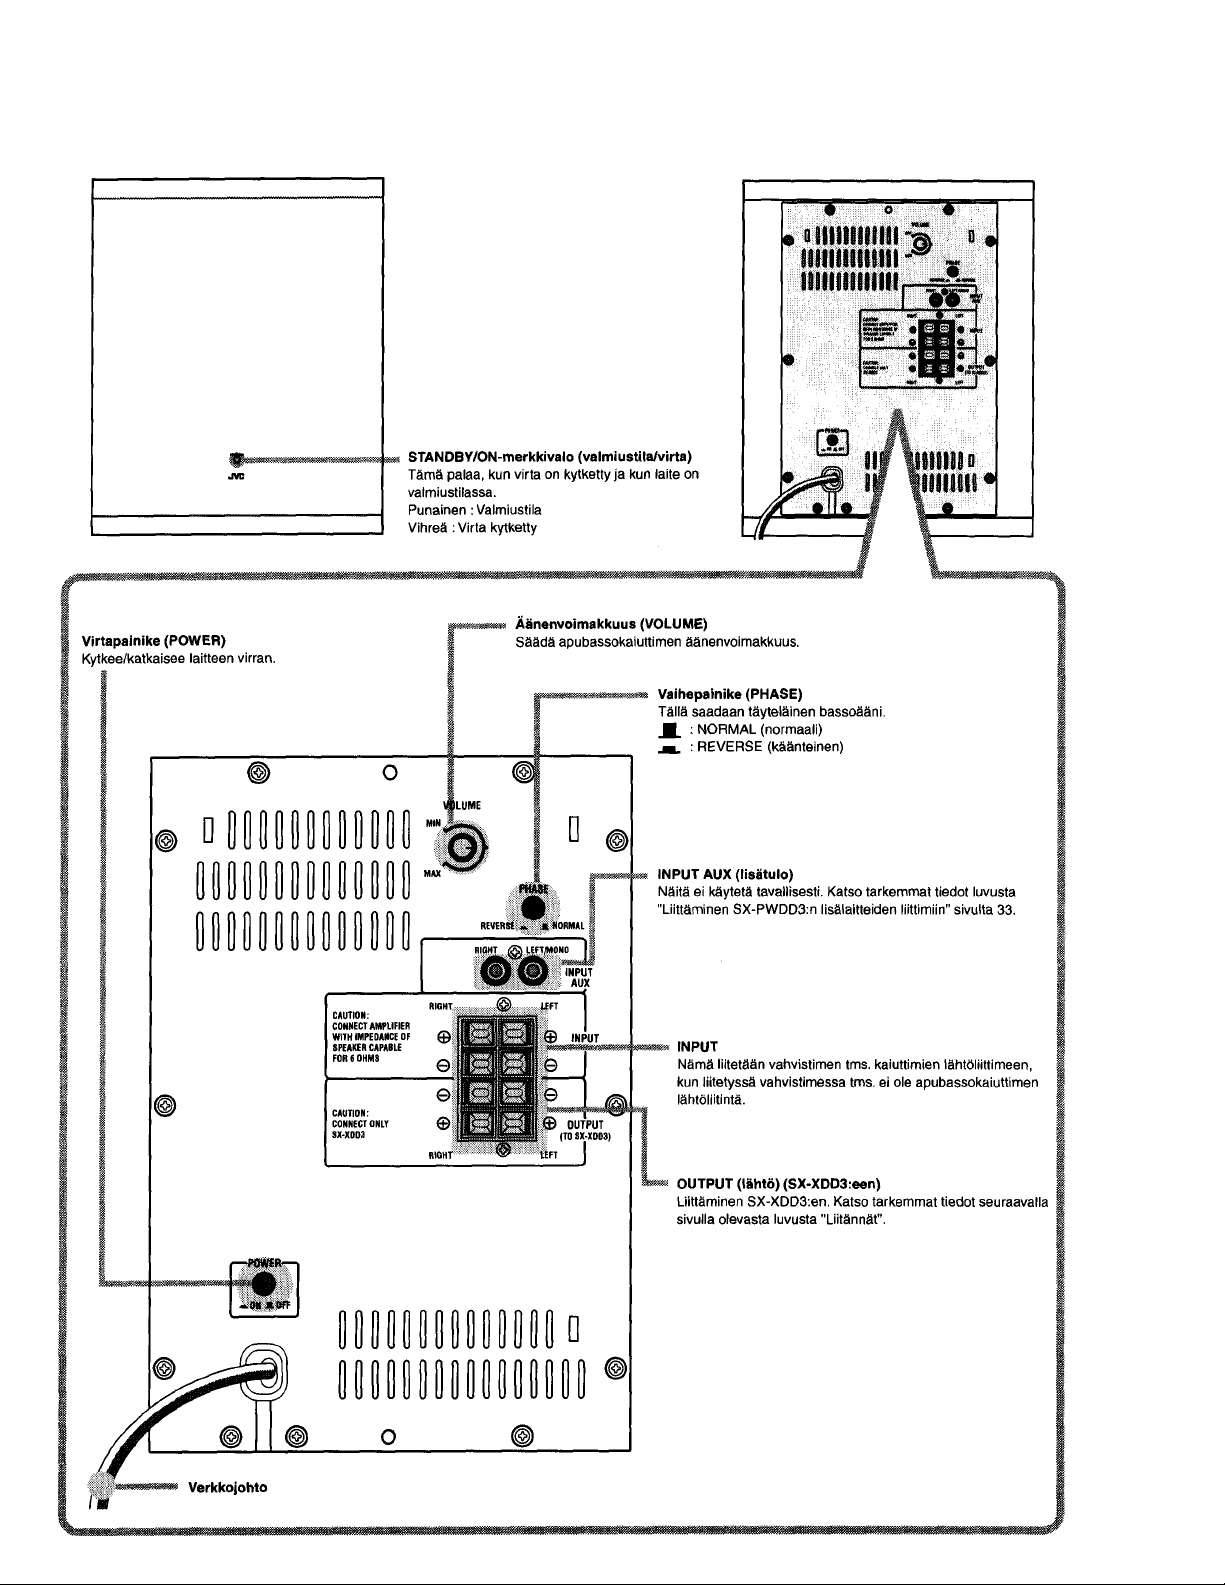
Osien nimet ja toiminnot (sx-pwdds)
lEtupaneeli
iTakapaneeli
-31
Page 39

Liitannat
HUOMAUTUS
> Varmista aina, ettS vahvistimesta ja kaiuttimista on katkaistu virta ennen kuin jàrjestelmà liitetáán vahvistimeen.
(ala kytke virtajohtoja verkkoulosottoon ennen kuin kaikki iiitànnat on tehty.)
’ Aia iiitd pààkaiuttimia (SX-XDD3) suoraan vahvistimeen. Kaiuttimet saattavat vahingoittua. Liità ne AiNA apubassokaiuttimeen
(SX-PWDD3).
■ Ennen liittàmistà
1. Katkaise virta vahvistimesta ennen kuin kaiutinjarjestelma liitetaan vahvistimeen. Vahvistin saattaa vahingoittua, jos kaiutinjohdot menevat oikosulkuun vahvistimen
virran ollessa kytketty.
2. Kaiutinjarjestelman nimellisimpedanssi on 6 ohmia.
Kayta vahvistinta, joka ottaa vastaan 6 ohmin kuormitusimpedanssin.
3. Jarjestelmàn suurin sallittu tulo on 50 wattia. Tama on arvo (rms), ¡olla musiikkilahteen hetkellinen tulo on mahdollista kaiuttimien vahingoittumatta.
■Tavalliset liitannat
1. Liita SX-XDD3 SX-PWDD3:en alla olevassa kuvassa 0) naylctylla lavalla.
2. Liita SX-PWDD3:n tuloliittimet vahvistimen kaiuttimien lahtoliittimiin alla olevassa kuvassa (2) naytetylla tavalla.
-32-
Page 40
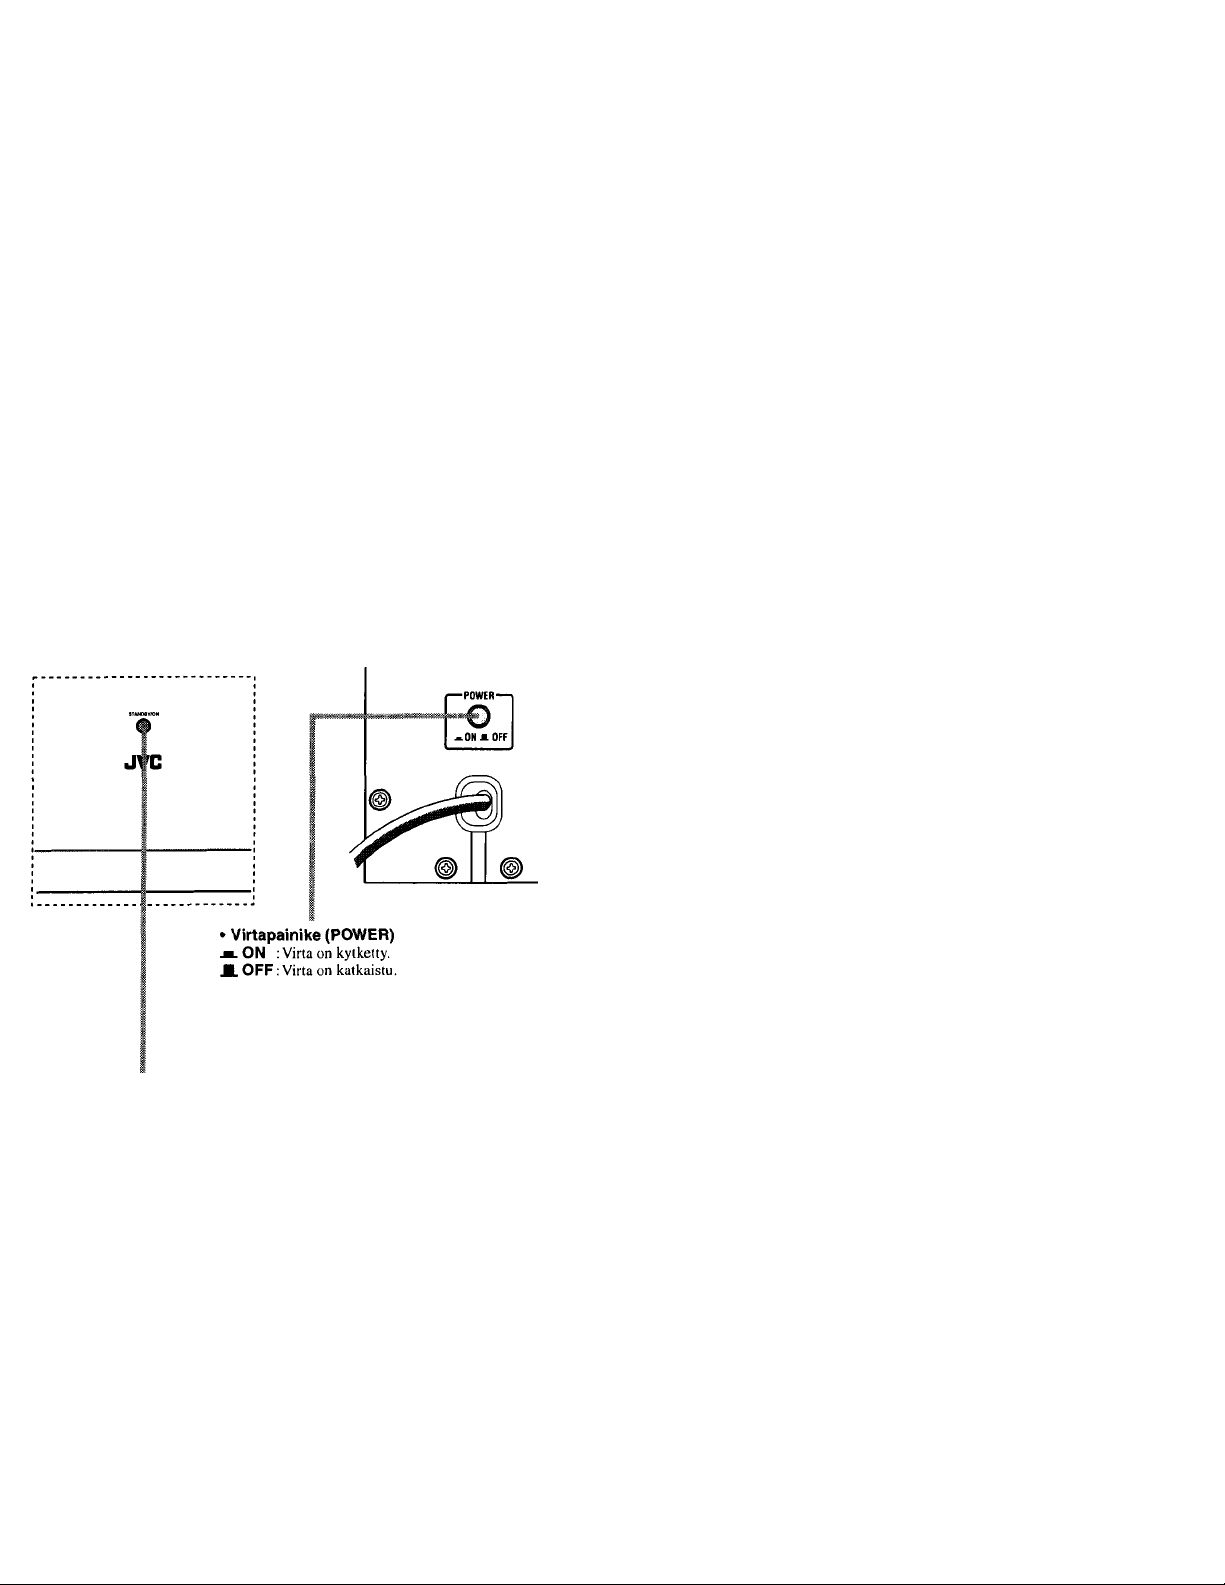
Liitannat (jatkuu)
Tee kaikki liitannat ennen kuin kytket verkkqjohdon verkkoulosottoon.
is
Àia Ulta vahvistimen tal muun laitteen REC OUT -liittimia SX-PWDD3:n lisaiaitteiden tuloliittimiin.
■ Liitannat SX-PWDD3:n iiittimeen iNPUT AUX (lisatulo)
• Kun SX-PWDD3 kaytetaan yksin seisovana apubassokaiuttimena.
• Liita nama liittimet vahvistimen apubassokaiuttimen lahtoliittimeen tai MONO-lahtoliittimeen/linjan labtoliittimeen RCA-pistokejohdolla (ei kuulu varusteisiin).
• Kun tama liitanta tehdaan, signaalia ei tuie lahtoliittimista.
• Kun SX-PWDD3 on ainoa apubassokaiutin, rajataajuus on kiintea arvossa 230 Hz.
• Jos lisatulot liitetaan myds kaytettaessa SX-DD3 jarjestelmaa tavallisissa olosuhteissa, matalata-alainen signaali INPUT-liittimesta ja lisatulon liittimista lahtee
I Virran kytkeminen
•Etupaneeli
HUOMAUTUS
sekoittuneena apubassokaiuttimesta.
Kaytto
Tee kaikki liitannat ennen kuin kytket verkkojohdon verkkoulosottoon.
HUOMAUTUS
•Takapaneeli
Jos tainiin laitteen aanenvoimakkuusnuppi on lahellà asentoa
MIN, vahvistimen àanenvoimakkuus on 0 tai vahvistimen
dànisignaalit ovat poikkeuksellisen matalat, automaattinen
virrankytkenta ei toimi vastaanotettaessa àgnisignaali (muoto
ei muutu valmiustilasta kytkettyyn tilaan ON).
• STANDBY/ON merkkivalo (automaattisella virran kytkennalla/
katkaisulla)
Kun virtapainike (POWER) painetaan kytkettyyn asentoon ON, STANDBY/
ON merkkivalo syttyy palamaan vihreana. Jos noin 30 sekuntia kuluu ilman
signaalia, muoto kytkeytyy valmiustilaan ja STANDBY/ON merkkivalo syttyy
palamaan punaisena.
Àanisignaalin tullessa muoto kytkeytyy automaattisesli kytkettyyn tilaan ON
ja STANDBY/ON merkkivalo muuttuu vihreaksi.
Kytketty tile ON: STANDBY/ON merkkivalo palaa vihreana.
Valmiustila : STANDBY/ON merkkivalo palaa punaisena
Kun taman laitteen virta halutaan katkaista kokonaan pois paiilta, paina
takaseinan virtapainike (POWER) asentoon “OFF” ja irrota verkkojohto
verkkoulosotosta.
-33-
Page 41

Kaytto (jatkuu)
■Aanenvoimakkuuden sààtàminen
Saada tamari kaiuttimen aanenvoimakkuus sopivaksi muiden kaiuttimien
aanenvoimakkuudelle.
7. Káánná tSmSn laitteen áánenvoimakkuussaádin (VOLUME)
asentoon “MIN”.
VOLUME
MAX
Asento antaa tavallisesti oikean tasapainon paakaiuttimien ja
apubassokaiuttimen valilla. Saada kuitenkin alia kuvatulla tavalla, jos
tasapaino muuttuu kuunteluhuoneen olosubteista tai apubassokaiuttimen
sijainnista riippuen,
2. Sáádá vahvistimen áánenvoimakkuus tavalliselle
kuuntelutasolle ja soita musiíkkiláhdettá. (Varo liian suurta
tu loa.)
3. Etsi apubassokaiuttimen áánenvoimakkuusnuppia pyórittámallá
asento, jossa áani on tasapainossa paakaiuttimien aanen
kanssa.
iVaihesiirto
On mahdollista muuttaa basson syvyyden tuntua kuunteluhuoneen olosuhteita
ja apubassokaiuttimen sijaintia vastaavaksi.
• Saada sellaiseen asentoon, jossa basso kuuluu taytelaisena.
PHASE
REVERSE
Vaihepainike (PHASE)
NORMAL
JL : NORMAL
(Pidetaan tavallisesti tassa asennossa.)
: REVERSE
(Kayta lata asentoa, Jos basso on riittamatdn.)
VOLUME
MAX
• Kun taman laitteen ja paakaiuttimien aanenvoimakkuus on
tasapainotcttu, sdada laman jarjestelman aanenvoimakkuus vahvistimen
íianenvoimakkuussaatimella.
IPaakaiuttimien suojapiiri
Jos vahvistimen aani ylittaa kaiutinjárjestelman suurimman sallitun tulon,
suojapiiri káynnistyy ja aanenvoimakkuus pienenee. Pienenna talloin
vahvistimen aanenvoimakkuus sellai.selle tasolle, jossa suojapiiri ei kiiynnisty.
-34-
Page 42

Vianmaaritys
Oire
Virta ei kytkeydy.
Automaattinen virrankatkaisu ei
toimi,
(Virta) Valmiustila ei ole kytkeytynj i
Áantá ei kuulu.
Aani vaihtelee hiljaisen ja kovan
aanen valilla.
Tekniset tiedot
SX-XDD3
Tyyppi
Kaiutin
Taajuusvaste
Aanenpainetaso
Impedanssi
Virrankasittelykyky
Mitat
Paino
Vakiovarusteet/Zubehdr
Kaiutinjohto (3 m) : x 4
Mahdoltinen atheuttaja
Onkn verkkojohto irronmit verkkouiosotostfi? Kytke verkkojohto lujasti verkkoulosottoon.
Ákni toistuu.
Heii Sdnentoision jaikeen
Onko ^envoimakkuus^kidin asennossa “MIN*'? Saada aanenvoimakkuus sopivaksi kaantamalla
LiiUnna) nvat virheeiiiaet tai I6ys3t.
Vahvistimen lianisignaati on cnltain heikku. Katso kayttdtoimenpiteita. (Katso .sivua 33 ja .34.)
Suojapiiri toimii. Pienenna vahvistimen aanenvoimakkuus sellaiselle tasolle,
Toimenpide
Katso kayttotoimenpiteita. (Katso sivua 33 ja 34.)
aanenvoimakkuussaadinta (VOLUME).
Tarkasta liitannat ja tee tarpeelliset korjaukset. (Katso sivuja
32ja33.)
jossa suojapiiri ei kaynnisty. (Katso s. .34.)
SX-PWDD3
Akustisesti ripusteltava tyyppi
(Magneettisesti eristetty tyyppi)
9,5 cm X I cm Raita-tyyppinen kalotti
230 Hz - 50 kHz
80 dBAV*m
6 £2
50 W (with SX-PWDD3)
125 mm x 331 mm x 123 mm
(L/K/S)
0,85 kg
Tuioimpedanssi
Lisáiaitteiden tuioiiittimet
Virtavaatimukset
Yhdysrakenteisen vahvistimen
Virrankulutus valmiustilassa
Tyyppi
Kaiutin
Taajuusvaste
Tuioiiittimet
SX-XDD3 iiitin
suurin iahto
Virrankulutus
Mitat
Paino
: Tehostettu apubassokaiutin
Basso-refleksityyppi,
magneettisesti eristetty
: 16,0 cm kartio (4£2)
: 30 Hz - 230 Hz
: INPUT AUX -liittimet 50 k£2
Tuioiiittimet 6£2 (kun SX-XDD3
on liitetty)
: Kaiutinliittimet (vasen/oikea)
: RCA-pistoke vasen (MONO)/
oikea
: Kaiutinliittimet vasen/oikea
erityise.sti SX-XDD3:a varten
: AC 230V 50 Hz
: 60 W
(I0%THD/AT 100Hz/4£2)
: 30 W
: 5,8 W
: 264 mm x 372 mm x 340 mm
(L/K/S)
: 9,9 kg
Pidatamme oikeudet muuttaa ulkoasua ja teknisia ominaisuuksia tuotteittemme parantamista varten ilman erillisla ilmoitusta.
EN. GE. FR. NL. SP. IT. SW. DA, FI.
JVC
VICTOR COMPANY OF JAPAN, LIMITED
-35-
0302NSMPRIJSC
 Loading...