

Page 1
NEDERLANDS
CASTELLANO
LT-37R70BU/SU LT-37E70BU
LT-32R70BU/SU LT-32E70BU
LT-26R70BU/SU LT-26E70BU
LT-37ED6SU/LT-32ED6SU/LT-26ED6SU
WIDE LCD PANEL TV INSTRUCTIONS
16:9 LCD TV BEDIENUNGSANLEITUNG
TELEVISEUR A ECRAN LCD PANORAMIQUE MANUEL D’INSTRUCTIONS
BREEDBEELD LCD TV GEBRUIKSAANWIJZING
TELEVISOR CON PANEL LCD PANORÁMICO MANUAL DE INSTRUCCIONES
TV LCD WIDESCREEN ISTRUZIONI
TELEVISOR COM ECRÃ PANORÂMICO DE
CRISTAL LÍQUIDO
INSTRUÇÕES
ENGLISH
DEUTSCH
FRANÇAIS
ITALIANO
PORTUGUÊS
© 2006 Victor Company of Japan, Limited 0506KTH-SW-MU
LT-26R70BU
LCT2091-001B-U
Page 2

I
II
ENGLISH
CASTELLANO
Dear Customer,
This apparatus is in conformance with the valid European directives and standards
regarding electromagnetic compatibility and electrical safety.
JVC Manufacturing U.K. Limited
2 Glenburn Road, College Milton Industrial Estate, East Kilbride G74 5BA
United Kingdom
DEUTSCH
Sehr geehrter Kunde, sehr geehrte Kundin,
dieses Gerät stimmt mit den gültigen europäischen Richtlinien und Normen bezüglich
elektromagnetischer Verträglichkeit und elektrischer Sicherheit überein.
JVC Manufacturing U.K. Limited
2 Glenburn Road, College Milton Industrial Estate, East Kilbride G74 5BA
Großbritannien
FRANÇAIS
Cher(e) client(e),
Cet appareil est conforme aux directives et normes européennes en vigueur concernant
la compatibilité électromagnétique et à la sécurité électrique.
Apreciado cliente,
Este aparato cumple con las normativas y normas europeas respecto a la seguridad
eléctrica y a la compatibilidad electromagnética.
JVC Manufacturing U.K.Limited
2 Glenburn Road, College Milton Industrial Estate, East Kilbride G74 5BA
Reino Unido
ITALIANO
Gentile Cliente,
Questa apparecchiatura è conforme alle direttive e alle norme europee relative alla
compatibilità elettromagnetica e alla sicurezza elettrica.
JVC Manufacturing U.K. Limited
2 Glenburn Road, College Milton Industrial Estate, East Kilbride G74 5BA
Regno Unito
PORTUGUÊS
Caro Cliente,
Este aparelho encontra-se em conformidade com as directivas Europeias válidas e
padrões referentes à compatibilidade magnética e segurança eléctrica.
JVC Manufacturing U.K. Limited
2 Glenburn Road, College Milton Industrial Estate, East Kilbride G74 5BA
Royaume-Uni
Geachte klant,
Dit apparaat voldoet aan de geldende Europese normen en richtlijnen inzake
elektromagnetische compatibiliteit en elektrische veiligheid.
JVC Manufacturing U.K. Limited
2 Glenburn Road, College Milton Industrial Estate, East Kilbride G74 5BA
Verenigd Koninkrijk
JVC Manufacturing U.K. Limited
2 Glenburn Road, College Milton Industrial Estate, East Kilbride G74 5BA
Reino Unido
NEDERLANDS
Page 3
III
IV
Information for Users on Disposal of Old Equipment
[European Union]
This symbol indicates that the electrical and electronic equipment should not be disposed as
general household waste at its end-of-life. Instead, the product should be handed over to the
applicable collection point for the recycling of electrical and electronic equipment for proper
treatment, recovery and recycling in accordance with your national legislation.
By disposing of this product correctly, you will help to conserve natural resources and will
help prevent potential negative effects on the environment and human health which could
otherwise be caused by inappropriate waste handling of this product. For more information
about collection point and recycling of this product, please contact your local municipal
office, your household waste disposal service or the shop where you purchased the product.
Penalties may be applicable for incorrect disposal of this waste, in accordance with national
legislation.
Attention:
This symbol is only
valid in the European
Union.
(Business users)
If you wish to dispose of this product, please visit our web page www.jvc-europe.com to
obtain information about the take-back of the product.
[Other Countries outside the European Union]
If you wish to dispose of this product, please do so in accordance with applicable national
legislation or other rules in your country for the treatment of old electrical and electronic
equipment.
ENGLISH
Informations relatives à l’élimination des appareils usagés,
à l’intention des utilisateurs
[Union européenne]
Lorsque ce symbole figure sur un appareil électrique et électronique, cela signifie qu’il ne
doit pas être éliminé en tant que déchet ménager à la fin de son cycle de vie. Le produit
doit être porté au point de pré-collecte approprié au recyclage des appareils électriques et
électroniques pour y subir un traitement, une récupération et un recyclage, conformément à
la législation nationale.
En éliminant correctement ce produit, vous contriburez à la conservation des ressources
naturelles et à la prévention des éventuels effets négatifs sur l’environnement et la santé
humaine, pouvant être dus à la manipulation inappropriée des déchets de ce produit. Pour
plus d’informations sur le point de pré-collecte et le recyclage de ce produit, contactez votre
mairie, le service d’évacuation des ordures ménagères ou le magasin dans lequel vous avez
acheté le produit.
Attention:
Ce symbole n’est
reconnu que dans
l’Union européenne.
Des amendes peuvent être infligées en cas d’élimination incorrecte de ce produit,
conformément à la législation nationale.
(Utilisateurs professionnels)
Si vous souhaitez éliminer ce produit, visitez notre page Web www.jvc-europe.com afin
d’obtenir des informations sur sa récupération.
[Pays ne faisant pas partie de l’Union européenne]
Si vous souhaitez éliminer ce produit, faites-le conformément à la législation nationale ou
autres règles en vigueur dans votre pays pour le traitement des appareils électriques et
électroniques usagés.
FRANÇAIS
Benutzerinformationen zur Entsorgung alter Geräte
[Europäische Union]
Dieses Symbol zeigt an, dass das elektrische bzw. elektronische Gerät nicht als normaler
Haushaltsabfall entsorgt werden soll. Stattdessen sollte das Produkt zur fachgerechten
Entsorgung, Weiterverwendung und Wiederverwertung in Übereinstimmung mit der
Landesgesetzgebung einer entsprechenden Sammelstelle für das Recycling elektrischer
und elektronischer Geräte zugeführt werden.
Die korrekte Entsorgung dieses Produkts dient dem Umweltschutz und verhindert mögliche
Schäden für die Umwelt und die menschliche Gesundheit, welche durch unsachgemäße
Behandlung des Produkts auftreten können. Weitere Informationen zu Sammelstellen und
dem Recycling dieses Produkts erhalten Sie bei Ihrer Gemeindeverwaltung, Ihrem örtlichen
Entsorgungsunternehmen oder in dem Geschäft, in dem Sie das Produkt gekauft haben.
Für die nicht fachgerechte Entsorgung dieses Abfalls können gemäß der
Hinweis:
Dieses Symbol ist nur
in der Europäischen
Union gültig.
Landesgesetzgebung Strafen ausgesprochen werden.
(Geschäftskunden)
Wenn Sie dieses Produkt entsorgen möchten, besuchen Sie bitte unsere Webseite www.
jvc-europe.com, um Informationen zur Rücknahme des Produkts zu erhalten.
[Andere Länder außerhalb der Europäischen Union]
Wenn Sie dieses Produkt entsorgen möchten, halten Sie sich dabei bitte an die
entsprechenden Landesgesetze und andere Regelungen in Ihrem Land zur Behandlung
elektrischer und elektronischer Geräte.
DEUTSCH
Informatie voor gebruikers over het weggooien van oude
apparatuur
[Europese Unie]
Deze markering geeft aan dat de elektrische en elektronische apparatuur bij het einde van
de gebruiksduur niet bij het huishoudelijk afval mag worden gegooid. Het product moet in
plaats daarvan worden ingeleverd bij het relevante inzamelingspunt voor hergebruik van
elektrische en elektronische apparatuur, voor juiste verwerking, terugwinning en hergebruik
in overeenstemming met uw nationale wetgeving.
Door dit product naar het inzamelingspunt te brengen, werkt u mee aan het behoud van
natuurlijke hulpbronnen en met het voorkomen van potentiële negatieve effecten op het
milieu en de volksgezondheid, die anders veroorzaakt zouden kunnen worden door onjuiste
afvalverwerking van dit product. Neem voor meer informatie over inzamelingspunten
en hergebruik van dit product contact op met de gemeente in uw woonplaats, het
afvalverwerkingsbedrijf of de winkel waar u het product hebt aangeschaft.
Let op:
Dit symbool is alleen
geldig in de Europese
Unie.
Er kunnen boetes gelden voor een onjuiste verwijdering van dit afval, in overeenstemming
met de nationale wetgeving.
(Zakelijke gebruikers)
Bezoek als u dit product wilt weggooien onze website www.jvc-europe.com voor informatie
over het terugnemen van het product.
[Landen buiten de Europese Unie]
Wanneer u dit product wilt verwijderen, houdt u dan aan de geldende nationale wetgeving
of andere regels in uw land voor de verwerking van oude elektrische en elektronische
apparatuur.
NEDERLANDS
Page 4
V
VI
Información para los usuarios sobre la eliminación de
equipos usados
[Unión Europea]
Este símbolo indica que los aparatos eléctricos y electrónicos no deben desecharse junto
con la basura doméstica al final de su vida útil. El producto deberá llevarse al punto de
recogida correspondiente para el reciclaje y el tratamiento adecuado de equipos eléctricos y
electrónicos de conformidad con la legislación nacional.
Si desecha el producto correctamente, estará contribuyendo a conservar los recursos
naturales y a prevenir los posibles efectos negativos en el medio ambiente y en la salud
de las personas que podría causar el tratamiento inadecuado del producto desechado.
Para obtener más información sobre el punto de recogida y el reciclaje de este producto,
póngase en contacto con su oficina municipal, su servicio de recogida de basura doméstica
o la tienda en la que haya adquirido el producto.
De acuerdo con la legislación nacional, podrían aplicarse multas por la eliminación
Atención:
Este símbolo sólo es
válido en la Unión
Europea.
incorrecta de estos desechos.
(Empresas)
Si desea desechar este producto, visite nuestra página Web www.jvc-europe.com para
obtener información acerca de la retirada del producto.
[Otros países no pertenecientes a la Unión Europea]
Si desea desechar este producto, hágalo de conformidad con la legislación nacional vigente
u otras normativas de su país para el tratamiento de equipos eléctricos y electrónicos
usados.
CASTELLANO
Informações para os Utilizadores sobre a Eliminação de
Equipamento Antigo
[União Europeia]
Este símbolo indica que o equipamento eléctrico e electrónico não deve ser eliminado como
um resíduo doméstico geral, no fim da respectiva vida útil. Pelo contrário, o produto deve
ser entregue num ponto de recolha apropriado, para efectuar a reciclagem de equipamento
eléctrico e electrónico e aplicar o tratamento, recuperação e reciclagem adequados, de
acordo com a respectiva legislação nacional.
Ao eliminar este produto da forma correcta, ajudará a conservar recursos naturais e ajudará
a evitar potenciais efeitos negativos no ambiente e saúde humana, que poderiam ser
causados pelo tratamento residual inadequado deste produto. Para mais informações sobre
o ponto de recolha e reciclagem deste produto, contacte a respectiva entidade local, o
serviço de eliminação de resíduos ou a loja onde adquiriu o produto.
Caso estes resíduos não sejam correctamente eliminados, poderão ser aplicadas
Atenção:
Este símbolo apenas
é válido na União
Europeia.
penalizações, em conformidade com a respectiva legislação nacional.
(utilizadores profissionais)
Se pretender eliminar este produto, visite a nossa página da web em www.jvc-europe.com
para obter informações sobre a devolução do produto.
[Outros países fora da União Europeia]
Se pretender eliminar este produto, faça-o de acordo com a legislação nacional aplicável ou
outras regras no seu país para o tratamento de equipamento eléctrico e electrónico velho.
PORTUGUÊS
Informazioni per gli utenti sullo smaltimento delle
apparecchiature obsolete
[Unione Europea]
Questo simbolo indica che l’apparecchiatura elettrica ed elettronica a cui è relativo non
deve essere smaltita tra i rifiuti domestici generici alla fine della sua vita utile. Il prodotto,
invece, va consegnato a un punto di raccolta appropriato per il riciclaggio di apparecchiature
elettriche ed elettroniche, per il trattamento, il recupero e il riciclaggio corretti, in conformità
alle proprie normative nazionali.
Mediante lo smaltimento corretto di questo prodotto, si contribuirà a preservare le risorse
naturali e a prevenire potenziali effetti negativi sull’ambiente e sulla salute umana che
potrebbero essere provocati, altrimenti, da uno smaltimento inappropriato del prodotto.
Per ulteriori informazioni sul punto di raccolta e il riciclaggio di questo prodotto, contattare
la sede comunale locale, il servizio di smaltimento rifiuti domestici o il negozio in cui si è
acquistato il prodotto.
Attenzione:
Questo simbolo è
valido solo nell’Unione
Europea.
L’utente è responsabile del conferimento dell’apparecchio a fina vita alle appropriate
strutture di raccolta, pena le sanzioni previste dalla vigente legislazione sui rifiuti.
(Per gli utenti aziendali)
Qualora si desideri smaltire questo prodotto, visitare la nostra pagina web www.jvc-europe.
com per ottenere informazioni sul ritiro del prodotto.
[Per altre nazioni al di fuori dell’Unione Europea]
Qualora si desideri smaltire questo prodotto, effettuare lo smaltimento in conformità alla
normativa nazionale applicabile o alle altre leggi della propria nazione relative al trattamento
delle apparecchiature elettriche ed elettroniche obsolete.
ITALIANO
Page 5
1
ENGLISH
2
IMPORTANT! PREPARE USE
SETTINGS
TROUBLE?
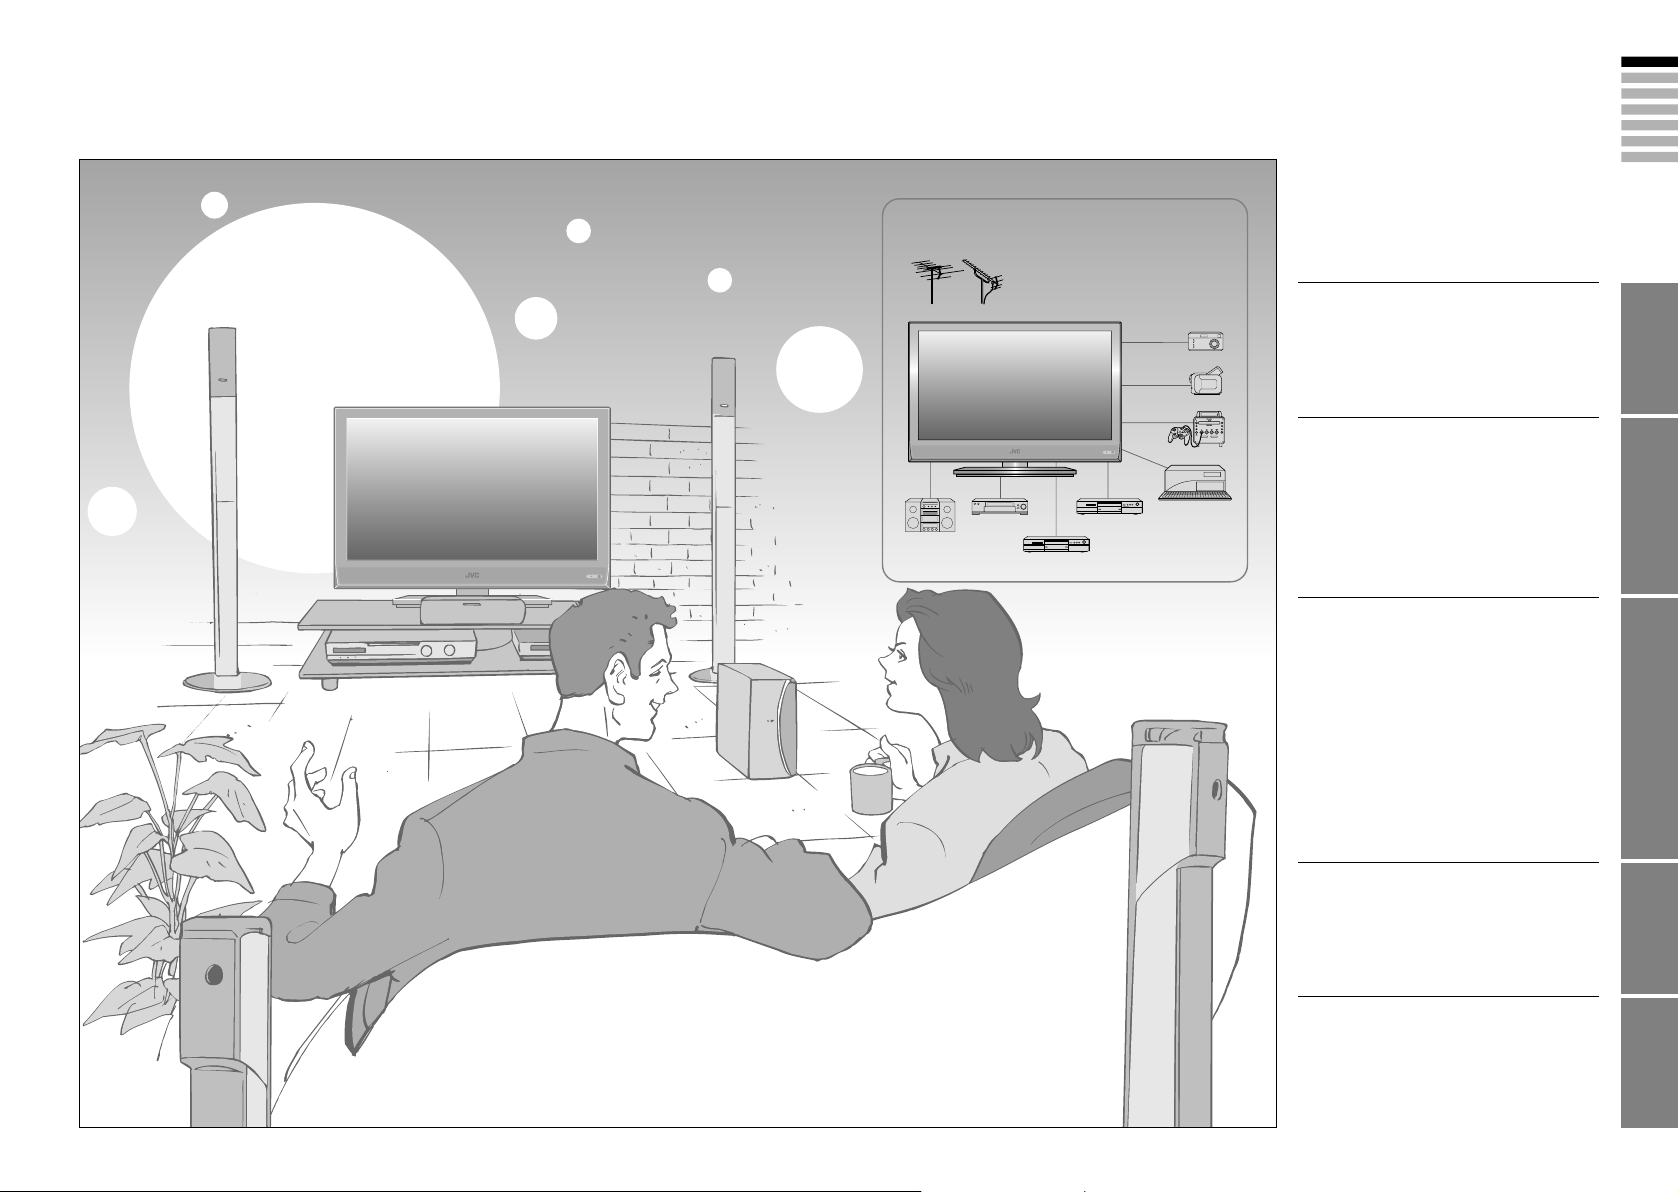
Expanding the world of
beautiful images
Contents
Enjoy rich multi-media with JVC
VHF/UHF
Digital camera
Video camera
First things first!
Warning ············································ 3
Audio components
VCR DVD player
DVD recorder
Game console
Personal
Computer
Getting started
Names of all the parts ······················ 5
Basic connections ···························· 7
Initial settings ··································· 9
Editing channels ····························· 11
· Registering channels
Connecting external devices ·········· 13
Let’s try it out
Enjoying your new TV! ··················· 15
· TV / Teletext / Video / etc.
Watching TV ···································17
Viewing teletext ······························ 19
Watching videos / DVDs ················ 21
Try the advanced features
Useful functions ······························23
· Take a snapshot
· View and search in multi-picture mode
· “Sleep timer” / “Child lock”
Operate JVC recorders and other devices ····
25
Just the way you like it
Customising your TV ······················ 27
Advanced picture adjustment ········· 29
· Reduce noise / Watch a more natural picture
· Set the aspect ratio, etc.
When you have trouble
Troubleshooting ····························· 31
Technical information ····················· 34
“CH/CC” List ··································· 35
Specifications ································· 36
Page 6
3
ENGLISH
4
First things
IMPORTANT! PREPARE USE
SETTINGS
TROUBLE?
first!
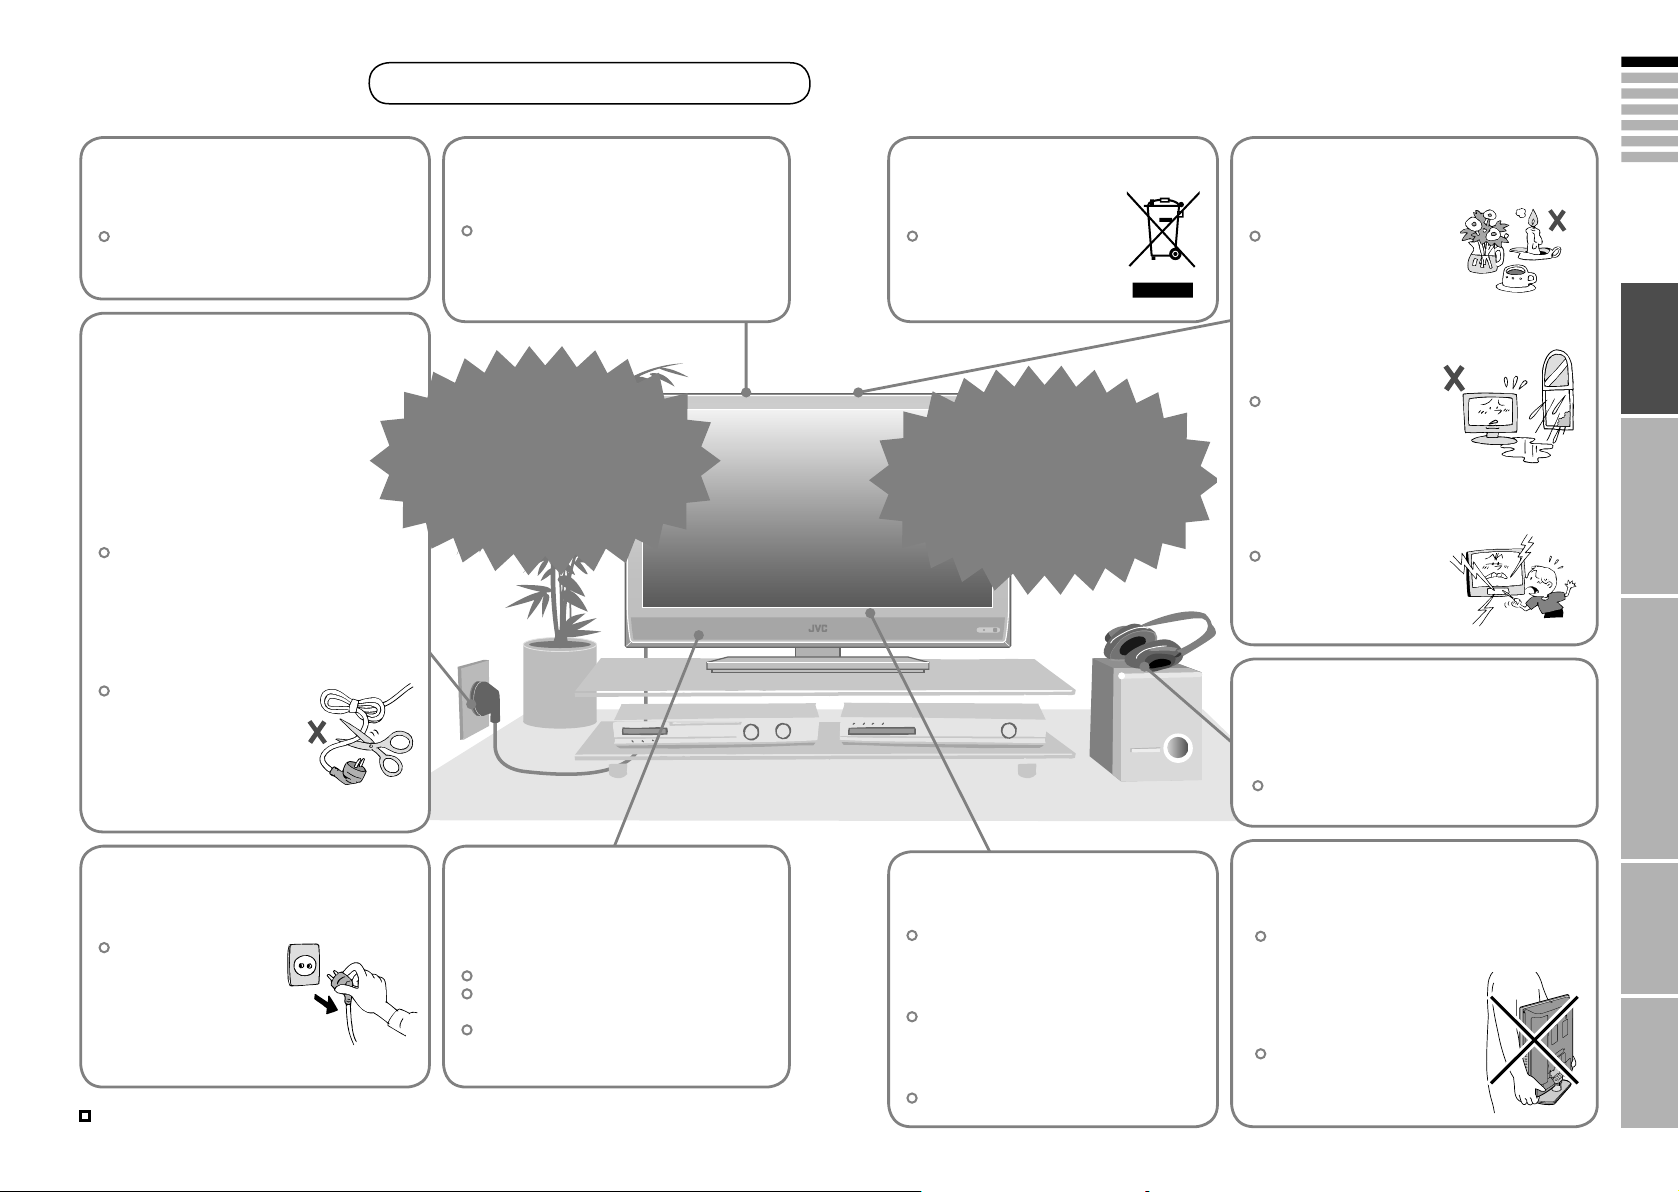
Warning
Follow this manual
regarding setup!
Connect only to a 220-240V, 50Hz AC
outlet.
Make enough room for
inserting and removing
the power plug!
Place the TV as
close to the outlet as
possible!
The main power supply for this TV is
controlled by inserting or removing the
power plug.
Never cut or damage
the power cord!
Please follow all the guidelines below
Do not allow the TV
to fall!
Do not rest your elbows on, or allow
children to hang from the TV.
There is a risk that the TV will fall and
cause injuries.
Never try to repair
the TV yourself!
If the problem cannot be solved in
“Troubleshooting” (P. 31), unplug
the power cord and contact your
retailer.
On disposal of the
TV!
Follow the instruction in
“Information for Users on
Disposal of Old Equipment”
(P.III to VI).
If the TV is damaged
or behaving strangely,
stop using it at once!
Unplug the power cord and contact
your retailer.
Never place anything on
the TV!
Placing liquids, naked
flames, cloths, paper,
etc. on the TV may
cause a fire.
Never expose to rain or
moisture!
To prevent fire or electric
shock, never allow
liquids to enter the unit.
Never insert objects into
the cabinet openings!
It may cause a fatal
electric shock. Take care
when children are near.
If the AC plug is not the
right shape, or the power
cord is not long enough,
use an appropriate plug
adapter or extension cable.
(Consult your retailer.)
Unplug the power cord
when going out!
The power buttons on
the remote control and
the TV unit cannot
completely turn off the
TV. (Make appropriate
arrangements for
bedridden people.)
For more details on installation, usage and safety
For more details on installation, usage and safety
When attaching the TV to
the wall, use the optional
JVC wall mounting unit!
Consult a qualified technician.
See the included manual on mounting
procedures.
JVC assumes no responsibility for
damage due to improper mounting.
Consult your retailer
Consult your retailer
Never dismantle the
rear panel!
It may cause an electric shock.
Never obstruct the
ventilation holes!
It may cause overheating or a fire.
Handle LCD panel
with care!
Use a soft, dry cloth when cleaning.
Never listen to
headphones at high
volume!
It may damage your hearing.
Hold the TV so as not to
scratch the screen!
Do not touch the screen when carrying the
TV.
Do not carry the
TV on your own!
In order to prevent accidents,
ensure that the TV is carried
by two or more people.
Page 7
5
ENGLISH
6
Getting
TV/AV
MENU
/OK
P
IMPORTANT! PREPARE USE
SETTINGS
TROUBLE?
started
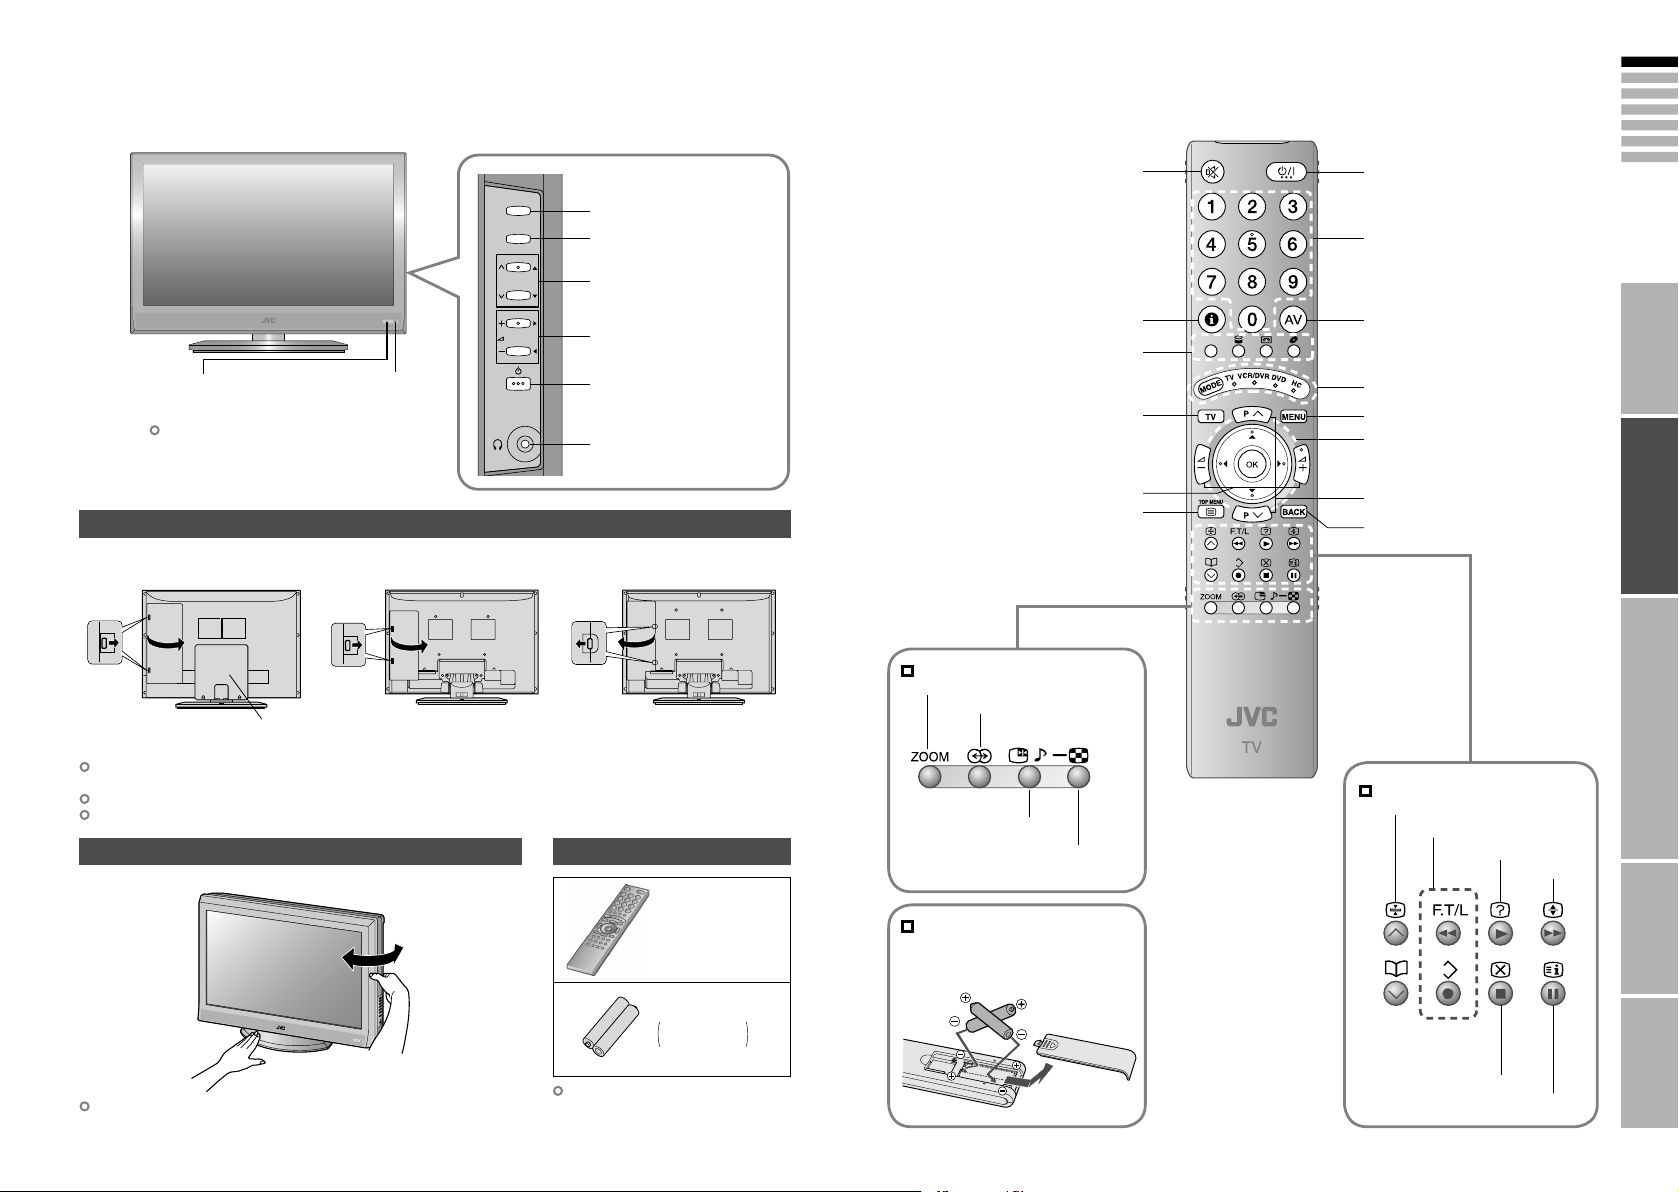
Names of all the parts
Press to
remove.
ON: Lit (Blue)
OFF: Unlit
Power lamp lights while
the TV is on.
“Power Lamp” (P. 28)
Remove the terminal cover
Cable cover
Remote control sensorPower lamp
Press to
remove.
Mute
Power On / Off
Switch between
TV / AV devices
Display on-screen
Change channel / page
menu / set
Change channel / page
Volume
Channel information
(P. 17)
Watch video, etc. (P. 21)
Colour buttons
Power On / Off
Return to TV
To headphones (P. 13)
Switch between
“TV / VCR / DVR / DVD / HC” (P. 25)
Display on-screen menu (P. 27)
Select and
confirm settings in menus
Volume
To teletext (P. 19)
Change channel / page
To previous channel
LT-32R70/E70/ED6LT-37R70/E70/ED6
LT-26R70/E70/ED6
Press to
remove.
When watching TV / Video
Change the aspect ratio (P. 17)
Turn on “3D Cinema Sound” (P. 17)
If the cover cannot be closed due to the cables being in the way
Do not force the cover to close (leave it open).
Connecting terminals on the back of the TV Connecting External devices (P. 13)
To remove the cable cover, refer to the included sheet.
Change the direction of TV
LT-37R70/E70/ED6
For LT-32R70/E70/ED6 and LT-26R70/E70/ED6, the direction of
the TV is fixed.
Check accessories
Remote control
(RM-C1900S)
“AAA/R03” Batteries
For confirming
the TV works
LT-26R70/E70/ED6
To attach the stand, refer to the
included sheet.
Take a snapshot of the
screen (P. 23)
View in multi-picture
mode (P. 23)
Insert the batteries
Use two “AAA/R03” dry cell batteries.
Insert the batteries from the - end, making
sure the + and - polarities are correct.
When viewing teletext (P. 19)
Hold the current page
Bookmark pages
Reveal hidden pages
Switch briefly
between teletext and TV
Enlarge the text
To index page
Page 8

7
ENGLISH
8
IMPORTANT! PREPARE USE
SETTINGS
TROUBLE?
Basic connections
Please read the user manuals of each device carefully before setup.
It is necessary to connect an aerial to watch TV.
Connect with other devices “Connecting external devices”
(P. 13)
Connect the aerial
AERIAL
After all the connections have been made, insert the plug into an AC outlet.
Connect a VCR / DVD recorder
AERIAL
EXT-2
EXT-1
VCR / DVD recorder
After all the connections have been made, insert the plug into an AC outlet.
Connect “T-V LINK” compatible recording device to “EXT-2”.
“T-V LINK” “What is “T-V LINK”?” (P. 9)
Power requirements
Connect the power cord only to a 220-240V, 50Hz
AC outlet.
When attaching the TV to the wall, use the
optional JVC wall mounting unit
Consult a qualified technician.
See the included manual on mounting procedures.
JVC assumes no responsibility for damage due to
improper mounting.
200mm × 200mm mount which conforms to VESA
standards.
Care when setting
Installation requirements
To avoid overheating, ensure the unit has ample
room.
200mm
50mm150mm 150mm 50mm
Tidying the cables
LT-32R70/E70/ED6, LT-26R70/E70/ED6LT-37R70/E70/ED6
Cable cover
To remove the cable cover, refer to the included sheet.
Page 9

9
ENGLISH
10
CH
>>
14%
Auto Program
28
> Language
>
United Kingdom
Country
Deutschland
France
Italia
España
Nederland
Belgium
Ireland
Switzerland
Danmark
Sverige
Österreich
Norge
Suomi
Auto Program
01
AV
PR
02
03
04
05
06
07
08
09
ID CH/CC
BBC1 CH
21
CH
22
CH
23
CH
24
CH
25
CC
02
CC
CC
04
CC
05
03
>
Edit
Download TV Recording Device
T-V LINK
IMPORTANT! PREPARE USE
SETTINGS
TROUBLE?
Initial settings
Set the menu language, installation location and automatically register the TV channels.
These channels can be edited later in “Editing channels” (P. 11).
(Channel data on the TV can be sent to a connected
recording device that is compatible with “T-V LINK”.)
To the previous screen
Exit
If the “JVC” logo does not appear or
if you wish to make changes later
“Language” and “Auto Program” (P. 28)
What is “T-V LINK”?
Connecting the TV to a “T-V LINK”
compatible device allows :
Channels on the TV to be instantly
registered on the device.
The “DIRECT REC” function to be
used.
“Technical information” (P. 34)
“T-V LINK” variations
“T-V LINK” (JVC) “Q-LINK” (Panasonic)
“Megalogic” (Grundig) “Data Logic” (Metz)
“SMARTLINK” (Sony) “Easy Link” (Philips)
Begin
The remote control
doesn’t work
1
Shown only when
powering on for the first time.
The power on the unit can also be used.
Confirm the mode is set to
“TV”.
Select a language
2
1 select
2 set
Select the country of installation
3
For the next page “ ” (Yellow)
TV
MENU
BACK
Automatically register channels
4
Check what was registered
5
Finish
select
If “ACI Start” appears, select and start settings.
(This will set up cable television channels.)
“What is “ACI” (Automatic Channel Installation)?”
(P. 34)
Edit channels
Confirm
⁄ in “Editing channels”
(P. 11)
When using “T-V LINK”
When not using “T-V LINK”
6
If “Feature Not Available”
appears :
Is the “T-V LINK” compatible
device connected to “EXT-2”?
Is the device turned on?
Page 10

11
ENGLISH
12
Download TV Recording Device
T-V LINK
Set Up
Set Up
Auto Program
Component Auto Select
EXT Setting
PC Position
Off
Off
HDMI Setting
Edit/Manual
Decoder(EXT-2)
Language
01
AV
PR
02
03
04
05
06
07
08
09
ID CH/CC
BBC1 CH
21
CH
22
CH
23
CH
24
CH
25
CC
02
CC
CC
04
CC
05
03
>
Edit
01
AV
PR
02
03
04
05
06
07
08
09
ID
CH/CC
BBC1 CH
21
CH
22
CH
23
CH
24
CH
25
CC
02
CC
03
CC
04
CC
05
>Edit
> Edit
01
AV
PR
02
03
04
05
06
07
08
09
ID
CH/CC
BBC1 CH
21
CH
22
CH
23
CH
24
CH
25
CC
03
CC
04
CC
05
01
AV
PR
02
03
04
05
06
07
08
09
ID CH/CC
BBC1 CH
21
CH
22
CH
23
CH
24
CH
25
CC
02
CC
03
CC
04
CC
05
A
>
Edit
>
Edit
01
AV
PR
02
03
04
05
06
07
08
09
ID CH/CC
BBC1 CH
21
CH
22
CH
23
CH
24
MBC
M6
ID List
MCM
MDR
MOVIE
MTV
MTV3
CH
25
CC
02
CC
03
CC
04
CC
05
M
01
AV
PR
02
03
04
05
06
07
08
09
ID CH/CC
BBC1 CH
21
CH
22
CH
23
CH
24
CH
25
CC
02
CC
03
CC
04
CC
05
JVC
>
Edit
01
AV
PR
02
03
04
05
06
07
08
09
ID CH/CC
BBC1 CH
21
CH
22
CH
23
CH
24
CH
25
CC
02
CC
CC
03
CC
04
>
Edit
>
Edit
01
AV
PR
02
03
04
05
06
07
08
09
ID CH/CC
BBC1 CH
21
CH
22
CH
23
CH
24
CH
25
CC
02
CC
CC
03
CC
04
12
>
01
AV
PR
02
03
04
05
06
07
ID CH/CC
CH
22
CH
23
CH
24
CH
25
CC
02
CC
03
CC
04
Edit
>
11
10
PR
12
13
14
15
16
17
ID
CH/CC
CH
02 (B/G
)
CC
06
Manual
ID
>Manual
11
10
PR
12
13
14
15
16
17
CH/CC
CH
08 (B/G
)
CC
06
ID
>
11
10
PR
12
13
14
15
16
17
CH/CC
CH
08
CC
06
Edit
ID
>
Manual
11
10
PR
12
13
14
15
16
CH/CC
CH
08 (I
)
CC
06
IMPORTANT! PREPARE USE
SETTINGS
TROUBLE?
Editing channels
Edit the channels registered with “Auto Program” in “Initial settings” (P. 9).
When coming from “Initial settings” (P. 9), skip to ⁄.
Display the menu bar
1
Select “Set Up”
2
Select “Edit / Manual”
3
Select a row
4
To the previous
screen
Exit
5
6
Edit
Confirm settings
1 select
2 next
1 select
2 next
select
Move a
channel’s
position
MOVE
Edit a
channel
name
ID
Insert a
channel
INSERT
Delete a
channel
DELETE
1 Begin 2 Select a destination 3 Finish
select
move out move in
1 Begin 2 Enter a channel name
(red)
When selecting a preset name from the “ID List”
enter
the first
character
When manually naming a channel
next
column
1 Begin
2 Select a “CH / CC” 3 Enter a number
select
“CH/CC” List (P. 35)
1 Delete
1 select
2 set
1 enter
2
next
column
3 set
Receives the
broadcast
signal.
7
Finish
If “Feature Not Available”
appears :
Is the “T-V LINK”
compatible device
connected to “EXT-2”?
Is the device turned on?
“T-V LINK” (P. 9)
When using
“T-V LINK”
When not using
“T-V LINK”
Register a
new channel
MANUAL
1 Begin
3 Set
2
Beginning channel search
From high
frequencies
If necessary, press 3
to change the broadcasting system.
“Receivable broadcast systems”
(P. 34)
(red)
From low
frequencies
or
Adjust
Picture fine tuning
Auto-search begins,
and the nearest
frequency is imported.
Repeat the previous
steps until the
desired channel is
displayed
/
Sound fine tuning
· Registering channels
select a system
Page 11

13
ENGLISH
14
IMPORTANT! PREPARE USE
SETTINGS
TROUBLE?
Connecting external devices
VCR / DVD / other devices
You can connect many different devices to the rear panel of the TV.
Please read the user manuals of each device before setting up.
(Connecting cables are not supplied with this TV.)
PC
To “EXT-3” R/L (PC IN)
Check for PC compatibility
“Technical information” (P. 34)
Game consoles
Video camera
VCR / DVD recorder
(“T-V LINK” compatible)
Satellite broadcast / Digital
broadcast tuner
Headphone
DVD player
PC IN
(R)
(L)
EXT-3
EXT-2
(T-V LINK)
EXT-1
(Y)
(Pr)
(Pb)
(R)
(L)
(R)
(L)
EXT-4
AUDIO
OUT
: signal direction
AERIAL
EXT-5
(HDMI)
Connect “DVI” devices
(P. 34)
“T-V LINK” (P. 9)
EXT-1
Output Input
· Composite signal
· Sound L / R
Use S-VIDEO “S-IN” (P. 22)
EXT-2
Output Input
· Composite signal
· Sound L / R
· T-V LINK
Use S-VIDEO “S-IN” (P. 22)
Select dubbing sources
“DUBBING” (P. 22)
Connect a decoder
“Decoder (EXT-2)” (P. 28)
EXT-3
Output Input
EXT-4
Output Input
“Component Auto Select” (P. 28)
Watching videos
·
Composite signal /
RGB / S-VIDEO
· Sound L / R
Dubbing videos
Using “T-V LINK”
·
Composite signal /
RGB / S-VIDEO
· Sound L / R
Watching videos
· Composite
signal / S-VIDEO
· Sound L / R
Watching DVDs
·
Component signal
(P. 36)
· Sound L / R
Amplifier
(L) (R)
Audio signals received from
EXT-5 cannot be sent to
the “AUDIO OUT” terminal.
Headphones
DVD player
(HDMI compatible)
EXT-5
Output Input
“HDMI Setting” (P. 28)
AUDIO OUT
Listening to the TV on external speakers
Output
· Sound L / R
Connecting
HDMI devices
· HDMI signal
(P. 36)
Page 12

15
ENGLISH
16
Let’s try it out
Picture
IMPORTANT! PREPARE USE
SETTINGS
TROUBLE?
Enjoying your new TV!
Watching TV
PAGE
17
TV mode TV and Text mode
View channel information
Change the aspect ratio
Enjoy “3D Cinema Sound”
Register your favourite channels
Text mode
19
PAGE
Viewing teletext
Enlarge the text
To the index page
Hold the current page
Switch briefly between teletext and TV
Bookmark your favourite pages
Reveal hidden pages
PAGE
21
Watching
videos / DVDs
Watch high quality video (S-VIDEO)
Name connected devices
Dub videos
PC position adjustment
Personal preferences
Adjust the picture
Adjust the sound
Advanced settings
(sleep-timer / child lock, etc.)
Basic settings
(channel settings, etc.)
PAGE
27
· TV / Teletext / Video / etc.
Page 13

17
ENGLISH
18
BBC
AV
12 : 00
16 : 9 Zoom
High3D Cinema Sound
Set 1 - 4?
Programmed!
Favourite 1 - 4?
1
BBC
AV
AV
02
03
04
05
06
07
08
09
PR List
01
BBC1
Auto
Panoramic
14:9 Zoom
16:9 Zoom
16:9 Zoom Subtitle
Full
Zoom
Regular
>
1
PR 01
2
PR 03
4
PR 07
3
PR
05
Favourite Setting
>
1
PR 01
2
PR 03
4
PR 07
3
Favourite Setting
P
IMPORTANT! PREPARE USE
SETTINGS
TROUBLE?
Watching TV
Set to “TV”
Mute
1
Power on
2
Press again to turn the screen off
The blue
power lamp
on the TV lights
and put the TV into standby mode.
Select a channel
up
down
E.g.
15 :
1 :
Volume
3
Move up or down a channel
Switch between mono / stereo /
bilingual broadcasting
“Stereo / t·u” ( P. 28)
To the previous channel
Note
To completely turn off the TV, unplug
the AC plug.
Basic operations using the side buttons
1
Power on
2
Volume
Change
the channel
Channel
information and
clock
INFORMATION
Change the aspect
ratio
ZOOM
Enjoy ambient
sound
3D CINEMA SOUND
Register a
channel to a button
FAVOURITE CHANNEL
PR List
Channels
registered in
“Initial settings” will
appear here.
select
Select a page
1 select
2 set
Move the picture with
1 or 4 while this bar is
displayed
High
Low
Mono
Off
While the channel
is displayed
Hold down
for 3 seconds
Press the number
to register it on
Recall the favourite channel
Press the
number you
registered
Check your favourite channels
Press “ ” and confirm that the channels
you have registered have a beside them
Delete a favourite channel
“MENU” “ ” “Features” “Favourite Setting”
select delete
Channel information
Time (in case of having viewed teletext)
(No indication)
1 select
Select and view a channel
2 view
When set to “Auto”, the aspect ratio
will turn to the ratio obtained from
the information the TV received.
Without receiving aspect information,
it will be the setting in “4:3 Auto
Aspect” (P. 30)
Not available in 1080i (1125i) /
720p (750p) signals.
In PC mode, “Regular” and “Full” can
be selected.
: For stereo sound
: For stereo sound (when the sound distorts in “High” mode)
: For mono sound (emulates a stereo-like sound)
: Turns off “3D Cinema Sound”
Disappears after
a few seconds
Customisations
(P. 28) to the picture
of a favourite
channel get saved
as well.
Page 14

19
ENGLISH
20
IMPORTANT! PREPARE USE
SETTINGS
TROUBLE?
Viewing teletext
This TV can display TV broadcasts and teletext on the same channel in two windows.
When watching TV
1
Enter a teletext page
2
Move up or down a page
up
down
TV
TEXT
TEXT
Hold the
current page
HOLD
Reveal
hidden pages
REVEAL
Hold the current page
Release
Press “ ” again
Display hidden information
(answers to quizzes, etc.)
Bookmark
your favourite
page
LIST MODE
View sub-pages
to
sub-page
Display your
favourites list
1
Select a coloured button to save your page to
2
Enter the number of the page to save
(RED) (GREEN) (YELLOW) (BLUE)
(red)
3
Save
4
Recall your favourite page
Press the coloured button as in step 2
.....
Enlarge
the text
SIZE
To the
index page
INDEX
Switch briefly
from teletext
to TV
CANCEL
Double the size of the
displayed text
Returns to page “100”
or a previously designated page
Leave the current page open,
while you switch to watch TV
Useful when running a page search.
Page 15

21
ENGLISH
22
1
2
3
4
5
6
EXT-1
EXT-2
EXT-3
EXT-4
HDMI
PC
EXT Mode
0
AV
>
EXT-1
Dubbing
EXT-2
EXT-4
EXT-3
EXT Setting
TV
>
EXT-1
Dubbing
EXT-2
EXT-4
EXT-3
EXT Setting
TV
>
EXT-1
Dubbing
EXT-2
EXT-4
EXT-3
EXT Setting
TV
ID List
VHS
S-VHS
DVC
CAM
SAT
STB
GAME
DVD
DVR
>
EXT-1
Dubbing
EXT-2
EXT-4
EXT-3
EXT Setting
TV
ID List
VHS
S-VHS
DVC
CAM
SAT
STB
GAME
DVD
DVR
>
EXT-1
Dubbing
EXT-2
EXT-4
EXT-3
EXT Setting
TV
>
EXT-1
DVD
Dubbing
EXT-2
EXT-4
EXT-3
EXT Setting
TV
>
EXT-1
Dubbing
EXT-2
EXT-4
EXT-3
EXT Setting
TV
>
EXT-1
Dubbing
EXT-2
EXT-4
EXT-3
EXT Setting
TV
Set Up
Set Up
Auto Program
Component Auto Select
Off
Off
HDMI Setting
Edit/Manual
Decoder(EXT-2)
EXT Setting
Language
PC Position
TV/AV
P
MENU
/OK
Set Up
Set Up
Auto Program
Component Auto Select
Off
Off
HDMI Setting
Edit/Manual
Decoder(EXT-2)
EXT Setting
Language
PC Position
IMPORTANT! PREPARE USE
SETTINGS
TROUBLE?
Watching videos / DVDs
PC Position
To TV
Select the video source
1
E.g. For EXT-1
Operate the connected device and play a video
2
Operate JVC recorders and other devices (P. 25)
Select the video source using
the side buttons
1
2
Select the
video source
3
1 select
2 watch
Switch
to S-VIDEO
input
S-IN
Advanced functions
Display the menu bar
1
Select “Set Up”
2
1
Select the “EXT” connected to S-VIDEO
Cancel this mode
1 Select an “EXT” to assign a name to 2 Show the name list
Press “ ” in 2 again
1 select
select
select
Select “EXT Setting”
2 next
2 Set the S-VIDEO mode
y
1 select
2 next
The device
selection
display will
change from
“E1” to “S1”.
Edit names
PC position adjustment
Display the menu bar
of connected
devices
ID LIST
3 Select a name from the list
1 select
1
Select “Set Up” Select “PC Position”
2
1 adjust
1 select
2 next
Shown only when “PC” is selected.
Reset position
1 select
2 next
Set up
dubbing on
“EXT-2”
DUBBING
Clear the name
Select the blank space in 3
1 Select the arrow 2 Select the dubbing source
select
2 set
select
3
2 set
Page 16

23
ENGLISH
24
Try the
Features
>
Off
Sleep Timer
>
Sleep Timer
Child Lock
Appearance
Blue Back
Favourite Setting
Type A
On
Power Lamp
On
Features
Sleep Timer
Child Lock
Appearance
Blue Back
Favourite Setting
Type A
On
Power Lamp
On
>
Features
>>
Set ID No.
ID
>
Child Lock
01
AV
PR
02
03
04
05
06
07
08
09
CH/CC
BBC1 CH
21
CH
22
CH
23
CH
24
CH
25
CC
02
CC
03
CC
04
CC
05
ID
>
Child Lock
01
AV
PR
02
03
04
05
06
07
CH/CC
BBC1 CH
21
CH
22
CH
23
CH
24
CH
25
CC
02
CC
03
IMPORTANT! PREPARE USE
SETTINGS
TROUBLE?
advanced
features
Useful functions
Take
snapshots
of the screen
FREEZE
Watch in
multi-picture
mode
MULTI-PICTURE
Current programme
Cancel
Press “ ” again, or change the channel
Still picture
Not available when the SUB-PICTURE is displayed,
or when in PC mode.
You cannot save or export the snapshot.
Select the number
of screens
Selecting “ ” returns to normal viewing mode
Not available in PC mode.
1 select
2 set
Watch in dual-picture mode
E.g. You can watch TV and video at the same time.
(For wide aspect ratio signals)
Main Sub
Switch between the
sound sources
Main
Sub
Change the channel
(Main)
(Sub)
Select a channel in 12-screen mode
All registered channels are displayed as still images.
1 select a
channel
Main
Only the selected frame
has a moving picture.
Move up or down a page
Not available for EXT-5 input.
· Take a snapshot
· View and search in multi-picture mode
· “Sleep timer” / “Child lock”
2 watch
Set a time
for the TV to
turn itself off
SLEEP TIMER
Stop
children from
watching
specific
channels
CHILD LOCK
1
2
3
4
Cancel
Remaining time
After steps 1 and 2 above
Set the time to “0” in step 4
You can confirm the remaining time at step
4, after repeating this process.
3
4
5
6
7
Release a channel
View a locked channel
Press “ ” again in step 6
1 select “Features”
2 next
1 select “Sleep Timer”
2 next
1 select a time in minutes
2 set
select
“Child Lock”
1 enter an “ID No.”
(a secret number of your choice)
2 to the next column
3 set
select a channel to lock
Lock more channels
Repeat steps 5 and 6
Use the numerical buttons to enter the channel number.
When n appears, press “ ” and enter your “ID No.”.
(If you forget your “ID No.”, check it in step 4.)
Page 17

25
ENGLISH
26
IMPORTANT! PREPARE USE
SETTINGS
TROUBLE?
Operate JVC recorders
The included remote control can be used to operate JVC recorders
and other devices.
1
2
3
Select a device
VCRs
DVD recorders
HDD recorders
TV
The indicator lights for 3 seconds
each time the remote control is
operated.
Home
theatre
system
DVD playersTV (P. 6)
VCR/DVR
DVDHC
Turn on the device
Operate the device
Other buttons can be used to
operate the TV at any time.
Operate the
VCR,
DVD recorder
or HDD recorder
VCR/DVR
Operate the
DVD player
DVD
and other devices
Select VCR / DVD recorder / HDD recorder
VCR
DVD recorders
HDD recorders
Operate DVD / HDD recorder menus
Display menu
Select
Display
top menu
Display the subtitle (DVD / HDD recorder mode)
Operate DVD menus
Select
Display
top menu
OK
OK
Back to
previous menu
Display menu
Back to
previous menu
Playback / Record etc.
Rewind / Playback
/ Fast-forward
Record / Stop / Pause
Select a chapter
Press “ ”
Playback etc.
Rewind / Playback
/ Fast-forward
Stop / Pause
Select a chapter
Try changing the remote control code
if you cannot operate a recorder.
Code A or 1 (Default)
Press and hold Press and hold
Confirm the code for your recorder by checking the manual it
came with.
Some models of JVC devices cannot be operated with this
remote control.
JVC DVD recorders and HDD recorders are set to code “C” or
“3” by default.
Note
If the battery is removed, the remote control code reverts back
to code A or 1.
Code C or 3
Operate the
home theatre
system
HC
Display the subtitle
Operate HC menus
Select
Display
top menu
Display the subtitle
Press “ ”
Mute
Volume
Select a surround mode
Press “ ”
Press “ ”
OK
Press “ ”
Display menu
Back to
previous menu
Press “ ”
Playback etc.
Rewind / Playback
/ Fast-forward
Stop / Pause
Select a chapter
Page 18

27
ENGLISH
28
Just the way
Standard
Picture
Picture Mode
Standard
Bright-1
Features
Colour Temp.
Hue
Colour
Sharp
Bright-2
Contrast
Cool
Picture
Picture Mode
Standard
IMPORTANT! PREPARE USE
SETTINGS
TROUBLE?
you like it
Customising your TV
To the previous
screen
Exit
The menu disappears
after one minute of
inactivity.
1
2
3
4
Display the menu bar
Select a menu
1 select
2 next
Select an item
select
Adjust / Configure
1 adjust /
select
2 set
When adjusting
with the sliding-bar
Move
When selecting
from presets
The item will change.
Some items have a
sub-menu.
Picture
Sound
Features
Set Up
Items
1 adjust
2 set
1 select
2 set
Selected menu’s title
Menu Item Adjustments / Configurations
Picture Mode
Bright-1
Contrast
Bright-2
Picture
Sharp
Colour
Hue
Colour Temp.
Features
Stereo / t · u
Bass
Sound
Treble
Balance
3D Cinema Sound
Tone Correction
Sleep Timer
Child Lock
Features
Appearance
Blue Back
Favourite Setting
Power Lamp
Auto Program
Edit / Manual
Language
Set Up
Decoder (EXT-2)
Component
Auto Select
EXT Setting
HDMI Setting
PC Position
Other settings · Change the aspect ratio “ZOOM” (P. 17)
· Turn on “3D Cinema Sound” “3D CINEMA SOUND” (P. 17)
Picture mode (Bright / Standard / Soft)
Backlight brightness (Darker Brighter)
Contrast (Lower Higher)
Brightness (Darker Brighter)
Sharpness (Softer Sharper)
Colour (Lighter Deeper)
Tint (Reddish Greenish)
Colour temperature (Warm / Normal / Cool)
Finer picture adjustments (P. 29)
Mode / Language (v : MONO / s : STEREO / t : SUB1 / u : SUB2)
Low tones (Weaker Stronger)
High tones (Weaker Stronger)
Speaker balance (Left Stronger Right Stronger)
Ambience level (High / Low / Mono / Off)
Make the sound more clear (On / Off)
Timer for turning off the TV (P. 24)
Stops children from watching specific channels (P. 24)
Format for displaying the channel number
(Type A / Type B)
Displays a blue screen and mute the sound
when the signal is weak or absent (On / Off)
Clear favourite channel settings (P. 17)
Lights power lamp (P. 5) while the TV is on (On / Off)
Select a country, it automatically registers channels (P. 10, ⁄)
Change registered channels or add new ones (P. 11)
Select a language for on-screen menus (P. 10, Ÿ)
For when connected to VCR with “T-V LINK” (On / Off)
Changes the TV input to “EXT-4” when a component signal is input to
“EXT-4” (On / Off) (Not available when viewing PC)
For use with video players and other devices (P. 22)
Size (1 / 2 / Auto), Audio (Digital / Analogue / Auto)
PC position adjustment (P. 21)
Page 19

29
ENGLISH
30
Super DigiPure
Auto
Picture
Picture Mode
Standard
Bright-1
Features
Colour Temp.
Hue
Colour
Sharp
Bright-2
Contrast
Cool
Picture
>
Super DigiPure
Movie Theatre
Colour Management
Picture Management
Colour System
4:3 Auto Aspect
Auto
Auto
On
On
Features
Auto
>>
Sub
Main
Auto
PAL
Colour System
>>
Regular
14:9 Zoom
Panoramic
4:3 Auto Aspect
Auto
On
On
On
On
IMPORTANT! PREPARE USE
SETTINGS
TROUBLE?
Advanced picture adjustment
By default, the TV automatically adjusts itself for the best picture.
1
Display the menu bar
Super
DigiPure
For
natural-looking
outlines
Off
: Function is
turned off
Min Max Auto
:
When the picture
loses sharpness
: When
noise appears
: Automatically
adjusts
To the previous
screen
Exit
The menu disappears
after one minute of
inactivity.
2
3
4
5
6
Select “Picture”
Select “Features”
Select an item
E.g. “Super DigiPure”
Change settings
E.g. “Super DigiPure”
Finish
1 select
2 next
1 select
2 next
1 select
2 next
1 select
2 set
Movie
Theatre
Colour
Management
Picture
Management
Smart
Picture
MPEG Noise
Reduction
Colour
System
For smooth
cinema film
For
natural-looking
pictures
Fix
bright / dark
pictures
Fix
brightness of
white areas
To reduce
MPEG video
noise
When
there is no
colour
Off
: Function is
turned off
Off
: Function is
turned off
Off
: Function is
turned off
Off
: Function is
turned off
Off
: Function is
turned off
On Auto
: Function is
always on
On
: Maintain a natural
colour balance
On
: Make it easier to view
bright / dark pictures
On
: Make it easier to view
white areas
On
: When noise appears
: Automatically
adjusts
Not available when
“Picture Mode” is set
to “Bright” (P. 28).
1 Select the screen to change settings on
Main
: Main picture
Sub
: Sub-picture in
MULTI-PICTURE mode (P. 23)
2 Select the colour system
PAL
: Western
Europe
SECAM
:
Eastern Europe
/ France
NTSC 3.58
: USA
3.58 MHz
NTSC 4.43
: USA
4.43 MHz
Auto
: When watching
videos, etc.
4:3 Auto
Aspect
· Reduce noise / Watch a more natural picture
· Set the aspect ratio, etc.
Set a default
aspect ratio
Select a default aspect ratio for Auto in “Zoom” (P.17)
Panoramic
16 : 9 4 : 3 14 : 9
Regular 14:9 Zoom
Page 20

31
ENGLISH
32
When you
IMPORTANT! PREPARE USE
SETTINGS
TROUBLE?
have trouble
Troubleshooting
Severe noise or
snow
Is the TV connected correctly to
the aerial?
Change the direction of the aerial.
Is the aerial or its cable
damaged?
Consult your retailer
Patterns, stripes
or noise
Is the aerial receiving interference
from high-voltage power lines or
wireless transmitters?
Consult your retailer
Are connected devices too close
to the TV?
Insert the minimum distance
between the aerial and the
cause of interference until no
interference
Ghosting
(Doubling of images)
Are you receiving interference
from signals reflected off
mountains or buildings?
Adjust the direction of your
aerial, or change to a
good-quality directional aerial
I can’t turn it on!
Is the power cord connected to the AC outlet
correctly?
The remote
control doesn’t
work!
Are the batteries flat?
Are you more than 7 meters away
from the TV?
Is the “MODE (TV, VDR/DVR, DVD, HC)” set to “TV”?
When viewing teletext, the TV menu bar does not appear.
Depending on the stability of the signal, there may be a time
lag when changing channels.
Problem Actions
Basics Screen Picture Sound
Remote control
stops working
Aspect ratio changes
unintentionally
PC screen alignment
is off
Poor picture quality
Strange picture
when using an external
device
Poor sound
No sound from the
audio component
Unplug TV, several minutes later plug it in again.
Press “ ” to return to your settings.
Adjust the “PC Position”.
Unnatural colour >>> Adjust “Colour” and “Bright-1”.
Noise >>> Set to the following functions.
Picture Mode : Standard
Super DigiPure : Max
Dull picture >>> Set to the following functions.
Picture Mode : Bright
Super DigiPure : Min
If you connected S-Video output device, check the “S-IN”
setting.
If the top of the image is distorted, check the video signal
quality itself.
If movement appears unnatural when receiving a signal from
a DVD player, etc. with 625p (progressive-scanning), change
the output setting of the external device to 625i (interlacescanning).
Adjust the “Bass” and “Treble”.
If receiving a poor signal in “Stereo / t·u”, switch to “Mono”.
Adjust the channel reception using “Manual”.
Audio signals received from EXT-5 cannot be sent to the
“AUDIO OUT” terminal.
Check your “Colour System”.
page
–
17
21
28
30
28
30
28
30
22
–
–
28
28
11
–
Page 21

33
ENGLISH
34
IMPORTANT! PREPARE USE
SETTINGS
TROUBLE?
Troubleshooting
(continued)
Technical information
Problem Actions
Wrong screen size 28
No picture, no sound –
No sound
Green and distorted
screen
Some functions do not
work
Some inputs cannot
be selected in the
sub-picture
“Feature Not Available”
Display ScreenFunctionsHDMI
appears
“ACI Error” appears –
Switch “Size” in “HDMI Setting” to “1” or “2”.
Use the cable marked with HDMI logo.
Check if the device is compliant with HDMI.
Switch “Audio” in “HDMI Setting” to “Digital” or “Auto” for
HDMI devices, or “Analogue” or “Auto” for DVI devices.
Wait a little for the signal to stabilize when switching the
signal format for an “HDMI” device.
It is not a malfunction. Some functions (dark background) in
the menu do not work depending on the situation.
“EXT-4”, “EXT-5” inputs and PC mode cannot be selected in
the sub-picture.
RGB input signal of “EXT-1” and “EXT-2” are not available in
dual-picture mode.
Is the “T-V LINK” compatible device connected to “EXT-2”?
Is the SCART CABLE “Fully Wired”?
Is the “T-V LINK” compatible device turned on?
After confirming all the conditions above, press “OK” button
again.
Press 2 to start “ACI” again.
If you still receive the “ACI Error” after numerous tries, press
3 to cancel “ACI”.
page
–
28
–
–
–
34
34
–
What is “T-V LINK”?
“T-V LINK” allows the TV to share information easily with a connected “T-V LINK” compatible device.
By using T-V LINK :
You can send the channel information programmed on the TV to the “T-V LINK” compatible device, so that
both the TV and the external device have the same channel settings. When connecting a new external device,
channel information is loaded into it, allowing channel setup to be completed very quickly. For more details, refer
to the external device’s manual.
You can easily record the TV programme you are viewing on a “T-V LINK” compatible device by using the
“DIRECT REC” feature. For more details, refer to the external device’s manual.
What is “ACI” (Automatic Channel Installation)?
Some cable companies transmit a signal called “ACI” which contains information that allows TV channels to be
registered automatically on your TV.
When an ACI signal is received, “ACI Start / ACI Skip” appears in the “Auto Program” screen.
Receivable broadcast systems
Depending on the country selected during “Auto Program”, the receivable broadcast system differs.
UNITED KINGDOM: Receive only PAL-I.
FRANCE: Can receive SECAM-L.
To receive SECAM-L in countries other than France:
1) Change the “Country” to “France” in “Auto Program”.
2) Press the “BACK” button to return to the menu and enter the channel using “Insert” or “Manual”.
PC Signals that can be displayed
*Macintosh* computers are not supported.
(Macintosh is a registered trademark of
Apple Computer, Inc.)
If the signal doesn’t appear, check that the vertical
frequency on the PC is set to “60Hz”.
Resolution
Vertical frequency (Hz) 60.0 60.0
640 x 480 (VGA)
1024 x 768 (XGA)
Connect “DVI” devices
Connect a “DVI“ device to “EXT-5 (HDMI)” using “DVI-HDMI” conversion cable. Connect analogue sound output of
the DVI device to L and R terminals in EXT-4.
Set “Audio” in “HDMI Setting” to “Analogue” or “Auto” (P. 28)
Black or white dots
appear on the screen
The shadow of a
different image is seen
on the screen.
LCD panels use fine dots (“pixels”) to display images.
While more than 99.99% of these pixels function properly,
a very small number of pixels may not light, or may light all
the time.
Please understand that this is not a malfunction.
When changing to another image after displaying a still image
for a long period of time, the shadow of the previous image
remains on the screen.
This is not a malfunction, it is known as “temporary image
retention”, a phenomenon that is unique to LCD panels. The
shadow will disappear after some time.
–
–
Page 22

35
ENGLISH
36
IMPORTANT! PREPARE USE
SETTINGS
TROUBLE?
“CH/CC” List
Specifications
To use the INSERT function (P. 11), find the “CH/CC” number corresponding to the TV’s Channel number from this
table.
When the Country setting is “France”, select a three-digit CH/CC number.
CH Channel
CH 02/CH 202 E2, R1
CH 03/CH 203 E3, ITALY A
CH 04/CH 204 E4, ITALY B, R2
CH 05/CH 205 E5, ITALY D, R6
CH 06/CH 206 E6, ITALY E, R7
CH 07/CH 207 E7, ITALY F, R8
CH 08/CH 208 E8, R9
CH 09/CH 209 E9, ITALY G
CH 10/CH 210 E10, ITALY H, R10
CH 11/CH 211
CH 12/CH 212
CH 21/CH 221 E21, R21
CH 22/CH 222 E22, R22
CH 23/CH 223 E23, R23
CH 24/CH 224 E24, R24
CH 25/CH 225 E25, R25
CH 26/CH 226 E26, R26
CH 27/CH 227 E27, R27
CH 28/CH 228 E28, R28
CH 29/CH 229 E29, R29
CH 30/CH 230 E30, R30
CH 31/CH 231 E31, R31
CH 32/CH 232 E32, R32
CH 33/CH 233 E33, R33
CH 34/CH 234 E34, R34
CH 35/CH 235 E35, R35
CH 36/CH 236 E36, R36
CH 37/CH 237 E37, R37
CH 38/CH 238 E38, R38
CH 39/CH 239 E39, R39
CH Channel
CH 102 F2
CH 103 F3
CH 104 F4
CH 105 F5
CH 106 F6
CH 107 F7
CH 108 F8
CH 109 F9
CH 110 F10
CH 121 F21
CH 122 F22
CH 123 F23
CH 124 F24
CH 125 F25
CH 126 F26
CH 127 F27
CH 128 F28
CH 129 F29
CH 130 F30
CH 131 F31
CH 132 F32
CH 133 F33
CH 134 F34
CH 135 F35
CH 136 F36
CH 137 F37
CH 138 F38
CH 139 F39
CH 140 F40
E11, ITALY H+1, R11
E12, ITALY H+2, R12
CH Channel
CH 40/CH 240 E40, R40
CH 41/CH 241 E41, R41
CH 42/CH 242 E42, R42
CH 43/CH 243 E43, R43
CH 44/CH 244 E44, R44
CH 45/CH 245 E45, R45
CH 46/CH 246 E46, R46
CH 47/CH 247 E47, R47
CH 48/CH 248 E48, R48
CH 49/CH 249 E49, R49
CH 50/CH 250 E50, R50
CH 51/CH 251 E51, R51
CH 52/CH 252 E52, R52
CH 53/CH 253 E53, R53
CH 54/CH 254 E54, R54
CH 55/CH 255 E55, R55
CH 56/CH 256 E56, R56
CH 57/CH 257 E57, R57
CH 58/CH 258 E58, R58
CH 59/CH 259 E59, R59
CH 60/CH 260 E60, R60
CH 61/CH 261 E61, R61
CH 62/CH 262 E62, R62
CH 63/CH 263 E63, R63
CH 64/CH 264 E64, R64
CH 65/CH 265 E65, R65
CH 66/CH 266 E66, R66
CH 67/CH 267 E67, R67
CH 68/CH 268 E68, R68
CH 69/CH 269 E69, R69
CH Channel
CH 141 F41
CH 142 F42
CH 143 F43
CH 144 F44
CH 145 F45
CH 146 F46
CH 147 F47
CH 148 F48
CH 149 F49
CH 150 F50
CH 151 F51
CH 152 F52
CH 153 F53
CH 154 F54
CH 155 F55
CH 156 F56
CH 157 F57
CH 158 F58
CH 159 F59
CH 160 F60
CH 161 F61
CH 162 F62
CH 163 F63
CH 164 F64
CH 165 F65
CH 166 F66
CH 167 F67
CH 168 F68
CH 169 F69
CC Channel
CC 01/CC 201 S1
CC 02/CC 202 S2
CC 03/CC 203 S3
CC 04/CC 204 S4
CC 05/CC 205 S5
CC 06/CC 206 S6
CC 07/CC 207 S7
CC 08/CC 208 S8
CC 09/CC 209 S9
CC 10/CC 210 S10
CC 11/CC 211 S11
CC 12/CC 212 S12
CC 13/CC 213 S13
CC 14/CC 214 S14
CC 15/CC 215 S15
CC 16/CC 216 S16
CC 17/CC 217 S17
CC 18/CC 218 S18
CC 19/CC 219 S19
CC 20/CC 220 S20
CC 21/CC 221 S21
CC 22/CC 222 S22
CC 23/CC 223 S23
CC 24/CC 224 S24
CC 25/CC 225 S25
CC 26/CC 226 S26
CC 27/CC 227 S27
CC 28/CC 228 S28
CC 29/CC 229 S29
CC 30/CC 230 S30
CC Frequency (MHz)
CC 110 116-124
CC 111 124-132
CC 112 132-140
CC 113 140-148
CC 114 148-156
CC 115 156-164
CC 116 164-172
CC 123 220-228
CC 124 228-236
CC 125 236-244
CC 126 244-252
CC 127 252-260
CC 128 260-268
CC 129 268-276
CC 130 276-284
CC 131 284-292
CC 132 292-300
CC 133 300-306
CC 141 306-311
CC 142 311-319
CC 143 319-327
CC 144 327-335
CC 145 335-343
CC 146 343-351
CC 147 351-359
CC 148 359-367
CC 149 367-375
CC 150 375-383
CC 151 383-391
CC Channel
CC 31/CC 231 S31
CC 32/CC 232 S32
CC 33/CC 233 S33
CC 34/CC 234 S34
CC 35/CC 235 S35
CC 36/CC 236 S36
CC 37/CC 237 S37
CC 38/CC 238 S38
CC 39/CC 239 S39
CC 40/CC 240 S40
CC 41/CC 241 S41
CC 75/CC 275 X
CC 76/CC 276 Y, R3
CC 77/CC 277 Z, ITALY C, R4
CC 78/CC 278 Z+1, R5
CC 79/CC 279 Z+2
CC Frequency (MHz)
CC 152 391-399
CC 153 399-407
CC 154 407-415
CC 155 415-423
CC 156 423-431
CC 157 431-439
CC 158 439-447
CC 159 447-455
CC 160 455-463
CC 161 463-469
Main unit
Model
LT-37R70BU/SU
LT-37E70BU
LT-37ED6SU
Broadcasting systems CCIR I / B / G / D / K / L (See “Technical information”, P. 34)
Colour systems
Channels and frequencies
TV broadcast : PAL, SECAM
External input : PAL, SECAM, NTSC 3.58/4.43MHz
E2-E12 / E21-E69, F2-F10 / F21-F69, IR A-IR J, ITALY A-H / H+1 / H+2,
R1-R12 / R21-R69, S1-S41, X / Y / Z / Z+1 / Z+2,
French cable channels (Frequency : 116-172 MHz / 220-469 MHz)
Sound-multiplex systems NICAM (I / B / G / D / K / L), A2 (B / G / D / K)
Teletext systems FLOF (Fastext), TOP, WST (standard system)
Power requirements AC 220 V - 240 V, 50Hz
Audio output (
Rated power output
) 10 W + 10 W
Speakers (16 cm x 4 cm) oval x 2 (15 cm x 5.5 cm) oval x 2 (12 cm x 5 cm) oval x 2
Power consumption
[standby]
Screen size
(visible area size measured diagonally)
Dimensions (W x H x D: mm)
[without stand]
Weights
[without stand]
153 W
[0.5 W]
94 cm 80 cm 66 cm
919 x 649.4 x 311
[919 x 603.7 x 128]
22.7 kg
[19.8 kg]
Accessories (See “Check accessories”, P. 5)
LT-32R70BU/SU
LT-32E70BU
LT-32ED6SU
127 W
[0.6 W]
800 x 591 x 244
[800 x 545 x 137.8]
17.4 kg
[15.5 kg]
LT-26R70BU/SU
LT-26E70BU
LT-26ED6SU
100 W
[0.6 W]
672 x 512 x 244
[672 x 471 x 137.7]
14.4 kg
[12.5 kg]
Terminals / Connectors
Terminal name Terminal type Signal type (IN)
Composite video, S-video,
Analogue RGB
AUDIO L / R
Composite video, S-video,
Analogue RGB
AUDIO L / R
Composite video, S-video
AUDIO L / R
Analogue component
(576i (625i) / 480i (525i),
Progressive : 576p (625p) / 480p (525p),
HD : 1080i (1125i), 720p (750p)
AUDIO L / R
HDMI
(576i (625i) / 480i (525i) /
576p (625p) / 480p (525p),
1080i (1125i), 720p (750p))
Input / Output
terminals
Input terminals
EXT-1
EXT-2
EXT-3
Euroconnector x1
(SCART connector)
Euroconnector x1
(SCART connector)
RCA connectors x 3,
S-VIDEO connector x 1
EXT-4 RCA connectors x 5
EXT-5 (HDMI) HDMI connector x 1
PC INPUT D-SUB (15 pins) x 1 Analogue PC signal (P. 34)
Output
terminals
AUDIO OUT RCA connectors x 2 Audio L / R
Headphone
Stereo mini-jack x 1
(3.5 mm in diameter)
We may change the design and specifications without notice.
Signal type (OUT)
TV out
Dubbing out
)
Headphone
output
Notes
“T-V LINK”
compatible
 Loading...