


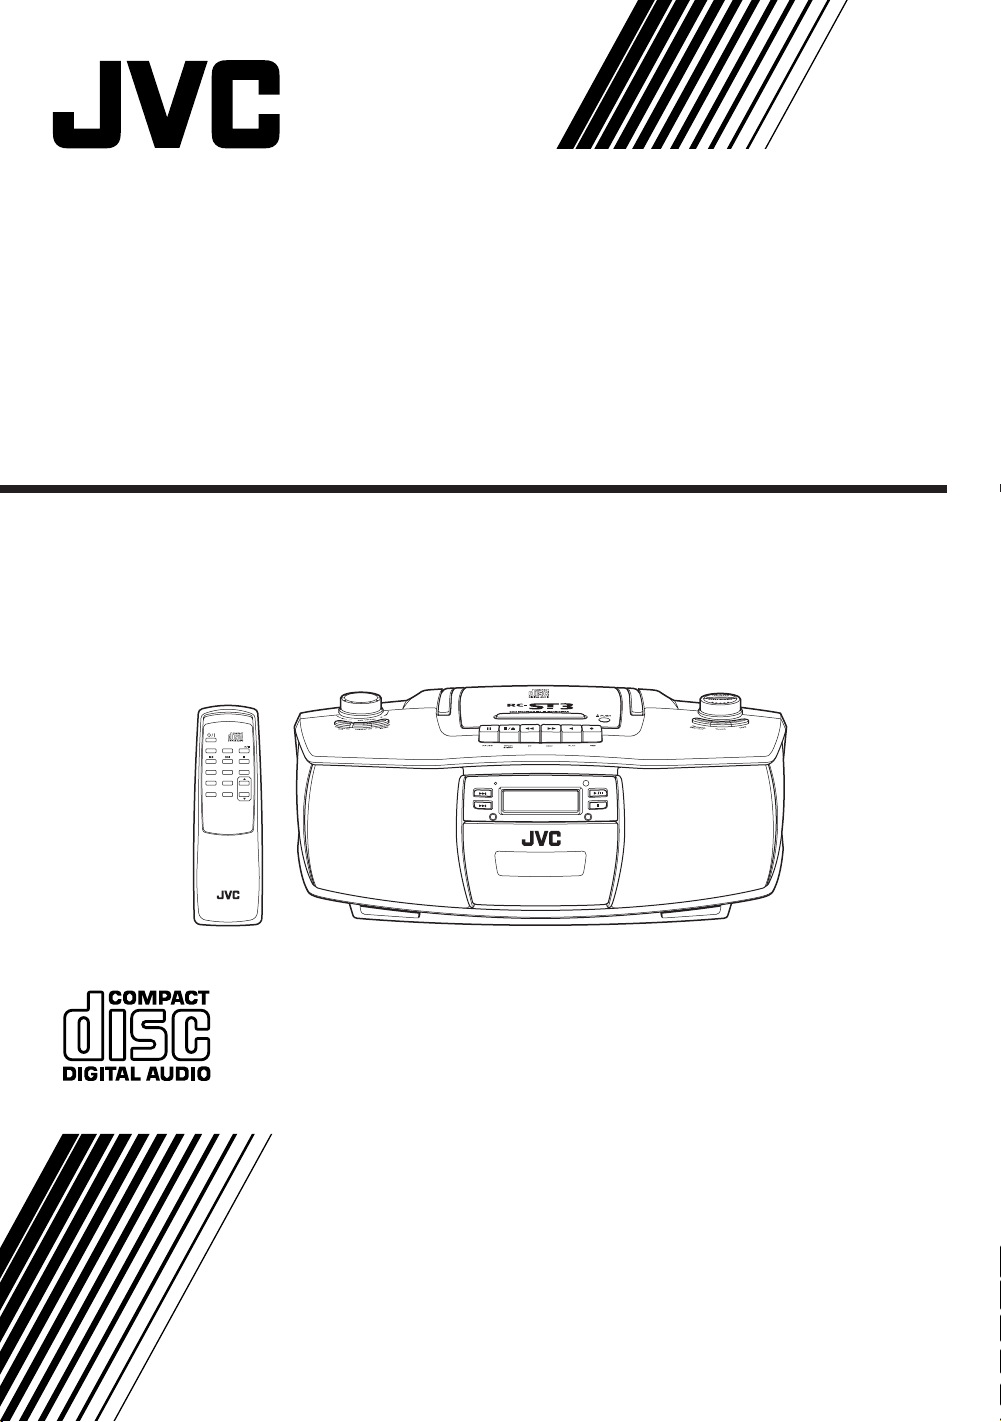
RC-ST3SL
CD PORTABLE SYSTEM
CD-PORTABLE-SYSTEM
CHAINE PORTABLE A CD
DRAAGBAAR CD-SYSTEEM
SISTEMA PORTATIL CON CD
SISTEMA PORTATILE CD
RC-ST3SL
TUNER
TAPE CD
PRESET/
PROGRAM
INTRO
REPEAT
FM MODE
HBS EQ
RANDOM
VOL
STANDBY
SEARCH UP
SEARCH DOWN
RANDOM INTRO
REMOTE
SENSOR
PLAY/PAUSE
STOP
INSTRUCTIONS
BEDIENUNGSANLEITUNG
MANUEL D’INSTRUCTIONS
GEBRUIKSAANWIJZING
MANUAL DE INSTRUCCIONES
ISTRUZIONI
RC-ST3
CD PORTABLE SYSTEM
601-610000-040
LVT1000-005A
[E]
Warnings, Cautions and Others
Warnung, Achtung und sostige Hinweise
Mises en garde, précautions et indications diverses
Waarschuwingen, voorzorgen en andere mededelingen
Avisos, Precauciones y Varios
Simboli di avvertenza, attenzione e altri
Caution –– STANDBY/ON button!
Disconnect the mains plug to shut the power off completely.
The STANDBY/ON button in any position does not
disconnect the mains line. The power can be remote
controlled.
Achtung — STANDBY/ON -Schalter!
Den Netzstecker aus der Steckdose ziehen, um die
Stromversorgung vollkommen zu unterbrechen. Der Schalter
STANDBY/ON unterbricht in keiner Stellung die
Stromversorgung vollkommen. Die Stromversorgung kann
mit der Fernbedienung ein- und ausgeschaltet werden.
Attention — Commutateur STANDBY/ON !
Déconnecter la fiche de secteur pour couper complètement
le courant. Le commutateur STANDBY/ON ne coupe
jamais complètement la ligne de secteur, quelle que soit sa
position. Le courant peut être télécommandé.
Voorzichtig — STANDBY/ON schakelaar!
Om de stroomtoevoer geheel uit te schakelen, trekt u de
stekker uit het stopkontakt. Anders zal er altijd een geringe
hoeveelheid stroom naar het apparaat lopen, ongeacht de
stand van de STANDBY/ON schakelaar. U kunt het
apparaat ook met de afstandsbediening aan- en uitschakelen.
CAUTION
To reduce the risk of electrical shocks, fire, etc.:
1. Do not remove screws, covers or cabinet.
2. Do not expose this appliance to rain or moisture.
Precaución –– Botón STANDBY/ON !
Quitar el enchufe principal para desconectar completamente
la tensión de red. El botón STANDBY/ON en cualquier
posición no desconecta la tensión de la red. La tensión
puede ser controlada a distancia.
Attenzione –– tasto STANDBY/ON !
Per interrompere l’erogazione di corrente, scollegare la
spina dalla presa. L’uso del tasto di accensione e spegnimento
STANDBY/ON non interrompe l’erogazione della
corrente. L’unità può essere accesa e spenta con il
telecomando.
Per l'Italia:
“Si dichiara che questo prodotto di marca JVC è conforme
alle prescrizioni del Decreto Ministeriale n.548 del 28/08/
95 pubblicato sulla Gazzetta Ufficiale della Repubblica
Italiana n.301 del 28/12/95.”
PRECAUCIÓN
Para reducir el riesgo de descargas eléctricas, fuego, etc.:
1. No quitar los tornillos, tapas o caja.
2. No exponer el aparato a la lluvia ni a la húmedad.
ACHTUNG
Zur Verhinderung von elektrischen Schlägen, Brandgefahr,
usw:
1. Keine Schrauben lösen oder Abdeckungen entfernen
und nicht das Gehäuse öffnen.
2. Dieses Gerät weder Regen noch Feuchtigkeit
aussetzen.
ATTENTION
Afin d’éviter tout risque d’électrocution, d’incendie, etc.:
1. Ne pas enlever les vis ni les panneaux et ne pas
ouvrir le coffret de l’appareil.
2. Ne pas exposer l’appareil à la pluie ni à l’humidité.
VOORZICHTIG
Ter vermindering van gevaar voor brand, elektrische
schokken, enz.:
1. Verwijder geen schroeven, panelen of de behuizing.
2. Stel dit toestel niet bloot aan regen of vocht.
ATTENZIONE
Per ridurre il rischio di scosse elettriche, incendio e altro:
1. Non rimuovere le viti, i coperchi o il rivestimento.
2. Non esporre questo apparecchio alla pioggia o
all’umidità.
– G-1 –

CAUTION:
• Do not block the ventilation openings or holes.
(If the ventilation openings or holes are blocked by a
newspaper or cloth, etc., the heat may not be able to get
out.)
• Do not place any naked flame sources, such as lighted
candles, on the apparatus.
• When discarding batteries, environmental problems must
be considered and local rules or laws governing the disposal
of these batteries must be followed strictly.
• Do not expose this apparatus to rain, moisture, dripping or
splashing and that no objects filled with liquids, such as
vases, shall be placed on the apparatus.
VOORZICHTIG
• Zorg dat u de ventilatieopeningen en -gaten niet afsluit.
(Als de ventilatieopeningen en -gaten worden afgesloten
door bijvoorbeeld papier of een doek, kan er hitte in het
apparaat worden opgebouwd.)
• Zet geen bronnen met open vuur, zoals brandende kaarsen,
op het apparaat.
• Wees milieubewust en gooi lege batterijen niet bij het
huishoudelijk afval. Lege batterijen dient u in te leveren met
het KCA of bij een innamepunt voor batterijen.
• Stel dit apparaat niet bloot aan regen, vocht, drupwater of
spatwater en plaats geen enkel voorwerp waarin zich een
vlocistof bevindt, zoals een vaas, op het apparaat.
ACHTUNG
• Blockieren Sie keine Belüftungsschlitze oder -bohrungen.
(Wenn die Belüftungsöffnungen oder -löcher durch eine
Zeitung oder ein Tuch etc. blockiert werden, kann die
entstehende Hitze nicht abgeführt werden.)
• Stellen Sie keine offenen Flammen, beispielsweise
angezündete Kerzen, auf das Gerät.
• Wenn Sie Batterien entsorgen, denken Sie an den
Umweltschutz. Batterien müssen entsprechend den
geltenden örtlichen Vorschriften oder Gesetzen entsorgt
werden.
• Setzen Sie dieses Gerät auf keinen Fall Regen, Feuchtigkeit
oder Flüssigkeitsspritzern aus. Es dürfen auch keine mit
Flüssigkeit gefüllen Objekte, z. B. Vasen, auf das Gerät
gestellt werden.
ATTENTION
• Ne bloquez pas les orifices ou les trous de ventilation.
(Si les orifices ou les trous de ventilation sont bloqués par
un journal un tissu, etc., la chaleur peut ne pas être
évacuée correctement de l’appareil.)
• Ne placez aucune source de flamme nue, telle qu’une
bougie, sur l’appareil.
• Lors de la mise au rebut des piles, veuillez prendre en
considération les problèmes de l’environnement et suivre
strictement les règles et les lois locales sur la mise au rebut
des piles.
• N’exposez pas cet appareil à la pluie, à l’humidité, à un
égouttement ou à des éclaboussures et ne placez pas des
objets remplis de liquide, tels qu’un vase, sur l’appareil.
PRECAUCIÓN
• No obstruya las rendijas o los orificios de ventilación.
(Si las rendijas o los orificios de ventilación quedan tapados
con un periódico, un trozo de tela, etc., no se podrá disipar
el calor).
• No ponga sobre el aparato ninguna llama al descubierto,
como velas encendidas.
• Cuando tenga que descartar las pilas, tenga en cuenta los
problemas ambientales y observe estrictamente los
reglamentos o las leyes locales sobre disposición de las
pilas.
• No exponga este aparato a la lluvia, humedad, goteos o
salpicaduras. Tampoco ponga recipientes conteniendo
líquidos, como floreros, encima del aparato.
ATTENZIONE
• Evitare di ostruire le aperture o i fori di ventilazione con
giornali, indumenti etc., in quanto s’impedirebbe al calore
di fuoriuscire.
• Non collocare fiamme libere (es. candele accese)
sull’apparecchio.
• Le pile devono essere smaltite nel rispetto dell’ambiente,
attenendosi ai regolamenti locali in materia.
• Non esporre l’apparecchio a pioggia, umidità, gocciolamenti
e spruzzi d’acqua ed evitare di sovrapporvi oggetti contenenti
liquidi (vasi etc.).
– G-2 –
IMPORTANT FOR LASER PRODUCTS / WICHTIGER HINWEIS FÜR LASER-PRODUKTE / IMPORTANT POUR LES
PRODUITS LASER / BELANGRIJKE INFORMATIE VOOR LASERPRODUKTEN / IMPORTANTE PARA PRODUCTOS
LASER / IMPORTANTE PER I PRODOTTI LASER
REPRODUCTION OF LABELS / ANBRINGUNGSORTE FÜR LABELS / REPRODUCTION DES ETIQUETTES /
VERLARING VAN DE LABELS / REPRODUCCIÓN DE ETIQUETAS / RIPRODUZIONE DI ETICHETTE
1 CLASSIFICATION LABEL, PLACED ON EXTERIOR
SURFACE
1 KLASSIFIKATIONSETIKETT AUF DER
AUßENSEITE
1 ÉTIQUETTE DE CLASSIFICATION, PLACÉE SUR
LA SURFACE EXTÉRIEURE
1 CLASSIFICATIELABEL, OP DE ACHTERZIJDE VAN
HET APPARAAT
1 ETIQUETA DE CLASIFICACIÓN, PEGADA EN LA
SUPERFICIE EXTERIOR
1 ETICHETTA DI CLASSIFICAZIONE, SITUATA
1. CLASS 1 LASER PRODUCT
2. CAUTION: Invisible laser radiation when open and
interlock failed or defeated. Avoid direct exposure to
beam.
3. CAUTION: Do not open the top cover. There are no
user serviceable parts inside the Unit; leave all
servicing to qualified service personnel.
1. LASER-PRODUKT DER KLASSE 1
2. GEFAHR: Sichtbare Laserstrahlung bei Öffnung und
fehlerhafter oder beschädigter Sperre. Direkten
Kontakt mit dem Strahl vermeiden!
3. ACHTUNG: Das Gehäuse nicht öffnen. Das Gerät
enthält keinerlei Teile, die vom Benutzer gewartet
werden können. Überlassen Sie Wartungsarbeiten
bitte qualifizierten Kundendienst-Fachleuten.
1. PRODUIT LASER CLASSE 1
2. ATTENTION: Radiation laser visible quand l’appareil
est ouvert ou que le verrouillage est en panne ou
désactivé. Eviter une exposition directe au rayon.
3. ATTENTION: Ne pas ouvrir le couvercle du dessus. Il
n’y a aucune pièce utilisable à l’intérieur. Laisser à un
personnel qualifié le soin de réparer votre appareil.
2 WARNING LABEL, PLACED INSIDE THE UNIT
2 WARNETIKETT IM GERÄTEINNEREN
2 ETIQUETTE D’AVERTISSEMENT PLACÉE À
L’INTERIEUR DE L’APPAREIL
2 WAARSCHUWINGSLABEL, IN HET APPARAAT
2 ETIQUETA DE AVISO, SITUADA EN EL INTERIOR
DE LA UNIDAD
2 ETICHETTA DI AVVERTENZA, AFFISSA
ALL’INTERNO DELL’UNITÀ
CAUTION -
INVISIBLE LASER RADIATION WHEN OPEN AND INTERLOCK
DEFEATED. AVOID DIRECT EXPOSURE TO BEAM.
VORSICHT !
UNSICHTBARE LASERSTRAHLUNG TRITT AUS, WENN DECKEL
GEÖFFNET UND WENN SICHERHEITSVERRIEGLUNG ÜBERBRÜCKT
IST. NICHT DEM STRAHL AUSSETZEN!
VARNING -
OSYNLIG LASERSTRÄLNING NÄR DENNA DEL ÄR ÖPPNAD OCH
SPÄRR ÄR URKOPPLAD STRÅLEN ÄR FARLIG.
ADVARSEL -
USYNLIG LASERSTRÅLING VED ÅBNING NÅR
SIKKERHEDSAFBRTDERE ER UDE AF FUNKTION. UNDGÅ
UDSÆTTELSE FOR STRÅLING.
1. PRODUCTO LÁSER DE CLASE 1
2. PELIGRO: Radiación láser visible cuando se abra un
sistema de bloqueo defectuoso o averiado. Evitar la
exposición directa al haz.
3. PRECAUCIÓN: No abrir la tapa superior. No hay
piezas reparables por el usuario en el interior de la
unidad; deje todo mantenimiento o reparación al
personal técnico cualificado.
1. CLASSE 1, PRODOTTI LASER
2. PERICOLO: radiazioni laser visibili quando
l’apparecchio è aperto e il dispositivo di bloccaggio è
guasto o è stato sbloccato. Evitare l’esposizione
diretta al raggio.
3. ATTENZIONE: non aprire il coperchio superiore.
Nessun utente deve sostituire o riparare le parti
interne di questo apparecchio; per eventuali
riparazioni, rivolgersi a tecnici qualificati.
1. KLAS 1 LASERPRODUKT
2. GEVAARLIJK: Zichtbaar laserstraling wanneer open
en de beveiliging faalt of uitgeschakeld is. Voorkom het
direkt blootstaan aan de straal.
3. VOORZICHTIG: De bovenkap niet openen. Binnenin
het toestel bevinden zich geen door de gebruiker te
repareren onderdelen: laat onderhoud over aan
bekwaam vakpersoneel.
– G-3 –

CONTENTS
English
HANDLING PRECAUTIONS ................................... 1
POWER SUPPLY ....................................................... 2
NAMES OF PARTS AND CONTROLS .................... 3
REMOTE CONTROL UNIT ...................................... 4
TURNING THE UNIT ON AND OFF ....................... 6
SETTING THE CLOCK ............................................. 6
ADJUSTING THE SOUND........................................ 7
HANDLING PRECAUTIONS
PLAYING COMPACT DISCS ................................... 8
RADIO RECEPTION ............................................... 12
CASSETTE OPERATIONS ..................................... 14
MAINTENANCE ...................................................... 16
TROUBLESHOOTING ............................................ 17
SPECIFICATIONS ................................................... 18
• When not in use
When not using the unit for an extended period of time,
disconnect the AC power cord from the AC outlet.
• AC power cord
– Do not handle the power cord with wet hands.
– When unplugging the power cord from the wall
outlet, always grasp and pull the plug, not the cord.
– Do not modify the power cord in any manner. Do
not bend it sharply or twist it.
– Consult your dealer when damage, disconnection or
contact failure is found with the power cord.
– In case of lightning, unplug the AC power cord.
• Do not disassemble the unit.
• Foreign objects and liquid
– Do not insert any metallic objects into the unit.
– If water or some liquid gets inside the unit, unplug
the power cord from the outlet and consult your
dealer.
• Avoid installing the unit in the following
places:
– Where the temperature may become excessively
high or low; the recommended temperature range is
between 5°C and 35°C.
– Where subject to vibrations.
– Where it is excessively humid, such as in a
bathroom.
– In a badly ventilated place.
– Near strong magnetic fields.
• Do not use the unit in direct sunlight or leave it
in a closed automobile, etc.
The unit might be exposed to high temperatures above
40°C.
• Ventilation
Do not block the ventilation holes of the unit; otherwise
heat cannot escape from the unit.
• CD pickup lens
Do not leave the disc compartment cover open;
otherwise the CD pickup lens might be contaminated
with dust. Do not touch the lens with fingers.
• Condensation
Moisture may form on the CD pickup lens when:
–A heater has just been switched on in the room where
the unit is used.
– The unit is in a place with smoke or high humidity.
– The unit has just moved from a cold place to a warm
room.
If the unit has condensation inside, it may not function
correctly. Should this occur, turn on the unit and wait
one or two hours before use.
• Do not place magnetic objects near the
speakers.
Since the speakers contain magnets inside, do not place
cassette tapes or magnetic cards nearby as recorded
data could be erased.
• Keep the unit away from a TV.
Do not place the unit near a TV or avoid using the unit
when the TV is turned on; otherwise the TV picture
could be distorted.
• Carrying handle
– Do not raise or lower the carrying handle with the
telescopic antenna extended, to avoid damage to the
antenna.
– Position the carrying handle so that it does not
interfere with operation.
1
POWER SUPPLY
Operation on household AC
1
Connect the supplied AC power cord to the
AC IN Ó jack on the rear panel of the unit.
2
Plug the AC power cord into an AC power
outlet.
Cautions
• Use only the JVC power cord provided with this unit
to avoid malfunction or damage to the unit.
• Even when you turn off the unit by pressing the
STANDBY/ON
continues to flow. To save power and for safety when
not using the unit for an extended period of time,
disconnect the power cord from the household AC
outlet.
button, a very small current
Operation on batteries
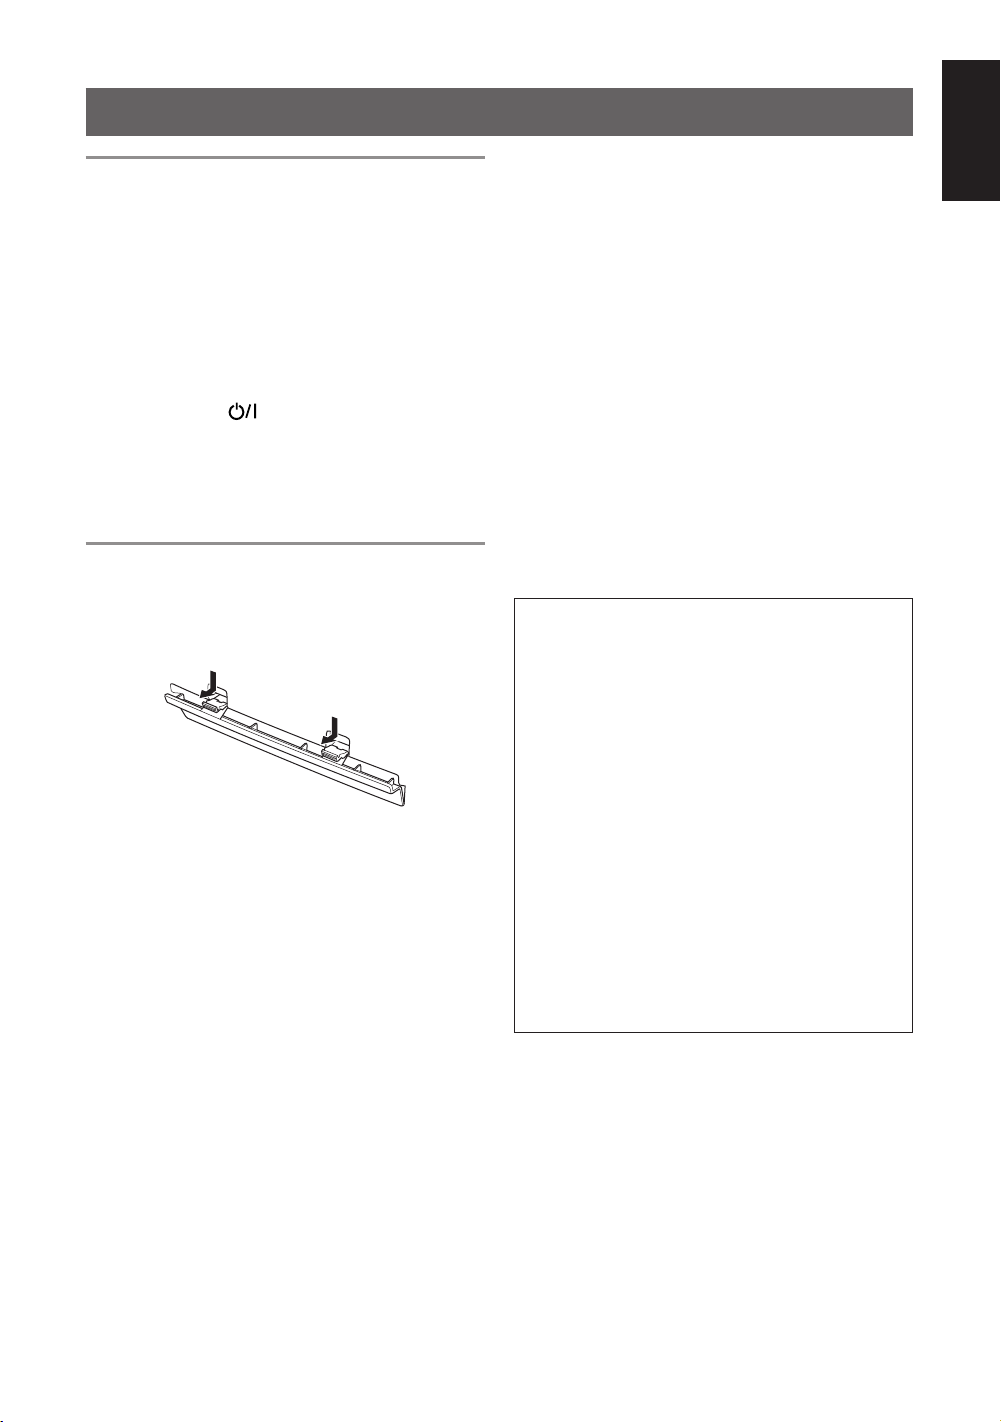
Installing batteries
1
Open the battery compartment cover by
pressing down the two tabs.
2
Install eight R20P (SUM-1)/D (13F) batteries.
Insert the batteries with ª and · positioned
correctly referring to the drawing above the battery
compartment.
3
Replace the cover.
Battery replacement
When the tape speed or output sound level decreases, or
CD playback becomes intermittent, replace all batteries
with fresh ones.
For better battery usage
•When making an important recording, use of new
batteries (preferably alkaline batteries with a longer
service life) is recommended to avoid any possible
failure.
• To prevent the power from being accidentally turned
on, remove the batteries when carrying the unit by hand
or in the trunk of a car, thus avoiding wasteful battery
consumption.
• Continuous operation of the unit causes the battery
power to be consumed quicker than non-continuous
operation.
• Operation of the unit in a cold place causes the battery
power to be consumed more quickly than in a warm
place.
Cautions
If batteries are used incorrectly, it may result in
electrolyte leakage or they may explode.
• Make sure that the batteries are installed with the
positive ª and negative · terminals positioned
correctly.
• Do not mix new and old batteries together, or mix
different types of batteries.
• Do not try to recharge non-rechargeable batteries.
• Remove the batteries when the unit is not to be used
for an extended period of time.
• Remove the batteries when operating the unit on
the household AC; though the power supply is
automatically switched from the batteries to the
household AC when the AC power cord is
connected.
• If chemicals leaking from batteries come in contact
with your skin, wash them off immediately with
water. If chemicals leak on the surface of the unit,
clean the unit completely.
English
2
English
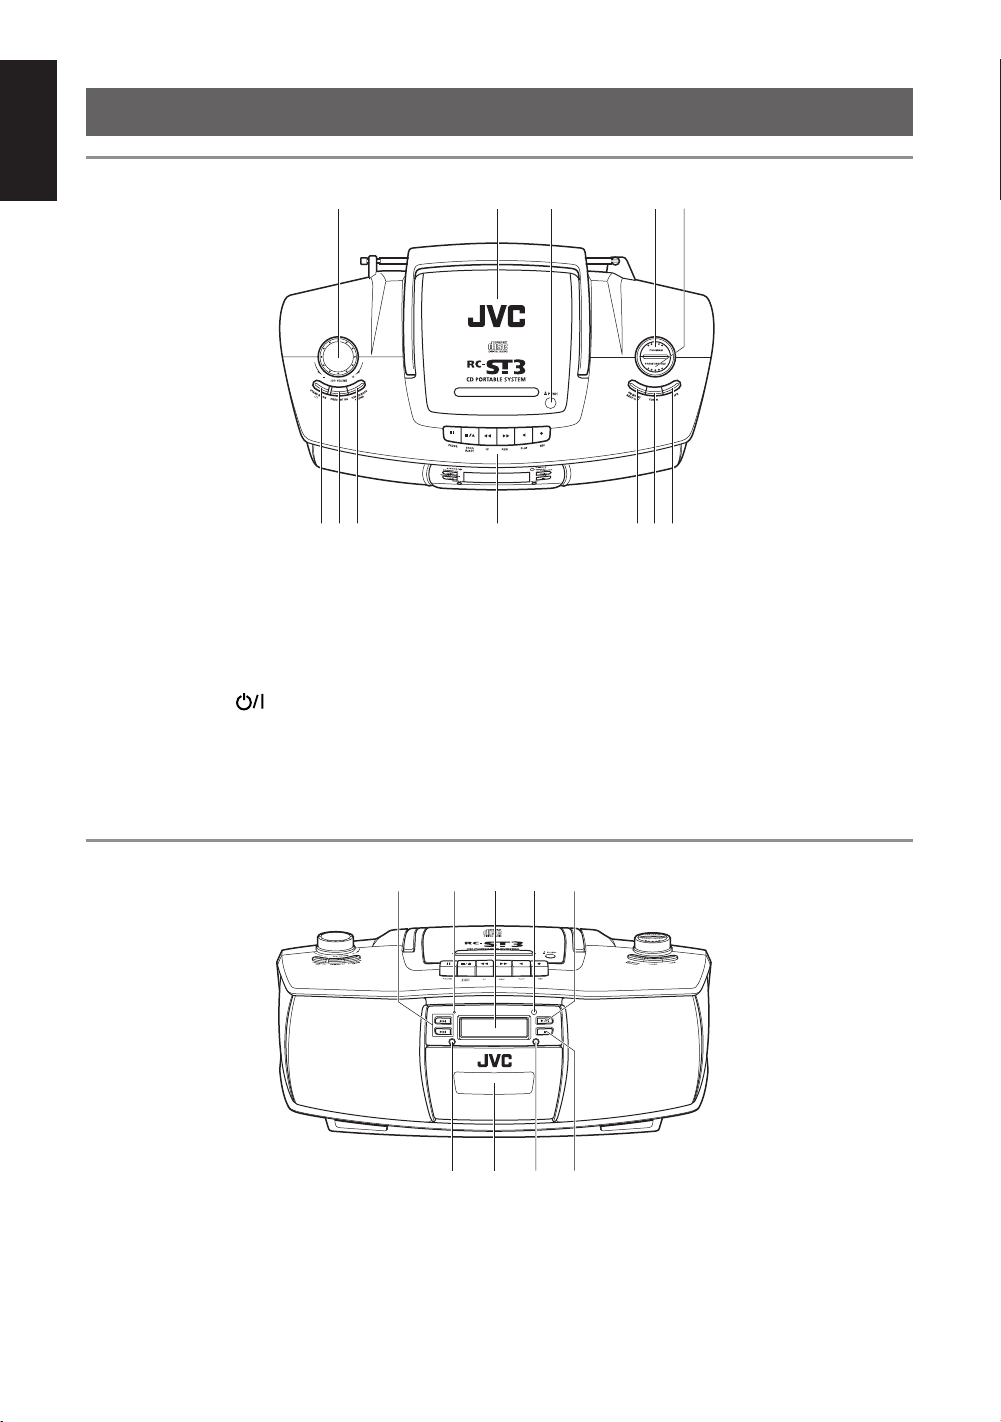
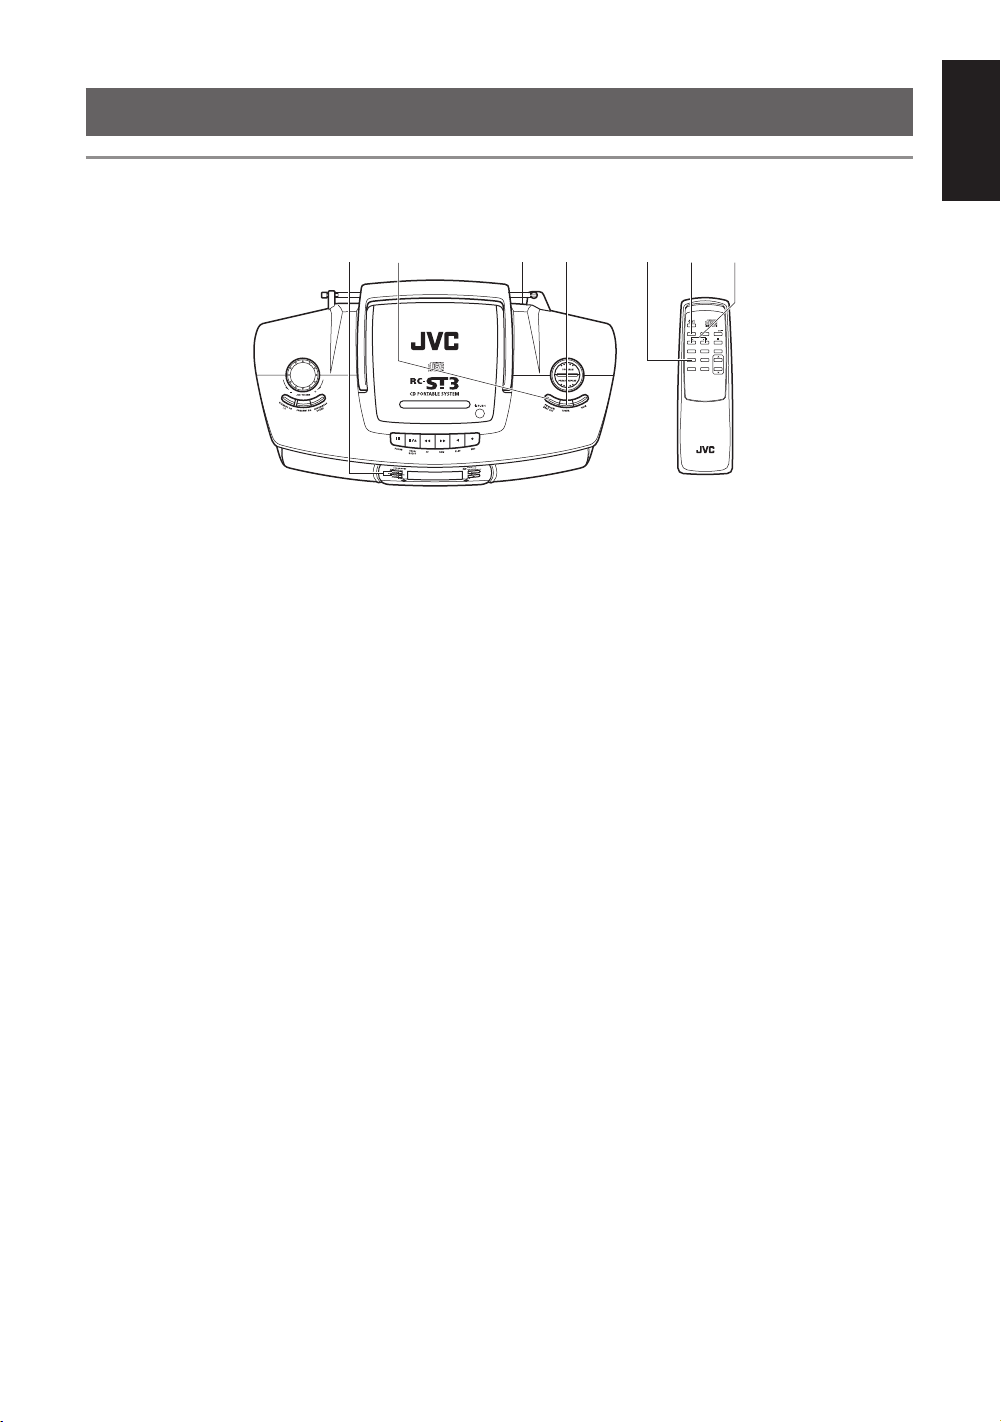
Top
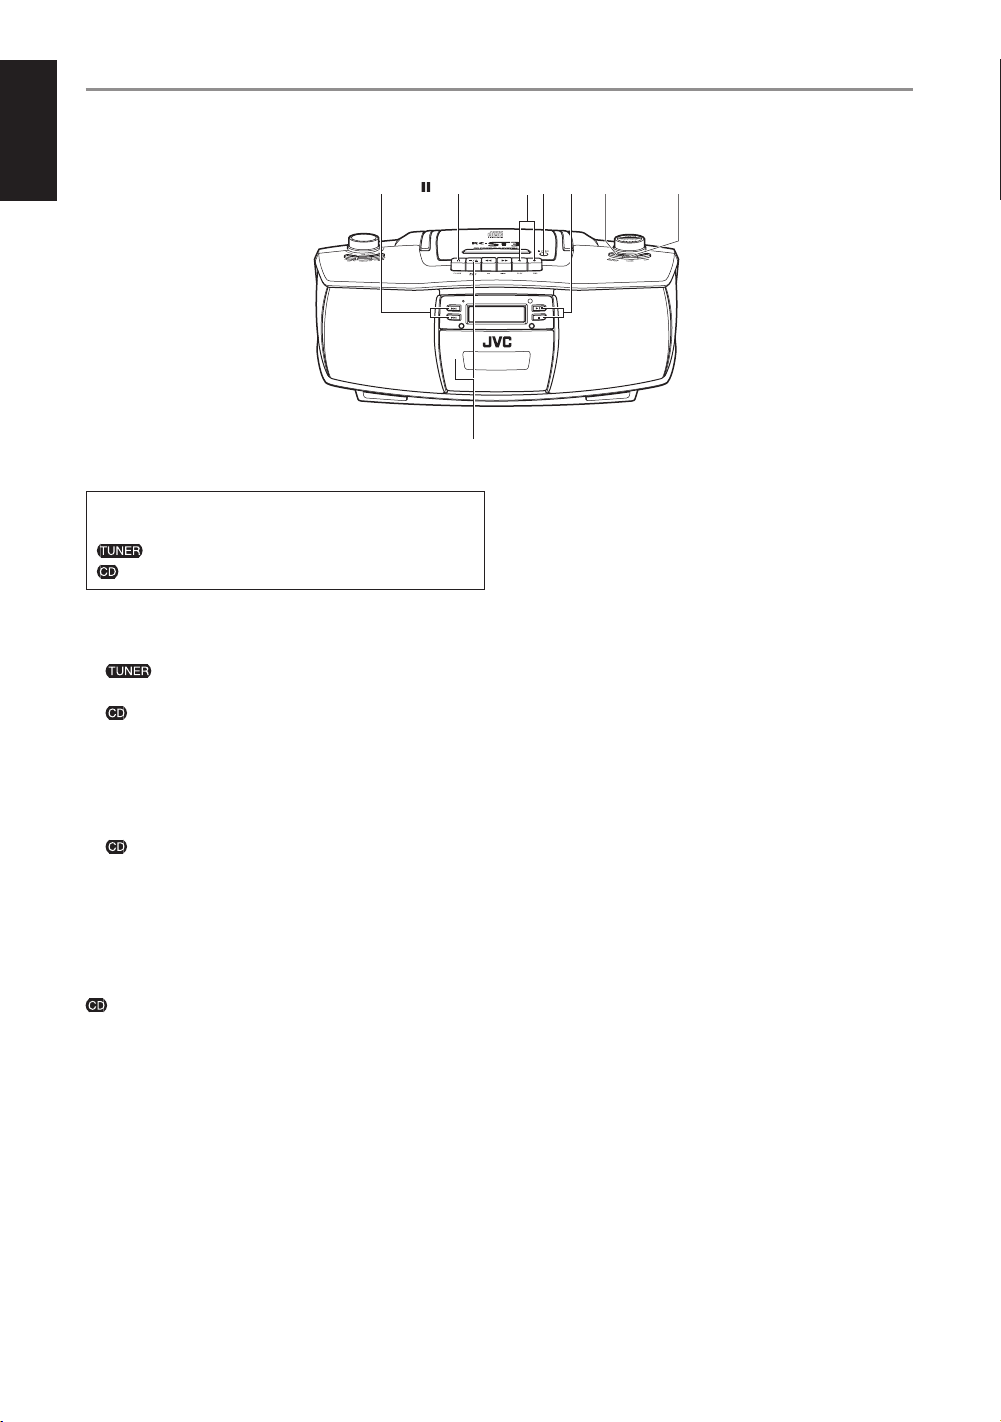
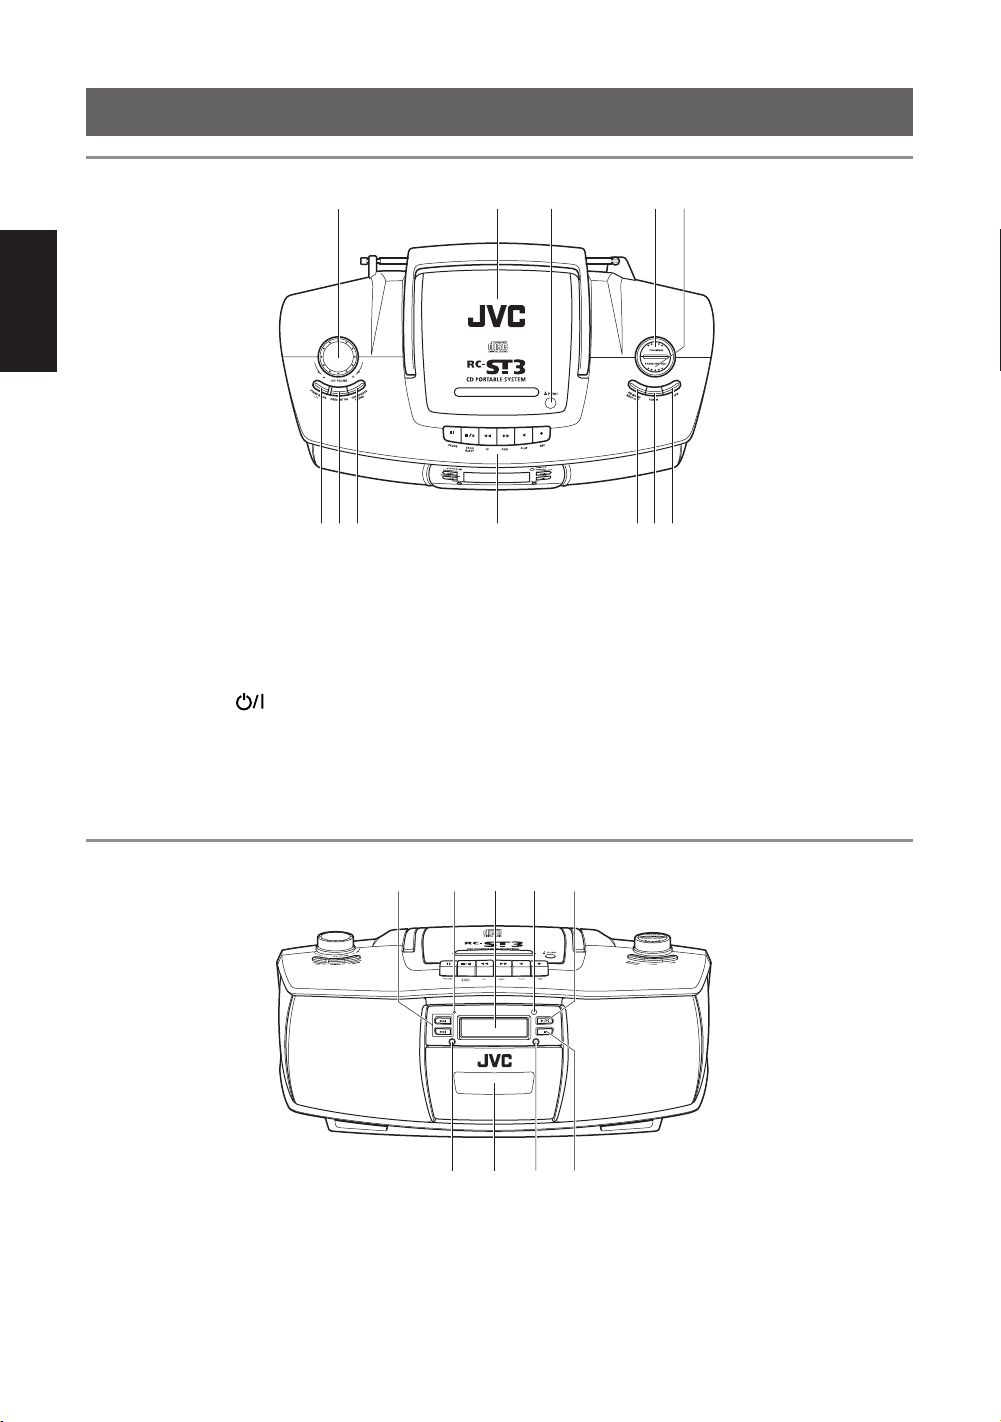
NAMES OF PARTS AND CONTROLS
1234 5
678 9 101112
1 JOG VOLUME control
2 Disc compartment
3 0 PUSH
4 PROGRAM button
5 PRESET/REPEAT button
6 STANDBY/ON
button
7 PRESET EQ button
8 HYPER-BASS SOUND button
Front
9 Cassette operation buttons
8 PAUSE button
§ STOP/EJECT button
1 FF button
¡ REW button
2 PLAY button
¶ REC button
10 FM MODE/BEAT CUT button
11 TUNER button
12 TAPE button
13 14 15 16 17
STANDBY
SEARC
H
U
P
SEARC
H
DO
W
N
RANDOM INTRO
CD PORTABLE SYSTEM
RC-ST3
REMOTE
SENSOR
PLAY/PAUSE
STOP
18 19 20 21
13 ¢ SEARCH UP and 4 SEARCH DOWN
buttons
14 STANDBY indicator
15 Display window
16 REMOTE SENSOR
3
17 3/8 PLAY/PAUSE button
18 RANDOM button
19 Cassette holder
20 INTRO button
21 7 STOP button

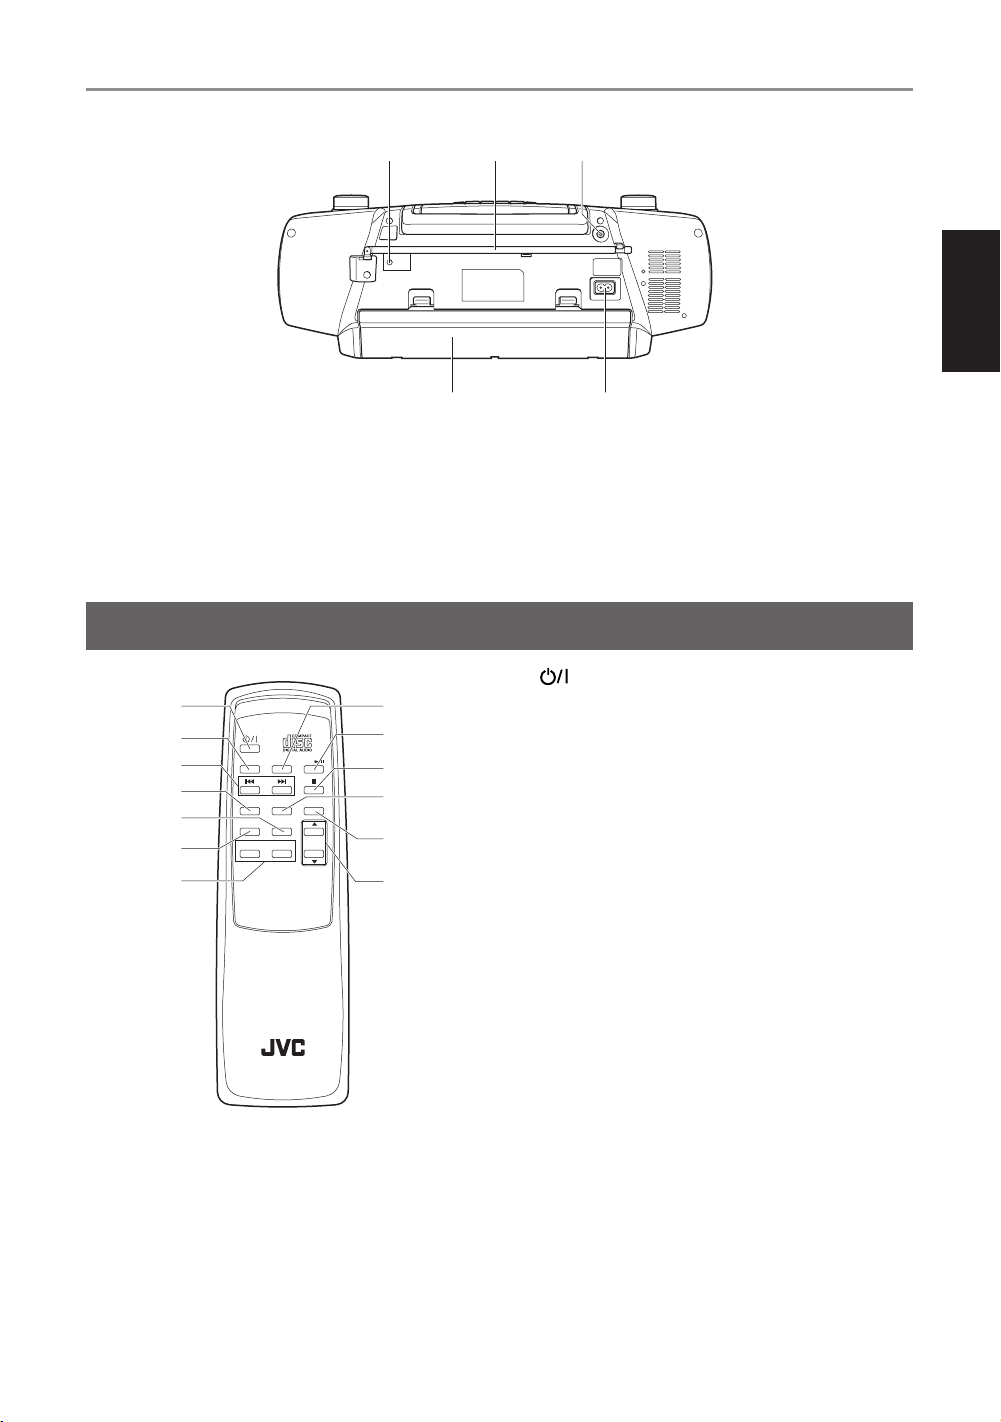
Rear
22 RESET key
23 FM telescopic antenna
24 PHONES jack
REMOTE CONTROL UNIT
1
2
3
4
5
6
7
TUNER
PRESET/
REPEAT
FM MODE
HBS EQ
TAPE CD
PROGRAM
RANDOM
INTRO
VOL
22
RESET
25 26
8
9
10
11
12
13
2423
PHONES
AC IN~
25 Battery compartment
26 AC IN Ó jack
1 button
2 TUNER button
3 4 and ¢ buttons
4 PRESET/REPEAT button
5 RANDOM button
6 FM MODE button
7 Sound control buttons
HBS button
EQ button
8 TAPE button
9 CD 3/8 button
10 7 button
11 PROGRAM button
12 INTRO button
13 VOL 5 and VOL ∞ buttons
English
4
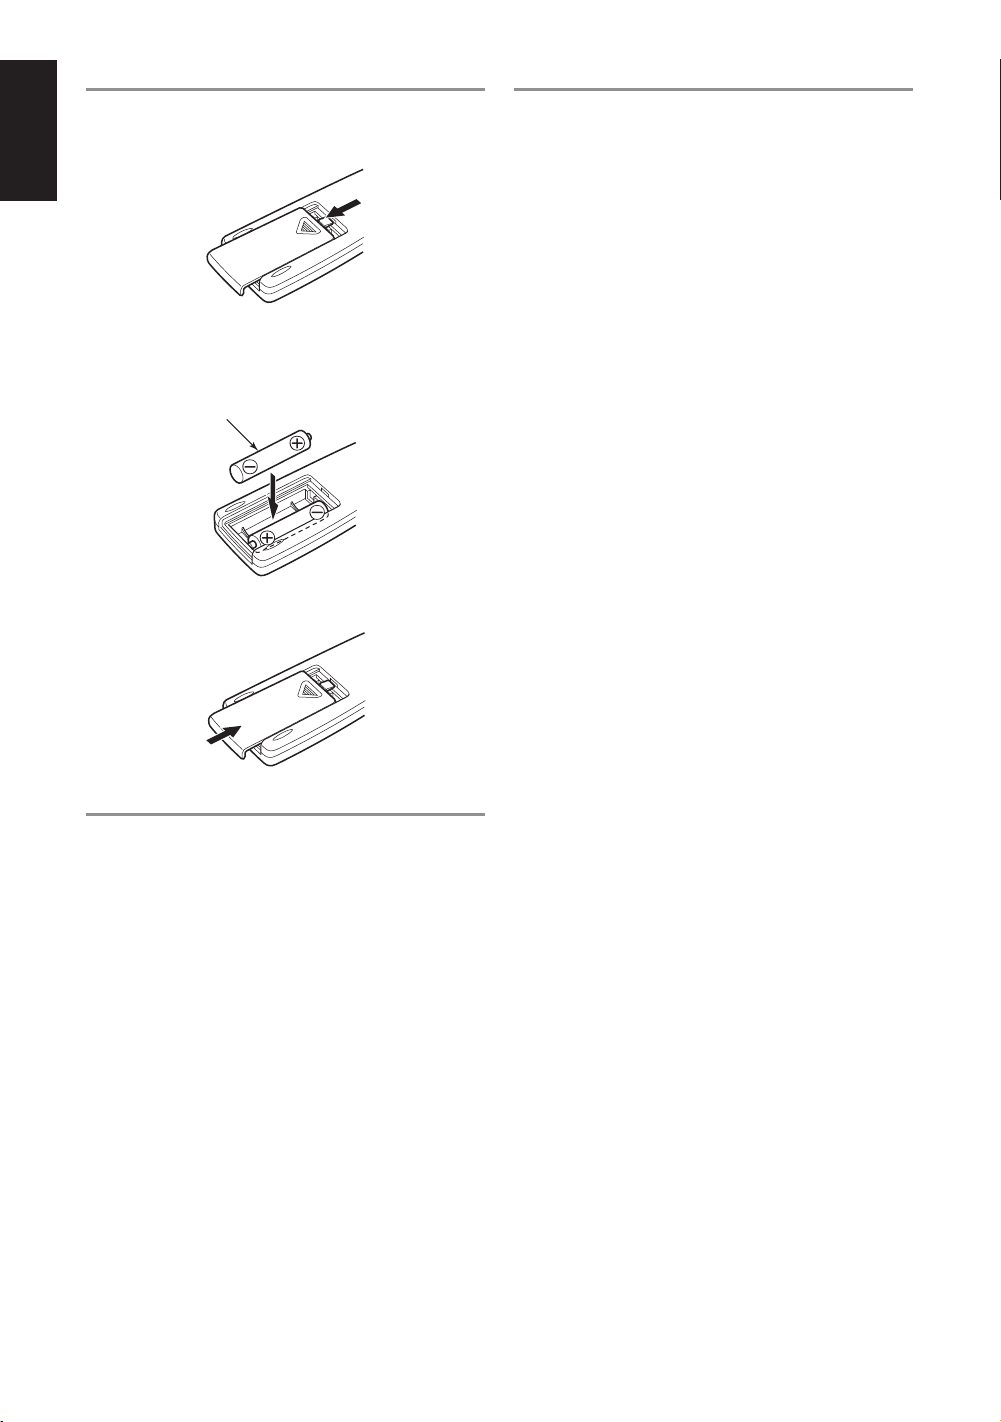
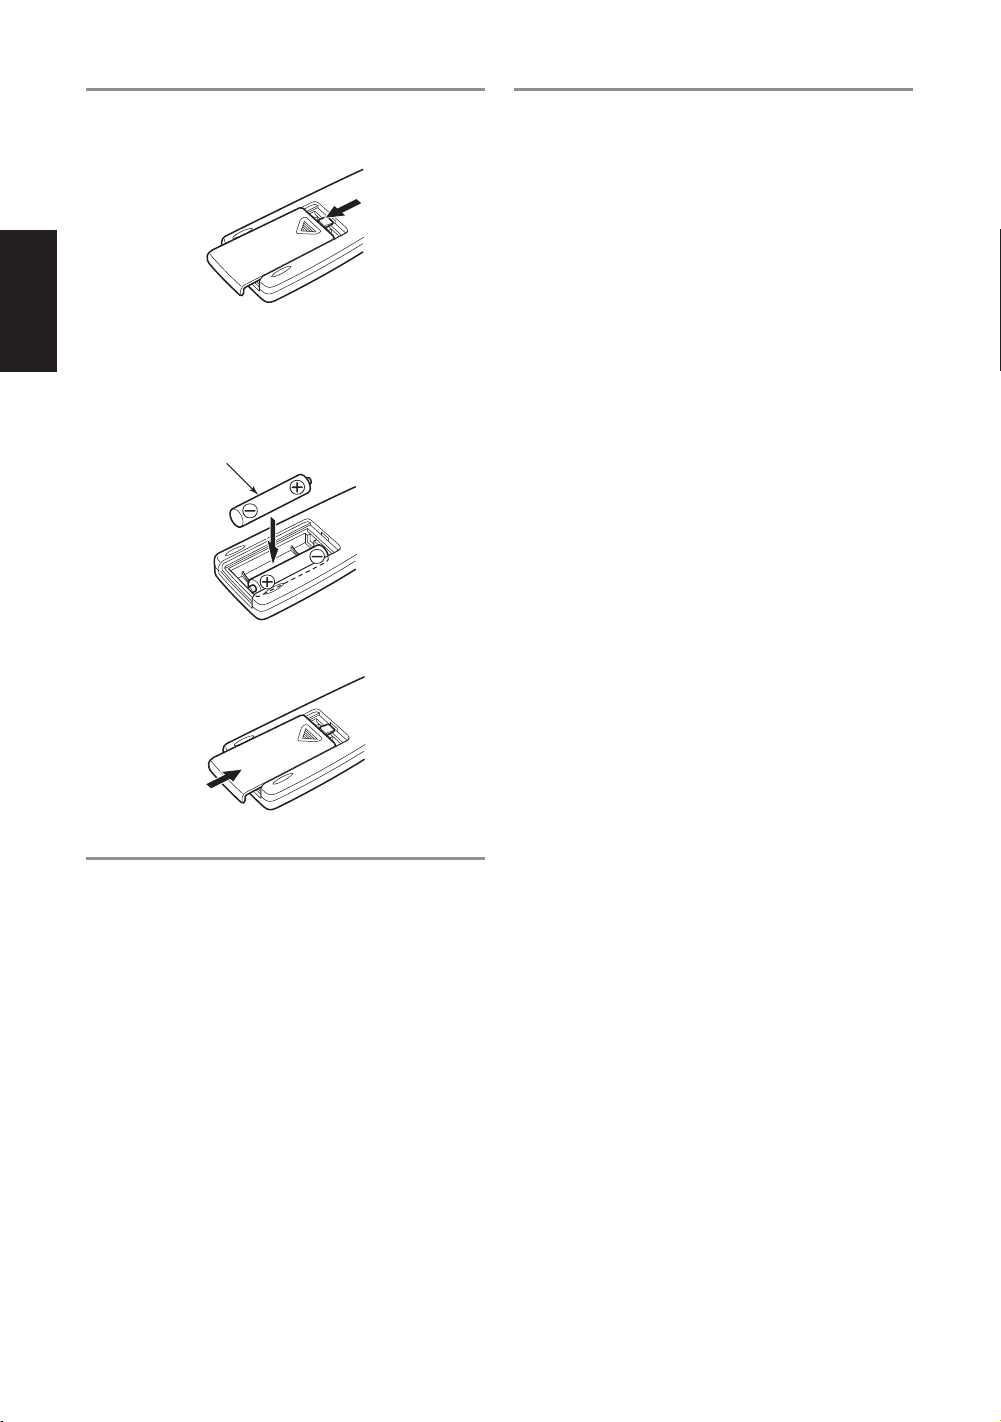
Installing batteries
1
English
Remove the battery compartment cover.
2
Insert two R03 (UM4)/AAA (24F) batteries.
Insert the · ends first. Make sure that the ª and ·
terminals are positioned correctly.
R03 (UM4)/AAA (24F) battery
3
Replace the cover.
Notes on using the remote control
unit
• Point the top of the remote control unit toward the
REMOTE SENSOR section as directly as possible.
The distance operable from the main unit decreases if
you point the remote control unit at an angle.
• Do not expose the REMOTE SENSOR section to
strong lighting or direct sunlight.
• Make sure that there are no obstacles between the
remote control unit and the REMOTE SENSOR
section.
121
Battery replacement
The maximum operating distance between the remote
control unit and the REMOTE SENSOR section on the
main unit is approximately 7 meters.
When this operating range decreases or operations with
the remote control unit become unstable, replace both
batteries with new ones.
5
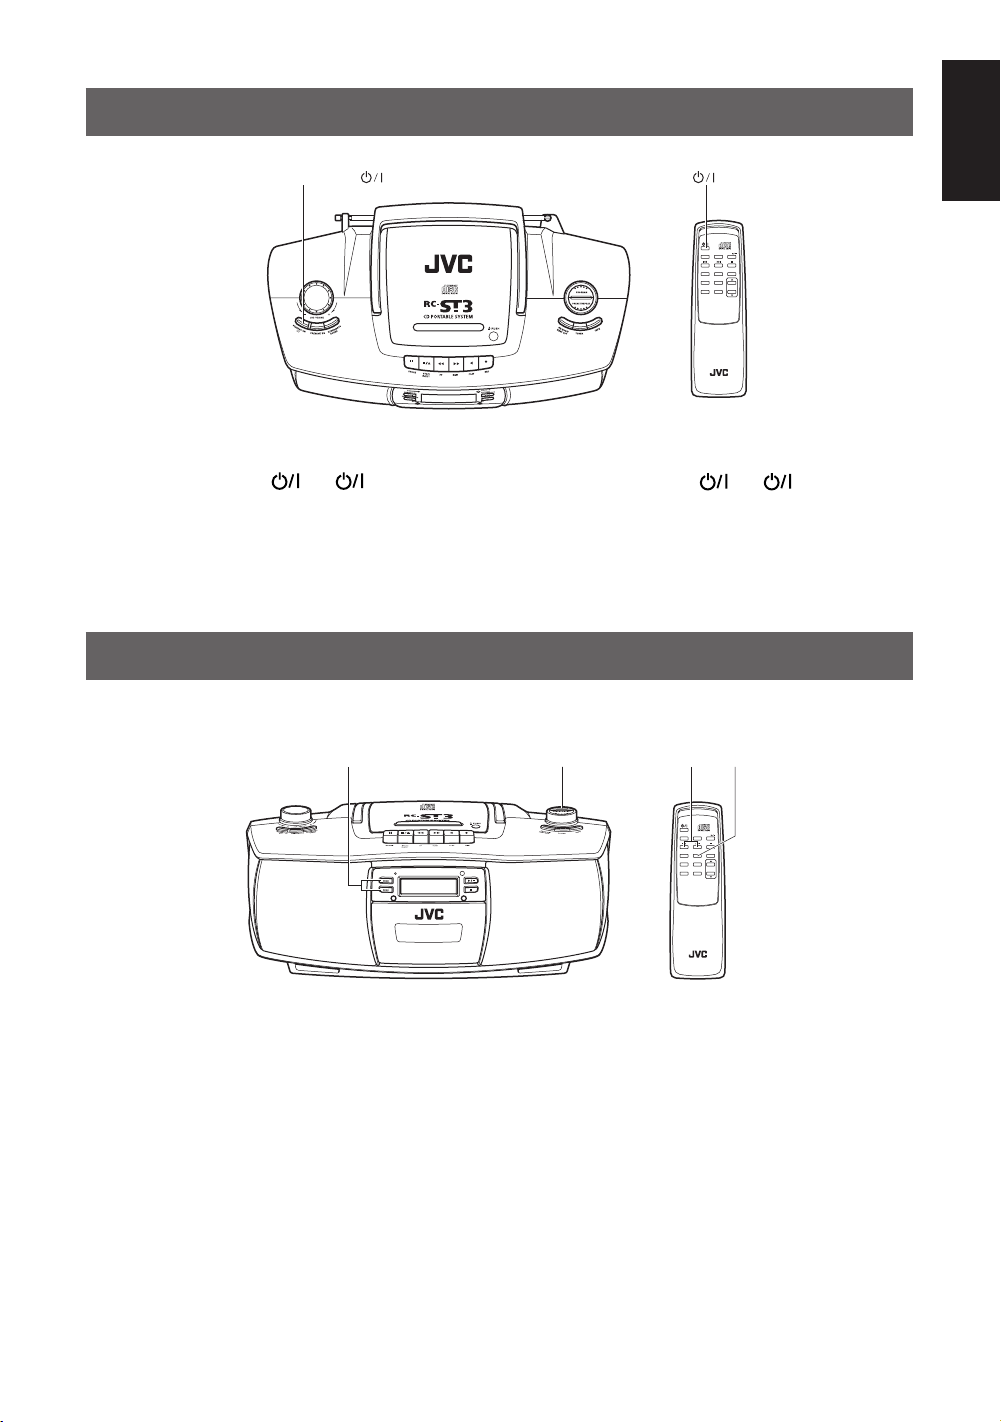
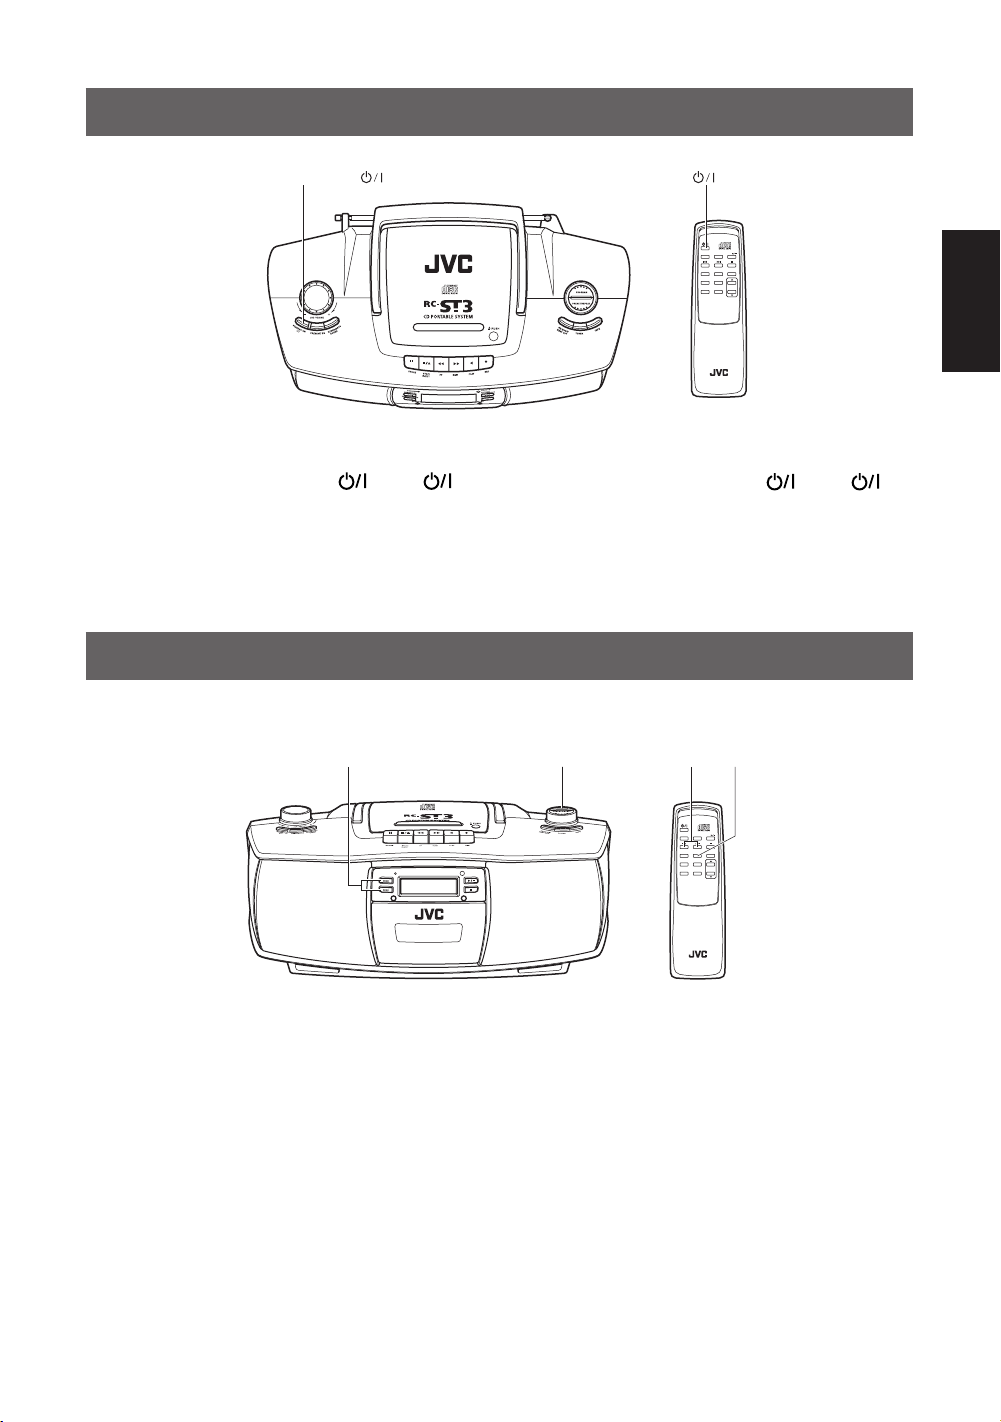
TURNING THE UNIT ON AND OFF
5
STANDBY/ON
To turn on the unit
Press STANDBY/ON (or on the remote
control unit).
The STANDBY indicator goes off. The unit turns on
ready to play the source selected when the unit was last
turned off.
SETTING THE CLOCK
The clock is displayed when the unit is in the standby mode.
TUNER
TAPE CD
PRESET/
PROGRAM
INTRO
REPEAT
FM MODE
RANDOM
VOL
HBS EQ
To turn off the unit
Press STANDBY/ON (or on the remote
control unit) again.
The STANDBY indicator lights up in red and the unit
enters the standby mode.
English
STANDBY
SEARCH UP
SEARCH DOWN
RANDOM INTRO
RC-ST3
CD PORTABLE SYSTEM
When the unit is turned off
1
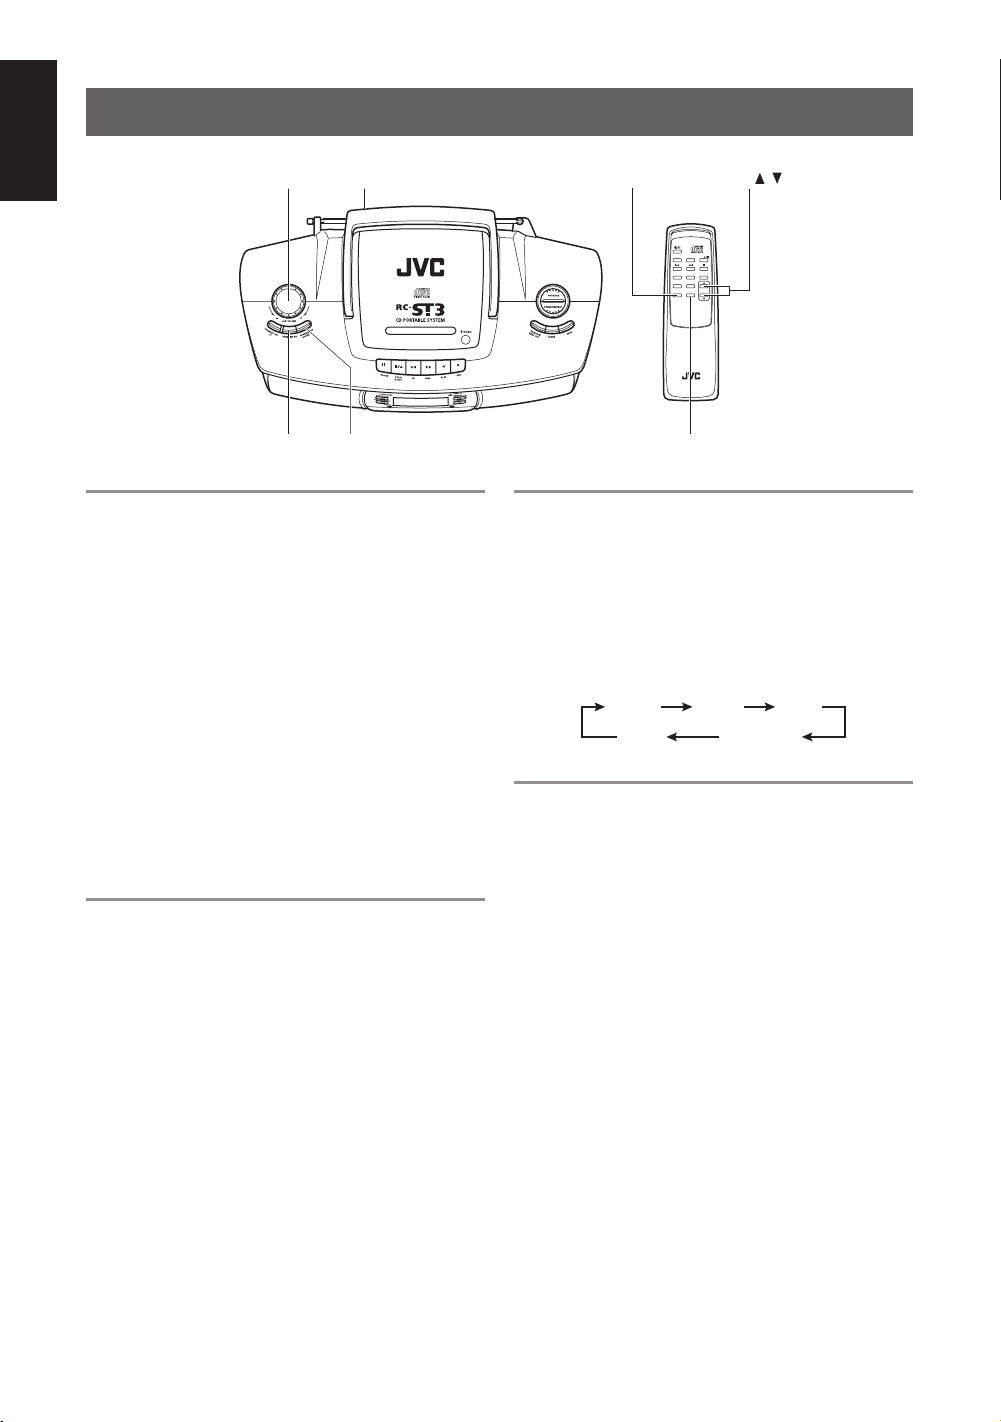
Press and hold PROGRAM on the main unit
until the hour indication starts flashing.
2
Press 4 or ¢ to set the hour.
3
Press and hold PROGRAM until the minute
indication starts flashing.
4
Press 4 or ¢ to set the minute.
5
Press and hold PROGRAM until the clock
starts functioning.
1,3,52,4
REMOTE
SENSOR
PLAY/PAUSE
STOP
2,4 3,
TUNER
TAPE CD
PRESET/
PROGRAM
INTRO
REPEAT
FM MODE
RANDOM
VOL
HBS EQ
Notes
• In step 1, you can press the PROGRAM button only
on the main unit, not on the remote control unit.
• If the unit is disconnected from the power source for a
certain period of time, the clock setting will be lost. In
this case, reset the clock again.
• The clock may gain or lose one to two minutes per
month.
6
ADJUSTING THE SOUND
English
JOG VOLUME
PRESET EQ HYPER-BASS SOUND
PHONES HBS VOL /
Volume adjustment
To increase the volume
Turn JOG VOLUME clockwise (or press VOL
5 on the remote control unit).
To decrease the volume
Turn JOG VOLUME counterclockwise (or
press VOL ∞ on the remote control unit).
Caution
Do not turn off the unit with the volume set to an
extremely high level; otherwise a sudden blast of sound
might be produced damaging your hearing and/or the
speakers, when you turn on the unit next time or start
playing another source.
Listening through headphones
Connect a pair of headphones to the PHONES
jack.
Use commercially available 3.5-mm stereo mini
headphones (16 Ω to 32 Ω).
No sound comes out of the speakers when headphones
are connected.
TUNER
TAPE CD
PRESET/
PROGRAM
INTRO
REPEAT
FM MODE
RANDOM
VOL
HBS EQ
EQ
Changing the EQ (equalizer) setting
The unit has several preset EQ (equalizer) settings so
that you can select one that most matches the type of
music being played.
Press PRESET EQ (or EQ on the remote control
unit) repeatedly.
Each time you press the button, the EQ setting changes
as shown below.
ROCK JAZZ POP
FLAT
CLASSIC
Reinforcing the bass sound
You can enjoy powerful bass sound by turning on the
Hyper-Bass Sound effect.
Press HYPER-BASS SOUND (or HBS on the
remote control unit).
When the Hyper-Bass Sound effect is turned on, the HBS
indicator lights up in the display window.
To turn off the effect
Press the same button again so that the HBS indicator
goes off.
Cautions
• Turn down the volume before connecting headphones
and keep the volume level low; as listening at high
volumes could damage your hearing.
• Do not drive while listening through headphones.
7
PLAYING COMPACT DISCS
Playable discs
The unit can play audio CDs (8 cm and 12 cm) with the
following mark.
The unit can also play CD-R and CD-RW discs recorded
in music CD format.
Notes on CD-R and CD-RW discs
• User-edited CD-R (Recordable) and CD-RW
(Rewritable) discs can be played only if they are
already finalized.
• Some CD-R and CD-RW discs may not be played on
the unit depending on the disc characteristics or
recording conditions.
• Before playing CD-R or CD-RW discs, read their
instructions and cautions carefully.
• Some CD-R and CD-RW discs may not be played on
the unit because of damage or stain on them, or if the
CD pickup lens is dirty.
• CD-RW discs may require a longer readout time (due
to the fact that the reflectance of CD-RW discs is lower
than that of regular CDs).
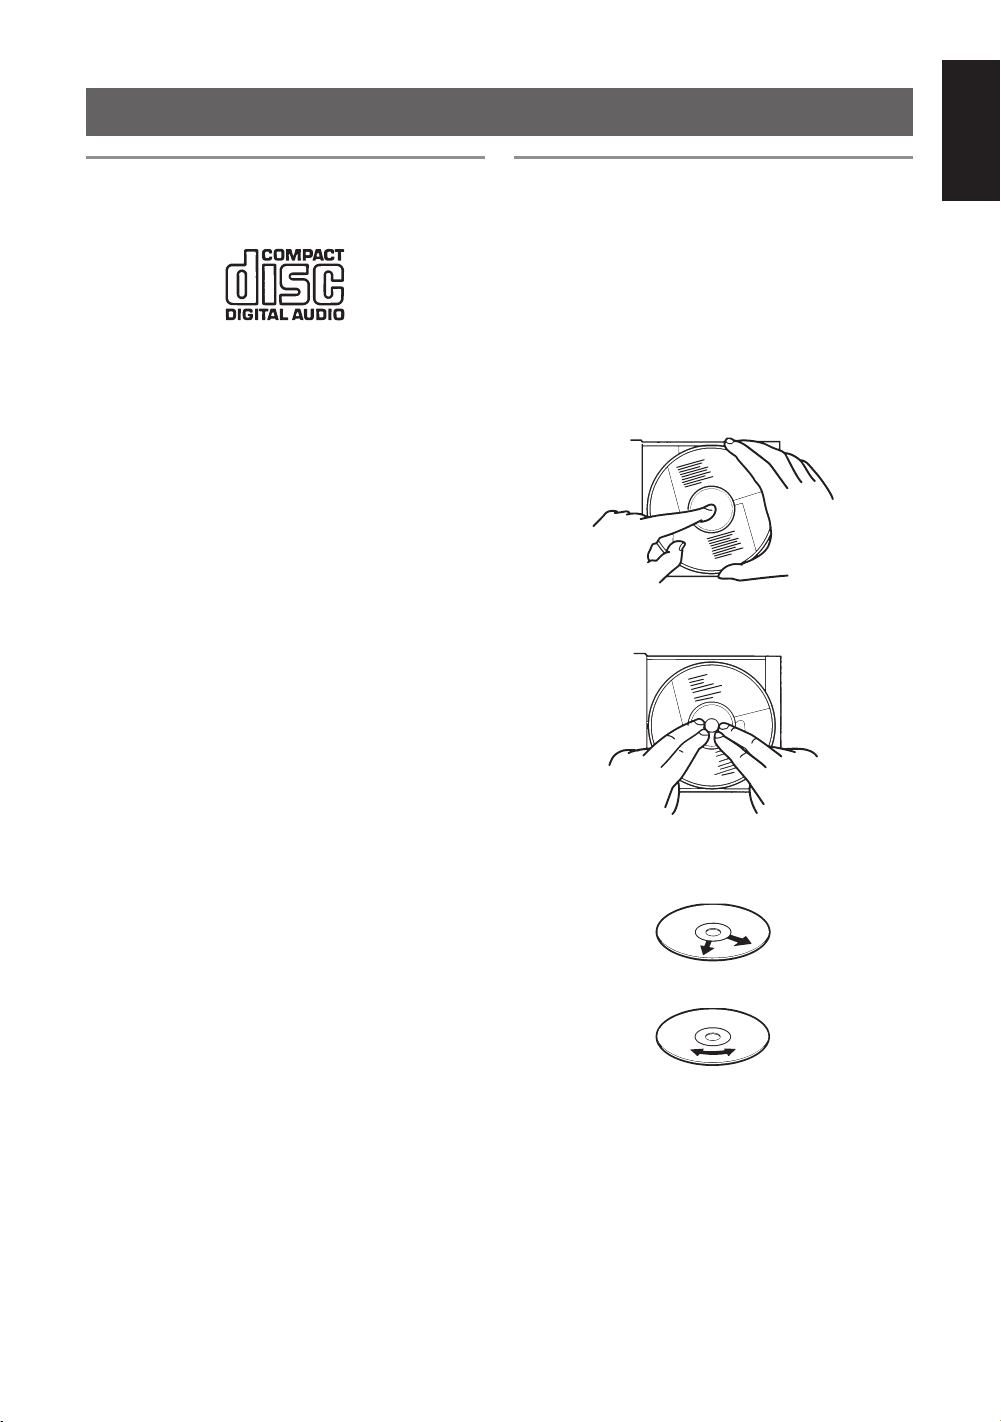
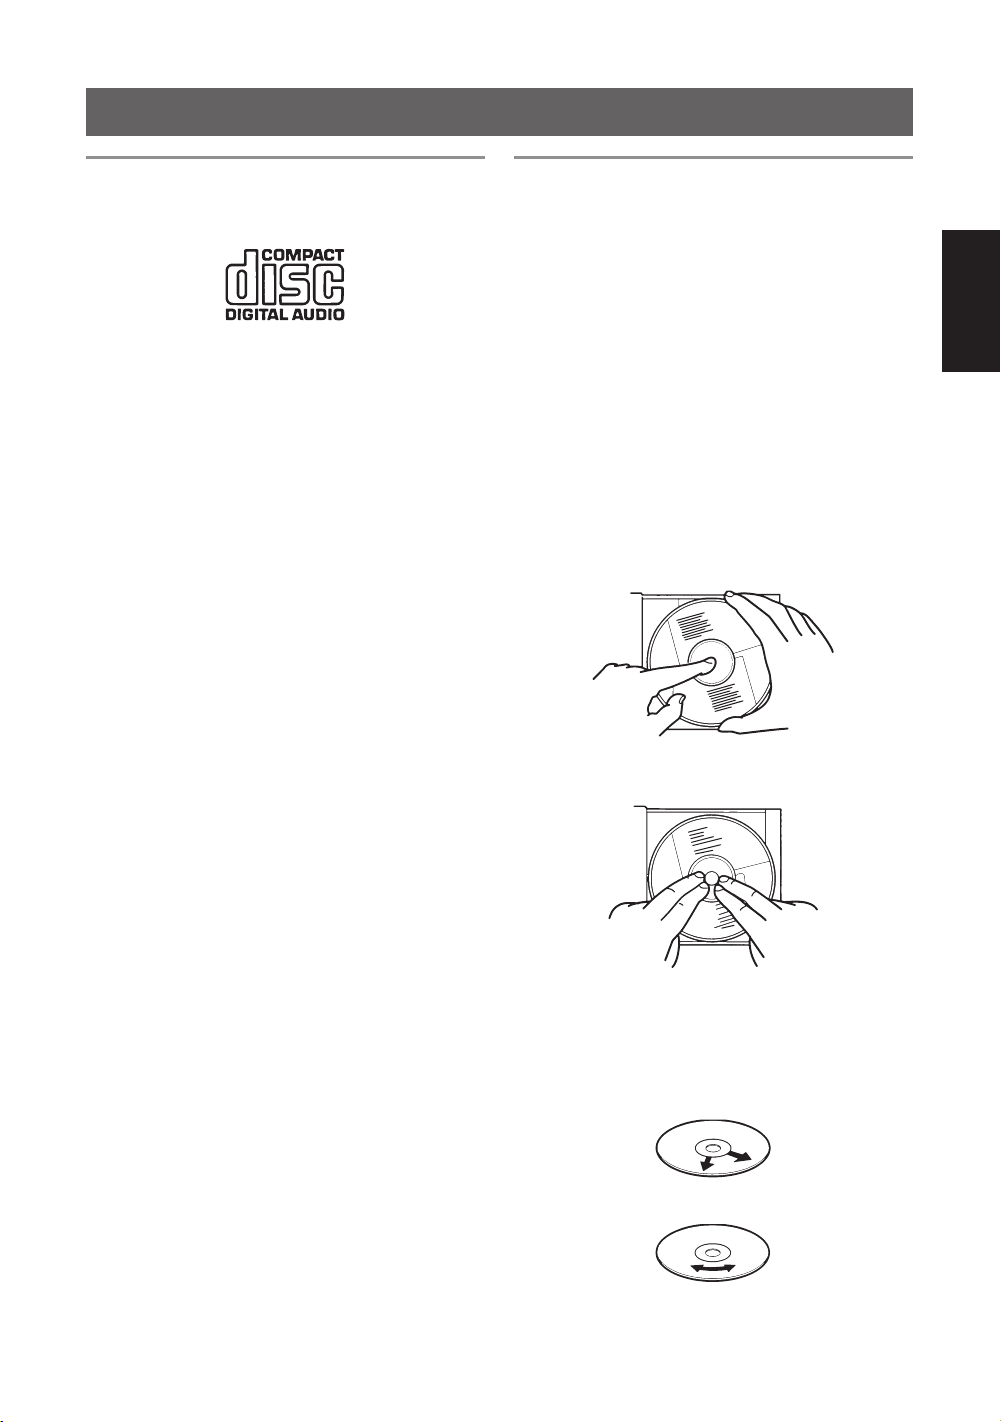
Notes on handling discs
English
The following care should be taken to keep discs in good
condition, since dirty, damaged or warped discs could
lead to sound deterioration and damage the unit.
• Do not touch the reflective recorded surface.
• Do not stick or write anything on both surfaces.
• Do not bend discs.
• Do not expose discs to direct sunlight, high
temperatures from a heater, etc., high humidity, or dust.
• After using a disc be sure to put it back in its case.
• To remove a disc from its storage case, press the center
and lift the disc out.
• When replacing a disc in its case, press the center part
to secure the disc.
• Clean off any dust, dirt or fingerprints on discs with a
soft, dry cloth, wiping from the center to edge. Never
use thinner, benzene, record cleaner or antistatic spray.
Correct
Incorrect
8
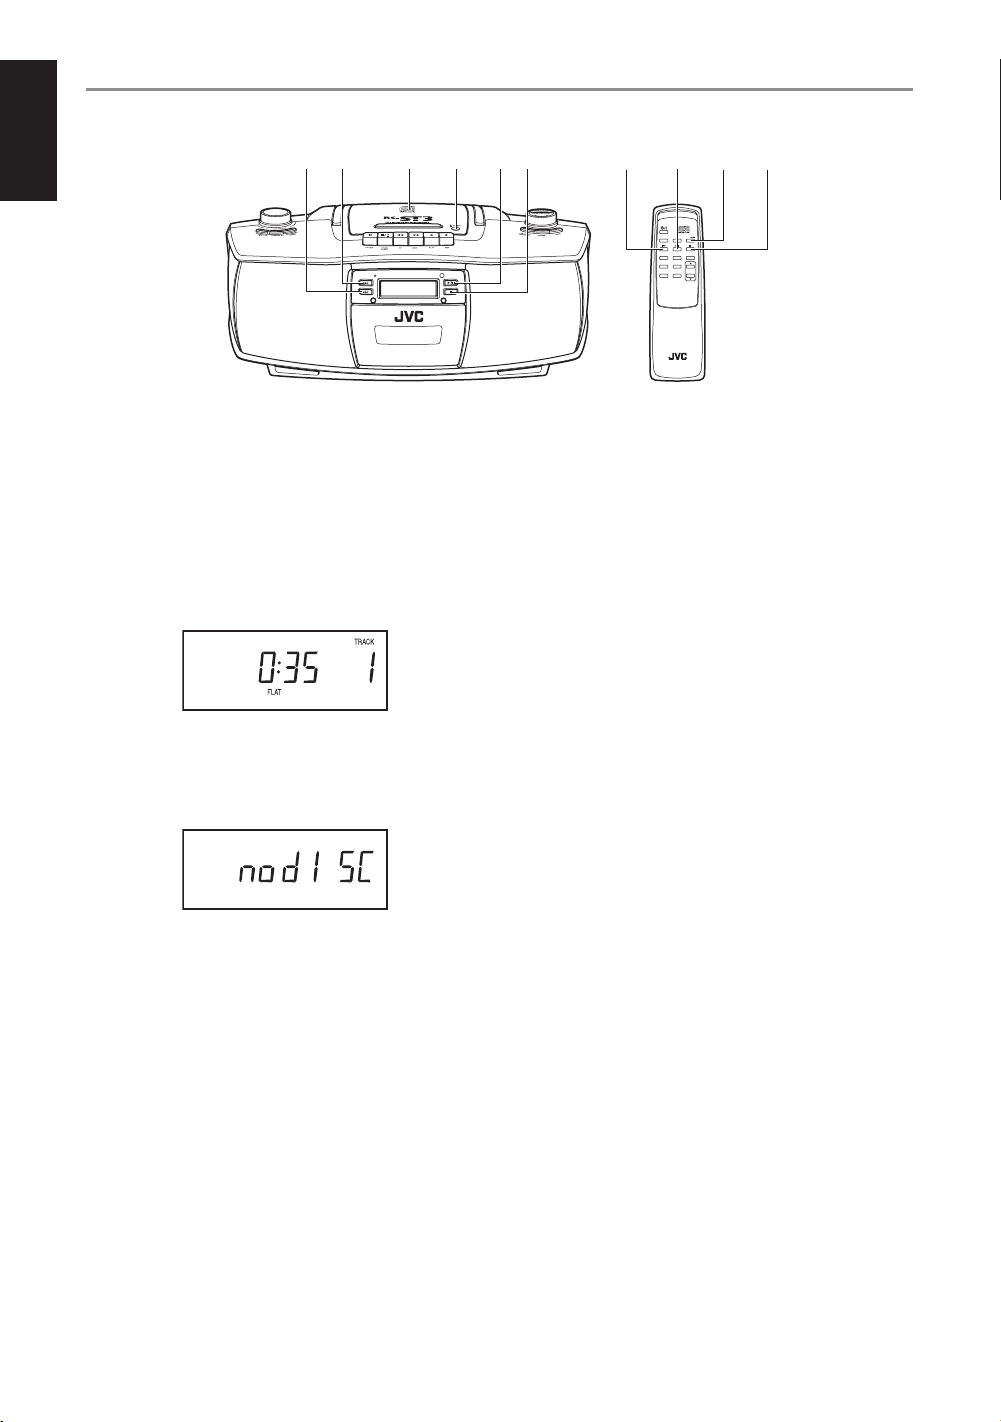
Basic operations
English
1
Press 0 PUSH to open the disc compartment
cover.
2
Load a disc with the label side facing up and
close the cover.
3
Press 3/8 PLAY/PAUSE (or CD 3/8 on the
remote control unit) to start playback.
During playback, the current track number and the
elapsed playing time of the track are displayed.
Notes
• The following indication is displayed when the unit
cannot read the disc information. Check if the disc is
dirty or scratched, or the disc is loaded upside down.
4¢
SEARCH UP
SEARC
2
STANDBY
H
D
O
WN
RANDOM INTRO
RC-ST3
CD PORTABLE SYSTEM
13
REMOTE
SENSOR
PLAY/PAUSE
STOP
7 STOP
4¢
TUNER
PRESET/
REPEAT
FM MODE
HBS EQ
TAPE CD
PROGRAM
RANDOM
CD 6
INTRO
VOL
7
To pause playback
Press 3/8 PLAY/PAUSE (or CD 3/8 on the
remote control unit).
To resume playback, press the button again.
Selecting a desired track before
playback
1
In the CD stop mode, press 4 or ¢
repeatedly until the desired track number is
displayed.
2
Press 3/8 PLAY/PAUSE (or CD 3/8 on the
remote control unit) to start playback.
Skipping tracks
Press 4 or ¢ during playback.
• To skip to the beginning of the next track: press ¢.
• To skip back to the beginning of the track currently
being played: press 4.
• To skip back to the beginning of the previous track:
press 4 twice in rapid succession.
• Skipping of sound may occur if a strong shock is
applied to the unit or the unit is subject to vibrations. If
this happens, stop playback (or at least lower the
volume), and replace the unit in a secure place.
To stop playback
Press 7 STOP (or 7 on the remote control unit).
The total playing time and total number of tracks of the
disc are displayed in the CD stop mode.
Caution
Never open the disc compartment unless the unit is in
the stop mode. When removing a disc from the disc
compartment, make sure that the disc has completely
stopped rotating.
9
Search
You can locate a desired position on the disc quickly by
fast-forward or reverse search.
Press and hold 4 or ¢ during playback.
• To search in the forward direction: ¢
• To search in the reverse direction: 4
Release the button when you find the desired position.
Playback continues from the selected position.
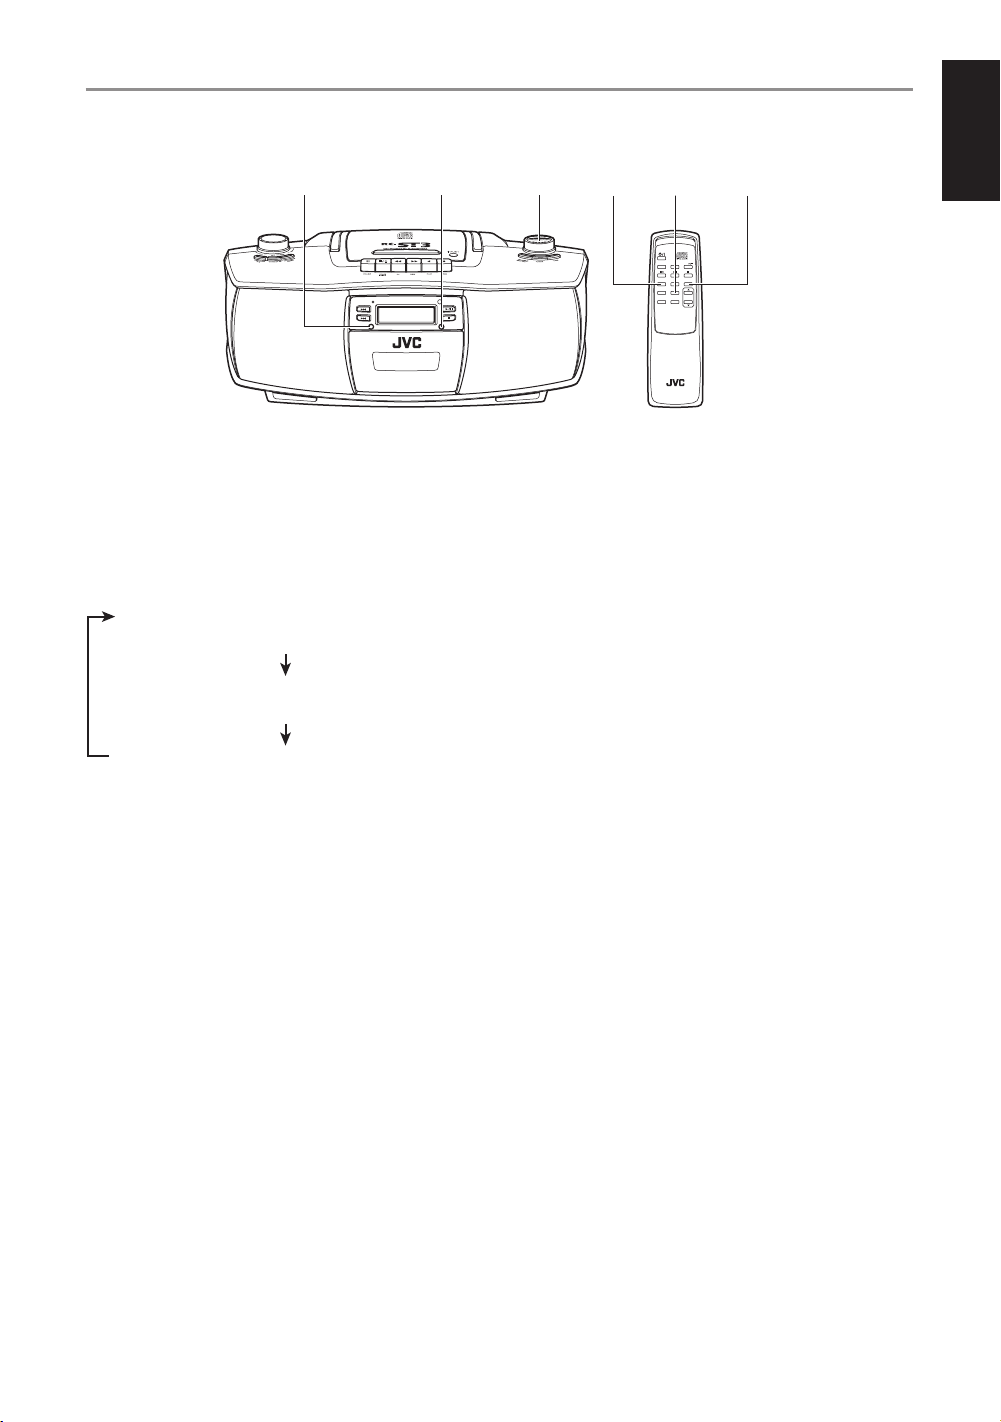
Various playback operations
RANDOM RANDOMINTRO INTRO
STANDBY
SEARCH UP
S
EARC
H
DOWN
RANDOM INTRO
CD PORTABLE SYSTEM
RC-ST3
REMOTE
SENSOR
PLAY/PAUSE
STOP
Repeat playback
Press PRESET/REPEAT before or during
playback.
Each time you press the button, the repeat mode changes
as shown below.
A single track is played repeatedly.
(“REPEAT” flashes in the display window.)
All the tracks are played repeatedly.
(“REPEAT” lights up steadily.)
PRESET/
REPEAT
PRESET/
REPEAT
TUNER
TAPE CD
PRESET/
PROGRAM
INTRO
REPEAT
FM MODE
RANDOM
VOL
HBS EQ
Introductory playback
You can play the introductory portion (10 seconds) of
each track successively.
Press INTRO before or during playback.
The INTRO indicator lights up in the display window,
and introductory playback starts.
To cancel introductory playback
Press INTRO again so that the INTRO indicator goes
off.
English
Repeat playback is canceled.
(“REPEAT” disappears from the display window.)
Random playback
Press RANDOM before or during playback.
The RANDOM indicator lights up in the display
window, and the tracks are played in random order.
Random playback ends when all the tracks are played
once.
To cancel random playback
Press RANDOM again so that the RANDOM indicator
goes off.
10
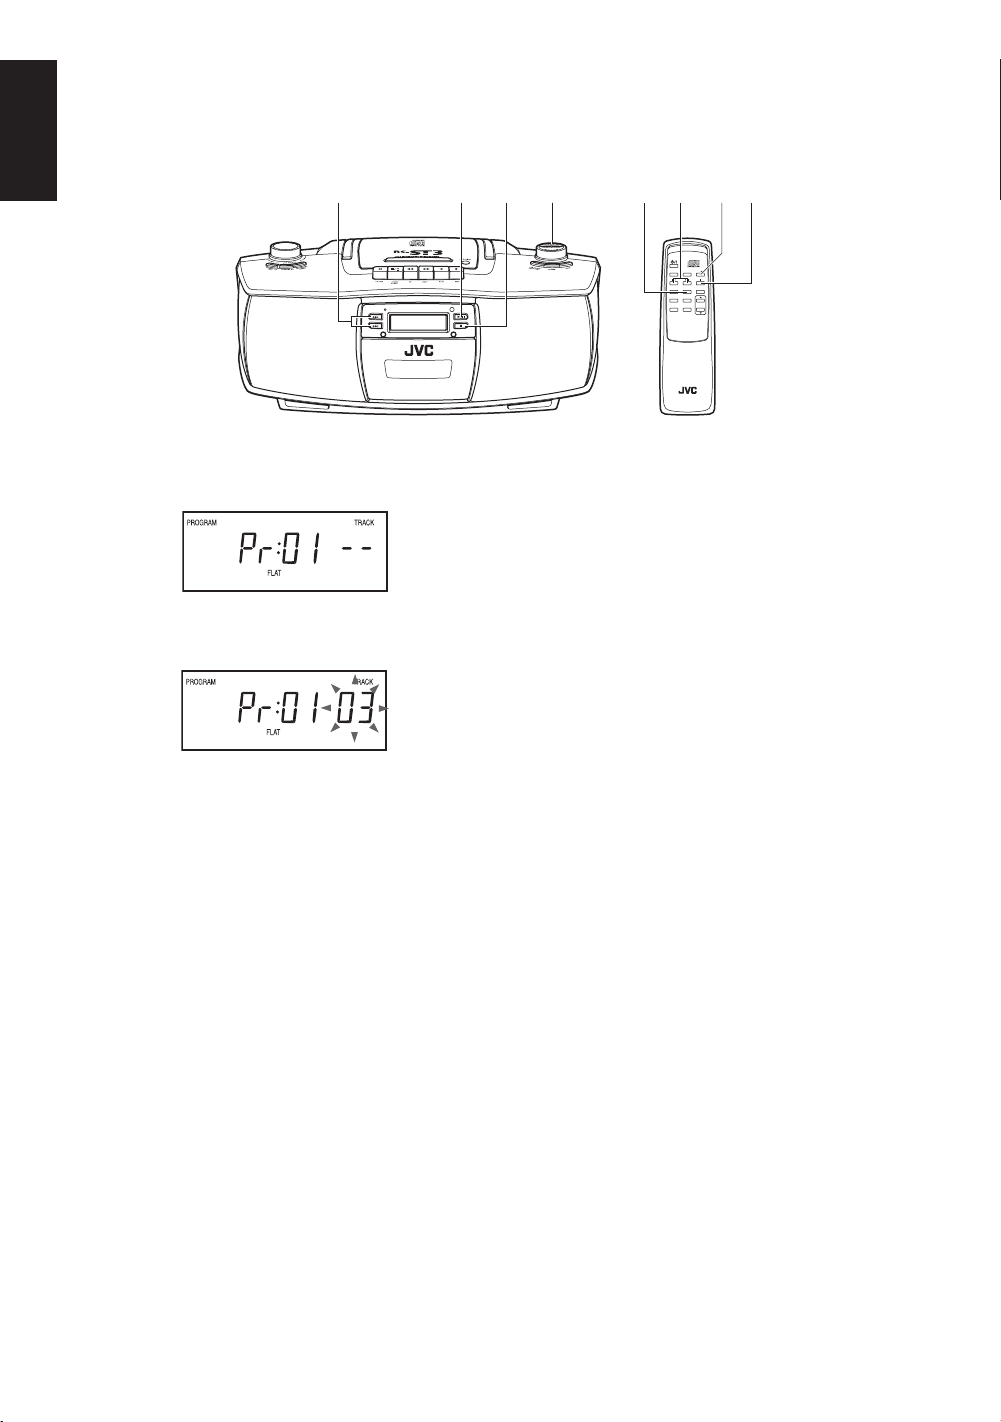
Programmed playback
You can program up to 16 tracks to be played in your
desired order.
English
STANDBY
SEARC
H UP
SEARCH DOW
N
RANDOM INTRO
RC-ST3
CD PORTABLE SYSTEM
7 STOP 7
REMOTE
SENSOR
PLAY/PAUSE
STOP
21,31,325 5
TUNER
TAPE CD
PRESET/
PROGRAM
REPEAT
FM MODE
RANDOM
HBS EQ
INTRO
VOL
1
Press PROGRAM in the CD stop mode.
2
Press 4 or ¢ to select a desired track to
be programmed.
3
Press PROGRAM.
The selected track is registered on the program.
4
Repeat steps 2 and 3 to program other tracks.
5
Press 3/8 PLAY/PAUSE (or CD 3/8 on the
remote control unit).
Programmed playback starts.
Note
The unit does not store more than 16 programmed tracks
in its memory. If you select more than 16 tracks,
programmed tracks are overwritten from the first track.
To check the order of tracks on the program
Press PROGRAM repeatedly in the CD stop mode.
To clear the program
Press 7 STOP (or 7 on the remote control unit) in the
CD stop mode.
The program is also canceled when you open the disc
compartment cover.
11
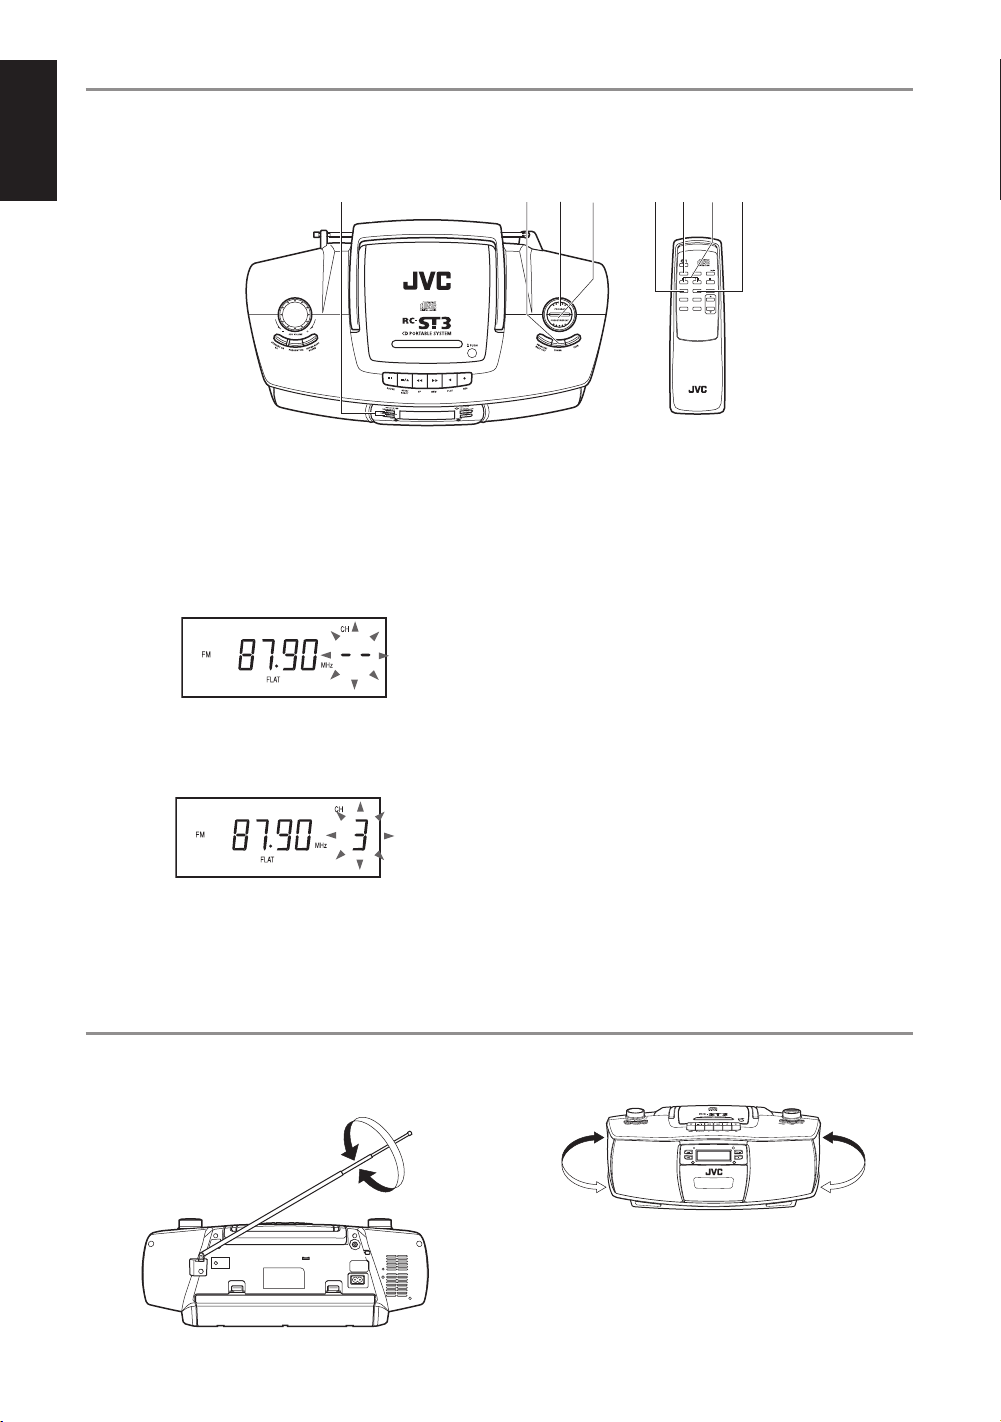
RADIO RECEPTION
3
Tuning to a station
FM MODE/
BEAT CUT
3
1
Press TUNER to set to the tuner mode.
2
Press TUNER to select the band, FM or AM
(MW).
3
Press and hold 4 or ¢ for about one
second.
The unit starts searching and stops when a station of
sufficient signal strength is tuned in.
If you press 4 or ¢ briefly and repeatedly, the
frequency changes step by step.
RESET
FM MODE
1,21,2
TUNER
TAPE CD
PRESET/
PROGRAM
INTRO
REPEAT
FM MODE
RANDOM
VOL
HBS EQ
Changing the FM reception mode
When an FM stereo broadcast is hard to receive or noisy,
reception may improve by changing to monaural
reception mode.
Press FM MODE/BEAT CUT (or FM MODE
on the remote control unit).
The MONO indicator lights up in the display window.
To restore stereo reception
Press the button again so that the MONO indicator goes
off.
English
12
Presetting stations
5
You can preset 20 FM and 12 AM stations.
English
1
Press TUNER to select the band, FM or AM
(MW).
2
Tune to a station you want to preset using 4
or ¢.
3
Press PROGRAM.
4
Press PRESET/REPEAT repeatedly to select
a preset number.
The selected preset number flashes.
14 22
5
Press PROGRAM.
143,5 3,
TUNER
TAPE CD
PRESET/
PROGRAM
INTRO
REPEAT
FM MODE
RANDOM
VOL
HBS EQ
The station with the preset number is stored in the
memory.
6
Repeat steps 2 to 5 to preset other stations,
allocating a different preset number to each
of them.
Note
If the unit is unplugged or a power failure occurs, the
preset stations will be erased from the memory. If this
happens, you need to preset the stations again.
Tuning to a preset station
After selecting the band, FM or AM (MW),
press PRESET/REPEAT repeatedly until the
desired preset number appears.
Adjusting the antennas
FM
13
AM
STANDBY
REMOTE
SENSOR
S
EAR
C
H
U
P
PLAY/PAUSE
S
EAR
C
H
STOP
DO
W
N
RANDOM INTRO
RC-ST3
CD PORTABLE SYSTEM
Note
Place the unit away from the TV or turn off the TV, when
listening to an AM station, to prevent the built-in ferrite
core antenna picking up interference from the TV.
CASSETTE OPERATIONS
Playing back a cassette
1 FF ¡ REW
1
Press TAPE to set to the tape mode.
2
Press § STOP/EJECT to open the cassette
holder.
3
Load a cassette with the open side up and the
playback side facing out, then close the
cassette holder.
4
Press 2 PLAY to start playback.
STANDBY
SEAR
CH U
P
S
EAR
CH
DOWN
RANDOM INTRO
RC-ST3
CD PORTABLE SYSTEM
1432
REMOTE
SENSOR
PLAY/PAUSE
STOP
To stop playback
Press § STOP/EJECT.
Playback automatically stops when the tape reaches the
end.
To fast-wind a tape
Press 1 FF or ¡ REW.
• To fast-wind in the forward direction: 1 FF
• To fast-wind in the reverse direction: ¡ REW
When the tape reaches the end, press § STOP/EJECT
to release the 1 FF or ¡ REW button.
English
Notes on cassette tapes
• It may be unlawful to record or play back
copyrighted material without the consent of the
copyright owner.
• Use only normal tapes of type I for playback and
recording.
• Use of tapes longer than 120 minutes is not
recommended, since characteristic deterioration may
occur and these tapes easily jam in the pinch roller and
capstan.
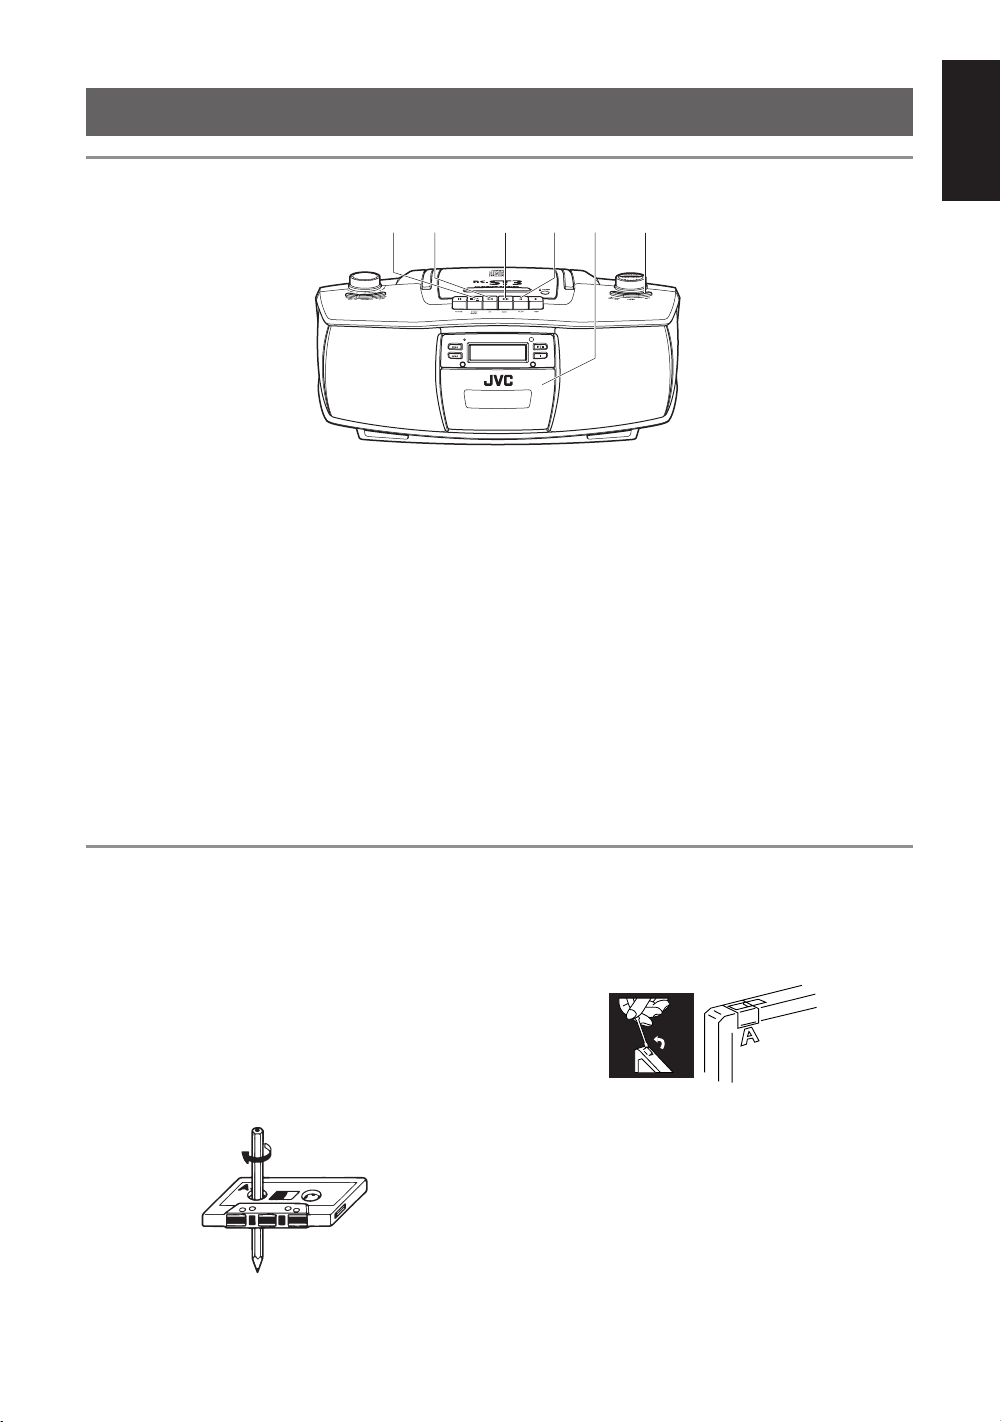
• Loose tape can cause trouble. If you notice some slack
in the tape, tighten it up using a pencil.
To prevent accidental erasure
Remove the tab(s) with a screwdriver. When you want
to erase the recording or re-record on the tape, reseal the
slot(s) with adhesive tape.
14
Recording on a cassette
2
English
The following marks are used to distinguish the two
recording sources in the procedure below.
: When recording from the radio
: When recording from a CD
1
Load a cassette.
2
Prepare the recording source.
: Set to the tuner mode and tune to a desired
station (see pages 12 and 13).
: Load a CD and set to the CD stop mode (see page
9). You can specify a desired track to start recording
by pressing 4 or ¢.
3
Press ¶ REC to start recording.
The 2 PLAY button is also depressed with the ¶ REC
button.
: The CD player starts playback when the cassette
deck enters the recording mode (synchronized
recording).
To stop recording
Press § STOP/EJECT.
Recording also stops when the tape reaches the end.
: The CD player stops playback when the tape stops
running at its end or by your pressing § STOP/
EJECT.
When the CD player reaches the end of the disc and
stops playback earlier, the tape continues running. In
this case, press § STOP/EJECT to stop the tape.
4/¢
PAUSE
STANDBY
SEARC
H U
P
SEARCH
D
O
WN
RANDOM INTRO
CD PORTABLE SYSTEM
1
FM MODE/
223
BEAT CUT
REMOTE
SENSOR
PLAY/PAUSE
TOP
S
RC-ST3
To start recording at the exact moment
1
In step 3 above, press 8 PAUSE before
pressing ¶ REC.
2
Press 8 PAUSE again to release the tape at
the exact moment you want to start recording.
To remove beats during AM broadcast
recording
Press FM MODE/BEAT CUT repeatedly to
select the better beat-cut reception mode.
To erase the recording
You can erase the recording on a tape without
overwriting the tape with a new recording.
1
Set to the CD stop mode with no disc loaded
in the unit.
2
Press ¶ REC to start erasing.
The 2 PLAY button is also depressed with the ¶ REC
button.
15
MAINTENANCE
Cleaning the cabinet
Wipe it with a soft, dry cloth. Never use benzene or
thinner as these could damage the surface finish.
Cleaning the heads, capstan and pinch
roller
When the tape is running, magnetic powder and dust
naturally accumulate on the heads, capstan and pinch
roller.
When they become too dirty:
• Sound quality deteriorates.
• The sound output level drops.
• The previous recording is not completely erased.
• Recording is not performed correctly.
To avoid these, clean the heads, capstan and pinch roller
every 10 hours of use.
For effective cleaning, use a cleaning kit available at
audio stores. Make sure that the cleaning fluid has dried
completely before loading a cassette.
Heads
Capstan
Pinch roller
Note
Do not use thinner or benzene, as these will damage the
rubber pinch roller (use of alcohol is permitted).
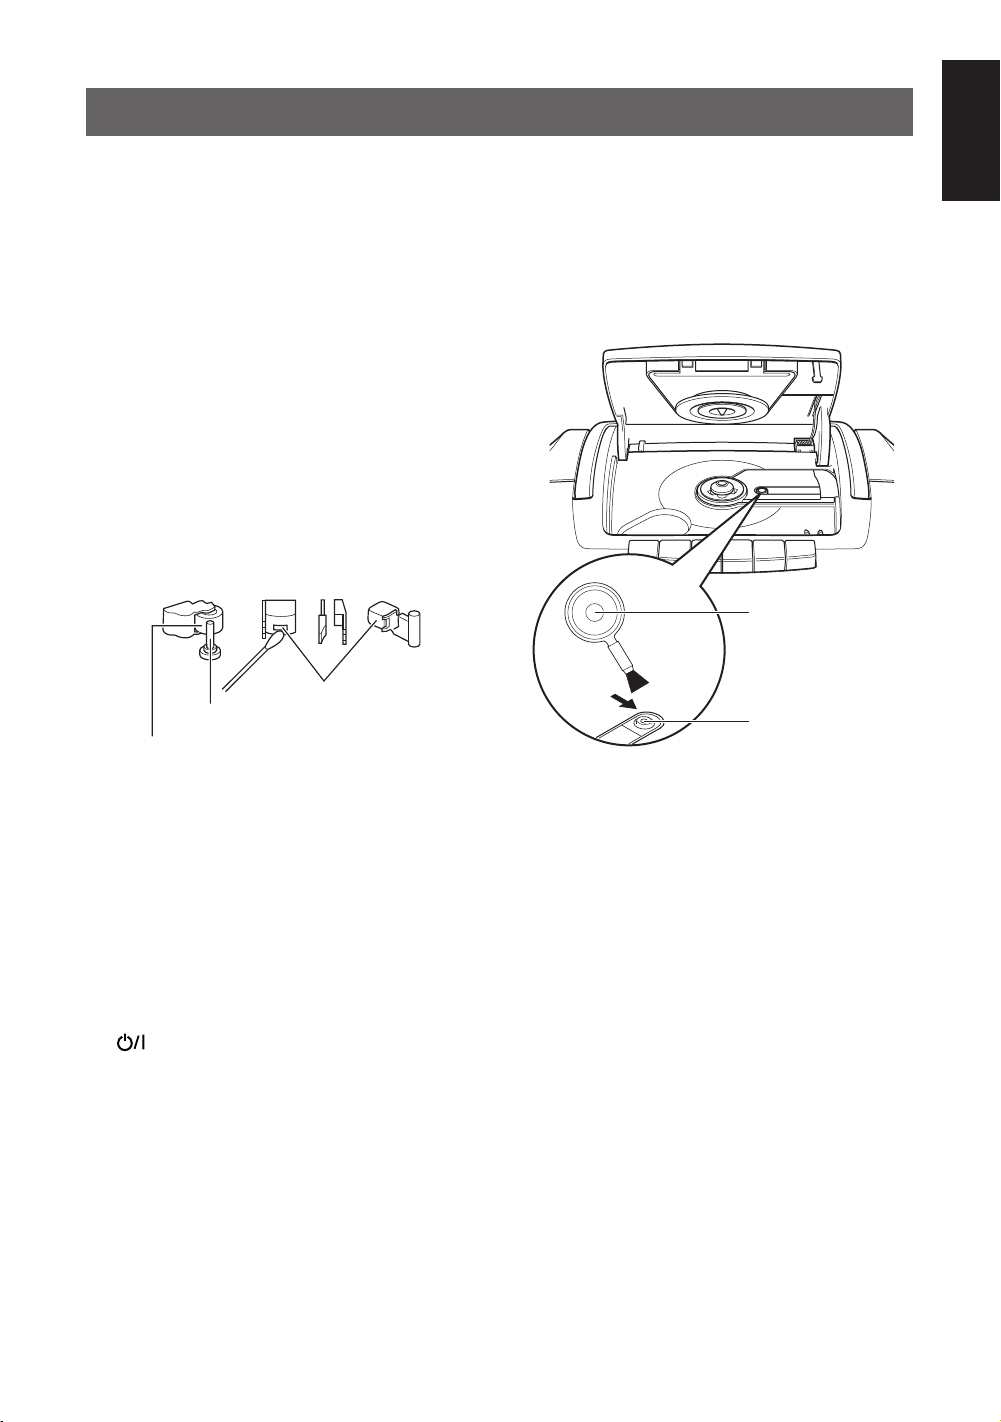
Cleaning the CD pickup lens
If the CD pickup lens is dirty, clean the lens to prevent
sound deterioration.
Gently wipe off fingerprints, etc. on the lens using a
cotton swab.
To blow off dust on the lens, use a blower available at
camera shops, etc., as shown below.
Blower
Lens
English
Demagnetizing the recording/playback
head
If the head becomes magnetized, noise will increase and
the sound will deteriorate.
Demagnetize the recording/playback head every 20 to
30 hours of use with a head demagnetizer available at
audio stores. When demagnetizing the head, turn off the
unit to the standby mode by pressing the STANDBY/
button.
ON
Caution
As the erasure head of the unit is of magnetic type, do
not demagnetize it.
16

TROUBLESHOOTING
English
What appears to be trouble is not always serious.
Referring to the following, check whether your problem
can be solved with a simple operation.
Power cannot be turned on.
= Is the AC power cord unplugged?
Remote control does not function.
= Are the batteries in the remote control unit
exhausted?
= Is the REMOTE SENSOR section exposed to
bright light (direct sunlight, etc.)?
No sound is heard from the speakers.
= Are headphones connected?
Playback sound is at a very low level.
= Are the batteries exhausted?
= Is the head of the cassette deck dirty?
The disc is loaded but does not play.
= Is the disc upside down?
= Is the disc dirty, damaged or warped?
= Is the CD pickup lens dirty?
= Is there moisture condensation on the CD pickup
lens? If so, turn on the unit and wait one or two
hours until moisture evaporates before use.
The ¶ REC button does not function.
= Is a cassette loaded?
= Are the erasure-prevention tabs of the cassette
broken off?
The tape speed is irregular and there are wow and
flutter.
= Is the pinch roller or capstan dirty?
= Are the batteries exhausted?
How to reset the unit
If normal operations are disabled, reset the unit as
follows:
1. Turn off the unit.
2. Press the RESET key with the tip of a small
screwdriver or similar tool.
3. Turn on the unit.
The clock setting and preset AM/FM stations will be
lost when the RESET key is pressed. You need to set
the clock and preset AM/FM stations again.
Radio reception is poor and there is much static.
= Is the antenna properly adjusted?
When the 2 PLAY button is pressed, the tape does
not run.
= Is the 8 PAUSE button pressed?
17

SPECIFICATIONS
Compact disc player
Signal detection system : Non-contact optical pickup
(semiconductor laser)
Number of channels : 2 channels (stereo)
Frequency response : 20 Hz - 20 000 Hz
Signal-to-noise ratio : 90 dB
Wow and flutter : Less than measurable level
Tuner
FM frequency range : 87.50 MHz - 108.00 MHz
AM frequency range : 522 kHz - 1 629 kHz
Antennas : Telescopic antenna for FM
Ferrite core antenna for AM
Cassette deck
Track system : 4-track 2-channel stereo
Motor : Electronic governor DC
motor for capstan
Heads : Hard Permalloy head for
recording/playback
Magnetic head for erasure
Frequency response : 80 Hz - 12 500 Hz
Wow and flutter : 0.15% (WRMS)
Fast-winding time : Approx. 120 sec.
(C-60 cassette)
General
English
Speakers : 10 cm × 2
Power output : 2 W per channel, min. RMS,
driven into 8 Ω at 1 kHz,
with no more than 10% total
harmonic distortion
(IEC 268-3)
Output terminal : PHONES × 1, output level
0 mW - 20 mW/32 Ω,
matching impedance: 16 Ω -
32 Ω
Power supply : AC 230 V Ó, 50 Hz
DC 12 V (batteries R20P
(SUM-1)/D (13F) × 8)
Power consumption : 19 W (operation mode)
3.2 W (standby mode)
Dimensions : 440 mm (W) × 168 mm (H)
× 241 mm (D)
Mass : Approx. 3.1 kg
(without batteries)
Accessories
AC power cord × 1
Remote control unit × 1
Batteries for the remote control unit,
R03 (UM-4)/AAA (24F) × 2
Design and specifications are subject to change without
notice.
18

INHALT
VORSICHTSMASSREGELN ZUM GEBRAUCH ... 1
STROMVERSORGUNG ............................................ 2
NAMEN DER KOMPONENTEN UND
BEDIENELEMENTE ............................................. 3
FERNBEDIENUNG ................................................... 4
EIN- UND AUSSCHALTEN DES GERÄTS ............ 6
EINSTELLEN DER UHR........................................... 6
Deutsch
VORSICHTSMASSREGELN ZUM GEBRAUCH
• Wenn das Gerät nicht gebraucht wird
Ziehen Sie den Netzstecker aus der Steckdose ab, wenn
Sie vorhaben, das Gerät längere Zeit nicht zu benutzen.
• Netzkabel
– Fassen Sie das Netzkabel nicht mit nassen Händen an.
–Ziehen Sie den Netzstecker grundsätzlich durch
Erfassen des eigentlichen Steckers ab; nicht am Kabel
zerren.
– Das Netzkabel darf in keiner Weise modifiziert
werden. Es darf auch nicht übermäßig gebogen oder
verdreht werden.
– Wenden Sie sich an Ihren Händler, wenn das
Netzkabel beschädigt oder unterbrochen ist oder
Kontaktmängel aufweist.
– Bei Gewitter empfiehlt es sich, das Netzkabel
abzuziehen.
• Das Gerät darf nicht zerlegt werden.
• Fremdkörper und Flüssigkeiten
– Stecken Sie keinerlei Metallgegenstände in das Gerät.
– Falls einmal Wasser in das Gerät eingedrungen sein
sollte, müssen Sie sofort den Stecker von der
Wandsteckdose abziehen und dann Ihren Händler um
Rat fragen.
• Das Gerät sollte nicht an Orten folgender Art
aufgestellt werden:
– Wo mit übermäßig hohen oder niedrigen
Temperaturen zu rechnen ist; der empfohlene
Temperaturbereich liegt zwischen 5°C und 35°C.
– Wo Vibrationen auftreten.
– Wo die Luftfeuchtigkeit sehr hoch ist, z.B. im
Badezimmer.
– Wo die Belüftung unzureichend ist.
– In der Nähe von Magnetfeldern.
• Lassen Sie das Gerät nicht unter direkter
Sonneneinstrahlung stehen oder im
geschlossenen Auto liegen.
Das Gerät könnte sonst Temperaturen über 40°C
ausgesetzt sein.
EINSTELLEN DES KLANGS ................................... 7
ABSPIELEN VON COMPACT-DISCS ..................... 8
RADIOEMPFANG ................................................... 12
KASSETTENDECKBETRIEB ................................. 14
PFLEGE .................................................................... 16
FEHLERSUCHE ....................................................... 17
TECHNISCHE DATEN ............................................ 18
• Belüftung
Die Lüftungsöffnungen am Gerät dürfen nicht blockiert
werden, da sonst die Wärme nicht entweichen kann.
• CD-Abtastlinse
Lassen Sie den CD-Fachdeckel nicht offen, da sich sonst
Staub auf der Abtastlinse ansammeln könnte. Berühren
Sie die Abtastlinse nicht mit den Fingern.
• Kondensation
Unter den folgenden Bedingungen schlägt sich auf der
Abtastlinse
– Wenn in dem Raum, wo das Gerät aufgestellt ist,
gerade ein Heizgerät eingeschaltet wurde.
– Wenn in der Umgebung starker Rauch oder hohe
Feuchtigkeit vorhanden sind.
– Wenn das Gerät gerade von einem kalten Ort in einen
warmen Raum gebracht wurde.
Wenn sich im Gerät Feuchtigkeit niedergeschlagen hat,
funktioniert es eventuell nicht normal. Schalten Sie in
solchem Fall das Gerät ein, und warten Sie ein oder zwei
Stunden, bevor Sie es benutzen.
• Bringen Sie keine magnetisch empfindlichen
Gegenstände in die Nähe der Lautsprecher.
Da die Lautsprecher magnetische Komponenten
enthalten, sollten Sie Tonbandkassetten und
Magnetstreifenkarten davon fernhalten, da sonst deren
Daten gelöscht werden könnten.
• Halten Sie das Gerät vom Fernsehgerät fern.
Stellen Sie das Gerät nicht in der Nähe eines
Fernsehgeräts auf, oder benutzen Sie es möglichst nicht,
solange das Fernsehgerät eingeschaltet ist. Andernfalls
würde das Fernsehbild eventuell gestört.
• Tragegriff
– Der Tragegriff sollte nicht bei ausgezogener Antenne
hoch- oder heruntergeklappt werden, da die Antenne
sonst beschädigt werden würde.
– Achten Sie darauf, dass die Stellung des Tragegriffs
nicht die Bedienung behindert.
eventuell Feuchtigkeit nieder:
1

STROMVERSORGUNG
Betrieb mit Netzspannung
1
Schließen Sie das mitgelieferte Netzkabel an
die AC IN Ó Buchse auf der Geräterückseite
an.
2
Stecken Sie den Netzkabelstecker in eine
Wandsteckdose.
Vorsicht
• Verwenden Sie grundsätzlich nur das mit diesem Gerät
gelieferte JVC-Netzkabel, um die Gefahr von
Störungen oder Beschädigung des Geräts zu
vermeiden.
• Auch wenn Sie das Gerät durch Betätigen der
STANDBY/ON
immer noch ein schwacher Strom. Wenn Sie vorhaben,
das Gerät längere Zeit nicht zu benutzen, sollten Sie
zum Stromsparen und zur Sicherheit den Netzstecker
aus der Wandsteckdose abziehen.
Taste ausgeschaltet haben, fließt
Betrieb mit Batterien
Einsetzen der Batterien
1
Öffnen Sie den Batteriefachdeckel, indem Sie
auf beide Haltezungen drücken.
2
Legen Sie acht R20P (SUM-1)/D (13F)
Batterien ein.
Legen Sie die Batterien mit korrekt ausgerichteter ª
und · Polarität gemäß den Hinweisen über dem
Batteriefachdeckel ein.
3
Schließen Sie den Batteriefachdeckel wieder.
Auswechseln der Batterien
Wenn die Bandgeschwindigkeit verlangsamt oder die
ausgestrahlte Lautstärke schwächer scheint, oder wenn
die Wiedergabe von CDs sporadisch unterbrochen wird,
sollten alle Batterien durch frische ersetzt werden.
Für bessere Batterienutzung
• Vor wichtigen Aufnahmen sollten Sie eventuell neue
Batterien (am besten Alkalizellen mit größerer
Betriebskapazität) einlegen, um jegliche Ausfälle zu
vermeiden.
• Vermeiden Sie, dass das Gerät beim Tragen oder im
Kofferraum eines Autos unbeabsichtigt eingeschaltet
wird, indem Sie die Batterien vorher herausnehmen.
Sie verhindern dadurch sinnlosen Batterieverbrauch.
• Bei ununterbrochenem Betrieb werden die Batterien
schneller aufgebraucht als bei gelegentlichem Betrieb.
• Bei Gerätbetrieb an einem kalten Ort werden die
Batterien schneller aufgebraucht als an einem warmen
Ort.
Vorsicht
Falls die Batterien falsch benutzt werden, können
sie explodieren, oder es kann Batteriesäure
auslaufen.
• Achten Sie darauf, dass die Batterien mit korrekt
ausgerichteter ª und · Polarität eingesetzt
werden.
• Legen Sie nicht frische und alte Batterien
gleichzeitig ein, und verwenden Sie keine
Kombinationen verschiedener Batterietypen.
• Versuchen Sie niemals, nicht-wiederaufladbare
Batterien aufzuladen.
• Nehmen Sie die Batterien heraus, wenn das Gerät
längere Zeit nicht benutzt werden soll.
• Nehmen Sie die Batterien heraus, wenn Sie das
Gerät mit Netzspannung betreiben, auch wenn die
Betriebsspannung bei Anschluss eines Netzkabels
automatisch von Batterie- auf Netzversorgung
umgeschaltet wird.
• Falls einmal aus den Batterien ausgelaufene
Chemikalien auf die Haut geraten sind, müssen sie
sofort mit Wasser abgewaschen werden. Falls
Chemikalien auf die Geräteoberfläche geraten sind,
ist das Gerät gründlich zu reinigen.
Deutsch
2
NAMEN DER KOMPONENTEN UND BEDIENELEMENTE
Oben
1234 5
Deutsch
678 9 101112
1 JOG VOLUME Regler
2 Disc-Fach
3 0 PUSH
4 PROGRAM Taste
5 PRESET/REPEAT Taste
6 STANDBY/ON
Taste
7 PRESET EQ Taste
8 HYPER-BASS SOUND Taste
Vorne
9 Kassettendeck-Bedienungstasten
8 PAUSE Taste
§ STOP/EJECT Taste
1 FF Taste
¡ REW Taste
2 PLAY Taste
¶ REC Taste
10 FM MODE/BEAT CUT Taste
11 TUNER Taste
12 TAPE Taste
13 14 15 16 17
STANDBY
SEARC
H
U
P
SEARC
H
DO
W
N
RANDOM INTRO
CD PORTABLE SYSTEM
RC-ST3
REMOTE
SENSOR
PLAY/PAUSE
STOP
18 19 20 21
13 ¢ SEARCH UP und 4 SEARCH DOWN
Tasten
14 STANDBY Anzeige
15 Anzeigefenster
16 REMOTE SENSOR
3
17 3/8 PLAY/PAUSE Taste
18 RANDOM Taste
19 Kassetenhalter
20 INTRO Taste
21 7 STOP Taste
Hinten
22 RESET Taste
23 FM-Teleskopantenne
24 PHONES Buchse
FERNBEDIENUNG
1
2
3
4
5
6
7
TUNER
PRESET/
REPEAT
FM MODE
HBS EQ
TAPE CD
PROGRAM
RANDOM
INTRO
VOL
22
RESET
25 26
8
9
10
11
12
13
2423
PHONES
AC IN~
Deutsch
25 Batteriefach
26 AC IN Ó Buchse
1 Taste
2 TUNER Taste
3 4 und ¢ Tasten
4 PRESET/REPEAT Taste
5 RANDOM Taste
6 FM MODE Taste
7 Sound control Tasten
HBS Taste
EQ Taste
8 TAPE Taste
9 CD 3/8 Taste
10 7 Taste
11 PROGRAM Taste
12 INTRO Taste
13 VOL 5 und VOL ∞ Tasten
4
Einsetzen der Batterien
1
Nehmen Sie den Batteriefachdeckel ab.
2
Deutsch
Legen Sie zwei R03 (UM4)/AAA (24F)
Batterien ein.
Legen Sie die Batterien mit dem · Ende zuerst ein.
Achten Sie darauf, dass die ª und · Pole korrekt
ausgerichtet sind.
R03 (UM4)/AAA (24F) Batterie
3
Schließen Sie den Batteriefachdeckel wieder.
Hinweise zum Gebrauch der
Fernbedienung
• Richten Sie die Vorderkante der Fernbedienung
möglichst direkt auf den REMOTE SENSOR Bereich
des Geräts. Die Bedienungsreichweite ist geringer,
wenn Sie die Fernbedienung in einem weniger direkten
Winkel auf das Gerät richten.
• Der REMOTE SENSOR Bereich des Geräts sollte
möglichst nicht in direktem Sonnenlicht oder unter
starker Beleuchtung liegen.
• Achten Sie darauf, dass zwischen Fernbedienung und
REMOTE SENSOR Bereich keine Hindernisse
vorhanden sind.
121
Auswechseln der Batterien
Die maximale Bedienungsreichweite zwischen
Fernbedienung und REMOTE SENSOR des Geräts
beträgt etwa 7 Meter.
Wenn diese Bedienungsreichweite abnimmt oder die
Bedienung per Fernbedienung unzuverlässig wird,
sollten beide Batterien durch neue ersetzt werden.
5
EIN- UND AUSSCHALTEN DES GERÄTS
5
STANDBY/ON
TUNER
TAPE CD
PRESET/
PROGRAM
INTRO
REPEAT
FM MODE
RANDOM
VOL
HBS EQ
Deutsch
Einschalten des Geräts
Betätigen Sie STANDBY/ON (oder auf
der Fernbedienung).
Die STANDBY Anzeige erlischt. Das Gerät schaltet sich
ein und ist bereit für die Wiedergabe der beim letzten
Ausschalten des Geräts
Betätigen Sie STANDBY/ON (oder auf
der Fernbedienung).
Die STANDBY Anzeige leuchtet rot, und das Gerät
schaltet in den Bereitschaftsmodus um.
Ausschalten gewählten Tonquelle.
EINSTELLEN DER UHR
Die Uhrzeit wird angezeigt, wenn das Gerät im Bereitschaftsmodus ist.
1,3,52,4
STANDBY
SEARCH UP
SEARCH DOWN
RANDOM INTRO
CD PORTABLE SYSTEM
Wenn das Gerät ausgeschaltet ist
1
Betätigen und halten Sie PROGRAM am
Gerät gedrückt, bis die Stundenanzeige zu
blinken beginnt.
2
Drücken Sie 4 oder ¢, um die Stunde
einzustellen.
3
Betätigen und halten Sie PROGRAM
gedrückt, bis die Minutenanzeige zu blinken
beginnt.
4
Drücken Sie 4 oder ¢, um die Minute
einzustellen.
5
Betätigen und halten Sie PROGRAM
gedrückt, bis die Uhr läuft.
RC-ST3
REMOTE
SENSOR
PLAY/PAUSE
STOP
Hinweise
• Bei Schritt 1 können Sie nur die PROGRAM Taste am
Gerät drücken, nicht aber die auf der Fernbedienung.
• Falls das Gerät längere Zeit keine Stromversorgung
erhält, geht die Uhrzeiteinstellung verloren. In solchem
Fall muss sie von neuem eingestellt werden.
• Die Uhr kann ein oder zwei Minuten pro Monat nachoder vorgehen.
2,4 3,
TUNER
TAPE CD
PRESET/
PROGRAM
INTRO
REPEAT
FM MODE
RANDOM
VOL
HBS EQ
6
EINSTELLEN DES KLANGS
JOG VOLUME
PHONES HBS VOL /
Deutsch
PRESET EQ HYPER-BASS SOUND
Einstellen der Lautstärke
Erhöhen der Lautstärke
Drehen Sie JOG VOLUME im Uhrzeigersinn
(oder betätigen Sie VOL 5 auf der
Fernbedienung).
Verringern der Lautstärke
Drehen Sie JOG VOLUME im
Gegenuhrzeigersinn (oder betätigen Sie VOL
∞ auf der Fernbedienung).
Vorsicht
Schalten Sie das Gerät nicht aus, solange die Lautstärke
auf einen hohen Pegel eingestellt ist. Andernfalls könnte
beim nächsten Einschalten oder bei der Wiedergabe einer
anderen Tonquelle ein plötzlicher Tonstoß Ihr Gehör
oder die Lautsprecher beschädigen.
Hören mit Kopfhörer
Schließen Sie den Kopfhörer an die PHONES
Buchse an.
Der Kopfhörer (16 Ω bis 32 Ω) sollte einen
handelsüblichen 3,5 mm Stereo-Mini-Klinkenstecker
aufweisen.
Wenn der Kopfhörer angeschlossen ist, bleiben die
Lautsprecher stumm.
TUNER
TAPE CD
PRESET/
PROGRAM
INTRO
REPEAT
FM MODE
RANDOM
VOL
HBS EQ
EQ
Ändern der EQ-Einstellung
(Equalizer)
Das Gerät weist mehrere EQ-Voreinstellungen
(Equalizer) auf, unter denen Sie den für die abgespielte
Musik bestgeeigneten wählen können.
Betätigen Sie mehrmals PRESET EQ (oder EQ
auf der Fernbedienung).
Mit jedem Tastendruck wechselt die EQ-Einstellung wie
folgend.
ROCK JAZZ POP
FLAT
CLASSIC
Verstärken des Bassklangs
Wenn Sie den Hyper-Bass Sound aktivieren, erhalten Sie
besonders kräftige Bässe.
Betätigen Sie HYPER-BASS SOUND (oder
HBS auf der Fernbedienung).
Wenn der Hyper-Bass Sound aktiviert ist, leuchtet die
HBS Anzeigelampe im Anzeigefenster.
Ausschalten des Basseffekts
Betätigen Sie dieselbe Taste noch einmal; die HBSAnzeigelampe erlischt.
Vorsicht
• Verringern Sie die Lautstärke, bevor Sie den
Kopfhörer anschließen, und hören Sie generell mit
nicht zu hoher Lautstärke, da hohe Lautstärkepegel das
Gehör schädigen können.
• Fahren Sie kein Fahrzeug, während Sie Musik o.ä. über
Kopfhörer hören.
7
ABSPIELEN VON COMPACT-DISCS
Abspielbare CDs
Das Gerät kann Audio-CDs (8 cm und 12 cm) abspielen,
die das folgende Symbol aufweisen.
Das Gerät kann außerdem CD-R und CD-RW Discs
abspielen, die im Music-CD-Format gebrannt wurden.
Hinweise zu CD-R und CD-RW Discs
• Vom Benutzer selbst gebrannte CD-R (einmalig
beschreibbar) und CD-RW Discs (mehrmals
beschreibbar) können nur abgespielt werden, wenn sie
schon finalisiert sind.
• Manche CD-R und CD-RW Discs können mit dem
Gerät aufgrund ihrer technischen Eigenschaften oder
Aufzeichnungsbedingungen eventuell nicht
wiedergegeben werden.
• Bevor Sie CD-R oder CD-RW Discs abspielen, sollten
Sie jegliche beiliegenden Anweisungen und
Vorsichtsmaßregeln sorgfältig durchlesen.
• CD-R und CD-RW Discs können mit diesem Gerät
zuweilen nicht wiedergegeben werden, weil sie
eventuell verschmutzt oder beschädigt sind, oder weil
möglicherweise die CD-Abtastlinse verschmutzt ist.
• Das Einlesen von CD-RW Discs erfordert eventuell
mehr Zeit (weil die Reflektanz von CD-RW Discs
geringer als die von normalen CDs ist).
Hinweise zur Handhabung von
Discs
Falls eine Disc verschmutzt, beschädigt oder verformt
ist, ist der Wiedergabeton eventuell schlechter und das
Gerät kann Schaden leiden. Gehen Sie mit den Discs
daher wie folgend vorsichtig um.
• Berühren Sie nicht die glänzende Aufzeichnungsfläche
der Discs.
• Keine der Disc-Flächen darf beschrieben oder mit
irgendwelchen Aufklebern versehen werden.
• Discs dürfen nicht gebogen werden.
• Bewahren Sie Discs nicht an Orten auf, die direkter
Sonneneinstrahlung, hohen Temperaturen z.B. nahe
Heizgeräten, Feuchtigkeit oder Staub ausgesetzt sind.
• Verstauen Sie Discs nach dem Gebrauch wieder in der
Hülle.
• Eine Disc wird aus der Hülle herausgenommen, indem
Sie auf den Mittenring drücken und gleichzeitig die
Disc herausheben.
• Verstauen Sie eine Disc wieder in der Hülle, indem
Sie beim Einlegen auf den Mittenring drücken.
Deutsch
• Staub, Schmutz und Fingerabdrücke lassen sich von
einer Disc entfernen, indem Sie mit einem weichen,
trockenen Tuch vom Rand her gerade zur Mitte hin
wischen. Verwenden Sie auf keinen Fall
Farbverdünner, Benzol, Schallplattenreiniger oder
Antistatikspray.
Richtig
Falsch
8
 Loading...