

Page 1

DVD PORTABLE
SYSTEM
NX-PB15V
SUPER VIDEO
INSTRUCTIONS
LVT2191-002A
[US/UX/A]
Page 2

IntroductionIntroduction
In this manual...
• The remote control buttons are used for explaining the operations
unless mentioned otherwise. However, if the unit has the same or
similar button names, they can also be used for the operations.
• “[ ]” means the button name.
Ex.) [MENU]: MENU button
• “File” and “track,” “group” and “folder” are used interchangeably.
Precautions
Notes on the power cord
• When you go away for an extended period of time, remove the plug
from the wall outlet.
• When unplugging the unit from the wall outlet, always pull the plug,
not the power cord.
• Do not handle the power cord with wet hands.
• Disconnect the power cord before cleaning the unit or moving the
unit.
• Do not alter, twist or pull the power cord, or put anything heavy on it,
which may cause fire, electric shock, or other accidents.
Avoid moisture, water, dust, and high temperatures
• Do not place the unit in moist or dusty places.
• If water gets inside the unit, turn off the power and remove the plug
from the wall outlet, then consult your dealer. Using the unit in this
state may cause a fire or electrical shock.
• Do not expose the unit to direct sunlight or place it near a heating
device.
Notes on installation
• Select a place which is level, dry and neither too hot nor too cold—
between 5˚C and 35˚C.
• Do not install the unit in a place subject to vibrations.
• Do not put heavy objects on the unit.
To prevent malfunction or damage to the unit
• Do not insert any metallic objects, such as wires, hairpins, coins, etc.
into the unit.
• Do not block the vents.
Notes on using the unit
• When moving the unit, hold the display panel so that it does not open.
Do not carry the unit with the display panel open.
• Before moving the unit, be sure to remove iPod, disc, USB mass
storage class device, and SD card, then disconnect the power cord.
There are no user-serviceable parts inside. If anything goes wrong,
unplug the power cord and consult your dealer.
2
Page 3
ContentsContents
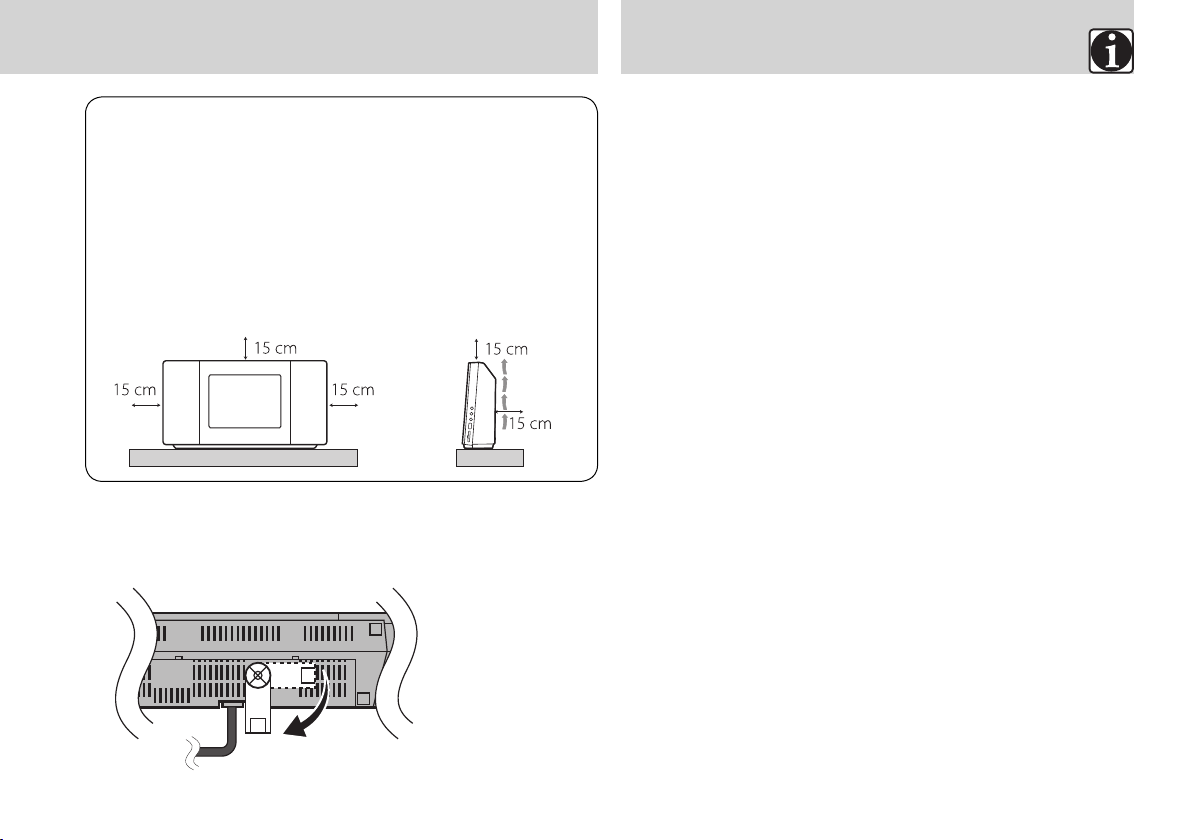
CAUTION: Proper Ventilation
To avoid risk of electric shock and fire, and to prevent damage, locate
the apparatus as follows:
1. Front: No obstructions and open spacing.
2. Sides/Top/Back: No obstructions should be placed in the areas
indicated by the dimensions in the illustration.
3. Bottom: Place on the level surface. Maintain an adequate air path
for ventilation by placing on a stand with a height of 10 cm or
more.
Front view Side view
To prevent the unit from falling down
Use the stand on the bottom of the unit to prevent the unit from falling
down before use.
Introduction ............................2
Getting started ........................ 4
Preparing FM antenna ......................4
Connecting a TV ...................................... 4
Setting the voltage selector ...........5
Connecting power cord ...................5
Preparing remote control ................ 5
Basic operation .......................6
Fade Muting ......................................... 7
Operating the monitor of the
main unit ..................................8
Selecting a source .............................. 8
Setting the monitor of the main
unit .......................................................... 8
Setting the clock .....................9
Setting the clock .................................9
Switching the time display format
(24 hour/12 hour) ............................... 9
Playing iPod ...........................10
Connecting an iPod device ...........10
Compatible iPod models ...............10
Playback operations ........................10
Menu operations ..............................11
Playing DVD/CD/USB/SD......12
Placing a disc......................................12
Connecting a USB mass storage
class device .........................................12
Inserting an SD card ........................12
Playback operations ........................13
Resume play .......................................13
Displaying the on-screen bar .......13
Various playback for DVD/CD/
USB/SD ....................................14
Using the disc menu........................14
Selecting the audio track/subtitle
language/view angle ......................14
Playback using the control screen
.................................................................14
Slow-motion playback ....................15
Frame-by-frame playback .............15
Time search/Chapter search .........15
Repeat play .........................................15
Random Play ......................................16
Program Play ......................................16
Playing still picture (JPEG file) ...... 17
Listening to the FM radio/
External device ......................18
FM radio ...............................................18
External device ..................................19
Setting a setup menu ..........20
Adjusting the sound/Setting
the Timer ................................22
Adjusting the sound ........................22
Sleep Timer .........................................22
Daily Timer ..........................................23
References..............................24
Playable disc/file types ........26
Troubleshooting ...................28
Specifications ........................31
3
Page 4
Getting startedGetting started
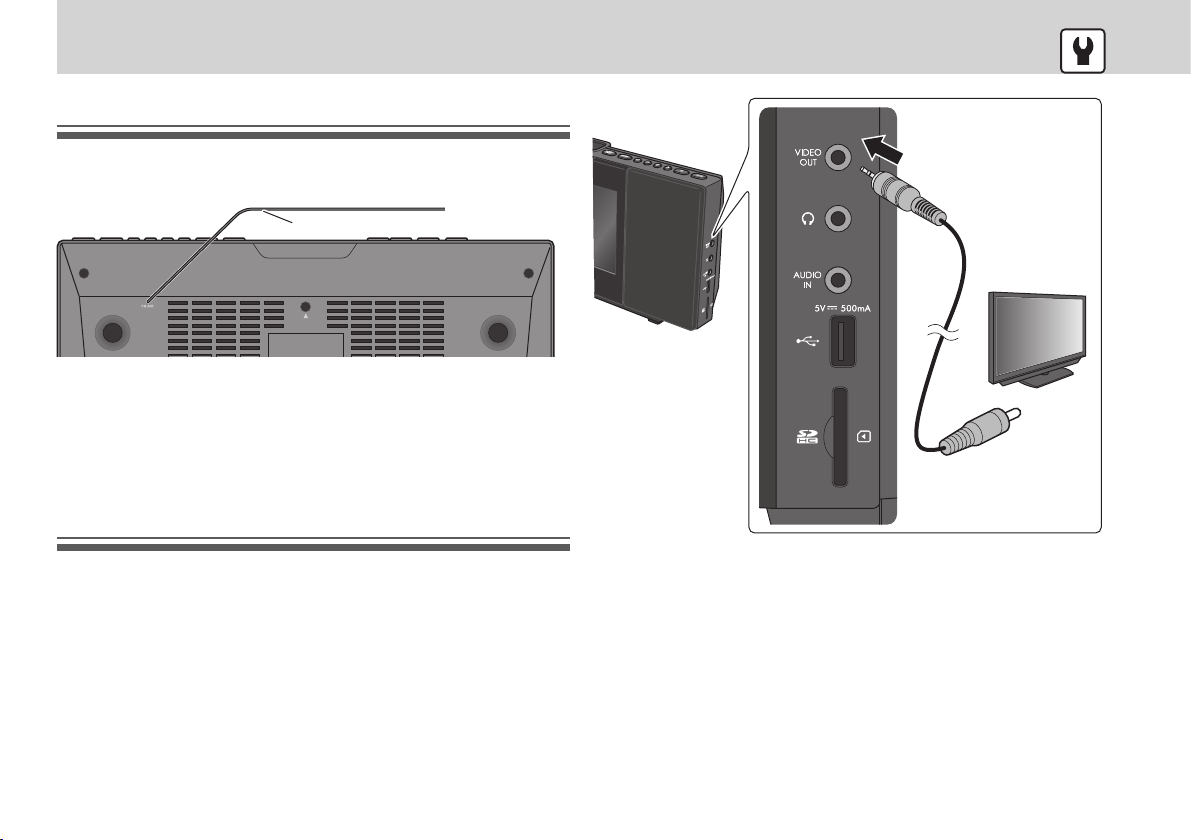
Preparing FM antenna
Connect the power cord after all other connections have been made.
Extend the FM antenna so that you can obtain the best reception.
• If the unit or antenna is located near the window, you may be able to
obtain the best reception since the unit can receive sufficient signal.
FM antenna
• Make sure the antenna conductor does not touch any other terminals,
connecting cords or the power cord. Also, keep the antenna away
from metallic parts of the unit, connecting cords, and the AC power
cord. Otherwise, it could cause poor reception.
Connecting a TV (only when viewing the
picture/video on the TV)
You can view the picture/video played back by this unit (except the still
pictures of iPod) on the TV or monitor connected to the unit. Connect
the video input jack of the TV to the VIDEO OUT jack of the unit with the
video cord (supplied).
• The unit does not export some of the setting menu screens such as
LCD, clock, and timer setups from the video output. It does not export
any signals when an analog audio source is played back.
• To change the aspect ratio for the picture output to the TV, refer to
page 20.
• To change the TV system between NTSC and PAL, refer to page 20.
Video cord
(supplied)
TV
To the video input
terminal
• Connect the unit directly to a TV or a monitor without routing
through a video cassette recorder (VCR) or an HDD/DVD recorder.
Otherwise, picture distortion may occur during playback. Connecting
an integrated TV/VCR system to the unit may also interfere with your
viewing.
• For cathode-ray tube television (CRT): The speakers of the unit are not
magnetically shielded. If the unit has been installed near the TV, keep
the unit away from TV. Otherwise, color distortion may occur on the
TV.
4
Page 5
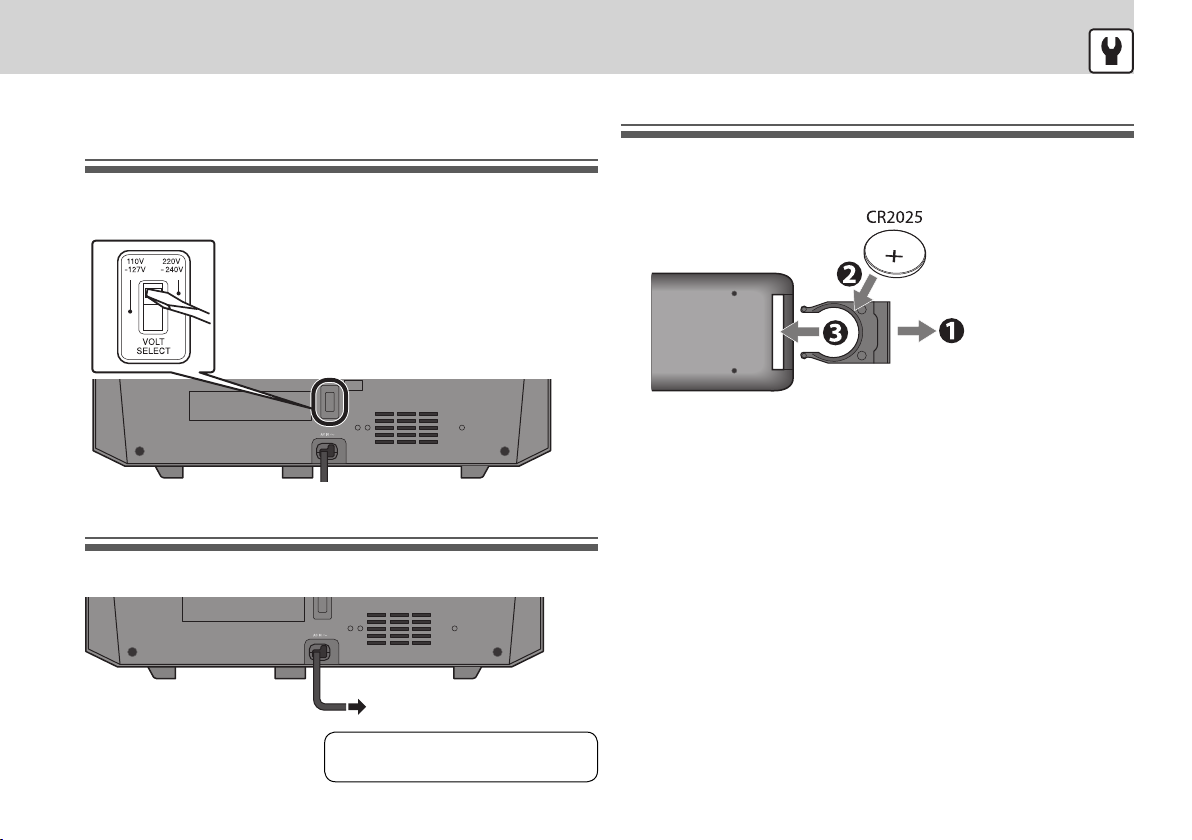
Connect the power cord after all other connections have been made.
Setting the voltage selector
(not applicable for Australia)
Before plugging in, select the voltage range for your area with the
voltage selector by using a screwdriver or a similar tool.
Main unit (rear)
CAUTION for mains (AC) line
BEFORE PLUGGING IN, do check that your mains
(AC) line voltage corresponds with the position
of the voltage selector switch provided on the
outside of this equipment and, if different, reset
the voltage selector switch, to prevent from a
damage or risk of fire/electric shock.
Connecting power cord
Be sure to connect the power cord to a wall outlet after all other
connections have been made.
• If a wall outlet does not
match the AC plug, use the
supplied AC plug adaptor (not
supplied for Saudi Arabian
and Australian models).
To wall outlet
Set the clock before using this
unit (refer to page 9).
Preparing remote control
When you use the remote control for the first time, pull out the insulation
sheet.
To replace the battery in the remote control
Caution
Danger of explosion if battery is incorrectly replaced.
Replace only with the same or equivalent type.
• Store the battery in a place where children cannot reach.
If a child accidentally swallows the battery, consult a doctor
immediately.
• To prevent the battery from overheating, cracking, or starting a fire:
– Do not recharge, short, disassemble or heat the battery or dispose
of it in a fire.
– Do not leave the battery with other metallic materials.
– Wrap the battery with tape and insulate when throwing away or
saving it.
– Do not poke the battery with tweezers or similar tools.
• Dispose of battery in the proper manner, according to federal, state,
and local regulations.
• The battery (battery pack or battery installed) shall not be exposed to
excessive heat source such as sunshine, fire or the like.
5
Page 6
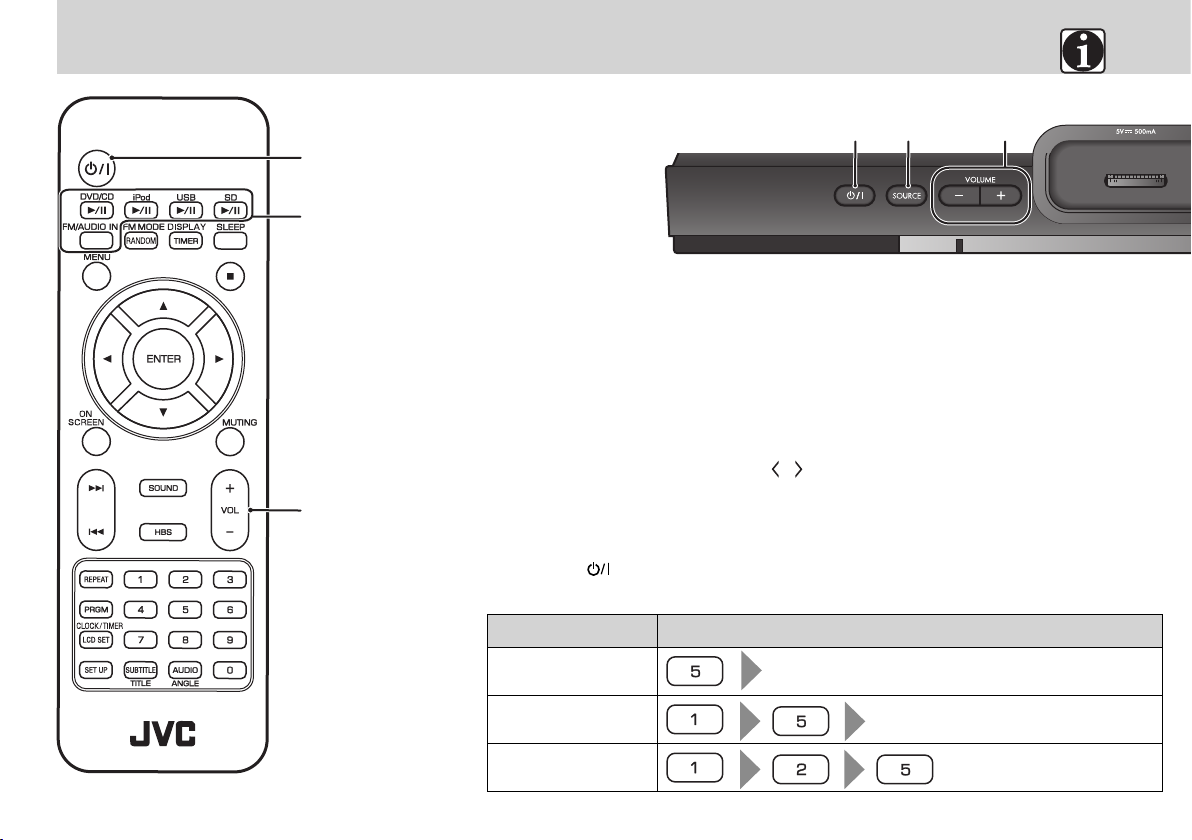
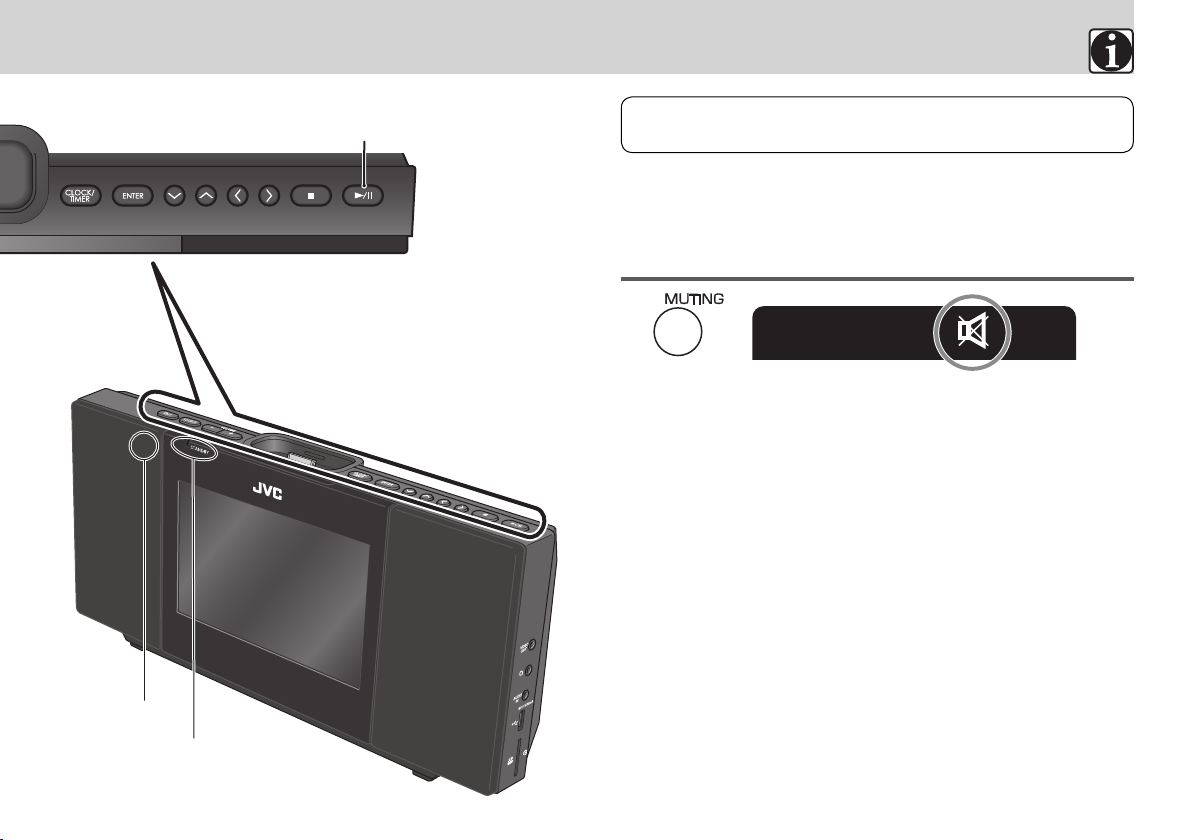
Basic operationBasic operation
1
2
Turn on the power
1
• The power can also be turned on at the selected source by pressing one of the [6] buttons for the target
source on the remote control.
Select a source
2
• Remote: Press [6] for the target source. For selecting "FM" and "AUDIO IN," press [FM/AUDIO IN]. Each
time you press the button, the source alternates between "FM" and "AUDIO IN."
• Main unit: Press [SOURCE] repeatedly until the source you want is selected, then press [ENTER]. (For
details, refer to "Selecting a source" on page 8.
• You can also select the source by pressing [2] [3] ([
Adjust the volume
3
3
How to select a number
using the remote control
• Adjusts the volume within the range of 0 to 32.
• To turn off the power, press
• When using the remote control, point it at the remote sensor directly.
2-1
][ ] on the main unit), then [ENTER].
. The STANDBY lamp is turned on.
[
]
Number to select Buttons to press
5
( )
[ENTER]
31
15
125
( )
[ENTER]
6
Page 7
2-2
• DO NOT turn off the unit with the volume set to an extremely high
level.
Fade Muting
• To restore the volume, press again.
Remote sensor
STANDBY lamp
7
Page 8
Operating the monitor of the main unitOperating the monitor of the main unit
Selecting a source
When the power is turned on, the source selecting screen (home screen)
is displayed on the monitor of the main unit.
Press [SOURCE] repeatedly to select the source
1
you want.
Each time you press the button, tab selection moves to right.
iPod
DVD/CD
Press [6] to enter the source screen.
2
Playback starts.
iPod
• To return to the source selecting screen (home screen), press [SOURCE]
on the main unit.
USB SD FM
Music
Video
Play Mode
Shue Songs
Now Playing
AUDIO IN
• When “iPod”
is selected as
the source,
this screen is
displayed.
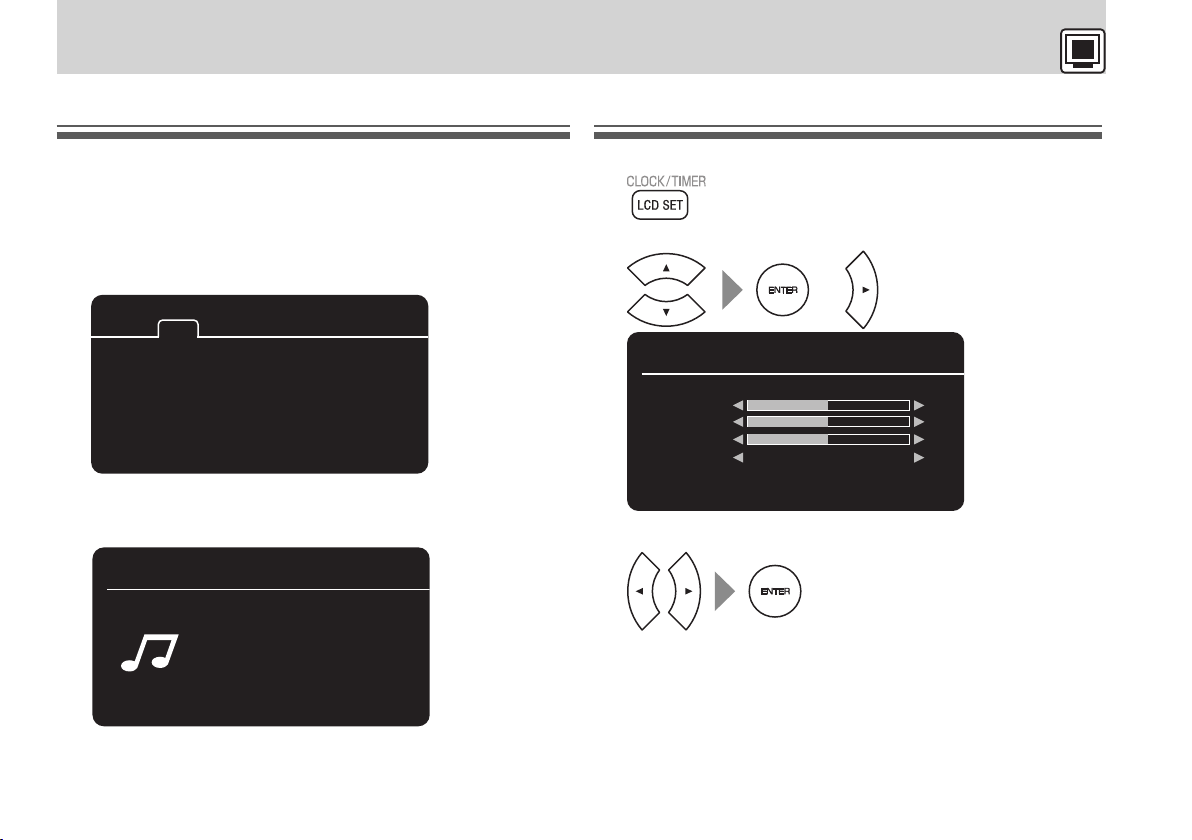
Setting the monitor of the main unit
Display the monitor setting screen
1
“LCD Set”
Select the menu for setting the monitor
2
or
LCD Set Clock Timer
Brightness
Contrast
Color
LCD Screen
Adjust the value
3
• To return to the playback screen, press [LCD SET] or one of the source
buttons on the remote control. To return to the home screen, press
[SOURCE] on the main unit.
• To initialize the “LCD Set/Clock/Timer” settings, press [LCD SET], then
select “System” = “Default” = “Restore.”
8
System
16:9
The selected item
lights blue.
• The adjustable item lights yellow.
Page 9
Setting the clockSetting the clock
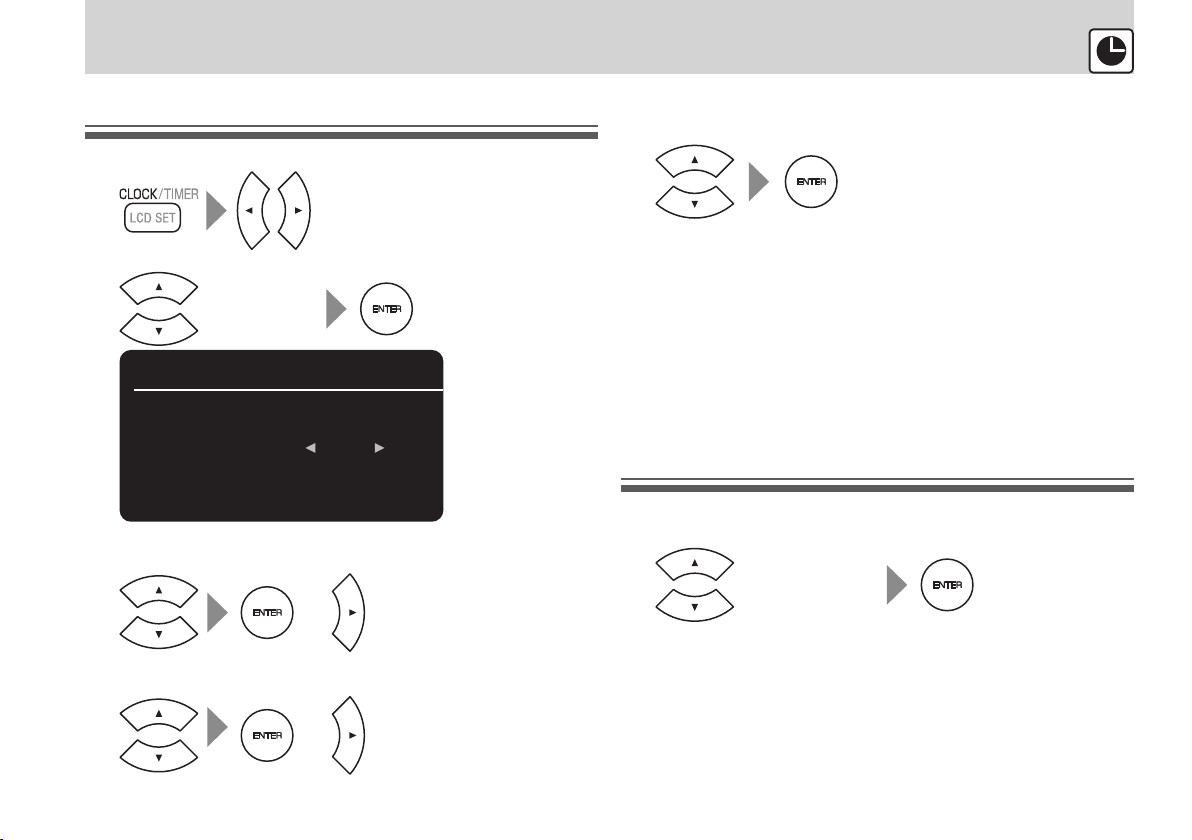
Setting the clock
Display the clock setting screen
1
“Clock”
Select “Time Set”
2
“Time Set”
System
LCD Set Clock
Select “AM” or “PM”
3
The selected part lights yellow.
Adjust the value for “Hour,” and “Minute”
4
Timer
Time Set 00:00
Time Format 24H
or
or
The selected item
lights blue.
• When “Time Format“ is set
to “24H,“ “AM“ or “PM“ is not
displayed. Go to step 4.
Repeat this procedure.
Finish the clock setting by adjusting the minute
5
value of the last position
To return to the playback screen, press [LCD SET] or one of the source
buttons on the remote control. To return to the home screen, press
[SOURCE] on the main unit.
• The clock may gain or lose 1 to 2 minutes per month. You may need to
readjust the clock periodically.
• If a power failure occurs, the clock loses its settings. You need to set
the clock again.
• To display the time on the monitor of the main unit, press [DISPLAY]
after setting the clock (the time indication disappears in 5 seconds).
Switching the time display format (24 hour/12 hour)
Select “Time Format” in step 2 of “Setting the
1
clock” on the left column
“Time Format”
Select the time format
2
Press [2] [3] to select “24H” or “12H.”
Confirm the entry
3
Press [ENTER]
To return to the playback screen, press [LCD SET] or one of the source
buttons on the remote control. To return to the home screen, press
[SOURCE] on the main unit.
9
Page 10

Playing iPodPlaying iPod
Connecting an iPod device
• It is not necessary to
use the dock adaptor
Dock adaptor
(supplied with the
iPod or sold in Apple
inc.)
Be careful not to injure your fingertips or damage the terminal of the
direct dock.
• Take the iPod protect case off before connecting.
• Connect the iPod firmly.
• Refer to page 24
You cannot send any data to the iPod from the unit.
iPod
for more about connecting an iPod.
for some iPod models
(iPod nano 6th
generation, etc.).
• When detaching the
dock adaptor from the
dock, pull up the dock
adaptor with your
fingernail or sharp
pointed tool using the
slot.
Compatible iPod models
Made for Audio Video
iPod nano (3rd, 4th, 5th, 6th generation)
iPod nano (2nd generation) —
iPod nano
iPod touch (2nd, 3rd, 4th generation)
iPod touch
—
Made for Audio Video
iPod classic
iPod video (5th generation)
Playback operations
iPod
Music
Video
Play Mode
Shue Songs
Now Playing
Playback starts, and menu of the iPod appears.
To pause
To select the track
To fast-forward a track
To fast-reverse a track
Press [iPod 6] during playback
Press [¢] or [4]
Press and hold [¢]
Press and hold [4]
10
Page 11

Menu operations
To select a menu item
To go back to the previous item, press [2].
• The menus displayed on the screen differ depending on iPod models.
• Operate iPod touch itself as follows to adjust the settings or to use the
applications:
- Press the home button.
- Select the application icons on the home screen.
• Sound distortion may occur when playing back audio sources with
high recording levels. If distortion occurs, it is recommended to turn
off the equalizer of iPod.
• For information on operating the iPod, see the instruction manual for
iPod.
Viewing the video/picture from iPod
\
Select “Video”
item \ a desired file, then press
[ENTER]
• The items displayed on the screen differ depending on iPod models.
Selecting play modes
The currently selected play mode is shown below "Play Mode" on the
menu screen. (Ex. "Shuffle songs")
Shuffle play
Select “Play Mode” \ “SHUFFLE” \ one of the
following, then press [ENTER]
ALBUM Plays back all tracks in the current album at random
SONG Plays back all tracks in the iPod at random
OFF Cancels
Repeat play
Select “Play Mode” \ “REPEAT” \ one of the
following, then press [ENTER]
ALL Repeats all tracks in the iPod
ONE Repeats the current track
OFF Cancels
Display the current song information
You can check the album name, artist name, and song name.
Select “Now playing," then press [ENTER].
11
Page 12

Playing DVD/CD/USB/SDPlaying DVD/CD/USB/SD
Placing a disc
Pull the display panel of the main unit down forward then place a disc
into the holder.
• When opening or closing the display panel, support the unit by hand
to prevent it from falling down.
Label side
• When placing a disc, be sure to place a disc with the label side facing
forward.
• Close the display panel before you start playback.
• “NO DISC” appears when no disc is placed to the unit.
• When placing or removing a disc, take enough care not to touch the
pickup lens.
• Do not open the display panel during playback; otherwise, the
rotating disc may hurt your fingers, etc.
Caution for the monitor of the main unit
• When opening or closing the display panel, open it slowly not to
damage the monitor by hitting it to the table or floor.
Connecting a USB mass storage class device
<Side view of the main unit>
• Refer to page 24 for more about connecting a USB mass storage class
device.
Compatible USB device
You can connect only USB mass storage class devices which stores
audio files using Microsoft® Windows Media Player®.
It is impossible to connect the Digital Audio Player which stores the
audio file using any other application than the above.
Inserting an SD card
<Side view of the main unit>
• When removing the SD card, push it in and then pull it out.
• Refer to page 25 for more about inserting an SD card.
You cannot send any data to the disc, USB mass storage class
device, or SD card from the unit.
12
Page 13

Playback operations
To play a disc
To pause a disc
To pause a USB mass
storage class device
To pause an SD card
To select a track
To fast-forward a track
To fast-reverse a track
To select a group
(MP3/WMA/JPEG only)
To stop playback
• To restore normal playback, press [6] for the target source (DVD,
USB, SD).
To play a USB mass
storage class device
Press [DVD/CD 6] during playback
Press [USB 6] during playback
Press [SD 6] during playback
Press [¢] or [4]
• To start playback from the desired
track, press the number button. (To
select a number, refer to page 6.)
Press and hold [¢]
• The search speed changes as x2, x4,
x8, x20.
Press and hold [4]
• The search speed changes as x2, x4,
x8, x20.
Press [2] or [3]
Press [7]
To play an SD card
Resume play
This unit stores the stopped point. When you start playback again, it
starts from the stopped point.
During playback...
Press [7] once
• To clear the stored track (or chapter), press [7] while “RESUME” is
displayed.
Displaying the on-screen bar
Ex.: DVD Video
You can check the source information and playback status using the
on-screen bar.
/
/
/
• To remove the on-screen bar, press [ON SCREEN] repeatedly.
Title (1/7) / Chapter (1/06) (current /total number)
Track (1/26) (current/total number in the folder)
Playback time indication
Audio language / Subtitle language
Angle
Audio format
Repeat mode
Playing back a disc with PBC (VCD/SVCD)
13
Page 14

Various playback for DVD/CD/USB/SDVarious playback for DVD/CD/USB/SD
Using the disc menu
<For DVD Video>
Display the menu
1
or (Hold)
Select the menu
2
• To go back to the previous menu, press [MENU].
<For VCD/SVCD with Play Back Control (PBC)>
You can play VCD/SVCD from its menu using the Play Back Control (PBC).
While the disc menu is displayed...
Press the number button to select an item on the
menu
• To select a number, refer to page 6.
• To move to the next/previous page of the current menu, press [¢]
or [4].
• To cancel Play Back Control (PBC), press [MENU].
Select a track you want to play by pressing [¢] [4] or the number
buttons.
• To reactivate Play Back Control (PBC), press [MENU] again.
Selecting the audio track/subtitle language/view angle
During playback, press one of the buttons on the
table below repeatedly to use the desired function
Selecting the
audio language
or audio track
Selecting the
subtitle language
Selecting the
view angle (Hold)
This function can be used for DVD
Video/DVD-VR/VCD/SVCD/DivX files.
This function can be used for DVD
Video/DVD-VR/SVCD/DivX files.
This function can be used only for
DVD Video.
Playback using the control screen
After you select the source, the control screen appears automatically in
the following cases:
• When the unit detects MP3/WMA files.
• When playback of JPEG/MPEG-1/MPEG-2/DivX files is stopped.
14
Page 15

Current playing file / 2 Folder list / 3 File list
1
Track information / 5 File type
4
Press [5] [∞] [2] [3] repeatedly to select a file, then
press [ENTER]
• If different types of playable files (audio/still picture/moving picture)
are contained, select a file type to play. (See below.)
Selecting the file type
Audio file
1
Still picture
2
Moving picture
Cursor
3
Press [2] [3] repeatedly to move the cursor, then
press [ENTER]
The files of the selected type are listed on the control screen.
Time search/Chapter search
You can move to a particular point by specifying the elapsed playing
time or by selecting chapter number using the on-screen bar.
Display the setting bar
1
Press [ON SCREEN] three times
Move the cursor to the time (or chapter)
2
indication
Press [2] [3] repeatedly
Specify the time (or chapter)
3
Press the number button (to select a number, refer to page 6.)
Start playback
4
Perform step 2 and 3 repeatedly, then press [ENTER]
Slow-motion playback
While playback is paused...
Press [3]
Each time you press the button, the playback speed changes as follows.
(Normal
1/2 1/3 1/4 1/5 1/6 1/7 1/8
Frame-by-frame playback
The picture is played back frame by frame.
While playback is paused...
Press [5] repeatedly
Play
playback)
Repeat play
During playback...
REP : REP 1
Each time you press the button, the repeat modes change as follows.
(Canceled)
• The selectable repeat modes differ depending on the disc/file.
REP 1 Repeats the current track
REP DIR Repeats the current group (MP3/WMA/JPEG only)
REP ALL Repeats all tracks
• Repeat play cannot be used during playback of PBC (VCD/SVCD).
• “REP DIR” cannot be used during program playback.
15
Page 16

Various playback for DVD/CD/USB/SDVarious playback for DVD/CD/USB/SD
Random play
During playback...
Playback starts in random order. Random play stops automatically after
all tracks have been played.
• You cannot go back to the previous tracks using [4] during Random
play.
• To stop Random play, press [RANDOM] again then select “RANDOM
OFF.” The playback starts in the normal order from the currently
playing track.
Program play
You can use program play while plaing music, still pictures and DVD
Video.
Select a source and stop playback
1
Display the program setting screen
2
Select the program number you want to store the
3
track into
Select a track number
4
• For DVD Video, select a title number and chapter number.
• To select a number, refer to page 6.
Repeat steps 3 and
5
• You can select up to 16 tracks.
• To erase the entire program, press [5] [∞] [2] [3] to select
“CLEAR”, and press [ENTER].
Start program playback
6
4
“PLAY”
Playback starts in the programmed order.
• Program play also starts by pressing [DVD/CD 6], [USB 6], or
[SD 6].
• Program play cannot be used for DVD-VR
16
Page 17

Editing the program
While playback is stopped...
Select the program number of the track you want
1
to replace
Press [PRGM] to display the program setting screen, and press [5]
[∞] [2] [3].
• To add a track at the end of the program, move the cursor to the
last program number.
Perform step 4 in the left column to select a new
2
track
• To erase a programed track, press the number button [0] a few times.
• To erase the entire program, press [7].
Playing still picture (JPEG file)
• No audio signal of other source is emitted during still picture playback.
Select still picture for the file type
1
Press [2] [3] repeatedly to select still picture for file type on the
control screen (refer to page 14), and press [ENTER].
The files of still picture are listed on the control screen.
Select a file in the list
2
The thumbnail of the selected file is
displayed on the control screen.
• You can also select a file using the number buttons. (To select a
number, refer to page 6.)
• To select a folder, press [2] to move the cursor to the folder list,
and press [5] [∞] and then [ENTER].
Start playback
3
Slide-show playback starts. Playback stops automatically after all
pictures contained on the disc/USB mass storage class device/SD
card have been played.
• Playback also starts by pressing [DVD/CD 6], [USB 6] or
[SD 6].
• Repeat play or Random play can also be used for still pictures.
(Refer to pages 15 and 16.)
• To pause slide-show playback, press [DVD/CD 6], [USB 6], or
[SD 6].
• To cancel slide-show playback and select the file manually, press
[4] [¢].
Reflecting or rotating images
During playback of the still picture or while playback is paused...
The image reflects
[5]
vertically.
The image reflects
[∞]
horizontally.
• Press [ENTER] to return to the normal display. The slide-show playback
starts again.
The image rotates to left
[2]
by 90 degrees.
The image rotates to right
[3]
by 90 degrees.
17
Page 18

Listening to the FM radio/External deviceListening to the FM radio/External device
FM radio
Selecting a station
Press [FM/AUDIO IN] to select “FM” as the source
1
AUDIO IN
Start searching
2
Radio
Stereo
(Hold)
The unit starts searching for the stations automatically, and the
station search stops when a station of sufficient signal strength is
found.
• To stop the search manually, press [2] [3] again.
• When you press the button repeatedly, the frequency changes.
FM 87.50 MHz
Searching...
Storing stations automatically in the unit
(Auto Preset)
• You can preset up to 20 FM stations.
(Hold)
The unit starts searching for stations automatically, and stores them into
the preset numbers.
• Searching stops automatically when the unit has finished searching
for all receivable stations, or 20 stations have been stored.
Storing stations manually in the unit
(Manual Preset)
Display the preset number while listening to the
1
target station
Radio
Stereo
FM 87.50 MHz
Sel 01
Select a preset number
2
Radio
Stereo
FM 87.50 MHz
Sel 05
18
Page 19

External device
Store the preset station
3
“Save XX” (“XX” is the preset number) is displayed on the screen.
• Press the button within 5 seconds after selecting the preset
number.
Tuning in to a preset station
Press [¢] or [4]
Improving the reception
If an FM stereo broadcast is hard to listen to, you can improve the
reception by switching to monaural mode.
Canceled (no indication)
• When the monaural mode (Mono) is activated, the reception is
improved. However, the stereo effect is lost.
• To restore stereo reception, press [FM MODE] to turn off “Mono.”
Connecting an external device
Connect an external device using a stereo mini plug cord (not supplied).
• Be sure to turn down the volume before connecting the unit and
external device.
<Side view of the main unit>
Playing an external device
Press [FM/AUDIO IN] repeatedly to select “AUDIO IN” as the source, then
start playback of the connected external device.
AUDIO IN
• Refer to the instruction manual of the external device.
• When the volume from the connected external device is too small to
listen to, turn up the volume of the external device.
19
Page 20

Setting a setup menuSetting a setup menu
Setting an item
• Setup menu can be used only when “DVD/CD,” “USB,” or “SD” is selected
as the source.
Display the setup menu
1
• If a disc or file is playing,
playback is paused.
Select an item
2
Confirm the item
3
• To exit the setup menu, press [SET UP] again.
TVSYSTEM
TVTYPE
DEFAULT
Menu / 2 Items in the menu
1
Setup menu items
____(underlined): initial setting
Menu Item Contents
TV SYSTEM
You can select the TV system.
NTSC or PAL
Menu Item Contents
TV TYPE You can select the monitor type
to match the connected external
monitor when you play back a
picture recorded for wide-screen
televisions.
• By selecting “AUTO” mode, the
color system of the unit changes
automatically to match the color
system of the picture.
4:3 PS/4:3 AUTO PS
(Pan Scan conversion)
For a conventional (4:3) TV. The
picture is zoomed in to fill the screen
vertically and the left and right sides
of the picture are cut off.
4:3 LB/4:3 AUTO LB
(Letter Box conversion)
For a conventional (4:3) TV. Displays
a wide-screen picture to fit the
width of the TV screen keeping the
aspect ratio.
16:9/16:9 AUTO
(Wide-screen television)
Select this when the aspect ratio
of your wide-screen TV is fixed to
16:9. Displays a 4:3 picture to fit the
length of the TV screen keeping the
aspect ratio.
20
Page 21

Menu Item Contents
DEFAULT You can set all the items on the
setup menu to the initial settings.
OSD LANGUAGE You can select the language
displayed on the screen.
MENU LANG You can select the initial menu
language for DVD Video displayed
on the screen.
AUDIO LANG You can select the audio language
or audio track of the loaded disc.
SUBTITLE LANG You can select the subtitle language
of the loaded disc.
DIVX [R] VOD The unit has its own Registration
Code. If necessary, you can confirm
it.
DOWNMIX You can select the outcoming sound
w
hen playing a multi-channel DVD
.
disc
LT/RT
Surround signals are downmixed to
the front channel signals.
STEREO
Only front channel sounds come
out.
Menu Item Contents
NIGHT MODE You can set the sound to reduces the
intensity of loud sounds and raises
the level of very soft sounds.
ON or OFF
DYNAMIC RANGE You can select the Dynamic Range
Compression (DRC) for night-time
listening (Only DVD recorded with
Dolby Digital)
FULL, 6/8, 4/8, or 2/8
When you select “FULL,” the effect of
DRC increases, and the value is set
lower, the effect of DRC is reduced.
OFF
When “OFF” is selected, the effect is
not available.
21
Page 22

Adjusting the sound/Setting the TimerAdjusting the sound/Setting the Timer
Adjusting the sound
Hyper Bass Sound (HBS)
You can reinforce the bass sound.
HBS ON
HBS ON HBS OFF
Sound mode
You can select the sound mode suitable for your favorite music.
(Canceled)
* CLASS: Classical music
(Canceled)
Sleep Timer
The unit is turned off automatically after the set time (minutes) has
elapsed.
Sleep 10
Each time you press the button, the display changes as follows.
(Canceled)
• The displayed number is the remaining time (minutes) until the unit is
turned off.
• To check the remaining time until the unit is turned off, press [SLEEP]
once while the sleep timer is on.
22
Page 23

Daily Timer
By using Daily Timer, you can wake up with your favorite music.
• Set the clock beforehand (refer to page 9).
• Prepare the playback source beforehand.
Display the Daily Timer setting screen
1
“Timer”
The setting items are displayed.
LCD Set Clock Timer
Timer On 00:00
Timer O 00:00
Source FM
FM CH 01
Set the timer contents
2
You can set the following each items:
Timer On Hour and minute for the on-time
Timer Off Hour and minute for the off-time
Source
Playback source
• “AUDIO IN” is not available.
System
Select the setting item.
1
Start setting the selected item.
2
or
Set the item.
3
• To set hour and minute: Press [5] or [∞] and then press
[ENTER].
• Select a source: Press [3] or [2] and then press [ENTER].
– When you select “FM,” press [3] or [2] to select a preset
number in “FM CH.”
• To correct a misentry, repeat the procedure from step 1 to
change the setting.
Activate Daily Timer
3
(Hold)
The timer indicator ( ) lights up.
• To cancel a Daily Timer, press and hold [TIMER] while the unit is turned
on. The timer indicator (
Turn off the unit
4
The STANDBY lamp starts blinking.
• Daily Timer does not work while the unit is turned on.
) disappears.
23
Page 24

ReferencesReferences
Using headphones
Connect headphones (not supplied) to the jack.
• When headphones are connected to the unit, no sound is output from
the speakers.
Caution for using the headphone
Be sure to turn down the volume before connecting or putting on the
headphones.
Stereo mini
plug cord
Headphones
(not supplied)
Notes on using iPod
• Do not connect or disconnect the iPod when the unit is turned on.
• Do not carry the unit with iPod connected. It might cause damage to
the dock or you might drop the iPod.
• Do not touch or hit the iPod terminal pins or connector pins in the
dock for iPod directly. Doing so might cause damage to the connector
pins.
• Keep iPod in a straight position while connecting/disconnecting it.
• iPod is charged through the dock when the unit is turned on.
• The information displayed on the screen of the main unit differs
depending on the type of the iPod.
• Depending on the type of the iPod, the iPod may operate differently.
• If iPod does not play correctly, update iPod software to the latest
version.
– For details about updating iPod, check on the Apple web
site<http://www.apple.com/>.
Notes on using USB mass storage class
device/SD card
• Disconnect the USB mass storage class device after stopping playback.
• Do not use a USB hub.
• When connecting with a USB cable, use a USB 2.0 cable whose length
is less than 1 m.
• Deactivate the security function of the USB mass storage class device.
• The USB mass storage class device is charged through the
terminal when “USB” is selected as the source. (Some USB mass storage
class devices may not be charged through the
“USB” is selected as the source.)
• You cannot connect a computer to the
• Electrostatic shock at connecting a USB mass storage class device may
cause abnormal playback of the device. In this case, disconnect the
USB mass storage class device then reset this unit and the USB mass
storage class device.
• While playing back a file on a USB mass storage class device, do not
disconnect the device. Doing so may cause malfunction on both the
unit and the device.
• This unit may not recognize some USB mass storage class devices.
terminal even if
terminal of the unit.
24
Page 25

• DO NOT insert any object other than an SD card into the insertion slot.
• DO NOT use a cracked or deformed SD card.
• Make sure that SD card playback has stopped before removing the SD
card. Otherwise, the data may be damaged.
• Never insert an SD card upside down. Otherwise, it will not be able to
be removed.
• When you play a miniSD™/microSD™ card, be sure to attach the
miniSD™/microSD™ adaptor to the card before insertion.
• You can use an SD card of up to 32 GB.
• For USB/SD playback...
– You cannot play back files larger than 2 GB.
– This unit may not play back some USB mass storage class devices/
SD cards and does not support DRM (Digital Rights Management).
Therefore, this unit cannot play back files downloaded from the
internet (files protected by Digital Rights Management) using a
computer.
– The more files are contained, the longer it will take to read them.
– Folders are played back in the same order as they have been
created. In a folder, files are also played back in the same order as
they have been recorded.
• The order of playback may differ depending on the recording
method.
• If you change a folder name or file name, the order of playback
may change.
Maintenance
To get the best performance of the unit, keep your discs and the
mechanism clean.
Handling discs
• Remove the disc from its case by holding it at the edge while pressing
the center hole lightly.
• Do not touch the shiny surface of the disc, or bend the disc.
• Put the disc back in its case after use.
• Be careful not to scratch the surface of the disc when placing it back in
its case.
• Avoid exposure to direct sunlight, temperature extremes, and
moisture.
To clean the disc
• Wipe the disc with a soft cloth in a straight line from center to edge.
Cleaning the unit
• Stains should be wiped off with a soft cloth. If the unit is heavily
stained, wipe it with a cloth soaked in water-diluted neutral detergent
and wrung well, then wipe clean with a dry cloth.
• Since the unit may deteriorate in quality, become damaged, or get its
paint peeled off, be careful about the following:
– DO NOT wipe it hard.
– DO NOT wipe it with thinner or benzine.
– DO NOT apply any volatile substances such as insecticides to it.
– DO NOT allow any rubber or plastic to remain in contact for a long
time.
Cleaning the Disc pickup lens
Keep the CD pickup lens clean, or the sound may
be degraded. Use a blower (available at a camera
store, etc.) to blow dust off the lens.
25
Page 26

Playable disc/file typesPlayable disc/file types
• This unit can play back...
– Audio CD
– VCD and SVCD
– CD-R/CD-RW in Audio CD, VCD and SVCD format
– DVD
– DVD-R/DVD-RW/+R in DVD Video format
– DVD-R/DVD-RW in DVD Video Recording (VR) format
– MP3/WMA/JPEG/MPEG1/MPEG2/DivX files on a CD-R/CD-RW (ISO
9660 format)/DVD-R/DVD-RW/+R/+RW (written in the UDF-Bridge
format).
– MP3/WMA/JPEG/MPEG1/MPEG2 files on a USB mass storage class
device/SD card/SDHC card (maximum data transfer rate: 2 Mbps).
• DVD players and DVDs have their own Region Codes.
This unit can play back only DVDs with an appropriate Region Code.
– Saudi Arabia: 2
– Southeast Asia: 3
– Australia: 4
Ex.: For Southeast Asia
• “RG ERROR” appears if a DVD with an incompatible Region Code is
loaded.
• The following discs cannot be played back:
DVD-RAM, CD-I (CD-I Ready) and Photo CD.
Playing back these discs will generate noise and damage the speakers.
• This unit cannot play SACD files, and does not support DRM (Digital
Rights Management).
• This unit cannot play DVD-VR discs compatible with CPRM (the
abbreviation of Content Protection for Recordable Media, and it is a
technique for copyright protection for recording media).
• This unit cannot play “packet write” discs.
• Some disc, file or device is not supported for playback.
• It is possible to play back finalized +R (DVD Video format only) discs.
The DVD indicator lights up when a +R disc is loaded.
• Some discs may not be played back because of their characteristics,
recording conditions, or damage or stains on them. For similar reasons,
some file names may not be displayed properly.
• DVD Logo is a trademark of DVD Format/Logo Licensing Corporation.
• The non-DVD side of a “DualDisc” does not comply with the “Compact
Disc Digital Audio” standard. Therefore, the use of the Non-DVD side of
a DualDisc on this product may not be recommended.
• This unit outputs multi-channel sound mixed to stereo sound from the
speakers or the connected headphones.
• This unit accommodates both NTSC and PAL system and can play back
discs/files recorded in either system.
• The playback conditions of a visual software may be decided by the
producer of the software. This unit may not be operated as you use
the unit because the unit plays the discs/files according to the content
created by the producer. If the unit does not work correctly, “INVALID
KEY” is displayed.
• For MP3/WMA/JPEG playback...
– This unit can play back MP3/WMA files with the extension code
<.mp3> or <.wma> (regardless of the letter case upper/lower).
– Some MP3/WMA files may not be played back due to their recording
conditions.
– This unit can play only discs of ISO 9660 Level 1 or Level 2.
26
Page 27

– This unit can recognize up to 999 tracks and 130 folders on a disc,
USB mass storage class device, or SD card .
– Some discs may not be played back because of their characteristics,
recording conditions, or it may take more time to read.
– The reading time for the media differs according to the number of
folders or files recorded on the media.
– If any letters other than half-size font characters are used for the file
name of MP3/WMA/JPEG, they will not be displayed correctly.
– The order of the file/folder displayed on the menu screen for the
MP3/WMA/JPEG file may differ from the order of the file/folder
displayed on the computer.
– MP3/WMA files containing still pictures may take more time to play.
The elapsed time is not displayed until playback starts. The elapsed
time may not be displayed correctly.
– An MP3/WMA file with a sampling frequency of 44.1 kHz and
transmission rate of 128 kbps is recommended.
– This unit cannot play MP3i and MP3PRO file.
– This unit cannot play WMA-DRM.
– This unit can play JPEG files of base-line type, but cannot play
monochrome JPEG files.
– This unit can play JPEG files recorded using a digital camera based
on the DCF (Design rule for Camera File System) standard (if you use
the auto turning function for the files on the digital camera, the files
may be not based on the DCF standard, and may not be displayed).
– Files created, edited, or saved again using computer software may
not be displayed.
– This unit cannot play movies such as MOTION JPEG, or still pictures
such as files other than JPEG (TIFF etc.), or pictures with audio
signal.
– We recommend a JPEG file with a resolution of “640 pixel x 480
pixel.” It may take more times to read if the file is recorded in a
resolution higher than that. This unit cannot play the files with a
higher resolution than “8192 pixel x 7680 pixel.”
• For MPEG1/MPEG2 files
– The stream structure must be based on the MPEG System stream
standard, or MPEG program stream standard.
– We recommend a maximum resolution of “720 pixel x 576 pixel” (25
fps) and “720 pixel x 480 pixel” (30 fps) for files.
– We also recommend a resolution of “352 x 576,” “480 x 576,” “352 x
288” (25 fps) and “352 x 480,” “480 x 480,” “352 x 240” (30 fps) for files.
– Profile and Level must be MP@ML (Main Profile at Main Level), SP@
ML (Simple Profile at Main Level), or MP@LL (Main Profile at Low
Level).
– Audio streams must be based on the MPEG1 Audio Layer-2, MPEG2
Audio Layer-2, or Dolby Digital (only MPEG2 file) standard.
27
Page 28

TroubleshootingTroubleshooting
If you are having a problem with your unit, check this list for a possible solution before calling for service.
If the unit does not work correctly, disconnect the AC power cord from the wall outlet, wait for a while, then connect the cord again.
Symptoms Causes/Remedies
Power does not come on. • Power plug is not inserted securely. Plug it in securely.
Adjustments or settings are suddenly canceled
before you finish.
Unable to operate the unit from the remote
control.
General
No sound is heard. • Headphones are connected.
Sound quality is low. • The terminals or disc pickup lens is dirty. Clean them.
The iPod does not play, but “iPod” appears on
the display.
iPod
The disc/USB mass storage class device/SD card
does not play.
Disc/USB/SD
• There is a time limit. Start the procedure again.
• The path between the remote control and the remote sensor on the unit is
blocked.
• The battery is exhausted.
• Adjust the volume.
• The iPod battery is low or exhausted. Charge the iPod battery.
• Select the correct source — “DVD/CD,” “USB,” or “SD.”
• There is moisture condensation. Turn the unit on and wait for a few hours before
use.
• The disc is placed incorrectly. Place the disc with the label side facing forward.
• The disc is recorded using “packet writing (UDF file system).” It cannot be played.
• The disc is not be finalized correctly. Use finalized discs.
• The disc pickup lens is dirty. Clean it (Refer to page 25).
• The USB mass storage class device is not connected properly or the SD card is
not inserted properly.
• It is impossible to play USB mass storage class devices with a security function.
28
Page 29

Symptoms Causes/Remedies
The disc/USB mass storage class device/SD card
does not play.
Groups and files are not played back as you
expect.
The disc/USB mass storage class device/SD card
sound is discontinuous.
Disc/USB/SD
No picture is displayed on the TV screen or
monitor.
The picture displayed on the TV screen is
distorted.
Hard to listen to broadcasts because of noise. • The FM antenna is not properly extended and positioned.
FM radio
Hard to listen to broadcasts because of noise. • Improve the reception switching to monaural mode (Refer to page 19).
• It is impossible to play audio files (ex. AAC files) recorded using any other
application than Microsoft® Windows Media Player®.
• MP3/WMA/JPEG files are not recorded on the disc, USB mass storage class
device, or SD card.
• It is impossible to play audio files other than MP3/WMA files.
• Disc: Playing order is determined depending on the recording application in
which the groups and files are recorded.
• USB mass storage class device or SD card: Folders are played back in the same
order as they have been created. In a folder, files are also played back in the same
order as they have been recorded.
• The disc is scratched or dirty.
• MP3/WMA files have not been properly recorded onto the USB mass storage
class device or SD card.
• In this case, disconnect and connect the USB mass storage class device or
remove and insert the SD card again after turning off the unit.
• If the unit is used at an extremely high volume, the sound may skip due to
vibration. Turn down a volume.
• Connect the video cord correctly (Refer to page 4).
• Check whether the input setting is correct for the TV or monitor.
• The TV SYSTEM setting is not appropriate. Select the TV SYSTEM suitable for your
TV (Refer to page 20).
• Electrostatic discharge from your body may cause noise. If this happens, turn the
unit off then on again.
29
Continued on the next page
Page 30

TroubleshootingTroubleshooting
Symptoms Causes/Remedies
No sound is heard from the external device. • Select the source as “AUDIO IN.”
device
External
Daily Timer does not work. • The unit has been turned on when the on-time comes. The timer stars working
Timer
• JVC bears no responsibility for any loss of data in iPod, disc, USB mass storage class device, or SD card while using this unit.
• This item incorporates copy protection technology that is protected by U.S. patents and other intellectual property rights of Rovi Corporation.
Reverse engineering and disassembly are prohibited.
• Microsoft and Windows Media are either registered trademarks or trademarks of Microsoft Corporation in the United States and/or other
countries.
• Manufactured under license from Dolby Laboratories. Dolby and the double-D symbol are trademarks of Dolby Laboratories.
• DivX®, DivX Certified® and associated logos are trademarks of Rovi Corporation or its subsidiaries and are used under license.
• ABOUT DIVX VIDEO: DivX® is a digital video format created by DivX, LLC, a subsidiary of Rovi Corporation. This is an official DivX Certified®
device that plays DivX video. Visit divx.com for more information and software tools to convert your files into DivX videos.
• ABOUT DIVX VIDEO-ON-DEMAND: This DivX Certified® device must be registered in order to play purchased DivX Video-on-Demand (VOD)
movies. To obtain your registration code, locate the DivX VOD section in your device setup menu. Go to vod.divx.com for more information on
how to complete your registration.
• “Made for iPod” means that an electronic accessory has been designed to connect specifically to iPod, and has been certified by the developer
to meet Apple performance standards. Apple is not responsible for the operation of this device or its compliance with safety and regulatory
standards.
• iPod, iPod classic, iPod nano, and iPod touch are trademarks of Apple Inc., registered in the U.S. and other countries.
• SDHC Logo is a trademark.
• Check the connection.
• Turn up the volume of the external device.
only when the unit is turned off.
30
Page 31

SpecificationsSpecifications
Amplifier section
Output Power: 3 W (1.5 W + 1.5 W) at 4 Ω (1 % THD)
Audio input: AUDIO IN: 125 mV/47 k Ω
Headphones output: Stereo mini (ø 3.5 mm)
Video out: Composite
Tun er
FM tuning range: 87.50 MHz - 108.00 MHz
DVD/CD player
Wow and flutter: Immeasurable
Playable files: Refer to “Playable disc/file types” on page 26.
USB
USB specification: Compatible with USB 2.0 Full Speed
Compatible device: USB mass storage class device
Compatible file system: FAT16, FAT32
Output power: DC 5 V
Playable files: Refer to “Playable disc/file types” on page 26.
SD
Compatible device: SD, SDHC
Compatible file system: FAT16, FAT32
Playable files: Refer to “Playable disc/file types” on page 26.
iPod
Output power: DC 5 V
500 mA
500 mA
General
Display: 7.0 inches wide-LCD display
(800 x 480 pixel)
Speaker type: Bass-Reflex type
Speaker unit: 8 cm × 2
Speaker impedance: 4 Ω
Power requirements:
For Australia: AC 240 V
For other countries: AC 110 V – 127 V/AC 220 V – 240 V
(adjustable with the voltage selector),
50 Hz/60 Hz
Power consumption: 28 W (at operation)
0.50 W or less (on standby)
Color system: PAL/NTSC
Dimensions (approx.): 364 mm × 170 mm × 105 mm (W × H × D)
Mass (approx.): 2.3 k
Supplied accessories
Check to make sure that you have all the following items.
• Video cord (×1)
• Remote control (×1)
• Lithium coin battery CR2025 (×1)
– The battery has been installed in the remote control when shipped
from the factory.
• AC plug adaptor (×1) (not supplied for Saudi Arabian and Australian
models)
g
, 50 Hz
Design and specifications are subject to change without notice.
31
Page 32

Mains (AC) Line Instruction
(Not applicable for Australian model)
Main unit (rear)
CAUTION for mains (AC) line
BEFORE PLUGGING IN, do check that your mains (AC) line voltage
corresponds with the position of the voltage selector switch provided on the
outside of this equipment and, if different, reset the voltage selector switch, to
prevent from a damage or risk of fi re/electric shock.
NX-PB15V DVD PORTABLE SYSTEM
EN
© 2011 Victor Company of Japan, Limited
0911KMMMDWMTS
 Loading...