

Page 1
Before operating the un it , pl ea se r ead this manual thoroughly.
ATTENTION
If you purchase a univers al r em ot e co ntrol from your local retai le r, pl ea se c ontact the remote manufac tu re r fo r th e
required programmin g co de .
PLEASE HAVE TH E MODEL NUM BE R READY PRIOR TO CALLING
FOR RECYCLING INFORMAT ION, PLEASE CONTAC T CUSTOME R SE RVICE.
CUSTOMER SE RVICE - 1-888-582-8870
ENGLISH
USER GUIDE
LT-65MA875
(65" class/ 65 diagonal)"
Page 2

Contents
Safety and warnin gs................................................................................................ 2-3
Warnings an d Cautions................................................................................. ........... 4
Introduction............................................................................................................ 5-6
Installation. .............................................................................................................7-10
........................................................................................ ......................11
Remote Control. ......................................................................................................12
Operation...................................................... ..........................................................13-25
Trouble Sho oting..................................................................................................... 26-27
Wall Mount
Page 3
TO REDUCE THE RISK OF ELECTRIC SHOCK, DO
NOT REMOVE COVER (OR BACK).NO USER
SERVICEABLE PARTS INSIDE. REFER SERVICING
TO QUALIFIED SERVICE PERSONNEL.
RISK OF ELECTRIC SHOCK
DO NOT OPEN!
CAU TION
CAUT ION
The symbol indicates that dangerous
voltages constituting a risk of electric
shock are present within this unit.
The symbol indicates that there are
important operating and maintenance
instructions in the literaturaccompanying
this unit.
To reduce the risk of fire or electric
shock, do not expose this apparatus to
rain or moisture.
WARNING:
The batteries shall not be exposed to
excessive heat such as sunshine, fire or
the like.
WARNING:
WARNING
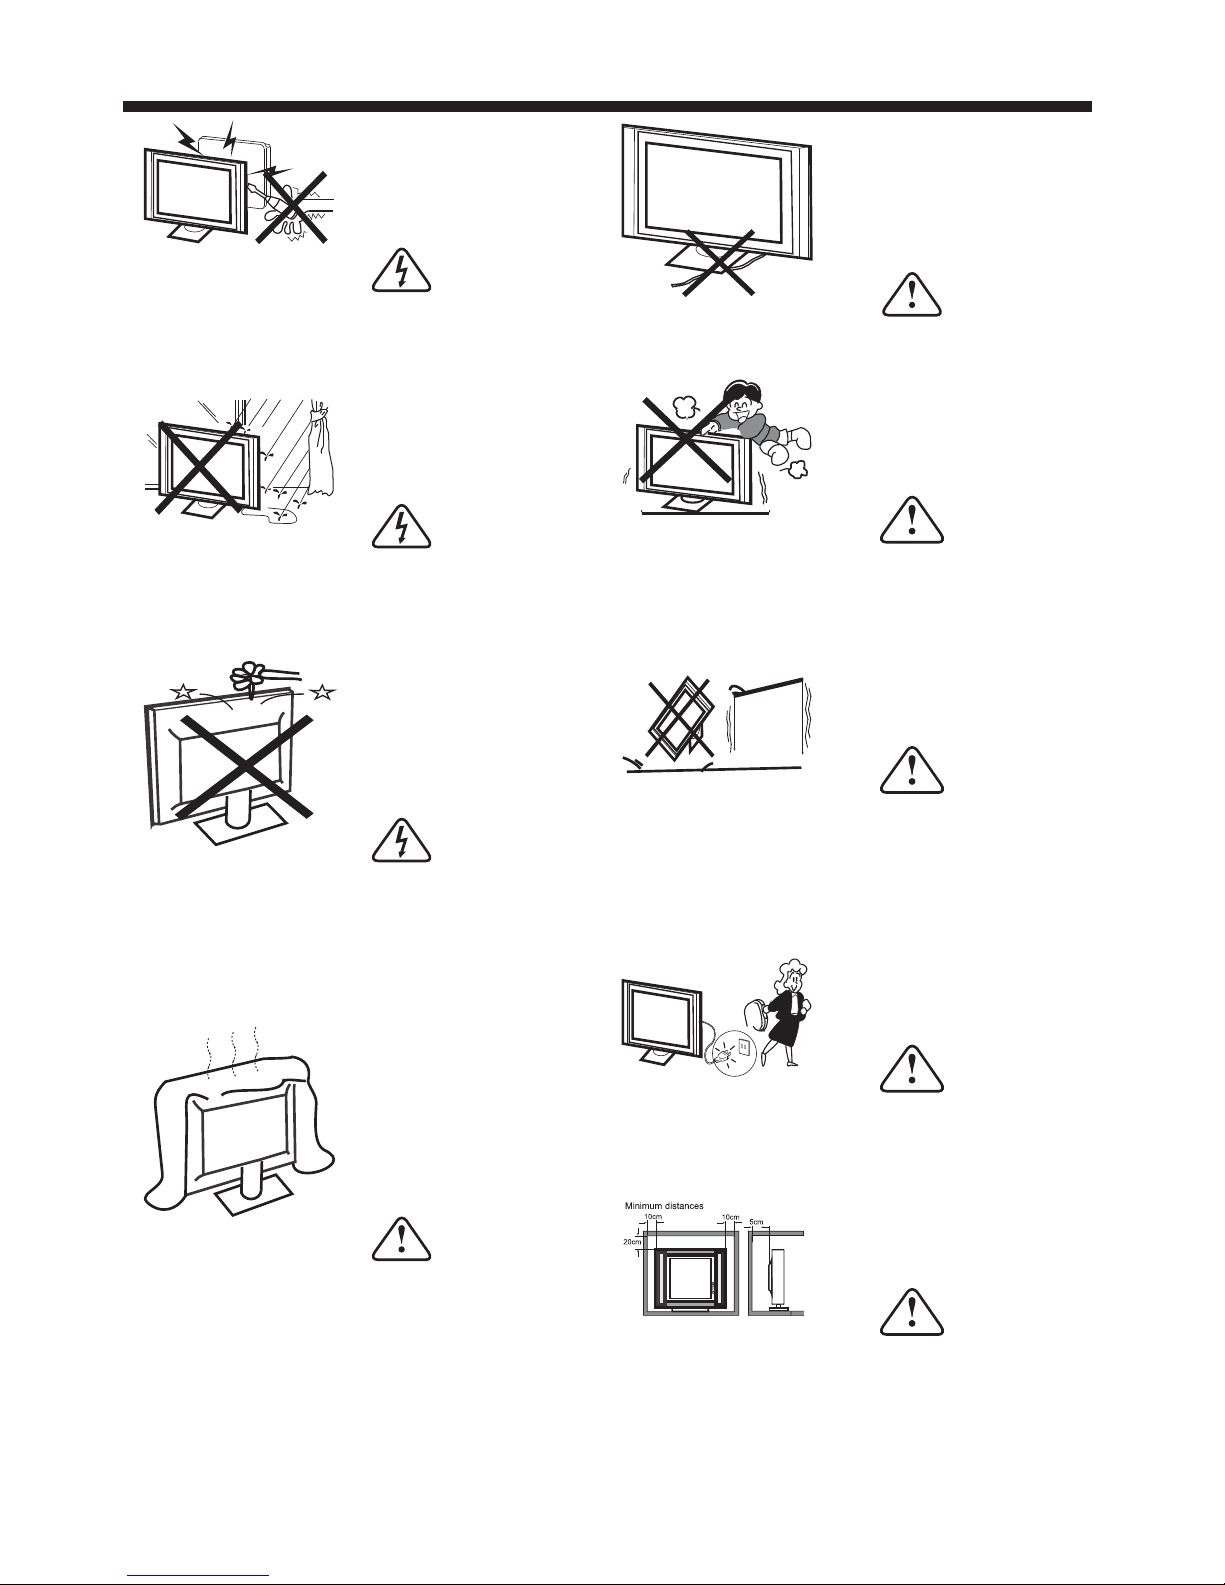
Neve r place a television set i n an unstable
loca tion. A telev ision set may f all, causing serious
pers onal inju ry or death. Ma ny injuries,
part icularly to children , can be avoided by taking
simp le
prec autions such as:
– Usin g cabinet s or stands rec ommended by the
manu facturer of the televi sion set.
– Only u sing furniture that ca n safely support the
tele vision set.
– Ensu ring the television se t is not overhanging
the ed ge of the supporting fur niture.
– Not pl acing the television s et on tall furniture
(for e xample, cupboards or b ookcases) without
anch oring bot h the furnitu re and the television se t
to a sui table support.
– Not pl acing the television s et on cloth or other
mate rials that may be locate d between the
tele vision set and support ing furniture.
– Educ ating children about t he dangers of
clim bing on fur niture to rea ch the television set or
its co ntrols.
If you r existing televisio n set is being retained an d
relo cated, the same consid erations as above
shou ld be appli ed.
SA FETY AN D WARNI NGS
-2-
IMPORTANT SAFETY INSTRUCTIONS
Important Safety Instructions
1) Read these instructions.
2) Keep these instructions.
3) Heed all warnings.
4) Follow all instructions.
5) Do not use this apparatus near water.
6) Clean only with non abrasive dry cloth.
7) Do not block any ventilation openings, inst all in
accordance with the instructions.
8) Do not install near any heat sources such as
radiators, heat registers, stoves, or other
apparatus (including amplifiers ) that pr oduce
heat.
9) Do not defeat the safety purpose of the
polarized plug. If the provided plug does not fi t
into your outlet, consult an electrician for
replacement of the obsolete outlet.
10) Protect the power cord from being walked on
or pinched particularly at plugs, convenie nce
receptacles, and the point where they exit from
the apparatus.
11) Only use attachments/accessories specified
by the manufacturer.
12) Unplug this apparatus during ligh ting st orms
or when unused for long periods of time.
13) Refer all servicing to qualified service
personnel. Servicing is required wh en the
apparatus has been damaged in any way, such as
when power-supply cord or plug is damag ed,
liquid has been spilled or objects have f allen i nto
the apparatus, the apparatus has been expose d
to rain or moisture, does not operate normally, or
has been dropped.
14) Mains plug is used as the disconnect device,
the disconnect device shall remain readily
operable.
15) Do not cover the ventilation openings with
items such as newspapers, table-cloth, curtains ,
etc.
16) No naked flame sources, such as lighted
candles, should be placed on the appara tus.
17) Attention should be drawn to the
environmental aspects of battery disposa l.
18) Use apparatus in moderate climate.
19) The apparatus shall not be exposed to
dripping or splashing and that no objec ts fill ed
with liquids, such as vases, shall be placed on th e
apparatus.
20) Use only with a cart , stand, tripod, bracket, or
table specified by the manufacturer, or sold wi th
the apparatus. When a cart is used, use caution
when moving the cart/apparatus combinati on to
avoid injury from tip-over.
Page 4
This symbol indicates that this product
incorporates double insulation between
hazardous mains voltage and user
accessible parts. When servicing use only
identical replacement parts.
This marking indicates that this product
should not be dispo sed with other
household waste s throughout the EU. To
prevent possibl e harm to the environment
or human health from uncontrolled waste
disposal, recycle it responsibly to promote
the sustainable reuse of material
resources. To retu rn your used device,
please use the return and collection
systems or contact the retailer where the
product was purchased. They can take this
product for environmental safe recycling.
Warning: Cha nges or modification s to this unit not
expr essly approved by the pa rty responsible for
comp liance could void the us er’s au thority to operate
the eq uipment.
NOTE : This equipmen t has been tested and foun d to
comp ly with the limits for a Cla ss B digital device,
purs uant to Part 15 of the FCC Rul es.These limits are
desi gned to pro vide reason able prot ection agai nst
harm ful interference in a re sidential installa tion. This
equi pment gen erates, use s and can radiate radio
freq uency energy and, if not i nstalled and used in
acco rdance wi th the instru ctions, may cause harm ful
inte rference to radio comm unications.
Howe ver, there i s no guarante e that interference wi ll
not oc cur in a particular inst allation. If this equi pment
does c ause harmful interfe rence to radio or televi sion
rece ption, which can be dete rmined by turning the
equi pment off and on, t he user is encouraged to t ry to
corr ect the interference b y one or more of the followi ng
meas ures:
- Reor ient or relocate the rec eiving antenna.
- Incr ease the separation be tween the equipment an d
rece iver.
- Conn ect the equipment into a n outlet on a circuit
different from that t o which the receiver is co nnected.
-Con sult the dealer or an expe rienced radio/TV
tech nician for help.
This d evice complies with Pa rt 15 of the FCC Rules.
Oper ation is subject to the fo llowing two conditio ns:
(1) th is device may not cause ha rmful interference ,
and( 2) this device must acce pt any interference
rece ived, including inte rference that may caus e
unde sired ope ration.
SA FETY AN D WARNI NGS
-3-
Page 5
Warning
High voltages are used in the operation
of this television receiver. Do not remove
the cabinet back from your set. Refer
servicing to qualified service personnel.
Warning
To prevent fire or electrical shock
hazard, do not expose the television
receiver to rain or moisture.
Warning
Do not drop or push objects into the
television cabinet slots or openings.
Never spill any kind of liquid on the
television receiver.
Caution
Do not block the ventilation holes in the
back cover. Adequate ventilation is
essential to prevent failure of electrical
components.
Caution
Do not trap the power supply cord under
the television receiver.
Caution
Never stand on, lean on, or suddenly push
the television or its stand. You should pay
special attention to children. Serious injury
may result if it should fall.
Caution
Do not place your television on an unstable
cart, stand, shelf or table. Serious injury to
an individual , and damage to the
television, may result if it should fall.
Caution
When the television receiver is not
used for an extended period of time, it
is advisable to dis connect the AC power
cord from the AC outlet.
Dim:515*320m m(不包 括底座)
WARNINGS AND CAUTIONS
-4-
Page 6

®
HDMI CEC Contr ol
Enjo y the benefit of having HD MI CEC-compatible
prod ucts plug and play! No set up is needed! CEC
tech nology lets different devices disco ver and
comm unicate with each othe r.
®
DTS St udio Sound
DTS St udio Sound is an advance d surround sound
solu tion suite that accura tely extracts and plac es
audi o cues for an i mmersive su rround experience
over t he TV’s bu ilt-in sp eakers. To comple te the audio
expe rience, post process ing and psychoacoust ic
tech niques are implement ed to provide 3D audio
rend ering to match 3D video co ntent, for bass and
dial og enhanc ement and to de liver con sistent and
leve l volume across conten t.
4K ULTRA HD CONNETED
Four t imes the pixel resolut ion of the 1080full HD.
4K Ult ra HD TVs with at lea st 8 million active pixe ls.
Our te levisions that resol ution has standardiz ed to
3,84 0 by 2,160.
HDR
Expa nding the TV's co ntrast ratio and color p alette
to offer a more realist ic, natural image than w hat's
poss ible with today's HDTV s. Support HDR video,
HDR Cr eates a wid er gamut of col ors, allowing for a
more v ivid display. HD R for TVs aims to sho w you a
more r ealistic image, one wi th more contrast,
brig htness and color than be fore.
Audi o accessibility
Your TV pr ovides au dio descrip tions of me nus and
some r emote control functi ons. Depending on the
broa dcaster, audio narrat ion of key elements in
prog rams may also be availab le.
Cong ratulations on your pu rchase of a high-quali ty
JVC pr oduct. Your r epresents t he state of the art in
LED TV des ign and is desi gned for re liable and
trou ble-free performan ce.
TM
Google Chromecast built-in
UNLI MITED ENTERTAINMENT, ALL ON YO UR
SCHE DULE
• With G oogle Chromecast™ bu ilt-in, you are in
comm and. Access more than 200 ,000 TV shows
and mo vies, millions of song s and more through
apps l ike Netflix, YouTub e, and Google P lay.
Disc over new content, with m ore apps being
adde d all the time at g.co/cas tapps.
USE YOUR P HONE AS A REMOTE
• By usi ng your pho ne, there's n othing new to
lear n—cast your apps, your p laylists, your TV
show s—without new log-in s or downloads. It's
simp le to search, browse, qu eue, and control from
anyw here in the home.
MULTI-TASK WIT HOUT INTERRUP TING WHAT’S
PLAYING
• Whil e you are casting, you can k eep using your
phon e for other things witho ut disrupting what is
play ing on the TV.
Introduction
INTRODUCTION
-5-
Page 7
INTRODUCTION
!Thank you very much for purchasing this TV. To enjoy
your product from the very
beginning, read this manual carefully and keep it handy for
easy reference.
INSTALLATION
CAUTION
*Locate the TV in the room where light does not strike the
screen directly.
*Total darkness or a reflection on the picture screen can
cause eyestrain. Soft and indirect lighting is recommended
for comfortable viewing.
*Allow enough space between the TV and the wall to permit
ventilation.
*Avoid excessively warm locations to prevent possible
damage to the cabinet or premature component failure.
*Do not cover the ventilation openings when using theTV.
Never tamper with any components inside the TV, or any
other adjustment controls not mentioned in this manual.
All LED-TVs are high voltage instruments. When you
clean up dust or water drops on the LED PANEL or
CABINET, the power cord should be pulled out from the
receptacle, then wipe the TV with a dry soft cloth.
During thunder and lighting, unplug the power cord and
antenna cord to prevent damage to your TV. All repairs
to this TV should only be performed by qualified TV
service personnel.
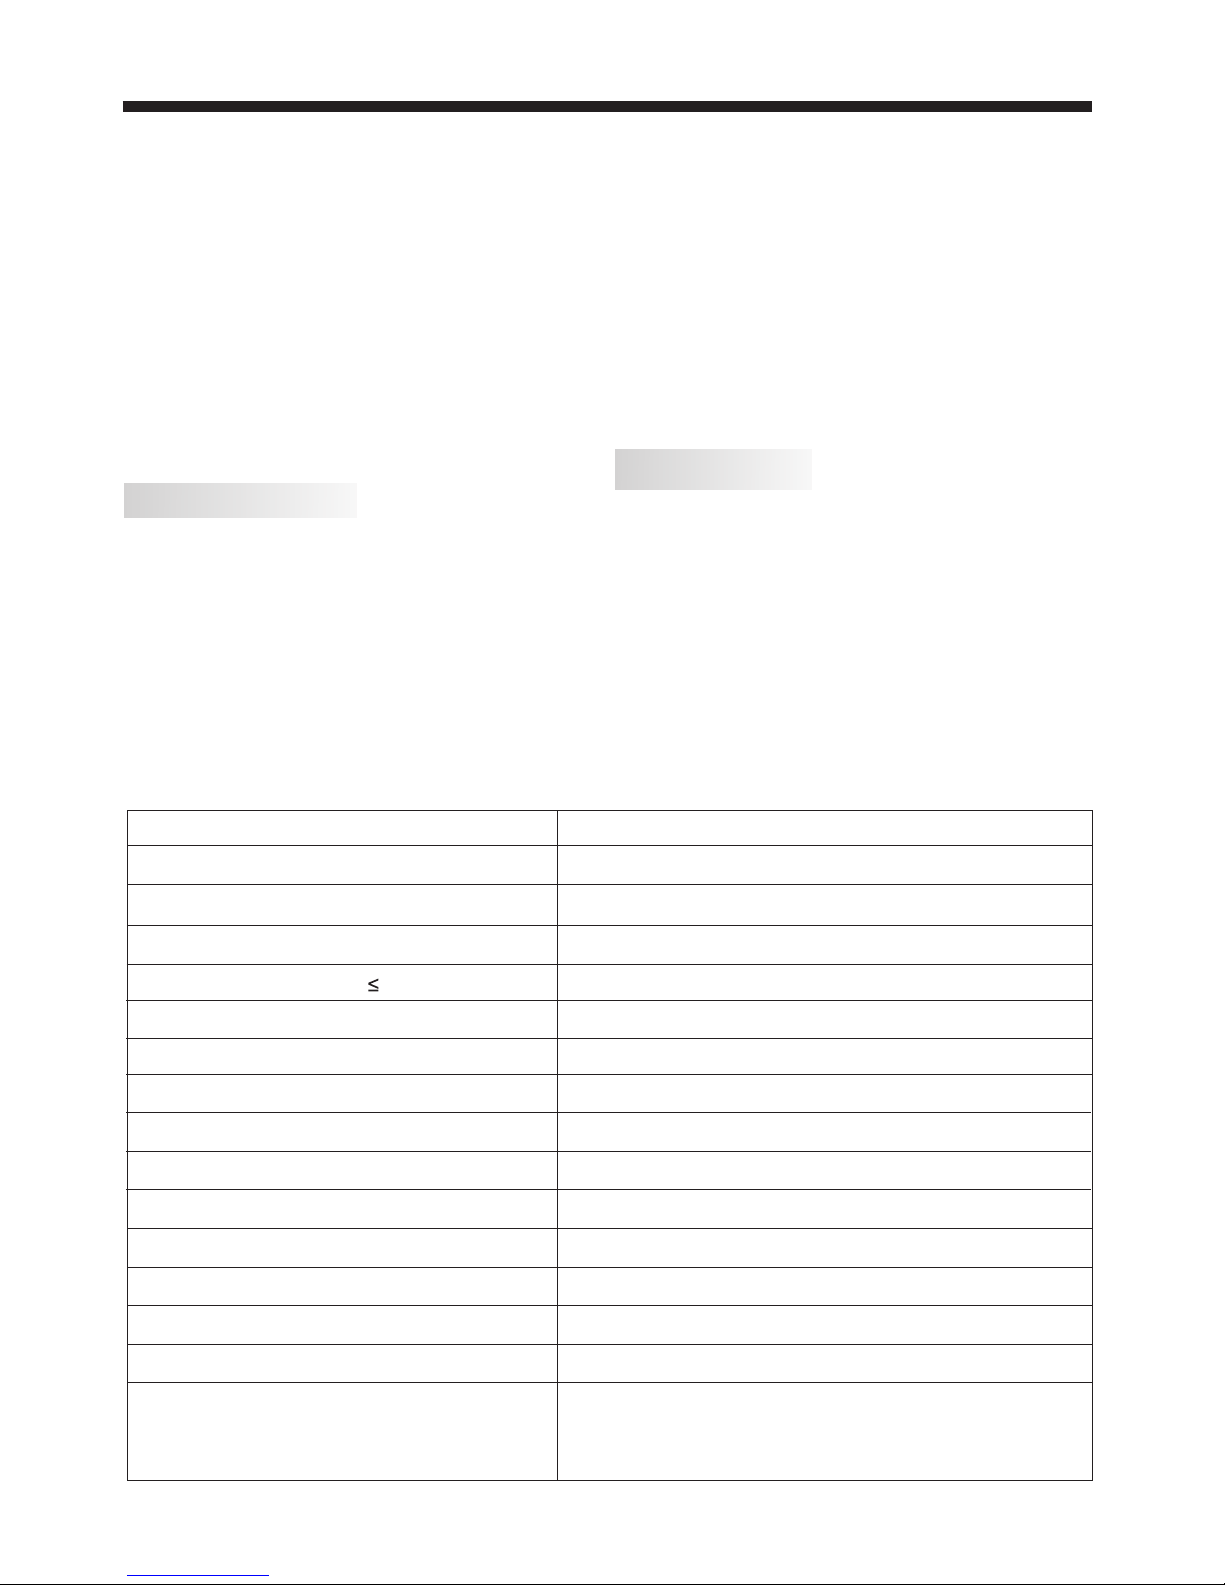
Main Specifications
Main features
■ Integrated ATSC TV tuner for HDTV broadcast reception
■ High brightness provides a v iv id and brilliant p ic tu re
■ Deeper blacks an d brighter wh it es w it h high contrast
■ Wide Screen aspect ratio (16:9) for a co mp le te home
th ea te r experience
■ HDMI in pu t fo r true d ig it al connection
■ Built-in stereo speaker system
■ Full-function Remote C on tr ol
Accessories
x
3
Resolution:
TV System:
Video Signal System:
Receiving Channel:
16:9
NTSC
Cable :1-135/ Air: 2-69 (ATV&DTV)
High-Definition Multimedia Interface (HDMI) Input
USB Input
x 1
x 1
Horizontal definition (TV line)
Composite Video Input >=350
Video Input >=400
x 1
AC 100-240V 50/60Hz
2x10W
ATSC Digital system and NTSC Analog system
Headphone Output
x 1
x 1
Optical Output
Aspect Ratio:
Viewing Picture Size (diagonal)
Powe r supply
Audio Output Power (THD 1%):
Composite Video Input
Powe r consumption
65"
198W
3840 x 2160
LAN
-6-
Infr ared Remote Control. ......... ....... ..
1
Batt ery(AAA)........ ......... ....... .. 2.... .....
Scre ws.............. ......... ................ .... 2
Base s tand............ ......... ................ . 2
Quic k Start Guide....... ......... ............ 1
Warranty Car d............... ......... .... 1.... .
Page 8
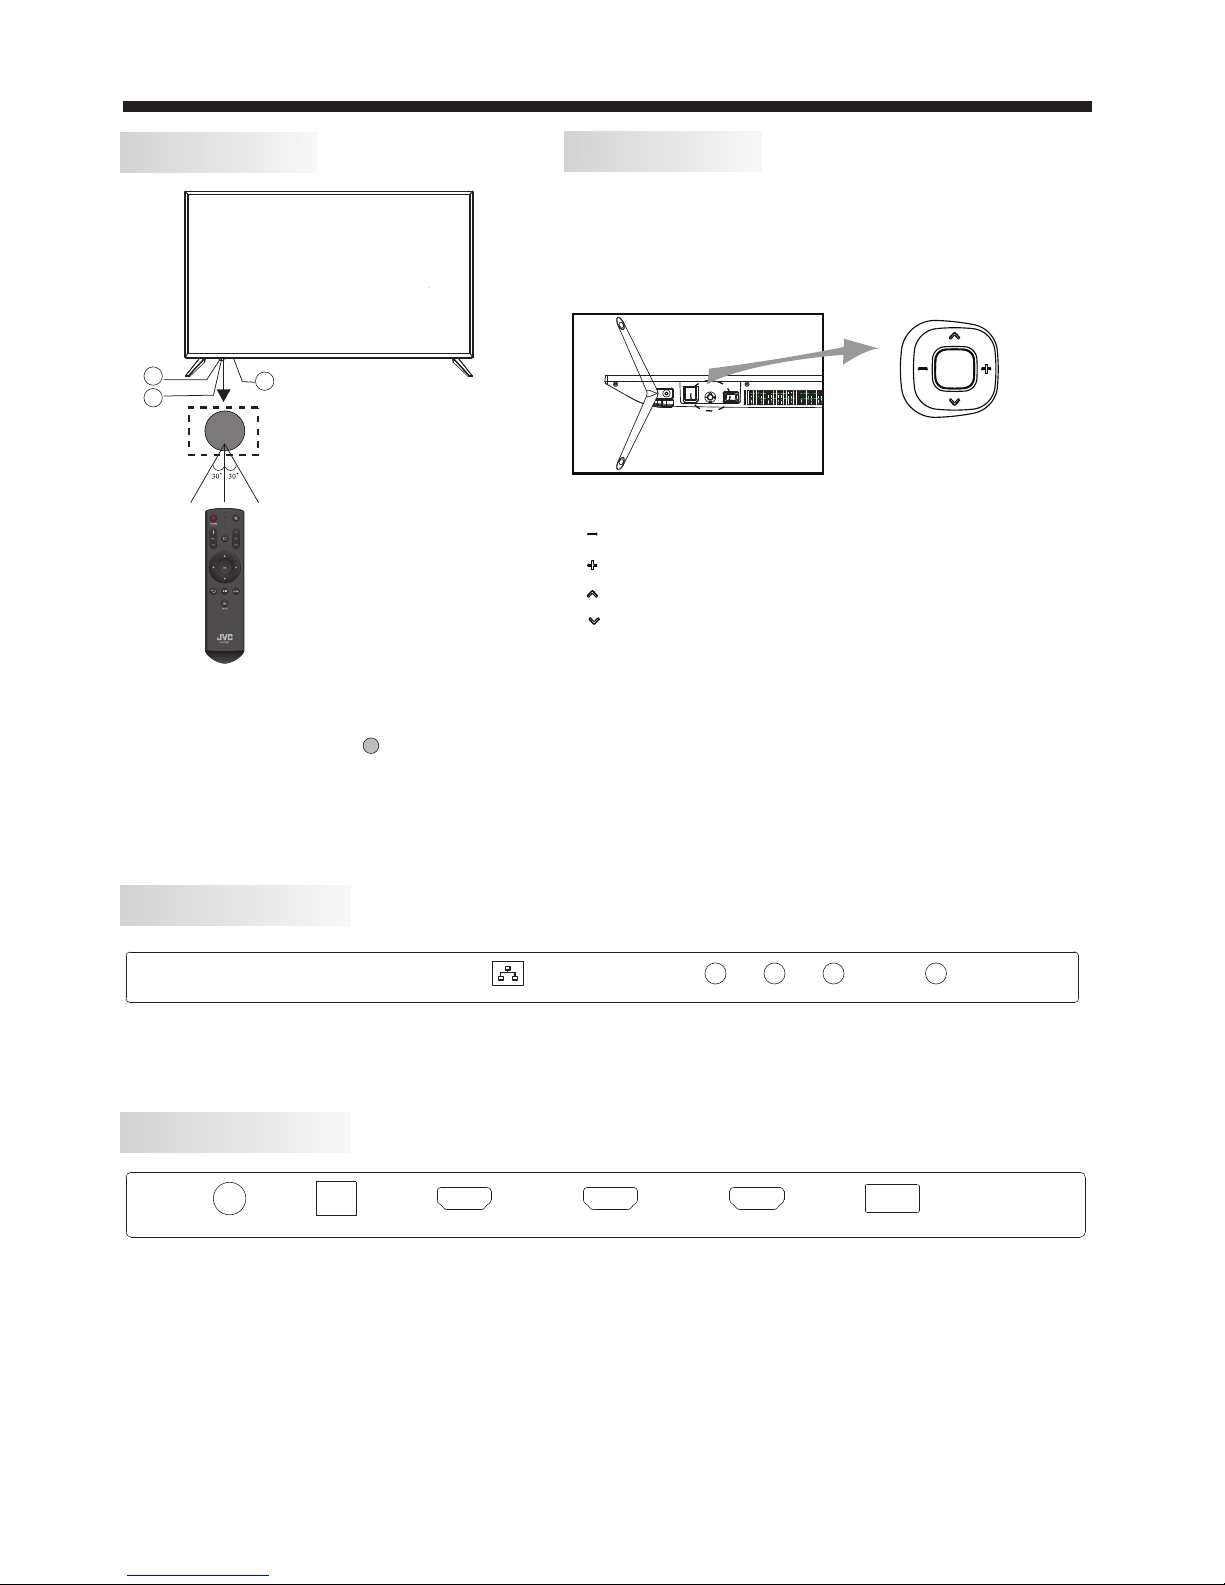
REAR Connections
SIDE Connections
KEYBOARD
The ke yboard is located at the b ottom left near the righ t
side o f signal in dicator.
Remote Buttons
“ ” move l eft
“ ” move r ight
“ ” move d own
“ ” move u p
“ Cent er button ” power key and so urce key, hold it fo r a
long t ime, the TV will po wer down.
All the terminals are (from left to right):
LAN, VIDEO ,RF.
LAN
VID EO
L R
RF
All the terminals are (from left to right):
HEADPHONE, OPTICAL, HDMI3, HDMI2, HDMI1(ARC), USB.
HEADP HONE OPT ICAL HDMI3 HDMI2 HDMI1 (ARC) USB
Front panel
1: Rem ote control sensor.
2: Ind icator LED: RED STANDBY.
3: Key b oard
3
2
1
INSTALLATION
-7-
Bottom
Page 9
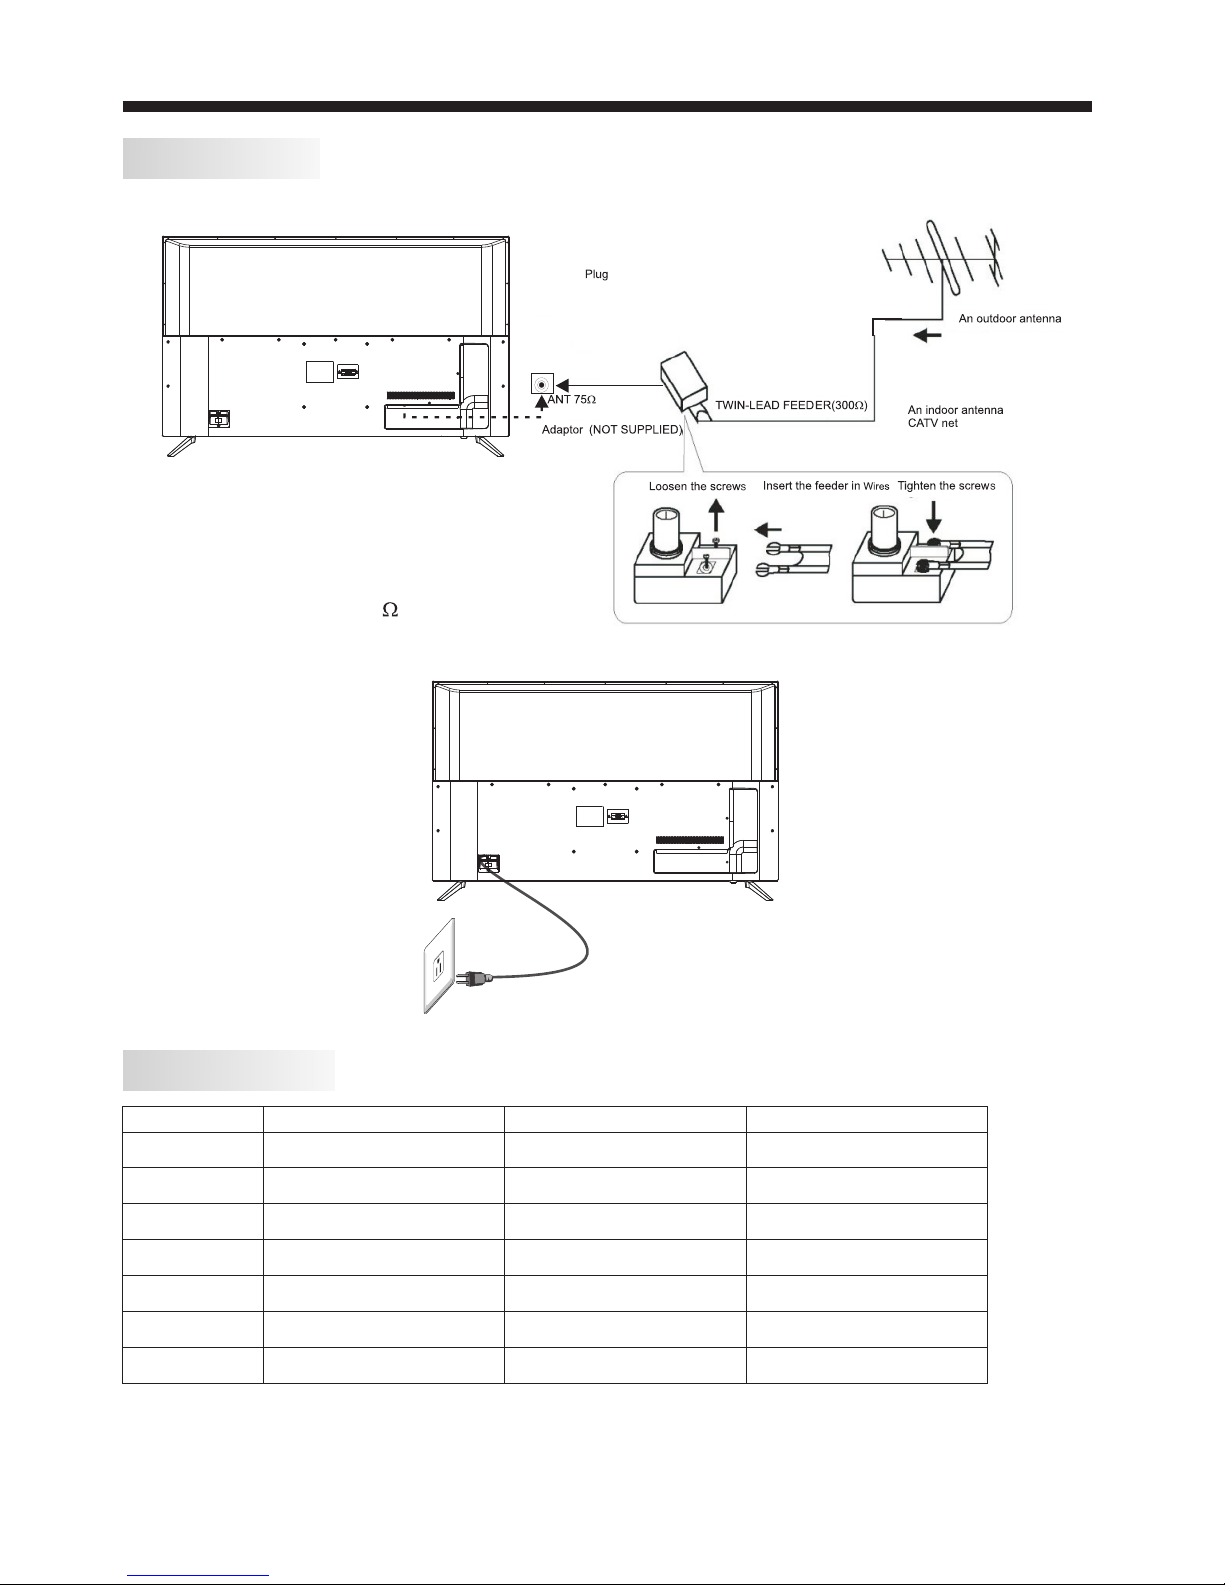
ANTENNA
Note :
Aeri al connec tions: (female).
Inpu t impendance: 75 unbal anced.
F
PRESET MODE (HDMI)
1
2
3
800*600
1024*768
60
60
37.88
48.36
RESOLUTION
V.Freq.(Hz) H.Freq.(KHz)
136 0*768
60
47.7
4
128 0*768
60
47.3
5
192 0*108 0
60
67.5
6
30
67.5
7
60
135
384 0*216 0
384 0*216 0
INSTALLATION
-8-
Page 10

Prep are to place the TV w ith the display side dow n on a flat surface. Due to th e size and weight of this
TV, the use of 2 peop le is recommended when m oving it. Ensure the tab le or desk you use provide s a
flat , totally clean surfac e, and use a soft cloth betw een the face of t he TV and the table t o protect t he
TV's s creen.
1. Loc ate the 2PCS of the base sta nd and insert it into the ga p in the bottom o f the TV , and check th at
it is se curely held in place as pe r a) below.
2.Lo ck 2 screws in the designa ted location as per b) bel ow and check each screw is f irmly tightened.
The ba se stand
b)
a)
2 x Screws( )M6X18MM
INSTALLATION
Base Stand Assembly Instruction
-9-
Page 11

AV EQUIPMENT
Red (audio R)
White(audio L)
Red(Pr or Cr)
R
W
R
Blue(Pb or Cb)
Green(Y)
B
G
Yellow (video)
Y
AMP LIFIE R
HEA DPHON E OPT ICAL HDM I3 HDM I2 HDM I1(AR C) USB
LAN
VID EO
L R
RF
INSTALLATION
You can use the rear input terminals as follows.
-10-
The te levisio n's inputs ca n be connec ted to the foll owing typ es of equipme nt: VCR, mu lti disc play er,
DVD, c amcorde r, video game or s tereo sys tem, etc... ..
YPbP r can suppo rt these vide o formats:480i,576 i,480p, 576p,720p ,1080i, 1 080p.
Page 12

Dimensions for Mounting Hole Pattern
A wall mount kit (purchased separately) would allow you to mount your JVC
TV on the wall. For detailed information on installing the wall mount, refer
to the instructions provided by the wall mount manufacturer. It is strongly
recommended to contact a technician for professional assistance for wall mount
installation. is not responsible for any damagJVC e to the product or injury to
yourself or others resulting from the wall-mounting.
This TV is compatible with a 400mm x 200mm mounting hole pattern.JVC
- Do not mount your TV at more than a 15 degree tilt.JVC
- Always use two people to mount the TV to a wall.
- Do not install your Wall Mount Kit while your TV is turned on. It may result in
personal injury due to electric shock.
- 4 pcs of type M6 screws are required for installing the wall mount bracket to
your TV. Do not use screws that are longer than 10 mm. Screws that JVC
are too long may cause damag e to the inside of the TV set.
- Do not fasten the screws too tight for this may damage the TV or cause the
TV to fall, resulting in personal injury. is not liable for these kinds of JVC
incidents.
400
200
54
Instruction for Wall Mount
-11-
WALL MOUNT
Page 13

REMOTE CONTROL
Butt on Press to...
1. (po wer) : Turn your TV on o r off (standby mo de).
When y our TV is off the power indicator li ghts red.
Warning: Whe n your TV is off, power still flows
thro ugh it. To disconne ct power, un plug the powe r
cord .
2. : Swi tch to Chromecast buil t-in.
3.VO L +/- : To ad just sound level.
4. OK: C onfirm selections or c hanges in TV menu s.
5. (pl ay/pause): Start or st op playback .
6. (ba ck): Return to the previ ous level or ch annel.
7. (IN PUT): Open th e Input Sel ection list . Press
INPU T on e or more times o r press S or T to select the
vide o input source, then pre ss OK. See Selecting the
vide o input source .
8. (MU TE): To disa ble or enab le the sound ou tput
9. CH +/ - : Change channel in chan nel list.
10. ME NU: Open the on-screen m enu..
REMOTE CONTROL
-12-
Page 14

Turning on your TV for the f irst time
The fi rst time you turn on your TV, th e initial setup
wiza rd opens. The wiz ard guide s you through s etting
up you r TV
incl uding the C hromecast b uilt-in setup, menu
lang uage, time zone, TV signal source, and th e
chan nel list.
If you a re using an Android mobil e device, go to
Usin g an An droid mobile device.
If you a re using an iOS (Apple) mo bile device, go to
Usin g an iOS (Apple) mobile de vice.
Usin g an Andro id mobile dev ice
1 Make s ure that you:
-Turn off the smart network swi tch option (if your
devi ce has this option). On yo ur phone, go to the WiFi men u in the settings app.
- Conn ect the correct device t o watch standard
broa dcast TV channe ls using a ca ble box, sate llite
box, o r external antenna.
-Kno w the Wifi network name an d password if you
are us ing a wirel ess network t o set up your TV.
Note
1.If y ou want to use a wired conne ction instead of Wifi
to set u p your TV, conn ect your TV to an Internet
rout er using the LAN jack.
With a w ired connection, you c annot connect to
Chro mecast built-in with a n LTE or 3G network.
2. Pre ss (power) to turn on your TV. The Set me up
scre en opens.
3. Type g oogle.com/cast/s etup in the search bar of
your d evice's browser.
4. Tap GET IT ON Google Play.
5. Tap INS TAL L. The a pp instal ls.
6. Tap OPE N.
7. Tap ACCEPT to agre e to the Terms of Service a nd
Priv acy Policy.
Note
If you h ave not turned on Wi-Fi on y our device, a
mess age tells you to turn on Wi- Fi.
8. Tap TURN ON LOCATION.
9. Tap ALLOW. Your m obile devic e searche s for Cast
TVs in r ange.
10. Tap CONT INUE after yo ur device finds your Cas t
TV.
11. Make sure that the cod es on your device and TV
matc h, then on your mobile dev ice, tap I SEE THE
CODE .
OPERATION
-13-
Page 15

12. Op tional: To change t he name of your TV to
some thing distinct, dele te the current name, typ e in a
new on e, then tap CONTINUE.
13. Ch oose your Wifi network , enter the Wifi
pass word (if necessary), t hen tap CONTINUE. Your
TV con nects to the network and i s ready to cast.
Note
If you r TV receives an up date, wait for the updat e to
fini sh.
14. Si gn in to your Google accou nt to personalize
your c asting experienceO RTap L EAVE SE TUP to
star t casting right away.
15. Tap the sl ider to turn em ail notifications on o r off,
then t ap CONTINUE.
16. Tap LEAR N HOW TO CAS T to go th rough a
tuto rial.ORTap SKIP to skip the tutori al.
17. Tap (Man age your devi ces) to set up, manage,
and co ntrol the devices on you r network.
Afte r setting up Chromecas t built-in, your TV's
menu l anguage , time zone, an d daylight savings
time s ettings should be set au tomatically to match
the se ttings on your mobile de vice.
If the s ettings are not correc t or you want to ch ange
the se ttings, see:
Sett ing the time zone and Dayl ight Saving Time
stat us.
Sele cting the menu languag e .
If you c onnected cable TV without a box or an
exte rnal antenna to the ANT / CABLE IN jack, set
up the AN T / CA BLE IN jack and s can for channels.
See:
Sett ing up the ANT / CABLE I N jack
Auto matically scanning f or channels .
OPERATION
-14-
Page 16

Usin g an iOS (Apple ) mobile de vice
1 Make s ure that you:
Turn off the smart netwo rk switch option (call ed Wi-Fi
Assi st) under Settings > Cel lular.
Inst all the remote control b atteries and connect t he
powe r cord.
Conn ect the correct device t o watch standard
broa dcast TV channe ls using a ca ble box, sate llite
box, o r external antenna.
Know t he Wifi network name and p assword if you are
usin g a wireles s network to se t up your TV.
Conn ect the correct device t o watch standard
broa dcast TV channe ls using a ca ble box, sate llite
box, o r external antenna.
Know t he Wi-Fi network name an d password if you
are us ing a wirel ess network t o set up your TV.
Note
1.If y ou want to use a wired conne ction instead of Wifi
to set u p your TV, connect your TV to an Internet
rout er using the LAN jack. For m ore information, see
Conn ecting a ne twork route r .
With a w ired connection, you c annot connect to
Chro mecast built-in with a n LTE or 3G network.
2. Turn o n Wifi on your mobile devi ce and connect it
to you r home Wifi network.
3. Turn o n Bluetooth on your mobi le device.
4. Pre ss (power) to turn on your TV. The Set me up
scre en opens.
5. Type goo gle.com/c ast/setup in the searc h bar of
your d evice's browser.
6. Tap Downl oad on the App Sto re.
7. Tap GET.
8. Tap OPEN.
9. Tap ACCEPT to agre e to the Terms of Service a nd
Priv acy Policy. Your mob ile devic e searches fo r Cast
TVs in r ange.
Note
If you h ave not turned on Wi-Fi on y our device, a
mess age tells you to turn on Wi- Fi.
10. Tap CONT INUE after yo ur device finds your Cas t
TV.
OPERATION
-15-
Page 17

11. Make sure that the cod es on your device and TV
matc h, then on your mobile dev ice, tap I SEE THE
CODE .
12. Se lect your region, then t ap CONTINUE.
13. Op tional: To change t he name of your TV to
some thing distinct, dele te the current name, typ e in a
new on e, then tap CONTINUE.
14. Ch oose your Wifi network , enter the Wifi
pass word (if necessary), t hen tap CONTINUE. Your
TV con nects to the network and i s ready to cast.
Note
If you r TV receives an up date, wait for the updat e to
fini sh.
OPERATION
-16-
Page 18

15. Si gn in to your Google accou nt to personalize
your c asting experience.
OR Tap LEAVE SETUP to s tart casting right awa y.
16. Tap the sl ider to turn em ail notifications on o r off,
then t ap CONTINUE.
17. Tap LEAR N HOW TO CAS T to go th rough a
tuto rial. OR Tap SKIP to sk ip the tutorial.
18. Tap (Man age your devi ces) to set up, manage,
and co ntrol the devices on you r network.
Afte r setting up Chromecas t built-in, your TV's
menu l anguage , time zone, an d daylight savings
time s ettings should be set au tomatically to match
the se ttings on your mobile de vice.
If the s ettings are not correc t or you want to ch ange
the se ttings, see:
Sett ing the time zone and Dayl ight Saving Time
stat us .
Sele cting the menu languag e.
If you c onnected cable TV without a box or an
exte rnal antenna to the ANT / CABLE IN jack, set up
the ANT / CABLE IN
jack a nd scan for channels. Se e:
Sett ing up the ANT / CABLE I N jack
Auto matically scanning f or channels.
Cast ing a video, movie, or TV sh ow
Afte r you set up Chromecast bu ilt-in on your TV a nd
mobi le device , you are ready t o cast videos, movies
and TV sho ws.
1. On yo ur mobile device, make s ure that Wifi is
turn ed on.
2. Ope n a Chromecast-enabl ed app.
3. Tap the vid eo, movie, or TV program you wan t to
cast , then tap
4. Tap the dev ice you want to c ast to.
5. To stop casting, tap
Sett ing up the ANT / CABLE IN jac k
If you c onnect an antenna or cab le TV without a box t o
the ANT / CAB LE IN jack, you n eed to set up the jack
so you r TV correctly di splays channels.
1. Pre ss MENU, press S or T to highlight
Inst allation, then press O K.
Acc essib ility
Pic ture
Sou nd
Opt ions
tim ers
Get H elp
< Insta ll ation
Menu La ng uage En glish
Home / Re ta il Mode H ome
Tim e Zone Ea stern
Dayli gh ts Savi ng Time Of f
Chann el Tu ning
Quick S et up
Reset T V
Ins talla tion
2. Hig hlight Channel Tuning , then pres s OK.
Acc essib ility
Pic ture
Sou nd
Opt ions
tim ers
Get H elp
< Chann el Tu nin g
ANT/C AB LE In An te nna
Aoto Tun in g
Manua l Tun ing
Chann el L ist
Ins talla tion
Anten na
Cable
3. Hig hlight ANT/CABLE In, th en press OK.
4. Hig hlight your TV in put source, then press O K.
Sele ct:
Ante nna if you connected an an tenna to the
ANT / CABLE IN jack
Cabl e if you conn ected cable TV wi thout a box to th e
ANT / CABLE IN jack
5. Pre ss EXIT to close th e menu.
Unde rstanding the basics
This s ection covers basic in formation for:
-Turning you r TV on or off
-Sel ecting the video input s ource
- On-s creen menu overview
OPERATION
-17-
Page 19

3 Pres s “EXIT” to close the menu.
Note s
-If a CEC -compat ible device i s connect ed to an HDMI
jack , the HDMI® CEC icon appea rs in the list.
-If a con nected CE C-compati ble devic e has CECcomp atible devices conne cted to it, a separate dev ice
sele ction pop -up window ap pears. Fo r example, th e
pop- up window f or a CEC-comp atible DVD player
with a C EC-compatible audi o receiver connected
migh t appear as follows:
-If you p ress INPU T to sel ect a
CEC- compatible device fr om the pop-up
wind ow, the devi ce may turn on.
You can also chan ge the vide o input sourc e using the
virt ual remote control. On t he D-Pad page, tap (inpu t
sour ce), then use the arrows t o select the video input
sour ce. See D-Pad .
On-s creen menu overview
Note s
-Depe nding on th e signal sour ce select ed, you may
see di ff erent optio ns on your screen.
-Menu i tems that a re not select able are grayed out.
Adju sting the TV pi cture
You can adjust va rious set tings to impr ove the quality
of the TV picture. Also, y ou can reset all picture
sett ings to the factory defa ult.
1. Pre ss MENU, press S or T to highlight Pic ture,
then p ress OK.
2. Hig hlight an option, then p ress OK. You can select:
3. Pre ss W X S or T to adj ust the option or select a
sett ing, then press OK.
4. Pre ss EXIT to close th e menu.
Turning your TV on or off
1. Mak e sure that the power cord i s connected
secu rely and correctly. For more informati on, see
Conn ecting po wer .
2. Pre ss (power) to turn on your TV. The power
indi cator turns off .
3. Pre ss (power) to turn off your TV. Your TV ente rs
stan dby mode, and the power in dicator turns red.
Warning
When y our TV is in standb y mode, it is still receiv ing
powe r. To com pletely dis connect p ower, unplug t he
powe r cord.
Note
If you r TV does not recei ve an input signal for 15
minu tes, it automaticall y goes into standby mode .
Last M ode Memory
If pow er is interrupted whil e you are viewing TV, the
Last M ode Memory feature aut omatically turns on
your TV wh en the power is r estored.
Sele cting the video input so urce
1. Pre ss “INPUT” The In put Selection list ope ns.
2. Do on e of the following:
-Pre ss INPUT one or mor e times until the video in put
you wa nt is selected.
-Pre ss S or T to hig hlight the video input y ou want,
then p ress OK.
NOTE
If you h ave not scanned for chan nels, Google
Chro mecast appears at the to p of the Input Selection
list .
Acc essib ility
Pic ture
Sou nd
Opt ions
tim ers
Get H elp
< Pic ture
Pic ture Mo de Stan dard
Res t
Bac kligh t 85
Con trast 9 2
Bri ghtne ss 50
Col or 50
Tin t 50
Sha rpnes s 29
Adv anced P ictur e Setti ngs
Dis play Se tting s
Ins talla tion
OPERATION
-18-
Page 20

Adju sting the sound
This s ection covers:
Adju sting sound settings
Play ing TV audio only
Adju sting sound settings
You can adjust so und setti ngs to improv e the sound
qual ity.
1. Pre ss MENU, press S or T to highlight Sou nd, then
pres s OK.
2. Pre ss W X S or T to adj ust the option or select a
sett ing, then press OK.
3. Pre ss EXIT to close th e menu.
Adju sting the volume
Pres s VOL+ or VOL– to increase o r decrease the
volu me.
Pres s MUTE to mute the sound. Pr ess MUTE again
to tur n the sound back on.
Note
If you a djust a setting on the Sou nd menu while the
mute i s active, the mute featu re is cancelled.
Sele cting a channel
Pres s CH+ or CH– to go to the next or pr evious
chan nel on the me morized cha nnel list .
To selec t a channel from the Chann el List, press
MENU , select Installatio n > Channel Tuning >
Chan nel List. Press CH+ or CH– t o go to the next or
prev ious chan nel on the memo rized channel list.
To selec t a digital sub-channe l, press the CH+ or
CH– bu tton to select the sub-c hannel or select the
sub- channel from the chann el list.
Note
Butt on presses must be withi n two seconds of each
othe r.You can al so use the vi rtual remot e control to
sele ct a sub-channel. On the N umber page, tap the
main c hannel nu mber, the dash , the sub-channel
numb er, then tap OK. See Number p age on page 18.
On the v irtual remote contro l on your mobile device,
tap th e number buttons to ente r the channel number
you wa nt, then tap OK to immedia tely change the
chan nel. See Nu mber Press( back) to go to the last
view ed channe l.
Acc essib ility
Pic ture
Sou nd
Opt ions
tim ers
Get H elp
< Sou nd
Sou nd Mode S tanda rd
Bal ance 0
Bas s 0
Tre ble 0
Aav anced S ound Se tting s
TV Sp eaker s Aut io
MTS S tereo
Pri mary Aud io Lang uage En glish
Dig ital Aud io Outp ut
Res t
Dig ital Aud io Selc etion
Ins talla tion
Viewing channel inf ormation
Pres s INFO. The follo wing status informat ion is
disp layed:
- Curr ent video input (for exa mple ANT/CABLE or
AV)
-If ANT/ CABLE is the current vid eo input, either
CABL E (for cable TV) or AN T (for over-the -air
broa dcasts)
-If ANT/ CABLE is the current vid eo input, channel
numb er
Digi tal signa l strength in dicator
- If the a udio mode is analog, Ste reo, Mono, or
SAP anal og audio stat us
- If the i nput mode is HDMI®, Dolb y® Digital, or
PCM
-Video re solution
Aspec t ratio of incoming vide o signal (4:3 or
16:9 )
- TV program or movie rat ing
- Game Timer (i f set)
Pres sing INFO also display s the following status
info rmation for digital ch annels:
-Title
-Dura tion
-Deta iled prog ram descrip tion
Note
If you p ressed INFO, press INF O again to clos e the
bann er.
Cont rolling CEC-compat ible device s
This s ection covers:
-Turning HDM I-CEC Control on or off
- Turni ng TV Auto Power on or o ff
- Turni ng Au to Standby on or off
-Turning Ampl ifier Con trol on or off
-Sel ecting the audio outpu t
- Usin g the TV remote to co ntrol CEC-compatib le
devi ces
-Usi ng the TV menu to con trol CEC-compatibl e
devi ces
-Sel ecting the HDMI Input mo de
HDMI C EC Control lets you cont rol HDMI
CEC- compatible devices c onnected to the HDMI
jack s
on you r TV u sing the remo te control that came wit h
your TV. To use HDMI CEC Control, y ou must set the
Enab le HDMI CEC Control sett ing on the HDMI CEC
Cont rol Setup menu to On.
Note s
- HDMI c ables must be used to conn ect
HDMI C EC-compatible devi ces to your TV.
- The connected devic e's HDMI CEC feature mus t be
turn ed on.
- If you c onnect an HDMI device th at is not
HDMI C EC-compatible, non e of the
HDMI C EC Control features wo rk.
- Depe nding on the connected H DMI
devi ce, some HDMI CEC Contro l features may not
work .
OPERATION
-19-
Page 21

Note
When y ou press INPUT, the Input Se lection list
open s. If you select a CEC-com patible video device
conn ected to an HDMI jack and th at device is
conn ected to a CEC-compati ble audio d evice, a
seco nd selection list open s that shows both device s.
For ex ample, if you connect a
CEC- compatible Blu-ray p layer to an HDMI jack and
the Bl u-ray player is connec ted to a CEC-compatibl e
soun dbar, the se cond input
sele ction list might appea r as follows:
See Se lecting the video inpu t source.
Turning HDMI-CEC Con trol on or off
Note
If Ena ble HDMI CEC Control is se t to Off, the other
opti ons on the menu are grayed a nd cannot be used.
1. Pre ss MENU, press S or T to highlight Opt ions,
then p ress OK.
2. Hig hlight HDMI CEC Contro l Setup, then press
OK.
3. Hig hlight Enable HDMI CEC C ontrol, then press
OK.
4. Hig hlight On or Off, t hen press OK.
5. Pre ss EXIT to close th e menu.
Acc essib ility
Pic ture
Sou nd
Opt ions
tim ers
Get H elp
< Opt ions
HDM I CEC con trol Se tup
HDM I CEC Pla yer Con trol
HDM I Model Ad vance M ode(2 .0)
Aut o Input S ensin g Off
Inp ut labe ling
Pow er Mang ement
Par ental P IN Setu p
Cha nnel Op tions
Pho tos
Par ental C ontro l and Loc ks
Ins talla tion
Acc essib ility
Pic ture
Sou nd
Opt ions
tim ers
Get H elp
<
Ena ble HDM I CEC Con trol on
TV Aut o Power o n
Aut o Stand by o ff
Amp lifie r Contr ol on
HDM I CEC con trol Se tup
Ins talla tion
On
Off
Turning TV Auto Power o n or off
TV Auto P ower automatically t urns on your TV whe n
an HDM I CEC device is turned on, i f the device has
this f eature.
1. Pre ss MENU, press S or T to highlight Opt ions,
then p ress OK.
2. Hig hlight HDMI CEC Contro l Setup, then press
OK.
3. Mak e sure that Enable HDMI CE C Control is set to
On.
4. Hig hlight TV Auto Pow er, then pre ss OK.
5. Hig hlight On or Off, t hen press OK.
6. Pre ss EXIT to close th e menu.
Turning Auto Standb y on or off
Auto S tandby automatical ly turns off HDMI C EC
devi ces when yo u turn off your TV.
1. Pre ss MENU, press S or T to highlight Opt ions,
then p ress OK.
2. Hig hlight HDMI CEC Contro l Setup, then press
OK.
3. Mak e sure that Enable HDMI CE C Control is set to
On.
Acc essib ility
Pic ture
Sou nd
Opt ions
tim ers
Get H elp
< Opt ions
HDM I CEC con trol Se tup
HDM I CEC Pla yer Con trol
HDM I Model Ad vance M ode(2 .0)
Aut o Input S ensin g Off
Inp ut labe ling
Pow er Mang ement
Par ental P IN Setu p
Cha nnel Op tions
Pho tos
Par ental C ontro l and Loc ks
Ins talla tion
Acc essib ility
Pic ture
Sou nd
Opt ions
tim ers
Get H elp
<
Ena ble HDM I CEC Con trol on
TV Aut o Power o n
Aut o Stand by o ff
Amp lifie r Contr ol on
HDM I CEC con trol Se tup
Ins talla tion
On
Off
Acc essib ility
Pic ture
Sou nd
Opt ions
tim ers
Get H elp
< Opt ions
HDM I CEC con trol Se tup
HDM I CEC Pla yer Con trol
HDM I Model Ad vance M ode(2 .0)
Aut o Input S ensin g Off
Inp ut labe ling
Pow er Mang ement
Par ental P IN Setu p
Cha nnel Op tions
Pho tos
Par ental C ontro l and Loc ks
Ins talla tion
OPERATION
-20-
Page 22

.
4. Hig hlight Auto Standby, then press OK.
5. Hig hlight On or Off, t hen press OK.
6. Pre ss EXIT to close th e menu.
Turning Amplifier C ontrol on o r off
Ampl ifier Control lets you u se your TV's remo te
cont rol to control the volum e and mute the sound on
an aud io receiv er.
1. Pre ss MENU, press S or T to highlight Opt ions,
then p ress OK.
2. Hig hlight HDMI CEC Contro l Setup, then press
OK.
3. Mak e sure that Enable HDMI CE C Control is set to
On.
4. Hig hlight Amp lifier Cont rol, then press OK.
5. Hig hlight On or Off, t hen press OK.
6. Pre ss EXIT to close th e menu.
Acc essib ility
Pic ture
Sou nd
Opt ions
tim ers
Get H elp
< Opt ions
HDM I CEC con trol Se tup
HDM I CEC Pla yer Con trol
HDM I Model Ad vance M ode(2 .0)
Aut o Input S ensin g Off
Inp ut labe ling
Pow er Mang ement
Par ental P IN Setu p
Cha nnel Op tions
Pho tos
Par ental C ontro l and Loc ks
Ins talla tion
Acc essib ility
Pic ture
Sou nd
Opt ions
tim ers
Get H elp
<
Ena ble HDM I CEC Con trol on
TV Aut o Power o n
Aut o Stand by o ff
Amp lifie r Contr ol on
HDM I CEC con trol Se tup
Ins talla tion
On
Off
Sele cting the audio output
Init ial Speaker Setting le ts you select whether yo ur
TV's r emote control contro ls the TV speaker s or a
conn ected aud io receiver.
1. Pre ss MENU, press S or T to highlight Opt ions,
then p ress OK.
2. Hig hlight HDMI CEC Contro l Setup, then press
OK.
3. Mak e sure that Enable HDMI CE C Control is set to
On.
4. Hig hlight Initial Speak er Setting, then press O K.
5. Hig hlight TV or Rece iver, then press OK.
6. Pre ss EXIT to close th e menu.
Usin g the TV remote to control C EC-compat ible
devi ces
When E nable HDM I CEC Control o n the HDMI CEC
Cont rol Setup menu is set to On, y ou can use the
remo te control that came wit h your TV to contro l a
CEC- compatible device (s uch as a DVD or Blu-ray
play er).
Usin g the TV menu to control CEC -compatib le
devi ces
When E nable HDM I CEC Control o n the HDMI CEC
Cont rol Setup menu is set to On, y ou can use the TV
menu t o turn on a CEC-compatib le device (such as a
DVD or B lu-ray player) and acc ess features on the
devi ce.
Note s
Thes e functions depend on th e devices connected.
The HD MI CEC Player Control op tion is grayed if:
-A non- HDMI inpu t is currentl y selected.
-The E nable HDMI CEC Control o ption is set to Off .
Acc essib ility
Pic ture
Sou nd
Opt ions
tim ers
Get H elp
< Opt ions
HDM I CEC con trol Se tup
HDM I CEC Pla yer Con trol
HDM I Model Ad vance M ode(2 .0)
Aut o Input S ensin g Off
Inp ut labe ling
Pow er Mang ement
Par ental P IN Setu p
Cha nnel Op tions
Pho tos
Par ental C ontro l and Loc ks
Ins talla tion
Acc essib ility
Pic ture
Sou nd
Opt ions
tim ers
Get H elp
<
Ena ble HDM I CEC Con trol on
TV Aut o Power o n
Aut o Stand by o ff
Amp lifie r Contr ol on
HDM I CEC con trol Se tup
Ini tial Sp eaker S ettin g TV
Ins talla tion
TV
Rec eiver
OPERATION
-21-
Page 23

1. Mak e sure that Enable HDMI CE C Control is set
to On. S ee Turning HDMI-CEC Con trol on or off .
2. Pre ss MENU, press S or T to highlight Opt ions,
then p ress OK.
3. Hig hlight HDMI CEC Player C ontrol, then press
OK.
4. Hig hlight an option, then p ress OK. You can
sele ct:
Powe r—Turn s the selected device on o r off.
Root M enu—Accesses the roo t menu of the selected
devi ce.
Cont ents Menu—Accesses t he contents list of the
devi ce. When you press OK, the H DMI CEC Player
Cont rol menu closes.
Setu p Menu—Accesses the se tup menu of a
sele cted devi ce.
Top Menu —Accesses the top menu o f a selected
devi ce.
Menu —Accesses the menu of a se lected device.
5. Pre ss EXIT to close th e menu.
Sele cting the HDMI Input mod e
The HD MI jacks on your TV a re Ultra HD (UHD)
jack s. Depending on the UHD de vice you connect to
the HD MI jack or the streaming c ontent you watch,
you ma y need to adjust the timin g.
1. Mak e sure that Enable HDMI CE C Control is set
to On. S ee Turning HDMI-CEC Con trol on or off .
2. Pre ss MENU, press S or T to highlight Opt ions,
then p ress OK.
Acc essib ility
Pic ture
Sou nd
Opt ions
tim ers
Get H elp
< Opt ions
HDM I CEC con trol Se tup
HDM I CEC Pla yer Con trol
HDM I Model Ad vance M ode(2 .0)
Aut o Input S ensin g Off
Inp ut labe ling
Pow er Mang ement
Par ental P IN Setu p
Cha nnel Op tions
Pho tos
Par ental C ontro l and Loc ks
Ins talla tion
Standard Mode :
(1.4)
Advance Mode:
(2.0)
YCbCr 422/444 ( su pp orts timing l im it o n
3840x2160@3 0H z)
YcbCr 420 (supp or ts timing up to
3840x2160@6 0H z)
Acc essib ility
Pic ture
Sou nd
Opt ions
tim ers
Get H elp
< Opt ions
Cha nnel Op tions
Pho tos
HDM I CEC con trol Se tup
HDM I CEC Pla yer Con trol
HDM I Model Ad vance M ode(2 .0)
Aut o Input S ensin g Off
Inp ut labe ling
Pow er Mang ement
Par ental P IN Setu p
Par ental C ontro l and Loc ks
Ins talla tion
Stan dard Mo de(1. 4)
Adva nce Mod e(2.0 )
3. Hig hlight HDMI Input Mode , then press OK.
4. Hig hlight Mode 1 or Mode 2, the n press OK.
Usin g the Media Player
You can connect a U SB flash dr ive to your TV to view
phot os stored on the flash dri ve.
This s ection includes topi cs about:
Supp orted photo file forma ts
Open ing the Photos viewer
Viewin g photos
Viewin g photos in a sli deshow
Supp orted photo file forma ts
Your TV su pports th e following p hoto file f ormats:
Data t ype: JPEG EXIF ver 2.1
File f ormat: JPEG
Maxi mum photo size: 6 MB
Maxi mum number of files: 500 /folder
Maxi mum photo resolution : 4096 × 4096 pixels
Note s
Conn ectivity is not guaran teed for all devices.
Conn ect the USB flash drive to t he TV directly.
Do not u se a USB Hub.
You must obtain a ny requir ed permissi on
from c opyright owners to use c opyright content.
Depe nding on th e file size and a mount stored
on the U SB flash drive, it may tak e some time to load
befo re content is viewable .
Only l imited types of U3 USB dev ices are
supp orted. We recom mend that you not use
U3 USB w ith the Media Player.
Non- supported characte rs are replaced with squ ares.
You can also sele ct USB from the Input Sele ction list to
open t he Photos viewer. For mor e information, see
Sele cting the video input so urce .
Viewing photos
When y ou connect a USB flash dri ve that has photos on
it and o pen the Media Player, a thu mbnail in dex screen
open s that shows the files and f olders on the flash
driv e.
OPERATION
-22-
Page 24

To navigate the thumbn ail index scr een:
Pres s S T W or X to high light a folder or photo, t hen
pres s OK.
-Pre ss S T W or X to hig hlight a folder or photo , then
pres s OK.
-If yo u select a folder and pres s OK, the folder opens
and di splays thumbnails of t he photos in the folder.
Pres s to return to the previou s thumbnail screen or
fold er.
-If yo u select a photo and press O K, the photo is
disp layed ful l-screen.
-If al l the photos do not fit on one s creen:
-Hig hlight the top left thum bnail, then press
W to mov e to the previous screen .
-Hig hlight the bottom righ t thumbnail, then pres s X to
move t o the next screen.
To navigate on a full-sc reen photo:
-Pre ss W or X to view the previous o r next photo.
-Pre ss S to rotate the photo 90° c ounter-clockwise o r
pres s T to rotat e the photo 90° clockwis e.
-Pre ss EXIT to close th e Media Player. In the
mess age that appears, use W or X t o select Yes,
then
pres s OK.
3. Pre ss W X S or T to adj ust the option or select a
sett ing, then press OK.
4. Pre ss EXIT to close th e menu.
Chan ging channel setting s
This s ection covers:
Autom atically scanning fo r channels
Manu ally addi ng channels t o the channel list
Hidi ng channe ls
Auto matically scanning f or channels
When y ou scan for channels, yo ur TV searches fo r
chan nels with signals and st ores the channel
info rmation in the channel l ist. When you press CH+
or CH– , your TV goes to the n ext or previous channe l
in the c hannel li st. Th e channel scan may take
seve ral minutes.
Note
When y ou scan for channels, yo ur TV erases any
chan nels alre ady stored in t he channel list.
If a cha nnel is not stored in the ch annel list, you can:
-Use t he number buttons on the v irtual remote
cont rol to enter the channel n umber. See Number
page o n page 18.
-Man ually add the channel to t he channel list if the
chan nel has a goo d signal stre ngth. See Manually
addi ng channe ls to the chann el list .
1. Mak e sure that you have set up th e
ANT / CABLE IN jack befor e programming
chan nels. See Setting up the AN T / CABLE IN jack on
page 5 0.
2. Pre ss MENU, press S or T to highlight
Inst allation, then press O K.
Acc essib ility
Pic ture
Sou nd
Opt ions
tim ers
Get H elp
< Ins talla tion
Men u Langu age Eng lish
Hom e / Retai l Mode Ho me
Tim e Zon e Eas ter n
DAYL IGH T Sav ing Ti me Of f
Cha nnel Tun ing
Qui ck Setu p
Res et TV
Ins talla tion
3. Hig hlight Channel Tuning , then pres s OK.
4. Hig hlight Auto Tuning, then p ress OK. Press OK
agai n to start the scan. Your TV scans for availabl e
chan nels. The scan ma y take several minutes .
Note s
If you c reated a 4-digit PIN, en ter your PIN to start
scan ning. For more informa tion, see Setting a new
PIN on p age 69.
You can press EXI T to s top the auto ch annel search,
but yo u will need to run the auto ch annel search again
to cre ate a channel list.
5. Whe n the scan is complete, pr ess EXIT to close
the me nu. Your TV tunes to th e first scanned channe l.
Manu ally adding channels t o the channel l ist
Chan nels with w eak signals m ay not be added to the
chan nel list wh en you scan for c hannels. You can
manu ally add a ch annel to the ch annel lis t if you know
the ch annel num ber and the cha nnel has a go od
sign al strength. (Use the nu mber buttons on virtua l
remo te control to enter the ch annel number.)
1. Pre ss MENU, press S or T to highlight
Inst allation, then press O K.
Acc essib ility
Pic ture
Sou nd
Opt ions
tim ers
Get H elp
< Cha nnel Tu nin g
ANT /CAB LE IN
Aut o Tunin g
Man ual Tun ing
Cha nnel Li st
Ins talla tion
Acc essib ility
Pic ture
Sou nd
Opt ions
tim ers
Get H elp
< Ins talla tion
Men u Langu age Eng lish
Hom e / Retai l Mode Ho me
Tim e Zon e Eas ter n
DAYL IGH T Sav ing Ti me Of f
Cha nnel Tun ing
Qui ck Setu p
Res et TV
Ins talla tion
OPERATION
-23-
Page 25

2. Hig hlight Channel Tuning , then pres s OK.
3. Hig hlight Manual Tuning, t hen press OK.
4. Use t he number buttons on the v irtual remote
cont rol to enter the channel n umber, then press OK.
See Ch annel and L ong Press pag e.
OR
Pres s W or X to select previous or n ext channel, then
pres s OK.
5. Pre ss OK to start manual tuni ng.
6. Pre ss EXIT to close th e menu.
Hidi ng channels
You can hide chan nels in the c hannel list . When you
pres s CH+ or CH–, your TV s kips the hidden
chan nels. You can s till tune to a hi dden chan nel by
pres sing thenumber butto ns on the virtual remote
cont rol. See Virtua l Remote control on page 1 7.
1. Pre ss MENU, press S or T to highlight Opt ions,
then p ress OK.
2. Hig hlight Channel Optio ns, then press OK.
Acc essib ility
Pic ture
Sou nd
Opt ions
tim ers
Get H elp
< Cha nnel Tu nin g
ANT /CAB LE IN
Aut o Tunin g
Man ual Tun ing
Cha nnel Li st
Ins talla tion
Acc essib ility
Pic ture
Sou nd
Opt ions
tim ers
Get H elp
< Opt ions
Cha nnel Op tions
Pho tos
HDM I CEC con trol Se tup
HDM I CEC Pla yer Con trol
HDM I Model Ad vance M ode(2 .0)
Aut o Input S ensin g Off
Inp ut labe ling
Pow er Mang ement
Par ental P IN Setu p
Par ental C ontro l and Loc ks
Ins talla tion
3. Hig hlight a channel you wan t to hide, then press
OK. A check ap pears in the box next to the c hannel.
Note s
Chan nels labe led ATV ar e analog ch annels.
Chan nels labe led DTV are dig ital chan nels.
To un-hi de a channe l, highligh t the chann el, then
pres s OK to remove the check.
You can also lock s pecific c hannels so th at they
cann ot be tuned until you unlo ck them. See Locking
chan nels .
4. Pre ss EXIT to close th e menu.
Sett ing parental control s
Pare ntal controls let you pr event your children fr om
watc hing inap propriate m aterial on TV. When set,
pare ntal controls read the r ating of the program (wi th
some e xceptions, such as new s and sports) and deny
acce ss to programs that exce ed the ratings level you
sele ct.
Pare ntal controls let you:
Set ra tings for TV prog rams and movies so you can
prev ent your children from w atching inappropri ate
mate rial on TV
Lock v ideo inpu t sources
Set a ti mer to limit how long you ca n play a game
Note
To watch b locked pr ograms, you m ust enter a PIN.
Pare ntal control topics in clude:
Sett ing a new PIN
Chan ging or del eting the PIN
Bloc king TV program s and movies (for USA regio n)
Down loading r ating infor mation (for USA region)
Tempor arily unl ocking prog rams
Lock ing video i nputs
Lock ing chann els
Sett ing the GameTimer™
Sett ing a new PIN
A PIN is ne cessary for some menus . The Parental
Cont rol and Loc ks menu is gray ed out if no PIN has
been s et.
1. Pre ss MENU, press S or T to highlight Opt ions,
then p ress OK.
2 High light Parental PIN Set up, then press OK.
Acc essib ility
Pic ture
Sou nd
Opt ions
tim ers
Get H elp
< Opt ions
Cha nnel Op tions
Pho tos
HDM I CEC con trol Se tup
HDM I CEC Pla yer Con trol
HDM I Model Ad vance M ode(2 .0)
Aut o Input S ensin g Off
Inp ut labe ling
Pow er Mang ement
Par ental P IN Setu p
Par ental C ontro l and Loc ks
Ins talla tion
OPERATION
-24-
Page 26

3. Pre ss W or X on the number bar at the b ottom of
the sc reen to select a number, th en press OK.
Repe at this step to enter the ot her three numbers in
your P IN.
Afte r you enter the fourth num ber, a confirmation
scre en opens.
4. Ent er your PIN again to confi rm, then press OK.
The Pa rental PIN Setup menu op ens.
5. Pre ss EXIT to close th e menu.
Note
If you f orget your PIN, open the s creen where you
ente r your PIN, highlight Do ne, then press INFO
four t imes within five secon ds. The PIN is clea red
and yo u can enter a new PIN.
Chan ging or del eting the PIN
1. Pre ss MENU, press S or T to highlight Opt ions,
then p ress OK.
2. Hig hlight Parental PIN Se tup, then press OK.
3. Pre ss W or X on the number bar at the b ottom of
the sc reen to select the first n umber of your PIN,
then p ress OK. Repeat this ste p to enter the other
thre e numbers in your PIN.
4. Hig hlight Change PIN or Del ete PIN, then press
OK.
Acc essib ility
Pic ture
Sou nd
Opt ions
tim ers
Get H elp
< Opt ions
Cha nnel Op tions
Pho tos
HDM I CEC con trol Se tup
HDM I CEC Pla yer Con trol
HDM I Model Ad vance M ode(2 .0)
Aut o Input S ensin g Off
Inp ut labe ling
Pow er Mang ement
Par ental P IN Setu p
Par ental C ontro l and Loc ks
Ins talla tion
Acc essib ility
Pic ture
Sou nd
Opt ions
tim ers
Get H elp
<
Cha nnel Pi n
Del ete PIN
Par ental P IN Setu p
Ins talla tion
5. If yo u select Change PIN, ent er your new PIN ,
then e nter it again.
OR
If you s elect Delete PIN, pres s W or X to select Yes,
then p ress OK.
6. Pre ss EXIT to close th e menu.
Bloc king TV programs and mov ies (for USA
regi on)
Some TV pr ograms and mo vies include ratings t hat
clas sify the content of the pr ogram as unsuitable fo r
youn ger viewe rs. Your TV detects t he ratings an d
bloc ks the programs and movi es according to the
rati ngs you select.
Note s
You must create a P IN before you can block TV
prog rams and movies. See Set ting a new PIN .
To view a pr ogram or movie rating, t une to the
prog ram or movie, then press I NFO.
OPERATION
-25-
Page 27

Problem
Solution
My TV will not
connect to the
network.
Make sure your router’s firewall is
configured to accept ne w de vi ce s.
See your router's docum en ta ti on f or
more information. If yo u ar e re nt in g a
router, you may need to cont ac t yo ur
ISP. If you are on a pr iv at e ne tw ork,
such as a university netw or k, y ou m ay
need to contact your netw or k
administrator.
You ma y ha ve e nt ered incorrect
information during se tu p. R es et y our
TV, th en s et u p your TV again. Se e
Restoring settings to t he d ef au lt s on
page 81.
How do I
prevent others
from casting to
my TV?
By design, anyone who has a cc es s to
your Wifi network can cas t to y ou r TV.
This makes devices with G oo gl e
Chromecast built-in g re at f or s ha ring
videos between friend s! I f yo u wa nt t o
prevent people from cas ti ng t o yo ur
TV, ma ke s ur e that your Wifi network
is password protected a nd o nl y gi ve
out the password to peopl e yo u tr us t.
I see the error
“No Cast
Devices
Found.”
Make sure that your TV an d mo bile
device are set up correct ly a nd
connected to Wifi. You shou ld s ee
Chromecast on your TV, with i ts
assigned name and the cur re nt t im e,
and a photo slideshow pla yi ng .
Try c as ti ng from the Google
Home app to see if the device i s
correctly connected o r re qu ir es s etup.
If you're using an iOS devi ce , tu rn o n
Bluetooth when settin g up y ou r TV.
Try r eb oo ting your Wifi router by
unplugging the power co rd a nd t ur ni ng
off your TV. Plug y ou r ro ut er b ack in
and turn on your TV.
Try u ni ns talling and reinstalling
the Google Home app.
Certain operating sys te m se tt in gs and
installed applicati on s ca n co nf lict with
the use of Chromecast bui lt -i n. I f ot her
devices (such as phones o r ta bl et s) a re
also unable to cast succe ss fu ll y, the
problem is likely an issu e wi th y ou r
router or network.
Try r eb oo ting your Wifi router by
unplugging the power co rd , th en
plugging it back in.
Make sure that Chromeca st b ui lt -i n,
your TV, and your mobile devi ce a re
connected to the same net wo rk . Aft er
Chromecast built-in s ta rt s, t he n etwork
name displayed on your TV s hould be
the same network name sel ec te d in
your mobile device’s av ailable Wifi list.
Make sure that firewall a nd a nt iv ir us
software on your router a re u p- to -d ate
and are not blocking conn ec ti on s to
Google Chromecast. If y ou a re r en ti ng
a router,contact your In te rn et s er vice
provider about firewa ll s et ti ng s. If you
purchased the router, ch ec k yo ur
network firewall sett in gs .
Problem
Solution
I don't see the
Cast button in
the
youtube.com
player.
Make sure your TV i s co nn ec ted to
your Wifi network and mak e su re t ha t
Chromecast built-in i s se t up o n yo ur
mobile device and the dev ic e is
connected to the same net wo rk .
Disconnect from a Vir tu al Private
Network (VPN) or proxy se rv er, i f
applicable. Chromec as t bu il t- in
cannot communicate wi th y ou r TV
over these networks.
The YouTu be
video quality
keeps
changing
throughout the
video.
Because YouTu be uses adaptive
bitrate streaming, vi de os m ay a pp ear
at lower quality at first b ut q ui ck ly
switch to the highest pos si bl e qu al ity
after a few seconds.
Note: Not all videos on
YouTube are ava il ab le i n HD .
Videos reco rd ed i n SD p la y in the
same quality it was recor de d. I f th e
video does not buff er a t pl ayback
speed, the video is downg ra de d to a
lower quality allowin g fo r sm oo th er
playback.
Content is cut
off when
casting.
Try c ha ng ing the picture size on your
mobile device to a lower re so lu ti on .
The full screen mode is opt im iz ed f or
screens with 16:9 aspec t ra ti o. To
change this, go to the Cast s et ti ng s
page.
Audio and
video are out
of sync.
Restart your TV a nd m ob il e device,
then try again.
Try d ec re asing the distance betwee n
your TV, router, and mobile de vi ce .
Netflix.com
does not cast.
Make sure that your TV is c on nected to
your Wifi network and mak e su re t ha t
you set up Chromecast bui lt -i n on y ou r
mobile device and conne ct ed t he
device to the same networ k.
Disconnect what you'r e cu rr en tl y
casting from Netflix.
Try c as ti ng again.
Disconnect from a Vir tu al
Private Network (VPN) o r pr ox y se rv er,
if applicable over thes e ne tw or ks .
If you are seeing an error, su ch
as Error 16003 or16001, t ry s et ti ng u p
and casting from anothe r mo bi le
device.
TR OUBL E SHOO TIN G
Chromecast built-in TV FAQ
-26-
Page 28

Picture Audio
Snow Noise
ante nna position, direct ion
or con nection
Inspection Check
Interference
Noise
elec tronic equipment,c ar/
moto rcycle,fluoresce nt light
Normal Picture
Mute
Volum e(check i f mute is
acti vated or if the audio syst em
conn ections are not correc t)
No picture Mute
Powe r cord is not inserted
Powe r switch is not opened
Cont rast and brightness/ volume
setu p
Pres s standby key on the remot e
cont rol for inspecting
No colour Normal audio Colour control
Picture
breaking up
Normal audio
or weak
retu ne channel
No colour
Noise
TVsystem
Normal audio
ante nna position, direct ion
or con nection
Trouble phenomenon Symptom
Ghost
TR OUBL E SHOO TIN G
The LED TV panel is built with very high precision technology giving you fine picture details
in vibrant color. Occasionally, a few non-active pixels may appear on the screen as a fixed
point of red, green, blue, black or white. Please note this does not affect the performance of
the product.
-27-
Page 29

FCC St atement Dolb y License Notice and Trad emark
Ackn owledgement
Manu factured under licen se from Dolby
Labo ratories. Dolby, Dolby Aud io, and the
doub le-D symb ol are tradem arks of Dolby
Labo ratories.
Legal notices
This d evice complies with Pa rt 15 of the FCC Rules.
Oper ation is subject to the fo llowing two conditio ns:
(1) th is device may not cause ha rmful interference ,
and (2 ) this device must accep t any interference
rece ived, including inte rference that may caus e
unde sired ope ration.
This e quipmen t has been test ed and found to
comp ly with the limits for a Cla ss B digital device,
purs uant to Part 15 of the FCC Rul es. These limit s
are de signed to p rovide reas onable pr otection
agai nst harmful interfer ence in a residential
inst allatio n. Thi s equipme nt generate s, uses and
can ra diate radio frequenc y energy and, if not
inst alled and u sed in accord ance with the
inst ructions, may cause ha rmful interference t o
radi o communications.
Howe ver, there i s no guarante e that interference
will n ot occur in a particular i nstallation. If this
equi pment doe s cause harmf ul interference to
radi o or television recept ion, which can be
dete rmined by turning the eq uipment off and o n, the
user i s encouraged to try to cor rect the interferenc e
by one o r more of the following me asures:
• Reor ient or relocate the rec eiving antenna.
• Incr ease the separation be tween the equipment
and re ceiver.
• Conn ect the equipment into a n outlet on a circuit
different from that t o which the receiver is
conn ected.
• Cons ult the dealer or an exper ienced radio/TV
tech nician for help.
Warning
Chan ges or modi fications n ot expressly approve d
by the p arty responsible for c ompliance could void
the us er's authority to oper ate the equipment.
Cabl es
Conn ections to this device m ust be made with
shie lded cabl es with metal lic RF/EMI connector
hood s to maintain complian ce with FCC Rules and
Regu lations .
For DT S patents, see
http ://patents.dts.c om. Manufac tured
unde r license from DTS Licen sing Limited.
DTS, t he Symbol,
& DTS an d the Symbol together ar e
regi stered trademarks an d DTS Studio
Soun d is a trademark of DTS, Inc .©
DTS, Inc. All Rights Reserve d.
Open S ource
This p roduction contains B itstream Vera Sans font s
unde r the following copyri ght:
Copy right © 2003 by Bitstrea m, Inc. All Rights
Rese rved. Bitstream
Vera is a t rademark of Bitstrea m, Inc.
The te rms HDMI and HDMI HighDefi nition Multimedia In terface, and the
HDMI L ogo are trademarks or re gistered
trad emarks of HDMI Licensi ng
Admi nistrator, Inc. in the Un ited States
and ot her countries.
“Thi s product is manufactu red, distributed, se rviced and
warr anted exclusively by S HENZHEN MTC CO., LTD..
“JVC ” is the trademark of JVC KE NWOOD Corporation,
used b y such company under lic ense.”
Page 30

 Loading...