

Page 1
User Guide
LT-40MAT588/LT-40MAB588
Version 8.1
For U .S.
English
Illustrations in this guide are provided
actual product appearance.
Page 2

Copyright
© 2018 Roku, Inc. All rights reserved. ROKU, the ROKU Logo,
trademarks of Roku, Inc. Material in this User Manual is the property of Roku, Inc., and is protected under US and
International copyright and/or other intellectual property laws. Reproduction or transmission of the materials, in whole
or in part, in any manner, electronic, print, or otherwise, without the prior written consent of Roku, Inc., is a violation of
, rights under the aforementioned laws.
No part of this publication may be stored, reproduced, transmitted or distributed, in whole or in part, in any manner,
electronic or otherwise, whether or not for a charge or other or no consideration, without the prior written permission
of Roku, Inc.
Requests for permission to store, reproduce, transmit or distribute materials shall be made to both of the following
address:
Roku, Inc.
150 Winchester Circle
Los Gatos, CA 95032
Product name:
Document name: User Guide
Document revision: 8.1 - U.S English
Publication date: 72 Nov, 2018
Page 3

Contents
Safety and Warnings ..........................................................................................................................1
W
elcome .................................................................................................................................................4
The new standard in Smart TVs ................................................................................................................................. 4
Get the most out of your new TV .............................................................................................................................. 5
Connections and Setup
Main features, Accessories, Specifications
Front panel, Rear/Side Connections
Installation
Base Stand Assembly Instruction
................................................................................................................... 8
..............................................................................................8
.......................................................................................... .......... 9
............................................................................................................................................... 10
....................................................................................................................11
.............................................................................................................................. 12External Connection
............................................................................................................................................ 16Wall Mount
C
onnecting an antenna, cable, or satellite box ...................................................................................
Connecting external equipment with a composite AV video cable ....................................................... 18
®
Connecting external equipment with an HDMI
Connecting headphones or analog sound bar to the TV .............................................................................. 19
Connecting headphones to the Roku Enhanced Voice Remote ............................................................... 19
Connecting
Preparing for Internet connectivity ......................................................................................................................... 20
AC power .............................................................................................................................................................................. 21
Roku remote batteries .....................
Roku TV remote ................................................................................................................................................................. 21
Panel buttons ..................................................................................................................................................................... 25
Single button ........
Three buttons ................................................................................................................................................................ 26
Game-pad style joystick .......................................................................................................................................... 26
Four buttons ........
Five buttons (with mute) ........................................................................................................................................ 27
Five buttons (without mute) ................................................................................................................................. 27
Seven buttons ...........................
an AV rece
iver or digital sound bar .............................................................................................. 20
............................................................................................................................... 21
......................................................................................................................................................... 25
.......................................................................................................................................................... 26
.................................................................................................................................... 28
cable .................................................................................. 18
................17
Guided Setup ....................................................................................................................................... 29
Starting Guided Setup ................................................................................................................................................... 29
Completing Guided Setup ........................................................................................................................................... 30
Network connection ................
Activation ....................................................................................................................................................................... 37
Connect your devices .............................................................................................................................................. 38
Home screen ................................
Personalize your Home screen ............................................................................................................................. 43
Benefits of connecting ................................................................................................................... 44
Connecting brings out your TV’s full potential!
What is streaming?
What if I didn’t connect my TV? .............................................................................................................................. 47
............................................
................................................................................................................................ 32
...................................................................................................................................... 41
............................................................................................... 44
............................................................................................................. 45
iii
Page 4

Setting up Antenna TV .................................................................................................................. 48
How do I set up the TV tuner? ................................................................................................................................. 49
Using your TV ...................................................................................................................................... 53
Status indicator ................................................................................................................................................................. 53
Standby mode energy savings................................................................................................................................. 54
Opting in to Smart TV experience (U.S. only) .................................................................................................. 54
Disable Smart TV experienc
Disable Auto Notifications ..................................................................................................................................... 55
Watching Antenna TV channels ............................................................................................................................. 56
Changing channels.................................................................................................................................................... 56
Favorite Channels in non-connected mode ................................................................................................. 57
Smart Gu
Viewing program information .............................................................................................................................
Adjusting settings while watching a show ..................................................................................................... 63
Pausing Live TV................................................................................................................................................................. 63
Requirements ...................................................................................
Enabling Live TV Pause ........................................................................................................................................... 64
Using Live TV Pause ................................................................................................................................................. 64
Notes about Live TV Pause ................................................................................................................................... 66
More Ways to Watch (U.S. only) ............................................................................................................................. 66
Using More W
Getting the most from More Ways to Watch .............................................................................................. 70
Switching TV inputs ....................................................................................................................................................... 70
Auto-detecting devices ........................................................................................................................................... 70
Adjusting audio/video settings
Playing content from USB storage devices ....................................................................................................... 71
Auto player launch..................................................................................................................................................... 71
Playing content from local network media servers ...................................................................................... 72
Using your TV in a hotel or dorm room .............................................................................................................. 72
About using your TV on a restricted public network ....................
Getting your Roku TV on line on a restricted public network ............................................................ 73
Roku voice remotes (select models only) .......................................................................................................... 75
Re-pairing your Roku voice remote .................................................................................................................. 75
Checking the Roku voice remote battery level........................................................................................... 75
Finding your Ro
Changing and previewing the Enhanced Voice Remote finder sound ........................................... 77
ide (U.S. only) ........................................................................................................................................... 59
ays to Watch .................................................................................................................................. 67
ku Enhanced Voice Remote ..........................................................
e ............................................................................................................................... 55
61
............................................................................. 63
..............................................................................
............................................. 70
......................................................... 72
.................................... 76
Adjusting TV settings .................................................................................................................... 78
Settings menu ...................................................................................................................................................................78
Options menu .................................................................................................................................................................... 79
Options menu settings ............................................................................................................................................ 80
Accessib
Accessibility menu settings .................................................................................................................................. 82
Video description through Secondary Audio Program (SAP)........................................................... 83
ility (U.S. only) .............................................................................................................................................. 82
iv
Page 5

Advanced audio settings DTS TruSurround (select models only) .................................................... 84
Advanced audio settings menu options
Advanced audio settings
Advanced audio settings menu options
Sonic Emotion settings ............................................................................................................................................ 86
Advanced picture settings ......................................................................................................................................... 87
Advanced picture settings menu options ..................................................................................................... 87
Expert Picture Settings (4K models only).......................................................................................................... 89
Changing privacy settings ........
Advertising..................................................................................................................................................................... 90
Microphone .................................................................................................................................................................... 91
Sonic Emotion Premium (select models only) ...................................... 85
.................................................................................................................................. 90
DTS TruSurround .............................................................. 84
Sonic Emotion Premium ................................................ 86
My Feed .................................................................................................................................................. 93
Movies Coming Soon ...................................................................................................................................................... 93
Movies, TV shows, and people ...............................
................................................................................................... 93
Searching for something to watch........................................................................................... 94
How do I search? ............................................................................................................................................................. 95
Keyboard search using the remote .................................................................................................................. 96
Voice Search from a Roku voice remote ...................................................................................................... 96
Searching from the Roku mobile app .............................................................................................................. 97
I found a sh
Follow on Roku................................................................................................................................................................. 99
Recent Searches .............................................................................................................................................................. 99
ow, now what? ........................................................................................................................................ 97
Using the Roku Channel Store ...................................................................................................100
Customizing your TV ..................................................................................................................... 102
Add TV inputs .................................................................................................................................................................. 102
Add streaming channels ............................................................................................................................................. 102
Rename inputs ................................................................................................................................................................. 103
Remove unwanted tiles................................................................................................................................................ 104
Rearrange tiles .................................................................................................................................................................. 105
Change themes ..
Edit Antenna TV channel lineup ............................................................................................................................. 106
nge menu volume ................................................................................................................................................... 107
Cha
Configure power settings ...........................................................................................................................................108
Power on settings ...................................................................
Auto power savings ..................................................................................................................................................108
Standby LED On/O
Fast TV start ................................................................................................................................................................. 109
Configure accessibility (U.S. only) .......................................................................................................................... 109
Captions mode............................................................................................................................................................. 109
Captions preferred language ...............................................................
Captions style ............................................................................................................................................................... 110
............................................................................................................................................................. 106
...................................................................................108
................................................................................................................................................ 109
................................................................ 110
v
Page 6

Audio Guide settings ............................................................................................................................................. 112
Changing caption settings (Canada only) ......................................................................................................... 113
Configuring parental controls ................................................................................................................................. 115
Creating a parental control PIN ........................................................................................................................ 115
Blocking Movie Store, TV Store, and News (U.S. only) ...................................
Blocking Broadcast TV shows ........................................................................................................................... 116
What happens when a TV show is blocked? .............................................................................................. 122
Changing the parental control PIN ..................................................................................................................... 123
Resetting parental controls ................................................................................................................................... 124
...................................... 116
More settings ..................................................................................................................................... 125
Changing network settings ........................................................................................................................................125
Changing ZIP Code ....................................................................................................................................................... 126
Changing time settings ............................................................................................................................................... 126
Scanning for Antenna TV channels again .......................................................................................................... 127
®
Setting the HDMI
Adjusting external device connections ............................................................................................................... 128
Using the TV in a home theater ............................................................................................................................... 129
Turning
Setting up a digital audio connection ............................................................................................................. 130
Controlling other devices through CEC ......................................................................................................... 131
Restarting the TV ............................................................................................................................................................ 133
Resetting the TV ...................................................................................................................
Reset audio/video setti
Factory reset everything .......................................................................................................................................134
What if i can’t access the Factory Reset option? .....................................................................................134
Network connection reset ................................................................................................................................... 135
Changing your Roku Channel Store PIN preference .................................................................................. 135
Gettin
g system updates ............................................................................................................................................ 136
Checking for updates on a connected TV ................................................................................................... 137
Getting updates on a non-connected TV .................................................................................................... 137
mode (4K models only) ...................................................................................................... 127
he speakers ......................................................................................................................................... 129
........................................... 133
ngs ................................................................................................................................... 133
Other devices .................................................................................................................................... 140
Screen Mirroring your phone or tablet .............................................................................................................. 140
Getting and using the Roku mobile app ..............................................................................
Private Listening on the Roku mobile app .................................................................................................. 141
Using a
universal remote ........................................................................................................................................... 141
FAQ ....................................................................................................................................................... 142
Other information ............................................................................................................................ 143
Notice .......................................................................................................................................... 143
............................. 141
vi
Page 7
Safety and Warnings
The lightning flash with arrowhead symbol,within an
equilateral triangle is intended to alert the user to the
CAUTION
RISK OF ELECTRIC SHOCK!
DO NOT OPEN!
ATTENTION
RISQUE DE CHOC ELECTRIQUE!
CAUTION:TO REDUCE THE RISK OF ELECTRIC SHOCK, DO NOT
REMOVE COVER(OR BACK).NO USER SERVICEABLE
PARTS INSIDE.REFER SERVICING TO QUALIFIED
SERVICE PERSONNEL.
WARNING: TO PREVENT FIRE OF SHOCK HAZARD, DO NOT EXPOSE THIS APPLIANCE
TO RAIN OR MOISTURE.
TO PREVENT THE SPREAD OF FIRE, KEEP CANDLES OR OPEN FLAMES AWAY
FROM THIS PRODUCT AT ALL TIMES.
CAUTION: TO PREVENT ELECTRIC SHOCK. DO NOT USE THIS POLARIZED PLUG WITH
AN EXTENSION CORD, RECEPTACLE OR OTHER OUTLET UNLESS THE
BLADES CAN BE FULLY INSERTED TO PREVENT BLADE EXPOSURE.
NE PAS OUVRIR!
presence of uninsulated dangerous voltage within the
to constitute a risk of electric shock.
The exclamation point within an equilateral triangle is
intended to alert the user to the presence of important
operating and maintenance(servicing)instructions in the
literature accompanying the appliance.
WARNING:
This equipment has been tested and found to comply with the limits for a Class B digital device,
pursuant to Part 15 of the FCC Rules. These limits are designed to provide reasonable protection
against harmful interference in a residential installation. This equipment generates, uses and can
radiate radio frequency energy and, if not installed and used in accordance with the instructions,
may cause harmful interference to radio communications.
However,there is no guarantee that interference will not occur in a particular installation. If this
equipment does cause harmful interference to radio or television receptions,which can be
interference by one or more of the following measures:
- Reorient or relocate the receiving antenna.
- Increase the separation between the equipment and receiver.
- Consult the dealer or an experienced radio/TV technician for help.
CAUTION:
Changes or modifications not expressly approved by the party responsible for compliance with
the FCC Rules could void the user’s authority to operate this equipment.
THIS DEVICE COMPLIES WITH PART 15 OF THE FCC RULES. OPERATION IS SUBJECT TO THE FOLLOWING
TWO CONDITIONS:
(1)THIS DEVICE MAY NOT CAUSE HARMFUL INTERFERENCE, AND (2) THIS DEVICE MUST ACCEPT ANY
INTERFERENCE RECEIVED, INCLUDING INTERFERENCE THAT MAY CAUSE UNDESIRED OPERATION.
Location of the required marking
The rating sheet and the safety caution are on the
rear of the unit.
BATTERY PRECAUTIONS:
Batteries should not be exposed to excessive heat
such as sunshine, fire or the like.
The remote control unit uses infrared beams to
Important Note:
In the spaces below, enter the model and serial
number of your television(located at the rear of the
television cabinet). Staple your sales receipt or
invoice to the inside cover of this guide. Keep this
user’s guide in a convenient place for future
reference. Keep the carton and original packaging
for future use.
transmit signals, so sunlight or fluorescent light on
the remote sensor may shorten operating distance.
Incorrect use of batteries may cause them to leak
or burst. Read the battery warning and use the
batteries properly.
Do not mix old and new batteries.
Do not mix alkaline, standard(carbon-zinc), or
rechargeable,(Ni-Cd, Ni-MH,etc.)batteries.
Remove batteries if the remote control will not be
operated for anextended period of time.
1
Page 8

Safety and Warnings
IMPORTANT SAFETY INSTURCTIONS
1) Read these instructions.
2) Keep these instructions.
3) Heed all warnings.
4) Follow all instructions.
5) Do not use this apparatus near water.
6) Clean only with non abrasive dry cloth.
7) Do not block any ventilation openings, install in
accordance with the instructions.
8) Do not install near any heat sources such as
radiations, heat registers, stoves, or other apparatus
(including amplifiers) that produce heat.
9) Do not defeat the safety purpose of the polarized
plug. If the provided plug does not fit into your outlet,
consult an electrician for replacement of the obsolete
outlet.
10) Protected the power cord from being walked on or
pinched particularly at plugs, convenience receptacles,
and the point where they exit from the apparatus.
11) Only use attachments/accessories specified by the
manufacturer.
12) Unplug this apparatus during lighting storms or
when unused for long periods of time.
13) Refer all servicing to qualified service personnel.
Servicing is required when the apparatus has been
damaged in any way, such as power-supply cord or
plug is damaged, liquid has been spilled or objects have
fallen into the apparatus, the apparatus has been
exposed to rain or moisture, does not operate normally,
or has been dropped.
14) Mains plug is used as the disconnect device, the
disconnect device shall remain readily operable.
15) Do not cover the ventilation opening with items such
as newspapers, table-cloth, curtains, etc.
16) No naked flame sources, such as lighted candles,
should be placed on the apparatus.
17) Attention should be drawn to the environmental
aspects of battery disposal.
18) Use apparatus in moderate climate.
19) The apparatus shall not be exposed to dripping or
splashing and that no objects filled with liquids, such as
vases, shall be placed on the apparatus.
20)Use only with a cart, stand, tripod, bracket, or table
specified by the manufacturer, or sold with the apparatus.
When a cart is used, use caution when moving the cart/
apparatus combination to avoid injury from tip-over.
The symbol indicates that dangerous
voltages constituting a risk of electric shock
are present within this unit.
The symbol indicates that there are
inportant operating and maintenance
instructions in the literature
accompany this unit.
WARNING:
To reduce the risk of fire or electric shock,do
not expose this apparatus to rain or moisture.
WARNING:
The batteries shall not be exposed to
excessive heat such as, fire or the like.
WARNING:
The excessive sound pressure from earphones
and headphones can cause hearing loss.
The symbol indicates that this product incorporates
double insulation between hazardous mains voltage
and user accessible parts. When servicing use only
identical replacement parts.
This marking indicates that this product should not
be disposed with other household wastes. To prevent
possible harm to the environment or human health
from uncontrolled waste disposal, recycle it
responsibly to promote the sustainable
reuse of material resources. To return your used
device, please use the return and collection systems
or contact the retailer where the product was
purchased. They can take this product for
environmental safe recycling.
2
Page 9
Safety and Warnings
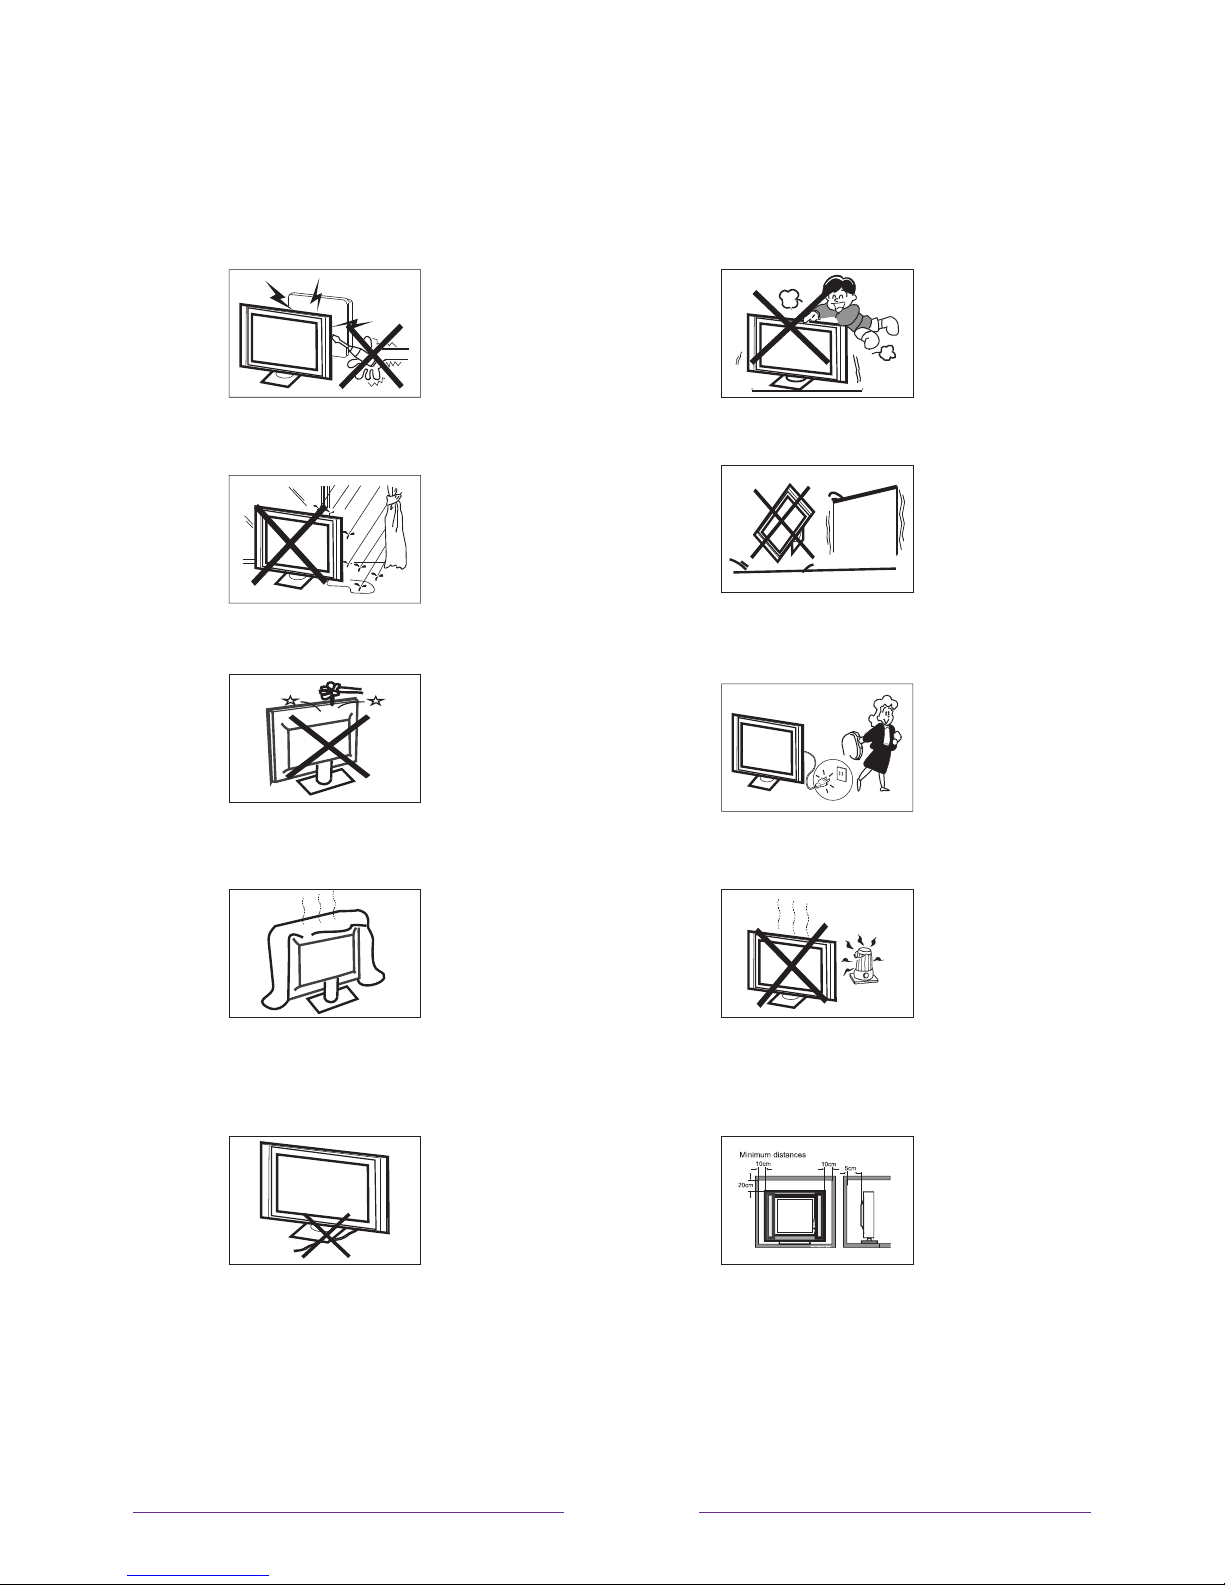
High voltages are used in the operation of this television
receiver. Do not remove the cabinet back from your set.
Refer servicing to qualified service personnel.
To prevent fire or electrical shock hazard, do not expose
the television receiver to rain or moisture.
Do not drop or push objects into the television cabinet
slots or openings. Never spill any kind of liquid on the
television receiver.
Never stand on, lean on, or suddenly push the television or
its stand. You should pay special attention to children.
Serious injury may result if it falls.
Do not place your television on an unstable cart, stand,
shelf or table. Serious injury to an individual , and damage
to the television, may result if it falls. Recommended to
utilize rear mount screw holes for anti-tipping(hardware
not included)
When the television receiver is not used for an
extended period of time, it is advisable to disconnect
the AC power cord from the AC outlet.
Do not block the ventilation holes in the back cover.
Adequate ventilation is essential to prevent failure of
electrical components.
Do not trap the power supply cord under the television
receiver.
Avoid exposing the television receiver to direct sunlight
and other sources of heat. Do not stand the television
receiver directly on other products which give o heat,
e.g. video cassette players and audio amplifiers. Do not
place naked flame sources, such as lighted candles on
the television.
If the television is to be built into a compartment or similar
enclosure, the minimum distances must be maintained. Heat
build-up can reduce the service life of your television, and
can also be dangerous.
3
Page 10

Welcome
Congratulations on the purchase of your new Roku TV! Discover the joy of endless
entertainment.
channels that may include paid subscription channels like Netflix or free channels like
YouTube, Crackle, CNET and literally thousands more.
Important:
content and features. This edition of the User Guide describes Roku TV version 8.0. To
determine the current version of your Roku TV, go to Settings > System > About
after you complete Guided Setup.
Your TV receives automatic updates from time to time, enabling new
The new standard in Smart TVs
most likely never seen before a home screen that you can
personalize with your favorite devices and streaming channels. Choose from hundreds
of thousands of streaming movies and TV episodes, plus music, sports, kids, family,
international and much more. You should never run out of things to watch.
Note:
content. Channel availability is subject to change and varies by country.
A paid subscription or other payments may be required for some channel
4
Page 11

Get the most out of your new TV
Follow these simple steps to get the most out of your new TV.
1. Connect to the Internet
• s easy, and it will unlock a world of entertainment. All you need
is a network connection. There are hundreds of free streaming channels,
paid subscription services like Netflix and Spotify, and convenient ways to
rent or buy a favorite film or show with, for example, Google Play.
2. Pick your favorite streaming channels
• Find the entertainment you love. From the latest blockbuster movies to
your favorite TV shows, with tons of live sports, a broad selection of music
streaming channels, popular programming in a dozen international
languages, 24x7 live news and so much more, your new Roku TV has your
sweet spot. A paid subscription or other payments may be required for
some channels.
3. Find Antenna TV shows in the Smart Guide
•
Only in the United States
right now, but what was on up to a week ago, and what will be on in the
coming two weeks. And for many over-the-air programs, if you start
watching the program after it is already in progress, or you see something
you missed in the Smart Guide, you can use More Ways to Watch to find
streaming channels where you can see the show from the beginning, find
other episodes, or entire seasons of the show, if applicable.
4. discover More Ways to Watch on other
inputs
•
Only in the United
ray player, or other source connected to the HDMI® or AV inputs, keep an
eye out for a notification of streaming channels that offer the program
series, or other programs with similar themes.
States, When watching programs from a cable box, Blu-
, use the Smart TV
other episodes, the entire
5
Page 12
5. Personalize your Home screen
• Put your favorite streaming channels, and TV inputs front-and-center on the
Home screen. No more flipping through inputs or wading through
complicated menus. You can even customize the names of each input and
move tiles around so your most-often used devices and streaming channels
are only a click away.
6. Search for your favorite movie, TV show, actor, or director
• easily search across top
streaming channels and Antenna TV channels. Search by movie or TV show
title, actor or director all from one place. Search by typing words or
phrases using the on-screen keyboard or on your mobile device or,
the United States
, speak words or phrases in a conversational tone using
Voice Search. Some channels and content require payment.
7. Pause live TV
• Pause, resume, fast forward, and rewind TV shows. Simply connect your
own USB drive with 16GB or bigger capacity to the TV and pause live TV for
up to 90 minutes.
Note:
Live TV Pause is available on digital TV shows received on the
Antenna TV input, and only when the TV is linked to a valid Roku account.
8. Control your TV with voice commands
•
Only in the United States
, use your Roku Voice Remote (select models),
Enhanced Voice Remote (select models), or the free Roku mobile app to
control your Roku TV. Use conversational voice commands to search for
programs by title, actor, director, or genre. Also use voice commands to
launch streaming channels, switch inputs, change Antenna TV channels, or
open the Smart Guide.
only in
9. Send your personal media to the big screen
• Send personal photos, videos, and music from your compatible smartphone
or tablet to the TV screen in just a few taps. Plus, with certain channels,
such as Netflix and YouTube, you can send movies, shows, sport highlights,
and more directly to your TV.
6
Page 13
10. Follow movies coming soon
• Use My Feed to choose from and follow a list of upcoming movies, and then
watch for alerts each time one of your followed movies becomes available
or changes price.
11. Take charge with a smartphone or tablet
• Control your TV with the included remote or from your compatible
smartphone or tablet with the free mobile app for iOS® and Android
mobile devices*. Browse channels, view My Feed, listen to audio from
Antenna TV and streaming channels. Search more easily using a your
keyboard and,
only in the United States
, Voice Search.
• Mirror your compatible smartphone or tablet on your TV. Share videos,
photos, web pages, and more from compatible devices.
12. Connect your Roku TV to networks found in hotels and college dorms
• You can temporarily link the TV to your smartphone or table to agree to
any terms, enter codes, or provide required information before you can get
Internet access.
Note:
Using your Roku TV on a restricted public network requires wireless
availability and use of your network-connected smartphone, tablet, or
computer to authenticate access to your account. You must use your Roku
TV remote to initiate the connection process. Streaming content might be
limited due to your geographic location or because of restrictions imposed
by the network host.
Go to support.roku.com for device compatibility information.
*
IOS® is a trademark or registered trademark of Cisco in the U.S. and other countries and is used under license.
7
Page 14

Connections and setup
Main features
40” wide screeen for a complete home theater experience
Super slim LCD TV with LED backlight
1920x1080 native resolution for HD performance
Integrated ATSC TV tuner for HDTV broadcast reception
Beautiful color depth with a contrast ratio of 5000:1
HDMI inputs for true digital connections
Specifications
Viewing Picture Size(diagonal)
Resolution:
Aspect Ratio:
TV System:
Video Signal System :
Receiving Channel :
Maximum Power Consumption:
Input Power Voltage:
Audio Output Power(THD≤7%)
High-Definition Multimedia Interface(HDMI) Input
40” class (39.5” diagonal)
1920x1080
16:9
ATSC Digital system and NTSC Analog system
NTSC
Cable: 1-135/Air: 2-69(ATV&DTV)
66W
100-240V ~ 50/60Hz
2x8W
x3
Accessories
Infrared Remote Control................................... 1
User’s Manaul.......................................................... 1
Battery (AAA)........................................................ 2
Composite Video Input
Audio Input
Headphone Output
Optical Output
USB 2.0 Input
“The product is manufactured, distributed, serviced and warranted exclusively by SHEN ZHEN MTC CO.,
LTD...“JVC” is the trademark of JVC KENWOOD Corporation, used by such company
under license.”
x1
x1
x1
x1
x1
8
Page 15
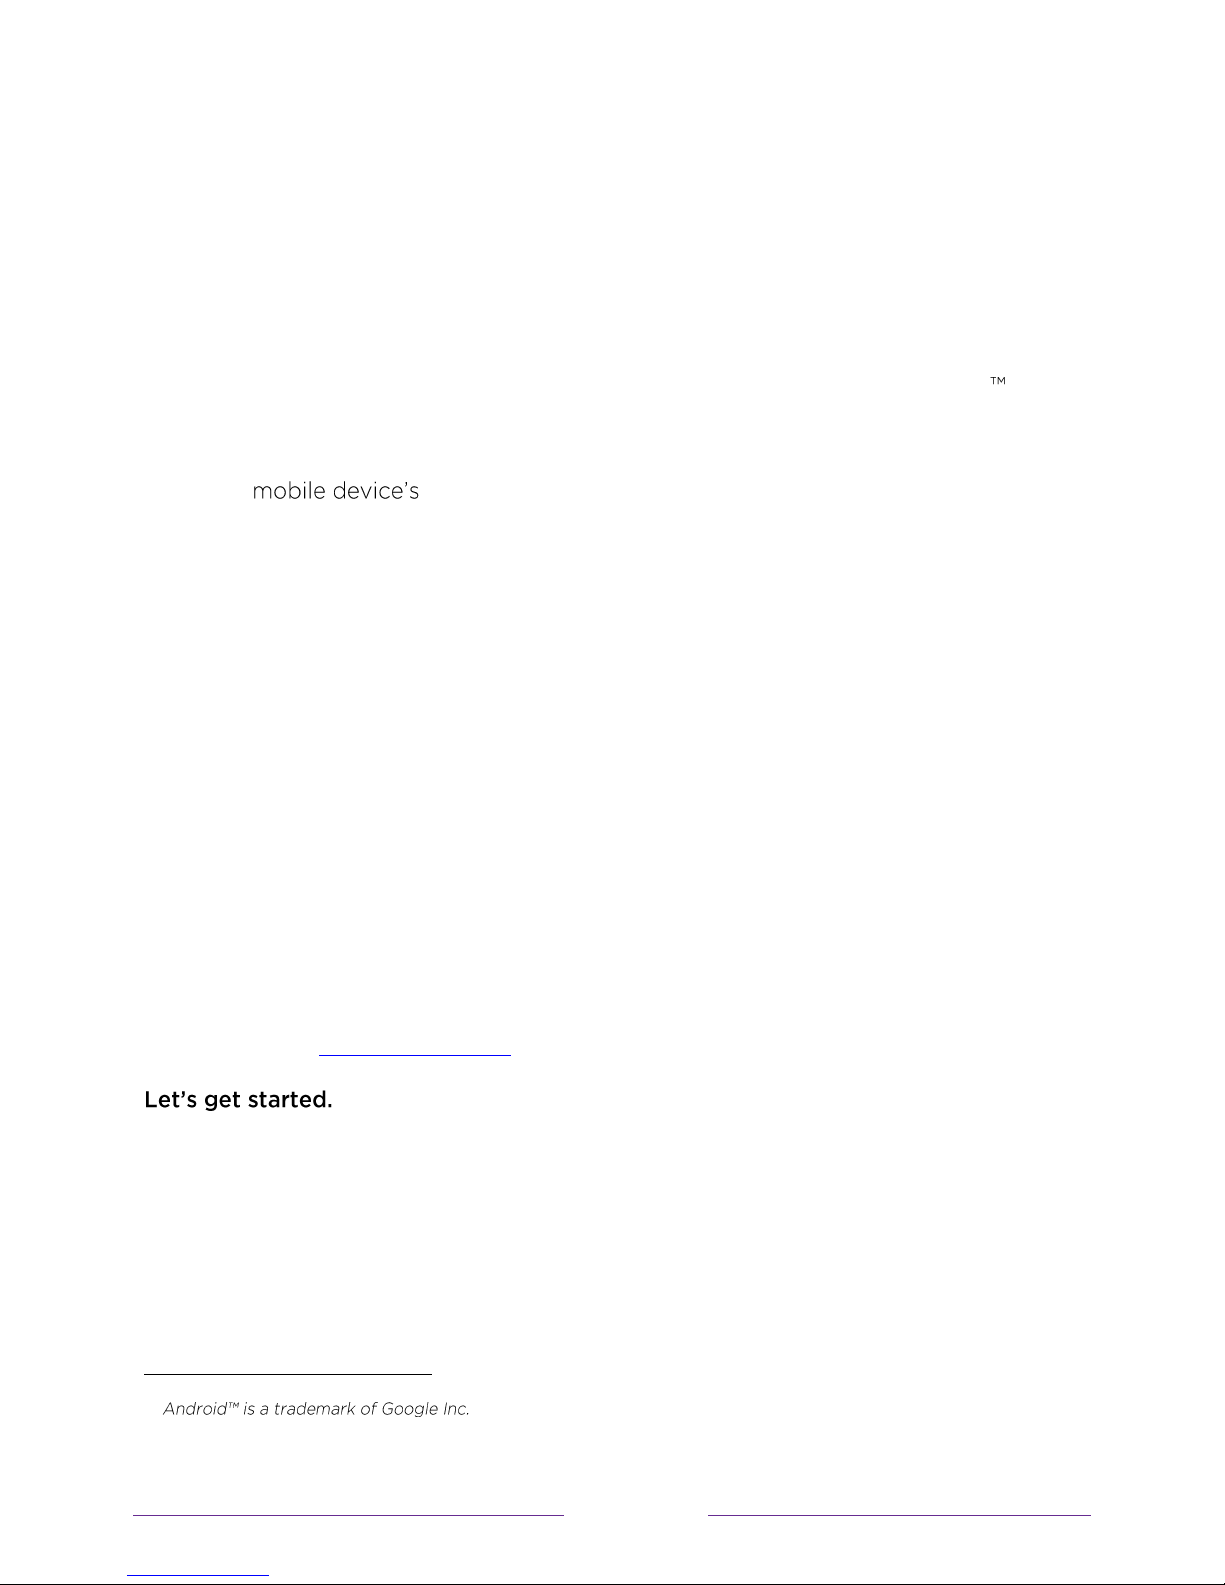
Front panel
1: Remote control sensor.
2: Indicator LED: RED STANDBY.
3: Power / Input button
2 1
3
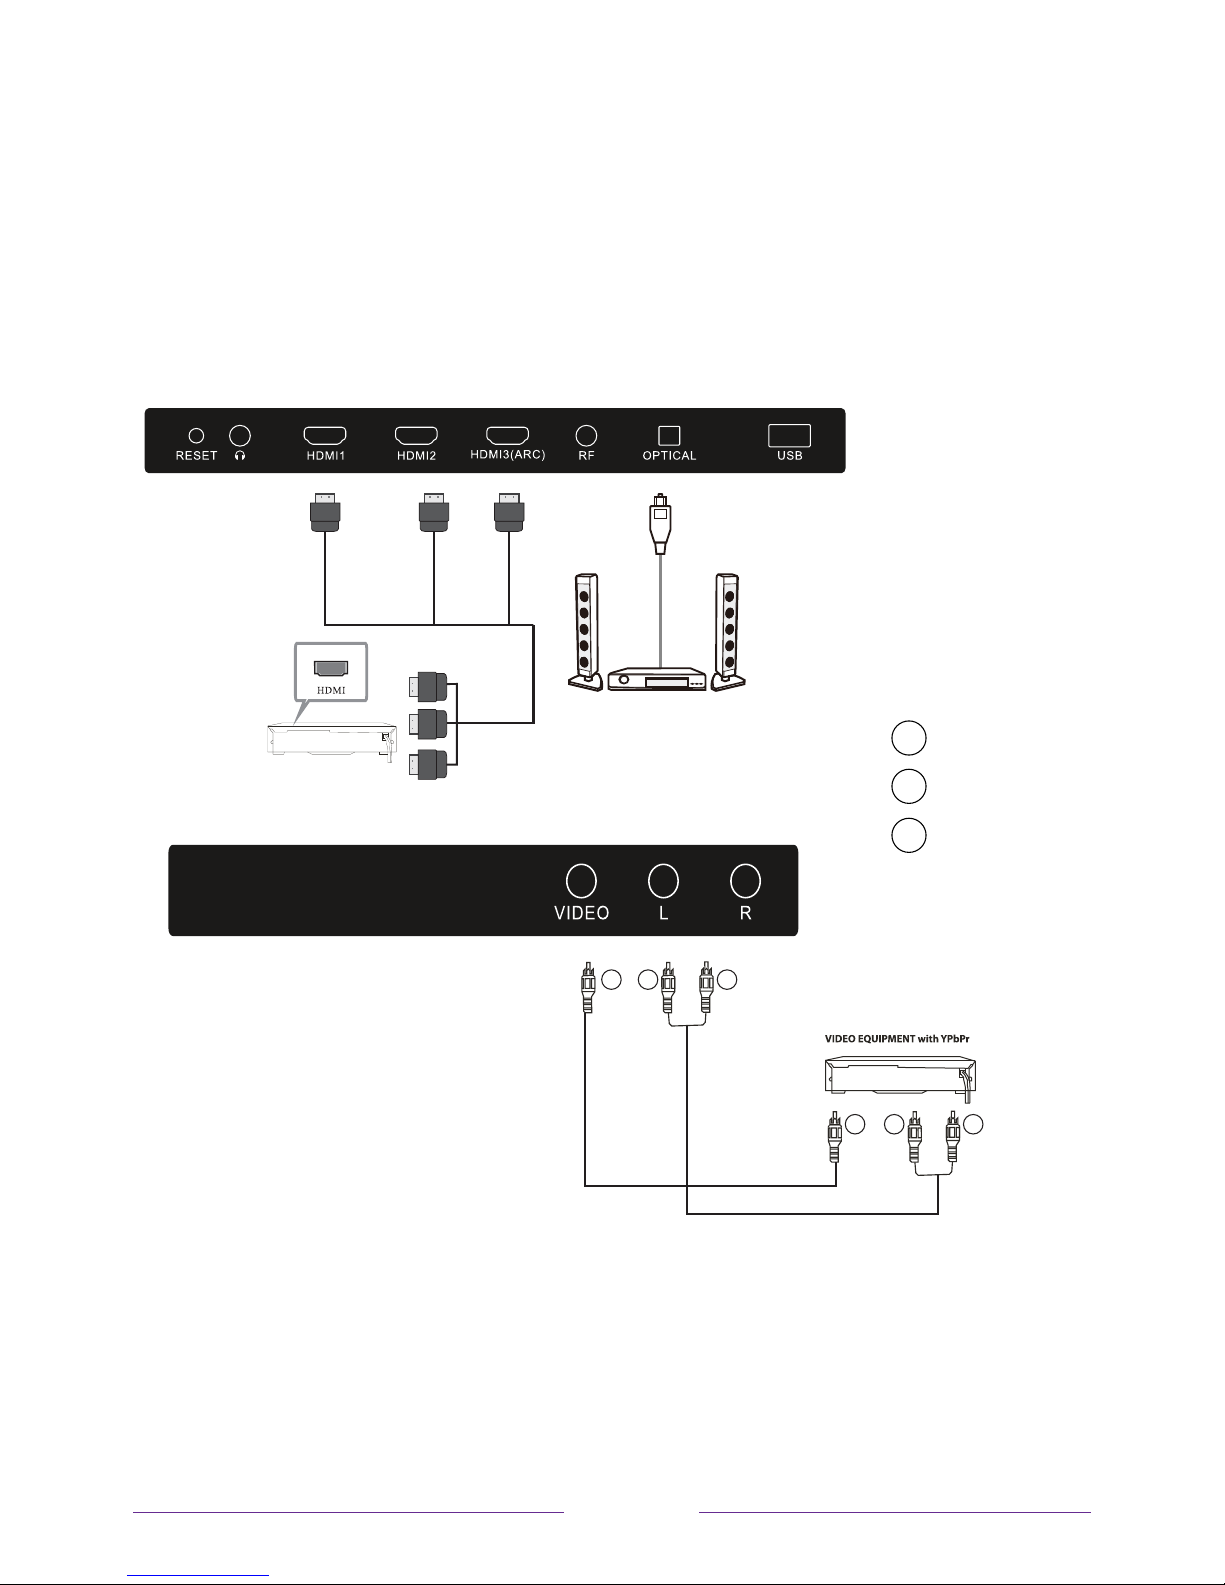
Rear Connections
All the terminals are(from left to right):
RESET, HEADPHONE OUTPUT, HDMI1, HDMI2, HDMI3(ARC), RF, OPTICAL OUTPUT, USB.
SIDE Connections
All the terminals are(from left to right):
VIDEO INPUT, AUDIO INPUT.
9
Page 16
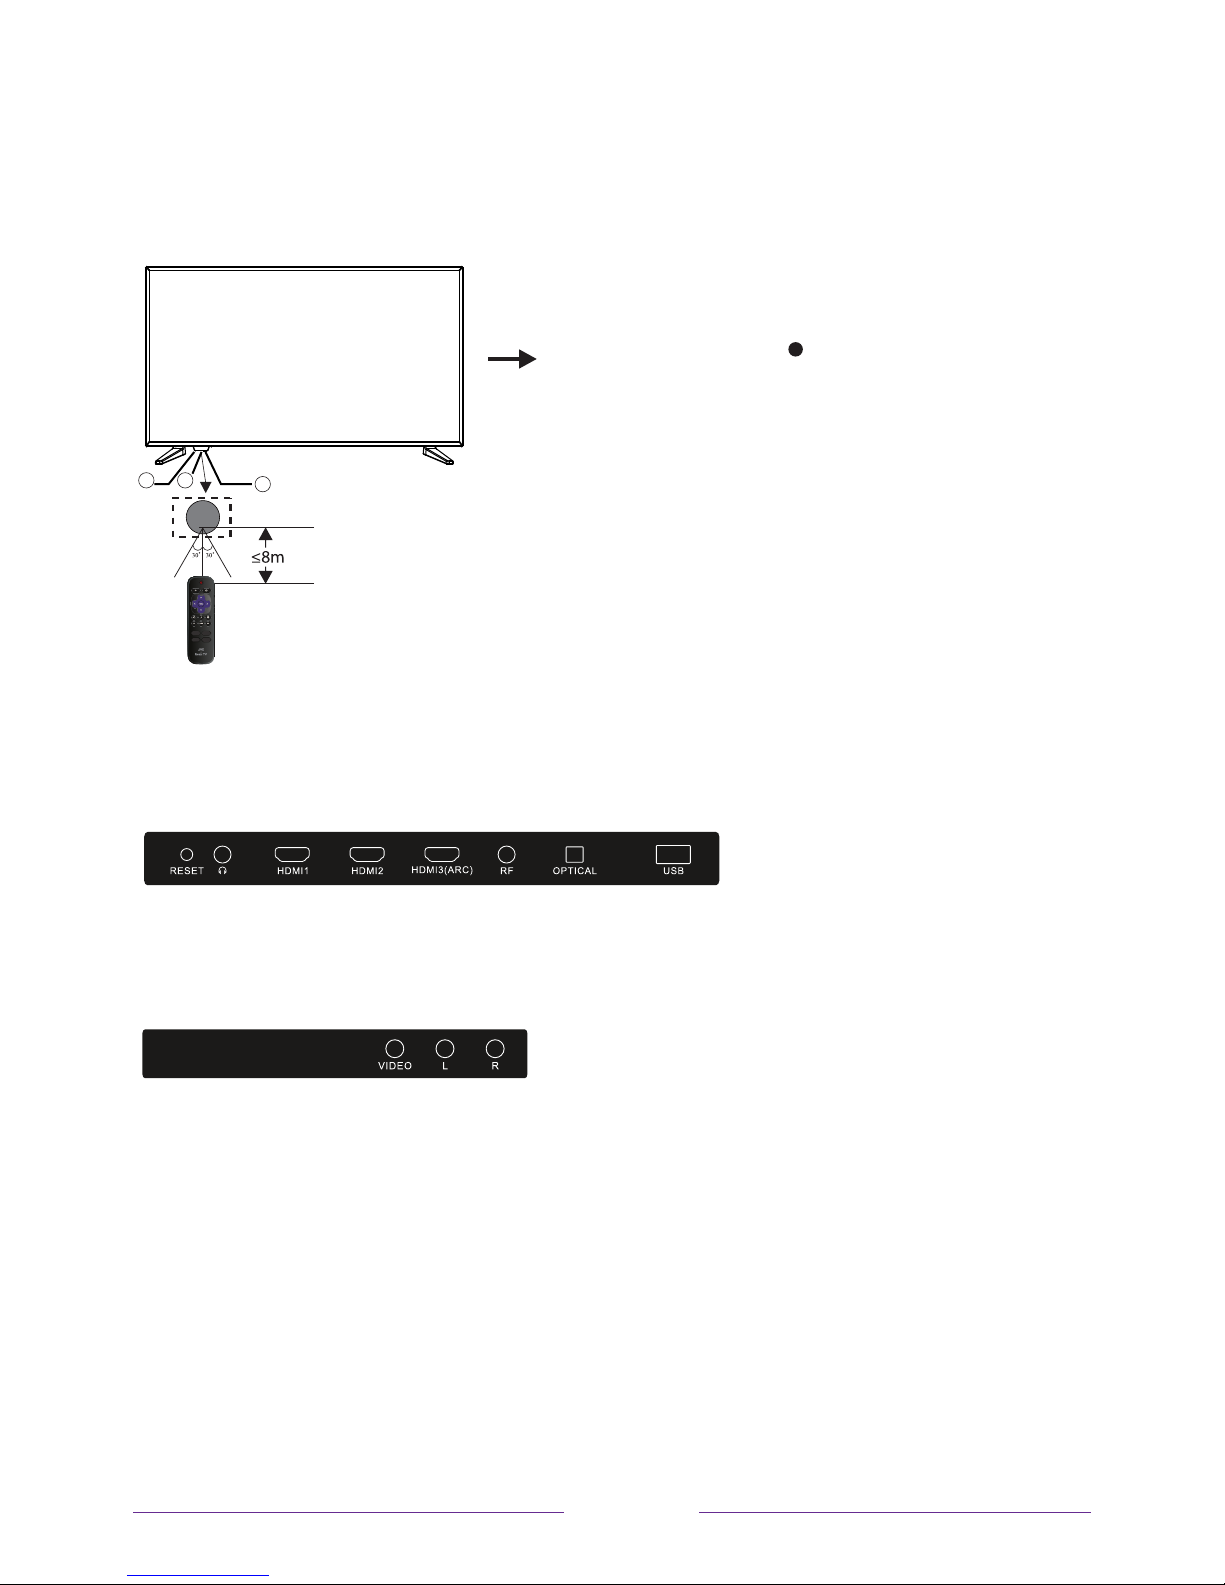
INSTALLATION
Antenna
Check to ensure that you have selected the right cables for the ports and that they are connected
External Equipment not included.)
OR
RF coaxial cable
(not included)
Note:
Aerial connections : F connector.
Input impendance : 75Ω unbalanced.
With the tuner built-in you can connect your TV to an antenna and enjoy over-the-air entertainment.
1. When the setup wizard is complete select the Antenna TV icon from the home screen.
2. Follow the on-screen instructions.
3. Whenever you want to watch antenna TV, select the Antenna icon.
Plug in and turn on TV
Connect your power cord to the TV, then plug it into the wall outlet.
Press the power button on your TV remote control.
Power Cord
Wall outlet
Power connection
Please note: After unpackint, allow the TV to reach ambient room temperature before
connection the TV to the mains power socket.
PRESET MODE(HDMI)
RESOLUTION V.Freq.(Hz) H.Freq.(KHz)
1 800*600 60 37.88
2
3
4
5
1024*768
1366*768
1280*768
1920*1080
60
60
60
60
CABLE
When shipped from the factory, the Signal Type option is for the RF connector(F-type) set to
the “AIR” (Over-the air antenna) mode.
48.36
47.7
47.3
67.5
10
Page 17
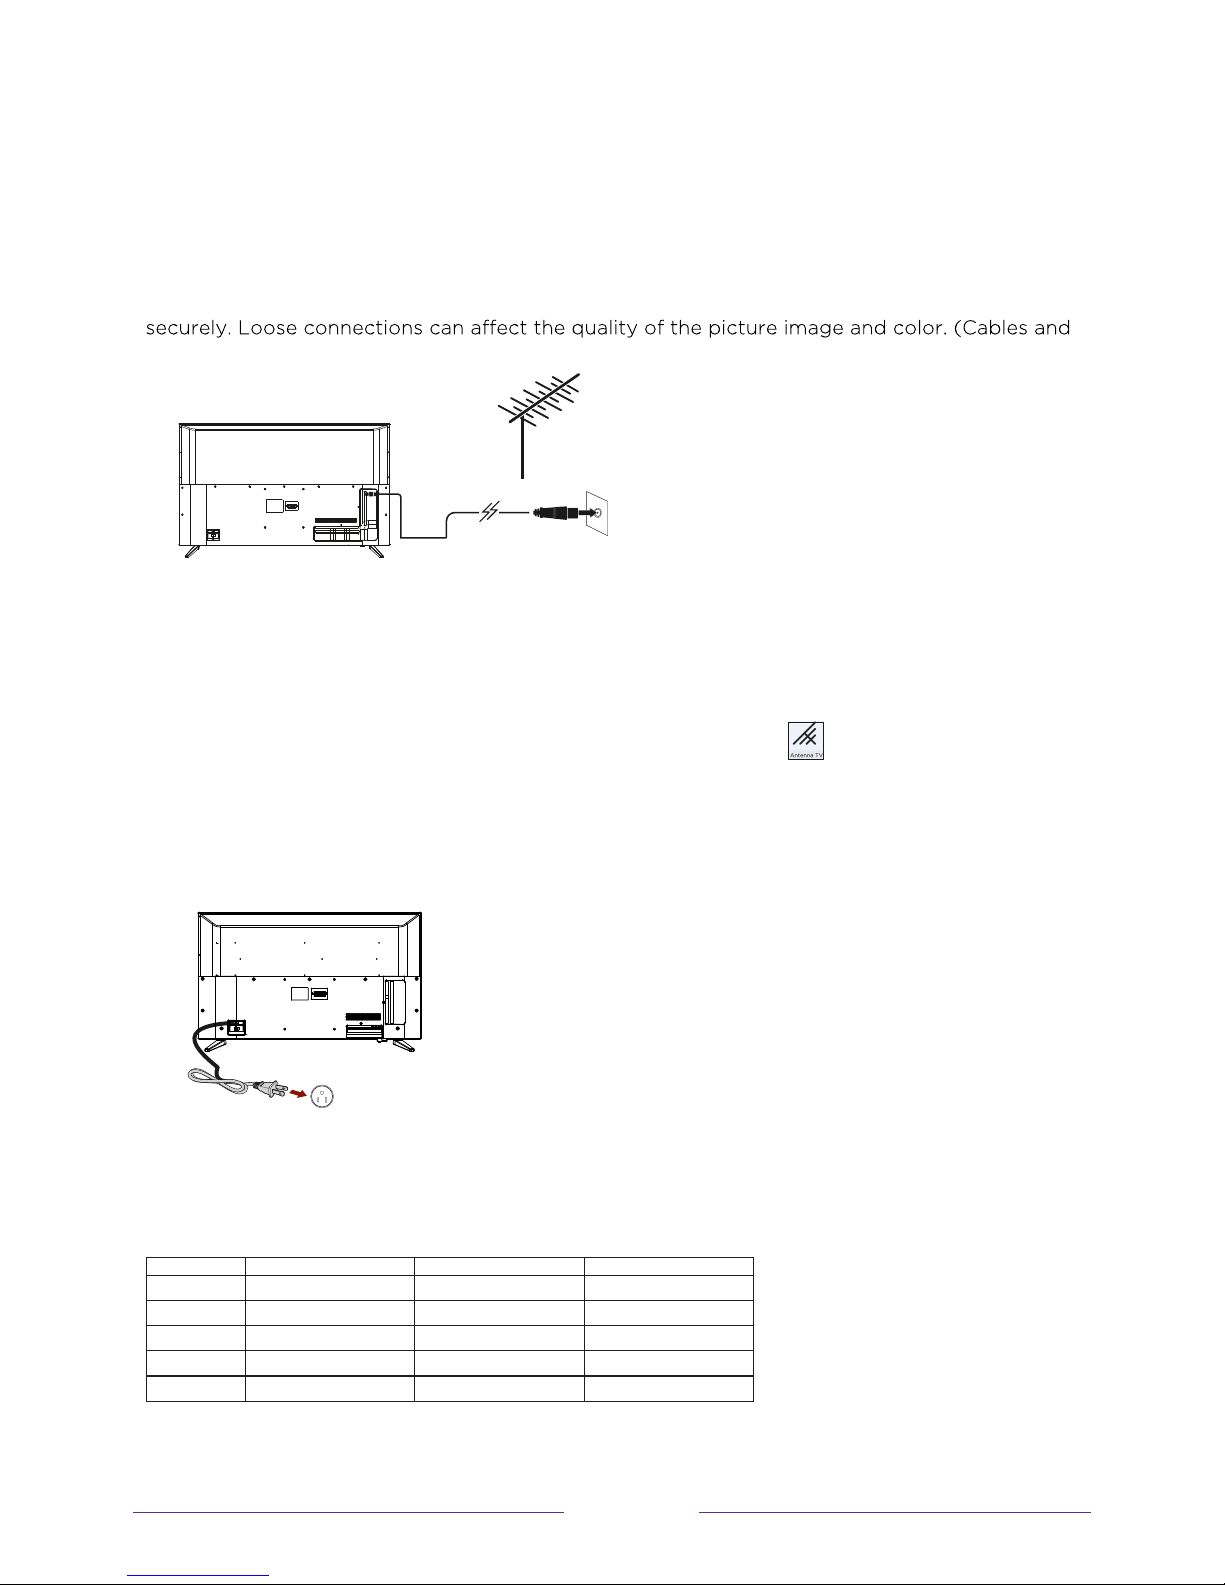
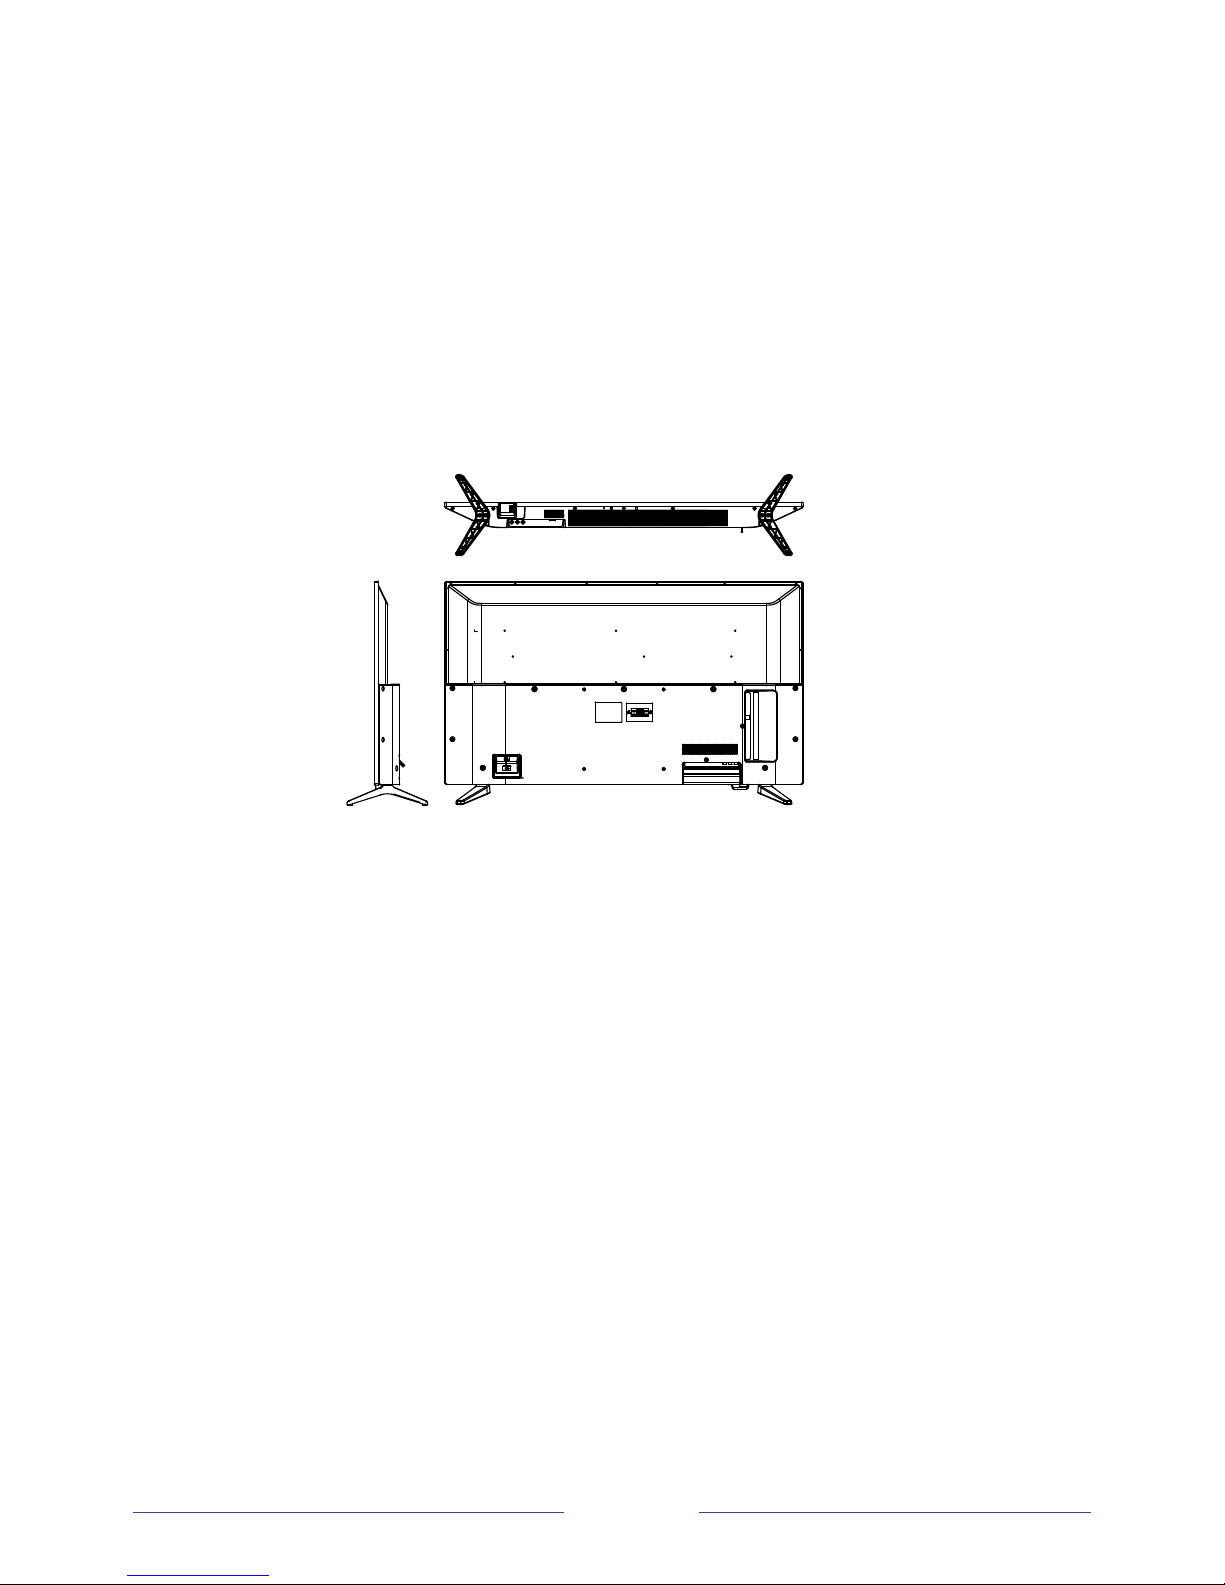
Base Stand Assembly Instruction
It is recommended two people handle TV stand installation.
To prevent scratch or damage to the TV screen, place the TV on a soft, flat surface.
Attach the stands to the bottom of the TV by inserting the stand into slots on the TV.
Secure the stands to the TV with the supplied screws.
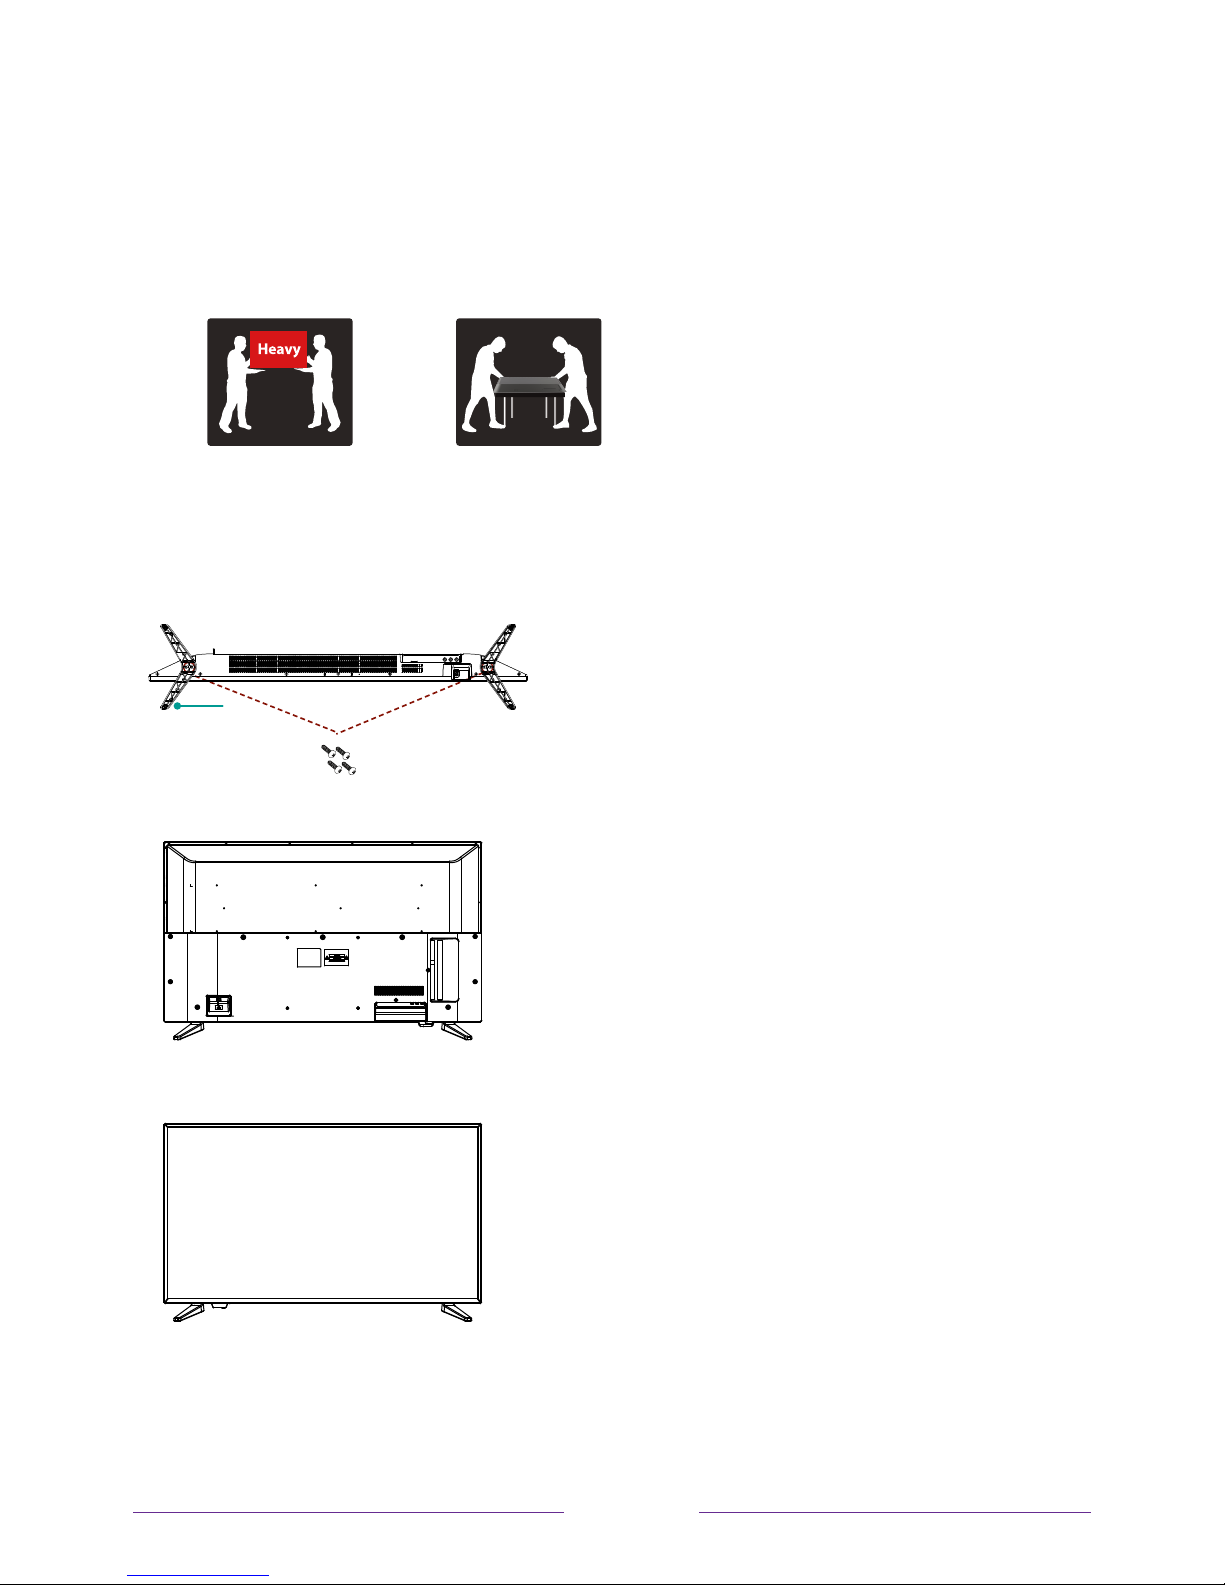
To attach the left and right leg that forms the stand:
1.Place the legs into the bottom slots of the TV, insert and tighten the screws
(found in the accessories bag) in the circled areas with the screwdriver (not provided).
leg
Screws
2. After securing the stand, place the TV on a stable surface. The TV is ready for use now.
Note: TV can also be wall mounted. Wall mount sold separately.
11
Page 18
External Connection
AV Equipment
You can use the rear input terminals as follows.
Video Equipment: VCR, Multi Disc Player, DVD Player, Camcorder, Video Game, etc.
AUDIO Receiver
Y
W
VIDEO
AUDIO L
Y
W R
Y
W R
AUDIO R
R
12
Page 19
External Connection
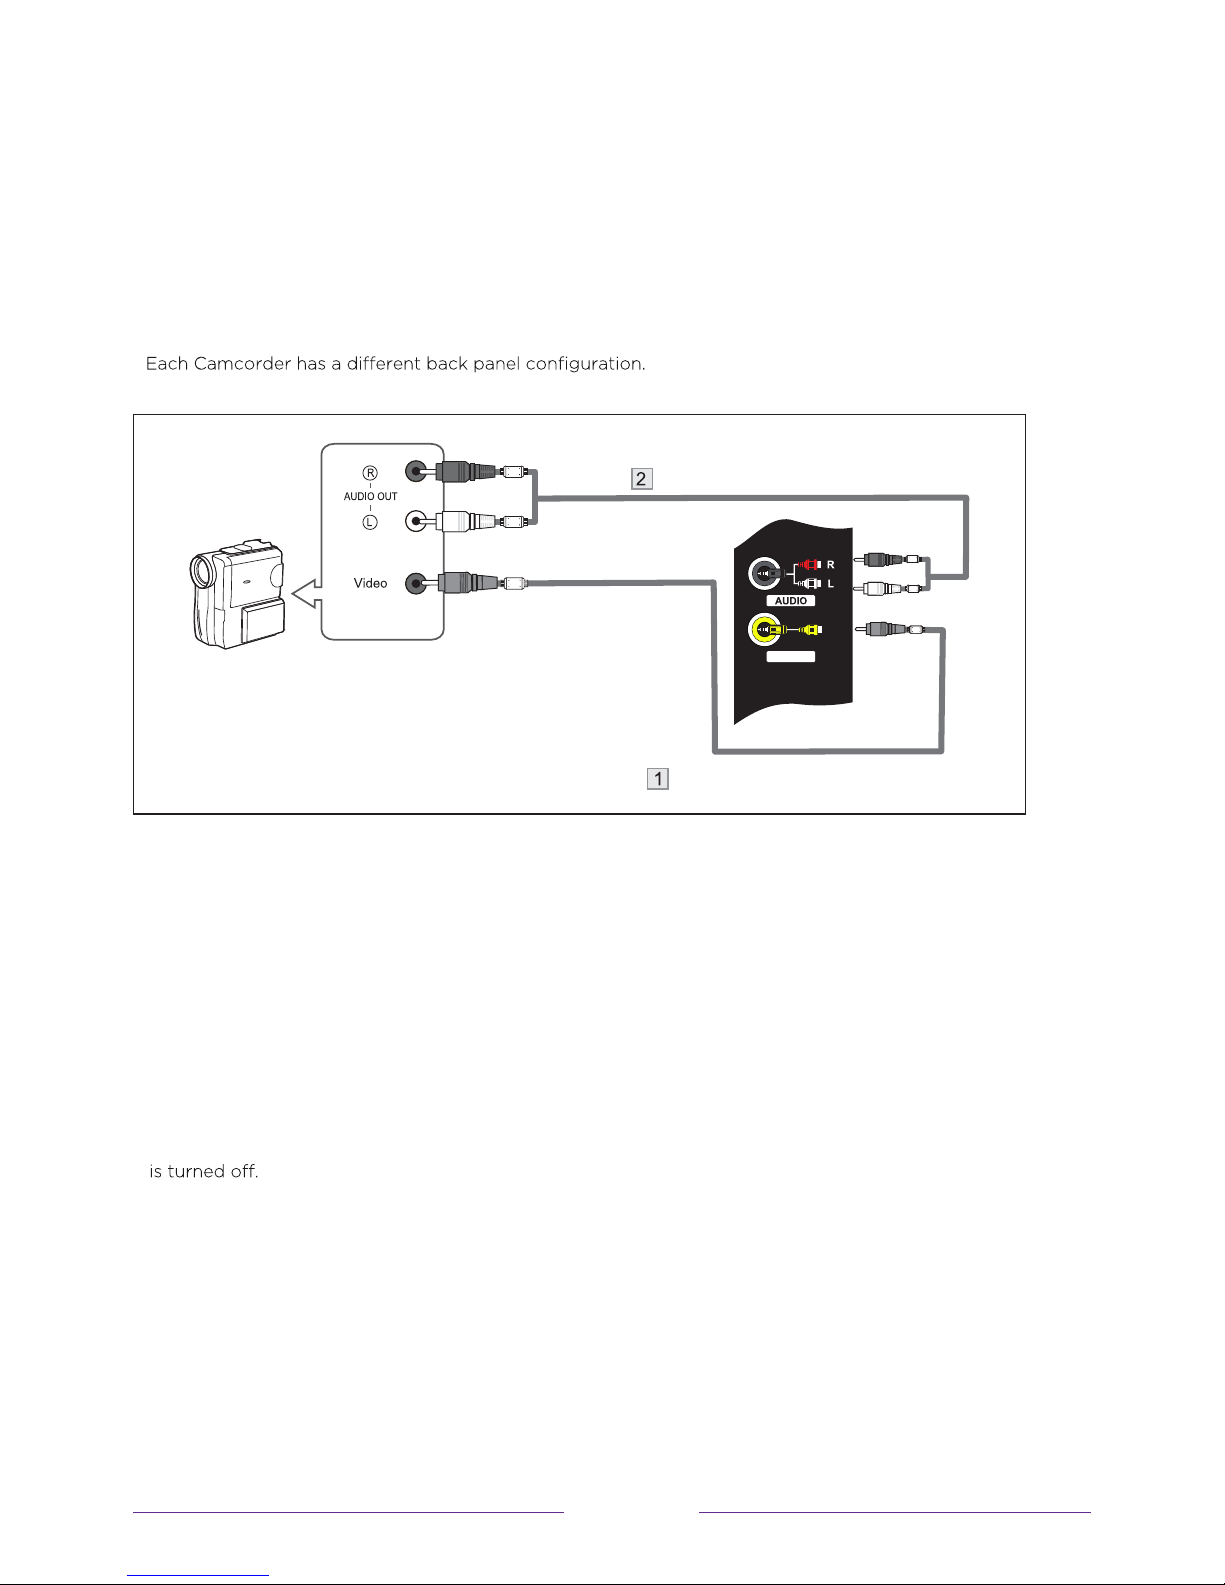
Connecting a Camcorder
The rear panel jacks on your TV make it easy to connect a camcorder to your TV. They allow you
to view the camcorder tapes without using a VCR.
When connecting a Camcorder or DVD, match the color of the connection terminal to the cable.
Red
White
Yellow
Camcorder
Audio Cable(Not supplied)
Red
White
Y
VIDEO
Yellow
Video Cable(Not supplied)
1. Connect a Video Cable between the AV VIDEO in jacks on the TV and the Video out jack on the
camcorder.
2. Connect Audio Cables between the AUDIO L and AUDIO R jacks on the TV and the AUDIO out jacks
on the camcorder.
3. Connect a Video Cable between the AV VIDEO in jacks on the TV and the Video out jack on the
DVD.
Notes:
1. Whenever you connect an external device to your TV, make sure that power on the unit
2. When connecting an external device, match the color of the connection terminal to the cable.
13
Page 20
14
External Connection
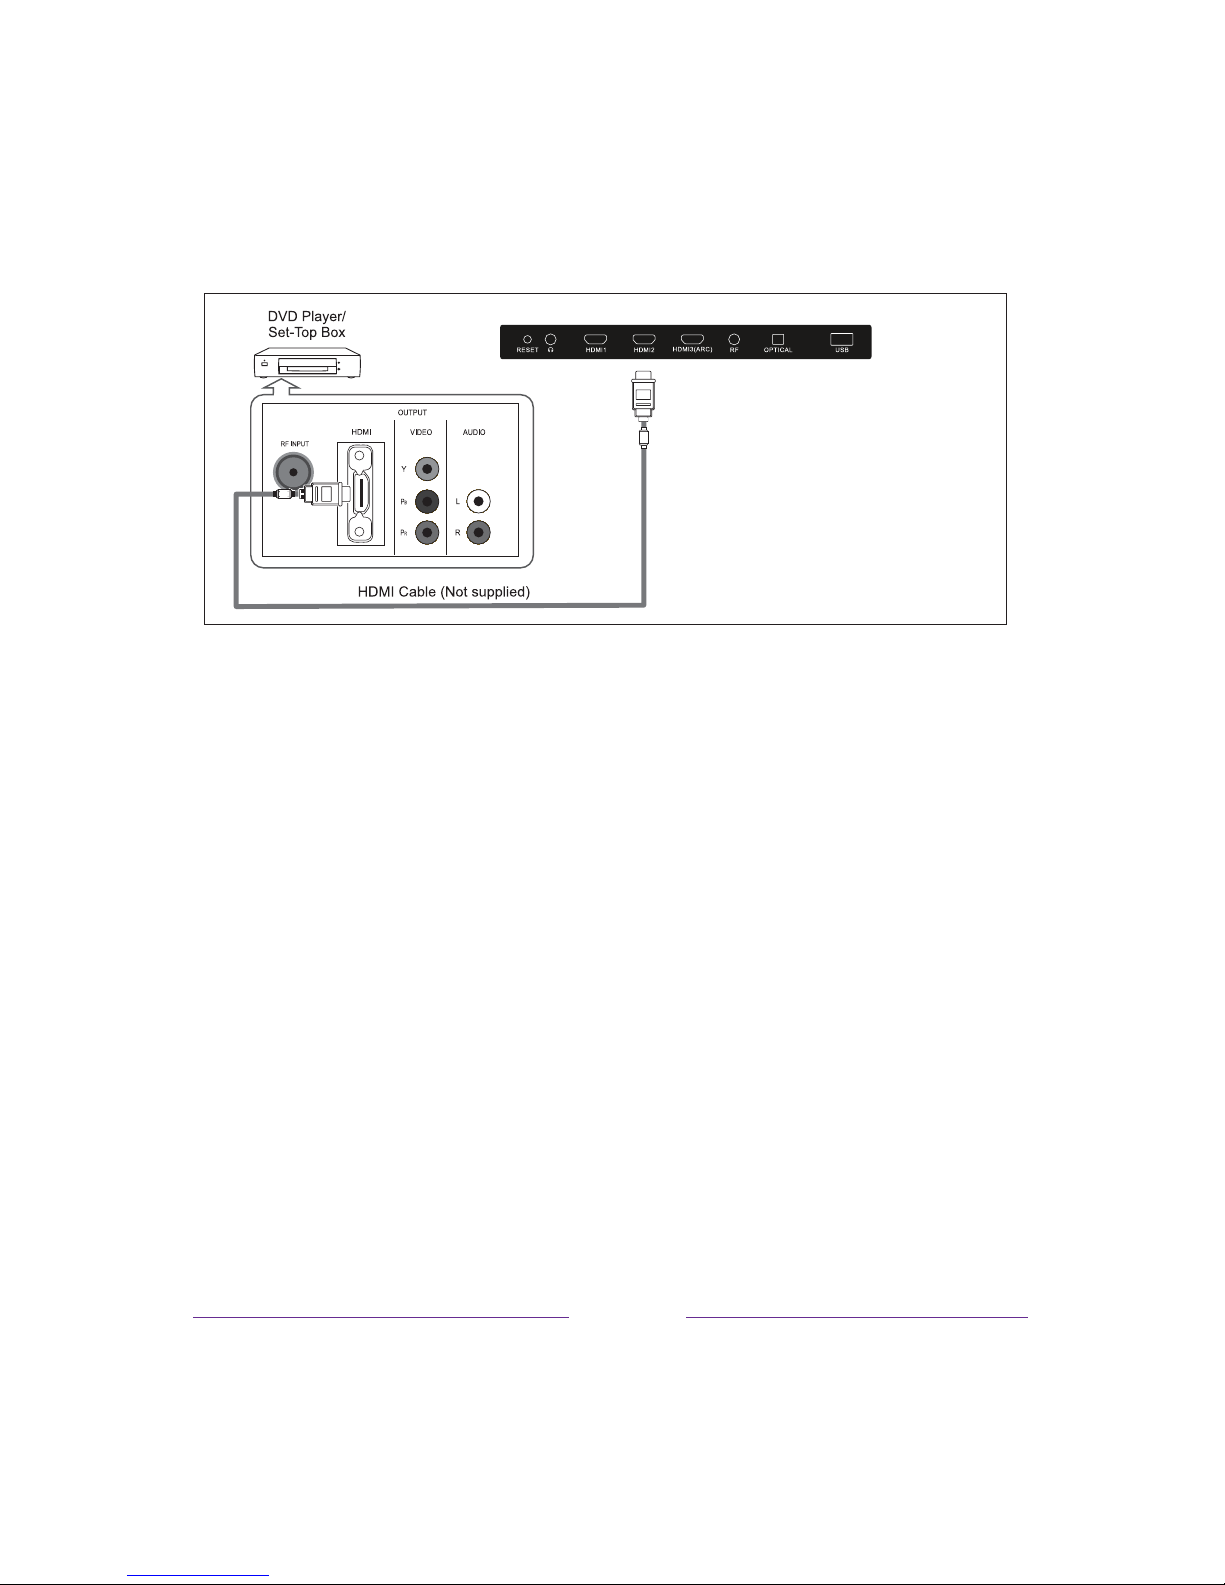
Connecting Digital Audio System
This connection can only be made if there is a HDMI Output connector on the external device.
What is HDMI?
HDMI, or high-definition multimedia interface, is a next-generation interface that enables the transmission of
digital audio and video signals using a single cable without compression.
Multimedia interface is a more accurate name for it especially because it allows multiple channels of digital audio.
The dierence between HDMI and DVI is that the HDMI device is smaller in size, has the HDCP(High Bandwidth
Digital Copy Protection) coding feature installed, and supports multi-channel digital audio.
Each DVD player/STB has a dierent back panel configuration.
Connect an HDMI Cable between the HDMI1, HDMI2, HDMI3 connector on the TV and the HDMI connector on the
DVD player/Set-Top Box.
Notes:
1. Whenever you connect an external device to your TV, make sure that power on the unit is turned o.
2. When connecting an external device, match the color of the connection terminal to the cable.
Page 21
External Connection
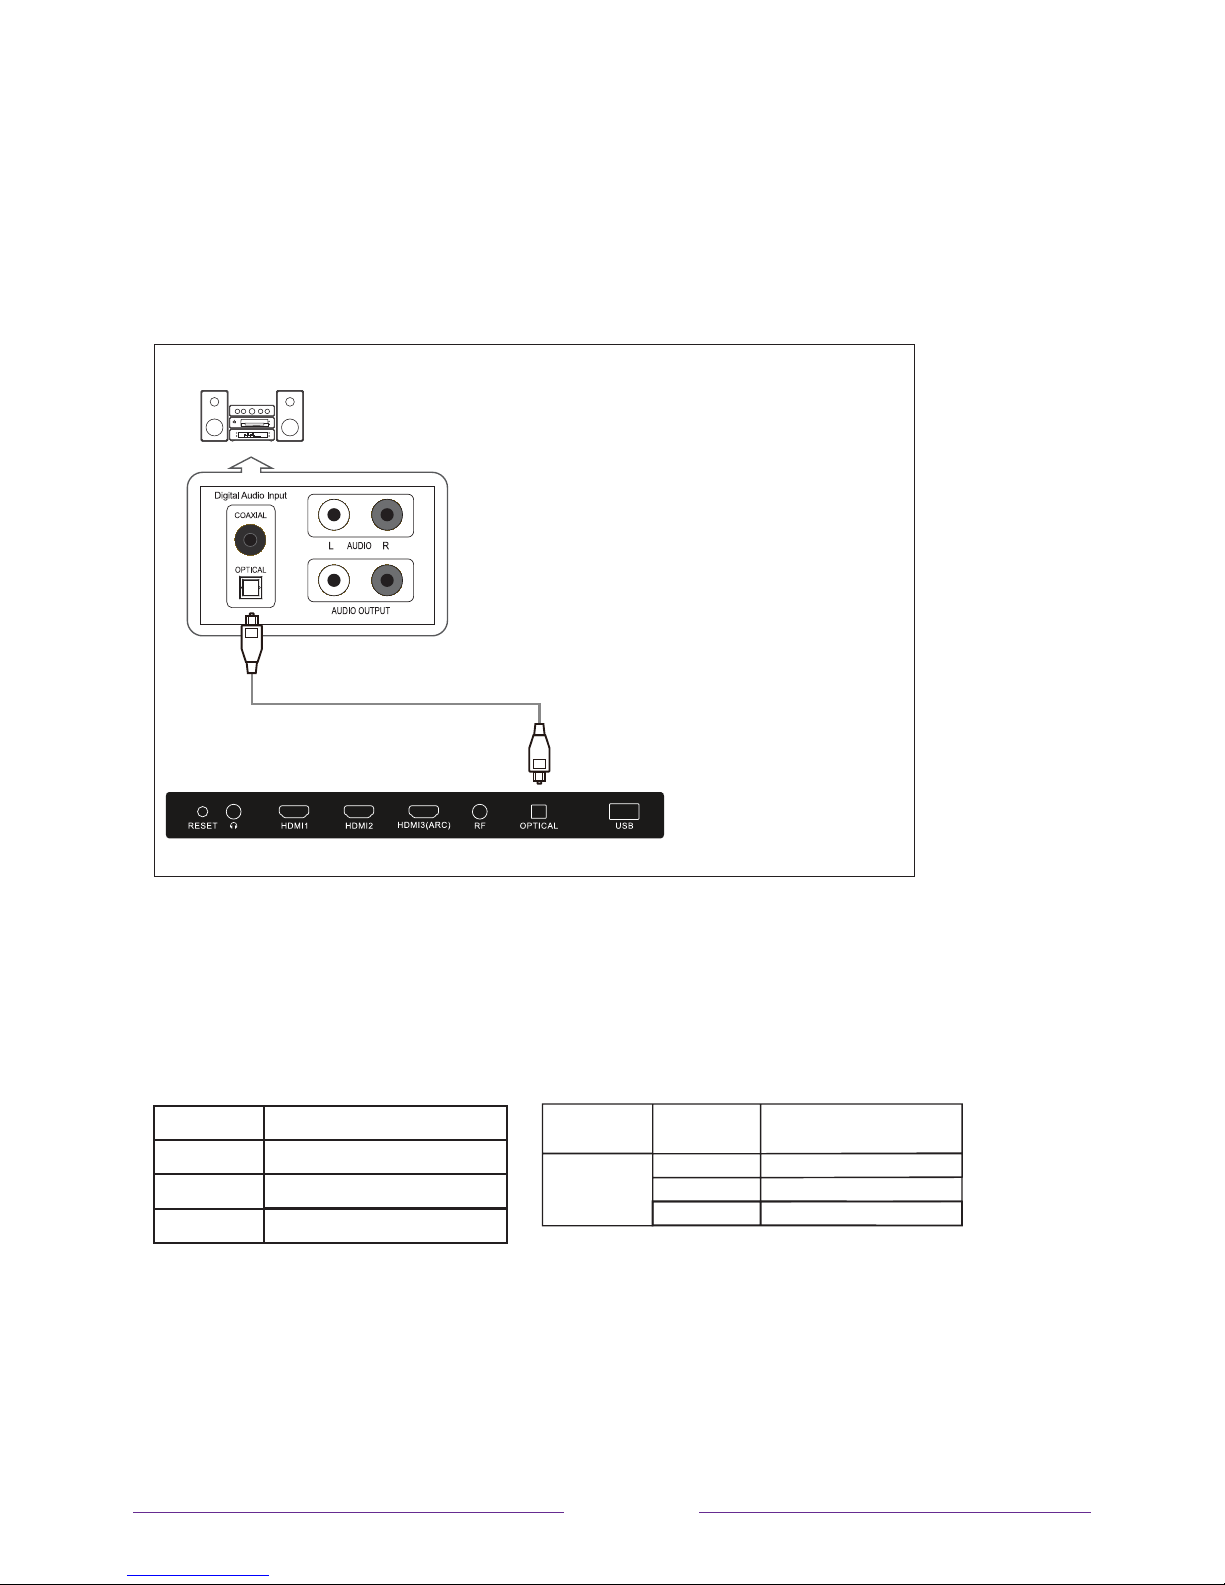
Connecting PC
The rear panel jacks on your TV make it easy to connect a Digital Audio System to your TV.
Digital Audio System
(Black)
AUDIO Receiver(Not included)
5.1 CH audio is possible when the TV is connected to an external device supporting 5.1 CH.
Connect an OPTICAL Cable between the OPTICAL jacks on the TV and the Digital Audio Input jacks
on the Digital Audio System. When a Digital Audio System is connected to the OPTICAL terminal:
Decrease the gain (volume) of the tv, and adjust the volume level with the Digital Audio System’s
volume control.
Supporting Signals
Input
Digital
Analog
CVBS
Mode
ATSC
PAL-M/PAL-N/NTSC M
PAL/NTSC
Input Resolution
HDMI
720p
1080i
1080p
Vertical
Frequency
50Hz/60Hz
50Hz/60Hz
50Hz/60Hz
15
Page 22
Wall Mount
Instruction for Wall Mount
A wall mount kit(purchased separately) would allow you to mount your JVC TV on the wall. For
detailed information on installing the wall mount, refer to the instructions provided by the wall
mount manufacturer. It is strongly recommended to contack a technician for professional
assistance for wall mount installation. JVC is not resposible for any damage to the product or
injury to yourself or others resultint from the wall-mounting.
Dimensions for Mounting Hole Pattern
This JVC TV is compatible with a 200mm x 200mm mounting hole pattern.
- 4 pcs of type M6 screws are required for installing the wall mount bracket to your JVC TV. Do
not use screws that are longer than 8mm. Screws that are too long may cause damage to the
inside of the TV set.
- Do not fasten the screws too tight for this may damage the TV or cause the TV to fall,
resulting in personal injury. JVC is not liable for these kinds of incidents.
- Do not mount your JVC TV at more than a 15 degree tilt.
- Always use two people to mount the TV to a wall.
- Do not install your Wall Mount Kit while your TV is turned on. It may result in personal injury
due to electric shock.
16
Page 23
specific information about attaching the base or a wall mount and making
connections to AC power and to your other audio/video devices. The following
information applies to all Roku TV models.
Connecting an antenna, cable, or satellite box
If you are using an antenna, CATV cable without a set-top box, or a cable or satellite
box that has only an antenna output, connect a 75-ohm coaxial cable (not provided)
from the device to the ANT/CABLE input on the TV.
Tip:
If you are using an antenna with a 300 ohm twin-lead cable, you need to use a
300-to-75 ohm adapter (not provided) to adapt the twin-lead cable to a connection
-
that is compatible with the TV input.
Tip:
If you receive your TV stations through a set top box from a cable or satellite TV
provider, connect it to the TV using the best connection method available. From most
to least desirable:
• HDMI® input Digital HD and SD video
• AV input analog SD video
• Antenna input analog SD video using NTSC
17
Page 24

Connecting external equipment with a composite
AV video cable
If the best connection available on your device is AV or composite video output,
connect it to the TV using a composite AV cable (not provided). Composite AV
cables typically have three RCA-type plugs on each end, color coded as follows:
• Yellow Video
• Red Audio, right channel
• White or black Audio, left channel
Connect each plug to the corresponding connector on the device and on the TV.
Note:
breakout cable (included) to adapt this input to the three RCA-type plugs on your
composite cable.
Select models have an AV Input that looks like a headphone jack. Use the
Connecting external equipment with an HDMI®
cable
If possible, connect your devices using HDMI® cables (not provided). They help to
provide the best video quality and also carry audio signals, so that only one cable is
needed. For better picture quality, we recommend that you use cables designated as
High Speed HDMI® Cables.
Tip:
You might need to configure the device to send its signal through its HDMI®
connector.
The connector labeled HDMI IN (ARC) has the additional ability to use the audio
return channel to send digital audio to a receiver or sound bar, as explained in
Connecting an AV receiver or digital sound bar.
18
Page 25
Connecting headphones or analog sound bar to the
TV
You can connect headphones or an analog sound bar (not provided) to the TV
headphone jack.
Tip:
Inserting a plug in the -in
speakers.
Warning:
lowest volume setting on your headphones that still lets you hear the sound.
Select models also have an audio line out connection that is not affected by TV
volume or mute settings and does not disable the TV speakers. Use this connection
when you want to use your amplifier or sound bar to control the TV volume. To turn
> TV speakers and change the setting.
Loud noise can damage your hearing. When using headphones, use the
s built-in speakers, in the Home screen menu, navigate to Settings > Audio
Connecting headphones to the Roku Enhanced
Voice Remote
Select Roku TVs come with the Roku Enhanced Voice Remote. On these models, you
can connect headphones to the jack on the left side of the remote.
Tip:
Inserting a plug in the remote
built-in speakers or attached receiver or sound bar. The volume and mute controls on
the right side of the remote adjust the volume level of the connected headphones.
Warning:
lowest volume setting on your headphones that still lets you hear the sound. You
might notice that connecting headphones to your remote shortens the
battery life somewhat.
Loud noise can damage your hearing. When using headphones, use the
19
Page 26

Connecting an AV receiver or digital sound bar
You can enjoy Dolby multichannel sound from your TV if you connect a digital
amplifier or sound bar (not provided) in either of two ways:
• Digital optical audio out (S/PDIF) Connect a TOSLINK optical cable (not
provided) from the TV to the Optical input on your receiver or sound bar.
• HDMI® ARC Connect an HDMI® cable (not provided) from the HDMI (ARC)
connector to the HDMI® input on your receiver or sound bar. This connection
uses the Audio Return Channel (ARC) feature of the HDMI® specification to
output sound from the TV to a compatible device. To use this feature, you
must configure the TV to enable HDMI® ARC, as explained in Enable HDMI®
ARC.
Preparing for Internet connectivity
If you want to watch streaming content and take advantage of the cool features of
your Roku TV, connect it to the Internet through a wireless modem/router or a
wireless access point (not provided). The TV has a built-in wireless LAN adapter.
Note:
The TV supports only its internal wireless network adapter it does not support
the use of a USB network adapter.
Select 4K models have wired in addition to wireless network connectivity. To use the
wired network connection, connect an RJ-45 Ethernet cable (not provided) from the
jack on the back of your TV to your network router or switch. The wired connection
supports both 10 Base-T and 100 Base-T Ethernet.
20
Page 27
AC power
Plug your TV into a power outlet. You can tell that the TV has power because the
status indicator lights up when the TV is off.
The topic Status indicator explains how the status indicator shows what is happening
with the TV.
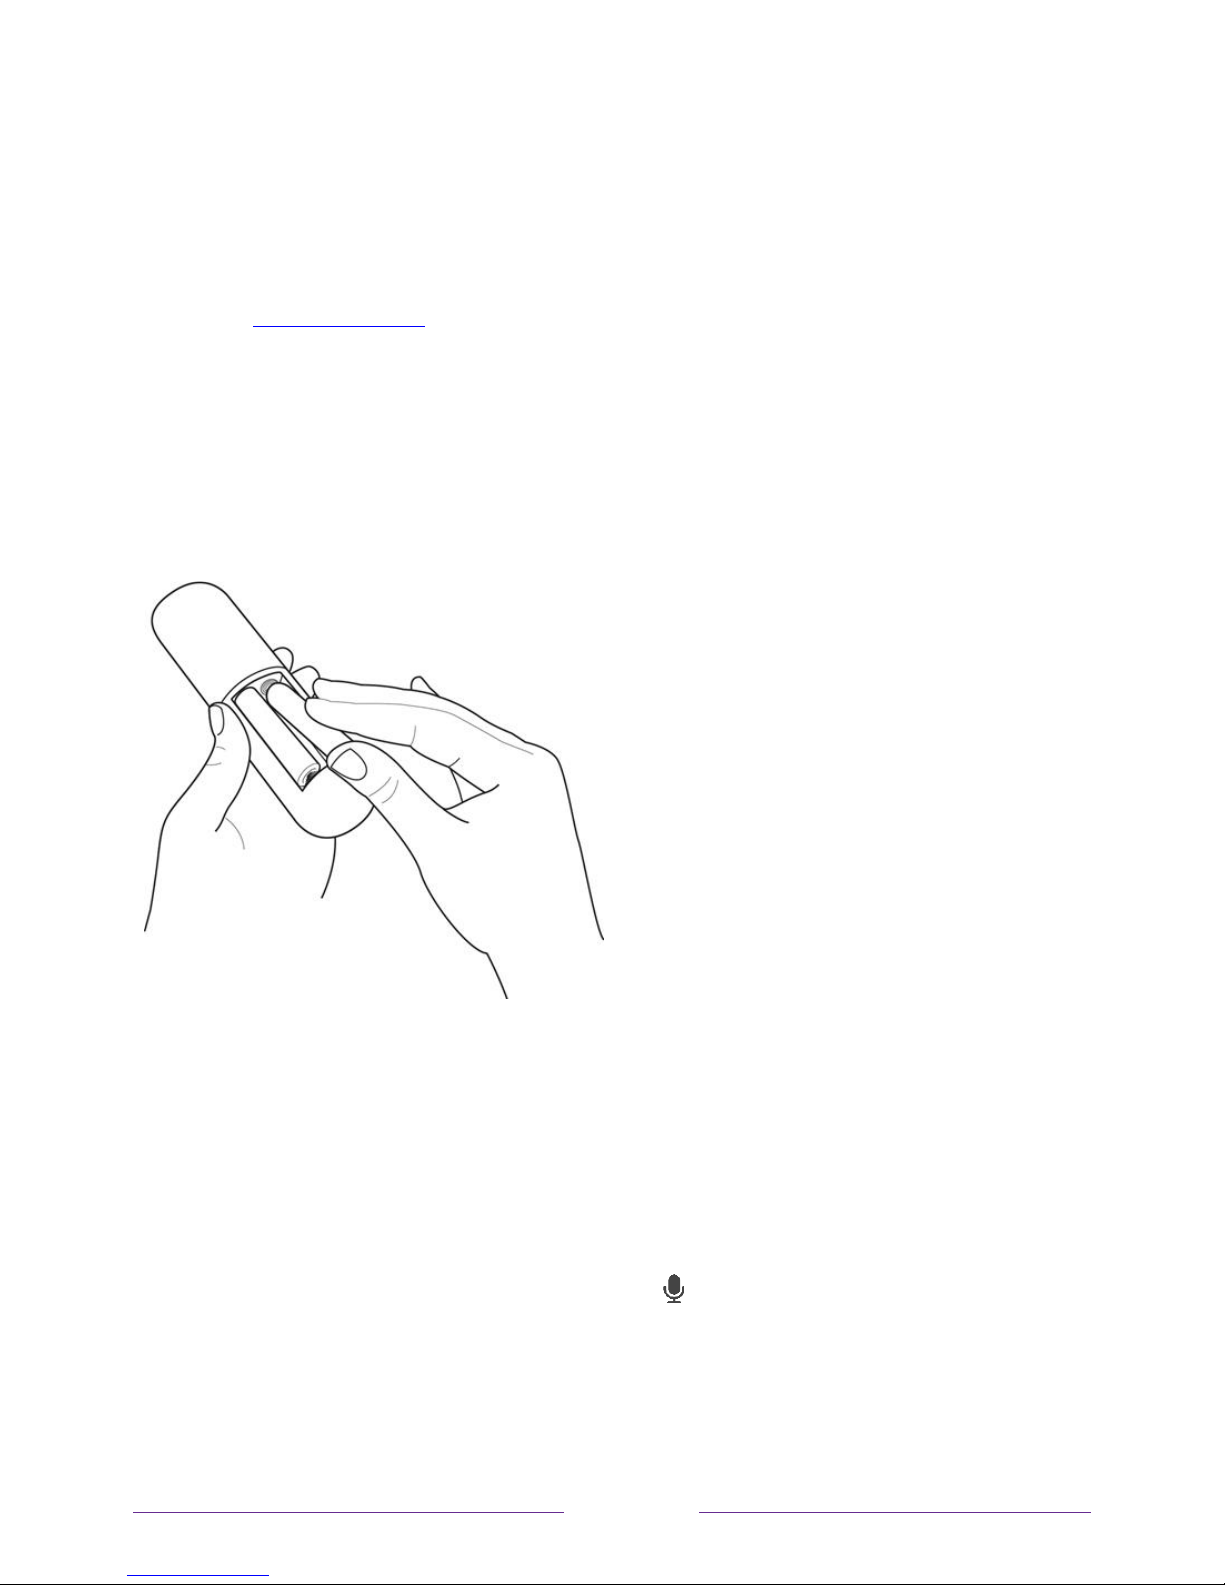
Roku remote batteries
Open the back of your Roku remote and insert the included batteries, observing the
proper orientation as indicated in the battery compartment. Reattach the back cover.
Roku TV remote
Use the following information to identify the buttons on your Roku remote.
Note:
have all buttons or features listed.
Certain remote buttons and features vary by model. Your remote might not
•
If your remote has a microphone button just below the purple pad, then you
have a Roku Voice Remote.
•
If your remote has a headphone jack on its left edge, then you have a Roku
Enhanced Voice Remote.
21
Page 28
The Roku voice remotes have additional capabilities as described in the following
table.
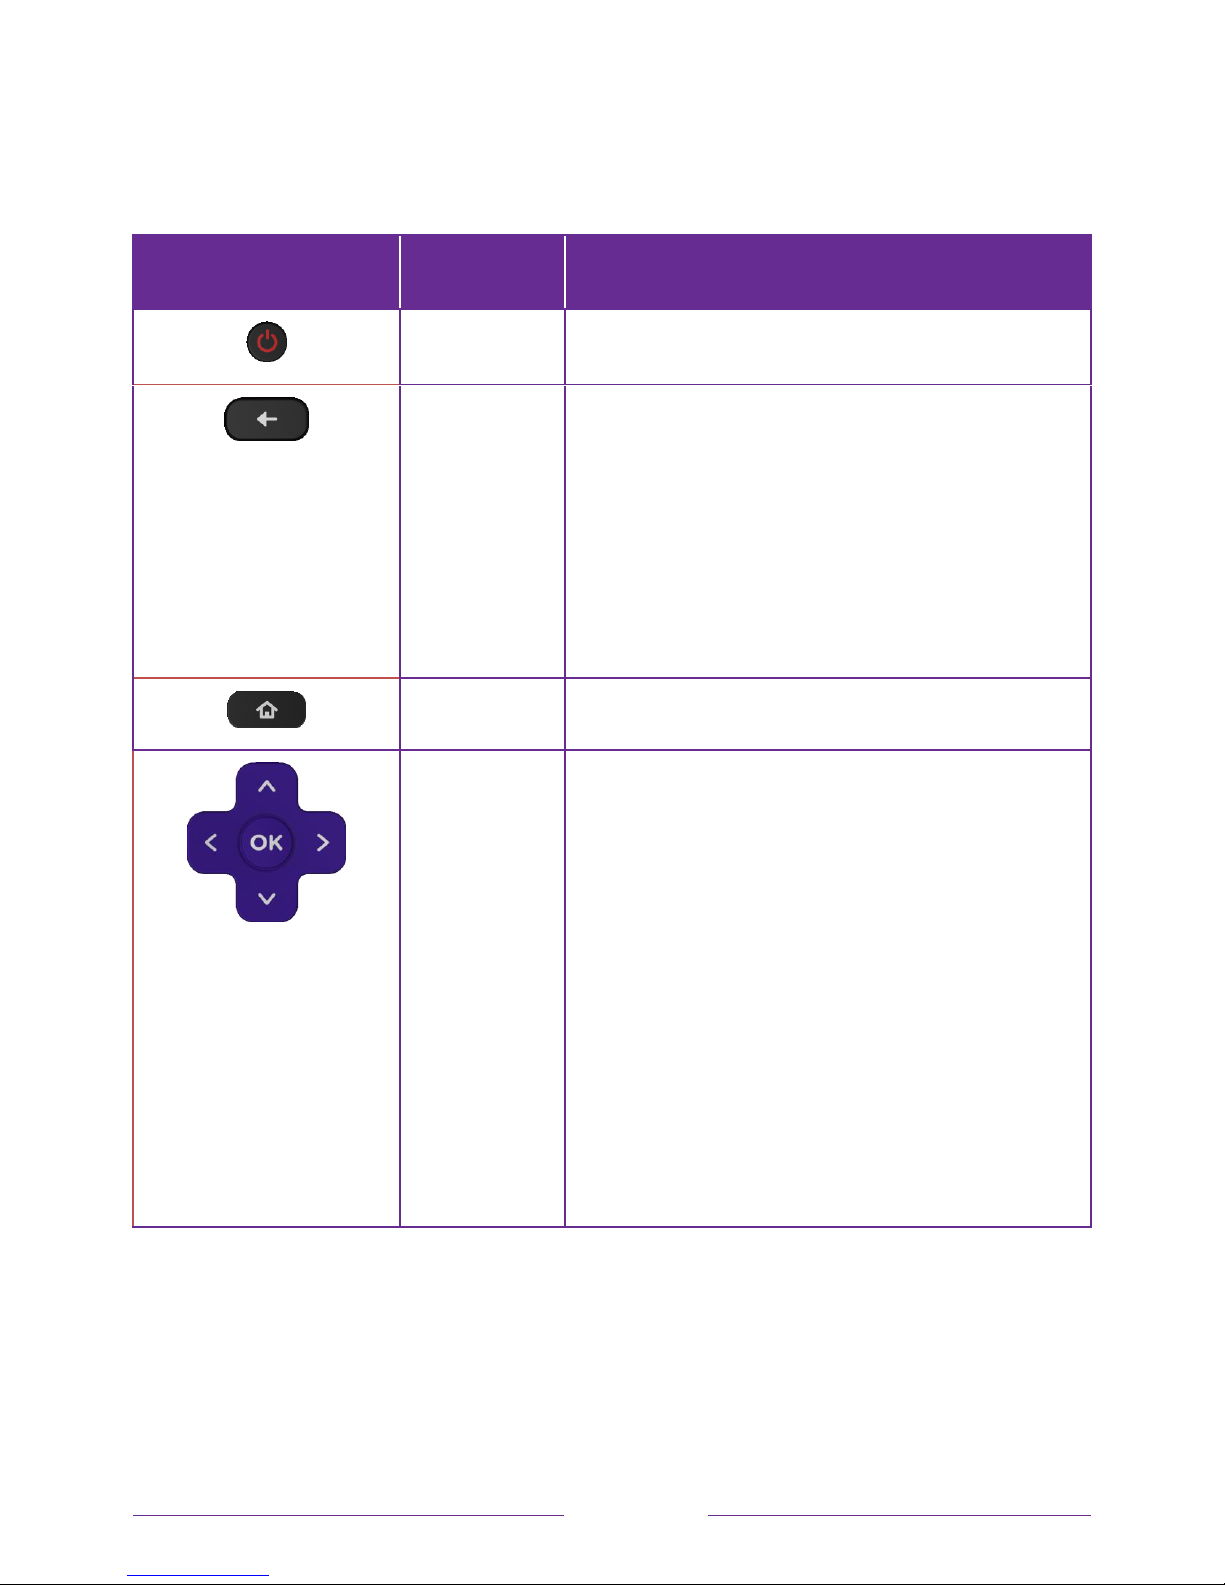
BUTTON FUNCTION DESCRIPTION
POWER
BACK
HOME
PAD
Turns TV on and off.
• Menu: Goes back to previous menu/screen.
• Home screen tile: Moves highlight back to the Home
screen option.
• Watching Antenna TV or a TV input: Returns to
Home screen.
• Playing streaming content: Stops playing stream
and returns to the previous menu or screen.
• Browsing streaming content: Goes to the previous
level in the content tree.
Immediately returns to the Home screen.
• LEFT/RIGHT/UP/DOWN moves the highlight in the
corresponding direction.
• OK selects the highlighted option.
While watching TV:
• UP/DOWN changes channel.
• LEFT displays the Smart Guide (connected mode)
or channel list (non-connected mode).
• LEFT/RIGHT
connected mode
between All Channels and FAVORITE CHANNELs.
• OK while in the channel list selects the highlighted
channel.
While watching live TV: displays the program
information banner.
only on TVs operating in non-
, while in the channel list switches
22
Page 29
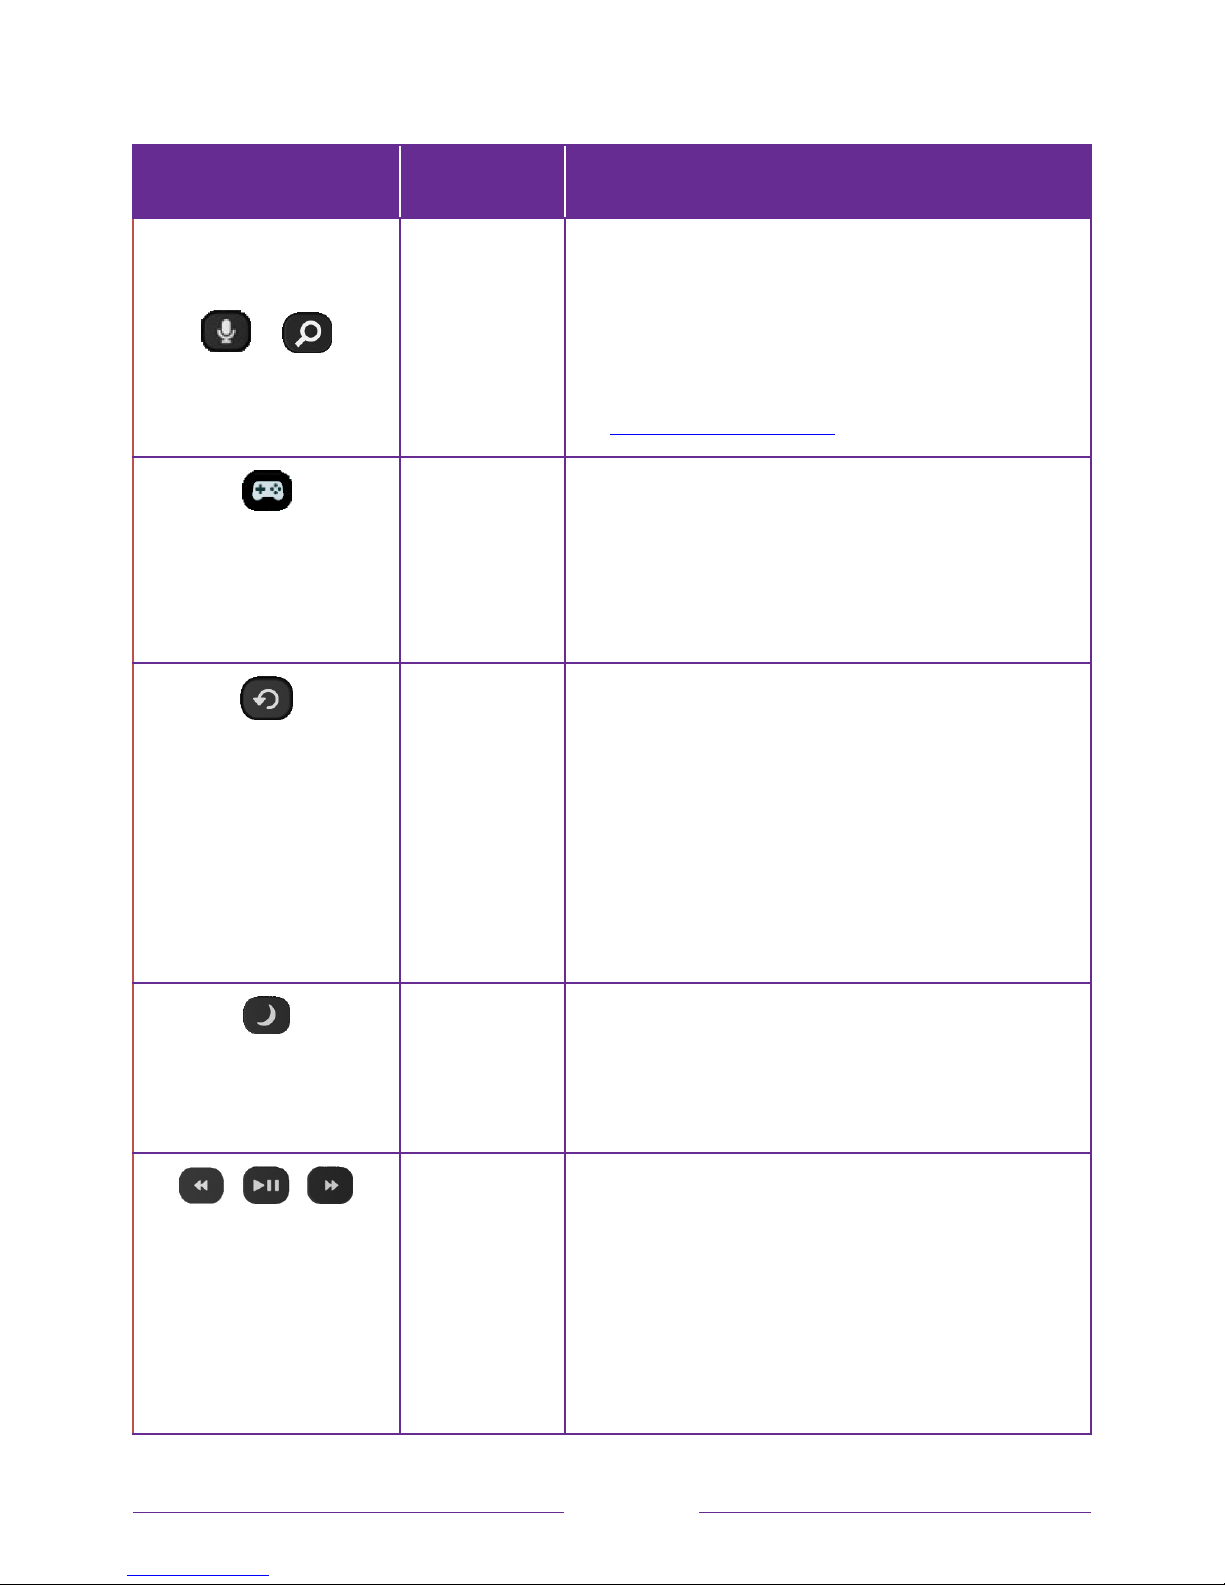
BUTTON FUNCTION DESCRIPTION
or
VOICE SEARCH
and VOICE
COMMANDS
GAME MODE
INSTANT REPLAY
Only in the United States on select models with Roku
voice remotes
show, actor, or director to search across many
streaming and Antenna TV channels. Say a command to
start streaming, change a channel, and more. For more
information, go to:
go.roku.com/voicesearch
Select models
Game mode or Not available at this time. Subsequent
presses toggle Game mode. When On, the TV performs
less image processing and has less input lag, producing
a better experience with action games.
for HDMI and AV inputs.
Select models
feature and Antenna TV channels: if Live TV Pause is
enabled, jumps back a few seconds with each press and
resumes playing.
Broadcast TV: If Live TV Pause is disabled, jumps to
previous channel.
. Hold and say the name of a movie, TV
. Displays a banner showing the current
Available only
. Streaming programs that support this
When using an on-screen keyboard: Backspaces in the
text you are entering.
Smart Guide: Returns to the current day and time.
SLEEP
MEDIA PLAYBACK
CONTROLS
Select models
sleep time, if any, or Sleep timer is off. Subsequent
presses cycle among the preset sleep time intervals.
Once set, the sleep timer remains in effect regardless of
what you are watching.
Rewind, pause, play, and fast forward streaming content
and Antenna TV channels (if Live TV Pause is enabled).
Press REWIND or FAST FORWARD one, two, or three
times to control the speed of the operation.
REWIND and FAST FORWARD also jump backward and
forward one page at a time when viewing long lists, such
as when you are browsing Antenna TV shows in the
channel list or Smart Guide (U.S. only).
. Displays a banner showing the remaining
23
Page 30
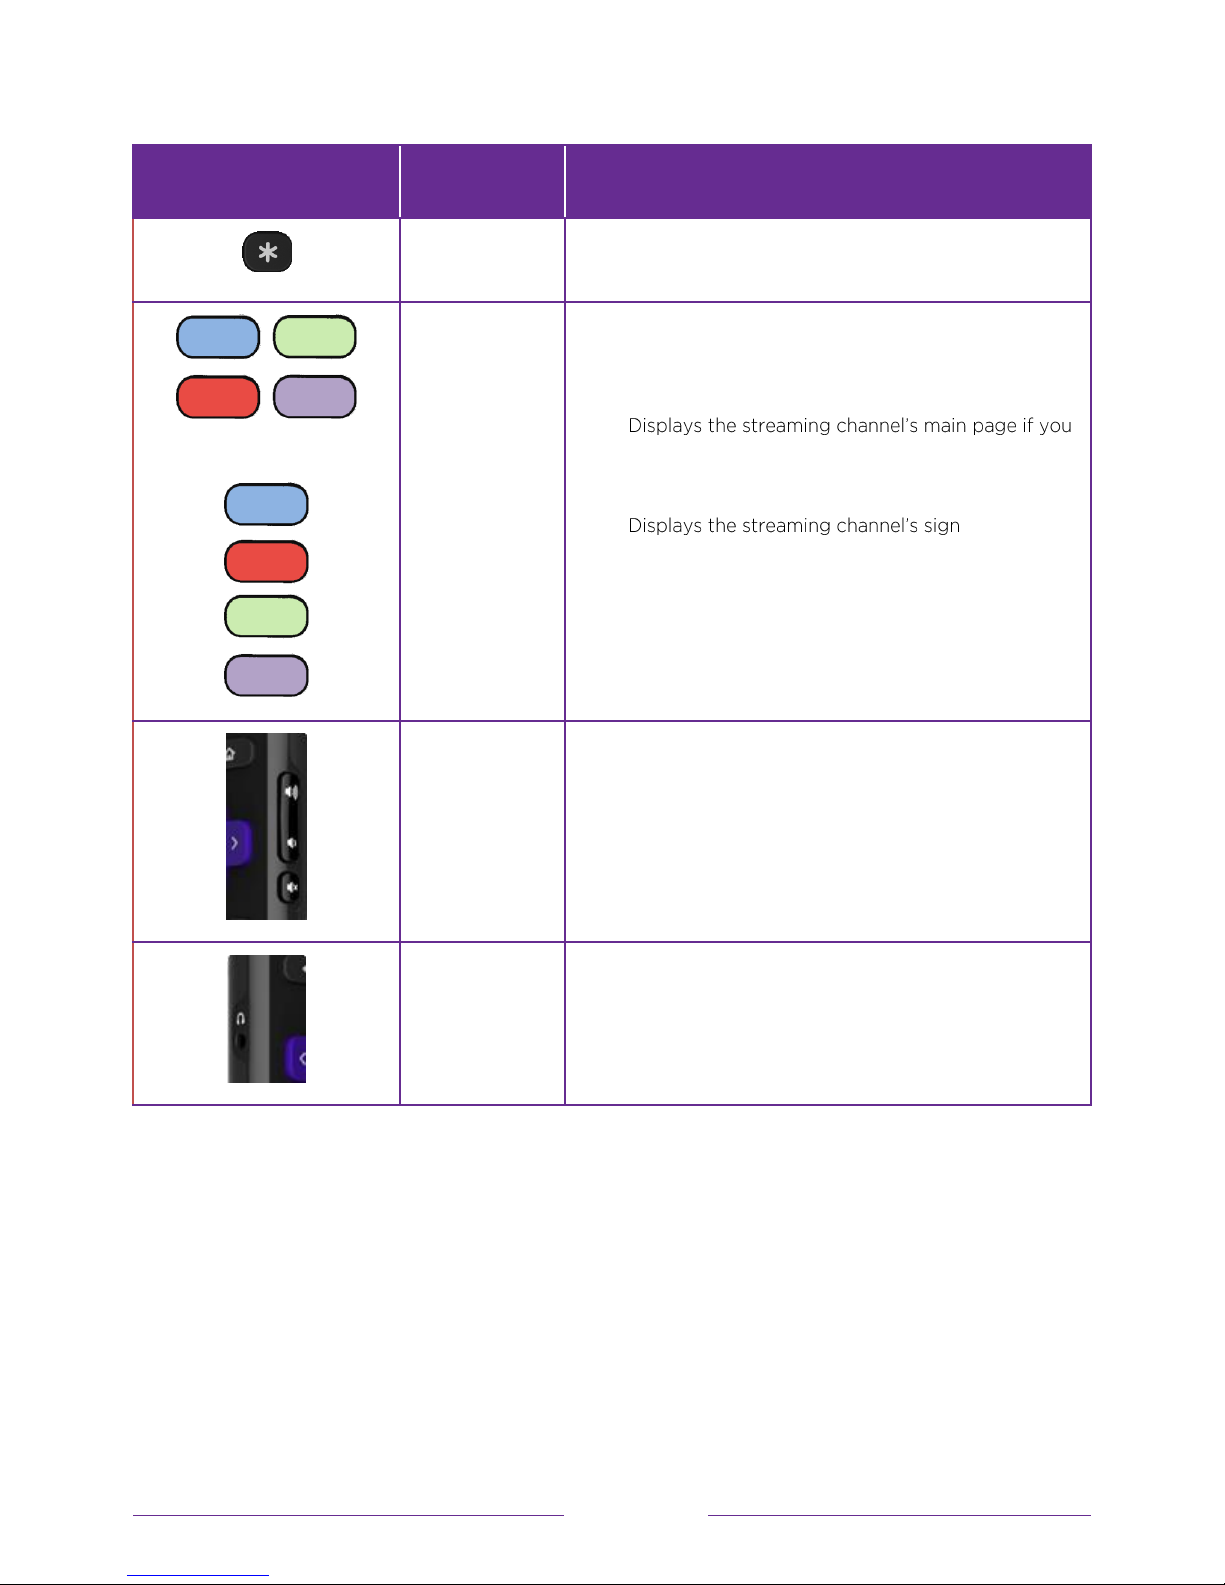
BUTTON FUNCTION DESCRIPTION
or
OPTIONS
PRESET
CHANNEL
SHORTCUT
VOLUME/MUTE
Displays additional options when available. On-screen
hints let you know when this button is active.
Dedicated buttons show the logo of a preset streaming
content provider. Dedicated content providers vary by
model and region. Pressing a button:
•
have already added the channel to your Home
screen.
• -up page if
you have not already added the channel.
Located on the right edge of the remote.
Increases/decreases volume and mutes the TV sound.
Note:
If the TV is muted, pressing VOLUME UP
unmutes. Pressing VOLUME DOWN does not unmute
the sound.
HEADPHONE
Select models with Roku Enhanced Voice Remote
Connect headphones to the jack on the left edge of the
remote to listen privately. Plugging in headphones
mutes the TV speakers.
.
24
Page 31

Panel buttons
Your TV has a set of panel buttons that perform simple control functions. The TV
panel buttons are not a substitute for the remote, as they do not give you access to
all TV functions.
Depending on model, your TV model has one of several different panel button
designs. Choose the one that applies to your TV from the following list:
• Single button
• Three buttons
• Game-pad style joystick
• Four buttons
• Five buttons (with mute)
• Five buttons (without mute)
• Seven buttons
Single button
If your TV has this style of panel button, you can perform the following functions:
• Turn TV on: short press.
• Display the Input List: short press when TV is on.
• Select the next input in the Input List: short press while the TV is showing the
Input List.
• Dismiss the Input List without changing inputs: no press.
• Turn TV off: long press.
Short press = less than two seconds
Long press = more than two seconds
No press: = no press within two seconds
25
Page 32

Three buttons
If your TV has this style of panel buttons, you can perform the following functions:
• Turn TV on: middle button, short or long press.
• Volume up: right button when Input List is not active.
• Volume down: left button when Input List is not active.
• Display Input List: middle button, short press when TV is on.
• Highlight next input in the Input List: right button when Input List is active.
• Highlight previous input in the Input List: left button when Input List is active.
• Select highlighted item in the Input List: middle button, short press, or no
press.
• Turn TV off: middle button, long press.
Short press = less than two seconds
Long press = more than two seconds
No press: = no press within four seconds
Game-pad style joystick
If your TV has this style of panel button, you can perform the following
functions:
• Press in: Toggle between power ON and Standby.
• Press up or down: Increase/decrease the volume.
• Press left or right: Switch inputs. Each press moves the highlight up or down
one item. Pausing for a few moments selects the highlighted item.
Four buttons
If your TV has this style of panel buttons, you can perform the following functions:
• Power: Turns the power on and off.
• Input: Selects among TV inputs. Each press moves down one item. Pausing for
a few moments selects the highlighted item.
• Volume +: Increases the volume.
• Volume : Decreases the volume.
26
Page 33

Five buttons (with mute)
If your TV has this style of panel buttons, you can perform the following functions.
Note that the order of the buttons might vary from model to model. Examine the
• Power: Turns the power on and off.
• Input: Selects among TV inputs. Each press moves down one item. Pausing for
a few moments selects the highlighted item.
• Volume +: Increases the volume.
• Volume : Decreases the volume.
• Mute: Mutes and unmutes the sound.
Five buttons (without mute)
If your TV has this style of panel buttons, you can perform the following functions.
Note that the order of the buttons might vary from model to model. Examine the
• Power: Turns the power on and off.
• Input +: Selects the next TV input. Each press moves down one item. Pausing
for a few moments selects the highlighted item.
• Input -: Selects the previous TV input. Each press moves up one item. Pausing
for a few moments selects the highlighted item.
• Volume +: Increases the volume.
• Volume : Decreases the volume.
27
Page 34

Seven buttons
If your TV has this style of panel buttons, you can perform the following functions.
Note that the order of the buttons might vary from model to model. Examine the
panel button l
• Input: Selects among TV inputs. Each press moves
down one item. Pressing Channel + or Channel moves
the highlight up or down. Pausing for a few moments
selects the highlighted item.
• Channel +: Moves the highlighted item up in the current
menu.
• Channel : Moves the highlighted item down in the
current menu.
• Volume +: Increases the volume.
• Volume : Decreases the volume.
• Mute: Mutes and unmutes the sound.
• Power: Turns the power on and off.
28
Page 35

Guided Setup
With the pr your TV. As the TV starts for
the first time, it leads you through Guided Setup, which configures the TV before you
start to use it.
:
• Answer a few questions
• Provide network connection information
• Get a software update
• Link your TV to your Roku account.
• Connect devices such as a DVD player, game console, or cable box.
Starting Guided Setup
To start Guided Setup, press the POWER button on the remote to turn on your TV.
Note:
Factory reset everything.
When you first turn on your TV, it will take a few seconds to get itself ready. Y
notice the following things happening:
Guided Setup normally runs only once, the first time you turn on your TV. If you
1. The status indicator blinks every time the TV is busy doing something; in this
2. The power-on screen appears and the status indicator blinks slowly for a few
more seconds. The power-on screen shows a brand logo while the TV starts up.
3. After a few seconds, Guided Setup starts.
29
Page 36

Completing Guided Setup
Follow these steps to complete Guided Setup. At this point, you should be seeing the
Language screen.
1.
Only on models that have a Roku voice remote
get started screen appears, Guided Setup starts the pairing process for the
voice remote. you have this type of remote because it will have
microphone or search button just below the down arrow on the purple pad.) If
the voice remote does not pair automatically, follow the instructions on the
screen to complete the pairing process.
Tip:
On TVs sold in the United States, if you are blind or visually impaired, you
: A few moments after the
can activate Audio Guide, a text-to-speech screen reader to help you navigate
on the remote four times in rapid succession. Repeat to disable Audio Guide.
(The button is located directly below the directional pad on the right side of
the Roku remote.)
Note:
If you enabled Audio Guide, choosing any language other than English
disables it.
button
2. Press the DOWN arrow on the remote to highlight your preferred language,
and then press OK or the RIGHT arrow.
30
Page 37

3.
Some models have a country selection screen
:
ahead to the next step. If you see this screen, select your country.
Note:
If you enabled Audio Guide, choosing any country other than United
States disables it.
4. Press OK or the RIGHT arrow on the remote to go to the next screen:
Note:
environment.
Some models show the title First things first instead of Set up
31
Page 38

5. Press OK to select Set up for home use. This is the right choice for enjoying
your TV at home. It provides energy saving options as well as access to all
features of the TV.
Note:
Store mode configures the TV for retail display and is not recommended
for any other use. In store mode, some features of the TV are missing or
limited. To switch from one mode to the other, you have to perform a factory
reset as explained in Factory reset everything, and then repeat Guided Setup.
Network connection
After you select Set up for home use, the TV prompts you to make a network
following screen.
32
Page 39

6.
Only models that display the Connect to the Internet screen:
Make a selection:
• Wireless connection
OK. The TV prompts you through wireless setup. Skip ahead to the next
step for help with the process.
• Wired connection
TV immediately attempts to connect to your wired network, your local
network, and then the Internet. Go to Step 9 to continue with Guided Setup.
• Connect to the Internet later
right now, you can skip this step and use the TV to watch Antenna TV
channels
Note:
If you decide not to connect, Guided Setup skips ahead to setting up
Highlight Set up new wireless connection and press
Highlight Connect to wired network and press OK. The
Benefits of connecting.
Connect your
devices to complete Guided Setup.
7.
On models that have wireless only, or models with both wired and wireless and
Wireless:
The TV scans for the wireless networks within range
and displays them in order, with the strongest signals first. In addition to your
own wireless signal, the TV might pick up signals from your neighbors.
Press the UP or DOWN arrows to highlight the name of your wireless network,
and then press OK to select it.
33
Page 40

Note:
Some networks, such as those often found in dorm rooms, hotels, and
other public places, require you to read and agree to terms, enter a code, or
provide identifying information before letting you connect to the Internet. If
your Roku TV detects that you are connecting to such a network, it prompts
you through the connection process using your compatible smartphone or
tablet to provide the needed information. For more information, see Using your
TV in a hotel or dorm room.
Other options
• Connect to the Internet later
right now, you can skip this step and use the TV to watch Antenna TV
channels
w in Benefits of connecting.
Note:
If you decide not to connect, Guided Setup skips ahead to setting up
Connect your
devices to continue.
• Scan again / Scan again to see all networks The name of this option
depends on the number of wireless networks within range.
o Scan again appears if the list already shows all available wireless
the list, you might need to adjust the location of your wireless router or
the TV, turn on your router, or make other changes. When everything is
ready, select Scan again to see if your network name now appears in the
list.
o Scan again to see all networks appears if there are more wireless
wireless network name in the list, this option displays the complete list. If
Note:
Highlighting either of these options displays an informational panel
with the unique media access control (MAC) address of your Roku TV.
You will need the MAC address if your wireless router is configured to
use MAC address filtering.
34
Page 41

• Private network
in the list. Select Private network to display an on-screen keyboard, and use
it to enter your network name. Unless you changed the factory-set network
name, you can find the name (also called SSID) on a label on the router.
Tip:
Wireless networks that are passwordicon adjacent to the name. This icon enables you to know that you are
going to be prompted to enter a password after you select that network.
8.
Only if you select a password protected wireless network
: An on-screen
keyboard appears. Use the keyboard to enter the network password.
After you submit your wireless network password, the TV displays progress
messages as it connects to your wireless network, your local network, and the
Internet.
35
Page 42

9.
Only if your TV cannot get the correct time zone and current time from your
network service provider
zone, and then press OK.
Tip:
Your TV needs to know the local time zone so that it can correctly display
: Use the UP and DOWN arrows to highlight your time
information about the program you are currently watching. If the TV is unable
to automatically determine the local time zone, it prompts you to choose your
time zone from a list.
As soon as the TV is able to connect to the Internet, it downloads and installs
its first software update, and then restarts.
Tip:
Your TV automatically checks for updates periodically. These updates
provide new features and improve your overall experience with the TV. After
an update, you might notice that some Options have moved, and that there are
new options or features. This User Guide describes version 8.0. To determine
your current Roku TV software version, go to
Settings > System > About
after
you complete Guided Setup. You can download an updated User Guide that
matches your Roku TV software version from the Roku TV web site.
36
Page 43

Activation
After the TV restarts, it displays the Activation screen:
10. Using a compatible computer, tablet, or smartphone with an Internet
connection, go to the web address displayed on the screen and enter the code
that appears on your screen.
Why do I need a Roku account?
You need a Roku account for several reasons:
• It links you, your Roku TV, and your other Roku streaming devices to the Roku
Channel Store and billing service.
•
your Roku TV.
• Roku can automatically send updates to your device.
You need a Roku account to activate your device and access entertainment across
thousands of streaming channels. Roku accounts are free, and while a valid credit card
number is not required to create your account, providing your credit card information
makes renting and purchasing entertainment from the Roku Channel Store fast and
convenient.
37
Page 44

After you log in or create your Roku account, the link page suggests that you
select some streaming channels. After you confirm your selections, the TV gets
an acknowledgement, and then adds your preexisting and newly-selected
streaming channels to your Roku TV. This process is automatic and takes a few
moments a little longer if you already have a lot of streaming channels to add.
Tip:
Streaming channels from all Roku streaming devices associated with your
account are synchronized periodically, so that all of your Roku streaming
devices have the same set of streaming channels (subject to compatibility with
the device).
Connect your devices
Next, Guided Setup helps you set up the external devices that you want to use
with it, such as a cable box, Blu-ray player, or game console.
38
Page 45

11. Press OK or the RIGHT arrow to proceed:
12. Connect all the devices you plan to use with your TV, turn them all on, and then
select Everything is plugged in and turned on. The TV now takes you step by
step through each of its inputs and asks what kind of device you have
connected. On each input that has a connected and active device, you can see
its picture and hear its sound.
13. Press the UP or DOWN arrows to highlight the label you want to associate with
the input. If you are not using the input, select Nothing
appear on the Home screen.
39
Page 46

14. While setting up your devices, rather than using the predefined names and
icons, you can set a custom name and icon. To do so, scroll up or down to
highlight Set custom name & icon, and then press OK. Follow the instructions
on the screen to enter a name and select an icon for the input. See Rename
inputs for more information.
Note:
If you have renamed the inputs, you cannot use voice commands to
switch inputs. Voice commands can only switch among inputs that have their
o
15. Repeat the previous step for each input.
Note:
Some Roku TVs, depending on where you live and other factors, show you an
introductory video filled with some great hints and tips. in
viewing this video, press on the remote to return to the Roku TV Home screen.
Whenever you press on the remote, the Home screen greets you.
From here, you can explore everything your TV has to offer. Press the arrow keys to
move around, and press OK
encourage you to explore, and you can probably figure out most of the capabilities
and settings on your own. If you have any questions or difficulties, you can find
answers and solutions in this guide.
40
Page 47

Home screen
The following illustrations show typical Home screens, which vary depending on
location, connected mode, selected theme, number of TV inputs enabled, and
streaming channels and apps added.
Note:
A paid subscription or other payments may be required for some channel
content. Channel availability is subject to change and varies by country. Not all
content is available in countries or regions where Roku® products are sold.
Typical connected Home screen, United States
1. Home screen menu shows options available to you when you are on the Home screen.
2. Highlighted option press OK on the remote to select.
3. TV input tiles select an input to watch the connected device.
4. Streaming channel and app tiles select a tile to go to the indicated streaming channel or
application.
5. Options hint press on the remote for options when this symbol is present.
6. Next screen hint press the RIGHT arrow on the remote to see the next screen.
41
Page 48

Typical connected Home screen, Canada
1. Home screen menu shows options available to you when you are on the Home screen.
2. Highlighted option press OK on the remote to select.
3. TV input tiles select an input to watch the connected device.
4. Streaming channel and app tiles select a tile to go to the indicated streaming channel or
application.
5. Options hint press on the remote for options when this symbol is present.
6. Next screen hint press the RIGHT arrow on the remote to see the next screen.
Typical non-connected Home screen
1. Home screen menu shows options available to you when you are on the Home screen.
2. Highlighted option press OK on the remote to select.
3. TV input tiles select an input to watch the connected device.
4. Options hint press on the remote for options when this symbol is present.
5. Next screen hint press the RIGHT arrow on the remote to see the next screen.
42
Page 49

Personalize your Home screen
There are many things you can do to personalize your Home screen and make it just
right for you and your family:
•
Only in connected mode
Channels menu option to browse the Roku Channel Store.
•
Only in connected mode
Themes to find and pick one to suit your mood.
•
Only in connected mode on U.S. models
as explained in Configure parental controls.
• Remove a tile by highlighting it and pressing . Then highlight Remove input
or Remove channel and press OK.
: Add streaming channels by using the Streaming
: Change the screen theme by going to Settings >
: Hide Movie Store, TV Store, or News
• Move a tile by highlighting it and pressing . Then highlight Move input or
Move channel and press OK. Use the arrows to move the tile, and then press
OK to lock it in its new location.
• Rename a TV input tile by highlighting it and pressing . Then highlight
Rename input and press OK. Highlight a new name in the list, and then press
OK to assign that name to the tile.
Rather than using the predefined names and icons, you can set a custom name
and icon. To do so, scroll up or down to highlight Set custom name & icon, and
then press OK. Follow the instructions on the screen to enter a name and select
an icon for the input.
Note:
If you have renamed the inputs, you cannot use voice commands to
switch inputs. Voice commands can only switch among inputs that have their
origina
43
Page 50

Benefits of connecting
Connecting brings out your TV’s full potential!
Make any night a movie night
Thousands of movies to choose from, across all major streaming movie channels like
Netflix, Crackle, and more*.
Get in the groove
Stream endless hours of music from free and subscription-based channels like Deezer
never run out of something new to watch.
and TuneIn. With almost instant access to thousands of music artists, your favorite
beats are just as close as your remote.
Explore your passions
In addition to popular streaming channels like YouTube, NHL, Sky News and Google
Play, your Roku TV also offers hundreds of streaming channels to fuel your passions
including fitness, cooking, religion, outdoors, International programming and much
more.
Enjoy FREE trials of popular channels
Your Roku TV comes loaded with special offers, including free trials (if eligible) from
popular streaming channels like Netflix, Hopster, Acorn TV, and many more.
REMEMBER THAT YOU MUST CANCEL BEFORE THE FREE TRIAL ENDS TO AVOID
SUBSCRIPTION FEES.
* A paid subscription or other payments may be required for some channels. Channel availability is subject to change
and varies by country. Not all content is available in countries or regions where Roku® products are sold.
44
Page 51

Take advantage of awesome features
Powerful, voice-enabled search helps you find movies and TV shows, actors, or
directors across multiple streaming channels. Search results also includes Antenna TV
programs airing in your region as well.
are available only in the United States.
Smart Guide is an electronic program guide that is available any time you are
-the- TV programs on the Antenna TV input. You can scroll up and
down to see all Antenna TV channels you receive. You can scroll left to see the
previous 7 days programs, and scroll right to see the upcoming 14 days of programs.
If you highlight a show that has a purple asterisk (), you can press the to see More
Ways to Watch. And your most-watched channels are automatically grouped into a
Favorites section at the top of the Smart Guide.
More Ways to Watch (U.S. only) gives you recommendations about the show you are
watching on the Antenna TV, HDMI, or AV input, gives you options to stream the
current show from the beginning, the entire season, or the entire series, and
recommends other shows with similar themes. It also uses the shows you watch to
display ads that are more relevant to you.
Live TV Pause lets you connect a USB drive (not provided) and pause live TV for up
Voice Search and Antenna TV search results
to 90 minutes. After pausing, you can play, fast-forward, rewind, and pause again to
any point within the rolling 90 minute window.
Voice commands let you use your Roku Voice Remote, Roku Enhanced Voice
Remote, or the Roku mobile app to change stations, TV inputs, and launch streaming
channels, and more.
Mobile Private Listening on the Roku mobile app lets you listen to streaming
programs -the- on headphones
(not provided) plugged into your IOS® or mobile device.
Voice commands are available only in the United States.
What is streaming?
Streaming is viewing or listening to video or audio content that is sent over the
Internet, or located on a network-connected media server or on a USB device
45
Page 52

With streaming, you can buy or rent most programs on demand, when
for you. When streaming, you can play, pause, rewind, and fast forward most of what
you are watching. You can also replay the last few seconds again, or turn on closed
captions.
Tip:
Some content cannot be paused or skipped. For example, if you are viewing live
programming or a program that is supported by ads, you might not be allowed to
skip the ads.
Your Roku TV lets you choose from thousands of streaming channels that offer a
huge selection of entertainment:
• Thousands of movies and TV episodes
• Unlimited music, live and on-demand
• Tons of live and on-demand sports
• Commercial-free kids programming
• International programming in 22 languages
• 24x7 news and in-depth news commentary
Many streaming channels are free. Some streaming channels, like Google Play, let you
purchase or rent the latest movie releases or popular TV series. Some channels such
as Netflix or Acorn TV charge a monthly subscription fee and others are available at
no additional cost if you subscribe to a companion service through your cable or
satellite provider.
If you have an existing subscription to a service like Netflix, you can just sign in with
your existing user name and password.
To play streaming content, you add streaming channels to your Home screen. Use the
Streaming Channels option on the Home screen menu to go to the Roku Channel
Store, and then select the streaming channel you want to add. The channel remains
on your Home screen unless you remove it, and you can watch it at any time.
For more information on using the Roku Channel Store feature, see Using the Roku
Channel Store.
Note:
A paid subscription or other payments may be required for some channels.
Channel availability is subject to change and varies by country. Not all content is
available in countries or regions where Roku® products are sold.
46
Page 53

What if I didn’t connect my TV?
What if you went through Guided Setup and chose Connect to the Internet later? No
worries. Your Roku TV makes it easy to connect whenever you want. As you move
around the Home
process. For example:
• N
Home screen offering a Connect Now option. Simply highlight and select the
Connect Now option to get started.
• Use the Connect and activate now option in the Settings menu. From the
Home screen menu, select Settings, then Network, and then Connect and
activate now.
• If you want to start over from the beginning, use the Settings menu to do a
Factory reset, and then go through Guided Setup again. This time, choose your
home network when prompted.
47
Page 54

Setting up Antenna TV
In addition to the other entertainment possibilities of your Roku TV, you may also
want to watch broadcast channels from an antenna or cable TV service connected to
the ANT input. On your Roku TV, you watch broadcast TV in much the same way you
watch other entertainment choices. You select a tile in this case, the Antenna TV
tile from the Home screen.
The first time you select the Antenna TV tile, you have to set up the TV tuner. Setting
up the TV tuner scans for active channels and adds them to your Antenna TV channel
list.
Why do I have to set up the TV tuner?
Not everyone needs to use the TV tuner. For example, you might have a set top box provided
by a cable or satellite company that receives all of your channels. Most of these set top boxes
use an HDMI® connection.
More and more people are watching only streaming TV and do not have a TV antenna or
remove it from the Home screen as explained in Remove unwanted tiles.
When you set up Antenna TV, the TV scans the signals on its antenna input for channels with a
good signal, and adds those to the channel list, skipping dead channels and channels with a
very weak signal.
The TV lets you add two analog channels, even if they have no signal, for the purpose of using
an older set top box, VCR, or game console that can only output a signal on analog channel 3
etup
Edit Antenna TV channel lineup.
48
Page 55

How do I set up the TV tuner?
1. Make sure your antenna (not provided) or TV cable is connected to the TV
ANT/CABLE input.
2. On the Home screen, select the Antenna TV tile.
3. Read the simple on-screen instructions, and then select Start finding channels.
4.
figure out your time zone from your Internet connection.
49
Page 56

Why does the TV need my time zone?
The TV needs to know your time zone so that it can correctly display time information
about the program you are currently watching.
5. When prompted, select whether to add analog channels 3 and 4. These
channels enable you to connect older set top boxes, VCRs, or game consoles.
6. Wait while your TV scans for A
50
Page 57

Scanning for channels can take several minutes.
Tip:
If you use a set-top box to receive cable TV channels
cable connected directly to the ANT input), you can save time by skipping
the cable TV portion of the channel scan.
7. When the channel scans finish, the TV shows the number of channels it added.
51
Page 58

8.
Only in connected mode
topic Pausing Live TV explains how to set up and use
want to set up Live TV Pause, or if this option is not available to you, select
Done to start watching Live TV.
Tip:
Repeat the channel scan from time to time to make sure you are receiving all
, you have the option of setting up Live TV Pause. The
of the latest channels. Broadcasters add and remove channels, move channels to
different parts of the spectrum, and change the power levels of their channels
periodically. Your antenna reception and picture quality depend on the position of
your antenna and on your location relative to the antennas of broadcasters in your
area.
Note:
and re-add the
Antenna TV tile from the Home screen or perform a factory reset. To repeat the
channel scan, go to Settings > TV inputs > Antenna TV > Scan again for channels
> Start finding channels.
Antenna tips:
• Press the UP and DOWN arrows to change channels.
• Press the LEFT arrow to display the channel list (non-connected mode) or
Smart Guide (connected mode), and then use the UP and DOWN arrows to
select a channel to watch. Or press REWIND or FAST FORWARD to jump
through the channel list or Smart Guide a page at a time.
• Press OK to display information about the current program.
• Press to see options for picture and sound settings.
•
Only on models that have a Roku voice remote
, hold down or , and then
say the name of a movie, TV show, actor, or director. The TV displays the result
and the streaming channels that offer the requested content.
United States
Note:
If you do not have a Roku voice remote, you can use the Roku mobile app to
, the results also include shows on Antenna TV channels.
search. For more information, see Getting and using the Roku mobile app.
52
Only in the
Page 59

Using your TV
This section provides information on using the day-to-day features of your TV.
Status indicator
Your TV has a single status indicator. It goes on and off and blinks in different ways
depending on the status of the TV, as shown in the following table:
TV CONDITION STATUS INDICATOR MEANING
On (screen is active) Off Screen is communicating that TV is on.
Screensaver (screen is active) Off Screen is communicating that TV is on.
Off (no power) Off TV is not connected to power.
Off (standby) On TV is connected to power and is ready
to use.
Starting up from off state Slow pulsing blink until
startup completes
On (receiving update from
USB)
Remote command received Dims on/off once TV has received your command.
Network connection lost Two short blinks, pause,
Powering down to standby
mode
Slow pulsing blink until
update completes
repeat
Slow pulsing blink until the TV
reaches standby.
TV is doing something.
TV is doing something.
TV was connected and paired with a
Roku account and now has no network
connection.
TV is doing something.
53
Page 60

Standby mode energy savings
When you turn off your TV, it remains in a higher power mode for a few minutes, after
which it goes into a very low power standby mode. If you turn on the TV again before
it has entered the very low power mode, it turns on immediately. After the TV goes
into the lower power standby mode, it takes a few seconds longer to start up.
Only in connected mode
optionally enable Fast TV start. When this option is enabled, your TV starts up almost
immediately regardless of how long it has been turned off, but uses somewhat more
power in standby mode. For more information, see Fast TV start.
on TVs that do not have an Energy Star® rating, you can
Opting in to Smart TV experience (U.S. only)
Only in connected mode in the United States
HDMI input, or AV input, your TV offers to enable the Smart TV experience. If you
features.
, the first time you select Antenna TV, an
54
Page 61

The Smart TV experience uses automatic content recognition (ACR) and other
technology to collect information about what you watch through your Antenna TV,
and on devices like media players and cable boxes connected to the HDMI or AV
inputs. Opting in means that you give permission to analyze the programs you watch
for the purpose of making recommendations, as well showing ads that are more
relevant to you.
If you decide not to enable the Smart TV experience at this first opportunity, you can
but be aware that previously collected information is retained and not deleted.
Disable Smart TV experience
If you decide you want to disable Smart TV experience, follow these steps:
1. From the Home screen, go to Settings > Privacy > Smart TV experience.
2. Navigate to the right to highlight Use info from TV inputs.
3. Press OK on the remote to clear the check box.
Disable Auto Notifications
If you want to keep the Smart TV experience enabled, but you do not want to see
notifications while you are watching shows, you can disable notifications. To do so,
follow these steps:
1. From the Home screen, go to Settings > Privacy > Smart TV experience.
2. Navigate to the right to highlight Use info from TV inputs.
3. Press DOWN on the remote to highlight Enable auto notifications.
4. Press OK on the remote to clear the check box.
Note:
you see in the Smart Guide when watching Antenna TV channels. Those
These settings do not affect recommendations for More Ways to Watch that
recommendations come from the Smart Guide and do not rely on ACR technology.
55
Page 62

Watching Antenna TV channels
Select the Antenna TV tile in the Home screen. Your TV remembers the last channel
you watched and starts with that channel playing.
Changing channels
To change channels, you can do any of the following:
• Press the UP arrow to change to the next higher channel.
• Press the DOWN arrow to change to the next lower channel.
• Press the LEFT arrow to display the channel list (in non-connected mode) or
Smart Guide (in connected mode), and then press the arrow keys to select the
channel or show you want to watch. Press REWIND and FAST FORWARD to
or show you want to watch, press OK
channels, press the BACK button).
•
Only if Live TV Pause is not enabled
Press again to return to the channel you were watching before you pressed .
Note:
If the button is not available on your remote, you can use this feature in
, press to jump to the previous channel.
the Roku mobile app. For more information, see Getting and using the Roku
mobile app.
56
Page 63

Favorite Channels in non-connected mode
You can quickly change from surfing among all channels or only your favorite
channels. First, you have to mark one or more channels as your favorites.
Note:
In the United States, in connected mode, favorite channels appear at the top of
the Smart Guide automatically after several days of watching Antenna TV channels.
For details, see Smart Guide.
Mark your favorite channels
In non-connected mode, you
watching Antenna TV channels.
1. Press the LEFT arrow to display the channel list. Notice that the words All
channels appear at the top of the channel list.
2. Scroll up or down to highlight a channel that you want to make a favorite.
3. Press
• Add to favorites
• Back
4. With Add to favorites highlighted, press OK. A symbol appears adjacent to
the channel to indicate that it is now a favorite.
5. Repeat these steps to add more favorite channels.
57
Page 64

Surf only your favorite channels
In non-connected mode, after
can switch to your channels.
1. Press the LEFT arrow to display the channel list.
2. Press the LEFT or RIGHT arrow once to switch to Favorites. Notice that the
word Favorites appears at the top of the channel list.
3. Highlight a channel and press OK to select one of the channels in the Favorites
channel list, or wait a few moments until the channel list disappears.
4. Press the UP or DOWN arrow to change to the previous or next favorite
channel. Each channel you select in this way is a favorite channel. Your channel
surfing is limited to favorite channels only.
Your favorite channel list remains in effect even if you turn off or unplug your TV, until
you switch back to all channels.
Note that when you press OK to view the program information banner while watching
a show, a symbol appears below the channel number.
Surf all channels again
In non-connected mode, you
watching Antenna TV channels.
1. Press the LEFT arrow to display the channel list.
2. Press the LEFT or RIGHT arrow once to switch to All channels. Notice that the
words All channels appear at the top of the channel list.
3. Highlight a channel and press OK to select one of the channels in the All
channels list, or wait a few moments until the channel list disappears.
4. Press the UP or DOWN arrow to change to the previous or next channel
among all your available channels. You can surf among all channels in your
channel list.
58
Page 65

Remove a channel from your favorites
In non-connected mode, you can remove a channel from your favorites whenever
1. Press the LEFT arrow to display either channel list All channels or Favorites.
2. Scroll up or down to highlight a favorite channel that you want to remove from
your favorites.
3. Press
• Remove from favorites
• Back
4. With Remove from favorites highlighted, press OK. The symbol adjacent to
the channel disappears.
5. Repeat these steps to remove other channels from Favorites.
Smart Guide (U.S. only)
Only in connected mode in the United States
TV shows through the Antenna TV input. The Smart Guide lets you scroll through all
TV channels (except those you have hidden, if any). You can see all the shows from
today, the previous 7 days, and the upcoming 14 days.
The ability to see shows that have already aired during the previous week enables you
to use More Ways to Watch to catch up on missed movies or episodes by selecting
them from one of the streaming channels. Your clue that there are More Ways to
Watch a show is a purple asterisk () next to the program name in the guide.
For example, you might turn on your TV at 10 minutes past the hour and discover you
are missing the current episode of
show title, so you can press and find that there are several streaming channels
where you can watch the current episode from the beginning. You also can find more
Empire
, use the Smart Guide to find over-the-air
. But, there is a purple asterisk next to the
episodes of
Note:
A paid subscription or other payments may be required for some channels.
Empire
, and other shows that have a similar theme.
59
Page 66

To view the Smart Guide, press the LEFT arrow. The Smart Guide opens showing the
name of the current program highlighted, and a lot more information.
1. Program information for the highlighted show. See Viewing program information for details.
2. More Ways to Watch indicator. See More Ways to Watch for more information.
3. Channel list. Navigate with the UP and DOWN arrows.
4. Time slots. Navigate with the LEFT and RIGHT arrows. Use the FF and REW buttons to skip
ahead or back 24 hours.
5. Program list
6. Progress bar showing the approximate time with respect to the time slots.
As you navigate, notice that the Smart Guide shows a light gray background for
programs and portions of programs that have already aired. It shows a black
background for programs and portions of programs that have not yet aired. The line
dividing these two zones is the progress bar.
Navigating the Smart Guide
• To switch to a program that is currently in progress, highlight it, and then press
OK.
• To return to the current time after navigating to a different time slot, press
REPLAY .
• To return to the currently airing program without causing a channel change,
press BACK.
• To see More Ways to Watch, highlight any show that has a purple asterisk (),
and then press .
60
Page 67

Favorite channels in the Smart Guide
The Smart Guide organizes your favorite channels at the top of the program list for
convenient access. It does this automatically as you use your TV over several days. If
you would prefer not to have a favorites section in the Smart Guide, you can turn this
feature off.
Turn off favorite channels
1. From the Home screen menu, navigate to Settings > TV inputs > Antenna TV >
Favorite channels.
2. Highlight
3. Press OK to clear the check mark.
.
Viewing program information
You can view program information in different ways:
•
Only in connected mode in the United States
any program listed in the Smart Guide. Press the LEFT arrow while watching
Antenna TV to see the Smart Guide. For more information, see Smart Guide.
• View program information for the current program in a banner at the bottom
of the screen. You can view program information in this way on both
connected and non-connected TVs. The following illustration shows the
information that is available:
, view program information for
61
Page 68

Program information banner
Program information might include any or all of the following, depending on availability
within the broadcast information:
• Channel number
• Channel call sign
• Favorite channel icon
• Signal strength
• Program title and episode name/number
• Start time, end time, and graph of program length showing current position
• Content rating
• Video resolution (480i, 480p, 720p, 1080i, 1080p, 4K)
• Frame rate (24Hz, 30Hz, 60Hz for television sources, 60Hz, 70Hz, 72Hz, 75Hz for
computer sources)
• Audio format (Mono, Stereo, logo)
• Audio features (SAP/MTS)
• Only on select 4K models: HDR or * logo (HDMI® and streaming sources)
• Closed captioning (CC)
• Current time
• Program description. If the entire description does not fit, press OK to expand the size of
the banner and see the entire description.
Tip:
Antenna
progress bar showing the current playback position within the rolling 90-minute
pause time. For more information, see Pausing Live TV.
*
-
62
Page 69

Adjusting settings while watching a show
Press to display the Options menu (except when you are viewing the program
information banner). Press the UP and DOWN arrows to highlight an option, and then
press the LEFT and RIGHT arrows to change the setting. The topic Adjusting TV
settings explains each of the settings in detail.
Pausing Live TV
Live TV Pause gives your Roku TV the ability to pause, play, fast forward, and rewind
digital Antenna TV. You can pause Antenna TV for up to 90 minutes.
Requirements
To use this feature, you need to:
1.
.
2. Provide your own dedicated USB drive with the following minimum
specifications.
• 16 GB
• 15 Mbps read/write speed
• USB 2.0 compliant
A USB flash drive (thumb drive) meeting the minimum requirements is highly
recommended. Note that using a larger drive does not extend the 90 minute
pause time.
Important:
After warning you and giving you a chance to cancel Live TV Pause
setup, all existing content on your USB drive is erased when you enable this
feature.
3.
Important:
Some TV models have more than one USB port. You can connect
your Live TV Pause USB drive to any port, but make sure that nothing is
connected to other USB ports while enabling Live TV Pause. Reconnect other
USB devices after you have finished enabling Live TV Pause.
63
Page 70

4. Enable Live TV Pause, as explained in the following topic.
Enabling Live TV Pause
You can start setting up Live TV Pause in any of the following ways:
• Go to Settings > TV inputs > Antenna TV > Live TV Pause, and then select
Enable.
• After completing a channel scan, select Set up Live TV Pause from the
available options.
• Press Play/Pause on the Roku remote while watching a digital Antenna TV
channel.
• Highlight the Antenna TV tile on the Home screen, press on the remote, and
then select Enable Live TV Pause.
After starting setup of Live TV Pause in any of these ways, the TV prompts you
through the steps needed to enable this feature. Setup takes only a few moments.
Note:
Use of a USB hub is not supported.
Using Live TV Pause
If you have used the Roku remote to watch streaming channels, using Live TV Pause
should be very familiar to you.
• While watching a digital Antenna TV channel, press PLAY/PAUSE to pause or
play the content. After the TV program has been paused for 90 minutes, the
TV resumes playing.
• After watching a channel for a while, press REWIND to jump back up to the
point where you first started watching the channel, up to 90 minutes.
• After pausing or rewinding, press FAST FORWARD to jump ahead up to the
point where you are once again watching the live TV program.
• Press FAST FORWARD or REWIND repeatedly to cycle through 1x, 2x, and 3x
skip speeds. Press INSTANT REPLAY to play back the last several seconds of
the program.
64
Page 71

• When the program is paused, press the LEFT and RIGHT arrows to move
forward and backward through the program approximately 10 seconds per
press. Small frames appear across the screen to identify your location in the
program.
Note:
If the button is not available on your remote, you can use the Roku mobile
app. For more information, see Getting and using the Roku mobile app.
Whenever you use any of the Live TV Pause features, the TV momentarily displays a
progress bar:
1. Time at current playback position.
2. Current playback position
3. Extent of pause time, representing the amount of time this channel has been buffered, up to 90
minutes.
4. 90 minute mark, representing the maximum extent of pause time.
5. Current time.
The progress bar also displays tick marks at each half hour point, to help you locate
the boundaries where one show ends and a new one begins.
65
Page 72

Notes about Live TV Pause
• You can use Live TV Pause only with digital broadcast and cable channels
ANT input (ATSC and Clear QAM channels).
• Changing channels erases and restarts the Live TV Pause buffer.
• Returning to the Home screen, selecting another input, or turning off the TV
erases and resets the Live TV Pause buffer.
• Removing the USB drive erases the Live TV Pause buffer.
More Ways to Watch (U.S. only)
Only in connected mode in the United States
recommendations on the Antenna TV, HDMI, or AV
input. You will automatically get these recommendations in the Smart Guide and in
the program information banner for Antenna TV programs. However, before you can
get recommendations for shows , you
must opt into the Smart TV experience to acknowledge that you want to allow the TV
to use automatic content recognition (ACR). See Opting in to Smart TV experience
for details.
Not every show provides
recommendation appears, see Using More Ways to Watch.
, More Ways to Watch gives you
66
Page 73

Using More Ways to Watch
As you use More Ways to Watch
TV when all of the following conditions are met:
• Your TV is operating in connected mode in the United States.
• If you are watching shows through and HDMI or AV input, y
Smart TV experience. (If you are watching Antenna TV channels, this setting
does not matter.)
•
Note that some programs, such as the daily news, typically do not activate
More Ways to Watch.
• At least one participating streaming channel offers the movie or TV show you
are watching, or other episodes, or more shows like the one you are watching.
If all of these conditions are met, you can view the suggestions. More Ways to Watch
recommendations appear in several places:
• When watching the HDMI and AV inputs, More Ways to Watch
notification in the lower right corner of the screen for a few seconds unless you
have disabled Enable auto notifications:
Note:
prompt by pressing OK.
After this banner disappears, you can restore the More Ways to Watch
67
Page 74

• For shows on Antenna TV channels, check the program information banner
that appears for a few moments when you change channels or when you press
OK while watching a show a More Ways
to Watch notification in the banner:
• In the Smart Guide, you can view More Ways to Watch recommendations on
any program that shows a purple asterisk next to its title:
68
Page 75

Regardless of which More Ways to Watch prompt appears, press to see the
recommendations. The options
watching and the available ways there are to watch, so you might see any or all of the
following:
• Watch from beginning Streaming channels on which the same TV show or
movie is available. Generally, this option does not appear on first run programs,
because streaming content is not available until a later date.
• More episodes Streaming channels where you can find other episodes of the
TV show you are watching. Does not apply to movies.
• More like this TV shows or movies with a similar theme.
• View full description Full description of the selected show.
Press the DOWN arrow to select an option, and then press the RIGHT arrow to select
the channel you want to use to watch from the beginning or watch more episodes, or
the other TV show or movie with a similar theme.
A completed any required sign-in,
More Ways to Watch takes you directly to the program in the streaming channel
where you can select and watch the program. Otherwise, it prompts you to add the
channel and, if you do, then takes you to the show.
69
Page 76

Getting the most from More Ways to Watch
•
suggestions.
• When you select a streaming channel, you leave the program you are currently
watching.
•
program buffer is deleted. In other words, you cannot return to an Antenna TV
channel and resume watching where you left off.
used the Live TV Pause feature to pause the program, your paused
Switching TV inputs
Switch TV inputs to access the device connected to that input, for example, a
Blu-ray player. Switching inputs is as
Home screen, and pressing OK. The video signal on the input, if any, plays on the
screen.
Tip:
To learn how to add, remove, rename, and rearrange the tiles on your Home
screen, see Customizing your TV.
Auto-detecting devices
Your TV automatically detects when you connect a new device to an HDMI® input and
turn on its power. The input is automatically added to the Home
already present.
Adjusting audio/video settings
While watching video content on any input, press to display the Options menu.
Press the UP and DOWN arrows to highlight an option, and then press the LEFT and
RIGHT arrows to change the setting. To learn about each of the audio and video
settings, see Adjusting TV settings.
70
Page 77

Playing content from USB storage devices
Only in connected mode
, your Home screen has the Roku Media Player tile.
Otherwise, the Home screen has the USB Media Player tile. You can play personal
music, video, and photo files from a personal USB flash drive or hard disk connected
To use this feature, make sure your media files are compatible with the Roku/USB
Media Player. To see the latest list of supported formats, view Help in the Media
Player*. The Roku/USB Media Player displays supported file types only, and hides file
types it knows it cannot play.
For more information about playing back your personal videos, music, and photos, go
to the following link on the Roku web site:
go.roku.com/rokumediaplayer
Auto player launch
Only in connected mode
Player when you connect a USB drive with a recognizable file system (such as
, you can set your TV to automatically open the Roku Media
FAT16/32, NTFS, HFS+ or EXT2/3). To configure this setting, from the Home screen,
navigate to Settings > System > USB media. At this point, the following options are
available:
• Auto-launch Choose Prompt, On, or Off, as desired.
o Prompt (default) Display a prompt each time a recognized USB drive is
connected. The prompt provides options to launch the Roku Media Player
as well as to change future auto-play behavior.
o On Always launch the Roku Media Player whenever you connect a
recognized USB drive.
o Off Never launch the Roku Media Player automatically.
• Launch channel Choose the app you want to use to play back media files.
*
There are many variants of each supported media format. Some variants may not play at all or may have issues or
inconsistencies during playback.
71
Page 78

Playing content from local network media servers
Only in connected mode
a media server on your local network. Media servers include personal computers
running media server software such as Plex or Windows Media Player, network file
storage systems that have built-in media server software, and other devices that
implement the specifications of the Digital Living Network Alliance. Some servers do
not fully implement the DLNA specification but are UPNP (Universal Plug and Play)
compatible. The Roku Media Player will connect to them as well.
Some media servers can convert files into Roku compatible formats. DRM-protected
content is not supported.
, your TV can play personal video, music, and photo files from
Using your TV in a hotel or dorm room
Hotels, school dorms, conference facilities, and similar locations with public wireless
Internet access often require you to interact with a web page to authenticate your
access. These types or networks are called
select a network of this type, the TV automatically detects that additional information
restricted public networks
. When you
is needed and prompts you through using another wireless device to supply the
requested information.
About using your TV on a restricted public network
Here are some points to keep in mind when using your TV on a restricted public
network:
• Using your Roku TV on a hotel or dorm room network requires wireless
availability and a network-connected smartphone, tablet, or computer to
authenticate access to your wireless access point.
• You will need your Roku TV remote.
• Some content might be limited or unavailable if you try to connect outside
your home country due to geo-filtering.
72
Page 79

Getting your Roku TV on line on a restricted public network
1. Either during Guided Setup or after using the Settings > Network menu to set
up a new connection, the TV automatically detects that you are connecting to
a restricted network and displays the following prompt:
Tip:
Your TV can connect to a restricted network only if
connect is selected in Settings > System > Advanced system settings. (Device
connect is enabled by default, but if you have disabled it, the TV cannot
complete the connection.)
Note:
Device connect is not present if the TV is in non-connected mode.
73
Page 80

2. After selecting the correct network, highlight I am at a hotel or college dorm,
and then press OK. The TV prompts you to use your smartphone, tablet, or
laptop to complete the connection.
3. Use a phone, tablet, or wireless-enabled computer to detect wireless networks.
-Fi Settings or Network
Settings screen to start scanning.
Note:
which you are connecting the TV.
The phone, tablet, or computer must be on the same wireless network to
4. Connect to the network named on your TV screen. The actual network name
varies.
Note:
The previous step connects your smartphone, tablet, or computer
directly to the TV. No connection charges apply and the connection does not
5. The wireless connection process prompts you for a password. Enter the
password as shown on the TV screen. The actual password varies.
6. Start the web browser on your smartphone, tablet, or computer. When you
attempt to open any web page, the restricted connection will prompt you for
whatever information it needs. In most cases, you must agree to terms and
conditions, provide identifying information, or enter a password, PIN, or room
number to proceed. The information requested depends on the organization
that controls the wireless connection.
74
Page 81

7. After you enter the requested information, the TV automatically proceeds to
complete its connection and resumes normal operation.
8. If the TV prompts you to link to your Roku account, use your smartphone,
tablet, or computer to complete the pairing operation and activate your Roku
TV.
Roku voice remotes (select models only)
Only on TVs with the Roku voice remotes
most out of your TV when it includes a Roku Voice Remote or Roku Enhanced Voice
Remote.
: The following topics explain how to get the
Re-pairing your Roku voice remote
The Roku voice remotes operate with wireless radio-frequency signals and must be
paired with your TV. You initially paired the remote when you set up your TV during
Guided Setup. But if your remote loses its pairing with the TV for some reason, you
can easily re-pair it using either of the following methods:
1. Remove the battery cover from the back of the remote.
2. Press and hold down the pairing button for 3 seconds or longer, until the
adjacent LED lights up.
3. Do one of the following:
• Turn on the TV using the power button on the TV side or back panel.
Pairing occurs as the TV starts up.
• Use the Roku mobile app or a different remote to navigate to Settings >
Remote > Pair remote.
Tip:
to hold the remote within two to three feet of the TV to ensure successful pairing.
Checking the Roku voice remote battery level
You can check the condition of the batteries in your Roku voice remote at any time
by navigating to Settings > Remote > Battery level. The resulting screen displays not
75
Page 82

only the battery level, but also other information that can be useful when you need
technical support with your remote.
Tip:
When you first turn on the TV, a battery level indicator appears in the upper right
corner of the screen for a few seconds.
Finding your Roku Enhanced Voice Remote
Only on TVs with the Roku Enhanced Voice Remote
way down into the sofa cushions or your dog has hidden it in the corner, you can use
and is designed to find your Enhanced Voice Remote somewhere in the same room as
the TV.
Select Find Remote on the Settings > Remote menu to see brief instructions on how
actually activate the feature. Here are the complete instructions:
, when your remote has found its
This feature has a limited range,
Activate Find Remote
• If your TV has a joystick-style control, press to the Left or Right to open the
Inputs menu, and then press Right to scroll down to Find Remote.
• If your TV has a column of labeled panel buttons, press the INPUT button to
open the Inputs menu, and then press the INPUT button again until you
highlight Find Remote.
A moment or two after highlighting Find Remote, the Roku Enhanced Voice Remote
starts playing your selected Find Remote sound to let you know where it is hiding.
76
Page 83

The sound automatically stops after a minute, or after you find the remote and press
any button.
Changing and previewing the Enhanced Voice Remote finder
sound
Only on TVs with the Roku Enhanced Voice Remote
your remote makes when you use the Find Remote feature. To customize the sound,
navigate to Settings > Remote > Change remote finder sound. Select the sound you
want to use from the available settings.
To preview the sound you have chosen, select Preview remote finder sound, and
then hold down OK on the remote to play the sound. When you release the OK
button, the sound will stop.
, you can customize the sound
77
Page 84

Adjusting TV settings
You can adjust most picture and sound settings while you are watching a program by
pressing to open the Options menu. There are some additional picture and sound
settings in the Settings menu.
In most cases, the changes you make apply only to the input you are using. Antenna
TV, the separate HDMI® inputs, and the AV input each have their own settings that the
TV remembers when you return to that input. The TV also separately remembers the
settings you specify while viewing streaming content.
Settings menu
Use the Settings menu to adjust overall TV settings. Press to go to the Home
screen, and then navigate to Settings > TV picture settings.
You can adjust the following overall TV picture settings from the Settings screen:
• TV brightness Provide a better viewing experience in darker or brighter
rooms. I s.
Note:
the Options menu while watching a program.
• HDR notification
notification in the upper right corner of the screen for a few seconds when
HDR or Dolby Vision content begins to play.
This setting is identical to the TV brightness setting you can access in
On select models only
o On The TV displays a notification when HDR or Dolby Vision content
begins to play.
: Controls whether the TV displays a
o Off The TV does not display a notification when HDR or Dolby Vision
content begins to play.
78
Page 85

Note:
This setting does not affect the HDR or Dolby Vision notification that
always appears in the program information banner. Press OK while watching a
show to open the program information banner.
• Settings per input Lists each TV input. Select an input, and then press to
display the Options
watching a live picture and listening to the sound from that input.
Tip:
Settings menu first
Options menu and adjust its settings whenever you are watching the input by
pressing .
Options menu
The Options menu for each TV input provides many settings for controlling the
appearance of the picture and the quality of the audio. To view the Options menu,
press whenever you are watching a TV input or streaming a video (except when
you are viewing the program information banner). The Options menu is a panel that
appears over the left side of the screen:
Typical Options menu
To adjust the settings on the Options menu, press the UP or DOWN arrow to
highlight a setting, and then press the LEFT or RIGHT arrow to change the setting.
see the changes you make right away in picture appearance or audio quality.
79
Page 86

Tip:
When you highlight a setting, the header text explains the effect of its current
value. When you begin to adjust a setting, the other options are hidden so you can
see more of the screen. Even though the other settings are hidden, you can move the
highlight up or down to adjust the other settings. As soon as you press the UP or
DOWN arrow, the other settings become visible again.
Options menu settings
• TV brightness Affects the overall brightness of the picture.
This setting
applies across the entire TV; that is, to all TV inputs and is identical to the TV
brightness setting under Settings > TV picture settings.
• Picture mode Provides picture presets for various viewing preferences.
setting applies to the currently-selected input only.
• Picture size Adjusts the aspect ratio of the picture, enabling you to view a
picture in its original format, or zoom or stretch it to fill the screen. The Auto
setting has been found to produce the best picture in most cases.
• Audio effect Adjusts the sound quality output from the TV speakers.
setting applies across the entire TV; that is, to all TV inputs.
the sound quality for headphones, HDMI (ARC), or SPDIF (TOSLINK)
connectors.
• Sleep timer Sets a timer that turns off the TV after the specific amount of
time.
This setting remains in effect even if you stop watching the current input.
This
This
It does not affect
• Closed captioning Controls when you see captions.
offered for Antenna TV, the AV input, and streaming videos. Any set value
remains in effect across only these inputs.
o Antenna TV Set captions to off, always on, on only when the TV sound
is muted, or on only during instant replay (when Live TV Pause has been
enabled).
o AV input Set captions to off, always on, or on only when the TV sound
is muted.
o Streaming video channel For streaming content that provides closed
captions, set captions to off, always on, on only when the TV sound is
80
This setting is only
Page 87

muted, or on only during instant replay (for streaming content that
supports instant replay).
Note that some streaming channels have other
methods for turning captions on and off. In these cases, the Closed
captioning option does not appear on the Options menu.
Note:
If the button is not available on your remote, you can use this
feature in the Roku mobile app. For more information, see Getting and
using the Roku mobile app.
• Captioning track
Closed Captioning is on.
captions.
Note:
Accessibility.
• SAP Selects whether to play a secondary audio program or multichannel
television sound, and which choice to play.
Only in the United States, the Captioning track setting is located under
TV on digital channels.
Only in Canada
: Selects which caption track to display when
This setting remains in effect on all inputs that provide
This setting applies only to Antenna
• Advanced audio settings
settings menu.
• Advanced picture settings Shows the Advanced picture settings menu.
Tip:
To dismiss the Options menu, just wait a few seconds without pressing any
Only on select models
: Shows the Advanced audio
buttons. Or press again to dismiss the menu immediately.
81
Page 88

Accessibility (U.S. only)
Only in the United States
These settings are also available on the Home screen under Settings > Accessibility.
, the settings on the Accessibility menu enable you to
Accessibility menu settings
• Audio Guide Turn the Audio Guide on or off. The Audio Guide is a text-to-
speech screen reader that helps blind and low-vision users navigate the Roku
user interface and on screen menus. When enabled, the Audio Guide reads out
text, menus, and other on-screen items.
Tip:
If Shortcut is enabled, you can enable or disable the Audio Guide by
pressing the four times in quick succession. (The button is located directly
below the directional pad on the right side of the Roku remote.)
• Speech rate Choose the speed at which the TV speaks Audio Guide prompts.
• Volume Set the volume of the Audio Guide in relation to the main TV
volume.
• Shortcut Enable or disable the shortcut feature. When disabled, pressing
four times in quick succession does not enable or disable the Audio Guide.
82
Page 89

• Closed captioning Controls when you see captions.
This setting is only
offered for Antenna TV, the AV input, and streaming videos. Any set value
remains in effect across only these inputs.
o Antenna TV Set captions to off, always on, on only when the TV sound
is muted, or on only during instant replay (when Live TV Pause has been
enabled).
o AV input Set captions to off, always on, or on only when the TV sound
is muted.
o Streaming video channel For streaming content that provides closed
captions, set captions to off, always on, on only when the TV sound is
muted, or on only during instant replay (for streaming content that
supports instant replay).
Note that some streaming channels have other
methods for turning captions on and off. In these cases, the Closed
captioning option does not appear on the Options menu.
Note:
If the button is not available on your remote, you can use this
feature in the Roku mobile app. For more information, see Getting and
using the Roku mobile app.
• Captioning track Selects which caption track to display when Closed
Captioning is on.
captions.
• SAP Selects whether to play a secondary audio program or multichannel
television sound, and which choice to play.
TV on digital channels.
This setting remains in effect on all inputs that provide
This setting applies only to Antenna
Video description through Secondary Audio Program (SAP)
Video description is audio descriptions of the action in a program, to help individuals
who are blind or visually impaired enjoy the program. You enable video description by
selecting one of the Secondary Audio Program (SAP) options.
To hear video description narrations in programs that have them, turn on SAP. If there
are multiple SAP options for a channel, such as Spanish and French, try each one to
determine which setting carries the video description track.
83
Page 90

Note:
Broadcasters provide video descriptions only on a small number of programs. If
you are unable to hear video descriptions after following these instructions, the
program you are viewing does not provide them.
For more details about video description, go to:
https://www.fcc.gov/consumers/guides/video-description.
Advanced audio settings – DTS TruSurround (select
models only)
This topic describes the Advanced audio settings menu for TV models with DTS
TruSurround. Each TV input has separate settings for fine tuning sound quality. All of
the settings in this menu apply only to the currently-selected input. To use the
Advanced audio settings menu, first press to display the Options menu. Then
select Advanced audio settings.
Advanced audio settings menu for models with DTS TruSurround
Advanced audio settings menu options – DTS TruSurround
• Audio effect
speech, make music sound its best, boost bass or treble, or simulate a theater.
Use Reset audio settings
settings to their original values.
Select from among various preset audio modes to improve
84
Page 91

• DTS TruSurround Simulates surround sound that otherwise would require
installation of a surround sound audio system. Sometimes, the effect interferes
with dialog clarity. Use the Dialog Clarity option to compensate.
• Dialog Clarity Available only when DTS TruSurround is On. Choose among
Low, Medium, and High settings to improve the clarity of dialog when you are
using the TruSurround feature.
• TruVolume Minimizes annoying volume fluctuations in programs.
• Reset audio settings
TruVolume settings, to their default settings for the selected Audio effect.
Returns DTS TruSurround, Dialog Clarity, and
Advanced audio settings – Sonic Emotion Premium
(select models only)
This topic describes the Advanced audio settings menu for TV models with Sonic
Emotion Premium. Sonic Emotion Premium is an audio technology that enables your
TV to produce a more immersive sound experience. Each TV input has separate
settings for fine tuning sound quality. All of the settings in this menu apply only to the
currently-selected input. To use the Advanced audio settings menu, first press to
display the Options menu. Then select Advanced audio settings.
Advanced audio settings menu for models with Sonic Emotion Premium
85
Page 92

Advanced audio settings menu options – Sonic Emotion Premium
• Audio effect Select from among various preset audio modes to improve
speech, make music sound its best, boost bass or treble, or simulate a theater.
Use Reset audio settings
settings to their original values.
• Sonic Emotion Premium
settings, as described in Sonic Emotion.
• Reset audio settings Returns Sonic emotion settings to their default settings
for the selected Audio effect.
Displays a menu with individual Sonic Emotion audio
Sonic Emotion settings
When you turn on Sonic Emotion from the Advanced audio settings menu, these
additional settings become available:
• Dialog Enhancement Enhances your ability to hear and understand dialog in
the program.
• Bass Enhancement Enhances the low frequency sound component in the
program.
• Absolute 3D Sound Simulates sound from multiple speakers that would
otherwise require installation of a surround sound audio system.
86
Page 93

Advanced picture settings
The Advanced picture settings menu for each TV input provides settings for fine
tuning the appearance of the picture. All of the settings in this menu apply only to the
currently-selected input.
To use the Advanced picture settings menu, first press to display the Options
menu. Then select Advanced picture settings.
Typical Advanced picture settings menu
Advanced picture settings menu options
• Picture mode Provides picture presets for various viewing preferences. This
setting duplicates the one on the Options menu. When you change the Picture
mode, other picture settings adjust accordingly. For example, setting the
Picture mode to Vivid sets Brightness, Contrast, Sharpness, and other values
to produce a very vibrant picture. Setting Picture mode to Movie changes the
settings to produce a picture suitable for enjoying movies in a darkened room.
If you make changes to the individual picture settings for example, Contrast,
or Sharpness these settings are saved for the current input
picture mode. In this way, you can set HDMI 1 Movie picture mode to
use different settings than the HDMI 2 Movie picture mode and Antenna
TV Movie picture mode. Use Reset picture settings, described below, to
selected picture mode to its original values.
and
the current
87
Page 94

• Local contrast
areas darker without affecting the brightness of light areas.
disabled when Game mode is enabled.
• Dynamic contrast
level to achieve the optimum contrast and prevent excessive differences
between light and dark areas of the screen.
Only on select models
Only on select models
: Sets the amount of dimming multiple
make dark
This option is
: Automatically adjusts the backlight
This option is disabled when Local
dimming/Local contrast is enabled.
• Backlight - Adjusts the overall light intensity of the screen.
On some models,
this option is disabled when Dynamic contrast is enabled.
• Brightness Adjusts the dark level of the black areas of the picture.
• Contrast Adjusts the white level of the light areas of the picture.
• Sharpness Adjusts the sharpness of the edges of objects in the picture.
• Color Adjusts the intensity of colors in the picture. A setting of 0 removes all
color and displays a black and white picture.
• Tint Adjusts the color balance from green to red to obtain accurate colors in
the picture.
• Color temperature Adjusts the overall colors in the picture from Normal to
slightly more bluish (Cool) to slightly more reddish (Warm).
• Action smoothing
smoothing applied to the video signal. A higher setting results in more
smoothing, but can cause undesirable picture artifacts in certain types of
content
• Natural Cinema
to 60Hz TV standards. Natural Cinema mode is On by default in Movie and
HDR Dark picture modes, and Off by default in other picture modes. When
. Each Picture mode has a different Action smoothing default setting.
Only on select models:
Only on select models:
Adjusts the amount of action
When enabled, this feature reduces
-per-second movies are upscaled
Natural Cinema mode is On, Action smoothing is turned off and disabled.
88
Page 95

• Action clarity
moving images such as sports.
• LED action clarity
LED backlight latency. Enabling this feature inserts black frames between
picture frames in a way that improves the clarity of fast movement. It provides
an improved viewing experience for video games and sporting events. When
LED action clarity is enabled, the Brightness and Dynamic contrast settings
are disabled. You can choose settings of Low, Medium, High, or Off to achieve
the desired picture quality. Enabling Game mode sets LED action clarity to
Medium.
• Game mode
enabled. When On, the TV performs less image processing and has less input
lag. When Off, the TV performs more image processing and has more input lag,
which is less desirable for action games.
• Reset picture settings -
Only on select 120Hz models:
Only on select models:
Reduces motion blur caused by
Only on HDMI® and AV inputs:
Reduces blur, especially for fast-
Controls whether Game mode is
selected Picture mode to their original values.
Tip:
To dismiss the Advanced picture settings menu, just wait a few seconds
without pressing any buttons. Or press again to dismiss the menu immediately.
Expert Picture Settings (4K models only)
4K (UHD) TV models have additional picture settings for demanding home theater
enthusiasts. Expert Picture Settings include gamma, noise reduction, 11 point white
balance adjustment, and extended color management.
You can access Expert Picture Settings only by using the Roku Mobile App on an iOS®
obile device. For more information, go to the following link on the Roku
web site:
go.roku.com/expertpicturesettings
89
Page 96

Changing privacy settings
Note:
Privacy settings are not present on TVs operating in non-connected mode.
Advertising
Only in connected mode,
your TV usage. You can change the privacy settings on your TV in two ways:
resetting the advertising identifier and limiting ad tracking.
Reset the advertising identifier
Resetting the advertising identifier clears the prior usage history that your TV stores,
and then begins tracking again. From that point forward, your new usage patterns
affect the advertisements you see on your TV.
1. From the Home screen menu, navigate to Settings > Privacy > Advertising.
2. Highlight Reset advertising identifier. Press to view more information about
this option. When you finishing reading the information, press OK to close the
More Information window.
by default your TV uses an advertising identifier to track
3. Press OK to reset the advertising identifier, and then press OK again to dismiss
the verification message.
Limit ad tracking
you do, your TV will display ads that are not pe
advertising identifier.
1. From the Home screen menu, navigate to Settings > Privacy > Advertising.
2. Highlight Limit ad tracking. Press to view more information about this
option. When you finish reading the information, press OK to close the More
Information window.
3. Press OK to select the Limit ad tracking check box.
Note:
If you perform a factory reset and then reconnect your TV, ad tracking is
restored until you repeat these steps.
90
Page 97

Microphone
Your Roku TV does not have a built-in microphone. However streaming channel
providers can use the microphone on the Roku voice remotes (only on select models)
or on your mobile device when the Roku mobile app is running. You can control
whether streaming channels have permission to use the microphone.
Note:
do not affect your
These settings affect only streaming channel access to the microphone. They
Channel microphone access
You can control which streaming channels have permission to use the microphone,
giving you control over how the microphone is used by each streaming channel. The
default setting is Prompt, so no channel will be able to turn on the microphone
without your permission.
To change microphone access settings:
1. From the Home screen menu, navigate to Settings > Privacy > Microphone.
2. Select Channel microphone access.
3. Choose one of the following settings:
• Prompt Display a notification each time any streaming channel requests
the use of the microphone. When a notification appears, you can choose
among Prompt, Always allow, and Never allow on a per-channel basis.
• Always allow Do not prompt, but always allow any streaming channel to
use the microphone.
• Never allow Do not prompt, but never allow any streaming channel to use
the microphone.
91
Page 98

Channel permissions
After granting or denying microphone access on a per-channel basis, you can reset
channel permissions to enable them to follow the system-wide setting you specify
under Channel microphone access.
To reset channel permissions:
1. From the Home screen menu, navigate to Settings > Privacy > Microphone.
2. Select Channel permissions.
3. Highlight Reset channel permissions, and then press OK.
92
Page 99

My Feed
Only in connected mode,
coming soon, and to get updates on movies, TV shows, and actors that you are
following.
use My Feed to find out when you can watch movies
Movies Coming Soon
My Feed gives you updates on your list of movies that are coming soon to theaters.
With My Feed, y movie is ready to stream, the channels
it is on, and how much it will cost.
Select the movies you want to follow by going to My Feed > Movies Coming Soon.
then see a list of newly released movies that are not yet available on Roku
streaming devices. Select a movie, and then select Follow this movie on Roku. When
you return to the main My Feed see banners for each of your newlyfollowed movies along with banners for movies and TV shows youre already
following.
Movies, TV shows, and people
In addition to following movies coming soon, you can follow any movie, TV show, or
actor across top streaming channels. To follow a program, use the Search feature to
find the movie, TV show, or name that you want to follow, and then select Follow this
movie/TV show/person on Roku. For more information, see Searching for something
to watch.
Note:
least one channel offering the movie, the content banner in My Feed shows Check
back later for updates.
My Feed alerts you any time a movie or TV show you are following becomes available
on another channel and whenever its price changes. A number in parentheses next to
The TV takes a bit of time to update your newly-followed shows. Until it finds at
93
Page 100

My Feed in the Home screen menu means that My Feed has updated information that
My Feed (3).
Note:
When a movie or TV show you are following becomes available, the streaming
channel offering the movie might require that you subscribe or pay a fee to view it.
94
 Loading...