

Page 1

: , BOM
姚瑞
娟
数字签名人 姚瑞娟
DN:cn=姚瑞娟,
ou=Shenzhen,
dc=com
日期:2014.03.24
14:02:43 +08'00'
邱
荣
数字签名人 邱荣
DN:cn=邱荣,
ou=Shenzhen, 全
球研发中心, 设计
5所(惠州设计所),
dc=com, tclking
日
期:2014.03.24
16:20:04 +08'00'
(BRAND NAME)
B.O.M.
R0
72-JVCT51-EUM1B
USER MANUAL
LT-40HW62U/LT-46HW65U(MT51F1)
JVC
2014.3.24
(TO):
(TYPE OF JOB.):
i)
ii)
iii)
iv)
Silk Screen Printing
(SCALE)
(SIZE)
(COLOUR)
IQC
:
1:1
:
A5
:
PLS. PRINT IN BLACK ON WHITE BACKGROUND.
PMC
Wash Pr in ti ng
QA
Four-Colour Printing
PE
Spraying Paint
Plastic Colour
MATERIALS: COVER PAGES: 200G ARTPAPER;
INNER PAGES: 70G PAPER.
: / : 200 ;
: 70 .
Others
TCL
TCL
PREPARED BY
CUSTOMER
CHECKED BY
ODF
ODF DATE:
/
CHECKED BY:
1 170
REVIEWED BY:
Page 2
EDGE LED TV
LT-40HW62U LT-46HW65U
USER MANUAL
GEBRUIKSAANWIJZING MANUAL DEL USUARIO
NÁVOD K OBSLUZE NÁVOD NA POUŽÍVANIE
MANUEL DE L'UTILISATEUR
Français EnglishNederlandsEspañolČesky
Slovenčina
Page 3

* Manufactured under license from Dolby and the double-D symbol are trademarks
of Dolby Laboratories.
* This product is protected by certain intellectual property rights of Microsoft.
* The “HD TV” Logo and “1080p” qualier Logo are trademarks of
DIGITALEUROPE.
* DVB and the DVB logos are trademarks of the DVB project.
* THIS PRODUCT IS LICENSED UNDER THE AVC PATENT PORTFOLIO
LICENSE FOR THE PERSONAL USE OF A CONSUMER OR OTHER USES
IN WHICH IT DOES NOT RECEIVE REMUNERATION TO (i) ENCODE VIDEO
IN COMPLIANCE WITH THE AVC STANDARD (*AVC VIDEO*) AND/OR (ii)
DECODE AVC VIDEO THAT WAS OBTAINED FROM A VIDEO PROVIDER
LICENSED TO PROVIDE AVC VIDEO. NO LICENSE IS GRANTED OR SHALL
BE IMPLIED FOR ANY OTHER USE. ADDITIONAL INFORMATION MAY BE
OBTAINED FROM MPEG LA, L.L.C. HTTP://WWW.MPEGLA.COM
* HDMI, the HDMI Logo and High-Denition Multimedia Interface are trademarks
or registered trademarks of HDMI Licensing LLC in the United States and other
countries.
Page 4
Page 5
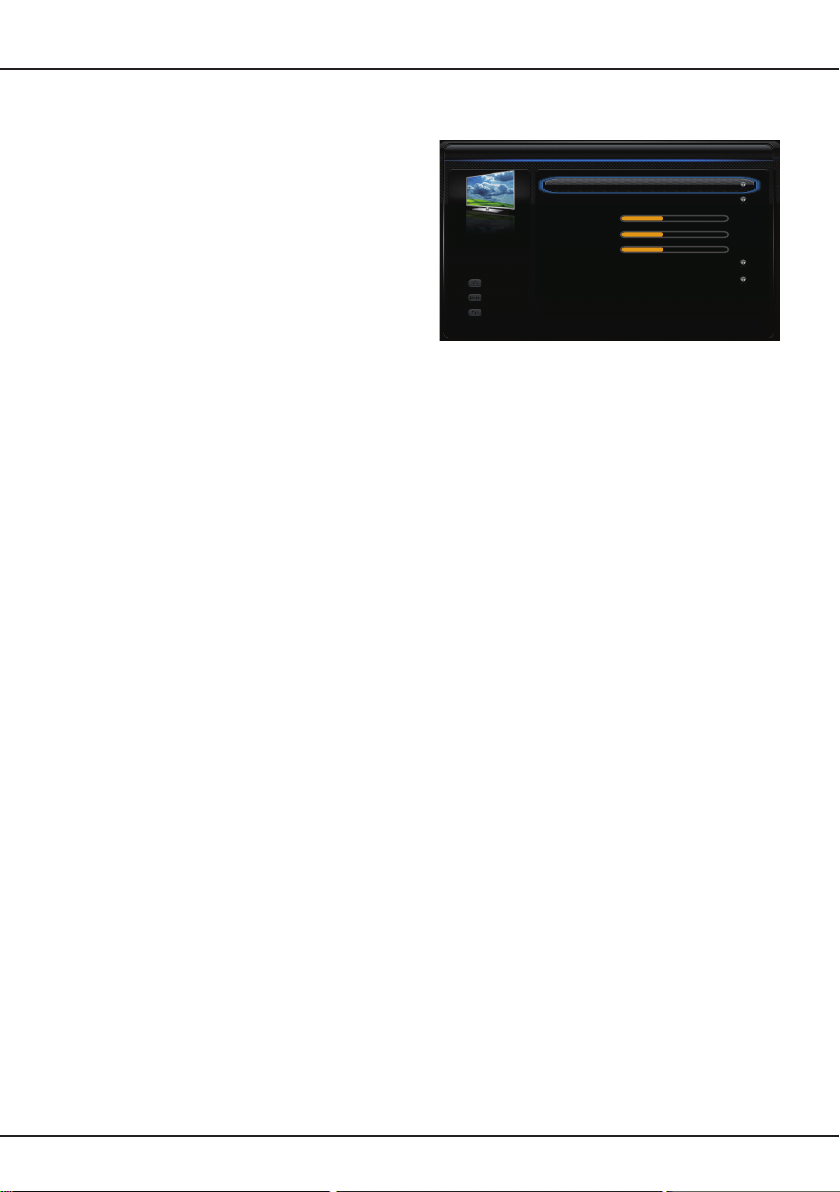
On screen display
Back
Exit
Select
3D-to-2D
Off
Distance to TV
Image safety
L-R switch Off
Off
Protrude
Depth of field 16
3D mode 2D-to-3D
3D
16
10
Pic ture
Soun d
PAP
Options
Lock
Setu p
Medi a
Smar t TV
Medi a
Pict ure S ound Network Settings
Smar t TV Chan nels Source
Initial setup
Language
Please select your language:
English
Български
Hrvatska
Česky
Dansk
Selec t Next
OK
Enter
Select
Menu
Back
Exit
Exit
Figure 1 Figure 2
Figure 3 Figure 4
Subtitle
Subti tle
Digit al s ubtitl e lan guage
Digit al s ubtitl e lan guage 2nd
Subti tle type
On
Engli sh
Engli sh
Norma l
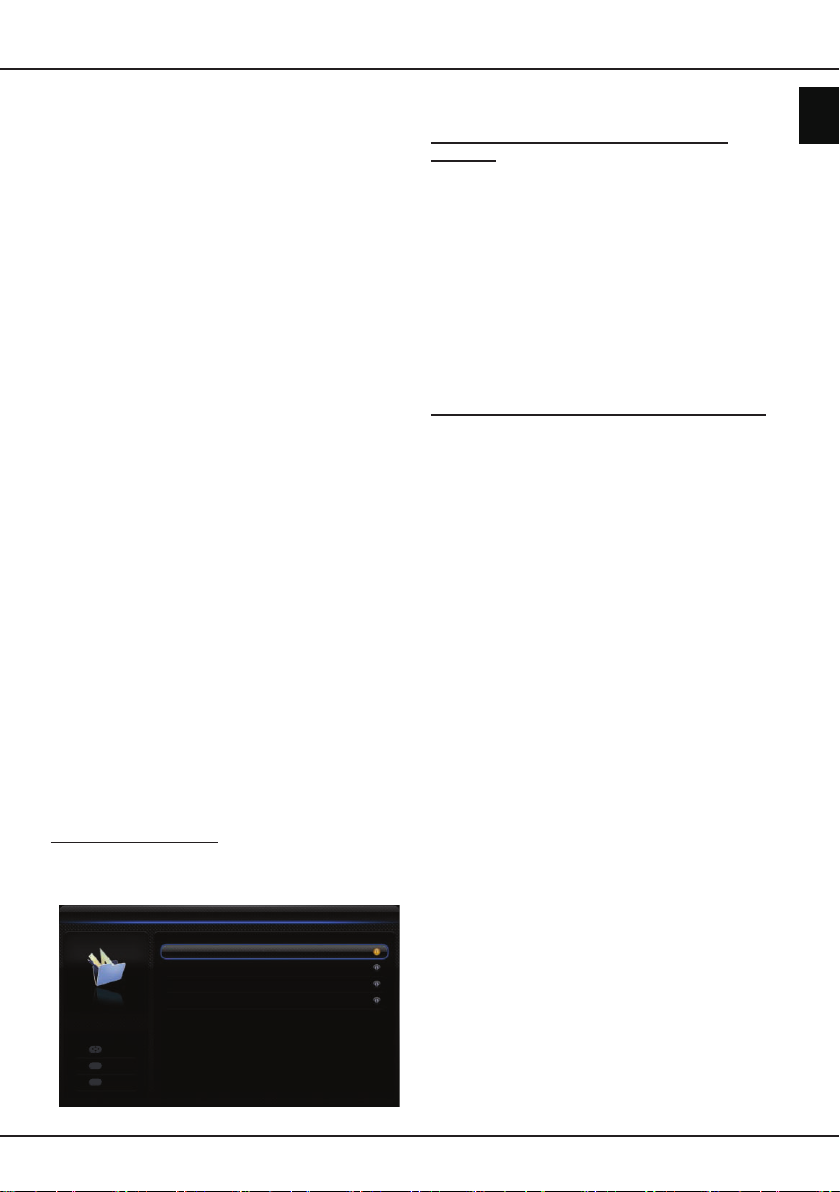
Channel install
Autom atic searc h
Autom atic updat e
Analo gue m anual scan
Anten na ma nual insta llati on
Clean chan nel list
Select
Menu
Back
Exit
Exit
Figure 5
Page 6
Important information
Safety
Ensure that your domestic mains supply voltage matches
the voltage indicated on the rating label located at the back
of your set. Where the mains plug or an appliance coupler is
used as disconnect device, it shall remain readily operable.
On certain models, the light indicator is located at the side of
the TV set. The absence of a light indication at the front does
not mean that the TV set is fully disconnected from the mains.
To disconnect the TV set completely, the mains plug must be
pulled out.
The TV set’s components are sensitive to heat. The
ambient temperature
not cover the vents at the back or sides of the TV set. Leave
sufcient space around it to allow adequate ventilation. Install
the appliance away from any source of heat (replace, etc.) or
appliances creating strong magnetic or electric elds.
Moisture
in rooms where the set is installed should not exceed
80%
humidity. Moving the set from a cold place to a warm
one can cause condensation on the screen (and on some
components inside the TV set). Let the condensation evaporate
before switching the TV set on again.
should not exceed
35º
Celsius. Do
maximum
WARNINGS
This appliance is intended for domestic household use only
and should not be used for any other application, such as for
non-domestic use or in a commercial environment.
If the supply cord is damaged, it must be replaced by the
manufacturer, its service agent or similarly qualied persons in
order to avoid a hazard.
The ventilation should not be impeded by covering the
ventilation openings with items, such as newspapers, tablecloths, curtains, etc.
The apparatus shall not be exposed to dripping or splashing
and no objects lled with liquids, such as vases shall be placed
on the apparatus.
No naked ame sources, such as lighted candles,
should be placed on the apparatus.
WARNING: To prevent injury, this apparatus must be securely
attached to the oor/wall in accordance with the installation
instructions.
CAUTION:
increase if required. Prolonged listening through headphones
at high volume settings can result in hearing damage.
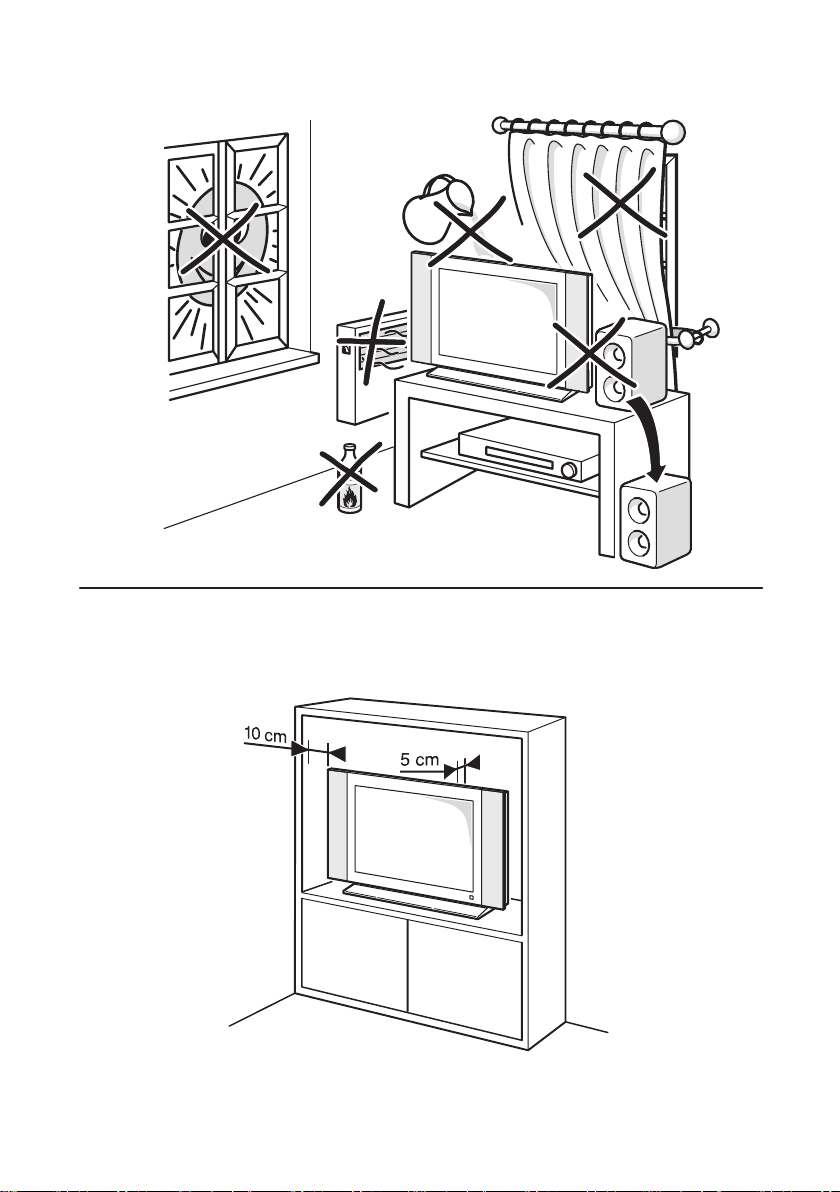
Ventilation
Place the television on a hard at surface away from direct
sunlight or heat sources. If it is in a cabinet, allow at least a
10cm gap all around. Do not obstruct the ventilation slots,
including those underneath with soft furnishings.
Overheating will shorten the life of the television and increase
the risk of re.
Connect headphones with the volume set low and
Eye Fatigue
When using this product as a computer monitor, health and
safety experts recommend short frequent breaks rather than
occasional longer breaks. For example a 5-10 minute break
after an hour of continuous screen work is considered to be
better than a 15 minute break every 2 hours.
Do not use the monitor against a bright background or where
sunlight or other bright light sources will shine directly onto the
screen.
The button on the TV set or the button on the remote
control can be used to switch it on and put it into standby
mode. If you are
lengthy period of time
the plug from the mains power socket.
During
the TV set from the mains and aerial so that it is not affected by
electrical or electromagnetic surges that could damage it. For
this reason, keep the
they can be
Unplug
smell of burning
circumstances, open the TV set yourself, as you run the risk of
electric shock
an
not going to be watching the TV for a
, switch it off completely by removing
thunderstorms
disconnected
the TV set immediately if you notice it giving off a
, we recommend that you disconnect
mains and aerial sockets
, if necessary.
smoke
or
. You must never, under any
in doing so.
accessible so
TV screen
The TV screen used in this product is made of glass. Therefore,
it can break when the product is dropped or impacted upon by
other objects.
The TV screen is a very high technology product, giving you
nely detailed pictures. Occasionally, a few nonactive pixels
may appear on the screen as a xed point of blue, green or
red. This does not affect the performance of your product.
Care
Use a glass-cleaning product to clean the screen and a soft
cloth and mild detergent to clean the rest of the set.
Important:
abrasive products may damage the screen.
Dust the vents at the back and sides regularly. Using solvents,
abrasive or alcohol-based products could damage the TV set.
If an object or liquid enters the appliance, unplug it immediately
and have it checked by an authorized engineer. Never open
the appliance yourself since this may put you at risk or damage
the appliance.
Important:
Batteries shall not be exposed to excessive heat such as
sunshine, re or the like. Remove batteries when the remote
control is not to be used for a long time. Batteries left in
equipment may cause damage through deterioration and
corrosive leakage, invalidating the guarantee.
To protect the environment use local recycling facilities for
battery disposal. Dispose of used batteries according to the
instructions.
CAUTION: Risk of explosion if batteries are replaced by an
incorrect type. Replace only with the same or equivalent type
recommended by the equipment manufacturer.
Using strong detergents, alcohol-based and
Hanging the TV set on the wall
Warning: This operation requires two people.
To ensure a safe installation, observe the following safety
notes:
• Check that the wall can support the weight of the TV set
and wall mount assembly. The TV can be mounted on a
wall using a 200mm x 200mm (LT-40HW62U) or 400mm
x 200mm (LT-46HW65U) VESA mounting kit supplied
separately.
• Follow the mounting instructions provided with the wall
mount. For certain models, make sure to screw the
hexagonal VESA wall mounting screw bosses (and screws)
provided with the set into the nuts for the wall mount at the
back of your set before your wall mounting.
• The TV set must be installed on a vertical wall.
• Make sure to use only screws suitable for the material of the
wall. The screw thread length must not exceed 15mm
(LT- 40HW62U) or 8mm (LT-46HW65U) into the TV.
EN
1
Page 7
• Make sure that the TV set cables are placed so that there is
no danger of tripping over them.
All other safety instructions about our TV sets are also
applicable here. For more information, refer to the instruction
installations printed separately.
Placing the TV on a table and other surfaces
Before setting up your television set, make sure that the
surface you want to put the set on can support its weight.
Do not place the set on an unstable surface (e.g. moving
shelf, very edge of a unit) and make sure that the front of the
television set does not overhang the surface it is standing on.
To avoid TV from falling please fasten TV to the wall by using
necessary screws (in Vesa wall mount holes), clamps, anchors
to be bought separately. Install TV near to the wall to avoid
falling backwards.
Multi product user manual
The features described in this manual are common to most
models. Some features may not be available on your TV and/
or your TV may include features that are not described in this
user manual. The illustrations in this manual may differ from
the actual product. Please refer to the actual product.
Products
Battery
Notice:
The sign Pb
below the
symbol for
batteries
indicates that
this battery
contains lead.
Information for Users on Disposal of Old
Equipment and Batteries
[European Union]
These symbols indicate that the electrical and
electronic equipment and the battery with this
symbol should not be disposed of as general
household waste at its end-of-life. Instead,
the products should be handed over to the
applicable collection points for the recycling
of electrical and electronic equipment as well
as batteries for proper treatment, recovery
and recycling in accordance with your national
legislation and the Directive 2002/96/EC and
2006/66/EC.
By disposing of these products correctly, you
will help to conserve natural resources and will
help to prevent potential negative effects on
the environment and human health which could
otherwise be caused by inappropriate waste
handling of these products.
For more information about collection points
and recycling of these products, please contact
your local municipal ofce, your household
waste disposal service or the shop where you
purchased the product.
Penalties may be applicable for incorrect
disposal of this waste, in accordance with
national legislation.
[Business users]
If you wish to dispose of this product, please
contact your supplier and check the terms and
conditions of the purchase contract.
[Other Countries outside the European
Union]
These symbols are only valid in the European
Union. If you wish to dispose of these items,
please do so in accordance with applicable
national legislation or other rules in your country
for the treatment of old electrical equipment and
batteries.
Dear Customer,
This apparatus is in conformance with the valid European directives and standards regarding electromagnetic compatibility and
electrical safety.
European representative of the manufacturer is:
TCL Operations Polska Sp. z o.o.
ul. A. Mickiewicza 31/41
96-300 Żyrardow, Poland
Email address: zyeee@tcl.com
Figures and illustrations in this User Manual are provided for reference only and may differ from actual product appearance. Product design and specications may be
changed without notice.
EN
2
Page 8

Contents
Important information................................................. 1
Chapter 1- Connections
Connect the power and antenna ...............................4
DVD player, home theatre system, PC...................... 4
DVD recorder,
Blu-ray Disc player, HD game console &
HD camcorder ...........................................................5
headphones,
cable receiver ............... 5
Chapter 2 - Getting started
Remote control functions ........................................... 6
Switch the TV on and off ...........................................7
Chapter 3 - Installing channels
Initial setup ................................................................8
Performing an automatic channel search .................. 8
Chapter 4 - Using your TV
Accessing channels ................................................... 9
Watching connected devices ..................................... 9
Volume ......................................................................9
Using TV menus ........................................................ 9
Selecting menu language ........................................ 10
Chapter 5 - Using more of your TV
Setting up your favourite channels .......................... 10
Energy saving .......................................................... 10
Viewing TV using the 3D function............................ 10
Audio description ..................................................... 10
PAP function .............................................................11
Using subtitles ..........................................................11
Turning on/off subtitles .............................................11
Enabling subtitle languages on digital TV channels . 11
Selecting a subtitle type on digital TV channels .......11
Selecting decoding page language in Teletext .........11
Digital Teletext language ..........................................11
SPDIF type ...............................................................11
T-Link....................................................................... 12
Enabling or disabling T-Link .....................................12
Using one-touch play ................................................12
Using system standby...............................................12
Network update .......................................................12
Common interface ................................................... 12
Using the common interface module ........................12
Accessing common interface services......................12
Software update ......................................................12
Changing to Shop or Home mode ........................... 13
MHEG function ........................................................ 13
Viewing photos, playing music and watching videos
from a USB storage device...................................... 13
Photo ........................................................................13
Music ........................................................................13
Video.........................................................................14
DivX video.................................................................14
Time access ............................................................14
Diagnostics on digital TV channels.......................... 14
Time shift ................................................................. 14
Reset shop ..............................................................15
Customising the input settings................................. 15
Using Electronic programme guide .........................15
PVR (Personal Video Recorder).............................. 15
Schedule list ............................................................ 16
Chapter 6 - Network
Network connection ................................................. 16
Connecting to a wired network .................................16
Connecting to a wireless network .............................17
TV remote ................................................................ 17
Chapter 7 - DLNA (Share & See)
Connecting to your PC ............................................17
Enabling DLNA function...........................................18
Adding media from your PC for sharing ..................18
DLNA application ..................................................... 18
Chapter 8 - HbbTV
HbbTV access ......................................................... 18
HbbTV deactivation ................................................. 18
Chapter 9 - Smart TV
Access Smart TV Applications (Apps) ..................... 18
YouTube ...................................................................19
Netix ........................................................................19
Skype ........................................................................ 19
Chapter 10 - Other information
Password in Parental Control .................................. 19
OSS Notice .............................................................. 19
Troubleshooting and Help Line ................................ 21
Specications ..........................................................24
English
EN
3
Page 9
Chapter 1
Connections
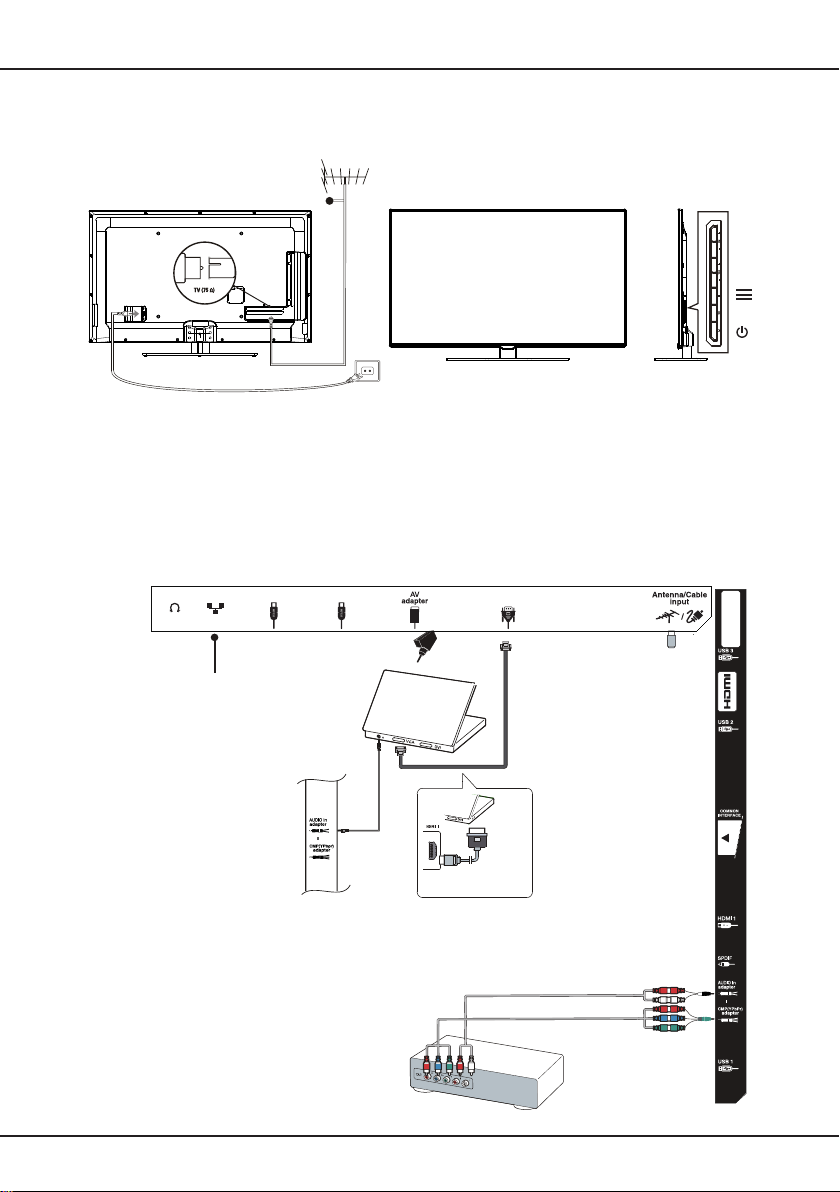
Connect the power and antenna
To switch on TV after connecting power cord, press O .
Note: Position of power socket varies according to TV model. On certain models, you have to turn on the power
switch rst.
Cable
-PR+
-VOL+
OK
Notes: -Disconnect the power cord before connecting devices.
DVD player, home theatre system, PC
Notes:
-Before connecting a PC, set the PC monitor refresh rate to 60Hz.
-It is recommended to use as short as possible high quality HDMI cables to avoid possible interferences.
-It is recommended to use 1m long or shorter VGA cable with ferrite beads in case VGA input is available
in TV and TV is connected using VGA cable. Maximum supported VGA resolution is 1920x1080/60Hz.
LAN VGA
HDMI 2HDMI 3 (ARC)
he
d t
from
n
e
y a
licens
Dolb
ies.
r
s.
e
ori
under
orato
b
ymbol are trademarks
a
orat
s
b
a
e-D
y L
nufactured
lb
Dolby L
of
doubl
Ma
Do
Network
connection
Or use an HDMI
connection.
EN
4
DVD player/
Home theater system
Page 10

Connections
DVD recorder,
headphones,
cable receiver
Note:
-Excessive sound pressure from earphones and
headphones can cause hearing loss.
DVD
recorder
Set-top box
he
m
t
o
r
f
nd
a
y
Dolb
r license
.
ies.
e
are trademarks
ories
orat
b
a
actured und
f
lby Laborator
y L
u
n
lb
double-D symbol
of Do
Do
Ma
OUT
IN
he
m
o
r
d t
f
arks
n
m
y a
s.
Dolb
er license
s.
are trade
orie
boratorie
orat
b
La
a
actured und
f
y L
OUT
u
n
lb
Ma
Do
of Dolby
double-D symbol
English
Cable
Blu-ray Disc player, HD game console &
HD camcorder
Notes:
-USB connectors are for data input from USB
drives and for connecting other relevant USB
HD game
console
devices where applicable.
-All USB devices have to be directly connected to
TV set without cable extenders. In case extender
is required it has to be as short as possible and
Blu-ray Disc
player
equipped with ferrite beads.
-ARC (Audio Return Channel) function is only
supported on
HDMI3 (ARC)
port.
HD Camcorder
-Number of USB ports may vary.
Notes:
-Not all connections available on all models.
-The location of the power socket on the TV may vary according to TV model.
-The positions and names of the function buttons and connectors on the TV may vary
according to TV model.
EN
5
Page 11
@
/
Chapter 2
Getting started
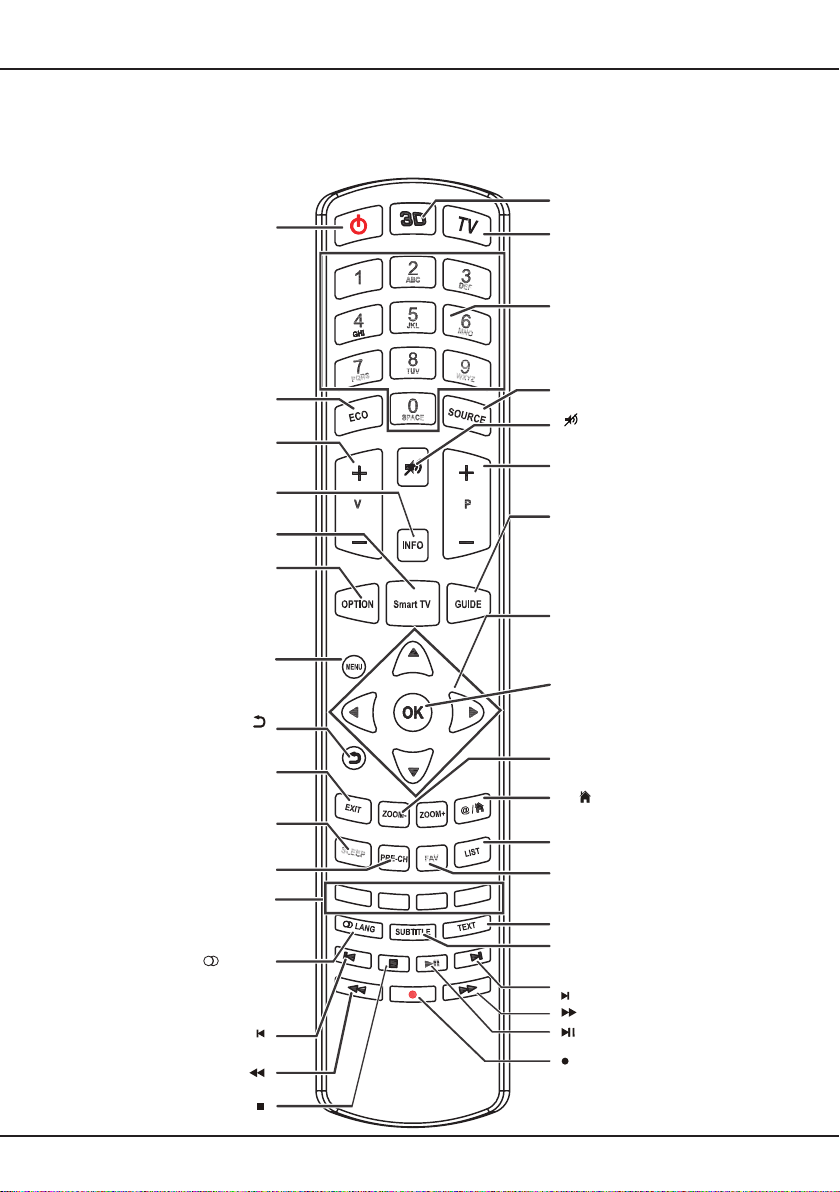
Remote control functions
Most of your television's functions are available via the menus that appear on the screen. The remote control supplied
with your set can be used to navigate through the menus and to congure all the general settings.
Note:
You are recommended to use the full screen mode. Do not use the display mode with black bars on both sides of the picture (such
as 4:3) for a long time; otherwise the TV screen may be damaged permanently.
Standby / quit standby.
To select desired power saving mode.
To control the volume.
To display programme information, if
To display the Smart TV homepage.
To display the function menu to perform
certain operations; to display the
Teletext page in different modes.
To access the main menu; to return to
to access the virtual keyboard in Smart
To return to the previous menu
To exit the menu structure or Teletext.
To toggle among the sleep timer options.
To return to the previous channel.
To select tasks or Teletext pages (see
footnote). The red button can also be
used for MHEG and HbbTV function.
To select a sound type available for
selected analogue TV programme; to
select an audio language available for
selected digital TV programme.
To select the previous photo, music or
SMART TV
the previous menu;
Colour buttons
To start fast reverse.
To stop playback.
O
ECO
V+/-
INFO
available.
OPTION
MENU
TV.
EXIT
SLEEP
PRE-CH
LANG
video.
3D
To toggle among the 3D input format
(This button can only be used for
options.
LT- 46HW65U model.)
TV
To access TV mode.
Alphanumeric buttons
To enter channel numbers; to enter a letter,
a digit or a symbol in some functions.
SOURCE
To select connected devices.
To switch the sound off and back on.
P+/-
To change channels/To page up or down
in some Smart TV applications.
GUIDE
To toggle the Electronic Programme
Guide on or off (only available for digital
channels).
◄/►
To navigate through the menus; to set
functions and change values.
▲/▼
To navigate through the menus; to select
menu options; to switch to the previous or
next photo, song or video in USB function.
OK
To conrm an entry or selection.
ZOOM-/ZOOM+
To select the picture format.
To operate in some Smart TV applications.
LIST
To display the channel list.
FAV
To bring up the
menu.
TEXT:
or off.
SUBTITLE
To select a subtitle language available for
selected digital TV programme.
To select the next photo, music or video.
To start fast forward.
To start or pause playback.
Recording button.
Footnote:
Red, green, yellow and blue buttons are
multi-function; please follow on-screen
prompts and section instructions.
Channel list selection
To toggle Teletext or Mix mode on
EN
6
Page 12

Getting started
If the batteries in your remote control are run down, you can use the buttons on your TV set. In TV mode, they have
the same functions as the corresponding buttons on the remote control. The OK button on the TV set can be pressed
repeatedly to select the required source. In the menus they have the following functions:
PR+ Up
PR- Down
VOL+, Right
VOL-, Left
MENU
OK OK
Switch the TV on and off
1.
When the power cord is connected, the TV will be turned on directly or be in standby mode. If the TV is in
standby mode, press the O or
2.
To put the TV into standby mode, press the O button on the set or the O button on the remote control. The
PR+ PR-
button on the set or the button on the remote control to turn it on.
TV set remains powered up, but with low energy consumption.
3.
To switch the TV off, unplug the mains plug from the mains outlet.
English
EN
7
Page 13

Chapter 3
Initial setup
Initial setup involves selecting all the settings required
to be able to search for and store all the analogue
and digital channels you can receive.
Make sure that the television is switched on and
follow all the steps in turn specied hereafter.
Note: If the channel search retrieved only the
analogue channels it could be caused by poor
broadcasting and therefore is not covered
by manufacturer warranty. Manufacturers
cannot be held responsible for lack of or poor
broadcasting in some areas.
Selec t Next
Home
Antenna
OK/►
, then press
Initial setup
Language
or
, then
Antenna
.
or
.
OK/►
The rst time you switch the set on, the
wizard opens, which guides you through the initial
setup process.
Initial setup
Please select your language:
English
Български
Hrvatska
Česky
Dansk
1.
2.
3.
4.
▲/▼
Press
OK/►
Press
OK/►
Press
Shop
Press
press
to select your language, then press
to enter the next step.
▲/▼
to select your country, then press
to enter the next step.
▲/▼
to select your location (
), then press
▲/▼
to select
OK/►
to enter the next step. (for more
OK/►
to enter the next step.
Network connection
information, see "Network connection" section
p.16)
Note: If you select
Password setting
France
, you will have to enter the
menu here in order to set
a password. Use the alphanumeric buttons to
enter a four-digit number for your password.
(Your password cannot be 0000) Re-enter the
same code to conrm the password. After that,
you will enter the next step automatically. (In
this step, you can only press ◄ to return to the
previous step.)
5.
Press
or
▲/▼
to select your tuner mode
Cable
.
- a) If you have selected
OK/►
• Press
• Press
Digital
• Press
▲/▼
Analogue
or
▲/▼
to enter.
to select
to select
Digital & Analogue
, then press
Scan
to start the automatic search for all DVB-T
digital and/or analogue channels.
Installing channels
Note: not all contries have
Selection
function.
- b) If you have selected
OK/►
• Press
• Press
Digital
• If you select
to enter.
▲/▼
to select
Analogue
or
Digital & Analogue
to enter. Then:
▲/▼
- Press
- Press
available (
to select
◄/►
to select the scan mode if
Full
- If you select
automatic search for all DVB-C digital and/or
analogue channels.
- If you select
buttons to adjust the values for
symbol rate, network ID
select the
modulation mode
to start the search for all DVB-C digital and/or
analogue channels.
• If you select
then follow all the same steps as for
& Analogue
Digital
above, to search for all DVB-C
digital channels.
▲/▼
Analogue
to select
• If you select
press
start the search for all analogue channels.
Note: To prevent the channel setup process from
being interrupted, wait for the message
indicating that the setup is complete.
6.
Before starting the scanning, you can also select
Skip scan
to skip the initial setup process. In this
case, to search and store your channels you may
do an automatic channel search by following the
instructions in the next section
automatic channel search
7.
During the setup, you can follow the hints available
at the bottom of the screen to return to the
previous step by pressing ◄. You can also press
EXIT
to exit or interrupt the search halfway.
- At anytime during the initial setup process, you
can press ◄ to return to the previous step.
- Once the initial setup process is complete,
you can press OK to exit the initial setup. The
channels are arranged in a preset order. If you
wish to skip channels, modify the preset order
or rename channels,
and press OK/► to enter.
Performing an automatic channel search
This section describes how to search and store
channels automatically. Instructions are for both
analogue and digital channels. This may be done in
any of the cases below:
- you have selected
Skip scan
Favorite Network
Cable
.
Digital & Analogue
.
, press
Scan
, then press
Advanced
or
Full
, press OK to start the
Advanced
).
, use the numeric
frequency
, and use
; then press OK
OK/►
, press
, press
Scan
to enter,
OK/►
, then press
Performing an
.
select Setup > Organiser
in the Initial setup
or
OK/►
OK/►
◄/►
to
Digital
to enter,
OK/►
.
,
to
EN
8
Page 14
Chapter 4
- you see
- you want to update your channels.
1.
2.
3.
4.
5.
6.
“Please scan channels!”
MENU
Press
on the remote control and select
Settings > Setup > Language
in TV mode
. Press
◄/►
select your desired menu language.
Press
select
MENU
Country
to return to
, then press
Setup
◄/►
, press
▲/▼
and, if required,
enter your password to select your country. The
TV installs and arranges channels according to
your country.
▲/▼
Press
press
to select
◄/►
to select
- a) If you have selected
▲/▼
• Press
OK/►
press
OK
Enter
Select
Menu
Back
Exit
Exit
Automatic search
• Select
Automatic search
display
Tuner mode
Antenna
to select
Channel install
to enter.
Channel install
Autom atic searc h
Autom atic updat e
Analo gue m anual scan
Anten na ma nual insta llati on
Clean chan nel list
, then
or
Antenna
.
, then press
.
Cable
, and
OK/►
• Press OK to skip the country selection and
enter the next step. Or use
◄/►
to reselect
your country, then press OK to enter.
Digital & Analogue
• Select
Analogue
, then press
OK/►
Digital
or
to start the
or
automatic search, which relates to all DVB-T
digital and/or analogue channels.
- b) If you have selected
▲/▼
• Press
press
• Select
display
to select
OK/►
to enter.
Automatic search
Automatic search
Cable
.
Channel install
, then press
.
, and
OK/►
• Press OK to skip the country selection and
enter the next step. Or use
◄/►
to reselect
your country, then press OK to enter.
- If you select
press
Digital & Analogue
OK/►
to enter. Select your scan
, then
mode if available and congure proper cable
information in the same way as in Initial
setup. Press
OK/►
▲/▼
to select
to start your automatic search relating
Scan
and press
to all DVB-C digital and analogue channels.
The search may take a few minutes. During the
process, you can press
Once the automatic search ends, press
MENU
to abort halfway.
MENU
return to the previous step or press OK to restart
your channel search.
After the automatic search, channels are arranged
in a preset order. If you wish to skip channels,
to
to
Using your TV
modify the preset order or rename channels, select
Settings > Setup > Organiser
and press
to enter. Here you can skip, sort, edit or delete
channels.
Using your TV
Accessing channels
Using the alphanumeric buttons:
press the
corresponding alphanumeric buttons to access the
channels.
.
Using the PR+/- or P+/- buttons:
scroll through the
channels.
Watching connected devices
Repeatedly press
SOURCE
on the remote control
or OK on the TV set to toggle between TV and
other input sources. To resume TV viewing, press
any numeric button to enter the channel, while
will cycle through all TV channels and other input
sources.
Volume
Volume control: use the
V+/-
set or
buttons on the remote control to increase
VOL +/-
buttons on the TV
or decrease the volume.
Sound mute: press the button to temporarily mute
to
the sound. Press this button again or the V+ button to
restore it.
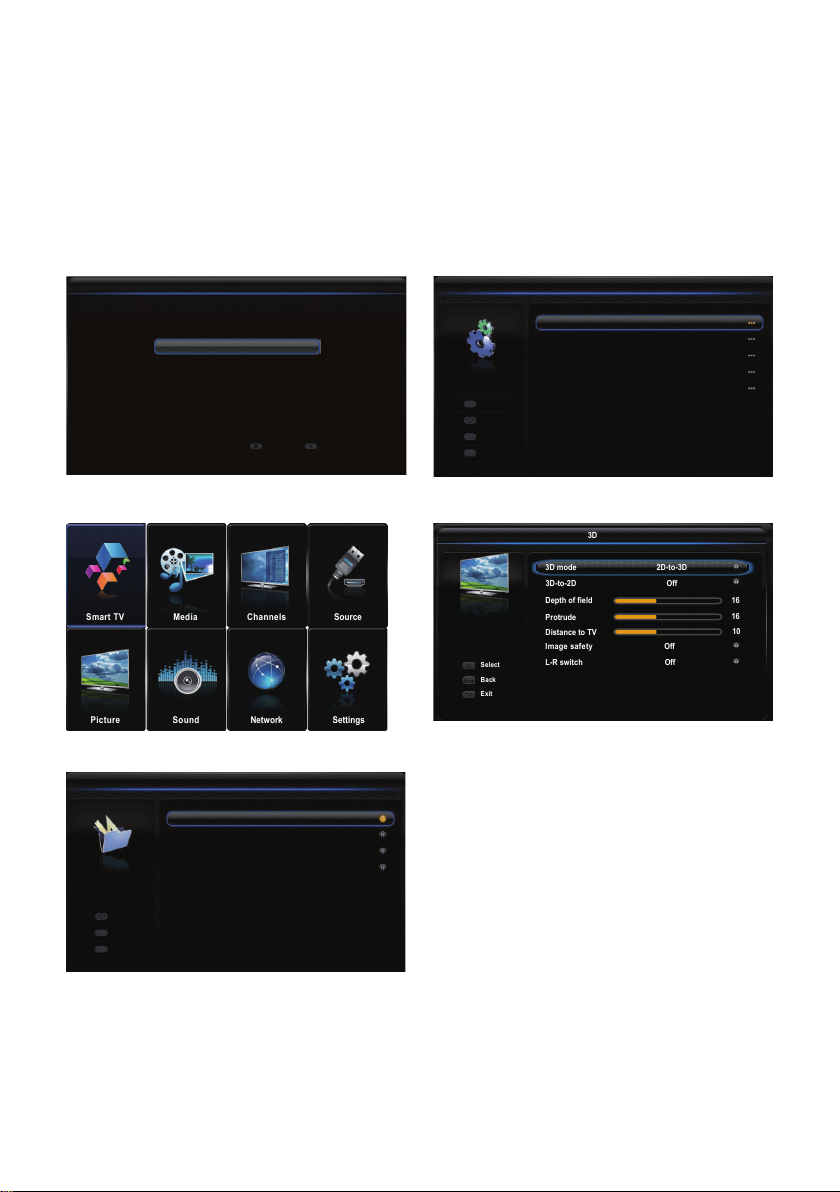
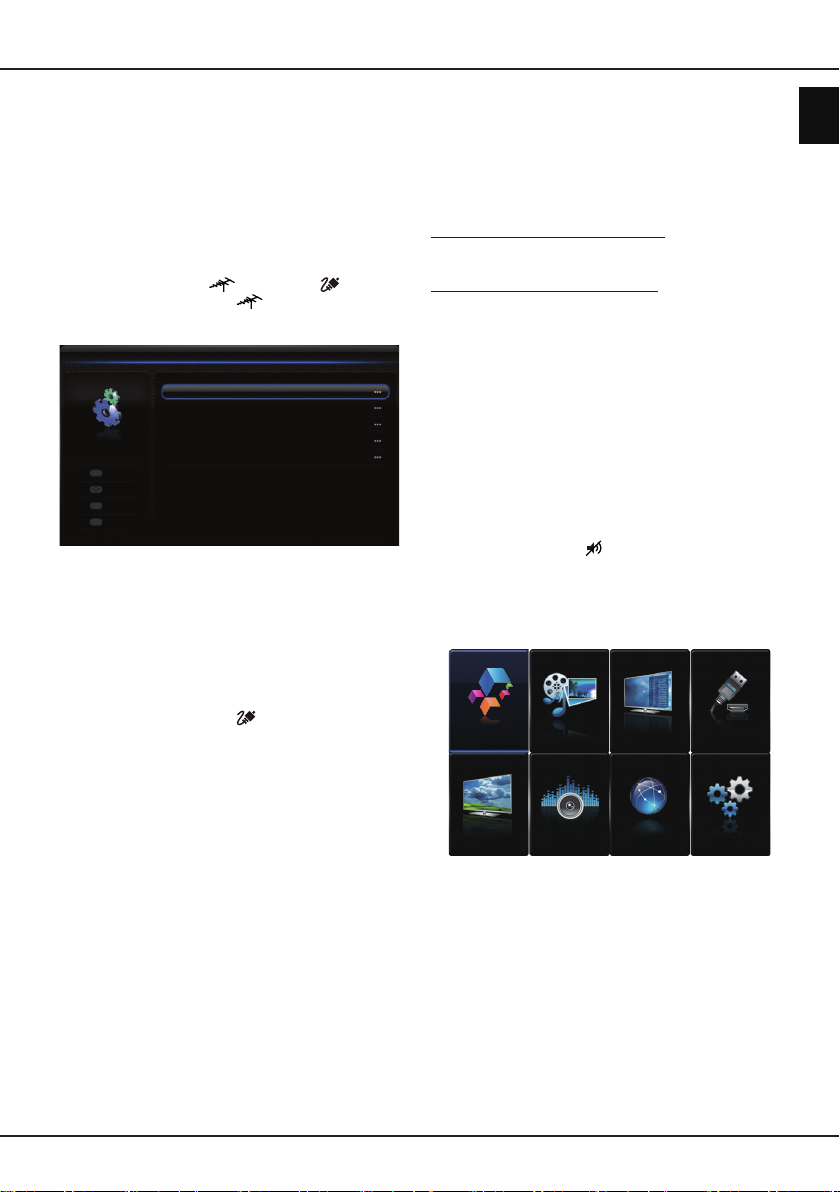
Using TV menus
1.
MENU
Press
Smar t TV Chan nels Source
to display the main menu.
Pic ture
Medi a
Soun d
PAP
to
Medi a
Pict ure S ound Network Settings
Smar t TV
Lock
The following items are available in the main menu:
Smart TV, Media, Channels, Source, Picture, Sound,
Network, Settings.
2.
Press
▲/▼/◄/►
to select the desired item, then
press OK to open the corresponding submenu.
to
3.
In submenus, use
◄/►
use
OK
to activate a setting. Use
corresponding submenu.
4.
5.
Press
Press
MENU
EXIT
▲/▼
to select menu options,
to set functions or change values. Use
OK/►
to return to the previous menu.
to close the menu.
Note: Some options may not be available for
certain signal sources.
OK/►
P+/-
Options
Setu p
to open the
English
EN
9
Page 15
Chapter 5
Selecting menu language
You can choose your preferred menu language
following the instructions below.
1.
2.
Press
Press
MENU
to display the main menu.
▲/▼/◄/►
to select
Settings > Setup
, then
press OK to enter.
3.
4.
5.
Language
Select
◄/►
Press
Language
EXIT
Press
and press
OK/►
to enter.
to select your desired language in the
menu to display the menus.
to close the menu.
Using more of your TV
Setting up your favourite channels
You can create a list of your favourite TV channels.
1.
2.
LIST
Press
.
Press the yellow button to enter
selection
. Press
▲/▼
to select
Channel list
Favorite list
and
press OK to enter.
3.
Press the blue button to start editing your favourite
list. Press
▲/▼
to scroll through the channel list
and press OK to select or deselect it.
4.
Repeat this procedure to set up other favourite
channels.
5.
Shortcut operation:
control to directly enter
Press
LIST/EXIT
to exit.
FAV
Press
on the remote
Channel list selection
.
Energy saving
1.
Press
MENU
on the remote control and select
Settings > Setup > ECO Settings > Energy
Saving
Press
.
◄/►
to select a desired power saving mode
2.
to achieve the desired power saving effect.
3.
Shortcut operation:
Press
EXIT
to close the menu.
Press
ECO
on the remote
control to select a desired power saving mode
directly.
Viewing TV using the 3D function
(only for LT-46HW65U)
WARNING:
• Some viewers may experience discomfort while
viewing 3D TV such as dizziness, nausea and
headaches. If you experience any such symptom,
stop viewing 3D TV, remove your 3D glasses and
rest.
• Watching 3D videos too closely or for a long period
of time may harm your eyesight.
• A responsible adult should frequently check on
children who are using the 3D function.
• Do not use the 3D glasses for any other purpose
than viewing 3D videos on a 3D TV.
• Do not use the 3D function or 3D glasses while
walking or moving around, otherwise this may result
in injuries due to running into objects, tripping, and/
or falling.
Using more of your TV
1.
2. 3D Mode:
3. L-R Switch:
4. Depth of Field:
5. 3D-to-2D:
6.
Audio description
Audio description refers to an additional narration
track for blind and visually impaired viewers of visual
media, including television programmes and movies.
The description narrator talks through the presentation
describing what is happening on the screen during
the natural pauses in the audio (and during dialogue if
deemed necessary).
MENU
Press
Picture > 3D navigation
adjust
on the remote control and select
, then press ◄/► to
3D navigation
3D mode 2D-to-3D
3D-to-2D
Depth of field 16
Protrude
Distance to TV
Image safety
Select
Back
Exit
L-R switch Off
to
3D
Manual.
Off
16
Off
10
Note: If 3D navigation is set to Auto, the settings
will be congured automatically.
Wear the 3D glasses rst, then
◄/►
press
among
and Line interleave
to select the right 3D input format
Sideby-Side, 2D-to-3D, Top and Bottom
.
Select On or
Off
to adjust the 3D
video between the left and right eyes for better 3D
viewing.
Achieve a good 3D effect with the
image converted from the 2D image.
Left
Select
or
Right
to display the
image in 2D mode (no 3D effect). This function is
deactivated when
EXIT
Press
Notes:
3D glasses from other manufacturers may not be
-
3D Mode
to close the menu.
is set to
2D-to-3D
or
Off
supported.
All photo functions are disabled in 3D mode.
-
If you change to a different signal source
-
or access Smart TV, the 3D mode will be
automatically disabled.
Some 3D modes may not be available depending
-
on the input format of the 3D video source.
Supported 3D modes:
-
Analogue TV, AV, CMP:
2D-to-3D
Digital TV, HDMI, USB, Videos from the Internet:
Top and Bottom, Side-by-Side, 2D-to-3D, Line
interleave, Frame sequential
.
-3D function in USB mode: During the playback
of a selected video from USB, press
MENU
to
display the video menu in the browser mode,
then select
3D Mode
. For more detail information,
refer to the above related descriptions.
.
EN
10
Page 16
Using more of your TV
You can use this feature if the current broadcast
contains audio description.
1.
2.
3.
4.
MENU
Press
Sound
Use
OK
to enter.
on the remote control and select
, then press OK to enter.
▲/▼
to select
Audio Description
, then press
You can turn the Audio Description function on or
off in the
Audio Description
menu.
To adjust the volume for Audio Description,
▲/▼
press
use
to go to the next menu line, then
◄/►
to set the volume.
PAP function
Use this function to display the pictures from different
source inputs side by side. Note that one window is
for both analogue and digital TV inputs, the other is
for VGA, HDMI and CMP inputs.
(Note: Not available
for AV on both windows.)
1.
2.
3.
4.
5.
Press
Select
Press
OK
to enter.
Press
Select
MENU
to display the main menu.
Picture
and press OK to enter.
▲/▼
to select the
◄/►
to turn on/off PAP function.
TV position
PAP
, press
option, and press
◄/►
to reposition the
TV window.
6.
Press
EXIT
to close the menu.
If you switch on the PAP function, you can press ◄/►
to toggle the focus window (with sound symbolized
by a musical note). When the focus is on the TV
window (with sound symbolised by a musical note),
the alphanumeric buttons and
When the focus is on the other window,
P+/-
work in TV mode.
P+/-
switches
available external sources.
Using subtitles
You can enable subtitles for each TV channel.
Subtitles are broadcast via Teletext or DVB-T/DVB-C
digital broadcasts. With digital broadcasts, you have
the additional option of selecting a preferred subtitle
language.
Turning on/off subtitles
1.
Press MENU on the remote control and select
Settings > Subtitle
2.
Press OK/► to enter
Select
Menu
Back
Exit
Exit
.
.
Subtitle
Subti tle
Digit al s ubtitl e lan guage
Digit al s ubtitl e lan guage 2nd
Subti tle type
On
Engli sh
Engli sh
Norma l
3.
Select the
select
Subtitle
On/Off
option, and press
to turn on/off subtitles.
◄/►
to
Enabling subtitle languages on digital TV
channels
1.
2.
MENU
Press
on the remote control and select
Settings > Subtitle > Digital subtitle language
◄/►
Press
to select a subtitle language as your
.
preferred language.
3.
4.
Press
2nd
Press
▲/▼
to select
Digital subtitle language
.
◄/►
to select a secondary subtitle
language.
5.
Shortcut operation:
Press
EXIT
to close the menu.
Press
SUBTITLE
on the remote
control to directly select a subtitle language available
for the selected digital TV programme.
Selecting a subtitle type on digital TV channels
1.
2.
MENU
Press
on the remote control and select
Settings > Subtitle > Subtitle type
◄/►
Press
Hearing impaired
to select a subtitle type. You can select
to display the hearing impaired
.
subtitles with your selected language.
Selecting decoding page language in Teletext
MENU
Press
Settings > Teletext > Decoding page language
on the remote control and select
.
Select a proper type of language in which Teletext will
display.
Digital Teletext language
On digital TV channels, depending on the
broadcaster, you may be able to enjoy a service with
multiple initial Teletext pages in different languages.
This function allows you to select an available
language as primary language, which relates to
different initial Teletext pages.
MENU
Press
Settings > Teletext > Digital teletext language
Press
on the remote control and select
◄/►
to select.
.
SPDIF type
Connect the TV to an audio device through the
SPDIF
output. To select a proper sound type for your SPDIF
output, press
Settings > SPDIF type
- If you select
MENU
on the remote control and select
.
PCM
, the SPDIF output format is PCM,
regardless of the programme’s sound format.
- If you select
Dolby D
, the SPDIF output format is
• Dolby Digital when the programme’s sound format
is Dolby Digital or Dolby Digital Plus or HE-AAC
• PCM when the programme’s sound format is
MPEG.
- If you select
Off
, this turns off the audio output from
the audio device connected to the SPDIF output.
English
EN
11
Page 17

Using more of your TV
Note: The options you may choose depend on
picture, you can select
Settings
the
the delay time to synchronize the sound with
the picture.
menu and press ◄/► to adjust
SPDIF delay
from
T-Link
Use this function to search for CEC devices connected
to the HDMI sockets in your TV and enable one-touch
play and one-touch standby between CEC devices.
Enabling or disabling T-Link
1.
2.
Using one-touch play
With one-touch play, pressing the play button on (for
example) your DVD remote control starts playback on
your DVD device and automatically switches your TV
to the correct source, displaying DVD content.
Using system standby
With system standby, pressing the O button on (for
example) your TV remote control switches your TV
and all connected HDMI devices to standby mode.
MENU
Press
Settings > T-Link
Press
is turned on,
Quick access
the
pressing the
Note: The CEC functions depend on the devices
on the remote control, then select
◄/►
connected and it is possible that some
devices may not interoperate correctly when
connected to this TV. The user manual or
the manufacturer of the problematic devices
should be consulted for further information.
.
to select On or
T-Link
menu which you can enter by
Option
Off
option will be available in
button on the remote control.
, if this function
Network update
MENU
Press
Settings > Network update
or disable the Network update function.
- When this function is on, the TV will automatically
update channels if your DTV service provider
updates their DTV network.
- When this function is off, you need to run the
channel search again to get new channels or
remove unavailable channels if your DTV service
provider adds or removes channels from their DTV
network.
on the remote control, then select
. Select
On/Off
to enable
Common interface
Encrypted digital TV channels can be decoded with a
common interface module and a card provided by a
digital TV service operator.
The common interface module may enable several
digital services, depending on the operator and
services you choose (for example, pay TV). Contact
your digital TV service operator for more information
about services and terms.
Using the common interface module
WARNING: Switch off your TV before inserting a
common interface module. Be sure to follow the
instructions described below. Wrong insertion of
a common interface module may damage both the
module and your TV.
1.
Following the directions printed on the common
interface module, gently insert the module into the
common interface slot on the TV.
2.
Push the module in as far as it will go.
3.
Turn on the TV and wait for the common interface
function to be activated. This may take several
minutes.
Note: Do not remove the common interface
module from the slot. Removing the module
will deactivate the digital services.
Accessing common interface services
After inserting and activating the common interface
module, press
select
This menu option is only available if the common
interface module is correctly inserted and activated.
On-screen applications and content are provided by
your digital TV service operator.
MENU
Settings > Common interface
on the remote control and
.
Software update
Note: Do not switch off or unplug the TV until the
upgrade is completed.
MENU
Press
Settings > Software update
-By network:
the latest software version from the Internet.
Make sure to set up a wired or wireless network
connection rst then select
OK/►
available, a progress bar appears. When the
download nishes, the TV will go black and upgrade
the software.
Note: Keep successful network connection during
-By channel:
of the software if available from the broadcast.
Use
enter.
• Use
on the remote control and select
Enables you to download and install
to enter. When new-version software is
upgrade.
Enables you to install the latest version
▲/▼
to select
◄/►
to automatically download the latest software
if available. After the software has been
downloaded successfully, you will be prompted
to decide if you want to install it right now. If yes,
follow the on-screen instructions to complete
your installation. You can also select to ignore
the installation here.
By Channel
to select
Yes
OK/►
. Press
By network
and press
Auto download
under
to enter.
and press
OK/►
to
EN
12
Page 18

Using more of your TV
◄/►
• Use
decline the automatic download.
• Use
OK/►
latest software. Follow the on-screen instructions
to complete. During the search, press
to cancel or exit the process.
to select No under
▲/▼
to select
if you wish to search manually for the
Manual Download
Auto download
and press
OK/EXIT
to
Changing to Shop or Home mode
1.
2.
3.
MENU
Press
Settings > Location
Press
Press
Note: According to the regulation of European
on the remote control and select
menu.
.
Shop
or
◄/►
to select your location:
EXIT
to exit.
Commission 2009/125/EC, in Home
mode, TV will be put into standby mode
automatically if there is no operation in
4 hours. This feature can be deactivated in
Settings
Home
MHEG function
Some digital TV broadcasters offer dedicated digital
text or interactive services (for example, BBC1 in the
UK). These services work like normal Teletext with
the addition of number, colour and navigation buttons.
Note: MHEG and subtitles are mutually exclusive
and cannot coexist on the same screen. If
Subtitle
is set to On, MHEG will not appear.
Please follow the instructions in the section
Turning on/off subtitles
Off
.
1.
Press the red button or
control.
2.
3.
4.
5.
▲/▼/◄/►
Press
Press OK to conrm or activate.
Press one of the colour buttons to select an option.
TEXT
Press
or
TEXT
to select or highlight items.
EXIT
to exit.
Subtitle
to set
on the remote
to
Viewing photos, playing music and watching
videos from a USB storage device
Your TV is tted with a USB connector that enables
you to view photos, listen to music or watch videos
stored on a USB drive.
Supported le formats:
Photo JPEG
Music MP3
Video AVI, MPG, MPEG, TS, DIVX, MKV...
Note: Some USB keys and USB products like
digital cameras or mobile phones are not
fully compatible with USB 2.0 standard so
they may not work with the TV multimedia
player. Not all USB keys or devices are
compatible with the USB function. Not all
above formats are recognised. The encoding
formats of your les will determine whether
or not they can be used.
To enter the
MENU
Photo
Use this function to display photos, if available.
1.
Select
main le content browser.
2.
In the main le content browser, use
select a photo or an inner le folder.
3.
Select an inner le folder, press OK to enter a sub
le content browser.
4.
Use
.
sub le content browser, press
the photo menu in folder mode.
5.
Select a photo, press OK to watch, and a slide
show begins from the selected photo. Press OK to
pause the photo. Press
menu in the browser mode. You can play, pause
or rotate the photo, select different play modes and
display effects, etc.
6.
Press the related buttons on the remote control
to perform the available functions shown on the
function bar at the bottom of the TV screen. Press
the
Shortcut operation:
remote control to rotate the photo.
Music
Use this function to play back music, if available.
1.
Select
main le content browser.
2.
Use
sub le content browser in the same way as in
photo display function, press
music menu in folder mode.
3.
Select a song, press OK to play, and automatic
playback begins from the selected song. Press
MENU
mode. You can play or pause the song, select
different play modes, etc.
Media center
on the remote control and select
Media > Photo
▲/▼/◄/►
-Sort:
Sort folders and photos by modication
Date or Name.
-Edit:
Copy, paste or delete a selected photo.
-Parser:
-Sort:
-Edit:
-Parser:
-Show lyrics:
-Audio only:
You can select
photos from all sub le folders.
INFO
button to show or remove the function bar.
Media > Music
▲/▼/◄/►
Sort folders and songs by Name, Genre,
Artist or Album.
Copy, paste or delete a selected song.
You can select
songs from all sub le folders.
to display the music menu in the browser
songs with lyrics. Select it and use
on/off lyrics synchronized display.
music with the screen turned off. Pressing any
key will turn the screen on.
Select and press OK to listen to the
menu manually, press
, then press OK to enter the
to select a photo in either main or
Press the green button on the
to select a song in either main or
This option is available for the
MENU
Recursive
MENU
to display the photo
, then press OK to enter the
MENU
Recursive
Media
.
▲/▼/◄/►
to display
to display
to display the
to display
◄/►
to
to turn
English
EN
13
Page 19

4.
Press the related buttons on the remote control
to perform the available functions shown on the
function bar at the bottom of the TV screen.
Video
Use this function to watch videos, if available.
1.
2.
3.
4.
DivX video
ABOUT DIVX VIDEO: DivX® is a digital video
format created by DivX, LLC, a subsidiary of Rovi
Corporation. This is an ofcial DivX Certied®
device that plays DivX video. Visit divx.com for more
information and software tools to convert your les
into DivX videos.
ABOUT DIVX VIDEO-ON-DEMAND: This DivX
Certied® device must be registered in order to play
purchased DivX Video-on-Demand (VOD) movies.
Obtain your registration code:
• Press
• Select
• Press
Go to vod.divx.com for more information on how to
complete your registration.
Deregister your TV:
If you wish to deregister your TV,
• Press
• Select
• Press
DivX®, DivX Certied®, DivX Plus® HD and
associated logos are trademarks of Rovi Corporation
or its subsidiaries and are used under license.
Media > Video
Select
main le content browser.
▲/▼/◄/►
Use
or sub le content browser in the same way as in
photo display function, press
video menu in folder mode.
-Sort:
Sort folders and videos by Type,
modication Date or Name.
-Edit:
Copy, paste or delete a selected video.
-Parser:
Select a video, press OK to watch, and automatic
playback begins from the selected video. Press
MENU
mode. You can play or pause the video, select
different play modes, screen modes and preset
picture settings, etc.
Press the related buttons on the remote control
to perform the available functions shown on the
function bar at the bottom of the TV screen. Press
the
bar.
displayed.
You can select
videos from all sub le folders.
to display the video menu in the browser
INFO
button to show or remove the function
MENU
on the remote control.
Settings > DivX(R) registration
OK/►
and your registration code will be
MENU
on the remote control.
Settings > DivX(R) deregistration
OK/►
and a message will guide you.
, then press OK to enter the
to select a video in either main
MENU
to display the
Recursive
to display
.
.
Using more of your TV
Time access
You can access the time from digital channels
following the instructions below.
1.
2.
Diagnostics on digital TV channels
1.
2.
Time shift
Allows you to record the TV programme so that you
will not miss the favourite part even if you go out.
Before you use the function, connect a USB drive to
the TV rst. For the rst time, you should do the disk
setup for the USB drive.
1.
2.
3.
4.
5.
6.
MENU
Press
select
synchronization
Press
To set the time manually, switch off the Auto
synchronization.
Press
Settings > Setup > Diagnostics
Press
the current digital channel, such as signal strength,
frequency, etc.
Note: This feature is available only in selected
Press
Settings > Setup > Time shift
Press
function, then press
Press
Time shift
Follow the directions on the screen to do the setup.
After the disk setup is done, press
select
Press OK to display the time shift menu.
-Press the pause button to pause the picture
and begin the time shift.
-Press the pause button to play the recorded
part.
-When the time shift menu disappears and only
the timing of the time shift remains on the screen,
you can press the pause button or OK to
access the time shift menu.
-Press the fast backward button◄◄ to fast
backward or the fast forward button ►► to fast
forward.
-Press the stop button to quit the time shift
function.
on the remote control and
Settings > Timer > Clock > Auto
◄/►
MENU
OK/►
products and, due to specic TV
network limitations and country technical
requirements, might not be available in
product or place of installation. This feature
might also be blocked by TV network due to
copyright protection (HD content, recording
protection). Please use
remote control to check if this feature is
available in your product.
MENU
◄/►
OPTION
Time shift
.
to select On.
on the remote control and select
to display some signal information on
on the remote control and select
to select On to switch on the time shift
EXIT
on the remote control and select
, then press OK to conrm.
.
.
OPTION
on the
.
to close the menu.
OPTION
and
EN
14
Page 20

Using more of your TV
Before you connect the USB drive to the TV,
-
make sure you have backed up the data in the
drive to avoid the loss of your important data due
to unforeseen malfunction.
We recommend you use a USB drive with free
-
capacity above 1GB and disk speed faster than
5.0MB/sec.
The bigger the USB drive free memory for time
-
shift, the bigger the recording length.
-If you change the channel in time shift mode, a
message prompts you to select
can select
execute the channel change.
Yes
to exit the time shift function and
Yes
or No. You
Reset shop
Allows you to reset the TV to factory default settings.
1.
2.
3.
4.
5.
MENU
Press
Settings > Setup
Select
Use the alphanumeric buttons to enter the
password.
Note: The super password is 0423. If you forget
Press
The
related instructions.
on the remote control and select
Reset shop
your code, enter the super password to
override any existing codes.
◄/►
Initial setup
, then press OK to conrm.
and press
to select OK and press OK to conrm.
menu appears. Follow the
OK/►
to enter.
Customising the input settings
You can congure your TV according to the
equipment you connect to it.
1.
2.
3.
4.
5.
After conguring, the selected source label will be
displayed after the name of the related connector in
the source list when pressing
control or OK on the TV set.
MENU
Press
Settings > Setup > Input settings
Press
Press
is connected to.
Press
attached to this connector.
Press
on the remote control and select
OK/►
▲/▼
to select a connector your equipment
◄/►
to select the type of apparatus
MENU
Input settings
to enter
to return to the
Setup
SOURCE
.
.
menu.
on the remote
Using Electronic programme guide
EPG is an on-screen guide that displays scheduled
TV programmes. You can navigate, select, view and
record programmes.
1.
2.
GUIDE
Press
and Next EPG
you to get information about the current or next
programme playing on each channel. Navigate
through the different programmes using the
navigation buttons on the remote control.
Use the colour buttons to view the
-Prev day
on the remote control, the
menu will appear, which allows
(Red): Lists the previous day’s EPG.
Now
8 Days EPG
.
-Next day
-View detail
this programme if available.
-Type lter
digital TV programmes.
• Press the blue button to display the
• Navigate through the different types and
• Select one or more types, which you want to
• Also, you can select some desired subtypes
• Press the blue button to exit the type and
• After ltering, all your desired digital TV
-Add schedule
remote control to bring up the
menu. For details on scheduled recording, refer
to the
3.
Press
the selected channel.
(Green): Lists the next day’s EPG.
(Yellow): Displays the description of
(Blue): Programme guide lter for
programmes’ type and subtype lists.
subtypes using the navigation buttons on the
remote control.
highlight from the
(or deselect). A checkmark will appear to
the left of the type when selected. When you
select a type, all its subtypes will be selected
automatically.
without selecting any type rst.
subtype list.
programmes will be highlighted.
Schedule list
GUIDE/EXIT
Type
list, press OK to select
(Option): Press
section.
to exit the EPG and switch to
OPTION
Schedule list
on the
PVR (Personal Video Recorder)
Allows you to record your favourite TV programmes.
Before you use the function, connect a USB drive to
the set rst. When using this function for the rst time,
you should setup the disk for the USB device.
Note: This feature is available only in selected
products and, due to specic TV
network limitations and country technical
requirements, might not be available in
product or place of installation. This feature
might also be blocked by TV network due to
copyright protection (HD content, recording
protection). Please use
remote control to check if this feature is
available in your product.
1.
2.
3.
OPTION
Press
Quick access menu, select
Press
Press:
- the recording button to start recording, the record
le is put into a folder named after the channel
number under the PVR folder in
▲/▼/◄/►
-
- the green or Stop button to stop recording
manually; in normal operation, the recording will
stop automatically when the recording duration
has passed.
on the remote control and in the
OK/►
to enter.
to adjust the recording duration.
OPTION
PVR
.
on the
Media > Video
English
;
EN
15
Page 21

Chapter 6
Note: if you change channels while recording a
programme, a prompt will appear on screen
asking you whether you want to conrm
the channel change. If you do so, your
4.
5.
Schedule list
This function is used to perform scheduled recording.
Warning: for this operation you have to insert a USB
recording device, otherwise the recording will not
start.
1.
2.
3.
recording will be interrupted.
In recording, PVR mini pane will also show on the
screen to indicate the recording progress.
To watch the recorded programme, exit PVR mode
rst and go to
PVR, then select the related record le. Press OK
to play. (It is the same if you record a digital radio
programme).
Notes:
-This feature is available only for non encrypted
digital channels. Even when CICAM (CI or
CI+) is inserted, this feature is not available on
encrypted channels.
Before you connect the USB drive to the set,
-
make sure you have backed up the data in the
drive to avoid the loss of your important data due
to unforeseen malfunction.
The bigger the USB drive free memory for the
-
PVR function, the bigger the recording length.
If you want to change channel or signal source
-
during recording, store the recording data before
changing the channel or source.
The set cannot play les normally if the
-
parameters of the le exceed the limitations of
the system, the le format is not supported, the
le is damaged, or the le cannot be decoded.
Do not disconnect the USB drive when the
-
system is reading a le or transmitting data,
otherwise the system or the drive may be
damaged.
Press
Quick access menu, select
Press OK to display the schedule list.
To add a schedule into your schedule list, press
the red button rst to display
-Channel number:
channel number.
-Start date:
the recording date.
-Start time:
-Stop time:
-Schedule type
• Set
switch to the scheduled programme when the
time you have set comes. When time is out and
you do not execute any operation, the dialogue
Media > Video
OPTION
on the remote control and in the
use the alphanumeric buttons to set
set the start time of the recording.
set the stop time of the recording.
Reminder
:
to be reminded that you can
Schedule list
◄/►
use
. Select the folder
Schedule list
to select the
.
. Then,
Network
box will disappear and no further operation will
be executed.
Record
• Set
scheduled recording when the time you have
set comes. When time is out and you do not
execute any operation, scheduled recording will
start automatically.
-Repeat type:
recording.
4.
Press
add the schedule you set into your schedule list.
5.
Press the red button to repeat above procedures
to add another schedule.
6.
If you wish to edit or delete a schedule, select it
and press OK to enter and follow the instructions
on screen.
7.
Press
, if you really want to start your
set different repeat modes for the
▲/▼/◄/►
EXIT
to select
to close the menu.
Add
, then press OK to
Network
Network connection
You can set up your TV so that it can access the
Internet through your local area network (LAN) using
a wired or wireless connection.
Connecting to a wired network
You can attach your TV to your LAN using cable in
three ways:
• You can attach your TV to your LAN by connecting
the LAN port on your TV to an external modem
using a Cat 5 cable minimum.
• You can attach your TV to your LAN by connecting
the LAN port on your TV to an IP Sharer, which is
connected to an external modem. Use Cat 5 cable
minimum for the connection.
• Depending on how your network is congured,
you may be able to attach your TV to your LAN by
connecting the LAN port on your TV directly to a
network wall outlet using a Cat 5 cable minimum.
Note that the wall outlet is attached to a modem or
router elsewhere in your house.
1.
2.
3.
4.
MENU
Press
Network > Network settings > Internet
connection
Press
Ethernet
Press
OK/►
not work, follow step 4 below.
Select
then press
You can set
- Select
enter the needed IP address automatically.
- Select
address manually, then:
• Press ▼ to go to the rst entry eld.
on the remote control and select
◄/►
. Press
▲/▼
to select
to select wired-mode connection.
▲/▼
to select
to check the Internet connectivity. If it does
Network > Network settings > IP setting
OK/►
Address type
Auto
if you want the TV to acquire and
Manual
to select On.
Interface
Connection test
to enter the
if you want to enter your IP
, then set
IP setting
Auto
to
, then press
Manual
or
◄/►
menu.
to
.
,
EN
16
Page 22

Chapter 7
• Enter the
gateway, Primary DNS
values. Use the alphanumeric buttons to enter
numbers and the navigation buttons to move
from one entry eld to another.
- Once
press
Connection test
Internet connectivity
5.
If you want to see the information on current
connection, such as
IP address
settings > Information
Connecting to a wireless network
To establish a wireless connection between your
TV and your network, you need a wireless router or
modem and a Wireless LAN Adapter.
1.
Press
Network > Network settings > Internet
connection
2.
Press
Wireless
3.
Press
OK/►
4.
You can set up the wireless network connection in
3 ways: a) or b) or c).
-a) Scan
• Press
The TV will search all access points within
range, access points found by the TV will be
displayed.
• Press
then press
Notes:
b) Manual
Press
you will be prompted to enter the correct SSID
of an available wireless router to set up the
connection.
c) Auto
If your AP (Access Point) supports WPS (WiFi Protected Setup), you can connect to the
network via PIN (Personal Identication Number)
or PBC (Push Button Conguration). WPS will
automatically congure the SSID and WPA key
in either mode.
IP address, Subnet mask, Default
Auto
Manual IP setting
or
MENU
to go back, press
, then press
, etc., select
MENU
▲/▼
to select
to select wireless-mode connection.
▲/▼
to select
to enter.
▲/▼
▲/▼
If you select a protected access point, you will
-
have to enter the corresponding password.
Press OK on the remote control to display the
virtual keyboard to enable you to enter the
password.
This set is able to memorize the available
-
access point, which enables it to connect to
the network even if you switch on your TV
after power-off.
▲/▼
Interface, Address type
on the remote control and select
◄/►
. Press
Interface
Wireless setting
to select
to select an available access point,
OK/►
to connect the TV.
to select
Manual
Secondary DNS
and
is completed,
▲/▼
to select
OK/►
again.
Network > Network
, then press
to select On.
Scan
to check the
OK/►
, then set
and press
, then press
, then press
◄/►
,
.
to
OK/►
OK/►
DLNA (Share & See)
▲/▼
Press
enter.
PIN:
•
Choose a random PIN code. Make sure
this code is installed on the AP. (For the
procedures, refer to your router manual.) Press
OK/►
PBC:
•
select
the PBC push button on your router within
2 minutes after you press
TV will automatically acquire all the network
setting values it needs and connect to your
network.
5.
To check the Internet connectivity, follow the
instructions in steps 3 and 4 of the preceding
section
6.
To see the information on current connection,
follow the instructions in step 5 of the preceding
section
to select
Select
again to set up the connection.
If your router has a PBC push button,
PBC
Connecting to a wired network
Connecting to a wired network
TV remote
This function allows you to turn a smart device into a
sophisticated remote control, providing more features
than your normal TV remote control. You can then
control your TV through your smart device.
1.
.
The following instructions are based on the example
of a smartphone.
2.
3.
4.
5.
6.
,
Network > TV Remote
Select
enter the
for downloading the TV Remote application and
other related information.
Download and install into the smartphone. the
correct TV Remote application for the smartphone.
Make sure the smartphone and the TV are in the
same home LAN (local area network) or network
segment.
Run the TV Remote application on the
smartphone, it will search and communicate with
the TV automatically to enable the TV Remote
functionality.
Once the TV and the smartphone are linked as
described in step 4, you will be able to enjoy the
extra features of the TV Remote function.
To quit the TV Remote function, press
remote control.
TV Remote
Auto
, then press
PIN
and press
, then press
menu. You will see details
OK/►
OK/►
OK/►
, then press OK to
to enter.
to enter. Press
again. Your
DLNA (Share & See)
Note: This manual covers products with either
Share & See
See
is DLNA-compatible.
or
DLNA
function.
Connecting to your PC
Make sure to set up a wired or wireless connection
from your TV to a router rst. Then connect your
PC to your router either through a network cable
OK/►
.
.
EXIT
on the
Share &
to
English
EN
17
Page 23

Chapter 8 & 9
or wirelessly. Also make sure to select
Network settings > Internet Connection
On
, and that your computer rewall won’t block the
connection.
Enabling DLNA function
Network > DLNA
Select
Follow the steps in turn specied hereafter, then you
can enjoy recorded video, image and music saved on
your PC.
, and set it to On.
Adding media from your PC for sharing
Install a DLNA media server on your PC. The simple
and familiar server you may install is Microsoft
Windows Media Player 11 and 11 above. Follow the
instructions below to allow your TV to access the
designated les on your PC.
1.
Open the Microsoft Windows Media Player 11.
Library > Media sharing
- Select
- Check the checkbox
- Select the icon of the TV set connected to your
PC.
Allow
- Select
PC, and select OK to enable the access.
Note: Use the
2.
desired settings.
Library > Add to Library
- Select
- Select your personal folders or folders of other
users that you can access for sharing.
Add
- Select
and press OK to enable the addition.
Share my media to
to allow the TV set to access your
Settings
button to customize your
DLNA application
Media
Select
enter media center. Then you can view photos, listen
to music or watch videos, which are stored on your
PC.
Note:
-
- Supported le formats:
in the main menu and press OK to
DLNA
If
is switched on, the TV will display the
list of available DLNA servers which are available
in local network.
Photo: JPEG
Music: LPCM
Video: MPEG2
Network >
, then
.
.
.
HbbTV
HbbTV (Hybrid broadcast broadband TV) is a service
offered by certain broadcasters and available only on
some digital TV channels. HbbTV delivers interactive
television over both broadcast and broadband
Internet. These interactive features are added to and
enrich the normal digital programmes, and include
services such as digital teletext, electronic programme
guide, games, voting, specic information related
HbbTV & Smart TV
to the current programme, interactive advertising,
information magazines, catch-up TV, etc.
In the broadband mode, your TV has to be connected
to the Internet. In addition to the broadcast
programme being watched, you can access the
same services as in broadcast mode and also many
other Internet-delivered interactive services such as
VOD (Video On Demand) or catch-up TV.
To fully enjoy HbbTV, you need to connect your TV to
the Internet (refer to section
Note: You cannot download les to your TV with
this function.
Network connection
).
HbbTV access
1.
2.
3.
4.
MENU
Press
Settings > HbbTV mode
Press
When you tune to a TV digital channel that offers
HbbTV, this will be signalled to you by an onscreen indication (generally a red button, but
other colour buttons may also be used). Press the
indicated
pages.
Use
through the HbbTV pages and press OK to
conrm.
on the remote control, then select
◄/►
to select On.
colour button
▲/▼/◄/►
and the colour buttons to navigate
.
to open the interactive
HbbTV deactivation
To avoid disturbances that may be caused by HbbTV
broadcasting tests, you can turn off the HbbTV
function:
1.
2.
Menu > Settings > HbbTV mode
Select
Then press
◄/►
to select
Off
.
.
Smart TV
Allows you to enjoy Internet Applications (Apps),
specially adapted Internet websites for your TV. You
can control the Apps with the TV remote control.
WARNING:
• Congure the network settings before using
TV
.
• Slow responses and/or interruptions may occur,
depending on your network conditions.
• If you experience a problem using an application,
please contact the content provider.
• According to circumstances of the content provider,
an application’s updates or the application itself may
be discontinued.
• Depending on your country's regulations, some
applications may have limited service or not be
supported.
Smart
Access Smart TV Applications (Apps)
1.
Smart TV
Select
OK
to display the smart TV home page. The App
in the main menu and press
EN
18
Page 24

Chapter 10
services depend on the country. Select
then press OK to display all the available country
options, press
press OK to conrm. Then select the “Close”
button and press OK to go back to the smart TV
homepage.
Shortcut operation:
control to display the smart TV home page directly.
2.
▲/▼/◄/►
Use
enter.
3.
Internet browsing is available with Smart TV portal
application. It can be accessed via the icon in the
portal or via the green button when TV portal page
is displayed.
Note: Since the connection with internet takes
YouTube
YouTube is a video-sharing website where you can
discover and watch videos uploaded by individuals or
some companies.
Smart TV > YouTube
Select
and press OK to enter, then follow the options and
hint displayed on screen to search and watch the
videos.
Netix
Netix provides on-demand movies and TV shows
delivered via the Internet.
Warning: Netix is available in certain countries only.
Unlimited membership is required. More information
can be found at www.netix.com. With a Netix
unlimited membership, you can instantly watch TV
shows and movies streamed over the Internet from
Netix right to your TV. Select
and press OK to enter, then follow the options and
hints displayed on screen to select your desired TV
shows or movies.
Skype
To use this function you need to purchase a webcam
rst.
Warning: this TV is only compatible with some specic
webcams.
This software application allows users to make voice
calls over the Internet. Besides this, this software
has also become popular for its additional features
which include instant messaging, le transfer, video
conferencing, etc.
Smart TV > Skype
Select
then follow the options and hints displayed on screen
to use the application.
For more information, please read the Skype User
Manual supplied with this television.
◄/►
to select your country and
Smart TV
Press
to select an App and press OK to
time, it’s recommended that you wait a few
minutes to use the smart TV feature after
activation of TV from standby.
to access
Smart TV > Netix
, and press OK to enter,
Country
on the remote
YouTube
,
,
,
Other information
Other information
Password in Parental Control
- The default password is 1234. You can change it to
a new one.
- The super password is 0423. If you forget your
code, enter the super password to override any
existing codes.
OSS Notice
This product uses some software programs which are
distributed under the GPL/LGPL.
GPL software: Gcc.
LGPL software: Glibc.
This product uses some software programs which are
distributed under the Independent JPEG Group.
This product uses some software programs which are
distributed under the Freetype Project.
This product uses some software programs which are
distributed under the zlib license.
This product uses some software programs which are
distributed under ICU license.
This product uses some software programs which are
distributed under libpng license.
OSS project URL:
http://www.gnu.org/software/libc/
http://gcc.gnu.org/
http://www.gnu.org/software/libc/
http://freetype.sourceforge.net
http://www.icu-project.org/
http://www.zlib.net/
http://www.libpng.org/pub/png/libpng.html
http://www.ijg.org/
[Legal Statement] of TCL - manufacturer of this
TV set. Due to the various capabilities of products
featuring the SmartTV - Services, as well as
limitations in the available content, certain features,
applications, and services may not be available on all
devices or in all territories. Some features on SmartTV
may also require additional peripheral devices or
membership fees that are sold separately. Please visit
our website for more information on specic device
information and content availability. The services and
availability of content through SmartTV are subject to
change from time to time without prior notice.
All content and services accessible through this
device belong to third parties and are protected by
copyright, patent, trademark and/or other intellectual
property laws. Such content and services are
provided solely for your personal noncommercial use.
You may not use any content or services in a manner
that has not been authorized by the content owner
or service provider. Without limiting the foregoing,
unless expressly authorized by the applicable content
owner or service provider, you may not modify, copy,
English
EN
19
Page 25

Other information
republish, upload, post, transmit, translate, sell, create
derivative works, exploit, or distribute in any manner
or medium any content or services displayed through
this device.
YOU EXPRESSLY ACKNOWLEDGE AND AGREE
THAT USE OF THE DEVICE IS AT YOUR SOLE
RISK AND THAT THE ENTIRE RISK AS TO
SATISFACTORY QUALITY, PERFORMANCE
AND ACCURACY IS WITH YOU. THE DEVICE
AND ALL THIRD PARTY CONTENT AND
SERVICES ARE PROVIDED “AS IS” WITHOUT
WARRANTY OF ANY KIND, EITHER EXPRESS
OR IMPLIED. TCL EXPRESSLY DISCLAIMS
ALL WARRANTIES AND CONDITIONS WITH
RESPECT TO THE DEVICE AND ANY CONTENT
AND SERVICES, EITHER EXPRESS OR,
IMPLIED, INCLUDING BUT NOT LIMITED TO,
WARRANTIES OF MERCHANTABILITY, OF
SATISFACTORY QUALITY, FITNESS FOR A
PARTICULAR PURPOSE, OF ACCURACY, OF
QUIET ENJOYMENT, AND NON-INFRINGEMENT
OF THIRD PARTY RIGHTS. TCL DOES NOT
GUARANTEE THE ACCURACY, VALIDITY,
TIMELINESS, LEGALITY, OR COMPLETENESS OF
ANY CONTENT OR SERVICE MADE AVAILABLE
THROUGH THIS DEVICE AND DOES NOT
WARRANT THAT THE DEVICE, CONTENT OR
SERVICES WILL MEET YOUR REQUIREMENTS,
OR THAT OPERATION OF THE DEVICE OR
SERVICES WILL BE UNINTERRUPTED OR
ERROR-FREE. UNDER NO CIRCUMSTANCES,
INCLUDING NEGLIGENCE, SHALL TCL BE LIABLE,
WHETHER IN CONTRACT OR TORT, FOR ANY
DIRECT, INDIRECT, INCIDENTAL, SPECIAL OR
CONSEQUENTIAL DAMAGES, ATTORNEY FEES,
EXPENSES, OR ANY OTHER DAMAGES ARISING
OUT OF, OR IN CONNECTION WITH, ANY
INFORMATION CONTAINED IN, OR AS A RESULT
OF THE USE OF THE DEVICE, OR ANY CONTENT
OR SERVICE ACCESSED BY YOU OR ANY THIRD
PARTY, EVEN IF ADVISED OF THE POSSIBILITY
OF SUCH DAMAGES.
Third party services may be changed, suspended,
removed, terminated or interrupted, or access may be
disabled at any time, without notice, and TCL makes
no representation or warranty that any content or
service will remain available for any period of time.
Content and services are transmitted by third parties
by means of networks and transmission facilities
over which TCL has no control. Without limiting
the generality of this disclaimer, TCL expressly
disclaims any responsibility or liability for any change,
interruption, disabling, removal of or suspension
of any content or service made available through
this device. TCL may impose limits on the use of
or access to certain services or content, in any
case and without notice or liability. TCL is neither
responsible nor liable for customer service related to
the content and services. Any question or request for
service relating to the content or services should be
made directly to the respective content and service
providers.
is a trademark of SRS Labs, Inc.
TruSurround HD technology is incorporated under
license from SRS Labs, Inc.
SRS TruSurround HD™ creates an immersive,
feature-rich surround sound experience from two
speakers, complete with rich bass, high frequency
detail and clear dialog.
EN
20
Page 26
Other information
Troubleshooting and Help Line
A check through the guide below could save you the trouble of returning your purchase or waiting for a service
engineer. If you still require assistance with operating this product you can phone the help line on the safety
leaet accompanying these instructions.
Analogue TV Sound
Symptoms Possible causes What to do
English
Crackling noises or
distorted sound.
Stereo switching to mono. A weak signal or a mono broadcast. Check the signal and your aerial system.
Interference from cars, uorescent
lights, video recorder, a radio broadcast,
personal computer or other equipment.
Turn off one piece of equipment at a time to
see if the interference clears. See also what
to do for picture interference.
Analogue TV Picture
Symptoms Possible causes What to do
Grainy (snowy) picture.
Extra outlines on objects in
the picture (ghosts).
Picture interference like
spots or streaks..
Picture interference like
wavy lines or patterns.
Sound interference may
also be present.
Your video recorder could be faulty.
Transmitter trouble.
Aerial has moved, is damaged or has
been disconnected.
The aerial is receiving reected signals
from hills or buildings.
Faulty aerial system
Weak aerial signal.
Interference from electrical equipment
such as power tools and motors.
Settings for the digital video equipment
output do not match the monitor’s VGA
or HDMI input specications.
Some other equipment is using the
same frequency.
Poor quality cable in the path between
the TV and the TV aerial.
Your aerial system is receiving an
unwanted signal on the same frequency
If you have a video recorder try plugging the
aerial directly into the television. If the fault
clears, the video recorder is probably faulty.
Have your aerial system checked.
Try to tune in a better signal from the same
television station.
Get your aerial system checked.
Try to tune in a better signal from the same
television station. Get your aerial system
checked.
Move the interfering equipment further away
or if possible, turn it off.
Change the refresh rate or resolution settings
on the digital equipment, if possible.
Put other equipment on stand-by to see if
the interference stops: change the output
frequency of the equipment that is causing
interference (see its instructions).
Get higher quality cable.
Get your aerial system checked.
Jumbled teletext characters Poor quality signal As for ‘Snowy picture’ and ‘Ghosts’
When RGB input is used
there is a distorted picture
or no picture.
Synchronisation signal is missing.
EN
21
Press the AV button to select the AV input
which receives the synchronisation signal.
Page 27

Other information
Digital Terrestrial TV
Symptoms Possible causes What to do
Picture blocking or freezing.
Sound breaking up.
Some channels are missing.
Any or all of the above
faults.
Weak signal or wrong type of aerial.
Not receiving one or more digital
multiplex frequencies.
Interference or other problem caused
by passing aerial signal through other
equipment.
Try re-tuning.
Aerial may not be suitable for digital TV
broadcasts.
You may be in a place which does not get a
good digital TV signal.
Get an aerial rigger to check the aerial
system.
Try connecting the aerial directly to the digital
TV receiver and then re-tuning.
If some equipment has a radio frequency
modulator, switch it off or change the
frequency of it and re-tune the analogue TV.
(Please see other equipment’s instructions
for how to do this.)
Multiplex
DVB-T (Digital Video Broadcasting - Terrestrial) is broadcast in groups of channels on one common frequency. This
arrangement is known as a
There are several multiplexes in the DVB-T system, each carrying a group of channels.
If the signal level on a particular multiplex frequency is poor you may lose the whole group of channels on that
multiplex.
Multiplex
.
General
Symptoms Possible causes What to do
Avoid old cables and adapter devices. Use
Picture is the wrong size
or the source device
(computer, DVD player,
set top box and so on) will
not let you set up the pixel
resolution the display can
reproduce.
Source device has not read the set-up
data from the display.
Connecting cable does not have all the
necessary connections.
only modern cables.
Re-start the source device after connecting
and powering up the display.
Change the graphics adapter in your
computer.
Check compatible video resolutions given in
these instructions.
Picture looks squashed or
stretched even though the
aspect ratio controls are
set correctly (for example
4:3 or 16:9).
No picture.
Equipment feeding the display is set to
the wrong aspect ratio.
Brightness and contrast levels are set
to minimum.
Make sure the source type is set
correctly.
EN
22
On the equipment feeding the TV choose the
correct output aspect ratio such as 4:3 (old
conventional) or 16:9 or 1280 x 720 or 1920
x 1080 pixels to match wide screens.
Increase the brightness and contrast settings.
Select proper source input.
Page 28
Other information
No sound.
Picture is too dark, too light
or tinted.
Picture is not clear.
The volume is set to minimum.
The mute is switched on.
Make sure the headphones are not
connected.
Wrong colour adjustment in menu.
Wrong brightness adjustment in menu.
Antenna cable is not correctly
connected.
Turn the volume up.
Press the mute button to release ‘mute’.
Disconnect headphones.
Adjust saturation in menu.
Adjust brightness in menu.
Connect antenna cable properly.
Remote
Symptoms Possible causes What to do
Insert new batteries.
Wrong functions or short
range.
Batteries exhausted.
Obstacle in the way.
Dirty remote control sensor on TV.
Remove any objects and aim from straight in
front of the remote sensor with a clear line of
sight.
Try to clean the remote control sensor lens
on the TV with a soft cloth.
Power
Symptoms Possible causes What to do
English
Television seems ‘dead’
- no lights come on and
nothing works.
Does not respond to
remote or local controls.
“Stuck” on stand-by.
Does not respond to
certain controls on the TV
or remote control.
Mains supply missing.
Main power switch is off.
Blown fuse or circuit breaker.
Micro-controller confused by electrical
disturbance.
Channel, installation, child or keyboard
lock is switched on (if tted).
EN
23
Check the power switches on the television
and at the power outlet. Check power is
present at the outlet.
Check the fuse or circuit breaker at your
main fuse box. Look for a possible cause of
failure before you replace or re-set it.
Switch off main power and wait ve minutes
before trying again. (Leave the TV unplugged
and call a service engineer if this does not
work.)
Please see relevant section of user
instruction.
Page 29

Specications for LT-40HW62U
Other information
Broadcasting
Sound system FM, Nicam, SRS
AC power Input: AC220V-240V~50HZ
Power consumption
Sound output power 2 x 8 watts
Headphone type Impedance 32 ohms or more, with 3.5mm stereo jack plug
RF aerial input 75 ohms
Receiving channels
Panel
Screen resolution 1920 pixel (horizontal) × 1080 pixel (vertical)
Recommended PC
resolution
USB supported le
formats
Connections
Diagonal screen size 40 inch/102 cm
Dimensions
Approximate weight
Accessories
Operating Conditions
Storage Conditions
Analogue: PAL/NTSC/SECAM M,B/G,I/D/K/L,L’
Digital: DVB-T/C/T2
Standby <0.3W
Efciency Class A
Analogue:
Digital:
Edge LED
Ratio: 16:9
Resolution: FHD
VGA: 1920X1080@60Hz
HDMI: 1920×1080@60Hz
Photo: JPEG
Music: MP3
Video: AVI, MP4, PS, TS...
RF in, Scart, VGA, YPBPR (video, audio), SPDIF, USBX2, HDMIX3,
Headphone, LAN, CI+
With stand: W 926 H 600 D 226 millimetres
Without stand: W 926 H 549 D 58 millimetres
With stand: 13.4 kg
Without stand: 11 kg
Remote control unit with 2 x batteries
instruction booklet, Power cord
table top stand, 4X screws, 4X stand screws, 1X stand spacer
Safety instruction sheet, Warranty card, Stand installation guide,
Buckle use sheet, 4 VESA kit screws, Skype User Manual
Conversion Cable x3 (Scart adaptor, CMP adaptor, Audio in adaptor)
Temperature 5°C - 35°C (41°F - 95°F)
Humidity 20 - 80% (non-condensing)
Temperature -15°C - 45°C (5°F - 113°F)
Humidity 10 - 90% (non-condensing)
ON mode 62W
Annual energy
45MHz~866MHz
DVB-T/T2 107.5MHz~858MHz;
DVB-C 114MHz~858MHz
Max 100W
91kWh/annum
1
Energy consumption per year, based on the power consumption of the television operating 4 hours
per day for 365 days. The actual energy consumption will depend on how the television is used.
We apologise for any inconvenience caused by minor inconsistencies in these instructions, which
may occur as a result of product development.
EN
24
Page 30

Specications for LT-46HW65U
Broadcasting
Sound system FM, Nicam, SRS
AC power Input: AC220V-240V~50HZ
Power consumption
Sound output power 2 x 8 watts
Headphone type Impedance 32 ohms or more, with 3.5mm stereo jack plug
RF aerial input 75 ohms
Receiving channels
Panel
Screen resolution 1920 pixel (horizontal) × 1080 pixel (vertical)
Recommended PC
resolution
USB supported le
formats
Connections
Diagonal screen size 40 inch/102 cm
Dimensions
Approximate weight
Accessories
Operating Conditions
Storage Conditions
Analogue: PAL/NTSC/SECAM M,B/G,I/D/K/L,L’
Digital: DVB-T/C/T2
Standby <0.3W
Efciency Class A
Analogue:
Digital:
Edge LED
Ratio: 16:9
Resolution: FHD
VGA: 1920X1080@60Hz
HDMI: 1920×1080@60Hz
Photo: JPEG
Music: MP3
Video: AVI, MP4, PS, TS...
RF in, Scart, VGA, YPBPR(video, audio), SPDIF, USBX3, HDMIX3,
Headphone, LAN, CI+
With stand: W 926 H 600 D 226 millimetres
Without stand: W 926 H 549 D 58 millimetres
With stand: 17.40kg
Without stand: 14.45kg
Remote control unit with 2 x batteries
instruction booklet, Power cord
table top stand, 4X screws, 1X stand spacer
Safety instruction sheet, Warranty card, Stand installation guide,
Buckle use sheet, Skype User Manual, 2 VESA kit screws
Conversion Cable x3 (Scart adaptor, CMP adaptor, Audio in adaptor)
Temperature 5°C - 35°C (41°F - 95°F)
Humidity 20 - 80% (non-condensing)
Temperature -15°C - 45°C (5°F - 113°F)
Humidity 10 - 90% (non-condensing)
ON mode 62W
Annual energy
45MHz~866MHz
DVB-T/T2 107.5MHz~858MHz;
DVB-C 114MHz~858MHz
Max 100W
91kWh/annum
Other information
English
1
Energy consumption per year, based on the power consumption of the television operating 4 hours
per day for 365 days. The actual energy consumption will depend on how the television is used.
We apologise for any inconvenience caused by minor inconsistencies in these instructions, which
may occur as a result of product development.
EN
25
Page 31

Informations importantes
Sécurité
Vériez que la tension de l'alimentation générale domestique
corresponde à la tension indiquée sur l'étiquette signalétique
située à l'arrière du boîtier. Quand la prise électrique ou
un coupleur d'appareil sont utilisés comme appareils de
déconnexion, ils doivent rester accessibles. Sur certains
modèles, l'indicateur lumineux est situé sur le côté du poste
TV. L’absence d’un témoin à l’avant ne signie pas que
le téléviseur est entièrement débranché du secteur. Pour
débrancher complètement le téléviseur, il faut retirer la prise
secteur.
Les composants de ce téléviseur sont sensibles à la chaleur.
La température ambiante maximale
35°C
. N’obstruez pas les orices de ventilation situés sur
les côtés ou à l’arrière du téléviseur. Laissez sufsamment
d’espace autour du téléviseur pour une ventilation efcace.
Installez ce téléviseur loin de toute source de chaleur
(cheminée, etc.) et de tout appareil générant de fortes ondes
magnétiques ou électriques.
Le taux d’humidité
doit pas excéder
frais à un endroit chaud est susceptible de provoquer de la
condensation sur l’écran (et sur certains composants internes).
Laissez la condensation s’évaporer avant de rallumer le
téléviseur.
de la pièce où le téléviseur est installé ne
80%
. Le transfert du téléviseur d’un endroit
ne doit pas dépasser
AVERTISSEMENTS
Cet appareil est destiné à un usage domestique en intérieur et
ne doit pas être autrement utilisé comme, par exemple, pour un
usage non domestique ou dans un environnement commercial.
Si le cordon d'alimentation est endommagé, il doit être
remplacé par le fabricant, son agent de réparation ou une
personne qualiée an d'éviter tout risque.
Pour ne pas gêner la ventilation, les orices de ventilation ne
doivent pas être couverts par des objets tels que journaux,
nappes de table, rideaux etc.
L’appareil ne doit pas être exposé au ruissellement ni à
la projection d’eau ; évitez de poser des objets remplis de
liquides, tels que des vases, au-dessus de l’appareil.
Aucune source de amme nue, telle que des bougies
allumées, ne doit être placée sur l'appareil.
AVERTISSEMENT : An d’éviter toute blessure, cet appareil
doit être solidement xé au sol/mur selon les instructions
d’installation.
ATTENTION :
minimum et l’augmenter si nécessaire. L’écoute prolongée
via un casque à volume élevé peut entraîner des dommages
auditifs.
Ventilation
Placez le téléviseur sur une surface plane et solide loin des
sources de chaleur ou de la lumière directe du soleil. Si elle
est placée dans une armoire, laissez un espace de 10 cm tout
autour de l'appareil. N'obstruez pas les fentes de ventilation, y
compris celles sous l'appareil avec des tissus d'ameublement.
Exposer à une chaleur excessive la télévision réduit sa durée
de vie et accroît le risque d'incendie.
Mettez le casque avec le volume réglé au
Fatigue oculaire
Lorsque vous utilisez cet appareil comme un écran d’ordinateur,
les experts de la santé et de la sécurité recommandent de faire
de fréquentes pauses courtes plutôt que de longues pauses
moins fréquentes. Par exemple, une pause de 5-10 minutes
après une heure de travail continu sur écran est considérée
meilleure qu’une pause de 15 minutes toutes les 2 heures.
N’utilisez pas le moniteur contre un fond lumineux ou lorsqu’il
est exposé directement à la lumière du soleil ou à d’autres
sources lumineuses fortes.
La touche O du poste TV ou la touche O de la télécommande
permet de l’allumer et le mettre en veille. Si vous
pas d’utiliser ce téléviseur pendant une longue période,
éteignez-le complètement en débranchant
En cas d’orage
téléviseur du secteur et de la prise d’antenne, an qu’il ne soit
pas endommagé par d’éventuelles surtensions électriques ou
électromagnétiques. Pour cette raison,
et la prise secteur
manière à pouvoir les
Débranchez
qu’il dégage une
devez en aucun cas ouvrir vous-même le téléviseur, vous
risquez de recevoir une
, nous recommandons de débrancher le
doivent rester facilement accessibles, de
débrancher
immédiatement le téléviseur si vous constatez
odeur de brûlé
en cas de besoin.
de la fumée
ou
décharge électrique
ne prévoyez
la prise secteur.
la prise d’antenne
. Vous ne
.
Écran TV
L’écran télé de cet appareil est en verre. Il peut facilement se
briser sous l’effet d’une chute ou d’un choc.
L’écran télé est un produit de haute technologie reproduisant
des images nettes au moindre détail. Il peut arriver,
occasionnellement, que quelques points xes bleus, verts ou
rouges, apparaissent sur l’écran. Ces points n’affectent pas les
performances de l’appareil.
Entretien
Utilisez un produit de nettoyage de vitres pour nettoyer l’écran
et un tissu doux imbibé d’un détergent doux pour le reste du
téléviseur.
Important :
abrasifs ou à base d’alcool peuvent endommager l’écran.
Dépoussiérez régulièrement les orices de ventilation situés
sur les côtés et à l’arrière du téléviseur. L’utilisation de solvants,
de produits abrasifs et de produits à base d’alcool peuvent
endommager le téléviseur. Si un objet ou un liquide pénètre
à l’intérieur du téléviseur, le débrancher immédiatement et le
faire contrôler par un technicien agréé. N’ouvrez en aucun cas
ce téléviseur par vos propres moyens ; vous pourriez vous
blesser ou l’endommager.
Important :
Les piles ne doivent pas être exposées à une chaleur
excessive telle que soleil, feu etc. Retirez les piles de la
télécommande lorsque celle-ci ne va pas être utilisée pendant
une longue période. Les piles laissées dans l’appareil peuvent
causer des dommages suite à des dégradations et des fuites
de liquide corrosif ; la garantie peut être annulée.
Pour protéger l’environnement, utilisez les installations locales
de recyclage pour l’élimination des piles. Mettez au rebut les
piles usagées en respectant les instructions.
ATTENTION : Risque d’explosion si la pile est remplacée par
un type incorrect. Remplacez uniquement avec le même type
ou un type équivalent recommandé par le fabricant.
L’utilisation d’un détergent agressif, de produits
Accrocher le téléviseur à un mur
Avertissement : Cette opération nécessite l’intervention
de deux personnes.
Pour une installation sans danger, respectez les consignes de
sécurité suivantes :
• Vériez que le mur ou la cloison est capable de supporter le
poids du téléviseur et du support mural. Le téléviseur peut
être monté sur un mur à l'aide d'un kit de xation VESA 200
FR
1
Page 32

mm x 200mm (LT-40HW62U) ou 400 mm x 200mm (LT46HW65U) fourni à part.
• Suivez les instructions d’installation fournies avec le support
mural. Sur certains modèles, veillez à visser les blocs (et vis)
de xation murale VESA hexagonaux livrés avec l’appareil
dans les écrous de montage mural situés à l’arrière de
l’appareil avant de procéder au montage mural.
• Le téléviseur doit être installé sur un mur vertical.
• N’utilisez que des vis adaptées au matériau de construction
du mur. La longueur letée de la vis ne doit pas dépasser
15mm (LT- 40HW62U) ou 8mm (LT-46HW65U) dans le
téléviseur.
• Acheminez les câbles du téléviseur de sorte qu’ils ne
représentent pas de danger si une personne s’y prend les
pieds par inadvertance.
Toutes les autres consignes de sécurité relatives aux
téléviseurs sont également applicables. Pour plus d'information,
reportez-vous aux instructions d'installations imprimées
séparément.
Placer le téléviseur sur une table ou d’autres surfaces
Avant d’installer votre téléviseur, vériez que la surface sur
laquelle vous souhaitez le placer supportera son poids.
Ne posez pas ce téléviseur sur une surface instable (étagère
mobile, bord d’un meuble) et vériez que la face du téléviseur
ne déborde pas de la surface sur laquelle il est posé.
Pour éviter que le téléviseur tombe, xez-le au mur à l’aide
des vis (dans les trous de montage mural VESA), attaches
et chevilles appropriées (achetées séparément). Installez le
téléviseur près du mur pour éviter qu’il ne tombe vers l’arrière.
Guide d’utilisation multi-produit
Les fonctions décrites dans le présent manuel sont communes
à la plupart des modèles. Certaines fonctions peuvent être
absentes sur votre téléviseur et/ou votre téléviseur peut inclure
des fonctions qui ne sont pas décrites dans le présent manuel.
Les illustrations du présent manuel peuvent être différentes de
celles du produit réel. Veuillez vous référer au produit réel.
Produits
Batterie
Remarque :
Le symbole
Pb situé en
dessous du
symbole de
la batterie
indique
que celle-ci
contient du
plomb.
Informations pour les utilisateurs sur
l’élimination des batteries et appareils
usés
[Union européenne]
Les symboles suivants indiquent que les
équipements électriques et électroniques et les
batteries marqués avec ce symbole ne doivent
pas être éliminés comme des déchets ménagers
à leur n de vie. Ils doivent être plutôt remis à
des points de collecte pour le recyclage des
équipements électriques et électroniques ainsi
que les batteries pour un traitement approprié,
la récupération et le recyclage, conformément à
la législation nationale et les directives 2002/96/
EC et 2006/66/EC.
En éliminant ces produits de façon appropriée,
vous contribuez à préserver les ressources
naturelles et à prévenir les effets négatifs
potentiels sur l’environnement et la santé
humaine qui pourraient autrement être causés
par le traitement inapproprié des déchets de ces
produits.
Pour obtenir des informations plus détaillées
sur le recyclage de ce produit, veuillez contacter
votre bureau municipal local, votre service des
ordures ménagères ou le magasin où vous l’avez
acheté.
Selon la législation nationale, des sanctions
peuvent être appliquées en cas d’élimination
incorrecte de ces déchets.
[Usagers professionnels]
Si vous souhaitez éliminer ce produit, contactez
votre revendeur et consultez les termes et
conditions du contrat d’achat.
[Autres pays en dehors de l’Union
Européenne]
Ces symboles ne sont valables qu’à l’intérieur
de l’Union européenne. Pour éliminer ces
produits, il convient de respecter la législation
nationale applicable ou d’autres règlements de
votre pays pour le traitement des équipements
électriques et électroniques et les batteries
usés.
Cher client,
Cet appareil est conforme aux directives européennes en vigueur et aux normes de compatibilité électromagnétique et sécurité
électrique.
Le représentant du fabricant en Europe est :
TCL Operations Polska Sp. z o.o.
ul. A. Mickiewicza 31/41
96-300 Żyrardow, Pologne
Adresse email : zyeee@tcl.com
Les gures et les illustrations contenues dans ce manuel d’utilisation sont fournies à titre indicatif et peuvent différer du produit réel. La conception et les caractéristiques du
produit sont sujettes à modications sans préavis.
FR
2
Page 33

Table des matières
Informations importantes ........................................... 1
Chapitre 1 : Connexions
Branchez l’alimentation et l’antenne .......................... 4
Enregistreur DVD, système Home Cinéma, PC ........ 4
Enregistreur DVD, casque, récepteur télévision
terrestre ..................................................................... 5
Lecteur de disques Blu-ray, console de jeux HD et
caméscope HD .......................................................... 5
Chapitre 2 : Pour commencer
Fonctions de la télécommande.................................. 6
Allumer et éteindre le téléviseur ................................ 7
Chapitre 3 : Installation des chaînes
Réglage initial ............................................................ 8
Effectuer une recherche automatique des chaînes ... 9
Chapitre 4 : Utilisation de votre téléviseur
Accès aux chaînes ..................................................10
Regarder les appareils connectés ........................... 10
Volume.....................................................................10
Utilisation des menus TV ......................................... 10
Sélection de la langue des menus........................... 10
Chapitre 5 : Plus d’utilisations de votre
téléviseur
Réglage de vos chaînes favorites ...........................10
Utilisation de la fonction 3D pour regarder la TV ......11
Description audio ......................................................11
Fonction PAP ........................................................... 12
Utilisation des sous-titres......................................... 12
Activer/désactiver les sous-titres ..............................12
Activation des langues de sous-titrage des chaînes
TV numériques .........................................................12
Sélection du type de sous-titrage des chaînes TV
numériques ...............................................................12
Sélection de la langue de la page de décodage dans
le télétexte ............................................................... 12
Langue du Télétexte numérique .............................. 12
Type SPDIF ............................................................. 12
T-Link ....................................................................... 13
Activer/désactiver T-Link ...........................................13
Lecture avec une seule touche ................................. 13
Utilisation de la veille système .................................. 13
Mise à jour réseau ................................................... 13
Interface commune .................................................. 13
Utilisation du module d’interface commune ..............13
Accès aux services de l’interface commune ............. 13
Mise à jour logiciel ................................................... 14
Passer en mode Magasin ou Maison ...................... 14
Fonction MHEG ....................................................... 14
Afcher des photos, écouter de la musique et
regarder des vidéos à partir d’un dispositif de
stockage USB .......................................................... 14
Photo ........................................................................15
Musique ....................................................................15
Vidéo .........................................................................15
Vidéo DivX ................................................................16
Accès à l’heure ........................................................ 16
Diagnostics sur les chaînes de TV numérique ........ 16
Time shift (Lecture différée) ..................................... 16
Réinitialisation Magasin ........................................... 17
Personnalisation des paramètres d’entrée .............. 17
Utilisation du guide électronique des programmes.. 17
PVR (Personal Video Recorder) (Enregistreur
vidéo personnel) ...................................................... 17
Liste des programmations ....................................... 18
Chapitre 6 : Réseau
Connexion réseau ...................................................19
Connexion à un réseau câblé ...................................19
Connexion à un réseau sans l ................................19
TV à distance........................................................... 20
Chapitre 7 : DLNA (Partager et Regarder)
Connexion à votre PC .............................................20
Activation de la fonction DLNA ................................ 20
Ajout de chiers multimédias de votre PC en mode
partage ....................................................................21
Fonction DLNA ........................................................ 21
Chapitre 8 : HbbTV
Accéder à l’HbbTV................................................... 21
Désactiver l’HbbTV .................................................. 21
Chapitre 9 : Smart TV
Accès aux applications (Apps) Smart TV ................ 22
YouTube ....................................................................22
Netix ........................................................................22
Skype ........................................................................ 22
Chapitre 10 : Autres informations
Mot de passe de contrôle parental .......................... 22
Notice du logiciel GPL-OSS ....................................22
Dépannage et téléphone du service d’assistance ... 24
Spécications ..........................................................27
FR
3
Page 34

Chapitre 1
Connexions
Branchez l’alimentation et l’antenne
Appuyez sur O pour allumer le téléviseur après le branchement du cordon d'alimentation.
Remarque : L’emplacement de la prise de courant dépend du modèle de téléviseur. Sur certains modèles, vous
devez d’abord mettre l’interrupteur d’alimentation sur marche.
Câble
-PR+
-VOL+
OK
Remarques : -Débranchez le cordon d’alimentation avant de connecter les autres appareils.
Enregistreur DVD, système Home Cinéma, PC
Remarques : -Avant de connecter un PC, réglez la fréquence de rafraîchissement du moniteur à 60 Hz.
-Nous vous conseillons d’utiliser des câbles HDMI de grande qualité et aussi courts que possible
pour éviter toute perturbation éventuelle.
-Nous vous conseillons d’utiliser un câble VGA d’une longueur inférieure à 1 m avec ferrite en
cas d’entrée VGA disponible sur le poste de TV et si la TV est reliée à l’aide d’un câble VGA. La
résolution VGA maximale supportée est de 1920x1080/60Hz.
LAN VGA
HDMI 2HDMI 3 (ARC)
he
d t
from
n
e
y a
licens
Dolb
ies.
r
s.
e
ori
under
orato
b
ymbol are trademarks
a
orat
s
b
a
e-D
y L
nufactured
lb
Dolby L
of
doubl
Ma
Do
Français
Connexion réseau
Ou utilisez une
connexion HDMI.
FR
4
Lecteur DVD/Système
Home Cinéma
Page 35

Connexions
Enregistreur DVD, casque, récepteur télévision terrestre
Remarque :
-L’utilisation d’un casque ou d’écouteurs avec un
volume sonore trop fort peut causer une perte
auditive.
Enregistreur DVD
Boîtier décodeur
OUT
IN
OUT
Lecteur de disques Blu-ray, console de
jeux HD et caméscope HD
Remarques :
-Les connecteurs USB sont destinés à
la saisie des données à partir de clés
USB et permettent de raccorder d’autres
périphériques USB en cas de besoin.
Console
de jeux HD
-Tous les périphériques USB doivent être
directement reliés au téléviseur sans rallonges
de câble. Lorsqu’une rallonge est nécessaire,
elle doit être aussi courte que possible et
Lecteur de
disque Blu-ray
dotée de ferrites.
-La fonction ARC (Audio Return Channel
(Retour de canal audio)) n’est supportée que
sur le port
HDMI 3 (ARC)
.
Caméscope HD
-Le nombre de ports USB peut varier.
Remarques :
-Toutes les connexions n’existent pas forcément sur tous les modèles.
-L’emplacement de la prise d’alimentation du téléviseur peut varier selon le modèle du
téléviseur.
-Les emplacements et les noms des touches de fonction et des connecteurs sur le
téléviseur peuvent varier selon le modèle du téléviseur.
Câble
he
m
t
o
r
f
nd
a
y
Dolb
r license
.
ies.
e
are trademarks
ories
orat
b
a
actured und
f
lby Laborator
y L
u
n
lb
double-D symbol
of Do
Do
Ma
he
m
o
r
d t
f
arks
n
m
y a
s.
Dolb
er license
s.
are trade
orie
boratorie
orat
b
La
a
actured und
f
y L
u
n
lb
Ma
Do
of Dolby
double-D symbol
FR
5
Page 36

@
/
Chapitre 2
Pour commencer
Fonctions de la télécommande
La plupart des fonctions de votre téléviseur sont disponibles par le biais des menus apparaissant à l’écran. La télécommande fournie avec
votre téléviseur peut être utilisée pour parcourir les menus et effectuer les différents réglages.
Remarque :
côtés de l’image (tel que 4:3) pendant une longue période, l’écran du téléviseur risque d’en être endommagé dénitivement.
certaines opérations ; pour afcher la page
pour accéder au clavier virtuel en mode
Il est conseillé d’utiliser le mode plein écran. N’utilisez pas un mode d’afchage présentant des barres noires sur les deux
3D
Pour passer d’une option de format d’entrée 3D à
une autre. (Cette touche est utilisable que sur le
Mode veille/quitter le mode veille.
Pour sélectionner le mode économie
Pour régler le volume.
Pour afcher des informations sur le
programme, si elles sont disponibles.
Pour afcher la page d’accueil Smart TV.
Pour ouvrir le menu fonctions et exécuter
Télétexte dans différents mode.
Pour accéder au menu principal ou pour
retourner au menu précédent.
ECO
d’énergie.
V+/-
INFO
SMART TV
OPTION
MENU
Smart TV.
modèle LT- 46HW65U).
TV
Accès au mode TV.
Touches alphanumériques
Pour entrer les numéros de chaînes ; pour entrer
une lettre, un chiffre ou un symbole dans certaines
fonctions.
SOURCE
Pour choisir une source parmi les appareils connectés.
Pour couper et rétablir le son.
P+/-
Pour changer de chaînes/aller en haut ou en bas de
page dans certaines applications Smart TV.
GUIDE
Pour activer/désactiver l’EPG (guide électronique
des programmes), (disponible uniquement pour les
chaînes numériques).
◄/►
Pour naviguer dans les menus ; pour régler des
fonctions et xer des valeurs.
▲/▼
Pour naviguer dans les menus ; pour sélectionner
les options de menu ; pour passer à la photo,
chanson ou vidéo précédente ou suivante en mode
USB.
OK
Pour conrmer une entrée ou une sélection.
Français
Pour retourner au menu précédent.
Pour quitter l’arborescence des menus ou le
Pour sélectionner une option d’arrêt
Pour retourner à la chaîne précédente.
Pour sélectionner les pages télétexte ou
des options (voir note en bas de page). Le
bouton rouge peut également être utilisé
pour la fonction MHEG et HbbTV.
Pour choisir un type sonore pour le
programme télé analogique sélectionné ;
pour choisir une langue audio pour le
programme télé numérique sélectionné.
Pour sélectionner la photo, la musique ou la
Pour démarrer le retour rapide.
EXIT
Télétexte.
SLEEP
automatique.
PRE-CH
Touches de couleur
LANG
vidéo précédente.
Pour arrêter la lecture.
FR
ZOOM-/ZOOM+
Pour sélectionner le format d’image.
Pour utiliser certaines applications Smart TV.
LIST
Pour afcher la liste des chaînes.
FAV
Pour afcher le menu
des chaînes).
TEXT
Pour activer ou désactiver le mode mixte ou télétexte.
SUBTITLE
Pour sélectionner la langue de sous-titrage d'un
programme de télévision numérique.
Pour sélectionner la photo, la musique ou la
vidéo suivante.
Pour démarrer l’avance rapide.
Pour démarrer la lecture ou marquer une
pause.
Touche d’enregistrement.
Note :
Les touches rouge, verte, bleu et jaune sont
multifonction ; veuillez suivre les instructions données
dans les paragraphes et les messages à l'écran.
Channel list selection
(Liste
6
Page 37

Pour commencer
Si vous n’arrivez pas à utiliser votre télécommande à cause de piles déchargées, vous pouvez toujours utiliser
les touches du téléviseur. En mode TV, elles ont les mêmes fonctions que les touches correspondantes de la
télécommande. Appuyez plusieurs fois sur la touche OK du téléviseur pour sélectionner la source souhaitée. Dans les
menus, elles ont les fonctions suivantes :
PR+ Haut
PR- Bas
VOL+ Droit
VOL- Gauche
MENU
OK OK
Allumer et éteindre le téléviseur
1.
Lorsque le téléviseur est branché, il sera directement en mode allumé ou en veille. Si le téléviseur est en
veille, appuyez sur la touche O ou
2.
Pour mettre le téléviseur en veille, appuyez sur la touche O du téléviseur ou la touche O de la
télécommande. Le téléviseur reste sous tension, mais consomme peu d’énergie.
3.
Pour éteindre le téléviseur, débranchez la prise secteur.
PR+/PR-
du téléviseur ou la touche de la télécommande pour l’allumer.
FR
7
Page 38

Chapitre 3
Réglage initial
Il s’agit de la sélection de tous les paramètres requis
pour la recherche et la mémorisation de toutes les
chaînes analogiques et numériques que vous pouvez
recevoir.
Assurez-vous que le téléviseur est allumé et suivez
toutes les étapes dans l’ordre indiqué ci-après.
Remarque : Si la recherche de chaînes ne trouve
La première fois que vous allumez le poste, l’assistant
de conguration
est lancé, et vous guidera dans la procédure de
conguration initiale.
1.
Sélectionnez la langue de votre choix au moyen
des touches
passer à l’étape suivante.
2.
Sélectionnez votre pays au moyen des touches
▲/▼
l’étape suivante.
3.
Appuyez sur
emplacement (
puis appuyez sur
prochaine étape.
4.
Appuyez sur
connection
sur
plus d'informations, voir paragraphe
réseau” à la page 19
Remarque : Si vous sélectionnez
que des chaînes analogiques, cela
peut être dû à un faible signal, et cette
situation n’est pas couverte par la
garantie du fabricant. Les fabricants ne
peuvent pas être tenus responsables de
l’absence de signaux ou de signaux de
faible puissance dans certaines régions.
Initial setup
Initial setup
Please select your language:
▲/▼
, puis appuyez sur
▲/▼
Home
▲/▼
(Réglage initiale)
English
Български
Hrvatska
Česky
Dansk
Selec t Next
, puis appuyez sur
OK/►
pour passer à
pour sélectionner votre
(Maison) or
OK/►
pour accéder à la
pour sélectionner
(connexion réseau), puis appuyez
OK/►
pour accéder à l’étape suivante. (Pour
)
France
vous devez accéder ici au menu
Password setting
pour dénir un mot de passe.
passe)
(Réglage du mot de
Utilisez les touches alphanumériques
pour taper les quatre chiffres de votre
mot de passe. (Votre mot de passe ne
peut pas être 0000) Ressaisissez le
même code pour conrmer le mot de
Language
OK/►
Shop
(Shop)),
network
“Connexion
(France)
pour
,
Installation des chaînes
passe. Vous passez automatiquement à
l’étape suivante. (Dans cette étape, vous
pouvez uniquement appuyer sur ◄ pour
5.
Utilisez
Remarque : la fonction
retourner à l’étape précédente.)
▲/▼
pour choisir le mode de recherche
Antenna
(Antenne) ou
- a) Si vous avez choisi
• Appuyez sur
• Appuyez sur
& Analogue
Digital
ou
OK/►
▲/▼
pour sélectionner
(Numérique et Analogique)
(Numérique) ou
Cable
Antenna
pour valider.
Analogue
(Analogique), puis appuyez sur
• Sélectionnez
touches
Scan
▲/▼
et appuyez sur
(Recherche) à l’aide des
OK/►
démarrer la recherche automatique des
stations numériques DVB-T et/ou des stations
analogiques.
Favorite Network Selection
(Sélection du réseau favori)
disponible dans tous les pays.
- b) Si vous avez choisi
• Appuyez sur
• Appuyez sur
& Analogue
Digital
ou
OK/►
▲/▼
(Numérique et Analogique)
(Numérique) ou
Cable
(Câble).
pour valider.
pour sélectionner
Analogue
(Analogique).
• Sélectionnez
Digital & Analogue
et Analogique), puis appuyez sur
valider. Puis :
- Appuyez sur
▲/▼
pour sélectionner
(Recherche), puis appuyez sur
- Appuyez sur
recherche si disponible (
Advanced
- Si vous choisissez
◄/►
pour sélectionner le mode
Full
(Avancé)).
Full
(Complet), appuyez
(Complet) ou
sur OK pour lancer la recherche automatique
de toutes les chaînes numériques et/ou
analogiques DVB-C.
- Si vous choisissez
Advanced
utilisez les touches numériques pour modier
les valeurs de
symbol rate
frequency
(fréquence),
(débit symbole),
(ID réseau), et utilisez les èches
sélectionner le
modulation mode
de modulation) ; puis appuyez sur OK pour
lancer la recherche de toutes les chaînes
numériques et / ou analogiques DVB-C.
• Si vous choisissez
appuyez sur
de la même manière que pour
Analogue
(Numérique et Analogique) ci-
Digital
OK/►
(Numérique),
pour valider, puis procédez
Digital &
dessus, pour rechercher toutes les chaînes
numériques DVB-C.
• Si vous choisissez
appuyez sur
sur les èches
Analogue
OK/►
pour valider, appuyez
▲/▼
pour sélectionner
(Analogique),
(Câble).
(Antenne).
Digital
OK/►
.
pour
n’est pas
Digital
(Numérique
OK/►
pour
Scan
OK/►
.
(Avancé),
network ID
◄/►
pour
(Type
Scan
Français
FR
8
Page 39

Installation des chaînes
(Recherche), puis appuyez sur
OK/►
pour
lancer la recherche de toutes les chaînes
analogiques.
Remarque : Pour éviter l’interruption du processus
de recherche des chaînes, attendez le
message de n de l’opération.
6.
Avant de lancer la recherche, vous pouvez
également sélectionner
Skip scan
(Ignorer
recherche) pour ignorer le processus de
conguration initiale. Dans ce cas, pour rechercher
et mémoriser vos chaînes, vous pouvez effectuer
une recherche automatique des chaînes selon
les instructions indiquées au paragraphe suivant
Effectuer une recherche automatique des
“
chaînes
7.
”.
Pendant la conguration, vous pouvez suivre les
conseils afchés en bas de l’écran pour retourner
à l’étape précédente en appuyant sur ◄. Ou
appuyez sur
EXIT
pour quitter ou interrompre la
recherche en cours.
- À tout moment, pendant la procédure de
démarrage initial, vous pouvez appuyer sur ◄
pour revenir à l'étape précédente.
- Une fois la conguration initiale terminée,
vous pouvez appuyer sur OK pour quitter la
procédure de réglage initiale. Les chaînes sont
organisées selon un ordre prédéni. Si vous
souhaitez ignorer des chaînes, modier l’ordre
prédéni ou renommer des chaînes, choisissez
Setup > Organiser
appuyez sur
(Réglages > Organiser) puis
OK/►
pour accéder.
Effectuer une recherche automatique des
chaînes
Cette section décrit comment rechercher et
mémoriser automatiquement les chaînes. Les
opérations s’appliquent à la fois aux chaînes
analogiques qu’à celles numériques. Ces opérations
s’effectuent dans tous les cas ci-dessous :
- vous avez choisi
Skip scan
(Ignorer rechercher)
dans la conguration initiale
- vous lisez le message
“Please scan channels!”
Veuillez rechercher les chaînes !») en mode TV
- vous souhaitez mettre vos chaînes à jour.
1.
Appuyez sur
sélectionnez
(Paramètres > Réglages > Langue). Utilisez
MENU
de la télécommande puis
Settings > Setup > Language
◄/►
pour sélectionner la langue des menus.
2.
Appuyez sur
(Réglages), appuyez sur
Country
MENU
pour revenir sur
▲/▼
pour sélectionner
(Pays), puis appuyez sur
Setup
◄/►
et, si
nécessaire, saisissez votre mot de passe pour
sélectionner votre pays. Le téléviseur installe et
organise les chaînes en fonction de votre pays.
3.
Utilisez les touches
mode
(Mode de syntonisation) puis sélectionnez
▲/▼
pour sélectionner
Tuner
(«
Antenna
l’aide des touches
- a) Si vous avez choisi
• Appuyez sur
install
sur
OK
Menu
Exit
• Sélectionnez
(Antenne) ou
◄/►
.
Antenna
▲/▼
pour sélectionner
(Installation des chaînes), et appuyez
OK/►
pour valider.
Channel install
Autom atic searc h
Autom atic updat e
Analo gue m anual scan
Anten na ma nual insta llati on
Enter
Select
Back
Exit
Clean chan nel list
Automatic search
automatique), puis appuyez sur
Automatic search
afcher
(Recherche
automatique).
• Appuyez sur OK pour abandonner la sélection
du pays et passez à l’étape suivante. Ou
◄/►
utilisez
pour sélectionnez votre pays,
puis appuyez sur OK pour valider.
• Sélectionnez
et Analogique),
Analogue
OK/►
Digital & Analogue
Digital
(Numérique) ou
(Analogique), puis appuyez sur
pour démarrer la recherche automatique
de toutes les chaînes numériques DVB-T et/ou
analogiques.
- b) Si vous avez choisi
• Appuyez sur
install
OK/►
sur
• Sélectionnez
▲/▼
(Installation des chaînes), et appuyez
pour valider.
Automatic search
Cable
pour sélectionner
automatique), puis appuyez sur
Automatic search
afcher
(Recherche
automatique).
• Appuyez sur OK pour abandonner la sélection
du pays et passez à l’étape suivante. Ou
◄/►
utilisez
pour sélectionnez votre pays,
puis appuyez sur OK pour valider.
- Sélectionnez
Digital & Analogue
(Numérique et Analogique), puis appuyez
OK/►
sur
mode de recherche s’il est disponible et
congurez correctement les informations du
pour valider. Sélectionnez votre
câble de la même manière que lors de la
conguration initiale. Appuyez sur les èches
▲/▼
pour sélectionner
et appuyez sur
OK/►
pour lancer la
Scan
recherche automatique de toutes les chaînes
numériques et analogiques DVB-C.
4.
La recherche peut prendre plusieurs minutes. Au
cours de la procédure, vous pouvez appuyer sur
MENU
pour abandonner en cours de route.
Cable
(Câble) à
(Antenne).
(Recherche
OK/►
(Numérique
(Câble).
(Recherche
OK/►
(Recherche)
Channel
pour
Channel
pour
FR
9
Page 40

Chapitre 4 & 5
5.
Une fois la recherche automatique terminée,
appuyez sur
MENU
pour retourner à la dernière
étape ou appuyez sur OK pour relancer la
recherche des chaînes.
6.
Après la recherche automatique, les chaînes
sont organisées selon un ordre prédéni. Si vous
souhaitez ignorer des chaînes, modier l’ordre
prédéni ou renommer des chaînes, choisissez
Settings > Setup > Organiser
Réglages > Organiser) puis appuyez sur
(Paramètres >
OK/►
pour accéder. Ici, vous pouvez ignorer, trier,
modier ou effacer des chaînes.
Utilisation de votre téléviseur
Accès aux chaînes
À l'aide des touches alphanumériques :
appuyez
sur les touches alphanumériques correspondantes
pour accéder aux chaînes.
Utilisation des touches PR+/- ou P+/- :
parcourez
les chaînes.
Regarder les appareils connectés
Appuyez sur la touche
SOURCE
de la télécommande
ou sur la touche OK du téléviseur pour passer de
la source d’entrée TV à une autre source. Pour
regarder de nouveau la télévision, appuyez sur l’une
des touches numériques pour accéder à la chaîne
correspondante. Pour parcourir les chaînes télé et les
autres sources d’entrée, utilisez les touches
P+/-
.
Volume
Contrôle du volume : Utilisez les touches
du téléviseur ou appuyez sur les touches
VOL+/V+/-
de
la télécommande pour augmenter ou diminuer le
volume.
Coupure du son : Appuyez sur la touche pour
couper provisoirement le son. Appuyez à nouveau sur
cette touche ou sur la touche V+ pour rétablir le son.
Utilisation des menus TV
1.
Appuyez sur
Smar t TV Chan nels Source
Pict ure S ound Network Settings
Pic ture
Medi a
MENU
pour afcher le menu principal.
Medi a
Soun d
Smar t TV
PAP
Lock
Options
Setu p
Les éléments suivants sont disponibles dans le
menu principal : Smart TV (Smart TV), Media
(Multimédia), Channels (Chaînes), Source
Utilisation de votre téléviseur &
Plus d’utilisations de votre téléviseur
(Source), Picture (Image), Sound (Son), Network
(Réseau), Settings (Réglages).
2.
Utilisez les touches
l’élément de votre choix, puis appuyez sur
la touche OK pour ouvrir le sous-menu
correspondant.
3.
Dans les sous-menus, utilisez
sélectionner les options de menu, et les touches
◄/►
pour régler des fonctions ou modier des
valeurs. Utilisez OK pour activer un réglage.
Utilisez les touches
menu correspondant.
4.
Appuyez sur
précédent.
5.
Appuyez sur
Remarque : Certaines options peuvent ne pas être
disponibles pour certaines sources.
Sélection de la langue des menus
Vous pouvez choisir votre langue préférée des menus
en suivant les instructions ci-dessous.
1.
Appuyez sur
principal.
2.
3.
4.
▲/▼/◄/►
Utilisez
Setup
(Paramètres > Réglages), puis appuyez sur
OK
pour accéder.
Sélectionnez
OK/►
pour accéder.
Appuyez sur les èches
la langue de votre choix dans le menu
(Langue) pour afcher les menus.
5.
Appuyez sur
Plus d’utilisations de votre téléviseur
Réglage de vos chaînes favorites
Vous pouvez créer une liste de vos chaînes TV
favorites.
1.
Appuyez sur
2.
Appuyez sur la touche jaune pour appeler la
Channel list selection
Appuyez sur
list
(Liste des favoris) et appuyez sur OK pour
accéder.
3.
Appuyez sur la touche bleue pour démarrer la
modication de votre liste de favoris. Utilisez
pour parcourir la liste des chaînes puis appuyez
sur OK pour sélectionner ou désélectionner.
4.
Répétez cette procédure pour dénir d’autres
chaînes favorites.
5.
Appuyez sur
Action rapide :
la télécommande pour accéder directement à la
Channel list selection
Économie d’énergie
1.
Appuyez sur
▲/▼/◄/►
pour sélectionner
▲/▼
OK/►
pour ouvrir le sous-
MENU
pour retourner au menu
EXIT
pour fermer le menu.
MENU
pour afcher le menu
pour sélectionner
Language
EXIT
LIST
(Langue) et appuyez sur
◄/►
pour sélectionner
pour fermer le menu.
.
(Liste des chaînes).
▲/▼
pour sélectionner
LIST/EXIT
pour quitter.
Appuyez sur la touche
(Liste des chaînes).
MENU
de la télécommande et
pour
Settings >
Language
Favorite
FAV
de
▲/▼
Français
FR
10
Page 41

Plus d’utilisations de votre téléviseur
sélectionnez
> Energy Saving
Settings > Setup > ECO Settings
(Paramètres > Réglages >
Paramètres ECO > Économie d’énergie).
2.
Utilisez
◄/►
pour sélectionner le mode économie
d’énergie approprié.
3.
Appuyez sur
Action rapide :
EXIT
pour fermer le menu.
Appuyez sur
ECO
de la
télécommande pour sélectionner directement le mode
d’économie d’énergie souhaité.
Utilisation de la fonction 3D pour regarder la
TV
(uniquement pour le modèle LT-46HW65U)
AVERTISSEMENT :
• En regardant la télé en 3D, certains spectateurs
peuvent ressentir un malaise, tel qu’étourdissement,
nausée et mal de tête. Si vous ressentez de tels
symptômes, arrêtez de regarder la télé en 3D,
enlevez vos lunettes 3D et reposez-vous.
• Regarder des vidéos en 3D de trop près ou pendant
une longue période peut nuire à votre vue.
• Un adulte responsable doit surveillez fréquemment
les enfants qui utilisent la fonction 3D.
• N’utilisez les lunettes 3D que pour regarder des
vidéos en 3D sur un téléviseur 3D.
• N’utilisez pas la fonction 3D ou des lunettes 3D tout
en marchant ou en se déplaçant, autrement vous
risquez de vous blesser en trébuchant, tombant et/
ou en percutant des objets.
1.
Appuyez sur la touche
et sélectionnez
Navigation 3D), puis appuyez sur les èches
(Manuel).
Select
Back
Exit
3D navigation
pour régler la
Manual
MENU
Picture > 3D navigation
de la télécommande
(Image >
(Navigation 3D) vers
3D
3D mode 2D-to-3D
3D-to-2D
Depth of field 16
Protrude
Distance to TV
Image safety
L-R switch Off
Off
Off
16
10
◄/►
Remarque : Si la navigation 3D est réglée sur Auto
(Automatique), les réglages seront
effectués automatiquement.
2. 3D Mode
3D, puis appuyez sur
le format d'entrée 3D correct parmi
Side
and Bottom
(Mode 3D) : Mettez d'abord les lunettes
◄/►
pour sélectionner
Side-by-
(Côte-à-Côte),
2D-to-3D
(Haut et Bas) et
(2D-vers-3D),
Line interleave
Top
(Entrelacement de lignes).
3. L-R Switch
On
(Commutateur G-D) : Sélectionnez
(Activer) ou
Off
(Désactiver) pour équilibrer la
vidéo en 3D entre la visualisation à gauche et à
droite lors du visionnement en 3D.
4. Depth of Field
(Profondeur de champ) : Obtenez
un bon effet 3D grâce à l’image convertie à partir
de l’afchage d’image en 2D.
5. 3D-to-2D
(Gauche) ou
(3D-vers-2D) : Sélectionnez
Right
(Droit) pour afcher l’image
Left
en mode 2D (sans effet 3D). Cette fonction est
désactivée lorsque l’option
est réglée sur
2D-to-3D
3D Mode
(Mode 3D)
(2D-vers-3D) ou
(Désactiver).
6.
Appuyez sur
EXIT
pour fermer le menu.
Remarques :
-Des lunettes 3D d’autres fabricants peuvent ne
pas être compatibles.
-Toutes les fonctions photo sont désactivées en
mode 3D.
-Si vous passez à une source de signal différent
ou accédez à la Smart TV, le mode 3D est
automatiquement désactivé.
-Certains modes 3D peuvent ne pas être
disponibles en fonction du format d’entrée de la
source vidéo 3D.
-Modes 3D pris en charge :
TV analogique, AV, CMP :
TV numérique, HDMI, USB, Vidéo sur Internet :
Top and Bottom
(Côte-à-Côte),
interleave
sequential
(Haut et Bas),
2D-to-3D
(Entrelacement de lignes),
(Images séquentielles).
2D-to-3D
(2D-vers-3D)
Side-by-Side
(2D-vers-3D),
Frame
-La fonction 3D en mode USB : Pendant la lecture
d’une vidéo sélectionnée sur USB, appuyez sur
MENU
pour afcher le menu vidéo en mode
navigation, puis sélectionnez
3D Mode
(Mode
3D). Pour plus de précisions, reportez-vous à la
description correspondante ci-dessus.
Description audio
La description audio se réfère à une piste de narration
supplémentaire pour les téléspectateurs aveugles et
malvoyants, concernant les programmes de télévision
et les lms.
Le narrateur de description parle pendant l’émission
décrivant ce qui se passe à l’écran lorsqu’il n’y a pas
d’audio (et pendant le dialogue si nécessaire).
Vous pouvez utiliser cette fonction si l’émission
contient une description audio.
1.
Appuyez sur
sélectionnez
MENU
de la télécommande et
Sound
(Son), puis appuyez sur OK
pour accéder.
2.
Utilisez les touches
Description
▲/▼
pour sélectionner
(Description audio) et appuyez sur la
touche OK pour accéder.
3.
Vous pouvez activer ou désactiver la fonction
Description audio dans le menu
Description
(Description audio).
Audio
Off
Line
Audio
FR
11
Page 42

Plus d’utilisations de votre téléviseur
4.
Pour régler le volume de la Description audio,
appuyez sur
suivante, puis utilisez
▲/▼
pour passer à la ligne de menu
◄/►
pour régler le volume.
Fonction PAP
Utilisez cette fonction pour afcher les images côte à
côte issues de différentes sources d’entrées. À noter
qu’une fenêtre afche les sources de la télévision
analogique et numérique, et l’autre afche les formats
VGA, HDMI et CMP.
(Remarque : Non disponible
pour Audio/Vidéo dans les deux fenêtres.)
1.
Appuyez sur
MENU
pour afcher le menu
principal.
2.
Sélectionnez
Picture
(Image) et appuyez sur OK
pour accéder.
3.
Appuyez sur
▲/▼
pour sélectionner l’option
PAP
et appuyez sur OK pour valider.
4.
Appuyez sur
◄/►
pour activer / désactiver la
fonction PAP.
5.
Sélectionnez
◄/►
6.
Appuyez sur
Si vous activez la fonction PAP, appuyez sur
TV position
(Position TV) et utilisez
pour repositionner la fenêtre TV.
EXIT
pour fermer le menu.
◄/►
pour basculer entre les fenêtres actives (avec un
son symbolisé par une note musicale). Quand la
fenêtre TV est active (avec un son symbolisé par
une note musicale), les touches alphanumériques
P+/-
et
fonctionnent en mode TV. Lorsque l’autre
fenêtre est active,
P+/-
permettent de parcourir
toutes les sources extérieures disponibles.
Utilisation des sous-titres
Vous pouvez activer les sous-titres pour chaque
chaîne de télévision. Les sous-titres sont diffusés
via le télétexte ou la transmission numérique DVB-T/
DVB-C. Avec la transmission numérique, vous avez
l’option supplémentaire de choisir une langue de
sous-titres préférée.
Activer/désactiver les sous-titres
1.
Appuyez sur
sélectionnez
MENU
de la télécommande et
Settings > Subtitle
(Paramètres >
Sous-titres).
2.
Appuyez sur
Menu
Exit
Select
Back
Exit
OK/►
pour valider.
Subtitle
Subti tle
Digit al s ubtitl e lan guage
Digit al s ubtitl e lan guage 2nd
Subti tle type
On
Engli sh
Engli sh
Norma l
3.
Sélectionnez l’option
◄/►
utilisez
Subtitle
pour sélectionner
(Sous-titres) et
On/Off
Désactiver) et ainsi activer ou désactiver les soustitres.
Activation des langues de sous-titrage des
chaînes TV numériques
1.
Appuyez sur
sélectionnez
subtitle language
MENU
de la télécommande et
Settings > Subtitle > Digital
(Paramètres > Sous-titres >
Langue des sous-titres numériques).
2.
Utilisez
◄/►
pour sélectionner une langue de
sous-titres préférée.
3.
4.
,
5.
Action rapide :
▲/▼
Utilisez
language 2nd
Utilisez
pour sélectionner
(Langue ss-titres numériq. 2nd).
◄/►
pour sélectionner une langue
secondaire pour les sous-titres.
Appuyez sur
EXIT
pour fermer le menu.
Appuyez sur
SUBTITLE
Digital subtitle
télécommande pour sélectionner directement une
langue de sous-titres disponible pour le programme
de télévision numérique sélectionné.
Sélection du type de sous-titrage des chaînes TV
numériques
1.
Appuyez sur
sélectionnez
MENU
de la télécommande et
Settings > Subtitle > Subtitle type
(Paramètres > Sous-titres > Type de sous-titres).
2.
◄/►
Utilisez
pour sélectionner un type de soustitrage. Vous pouvez sélectionner
impaired
(Malentendants) pour afcher les sous-
Hearing
titres malentendants dans la langue choisie.
Sélection de la langue de la page de décodage
dans le télétexte
Appuyez sur la touche
sélectionnez
language
Settings > Teletext > Decoding page
(Paramètres > Télétexte > Langue de la
MENU
de la télécommande et
page de décodage). Sélectionnez le type de langue
dans laquelle le télétexte va s’afcher.
Langue du Télétexte numérique
Vous pouvez, suivant le diffuseur, bénécier d’un
service avec plusieurs pages télétexte initiales
dans différentes langues sur certaines chaînes
numériques. Cette fonction vous permet de choisir
une langue disponible comme langue principale
associée aux différentes pages télétexte initiales.
Appuyez sur
choisissez
language
télétexte numérique.). Utilisez
MENU
de la télécommande puis
Settings > Teletext > Digital teletext
(Paramètres > Télétexte > Langue du
◄/►
pour choisir.
Type SPDIF
Connectez le téléviseur à un périphérique audio par
SPDIF
la sortie
. Pour sélectionner un type de son
approprié pour votre sortie SPDIF, appuyez sur la
(Activer/
Français
de la
FR
12
Page 43

Plus d’utilisations de votre téléviseur
MENU
touche
Settings > SPDIF type
- Si vous choisissez
SPDIF est PCM, quel que soit le format audio du
programme.
- Si vous choisissez
SPDIF est.
• Dolby Digital lorsque le format audio du programme
est Dolby Digital ou Dolby Digital Plus ou HE-AAC.
• PCM lorsque le format audio du programme est
MPEG.
- Sélectionnez
sortie audio de l’appareil audio branché à la sortie
SPDIF.
Remarque : Les options présentes dépendent de
de la télécommande et sélectionnez
l'image, vous pouvez choisir
delay
Settings
◄/►
synchroniser le son et l'image.
(Paramètres > Type SPDIF).
PCM
, le format de sortie
Dolby D
, le format de sortie
Off
(Désactiver) pour désactiver la
SPDIF
(Retard SPDIF)
(Réglages)
pour régler le temps de retard pour
depuis le menu
puis appuyez sur
T-Link
Utilisez cette fonction pour rechercher les appareils
CEC connectés aux prises HDMI de votre téléviseur
et utiliser une seule touche pour la lecture et la mise
en veille de ces appareils CEC.
Activer/désactiver T-Link
1.
Appuyez sur
sélectionnez
T-Link).
2.
Appuyez sur
Off
ou
l’option
access
accéder à l’aide de la touche
télécommande.
Lecture avec une seule touche
Avec cette fonction, appuyez sur la touche de lecture
de votre télécommande de DVD (par exemple)
et la lecture démarre, le téléviseur commute
automatiquement sur la bonne source et montre
l’image DVD.
Utilisation de la veille système
Avec cette fonction, appuyez sur la touche O de votre
télécommande de téléviseur (par exemple) et votre
téléviseur et tous les appareils connectés via HDMI
se mettent en veille.
Remarque : Les fonctions CEC dépendent du
MENU
de la télécommande puis
Settings > T-Link
◄/►
(Arrêt), si cette fonction est activée,
T-Link
(Accès rapide) auquel vous pouvez
pour sélectionner On (Activer)
est disponible dans le menu
type de périphériques raccordés et
il se peut que certains d’entre eux
ne communiquent pas correctement
lorsqu’ils sont connectés à ce modèle
de TV. Veuillez consulter le manuel
d’utilisation ou le fabricant pour de plus
(Paramètres >
Option
de votre
Quick
amples renseignements concernant les
périphériques qui posent problème.
Mise à jour réseau
Appuyez sur
sélectionnez
(Paramètres > Mise à jour réseau). Sélectionnez
Off
(Activer/Désactiver) pour activer ou désactiver la
fonction mise à jour réseau.
- Lorsque cette fonction est activée, le téléviseur
met automatiquement à jour les chaînes si votre
fournisseur de services DTV (télévision numérique)
met à jour son réseau DTV.
- Lorsque cette fonction est désactivée, vous devez
effectuer à nouveau la recherche des chaînes
pour obtenir les nouvelles chaînes ou supprimer
des chaînes inaccessibles si votre fournisseur de
services DTV ajoute ou supprime des chaînes de
son réseau DTV.
MENU
de la télécommande, puis
Settings > Network update
On/
Interface commune
Les chaînes TV numériques brouillées peuvent être
décodées avec un module d’interface commune
et une carte obtenue auprès d’un prestataire de
services de télévision numérique.
Le module d’interface commune peut activer
plusieurs services numériques en fonction du
prestataire et des services que vous choisissez (par
exemple, la télévision payante). Contactez votre
prestataire de services de télévision numérique pour
plus d’informations sur les services et les conditions.
Utilisation du module d’interface commune
AVERTISSEMENT : Éteignez votre TV avant
d’insérer un module d’interface commune.
Assurez-vous de suivre les instructions décrites
ci-dessous. L’insertion incorrecte d’un module
d’interface commune peut endommager le
module et votre téléviseur.
1.
En suivant les indications imprimées sur le
module d’interface commune, insérez doucement
le module dans l’emplacement qui lui est réservé
dans le téléviseur.
2.
Poussez le module jusqu’à l’insertion complète.
3.
Allumez le téléviseur et attendez l’activation du
module d’interface commune. Cela peut prendre
plusieurs minutes.
Remarque : Ne retirez pas le module d’interface
Accès aux services de l’interface commune
Après avoir inséré et activé le module d’interface
commune, appuyez sur
et sélectionnez
(Paramètres > Interface commune).
commune de son emplacement. Le
retrait du module désactivera les
services numériques.
MENU
Settings > Common interface
de la télécommande
FR
13
Page 44

Plus d’utilisations de votre téléviseur
Cette option de menu est disponible uniquement si le
module d’interface commune est correctement inséré
et activé. Les applications et le contenu à l’écran sont
fournis par votre prestataire de services de télévision
numérique.
Mise à jour logiciel
Remarque : Attendre que la mise à jour soit terminée
Appuyez sur
sélectionnez
(Paramètres > Mise à jour logiciel). Appuyez sur
OK/►
-By network
d’installer la dernière version du logiciel via Internet.
Congurez auparavant une connexion réseau
câblée ou sans l puis sélectionnez
(Via réseau) et appuyez sur
Une barre de progression s’afche lorsqu’une
nouvelle version du logiciel est disponible. Une fois
le téléchargement terminé, le téléviseur devient noir
et lance la mise à jour du logiciel.
Remarque : Il faut que la connexion réseau soit
-By channel
dernière version du logiciel si elle est retransmise.
Utilisez
chaîne) et appuyez sur
• Utilisez
• Utilisez les èches
• Utilisez les èches
avant d’éteindre ou de débrancher le
téléviseur.
MENU
de la télécommande puis
Settings > Software update
pour valider.
(Via réseau) : Permet de télécharger et
OK/►
maintenue avec succès au cours de la
mise à jour.
(Par chaîne) : Vous permet d’installer la
▲/▼
pour sélectionner
◄/►
Auto download
pour télécharger automatiquement le dernier
logiciel si disponible. Après que le logiciel ait
été téléchargé avec succès, vous serez invité à
décider si vous voulez l’installez tout de suite.
Si oui, suivez les indications à l’écran pour
terminer l’installation. Vous pouvez également
sélectionner d’ignorer l’installation à ce stade.
(Non) sous
automatique) pour refuser le téléchargement
automatique.
Manual Download
appuyez sur
manuellement le logiciel le plus récent. Suivez
les indications à l’écran pour terminer. Lors de la
recherche, appuyez sur
ou quitter la procédure.
Auto download
OK/►
pour sélectionner
(Téléchargement automatique)
OK/►
pour valider.
◄/►
npour sélectionner No
(Téléchargement
▲/▼
pour sélectionner
(Téléchargement manuel) et
si vous souhaitez rechercher
OK/EXIT
By network
pour accéder.
By Channel
Yes
(Oui) sous
pour annuler
(Par
Passer en mode Magasin ou Maison
1.
Appuyez sur
sélectionnez
Emplacement).
2.
Appuyez sur
emplacement :
MENU
de la télécommande puis
Settings > Location
◄/►
pour sélectionner votre
Shop
(Shop) ou
(Paramètres >
Home
(Maison).
3.
Appuyez sur
Remarque : Selon le règlement de la Commission
EXIT
pour quitter.
européenne 2009/125/CE, en
mode Home, le téléviseur passe
automatiquement en veille si aucune
opération n’est effectuée pendant
4 heures. Cette fonction peut être
désactivée dans le menu
(Paramètres)
.
Settings
Fonction MHEG
Certains diffuseurs TV numériques offrent des
services interactifs ou de texte numérique dédié (par
exemple, BBC1 au Royaume-Uni). Ces services
fonctionnent comme un système télétexte normal
avec en plus les touches numériques, de couleur et
de navigation.
Remarque : MHEG et sous-titres s’excluent
1.
Appuyez sur la touche rouge ou
télécommande.
2.
Utilisez les touches
ou mettre en surbrillance des éléments.
3.
Appuyez sur OK pour conrmer ou activer.
4.
Appuyez sur l’une des touches de couleur pour
sélectionner une option.
5.
Appuyez sur
mutuellement et ne peuvent pas
coexister sur le même écran. Si
(Sous-titres)
MHEG n’apparaît pas. Veuillez suivre
les instructions du paragraphe
désactiver les sous-titres”
régler
(Désactiver)
Subtitle
TEXT
est réglé sur
(Sous-titres)
.
▲/▼/◄/►
EXIT
ou
TEXT
pour sélectionner
pour quitter.
On
sur
Subtitle
(Activer)
“Activer/
pour
Off
de la
Afcher des photos, écouter de la musique et
regarder des vidéos à partir d’un dispositif de
stockage USB
Votre téléviseur est équipé d’un port USB qui vous
permet de voir des photos, d’écouter de la musique
ou de regarder des vidéos stockées sur un dispositif
de stockage USB.
Formats de chiers supportés :
Photo JPEG
Musique MP3
Vidéo AVI, MPG, MPEG, TS, DIVX, MKV...
Remarque : Certaines clés USB et certains produits
USB (appareils photo numériques ou
téléphones portables par exemple)
ne sont pas entièrement compatibles
avec le standard USB 2.0, il est donc
possible qu’ils ne fonctionnent pas avec
le lecteur multimédia du téléviseur. Les
clés ou appareils USB ne sont pas tous
compatibles avec la fonction USB. Les
formats ci-dessus ne sont pas tous
Français
,
FR
14
Page 45

Plus d’utilisations de votre téléviseur
reconnus. Les formats d’encodage de
vos chiers déterminent s’ils peuvent
Pour accéder manuellement au
Multimédia) appuyez sur la touche
télécommande et sélectionnez
Photo
Utilisez cette fonction pour afcher des photos, si
disponibles.
1.
Sélectionnez
et ensuite appuyez sur OK pour accéder à
l’exploration des chiers.
2.
Dans l’exploration des chiers, utilisez
pour sélectionner une photo ou un sous-dossier.
3.
Sélectionnez un sous-dossier et appuyez sur OK
pour accéder à l’explorateur des chiers.
4.
Utilisez
dans le dossier principal ou dans le sous-dossier,
appuyez sur
en mode dossier.
5.
Choisissez une photo, appuyez sur OK pour
valider, puis le diaporama démarre à partir de
la photo sélectionnée. Appuyez sur OK pour
effectuer un arrêt sur image. Appuyez sur
pour afcher le menu photo dans le mode
navigateur. Vous pouvez lire, ger ou faire pivoter
la photo, sélectionner différents modes d’afchage
et effets, etc.
6.
Appuyez les touches correspondantes de
la télécommande pour réaliser les fonctions
disponibles indiquées dans la barre de fonction
en bas de l’écran TV. Appuyez sur la touche
pour afcher ou masquer la barre de fonctions.
Action rapide :
télécommande pour tourner la photo.
Musique
Utilisez cette fonction pour lire de la musique, si
disponible.
1.
Sélectionnez
puis appuyez sur OK pour accéder à l’explorateur
de chiers
2.
Utilisez
dans le dossier principal ou dans un sous
dossier de la même manière que pour la fonction
d’afchage de photo, appuyez sur
afcher le menu musique en mode dossier.
être utilisés ou pas.
Media > Photo
▲/▼/◄/►
-Sort
(Trier) : Trier les dossiers et les photos par
Date de modication ou par Nom.
-Edit
(Modier) : Copier, coller ou supprimer une
photo sélectionnée.
-Parser
(Analyseur) : Vous pouvez sélectionner
Recursive
tous les sous-dossiers.
▲/▼/◄/►
-Sort
(Trier) : Trier les dossiers et les chansons
par Nom, Genre, Artiste ou Album.
pour sélectionner une photo
MENU
(Récursif) pour afcher les photos de
Appuyez sur la touche verte de la
Media > Music
pour sélectionner une chanson
Media center
MENU
Media
(Support > Photo),
pour afcher le menu photo
(Support > Musique),
(Centre
de la
(Support).
▲/▼/◄/►
MENU
MENU
pour
INFO
-Edit
(Modier) : Copier, coller ou supprimer une
chanson sélectionnée.
-Parser
(Analyseur) : Vous pouvez sélectionner
Recursive
de tous les sous-dossiers.
3.
Sélectionnez une chanson, appuyez sur OK ; la
lecture commence automatiquement à partir de la
chanson sélectionnée. Appuyez sur
afcher le menu musique en mode exploration.
Vous pouvez écouter ou suspendre la lecture
de la chanson, sélectionner un mode de lecture
différent, etc.
-Show lyrics
est disponible pour les chansons comportant
des paroles. Sélectionnez cette option et
utilisez
synchronisé des paroles.
-Audio only
et appuyez sur OK pour écouter la musique avec
l’écran éteint. Appuyez sur l’une des touches
pour rallumer l’écran.
4.
Appuyez les touches correspondantes de
la télécommande pour réaliser les fonctions
disponibles indiquées dans la barre de fonction en
bas de l’écran TV.
Vidéo
Utilisez cette fonction pour regarder des vidéos, si
disponibles.
1.
Sélectionnez
puis appuyez sur OK pour accéder à l’explorateur
de chiers.
2.
Utilisez
le dossier principal ou dans un sous dossier de la
même manière que pour la fonction d’afchage de
photo, appuyez sur
vidéo en mode dossier.
-Sort
Type, Date de modication ou par Nom.
-Edit
vidéo sélectionnée.
-Parser
Recursive
tous les sous-dossiers.
3.
Sélectionnez une vidéo, appuyez sur OK ; la
lecture commence automatiquement à partir de
la vidéo sélectionnée. Appuyez sur
afcher le menu vidéo en mode exploration. Vous
pouvez regarder ou mettre suspendre la lecture de
la vidéo, sélectionner un mode de lecture différent,
modes d’écran et de réglages d’image prédénis,
etc.
4.
Appuyez les touches correspondantes de
la télécommande pour réaliser les fonctions
disponibles indiquées dans la barre de fonction
en bas de l’écran TV. Appuyez sur la touche
pour afcher ou masquer la barre de fonctions.
(Récursif) pour afcher les chansons
(Afcher les paroles) : Cette option
◄/►
pour activer/désactiver l’afchage
(Audio uniquement) : Sélectionnez
Media > Video
▲/▼/◄/►
(Trier) : Trier les dossiers et les vidéos par
(Modier) : Copier, coller ou supprimer une
(Analyseur) : Vous pouvez sélectionner
pour sélectionner une vidéo
(Récursif) pour afcher les vidéos de
(Support > Vidéo),
MENU
pour afcher le menu
MENU
MENU
pour
pour
INFO
FR
15
Page 46

Plus d’utilisations de votre téléviseur
Vidéo DivX
À PROPOS DE VIDÉO DIVX : DivX® est un format
vidéo numérique créé par DivX, LLC, une liale de
Rovi Corporation. Cet appareil est ofciellement
certié DivX Certied® et peut lire les vidéos
DivX. Rendez-vous sur divx.com pour obtenir plus
d’informations et d’outils de conversion de chiers
vidéo en format DivX.
À PROPOS DE VIDÉO-À-LA-DEMANDE DIVX :
Vous devez inscrire votre appareil certié DivX
Certied® pour pouvoir lire les vidéos VOD (Vidéo à
la demande) DivX.
Obtenir un code d’inscription :
• Appuyez sur
• Sélectionnez
(Paramètres > Enregistrement DivX (R)).
• Appuyez sur la touche
code d’inscription.
Rendez-vous sur vod.divx.com et consultez les
instructions pour terminer votre inscription.
Annuler l’inscription de votre téléviseur :
Pour annuler l’inscription de votre téléviseur,
• Appuyez sur
• Sélectionnez
(Paramètres > Désenregistrement DivX(R)).
• Appuyez sur
afchées.
DivX®, DivX Certied®, DivX Plus® HD et les
logos correspondants sont des marques de Rovi
Corporation ou de ses liales et sont utilisés sous
licence.
MENU
de la télécommande.
Settings > DivX(R) registration
OK/►
pour afcher votre
MENU
de la télécommande.
Settings > DivX(R) deregistration
OK/►
et suivez les instructions
Accès à l’heure
Vous pouvez accéder à l’heure à partir de chaînes
numériques en suivant les instructions ci-dessous.
1.
Appuyez sur
sélectionnez
synchronization
Heure > Synchronisation automatique).
2.
Appuyez sur
Pour régler manuellement l'heure, désactivez la
synchronisation automatique.
MENU
de la télécommande et
Settings > Timer > Clock > Auto
(Paramètres > Horloge >
◄/►
pour sélectionner On (Activer).
Diagnostics sur les chaînes de TV numérique
1.
Appuyez sur
sélectionnez
(Paramètres > Réglages > Diagnostics).
2.
Appuyez sur
sur le signal de la chaîne numérique actuelle,
telles que force du signal, fréquence, etc.
MENU
de la télécommande puis
Settings > Setup > Diagnostics
OK/►
pour afcher des informations
Time shift (Lecture différée)
Vous permet d’enregistrer un programme TV de sorte
que vous ne manquiez pas vos émissions préférées,
même si vous sortez. Avant d’utiliser cette fonction,
connectez d’abord une clé USB à la télé. Lors de la
première utilisation, vous devez congurer le disque
de la clé USB.
Remarque : La fonction n’est disponible que dans
1.
Appuyez sur la touche
et sélectionnez
(Paramètres > Réglages > Lecture différée).
2.
Utilisez les touches
On
différée, puis appuyez sur
menu.
3.
Appuyez sur
sélectionnez
appuyez sur OK pour conrmer.
4.
Suivez les instructions à l’écran pour effectuer la
conguration.
5.
Une fois la conguration effectuée, appuyez sur
OPTION
différée).
6.
Appuyez sur OK pour afcher le menu de lecture
différée.
certains produits et peut ne pas l’être
dans le produit ou à l’endroit où il est
installé à cause de certaines limitations
du réseau de télévision et exigences
techniques du pays. Elle peut aussi être
bloquée par le réseau de télévision en
raison du droit d’auteur (contenu HD,
protection contre l’enregistrement).
Utilisez la touche
télécommande pour vérier si la fonction
est disponible dans votre produit.
Settings > Setup > Time shift
(Activer) pour activer la fonction de lecture
OPTION
Time shift
et sélectionnez
-Appuyez sur la touche de mise en pause pour
mettre en pause l'image et commencer le différé.
-Appuyez sur la touche de mise en pause pour
lire le morceau enregistré.
-Quand le menu de différé est fermé et que seule
le curseur de temps de différé reste sur l'écran,
vous pouvez appuyer sur la touche de pause
ou sur OK pour accéder au menu de différé.
-Appuyez sur la touche de retour rapide◄◄
ou d'avance rapide ►► pour exécuter ces
fonctions.
-Appuyez sur la touche d'arrêt pour quitter la
fonction de lecture différée.
-Avant de connecter la clé USB au téléviseur,
assurez-vous d’avoir sauvegardé les données se
trouvant sur cette clé pour éviter de perdre des
données importantes suite à des défaillances
imprévues.
-Nous vous recommandons d’utiliser une clé USB
ayant un espace disponible de plus de 1 Go et
une vitesse de disque supérieure à 5 Mbit/s.
-Plus la mémoire disponible sur le lecteur USB
est importante pour la lecture différée, plus la
durée d’enregistrement est longue.
OPTION
de la
MENU
de la télécommande
◄/►
pour sélectionner
EXIT
pour fermer le
de la télécommande et
(Lecture différée), puis
Time shift
(Lecture
Français
FR
16
Page 47

Plus d’utilisations de votre téléviseur
-Si vous changez de chaîne pendant la lecture
différée, un message vous invite à sélectionner
Yes
(Oui)
sélectionner
lecture différée et effectuer le changement de
chaîne.
ou
No
Yes
Vous pouvez
(Non).
pour quitter la fonction de
(Oui)
Réinitialisation Magasin
Cette option vous permet de réinitialiser le téléviseur
aux paramètres d’usine par défaut.
1.
Appuyez sur
choisissez
Réglages) puis OK pour conrmer.
2.
Choisissez
magasin) puis appuyez sur
3.
Tapez votre mot de passe à l’aide des touches
alphanumériques.
Remarque : Le super mot de passe est 0423. Si
4.
Utilisez les touches
puis appuyez sur OK pour conrmer.
5.
Le menu
Suivez les instructions correspondantes.
MENU
de la télécommande,
Settings > Setup
Reset shop
vous oubliez votre mot de passe, entrez
le super mot de passe pour remplacer
tous les mots de passe existants.
Initial Setup
(Paramètres >
(Retour aux réglages de
OK/►
pour accéder.
◄/►
pour sélectionner OK
(Réglage Initial) apparaît.
Personnalisation des paramètres d’entrée
Vous pouvez congurer votre téléviseur en fonction
des appareils que vous y connectez.
1.
Appuyez sur
sélectionnez
(Paramètrses > Réglages > Paramètres d’entrée).
2.
Appuyez sur
Settings
3.
Appuyez sur
vous avez connecté votre appareil.
4.
Appuyez sur
d’appareil connecté à ce port.
5.
Appuyez sur
Setup
Après la conguration, le nom de la source
sélectionnée sera afché après le nom du connecteur
correspondant dans la liste des sources en appuyant
SOURCE
sur
poste TV.
MENU
de la télécommande puis
Settings > Setup > Input settings
OK/►
(Paramètres d’entrée).
(Réglages).
de la télécommande ou sur OK du
pour accéder au menu
▲/▼
pour sélectionner le port auquel
◄/►
pour sélectionner le type
MENU
pour retourner au menu
Input
Utilisation du guide électronique des
programmes
L’EPG est un guide à l’écran qui afche les
programmes de télévision prévus. Vous pouvez
parcourir, sélectionner, afcher et enregistrer les
programmes.
1.
Appuyez sur
menu
suivant) apparaît ; il vous donne des informations
sur le programme actuel ou suivant de chaque
GUIDE
Now and Next EPG
de la télécommande, le
(Programme actuel et
chaîne. Utilisez les touches de navigation de
la télécommande pour parcourir les différents
programmes.
2.
Utilisez les touches de couleur pour voir
EPG
(Guide des programmes sur 8 jours).
-Prev day
du guide de la veille.
-Next day
guide du lendemain.
-View detail
description du programme en cours si elle est
disponible.
-Type lter
guide des programmes pour les programmes TV
numériques.
• Appuyez sur la touche bleue pour afcher
• Parcourez les différents types et sous-types
• Sélectionnez un ou plusieurs types que
• L’utilisateur peut également sélectionner
• Appuyez sur la touche bleue pour quitter la
• Après le ltrage, l’ensemble des programmes
-Add schedule
(Option) : Appuyez sur la touche
de la télécommande pour afcher le menu
Schedule list
Pour la procédure de programmation d’un
enregistrement, reportez-vous à la section “Liste
des programmations”.
3.
Appuyez sur
passer à la chaîne sélectionnée.
(Jour précédent) (Rouge) : Afchage
(Jour suivant) (Vert) : Afchage du
(Voir les détails) (Jaune) : Afche la
(Filtrer par type) (Bleu) : Filtrage du
la liste des types et des sous-types des
programmes.
au moyen des touches de navigation de la
télécommande.
vous voulez mettre en évidence à partir de
Type
la liste
les sélectionner (ou les désélectionner).
Une coche apparaîtra à gauche du type
sélectionné. Quand vous choisissez un type,
tous les sous-types seront automatiquement
sélectionnés.
certains sous-types désirés sans forcément
sélectionner un type.
liste des types et des sous-types.
de télévision numérique de votre choix sera
mis en surbrillance.
(Type) et appuyez sur OK pour
(Ajouter une programmation)
(Liste des programmations).
GUIDE/EXIT
pour quitter le guide et
8 Days
OPTION
PVR (Personal Video Recorder) (Enregistreur
vidéo personnel)
Vous permet d’enregistrer vos programmes télé
préférés. Avant d’utiliser cette fonction, commencez
par brancher une clé USB à l’appareil. Lors de la
première utilisation de cette fonction, vous devez
congurer le disque de votre dispositif USB.
Remarque : La fonction n’est disponible que dans
certains produits et peut ne pas l’être
dans le produit ou à l’endroit où il est
FR
17
Page 48

Plus d’utilisations de votre téléviseur
installé à cause de certaines limitations
du réseau de télévision et exigences
techniques du pays. Elle peut aussi être
bloquée par le réseau de télévision en
raison du droit d’auteur (contenu HD,
protection contre l’enregistrement).
Utilisez la touche
télécommande pour vérier si la fonction
est disponible dans votre produit.
1.
Appuyez sur la touche
télécommande et dans le menu Accès rapide,
sélectionnez
2.
Appuyez sur
3.
Appuyez sur :
- le bouton d'enregistrement pour lancer
l'enregistrement, le chier enregistré est placé
dans un dossier nommé après le numéro de
chaîne sous le dossier PVR dans
(Support > Vidéo) ;
- Utilisez
d’enregistrement.
- la touche verte ou Stop pour interrompre
manuellement l'enregistrement ; en
fonctionnement normal, l'enregistrement est
interrompu automatiquement quand la durée
d'enregistrement est atteinte.
Remarque : Si vous changez de chaîne alors que
4.
Pendant l’enregistrement, le mini volet PVR est
également afché à l’écran pour indiquer l’état
d’avancement de l’enregistrement.
5.
Pour regarder le programme enregistré, quittez
d’abord le mode PVR et allez à
(Support> Vidéo). Sélectionnez le dossier PVR,
puis sélectionnez le chier d’enregistrement
correspondant. Appuyer sur OK pour lire. (C’est
la même chose si l’utilisateur enregistre un
programme radio numérique).
Remarques :
-Cette fonction n’est disponible que pour les
chaînes numériques non cryptées. Même
lorsqu’une carte CICAM (CI ou CI+) est insérée,
la fonction n’est pas disponible sur les chaînes
cryptées.
-Avant de brancher le dispositif USB au poste,
assurez-vous d’avoir sauvegardé les données
du dispositif pour éviter toute perte de données
importantes à cause d’éventuelles défaillances.
-Plus la mémoire disponible sur le lecteur USB
est importante pour la fonction PVR, plus la
durée d’enregistrement est longue.
PVR
.
OK/►
▲/▼/◄/►
vous enregistrez un programme, un
message apparaît sur l'écran qui vous
demande si vous souhaitez conrmer
le changement de chaîne. Si vous le
conrmez, votre enregistrement est
interrompu.
OPTION
OPTION
de la
pour valider.
Media > Video
pour régler la durée
Media > Video
de la
-Si vous voulez changer de chaîne ou de source
de signal pendant l’enregistrement, sauvegardez
les données d’enregistrement avant d’effectuer
le changement de chaîne ou de source.
-L’appareil ne peut pas lire un chier normalement
si les paramètres du chier dépassent les
limites du système, le format du chier n’est pas
supporté, le chier est endommagé ou ne peut
être décodé.
-Ne retirez pas la clé USB lorsque le système est
en train de lire un chier ou de transmettre des
données, autrement le système ou la clé risque
d’être endommagé.
Liste des programmations
Cette fonction est utilisée pour réaliser une liste des
programmations.
Avertissement : pour cette opération, vous devez
introduire un dispositif de stockage USB, autrement
l'enregistrement sera annulé.
1.
Appuyez sur la touche
télécommande et dans le menu Accès
rapide, sélectionnez
programmations).
2.
Appuyez sur
programmations.
3.
Pour ajouter une programmation dans votre liste
des programmations, appuyez d’abord sur la
touche rouge pour afcher
des programmations). Ensuite,
-Channel number
◄/►
-Start date
date d’enregistrement à l’aide des touches
alphanumériques.
-Start time
début de l’enregistrement.
-Stop time
d’enregistrement.
-Schedule type
• Activez
un rappel et pouvoir ainsi passer à la
programmation que vous avez prévue lorsque
l’heure correspondante est arrivée. Si vous
laissez passer cette heure sans effectuer
d’opération, la boîte de dialogue disparaît et
aucune autre action n’est exécutée.
• Activez
démarrage de l’enregistrement lorsque l’heure
programmée correspondante est arrivée. Si
vous laissez passer cette heure sans effectuer
d’opération, l’enregistrement programmé
démarre automatiquement.
-Repeat type
mode répétition d’enregistrement différent.
4.
Utilisez
(Ajouter), et ensuite appuyez sur OK pour ajouter
OK
pour sélectionner le numéro de chaîne.
(Date de début) : indiquez la
(Heure de début) : dénir l’heure de
(Heure de n) : réglez l’heure de n
Reminder
Record
▲/▼/◄/►
OPTION
Schedule list
pour afcher la liste des
Schedule list
(Numéro de chaîne) : utilisez
(Type de programmation) :
(Rappel) pour recevoir
(Enregistrer) pour conrmer le
(Type de répétition) : Réglez un
pour sélectionner
de la
(Liste des
Add
Français
(Liste
FR
18
Page 49

Chapitre 6
la programmation réglée dans votre liste de
programmation.
5.
Appuyez sur la touche rouge pour répéter la
procédure ci-dessus pour ajouter une nouvelle
programmation.
6.
Si vous souhaitez modier ou effacer une
programmation, choisissez-la et appuyez sur OK
pour entrer et suivez les instructions à l'écran.
7.
Appuyez sur
EXIT
pour fermer le menu.
Réseau
Connexion réseau
Vous pouvez congurer votre téléviseur an qu’il
puisse accéder à Internet via votre réseau local (LAN)
au moyen d’une connexion câblée ou sans l.
Connexion à un réseau câblé
Vous pouvez connecter votre téléviseur à votre
réseau local (LAN) en utilisant un câble de trois
façons :
• Vous pouvez relier votre téléviseur à votre réseau
LAN en connectant le port LAN de votre téléviseur
à un modem externe par un câble Cat5 minimum.
• Vous pouvez connecter votre téléviseur à votre
réseau local en connectant le port LAN de votre
téléviseur à un IP Sharer (boîtier de partage IP) qui
est connecté à un modem externe. Utilisez un câble
Cat5 minimum pour la connexion.
• Selon la façon dont votre réseau est congurée,
vous serez en mesure de relier votre téléviseur à
votre réseau LAN en connectant le port LAN de
votre téléviseur directement à une prise murale
réseau à l'aide d'un câble Cat5 minimum. Notez
que la prise murale est connectée à un modem ou
un routeur quelque part dans votre maison.
1.
Appuyez sur
sélectionnez
Internet connection
réseau > Connexion Internet). Appuyez sur
pour sélectionner On (Activer).
2.
Appuyez sur
(Interface), puis réglez les èches
Ethernet
connexion par câble.
3.
Appuyez sur
test
(Test de connexion), puis appuyez sur
pour vérier la connectivité Internet. Si cela ne
fonctionne pas, suivez l’étape 4 ci-dessous.
4.
Sélectionnez
> IP setting
Conguration IP), puis appuyez sur
accéder au menu
IP). Vous pouvez dénir
d’adresse) sur
(Manuel).
MENU
de la télécommande et
Network > Network Settings >
(Réseau > Paramètres
▲/▼
pour sélectionner
(Ethernet) pour sélectionner le mode
▲/▼
pour sélectionner
Network > Network settings
(Réseau > Paramètres réseau >
IP setting
Auto
Address type
(Automatique) ou sur
◄/►
(Conguration
◄/►
Interface
sur
Connection
OK/►
OK/►
pour
(Type
Manual
- Sélectionnez
souhaitez que le téléviseur puisse obtenir et
saisir l’adresse IP requise automatiquement.
- Sélectionnez
saisir manuellement votre adresse IP, puis :
• Appuyez sur ▼ pour accéder à la première
zone de saisie.
• Entrez les valeurs d’
IP), de
réseau), de
défaut), de
Secondary DNS
les touches alphanumériques pour saisir les
numéros et les touches de navigation pour
vous déplacer d'une option à une autre.
- Une fois
setting
appuyez sur
appuyez sur
test
(Test de connexion), puis appuyez sur
OK/►
connectivity
5.
Si vous souhaitez consulter les informations
sur la connexion en cours, telles que
(Interface),
address
> Network settings > Information
Paramètres réseau > Information), puis appuyez
OK/►
sur
Connexion à un réseau sans l
Pour établir une connexion sans l entre votre
téléviseur et votre réseau, vous aurez besoin d'un
routeur sans l ou d'un modem et d'un adaptateur de
réseau sans l.
1.
Appuyez sur
sélectionnez
Internet connection
réseau > Connexion Internet). Appuyez sur
pour sélectionner On (Activer).
2.
Appuyez sur
(Interface), puis réglez les èches
Wireless
connexion sans l.
3.
Appuyez sur
setting
OK/►
4.
, pour valider.
Vous pouvez paramétrer la connexion réseau
sans l de 3 façons : a) ou b) ou c).
-a) Recherche
• Appuyez sur
(Recherche), puis appuyez sur
téléviseur recherche tous les points d’accès
à portée ; les points d’accès trouvés par le
téléviseur s’afchent.
Auto
(Automatique) si vous
Manual
(Manuel) si vous souhaitez
Subnet mask
Primary DNS
Auto
(Conguration IP manuelle) terminée,
MENU
▲/▼
pour vérier de nouveau
(Connectivité Internet).
Address type
(Adresse IP), etc., sélectionnez
.
MENU
Network > Network Settings >
▲/▼
(Sans l) pour sélectionner le mode de
▲/▼
(Conguration sans l) et appuyez sur
IP address
Default gateway
(Automatique) ou
(Masque de sous-
(DNS Secondaire). Utilisez
pour revenir en arrière,
pour sélectionner
(Type d’adresse),
de la télécommande et
(Réseau > Paramètres
pour sélectionner
pour sélectionner
▲/▼
pour sélectionner
(Adresse
(Passerelle par
(DNS Primaire) et de
Manual IP
Internet
(Réseau >
◄/►
OK/►
Réseau
Connection
Interface
IP
Network
◄/►
Interface
sur
Wireless
Scan
. Le
FR
19
Page 50

Chapitre 7
• Appuyez sur
d’accès disponible, puis appuyez sur
pour connecter le téléviseur.
Remarques :
-Si vous sélectionnez un point d’accès
protégé, vous devez entrer le mot de passe
correspondant. Appuyez sur OK de la
télécommande pour afcher le clavier virtuel
an de pouvoir entrer le mot de passe.
-Ce réglage est capable de mémoriser le point
d’accès disponible, ce qui lui permet de se
connecter au réseau même si vous allumez
votre TV après la mise hors tension.
-b) Manuel
Appuyez sur
(Manuel), puis appuyez sur
demande de saisir le bon identiant SSID d’un
routeur sans l disponible pour congurer la
connexion.
-c) Automatique
Si votre point d’accès prend en charge WPS
(Wi-Fi Protected Setup), vous pouvez vous
connecter au réseau en utilisant un code PIN
(Personal Identication Number) ou PBC
(Push Button Conguration). WPS congure
automatiquement le SSID et la clé WPA dans
chacun des modes.
Utilisez les touches
(Automatique) et appuyez sur la touche
pour accéder.
PIN :
•
pour accéder. Générez un code PIN aléatoire.
Assurez-vous que ce code est installé au
point d’accès. (Pour les procédures, reportezvous au manuel de votre routeur.) Appuyez
à nouveau sur
connexion.
PBC :
•
poussoir PBC, sélectionnez
appuyez sur
sur le bouton-poussoir PBC de votre routeur
dans les 2 minutes après avoir appuyé à
nouveau sur
automatiquement tous les paramètres réseau
dont il a besoin et se connecte au réseau.
5.
Pour vérier la connectivité Internet, suivez les
instructions des étapes 3 et 4 du paragraphe
précédent
6.
Pour consulter les informations sur la connexion
en cours, suivez les instructions de l’étape 5 du
paragraphe précédent
câblé
.
TV à distance
Cette fonction vous permet de transformer un
dispositif intelligent en télécommande sophistiquée,
▲/▼
pour sélectionner un point
▲/▼
pour sélectionner
Sélectionnez
OK/►
Si votre routeur dispose d’un bouton-
OK/►
OK/►
Connexion à un réseau câblé
OK/►
▲/▼
pour sélectionner
PIN
et appuyez sur
pour congurer la
PBC
pour accéder. Appuyez
. Votre téléviseur collecte
Connexion à un réseau
OK/►
Manual
, on vous
OK/►
OK/►
, puis
.
Auto
DLNA (Partager et Regarder)
offrant plus de fonctionnalités que la télécommande
ordinaire de votre téléviseur. Vous pouvez alors
commander votre téléviseur via votre dispositif
intelligent.
1.
Sélectionnez
> TV à distance), puis appuyez sur OK pour
accéder au menu
Vous trouverez des informations pour télécharger
l’application TV à distance et tout autre
renseignement relatif à cette procédure.
Les instructions suivantes sont basées sur l'exemple
d'un téléphone intelligent.
2.
Téléchargez et installez, sur votre téléphone
intelligent, l'application correcte de commande à
distance du téléviseur.
3.
Vériez que le téléphone intelligent et le téléviseur
sont sur le même réseau domestique local (LAN)
ou segment de réseau.
4.
Exécutez l'application de commande à distance
du téléviseur sur le téléphone intelligent, elle
détectera et communiquera automatiquement
avec le téléviseur pour activer la fonction de
commande à distance du téléviseur.
5.
Une fois le téléviseur et le téléphone intelligent
reliés comme décrit à l'étape 4, vous serez en
mesure de proter des fonctions supplémentaires
de commande à distance du téléviseur.
6.
Pour quitter la fonction TV à distance, appuyez sur
la touche
DLNA (Partager et Regarder)
Remarque : Ce manuel couvre des produits dotés
Connexion à votre PC
Assurez-vous d’établir d’abord une connexion câblée
ou sans l à partir de votre téléviseur à un routeur.
Connectez ensuite votre PC à votre routeur par un
câble réseau ou sans l. Veillez également à ce que
l’option
Connection
Connexion Internet) soit sur
le pare feu de votre ordinateur ne bloque pas la
connexion.
Activation de la fonction DLNA
Sélectionnez
réglez-la sur On (Activer).
Suivez dans l’ordre les étapes indiquées ci-après
pour pouvoir regarder des vidéos/photos et écouter
de la musique enregistrées sur votre PC.
Network > TV Remote
TV Remote
EXIT
sur la télécommande.
d’une fonction
et Regarder)
(Partager et Regarder)
DLNA.
Network > Network Settings > Internet
(Réseau > Paramètres réseau >
Network > DLNA
(TV à distance).
Share & See
DLNA. Share & See
ou
est compatible
On
(Activer) et que
(Réseau > DLNA), et
(Réseau
(Partager
Français
FR
20
Page 51

Chapitre 8 & 9
Ajout de chiers multimédias de votre PC en
mode partage
Installez un serveur multimédia DLNA sur votre PC.
En guise de serveur simple et familier, vous pouvez
installer Microsoft Windows Media Player 11 et la
version supérieure à 11. Respectez les instructions
suivantes pour permettre à votre téléviseur d’accéder
aux chiers sauvegardés désignés sur votre PC.
1.
Ouvrir Microsoft Windows Media Player 11.
- Sélectionnez
(Bibliothèque > Partage multimédia).
- Cochez la case
mes chiers mltiédia).
- Sélectionnez l’icône du poste TV connecté à
votre PC.
- Sélectionnez
au poste TV d’avoir accès à votre PC, et
appuyez sur la touche
autorisation.
Remarque : Pour personnaliser vos paramètres,
2.
- Sélectionnez
(Bibliothèque > Ajouter à la bibliothèque).
- Sélectionnez vos dossiers personnels ou des
dossiers d’autres utilisateurs auxquels vous
pouvez avoir accès en mode partage.
- Sélectionnez
pour activer vos ajouts.
Library > Media sharing
Share my media to
Allow
(Autoriser) pour permettre
OK
utilisez la touche
Library > Add to Library
Add
Settings
(Ajouter) et appuyez sur OK
(Partager
pour activer votre
(Paramètres)
Fonction DLNA
Sélectionnez
principal et appuyer sur OK pour accéder au centre
multimédia. Vous pouvez alors consulter des photos,
écouter la musique et regarder des vidéos qui sont
stockées sur votre ordinateur.
Remarque :
-Si
des serveurs DLNA disponibles sur le réseau
local.
-Formats de chiers supportés :
Photo : JPEG
Musique : LPCM
Vidéo : MPEG2
Media
(Support) dans le menu
DLNA
est activé, le téléviseur afche la liste
HbbTV
L’HbbTV (Hybrid broadcast broadband TV) est un
service proposé par certains diffuseurs et disponible
uniquement sur certains canaux de télévision
numérique. L’HbbTV offre une télévision interactive
à la fois par diffusion directe et par l’Internet haut
débit. Ces caractéristiques interactives complètent et
enrichissent les programmes numériques ordinaires,
et incluent des services tels que le télétexte
numérique, le guide électronique des programmes,
HbbTV & Smart TV
des jeux, des votes, des informations précises
concernant le programme en cours, de la publicité
interactive, des magazines d’information, de la
télévision de rattrapage, etc.
En mode haut débit, le téléviseur doit être connecté
à Internet. Outre l’émission que vous regardez,
vous pouvez accéder aux mêmes services qu’en
mode de diffusion et également à d’autres services
interactifs livrés sur Internet tels que la VOD (Vidéo
à la demande) ou la télévision de rattrapage.
Pour proter pleinement de l’HbbTV, vous devez
connecter votre téléviseur à Internet (voir le
paragraphe “Connexion réseau”).
Remarque : Cette fonction ne vous permet pas
de télécharger des chiers sur votre
téléviseur.
Accéder à l’HbbTV
1.
Appuyez sur la touche
télécommande, puis sélectionnez
HbbTV mode
.
2.
Appuyez sur
3.
Lorsque vous réglez une chaîne de télévision
numérique qui offre l’HbbTV, elle vous est signalée
par une indication à l’écran (généralement par
un bouton rouge, mais des boutons de couleurs
différentes peuvent également être utilisés).
Appuyez sur le
pour ouvrir les pages interactives.
4.
Utilisez les èches
couleur pour naviguer dans les pages HbbTV, puis
appuyez sur OK pour valider.
◄/►
MENU
de la
(Paramètres > Mode HbbTV).
pour sélectionner On (Activer).
bouton de couleur
▲/▼/◄/►
Settings >
qui s’afche
et les boutons de
Désactiver l’HbbTV
Pour éviter toute perturbation pouvant être causée
par des essais de diffusion HbbTV, vous pouvez
désactiver la fonction HbbTV :
1.
Sélectionnez
(Menu > Paramètres > Mode HbbTV).
2.
Puis appuyez sur
(Désactiver).
Menu > Settings > HbbTV mode
◄/►
pour sélectionner
Smart TV
Vous permet d’utiliser des applications (Apps) : ce
sont des sites Internet particulièrement adaptés
à votre téléviseur. Vous pouvez contrôler les
applications avec la télécommande du téléviseur.
AVERTISSEMENT :
• Congurez les paramètres de réseau avant d’utiliser
la fonction
• Les conditions de fonctionnement du réseau
peuvent ralentir les réponses et/ou provoquer des
interruptions.
• Si vous rencontrez des difcultés à utiliser une
application, contactez votre fournisseur de contenu.
Smart TV
.
Off
FR
21
Page 52

Chapitre 10
• Le fournisseur de contenu, à sa seule discrétion,
peut décider de cesser les mises à jour d’une
application ou arrêter l’application même.
• Selon les règlements en vigueur dans votre pays,
certaines applications peuvent ne bénécier que
d’un service limité ou ne pas être prises en charge.
Accès aux applications (Apps) Smart TV
1.
Sélectionnez
principal et appuyez sur OK pour afcher la page
d’accueil smart TV. Les services des applications
dépendent du pays. Sélectionnez
appuyez sur OK pour afcher toutes les options
disponibles pour le pays, puis appuyez sur
pour sélectionner votre pays et appuyez sur OK
pour conrmer. Ensuite, sélectionnez Fermer et
appuyez sur OK pour revenir à la page d’accueil
de la Smart TV.
Action rapide :
la télécommande pour accéder directement à la page
d’accueil de votre téléviseur.
2.
Utilisez
application et appuyez sur OK pour y accéder.
3.
La navigation sur Internet s’effectue depuis une
application du portail Smart TV. Elle peut être
accédée via l’icône dans le portail ou via la touche
verte lorsque la page du portail du téléviseur est
afchée.
Remarque : Étant donné que la connexion
YouTube
YouTube est un site de partage de vidéos sur lequel
vous pouvez découvrir et regarder des vidéos
téléchargées par des particuliers ou des entreprises.
Sélectionnez
YouTube) pour accéder à
appuyez sur OK pour valider, puis suivez les options
qui s’afchent à l’écran pour chercher et regarder les
vidéos.
Netix
Netix propose des lms à la demande et des
émissions de TV fournis par Internet.
Avertissement : Netix est disponible dans certains
pays.
Il est nécessaire de disposer d’un accès illimité.
Veuillez consulter le site www.netix.com pour obtenir
de plus amples renseignements. Avec un forfait
Netix illimité, vous pouvez instantanément regarder
des émissions TV et des lms diffusés en streaming
sur Internet directement sur votre téléviseur grâce
au service Netix. Sélectionnez
Smart TV
Appuyez sur la touche
▲/▼/◄/►
avec Internet prend du temps, il est
recommandé que vous attendiez
quelques minutes pour utiliser la
fonction smart TV après l’activation du
téléviseur à partir du mode veille.
Smart TV > YouTube
(Smart TV) dans le menu
Country
Smart TV
pour sélectionner une
YouTube
(Smart TV >
(YouTube), et
Smart TV > Netix
(Pays),
◄/►
de
Autres informations
(Smart TV > Netix), et appuyez sur OK pour valider,
puis suivez les options qui s’afchent à l’écran pour
sélectionner les programmes TV ou les lms de votre
choix.
Skype
Pour utiliser cette fonction, vous devez en premier
lieu vous munir d’une webcam.
Avertissement : Ce téléviseur est compatible
uniquement avec certaines caméras web sans l
dédiées.
Cette application logicielle permet aux utilisateurs
de passer des appels vocaux sur Internet. En outre,
ce logiciel est également devenu populaire pour
ses fonctionnalités supplémentaires qui incluent la
messagerie instantanée, le transfert de chiers, la
vidéoconférence, etc.
Sélectionnez
et appuyez sur OK pour valider, puis suivez les
options qui s’afchent à l’écran pour utiliser cette
application.
Pour plus d'information, veuillez lire le manuel
d'utilisateur Skype fourni avec ce téléviseur.
Smart TV > Skype
(Smart TV > Skype),
Autres informations
Mot de passe de contrôle parental
- Le mot de passe par défaut est 1234. L’utilisateur
peut le changer.
- Le super mot de passe est 0423. Si vous oubliez
votre mot de passe, entrez le super mot de passe
pour remplacer tous les mots de passe existants.
Notice du logiciel GPL-OSS
Ce produit utilise des logiciels qui sont distribués sous
licence GPL/LGPL.
Logiciel GPL : Gcc.
Logiciel LGPL : Glibc.
Ce produit utilise des logiciels qui sont distribués par
l’Independent JPEG Group.
Ce produit utilise des logiciels qui sont distribués par
Freetype Project.
Ce produit utilise des logiciels qui sont distribués sous
licence zlib.
Ce produit utilise des logiciels qui sont distribués sous
licence ICU.
Ce produit utilise des logiciels qui sont distribués sous
licence libpng.
Projet OSS adresse URL :
http://www.gnu.org/software/libc/
http://gcc.gnu.org/
http://www.gnu.org/software/libc/
http://freetype.sourceforge.net
http://www.icu-project.org/
http://www.zlib.net/
http://www.libpng.org/pub/png/libpng.html
Français
FR
22
Page 53

Autres informations
http://www.ijg.org/
[Disposition juridique] de TCL – fabricant de ce
téléviseur. En raison de la diversité des produits
offrant les services SmartTV, ainsi que des limitations
dans le contenu disponible, certaines fonctions,
certaines applications et certains services peuvent
ne pas être disponibles sur tous les appareils
ou dans toutes les régions. Certaines fonctions
SmartTV peuvent nécessiter un équipement ou une
souscription supplémentaire, à acquérir séparément.
N’hésitez pas à visiter notre site Internet pour en
savoir plus sur les matériels et sur la disponibilité des
contenus. Les services et la disponibilité des contenus
accessibles depuis votre SmartTV sont susceptibles
d’être modiés sans notication préalable.
Tous les contenus et les services accessibles
depuis cet appareil appartiennent à des tiers et
sont protégés par un copyright, un brevet, une
marque déposée et/ou un autre droit de propriété
intellectuelle. Ces contenus et services vous sont
fournis uniquement pour une utilisation personnelle
non commerciale. Il vous est interdit d’utiliser un
contenu ou un service d’une manière qui n’a pas
été autorisée par le propriétaire ou le fournisseur
du contenu ou du service. Sans préjudice de ce qui
précède, et sauf autorisation expresse du propriétaire
du contenu ou du fournisseur du service, il vous est
interdit de modier, copier, republier, charger, poster,
transmettre, traduire, vendre, créer des œuvres
dérivées, exploiter ou distribuer, d’une manière ou
d’une autre et sur tout support, un contenu ou un
service accessible depuis cet appareil.
VOUS RECONNAISSEZ DE MANIÈRE EXPRESSE
ET VOUS ACCEPTEZ QUE L’UTILISATION DE
CET APPAREIL EST À VOTRE SEUL RISQUE ET
QUE VOUS ASSUMEZ ENTIÈREMENT LE RISQUE
QUANT À UNE QUALITÉ, PERFORMANCES ET
UNE PRÉCISION SATISFAISANTES. L’APPAREIL
ET LES CONTENUS/SERVICES TIERS SONT
FOURNIS « TELS QUE », SANS GARANTIE
D’AUCUNE SORTE, AUSSI BIEN EXPRESSE
QU’IMPLICITE. TCL DÉCLINE EXPRESSÉMENT
TOUTE GARANTIE ET CONDITION CONCERNANT
L’APPAREIL ET LES CONTENUS/SERVICES,
EXPRESSE OU IMPLICITE, Y COMPRIS, SANS
S’Y LIMITER, TOUTE GARANTIE DE QUALITÉ
MARCHANDE, UNE QUALITÉ SATISFAISANTE,
L’ADÉQUATION À UN USAGE PARTICULIER, LA
PRÉCISION, UTILISATION SEREINE, ET LA NONVIOLATION DE DROITS APPARTENANT À DES
TIERS. TCL NE GARANTIT PAS L’EXACTITUDE,
LA VALIDITÉ, L’OPPORTUNITÉ, LA LÉGALITÉ
ET L’EXHAUSTIVITÉ DE TOUT CONTENU OU
SERVICE ACCESSIBLE DEPUIS CET APPAREIL,
NI GARANTIT QUE L’APPAREIL, LE CONTENU
OU LES SERVICES RÉPONDRONT À VOS
EXIGENCES, NI QUE LE FONCTIONNEMENT
DE L’APPAREIL ET DES SERVICES SERA
ININTERROMPU OU SANS ERREUR. EN AUCUNE
CIRCONSTANCE, Y COMPRIS LA NÉGLIGENCE,
TCL NE PEUT ÊTRE TENU RESPONSABLE,
AUSSI BIEN SUR UNE BASE CONTRACTUELLE
QUE DÉLICTUELLE, DES DOMMAGES DIRECTS,
INDIRECTS, FORTUITS, SPÉCIAUX OU
CONSÉCUTIFS, DES FRAIS D’AVOCAT, DES
DÉPENSES, OU DE TOUT AUTRE DOMMAGE
CONSÉCUTIF À, OU EN RELATION AVEC, TOUTE
INFORMATION FOURNIE AVEC L’APPAREIL, OU
l’UTILISATION DE L’APPAREIL, OU L’ACCÈS À UN
CONTENU OU À UN SERVICE PAR VOUS-MÊME
OU UN TIERS, MÊME APRÈS NOTIFICATION DE
LA POSSIBILITÉ DE TELS DOMMAGES.
Les services tiers peuvent être modiés, suspendus,
retirés, arrêtés ou interrompus, ou non accessibles
à tout moment, sans notication préalable, et TCL
ne fait aucune représentation ni n’offre de garantie
quant à la permanence de disponibilité d’un contenu
ou d’un service, pour quelque durée que ce soit.
Les contenus et les services sont fournis via des
réseaux et des installations de transmission tiers
sur lesquels TCL n’a aucun contrôle. Sans limiter
la généralité de ces clauses de non-responsabilité,
TCL rejette expressément toute responsabilité quant
à la modication, l’interruption, la désactivation, le
retrait ou la suspension de tout contenu ou service
disponible depuis cet appareil. TCL se réserve
le droit de limiter l’utilisation ou l’accès à certains
services ou contenus, quelle que soit la situation
et sans notication préalable ni responsabilité. TCL
n’est pas responsable du service client fourni quant
aux contenus et aux services. Toute question ou
demande concernant les contenus et les services doit
être adressée directement aux fournisseurs de ces
contenus et services.
est une marque déposé de SRS Labs, Inc.
La technologie TruSurround HD est fournie sous
licence de SRS Labs, Inc.
SRS TruSurround HD™ crée une expérience de son
ambiophonique impressionnante aux fonctionnalités
nombreuses à partir de deux haut-parleurs, le tout
avec des graves riches, une restitution des détails
aux fréquences élevées et un dialogue clair.
FR
23
Page 54

Autres informations
Dépannage et téléphone du service d’assistance
Un conseil du guide ci-dessous pourrait vous épargner la peine de retourner votre produit pour réparation ou
d’attendre les services d’un technicien qualié. Si vous n’arrivez pas à résoudre votre problème, vous pouvez
toujours téléphoner au numéro du service d'aide se trouvant dans la notice de sécurité accompagnant les
présentes instructions.
Son TV analogique
Symptômes Causes possibles Solution
Grésillement ou son
déformé.
La stéréo devient mono.
Interférences dues aux voitures,
lampes uorescentes, magnétoscope,
émissions radio, ordinateurs personnels
ou autres équipements.
Le signal est faible ou l’émission est en
mono.
Image TV analogique
Symptômes Causes possibles Solution
Votre magnétoscope est peut-être
défectueux.
Image grenue (neigeuse).
Des silhouettes autour
des objets de l'image
(fantômes).
Interférences d'image
telles que taches ou des
traînées.
Interférences d'image
telles que des lignes
ondulées ou des motifs.
Des interférences sonores
peuvent également
apparaître.
Enchevêtrement des
caractères du télétexte.
Lorsque l'entrée RGB
est utilisée, l’image est
déformée ou pas d'image.
Problèmes de l'émetteur.
L’antenne a été réorientée,
endommagée ou déconnectée.
L'antenne est en train de recevoir des
signaux rééchis par des collines ou
des bâtiments.
Système d'antenne défectueux
Signal d'antenne faible.
Interférences provenant d'équipements
électriques tels qu’outils et moteurs
électriques.
La sortie de l'équipement vidéo
numérique n’est pas compatible aux
spécications d'entrée VGA ou HDMI
du moniteur.
D’autres équipements utilisent la même
fréquence.
Câble de mauvaise qualité reliant le
téléviseur et l'antenne.
Votre système d'antenne est en train de
recevoir un signal parasite sur la même
fréquence
Signal de mauvaise qualité
Il n’y a pas de signal de synchronisation.
Éteignez un appareil à la fois pour voir si
les interférences disparaissent. Voir aussi
ce qu'il faut faire pour les interférences
concernant l’image.
Vériez le signal et votre système d'antenne.
Si vous avez un magnétoscope essayez
de brancher directement l'antenne au
téléviseur. Si le défaut disparaît, le défaut est
probablement dû au magnétoscope.
Vériez votre système d'antenne.
Essayez de syntoniser un meilleur signal de
la même station télé.
Faites contrôler votre système d'antenne.
Essayez de syntoniser un meilleur signal de
la même station télé. Faites contrôler votre
système d'antenne.
Eloignez l'équipement en cause ; éteignez-le
si possible.
Changez le taux de rafraîchissement ou la
résolution de l'équipement numérique, si
possible.
Mettez d'autres équipements en veille pour
voir si l’interférence disparait : changez la
fréquence de sortie de l'équipement qui est
à l'origine des interférences (consultez les
instructions de l'équipement).
Utilisez un câble de qualité supérieure.
Faites contrôler votre système d'antenne.
Même solution que pour « Image neigeuse »
et. « fantômes »
Appuyez sur la touche AV pour sélectionner
l'entrée AV qui reçoit le signal de
synchronisation.
Français
FR
24
Page 55

Autres informations
Télévision Numérique Terrestre
Symptômes Causes possibles Solution
Blocage ou gel de l’image.
Son coupé.
Certaines chaînes sont
manquantes.
Tous ou une partie des
défauts ci-dessus.
Signal faible ou mauvais type d'antenne.
Pas de réception d’une ou plusieurs
fréquences multiplex numériques.
Interférence ou autre problème causé
par le passage du signal d'antenne par
d'autres équipements.
Essayez une nouvelle recherche.
L’antenne n’est pas adaptée à la télévision
numérique.
Il se peut que l’endroit où vous êtes ne
reçoive pas un bon signal de télévision
numérique.
Faites appel à spécialiste pour vérier le
système d'antenne.
Essayez de connecter l'antenne directement
au récepteur de télévision numérique puis
effectuez une recherche.
Si un équipement dispose d’un modulateur
de fréquence radio, éteignez-le ou changez
la fréquence de celui-ci et effectuez une
recherche télé analogique. (Veuillez consulter
les instructions de l’équipement pour savoir
effectuer une cela.)
Multiplexage
DVB-T (Digital Video Broadcasting – Terrestrial (radiodiffusion vidéonumérique – terrestre) est diffusée en groupes
de canaux sur une fréquence commune. Cet arrangement est connu sous le nom
Le système DVB-T comprend plusieurs multiplexes, chacun transportant un groupe de canaux.
Si le niveau du signal sur une fréquence particulière du multiplexage est faible, l'ensemble du groupe de canaux de
ce multiplexage risque d’être perdu.
Multiplexage
.
Généralités
Symptômes Causes possibles Solution
Évitez les vieux câbles et adaptateurs.
La taille de l'image est
incorrecte ou l'appareil
source (ordinateur, lecteur
DVD, décodeur etc.) ne
vous permet pas de régler
la résolution en pixels que
l'écran peut reproduire.
L'appareil source n'a pas lu les données
de conguration de l'écran.
Le câble de connexion ne comprend
pas toutes les connexions nécessaires.
N’utilisez que des câbles récents.
Redémarrez l'appareil source après la
connexion et la mise sous tension de l'écran.
Changez la carte graphique de votre
ordinateur.
Vériez que les résolutions vidéo sont
compatibles à celles données dans cette
notice.
L’image semble écrasée
ou étirée, même si les
réglages du format d'image
sont correctement dénis
(par exemple 4:3 ou 16:9).
Pas d'image.
L'équipement alimentant l'écran est
réglé sur le mauvais format.
Les niveaux de luminosité et de
contraste sont au minimum.
Assurez-vous que le type de la source
d’alimentation est réglé correctement.
FR
25
Sélectionnez le format d'image de sortie
correct sur l'équipement alimentant le
téléviseur tel que 4:3 (ancien modèle), 16:9,
1280 x 720 ou 1920 x 1080 pixels pour
correspondre à la largeur de l’écran.
Augmentez les valeurs de luminosité et de
contraste.
Sélectionnez correctement l'entrée de la
source.
Page 56

Autres informations
Pas de son.
L’image est trop sombre,
trop claire ou teintée.
L’image n’est pas claire.
Le volume est au minimum.
La coupure de son est activé.
Assurez-vous que le casque n’est pas
connecté.
Mauvais réglage de la couleur dans le
menu.
Mauvais réglage de la luminosité dans
le menu.
Le câble de l'antenne n'est pas
correctement branché.
Augmentez le volume.
Appuyez sur la touche mute pour rétablir le
son.
Débranchez le casque à écouteurs.
Réglez la saturation dans le menu.
Réglez la luminosité dans le menu.
Branchez correctement le câble de l'antenne.
Télécommande
Symptômes Causes possibles Solution
Mettez des piles neuves.
Enlevez tout obstacle et visez tout droit le
capteur de la télécommande.
Essayez de nettoyer avec un chiffon doux la
cellule de détection de la télécommande sur
le téléviseur.
Fonctions ou portée
incorrectes.
Piles épuisées.
Existence d’un obstacle entre le
téléviseur et la télécommande.
Cellule de détection de la
télécommande sale sur le téléviseur.
Alimentation
Symptômes Causes possibles Solution
Français
Le téléviseur semble «
mort » - aucun voyant
ne s'allume et rien ne
fonctionne.
Aucune réponse à la
télécommande ou aux
touches de commande
locales.
Blocage en veille.
Ne répond pas à certaines
touches de commande
du téléviseur ou de la
télécommande.
Le téléviseur n’est pas branché au
secteur.
L’interrupteur secteur est mis sur arrêt.
Fusible grillé ou disjoncteur désarmé.
Microcontrôleur affecté par des
perturbations électriques.
Chaîne, installation, enfant ou blocage
clavier activé (si installé).
FR
26
Vériez les interrupteurs d'alimentation du
téléviseur et de la prise de courant. Vériez
que la prise est sous tension.
Vériez le fusible ou le disjoncteur de la
boîte à fusibles. Recherchez toute cause de
défaillance possible avant de le remplacer ou
réarmer.
Coupez le courant secteur et patientez
cinq minutes avant de réessayer. (Laissez
le téléviseur débranché et appelez un
technicien qualié si cela ne marche toujours
pas.)
Veuillez consulter la section correspondante
du Guide d'utilisation.
Page 57

Spécications du modèle LT-40HW62U
Autres informations
Diffusion
Système audio FM, Nicam, SRS
Alimentation secteur Entrée : 220 V-240 V CA~50 Hz
Consommation
électrique
Puissance sonore 2 x 8 watts
Type de casque Impédance 32 ohms ou plus avec prise stéréo 3,5 mm
Entrée d'antenne RF 75 ohms
Canaux reçus
Panneau
Résolution de l'écran 1920 pixel (horizontal) × 1080 pixel (vertical)
Résolution PC
recommandée
Formats de chiers
USB supportés
Connexions
Diagonale de l'écran 40 pouces (102 cm)
Dimensions
Poids approximatif
Accessoires
Conditions d’utilisation
Conditions de
stockage
Analogique : PAL/NTSC/SECAM M, B/G, I/D/K/L, L’
Numérique : DVB-T/C/T2
Veille <0,3W
Efcacité classe A
Analogique :
Numérique :
Edge LED
Résolution d'écran : 16:9
Résolution : FHD
VGA : 1920 x 1080 @ 60 Hz
HDMI : 1920 x 1080 @ 60Hz
Photo : JPEG
Musique : MP3
Vidéo : AVI, MP4, PS, TS...
Entrée RF, Péritel, VGA, YPBPR (vidéo, audio), SPDIF, USB x 2,
HDMI x 3,
Casque d'écoute, Réseau (LAN), CI+
Avec support : L 926 H 600 P 226 millimètres
Sans support : L 926 H 549 P 58 millimètres
Avec support : 13,4 kg
Sans support : 11 kg
Télécommande alimentée par 2 x piles fournies
Livret d'instructions, Cordon d'alimentation
Support de table, 4 x vis, 4 x vis pour le support, 1 x entretoise
Consignes de sécurité, Carte de garantie, Guide d'installation du
support,
Feuillet d'utilisation des attaches, Manuel d'utilisateur Skype, 4 vis kit
VESA
Câble adaptateur x 3 (Péritel, CMP, Entrée audio)
Température 5°C - 35°C (41°F - 95°F)
Humidité 20 à 80% (sans condensation)
Température -15°C - 45°C (5°F - 113°F)
Humidité 10 à 90% (sans condensation)
Fonctionnement
62W
Consommation
d’énergie annuelle
45MHz~866MHz
DVB-T/T2 107,5 MHz~858 MHz ;
DVB-C 114 MHz~858 MHz
100W max.
91 kWh/an
1
Consommation d'énergie par an, basée sur la consommation d'énergie du téléviseur fonctionnant
4 heures par jour pendant 365 jours. La consommation d'énergie réelle dépend toujours de la
manière dont le téléviseur est utilisé.
Nous nous excusons pour tout inconvénient causé par des incohérences mineures dans cette notice
d’emploi, qui peuvent survenir suite au développement des produits.
FR
27
Page 58

Spécications du modèle LT-46HW65U
Autres informations
Diffusion
Système audio FM, Nicam, SRS
Alimentation secteur Entrée : 220 V-240 V CA~50 Hz
Consommation
électrique
Puissance sonore 2 x 8 watts
Type de casque Impédance 32 ohms ou plus avec prise stéréo 3,5 mm
Entrée d'antenne RF 75 ohms
Canaux reçus
Panneau
Résolution de l'écran 1920 pixel (horizontal) × 1080 pixel (vertical)
Résolution PC
recommandée
Formats de chiers
USB supportés
Connexions
Diagonale de l'écran 40 pouces (102 cm)
Dimensions
Poids approximatif
Accessoires
Conditions d’utilisation
Conditions de
stockage
Analogique : PAL/NTSC/SECAM M, B/G, I/D/K/L, L’
Numérique : DVB-T/C/T2
Veille <0,3W
Efcacité classe A
Analogique :
Numérique :
Edge LED
Résolution d'écran : 16:9
Résolution : FHD
VGA : 1920 x 1080 @ 60 Hz
HDMI : 1920 x 1080 @ 60Hz
Photo : JPEG
Musique : MP3
Vidéo : AVI, MP4, PS, TS...
Entrée RF, Péritel, VGA, YPBPR (vidéo, audio), SPDIF, USB x 3,
HDMI x 3, casque d'écoute, Réseau (LAN), CI+
Avec support : L 926 H 600 P 226 millimètres
Sans support : L 926 H 549 P 58 millimètres
Avec support : 17,40kg
Sans support : 14,45kg
Télécommande alimentée par 2 x piles fournies
Livret d'instructions, Cordon d'alimentation
Support de table, 4 x vis, 1 x entretoise
Consignes de sécurité, Carte de garantie, Guide d'installation du
support,
Feuillet d'utilisation des attaches, Manuel d'utilisateur Skype, 2 vis kit
VESA
Câble adaptateur x 3 (Péritel, CMP, Entrée audio)
Température 5°C - 35°C (41°F - 95°F)
Humidité 20 à 80% (sans condensation)
Température -15°C - 45°C (5°F - 113°F)
Humidité 10 à 90% (sans condensation)
Fonctionnement
62W
Consommation
d’énergie annuelle
45MHz~866MHz
DVB-T/T2 107,5 MHz~858 MHz ;
DVB-C 114 MHz~858 MHz
100W max.
91 kWh/an
Français
1
Consommation d'énergie par an, basée sur la consommation d'énergie du téléviseur fonctionnant 4
heures par jour pendant 365 jours. La consommation d'énergie réelle dépend toujours de la manière
dont le téléviseur est utilisé.
Nous nous excusons pour tout inconvénient causé par des incohérences mineures dans cette notice
d’emploi, qui peuvent survenir suite au développement des produits.
FR
28
Page 59

Belangrijke informatie
Veiligheid
Controleer of uw huishoudelijke netspanning overeenkomt met
de spanning aangegeven op het nominale specicatieplaatje
op de achterzijde van uw TV. Indien u het netsnoer of een
apparaatkoppeling gebruikt voor ontkoppeling is het apparaat
na inschakeling direct weer beschikbaar voor gebruik. Op
bepaalde modellen bevindt het lampje zich aan de zijkant van
het tv-toestel. Wanneer het indicatielampje aan de voorzijde
uit is, dan betekent dat niet dat het TV-toestel volledig van het
elektriciteitsnet ontkoppeld is. Om het TV-toestel helemaal te
ontkoppelen, moet de stekker eruit getrokken worden.
De onderdelen van het TV-toestel zijn hittegevoelig. De
maximale omgevingstemperatuur
Celsius zijn. Dek de ventilatieopeningen aan de achterzijde
of zijkanten van het TV-toestel niet af. Laat voldoende ruimte
rondom de TV vrij voor een goede ventilatie. Plaats het
apparaat uit de buurt van hittebronnen (open haarden enz.)
of apparaten die sterke magnetische of elektronische velden
produceren.
De vochtigheidsgraad
geïnstalleerd wordt, mag niet hoger zijn dan
verplaatsen van het TV-toestel vanuit een koude naar een
warme ruimte kan condensvorming op het scherm (en op
sommige onderdelen in het TV-toestel) veroorzaken. Laat de
condens verdampen voordat u het TV-toestel weer inschakelt.
in kamers waar het TV-toestel
mag niet hoger dan
80%
. Het
35°
WAARSCHUWINGEN
Dit apparaat is alleen bestemd voor huishoudelijk gebruik en
mag voor geen andere toepassing worden gebruikt, zoals voor
niet-huishoudelijk gebruik of in een commerciële omgeving.
Een beschadigde voedingskabel moet worden vervangen door
de fabrikant, servicevertegenwoordiging van de fabrikant of
een dergelijke gekwaliceerde persoon om gevaarlijke situaties
te voorkomen.
De ventilatie mag niet worden belemmerd door het bedekken
van de ventilatieopeningen met voorwerpen zoals kranten,
tafelkleden, gordijnen enz.
Het toestel mag niet aan druip- of spatwater worden
blootgesteld en er mogen geen voorwerpen gevuld met
vloeistoffen, zoals vazen, op het product geplaatst worden.
Plaats geen bronnen met een open vlam, zoals
brandende kaarsen, op het toestel.
WAARSCHUWING: Om letsel te voorkomen, moet dit
apparaat veilig tegen de vloer/muur worden bevestigd in
overeenstemming met de installatie-instructies.
VOORZICHTIG:
laag ingesteld en verhoog indien nodig. Langdurig luisteren
via hoofdtelefoons met hoge volume-instellingen kan tot
gehoorschade leiden.
Ventilatie
Plaats de televisie op een hard en vlak oppervlak, uit de buurt
van direct zonlicht of hittebronnen. Als u het in een kabinet
plaatst, dient u minstens 10cm speling rondom het gehele
toestel te behouden. Blokkeer geen van de ventilatieopeningen,
inclusief die op de onderzijde met zachte bekleding.
Oververhitting zal de levensduur van de televisie verkorten en
het risico op brand verhogen.
Sluit hoofdtelefoons aan met het volume op
Oogvermoeidheid
Wanneer u dit product als een computermonitor gebruikt, raden
gezondheid- en veiligheidsexperts frequente korte pauzes aan
in plaats van af en toe lange pauzes. Bijvoorbeeld een pauze
van 5-10 minuten na een uur continu schermwerk wordt als
beter beschouwd dan een pauze van 15 minuten ieder 2 uur.
Gebruik de monitor niet tegen een lichte achtergrond of waar
zonlicht of andere heldere lichtbronnen rechtstreeks op het
scherm zullen schijnen.
De O-knop op het TV-toestel of de O-toets op de
afstandsbediening kan gebruikt worden om het TV-toestel aan
te zetten en in de stand-by-modus te schakelen. Als u voor
langere tijd niet naar de TV gaat kijken
helemaal uit door de stekker uit het stopcontact te halen.
Wij raden u aan om tijdens
stopcontact te halen (ook van de antenne) zodat het TV-toestel
niet beïnvloed wordt door elektrische of elektromagnetische
pieken die schade kunnen aanrichten. Dit is de reden om
stopcontacten en antenneaansluitingen
te houden zodat ze
noodzakelijk.
Ontkoppel
of
ook het TV-toestel zelf openen, omdat u het risico op een
elektrische schok
het TV-toestel onmiddellijk als u een
rook
bespeurt. U mag nooit, in welke omstandigheden dan
onweersbuien
ontkoppeld kunnen worden
loopt wanneer u dat doet.
, schakel het dan
de stekker uit het
toegankelijk
, indien
brandgeur
TV-scherm
Het TV-scherm gebruikt in dit product is van glas gemaakt.
Het kan daarom breken wanneer u het product laat vallen of
klappen van andere voorwerpen laat opvangen.
Het TV-scherm is een product met een zeer geavanceerde
technologie en levert een uiterst gedetailleerde weergave.
Soms kunnen enkele inactieve pixels op het scherm
verschijnen als een vast blauw, groen of rood puntje. Dit zal de
prestatie van uw product echter niet aantasten.
Zorg
Gebruik een glasreiniger om het scherm en een zachte doek
en mild schoonmaakmiddel om de rest van het TV-toestel
schoon te maken.
Belangrijk:
op alcohol gebaseerde en schurende producten kunnen het
scherm beschadigen.
Stof de ventilatieopeningen aan de achterkant en zijkanten
regelmatig af. Oplosmiddelen, schurende of op alcohol
gebaseerde producten kunnen uw TV-toestel beschadigen.
Als een voorwerp of vloeistof in het apparaat binnendringt,
haal dan onmiddellijk de stekker uit het stopcontact en laat
het nakijken door een geautoriseerde reparateur. Open het
apparaat nooit zelf aangezien u gevaar kunt lopen of het
apparaat kunt beschadigen.
Belangrijk:
Batterijen dienen nooit aan overmatige hitte, zoals zonlicht,
open vlammen e.d. blootgesteld te worden. Haal de batterijen
uit de afstandsbediening als deze voor een lange tijd niet wordt
gebruikt. In de apparatuur achtergebleven batterijen kunnen
door verslechtering en corrosieve lekkage schade veroorzaken
en de garantie ongeldig maken.
Breng uitgeputte batterijen naar plaatselijke recyclebedrijven
voor het verwijderen van batterijen om het milieu te
beschermen. Verwijder de batterijen op de voorgeschreven
wijze.
VOORZICHTIG: Ontplofngsgevaar als de batterijen door
een onjuist type worden vervangen. Vervang alleen door het
hetzelfde of gelijkwaardig type dat door de fabrikant van de
apparatuur aanbevolen wordt.
Het gebruik van sterke schoonmaakmiddelen,
Het TV-toestel ophangen aan de muur
Waarschuwing: hier zijn twee mensen voor nodig.
NL
1
Page 60

Om voor een veilige installatie te zorgen, neem de volgende
veiligheidsaanwijzingen in acht:
• Controleer of de muur het gewicht van het TV-toestel en
de muursteun kan dragen. De TV kan op een muur worden
gemonteerd met gebruik van een 200mm x 200mm (LT40HW62U) of 400mm x 200mm (LT-46HW65U) VESA
montagekit, afzonderlijk verkrijgbaar.
• Volg de bevestigingsaanwijzingen op die meegeleverd
zijn bij de muursteun. U dient voor sommige modellen
de zeskantige VESA-muurmontage schroefnaven (en
schroeven), meegeleverd met de set, in de moeren voor de
muursteun achterop uw set te schroeven voordat u de steun
op de muur bevestigt.
• Het TV-toestel moet tegen een verticale muur gehangen
worden.
• Gebruik alleen schroeven die geschikt zijn voor het materiaal
van de muur. De schroefdraad mag niet verder dan 15mm
(LT- 40HW62U) of 8mm (LT-46HW65U) in de TV steken.
• Zorg ervoor dat de TV-kabels zodanig gelegd zijn dat er geen
struikelgevaar is.
Alle overige veiligheidsaanwijzingen m.b.t. onze TV-toestellen
zijn ook hier van toepassing. Voor meer informatie, raadpleegt
u de afzonderlijk afgedrukte installatie-instructies.
De TV op een tafel en andere oppervlakken plaatsen
Voordat u uw TV-toestel opstelt, controleer of het oppervlak
waar u het TV-toestel op wilt plaatsen het gewicht kan dragen.
Plaats het TV-toestel niet op een instabiel oppervlak
(bijvoorbeeld, een bewegende plank, de uiterste rand van een
apparaat) en controleer of de voorzijde van het TV-toestel niet
over het oppervlak hangt waar het op rust.
Om het vallen van de TV te voorkomen, bevestig de TV tegen
de muur met behulp van de noodzakelijke schroeven (in
de gaten van de Vesa-muursteun), klemmen en ankers die
afzonderlijk moeten worden gekocht. Installeer de TV in de
buurt van de muur om het achterovervallen te voorkomen.
Gebruikershandleiding voor meerdere producten
De functies die in deze handleiding worden beschreven zijn
voor de meeste modellen gebruikelijk. Sommige functies
zijn mogelijk niet beschikbaar op uw TV en/of uw TV kan
functies bevatten die niet in deze gebruikershandleiding zijn
beschreven. De illustraties in deze gebruiksaanwijzing kunnen
afwijken van het echte product. Raadpleeg het echte product.
Producten
Batterij
Noticatie:
Het teken
“Pb” onder het
symbool voor
batterijen geeft
aan dat deze
batterij lood
bevat.
Informatie voor gebruikers over de
verwijdering van oude apparatuur en
batterijen
[Europese Unie]
Deze symbolen geven aan dat de elektrische
en elektronische apparatuur en de batterij met
dit symbool aan het einde van de levensduur
niet als gewoon huishoudelijk afval weggegooid
mogen worden. De producten dienen
echter te worden overhandigd bij specieke
inzamelpunten voor de recycling van elektrische
en elektronische apparatuur en tevens batterijen
voor hun correcte verwerking, terugwinning en
hergebruik, zoals is bepaald door uw nationale
wetgeving en de Richtlijnen 2002/96/EC en
2006/66/EC.
Door deze producten correct te verwijderen,
zult u bijdragen aan de instandhouding van de
natuurlijke hulpbronnen en helpen om potentiële
negatieve effecten op het milieu en de
volksgezondheid te voorkomen die anders door
onjuiste afvalverwerking van deze producten
zouden kunnen worden veroorzaakt.
Voor meer informatie over inzamelpunten en
recycling van deze producten, neem contact op
met het gemeentekantoor, de dienst belast met
de verwijdering van uw huishoudelijk afval of de
winkel waar u het product hebt gekocht.
Sancties kunnen gelden voor onjuiste
verwijdering van deze afvalstoffen, in
overeenstemming met de nationale wetgeving.
[Zakelijke gebruikers]
Als u dit product wenst te verwijderen, neem
dan contact op met uw leverancier en controleer
de bepalingen en voorwaarden van de
koopovereenkomst.
[Andere landen buiten de Europese Unie]
Deze symbolen gelden alleen in de Europese
Unie. Als u deze artikelen wenst te verwijderen,
doe dat in overeenstemming met de
toepasselijke nationale wetgeving of andere
regels in uw land voor de behandeling van oude
elektrische apparatuur en batterijen.
Geachte klant,
Dit apparaat is in overeenstemming met de geldige Europese richtlijnen en normen met betrekking tot elektromagnetische
compatibiliteit en elektrische veiligheid.
Europese vertegenwoordiging van de fabrikant is:
TCL Operations Polska Sp. z o.o.
ul. A. Mickiewicza 31/41
96-300 Żyrardow, Poland
E-mailadres: zyeee@tcl.com
De afbeeldingen en illustraties in deze handleiding dienen louter ter referentie en kunnen in uiterlijk van het werkelijk product afwijken. Productontwerp en specicaties
kunnen zonder voorafgaande kennisgeving worden gewijzigd.
NL
2
Page 61

Inhoudsopgave
Belangrijke informatie ................................................ 1
Hoofdstuk 1 - Aansluitingen
Het netsnoer en antenne aansluiten.......................... 4
DVD-speler, thuistheatersysteem .............................. 4
DVD-recorder, hoofdtelefoon, kabelontvanger .......... 5
Blu-ray Disc-speler, HD-spelconsole &
HD camcorder ........................................................... 5
Hoofdstuk 2 - Aan de slag
Functies van de afstandsbediening ........................... 6
De TV in/uitschakelen ................................................ 7
Hoofdstuk 3 - Kanalen installeren
Eerste instelling ......................................................... 8
Een automatisch zoekopdracht naar kanalen
uitvoeren .................................................................... 9
Hoofdstuk 4 - Uw TV gebruiken
Kanalen benaderen ................................................. 10
Aangesloten apparaten bekijken ............................. 10
Volume.....................................................................10
TV-menu's gebruiken ...............................................10
Menutaal selecteren ................................................ 10
Hoofdstuk 5 - Meer van uw TV gebruiken
Uw favoriete kanalen instellen ................................. 10
Tv kijken met gebruik van de 3d-functie ...................11
Audiobeschrijving .....................................................11
PAP-functie ...............................................................11
Ondertitels gebruiken .............................................. 12
Ondertitels in-/uitschakelen ......................................12
Ondertitelingstalen voor digitale TV-kanalen
inschakelen ...............................................................12
Een ondertitelingtype op digitale TV-kanalen
selecteren .................................................................12
In teletekst een decodering van de paginataal
selecteren ................................................................ 12
Taal van digit teletekst ............................................. 12
SPDIF-type .............................................................. 12
T-Link ....................................................................... 13
Inof uitschakelen van T-Link .....................................13
One-touch afspelen gebruiken .................................13
Systeem-stand-by gebruiken ....................................13
Netwerk update ....................................................... 13
Gemeenschappelijke interface ................................ 13
De common interface-module gebruiken ..................13
Toegang tot common interface-diensten ..................13
Software bijwerken .................................................. 13
Schakelen naar de winkel- of thuismodus ............... 14
MHEG-functie .......................................................... 14
Foto's bekijken, muziek afspelen en naar video's
kijken vanaf een USB-opslagapparaat .................... 14
Foto...........................................................................14
Muziek ......................................................................15
Video .........................................................................15
DivX-video ................................................................15
Toegang tot de tijd ................................................... 16
Storingen op digitale TV-kanalen opsporen .............16
Tijdverschuiving ....................................................... 16
Reset winkel ............................................................ 16
Aanpassen van inganginstellingen .......................... 17
Elektronische programmagids gebruiken ................ 17
PVR (Personal Video Recorder) (Persoonlijke
Videorecorder) ......................................................... 17
Planningslijst............................................................ 18
Hoofdstuk 6 - Netwerk
Netwerkaansluiting .................................................. 18
Op een bekabeld netwerk aansluiten .......................18
Verbinden met een draadloos netwerk .....................19
Tv-afstandsbediening .............................................. 20
Hoofdstuk 7 - DLNA (Delen & Bekijken)
Aansluiten op uw PC ............................................... 20
De DLNA-functie inschakelen.................................. 20
Media van uw PC voor het delen toevoegen ........... 20
DLNA-toepassing .................................................... 20
Hoofdstuk 8 - Hbb-tv
HbbTV-toegang ....................................................... 21
HbbTV-deactivatie ................................................... 21
Hoofdstuk 9 - Smart TV
Toegang tot Smart TV applicaties (Apps) ................ 21
YouTube ....................................................................21
Netix ........................................................................22
Skype ........................................................................22
Hoofdstuk 10 - Overige informatie
Wachtwoord in Ouderlijk toezicht ............................ 22
OSS aankondiging................................................... 22
Problemen Opsporen en Hulplijn............................. 24
Specicaties ............................................................ 27
NL
3
Page 62

Hoofdstuk 1
Aansluitingen
Het netsnoer en antenne aansluiten
Om na het aansluiten van het netsnoer de TV in te schakelen, druk op O.
Opmerking: De plaats van de voedingsaansluiting verschilt per TV-model. Bij bepaalde modellen, moet u eerst
de stroom inschakelen.
Kabel
-PR+
-VOL+
OK
Opmerkingen: -Haal de stekker uit het stopcontact voordat u apparaten aansluit.
DVD-speler, thuistheatersysteem
Opmerkingen: -Voordat u een PC aansluit, moet u de verversingsfrequentie van de monitor op 60 Hz
instellen.
-Het wordt aangeraden om zo kort mogelijke HDMI-kabels van hoge kwaliteit te gebruiken om
mogelijke storingen te voorkomen.
-Het wordt aangeraden om een VGA-kabel van 1m of korter te gebruiken met ferrietringen te
gebruiken wanneer VGA-invoer mogelijk is en de tv aangesloten is met gebruik van een VGAkabel. De maximaal ondersteunde VGA-resolutie is 1920x1080/60Hz.
LAN VGA
HDMI 2HDMI 3 (ARC)
he
d t
from
n
e
y a
licens
Dolb
ies.
r
s.
e
ori
under
orato
b
ymbol are trademarks
a
orat
s
b
a
e-D
y L
nufactured
lb
Dolby L
of
doubl
Ma
Do
Nederlands
Netwerkaansluiting
Of gebruik een
HDMI-aansluiting.
NL
4
DVD-speler/homecinema
Page 63

Aansluitingen
DVD-recorder, hoofdtelefoon, kabelontvanger
Opmerking:
-Te hoge geluidsdruk van oor- en hoofdtelefoons kan
tot gehoorverlies leiden.
DVD-recorder
Set-top box
he
m
t
o
r
f
nd
a
y
Dolb
r license
.
ies.
e
are trademarks
ories
orat
b
a
actured und
f
lby Laborator
y L
u
n
lb
double-D symbol
of Do
Do
Ma
OUT
IN
he
m
o
r
d t
f
arks
n
m
y a
s.
Dolb
er license
s.
are trade
orie
boratorie
orat
b
La
a
actured und
f
y L
OUT
u
n
lb
Ma
Do
of Dolby
double-D symbol
Kabel
Blu-ray Disc-speler, HD-spelconsole & HD
camcorder
Opmerkingen:
-De USB-connectors zijn voor gegevensinvoer vanaf
USB-schijven en voor het aansluiten van andere
HD-spelconsole
relevante USB-apparaten waar van toepassing.
-Alle USB-apparaten moeten rechtstreeks
aangesloten worden op de tv-set zonder gebruik
van verlengkabels. In het geval een verlenging
Blu-ray
Diskspeler
vereist is dient deze zo kort mogelijken voorzien van
ferrietringen te zijn.
-De ARC-functie (Audio Return Channel) wordt
alleen op de
HDMI 3 (ARC)
-poort ondersteund.
HD-camcorder
-Het aantal USB-poorten kan verschillen.
Opmerkingen:
-Niet alle aansluitingen zijn op alle modellen beschikbaar.
-De plaats van de voedingsaansluiting op de TV kan verschillen naargelang het TV-model.
-De positie en namen van de functieknoppen en aansluitingen op de TV kunnen verschillen
naargelang het TV-model.
NL
5
Page 64

@
/
Hoofdstuk 2
Aan de slag
Functies van de afstandsbediening
De meeste functies van uw televisie zijn via de menu's beschikbaar die op het scherm verschijnen. De afstandsbediening die met uw TV-
toestel meegeleverd is, kan worden gebruikt om door de menu's te navigeren en de algemene instellingen te congureren.
Opmerking:
beide zijden van het beeld (zoals 4:3) voor een langere tijdsperiode, anders kan het TV-scherm permanent beschadigd raken.
Om programma-informatie weer te geven, indien
Om de startpagina van Smart TV weer te geven.
Het functiemenu weergeven om bepaalde acties
uit te voeren; de Teletekstpagina in verschillende
Het is aan te raden om de volledige schermmodus te gebruiken. Gebruik niet de weergavemodus met zwarte balken aan
3D
Om tussen de 3D ingangsformaat-opties te kunnen
schakelen. (Deze knop kan alleen worden gebruikt
Standby/standby beëindigen.
Om de gewenste energiebesparingmodus te
Om het volume te regelen.
ECO
selecteren.
V+/-
INFO
beschikbaar.
SMART TV
OPTION
modi weergeven.
Om het hoofdmenu te openen; om naar het
toegang tot het virtuele toetsenbord in
vorige menu terug te keren.
MENU
Smart TV.
voor het LT-46HW65U-model.)
TV
Om naar de TV-modus te gaan.
Alfanumerieke knoppen
Om kanaalnummers in te voeren; om in sommige
functies een letter, een cijfer of een symbool in te
voeren.
SOURCE
Om de aangesloten apparaten te selecteren.
Om het geluid uit en weer in te schakelen.
P+/-
Om van kanaal te veranderen/om een pagina omhoog
of omlaag in sommige Smart TV-toepassingen.
GUIDE
Om de Elektronische Programmagids in of
uit te schakelen (alleen voor digitale kanalen
beschikbaar).
◄/►
Om in de menu's te navigeren; om functies in te
stellen en waarden te wijzigen.
▲/▼
Om in de menu's te navigeren; om menuopties te
selecteren; om in de USB-functie naar de vorige of
volgende foto, lied of video te schakelen.
OK
Om een invoer of selectie te bevestigen.
Nederlands
Om naar het vorige menu terug te keren.
Om de menustructuur of teletekst af te sluiten.
Om tussen de slaaptimeropties te schakelen.
Om naar het vorige kanaal terug te keren.
Om taken of Teletekstpagina’s te selecteren
(zie voetnoot). De rode toets kan ook voor de
MHEG- en HbbTV-functie worden gebruikt.
Om een geluidstype te selecteren die
beschikbaar is voor het geselecteerde analoge
TV-programma. Om een audiotaal te selecteren
die beschikbaar is voor het geselecteerde
Om de vorige foto, muziekstuk of video te
Om snel achteruit te spoelen.
Om met afspelen te stoppen.
EXIT
SLEEP
PRE-CH
Kleurtoetsen
LANG
digitale TV-programma.
selecteren.
NL
ZOOM-/ZOOM+
Om het beeldformaat te selecteren.
Voor gebruik in sommige Smart TV-applicaties.
LIST
Om de kanaallijst weer te geven.
FAV
Channel list selection
Om het
selectie) naar voren te halen.
TEXT
Om Teletekstmodus of Mixmodus in of uit te schakelen.
SUBTITLE
Om een ondertitelingstaal te selecteren die beschikbaar
is voor het geselecteerde digitale TV-programma.
Om de volgende foto, muziekstuk of video te
selecteren.
Om snel vooruit te spoelen.
Om afspelen te starten of te pauzeren.
Opnametoets.
Voetnoot:
De rode, groene, blauwe en gele toetsen
zijn multifunctioneel; volg a.u.b. de
schermmeldingen en sectie-instructies.
menu (Kanaallijst
6
Page 65

Aan de slag
Als de batterijen in uw afstandsbediening uitgeput zijn, dan kunt u de knoppen op uw TV-toestel gebruiken. In de TVmodus hebben ze dezelfde functies als de corresponderende toetsen op de afstandsbediening. U kunt de gewenste
bron selecteren door meerdere keren op de OK knop op de TV te drukken. In de menu’s hebben zij de volgende
functies:
PR+ Omhoog
PR- Beneden
VOL+ Rechts
VOL- Links
MENU
OK OK
De TV in/uitschakelen
1.
Wanneer het netsnoer wordt aangesloten, zal de TV direct worden ingeschakeld of in de stand-by-modus
worden geschakeld. Druk in de stand-by-modus op de O- of
de afstandsbediening om de TV in te schakelen.
2.
Druk op de O-knop op het TV-toestel of de O-toets op de afstandsbediening om de TV in de stand-by-modus
te schakelen. Het TV-toestel blijft vervolgens ingeschakeld, echter met een zeer laag energieverbruik.
3.
U kunt de TV uitschakelen door de stekker uit het stopcontact te halen.
PR+/PR-
-knop op het TV-toestel of de toets op
NL
7
Page 66

Hoofdstuk 3
Eerste instelling
Wanneer u de TV voor het eerst instelt, moet u alle
instellingen selecteren die vereist zijn om alle analoge
en digitale kanalen die u kunt ontvangen te kunnen
opzoeken en opslaan.
Zorg ervoor dat de televisie is ingeschakeld en volg
alle stappen die hieronder worden aangegeven stap
voor stap op.
Opmerking: Als de gevonden kanalen na de
De eerste keer dat u het toestel inschakelt, wordt
de
geopend, die leidt u door het eerste instellingsproces.
1.
2.
3.
4.
Opmerking: Als u
kanaalscan alleen analoog zijn, kan dit
liggen aan een zwakke uitzending, dit
wordt dus niet door de garantie van de
fabrikant gedekt. Fabrikanten kunnen niet
aansprakelijk worden gesteld voor een
zwakke of geen uitzending in bepaalde
gebieden.
Initial setup
Initial setup
Druk op
vervolgens op
(Aanvankelijke Instelling) -wizard
Please select your language:
English
Български
Hrvatska
Česky
Dansk
Selec t Next
▲/▼
om uw taal te selecteren, druk
OK/►
om naar de volgende stap te
Language
gaan.
▲/▼
Druk op
vervolgens op
om uw land te selecteren, druk
OK/►
om naar de volgende stap te
gaan.
▲/▼
Druk op
(Thuis) of
OK/►
Druk op
om uw locatie (selecteer
Shop
(Winkel)) en druk vervolgens op
om door te gaan naar de volgende stap.
▲/▼
Network connection
om
Home
(netwerkverbinding) te selecteren, en druk
vervolgens op
OK/►
om naar de volgende
stap te gaan. (Voor meer informatie, zie sectie
"Netwerkaansluiting" op pagina 18)
France
(Frankrijk)
zult u het
Password setting
(Wachtwoordinstelling)
selecteert,
-menu
moeten openen
om een wachtwoord in te stellen. Gebruik
de alfanumerieke toetsen om een viercijferig nummer als uw wachtwoord in
te voeren. (Uw wachtwoord kan niet
0000 zijn) voer dezelfde code in om het
wachtwoord te bevestigen. Daarna zult
u automatisch naar de volgende stap
gaan. (In deze stap, kunt u alleen op ◄
drukken om naar de vorige stap terug te
keren.)
5.
▲/▼
Druk op
om uw tuner-modus
(Antenne) of
- a) Indien u
Cable
Antenna
geselecteerd.
• Druk op
• Druk op
OK/►
▲/▼
& Analoog) of
om te openen.
Digital & Analogue
om
Digital
(Analoog) te selecteren, en druk op
• Druk op
▲/▼
om
Scan
selecteren, druk vervolgens op
automatisch zoeken naar alle DVB-T digitale
en/of analoge kanalen te starten.
Opmerking: niet alle landen hebben de
Network Selection
Voorkeursnetwerk)
- b) Indien u
• Druk op
• Druk op
& Analoog) of
Cable
OK/►
om te openen.
▲/▼
om
Digital
Digital & Analogue
(Analoog) te selecteren.
• Indien u
Digital & Analogue
Analoog) selecteert, drukt u op
openen. Vervolgens,
- Druk op
▲/▼
om
selecteren, en druk vervolgens op
- Druk op
◄/►
om de scanstand te selecteren,
indien beschikbaar, (
(Geavanceerd)).
- Wanneer u
OK
Full
(Vol) selecteert, drukt u op
om te beginnen met het automatisch
zoeken naar alle digitale en/of analoge DVBC-kanalen.
- Wanneer u
Advanced
selecteert, gebruikt u de numerieke toetsen
om de waarden voor
symbol rate
(Symboolsnelheid),
(Netwerk ID) in te stellen, en gebruikt u
modulation mode
om de
te selecteren; druk vervolgens op OK om te
beginnen met zoeken naar alle digitale en/of
analoge DVB-C-kanalen.
op
Digital
OK/►
(Digitaal) selecteert, drukt u
om dit te openen, en doorloopt u
• Indien u
vervolgens dezelfde stappen als voor
Analogue
(Digitaal & Analoog) hierboven, om
te zoeken naar alle digitale DVB-C-kanalen.
• Indien u
Analogue
OK/►
u op
om naar binnen te gaan, en drukt
u vervolgens op
▲/▼
te selecteren. Druk vervolgens op
te beginnen met zoeken naar alle analoge
kanalen.
Kanalen installeren
(Kabel).
(Antenne) heeft
(Digitaal) of
(Scannen) te
(Kabel) heeft geselecteerd.
(Digitaal) of
Scan
(Scannen) te
Full
(Vol) of
(Geavanceerd)
frequency
(Analoog) selecteert, drukt
Scan
om
Antenna
(Digitaal
Analogue
OK/►
.
OK/►
om het
Favorite
(Selectie v.
functie.
(Digitaal
Analogue
(Digitaal &
OK/►
om dit te
OK/►
.
Advanced
(Frequentie),
network ID
◄/►
(modulatiestand)
Digital &
(Scannen)
OK/►
om
Nederlands
NL
8
Page 67

Kanalen installeren
Opmerking: Wacht op de melding dat het instellen
voltooid is om te voorkomen dat
het instellen van de kanalen wordt
onderbroken.
6.
Voordat u de scan start, kunt u ook
Skip scan
(Scan overslaan) selecteren om de initiële set-up
over te slaan. In dit geval kunt u voor het zoeken
en opslaan van uw kanalen de automatische
zoekfunctie voor kanalen gebruiken door de
instructies in het volgende deel te doorlopen
"Een automatisch zoekopdracht naar kanalen
uitvoeren".
7.
Tijdens het instellen kunt u de aanwijzigen
onderaan het scherm opvolgen om naar de vorige
stap terug te keren door op ◄ te drukken. U
kunt ook op
EXIT
drukken om af te sluiten of het
zoeken tussentijds te onderbreken.
- Op elk moment tijdens het installatieproces kunt
u op ◄ drukken om terug te keren naar de vorige
stap.
- Zodra de eerste installatie is voltooid, kunt u op
OK
drukken om de installatie af te sluiten. De
kanalen worden in een vooringestelde volgorde
gerangschikt. Om kanalen over te slaan kunt
u de vooringestelde volgorde of namen van
kanalen wijzigen door
Setup > Organiser
(Instelling > Organiser) te selecteren en op
OK/►
te drukken.
Een automatisch zoekopdracht naar kanalen
uitvoeren
Dit hoofdstuk beschrijft het automatisch zoeken en
opslaan van kanalen. De instructies gelden voor
beide analoge en digitale kanalen. Dit kan in elk van
de volgende gevallen worden uitgevoerd:
Skip scan
- u hebt
(Scan overslaan) geselecteerd
tijdens de oorspronkelijke instelling
Please scan channels!
- “
” (“Kanalen scannen
a.u.b.!”) wordt weergegeven in TV-stand
- u wilt uw kanalen bijwerken.
1.
MENU
Druk op
selecteer
op de afstandsbediening en
Settings > Setup > Language
(Instellingen > Instelling > Taal). Druk op
◄/►
om
uw menutaal te selecteren.
2.
MENU
Druk op
(instelling), en druk op
om terug te gaan naar
▲/▼
om
Country
te selecteren en druk vervolgens op
Setup
◄/►
(Land)
en voer
indien nodig uw wachtwoord in om uw land te
selecteren. De TV stelt en rangschikt de kanalen in
aan de hand van uw land.
3.
Druk op
▲/▼
Tuner mode
om
(Afstemfuncie)
te selecteren, druk vervolgens op
Antenna
(Antenne),
- a) Indien u
Antenna
Cable
(Kabel).
(Antenne) heeft
◄/►
om
geselecteerd.
• Druk op
▲/▼
(Kanaalinstallatie) en druk op
Channel install
om
OK/►
om te
openen.
Channel install
Autom atic searc h
Autom atic updat e
Analo gue m anual scan
Anten na ma nual insta llati on
OK
Enter
Select
Menu
Back
Exit
Exit
• Selecteer
en druk vervolgens op
search
Clean chan nel list
Automatic search
(Kanalen zoeken)
OK/►
om
Automatic
(Kanalen zoeken) weer te geven.
• Druk op OK om de landselectie over te slaan
en om naar de volgende stap te gaan. Of
◄/►
gebruik
om uw land opnieuw te selecteren
en druk vervolgens op OK om te openen.
• Selecteer
Analoog),
(Analoog) en druk vervolgens op
Digital & Analogue
Digital
(Digitaal) of
(Digitaal &
Analogue
OK/►
om
het automatisch zoeken te starten, welke
betrekking heeft op alle DVB-T digitale en/of
analoge kanalen.
- b) Indien u
• Druk op
(Kanaalinstallatie) en druk op
▲/▼
Cable
(Kabel) heeft geselecteerd.
Channel install
om
OK/►
om te
openen.
• Selecteer
en druk vervolgens op
search
Automatic search
(Kanalen zoeken)
OK/►
om
Automatic
(Kanalen zoeken) weer te geven.
• Druk op OK om de landselectie over te slaan
en om naar de volgende stap te gaan. Of
◄/►
gebruik
om uw land opnieuw te selecteren
en druk vervolgens op OK om te openen.
- Selecteer
Analoog) en druk vervolgens op
Digital & Analogue
(Digitaal &
OK/►
te openen. Selecteer indien beschikbaar
uw scanmodus en congureer de juiste
kabelinformatie op dezelfde manier als in de
initiële instellingen. Druk op
▲/▼
(Scannen) te selecteren, en druk op
om
Scan
OK/►
om automatisch te zoeken op alle digitale en
analoge DVB-C-kanalen.
4.
Het zoeken kan een paar minuten duren. Tijdens
het zoekproces kunt u op
MENU
drukken om het
proces halverwege te onderbreken.
5.
Druk op
MENU
wanneer het automatisch zoeken
stopt om naar de laatste stap terug te keren of druk
op OK om het opzoeken van kanalen opnieuw te
starten.
6.
Na het automatisch zoeken, worden de kanalen
volgens een vooringestelde volgorde gerangschikt.
Om kanalen over te slaan kunt u de vooringestelde
om
NL
9
Page 68

Hoofdstuk 4 & 5
Uw TV gebruiken & Meer van uw TV gebruiken
volgorde of namen van kanalen wijzigen door
Settings > Setup > Organiser
(Instellingen
> Instelling > Organiser) te selecteren en op
OK/►
te drukken. Hier kunt u kanalen overslaan,
sorteren, bewerken of verwijderen.
Uw TV gebruiken
Kanalen benaderen
Met behulp van de alfanumerieke toetsen:
Druk op
de corresponderende cijfertoetsen om de kanalen te
openen.
Met gebruik van de PR+/- of P+/- toetsen:
De
kanalen doorlopen.
Aangesloten apparaten bekijken
Druk herhaaldelijk op
SOURCE
op de
afstandsbediening of op OK op het TV-toestel om te
schakelen tussen TV en andere ingangsbronnen. Om
verder TV te kunnen kijken, drukt u op een numerieke
toets om naar het kanaal te gaan terwijl
P+/-
door alle
TV-kanalen en andere ingangsbronnen zal gaan.
Volume
Volumeregeling: gebruik de
of druk op de
V+/-
-toetsen op de afstandsbediening
VOL+/-
-knoppen op de TV
om het volume harder of zachter te zetten.
Het geluid dempen: druk op de -toets om het geluid
tijdelijk te dempen. Druk nogmaals op deze toets of
de V+-toets om het geluid te herstellen.
TV-menu's gebruiken
1.
MENU
Druk op
Smar t TV Chan nels Source
Pic ture
Medi a
Pict ure S ound Network Settings
om het hoofdmenu weer te geven.
Medi a
Soun d
Smar t TV
PAP
Lock
Options
Setu p
De volgende items zijn beschikbaar in het
hoofdmenu: Smart TV, media, TV, bron, beeld,
geluid, netwerk, instellingen.
2.
Druk op
▲/▼/◄/►
om de gewenste optie te
selecteren, druk vervolgens op OK om naar het
betreffende submenu te gaan.
3.
Gebruik in de submenu’s
te selecteren, gebruik
▲/▼
om de menuopties
◄/►
om functies in te
stellen en waarden te veranderen. Gebruik OK om
de instelling te activeren. Gebruik
OK/►
om het
betreffende submenu te openen.
4.
Druk op
MENU
om naar het vorige menu terug te
keren.
5.
Druk op
EXIT
om het menu af te sluiten.
Opmerking: Sommige opties zijn voor bepaalde
signaalbronnen mogelijk niet
beschikbaar.
Menutaal selecteren
U kunt uw gewenste menutaal selecteren door
onderstaande instructies op te volgen.
1.
2.
Druk op
Druk op
MENU
om het hoofdmenu weer te geven.
▲/▼/◄/►
Settings > Setup
om
(Instellingen > Instelling) te selecteren, en druk
vervolgens op OK om te openen.
3.
Selecteer
Language
(Taal) en druk op
OK/►
om
te openen.
4.
5.
Druk op
Language
Druk op
◄/►
om de gewenste taal in het
(Taal)-menu te selecteren.
EXIT
om het menu af te sluiten.
Meer van uw TV gebruiken
Uw favoriete kanalen instellen
U kunt een lijst van uw favoriete TV-kanalen maken.
1.
2.
LIST
Druk op
.
Druk op de gele toets en selecteer
selection
Favorite list
(Kanaallijst selectie). Druk op
(favorietenlijst) te selecteren en druk
Channel list
▲/▼
om
op OK om deze te openen.
3.
Druk op de blauwe toets om uw lijst met favorieten
te wijzigen. Druk op
▲/▼
om door de lijst van
kanalen te bladeren en druk op OK om kanalen te
selecteren en deselecteren.
4.
Herhaal deze handelingen om andere favoriete
kanalen in te stellen.
5.
Snelbediening:
om rechtstreeks de
Druk op
LIST/EXIT
om af te sluiten.
Druk op
Channel list selection
FAV
p de afstandsbediening
(Kanaallijst
selectie) te openen.
Energiebesparing
1.
MENU
Druk op
selecteer
Settings > Setup > ECO Settings >
Energy Saving
op de afstandsbediening en
(Instellingen > Instelling > ECO
Dynam. Verlicht. > Energiebesparing).
2.
Druk op
◄/►
om een gewenste
energiebesparende modus te selecteren om het
gewenste energiebesparingseffect te bereiken.
3.
Snelbediening:
Druk op
EXIT
om het menu af te sluiten.
Druk op
ECO
op de
afstandsbediening om direct een gewenste
energiebesparende modus te selecteren.
Nederlands
NL
10
Page 69

Meer van uw TV gebruiken
Tv kijken met gebruik van de 3d-functie
(Alleen voor LT-46HW65U)
WAARSCHUWING:
• Sommige kijkers kunnen zich wat ongemakkelijk
voelen door het kijken van 3D TV, namelijk
duizeligheid, misselijkheid en hoofdpijn. Mocht u
dergelijke symptomen ervaren, stop dan met TV
kijken, verwijder uw 3D-bril en rust eventjes.
• Langdurig of vanaf te korte afstand naar 3D-video’s
kijken kan uw gezichtsvermogen aantasten.
• Een verantwoordelijke volwassene dient kinderen
die de 3D-functie gebruiken, regelmatig te
controleren.
• Gebruik de 3D-bril voor geen enkel ander doeleinde
dan het kijken van 3D-video’s op een 3D TV.
• Gebruik de 3D-functie of 3D-bril nooit terwijl u loopt
of rond beweegt om letsel te voorkomen wegens
het lopen tegen voorwerpen, struikelen en/of vallen.
1.
MENU
Druk op
selecteer
op de afstandsbediening en
Picture > 3D navigation
Navigatie), en druk vervolgens op
navigation
(3D Navigatie) op
Manual
(Beeld > 3D
◄/►
om de
(Handmatig)
3D
in te stellen.
3D
3D mode 2D-to-3D
Select
Back
Exit
3D-to-2D
Depth of field 16
Protrude
Distance to TV
Image safety
L-R switch Off
Off
16
Off
10
Opmerking: Als 3D-navigatie is ingesteld op auto,
worden de instellingen automatisch
gecongureerd.
2. 3D Mode
en druk vervolgens op
3D-ingangsformaat te selecteren uit
(Naast elkaar),
Bottom
(3D Modus): Draag eerst de 3D-bril,
◄/►
om het juiste
Side-by-Side
2D-to-3D
(2D naar 3D)
(Boven en Onder) en
Line interleave
Top and
(Line
Interleave).
3. L-R Switch
Off
of
(L-R Schakelaar): Selecteer On (Aan)
(Uit) om de 3d-video tussen de linkeren rechterogen in te stellen voor een betere
3d-weergave.
4. Depth of Field
(Diepte van Veld): Een goed
3d-effect bereiken waarbij het beeld omgezet
wordt van het 2d-beeld.
5. 3D-to-2D
Right
of
(3D-naar-2D): Selecteer
(Rechts) om het beeld in 2d-stand weer
Left
(Links)
te geven (geen 3d-effect). Deze functie wordt
gedeactiveerd wanneer
wordt ingesteld op
3D Mode
2D-to-3D
(3D Modus)
(3D-naar-2D) of
Off
(Uit).
6.
Druk op
EXIT
om het menu af te sluiten.
Opmerkingen:
-3D-brillen van andere fabrikanten worden
mogelijk niet ondersteund.
-Alle fotofuncties worden in de 3D-modus
uitgeschakeld.
-Als u naar een andere signaalbron verandert of
de SmartTV opent, zal de 3D modus automatisch
uitgeschakeld worden.
-Bepaalde 3D-modi zijn mogelijk niet beschikbaar,
dit is afhankelijk van het ingangformaat van de
3D-videobron.
-Ondersteunde 3D-modi:
Analoge TV, AV, CMP:
Digitale tv, HDMI, USB, video’s van het internet:
Top and Bottom
Side
(Naast elkaar),
Line interleave
Sequential
(Framesequentie)
2D-to-3D
(Boven en Onder),
2D-to-3D
(2D-naar-3D)
(2D-naar-3D),
(Line Interleave) en
-3D-functie in de USB-modus: Druk tijdens het
afspelen van een geselecteerde video vanaf
MENU
USB op
om het videomenu in de browser-
modus te openen en selecteer vervolgens
Mode
(3D Modus).
Zie voor meer informatie de
hierboven gerelateerde beschrijvingen.
Audiobeschrijving
Audiobeschrijving verwijst naar een extra verhaaltrack
voor blinde en visueel gehandicapte kijkers van
visuele media, inclusief televisieprogramma's en
lms.
De beschrijvingsverteller praat door de vertoning
heen en beschrijft tijdens de natuurlijke pauzes in de
audio (en tijdens de dialoog indien noodzakelijk) wat
er op het scherm gebeurt.
U kunt deze functie gebruiken als de huidige
uitzending audiobeschrijving bevat.
1.
2.
MENU
Druk op
selecteer
OK
Druk op
Sound
om te bevestigen.
▲/▼
op de afstandsbediening en
(Instellen). Druk vervolgens op
Audio Description
om
(Audiobeschrijving) te selecteren en druk
vervolgens op OK om te openen.
3.
U kunt de audiobeschrijvingsfunctie aan- of
uitzetten in het menu
Audio Description
(Audiobeschrijving).
4.
▲/▼
Druk op
om naar de volgende menuregel te
gaan, en gebruik
◄/►
om het volume in te stellen.
PAP-functie
Gebruik deze functie om de beelden van de
verschillende broningangen naast elkaar weer te
geven. Merk op dat een scherm er is voor zowel
analoge en digitale TV-ingangen, en de ander voor
VGA-, HDMIen CMP-ingangen.
beschikbaar voor AV op beide beelden.)
(Opmerking: Niet
Side-by-
Frame
3D
NL
11
Page 70

Meer van uw TV gebruiken
1.
2.
Druk op
Selecteer
MENU
om het hoofdmenu weer te geven.
Picture
(Beeld) en druk op OK om
verder te gaan.
3.
Druk op
▲/▼
om de
PAP
-optie te selecteren, en
druk vervolgens op OK om die binnen te gaan.
4.
Druk op
◄/►
om de PAP-functie in of uit te
schakelen.
5.
Selecteer
TV position
(TV-positie), druk op
◄/►
om het TV-venster opnieuw te positioneren.
6.
Druk op
EXIT
om het menu af te sluiten.
Als u overschakelt op de PAP-functie, kunt u op
◄/►
drukken om van focusvenster te wisselen
(met geluid gesymboliseerd door een muzieknoot).
Wanneer de focus ligt op het TV-venster (met
geluid gesymboliseerd door een muzieknoot),
werken de alfanumerieke toetsen en
P+/-
in TVmodus. Wanneer de focus op een ander venster
ligt, zijn de
P+/-
-toetsen beschikbaar voor externe
bronnen.
Ondertitels gebruiken
U kunt ondertiteling voor elk TV-kanaal inschakelen.
Ondertitels worden uitgezonden via teletekst of
DVB-T/DVB-C digitale uitzendingen. Bij digitale
uitzendingen hebt u de extra optie om de gewenste
ondertitelingstaal te selecteren.
Ondertitels in-/uitschakelen
1.
Druk op
selecteer
MENU
op de afstandsbediening en
Settings > Subtitle
(Instellingen >
Ondertitel).
2. Druk op OK/► om te openen.
Subtitle
Menu
Exit
3.
Selecteer de
◄/►
op
Select
Back
Exit
om
Subtitle
On/Off
Subti tle
Digit al s ubtitl e lan guage
Digit al s ubtitl e lan guage 2nd
Subti tle type
-optie (Ondertitel), en druk
(Aan/Uit) te selecteren om
On
Engli sh
Engli sh
Norma l
ondertitels aan/uit te zetten.
Ondertitelingstalen voor digitale TV-kanalen
inschakelen
1.
Druk op
selecteer
language
MENU
op de afstandsbediening en
Settings > Subtitle > Digital subtitle
(Instellingen > Ondertitel > Taal van
digitale ondertitels).
2.
Druk op
◄/►
om een ondertitelingstaal als uw
voorkeurstaal te selecteren.
3.
Druk op
▲/▼
Digital subtitle language 2nd
om
(Taal van digit ondertitels 2e) te selecteren.
4.
Druk op
◄/►
om een tweede ondertitelingstaal te
selecteren.
5.
Snelbediening:
Druk op
EXIT
om het menu af te sluiten.
Druk op
SUBTITLE
op de
afstandsbediening om direct een ondertitelingstaal te
selecteren die voor een geselecteerd TV-programma
beschikbaar is.
Een ondertitelingtype op digitale TV-kanalen
selecteren
1.
Druk op
selecteer
MENU
op de afstandsbediening en
Settings > Subtitle > Subtitle type
(Instellingen > Ondertitel > Ondertitelingstype).
2.
◄/►
Druk op
om een ondertitelingtype
te selecteren. U kunt
Hearing impaired
(Slechthorend) selecteren om de ondertiteling voor
slechthorenden in uw geselecteerde taal weer te
geven.
In teletekst een decodering van de paginataal
selecteren
MENU
Druk op
op de afstandsbediening en selecteer
Settings > Teletext > Decoding page language
(IInstellingen > Teletekst > Taal v. decodeerpagina).
Selecteer een passend taaltype, waarin Teletext wordt
getoond.
Taal van digit teletekst
Afhankelijk van de omroep, is het op digitale
TV-kanalen mogelijk om van een service met
meerdere eerste teletekstpagina’s in verschillende
talen te genieten. Deze functie stelt u in staat
om een beschikbare taal als eerste taal voor de
openingspagina van Teletekst te selecteren.
MENU
Druk op
op de afstandsbediening en selecteer
Settings > Teletext > Digital teletext language
(Instellingen > Teletekst > Taal van digitale teletekst).
◄/►
Druk op
om te selecteren.
SPDIF-type
Sluit de tv op een audioapparaat aan door middel van
SPDIF
de
SPDIF-uitvoer te selecteren, drukt u op
afstandsbediening en selecteert u
type
- Wanneer u
-uitgang. Om het juiste geluidstype voor uw
MENU
Settings > SPDIF
(Instellingen > SPDIF-type).
PCM
selecteert, is de SPDIFuitvoerindeling altijd PCM, ook als de geluidsindeling
van het programma een andere indeling heeft.
- Wanneer u
Dolby D
selecteert, is de SPDIF-
uitvoerindeling
• Dolby Digital wanneer de geluidsindeling van het
programma Dolby Digital is of Dolby Digital Plus of
HE-AAC
• PCM wanneer de geluidsindeling van het
programma MPEG is.
Nederlands
op de
NL
12
Page 71

Meer van uw TV gebruiken
- Selecteer
van het audio-apparaat dat met de SPDIF-uitgang
verbonden is.
Opmerking: De opties die u kunt kiezen zijn
Off
(Uit) om de audio-uitgang uit te zetten
afhankelijk van beeld, u kunt kiezen
SPDIF delay
voor
Settings
het
◄/►
drukken om de vertragingstijd te
synchroniseren met het beeld.
(SPDIF-vertraging)
(instellingen)
-menu en op
T-Link
Gebruik deze functie om naar CEC-apparaten te
zoeken die op de HDMI-aansluitingen van uw TV zijn
aangesloten en schakel one-touch afspelen en onetouch stand-by tussen CEC-apparaten in.
Inof uitschakelen van T-Link
1.
2.
One-touch afspelen gebruiken
Met one-touch afspelen, wordt het afspelen op uw
DVD-apparaat gestart door op de afspeeltoets op
(bijvoorbeeld) de afstandsbediening van uw DVDapparaat te drukken en schakelt uw TV automatisch
over naar de juiste bron om de DVD-inhoud weer te
geven.
Systeem-stand-by gebruiken
Met systeem-stand-by, wordt uw TV en alle
aangesloten HDMI-apparaten naar de standby-modus geschakeld door op de O-toets op
(bijvoorbeeld) de afstandsbediening van uw TV te
drukken.
MENU
Druk op
selecteer
Druk op
(Uit), wanneer deze functie is ingeschakeld zal
T-Link
de
access
door op de
te drukken.
Opmerking: De CEC-functies zijn afhankelijk
op de afstandsbediening en
Settings > T-Link
◄/►
om On (Aan) te selecteren of
”-optie beschikbaar zijn in het
(Snelle toegang)-menu dat u kunt openen
Option
-knop op uw afstandsbediening
van de aangesloten apparatuur
en het kan gebeuren dat correcte
onderlinge werking van bepaalde
apparatuur niet mogelijk is wanneer
aangesloten op deze TV. Raadpleeg
de gebruikshandleiding of de fabrikant
van de problematische apparatuur
voor meer informatie.
(Instellingen > T-Link).
Off
Quick
Netwerk update
MENU
Druk op
vervolgens
> NNetwerkupdate). Selecteer
de functie Netwerk update in of uit te schakelen.
- Wanneer deze functie is ingeschakeld, zal de TV
automatisch de kanalen bijwerken als uw DTVdienstverlener zijn DTV-netwerk bijwerkt.
op de afstandsbediening, en selecteer
Settings > Network update
On/Off
(Instellingen
(Aan/Uit) om
- Wanneer deze functie is uitgeschakeld, moet u
opnieuw de kanalen scannen om opnieuw kanalen
te ontvangen of om onbeschikbare kanalen te
verwijderen, als uw DTV-dienstverlener kanalen
toevoegt of verwijdert van hun DTV-netwerk.
in
Gemeenschappelijke interface
Gecodeerde digitale TV-kanalen kunnen gedecodeerd
worden met een common interface-module en
een kaart die leverbaar is via een digitale TVdienstverlener.
De common interface-module kan enkele digitale
diensten mogelijk maken, afhankelijk van de provider
en diensten die u kiest (bijvoorbeeld betaal-TV).
Neem contact op met uw TV-dienstverlener voor meer
informatie over diensten en voorwaarden.
De common interface-module gebruiken
WAARSCHUWING: Schakel uw TV uit voordat
u een common interface-module aansluit. Zorg
ervoor om de hieronder beschreven instructies op
te volgen. Verkeerd aansluiten van een common
interface-module kan zowel de module als uw TV
beschadigen.
1.
Volg de instructies op die op de common interfacemodule gedrukt zijn, steek voorzichtig de module
in de sleuf in de TV die daarvoor is bestemd.
2.
Druk de module er zover mogelijk in.
3.
Schakel de TV in en wacht totdat de functie van
common interface wordt geactiveerd. Dit kan
enkele minuten duren.
Opmerking: Haal de common interface-module
Toegang tot common interface-diensten
Druk, na het er in steken en activeren van de common
interface-module, op
en selecteer
(Instellingen > Common Interface).
Deze menuoptie is alleen beschikbaar als de common
interface-module correct ingestoken en geactiveerd
is. On-screen toepassingen en inhoud worden door
uw digitale TV-dienstverlener geleverd.
niet uit de sleuf. Het eruit halen van
de module zal de digitale diensten
deactiveren.
MENU
Settings > Common interface
op de afstandsbediening
Software bijwerken
Opmerking: Schakel de tv niet uit of verwijder de
Druk op
Settings > Software update
bijwerken). Druk op
By network
- “
de laatste softwareversie van Internet te
downloaden en te installeren. Zorg ervoor om eerst
een bekabelde of draadloze verbinding tot stand
stekker niet uit het stopcontact totdat
de upgrade is voltooid.
MENU
op de afstandsbediening en selecteer
(Via netwerk): Geeft u de mogelijkheid
(Instellingen > Software
OK/►
om te openen.
NL
13
Page 72

Meer van uw TV gebruiken
te brengen, selecteer vervolgens
netwerk) en druk op
Wanneer een nieuwe versie van de software
beschikbaar is, verschijnt een voortgangsbalk.
Wanneer het downloaden is voltooid, zal het beeld
van de TV zwart worden en zal de TV de software
bijwerken.
Opmerking: Houd de netwerkverbinding in stand
By channel
- “
nieuwste versie van de software te installeren indien
deze beschikbaar is. Druk op
(Via kanaal) te selecteren, en druk vervolgens op
OK
om die binnen te gaan.
• Gebruik
• Gebruik
• Gebruik
◄/►
download
indien beschikbaar, automatisch de nieuwste
software te downloaden. Nadat de software met
succes is gedownload, wordt u gevraagd om
te beslissen of u het direct wilt installeren. Zo
ja, volg de aanwijzingen op het scherm om de
installatie te voltooien. U kunt ook ervoor kiezen
om de installatie te negeren.
◄/►
Auto download
onder
automatische download af te wijzen.
▲/▼
(hHandmatige Download) te selecteren en druk
OK/►
op
software wilt zoeken. Volg de aanwijzingen op
het scherm om de installatie te voltooien. Druk
tijdens het zoeken op
annuleren of af te sluiten.
OK/►
tijdens de upgrade.
(Via kanaal): Stelt u in staat de
Yes
om
(Autodownload) te selecteren om,
om No (Nee) te selecteren
Manual Download
om
als u handmatig naar de nieuwste
By network
om het uit te voeren.
▲/▼
om
(Ja) onder
(Autodownload) om de
OK/EXIT
Auto
om het proces te
(Via
By Channel
Schakelen naar de winkel- of thuismodus
1.
2.
3.
Opmerking: Zoals bepaald door de Europese
MENU
Druk op
selecteer
Locatie).
◄/►
Druk op
(Winkel) of
EXIT
Druk op
op de afstandsbediening en
Settings > Location
om uw locatie te selecteren:
Home
(Thuis).
om af te sluiten.
Commissie Richtlijn 2009/125/EC, zal
de TV in de thuismodus automatisch
op stand-by worden gezet als er 4 uur
lang geen actie wordt uitgevoerd. Deze
functie kan worden gedeactiveerd in
Settings
het
-menu
(Instellingen >
Shop
(Instellingen)
.
MHEG-functie
Sommige digitale TV-zenders bieden speciale digitale
tekst of interactieve services (bijvoorbeeld BBC1 in
het VK). Deze diensten werken op dezelfde manier
als gewone teletekst met de nummer-, kleur- en
navigatietoetsen.
Opmerking: MHEG en ondertitels sluiten elkaar
uit en kunnen niet gelijktijdig op het
scherm worden gebruikt. Als
(Ondertitel)
MHEG niet getoond worden. Volg de
instructies in de sectie "Ondertitels in-/
uitschakelen" om
Off
op
1.
Druk op de rode toets of op
afstandsbediening.
2.
3.
4.
5.
▲/▼/◄/►
Druk op
te markeren.
Druk op OK om te bevestigen of te activeren.
Druk op één van de kleurtoetsen om een optie te
selecteren.
TEXT
Druk op
of
EXIT
On
op
(Aan)
Subtitle
te zetten.
(Uit)
TEXT
om een item te selecteren of
om af te sluiten.
Subtitle
staat, zal
(Ondertitel)
op de
Foto's bekijken, muziek afspelen en naar
video's kijken vanaf een USB-opslagapparaat
Uw TV is met een USB-aansluiting uitgerust waarmee
u foto’s kunt bekijken, naar muziek kunt luisteren of
video’s bekijken die op een USB-opslagapparaat zijn
opgeslagen.
Ondersteunde bestandsformaten:
Foto JPEG
Muziek MP3
Video AVI, MPG, MPEG, TS, DIVX, MKV...
Opmerking: Sommige USB-sticks en USB-
Om handmatig de
openen, druk op
selecteer
Foto
Gebruik deze functie om foto’s weer te geven, indien
beschikbaar.
1.
Selecteer
vervolgens op OK om de inhoud-browser van het
hoofdbestand te openen.
2.
In de inhoud-browser van het hoofdbestand
gebruik
te selecteren.
3.
Selecteer een subfolder en druk op OK om een
inhoud-browser van een subfolder te openen.
4.
Gebruik
browser van een hoofd- of subbestand te
selecteren en druk op
de mapmodus weer te geven.
producten zoals digitale camera’s of
mobiele telefoons zijn niet volledig
compatibel met de USB 2.0-standaard
waardoor het mogelijk is dat zij niet met
de multimediaspeler van de TV werken.
Niet alle USB-sticks of -apparaten zijn
compatibel met de USB-functie. Niet
alle bovenstaande formaten worden
herkend. Het coderingsformaat van
uw bestanden bepaalt of ze wel of niet
gebruikt kunnen worden.
Media center
MENU
Media
(Media).
Media > Photo
▲/▼/◄/►
▲/▼/◄/►
om een foto of een interne map
om een foto in de inhoud-
(Mediacentrum) te
op de afstandsbediening en
(Media > Foto) en druk
MENU
om het fotomenu in
Nederlands
NL
14
Page 73

Meer van uw TV gebruiken
-Sort
(Sorteren): Sorteer mappen en foto’s op
wijzigingsdatum of naam.
-Edit
(Bewerken): Kopieer, plak of verwijder een
geselecteerde foto.
-Parser
(Parser): U kunt
kiezen om foto’s uit alle onderliggende
bestandsmappen weer te geven.
5.
Selecteer een foto, druk op OK om te bekijken, en
een diavoorstelling wordt vanaf de geselecteerde
foto gestart. Druk op OK om de foto te
pauzeren. Druk op
de browsermodus weer te geven. U kunt de foto
weergeven, pauzeren of roteren, verschillende
weergavemodi en weergave-effecten, enz.
selecteren.
6.
Druk op de bijbehorende toetsen op de
afstandsbediening om de beschikbare functies,
weergegeven in de functiebalk aan de onderkant
van het TV-scherm, uit te voeren. Druk op de
INFO
-toets om de functiebalk weer te geven of te
verbergen.
knop op de afstandsbediening om de foto te
draaien.
Muziek
Gebruik deze functie om muziek af te spelen, indien
beschikbaar.
1.
Selecteer
vervolgens op OK om de inhoud-browser van het
hoofdbestand te openen.
2.
Gebruik
inhoud-browser van een hoofd- of subbestand te
selecteren en druk op
in de mapmodus weer te geven.
-Sort
naam, genre, artiest of album.
-Edit
geselecteerd nummer.
-Parser
kiezen om nummers uit alle onderliggende
bestandsmappen weer te geven.
3.
Selecteer een nummer, druk op OK om af te
spelen en het automatisch afspelen wordt vanaf
het geselecteerde nummer gestart. Druk op
om het muziekmenu in de browsermodus weer te
geven. U kunt het nummer afspelen of pauzeren
en verschillende afspeelmodi, enz. selecteren.
-Show lyrics
is beschikbaar voor liedjes met songteksten.
Selecteer de optie en gebruik
gesynchroniseerde songtekstweergave in/uit te
schakelen.
-Audio only
op OK om naar de muziek te luisteren terwijl
het scherm uitgeschakeld is. Druk op een
willekeurige toets om het scherm weer in te
schakelen.
Snelbediening:
Media > Music
▲/▼/◄/►
(Sorteren): Sorteer mappen en nummers op
(Bewerken): Kopieer, plak of verwijder een
(Parser): U kunt
(Songtekst weergeven): Deze optie
(Alleen audio): Selecteer en druk
Recursive
MENU
om het fotomenu in
(Media > Muziek), druk
om een nummer in de
MENU
Recursive
(Recursief)
Druk op de groene
om het muziekmenu
(Recursief)
◄/►
om de
MENU
4.
Druk op de bijbehorende toetsen op de
afstandsbediening om de beschikbare functies,
weergegeven in de functiebalk aan de onderkant
van het TV-scherm, uit te voeren.
Video
Gebruik deze functie om video’s te bekijken, indien
beschikbaar.
1.
Selecteer
vervolgens op OK om de inhoud-browser van het
hoofdbestand te openen.
2.
Gebruik
de fotoweergavefunctie een video in de inhoudbrowser van een hoofd- of subbestand te
selecteren en druk op
de mapmodus weer te geven.
-Sort
-Edit
-Parser
3.
Selecteer een video, druk op OK om af te spelen
en het automatisch afspelen wordt vanaf het
geselecteerde nummer gestart. Druk op
om het videomenu in de browsermodus weer te
geven. U kunt de video afspelen, pauzeren en
verschillende afspeelmodi, weergavemodi en
voorinstellingen van het beeld, enz. selecteren.
4.
Druk op de bijbehorende toetsen op de
afstandsbediening om de beschikbare functies,
weergegeven in de functiebalk aan de onderkant
van het TV-scherm, uit te voeren. Druk op de
INFO
verbergen.
DivX-video
INFORMATIE OVER DIVX-VIDEO: DivX® is een
digitale video-indeling gemaakt door DivX, LLC, een
dochteronderneming van Rovi Corporation. Dit is
een ofcieel DivX Certied® apparaat dat DivX-video
afspeelt. Bezoek divx.com voor meer informatie en
softwaretools om uw bestanden naar DivX-video’s te
converteren.
INFORMATIE OVER DIVX-VIDEO-ON-DEMAND: Dit
DivX Certied® apparaat moet worden geregistreerd
om DivX Video-on-Demand (VOD)-lmen af te spelen.
Vraag uw registratiecode aan:
• Druk op
• Selecteer
(Instellingen > DivX(R) registratie).
• Druk op
geven.
Ga naar vod.divx.com voor meer informatie over hoe
u uw inschrijving kunt voltooien.
Media > Video
▲/▼/◄/►
(Sorteren): Sorteer mappen en video’s op
soort, wijzigingsdatum of naam.
(Bewerken): Kopieer, plak of verwijder een
geselecteerde video.
(Parser): U kunt
kiezen om video’s uit alle onderliggende
bestandsmappen weer te geven.
-toets om de functiebalk weer te geven of te
MENU
op de afstandsbediening.
Settings > DivX(R) registration
OK/►
om uw registratiecode weer te
(Media > Video), druk
om op dezelfde wijze als in
MENU
om het videomenu in
Recursive
(Recursief)
MENU
NL
15
Page 74

Meer van uw TV gebruiken
De registratie van uw TV afmelden:
Als u de registratie van uw TV wilt afmelden:
• Druk op
• Selecteer
• Druk op
DivX®, DivX Certied®, DivX Plus® HD en de
bijbehorende logo's zijn handelsmerken van Rovi
Corporation of haar dochterondernemingen en
worden onder licentie gebruikt.
MENU
op de afstandsbediening.
(Instellingen > DivX(R) uitschrijving).
Settings > DivX(R) deregistration
OK/►
en volg de instructies op het scherm.
Toegang tot de tijd
U kunt de tijd van digitale kanalen met behulp van de
volgende onderstaande instructies benaderen.
1.
2.
MENU
Druk op
selecteer
synchronization
Automatische synchronisatie).
Druk op
Schakel de Automatische synchronisatie uit als u
de tijd handmatig wilt instellen.
op de afstandsbediening en
Settings > Timer > Clock > Auto
(Instellingen > Timer > Tijd >
◄/►
om On (Aan) te selecteren.
Storingen op digitale TV-kanalen opsporen
1.
2.
MENU
Druk op
selecteer
(Instellingen > Instelling > Diagnostiek).
Druk op
signaalsterkte, frequentie, enz., van het huidige
kanaal weer te geven.
op de afstandsbediening en
Settings > Setup > Diagnostics
OK/►
om signaalgegevens zoals
Tijdverschuiving
Stelt u in staat het TV-programma op te nemen zodat
u niet het favoriete deel hoeft te missen, zelfs als u
uitgaat. Voordat u van de functie gebruikmaakt, sluit
eerst een USB-apparaat op de TV aan. Bij de eerste
keer, moet u de set-up van de disk voor het USBapparaat uitvoeren.
Opmerking: De functie is alleen in geselecteerde
1.
Druk op
selecteer
(Instellingen > Instelling > Tijdsverschuiving).
producten beschikbaar en, als gevolg
van specieke beperkingen van het
TV-netwerk en technische vereisten
van het land, kan het mogelijk in
het product of op de plaats van
installatie niet beschikbaar zijn. De
functie kan ook door het TV-netwerk
worden geblokkeerd als gevolg van
auteursrechtelijke bescherming (HDinhoud, opnamebeveiliging). Gebruik
OPTION
op de afstandsbediening
om te controleren of de functie op uw
product beschikbaar is.
MENU
op de afstandsbediening en
Settings > Setup > Time shift
2.
3.
4.
5.
6.
◄/►
Druk op
tijdsverschuivingsfunctie in te schakelen, en druk
vervolgens op
Druk op
selecteer vervolgens
en druk vervolgens op OK om te bevestigen.
Volg de aanwijzingen op het scherm op om de
installatie uit te voeren.
Nadat de schijfset-up voltooid is, druk op
en selecteer
Druk op OK om het tijdsverschuivingsmenu weer
te geven.
-Druk op de pauzeknop om het beeld te
pauzeren en de tijdssprong te beginnen.
-Druk op de pauzeknop om het opgenomen
gedeelte af te spelen.
-Wanneer het tijdssprongmenu verdwijnt en
alleen de tijd van de tijdssprong achterblijft op
het scherm, kunt u op de pauzeknop drukken
of op OK om het tijdssprongmenu te openen.
-Druk op de knop terugspoelen ◄◄ om achteruit
te spoelen of de knop vooruitspoelen ► ► om
vooruit te spoelen.
-Druk op de stopknop om de tijdssprongfunctie
te stoppen.
-Maak een back-up van de gegevens op het
apparaat voordat u het USB-apparaat op het
TV-toestel aansluit om verlies van belangrijke
gegevens wegens onverwachte storingen te
voorkomen.
-Wij raden u aan om een USB-apparaat te
gebruiken met een vrije bestandcapaciteit van
groter dan 1 GB en een disksnelheid van hoger
dan 5,0 MB/sec.
-Hoe groter de vrije schijfruimte die beschikbaar
is op de USB-schijf voor tijdsverschuiving, des te
groter is de opnamelengte.
-Als u in tijdverschuiving van kanaal wisselt,
zal er een melding verschijnen waarin u
wordt gevraagd om
selecteren. U kunt
tijdverschuivingsfunctie te sluiten en van kanaal
te wisselen.
om On (Aan) te selecteren om de
EXIT
OPTION
om het menu te sluiten.
op de afstandsbediening en
Time shift
Time shift
Yes
Yes
(Tijdsverschuiving)
(Tijdsverschuiving).
of No
(Ja)
selecteren om de
(Ja)
(Nee)
Reset winkel
Hiermee kunt u het TV-toestel naar de
fabrieksinstellingen resetten.
1.
2.
3.
MENU
Druk op
selecteer
Instelling). Druk vervolgens op OK om te
bevestigen.
Selecteer
OK/►
Gebruik de alfanumerieke toetsen om het
wachtwoord in te voeren.
Opmerking: Het superwachtwoord is 0423. Als
op de afstandsbediening en
Settings > Setup
Reset shop
om te openen.
u uw code bent vergeten, kunt u
(Instellingen >
(Reset winkel) en druk op
OPTION
te
Nederlands
NL
16
Page 75

Meer van uw TV gebruiken
het superwachtwoord invoeren om
4.
Druk op
op OK om te bevestigen.
5.
Het
verschijnt. Volg de getoonde aanwijzingen.
bestaande codes te overschrijven.
◄/►
en selecteer OK en druk nogmaals
Initial setup
(Aanvankelijke Instelling)-menu
Aanpassen van inganginstellingen
U kunt uw TV congureren aan de hand van de
apparatuur die u erop hebt aangesloten.
1.
2.
3.
4.
5.
Na het congureren, zal bij het indrukken van
SOURCE
het TV-toestel, de label van de geselecteerde bron
achter de naam van de bijbehorende connector in de
bronnenlijst worden weergegeven.
MENU
Druk op
selecteer
(Instellingen > Instelling > Inganginstellingen).
Druk op
(Inganginstellingen) te gaan.
Druk op
waarop uw apparatuur is aangesloten.
◄/►
Druk
aangesloten is op deze aansluiting.
Druk op
(Instelling)-menu .
op de afstandsbediening en
Settings > Setup > Input settings
OK/►
om naar
▲/▼
om een aansluiting te selecteren
om het apparaattype te selecteren wat
MENU
op de afstandsbediening of op OK op
Input Settings
om terug te keren naar het
Setup
Elektronische programmagids gebruiken
EPG is een gids op het scherm die ingeplande
TV-programma’s weergeeft. U kunt programma's
navigeren, selecteren, bekijken en opnemen.
1.
2.
GUIDE
Druk op
Now and Next EPG
het
EPG) te openen. U kunt hier informatie vinden
over het huidige en volgende programma op
elk kanaal. Gebruik de navigatietoetsen op de
afstandsbediening om door de verschillende
programma’s te navigeren.
Maak gebruik van de kleurtoetsen om
(8 Dagen EPG) te zien.
-Prev day
met de EPG van de vorige dag.
-Next day
lijst met de EPG van de volgende dag.
-View detail
beschrijving van dit programma indien
beschikbaar.
-Type lter
programmagids voor digitale TV-programma’s.
• Druk op de blauwe toets om de lijst van het
type en subtype van het programma weer te
geven.
• Verplaats door de verschillende types en
sybtypes met behulp van de pijltoetsen op de
afstandsbediening.
op de afstandsbediening om
”-menu (Nu en straks
8 Days EPG
(Vorige dag) (Rood): Bekijk een lijst
(Volgende dag) (Groen): Bekijk een
(Zie detail) (Geel): Toont de
(Typelter) (Blauw): Filter van de
• Selecteer één of meer types uit de
lijst die u wilt markeren, druk op OK om te
selecteren (of deselecteren). Aan de linkerkant
van het type verschijnt een vinkje wanneer
deze geselecteerd wordt. Wanneer u een type
selecteert, worden alle bijbehorende subtypes
eveneens geselecteerd.
• De gebruiker kan ook sommige gewilde
subtypes selecteren zonder eerst een type te
selecteren.
• Druk op de blauwe toets om de lijst van het
type en subtype af te sluiten.
• Na ltering worden al uw gewenste digitale TV-
programma’s gemarkeerd.
-Add schedule
OPTION
op
Schedule list
te brengen. Voor meer informatie over geplande
opname, zie de sectie "Planningslijst".
3.
Druk op
naar het geselecteerde kanaal te schakelen.
(Schema toev.) (Optie): Druk
op de afstandsbediening om de
-menu (Planningslijst) naar voren
GUIDE/EXIT
om de EPG af te sluiten en
Type
PVR (Personal Video Recorder) (Persoonlijke
Videorecorder)
U kunt met deze functie uw favoriete TV-programma
opnemen. Voordat u van de functie gebruikmaakt,
sluit eerst een USB-apparaat op de TV aan. Wanneer
u deze functie voor de eerste keer gebruikt, dient u de
disk voor het USB-apparaat in te stellen.
Opmerking: De functie is alleen in geselecteerde
1.
Druk op
selecteer in het menu Snelle toegang de optie
PVR
2.
Druk op
3.
Druk op:
- de opname-knop start de opname, het
opnamebestand wordt in een map met de naam
van het kanaalnummer onder de map PVR
geplaatst in
geplaatst;
-▲/▼/◄/►
- de groene knop of stopknop stopt de opname
handmatig. Wanneer de opname niet wordt
producten beschikbaar en, als gevolg
van specieke beperkingen van het
TV-netwerk en technische vereisten
van het land, kan het mogelijk in
het product of op de plaats van
installatie niet beschikbaar zijn. De
functie kan ook door het TV-netwerk
worden geblokkeerd als gevolg van
auteursrechtelijke bescherming (HDinhoud, opnamebeveiliging). Gebruik
OPTION op de afstandsbediening
om te controleren of de functie op uw
product beschikbaar is.
OPTION
op de afstandsbediening en
.
OK/►
om te openen.
Media> Video
om de opnametijd aan te passen.
(Media > Video)
(Type)
NL
17
Page 76

Hoofdstuk 6
gestopt zal de opname automatisch stoppen
wanneer de opnameduur is verstreken.
Opmerking: Als u van kanaal wisselt terwijl een
4.
Er wordt tijdens de opname ook een PVRminipaneeltje getoond om de voortgang van de
opname aan te geven.
5.
Voor het bekijken van het opgenomen programma,
sluit eerst de PVR-modus af en ga naar
> Video
PVR, en selecteer vervolgens het betreffende
recordbestand. Druk op OK om af te spelen. (Het
is hetzelfde wanneer de gebruiker een digitaal
radioprogramma opneemt).
Opmerkingen:
-Deze functie is alleen beschikbaar voor digitale
kanalen zonder encryptie. Zelfs wanneer de
CICAM (CI of CI+) is geplaatst, is de functie niet
op gecodeerde kanalen beschikbaar.
-Maak een back-up van de gegevens op het
apparaat voordat u het USB-apparaat op het
TV-toestel aansluit om verlies van belangrijke
gegevens wegens onverwachte storingen te
voorkomen.
-Hoe groter de vrije schijfruimte die beschikbaar
is op de USB-schijf voor de PVR-functie, des te
groter is de opnamelengte.
-Als u het kanaal of de signaalbron tijdens het
opnemen wilt wijzigen, sla de opgenomen
gegevens op voordat u de zender of de bron
wijzigt.
-Het TV-toestel kan bestanden niet normaal
afspelen als de parameters van het bestand
de systeembeperkingen overschrijden, het
bestandsformaat niet wordt ondersteund, het
bestand beschadigd is of het bestand niet
gedecodeerd kan worden.
-Ontkoppel het USB-geheugenapparaat niet
wanneer het systeem een bestand inleest of
gegevens overdraagt, anders kan het systeem of
apparaat beschadigd raken.
Planningslijst
Deze functie wordt gebruikt om geprogrammeerde
opname uit te voeren.
Waarschuwing: voor deze bewerking moet u een
USB-opname-apparaat aansluiten, anders zal de
opname niet starten.
1.
Druk op
selecteer in het menu Snelle toegang de optie
Schedule list
programma wordt opgenomen,
zal er een melding op het scherm
verschijnen om u te vragen of u de
kanaalwijziging wilt bevestigen. Als u
inderdaad bevestigt, zal uw opname
worden onderbroken.
(Media > Video). Selecteer de map
OPTION
op de afstandsbediening en
(Schemalijst).
Media
Netwerk
2.
Druk op OK om de programmalijst weer te geven.
3.
Om een programma in uw programmalijst toe te
voegen, druk eerst op de rode toets om
list
(Planningslijst) weer te geven. Vervolgens,
-Channel number
◄/►
om het kanaalnummer te selecteren.
-Start date
alfanumerieke toetsen om de opnamedatum in te
stellen.
-Start time
opname in.
-Stop time
opname in.
-Schedule type
• Stel een
herinnerd te worden dat u kunt overschakelen
naar het geplande programma wanneer de tijd
bereikt is die u ingesteld hebt. Wanneer de tijd
verstreken is en u voert de bewerking niet uit,
zal het dialoogvenster verdwijnen en zullen
er verder geen andere bewerkingen worden
uitgevoerd.
Record
• Stel
of u echt uw geplande opname wilt starten
wanneer de tijd bereikt is die u ingesteld hebt.
Wanneer de tijd verstreken is en u voert geen
actie uit, zal de geprogrammeerde opname
automatisch starten.
-Repeat type
herhalingsmodi van de opname in.
4.
5.
6.
7.
▲/▼/◄/►
Druk op
selecteren en druk vervolgens op OK om het door
u ingestelde programma in uw programmalijst toe
te voegen.
Druk op de rode toets om bovenstaande
procedures te herhalen om een ander programma
toe te voegen.
Als u een opnameschema wilt aanpassen of
wissen, kunt u het selecteren, op OK drukken om
te openen en de instructies op het scherm volgen.
EXIT
Druk op
(Zendernummer): Gebruik
(Startdatum): gebruik de
(Starttijd): stel de starttijd van de
(Eindtijd): stel de eindtijd voor de
(Planningstype):
Reminder
om het menu af te sluiten.
(Herinnering) in om
(Opnemen) in om te controleren
(Herhaaltype): Stel verschillende
Add
om
(Toevoegen) te
Schedule
Netwerk
Netwerkaansluiting
U kunt uw TV zodanig instellen dat het
Internettoegang heeft via uw lokaal area netwerk
(LAN) m.b.v. een bekabelde of draadloze verbinding.
Op een bekabeld netwerk aansluiten
U kunt uw TV op drie manieren via een kabel op uw
LAN aansluiten:
• U kunt uw TV aansluiten op uw LAN door de LANpoort op uw TV op een externe modem aan te
sluiten via minimaal een Cat 5-kabel.
• U kunt uw TV aan uw LAN koppelen door de LANpoort op uw TV op een IP-Sharer aan te sluiten,
Nederlands
NL
18
Page 77

Netwerk
die op een externe modem is aangesloten. Gebruik
minimaal een cat 5-kabel minimum voor de
verbinding.
• Afhankelijk van hoe uw netwerk is gecongureerd,
kunt u uw TV rechtstreeks aansluiten op uw LAN
door de LAN-poort op uw TV rechtstreeks op een
netwerkmuurcontact aan te sluiten via minimaal een
Cat 5-kabel. Vergeet niet dat de contactdoos op een
modem of router elders in uw woning aangesloten
moet zijn.
1.
2.
3.
4.
5.
MENU
Druk op
selecteer
connection
Internetverbinding). Druk op
selecteren.
Druk op
selecteren, en stel vervolgens
(Ethernet) om de verbindingsstand met kabel te
selecteren.
Druk op
(Verbindingstest) te selecteren, en druk op
om op verbinding met internet te testen. Volg
wanneer dit niet werkt stap 4 hieronder.
Selecteer
setting
instelling) en druk vervolgens op
IP setting
Address type
(Automatisch) of op
- Selecteer
automatisch het benodigde IP-adres ophaalt en
invoert.
- Selecteer
handmatig in wilt stellen en vervolgens:
• Druk op ▼ om naar het eerste invoer vak te
gaan.
• Voer de waarden van
Subnet mask
(Standaard gateway),
DNS) en
in. Gebruik de alfanumerieke toetsen om cijfers
in te voeren en de navigatieknoppen om van
het ene invoerveld naar het andere te gaan.
- Zodra
(Handmatige IP-instelling) is voltooid, drukt u op
MENU
Connection test
en drukt u op
connectivity
Als u informatie over de huidige verbinding, zoals
Interface
IP address
Network > Network settings > Information
u
(Netwerk > Netwerkinstellingen > Informatie), en
drukt u vervolgens op
op de afstandsbediening en
Network > Network settings > Internet
(Netwerk > Netwerkinstellingen >
▲/▼
▲/▼
(Netwerk > Netwerkinstellingen > IP-
Auto
om terug te gaan, drukt u op
Interface
om
Connection test
om
Network > Network settings > IP
-menu (IP-instelling) te openen. U kunt
(Adrestype) instellen op
Auto
(Automatisch) als u wilt dat de tv
Manual
(Subnet Mask),
Secondary DNS
(Automatisch) of
(Verbindingstest) te selecteren,
OK/►
(Internetconnectiviteit) te testen.
(Interface),
(IP-adres), etc. wilt zien, selecteert
◄/►
om On (Aan) te
(Interface) te
◄/►
Manual
(Handmatig).
(Handmatig) als u het IP-adres
IP address
Primary DNS
(Secundaire DNS)
Manual IP setting
om opnieuw op
Address type
OK/►
.
Ethernet
in op
OK/►
OK/►
om het
Auto
(IP-adres),
Default gateway
(Primaire
▲/▼
om
Internet
(Adrestype),
Verbinden met een draadloos netwerk
Om een draadloze verbinding tussen uw TV en uw
netwerk op te zetten, hebt u een draadloze router of
modem en een draadloze LAN-adapter nodig.
1.
2.
3.
MENU
Druk op
selecteer
connection
Internetverbinding). Druk op
selecteren.
Druk op
selecteren, en stel vervolgens
(Draadloos) om de draadloze verbindingsstand te
selecteren. Druk op
(Draadloosinstelling) te selecteren, en druk
vervolgens op OK om die binnen te gaan.
U kunt de draadloze netwerkverbinding op 3
manieren instellen: a) of b) of c).
-a) Scannen
• Druk op
selecteren, en druk vervolgens op
De tv doorzoekt alle toegangspunten binnen
bereikt, de tv zal de gevonden toegangspunten
weergeven.
• Druk op
toegangspunt te selecteren, en druk op
om verbinding te maken met de tv.
Opmerkingen:
-Als u een beveiligd toegangspunt
selecteert, zult u het corresponderende
wachtwoord moeten invoeren. Druk op OK
op de afstandsbediening om het virtuele
toetsenbord weer te geven waarmee u het
wachtwoord kunt invoeren.
-Het beschikbare toegangspunt wordt
opgeslagen, waardoor er ook verbinding
gemaakt kan worden met het netwerk nadat u
uw tv opnieuw inschakelt na uitschakeling.
-b) Handmatig
Druk op
selecteren, en druk vervolgens op
worden gevraagd om de juiste SSID in te voeren
van een beschikbare draadloze router om de
verbinding in te stellen.
-c) Automatisch
Als uw AP de WPS-optie (Wi-Fi Beveiligde
Instelling) ondersteunt, kunt u met het netwerk
via PIN (Persoonlijk Identicatienummer) of PBC
(Drukknop Conguratie) verbinding maken .
WPS zal het SSID- en WPA-wachtwoord in beide
modi automatisch congureren.
Druk op
selecteren en druk vervolgens op
openen.
PIN:
•
te openen. Genereer een willekeurige PINcode. Zorg ervoor dat deze code geïnstalleerd
op de afstandsbediening en
Network > Network settings > Internet
(Netwerk > Netwerkinstellingen >
▲/▼
Selecteer
Interface
om
▲/▼
om
▲/▼
om een beschikbaar
▲/▼
om
▲/▼
om
PIN
◄/►
(Interface) te
▲/▼
om
Scan
(Scannen) te
Manual
(Handmatig) te
Auto
(Automatisch) te
en druk op
om On (Aan) te
◄/►
in op
Wireless setting
OK/►
OK/►
OK/►
Wireless
OK/►
om
.
OK/►
, u zult
om te
NL
19
Page 78

Hoofdstuk 7
is in de AP. (lees voor procedures a.u.b. de
handleiding van uw router.) Druk nogmaals op
OK/►
om de verbinding tot stand te brengen.
PBC:
•
Als uw router een PBC-drukknop heeft,
PBC
kunt u
OK/►
minuten op de PBC-drukknop op uw router
nadat u nogmaals op
zal automatisch de vereiste waarden voor
de netwerkinstelling identiceren en met uw
netwerk verbinding maken.
4.
Herhaal de instructies in stap 3 en 4 van de vorige
sectie
te controleren op verbinding met internet.
5.
Herhaal de instructies in stap 5 van de vorige
sectie
informatie over de huidige verbinding te zien.
selecteren en vervolgens op
drukken om te openen. Druk binnen 2
OK/►
drukt. Uw TV
Op een bekabeld netwerk aansluiten
Op een bekabeld netwerk aansluiten
om
om
Tv-afstandsbediening
Deze functie stelt u in staat om een slim apparaat in
een geavanceerde afstandsbediening te veranderen,
die u meer functies biedt dan een normale tvafstandsbediening. U kunt zo de tv bedienen door
middel van uw slim apparaat.
1.
Selecteer
Remote), en druk op OK om naar het
(TV Remote)-menu te gaan. U ziet informatie over
het downloaden van de tv-afstandsbedieningsapp
en andere gerelateerde informatie.
De volgende instructies zijn gebaseerd op het
voorbeeld van een smartphone.
2.
Download en installeer op de smartphone de juiste
TV-afstandsbedieningapp voor de smartphone.
3.
Zorg ervoor dat de smartphone en de TV zich op
hetzelfde huis-LAN bevinden (local area network)
of netwerksegment.
4.
Voer de TV-afstandsbedieningtoepassing uit op
de smartphone. Deze zoekt en communiceert
automatisch met de TV om de TV-afstandsbedieni
ngsfunctionaliteit in te schakelen.
5.
Zodra de TV en de smartphone zijn gekoppeld
zoals beschreven in stap 4, bent u in
staat om van de extra functies van de TV-
afstandsbedieningsfunctie te genieten.
6.
Druk op
afstandsbedieningsfunctie af te sluiten.
Network > TV Remote
EXIT
op de afstandsbediening om de tv-
(Netwerk > TV
TV Remote
DLNA (Delen & Bekijken)
Opmerking: Deze handleiding heeft betrekking op
producten met
Bekijken)
& See
compatibel.
Share & See
DLNA
of met
(Delen & Bekijken)
-functie.
(Delen &
Share
is DLNA-
DLNA (Delen & Bekijken)
Aansluiten op uw PC
Zorg ervoor om eerst een bekabelde of draadloze
verbinding vanaf uw TV naar een router tot stand
te brengen. Verbind vervolgens uw PC via een
netwerkkabel of draadloos met uw router. Controleer
Network > Network settings > Internet
ook of
Connection
Internetverbinding), op On (Aan) staat, en of uw
rewall de verbinding niet blokkeert.
De DLNA-functie inschakelen
Selecteer
stel deze in op On (Aan).
Volg de hierna vermelde stappen beurtelings
op, vervolgens kunt u van opgenomen video’s,
afbeeldingen en muziek genieten die op uw PC zijn
opgeslagen.
Media van uw PC voor het delen toevoegen
Installeer een DLNA-mediaserver op uw PC. De
eenvoudige en veelgebruikte server die u kunt
installeren is Microsoft Windows Media Player 11 en
hoger. Volg de instructies hieronder om uw tv toegang
te geven tot de benodigde bestanden op uw pc.
1.
Open de Microsoft Windows Media Player 11.
2.
DLNA-toepassing
Selecteer
op OK om het mediacentrum te openen. Vervolgens
kunt u foto’s bekijken, naar muziek luisteren of naar
video’s kijken die op uw PC zijn opgeslagen.
Opmerking:
(Netwerk > Netwerkinstellingen >
Network > DLNA
- Selecteer
> Het delen van media).
- Vink het selectievakje
media delen naar) aan.
- Selecteer het pictogram van het TV-toestel die
op uw PC is aangesloten.
- Selecteer
toegang tot uw PC toe te staan en selecteer OK
om uw toestemming in te schakelen.
Opmerking: Gebruik de
- Selecteer
> Toevoegen aan bibliotheek).
- Selecteer uw persoonlijke mappen of mappen
van andere gebruikers die u voor het delen kunt
benaderen.
- Selecteer
het toevoegen in te schakelen.
-Als
beschikbare DLNA-servers weergeven die op het
lokale netwerk beschikbaar zijn.
Library > Media sharing
Allow
toets om de gewenste instellingen
aan te passen.
Library > Add to Library
Add
Media
(Media) in het hoofdmenu en druk
DLNA
is ingeschakeld, zal de TV de lijst van
(Netwerk > DLNA) en
(Bibliotheek
Share my media to
(Toestaan) om het TV-toestel
Settings
(Instellingen)
(Bibliotheek
(Toevoegen) en druk op OK om
Nederlands
(Mijn
-
NL
20
Page 79

Hoofdstuk 8 & 9
-Ondersteunde bestandsformaten:
Foto: JPEG
Muziek: LPCM
Video: MPEG2
HbbTV
HbbTV (Hybrid broadcast broadband TV) is een
dienst die aangeboden wordt door bepaalde
omroepen en die alleen beschikbaar is op bepaalde
digitale tv-kanalen. HbbTV biedt interactieve televisie
via zowel het tv-signaal als over breedbandinternet.
Deze interactieve functies worden toegevoegd aan
de normale digitale programma's en verrijken de
ervaring. Dit zijn diensten zoals digitale teletekst,
elektronische tv-gidsen, games, stemmen, specieke
informatie gerelateerd aan het huidige programma,
interactieve advertenties, informatiemagazines,
programma's later terugkijken, etc.
In de breedbandstand is het nodig voor uw tv om
verbonden te zijn met internet. Naast de programmauitzending die wordt bekeken, heeft u toegang tot
dezelfde diensten als in tv-signaalstand en daarnaast
veel andere via internet verzonden interactieve
diensten zoals VOD (Video On Demand) of het later
bekijken van programma's.
Om volledig gebruik te kunnen maken van
alle mogelijkheden die HbbTV biedt, dient u
uw tv aan te sluiten op het internet (zie de
sectie"Netwerkaansluiting").
Opmerking: U kunt met deze functie geen
bestanden naar uw TV downloaden.
HbbTV-toegang
1.
2.
3.
4.
MENU
Druk op
selecteer
HbbTV modus).
Druk op
Wanneer u afstemt op een digitaal tv-kanaal
dat HbbTV aanbiedt, wordt u hier opmerkzaam
op gemaakt door een indicatie op het scherm
(normaal gesproken een rode knop, maar andere
kleuren kunnen ook worden gebruikt). Druk op de
geïndiceerde
pagina's te openen.
Gebruik
door de HbbTV-pagina's te bladeren en druk op
OK
om te bevestigen.
op de afstandsbediening, en
Settings > HbbTV mode
◄/►
om On (Aan) te selecteren.
gekleurde knop
▲/▼/◄/►
en de kleurenknoppen om
(Instellingen >
om de interactieve
HbbTV-deactivatie
Om storingen te voorkomen die kunnen worden
veroorzaakt door HbbTV-testuitzendingen, kunt u de
HbbTV-functie uitschakelen:
1.
Selecteer
> Instellingen > HbbTV modus).
2.
Druk vervolgens op
selecteren.
Menu > Settings > HbbTV mode
◄/►
om
Off
(Uit) te
(Menu
HbbTV & Smart TV
Smart TV
Hiermee kunt u genieten van internetapplicaties
(Apps), speciaal aangepaste internetwebsites voor
uw TV. U kunt de Apps met de afstandsbediening van
de TV bedienen.
WAARSCHUWING:
• Congureer de netwerkinstelling voor het gebruik
Smart TV
van
• Langzame reacties en/of onderbrekingen kunnen
optreden, afhankelijk van uw netwerkcondities.
• Indien u bij het gebruik van een applicatie een
probleem ondervindt, neemt u dan contact op met
de inhoudsleverancier.
• Naar gelang de omstandigheden van de
inhoudsleverancier kan het bijwerken van een
applicatie of de applicatie zelf worden gestaakt.
• Afhankelijk van de geldende voorschriften in uw
land, kunnen sommige applicaties beperkte service
hebben die al dan niet worden ondersteund.
.
Toegang tot Smart TV applicaties (Apps)
1.
Selecteer
op OK om de startpagina van Smart TV weer te
geven. De App-services zijn afhankelijk van het
land. Selecteer
op OK om alle beschikbare landopties weer te
geven. Druk vervolgens op
te selecteren en druk op OK om te bevestigen.
Selecteer vervolgens “Sluiten” en druk op OK om
terug te gaan naar de smart tv-startpagina.
Snelbediening:
afstandsbediening om direct de startpagina van
Smart TV weer te geven.
2.
Gebruik
druk op OK om te openen.
3.
Surfen op internet is beschikbaar met de Smart
TV-portaalapplicatie. Het kan via het pictogram in
het portal worden benaderd of via de groene toets
wanneer de TV portal-pagina wordt weergegeven.
Opmerking: Aangezien het verbinden met internet
YouTube
Youtube is een website waarop video's gedeeld
kunnen worden en waar u video's kunt ontdekken en
bekijken die geüpload zijn door personen en sommige
bedrijven.
Selecteer
YouTube) om naar
om het te openen. Volg de opties en aanwijzing die
worden weergegeven op het scherm om video's te
zoeken en te bekijken.
Smart TV
▲/▼/◄/►
Smart TV > YouTube
in het hoofdmenu en druk
Country
(Land) en druk vervolgens
◄/►
om uw land
Druk op
tijd kost, wordt het aangeraden dat u
na activering van de TV vanuit standby een paar minuten wacht met het
gebruik van de functie van Smart TV.
Smart TV
om een App te selecteren en
YouTube
op de
(Smart TV >
te gaan, en druk op OK
NL
21
Page 80

Hoofdstuk 10
Netix
Netix biedt lms en tv-shows aan die worden
geleverd via het internet.
Waarschuwing: Netix is beschikbaar in bepaalde
landen.
Een ongelimiteerd lidmaatschap is benodigd. Zie
voor meer informatie www.netix.com. Met een
ongelimiteerd Netix-lidmaatschap kunt u onmiddellijk
tv-shows en lms bekijken die via Netix rechtstreeks
via het internet naar uw tv gestreamd worden.
Selecteer
druk op OK om het te openen, en volg de opties en
aanwijzingen die worden weergegeven op het scherm
om uw gewenste tv-shows en lms te selecteren.
Skype
Om deze functie te gebruiken dient u eerst een
webcam aan te schaffen.
Waarschuwing: Deze TV is alleen compatibel met
een aantal specieke webcams.
Deze softwareapplicatie stelt gebruikers in staat
videogesprekken te voeren over het internet.
Hiernaast is de software populair vanwege de
aanvullende functies waaronder chatberichten,
bestandsoverdracht, videovergaderingen, etc.
Selecteer
druk op OK om het te openen, en volg de opties en
aanwijzingen die worden weergegeven op het scherm
om uw gewenste tv-shows en lms te selecteren.
Voor meer informatie, lees de met deze televisie
geleverde Skype-gebruikershandleiding.
Smart TV > Netix
Smart TV > Skype
(Smart TV > Netix), en
(Smart TV > Skype), en
Overige informatie
Wachtwoord in Ouderlijk toezicht
- Het standaardwachtwoord is 1234. U kunt het in
een nieuw wachtwoord veranderen.
- Het superwachtwoord is 0423. Als u uw code bent
vergeten, kunt u het superwachtwoord invoeren om
bestaande codes te overschrijven.
OSS aankondiging
Dit product maakt gebruik van een aantal
softwareprogramma’s die worden verspreid onder
GPL/LGPL.
GPL-software: Gcc.
LGPL-software: Glibc.
Dit product maakt gebruik van een aantal
softwareprogramma’s die worden verspreid onder de
Independent JPEG Group.
Dit product maakt gebruik van een aantal
softwareprogramma’s die worden verspreid onder het
Freetype Project.
Dit product maakt gebruik van een aantal
softwareprogramma’s die worden verspreid onder de
zlib-licentie.
Overige informatie
Dit product maakt gebruik van een aantal
softwareprogramma’s die worden verspreid onder de
ICU-licentie.
Dit product maakt gebruik van een aantal
softwareprogramma’s die worden verspreid onder de
libpng-licentie.
OSS project-URL:
http://www.gnu.org/software/libc/
http://gcc.gnu.org/
http://www.gnu.org/software/libc/
http://freetype.sourceforge.net
http://www.icu-project.org/
http://www.zlib.net/
http://www.libpng.org/pub/png/libpng.html
http://www.ijg.org/
[Wettelijke verklaring] van TCL - fabrikant van dit
TV-toestel. Vanwege de diverse mogelijkheden
van producten met Smart TV-diensten, evenals
beperkingen in de beschikbare inhoud, kunnen
bepaalde functies, applicaties en diensten niet
beschikbaar zijn op alle apparaten of in alle territoria.
Sommige functies op Smart TV vereisen eventueel
afzonderlijk aan te schaffen extra randapparatuur
of een lidmaatschap. Bezoek onze website voor
meer informatie over specieke informatie over het
apparaat en de beschikbaarheid van de inhoud. De
diensten en de beschikbaarheid van de inhoud via
Smart TV zijn van tijd tot tijd onderhevig aan wijzigen
zonder voorafgaande kennisgeving.
Alle inhoud en diensten toegankelijk via dit apparaat
zijn eigendom van derden en worden beschermd
door auteursrecht, octrooirecht, merkenrecht en/of
andere intellectuele eigendomsrechten. Dergelijke
inhoud en diensten worden uitsluitend aangeboden
voor uw persoonlijk niet-commercieel gebruik. Het
is niet toegestaan enige inhoud of diensten op een
manier te gebruiken die niet is geautoriseerd door
de eigenaar van de inhoud of dienstverlener. Zonder
het voorgaande te beperken, tenzij uitdrukkelijk
toegestaan door de van toepassing zijnde eigenaar
van de inhoud of dienstverlener, mag u de inhoud
of diensten met betrekking tot dit apparaat op geen
enkele manier of met geen enkel middel wijzigen,
kopiëren, publiceren, uploaden, posten, verzenden,
vertalen, verkopen, ander werk uit aeiden,
exploiteren of distribueren.
U ERKENT UITDRUKKELIJK EN GAAT ERMEE
AKKOORD DAT HET GEBRUIK VAN HET APPARAAT
GEHEEL OP UW EIGEN RISICO IS EN DAT HET
VOLLEDIGE RISICO VOOR GOEDE KWALITEIT,
PRESTATIES EN NAUWKEURIGHEID OOK OP UW
RISICO IS. HET APPARAAT EN ALLE INHOUD EN
DIENSTEN VAN DERDEN WORDEN GELEVERD
Nederlands
NL
22
Page 81

Overige informatie
“ZOALS ZE ZIJN” ZONDER ENIGE VORM VAN
GARANTIE, HETZIJ EXPLICIET OF IMPLICIET.
TCL WIJST ALLE GARANTIES VAN DE HAND
MET BETREKKING TOT HET APPARAAT EN ALLE
INHOUD EN DIENSTEN, HETZIJ EXPLICIET OF
IMPLICIET, INCLUSIEF MAAR NIET BEPERKT TOT,
GARANTIES VAN VERKOOPBAARHEID, GOEDE
KWALITEIT, GESCHIKTHEID VOOR EEN BEPAALD
DOEL, NAUWKEURIGHEID, ONGESTOORD
GENIETEN EN GEEN INBREUK OP RECHTEN
VAN DERDEN. TCL BIEDT GEEN GARANTIE
MET BETREKKING TOT DE GELDIGHEID,
TIJDIGHEID, WETTIGHEID, VOLLEDIGHEID
VAN INFORMATIE OF DIENSTEN DIE VIA DIT
APPARAAT TER BESCHIKKING GESTELD ZIJN
EN GARANDEERT NIET DAT HET APPARAAT MET
INHOUD OF DIENSTEN AAN UW EISEN VOLDOET,
OF DAT DE WERKING VAN HET APPARAAT OF
DIENSTEN ONONDERBROKEN OF FOUTLOOS
ZULLEN VERLOPEN. IN GEEN GEVAL, INCLUSIEF
NALATIGHEID, ZAL TCL AANSPRAKELIJK ZIJN,
HETZIJ IN CONTRACT OF ONRECHTMATIG, VOOR
DIRECT, INDIRECT, INCIDENTEEL, BIJZONDERE
OF GEVOLGSCHADE, ADVOCAATKOSTEN, OF
ENIGE ANDERE SCHADE ALS GEVOLG VAN OF
IN VERBAND MET ENIGE INFORMATIE IN, OF ALS
GEVOLG VAN HET GEBRUIK VAN HET APPARAAT,
OF ENIGE INHOUD OF DIENSTEN TOEGANKELIJK
DOOR U OF DERDEN, ZELFS ALS U OP DE
HOOGTE BENT VAN DERGELIJKE MOGELIJKE
SCHADE.
Diensten van derden kunnen worden gewijzigd,
geschorst, verwijderd, beëindigd of onderbroken
worden, of toegang kan op ieder moment worden
uitgeschakeld zonder voorafgaande kennisgeving, en
TCL geeft geen garantie dat de inhoud of diensten
beschikbaar blijven voor een bepaalde periode.
Inhoud en diensten door derden worden overgebracht
door middel van netwerken transmissiefaciliteiten
waarover TCL geen controle heeft. Zonder de
algemeenheid van deze voorwaarden te beperken,
wijst TCL uitdrukkelijk elke verantwoordelijkheid of
aansprakelijkheid af voor elke wijziging, onderbreking,
uitschakeling, verwijdering van of opschorting
van enige inhoud of dienst die via dit apparaat
ter beschikking is gesteld. TCL kan beperkingen
opleggen met betrekking tot het gebruik of toegang
tot bepaalde diensten of inhoud, op elk moment
en zonder kennisgeving of aansprakelijkheid. TCL
is niet verantwoordelijk of aansprakelijk voor de
klantenservice met betrekking tot de inhoud en de
diensten. Mocht u een vraag of verzoek hebben met
betrekking tot de dienstverlening van de inhoud of
diensten dan moet u rechtstreeks contact opnemen
met de desbetreffende eigenaar van de inhoud en/of
dienstverleners.
is een handlesmerk van SRS Labs, Inc.
TruSurround HD-technologie is opgenomen onder
licentie van SRS Labs, Inc.
SRS TruSurround HD™ creëert een meeslepende
en veelzijdige surround sound-ervaring van twee
luidsprekers, compleet met rijke bas, hoge frequentie
detail en duidelijk dialoogvenster.
NL
23
Page 82

Overige informatie
Problemen Opsporen en Hulplijn
Raadpleeg de volgende richtlijnen alvorens u besluit uw apparaat terug te brengen naar de verkoper of
een servicemonteur te bellen. U kunt de hulplijn vermeld op het veiligheidsblad dat aan deze handleiding is
bijgevoegd bellen als u desondanks nog altijd assistentie nodig heeft.
Analogische Geluiden TV
Problemen Mogelijke oorzaken Wat te doen als
Geruis of vervormd geluid.
Het geluid wijzigt van
stereo naar mono.
Interferentie veroorzaakt door auto's,
uorescentielampen, videorecorder,
radiozender, persoonlijke computer of
andere apparatuur.
Een zwak signaal of mono uitzending. Controleer het signaal en uw antenne.
Schakel een apparaat per keer uit tot de
interferentie is verholpen. Stel tevens de
reacties van het beeld vast.
Analogisch Beeld TV
Problemen Mogelijke oorzaken Wat te doen als
Uw videorecorder vertoont een storing.
Onscherp beeld (sneeuw).
Extra omtrekken van
voorwerpen op het beeld
(spookbeelden).
Interferentie op beelden
in de vorm van vlekken of
strepen.
Interferentie op beelden
zoals golvende lijnen of
patronen. Eventueel tevens
interferentie op geluid.
Verwarde letters teletekst Signaal van een slechte kwaliteit Zie 'sneeuw' en 'spookbeelden'
Het beeld is vervormd of u
ziet geen enkel beeld als u
de RGB ingang gebruikt.
Problemen aan de zender.
Uw antenne is verplaats, heeft schade
opgelopen of is losgeraakt.
De antenne ontvangt signalen die
door heuvels of gebouwen worden
weerkaatst.
Uw antenne stoort
Zwak signaal.
Interferentie veroorzaakt door
elektrische apparatuur zoals
gereedschap en motoren.
De instellingen van de digitale
videoapparatuur uitgang komt niet
overeen met de eigenschappen van
de VGA of HDMI ingang van uw
beeldscherm.
Andere apparatuur maakt gebruik van
dezelfde frequentie.
Slechte kabel tussen de tv en de
antenne.
Uw antenne ontvangt op dezelfde
frequentie een ongewenst signaal
Het synchronisatiesignaal ontbreekt.
Steek de antenne stekker direct in de tv als
u een videorecorder heeft. Uw videorecorder
vertoont zeer waarschijnlijk een storing als
het probleem verholpen is.
Laat uw antenne controleren.
Probeer of u een sterker signaal van het tvstation kunt ontvangen.
Laat uw antenne controleren.
Probeer of u een sterker signaal van het tvstation kunt ontvangen. Laat uw antenne
controleren.
Verplaats de apparatuur die interferentie
veroorzaakt of schakel deze uit.
Wijzig, indien mogelijk, de
verversingsfrequentie of de ingestelde
resolutie van de digitale apparatuur.
Plaats de andere apparatuur in stand-by en
stel vast of de interferentie wordt verholpen:
wijzig de uitgangsfrequentie van de
apparatuur dat de interferentie veroorzaakt
(zie de handleiding).
Zorg voor een betere kabel.
Laat uw antenne controleren.
Druk op de AV knop en selecteer de AV
ingang die het synchronisatiesignaal
ontvangt.
Nederlands
NL
24
Page 83

Overige informatie
Digitale Aardse TV
Problemen Mogelijke oorzaken Wat te doen als
Beeld geblokkeerd of stil.
Onderbroken geluid.
Een aantal kanalen
ontbreken.
Zie de bovenstaande
storingen.
Zwak signaal of verkeerde antenne.
Een of meerdere digitale multiplex
frequenties worden niet ontvangen.
Interferentie of ander probleem
veroorzaakt door het antenne signaal
dat door andere apparatuur loopt.
Probeer het signaal opnieuw in te stellen.
De antenne is wellicht niet geschikt voor
digitale tv-zenders.
U bevindt zich op een plaats waar het digitale
tv-signaal zwak is.
Laat uw antenne door een antennemonteur
controleren.
Sluit de antenne direct aan op de digitale tv
ontvanger en probeer het kanaal opnieuw in
te stellen.
Als bepaalde apparatuur uitgerust is met
een radio frequentie modulator, schakel
het uit of wijzig de frequentie ervan en stel
de analogische tv opnieuw in. (Raadpleeg
hiervoor de handleiding van de andere
apparatuur.)
Multiplex
DVB-T (Digital Video Broadcasting - Terrestrial) wordt uitgezonden in groepen kanalen die dezelfde frequentie
hebben. Dit wordt
Het DVB-T systeem bevat meerdere multiplexes die ieder een groep kanalen bevatten.
U moet de hele groep kanalen van een multiplex loshalen als het signaal van een bepaalde multiplex frequentie erg
zwak is.
Multiplex
genoemd.
Algemeen
Problemen Mogelijke oorzaken Wat te doen als
Maak geen gebruik van oude kabels en
adapters. Gebruik uitsluitend moderne
Verkeerd formaat beeld of u
kunt de pixel resolutie van
het display niet op de bron
(computer, DVD-speler,
set top box enzovoorts)
instellen.
De bron leest de instellingsgegevens
van het display niet af.
De aangesloten kabel bevat niet alle
noodzakelijke verbindingen.
kabels.
Schakel de bron weer in nadat u het display
heeft aangesloten en ingeschakeld.
Wijzig de grasche adapter van uw computer.
Controleer de compatibele beeldresoluties
die in deze handleiding zijn vermeld.
Het beeld wordt
samengedrukt of is
uitgerekt, ondanks dat u de
afmetingen correct heeft
ingesteld (bijv. 4:3 of 16:9).
Geen beeld.
De apparatuur waar het display op is
aangesloten, is verkeerd ingesteld.
De helderheid en het contrast zijn op
een minimum ingesteld.
Zorg ervoor dat het brontype correct is
ingesteld.
NL
25
Stel de apparatuur waarop de tv is
aangesloten correct in, zoals bijvoorbeeld 4:3
(oud normaal), 16:9 of 1280 x 720 of 1920 x
1080 pixels voor breedbeeld.
Laat de helderheid en het contrast toenemen.
Selecteer de juiste broningang.
Page 84

Overige informatie
Het volume is op een minimum
ingesteld.
Geen geluid.
Het beeld is te donker, te
licht of getint.
Het beeld is niet duidelijk. Antennekabel is incorrect aangesloten. Sluit de antennekabel correct aan.
De mute functie is geactiveerd.
Controleer of de hoofdtelefoons niet zijn
aangesloten.
Verkeerde kleurafstelling in het menu.
Verkeerde helderheidinstelling in het
menu.
Laat het volume toenemen.
Druk op de mute toets om de 'mute' functie
te deactiveren.
Koppel de hoofdtelefoon los.
Pas de verzadiging aan in het menu.
Pas de helderheid aan in het menu.
Afstandsbediening
Problemen Mogelijke oorzaken Wat te doen als
Vervang de batterijen door nieuwe
exemplaren.
Verwijder de obstakels en richt recht op de
remote sensor.
Probeer de lens van de
afstandsbedieningsensor op de TV met een
zacht doekje te reinigen.
Verkeerde functies of kort
bereik.
Batterijen uitgeput.
Obstakels.
Vuile afstandsbedieningsensor op de
TV.
Vermogen
Problemen Mogelijke oorzaken Wat te doen als
Nederlands
De televisie functioneert
niet - de lampjes branden
niet en niets reageert.
De televisie reageert niet
op de afstandsbedieningen
of de knoppen op het
apparaat.
"Geblokkeerd" in stand-by.
De televisie reageert niet
op bepaalde knoppen
op het apparaat of de
afstandsbediening.
Geen voeding.
Knop aan/uit geplaatst op uit.
Zekering doorgebrand of
aardlekschakelaar uitgeschakeld.
Micro-controller verward wegens een
elektrische storing.
Kanaal, installatie, kinderslot of
toetsenvergrendeling geactiveerd
(indien aanwezig).
NL
26
Controleer de knop aan/uit op de televisie en
controleer het stopcontact. Controleer of het
stopcontact onder stroom staat.
Controleer de zekering of de
aardlekschakelaar in uw stoppenkast. Stel
de mogelijke oorzaak van het probleem
vast alvorens u de zekering vervangt of de
aardlekschakelaar opnieuw inschakelt.
Schakel de voeding uit en wacht vijf minuten
alvorens u de voeding weer inschakelt. (Haal
de stekker van de tv uit het stopcontact en
wend u tot een servicemonteur als dit niet
werkt.)
Raadpleeg het desbetreffende deel in de
gebruikershandleiding.
Page 85

Specicaties voor LT-40HW62U
Overige informatie
Zendinstallatie
Geluidssysteem FM, Nicam, SRS
AC voeding Ingang: AC220V-240V~50HZ
Vermogensverbruik
Geluid
uitgangsvermogen
Soort hoofdtelefoon Impedantie 32 ohm of hoger met een stereo 3, 5mm stekker
RF antenne ingang 75 ohm
Ontvangende kanalen
Paneel
Beeldresolutie 1920 pixels (horizontaal) × 1080 pixel (verticaal)
Aanbevolen resolutie PCVGA: 1920X1080 @ 60Hz
USB ondersteunde
bestandsformaten
Aansluitingen
Diagonale afmeting
scherm
Afmetingen
Gewicht bij benadering
Accessoires
Werkcondities
Opslagcondities
Analogisch: PAL/NTSC/SECAM M,B/G,I/D/K/L,L’
Digitaal: DVB-T/C/T2
Stand-by <0,3W
Efciëntie Klasse A
2 x 8 watt
Analogisch:
Digitaal:
Edge LED
Ratio: 16:9
Resolutie: FHD
HDMI: 1920 x 1080 @ 60Hz
Foto: JPEG
Muziek: MP3
Video: AVI, MP4, PS, TS...
RF in, Scart, VGA, YPBPR (video, audio), SPDIF, USBX2, HDMIX3,
Hoofdtelefoon, LAN, CI+
40 inch / 102 cm
Met steunpoot: W 926 H 600 D 226 millimeter
Zonder steunpoot: W 926 H 549 D 58 millimeter
Met steunpoot: 13,4 kg
Zonder steunpoot: 11 kg
Afstandsbedieningeenheid met 2 x batterijen
gebruikshandleiding, Voedingskabel
tafelstandaard, 4X schroeven, 4X steunschroeven, 1X steunverdeler
Veiligheidsinstructies, garantiekaart, installatiegids steun,
Gebruikskaart sluitingen, 4 VESA-kitschroeven, Skypegebruikershandleiding
Conversiekabel x3 (Scart adapter, CMP adapter, Audio in adapter)
Temperatuur 5°C - 35°C (41°F - 95°F)
Vochtigheid 20 - 80% (niet-condenserend)
Temperatuur -15°C - 45°C (5°F - 113°F)
Vochtigheid 10 - 90% (niet-condenserend)
Aan 62W
Jaarlijks verbruik
45MHz~866MHz
DVB-T/T2 107, 5MHz~858MHz;
DVB-C 114MHz~858MHz
Max 100W
91kWh/jaar
1
Energieverbruik per jaar, gebaseerd op het vermogen dat de televisie gedurende 4 uur per dag en
365 dagen per jaar verbruikt. Het daadwerkelijke energieverbruik hangt af van de manier waarop u
de televisie gebruikt.
We verontschuldigen ons voor problemen veroorzaakt door onduidelijkheden in deze handleiding
die aan de ontwikkeling van het product zijn verbonden.
NL
27
Page 86

Specicaties voor LT-46HW65U
Overige informatie
Zendinstallatie
Geluidssysteem FM, Nicam, SRS
AC voeding Ingang: AC220V-240V~50HZ
Vermogensverbruik
Geluid
uitgangsvermogen
Soort hoofdtelefoon Impedantie 32 ohm of hoger met een stereo 3, 5mm stekker
RF antenne ingang 75 ohm
Ontvangende kanalen
Paneel
Beeldresolutie 1920 pixels (horizontaal) × 1080 pixel (verticaal)
Aanbevolen resolutie PCVGA: 1920X1080 @ 60Hz
USB ondersteunde
bestandsformaten
Aansluitingen
Diagonale afmeting
scherm
Afmetingen
Gewicht bij benadering
Accessoires
Werkcondities
Opslagcondities
Analogisch: PAL/NTSC/SECAM M,B/G,I/D/K/L,L’
Digitaal: DVB-T/C/T2
Stand-by <0,3W
Efciëntie Klasse A
2 x 8 watt
Analogisch:
Digitaal:
Edge LED
Ratio: 16:9
Resolutie: FHD
HDMI: 1920 x 1080 @ 60Hz
Foto: JPEG
Muziek: MP3
Video: AVI, MP4, PS, TS...
RF in, Scart, VGA, YPBPR(video, audio), SPDIF, USBX3, HDMIX3,
hoofdtelefoon, LAN, CI+
40 inch / 102 cm
Met steunpoot: W 926 H 600 D 226 millimeter
Zonder steunpoot: W 926 H 549 D 58 millimeter
Met steunpoot: 17,40kg
Zonder steunpoot: 14,45kg
Afstandsbedieningeenheid met 2 x batterijen
gebruikshandleiding, Voedingskabel
tafelstandaard, 4X schroeven, 1X steunverdeler
Veiligheidsinstructies, garantiekaart, installatiegids steun,
Gebruikskaart sluitingen, Skype-gebruikershandleiding, 2 VESAkitschroeven
Conversiekabel x3 (Scart adapter, CMP adapter, Audio in adapter)
Temperatuur 5°C - 35°C (41°F - 95°F)
Vochtigheid 20 - 80% (niet-condenserend)
Temperatuur -15°C - 45°C (5°F - 113°F)
Vochtigheid 10 - 90% (niet-condenserend)
Aan 62W
Jaarlijks verbruik
45MHz~866MHz
DVB-T/T2 107, 5MHz~858MHz;
DVB-C 114MHz~858MHz
Max 100W
91kWh/jaar
Nederlands
1
Energieverbruik per jaar, gebaseerd op het vermogen dat de televisie gedurende 4 uur per dag en
365 dagen per jaar verbruikt. Het daadwerkelijke energieverbruik hangt af van de manier waarop u
de televisie gebruikt.
We verontschuldigen ons voor problemen veroorzaakt door onduidelijkheden in deze handleiding
die aan de ontwikkeling van het product zijn verbonden.
NL
28
Page 87

Información importante
Seguridad
Cerciórese de que la tensión de su red eléctrica doméstica se
ajusta al voltaje indicado en la etiqueta de especicaciones
situada en la parte posterior del aparato. En los lugares
donde el enchufe del cable de alimentación del equipo o un
acoplador se usen como dispositivos para la desconexión
del TV, estos serán de fácil acceso. En ciertos modelos, el
indicador luminoso se encuentra en el lateral del aparato de
TV. La ausencia de una indicación luminosa en la parte frontal,
no indica que el televisor esté totalmente desconectado de la
corriente. Para desconectar el televisor completamente, debe
desenchufarse de la toma de corriente.
Los componentes del televisor son sensibles al calor. La
temperatura ambiente máxima
No cubra la rejilla de ventilación situada en la parte posterior
o en los laterales del televisor. Deje espacio suciente a su
alrededor para permitir una ventilación adecuada. Instale
el electrodoméstico alejado de cualquier fuente de calor
(chimeneas, ...) o de otros electrodomésticos que creen
fuertes campos magnéticos o eléctricos.
La humedad en
no debe exceder del
lugar fresco a otro cálido puede provocar condensación en la
pantalla (y en algunos componentes interiores del televisor).
Deje que se evapore la condensación antes de volver a
encender el televisor.
las habitaciones donde se instale el televisor
80%
no debe exceder de
. El traslado del televisor de un
35ºC
.
ADVERTENCIAS
Este aparato está diseñado sólo para uso doméstico y no
debería ser utilizado para cualquier otra aplicación, tales como
uso no-doméstico o utilización comercial.
Si el cable de alimentación está dañado deberá ser sustituido
por el fabricante, su agente de reparaciones o una persona de
similar cualicación para evitar cualquier peligro.
No debería impedir la ventilación tapando las aberturas de
ventilación con objetos como periódicos, manteles, cortinas,
etc.
El aparato no deberá exponerse a goteos ni salpicaduras y no
se colocarán objetos llenos de líquido, como oreros, sobre él.
No debería colocar sobre el aparato llamas
desprotegidas, como velas encendidas.
ADVERTENCIA: Para evitar lesiones, este aparato debe estar
correctamente colocado sobre el suelo/rme en la pared, de
acuerdo con las instrucciones de instalación.
PRECAUCIÓN:
y luego vaya aumentándolo si fuese necesario. Escuchar
los auriculares durante tiempo prolongado con un volumen
elevado puede provocar lesiones de oído.
Ventilación
Coloque el televisor sobre una supercie horizontal dura,
alejado de los rayos directos del sol y de fuentes de calor.
Si está connado dentro un mueble, permita un espacio de
al menos 10 cm a su alrededor. No obstruya las ranuras de
ventilación, incluidas las situadas en la parte inferior, con
materiales esponjosos.
El sobrecalentamiento acortará la vida del televisor y
aumentará el riesgo de incendio.
Conecte los auriculares con un volumen bajo
Fatiga visual
Cuando utilice este producto como un monitor de PC,
los expertos en salud y seguridad recomiendan realizar
pequeños descansos frecuentes en lugar de largos descansos
ocasionales. Por ejemplo, un descanso de 5-10 minutos
después de una hora de trabajo continuado delante de la
pantalla se considera mejor que un descanso de 15 minutos
cada 2 horas.
No use el monitor contra un fondo brillante ni donde la luz
del sol u otras fuentes de luz incidan directamente sobre la
pantalla.
El botón O del televisor, o el botón O del mando a distancia,
se pueden usar para encenderlo o ponerlo en modo en espera
(standby). Si no va a ver el televisor
prolongado de tiempo
enchufe de la toma de corriente.
tormentas eléctricas
Durante
desconecte el televisor de la red eléctrica y de la antena, de
tal forma que no se vea afectado por sobrecargas eléctricas
o electromagnéticas que pudieran dañarlo. Por este motivo,
mantenga las
para que se puedan
Desconecte
desprende un olor
bajo ninguna circunstancia, abrir el televisor, ya que corre el
riesgo de recibir una
inmediatamente el televisor si percibe que
, apáguelo completamente retirando el
tomas de corriente y de la antena
desconectar
a humo
descarga eléctrica
durante un periodo
, recomendamos que
si fuera necesario.
a quemado
o
. No debe nunca,
al hacerlo.
accesibles
Pantalla TV
La pantalla TV usada en este producto es de cristal. Por tanto,
puede romperse si el producto se cae o recibe un impacto.
La pantalla TV es un producto de muy alta tecnología, que
ofrece imágenes muy detalladas. Ocasionalmente, pueden
aparecer píxeles inactivos en la pantalla como puntos jos
azules, verdes o rojos. Esto no afecta al funcionamiento del
producto.
Cuidados
Use un limpiacristales para limpiar la pantalla y un paño suave
con un detergente neutro para limpiar el resto del televisor.
Importante:
contengan alcohol o abrasivos puede dañar la pantalla.
Limpie el polvo de las rejillas de ventilación situadas en la
parte posterior y los laterales de forma regular. El uso de
disolventes, productos abrasivos o que contengan alcohol
puede dañar el televisor. En caso de que un objeto o un líquido
entre en el interior del televisor, desconéctelo inmediatamente
y haga que lo examine un técnico autorizado. No abra nunca
el televisor, ya que esto le puede poner en riesgo o puede
dañar el aparato.
Importante:
No se deben exponer las pilas a una temperatura excesiva,
como la luz directa del sol, fuego o similares. Quite las pilas
cuando el mando a distancia no se utilice por un período
prolongado. Las pilas que se dejen en el equipo pueden
causar daño, por deterioro o por ltración corrosiva, lo que
invalidará la garantía.
Para proteger el medio ambiente, utilice los centros locales de
reciclaje para desechar las pilas. Deseche las pilas usadas de
acuerdo con las instrucciones.
PRECAUCIÓN: Existe riesgo de explosión si las pilas se
reemplazan por otras de un tipo incorrecto. Reemplácelas
solamente por otras del mismo tipo o uno equivalente
recomendado por el fabricante.
El uso de detergentes fuertes, productos que
Colgar el televisor en la pared
Advertencia: Esta operación requiere dos personas.
Para garantizar una instalación segura, observe las siguientes
notas de seguridad:
• Compruebe que la pared pueda soportar el peso del
ES
1
Page 88

televisor y del soporte de la pared. El TV se puede montar
sobre una pared usando un kit de montaje VESA de 200mm
x 200mm (LT-40HW62U) o de 400mm x 200mm (LT46HW65U) de venta por separado.
• Siga las instrucciones de montaje que se adjuntan con el
soporte de pared. Para algunos modelos, asegúrese de
atornillar las bases de refuerzo para tornillos hexagonales
de montaje en pared VESA (y los tornillos), incluidos con
el equipo, a las tuercas para montaje en pared, en la parte
posterior de su equipo antes de su montaje en la pared.
• El televisor debe instalarse en una pared vertical.
• Asegúrese de emplear únicamente tornillos adecuados para
el material del que está construida la pared. La longitud de la
rosca del tonillo no debe superar los 15mm (LT- 40HW62U) o
8mm (LT-46HW65U) dentro del TV.
• Asegúrese de que los cables del televisor están colocados
de manera que no haya riesgo de tropezar con ellos.
Todas las instrucciones de seguridad sobre televisores
son de aplicación aquí. Para más información, consulte las
instrucciones de instalación impresas por separado.
Colocar el TV sobre una mesa y otras supercies
Antes de instalar el televisor, asegúrese de que la supercie
donde desea colocar el televisor puede soportar su peso.
No coloque el televisor sobre una supercie inestable (por
ejemplo, una estantería oja, o al borde de un mueble) y
asegúrese de que la parte frontal del televisor no sobresalga
de la supercie donde se asienta.
Para evitar que se caiga el TV, por favor je el TV a la pared
usando los tornillos (en los oricios para montaje de soportes
VESA), abrazaderas y tacos de pared necesarios, a comprar
por separado. Instale el TV junto a la pared para evitar que
caiga hacia atrás.
Manual de usuario multiproducto
Las funciones que se describen en este manual son comunes
para la mayoría de los modelos. Algunas funciones pueden
no estar disponibles en su TV, y/o su TV puede incluir algunas
funciones no descritas en este manual. Las ilustraciones en
este manual pueden ser diferentes del producto real. Por
favor, vea el producto real.
Productos
Batería
Aviso:
El signo Pb
debajo del
símbolo de
las pilas
indica que esa
pila/batería
contiene
plomo.
Información para usuarios sobre la
eliminación de Equipos viejos y Baterías/
Pilas usadas
[Unión Europea]
Estos símbolos indican que los equipos
electrónicos y las pilas marcadas con este
símbolo no se deberían eliminar arrojándolos
a la basura doméstica al nal de su vida útil.
En su lugar, los productos deben entregarse
a los puntos de recogida aplicables para el
reciclaje de los equipos eléctricos y electrónicos
así como las baterías para un tratamiento,
recuperación y reciclaje adecuados conforme a
la legislación nacional y a la Directiva 2002/96/
EC y 2006/66/EC.
Eliminando los productos correctamente,
ayudará a conservar los recursos naturales
y ayudará a evitar los efectos negativos
potenciales en el medio ambiente y en la salud
humana, que de lo contrario serían causados
por una manipulación inapropiada de la basura
de estos productos.
Para más información sobre los puntos
de recogida selectiva y reciclaje de estos
productos, por favor contacte con su ocina
municipal, con el servicio de recogida de
basuras o con la tienda en la que compró el
producto.
Pueden ser impuestas multas por una
eliminación incorrecta de esta basura, según
indica la legislación nacional.
[Propietarios de negocios]
Si desea deshacerse de este producto, por favor
contacte con su suministrador y compruebe los
términos y condiciones del contrato de compra.
[Otros países no pertenecientes a la
Unión Europea]
Estos símbolos sólo son válidos en la Unión
Europea. Si usted desea deshacerse de estos
elementos, por favor hágalo de acuerdo con
la legislación nacional aplicable o con otras
normas de su país para el tratamiento de
equipos eléctricos viejos, y baterías usadas.
Estimado cliente,
Este aparato está en conformidad con las directivas y estándares europeos en vigor referentes a la compatibilidad electromagnética y
a la seguridad eléctrica.
El representante europeo del fabricante es:
TCL Operations Polska Sp. z o.o.
ul. A. Mickiewicza 31/41
96-300 Żyrardow, Polonia
Correo electrónico: zyeee@tcl.com
Las guras e ilustraciones que aparecen en este Manual de Usuario se presentan únicamente a modo de referencia y pueden diferir de la apariencia real del producto. El
diseño y las especicaciones del producto pueden variar sin previo aviso.
ES
2
Page 89

Índice de Contenidos
Información importante .............................................. 1
Capítulo 1 – Conexiones
Conectar la alimentación y la antena ........................ 4
Reproductor de DVD Sistema de home theatre,
PC.............................................................................. 4
Grabador de DVD, auriculares, receptor de cable .... 5
Reproductor Blu-ray Disc, consola de videojuegos y
grabadoras de video HD............................................ 5
Capítulo 2 – Puesta en marcha
Funciones del mando a distancia .............................. 6
Encender y apagar el TV ........................................... 7
Capítulo 3 – Instalar canales
Conguración inicial .................................................. 8
Realizar una búsqueda automática de canales......... 9
Capítulo 4 – Usar su TV
Acceder a los canales ............................................... 9
Mirar los dispositivos conectados ............................ 10
Volumen...................................................................10
Usar los menús de TV ............................................. 10
Seleccionar el idioma del menú............................... 10
Capítulo 5 – Usar más de su TV
Congurar sus canales favoritos ............................. 10
Ver la TV utilizando la función 3D ............................10
Audio descriptivo ......................................................11
Función PAP .............................................................11
Usar subtítulos......................................................... 12
Activar/Desactivar subtítulos ....................................12
Habilitar los idiomas de subtítulos en canales de
TV digital ...................................................................12
Seleccionar un tipo de subtítulo en canales de
TV digital ...................................................................12
Seleccionar el idioma de la página de decocicación
en el Teletexto ......................................................... 12
Idioma de teletexto digital ........................................ 12
Tipo SPDIF .............................................................. 12
T-Link ....................................................................... 12
Habilitar o inhabilitar T-Link ......................................12
Usar la Reproducción con una tecla .........................13
Usar el modo en espera ...........................................13
Actualización de Cadenas ....................................... 13
Interfaz común ......................................................... 13
Usar el modulo CI (Interfaz Común) .........................13
Acceder a servicios de Interfaz Común (CI) .............13
Actualizar software .................................................. 13
Cambiar al modo Tienda u Hogar............................14
Función MHEG ........................................................ 14
Ver fotos, reproducir música y ver videos desde un
dispositivo de almacenamiento USB ....................... 14
Foto...........................................................................14
Música ......................................................................14
Vídeo ........................................................................15
Vídeo DivX ................................................................15
Acceder a la hora .................................................... 15
Diagnóstico de los canales de televisión digitales... 16
Desplazamiento de tiempo ...................................... 16
Restablecer valores de fábrica ................................ 16
Personalización de los ajustes de entrada .............. 16
Utilizar la Guía Electrónica de Programas............... 17
PVR (Grabador interactivo de video)....................... 17
Lista de programaciones ......................................... 18
Capítulo 6 – Red
Conexión de Red ..................................................... 18
Conectarse a una red cableada ...............................18
Conectarse a una red inalámbrica ............................19
TV remoto ................................................................ 19
Capítulo 7 – DLNA (Compartir y Ver)
Conectarse a su PC ................................................ 20
Habilitar la función DLNA.........................................20
Agregar multimedia desde su PC para compartir.... 20
Aplicación DLNA ...................................................... 20
Capítulo 8 – HbbTV
Acceder a HbbTV .................................................... 20
Desactivación de HbbTV ......................................... 21
Capítulo 9 – Smart TV
Acceder a Aplicaciones ‘Smart TV’ (Apps) .............. 21
YouTube ....................................................................21
Netix ........................................................................21
Skype ........................................................................21
Capítulo 10 – Otra información
Contraseña en el Control Parental .......................... 21
Aviso OSS ............................................................... 22
Solución de problemas y línea de ayuda................. 24
Especicaciones ...................................................... 27
ES
3
Page 90

Capítulo 1
Conexiones
Conectar la alimentación y la antena
Para encender el TV tras conectar el cable de alimentación, pulse O.
Nota: La posición de la conexión de alimentación varía de acuerdo con el modelo de TV. En determinados
modelos, tiene que encender el interruptor de alimentación primero.
Cable
-PR+
-VOL+
OK
Notas: -Desconecte el cable de alimentación antes de conectar dispositivos.
Reproductor de DVD Sistema de home theatre, PC
Notas: -Antes de conectar un ordenador, je la frecuencia de actualización del monitor del ordenador en 60 Hz.
-Se recomienda que utilice cables HDMI de alta calidad lo más cortos posibles para evitar las posibles
interferencias.
-Se recomienda usar un cable VGA de no más de 1 m con ferrita en el caso de que tenga disponible
en el TV una entrada VGA y esté conectada usando un cable VGA. La máxima resolución VGA
soportada es 1920 x 1080/60 Hz.
LAN VGA
HDMI 2HDMI 3 (ARC)
he
d t
from
n
e
y a
licens
Dolb
ies.
r
s.
e
ori
under
orato
b
ymbol are trademarks
a
orat
s
b
a
e-D
y L
nufactured
lb
Dolby L
of
doubl
Ma
Do
Conexión de Red
O utilice una
conexión HDMI.
ES
4
Reproductor DVD/
Sistema Home theatre
Español
Page 91

Conexiones
Grabador de DVD, auriculares, receptor de cable
Nota:
-La presión excesiva de sonido desde audífonos y
auriculares puede provocar pérdida auditiva.
Grabador de DVD
Decodicador
OUT
IN
OUT
Cable
he
m
t
o
r
f
nd
a
y
Dolb
r license
.
ies.
e
are trademarks
ories
orat
b
a
actured und
f
lby Laborator
y L
u
n
lb
double-D symbol
of Do
Do
Ma
he
m
o
r
d t
f
arks
n
m
y a
s.
Dolb
er license
s.
are trade
orie
boratorie
orat
b
La
a
actured und
f
y L
u
n
lb
Ma
Do
of Dolby
double-D symbol
Reproductor Blu-ray Disc, consola de
videojuegos y grabadoras de video HD
Notas:
-Los conectores USB sirven para la entrada de
datos desde unidades USB y para conectar
Consola para
juegos HD
otros dispositivos USB en su caso.
-Todos los dispositivos USB deben conectarse
directamente al TV, sin cables de extensión. En
el caso de que necesite un cable de extensión
Reproductor de
Blu-Ray Disc
deberá ser lo más corto posible y equipado con
ferrita.
-La función ARC (Canal de retorno de audio)
está soportada sólo en el puerto
HDMI 3 (ARC)
.
Videocámara HD
-El número de puertos USB puede variar.
Notas:
-No todas las conexiones están disponibles en todos los modelos.
-La ubicación de la conexión de alimentación en el TV puede variar de acuerdo con el
modelo de TV.
-Las posiciones y los nombres de los botones de funciones y los conectores en el TV
pueden variar de acuerdo con el modelo de TV.
ES
5
Page 92

@
/
Capítulo 2
Puesta en marcha
Funciones del mando a distancia
La mayoría de las funciones del televisor están disponibles en los menús que aparecen en pantalla. El mando a distancia que se adjunta
con el televisor se puede emplear para navegar por los menús y para realizar la conguración general.
Nota:
Se recomienda utilizar el modo de pantalla completa. No use el modo pantalla con barras negras a ambos lados de la imagen (como, por
ejemplo, 4:3) durante un periodo prolongado de tiempo, ya que de lo contrario, la pantalla TV puede presentar daños de forma permanente.
Modo Standby / Salir de Standby.
Para seleccionar el modo de ahorro de
Para controlar el volumen.
Para mostrar información sobre el
programa, si se encuentra disponible.
Para mostrar la página de inicio de Smart TV.
Para mostrar el menú de funciones para
realizar determinadas operaciones; para
mostrar la página de teletexto en modos
Para acceder al menú principal; para
para acceder al teclado virtual en Smart
Para salir de la estructura del menú o del
Para seleccionar tareas o las páginas de
Teletexto (vea nota a pie). El botón rojo
también se puede usar para las funciones
analógico seleccionado; para seleccionar
un idioma de audio disponible para un
programa de TV digital seleccionado.
Para seleccionar la foto, música o vídeo
regresar al menú previo.
Para volver al menú anterior.
Para cambiar entre las opciones del
temporizador de apagado.
Para regresar al canal previo.
Botones de color
Para seleccionar un tipo de sonido
disponible para un programa de TV
Para iniciar rebobinado rápido.
Para detener la reproducción.
ECO
energía deseado.
V+/-
INFO
SMART TV
OPTION
diferentes.
MENU
TV.
EXIT
Teletexto.
SLEEP
PRE-CH
MHEG y HbbTV.
LANG
anterior.
3D
Para cambiar entre las opciones de formato
de la entrada 3D.
para el modelo LT- 46HW65U.)
TV
Para acceder al modo TV.
Botones alfanuméricos
Para introducir números de canales; para
introducir una letra, un dígito o un símbolo en
algunas funciones.
SOURCE
Para seleccionar dispositivos conectados.
Para desactivar el sonido y volver a activarlo.
P+/-
Para cambiar canales / páginas del menú arriba
o abajo en algunas aplicaciones Smart TV.
GUIDE
Para activar o desactivar la Guía Electrónica
de Programas (sólo disponible para canales
digitales).
◄/►
Para desplazarse por el menú principal; para
establecer funciones y cambiar valores.
▲/▼
Para navegar por los menús; para seleccionar
opciones de menú; para cambiar a la foto,
canción o vídeo anterior o al siguiente en la
función USB.
OK
Para conrmar una entrada o selección.
ZOOM-/ZOOM+
Para seleccionar el formato de imagen.
Para utilizar algunas aplicaciones de la TV
inteligente.
LIST
Para mostrar la lista de canales.
FAV
Muestra el menú
(Selección lista canales).
TEXT
Para activar o desactivar el modo Teletexto o Mezcla.
SUBTITLE
Para seleccionar un idioma de subtítulos disponible
para un programa de TV digital seleccionado.
Para seleccionar la foto, música o vídeo
siguiente.
Para iniciar avance rápido.
Para iniciar o pausar la reproducción.
Botón de grabación.
Nota a pie:
Los botones rojo, verde, azul y amarillo son
multifunción; por favor, siga la información que
le aparezca en la pantalla y las instrucciones
de la sección.
(Este botón solo se puede usar
Channel list selection
Español
ES
6
Page 93

Puesta en marcha
Si las pilas del mando a distancia están gastadas, se pueden emplear los botones del televisor. En modo TV, presentan
las mismas funciones que los correspondientes botones del mando a distancia. El botón OK en el TV puede pulsarse
repetidamente para seleccionar la fuente requerida. En los menús, presentan las siguientes funciones:
PR+ Arriba
PR- Abajo
VOL+ Derecha
VOL- Izquierda
MENU
OK OK
Encender y apagar el TV
1.
Cuando se enchufa el cable de alimentación, el TV se encenderá directamente o pasará a modo en espera
(Standby). Si el TV está en modo standby, pulse el botón O o
distancia, para encenderlo.
2.
Para que el TV entre en modo standby, pulse el botón O en el equipo, o el botón O del mando a distancia.
El TV permanecerá encendido, pero con bajo consumo de energía.
3.
Para desconectar el TV, desenchufe la fuente de alimentación de la toma de corriente.
PR+/PR-
en el equipo, o el botón del mando a
ES
7
Page 94

Capítulo 3
Conguración inicial
La conguración inicial implica la selección de todos
los parámetros necesarios para poder buscar y
guardar todos los canales analógicos y digitales que
se puedan recibir.
Asegúrese de que el televisor está encendido y siga
todos los pasos en el orden en el que se especican
a continuación.
Nota: Si la búsqueda de canales sólo obtiene
canales analógicos, puede ser debido a
una transmisión débil, y esto no lo cubre la
garantía. Los fabricantes no pueden hacerse
responsables de las transmisiones débiles o de
la ausencia de transmisión en algunas zonas.
La primera vez que encienda el aparato, el asistente de
Initial setup
a través del proceso de conguración inicial.
1.
Pulse
pulse
2.
Pulse
pulse
3.
Pulse
(
OK/►
4.
Pulse
(Conexión de red). Luego, pulse
al siguiente paso. (Para más información, vea la
sección “Conexión de Red”en página 18)
Nota: Si selecciona
5.
Pulse
sintonizador
(Cable).
(Conguración inicial) se abrirá, guiándole
Initial setup
Please select your language:
English
Български
Hrvatska
Česky
Dansk
Selec t Next
▲/▼
para seleccionar el idioma, y después
OK/►
para entrar en el paso siguiente.
▲/▼
para seleccionar su país, y después
OK/►
para entrar en el siguiente paso.
▲/▼
Home
para seleccionar su localización
(Hogar) o
Shop
(Tienda)) y luego pulses
para ir al paso siguiente.
▲/▼
para seleccionar
France
acceder al menú de
(Cong. Contraseña)
network connection
OK/
► para ir
, tendrá que
(Francia)
Password setting
, a n de establecer una
contraseña. Use los botones alfanuméricos
para introducir los cuatro dígitos de su
contraseña. (Su contraseña no puede ser
0000) Vuelva a introducir el mismo código
para conrmar la contraseña. Tras esto,
pasará automáticamente al siguiente paso.
(En este paso, usted sólo puede pulsar ◄
para volver al paso anterior.)
▲/▼
para seleccionar su modo de
Antenna
(Antena) o
- a) Si ha seleccionado
Antenna
Language
Cable
(Antena).
Instalar canales
OK/►
• Pulse
• Pulse
Analogue
(Digital) o
pulse
• Pulse
luego pulse
automática de todos los canales DVB-T
digitales y/o analógicos.
Nota: Nota: no todos los países disponen de
la función
(Selección Red favorita)
- b) Si ha seleccionado
• Pulse
• Pulse
Analogue
(Digital) o
• Seleccione
Analógico), después pulse
Después:
- Pulse
después pulse
- Pulse
búsqueda si está disponible (
o
- Si selecciona
comenzar la búsqueda automática de todos
los canales DVB-C digitales y/o analógicos.
- Si selecciona
los botones alfanuméricos para ajustar los
valores de
rate
de red), y utilice
modulation mode
a continuación pulse OK para comenzar
la búsqueda de todos los canales DVB-C
digitales y/o analógicos.
• Si selecciona
para acceder, después siga los mismos pasos
anteriores que en
y Analógico) para buscar todos los canales
DVB-C digitales.
• Si selecciona
OK/►
seleccionar
pulse
todos los canales analógicos.
Nota: Para no interrumpir el proceso de
conguración de canales, espere a que se
muestre el mensaje que indica que se ha
completado la conguración.
6.
Antes de comenzar la búsqueda, puede
seleccionar también
para saltar el proceso de conguración inicial. En
este caso, para buscar y almacenar sus canales
debe realizar una búsqueda automática de
para entrar.
▲/▼
para seleccionar
(Digital y Analógico) o
Analogue
OK/►
▲/▼
para seleccionar
(Analógico), después
.
OK/►
para iniciar la búsqueda
Favorite Network Selection
Cable
OK/►
para entrar.
▲/▼
para seleccionar
(Digital y Analógico) o
Analogue
(Analógico).
Digital & Analogue
▲/▼
para seleccionar
OK/►
▲/▼
Advanced
para seleccionar el modo de
(Avanzado)).
.
Full
(Completo), pulse OK para
Advanced
frequency
(frecuencia),
(velocidad de símbolo),
◄/►
para seleccionar el
(modo de modulación);
Digital
(Digital), pulse
Digital & Analogue
Analogue
(Analógico), pulse
para acceder, pulse
Scan
OK/►
(Buscar), y a continuación
para comenzar la búsqueda de
Skip scan
Digital &
Scan
.
Digital &
OK/►
(Avanzado), use
▲/▼
(Omitir búsqueda),
Digital
(Buscar),
(Cable).
Digital
(Digital y
para entrar.
Scan
(Buscar),
Full
(Completo),
symbol
network ID
OK/►
(Digital
para
(ID.
Español
ES
8
Page 95

Capítulo 4
canales siguiendo las instrucciones de la siguiente
Realizar una búsqueda automática de
sección “
canales
7.
Realizar una búsqueda automática de canales
Esta sección describe cómo buscar y almacenar
canales de forma automática. Las instrucciones
son las mismas para los canales digitales y para los
digitales. Esto puede realizarse en cualquiera de los
siguientes casos:
- ha seleccionado
conguración inicial
- aparece
busque canales!) en el modo TV
- quiere actualizar sus canales.
1.
2.
3.
”.
Durante la conguración, el usuario puede seguir
las sugerencias disponibles en la parte inferior de
la pantalla, para volver al paso anterior pulsando
◄. O pulsar
EXIT
para salir o interrumpir la
búsqueda.
- En cualquier momento durante el proceso de
conguración inicial, puede pulsar ◄ para
regresar al paso previo.
- Una vez completado el proceso de conguración,
puede pulsar OK para salir de la conguración
inicial. Los canales siguen un orden predenido.
Si desea saltar canales, modicar el orden
predenido o cambiar el nombre de los canales,
seleccione
Organizador) y a continuación, pulse
Pulse
Settings > Setup > Language
Conguración > Idioma). Pulse
Setup > Organiser
Skip scan
“Please scan channels!”
MENU
en el mando a distancia y seleccione
(Conguración >
(Omitir búsqueda) en la
(¡Por favor
(Ajustes >
◄/►
OK/►
para
.
seleccionar el idioma del menú que desee.
MENU
Pulse
para regresar a
(Conguración), use
Country
(País), y luego use
Setup
▲/▼
para seleccionar
◄/►
y, si fuese
necesario, introduzca su contraseña para
seleccionar su país. El televisor instala y ordena
los canales según su país.
▲/▼
Pulse
para seleccionar
sintonizador), luego pulse
Antenna
(Antena) o
- a) Si ha seleccionado
▲/▼
• Use
para seleccionar
(Instalar Canal), y pulse
Channel install
Autom atic searc h
Autom atic updat e
Analo gue m anual scan
Anten na ma nual insta llati on
OK
Enter
Select
Menu
Back
Exit
Exit
Clean chan nel list
Tuner mode
◄/►
para seleccionar
Cable
(Cable).
Antenna
Channel install
OK/►
para entrar.
(Modo
(Antena).
Usar su TV
• Seleccione
automática), después pulse
Automatic search
• Pulse OK para omitir la selección de país
y pasar al paso siguiente. O use
volver a seleccionar su país, después pulse
OK
• Seleccione
Analógico) o
(Analógico), a continuación pulse
iniciar el proceso de búsqueda automática, que
identicará todos los canales DVB-T digitales
y/o analógicos.
- b) Si ha seleccionado
• Use
(Instalar Canal), y pulse
• Seleccione
automática), después pulse
Automatic search
• Pulse OK para omitir la selección de país
y pasar al paso siguiente. O use
volver a seleccionar su país, después pulse
OK
- Seleccione
Analógico), después pulse
Seleccione su modo de exploración, si está
disponible, y congure adecuadamente la
información del cable de la misma forma que
en la Conguración inicial. Pulse
seleccionar
para comenzar su búsqueda automática
de todos los canales DVB-C digitales y
analógicos.
4.
La búsqueda puede tardar unos minutos. Durante
el proceso, puede pulsar
mitad.
5.
Una vez que nalice la búsqueda automática,
MENU
pulse
OK
para reiniciar su búsqueda de canales.
6.
Tras la búsqueda automática, los canales
aparecerán en un orden predenido. Si desea
saltar canales, modicar el orden predenido o
cambiar el nombre de los canales, seleccione
Settings > Setup > Organiser
Conguración > Organizador) y a continuación,
OK/►
pulse
eliminar canales.
Automatic search
(Búsqueda
OK/►
(Búsqueda automática).
para entrar.
Digital & Analogue
Digital
▲/▼
para seleccionar
Automatic search
(Digital) o
(Digital y
Analogue
Cable
(Cable).
Channel install
OK/►
para entrar.
(Búsqueda
OK/►
(Búsqueda automática).
para entrar.
Digital & Analogue
OK/►
Scan
(Buscar) y pulse
MENU
para abortar a la
para volver al último paso, o pulse
(Ajustes >
. Aquí puede saltar, ordenar, editar o
para abrir
◄/►
para
OK/►
para abrir
◄/►
para
(Digital y
para entrar.
▲/▼
OK/►
Usar su TV
Acceder a los canales
Uso de los botones alfanuméricos:
Pulse los
botones alfanuméricos correspondientes para
acceder a los canales.
Usar los botones PR+/- o P+/-:
Desplácese por los
canales.
para
para
ES
9
Page 96

Capítulo 5
Mirar los dispositivos conectados
Pulse varias veces el botón
a distancia o pulse OK en el televisor para cambiar
entre TV y otras fuentes de entrada. Para continuar
viendo el TV, pulse cualquier botón numérico para
introducir un canal, mientras que si usa
avanzando por todos los canales TV y otras fuentes
de entrada.
Volumen
Control de volumen: use los botones
televisor, o pulse los botones
distancia para regular el volumen.
Silenciar sonido: pulse el botón para silenciar
temporalmente el sonido. Vuelva a pulsar este botón
o el botón V+ para restaurarlo.
Usar los menús de TV
1.
MENU
Pulse
Smar t TV Chan nels Source
Pict ure S ound Network Settings
para mostrar el menú principal.
Pic ture
Medi a
Medi a
Smar t TV
Tiene disponibles los siguientes elementos en
el menú principal: Smart TV, Medios, Canales,
Fuente, Imagen, Sonido, Red, Conguración.
2.
Pulse ▲/▼/◄/► para seleccionar el elemento
deseado; después pulse OK para abrir el
correspondiente submenú.
3.
En los submenús, use
las opciones de menú, use
las funciones o cambiar valores. Use OK para
activar una conguración. Use
submenú correspondiente.
4.
5.
Pulse
Pulse
MENU
para volver al menú anterior.
EXIT
para cerrar el menú.
Nota: Algunas opciones pueden no estar
disponibles para ciertas fuentes de señal.
Seleccionar el idioma del menú
Puede escoger su idioma del menú preferido,
siguiendo las siguientes instrucciones.
1.
2.
3.
MENU
Pulse
Pulse
Setup
OK
para entrar.
Seleccione
para mostrar el menú principal.
▲/▼/◄/►
(Ajustes > Conguración), y después pulse
Language
SOURCE
V+/-
del mando a
Soun d
PAP
Lock
▲/▼
para seleccionar
◄/►
para seleccionar
(Idioma) y pulse
en el mando
P+/-
irá
VOL+/-
del
Options
Setu p
para congurar
OK/►
para abrir el
Settings >
OK/►
.
Usar más de su TV
4.
5.
◄/►
Pulse
en el menú
menús.
EXIT
Pulse
para seleccionar su idioma deseado
Language
(Idioma), para ver los
para cerrar el menú.
Usar más de su TV
Congurar sus canales favoritos
Usted puede crear una lista de sus canales favoritos
de TV.
1.
2.
3.
LIST
Pulse
Pulse el botón amarillo para acceder a
list selection
▲/▼
favoritos), y pulse
.
(Selección lista canales). Pulse
hasta seleccionar
OK/►
Favorite list
para entrar.
Channel
(Lista de
Pulse el botón azul para empezar a editar la lista
de favoritos. Pulse
▲/▼
para desplazarse por
la lista de canales y OK para seleccionarlos o
deseleccionarlos.
4.
Repita este procedimiento para congurar otros
canales favoritos.
5.
Método abreviado:
distancia para entrar directamente en
selection
LIST/EXIT
Pulse
(Selección lista canales).
para salir.
FAV
Pulse
en el mando a
Channel list
Ahorro de energía
1.
Pulse
MENU
en el mando a distancia y seleccione
Settings > Setup > ECO Settings > Energy
Saving
(Ajustes > Conguración > Conguración
ECO > Ahorro de energía).
2.
Pulse
◄/►
para seleccionar el modo de ahorro
de energía deseado.
3.
Método abreviado:
Pulse
EXIT
para cerrar el menú.
Pulse
ECO
en el mando a
distancia para seleccionar el modo de ahorro de
energía directamente.
Ver la TV utilizando la función 3D
(sólo para el LT-46HW65U)
ADVERTENCIA:
• Algunos espectadores pueden experimentar alguna
incomodidad mientras ven TV en 3D, como mareos,
náuseas, o dolores de cabeza. Si experimenta
alguno de estos síntomas, deje de ver TV en 3D,
quítese sus gafas 3D, y descanse.
• Ver vídeos 3D desde demasiado cerca, o durante
mucho tiempo, puede dañar su vista.
• Debe haber un adulto responsable que controle
frecuentemente a los niños que estén utilizando la
función 3D.
• No utilice las gafas 3D con otra nalidad que no
sea ver vídeos 3D en una TV 3D.
• No utilice la función 3D ni las gafas 3D mientras
esté andando o moviéndose, o de otro modo,
pueden producirse lesiones debidas a golpes
contra objetos, tropiezos, y/o caídas.
Español
ES
10
Page 97

Usar más de su TV
1.
MENU
Pulse
en el mando a distancia y seleccione
Picture > 3D navigation
3D), después pulse
navigation
Select
Back
Exit
◄/►
(Navegación 3D) en
3D
3D mode 2D-to-3D
3D-to-2D
Depth of field 16
Protrude
Distance to TV
Image safety
L-R switch Off
(Imagen > navegación
Manual
Off
Off
3D
(Manual).
para ajustar
Nota: Si la navegación 3D está en Auto,
la conguración se congurará
automáticamente.
2. 3D Mode
3D, luego use
de entrada 3D correcto entre
a-Lado),
(Arriba y Abajo) y
(Modo 3D): Primero póngase las gafas
◄/►
para seleccionar el formato
Side-by-Side
2D-to-3D
(2D-a-3D),
Line interleave
Top and Bottom
(Intercalar
línea).
3. L-R Switch
Off
(Alternar I-D): Seleccione On (Act) o
(Des) para ajustar el vídeo 3D entre los ojos
izquierdo y derecho para una mejor visión 3D.
4. Depth of Field
(Profundidad de Campo): Lograr
un buen efecto 3D con la imagen convertida
desde una imagen 2D.
5. 3D-to-2D
Right
(3D a 2D): Seleccione
(Derecha) para mostrar la imagen en modo
Left
(Izquierdo) o
2D (sin efecto 3D). Esta función está desactivada
cuando el
en
6.
Pulse
3D Mode
2D-to-3D
(2D a 3D) o
EXIT
para cerrar el menú.
(Modo 3D) está establecido
Off
(Des).
Notas:
-Las gafas 3D de otros fabricantes pueden no ser
compatibles.
-Todas las funciones de foto están deshabilitadas
en el modo 3D.
-Si cambia a una fuente de señal diferente o
accede al Smart TV, el modo 3D se desactivará
automáticamente.
-Algunos modos 3D pueden no estar disponibles,
dependiendo del formato de entrada de la fuente
de vídeo 3D.
-Modos 3D soportados:
TV Analógica, AV, CMP:
TV Digital, HDMI, USB, Vídeos de Internet:
Top and Bottom
Side
(Lado a Lado),
interleave
(Intercalar Línea),
2D-to-3D
(Arriba y Abajo),
2D-to-3D
(2D a 3D),
Frame sequential
(2D a 3D)
Side-by-
(Fotograma secuencial).
-Función 3D en modo USB: Durante la
reproducción de un vídeo seleccionado
16
10
(Lado-
Line
desde el USB, pulse
MENU
para visualizar
el menú del vídeo en el modo explorador,
después seleccione
3D Mode
(Modo 3D).
Para información más detallada, consulte las
descripciones anteriores al respecto.
Audio descriptivo
El audio descriptivo se reere a una pista
de narración adicional del medio visual para
espectadores ciegos o con discapacidad visual, que
se incluye en programas de TV y películas.
El narrador de la descripción habla durante la
presentación describiendo lo que ocurre en la
pantalla durante las pausas naturales del audio (y
durante el diálogo si fuese necesario).
Puede utilizar esta función si la emisión actual
contiene audio descriptivo.
1.
MENU
Pulse
Sound
en el mando a distancia, seleccione
(Sonido) y, a continuación, pulse OK para
conrmar.
2.
Use
▲/▼
para seleccionar
Audio Description
(Audio Descriptivo), y después pulse OK para
acceder.
3.
Puede activar y desactivar la función de Audio
Descriptivo en el menú
Audio Description
Descriptivo).
4.
Para ajustar el volumen del Audio Descriptivo,
▲/▼
pulse
menú y después utilice
para pasar a la siguiente línea del
◄/►
para ajustar el
volumen.
Función PAP
Use esta función para mostrar las imágenes
procedentes de diferentes entradas de fuentes una
al lado de la otra. Tenga en cuenta que una ventana
es para entradas de TV analógicas y digitales, la otra
es para entradas VGA, HDMI y CMP.
(Nota: No está
disponible para AV en ambas ventanas.)
1.
2.
MENU
Pulse
Seleccione
para mostrar el menú principal.
Picture
(Imagen) y pulse OK para
acceder.
3.
Pulse
▲/▼
para seleccionar la opción
PAP
pulse OK para acceder.
4.
5.
6.
◄/►
Pulse
Seleccione
◄/►
Pulse
para activar/desactivar la función PAP.
TV position
(Posición del TV), pulse
para desplazar la ventana del TV.
EXIT
para cerrar el menú.
Si activa la función PAP, puede usar
◄/►
cambiar la ventana del foco (con el sonido
simbolizado por una nota musical). Cuando el
foco está sobre la ventana del TV (con el sonido
simbolizado por una nota musical), los botones
alfanuméricos y el botón
P+/-
trabajan en modo TV.
Cuando el enfoque se encuentra en otra ventana,
P+/-
cambia las fuentes externas disponibles.
(Audio
, y
para
ES
11
Page 98

Usar más de su TV
Usar subtítulos
Se pueden activar subtítulos para cada canal de TV.
Los subtítulos son emitidos a través del Teletexto
o de las emisiones digitales DVB-T/DVB-C. Con
las emisiones digitales, tiene la opción adicional de
seleccionar un idioma de subtítulos preferido.
Activar/Desactivar subtítulos
1.
2.
3.
MENU
Pulse
en el mando a distancia y seleccione
Settings > Subtitle
OK/►
Pulse
Menu
Exit
Select
Back
Exit
para entrar.
Subti tle
Digit al s ubtitl e lan guage
Digit al s ubtitl e lan guage 2nd
Subti tle type
Seleccione la opción
◄/►
para seleccionar
(Ajustes > Subtítulos).
Subtitle
On
Engli sh
Engli sh
Norma l
Subtitle
(Subtítulos) y pulse
On/Off
(Activar/Desactivar)
para activar/desactivar los subtítulos.
Habilitar los idiomas de subtítulos en canales de
TV digital
1.
MENU
Pulse
en el mando a distancia y seleccione
Settings > Subtitle > Digital subtitle language
(Ajustes > Subtítulos > Idioma del subtítulo
digital).
2.
Pulse
◄/►
para seleccionar un idioma de
subtítulos como su idioma preferido.
3.
4.
▲/▼
Pulse
para seleccionar
language 2nd
◄/►
Pulse
para seleccionar un idioma de
(2º idioma del subtítulo digital).
Digital subtitle
subtítulos secundario.
5.
Método abreviado:
Pulse
EXIT
para cerrar el menú.
Pulse
SUBTITLE
en el mando a
distancia para seleccionar directamente un idioma de
subtítulos disponible para el programa de TV digital
seleccionado.
Seleccionar un tipo de subtítulo en canales de TV
digital
1.
MENU
Pulse
en el mando a distancia y seleccione
Settings > Subtitle > Subtitle type
(Ajustes >
Subtítulos > Tipo de Subtítulo).
2.
◄/►
Pulse
para seleccionar un tipo de
subtítulos. Puede seleccionar
Hearing impaired
(Deciencias auditivas) para mostrar los subtítulos
para sordos en su idioma seleccionado.
Seleccionar el idioma de la página de
decocicación en el Teletexto
MENU
Pulse
Settings > Teletext > Decoding page language
en el mando a distancia y seleccione
(Ajustes > Teletexto > Idioma de la página de
decodicación). Seleccione un tipo adecuado de
idioma en el que aparecerá el teletexto.
Idioma de teletexto digital
En los canales digitales de TV, dependiendo de
la cadena, existe la posibilidad de disfrutar de un
servicio con varias páginas iniciales de Teletexto en
distintos idiomas. Esta función permite seleccionar
un idioma disponible como idioma principal para
páginas de teletexto iniciales distintas.
MENU
Pulse
Settings > Teletext > Digitial teletext language
en el mando a distancia y seleccione
(Ajustes > Teletexto > Idioma de teletexto digital).
◄/►
Pulse
para seleccionar.
Tipo SPDIF
Conecte el TV a un dispositivo de audio mediante
SPDIF
la salida
adecuado para su salida SPDIF, pulse
mando a distancia y seleccione
type
(Ajustes > Tipo SPDIF).
- Si selecciona
. Para seleccionar un tipo de sonido
MENU
en el
Settings > SPDIF
PCM
, el formato de la salida SPDIF
será PCM, independientemente del formato de
sonido del programa.
- Si selecciona
Dolby D
, el formato de la salida
SPDIF será
• Dolby Digital si el formato de sonido del programa
es Dolby Digital, Dolby Digital Plus o HE-AAC
• PCM si el formato de sonido del programa es
MPEG.
- Seleccione
Off
(Des) para desactivar la salida de
audio desde el dispositivo de audio conectado a la
salida SPDIF.
Nota: Las opciones que puede elegir dependerán
◄/►
para ajustar
SPDIF
de la imagen, puede seleccionar
delay
(Retardo SPDIF)
Settings
(Ajustes)
desde el menú
y usar
el tiempo de retardo para sincronizar el
sonido con la imagen.
T-Link
Use esta función para buscar dispositivos CEC
conectados en los puertos HDMI de su TV y
habilitar las funciones de ‘reproducir con una tecla’ y
‘desactivar con una tecla’ entre los dispositivos CEC.
Habilitar o inhabilitar T-Link
1.
2.
MENU
Pulse
seleccione
Pulse
en el mando a distancia, y después
Settings > T-Link
◄/►
para seleccionar On (Act) u
(Ajustes > T-Link).
si la función está activada, la opción
Off
T-Link
(Des),
estará
Español
ES
12
Page 99

Usar más de su TV
disponible en el menú
rápido) en el que puede entrar pulsado el botón
Option
en el mando a distancia.
Usar la Reproducción con una tecla
Con la reproducción con una tecla, pulsando el
botón de reproducción de (por ejemplo) el mando a
distancia de su DVD, comienza la reproducción en
su dispositivo DVD y cambia automáticamente a la
fuente correcta, mostrando el contenido del DVD.
Usar el modo en espera
Con el modo en espera, pulsando el botón O (por
ejemplo) del mando a distancia de su TV, cambia
su TV y todos los dispositivos HDMI conectados al
modo en espera.
Nota: Las funciones CEC dependerán de los
dispositivos conectados y es posible
que algunos dispositivos no funcionen
correctamente cuando se conectan a
este TV. Debería consultar el manual del
usuario o al fabricante de los dispositivos
problemáticos para obtener más
información.
Quick access
(Acceso
Actualización de Cadenas
MENU
Pulse
seleccione
Actualizar de cadenas). Seleccione
Desactivar) para habilitar o deshabilitar la función de
actualización de cadenas.
- Cuando esta función esté activada, la TV
actualizará automáticamente los canales, si su
proveedor de servicio DTV actualiza sus cadenas
DTV.
- Cuando esta función esté desactivada, necesitará
realizar de nuevo la búsqueda de canales o borrar
los canales no disponibles, si su proveedor de
servicio DTV añade o elimina canales de sus
cadenas DTV.
en el mando a distancia, a continuación
Settings > Network update
(Ajustes >
On/Off
(Activar/
Interfaz común
Los canales digitales de TV codicados se pueden
decodicar con un módulo de interfaz común y una
tarjeta que proporciona su operador de servicio de
TV digital.
El módulo de interfaz común puede activar varios
servicios digitales, dependiendo del operador y de
los servicios que usted escoja (por ejemplo, TV de
pago). Póngase en contacto con su operador de
servicios de TV para obtener más información sobre
condiciones y servicios.
Usar el modulo CI (Interfaz Común)
ADVERTENCIA: Desconecte la TV antes de
insertar un módulo de interfaz común. Asegúrese
de seguir las instrucciones que se detallan a
continuación. Una inserción incorrecta de un
módulo de interfaz común puede dañar tanto el
módulo como su TV.
1.
Siga las instrucciones impresas en el módulo
de interfaz común, e introduzca suavemente el
módulo en la ranura de la interfaz común de la TV.
2.
Empuje el módulo hasta donde alcance.
3.
Encienda la TV y espere a que se active la función
de interfaz común. Esto puede tardar varios
minutos.
Nota: No retire el módulo de interfaz común de la
ranura. En caso de hacerlo, se desactivarán
los servicios digitales.
Acceder a servicios de Interfaz Común (CI)
Tras insertar y activar el módulo de interfaz común,
MENU
pulse
Settings > Common interface
común).
Esta opción de menú solo está disponible si el
módulo de interfaz común está insertado y activado
correctamente. Su operador de servicios de TV
digital le ofrece las aplicaciones y el contenido en
pantalla.
en el mando a distancia y seleccione
(Ajustes > Interfaz
Actualizar software
Nota: No apague ni desconecte el TV hasta que la
actualización haya nalizado.
MENU
Pulse
Settings > Software update
del software). Pulse
-By network
e instalar la última versión del software desde
Internet. Asegúrese primero de tener congurada
la Red por cable o inalámbrica, luego seleccione
By network
Cuando esté disponible una nueva versión del
software, aparecerá una barra de progreso. Cuando
nalice la descarga, la pantalla de la TV se volverá
negra y se actualizará el software.
Nota: Mantenga una buena conexión a Internet
-By channel
última versión del software si está disponible en
la transmisión. Use
Channel
acceder.
• Use
en el mando a distancia y seleccione
(Por Red): Le permite descargar
(Por Red) y pulse
durante la actualización.
(Por canal): Le permite instalar la
(Por canal), y después pulse OK para
◄/►
para seleccionar
Auto download
de
descargar automáticamente el último software,
si está disponible. Tras haber descargado el
software con éxito, se le pedirá que decida si
quiere instalarlo en ese momento. Si es así, siga
las instrucciones de la pantalla para completar la
instalación. Aquí también puede seleccionar la
opción de ignorar la instalación.
(Ajustes > Actualización
OK/►
para entrar.
OK/►
▲/▼
para seleccionar
Yes
(Descarga Auto), para
(Sí) dentro
para entrar.
By
ES
13
Page 100

Usar más de su TV
◄/►
• Use
download
descarga automática.
• Use
(Descarga manual) y pulse
buscar manualmente el software más reciente.
Siga las instrucciones de la pantalla para
completarla. Durante la búsqueda, pulse
EXIT
para seleccionar No (No) en
(Descarga Auto) para rechazar la
▲/▼
para seleccionar
para cancelar el proceso o salir.
Manual Download
OK/►
Auto
si desea
OK/
Cambiar al modo Tienda u Hogar
1.
2.
3.
MENU
Pulse
Settings > Location
Pulse
(Tienda) o
Pulse
Nota: Según la norma de la Comisión Europea
en el mando a distancia y seleccione
◄/►
para seleccionar su colocación:
Home
EXIT
para salir.
2009/125/EC, en modo Hogar, la TV pasará
automáticamente a modo en espera si no se
activa ninguna función durante 4 horas. Esta
función se puede desactivar en el menú de
Settings
(Ajustes > Ubicación).
(Hogar).
(Ajustes)
.
Shop
Función MHEG
Algunas cadenas de emisión de TV digital ofrecen
texto digital dedicado o servicios interactivos (por
ejemplo la BBC1, en RU). Estos servicios funcionan
igual que el teletexto normal y utilizan los botones
numéricos, de color y de navegación.
Nota: La función MHEG y los subtítulos son
mutuamente excluyentes y no pueden
coexistir en la misma pantalla. Si establece
la opción
la función MHEG no estará disponible. Por
favor, siga las instrucciones de la sección
“
ajustar los
1.
Pulse el botón rojo o el botón
a distancia.
2.
3.
4.
5.
▲/▼/◄/►
Pulse
elementos.
Pulse OK para conrmar o activar.
Pulse una de las teclas de color para seleccionar
una opción.
TEXT
Pulse
Subtitle
Activar/Desactivar subtítulos
EXIT
o
(Subtítulo)
Subtitle
(Subtítulos)
para seleccionar o resaltar
para salir.
en
TEXT
On
(Act)
” para
Off
en
(Des)
en el mando
,
Ver fotos, reproducir música y ver videos
desde un dispositivo de almacenamiento USB
Su TV está equipada con un conector USB, que le
permite ver imágenes, escuchar música o ver videos
guardados en un dispositivo de almacenamiento
USB.
Formatos de archivo compatibles:
Foto JPEG
Música MP3
Vídeo AVI, MPG, MPEG, TS, DIVX, MKV...
Nota: Algunas memorias USB y otros productos
USB como las cámaras digitales o los
teléfonos móviles no son totalmente
.
compatibles con el estándar USB 2.0, así
que quizás no funcionen con el reproductor
multimedia del TV. No todas las memorias
o dispositivos USB son compatibles con
la función USB. No siempre todos los
formatos mencionados anteriormente son
reconocidos. El formato de codicación de
sus archivos, determinará si pueden o no
usarse.
Para entrar manualmente en el
de medios), pulse
seleccione
Foto
Use esta función para mostrar fotos, si están
disponibles.
1.
Seleccione
después pulse OK para acceder al explorador
principal de archivos.
2.
En el explorador principal de archivos, use
▲/▼/◄/►
carpeta de archivos interna.
3.
Seleccione una subcarpeta de archivos, pulse OK
para abrirla.
4.
▲/▼/◄/►
Use
en el explorador de archivos principal como en
el de sub-archivos, pulse
menú de fotos en el modo carpeta.
-Sort
(Ordenar): Ordena carpetas y fotos por
Fecha de modicación o por Nombre.
-Edit
(Editar): Copia, pega o elimina una foto
seleccionada.
-Parser
Recursive
todas las subcarpetas de archivos.
5.
Seleccione una foto, pulse OK para verla, y dará
comienzo una presentación de diapositivas a
partir de la foto seleccionada. Pulse OK para dejar
la foto en pausa. Pulse
menú de fotos en el modo de explorador. Puede
reproducir, hacer una pausa o rotar la foto,
seleccionar un modo de reproducción diferente y
el efecto a mostrar, etc.
6.
Pulse los botones correspondientes en el mando
a distancia para utilizar las funciones disponibles
que se muestran en la barra de funciones en la
parte inferior de la pantalla del televisor. Pulse
el botón
funciones.
verde en el mando a distancia para girar la foto.
Música
Utilice esta función para reproducir música, si está
disponible.
MENU
Media
(Medios).
Media > Photo
para seleccionar una foto o una
para seleccionar una foto, tanto
(Analizador): Puede seleccionar
(Recursivo) para mostrar las fotos de
INFO
para mostrar u ocultar la barra de
Método abreviado:
Media center
en el mando a distancia y
(Medios > Foto),
MENU
para mostrar el
MENU
para visualizar el
Pulse el botón
(Centro
Español
ES
14
 Loading...