

Page 1
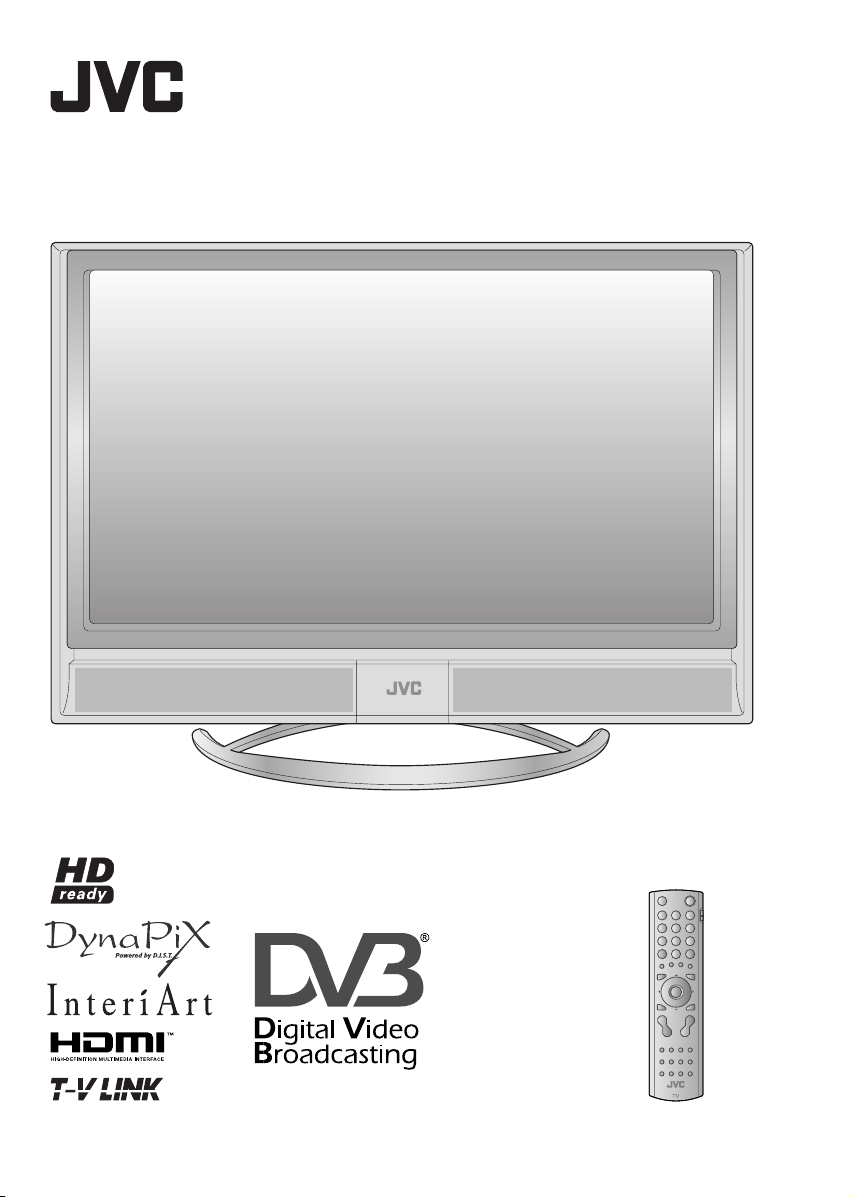
LT-37DM6ZJ
WIDE LCD PANEL TV INSTRUCTIONS
Trade Mark of the DVB Digital Video Broadcasting
Project (1991 to 1996) Number : 3716
LCT1951-001A-U
Page 2
Expanding the world of
2
Page 3
beautiful images
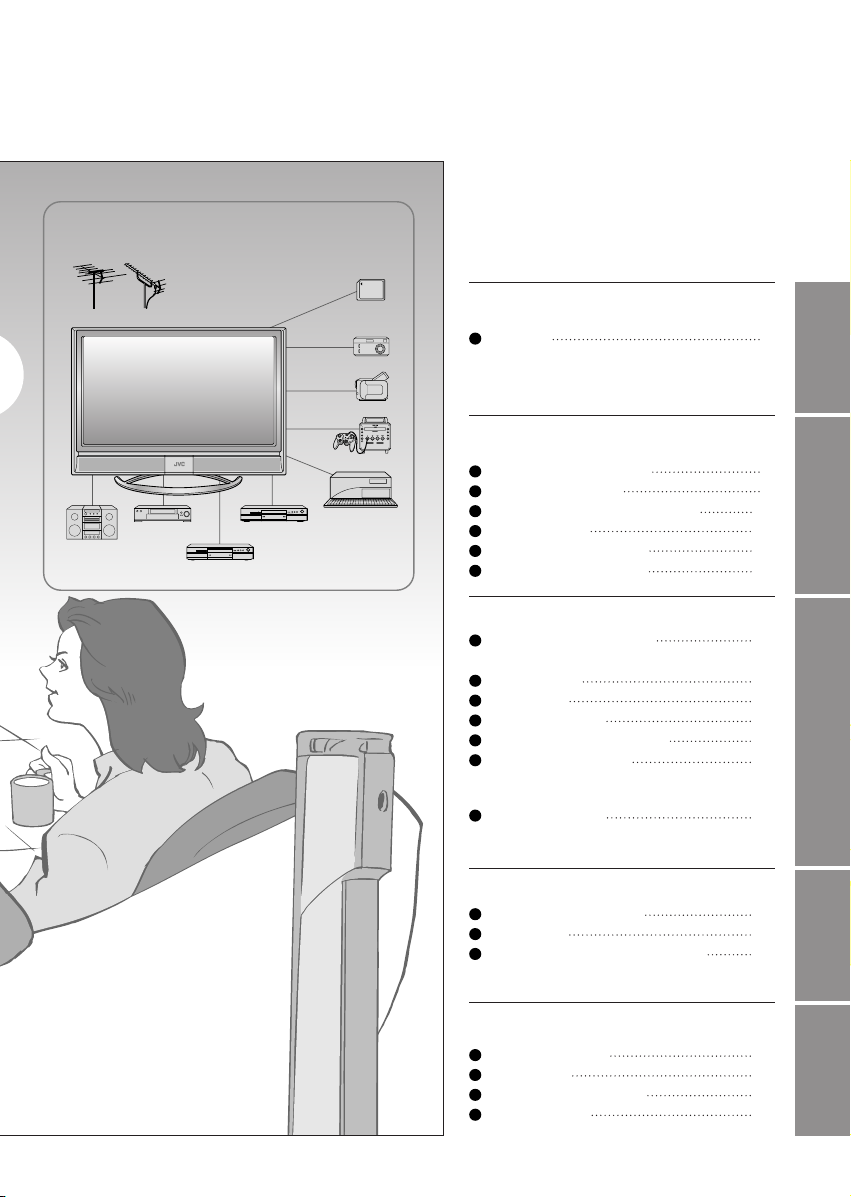
Contents
Enjoy rich multi-media with JVC
VHF / UHF / DVB-T broadcasting
VCR DVD player
Audio components
DVD recorder
Media Cards
Digital camera
Video camera
Game console
Personal
computer
*In this manual,
ATV : analogue terrestrial broadcasting (VHF/UHF)
DTV : digital terrestrial broadcasting (DVB-T)
First things fi rst!
Warning 4
Getting started
Names of all the parts
Basic connections
Connecting external devices
Initial settings
Editing DTV channels
Editing ATV channels
6
8
10
12
14
16
Let's try it out
Enjoying your new TV! 18
· TV / Teletext / EPG / Video / Menu
Watching TV
Using EPG
Viewing teletext
Watching videos / DVDs
Using a media card
20
22
24
26
28
Try the advanced features
Useful functions 32
· Multi-picture / Favourite channel
· Sleep timer / Child lock
Just the way you like it
Customising your TV
Using DTV
Advanced picture adjustment
·
Reduce noise / Watch a more natural picture
· Set the aspect ratio, etc.
36
38
44
When you have trouble
Troubleshooting
CH/CC List
Technical information
Specifi cations
46
49
50
51
IMPORTANT! PREPARE USE
SETTINGS
TROUBLE?
3
Page 4
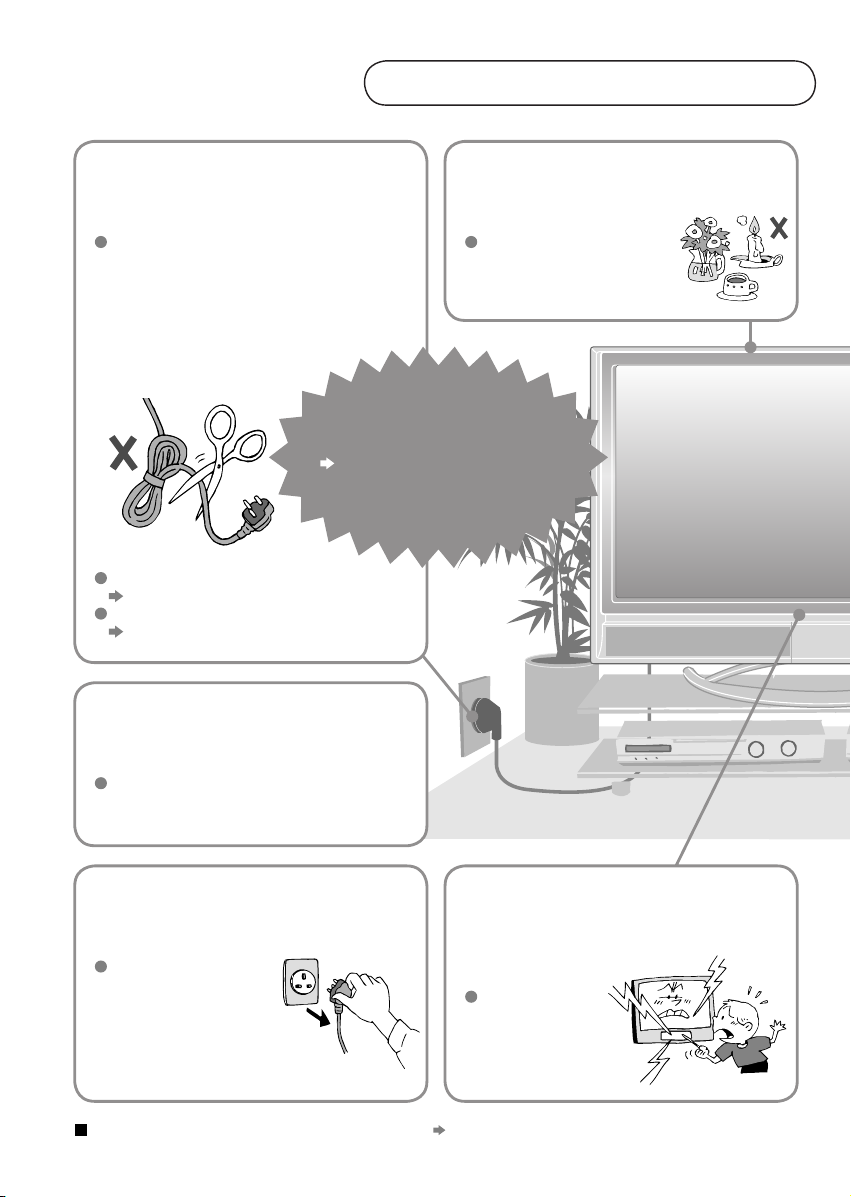
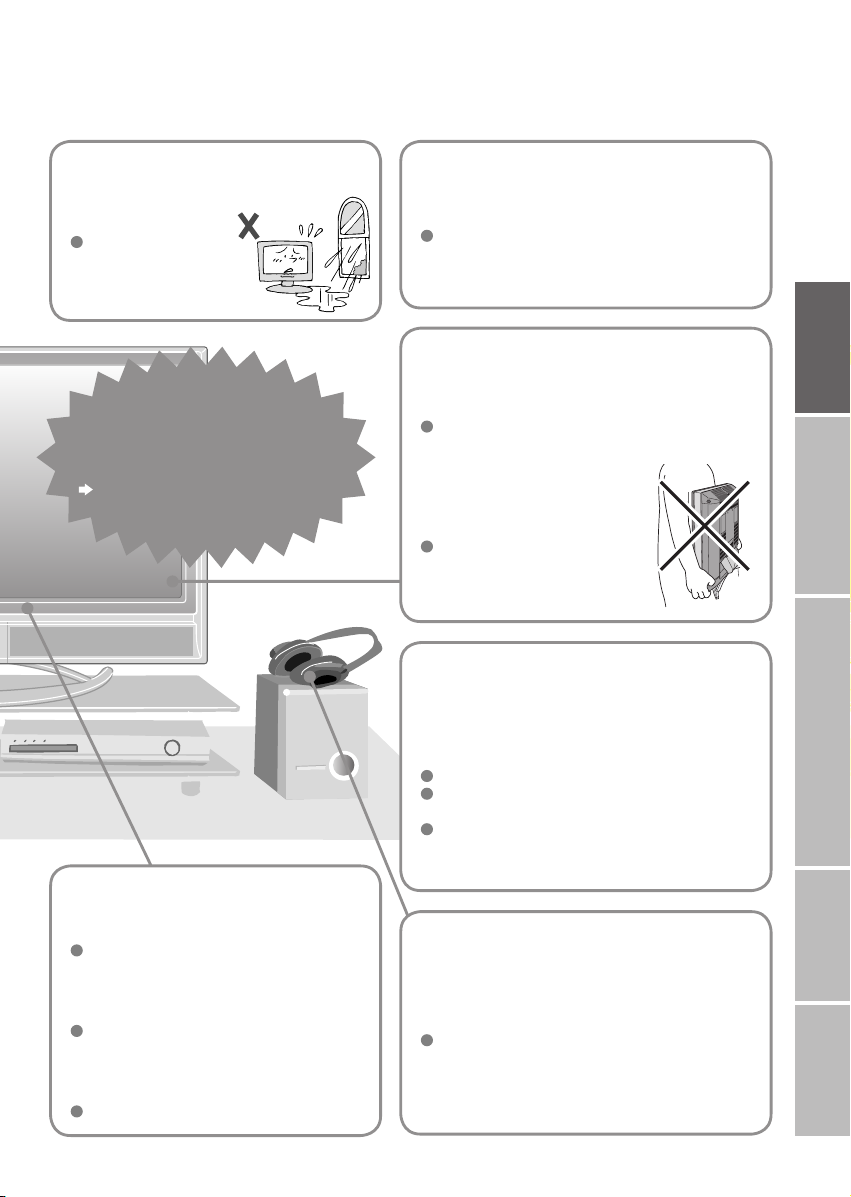
Warning
Please follow all the guidelines below
Never cut or damage
the power cord!
If the AC plug is not the right shape,
or the power cord is not long enough,
use an appropriate plug adapter
or extension cable.
(Consult your retailer.)
Never try to repair
the TV yourself!
If the problem cannot be solved in
"Troubleshooting" (P. 42), unplug
the power cord and contact
your retailer.
If you have cut or damaged the power cord.
"Technical information" (P. 46)
To change the fuse in UK plugs
"Technical information" (P. 46)
Follow this manual
regarding setup!
Connect only to a 110-240V, 50/60Hz AC
outlet.
Never place anything
on the TV!
Placing liquids, naked
fl ames, cloths, paper,
etc. on the TV may
cause a fi re.
4
Unplug the power cord
when going out!
The power buttons on
the remote control and
the TV unit can not
completely turn off the
TV. (Make appropriate
arrangements for
bedridden people.)
For more details on installation, usage and safety
Never insert objects
into the cabinet
openings!
It may cause a
fatal electric
shock.
Take care when
children are near.
Consult your retailer
Page 5
Never expose to rain
or moisture!
To prevent fi re or
electric shock, never
allow liquids to enter
the unit.
If the TV is damaged
or behaving strangely,
stop using it at once!
Unplug the power cord and
contact your retailer.
Do not allow the TV
to fall!
Do not rest your elbows on, or allow children
to hang from the TV.
There is a risk that the TV will fall and cause
injuries.
Hold the TV so as not to
scratch the screen!
Do not touch the screen when carrying the
TV.
Do not carry the
TV on your own!
In order to prevent accidents,
ensure that the TV is carried
by two or more people.
When attaching the TV to
the wall, use the optional
JVC wall mounting unit!
IMPORTANT! PREPARE USE
Never dismantle the
rear panel!
It may cause an electric shock.
Never obstruct the
ventilation holes!
It may cause overheating or a fi re.
Handle LCD panel
with care!
Use a soft, dry cloth when cleaning.
Consult a qualifi ed technician.
See the included manual on mounting
procedures.
JVC assumes no responsibility for damage
due to improper mounting.
Never listen to
headphones at high
volume!
It may damage your hearing.
SETTINGS
TROUBLE?
5
Page 6
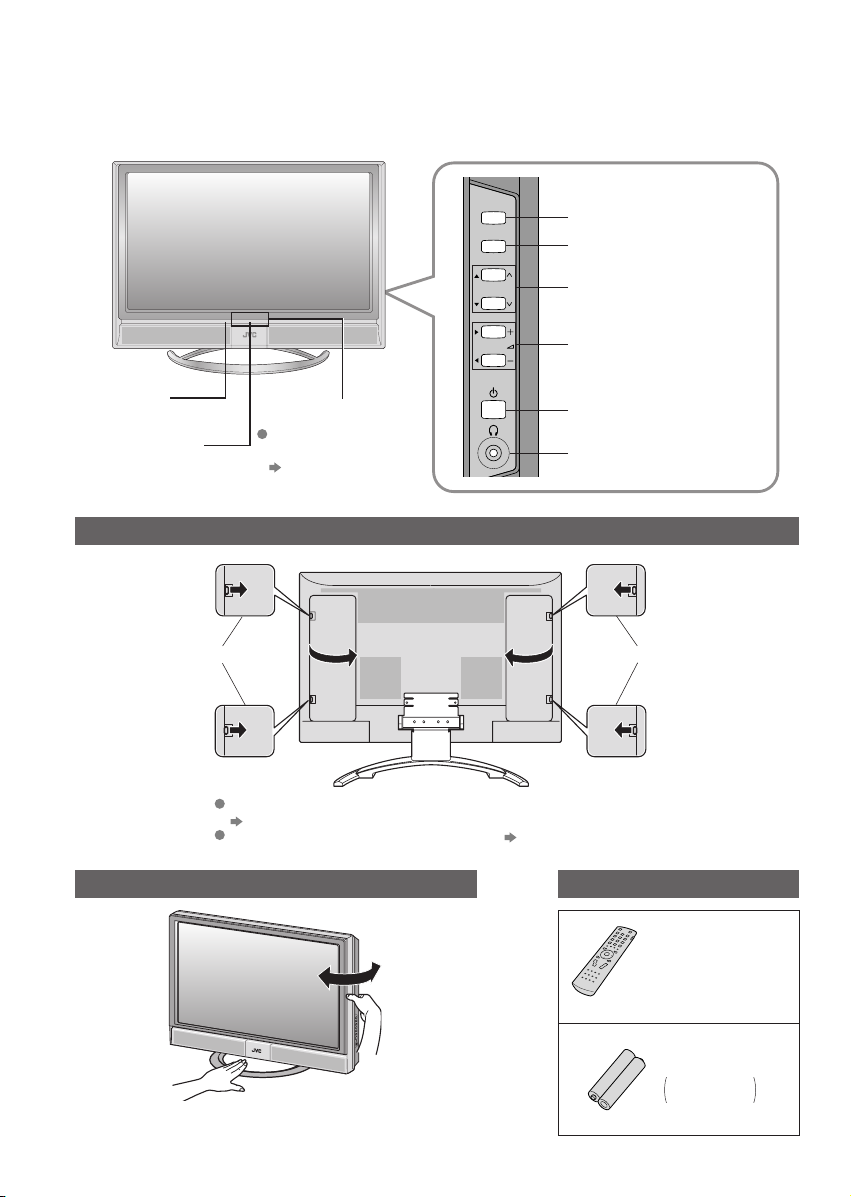
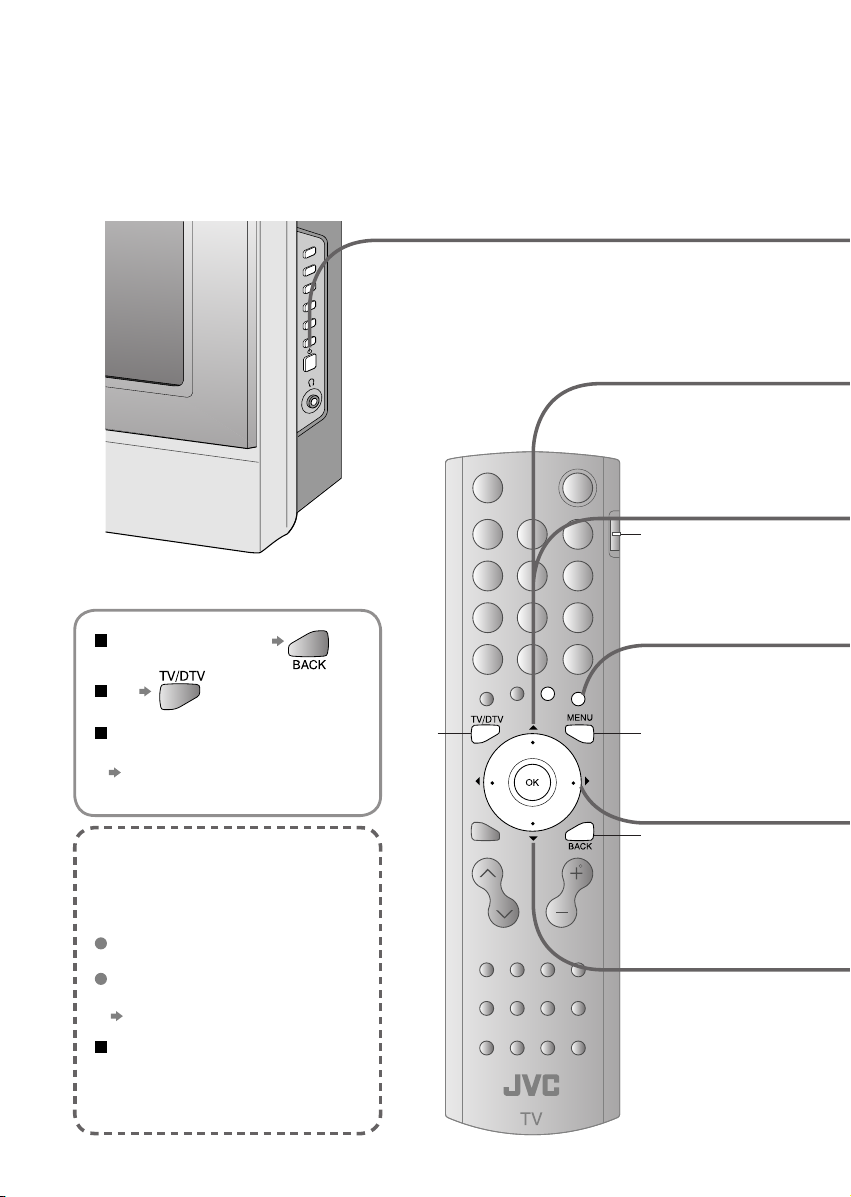
Names of all the parts
Remote control
sensor
Power lamp
ON: Lit (Green)
OFF: Unlit
TV/AV
MENU
/OK
Switch between
TV / AV devices
Display on-screen
menu / set
P
Change channel / page
Volume
Illumination lamp
Illumination lamp lights
while the TV is on.
“ILLUMINATION” (P.37)
Power On/Off
To headphones
Remove the terminal covers
Press to remove. Press to remove.
(P. 10)
6
If the cover cannot be closed due to the cables being in the way
Do not force the cover to close (leave it open).
Connecting terminals on the back of the TV Connecting External devices (P. 10)
Change the direction of TV
Check accessories
Remote control
(RM-C1813H)
AA/R6 Batteries
For confi rming
the TV works
Page 7
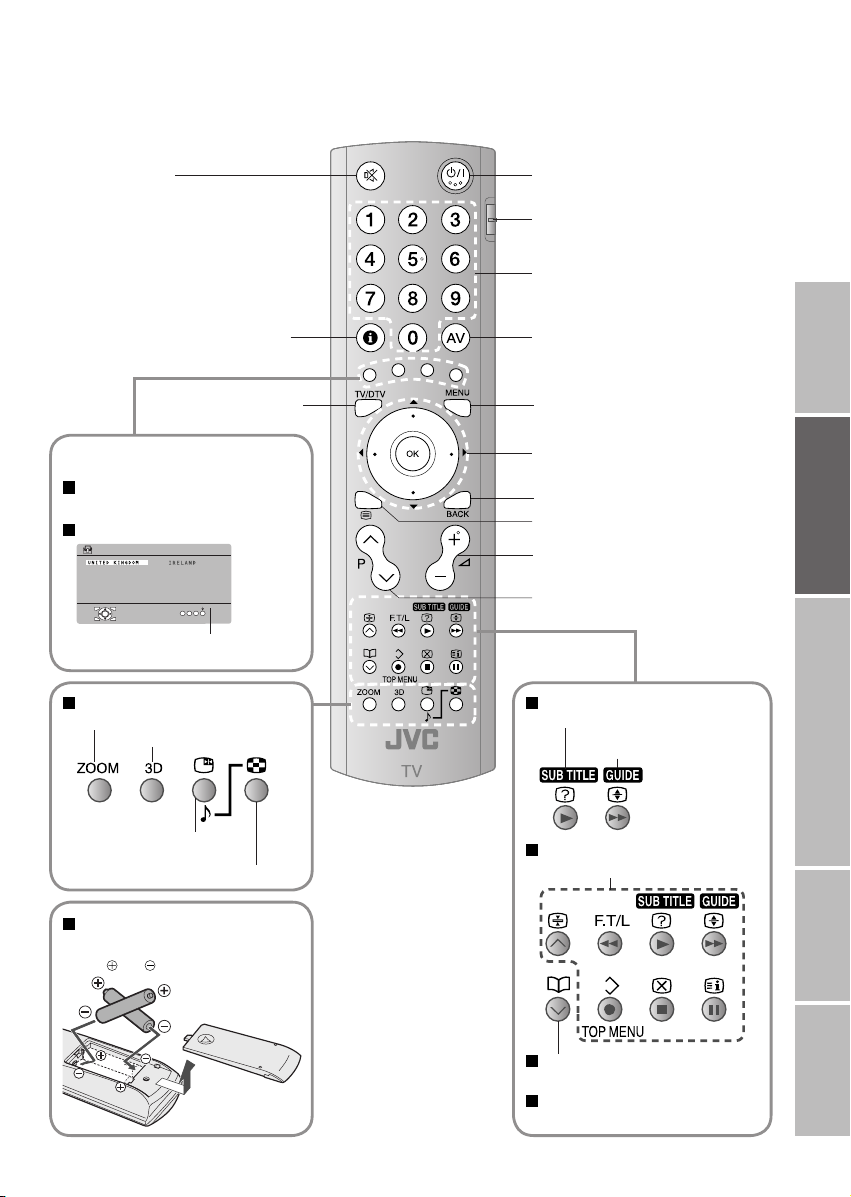
Mute
Power On/Off
Switch between VCR/TV/DVD
(P. 26)
Channel information
(P. 20)
To ATV/DTV
The coloured buttons can perform different
functions according to the situation.
When viewing teletext
Follow on-screen instructions.
Other uses
> COUNTRY
OK
When watching TV/Video
Change the aspect ratio (P. 20)
Turn on 3D sound (P. 20)
Take a snapshot
of the screen (P. 20)
View in multi-picture mode (P. 32)
(P. 24)
START
Follow instructions
in on-screen guides.
Change the channel/page
Watch video, etc.
To menu
(P. 36)
(P. 26)
Select and
confi rm settings in menus
To the previous channel
To teletext
(P. 24)
Volume
Change the channel/page
When watching DTV
View subtitles (P. 20)
View the electronic
programme guide (EPG)(P. 22)
When watching ATV
when viewing teletext (P. 24)
(P. 16)
IMPORTANT! PREPARE USE
SETTINGS
Insert the batteries
Use two AA/R6 dry cell batteries.
Insert the batteries from the - end, making
and polarities are correct.
sure the
When choosing a favourite
(P. 33)
channel
When operating a JVC VCR
(P. 26)
or DVD
TROUBLE?
7
Page 8
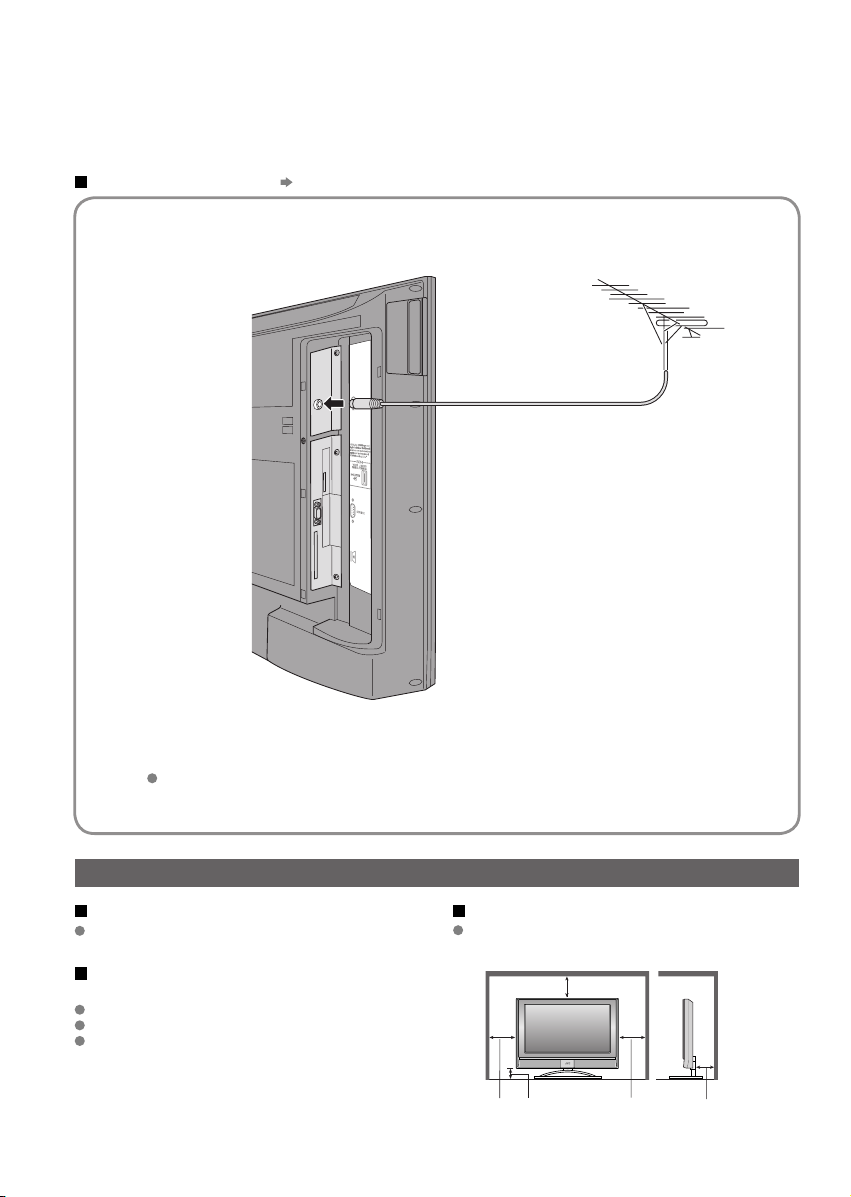
Basic connections
Please read the user manuals of each device carefully before setup.
It is necessary to connect an aerial to watch TV.
Connect with other devices
"Connecting external devices" (P. 10)
Connect the aerial
Right side of back surface
AERIAL
8
After all the connections have been made, insert the plug into an AC outlet.
Care when setting
Power requirements
Connect the power cord only to a 110-240V,
50/60Hz AC outlet.
When attaching the TV to the wall, use the
optional JVC wall mounting unit
Consult a qualifi ed technician.
See the included manual on mounting procedures.
JVC assumes no responsibility for damage due to
improper mounting.
Installation requirements
To avoid overheating, ensure the unit has ample
room.
200mm
50mm150mm 150mm 50mm
Page 9
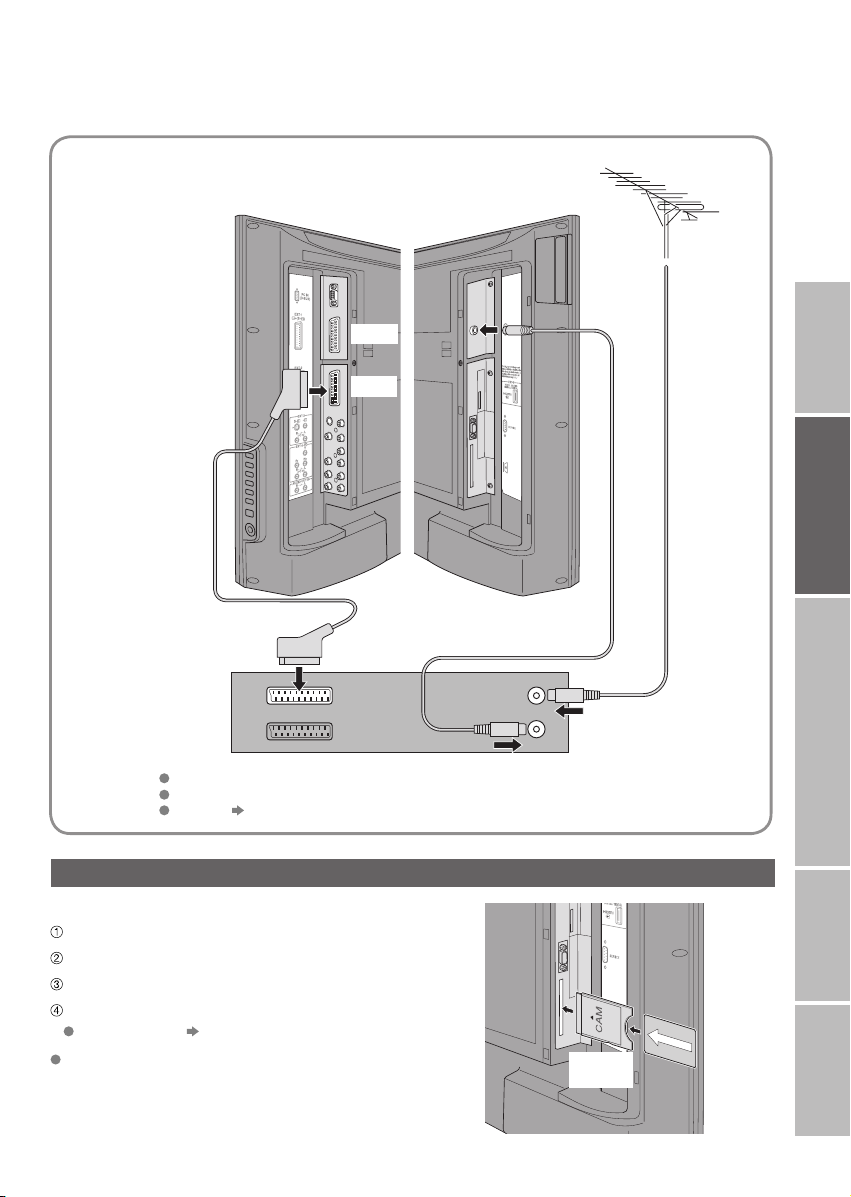
Connect a VCR / DVD recorder
AERIAL
Left side of
back surface
VCR / DVD recorder
After all the connections have been made, insert the plug into an AC outlet.
Connect T-V LINK compatible recording device to EXT-2.
T-V LINK "What is T-V LINK?" (P. 12)
EXT-1
EXT-2
Right side of
back surface
IMPORTANT! PREPARE USE
Watch pay-per-view
Contract with a broadcasting company beforehand.
Unplug the power cord
Insert the Viewing Card into the CAM.
Insert the CAM.
Plug the power cord, and turn the power on.
Set pay-per-view (P. 42)
The CAM and Viewing Card will be sent by the broadcasting
company after contracting with them.
Conditional
Access
Module
Viewing
Card
SETTINGS
TROUBLE?
9
Page 10
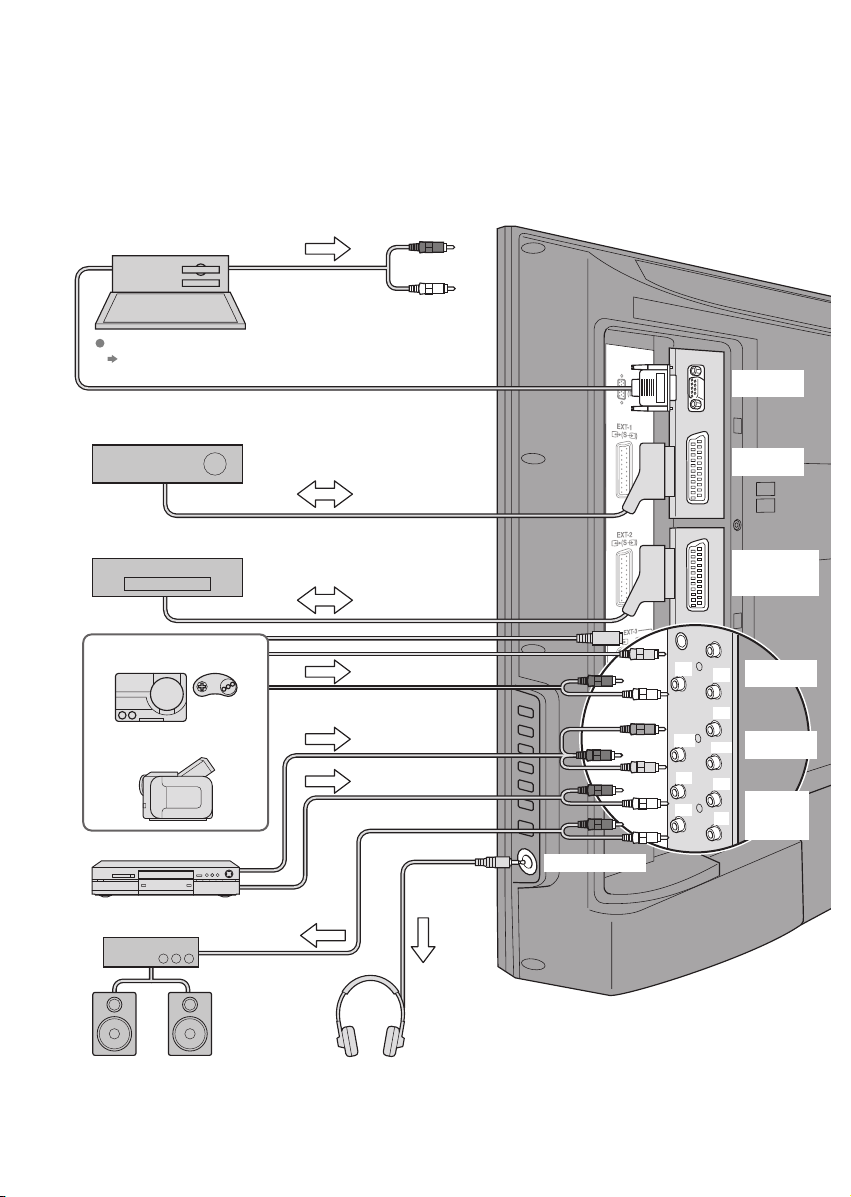
Connecting external devices
You can connect many different devices to the rear panel of the TV.
Please read the user manuals of each device before setting up.
(Connecting cables are not supplied with this TV.)
PC
To EXT-3 R/L (PC IN)
Check for PC compatibility
"Technical information" (P. 50)
PC IN
Satellite broadcast tuner
EXT-1
VCR / DVD recorder
(T-V LINK compatible)
EXT-2
(T-V LINK)
10
Game consoles
Video camera
DVD player
Amplifi er
(L) (R)
Headphones
Headphones
(R)
(Pr)
(R)
(R)
(L)
(Y)
(Pb)
(L)
(L)
EXT-3
EXT-4
AUDIO
OUT
Page 11
VCR / DVD / other devices
: signal direction
AERIAL
EXT-5
(HDMI)
Media Card slot
(“Using a media card” P.28)
DVD player
(HDMI compatible)
Connect DVI devices
(P. 50)
T-V LINK
EXT-1
Output
· Composite
signal
· Sound L / R
Use S-VIDEO "S-IN" (P. 27)
EXT-2
Output
· Composite signal
· S-VIDEO (only for
DTV)
· Sound L / R
· T-V LINK
Use S-VIDEO "S-IN" (P. 27)
Use DTV S-OUT "S-OUT" (P. 27)
Select dubbing sources
"DUBBING" (P. 27)
Connect a decoder
"DECODER (EXT-2)" (P. 37)
EXT-3
Output
EXT-4
Output
Component auto select (P. 37)
EXT-5
Output
(P. 12)
Watching videos
Input
·
Composite signal /
RGB / S-VIDEO
· Sound L / R
Dubbing videos
Using T-V LINK
Input
·
Composite signal /
RGB / S-VIDEO
· Sound L / R
Watching videos
Input
· Composite
signal / S-VIDEO
· Sound L / R
Watching DVDs
Input
·
Component signal
(P. 51)
· Sound L / R
Connecting
HDMI devices
Input
· HDMI signal
(P. 51)
IMPORTANT! PREPARE USE
SETTINGS
Not available.
(For service adjustments)
CAM slot
(“Watch pay-per-view” P.9)
HDMI setting (P. 37)
AUDIO OUT
Listening to the TV on external speakers
Output
· Sound L / R
TROUBLE?
11
Page 12
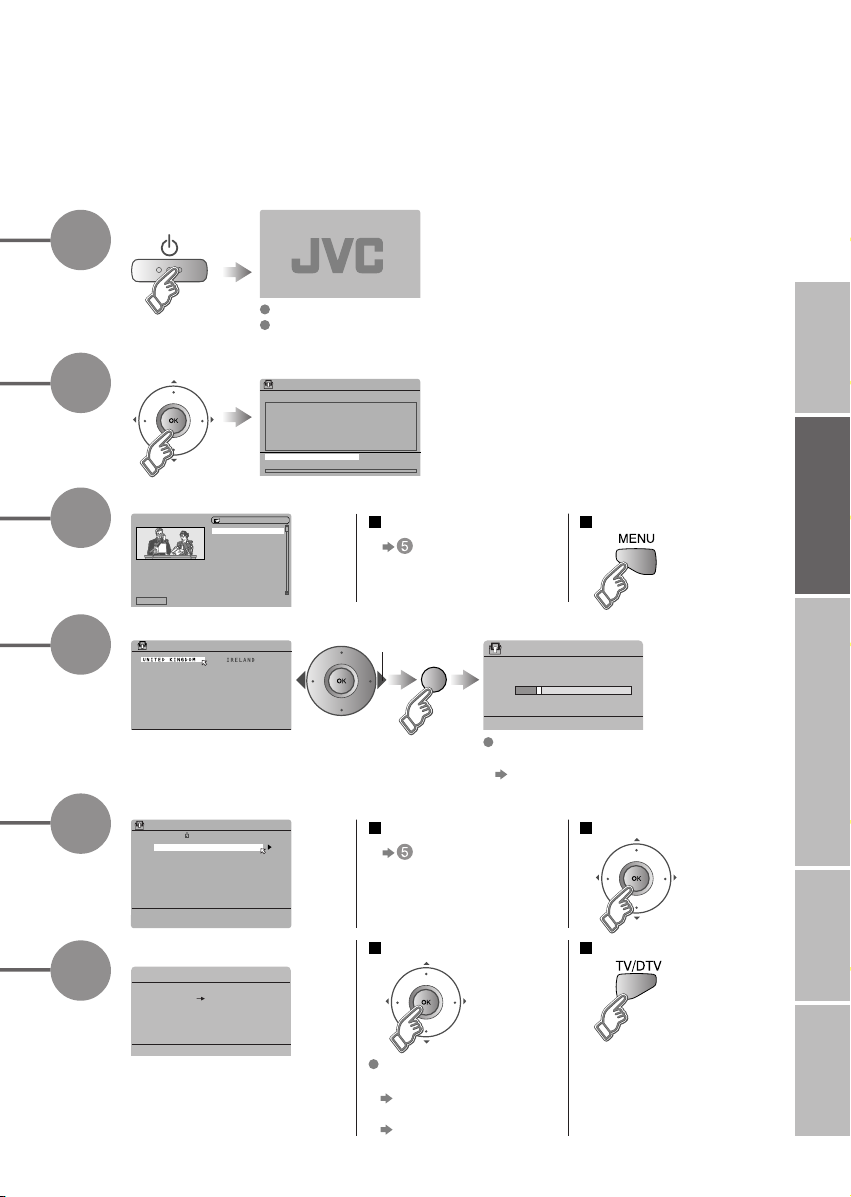
Initial settings
Register DTV/ATV channels on TV. These channels can be edited later.
(In this manual, digital broadcasting is indicated as DTV, and analogue broadcasting as ATV.)
(Set to "TV".)
To the previous screen
12
Exit
If the "JVC" logo does not appear or
if you wish to make changes later
DTV : "Automatic Seach" (P. 42)
ATV : "AUTO PROGRAM"(P. 37)
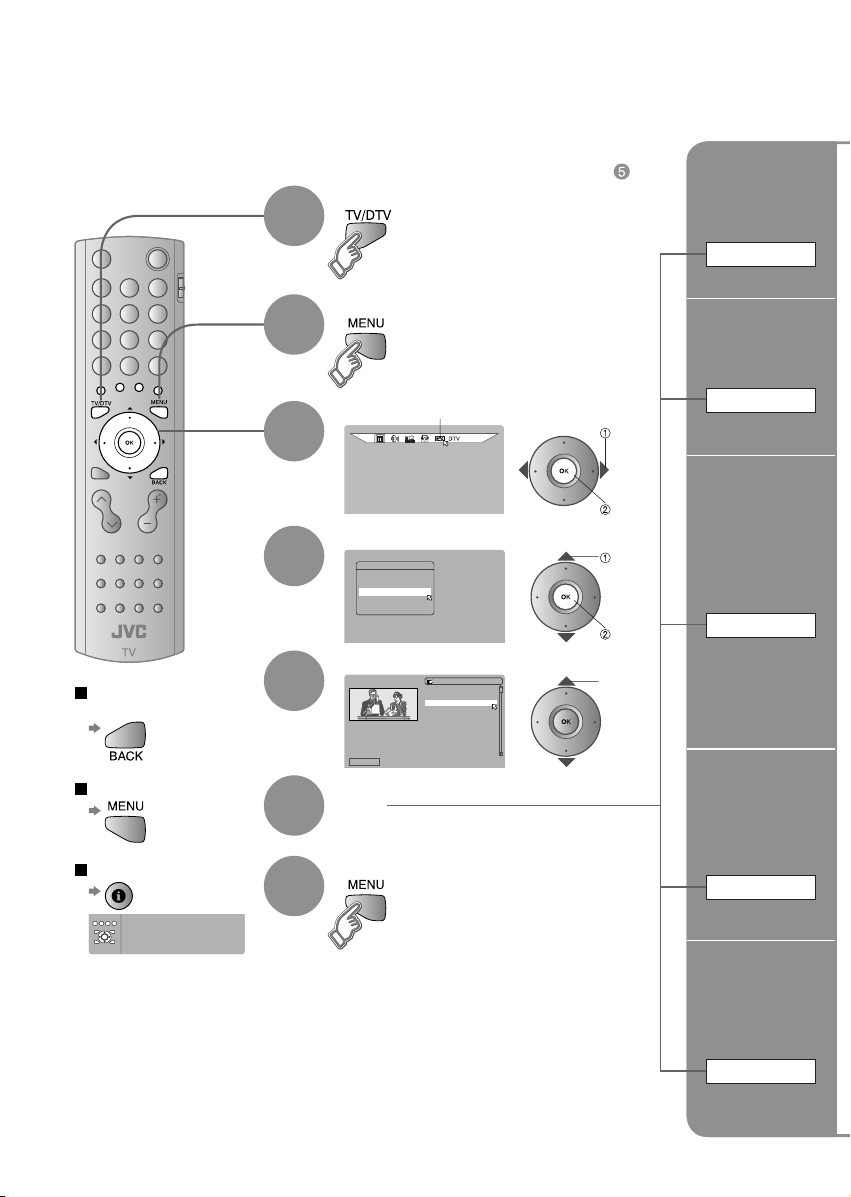
TV/DTV
What is "T-V LINK"?
Connecting the TV to a T-V LINK
compatible device allows :
ATV Channels on the TV to be
instantly registered on the device.
The "DIRECT REC" function to
be used.
"Technical information" (P. 50)
T-V LINK variations
“T-V LINK” (JVC) “Q-LINK” (Panasonic)
“Megalogic” (Grundig) “Data Logic” (Metz)
“SMARTLINK” (Sony) “Easy Link” (Philips)
MENU
BACK
Page 13
>EDIT
01
AV
PR
02
03
04
05
06
07
08
09
ID CH
BBC1 CH
21
BBC2 CH
22
ITV CH
23
CH4 CH
24
CH5 CH
25
CH
26
CH
27
CH
28
1
Begin
Shown only when powering on for the fi rst time.
The power button on the remote control can also be used.
IMPORTANT! PREPARE USE
2
3
4
5
Automatically register DTV channels
Installation > Automatic Search
Channels:
BBC ONE
BBC TWO
BBC THREE
BBC NEWS 24
BBCi
CBBC Channel
UHF CH:68
100%
Check what was registered
1 BBC ONE
Select Delete Edit Name Lock Favourites
EDIT PR LIST
1. BBC ONE
2. BBC TWO
7. BBC THREE
30. CBBC Channel
40. BBC NEWS 24
51. BBCi
Edit DTV channels Confi rm
in "Editing DTV
channels" (P. 14)
Automatically register ATV channels
> COUNTRY
select
(blue)
Check what was registered
Edit ATV channels
in "Editing ATV
channels" (P. 16)
>> AUTO PROGRAM
CH 28
14%
If "ACI START" appears, select and start settings.
(This will set up cable television channels.)
"What is ACI (Automatic Channel
Installation)?" (P. 50)
Confi rm
SETTINGS
6
Finish
T-V LINK
DOWNLOAD TV RECORDING DEVICE
If "FEATURE NOT
AVAILABLE" appears :
Is a T-V LINK compatible
device connected to EXT-2?
Is the device turned on?
When not using T-V LINKWhen using T-V LINK
TROUBLE?
13
Page 14
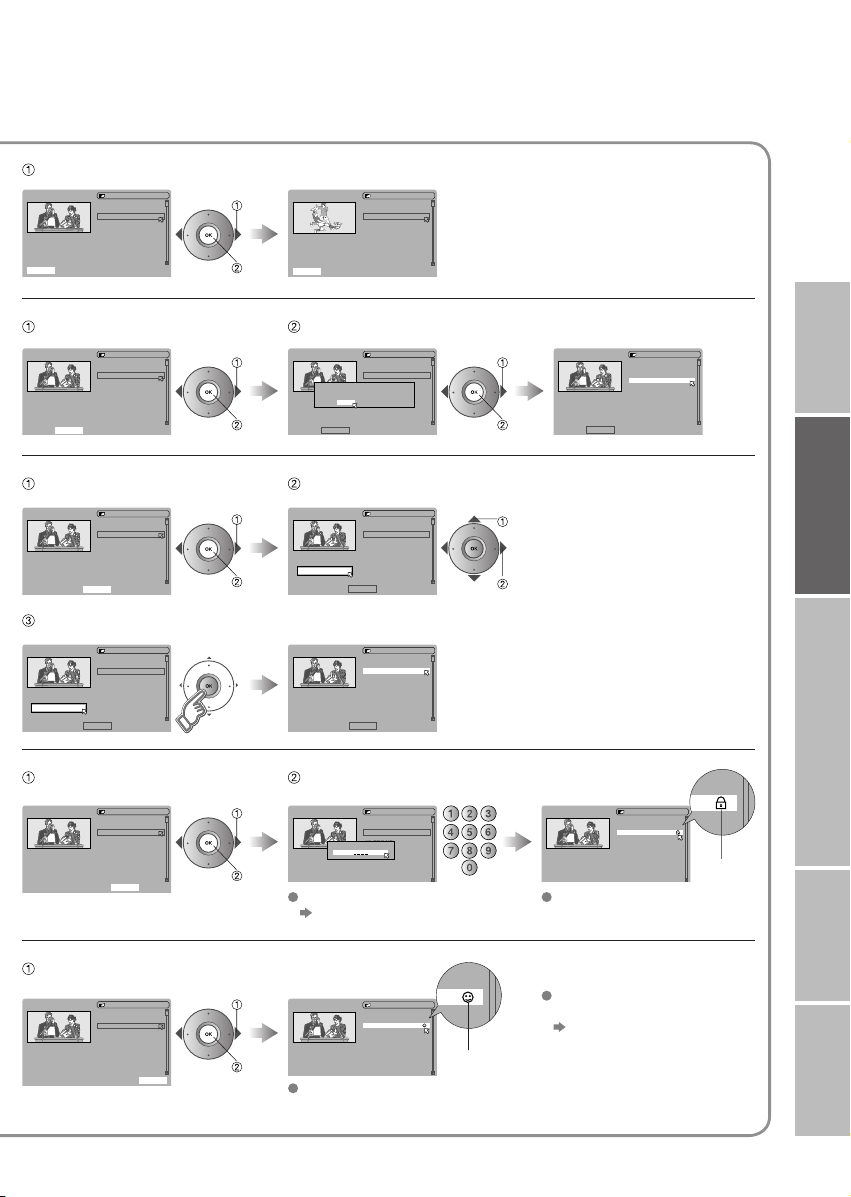
Editing DTV channels
Edit the channels registered with "Automatic search" in "Initial settings" (P. 12).
To the previous
screen
When coming from "Initial settings" (P. 12), skip to .
Select DTV
1
Display the menu bar
2
3
4
5
Select "DTV"
Select "Edit PR List"
DTV
Timers
Configuration
Edit PR List
Installation
Common Interface
Select a channel
1 BBC ONE
EDIT PR LIST
1. BBC ONE
2. BBC TWO
7. BBC THREE
30. CBBC Channel
40. BBC NEWS 24
51. BBCi
select
next
select
next
select
Confi rm
the channel
picture
Select
Delete
a channel
Delete
Edit a
channel name
Edit Name
14
Exit
Tips for operation
Red: Page up
Green: Pagedown
MENU
TV/DTV: Go to DTV
OK
Guide: Go to guide
Back: Go to previous
i: Exit help
6
7
Select Delete Edit Name Lock Favourites
Edit
Finish
Stop Children
from watching
specifi c
channels
Lock
Register your
favourite
channel
Favourites
Page 15
Select "Select"
1 BBC ONE
1. BBC ONE
2. BBC TWO
7. BBC THREE
30. CBBC Channel
40. BBC NEWS 24
51. BBCi
EDIT PR LIST
select
7 BBC THREE
EDIT PR LIST
1. BBC ONE
2. BBC TWO
7. BBC THREE
30. CBBC Channel
40. BBC NEWS 24
51. BBCi
Edit Name Lock Favourites
DeleteSelect
Select "Delete"
1 BBC ONE
Select Edit Name Lock Favourites
1 BBC ONE
Select Delete Lock Favourites
EDIT PR LIST
1. BBC ONE
2. BBC TWO
7. BBC THREE
30. CBBC Channel
40. BBC NEWS 24
51. BBCi
Delete
EDIT PR LIST
1. BBC ONE
2. BBC TWO
7. BBC THREE
30. CBBC Channel
40. BBC NEWS 24
51. BBCi
Edit Name
Decide
1 BBC ONE
BBC 3CH
Select Delete Edit Name Lock Favourites
1 BBC ONE
Select Delete Favourites
EDIT PR LIST
1. BBC ONE
2. BBC TWO
7. BBC THREE
30. CBBC Channel
40. BBC NEWS 24
51. BBCi
EDIT PR LIST
1. BBC ONE
2. BBC TWO
7. BBC THREE
30. CBBC Channel
40. BBC NEWS 24
51. BBCi
Edit Name Lock
view
Select "Yes"
1 BBC ONE
select
next
Select Delete Edit Name Lock Favourites
Change the nameSelect "Edit Name"
1 BBC ONE
select
BBC
next
Select Delete Edit Name Lock Favourites
1 BBC ONE
Select Delete Lock Favourites
Enter PIN codeSelect "Lock"
1 BBC ONE
select
next
Default is "0000".
DeleteSelect
Edit Name Lock Favourites
EDIT PR LIST
1. BBC ONE
2. BBC TWO
7. BBC THREE
30. CBBC Channel
40. BBC NEWS 24
The selected service will be permanently
51. BBCi
deleted. Are you sure?
Edit Name
Enter PIN code
NoYes
EDIT PR LIST
1. BBC ONE
2. BBC TWO
7. BBC THREE
30. CBBC Channel
40. BBC NEWS 24
51. BBCi
EDIT PR LIST
1. BBC ONE
2. BBC TWO
7. BBC 3CH
30. CBBC Channel
40. BBC NEWS 24
51. BBCi
EDIT PR LIST
1. BBC ONE
2. BBC TWO
7. BBC THREE
30. CBBC Channel
40. BBC NEWS 24
51. BBCil
"Change the PIN code" (P. 41)
1 BBC ONE
select
delete
Select Edit Name Lock Favourites
enter character
move position
1 BBC ONE
To release, repeat the
same steps.
Delete
EDIT PR LIST
1. BBC ONE
2. BBC TWO
7. BBC THREE
30. CBBC Channel
40. BBC NEWS 24
51. BBCi
EDIT PR LIST
1. BBC ONE
2. BBC TWO
7. BBC THREE
30. CBBC Channel
40. BBC NEWS 24
51. BBCi
Lock icon
IMPORTANT! PREPARE USE
SETTINGS
Select "Favourites"
1 BBC ONE
Select Delete Lock
EDIT PR LIST
1. BBC ONE
2. BBC TWO
7. BBC THREE
30. CBBC Channel
40. BBC NEWS 24
51. BBCi
Edit Name Favourites
select
1 BBC ONE
set
To release, repeat the
same steps.
EDIT PR LIST
1. BBC ONE
2. BBC TWO
7. BBC THREE
30. CBBC Channel
40. BBC NEWS 24
51. BBCi
Favourite icon
Move through only your
favourite channels
"Favourite Mode" (P. 41)
TROUBLE?
15
Page 16
>EDIT
01
AV
PR
02
03
04
05
06
07
08
09
ID CH
BBC1 CH
21
BBC2 CH
22
ITV CH
23
CH4 CH
24
CH5 CH
25
CH
26
CH
27
CH
28
Editing ATV channels
Edit the channels registered with "AUTO PROGRAM" in "Initial settings" (P. 12).
When coming from "Initial settings" (P. 12), skip to .
Select ATV
1
Display the menu bar
2
Move a
channel's
position
MOVE
To the previous
screen
Exit
3
4
5
6
7
8
Select "SET UP"
Select "EDIT/MANUAL"
SET UP
AUTO PROGRAM
EDIT/MANUAL
DECODER(EXT-2)
COMPONENT AUTO SELECT
EXT SETTING
HDMI SETTING
ATTENUATOR
OFF
ON
OFF
Select a row
Edit
Confi rm settings
Finish
T-V LINK
DOWNLOAD TV RECORDING DEVICE
select
When using
T-V LINK
select
next
select
next
Edit a
channel
name
ID
Insert
a channel
INSERT
Delete
a channel
DELETE
16
If "FEATURE NOT
AVAILABLE" appears :
Is a T-V LINK
compatible device
connected to EXT-2?
Is the device turned on?
T-V LINK (P. 12)
When not using
T-V LINK
Register a
new channel
MANUAL
Page 17

Begin Select a destination Finish
>EDIT
ID CH
PR
AV
BBC1 CH
01
BBC2 CH
02
03
CH4 CH
04
CH5 CH
05
06
07
move out move in
08
09
CH
CH
CH
21
22
24
25
26
27
28
ITV CH
23
select
>EDIT
PR
AV
01
02
03
04
05
06
07
08
09
ID CH
BBC1 CH
BBC2 CH
CH4 CH
CH5 CH
ITV CH
21
22
24
25
23
CH
26
CH
27
CH
28
IMPORTANT! PREPARE USE
Begin Enter a channel name
>EDIT
ID CH
PR
(red) (blue)
AV
01
02
03
04
05
06
07
08
09
BBC1 CH
BBC2 CH
ITV CH
CH4 CH
CH5 CH
A
21
22
23
24
25
CH
26
CH
27
CH
28
enter
the fi rst
character
When selecting a preset name from the ID LIST
When manually naming a channel
Begin Enter a CH number
>EDIT
ID CH
PR
AV
BBC1 CH
(green)
01
BBC2 CH
02
ITV CH
03
CH4 CH
04
CH5 CH
05
06
07
08
09
CH/CC List (P. 49)
In Ireland, slect CH/CC with .
CH
CH
CH
21
22
23
24
25
30
27
28
Set
Receives the
broadcast signal.
Delete
(yellow)
>EDIT
PR
AV
01
02
03
04
05
06
07
ID CH
BBC2 CH
ITV CH
CH4 CH
CH5 CH
22
23
24
25
CH
26
CH
27
next
column
>EDIT
PR
AV
01
02
03
04
05
06
07
08
09
>EDIT
ID CH
BBC1 CH
BBC2 CH
ITV CH
CH4 CH
CH5
M
ID CH
PR
AV
BBC1 CH
01
BBC2 CH
02
ITV CH
03
CH4 CH
04
CH5 CH
05
06
07
JVC
08
09
ID LIST
M6
MBC
21
MCM
22
MDR
23
MOVIE
24
MTV
CH
25
MTV3
CH
26
CH
27
CH
28
21
22
23
24
25
CH
26
CH
27
CH
28
select
set
enter
next
column
set
SETTINGS
Begin
(blue)
Set
Search for a channel
>MANUAL
ID CH
PR
>EDIT
10
11
12
13
14
15
16
17
ID
PR
10
11
12
13
14
15
16
17
29
CH
CH
30
CH
29
CH
CH
35
From high
frequencies
(red) (green)
or
From low
frequencies
>MANUAL
PR
10
11
12
13
14
15
16
17
Auto-search begins, and the nearest
frequency is imported.
Repeat the previous steps until the
desired channel is displayed
Picture fi ne tuning
CH
ID
29
CH
CH
35
(yellow) (blue)
/
TROUBLE?
17
Page 18

Enjoying your new TV!
PAGE
28
PAGE
20
PAGE
24
Using a
media card
View photos
Watch videos
Watching TV
View channel information
Change the aspect ratio
Enjoy 3D sound
Take snapshots of the screen
Viewing teletext
Enlarge the text
To the index page
Hold the current page
Switch briefl y between teletext and TV
Bookmark your favourite pages
18
TV and Text mode
PAGE
22
Using EPG
View the programme list
for 8 days
Search from a genre
Reserve a programme to
watch / record
Page 19

PAGE
Watching
IMPORTANT! PREPARE USE
26
videos / DVDs
Watch high quality video (S-VIDEO)
Name connected devices
Dub videos
Personal preferences
Adjust the picture
Adjust the sound
PAGE
36
SETTINGS
Use DTV
(
timer-record / confi guration / channel settings, etc.
Basic settings
(channel settings, etc.)
Advanced settings
(sleep-timer / child lock, etc.)
)
TROUBLE?
19
Page 20

Watching TV
Power on
1
2
3
The green power lamp
on the TV lights.
Press again to turn the screen off
and put the TV into standby mode.
Select ATV/DTV
DTV : Digital broadcasting
ATV : Analogue broadcasting
Select a channel
Channel
information and
clock
INFORMATION
Move up or down a channel
up
down
With DTV, you can select only from
your favourite channels (P. 41)
Mute
Switch between stereo/mono/
bilingual broadcasting
"STEREO/ · " ( P. 36)
Note
To completely turn off the TV, unplug the AC plug.
Watch pay-per-view (P. 42)
Add a new station (P. 42)
Volume
To the previous channel
Basic operations using the side buttons
1
2
Power on
Volume
Change
P
the channel
TV/AV
MENU
/OK
P
View subtitles
SUBTITLE
(DTV)
Change the aspect
ratio
ZOOM
Enjoy ambient
sound
3D SOUND
Take snapshots
of the screen
FREEZE
20
Page 21

When DTV is selected
Name of station
ITV News
41
Now: 13:00-14:00 Steve Scott
13:19
Next: 14:00-14:30 Steve Scott
Time
Channel
When ATV is selected
PR LIST
PR ID
AV
BBC1
01
02
03
04
05
06
07
Select a page
Select and view a channel
Reception level
CH61
PR LIST
Channels registered
in "Initial settings"
will appear here.
Current
programme
Following
programme
select
BBC1
12 : 00
(No indication)
select
view
Channel information
Time
(in case of having viewed teletext)
IMPORTANT! PREPARE USE
Subtitle ON
Today's news!
ZOOM
AUTO
REGULAR
PANORAMIC
14:9 ZOOM
16:9 ZOOM
16:9 ZOOM SUBTITLE
FULL
3D SOUND HIGH
Cancel
Press again, or change the channel
Shown only when
subtitles exist
To avoid subtitle recording,
turn the subtitles off before
recording.
select
16 : 9 ZOOM
set
Move the picture with
or while this bar
is displayed
HIGH
: For stereo sound
LOW
: For stereo sound (when the sound distorts in HIGH mode)
MONO
: For mono sound (emulates a stereo-like sound)
OFF
: Turns off 3D SOUND
Turn off subtitles
When set to AUTO, the aspect ratio
will turn to the ratio obtained from
the information the TV received.
Without receiving aspect information,
it will be the setting in "4:3 AUTO
ASPECT" (P. 44).
Not available in PC mode or 1080i
(1125i)/720p (750p) signals.
Current programme
Not available when viewing DTV or PC.
Not available when the SUB-PICTURE
is displayed.
You cannot save or export the snapshot.
Still picture
SETTINGS
TROUBLE?
21
Page 22

(
Using EPG
Electronic Programme Guide
You can fi nd a programme from an eight-day programme guide,
check its information, and make a reservation.
Select DTV
1
)
Display EPG
2
Find a programme
3
Close EPG
Search from a genre
While EPG is
displayed...
Display the
Genre List
(green)
Electronic Programme Guide 05:27 20/10/2004
GENRE
20/10
2. BBC TWO
21/10
7. BBC THREE
22/10
30. CBBC Channel
23/10
40. BBC NEWS 24
24/10
51. BBCi
25/10
89. BBC R Scotland
26/10
90. BBC R n Gaidheal
27/10
800. 16:9monoscope
select
04:00-6:00
Secondary Schools, How industrialisation changed the day-to-day
lives of the British people.
Select
a date
History: Britain 1750-1900
Select
a channel
next
Electronic Programme Guide 05:27 20/10/2004
GENRE
20/10
2. BBC TWO
21/10
7. BBC THREE
22/10
30. CBBC Channel
23/10
40. BBC NEWS 24
24/10
51. BBCi
25/10
89. BBC R Scotland
26/10
90. BBC R n Gaidheal
27/10
800. 16:9monoscope
04:00-6:00
History: Britain 1750-1900
Secondary Schools, How industrialisation changed the day-to-day
lives of the British people.
Genre
All
News
Sports
Movies
Drama
Entertainment
Lifestyle
Kids
Education
All
04:00-
History: Britain 1750-1900
06:00-
Big Cook Little Cook
06:20-
Tots TV
06:30-
Bobinogs
06:45-
Wide Eye
07:00-
Snailsbury Tales
07:15-
Arthur
07:30-
I Love Mummy
EPG
All
04:00-
History: Britain 1750-1900
06:00-
Big Cook Little Cook
06:20-
Tots TV
06:30-
Bobinogs
06:45-
Wide Eye
07:00-
Snailsbury Tales
07:15-
Arthur
07:30-
I Love Mummy
Select
a programme
You can check
programme content.
Select a genre
select
set
22
Electronic Programme Guide 05:43 20/10/2004
GENRE
20/10
1. BBC ONE
21/10
2. BBC TWO
22/10
7. BBC THREE
23/10
40. CBBC Chennel
24/10
40. BBC NEWS 24
25/10
51. BBCi
26/10
89. BBC R Scotland
27/10
90. BBC R n Gaidheal
03:25-6:00
BBC ONE joins the BBC's rolling news channel for a night of news,
with bulletins on the hour and the headlines every 15 minutes.
BBC News 24
Movies
00:15-
Last Embrace
Find a programme
Only programmes in the selected genre are displayed.
select
next
Page 23

Reservations
After
Reserve a
programme
to watch
Programme-
view setting
After
·Set the recording device to external input mode before the start time.
·For T-V LINK incompatible devices, manually set the timer on the device.
·Make sure that recording times on the recording device do not overlap with
·When Rec Timer has been set, the power lamp on the TV will :
·Some T-V LINK compatible DVD recorders may not work correctly.
Reserve a
programme
to record
Programme-
record setting
Electronic Programme Guide 06:06 20/10/2004
All
GENRE
20/10
2. BBC TWO
06:0021/10
22/10
23/10
24/10
25/10
26/10
27/10
04:00-6:00
Secondary Schools, How industrialisation changed the day-to-day
lives of the British people.
Cancel the reservation
(red)
REC TIMER 06:02 20/10/2004
No. Name Start End Date Mode
1 BBC ONE 00:00 00:00 01/01/2004 Inactive
2 BBC ONE 00:00 00:00 01/01/2004 Inactive
3 BBC ONE 00:00 00:00 01/01/2004 Inactive
4 BBC ONE 00:00 00:00 01/01/2004 Inactive
5 BBC ONE 00:00 00:00 01/01/2004 Inactive
6 BBC ONE 00:00 00:00 01/01/2004 Inactive
7 BBC ONE 00:00 00:00 01/01/2004 Inactive
8 BBC ONE 00:00 00:00 01/01/2004 Inactive
9 BBC ONE 00:00 00:00 01/01/2004 Inactive
10 BBC ONE 00:00 00:00 01/01/2004 Inactive
7. BBC THREE
30. CBBC Channel
40. BBC NEWS 24
51. BBCi
89. BBC R Scotland
90. BBC R n Gaidheal
800. 16:9monoscope
Name BBC TWO
Start
End
Date
Mode
Big Cook Little Cook
06:20-
Tots TV
06:30-
Bobinogs
06:45-
Wide Eye
07:00-
Snailsbury Tales
07:15-
Arthur
07:30-
I Love Mummy
07:55-
Newsround
History: Britain 1750-1900
(yellow)
Select the reserved programme and press "OK"
06:30
06:45
20/10/2004
Once
Prepare for recording
For details, refer to the manual of the recorder.
recording times on the TV.
Start blinking 3 minutes before the start time (green or red)
Light during recording (green or orange)
Exit
Press "MENU"
Confi rm the reservation
Electronic Programme Guide 06:06 20/10/2004
GENRE
2. BBC TWO
7. BBC THREE
30. CBBC Channel
40. BBC NEWS 24
51. BBCi
89. BBC R Scotland
90. BBC R n Gaidheal
800. 16:9monoscope
History: Britain 1750-1900
All
06:0006:2006:3006:4507:0007:1507:3007:55-
Big Cook Little Cook
Tots TV
Bobinogs
Wide Eye
Snailsbury Tales
Arthur
I Love Mummy
Newsround
(red)
20/10
21/10
22/10
23/10
24/10
25/10
26/10
27/10
04:00-6:00
Secondary Schools, How industrialisation changed the day-to-day
lives of the British people.
Change a reservation
"MENU" " " "Rec Timer"
select a
reservation
next
Cancel a reservation
"MENU" " " "Rec Timer"
select a
reservation
set the
mode to
"Inactive"
REC TIMER 06:02 20/10/2004
No. Name Start End Date Mode
1 BBC ONE 00:00 00:00 01/01/2004 Inactive
2 BBC ONE 00:00 00:00 01/01/2004 Inactive
3 BBC ONE 00:00 00:00 01/01/2004 Inactive
4 BBC ONE 00:00 00:00 01/01/2004 Inactive
5 BBC ONE 00:00 00:00 01/01/2004 Inactive
6 BBC ONE 00:00 00:00 01/01/2004 Inactive
Name BBC TWO
7 BBC ONE 00:00 00:00 01/01/2004 Inactive
Start
8 BBC ONE 00:00 00:00 01/01/2004 Inactive
End
9 BBC ONE 00:00 00:00 01/01/2004 Inactive
Date
10 BBC ONE 00:00 00:00 01/01/2004 Inactive
Mode
REC TIMER 06:02 20/10/2004
No. Name Start End Date Mode
1 BBC ONE 06:30 06:45 20/10/2004 Inactive
2 BBC ONE 00:00 00:00 01/01/2004 Inactive
3 BBC ONE 00:00 00:00 01/01/2004 Inactive
4 BBC ONE 00:00 00:00 01/01/2004 Inactive
5 BBC ONE 00:00 00:00 01/01/2004 Inactive
6 BBC ONE 00:00 00:00 01/01/2004 Inactive
7 BBC ONE 00:00 00:00 01/01/2004 Inactive
8 BBC ONE 00:00 00:00 01/01/2004 Inactive
9 BBC ONE 00:00 00:00 01/01/2004 Inactive
10 BBC ONE 00:00 00:00 01/01/2004 Inactive
06:30
06:45
20/10/2004
Once
Change with
Enter using the
numerical keypad
Change with
(Once/Daily/Weekly)
At the start time, the
channel will
automatically change.
If the TV's power is off
at the start time,
nothing happens.
REC TIMER 06:02 20/10/2004
Name
No.
1 BBC TWO 06:30 06:45 20/10/2004 Active
BBC ONE
2
BBC ONE
3
BBC ONE
4
BBC ONE
5
6 BBC ONE 00:00 00:00 01/01/2004 Inactive
7 BBC ONE 00:00 00:00 01/01/2004 Inactive
8 BBC ONE 00:00 00:00 01/01/2004 Inactive
9 BBC ONE 00:00 00:00 01/01/2004 Inactive
10 BBC ONE 00:00 00:00 01/01/2004 Inactive
At the start time,
the channel will
automatically change
and the device
connected to EXT-2
will begin recording
the programme.
Date
End
Start
01/01/2000
00:00
00:00
01/01/2000
00:00
00:00
01/01/2000
00:00
00:00
01/01/2000
00:00
00:00
Mode
Inactive
Inactive
Inactive
Inactive
IMPORTANT! PREPARE USE
SETTINGS
TROUBLE?
23
Page 24

Viewing teletext
This TV can display TV broadcasts and teletext on the same channel in two windows.
Select ATV/DTV
1
When ATV is selected
When watching TV
Bookmark
your favourite
page
LIST MODE
(ATV)
2
When DTV is selected
Operate according to
the screen indications
When ATV is selected
Enter a teletext page
Move up or down a page
up
down
View sub-pages
to
sub-page
(RED) (
Display your
1
favourites list
Select a coloured button to save your page to
2
Enter the number of the page to save
GREEN
(red) (blue)(green) (yellow)
3
) (
YELLOW
) (
BLUE
TV
TEXT
)
TEXT
.....
24
Save
4
Recall your favourite page
Press the coloured button as in step 2
Page 25

Hold the
current page
HOLD
(ATV)
Reveal
hidden pages
REVEAL
(ATV)
Enlarge
the text
SIZE
(ATV)
Hold the current page
Release
Display hidden information
(answers to quizzes, etc)
Double the size of the
displayed text
Press again
IMPORTANT! PREPARE USE
To the
index page
INDEX
(ATV)
Switch briefl y
from teletext
to TV
CANCEL
(ATV)
Returns to page "100"
or a previously designated page
Leave the current page open,
while you switch to watch TV
Useful when running a page search.
SETTINGS
TROUBLE?
25
Page 26

Watching videos / DVDs
Select the video source
1
E1 VCR
*1
AV (PR 0)
To TV
Operate the
VCR (DVD)
E1
E2
E3
E4
*1 : Only appears when AV
has been registered as
a channel.
*2 : Switches to DTV.
2
E.g. For EXT-1
Operate the connected
device and play a video
Operate JVC VCRs and other devices
DVD players
1
VCRs and DVD recorders
Turn on the device
2
Select a channel (VCR mode)
3
Rewind/Playback/Fast-forward
Stop/Pause
*2
DTV
PC
E5
26
Record/Display DVD top menu
Select a chapter (DVD mode)
Some models of JVC devices cannot be operated with this remote control.
Page 27

1
Advanced functions
Display the
menu bar
Switch
to S-VIDEO
input/output
S-IN
S-OUT
(DTV)
Edit names
of connected
devices
ID LIST
Select "SET UP" Select "EXT SETTING"
2
select
SET UP
AUTO PROGRAM
EDIT/MANUAL
DECODER(EXT-2)
COMPONENT AUTO SELECT
EXT SETTING
HDMI SETTING
ATTENUATOR
next
Select the EXT connected to S-VIDEO
> EXT SETTING
EXT-1
EXT-3
TV
DTV
Cancel this mode
Set the S-OUT
DUBBING
EXT-2
EXT-4
select
(yellow)
Press
Cancel S-IN at “EXT-2”, then select “DTV” and
press yellow button. (available only for DTV)
(yellow)
in again
Set S-VIDEO input
> EXT SETTING
EXT-1
S
EXT-3
TV
DTV
Select an EXT to assign a name to Show the name list
> EXT SETTING
EXT-1
EXT-3
TV
DTV
DUBBING
EXT-2
EXT-4
select
(blue)
> EXT SETTING
EXT-1
EXT-3
TV
DTV
Select a name from the list
> EXT SETTING
EXT-1
EXT-3
TV
DTV
DUBBING
EXT-2
EXT-4
Clear the name
ID LIST
VHS
S-VHS
DVC
CAM
SAT
STB
GAME
DVD
DVR
select
set
Select the blank space in
> EXT SETTING
EXT-1
DVD
EXT-3
TV
DTV
DUBBING
EXT-2
EXT-4
DUBBING
EXT-2
EXT-4
DUBBING
EXT-2
EXT-4
OFF
ON
OFF
select
next
The device
selection
display will
change from
E1 to S1.
S-OUT is not
available when
EXT-2 receives
an RGB input.
ID LIST
VHS
S-VHS
DVC
CAM
SAT
STB
GAME
DVD
DVR
IMPORTANT! PREPARE USE
SETTINGS
Set up
dubbing on
EXT-2
DUBBING
Select the arrow Select the dubbing source
> EXT SETTING
EXT-1
EXT-3
TV
DTV
DUBBING
EXT-2
EXT-4
Record DTV with S-VIDEO
select
> EXT SETTING
EXT-1
EXT-3
TV
DTV
DUBBING
EXT-2
EXT-4
Set S-OUT at “DTV”.
select
TROUBLE?
27
Page 28

Using a media card
By inserting a media card into the TV, you can easily view photos taken with a digital camera or videos
taken with a JVC digital media camera “Everio”.
Readable Media Cards:
SD Memory Card, MultiMediaCard, Memory Stick (Memory Stick PRO is not supported), xD-Picture Card,
CompactFlash and Microdrive Hard Disk for JVC digital media camera “Everio”.
Do not use any media card that is not specifi ed. Otherwise, it may cause a malfunction.
Please read the instruction in this chapter carefully. Improper handling may destroy the data on a card
or cause other problems to the TV and the card. JVC will not be responsible for any problems due to
improper handling.
Operation can not be guaranteed if a card conversion adapter is used.
Open the door.
1
2
Push “PUSH-OPEN”.
Insert the media card.
Follow the illustration exactly when inserting the card.
When it cannot be inserted smoothly, do not force it but
check the card direction again.
The message will appear on the screen.
PLEASE CLOSE THE DOOR.
Ridge
Operation Confi rmed Cards
Microdrive Hard Disk (*1) Hitachi 2GB, 4GB
Panasonic 128MB, 256MB, 512MB, 1GB
SD Memory Card
CompactFlash LEXAR 512MB, 1GB
xD-Picture Card
Memory Stick SONY 64MB, 128MB
*1: Only Microdrive Hard Disks usable for JVC digital media camera “Everio” has been confi rmed.
Cards that are not listed above may not be operable or the data may be earased.
The above operation confi rmed cards are not fully guaranteed to work with this TV.
Products and company names included in this instruction manual are trademarks and/or registered trademarks
of their respective holders.
LEXAR 128MB
SanDisk 32MB, 64MB, 128MB, 256MB
OLYMPUS 256MB
Fujifi lm 32MB, 64MB, 128MB
28
Page 29

3
4
5
6
Close the door.
MEDIA CARD VIEWER will start up.
SELECT ONE AND PRESS OK:
PHOTO VIDEO FILE
Recognition of the card can take signifi cantly more time
if the card contains a large number of fi les.
When a message “NO MEDIA DETECTED” appears,
insert the card again.
Operate MEDIA CARD VIEWER
according to the explanation on page 30.
Stop MEDIA CARD VIEWER.
Open the door.
Push “PUSH-OPEN”.
IMPORTANT! PREPARE USE
7
8
Remove the media card.
Caution
Do not remove the card before stopping “MEDIA CARD
VIEWER”. Otherwise, the TV may not operate properly or
the data on the card may be destroyed.
Close the door.
SETTINGS
TROUBLE?
29
Page 30

Using a media card
Never unplug the power cord when using Media Card Viewer, the
data on the card may be erased. If Media Card Viewer is behaving
strangely, remove the card and unplug the power cord, then plug it in
again.
Select an item.
1
SELECT ONE AND PRESS OK:
PHOTO VIDEO FILE
When two cards are inserted:
Select a card.
SELECT ONE AND PRESS OK:
SD Card
COMPACT FLASH
select
next
select
View
photos
PHOTO
When no fi le can be read.
NO FILE IN THIS MODE
next
Stop MEDIA CARD VIEWER.
2
Returns to DTV channel.
To the previous
screen
Compatible File Formats
The fi le formats that are not listed below are not compatible with this TV. Even if they are listed
below, they are not fully guaranteed to work correctly.
File Formats Standard Codec Size (pixcels) / Rate Extension
Photo JPEG
MPEG-2-PS
(*1)
Video
MPEG-4
(*3)
*1:
MPEG-2-PS fi les can only be read in slot for the Microdrive Hard Disk and CompactFlash.
Only MPEG-2-PS recorded by JVC digital media camera “Everio” can be played back.
*2: Audio must be Dolby Digital enable to playback the sound data.
*3: MPEG-4 fi les may not be detected or played back correctly.
Manufactured under license from Dolby Laboratories. “Dolby”, and the double-D symbol are
trademarks of Dolby Laboratories.
Exif 2.0 , JFIF,
DCF 2.0
SD-VIDEO
SD-VIDEO ASF
Remove the media card. (Step 7 of P. 29)
Start up MEDIA CARD VIEWER once again.
“MENU” “ ” “FEATURES”
“MEDIA CARD VIEWER” (P. 37)
JPEG 160 x 120 to 2560 x 1920
Video: MPEG-2-PS MP/ML
Audio: Dolby Digital (*2)
Video: MPEG-4 Simple profi le
Audio: G.726
720 x 576 / PAL,
352 x 288 / PAL,
720 x 480 / NTSC,
352 x 240 / NTSC
352 x 288 / 30 frames,
240 x 176 / 15 frames,
160 x 120 / 5 frames
JPG, jpg
JPEG, jpeg
MOD, mod
ASF, asf
Watch
videos
VIDEO
Find fi les
FILE
30
Page 31

How to use MEDIA CARD VIEWER
Select a photo
CF
PAGE
0001/
0002
select
view
nextprevious
pause/release
IMPORTANT! PREPARE USE
Rotate a photo
During slide show
pause
rotate
Photos are shown in alphabetical order of the fi le names.
Screen size is automatically adjusted. (Zoom function is not available.)
The slide-show interval cannot be changed.
Rotated-photo’s data cannot be saved (overwritten) to the card.
Photos are shown in the form of a
slide show.
Select a video
CF
PAGE
0001/
0002
Videos are played in alphabetical order of the fi le names.
Screen size depends on the recorded picture size. (Zoom function is not available.)
select
play
Play photos and videosOpen a folder
FILE LIBRARY
CARD
JVC01
JVC02
JVC03
JVC04
JVC05
JVC06
JVC07
Folder : CARD SD 0000/0007
Return to previous folder
select a folder name
on top
return
select
open
Photos and videos are played in alphabetical order of the fi le names.
Operations other than play/pause/stop can not be made.
When different types of fi le format is placed under the same folder,
fi les may not be played back correctly. Be sure to place the fi les into
a separate folders for each format.
JVC01
DSC0001
DSC0002
DSC0003
DSC0004
DSC0005
DSC0006
DSC0007
Folder : JVC01
FILE LIBRARY
File size : 12KB
Date : 08/10/2005
SD 0001/0007
stop
fast forwardrewind
pause/release
stop
select
play
SETTINGS
Displaying interval of photos may vary depending on the size of the fi le.
Noise may appear during the slideshow.
When each fi le uses a different recording format, the screen is temporarily disturbed.
Only the fi rst 8 characters of the FOLDER or FILE name are displayed. Double-byte characters cannot be displayed.
Folders and fi les are displayed in alphabetical order.
The date will not be displayed when there is no information in the fi le.
Motion JPEG is not compatible with this TV.
Files edited or saved on your PC may not be played back correctly.
TROUBLE?
31
Page 32

Useful functions
Select the number
of screens
Selecting " " returns to normal viewing mode
Not available in PC mode.
Watch in dual-picture mode
E.g. You can watch TV and video at the same time.
(For wide aspect ratio signals)
select
set
Watch in
multi-picture
mode
MULTI-PICTURE
Main Sub
Switch between
the sound sources
When watching DTV programmes, there may
be occasions where the aspect ratio changes,
for example during commercials. In this case,
the layout of the screen in dual-picture mode
changes automatically according to the aspect
ratio signal.
Select a channel in 12-screen mode (ATV)
All registered channels are displayed as still images.
Main
Only the selected frame
has a moving picture.
Move up or down a page
Not available when in DTV channels or
EXT-5 input.
Main
Sub
Change the channel
(Main)
(Sub)
select a
channel
watch
32
Page 33

While the channel
is displayed
(For 3 seconds)
Press the number
to register it on
SET 1 - 4?
"NOT AVAILABLE" is displayed:
Already registered
IMPORTANT! PREPARE USE
Register a
channel to
a button
FAVOURITE CHANNEL
(ATV)
PROGRAMMED!
Disappears after
a few seconds
Recall the favourite channel
Press the number
you registered
FAVOURITE 1 - 4?
Customisations (P. 36) to the
BBC1
1
Check your favourite channels
picture of a favourite channel
get saved as well.
"NOT MEMORY" is displayed:
Not registered
Press and confi rm that the channels
you have registered have a
Delete a favourite channel
"MENU" " " "FEATURES" "FAVOURITE SETTING"
FAVOURITE SETTING
1
2
3
4
FAVOURITE SETTING
07
PR
01
PR
PR 23
11
PR
1
07
PR
2
01
PR
3
4
11
PR
select Delete
(blue)
beside them
SETTINGS
TROUBLE?
33
Page 34

Useful functions
1
FEATURES
Set a time
for the TV to
turn itself off
SLEEP TIMER
FEATURES
2
FEATURES
SLEEP TIMER
CHILD LOCK
3
APPEARANCE
BLUE BACK
FAVOURITE SETTING
ILLUMINATION
MEDIA CARD VIEWER
> SLEEP TIMER
TYPE A
BRIGHT
ON
4
Cancel
Set the time to "0" in step 4
Remaining time
You can confi rm the remaining time at step 4,
after repeating this process.
select
"FEATURES"
next
select
"SLEEP TIMER"
next
select a time in
minutes
set
34
Page 35

ID
BBC
BBC
1
Stop
children from
watching
specifi c
channels
CHILD LOCK
(ATV)
2
3
4
5
6
FEATURES
SLEEP TIMER
CHILD LOCK
APPEARANCE
BLUE BACK
FAVOURITE SETTING
ILLUMINATION
MEDIA CARD VIEWER
>> SET ID NO.
> CHILD LOCK
(blue)
FEATURES
PR
ID
AV
BBC1 CH
01
BBC2 CH
02
ITV CH
03
CH4 CH
04
CH5 CH
05
06
07
08
09
FEATURES
TYPE A
ON
BRIGHT
CH
CH
CH
CH
> CHILD LOCK
PR
AV
01
02
03
04
05
06
07
21
22
23
24
25
26
27
28
ID
BBC1 CH
BBC2 CH
ITV CH
CH4 CH
CH5 CH
select
"FEATURES"
next
select
"CHILD LOCK"
enter an "ID NO."
(a secret number of your choice)
to the next column
set
select a channel to lock
CH
CH
Lock more channels
21
22
23
24
25
26
Repeat steps 5 and 6
IMPORTANT! PREPARE USE
7
Release a channel
View a locked channel
(blue)
Press again in step 6
Use the numerical buttons to enter the channel number.
appears, press and enter your "ID NO.".
When
(If you forget your "ID NO.", check it in step 4.)
SETTINGS
TROUBLE?
35
Page 36

Customising your TV
Display the menu bar
PICTURE
SOUND
PICTURE
PICTURE MODE
BRIGHT-1
CONTRAST
BRIGHT-2
SHARP
COLOUR
HUE
COLOUR TEMP.
FEATURES
Items
PICTURE
PICTURE MODE
BRIGHT-1
CONTRAST
BRIGHT-2
SHARP
COLOUR
HUE
COLOUR TEMP.
FEATURES
FEATURES
adjust
SET UP
DTV (P. 34)
PICTURE
Selected menu's title
STANDARD
COOL
STANDARD
COOL
Sub-menu
Adjustments / Confi gurations
To the previous
screen
Exit
The menu disappears
after one minute of
inactivity.
1
2
3
4
Select a menu
select
next
Select an item
select
Adjust/Confi gure
adjust/
select
set
When adjusting
with the sliding-bar
36
Move
When selecting
from presets
The item will change.
Some items have a
sub-menu.
set
select
set
Page 37

Menu
PICTURE MODE
BRIGHT-1
CONTRAST
PICTURE
BRIGHT-2
SHARP
COLOUR
HUE
COLOUR TEMP.
FEATURES
STEREO / I · II
BASS
SOUND
TREBLE
BALANCE
3D SOUND
A.H.B.
* Sound enhancement technology (ON / OFF)
BBE
SLEEP TIMER
CHILD LOCK
FEATURES
APPEARANCE
BLUE BACK
FAVOURITE SETTING
ILLUMINATION
MEDIA CARD VIEWER
AUTO PROGRAM
EDIT / MANUAL
DECODER(EXT-2)
SET UP
COMPONENT
AUTO SELECT
EXT SETTING
HDMI SETTING
ATTENUATOR
Item Adjustments / Confi gurations
Picture mode (BRIGHT / STANDARD / SOFT)
Backlight brightness (Darker Brighter)
Contrast (LOWER HIGHER)
Brightness (DARKER BRIGHTER)
Sharpness (SOFTER SHARPER)
Colour (LIGHTER DEEPER)
Tint (REDDISH GREENISH)
Colour temperature (WARM / NORMAL / COOL)
Finer picture adjustments (P. 44)
Mode / Language ( : STEREO / : MONO / : SUB1 / : SUB2)
Low tones (WEAKER STRONGER)
High tones (WEAKER STRONGER)
Speaker balance (LEFT STRONGER RIGHT STRONGER)
Ambience level (HIGH / LOW / MONO / OFF)
Emphasize the bass sound (ON / OFF)
Timer for turning off the TV (P. 34)
Stop children from watching specifi c channels (P. 35)
Format for displaying the channel number (TYPE A / TYPE B / TYPE C / TYPE D)
Display a blue screen and mute the sound
when the signal is weak or absent (ON / OFF)
Clear favourite channel settings (P. 33)
Lights illumination lamp (P.6) while the power is turned on (BRIGHT / SOFT / OFF)
Display photos or videos recorded on the media card (P. 30)
·
If a card is not inserted, message “NO MEDIA DETECTED” will appear on
the display.
Select the country of installation, automatically register channels (P. 12, )
Change registered channels or add new ones (P. 16)
For when connected to VCR with T-V LINK (ON / OFF)
Changes the TV input to EXT-4 when the component signals
are input to EXT-4. (ON/OFF) (Not available when viewing DTV or PC)
For use with video players and other devices (P. 27)
SIZE (AUTO / 1 / 2)
AUDIO (AUTO / ANALOGUE / DIGITAL)
For when the picture is not displayed because of too strong radio waves
(ON/OFF)
IMPORTANT! PREPARE USE
SETTINGS
TROUBLE?
Other settings * BBE licence (P. 50)
· Change the aspect ratio "ZOOM" (P. 20)
· Turn on 3D SOUND "3D SOUND" (P. 20)
37
Page 38

Using DTV
DTV original function and setting, such as a recorder-linked timer-record setting,
can be selected from the DTV menu.
Select DTV
Timer-record setting
1
Display the menu bar
2
To the previous
screen
Exit
The menu disappears
after one minute of
inactivity.
3
4
Select "DTV"
Select an item
DTV
Rec Timer
Configuration
Edit PR List
Installation
Common Interface
Rec Timer "
Confi guration "Change AV settings" (P. 40)
Edit PR List "Editing DTV channels" (P. 14)
Installation "Reset channel/Register a new
Common Interface "Set pay-per-view" (P. 42)
Recording using timer setting
channel/Initialise the DTV settings"
(P. 42)
select
next
select
next
" (P. 38)
Recording
using timer
setting
Rec Timer
38
Page 39

Select an "Inactive" column
1
REC TIMER 06:02 20/10/2004
No.
Name
1 BBC ONE 00:00 00:00 01/01/2000 Inactive
2
BBC ONE
3
BBC ONE
4
BBC ONE
5
BBC ONE
Start
00:00
00:00
00:00
00:00
End
00:00
00:00
00:00
00:00
Date
01/01/2000
01/01/2000
01/01/2000
01/01/2000
Mode
Inactive
Inactive
Inactive
Inactive
select
set
Settings can be overwritten.
IMPORTANT! PREPARE USE
Channels Start to End Dates Timer-record
Input timer-record setting details
2
REC TIMER 06:02 20/10/2004
No. Name Start End Date Mode
1 BBC ONE 00:00 00:00 01/01/2004 Inactive
2 BBC ONE 00:00 00:00 01/01/2004 Inactive
3 BBC ONE 00:00 00:00 01/01/2004 Inactive
4 BBC ONE 00:00 00:00 01/01/2004 Inactive
5 BBC ONE 00:00 00:00 01/01/2004 Inactive
6 BBC ONE 00:00 00:00 01/01/2004 Inactive
7 BBC ONE 00:00 00:00 01/01/2004 Inactive
8 BBC ONE 00:00 00:00 01/01/2004 Inactive
9 BBC ONE 00:00 00:00 01/01/2004 Inactive
10 BBC ONE 00:00 00:00 01/01/2004 Inactive
Name BBC TWO
Start
End
Date
Mode
Set
3
For more details about the timer-record
setting, refer to the notice of
"Prepare for recording" (P. 23)
REC TIMER 06:02 20/10/2004
Name
No.
1 BBC TWO 06:30 06:45 20/10/2004 Active
BBC ONE
2
BBC ONE
3
BBC ONE
4
BBC ONE
5
6 BBC ONE 00:00 00:00 01/01/2004 Inactive
7 BBC ONE 00:00 00:00 01/01/2004 Inactive
8 BBC ONE 00:00 00:00 01/01/2004 Inactive
9 BBC ONE 00:00 00:00 01/01/2004 Inactive
10 BBC ONE 00:00 00:00 01/01/2004 Inactive
Date
End
Start
01/01/2000
00:00
00:00
01/01/2000
00:00
00:00
01/01/2000
00:00
00:00
01/01/2000
00:00
00:00
setting state
06:30
06:45
20/10/2004
Once
A message will be displayed if
Mode
you set past dates.
Inactive
Inactive
Inactive
The channel will be selected
Inactive
automatically at the set start time,
and the recorder connected to
EXT-2 will start recording.
Active : timer set
Inactive : completed, cancelled
Change with
Enter using the
numerical keypad
Change with
(Once/Daily/Weekly)
SETTINGS
Cancel a timer-record setting
Select the column at step 1 and press . (Mode will be changed to "Inactive")
Change a timer-record setting
Select the column at step 1 and repeat steps 2 and 3.
TROUBLE?
39
Page 40

Using DTV
Available for changing subtitle languages for DTV, favourite channel selection,
changing PIN code, and upgrading the tuner software.
Also, you can upgrade the tuner software as newer versions become available.
Select DTV
AV setting
1
Display the menu bar
2
To the previous
screen
Exit
The menu disappears
after one minute of
inactivity.
3
4
Select "DTV"
Select an item
DTV
Rec Timer
Configuration
Edit PR List
Installation
Common Interface
Rec Timer "
Confi guration "Change AV settings" (P. 40)
Edit PR List "Editing DTV channels" (P. 14)
Installation "Reset channel/Register a new
Common Interface "Set pay-per-view" (P. 42)
Recording using timer setting
channel/Initialise the DTV settings"
(P. 42)
select
next
select
next
" (P. 38)
Change
AV settings
Confi guration
40
Page 41

d
Subtitle
English
Subtitle
English
Select a confi guration item
1
CONFIGURATION
Change settings
Audio Language
2
Favourite Mode
select
Audio Language
Subtitle
Favourite Mode
Receiver Upgrade
Enter PIN code
Subtitle
: Change language
: Channel selection method
Audio Language
Subtitle
Favourite Mode
Switch languages
(English / Welsh / Gaelic)
Select only DTV channels registered by using
"Favourites"(P. 14) with
English
English
Off
V.3.3
select
IMPORTANT! PREPARE USE
(On/Off)
Receiver Upgrade
Enter PIN code
: Upgrade tuner
Automatic Download
Search for New Version
: Change PIN code
Input the current code
Subtitle
Favourite Mode
Receiver Upgra
Enter PIN code
Enter PIN code
Input a new code twice.
00:00 00:00 01/01/2004 Inactive
Favourite Mode
00:00 00:00 01/01/2004 Inactive
Receiver Upgrade
00:00 00:00 01/01/2004 Inactive
Enter PIN code
00:00 00:00 01/01/2004 Inactive
00:00 00:00 01/01/2004 Inactive
PIN code:
00:00 00:00 01/01/2004 Inactive
Confirm:
00:00 00:00 01/01/2004 Inactive
00:00 00:00 01/01/2004 Inactive
00:00 00:00 01/01/2004 Inactive
Automatically and periodically
(Enabled/Disabled)
Download now (Press "OK" button.)
Default is "0000".
If you forget the code
Default the code in
"Reset channel registration"
(P. 42)
Off
V.3.3
00:00 00:00 01/01/2004 Inactive
Favourite Mode
00:00 00:00 01/01/2004 Inactive
Receiver Upgrade
00:00 00:00 01/01/2004 Inactive
Enter PIN code
00:00 00:00 01/01/2004 Inactive
00:00 00:00 01/01/2004 Inactive
00:00 00:00 01/01/2004 Inactive
PIN code changed.
00:00 00:00 01/01/2004 Inactive
00:00 00:00 01/01/2004 Inactive
00:00 00:00 01/01/2004 Inactive
V.3.3
Off
SETTINGS
TROUBLE?
41
Page 42

Using DTV
Available for registration of DTV channels, initialisation of all DTV settings,
and downloading software to use pay-per-view.
Select DTV
Registration and setting
1
Display the menu bar
2
Select "DTV"
3
Select an item
4
DTV
Rec Timer
Configuration
Edit PR List
Installation
Common Interface
select
next
select
next
Reset
channel
registration
Register a
new channel
Initialise the
DTV settings
Installation
42
To the previous
screen
Exit
The menu disappears
after one minute of
inactivity.
Rec Timer "
Confi guration "Change AV settings" (P. 40)
Edit PR List "Editing DTV channels" (P. 14)
Installation "Reset channel/Register a new
Common Interface "Set pay-per-view" (P. 42)
Recording using timer setting
channel/Initialise the DTV settings"
(P. 42)
" (P. 38)
Set pay-perview
Common Interface
Page 43

Select an installation item
1
Installation
Automatic Search
Manual Search
Factory Settings
Change setting
2
Automatic Search
Select "Yes"
Start automatic search? Current PR list
will be replaced.
Manual Search
Enter a channel number
Installation > Manual Search
Channel Number
61
Signal Level:
Signal Quality:
: Reset channel registration
select
NoYes
next
: Register a new channel
select
next
Installation > Automatic Search
Channels:
BBC ONE
BBC TWO
BBC THREE
BBC NEWS 24
BBCi
CBBC Channel
UHF CH:68
100%
Receive the channel
Installation > Manual Search
Channel Number
62
Signal Level:
Signal Quality:
Displays "Edit PR List"
(P. 14) after registering
channels.
When receiving is
completed, a message
will be displayed and
the screen will return to .
IMPORTANT! PREPARE USE
Factory Setting
: Initialise the DTV settings
Select "Yes" Start channel registration
select
Are you sure you want to delete the PR list
and reset all settings?
Yes N o
Preparation : Set the CAM etc. after contracting with the broadcasting company
"Watch pay-per-view" (P. 9)
next
Select the broadcasting station
Common Interface
Top Up TV
Select "Yes"
Software Download
Do you want to upgrade your module?
Yes
No
Press Ok to select, or Exit to quit
Use this menu for settings and contract content for pay-per-view.
For details, consult your broadcasting company
CancelOK
select
download
PR list Empty. Start automatic search.
Ok
Select "Software Download"
Main menu
Module information
Smart card information
Language
Software Download
Press Ok to select, or Exit to quit
Software Download
Searching for a new software version. Please wait...
Press Ok Exit to quit
CancelOK
CancelOK
(P.12)
select
next
in "Initial settings"
SETTINGS
TROUBLE?
43
Page 44

Advanced picture adjustment
By default, the TV automatically adjusts itself for the best picture.
To the previous
screen
Exit
The menu disappears
after one minute of
inactivity.
1
2
3
4
5
6
Display the menu bar
Select "PICTURE"
PICTURE
Select "FEATURES"
PICTURE
PICTURE MODE
BRIGHT-1
CONTRAST
BRIGHT-2
SHARP
COLOUR
HUE
COLOUR TEMP.
FEATURES
STANDARD
COOL
Select an item
> FEATURES
DIGITAL VNR
Super DigiPure
MOVIE THEATRE
COLOUR MANAGEMENT
PICTURE MANAGEMENT
COLOUR SYSTEM
4:3 AUTO ASPECT
E.g. DIGITAL VNR
AUTO(LOW
AUTO
AUTO
ON
ON
)
Change settings
> FEATURES
DIGITAL VNR
Super DigiPure
MOVIE THEATRE
COLOUR MANAGEMENT
PICTURE MANAGEMENT
COLOUR SYSTEM
4:3 AUTO ASPECT
E.g. DIGITAL VNR
AUTO(LOW
AUTO
AUTO
ON
ON
)
Finish
select
next
select
next
select
next
select
set
DIGITAL
VNR
Super
DigiPure
MOVIE
THEATRE
COLOUR
MANAGEMENT
PICTURE
MANAGEMENT
COLOUR
SYSTEM
44
4:3 AUTO
ASPECT
Page 45

To reduce
noise
For
natural-looking
outlines
AUTO(LOW
AUTO
AUTO
ON
ON
AUTO(LOW
AUTO
AUTO
ON
ON
)
MIN
: When
the picture
loses sharpness
AUTO(LOW) AUTO(HIGH) MAX
: When noise
appears
level
IMPORTANT! PREPARE USE
)
OFF
: Function is
turned off
MIN AUTO MAX
: When
noise appears
: When the picture
loses sharpness
level
For smooth
cinema fi lm
For
natural-looking
pictures
Fix
bright/dark
pictures
When
there is no
colour
AUTO(LOW
AUTO(LOW
AUTO(LOW
>> COLOUR SYSTEM
MAIN
AUTO
AUTO
ON
ON
AUTO
AUTO
ON
ON
AUTO
AUTO
ON
ON
)
)
)
SUB
AUTOPAL
OFF
: Function is
turned off
OFF
: Function is
turned off
OFF
: Function is
turned off
Select the screen to change settings on
MAIN
: Main picture
Select the colour system
PAL
: Western
Europe
: USA
ON
: Function is
always on
ON
: Maintain a natural
colour balance
ON
: Make it easier to view
bright / dark pictures
SUB
: Sub-picture in
MULTI-PICTURE mode (P. 32)
NTSC 3.58
3.58 MHz
NTSC 4.43
: USA
4.43 MHz
AUTO
: Automatically
adjusts
AUTO
: When watching
videos, etc.
SETTINGS
Set a default
aspect ratio
>> 4:3 AUTO ASPECT
PANORAMIC
REGULAR
14:9 ZOOM
Select a default aspect ratio for "AUTO" in "ZOOM"
(P.20)
PANORAMIC
16 : 9 4 : 3 14 : 9
REGULAR 14:9 ZOOM
TROUBLE?
45
Page 46

Troubleshooting
Severe noise or
snow
Is the TV connected correctly to
the aerial?
Change the direction of the aerial.
Is the aerial or its cable
damaged?
Consult your retailer
Patterns, stripes
or noise
I can't turn it on!
Is the power cord connected to the AC outlet
Is the aerial receiving interference
from high-voltage power lines or
wireless transmitters?
Consult your retailer
Are connected devices too close
to the TV?
Insert the minimum distance
between the aerial and the
cause of interference until no
interference
correctly?
46
Ghosting
(Doubling of images)
Are you receiving interference
from signals refl ected off
mountains or buildings?
Adjust the direction of your
aerial, or change to a
good-quality directional aerial
The remote
control doesn't
work!
Are the batteries fl at?
Are you more than 7 metres away
from the TV?
Is the "VCR/TV/DVD SWITCH" set to "TV"?
When viewing teletext, the TV menu bar
does not appear.
Depending on the stability of the signal, there
may be a time lag when changing channels.
Page 47

Problem Actions
page
Not displayed
(black screen)
Basics Picture
Remote control
stops working
DTV screen is frozen
Some functions
do not work
Aspect ratio changes
unintentionally
Screen
Black or white dots
appear on the screen
Is the ATV reception poor, too?
Following the instructions in "Severe noise or snow"
can solve this problem.
Is there a DTV transmission tower nearby?
Turn "ATTENUATOR" to "ON", since the radio waves
are too strong.
There may be problems at the antenna, radio waves,
or the area you live in, where reception is bad.
Consult your retailer.
When a media card is inserted into the TV, remove the card
fi rst. Then, unplug TV, several minutes later plug it in again.
Hold down and on the TV
simultaneously to restart.
It is not a malfunction. Some functions (dark background)
in the menu do not work depending on the situation.
Press to return to your settings.
LCD panels use fi ne dots ("pixels") to display images.
While more than 99.99% of these pixels function properly,
a very small number of pixels may not light,
or may light all the time.
Please understand that this is not a malfunction.
46
37
20
-
IMPORTANT! PREPARE USE
-
-
-
-
Poor picture quality
Strange picture
when using an external
device
Unnatural colour >>> Adjust COLOUR and BRIGHT-1.
Check your COLOUR SYSTEM.
Noise >>> Set to the following functions.
PICTURE MODE : STANDARD
DIGITAL VNR : AUTO (HIGH)
Super DigiPure : MIN
Dull picture >>> Set to the following functions.
PICTURE MODE : BRIGHT
DIGITAL VNR : MIN
Super DigiPure : MAX
If you connected S-Video output device, check the
“S-IN” setting.
If the top of the image is distorted, check the video
signal quality itself.
If movement appears unnatural when receiving a signal
from a DVD player, etc. with 625p (progressive-scanning),
change the output setting of the external device to 625i
(interlace-scanning).
37
44
37
44
44
37
44
44
27
SETTINGS
TROUBLE?
-
-
47
Page 48

Troubleshooting
(continued)
Problem Actions
Sound
Poor sound
Wrong screen size
HDMI
No sound
Green and
distorted screen
Functions
Some inputs are
skipped in the
sub-picture
"FEATURE NOT
AVAILABLE"
Adjust the BASS and TREBLE.
If receiving a poor signal in "STEREO/ · ", switch to MONO.
Switch SIZE in HDMI SETTING to "1" or "2".
Switch AUDIO in HDMI SETTING to ANALOGUE or DIGITAL.
Wait a little for the signal to stabilize when switching
the signal format for an HDMI device.
DTV channels, EXT-4/EXT-5 inputs, and PC mode
cannot be selected in the sub-picture.
Is the T-V LINK compatible device connected to EXT-2?
Is the SCART CABLE "Fully Wired"?
Is the T-V LINK compatible device turned on?
After confi rming all the conditions above,
press "OK" button again.
page
37
37
37
37
-
-
50
50
-
48
"ACI ERROR"
Error message
"NO RECORDING"
"NO RECORDING
POSSIBLE"
"NO RECORDING
MEDIA PROBLEM"
"NO RECORDING
DEVICE BUSY"
Press to start ACI again.
If you still receive the "ACI ERROR" after numerous tries,
press to cancel ACI.
A problem occurs at the recorder.
The displayed video cannot be recorded.
The recorder is not ready for recording.
Check the videotape or DVD disc.
The recorder is recording another programme, or is playing.
-
-
-
-
-
Page 49

Problem Actions
page
DTV
An error message
does not disappear
Deleting a DTV channel may cause an error message to
appear while other channels displayed.
Register channels again in "Automatic Search"
CH/CC List
To use the INSERT function (P. 16), fi nd the CH/CC number corresponding to the TV's channel number
from this table. If you want to know a particular TV channel's channel menu, look in TV listings magazines or
contact the broadcaster.
When the COUNTRY setting is UNITED KINGDOM, the CC number channels and channels from CH02 to
CH12 cannot be received.
CH Channel
CH 02 E2, IR A
CH 03 E3, IR B
CH 04 E4, IR C
CH 05 E5, IR D
CH 06 E6, IR E
CH 07 E7, IR F
CH 08 E8, IR G
CH 09 E9
CH 10 E10, IR H
CH 11 E11, IR J
CH 12 E12
CH 21 E21
CH 22 E22
CH 23 E23
CH 24 E24
CH 25 E25
CH 26 E26
CH 27 E27
CH 28 E28
CH 29 E29
CH 30 E30
CH 31 E31
CH 32 E32
CH 33 E33
CH 34 E34
CH 35 E35
CH 36 E36
CH 37 E37
CH 38 E38
CH 39 E39
CH Channel
CH 40 E40
CH 41 E41
CH 42 E42
CH 43 E43
CH 44 E44
CH 45 E45
CH 46 E46
CH 47 E47
CH 48 E48
CH 49 E49
CH 50 E50
CH 51 E51
CH 52 E52
CH 53 E53
CH 54 E54
CH 55 E55
CH 56 E56
CH 57 E57
CH 58 E58
CH 59 E59
CH 60 E60
CH 61 E61
CH 62 E62
CH 63 E63
CH 64 E64
CH 65 E65
CH 66 E66
CH 67 E67
CH 68 E68
CH 69 E69
CC Channel
CC 01 S1
CC 02 S2
CC 03 S3
CC 04 S4
CC 05 S5
CC 06 S6
CC 07 S7
CC 08 S8
CC 09 S9
CC 10 S10
CC 11 S11
CC 12 S12
CC 13 S13
CC 14 S14
CC 15 S15
CC 16 S16
CC 17 S17
CC 18 S18
CC 19 S19
CC 20 S20
CC 21 S21
CC 22 S22
CC 23 S23
CC 24 S24
CC 25 S25
CC 26 S26
CC 27 S27
CC 28 S28
CC 29 S29
CC 30 S30
CC Channel
CC 31 S31
CC 32 S32
CC 33 S33
CC 34 S34
CC 35 S35
CC 36 S36
CC 37 S37
CC 38 S36
CC 39 S39
CC 40 S40
CC 41 S41
CC 75 X
CC 76 Y
CC 77 Z
CC 78 Z+1
CC 79 Z+2
43
IMPORTANT! PREPARE USE
SETTINGS
TROUBLE?
49
Page 50

Technical information
What is T-V LINK?
T-V LINK allows the TV to share information easily with a connected T-V LINK compatible device.
By using T-V LINK :
You can send the ATV channel information programmed on the TV to the T-V LINK compatible device, so that
both the TV and the external device have the same channel settings. When connecting a new external device,
channel information is loaded into it, allowing channel setup to be completed very quickly. For more details,
refer to the external device's manual.
You can easily record the TV programme you are viewing on a T-V LINK compatible device by using the
"DIRECT REC" feature. For more details, refer to the external device's manual.
After timer-record setting, the TV will instruct the recorder to start and stop recording, via DIRECT REC.
What is ACI (Automatic Channel Installation)?
Some cable companies transmit a signal called ACI which contains information that allows TV channels to be
registered automatically on your TV.
When an ACI signal is received, "ACI START/ACI CANCEL" appears in the "AUTO PROGRAM" screen.
PC Signals that can be displayed
*Macintosh* computers are not supported.
(Macintosh is a registered trademark of
Apple Computer, Inc.)
If the signal doesn't appear, check that the vertical
frequency on the PC is set to 60Hz.
Connect DVI devices
Connect a DVI device to EXT-5 (HDMI) using DVI-HDMI conversion cable. Connect analogue sound output of
the DVI device to L and R terminals in EXT-4.
Set AUDIO in HDMI SETTING to ANALOGUE or AUTO (P. 37)
Resolution
Vertical frequency (Hz)
Horizontal frequency (kHz)
640 x 480 (VGA) 1024 x 768 (XGA)
60.0 60.0
31.5 42.0
If you accidentally cut the power cord
Attach a new plug following the steps below. If in doubt, contact your local retailer.
Important
Never connect to the larger terminal marked with an "E", the safety earth
symbol " " or coloured green or green-and-yellow.
The wires in the mains lead on this product are coloured with the following code:
· Blue: Neutral wire (connect to the black terminal, or one marked "N")
· Brown: Live wire (connect to the red terminal, or one marked "L")
Change the fuse in the plug
Open the plug as illustrated on the right.
When replacing the fuse, always use a correctly rated and approved type and
re-fi t the fuse cover when fi nished.
If in doubt, contact your local retailer.
Licence
Manufactured under license from BBE Sound, Inc.
Licensed by BBE Sound, Inc. under USP4638258, 5510752 and 5736897.
BBE and BBE symbol are registered trademarks of BBE Sound, Inc.
50
Fuse
Page 51

Specifi cations
Main unit
Broadcasting systems
Colour systems
Channels and frequencies
Sound-multiplex systems
Teletext systems
Power requirements
Audio output (
Speakers
Power consumption
[standby]
Screen size
(
visible area size measured diagonally
Dimensions (W x H x D : mm)
[without stand]
Weights
[without stand]
Accessories
This TV has the CAM (Conditional Access Module) slot for watching pay-per-view.
Please note that the CAM and viewing card must be purchased separately.
Input / Output
terminals
Input terminals
Output
terminals
Media Card
Slots
We may change the design and specifi cations without notice.
Model LT-37DM6ZJ
Rated power output
CCIR, I
PAL
·The EXT terminals also support the NTSC 3.58/4.43 MHz system.
Analogue :
E21-E69 (UNITED KINGDOM)
IR A-J, E2-E12, E21-E69 (IRELAND)
Digital : 474 MHz-850 MHz (channel 21-68)
NICAM (I) system.
Analogue : FLOF (Fastext), WST (World Standard System).
Digital : MHEG 5 UK profi le
AC 110 V - 240 V, 50/60 Hz
)
10 W + 10 W
6.6 cm round x 2
185 W
[2.6 W]
94 cm
)
926 x 689.5 x 297
[926 x 631.5 x 108.5]
26.5 kg
[21 kg]
(See "Check accessories", P. 5)
Terminals / Connectors / Slots
Terminal name Terminal type Signal type (IN) Signal type (OUT)
EXT-1
EXT-2
EXT-3
EXT-4
EXT-5 (HDMI)
PC INPUT
AUDIO OUT
Headphone
Slot (Small)
Slot (Large)
Euroconnector x1
(SCART connector)
Euroconnector x1
(SCART connector)
RCA connectors x 3,
S-VIDEO connector x 1
RCA connectors x 5
HDMI connector x 1
D-SUB (15 pins) x 1 Analogue PC signal (P. 46)
RCA connectors x 2 Audio L / R
Stereo mini-jack x 1
(3.5 mm in diameter)
(See “Using a Media card”, P. 28-31)
Composite video, S-video,
Analog RGB, AUDIO L / R
Composite video, S-video,
Analog RGB, AUDIO L / R
Composite video, S-video
AUDIO L / R
Analogue component
(576i (625i) / 480i (525i),
Progressive : 576p (625p) / 480p (525p),
HD : 1080i (1125i), 720p (750p)
AUDIO L / R
HDMI
(576i (625i) / 480i (525i) /
576p (625p) / 480p (525p),
1080i (1125i), 720p (750p))
TV out
Dubbing out
(S-VIDEO out is available
only for DTV channels)
)
Headphone
output
IMPORTANT! PREPARE USE
SETTINGS
TROUBLE?
51
Page 52

For users in the UK :
If you have any problems setting up your
new TV, please call the
Helpline on
For users in the Republic of Ireland :
If you have any problems setting up your
new TV, please call the
Helpline on
C
2005 Victor Company of Japan, Limited 0905KTH-CR-MU
0870 330 5000.
1890-582500.
 Loading...