

Page 1

FIXD IP DOME CAMERA
FIXD MEGAPIXEL IP DOME CAMERA
INSTRUCTIONS
VN-V225U
(Installation)
VN-X235U
● This is a supplementary instruction manual to
[READ ME FIRST]. Please read through this
manual together with the bundled [READ ME
FIRST] (sheet).
● For image and network settings, please refer to
[INSTRUCTIONS (Setting)].
LST0926-001A
Page 2

Getting Started
Features
High picture quality
The camera employs a progressive CCD with a
resolution of about 330,000 pixels (1/4"), which
enables video surveillance using high-quality
images. (VN-V225U)
The camera employs a progressive CCD with a
resolution of about 1.25 megapixels (1/3"), which
enables video surveillance using high-definition
and high-quality images. (VN-X235U)
Wider shooting range
The adjustable range for the shooting direction is
very wide, and the rotation control mechanism
enables the camera to be mounted to the wall
surface.
Unblocked Design
The dome-shaped design enables ease of use
without being blocked by the camera.
Embedding to the ceiling without
brackets
There is no need to prepare brackets for
embedding the camera to the ceiling.
High zoom ratio varifocal lens
The camera comes with a built-in varifocal lens
with an optical zoom ratio of 3.6x (VN-V225U)
and 3x (VN-X235U) for more detailed
surveillance.
Support for PoE (Power over Ethernet)
This camera supports PoE (IEEE802.3af) and
enables power supply through a LAN cable.
Supports night surveillance
Surveillance under low illumination, such as
during night time, is possible by turning the
infrared cut filter Off to switch to the highsensitivity mode (black-and-white mode).
Electronic Sense Up function
During surveillance at a dimly lit location,
shooting can be performed by lengthening the
exposure time to increase the sensitivity of the
camera.
High frame rate
Data transmission is possible in VGA size (640 x
480) at a rate of 30 fps. (VN-V225U)
Data transmission is possible in Quad-VGA size
(1280 x 960) at a rate of 15 fps. (VN-X235U)
Support for dual stream
JPEG and MPEG images can be distributed
simultaneously.
Support for multicast
This product supports multicast, which enables
transmission of image data to multiple
computers on the network without lowering the
frame rate.
Built-in web server
You can configure the picture quality and
communication settings using the Internet
Explorer.
HTTP-based API
This product comes with HTTP-based API. This
feature enables you to perform setting and
control via the network.
Built-in JPEG and MPEG4 Viewer
Monitoring on a PC is possible by downloading
the built-in viewer to the PC.
Motion detection feature
This feature enables output of an alarm upon
detection of motion in the video image within
preset area.
FTP transmission of pre-/post-recorded image
files is possible using the alarm input.
Digital PTZ functions (VN-X235U)
This camera comes with a digital PTZ (Pan/Tilt/
Zoom) function, which enables you to clip and
enlarge a specific area to monitor from the
image that is being captured. This allows
surveillance to be performed on a wide field of
view using a small bandwidth.
Privacy mask function
You can configure the privacy mask setting to
exclude a specific area from the targeted
shooting area.
The shape and location of the mask can be set
as required.
Support for audio input/output
Audio sound can be sent to a PC by connecting
an external microphone. Also, audio sound input
to the PC can be output through an audio signal
input/output cable via the network.
2
Page 3

Analog signal output (for installation)
This camera is equipped with an analog video
monitor signal output terminal, which is used for
adjusting the camera angle during installation.
Saving JPEG images to the FTP server
at regular intervals
JPEG images may be uploaded to the FTP
server at regular intervals.
Alarm input/output
This camera comes with a motion detection
feature and dual alarm input.
During motion detection or alarm input, actions
such as mail delivery, message transmission via
TCP/UDP, alarm output, or a combination of any
two actions can be triggered.
Installing an FTP server enables uploading of
images before and after the alarm input time
(pre-/post-recording) to the server.
Fine focus adjust
This feature eases fine-tuning of the focus, and
enables focus to be accurately adjusted
speedily.
How to read this INSTRUCTIONS
(Installation)
䡵 Symbols used in this manual
Note :States precautions to be taken
during operation.
Memo :States restrictions on the functions
or use of this equipment. For
reference purposes.
A :Indicates the page numbers or
items to refer to.
䡵 Contents of this manual
● JVC holds the copyright to this manual. Any
part or all of this manual may not be
reproduced without prior consent from the
company.
● Windows is a registered trademark of
Microsoft Corporation in the U.S.
● Product names of other companies
described in this manual are trademarks or
registered trademarks of the respective
companies. Symbols such as 姠, 姞 and 姝
are omitted in this manual.
● Design, specifications and other contents
described in this manual are subject to
change for improvements without prior
notice.
Contents
Getting Started
Features ........................................................ 2
Contents ........................................................ 3
Precautions ................................................... 4
Name and Function of Parts.......................... 6
Connection/Installation
Mounting the Camera.................................. 10
Embedding the Camera into the Ceiling
Mounting with the cables pulled out
from the side ........................................12
Connecting the Alarm Input/Output Cable
Others
Troubleshooting ........................................... 14
Specifications .............................................. 15
....10
..... 13
3
Page 4

Getting Started
Precautions
Storage and Operating Environment
䢇 This product is an indoor camera. It cannot
be used outdoors.
䢇 Do not store in the following environments.
It might result in malfunctions or failure.
●
Hot or cold locations beyond the allowable
operating temperature range of -10
50
I
● Locations beyond the allowable operating
humidity range of 35 % RH to 90 % RH
(condensation is not allowed)
● Near equipment that emits strong
magnetic fields, such as transformers or
motors
● Near equipment that emits radio waves,
such as transceivers and mobile phones
● Locations with excessive dust and sand
● Locations that are subject to strong
vibrations
● Locations prone to moisture such as
window side
● Locations that are subject to steam or oil,
such as kitchens
● Locations that are subject to emission of
radiation, X-rays or corrosive gases
䢇 Use of this product and cables connected to
this product at locations where strong electric
waves and magnetic waves are generated
(e.g., near radio, TV, transformer, monitor,
etc.) may cause noise interferences in the
images or changes in the color.
䢇 Do not install this camera at a location that is
directly subject to cold air, or near the
discharge outlet of an air-conditioner. Drastic
changes in the temperature may fog up the
dome cover.
䢇 Do not install this camera at a location that
traps heat
This product also discharges heat from the
surface of the main unit. Do not install it at
locations that may trap heat, such as the
corner of a wall.
Handling Precautions
䢇 Do not block the vents
Inadequate heat ventilation may result in
malfunction of this product. Be sure not to
block the vents around the product.
I
to
Copyright Protection
䢇 With the exception of the user being the
copyright holder or when permission such as
for duplication has been granted by the
copyright holder, permission is required in
principle for the duplication, modification, or
transmission of copyrighted video and audio
data.
䢇 Unauthorized duplication, modification, or
transmission of copyrighted material may
constitute a copyright infringement, and the
user may be liable to compensate for any
damages. When using copyrighted video/
audio data, be sure to check the license
agreement of the copyrighted material
thoroughly.
䢇 When rights or rights holders are involved
with regard to the targeted duplicating
subject, permission may be required for
shooting or using (processing) it. Be sure to
check the licensing conditions thoroughly.
Disclaimer
䢇 The motion detection feature is not a feature
to prevent theft or fire. Our company shall not
be liable for any loss or damage resulting
from the use of this feature.
䢇 We shall not be responsible for any loss or
damage caused in the event of privacy
invasion as a result of the camera footages of
this product.
Maintenance
䢇 Turn off the power before performing
maintenance.
䢇 Wipe using a soft cloth.
Wiping with thinner or benzene may melt or
tarnish its surface. For tough stains, wipe
using a cloth that is dipped into a neutral
detergent diluted with water, followed by
wiping with a dry cloth.
Saving Energy
䢇 If the camera is not to be used for a long time,
turn off the power of the system for safety
and energy conservation reasons.
4
Page 5

Others
䢇 This camera comes with a built-in AGC
circuit. Setting AGC to AMidB, AHighB or
ASuperB increases the sensitivity of a dark
image, and the screen may appear grainy.
This is not a malfunction.
䢇 When this camera is used with the white
balance set to AAT W B (Auto Tracking White
Balance), the color tone of some objects may
differ slightly from the actual color due to the
principle of the automatic tracking white
balance circuit. This is not a malfunction.
䢇 If a high brightness subject (such as a lamp)
is shot, vertical lines may appear in the image
displayed on the screen (smear), or bleeding
may appear around the bright subject
(blooming). These phenomena are
characteristics of the CCD, and are not
caused by malfunction of the camera.
䢇 For regions with a commercial power supply
frequency of 50 Hz, switch to the Flickerless
mode during use under fluorescent lights
(excluding inverter lighting equipment) to
prevent flickers.
䢇 When switching between color and black-
and-white images in the B&W mode, the
brighter area on the screen is emphasized,
which may reduce the visibility. However, this
is not a malfunction.
䢇 When the electronic sensitivity enhancement
feature is enabled, the screen may appear
grainy and more white spots may appear as
the sensitivity is increased. However, this is
not a malfunction.
䢇 If the power supply voltage is momentarily cut
off or reduced due to lightning or turning on of
the air conditioner’s power, the image may be
disrupted or noise interference may occur.
䢇 The rotation angle of this camera is increased
to enable installation at a wider variety of
locations. When the zoom of the lens is at the
wide end, and tilted at an angle close to ±80°,
a part of the camera may come into view on
the screen depending on the rotation angle.
When this occurs, adjust the field angle
accordingly.
䢇 When using multicast, make use of an
IGMPv2-compliant network switch.
䢇 Power can be supplied to this camera either
by using PoE or connecting to an AC 24 V
power supply. Make sure that power is
supplied using only one of the above
methods at any one time. Connecting
simultaneously using the power cable and to
PoE via a LAN cable may cause the camera
to break down or malfunction.
䢇 Some hubs/switches of products that are
equipped with intelligent features may include
a broadcast/multicast suppression function.
Viewing of multicast images on this product
may fail if this function is enabled.
䢇 During viewing using the integrated viewer,
the video and audio sound may appear outof-sync. This is not a malfunction.
䢇 It is recommended to use shielded LAN
cables, shielded alarm cables and shielded
audio cables for connection with this product.
The safety and reliability of this product has
been checked by using shielded cables.
5
Page 6
Getting Started
Name and Function of Parts
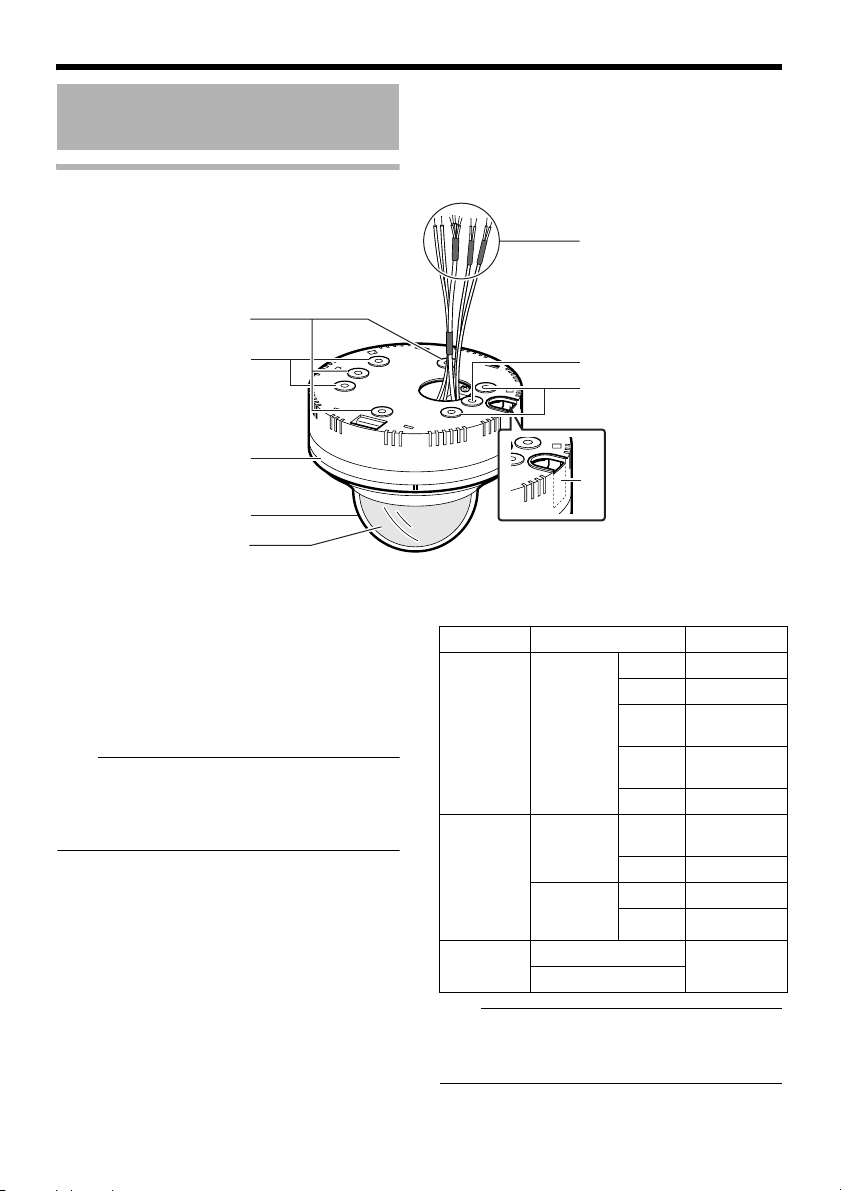
Camera
A
G
B
C
D
E
A
Mounting holes (oval) ⳯ 4
Use these holes when mounting the camera
directly to the ceiling or a wall.
B Mounting holes (round) ⳯ 4
Use these holes when mounting the camera
directly to the ceiling or a wall.
They are also used for mounting the camera to
an electrical box.
Note:
● To mount the camera using an electrical box,
please consult the dealer shop from which
the camera is purchased or any nearby JVC
Service Centers.
C Outer casing
Use these holes when mounting the camera
directly to the ceiling or a wall.
D Dome cover
E Inner dome
F Cable outlet
Use this outlet to pull out the cable from the side
of the camera without making a hole in the
ceiling. Break the section marked by a dotted
line, and pull out the cable.
(A page 12)
A
B
F
G Alarm cable/Audio cable/Power cable
(A [READ ME FIRST])
Type Color Signal name
Alarm cable Black
Audio cable Pink
Powe r cable
Note:
● Do not use PoE and an AC24 V power supply
at the same time. Doing so may cause the
camera to break down or malfunction.
(Shielded
cable)
(Shielded
cable)
Black
(Shielded
cable)
Red (Unshielded cable)
Black (Unshielded cable)
Red Alarm input 1
Brown Alarm input 2
Orange Alarm
Yellow Alarm
Black GND
White Microphone
Yellow GND
White Line output
Yellow GND
output 1
output 2
input
AC 24 V
Power Supply
6
Page 7

Camera Body/Interior
T The following is an illustration when the dome cover, inner dome, and outer casing are removed.
Removal procedures (A page 11 ARemove the outer casingB)
Lens
(A page 8)
H
I
J
K
H [10BASE-T/100BASE-TX(PoE)] LAN cable
connector (RJ-45)
I Fall prevention sheet
This sheet connects the camera unit with the dome
cover.
J Camera Unit
K
Fall prevention wire (supplied) and wire
mounting screw
Connects the camera unit J with the outer
casing C using the fall prevention wire fastening
hook L.
L Fall prevention wire fastening hook
M Ceiling mounting brackets (x3)
These brackets are used when embedding the
camera to the ceiling. (A page 10)
N Camera unit fastening screw
Fastens the camera unit J and the outer casing C.
How to remove (A page 11)
Rear face of camera unit
K
O
MAC address
P
N
H
M
L
O [MAC address] indication
The MAC address is a unique physical address
of the product. This address cannot be altered.
P Fall prevention wire mounting screw
Use the screw for attaching the fall prevention
wire from the ceiling.
(Fall prevention wire is not provided. )
7
Page 8

Getting Started
Name and Function of Parts
(continued)
Lens
Y
Q
R
S
T
Q
Tilt fastening screw
Note:
● After adjusting the field angle, tighten the tilt
fastening screw to secure the camera so that
its field angle does not go out of alignment.
(A [READ ME FIRST])
R Focus adjustment ring
Move the ring to the left and right to adjust the
focus.
(A [READ ME FIRST])
S Zoom adjustment ring
Move the ring to the left and right to adjust the
field angle.
(A [READ ME FIRST])
T [MONITOR] terminal (pin jack)
(A [READ ME FIRST])
X
W
U
V
T
U
U [RESET] button
This button has two functions as described
below, depending how it is being pressed.
● Reset function (press for less than 2 seconds
and release)
Reboots the camera. Reboot takes about 1
minute. During this interval, the [RESET]
button is disabled.
● Focus adjust function (press for at least 2
seconds and release in less than 5 seconds)
The camera enters the focus adjust mode
and the status indicator V blinks in green
and orange alternately.
This function can also be used on the viewer.
Refer to [INSTRUCTIONS (Setting)].
Note:
● During the focus adjust mode, the screen
may flicker when the electronic shutter is
operating. This is not a malfunction.
● Pressing this button for 5 seconds or longer
switches the camera to the Service Check
mode. The status indicator lights up in orange
color in this mode. Do not press the button for
5 seconds or longer.
● To make use of the focus adjust function of
the Reset button, restart the camera after
setting the [MONITOR OUT] output selection
switch W to ANB or APB.
8
Page 9

V Status indicator
Indicates the current status of the camera.
Starting up : Lights up in orange
After startup is complete : Lights up in green
Error : Blinks in orange
Memo:
● When the camera is in the focus adjust mode,
the status indicator blinks in green and
orange alternately.
● The indicator light after startup can be set to
off or blink in green using the [LED State] of
the integrated viewer. To alter the settings of
the LED indicator, refer to [INSTRUCTIONS
(Setting)].
W [MONITOR OUT] selection switch
Use this switch to select whether to send output
from the [MONITOR] terminal T, and also the
corresponding signal format.
[N] : Select this when connecting to an
NTSC-compatible monitor.
[OFF]
: Disables output. Select this setting when
sending images to the network.
[P] : Select this when connecting to a PAL-
compatible monitor.
[Default setting : AOFFB]
Note:
● Images are not sent to the network when this
is set to ANB or APB.
● When the switch setting is altered, press the
[RESET] button for less than 2 seconds to
reboot the camera.
X Rotation control
Adjusts the inclination of the image by rotating
the lens unit with the center of the lens as the
axis.
(A [READ ME FIRST])
Note:
● Do not hold the lens section when adjusting
the camera direction. The lens section may
be damaged if you apply force to it.
Y [FOCUS ADJ] fine focus adjust
This is used to focus the lens.
(A [READ ME FIRST])
9
Page 10

Connection/Installation
Mounting the Camera
Selecting a Mounting Method
The procedures vary according to the mounting
method. Mount the camera accordingly by
referring to the respective section.
Note:
● Be sure to put on protective glasses to
protect your eyes from falling objects when
mounting the camera to the ceiling.
● To mount the camera using an electrical box,
please consult the dealer shop from which
the camera is purchased or any nearby JVC
Service Centers.
Mounting Methods
䢇 Embedding into the ceiling (A page 10)
䢇 Mounting directly to the ceiling or the
wall (A [READ ME FIRST])
䢇 Mounting with the cables pulled out
from the side (A page 12)
Warning
● Special attention is required when
mounting the camera to a wall or ceiling.
Make sure that the mounting work is
performed by a specialist. Improper
mounting may cause the camera to fall off
and result in injuries.
● We are not liable for any damage, injury or
other problems caused by a camera that
has fallen off due to failure to follow the
installation instructions and improper
mounting. Pay careful attention during
mounting.
● To prevent the camera from falling off,
mount it to a firm place (ceiling slab or
channel) using a fall prevention wire.
● Take note of the length, strength, pull and
material (insulation) of the fall prevention
wire.
● Insufficient tightening of the mounting
screws and nuts may cause the camera to
fall off. Make sure that there are properly
and firmly tightened.
● Do not mount the camera near lighting
equipment that may be heated up to a high
temperature, such as a spotlight. This may
result in malfunction of the equipment or
cause fire.
Embedding the Camera into the Ceiling
T The camera can be mounted to ceilings with
a thickness between 9.5 mm and 22 mm.
䡵 Preparation
1 Make a hole in the ceiling (R120 mm)
2 Pull out the cables from the hole in
the ceiling
Pull out the fall prevention wire, LAN cable,
power cable, alarm cable, and audio cable that
are attached to the ceiling slab from the hole.
(Fall prevention wire is not provided)
Note:
● Take note of the length, strength, pull and
material (insulation) of the fall prevention
wire.
● The inner diameter of the ring section of the
fall prevention wire to be mounted to the
camera should be betweenR3.1 mm and R5.5
mm, and the outer diameter not larger than
R9 mm.
Fall prevention wire
1
(Not supplied)
Cables (power cable,
alarm cable, audio
cable, etc.)
LAN cable
R120 mm
Approx. 100 mm
2
3 Remove the dome cover
Turn the dome cover in the anti-clockwise
direction to remove it. To prevent damage to the
dome cover, a protection sheet is affixed.
Dome cover
protective sheet
10
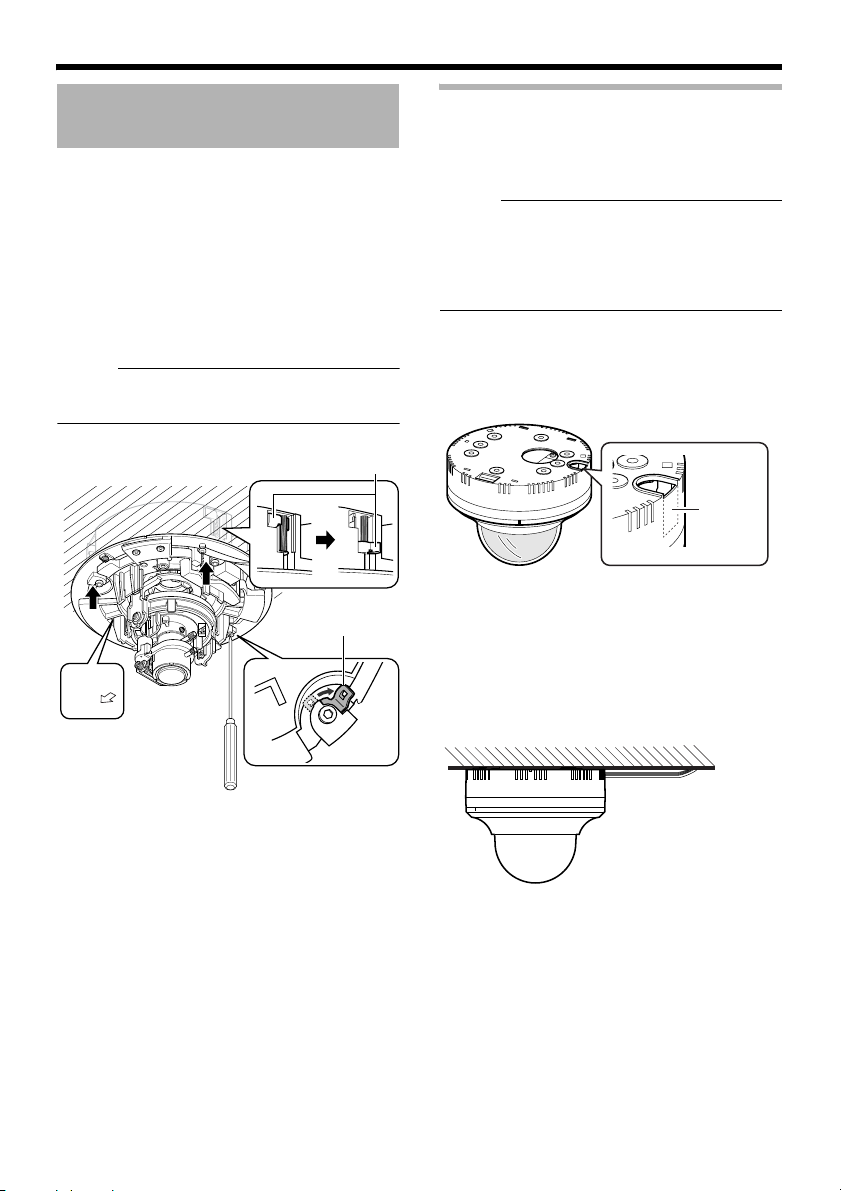
Page 11

4 Remove the inner dome
The inner dome is fastened using 2 catches.
Remove the inner dome by unfastening it from
the catches.
5 Remove the outer casing
(This mounting method does not make use of an
outer casing. )
Remove the fastening screw from the camera
A
unit using a screwdriver
B Turn the camera unit in the anti-clockwise
direction to remove the outer casing
6 Remove the attached fall prevention
wire
Remove the fall prevention wire that is attached
to the camera unit.
Inner dome
4
A
5
Camera unit fastening
screw
6
B
5
Outer casing
䡵 Connection
Memo:
● For details, please also refer to the [READ
Note:
● For your safety, turn on the power only after
ME FIRST] (sheet) provided.
all connections are completed.
1 Mount the fall prevention wire that
connects the camera and the ceiling
to the camera unit
2 Connect the alarm cables and audio
cables
3 Connect the LAN cable
4 Connect the power cable
Note:
● Connection of a power cable is not necessary
when PoE is used.
Memo:
● For cables that are not used, be sure to wrap
the ends individually with insulating tape.
5 Insert the camera unit into the hole in
the ceiling
5
2, 4
Solder welding or
crimping
Fall
prevention
wire
Insulating tape
1
3
11
Page 12
Connection/Installation
Mounting the Camera
(continued)
䡵 Mounting
1 Align the shooting direction with the
shooting direction mark (j), followed
by mounting the camera
2 Fasten the camera (x3 locations)
A
Turn the tip of the ceiling mounting bracket such
as by using a screwdriver
B The camera is fastened after the ceiling
mounting brackets are hooked to the ceiling
Memo:
● To remove the camera, perform the above
procedure in the reverse sequence.
Ceiling mounting bracket
(Sections that hook to the ceiling)
Ceiling mounting
bracket (t ip)
1
T
N
Align with
shooting
direction
P
U
FRO
2
Mounting with the cables pulled out from the side
When mounting the camera to the ceiling or wall,
you can pull out the cables from the side without
having to make a hole in the ceiling.
Memo:
●
The basic mounting procedures are identical to
those described for “Direct mounting to the
ceiling/horizontal mounting to the wall”.
● For details on mounting, please refer to the
[READ ME FIRST] (sheet) provided.
1 Break the portion illustrated by the
dotted lines in the diagram such as by
using a pair of radio pliers
Break
2 Mount the outer casing to the ceiling
or wall
3 Pull out the cables from the cable
outlet
4 Connect the cables
䡵 Image Adjustment
After mounting is complete, adjust the video
image while referring to the actual display on the
monitor.
(A [READ ME FIRST])
䡵 Mounting the Dome Cover
After video image adjustment is complete, mount
the inner dome and dome cover accordingly.
Installation is complete after the dome cover is
mounted and the protective sheet removed.
(A [READ ME FIRST])
12
Page 13

Connecting the Alarm Input/Output Cable
Alarm output
Connect to alarm devices such as alarm,
indicator, light or buzzer.
Alarm Input
Connect the cable to sensors such as infrared
sensors, door sensors, metal sensors and
manual switches.
䡵 Input Requirements
● Non-voltage relay NPN open collector input
● Polarity of input detection can be selected
using a software
● Make/break (500 ms and above)
● Circuit current of 1 mA during low-level input
● Applied voltage of 3.3 V during high-level
input
OUT
GND
OUT
GND
Sensor example
(1)
VCC
R
Sensor example
(2)
Relay switch, etc.
This unit
DC3.3 V
R
(Alarm input equivalent
circuit)
Input 1 or
Input 2
3.3 V1mA
GND
䡵 Output Requirements
● NPN open collector output equivalent (Refer
to the INSTRUCTIONS (Setting) on
procedures to set the output logic. )
● Allowable applied voltage: DC 12 V and
below
● Allowable inflow current: 50 mA
● Momentary (100 ms to 5000 ms) output
(Refer to [INSTRUCTIONS (Setting)] for
procedures to set the time. )
Alarm device
This unit
Output 1 or
Output 2
GND
(Alarm output equivalent
circuit)
Note:
GND
● Connect the GND cable of the camera to the
GND terminal of the alarm device.
(example)
DC 12 V
R
IN
13
Page 14
Others
Troubleshooting
Symptom Causes and Countermeasures
Images are not output to the
monitor
Band noise is found at the lower
part of the monitor image
Images via the network are
disrupted
No audio sound is heard from the
external microphone
● Set the [MONITOR OUT] selection switch to ANB or APB, and
press the Reset button.
● When using the [MONITOR] output, set the privacy mask to
AOffB. (A [INSTRUCTIONS (Setting)])
● When using the [MONITOR] output, set the privacy mask to
AOffB.
● Set the [MONITOR OUT] selection switch to AOFFB, and
press the [RESET] button for less than 2 seconds.
● Check the connection between the external microphone and
the camera.
14
Page 15

Specifications
CAMERA HEAD
Image pickup device
VN-V225U : 1/4" square pixel
progressive-scan CCD
(complementary filter)
VN-X235U : 1/3" square pixel
progressive-scan CCD
(complementary filter)
Effective pixels
VN-V225U : Approx. 330,000 pixels
659 (H)⳯494 (V)
VN-X235U : Approx. 1,250,000 pixels
1296 (H)⳯966 (V)
䡵 Monitor output
Monitor output⳯1 (75 K, 1 Vp-p)
Minimum brightness of object (VN-V225U)
Color : 0.4 lx (typ., 50 %, F1.2, AGC
Super, 1/30 s)
Black-and-white : 0.03 lx (typ., 50 %, F1.2,
AGC Super, 1/30 s)
Minimum brightness of object (VN-X235U)
Color : 0.8 lx (typ., 50 %, F1.2, AGC
Super, 1/30 s)
Black-and-white : 0.08 lx (typ., 50 %, F1.2,
AGC Super, 1/30 s)
䡵 Audio input
Connection of plug-in power microphone
supported
Reference voltage
: DC 2.7 V (typ.),
impedance : 2.2 kK (typ.)
䡵 Audio output
Line output (200 K, max. 2 Vp-p)
䡵 Network output
Image compression format
: JPEG, MPEG4
Frame size : 1280⳯960 (VN-X235U only)
640⳯480
320⳯240
Horizontal resolution
VN-V225U : 400 TV lines (typ.)
VN-X235U : 700 TV lines (typ.)
Network interface
:RJ-45
100BASE-TX/10BASE-T/
FULL/HALF/Auto negotiation
supported
Lens
VN-V225U
Focal length : f=2.8 mm to 10.5 mm
Maximum aperture ratio
: F1.2 (f=2.8 mm) to F2.7
(f=10.5 mm)
Aperture range : F1.2 to F360
Field angle adjustment
: 3.75x
IR filter : Switchable
VN-X235U
Focal length : f=3 mm to 9 mm
Maximum aperture ratio
: F1.2 (f=3 mm) to
F2.1 (f=9 mm)
Aperture range : F1.2 to F360
Field angle adjustment
:3x
IR filter : Switchable
LAN specifications
Compliant with IEEE802.3, IEEE802.3u and
IEEE802.3af
Communication protocols
: TCP/IP, UDP/IP, HTTP, FTP,
ICMP, ARP, RTP, DHCP,
SNTP, SMTP, IPv4, IPv6,
DSCP, and IGMP
15
Page 16

Others
Specifications (continued)
Overall
Alarm input ⳯2 : No-voltage a contact input,
NPN open collector input,
low-level input, latch/
momentary (500 ms and
above) input (circuit current
during low-level input: 1 mA;
applied voltage during highlevel input: DC 3.3 V)
Alarm output ⳯2 : NPN open collector output
(allowable applied voltage:
12 V; allowable inflow
current: 50 mA)
Internal memory : 8 MB
Supply voltage : AC 24 V or PoE (DC -48 V)
Current consumption
: AC 24 V 0.35 A PoE 7 W
Surrounding temperature
:-10 I to 50 I (operation)
0 I to 40 I
(recommended)
Ambient humidity : 35 % RH to 90 % RH
(without condensation)
Mass : Approx. 750 g (1.65 lbs)
Accessories
Safety Precautions 1
Read Me First 1
CD-ROM 1
Warranty Card (For USA) 1
Service Information Card (For USA) 1
Te m pl a t e 1
16
Page 17

Dimension [Unit: mm (inches)]
T Specifications and appearance of this unit are subject to change for further improvements without
prior notice.
17
Page 18

VN-V225U/VN-X235U
FIXD IP DOME CAMERA /
FIXD MEGAPIXEL IP DOME CAMERA
© 2009 Victor Company of Japan, Limited
LST0926-001A
 Loading...