

Page 1
ENGLISH
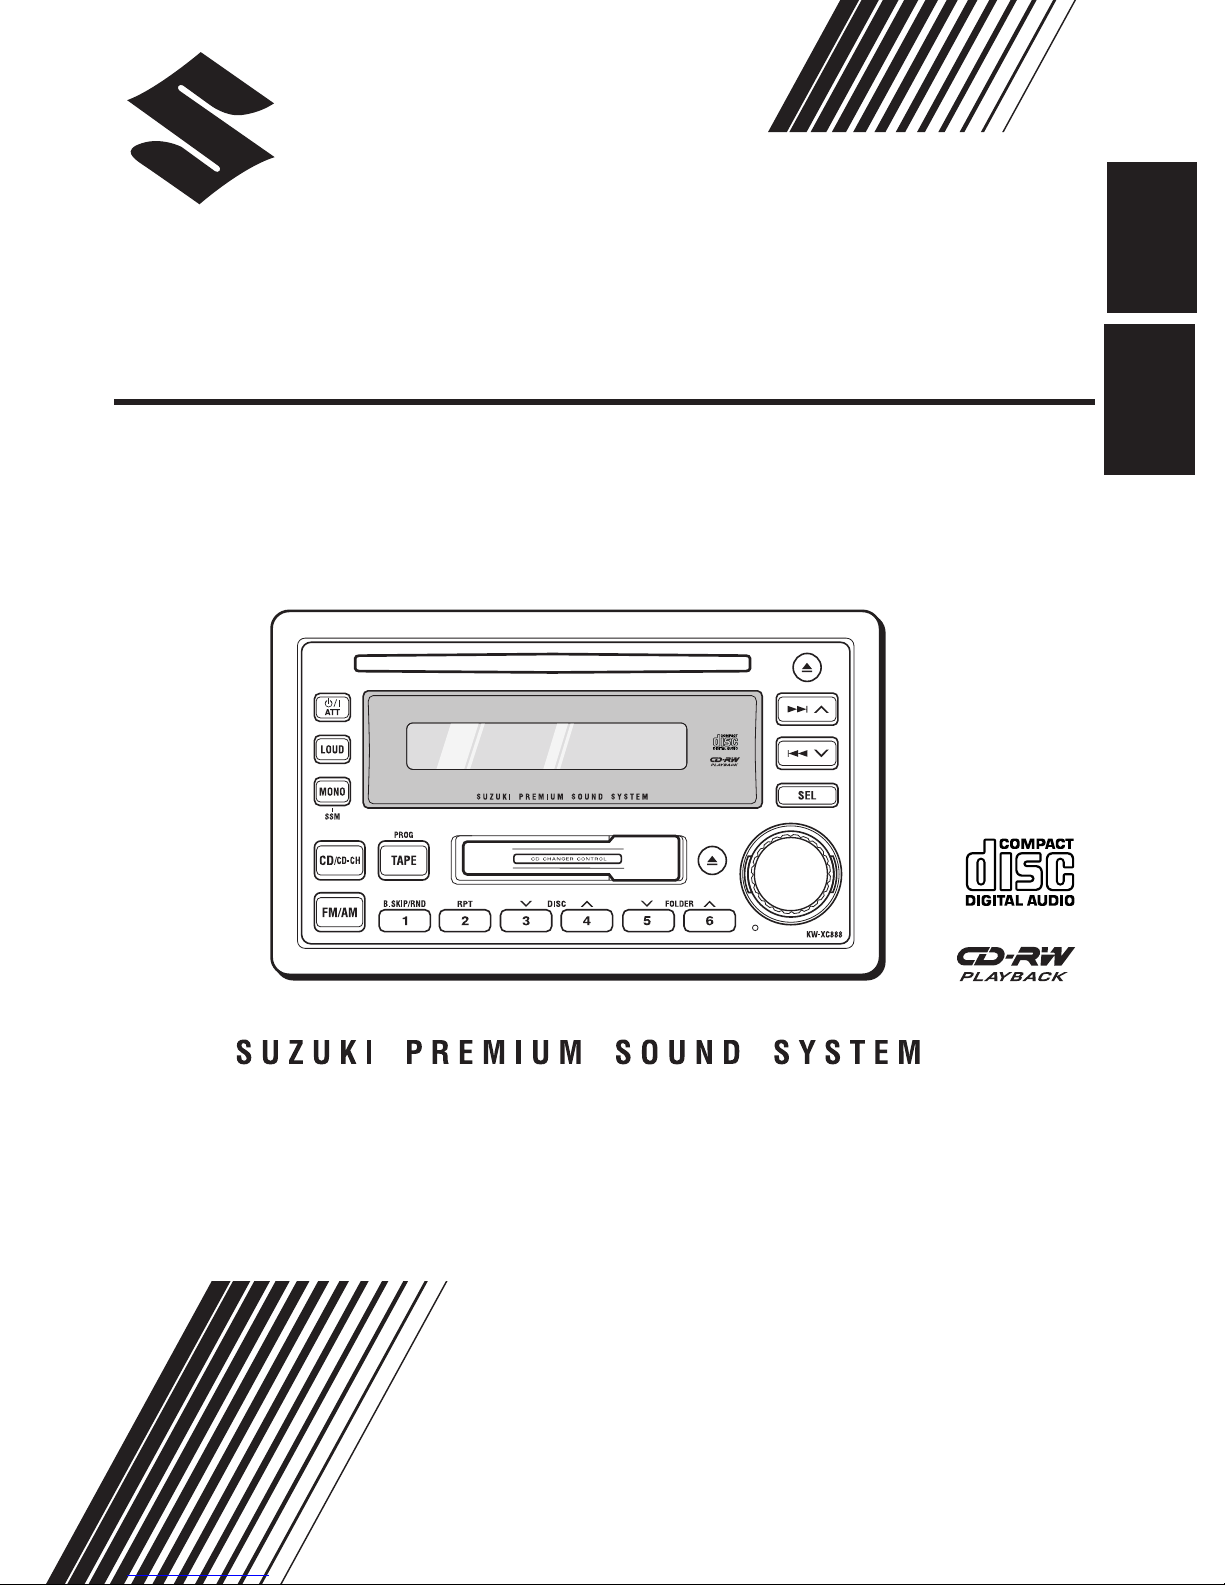
CD/CASSETTE RECEIVER
KW-XC888
INDONESIA
INSTRUCTIONS
INSTRUKSI
LVT1139 - 002A
(UN)
Page 2
IMPORTANT FOR LASER PRODUCTS
1. CLASS 1 LASER PRODUCT
2. CAUTION: Do not open the top cover. There are no user serviceable parts inside unit; leave all
servicing to qualified service personnel.
3. CAUTION: Visible and invisible laser radiation when open and interlock failed or defeated. Avoid
ENGLISH
direct exposure to beam.
4. REPRODUCTION OF LABEL: CAUTION LABEL, PLACED OUTSIDE THE UNIT.
CAUTION on Volume Setting
CDs produce very little noise compared with other sources. If the volume level is adjusted for the tuner, for
example, the speakers may be damaged by the sudden increase in the output level. Therefore, lower the
volume before playing a CD and adjust it as required during playback.
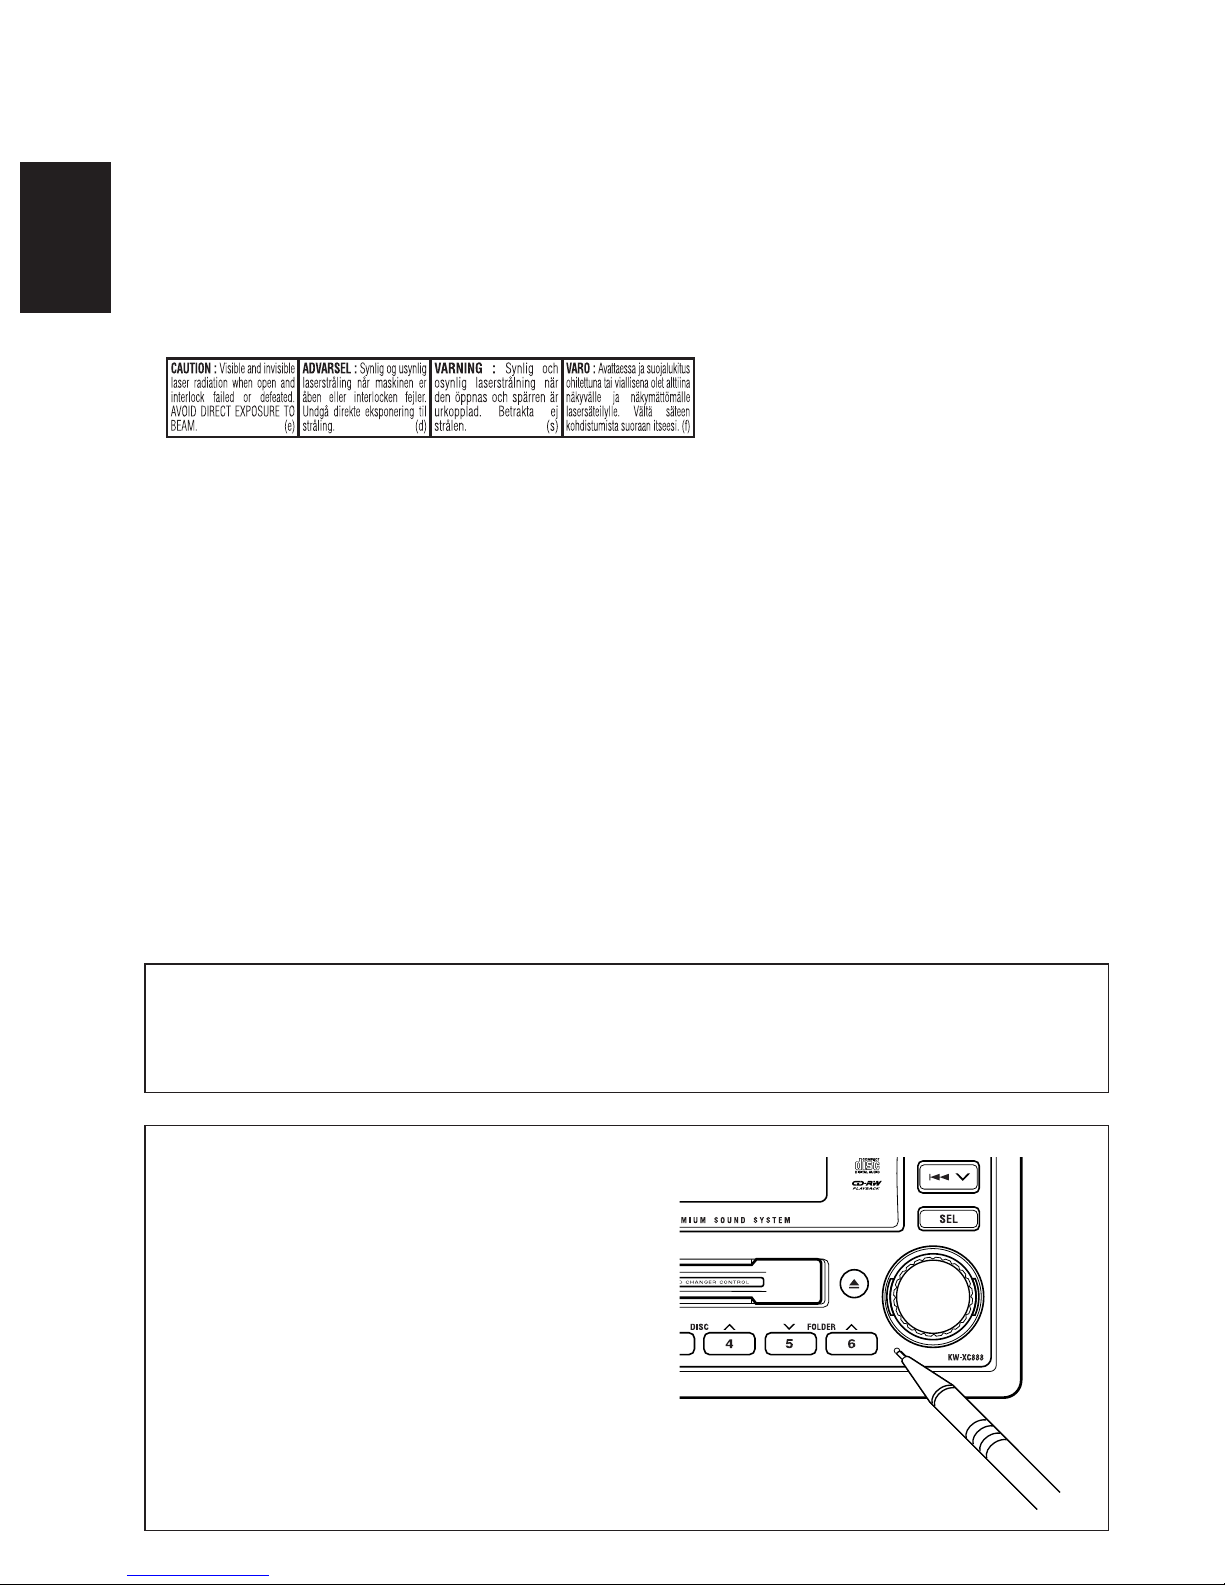
How to reset your unit
Press the reset button on the front panel using
a ball-point pen or similar tool.
Note:
Your preset adjustments—such as preset channels
or sound adjustments—will be erased.
2
Page 3

CONTENTS
How to reset your unit .................................... 2
LOCATION OF THE BUTTONS ............ 4
BASIC OPERATIONS ....................... 5
RADIO OPERATIONS ...................... 6
Listening to the radio ................................. 6
Storing stations in memory ....................... 7
Tuning in to a preset station ...................... 8
Selecting FM reception mode ................... 8
CD OPERATIONS........................... 9
Playing a CD ............................................. 9
Locating a track or a particular portion
on a CD ................................................. 10
Selecting CD playback modes .................. 10
TAPE OPERATIONS ........................ 11
Listening to a tape ..................................... 11
Finding the beginning of a tune ................. 12
Other convenient tape functions ............... 13
SOUND ADJUSTMENTS................... 14
CD CHANGER OPERATIONS .............. 15
About MP3 discs ....................................... 15
Connecting the CD changer ...................... 16
Playing discs ............................................. 16
Locating a track or a particular portion
on a disc ................................................ 17
Locating a disc in the magazine ................ 17
Locating a folder on a disc ........................ 18
Selecting the playback modes .................. 18
ENGLISH
ADDITIONAL INFORMATION ............. 19
Handling cassettes .................................... 19
Handling discs ........................................... 20
TROUBLESHOOTING ...................... 21
SPECIFICATIONS........................... 23
BEFORE USE
*For safety....
• Do not raise the volume level too much, as this will
block outside sounds, making driving dangerous.
• Stop the car before performing any complicated
operations.
*Temperature inside the car....
If you have parked the car for a long time in hot or
cold weather, wait until the temperature in the car
becomes normal before operating the unit.
3
Page 4
ENGLISH
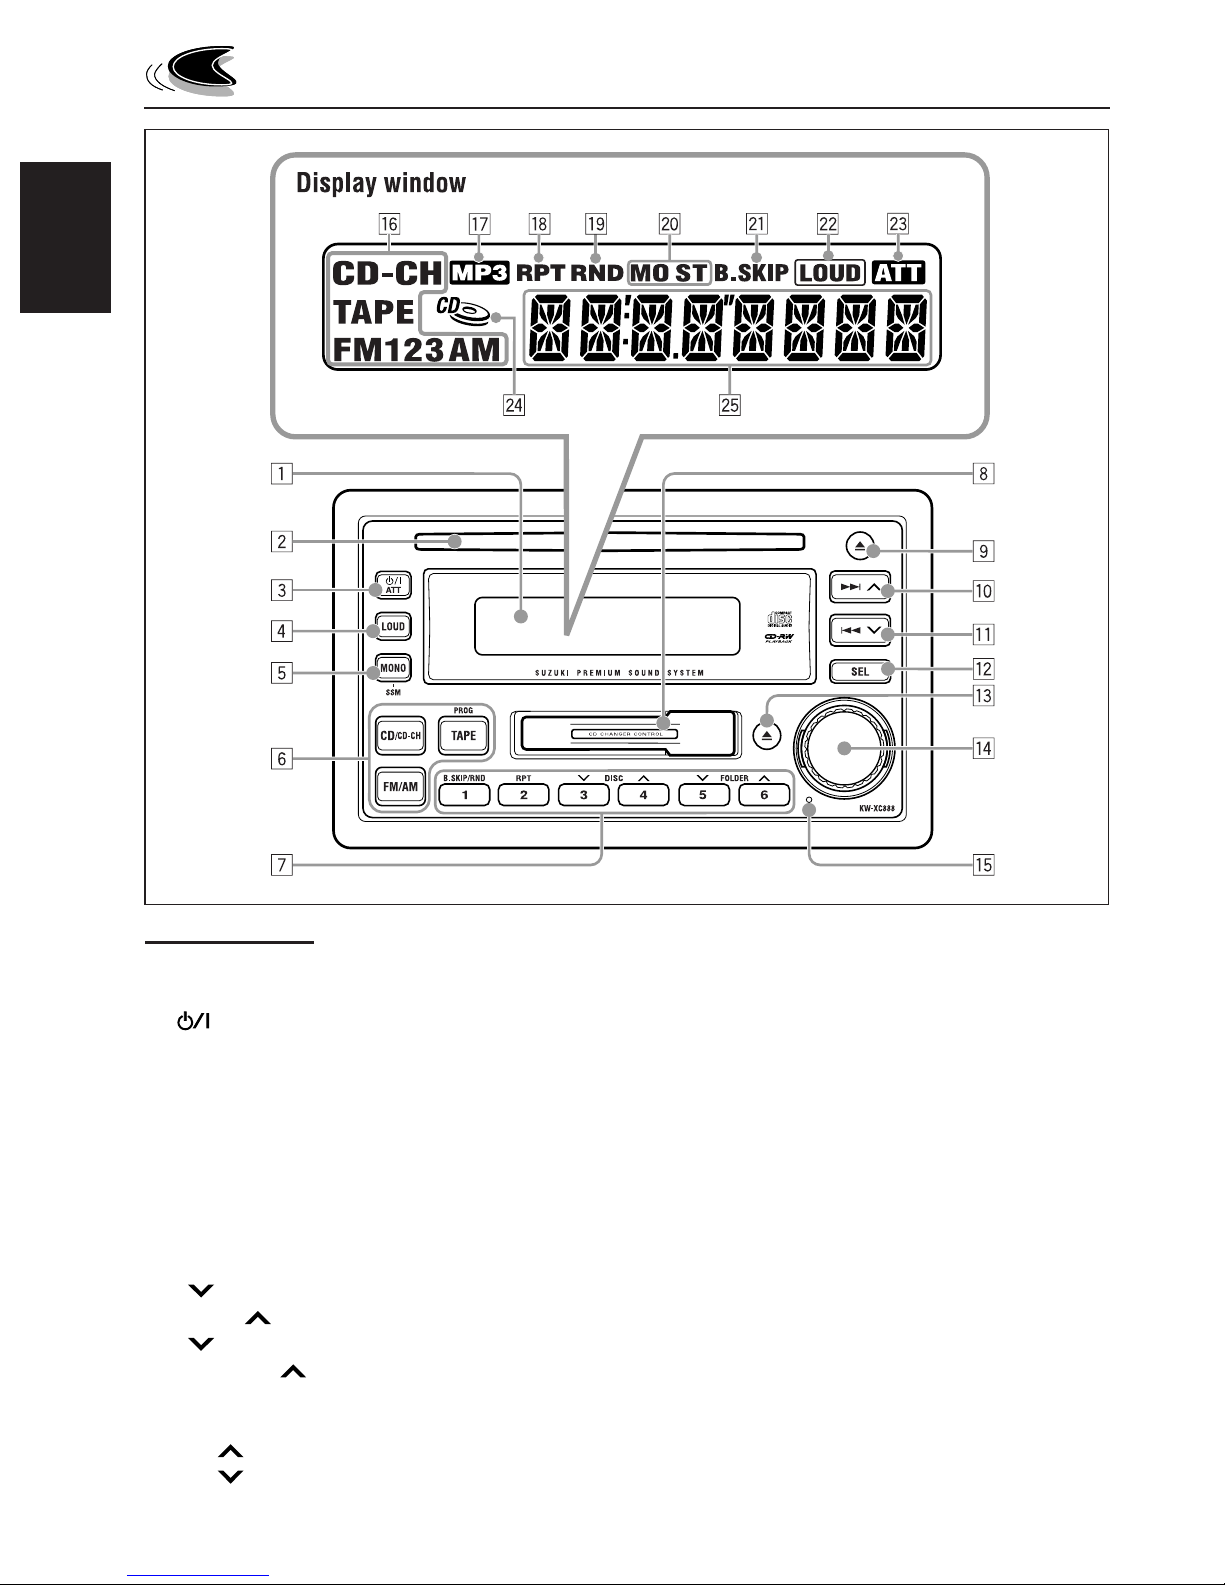
LOCATION OF THE BUTTONS
Control Panel
1 Display window
2 CD loading slot
3
4 LOUD (loudness) button
5 MONO (monaural) /SSM button
6 Source buttons
• CD/CD-CH button
• FM/AM button
• TAPE (PROG) button
7 Number buttons
• B.SKIP/RND (blank skip/random) button
• RPT (repeat) button
•
• DISC
• FOLDER button
• FOLDER button
8 Cassette compartment
9 CD 0 (eject) button
p ¢ button
q 4
(standby/on/attenuator) button
ATT
/
DISC button
button
button
w SEL (select) button
e Tape 0 (eject) button
r Control dial
t Reset button
Display window
y Source indicators
CD, CD-CH (CD-changer), TAPE, FM1, FM2,
FM3, AM
u MP3 indicator
i RPT (repeat) indicator
o RND (random) indicator
; Tuner reception indicators
MO (monaural), ST (stereo)
a B.SKIP (blank skip) indicator
s LOUD (loudness) indicator
d ATT (attenuator) indicator
f CD-in indicator
g Main display
4
Page 5
1
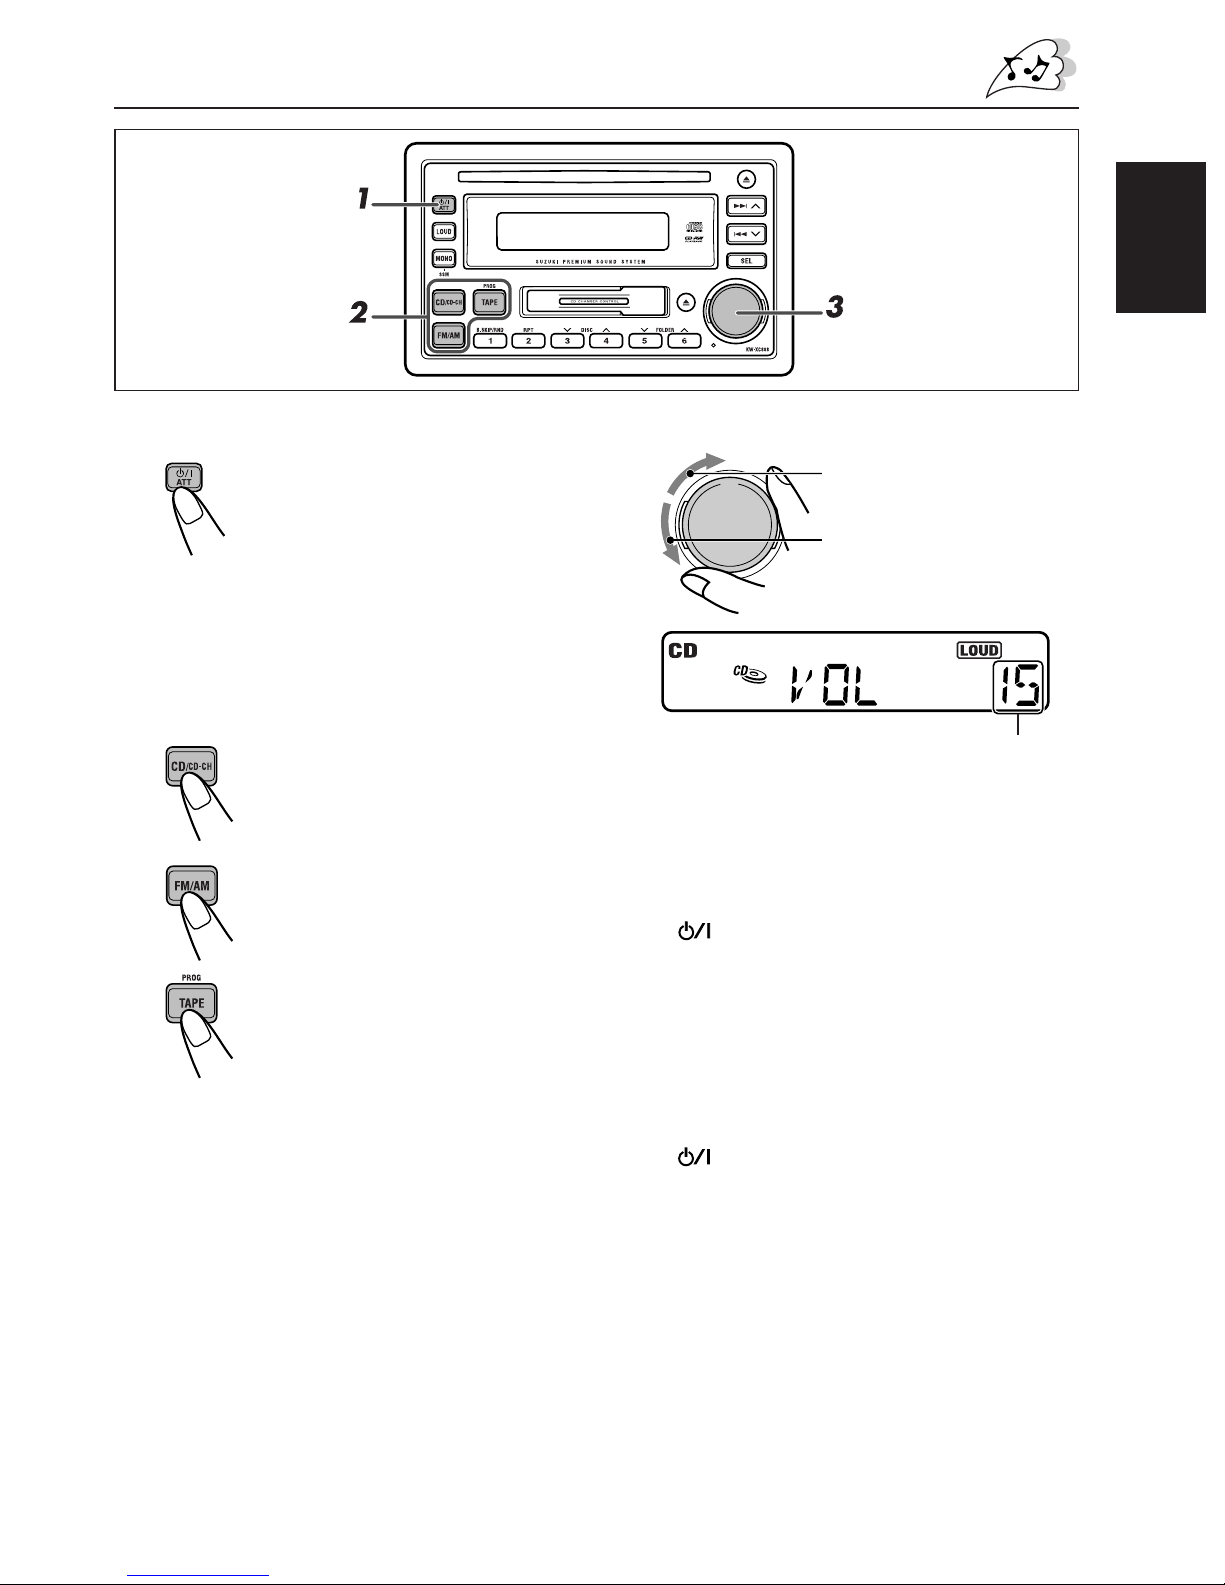
Turn on the power.
Note on One-Touch Operation:
When you select a source in step 2 below, the
power automatically comes on. You do not have
to press this button to turn on the power.
BASIC OPERATIONS
3
Adjust the volume.
To increase the volume
To decrease the volume
ENGLISH
2
Select the source.
• Each time you press CD/
CD-CH, the source alternates
between CD* and CDchanger**.
• Each time you press FM/AM, the
band changes to FM (FM1,
FM2, FM3) and AM.
• Press TAPE (PROG), so that the
source is selected as TAPE***.
* If a disc is not in the loading slot, you cannot
select CD as the source to play. (“NO DISC” will
appear on the display.)
** Without connecting the CD changer, you cannot
select it as the source to play.
*** If a cassette is not in the cassette compartment,
you cannot select TAPE as the source to play.
(“NO TAPE” will appear on the display.)
To operate the tuner, see pages 6 – 8.
To play the CD, see pages 9 and 10.
To operate the tape deck, see pages 11 – 13.
To operate the CD changer, see pages 15 – 18.
Volume level
4
Adjust the sound as you want
(see page 14).
To drop the volume immediately
Press
source. The ATT indicator starts flashing on the
display, and the volume level will drop
immediately.
To resume the previous volume level, press
the button briefly again.
briefly while listening to any
ATT
/
To turn off the power
Press
• If you turn off the power while listening to a
CD, the CD play will start from where playback
has been stopped previously, next time you
turn on the power.
• If you turn off the ignition key without
turning off this unit, the unit will
automatically turn on when you turn on the
ignition key next time. If the last selected
source is ready for playback (ex. a CD or a
tape is in the unit), playback starts
automatically.
for more than 1 second.
ATT
/
5
Page 6
ENGLISH
RADIO OPERATIONS
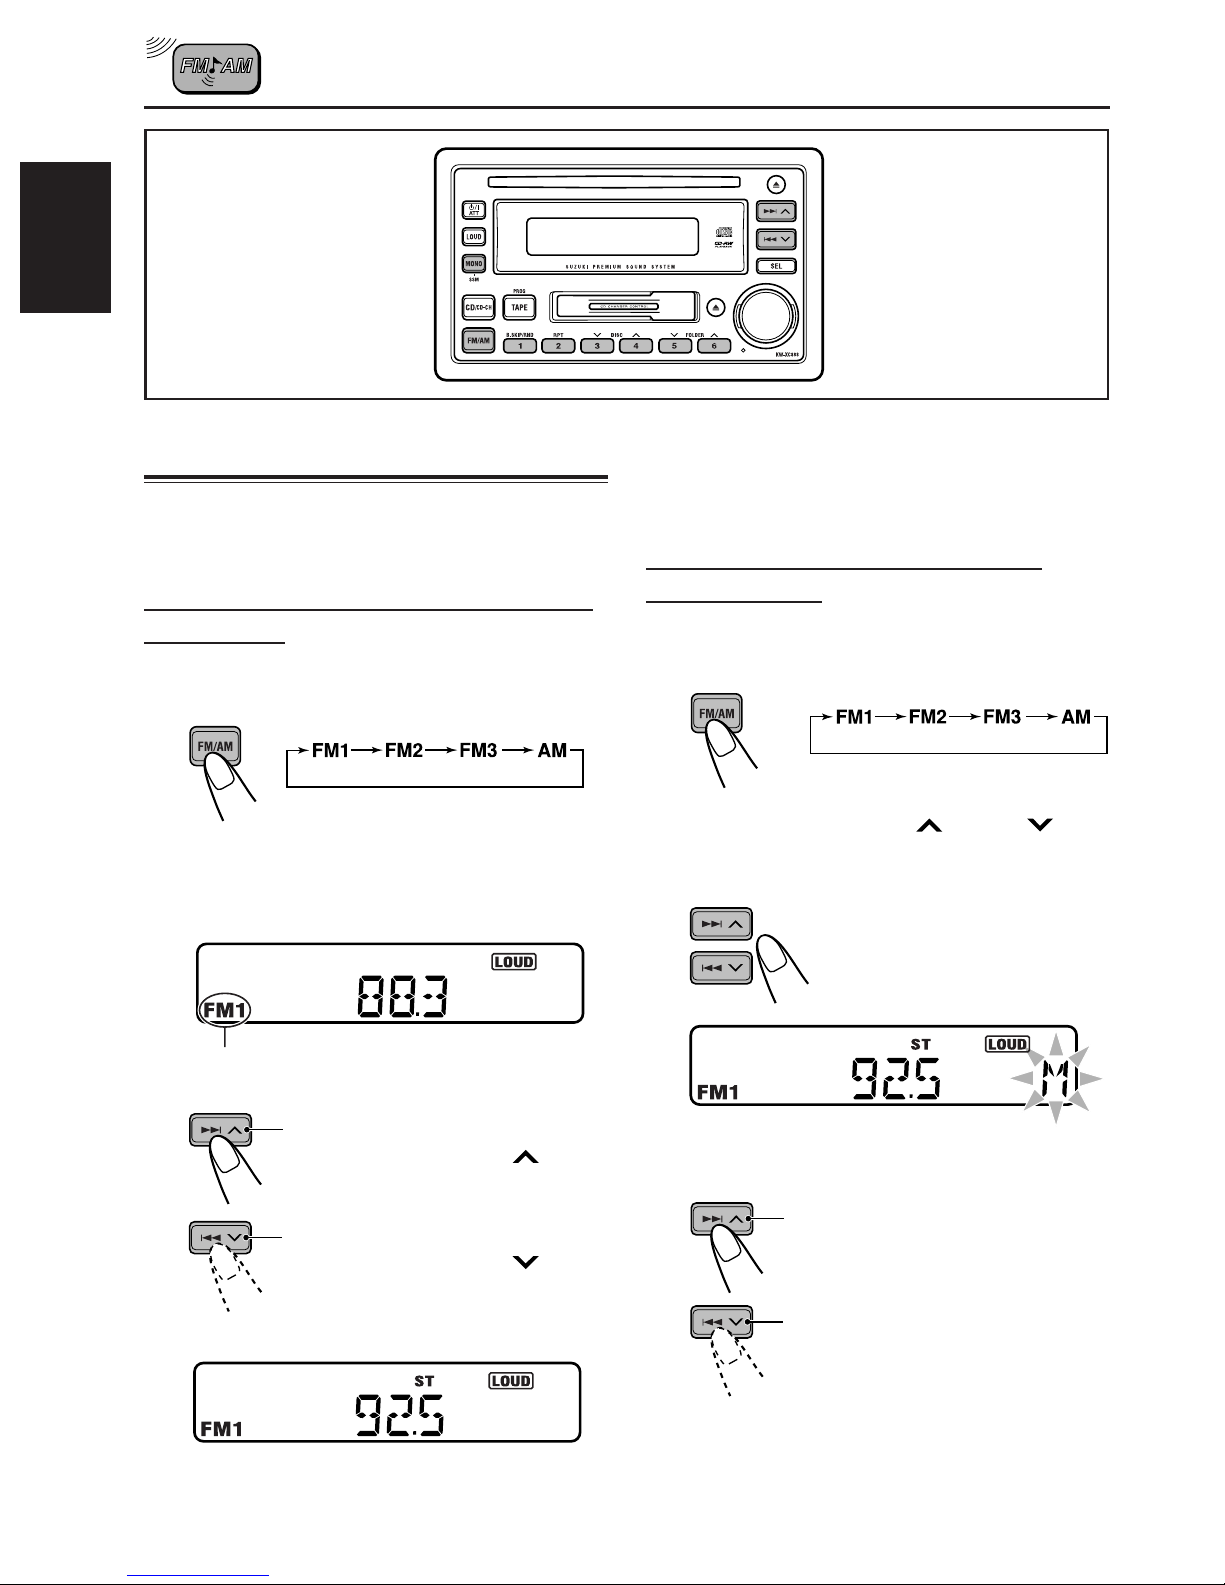
Listening to the radio
You can use either automatic searching or manual
searching to tune in to a particular station.
Searching for a station automatically:
Auto search
1
Select the band (FM1, FM2, FM3 or
AM).
Note:
This receiver has three FM bands (FM1, FM2,
and FM3). You can use any one of them to listen
to an FM broadcast.
To stop searching before a station is received,
press the same button you have pressed for
searching.
Searching for a station manually:
Manual search
1
Select the band (FM1, FM2, FM3, or
AM).
2
Press and hold ¢ or 4
until “M” (manual) starts flashing on
the display.
Selected band appears.
2
Start searching for a station.
To search for stations of higher
frequencies, press ¢
To search for stations of lower
frequencies, press 4
When a station is received, searching stops.
ST indicator lights up when receiving an FM
broadcast in stereo.
6
briefly.
briefly.
3
Tune in to a station you want while
“M” is flashing.
To tune in to stations of higher
frequencies
To tune in to stations of lower
frequencies
Page 7
Notes:
• If you release your finger from the button, the
manual search will automatically turn off after
5 seconds.
• If you hold down the button, the frequency keeps
changing (in 50 kHz intervals for FM and 9 kHz for
AM) until you release the button.
Storing stations in memory
You can use one of the following methods to store
broadcasting stations in memory.
• Automatic preset: SSM (Strong-station
Sequential Memory)
• Manual preset
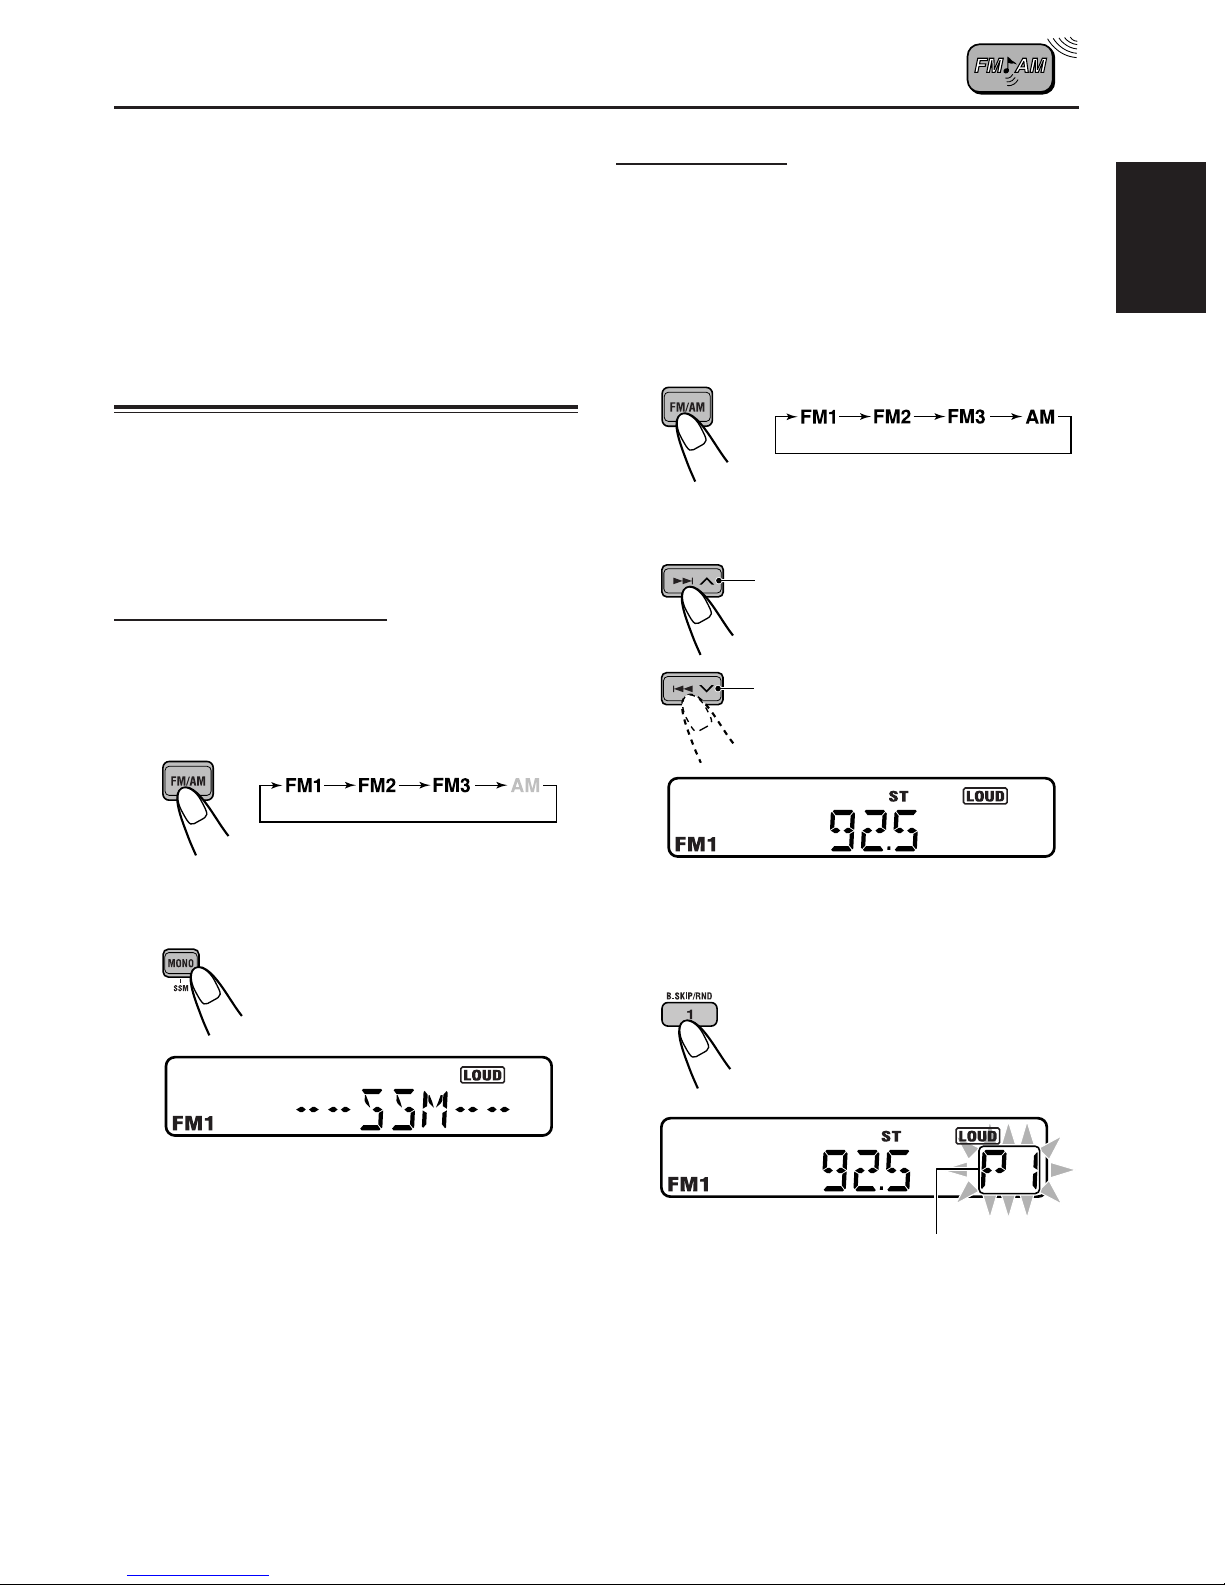
Automatic preset: SSM
You can preset up to 6 local stations in each FM
band (FM1, FM2, and FM3).
1
Select the band (FM1, FM2, or FM3).
Manual preset
You can preset up to 6 stations in each band
(FM1, FM2, FM3, and AM) manually.
Ex.: Storing an FM station of 92.5 MHz into the
preset channel number 1 of the FM1 band
1
Select the FM1 band.
2
Tune in to a station (in this example,
of 92.5 MHz).
To tune in to stations of higher
frequencies
To tune in to stations of lower
frequencies
ENGLISH
2
Press MONO/SSM for more than 1
second.
“SSM” appears, then disappears when
automatic preset is over.
Local stations with the strongest signals are
searched for and stored automatically in the
band you have selected (FM1, FM2, and FM3).
These stations are preset in the number
buttons—No. 1 (lowest frequency) to No. 6
(highest frequency).
When automatic preset is over, the station stored
in the number 1 button will be automatically
tuned in.
3
Press and hold the number button
(in this example, 1) for more than
2 seconds.
Preset number flashes for a while.
CONTINUED ON THE NEXT PAGE
7
Page 8
4
Repeat the above procedure to store
other stations into other preset
numbers.
Notes:
• A previously preset station is erased when a new
ENGLISH
station is stored in the same preset number.
• Preset stations are erased when power supply to the
memory circuit is interrupted ( for example, during
battery replacement). If this occurs, preset the
stations again.
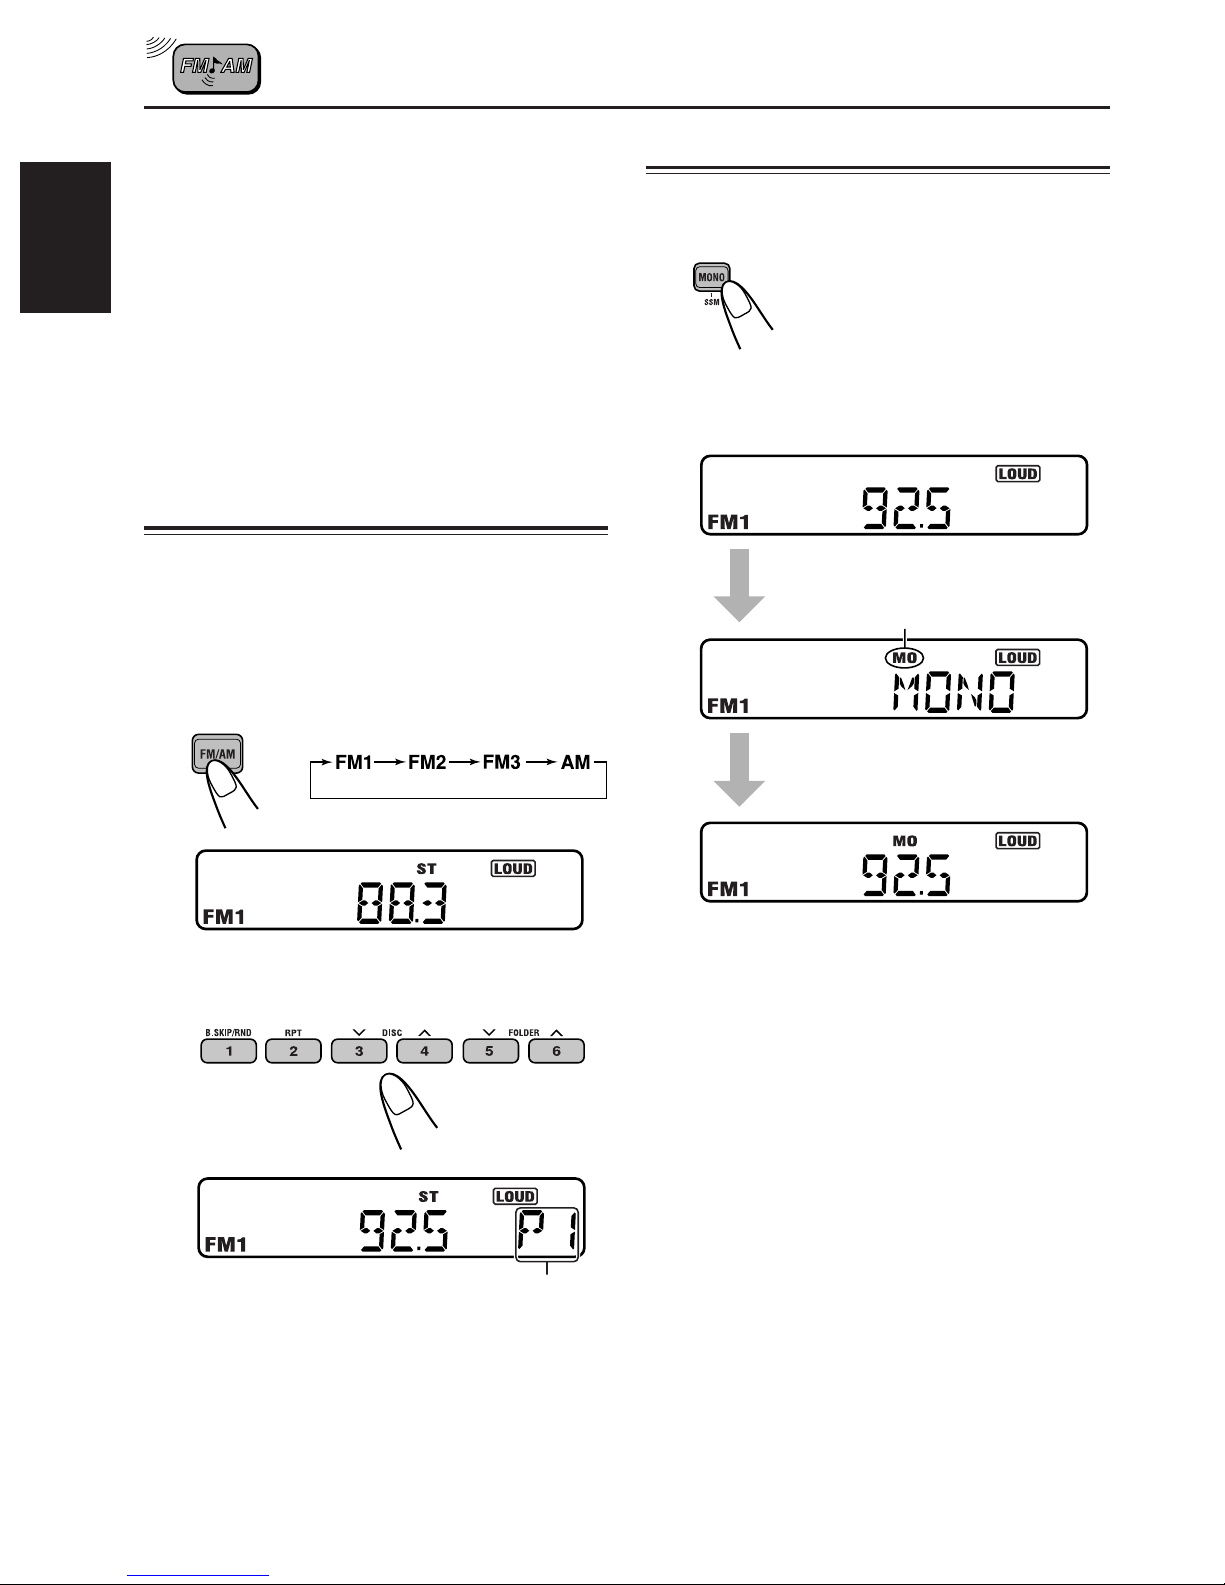
Tuning in to a preset station
You can easily tune in to a preset station.
Remember that you must store stations first. If you
have not stored them yet, see page 7.
1
Select the band (FM1, FM2, FM3, or
AM) you want.
Selecting FM reception mode
When an FM stereo broadcast is hard to
receive:
Press MONO/SSM briefly so that
MO indicator lights up on the
display (“MONO” appears on the
display).
Each time you press the button,
the MO indicator goes on and off
alternately.
MO (monaural) indicator
2
Select the number (1 – 6) for the
preset station you want.
EX.: When you press number button 1
When the MO indicator is lit, the sound you
hear becomes monaural but reception will be
improved.
Preset number
8
Page 9
CD OPERATIONS
ENGLISH
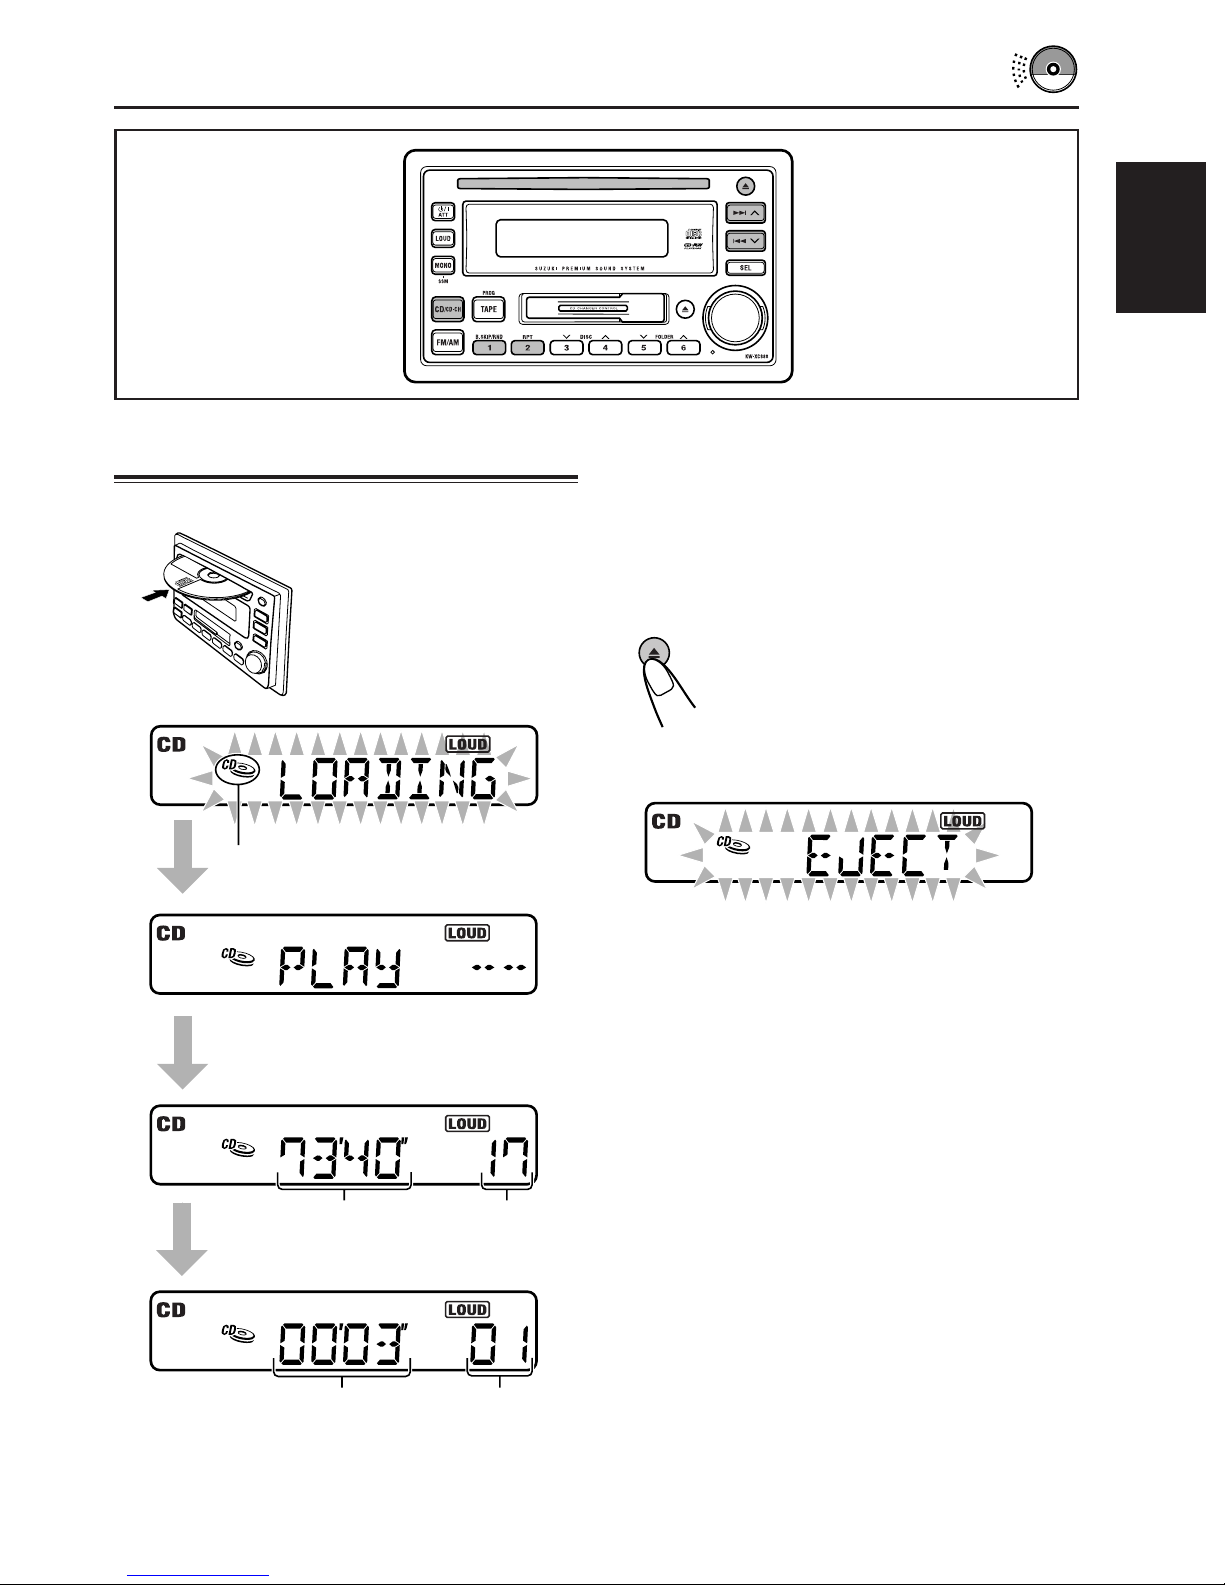
Playing a CD
Insert a CD into the loading slot.
The unit turns on, draws
in the CD and starts
playback automatically
(the CD-in indicator and
“LOADING” flash on the
display).
CD-in indicator
Total playing
time of the
inserted disc
Total track
number of the
inserted disc
Note on One-Touch Operation:
When a CD is already in the loading slot, pressing
CD/CD-CH turns on the unit and starts playback
automatically.
To stop play and eject the CD
Press CD 0.
CD play stops and the CD
automatically ejects from the loading
slot (the CD-in indicator and “EJECT”
flash on the display). The source
changes to the last selected source.
Notes:
• When a CD is inserted upside down, the CD
automatically ejects.
• If the ejected disc is not removed for about
15 seconds, the disc is automatically inserted again
into the loading slot to protect it from dust. (CD play
will not start this time.)
• You can eject the CD even when the ignition key is
turned off. (However, you cannot load the CD into
the loading slot when the ignition key is turned off.)
• If you change the source, CD play also stops (without
ejecting the disc).
Next time you select “CD” as the source, CD play
starts from where playback had been stopped
previously.
Elapsed playing
time
Current track
number
9
Page 10
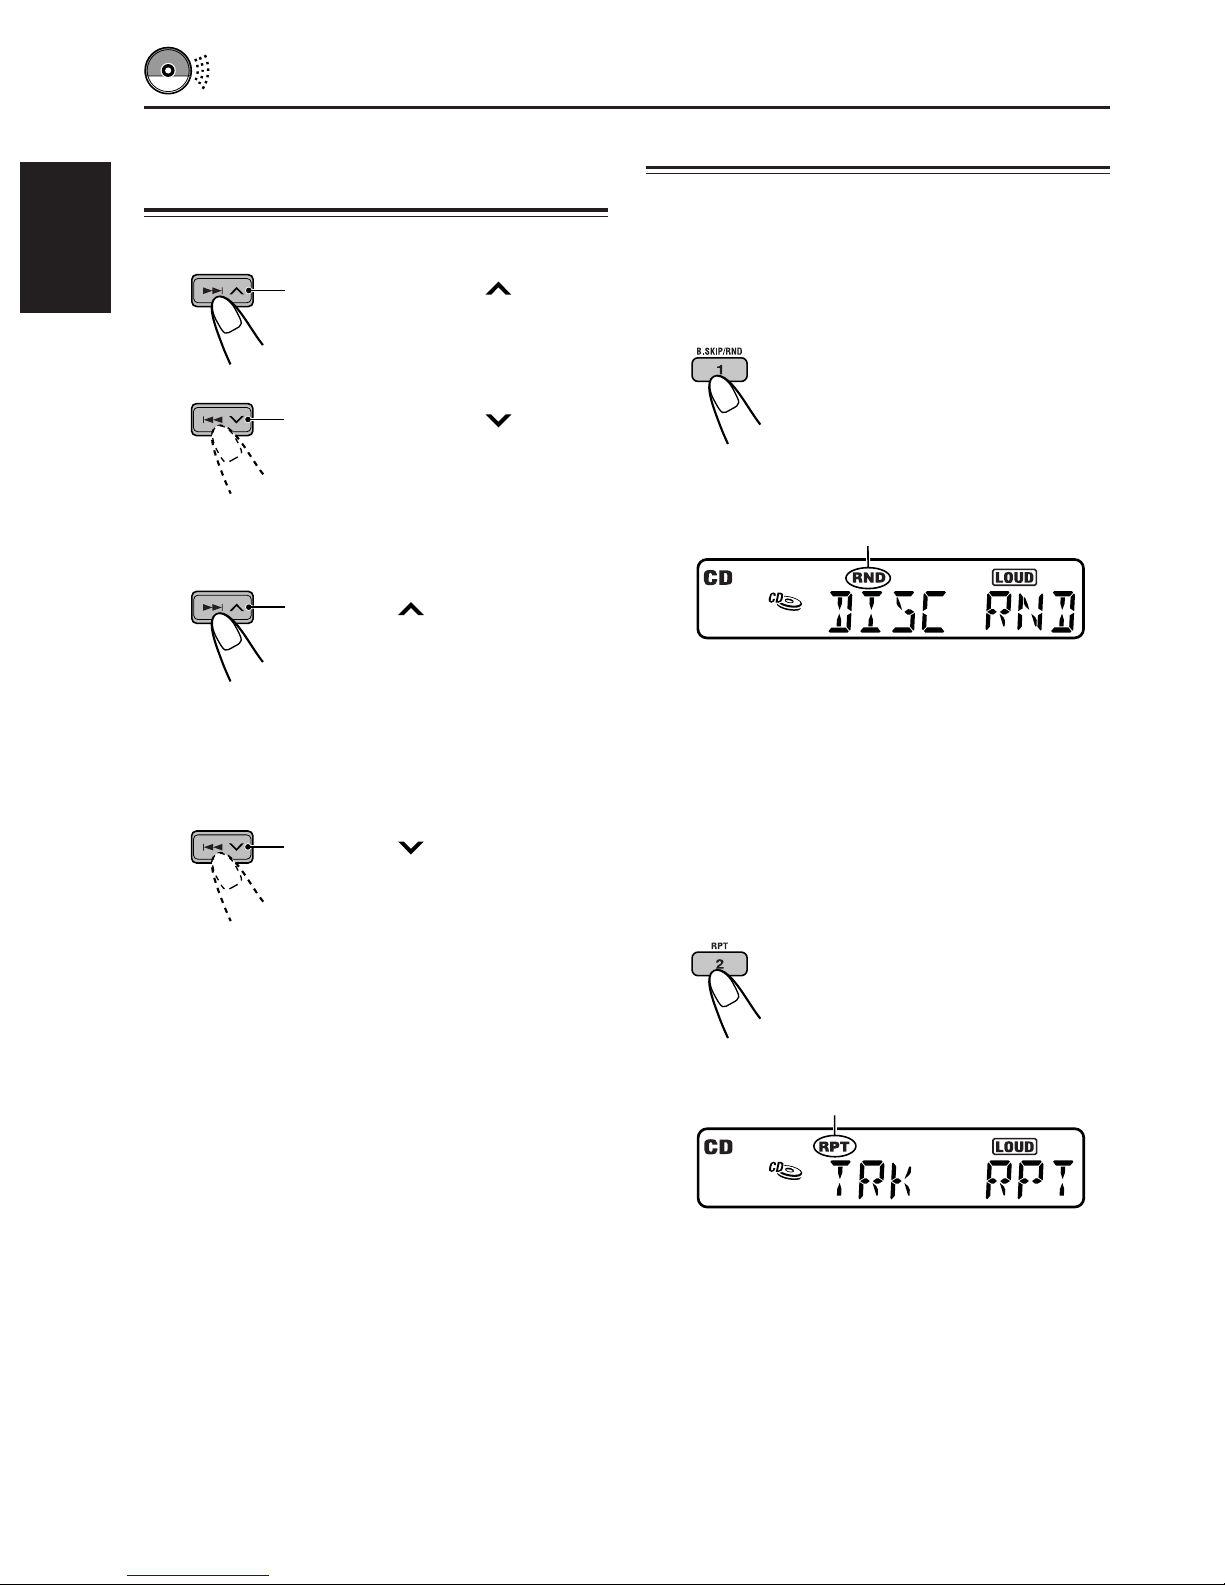
Locating a track or a
Selecting CD playback modes
particular portion on a CD
To fast-forward or reverse the track
ENGLISH
To go to the next tracks or the previous
track
Press and hold ¢ while
playing a CD, to fast-forward the
track.
Press and hold 4 while
playing a CD, to reverse the
track.
Press ¢ briefly while
playing a CD, to go ahead to the
beginning of the next track.
Each time you press the button
consecutively, the beginning of
the next track is located and
playback.
To play back tracks at random
(Random Play)
You can play back all tracks on the CD at
random.
Press B.SKIP/RND so that
“DISC RND” appears on the
display.
Each time you press the button,
CD random play mode turns on
and off alternately.
RND indicator
When CD random mode is turned on, the
RND indicator lights up on the display and a
randomly selected track starts playing.
Press 4 briefly while
playing a CD, to go back to the
beginning of the current track.
Each time you press the button
consecutively, the beginning of
the previous track is located and
playback.
To play back tracks repeatedly
(Repeat Play)
You can play back the current track repeatedly.
Press RPT so that “TRK RPT”
appears on the display.
Each time you press the button,
CD repeat play mode turns on
and off alternately.
RPT indicator
When CD repeat mode is turned on, the
RPT indicator lights up on the display.
10
Page 11
TAPE OPERATIONS
ENGLISH
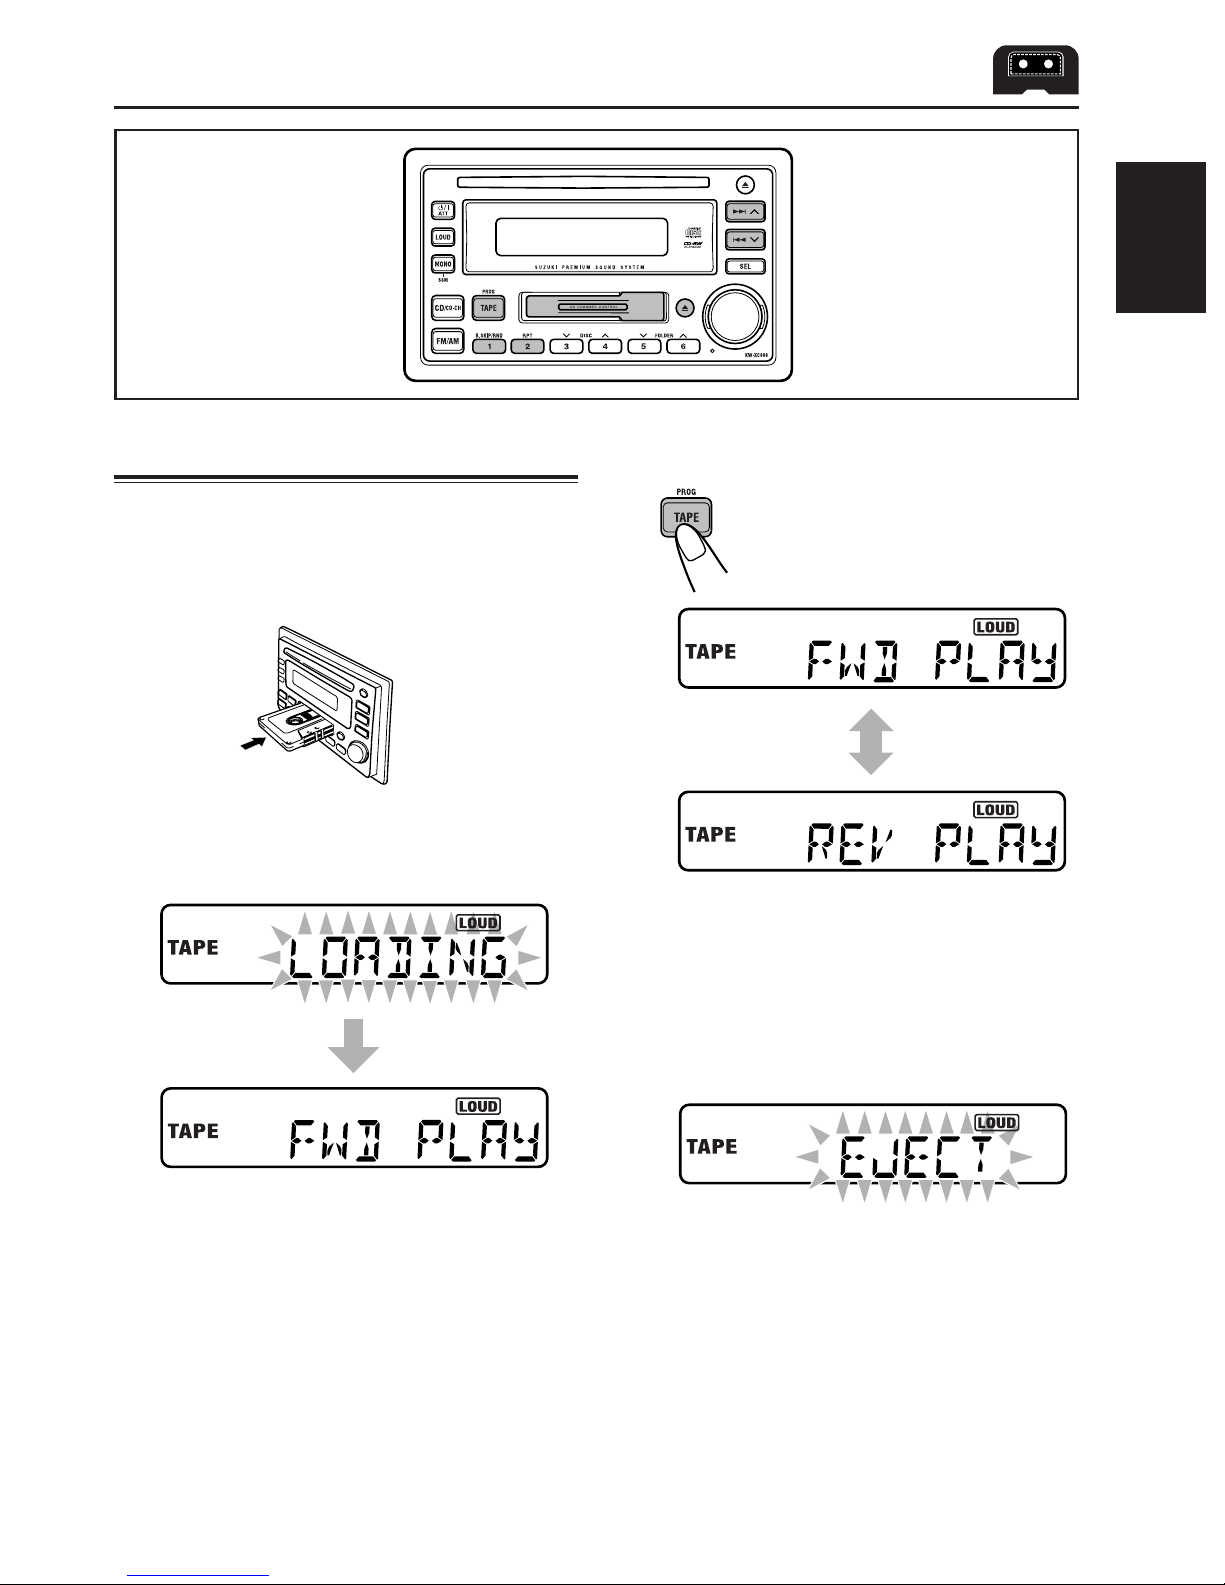
Listening to a tape
You can play back type I (normal) tapes.
1
Insert a cassette into the cassette
compartment.
The unit turns on and tape play starts
automatically (“LOADING” flashes on the
display).
2
Select the tape direction.
Each time you press the button,
the tape direction changes
alternately.
To stop play and eject the cassette
Press Tape 0.
Tape play stops and the cassette automatically
ejects from the cassette compartment (“EJECT”
flashes on the display).
When one side of the tape reaches its end
during play, the other side of the tape
automatically starts playing. (Auto Reverse)
Note on One-Touch Operation:
When a cassette is already in the cassette
compartment, pressing TAPE (PROG) turns on
the unit and starts tape play automatically.
Notes:
• If you change the source, the tape play also stops
(without ejecting the cassette this time).
• You can also eject the cassette by pressing Tape 0
with the ignition key turned off. (However, you
cannot load the cassette into the cassette
compartment when the ignition key is turned off.)
11
Page 12
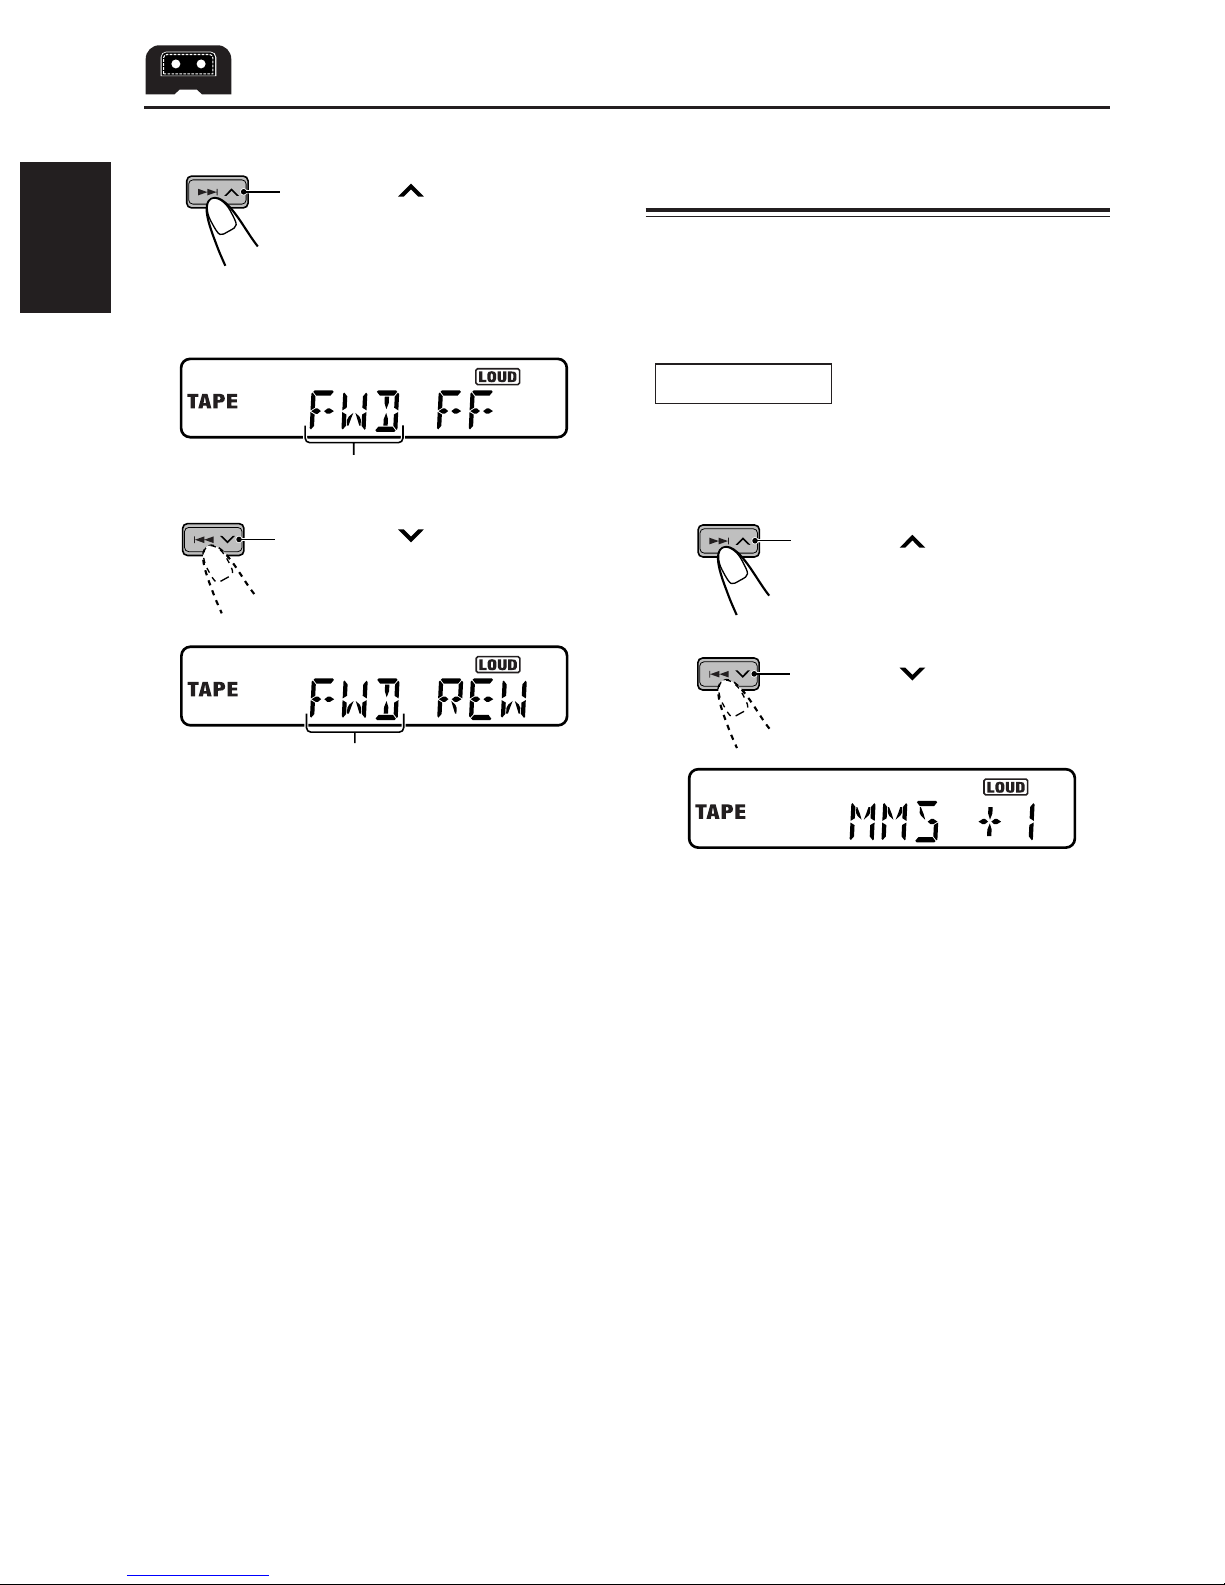
To fast-forward and rewind a tape
Finding the beginning of a
ENGLISH
Press ¢ for more than 1
second to fast-forward the tape.
When the tape reaches its end,
the tape is reversed and
playback starts from the
beginning of the other side.
Corrent tape direction
Press 4
second to rewind the tape.
When the tape reaches its end,
playback of the same side starts.
Corrent tape direction
for more than 1
tune
Multi Music Scan allows you to automatically
start playback from the beginning of a specified
tune. You can specify up to 9 tunes ahead of or
before the current tune.
During playback
Specify where (how many tunes ahead of or
before the current tune) the tune you want is
located.
Press ¢
locate a tune ahead of the
current tune on the tape.
Press 4 repeatedly to
locate a tune before the current
tune on the tape.
repeatedly to
To stop fast forward or rewind at any position
on the tape, press TAPE (PROG).
Tape play starts from that position on the tape.
Note:
When the tape reaches its end while fast-forwarding,
the tape direction will be changed automatically.
When the beginning of the specified tune is
located, playback starts automatically.
Notes:
• While locating a specified tune:
– If the tape is rewound to its beginning, playback
starts from the beginning of that side.
– If the tape is fast-forwarded to the end, it is
reversed and played from the beginning of the
other side.
• In the following cases, Multi Music Scan may not
operate correctly:
– Tapes with tunes having long pianissimo
passages (very quiet parts) or non-recorded
portions.
– Tapes with short non-recorded sections.
– Tapes with high level noise or humming between
tunes.
12
Page 13
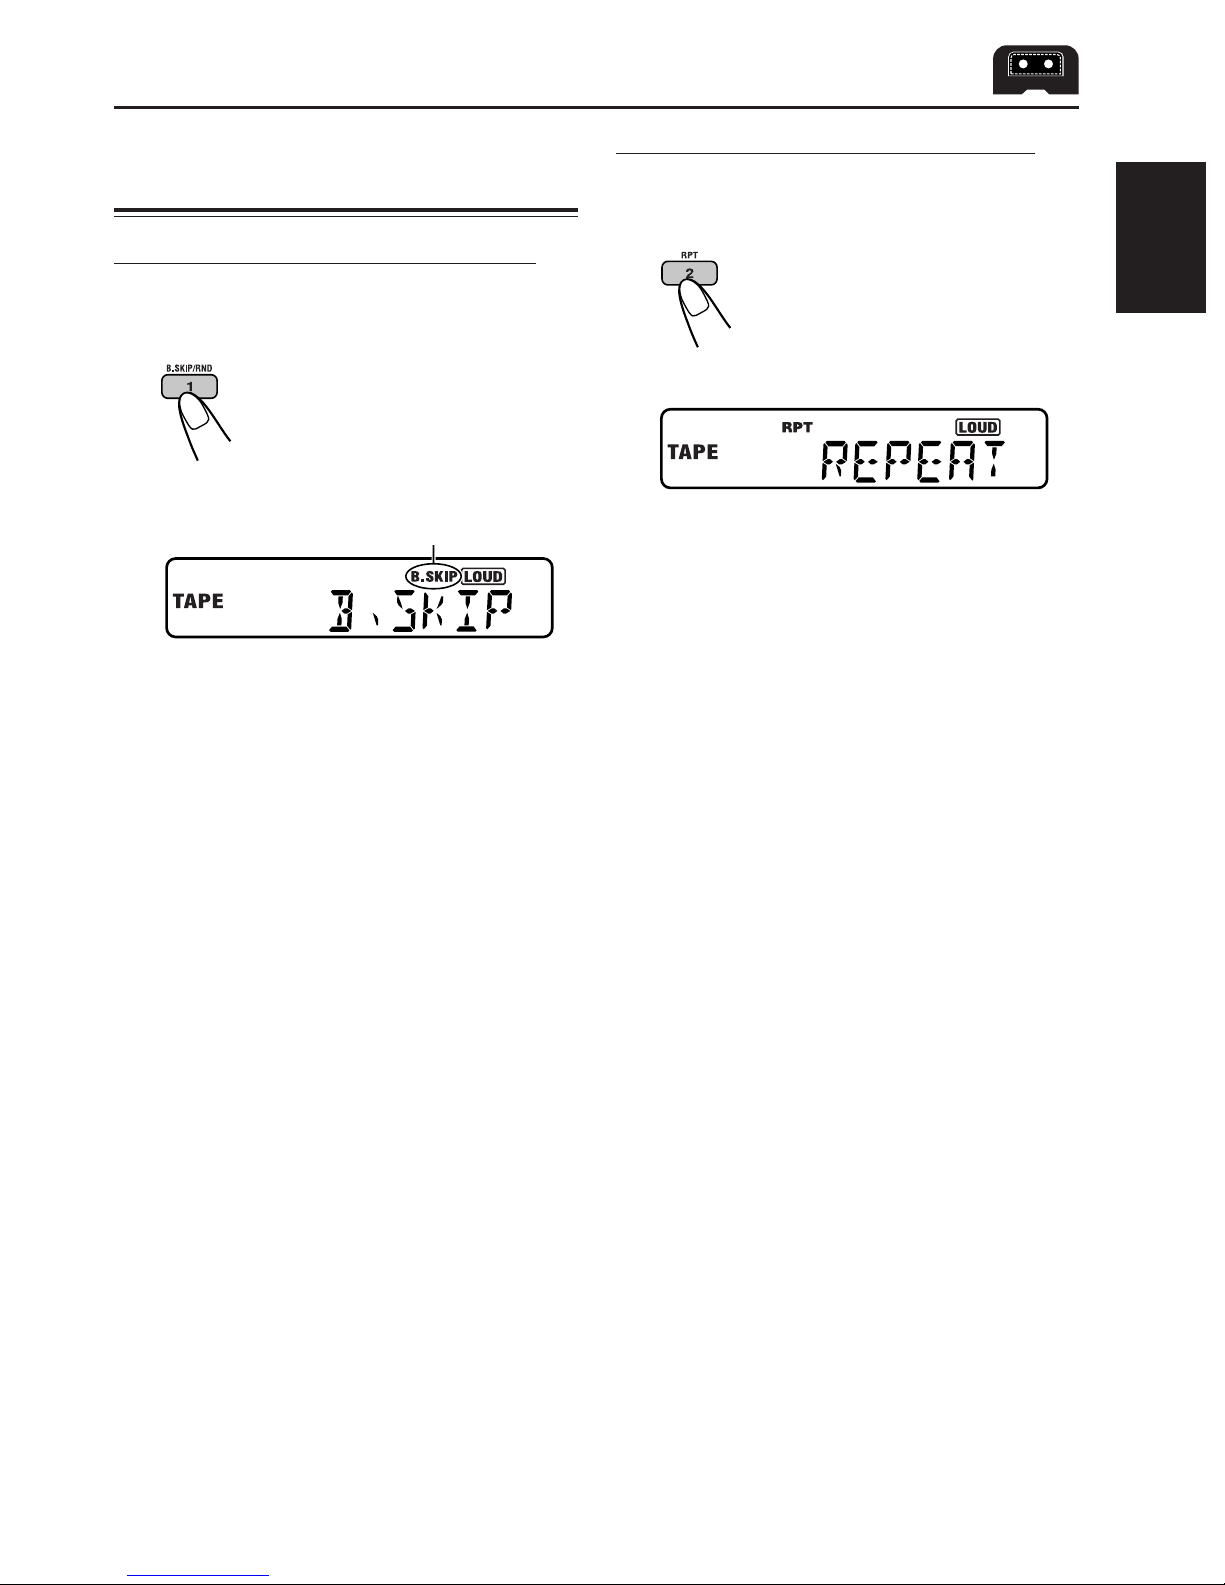
Other convenient tape
functions
Playing the current tune repeatedly
You can play the current tune repeatedly
(Repeat Play).
Skipping blank portions on the tape
You can skip blank portions between the tunes
(Blank Skip).
Press B.SKIP/RND so that
“B.SKIP” appears on the display.
Each time you press the button,
skip function mode turns on and
off alternately.
B.SKIP indicator
When this function is on, the B.SKIP
indicator lights up on the display and the
unit skips blank portions of 15 seconds or
more, fast-forwards to the next tune, then
starts playing it.
While the unit is skipping blank portions, the
B.SKIP indicator flashes.
Press RPT so that “REPEAT”
appears on the display.
Each time you press the button,
repeat play mode turns on and
off alternately.
When the repeat mode is turned on, the
RPT indicator lights up on the display.
Notes:
• In the following cases, Blank Skip and Repeat Play
may not operate correctly:
– Tapes with tunes having long pianissimo
passages (very quiet parts) or non-recorded
portions.
– Tapes with short non-recorded sections.
– Tapes with high level noise or humming between
tunes.
• In the following cases, Repeat Play function for
tape will be turned off.
– If the source is changed to any other than
“TAPE.”
– If the cassette is ejected.
– If the unit is turned off.
ENGLISH
13
Page 14
ENGLISH
SOUND ADJUSTMENTS
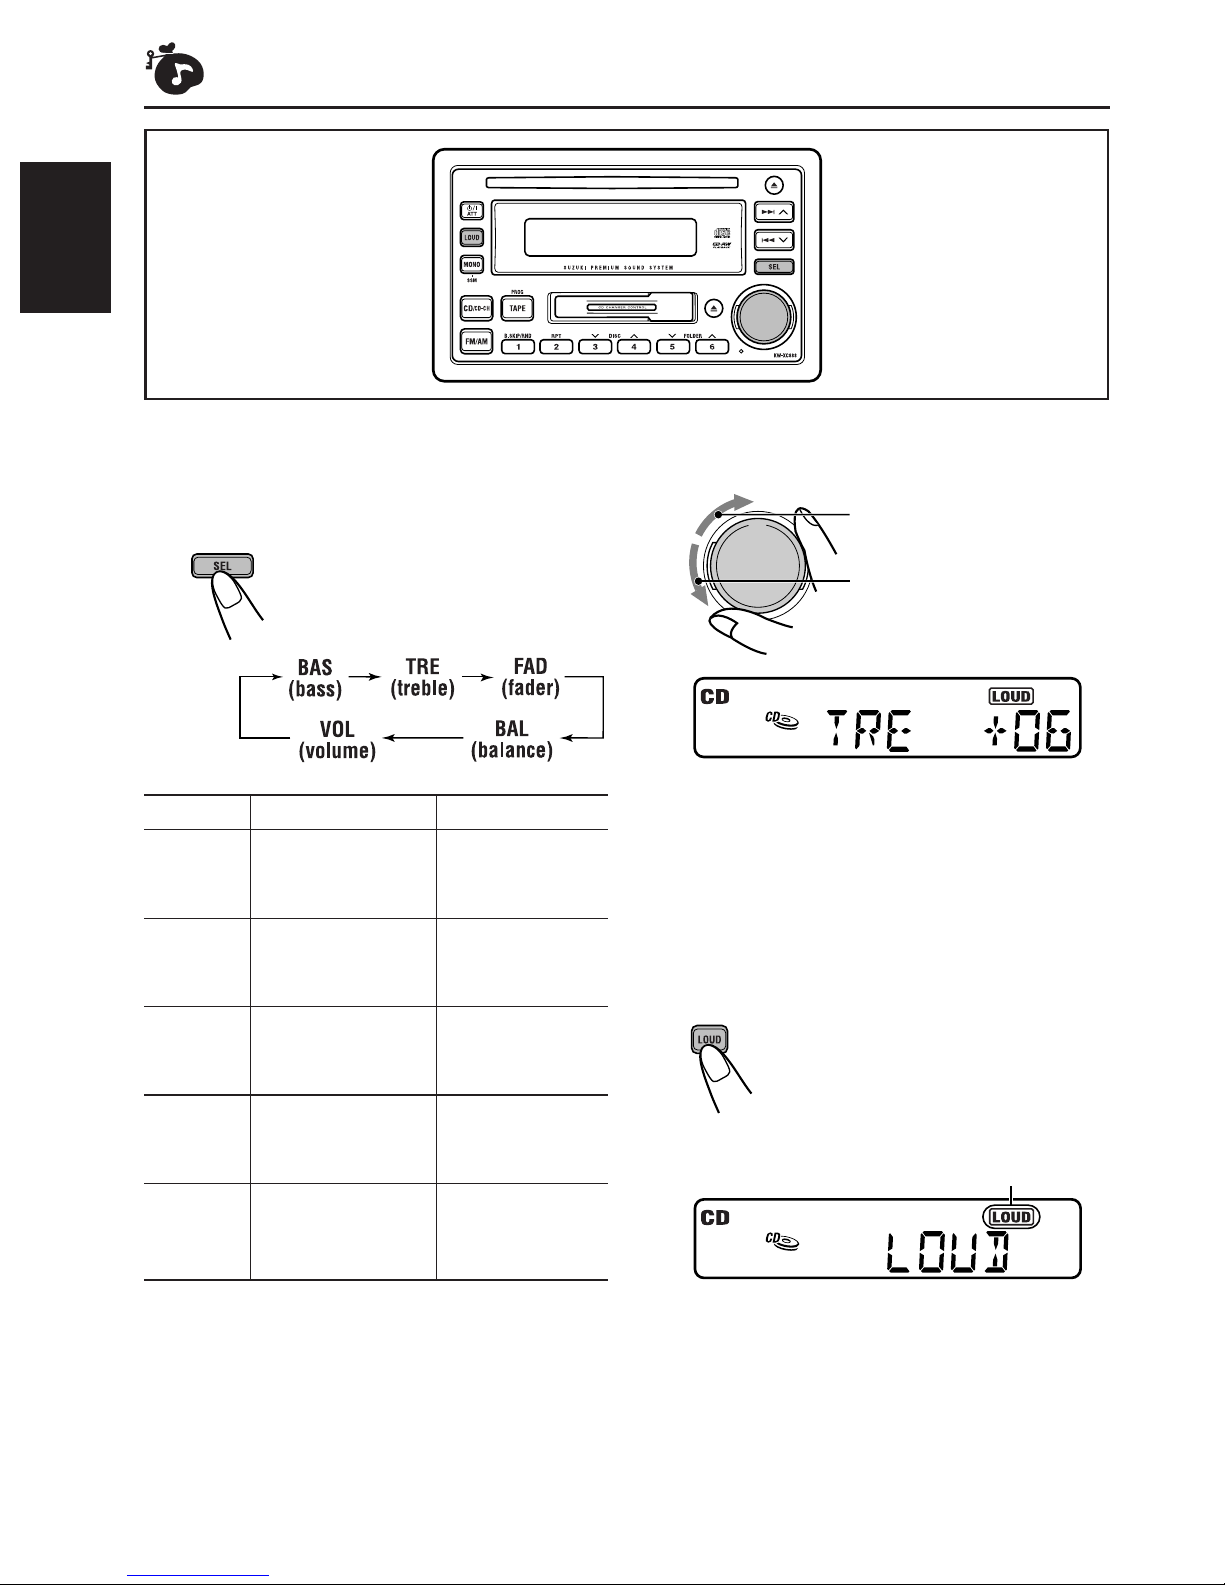
You can adjust the sound characteristics to your
preference.
1
Select the item you want to adjust.
Each time you press the button,
the adjustable items change as
follows:
Indication To do: Range
BAS Adjust the bass. –06 (min.)
|
+06 (max.)
TRE Adjust the treble. –06 (min.)
|
+06 (max.)
1
FAD*
BAL Adjust the left L06 (Left only)
2
VOL*
Adjust the front R06 (Rear only)
and rear speaker |
balance. F06 (Front only)
and right speaker |
balance. R06 (Right only)
Adjust the volume. 00 (min.)
|
50 (max.)
2
Adjust the level.
To increase the level
To decrease the level
Ex.: When you adjust “TRE” (treble)
3
Repeat steps 1 and 2 to adjust the
other items.
While listening at a low volume level:
You can boost low and high frequencies to
produce a well-balanced sound at low volume
level.
Press LOUD so that “LOUD”
appears on the display.
Each time you press the button,
the loudness mode turns on and
off alternately.
LOUD indicator
*1If you are using a two-speaker system, set the fader
level to “00.”
*2Normally the control dial works for volume
adjustment. So you do not have to select “VOL” to
adjust the volume level.
14
When the loudness mode is turned on, the
LOUD indicator lights up on the display.
Page 15
CD CHANGER OPERATIONS
ENGLISH
We recommend that you use the JVC MP3compatible CD changer with this unit.
This unit cannot read MP3 “tracks” (word “file” is
not used to indicate MP3 files, “track” is used in
this manual) recorded on CD-Rs, CD-RWs or
CD-ROMs. However, by using the JVC MP3compatible CD changer, you can playback your
original CD-Rs and CD-RWs recorded either in
audio CD format or in MP3 format.
• If you have another CD changer, consult your
car dealer or JVC car audio dealer for
connections.
About MP3 discs
What is MP3?
MP3 is an abbreviation of Motion Picture Experts
Group (or MPEG) Audio Layer 3. MP3 is simply a
file format with a data compression ratio of 1:10
(128 Kbps*). That means, by using MP3 format,
one CD-R or CD-RW can contain 10 times as
much data volume as a regular CD can.
How are MP3 tracks recorded?
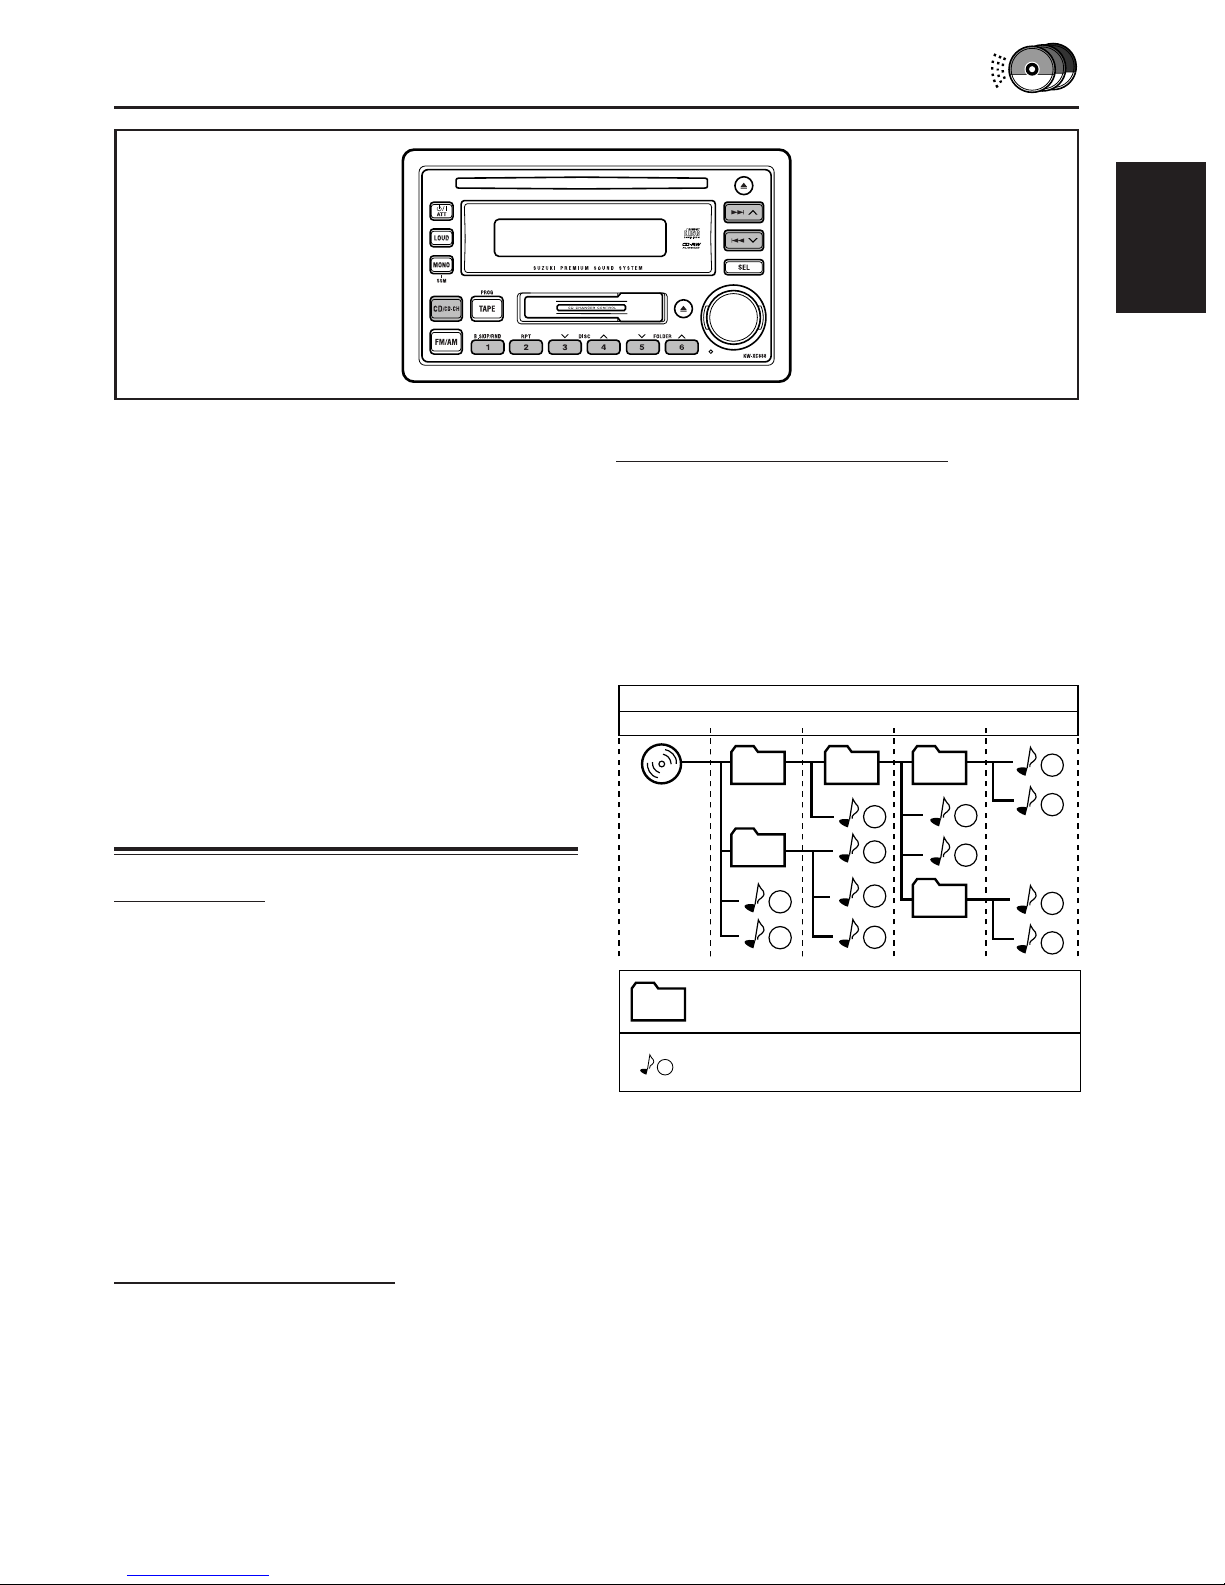
MP3 tracks can be recorded in “folders.”
During recording, the tracks and folders can be
arranged in a way similar to arranging tracks and
folders of computer data.
“Root” is similar to the root of a tree. Every track
and folder can be linked to and be accessed
from the root.
Hierarchy
Level 1 Level 2 Level 3 Level 4 Level 5
6
7
8
9
ROOT
01
1
01
05
1
2
: Folders and their playback order
: MP3 tracks and their playback order
02 03
3
10
11
12
04
4
5
* Bit rate is the average number of bits that one
second of audio data will consume. The unit used is
Kbps. To get a better audio quality, choose a higher
bit rate. The most popular bit rate for encoding is
128 Kbps.
Incompatible with ID3-tag
ID3-tag is extra information data stored within an
MP3 track such as album title, performer name,
song title, recording year, music genre and a
brief comment.
• This unit cannot show ID3-tag on the display.
15
Page 16
Connecting the CD changer
Before connecting the CD changer
• To prevent short circuits, it is recommended to
disconnect the car battery’s negative terminal
ENGLISH
and make all electrical connections before
connecting the CD changer.
• When mounting the unit removed from your car,
be sure to use the screws provided, as
instructed. If other screws are used, there is a
possibility that parts could become loose or
damaged.
• When tightening screws or bolts, be careful not
to pinch any connection cord.
• If you are not sure how to connect the CD
changer correctly, consult your car dealer or
JVC car audio dealer, or have it installed by a
qualified technician. Refer also to the
instructions supplied for the CD changer.
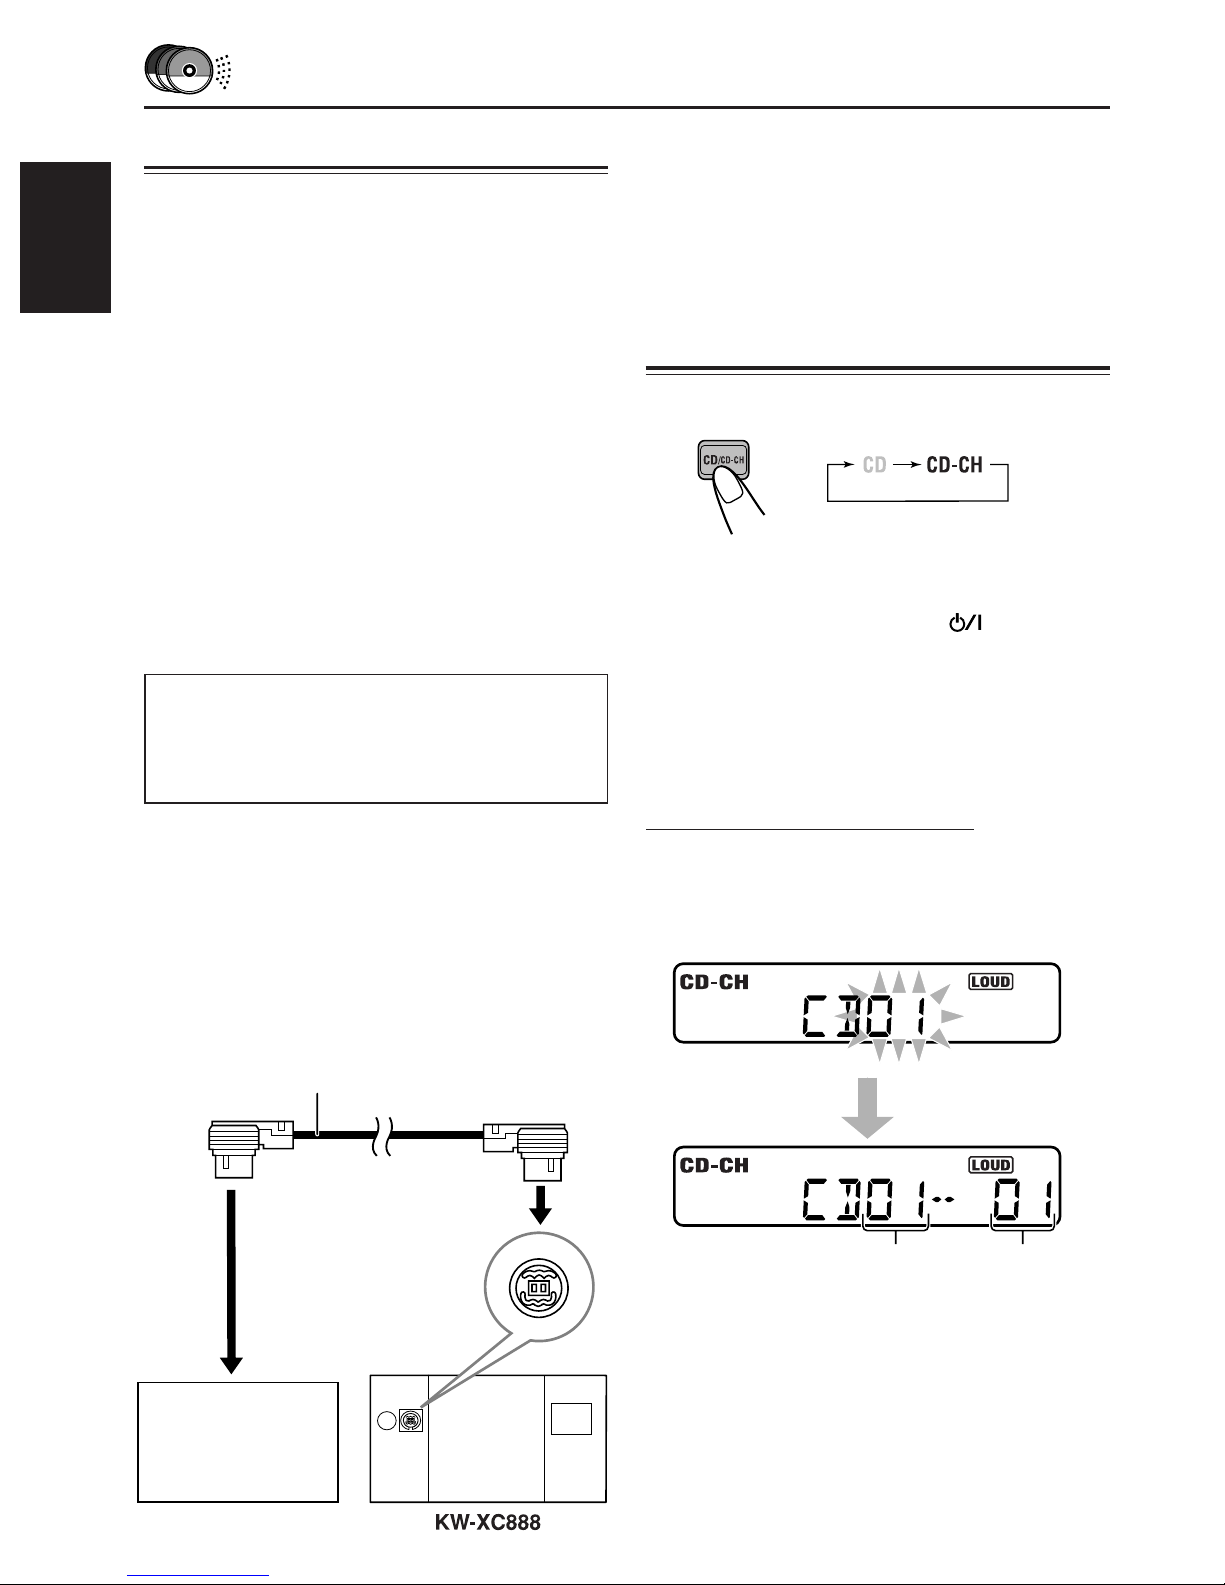
The following illustration shows the connection
to JVC CD changer. If you have another CD
changer, consult your car dealer or JVC car
audio dealer for connections.
3
Re-install this unit to your car using
the screws removed in step 1.
• For JVC CD changer installation, refer to
the instructions supplied for JVC CD
changer.
Playing discs
Select the CD changer (CD-CH).
Note on One-Touch Operation:
When you press CD/CD-CH, the power automatically
comes on. You do not have to press
on the power.
• If you change the source, CD changer play also
stops. Next time you select the CD changer as the
source, CD changer play starts from where
playback has been stopped previously.
ATT
/
to turn
1
Remove this unit from your car.
• Be sure to keep all the screws and parts
removed from your car.
2
Connect this unit to JVC CD
changer with the connection cord
supplied for the CD changer.
Connection cord supplied for the CD changer
When the current disc is a CD:
Playback starts from the first track of the current
disc.
The display changes to show the following:
Current disc
number
Current track
number
JVC CD changer
16
Page 17
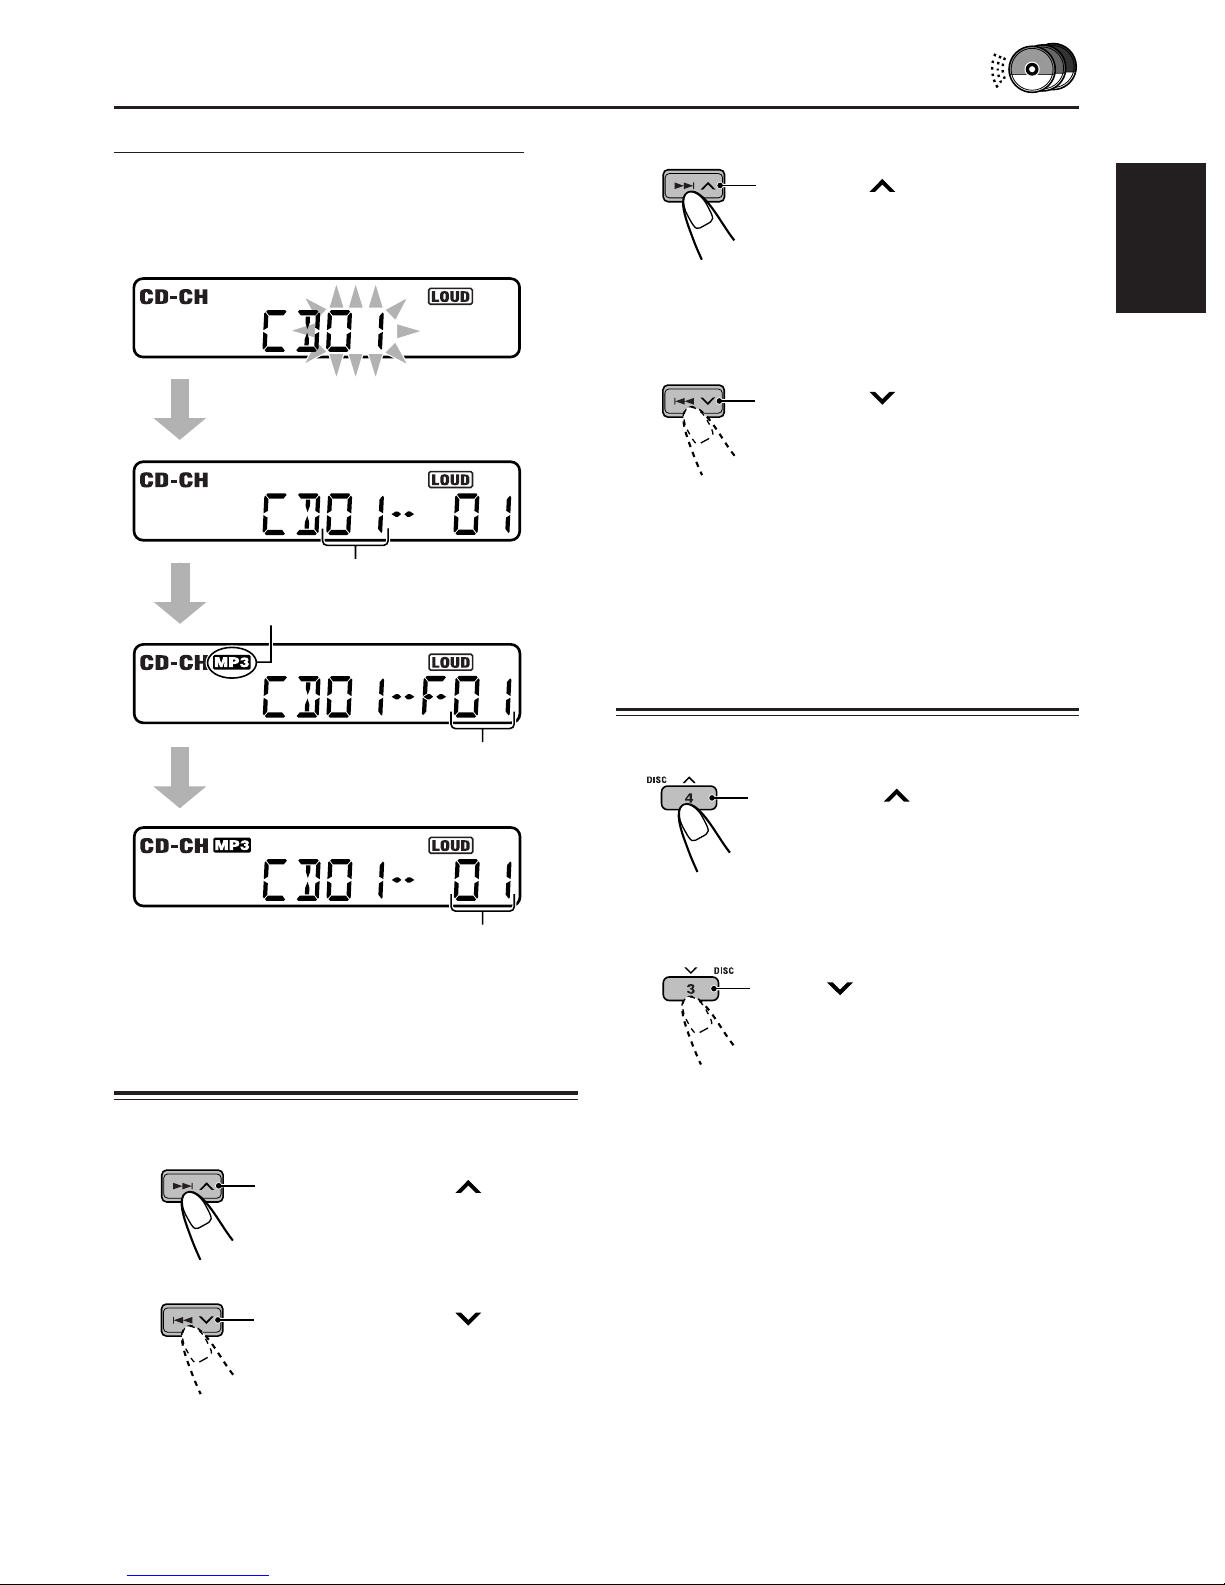
When the current disc is an MP3 disc:
Playback starts from the first folder of the current
disc once track check is completed.
The display changes to show the following:
To go to the next or previous tracks
Press ¢ briefly while
playing a disc, to go ahead to the
beginning of the next track.
Each time you press the button
consecutively, the beginning of
the next track is located and
playback.
ENGLISH
Current disc number
MP3 indicator
Current folder
number
Current track
number
Locating a track or a
particular portion on a disc
To fast-forward or reverse the track
Press 4
playing a disc, to go ahead to the
beginning of the current track.
Each time you press the button
consecutively, the beginning of
the previous track is located and
playback.
briefly while
Locating a disc in the
magazine
To skip to the next or previous discs
Press DISC while playing a
disc, to go to the next disc.
Each time you press the button
consecutively, the next disc is
located and the first track in the
disc starts playback.
Press
disc, to go the previous disc.
Each time you press the button
consecutively, the previous disc
is located and the first track in
the disc starts playback.
DISC while playing a
Press and hold ¢ while
playing a disc, to fast-forward the
track.
Press and hold 4
playing a disc, to reverse the
track.
while
17
Page 18
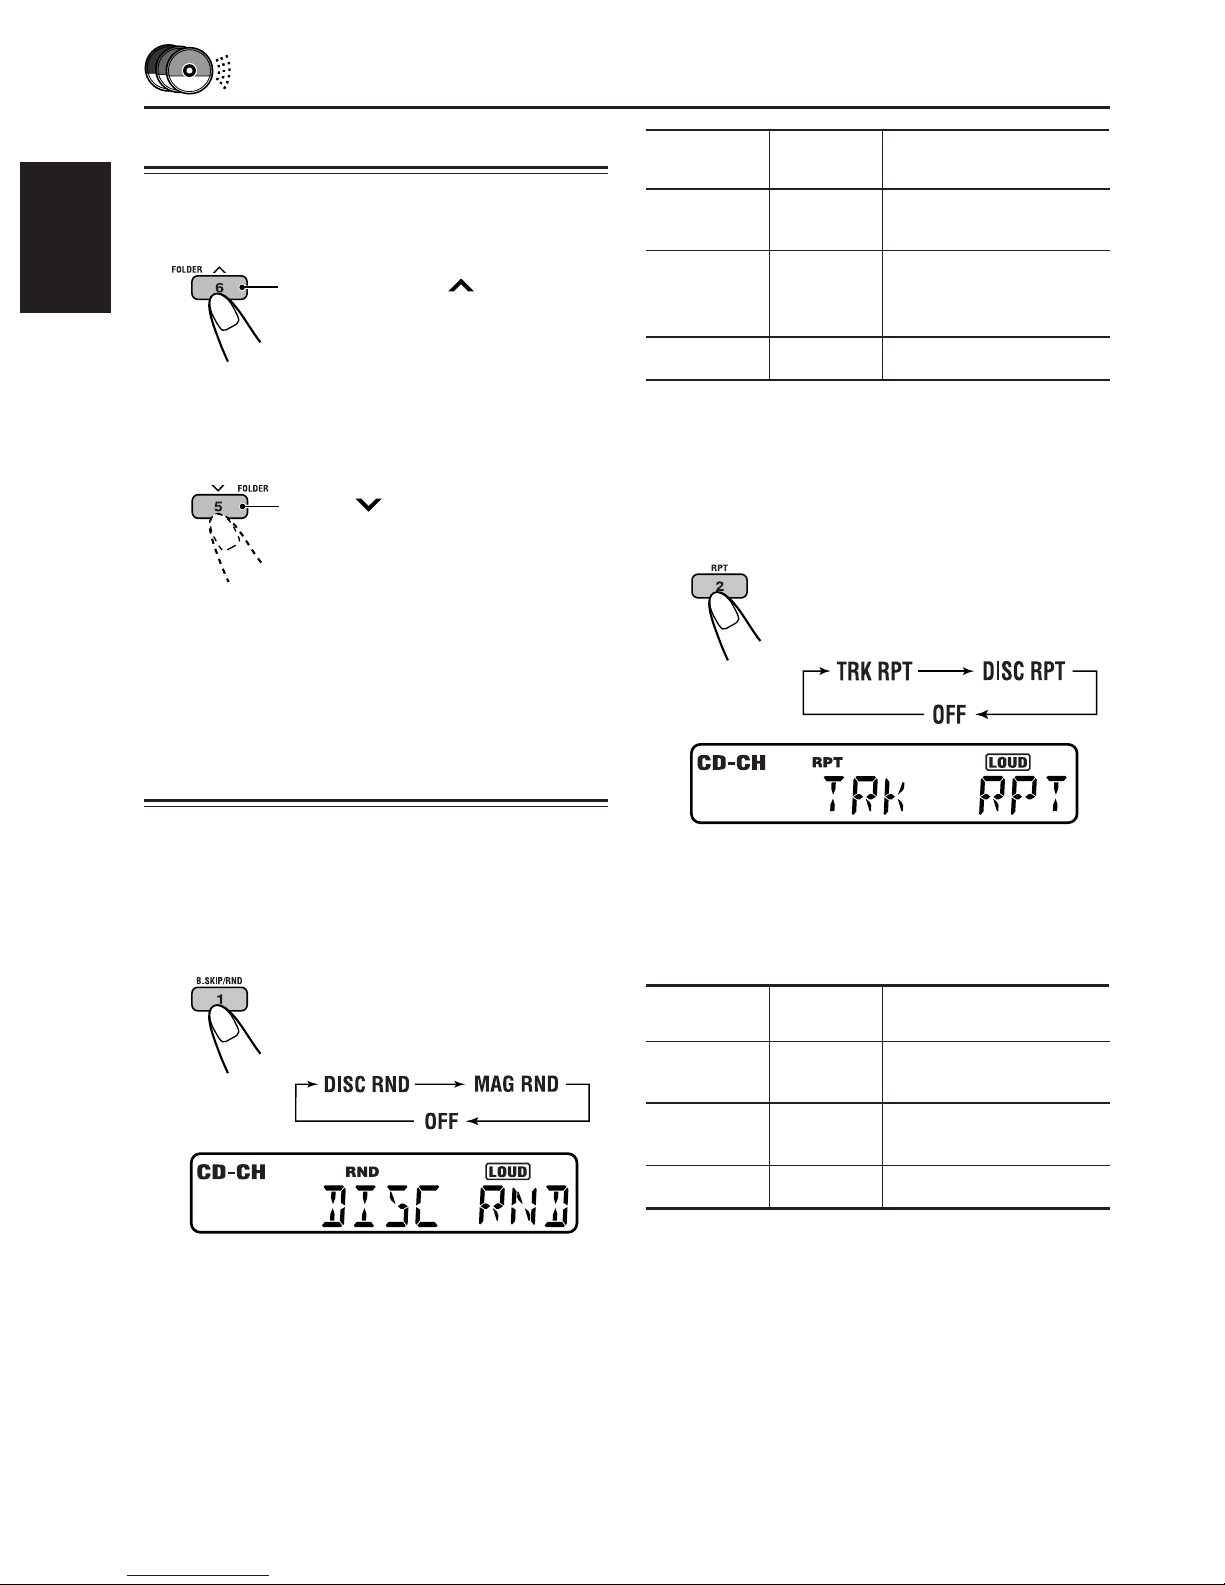
Locating a folder on a disc
Mode
RND
Indicator
Plays at random
To skip to the next or previous folders
(only for MP3 discs)
ENGLISH
Press FOLDER while playing
an MP3 disc, to go to the next
folder.
Each time you press the button
consecutively, the next folder is
located and the first track in the
folder starts playback.
Press
an MP3 disc, to go the previous
folder.
Each time you press the button
consecutively, the previous folder
is located and the first track in
the folder starts playback.
FOLDER while playing
Selecting the playback modes
DISC RND Lights All tracks of the current
(or specified) disc.
MAG RND Flashes All tracks of all discs
inserted in the
magazine.
OFF Goes off Canceled.
To play back tracks repeatedly
(Track Repeat/Disc Repeat Play)
You can play back a track or a disc repeatedly.
Each time you press the button,
the repeat play mode changes
as follows:
To play back tracks at random
(Disc Random/Magazine Random Play)
You can play back tracks on a disc or on all
loaded discs at random.
Each time you press the button,
the random play mode changes
as follows:
Ex.: When you select “DISC RND”
Note:
MP3 indicator also lights up if the current playing
disc is an MP3 disc.
Ex.: When you select “TRK RPT”
Note:
MP3 indicator also lights up if the current playing
disc is an MP3 disc.
Mode
TRK RPT Lights The current (or
DISC RPT Flashes All tracks of the current
OFF Goes off Canceled.
RPT
Indicator
Plays repeatedly
specified) track.
(or specified) disc.
18
Page 19
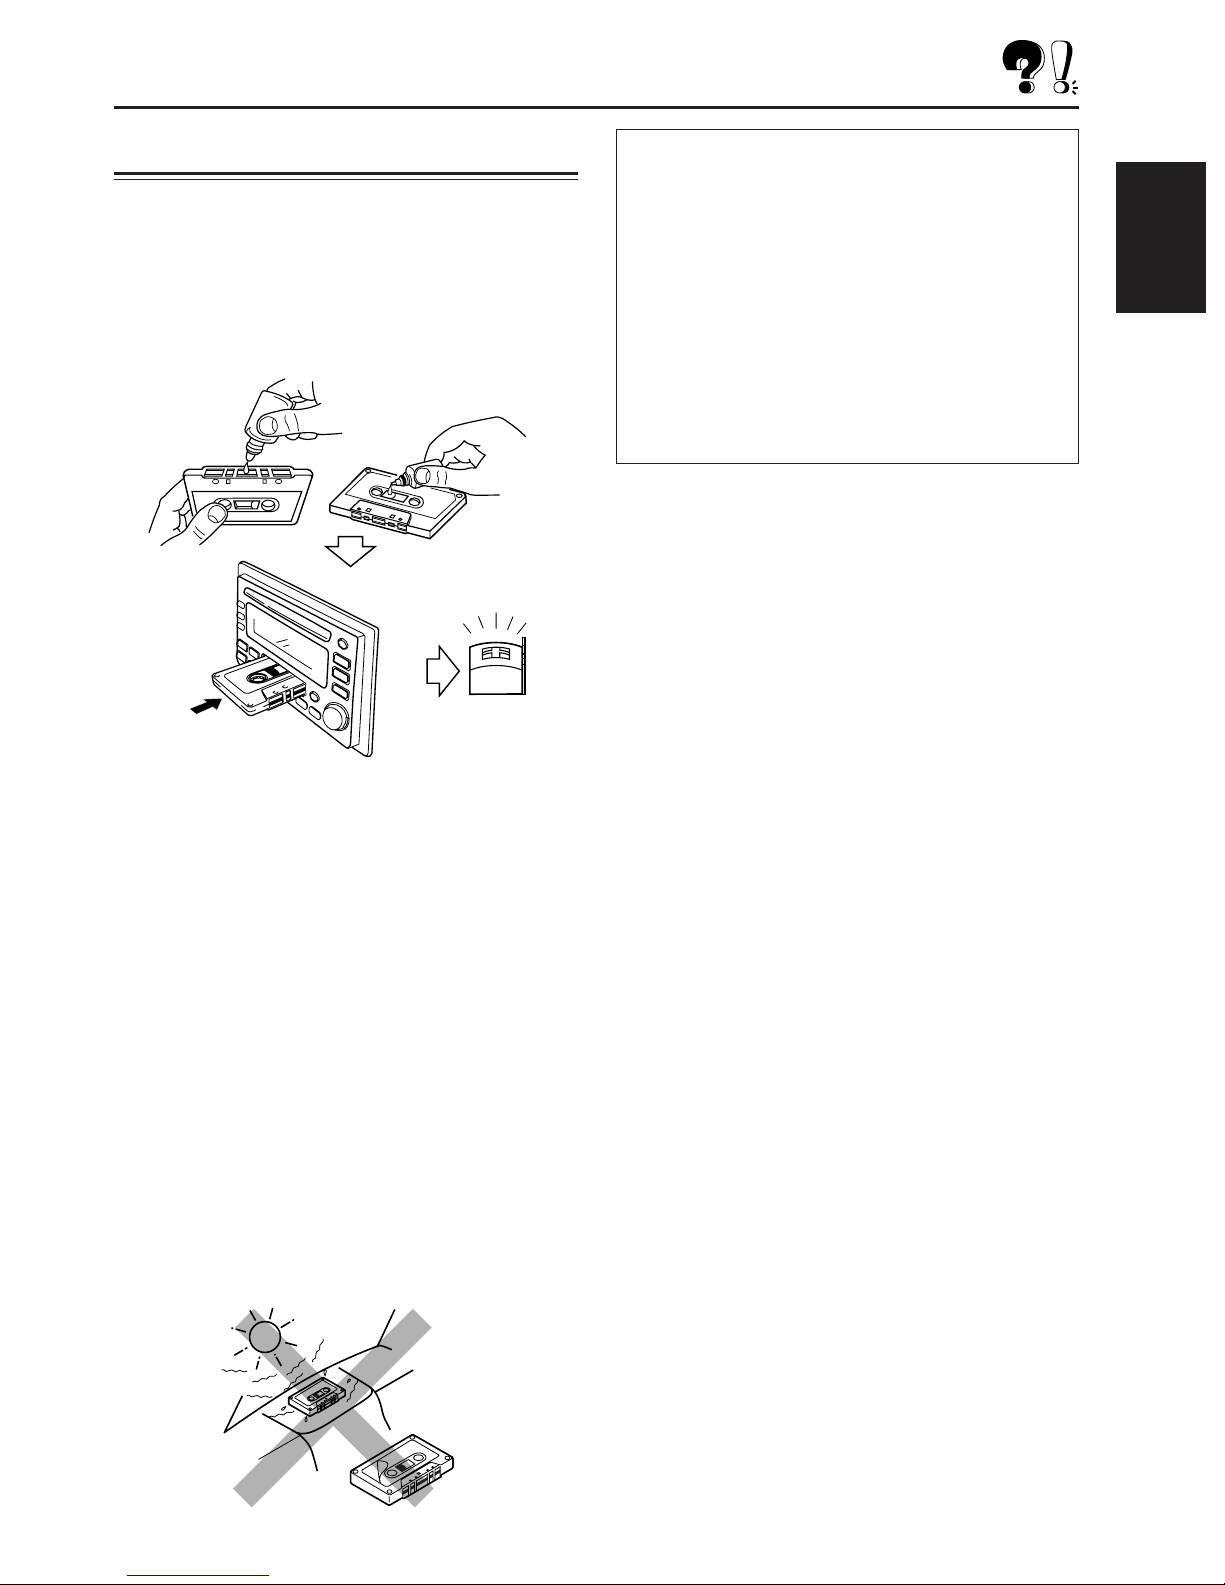
ADDITIONAL INFORMATION
Handling cassettes
The cassette deck built in this unit requires very
little attention, but you will be able to extend the
life of the cassette deck if you follow the
instructions below.
To clean the heads
CAUTIONS:
• Do not play the tapes with peeling labels;
otherwise, they can damage the unit.
• Tighten tapes to remove slack since loose tape
may become entangled with the mechanism.
• Do not leave a cassette in the cassette
compartment after use, as the tape may become
slack.
• The use of C-120 or longer tape is not
recommended, since characteristic deterioration
may occur and this tape easily jams in the pinch
rollers and the capstans.
The function below is also provided to ensure the
longer life of the cassette deck.
Ignition key-off release
When you turn off the ignition key with a cassette
in the compartment, the unit automatically
releases the tape from its head.
ENGLISH
• Clean the heads after every 10 hours of use
using a wet-type head cleaning tape (available
at an audio store).
When the head becomes dirty, you may realize
the following symptoms:
– Sound quality is reduced.
– Sound level decreases.
– Sound drops out.
• Do not play dirty or dusty tapes.
• Do not touch the highly-polished head with any
metallic or magnetic tools.
To keep the tape clean
• Always store the tapes in their storage cases
after use.
• Do not store tapes in the following places:
– Subject to direct sunlight
– With high humidity
– At extremely hot temperatures
19
Page 20
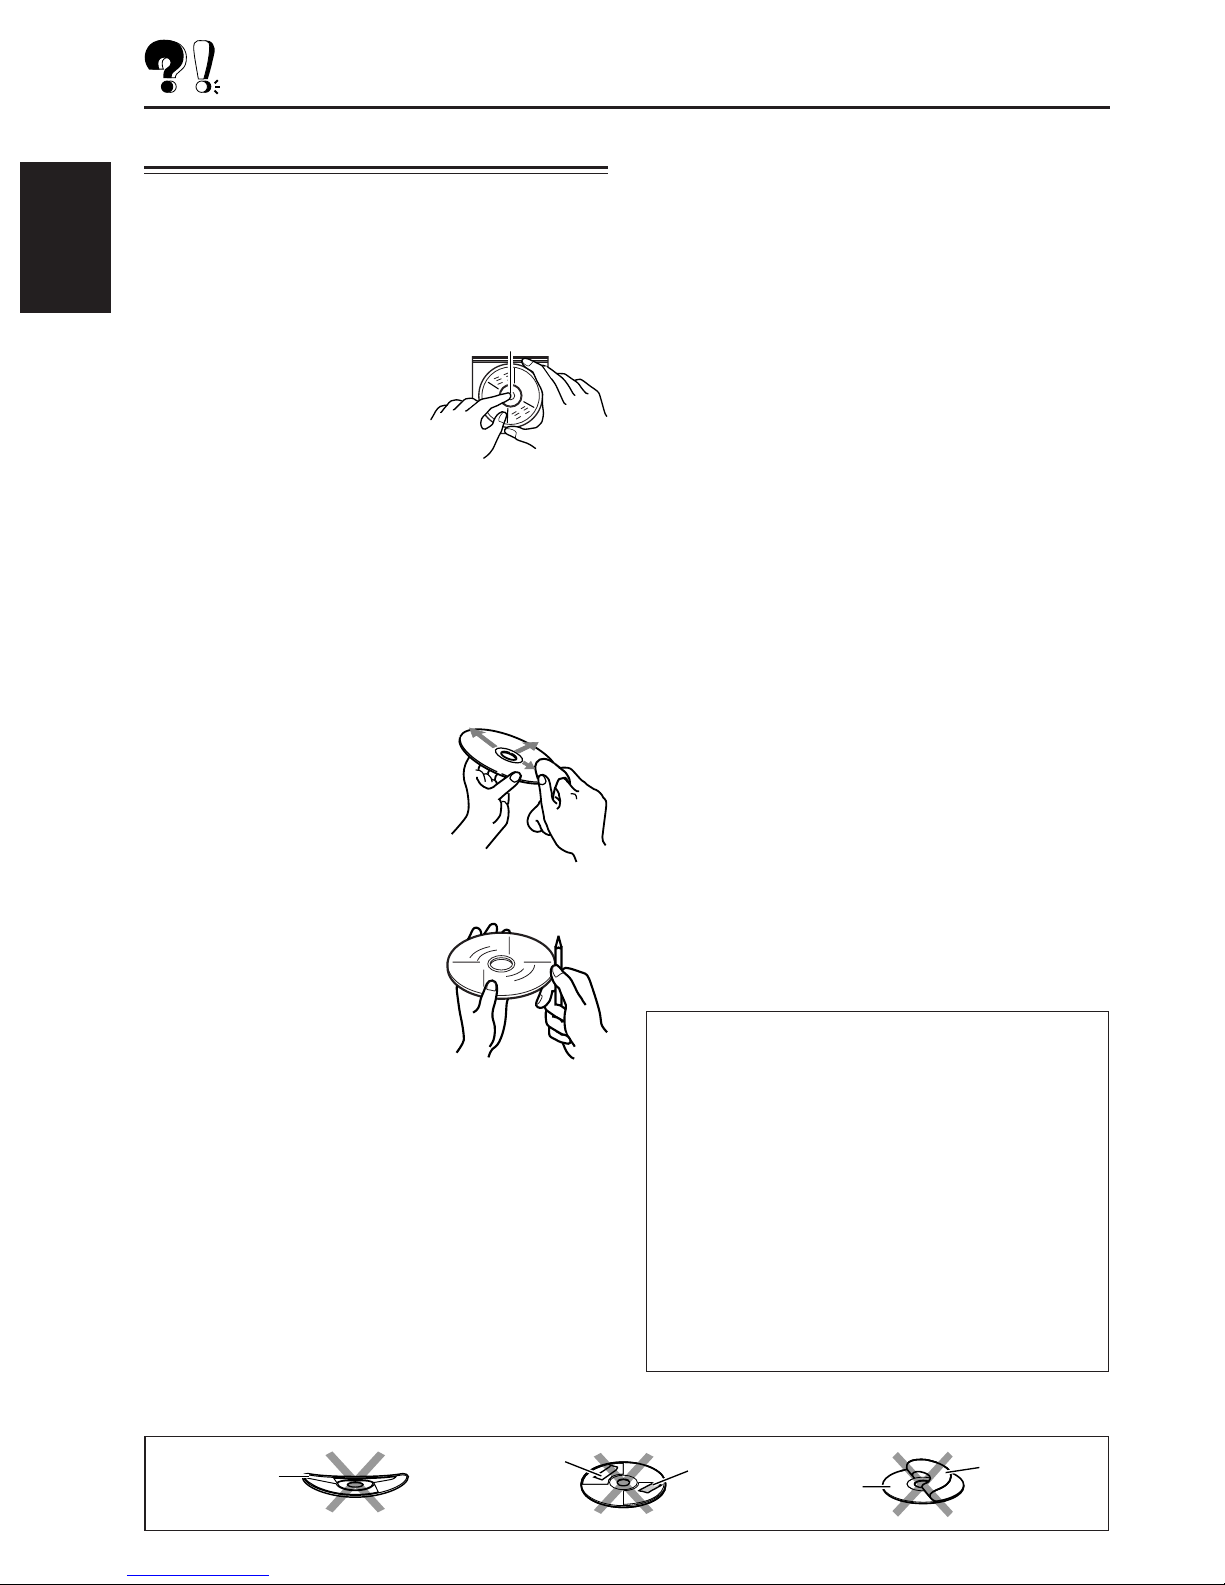
Handling discs
This unit has been designed to reproduce CDs,
CD-Rs (Recordable), and CD-RWs (Rewritable).
• This unit is not compatible with MP3 discs,
ENGLISH
but can operate a JVC MP3-compatible CD
changer.
How to handle discs
When removing a disc
from its case, press down
the center holder of the case
and lift the disc out, holding it by the edges.
• Always hold the disc by the edges. Do not
touch its recording surface.
When storing a disc into its case, gently insert
the disc around the center holder (with the
printed surface facing up).
• Make sure to store discs in their cases after
use.
To keep discs clean
A dirty disc may not play
correctly. If a disc does
becomes dirty, wipe it with a
soft cloth in a straight line from
center to edge.
To play new discs
New discs may have some
rough spots around the inner
and outer edges.
If such a disc is used, this unit
may reject the disc.
To remove these rough spots, rub the edges with
a pencil or ball-point pen, etc.
Moisture condensation
Moisture may condense on the lens inside the
CD player in the following cases:
• After starting the heater in the car.
• If it becomes very humid inside the car.
Should this occur, the CD player may
malfunction. In this case, eject the disc and leave
the unit turned on for a few hours until the
moisture evaporates.
When playing a CD-R or CD-RW
Before playing back CD-Rs or CD-RWs, read
their instructions or cautions carefully.
• Use only “finalized” CD-Rs or CD-RWs.
• Some CD-Rs or CD-RWs may not play back on
this unit because of their disc characteristics,
and for the following reasons:
— Discs are dirty or scratched.
— Moisture condensation on the lens inside
the unit.
— The pickup lens inside the unit is dirty.
• CD-RWs may require a longer readout time
since the reflectance of CD-RWs is lower than
that of regular CDs.
• CD-Rs or CD-RWs are susceptible to high
temperatures or high humidity, so do not leave
them inside your car.
• Do not use following CD-Rs or CD-RWs:
— Discs with stickers, labels, or protective seal
stuck to the surface.
— Discs on which labels can be directly printed
by an ink jet printer.
Using these discs under high temperatures or
high humidity may cause malfunctions or
damage to discs. For example,
— Stickers or labels may shrink and warp a
disc.
— Stickers or labels may peel off so discs
cannot be ejected.
— Print on discs may get sticky.
Read instructions or cautions about labels and
printable discs carefully.
CAUTIONS:
• Do not insert 8 cm discs (single CDs) into the
loading slot. (Such discs cannot be ejected.)
• Do not insert any disc of unusual shape—like a
heart or flower; otherwise, the unit will
malfunction.
• Do not expose discs to direct sunlight or any
heat source or place them in a place subject to
high temperature and humidity. Do not leave
them in a car.
• Do not use any solvent (for example,
conventional record cleaner, spray, thinner,
benzine, etc.) to clean discs.
Warped
disc
20
Sticker
Sticker
residue
Disc
Stick-on
label
Page 21
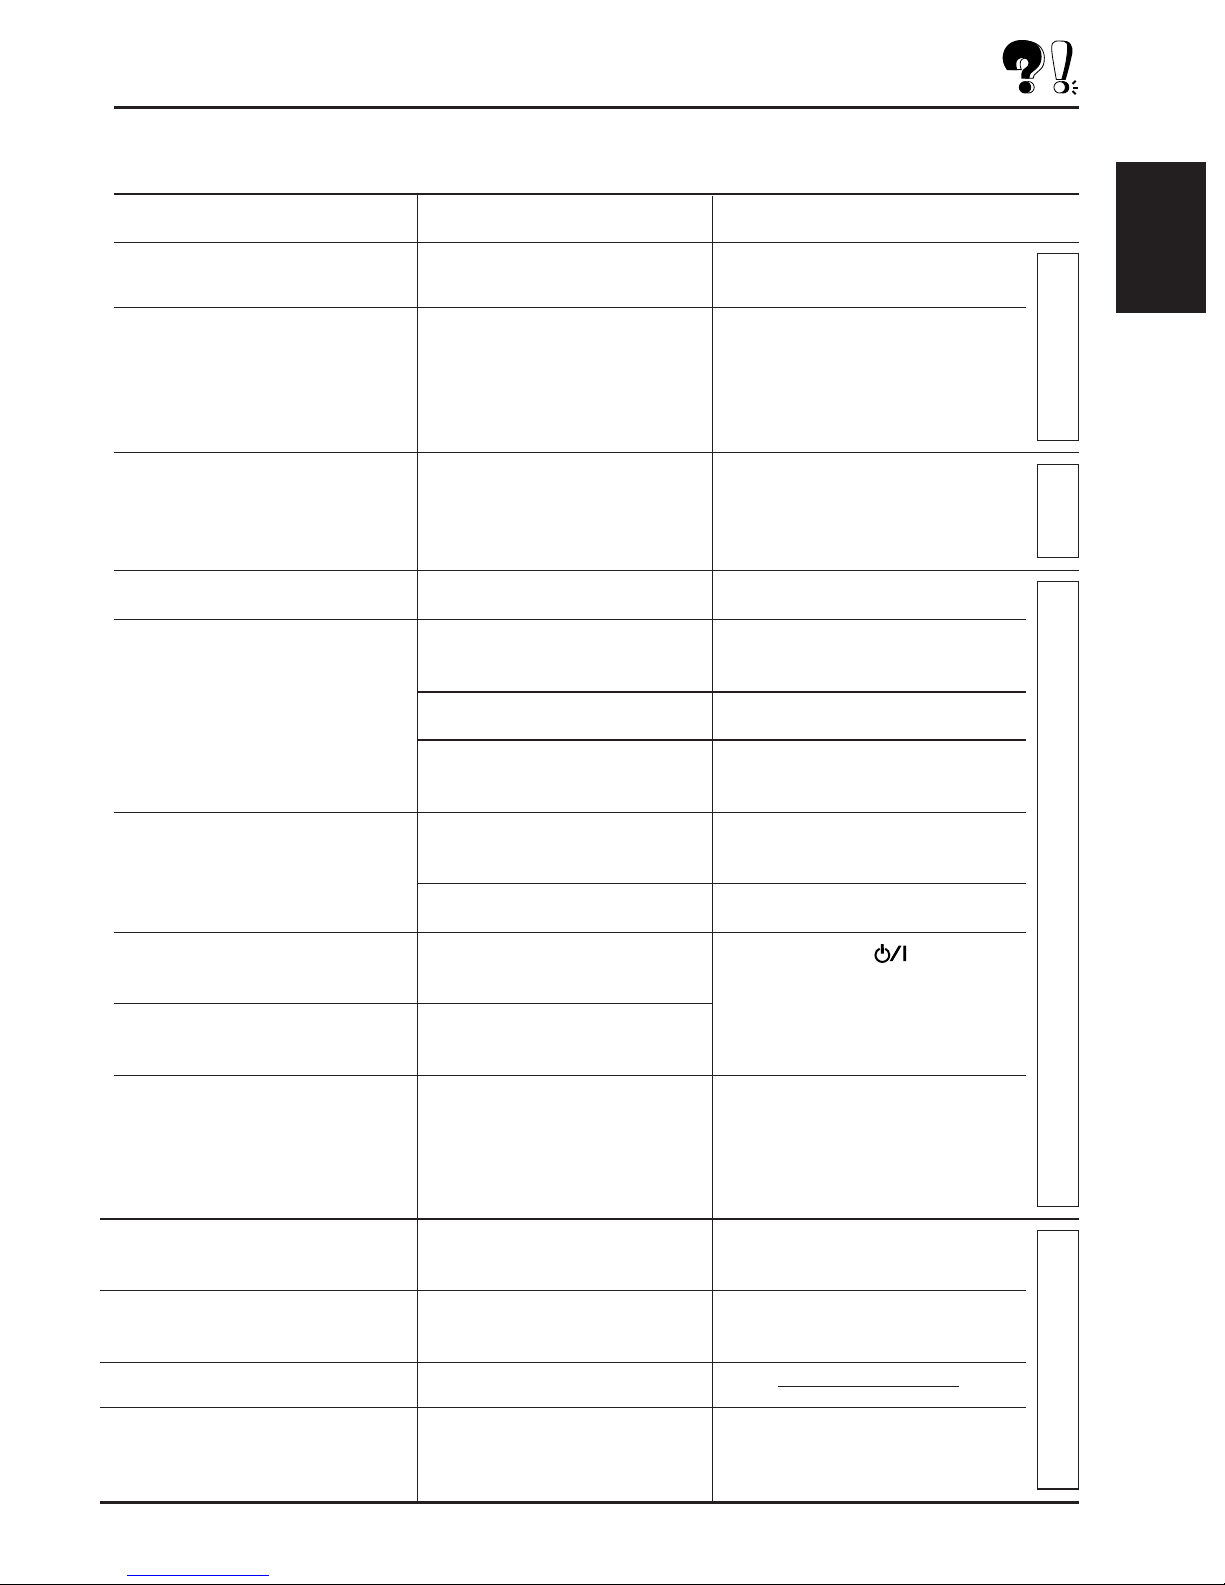
TROUBLESHOOTING
What appears to be trouble is not always serious. Check the following points before calling a service
center.
Symptoms
• Sound cannot be heard
from the speakers.
• This unit does not work at
all.
• SSM (Strong-station
Sequential Memory)
automatic preset does not
work.
• Disc cannot be played back.
• Disc sound is sometimes
interrupted.
Causes
The volume control is turned
to the minimum level.
The built-in microcomputer
may have functioned
incorrectly due to noise, etc.
Signals are too weak.
Disc is inserted upside down.
You are driving on rough
roads.
Disc is scratched.
Connections are incorrect.
Remedies
Adjust it to the optimum level.
Press the reset button on the
front panel. (Your preset
adjustments will also be
erased.)
(See page 2.)
Store stations manually.
Insert the disc correctly.
Stop disc play while driving on
rough roads.
Change the disc.
Check the cords and
connections.
ENGLISH
General
FM/AM
• “NO DISC” appears on the
display.
• Disc can neither be played
back nor ejected.
• “ERROR” flashes on the
display.
• CD-R/CD-RW cannot be
played back.
• Tracks on the CD-R/CD-RW
cannot be skipped.
• “NO TAPE” appears on the
display.
• A cassette tape cannot be
inserted.
• Cassette tapes become hot.
No disc is in the loading slot.
Disc is inserted incorrectly.
The CD player may be
functioning incorrectly.
CD loading or CD ejection
does not work correctly.
CD-R/CD-RW is not finalized.
No tape is in the cassette
compartment.
You have tried to insert a
cassette in the wrong way.
This is not a malfunction.
Insert a disc into the loading
slot.
Insert the disc correctly.
While pressing
press and hold CD 0 buttons
for more than 2 seconds to
eject a CD.
• Insert a finalized CD-R/
CD-RW.
• Finalize the CD-R/CD-RW
with the component which
you used for recording.
Insert a tape into the cassette
compartment.
Insert the cassette with the
exposed tape facing right.
ATT
/
,
Disc playback
• Tape sound is at very low
level and sound quality is
degraded.
The tape head is dirty.
Clean it with a head cleaning
tape.
Tape playback
21
Page 22
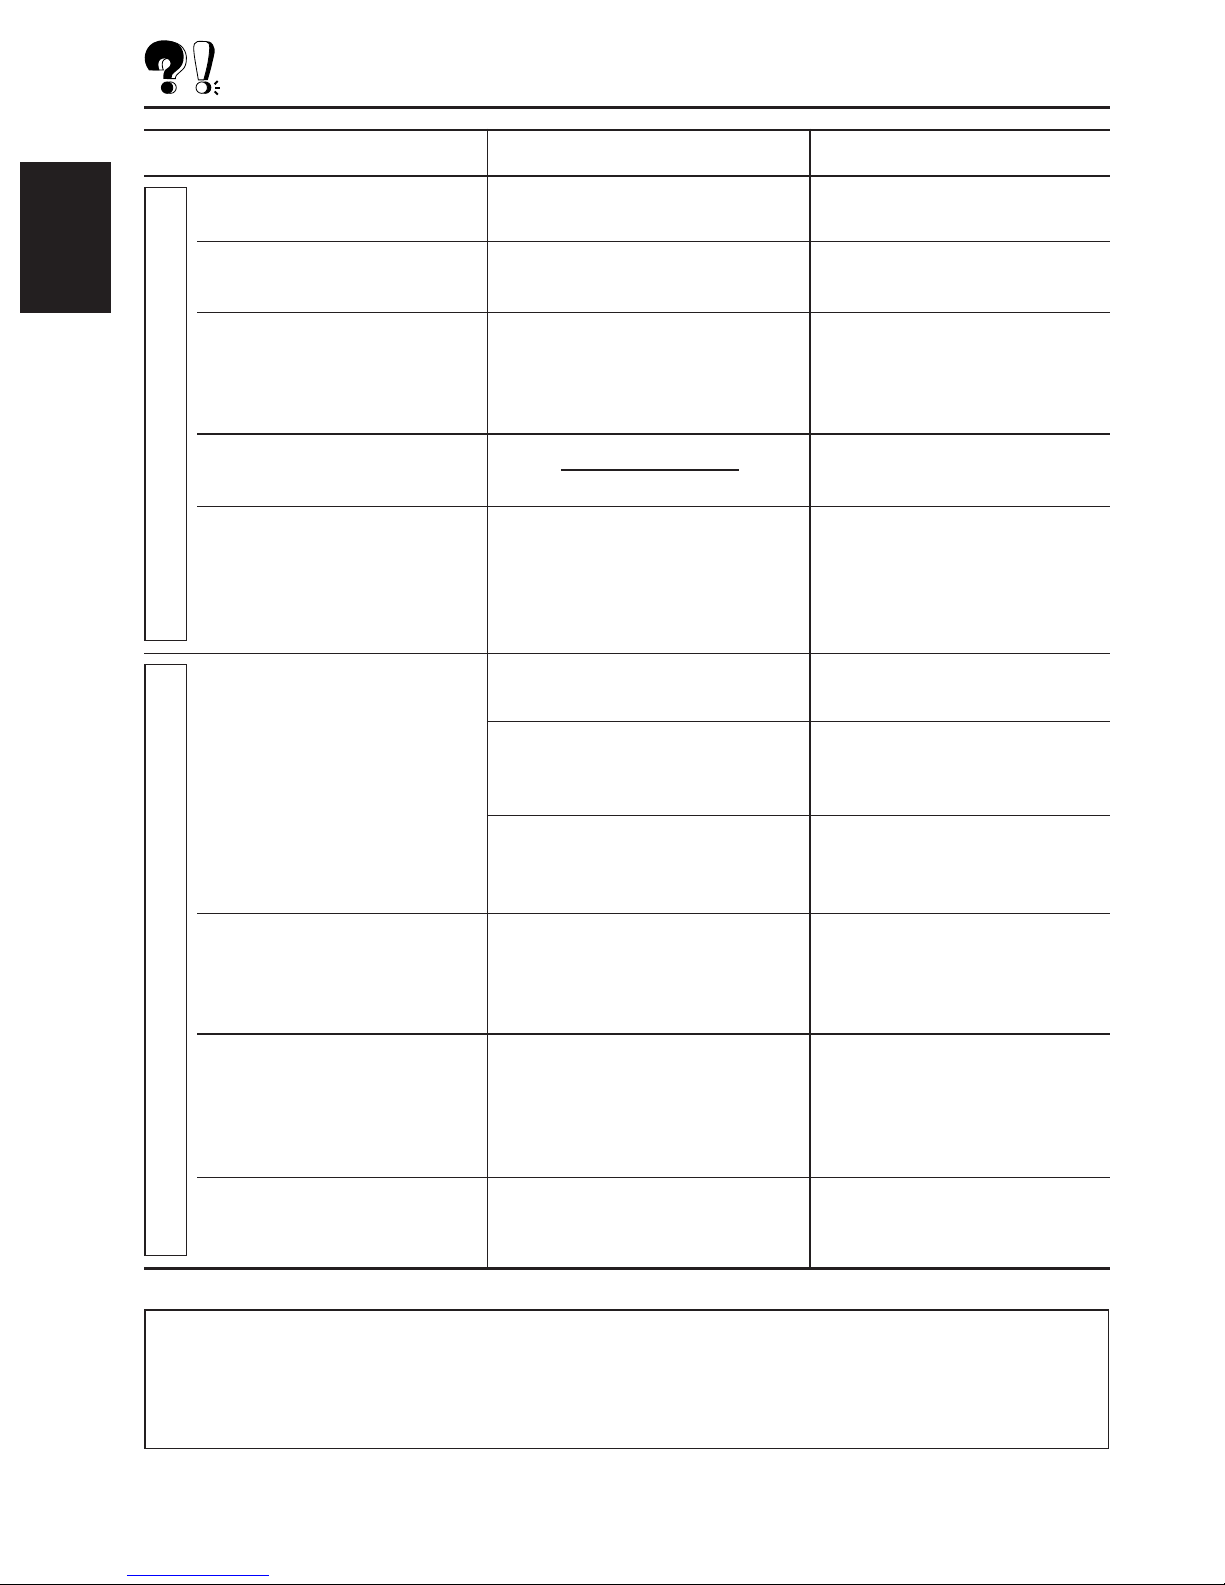
Symptoms
Causes
Remedies
ENGLISH
CD changer (General)
•“NO CD” appears on the
display.
•“NO MAG” appears on the
display.
•“RESET 8” flashes on the
display.
•“RESET 1” – “RESET 7”
flashes on the display.
• The CD changer does not
work at all.
• Disc cannot be played
back.
No disc is on the disc tray of the
magazine.
No magazine is loaded in the
CD changer.
This unit is not connected to a
CD changer correctly.
The built-in microcomputer may
function incorrectly due to noise,
etc.
No MP3 tracks are recorded on
the disc.
MP3 tracks do not have the
extension code—<.mp3> in their
file names.
Place a disc on the disc tray of
the magazine.
Insert the magazine into the
CD changer.
Connect this unit and the CD
changer correctly and press
the reset button of the CD
changer.
Press the reset button of the
CD changer.
Press the reset button on the
front panel. (Your preset
adjustments will also be
erased.)
(See page 2.)
Change the disc.
Add the extension code
—<.mp3> to their file names.
• Noise is generated.
• A longer readout time is
CD changer (MP3 discs)
required.
• Tracks cannot be played
back as you have intended
them to play.
MP3 tracks are not recorded in
the format compliant with ISO
9660 Level 1 or 2.
The track played back is not an
MP3 file (although it has the
extension code—<.mp3>).
Readout time varies due to the
complexity of the folder/track
configuration.
Playback order is determined
when the tracks are recorded.
Change the disc.
(Record MP3 tracks using a
compliant application.)
Skip to another track or
change the disc. (Do not add
the extension code—<.mp3>
to non-MP3 files.)
It is not recommended to use
too many hierarchies and
folders, and to record any
other types of audio tracks
together with MP3 tracks.
Insert a disc that contains
tracks encoded in an
appropriate format.
About mistracking:
Mistracking may result from driving on extremely rough roads. This does not damage the
unit and the CD, but will be annoying. We recommend that you stop CD play while
driving on such rough roads.
22
Page 23

SPECIFICATIONS
AUDIO AMPLIFIER SECTION
Maximum Power Output (DC 16V):
Front: 50 W per channel
Rear: 50 W per channel
Continuous Power Output (10% THD):
Front: 25 W per channel into 4 Ω.
Rear: 25 W per channel into 4 Ω.
Load Impedance: 4 Ω (4 to 8 Ω allowance)
TUNER SECTION
Frequency Range:
FM: 87.5 MHz to 108.0 MHz
AM: 531 kHz to 1 602 kHz
[FM Tuner]
Usable Sensitivity: 6 dBµV
Stereo Separation: 28 dB
[AM Tuner]
Sensitivity: 30 dBµV
CASSETTE DECK SECTION
Frequency Response: 30 Hz to 16 000 Hz
Wow and Flutter: 0.2 % (WRMS)
GENERAL
Power Requirement:
Operating Voltage: DC 14.4 V
(11 V to 16 V allowance)
Grounding System: Negative ground
Dimensions (W x H x D):
Installation Size:
178 mm x 100 mm x 175 mm
Front Panel Size:
183 mm x 103 mm x 15 mm
Mass: 2.2 kg (excluding accessories)
Design and specifications are subject to change
without notice.
ENGLISH
CD PLAYER SECTION
Type: Compact disc player
Signal Detection System: Non-contact optical
pickup (semiconductor laser)
Number of channels: 2 channels (stereo)
Frequency Response: 30 Hz to 20 000 Hz
Signal-to-Noise Ratio: 75 dB
Wow and Flutter: Less than measurable limit
Channel Separation (1 kHz): 65 dB
23
Page 24
Having TROUBLE with operation?
Please reset your unit
Refer to page of How to reset your unit
Punya MASALAH pengoperasian ?
Tolong reset unit anda
Lihat pada halaman tentang mereset unit
© 2004 VICTOR COMPANY OF JAPAN, LIMITED
0504MNMMDWJEIN
 Loading...