

Page 1

ENGLISHРУCCKИЙ
INSTRUCTIONS
ИНСТРУКЦИИ ПО ЭКСПЛУАТАЦИИ
GET0329-001A
[EE]
CD/CASSETTE RECEIVER
ПРИЕМНИК С ПРОИГРЫВАТЕЛЕМ КОМПАКТ-ДИСКОВ
И КАССЕТ
KW-XC407
For installation and connections, refer to the separate manual.
Указания по установке и выполнению соединений приводятся в отдельной инструкции.
For canceling the display demonstration, see page 8.
Информацию об отмене демонстрации функций дисплея см. на стр. 8.
В соответствии с Законом Российской Федерации “О защите прав потре бителей” срок службы
(годности) данного товара “по истечении которого он может представлять опасность для жизни,
здоровья потребителя, причинять вред его имуществу или окружающей среде” составляет семь (7)
лет со дня производства. Этот срок является временем, в течение которого потребитель данного
товара может безопасно им пользоваться при условии соблюдения ин струк ции по эксплуатации
данного товара, проводя необходимое обслуживание, включающее замену расходных материалов
и/или соответствующее ремонтное обеспечение в специализированном сервисном центре.
Дополнительные косметические материалы к данному товару, поставляе мые вместе с ним, могут
храниться в течение двух (2) лет со дня его производства.
Срок службы (годности), кроме срока хранения дополнительных космети ческих материалов,
упомянутых в предыдущих двух пунктах, не затрагивает никаких других прав потребителя, в
частности, гарантийного свидетельства JVC, которое он может получить в соответствии с законом о
правах потребителя или других законов, связанных с ним.
Page 2

2
ENGLISH
Warning:
If you need to operate the unit while driving,
be sure to look ahead carefully or you may
be involved in a traffic accident.
How to reset your unit
This will reset the microcomputer. Your
preset adjustments will also be erased.
Thank you for purchasing a JVC product.
Please read all instructions carefully before operation, to ensure your complete understanding and to
obtain the best possible performance from the unit.
IMPORTANT FOR LASER PRODUCTS
1. CLASS 1 LASER PRODUCT
2. CAUTION: Do not open the top cover. There are no user serviceable parts inside the unit; leave
all servicing to qualified service personnel.
3. CAUTION: Visible and invisible laser radiation when open and interlock failed or defeated.
Avoid direct exposure to beam.
4. REPRODUCTION OF LABEL: CAUTION LABEL, PLACED OUTSIDE THE UNIT.
Caution on volume setting:
Discs produce very little noise compared
with other sources. Lower the volume
before playing a disc to avoid damaging
the speakers by the sudden increase of the
output level.
How to forcibly eject a disc
If a disc cannot be recognized or cannot be
ejected, eject the disc as follows.
• If this does not work, reset your unit.
• Be careful not to drop the disc when it
ejects.
Page 3

3
ENGLISH
How to reset your unit ........................... 2
How to forcibly eject a disc ................... 2
How to read this manual ........................ 4
How to use the MODE button ............... 4
Control panel —
KW-XC407
....... 5
Parts identification ................................. 5
Remote controller — RM-RK50
... 6
Main elements and features ................... 6
Getting started ....................... 7
Basic operations .................................. 7
Canceling the display demonstrations ... 8
Setting the clock .................................... 8
Radio operations ................... 9
Listening to the radio ........................... 9
Storing stations in memory .................... 9
Listening to a preset station ................... 10
Scanning broadcast stations ................... 10
Assigning titles to the stations ............... 11
Disc operations ...................... 12
Playing a disc in the unit ..................... 12
Playing discs in the CD changer ........... 13
Other main functions ............................. 15
Changing the display information ......... 15
Selecting the playback modes ................ 16
Tape operations ..................... 17
Playing a tape ..................................... 17
Finding the beginning of a tune ............. 17
Other convenient tape functions ............ 17
Sound adjustments ................ 18
Selecting preset sound modes
(EQ: equalizer) ................................. 18
Adjusting the sound ............................... 18
Storing your own sound adjustments ..... 19
General settings — PSM ......... 20
Basic procedure ..................................... 20
External component operations
... 22
Playing an external component ............ 22
Maintenance .......................... 23
Handling discs ....................................... 23
Handling cassettes ................................. 23
More about this unit ............... 24
Troubleshooting ..................... 27
Specifications ......................... 29
Temperature inside the car....
If you have parked the car for a long time in
hot or cold weather, wait until the temperature
in the car becomes normal before operating the
unit.
Contents
For safety....
• Do not raise the volume level too much, as
this will block outside sounds, making driving
dangerous.
• Stop the car before performing any
complicated operations.
Page 4
4
ENGLISH
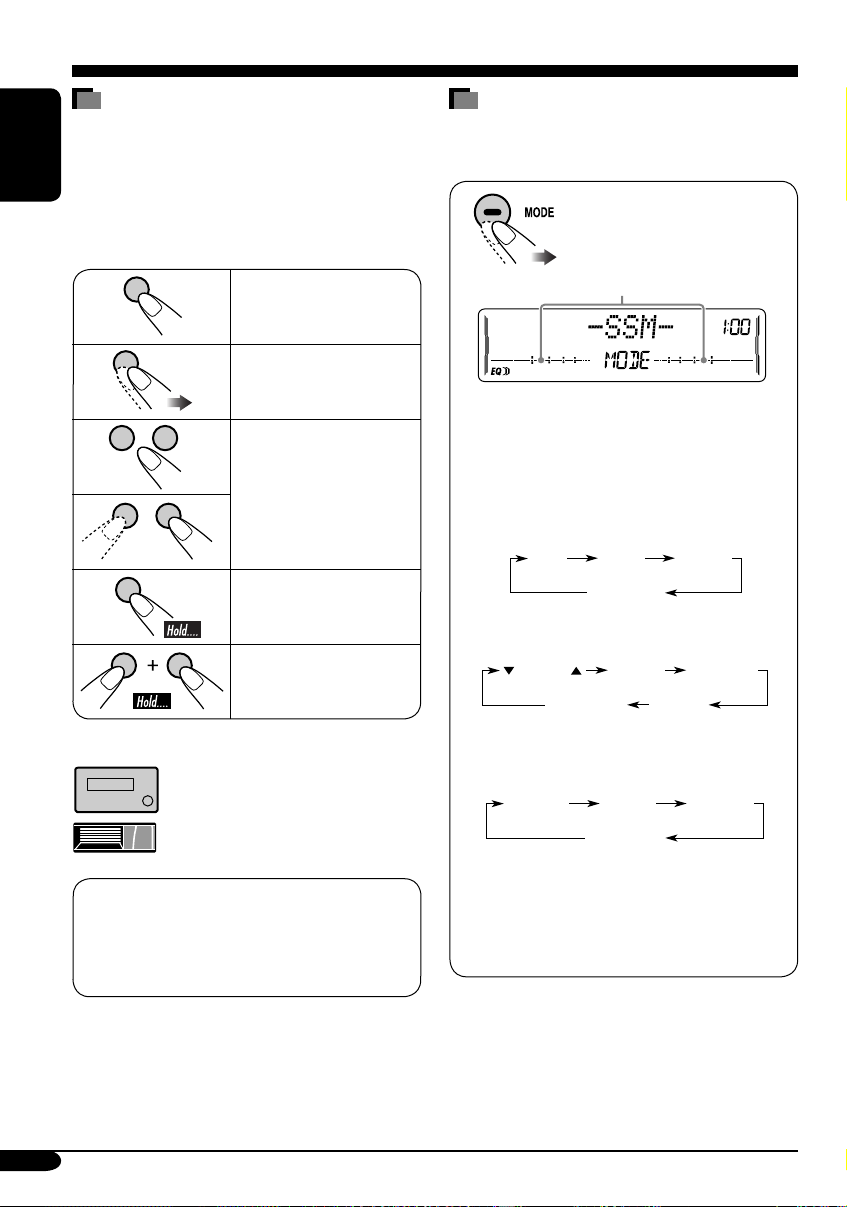
How to read this manual
The following methods are used to make the
explanations simple and easy-to-understand:
• Some related tips and notes are explained in
“More about this unit” (see pages 24 – 26).
• Button operations are mainly explained with
the illustrations as follows:
Press briefly.
Press repeatedly.
Press either one.
Press and hold until
your desired response
begins.
Press and hold both
buttons at the same
time.
The following marks are used to indicate...
: Built-in CD player operations.
: External CD changer operations.
How to use the MODE button
Press MODE repeatedly to select the different
functions available during play.
Time countdown indicator
Ex.: When “SSM” is selected
While listening to the radio:
• You cannot select “SSM” or “SCAN”
if you are listening to the station stored
in the EX (extra) button, see page 10 for
details.
While listening to a disc:
While listening to a tape:
While adjusting the sound mode:
• Pressing MODE allows you to store the
adjusted sound mode into memory. (See
page 19 for details.)
* Depending on the level meter setting. (See
page 20 for details.)
SSM SCAN MONO
Canceled
(Station frequency)*
DOLBY B B.SKIP REPEAT
REPEAT RANDOM
INTRO
Canceled
(Track no. and
Elapsed playing time)*
Canceled
(Playback direction)*
–10 +10
This unit is equipped with the steering
wheel remote control function.
• For connection, see the Installation/
Connection Manual (separate volume).
Page 5
5
ENGLISH
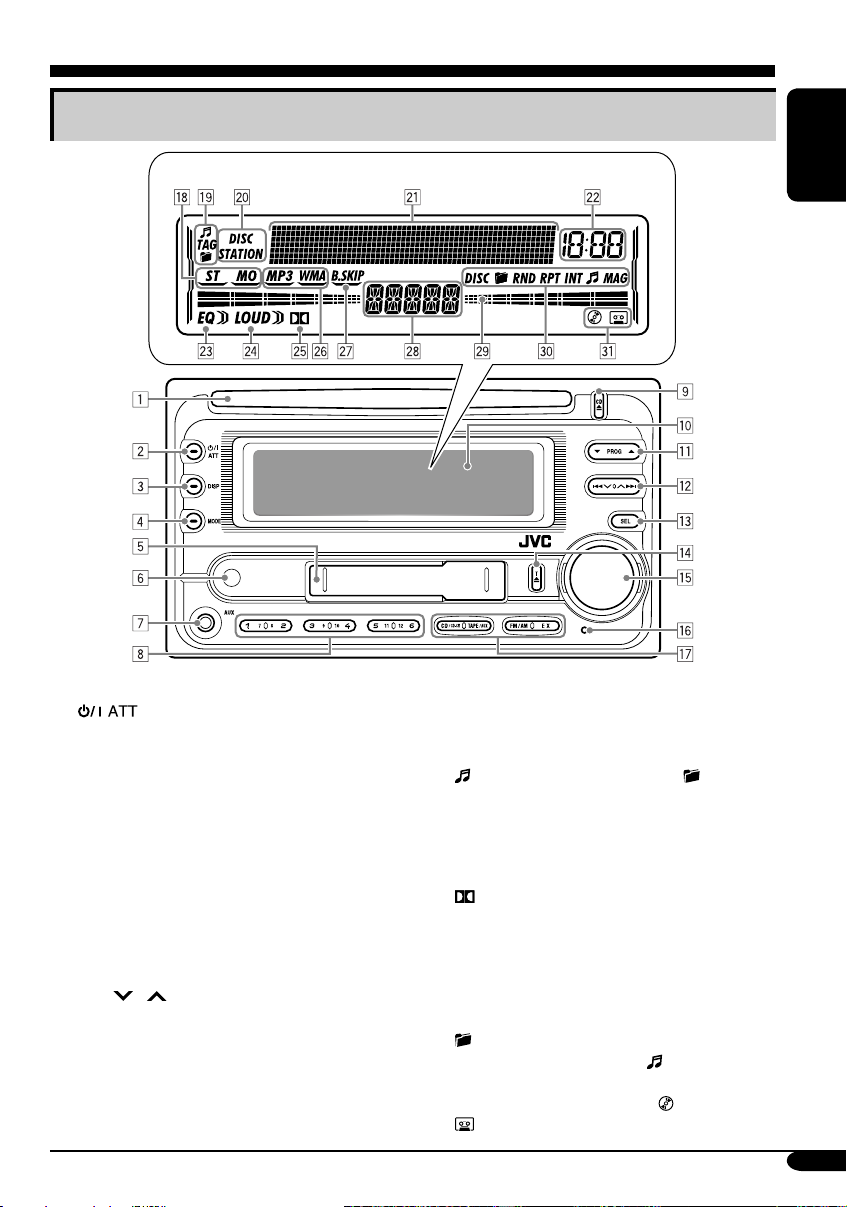
Control panel — KW-XC407
1 Loading slot
2 (standby/on attenuator) button
3 DISP (display) button
4 MODE button
5 Cassette compartment
6 Remote sensor
• DO NOT expose the remote sensor to
strong light (direct sunlight or artificial
lighting).
7 AUX (auxiliary) input jack
8 Number buttons
9 CD 0 (CD eject) button
p Display window
q 5 (up) / ∞ (down) buttons
PROG (program) 5 / ∞ buttons
w 4
/ ¢ buttons
e SEL (select) button
r T 0 (tape eject) button
t Control dial
y Reset button
u Source buttons—CD/CD-CH, TAPE/AUX,
FM/AM, EX (extra)
Display window
i Tuner reception indicators—ST (stereo),
MO (monaural)
o Disc information indicators—
(track/file), TAG (ID3 Tag), (folder)
; Text name indicators—DISC, STATION
a Main display, level meter
s Clock indicator
d EQ (equalizer) indicator
f LOUD (loudness) indicator
g (Dolby B NR) indicator
h Playback disc indicators—MP3, WMA
j B.SKIP (blank skip) indicator
k Source display
l Level meter, volume meter, time countdown
indicator
/ Playback mode indicators—DISC,
(folder), RND (random),
RPT (repeat), INT (intro), (track/file),
MAG (magazine)
z Loaded source indicators— (disc),
(tape)
Parts identification
Display window
Page 6

6
ENGLISH
Remote controller — RM-RK50
Main elements and features
1 (standby/on/attenuator) button
•
Turns the power on if pressed briefly or
attenuates the sound when the power is on.
• Turns the power off if pressed and held.
2 5 U (up) / D (down) ∞ buttons
•
Changes the FM/AM bands with 5 U only.
•
Changes the preset stations with D ∞ only.
• Changes the folder of the MP3/WMA
discs.
•
Changes the tape directions with 5 U only.
• While playing an MP3 disc on an
MP3-compatible CD changer:
– Changes the disc if pressed briefly.
– Changes the folder if pressed and held.
3 VOL – / VOL + buttons
• Adjusts the volume level.
4 SOUND button
• Selects the sound mode (EQ: equalizer).
5 SOURCE button
• Selects the source.
6 2 R (reverse) / F (forward) 3 buttons
• Searches for stations if pressed briefly.
• Fast-forwards or reverses the track if
pressed and held.
• Changes the tracks of the disc if pressed
briefly.
• Fast-forwards or reverses the tape if
pressed and held.*
• Finds the beginning of a tune (MMS)
while listening to a tape if pressed
briefly.*
* To release these operations, press 5 U.
Playback resumes.
Installing the lithium coin battery
(CR2025)
• When operating, aim the remote controller
directly at the remote sensor on the unit.
Make sure there is no obstacle in between.
Warning:
• Do not install any battery other than
CR2025 or its equivalent; otherwise, it
may explode.
• Store the battery in a place where children
cannot reach to avoid risk of accident.
• To prevent the battery from over-heating,
cracking, or starting a fire:
– Do not recharge, short, disassemble,
heat the battery, or dispose of it in a fire.
– Do not leave the battery with other
metallic materials.
– Do not poke the battery with tweezers or
similar tools.
– Wrap the battery with tape and insulate
when throwing away or saving it.
Caution:
Page 7

7
ENGLISH
~ Turn on the power.
Ÿ For FM/AM tuner
For your favorite station
• Stored your favorite
station, see page 10 for
details.
For CD/CD-CH
• Select “CD-CH” when using an Apple
iPod® or a JVC D. player (see page 22).
iPod is a trademark of Apple Computer,
Inc., registered in the U.S. and other
countries.
For TAPE/AUX
* You cannot select these sources if they
are not ready.
! Adjust the volume.
Volume level appears.
Volume level indicator
⁄ Adjust the sound as you want.
(See pages 18 and 19.)
To drop the volume in a moment (ATT)
To restore the sound, press
it again.
To turn off the power
Getting started
Basic operations
Page 8

8
ENGLISH
Canceling the display
demonstrations
If no operations are done for about 20 seconds,
display demonstration starts.
[Initial: DEMO ON] —see page 20.
1
2
3
4 Finish the procedure.
To activate the display demonstration
In step 3 above...
Setting the clock
1
2 Set the hour and minute.
1 Select “CLOCK HOUR,” then
adjust the hour.
2 Select “CLOCK MIN,” (minute)
then adjust the minute.
3 Finish the procedure.
Page 9
9
ENGLISH
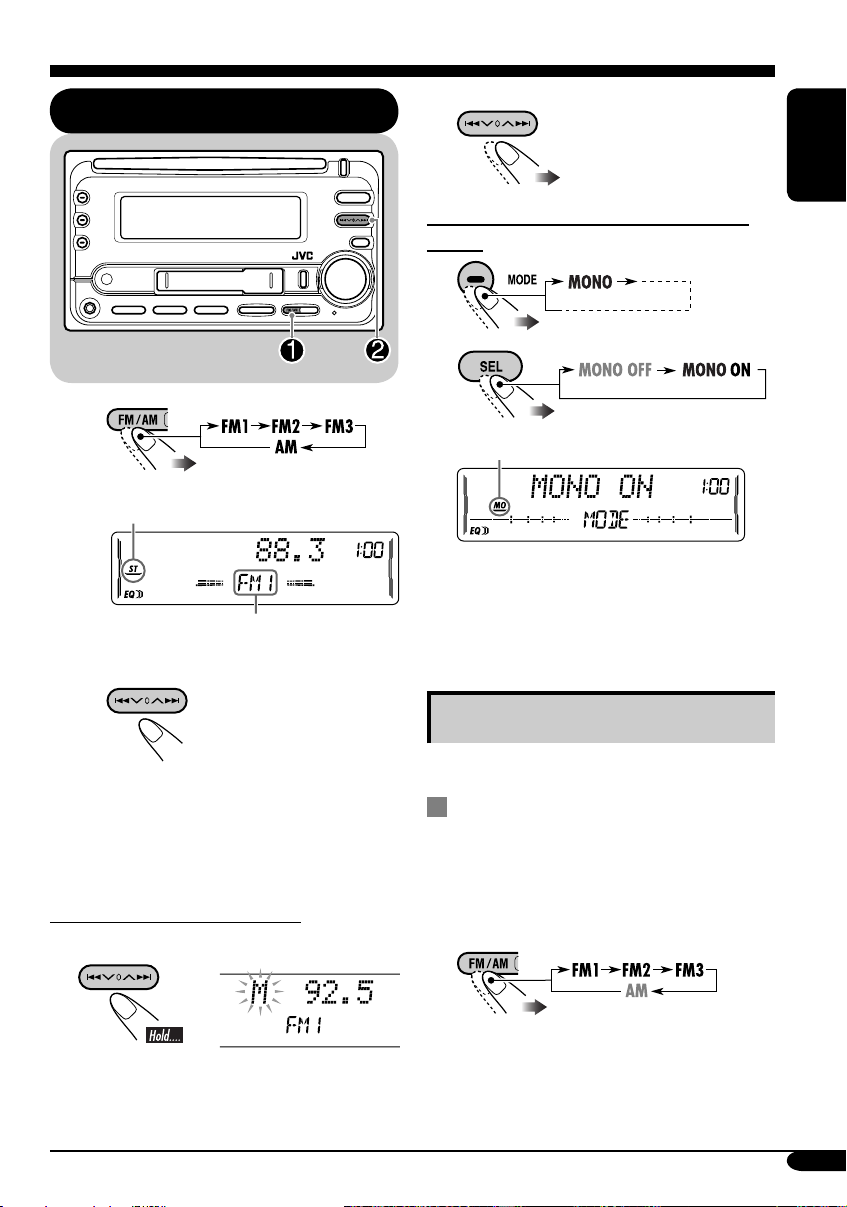
2 Select the desired station frequencies.
When an FM stereo broadcast is hard to
receive
1
2
Lights up when monaural mode is activated.
Reception improves, but stereo effect will
be lost.
To restore the stereo effect, repeat the same
procedure. Then, in step 2, select “MONO
OFF.”
Storing stations in memory
You can preset six stations for each band.
FM station automatic presetting —
SSM (Strong-station Sequential
Memory)
1
Select the FM band (FM1 – FM3)
you want to store into.
Radio operations
Listening to the radio
~
Lights up when receiving an FM stereo
broadcast with sufficient signal strength.
Selected band appears.
Ÿ Start searching for a station.
When a station is received, searching
stops.
To stop searching, press the same
button again.
To tune in to a station manually
In step Ÿ above...
1
To be continued....
Page 10

10
ENGLISH
Listening to a preset station
1
2 Select the preset station (1 – 6) you
want.
or
To tune in to your favorite station (EX)
If you press the button
again, the previous source
will be played back again.
Scanning broadcast stations
1
2 Start scanning.
Each time a broadcast is tuned in, scanning
stops for about 5 seconds (tuned frequency
appears on the display), and you can check
what program is now being broadcast.
3 Start listening to the program.
2
3
“SSM” flashes, then disappears when
automatic presetting is over.
Local FM stations with the strongest signals are
searched and stored automatically in the FM
band.
Manual presetting
Ex.: Storing FM station of 92.5 MHz into the
preset number 4 of the FM1 band.
1
2
3
Preset number flashes for a while.
Storing your favorite station into the
EX (extra) button
Ex.: Storing your favorite FM station of
92.5 MHz into the EX button
While listening to an FM station, tune in
to your favorite station, then....
Page 11

11
ENGLISH
4 Repeat steps 1 to 3 until you
finish entering the title.
4 Finish the procedure.
To erase the entire title
In step 3 on the left...
To change the information shown on the
display
* If no title is assigned, “NO NAME” appears
for a while.
Available characters
Assigning titles to the stations
You can assign titles to 30 station frequencies
(including both FM and AM). Each station
name can be assigned up to 10 characters.
However, you cannot assign title to the station
frequency stored in the EX button.
1 Tune in to the station you would like
to assign a title to.
2 Enter the assigning mode.
3 Assign a title.
1 Select a character set.
2 Select a character.
3 Move to the next (or previous)
character position.
Station frequency
(and Preset no.)
Assigned title*
Upper case
Lower case
Numbers and symbols
Page 12

12
ENGLISH
• When inserting an audio CD or a CD Text
disc:
To stop play and eject the disc
The source changes to the last
selected source.
*1 Either the MP3 or WMA indicator lights up
depending on the detected file.
*2 Depending on the level meter setting. (See
page 20 for details.)
Disc operations
Playing a disc in the unit
Total playing time
of the inserted disc
Total track number
of the inserted disc
Elapsed playing
time*
2
Current track
number*
2
• When inserting an MP3 or a WMA disc:
Total file
number
Total folder
number
Elapsed playing
time*
2
Current track
number*
2
Disc information appears
automatically (see page 15).
CD Text: Disc title/performer =
Track title appears automatically
(see page 15).
All tracks will be played repeatedly until
you change the source or eject the disc.
Page 13

13
ENGLISH
All tracks of the inserted discs in the magazine
will be played repeatedly until you change
the source or eject the magazine from the CD
changer.
~
*
If you have changed “EXT INPUT”
setting to “EXT INPUT” (see page
21), you cannot select the CD
changer.
See also page 22 for using iPod or
JVC D. player.
Ÿ Select a disc.
For disc number from 01 – 06:
For disc number from 07 – 12:
About the CD changer
It is recommended to use a JVC MP3compatible CD changer with your unit.
• You can also connect other CH-X series
CD changers (except CH-X99 and
CH-X100). However, they are not
compatible with MP3 discs, so you cannot
play back MP3 discs.
• You cannot play any WMA disc in the CD
changer.
• You cannot use the KD-MK series CD
changers with this unit.
• Disc text information recorded in the CD
Text can be displayed when a JVC CD
Text compatible CD changer is connected.
For connection, see Installation/Connection
Manual (separate volume).
Playing discs in the CD changer
Selected disc number
Track number
Page 14

14
ENGLISH
• When the current disc is an MP3 disc:
• When the current disc is an audio CD or a
CD Text disc:
*1 “ROOT” appears if no folder is included in
the disc.
*2 Depending on the level meter setting. (See
page 20 for details.)
To fast-forward or reverse the track
To go to the next or previous tracks
To go to the next or previous folders (for
MP3 and WMA discs)
To locate a particular track (for CD) or
folder (for MP3 or WMA discs) directly
To select a number from 01 – 06:
To select a number from 07 – 12:
• To use folder search on MP3/WMA discs, it
is required that folders are assigned with
2-digit numbers at the beginning of their
folder names—01, 02, 03, and so on.
To select a particular track in a folder (for
MP3 or WMA disc):
Elapsed playing
time*
2
Current track
number*
2
Disc information appears
automatically (see page 15).
Folder name*
1
Elapsed playing
time*
2
Current track
number*
2
CD Text: Disc title/performer =
Track title appears automatically
(see page 15).
(For MP3/WMA
discs)
(For MP3 discs)
Page 15

15
ENGLISH
Other main functions
Skipping a track quickly during play
• For MP3 or WMA disc, you can skip a track
within the same folder.
Ex.: To select track 32 while playing track 6
1
2
First time you press 5 / ∞ button, the track
skips to the nearest higher or lower track
with a track number of multiple ten (ex.
10th, 20th, 30th).
Then each time you press the button, you
can skip 10 tracks.
• After the last track, the first track will be
selected and vice versa.
3
Prohibiting disc ejection
You can lock a disc in the loading slot.
To cancel the prohibition, repeat the same
procedure.
Changing the display information
While playing an audio CD or a CD
Text
While playing an MP3 or WMA disc
• When “TAG DISP” is set to
“TAG ON” (see page 21)
• When “TAG DISP” is set to
“TAG OFF”
: Current track/file number and
Elapsed playing time
*3 If the current disc is an audio CD,
“NO NAME” appears.
*4 If an MP3/WMA file does not have ID3 tags,
folder name and file name appear. In this
case, the TAG indicator will not light up.
–10 +10
Only possible on JVC
MP3-compatible CD changer
Page 16

16
ENGLISH
Selecting the playback modes
You can use only one of the following playback modes at a time.
Select your desired playback mode.
1 2
Repeat play
Ex.: When “TRACK RPT” is selected
Mode Plays repeatedly
TRACK RPT : The current track.
• RPT and light up.
FOLDER RPT*1 : All tracks of the current folder.
• and RPT light up.
DISC RPT*2 : All tracks of the current disc.
• DISC and RPT light up.
REPEAT OFF : Cancels.
Random play
Ex.: When “DISC RND” is selected
Mode Plays at random
FOLDER RND*1: All tracks of the current folder,
then tracks of the next folder and so
on.
•
and RND light up.
DISC RND : All tracks of the current disc.
• DISC and RND light up.
MAG RND*
2
: All tracks of the inserted discs.
• RND and MAG light up.
RANDOM OFF : Cancels.
Intro scan
Ex.: When “TRACK INT” is selected
Mode
Plays the beginning 15 seconds of...
TRACK INT : All tracks of the current disc.
• INT and light up.
FOLDER INT*1 : The first track of every folder of
the current disc.
• and INT light up.
DISC INT*
2
: The first tracks of the inserted
discs.
• DISC and INT light up.
INTRO OFF : Cancels.
*1 Only while playing an MP3 disc or WMA disc.
*2 Only while playing discs in the CD changer.
Page 17
17
ENGLISH
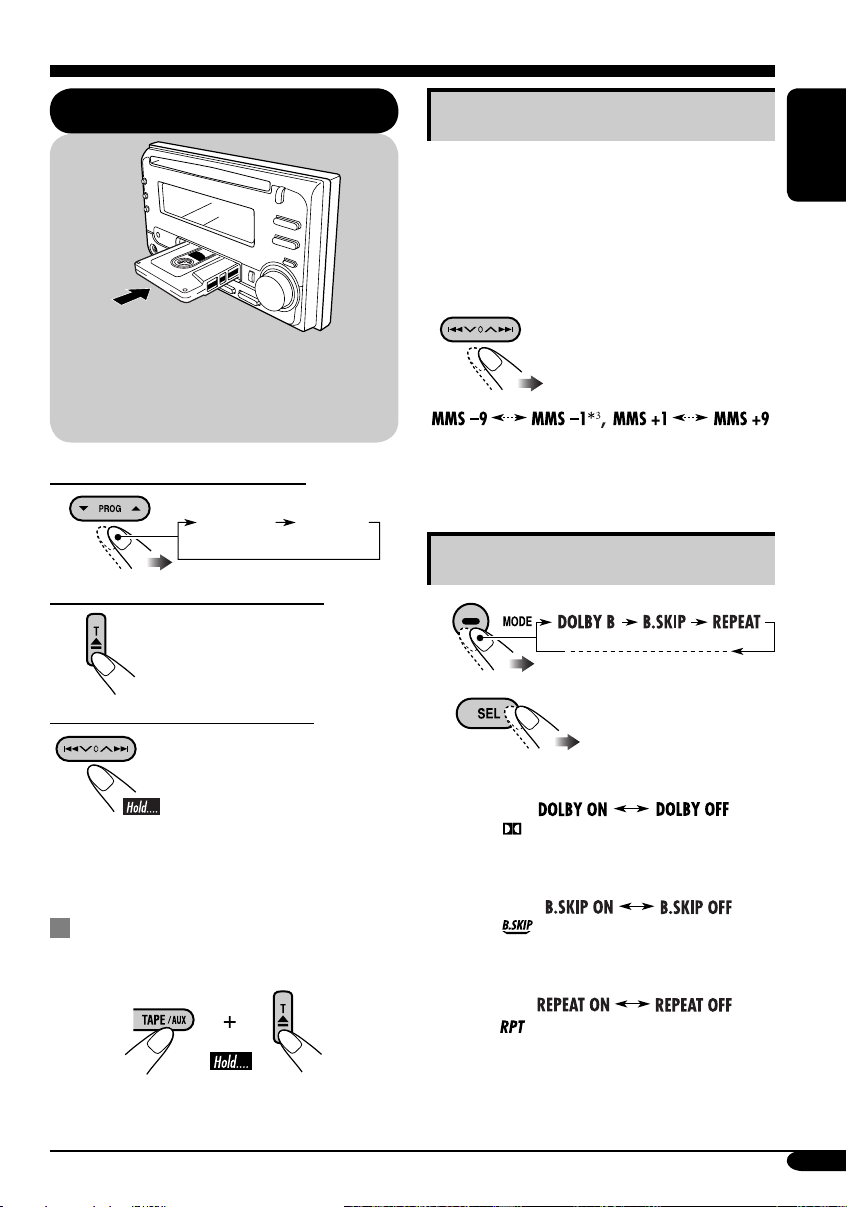
To change the playback direction
To stop play and eject the cassette
The source changes to the last
selected source.
To fast-forward or rewind a tape
When the tape reaches its
end while fast-forwarding,
the tape direction will change
automatically.
To stop fast-forwarding or rewinding, press
the PROG button.
Prohibiting tape ejection
You can lock a tape in the loading slot.
To cancel the prohibition, repeat the same
procedure.
Tape operations
Playing a tape
Finding the beginning of a tune
Multi Music Scan (MMS) allows you to
automatically start playback from the beginning
of a specified tune.
Specify the tune you want to locate
(how many tunes ahead of or before the
current tune)
When the beginning
of the specified tune is
located, playback starts
automatically.
*3 Goes back to the beginning of the current
tune.
Other convenient tape functions
1
2
• To turn on or off Dolby B NR*
4
( lights up on the display)
• To skip blank portions on the tape
( lights up on the display)
• To play the current tune repeatedly
( lights up on the display)
*4 Manufactured under license from Dolby
Laboratories. “Dolby” and the doubleD symbol are trademarks of Dolby
Laboratories.
Playback starts automatically. When one
side of the tape reaches its end during play,
the other side of the tape automatically
starts playing. (Auto Reverse)
FWD PLAY
(Forward play)
REV PLAY
(Reverse play)
Page 18

18
ENGLISH
Sound adjustments
Selecting preset sound modes
(EQ: equalizer)
You can select a preset sound mode suitable to
the music genre.
~
Ÿ
FLAT O Hard Rock O R & B O
POP O JAZZ O DanceMusic O
Country O Reggae O Classic O
USER 1 O USER 2 O USER 3 O
(back to the beginning)
To select the sound mode directly
You can select the sound mode directly using
the remote controller.
Adjusting the sound
You can adjust the sound characteristics to your
preference.
1
2
Indication Range
FADER*
1
Adjust the front and rear
speaker balance.
R06 (Rear only)
to
F06 (Front only)
BAL (balance)
Adjust the left and right
speaker balance.
L06 (Left only)
to
R06 (Right only)
LOUD
(loudness)
Boost low and high
frequencies to produce a
well-balanced sound at low
volume level.
LOUD ON
LOUD OFF
VOLUME*
2
Adjust the volume.
00 (min.) to
30 or 50 (max.)*
3
*1 If you are using a two-speaker system, set
the fader level to “00.”
*2 Normally the control dial works as the
volume control. So you do not have to select
“VOLUME” to adjust the volume level.
*
3
Depending on the amplifier gain control
setting. (See page 21 for details.)
Page 19

19
ENGLISH
Storing your own sound
adjustments
You can adjust the sound modes and store your
own adjustments in memory.
1
2 Select one of the sound mode to
adjust.
Ex.: When “JAZZ” is selected
3 Select the sound elements to adjust
while the selected sound mode is
shown.
LOW LEVEL O LOW FREQ. O
LOW WIDTH O MID LEVEL O
MID WIDTH O HIGH LEVEL O
HIGH FREQ. O (back to the
beginning)
• (LOW, MID, HIGH) LEVEL:
Adjust the enhancement level.
• (LOW, HIGH) FREQ:
Select the center frequency to adjust.
• (LOW, MID) WIDTH :
Select the band width level.
4 Adjust the selected sound elements
while the indication on step 3 is
shown.
Indication
Preset values
LOW MID HIGH
LEVEL –06
(min.) to
+06
(max.)
–06
(min.) to
+06
(max.)
–06
(min.) to
+06
(max.)
FREQ 60Hz
80Hz
100Hz
120Hz
8kHz
10kHz
12kHz
15kHz
WIDTH 1 (min.)
to
4 (max.)
1 (min.)
to
2 (max.)
5 Repeat steps 3 and 4 to set (or
adjust) the other sound elements.
6 Select one of the user sound modes
(USER 1, USER 2, USER 3).
7 Store the adjustments.
“MEMORY” appears for a
while.
Page 20

20
ENGLISH
Indications Selectable settings, [reference page]
DEMO MODE
Display
demonstration
DEMO ON : [Initial]; Display demonstration will be activated
automatically if no operation is done for about
20 seconds, [8].
DEMO OFF : Cancels.
CLOCK HOUR
Hour adjustment
1 – 12, [8]
[Initial: 1 (1:00)]
CLOCK MIN
Minute adjustment
00 – 59, [8]
[Initial: 00 (1:00)]
CLOCK DISP
Clock display
CLOCK ON : Clock time is shown on the display at all times even
when the unit is turned off.
CLOCK OFF : [Initial];
Clock time is shown
when the unit is turned
on
. If the unit is turned off,
pressing DISP will show
the clock time for about 5 seconds.
LEVELMETER
Audio level meter
You can select one of the four different level meter patterns or a
demonstration of all the patterns.
LEVEL ALL [Initial] O LEVEL 1 O LEVEL 2 O LEVEL 3 O
LEVEL 4 O LEVEL OFF (canceled) O (back to the beginning)
LEVEL ALL : Demonstrates all the level meter patterns, each for
about 20 seconds.
LEVEL 1 LEVEL 2
LEVEL 3 LEVEL 4
General settings — PSM
Basic procedure
You can change PSM (Preferred Setting Mode)
items listed in the table that follows.
1
2 Select a PSM item.
3 Adjust the PSM item selected.
4 Repeat steps 2 and 3 to adjust the
other PSM items if necessary.
5 Finish the procedure.
Page 21

21
ENGLISH
Indications Selectable settings, [reference page]
DIMMER
Dimmer
AUTO : [Initial]; Dims the display when you turn on the
headlights.
ON : Activates dimmer.
OFF : Cancels.
CONTRAST
Display contrast
1 – 10 : Adjust the display contrast to make the display indications
clear and legible.
[Initial: 5]
TEL
Telephone muting
MUTING1/MUTING2: Select either one which mutes the sounds while
using the cellular phone.
OFF: [Initial]; Cancels.
SCROLL*
1
Scroll
ONCE : [Initial]; Scrolls the disc information once.
AUTO :
Repeats scrolling (5-second intervals in between).
OFF : Cancels.
• Pressing DISP for more than one second can scroll the display regardless
of the setting.
EXT INPUT*
2
External input
CHANGER : [Initial]; To use a JVC CD changer [13], an Apple iPod,
or a JVC D. player [22].
EXT INPUT : To use another external component, [22].
AUX ADJUST
Auxiliary input
level adjustment
AUX ADJ 00 – AUX ADJ 05: Adjust the auxiliary input level
accordingly, to avoid the sudden increase of the output
level when changing the source from external component
connected to the AUX input jack on the control panel.
[Initial: AUX ADJ 00]
TAG DISP
Tag display
TAG ON : [Initial]; Shows the ID3 tag while playing MP3/WMA
tracks, [15].
TAG OFF : Cancels.
AMP GAIN
Amplifier gain
control
You can change the maximum volume level of this unit.
LOW PWR : VOLUME 00 – VOLUME 30 (Select this if the
maximum power of the speaker is less than 50 W to avoid
damaging the speaker.)
HIGH PWR : [Initial]; VOLUME 00 – VOLUME 50
IF FILTER
IF filter
AUTO : [Initial]; Increases the tuner selectivity to reduce noise
interference between the stations. (Stereo effect will also
be lost.)
WIDE : Subject to noise interference from adjacent stations, but
sound quality will not be degraded and will retain the
stereo effect.
*
1
Some characters or symbols will not be shown correctly (or will be blanked) on the display.
*2 Cannot be selected if the source is “CD-CH” or “EXT.”
Page 22

22
ENGLISH
External component operations
~ For selecting the external
component connected to....
• AUX input jack
• CD changer jack on the rear
using KS-U57 or KS-U58
If “EXT” does not appear, see page
21 and select the external input
(EXT INPUT).
Ÿ Turn on the connected component
and start playing the source.
! Adjust the volume.
⁄ Adjust the sound as you want.
(See pages 18 and 19.)
Playing an external component
You can connect an external component to....
• CD changer jack on the rear using:
– Line Input Adapter—KS-U57 (not
supplied) or AUX Input Adapter—KS-U58
(not supplied) for any other components
(except iPod or D. player).
– Interface adapter for iPod
®
—KS-PD100
(not supplied) for controlling iPod.
– D. player interface adapter—KS-PD500
(not supplied) for controlling D. player.
• AUX (auxiliary) input jack on the control
panel.
For connection, see Installation/Connection
Manual (separate volume).
This unit is ready for any Apple iPod® or
JVC D. player control interface.
• For details, refer also to the manual
supplied with the interface adapter
for iPod
®
—KS-PD100 or D. player—
KS-PD500.
• CD changer jack on the rear
using interface adapter for iPod
—KS-PD100 or for D. player—
KS-PD500
Page 23

23
ENGLISH
Maintenance
Center holder
Do not use the following discs:
Warped
disc
Sticker
Sticker
residue
Disc
Stick-on
label
Handling cassettes
To clean the head
• Clean the heads after every 10 hours of use
using a wet-type head cleaning tape (available
at an audio store).
When the head becomes dirty, you may
realize the following symptoms:
– Sound quality is reduced.
– Sound level decreases.
– Sound drops out.
• Do not touch the highly-polished head with
any metallic or magnetic tools.
To keep the tape clean
• Always store the cassettes in their storage
cases after use.
• Do not store cassettes in the following places:
– Subject to direct sunlight
– With high humidity
– At extremely hot temperatures
Handling discs
Moisture condensation
Moisture may condense on the lens inside the
CD player in the following cases:
• After starting the heater in the car.
• If it becomes very humid inside the car.
Should this occur, the CD player may
malfunction. In this case, eject the disc and
leave the unit turned on for a few hours until the
moisture evaporates.
How to handle discs
When removing a disc from
its case, press down the center
holder of the case and lift the
disc out, holding it by the edges.
• Always hold the disc by the
edges. Do not touch its recording surface.
When storing a disc into its case, gently insert
the disc around the center holder (with the
printed surface facing up).
• Make sure to store discs into the cases after
use.
To keep discs clean
A dirty disc may not play correctly.
If a disc does become dirty, wipe
it with a soft cloth in a straight line
from center to edge.
• Do not use any solvent (for example,
conventional record cleaner, spray, thinner,
benzine, etc.) to clean discs.
To play new discs
New discs may have some rough
spots around the inner and outer
edges. If such a disc is used, this
unit may reject the disc.
To remove these rough spots, rub the edges
with a pencil or ball-point pen, etc.
Page 24

24
ENGLISH
More about this unit
Basic operations
Turning on the power
• By pressing the source buttons on the unit,
you can also turn on the power. If the source
is ready, playback also starts.
Turning off the power
• If you turn off the ignition key without
turning off this unit, the unit will
automatically turn on when you turn on the
ignition key next time. If the last selected
source is ready for playback (ex. a disc
or a tape is in the unit), playback starts
automatically.
• If you turn off the power while listening to a
disc, disc play will start from where playback
has been stopped previously, next time you
turn on the power.
Selecting the sources
• When no disc or cassette is loaded in the unit,
“CD” or “TAPE” cannot be selected.
• Without connecting to the CD changer,
“CD-CH” cannot be selected.
Tuner operations
Storing stations in memory
• During SSM search...
– All previously stored stations are erased and
stations are stored newly.
– Received stations are preset in No. 1 (lowest
frequency) to No. 6 (highest frequency).
– When SSM is over, the station stored in
No. 1 will be automatically tuned in.
• When storing a station manually, a previously
preset station is erased when a new station is
stored in the same preset number.
Disc operations
Caution for DualDisc playback
• The Non-DVD side of a “DualDisc” does
not comply with the “Compact Disc Digital
Audio” standard. Therefore, the use of NonDVD side of a DualDisc on this product may
not be recommended.
General
• MP3 and WMA (Windows Media® Audio)
“tracks” (words “file” and “track” are used
interchangeably) are recorded in “folders.”
• This unit has been designed to reproduce
CDs/CD Texts, and CD-Rs (Recordable)/
CD-RWs (Rewritable) in audio CD (CD-DA),
MP3 and WMA format.
• When a disc has been loaded, selecting “CD”
for the playback source starts disc play.
Inserting a disc
• When a disc is inserted upside down, the disc
automatically ejects and the unit starts playing
the last selected source.
• Do not insert 8 cm discs (single CD) and
unusual shape discs (heart, flower, etc.) into
the loading slot.
Playing a disc
• While fast-forwarding or reversing on an MP3
or WMA disc, you can only hear intermittent
sounds.
Playing a CD-R or CD-RW
• Use only “finalized” CD-Rs or CD-RWs.
• This unit can play back only the files of the
same type which is first detected if a disc
includes both audio CD (CD-DA) files and
MP3/WMA files.
• This unit can play back multi-session discs;
however, unclosed sessions will be skipped
while playing.
Page 25

25
ENGLISH
• Some CD-Rs or CD-RWs may not play
back on this unit because of their disc
characteristics, and for the following causes:
– Discs are dirty or scratched.
– Moisture condensation occurs on the lens
inside the unit.
– The pickup lens inside the unit is dirty.
– CD-R/CD-RW on which the files are
written with “Packet Write” method.
– There are improper recording conditions
(missing data, etc.) or media conditions
(stain, scratch, warp, etc.).
• CD-RWs may require a longer readout time
since the reflectance of CD-RWs is lower
than that of regular CDs.
• Do not use the following CD-Rs or CD-RWs:
– Discs with stickers, labels, or protective seal
stuck to the surface.
– Discs on which labels can be directly
printed by an ink jet printer.
Using these discs under high temperatures
or high humidity may cause malfunctions or
damages to the unit.
Playing an MP3/WMA disc
• This unit can play back MP3/WMA files
with the extension code <.mp3> or <.wma>
(regardless of the letter case—upper/lower).
• This unit can show the names of albums,
artists (performer), and ID3 Tag (Version 1.0,
1.1, 2.2, 2.3, or 2.4) for MP3 files and for
WMA files.
• This unit can display only one-byte
characters. No other characters can be
correctly displayed (see page 11).
• This unit can play back MP3/WMA files
meeting the conditions below:
– Bit rate: 8 kbps — 320 kbps
– Sampling frequency:
48 kHz, 44.1 kHz, 32 kHz (for MPEG-1)
24 kHz, 22.05 kHz, 16 kHz (for MPEG-2)
48 kHz, 44.1 kHz, 32 kHz (for WMA)
– Disc format: ISO 9660 Level 1/ Level 2,
Romeo, Joliet, Windows long file name
• The maximum number of characters for file/
folder names vary among the disc format used
(includes 4 extension characters—<.mp3> or
<.wma>).
– ISO 9660 Level 1: up to 12 characters
– ISO 9660 Level 2: up to 31 characters
– Romeo*: up to 128 (72) characters
– Joliet*: up to 64 (36) characters
– Windows long file name*: up to 128 (72)
characters
* The parenthetic figure is the maximum
number of characters for file/folder names
in case the total number of files and folders
is 313 or more.
• This unit can recognize the total of 512 files,
of 200 folders, and of 8 hierarchies.
• This unit can play back the files recorded in
VBR (variable bit rate).
The files recorded in VBR have a discrepancy
in elapsed time display, and do not show the
actual elapsed time. This difference becomes
noticeable especially after performing the
search function.
• This unit cannot play back the following files:
– MP3 files encoded with MP3i and
MP3 PRO format.
– MP3 files encoded in an unappropriated
format.
– MP3 files encoded with Layer 1/2.
– WMA files encoded with lossless,
professional, and voice format.
– WMA files which are not based upon
Windows Media
®
Audio.
– WMA files copy-protected with DRM.
– Files which have the data such as WAVE,
ATRAC3, etc.
• The search function works but search speed is
not constant.
To be continued....
Page 26

26
ENGLISH
Changing the source
• If you change the source, playback also stops
(without ejecting the disc).
Next time you select “CD” or “CD-CH” for
the playback source, disc play starts from
where it has been stopped previously.
Ejecting a disc
• If the ejected disc is not removed within
15 seconds, the disc is automatically inserted
again into the loading slot to protect it from
dust. (Disc will not play this time.)
Tape operations
Playing a tape
• While locating a specified tune:
– If the tape is rewound to its beginning,
playback starts from the beginning of that
side.
– If the tape is fast-forwarded to the end, it is
reversed and played from the beginning of
the other side.
• In the following cases, Multi Music Scan
(MMS), Blank Skip, and Repeat Play may not
operate correctly:
– Tapes with tunes having long pianissimo
passages (very quiet parts) or non-recorded
portions.
– Tapes with short non-recorded sections.
– Tapes with high level noise or humming
between tunes.
– The Dolby NR setting does not match. For
example, if the tape is recorded with the
Dolby C NR.
• Do not use the following tape:
– Dirty or dusty tapes.
– Cassette with peeling labels.
– Loose tape which may become entangled
with the mechanism.
Changing the source
• If you change the source, playback also stops
(without ejecting the cassette).
Ignition key-off release
• When you turn off the ignition key with
a cassette in the compartment, the unit
automatically releases the tape from its head.
General settings—PSM
• If you change the “TAG DISP” setting from
“TAG OFF” to “TAG ON” while playing
MP3/WMA file, the tag display will be
activated when the next file starts playing.
• If you change the “AMP GAIN” setting
from “HIGH PWR” to “LOW PWR”
while the volume level is set higher than
“VOLUME 30,” the unit automatically
changes the volume level to “VOLUME 30.”
Other main functions
• If you try to assign a title to the 31st station
frequency, “NAME FULL” flashes. Delete
unwanted titles before assignment.
Available characters on the display
These characters (including the Roman
alphabets) can use to show other information
such as disc title/performer on the display.
Russian letters
Upper case
Lower case
Numbers and symbols
Page 27

27
ENGLISH
Troubleshooting
What appears to be trouble is not always serious. Check the following points before calling a service
center.
To be continued....
Symptoms Remedies/Causes
General
• Sound cannot be heard from the
speakers.
• Adjust the volume to the optimum level.
• Check the cords and connections.
• The unit does not work at all. Reset the unit (see page 2).
FM/AM
• SSM automatic presetting does not
work.
Store stations manually.
• Static noise while listening to the radio. Connect the aerial firmly.
Disc playback
• Disc cannot be played back. Insert the disc correctly.
• CD-R/CD-RW cannot be played back.
• Tracks on the CD-R/CD-RW cannot be
skipped.
• Insert a finalized CD-R/CD-RW.
•
Finalize the CD-R/CD-RW with the component
which you used for recording.
• Disc can be neither played back nor
ejected.
• Unlock the disc (see page 15).
• Eject the disc forcibly (see page 2).
• Disc sound is sometimes interrupted. • Stop playback while driving on rough roads.
• Use an unscratched disc.
• Check the cords and connections.
• “NO DISC” appears on the display. Insert a correct disc into the loading slot.
MP3/WMA playback
• Disc cannot be played back. • Use a disc with MP3/WMA tracks recorded in
the format compliant with ISO 9660 Level 1,
Level 2, Romeo, or Joliet.
• Add the extension code <.mp3> or <.wma> to
the file names.
• Noise is generated. Skip to another track or change the disc. (Do not
add the extension code <.mp3> or <.wma> to
non-MP3 or WMA tracks.)
• A longer readout time is required
(“CHECK” keeps flashing on the
display).
Do not use too many hierarchies and folders.
Page 28

28
ENGLISH
Symptoms Remedies/Causes
MP3/WMA playback
• Tracks do not play back in the order
you have intended them to play.
Playback order is determined when the files are
recorded.
• Elapsed playing time is not correct. This sometimes occurs during play. This is caused
by how the tracks are recorded on the disc.
• “NO FILES” appears on the display. Insert a disc that contains MP3/WMA tracks.
• Correct characters are not displayed
(e.g. album name).
This unit can only display alphabets (upper/lower
case), numbers, and a limited number of symbols.
Tape playback
• A cassette cannot be inserted. Insert the cassette with the exposed tape facing
right.
• Cassette can be neither played back nor
ejected.
Unlock the cassette (see page 17).
• “NO TAPE” appears on the display. Insert a cassette correctly.
• Cassette tapes become hot. This is not a malfunction.
• Tape sound is at very low level and
sound quality is degraded.
Clean the tape head using a head cleaning tape.
CD changer
• “NO DISC” appears on the display.
Insert a disc into the magazine.
• “NO MAG” appears on the display. Insert the magazine.
• “RESET 8” appears on the display. Connect this unit and the CD changer correctly
and press the reset button of the CD changer.
• “RESET 1” – “RESET 7” appears on
the display.
Press the reset button of the CD changer.
• The CD changer does not work at all. Reset the unit (see page 2).
• Microsoft and Windows Media are either registered trademarks or trademarks of Microsoft
Corporation in the United States and/or other countries.
Page 29

29
ENGLISH
Specifications
AUDIO AMPLIFIER SECTION
Maximum Power Output:
Front: 50 W per channel
Rear: 50 W per channel
Continuous Power Output (RMS):
Front: 19 W per channel into 4 Ω, 40 Hz
to 20 000 Hz at no more than 0.8%
total harmonic distortion.
Rear: 19 W per channel into 4 Ω, 40 Hz
to 20 000 Hz at no more than 0.8%
total harmonic distortion.
Load Impedance: 4 Ω (4 Ω to 8 Ω allowance)
Equalizer Control Range:
Low: ±12 dB (60 Hz, 80 Hz, 100 Hz, 120 Hz)
Mid: ±12 dB
High: ±12 dB (8 kHz, 10 kHz, 12 kHz, 15 kHz)
Frequency Response: 40 Hz to 20 000 Hz
Signal-to-Noise Ratio: 70 dB
Line-Out Level/Impedance:
2.0 V/20 kΩ load (full scale)
Output Impedance: 1 kΩ
Other terminals: CD changer, AUX (auxiliary)
input jack
TUNER SECTION
Frequency Range:
FM: 87.5 MHz to 108.0 MHz
AM: 531 kHz to 1 602 kHz
[FM Tuner]
Usable Sensitivity: 11.3 dBf (1.0 µV/75 Ω)
50 dB Quieting Sensitivity:
16.3 dBf (1.8 µV/75 Ω)
Alternate Channel Selectivity (400 kHz): 65 dB
Frequency Response: 40 Hz to 15 000 Hz
Stereo Separation: 30 dB
Capture Ratio: 1.5 dB
[AM Tuner]
Sensitivity: 20 µV
Selectivity: 35 dB
CD PLAYER SECTION
Type: Compact disc player
Signal Detection System: Non-contact optical
pickup (semiconductor laser)
Number of Channels: 2 channels (stereo)
Frequency Response: 5 Hz to 20 000 Hz
Dynamic Range: 96 dB
Signal-to-Noise Ratio: 98 dB
Wow and Flutter: Less than measurable limit
MP3 Decoding Format:
MPEG1/2 Audio Layer 3
Max. Bit Rate: 320 kbps
WMA (Windows Media
®
Audio) Decoding
Format:
Max. Bit Rate: 192 kbps
CASSETTE DECK SECTION
Wow and Flutter: 0.1 % (WRMS)
Fast-Wind Time: 100 sec. (C-60)
Frequency Response: 30 Hz to 16 000 Hz
(Normal tape)
Signal-to-Noise Ratio: (Normal tape)
Dolby B NR ON: 65 dB
Dolby B NR OFF: 56 dB
Stereo Separation: 40 dB
GENERAL
Power Requirement:
Operating Voltage:
DC 14.4 V (11 V to 16 V allowance)
Grounding System: Negative ground
Allowable Operating Temperature:
0°C to +40°C
Dimensions (W × H × D):
Installation Size (approx.):
178 mm × 100 mm × 158 mm
Set Size (approx.):
178 mm × 100 mm × 175 mm
Mass (approx.):
2.3 kg (excluding accessories)
Design and specifications are subject to change
without notice.
Page 30

2
РУCCKИЙ
Предупреждение:
Если приемник используется во время
поездки на автомобиле, следует, не
отвлекаясь, следить за дорогой, иначе
может произойти дорожно-транспортное
происшествие.
Как перенастроить Ваше
устройство
При этом перезапустится
микропроцессор. Запрограммированные
настройки будут также удалены.
Благодарим Вас за приобретение изделия JVC.
Перед тем, как приступать к эксплуатации, пожалуйста, внимательно прочитайте все
инструкции с тем, чтобы полностью изучить и обеспечить оптимальную работу этого
устройства.
ВАЖНО ДЛЯ ЛАЗЕРНОЙ АППАРАТУРЫ
1. ЛАЗЕРНАЯ АППАРАТУРА КЛАССА 1
2. ПРЕДУПРЕЖДЕНИЕ: Не открывайте верхнюю крышку. Внутри устройства нет
частей, которые пользователь может отремонтировать. Ремонт должен осуществляться
квалифицированным обслуживающим персоналом.
3. ПРЕДУПРЕЖДЕНИЕ: Видимое и невидимое лазерное излучение при открытом
устройстве, отказе или нарушении блокировки. Избегайте прямого воздействия
излучения.
4. ЭТИКЕТКА: ПРЕДУПРЕЖДАЮЩАЯ ЭТИКЕТКА, РАЗМЕЩЕННАЯ НА НАРУЖНОЙ
СТОРОНЕ УСТРОЙСТВА.
Предостережение, касающееся
настройки громкости:
По сравнению с другими источниками
звука диски создают незначительный
шум. Уменьшите громкость перед
воспроизведением диска, чтобы
предотвратить повреждение динамиков
из-за внезапного повышения уровня
громкости на выходе.
Принудительное извлечение
диска
Если диск не распознается или не
извлекается, извлеките диск следующим
образом.
• Если это не поможет, попробуйте
перенастроить приемник.
• Будьте осторожны, не уроните диск при
извлечении.
Page 31

3
РУCCKИЙ
Как перенастроить Ваше
устройство ........................................... 2
Принудительное извлечение диска .... 2
Как пользоваться данным
руководством ..................................... 4
Как пользоваться кнопкой MODE ..... 4
Панель управления — KW-XC407
... 5
Расположение кнопок .......................... 5
Пульт дистанционного
управления — RM-RK50
.............. 6
Основные элементы и функции ......... 6
Начало работы ............................. 7
Основные операции ........................... 7
Отмена демонстрации функций
дисплея ................................................ 8
Настройка часов .................................... 8
Операции с радиоприемником
... 9
Прослушивание радио ....................... 9
Сохранение радиостанций .................. 9
Прослушивание запрограммированной
радиостанции
...................................... 10
Сканирование радиовещательных
станций ................................................ 10
Присвоение названий
радиостанциям .................................. 11
Операции с дисками ................... 12
Воспроизведение диска в
приемнике ........................................ 12
Воспроизведение дисков с помощью
устройства автоматической смены
компакт-дисков .............................. 13
Другие основные функции .................. 15
Изменение информации на дисплее
... 15
Выбор режимов воспроизведения ..... 16
Операции с кассетой .................. 17
Воспроизведение кассеты ................ 17
Поиск начала мелодии ......................... 17
Другие полезные функции
проигрывателя кассет ....................... 17
Настройки звучания .................... 18
Выбор запрограммированных
режимов звучания
(EQ: эквалайзер)
............................... 18
Настройка звучания ............................. 18
Сохранение собственных настроек
звучания .............................................. 19
Общие настройки—PSM ............. 20
Стандартная процедура ....................... 20
Операции с внешними
устройствами
............................... 22
Воспроизведение с внешних
устройств .......................................... 22
Обслуживание ............................. 23
Обращение с дисками .......................... 23
Обращение с кассетами ...................... 23
Дополнительная информация о
приемнике .................................. 24
Устранение проблем ................... 27
Технические характеристики .... 29
Температура внутри автомобиля....
Если Вы припарковали Ваш автомобиль на
длительное время в жаркую или холодную
погоду, перед тем, как включать это
устройство, подождите до тех пор, пока
температура в автомобиле не придет в
норму.
Содержание
Для Вашей безопасности....
• Не повышайте слишком сильно
громкость, поскольку в результате этого
заглушаются внешние звуки, что делает
опасным управление автомобилем.
• Остановите автомобиль перед тем, как
выполнять любые сложные операции.
Page 32

4
РУCCKИЙ
Как пользоваться данным
руководством
Для того, чтобы сделать объяснения
простыми и понятными, используются
следующие методы:
•
Некоторые советы и примечания приведены
в разделе “Дополнительная информация о
приемнике” (см. стр. 24 – 26).
•
Операции, выполняемые с использованием
кнопок, в основном, описаны с помощью
иллюстраций, например:
Нажать
кратковременно.
Нажать
неоднократно.
Нажать любую из
указанных.
Нажать и удерживать
до получения
необходимого
результата.
Нажмите и
удерживайте
нажатыми обе кнопки
одновременно.
Используются следующие обозначения...
: Операции с встроенным
проигрывателем компактдисков.
: Операции с внешним
устройством автоматической
смены компакт-дисков.
Как пользоваться кнопкой
MODE
Нажимайте кнопку “MODE” для выбора
различных функций, доступных во время
воспроизведения.
Индикатор обратного отсчета времени
Пример: Если выбрано “SSM”
При прослушивании радио:
• Невозможно выбрать “SSM” или
“SCAN” при прослушивании
радиостанции, сохраненной на кнопке
EX (дополнительно) – подробнее см. на
стр. 10.
При прослушивании диска:
При прослушивании кассеты:
При настройке режима звучания:
• Нажатие кнопки “MODE” позволяет
сохранить установленный режим
звучания в памяти. (Подробнее см. на
стр. 19.)
* В зависимости от настройки
индикатора уровня. (Подробнее см. на
стр. 20.)
Приемник поставляется с функцией
рулевого пульта дистанционного
управления.
• Информацию о подключении
см. в Руководство по установке/
подключению (в отдельном издании).
Page 33

5
РУCCKИЙ
Панель управления — KW-XC407
1 Загрузочный отсек
2 Кнопка (резервный/работающий/
аттенюатор)
3 Кнопка DISP (дисплей)
4 Кнопка MODE
5 Кассетоприемник
6 Телеметрический датчик
• НE подвергайте телеметрический
датчик воздействию яркого света
(прямых солнечных лучей или
искусственного освещения).
7 Дополнительный входной разъем AUX
8 Нумерованные кнопки
9
Кнопка CD 0 (извлечение компакт-диска)
p Окно дисплея
q Кнопки 5 (вверх) / ∞ (вниз)
Кнопка PROG (программа) 5 / ∞
w Кнопки 4 / ¢
e Кнопка SEL (выбор)
r Кнопка T 0 (извлечение кассеты)
t Диск управления
y Кнопка сброса
u Кнопки источника—CD/CD-CH, TAPE/
AUX, FM/AM, EX (дополнительно)
Окно дисплея
i Индикаторы приема тюнера—ST
(стерео), MO (монофонический)
o Индикаторы информации на диске—
(дорожка/файл), TAG (метка ID3),
(папка)
; Текстовые индикаторы имен—DISC,
STATION
a Основной дисплей, индикатор уровня
s Индикатор часов
d Индикатор EQ (эквалайзер)
f Индикатор LOUD (громкость)
g Индикатор
(Dolby B NR)
h Индикаторы воспроизведения диска—
MP3, WMA
j
Индикатор B.SKIP (пропуск пустых мест)
k Отображение источника
l Индикаторы уровня, громкости и
обратного отсчета времени
/ Индикаторы режима воспроизведения—
DISC, (папка), RND (произвольное),
RPT (повторное), INT (прослушивание
вступлений), (дорожка/файл), MAG
(загрузочный механизм)
z Индикаторы загруженного источника—
(диск), (кассета)
Расположение кнопок
Окно дисплея
Page 34

6
РУCCKИЙ
Пульт дистанционного управления — RM-RK50
Основные элементы и функции
1 Кнопка (резервный/работающий/
аттенюатор)
•
Включение питания при кратковременном
нажатии или ослабление звука при
включенном питании.
• Отключение питания при нажатии и
удержании.
2 Кнопки 5 U (вверх) / D (вниз) ∞
• Смена диапазонов FM/AM только с
помощью 5 U.
• Смена запрограммированных
радиостанций только с помощью D ∞.
• Изменение папки дисков MP3/WMA.
• Изменение направлений ленты только с
помощью кнопки 5 U.
• При воспроизведении диска
MP3 с помощью устройства
автоматической смены компакт-дисков,
поддерживающего формат MP3:
– Смена диска при кратковременном
нажатии.
– Смена папки при нажатии и
удерживании нажатой.
3 Кнопки VOL – / VOL +
• Настройка уровня звука.
4 Кнопка SOUND
•
Выбор режимов звучания (EQ: эквалайзер).
5 Кнопка SOURCE (источник звука)
• Осуществляет выбор источника звука.
6 Кнопки 2 R (назад) / F (вперед) 3
• При кратковременном нажатии
выполняется поиск радиостанций.
• Быстрая перемотка дорожки вперед или
назад при нажатии и удерживании
нажатыми.
• Смена дорожек диска при
кратковременном нажатии.
•
Быстрая перемотка или смена направления
кассеты при нажатии и удержании.*
• Поиск начала мелодии (MMS) во
время прослушивания кассеты при
кратковременном нажатии.*
* Для выхода из этих операций нажмите 5 U.
Воспроизведение возобновляется.
Установка литиевой батареи-
таблетки (CR2025)
•
При использовании направляйте пульт
дистанционного управления непосредственно
на датчик дистанционного управления,
расположенный на приемнике. Убедитесь в
том, что между ними нет никаких препятствий.
Предупреждение:
•
Не устанавливайте никаких аккумуляторных
батарей, кроме CR2025 или эквивалентных, в
противном случае может произойти взрыв.
• Во избежание несчастных случаев храните
аккумуляторную батарею в недоступном для
детей месте.
• Во избежание перегрева или растрескивания
батареи, а также риска возникновения
пожара соблюдайте следующие указания:
– Не перезаряжайте, не укорачивайте, не
разбирайте и не нагревайте батарею, а также
не подвергайте ее воздействию огня.
– Не оставляйте аккумуляторную батарею
рядом с другими металлическими
материалами.
– Не разбирайте аккумуляторную батарею
с помощью пинцета или аналогичного
инструмента.
– При утилизации батареи или помещении
ее на хранение оберните батарею
изоляционной лентой и изолируйте ее
полюса.
Внимание:
Page 35

7
РУCCKИЙ
~ Включение питания.
Ÿ Для тюнера FM/AM
Для любимой радиостанции
• Сохраненная
любимая
радиостанция,
подробнее см. на стр.
10.
Для CD/CD-CH
• Выберите “CD-CH” при
использовании проигрывателя Apple
iPod® или проигрывателя JVC D. (см.
стр. 22).
iPod является торговой маркой Apple
Computer, Inc., зарегистрированной
в США и других странах.
Для TAPE/AUX
* Если эти источники не готовы, их
невозможно выбрать.
! Настройка громкости.
Отображается уровень громкости.
Индикатор уровня громкости
⁄ Настройка необходимого звука.
(см. стр. 18 и 19.)
Мгновенное снижение громкости (ATT)
Для восстановления звука
нажмите еще раз.
Выключение питания
Начало работы
Основные операции
Page 36

8
РУCCKИЙ
Отмена демонстрации
функций дисплея
Если в течение 20 секунд не будет выполнено
операций, начнется демонстрация функций
дисплея.
[По умолчанию: DEMO ON]—см. стр. 20.
1
2
3
4 Завершите процедуру.
Включение демонстрации функций
дисплея
В действии 3 выше...
Настройка часов
1
2
Установите час, минуту и формат
времени—12- или 24-часовой.
1 Выберите “CLOCK HOUR” и
настройте час.
2 Выберите “CLOCK MIN”
(минута), затем установите
минуты.
3 Завершите процедуру.
Page 37

9
РУCCKИЙ
2 Выберите частоты желаемых
радиостанций.
При слабом стереофоническом
радиовещании на частоте FM
1
2
Загорается при включении
монофонического режима.
Прием улучшается, но стереоэффект
будет потерян.
Для восстановления эффекта стерео
повторите данную процедуру. Затем в
действии 2 выберите “MONO OFF”.
Сохранение радиостанций
Для каждого диапазона частот можно
запрограммировать 6 радиостанций.
Автоматическое
программирование FMрадиостанций—SSM (Strongstation Sequential Memory—
последовательная память для
радиостанций с устойчивым
сигналом)
1 Выберите необходимый диапазон
FM (FM1 – FM3) для сохранения.
Операции с радиоприемником
Прослушивание радио
~
Данный индикатор отображается при
приеме стереосигнала FM-передачи
достаточной силы.
Появится выбранный диапазон.
Ÿ Начните поиск радиостанции.
При обнаружении радиостанции
поиск прекращается.
Чтобы остановить поиск, нажмите
эту же кнопку еще раз.
Настройка на радиостанцию вручную
В действии Ÿ выше...
1
Продолжение на следующей странице....
Page 38

10
РУCCKИЙ
Прослушивание
запрограммированной
радиостанции
1
2 Выберите необходимую
радиостанцию (1 – 6).
или
Для настройки на любимую
радиостанцию (EX)
При повторном нажатии
на кнопку возобновится
воспроизведение
предыдущего источника.
Сканирование
радиовещательных станций
1
2 Начните сканирование.
Каждый раз при настройке на
радиовещание сканирование
останавливается приблизительно на 5
секунд (на дисплее появляется частота
настройки), что позволяет проверить, какая
программа передается в настоящее время.
3
Начните прослушивание программы.
2
3
На дисплее мигает надпись “SSM”,
которая исчезает по завершении
автоматического программирования.
Осуществляется поиск местных FMрадиостанций с наиболее сильными
сигналами и их автоматическое сохранение
в диапазоне FM.
Программирование вручную
Пример: Сохранение FM-радиостанции
с частотой 92,5 МГц для
запрограммированного канала с
номером 4 диапазона FM1.
1
2
3
Запрограммированный номер мигает
некоторое время.
Сохранение любимой радиостанции на
кнопке EX (дополнительно)
Пример: сохранение любимой FM-
радиостанции с частотой 92,5 МГц
на кнопке EX
При прослушивании FM-радиостанции
настройтесь на любимую станцию, а
затем
....
Page 39

11
РУCCKИЙ
4 Повторяйте действия 1 и 3
пока не завершите ввод названия
Удаление названия.
4 Завершите процедуру.
Удаление названия полностью
В действии 3 слева...
Для изменения информации,
отображаемой на дисплее
* Если название не назначено, временно
появляется надпись “NO NAME”.
Допустимые символы
Символы верхнего регистра
Символы нижнего регистра
Цифры и знаки
Присвоение названий
радиостанциям
Можно присвоить названия 30 частотам
радиостанций (включая как FM, так и AM).
Каждой радиостанции можно присвоить
имя длиной до 10 символов.
Однако невозможно присвоить название
частоте радиостанции, сохраненной на
кнопке EX.
1 Настройка на радиостанцию,
которой необходимо присвоить
название.
2 Введите режим присвоения.
3 Присвоение названия.
1 Выберите набор символов.
2 Выберите символ.
3 Перейдите к положению
следующего (предыдущего)
символа.
Page 40

12
РУCCKИЙ
• При установке звукового компакт-диска
или CD-текста:
Останов воспроизведения и
извлечение диска
В качестве источника звука
указывается последний
выбранный источник.
*
1
Загорается индикатор MP3 или WMA, в
зависимости от найденного файла.
*
2
В зависимости от настройки индикатора
уровня. (Подробнее см. на стр. 20.)
Все дорожки будут воспроизводиться
последовательно до тех пор, пока не
произойдет смена источника или не
будет извлечен диск.
Операции с дисками
Воспроизведение диска в
приемнике
Общее время
воспроизведения
вставленного
диска
Общее количество
дорожек
вставленного
диска
Время от
начала
воспрои-
зведения*
2
Номер
текущей
дорожки*
2
• При установке дисков MP3 или WMA:
Общее
количество
файлов
Общее
количество
папок
Время от
начала воспрои-
зведения*
2
Номер текущей
дорожки*
2
Информация диска отображается
автоматически (см. стр. 15).
CD-текст: Название диска/
исполнитель = Название
дорожки появляется
автоматически (см. стр. 15).
Page 41

13
РУCCKИЙ
Все дорожки дисков, вставленных
в загрузочный механизм, будут
воспроизводиться последовательно до тех
пор, пока не п роизойдет смена источника
или загрузочный механизм не будет
извлечен из устройства автоматической
смены компакт-дисков.
~
*
Если изменена настройка “EXT
INPUT” на “EXT INPUT” (м.
стр. 21) невозможно выбрать
устройство автоматической смены
компакт-дисков.
См. также стр. 22 относительно
использования iPod или
проигрывателя JVC D.
Ÿ Выберите диск.
Для дисков с номерами 01 – 06:
Для дисков с номерами 07 – 12:
Номер выбранного диска
Номер дорожки
Об устройстве автоматической
смены компакт-дисков
Для подключения к данному приемнику
рекомендуется использовать устройство
автоматической смены компакт-дисков
компании JVC, совместимое с MP3.
• Кроме того, можно подключать другие
устройства автоматической смены
компакт-дисков серии CH-X (кроме
моделей CH-X99 и CH-X100). Однако
эти устройства не поддерживают диски
MP3, поэтому воспроизведение дисков
MP3 невозможно.
•
Невозможно воспроизводить
диски WMA с помощью устройства
автоматической смены компакт-дисков.
• С данным приемником нельзя
использовать устройства
автоматической смены компакт-дисков
серии KD-MK.
• Текстовая информация о дисках,
записанная с помощью функции
“CD Text”, может отображаться,
если подключено устройство
автоматической смены компакт-дисков
JVC, поддерживающее функцию “CD
Text”.
Информацию о подключении см. в
Руководство по установке/подключению
(в отдельном издании).
Воспроизведение дисков
с помощью устройства
автоматической смены
компакт-дисков
Page 42

14
РУCCKИЙ
• Если текущий диск имеет формат MP3:
• Если текущим диском является звуковой
компакт-диск или диск с CD-текстом:
*
1
Если на диске нет папок, появляется
надпись “ROOT”.
*
2
В зависимости от настройки индикатора
уровня. (Подробнее см. на стр. 20.)
Быстрая перемотка дорожки вперед
или назад
Переход к следующим или
предыдущим дорожкам
Переход к следующим или
предыдущим папкам (для дисков MP3
или WMA)
Непосредственное определение
местоположения дорожки (для
компакт-диска) или папки (для дисков
MP3 или WMA)
Выбор номера 01 – 06:
Выбор номера 07 – 12:
• Для использования функции поиска папок
на дисках MP3 или WMA необходимо
присвоить папкам номера из 2-х цифр,
добавляемые в начало имен папок: 01, 02,
03 и т.д.
Для выбора определенной дорожки в
папке (для дисков MP3 или WMA):
Время от
начала воспрои-
зведения*
2
Номер текущей
дорожки*
2
Информация диска отображается
автоматически (см. стр. 15).
Имя папки*
1
Время от
начала воспрои-
зведения*
2
Номер текущей
дорожки*
2
CD-текст: Название диска/
исполнитель = Название
дорожки появляется
автоматически (см. стр. 15).
(Для дисков
MP3 и WMA)
(Для дисков MP3)
Page 43

15
РУCCKИЙ
Другие основные функции
Быстрый переход на дорожку
во время воспроизведения
• Для дисков MP3 или WMA можно быстро
перейти на дорожку в той же папке.
Пример: выбор дорожки 32 во время
воспроизведения дорожки 6
1
2
При первом нажатии кнопки 5 / ∞
осуществляется переход на ближайшую
дорожку с большим или меньшим
номером, кратным 10 (например, 10, 20
или 30).
При каждом нажатии кнопки
осуществляется переход на 10 дорожек.
• После последней дорожки будет
выбрана первая и наоборот.
3
Запрещение извлечения диска
Можно заблокировать диск в загрузочном
отсеке.
Для отмены блокировки повторите эту же
процедуру.
Изменение информации на
дисплее
При воспроизведении звукового
компакт-диска или CD-текста
При воспроизведении диска
MP3 или WMA
• Если для параметра “TAG DISP”
установлено значение “TAG ON” (см.
стр. 21)
• Если для параметра “TAG DISP”
установлено значение “TAG OFF”
: Номер текущей дорожки/файла и
истекшее время воспроизведения
*
3
Если текущим диском является звуковой
компакт-диском, появляется надпись “NO
NAME”.
*
4
Если в файле MP3 или WMA нет тегов
ID3, появляется имя папки и имя файла.
В этом случае индикатор TAG не
загорается.
–10 +10
Дорожка
Доступно только на
устройстве автоматической
смены компакт-дисков JVC,
совместимом с MP3
Page 44

16
РУCCKИЙ
Выбор режимов воспроизведения
В одно и то же время возможна работа только в одном из следующих режимов воспроизведения.
Выберите необходимый режим воспроизведения.
1 2
Повторное воспроизведение
Пример: Если выбрано “TRACK RPT”
Режим Повторное воспроизведение
TRACK RPT : Текущая дорожка.
• Загораются индикаторы RPT и
.
FOLDER RPT*
1
: Все дорожки текущей папки.
• Загораются индикаторы
и
RPT.
DISC RPT*
2
: Все дорожки на текущем диске.
• Загораются индикаторы DISC
и RPT.
REPEAT OFF : Отмена.
Воспроизведение в произвольном
порядке
Пример: Если выбрано “DISC RND”
Режим Воспроизведение в
произвольном порядке
FOLDER RND*
1
:
Все дорожки текущей папки, затем
дорожки следующей папки и т.д.
• Загораются индикаторы и
RND.
DISC RND : Все дорожки на текущем диске.
• Загораются индикаторы DISC
и RND.
MAG RND*
2
: Все дорожки вставленных
дисков.
• Загораются индикаторы RND
и MAG.
RANDOM OFF : Отмена.
Прослушивание вступлений
Пример: Если выбрано “TRACK INT”
Режим Воспроизведение первых 15
секунд...
TRACK INT : Все дорожки на текущем диске.
• Загораются индикаторы INT и
.
FOLDER INT*
1
: Для первой дорожки каждой
папки текущего диска.
• Загораются индикаторы
и
INT.
DISC INT*
2
: Для первых дорожек
вставленных дисков.
• Загораются индикаторы DISC
и INT.
INTRO OFF : Отмена.
*
1
Только при воспроизведении диска MP3 или WMA.
*
2
Только при воспроизведении дисков с помощью устройства автоматической смены
компакт-дисков.
Page 45

17
РУCCKИЙ
Для смены направления
воспроизведения
Для остановки воспроизведения и
извлечения кассеты
В качестве источника звука
указывается последний
выбранный источник.
Для быстрой перемотки кассеты
вперед или назад
Если кассета подходит к
концу во время перемотки
вперед, направление
воспроизведения кассеты
изменится.
Для остановки быстрой перемотки вперед
или назад нажмите кнопку “PROG”.
Запрет извлечения кассеты
Можно заблокировать кассету в
загрузочном отсеке.
Для отмены блокировки повторите эту же
процедуру.
Операции с кассетой
Воспроизведение кассеты
Поиск начала мелодии
Режим Multi Music Scan (MMS) позволяет
автоматически начать воспроизведение
указанной мелодии с самого начала.
Укажите мелодию, к которой
необходимо перейти (на сколько
мелодий вперед или назад
относительно текущей мелодии)
Когда начало указанной
мелодии найдено,
автоматически начинается
ее воспроизведение.
*
3
Возврат к началу текущей мелодии.
Другие полезные функции
проигрывателя кассет
1
2
• Для включения или выключения
Dolby B NR*
4
• Для пропуска пустых мест на
кассете
• Для повторяющегося
воспроизведения текущей
мелодии
*
4
Изготовлено по лицензии компании Dolby
Laboratories. “Долби” и знак в виде двойной
буквы D являются товарными знаками
компании Dolby Laboratories.
Воспроизведение начинается автоматически.
Когда одна сторона кассеты подходит
к концу во время воспроизведения,
автоматически начинается воспроизведение
другой стороны кассеты. (Автоматический
переворот)
Page 46

18
РУCCKИЙ
Настройки звучания
Можно выбрать режим звучания,
соответствующий музыкальному жанру.
~
Ÿ
FLAT O Hard Rock O R & B O
POP O JAZZ O DanceMusic O
Country O Reggae O Classic O
USER 1 O USER 2 O USER 3 O
(возврат в начало)
Непосредственный выбор режимов
звучания
Можно выбрать режим звучания
непосредственно с помощью пульта
дистанционного управления.
Настройка звучания
Можно выбрать режим звучания,
соответствующий музыкальному жанру.
1
2
Индикатор Диапазон
FADER*
1
Настройка баланса
передних и задних
динамиков.
R06 (только
задние) до
F06 (только
передние)
BAL (баланс)
Настройка баланса левых
и правых динамиков.
L06 (только
левые)
до
R06 (только
правые)
LOUD
(громкость)
Увеличьте низкие и
высокие частоты для
получения хорошо
сбалансированного
звучания при низком
уровне громкости.
LOUD ON
LOUD OFF
VOLUME*
2
Настройте громкость.
От 00 (мин.) до
30 или 50
(макс.)*
3
*
1
При использовании системы с двумя
динамиками установите для микшера
уровень “00”.
*
2
Обычно диск управления выполняет
функции регулятора громкости. Поэтому
нет необходимости выбирать “VOLUME”
(громкость) для настройки уровня
громкости.
*
3
В зависимости от настройки регулятора
усиления. (Подробнее см. на стр. 21.)
Выбор запрограммированных
режимов звучания
(EQ:
эквалайзер)
Page 47

19
РУCCKИЙ
Сохранение собственных
настроек звучания
Можно настроить режимы звучания и
сохранить свои настройки в памяти.
1
2 Выберите один из режимов
звучания для настройки.
Пример: Если выбран “JAZZ”
3 Выберите элементы звучания для
настройки, когда отображается
выбранный режим звучания.
LOW LEVEL O LOW FREQ. O
LOW WIDTH O MID LEVEL O
MID WIDTH O HIGH LEVEL O
HIGH FREQ. O (возврат в начало)
• (LOW, MID, HIGH) LEVEL:
Настройте уровень усиления.
• (LOW, HIGH) FREQ:
Выберите среднюю настраиваемую
частоту.
• (LOW, MID) WIDTH :
Выберите уровень полосы частот.
4 Настройте выбранные элементы
звучания, когда отображается
индикация действия 3.
Индикатор
Запрограммированные
настройки
LOW MID HIGH
LEVEL –06
(мин.)
до
+06
(макс.)
–06
(мин.)
до
+06
(макс.)
–06
(мин.)
до
+06
(макс.)
FREQ 60Hz
80Hz
100Hz
120Hz
8kHz
10kHz
12kHz
15kHz
WIDTH От 1
(мин.)
до 4
(макс.)
От 1
(мин.)
до 2
(макс.)
5 Повторите действия 3 и 4 для
установки (или настройки) других
элементов звучания.
6 Выберите любой из режимов
звучания, определенных
пользователем (USER 1, USER 2,
USER 3).
7 Сохраните настройки.
Сообщение “MEMORY”
появится на некоторое
время.
Page 48

20
РУCCKИЙ
Индикация Выбираемые настройки, [страница для справки]
DEMO MODE
Демонстрация
функций дисплея
DEMO ON : [По умолчанию]; Если в течение 20 секунд
не будет выполнено операций, начнется
демонстрация функций дисплея, [8].
DEMO OFF : Отмена.
CLOCK HOUR
Настройка часа
1 – 12, [8]
[По умолчанию: 1 (1:00)]
CLOCK MIN
Настройка минуты
00 – 59, [8]
[По умолчанию: 00 (1:00)]
CLOCK DISP
Отображение
часов
CLOCK ON : Время постоянно отображается на дисплее, даже
когда устройство выключено.
CLOCK OFF : [По умолчанию]; Время отображается, когда
устройство включено. Если устройство
выключено, ппри нажатии “DISP” время
отображается примерно в течение 5 секунд.
LEVELMETER
Аудиометр
Можно выбрать один из четырех различных режимов отображения
индикатора уровня или режим демонстрации всех индикаторов.
LEVEL ALL [По умолчанию] O LEVEL 1 O LEVEL 2 O LEVEL 3
O LEVEL 4 O LEVEL OFF (отменено) O (возврат на начало)
LEVEL ALL : Демонстрация всех режимов отображения
индикатора уровня по очереди, примерно по 20
секунд каждый.
Общие настройки — PSM
Стандартная процедура
Можно изменять параметры PSM
(предпочитаемый режим настройки),
которые перечислены в таблице ниже.
1
2 Выберите параметр PSM.
3 Настройте выбранный параметр
PSM.
4 Повторите действия 2 и 3 для
настройки других параметров PSM,
если необходимо.
5 Завершите процедуру.
LEVEL 1 LEVEL 2
LEVEL 3 LEVEL 4
Page 49

21
РУCCKИЙ
Индикация Выбираемые настройки, [страница для справки]
DIMMER
Зaтeмнeниe
AUTO : [По умолчанию]; затемнение дисплея при включении
фaр.
ON : Включение затемнения.
OFF : Отмена.
CONTRAST
Контрастность
дисплея
1 – 10 : Настройте контрастность изображения, чтобы
индикация на экране была видна ясно и четко.
[По умолчанию: 5]
TEL
Отключение
звука телефона
MUTING1/MUTING2: Выберите любой из параметров,
обеспечивающий отключение звука при использовании
сотового телефона.
OFF: [По умолчанию]; Отмена.
SCROLL*
1
Прокрутка
ONCE : [По умолчанию]; однократная прокрутка
информации на диске.
AUTO :
Повторение прокрутки (с интервалом 5 секунд).
OFF : Отмена.
• При нажатии кнопки DISP в течение более одной секунды
происходит включение функции прокрутки информации на дисплее
независимо от имеющейся настройки.
EXT INPUT*
2
Ввод внешних
сигналов
CHANGER : [По умолчанию]; Для использования устройства
автоматической смены компакт-дисков JVC [13],
Apple iPod или проигрывателя JVC D. [22].
EXT INPUT : Используется любое внешнее устройство, [22].
AUX ADJUST
Настройка
уровня
дополнительного
входного сигнала
AUX ADJ 00 – AUX ADJ 05: Соответствующая настройка уровня
дополнительного входного сигнала во избежание
неожиданного увеличения уровня выходного
сигнала при переходе с внешнего устройства,
подключенного к входному разъему AUX на панели
управления, на другой источник.
[По умолчанию: AUX ADJ 00]
TAG DISP
Отображение
тегов
TAG ON : [По умолчанию]; отображение тега ID3 во время
воспроизведения дорожек MP3/WMA, [15].
TAG OFF : Отмена.
AMP GAIN
Регулятор
усиления
Можно изменить максимальный уровень громкости данного
приемника.
LOW PWR : VOLUME 00 – VOLUME 30 (Выберите этот параметр,
если максимальная мощность динамика менее 50 Вт
для предотвращения его повреждения.)
HIGH PWR : [По умолчанию]; VOLUME 00 – VOLUME 50
IF FILTER
Фильтр
промежуточных
частот
AUTO : [По умолчанию]; Повышение избирательности
тюнера для устранения интерференционных помех
от других радиостанций. (Сопровождается потерей
стереоэффекта.)
WIDE : Могут возникать интерференционные помехи от
соседних радиостанций, но качество звучания при
этом не ухудшается и сохраняется стереоэффект.
*
1
Некоторые буквы или символы не будут отображаться правильно (или не будут
отображаться) на дисплее.
*
2
Выбор невозможен, если источником является “CD-CH” или “EXT”.
Page 50

22
РУCCKИЙ
Операции с внешними устройствами
~ Для выбора внешнего
компонента, подключенного к....
• Дополнительному входному
разъему AUX
• Разъему устройства
автоматической смены
компакт-дисков на задней
панели с использованием
KS-U57 или KS-U58
Если надпись “EXT” не появляется,
см. стр. 21 и выберите вход для
внешнего устройства (EXT INPUT).
Ÿ Включите подключенное
устройство и начните
воспроизведение звука с его
помощью.
! Настройка громкости.
⁄ Настройка необходимого звука.
(См. страницы 18 и 19.)
Это устройство пригодно для любого
интерфейса управления Apple iPod
®
или
проигрывателя JVC D.
• Подробности см. в руководстве,
поставляемом с интерфейсным
адаптером для iPod®—KS-PD100 или
проигрывателя D.—KS-PD500.
• Разъему устройства
автоматической смены
компакт-дисков на задней
панели с использованием
интерфейсного адаптера
для iPod KS-PD100 или для
проигрывателя D.—KS-PD500
Воспроизведение с внешних
устройств
Можно подключить внешний компонент
к....
• Разъему устройства автоматической
смены компакт-дисков на задней панели с
использованием:
–
адаптер для подключения
радиотрансляционной линии—KS-U57 (не
входит в комплект поставки) или адаптер
для подключения внешних устройств
(AUX)—KS-U58 (не входит в комплект
поставки) для любых других устройств
(кроме iPod и проигрывателя D.).
– интерфейсного адаптера для iPod®—
KS-PD100 (не входит в комплект
поставки) для управления iPod.
– интерфейсного адаптера для
проигрывателя D.—KS-PD500 (не входит
в комплект поставки) для управления
проигрывателем D.
• Дополнительному входному разъему AUX
на панели управления.
Информацию о подключении см. в
Руководство по установке/подключению (в
отдельном издании).
Page 51

23
РУCCKИЙ
Не используйте следующие диски:
Изогнувшийся
диск
Диск с
наклейкой
Диски с
остатками
наклейки
Диск
Диск с
наклеиваемой
этикеткой
Обслуживание
Центральный
держатель
Обращение с кассетами
Для чистки головки
• Чистите головки после каждых 10 часов
использования с помощью чистящей
ленты влажного типа (доступна в
аудиомагазинах).
На загрязнение головок указывают
следующие симптомы:
– снижение качества звука;
– снижение уровня звука;
– пропадание звука.
• Не касайтесь тщательно отполированной
поверхности головки какими-либо
металлическими или магнитными
предметами.
Для хранения кассет в чистом
виде
• После прослушивания всегда помещайте
кассеты в футляр для хранения.
• Не храните кассеты в следующих условиях:
– под воздействием прямых солнечных
лучей;
– при высокой влажности;
– при очень высокой температуре
Обращение с дисками
Конденсация влаги
Влага может конденсироваться на линзе
внутри проигрывателя компакт-дисков в
следующих случаях:
• После включения автомобильного
обогревателя.
• При повышении влажности внутри
автомобиля.
Конденсация влаги может привести к
неисправности проигрывателя компактдисков. В этом случае извлеките диск
и оставьте приемник включенным на
несколько часов, чтобы испарилась влага.
Как обращаться с дисками
При извлечении диска
из футляра нажмите на
центральный держатель
футляра и снимите диск,
удерживая его за края.
• Всегда удерживайте диск за
края. Не прикасайтесь к поверхности, на
которой находится запись.
Чтобы поместить диск в футляр, аккуратно
установите диск на центральный держатель
(стороной с изображением вверх).
• После прослушивания обязательно
помещайте диски в футляры.
Хранение дисков в чистом виде
Воспроизведение грязного диска может
быть некорректным.
Если диск загрязнится, протрите
его мягкой тканью по прямой
линии от центра к краю.
• Не используйте растворитель
(например, обычное средство для
чистки кассет, распыляемые средства,
разбавитель, бензин и т.д.) для чистки
дисков.
Прослушивание новых дисков
Вблизи внутреннего и внешнего
краев новых дисков иногда
бывают грубые выступы. Такой
диск не может быть загружен в
приемник.
Чтобы удалить такие пятна, потрите их
карандашом или шариковой ручкой и т.д.
Page 52

24
РУCCKИЙ
Дополнительная информация о приемнике
Основные операции
Включение питания
• Для включения питания можно также
использовать кнопки источников
на устройстве. Если источник готов,
воспроизведение также начинается. Если
источник готов, воспроизведение также
начинается.
Выключение питания
• Если выключить зажигание, не
отключая устройства, при последующем
включении зажигания устройство
включится автоматически. Если
последний выбранный источник готов
к воспроизведению (например, диск
или кассета находятся в устройстве),
воспроизведение начнется автоматически.
• Если питание отключается во время
прослушивания диска, при последующем
включении питания воспроизведение
диска начнется с того места, где оно было
остановлено.
Выбор источников
• Если в устройство не загружены ни диск,
ни кассета, выбрать источники “CD” или
“TAPE” невозможно.
• Источник “CD-CH” невозможно
выбрать, если не подключено устройство
автоматической смены компакт-дисков.
Операции с тюнером
Сохранение радиостанций
• Во время поиска SSM...
– Все ранее сохраненные радиостанции
удаляются, и сохранение радиостанций
будет выполняться заново.
– Выполняется программирование
принимаемых радиостанций для
кнопок № 1 (наименьшая частота) – № 6
(наибольшая частота).
– По завершении использования функции
SSM будет выполнена автоматическая
настройка на радиостанцию,
сохраненную под номером 1.
• В режиме сохранения радиостанций
вручную ранее запрограммированная
радиостанция удаляется, если
сохранение новой радиостанции
выполняется с использованием того же
запрограммированного номера.
Операции с дисками
Предостережение для
воспроизведения дисков DualDisc
• Сторона диска DualDisc, отличная от
DVD, не совместима со стандартом
“Compact Disc Digital Audio”. Поэтому
не рекомендуется использовать сторону
диска DualDisc, отличную от DVD, на
данном устройстве.
Общие сведения
• “Дорожки” MP3 и WMA (Windows
Media® Audio) (слова “файл” и “дорожка”
взаимозаменяемы в данном руководстве)
записываются в “папки”.
• Данный приемник предназначен для
воспроизведения компакт-дисков/CDтекста, а также дисков однократной или
многократной записи в формате звукового
компакт-диска (CD-DA), MP3 и WMA.
• Если диск загружен, при выборе “CD”
в качестве источника начинается
воспроизведение диска.
Установка диска
• Если диск вставлен обратной стороной,
вместо воспроизведения диска устройство
начинает воспроизводить последний
выбранный источник.
•
Не устанавливайте диски диаметром
8 см (компакт-диски с одиночными
композициями) и диски необычной формы
(сердце, цветок и т.д.) в загрузочный отсек.
Воспроизведение диска
• При быстрой перемотке дорожки MP3 или
WMA вперед или назад можно услышать
лишь прерывистый звук.
Воспроизведение компакт-дисков
однократной и многократной записи
• Используйте только “завершенные”
компакт-диски однократной и
многократной записи.
• Данный приемник может воспроизводить
только файлы одного типа, который
первым будут распознан, если на диске
содержатся файлы как в ф ормате
звукового компакт-диска (CD-DA), так и в
формате MP3/WMA.
• На данном приемнике возможно
воспроизведение дисков с несколькими
сеансами записи; однако, незавершенные
сеансы будут пропускаться при
воспроизведении.
Page 53

25
РУCCKИЙ
• Некоторые компакт-диски однократной
или многократной записи не
воспроизводятся на данном приемнике
в связи с их особенностями, а также по
следующим причинам:
– Диски загрязнены или поцарапаны;
– На линзе внутри приемника
присутствует конденсат влаги;
– Линза звукоснимателя загрязнена;
– При записи файлов на компакт-диск
однократной или многократной записи
использовался метод пакетной записи;
– Некорректное состояние записи
(отсутствие данных и т.д.) или носителя
(пятно, царапина, деформация и т.д.).
• Для считывания дисков многократной
записи может потребоваться больше
времени, так как они имеют меньшую
отражательную способность по сравнению
с обычными компакт-дисками.
• Не используйте следующие компакт-диски
однократной или многократной записи:
– Диски с наклейками, этикетками или
защитными пленками на поверхности;
–
Диски, на которых можно печатать
этикетки с помощью струйного принтера.
Использование этих дисков при высоких
температурах или высокой влажности
может привести к неисправности или
повреждению устройства.
Воспроизве дение диска MP3/WMA
• Данный приемник может воспроизводить
файлы MP3/WMA с расширением <.mp3>
или <.wma> (не зависит от регистра).
• Данный приемник может отображать
названия альбомов, артистов
(исполнителей) и тег ID3 (версии 1,0, 1,1,
2,2, 2,3 или 2,4) для файлов MP3 и файлов
WMA.
• Данный приемник может обрабатывать
только однобайтовые символы. Все
остальные символы отображаются
неправильно (см. стр. 11).
• Файлы MP3/WMA отображаются на
данном приемнике в соответствии со
следующими характеристиками:
– Cкорость передачи данных: 8 кбит/с
— 320 кбит/с
– Частота дискретизации:
48 кГц, 44,1 кГц, 32 кГц (для MPEG-1)
24 кГц, 22,05 кГц, 16 кГц (для MPEG-2)
48 кГц, 44,1 кГц, 32 кГц (для WMA)
– Формат диска: ISO 9660 Level 1/ Level
2, Romeo, Joliet, длинное имя файла
Windows
•
Максимальное количество символов для
названий файлов или папок зависит от
используемого формата диска (включая 4
символа расширения <.mp3> или <.wma>).
– ISO 9660 Level 1: до 12 символов
– ISO 9660 Level 2: до 31 символов
– Romeo*: до 128 (72) символов
– Joliet*: до 64 (36) символов
– Длинное имя файла Windows*: до 128
(72) символов
*
Значение в скобках представляет собой
максимально допустимое число символов
для имен файлов/папок в случае, если
суммарное количество файлов и папок
составляет 313 или больше.
• Данный приемник может в сумме
распознать 512 файлов, 200 папок и 8
иерархий.
• Данный приемник может воспроизводить
файлы, записанные в режиме VBR
(переменная скорость в битах).
Для файлов, записанных в режиме VBR,
по разному отображается время от
начала воспроизведения, и это время не
соответствуют действительности. Это
различие становится особенно заметно
после выполнения функции поиска.
• Данный приемник не может
воспроизводить следующие файлы:
– файлы MP3, закодированные в форматах
MP3i и MP3 PRO;
– файлы MP3, закодированные в
непредусмотренном формате;
– файлы MP3, закодированные в формате
Layer 1/2;
–
файлы WMA, закодированные в формате
“без потерь”, профессиональном и
голосовом форматах;
– файлы WMA, основой которых служит
формат, отличный от формата Windows
Media® Audio;
– файлы WMA, защищенные от
копирования по методу DRM;
– файлы, содержащие данные, например,
WAVE, ATRAC3 и т.д.
• Функция поиска выполняется, но скорость
поиска не является постоянной.
Продолжение на следующей странице....
Page 54

26
РУCCKИЙ
Смена источника звука
• При смене источника воспроизведение
прекращается (извлечения диска не
происходит).
При повторном выборе “CD” или
“CD-CH” в качестве источника
воспроизведение начнется с того места,
где оно было остановлено ранее.
Извлечение диска
• Если в течение 15 секунд извлеченный
диск не будет вынут, он автоматически
помещается обратно в загрузочный
отсек в целях защиты от загрязнения.
(Воспроизведение диска при этом не
начинается).
Операции с кассетой
Воспроизведение кассеты
• Во время поиска указанной мелодии:
– Если кассета перемотана на начало,
ее воспроизведение начнется с начала
данной стороны.
– Если кассета перемотана в конец, ее
воспроизведение начинается с начала
другой стороны.
• Режим Multi Music Scan (MMS), пропуск
пустых мест и повторное воспроизведение
могут работать некорректно в следующих
случаях:
– При воспроизведении кассет с
мелодиями, в которых присутствуют
продолжительные отрывки пианиссимо
(очень тихо) или отрывки с отсутствием
записи.
– При воспроизведении кассет с
непродолжительными отрывками, на
которых отсутствует запись.
– При воспроизведении кассет с высоким
уровнем шума или гула между
мелодиями.
– При несоответствии настройки Dolby
NR. Например, если кассета записана в
формате “Dolby C NR”.
• Не используйте следующие кассеты:
– Грязные или пыльные кассеты.
– Кассеты с отслаивающимися
этикетками.
– Кассеты с провисающей лентой, которая
может запутаться в механизме.
Смена источника звука
• При смене источника звука
воспроизведение прекращается
(извлечения кассеты не происходит).
Освобождение пленки в момент
выключения зажигания
• Если в момент выключения зажигания
в кассетоприемнике находится кассета,
устройство автоматически отведет пленку
от считывающей головки.
Общие настройки—PSM
• Если для настройки “TAG DISP”
вместо значения “TAG OFF” будет
установлено значение “TAG ON” во время
воспроизведения файла MP3/WMA,
отображение тегов будет активировано
при воспроизведении следующего файла.
• Если для элемента “AMP GAIN” настройка
“HIGH PWR” меняется на “LOW PWR”
и при этом для уровня громкости
установлено значение больше “VOLUME
30”, приемник автоматически меняет
уровень громкости на “VOLUME 30”.
Другие основные функции
• При попытке присвоить название 31-й
частоте радиостанции мигает надпись
“NAME FULL”. Прежде чем присваивать
названия, удалите ненужные названия.
Доступные символы дисплея
Эти символы (включая буквы латинского
алфавита) можно также использовать
для отображения на дисплее другой
информации, например, названий дисков
или исполнителей.
Кириллица
Символы верхнего регистра
Символы нижнего регистра
Цифры и знаки
Page 55

27
РУCCKИЙ
Устранение проблем
Не всякое нарушение в работе устройства является результатом его неисправности. Перед
обращением в сервисный центр проверьте следующее.
Продолжение на следующей странице....
Симптомы Способы устранения/Причины
Общие сведения
• Не слышен звук динамиков. • Установите оптимальный уровень
громкости.
• Проверьте кабели и соединения.
• Приемник не работает. Перенастройте приемник (см. стр. 2).
FM/AM
• Автоматическое программирование
SSM не работает.
Сохраните радиостанции вручную.
• Статические помехи при
прослушивании радио.
Плотно подсоедините антенну.
Воспроизведение диска
• Диск не воспроизводится. Вставьте диск правильно.
• Не воспроизводятся компакт-диски
однократной и многократной
записи.
• Не осуществляется переход
на дорожки компакт-дисков
однократнойи многократной записи.
• Вставьте компакт-диск однократной или
многократной записи с закрытым сеансом.
•
Закройте сеанс компакт-диска однократной
или многократной записи с помощью
устройства, которое использовалось для
записи.
• Диск не может быть воспроизведен
и или извлечен.
• Снимите блокировку с диска (см. стр. 15).
• Принудительно извлеките диск (см. стр. 2.)
• Звук, записанный на диске, иногда
прерывается.
• Остановите воспроизведение на время езды
по неровной дороге.
• Используйте диск без царапин.
• Проверьте кабели и соединения.
• На дисплее появляется надпись “NO
DISC”.
Поместите соответствующий диск в
загрузочный отсек.
Воспроизведение MP3/WMA
• Диск не воспроизводится. • Используйте диск с дорожками MP3/WMA,
записанными в формате, совместимом с ISO
9660 Level 1, Level 2, Romeo или Joliet.
• Добавьте к именам файлов расширение
<.mp3> или <.wma>.
• Слышен шум. Перейдите к другой дорожке или смените
диск. (Не добавляйте расширение <.mp3> или
<.wma> к файлам, не являющимся файлами
MP3 или WMA.)
• Для чтения требуется более
длительное время (на дисплее
продолжает мигать надпись
“CHECK”).
Не используйте слишком сложную иерархию
с большим количеством папок.
Page 56

28
РУCCKИЙ
Симптомы Способы устранения/Причины
Воспроизведение MP3/WMA
• Порядок воспроизведения дорожек
отличается от заданного.
Порядок воспроизведения определяется при
записи файлов.
• Время от начала воспроизведения
неправильное.
Это иногда происходит во время
воспроизведения. Причиной является способ
записи дорожек на диск.
• На дисплее появляется надпись
“NO FILES”.
Вставьте диск, содержащий дорожки MP3 или
WMA.
• Не отображаются правильные
символы (т.е. название альбома).
Данное устройство может отображать только
буквы (верхнего и нижнего регистров),
цифры и ограниченное число символов.
Воспроизведение кассеты
• Невозможно вставить кассету. Вставьте кассету пленкой вправо.
• Кассету невозможно ни
воспроизвести, ни извлечь.
Снимите блокировку с кассеты (см. стр. 17).
• На дисплее появляется надпись
“NO TAPE”.
Правильно вставьте кассету.
• Пленка кассеты нагревается. Это не является неисправностью.
• Уровень записи на кассете очень
низкий, а качество звука плохое.
Очистите головку с использованием чистящей
ленты.
Устройство автоматической смены компакт-дисков
• На дисплее появляется надпись
“NO DISC”.
Вставьте диск в загрузочное отверстие.
• На дисплее появляется надпись
“NO MAG”.
Вставьте загрузочный механизм.
• На дисплее появляется надпись
“RESET 8”.
Правильно подключите приемник к
устройству автоматической смены компактдисков и нажмиzzz сброса устройства
автоматической смены компакт-дисков.
• На дисплее появляется надпись
“ RESET 1” – “RESET 7”.
Нажмите кнопку сброса устройства
автоматической смены компакт-дисков.
• Устройство автоматической смены
компакт-дисков совершенно не
работает.
Перенастройте приемник (см. стр. 2).
• Microsoft и Windows Media являются либо зарегистрированными торговыми марками или
торговыми марками корпорации Microsoft в США и/или других странах.
Page 57

29
РУCCKИЙ
Технические характеристики
БЛОК УСИЛИТЕЛЕЙ ЗВУКА
Максимальная выходная мощность:
Передние: 50 Вт на каждый канал
Задние: 50 Вт на каждый канал
Длительная выходная мощность (RMS):
Передние: 19 Вт на канал в при
4 Ω, от 40 Гц до 20 000
Гц и не более чем 0,8%
общего гармонического
искажения.
Задние: 19 Вт на канал в при
4 Ω, от 40 Гц до 20 000
Гц и не более чем 0,8%
общего гармонического
искажения.
Импеданс нагрузки:
4 Ω (допустимо от 4 Ω до 8 Ω)
Диапазон настройки эквалайзера:
Low (нижн): ±12 дБ (60 Гц, 80 Гц, 100 Гц,
120 Гц)
Mid (средн): ±12 дБ
High (верхн): ±12 дБ (8 кГц, 10 кГц,
12 кГц, 15 кГц)
Частотная характеристика:
от 40 Гц до 20 000 Гц
Отношение сигнал/помеха: 70 дБ
Уровень линейного выхода/полное
сопротивление:
нагрузка 2,0 В/20 kΩ (полная шкала)
Импеданс выходного сигнала: 1 kΩ
Другие терминалы: Устройство
автоматической смены компакт-дисков,
дополнительный входной разъем AUX
БЛОК РАДИОПРИЕМНИКА
Диапазон частот:
FM: от 87,5 МГц до 108,0 МГц
AM: от 531 кГц до 1 602 кГц
[Радиоприемник в диапазоне FM]
Полезная чувствительность:
11,3 dBf (1,0 µВ/75 Ω)
50 дБ пороговая чувствительность:
16,3 dBf (1,8 µВ/75 Ω)
Альтернативная отстройка (400 кГц): 65 дБ
Частотная характеристика:
от 40 Гц до 15 000 Гц
Разделение стереоканалов: 30 дБ
Коэффициент захвата: 1,5 дБ
[Радиоприемник в диапазоне AM]
Чувствительность: 20 µВ
Избирательность: 35 дБ
БЛОК ПРОИГРЫВАТЕЛЯ
КОМПАКТ-ДИСКОВ
Тип: проигрыватель компакт-дисков
Система обнаружение сигнала:
бесконтактное оптическое считывание
(полупроводниковый лазер)
Число каналов: 2 канала (стерео)
Частотная характеристика: от 5 Гц до
20 000 Гц
Динамический диапазон: 96 дБ
Отношение сигнал/помеха: 98 дБ
Коэффициент детонации: в пределах
допусков измерительной аппаратуры
Формат декодирования MP3:
MPEG1/2 Audio Layer 3
Макс. скорость передачи битов:
320 кбит/с
Формат декодирования WMA (Windows
Media
®
Audio):
Формат:
Макс. скорость передачи битов:
192 кбит/с
БЛОК КАССЕТНОЙ ДЕКИ
Коэффициент детонации: 0,1 %
(среднеквадратичное значение
коэффициента детонации)
Время быстрой перемотки: 100 секунд (C-60)
Частотная характеристика:
от 30 Гц до 16 000 Гц (нормальная кассета)
Отношение сигнал/помеха: (нормальная
кассета)
При включенном Dolby B NR: 65 дБ
При выключенном Dolby B NR: 56 дБ
Разделение стереоканалов: 40 дБ
ОБЩИЕ ТРЕБОВАНИЯ
Электрическое питание:
Рабочее напряжение:
постоянное напряжение 14,4 В
(допустимо от 11 В до 16 В)
Система заземления: отрицательное заземление
Допустимая рабочая температура:
от 0°C до +40°C
Габариты, мм (Ш × В × Г):
Монтажный размер (прибл.):
178 мм × 100 мм × 158 мм
Размер комплекта (прибл.):
178 мм × 100 мм × 175 мм
Масса (прибл.):
2,3 кг (без дополнительных
принадлежностей)
Конструкция и технические требования
могут быть изменены без уведомления.
Page 58

EN, RU
1005DTSMDTJEIN
Having TROUBLE with operation?
Please reset your unit
Refer to page of How to reset your unit
Затруднения при эксплуатации?
Пожалуйста, перезагрузите Ваше устройство
Для получения информации о перезагрузке Вашего устройства
обратитесь на соответствующую страницу
© 2005 Victor Company of Japan, Limited
 Loading...