

Page 1
Q
Q
3
7
6
3
1
5
1
5
0
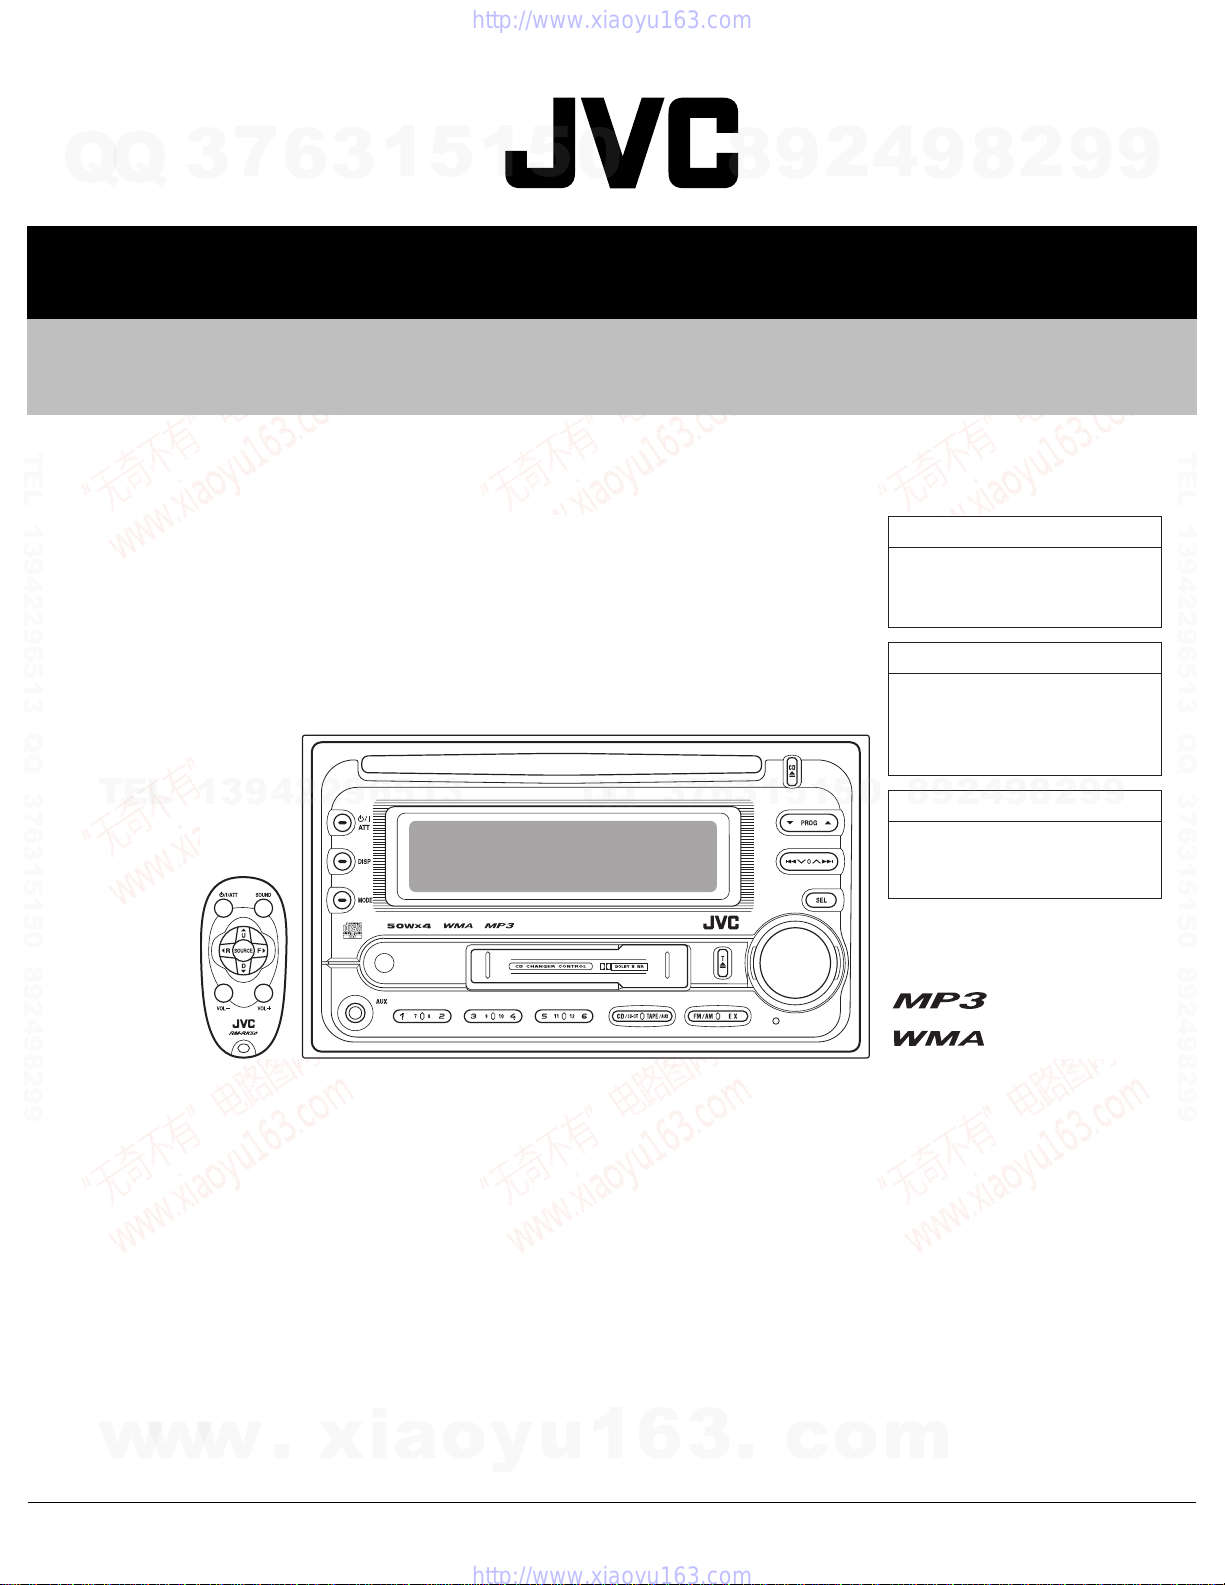
SERVICE MANUAL
CD/CASSETTE RECEIVER
TEL 13942296513 QQ 376315150 892498299
MA22020059
KW-XC404,KW-XC405,KW-XC406
8
9
2
4
9
UI ---------------------------- India
UT ------------------------- Taiwan
U -------------------- Other Areas
2
8
KW-XC404
Area suffix
KW-XC405
Area suffix
9
9
TEL 13942296513 QQ 376315150 892498299
TEL
13942296513
Lead free solder used in the board (material : Sn-Ag-Cu, melting point : 219 Centigrade)
TABLE OF CONTENTS
1 PRECAUTIONS . . . . . . . . . . . . . . . . . . . . . . . . . . . . . . . . . . . . . . . . . . . . . . . . . . . . . . . . . . . . . . . . . . . . . . . 1-3
2 SPECIFIC SERVICE INSTRUCTIONS . . . . . . . . . . . . . . . . . . . . . . . . . . . . . . . . . . . . . . . . . . . . . . . . . . . . . . 1-6
3 DISASSEMBLY . . . . . . . . . . . . . . . . . . . . . . . . . . . . . . . . . . . . . . . . . . . . . . . . . . . . . . . . . . . . . . . . . . . . . . . 1-7
4 ADJUSTMENT . . . . . . . . . . . . . . . . . . . . . . . . . . . . . . . . . . . . . . . . . . . . . . . . . . . . . . . . . . . . . . . . . . . . . . . 1-39
5 TROUBLESHOOTING . . . . . . . . . . . . . . . . . . . . . . . . . . . . . . . . . . . . . . . . . . . . . . . . . . . . . . . . . . . . . . . . . 1-44
Q
Q
3
7
6
3
1
5
1
5
0
9
8
U -------------------- Other Areas
9
4
2
KW-XC406
Area suffix
8
2
9
9
w
w
w
.
xia
o
y
u
1
6
3
.
c
COPYRIGHT © 2005 Victor Company of Japan, Limited
o
m
No.MA220
2005/9
Page 2
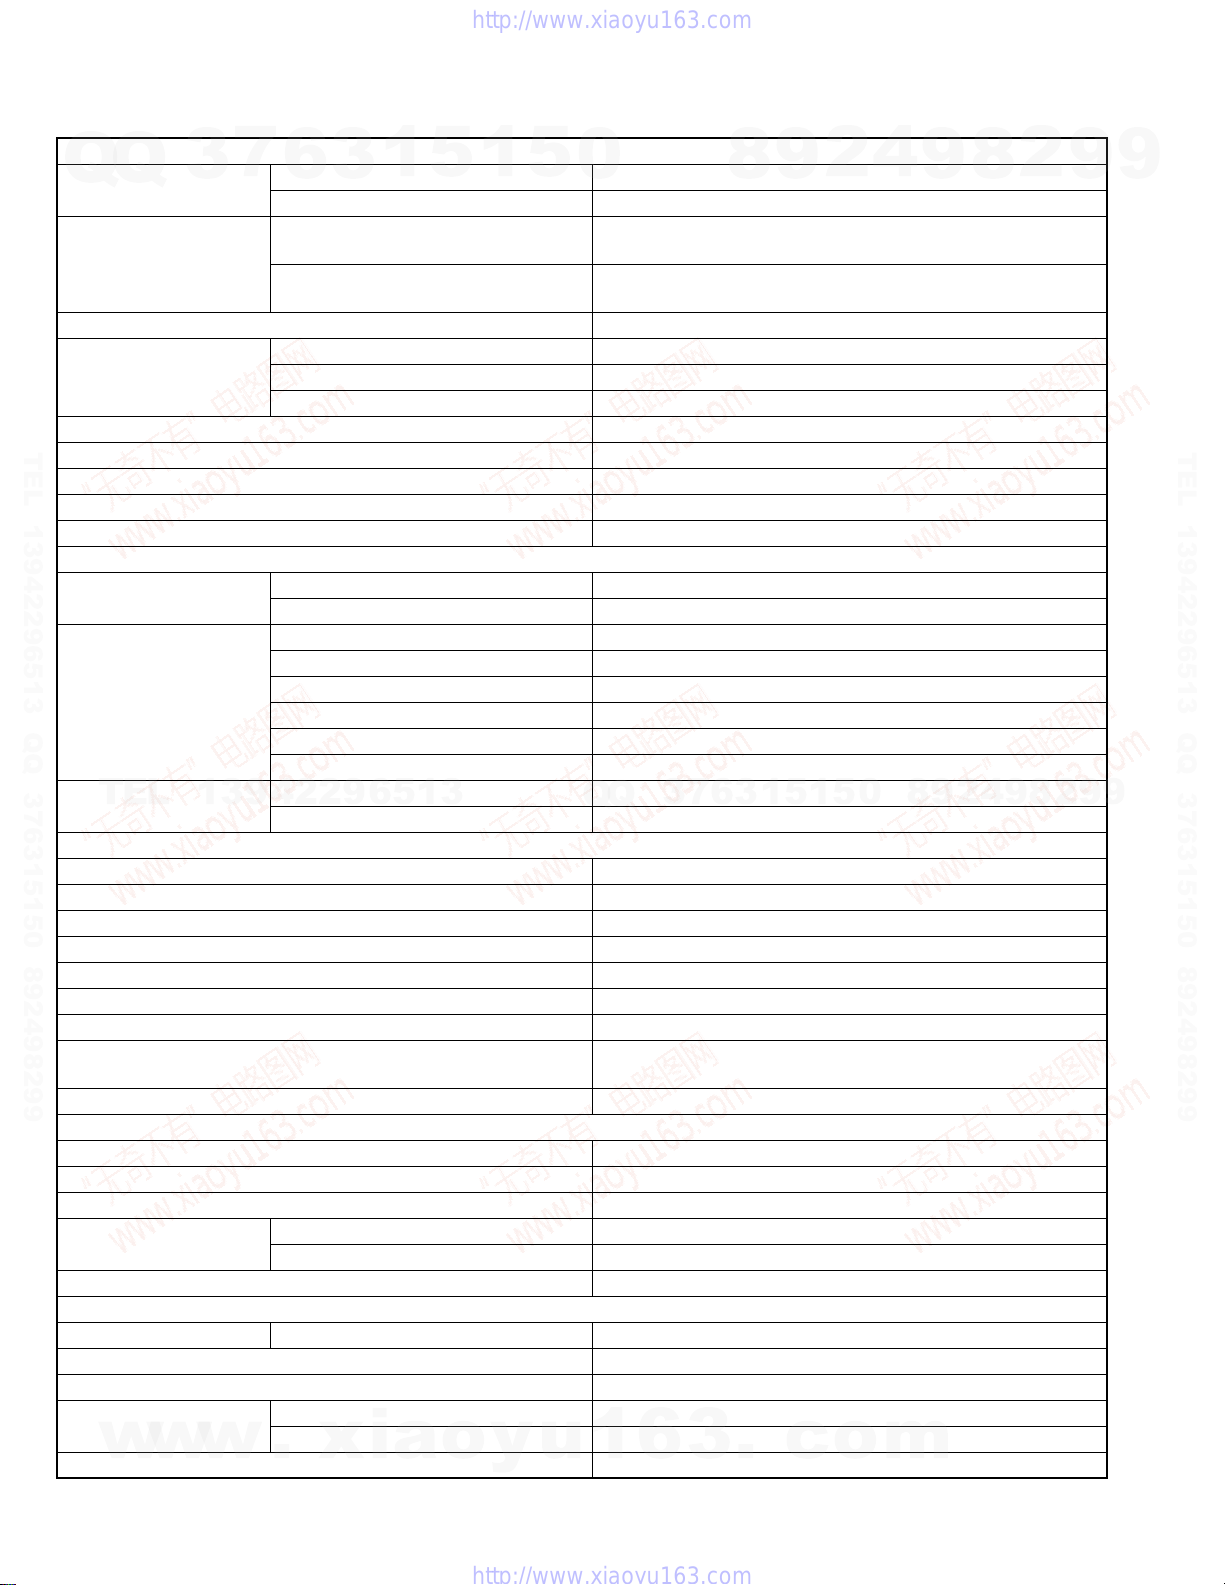
SPECIFICATION
7
Q
Q
Maximum Power Output Front 50 W per channel
Continuous Power Output
(RMS)
Load Impedance 4 Ω (4 Ω to 8 Ω allowance)
Equalizer Control Range Low ±12 dB (60 Hz, 80 Hz, 100 Hz, 120 Hz)
Frequency Response 40 Hz to 20 000 Hz
TEL 13942296513 QQ 376315150 892498299
Signal-to-Noise Ratio 70 dB
Line-Out Level/Impedance 2.0 V/20 kΩ load (full scale)
Output Impedance 1 kΩ
Other terminals CD changer, AUX (auxiliary) input jack
Frequency Range FM 87.5 MHz to 108.0 MHz
FM Tuner Usable Sensitivity 11.3 dBf (1.0 µV/75 Ω)
AM Tuner Sensitivity 20 µV
TEL
Type Compact disc player
Signal Detection System Non-contact optical pickup (semiconductor laser)
Number of Channels 2 channels (stereo)
Frequency Response 5 Hz to 20 000 Hz
Dynamic Range 96 dB
Signal-to-Noise Ratio 98 dB
Wow and Flutter Less than measurable limit
MP3 Decoding Format MPEG1/2 Audio Layer 3
WMA (Windows Media
Wow and Flutter 0.1 % (WRMS)
Fast-Wind Time 100 sec. (C-60)
Frequency Response (Normal tape) 30 Hz to 16 000 Hz
Signal-to-Noise Ratio
(Normal tape)
Stereo Separation 40 dB
Power Requirement Operating Voltage DC 14.4 V (11 V to 16 V allowance)
Grounding System Negative ground
Allowable Operating Temperature 0°C to +40°C
Dimensions (W × H × D) Installation Size (approx.) 178 mm × 100 mm × 158 mm
w
Mass (approx.) 2.3 kg (excluding accessories)
Design and specifications are subject to change without notice.
3
13942296513
w
w
6
Rear 50 W per channel
Front 19 W per channel into 4 Ω, 40 Hz to 20 000 Hz at no more than
Rear 19 W per channel into 4 Ω, 40 Hz to 20 000 Hz at no more than
Mid ±12 dB
High ±12 dB (8 kHz, 10 kHz, 12 kHz, 15 kHz)
AM 531 kHz to 1 602 kHz
50 dB Quieting Sensitivity 16.3 dBf (1.8 µV/75 Ω)
Alternate Channel Selectivity (400 kHz) 65 dB
Frequency Response 40 Hz to 15 000 Hz
Stereo Separation 30 dB
Capture Ratio 1.5 dB
Selectivity 35 dB
® Audio) Decoding Format Max. Bit Rate: 192 kbps
Dolby B NR ON 65 dB
Dolby B NR OFF 56 dB
Set Size (approx.) 178 mm × 100 mm × 175 mm
.
xia
3
1
AUDIO AMPLIFIER SECTION
5
1
5
0
0.8% total harmonic distortion.
0.8% total harmonic distortion.
TUNER SECTION
Q
Q
CD PLAYER SECTION
Max. Bit Rate: 320 kbps
CASSETTE DECK SECTION
GENERAL
o
y
u
1
3
6
6
7
3
8
3
.
9
1
1
5
c
2
5
o
4
0
m
9
8
9
8
2
4
2
9
8
9
2
9
9
TEL 13942296513 QQ 376315150 892498299
9
1-2 (No.MA220)
Page 3
Q
Q
1.1 Safety Precautions
3
7
6
3
1
SECTION 1
PRECAUTIONS
5
1
5
0
8
9
2
4
9
8
2
9
9
!
!
TEL 13942296513 QQ 376315150 892498299
TEL
13942296513
Burrs formed during molding may be left over on some parts of the chassis. Therefore,
pay attention to such burrs in the case of preforming repair of this system.
Please use enough caution not to see the beam directly or touch it in case of an
adjustment or operation check.
7
3
Q
Q
6
3
1
5
1
5
0
8
9
2
4
9
8
2
9
TEL 13942296513 QQ 376315150 892498299
9
w
w
w
.
xia
o
y
u
1
6
3
.
c
o
m
(No.MA220)1-3
Page 4
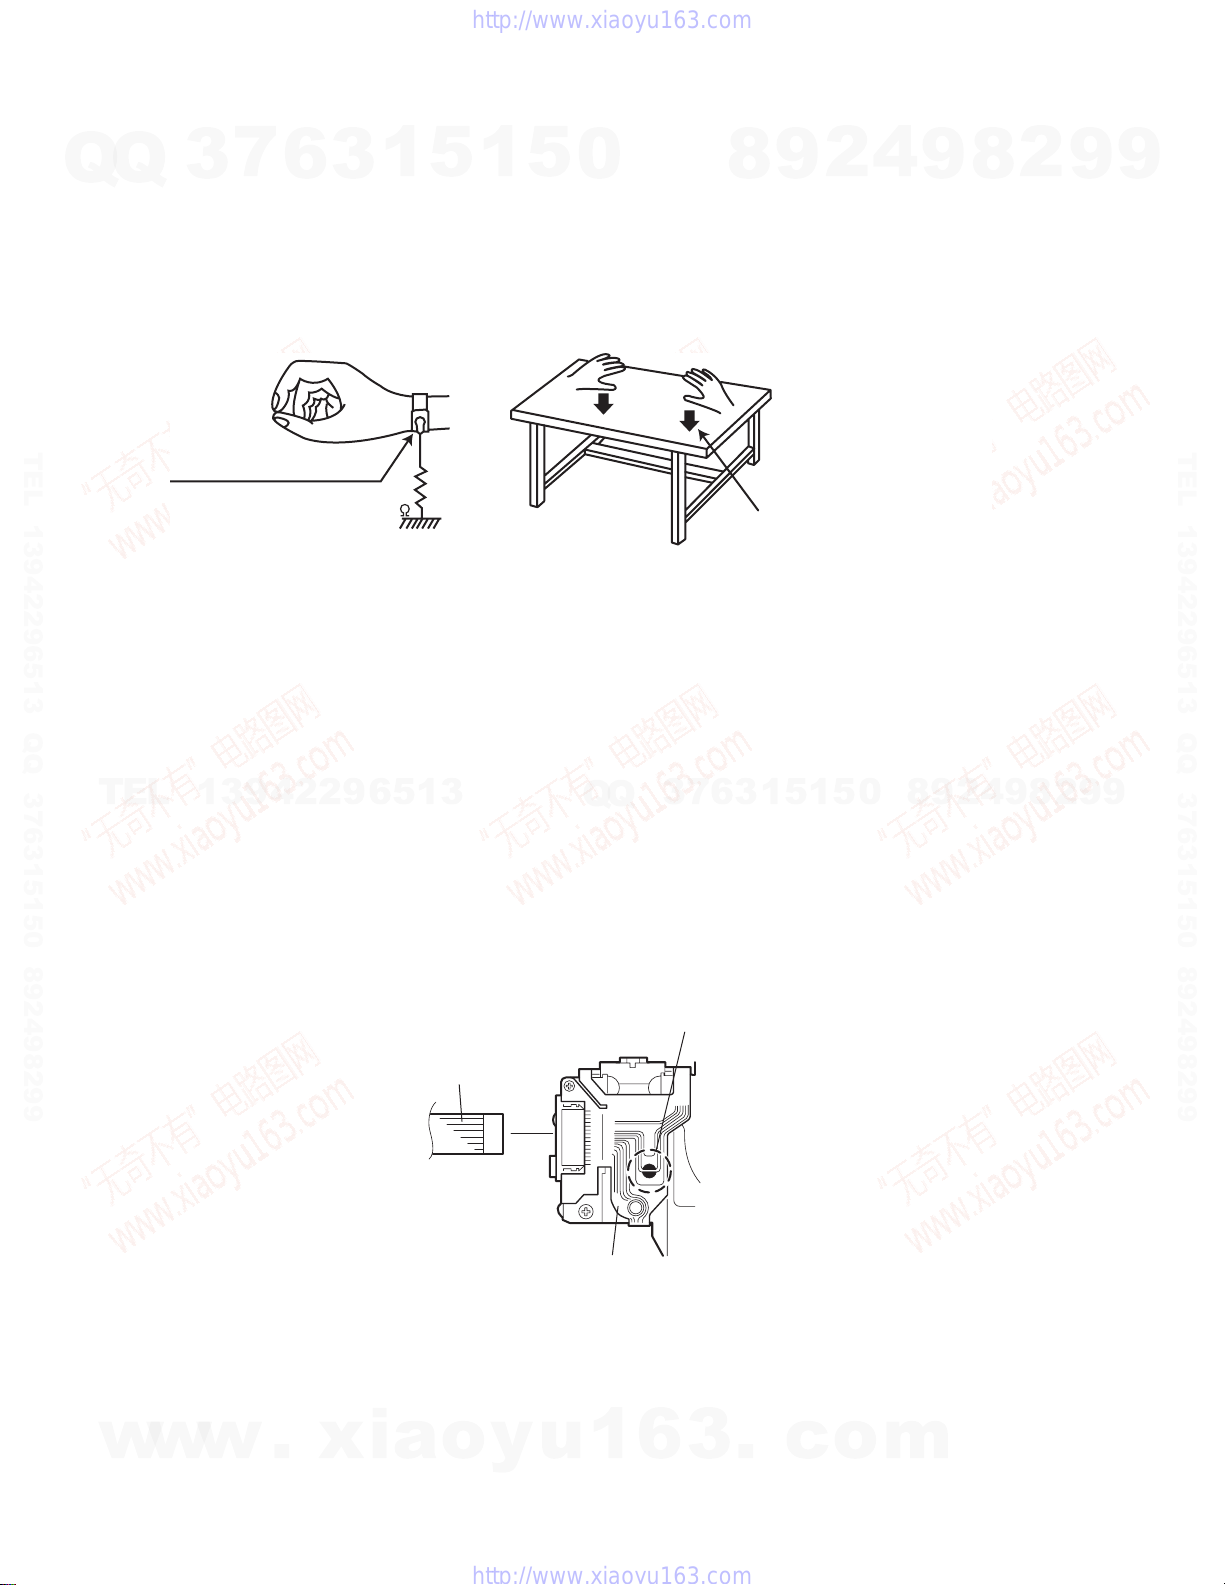
1.2 Preventing static electricity
Electrostatic discharge (ESD), which occurs when static electricity stored in the body, fabric, etc. is discharged, can destroy the laser
diode in the traverse unit (optical pickup). Take care to prevent this when performing repairs.
7
Q
Q
1.2.1 Grounding to prevent damage by static electricity
Static electricity in the work area can destroy the optical pickup (laser diode) in devices such as CD players.
Be careful to use proper grounding in the area where repairs are being performed.
(1) Ground the workbench
Ground the workbench by laying conductive material (such as a conductive sheet) or an iron plate over it before placing the
traverse unit (optical pickup) on it.
(2) Ground yourself
Use an anti-static wrist strap to release any static electricity built up in your body.
3
6
3
1
5
1
5
0
8
9
2
4
9
8
2
9
9
TEL 13942296513 QQ 376315150 892498299
(3) Handling the optical pickup
• In order to maintain quality during transport and before installation, both sides of the laser diode on the replacement optical
• Do not use a tester to check the condition of the laser diode in the optical pickup. The tester's internal power source can easily
1.3 Handling the traverse unit (optical pickup)
(1) Do not subject the traverse unit (optical pickup) to strong shocks, as it is a sensitive, complex unit.
(2) Cut off the shorted part of the flexible cable using nippers, etc. after replacing the optical pickup. For specific details, refer to the
replacement procedure in the text. Remove the anti-static pin when replacing the traverse unit. Be careful not to take too long a
TEL
time when attaching it to the connector.
(3) Handle the flexible cable carefully as it may break when subjected to strong force.
(4) It is not possible to adjust the semi-fixed resistor that adjusts the laser power. Do not turn it.
1.4 Attention when traverse unit is decomposed
*Please refer to "Disassembly method" in the text for the CD pickup unit.
• Apply solder to the short land before the flexible wire is disconnected from the connector on the CD pickup unit.
(If the flexible wire is disconnected without applying solder, the CD pickup may be destroyed by static electricity.)
• In the assembly, be sure to remove solder from the short land after connecting the flexible wire.
(caption)
Anti-static wrist strap
1M
pickup are shorted. After replacement, return the shorted parts to their original condition.
(Refer to the text.)
destroy the laser diode.
13942296513
Q
Q
Short-circuit point
(Soldering)
Conductive material
(conductive sheet) or iron plate
1
5
1
3
6
7
3
5
0
8
9
2
4
9
8
2
9
TEL 13942296513 QQ 376315150 892498299
9
w
w
1-4 (No.MA220)
w
.
xia
Flexible wire
o
y
u
Pickup
1
6
3
.
c
o
m
Page 5
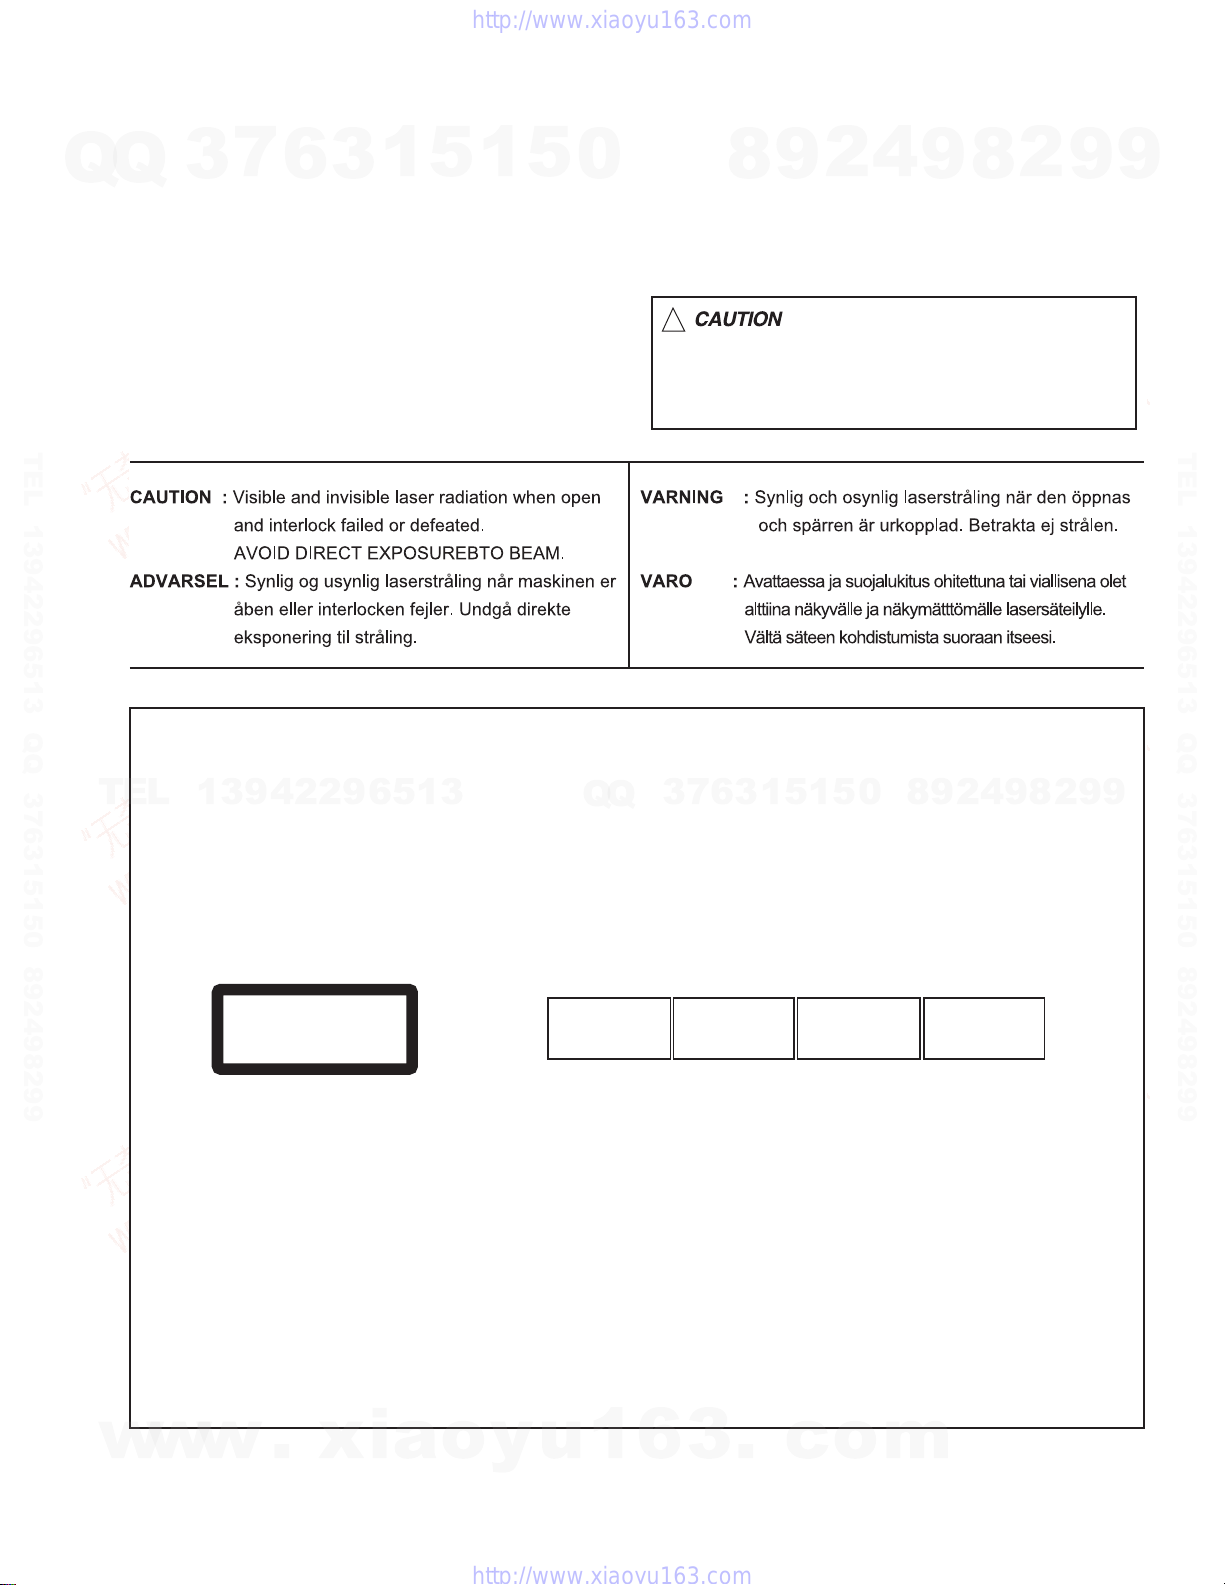
1.5 Important for laser products
!
1.CLASS 1 LASER PRODUCT
3
7
6
Q
TEL 13942296513 QQ 376315150 892498299
2.DANGER : Invisible laser radiation when open and inter
Q
lock failed or defeated. Avoid direct exposure to beam.
3.CAUTION : There are no serviceable parts inside the
Laser Unit. Do not disassemble the Laser Unit. Replace
the complete Laser Unit if it malfunctions.
4.CAUTION : The CD,MD and DVD player uses invisible
laser radiation and is equipped with safety switches which
prevent emission of radiation when the drawer is open and
the safety interlocks have failed or are defeated. It is
dangerous to defeat the safety switches.
3
1
5
1
5
0
5.CAUTION : If safety switches malfunction, the laser is able
to function.
6.CAUTION : Use of controls, adjustments or performance of
procedures other than those specified here in may result in
hazardous radiation exposure.
8
4
2
9
Please use enough caution not to
see the beam directly or touch it
in case of an adjustment or operation
check.
9
8
2
9
9
TEL 13942296513 QQ 376315150 892498299
REPRODUCTION AND POSITION OF LABELS
TEL
13942296513
CLASS 1
LASER PRODUCT
WARNING LABEL
Q
Q
CAUTION : Visible and Invisible
laser radiation when open and
interlock failed or defeated.
AVOID DIRECT EXPOSURE TO
BEAM. (e)
3
6
7
3
ADVARSEL : Synlig og usynlig
laserstråling når maskinen er
åben eller interlocken fejeler.
Undgå direkte eksponering til
stråling. (d)
1
5
1
VARNING : Synlig och
osynling laserstrålning när
den öppnas och spärren är
urkopplad. Betrakta ej
strålen. (s)
5
0
4
2
9
8
VARO : Avattaessa ja suojalukitus
ohitettuna tai viallisena olet alttiina
näkyvälle ja näkymättömälle
lasersäteilylle. Vältä säteen
kohdistumista suoraan itseesi. (f)
9
8
2
9
9
w
w
w
.
xia
o
y
u
1
6
3
.
c
o
m
(No.MA220)1-5
Page 6
SECTION 2
SPECIFIC SERVICE INSTRUCTIONS
7
Q
Q
This service manual does not describe SPECIFIC SERVICE INSTRUCTIONS.
3
6
3
1
5
1
5
0
8
9
2
4
9
8
2
9
9
TEL 13942296513 QQ 376315150 892498299
TEL
13942296513
Q
Q
3
7
6
3
1
5
1
5
0
8
9
2
4
9
8
2
9
TEL 13942296513 QQ 376315150 892498299
9
w
w
1-6 (No.MA220)
w
.
xia
o
y
u
1
6
3
.
c
o
m
Page 7
7
Q
Q
3.1 Main body section
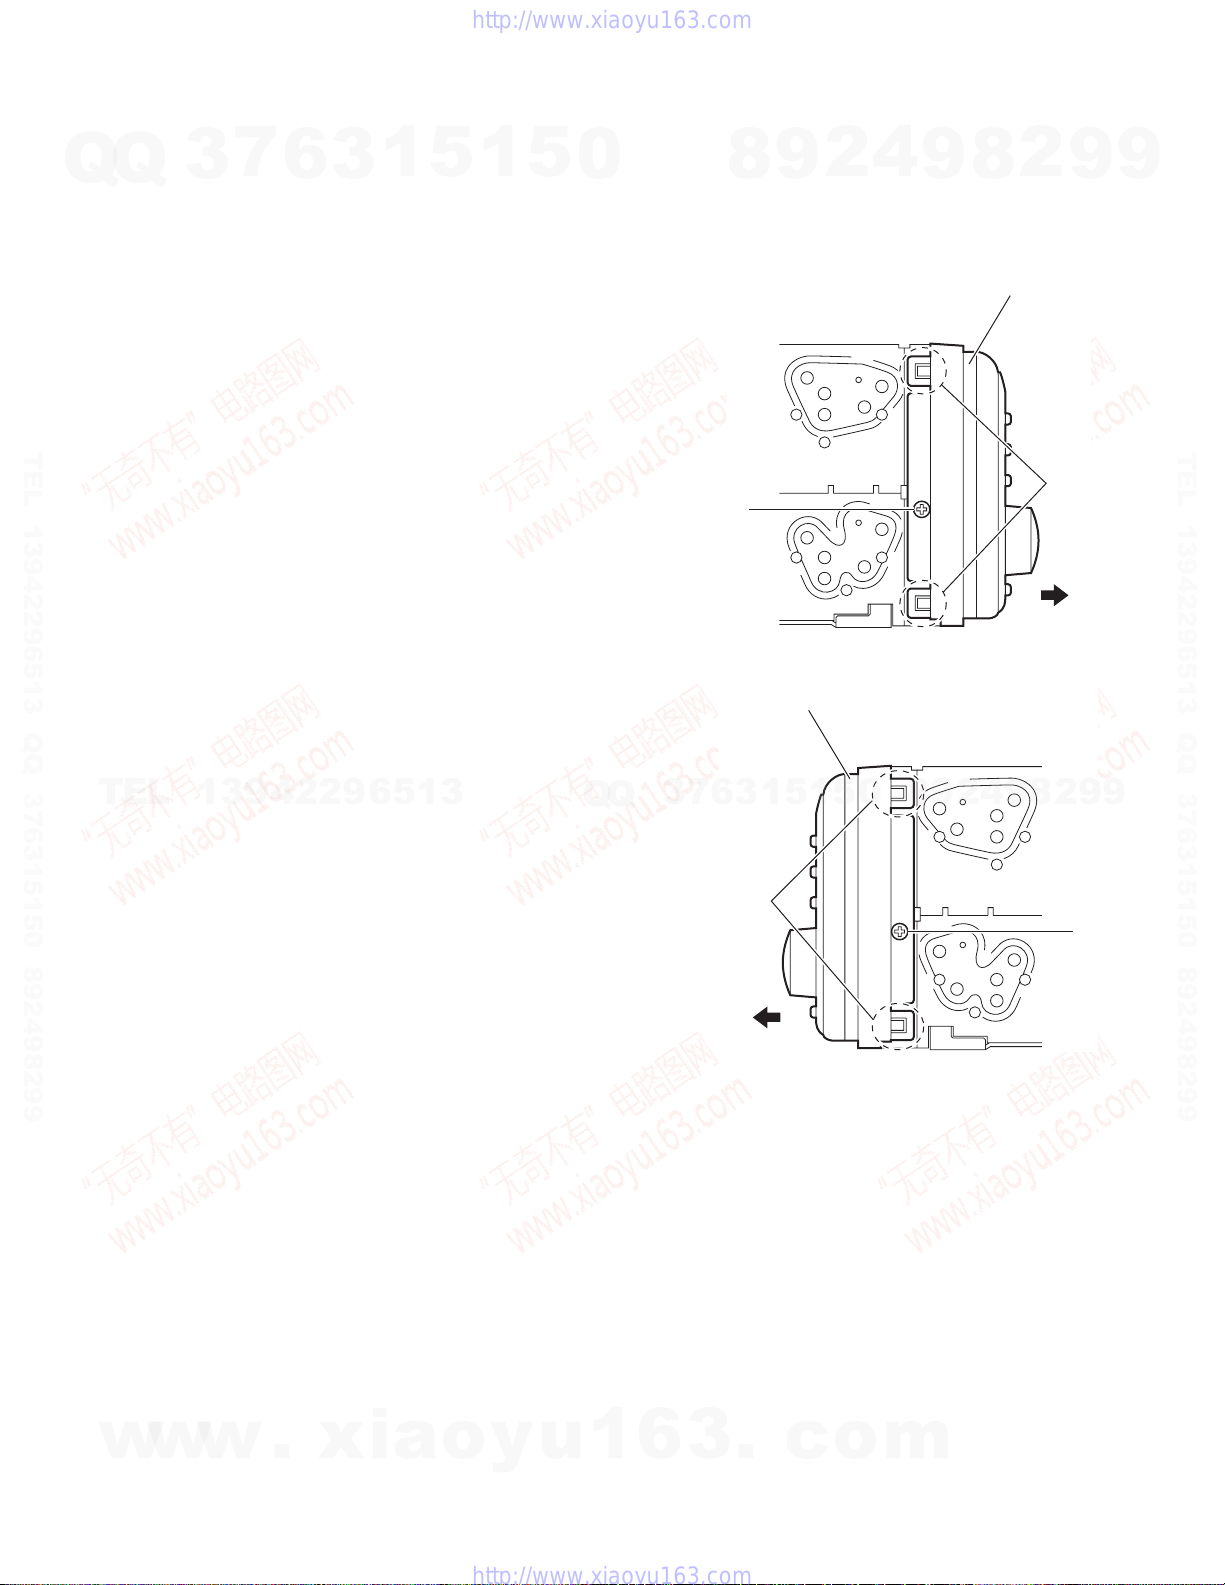
3.1.1 Removing the front panel assembly
3
(See Figs.1 and 2)
(1) From the both side of the main body, remove the two
screws A attaching the front panel assembly. (See Figs.1
and 2.)
(2) Release the four joints a and remove the front panel as-
sembly in the direction of the arrow. (See Figs.1 and 2.)
6
3
1
SECTION 3
DISASSEMBLY
5
1
5
0
8
9
2
4
8
9
Front panel assembly
2
9
9
TEL 13942296513 QQ 376315150 892498299
TEL
13942296513
Q
Q
3
7
A
Front panel assembly
5
1
5
1
3
6
a
0
Fig.1
8
9
2
4
9
8
a
2
9
A
TEL 13942296513 QQ 376315150 892498299
9
w
w
w
.
xia
o
y
u
1
6
3
.
c
o
Fig.2
m
(No.MA220)1-7
Page 8
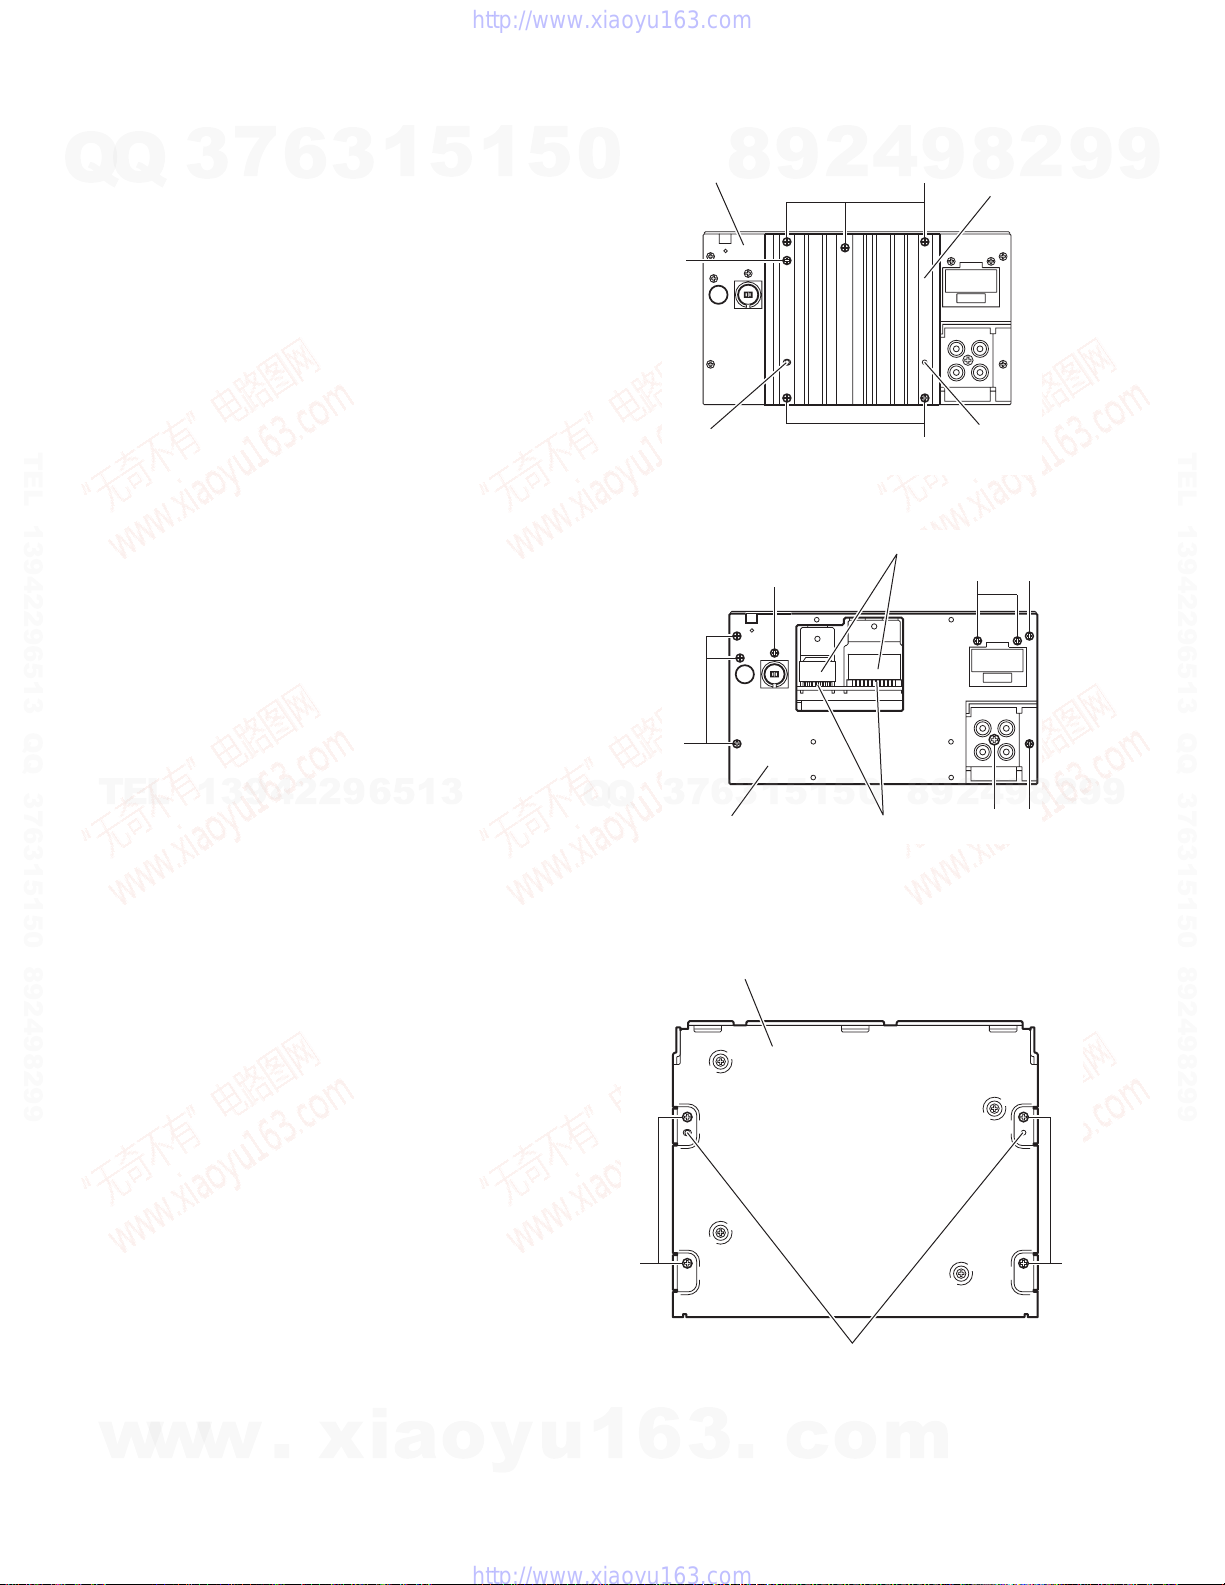
3.1.2 Removing the heat sink
(See Figs.3 and 4)
(1) From the back side of the main body, remove the six
screws B attaching the heat sink. (See Fig.3.)
Q
Q
(2) Remove the heat sink from the main body.
Note:
• Before attaching the heat sink, attach the cooling rubbers on
the power amplifier IC. (See Fig.4)
• When attaching the heat sink, set the projections b on the
rear bracket in the holes of the heat sink. (See Fig.3.)
3.1.3 Removing the rear bracket
(See Fig.4)
• Remove the heat sink.
(1) From the back side of the main body, remove the six
TEL 13942296513 QQ 376315150 892498299
screws C, two screws D and screw E attaching the rear
bracket.
(2) Remove the rear bracket from the main body.
3
7
6
3
1
5
1
5
0
Rear bracket
B
8
9
C
4
2
Fig.3
Cooling rubbers
9
B
B
2
8
Heat sink
bb
CD
9
9
TEL 13942296513 QQ 376315150 892498299
TEL
3.1.4 Removing the bottom chassis assembly
(See Fig.5)
• Remove the front panel assembly, heat sink and rear bracket.
(1) From the bottom side of the main body, remove the four
screws F attaching the bottom chassis assembly.
(2) Take out the bottom chassis assembly from the main body.
Reference:
When attaching the bottom chassis assembly, set the projections c of the main body in the holes of the bottom chassis assembly.
13942296513
Q
C
3
6
7
3
Q
Rear bracket
Bottom chassis assembly
5
1
5
1
Power amplifier IC
Fig.4
0
8
9
2
4
E
9
C
8
2
9
9
FF
w
w
1-8 (No.MA220)
w
.
xia
o
y
u
1
6
3
.
c
c
Fig.5
o
m
Page 9
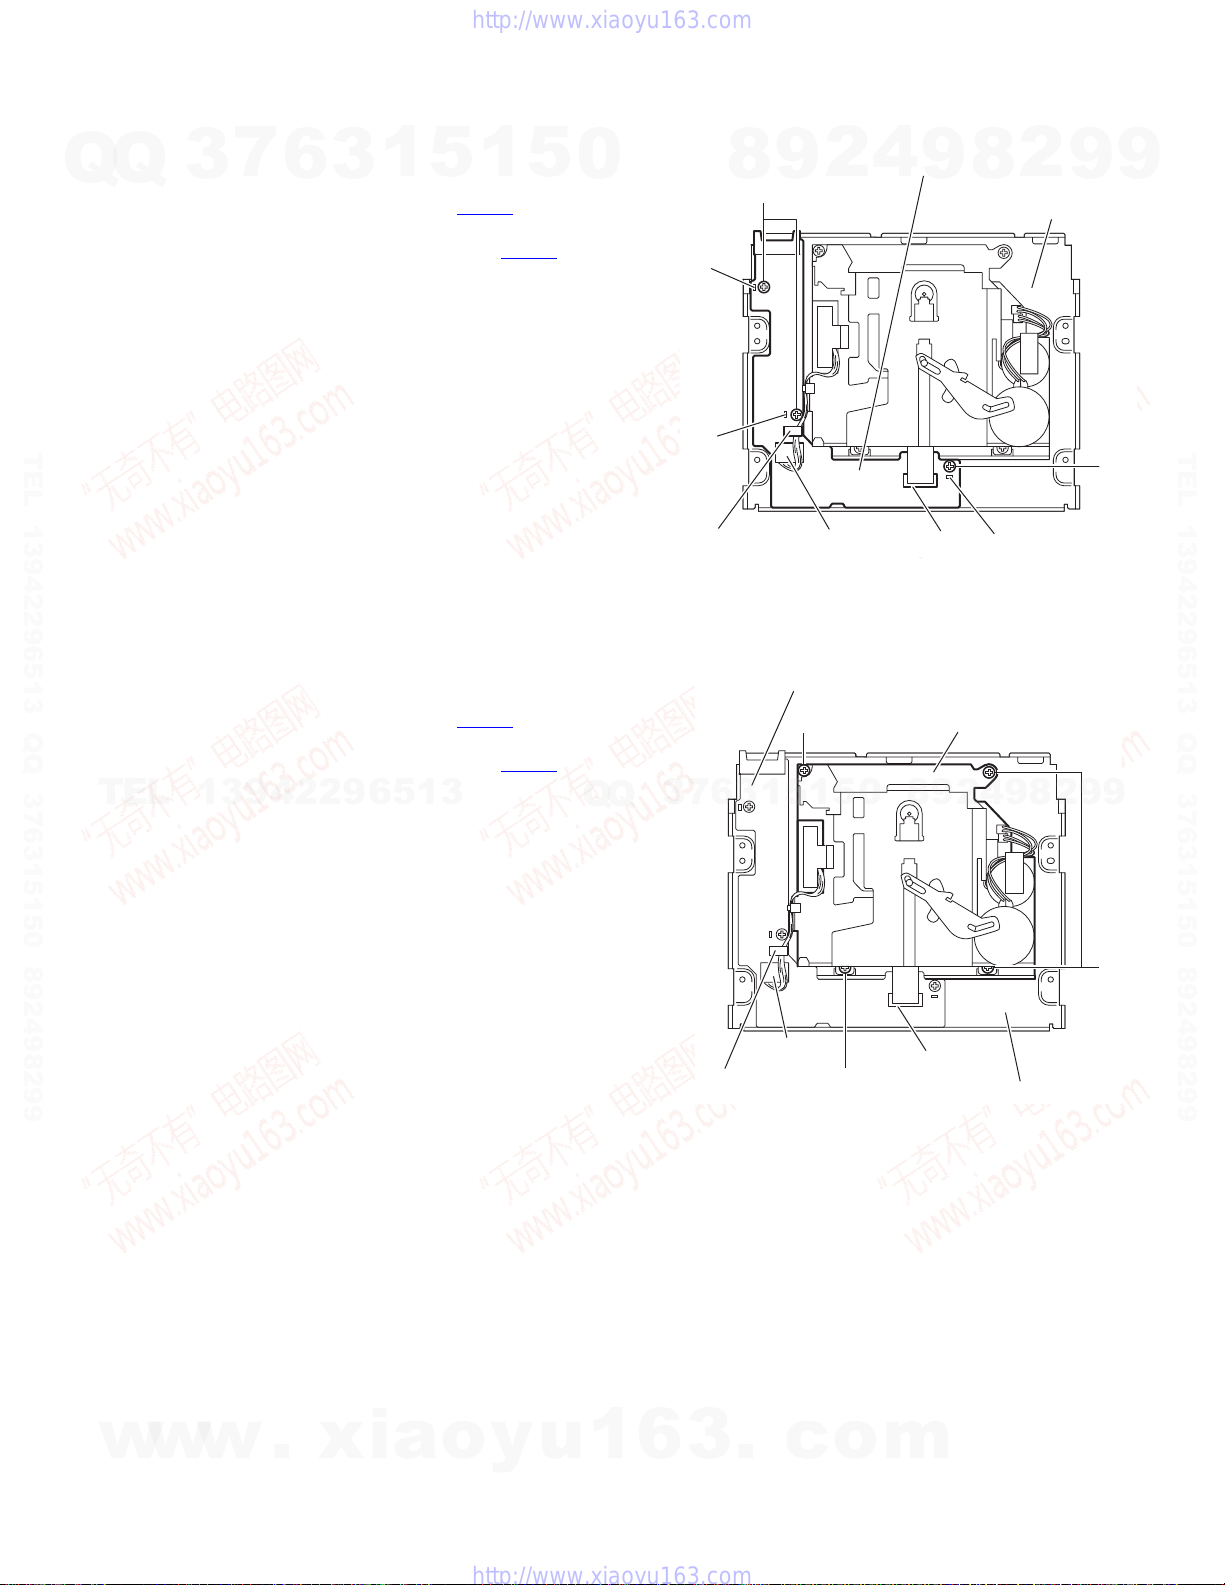
3.1.5 Removing the mechanism control board
(See Fig.6)
• Remove the front panel assembly, heat sink, rear bracket and
Q
TEL 13942296513 QQ 376315150 892498299
bottom chassis assembly.
Q
(1) From the inside of the bottom chassis assembly, discon-
nect the card wire from the connector CN403
anism control board.
(2) Disconnect the wire from the connector CN402
mechanism control board.
(3) Remove the three screws G attaching the mechanism con-
trol board.
(4) Take out the mechanism control board from the bottom
chassis assembly.
Reference:
• When attaching the mechanism control board, set the projections d of the bottom chassis assembly in the holes of the
mechanism control board.
• After attaching the mechanism control board, fix the wire
with the wire clamp as before.
3
7
6
3
1
5
1
5
on the mech-
0
on the
d
d
8
G
Mechanism control board
4
2
9
2
8
9
Bottom chassis assembly
9
9
TEL 13942296513 QQ 376315150 892498299
G
3.1.6 Removing the cassette mechanism assembly
(See Fig.7)
• Remove the front panel assembly, heat sink, rear bracket and
bottom chassis assembly.
(1) From the inside of the bottom chassis assembly, discon-
nect the card wire from the connector CN403
anism board.
(2) Disconnect the wire from the connector CN402 on the
TEL
mechanism board.
(3) Remove the four screws H attaching the cassette mecha-
Reference:
After attaching the mechanism board, fix the wire with the wire
clamp as before.
13942296513
nism assembly.
on the mech-
Q
Q
Wire clamp
Mechanism control board
H
5
1
3
6
7
3
CN402
Wire clamp
CN403CN402
Fig.6
Cassette mechanism assembly
9
8
0
5
1
CN403
H
Bottom chassis assembly
2
d
4
9
8
2
9
9
H
w
w
w
.
xia
o
y
u
1
6
3
.
c
o
Fig.7
m
(No.MA220)1-9
Page 10
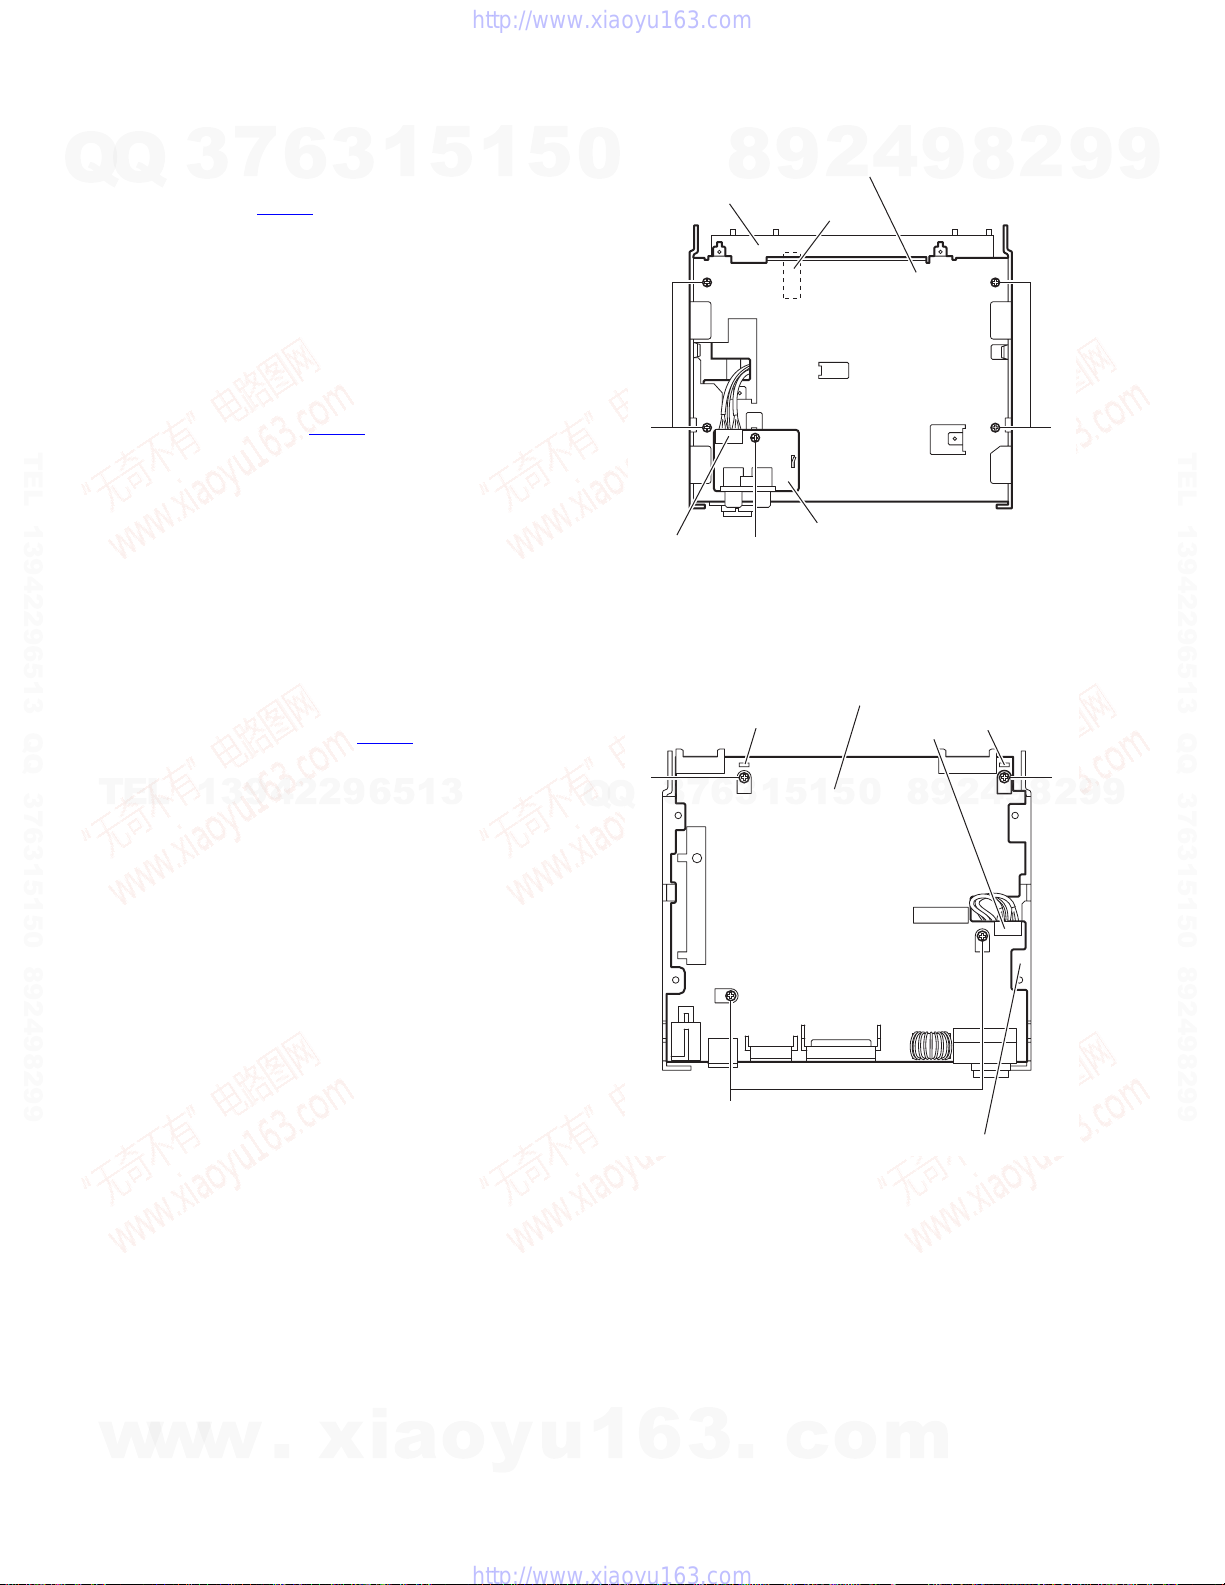
3.1.7 Removing the func board
(See Fig.8)
• Remove the front panel assembly, heat sink, rear bracket and
bottom chassis assembly.
Q
Q
(1) From the bottom side of the main body, disconnect the wire
from the connector CN321
(2) Remove the screw J and take out the func board from the
main body.
3.1.8 Removing the middle chassis assembly
(See Fig.8)
• Remove the front panel assembly, heat sink, rear bracket and
bottom chassis assembly.
(1) From the bottom side of the main body, remove the four
screws K attaching the middle chassis assembly.
(2) Disconnect the connector CN705
TEL 13942296513 QQ 376315150 892498299
middle chassis assembly from the CD mechanism assembly in an upward direction.
3
7
6
on the func board.
1
3
of the main board on the
5
1
5
0
KK
8
Main board
Middle chassis assembly
9
CN705
2
4
9
8
2
9
9
TEL 13942296513 QQ 376315150 892498299
3.1.9 Removing the main board
(See Fig.9)
• Remove the front panel assembly, heat sink, rear bracket, bot-
tom chassis assembly and middle chassis assembly.
(1) From the top side of the middle chassis assembly, discon-
nect the wire from the connector CN323
(2) Remove the four screws M attaching the main board on the
middle chassis.
TEL
(3) Remove the main board from the middle chassis.
Reference:
When attaching the main board, set the projections e of the
middle chassis in the holes of the main board.
13942296513
on the main board.
Q
Q
M
CN321
3
7
6
3
J
e
1
Func board
Fig.8
Main board
5
1
5
0
CN323
9
8
2
e
4
9
8
M
2
9
9
w
w
1-10 (No.MA220)
w
.
xia
o
y
u
1
6
3
M
.
c
Fig.9
o
Middle chassis
m
Page 11
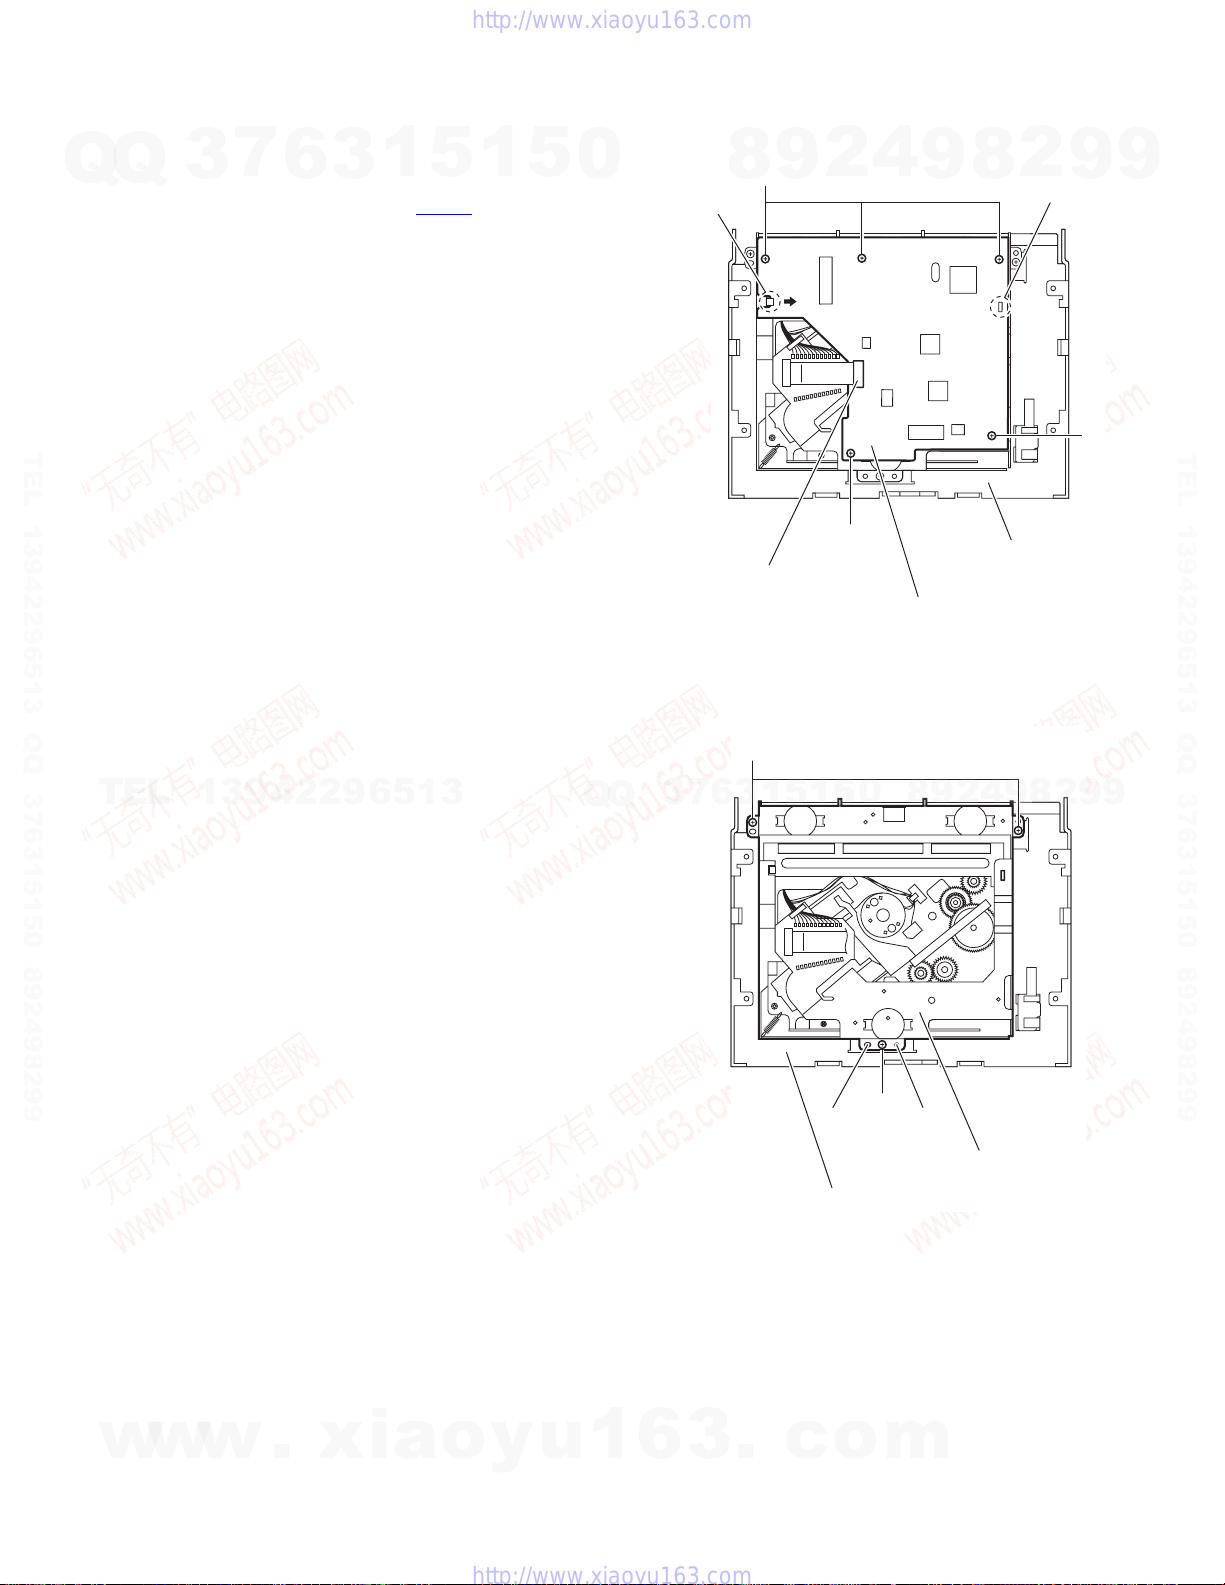
3.1.10 Removing the mechanism board
(See Fig.10)
• Remove the front panel assembly, heat sink, rear bracket, bot-
Q
tom chassis assembly and middle chassis assembly.
Q
(1) From the inside of the top chassis assembly, disconnect
the card wire from the connector CN601
board.
(2) Remove the five screws N attaching the mechanism board.
(3) Lift the mechanism board to remove the joint f and remove
the joint g in the direction of the arrow.
3
7
6
3
1
5
1
on the mechanism
5
0
8
g
N
9
2
4
9
8
2
f
9
9
TEL 13942296513 QQ 376315150 892498299
3.1.11 Removing the CD mechanism assembly
(See Fig.11)
• Remove the front panel assembly, heat sink, rear bracket, bot-
tom chassis assembly, middle chassis assembly and mechanism board.
(1) From the inside of the top chassis assembly, remove the
TEL
(2) Take out the CD mechanism assembly from the top chas-
Reference:
When attaching the CD mechanism assembly, set the projections h of the top chassis assembly in the holes of the CD
mechanism assembly.
13942296513
three screws P attaching the CD mechanism assembly.
sis.
Q
Q
3
7
6
CN601
P
1
3
5
N
Mechanism board
Fig.10
0
5
1
Top chassis assembly
8
9
4
2
9
8
2
N
9
TEL 13942296513 QQ 376315150 892498299
9
w
w
w
.
xia
o
y
u
1
6
3
h h
Top chassis assembly
.
c
o
P
CD mechanism assembly
Fig.11
m
(No.MA220)1-11
Page 12
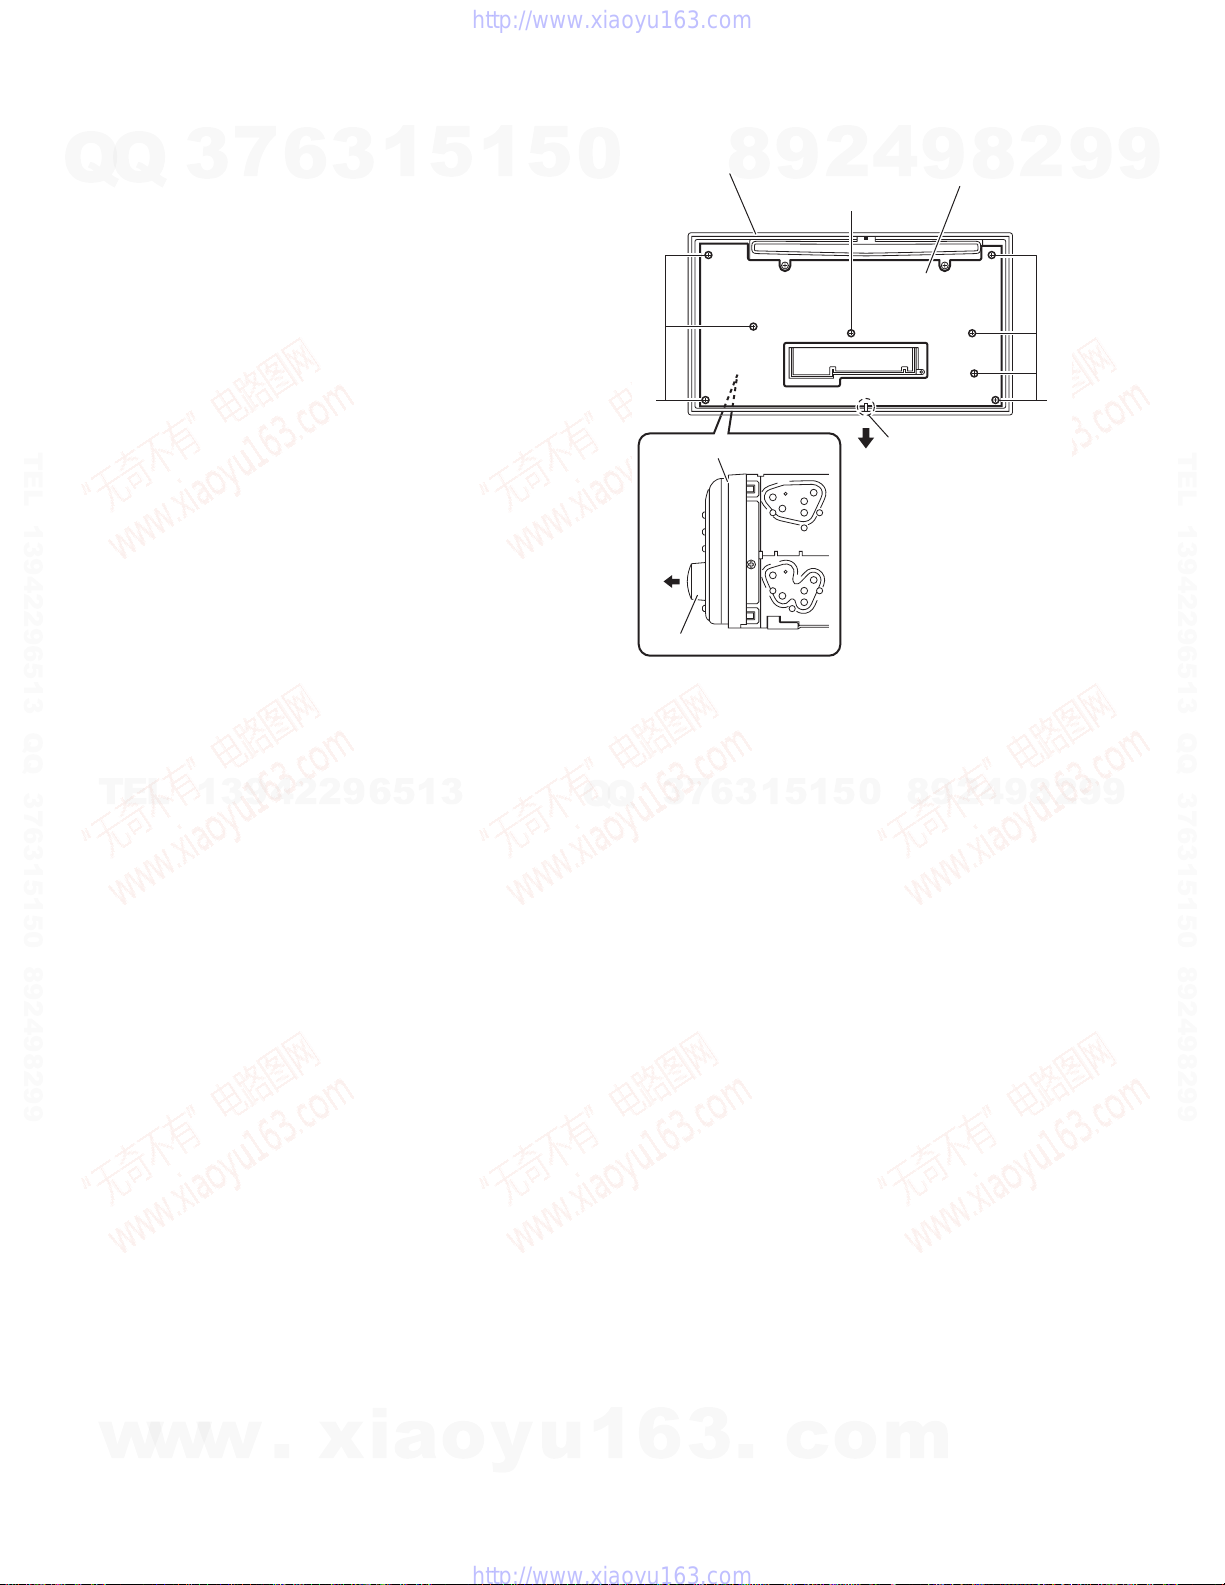
3.1.12 Removing the switch board
(See Fig.12)
• Remove the front panel assembly.
(1) From the inside of front panel assembly, remove the eight
Q
Q
screws Q attaching the switch board.
(2) Remove the volume knob from the front side of the front
panel assembly in the direction of the arrow while lifiting the
switch board little by little.
(3) Release the sections j while extending the lower section of
the front panel assembly in the direction of the arrow and
take out the switch board.
3
7
6
3
1
5
1
5
0
Front panel assembly
QQ
8
9
2
Q
4
Switch board
9
8
2
9
9
TEL 13942296513 QQ 376315150 892498299
TEL
13942296513
Q
Front panel assembly
Volume knob
7
3
Q
6
3
1
5
1
Fig.12
0
5
j
9
9
2
8
9
4
2
9
8
TEL 13942296513 QQ 376315150 892498299
w
w
1-12 (No.MA220)
w
.
xia
o
y
u
1
6
3
.
c
o
m
Page 13
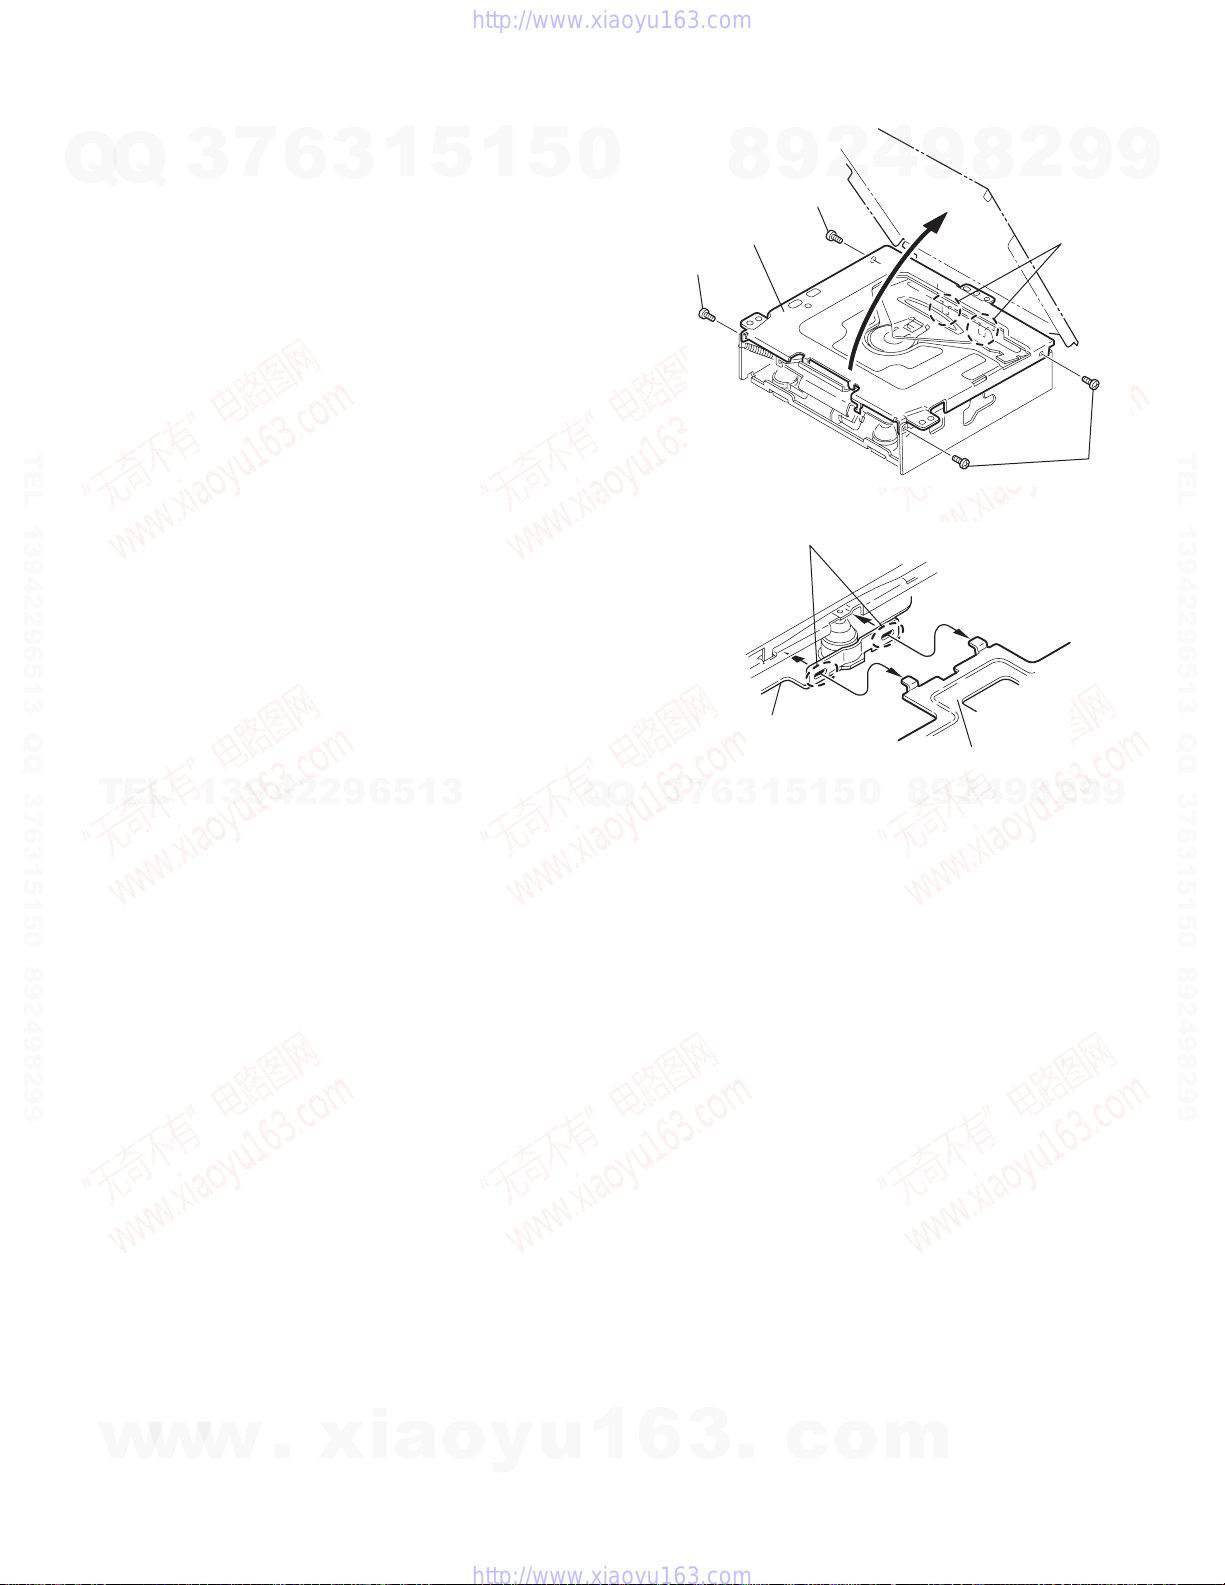
3.2 CD Mechanism section
A
3.2.1 Removing the top cover
(See Figs.1 and 2)
Q
(1) Remove the four screws A on the both side of the body.
Q
(2) Lift the front side of the top cover and move the top cover
backward to release the two joints a.
3
7
6
3
1
5
1
5
0
9
8
Top cover
A
2
4
9
8
2
9
Joints a
9
TEL 13942296513 QQ 376315150 892498299
TEL
13942296513
Q
Q
3
7
6
3
Joints a
5
1
1
5
0
Fig.1
Fig.2
8
Top cover
2
9
4
9
8
2
9
TEL 13942296513 QQ 376315150 892498299
A
9
w
w
w
.
xia
o
y
u
1
6
3
.
c
o
m
(No.MA220)1-13
Page 14
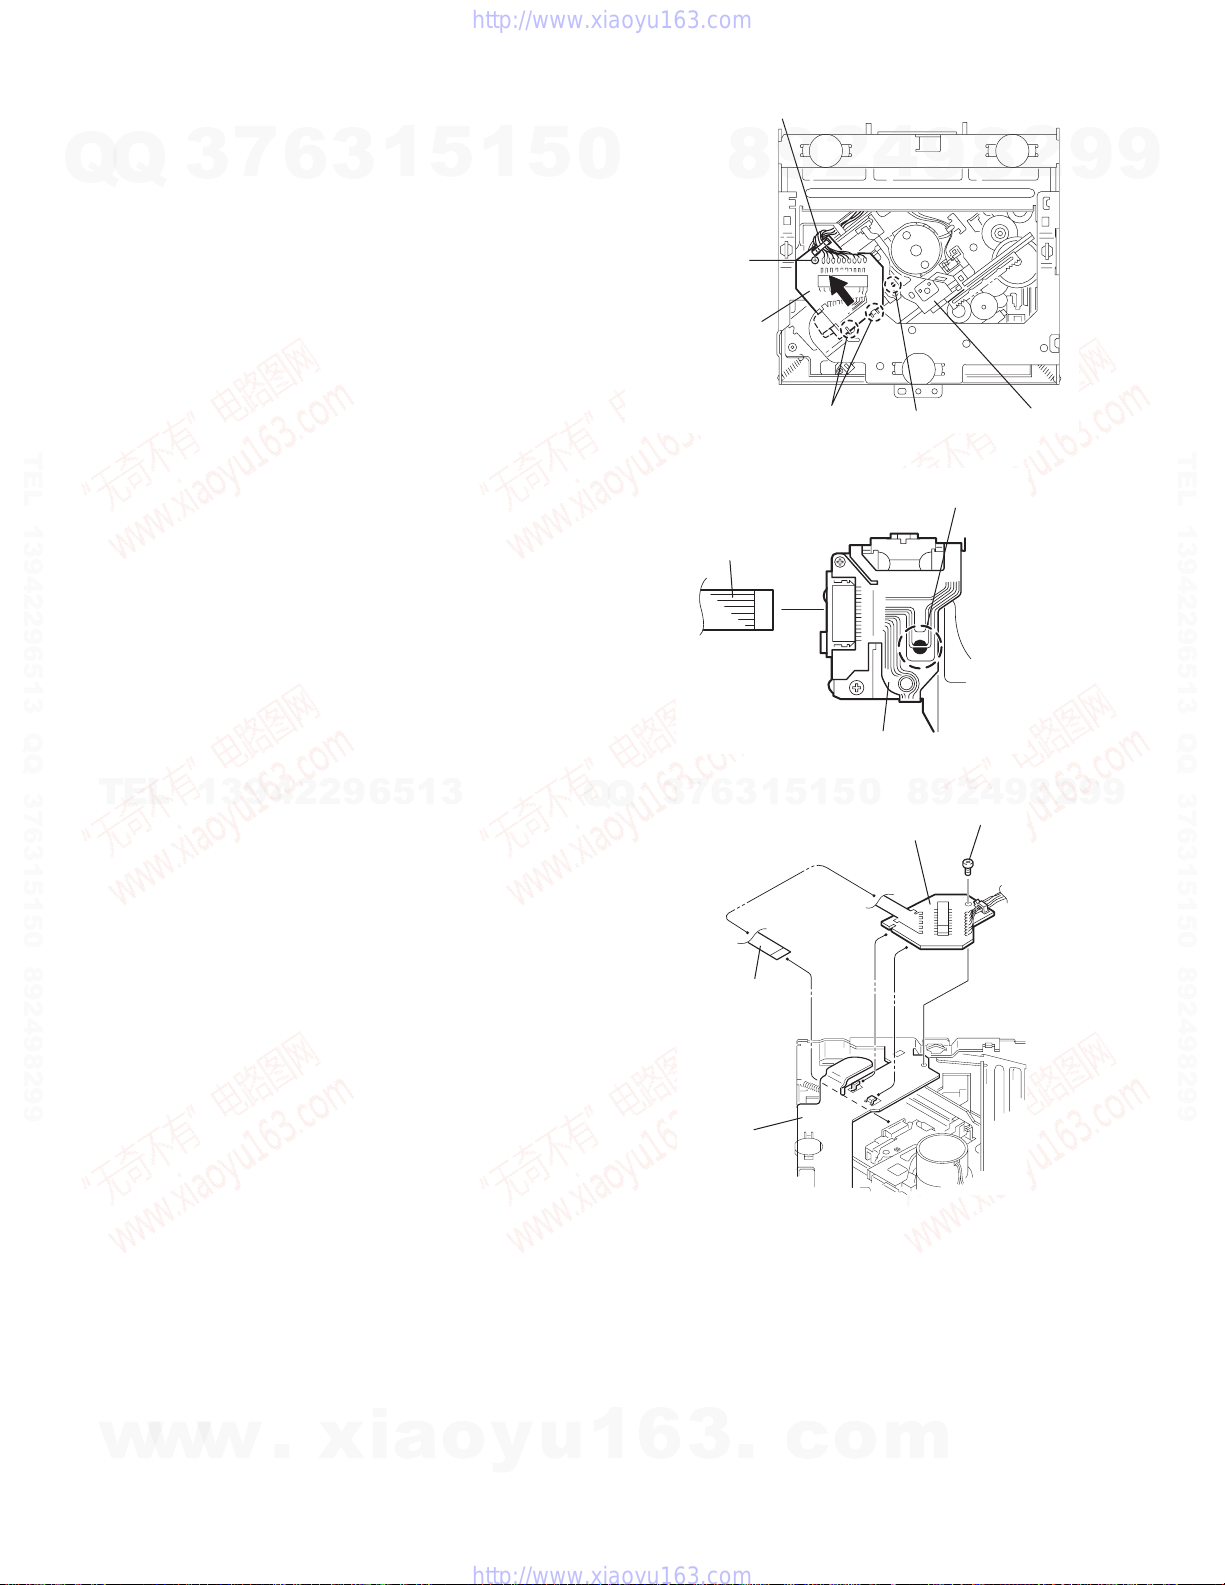
3.2.2 Removing the connector board
(See Figs.3 to 5)
CAUTION:
Before disconnecting the flexible wire from the pickup, solder
Q
Q
the short-circuit point on the pickup. No observance of this instruction may cause damage of the pickup.
(1) Remove the screw B fixing the connector board.
(2) Solder the short-circuit point on the pickup.
(3) Disconnect the flexible wire from the pickup.
(4) Move the connector board in the direction of the arrow to
release the two joints b.
(5) Unsolder the wires on the connector board if necessary.
CAUTION:
Unsolder the short-circuit point after reassembling.
TEL 13942296513 QQ 376315150 892498299
3
7
6
3
1
5
1
5
0
Connector board
Flexible wire
Wires
8
B
9
Joints b
4
2
Short-circuit point
Fig.3
Short-circuit point
8
9
(Soldering)
2
Pickup
9
9
TEL 13942296513 QQ 376315150 892498299
TEL
13942296513
Q
Q
6
7
3
Flexible wire
Frame
3
1
5
1
Connector board
Pickup
Fig.4
5
Fig.5
0
8
9
2
4
B
9
8
2
9
9
w
w
1-14 (No.MA220)
w
.
xia
o
y
u
1
6
3
.
c
o
m
Page 15
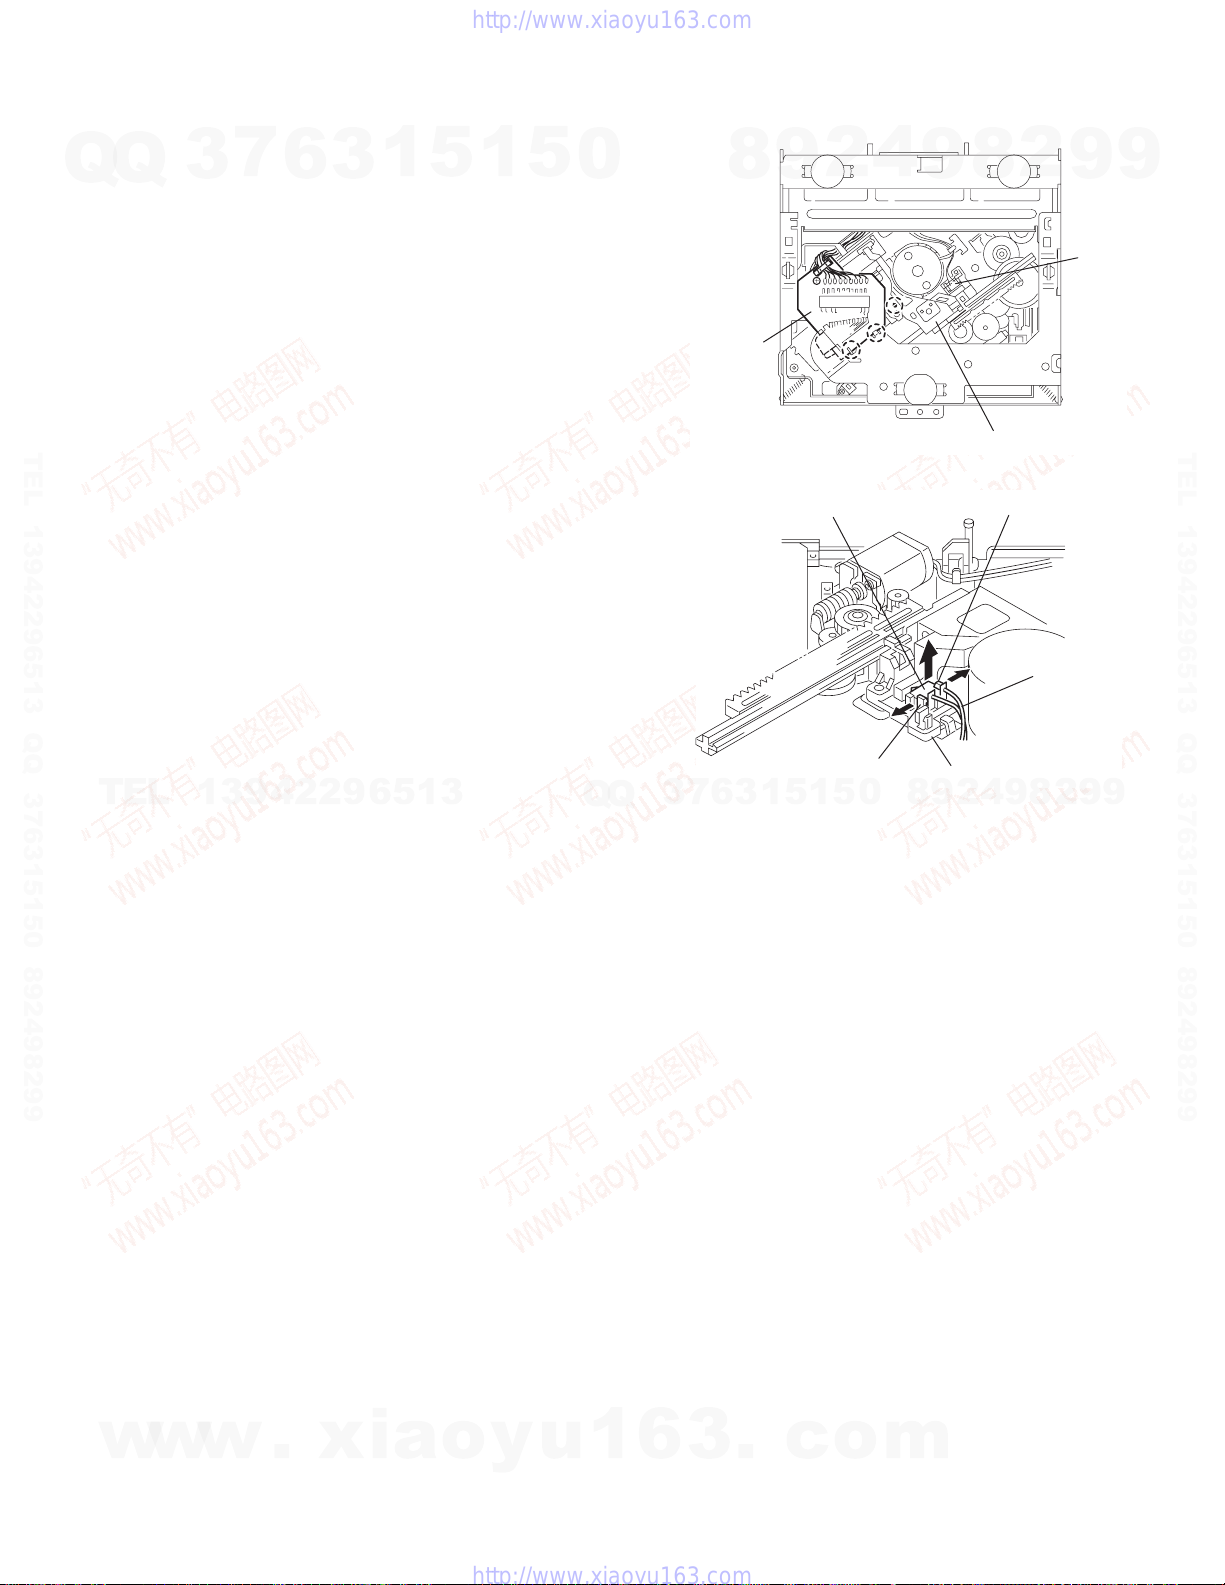
3.2.3 Removing the DET switch
(See Figs.6 and 7)
(1) Extend the two tabs c of the feed sw. holder and pull out
Q
the switch.
Q
(2) Unsolder the DET switch wire if necessary.
3
7
6
3
1
5
1
5
0
8
Connector
board
9
2
4
9
8
2
9
DET
switch
9
TEL 13942296513 QQ 376315150 892498299
TEL
13942296513
Q
Q
3
7
6
3
1
DET switch
5
1
5
Tab c
0
Fig.6
Feed sw. holder
9
8
Fig.7
Pickup
Tab c
DET switch wire
8
9
4
2
2
9
TEL 13942296513 QQ 376315150 892498299
9
w
w
w
.
xia
o
y
u
1
6
3
.
c
o
m
(No.MA220)1-15
Page 16
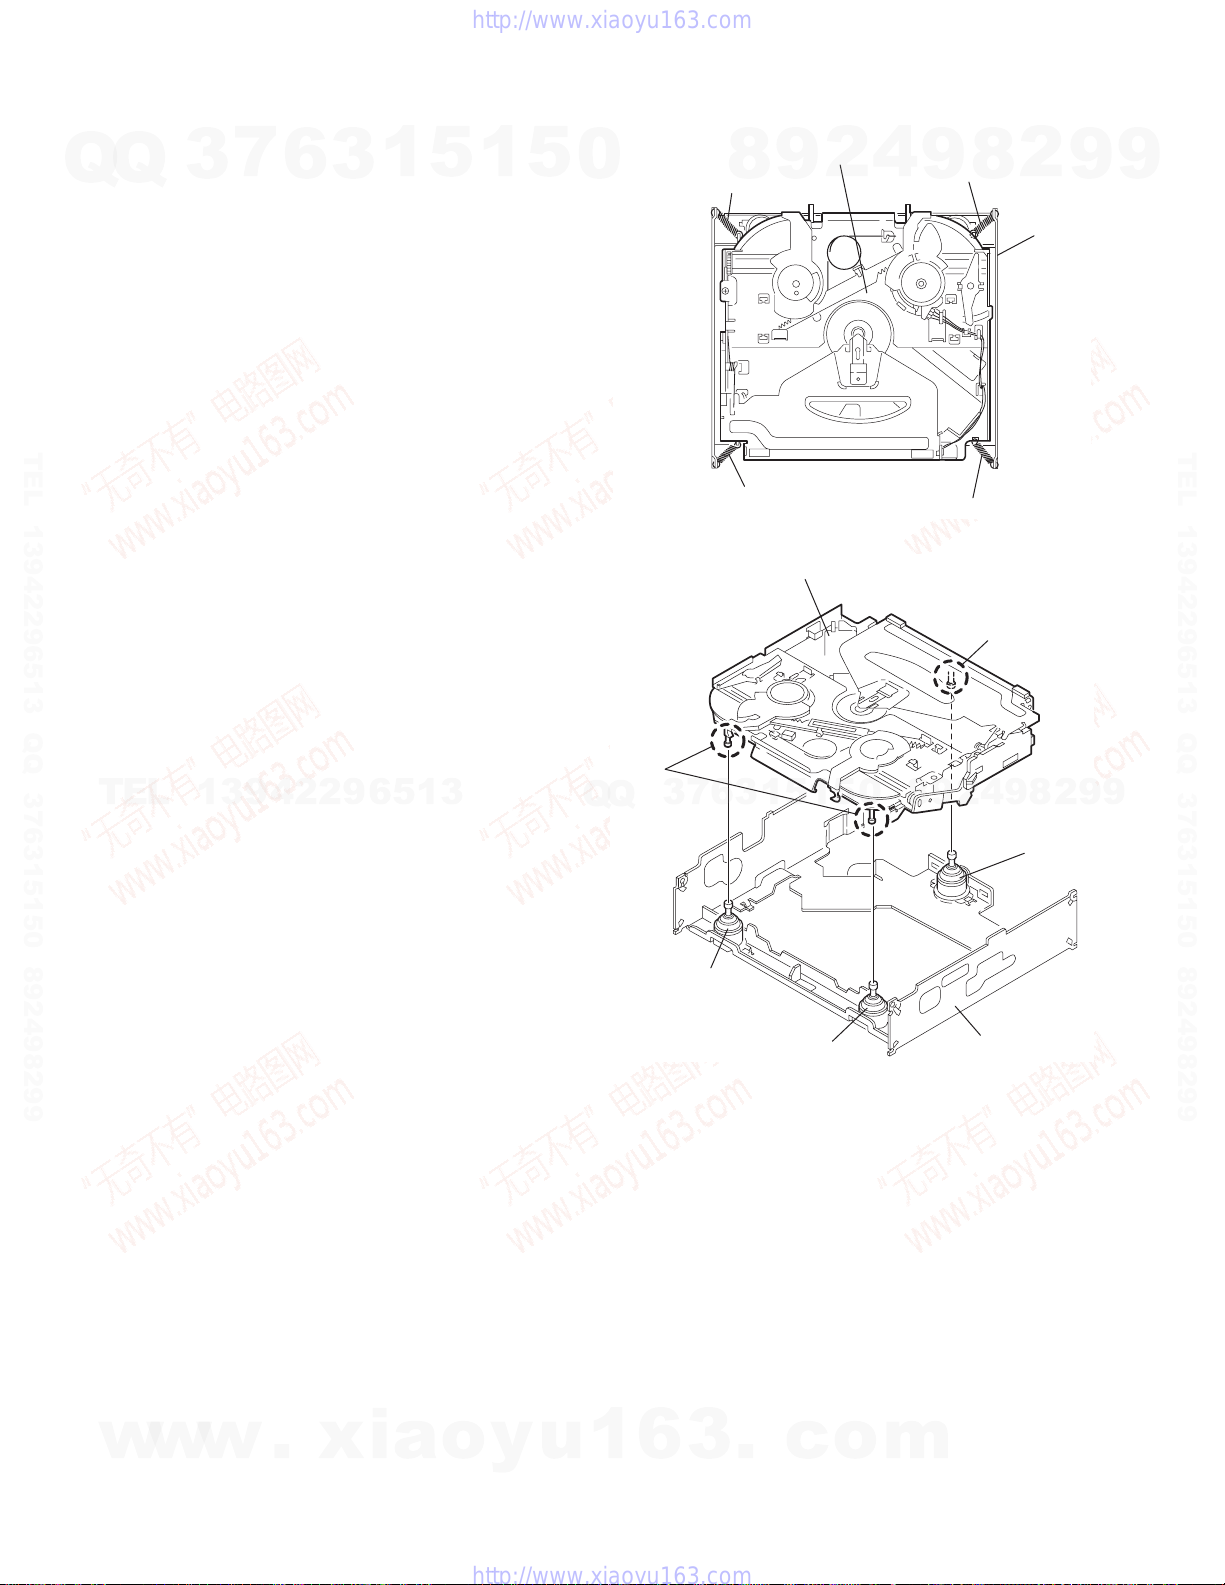
r
3.2.4 Removing the chassis unit
(See Figs.8 and 9)
• Prior to performing the following procedure, remove the top
cover and connector board.
Q
Q
(1) Remove the two suspension springs (L) and (R) attaching
the chassis unit to the frame.
CAUTION:
• The shape of the suspension spring (L) and (R) are different. Handle them with care.
• When reassembling, make sure that the three shafts
on the underside of the chassis unit are inserted to the
dampers certainly.
3
7
6
3
1
5
1
5
0
Suspension spring (R)
8
Chassis unit
2
9
4
Suspension spring (L)
8
9
2
Frame
9
9
TEL 13942296513 QQ 376315150 892498299
Suspension spring (R)
Shafts
TEL
13942296513
Q
Q
7
3
Damper
Chassis unit
1
3
6
5
1
Fig.8
5
Suspension spring (L)
4
2
9
8
0
Shaft
9
2
8
Dampe
9
TEL 13942296513 QQ 376315150 892498299
9
w
w
1-16 (No.MA220)
w
.
xia
o
y
u
1
6
3
.
Damper
c
Fig.9
o
Frame
m
Page 17
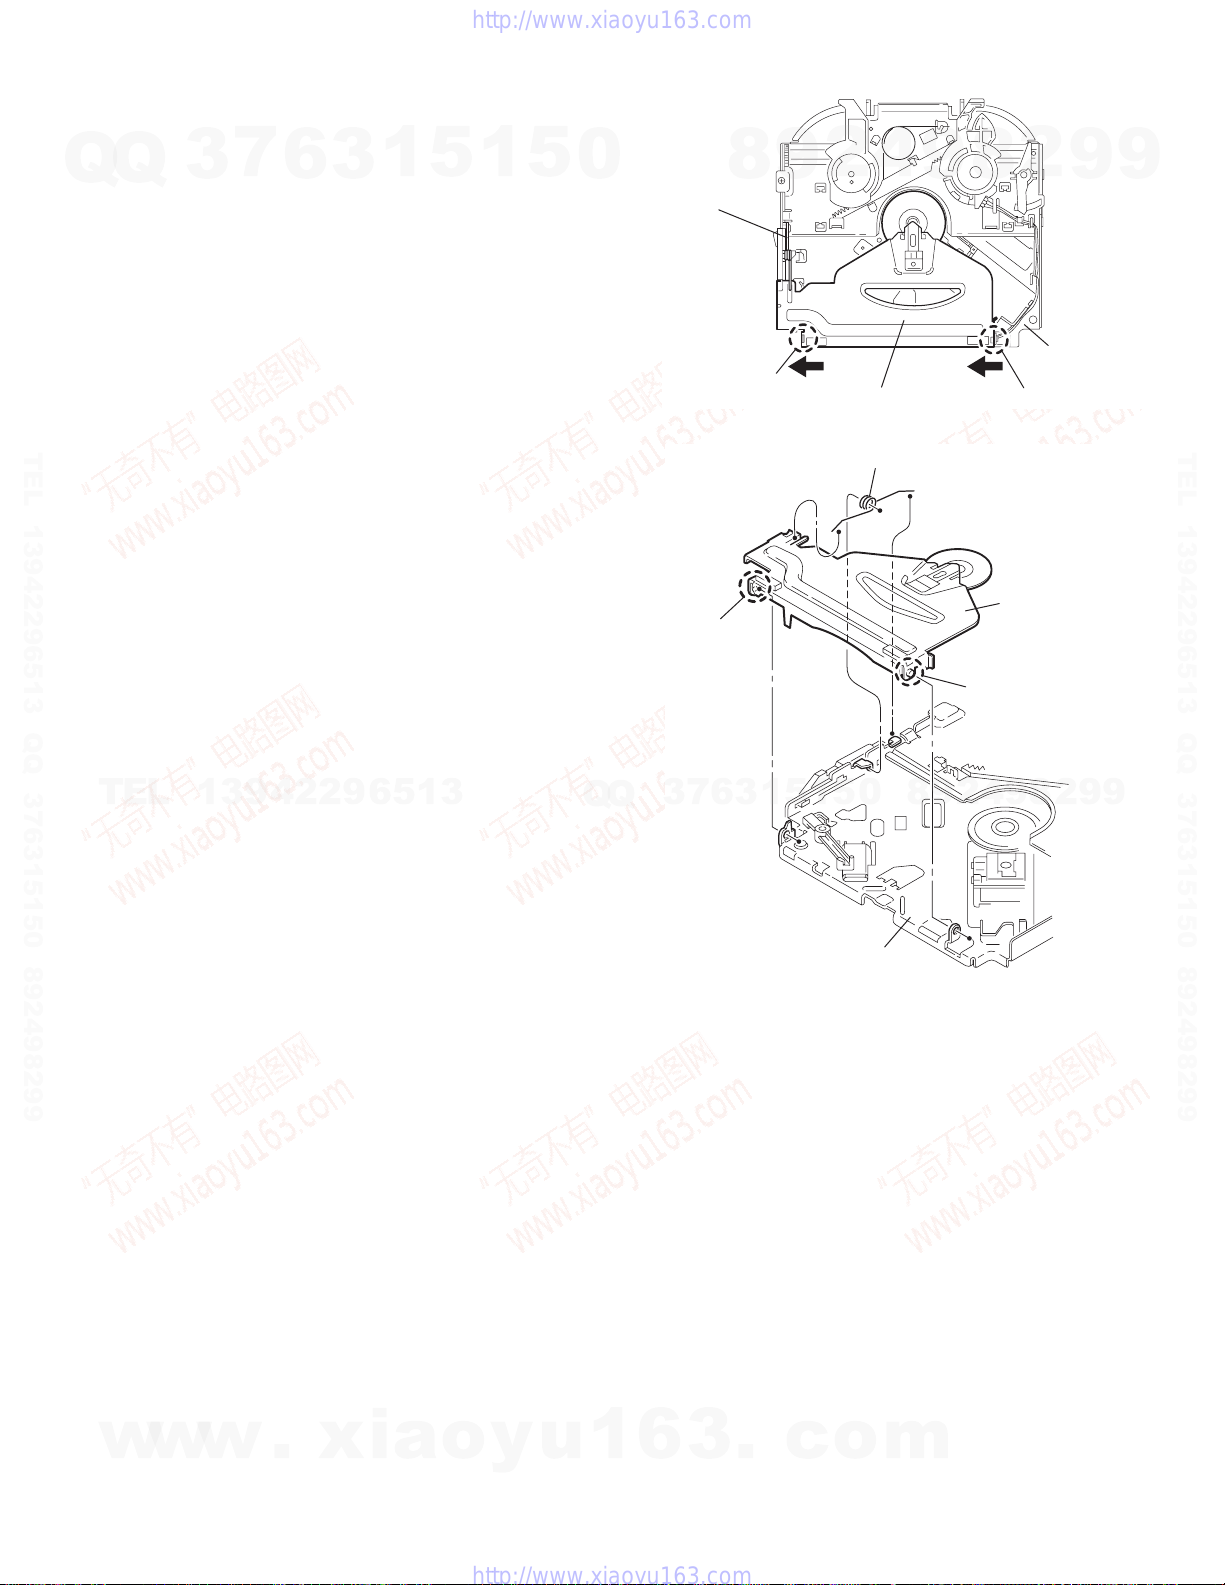
3.2.5 Removing the clamper assembly
(See Figs.10 and 11)
• Prior to performing the following procedure, remove the top
Q
TEL 13942296513 QQ 376315150 892498299
cover.
Q
(1) Remove the clamper arm spring.
(2) Move the clamper assembly in the direction of the arrow to
release the two joints d.
3
7
6
3
1
5
1
5
0
Clamper arm
spring
8
Joint d
4
2
9
Clamper assembly
Fig.10
Clamper arm spring
9
8
Joint d
2
9
Chassis rivet
assembly
9
TEL 13942296513 QQ 376315150 892498299
TEL
13942296513
Q
Q
Joint d
1
3
6
7
3
Chassis rivet assembly
5
1
5
0
8
Fig.11
9
Clamper assembly
Joint d
8
9
4
2
2
9
9
w
w
w
.
xia
o
y
u
1
6
3
.
c
o
m
(No.MA220)1-17
Page 18
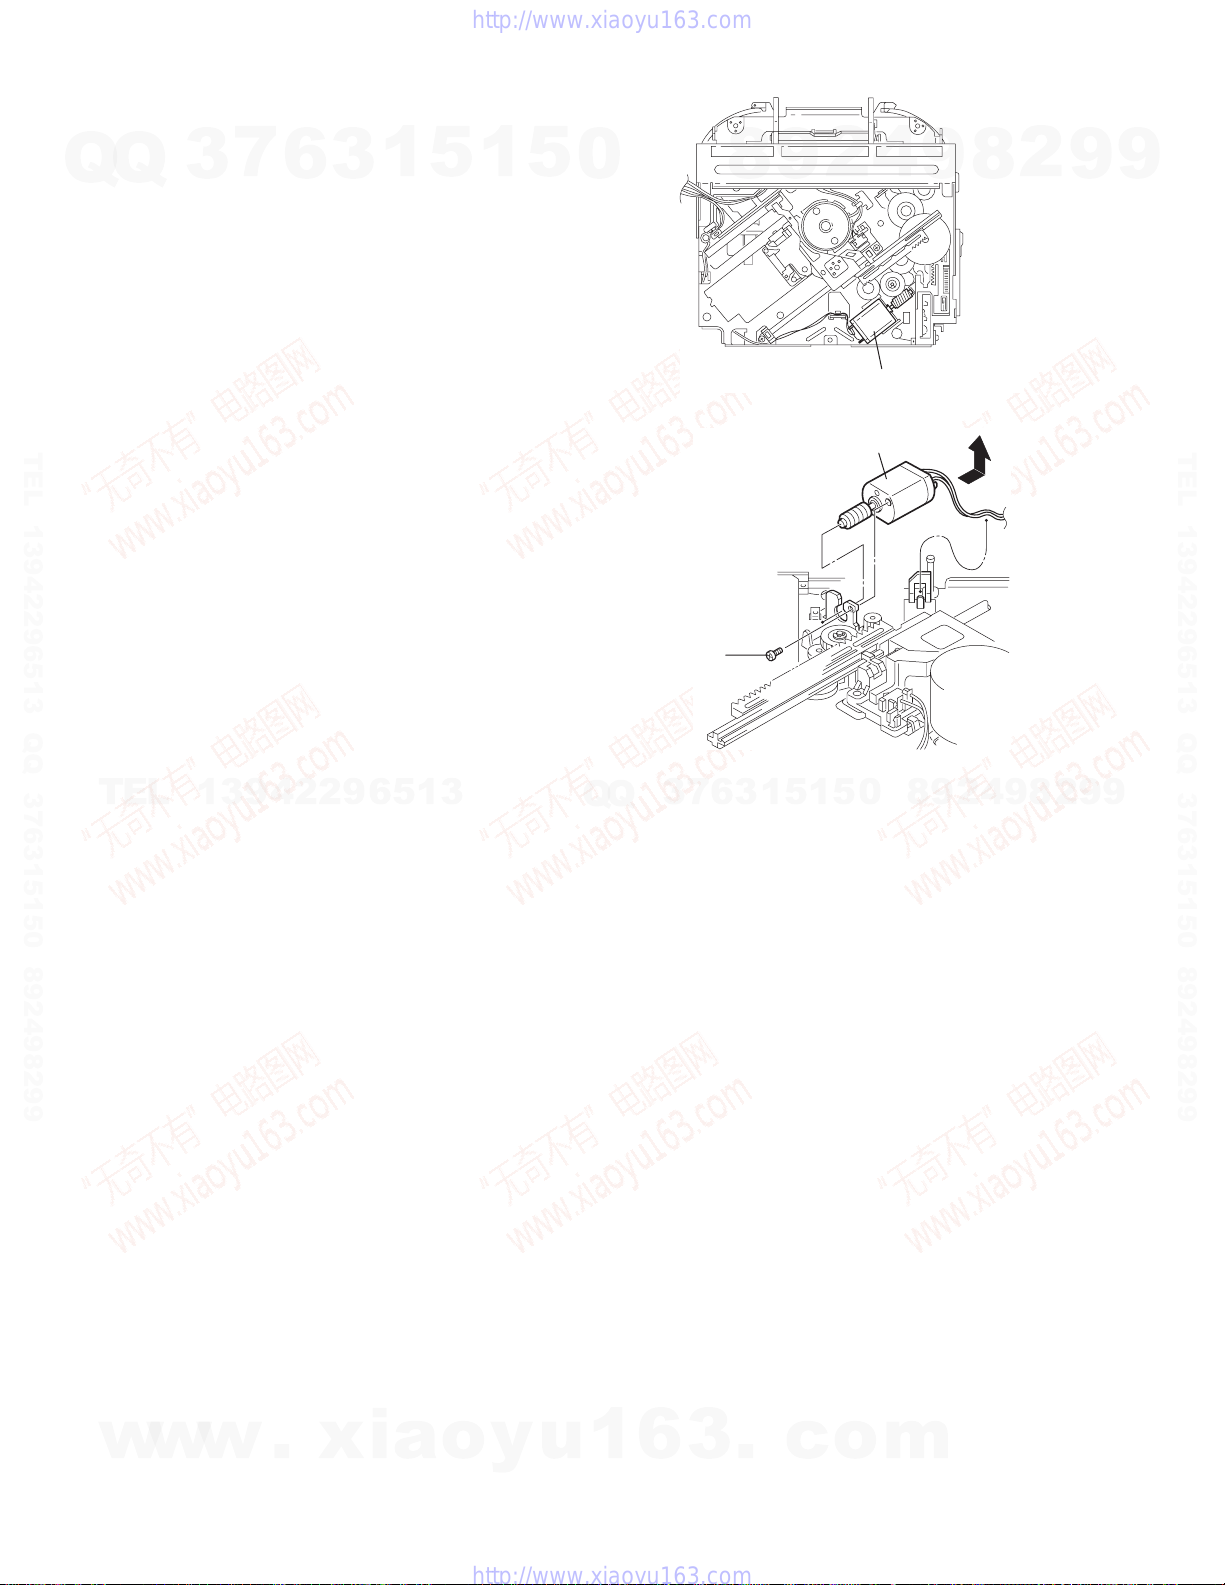
3.2.6 Removing the loading / feed motor assembly
(See Figs.12 and 13)
• Prior to performing the following procedure, remove the top
cover, connector board and chassis unit.
Q
Q
(1) Remove the screw C and move the loading / feed motor as-
sembly in the direction of the arrow to remove it from the
chassis rivet assembly.
(2) Disconnect the wire from the loading / feed motor assembly
if necessary.
CAUTION:
When reassembling, connect the wire from the loading /
feed motor assembly to the flame as shown in Fig.12.
3
7
6
3
1
5
1
5
0
4
2
9
8
Loading / feed motor assembly
Fig.12
9
8
2
9
9
TEL 13942296513 QQ 376315150 892498299
TEL
13942296513
Q
Q
3
7
Loading / feed motor assembly
C
Fig.13
8
0
5
1
5
1
3
6
9
2
4
9
8
2
9
TEL 13942296513 QQ 376315150 892498299
9
w
w
1-18 (No.MA220)
w
.
xia
o
y
u
1
6
3
.
c
o
m
Page 19
r
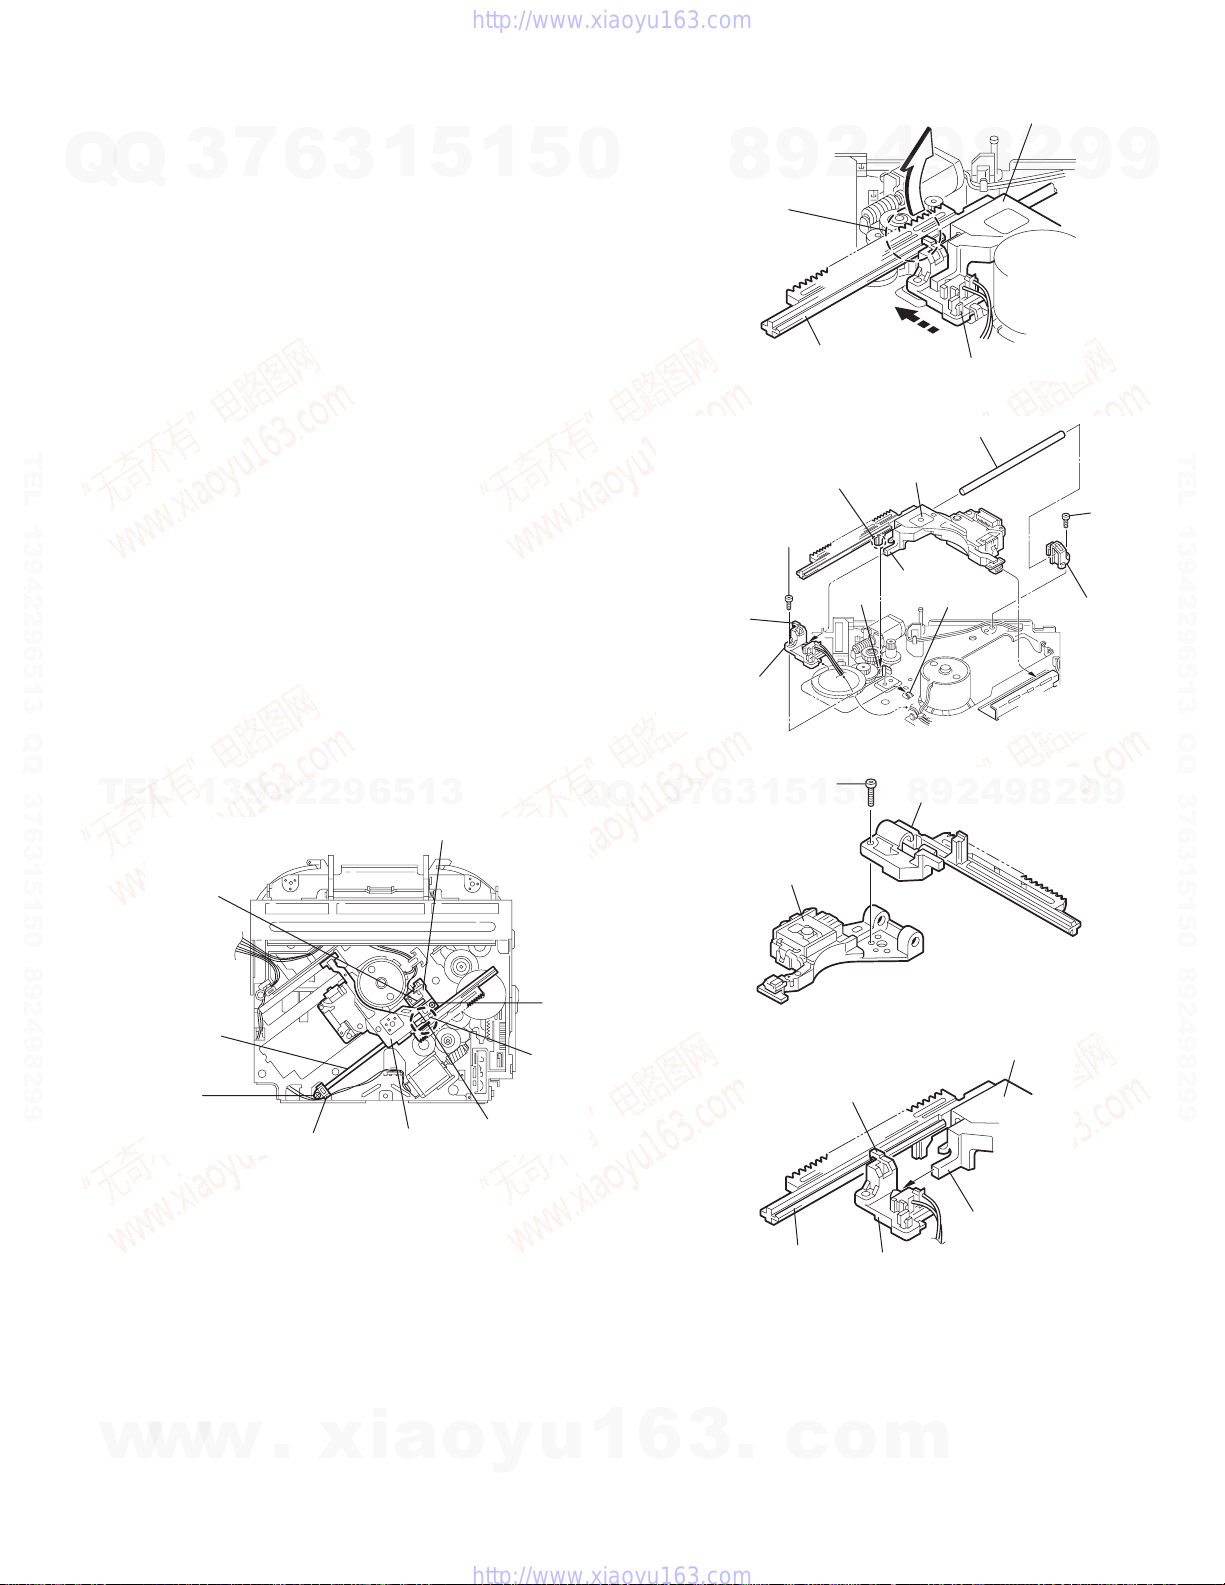
3.2.7 Removing the pickup unit
(See Figs.14 to 18)
• Prior to performing the following procedure, remove the top
Q
TEL 13942296513 QQ 376315150 892498299
cover, connector board and chassis unit.
Q
(1) Remove the screw D and pull out the pu. shaft holder from
the pu. shaft.
(2) Remove the screw E attaching the feed sw. holder.
(3) Move the part e of the pickup unit upward with the pu. shaft
and the feed sw. holder, then release the joint f of the feed
sw. holder in the direction of the arrow. The joint g of the
pickup unit and the feed rack is released, and the feed sw.
holder comes off.
(4) Remove the pu. shaft from the pickup unit.
(5) Remove the screw F attaching the feed rack to the pickup
unit.
3.2.8 Reattaching the pickup unit
(See Figs.14 to 17)
(1) Reattach the feed rack to the pickup unit using the screw F.
(2) Reattach the feed sw. holder to the feed rack while setting
the joint g to the slot of the feed rack and setting the joint f
of the feed rack to the switch of the feed sw. holder correctly.
(3) As the feed sw. holder is temporarily attached to the pickup
unit, set to the gear of the joint g and to the bending part of
the chassis (joint h) at a time.
CAUTION:
(4) Reattach the feed sw. holder using the screw E.
(5) Reattach the pu. shaft to the pickup unit. Reattach the pu.
TEL
shaft holder to the pu. shaft using the screw D.
7
3
Make sure that the part i on the underside of the feed
rack is certainly inserted to the slot j of the change lock
lever.
6
13942296513
1
3
Feed sw. holder
5
1
5
0
Q
Feed sw. holder
3
Q
7
Joint g
6
8
Part e
3
9
Feed rack
E
5
1
2
Part i
Slot j
F
5
1
4
9
Fig.15
Pickup unit
Joint f
Fig.16
Feed rack
8
0
Pickup unit
2
8
Feed sw. holder
Pu. shaft
Joint h
8
9
4
2
9
9
9
D
Pu. shaft holde
9
9
2
TEL 13942296513 QQ 376315150 892498299
Joint f
Pu. shaft
D
Pu. shaft holder
Pickup unit
Fig.14
Part e
E
Joint g
Pickup unit
Feed rack
Fig.17
Pickup unit
Joint g
Joint f
Feed sw. holder
Fig.18
w
w
w
.
xia
o
y
u
1
6
3
.
c
o
m
(No.MA220)1-19
Page 20
r
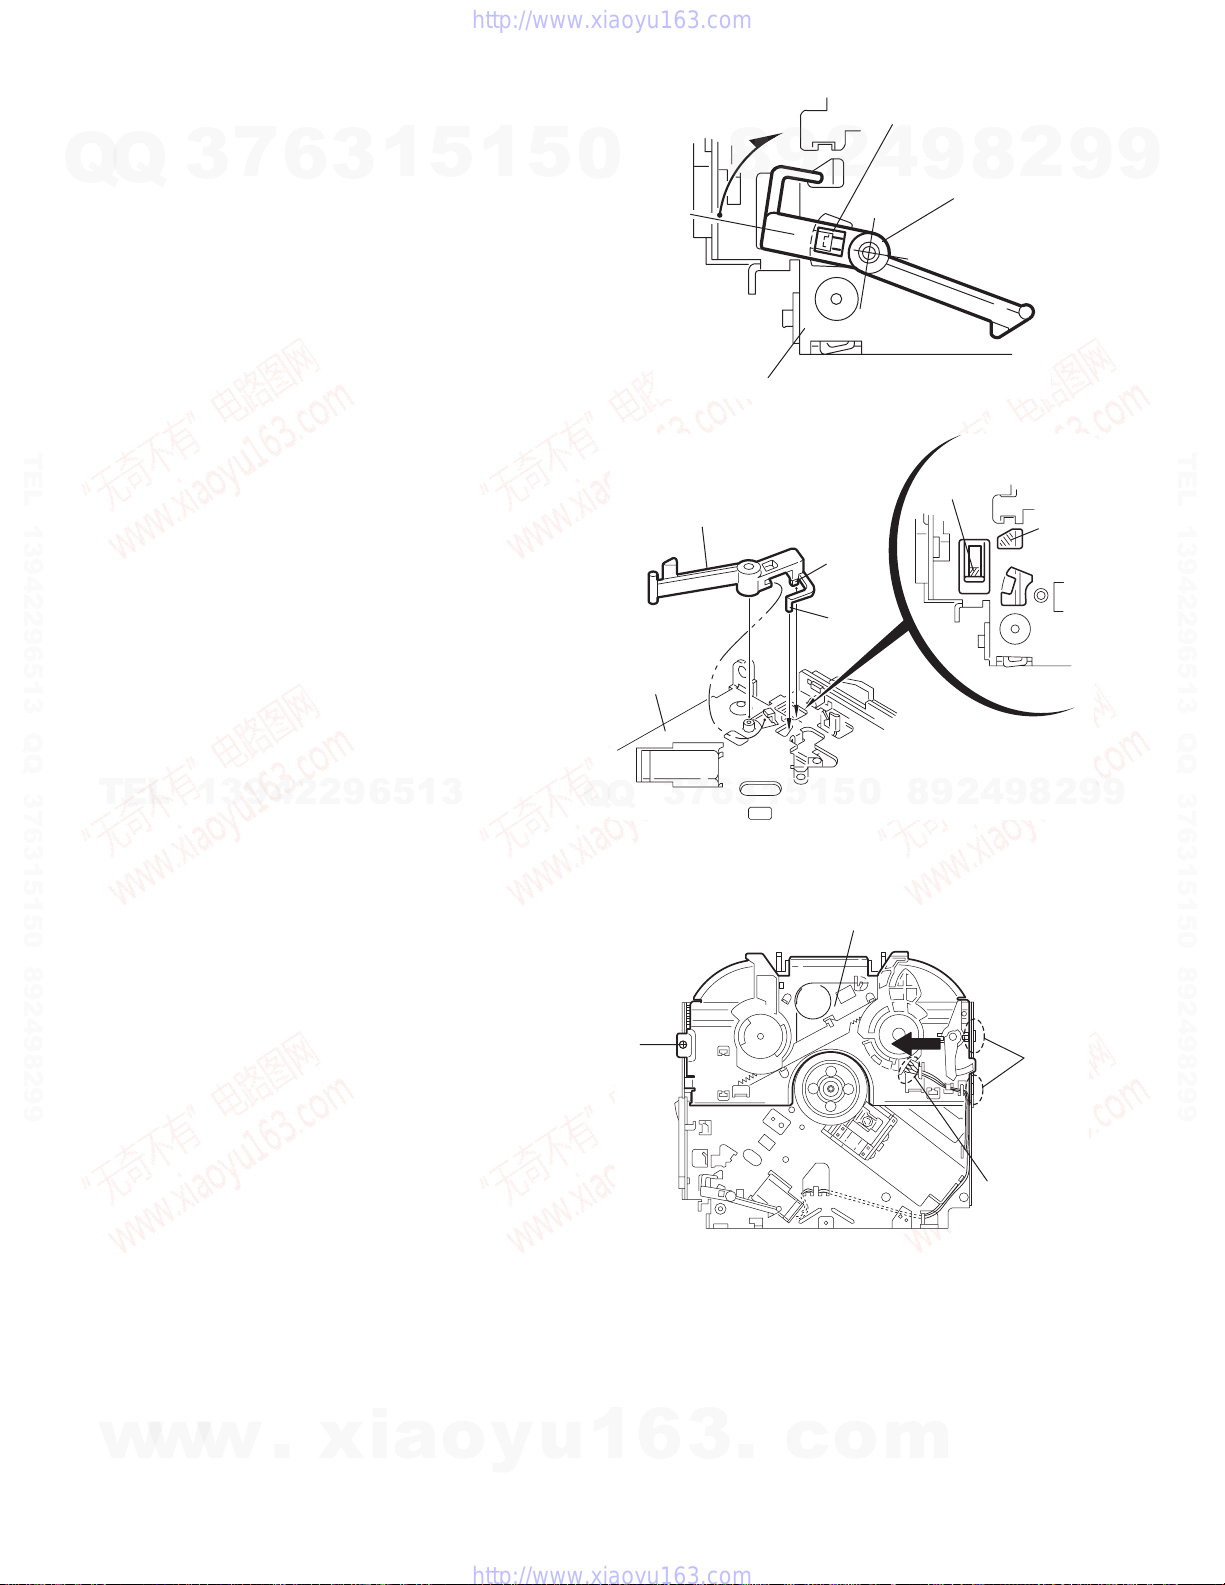
3.2.9 Removing the trigger arm
(See Figs.19 and 20)
• Prior to performing the following procedure, remove the top
cover, connector board and clamper unit.
Q
Q
(1) Turn the trigger arm in the direction of the arrow to release
the joint k and pull out upward.
CAUTION:
When reassembling, insert the part m and n of the trigger
arm into the part p and q at the slot of the chassis rivet
assembly respectively and join the joint k at a time.
TEL 13942296513 QQ 376315150 892498299
3
7
6
3
1
5
1
5
0
Chassis rivet assembly
Trigger arm
Chassis
rivet
assembly
8
9
2
Fig.19
Part m
Part n
Joint k
4
9
Trigger arm
Part p
8
2
Part q
9
9
TEL 13942296513 QQ 376315150 892498299
TEL
3.2.10 Removing the top plate assembly
(See Fig.21)
• Prior to performing the following procedure, remove the top
cover, connector board, chassis unit, and clamper assembly.
(1) Remove the screw H.
(2) Move the top plate assembly in the direction of the arrow to
release the two joints r.
(3) Unsolder the wire marked s if necessary.
13942296513
Q
Q
H
3
7
5
1
3
6
Top plate assembly
1
0
5
Fig.20
Fig.21
8
9
2
4
s
9
2
8
Joints
9
9
w
w
1-20 (No.MA220)
w
.
xia
o
y
u
1
6
3
.
c
o
m
Page 21
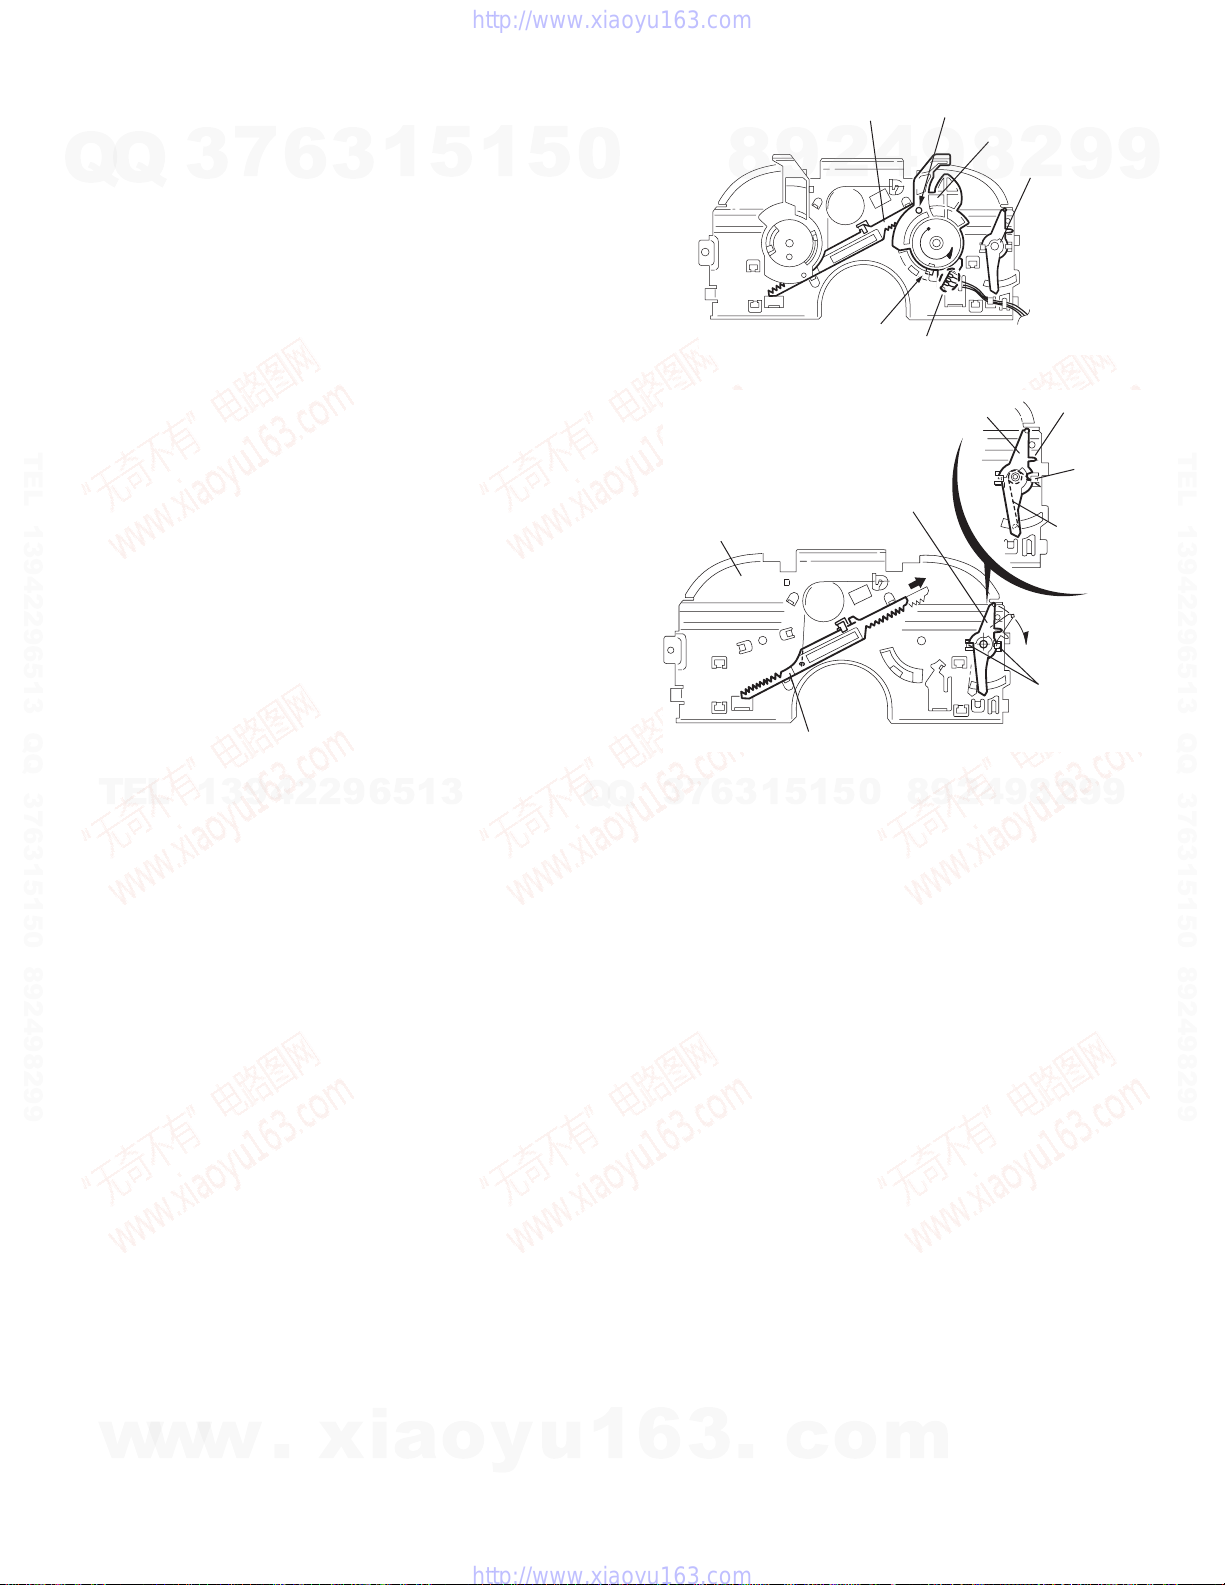
3.2.11 Removing the mode sw. / select lock arm
(See Figs.22 and 23)
• Prior to performing the following procedure, remove the top
Q
TEL 13942296513 QQ 376315150 892498299
plate assembly.
Q
(1) Bring up the mode sw. to release from the link plate (joint t)
and turn in the direction of the arrow to release the joint u.
(2) Unsolder the wire of the mode sw. marked s if necessary.
(3) Turn the select lock arm in the direction of the arrow to re-
lease the two joints v.
(4) The select lock arm spring comes off the select lock arm at
the same time.
3
7
6
3
1
5
1
5
0
Top plate
8
2
9
Select lock arm
Link plate
4
Joint u
Fig.22
Select lock arm
Joint t
9
s
Mode sw.
Select lock arm
2
8
Top plate
9
9
Hook w
Select lock
arm spring
TEL 13942296513 QQ 376315150 892498299
TEL
13942296513
Q
Q
3
7
6
3
Link plate
1
5
1
5
0
Fig.23
8
9
2
4
9
Joints v
2
8
9
9
w
w
w
.
xia
o
y
u
1
6
3
.
c
o
m
(No.MA220)1-21
Page 22
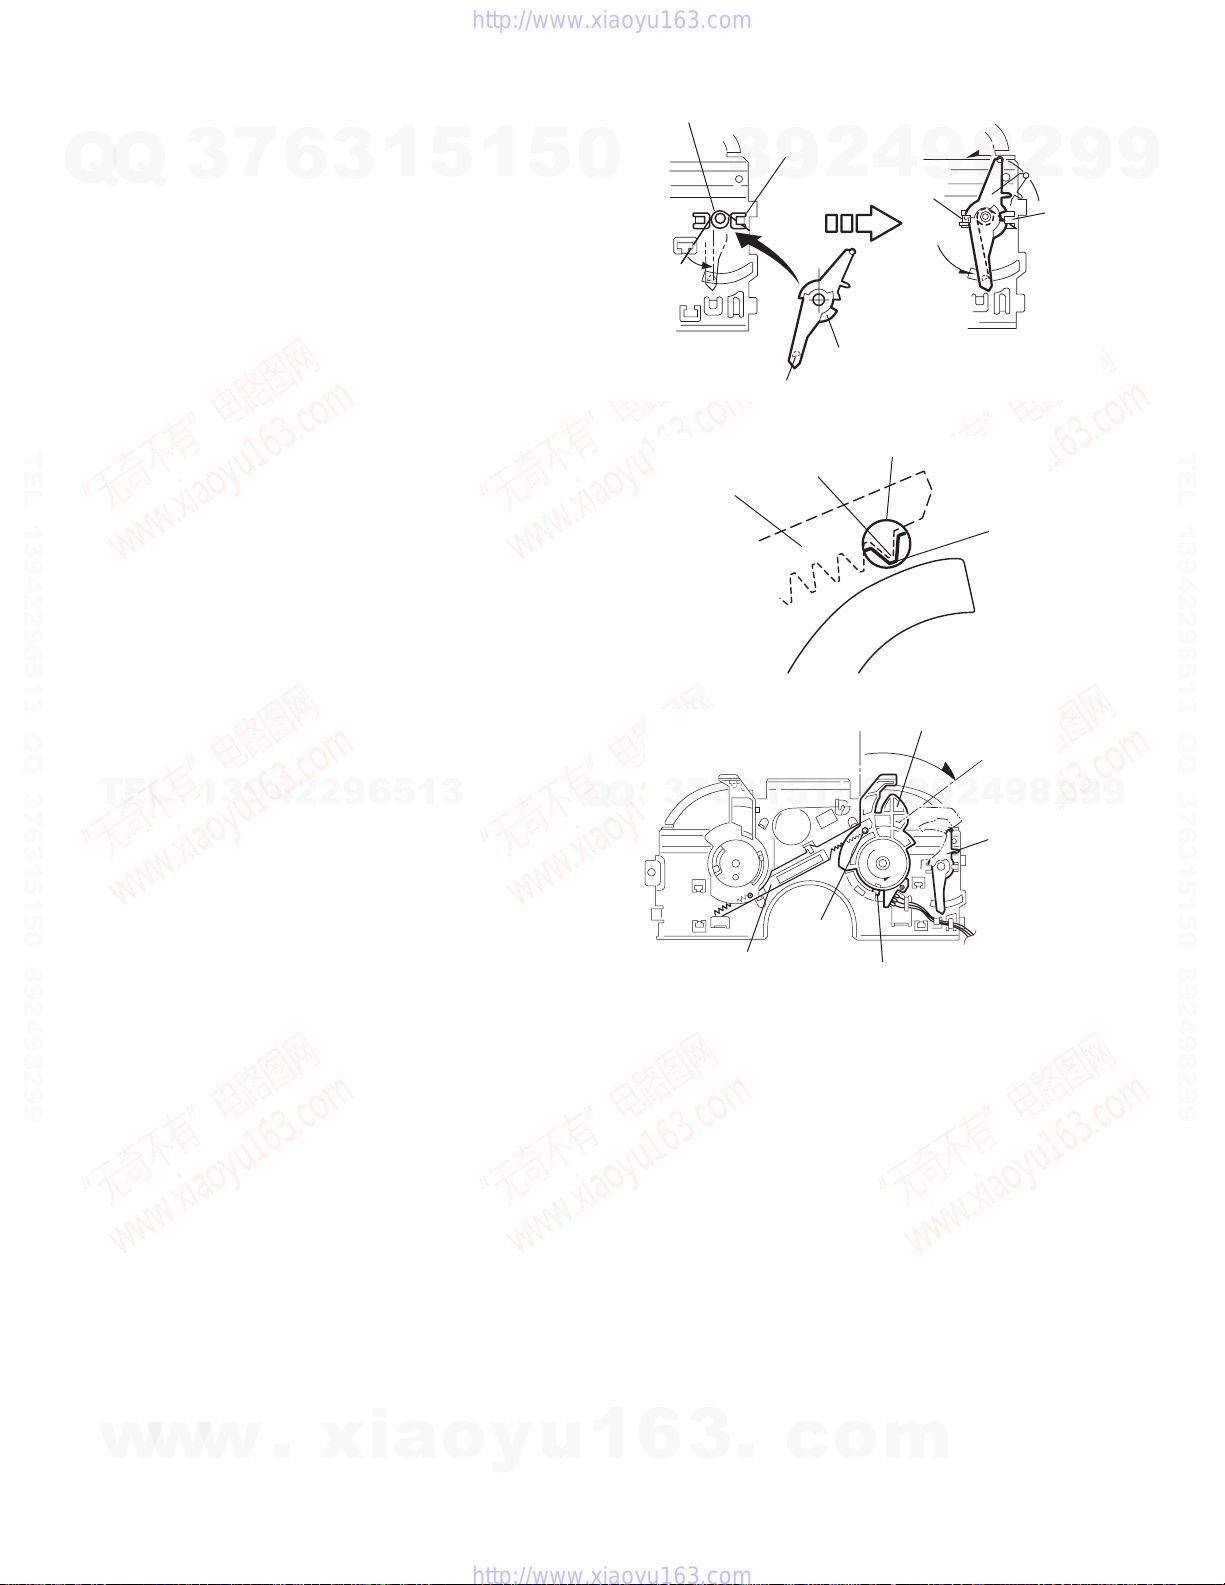
3.2.12 Reassembling the mode sw. / select lock arm
(See Figs.24 to 26)
REFERENCE:
Reverse the above removing procedure.
Q
Q
(1) Reattach the select lock arm spring to the top plate and set
the shorter end of the select lock arm spring to the hook w
on the top plate.
(2) Set the other longer end of the select lock arm spring to the
boss x on the underside of the select lock arm, and join the
select lock arm to the slots (joint v). Turn the select lock
arm as shown in the figure.
(3) Reattach the mode sw. while setting the part t to the first
peak of the link plate gear, and join the joint u.
CAUTION:
When reattaching the mode sw., check if the points y and
TEL 13942296513 QQ 376315150 892498299
z are correctly fitted and if each part operates properly.
3
7
6
3
1
5
1
5
Select lock arm spring
0
Link plate
8
Boss x
Hook w
9
Point y
4
2
Select lock arm
Fig.24
9
Joint v
Joint t
8
Point z
2
Joint v
9
9
TEL 13942296513 QQ 376315150 892498299
TEL
13942296513
Q
Q
3
7
3
6
Link plate
1
5
Joint t
1
Fig.25
0
5
Joint u
Fig.26
Mode sw.
2
9
8
9
4
Select
lock arm
8
2
9
9
w
w
1-22 (No.MA220)
w
.
xia
o
y
u
1
6
3
.
c
o
m
Page 23
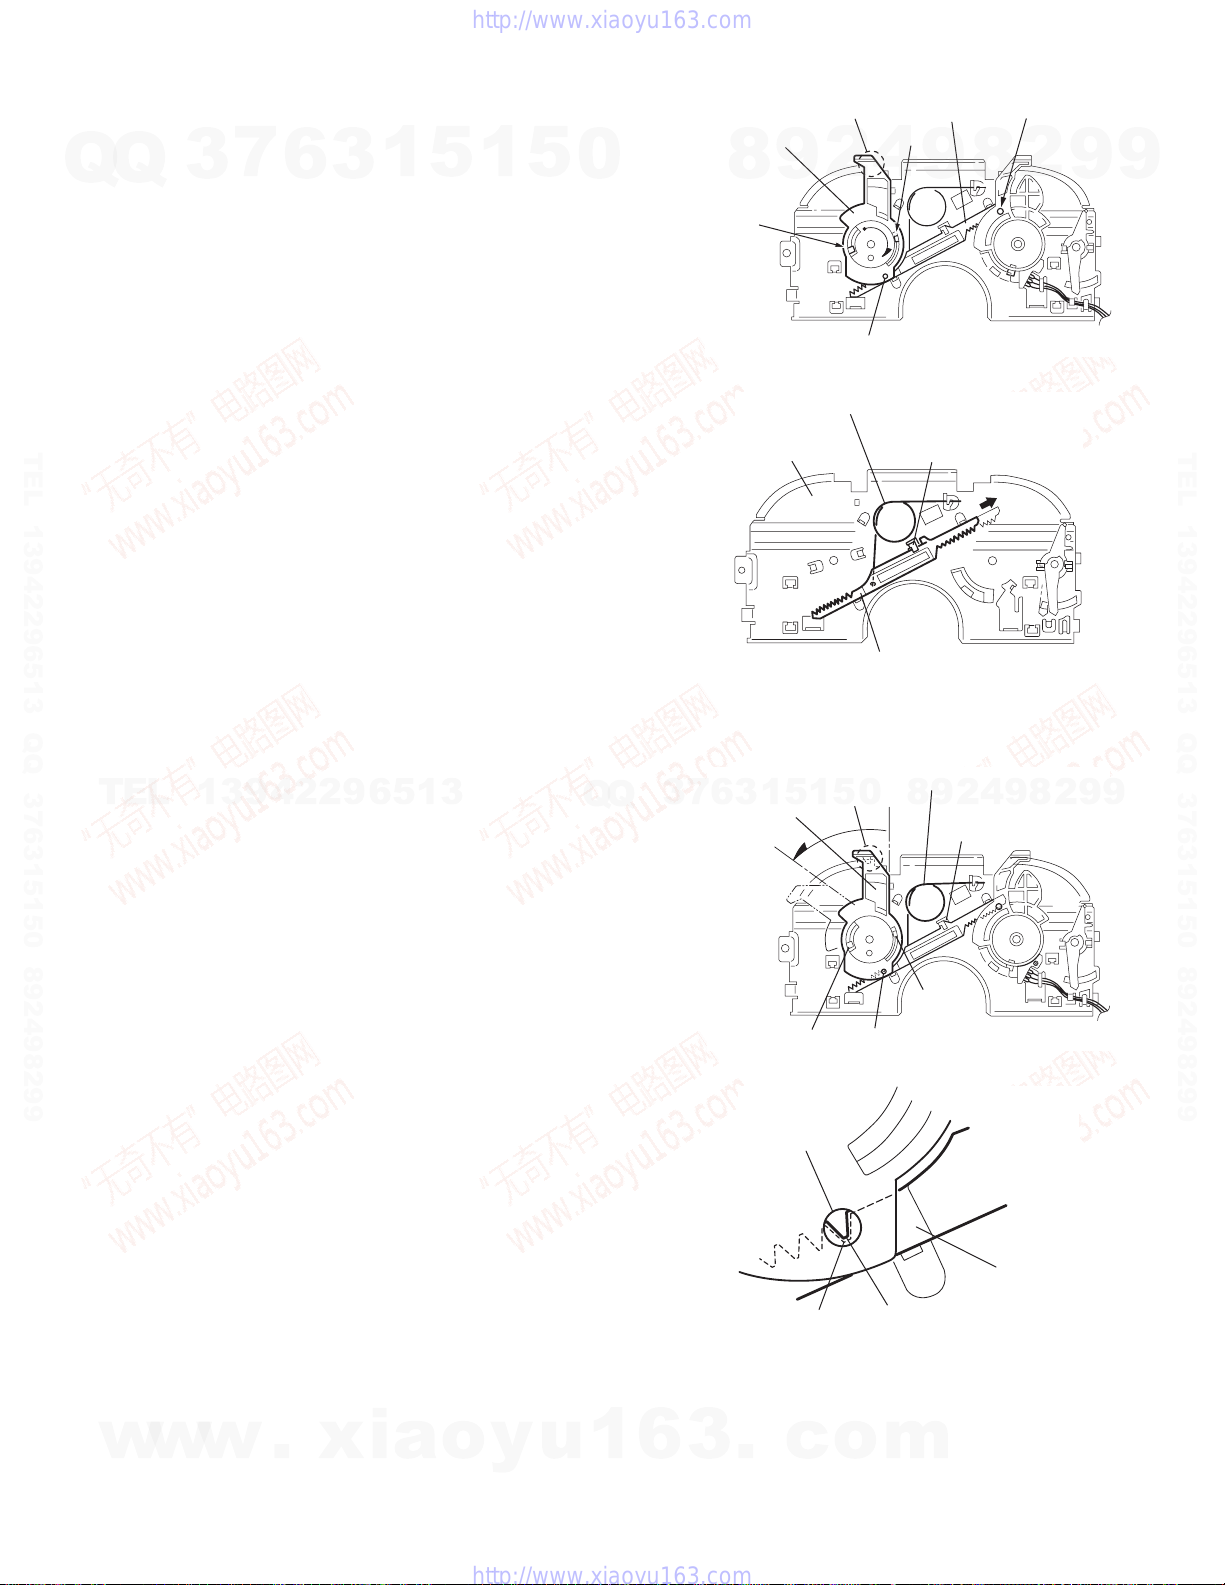
3.2.13 Removing the select arm R / link plate
(See Figs.27 and 28)
• Prior to performing the following procedure, remove the top
Q
TEL 13942296513 QQ 376315150 892498299
plate assembly.
Q
(1) Bring up the select arm R to release from the link plate
(joint a') and turn as shown in the figure to release the two
joints b' and joint c'.
(2) Move the link plate in the direction of the arrow to release
the joint d'. Remove the link plate spring at the same time.
REFERENCE:
3.2.14 Reattaching the Select arm R / link plate
(See Figs.29 and 30)
REFERENCE:
Reverse the above removing procedure.
TEL
(1) Reattach the link plate spring.
(2) Reattach the link plate to the link plate spring while joining
them at joint d'.
(3) Reattach the joint a' of the select arm R to the first peak of
the link plate while joining the two joints b' with the slots.
Then turn the select arm R as shown in the figure. The top
plate is joined to the joint c'.
CAUTION:
7
3
Before removing the link plate, remove the mode sw..
13942296513
When reattaching the select arm R, check if the points e'
and f' are correctly fitted and if each part operates properly.
6
3
1
5
1
5
0
Q
Q
3
7
Select arm R
9
8
Joint b'
Link plate spring
Top plate
5
1
3
6
Select arm R
Joint b'
Joint c'
2
Joint c'
1
5
Joint b'
4
Joint a'
Fig.27
Link plate
Fig.28
Link plate spring
0
Joint a'
Fig.29
Link plate
9
Joint d'
2
9
8
Joint d'
Joint b'
8
4
Joint r
2
8
9
9
2
9
9
TEL 13942296513 QQ 376315150 892498299
9
w
w
w
.
xia
o
y
u
1
6
3
.
Joint a'
Point e'
c
o
Link plate
Point f'
Fig.30
m
(No.MA220)1-23
Page 24
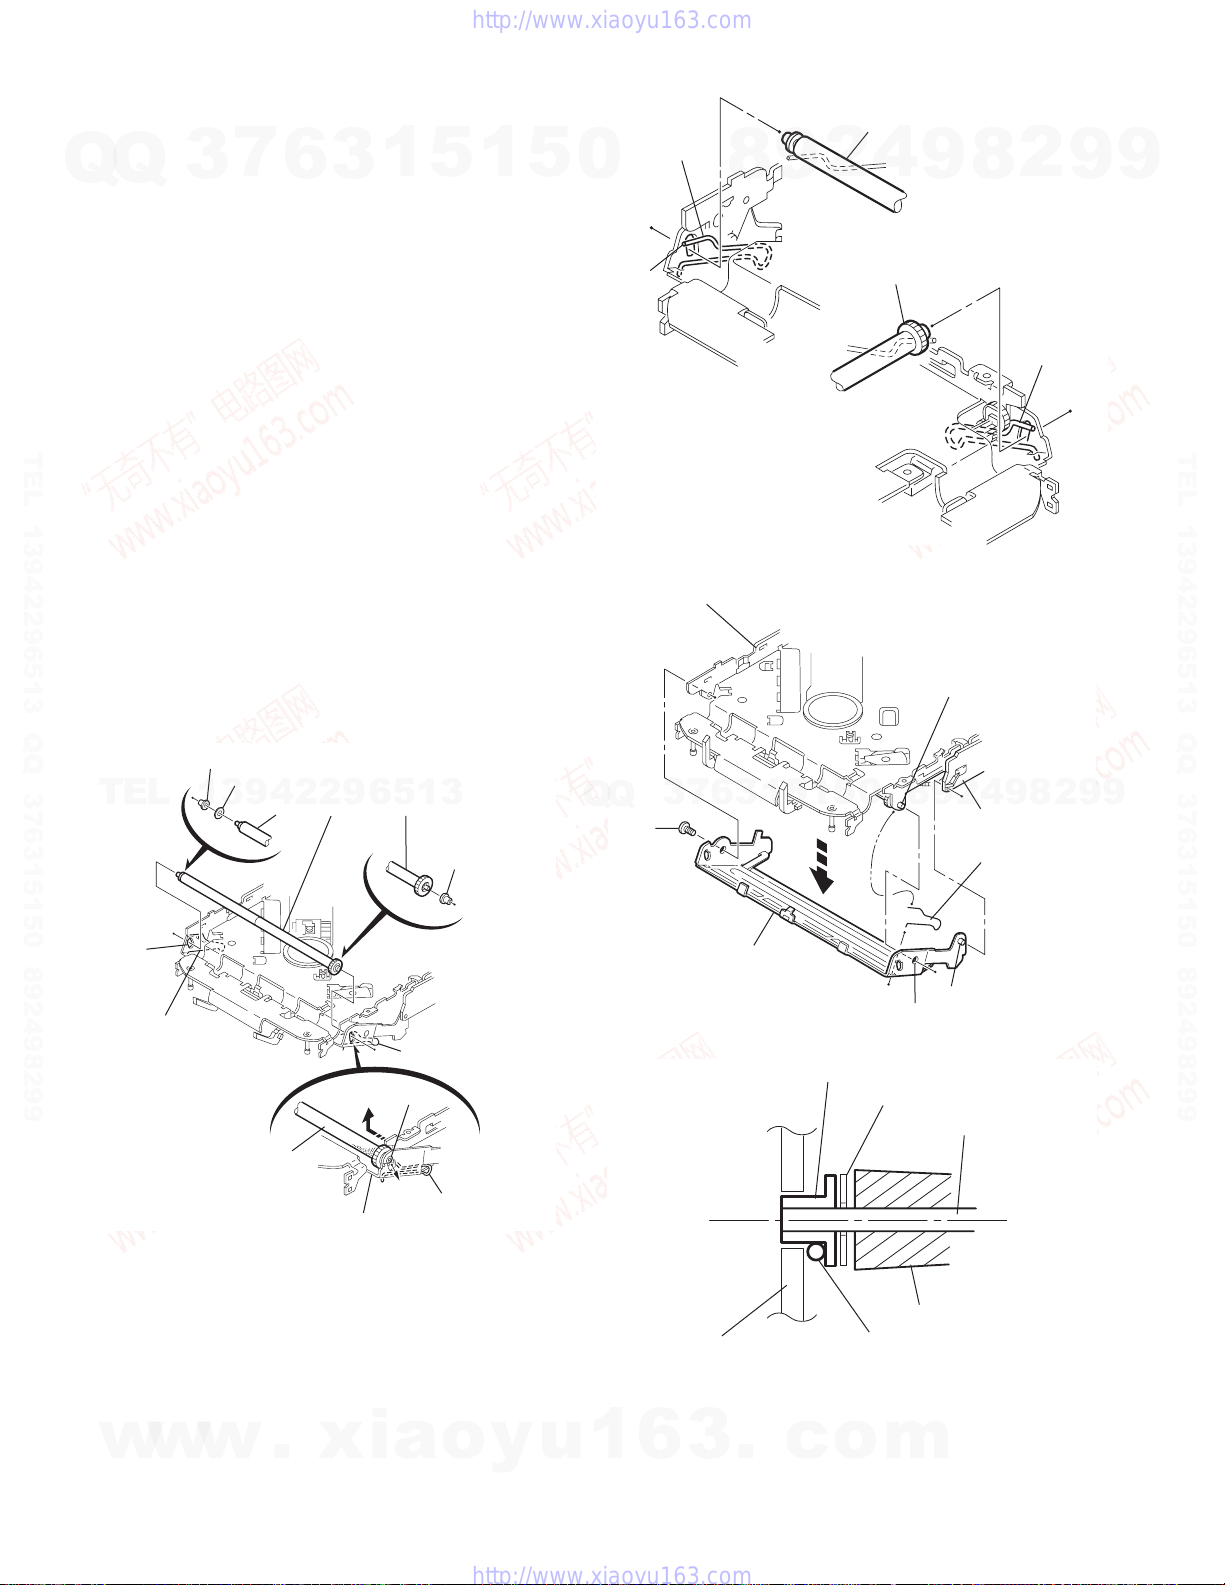
3.2.15 Removing the loading roller assembly
(See Figs.31 to 33)
• Prior to performing the following procedure, remove the
clamper assembly and top plate assembly.
Q
Q
(1) Push inward the loading roller assembly on the gear side
and detach it upward from the slot of the joint g' of the lock
arm rivet assembly.
(2) Detach the loading roller assembly from the slot of the joint
h' of the lock arm rivet assembly.
The roller guide comes off the gear section of the loading
roller assembly.
Remove the roller guide and the HL washer from the shaft
of the loading roller assembly.
(3) Remove the screw J attaching the lock arm rivet assembly.
TEL 13942296513 QQ 376315150 892498299
(4) Push the shaft at the joint i' of the lock arm rivet assembly
inward to release the lock arm rivet assembly from the slot
of the L side plate.
(5) Extend the lock arm rivet assembly outward and release
the joint j' from the boss of the chassis rivet assembly. The
roller guide springs on both sides come off at the same
time.
CAUTION:
When reassembling, reattach the left and right roller
guide springs to the lock arm rivet assembly before reattaching the lock arm rivet assembly to the chassis rivet
assembly. Make sure to fit the part k' of the roller guide
spring inside of the roller guide. (Refer to Fig.34.)
3
7
6
3
1
5
1
5
Roller guide
spring
0
Part k'
Chassis rivet assembly
8
Loading roller assembly
4
2
9
Loading roller assembly
Fig.32
9
Boss
8
Roller guide
spring
2
9
9
TEL 13942296513 QQ 376315150 892498299
Roller guide
TEL
Joint h'
Roller guide spring
Loading roller assembly
13942296513
HL washer
Loading roller assembly
Joint g'
Lock arm rivet assembly
Fig.31
Roller guide
Roller guide spring
Roller guide spring
3
6
7
3
Q
Q
J
Lock arm rivet assembly
Lock arm rivet assembly
5
1
Roller guide
8
0
5
1
Joint j'
Fig.33
HL washer
Roller shaft assembly
Loading roller
Roller guide spring
Fig.34
8
9
4
2
9
L side plate
Roller guide spring
Joint i'
2
9
9
w
w
1-24 (No.MA220)
w
.
xia
o
y
u
1
6
3
.
c
o
m
Page 25
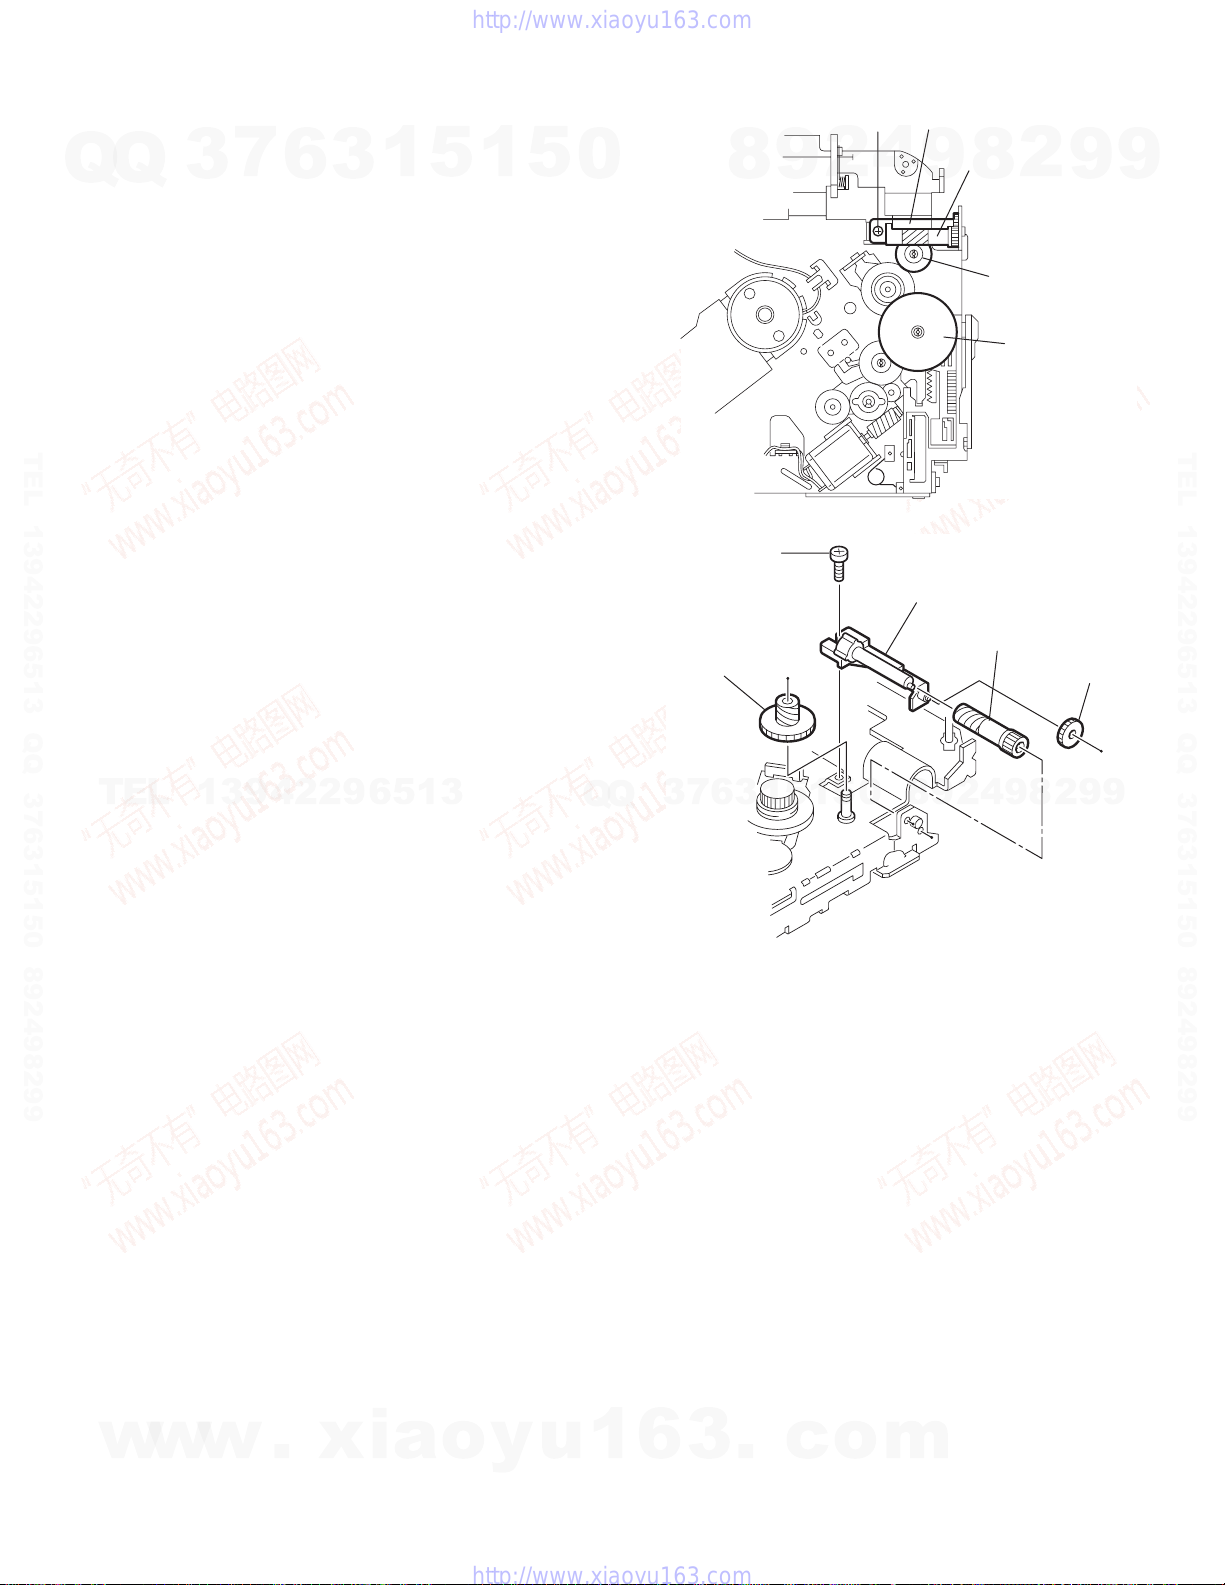
3.2.16 Removing the loading gear 5, 6 and 7
(See Figs.35 and 36)
• Prior to performing the following procedure, remove the top
Q
TEL 13942296513 QQ 376315150 892498299
cover, chassis unit, pickup unit and top plate assembly.
Q
(1) Remove the screw K attaching the loading gear bracket.
The loading gear 6 and 7 come off the loading gear bracket.
(2) Pull out the loading gear 5.
3
7
6
3
1
5
1
5
0
Loading gear 5
8
9
K
Loading gear bracket
K
4
2
9
Fig.35
Loading gear bracket
Loading gear 6
2
8
Loading gear 5
Loading gear 3
Loading gear 6
Loading gear 7
9
9
TEL 13942296513 QQ 376315150 892498299
TEL
13942296513
Q
Q
3
7
6
3
1
5
1
5
0
8
Fig.36
9
2
4
9
8
2
9
9
w
w
w
.
xia
o
y
u
1
6
3
.
c
o
m
(No.MA220)1-25
Page 26
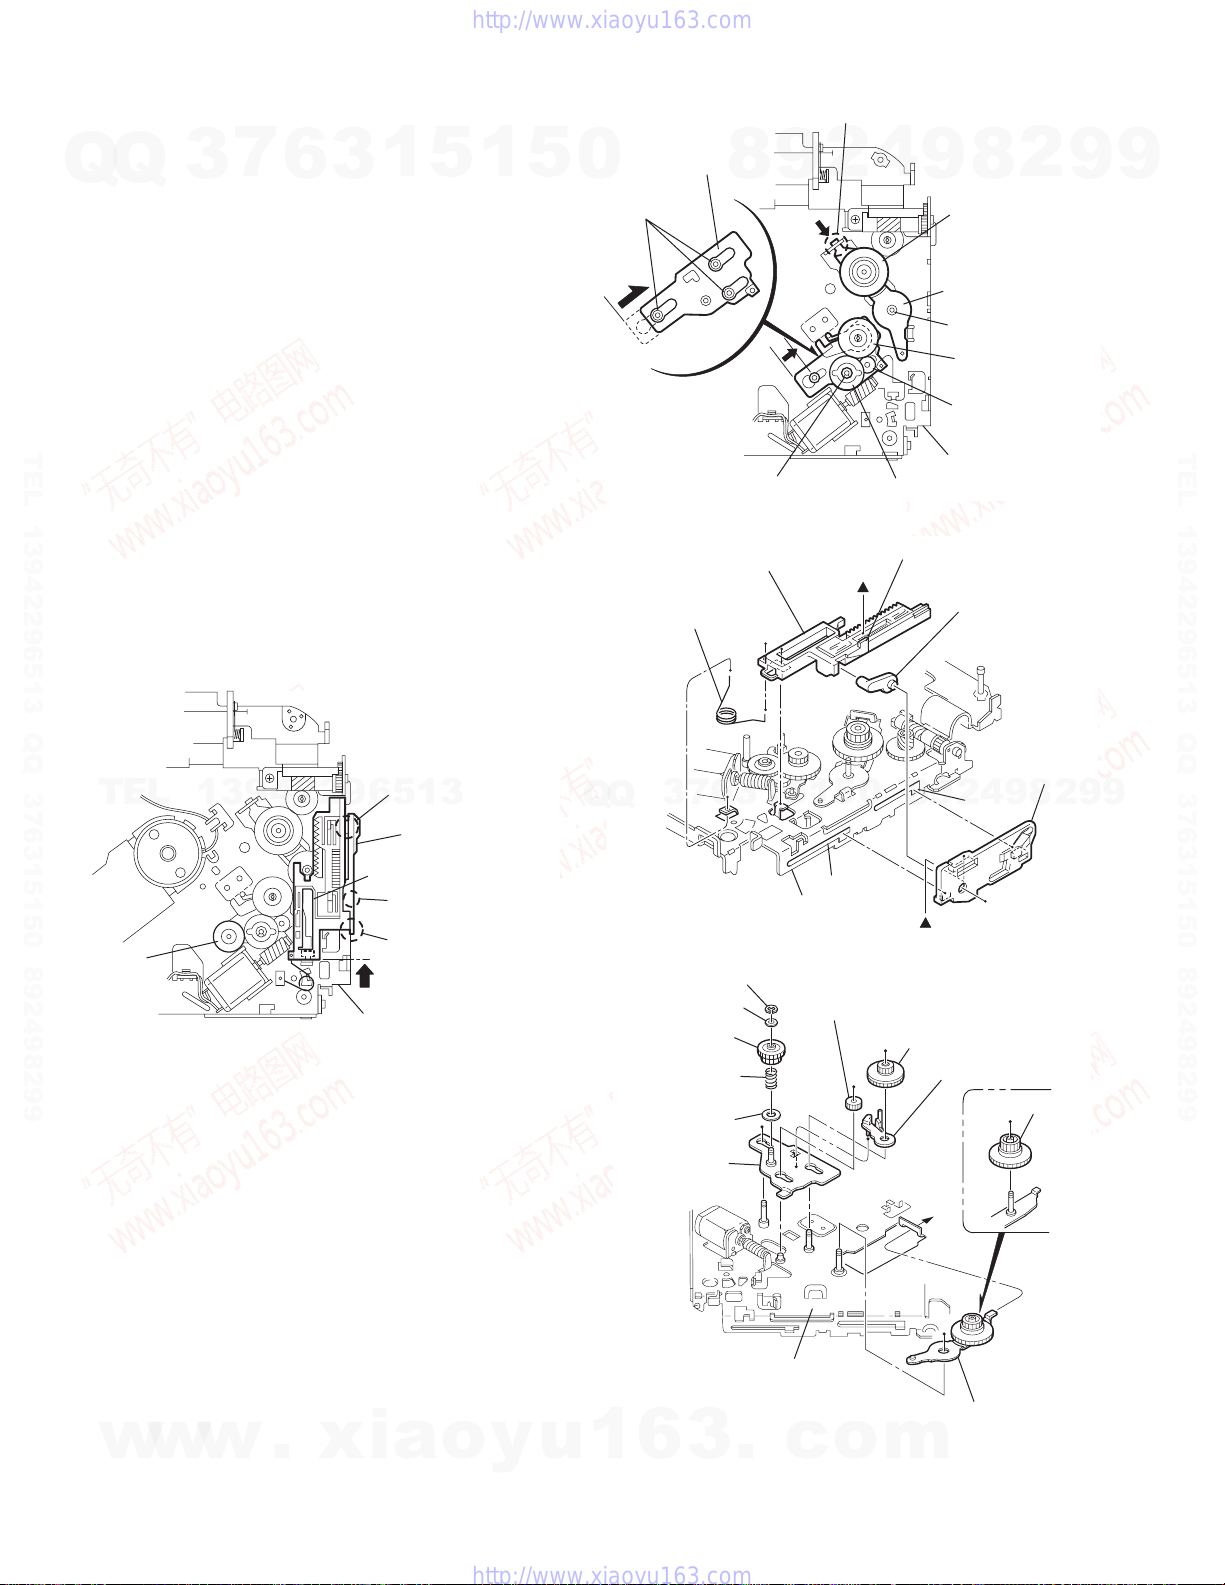
3.2.17 Removing the gears
(See Figs.37 to 40)
• Prior to performing the following procedure, remove the top
cover, chassis unit, top plate assembly and pickup unit.
Q
Q
• Pull out the loading gear 3. (See Fig.35.)
(1) Pull out the feed gear.
(2) Move the loading plate assembly in the direction of the ar-
row to release the L side plate from the two slots m' of the
chassis rivet assembly. (See Fig.37.)
(3) Detach the loading plate assembly upward from the chas-
sis rivet assembly while releasing the joint n'. Remove the
slide hook and loading plate spring from the loading plate
assembly.
(4) Pull out the loading gear 2 and remove the change lock le-
ver.
(5) Remove the E ring and washer attaching the change gear
TEL 13942296513 QQ 376315150 892498299
2.
(6) The change gear 2, change gear spring and adjusting
washer come off.
(7) Remove the loading gear 1.
(8) Move the change plate rivet assembly in the direction of the
arrow to release from the three shafts of the chassis rivet
assembly upward. (See Fig.38.)
(9) Detach the loading gear plate rivet assembly from the shaft
of the chassis rivet assembly upward while releasing the
joint p'. (See Figs.38 and 40.)
(10) Pull out the loading gear 4.
3
7
6
3
1
5
1
5
0
Change plate
rivet assembly
Shafts
Loading plate assembly
Loading plate spring
8
E ring
9
Joint p'
2
Fig.38
4
Change gear 2
Joint n'
8
9
Loading gear 4
Loading gear plate
rivet assembly
Shaft
Loading gear 2
Loading gear 1
Chassis rivet assembly
Slide hook
2
9
9
TEL 13942296513 QQ 376315150 892498299
TEL
Feed gear
13942296513
Fig.37
Slot m'
L side plate
Loading plate assembly
Joint n'
Slot m'
Chassis rivet assembly
Q
Q
Change gear 2
Change gear
Change plate
rivet assembly
1
3
6
7
3
Chassis rivet assembly
E ring
Washer
spring
Adjusting
washer
0
5
1
5
Slot m'
Fig.39
Loading gear 1
L side plate
9
4
2
9
8
Loading gear 2
Slot m'
Change lock lever
Loading gear 4
8
2
9
9
w
w
1-26 (No.MA220)
w
.
xia
Chassis rivet assembly
o
y
u
1
6
3
.
c
o
Fig.40
Loading gear plate rivet
assembly
m
Page 27
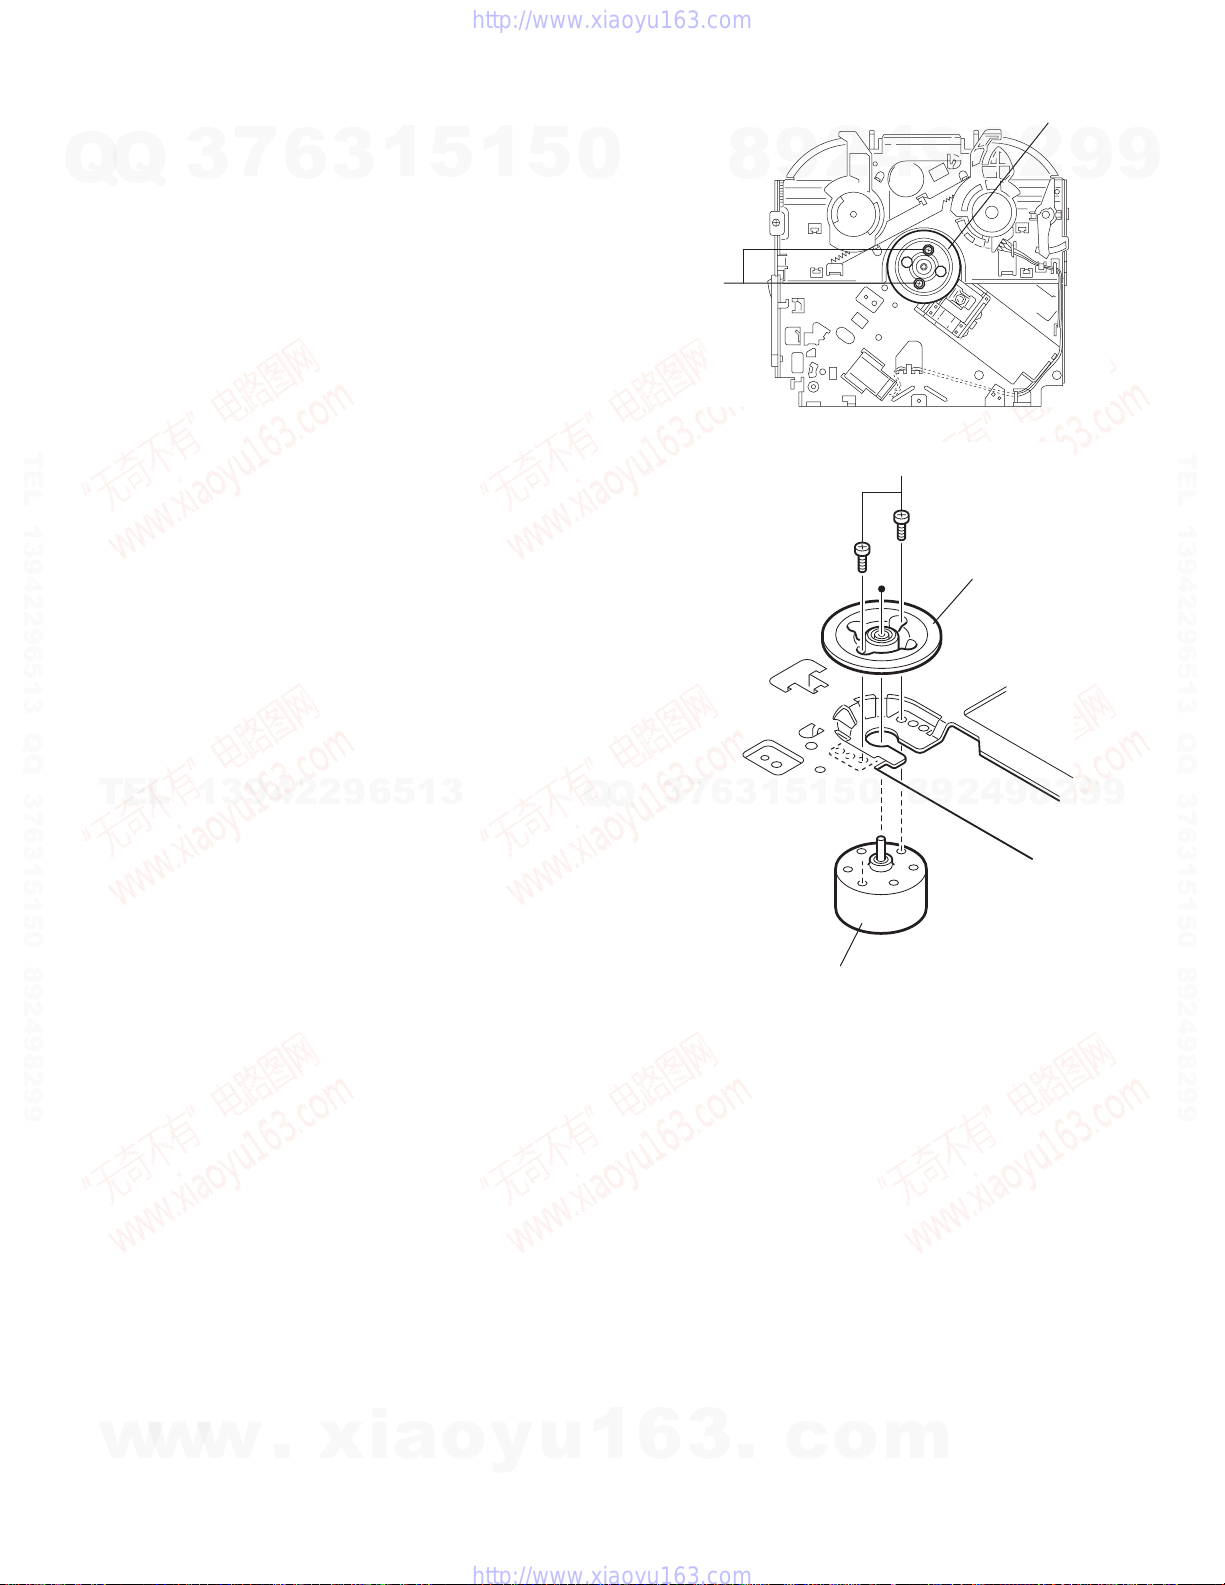
3.2.18 Removing the turn table / spindle motor
(See Figs.41 and 42)
• Prior to performing the following procedure, remove the top
Q
TEL 13942296513 QQ 376315150 892498299
cover, connector board, chassis unit and clamper assembly.
Q
(1) Remove the two screws L attaching the spindle motor as-
sembly through the slot of the turn table on top of the body.
(2) Unsolder the wire on the connector board if necessary.
3
7
6
3
1
5
1
5
0
L
8
9
2
4
Fig.41
L
9
Turn table
8
Turn table
2
9
9
TEL 13942296513 QQ 376315150 892498299
TEL
13942296513
Q
Q
3
7
6
5
1
3
Spindle motor
1
5
0
8
Fig.42
9
2
4
9
8
2
9
9
w
w
w
.
xia
o
y
u
1
6
3
.
c
o
m
(No.MA220)1-27
Page 28
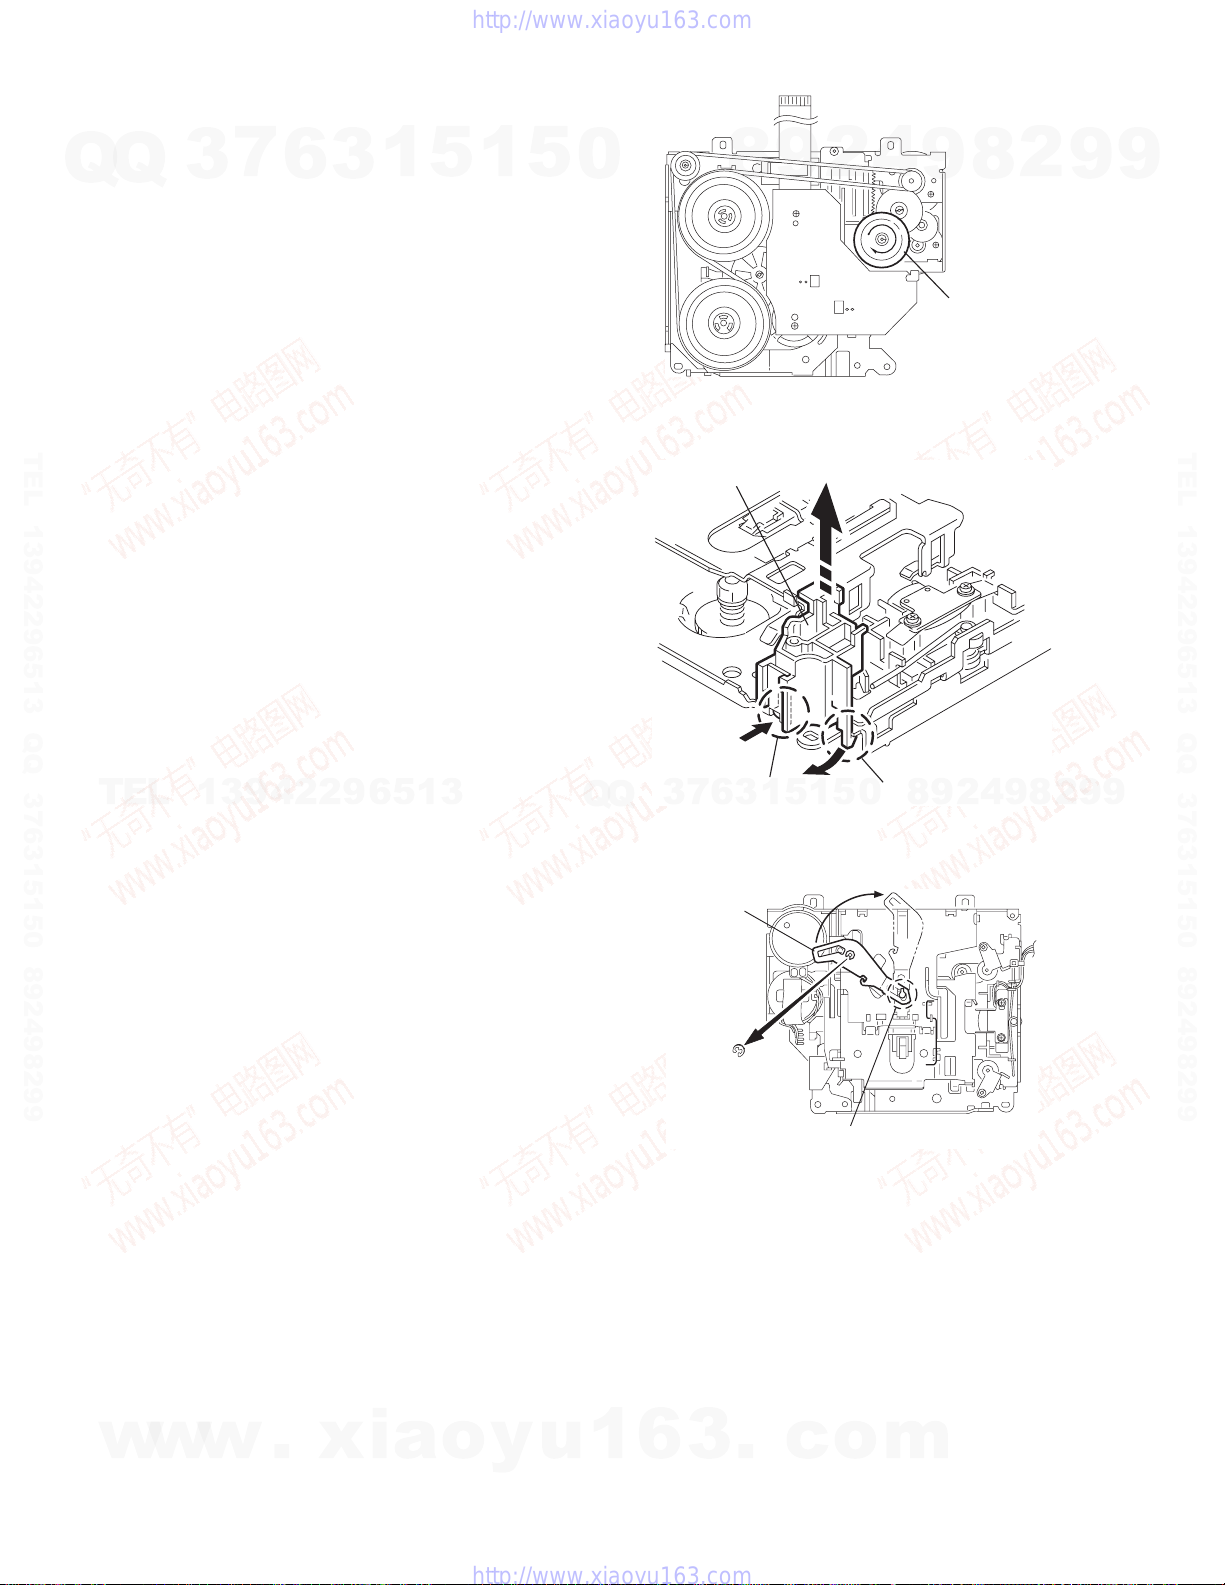
r
3.3 Cassette mechanism assembly
REFERENCE:
Prior to performing the following procedures, turn the mode
gear on the bottom of the body until the respective part comes
Q
Q
to the EJECT position (Refer to Fig.1).
3.3.1 Removing the cassette guide
TEL 13942296513 QQ 376315150 892498299
(See Fig.2)
(1) Turn the mode gear to set to RVS play or subsequent
mode.
(2) Remove the cassette guide from the main chassis while re-
leasing each two joint tabs a in the direction of the arrow.
3
7
6
3
1
5
1
5
0
Cassette guide
8
9
2
Fig.1
4
9
8
Mode gea
2
9
9
TEL 13942296513 QQ 376315150 892498299
TEL
3.3.2 Removing the load arm
(See Fig.3)
(1) Remove the E-washer attaching the load arm.
(2) Move the load arm in the direction of the arrow and release
the joint b on the cassette catch.
13942296513
Q
Q
6
7
3
Load arm
E-washer
Tab a
1
3
5
5
1
Fig.2
Joint b
Fig.3
0
Tab a
8
9
2
4
9
8
2
9
9
w
w
1-28 (No.MA220)
w
.
xia
o
y
u
1
6
3
.
c
o
m
Page 29
r
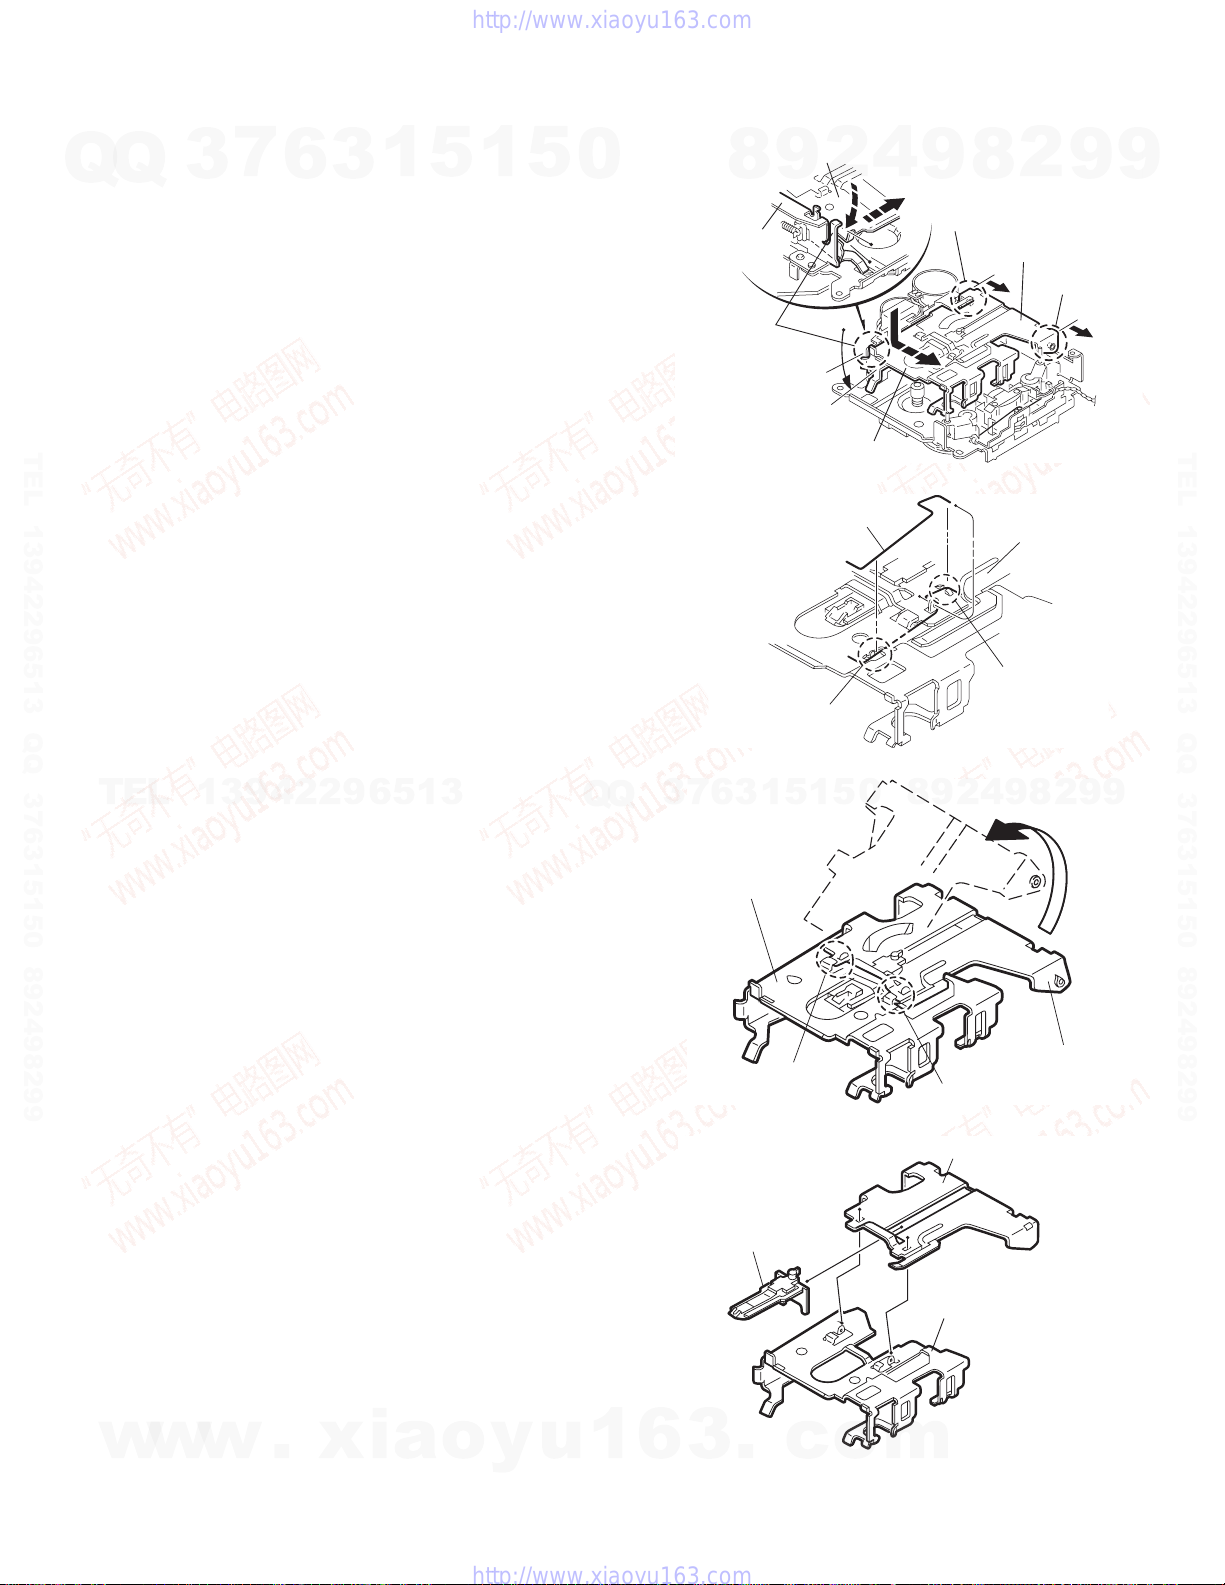
3.3.3 Removing the cassette hanger assembly / cassette holder
(See Fig.4 to 7)
(1) Check the mode is set to EJECT. Push down the front part
Q
of the cassette holder and move in the direction of the ar-
Q
row to release the joint c.
(2) Move the rear part of the cassette hanger assembly in the
direction of the arrow to release it from the two joint bosses
d.
(3) Release the holder stabilizer spring from the hooks e and
f, then pull out from the cassette hanger assembly.
(4) Bring up the rear side of the cassette hanger assembly to
release the joint g and h.
(5) Pull out the cassette catch from the cassette hanger as-
sembly.
3
7
6
3
1
5
1
5
0
Cassette holder assembly
8
Side bracket
Joints c
9
2
4
9
Boss d
2
8
Cassette hanger
assembly
Boss d
9
9
TEL 13942296513 QQ 376315150 892498299
TEL
13942296513
Q
Q
7
3
Cassette holder
assembly
Cassette holder assembly
Fig.4
Cassette stabilizer spring
Hook e
Fig.5
0
5
1
5
1
3
6
8
Cassette hange
Hook f
4
2
9
assembly
2
8
9
9
TEL 13942296513 QQ 376315150 892498299
9
w
w
w
.
xia
Cassette hanger
Hook g
Cassette catch
o
y
u
1
6
3
.
c
o
Hook h
Fig.6
Cassette hanger assembly
Cassette holder assembly
m
Fig.7
assembly
(No.MA220)1-29
Page 30
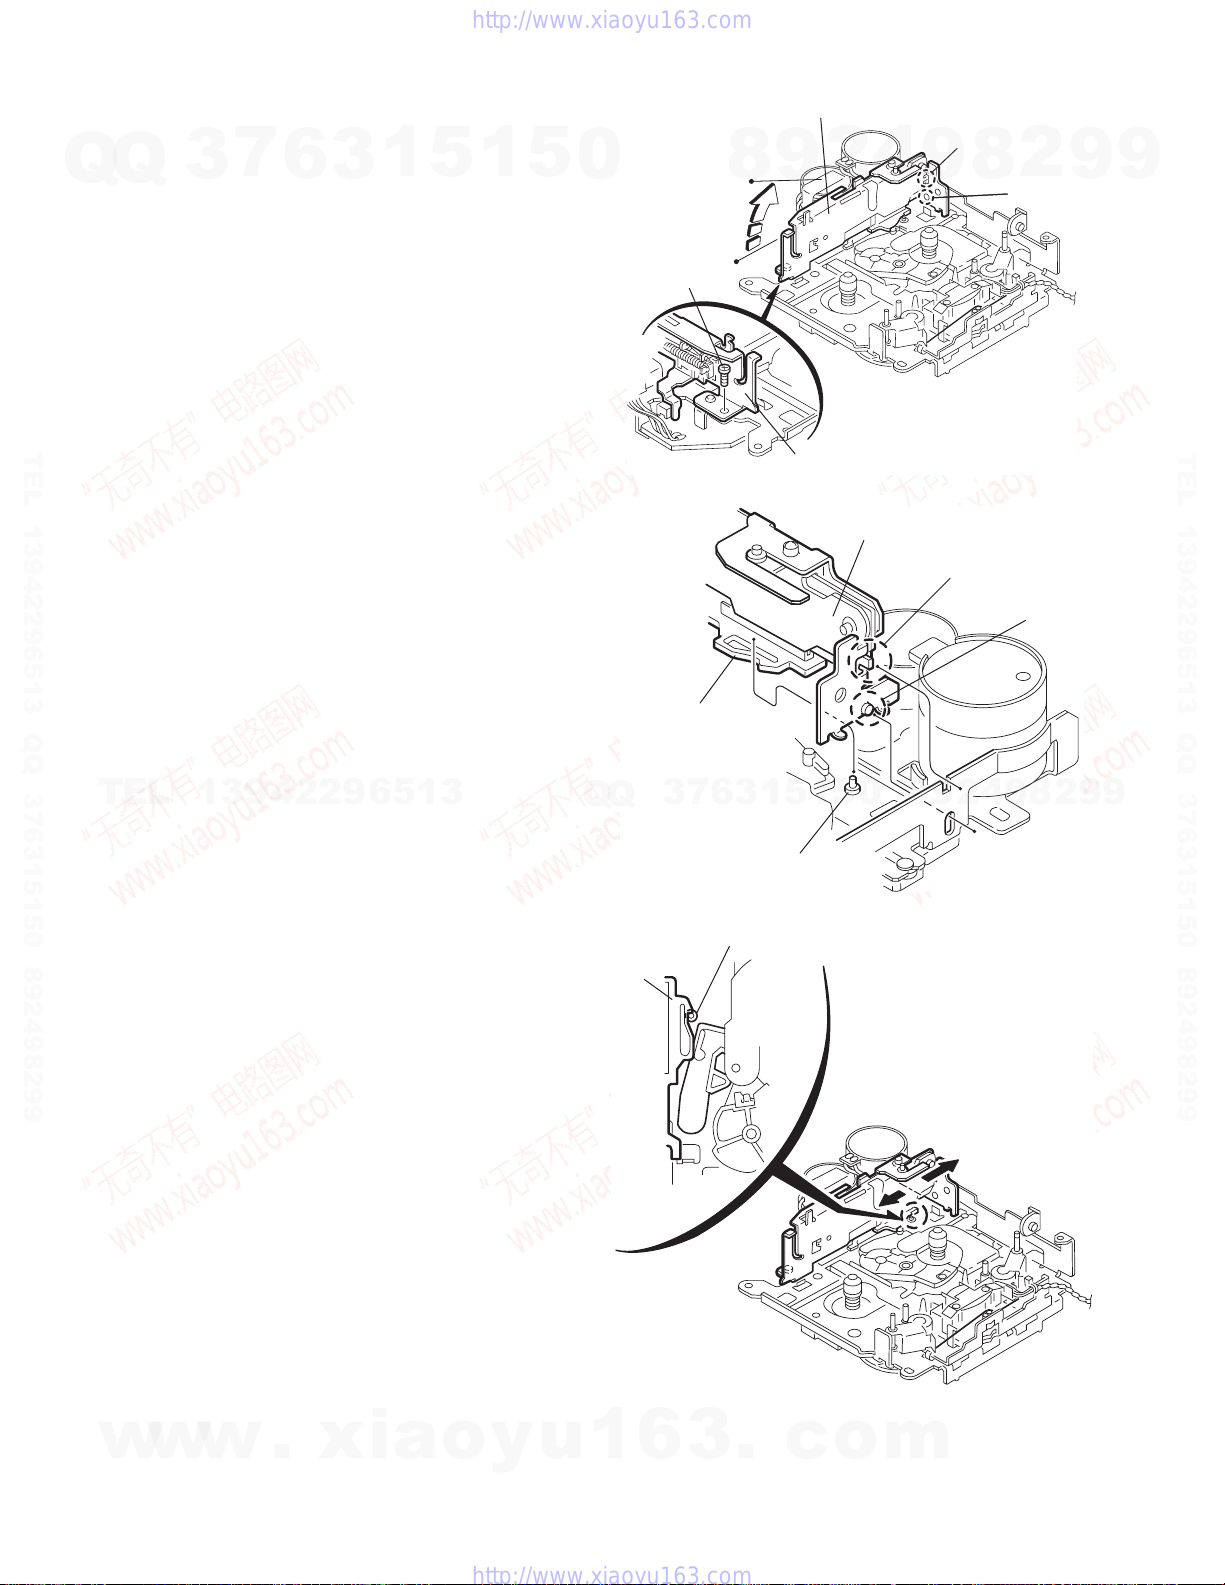
3.3.4 Removing the side bracket assembly
(See Fig.8 to 10)
(1) Remove the screw A attaching the side bracket assembly.
(2) Detach the front side of the side bracket assembly upward
Q
Q
and pull out forward to release the joint i and j in the rear.
CAUTION:
When reassembling, make sure that the boss k of the
main chassis is set in the notch of the load rack under the
side bracket assembly. Do not reattach the load rack on
the boss k.
CAUTION:
After reattaching the side bracket assembly, confirm operation.
TEL 13942296513 QQ 376315150 892498299
3
7
6
3
1
5
1
5
0
A
Side bracket assembly
4
2
9
8
Side bracket assembly
Fig.8
Side bracket assembly
Joint i
9
Joint i
8
2
Joint j
Joint j
9
9
TEL 13942296513 QQ 376315150 892498299
TEL
13942296513
Q
Q
Load rack
Load rack
3
7
6
Boss k
1
3
Boss k
5
1
5
Fig.9
0
8
9
2
4
9
8
2
9
9
w
w
1-30 (No.MA220)
w
.
xia
o
y
u
1
6
3
.
c
Fig.10
o
m
Page 31
r
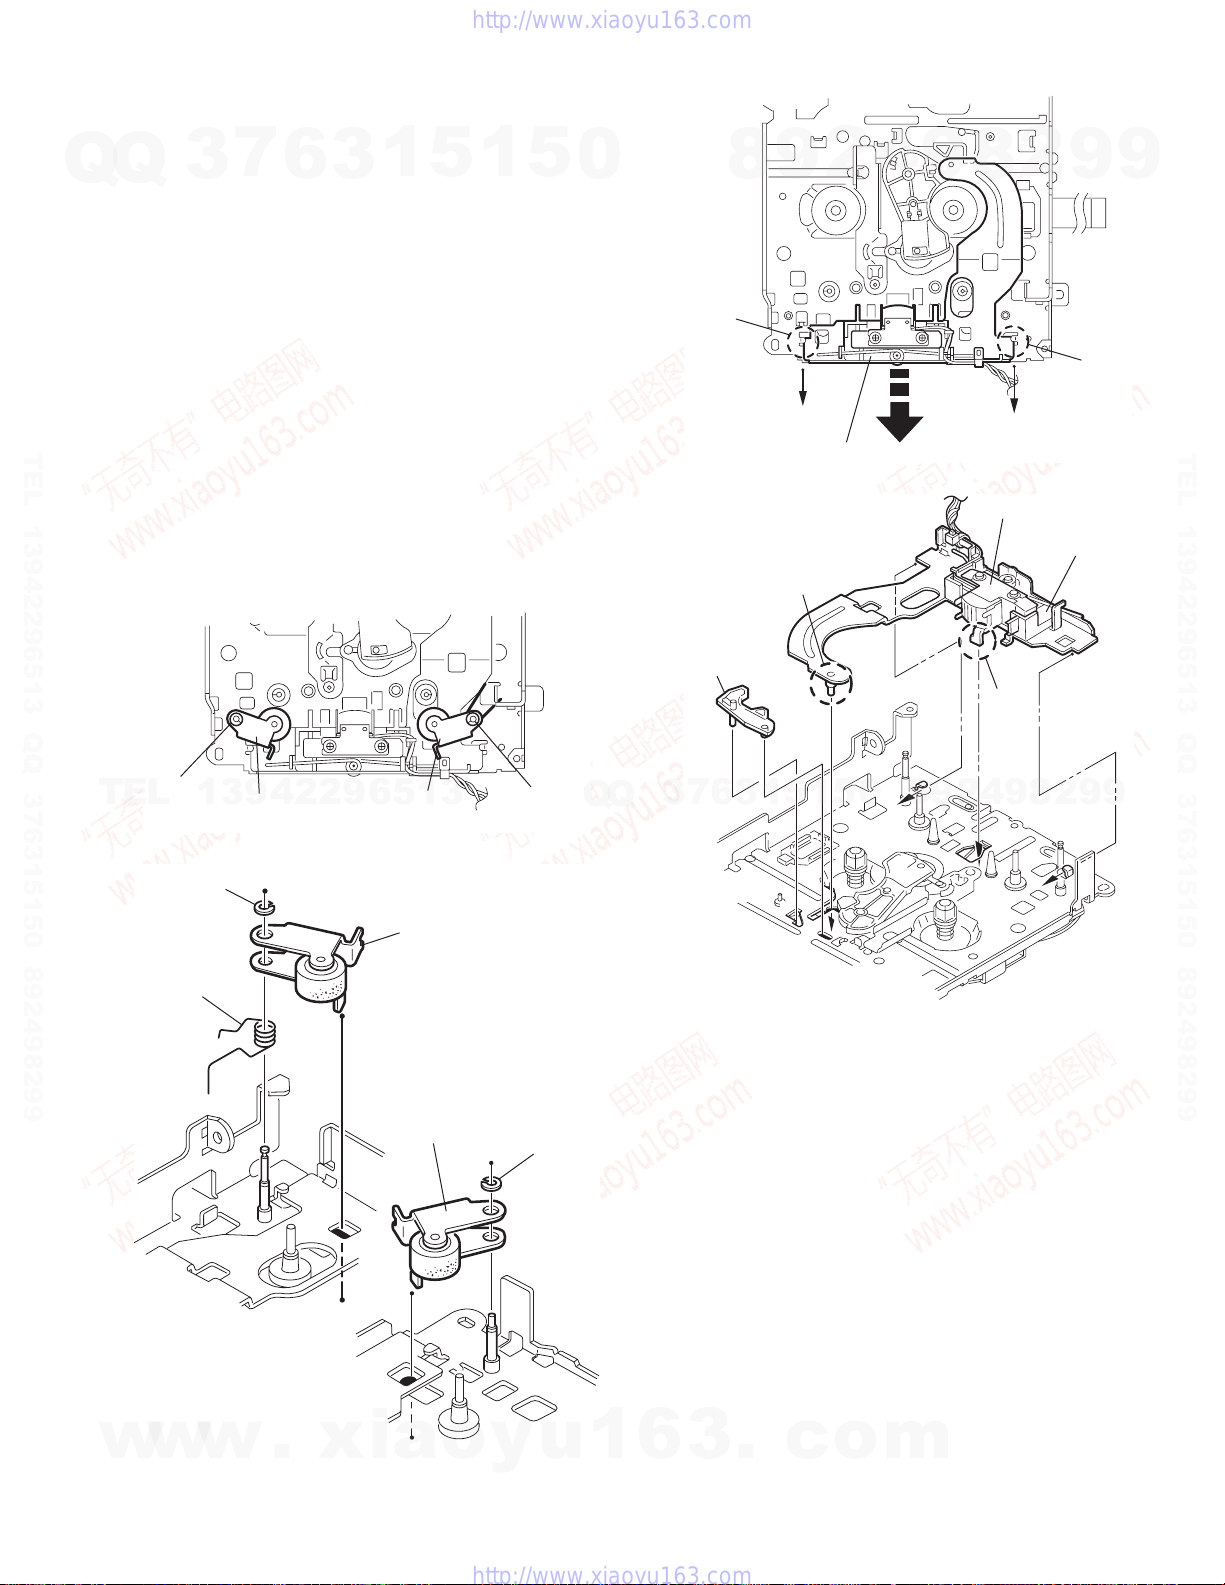
3.3.5 Removing the pinch arm (F) assembly
(See Fig.11 and 12)
(1) Remove the polywasher and pull out the pinch arm (F) as-
Q
TEL 13942296513 QQ 376315150 892498299
sembly.
Q
(2) Remove the compulsion spring.
3.3.6 Removing the pinch arm (R) assembly
(See Fig.11 and 12)
(1) Remove the polywasher and pull out the pinch arm (R) as-
sembly.
3.3.7 Removing the slide chassis assembly
(See Fig.13 and 14)
REFERENCE:
It is not necessary to remove the head and the tape guide.
(1) Move the slide chassis assembly in the direction of the ar-
row to release the two joints l and remove from the main
chassis.
(2) Remove the rack link.
CAUTION:
7
3
When reassembling, first reattach the rack link, and next
fit the boss m and hook n of the slide chassis assembly
to the hole of the main chassis, and engage the two joints
l.
6
3
1
5
1
5
0
Joint l
2
9
8
Slide chassis assembly
Boss m
4
Fig.13
9
8
Head
2
Tape guide
9
Joint l
9
TEL 13942296513 QQ 376315150 892498299
Polywasher
TEL
Polywasher
Compulsion
spring
13942296513
Pinch arm
(R) assembly
Pinch arm
(F) assembly
Fig.11
Pinch arm (F) assembly
Pinch arm
(R) assembly
Polywashe
Polywasher
Q
Q
Rack link
7
3
6
3
1
5
1
5
0
8
Fig.14
9
2
Hook n
9
4
8
2
9
9
w
w
w
.
xia
Fig.12
o
y
u
1
6
3
.
c
o
m
(No.MA220)1-31
Page 32
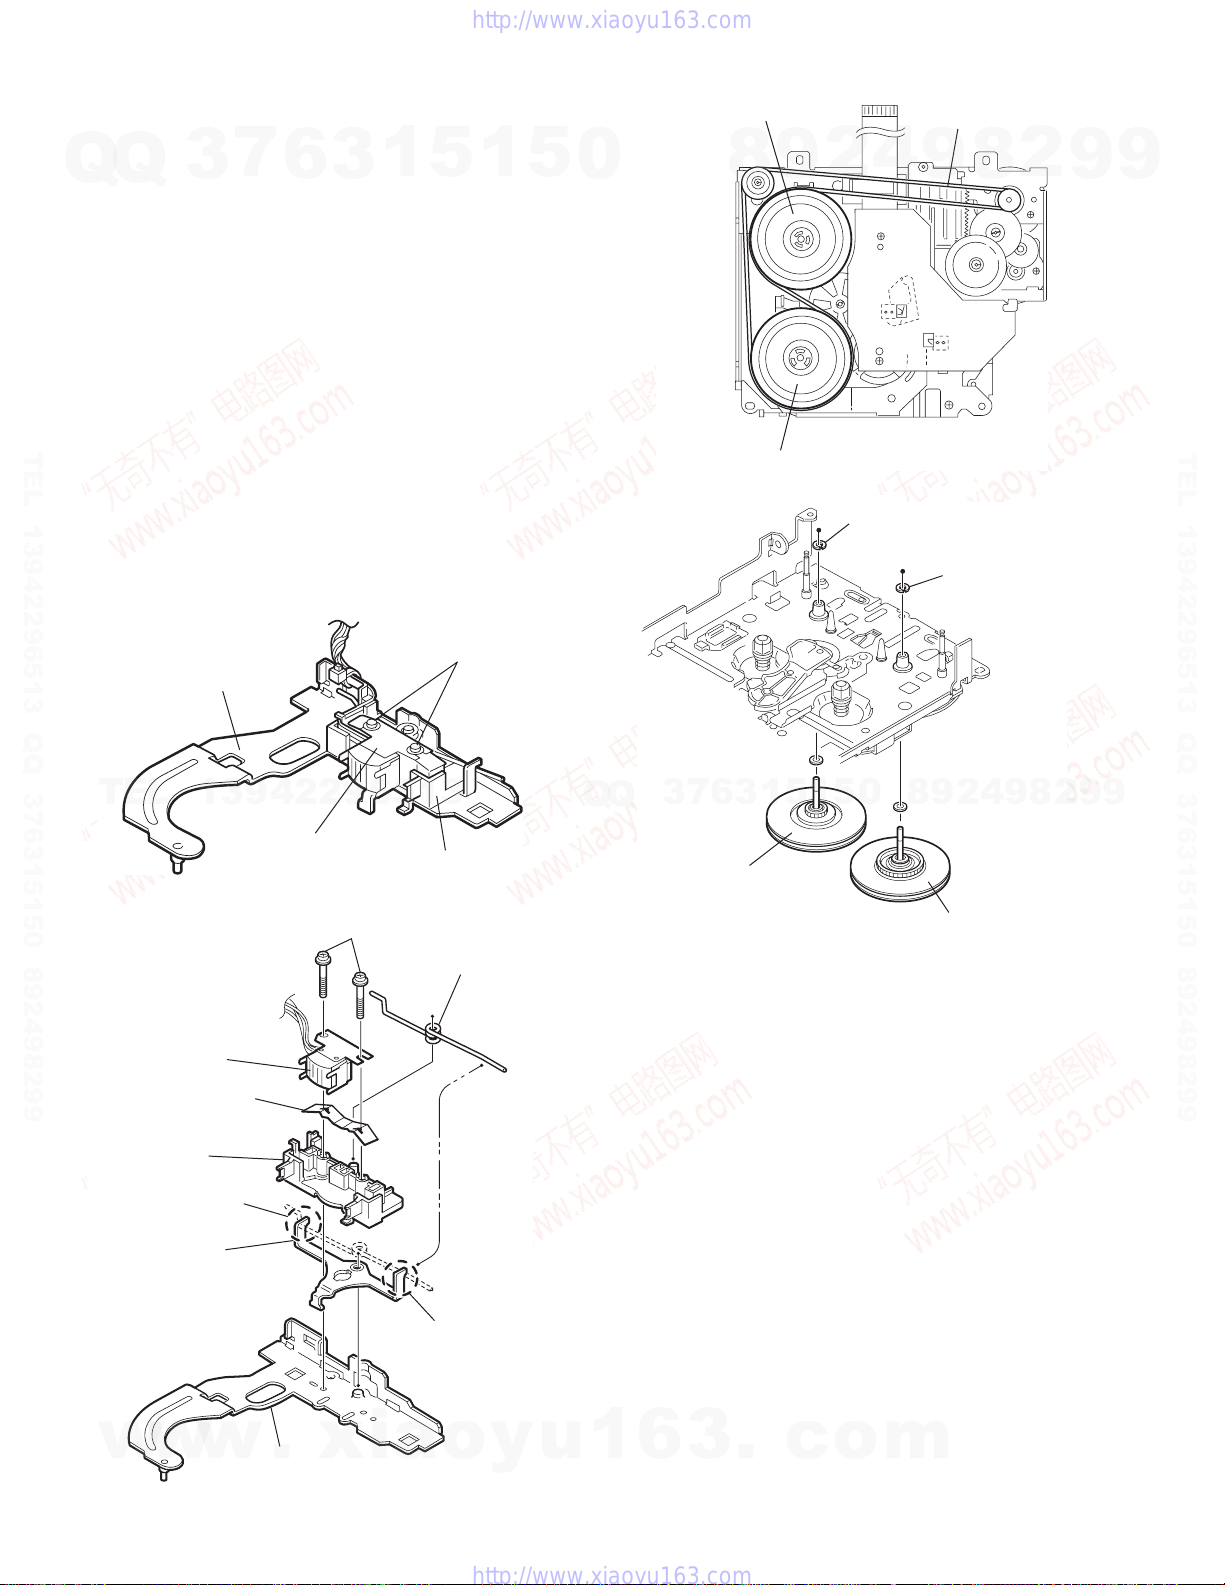
3.3.8 Removing the head / tape guide
(See Fig.16 and 17)
REFERENCE:
It is not necessary to remove the slide chassis assembly.
Q
Q
(1) Remove the band attaching the wire to the head.
(2) Remove the two screws B, the head and the head support
spring.
(3) Remove the pinch arm spring from the tape guide.
(4) Remove the tape guide and the pinch spring arm.
CAUTION:
When reattaching the pinch arm spring, set both end of
it to the pinch spring arm (remarked o).
CAUTION:
When reattaching the head, set the wires into the groove
TEL 13942296513 QQ 376315150 892498299
3.3.9 Removing the flywheel assembly (F) & (R)
REFERENCE:
of the tape guide (Fig.16).
(See Fig.18 and 19)
It is not necessary to remove the slide chassis assembly.
(1) Remove the belt at the bottom.
(2) Remove the two polywashers on the upper side.
(3) Pull out each flywheel assembly downward.
Slide chassis assembly
3
7
6
3
1
5
B
1
5
0
Flywheel assembly (F)
Flywheel assembly (R)
8
9
4
2
Fig.17
Polywasher
Belt
9
Polywasher
8
2
9
9
TEL 13942296513 QQ 376315150 892498299
TEL
Head support spring
Tape guide
Pinch spring arm
13942296513
Head
o
Head
Fig.15
Tape guide
B
Pinch arm spring
9
9
2
8
9
4
2
9
8
0
5
1
5
1
3
6
7
3
Q
Q
Flywheel assembly (F)
Flywheel assembly (R)
Fig.18
o
w
w
1-32 (No.MA220)
w
Slid chassis assembly
.
xia
Fig.16
o
y
u
1
6
3
.
c
o
m
Page 33
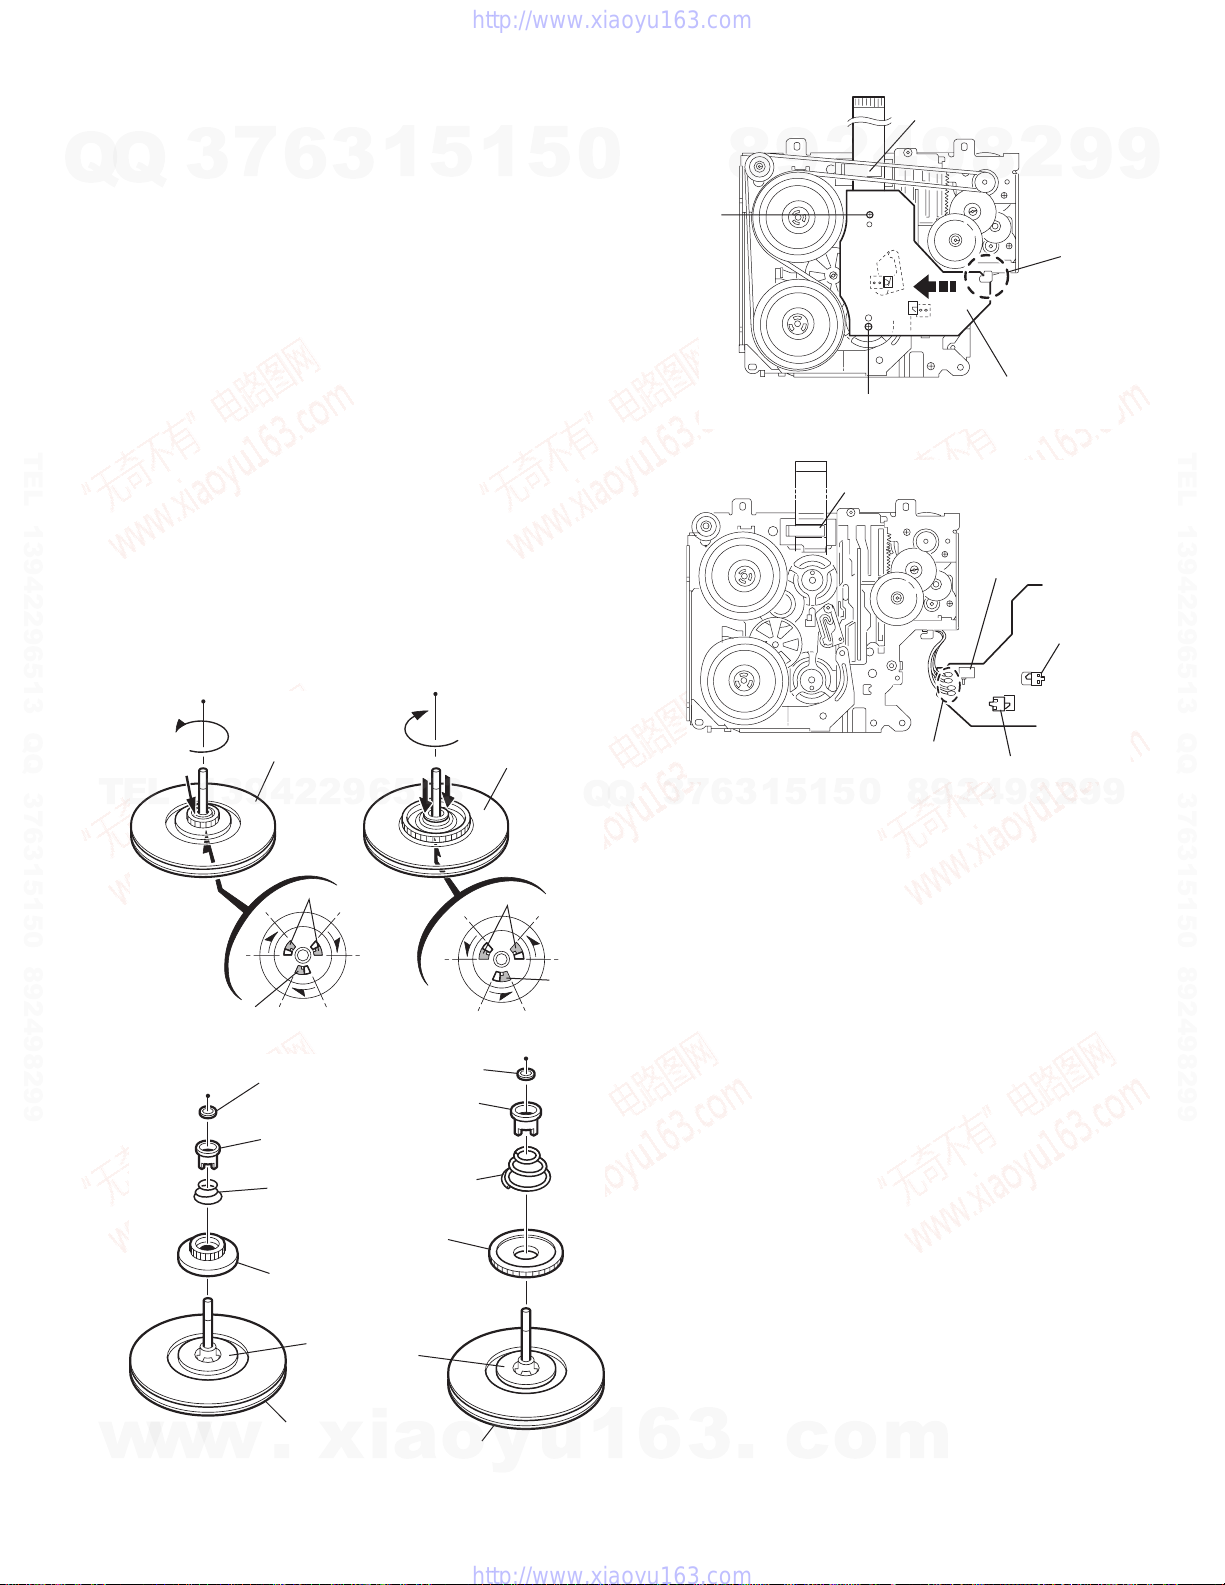
r
3.3.10 Disassembling the flywheel assembly (F)
(See Fig.19 and 20)
(1) Push and turn counterclockwise the spring holder (F) to re-
Q
TEL 13942296513 QQ 376315150 892498299
lease the three joints p on the bottom of the flywheel.
Q
(2) The spring holder (F), the TU spring and the friction gear
play come off.
(3) Remove the polywasher and felt.
3.3.11 Disassembling the flywheel assembly (R)
(See Fig.19 and 20)
(1) Push and turn clockwise the spring holder (R) to release
the three joints q on the bottom of the flywheel.
(2) The spring holder (R), the FF spring and the friction gear
FF come off.
(3) Remove the polywasher and the felt.
3.3.12 Removing the reel board
(See Fig.21 and 22)
(1) Remove the two screws C attaching the reel board.
(2) Move the reel board in the direction of the arrow to release
the joint r.
(3) Unsolder the wires if necessary.
CAUTION:
7
3
When reattaching, confirm operation of the MODE
switch and the ST-BY switch.The mode position between EJECT and ST-BY is optimum for reattaching.Connect the card wire extending from the reel board
to the FFC pad before reattaching the reel board.
6
3
1
5
1
5
0
C
8
9
2
FFC pad
4
C
FFC pad
9
Fig.21
2
8
Reel board
CT-1 switch
MODE switch
9
Joint
9
TEL 13942296513 QQ 376315150 892498299
TEL
Flywheel
assembly (F)
13942296513
Joints p
Joint p
Fig.19
Polywasher
Spring holder (F)
TU spring
Friction gear FF
Friction gear play
Polywasher
Spring holder (R)
FF spring
Flywheel
assembly (R)
Joints q
Joint q
Q
Q
3
7
6
3
1
5
1
5
0
Fig.22
Soldering
9
8
ST-BY switch
9
4
2
8
2
9
9
w
w
Felt
Flywheel assembly (F)
w
.
xia
Fig.20
Felt
Flywheel assembly (R)
o
y
u
1
6
3
.
c
o
m
(No.MA220)1-33
Page 34
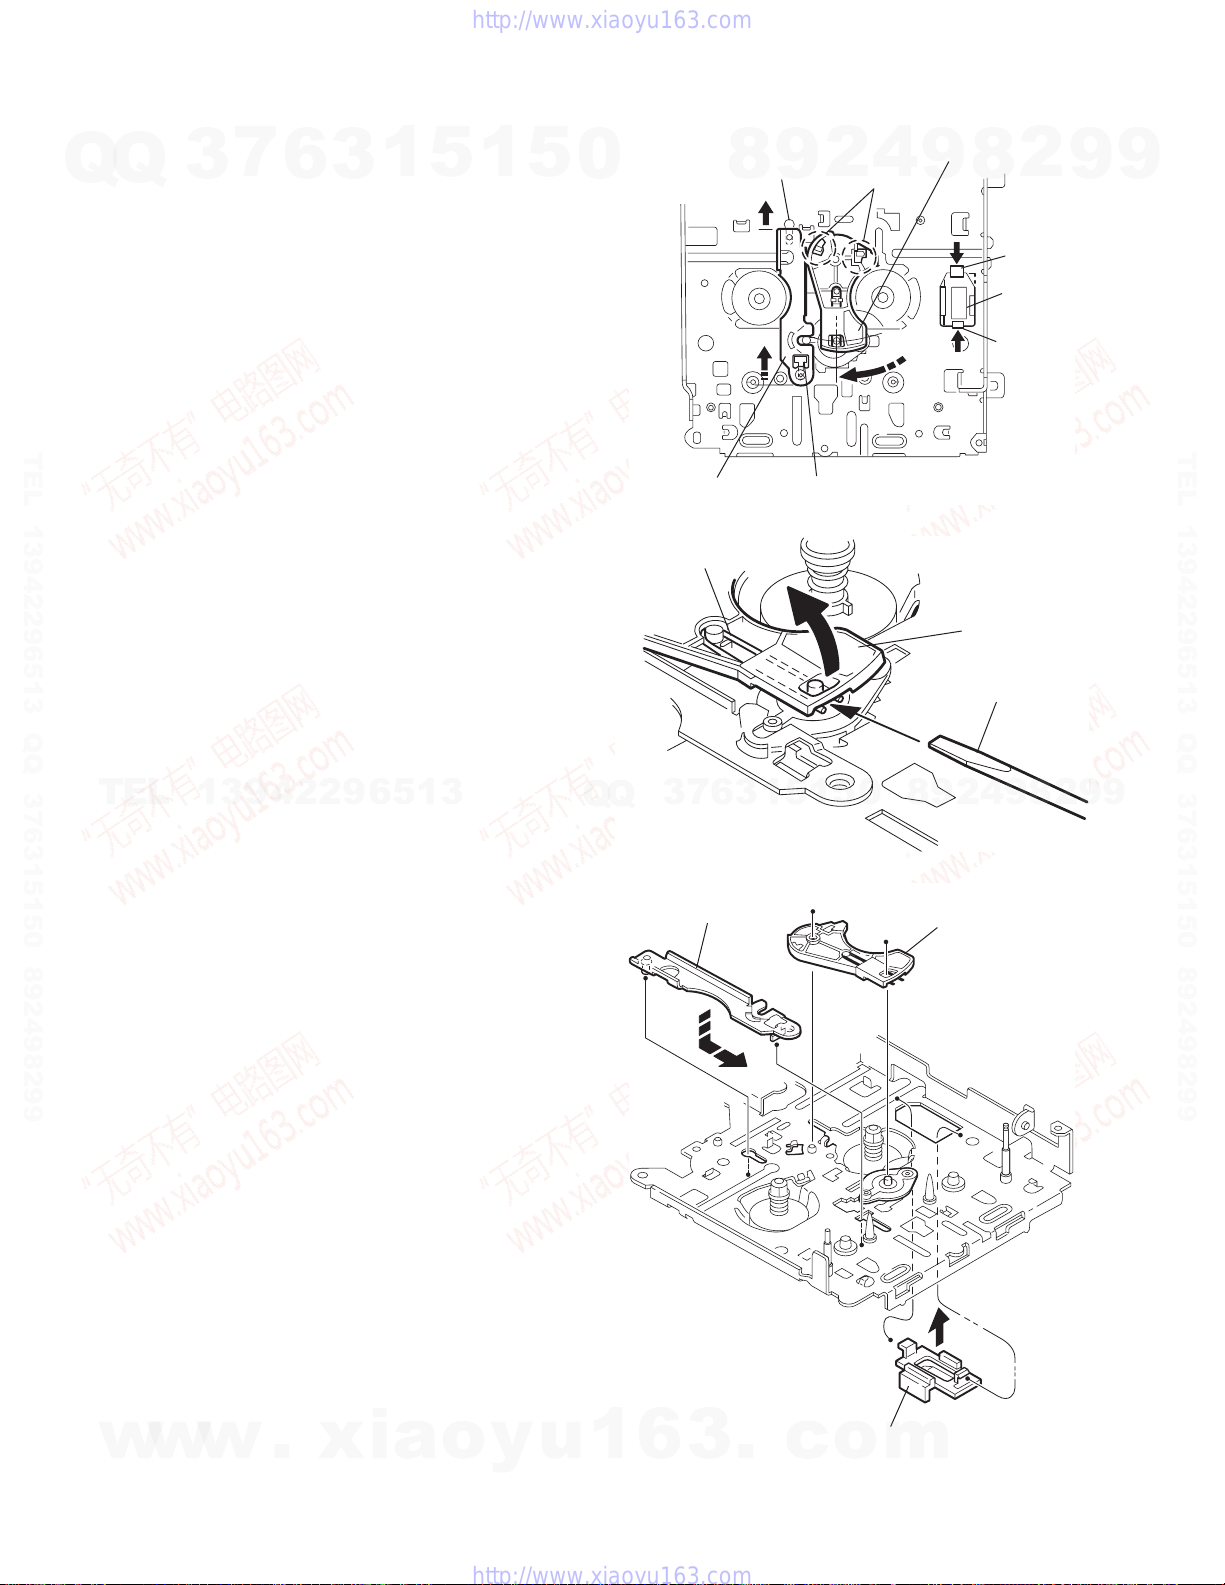
3.3.13 Removing the gear base arm / gear base link assembly
(See Fig.23 to 25)
(1) Move the gear base arm in the direction of the arrow.
(2) Insert a slotted screwdriver to the gear base spring under
Q
Q
the gear base arm, and release the gear base arm upward
from the boss on the gear base assembly.
(3) Remove the gear base arm from the main chassis while re-
leasing the two joints s.
(4) Move the gear base link assemby in the direction of the ar-
row to release the two joints t.
REFERENCE:
When reattaching the gear base arm, make sure that the
boss on the gear base assembly is inside the gear base
spring.
3.3.14 Removing the FFC pad
TEL 13942296513 QQ 376315150 892498299
(See Fig.25 and 27)
(1) Push each joint hook u of the FFC pad and remove toward
the bottom.
3
7
6
3
1
5
1
5
0
Gear base
link assembly
Gear base spring
Joint t
8
9
Joint t
2
Joints s
Fig.23
Gear base arm
4
9
8
2
Hook u
FFC pad
Hook u
9
9
TEL 13942296513 QQ 376315150 892498299
TEL
13942296513
Q
3
Q
Gear base link
assembly
7
6
3
1
5
1
0
5
Fig.24
Gear base arm
Screwdriver
4
2
9
8
Gear base arm
9
8
2
9
9
w
w
1-34 (No.MA220)
w
.
xia
o
y
u
1
6
3
.
c
FFC pad
o
Fig.25
m
Page 35
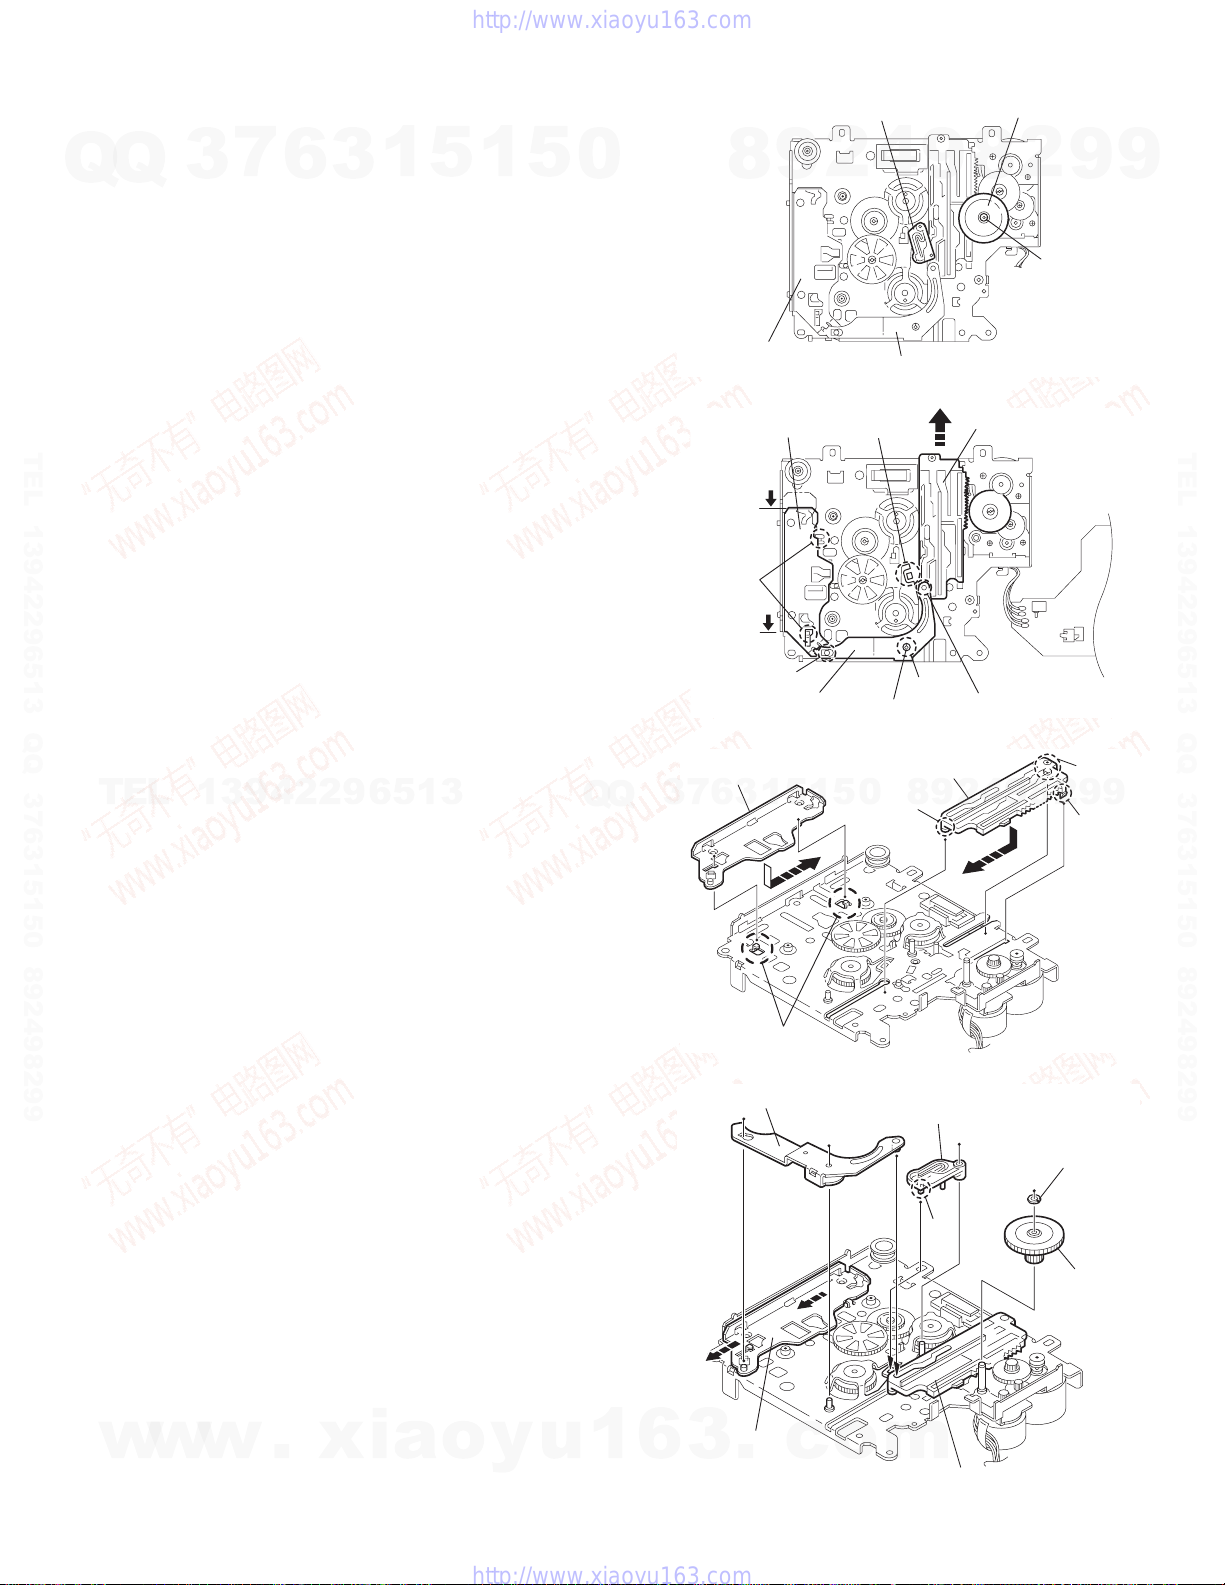
r
r
3.3.15 Removing the mode gear
(See Fig.26 and 29)
(1) Remove the polywasher on the bottom and pull out the
Q
TEL 13942296513 QQ 376315150 892498299
TEL
mode gear.
Q
3.3.16 Removing the mode switch actuator
(See Fig.26, 27 and 29)
(1) Pull out the mode switch actuator at the bottom.
REFERENCE:
3.3.17 Removing the direction link / direction plate
(See Fig.27 to 29)
(1) Remove the polywasher attaching the direction link.
(2) Bring up the direction link to release the three joints x, y
and z at a time.
(3) Move the direction plate in the direction of the arrow to re-
lease the two joints a’.
REFERENCE:
REFERENCE:
3.3.18 Removing the mode rack assembly
(See Fig.27 and 28)
(1) Move the mode rack assembly in the direction of the arrow
to release the two joints b’ and the joint c’.
REFERENCE:
7
3
When reattaching the mode switch actuator to the main
chassis, make sure to set on the shaft and insert v into
the slot w.
When reattaching the direction plate, engage the two
joints a’ and move in the direction of the arrow (Refer to
Fig.28).
When reattaching the direction link, move the direction
plate in the direction of the arrow and engage the three
joint x, y and z at a time (Refer to Fig.29).
6
13942296513
When reattaching, set the two b’ on the bottom of the
mode rack assembly into the slots of the main chassis
and move in the direction of the arrow (See Fig.28).
3
1
5
1
5
0
Q
Q
Direction plate
Direction plate
7
3
8
Direction plate
Joints a'
Joint z
Direction link
1
3
6
Mode switch actuator
4
2
9
Direction link
Fig.26
Slot w
Fig.27
0
Joint b'
Joint y
8
Polywasher
Mode rack assembly
5
1
5
Mode gear
2
8
9
Mode rack assembly
Joint x
9
4
2
9
9
Polywashe
Joint b'
9
2
8
Joint c'
9
TEL 13942296513 QQ 376315150 892498299
9
w
w
w
.
xia
o
y
u
1
6
Joints a'
Direction link
Direction plate
3
.
c
Fig.28
Mode switch actuator
v
o
m
Mode rack assembly
Fig.29
Polywasher
Mode gea
(No.MA220)1-35
Page 36
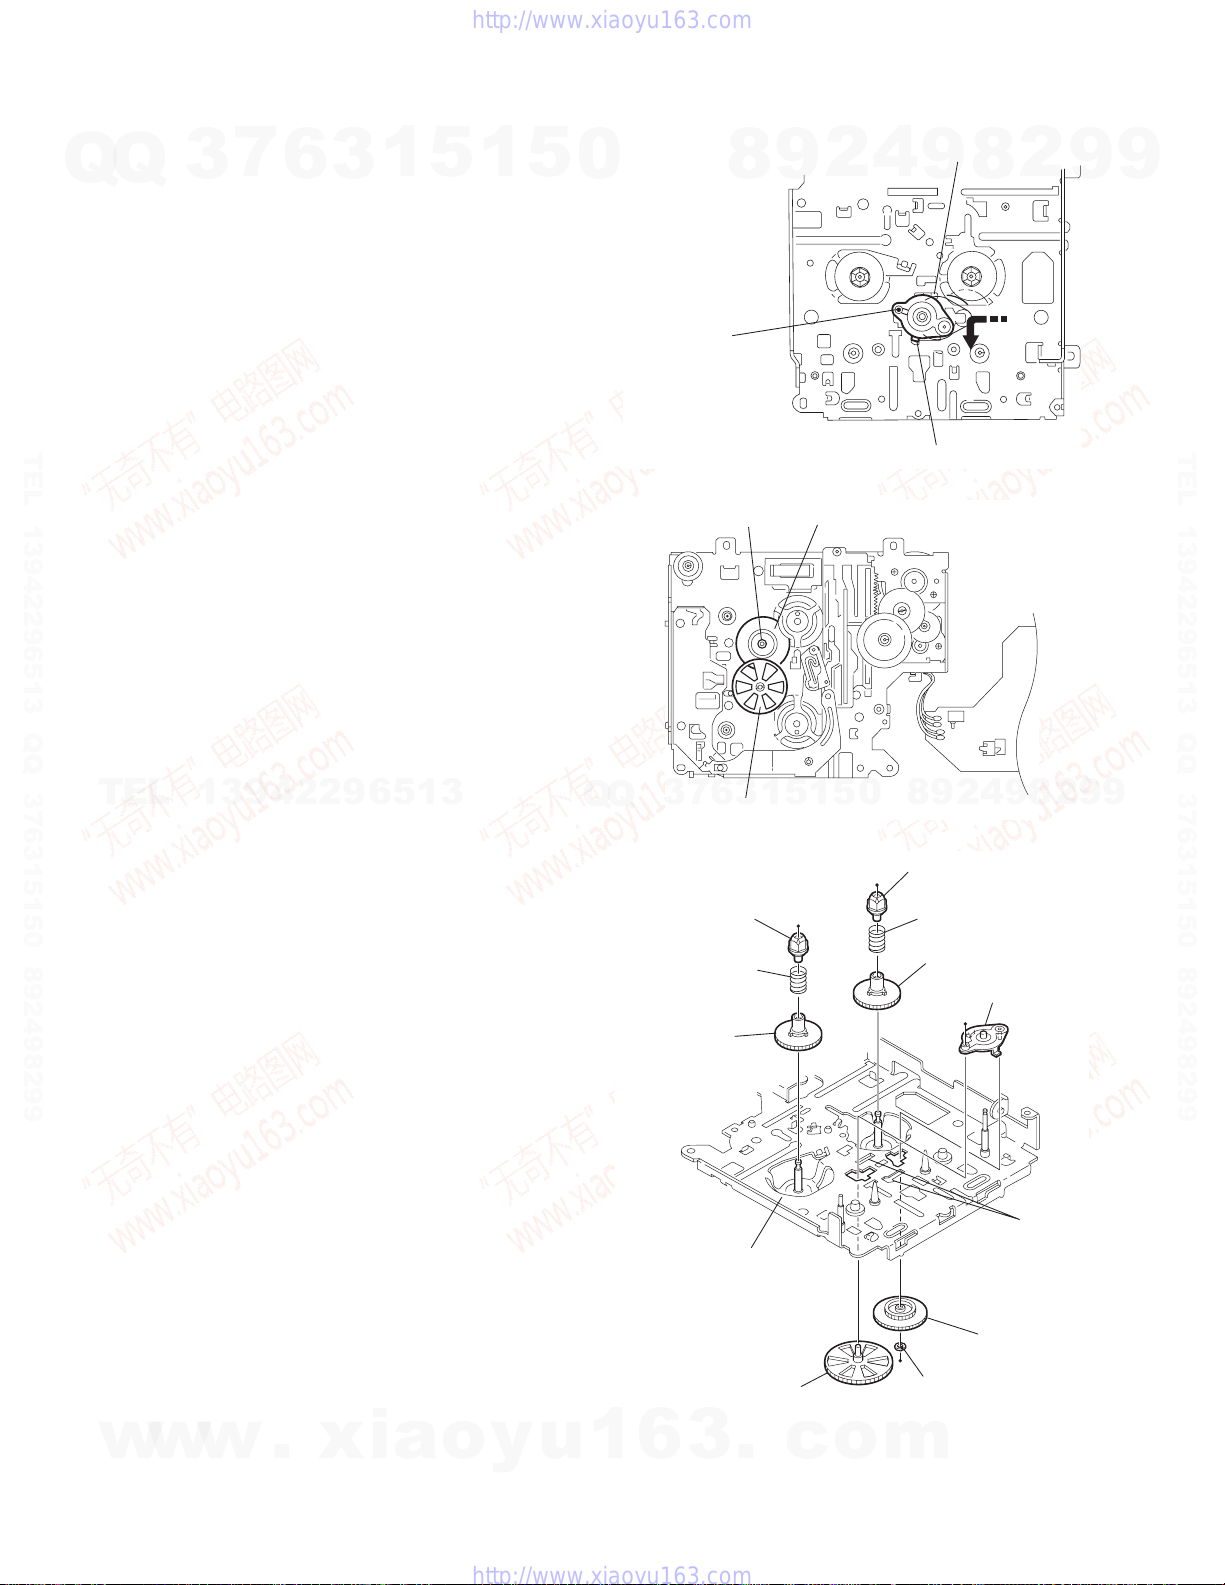
r
3.3.19 Removing the gear base assembly / take up gear / reflector gear
(See Fig.30 to 32)
(1) Push in the pin d’ of the gear base assembly on the upper
side of the body and move the reflector gear toward the
Q
Q
bottom, then pull out.
(2) Remove the polywasher on the bottom and pull out the
take up gear.
(3) Move the gear base assembly in the direction of the arrow
to release it from the two slots e’ of the main chassis.
REFERENCE:
The parts are damaged when removed. Please replace
with new ones.
3.3.20 Removing the reel driver / reel spindle
(See Fig.32)
(1) Draw out the reel driver from the shaft on the main chassis
TEL 13942296513 QQ 376315150 892498299
and remove the reel driver spring and the reel spindle respectively.
CAUTION:
The reel driver is damaged when removed. Please replace with a new one.
3
7
6
3
1
5
1
5
0
Gear base assembly
Pin d'
8
Polywasher
2
9
Fig.30
Take up gear
4
Slot e'
9
Slot e'
8
2
9
9
TEL 13942296513 QQ 376315150 892498299
TEL
13942296513
3
Q
Q
Reel driver
Reel driver spring
Reel spindle
Main chassis
1
3
6
7
Reflector gear
5
1
0
5
Fig.31
4
2
9
8
Reel driver
Reel driver spring
Reel spindle
Gear base assembly
Take up gea
8
9
Slots e’
2
9
9
w
w
1-36 (No.MA220)
w
.
xia
o
y
u
1
6
Reflector gear
3
.
c
Fig.32
o
Polywasher
m
Page 37
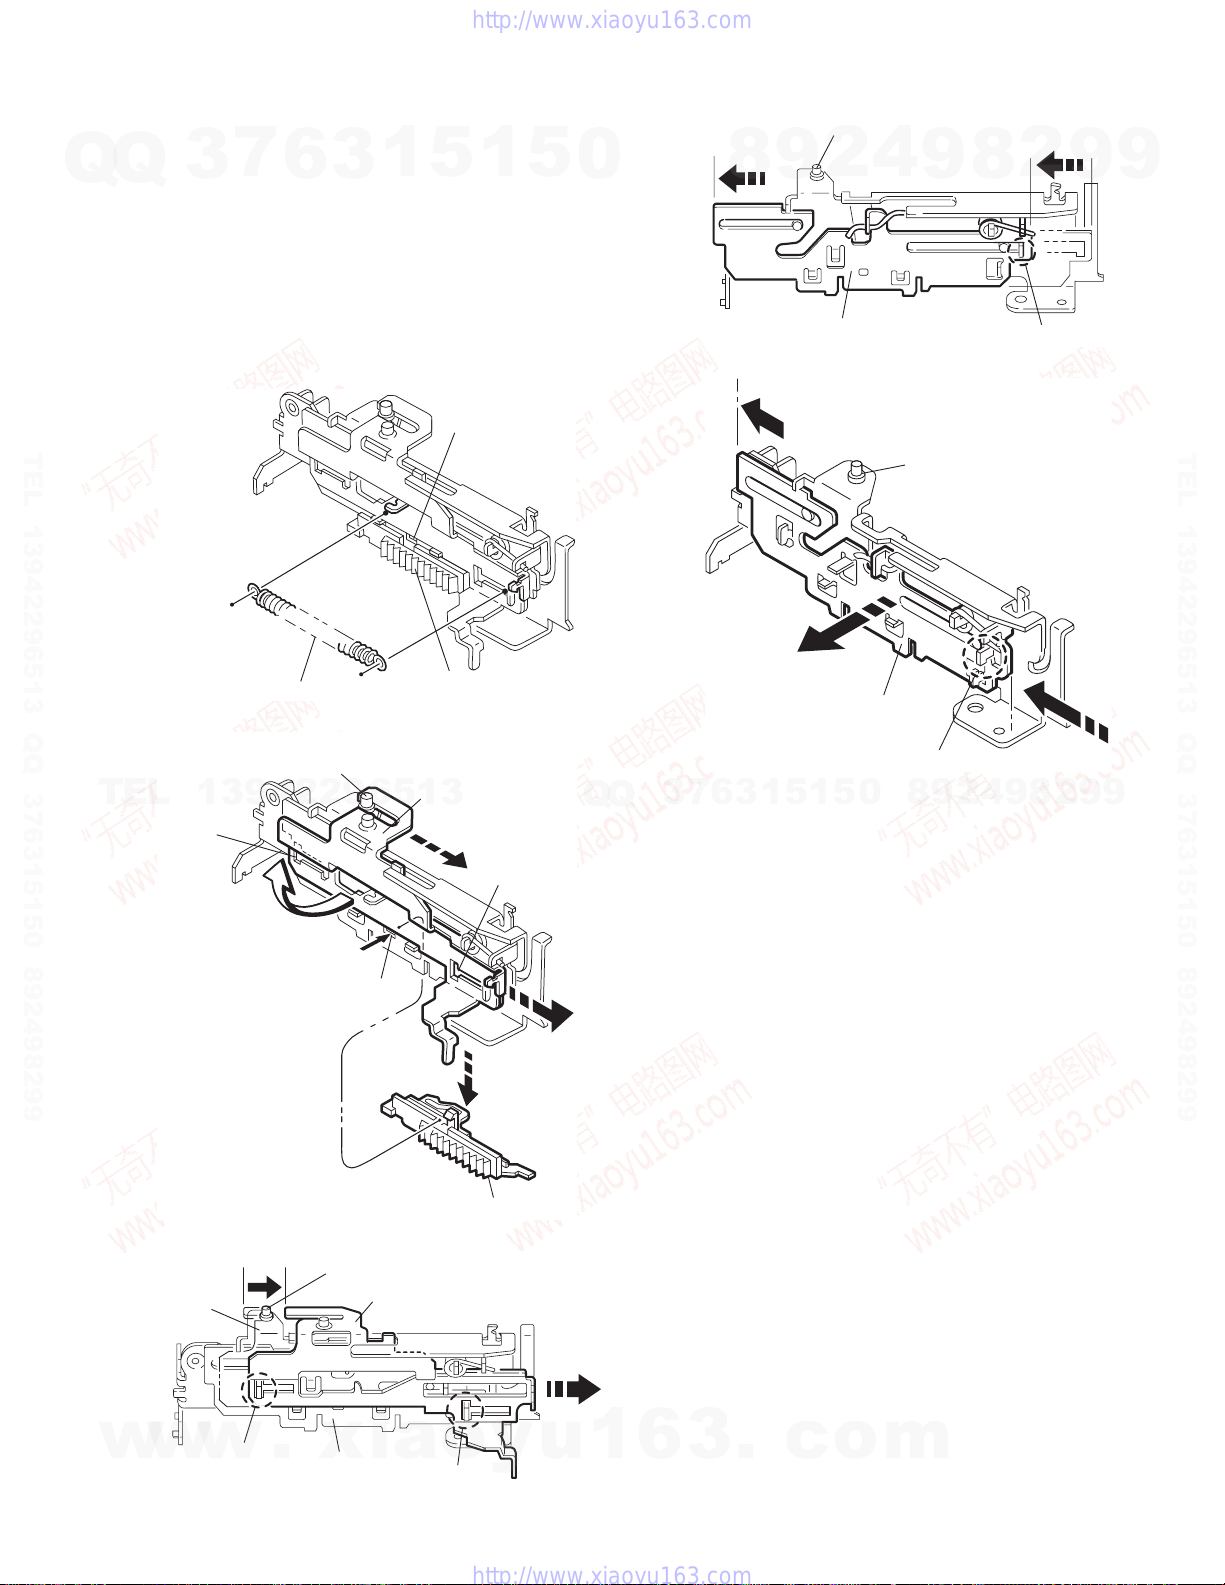
3.3.21 Removing the side bracket assembly
(See Fig.33 to 37)
(1) Remove the eject cam plate spring.
Q
TEL 13942296513 QQ 376315150 892498299
(2) Push the joint f’ through the slot to remove the load rack
Q
downward.
(3) Move the eject cam limiter in the direction of the arrow to
release it from the boss g’ of the side bracket assembly and
from the two joints h’.
(4) Move the eject cam plate in the direction of the arrow to re-
lease the joint i’.
CAUTION:
7
3
When reassembling, confirm operation of each part before reattaching the eject cam plate spring.
6
3
1
5
Joint f'
1
5
0
Side bracket assembly
8
Boss g'
2
9
Eject cam plate
4
Fig.36
Side bracket assembly
9
8
2
Joint i'
9
9
TEL 13942296513 QQ 376315150 892498299
TEL
Side bracket
assembly
Eject cam plate spring
Fig.33
Side bracket assembly
Boss g'
13942296513
Joint h'
Joint f'
Fig.34
Boss g'
Load rack
Eject cam limiter
Joint h'
Load rack
Eject cam limiter
Q
Q
3
7
6
3
Eject cam plate
1
5
1
5
0
Joint i'
Fig.37
8
9
2
4
9
8
2
9
9
w
w
w
Joint h'
.
xia
Eject cam plate
Fig.35
o
y
u
1
6
Joint h'
3
.
c
o
m
(No.MA220)1-37
Page 38
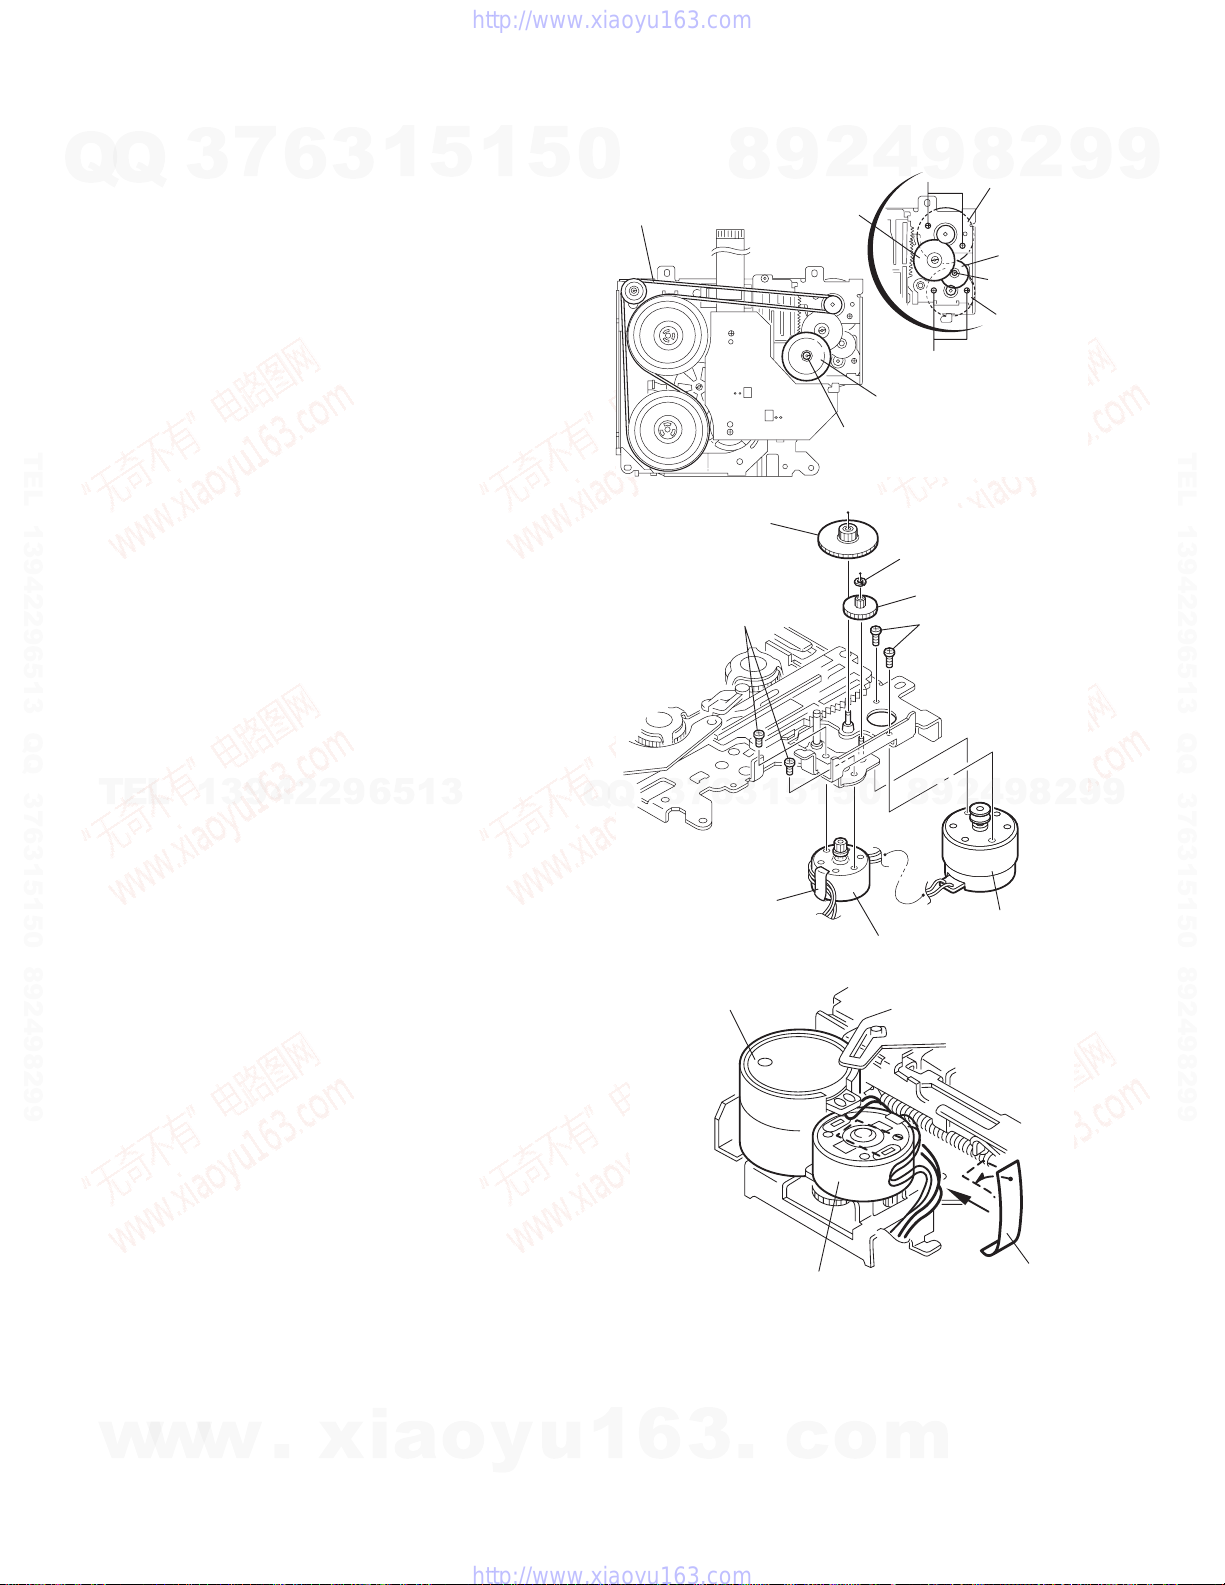
r
r
3.3.22 Removing the main motor assembly / sub motor assembly
(See Fig.38 to 40)
(1) Remove the belt at the bottom.
(2) Remove the polywasher and pull out the mode gear.
Q
Q
(3) Pull out the reduction gear (B).
(4) Remove the polywasher and pull out the reduction gear
(A).
(5) Remove the two screws attaching the main motor assem-
bly.
(6) Remove the two screws E attaching the sub motor assem-
bly.
(7) Unsolder the wires on the reel board if necessary.
CAUTION:
When reassembling, adjust the length of the wires extending from the sub motor asswmbly by attaching them
TEL 13942296513 QQ 376315150 892498299
to the side of the sub motor assembly with the wires extending from the main motor assembly using a spacer.
3
7
6
3
1
5
1
5
0
Belt
Reduction gear (B)
2
9
8
Reduction gear (B)
Polywasher
Fig.38
E
D
4
9
E
Mode gear
Polywasher
Reduction gear (A)
D
Main motor
2
8
assembly
Reduction
gear (A)
Polywashe
Sub motor
assembly
9
9
TEL 13942296513 QQ 376315150 892498299
TEL
13942296513
7
3
Q
Q
Main motor assembly
5
1
5
1
3
6
Spacer
Sub motor assembly
Fig.39
Sub motor assembly
Fig.40
9
8
0
Main motor assembly
2
4
9
Space
8
2
9
9
w
w
1-38 (No.MA220)
w
.
xia
o
y
u
1
6
3
.
c
o
m
Page 39
SECTION 4
ADJUSTMENT
7
Q
Q
4.1 Adjustment method
Test instruments required for adjustment
TEL 13942296513 QQ 376315150 892498299
3
(1) Digital oscilloscope (100MHz)
(2) Frequency counter meter
(3) Electric voltmeter
(4) Wow & flutter meter
(5) Test tapes
• VT724...........................For DOLBY level measurement
• VT739..............For playback frequency measurement
• VT712....For wow flutter & tape speed measurement
• VT703........................For head azimuth measurement
(6) Torque gauge............................Cassette type for CTG-N
(7) Laser power meter(Reader:LP800102)
(8) Prove for MD (Reader:LP8010-02)
(9) Pre masterd disc (TGYS-1)
(10)Test disc (JVC:CTS1000)
6
1
3
5
(Mechanism adjustment)
1
5
0
Standard volume position
Balance and Bass, Treble volume, Fader : Center (Indication "0")
Loudness, Dolby NR, Sound, Cruise : Off
Volume position is about 2V at speaker output with following
conditions, Playback the test tape VT721.
AM mode 999kHz/62dB, INT/400Hz, 30%
FM mono mode 97.9MHz/66dB, INT/400Hz, 22.5kHz
FM stereo mode 1kHz, 67.5kHz dev. pilot 7.5kHz dev.
Output level 0dB (1µV,50Ω/open terminal)
8
9
4
2
modulation signal on receiving.
deviation pilot off mono
9
8
2
9
9
TEL 13942296513 QQ 376315150 892498299
Measuring conditions (Amplifier section)
• Power supply voltage.............. DC14.4V (11V to 16V allowance)
• Load impedance............ 4Ω (4Ω to 8Ω allowance)
• Line out level/Impedance..............1.0V/20k load (250 nWb/m)
TEL
13942296513
Q
Q
3
7
6
3
1
5
1
5
0
8
9
2
4
9
8
2
9
9
w
w
w
.
xia
o
y
u
1
6
3
.
c
o
m
(No.MA220)1-39
Page 40
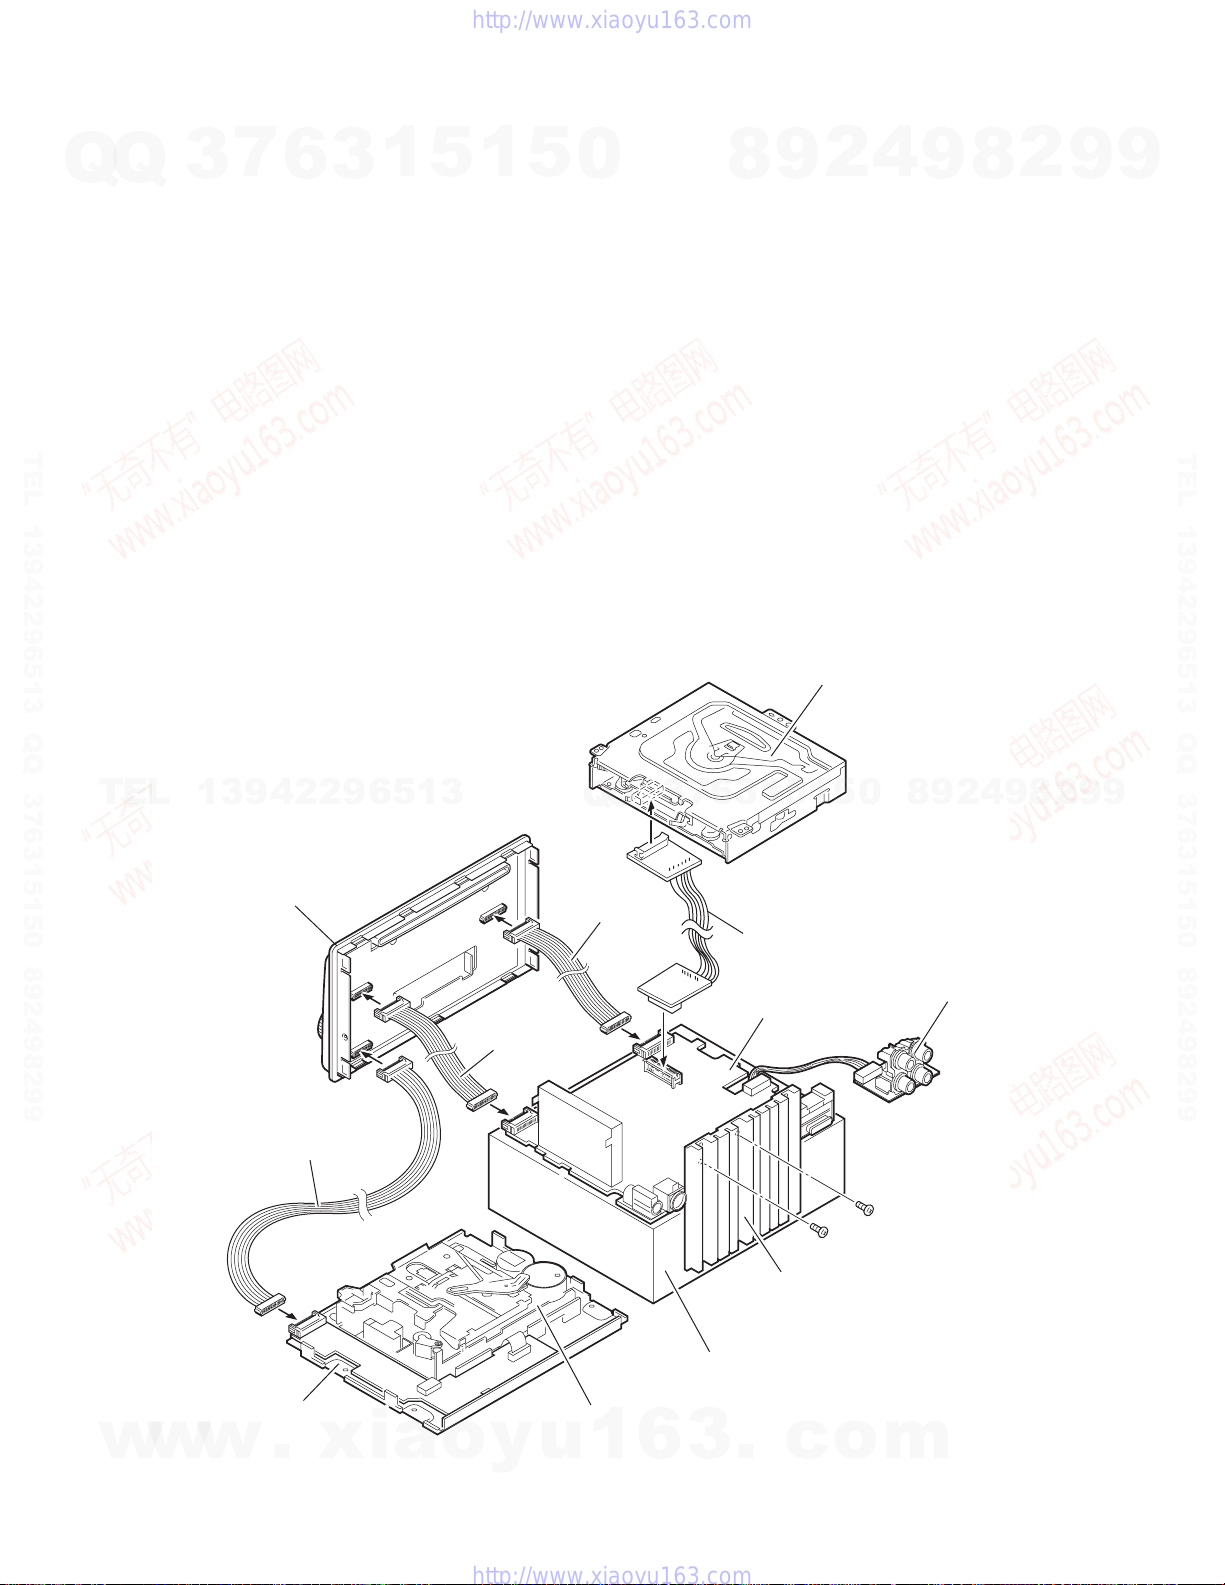
Information for using a car audio service jig
(1) We're advancing efforts to make our extension cords common for all car audio products.
Please use this type of extension cord as follows.
(2) As a U-shape type top cover is employed, this type of extension cord is needed to check operation of the mechanism assembly
Q
Q
after disassembly.
(3) Extension cord : EXTSH002-22P ( 22 pin extension cord ) For connection between the mechanism assembly and main board.
EXTXC004-20P ( 20 pin extension cord ) For connection between the front panel assembly and main board.
EXTXC004-16P ( 16 pin extension cord ) For connection between the front panel assembly and main board.
EXTXC004-16P ( 16 pin extension cord ) For connection between the front panel assembly and cassette mechanism assembly.
(4) Check for mechanism driving section such as motor ,etc.
Disassembly method
(1) Remove the front panel assembly.
(2) Remove the heat sink.
(3) Remove the rear bracket.
TEL 13942296513 QQ 376315150 892498299
(4) Remove the bottom chassis assembly and middle chassis assembly.
(5) Remove the main board.
(6) Remove the CD mechanism assembly.
(7) Reattach the heat sink with two screws to the main board. (Refer to Disassembly method.)
(8) Connect the main board, front panel assembly, bottom chassis assembly and CD mechanism assembly with the extension
cords.
CAUTION :
Be sure to attach a heat sink on the power amplifier IC of a main board when supplying the power.
If voltage is applied without attaching the heat sink, the
power amplifier IC will be destroyed by heat.
3
7
6
3
1
5
1
5
0
4
2
9
8
CD mechanism assembly
9
8
2
9
9
TEL 13942296513 QQ 376315150 892498299
TEL
13942296513
Front panel assembly
EXTXC004-16P
Q
EXTXC004-20P
EXTXC004-16P
5
1
3
6
7
3
Q
EXTSH002-22P
Main board
Heat sink
*The box etc. is used as a stand.
1
5
0
2
9
8
Func board
4
9
8
2
9
9
Bottom chassis assembly
w
w
1-40 (No.MA220)
w
.
xia
Cassette mechanism assembly
o
y
u
1
6
3
.
c
o
m
Page 41
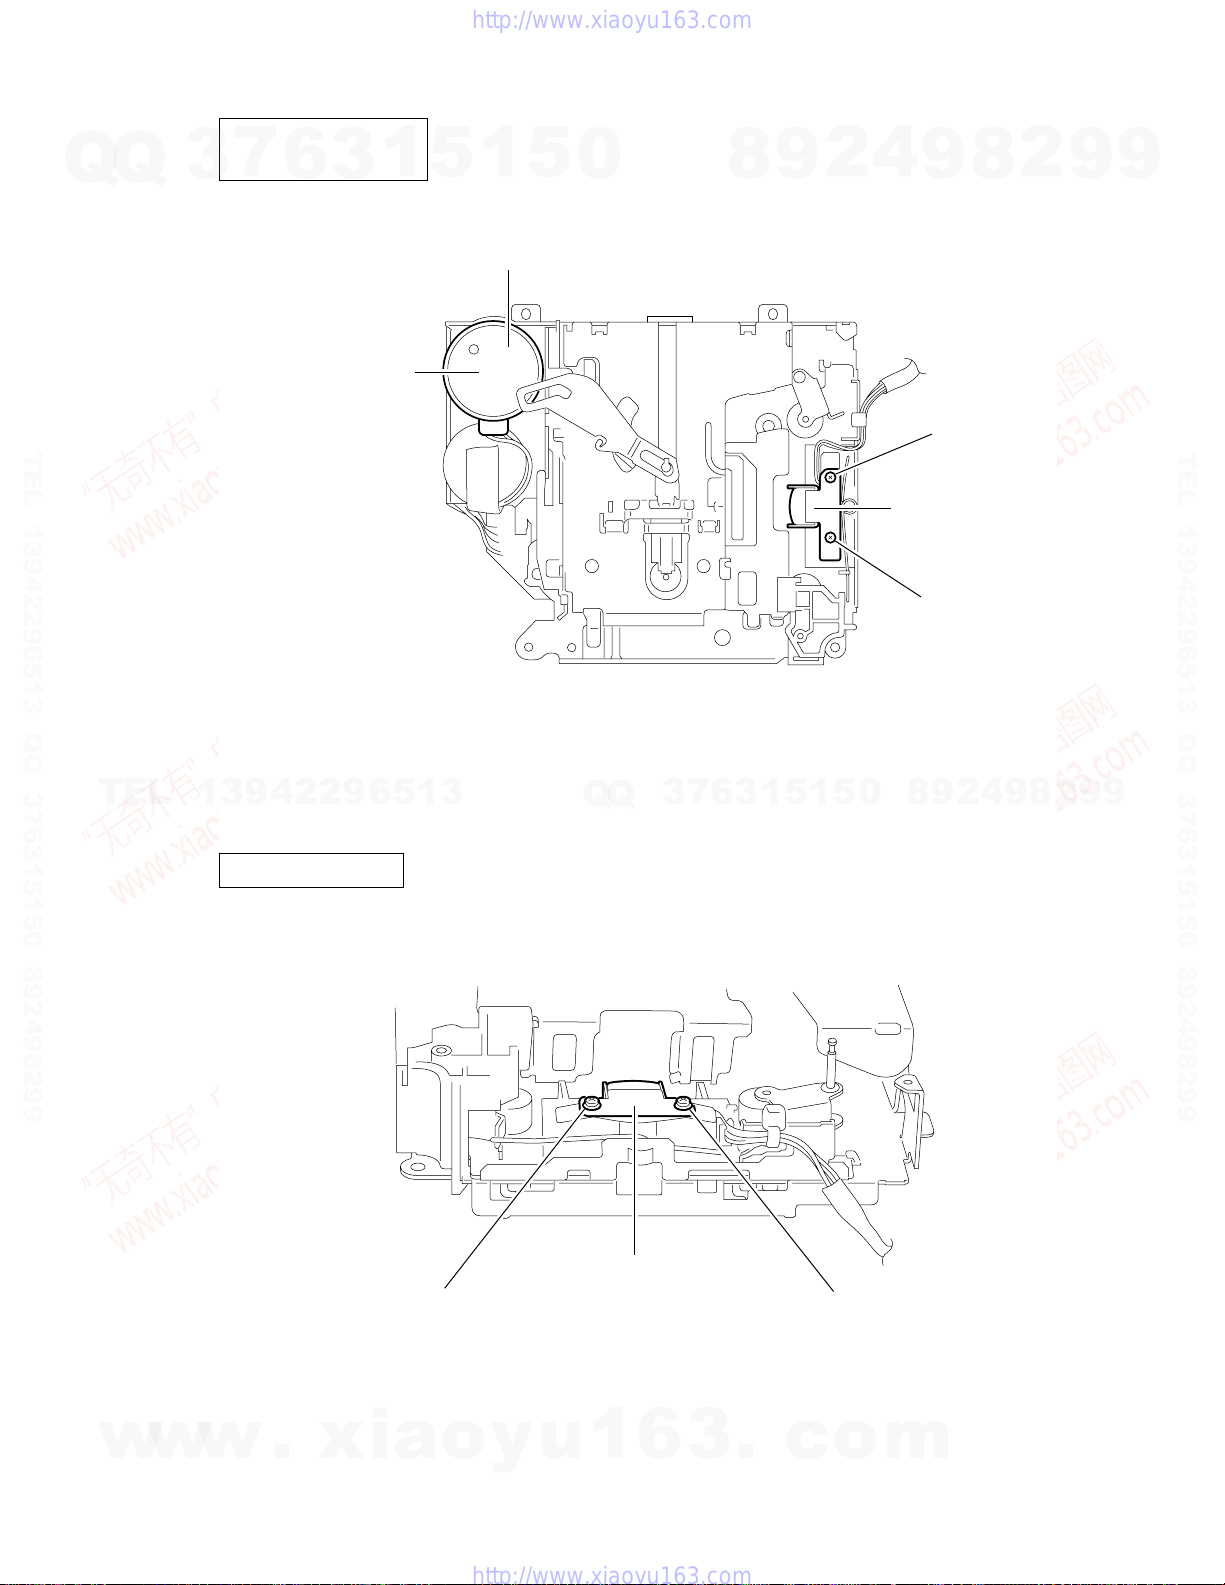
A
Arrangement of adjusting & test points
Cassette mechanism
(Surface)
7
Q
Q
TEL 13942296513 QQ 376315150 892498299
3
6
Tape speed adjust
3
1
5
Motor assembly
1
5
0
8
9
2
4
9
Azimuth screw
Playback head
2
8
(Forward)
9
9
TEL 13942296513 QQ 376315150 892498299
TEL
13942296513
Head section view
Q
Q
3
7
6
3
1
5
1
Azimuth screw B
8
0
5
(Reverse)
4
2
9
9
8
2
9
9
w
w
w
.
xia
Azimuth screw B
(Reverse)
o
y
Playback head
u
1
6
3
Azimuth screw A
.
c
(Forward)
o
m
(No.MA220)1-41
Page 42
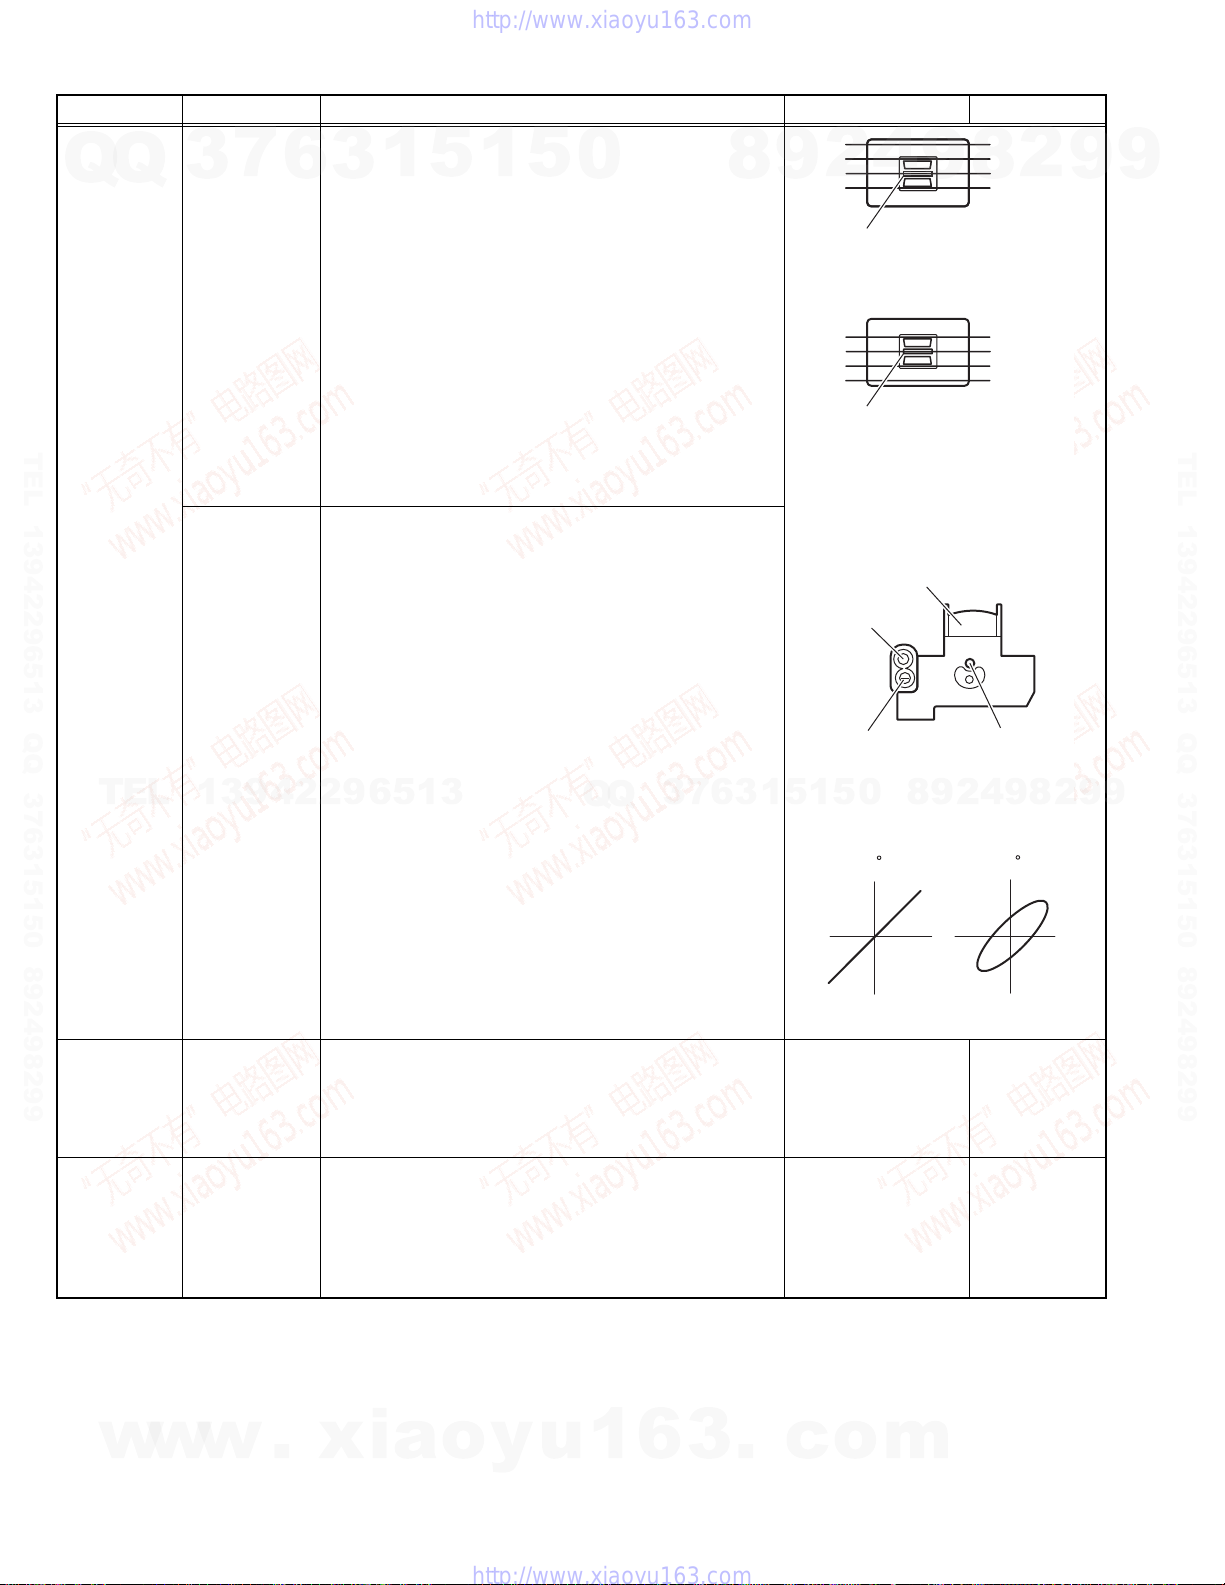
Item Conditions Adjustment and Confirmation methods S.Values Adjust
1. Head azimuth adjust-
Q
Q
ment
TEL 13942296513 QQ 376315150 892498299
Test tape:
SCC-1659
7
3
VT703 (10kHz)
6
Head height adjustment
Adjust the azimuth directly. When you adjust the height
1
5
1
3
using a mirror tape, remove the cassette housing from
the mechanism chassis. After installing the cassette
housing, perform the azimuth adjustment.
(1) Load the SCC-1659 mirror tape. Adjust with height
adjustment screw A and azimuth adjustment screw
B so that line A of the mirror tape runs in the center
between Lch and Rch in the reverse play mode.
(2) After switching from REV to FWD then to REV,
check that the head position set in procedure 1 is not
changed. (If the position has shifted, adjust again
and check.)
(3) Adjust with azimuth adjustment screw B so that line
B of the mirror tape runs in the center between Lch
and Rch in the forward play mode.
5
0
8
9
4
2
Head shield
The head is at low position
during.
Head shield
The head is at High position
during REV.
9
8
A line
B line
2
9
9
TEL 13942296513 QQ 376315150 892498299
TEL
2. Tape speed
and wow flutter confirmation
3. Play back
frequency response confirmation
Test tape:
VT724 (1kHz)
VT703 (10kHz)
VT721 (315Hz)
13942296513
Test tape:
VT712 (3kHz)
Test tape:
VT724 (1kHz)
VT739 (63Hz /
1kHz / 10kHz)
Head azimuth adjustment
(1) Load VT724 (1kHz) and play it back in the reverse
play mode. Set the Rch output level to max.
(2) Load VT703 (10kHz) and play it back in the forward
play mode. Adjust the Rch and Lch output levels to
max, with azimuth adjustment screw B. In this case,
the phase difference should be within 45 .
(3) Engage the reverse mode and adjust the output lev-
el to max, with azimuth adjustment screw C.(The
phase difference should be 45 or more.)
(4) When switching between forward and reverse
modes, the difference between channels should be
within 3dB. (Between FWD L and R, REV L and R.)
(5) When VT721 (315Hz) is played back, the level differ-
ence between channels should be within 1.5dB.
(1) Check to see if the reading of the F, counter / wow
flutter meter is within 3015Hz to 3045Hz (FWD/
REV), and less than 0.35% (JIS RMS).
(2) In case of out of specification, adjust the motor with
a built-in volume resistor.
(1) Play test tape VT724, and set the volume position at
2V.
(2) Play test tape VT739 and confirm.1kHz / 10kHz: -1
±3dB,1kHz / 63Hz: 0 ±3dB,
(3) When 10kHz is out of specification, it will be neces-
sary to read adjust the azimuth.
Q
Q
3
7
6
Output
level:
Maximum
FWD Adj B
REV Adj C
5
1
5
1
3
Tape speed:
3015Hz to 3045Hz
Wow flutter:
less than 0.35%
Speaker out
1kHz / 63Hz: 0 ±3dB
1kHz / 10kHz: -1 ±3dB
PBHead
HEIGHT Adj A
9
4
2
9
8
0
(0 ) (45 )
phase
Built-in volume
resistor
8
2
9
9
The tuner section is of an adjustment-freedesign. In case the tuner is in trouble, replace the tuner pack.
w
w
w
1-42 (No.MA220)
.
xia
o
y
u
1
6
3
.
c
o
m
Page 43
4.2 Service mode
7
Q
Q
TEL 13942296513 QQ 376315150 892498299
3
Set up
6
Press POWER ON [SEL] [POWER] [CD EJECT] together more than 2 sec.
UP,DW button to select
SEL button to determination
For next operation, service mode is stop automaticaly.
1. No input signal (key operation) more than 5 sec.
2. press other key without SEL,UP,DOWN.
3. ACC to OFF.
1
5
1
3
DEL EPROM EEPROM clear
CD ERROR CD error history call change by FF button E1 to TOTAL
DEL CD CD error history clear
MAIN TEMP Templature indication of main board
VERSION Micon version indication
5
0
8
9
2
4
9
8
2
9
9
TEL 13942296513 QQ 376315150 892498299
TEL
13942296513
Q
Q
3
7
6
3
1
5
1
5
0
8
9
2
4
9
8
2
9
9
w
w
w
.
xia
o
y
u
1
6
3
.
c
o
m
(No.MA220)1-43
Page 44
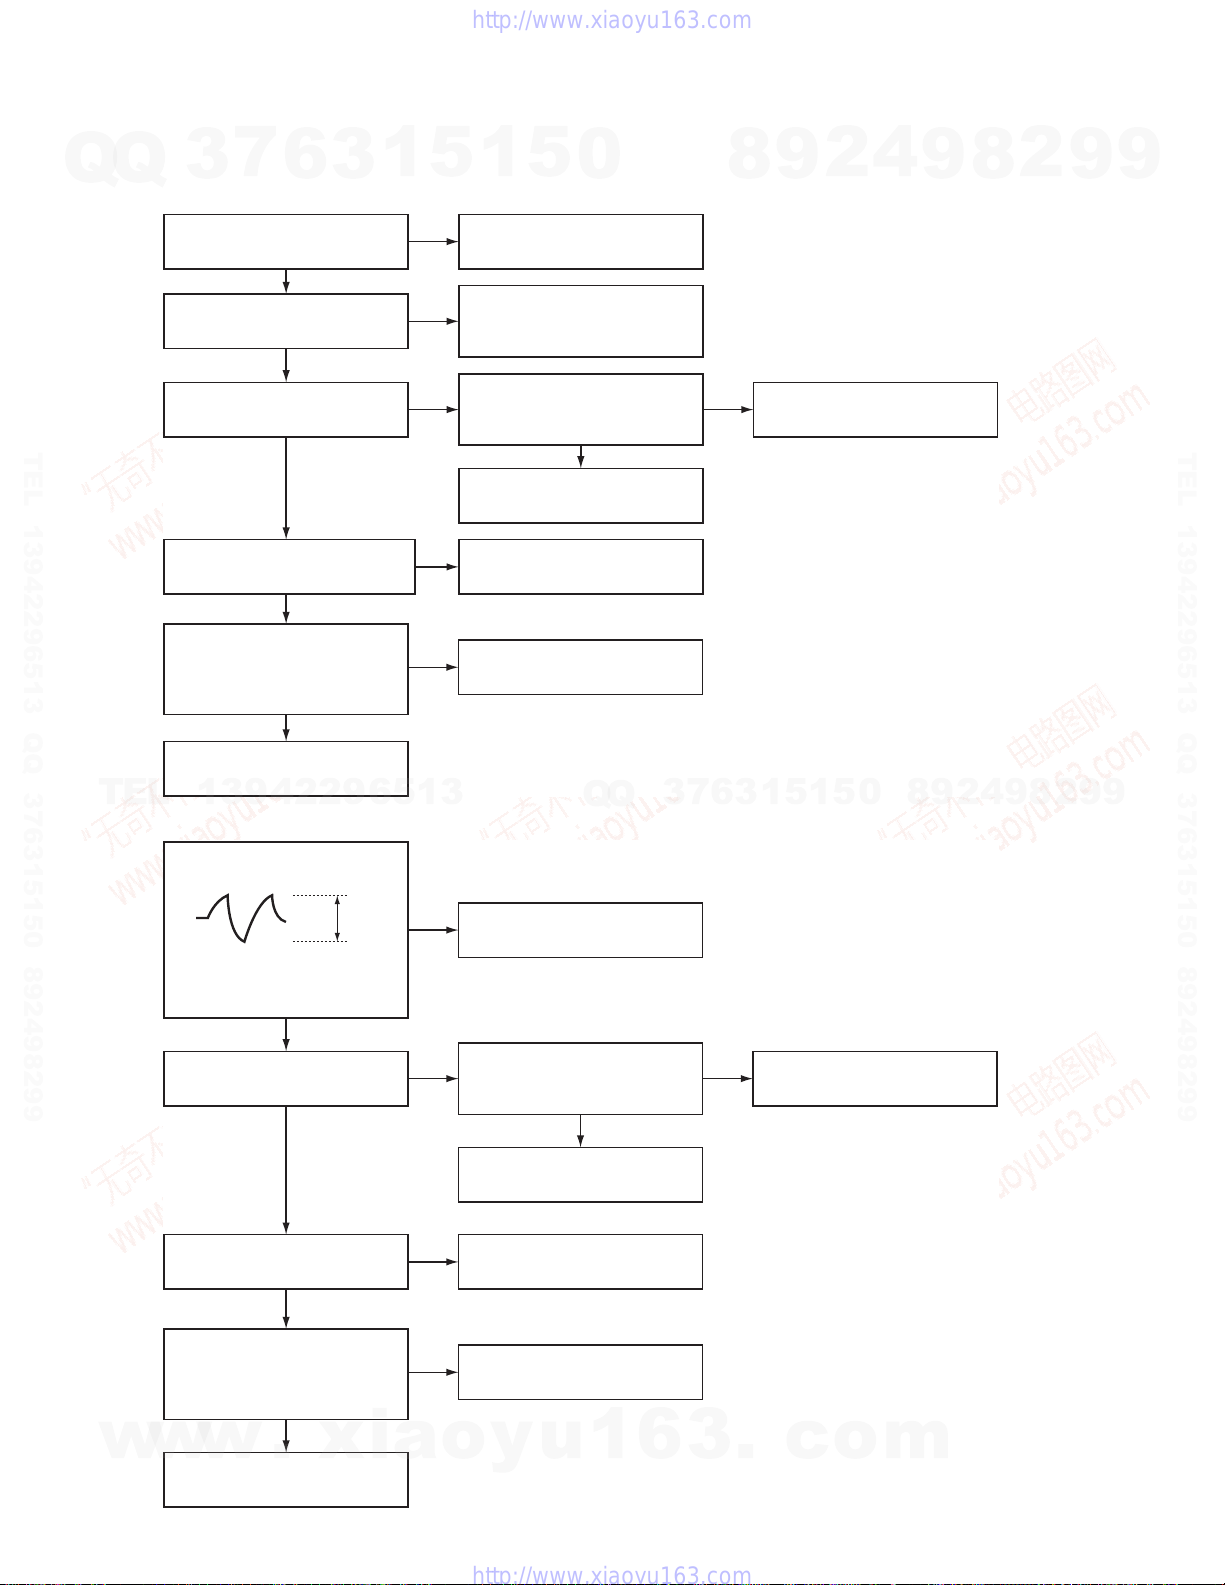
Q
Q
5.1 Feed section
3
7
6
3
1
SECTION 5
TROUBLESHOOTING
5
1
5
0
8
9
2
4
9
8
2
9
9
Is the voltage present at both
sides of the feed motor?
NO
Is the voltage output at pin 17
and pin 18 of IC681?
NO
Is the voltage input at pin 24
of IC681?
TEL 13942296513 QQ 376315150 892498299
NO
Is the voltage output at pin 40
of IC621?
NO
Is the power supply present
at pin 6, pin 15, pin 25, pin 39,
pin 43, pin 48, pin 51 and pin
64 of IC621?
NO
Check the connections of
TEL
5.2 Focus section
CD8V power supply.
13942296513
YES
YES
YES YES
YES
YES
Check the feed motor.
Check the connections
between the feed motor and
IC681.
Is the power supply present
at pin 10, pin 19 and pin 28
of IC681?
NO
Check the connections of
CD8V power supply.
Check the connections
between IC681 and IC621.
Check IC621.
3
Q
Q
7
6
3
1
Check IC681.
5
1
5
0
8
9
2
4
9
8
2
9
TEL 13942296513 QQ 376315150 892498299
9
w
w
When the lens is moving:
4V
Does the S-search waveform
appear at IC681 pin 13 and
pin 14?
NO
Is the voltage input at pin 1
and pin 2 of IC681?
NO
Is the voltage output at pin 33
of IC621?
NO
Is the power supply present
at pin 6, pin 15, pin 25, pin 39,
pin 43, pin 48, pin 51 and pin
64 of IC621?
w
Check the connections of
CD8V power supply.
NO
.
xia
YES
Check the pickup and
its connections.
Is the power supply present
YES YES
at pin 10, pin 19 and pin 28
of IC681?
NO
Check the connections of
CD8V power supply.
YES
Check the connections
between IC681 and IC621.
YES
o
Check IC621.
y
u
1
6
3
.
Check IC681.
c
o
m
1-44 (No.MA220)
Page 45
5.3 Spindle section
YES
Is the disk rotated?
7
Q
Q
TEL 13942296513 QQ 376315150 892498299
3
Is the voltage output at pin 15
and pin 16 of IC681?
Is the voltage input at pin 26
of IC681?
Is the voltage output at pin 41
of IC621?
Is the power supply present
at pin 6, pin 15, pin 25, pin 39,
pin 43, pin 48, pin 51 and pin
64 of IC621?
6
NO
NO
NO
NO
NO
3
1
Does the RF signal appear at
pin 19 of IC601?
5
1
5
0
YES
Check the spindle motor and
its wiring.
Is the power supply present
YES YES
at pin 10, pin 19 and pin 28
of IC681?
NO
Check the connections of
CD8V power supply.
YES
Check the connections
between IC681 and IC621.
YES
Check IC621.
YES
Is the RF waveform at pin
19 of IC601 distorted?
8
Check the circuits in
the vicinity of IC601
or the pickup.
2
9
Check IC681.
4
NONO
Proceed to the Tracking
section
9
8
2
YES
9
9
TEL 13942296513 QQ 376315150 892498299
Check the connections of
TEL
5.4 Tracking section
13942296513
CD8V power supply.
Q
When the disc is rotated
at first:
Approx. 1.2V
Is the tracking error signal
output at pin 11 of IC601?
NO
Check the circuits in IC601 or
the vicinity of IC601.
NO
Replace IC601 or repair the
malfunction connection point
Q
YES
YES
5
1
3
6
7
3
Check IC601.
Check the pickup and
its connections.
1
5
0
8
9
2
4
9
8
2
9
9
w
w
w
.
xia
o
y
u
1
6
3
.
c
o
m
(No.MA220)1-45
Page 46
5.5 Signal processing section
7
YES
6
YES
Normal
1
5
3
Is 9V present at pin 40
of IC151?
Is 9V present at pin 10
of IC901?
Check IC901 and its
peripheral circuits.
1
NO
NO
5
0
Is the audio signal
(including sampling
YES YES
output components)
output to pins 1 and 7 of
IC572 during playback?
Check IC572 and its
peripheral circuits.
Check the connections
YES
between pin 40 of IC151
and pin 10 of IC901.
Is the sound output from
both channels (L, R)?
Q
Q
No sound from either
channel.
Compare the L-ch and
R-ch to locate the
defective point.
TEL 13942296513 QQ 376315150 892498299
3
NO
NO
NO
8
9
4
2
Is the audio signal output
at pin 36 and pin 37 of
IC151 during playback?
Check IC151 and its
peripheral circuits.
8
9
NO
Check the power
amplifier IC181.
2
YES
9
9
TEL 13942296513 QQ 376315150 892498299
TEL
13942296513
Q
Q
3
7
6
3
1
5
1
5
0
8
9
2
4
9
8
2
9
9
w
w
1-46 (No.MA220)
w
.
xia
o
y
u
1
6
3
.
c
o
m
Page 47
5.6 Maintenance of laser pickup
(1) Cleaning the pick up lens
Before you replace the pick up, please try to clean the lens
Q
TEL 13942296513 QQ 376315150 892498299
TEL
with a alcohol soaked cotton swab.
Q
(2) Life of the laser diode
When the life of the laser diode has expired, the following
symptoms will appear.
• The level of RF output (EFM output: amplitude of eye
(3) Semi-fixed resistor on the APC PC board
The semi-fixed resistor on the APC printed circuit board
which is attached to the pickup is used to adjust the laser
power.Since this adjustment should be performed to match
the characteristics of the whole optical block, do not touch
the semi-fixed resistor.
If the laser power is lower than the specified value, the laser diode is almost worn out, and the laser pickup should
be replaced. If the semi-fixed resistor is adjusted while the
pickup is functioning normally, the laser pickup may be
damaged due to excessive current.
7
3
pattern) will be low.
YES
13942296513
6
Is RF output
1.3 0.4Vp-p?
OK
3
1
5
NO
1
5
Replace it.
0
Q
5.7 Replacement of laser pickup
Replace the pickup with a normal one. (Refer
to "Removing the pickup unit" on the previous page.)
Plug the power cord in, and turn the power on.
At this time, check that the laser emits for about
seconds and the objective lens moves up and down.
Note: Do not observe the laser beam directly.
7
3
Q
Turn of the power switch and, disconnect the
power cord.
6
8
3
9
Check the eye-pattern at
pin 19 of IC601.
1
5
1
4
2
Play a disc.
0
5
9
Finish.
8
9
2
8
4
2
9
8
9
2
9
9
TEL 13942296513 QQ 376315150 892498299
9
w
w
w
.
xia
o
y
u
1
6
3
.
c
o
m
(No.MA220)1-47
Page 48
5.8 16 PIN CORD DIAGRAM
BK
8
7
Q
Q
3
7
6
RD
YL
16
1
3
OR/WH
15
5
1
5
0
BK
Black
8
9
2
GN
4
Green
9
8
2
9
9
BL
6
BL/WH
5
WH
4
GN
3
TEL 13942296513 QQ 376315150 892498299
TEL
VI
2
GY
1
16 YL
8 BK
7 RD
15 OR/WH
3 GN
13942296513
11 GN/BK
2 VI
14
NC
NC
13
WH/BK
12
GN/BK
11
VI/BK
10
GY/BK
9
MEMORY
GND
ACC
ILL
RL+
RL-
RR+
Q
Red
Blue
3
RD
BL
WH White
Q
7
6
3
VI Violet
GY
YL
OR Orange
5
1
5
1
0
Gray
Yellow
GND
8
9
2
4
9
8
2
9
TEL 13942296513 QQ 376315150 892498299
9
w
w
REMOTE
RR
FR
FL
RL
10 VI/BK
12 WH/BK
Rear Right
Front Right
Front Left
Rear Left
w
Remote out
4 WH
1 GY
9 GY/BK
5 BL/WH
6 BL
.
xia
RR-
FL+
FL-
FR+
FR-
REMOTE
ANT
o
y
ANT
ACC
ILL
GND
u
MEMORY
REMOTE
OUTPUT
ONLY
POWER
ANTENNA
Auto Antenna
ACC Line
Illuminations Control
Ground
1
6
3
.
Memory Backup Battery+
c
o
m
1-48 (No.MA220)
Page 49
7
Q
Q
TEL 13942296513 QQ 376315150 892498299
3
6
3
1
5
1
5
0
8
9
2
4
9
8
2
9
9
TEL 13942296513 QQ 376315150 892498299
TEL
13942296513
Q
Q
3
7
6
3
1
5
1
5
0
8
9
2
4
9
8
2
9
9
w
w
w
.
xia
o
y
u
1
6
3
.
c
o
m
(No.MA220)1-49
Page 50
7
Q
Q
TEL 13942296513 QQ 376315150 892498299
3
6
3
1
5
1
5
0
8
9
2
4
9
8
2
9
9
TEL 13942296513 QQ 376315150 892498299
TEL
13942296513
Q
Q
3
7
6
3
1
5
1
5
0
8
9
2
4
9
8
2
9
9
w
w
Victor Company of Japan, Limited
w
AV & MULTIMEDIA COMPANY CAR ELECTRONICS CATEGORY 10-1,1chome,Ohwatari-machi,Maebashi-city,371-8543,Japan
(No.MA220)
.
xia
o
y
u
1
6
3
.
c
o
m
Printed in Japan
VPT
Page 51
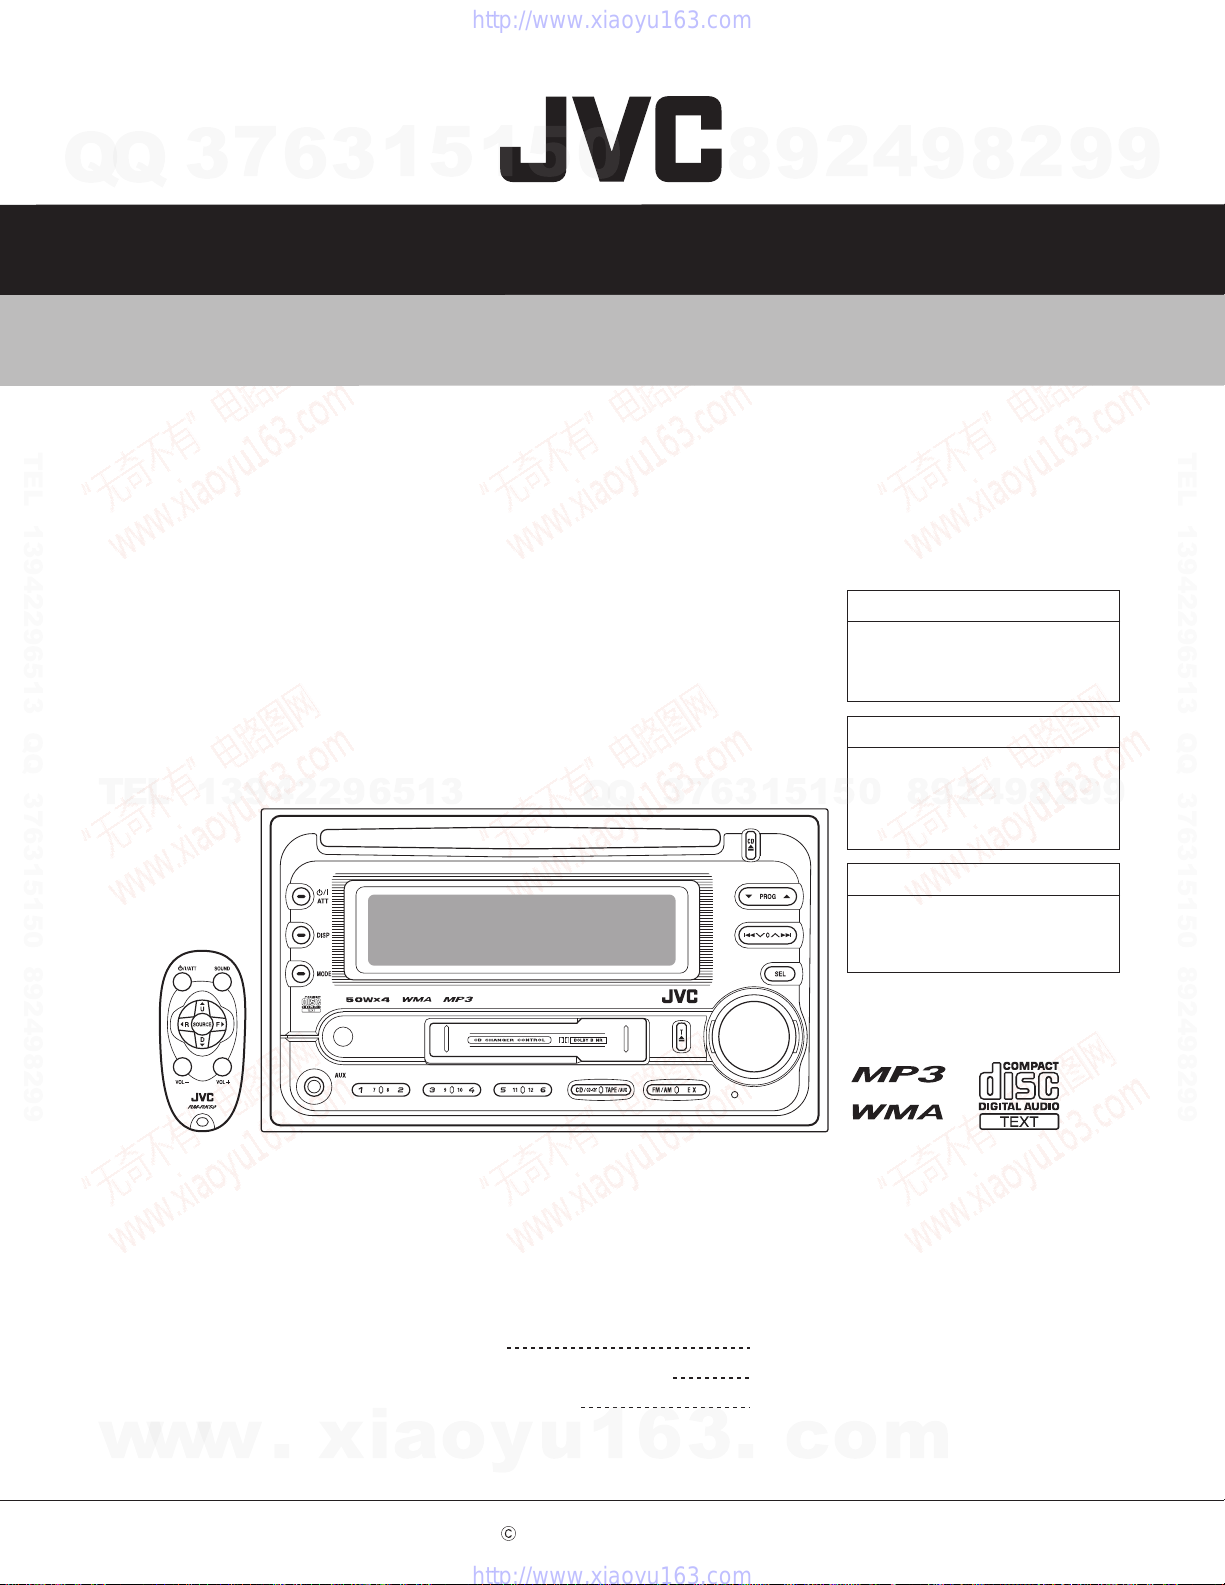
Q
Q
3
7
6
3
1
5
1
5
0
SCHEMATIC DIAGRAMS
CD/CASSETTE RECEIVER
TEL 13942296513 QQ 376315150 892498299
KW-XC404,KW-XC405
KW-XC406
CD-ROM No.SML200509
TEL
13942296513
Q
Q
3
7
6
8
3
9
1
5
4
2
UI ---------------------------- India
8
0
5
1
UT ------------------------- Taiwan
U -------------------- Other Areas
8
9
KW-XC404
Area suffix
KW-XC405
Area suffix
2
9
4
2
9
8
9
2
9
9
TEL 13942296513 QQ 376315150 892498299
9
w
w
w
KW-XC406
Area suffix
U -------------------- Other Areas
Lead free solder used in the board (material : Sn-Ag-Cu, melting point : 219 Centigrade)
Contents
.
xia
Block diagram
Standard schematic diagrams
Printed circuit boards
o
y
u
1
6
3
2-1
2-2
2-6 to 9
.
c
o
m
COPYRIGHT 2005 Victor Company of Japan, Limited.
No.MA220SCH
2005/9
Page 52
Safety precaution
7
Q
Q
!
!
TEL 13942296513 QQ 376315150 892498299
3
Burrs formed during molding may be left over on some parts of the chassis. Therefore,
pay attention to such burrs in the case of preforming repair of this system.
Please use enough caution not to see the beam directly or touch it in case of an
adjustment or operation check.
6
3
1
5
1
5
0
8
9
2
4
9
8
2
9
9
TEL 13942296513 QQ 376315150 892498299
TEL
13942296513
Q
Q
3
7
6
3
1
5
1
5
0
8
9
2
4
9
8
2
9
9
w
w
w
.
xia
o
y
u
1
6
3
.
c
o
m
Page 53
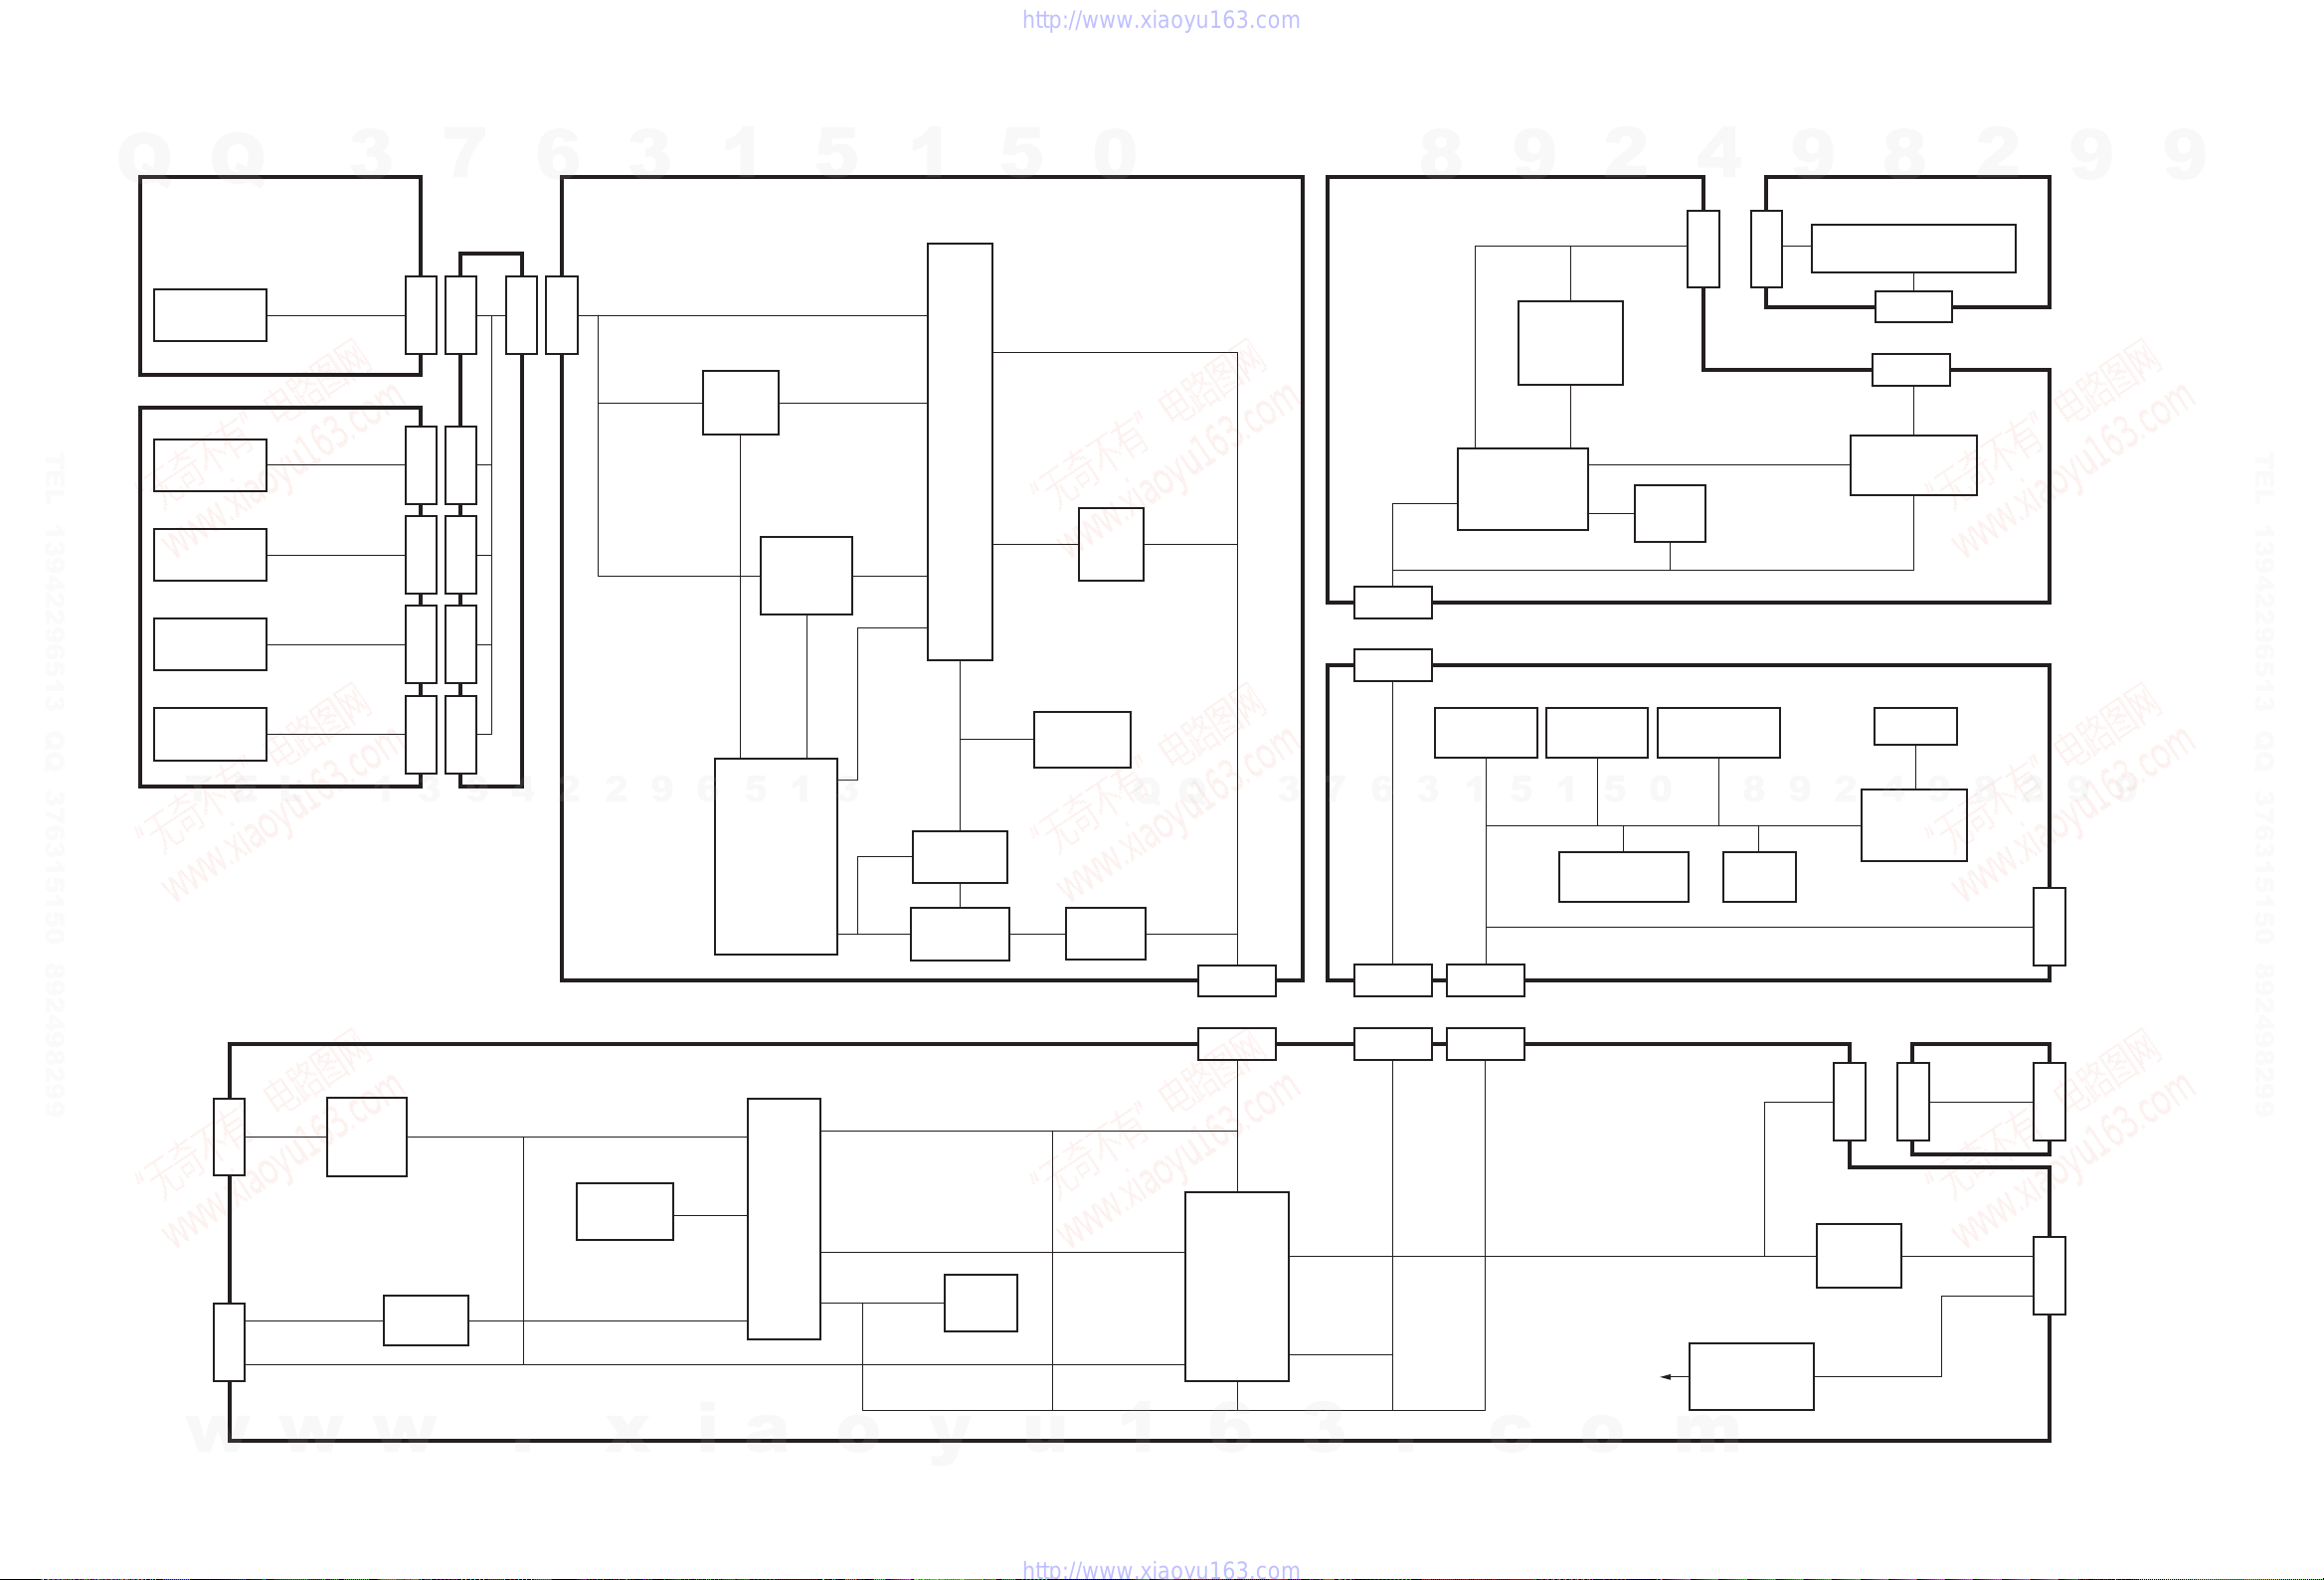
PICK UP
CN601
FOCUS+
FOCUSTRACKING+
TRACKINGSPINDLE+
SPINDLELOAD/FEED+
LOAD/FEED-
VA,VB
VE,VF
LD,MD
VREF
SW1,SW2,REST
IC681
CD
DRIVER
CDON
LOAD
LD/FE
FMO
FOO
DMO
TRO
IC621
D.SERVO
&
DSP
IC572
CD LPF
CD.L-CH
CD.R-CH
BUS0
BUS1
BUS2
BUS3
BUCK
CCE
DSPRST
PLLCE,PLLDO,PLLCK
PLLDI,MRC,SD/ST
SMETER,CFSEL
TU1
FM/AM
TUNER
TU-L
TU-R
IC402
MOTOR
DRIVER
SUBMO+
SUBMO-
TAPEIN
MODE
REEL
STANDBY
FF/REW
MSIN
HEAD SEL
SCK,SI/SO
IC431
CPU
IC461
J-BUS
PREQ
P.DET
A.MUTE
CN403
CN401
CASSETTE MECHA
CN402
FWD-L,FWD-R
REW-L,REW-R
Lch
Rch
IC401
HEAD AMP
IC181
POWER
AMP
OUTFL+/OUTFR+/OUTRL+/OUTRR+/-
FRONT L+/FRONT R+/REAR L+/REAR R+/-
CN901
SPK
BATT
IC901
REGULATOR
to
each
block
CD-CH
SCK
SI/SO
IC781
JVC BUS
CH-L,CH-R
SDA
SCL
BUSINT,BUSI/O
BUSSCK,BUSSO
IC701
CPU
IC702
EEPROM
LCDRST,LCDDA
LCDSCK,LCDCE
KEY0 to KEY2
VOL1,VOL2
REMOCON
KEYILL,RESET
AUX_L
AUX_R
EVOLDA
EVOLCK
CN801
IC151
E.VOLME
TAPE-L
TAPE-R
IC801
LCD
DRIVER
LCDDATA
LCDSCK
LCDCE
LCDRST
LCD1
S851 to S870
SW
EN851
ENCODER
IC802
REMOCON
KEY0
KEY1
KEY2
VOL1
VOL2
REMOTE
CN902
CN702
Main amplifier section
LCD and user control keys section
Cassette mechanism control section
CN802
CN803
CN701
LOAD/FEED
MOTOR
SPINDLE
MOTOR
REST SW
SW1,SW2
CN001
Block diagram
D811 to D839
LED
KEYILL
SEG1 to SEG62
COM1 to COM10
SUBMO+
SUBMO-
VA,VB,VE,VF
MD,LD,VREF
FOCUS+
FOCUSTRACKING+
TRACKING-
LOAD/FEED+
LOAD/FEED-
SPINDLE+
SPINDLE-
REST
SW1,SW2
IC601
CD RF
RFGC,RF
RFRP,FE
SEL,TEB
RFDC
IC501
CPU
IOP
RWSEL
IC652
MP3 DEC
DATA
LRCK
BCK
IC571
24Bit DAC
LRCK
BCK
SDO
CN501
PICTCLK,PICTDI
CDMUTE,CDREQ
B.DET,P.DET
CDRESET
IC503
J-BUS
BUFF
BUSSI/SO
BUSCLK
BUSSI
BUSSO
BUSIO
/BUSIO
BUSCLK
IC703
RESET
CN705
CDREQ,CDMUTE
CDRESET,PS2
POWER
CD-L
CD-R
ANT
J1
RESET
CD servo control section
ACC,
REMOTE
AUTO ANT
CN322
CN323
J321
LINE OUT
PJ801
AUX IN
AUX_L
AUX_R
MP3DA
MP3CK
SDA
SCL
IC502
EEPROM
S871
RESET
RESET
AUX_L,AUX_R
TU-L/R
CH-L/R
SI/SO
SCK
CSTREQ
CSTMUTE
Q
Q
3
7
6
3
TEL 13942296513 QQ 376315150 892498299
T
E
L
1
3
9
4
2
2
1
9
6
5
5
1
3
1
5
0
Q
8
Q
3
7
6
3
9
5
1
1
2
5
4
0
9
2
9
8
8
4
9
2
8
2
9
9
9
TEL 13942296513 QQ 376315150 892498299
9
w
w
w
.
x
i
a
o
y
u
1
6
3
.
c
o
m
2-1
Page 54
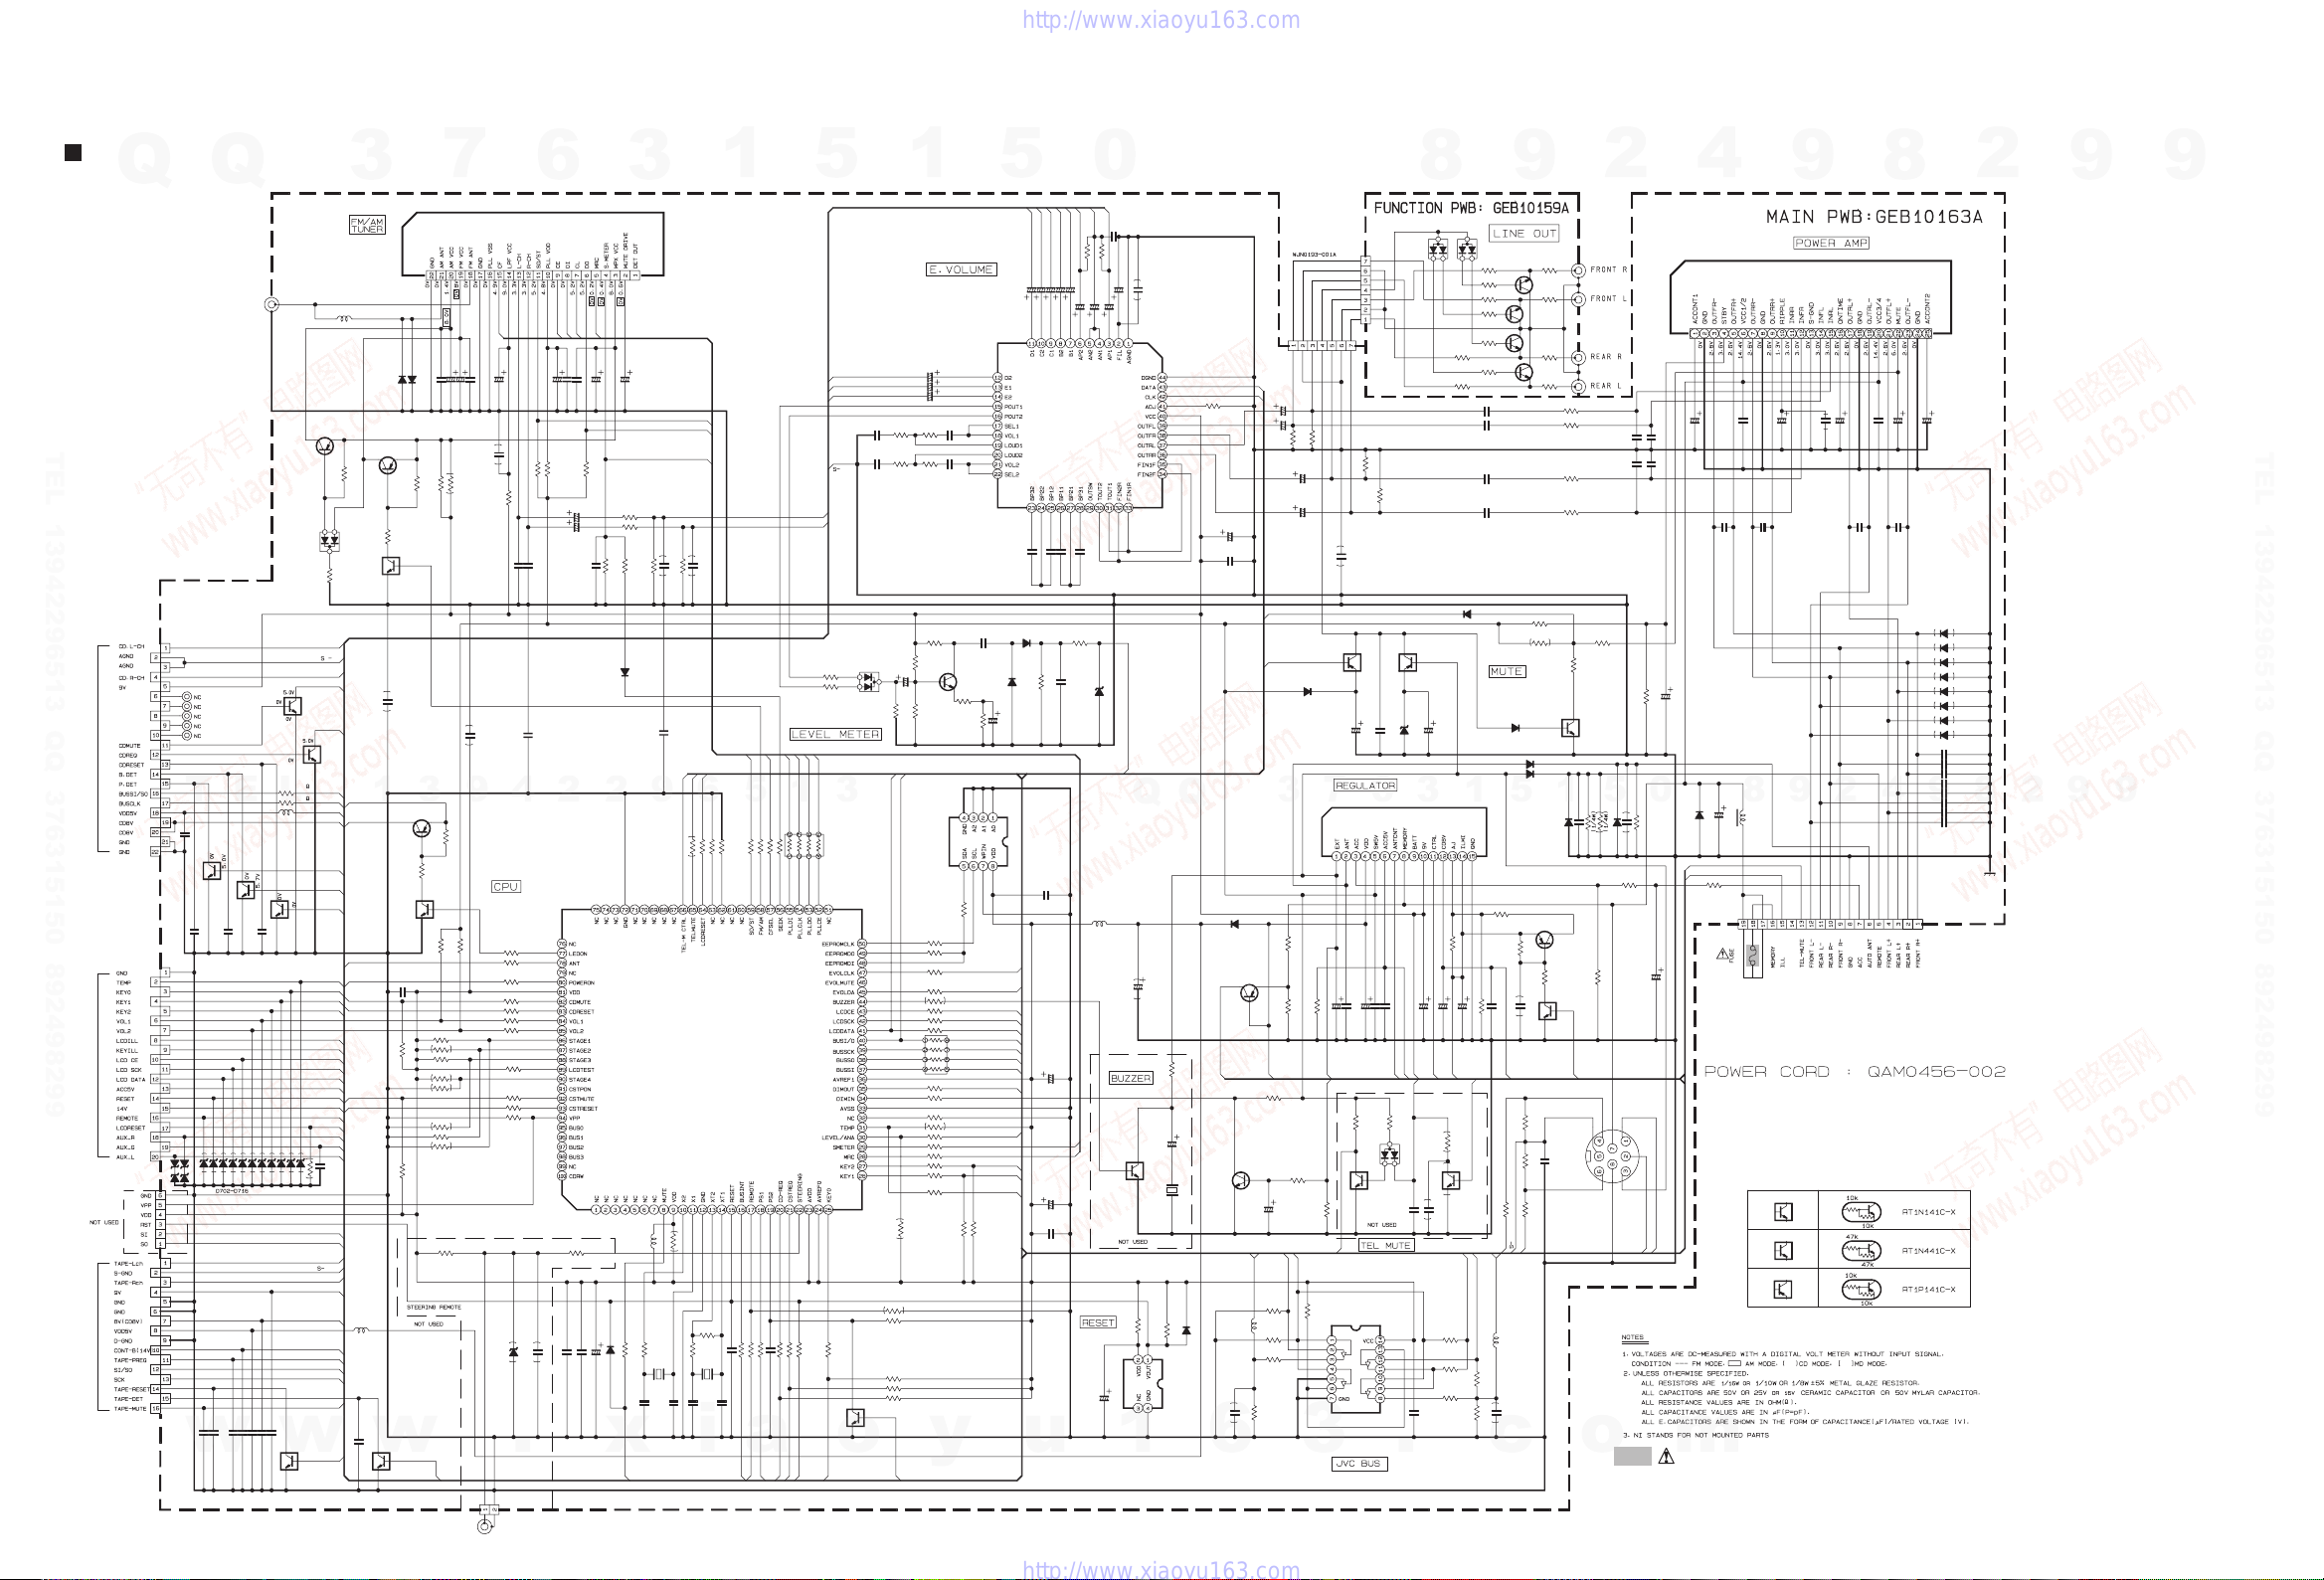
Parts are safety assurance parts.
When replacing those parts make
sure to use the specified one.
Q1
D182
C182
J1
C202
Q2
R770
TU1
IC151
Q951
R251R252
C255
Q941
C256
C102
R153
C160
Q3
C711
Q902
R743
R744
R745
R747
R730
R771
R760
Q904
C181
C253
C281
R763
IC181
Q905
C259
Q341
Q351
D331
C154
R765
R772
C286
R774
R775
RA701
CN902
C971
C973
R976
Q901
D973
R977
R921
C254
R191
Q181
R193
Q952
Q971
C282
C285 C185 C186
R181
R182
R906
R281
R282
R778
R201
R101
R151R152
CN703
Q921
CN901
CN704
D906
L1
D903
R194
D285
R766
R728
C155
D286
D287
D288
C156
R731
C713
IC701
R788
IC781
R782
R785
R783
R781
R789
R713
R711
R715
R717
R972
R971
D185
D186
R705
X702X701
R980
D187
R722
R724
R726
R721
R741
R742
R761
C159
R762
R776
Q701
Q702
D904
D188
R901
R902
C710
C289
C290
Q903
C187
C188
R922
C189
C190
C288
C287
D181
Q331
IC901
D321
D971
R718
Q321
R719
R355
R335
R325
R345
R341
R331
R351
R321
R322
R342
R352
R332
C715
Q922
L703
Q703
CN705
R773
Q708
Q707
R748
R749
R779
L701
R734
R733
R732
R739
R740
R727
R768
C714
D951
Q923
R735
R736
R759
L702
C194
L781
C5
C1
C191
R2
R1
R4
R3
R5
R6
C3
C4
C9
C258
C257
R9
R915
C8
R10
D2
C6
R8
C157
C158
C10
R941
C706
C725
R701
C726
C7
C910
C727
D3
C722
C721
C184
IC702
C284
Q706
C283
C183
C152
R758
L901
R916
D702
D703
D704
C195
C252
CN701
C161
C974
R764
C972
R141
C153
R241
R974
R242
R142
C141
D972
R979
R904
C251
C151
R907
R908
R924
R925
D705
C909
D901
C901
R978
R975
C196
R192
R923
R973
C952
D952
D921
D706
D707
D708
C941
C199
R905
C922
BZ941
C101
C201
R202
R102
C203
C103
D709
CN702
D710
D711
D712
R710
R729
R777
D907
R11
D718
C12
C719
C718
R750
D4
R13
R769
R767
CN322
CN323
C198
C165
IC703
R790
C781
R784
C162
R786 R787
R712
C263
C197
C903
C911
R195
C953
R704
C703
C704
R703
C702
C701
C717
C712
C260
D974
C264
R725
R723
C265
C164
R155
R154
R254
R754
R255
C914
C915
R914
C180
C913
C904
C906
C905
C907
D905
C912
R912
C728
R903
C902
J321
R256
R910R911
C921
D716
D714D713
D715
C11
C193
C192
C908
C163
R156
R751
R753
R752
R746
R755
C951
D717
C707
C708
C705
D701
R707
R708
C2
R756
R757
R913
Q705
R706
Q704
R709
R714
R716
R720
C733C730
C782
C783
R909
C731
C732
RA702
C716
C723
C724
C720
R7
D1
C923
R926
R702
L704
L782
C735
C736
2SA1365/F/-X
1SS355W-X
QFV91HJ-474Z
QNB0190-001
1/50
2SA1365/F/-X
47k
QAU0403-001
BD3807K
RT1P141C-X
47k4.7k
220P
RT1N141C-X
0.1
1/50
33k
0.047
RT1N141C-X
220/10
RT1N141C-X
1k
1k
10k
270
47k
47k
1k
2SA1365/F/-X
QFV91HJ-474Z
2.2/50
QFV91HJ-474Z
1k
LA47516
RT1N141C-X
0.22
KTD1304-X
KTD1304-X
MC2836-X
2.2/50
1k
47k
0.1
47k
47k
1K
QNZ0095-001
1/50
0.047
12k
2SA1365/F/-X
CRS03-W
47
47k
2.2/50
2.2K
RT1N441C-X
0
RT1P141C-X
2SC3928A/QR/-X
QFV91HJ-474Z
0.1 0.1 0.1
27k
27k
10k
27k
27k
1k
12k
12k
UDZW6.2B-W
47k4.7k
QGF0501F1-06X
2SC3928A/QR/-X
QNZ0611-001
QGA2006F1-02
CRS03-W
4.7u
1SS355W-X
47K
CRS03-W
1k
1K
220P
CRS03-W
CRS03-W
CRS03-W
0.1
0
0.047
UPD784217AGC340
330
SN74AHC126NS-X
22k
100
100
100k
100k
47k
47k
47k
47k
220K
220K
CRS03-W
CRS03-W
10M
12k
CRS03-W
10k
10k
1k
3.3k
2.2k
10K
1k
100/10
1k
1k
RT1N441C-X
RT1N441C-X
CRS03-W
CRS03-W
QRE142J-102X9.1k
220/10
100P
100P
2SA1530A/QR/-X
100P
100P
4.7k
100P
100P
100P
100P
1SS355W-X
KTD1304-X
R2S25400DS-E
MC2836-X
MC2838-X
2.2K
KTD1304-X
22K
2.2K
2.2K
2.2K
2.2K
820
820
820
820
180
180
180
180
0.01
RT1N141C-X
47u
RT1N141C-X
QGB2027M4-22S
47k
RT1N141C-X
RT1N141C-X
0
0
10k
47u
1k
1k
47K
2.2k
2.2k
1k
1k
0.1
1SS355W-X
RT1N141C-X
47k
47k
47k
47u
0.022
1.8u
220/10
0.01
0.022
2.2k
10k
1k
10k
10
22
47/10
0.01
0.1/50
0.01
0.01
27
47k
100/10
10k
1SS355W-X
100/10
47k
0.01
0.01
330P
3.3k
0.01
0.11k0.1
0.01
0.1
0.1
MC2838-X
0.01
0.01
100P
BR24L16F-W-X
100P
RT1N141C-X
100P
100P
2.2/50
1k
QQR0703-001
2.2k
2.2/50
2.2/50
QGB1004K1-20
10/16
0.22
47k
22/16
100k
2.2/50
100k
180k
100
100
0.047
1SS355W-X
120K
5.6k
QTE1H55-225Z
QTE1H55-225Z
47k
47K
47k
1k
220/10
1N5401-F64
QEZ0676-338
1k
22k
4.7/25
27K
100k
47k
100/16
MA8110/M/-X
MC2836-X
1/50
0.01
1k
0.1
QAN0023-001Z
0.015
0.015
27k
27k
820P
820P
QGB1004K1-16
1K
47k
47k
CRS03-W
QMFZ047-150-T
180k
1SS355W-X
0.01
470P
0.01
1k
1SS355W-X
39k
47k
47k
QGA2001F1-07
QGA2001F1-07
1/50
4.7/25
S-80833CNNB-G-W
10k
0.047
47k
4.7/25
47k 22k
1k
4.7/25
1/50
22/16
10/16
1.8k
0.1
47k
QAX0401-001
27P
22P
820
QAX0617-001Z
27P
8P
0.01
220/10
0.012
MA8051/M/-X
4.7/25
3.3k
3.3k
4.7/25
4.7/25
47K
47K
47K
47K
47K
0.22
220/10
10k
0.1
0.1
22/16
220/10
0.01
0.1
CRS03-W
0.1
1K
0.1
4.7k
2.2/50
QNN0746-001
33k
15k47k
22/16
0.01
22/16
47/16
0.1
4.7/25
33k
1k1k1k
270
47K
100/10
MA8062/M/-X
100P
47/6.3
0.01
1SS355W-X
47k
2.2k
47/10
2.2K
0
1K
RT1N441C-X
100
RT1N141C-X
1k
1k
1k
10k
0.01
0.01
47K
0.01
0.01
1K
100P
0.01
0.01
0.01
4.7
1SS355W-X
0.1
3.3K
0
4.7u
1.8u
100P
100P
PLLDI
SD/ST
CSTRST
TU-R
TAPE-L
ILL
TU-L
TEL
RESET
GND
CH-R
TAPE-L
TAPE-R
CSTMUTE
SCK
SI/SO
CSTREQ
14V
CD8V
9V
TAPE-R
AUX_R
GND
AUX_G
REMOCON
14V
RESET
ACC5V
KEY0
KEY1
KEY2
CSTMUTE
CDRESET
CDMUTE
CDRESET
CDMUTE
PS2
POWER
DIMOUT
SI/SO
POWER
ANT
CSTRST
EVOLCK
KEY1
KEY2
SCK
SI/SO
BUSSO
BUSSCK
BUSI/O
LCDDA
LCDSCK
LCDCE
LEVEL
MRC
SMETER
EVOLDA
CD8V
VDD5V
LCDRST
SI
DIMIN
LCDILL
EVOLDA
EVOLCK
MUTE
KEYILL
LCDILL
KEYILL
LCDCE
LCDSCK
SW5V
CD-L
CDREQ
GND
CD-R
SO
SMETER
TEMP
LCDDA
AUX_L
TEMP
TEL-M
TEL-M
PLLCE
PLLCK
MRC
CFSEL
PLLDO
MUTE
9V
CD-L
CD-R
TU-L
TU-R
CH-L
BUSSO
CH-R
PS2
KEY0
RESET
CSTREQ
CDREQ
REMOCON
BUSINT
ACC5V
PS2
SO
SI
SI/SO
PLLDI
PLLCK
PLLDO
PLLCE
LCDRST
CFSEL
SD/ST
TELM
BUSINT
BUSSCK
SCK
BUSI/O
GND
CH-L
SCK
SI/SO
ANT
DIMOUT
CD8V
LCDILL
POWER
VDD5V
PS2
14V
TELM
ILL
TEL
LEVEL
ACC5V
AUX_L
AUX_G
AUX_R
TO CN501
(SHEET 2)
TO CN801
(SHEET 4)
TO CN802
(SHEET 4)
Standard schematic diagrams
Main amplifier section
3
7
9
6
4
.
2
2
x
3
1
w
Q
TEL 13942296513 QQ 376315150 892498299
T
w
Q
E
L
w
3
9
1
6
5
i
a
1
5
3
o
1
y
5
u
2-2
9
2
8
2
9
9
SHEET 1
9
TEL 13942296513 QQ 376315150 892498299
9
0
1
Q
Q
6
3
3
7
6
.
8
3
1
c
9
5
2
5
1
o
4
0
m
2
8
4
9
8
9
Page 55
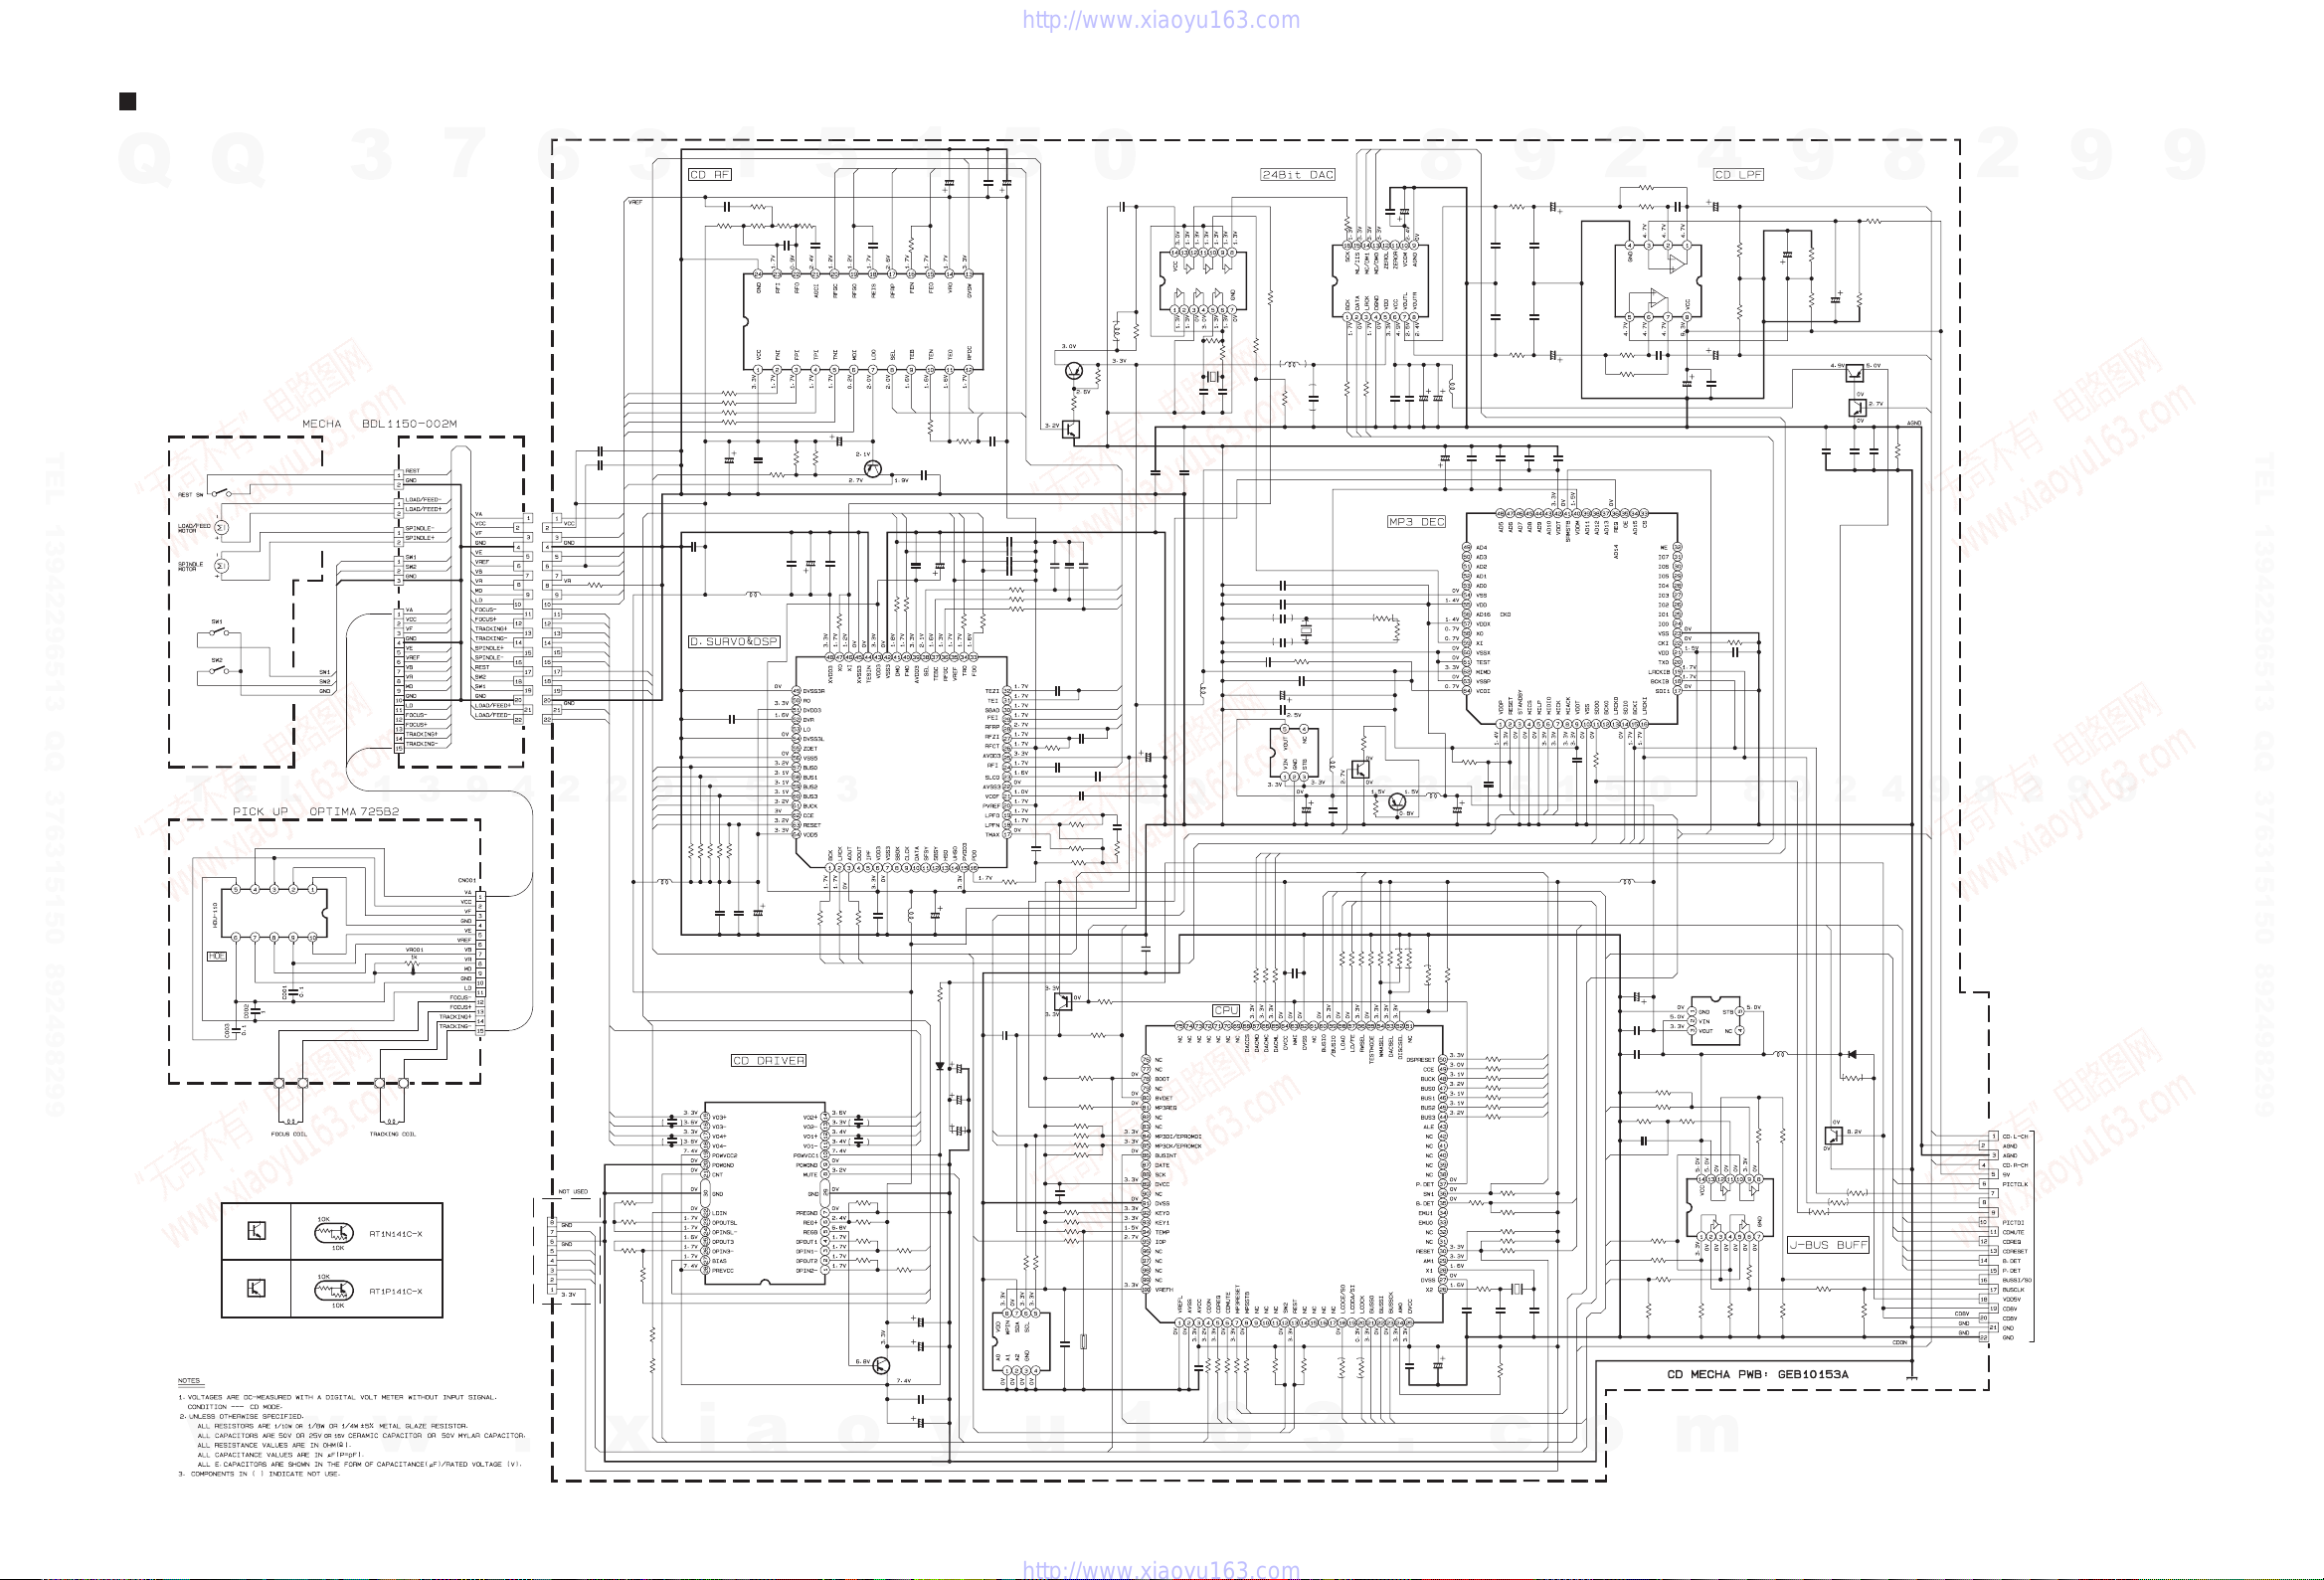
R572
IC621
Q651
IC502
R581
CN501
R565
Q601
R615
R566
C693
C694
L571
L501
IC501
Q501
R678
R616
R601
R602
R603
R604
C603
R608
C604
C610
R610R611R612R614
R613
C611
C605
R632
R633
R634
C631
C632
C636
C637
C630
C627
C626
C625
R629
C629
C628
R626
R625
R624
R628
C614
C643
L622
L623
CN502
R548
IC504
R523
R522
R521
R520
R519
R518
R517
R543
R509
R544
R511
R540
R512
C613
R655
Q652
R515
R513
R516
R541
R514
C508
R525
X501
R510
R542
C577
L651
C667
C666
C656
R568
R675
C664
C665
R689
R690
C668
R651
R685
C507
R687
R564
IC652
B501
R683
R539
R545
C669
C676
R570
C675
R582
C585
C586
Q572
Q571
R583
R585
R584
R586
C587
C588
C589
C590
R589
R549
R550
C511
C513
C512
R561
R563
R562
R556
R553
R569
Q574
Q573
C685
C686
C551
C687
L502
Q502
IC681
R681
R682
R686
R688
C612
Q681
C682
C684
C690
C683
C688
C689
D506
R533
IC601
B681
R508
L653
R656
IC572
R598
R599
IC571
C599
C644
C506
R502
C578
R657
R503
C601
C602
R534
R605
R606
R607
C609
C608
R609
C606
C607
R630
R631
C633
C635
C634
R635
R636
R637
C638
C639
C624
C623
R627
R621
R622
R623
C622
C621
R638
R639
R640
R641
R642
C645
C646
C640
C641
C642
L621
C501
R546
R547
IC503
IC651
R532
R504
R505
R535
R536
R537
R506
R507
R526
R528
R531
R530
C514
C616
TH501
C510
C505
C504
C503
C571
C509
C502
C651
C652
C598
R677
C653
C572
R668
X571
IC573
C663
C662
L652
R527
C654
R654
R529
R573
R575
B682
C661
C655
C659
C660
R574
X651
C575
C576
L572
C574
C573
C582 C581
C583C584
R588 R587
R592R590
R591
C591
C592
C593
R501
R560
R552
R558 R559
R551
R555
R557
R554
R577
R576
C594
L573
R578
R579
CN601
D682
R684
R524
R691
C596
C595
R593
C597
R594
R595
C580
C561
2.2M
TC94A14FA
2SA1365/F/-X
BR24L01AFV-W-X
24K
QGB2027L1-22X
2SB1132/QR/-W
150
47/16
47/16
47u
TMP91CW12AF5VD9
RT1P141C-X
10k
82k
82k
330k
330k
100/6.3
820
0.01
5p
10010k
2k15k
1k
68p
0.0068
0
0
0
470p
470p
0.047
0.047
0.033
0.01
0.0027
0.01
10k
0.033
47/6.3
470k
47k
5.6k
1.5M
0.01
0.01
47u
47u
QGF0501F1-08X
8.2k
NJU7241F33-X
100
100
100
100
100
100
100
100
47k
100
1k
47k
47k
0.01
10k
RT1N141C-X
47k
1k
1k
100
47k
0.01
100k
NAX0385-001X
100
10k
0.1
47u
0.01
100p
0.1
1k
220
2200P
0.1
12k
33k
47/6.3
100k
6.8k
0.01
6.8k
TC94A34FG-002
0
6.8k
47k
10k
0.01
1k
24K
4.7/35
4.7/35
RT1N141C-X
RT1P141C-X
8.2K
27K
8.2K
27K
150p
150p
4.7/35
4.7/35
10k
4.7k
4.7k
0.1
0.01
100/6.3
100k
6.8k 3.9k
0
18k
1k
RT1N141C-X
2SA1365/F/-X
0.01
47u
RT1N141C-X
BA5830FP-X
6.8k
2.2K
12k
1.8k
0.01
2SB1184/QR/-X
4.7/35
47/16
10/6.3
0.1
47/16
1SS355W-X
100
TA2157FN-X
0
47k
47u
47k
NJM4580V-X
47
47
PCM1753-X
-
0.33
0.01
1k
100/6.3
2.2k
1k
47/6.3
0.01
100
22
22
82k
0.1
0.1
56k
47/6.3
0.01
100
100
0.047
0.047
0.047
100
100
1M
0.01
47/6.3
0.015
47p
15k
47
47
47
47/6.3
0.01
4.7k
4.7k
4.7k
4.7k
10k
47/6.3
0.01
0.01
47/6.3
100p
47u
0.01
270
270
SN74AHCT126PW-X
NJU7772F15-X
1k
100
100
100
100
100
47k
47k
47k
47k
47k
47k
0.001
10/6.3
NAD0028-103X
0.01
22P
22P
100/6.3
27P
0.01
0.01
47/6.3
0.01
1000p
47/6.3
27P
47
NAX0375-001X
SN74AHCU04PW-X
10/6.3
100p
47u
0.1
39
1K
1K
0
0.01
0.01
0.1
100p
47
100/6.3
47u
100/6.3
0.1
100p 100p
820p820p
47k 47k
10k10k
10k
47/6.3
47/6.3
47/16
1k
100
100k
100k 0
100k
100
100k
33k
100
1K
1000p
47k
2.2k
QGF0527F2-22W
1SR154-400-X
8.2k
15k
100p
0.047
4.7
1000p
47
47
0.012
0.012
PICTDI
VA
VF
VE
VB
MD
LD
FOCUSFOCUS+
MD
LOAD/FEED+
CDON
SEL
RFGC
TE
RFDC
RFRP
FE
RF
BUS0
VB
CDRESET
BUS3
BUS2
BUS1
BUCK
CCE
DSPRST
TEB
AGND
PICTCLK
IOP
BUS3
BUS2
BUS1
BUS0
BUCK
CCE
DSPRST
SW1
MP3DA
MP3CK
IOP
TRO
VREF
CDON
FOCUS+
FOCUSTRACKING+
TRACKING-
DMO
FOO
VA
SPINDLE+
SPINDLE-
B.DET
LOAD/FEED-
BUSSO
BUSSI
BUSIO
/BUSIO
VF
VE
VREF
CD.L-CH
CDON
CD.R-CH
CD.L-CH
9V
CD.R-CH
TRACKING+
TRACKING-
BUSSI/SO
SPINDLE+
SPINDLE-
LOAD/FEED+
BUSSCK
LOAD/FEED-
LD
BUSCLK
REST
SW2
SW1
BUSSO
BUSSCK
BOOT
RESET
BUSSI
CDMUTE
CDREQ
P.DET
B.DET
CDRESET
CD8V
BCK
FMO
MP3STB
SDO
MP3DA
LRCK
BCK
DACML
DACMC
8VDET
DACMD
FE
RWSEL
RFRP
SDO
RFGC
CDON
PICTDI
RF
SEL
TEB
RFDC
TE
FOO
TRO
FMO
DMO
LRCK
DATA
CDON
P.DET
CDREQ
BUSSI
BUSSO
BUSSCK
CDON
8VDET
CDMUTE
RWSEL
PICTCLK
MP3RST
DACMD
DACMC
DACML
BOOT
/BUSIO
BUSIO
VREF
RESET
SW2
MP3RST
LD/FE
MP3CK
LOAD
DATA
BCK
LRCK
MP3STB
LOAD
BUSSCK
LD/FE
REST
TO CN705
(SHEET 1)
CD servo control section
3
7
9
6
4
2
.
3
2
9
x
Q
Q
3
TEL 13942296513 QQ 376315150 892498299
T
E
w
L
w
1
w
6
i
1
5
a
1
5
3
o
1
y
5
u
9
2
8
2
9
9
9
TEL 13942296513 QQ 376315150 892498299
9
SHEET 2
0
4
m
8
2
8
4
9
9
1
o
2
5
0
Q
1
Q
6
3
7
3
6
8
3
.
9
5
1
c
2-3
Page 56
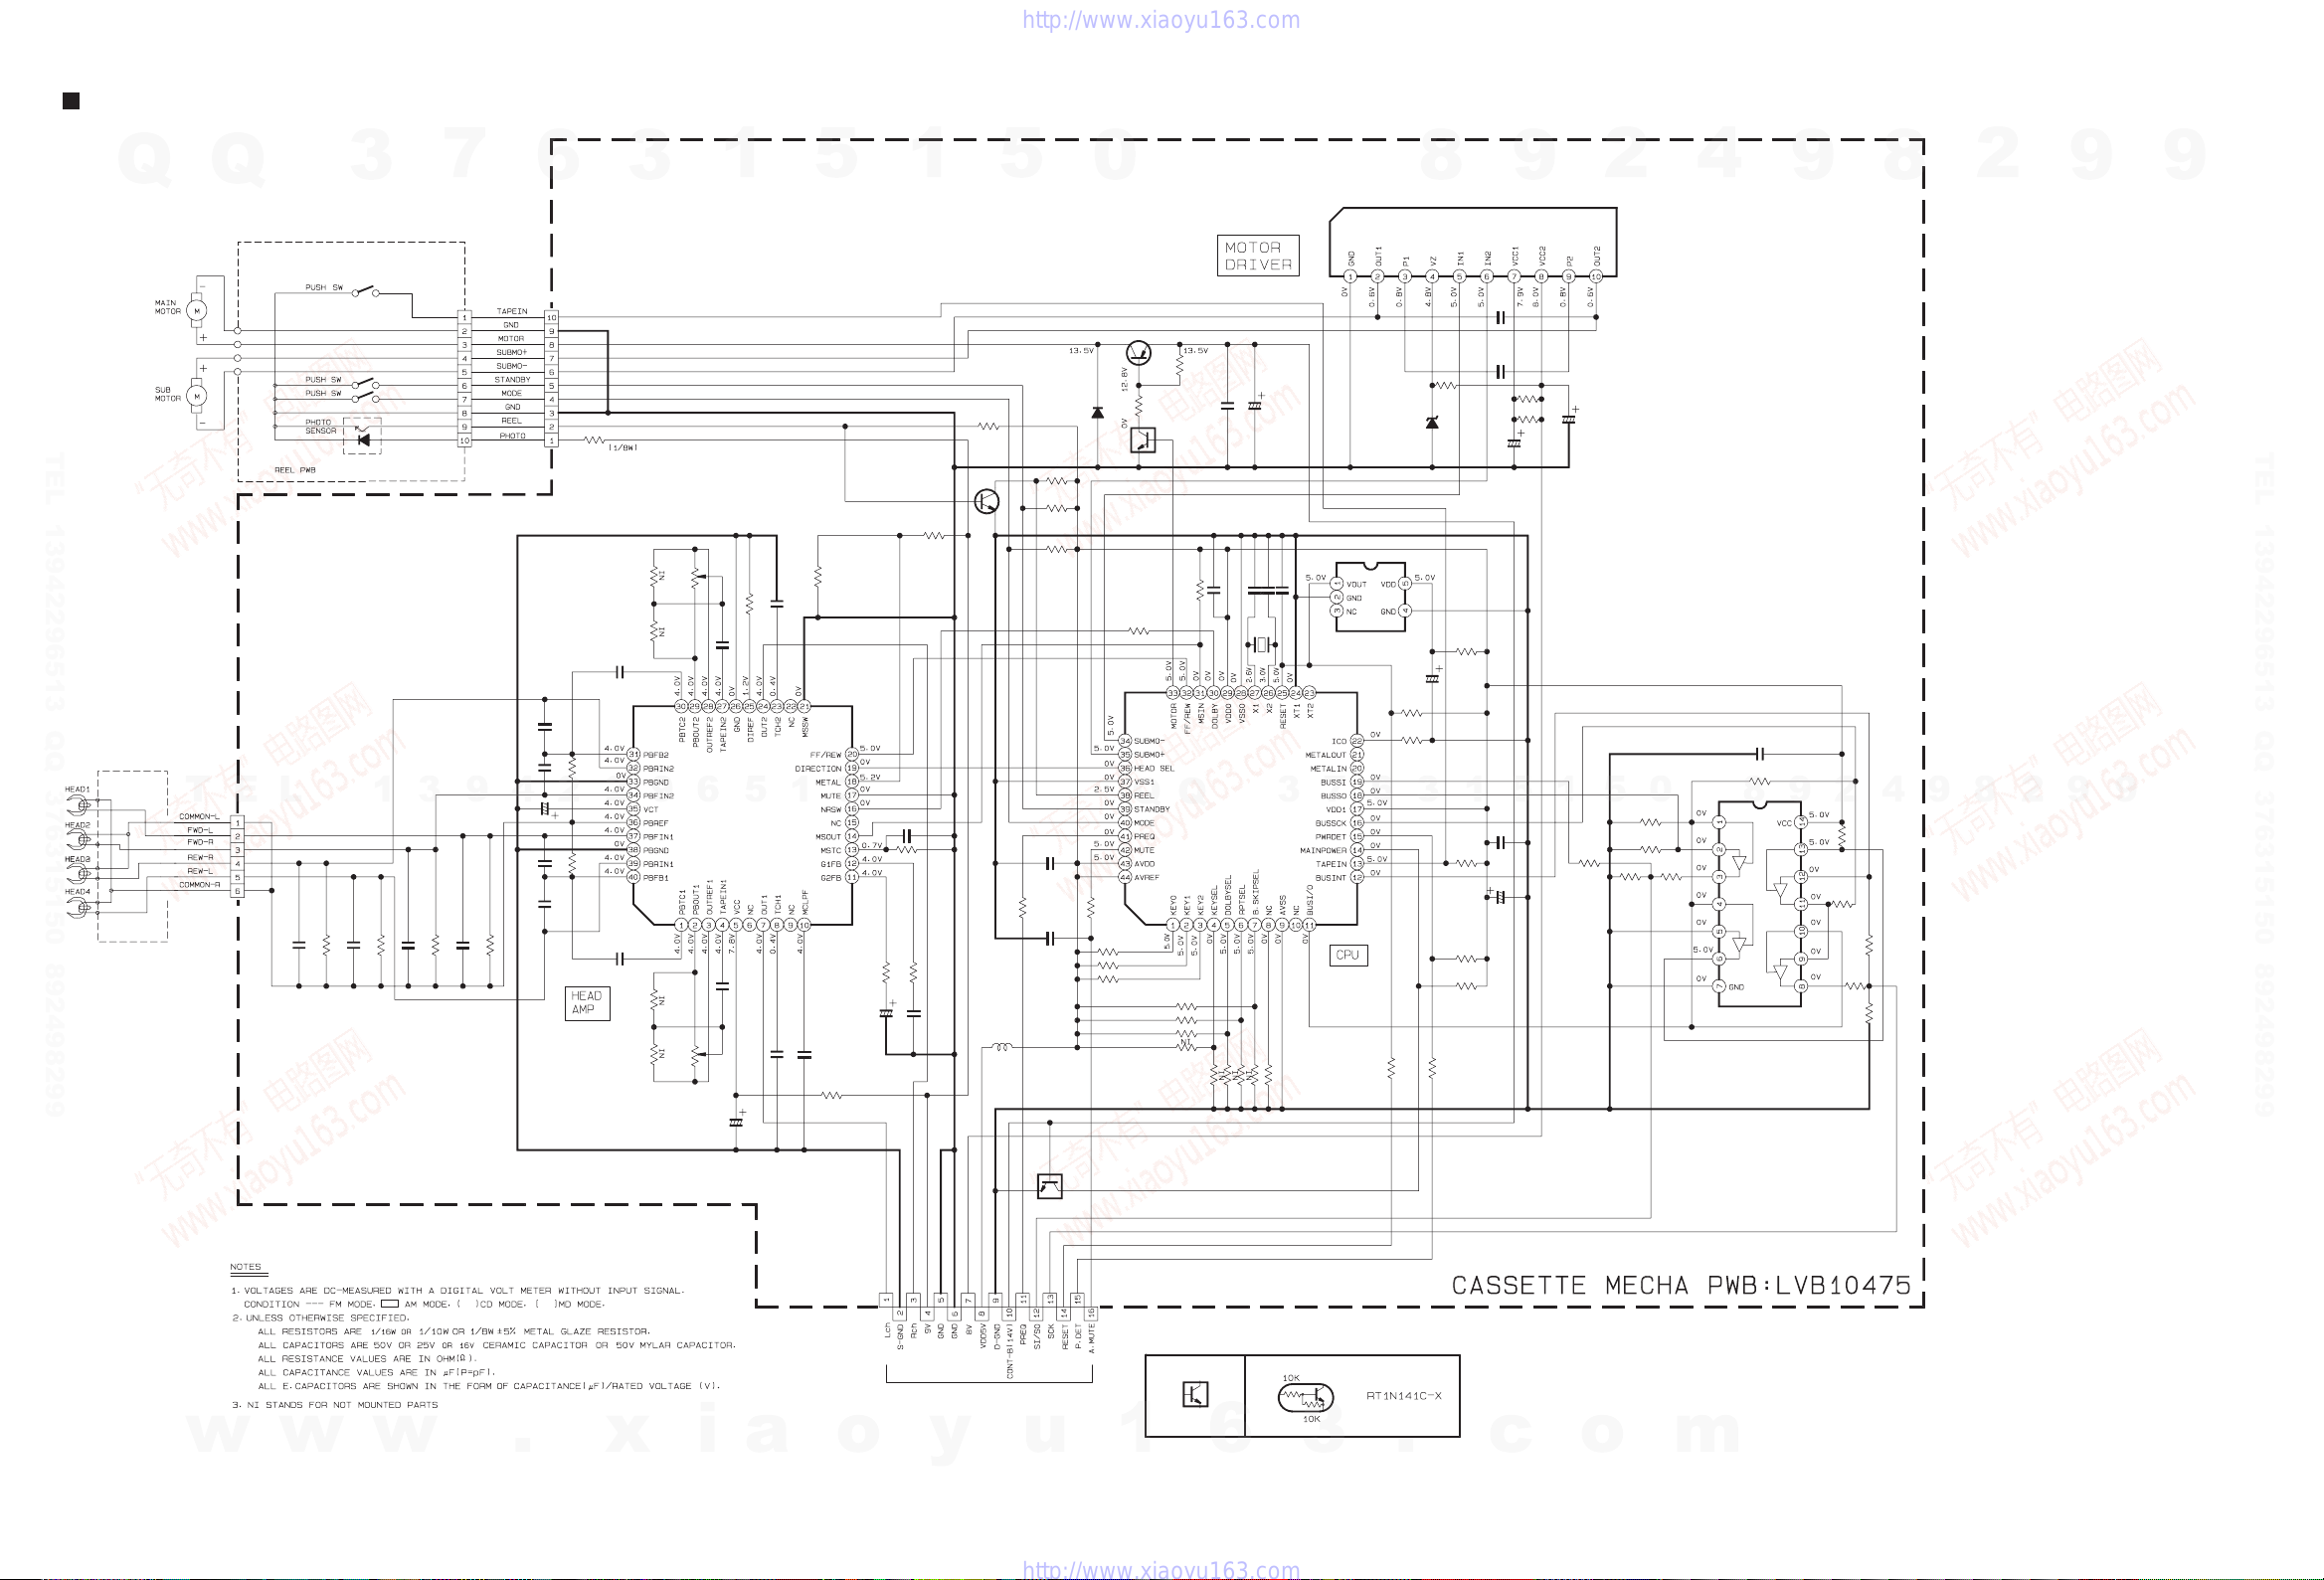
IC401
IC431
IC402
IC461
Q431
CN402
C409
R412
C410
R448
R431
R433
R435
C425
C424
R425
R424
R461
R465
R464
R466
R462 R463
R468
R470
C461
R401
R416
C422
C438
Q402
R442
R441
X431
CN401
R443
Q403
C431
C432
R440
R447
R446
R445
Q432
R439
R417
R438
R437
R450
L431
R449
CN403
R451
R426
C439
IC432
R491
C411
C427
C401
C402
C403
C404
R402
R403
R404
R405
C406
R406
C405
C416
C407
C408
R407
C417
R411 R410R408
R409
VR401
VR402
C412
C413
R413
C414
C418
R432
R434
R436
C423
D401
R467
R469R471
R414
R415
C419
C421
R423
R422
D402
C436
C435
C433
C434
C437
R444
R418
R455
R456
R452
R454
C426
R457
R458
C428
CXA2560Q
UPD789166GB-590
LB1641
SN74AHC126NS-X
RT1N141C-X
QGA2001F1-06
22/16
100
0.015
68k
47k
47k
0.01
0.1
68
2.2k
22k
22k
100k
100k
330k
100
330
100
0.01
680
1.5M
0.1
0.01
RT1N141C-X
47k
47k
QGB1004K1-16
2.2K
2SB1322/RS/-T
47/6.3
0.01
47k
47k
47k
56k
2SC3928A/QR/-X
47K
10k
47K
47K
47K
47u
10K
QGF1205C1-10
47k
68
0.01
BD4833FVE-W
0
0.015
10/16
100P
100P
100P
100P
100k
100k
100k
100k
100P
180
100P
0.1
100P 100P
180
0.1
QVP0033-333Z QVP0033-333Z
0.1
0.1
18k
22/16
220P
47k
10/16
MA8047/H/-X
10k
22k
330k
3.9k
22k
0.47/50
0.01
47k
3.3k
1A3G-T1
QAX0414-001Z
22P
22P
47/6.3
0.01
0.01
47k
15k
1k
1k
47k
10/16
1k
1k
100P
TO CN803
(SHEET 4)
Cassette mechanism control section
Q
Q
3
7
6
3
TEL 13942296513 QQ 376315150 892498299
T
E
L
1
3
9
4
2
2
9
1
6
5
1
5
3
1
5
0
Q
Q
3
7
6
8
3
1
9
5
1
2
5
4
0
8
9
9
8
2
9
9
TEL 13942296513 QQ 376315150 892498299
9
9
2
8
9
4
2
w
w
w
.
x
i
a
o
y
u
2-4
1
6
3
.
c
o
m
SHEET 3
Page 57
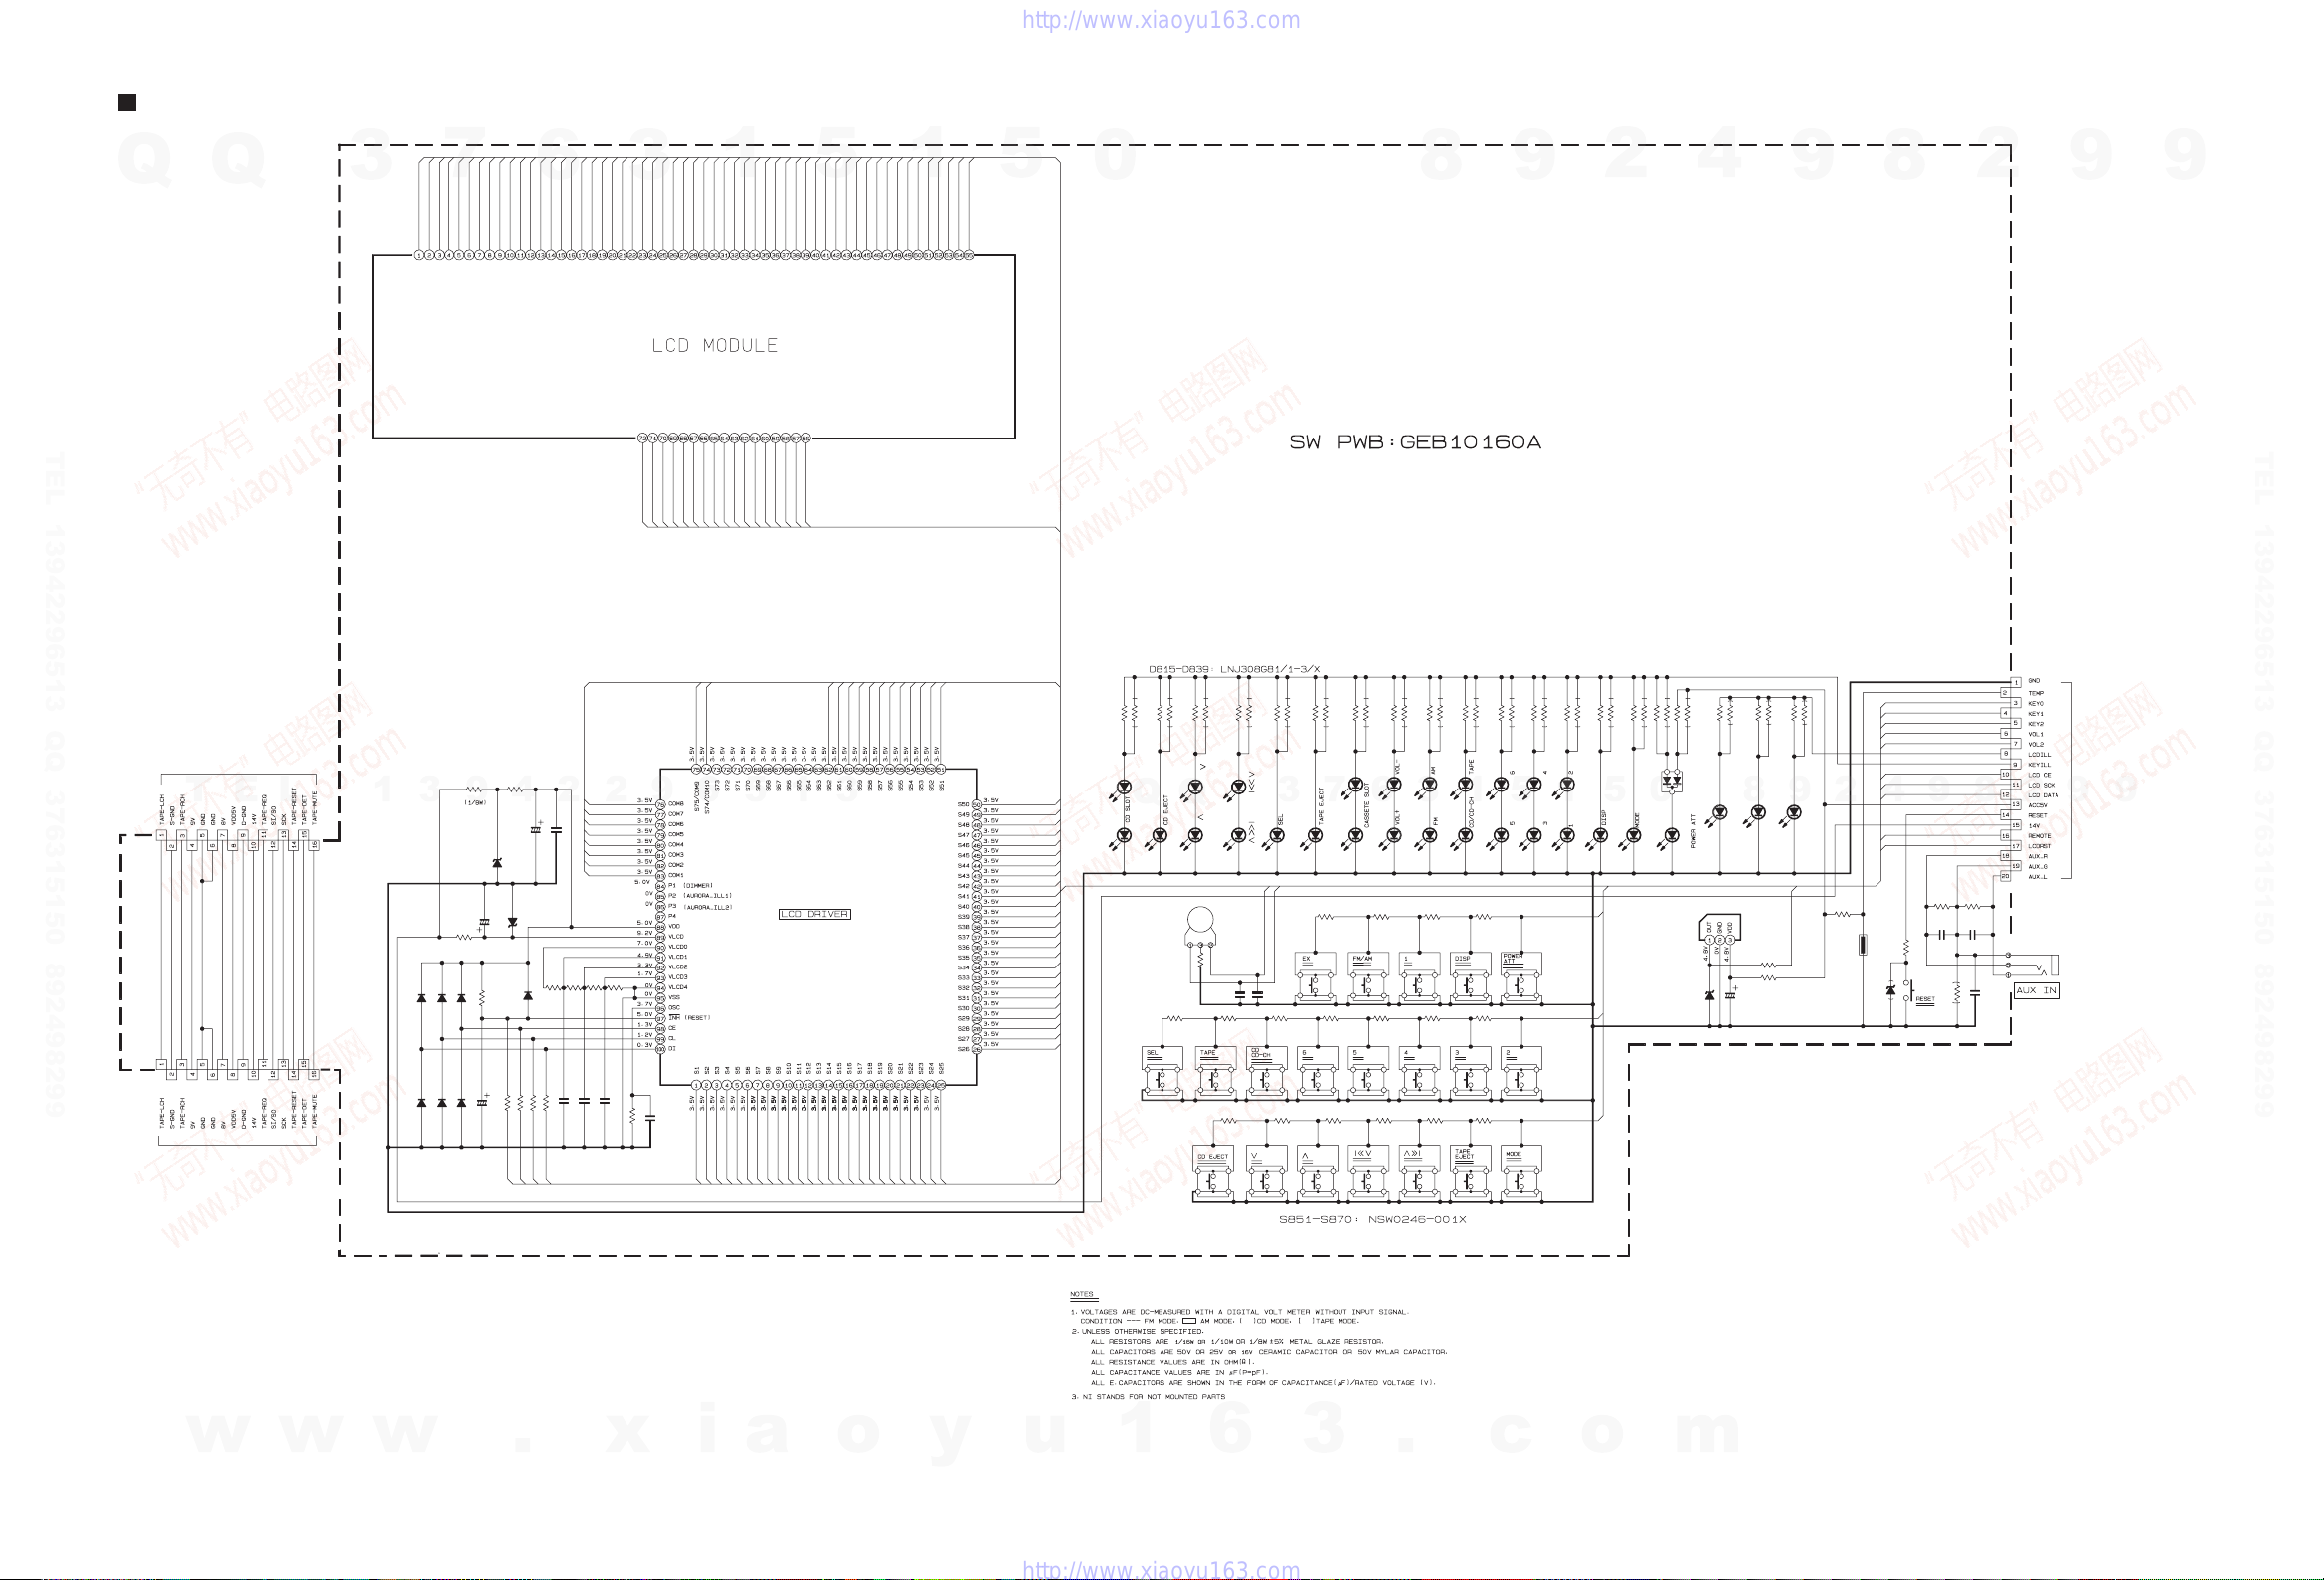
LCD and user control keys section
S851S852
R855
R874
R802
IC801
S854
R806R805R804
R801
R807
D802
R803
S853
R886
S855
S856S857S858S859S860S861S862S863
S864S865S866S867S868S869S870
LCD1
CN801
IC802
R854
R853
R871R872R873
R875R876R877R878R879R880
R881
R882R883R884R885
EN851
R887
CN803
CN802
R856 R857
C810 C811
PJ801
R863
TH855
R859
D842
D841
R811
D804
D806
C806
C802
D808
R812
D803
D805
D801
C803
C805
C804
C808
D807
D809
C801
C807
C813
C814
R860
D815
D816
D837
D832
R844
R843
R850
R849
R826
R825
R824
R823
D811
R813
R814
D814
D818
D820
D822
D824
D826
D828
D830
D834
D836
D839
D812
D813
D838
D835
D833
D829
D827
D825
D823
D821
D819
D817
D831
R822
R841
R842
R821
R820
R819
R828
R827
R830
R829
R832
R831
R834
R833
R836
R835
R838
R837
R840
R839
R846
R845
R848
R847
R852
R851
R816
R815
R818
R817
D840
C809
R810
R809
R808
S871
R858
C812
10K
1.2k
220
PT6578LQ-L
10k10k10k
1.8k
10k
MA8091/M/-X
820
1.8k
QLD0380-001
QGB1004J1-20X
RPM7338-V4
470
10k
620620820
6206208201.2k1.8k3k5.6k
6206208201.2k
QSW0976-001
3k
QGB1004J1-16X
47K 47K
0.0047 0.0047
QNS0180-002
3.3k
NADOO28-103X
0
MA8062/M/-X
MA8051/M/-X
68k
1SS355W-X
1SS355W-X
4.7/6.3
0.1
1SS355W-X
390k
1SS355W-X
1SS355W-X
MA8051/M/-X
0.1
680P
0.1
4.7/6.3
1SS355W-X
1SS355W-X
0.1
4.7/16
0.01
0.01
0
470
470
470
470
470
470
470
470
NSPW310BS/BRST/
390
390
TO1608BCHC/Z/-X
NSPW310BS/BRST/
NSPW310BS/BRST/
820
470
470
680
820
470
330
330
330
330
330
330
330
330
330
330
330
330
330
330
330
330
330
330
330
330
390
390
390
390
MC2838-X
4.7/6.3
3.3K
3.3K
3.3K
NSW0246-001X
470
0.047
SEG26
SEG27
SEG28
SEG29
SEG30
SEG31
SEG32
SEG33
SEG34
SEG35
SEG36
SEG37
SEG38
SEG39
SEG40
SEG41
SEG42
SEG43
SEG44
SEG45
SEG46
SEG47
SEG48
SEG49
SEG50
LCDRESET
LCDRST
COM4
COM5
COM6
COM7
COM3
COM8
COM1
COM2
KEY0
KEY0
KEY1
KEY2
KEY1
KEY2
VOL1
VOL2
LCDCE
LCDSCK
LCDDATA
14V
REMOTE
SEG1
SEG2
SEG3
SEG4
SEG5
SEG6
SEG7
SEG8
SEG9
SEG10
SEG11
SEG12
SEG13
SEG14
SEG15
SEG16
SEG17
SEG18
SEG19
SEG20
SEG21
SEG22
SEG23
SEG24
SEG25 SEG51
SEG52
SEG53
SEG1
SEG2
SEG3
SEG4
SEG5
SEG6
SEG7
SEG8
SEG9
SEG10
SEG11
SEG12
SEG13
SEG14
SEG15
SEG16
SEG17
SEG18
SEG19
SEG20
SEG21
SEG22
SEG23
SEG24
SEG25
SEG26
SEG27
SEG28
SEG29
SEG30
SEG31
SEG32
SEG33
SEG34
SEG35
SEG36
SEG37
SEG38
SEG39
SEG40
SEG41
SEG42
SEG43
SEG44
SEG45
SEG46
SEG47
SEG48
SEG49
SEG50
SEG51
SEG52
SEG53
SEG54
SEG55
SEG54
SEG55
SEG56
SEG57
SEG58
SEG59
SEG60
SEG61
SEG62
COM10
COM9
LCDDATA
LCDSCK
LCDCE
REMOTE
LCDRESET
VOL2
VOL1
COM1
COM2
COM3
COM4
COM5
COM6
COM7
COM8
COM9
COM10
SEG62
SEG61
SEG60
SEG59
SEG58
SEG57
SEG56
TO CN702
(SHEET 1)
TO CN401
(SHEET 3)
TO CN701
(SHEET 1)
Q
Q
3
7
6
3
TEL 13942296513 QQ 376315150 892498299
1
5
1
5
0
8
9
2
4
9
8
2
9
9
TEL 13942296513 QQ 376315150 892498299
T
E
L
1
3
9
4
2
2
9
6
5
1
3
Q
Q
3
7
6
3
1
5
1
5
0
8
9
2
4
9
8
2
9
9
w
w
w
.
x
i
a
o
y
u
1
6
3
.
c
o
m
SHEET 4
2-5
Page 58
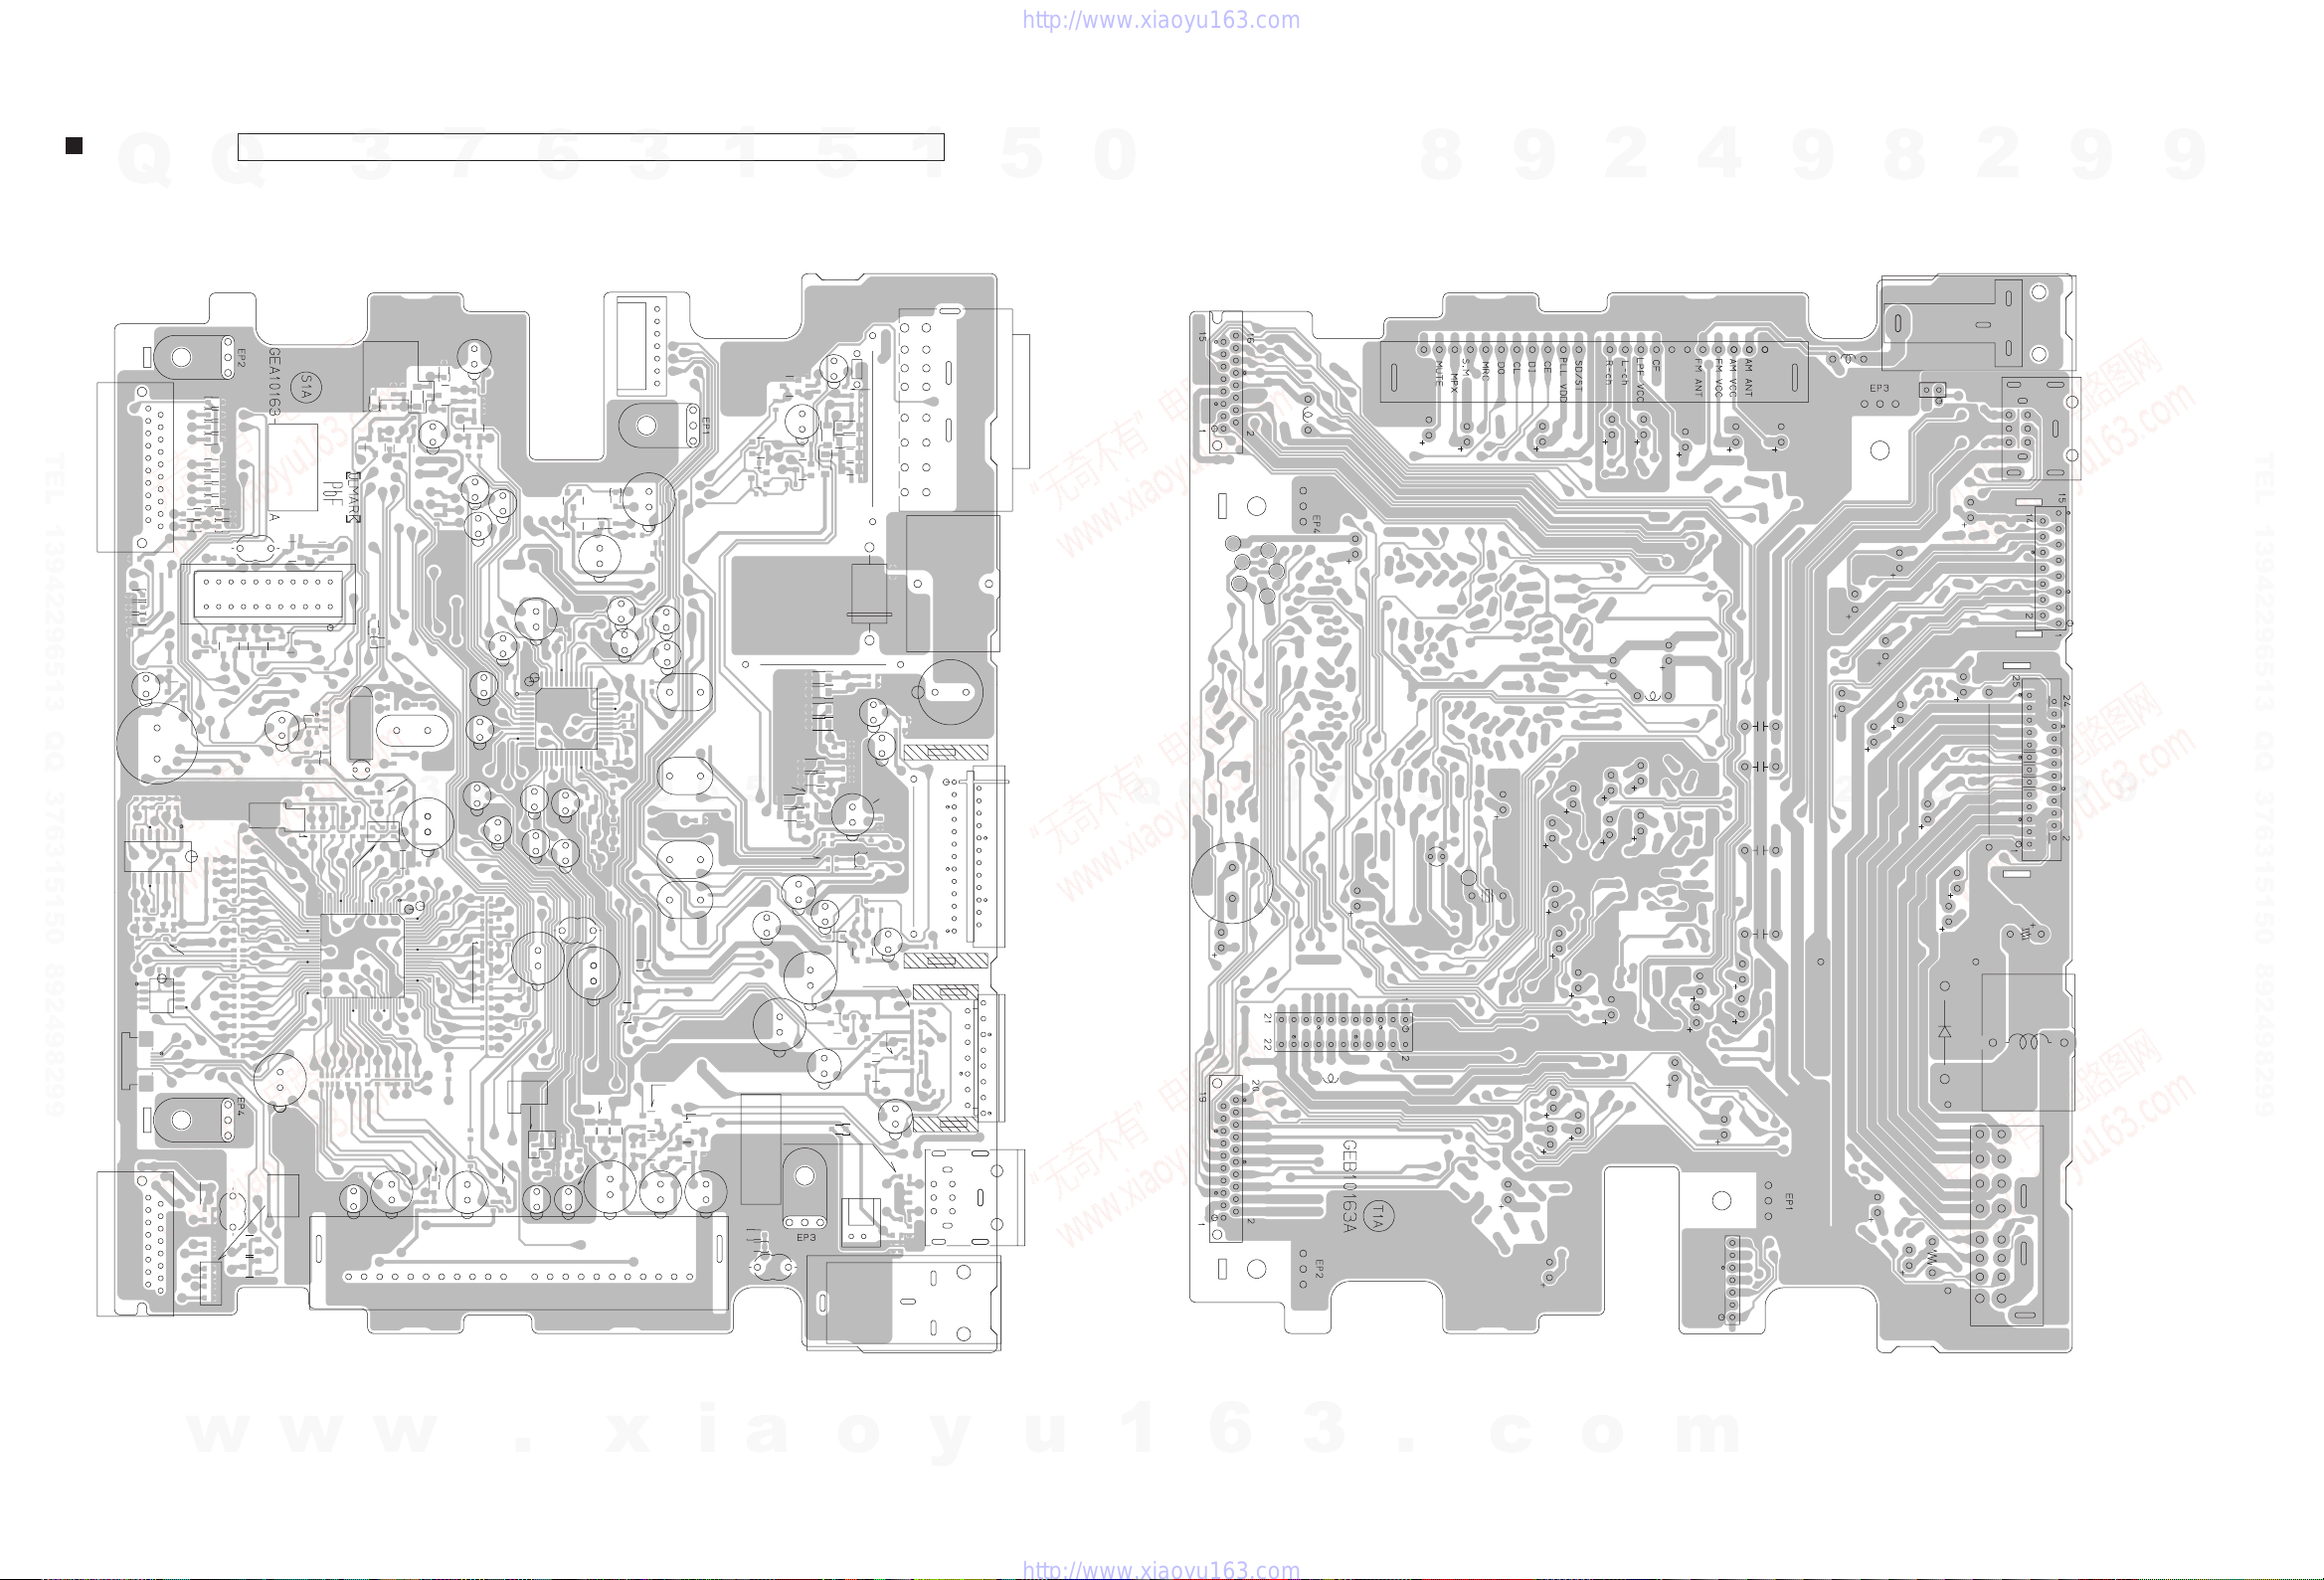
Forward side Reverse side
BZ941
C1
C2
C3
C4
C5
C6
C7
C8
C9
C10
C11
C101
C102
C103
C141
C151
C152
C153
C154
C155
C156
C157
C158
C159
C160
C161
C162
C163
C164
C165
C180
C181
C182
C183
C184
C185
C186
C187
C188
C189
C190
C191
C192
C193
C194
C195
C196
C197
C198
C199
C201
C202
C203
C251
C252
C253
C254
C255
C256
C257
C258
C259
C260
C263
C264
C265
C281
C282
C283
C284
C285
C286
C287
C288
C289
C290
R701
R702
C713
C708
C710
C711
C712
C714
C715
C716
R703
C717
C718
R704
R705
R706
R707
R708
R709
R710
R711
R712
R713
R714
C719
R715
R716
R717
R718
R719
R720
CN704
CN703
CN705
C901
C902
C903
C904
C905
C906
C907
C908
C909
C910
C911
C912
C913
C914
C915
C921
C922
C941
C951
C952
C953
C971
C972
C973
C974
CN323
X702
CN701
CN702
X701
L701
CN901
CN902
D1
D2
D3
D4
D181
D185
D186
D187
D188
D285
D286
D287
D288
D717
Q701
Q702
Q703
Q704
Q705
Q706
Q707
Q708
C701
C702
C703
C704
C705
C706
C707
C720
D901
R917
D903
D904
D905
D906
D907
D921
D951
D952
D971
D972
D973
D974
IC151
IC181
IC702
IC703
IC781
R781
IC901
J1
L1
L704
RA701
RA702
C781
C782
L901
Q1
Q2
Q3
Q181
C721
C722
C723
C724
C725
C726
C727
C728
Q901
Q902
Q903
Q904
Q905
Q921
Q922
Q941
Q951
Q952
Q971
R1
R2
R3
R4
R5R6R7
R8
R9
R10
R11
R13
R101
R102
R141
R142
R151
R152
R153
R154
R155
R156
R181
R182
R191
R192
R193
R194
R195
R201
R202
R241
R242
R251
R252
R254
R255
R256
R281
R282
R758
R921
R759
R735
R736
L781
L782
C783
L702
L703
D701
D702
D703
D704
D705
R901
R902
R903
R904
R905
R906
R907
R908
R909
R910
R911
R912
R913
R914
R915
R916
R922
R923
R924
R925
R941
R971
R972
R973
R974
R975
R976
R977
R978
R979
R980
D706
D707
TU1
D708
D709
B901
B902
B903
C142
C143
C916
D710
Q923
C923
R926
IC701
R782
R783
R784
R785
R786
R787
R788
R789
R790
D711
D712
D713
D714
D715
D716
R721
C730
C731
C732
C733
R722
R723
R724
R725
R726
R727
R728R729
R730
R731
R732
R733
R734
R739
R740
R741
R742
R743
R744
R745
R746
R747
R748
R749
R750
R751
R752
R753
R754
R755
R756
R757
R760
R761
R762
R763
R764
R765
R766
R767
R768
R769
R770
R771
R772
R773
R774
R775
R776
R777
R778
R779
D718
D182
R918
C12
C735
C736
C737
BZ941
C2
C3
C5
C6
C8
C9
C102
C151
C152
C153
C154
C159
C161
C162
C163
C164
C165
C181
C182
C192
C193
C195
C196
C197
C198
C202
C251
C252
C253
C254
C263
C264
C265
C281
C282
C708
C710
C711
C712
CN704
CN705
C901
C902
C903
C904
C906
C909
C911
C915
C921
C941
C951
C952
C971
C972
CN323
X702
CN701
CN702
X701
L701
CN901
CN902
D901
IC181
IC901
J1
L1
L901
L702
L703
R901
TU1
B901
B902
B903
VPP
VDD
VSS
RST
SI
SO
X1
Lead free solder used in the board (material : Sn-Ag-Cu, melting point : 219 Centigrade)
Printed circuit boards
Main board
Q
Q
3
7
6
3
TEL 13942296513 QQ 376315150 892498299
T
w
E
L
w
1
w
3
9
4
.
2
2
x
9
1
5
1
5
0
8
9
2
4
9
8
2
9
9
TEL 13942296513 QQ 376315150 892498299
0
m
8
9
2
4
9
8
2
9
9
1
3
o
y
u
Q
1
Q
6
7
3
3
6
.
3
1
c
5
1
o
5
6
5
i
a
2-6
Page 59
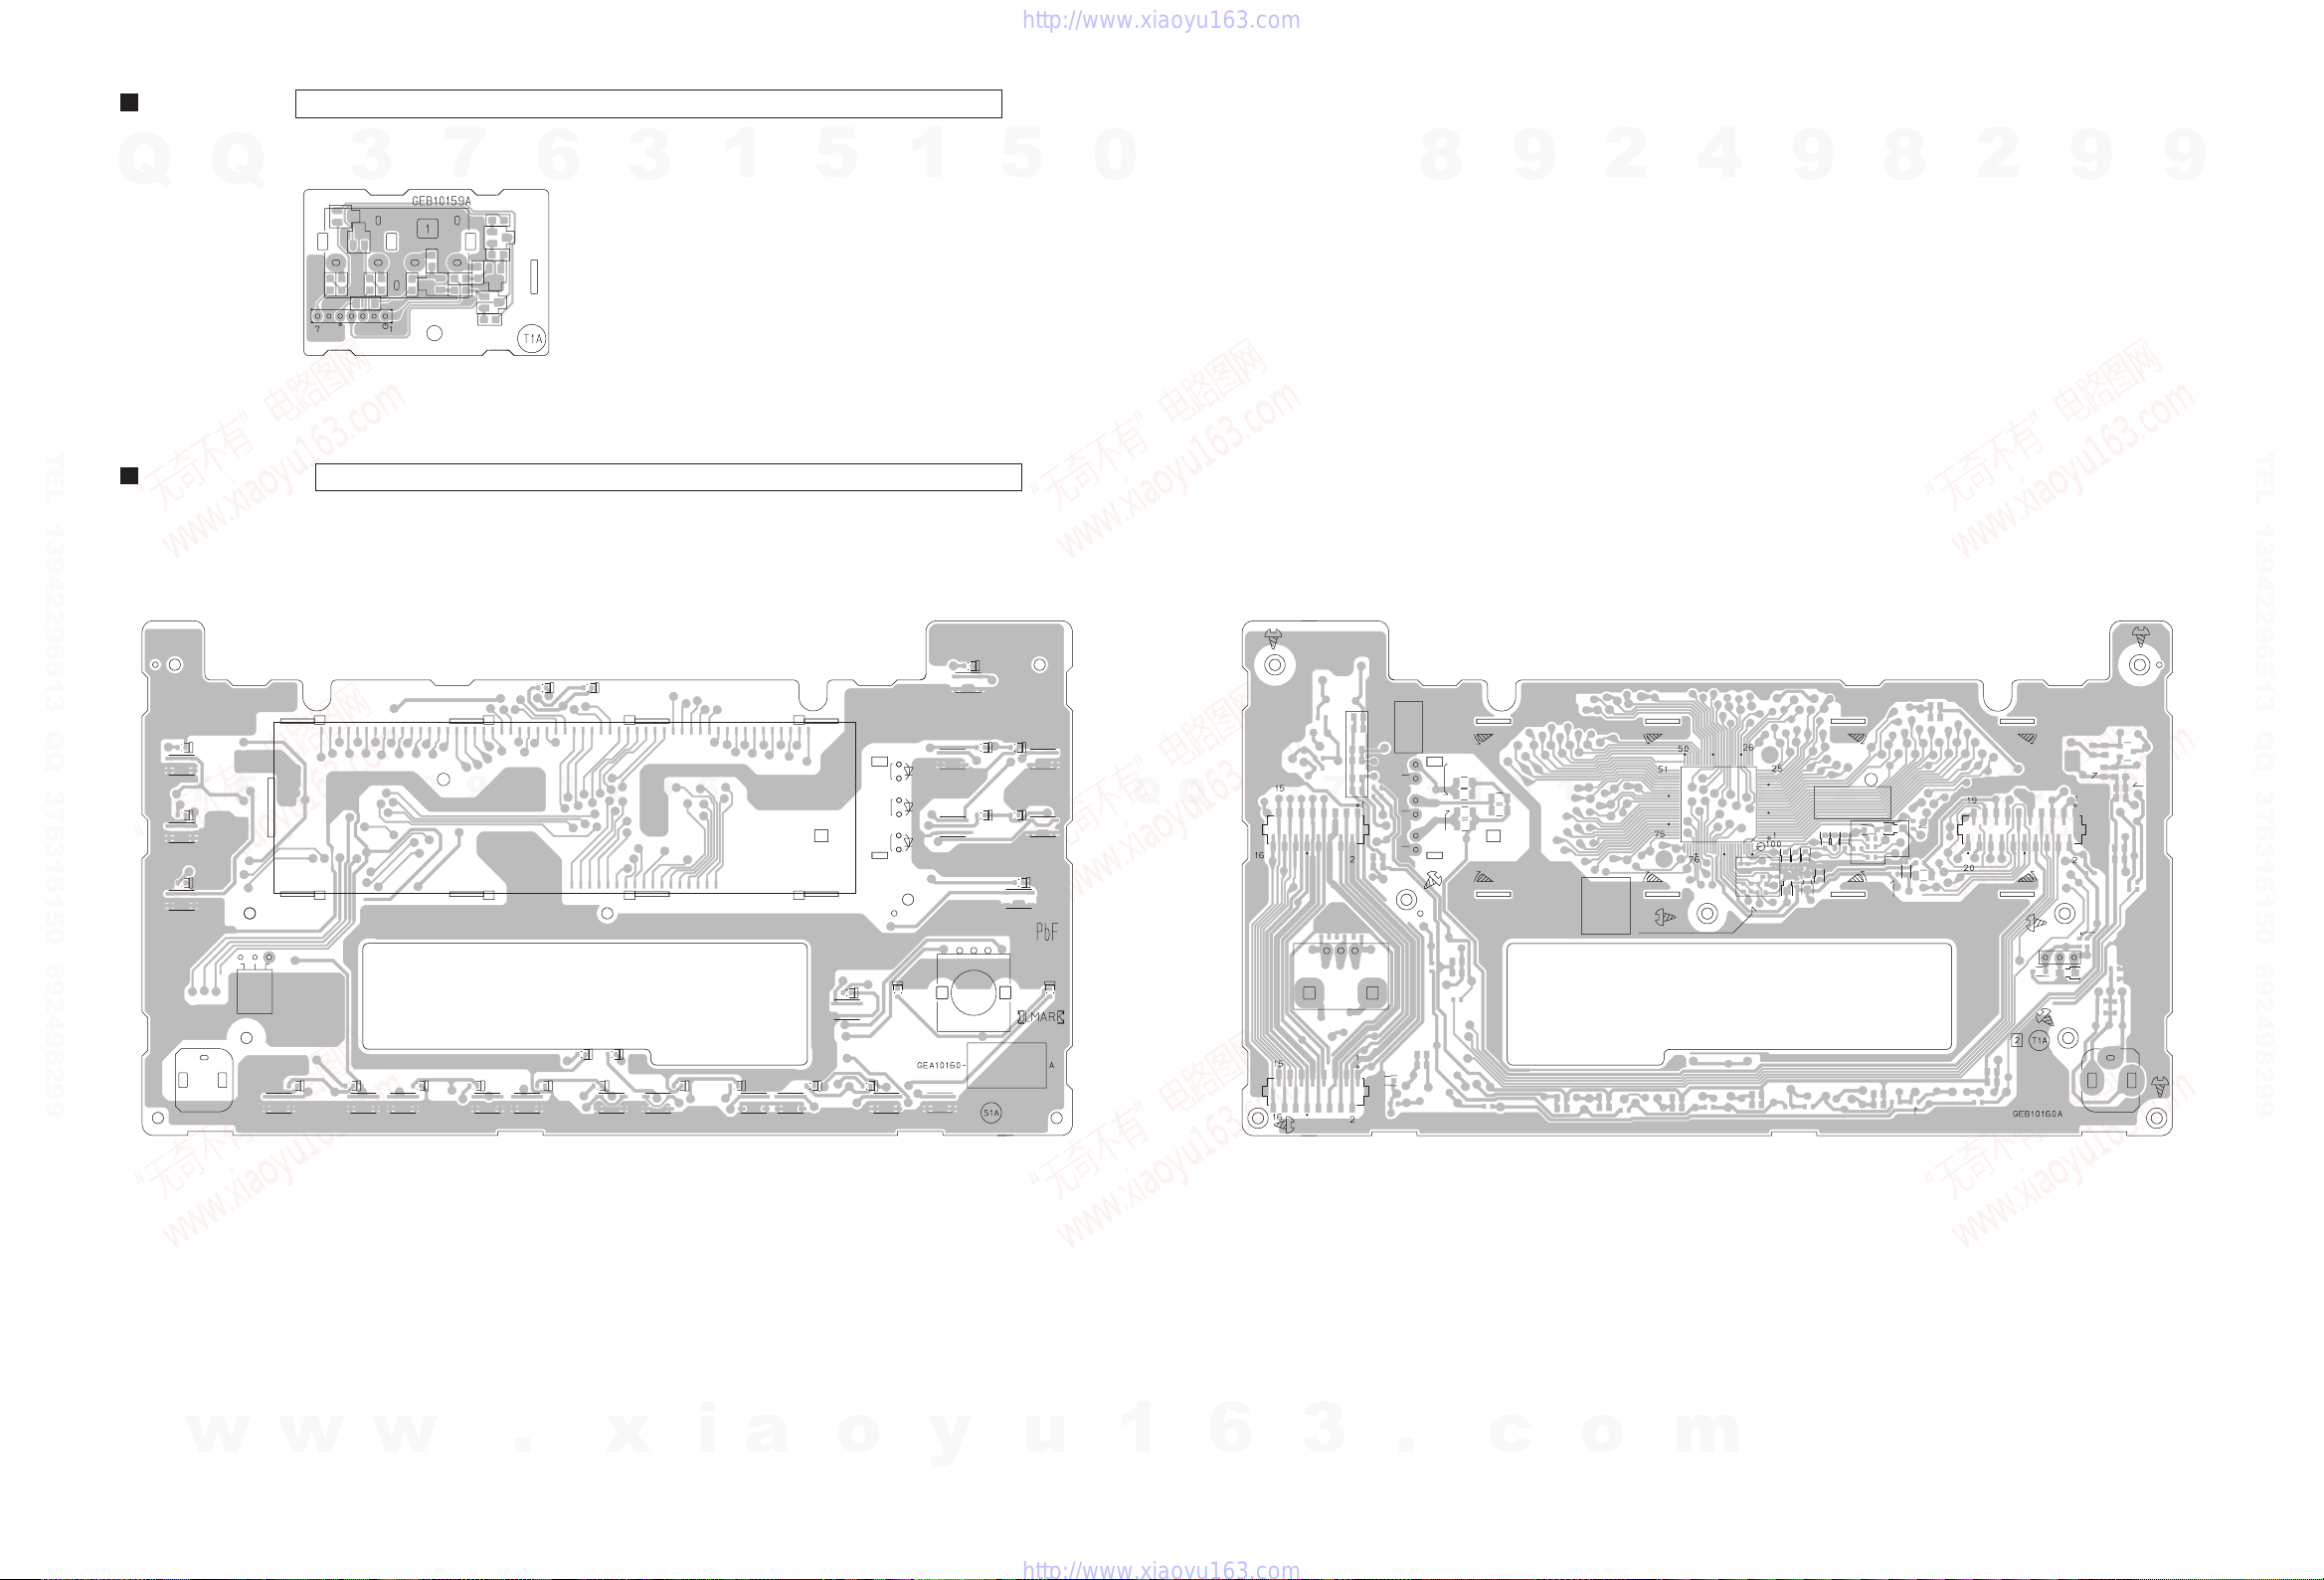
Forward side Reverse side
J321
CN322
Q331
Q341
Q321
Q351
R325
R345
R351
R331
R322
D331
R335
R355
R332
R342
R321
R341
R352
D321
B331
D811
D812
D813
D814
D815
D816
D817
D818
D819
D820
D821
D822
D823
D824
D825 D826
D827
D828
D829
D830
D831
D832
D833
D834
D835
D836
D837
D838
D839
EN851
IC802
LCD1
PJ801
S851
S864
S853
S854
S855
S856
S857
S858
S859
S860
S861
S862
S863
S852
S865
S866
S867
S868
S869
S870
S871
C801
C802
C803
C804
C805
C806
C807
C808
C809
C810
C811
C812
C813
C814
CN801
CN802
CN803
D801
D802
D803
D804
D805
D806
D807
D808
D809
R863
D811
D812
D813
D840
D841
D842
EN851
IC801
IC802
PJ801
R801
R802
R803
R804
R805
R806
R807
R808
R809
R810
R811
R812
R813
R814
R815
R816
R817
R818
R819
R820
R821
R822
R823
R824
R825
R826
R827
R828
R829
R830
R831
R832
R833
R834
R835
R836
R837
R838
R839
R840
R841
R842
R843
R844
R845
R846
R847
R848
R849
R850
R851
R852
R853
R854
R855
R856
R857
R858
R859
R860
R871
R872
R873
R874
R875
R876
R877
R878
R879
R880
R881
R882
R883
R884
R885
R886
R887
TH855
Lead free solder used in the board (material : Sn-Ag-Cu, melting point : 219 Centigrade)
Lead free solder used in the board (material : Sn-Ag-Cu, melting point : 219 Centigrade)
Func board
Switch board
Q
Q
3
7
6
3
TEL 13942296513 QQ 376315150 892498299
1
5
1
5
0
8
9
2
4
9
8
2
9
9
TEL 13942296513 QQ 376315150 892498299
T
E
L
1
3
9
4
2
2
9
6
5
1
.
x
i
a
w
w
w
3
o
9
9
2
8
9
4
2
9
8
2-7
0
5
1
5
1
3
6
7
3
3
.
c
o
m
Q
Q
1
6
y
u
Page 60
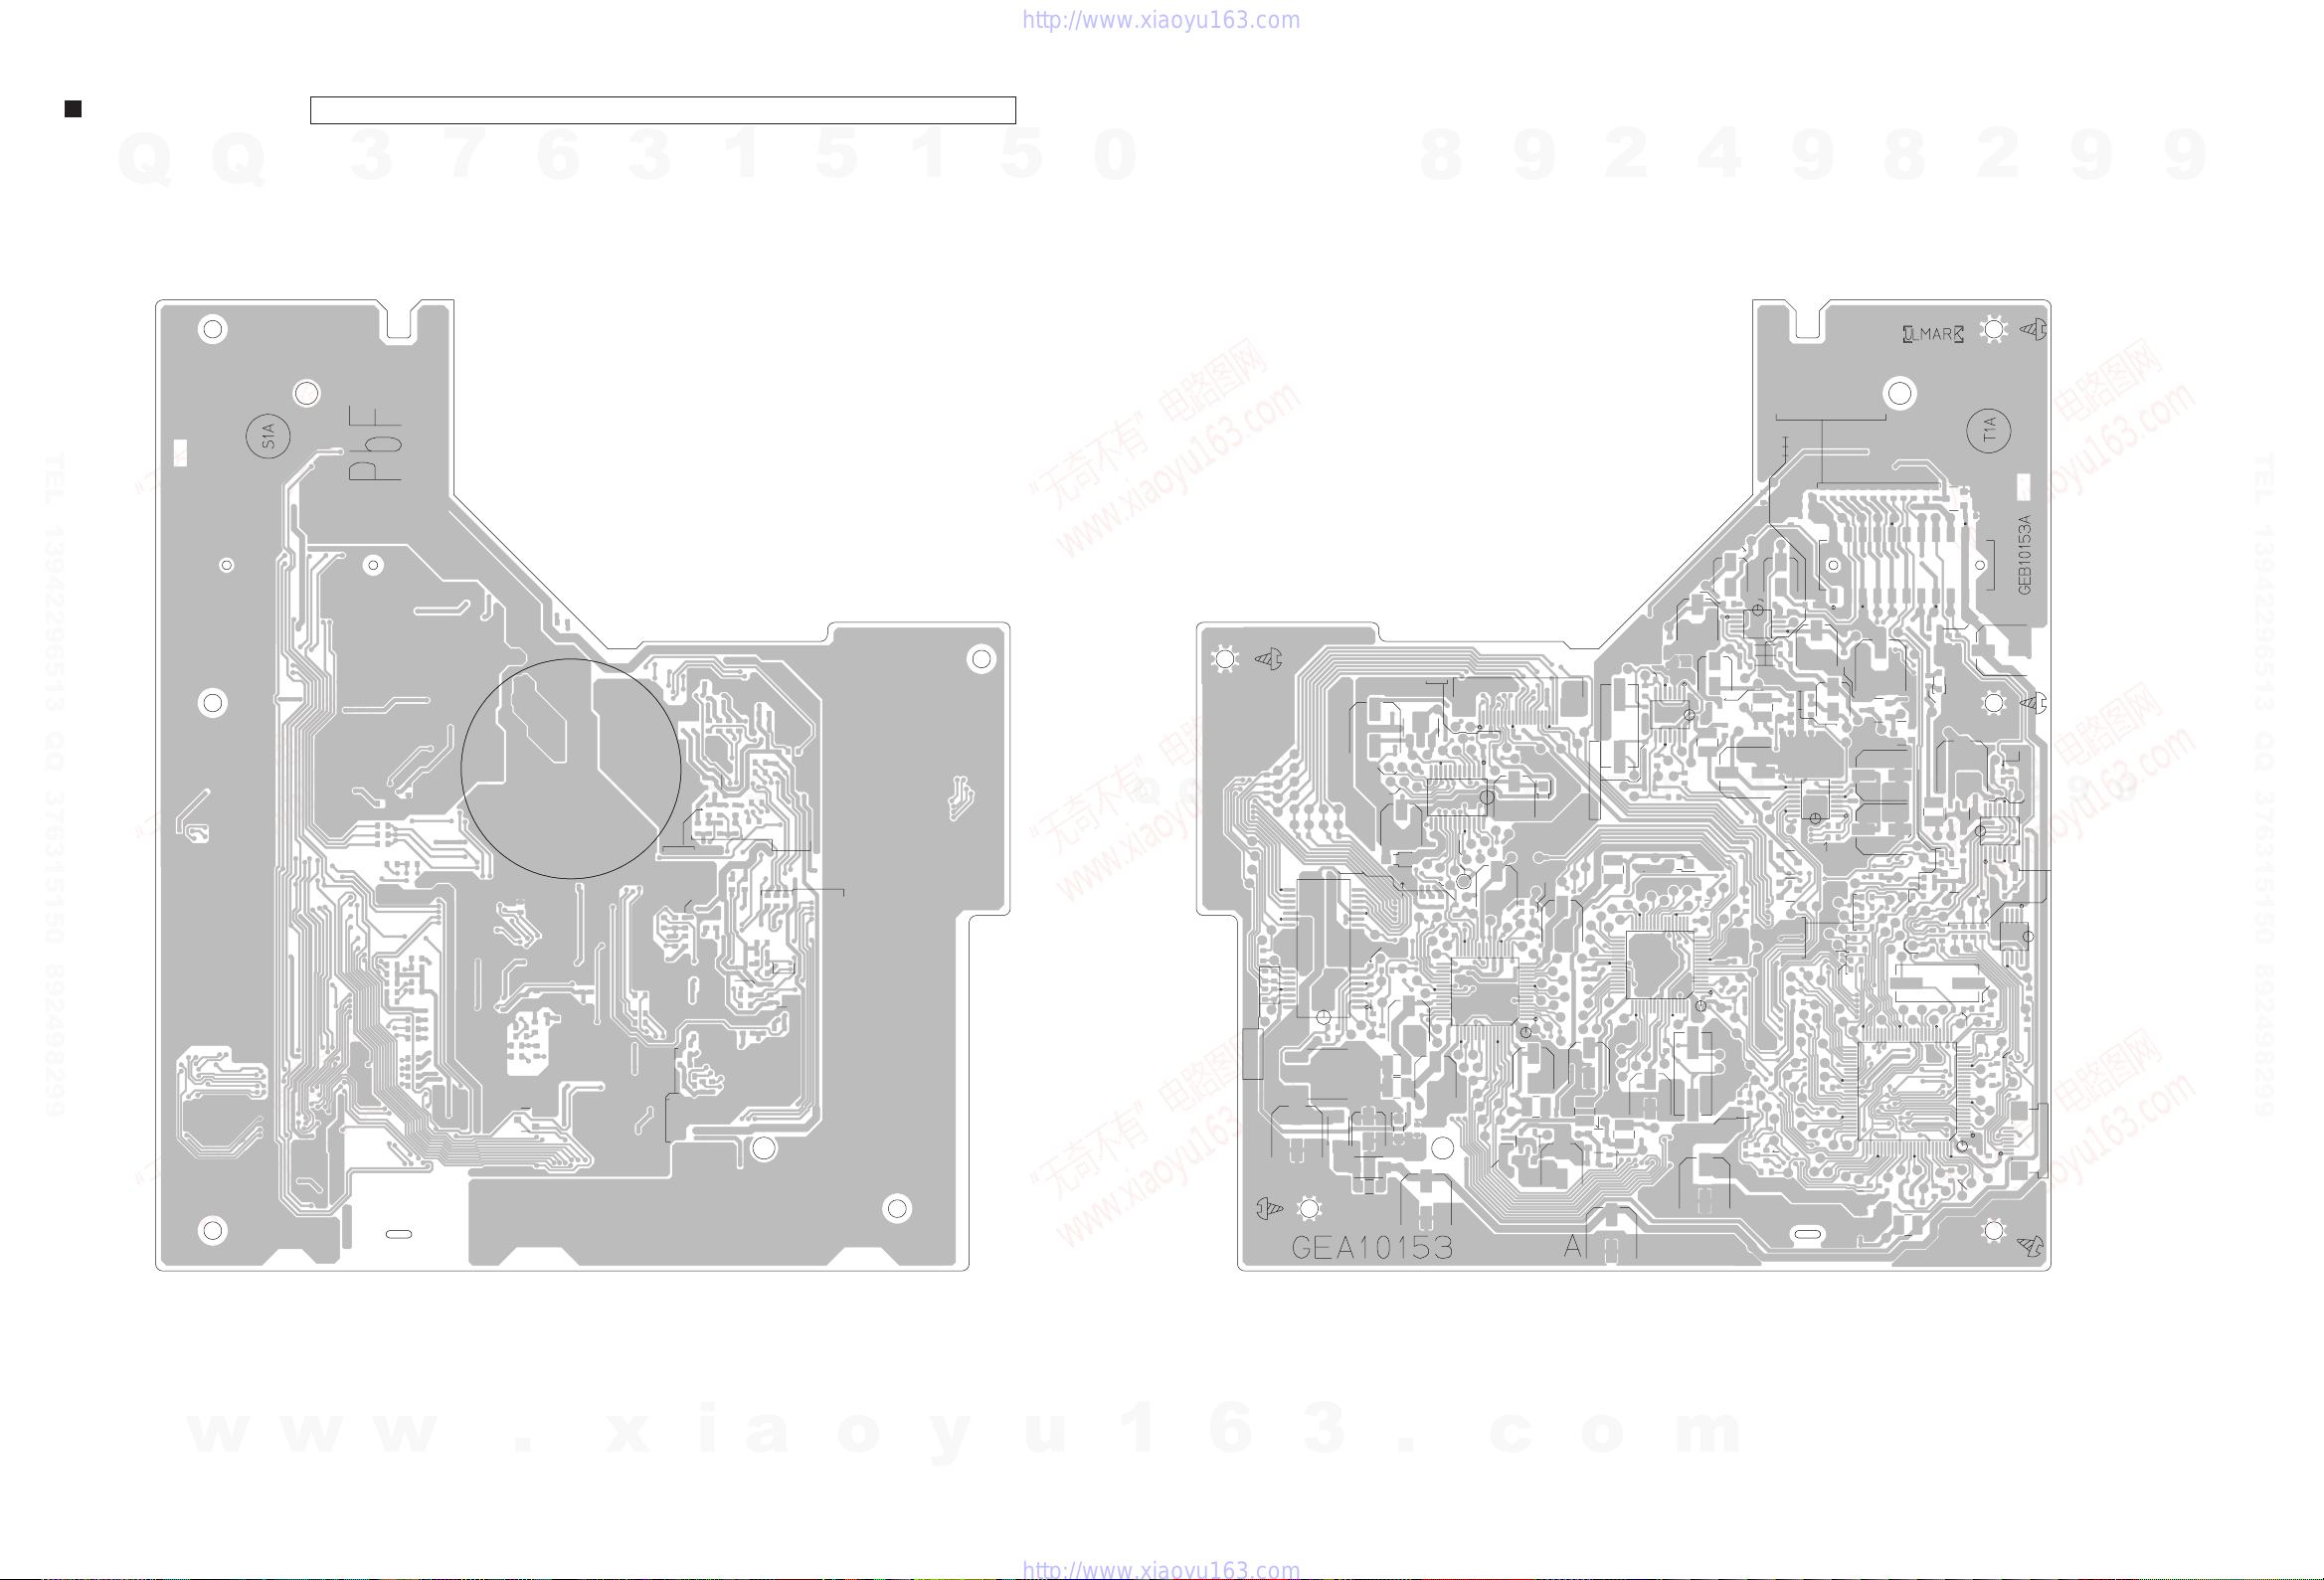
Forward side Reverse side
R678
Q652
C576
C602
C605
C608
C609
C610
C611
C621
C625
C626
C627
C631
C632
C636
C637
C638
C640
C642
C643
C644
C646
C659
C660
C664
C665
C666
C667
C669
R655
R543
R544
R504
R505
R535
R536
R537
R527
R526
R528
R539
R530
R529
R507
R506
R564
R565
R566
R601
R602
R603
R604
R605
R606
R607
R608
R609
R610
R611
R612
R613
R614
R615
R621
R622
R623
R624
R625
R626
R627
R628
R629
R630
R631
R632
R633
R634
R635
R636
R637
R638
R639
R640
R641
R642
R675
TH501
C614
C676
C675
R579 R578
R616
R524
C580
C501
C508
C502
C503
C504
C505
C509
C510
C506
C511
C512
C513
C551
C578
C575
C573
C574
R657
R656
C581
C582
C583
C584
C585
C586
C587 C588
C589
C590
C591
C592
C593
C601
C603
C604
C606
C607
C612
C613
C622
C623
C624
C628
C629
C630
C633
C634
C635
C639
C641
C645
C651
C652
C653
C654
C655
C656
C661
C663
C668
R545
IC573
C673
C681
C682
C683
C684
CN501
CN502
CN601
C599
D681
D682
IC502
IC503
IC504
R573
IC572
IC601
IC621
IC651
IC652
IC681
L501
L502
L572
L621
L622
L623
L651
L652
L653
Q501
Q502
Q571
Q572
Q601
Q681
R548
R547
R509
R546
R502
R503
R523
R522
R521
R520
R519
R518
R517
R532
R534
R533
R508
R531
R540
R511
R512
R515
R513
R514
R516
R541
R510
R542
R525
R549
R550
R551
R552
R553
R554
R555
R556
R557
R558
R559
R560
R561
R562
R563
R577
R575
R572
R574
R581
R582
R583 R584
R585 R586
R587
R588
R589
R590
R591
R592
R651
R689
R690
R654
C514
C507
R685R687
R668
R576
C571
R677
R681
R682
R683
R684
R686
R688
R691
X501
C572
RFDC
TEB
SEL
TE
FE
RFRP
RF
RFGC
RWSEL
VREF
BUS0
1
2
CCE
BUCK
3
C577
B501
X651
Q574
R501
R568
R569
R570
Q573
C662
RCH
SCK
LRCK
DSEL
REQ
BDET
SI/SO
VDD
BUSCK
PDET
RESET
CDMUTE
DATA
BCK
9V
LCH
X571
L573
R598
R599
C647
C674
B571
R594
C594
C597
R595
C561
C521
C522
C524
C526
C528
C530
C531
C534
C535
C533
C527
C538
C539
C523
C525
C529
C536
C537
C532
C616
C687
C685 C686
C688
Q651
C596
C595
R593
C598
C689
C690
C615
B681
D506
IC501
C693
C694
IC571
Lead free solder used in the board (material : Sn-Ag-Cu, melting point : 219 Centigrade)
Mechanism board
Q
Q
3
7
6
3
TEL 13942296513 QQ 376315150 892498299
T
E
w
L
w
1
w
3
9
4
.
2
2
x
9
6
i
1
5
a
1
5
3
o
1
y
5
u
0
1
Q
Q
6
3
7
3
6
.
8
3
1
9
5
c
1
o
2
5
0
m
4
8
9
9
2
8
4
9
2
8
2
9
9
9
TEL 13942296513 QQ 376315150 892498299
9
2-8
Page 61
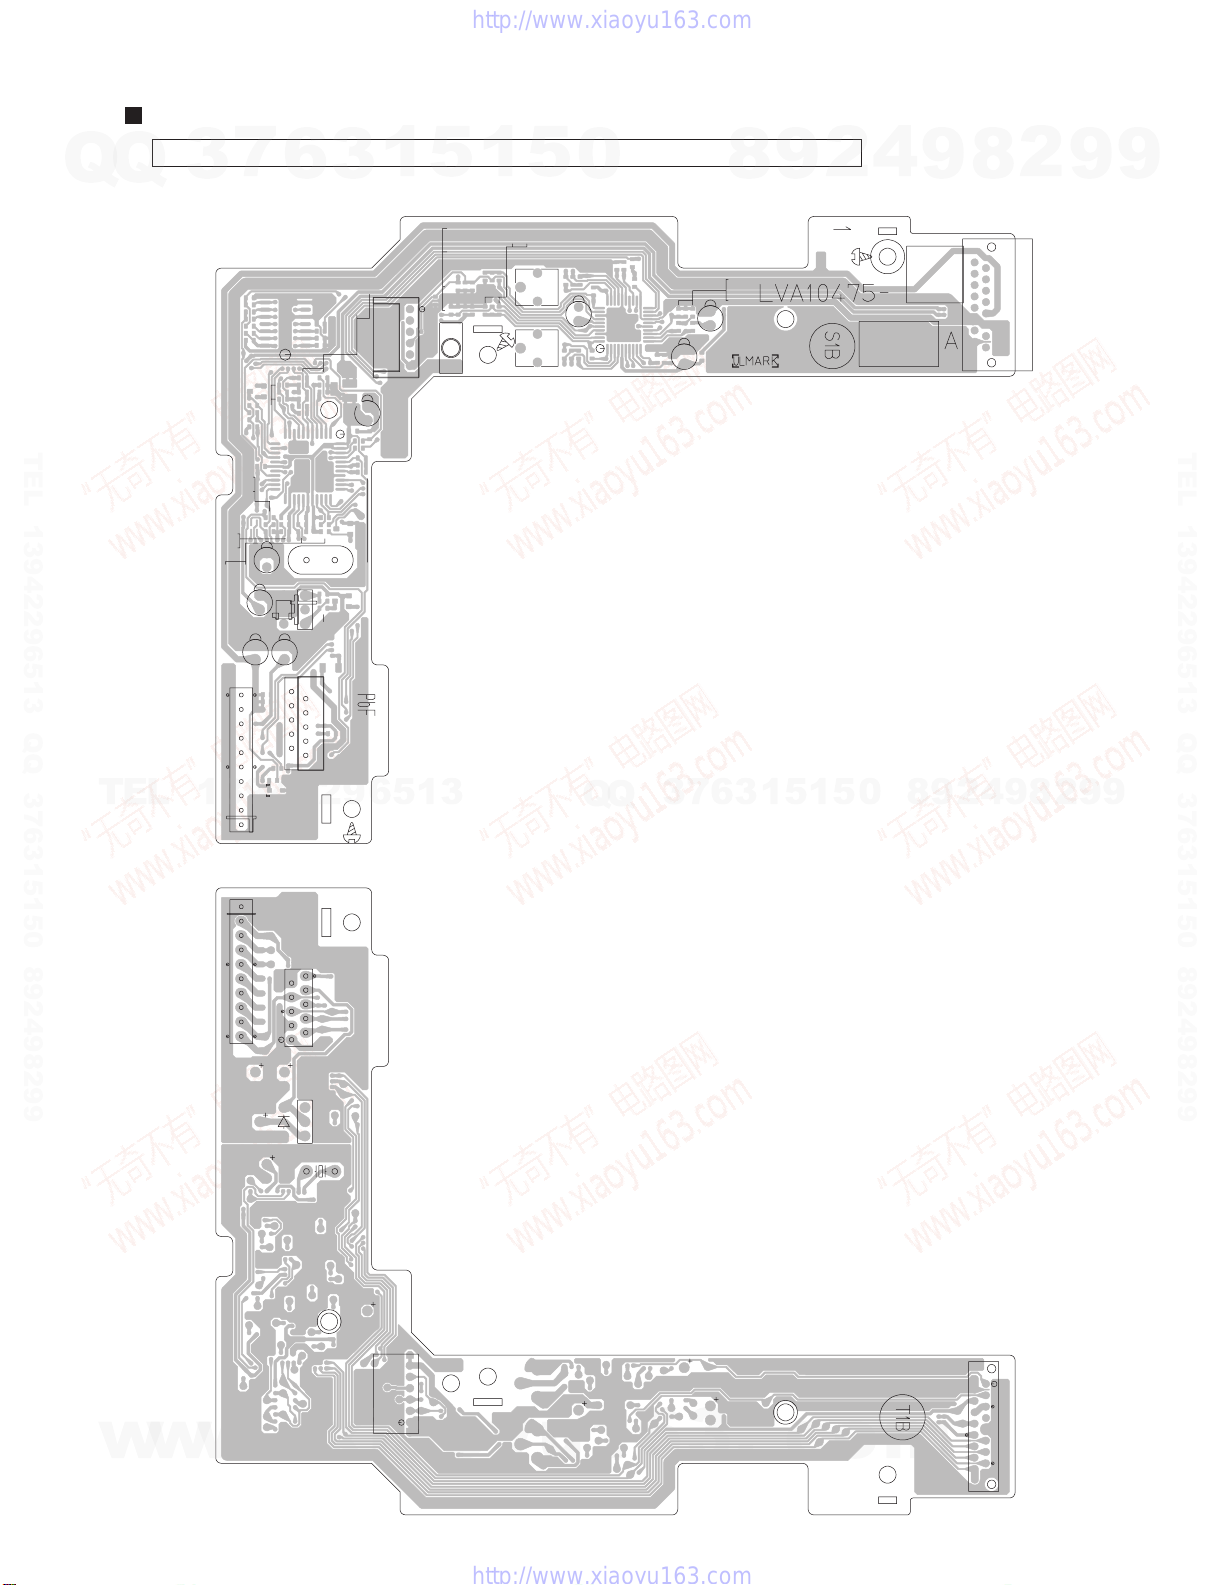
Mechanism control board
Lead free solder used in the board (material : Sn-Ag-Cu, melting point : 219 Centigrade)
Q
Q
TEL 13942296513 QQ 376315150 892498299
TEL
7
3
C434
R457
R450
C437
C436
C435
IC402
13942296513
R471
R470
R468
R466
R469
R467
C461
R440
R458
R441
R461
R442
R449
R443
C432
C426
Q431
R444
R491
R448
C427
IC432
R425
R426
R451
R452
R454
C424
6
IC461
C433
D402
R424
D401
Q403
IC431
C423
CN403
C428
R423
R422
X431
3
R432
R431
R435
R436
R434
R433
R462
R463
R464
R465
Q432
R447
R446
R445
Q402
R401
C425
R439
R437
R438
L431
1
C431
C439
C438
R456
R455
CN402
5
C402
R403R404
C403
C401
C404
R402
R405
1
C407
C408
R407
VR402
VR401
5
C405
C406
R406
0
Forward side
R417
C417
R413
R410
R411
C413
C411
C409
R408
C412
R409
C410
IC401
Q
Q
R418
C418
C416
3
C414
7
R412
6
8
C421
C422
R414
R415R416
C419
3
9
1
5
1
2
5
4
0
9
8
9
CN401
2
8
4
2
9
8
9
2
9
9
TEL 13942296513 QQ 376315150 892498299
9
w
w
IC402
C426
C427
w
CN403
C423
Q403
D402
C433
X431
.
xia
C431
CN402
o
y
Reverse side
VR401 VR402
C409
u
1
6
C414
C419
3
.
c
o
m
CN401
2-9
Page 62
7
Q
Q
TEL 13942296513 QQ 376315150 892498299
3
6
3
1
5
1
5
0
8
9
2
4
9
8
2
9
9
TEL 13942296513 QQ 376315150 892498299
TEL
13942296513
Q
Q
3
7
6
3
1
5
1
5
0
8
9
2
4
9
8
2
9
9
w
w
Victor Company of Japan, Limited
AV & MULTIMEDIA COMPANY CAR ELECTRONICS CATEGORY 10-1,1chome,Ohwatari-machi,Maebashi-city,371-8543,Japan
(No.MA220SCH)
w
.
xia
o
y
u
1
6
3
.
c
o
m
Printed in Japan
VPT
Page 63
Q
Q
3
7
6
3
1
5
1
5
0
PARTS LIST
[ KW-XC404 ] [ KW-XC405 ]
[ KW-XC406 ]
TEL 13942296513 QQ 376315150 892498299
* All printed circuit boards and its assemblies are not available as service parts.
4
2
9
8
KW-XC404
Area suffix
UI ---------------------------- India
9
8
2
9
9
TEL 13942296513 QQ 376315150 892498299
TEL
KW-XC405
13942296513
- Contents -
Exploded view of general assembly and parts list (Block No.M1)
CD mechanism assembly and parts list (Block No.MB)
Cassette mechanism assembly and parts list (Block No.MP)
Electrical parts list (Block No.01~05)
Packing materials and accessories parts list (Block No.M3)
Q
Q
6
7
3
Area suffix
U -------------------- Other Areas
UT -----------------------------Taiwan
Area suffix
U -------------------- Other Areas
3
1
5
KW-XC406
1
5
0
8
9
2
4
9
8
3-2
3-6
3-8
3-13
3-20
2
9
9
w
w
MA220
w
.
xia
o
y
u
1
6
3
.
c
o
m
3-1
Page 64
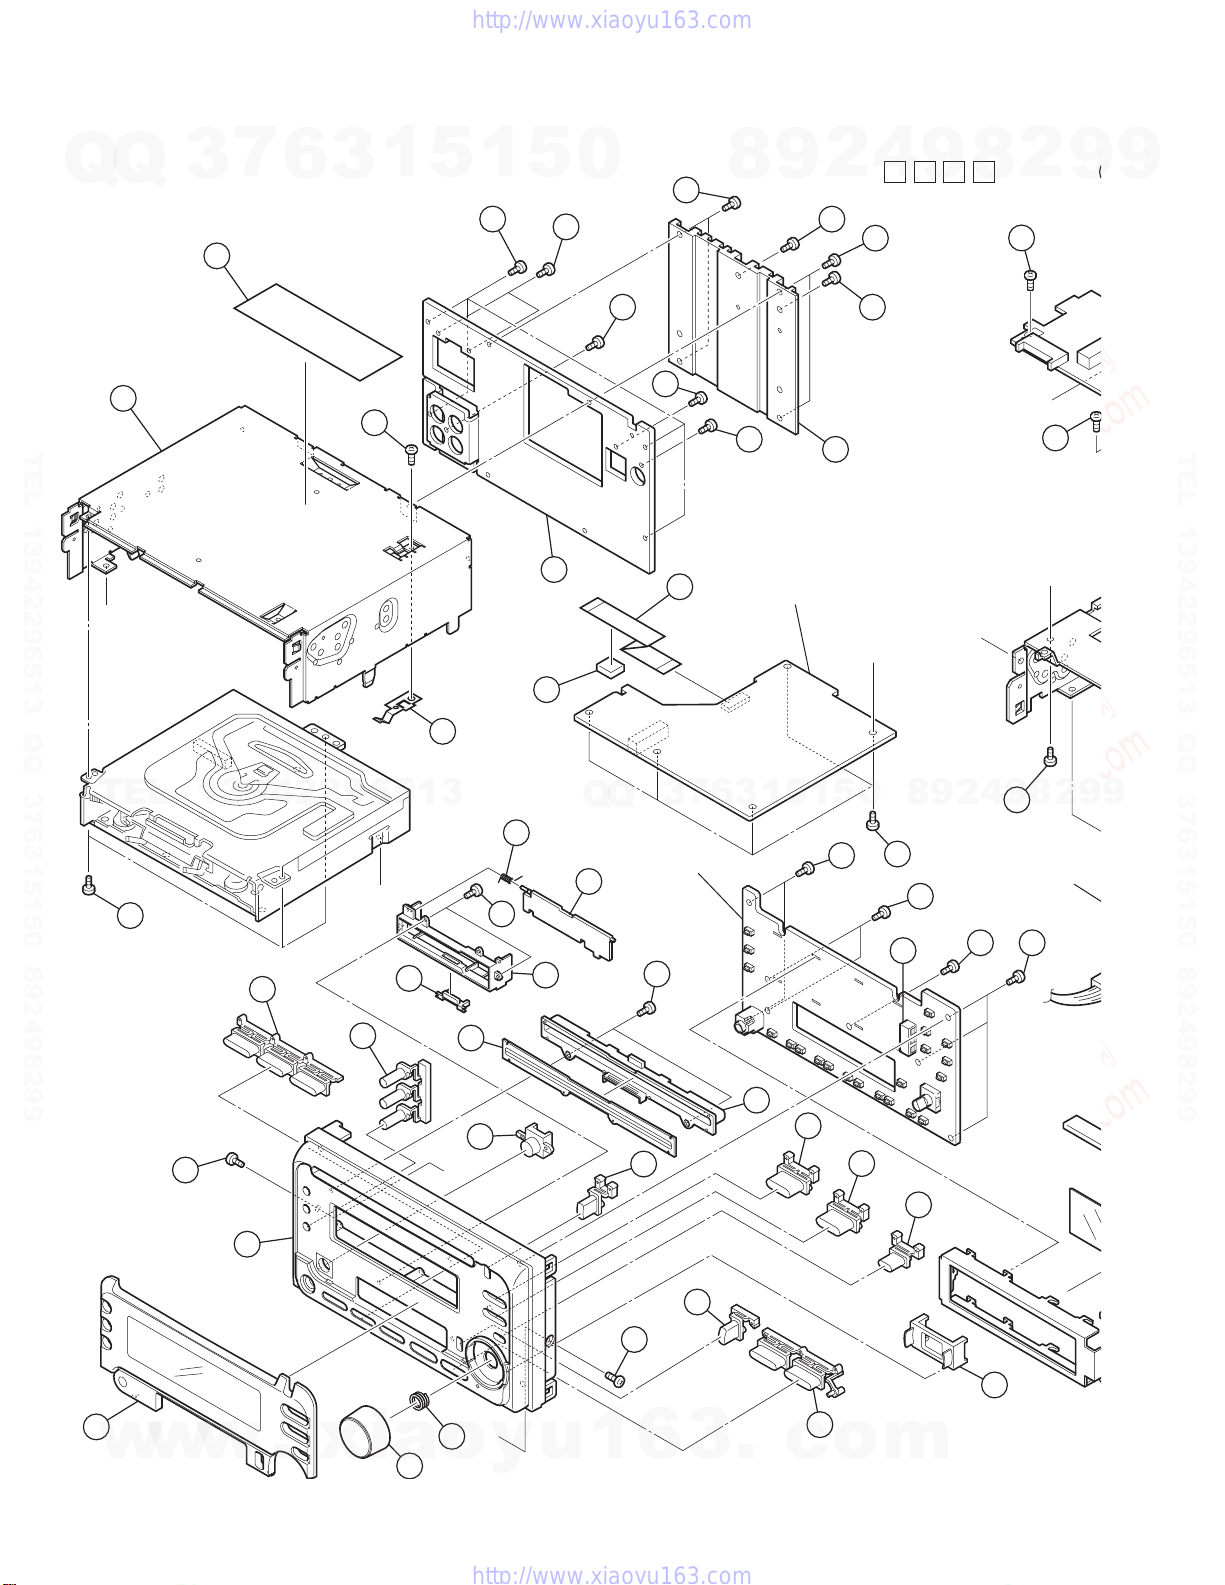
d
Exploded view of general assembly and parts list
7
Q
Q
1
TEL 13942296513 QQ 376315150 892498299
B
3
68
6
3
1
9
5
5
1
13
5
17
4
62
0
18
28
14
61
2
9
8
Block No.
20
19
Mechanism board
6
4
18
15
D
2
8
9
M
M
1
M
10
a
10
B
C
9
9
TEL 13942296513 QQ 376315150 892498299
TEL
7
13942296513
D
31
22
29
45
33
Q
43
Switch board
42
50
44
48
46
C
50
47
34
35
22
49
36
8
49
67
37
38
11
Func boar
4949
a
9
9
2
8
9
4
2
9
8
0
5
1
5
1
3
6
7
3
Q
3-2
30
w
w
w
.
xia
39
A
40
o
y
u
1
6
3
.
32
c
o
41
m
Page 65
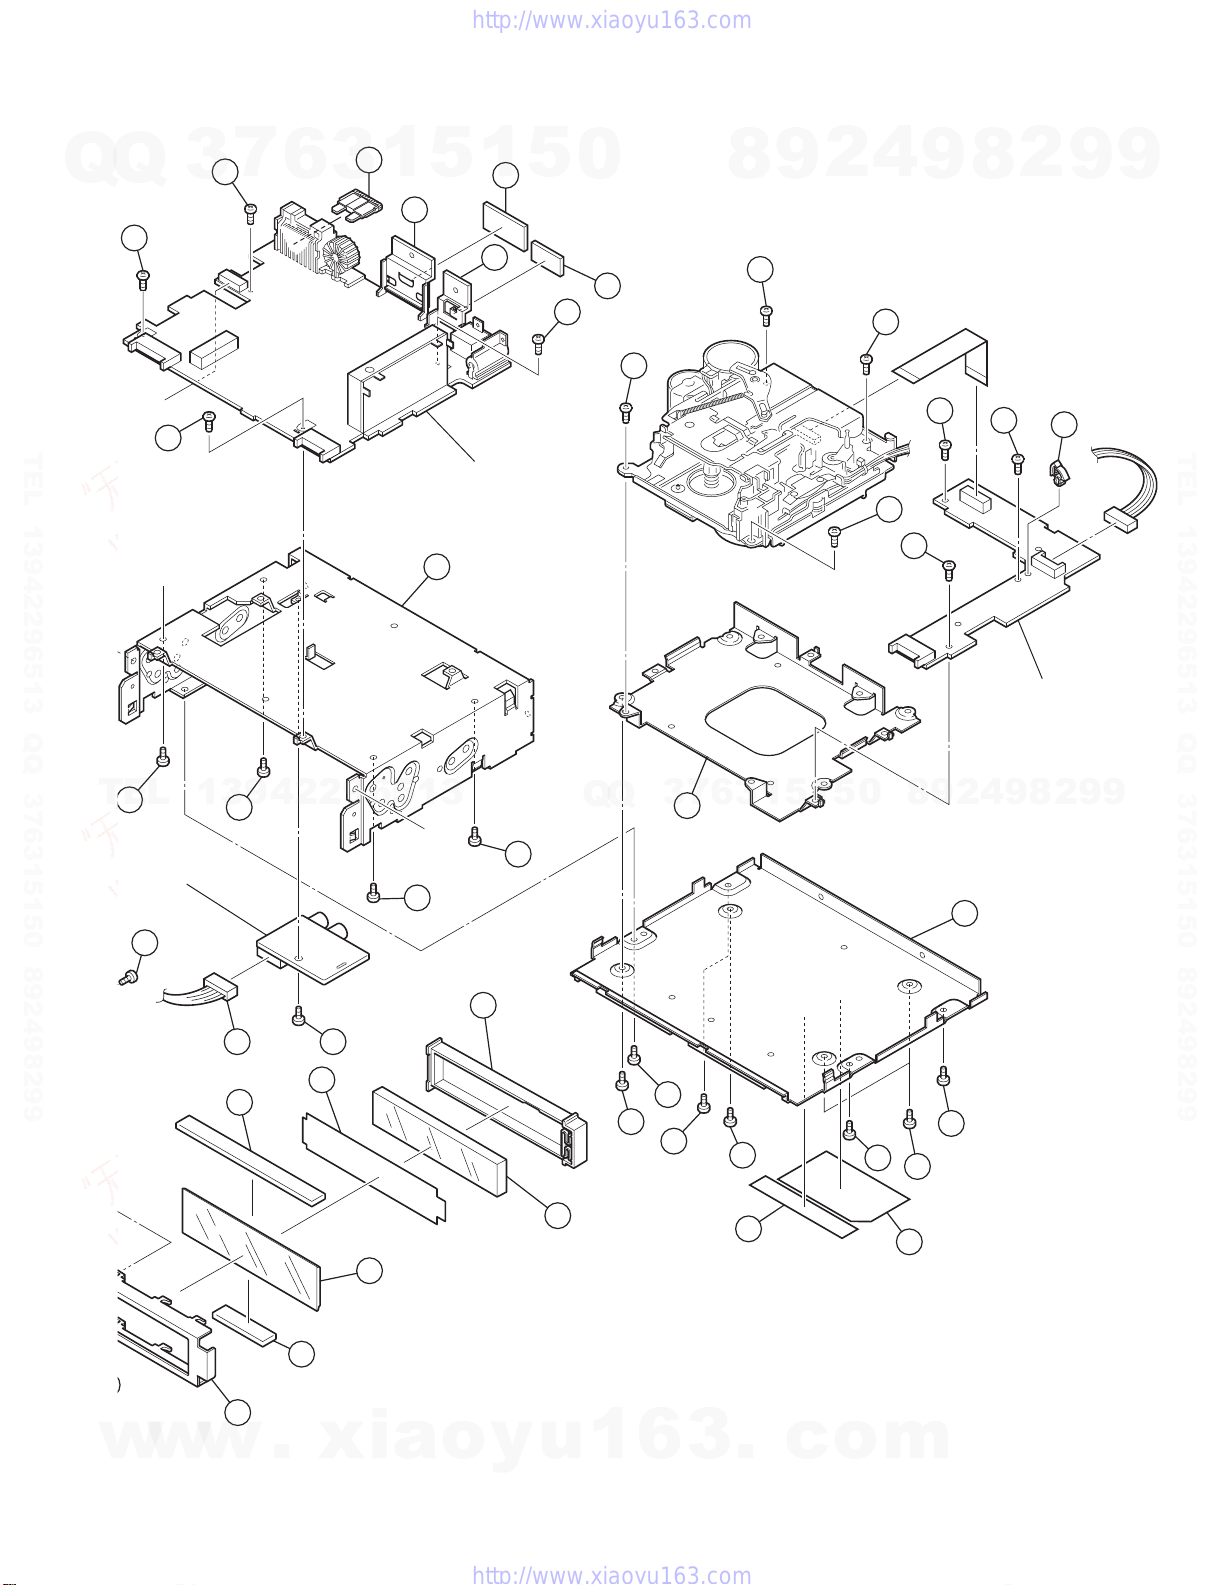
7
3
Q
Q
10
a
TEL 13942296513 QQ 376315150 892498299
10
10
B
6
64
3
1
65
5
1
21
66
Main board
2
5
0
16
10
25
8
25
9
2
4
25
25
24
9
24
2
8
24
Mechanism control
board
9
60
9
TEL 13942296513 QQ 376315150 892498299
TEL
11
Func board
49
a
13942296513
11
A
11
2763
54
59
57
58
52
11
53
Q
Q
26
3
12
12
23
7
6
3
26
56
1
5
1
5
0
12
55
8
26
9
12
2
3
4
9
8
2
9
9
w
w
51
w
.
xia
o
y
u
1
6
3
.
c
o
m
3-3
Page 66
General Assembly
7
Q
Q
Symbol No. Part No. Part Name Description Local
1 LV10863-001A TOP CHASSIS
2 LV10864-002A MIDDLE CHASSIS
3 LV10865-001A BOTTOM CHASSIS
4 GE31799-001A REAR BRACKET
5 LV34654-001A EARTH PLATE
6 LV34655-001A HEAT SINK
7 QYSDST2604ZA TAP SCREW M2.6 x 4mm(x3)
8 QYSDST2004ZA TAP SCREW M2 x 4mm(x5)
9 QYSDST2606ZA TAP SCREW M2.6 x 6mm
10 GE40235-004A SCREW (x4)
11 QYSDST2606ZA TAP SCREW M2.6 x 6mm(x4)
12 QYSDST2606ZA TAP SCREW M2.6 x 6mm(x4)
TEL 13942296513 QQ 376315150 892498299
13 QYSDST2606ZA TAP SCREW M2.6 x 6mm(x4)
14 QYSDST2606ZA TAP SCREW M2.6 x 6mm
15 QYSDST2606ZA TAP SCREW M2.6 x 6mm
16 LV43693-001A COOLING RUBBER
17 QYSDSF2606ZA TAP SCREW M2.6 x 6mm(x2)
18 QYSDST2606ZA TAP SCREW M2.6 x 6mm(x4)
19 QYSDST2606ZA TAP SCREW M2.6 x 6mm
20 QYSDST2606ZA TAP SCREW M2.6 x 6mm
21 LV43694-001A COOLING RUBBER
22 QYSDST2004ZA TAP SCREW M2 x 4mm(x2)
23 LV21628-001A CS MECHA BKT
24 QYSDST2606ZA TAP SCREW M2.6 x 6mm(x3)
25 QYSDST2606ZA TAP SCREW M2.6 x 6mm(x4)
26 QYSDST2606ZA TAP SCREW M2.6 x 6mm(x4)
27 QYSDST2606ZA TAP SCREW M2.6 x 6mm
28 QYSDSF3006ZA TAP SCREW M3 x 6mm
29 GE10129-001A FRONT PANEL 404UI,405U,405UT
29 GE10129-002A FRONT PANEL 406U
30 GE31801-008A FINDER ASSY 404UI
30 GE31801-007A FINDER ASSY 405U,405UT
30 GE31801-010A FINDER ASSY 406U
TEL
31 GE31768-001A PRESET BUTTON 404UI,405U,405UT
31 GE31768-002A PRESET BUTTON 406U
32 GE31769-001A D FUNCTION BTN 404UI,405U,405UT
32 GE31769-002A D FUNCTION BTN 406U
33 GE31778-001A BLOCK BUTTON 404UI,405U,405UT
33 GE31778-002A BLOCK BUTTON 406U
34 GE31779-001A BUTTON(CDEJ) 404UI,405U,405UT
34 GE31779-002A BUTTON(CDEJ) 406U
35 GE31780-001A CASS EJECT BTN 404UI,405U,405UT
35 GE31780-002A CASS EJECT BTN 406U
36 GE31781-001A BUTTON(GROUP) 404UI,405U,405UT
36 GE31781-002A BUTTON(GROUP) 406U
37 GE31782-001A SEEK BUTTON 404UI,405U,405UT
37 GE31782-002A SEEK BUTTON 406U
38 GE31783-001A DISP BUTTON 404UI,405U,405UT
38 GE31783-002A DISP BUTTON 406U
39 GE31763-001A VOLUME KNOB 404UI,405U,405UT
39 GE31763-002A VOL KNOB 406U
40 GE40127-001A KNOB SPRING
41 GE31770-001A RIM LENS
42 GE31775-001A CASS.LID
43 VKW5312-001 DOOR SPRING
44 GE31767-001A CASS.GUIDE
45 GE40288-001A CASSETTE LENS
46 GE40295-001A REMOTE LENS
47 LV34662-001A DISC GUIDE
48 LV34709-001A BLIND
49 VKZ4777-010 MINI SCREW (x8)
50 VKZ4777-011 MINI SCREW (x4)
51 GE31771-001A LCD CASE
52 GE31772-001A LENS CASE
53 GE31773-001A LCD LENS
54 GE40285-001A LIGHTING SHEET
55 GE31979-002A NAME PLATE 404UI
55 GE31981-003A NAME PLATE 405U,405UT
55 GE32111-001A NAME PLATE 406U
56 LV41843-002A LASER CAUTION
57 QLD0380-001 LCD MODULE
58 QNZ0817-001 RUBBER CONNECTO
w
59 QNZ0818-001 RUBBER CONNECTO
60 QZW0143-001 WIRE CLAMP
3
13942296513
w
w
6
.
xia
3
1
5
o
1
y
5
u
0
Q
Q
1
3
6
7
3
6
8
3
.
9
1
1
5
c
2
5
o
Block No. [M][1][M][M]
4
9
2
9
8
0
8
4
2
9
m
8
9
2
9
9
TEL 13942296513 QQ 376315150 892498299
9
3-4
Page 67
Symbol No. Part No. Part Name Description Local
3
7
6
Q
TEL 13942296513 QQ 376315150 892498299
61 QUQ105-2207AE-E FFC WIRE 22pin 7cm
Q
62 VYSH101-009 SPACER
63 WJN0193-001A E-SH C WIRE C-C
64 QMFZ047-150-T FUSE 15A
65 LV34650-001A IC BKT
66 LV34651-001A REG BKT
67 GE31774-001A LED HOLDER
68 GE31574-031A UT LABEL 405UT
3
1
5
1
5
0
8
9
2
4
9
8
2
9
9
TEL 13942296513 QQ 376315150 892498299
TEL
13942296513
Q
Q
3
7
6
3
1
5
1
5
0
8
9
2
4
9
8
2
9
9
w
w
w
.
xia
o
y
u
1
6
3
.
c
o
m
3-5
Page 68
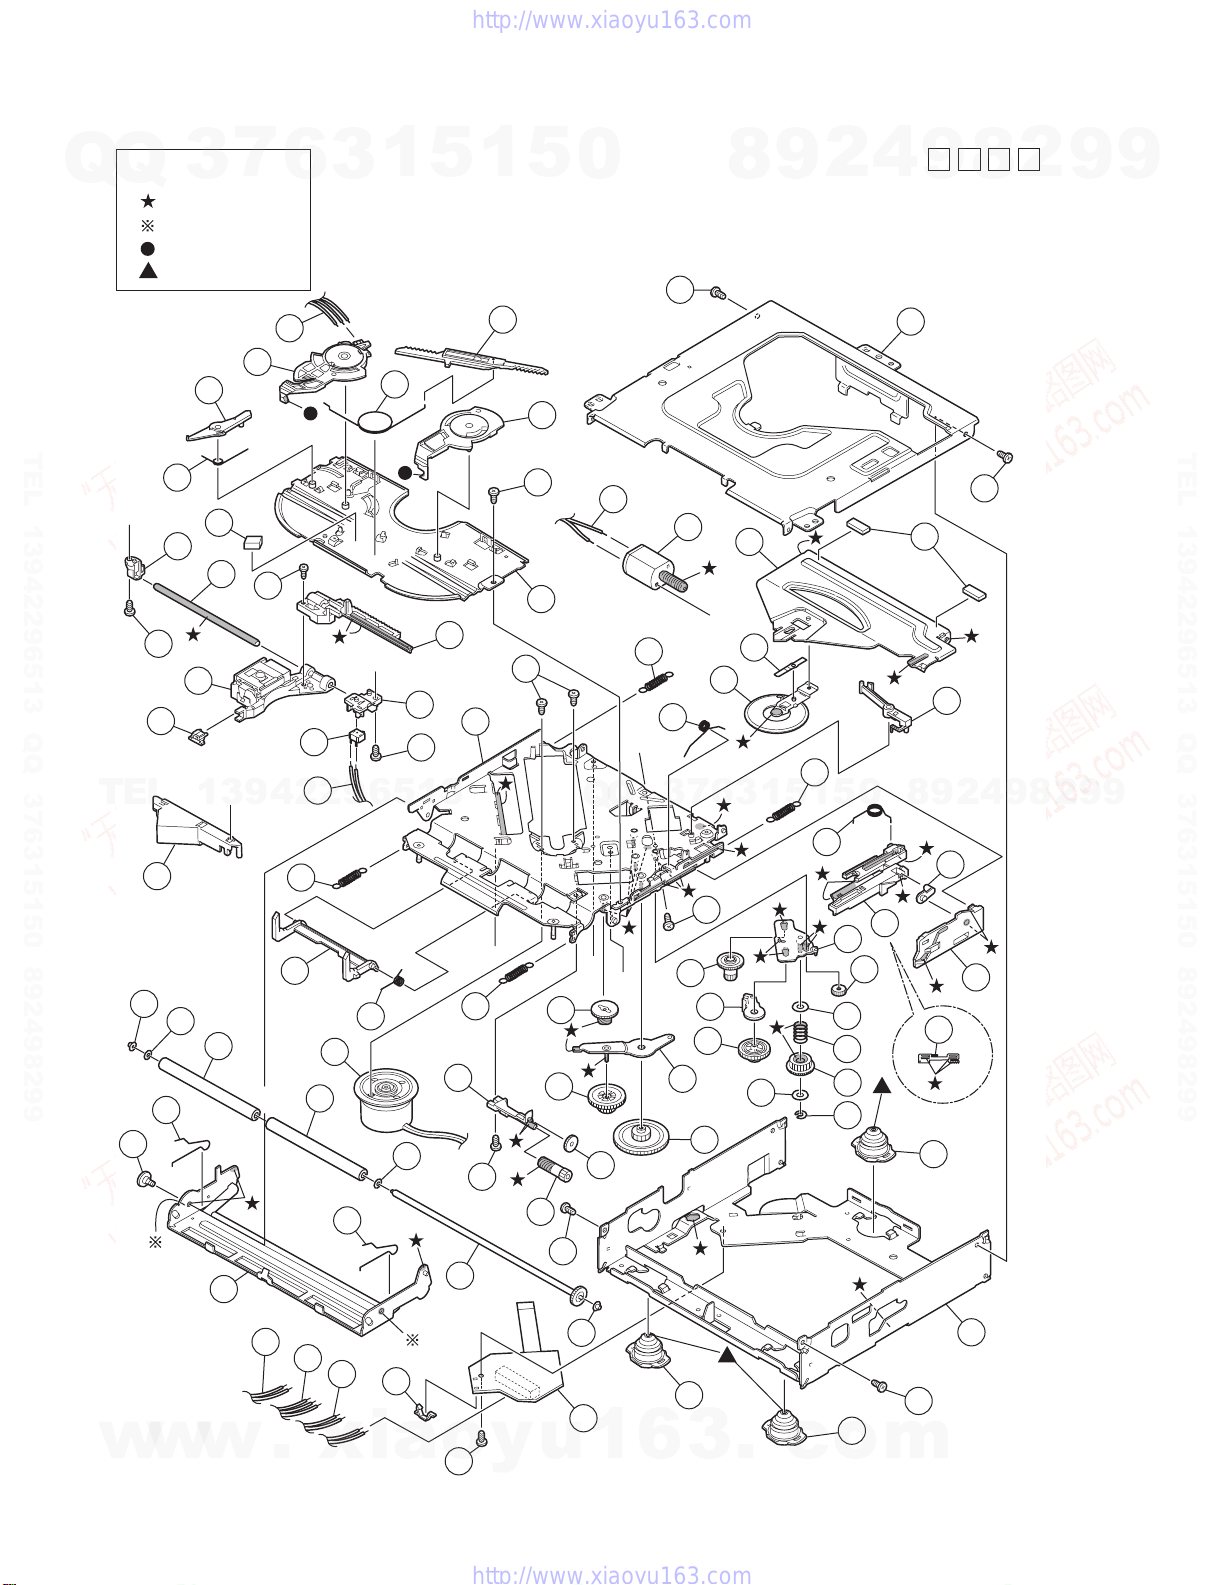
CD mechanism assembly and parts list
7
3
Q
TEL 13942296513 QQ 376315150 892498299
Grease
Q
C
112
24
TEL
TNG-87
GP-501MK
CFD-005Z
GP-305T
26
31
36
22
29
61
13942296513
6
74
72
116
62
D
75
3
1
35
B
21
112
5
19
1
5
TN-2001-1013
34
33
111
25
114
11
0
73
Q
Q
111
85
38
30
A
7
3
A
13
6
8
15
23
3
9
1
Block No.
2
32
1
5
5
4
0
9
2
37
8
M
27
9
B
8
2
111
4
M
M
2
9
8
9
2
9
9
TEL 13942296513 QQ 376315150 892498299
9
93
101
w
w
76
122
94
100
84
w
73
38
95
14
100
74
a
.
xia
75
94
96
77
123
32
97
a
113
81
o
111
99
115
D
y
C
B
90
89
92
91
111
93
71
u
1
The parts without symbol number are not service.
6
18
82
3
3
88
87
20
.
125
c
12
86
121
16
17
124
3
o
83
4
111
m
28
98
83
1
3-6
Page 69
CD mechanism
7
Q
Q
TEL 13942296513 QQ 376315150 892498299
TEL
w
3
Symbol No. Part No. Part Name Description Local
1 30320101T FRAME
2 30320102T TOP COVER
3 30320115T DANPER F (x2)
4 30320116T DANPER R
11 303205505T CHASSIS RIVET
12 303205503T CHANGE P. RVT A
13 303205301T CLAMPER ASSY
14 303205302T SPINDLE MOTOR A
15 30320502T CLAMPER ARM
16 30320503T CHANGE GEAR SPG
17 30320505T CHANGE GEAR 2
18 30320506T FEED GEAR
19 30320507T FEED RACK
20 30320509T CHANGE LOCK RAR
21 30320510T FEED SW HOLDER
22 30320511T PU SHAFT HOLDER
23 30320513T CLAMPER SUB SPG
24 30320514T FD SUB HOLDER
25 30320518T TOP PLATE
26 30320519T SELECT LOCK ARM
27 30320520T TRIGGER ARM
28 30320521T SLIDE HOOK
29 30320522T PU SHAFT
30 30320525T CLAMPER ARM SPG
31 30320526T SELECT L ARM SP
32 30320538T SUSPENSION SP R (x2)
33 30320529T SELECT ARM R
34 30320530T LINK PLATE
35 30320531T LINK PLATE SPG
36 30320523T CUSHION F
37 30320524T CUSHION R (x2)
38 30320539T SUSPENSION SP L (x2)
61 69011614T PICKUP OPT-725
13942296513
62 64180406T DET SW ESE22
71 303210302T CONN BOARD ASSY
72 30321002T MODE SW
73 30321003T LOAD MOTOR WIRE
74 30321005T MODE SW WIRE
75 30321009T SL WIRE
76 30321011T WIRE HOLDER
77 19501403T WIRE CLUMPER
81 303211301T ROLLER SHAFT AS
82 303211501T L GEAR PLATE RV
83 303211302T LOADING PLATE A
84 303211502T LOCK ARM RV ASS
85 303211303T L/F MOTOR ASSY
86 30321101T LOADING GEAR 1
87 30321102T LOADING GEAR 2
88 30321103T LOADING GEAR 3
89 30321104T LOADING GEAR 4
90 30321105T LOADING GEAR 5
91 30321106T LOADING GEAR 6
92 30321107T LOADING GEAR 7
93 30321149T ROLLER GUIDE (x2)
94 30321114T ROLLER GUIDE SP (x2)
95 30321116T DISC STOPPER AR
96 30321117T DISC ST ARM SPG
97 30321118T LD GEAR BRACKET
98 30321125T L SIDE PLATE
99 30321131T LOAD PLATE SPG
100 30321133T LDG ROLLER (x2)
101 18211223T COLLAR SCREW
111 9P0420031T SCREW (x6)
112 9P0420041T TAP.SCREW (x2)
113 9B0320041T SCREW
114 9C0117183T SCREW (x2)
115 9C0120203T SCREW
116 9C0317503T SCREW
121 9W0130170T PW 3.5X8X0.3
122 9W0513060T HL WASHER
123 9W0710070T L WASHER
124 9E0100152T E RING
w
w
125 9W0113020T PW 2.1X4X0.13
6
.
xia
3
1
5
o
1
y
5
u
0
Q
Q
1
3
6
7
3
6
8
3
.
9
1
1
5
c
2
5
o
4
0
m
Block No. [M][B][M][M]
9
2
9
8
8
4
2
9
8
9
2
9
9
TEL 13942296513 QQ 376315150 892498299
9
3-7
Page 70
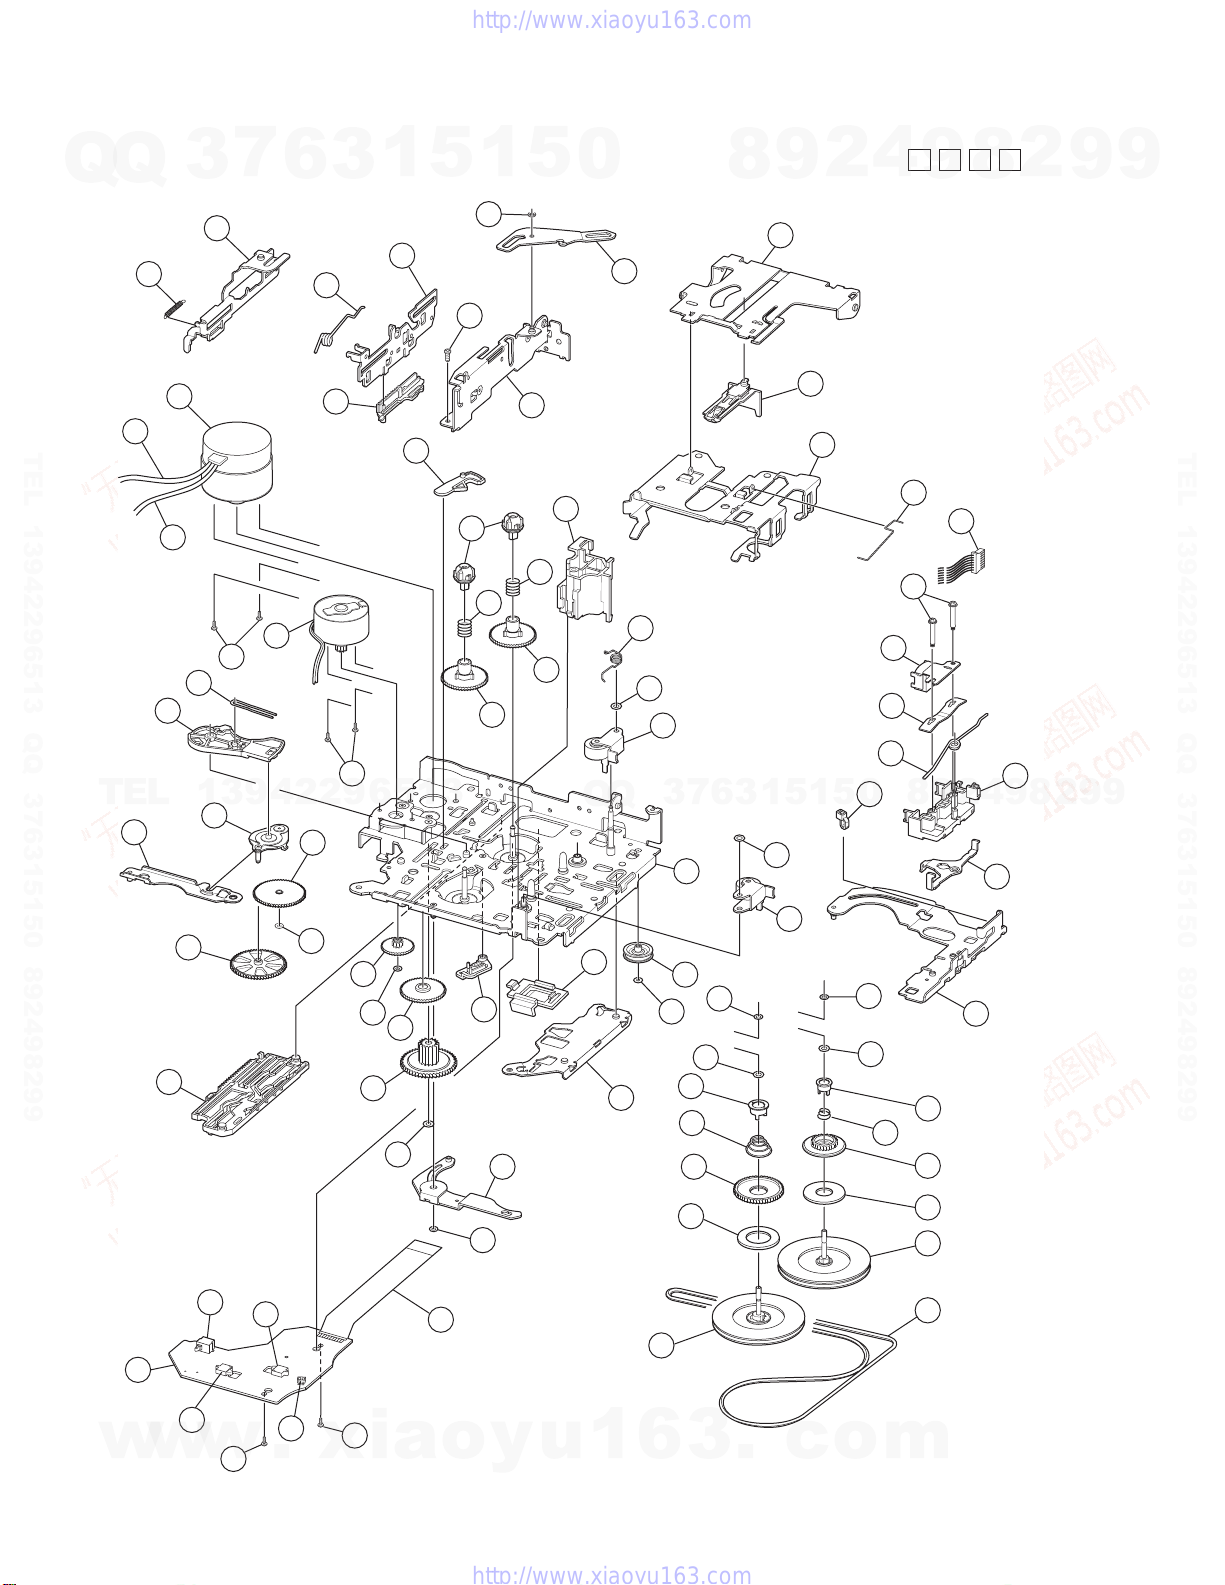
Cassette mechanism assembly and parts list
Q
Q
3
7
6
CDS-802JE3
3
1
5
1
5
0
8
Block No.
2
9
4
M
9
P
8
MM
2
9
9
108
39
116
66
38
27
3
32
66
67
38
Q
Q
114
5
3
7
1
24
59
17
TEL 13942296513 QQ 376315150 892498299
94
TEL
7
93
106
65
33
13942296513
11
64
34
16
44
28
46
117
6
3
1
114
4
50
5
23
1
5
75
0
91
25
62
63
73
8
9
96
2
4
26
35
9
8
2
9
9
TEL 13942296513 QQ 376315150 892498299
82
w
w
10
45
84
87
w
107
83
111
86
.
xia
107
37
111
43
40
114
6
51
47
21
22
111
85
o
y
u
The parts without symbol number are not service.
1
110
13
6
31
113
42
61
49
74
3
109
.
c
109
113
o
2
41
60
48
72
12
71
m
3-8
Page 71
Cassette mechanism
7
Q
Q
TEL 13942296513 QQ 376315150 892498299
TEL
w
3
Symbol No. Part No. Part Name Description Local
1 X-0802-1009S MAIN CHASSIS AS
2 X-0802-1002S SLIDE CHASSIS A
3 X-0802-1003S SIDE BKT ASSY
4 X-0802-1004S CASSETTE HANGER
5 X-0802-1005S PINCH ARM F ASS
6 X-0802-1006S PINCH ARM R ASS
7 X-0802-1007S GEARBASE LINK A
10 X-0802-2001S MODE RACK ASSY
11 X-0802-2002S GEAR BASE ASSY
12 1-0802-6001S FLYWHEEL ASSY F
13 1-0802-6002S FLYWHEEL ASSY R
16 X-0802-7002S SUB MOTOR ASSY
17 X-0802-7004S MAIN MOTOR ASSY
21 1-0802-1002S DIRECTION PLATE
22 1-0802-1005S DIRECTION LINK
23 1-0802-1006S CASSETTE HOLDER
24 1-0802-1011S EJECT CAM LIMIT
25 1-0802-1012S HEAD SUPT SPG
26 1-0802-1013S PINCH SPG ARM
27 1-0802-1014S LOAD ARM
28 1-0802-1015S EJECT CAM PLATE
31 1-0101-2056S IDLE PULLEY(A1)
32 1-0802-2001S CASSETTE GUIDE
33 1-0802-2004S GEAR BASE ARM
34 1-0802-2006S LOAD RACK
35 1-0802-2007S TAPE GUIDE
37 1-0802-2009S REDUCTION GEARA
38 1-0802-2010S REEL SPINDLE (x2)
39 1-0802-2011S REEL DRIVER (x2)
40 1-0802-2012S REDUCTION GEARB
41 1-0802-2013S SPG HOLDER F
42 1-0802-2014S SPG HOLDER R
43 1-0802-2015S MODE GEAR
13942296513
44 1-0802-2016S TAKE UP GEAR
45 1-0802-2017S REFLECTOR GEAR
46 1-0802-2018S RACK LINK
47 1-0802-2019S MODE SW ACTUATR
48 1-0802-2020S FRICTION GEARPL
49 1-0802-2021S FRICTION GEARFF
50 1-0802-2022S CASSETTE CATCH
51 1-0802-2026S FFC PAD
59 1-0802-4001S EJECT CAM PL SP
60 1-0802-4002S TU SPG
61 1-0802-4003S FF SPG
62 1-0802-4004S PINCH ARM SPG
63 1-0802-4005S HOLDER STAB SPG
64 1-0802-4006S HOLDER CUSH SPG
65 1-0802-4007S GEAR BASE SPG
66 1-0802-4008S REEL DRIVER SPG (x2)
67 1-0802-4013S COMPULSION SPG
71 1-0802-5001S BELT
72 1-0802-5002S FELT 7.5*18.5*1
73 1-0802-5003S AZIMUTH SCREW (x2)
74 1-0802-5004S FELT 11*18.5*1
75 1-0050-5023S WTRE CLAMPER
82 1-0802-7001S REEL PCB DL
83 1-0802-7010S SW(MATSUCHITA ESE22)
84 1-0802-7003S SW(MICMPU11750)
85 1-0802-7016S FLAT CABLE 10P
86 1-0801-7024S PHOTO SENSOR
87 1-0802-7009S SW(MICMPU12370)
91 1-0802-7007S HEAD(MITSUMI P-5344)
93 1-0801-7009-0S M.MOTOR WIRE B
94 1-0801-7009-1S M.MOTOR WIRE R
96 1-0802-7017S JOINT WIRE ASSY
106 2-1032-0025-C2S SCREW (x2)
107 2-13S2-0025-P2S +PLAIN SCR M2 (x2)
108 2-1112-6035-C2S +PLAIN SCR M2.6
109 2-1816-0032-E8S MYLAR WASHER(S) (x2)
110 2-1812-0032-D2S PSW-S 1.2
111 1-0036-5024S PSW(REEL) (x3)
113 2-1821-0040-D1S POLY WASHER (x2)
w
w
114 2-1821-0040-D2S PSW-S 2.1 (x3)
116 2-1711-5040-16S E RING
6
.
xia
3
1
5
o
1
y
5
u
0
Q
Q
1
3
6
7
3
6
8
3
.
9
1
1
5
c
2
5
o
4
0
m
Block No. [M][P][M][M]
9
2
9
8
8
4
2
9
8
9
2
9
9
TEL 13942296513 QQ 376315150 892498299
9
3-9
Page 72
Symbol No. Part No. Part Name Description Local
117 2-1031-7030-C2S SCREW (x2)
Q
Q
TEL 13942296513 QQ 376315150 892498299
3
7
6
3
1
5
1
5
0
8
9
2
4
9
8
2
9
9
TEL 13942296513 QQ 376315150 892498299
TEL
13942296513
Q
Q
3
7
6
3
1
5
1
5
0
8
9
2
4
9
8
2
9
9
3-10
w
w
w
.
xia
o
y
u
1
6
3
.
c
o
m
Page 73
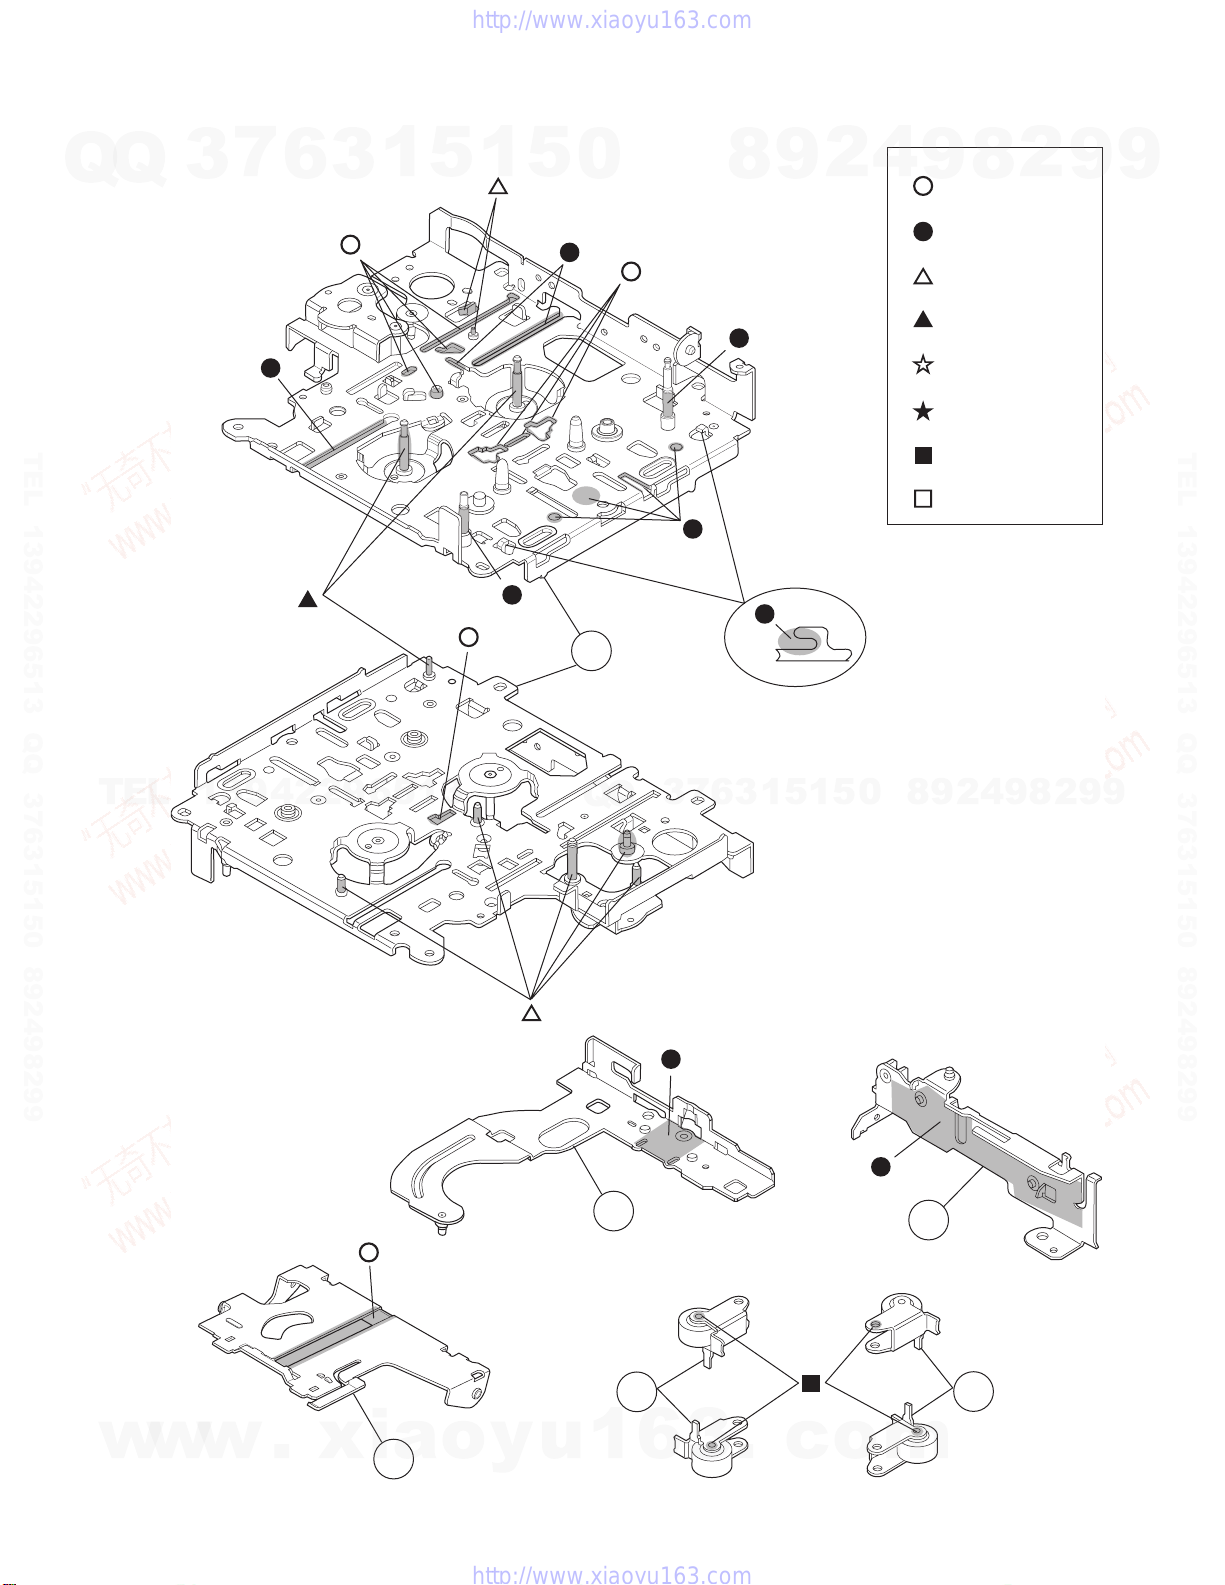
Grease point 1/2
7
Q
Q
TEL 13942296513 QQ 376315150 892498299
3
6
3
1
5
1
5
0
1
8
9
2
4
8
9
FG-84M
MEA-512R
MEN-223
SW-902
CFD-409
CFD-250H
EP-56
SW-474B
2
9
9
TEL 13942296513 QQ 376315150 892498299
TEL
13942296513
Q
Q
2
3
7
6
3
1
5
1
5
0
8
9
9
2
8
9
4
2
9
3
w
w
w
.
xia
5
o
y
u
1
6
3
.
c
o
4
m
6
3-11
Page 74
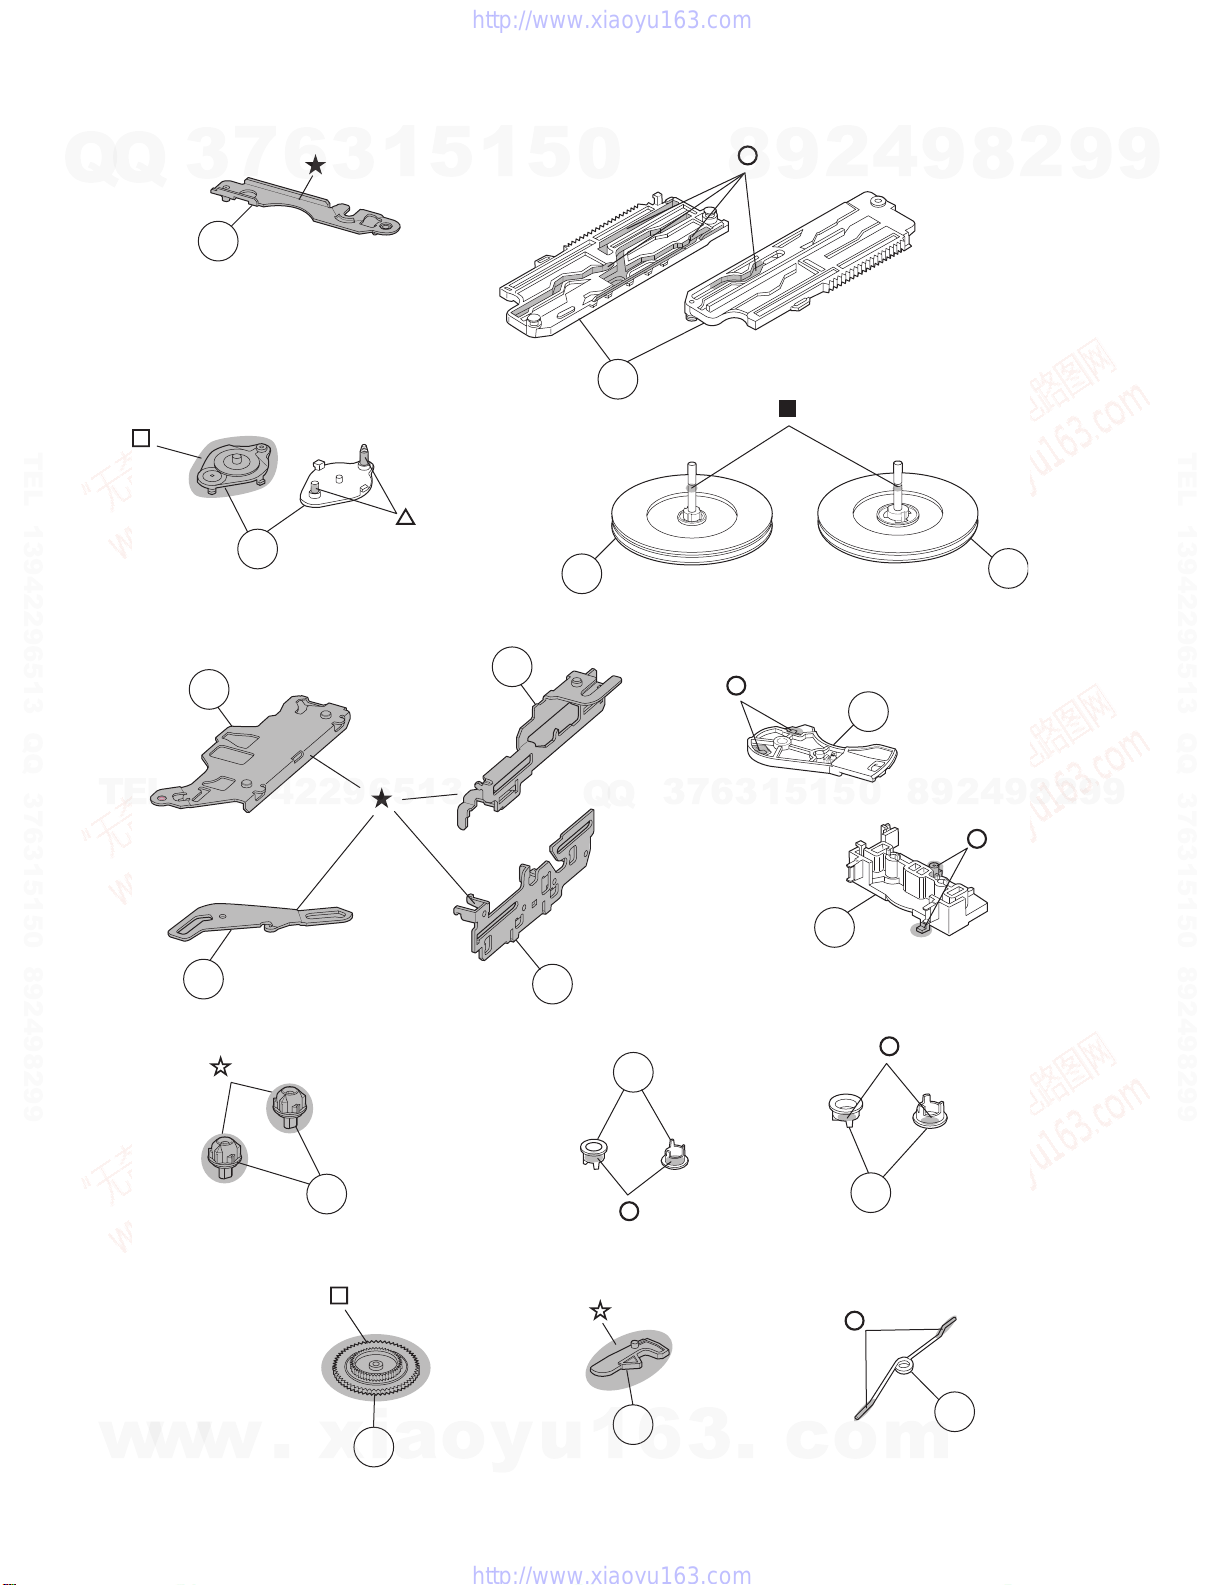
Grease point 2/2
7
Q
Q
TEL 13942296513 QQ 376315150 892498299
3
7
21
6
11
3
1
5
1
24
5
0
10
12
8
9
2
33
4
9
8
13
2
9
9
TEL 13942296513 QQ 376315150 892498299
TEL
13942296513
27
39
28
Q
Q
41
3
7
6
3
1
5
1
35
5
0
42
8
9
2
4
9
8
2
9
9
3-12
w
w
w
.
xia
44
46
o
y
u
1
6
3
.
c
o
62
m
Page 75
Electrical parts list
Main board
Q
Q
Symbol No.
IC151 BD3807K IC
IC181 LA47516 POWER IC
IC701 UPD784217AGC340 IC
IC702 BR24L16F-W-X IC
IC703 S-80833CNNB-G-W IC
IC781 SN74AHC126NS-X IC
IC901 R2S25400DS-E REGULATOR IC
Q1 2SA1365/F/-X TRANSISTOR
TEL 13942296513 QQ 376315150 892498299
Q2 2SA1365/F/-X TRANSISTOR
Q3 RT1N141C-X DIGI TRANSISTOR
Q181 RT1N441C-X TRANSISTOR
Q701 RT1N441C-X TRANSISTOR
Q702 RT1N441C-X TRANSISTOR
Q703 RT1N141C-X DIGI TRANSISTOR
Q704 RT1N141C-X DIGI TRANSISTOR
Q705 RT1N441C-X TRANSISTOR
Q706 RT1N141C-X DIGI TRANSISTOR
Q707 RT1N141C-X DIGI TRANSISTOR
Q708 RT1N141C-X DIGI TRANSISTOR
Q901 2SA1365/F/-X TRANSISTOR
Q902 RT1N141C-X DIGI TRANSISTOR
Q903 2SA1530A/QR/-X TRANSISTOR
Q904 2SA1365/F/-X TRANSISTOR
Q905 RT1N141C-X DIGI TRANSISTOR
Q921 2SC3928A/QR/-X TRANSISTOR
Q951 RT1P141C-X DIGI TRANSISTOR
Q952 RT1P141C-X DIGI TRANSISTOR
Q971 2SC3928A/QR/-X TRANSISTOR
D1 1SS355W-X SI DIODE
TEL
D2 1SS355W-X SI DIODE
D3 MC2838-X DIODE
D4 1SS355W-X SI DIODE
D181 1SS355W-X SI DIODE
D182 1SS355W-X SI DIODE
D701 1SS355W-X SI DIODE
D713 UDZW6.2B-X DIODE
D714 UDZW6.2B-X DIODE
D715 UDZW6.2B-X DIODE
D716 UDZW6.2B-X DIODE
D718 1SS355W-X SI DIODE
D901 1N5401-F64 DIODE
D903 1SS355W-X SI DIODE
D904 CRS03-W SB DIODE
D905 CRS03-W SB DIODE
D906 CRS03-W SB DIODE
D907 CRS03-W SB DIODE
D951 1SS355W-X SI DIODE
D952 UDZW11B-X Z DIODE
D971 MC2838-X DIODE
D972 1SS355W-X SI DIODE
D973 CRS03-W SB DIODE
D974 UDZW5.1B-X SI DIODE
C1 NCB31HK-103X C CAPACITOR 0.01uF 50V K
C2 QERF1AM-476Z E CAPACITOR 47uF 10V M
C3 QERF1AM-476Z E CAPACITOR 47uF 10V M
C4 NCB31HK-103X C CAPACITOR 0.01uF 50V K
C5 QERF1AM-227Z E CAPACITOR 220uF 10V M
C6 QERF1AM-107Z E CAPACITOR 100uF 10V M
C7 NCB31EK-103X C CAPACITOR 0.01uF 25V K
C8 QERF1AM-107Z E CAPACITOR 100uF 10V M
C9 QERF1HM-104Z E CAPACITOR 0.1uF 50V M
C10 NCS31HJ-331X C CAPACITOR 330pF 50V J
C12 NCB31HK-103X C CAPACITOR 0.01uF 50V K
C101 NCB31HK-153X C CAPACITOR 0.015uF 50V K
C102 QTE1H56-105Z E CAPACITOR 1uF 50V M
C141 NCB31CK-473X C CAPACITOR 0.047uF 16V K
C151 QTE1H55-225Z E CAPACITOR 2.2uF 50V
w
w
C152 QTE1H56-225Z E CAPACITOR 2.2uF 50V M
C153 QERF1HM-225Z E CAPACITOR 2.2uF 50V M
7
3
Part No. Part Name Description Local
6
3
1
5
1
Block No. [0][1]
5
13942296513
w
.
xia
o
y
u
0
Q
Q
1
Symbol No.
C154 QERF1HM-225Z E CAPACITOR 2.2uF 50V M
C155 NCB31HK-221X C CAPACITOR 220pF 50V K
C156 NCB31CK-104X C CAPACITOR 0.1uF 16V K
C157 NCB31HK-103X C CAPACITOR 0.01uF 50V K
C158 NCB31HK-103X C CAPACITOR 0.01uF 50V K
C159 QTE1A56-107Z E CAPACITOR 100uF 10V M
C160 NCB31CK-473X C CAPACITOR 0.047uF 16V K
C161 QTE1C56-106Z E CAPACITOR 10uF 16V M
C162 QERF1EM-475Z E CAPACITOR 4.7uF 25V M
C163 QERF1EM-475Z E CAPACITOR 4.7uF 25V M
C164 QTE1E56-475Z E CAPACITOR 4.7uF 25V M
C165 QTE1E56-475Z E CAPACITOR 4.7uF 25V M
C181 QFV91HJ-474Z MF CAPACITOR 0.47uF 50V J
C182 QFV91HJ-474Z MF CAPACITOR 0.47uF 50V J
C183 NDC31HJ-101X C CAPACITOR 100pF 50V J
C184 NDC31HJ-101X C CAPACITOR 100pF 50V J
C185 NCB31CK-104X C CAPACITOR 0.1uF 16V K
C186 NCB31CK-104X C CAPACITOR 0.1uF 16V K
C187 NDC31HJ-101X C CAPACITOR 100pF 50V J
C188 NDC31HJ-101X C CAPACITOR 100pF 50V J
C189 NDC31HJ-101X C CAPACITOR 100pF 50V J
C190 NDC31HJ-101X C CAPACITOR 100pF 50V J
C191 NCB31HK-223X C CAPACITOR 0.022uF 50V K
C192 QTE1C56-476Z E CAPACITOR 47uF 16V M
C193 QERF1CM-226Z E CAPACITOR 22uF 16V M
C194 NCB31HK-223X C CAPACITOR 0.022uF 50V K
C195 QERF1HM-225Z E CAPACITOR 2.2uF 50V M
C196 QERF1EM-475Z E CAPACITOR 4.7uF 25V M
C197 QERF1HM-105Z E CAPACITOR 1uF 50V M
C198 QERF1HM-105Z E CAPACITOR 1uF 50V M
C201 NCB31HK-153X C CAPACITOR 0.015uF 50V K
C202 QTE1H56-105Z E CAPACITOR 1uF 50V M
C251 QTE1H55-225Z E CAPACITOR 2.2uF 50V
C252 QTE1H56-225Z E CAPACITOR 2.2uF 50V M
C253 QERF1HM-225Z E CAPACITOR 2.2uF 50V M
7
3
C254 QERF1HM-225Z E CAPACITOR 2.2uF 50V M
C255 NCB31HK-221X C CAPACITOR 220pF 50V K
C256 NCB31CK-104X C CAPACITOR 0.1uF 16V K
C257 NCB31HK-103X C CAPACITOR 0.01uF 50V K
C258 NCB31HK-103X C CAPACITOR 0.01uF 50V K
C259 NCB31CK-224X C CAPACITOR 0.22uF 16V K
C263 QERF1EM-475Z E CAPACITOR 4.7uF 25V M
C264 QTE1E56-475Z E CAPACITOR 4.7uF 25V M
C265 QTE1E56-475Z E CAPACITOR 4.7uF 25V M
C281 QFV91HJ-474Z MF CAPACITOR 0.47uF 50V J
C282 QFV91HJ-474Z MF CAPACITOR 0.47uF 50V J
C283 NDC31HJ-101X C CAPACITOR 100pF 50V J
C284 NDC31HJ-101X C CAPACITOR 100pF 50V J
C285 NCB31CK-104X C CAPACITOR 0.1uF 16V K
C286 NCB31CK-104X C CAPACITOR 0.1uF 16V K
C287 NDC31HJ-101X C CAPACITOR 100pF 50V J
C288 NDC31HJ-101X C CAPACITOR 100pF 50V J
C289 NDC31HJ-101X C CAPACITOR 100pF 50V J
C290 NDC31HJ-101X C CAPACITOR 100pF 50V J
C701 NDC31HJ-8R0X C CAPACITOR 8pF 50V J
C702 NDC31HJ-270X C CAPACITOR 27pF 50V J
C703 NDC31HJ-270X C CAPACITOR 27pF 50V J
C704 NDC31HJ-220X C CAPACITOR 22pF 50V J
C705 NCB31HK-103X C CAPACITOR 0.01uF 50V K
C706 NCB31HK-103X C CAPACITOR 0.01uF 50V K
C708 QERF0JM-476Z E CAPACITOR 47uF 6.3V M
C710 QERF1AM-227Z E CAPACITOR 220uF 10V M
C711 QERF1AM-227Z E CAPACITOR 220uF 10V M
C712 QERF1AM-227Z E CAPACITOR 220uF 10V M
C713 NCB31CK-473X C CAPACITOR 0.047uF 16V K
C714 NCB31CK-104X C CAPACITOR 0.1uF 16V K
C715 NCB31HK-103X C CAPACITOR 0.01uF 50V K
C716 NDC31HJ-101X C CAPACITOR 100pF 50V J
C717 NCB31HK-103X C CAPACITOR 0.01uF 50V K
C720 NCB31HK-103X C CAPACITOR 0.01uF 50V K
C721 NCB31HK-103X C CAPACITOR 0.01uF 50V K
C722 NCB31HK-103X C CAPACITOR 0.01uF 50V K
C723 NCB31HK-103X C CAPACITOR 0.01uF 50V K
C724 NCB31HK-103X C CAPACITOR 0.01uF 50V K
6
3
C725 NCB31CK-104X C CAPACITOR 0.1uF 16V K
C726 NCB31CK-104X C CAPACITOR 0.1uF 16V K
Part No. Part Name Description Local
9
8
1
5
1
3
6
.
c
2
5
o
4
0
m
9
8
9
2
8
4
2
9
8
9
2
9
9
TEL 13942296513 QQ 376315150 892498299
9
3-13
Page 76
Symbol No.
Part No. Part Name Description Local
Symbol No.
Part No. Part Name Description Local
C727 NCB31CK-104X C CAPACITOR 0.1uF 16V K
Q
Q
C728 NCB31CK-104X C CAPACITOR 0.1uF 16V K
C730 NCB31HK-103X C CAPACITOR 0.01uF 50V K
C731 NCB31HK-103X C CAPACITOR 0.01uF 50V K
C732 NCB31HK-103X C CAPACITOR 0.01uF 50V K
C733 NCB31HK-103X C CAPACITOR 0.01uF 50V K
C735 NDC31HJ-101X C CAPACITOR 100pF 50V J
C736 NDC31HJ-101X C CAPACITOR 100pF 50V J
C781 NCB31CK-473X C CAPACITOR 0.047uF 16V K
C901 QEZ0676-338 E CAPACITOR 3300uF
C902 QERF1HM-225Z E CAPACITOR 2.2uF 50V M
C903 QERF1CM-226Z E CAPACITOR 22uF 16V M
C904 QERF1CM-226Z E CAPACITOR 22uF 16V M
C905 NCB31HK-103X C CAPACITOR 0.01uF 50V K
C906 QERF1AM-227Z E CAPACITOR 220uF 10V M
C907 NCB31CK-104X C CAPACITOR 0.1uF 16V K
C908 NCB31CK-104X C CAPACITOR 0.1uF 16V K
TEL 13942296513 QQ 376315150 892498299
C909 QERF1AM-227Z E CAPACITOR 220uF 10V M
C910 NCB31CK-104X C CAPACITOR 0.1uF 16V K
C911 QERF1CM-106Z E CAPACITOR 10uF 16V M
C912 NCB31CK-104X C CAPACITOR 0.1uF 16V K
C921 QERF1CM-226Z E CAPACITOR 22uF 16V M
C951 QERF1AM-107Z E CAPACITOR 100uF 10V M
C952 QERF1CM-107Z E CAPACITOR 100uF 16V M
C953 NCB31CK-104X C CAPACITOR 0.1uF 16V K
C971 QERF1HM-105Z E CAPACITOR 1uF 50V M
C972 QERF1CM-226Z E CAPACITOR 22uF 16V M
C973 NCB31EK-473X C CAPACITOR 0.047uF 25V K
C974 NCB31CK-224X C CAPACITOR 0.22uF 16V K
R1 NRSA63J-103X MG RESISTOR 10kΩ 1/16W J
R2 NRSA63J-222X MG RESISTOR 2.2kΩ 1/16W J
R3 NRSA63J-103X MG RESISTOR 10kΩ 1/16W J
R4 NRSA63J-102X MG RESISTOR 1kΩ 1/16W J
R5 NRS181J-100X MG RESISTOR 10Ω 1/8W J
R7 NRS181J-4R7X MG RESISTOR 4.7Ω 1/8W J
R8 NRSA63J-473X MG RESISTOR 47kΩ 1/16W J
TEL
R9 NRSA63J-270X MG RESISTOR 27Ω 1/16W J
R10 NRSA63J-103X MG RESISTOR 10kΩ 1/16W J
R11 NRSA63J-184X MG RESISTOR 180kΩ 1/16W J
R13 NRSA63J-393X MG RESISTOR 39kΩ 1/16W J
R101 NRSA63J-123X MG RESISTOR 12kΩ 1/16W J
R102 NRSA63J-273X MG RESISTOR 27kΩ 1/16W J
R141 NRSA63J-104X MG RESISTOR 100kΩ 1/16W J
R142 NRSA63J-101X MG RESISTOR 100Ω 1/16W J
R151 NRSA63J-473X MG RESISTOR 47kΩ 1/16W J
R152 NRSA63J-472X MG RESISTOR 4.7kΩ 1/16W J
R153 NRSA63J-333X MG RESISTOR 33kΩ 1/16W J
R154 NRSA63J-473X MG RESISTOR 47kΩ 1/16W J
R155 NRSA63J-473X MG RESISTOR 47k
R156 NRSA63J-333X MG RESISTOR 33kΩ 1/16W J
R181 NRSA63J-273X MG RESISTOR 27k
R182 NRSA63J-273X MG RESISTOR 27k
R191 NRSA63J-222X MG RESISTOR 2.2kΩ 1/16W J
R192 NRSA63J-273X MG RESISTOR 27k
R193 NRSA63J-0R0X MG RESISTOR 0
R195 NRSA63J-182X MG RESISTOR 1.8kΩ 1/16W J
R201 NRSA63J-123X MG RESISTOR 12k
R202 NRSA63J-273X MG RESISTOR 27kΩ 1/16W J
R241 NRSA63J-104X MG RESISTOR 100k
R242 NRSA63J-101X MG RESISTOR 100
R251 NRSA63J-473X MG RESISTOR 47kΩ 1/16W J
R252 NRSA63J-472X MG RESISTOR 4.7k
R254 NRSA63J-473X MG RESISTOR 47k
R255 NRSA63J-473X MG RESISTOR 47kΩ 1/16W J
R256 NRSA63J-333X MG RESISTOR 33k
R281 NRSA63J-273X MG RESISTOR 27k
R282 NRSA63J-273X MG RESISTOR 27k
R701 NRSA63J-102X MG RESISTOR 1k
R703 NRSA63J-821X MG RESISTOR 820Ω 1/16W J
R704 NRSA63J-473X MG RESISTOR 47k
R705 NRSA63J-106X MG RESISTOR 10M
R706 NRSA63J-101X MG RESISTOR 100Ω 1/16W J
R707 NRSA63J-473X MG RESISTOR 47k
R708 NRSA63J-222X MG RESISTOR 2.2k
R709 NRSA63J-102X MG RESISTOR 1kΩ 1/16W J
w
R710 NRSA63J-102X MG RESISTOR 1k
R712 NRSA63J-102X MG RESISTOR 1k
w
7
3
6
13942296513
w
.
xia
3
1
5
Ω
1/16W J
Ω
1/16W J
Ω
1/16W J
Ω
1/16W J
Ω
1/16W J
Ω
1/16W J
Ω
1/16W J
Ω
1/16W J
Ω
1/16W J
Ω
1/16W J
Ω
1/16W J
Ω
1/16W J
Ω
1/16W J
Ω
1/16W J
Ω
1/16W J
Ω
1/16W J
Ω
1/16W J
Ω
1/16W J
o
Ω
1/16W J
Ω
1/16W J
1
y
5
u
R713 NRSA63J-473X MG RESISTOR 47kΩ 1/16W J
0
R714 NRSA63J-102X MG RESISTOR 1kΩ 1/16W J
R715 NRSA63J-473X MG RESISTOR 47kΩ 1/16W J
R716 NRSA63J-102X MG RESISTOR 1kΩ 1/16W J
R717 NRSA63J-473X MG RESISTOR 47kΩ 1/16W J
R720 NRSA63J-103X MG RESISTOR 10k
R721 NRSA63J-332X MG RESISTOR 3.3k
R722 NRSA63J-103X MG RESISTOR 10kΩ 1/16W J
R723 NRSA63J-332X MG RESISTOR 3.3kΩ 1/16W J
R724 NRSA63J-103X MG RESISTOR 10kΩ 1/16W J
R725 NRSA63J-332X MG RESISTOR 3.3kΩ 1/16W J
R726 NRSA63J-102X MG RESISTOR 1kΩ 1/16W J
R727 NRSA63J-102X MG RESISTOR 1kΩ 1/16W J
R728 NRSA63J-102X MG RESISTOR 1kΩ 1/16W J
R731 NRSA63J-0R0X MG RESISTOR 0Ω 1/16W J
R732 NRSA63J-473X MG RESISTOR 47kΩ 1/16W J
R733 NRSA63J-102X MG RESISTOR 1kΩ 1/16W J
R734 NRSA63J-102X MG RESISTOR 1kΩ 1/16W J
R739 NRSA63J-222X MG RESISTOR 2.2kΩ 1/16W J
R740 NRSA63J-222X MG RESISTOR 2.2kΩ 1/16W J
R741 NRSA63J-222X MG RESISTOR 2.2k
R743 NRSA63J-102X MG RESISTOR 1k
R744 NRSA63J-102X MG RESISTOR 1kΩ 1/16W J
R745 NRSA63J-103X MG RESISTOR 10kΩ 1/16W J
R746 NRSA63J-271X MG RESISTOR 270Ω 1/16W J
R747 NRSA63J-271X MG RESISTOR 270Ω 1/16W J
R748 NRSA63J-0R0X MG RESISTOR 0Ω 1/16W J
R749 NRSA63J-0R0X MG RESISTOR 0Ω 1/16W J
R750 NRSA63J-102X MG RESISTOR 1kΩ 1/16W J
R751 NRSA63J-102X MG RESISTOR 1kΩ 1/16W J
R752 NRSA63J-102X MG RESISTOR 1kΩ 1/16W J
R753 NRSA63J-102X MG RESISTOR 1kΩ 1/16W J
R754 NRSA63J-473X MG RESISTOR 47kΩ 1/16W J
R755 NRSA63J-473X MG RESISTOR 47kΩ 1/16W J
R756 NRSA63J-222X MG RESISTOR 2.2kΩ 1/16W J
R760 NRSA63J-102X MG RESISTOR 1kΩ 1/16W J
R761 NRSA63J-102X MG RESISTOR 1kΩ 1/16W J
R762 NRSA63J-102X MG RESISTOR 1kΩ 1/16W J
Q
Q
R763 NRSA63J-102X MG RESISTOR 1kΩ 1/16W J
R764 NRSA63J-473X MG RESISTOR 47kΩ 1/16W J
R765 NRSA63J-102X MG RESISTOR 1kΩ 1/16W J
R766 NRSA63J-102X MG RESISTOR 1kΩ 1/16W J
R767 NRSA63J-473X MG RESISTOR 47kΩ 1/16W J
R768 NRSA63J-102X MG RESISTOR 1kΩ 1/16W J
R769 NRSA63J-473X MG RESISTOR 47kΩ 1/16W J
R770 NRSA63J-473X MG RESISTOR 47kΩ 1/16W J
R773 NRSA63J-473X MG RESISTOR 47kΩ 1/16W J
R774 NRSA63J-473X MG RESISTOR 47kΩ 1/16W J
R775 NRSA63J-473X MG RESISTOR 47kΩ 1/16W J
R776 NRSA63J-102X MG RESISTOR 1k
R777 NRSA63J-473X MG RESISTOR 47kΩ 1/16W J
R778 NRSA63J-102X MG RESISTOR 1k
R779 NRSA63J-103X MG RESISTOR 10k
R781 NRSA63J-104X MG RESISTOR 100kΩ 1/16W J
R782 NRSA63J-223X MG RESISTOR 22k
R783 NRSA63J-101X MG RESISTOR 100
R784 NRSA63J-473X MG RESISTOR 47kΩ 1/16W J
R785 NRSA63J-101X MG RESISTOR 100
R786 NRSA63J-473X MG RESISTOR 47kΩ 1/16W J
R787 NRSA63J-223X MG RESISTOR 22k
R788 NRSA63J-331X MG RESISTOR 330
R789 NRSA63J-104X MG RESISTOR 100kΩ 1/16W J
R790 NRSA63J-103X MG RESISTOR 10k
R901 QRE142J-102X C RESISTOR 1k
R902 NRSA63J-912X MG RESISTOR 9.1kΩ 1/16W J
R903 NRSA63J-472X MG RESISTOR 4.7k
R904 NRSA63J-562X MG RESISTOR 5.6k
R905 NRSA63J-102X MG RESISTOR 1k
R906 NRSA63J-103X MG RESISTOR 10k
R907 NRSA63J-473X MG RESISTOR 47kΩ 1/16W J
R908 NRSA63J-473X MG RESISTOR 47k
R909 NRSA63J-473X MG RESISTOR 47k
R910 NRSA63J-153X MG RESISTOR 15kΩ 1/16W J
R911 NRSA63J-473X MG RESISTOR 47k
R912 NRS181J-102X MG RESISTOR 1k
R914 NRSA63J-103X MG RESISTOR 10kΩ 1/16W J
1
R915 NRSA63J-473X MG RESISTOR 47k
R916 NRSA63J-222X MG RESISTOR 2.2k
3
6
7
3
6
8
3
.
9
1
1
5
c
2
5
o
4
0
m
9
8
9
8
Ω
Ω
1/16W J
2
Ω
1/16W J
Ω
1/16W J
Ω
Ω
Ω
Ω
Ω
Ω
Ω
Ω
1/4W J
Ω
1/16W J
Ω
Ω
Ω
Ω
Ω
1/8W J
Ω
1/16W J
Ω
1/16W J
Ω
1/16W J
9
4
1/16W J
1/16W J
1/16W J
1/16W J
1/16W J
1/16W J
1/16W J
Ω
1/16W J
Ω
1/16W J
1/16W J
1/16W J
1/16W J
1/16W J
1/16W J
Ω
1/16W J
2
8
9
2
9
9
TEL 13942296513 QQ 376315150 892498299
9
3-14
Page 77
Symbol No.
Q
TEL 13942296513 QQ 376315150 892498299
R921 NRSA63J-473X MG RESISTOR 47kΩ 1/16W J
Q
R922 NRSA63J-472X MG RESISTOR 4.7kΩ 1/16W J
R923 NRSA63J-104X MG RESISTOR 100kΩ 1/16W J
R971 NRSA63J-224X MG RESISTOR 220kΩ 1/16W J
R972 NRSA63J-224X MG RESISTOR 220kΩ 1/16W J
R973 NRSA63J-473X MG RESISTOR 47k
R974 NRSA63J-184X MG RESISTOR 180k
R975 NRSA63J-223X MG RESISTOR 22kΩ 1/16W J
R976 NRSA63J-123X MG RESISTOR 12kΩ 1/16W J
R977 NRSA63J-470X MG RESISTOR 47Ω 1/16W J
R978 NRSA63J-102X MG RESISTOR 1kΩ 1/16W J
R979 NRSA63J-124X MG RESISTOR 120kΩ 1/16W J
R980 NRSA63J-123X MG RESISTOR 12kΩ 1/16W J
RA701 NRZ0065-102X MG RESISTOR 1k
RA702 NRZ0065-102X MG RESISTOR 1k
L1 QQL244J-4R7Z COIL 4.7uH J
L701 QQL244J-470Z COIL 47uH J
L702 QQL244J-470Z COIL 47uH J
L703 QQL244J-470Z COIL 47uH J
L704 NQL114M-4R7X COIL 4.7uH M
L781 NQL093K-1R8X COIL 1.8uH K
L782 NQL093K-1R8X COIL 1.8uH K
L901 QQR0703-001 CHOKE COIL
CN323 QGA2001F1-07 CONNECTOR W-B (1-7)
CN701 QGB1004K1-20 CONNECTOR B-B (1-20)
CN702 QGB1004K1-16 CONNECTOR B-B (1-16)
CN705 QGB2027M4-22S CONNECTOR B-B (1-22)
CN901 QNZ0611-001 16P CONNECTOR
CN902 QNZ0095-001 CONNECTOR
J1 QNB0190-001 ANTENNA JACK
TU1 QAU0403-001 TUNER PACK
X701 QAX0617-001Z CRYSTAL 12.500MHz
X702 QAX0401-001 CRYSTAL 32.768KHz
TEL
Func board
Symbol No.
Q321 KTD1304-X TRANSISTOR
Q331 KTD1304-X TRANSISTOR
Q341 KTD1304-X TRANSISTOR
Q351 KTD1304-X TRANSISTOR
D321 MC2836-X DIODE
D331 MC2836-X DIODE
R321 NRSA63J-821X MG RESISTOR 820
R322 NRSA63J-181X MG RESISTOR 180
R325 NRSA63J-222X MG RESISTOR 2.2k
R331 NRSA63J-821X MG RESISTOR 820Ω 1/16W J
R332 NRSA63J-181X MG RESISTOR 180
R335 NRSA63J-222X MG RESISTOR 2.2kΩ 1/16W J
R341 NRSA63J-821X MG RESISTOR 820
R342 NRSA63J-181X MG RESISTOR 180
R345 NRSA63J-222X MG RESISTOR 2.2kΩ 1/16W J
R351 NRSA63J-821X MG RESISTOR 820
R352 NRSA63J-181X MG RESISTOR 180
R355 NRSA63J-222X MG RESISTOR 2.2kΩ 1/16W J
CN322 QGA2001F1-07 CONNECTOR W-B (1-7)
J321 QNN0746-001 PIN JACK
w
Part No. Part Name Description Local
3
7
6
3
1
5
1
Ω
Ω
Ω
13942296513
Block No. [0][2]
Part No. Part Name Description Local
Ω
Ω
Ω
Ω
Ω
Ω
Ω
Ω
w
w
.
xia
o
y
5
1/16W J
Ω
1/16W J
1/16W J
1/16W J
1/16W J
1/16W J
1/16W J
1/16W J
1/16W J
1/16W J
u
0
Q
Q
1
Switch board
Symbol No.
IC801 PT6578LQ-L IC
IC802 RPM7338-V4 RM.RECEIVER
D801 UDZW5.1B-X SI DIODE
D802 UDZW9.1B-X Z DIODE
D803 1SS355W-X SI DIODE
D804 1SS355W-X SI DIODE
D805 1SS355W-X SI DIODE
D806 1SS355W-X SI DIODE
D807 1SS355W-X SI DIODE
D808 1SS355W-X SI DIODE
D809 1SS355W-X SI DIODE
D811 NSPW310BS/BRST/ LED
D812 NSPW310BS/BRST/ LED
D813 NSPW310BS/BRST/ LED
D814 TO1608BCHC/Z/-X LED
D815 LNJ308G81/1-3/X LED
D816 LNJ308G81/1-3/X LED
D817 LNJ308G81/1-3/X LED
D818 LNJ308G81/1-3/X LED
D819 LNJ308G81/1-3/X LED
D820 LNJ308G81/1-3/X LED
D821 LNJ308G81/1-3/X LED
D822 LNJ308G81/1-3/X LED
D823 LNJ308G81/1-3/X LED
D824 LNJ308G81/1-3/X LED
D825 LNJ308G81/1-3/X LED
D826 LNJ308G81/1-3/X LED
D827 LNJ308G81/1-3/X LED
D828 LNJ308G81/1-3/X LED
D829 LNJ308G81/1-3/X LED
D830 LNJ308G81/1-3/X LED
D831 LNJ308G81/1-3/X LED
7
3
D832 LNJ308G81/1-3/X LED
D833 LNJ308G81/1-3/X LED
D834 LNJ308G81/1-3/X LED
D835 LNJ308G81/1-3/X LED
D836 LNJ308G81/1-3/X LED
D837 LNJ308G81/1-3/X LED
D838 LNJ308G81/1-3/X LED
D839 LNJ308G81/1-3/X LED
D840 MC2838-X DIODE
D841 UDZW5.1B-X SI DIODE
C801 NCB31CK-104X C CAPACITOR 0.1uF 16V K
C802 NCB31CK-104X C CAPACITOR 0.1uF 16V K
C803 NCB31CK-104X C CAPACITOR 0.1uF 16V K
C804 NCB31CK-104X C CAPACITOR 0.1uF 16V K
C805 NCS31HJ-681X C CAPACITOR 680pF 50V J
C806 NBE20JM-475X TA E CAPACITOR 4.7uF 6.3V M
C807 NBE21CM-475X TA E CAPACITOR 4.7uF 16V M
C808 NBE20JM-475X TA E CAPACITOR 4.7uF 6.3V M
C809 NBE20JM-475X TA E CAPACITOR 4.7uF 6.3V M
C810 NCB31HK-472X C CAPACITOR 4700pF 50V K
C811 NCB31HK-472X C CAPACITOR 4700pF 50V K
C812 NCB31CK-473X C CAPACITOR 0.047uF 16V K
C813 NCB31HK-103X C CAPACITOR 0.01uF 50V K
C814 NCB31HK-103X C CAPACITOR 0.01uF 50V K
R801 NRS181J-182X MG RESISTOR 1.8kΩ 1/8W J
R802 NRSA63J-221X MG RESISTOR 220Ω 1/16W J
R803 NRSA63J-821X MG RESISTOR 820
R804 NRSA63J-103X MG RESISTOR 10k
R805 NRSA63J-103X MG RESISTOR 10k
R806 NRSA63J-103X MG RESISTOR 10k
R807 NRSA63J-103X MG RESISTOR 10kΩ 1/16W J
R808 NRSA63J-332X MG RESISTOR 3.3k
R809 NRSA63J-332X MG RESISTOR 3.3k
R810 NRSA63J-332X MG RESISTOR 3.3kΩ 1/16W J
R811 NRSA63J-683X MG RESISTOR 68k
R812 NRSA63J-394X MG RESISTOR 390k
R814 NRS181J-391X MG RESISTOR 390Ω 1/8W J
6
3
R816 NRS181J-391X MG RESISTOR 390
R818 NRS181J-391X MG RESISTOR 390
Block No. [0][3]
4
2
9
8
Part No. Part Name Description Local
0
5
1
5
1
3
6
.
c
o
9
9
8
m
2
8
4
2
9
2
8
Ω
1/16W J
Ω
1/16W J
Ω
1/16W J
Ω
1/16W J
Ω
1/16W J
Ω
1/16W J
Ω
1/16W J
Ω
1/16W J
Ω
1/8W J
Ω
1/8W J
9
9
9
TEL 13942296513 QQ 376315150 892498299
9
3-15
Page 78
Symbol No.
R820 NRSA02J-821X MG RESISTOR 820Ω 1/10W J
Q
R822 NRSA02J-821X MG RESISTOR 820Ω 1/10W J
R824 NRSA02J-471X MG RESISTOR 470Ω 1/10W J
R826 NRSA02J-471X MG RESISTOR 470Ω 1/10W J
R828 NRSA02J-331X MG RESISTOR 330Ω 1/10W J
R830 NRSA02J-331X MG RESISTOR 330
R832 NRSA02J-331X MG RESISTOR 330
R834 NRSA02J-331X MG RESISTOR 330Ω 1/10W J
R836 NRSA02J-331X MG RESISTOR 330Ω 1/10W J
R838 NRSA02J-331X MG RESISTOR 330Ω 1/10W J
R840 NRSA02J-331X MG RESISTOR 330Ω 1/10W J
R842 NRSA02J-471X MG RESISTOR 470Ω 1/10W J
R844 NRSA02J-471X MG RESISTOR 470Ω 1/10W J
R846 NRSA02J-331X MG RESISTOR 330Ω 1/10W J
R848 NRSA02J-331X MG RESISTOR 330Ω 1/10W J
R850 NRSA02J-471X MG RESISTOR 470Ω 1/10W J
R852 NRSA02J-331X MG RESISTOR 330Ω 1/10W J
TEL 13942296513 QQ 376315150 892498299
R853 NRSA63J-103X MG RESISTOR 10kΩ 1/16W J
R854 NRSA63J-471X MG RESISTOR 470Ω 1/16W J
R855 NRSA63J-103X MG RESISTOR 10kΩ 1/16W J
R856 NRSA63J-473X MG RESISTOR 47k
R857 NRSA63J-473X MG RESISTOR 47k
R859 NRSA63J-0R0X MG RESISTOR 0Ω 1/16W J
R860 NRSA63J-0R0X MG RESISTOR 0Ω 1/16W J
R863 NRSA63J-332X MG RESISTOR 3.3kΩ 1/16W J
R871 NRSA63J-621X MG RESISTOR 620Ω 1/16W J
R872 NRSA63J-621X MG RESISTOR 620Ω 1/16W J
R873 NRSA63J-821X MG RESISTOR 820Ω 1/16W J
R874 NRSA63J-122X MG RESISTOR 1.2kΩ 1/16W J
R875 NRSA63J-621X MG RESISTOR 620Ω 1/16W J
R876 NRSA63J-621X MG RESISTOR 620Ω 1/16W J
R877 NRSA63J-821X MG RESISTOR 820Ω 1/16W J
R878 NRSA63J-122X MG RESISTOR 1.2kΩ 1/16W J
R879 NRSA63J-182X MG RESISTOR 1.8kΩ 1/16W J
R880 NRSA63J-302X MG RESISTOR 3kΩ 1/16W J
R881 NRSA63J-562X MG RESISTOR 5.6kΩ 1/16W J
R882 NRSA63J-621X MG RESISTOR 620Ω 1/16W J
R883 NRSA63J-621X MG RESISTOR 620Ω 1/16W J
R884 NRSA63J-821X MG RESISTOR 820Ω 1/16W J
R885 NRSA63J-122X MG RESISTOR 1.2kΩ 1/16W J
R886 NRSA63J-182X MG RESISTOR 1.8kΩ 1/16W J
R887 NRSA63J-302X MG RESISTOR 3kΩ 1/16W J
CN801 QGB1004J1-20X CONNECTOR B-B (1-20)
CN802 QGB1004J1-16X CONNECTOR B-B (1-16)
CN803 QGB1004J1-16X CONNECTOR B-B (1-16)
EN851 QSW0976-001 ROTARY ENCODER
PJ801 QNS0180-002 3.5 JACK
S851 NSW0246-001X TACT SW
S852 NSW0246-001X TACT SW
S853 NSW0246-001X TACT SW
S854 NSW0246-001X TACT SW
S855 NSW0246-001X TACT SW
S856 NSW0246-001X TACT SW
S857 NSW0246-001X TACT SW
S858 NSW0246-001X TACT SW
S859 NSW0246-001X TACT SW
S860 NSW0246-001X TACT SW
S861 NSW0246-001X TACT SW
S862 NSW0246-001X TACT SW
S863 NSW0246-001X TACT SW
S864 NSW0246-001X TACT SW
S865 NSW0246-001X TACT SW
S866 NSW0246-001X TACT SW
S867 NSW0246-001X TACT SW
S868 NSW0246-001X TACT SW
S869 NSW0246-001X TACT SW
S870 NSW0246-001X TACT SW
S871 NSW0246-001X TACT SW
TH855 NAD0028-103X N THERMISTOR 10k
Part No. Part Name Description Local
Q
TEL
w
w
7
3
6
13942296513
w
.
xia
3
1
5
Ω
1/10W J
Ω
1/10W J
Ω
1/16W J
Ω
1/16W J
Ω
o
1
y
5
u
Mechanism board
0
Symbol No.
IC501 TMP91CW12AF5VD9 IC
IC502 BR24L01AFV-W-X IC
IC503 SN74AHCT126PW-X IC(DIGITAL)
IC504 NJU7241F33-X IC
IC571 PCM1753-X IC
IC572 NJM4580V-X IC
IC573 SN74AHCU04PW-X IC
IC601 TA2157FN-X RF AMP IC
IC621 TC94A14FA IC
IC651 NJU7772F15-X IC
IC652 TC94A34FG-002 IC
IC681 BA5830FP-X IC
Q501 RT1P141C-X DIGI TRANSISTOR
Q502 RT1N141C-X DIGI TRANSISTOR
Q571 RT1P141C-X DIGI TRANSISTOR
Q572 RT1N141C-X DIGI TRANSISTOR
Q573 2SA1365/F/-X TRANSISTOR
Q574 RT1N141C-X DIGI TRANSISTOR
Q601 2SA1947/E/-X CHIP.TR.C.M
Q651 2SA1365/F/-X TRANSISTOR
Q652 RT1N141C-X DIGI TRANSISTOR
Q681 2SB1184/QR/-X TRANSISTOR
D506 1SS355W-X SI DIODE
D682 1SR154-400-X DIODE
C501 NCB31HK-103X C CAPACITOR 0.01uF 50V K
C502 NCB31HK-103X C CAPACITOR 0.01uF 50V K
C503 NEAG0JM-107X E CAPACITOR 100uF 6.3V M
C504 NDC31HJ-220X C CAPACITOR 22pF 50V J
C505 NDC31HJ-220X C CAPACITOR 22pF 50V J
C506 NCB31HK-103X C CAPACITOR 0.01uF 50V K
C507 NCB31HK-103X C CAPACITOR 0.01uF 50V K
Q
Q
C508 NCB31HK-103X C CAPACITOR 0.01uF 50V K
C509 NCB31HK-103X C CAPACITOR 0.01uF 50V K
C510 NCB31HK-103X C CAPACITOR 0.01uF 50V K
C511 NCB31CK-104X C CAPACITOR 0.1uF 16V K
C512 NEAG0JM-107X E CAPACITOR 100uF 6.3V M
C513 NCB31HK-103X C CAPACITOR 0.01uF 50V K
C514 NCS31HJ-102X C CAPACITOR 1000pF 50V J
C551 NCB31HK-103X C CAPACITOR 0.01uF 50V K
C561 NCB31EK-123X C CAPACITOR 0.012uF 25V K
C571 NDC31HJ-270X C CAPACITOR 27pF 50V J
C572 NDC31HJ-270X C CAPACITOR 27pF 50V J
C573 NCB31CK-104X C CAPACITOR 0.1uF 16V K
C574 NEAG0JM-107X E CAPACITOR 100uF 6.3V M
C575 NEAG0JM-107X E CAPACITOR 100uF 6.3V M
C577 NCB31CK-104X C CAPACITOR 0.1uF 16V K
C578 NEAG0JM-107X E CAPACITOR 100uF 6.3V M
C580 NCB31EK-123X C CAPACITOR 0.012uF 25V K
C581 NDC31HJ-101X C CAPACITOR 100pF 50V J
C582 NDC31HJ-101X C CAPACITOR 100pF 50V J
C583 NCS31HJ-821X C CAPACITOR 820pF 50V J
C584 NCS31HJ-821X C CAPACITOR 820pF 50V J
C585 NEAG1VM-475X E CAPACITOR 4.7uF 35V M
C586 NEAG1VM-475X E CAPACITOR 4.7uF 35V M
C587 NDC31HJ-151X C CAPACITOR 150pF 50V J
C588 NDC31HJ-151X C CAPACITOR 150pF 50V J
C589 NEAG1VM-475X E CAPACITOR 4.7uF 35V M
C590 NEAG1VM-475X E CAPACITOR 4.7uF 35V M
C591 NEAG0JM-476X E CAPACITOR 47uF 6.3V M
C592 NEAG0JM-476X E CAPACITOR 47uF 6.3V M
C593 NEAG1CM-476X E CAPACITOR 47uF 16V M
C594 NCS31HJ-102X C CAPACITOR 1000pF 50V J
C595 NCB31CK-473X C CAPACITOR 0.047uF 16V K
C596 NDC31HJ-101X C CAPACITOR 100pF 50V J
C597 NCS31HJ-102X C CAPACITOR 1000pF 50V J
C598 NCS31HJ-102X C CAPACITOR 1000pF 50V J
C601 NEAG0JM-476X E CAPACITOR 47uF 6.3V M
C602 NCB31HK-103X C CAPACITOR 0.01uF 50V K
C603 NEAG0JM-107X E CAPACITOR 100uF 6.3V M
1
C604 NCB31HK-103X C CAPACITOR 0.01uF 50V K
C605 NCB31HK-682X C CAPACITOR 6800pF 50V K
Part No. Part Name Description Local
7
3
6
3
6
8
3
.
9
1
1
5
c
2
5
o
4
0
m
Block No. [0][4]
8
9
4
2
9
8
2
9
8
9
2
9
9
TEL 13942296513 QQ 376315150 892498299
9
3-16
Page 79
Symbol No.
Part No. Part Name Description Local
Symbol No.
Part No. Part Name Description Local
Q
TEL 13942296513 QQ 376315150 892498299
C606 NEAG0JM-476X E CAPACITOR 47uF 6.3V M
Q
C607 NCB31HK-103X C CAPACITOR 0.01uF 50V K
C608 NCB31CK-104X C CAPACITOR 0.1uF 16V K
C609 NCB31CK-104X C CAPACITOR 0.1uF 16V K
C610 NDC31HJ-5R0X C CAPACITOR 5pF 50V J
C611 NDC31HJ-680X C CAPACITOR 68pF 50V J
C612 NCB31HK-103X C CAPACITOR 0.01uF 50V K
C613 NCB31HK-103X C CAPACITOR 0.01uF 50V K
C614 NCB31HK-103X C CAPACITOR 0.01uF 50V K
C616 NBE20JM-106X TA E CAPACITOR 10uF 6.3V M
C621 NCB31HK-103X C CAPACITOR 0.01uF 50V K
C622 NEAG0JM-476X E CAPACITOR 47uF 6.3V M
C623 NDC31HJ-470X C CAPACITOR 47pF 50V J
C624 NCB31HK-153X C CAPACITOR 0.015uF 50V K
C625 NCB31HK-103X C CAPACITOR 0.01uF 50V K
C626 NCB31HK-272X C CAPACITOR 2700pF 50V K
C627 NCB31HK-103X C CAPACITOR 0.01uF 50V K
C628 NEAG0JM-476X E CAPACITOR 47uF 6.3V M
C629 NCB31EK-333X C CAPACITOR 0.033uF 25V K
C630 NCB31EK-333X C CAPACITOR 0.033uF 25V K
C631 NDC31HJ-471X C CAPACITOR 470pF 50V J
C632 NDC31HJ-471X C CAPACITOR 470pF 50V J
C633 NCB31CK-473X C CAPACITOR 0.047uF 16V K
C634 NCB31CK-473X C CAPACITOR 0.047uF 16V K
C635 NCB31CK-473X C CAPACITOR 0.047uF 16V K
C636 NCB31CK-473X C CAPACITOR 0.047uF 16V K
C637 NCB31CK-473X C CAPACITOR 0.047uF 16V K
C638 NCB31HK-103X C CAPACITOR 0.01uF 50V K
C639 NEAG0JM-476X E CAPACITOR 47uF 6.3V M
C640 NCB31HK-103X C CAPACITOR 0.01uF 50V K
C641 NEAG0JM-476X E CAPACITOR 47uF 6.3V M
C642 NDC31HJ-101X C CAPACITOR 100pF 50V J
C643 NCB31HK-103X C CAPACITOR 0.01uF 50V K
C644 NCB31AK-334X C CAPACITOR 0.33uF 10V K
C645 NEAG0JM-476X E CAPACITOR 47uF 6.3V M
C646 NCB31HK-103X C CAPACITOR 0.01uF 50V K
C651 NEAG0JM-476X E CAPACITOR 47uF 6.3V M
TEL
C652 NCB31HK-103X C CAPACITOR 0.01uF 50V K
C653 NEAG0JM-476X E CAPACITOR 47uF 6.3V M
C654 NCB31CK-104X C CAPACITOR 0.1uF 16V K
C655 NCB31HK-103X C CAPACITOR 0.01uF 50V K
C656 NCB31CK-104X C CAPACITOR 0.1uF 16V K
C659 NCB31CK-104X C CAPACITOR 0.1uF 16V K
C660 NDC31HJ-101X C CAPACITOR 100pF 50V J
C661 NCB31HK-103X C CAPACITOR 0.01uF 50V K
C662 NDC31HJ-101X C CAPACITOR 100pF 50V J
C663 NBE20JM-106X TA E CAPACITOR 10uF 6.3V M
C664 NCB31HK-222X C CAPACITOR 2200pF 50V K
C665 NCB31CK-104X C CAPACITOR 0.1uF 16V K
C666 NDC31HJ-101X C CAPACITOR 100pF 50V J
C667 NCB31HK-103X C CAPACITOR 0.01uF 50V K
C668 NEAG0JM-476X E CAPACITOR 47uF 6.3V M
C669 NCB31HK-103X C CAPACITOR 0.01uF 50V K
C682 NEAG1VM-475X E CAPACITOR 4.7uF 35V M
C683 NCB31CK-104X C CAPACITOR 0.1uF 16V K
C684 NEAG1CM-476X E CAPACITOR 47uF 16V M
C689 NEAG1CM-476X E CAPACITOR 47uF 16V M
C690 NBE20JM-106X TA E CAPACITOR 10uF 6.3V M
C693 NEAG1CM-476X E CAPACITOR 47uF 16V M
R501 NRSA63J-102X MG RESISTOR 1kΩ 1/16W J
R502 NRSA63J-102X MG RESISTOR 1kΩ 1/16W J
R503 NRSA63J-102X MG RESISTOR 1k
R504 NRSA63J-101X MG RESISTOR 100
R505 NRSA63J-101X MG RESISTOR 100Ω 1/16W J
R506 NRSA63J-473X MG RESISTOR 47k
R507 NRSA63J-473X MG RESISTOR 47k
R508 NRSA63J-473X MG RESISTOR 47k
R509 NRSA63J-473X MG RESISTOR 47k
R510 NRSA63J-101X MG RESISTOR 100Ω 1/16W J
R511 NRSA63J-102X MG RESISTOR 1k
R512 NRSA63J-473X MG RESISTOR 47k
R513 NRSA63J-102X MG RESISTOR 1kΩ 1/16W J
R514 NRSA63J-473X MG RESISTOR 47k
R515 NRSA63J-473X MG RESISTOR 47k
R516 NRSA63J-102X MG RESISTOR 1kΩ 1/16W J
w
w
R517 NRSA63J-101X MG RESISTOR 100
R518 NRSA63J-101X MG RESISTOR 100
7
3
6
13942296513
w
.
xia
3
1
5
o
1
Ω
1/16W J
Ω
1/16W J
Ω
1/16W J
Ω
1/16W J
Ω
1/16W J
Ω
1/16W J
Ω
1/16W J
Ω
1/16W J
Ω
1/16W J
Ω
1/16W J
y
Ω
1/16W J
Ω
1/16W J
5
u
0
Q
Q
1
R519 NRSA63J-101X MG RESISTOR 100Ω 1/16W J
R520 NRSA63J-101X MG RESISTOR 100Ω 1/16W J
R521 NRSA63J-101X MG RESISTOR 100Ω 1/16W J
R522 NRSA63J-101X MG RESISTOR 100Ω 1/16W J
R523 NRSA63J-101X MG RESISTOR 100Ω 1/16W J
R525 NRSA63J-104X MG RESISTOR 100k
R526 NRSA63J-473X MG RESISTOR 47k
R528 NRSA63J-473X MG RESISTOR 47kΩ 1/16W J
R530 NRSA63J-473X MG RESISTOR 47kΩ 1/16W J
R531 NRSA63J-473X MG RESISTOR 47kΩ 1/16W J
R532 NRSA63J-102X MG RESISTOR 1kΩ 1/16W J
R533 NRSA63J-101X MG RESISTOR 100Ω 1/16W J
R534 NRSA63J-101X MG RESISTOR 100Ω 1/16W J
R535 NRSA63J-101X MG RESISTOR 100Ω 1/16W J
R536 NRSA63J-101X MG RESISTOR 100Ω 1/16W J
R537 NRSA63J-101X MG RESISTOR 100Ω 1/16W J
R539 NRSA63J-473X MG RESISTOR 47kΩ 1/16W J
R540 NRSA63J-473X MG RESISTOR 47kΩ 1/16W J
R541 NRSA63J-101X MG RESISTOR 100Ω 1/16W J
R542 NRSA63J-103X MG RESISTOR 10kΩ 1/16W J
R543 NRSA63J-101X MG RESISTOR 100
R544 NRSA63J-101X MG RESISTOR 100
R545 NRSA63J-103X MG RESISTOR 10kΩ 1/16W J
R546 NRSA63J-271X MG RESISTOR 270Ω 1/16W J
R547 NRSA63J-271X MG RESISTOR 270Ω 1/16W J
R548 NRSA63J-822X MG RESISTOR 8.2kΩ 1/16W J
R549 NRSA63J-472X MG RESISTOR 4.7kΩ 1/16W J
R550 NRSA63J-472X MG RESISTOR 4.7kΩ 1/16W J
R551 NRSA63J-104X MG RESISTOR 100kΩ 1/16W J
R552 NRSA63J-104X MG RESISTOR 100kΩ 1/16W J
R553 NRSA63J-183X MG RESISTOR 18kΩ 1/16W J
R554 NRSA63J-333X MG RESISTOR 33kΩ 1/16W J
R555 NRSA63J-101X MG RESISTOR 100Ω 1/16W J
R556 NRSA63J-0R0X MG RESISTOR 0Ω 1/16W J
R557 NRSA63J-104X MG RESISTOR 100kΩ 1/16W J
R558 NRSA63J-104X MG RESISTOR 100kΩ 1/16W J
R559 NRSA63J-0R0X MG RESISTOR 0Ω 1/16W J
7
3
R560 NRSA63J-101X MG RESISTOR 100Ω 1/16W J
R561 NRSA63J-104X MG RESISTOR 100kΩ 1/16W J
R562 NRSA63J-392X MG RESISTOR 3.9kΩ 1/16W J
R563 NRSA63J-682X MG RESISTOR 6.8kΩ 1/16W J
R568 NRSA63J-102X MG RESISTOR 1kΩ 1/16W J
R569 NRSA63J-102X MG RESISTOR 1kΩ 1/16W J
R570 NRSA63J-102X MG RESISTOR 1kΩ 1/16W J
R572 NRSA63J-225X MG RESISTOR 2.2MΩ 1/16W J
R573 NRSA63J-102X MG RESISTOR 1kΩ 1/16W J
R574 NRSA63J-470X MG RESISTOR 47Ω 1/16W J
R575 NRSA63J-102X MG RESISTOR 1kΩ 1/16W J
R576 NRSA63J-102X MG RESISTOR 1kΩ 1/16W J
R577 NRSA63J-101X MG RESISTOR 100
R578 NRSA63J-473X MG RESISTOR 47kΩ 1/16W J
R579 NRSA63J-222X MG RESISTOR 2.2k
R581 NRSA63J-243X MG RESISTOR 24k
R582 NRSA63J-243X MG RESISTOR 24kΩ 1/16W J
R583 NRSA63J-822X MG RESISTOR 8.2k
R584 NRSA63J-822X MG RESISTOR 8.2k
R585 NRSA63J-273X MG RESISTOR 27kΩ 1/16W J
R586 NRSA63J-273X MG RESISTOR 27k
R587 NRSA63J-473X MG RESISTOR 47kΩ 1/16W J
R588 NRSA63J-473X MG RESISTOR 47k
R589 NRSA63J-103X MG RESISTOR 10k
R590 NRSA63J-103X MG RESISTOR 10kΩ 1/16W J
R591 NRSA63J-103X MG RESISTOR 10k
R592 NRSA63J-103X MG RESISTOR 10k
R593 NRSA63J-4R7X MG RESISTOR 4.7Ω 1/16W J
R594 NRSA63J-470X MG RESISTOR 47
R595 NRSA63J-470X MG RESISTOR 47
R601 NRSA63J-823X MG RESISTOR 82k
R602 NRSA63J-823X MG RESISTOR 82k
R603 NRSA63J-334X MG RESISTOR 330kΩ 1/16W J
R604 NRSA63J-334X MG RESISTOR 330k
R605 NRSA63J-220X MG RESISTOR 22
R606 NRSA63J-220X MG RESISTOR 22Ω 1/16W J
R607 NRSA63J-823X MG RESISTOR 82k
R608 NRSA63J-821X MG RESISTOR 820
R609 NRSA63J-563X MG RESISTOR 56kΩ 1/16W J
6
3
R610 NRSA63J-101X MG RESISTOR 100
R611 NRSA63J-103X MG RESISTOR 10k
6
8
3
.
9
1
1
5
c
2
5
o
4
0
m
9
8
9
8
2
4
2
9
Ω
1/16W J
Ω
1/16W J
Ω
1/16W J
Ω
1/16W J
2
8
Ω
1/16W J
Ω
1/16W J
Ω
1/16W J
Ω
1/16W J
Ω
1/16W J
Ω
1/16W J
Ω
1/16W J
Ω
1/16W J
Ω
1/16W J
Ω
1/16W J
Ω
1/16W J
Ω
1/16W J
Ω
1/16W J
Ω
1/16W J
Ω
1/16W J
Ω
1/16W J
Ω
1/16W J
Ω
1/16W J
Ω
1/16W J
Ω
1/16W J
9
9
9
TEL 13942296513 QQ 376315150 892498299
9
3-17
Page 80
Symbol No.
Part No. Part Name Description Local
Symbol No.
Part No. Part Name Description Local
R612 NRSA63J-202X MG RESISTOR 2kΩ 1/16W J
Q
Q
R613 NRSA63J-102X MG RESISTOR 1kΩ 1/16W J
R614 NRSA63J-153X MG RESISTOR 15kΩ 1/16W J
R615 NRSA63J-151X MG RESISTOR 150Ω 1/16W J
R616 NRSA63J-103X MG RESISTOR 10kΩ 1/16W J
R621 NRSA63J-470X MG RESISTOR 47
R622 NRSA63J-470X MG RESISTOR 47
R623 NRSA63J-470X MG RESISTOR 47Ω 1/16W J
R624 NRSA63J-562X MG RESISTOR 5.6kΩ 1/16W J
R625 NRSA63J-473X MG RESISTOR 47kΩ 1/16W J
R626 NRSA63J-474X MG RESISTOR 470kΩ 1/16W J
R627 NRSA63J-153X MG RESISTOR 15kΩ 1/16W J
R628 NRSA63J-155X MG RESISTOR 1.5MΩ 1/16W J
R629 NRSA63J-103X MG RESISTOR 10kΩ 1/16W J
R630 NRSA63J-101X MG RESISTOR 100Ω 1/16W J
R631 NRSA63J-101X MG RESISTOR 100Ω 1/16W J
R632 NRSA63J-0R0X MG RESISTOR 0Ω 1/16W J
TEL 13942296513 QQ 376315150 892498299
R633 NRSA63J-0R0X MG RESISTOR 0Ω 1/16W J
R634 NRSA63J-0R0X MG RESISTOR 0Ω 1/16W J
R635 NRSA63J-101X MG RESISTOR 100Ω 1/16W J
R636 NRSA63J-101X MG RESISTOR 100
R637 NRSA63J-105X MG RESISTOR 1M
R638 NRSA63J-472X MG RESISTOR 4.7kΩ 1/16W J
R639 NRSA63J-472X MG RESISTOR 4.7kΩ 1/16W J
R640 NRSA63J-472X MG RESISTOR 4.7kΩ 1/16W J
R641 NRSA63J-472X MG RESISTOR 4.7kΩ 1/16W J
R642 NRSA63J-103X MG RESISTOR 10kΩ 1/16W J
R651 NRSA63J-104X MG RESISTOR 100kΩ 1/16W J
R654 NRSA63J-390X MG RESISTOR 39Ω 1/16W J
R655 NRSA63J-103X MG RESISTOR 10kΩ 1/16W J
R656 NRSA63J-473X MG RESISTOR 47kΩ 1/16W J
R657 NRSA63J-222X MG RESISTOR 2.2kΩ 1/16W J
R668 NRSA63J-470X MG RESISTOR 47Ω 1/16W J
R675 NRSA63J-221X MG RESISTOR 220Ω 1/16W J
R681 NRSA63J-682X MG RESISTOR 6.8kΩ 1/16W J
R682 NRSA63J-222X MG RESISTOR 2.2kΩ 1/16W J
R683 NRSA63J-682X MG RESISTOR 6.8kΩ 1/16W J
TEL
R684 NRSA63J-822X MG RESISTOR 8.2kΩ 1/16W J
R685 NRSA63J-682X MG RESISTOR 6.8kΩ 1/16W J
R686 NRSA63J-123X MG RESISTOR 12kΩ 1/16W J
R687 NRSA63J-682X MG RESISTOR 6.8kΩ 1/16W J
R688 NRSA63J-182X MG RESISTOR 1.8kΩ 1/16W J
R689 NRSA63J-123X MG RESISTOR 12kΩ 1/16W J
R690 NRSA63J-333X MG RESISTOR 33kΩ 1/16W J
R691 NRSA63J-153X MG RESISTOR 15kΩ 1/16W J
L501 NQL114K-470X COIL 47uH K
L502 NQL114K-470X COIL 47uH K
L572 NQL114K-470X COIL 47uH K
L621 NQL114K-470X COIL 47uH K
L622 NQL114K-470X COIL 47uH K
L623 NQL114K-470X COIL 47uH K
L651 NQL114K-470X COIL 47uH K
L652 NQL114K-470X COIL 47uH K
L653 NQL114K-470X COIL 47uH K
CN501 QGB2027L1-22X CONNECTOR B-B (1-22)
CN601 QGF0527F2-22W CONNECTOR FFC/FPC (1-22)
TH501 NAD0028-103X N THERMISTOR 10k
X501 NAX0385-001X CRYSTAL 24.576MHz
X571 NAX0375-001X CRYSTAL 16.9344MHz
7
3
6
13942296513
Mechanism control board
Symbol No.
IC401 CXA2560Q IC
IC402 LB1641 IC
IC431 UPD789166GB-590 IC
IC432 BD4833FVE-W IC
IC461 SN74AHC126NS-X IC
Q402 RT1N141C-X DIGI TRANSISTOR
Part No. Part Name Description Local
w
w
w
.
xia
3
1
5
1
Ω
1/16W J
Ω
1/16W J
Ω
1/16W J
Ω
1/16W J
Ω
Block No. [0][5]
o
y
5
u
Q403 2SB1322/RS/-T TRANSISTOR
0
Q431 RT1N141C-X DIGI TRANSISTOR
Q432 2SC3928A/QR/-X TRANSISTOR
D401 MA8047/H/-X Z DIODE
D402 1A3G-T1 SI DIODE
C401 NDC31HJ-101X C CAPACITOR 100pF 50V J
C402 NDC31HJ-101X C CAPACITOR 100pF 50V J
C403 NDC31HJ-101X C CAPACITOR 100pF 50V J
C404 NDC31HJ-101X C CAPACITOR 100pF 50V J
C405 NDC31HJ-101X C CAPACITOR 100pF 50V J
C406 NDC31HJ-101X C CAPACITOR 100pF 50V J
C407 NDC31HJ-101X C CAPACITOR 100pF 50V J
C408 NDC31HJ-101X C CAPACITOR 100pF 50V J
C409 QEKJ1CM-226Z E CAPACITOR 22uF 16V M
C410 NCB31HK-153X C CAPACITOR 0.015uF 50V K
C411 NCB31HK-153X C CAPACITOR 0.015uF 50V K
C412 NCB31CK-104X C CAPACITOR 0.1uF 16V K
C413 NCB31CK-104X C CAPACITOR 0.1uF 16V K
C414 QEKJ1CM-226Z E CAPACITOR 22uF 16V M
C416 NCB31CK-104X C CAPACITOR 0.1uF 16V K
C417 NCB31CK-104X C CAPACITOR 0.1uF 16V K
C418 NDC31HJ-221X C CAPACITOR 220pF 50V J
C419 QEKJ1HM-474Z E CAPACITOR 0.47uF 50V M
C421 NCB31HK-103X C CAPACITOR 0.01uF 50V K
C422 NCB31CK-104X C CAPACITOR 0.1uF 16V K
C423 QEKJ1CM-106Z E CAPACITOR 10uF 16V M
C424 NCB31CK-104X C CAPACITOR 0.1uF 16V K
C425 NCB31HK-103X C CAPACITOR 0.01uF 50V K
C426 QEKJ1CM-106Z E CAPACITOR 10uF 16V M
C427 QEKJ1CM-106Z E CAPACITOR 10uF 16V M
C428 NDC31HJ-101X C CAPACITOR 100pF 50V J
C431 QEKJ0JM-476Z E CAPACITOR 47uF 6.3V M
C432 NCB31HK-103X C CAPACITOR 0.01uF 50V K
C433 QEKJ0JM-476Z E CAPACITOR 47uF 6.3V M
C434 NCB31HK-103X C CAPACITOR 0.01uF 50V K
C435 NDC31HJ-220X C CAPACITOR 22pF 50V J
Q
Q
C436 NDC31HJ-220X C CAPACITOR 22pF 50V J
C437 NCB31HK-103X C CAPACITOR 0.01uF 50V K
C438 NCB31HK-103X C CAPACITOR 0.01uF 50V K
C439 NCB31HK-103X C CAPACITOR 0.01uF 50V K
C461 NCB31HK-103X C CAPACITOR 0.01uF 50V K
R401 NRS181J-681X MG RESISTOR 680Ω 1/8W J
R402 NRSA63J-104X MG RESISTOR 100kΩ 1/16W J
R403 NRSA63J-104X MG RESISTOR 100kΩ 1/16W J
R404 NRSA63J-104X MG RESISTOR 100kΩ 1/16W J
R405 NRSA63J-104X MG RESISTOR 100kΩ 1/16W J
R406 NRSA63J-181X MG RESISTOR 180
R407 NRSA63J-181X MG RESISTOR 180Ω 1/16W J
R412 NRSA63J-101X MG RESISTOR 100
R413 NRSA63J-183X MG RESISTOR 18k
R414 NRSA63J-392X MG RESISTOR 3.9kΩ 1/16W J
R415 NRSA63J-223X MG RESISTOR 22k
R416 NRSA63J-155X MG RESISTOR 1.5M
R417 NRSA63J-103X MG RESISTOR 10kΩ 1/16W J
R418 NRSA63J-153X MG RESISTOR 15k
R422 NRSA63J-332X MG RESISTOR 3.3kΩ 1/16W J
R423 NRSA63J-473X MG RESISTOR 47k
R424 NRSA63J-222X MG RESISTOR 2.2k
R425 NRSA63J-680X MG RESISTOR 68Ω 1/16W J
R426 NRSA63J-680X MG RESISTOR 68
R432 NRSA63J-473X MG RESISTOR 47k
R433 NRSA63J-473X MG RESISTOR 47kΩ 1/16W J
R435 NRSA63J-473X MG RESISTOR 47k
R437 NRSA63J-473X MG RESISTOR 47k
R438 NRSA63J-473X MG RESISTOR 47k
R439 NRSA63J-473X MG RESISTOR 47k
R440 NRSA63J-473X MG RESISTOR 47kΩ 1/16W J
R441 NRSA63J-473X MG RESISTOR 47k
R442 NRSA63J-473X MG RESISTOR 47k
R443 NRSA63J-222X MG RESISTOR 2.2kΩ 1/16W J
R444 NRSA63J-473X MG RESISTOR 47k
R445 NRSA63J-563X MG RESISTOR 56k
R446 NRSA63J-473X MG RESISTOR 47kΩ 1/16W J
1
R447 NRSA63J-473X MG RESISTOR 47k
R448 NRSA63J-683X MG RESISTOR 68k
3
6
7
3
6
8
3
.
9
1
1
5
c
2
5
o
4
0
m
9
8
9
8
2
Ω
Ω
Ω
Ω
Ω
Ω
Ω
1/16W J
Ω
Ω
Ω
Ω
Ω
Ω
Ω
Ω
Ω
Ω
Ω
9
4
1/16W J
1/16W J
1/16W J
1/16W J
Ω
1/16W J
1/16W J
1/16W J
Ω
1/16W J
1/16W J
1/16W J
1/16W J
1/16W J
1/16W J
1/16W J
1/16W J
1/16W J
1/16W J
1/16W J
1/16W J
2
8
9
2
9
9
TEL 13942296513 QQ 376315150 892498299
9
3-18
Page 81
Symbol No.
Part No. Part Name Description Local
3
7
6
Q
TEL 13942296513 QQ 376315150 892498299
R449 NRSA63J-103X MG RESISTOR 10kΩ 1/16W J
Q
R450 NRSA63J-473X MG RESISTOR 47kΩ 1/16W J
R451 NRSA63J-473X MG RESISTOR 47kΩ 1/16W J
R454 NRSA63J-473X MG RESISTOR 47kΩ 1/16W J
R455 NRSA63J-102X MG RESISTOR 1kΩ 1/16W J
R456 NRSA63J-102X MG RESISTOR 1k
R457 NRSA63J-102X MG RESISTOR 1k
R458 NRSA63J-102X MG RESISTOR 1kΩ 1/16W J
R461 NRSA63J-223X MG RESISTOR 22kΩ 1/16W J
R462 NRSA63J-334X MG RESISTOR 330kΩ 1/16W J
R463 NRSA63J-101X MG RESISTOR 100Ω 1/16W J
R464 NRSA63J-104X MG RESISTOR 100kΩ 1/16W J
R465 NRSA63J-223X MG RESISTOR 22kΩ 1/16W J
R466 NRSA63J-104X MG RESISTOR 100kΩ 1/16W J
R467 NRSA63J-103X MG RESISTOR 10kΩ 1/16W J
R468 NRSA63J-331X MG RESISTOR 330Ω 1/16W J
R469 NRSA63J-223X MG RESISTOR 22kΩ 1/16W J
R470 NRSA63J-101X MG RESISTOR 100Ω 1/16W J
R471 NRSA63J-334X MG RESISTOR 330kΩ 1/16W J
R491 NRSA63J-0R0X MG RESISTOR 0Ω 1/16W J
VR401 QVP0033-333Z TRIM RESISTOR 33k
VR402 QVP0033-333Z TRIM RESISTOR 33k
L431 NQL114K-470X COIL 47uH K
CN401 QGB1004K1-16 CONNECTOR B-B (1-16)
CN402 QGA2001F1-06 CONNECTOR W-B (1-6)
CN403 QGF1205C1-10 CONNECTOR FFC/FPC (1-10)
X431 QAX0414-001Z CRYSTAL 4.19430MHz
3
1
5
1
Ω
1/16W J
Ω
1/16W J
Ω
Ω
5
0
8
9
2
4
9
8
2
9
9
TEL 13942296513 QQ 376315150 892498299
TEL
13942296513
Q
Q
3
7
6
3
1
5
1
5
0
8
9
2
4
9
8
2
9
9
w
w
w
.
xia
o
y
u
1
6
3
.
c
o
m
3-19
Page 82
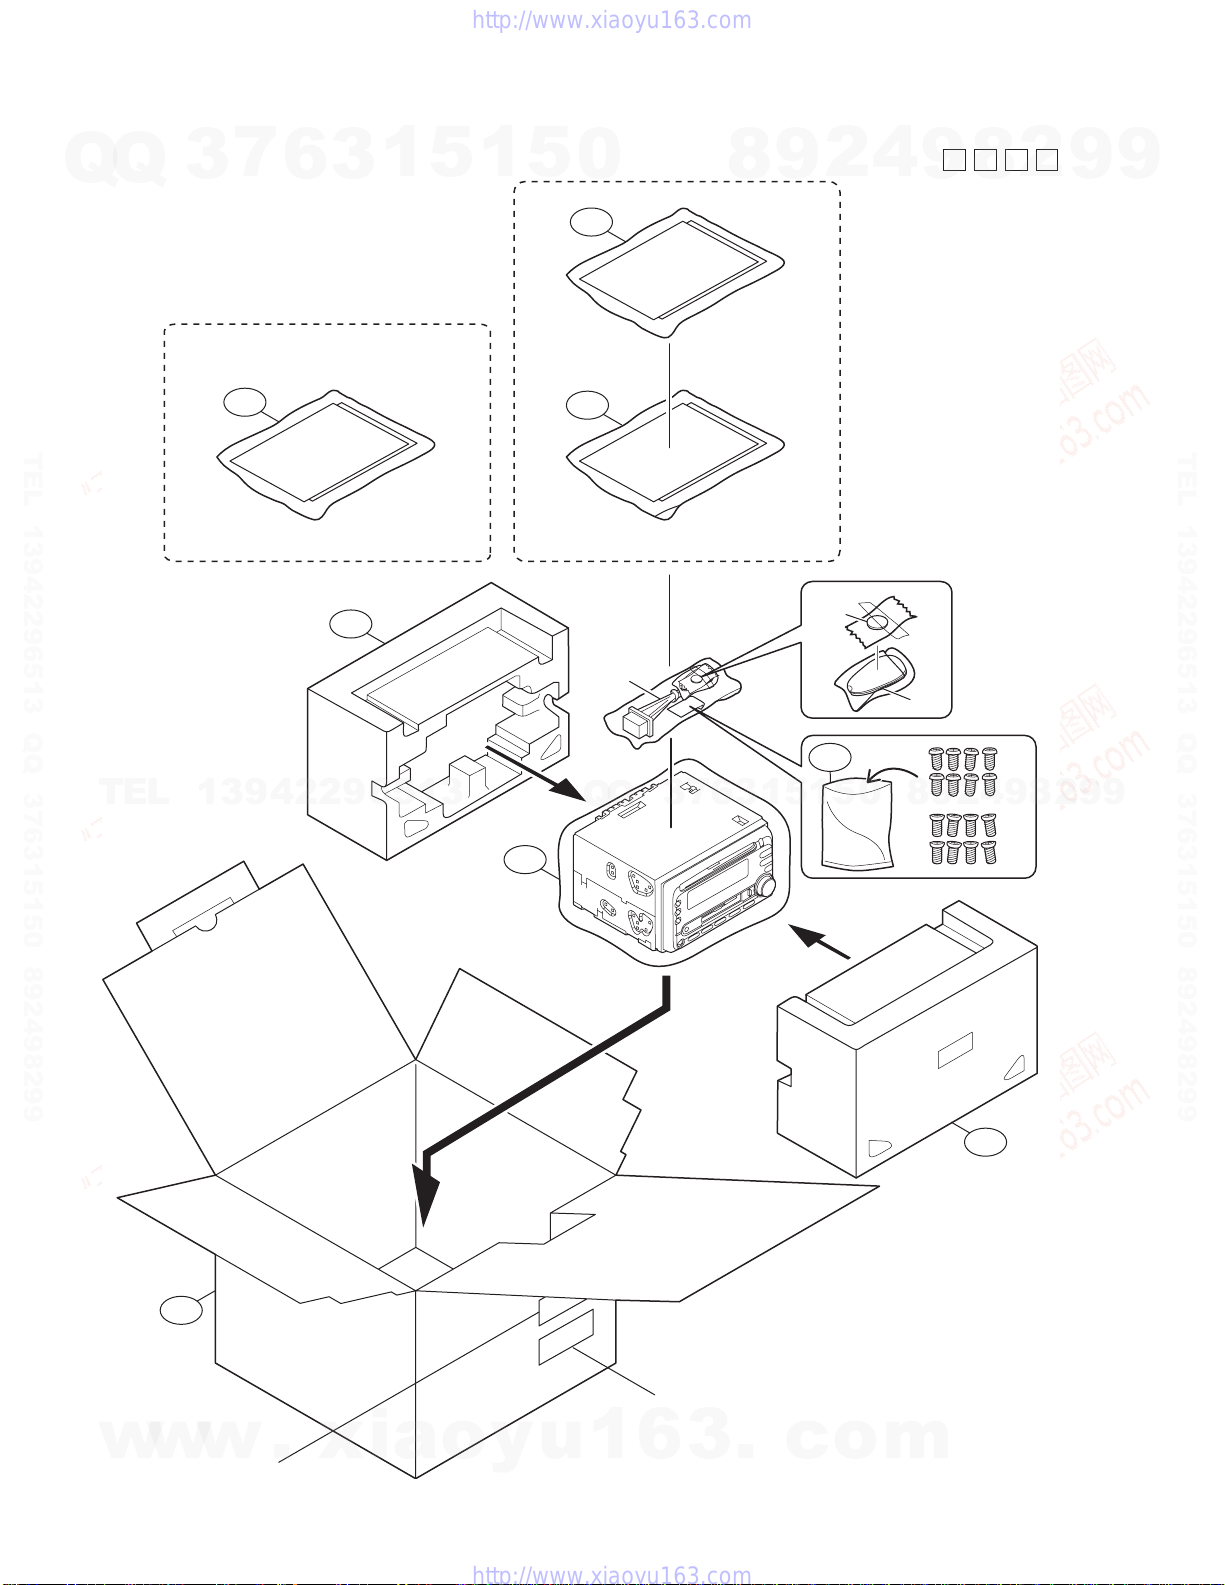
Packing materials and accessories parts list
Q
Q
3
7
6
3
1
5
1
5
0
8
9
Block No.
4
2
M
9
3
8
M
2
M
9
9
P3
P3
TEL 13942296513 QQ 376315150 892498299
TEL
13942296513
A1,A2,A4,A5,
A6,A7
P6
P2
P3
Q
KW-XC405_U,XC406_UKW-XC404_UI,XC405_UT
A10
Q
3
7
A3
A1,A2,A4,A5,
A6,A7
1
5
1
3
6
A12
P4
5
0
8
KIT
A11
9
2
4
A8
9
A9
8
2
9
TEL 13942296513 QQ 376315150 892498299
9
3-20
w
w
P1
w
A14
.
xia
A13
o
y
u
1
6
3
.
c
o
P5
m
Page 83
Packing and Accessories
7
Q
Q
TEL 13942296513 QQ 376315150 892498299
3
Symbol No. Part No. Part Name Description Local
A 1 GET0328-001A INST BOOK ENG 404UI
A 1 GET0327-004B INST BOOK ENG CHI(TAIWAN) 405UT
A 1 GET0327-001A INST BOOK ENG THA 405U,406U
A 2 GET0327-003A INST BOOK RUS 405U,406U
A 3 GET0327-002A INST BOOK KOR CHI(TAIWAN) ARA PER 405U,406U
A 4 GET0328-002A INST.MANUAL 404UI
A 4 GET0327-008A INST.MANUAL 405UT
A 4 GET0327-005A INST.MANUAL 405U,406U
A 5 GET0327-006A INST.MANUAL 405U,406U
A 6 GET0327-007A INST.MANUAL 405U,406U
A 7 VJC3300-001SS BLIND PLATE
A 8 QYSDSP5008ZA SCREW M5 x 8mm(x8)
A 9 QYSSSP5008ZA SCREW M5 x 8mm(x8)
A 10 QAM0456-002 POWER CORD
A 11 RM-RK50C REMOCON
A 12 ------------ BATTERY
A 13 LV33728-001A CARTON LABEL
A 14 GE31574-031A UT LABEL 405UT
KIT SRW-222 SCREW PARTS KIT A8 A9
P 1 GE31980-001A CARTON 404UI
P 1 GE31982-001A CARTON 405U,405UT
P 1 GE32112-001A CARTON 406U
P 2 QPC03004315P POLY BAG 30cm x 43cm
P 3 FSPG4002-001 POLY BAG 404UI,405UT
P 3 FSPG4002-001 POLY BAG (x2) 405U,406U
P 4 QPA00801205 POLY BAG 8cm x 12cm
P 5 LV10524-002A CUSHION FRONT
P 6 LV10525-002A CUSHION REAR
6
3
1
5
1
5
0
8
9
2
4
Block No. [M][3][M][M]
9
8
2
9
9
TEL 13942296513 QQ 376315150 892498299
TEL
13942296513
Q
Q
3
7
6
3
1
5
1
5
0
8
9
2
4
9
8
2
9
9
w
w
w
.
xia
o
y
u
1
6
3
.
c
o
m
3-21
 Loading...