

JVC KW-AVX726, KW-AVX725, KW-AVX724, KW-AVX626, KW-AVX625 Instructions Manual
...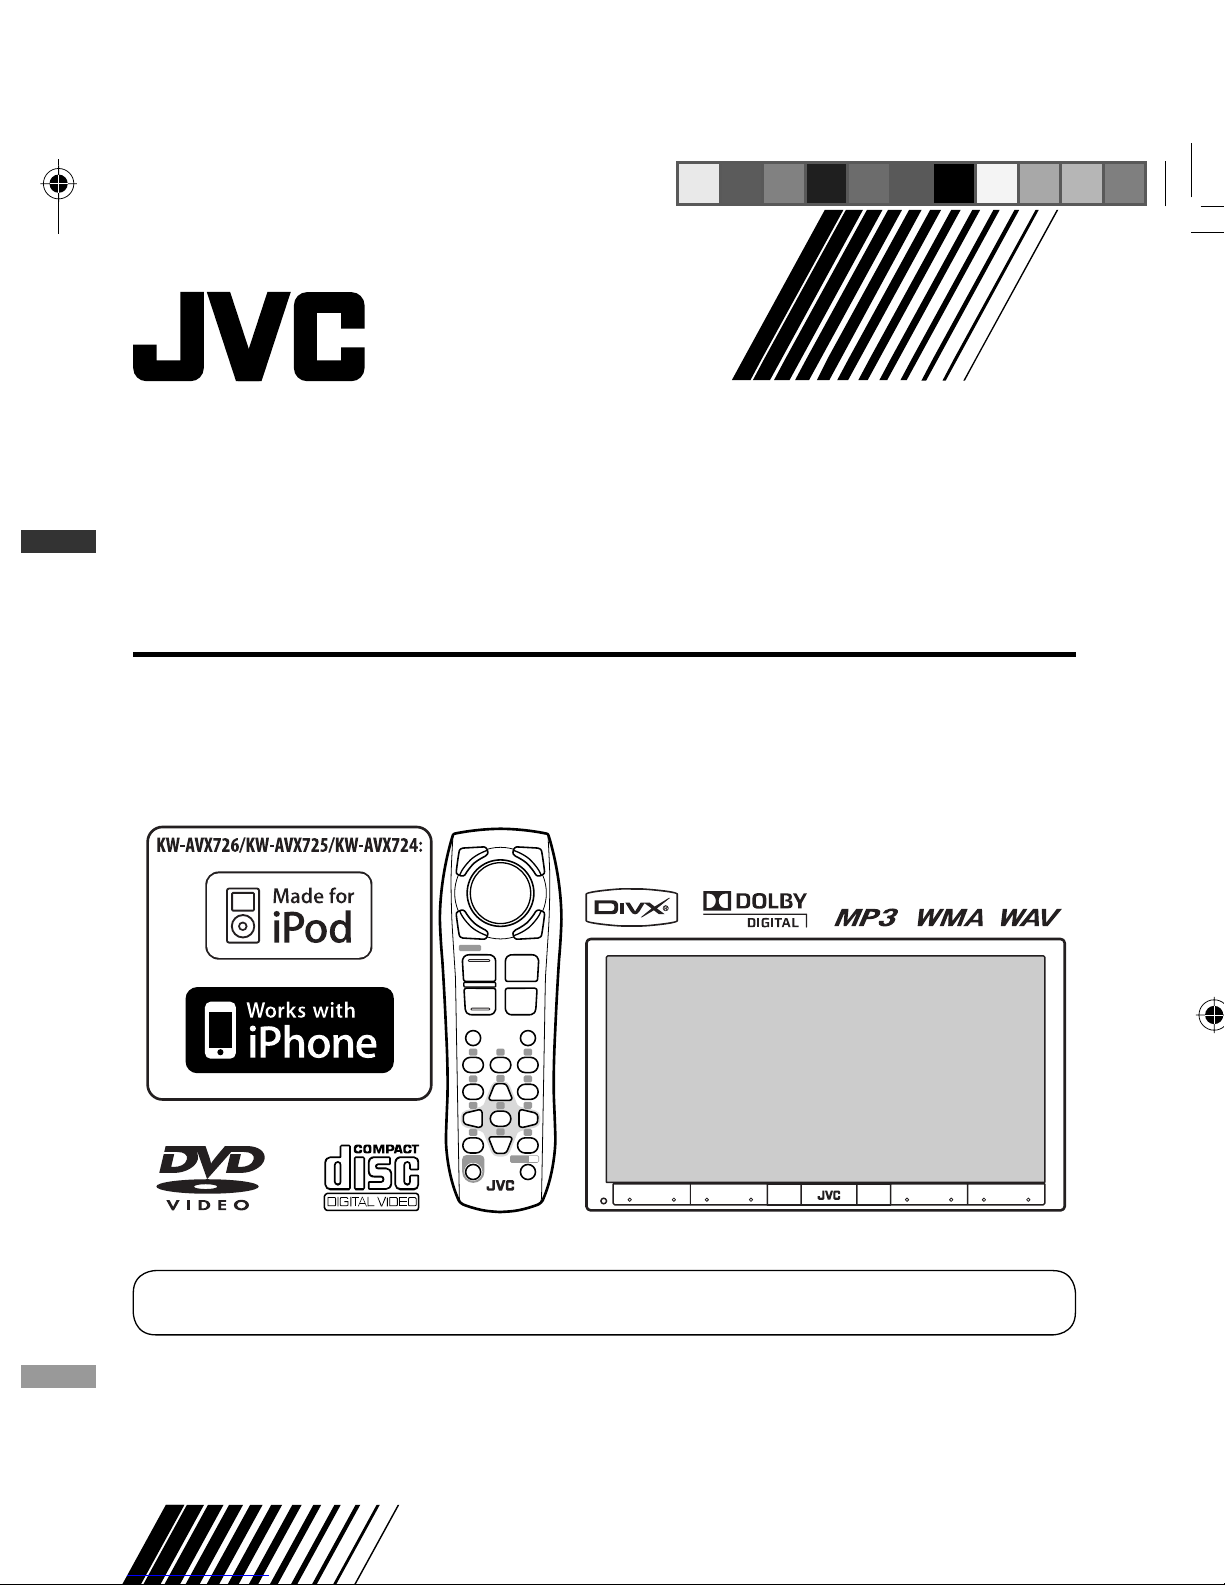
DVD RECEIVER WITH MONITOR
INSTRUCTIONS
For canceling the display demonstration, see page 10.
For installation and connections, refer to the separate manual.
KW-AVX726/KW-AVX725/KW-AVX724/
KW-AVX626/KW-AVX625/KW-AVX624
Thank you for purchasing a JVC product.
Please read all instructions carefully before operation, to ensure your complete understanding and to obtain the best
possible performance from the unit.
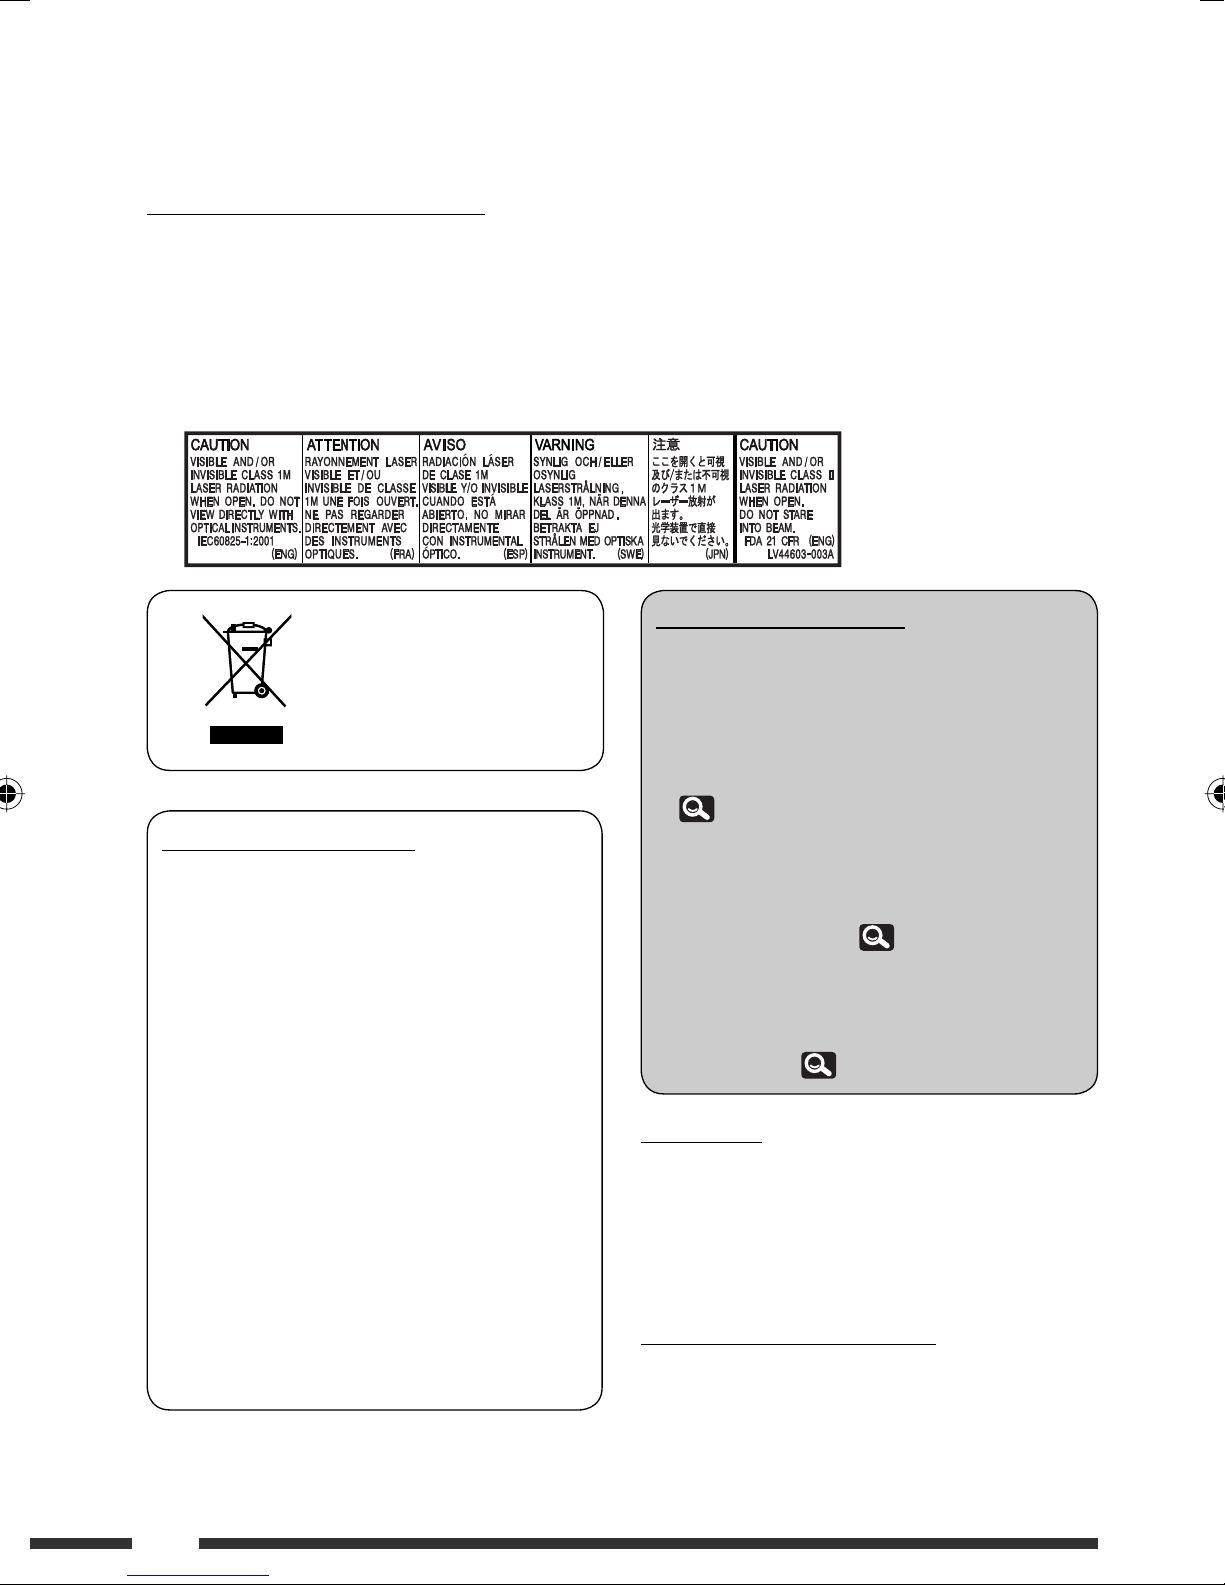
IMPORTANT FOR LASER PRODUCTS
1. CLASS 1 LASER PRODUCT
2. CAUTION: Do not open the top cover. There are no user serviceable parts inside the unit; leave all servicing to
qualified service personnel.
3. CAUTION: Visible and/or invisible class 1M laser radiation when open. Do not view directly with optical
instruments.
4. REPRODUCTION OF LABEL: CAUTION LABEL, PLACED OUTSIDE THE UNIT.
How to read this manual
• < > is used to indicate the variable screens/
[European Union only]
Cautions on the monitor:
• The monitor built in this unit has been produced
with high precision, but it may have some
ineffective dots. This is inevitable and is not
malfunction.
• Do not expose the monitor to direct sunlight.
• Do not operate the touch panel using a ball-point
pen or similar tool with the sharp tip.
Touch the buttons on the touch panel with your
finger directly (if you are wearing a glove, take it
off).
• When the temperature is very cold or very hot...
– Chemical changes occur inside, causing
malfunction.
– Pictures may not appear clearly or may move
slowly. Pictures may not be synchronized with
the sound or picture quality may decline in such
environments.
menus/operations/settings that appear on the
touch panel.
• [ ] is used to indicate the buttons on the touch
panel.
• ( page number) is used to indicate the
reference page number of the related topics/
operations/settings.
• Operation index: To locate easily the desired
operations/functions. ( 59)
• Indication language: English indications
are used for the purpose of explanation. You
can select the indication language from the
<AV Menu>. ( 13)
For safety...
• Do not raise the volume level too much, as this will
block outside sounds, making driving dangerous.
• Stop the car before performing any complicated
operations.
Temperature inside the car...
If you have parked the car for a long time in hot or cold
weather, wait until the temperature in the car becomes
normal before operating the unit.
2
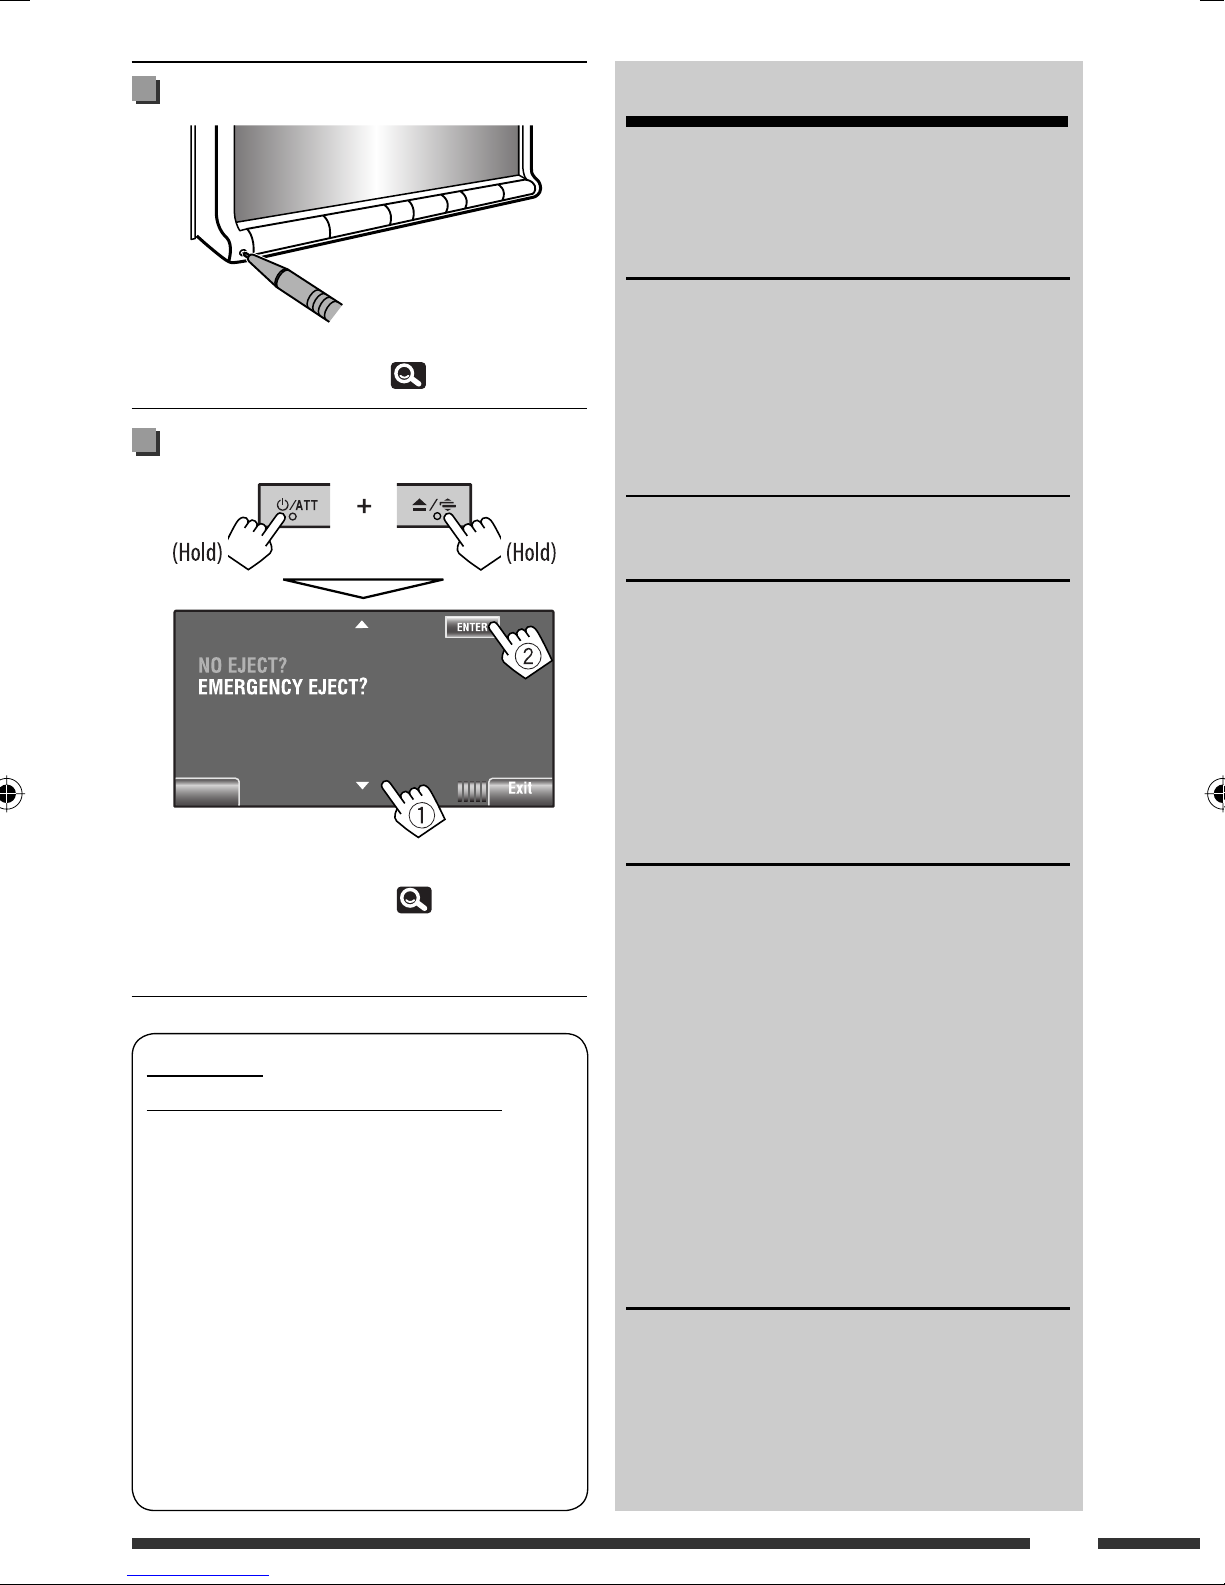
How to reset your unit
CONTENTS
How to read this manual .............................. 2
How to reset your unit ................................. 3
How to forcibly eject a disc ........................... 3
INTRODUCTIONS
Playable disc type ........................................ 4
• Your preset adjustments will also be erased (except the
registered Bluetooth device). ( 24, 35)
How to forcibly eject a disc
Back
• You can forcibly eject the loaded disc even if the disc is
locked. To lock/unlock the disc, 27.
• Be careful not to drop the disc when it ejects.
• If this does not work, reset your unit.
Basic operations ........................................... 5
• Using the monitor panel/touch panel ......... 5
• Using the remote controller (RM-RK252) .... 7
Preparation .................................................. 10
AV MENU
AV Menu operations .................................... 11
OPERATIONS
Listening to the radio ................................... 26
Disc operations ............................................. 27
• Operation buttons on the screen ................ 29
• Operations using the remote controller
(RM-RK252) ................................................ 30
USB operations (for
KW-AVX725/KW-AVX724
KW-AVX726/
) ....................... 34
EXTERNAL DEVICES
Using the Bluetooth® devices ....................... 35
• Connecting a new Bluetooth device ........... 35
• Using the Bluetooth cellular phone ............ 36
• Using the Bluetooth audio player ............... 38
WARNINGS:
(To prevent accidents and damage)
• DO NOT install any unit or wire any cable in a
location where;
– it may obstruct the steering wheel and gearshift
lever operations.
– it may obstruct the operation of safety devices
such as air bags.
– it may obstruct visibility.
• DO NOT operate the unit while driving.
If you need to operate the unit while driving, be
sure to look around carefully.
• The driver must not watch the monitor while
driving.
Listening to the CD changer ......................... 38
Listening to the iPod/iPhone ....................... 39
• When connected with the USB cable .......... 39
• When connected with the interface
adapter ....................................................... 40
Using other external components ................ 41
• AV-INPUT .................................................... 41
• EXT-INPUT .................................................. 42
REFERENCES
Maintenance ................................................ 43
More about this unit .................................... 44
Troubleshooting ........................................... 52
Specifications ............................................... 56
Operation index ........................................... 59
3
Playable disc type
Disc type Recording format, file type, etc Playable
DVD
• DTS sound cannot be
reproduced.
DVD Recordable/Rewritable
(DVD-R/-RW *2, +R/+RW *3)
• DVD Video: UDF bridge
• DVD-VR
• DivX/MPEG1/MPEG2/JPEG/
MP3/WMA/WAV: ISO 9660 level
1, level 2, Romeo, Joliet
Dual Disc DVD side
CD/VCD Audio CD/CD Text (CD-DA)
DVD-Video *
Region Code: South East Asia, Hong Kong region: 3
Australia: 4
India: 5
Ex.:
DVD-Audio/DVD-ROM
DVD-Video
DVD-VR
DivX/MPEG1/MPEG2
JPEG
MP3/WMA/WAV
AAC/MPEG4/DVD+VR/DVD-RAM
Non-DVD side
1
VCD (Video CD)
DTS-CD/SVCD (Super Video CD)/CD-ROM/
CD-I (CD-I Ready)
CD Recordable/Rewritable
(CD-R/-RW)
• ISO 9660 level 1, level 2, Romeo,
Joliet
*1 If you insert a DVD Video disc of an incorrect Region Code, “Region code error” appears on the screen.
*2 DVD-R recorded in multi-border format is also playable (except for dual layer discs). DVD-RW dual layer discs are not
playable.
*3 It is possible to play back finalized +R/+RW (Video format only) discs. “DVD” is selected as its disc type when a
+R/+RW disc is loaded. +RW double layer discs are not playable.
CD-DA
VCD (Video CD)
DivX/MPEG1/MPEG2
JPEG
MP3/WMA/WAV
AAC/MPEG4
Caution for DualDisc playback
The Non-DVD side of a “DualDisc” does not comply with the “Compact Disc Digital Audio” standard. Therefore, the
use of Non-DVD side of a DualDisc on this product may not be recommended.
4
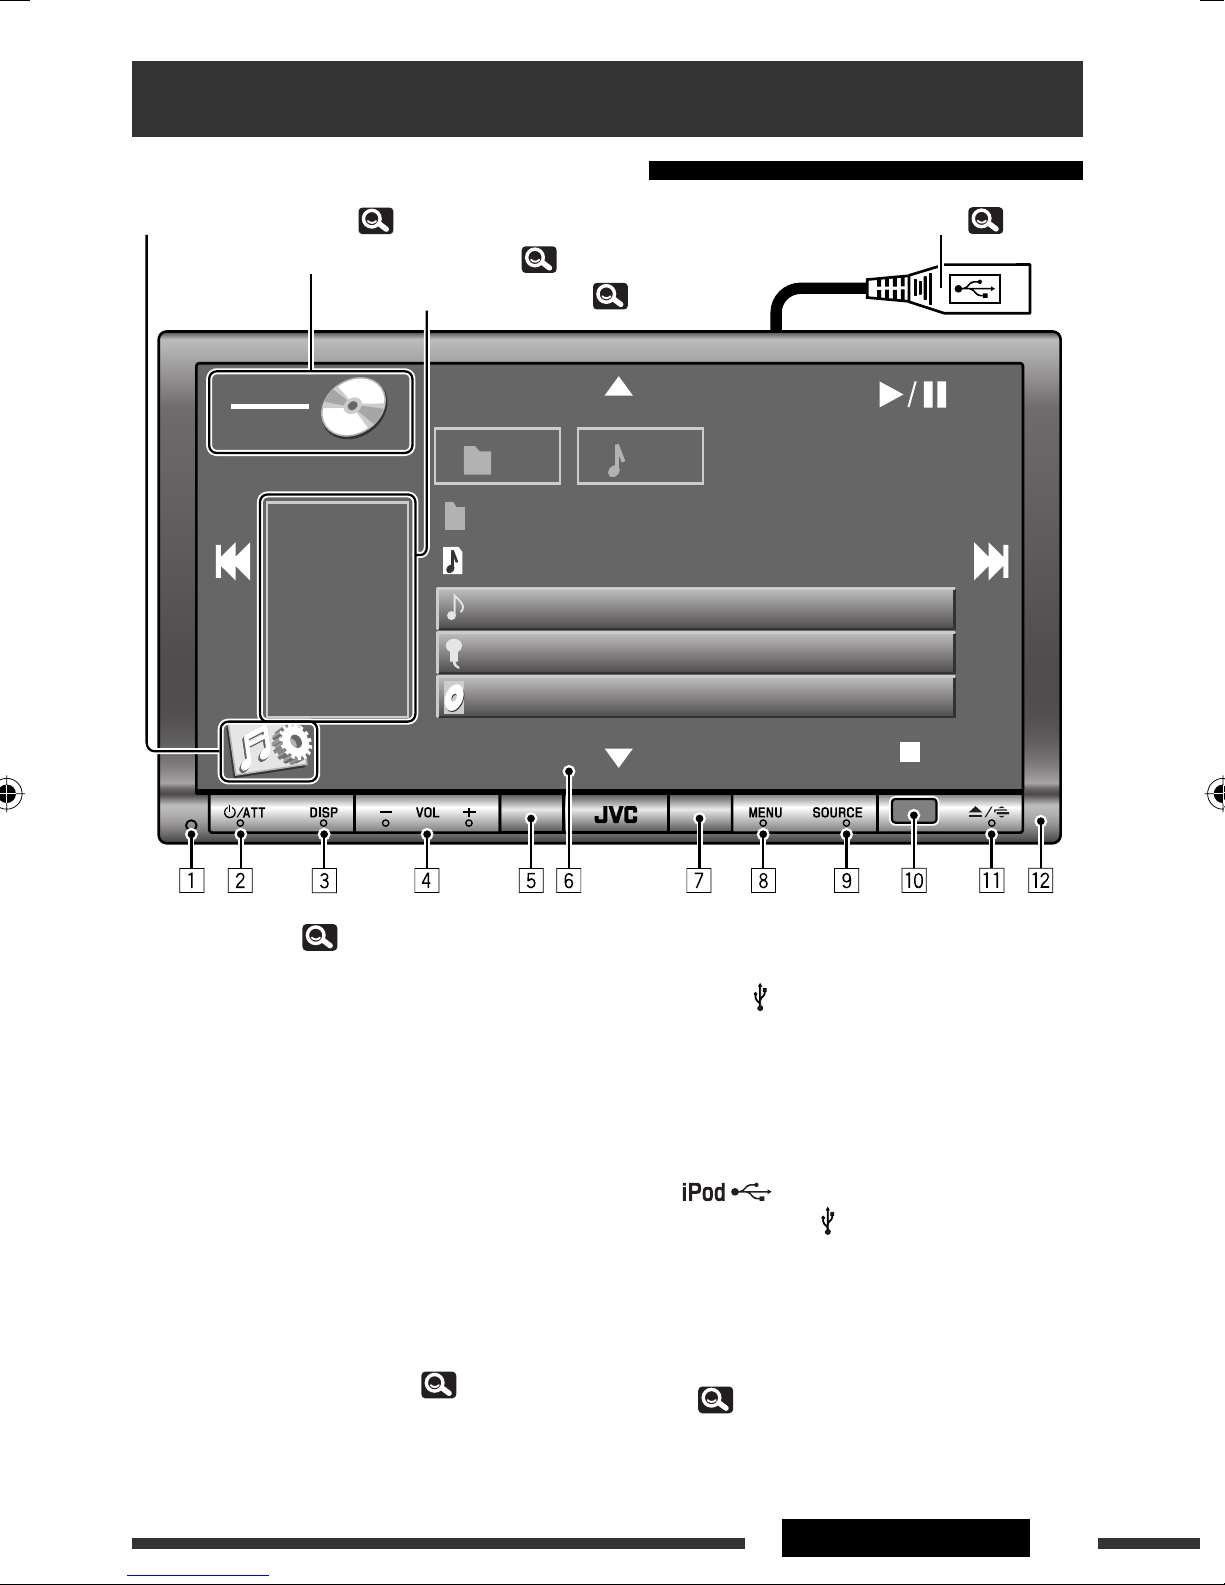
Basic operations
Using the monitor panel/touch panel
Display <AV Menu> screen, ( 11)
Display the <Source Menu> screen, (
Display/exit the Short Cut icons, (
SOURCE
CD
MP3
FLAT
3:00
AM
6)
7)
01 01
Folder Name
File Name
Track Title
Artist Name
Disc Title
USB cable from the rear of the unit, (
0:02:26
34) *
1
1 Resets the unit ( 3).
2 • Turns on the power.
• Attenuates the sound (if the power is on).
• Turns off the power. (Hold)
3 Changes the display information. *
4 • Adjusts the volume.
•
Bluetooth PHONE
the incoming calls. *
5 Remote sensor
6 Touch panel (see the following pages).
• Most of the touch panel operations are explained
unless mentioned otherwise.
• The screen will turn off if no operation is
done for about 10 seconds (depends on the
<Illumination> setting). ( 16)
7 Motion sensor
8 Displays <AV Menu> screen.
: Adjusts the volume of
3
2
9 • Selects the source. *
TUNER
USB
=
AUDIO
•
Bluetooth PHONE
<Dial Menu> screen. *5 (Hold)
p •
KW-AVX726/KW-AVX725/KW-AVX724
:
– Selects “
– Switches the setting between “HEAD MODE”
•
KW-AVX626/KW-AVX625/KW-AVX624
AV-IN : Selects “
*1 – *5 : 6
=
*1/
iPod
Bluetooth PHONE
=
USB/
and “iPod MODE” (Hold)
4
DISC (DVD/VCD/CD)
*1 =
CD-CH/iPod/EXT-IN
=
Bluetooth
AV-IN
= (back to the beginning)
: Displays the
iPod
” as the source.
AV-IN
” as the source.
Continued on the next page
=
:
:
5INTRODUCTIONS
q • Displays <Open/Tilt> screen. *
6
[Open] : Opens the monitor panel.
[Eject] : Ejects the disc.
[Close] : Closes the monitor panel.
[Tilt +] : Tilts open the monitor panel.
[Tilt –] : Tilts close the monitor panel.
• Ejects the disc and display <Open/Tilt>
screen. (Hold)
• Closes the monitor panel when the panel is
opened.
w Monitor panel
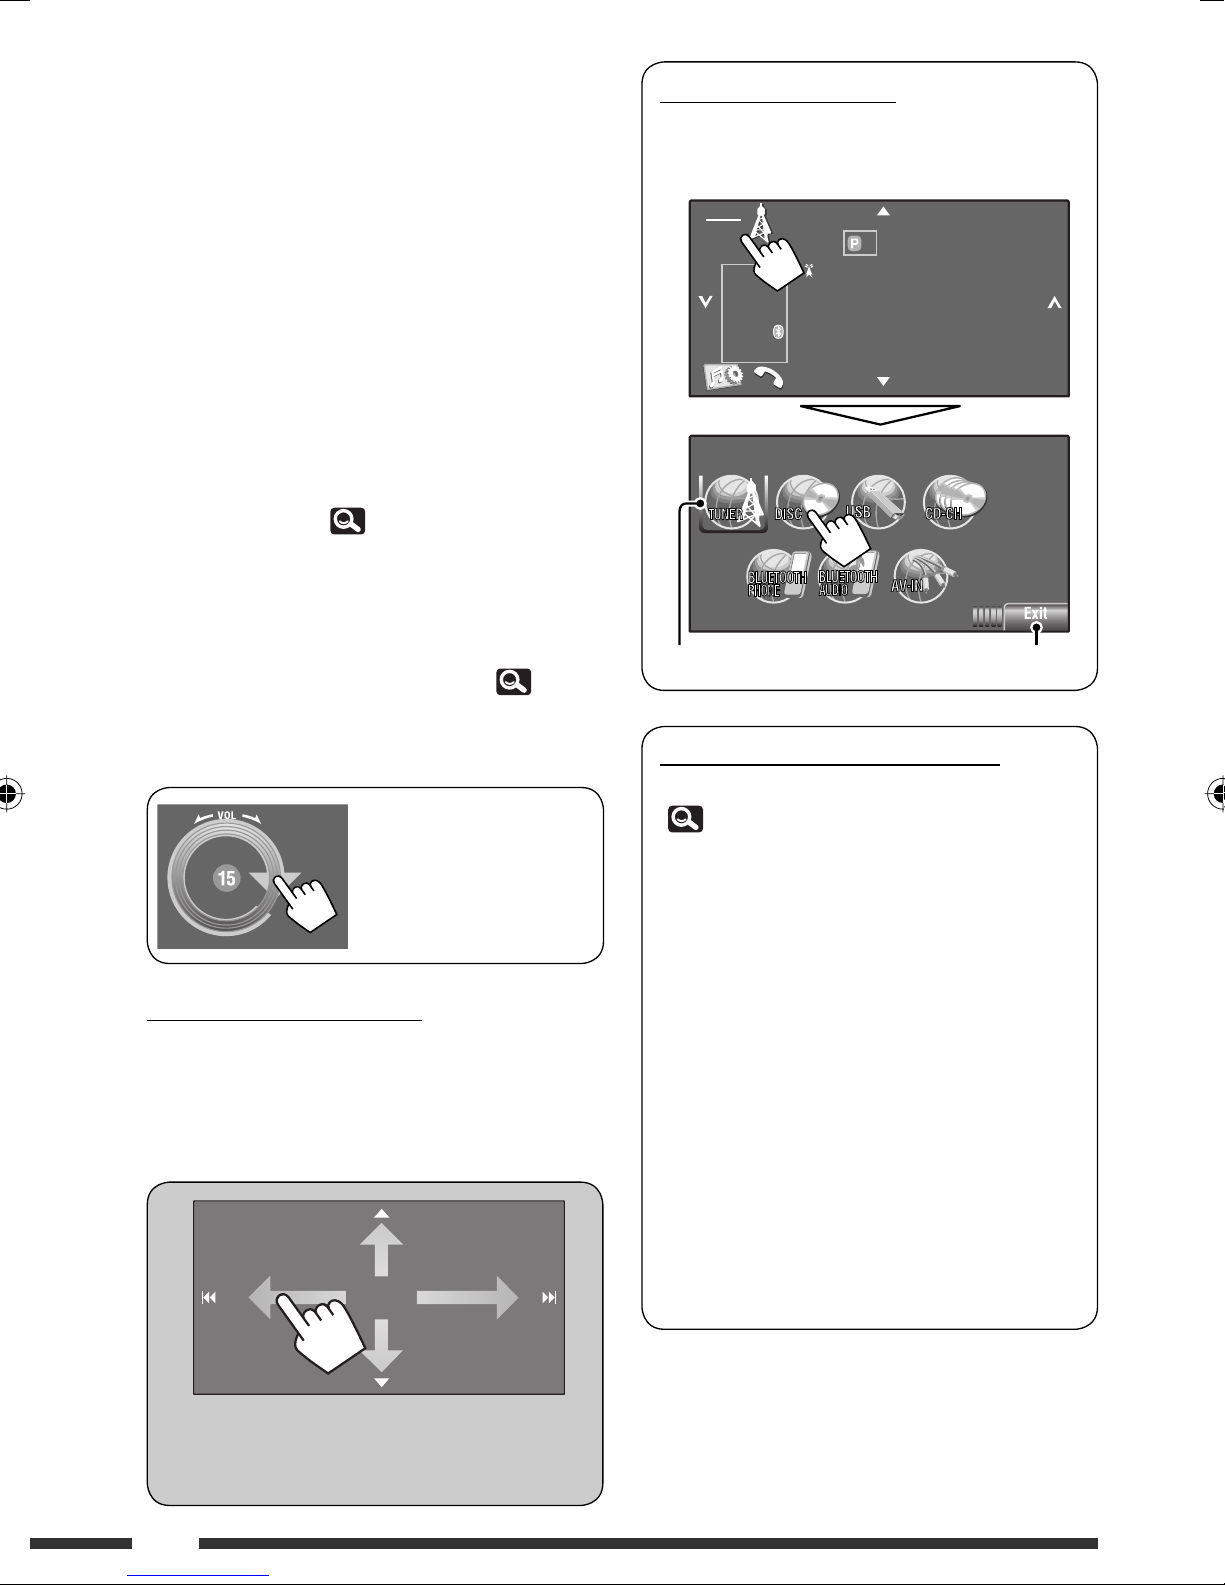
<Source Menu> screen
You can also select the source using the touch
panel.
SOURCE
TUNER
FLAT
ST
3:00
AM
1FM1 87. 5 MHz
ABC Radio
BAND
*1 For
KW-AVX726/KW-AVX725/KW-AVX724
2
*
Available display information varies among the
playback sources. (
50)
.
*3 This adjustment does not affect the volume level of
other sources.
*4 Available sources depend on the external components
you have connected, media you have attached, and
the <Input> settings you have made. ( 15, 16)
*5 Only when Bluetooth phone is connected.
*6 Shaded items cannot be used.
You can also adjust the
volume by moving your
finger on the touch panel
as illustrated.
Caution on volume setting:
Digital devices (CD/USB) produce very little noise
compared with other sources. Lower the volume before
playing these digital sources to avoid damaging the
speakers by sudden increase of the output level.
Source Menu
Current source Exit
Touch panel and button illumination
Dependable on the <Illumination> setting.
( 16)
• Turned off:
When no operation is done for about 10 seconds.
• Turned on again:
– When you touch the touch panel or move your
hand nearby.
– When you use the remote controller.
– When a call/SMS comes in (for Bluetooth
cellular phone).
– When the signal from the rear view camera
comes in.
• Always turned on:
– When <AV Menu> screen is displayed.
– When <Source Menu> screen is displayed.
– When <Open/Tilt> screen is displayed.
– When <Illumination> is set to <Normal>.
When you drag your finger on the touch panel, it
functions in the same way as touching [5 / ∞ /
4 / ¢].
6
Short Cut icons
Using the remote controller
You can easily access some frequently used
functions by using the Short Cut icons.
SOURCE
TUNER
FLAT
ST
AM
3:00
Short Cut window appears.
• To exit from the window, press the button again.
SOURCE
TUNER
FLAT
ST
AM
3:00
Press a Short Cut icon.
Setup
Beep
Telephone Muting
Illumination
Motion Sensitiv.
Initialize
Back
1FM1 87. 5 MHz
ABC Radio
1FM1 87. 5 MHz
Normal
Proximity/Motion
Proxi/Motion-LCD
Touch Panel
Touch Panel - LCD
(RM-RK252)
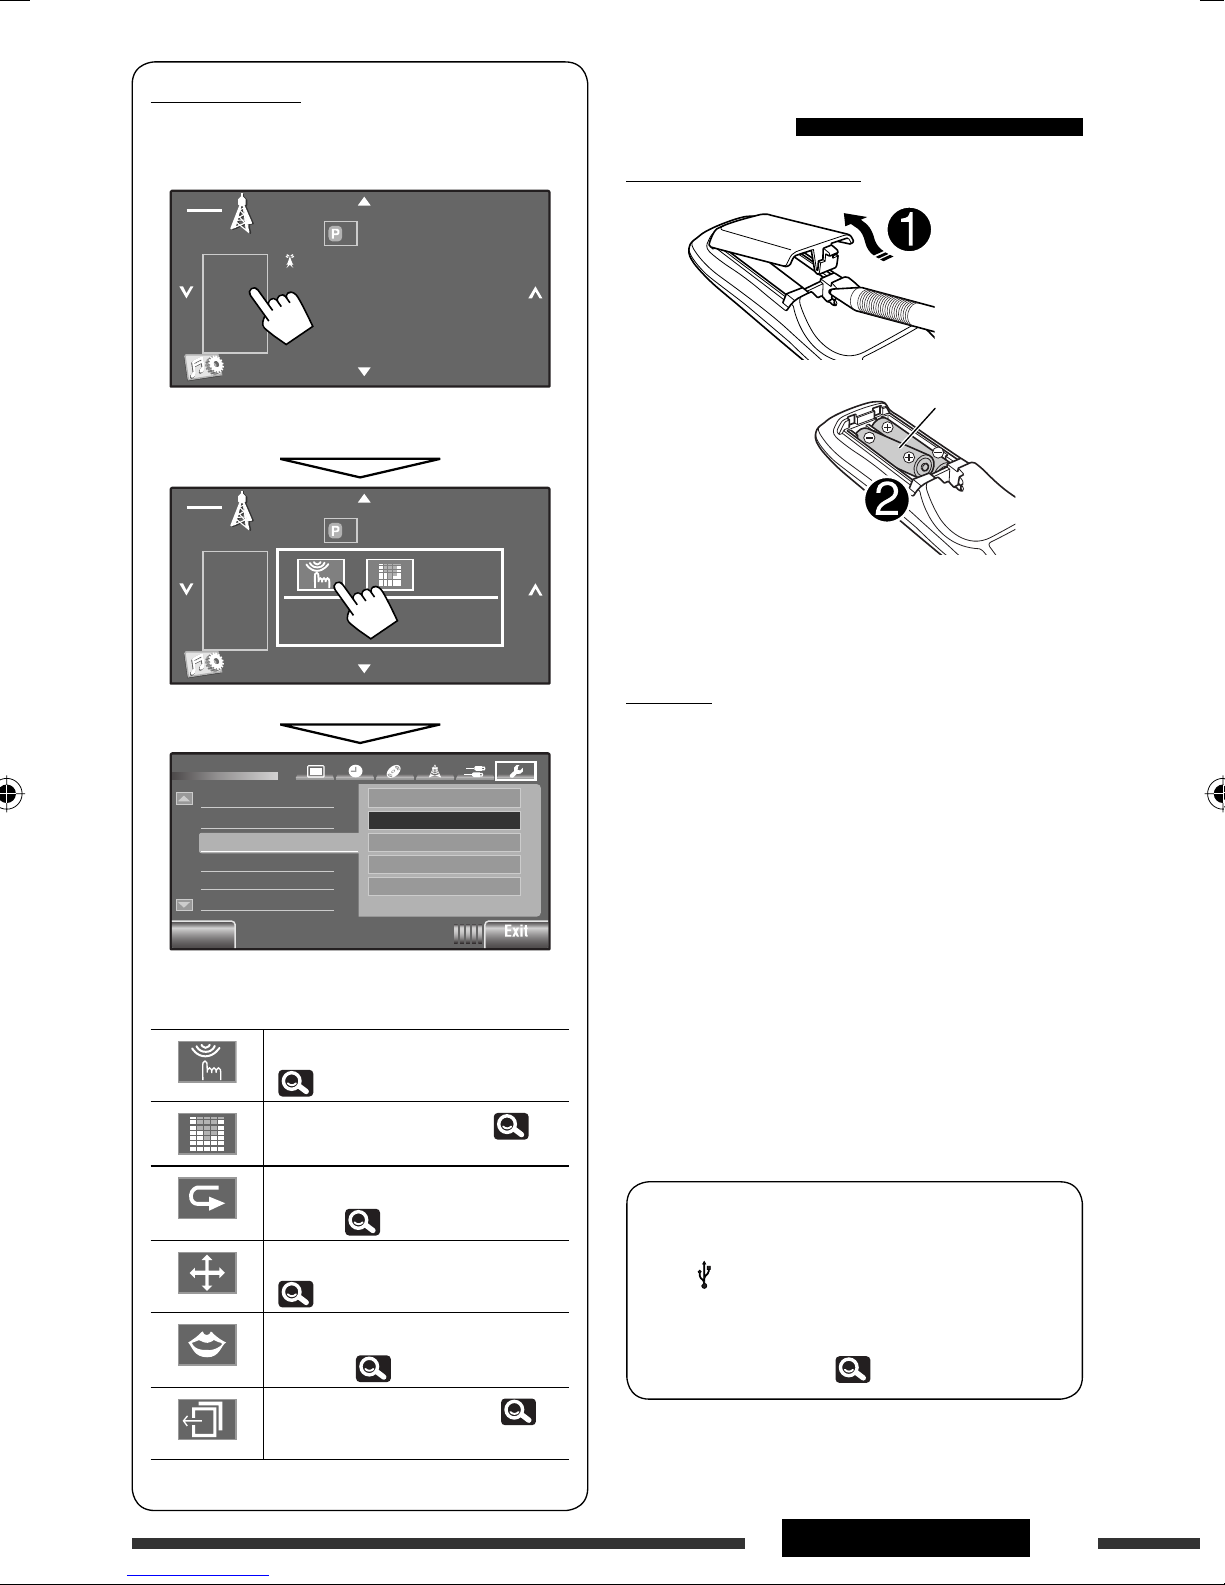
Installing the batteries
BAND
R03/LR03/AAA
Insert the batteries into the remote controller by
matching the polarity (+ and –) correctly.
BAND
Caution:
• Danger of explosion if battery is incorrectly replaced.
Replace only with the same or equivalent type.
• Battery shall not be exposed to excessive heat such as
sunshine, fire, or the like.
If the effectiveness of the remote controller
decreases, replace the batteries.
The corresponding screen is displayed.
Available icons vary among the sources.
Displays <Illumination> menu.
( 16)
Changes the sound mode. ( 17)
Turns on or off Track/Chapter
Repeat. ( 20)
Displays <Aspect> menu.
( 13)
Activates <Voice Dialing>
function. ( 23)
Displays <Redial> menu. (
23)
Before using the remote controller:
• Aim the remote controller directly at the remote
sensor on the unit.
• DO NOT expose the remote sensor to bright light
(direct sunlight or artificial lighting).
The following describes all the available operations
for all the sources.
• USB/
iPod operations are only applicable for
KW-AVX726/KW-AVX725/KW-AVX724
.
• To easily locate the available operations between
different type of files,
30, 31.
Continued on the next page
7INTRODUCTIONS
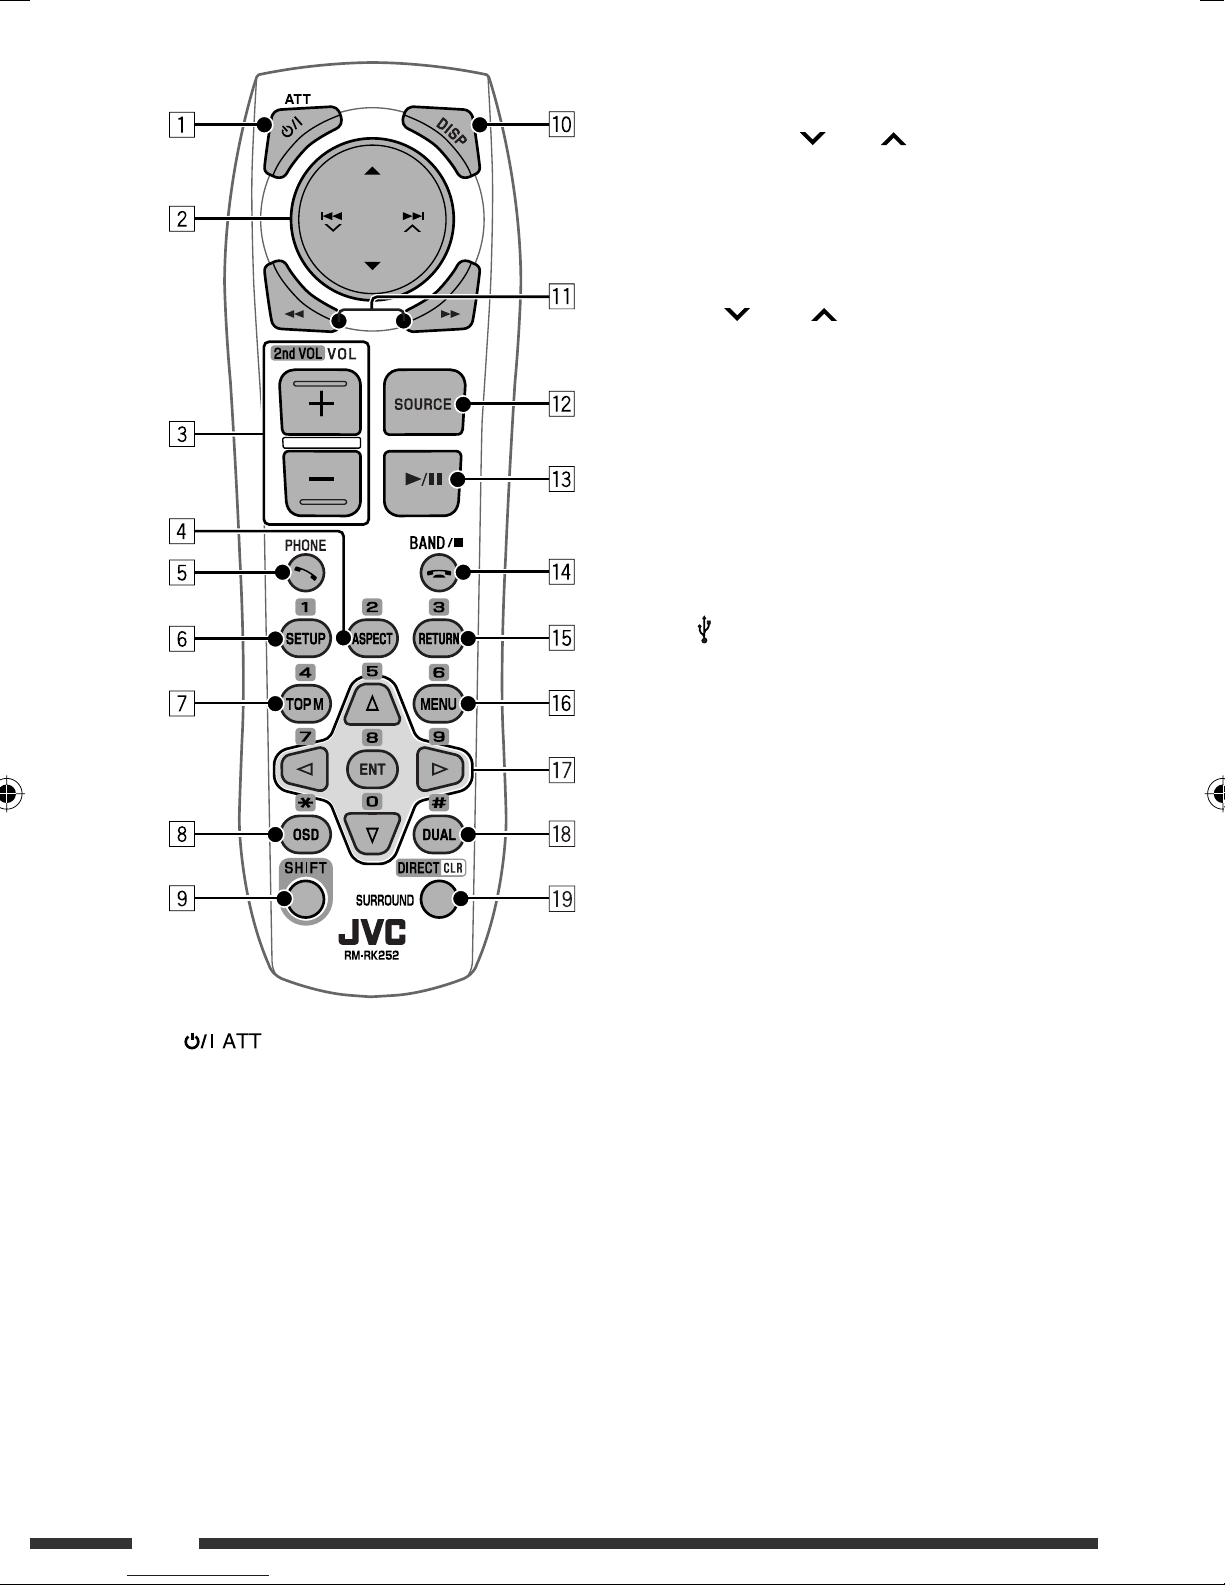
1 button
• Turns the power on if pressed briefly or
attenuates the sound when the power is on.
• Turns the power off if pressed and held.
2 5/∞ buttons
•
•
TUNER
DISC/USB
: Selects the preset stations.
:
– DVD-Video: Selects the title.
– DVD-VR: Selects the program/Playlist.
–
USB
/other discs (except VCD/CD): Selects the
folders if included.
•
CD-CH
:
– Selects the folders if included.
•
iPod
:
– 5 : Enters the main menu (then 5 / ∞ /
4 / ¢ work as menu
selecting buttons.)
5 : Returns to the previous menu.
∞ : Confirms the selection.
–
∞ : Pauses or resumes playback.
4 / ¢ buttons
•
TUNER
:
– Searches for stations automatically if pressed
briefly.
– Searches for stations manually if pressed and
held.
•
DISC/USB/CD-CH
:
– Reverse skip/forward skip if pressed briefly.
– Reverse search/forward search if pressed and
held.
•
iPod
:
– Reverse skip/forward skip if pressed briefly.
– Reverse search/forward search if pressed and
held.
•
iPod
:
– Reverse skip/forward skip if pressed briefly.
– Reverse search/forward search if pressed and
held.
In menu selecting mode:
– Selects an item if pressed briefly. (Then, press
∞ to confirm the selection.)
– Skips 10 items at a time if pressed and held.
•
Bluetooth AUDIO
:
– Reverse skip/forward skip if pressed briefly.
3 VOL (volume) + / – buttons
• Adjusts the volume level.
Bluetooth PHONE
•
:
– Adjusts the volume of the incoming calls.
2nd VOL (volume) buttons
• Not applicable for this unit.
4 * ASPECT button
• Changes the aspect ratio of the playback
pictures.
8

5 PHONE button
Applicable only when a Bluetooth phone is
connected.
• Displays <Dial Menu> screen.
• Displays <Redial> menu if pressed and held.
• Answers incoming calls.
6 * SETUP button
• Not applicable for this unit.
7 * TOP M (menu) button
• DVD-Video: Shows the disc menu.
• DVD-VR: Shows the Original Program screen.
• VCD: Resumes PBC playback.
8 OSD (on-screen display) button
• Shows the on-screen bar.
• Does not function as “*.”
9 SHIFT button
• Functions with other buttons.
p DISP (display) button
• Changes the display information.
q 1 / ¡ buttons
•
DISC/USB/ iPod
: Reverse search/forward
search.
t * RETURN button
• VCD: Returns to the PBC menu.
y * MENU button
• DVD-Video: Shows the disc menu.
• DVD-VR: Shows the Playlist screen.
• VCD: Resumes PBC playback.
u * % / fi buttons
• DVD-Video: Makes selection/settings.
•
CD-CH
: Changes discs in the magazine.
@ / # buttons
• DVD-Video: Makes selection/settings.
• DivX/MPEG Video: Skips back or forward by
about 5 minutes.
ENT (enter) button
• Confirms selection.
i DUAL button
• Not applicable for this unit.
• Does not function as “#.”
o DIRECT button
•
DISC/USB
: Enters direct search mode for
chapter/title/program/playlist/folder/track
when pressed with SHIFT button ( 31).
w SOURCE button
• Selects the source.
e 3 (play) / 8 (pause) button
•
DISC/USB/ iPod
•
Bluetooth PHONE
•
Bluetooth AUDIO
r (end call) button
•
Bluetooth PHONE
: Starts playback/pauses.
: Answers incoming calls.
: Starts playback.
: Ends the call.
BAND button
•
TUNER
: Selects the bands.
7 (stop) button
•
DISC/USB/ iPod
•
Bluetooth AUDIO
: Stops playback.
: Pauses.
CLR (clear) button
•
DISC/USB
: Erases the misentry when pressed
with SHIFT button.
SURROUND button
• Not applicable for this unit.
* Functions as number buttons when pressed with SHIFT
button.
–
DISC/USB
: Enters chapter/title/program/playlist/
folder/track number after entering search mode by
pressing SHIFT and DIRECT. ( 31)
–
TUNER
: (Number 1 to 6) : Enters preset station
number.
9INTRODUCTIONS
Preparation
Canceling the display demonstration and setting the clock
~ Turn on the power.
Ÿ Display <AV Menu> screen.
or
! Display <Setup> screen.
AV Menu
BAND
@ Set the clock.
Setup
Demonstration
Wall Paper
Color
Scroll
Dimmer
Dimmer Time Set
Back
Setup
Time Set
Time Format
OSD Clock
Back
Setup
Time Set
Time Format
OSD Clock
Bright
Blue
AutoOnce
Auto
7 AM6 PM
1 : 00
12Hours 24Hours
Off
3 : 45
AM
PM
⁄ Cancel the demonstration.
Select [
Off
Setup
Demonstration
Wall Paper
Color
Scroll
Dimmer
Dimmer Time Set
Back
].
Metal
Blue
Auto
Back
Back
¤ Finish the procedure.
Back
AutoOnce
7 AM6 PM
10 INTRODUCTIONS
AV Menu operations
You can use the <AV Menu> for most of the
operations and settings. The available menu items
shown on the touch panel, depends on the selected
source.
• Non-available items will be shaded.
The following steps are one of the fundamental
procedures.
• You can perform the operations/change the settings
by following these steps unless mentioned otherwise.
~ Turn on the power.
Ÿ Display <AV Menu> screen.
! Press the desired icon/item to perform
the desired operations/settings.
Moves to the preceding
menu page
Setup
Demonstration
Wall Paper
Color
Scroll
Dimmer
Dimmer Time Set
Back
Returns to the previous
screen.
Moves to the succeeding
menu page
Indicates the next hierarchy
level/setting item exists
Bright
Blue
AutoOnce
Auto
7 AM6 PM
Indicates the remaining
time before the current
screen exit automatically.
or
AV Menu
Setup : 12 – 16
Equalizer : 17
Sound : 18
Mode : 19 – 21
List : 21 – 22
Bluetooth : 23 – 25
BAND
• Some of the settings do not open the sub-setting
screen, but just selecting an option will change the
setting.
Exit
• To exit from the setting, press [
].
Continued on the next page
11AV MENU

Menu item Selectable setting/item
Initial: Underlined
Demonstration
♦
♦
Off
On
: Cancels.
: Activates the demonstration on the screen. To stop it
temporarily, touch the screen. (
Wall Paper You can select the background picture of the screen.
♦
Bright, Future, Horizon, Plain
Color You can select the color of the background picture.
♦
Blue, Light-Blue, Red, Orange, Yellow, Green, Purple, Dark-Blue,
Dark-Green, Brown, Light-Brown, Black
Scroll
♦
♦
♦
Off
Once
Auto
: Cancels.
: Scrolls the displayed information once.
: Repeats scrolling (at 5-second intervals).
• Touching the information bar scrolls the text regardless of the setting.
♦
Dimmer
Display
Dimmer Time Set
Off
♦
On
♦
Auto
♦
Dimmer Time Set
Sets the Dimmer On (
: Cancels.
: Activates dimmer.
: Dims the monitor when you turn on the headlights. *
: Activates the Dimmer Time setting (see below).
)/Off ( ) times.
10)
1
Dimmer Level You can select the brightness for dimmer.
♦
01 (bright), 02 (middle), 03 (dark)
Bright You can adjust the brightness of the screen.
♦
–15 to +15; Initial 00
Picture Adjust *
2
You can adjust the following to make the screen clear and legible for watching
the playback picture. The setting will be stored—one for “
iPod
” (common) and the other for “
AV-IN
.”
Press [5] or [∞] to adjust. (–15 to +15; Initial 00)
♦
Bright
♦
Contrast
♦
Color
♦
Tint
: Adjust if the picture is too bright or too dark.
: Adjust the contrast.
: Adjust the color of the picture—lighter or darker.
: Adjust the tint if the human skin color is unnatural,
only when color system setting is <NTSC>.
( 13)
1
*
The ILLUMINATION CONTROL lead connection is required. (See the Installation/Connection Manual.)
*2 Adjustable only when the source is “
DISC/USB/ iPod
” (the media must contain pictures or videos) or “
DISC/USB/
AV-IN
.”
12
Menu item Selectable setting/item
Aspect *
Display
Language *
3
You can change the aspect ratio of the picture.
Aspect ratio of the incoming signal
4:3 16:9
Regular:
For 4:3 original pictures
Full:
For 16:9 original pictures
Panorama:
For viewing 4:3 pictures
naturally on the wide screen
Auto: • For “
DISC
”: Aspect ratio is automatically
selected to match the incoming signals.
• For the other video sources: Aspect ratio is
fixed to <Regular>.
4
Select the indication language shown on the screen.
♦
English, Español, Français, Deutsch, Italiano, Nederlands, Svenska,
Dansk, Руccĸий, Português, , , ,
, Türkçe, ,
• The characters you can enter for assigning the titles also change according to
the language selected. ( 48)
NTSC/PAL *
Time Set
Time Format
Clock
OSD Clock
Menu Language *
Audio Language *
Disc
Subtitle *
4
Select the color system of the external monitor connected.
♦
NTSC, PAL
Initial 1:00AM (
10)
Select either 12-hour system or 24-hour system. (
♦
12 Hours, 24 Hours
♦
Off
♦
On
5
Select the menu language; Initial English ( 50)
5
Select the audio language; Initial English ( 50)
5
Select the subtitle language or erase the subtitle <Off>.; Initial English
: Cancels.
: The clock time is displayed on the playback picture.
( 50)
3
*
Not adjustable when no picture is shown.
*4 Turn off then on the power so that your setting takes effect.
*5 Selectable only for “
DISC/USB
” (Playback stops when you change the setting.)
10)
Continued on the next page
13AV MENU
Menu item Selectable setting/item
Monitor Type *
16:9 4:3LB
4:3PS
OSD Position *
File Type *
6
6
Select the monitor type to watch a wide screen picture on the external
monitor.
♦
16:9
: Select when the aspect ratio of the external
monitor is 16:9.
♦
4:3LB
(Letterbox)/
: Select when the aspect ratio of the external
monitor is 4:3.
4:3PS (Pan Scan)
6
Select the position of the on-screen bar. ( 33)
♦
♦
1
2
: Higher position.
: Lower position.
Select the playback file type when a disc/USB contains different types of
files. You can store this setting separately for each source—
“
DISC/USB
♦
Audio
♦
Still Picture
♦
Video
♦
Audio&Video
.” *
7
: Plays back audio files.
: Plays back JPEG files.
: Plays back DivX/MPEG1/MPEG2 files.
:
Plays back audio files and DivX/MPEG1/MPEG2 files.
DivX Regist.
Disc
(Registration) *
6
iPod Artwork *
D. (Digital) Audio Output *
7, *8
This unit has its own Registration Code. Once you have played back a file
with which the Registration Code recorded, this unit’s Registration Code
is overwritten for copyright protection.
While playing back a track (in “HEAD MODE”), Artwork recorded for the
track is displayed on the monitor.
♦
♦
Off
On
: Cancels.
: Activates Artwork display. To display the artwork,
press DISP repeatedly.
• It takes 5 seconds or more to display an
Artwork and no operations are available while
loading it.
6
Select the signal format emitted through the DIGITAL OUT (optical)
terminal. ( 49)
♦
PCM
: Select this when connecting an amplifier or a
decoder incompatible with Dolby Digital or MPEG
Audio, or when connecting to a recording device.
♦
Dolby D
: Select this when connecting an amplifier or a
decoder compatible with Dolby Digital.
♦
Stream
:
Select this when connecting an amplifier or a decoder
compatible with Dolby Digital or MPEG Audio.
*6 Selectable only for “
*7 For
KW-AVX726/KW-AVX725/KW-AVX724
DISC/USB
*8 Skip the track so that your setting takes effect.
14
.” (Playback stops when you change the setting.)
.
Menu item Selectable setting/item
Down Mix *
Disc
D. (Dynamic)
Range Compres.
(Compression) *
IF Band Width
Tuner
AV Input *
Input
10
9
When playing back a multi-channel disc, this setting affects the signals
reproduced through the LINE OUT jacks.
♦
Dolby Surr.
: Select this to enjoy multi-channel surround audio
by connecting an amplifier compatible with Dolby
Surround.
♦
Stereo
: Normally select this.
You can enjoy a powerful sound at a low volume level while playing Dolby
Digital software.
9
♦
Auto
: Select to apply the effect to multi-channel encoded
software.
♦
On
♦
Auto
: Select to always use this function.
: Increases the tuner selectivity to reduce interference
noises between adjacent stations. (Stereo effect may be
lost.)
♦
Wide
: Subject to the interference from adjacent stations, but
sound quality will not be degraded and the stereo effect
will remain.
You can determine the use of LINE IN and VIDEO IN jacks. ( 41)
♦
Off
: Select when no component is connected (“
AV-IN
” is
skipped while selecting the source).
♦
iPod (Off) *
11
: Select when connecting the iPod/iPhone using the USB
Audio and Video cable for iPod/iPhone. ( 39)
♦
Audio&Video
♦
Audio
: Select when connecting an AV component such as a VCR.
: Select when connecting an audio component such as a
portable audio player.
♦
Camera *
12
: Select when connecting a rear view camera to display
the picture (as it is taken).
♦
Navigation
: Select when connecting a Navigation System. ( 42)
9
Selectable only for “
*
*10 Not selectable when “
*11 For
KW-AVX726/KW-AVX725/KW-AVX724
DISC/USB
AV-IN
” is selected as the source.
*12 The REVERSE GEAR SIGNAL lead connection is required. See Installation/Connection Manual. The rear view through
the camera appears on the screen in <Full> aspect ratio (regardless of the aspect ratio setting) when you shift the
gear to the reverse (R) position. When you press DISP on the monitor panel, or when you shift the gear to another
position other than the reverse (R) position, the rear view screen is cleared.
.” (Playback stops when you change the setting.)
.
Continued on the next page
15AV MENU
Menu item Selectable setting/item
External Input *
13, *14
For connecting an external component to the CD changer jack on the rear.
♦
Changer/iPod *
♦
External
15
: CD changer, (
38), iPod, ( 40).
: Any other than the above, ( 42).
Input
Beep
Telephone Muting *
Illumination You can turn off the screen and the light of the buttons on the monitor panel
♦
Off
♦
On
16
♦
Off
♦
Muting1,
Muting2
while turning on the unit.
: Cancels.
: Activates the key-touch tone.
: Cancels.
: Select either one which mutes the sounds while
using the cellular phone.
( 6)
Buttons on the
monitor panel
Normal: Always lights. Always lights.
Screen
Proximity/Motion: Lights up when your
Always lights.
hand moves close to
the buttons.
Others
Proxi/Motion-LCD: Lights up when your
hand moves close to
the buttons.
Touch Panel: Lights up when your
Lights up when your
hand moves close to
the buttons.
Always lights.
finger touches the
buttons or touch panel.
Touch Panel-LCD: Lights up when your
finger touches the
buttons or touch panel.
Motion Sensitiv. Change the sensitivity of the sensor for <
♦
Low, Mid, High
Illumination> above.
Lights up when your
finger touches the
buttons or touch panel.
Initialize Initialize all settings you have made in <AV Menu>. Press and hold [Enter]
to initialize the settings, then reset the unit. (
3)
13
Not required for Bluetooth. They are automatically detected.
*
*14 Not selectable when the component connected to the CD changer jack is selected as the source.
*15 The name of the component detected through the CD changer jack is shown.
*16 The TEL MUTING lead connection is required. See Installation/Connection Manual.
16

Selects a preset sound mode suitable to the music
genre.
♦
Flat (Initial), Hard Rock, R&B, Pop, Jazz, Dance,
Country, Reggae, Classic, User1, User2, User3
1 Display <AV Menu> screen.
or
2 Adjust the settings, then store.
Equalizer
Back Edit
2 Display <Equalizer> screen.
AV Menu
3 Select a sound mode.
Equalizer
Back Edit
Moves to the other 6 sound modes.
Ex.: When <Hard Rock> is selected
BAND
Makes adjustments by moving each bar directly.
User Store
User1
User2
User3
Back
Ex.: When storing into <
User2>.
Preset equalizing values
Sound
mode
60 Hz
150 Hz
Flat 00 00 00 00 00 00 00
Hard Rock +03 +03 +01 00 00 +02 +01
R&B +03 +02 +02 00 +01 +01 +03
Pop 00 +02 00 00 +01 +01 +02
Jazz +03 +02 +01 +01 +01 +03 +02
Dance +04 +02 00 –02 –01 +01 +01
1 kHz
400 Hz
2.5 kHz
6.3 kHz
15 kHz
Storing your own adjustments
You can store your adjustments into <User1>,
<User2>, and <User3>.
1 Perform steps 1 and 2 above to enter the
<Equalizer> screen.
Country +02 +01 00 00 00 +01 +02
Reggae +03 00 00 +01 +02 +02 +03
Classic +02 +03 +01 00 00 +02 00
User1/2/3 00 00 00 00 00 00 00
17AV MENU
Menu item Selectable setting/item
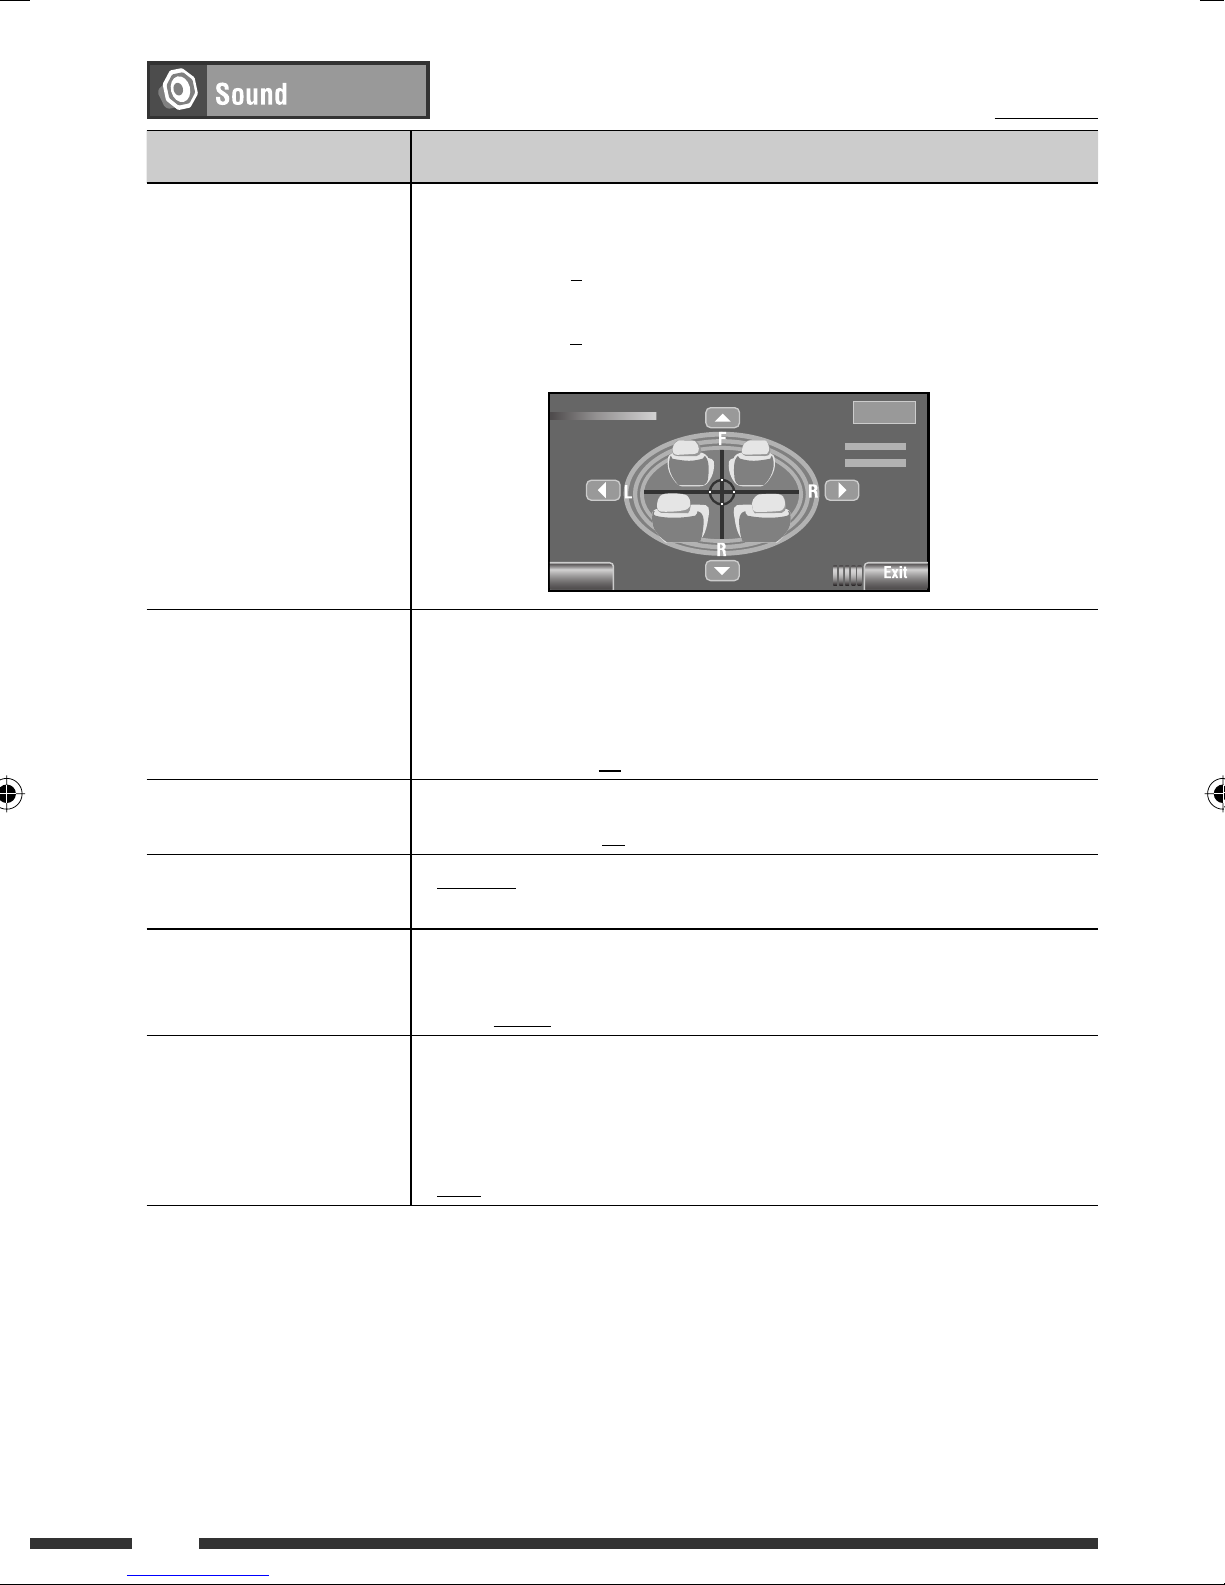
Fader/Balance Fader : Adjust the front and rear speaker output balance.
• When using a two-speaker system, set the fader level to “0.”
♦
F6 to R6; Initial 0
Balance : Adjust the left and right speaker output balance.
♦
L6 to R6; Initial 0
Press [
5/∞/2/3 ] to adjust.
Initial: Underlined
Volume Adjust *
1
Subwoofer Level *
High Pass Filter *
Crossover *
2
Fader/Balance
Back
Reset
Fader 0
Balance 0
Adjust and store the auto-adjustment volume level for each source, comparing
to the FM volume level. The volume level will automatically increase or decrease
when you change the source.
• <Fix> appears if “
♦
–12 to +12; Initial 00
2
2
Adjust the subwoofer output level.
♦
–06 to +08; Initial 00
♦
Through
♦
On
TUNER/Bluetooth PHONE
” is selected as the source.
: Select when the subwoofer is not connected.
: Select when the subwoofer is connected.
Select the crossover frequency between the front/rear speakers and the
subwoofer.
♦
80Hz, 120Hz, 150Hz
Amplifier Gain *
1
*
For “
DISC/USB
3
”: You can make the adjustments separately depending on the audio format—Dolby digital/MPEG
Audio and the others.
*2 For
KW-AVX726/KW-AVX725/KW-AVX724
*3 The volume level automatically changes to “VOL 30” if you change to <Low> with the volume level set higher than
“VOL 30.”
18
You can change the maximum volume level of this unit.
♦
♦
Off
Low
: Deactivates the built-in amplifier.
: VOL 00 to 30 (Select this if the maximum power of the
speakers is less than 50 W.)
♦
High
: VOL 00 to 50
.
Initial: Underlined
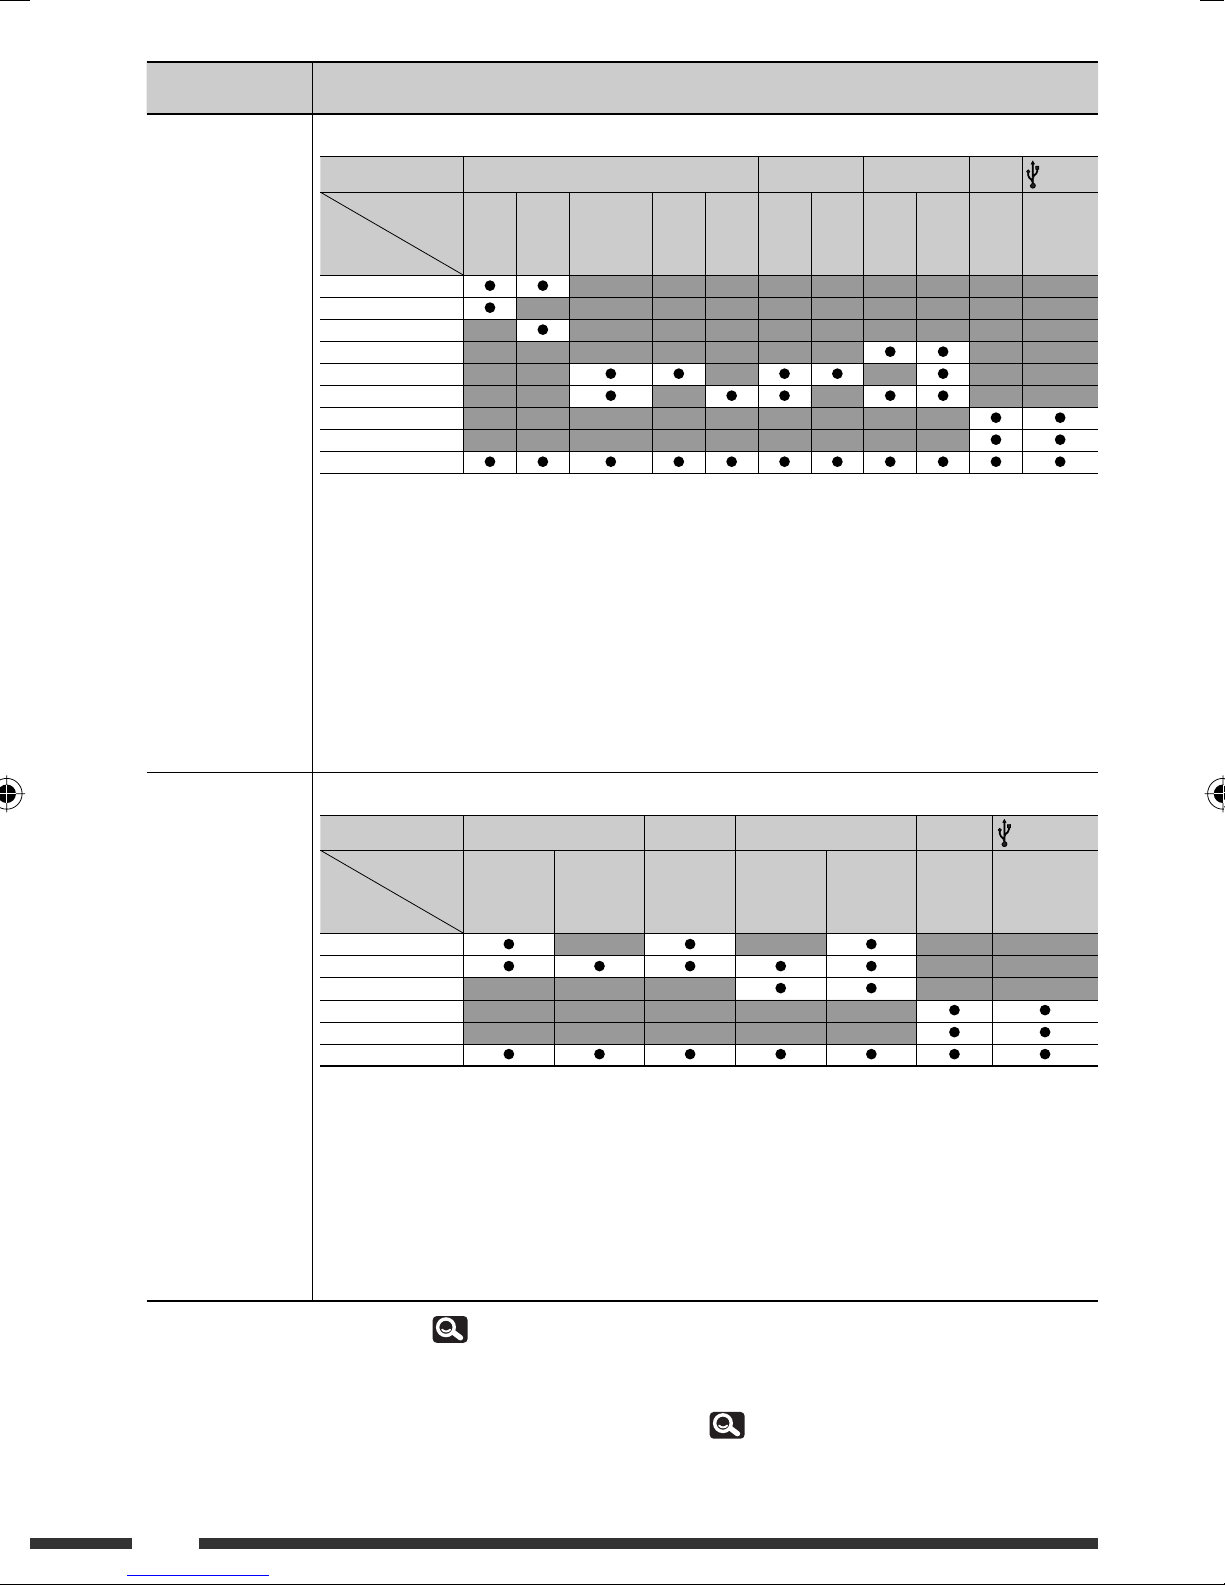
Selectable items when the source is:
•
TUNER
•
DISC, USB, CD-CH, iPod
•
iPod
•
AV-IN, EXT-IN
: Mono, SSM, Title Entry
: Repeat, Random
1, *2
*
: Repeat, Random, Audiobooks
: Title Entry
Menu item Selectable setting/item
Mono When an FM stereo broadcast is hard to receive, activate monaural mode for better
reception. The MONO indicator lights up.
♦
♦
ON
OFF
: Activate monaural mode to improve FM reception, but stereo effect
will be lost. The MONO indicator lights up.
: Restore the stereo effect.
SSM (Strong-station
Sequential Memory)
You can automatically preset 6 stations for each FM band.
• Local FM stations with the strongest signals are searched and stored automatically in the
FM band.
Mode
Mono
SSM
Title Entry
Back
Back
Start
Enter
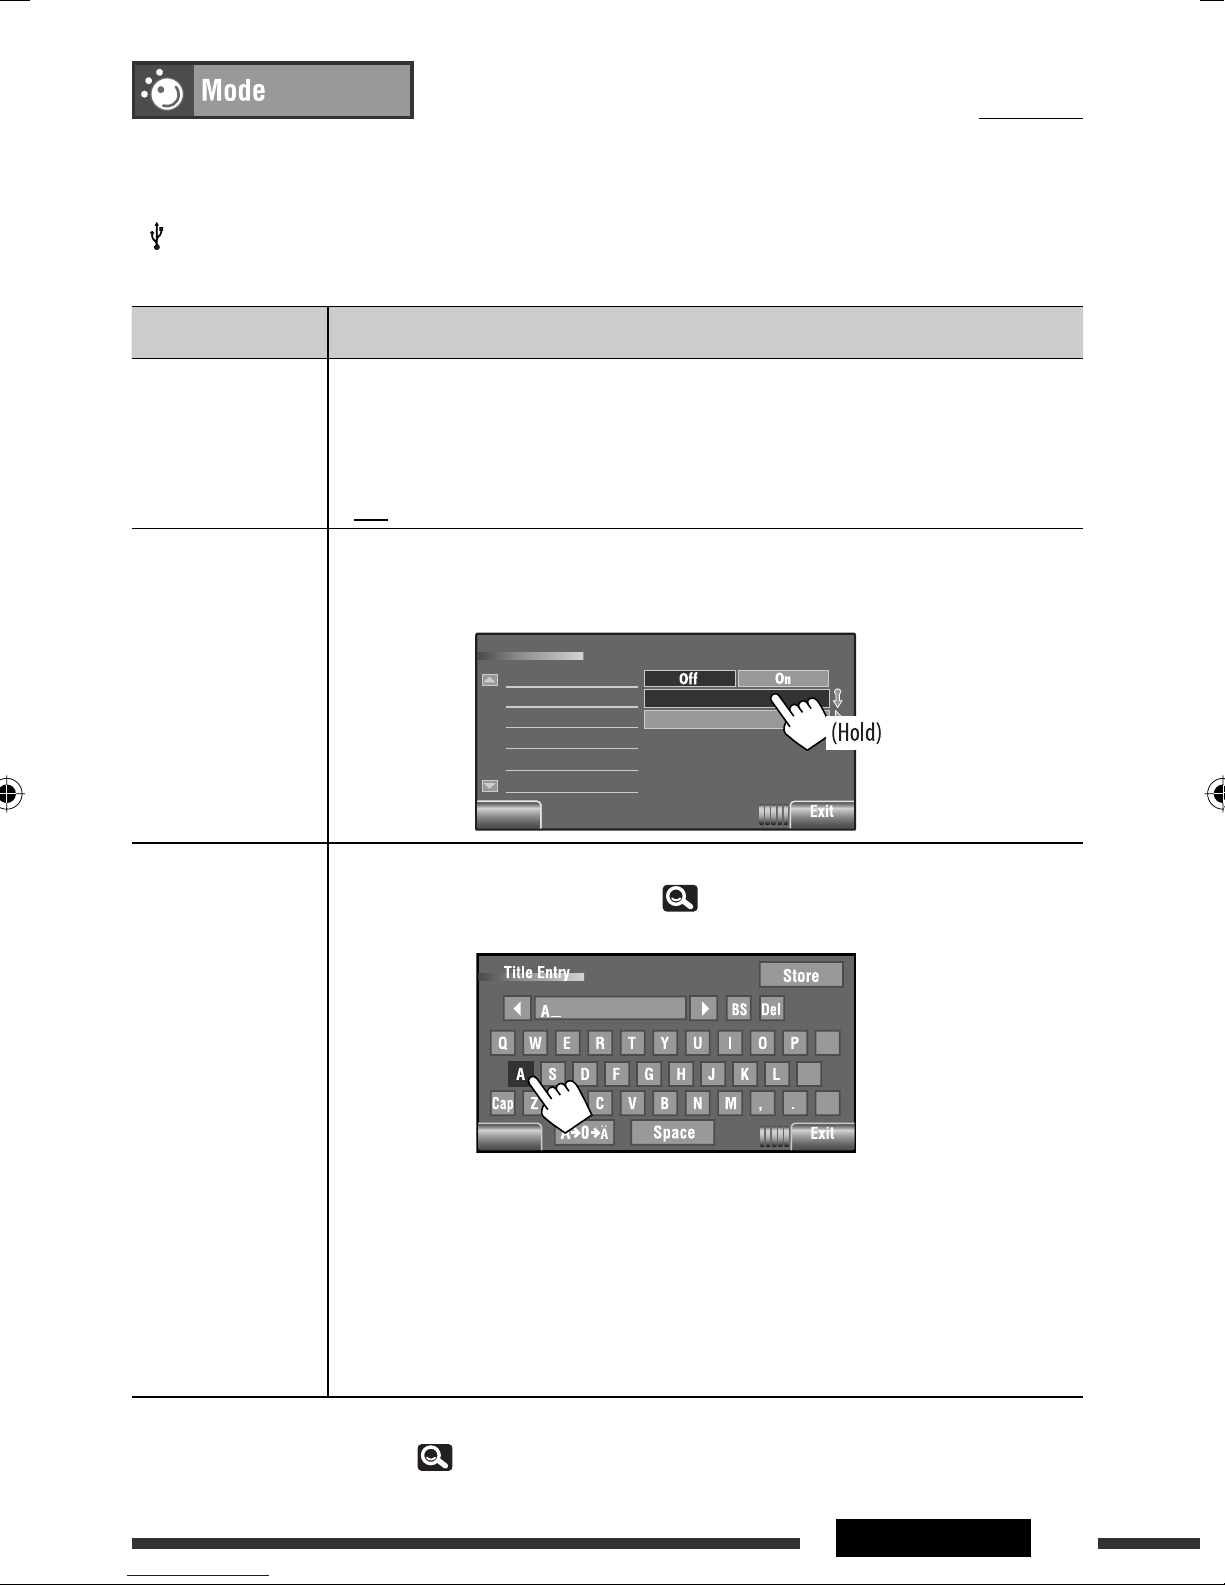
Title Entry You can assign titles (up to 16 characters) to 30 station frequencies (FM and AM),
and
EXT-IN
. (For available characters, 48.)
Press [Enter] to show the <Title Entry> screen.
@
;
/
Back
AV-IN
,
[Store] : Confirm the entry.
[2/3] : Move the cursor.
[BS] : Erase the character before the cursor.
[Del] : Erase the character on the cursor.
[Cap] : Change the letter case (upper/lower).
[A = 0 = Ä] : Change the character set.
[Space] : Enter a space.
1
For
KW-AVX726/KW-AVX725/KW-AVX724
*
*2 Not applicable in “iPod MODE.” ( 39)
.
Continued on the next page
19AV MENU
Menu item Selectable setting/item
Repeat *
3
Available items depend on the loaded disc type and playback file.
Source
Repeat
Chapter
Title
Program
Disc
Folder
Track
One
All
Off
♦
Chapter
♦
Title
♦
Program
♦
Disc
♦
Folder
♦
Track
♦
One
♦
All
♦
Off
Disc/file type
: Repeats current chapter.
: Repeats current title.
: Repeats current program (for DVD-VR, not available during Playlist playback).
: Repeats all tracks of the current disc.
: Repeats all tracks of the current folder.
: Repeats current track. (For VCD: When PBC is not in used.)
: Functions the same as “Repeat One” of the iPod.
: Functions the same as “Repeat All” of the iPod.
: Cancels.
DVD-Video
DISC USB
DVD-VR
DivX/MPEG/
MP3/WMA/
WAV
JPEG
VCD/CD
4
*
MPEG/MP3/
WMA/WAV
CD-CH iPod iPod
JPEG
CD
MP3
—
—
4
*
Random
3
*
Available items depend on the loaded disc type and playback file.
Source
Disc/file type
Random
Folder
Disc/USB (All)
All
Song
Album
Off
♦
Folder
♦
Disc/USB
DISC USB
DivX/MPEG/
MP3/WMA/
WAV
VCD/CD
: Randomly plays all tracks of the current folder, then tracks of the next folders.
: Randomly plays all tracks. (For VCD: When PBC is not in used.)
4
*
MPEG/MP3/
WMA/WAV
(All)
♦
All
♦
Song
♦
Albums
♦
Off
3
Not applicable in “iPod MODE.” ( 39)
*
*4 For
KW-AVX726/KW-AVX725/KW-AVX724
: Randomly plays all tracks of all loaded discs.
: Functions the same as “Shuffle Songs” *6 of the iPod.
: Functions the same as “Shuffle Albums” of the iPod.
: Cancels.
.
*5 Not applicable for video file.
*6 You can activate <Shuffle Songs> in <Search Mode> menu. ( 22)
CD-CH iPod iPod
CD
MP3
—
4,
5
*
*
—
20
Menu item Selectable setting/item
Audiobooks *
7
*
For
7,
*8You can select the playback speed of the “Audiobook” audio file in your iPod.
♦
Normal
♦
Faster
♦
Slower
: Plays at normal speed.
: Plays faster.
: Plays slower.
KW-AVX726/KW-AVX725/KW-AVX724
.
*8 Not applicable in “iPod MODE.” ( 39)
Source Operation/setting
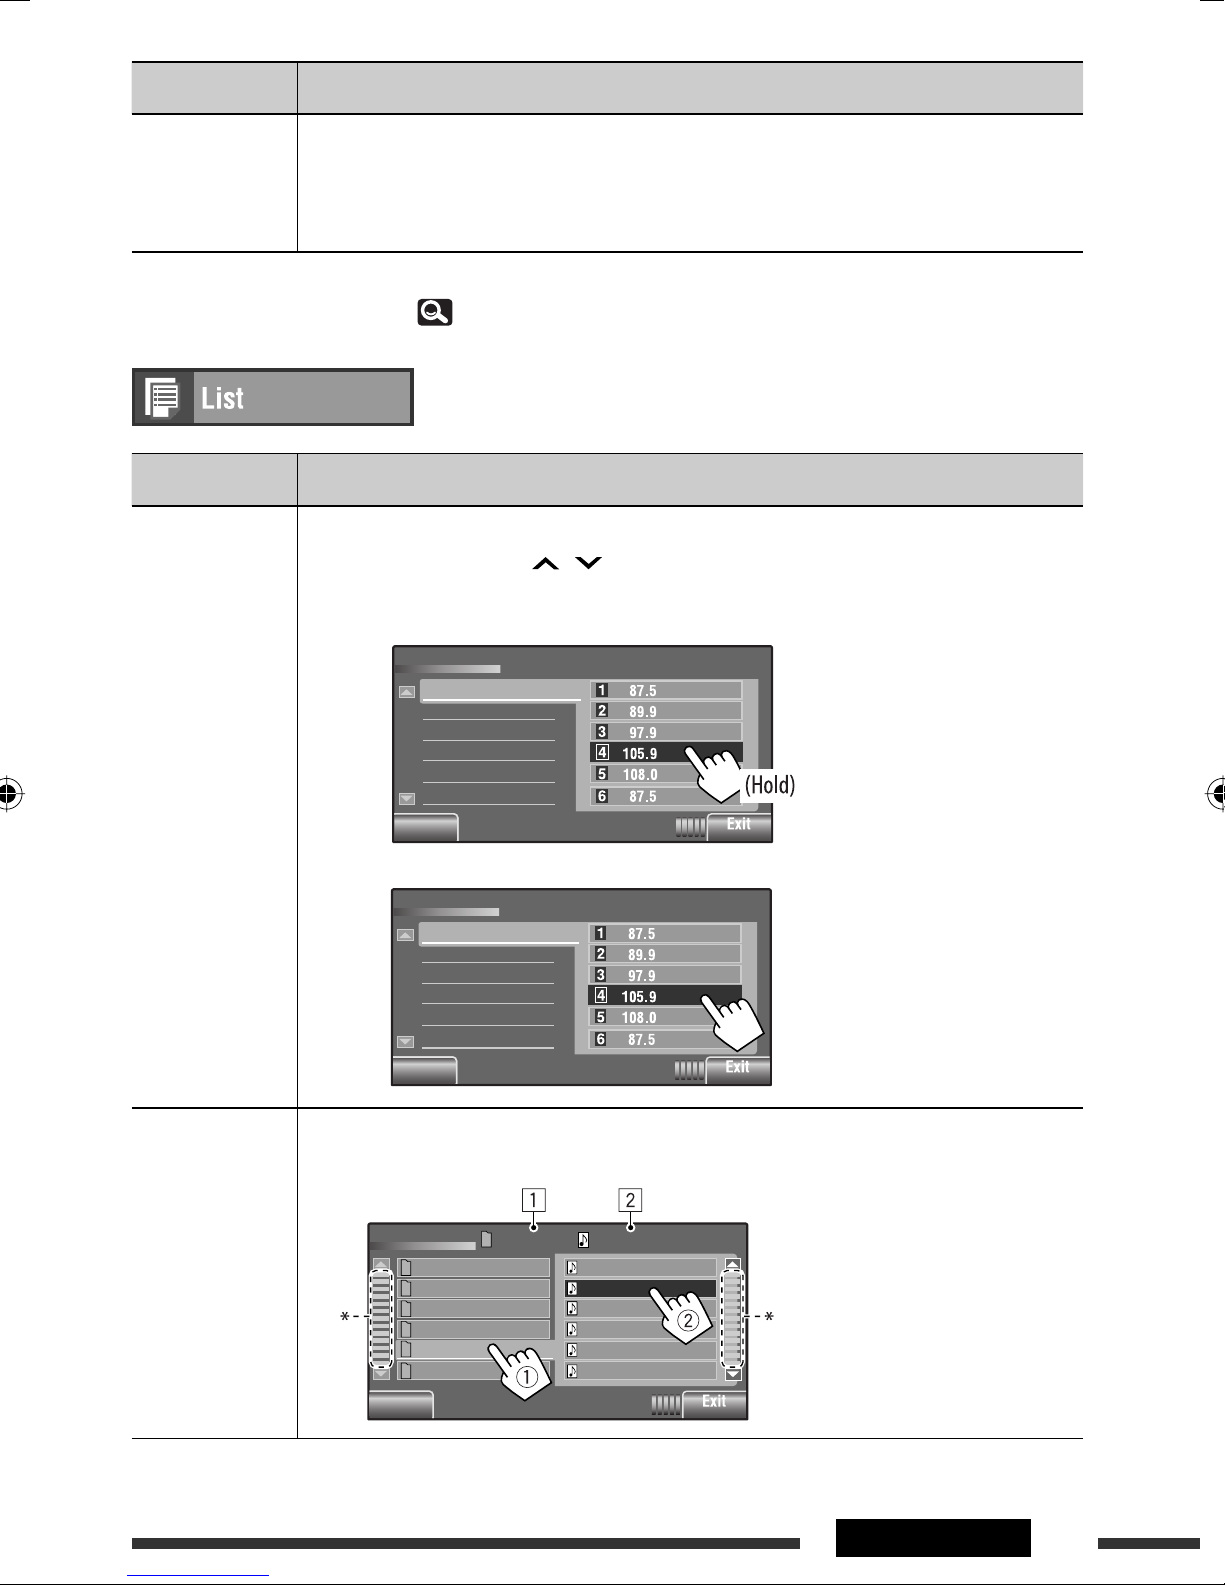
TUNER • Storing a preset station manually
1 Press [BAND], then [ / ] to tune in to the station you want to preset.
2 Select <List> from the <AV Menu>.
3 Press and hold a preset number.
List
FM1
FM2
FM3
The station selected in step
1 is now stored in preset
number 4.
DISC/USB *
Back
Back
• Selecting a preset station on the list
List
FM1
FM2
FM3
Back
Back
1
Selecting a track on the list
If the device contains folders, you can display the Folder/Track (File) Lists, then start playback.
1 Current folder list number/
List
Back
Back
Folder 01
Folder 02
Folder 03
Folder 04
Folder 05
Folder 06
0003/00990005/0035
Track001.mp3
Track002.mp3
Track003.mp3
Track004.mp3
Track005.mp3
Track006.mp3
total folder list number
2 Current track list number/total
track list number of the
current folder
* Press: Skips the list up or down.
Drag: Scrolls the list up or down.
*1 For
KW-AVX726/KW-AVX725/KW-AVX724
.
Continued on the next page
21AV MENU
Source Operation/setting
Bluetooth PHONE Selecting a preset phone number on the list to make a call
List
Phone Number
Back
Back
CD-CH Selecting a disc on the list
iPod *
2, *3
Disc List
Back
Back
Disc 01
Disc 02
Disc 03
Disc 04
MP3 Disc
Disc 06
To go to the other list
Selecting a track/video from <Search Mode>
Search Mode
Music
Videos
Shuffle Songs
Back
Back
List
Playlists
Artists
Albums
Songs
Podcasts
Genres
Back
Back
Playlists
Artists
Albums
Songs
Podcasts
Genres
0003/0099
Track 01
Track 02
Track 03
Track 04
Track 05
Track 06
If an MP3 disc is selected, Folder/
Track List appear. Select a track to
start playback.
♦
Music : Playlists, Artists, Albums,
Songs, Podcasts, Genres, Composers,
Audiobooks
♦
Videos : Video Playlists, Movies,
Music Videos, TV shows, Video
Podcasts
♦
Shuffle Songs : Playback starts if
this is selected.
Current track (video) number/total track
(video) number
2
For
KW-AVX726/KW-AVX725/KW-AVX724
*
*3 Not applicable in “iPod MODE.” ( 39)
22
.

Select “
Bluetooth PHONE
” or “
Bluetooth AUDIO
” as the source for operations.
• Firstly, use <Open> or <Search> to register and establish the connection with a device.
Menu item Selectable setting/item
Dial Menu *
1
Select the method to make a call.
♦
Redial
♦
Received Calls
♦
Phonebook
♦
Missed Calls
♦
Phone Number
: Shows the list of the phone numbers you have dialed.
: Shows the list of the received calls.
: Shows the phone book of the connected cellular phone.
: Shows the list of the missed calls.
: Shows the phone number entry screen.
Phone Number
Back
Back
[BS] : Erase the character before the cursor.
[Del] : Erase the character on the cursor.
[Preset] : Goes to Preset List. You can preset the entered
number by selecting a preset number.
[Dial] : Calls the entered number.
♦
Voice Dialing
: Only when the connected cellular phone has the voice
recognition system: = Speak the name you want to call.
Message *
2
If <Message Info> is set to <Manual>... ( 25)
Access the message list to read messages.
♦
Unread
♦
Read
♦
Unsent
♦
Sent
• The number of messages in each history is also shown.
1
Only for the device connected for “
*
*2 Selectable only when the source is “
(Short Message Service).
: Messages you have not read.
: Messages you have read.
: Messages you have not sent.
: Messages you have sent.
Bluetooth PHONE
Bluetooth PHONE
.”
” and the connected cellular phone is compatible with SMS
Continued on the next page
23AV MENU
 Loading...