

Page 1

MONITOR WITH DVD RECEIVER
MONITOR MIT DVD-RECEIVER
MONITEUR AVEC RÉCEPTEUR DVD
MONITOR MET DVD-ONTVANGER
KW-AV60BT/KW-AV60
For canceling the display demonstration, see page 7.
Zum Abbrechen der Displaydemonstration siehe Seite 7.
Pour annuler la démonstration des affichages, référez-vous à la page 7.
Zie bladzijde 7 voor het annuleren van de displaydemonstratie.
ENGLISHDEUTSCHFRANÇAIS
NEDERLANDS
For installation and connections, refer to the separate manual.
Für den Einbau und die Anschlüsse siehe das eigenständige Handbuch.
Pour l’installation et les raccordements, se référer au manuel séparé.
Bijzonderheden over de installatie en aansluiting van het apparaat vindt u in de desbetreffende handleiding.
INSTRUCTIONS
BEDIENUNGSANLEITUNG
MANUEL D’INSTRUCTIONS
GEBRUIKSAANWIJZING
LVT2294-001B
A
[E]
Page 2
Thank you for purchasing a JVC product.
Please read all instructions carefully before operation, to ensure your complete understanding and to obtain the best
possible performance from the unit.
IMPORTANT FOR LASER PRODUCTS
1. CLASS 1 LASER PRODUCT
ENGLISH
2. CAUTION: Do not open the
top cover. There are no user
serviceable parts inside the
unit; leave all servicing to
qualified service personnel.
3. CAUTION: Visible and/or invisible class 1M laser radiation when open. Do not view directly with optical
instruments.
4. REPRODUCTION OF LABEL: CAUTION LABEL, PLACED OUTSIDE THE UNIT.
Information for Users on Disposal of Old Equipment and Batteries
[European Union only]
These symbols indicate that the product and the battery with this symbol should not be
disposed as general household waste at its end-of-life.
If you wish to dispose of this product and the battery, please do so in accordance with applicable
national legislation or other rules in your country and municipality.
By disposing of this product correctly, you will help to conserve natural resources and will help
prevent potential negative effects on the environment and human health.
Notice:
The sign Pb below the symbol for batteries indicates that this battery contains lead.
Products
Battery
WARNINGS: (To prevent accidents and damage)
• DO NOT install any unit or wire any cable in a location
where;
– it may obstruct the steering wheel and gearshift
lever operations.
– it may obstruct the operation of safety devices
such as air bags.
– it may obstruct visibility.
• DO NOT operate the unit while driving.
If you need to operate the unit while driving, be sure
to look around carefully.
• The driver must not watch the monitor while driving.
• The driver must not put on the headphones while
driving.
2
Page 3

Cautions on the monitor:
• The monitor built in this unit has been produced with
high precision, but it may have some ineffective dots.
This is inevitable and is not considered defective.
• Do not expose the monitor to direct sunlight.
• Do not operate the touch panel using a ball-point
pen or similar tool with the sharp tip.
Touch the buttons on the touch panel with your
finger directly (if you are wearing a glove, take it off).
• When the temperature is very cold or very hot...
Chemical changes occur inside, causing malfunction.
–
– Pictures may not appear clearly or may move
slowly. Pictures may not be synchronized with
the sound or picture quality may decline in such
environments.
For safety...
• Do not raise the volume level too much, as this will
make driving dangerous by blocking outside sounds,
and may cause hearing loss.
• Stop the car before performing any complicated
operations.
Temperature inside the car...
If you have parked the car for a long time in hot or cold
weather, wait until the temperature in the car becomes
normal before operating the unit.
For security reasons, a numbered ID card is provided
with this unit, and the same ID number is imprinted on
the unit’s chassis. Keep the card in a safe place, as it will
help the authorities to identify your unit if stolen.
How to reset your unit
ENGLISH
• Your preset adjustments will also be erased (except
the registered Bluetooth devices).
How to forcibly eject a disc
Press SRC/ and 0 at the same time.
+
• Be careful not to drop the disc when it ejects.
• If this does not work, reset your unit. (☞ above)
How to read this manual:
• Illustrations of KW-AV60BT are mainly used for explanation.
• This manual mainly explains operations using the buttons on the monitor panel and touch panel. For
operations using the remote controller (RM-RK252P: separately purchased) , ☞ page 57.
• < > indicates the variable screens/menus/operations/settings that appear on the touch panel.
• [ ] indicates the buttons on the touch panel.
• Indication language: English indications are used for the purpose of explanation. You can select the
indication language from the <Settings> menu. (☞ page 43 )
3
Page 4

Contents
How to reset your unit ........................................... 3
How to forcibly eject a disc ....................................3
INTRODUCTIONS
ENGLISH
Detaching/attaching the monitor panel ...5
Component names and functions ............6
Initial settings .......................................7
Setting the clock ....................................8
Common operations ...............................9
Turning on the power ........................................... 9
Turning off the power ............................................ 9
Adjusting the volume ...........................................9
Turning off the screen ........................................... 9
Turning on/off the AV source ..............................10
Touch screen operation ........................................ 10
Switching screens ................................11
AV SOURCE OPERATIONS
Selecting the playback source ...............12
Listening to the radio ...........................13
Disc operations.....................................18
Playing a disc....................................................... 18
Playable disc types ..............................................19
Playback operations ............................................20
Settings for disc playback ....................................24
USB operations.....................................25
Playing a USB device ........................................... 25
Listening to the iPod/iPhone device ......27
Preparation .........................................................27
Setting iPod control mode ................................... 28
Selecting preference settings for iPod/iPhone
playback .............................................................. 28
iPod/iPhone playback operations for
<Head> mode .................................................... 29
iPod/iPhone playback operations for
<iPod Out> mode .............................................. 30
Using an App of iPod touch/iPhone ..................... 31
Using other external components ..........33
Front AUX ............................................................33
AV-IN ...................................................................33
Sound adjustment ................................ 34
Using the sound equalization .............................. 34
Adjusting the crossover frequency ....................... 35
Changing display design .......................36
Setting for video playback ....................38
Adjusting the picture ........................................... 38
Changing the aspect ratio ................................... 39
Zooming the picture ............................................ 39
Using a rear view camera ......................40
Setting menu items ..............................41
Memorizing/recalling the settings ..................... 44
Updating the system ...........................................45
Adjusting the touch position .............................. 45
BLUETOOTH OPERATIONS
Information for using Bluetooth®
devices..........................................46
Bluetooth operations for KW-AV60BT ....46
Connecting Bluetooth devices .............................47
Using the Bluetooth mobile phone ...................... 49
Using the Bluetooth audio player ........................ 54
Bluetooth device settings .................................... 55
Bluetooth operations for KW-AV60 ........56
Using the Bluetooth mobile phone ..................... 56
Using the Bluetooth audio player .......................56
REFERENCE
Using the remote controller ..................57
Operations using the remote controller .............. 57
Maintenance .......................................60
More about this unit .............................61
Troubleshooting ...................................64
Specifications.......................................68
4
Page 5

INTRODUCTIONS
Detaching/attaching the monitor panel
Cautions
• Hold the monitor panel securely so as not to drop it accidentally.
• Fit the monitor panel onto the attaching plate until it is firmly locked.
Turn off the power before detaching the monitor panel.
(☞ page 9)
1
2
3
ENGLISH
AttachingDetaching
Soft case (supplied)
5
Page 6
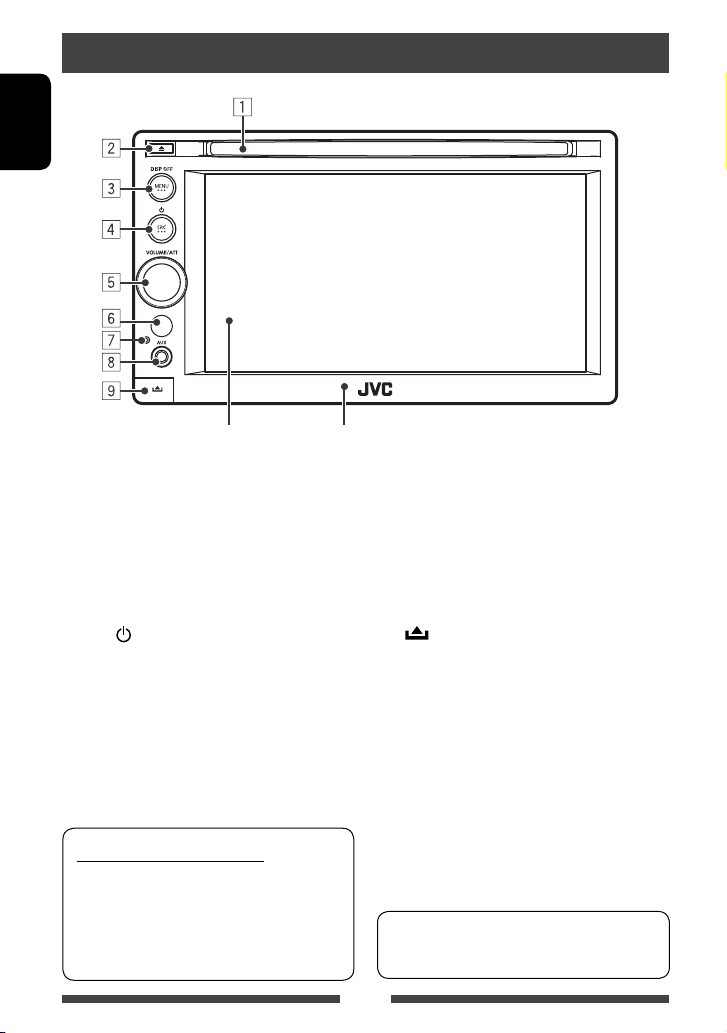
Component names and functions
ENGLISH
Screen (touch panel) Monitor panel
1 Loading slot
2 0 (Eject) button
Ejects the disc.
3 MENU/DISP OFF button
• Displays <AV Menu> screen. (Press)
(☞ page 11)
• Turns off/on the screen. (Hold) (☞ page 9)
4 SRC /
button
• Turns off the power. (Hold) (☞ page 9)
• Turns on the power. (☞ page 9)
• Selects the AV source. (Press) (☞ page 12)
Caution on volume setting:
Digital devices (CD/USB/iPod) produce very little
noise compared with other sources. Lower the
volume before playing these digital sources to
avoid damaging the speakers by sudden increase
of the output level.
5 VOLUME/ATT knob. (☞ page 9)
• Attenuates the sound. (Press)
• Adjusts the audio volume. (Turn)
6 Remote sensor
7 Reset button
Resets the unit. (☞ page 3 )
8 AUX input jack
(Detach) button
9
Detaches the monitor panel. (☞ page 5)
You can change the color of the buttons on the
monitor panel. (☞ page 36)
6
Page 7
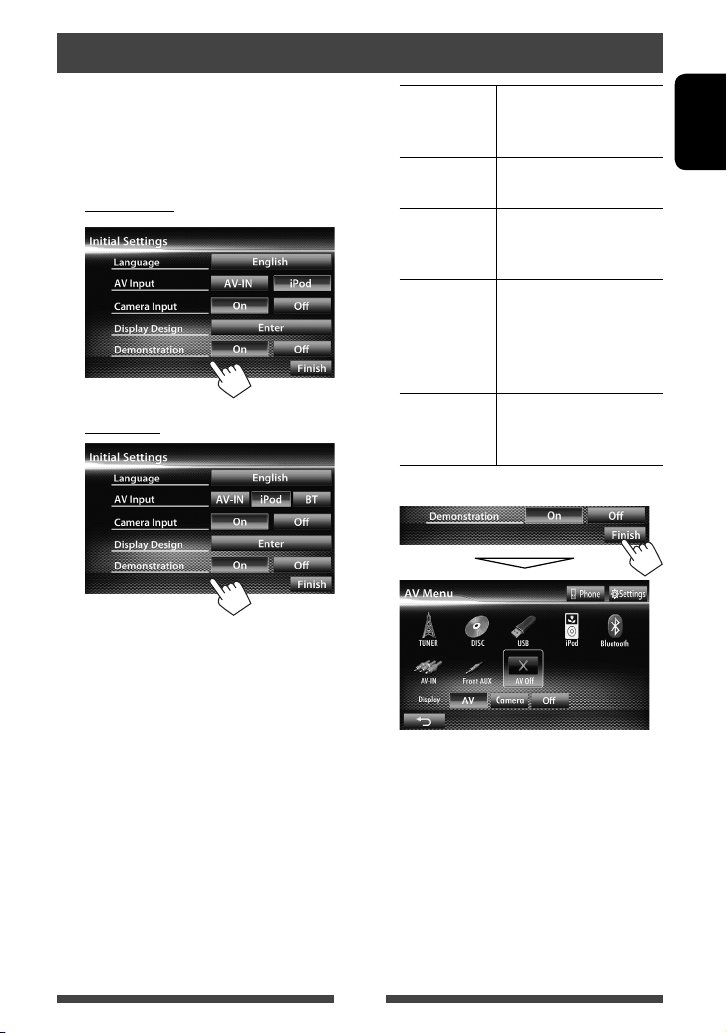
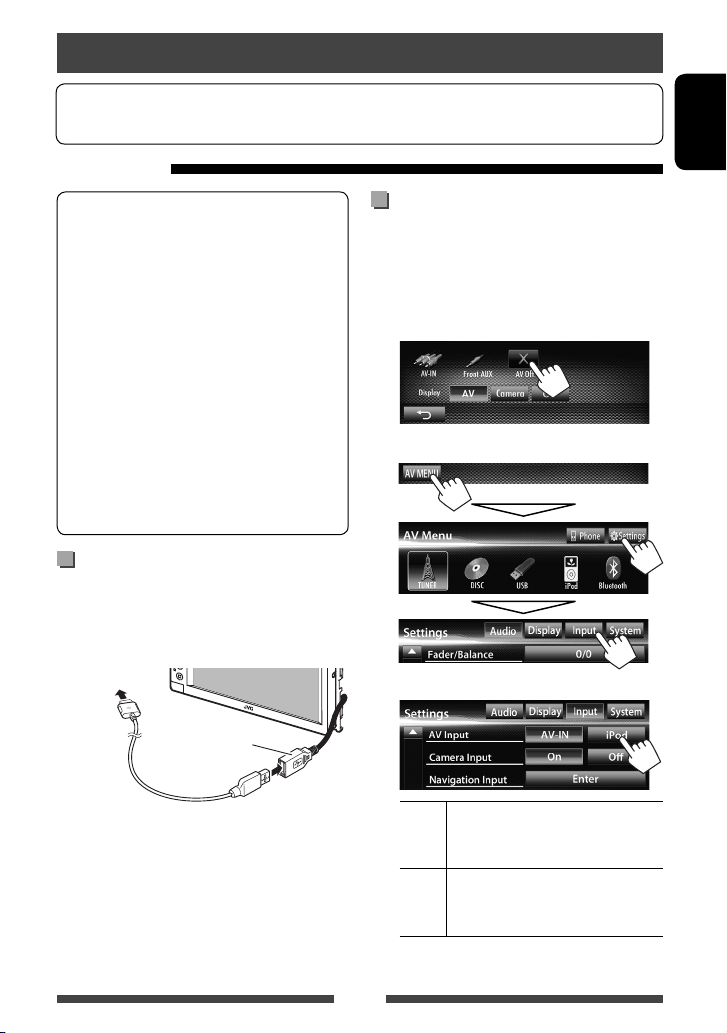
Initial settings
When you power on the unit for the first time or reset
the unit, the initial setting screen appears.
• You can also change the settings on the <Settings>
screen. (☞ page 41 )
1 For KW-AV60BT
For KW-AV60
Language Select the text language used
for on-screen information.
(☞page 43 )
AV Input Select an external component
to play. (☞page 42 )
Camera Input Select <On> when
connecting the rear view
camera. (☞page 43 )
Display
Design
Demonstration
Select the background
and the colors of the text,
touch panel buttons and
the monitor panel buttons.
(☞page 36)
Activate or deactivate the
display demonstration.
(☞page 42 )
2 Finish the procedure.
ENGLISH
<AV Menu> screen is displayed.
• <AV Off> is selected initially. Select the
playback source. (☞page 12)
7
Page 8
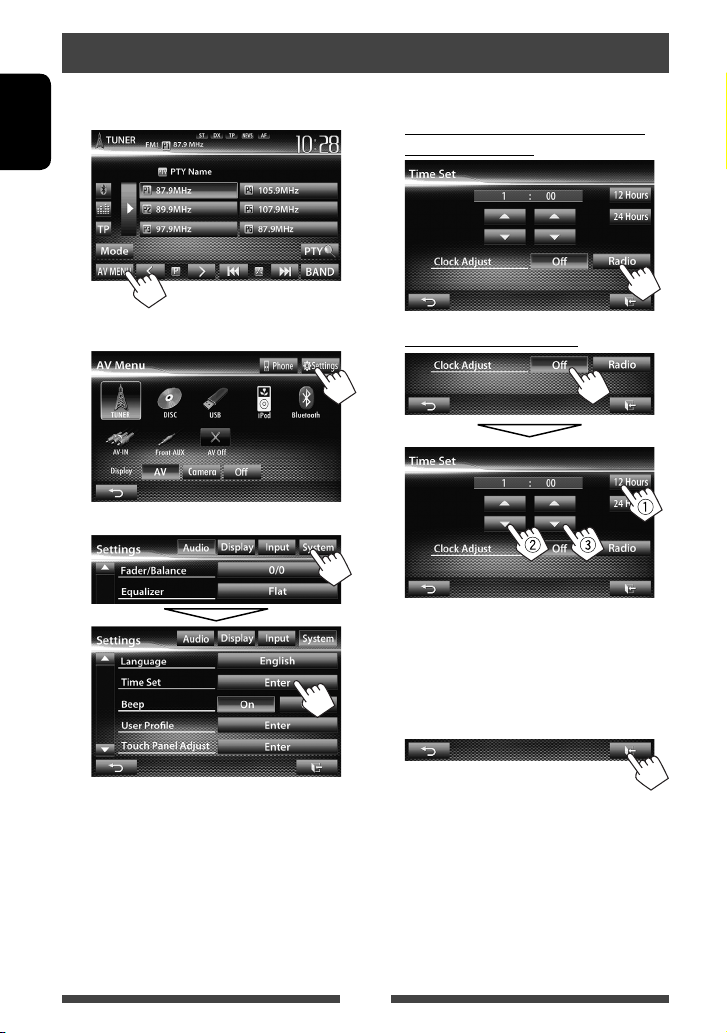
Setting the clock
1 Display <AV Menu> screen.
On the source control screen:
ENGLISH
2 Display <Settings> screen.
3
4 Set the clock time.
To synchronize the clock time with
Radio Data System
To set the clock manually
Select the time display format
1
Adjust the hour
2
Adjust the minute
3
5 Finish the procedure.
8
Page 9
Common operations
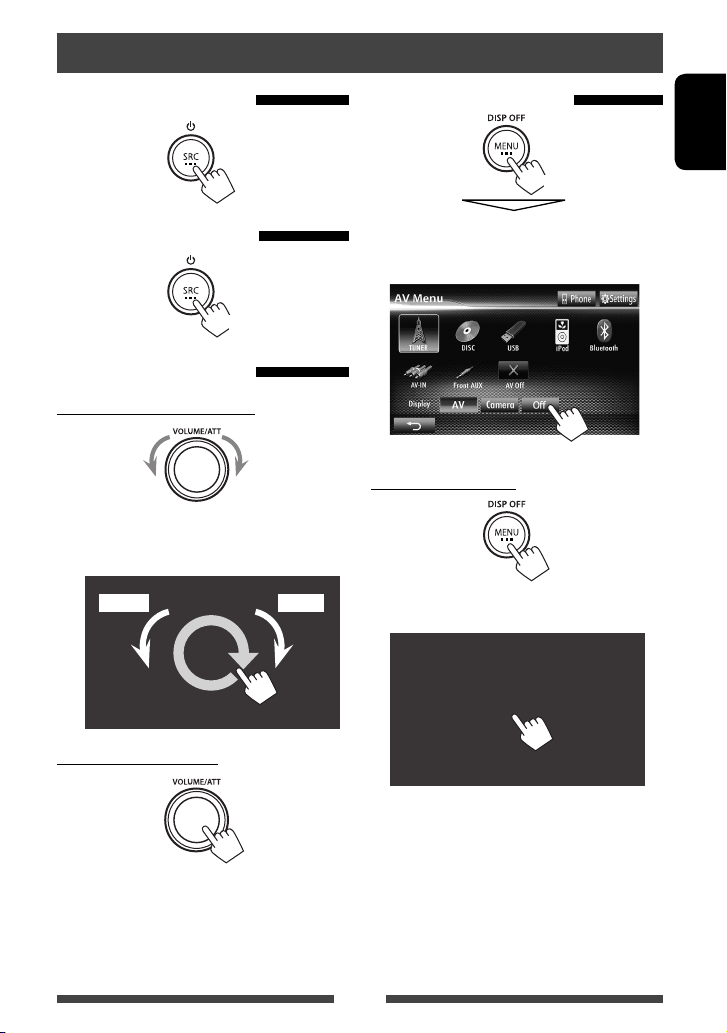
Turning on the power
Turning off the power
(Hold)
Adjusting the volume
To adjust the volume (00 to 50)
IncreaseDecrease
• On the source control screen, you can also adjust the
volume by moving your finger on the touch panel as
illustrated.
IncreaseDecrease
Turning off the screen
ENGLISH
(Hold)
The screen is turned off.
• You can also turn off the screen on <AV Menu>
screen.
To turn on the screen
or
Touch the screen to display <AV Menu> screen.
To attenuate the sound
The ATT indicator lights up.
To cancel the attenuation, press the VOLUME/ATT
knob.
9
Page 10
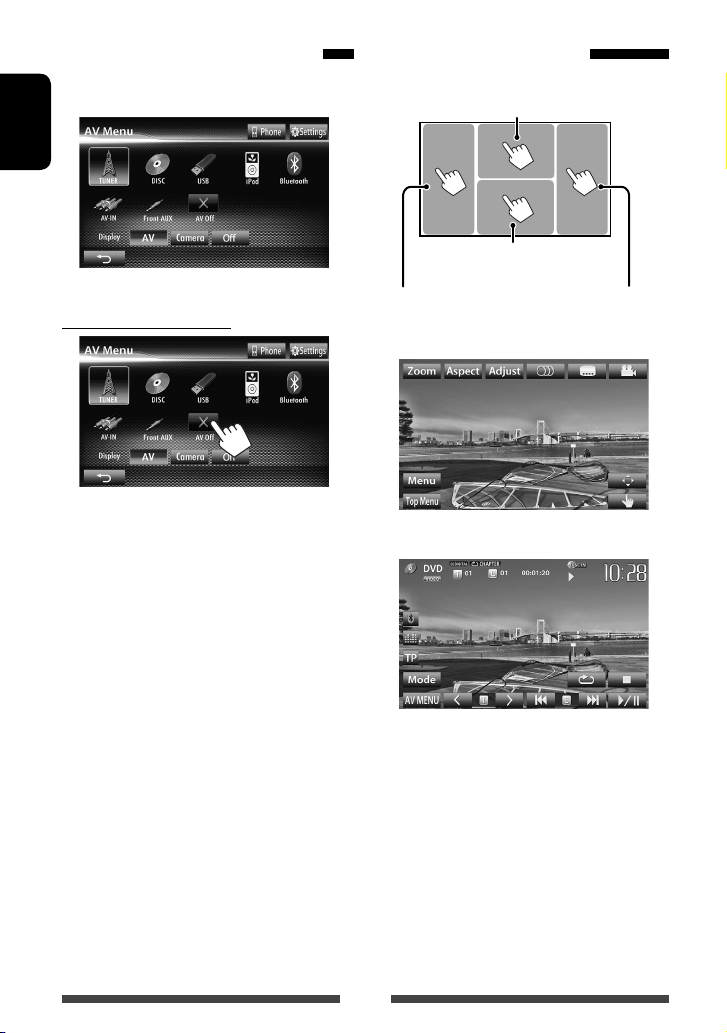
Turning on/off the AV source
You can activate the AV func tion by selecting source on
<AV Menu> screen.
ENGLISH
To turn off the AV source
AV source is turned off.
Touch screen operation
A Displays the video control menu while
playing a video.
B Displays the source control
screen while playing a video.
Goes to the previous
chapter/track.*
A Video control menu
B S ource control screen for video playback
Goes to the next
chapter/track.*
• The operation buttons disappear by touching the
screen or when no operation is done for about 10
seconds.
* Not available for video from an external component.
Dragging your finger to left or right functions in the
same way as touching.
10
Page 11
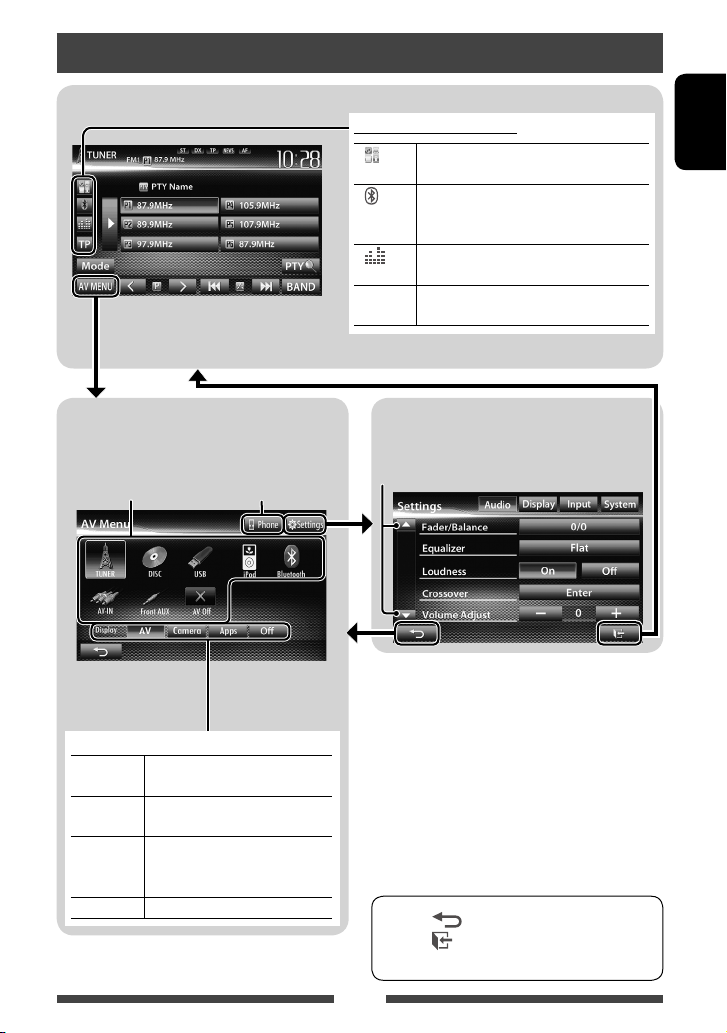
Switching screens
Source control screen
• Pressing MENU on the monitor panel also
displays <AV Menu>.
Common operating buttons
1
[ ] *
[ ]*2*
[
[TP] Activates/deactivates TA standby reception
Displays the screen of App from connected
iPod touch/iPhone. (☞ page 31)
3
• Displays the phone control screen. (Press)
• Switches to the last connected mobile
phone. (Hold) (
Displays the sound adjustment screen.
]
(
☞ page 34)
mode. (☞ page 16 )
☞ page 48)
ENGLISH
<AV Menu> screen
Displays source control screen/settings screen and
changes picture source.
☞ page 12
Select an item to display on the screen.
[AV] Displays the source control screen.
(☞above)
[Camera] Displays the picture from the rear
view camera. (☞page 40)
[Apps]*1Displays the screen of App from
connected iPod touch/iPhone.
(☞page 31)
[Off]
Turns off the screen. (
Displays the phone
control screen *
☞page 9)
<Settings> screen
Changes the detailed settings. (☞ page 41)
Changes the page
2
*1 Appears when <Input> setting in <Navigation
Input> screen is set to <iPhone>. (☞ page 31)
2
Only for KW-AV60BT.
*
3
The icon varies depending on the connection status of
*
the Bluetooth device (☞ page 46).
• Press [ ] to return to the previous screen.
• Press [
] to display the current source control
screen.
11
Page 12
AV SOURCE OPERATIONS
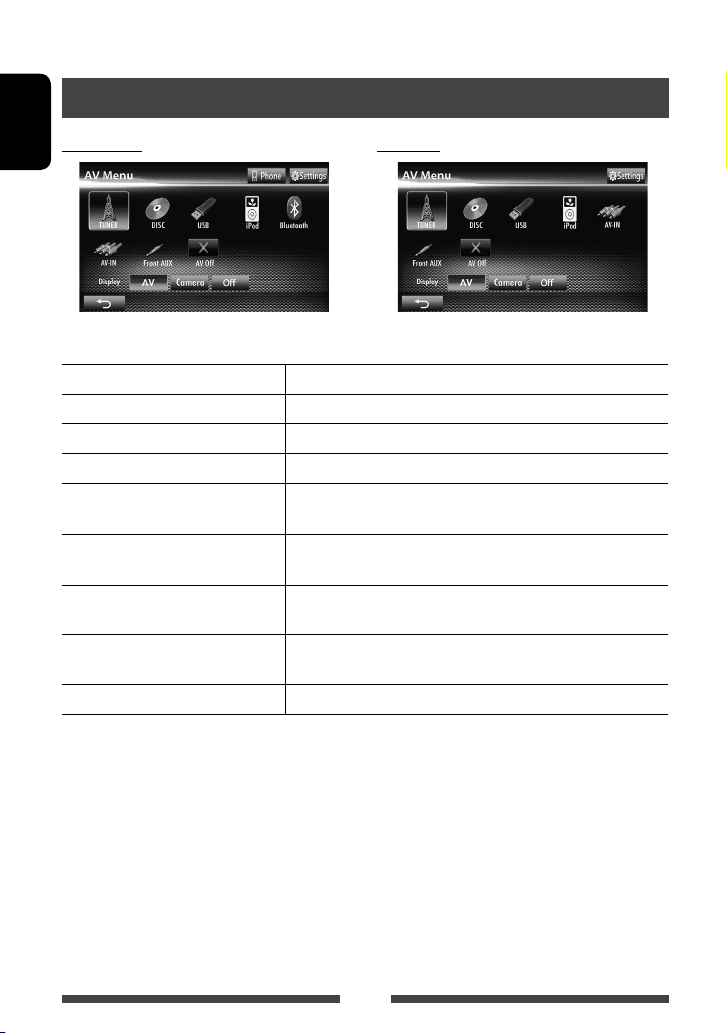
Selecting the playback source
KW-AV60BT KW-AV60
ENGLISH
• Pressing SRC on the monitor panel repeatedly also selects the playback source.
TUNER
(☞ page 13 )
DISC
(☞ page 18)
USB
(☞ page 25)
iPod
(☞ page 27)
Bluetooth
☞ page 54/ KW-AV60: ☞ page 56)
AV-IN
Apps
*1 ( KW-AV60BT:
*2 (☞ page 33)
*3 (☞ page 31)
Switches to the radio broadcast.
Plays a disc.
Plays files on a USB device.
Plays an iPod/iPhone.
• KW-AV60BT: Plays a Bluetooth audio player.
• KW-AV60: Operates a Bluetooth device.
Switches to an external component connected to LINE IN/VIDEO IN jacks
on the rear panel.
Switches to the screen of App from the connected iPod touch/
iPhone.
Front AUX
AV Off
1
*
2
*
3
*
(☞ page 33)
(☞ page 10)
For KW-AV60 : Appears only when <AV Input> is set to <BT>. (☞ page 42)
Appears only when <AV Input> is set to <AV-IN>. (☞ page 42)
Appears only when <AV Input> is set to <iPod>. (☞ page 42)
Switches to an external component connected to AUX input terminal on
the monitor panel.
Turns off the AV source.
12
Page 13
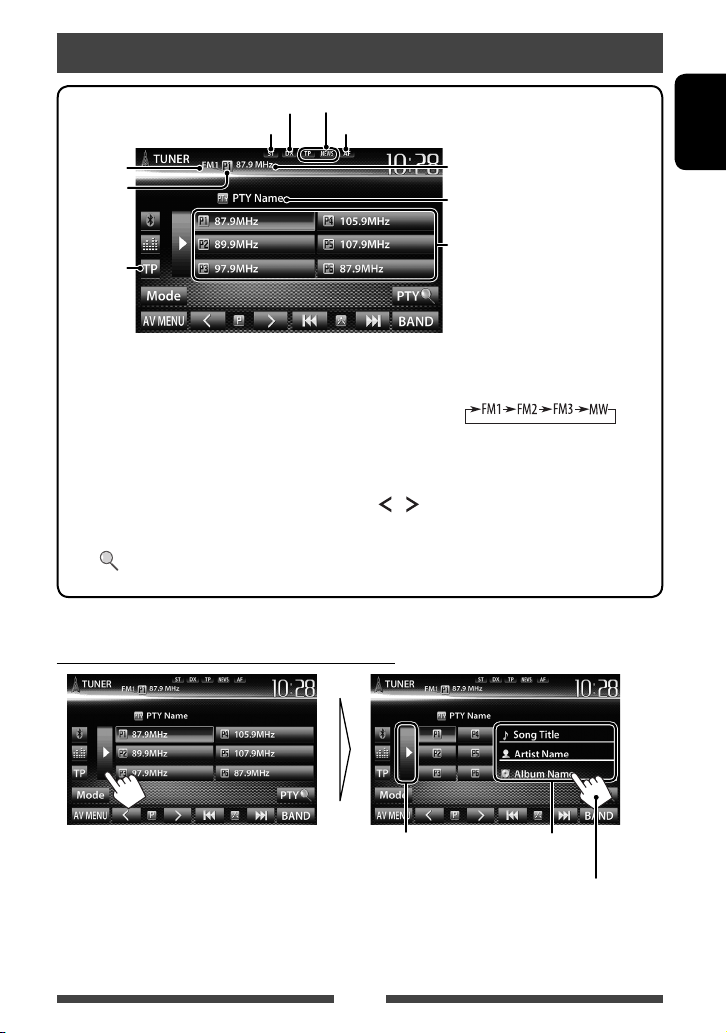
Listening to the radio
DX/LO indicator
ST/MO indicator
Band
Preset no.
☞ page 16
Standby reception indicators
AF indicator
The station frequency currently tuned
in/PS (station name) for FM Radio Data
System when PS signal is coming in
PTY code for FM Radio Data System
Preset list
• The ST indicator lights up when receiving an FM stereo broadcast with sufficient signal strength.
[P1] – [P6] • Tunes in the preset station.
[BAND] Selects the band.
(Press)
• Presets the currently tuned
station. (Hold)
Activates/deactivates TA standby
reception mode. (
☞ page 16)
[TP]*
[3] Displays/hides the information of
[PTY
the current station (
Enters FM Radio Data System
]*
program search mode. (
☞ below).
☞ page 15)
[4] [¢] Searches for a station.
• Auto search (Press)
• Manual search (Hold)
] [ ]
[
[Mode]*
Selects a preset station.
Displays tuner setting screen.
(☞ pages 14 – 17)
[AV MENU] Displays <AV Menu> screen.
* Appears only when FM is selected as the source.
Displaying the information of the current station
ENGLISH
Hides the text
information
13
Text information (only for
Radio Text Plus)
Scrolls the text information
Page 14
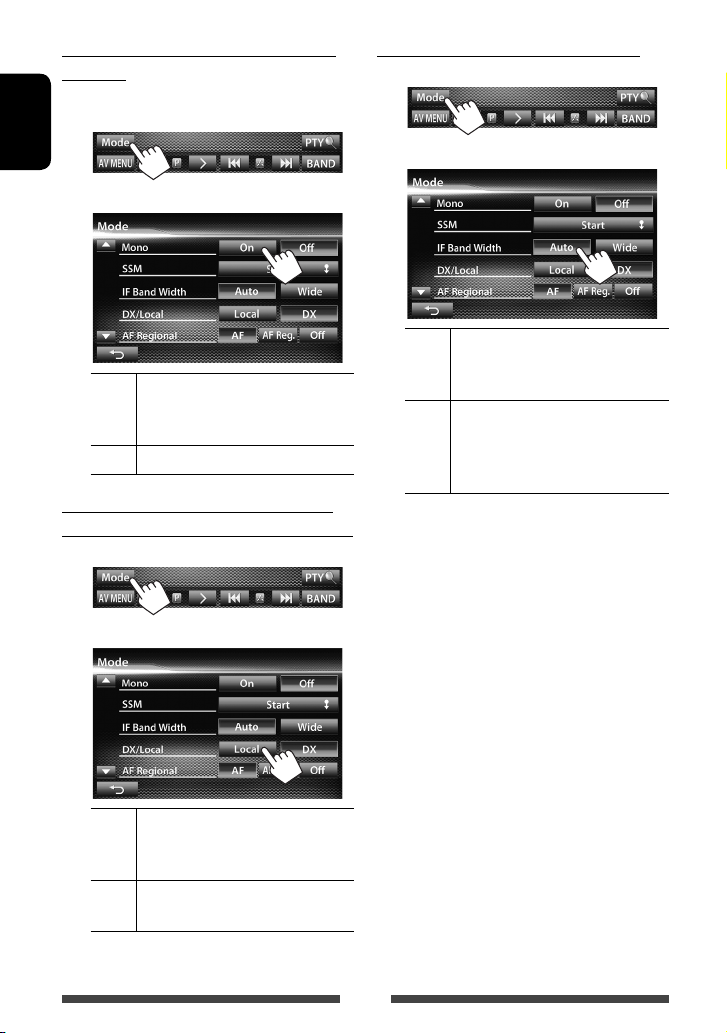
When an FM stereo broadcast is hard to
receive...
Activate monaural mode for better reception.
1
ENGLISH
2
On Activate monaural mode to improve FM
reception, but the stereo effect will be
lost. The MO indicator lights up.
Off Restore the stereo effect.
To tune in FM stations only with strong
signals—LO/DX (Local/ Distance-extreme)
1
When the FM reception is interfered...
1
2
Auto Increases the tuner selectivity to reduce
interference noises between adjacent
stations. (Stereo effect may be lost.)
Wide Subject to the interference from
adjacent stations, but sound quality
will not be degraded and the stereo
effect will remain.
2
Local Select this to tune in only to stations
with sufficient signal strength. The LO
indicator lights up.
DX Deactivate the function. The DX
indicator lights up.
14
Page 15
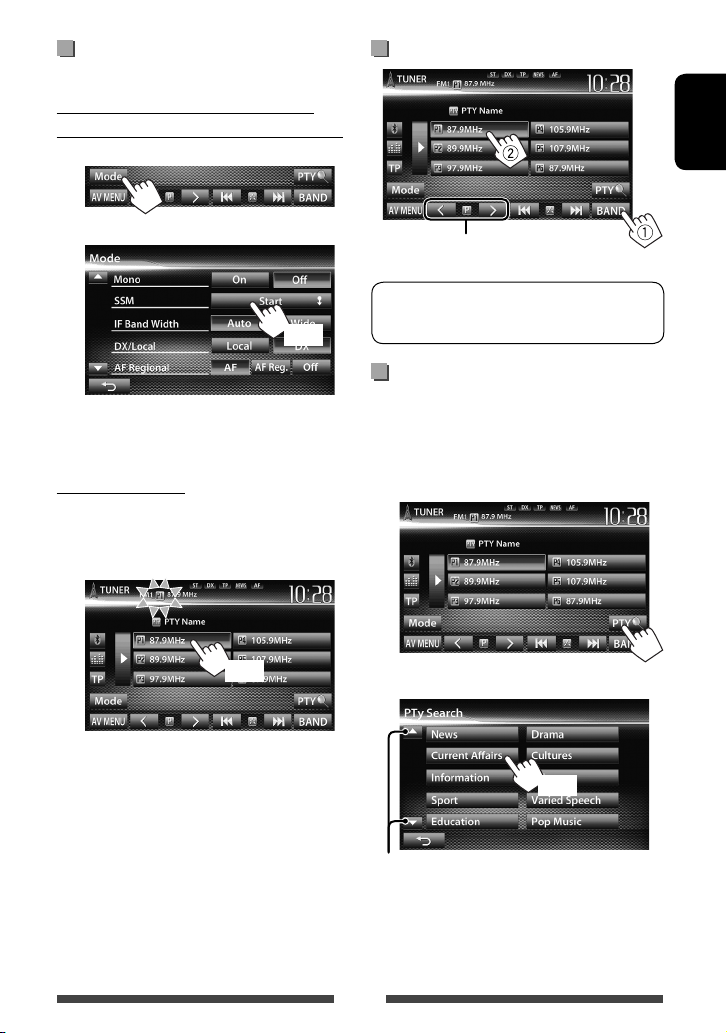
Storing stations in memory
You can preset six stations for each band.
Automatic presetting — SSM (Strongstation Sequential Memory) (For FM only)
1
Selecting a preset station
ENGLISH
2
(Hold)
Local stations with the strongest signals are searched
and stored automatically.
Manual presetting
1 Tune in to a station you want to preset.
(☞ page 13)
2 Select a preset number.
(Hold)
The station selected in step 1 is stored.
Also changes preset stations
The following features are available only for FM
Radio Data System stations.
Searching for FM Radio Data System
program—PTY Search
You can search for your favorite programs being
broadcast by selecting the PTY code for your favorite
programs.
1
2 Select a PTY code.
(Hold)
Changes the page
PTY Search starts.
If there is a station broadcasting a program of the
same PTY code as you have selected, that station
is tuned in.
15
Page 16
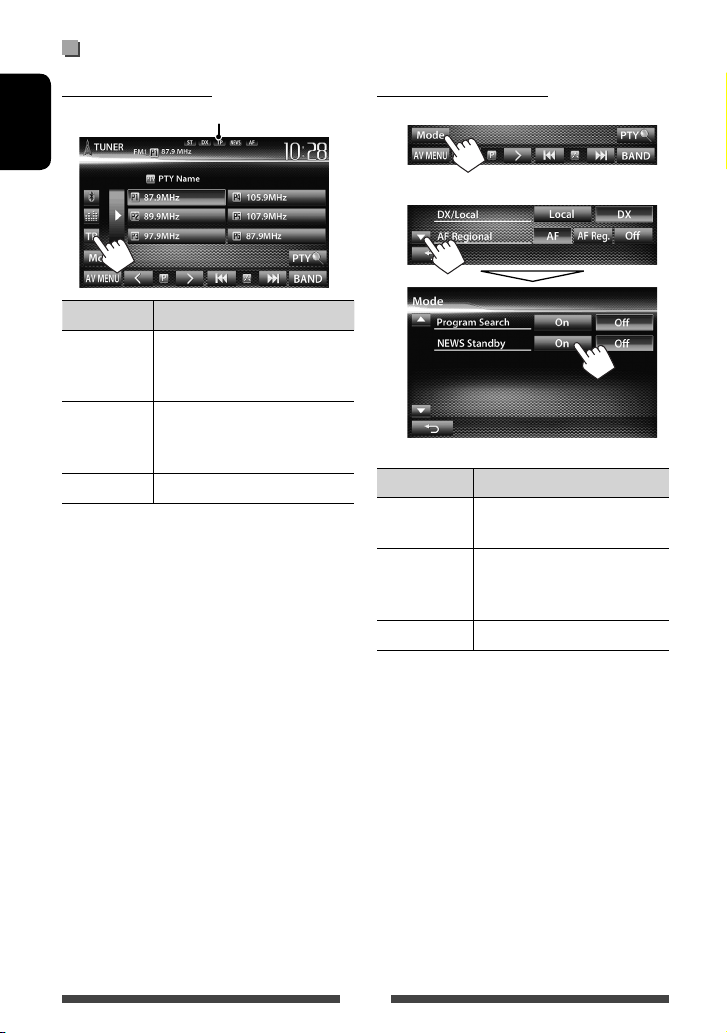
Activating/deactivating TA/News Standby Reception
TA Standby Reception
TP indicator
ENGLISH
TP indicator TA Standby Reception
Lights up The unit will temporarily switch
to Traffic Announcement (TA) if
available.
Flashes Not yet activated. Tune in to another
station providing the Radio Data
System signals.
Goes off Deactivated.
• The volume adjustment for Traffic Announcement
is automatically memorized. The next time the unit
switches to Traffic Announcement, the volume is set
to the previous level.
News Standby Reception
1
2
NEWS indicator News Standby Reception
Lights up The unit will temporarily switch to
News Program if available.
Flashes Not yet activated. Tune in to
another station providing the
Radio Data System signals.
Goes off Deactivated.
• The volume adjustment while receiving News is
automatically memorized. The next time the unit
switches to News, the volume is set to the previous
level.
16
Page 17

Tracing the same program
—Network-Tracking Reception
When driving in an area where FM reception is not
sufficient enough, this unit automatically tunes in to
another FM Radio Data System station of the same
network, possibly broadcasting the same program with
stronger signals.
Program A broadcasting on different frequency
areas (01 – 05)
When shipped from the factory, Network-Tracking
Reception is activated.
To change the Network-Tracking
Reception setting
1
Automatic station selection—
Program Search
Usually when you select preset stations, the preset
station is tuned in.
If the signals from the preset FM Radio Data System
station are not sufficient for good reception, this
unit, using the AF data, tunes in to another station
broadcasting the same program as the original preset
station is broadcasting.
To activate Program Search
1
2
ENGLISH
2
AF Switches to another station. The program
may differ from the one currently received
(the AF indicator lights up).
AF Reg. Switches to another station broadcasting
the same program (the AF indicator
lights up).
Off Cancels.
• The unit takes some time to tune in to another
station using program search.
To deactivate, select <Off>.
17
Page 18
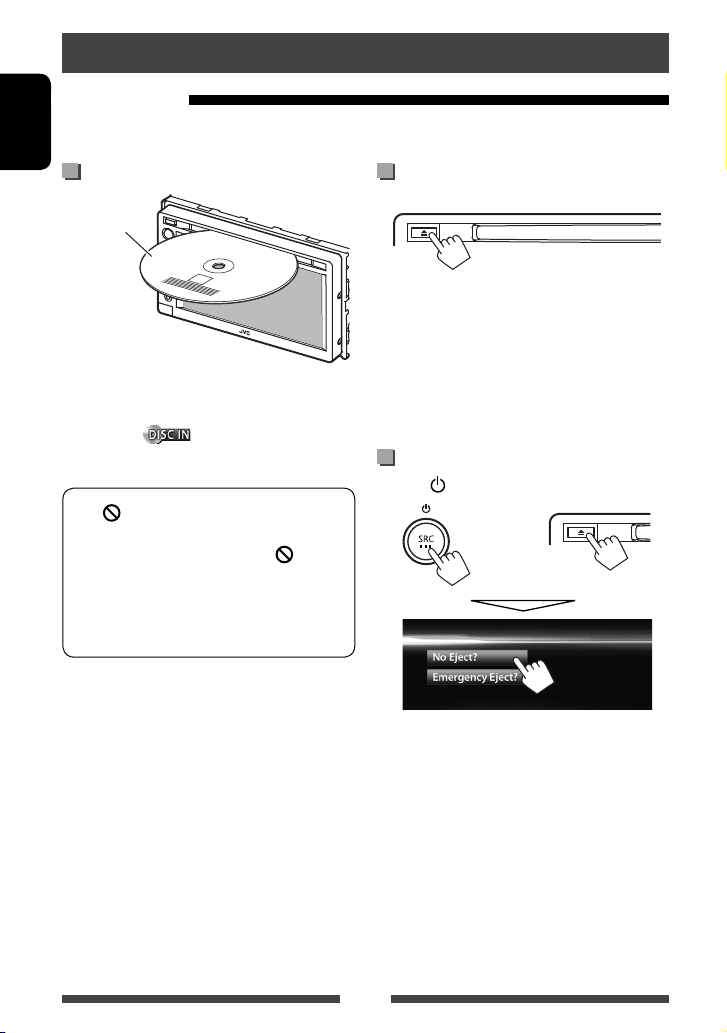
Disc operations
Playing a disc
• If a disc does not have any disc menu, all tracks on it will be played repeatedly until you change the source or eject
the disc.
ENGLISH
Inserting a disc
Label side
The source changes to “
• The DISC IN (
disc is inserted.
• If “
” appears on the screen, the unit cannot
accept the operation you have tried to do.
– In some cases, without showing “
operations will not be accepted.
• When playing back a multi-channel encoded
disc, the multi-channel signals are downmixed
to stereo.
DISC
” and playback starts.
) indicator lights up while a
,”
To eject a disc
• You can eject a disc when playing another AV source.
• If the ejected disc is not removed within 15 seconds,
the disc is automatically inserted again into the
loading slot to protect it from dust.
• If the disc cannot be ejected, ☞ page 3 .
When removing a disc, pull it horizontally.
To prohibit disc ejection
Press SRC/ and 0 at the same time.
+
To cancel the prohibition, repeat the same procedure
to select <Eject OK?>.
18
Page 19

Playable disc types
Disc type Recording format, file type, etc. Playable
DVD
• DTS sound cannot be
reproduced or emitted from
this unit.
DVD Recordable/Rewritable
(DVD-R/-RW *
2
, +R/+RW *3)
• DVD Video: UDF bridge
• DVD-VR
/MPEG1/MPEG2/JPEG/
• DivX
MP3/WMA/WAV : ISO 9660 level
1, level 2, Romeo, Joliet
DVD-Video *
Region Code: 2
DVD-Audio/DVD-ROM
DVD-Video
DVD-VR *
DivX /MPEG1/MPEG2
JPEG
MP3/WMA/WAV
MPEG4/AAC/DVD+VR/DVD-RAM
Dual Disc DVD side
Non-DVD side
CD/VCD Audio CD/CD Text (CD-DA)
VCD (Video CD)
DTS-CD/SVCD (Super Video CD)/CD-ROM/CD-I(CD-I Ready)
CD Recordable/Rewritable
(CD-R/-RW)
• ISO 9660 level 1, level 2,
Romeo, Joliet
CD-DA
VCD (Video CD)
DivX
JPEG
MP3/WMA/WAV
MPEG4/AAC
*1 If you insert a DVD Video disc of an incorrect Region Code, “Region Code Error” appears on the screen.
2
DVD-R recorded in multi-border format is also playable (except for dual layer discs). DVD-RW dual layer discs are not
*
playable.
3
It is possible to play back finalized +R/+RW (Video format only) discs. “DVD” is selected as its disc type when a
*
+R/+RW disc is loaded. +RW double layer discs are not playable.
4
This unit cannot play back contents protected with CPRM (Content Protection for Recordable Media).
*
Caution for DualDisc playback
The Non-DVD side of a “DualDisc” does not comply with the “Compact Disc Digital Audio” standard. Therefore, the use
of Non-DVD side of a DualDisc on this product may not be recommended.
1
4
/MPEG1/MPEG2
ENGLISH
19
Page 20
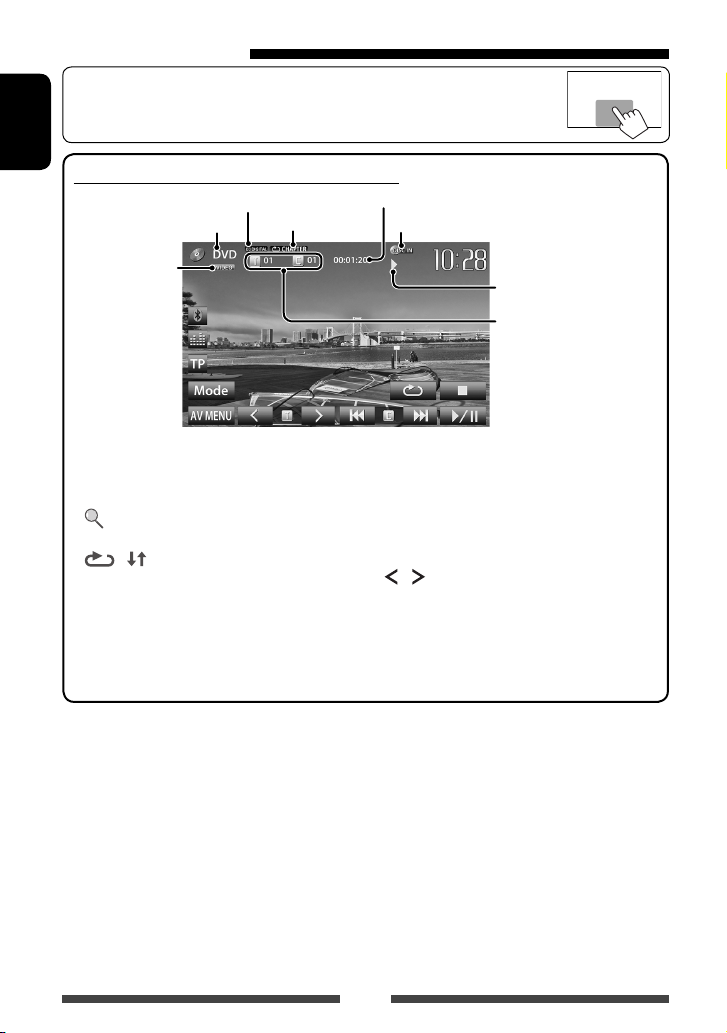
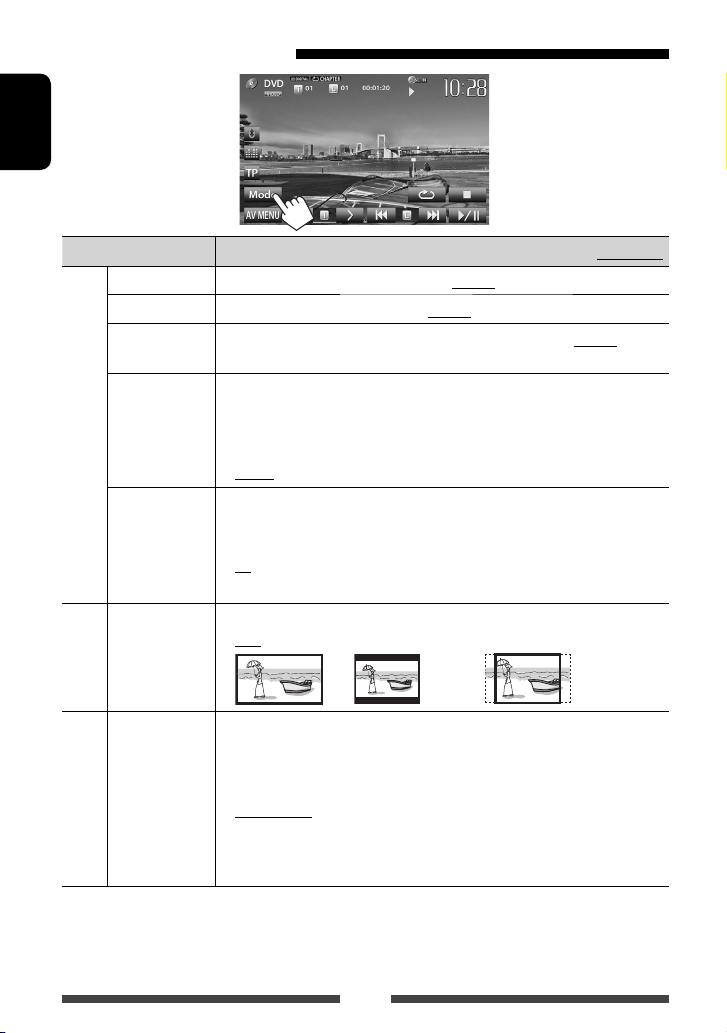
Playback operations
• When the operation buttons are not displayed on the screen, touch the area shown on
the illustration.
ENGLISH
For DVD/DVD-VR/VCD/DivX/MPEG1/MPEG2/JPEG
Audio format
Media type
Playback mode
(☞page 23)
Playing time
DISC IN indicator
Video format/
video playback
mode—VIDEO/
VR-PRG (program)/
VR-PLAY (playlist)/
DivX/MPEG/PBC
[7]*
[
[
2
3
]*
] [ ]*
Stops playback.
Displays folder/track list. (☞
page 21)
4
Selects playback mode. (☞
page 23)
[4] [¢]*5• Selects chapter/track.
[
] [ ]*5 *7
[6] Starts/pauses playback.
7
[Mode]*
1
*
To display the Original Program/Playlist screen, ☞page22.
2
Appears only for DVD/DVD-VR/VCD.
*
3
Does not appear for DVD/DVD-VR/VCD.
*
4
Does not appear for DVD/DVD-VR/JPEG.
*
5
The icon displayed between the buttons varies depending on the type of disc or file.
*
6
Search speed varies depending on the type of disc or file.
*
7
Does not appear for VCD.
*
[AV MENU] Displays <AV Menu> screen.
Playback status
(3: play / 8: pause / 7: stop)
• DVD Video: Title no./
Chapter no.
• DVD-VR: Program no. (or
Playlist no.)/Chapter no.*
• DivX/MPEG1/MPEG2:
Folder no./Track no.
• JPEG: Folder no./File no.
• VCD: Track no.
(Press)
• Reverse/forward search.*
(Hold)
Selects title (DVD)/program or
playlist (DVD-VR)/folder(DivX/
MPEG1/MPEG2/JPEG). *
1
Changes the settings for disc
playback. (☞ page 24)
1
6
20
Page 21
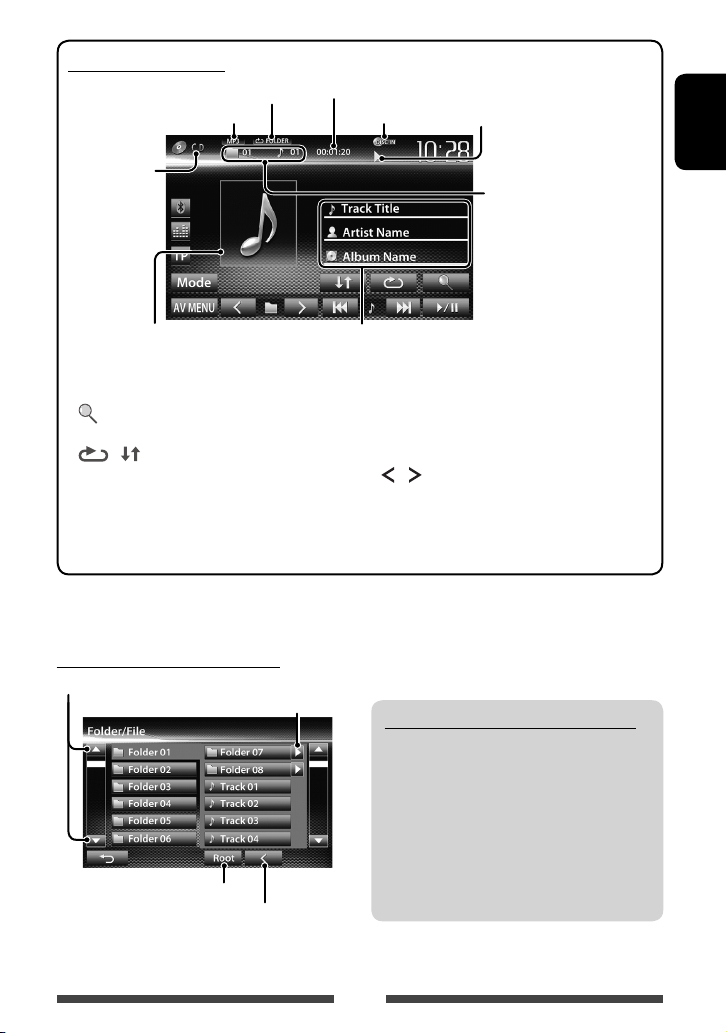
For CD/MP3/WMA/WAV
Playback mode (☞ page 23)
Audio format
Playing time
DISC IN indicator
Playback status
(3: play / 8: pause )
Media type
While playing, the jacket picture is
shown if the file has the tag data
including the jacket picture.
[ ]*
1
Displays folder/track list.
(☞below)
[
] [ ]
Selects playback mode.
(☞page23)
[6] Star ts/pauses playback.
1
*
Does not appear for CD.
2
Search speed varies depending on the type of disc or file.
*
Selecting folder/track on the list
Changes the page
Plays tracks/files in the folder
Returns to the root folder
Returns to the upper layer
• MP3/WMA/WAV: Folder
no./Track no.
• CD: Track no.
Track/file information
• Touching an information bar scrolls the text if not all of the
text is shown.
[4] [¢] • Selects track. (Press)
• Reverse/forward search.*
(Hold)
] [ ]*1
[
[Mode]*
Selects folder.
1
Changes the settings for disc
playback. (☞ page 24)
[AV MENU] Displays <AV Menu> screen.
Playing Recordable/Rewritable discs
• This unit can recognize a total of 5 000 files and
250 folders (a maximum of 999 files per folder).
• Use only “finalized” discs.
• This unit can play back multi-session discs;
however, unclosed sessions will be skipped
while playing.
• Some discs or files may not be played back due
to their characteristics or recording conditions.
ENGLISH
2
21
Page 22
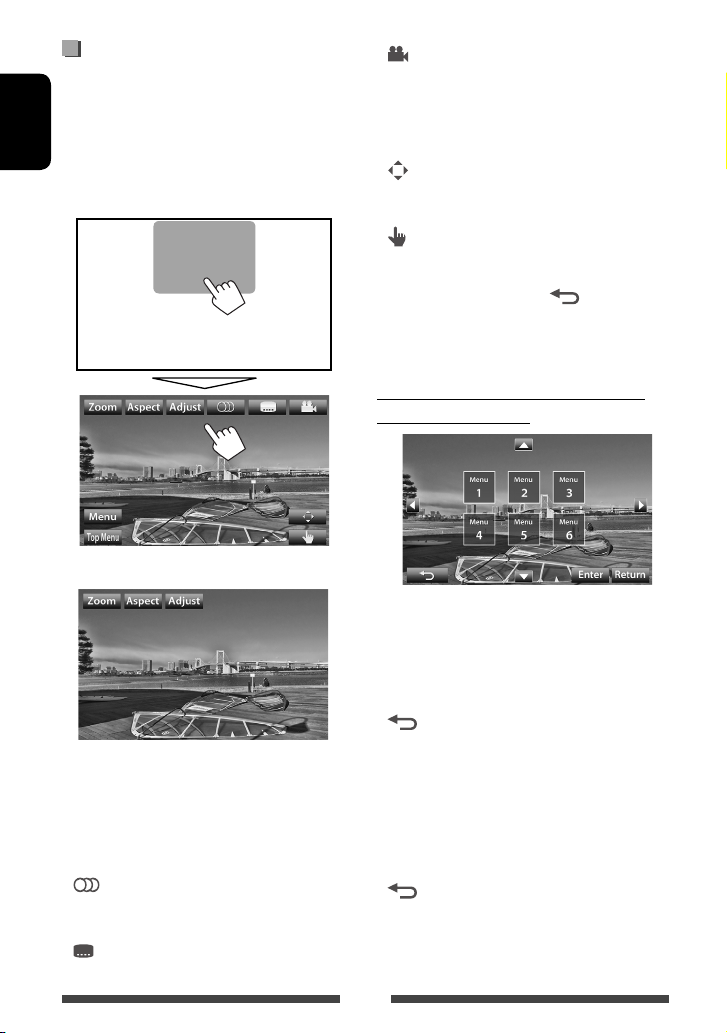
Video menu operations
You can display the video menu screen while watching
the playback pictures on the screen.
• Available items on the screen differ depending on the
types of the loaded disc and playback files.
ENGLISH
• The operation buttons disappear by touching the
screen or when no operation is done for about 10
seconds.
• The screen for MPEG1/MPEG2 differs from the above.
[Zoom] Displays the picture size selecting
screen. (☞ page 39)
[Aspect]
[Adjust] Displays picture adjustment screen.
[
[
Selects aspect ratio. (☞ page 39)
(☞ page 38)
] Selects the audio type.
• For DVD-VR: Selects the audio
channel (ST: stereo, L: left, R: right).
] Selects the subtitle type.
[ ]
[Menu] Displays the disc menu (DVD)/playlist
[Top Menu] Displays the disc menu (DVD)/original
[
[
• Touching any position other than operation buttons
displays the source control screen.
Selects view angle.
(DVD-VR).
program (DVD-VR).
Displays the menu/playlist/original
]
program/scene selecting screen.
(☞ below)
Switches to the direct menu selection
]
mode. Touch the target item to select.
• To exit from the menu selecting
screen, press [
].
Using menu/playlist/original program/
scene selecting screen
[5] [∞]
[2] [3]
[Enter] Confirms the selection.
[Return] Returns to the menu screen of the
[
• For DivX only
[2] [3] Skips back or forward by about 5
[Return] Returns to the previous screen.
[
Selects an item.
previous layer.
Displays the menu screen of the top
]
layer when several menu screens exist
on the disc.
minutes.
Exits from the scene selecting screen.
]
22
Page 23
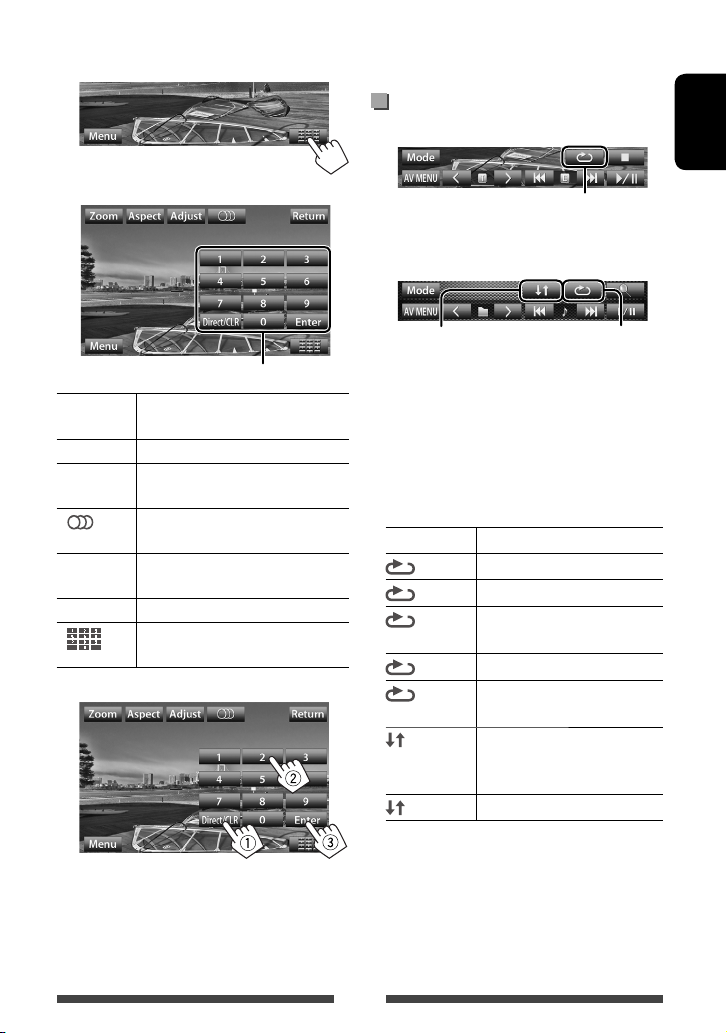
Only for VCD
1
• To deactivate the PBC function, press [7] then the
direct selecting buttons to select a track number.
Selecting playback mode
For DVD/DVD-VR
ENGLISH
2
Direct selecting buttons (☞ below)
[Zoom] Displays the picture size selecting
screen. (☞ page 39)
[Aspect]
[Adjust] Displays picture adjustment screen.
[
[Return] Displays the previous screen or the
[Menu] Displays the disc menu.
[ ]
• To select a track directly
Selects aspect ratio. (☞ page 39)
(☞ page 38)
] Selects the audio channel (ST: stereo,
L: left, R: right).
menu.
Displays/hides the direct selecting
buttons. (☞ below)
Selects Repeat playback mode
For VCD (without PBC)/CD/DivX/MPEG1/MPEG2/MP3/
WMA/WAV
Selects Random
playback mode*
* You cannot activate the repeat mode and the random
mode at the same time.
• Each time you press the button, the playback mode
changes. (The corresponding indicator lights up.)
– Available items differ depending on the types of
loaded disc and playback file.
Indicator Playback mode
CHAPTER
TITLE
PROGRAM
SONGS
FOLDER
FOLDER
ALL
Repeats current chapter.
Repeats current title.
Repeats current program (not
available for Playlist playback).
Repeats current track.
Repeats all tracks of the current
folder.
Randomly plays all tracks of
current folder, then tracks of next
folders.
Randomly plays all tracks.
Selects Repeat
playback mode*
– To switch between chapter/track entry and title/
folder entry, press [Direct/CLR].
– When you enter a wrong number, press [Direct/
CLR] to delete the last entry.
To cancel, press the button repeatedly until the
indicator disappears.
23
Page 24
Settings for disc playback
ENGLISH
Disc Setup items Selectable setting/item Initial: Underlined
Menu Language
Audio Language
Subtitle
Down Mix When playing back a multi-channel disc, this setting affec ts the signals reproduced
For DVD/DVD-VR/DivX
D. (Dynamic)
Range Compres.
(Compression)
Monitor Type Select the monitor type to watch a wide screen picture on the external monitor.
VCD/CD
For discs except
File Type Select the playback file type when a disc contains different types of files.
video/picture files
For discs containing audio/
Select the initial disc menu language; Initial English (☞ page 62).
Select the initial audio language; Initial English (☞ page 62).
Select the initial subtitle language or erase the subtitle (Off) ; Initial English (☞
page 62).
through the FRONT OUT/REAR OUT jacks.
♦ Dolby Surround : Select this to enjoy multi-channel surround audio by
connecting an amplifier compatible with Dolby Surround.
♦ Stereo : Normally select this.
You can change the dynamic range while playing Dolby Digital software.
♦ Off : Selec t this to enjoy a powerful sound at a low volume
level with its full dynamic range.
♦ On : Selec t this to reduce the dynamic range a little.
♦ Dialog : Select this to reproduce the movie dialog more clearly.
♦ 16:9
♦ Audio
♦ Still Picture
♦ Video
♦ Audio&Video
• For playable file types, ☞ page 19.
• If the disc contains no files of the selected type, the existing files are played in the
following priority: audio, video, then still picture.
♦ 4:3 LB (Letterbox) ♦ 4:3 PS (PanScan)
: Plays back audio files.
: Plays back JPEG files.
: Plays back DivX/MPEG1/MPEG2 files.
: Plays back audio files and DivX/MPEG1/MPEG2 files.
24
Page 25
USB operations
Playing a USB device
• This unit can play JPEG/MPEG1/MPEG2 */MP3/WMA/
WAV files stored in a USB mass storage class device.
• This unit can recognize a total of 5 000 files and 250
folders (a maximum of 999 files per folder).
• Make sure all important data has been backed up to
avoid losing the data.
* Except for MPEG2 files recorded by JVC Everio
camcorder (extension code <.mod>).
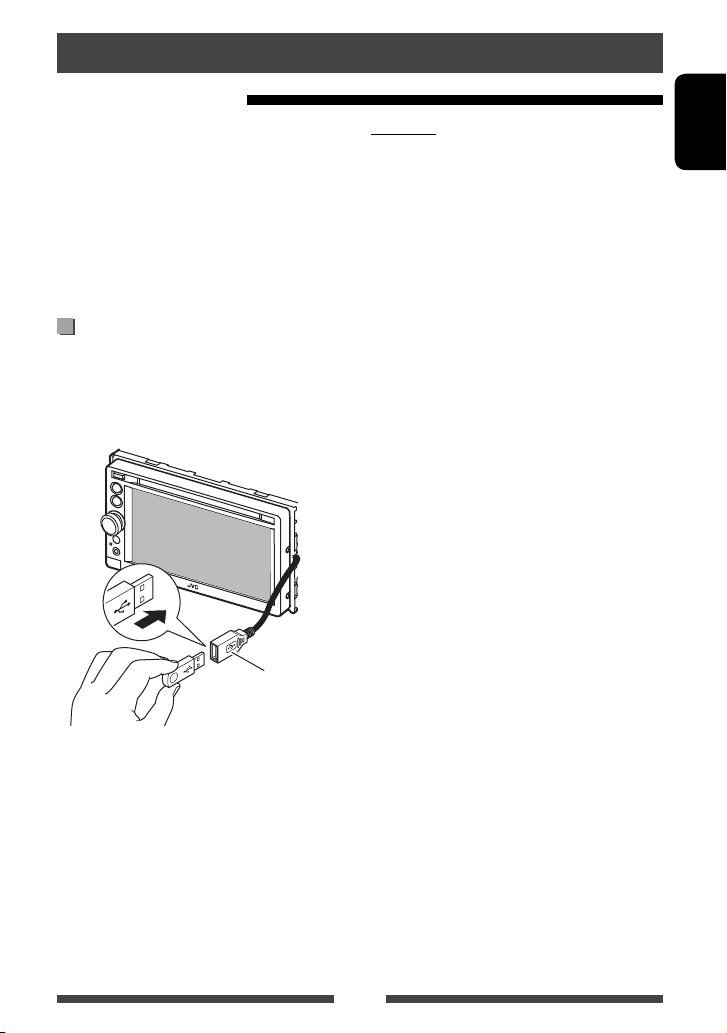
Connecting a USB device
You can connect a USB mass storage class device such as
a USB memory, Digital Audio Player etc. to the unit.
• You cannot connect a computer or portable HDD to
the USB cable from the rear of the unit.
USB cable from the
rear of the unit
The source changes to “
• All tracks in the USB device will be played repeatedly
until you change the source.
USB
” and playback starts.
Cautions:
• This unit may not play back files in a USB device
properly when using a USB extension cord.
• USB devices equipped with special functions such as
data security functions cannot be used with the unit.
• Do not use a USB device with 2 or more partitions.
• Depending on the shape of the USB devices and
connection ports, some USB devices may not be
attached properly or the connection might be loose.
• This unit cannot recognize a USB device whose rating
is other than 5 V and exceeds 1 A.
• This unit may not recognize a memory card inserted
into the USB card reader.
• Connect only one USB device to the unit at a time. Do
not use a USB hub.
• When connecting with a USB cable, use the USB 2.0
cable.
• The maximum number of characters for (when the
characters are 1 byte):
– Folder names: 50 characters
– File names: 50 characters
• Avoid using the USB device if it might effect driving
safety.
• Do not pull out and connect the USB device
repeatedly while “Now Reading” is shown on the
screen.
• Electrostatic shock at connecting a USB device may
cause abnormal playback of the device. In this case,
disconnect the USB device then reset this unit and
the USB device.
• Operation and power supply may not work as
intended for some USB devices.
• Do not leave a USB device in the car, or expose
to direct sunlight or high temperature to avoid
deformation or damage to the device.
ENGLISH
25
Page 26
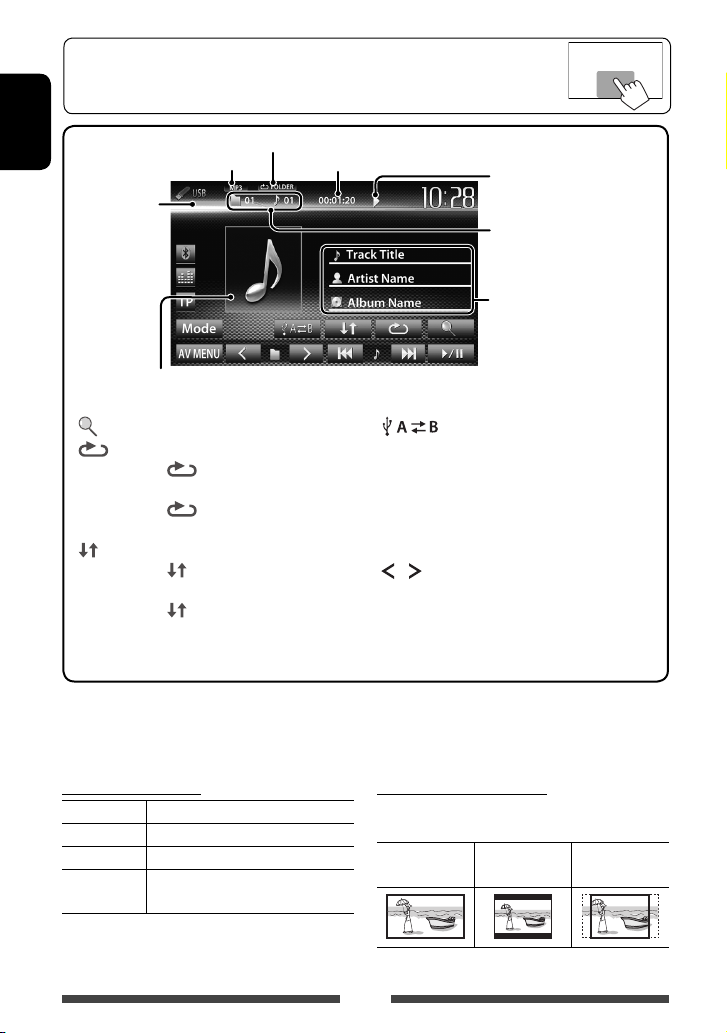
• When the operation buttons are not displayed on the screen, touch the area shown on
the illustration.
• To change settings for video playback, ☞ page 38.
ENGLISH
Video format—
MPEG/JPEG
While playing, the jacket picture is shown if the file has the tag
data including the jacket picture.
[ ]
[
]
] Selects random playback mode. *1 *
[
Playback mode (☞ below)
Audio format
Playing time
Displays folder/track list. (☞ page 21)
Selects repeat playback mode. *
1 *2
• SONGS: Repeats current
track.
FOLDER: Repeats all tracks of
•
the current folder.
• FOLDER: Randomly plays all
tracks of the folder.
ALL: Randomly plays all tracks.
•
[
Switches between the internal and
]
external memory source of the
connected device (such as mobile
phone).
[6] Starts/pauses playback.
[4] [¢]*3• Selects track. (Press)
2
[
] [ ]
• Reverse/forward search.*
Selects folder.
[Mode] Changes the settings for <File Type>
and <Monitor Type>. (☞below)
[AV MENU] Displays <AV Menu> screen.
• Available items differ depending on the types of playback file.
*1 To cancel random or repeat mode, press the button repeatedly until the indicator disappears.
2
You cannot activate the repeat mode and the random mode at the same time.
*
3
The icon displayed between the buttons varies depending on the file type.
*
4
Search speed varies depending on the file type.
*
Setting <File Type>
Audio Plays back audio files.
Still Picture Plays back JPEG files.
Video Plays back MPEG1/MPEG2 files.
Setting <Monitor Type>
Select the monitor type to watch a wide screen picture
on the external monitor.
16:9 4:3 LB
Audio&Video Plays back audio files and MPEG1/
MPEG2 files.
• If the USB device contains no files of the selected
type, the existing files are played in the following
priority: audio, video, then still picture.
26
Playback status
(3: play / 8: pause)
• MP3/WMA/WAV: Folder no./
Track no.
• JPEG: Folder no./File no.
Track/file information (for MP3/
WMA/WAV)
• Touching an information bar
scrolls the text if not all of the
text is shown.
4
(Hold)
4:3 PS
(Letterbox)
(PanScan)
Page 27
Listening to the iPod/iPhone device
• To use App of iPod touch/iPhone , ☞ page 31.
Preparation
iPod/iPhone that can be connected to this unit:
Made for
– iPod with video (5th Generation)
– iPod classic
– iPod nano (6th Generation)
– iPod nano (5th Generation)
– iPod nano (4th Generation)
– iPod nano (3rd Generation)
– iPod nano (2nd Generation)
– iPod nano (1st Generation)
– iPod touch (4th Generation)
– iPod touch (3rd Generation)
– iPod touch (2nd Generation)
– iPod touch (1st Generation)
– iPhone 4
– iPhone 3GS
– iPhone 3G
– iPhone
Connecting iPod/iPhone
Connect your iPod/iPhone using the appropriate cable
according to your purpose.
• To listen to music: USB 2.0 cable (accessory of the
iPod/iPhone)
To iPod/iPhone
Setting <AV Input> for iPod/iPhone
playback
Select appropriate input setting for <AV Input>
according to the connection method of the iPod/iPhone.
1 Turn off the AV source.
On <AV Menu> screen:
2 Display <Input> setting screen.
3
ENGLISH
USB cable from the
rear of the unit
• To watch video and listen to music: USB
Audio and Video cable for iPod/iPhone—KS-U30
(separately purchased) (☞Installation/Connection
Manual)
Caution:
• Video is not displayed on the screen if connected with
any cable other than KS-U30.
AV-IN Selec t this when the iPod/iPhone is
connected by using USB 2.0 cable
(accessory of the iPod/iPhone).
iPod Select this when the iPod/iPhone is
connected by using KS-U30 (separately
purchased).
27
Page 28
Setting iPod control mode
Select the unit controlling iPod/iPhone playback.
When the source is “
1
ENGLISH
iPod
”...
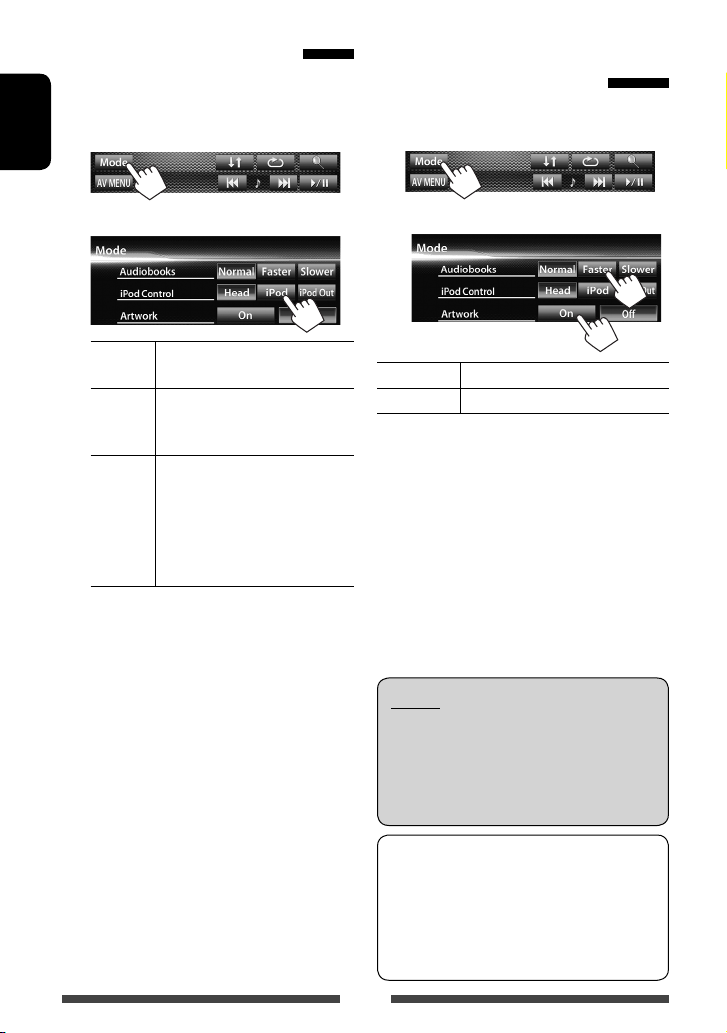
Selecting preference settings for iPod/iPhone playback
When the source is “
1
iPod
”...
2
Head Controls playback from this unit.
(☞ page 29)
iPod Controls audio/video playback from
the iPod/iPhone.
• Playback information is shown.
iPod
Out *
• When using iPod nano (1st Generation) or iPod
with video (5th Generation) with <iPod> selected
for <iPod Control>, select <iPod> for <AV
Input> and connect iPod using KS-U30 (separately
purchased). (☞page 27)
* <iPod Out> is available only for the following iPod/
iPhone models:
– iPod nano (6th Generation)
– iPod touch (4th Generation)
– iPod touch (3rd Generation)
– iPod touch (2nd Generation)
– iPhone 4
– iPhone 3GS
– iPhone 3G
Displays the menu and playback
screen output from iPod/iPhone.
(☞page 30)
• You can control playback from
this unit in the same way as on
the iPod/iPhone.
2
Audiobooks Selec t the speed of audio books.
Artwork Shows/hides the iPod artwork.
Notice:
When operating an iPod/iPhone, some operations
may not be performed correctly or as intended. In
this case, visit the following JVC web site: <http://
www3.jvckenwood.com/english/car/> (English
website only)
For some iPod/iPhone models, the performance
may be abnormal or unstable during operation. In
this case, disconnect the iPod/iPhone device, then
check its condition.
If the performance is not improved or slow, reset
your iPod/iPhone.
28
Page 29
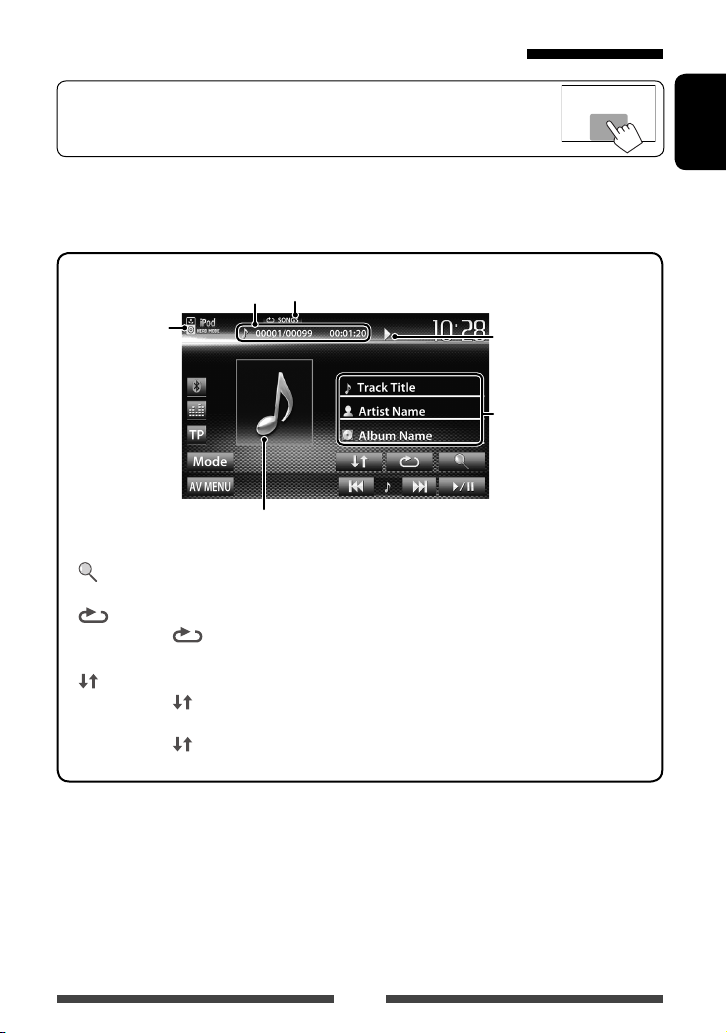
iPod/iPhone playback operations for <Head> mode
• When the operation buttons are not displayed on the screen, touch the area shown on
the illustration.
• To change settings for video playback, ☞ page 38.
• Select “
iPod
” as the source. (☞ page 12)
• Make sure to select <Head> for <iPod Control>. (☞ page 28)
• When you turn on this unit, the iPod/iPhone is charged through the unit.
ENGLISH
Track no./Total track number/
iPod control mode
(☞ page 28)
While playing, Artwork (the picture displayed on the screen of iPod/iPhone) is shown if the song
contains the Artwork (☞ page 28).
[ ]
Playing time
Displays the Music/Video menu on
the iPod/iPhone. (☞ page 30)
[
Selects Repeat playback mode. *
]
• SONGS: Functions the
same as “Repeat One.”
[
] Selects R andom playback mode. *
• SONGS: Functions the same
as “Shuffle Songs.”
ALBUMS: Functions the
•
Playback mode (☞ below)
[6] Starts/pauses playback.
[4] [¢]
1
[Mode] Changes the settings for iPod
1
[AV MENU] Displays <AV Menu> screen.
• Selects a track/video. *2 (Press)
• Reverse/forward search. (Hold)
playback. (☞ page 28)
same as “Shuffle Albums.”
• To watch the video, select an item on the list of the Video menu. (☞ page 30)
1
*
To cancel random and repeat mode, press the button repeatedly until the indicator disappears.
2
You cannot resume playback for video sources.
*
Playback status ( 3:
play/8: pause)
Song/video information
• Touching an information bar
scrolls the text if not all of
the text is shown.
29
Page 30
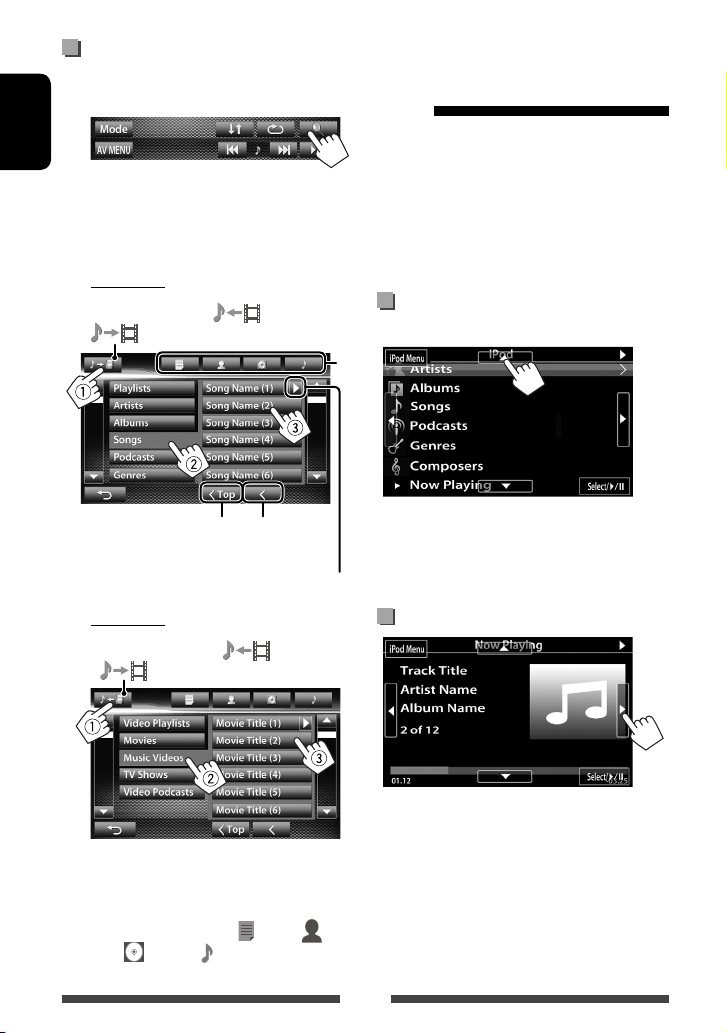
Selecting a track/video from menu
on the iPod/iPhone
1
ENGLISH
2 Select the menu (Music or Video) (1), a
category (2), then a desired item (3).
• Select the item in the selected layer until a
desired track starts playing.
Music menu:
Switches between Music ( ) and Video
( )
iPod/iPhone playback operations for <iPod Out> mode
• Connect the iPod touch/iPhone using KS-U30
(separately purchased). (☞ Installation/Connection
Manual)
• Select <iPod> for <AV Input> setting. (☞page 27)
• Make sure to select <iPod Out> for <iPod
Control>. (☞ page 28)
iPod
• Select “
*
” as the source. (☞ page 12)
Selecting a track from the menu on
the iPod/iPhone
Returns to the top layer
Video menu:
Switches between Music ( ) and Video
( )
• Available categories differ depending on the type of
your iPod/iPhone.
* You can switch to the top of the category by pressing
the corresponding tab: Playlist (
Albums (
) or Songs( ).
Returns to the
previous layer
Plays all items in the layer
), Artist ( ),
[5] [∞] Selects a category.
[Select/6] Confirms the selection.
[iPod Menu] Returns to the previous layer.
Operations during playback
[2] [3] Skips to the previous/next track.
[Select/6] Starts/pauses playback.
[iPod Menu] Displays the menu.
30
Page 31

Using an App of iPod touch/iPhone
You can use an App of the connected iPod touch/iPhone on this unit.
• You can operate some functions of an App on the touch panel.
Preparation
• Connect the iPod touch/iPhone using KS-U30 (separately purchased). (☞ Installation/Connection Manual)
• Select <iPod> for <AV Input> setting. (☞page 27)
• For Apps you can use on this unit, visit < http://www3.jvckenwood.com/english/car/>.
1 Start App on your iPod touch/iPhone.
2 Select “
Apps
” as the source.
On <AV Menu> screen:
• When you use an App of the iPod touch or iPhone,
see also page 63 for safety instructions.
Displaying the screen of App while
listening to other source
You can switch the display to screen of App from
connected iPod touch/iPhone while listening to other
• You can also play back the audio/video using iPod/
iPhone itself instead of the unit.
– You can operate for basic playback on the touch
panel.
Audio
source.
Activating input of iPod touch/iPhone to
show buttons for switching display
1 Turn off the AV source.
On <AV Menu> screen:
2 Display <Input> setting screen.
Video
ENGLISH
31
Page 32

3 Select <iPhone> for <Input> setting
on <Navigation Input> screen.
ENGLISH
• When <Input> is set to <iPhone>, [Apps] button
is shown on the <AV Menu> screen, and [
button is shown on the source control screen. You can
display the screen of App by pressing either button.
(☞below)
• When <Input> is set to <iPhone>, <AV Input>
setting is automatically changed and fixed to
<iPod>.
To deactivate, select <Off> for <Input>.
To view the screen of App
On <AV Menu> screen:
or
On source control screen:
]
To cancel the screen of App
32
Page 33

Using other external components
• When the operation buttons are not displayed on the screen, touch the area shown on
the illustration.
• To change settings for video playback, ☞ page 38.
ENGLISH
Source type (“AV-IN” or
[Mode]* Changes the AV-IN name.
[AV MENU] Displays <AV Menu> screen.
* Appears when “
AV-IN
AV-IN name* ( ☞ below)
“Front AUX”)
*
• Press [2] or [3] to select an AV-IN name.
” is selected as the source.
1 Connect an external component.
3.5 mm stereo mini plug
(not supplied)
2 Select “
FrontAUX
(☞ page 12)
” as the source.
3 Turn on the connected component and
start playing the source.
AV-IN Front AUX
You can connect an external component to the LINE IN/
VIDEO IN jacks. (☞ Installation/Connection Manual)
Preparation:
Select <AV-IN> for <AV Input> setting. (☞ page 42 )
• <AV Input> setting can be changed only when
<Input> setting in <Navigation Input> is set to
< Off>.
1 Select “
2 Turn on the connected component and
AV-IN
” as the source. (☞ page 12)
start playing the source.
33
Page 34

Sound adjustment
Using the sound equalization
• The adjustment is memorized for each source until you adjust the sound again. If the source is a disc, the
adjustment is stored for each of the following categories.
ENGLISH
– DVD/DVD-VR/ VCD
– CD
– DivX/MPEG1/MPEG2/MP3/WMA/WAV
• You cannot adjust the sound when the AV source is turned off.
Selecting a preset sound mode
1 On <AV Menu> screen:
or
On the source control screen:
2 Select a sound mode.
Storing your own adjustment
Customizing preset sound mode
1 Select a sound mode. (☞ “Selecting a preset
sound mode”)
2 Adjust the level of each band (1), then
select the subwoofer level (2).
The adjustments are stored and <User> is
activated.
• To finish the procedure, press [
• To make precise adjustments, ☞
].
page 35.
Changes the page
34
Page 35

Adjusting the sound precisely
1 Perform steps 1 and 2 of “Selecting a
preset sound mode,” then...
2 Select a band.
3 Adjust the sound.
Reset Changes level of Low/Mid/
High to 0.
Freq Selects frequency.
Q Adjusts the width of the
frequency.*
Bass Activates/deactivates bass.*
SW Level Adjusts subwoofer level.
The adjustments are overwritten if <User>
setting has been made (☞ page 34), and <User>
is activated.
1
Adjusting the crossover frequency
1 On <AV Menu> screen:
ENGLISH
2
3 Select the item to adjust, then make
adjustments.
Adjusts the crossover for front or rear speakers
(high pass filter).
2
Adjusts the crossover for subwoofer (low pass filter).
• The adjustments are memorized until you
adjust sound again.
• To make adjustment for other bands, repeat
2 and 3.
steps
1
Fixed for “High” band.
*
2
Only for “Low” band.
*
Adjusts the crossover frequency.
Selects the phase for the subwoofer.*
Adjusts the subwoofer level.
* Not selectable when <Freq> is set to <Through>.
35
Page 36

Changing display design
You can change the background, the color of text, touch panel buttons, and monitor panel buttons.
1 On <AV Menu> screen:
ENGLISH
2
3 Select an item (<Backgrnd>, <Text> or
<Buttons>), then change the setting.
Background
Select a background
1
Basic image (default)
You can select a color on the color
palette or adjust the color on the user
color adjuster (☞ the right column)
For setting your favorite scene as the background,
☞ page 37
Select/
2
Dimmer setting: You can make selections for each
dimmer setting—< > (Dimmer On) or < >
(Dimmer Off )
Text/Buttons
Select/adjust the color. (For details, ☞ above.)
Variable color illumination*
• Illumination color changes gradually.
* Appears only for button color selecting screen.
When variable color illumination is selected, you
cannot adjust the color.
adjust the color
Color palette
User color adjuster: You can make your own
color adjustment and store it to <User>
36
Page 37

Using your favorite scene as the
background
While playing a video or JPEG, you can capture an image
and use the captured image as a background.
• You cannot capture copyrighted content and image
from iPod/iPhone.
• When using a JPEG file as the background, make sure
that the resolution is 800 x 600 pixels.
• The color of the captured image may look different
from that of the actual scene.
1 Play back a video or JPEG.
2 Display <Display Design> screen.
(☞page 36)
3
4 Adjust the image.
5 Capture the image displayed on the
screen.
ENGLISH
A confirmation message appears. Press [Yes] to
store the newly captured image. (The existing
image is replaced with the new one.)
• Press [No] to return to the previous screen.
[6] *1Starts/pauses playback.
1
[E] *
[3] Magnifies the scene. (<Full>,
[5] [∞]
[2] [3] *
• To cancel the capture, press [
1
*
2
*
Advances scenes frame-by-frame.
<Zoom1> – <Zoom3>)
Moves the zooming frame.
2
].
Not displayed when playing an external
component connected to LINE IN/VIDEO IN jacks.
Not displayed when <Full> is selected.
37
Page 38

Setting for video playback
You can change the setting for video playback.
Adjusting the picture
ENGLISH
You can adjust the picture quality.
1 Display the adjustment menu.
2 Select Dimmer On (< >) or Off
(<
>).
3 Adjust the picture (–15 to +15).
Adjusts the brightness
Adjusts the contrast
Adjusts the blackness
Adjusts the color
Adjusts the tint *
Adjusts the detail
* Adjustable only when the incoming signal is
NTSC.
38
Page 39

Changing the aspect ratio
You can change the aspect ratio for video playback.
1
2
Zooming the picture
You can zoom the picture (<Full>, <Zoom1> to
<Zoom3>).
• When <Aspect> is set to <Panorama> or
<Auto> (☞ the left column), the picture is zoomed
with the aspect ratio of the <Full> setting.
1
ENGLISH
4:3 signal 16:9 signal
Full*
:
For 16:9 original
pictures
Panorama:
For viewing 4:3
pictures naturally
on the wide screen
Regular* :
For 4:3 original
pictures
Auto: • For “
*
While DivX is played back with <Monitor Type>
set to <16:9> (☞ page 24), the aspect ratio is not set
correctly.
DISC
” / “
USB
”
only: Aspect ratio is
automatically selected to
match to the incoming
signals.
2
[5] [∞] [2] [3]* : Moves the zooming frame.
* Not displayed when <Full> is selected.
• Zooming function cannot be used for some video
sources.
39
Page 40

Using a rear view camera
• To use a rear view camera, the REVERSE GEAR SIGNAL lead connection is required. For connecting a rear view
camera, ☞ Installation/Connection Manual.
Activating the rear view camera
ENGLISH
1 On <AV Menu> screen:
2
To deactivate, select <Off>.
Displaying the picture from the rear
view camera
The rear view screen is displayed when you shift the
gear to the reverse (R) position.
To display the picture from the rear view
camera manually
On <AV Menu> screen:
When displaying the picture from the rear view
camera manually, you can change the setting of the
picture. (☞ page 38)
To cancel the rear view screen
40
Page 41

Setting menu items
• When changing settings for <Amplifier Gain>, <AV Input> and <Input> setting in <Navigation Input>,
turn off the AV source. For other settings, change them when the AV source is turned on.
Menu item Selectable setting/item Initial: Underlined
Fader/Balance Fader : Adjust the front and rear speaker output balance.
♦ F6 to R6; Initial 0
• When using a two-speaker system, set the fader to the center (0).
Balance : Adjust the left and right speaker output balance.
♦ L6 to R6; Initial 0
Press [ 5/∞/2/3 ] or drag [
• To clear the adjustment, press [Center].
Equalizer
Loudness You can activate/deactivate loudness.
Audio
Crossover
Volume Adjust
Amplifier Gain *
Speaker Select
* To change the setting, turn off the AV source by pressing [AV Off ] on <AV Menu> screen beforehand.
Change the sound mode or adjust and store the equalization for each source.
(☞ page 34)
♦ Flat/Natural/Dynamic/Vocal Boost/Bass Boost/Vibrant/User
♦ On
♦ Off
Adjust the crossover frequency. (☞ page 35)
Adjust and store the auto-adjustment volume level for each source. (For
discs, the adjustment is stored for each of the following categories: DVD/
DVD-VR, VCD/CD, and DivX/MPEG1/MPEG2/MP3/WMA/WAV.) The volume
level will automatically increase or decrease when you change the source.
♦ –15 to +6; Initial 0
♦ On : Activates the built-in amplifier.
♦ Off : Deactivates the built-in amplifier.
Select the size of the connected speaker.
♦ Standard/Narrow/Middle/Wide
: Boost low and high frequencies to produce a well-
balanced sound at a low volume level.
: Cancels.
] to adjust.
ENGLISH
41
Page 42
Menu item Selectable setting/item Initial: Underlined
Dimmer ♦ Auto
: Dims the screen and button illumination when you turn
on the headlights.
• The ILLUMI lead connection is required. (☞
ENGLISH
♦ On
♦ Off
♦ Dimmer
Time Set
Installation/Connection Manual)
: Activates dimmer.
: Cancels.
: Sets the Dimmer O n ( )/Off ( ) times.
• Press [5] or [∞] to set the time.
Display Design Change the display design (background, the color of text, touch panel
buttons, and monitor panel buttons). (☞ page 36)
OSD Clock
Demonstration
Display
Scroll
♦ On
♦ Off
♦ On
♦ Off
♦ Auto
♦ Once
♦ Off
: Displays the clock while a video source is played back.
: Cancels.
: Activates the demonstration on the screen.
: Cancels.
: Repeats scrolling.
: Scrolls the displayed information once.
: Cancels.
• Touching an information bar scrolls the text regardless of this setting.
GUI Adjust Adjust the brightness and blackness of the screen.
Press [Enter] to display the setting screen, select Dimmer On ( )/Off ( ),
then change the following settings:
♦ Brightness
: Adjusts brightness (–15 to +15; Initial 00 for Dimmer
On/+15 for Dimmer Off).
NTSC/PAL
AV Input *
♦ Black
Select the color system of the external monitor.
♦ NTSC, PAL
1
You can determine the use of LINE IN/VIDEO IN jacks.
♦ AV-IN *
: Adjusts blackness (–15 to +15; Initial 00).
2
: Selec t to use the external component connected to
LINE IN/VIDEO IN jacks or the iPod/iPhone connected by
using USB 2.0 cable. (☞ pages 27 and 33)
Input
♦ iPod
♦ BT*
: Selec t to use the iPod/iPhone connected by using JVC
2 *3
KS-U30. (☞ page 27)
: Selec t when playing back the Bluetooth audio player
using the Bluetooth adapter (KS-BTA100). (☞ page 56)
1
To change the setting, turn off the AV source by pressing [AV Of f] on <AV Menu> screen beforehand. <AV Input>
*
setting can be changed only when <Input> setting in <Navigation Input> is set to <Off>.
2
When <AV Input> is set to <AV-IN> or <BT>, the video from iPod/iPhone is not displayed on the screen.
*
3
Only for KW-AV60.
*
42
Page 43

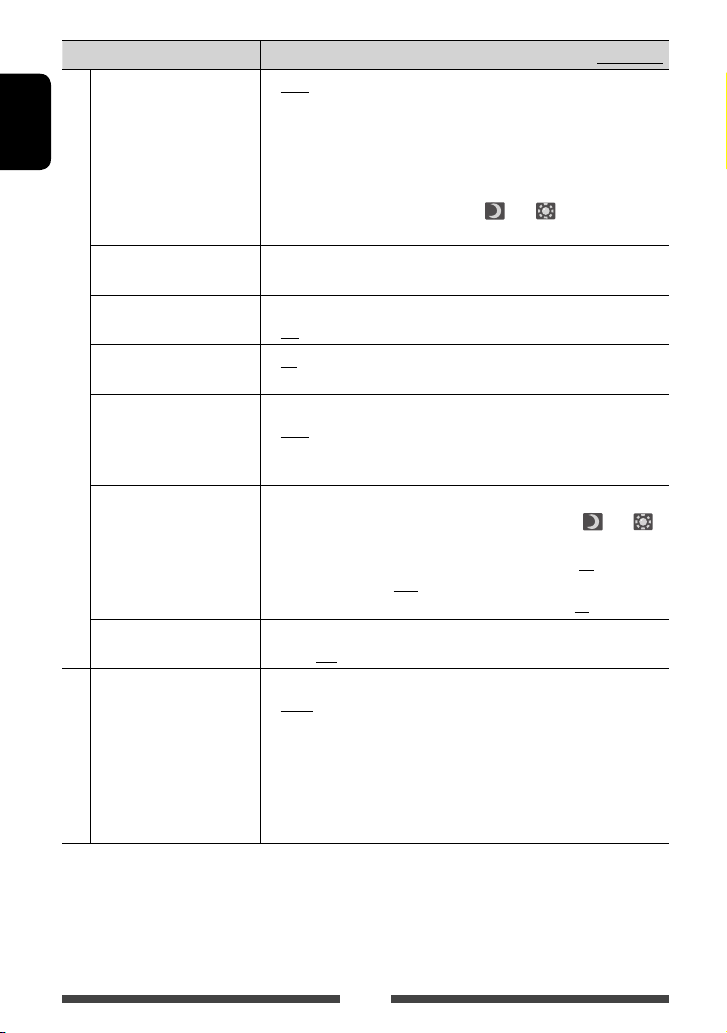
Menu item Selectable setting/item Initial: Underlined
Camera Input ♦ On
♦ Off
Input
Navigation Input Change the settings for displaying the screen of App from connected iPod
touch/iPhone . (☞ page 31 )
• <Navigation Mute> is not used for this unit .
Language Select the text language used for on-screen information.
♦ English /Español/Français/Deutsch/Italiano/Nederlands/Svenska/
Dansk/Руccĸий /Português
• “Please Power Off” appears when the setting is changed. Turn off the
power, then turn on to enable the change.
♦ GUI
Language
Time Set
Beep
User Profile
System
Touch Panel Adjust
Initialize Initialize all settings you have made. Hold [Enter] to initialize the settings.
DivX® VOD
System Information Displays the version information on the software. You can update the
Adjust the clock time. (☞ page 8)
♦ On
♦ Off
You can memorize, recall, or clear the settings you have made. (☞ page 44)
Adjust the touch position of the buttons on the screen. (☞ page 45)
• After initializing the settings, adjust the settings on the <Initial
Settings> screen. (☞ page 7)
This unit has its own Registration Code. Once you have played back a file
with which the Registration Code recorded, this unit’s Registration Code is
overwritten for copyright protection.
• Press [Enter] to display the information.
• To return to the previous screen, press [OK].
software. (☞ page 45)
: Displays the picture from the rear view camera when
you shift the gear to the reverse (R) position.
: Cancels.
: Selec t a language (<English> or <Local>: the
language selected above) used for displaying operation
buttons and menu items.
: Activates the key-touch tone.
: Cancels.
ENGLISH
43
Page 44

Memorizing/recalling the settings
You can memorize the following settings:
• Settings on <Settings> screen: Fader/Balance, Equalizer, Loudness, Crossover (HPF/LPF/SW Level
settings), Volume Adjust, Speaker Select, Dimmer, Display Design , AV Input, Camera Input, Navigation
AV-IN
• Settings for “
ENGLISH
Memorizing your settings
1 On <Settings> screen:
2
”: AV-IN Name
Recalling your settings
• Turn off the AV source by pressing [AV Off] on <AV
Menu> beforehand.
1 On <User Profile> screen (☞ step 2 on the left
column):
A confirmation message appears. Press [Yes].
2 Finish the procedure.
Clearing your settings
1 On <User Profile> screen (☞ step 2 on the left
column):
3 Select an item (<User1>, <User2> or
<User3>) to memorize the settings.
A confirmation message appears. Press [Yes].
4 Finish the procedure.
2
Clears all settings memorized in <User1>,
<User2> and < User3>
A confirmation message appears. Press [Yes].
3 Finish the procedure.
44
Page 45
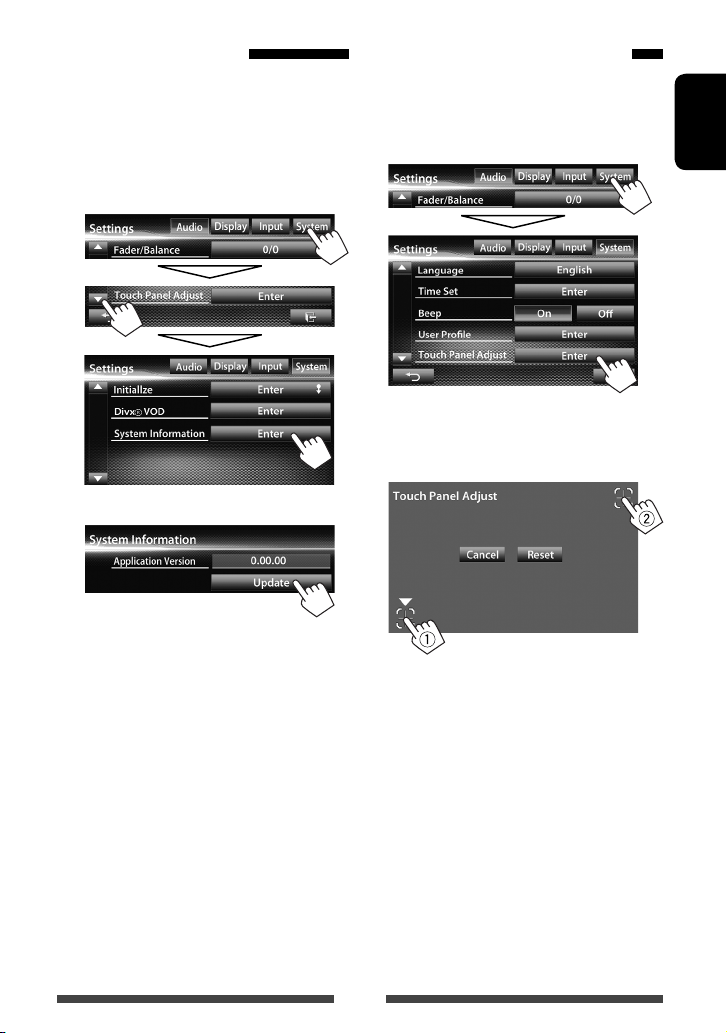
Updating the system
You can update the system by connecting a USB device
containing an update file.
1 Create an update file, copy it to a USB
device, and connect it to the unit.
• To connect a USB device, ☞ page 25.
2 On <Settings> screen:
3
Adjusting the touch position
You can adjust the touch position on the touch panel if
the position touched and the operation performed do
not match.
1 On <Settings> screen:
2 Touch the center of the marks at the
lower left and at the upper right as
instructed.
ENGLISH
It may take a while.
If the update has been completed successfully,
“Update Completed” appears. Reset the unit.
• If the update has failed, turn the power off and then
on, and retry the update.
• Even if you have turned off the power during the
update, you can restart the update after the power
is turned on. The update will be performed from the
beginning.
• To cancel the current operation, press [Cancel].
• To reset to the initial setting, press [Reset].
45
Page 46

BLUETOOTH OPERATIONS
Information for using Bluetooth® devices
• Some Bluetooth devices may not be connected to
ENGLISH
this unit depending on the Bluetooth version of the
device.
• This unit may not work for some Bluetooth devices.
• Connecting condition may vary depending on
circumstances around you.
• For some Bluetooth devices, the device is
disconnected when the unit is turned off.
Bluetooth operations for KW-AV60BT
Bluetooth is a short-range wireless radio communication technology for the mobile device such as mobile phones,
portable PCs, and other devices. The Bluetooth devices can be connected without cables and communicate with each
other.
• Refer to pages i and ii at the end of manual to check the countries where you may use the Bluetooth® function.
Bluetooth Information: If you wish to
receive more information about Bluetooth, visit
the following JVC web site: <http://www3.
jvckenwood.com/english/car/> (English website
only)
Bluetooth profile
This unit supports the following Bluetooth profiles;
• HFP (Hands-Free Profile) 1.5
• OPP (Object Push Profile) 1.1
• A2DP (Advanced Audio Distribution Profile) 1.2
• AVRCP (Audio/Video Remote Control Profile) 1.3
• PBAP (Phone Book Access Profile) 1.0
When shipped from the factory, the Bluetooth
adapter (KS-UBT1) is attached.
Bluetooth adapter
(KS-UBT1)
Icons for Bluetooth button
: No device is connected.
: A Bluetooth audio player is
connected.
: A Bluetooth mobile phone is
connected.
: Both a Bluetooth mobile phone and
audio player are connected.
• Keep the Bluetooth adapter attached when using
the Bluetooth function.
• This port is designed for the use with KS-UBT1
only. Other Bluetooth adapters or USB devices
cannot be used.
46
Page 47

Connecting Bluetooth devices
Connecting a new Bluetooth device
for the first time
When you connect a Bluetooth device to the unit
for the first time, make pairing between the unit
and the device. Pairing allows Bluetooth devices to
communicate each other.
To make pairing, you may need to enter the PIN
(Personal Identification Number) code of your Bluetooth
device you want to connect.
• Once the connection is established, it is registered in
the unit even if you reset the unit. Up to 5 devices can
be registered in total.
• Only one device for Bluetooth phone and one for
Bluetooth audio can be connected at a time.
• To use the Bluetooth function, you need to turn on
Bluetooth function of the device.
1 Display the Bluetooth setting screen.
On <AV Menu> screen:
Mobile phone
Audio player
For connecting a Bluetooth mobile phone
2 Change the PIN code.
• If you skip changing the PIN code, go to step 3.
ENGLISH
PIN code (initial: 0000)
Deletes last character
3
4
The phone setting screen is displayed.
For connecting a Bluetooth audio player
<Mode> screen is displayed.
Cancel
5 Operate the Bluetooth device to
connect.
“Connected” appears. Press [OK] to confirm the
operation.
Now connection is established and you can use the
Bluetooth device through the unit.
47
Page 48

Connecting/disconnecting a
registered Bluetooth device
1 Display the Bluetooth setting screen.
(☞ page 47)
• For Bluetooth mobile phone: Phone setting
ENGLISH
screen
• For Bluetooth audio player: <Mode> screen
2 To connect
Select the device you want to connect.
To disconnect
A confirmation message appears. Press [Yes].
Deleting a registered Bluetooth
device
1 On <Connect Device> screen (☞ Step 2 on the
left column)
:
2 Select a device to delete the
registration.
“Connected” appears. Press [OK] to confirm the
operation.
• All registered devices (mobile phone and audio
player) are listed on <Connect Device>.
– Selectable items depend on the device you
are operating.
• When a mobile phone is connected, holding
] on the source control screen switches
[
between the last connected mobile phone and
current one.
A confirmation message appears. Press [Yes].
To detach the Bluetooth adapter
“JV C ”
• Store the Bluetooth adapter in the supplied bag.
• When inserting the Bluetooth adapter again,
attach it firmly with the JVC logo facing up.
48
Page 49

Using the Bluetooth mobile phone
Receiving a call
When a call comes in...
Status of the device/Battery
reminder (only when the
information comes from the device)
Rejects the call
• Phone operation is not available while the picture
from the rear view camera is displayed. (☞ page 40)
When <Auto Answer> is set to <On>
The unit answers the incoming call automatically.
(☞ page 55)
Call information
(if acquired)
Adjusting the volume of
microphone
While talking...
ENGLISH
• This adjustment does not affect the volume level of
the other sources.
• To adjust the volume of calls/earpiece, turn the
volume adjustment knob.
Switching between handsfree mode
and phone mode
While talking...
Ending a call
While talking...
Each time you press the button, the talking method is
switched (
mode).
: handsfree mode / : phone
Checking SMS reception
If the mobile phone is compatible with SMS (Short
Message Service), the unit tells you a message has been
received.
To read a received message, operate the mobile
phone after stopping the car in a safe place.
• You cannot read, edit, or send a message through
the unit.
• For some mobile phones, the notification message
may not be shown even if the SMS function is
supported.
49
Page 50

Making a call
1 On the source control screen:
ENGLISH
Direct number entry
Deletes last character
• You can also display the phone control screen by
Phone] on <AV Menu> screen.
pressing [
2 Select a method to make a call.
Direct number entry
☞the right column)
(
Preset list (For presetting, ☞ page 52)
Voice dialing (
☞ the right column)
To reduce echo/noise while talking
Make sure that NR/EC (Noise reduction/Echo cancel)
function is activated on the screen while talking.
Preset list/phone book/call
☞ page 51)
lists (
Hold: Adds “+”
Presets the entered phone number on
the preset list (☞ page 52)
• You can enter up to 32 numbers.
Voice Dialing
• Available only when the connected mobile phone has
the voice recognition system.
Speak the name you want to call.
To cancel, press [Cancel].
Select <On> to reduce the noise and cancel the echo
while talking.
50
Page 51

Using the preset list/phone book/call lists
1
2 Select the initial.
[Preset] From preset list
[
]
From dialled call list.
[
[
[
From received call list.
]
From missed call list.
]
From phone book.
]
• For copying the phone book,
☞ page 52.
2
To use the A to Z search on phone book
When phone book list screen is displayed, you can
search by initial.
1
ENGLISH
Displays the other letters
3 Select a phone number from the list.
To display the details of an entry
When phone book list screen is displayed, you can
display the details of an entry and select a phone
number if several phone numbers are registered.
1 Display the details of the desired entry.
2 Select a phone number to call.
51
Page 52

Presetting the phone numbers
You can preset up to 6 phone numbers.
1 On the source control screen:
ENGLISH
2 Select an item from phone book/call
lists.
3 Select a phone number.
(Hold)
4 Select a preset number to store.
Copying the phone book
You can copy the phone book memory of a mobile
phone into the unit (up to 400 entries).
1 On the source control screen:
2
PIN code (initial: 0000)
• You can also preset a phone number entered on the
direct number entry screen by pressing [Save]. (☞
page 50)
Numbers of the phone book entries copied
3 Operate the target mobile phone.
• Refer to the instruction manual supplied with
your mobile phone.
• To cancel the transfer, press [Finish].
4 Finish the procedure.
The phone book memory is copied from the
mobile phone.
52
Page 53

Deleting the phone number entries
in the unit
1 Display the preset list/phone book/call
list you want to delete.
(☞ page 51)
2
• You cannot delete data when <Phone> is
selected.
3 Select the item you want to delete.
Delete all the numbers/names in the selected list
A confirmation message appears. Press [Yes].
About mobile phones compatible
with Phone Book Access Profile
(PBAP)
If your mobile phone supports PBAP, the phone book
and call lists are automatically copied to the unit when
the mobile phone is connected.
• Phone book: up to 5 000 entries
• Dialled calls, received calls, and missed calls: up to 50
entries each
To display the phone book/call lists of the
mobile phone or the unit
Connected mobile phone
This unit
ENGLISH
53
Page 54

Using the Bluetooth audio player
• To register a new device, ☞ page 47.
• To connect/disconnect a device, ☞ page 48.
ENGLISH
Status of the device/Battery reminder
(only when the information comes
from the device)
Playback mode *1 (☞ below)
Track no./Playing time *
1
Playback status
(3: play / 8: pause) *
☞ page 46
Tag data (current track title/artist
name/album title) *
• Touching an information bar
scrolls the text if not all of the
text is shown.
• The operation buttons, indications and information displayed on the screen differ depending on the
connected device.
[8] Pauses playback.
Selects Repeat playback mode. *
]
[
[ ] Selects Random playback
mode. *
1 *2
[3] Starts playback.
[4] [¢] • Selects track. (Press)
1 *2
• Reverse/forward search. (Hold)
[ Mode] Displays the Bluetooth setting
screen. (☞ page 55)
[ AV MENU] Displays <AV Menu> screen.
1
*
Available only for the devices compatible with AVRCP 1.3.
2
To cancel random and repeat mode, press the button repeatedly until the indicator disappears.
*
1
1
54
Page 55

Bluetooth device settings
Mobile phone
Menu items S electable setting/item Initial: Underlined
Connection
♦ Connect
♦ Disconnect
: ☞ page 48
: ☞ page 48
PIN Code Changes the PIN code of the unit.
• Touch the current PIN code, enter a new PIN code, then press [Save].
Device Name Shows the device name to be shown on the Bluetooth device—JVC Unit.
Device Address Shows the MAC address of the unit.
1
Phone Device*
Audio Device*
Auto connect
Shows the phone device name.
2
Shows the audio device name.
♦ On
: The connection is automatically established with the last connected
Bluetooth device when the unit is turned on.
HF/Audio
Output
♦ Off
Select the speakers used for Bluetooth (both phone use and audio player).
♦ Front
♦ All
: Cancels.
: From front speakers only.
: From all speakers.
Initialize Hold [Enter] to clear the registration of Bluetooth devices and memory of the preset list and
call lists.
Auto Answer *
1
♦ On
♦ Off
: The unit answers the incoming calls automatically.
: The unit does not answer the calls automatically. Answer the calls
manually.
SMS Notify*
1
♦ On
: The unit informs you of the arrival of a message by ringing and
displaying “Receiving Message.”
Ring Mode*
1
♦ Off
♦ System
♦ Phone
: The unit does not inform you of the arrival of a message.
: Selec ts the ring tone set on the unit.
: Selec ts the ring tone set on the mobile phone. (This function may not
work depending on the mobile phone.)
Ring Tone
Change*
1
*
Appears only for the phone setting screen.
2
Appears only for <Mode> screen while “
*
When <Ring Mode> is set to <System>, press [Enter], then select the ring tone for
1
received calls and SMS from <Tone1>, <Tone2>, <Tone3>.
♦ Call Tone
♦ Message Tone
: Selec ts the ring tone for phone calls.
: Selec ts the ring tone for SMS.
BT Audio
Bluetooth audio player
BT Audio
On “
” source control screen:
” is selected as the source.
ENGLISH
55
Page 56

Bluetooth operations for KW-AV60
For Bluetooth operations, it is required to connect the Bluetooth adapter, KS-BTA100 (separately purchased) to the
LINE IN terminals on the rear of the unit. (☞ the Installation/Connection Manual)
• KS-BTA100 is not available in some countries. Please contact your dealer where you purchased this unit.
ENGLISH
• For details, refer also to the instructions supplied with the Bluetooth adapter and the Bluetooth device.
• Operations may be different according to the connected device.
Preparation
1 Register (pair) a Bluetooth device with KS-BTA100.
• Refer to the instructions manual supplied with KS-BTA100.
2 Select <BT> for <AV Input> setting. (☞ page 42)
Using the Bluetooth mobile phone
KS-BTA100
(Low) (High)
(Press)
Microphone
(Hold)
Adjusting the microphone volume
Volume level: High/Normal (initial)/Low
• Receiving a call
When a call comes in...
• Making a call
Making a call to the last connected number from your phone.
• Switching between handsfree and phone
While talking...
• Ends/rejects call
• Voice dialing
Voice dialing is available only when the connected mobile phone
has the voice recognition system.
About microphone volume:
• When you turn off the power of the unit, the volume level changes to Normal.
Using the Bluetooth audio player
1 Select “
KS-BTA100
Bluetooth
” as the source. (☞ page 12)
Starts playback/pauses.
• If playback does not start, operate the Bluetooth audio player to
start playback.
• Selects track. (Press)
• Fast-forwards or reverses the track. (Hold)
56
Page 57

REFERENCE
Using the remote controller
To use the remote controller, purchase RM-RK252P separately.
Installing the batteries
R03/LR03/AAA
Insert the batteries into the remote controller by
matching the polarity (+ and –) correctly.
Caution:
• Danger of explosion if battery is incorrectly replaced.
Replace only with the same or equivalent type.
• Battery shall not be exposed to excessive heat such as
sunshine, fire, or the like.
If the effectiveness of the remote controller
decreases, replace the batteries.
Before using the remote controller:
• Aim the remote controller directly at the remote
sensor on the unit.
• DO NOT expose the remote sensor to bright light
(direct sunlight or artificial lighting).
The unit is equipped with the steering wheel
remote control function.
• See the Installation/Connection Manual
• Operations may differ depending on the types of
Operations using the remote controller
Button Operations
Attenuates/restores the sound.
ATT /
DISP Does not function for this unit.
5 / ∞
/
• Selects the preset stations.
• Selects a title/item/folder.
• Searches for stations
automatically.
• Searches for stations manually.
(Hold)
• Selects track.
• Reverse search/forward search.
(Hold)
Button Operations
1 / ¡
ENGLISH
(separate volume) for connection.
the steering wheel remote control.
• Reverse search/forward search.
• DVD-Video/DVD-VR/VCD: Slow
motion playback (during pause).
– DVD-VR/VCD: Reverse slow
motion does not work.
57
Page 58

Button Operations
• Adjusts the volume level.
VOL +/VOL –
• “2nd VOL” function does not
work for this unit.
ENGLISH
SOURCE Selects the source.
6
PHONE /
Starts/pauses*
Answers incoming calls.*
1
playback.
• Selects the bands.
BAND / 7/
• Stops playback.
• Ends the call.
• Pauses playback of Bluetooth
2
audio.*
• Enters a number while holding
0 – 9
(☞ page 59)
SHIFT.
• “SETUP” function does not work
for this unit.
1 – 6
Enters preset station number while
holding SHIFT.
Changes the aspect ratio.
ASPECT
• To check the current aspect ratio
setting, operate on the touch
panel. (☞ page 39)
RETURN Returns to the previous screen.
• DVD-Video: Shows the disc
TOP M
(☞ page 59)
menu.
• DVD-VR: Shows the Original
Program screen.
• VCD: Resumes PBC playback.
• DVD-Video: Shows the disc
MENU
(☞ page 59)
menu.
• DVD-VR: Shows the Playlist
screen.
• VCD: Resumes PBC playback.
• DVD-Video: Makes selection/
% / fi/@ / #
settings.
: Skips back or forward by
• DivX
about 5 minutes.
Button Operations
ENT Confirms selection.
OSD/
DUAL/
Does not function for this unit.
Does not function for this unit.
SHIFT Functions with other buttons.
2
• Enters direct search mode when
pressed with SHIFT button.
(☞ page 59)
DIRECT/CLR
• Erases the misentry when
pressed with SHIFT button.
• “SURROUND” function does not
work for this unit.
1
Does not work while listening to Bluetooth audio.
*
2
Only for K W-AV60BT.
*
58
Page 59

Searching for an item directly
Tuner frequency
1 Press DIRECT while holding SHIFT to enter the
search mode.
2 Press number buttons while holding SHIFT to enter
a frequency.
• To erase a misentry, press CLR (clear) while
holding SHIFT.
3 Press ENT to confirm the entry.
DVD-Video/DVD-VR/DivX/MPEG1/MPEG2/JPEG/
MP3/WMA/WAV/VCD/CD
1 Press DIRECT while holding SHIFT to enter the
search mode.
• Each time you press DIRECT, the item to search
for changes.
2 Press a number button while holding SHIFT to
select a desired item.
• To erase a misentry, press CLR (clear) while
holding SHIFT.
3 Press ENT to confirm the selection.
Various disc operations
Using the disc menu
• DVD-Video/DVD-VR
1 For DVD Video, press TOP M or MENU.
For DVD-VR, press...
TOP M: To display Original Program
MENU: To display Playlist
2 Press % / fi/@ / # to select an item you want to
play.
3 Press ENT to confirm the selection.
• VCD
During PBC playback...
1 Press DIRECT while holding SHIFT to enter the
search mode.
2 Press a number button while holding SHIFT to
select the item you want to play.
3 Press ENT to confirm the selection.
• To return to the previous screen, press RETURN.
To cancel PBC playback
1 Press 7 to stop PBC playback.
2 Press DIRECT while holding SHIFT.
3 Press a number button while holding SHIFT to
select a desired track.
4 Press ENT to confirm the selection.
ENGLISH
• To resume PBC, press TOP M or MENU.
59
Page 60

Maintenance
Caution on cleaning the unit
Do not use any
solvent (for
ENGLISH
example, thinner,
benzine, etc.),
detergent, or
insecticide. This may damage the monitor or the unit.
Recommended cleaning method:
Gently wipe the panel with a soft, dry cloth.
How to clean the connector
Frequent detachment
will deteriorate the
connectors.
To minimize this
possibility, periodically
wipe the connectors
with a cotton swab or cloth moistened with alcohol,
being careful not to damage the connectors.
Moisture condensation
Moisture may condense on the lens inside the unit in
the following cases:
• After starting the heater in the car.
• If it becomes very humid inside the car.
Should this occur, the unit may malfunction. In this
case, eject the disc and leave the unit turned on for a
few hours until the moisture evaporates.
Connectors
To keep discs clean
A dirty disc may not play correctly.
If a disc does become dirty, wipe it with a
soft cloth in a straight line from center to
edge.
• Do not use any solvents (for example, conventional
record cleaner, spray, thinner, benzine, etc.) to clean
discs.
To play new discs
New discs may have some rough spots
around the inner and outer edges. If
such a disc is used, this unit may reject
the disc.
To remove these rough spots, rub the edges with a
pencil or ball-point pen, etc.
Do not use the following discs:
8 cm CD Warped disc
Sticker and sticker
residue Stick-on label
How to handle discs
When removing a disc from
its case, press down the center
holder of the case and lift the
disc out, holding it by the edges.
• Always hold the disc by the
edges. Do not touch its recording surface.
When storing a disc in its case, gently insert the
disc around the center holder (with the printed surface
facing up).
• Make sure to store discs in their cases after use.
Center holder
60
Unusual shape
Transparent or semi-
transparent parts on its
recording area
C-thru Disc (semi-
transparent disc)
Page 61

More about this unit
File playback
Playing DivX files (for discs only)
• This unit can play back DivX files with the extension
code <.divx>, <.div>, or <.avi> (regardless of the
letter case—upper/lower).
• Audio stream should conform to MP3 or Dolby
Digital.
• The file encoded in the interlaced scanning mode
may not be played back correctly.
• The maximum bit rate for video signals (average) is
4 Mbps.
Playing MPEG1/MPEG2 files
• This unit can play back MPEG1/MPEG2 files with the
extension code <.mpg>, <.mpeg>, or <.mod>.
• The stream format should conform to MPEG system/
program stream.
The file format should be MP@ML (Main Profile at
Main Level)/SP@ML (Simple Profile at Main Level)/
MP@LL (Main Profile at Low Level).
• Audio streams should conform to MPEG1 Audio
Layer-2 or Dolby Digital.
• The maximum bit rate for video signals (average) is
4 Mbps.
Playing JPEG files
• This unit can play back JPEG files with the extension
code <.jpg>, or <.jpeg>.
• This unit can play back JPEG files that are at 32 x 32 to
8 192 x 7 680 resolution.
It may take time to display the file depending on its
resolution.
• This unit can play back baseline JPEG files.
Progressive JPEG files or lossless JPEG files cannot be
played.
Playing MP3/WMA/WAV files
• This unit can play back files with the extension code
<.mp3>, <.wma>, or <.wav> (regardless of the
letter case—upper/lower).
• This unit can play back the files meeting the
conditions below:
– Bit rate:
MP3/WMA: 32 kbps — 320 kbps
– Sampling frequency:
48 kHz, 44.1 kHz, 32 kHz (for MPEG1)
24 kHz, 22.05 kHz, 16 kHz (for MPEG2)
48 kHz, 44.1 kHz, 32 kHz, 22.05 kHz (for WMA)
44.1 kHz (for WAV )
• This unit can show ID3 Tag Version
1.0/1.1/2.2/2.3/2.4 (for MP3).
• This unit can also show WAV/WMA Tag.
• This unit can play back files recorded in VBR (variable
bit rate).
• Files recorded in VBR have a discrepancy in elapsed
time indication.
• This unit cannot play back the following files:
– MP3 files encoded with MP3i and MP3 PRO
format.
– MP3 files encoded with Layer 1/2.
– WMA files encoded with lossless, professional, and
voice format.
– WMA files which are not based upon Windows
Media® Audio.
– WMA files copy-protected with DRM.
• This unit can display the jacket picture meeting the
conditions below:
– Picture size: 32 x 32 to 1 232 x 672 resolution
– Data size: less than 650 KB.
− File type: JPEG
ENGLISH
We bear no responsibility for any loss of data
in an iPod/iPhone and USB mass storage
class device while using this unit.
61
Page 62

Sound signals emitted through the rear terminals
Through the analog terminals (Speaker out/REAR OUT/FRONT OUT)
2-channel signal is emitted. When playing multi-channel encoded disc, multi-channel signals are downmixed.
Language codes (for DVD/DVD-VR/DivX language selection)
ENGLISH
Code Language Code Language Code Language Code Language
AA Afar GL Galician MI Maori SO Somali
AB Abkhazian GN Guarani MK Macedonian SQ Albanian
AF Afrikaans GU Gujarati ML Malayalam SR Serbian
AM Ameharic HA Hausa MN Mongolian SS Siswati
AR Arabic HI Hindi MO Moldavian ST Sesotho
AS Assamese HR Croatian MR Marathi SU Sundanese
AY Aymara HU Hungarian MS Malay (MAY) SW Swahili
AZ Azerbaijani HY Armenian MT Maltese TA Tamil
BA Bashkir IA Interlingua MY Burmese TE Telugu
BE Byelorussian IE Interlingue NA Nauru TG Tajik
BG Bulgarian IK Inupiak NE Nepali TH Thai
BH Bihari IN Indonesian NO Nor wegian TI Tigrinya
BI Bislama IS Icelandic OC Occitan TK Turkmen
BN Bengali, Bangla IW Hebrew OM (Afan) Oromo TL Tagalog
BO Tibetan JA Japanese OR Oriya TN Setswana
BR Breton JI Yiddish PA Panjabi TO Tonga
CA Catalan JW Javanese PL Polish TR Turkish
CO Corsican KA Georgian PS Pashto, Pushto TS Tsonga
CS Czech KK Kazakh QU Quechua TT Tatar
CY Welsh KL Greenlandic RM Rhaeto-Romance TW Twi
DZ Bhutani KM Cambodian RN Kirundi UK Ukrainian
EL Greek KN Kannada RO Rumanian UR Urdu
EO Esperanto KO Korean (KOR) RW Kinyarwanda UZ Uzbek
ET Estonian KS Kashmiri SA Sanskrit VI Vietnamese
EU Basque KU Kurdish SD Sindhi VO Volapuk
FA Persian KY Kirghiz SG S angho WO Wolof
FI Finnish LA Latin SH Serbo-Croatian XH Xhosa
FJ Fiji LN Lingala SI Singhalese YO Yoruba
FO Faroese LO Laothian SK Slovak ZU Zulu
FY Frisian LT Lithuanian SL Slovenian
GA Irish LV Latvian, Lettish SM Samoan
GD Scots Gaelic MG Malagasy SN Shona
62
Page 63

• Manufactured under license from Dolby Laboratories. Dolby and the double-D symbol are trademarks of Dolby
Laboratories.
• “DVD Logo” is a trademark of DVD Format/Logo Licensing Corporation registered in the US, Japan and other
countries.
• DivX®, DivX Certified® and associated logos are trademarks of Rovi Corporation or its subsidiaries and are used
under license.
ABOUT DIVX VIDEO: DivX® is a digital video format created by DivX, LLC, a subsidiary of Rovi Corporation. This is
an official DivX Certified® device that plays DivX video. Visit divx.com for more information and software tools to
convert your files into DivX videos.
ABOUT DIVX VIDEO-ON-DEMAND: This DivX Certified® device must be registered in order to play purchased DivX
Video-on-Demand (VOD) movies. To obtain your registration code, locate the DivX VOD section in your device
setup menu. Go to vod.divx.com for more information on how to complete your registration.
• Microsoft and Windows Media are either registered trademarks or trademarks of Microsoft Corporation in the
United States and/or other countries.
• “Made for iPod,” and “Made for iPhone” mean that an electronic accessory has been designed to connect
specifically to iPod, or iPhone, respectively, and has been cer tified by the developer to meet Apple performance
standards. Apple is not responsible for the operation of this device or its compliance with safety and regulatory
standards. Please note that the use of this accessory with iPod, or iPhone may affect wireless performance.
iPhone, iPod, iPod classic, iPod nano, and iPod touch are trademarks of Apple Inc., registered in the U.S. and other
countries.
• This item incorporates copy protection technology that is protected by U.S. patents and other intellectual property
rights of Rovi Corporation. Reverse engineering and disassembly are prohibited.
• Font for this product is designed by Ricoh.
Only for KW-AV60BT
The Bluetooth word mark and logos are owned by the Bluetooth SIG, Inc. and any use of such marks by
•
JVCKENWOODCorporation is under license. Other trademarks and trade names are those of their respective owners.
ENGLISH
SAFETY INSTRUCTIONS
Use of the iPhone Navigation App is only permitted if the traffic conditions are suitable and you are absolutely
sure that no risk, obstruction or injury will be incurred to you, your passengers or other road users. The
requirements of the Road Traffic Regulations must always be followed and may vary by state. The destination
must not be entered while the vehicle is in motion.
iPhone Navigation guidance may not be applicable to the current situation because of changes in traffic
conditions (e.g. changes in tollroads, principal roads, one-way traffic, or other traffic regulations). In this case,
observe the current traffic signs or regulations.
• Traffic signs should be observed carefully while driving using the iPhone Navigation App. iPhone Navigation
App is only an aid. Driver must always decide whether or not to heed the information provided. We do not
accept liability for erroneous data provided by the iPhone Navigation App.
• Do not operate the unit while driving.
63
Page 64

Troubleshooting
What appears to be trouble is not always serious. Check the following points before calling a service center.
• For operations with the external components, refer also to the instructions supplied with the adapters used for the
connections (as well as the instructions supplied with the external components).
ENGLISH
• Messages (enclosed in “ ”) in the tables below are shown in the language selected on <Language> (☞page 43 ).
If the following messages appear
Message Remedy/Cause
“No Signal” • Start the playback on the external component connected to VIDEO IN jack.
• Check the cords and connections.
• Signal input is too weak.
“MISWIRING Check wiring
connection then reset unit”
“WARNING Check wiring
connection then reset unit”
“Parking Brake” No playback picture is shown when the parking brake is not engaged.
“Eject Error” / “Loading Error”
“Restricted Device”
“USB Device Error” • The USB power voltage is abnormal.
“No BT Dongle”* Bluetooth adapter (KS-UBT1) is removed.
“Connection Error”* The device is registered but the connection has failed. Connect the registered
“Please Wait...”*
“No Voice Device”* The connected mobile phone does not have the voice recognition system.
“No Data”* No phone book data is contained in the connected Bluetooth phone.
“Initialize Error”* The unit has failed to initialize the Bluetooth module. Try the operation again.
“Dial Error”* Dialing has failed. Try the operation again.
“Hung Up Error”* The call has not ended yet. Park your car, and use the connected mobile phone
“Pick Up Error”* The unit has failed to receive a call.
“Pairing Error”* Pairing between the unit and Bluetooth device has failed. Register the device
* Only for KW-AV60BT.
A speaker cord has shorted or it has come in to contact with the car chassis.
Wire or insulate the speaker cord as appropriate, then reset the unit
(☞page3 ). See also the Installation/Connection Manual.
Eject the disc forcibly. (☞ page 3 )
Check whether the connected iPod/iPhone is compatible with this unit. (☞
page 27)
• Turn off and turn on the unit.
• Connect another USB device.
device. (☞ page 48)
The unit is preparing to use the Bluetooth function. If the message does not
disappear, turn off and turn on the unit, then connect the device again (or reset
the unit).
to end the call.
again. (☞ page 47)
64
Page 65

If there seems to be a problem
Symptom Remedy/Cause
No sound comes out of the speakers. • Adjust the volume to the optimum level.
• Check the cords and connections.
No picture is displayed on the screen.
The unit does not work at all.
General
The remote controller*
Desired source button (“
AV-IN
”, or “
“
1
does not work. Replace the battery.
Bluetooth
Apps
”) is not displayed on
<AV Menu> screen.
SSM automatic presetting does not work.
TUNER
Static noise while listening to the radio. Connect the aerial firmly.
Disc can be neither recognized nor played
back.
Disc cannot be ejected.
• Recordable/Rewritable discs cannot be
played back.
• Tracks on the Recordable/Rewritable discs
cannot be skipped.
Disc in general
Playback does not start. The format of files is not supported by the unit.
No picture appears on the external monitor. • Connect the video cord correctly.
Disc cannot be played back. • Record the tracks using a compliant application on the
Turn on the screen. (☞ page 9)
Reset the unit. (☞ page3 )
”*2,
Select appropriate setting for <AV Input>. (☞ page 42)
Store stations manually. (☞ page 15 )
Eject the disc forcibly. (☞ page 3 )
Unlock the disc. (☞ page 18)
• Insert a finalized disc.
• Finalize the discs with the component which you used
for recording.
• Select the correct input on the external monitor.
appropriate discs. (☞ page 19)
• Add appropriate extension codes to the file names.
ENGLISH
Tracks are not played back as you have
intended them to play.
DivX/MPEG1/MPEG2/
JPEG/MP3/WMA/WAV
“Now Reading...” keeps flashing on the
screen.
USB
While playing a track, sound is sometimes
interrupted.
1
Purchase RM-RK252P separately.
*
2
Only for KW-AV60.
*
Playback order may differ from the one played back using
other players.
Turn off the power and on again.
The tracks are not properly copied into the USB device.
Copy tracks again, and try again.
65
Page 66

ENGLISH
iPod/iPhone
AV-IN
Symptom Remedy/Cause
No sound comes out of the speakers. • Disconnec t the iPod, then connect it again.
iPod
• Select another source, then reselect “
The iPod/iPhone does not turn on or does
not work.
Sound is distorted. Deactivate the equalizer either on this unit or the iPod/
A lot of noise is generated. Turn off (uncheck) “VoiceOver” of the iPod. For details, visit
No operations are available when playing
back a track containing Artwork.
Sound does not synchronize with the video.
• Videos cannot be played.
• No sound of videos come out.
No picture appears on the screen. • Turn on the video component if it is not on.
• Check the connecting cable and its connection.
• Update the firmware version.
• Charge the battery.
• Check whether the iPod control mode is correctly
selected. (☞ page 28)
• Reset the iPod/iPhone.
iPhone.
<http://www.apple.com>.
Operate the unit after the Artwork is loaded. (☞ page 29)
Select <iPod> for <AV Input>. (☞ page 42)
• Connect with USB Audio and Video cable JVC KS-U30.
Other cables cannot be used.
• Select <iPod> for <AV Input>. (☞ page 42)
• Connect the video component correctly.
”.
66
Page 67

Symptom Remedy/Cause
Phone sound quality is poor. • Reduce the distance between the unit and the
Bluetooth mobile phone.
• Move the car to place where you can get a better signal
reception.
The sound is interrupted or skipped while
using a Bluetooth audio player.
The connected audio player cannot be
controlled.
Bluetooth device does not detect the unit. • Check whether the Bluetooth adapter (KS-UBT1) is
Bluetooth (only for KW-AV60BT )
The unit does not make pairing with the
Bluetooth device.
Echo or noise occurs. • Adjust the microphone unit position.
The unit does not respond when you try to
copy the phone book to the unit.
• Reduce the distance between the unit and the
Bluetooth audio player.
• Disconnect the device connected for Bluetooth phone.
• Turn off, then turn on the unit.
• (When the sound is not yet restored) connect the player
again.
Check whether the connected audio player supports AVRCP
(Audio Video Remote Control Profile).
inserted correctly.
• Search from the Bluetooth device again.
• When “Waiting for connection...” appears on the screen,
press [Cancel] then connect a Bluetooth device.
Enter the same PIN code for both the unit and target
device. If the PIN code of the device is not indicated on its
instructions, try “0000” or “1234.”
• Make sure that NR/EC (Noise reduction/Echo cancel)
function is activated. (☞ page 50)
You may have tried to copy the same entries (as stored)
to the unit.
ENGLISH
67
Page 68

Specifications
Maximum Power Output Front/Rear 50 W per channel
Continuous Power Output
(RMS)
ENGLISH
Load Impedance 4 Ω (4 Ω to 8 Ω allowance)
Equalizer Control Range Frequencies Low: 60Hz, 80Hz, 100Hz, 150Hz
AMPLIFIER
Signal-to-Noise Ratio 70 dB
Audio Output Level
LINE OUT (FRONT/REAR),
SUBWOOFER
Other Terminals Input LINE IN, VIDEO IN, CAMERA IN, USB input, MIC
Frequency Range FM 87.5 MHz to 108.0 MHz
FM Tuner Usable Sensitivity 9.3 dBf (0.8 μV/75 Ω)
FM/AM TUNER
MW Tuner Sensitivity/Selectivity 20 μV/40 dB
LW Tuner Sensitivity 50 μV
Signal Detection System Non-contact optical pickup (semiconductor laser)
Frequency Response DVD, fs=48 kHz/96 kHz 16 Hz to 22 000 Hz
Dynamic Range 93 dB
Signal-to-Noise Ratio 95 dB
DVD/CD
Wow and Flutter Less than measurable limit
Color System PAL/NTSC
Video-Out (composite) 1 Vp-p/75 Ω
* Only for KW-AV60BT.
Front/Rear 20 W per channel into 4 Ω, 40 Hz to 20 000
Hz at no more than 0.8% total harmonic
distortion
Mid: 500Hz, 1kHz, 1.5kHz, 2kHz
High: 10kHz, 12.5kHz, 15kHz, 17.5kHz
Level ±10 dB
Line-Out Level/Impedance 4 V/20 kΩ load (full scale)
Output Impedance 1 kΩ
IN*, AUX, Aerial input
Others OE REMOTE
AM (MW) 531 kHz to 1 611 kHz
(LW) 153 kHz to 279 kHz
50 dB Quieting Sensitivity 16.3 dBf (1.8 μV/75 Ω)
Alternate Channel Selectivity
(400 kHz)
Frequency Response 40 Hz to 15 000 Hz
Stereo Separation 40 dB
VCD/CD 16 Hz to 20 000 Hz
65 dB
68
Page 69
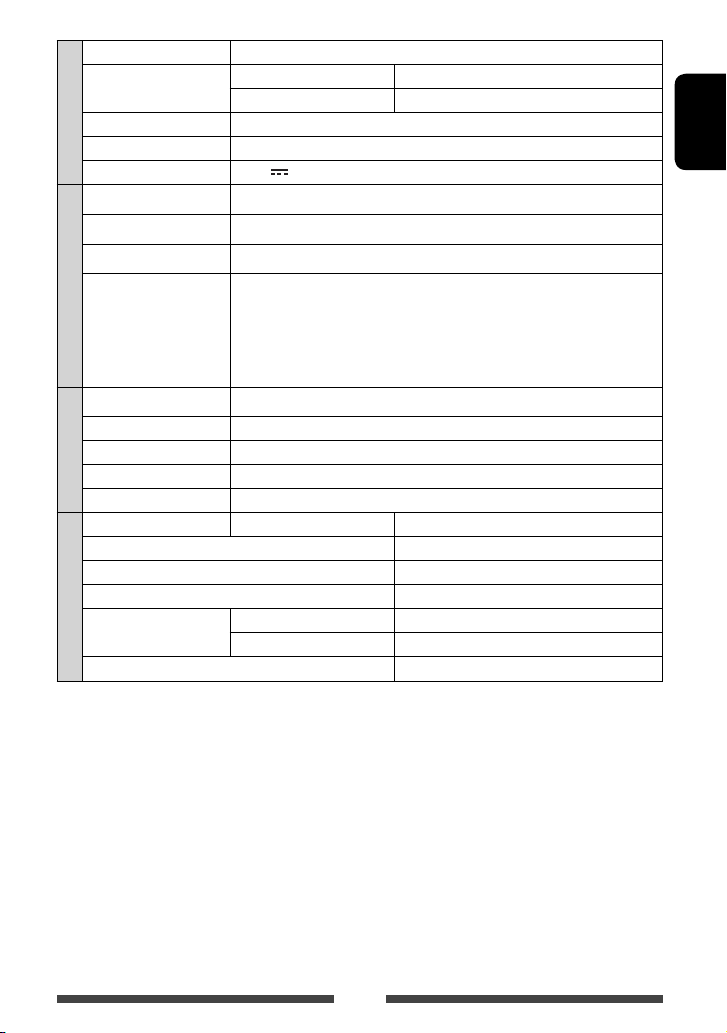
USB Standards USB 2.0 Full Speed
Data Transfer Rate Full Speed Maximum 12 Mbps
USB
Compatible Device Mass storage class
Compatible File System FAT 32/16/12
Max. Current DC 5 V
Version Bluetooth 2.0 certified
Output Power +4 dBm Max. (Power class 2)
Service Area Within 10 m
Profile HFP (Hands-Free Profile) 1.5
BLUETOOTH*
Screen Size 6.1 inch wide liquid cr ystal display
Number of Pixel 1 152 000 pixels: 800 (horizontal) × 3 (RGB) × 480 (vertical)
Drive Method TFT (Thin Film Transistor) active matrix format
MONITOR
Color System NTSC/PAL
Aspect Ratio 16:9 (wide)
Power Requirement Operating Voltage DC 14.4 V (11 V to 16 V allowance)
Grounding System Negative ground
Allowable Storage Temperature –10°C to +60°C
Allowable Operating Temperature 0°C to +40°C
GENERAL
Dimensions (W × H × D) Installation Size (approx.) 182 mm × 111 mm × 160 mm
Mass (approx.) 2.3 k
* Only for KW-AV60BT.
Low Speed Maximum 1.5 Mbps
1 A
OPP (Object Push Profile) 1.1
A2DP (Advanced Audio Distribution Profile) 1.2
AVRCP (Audio/Video Remote Control Profile) 1.3
PBAP (Phone Book Access Profile) 1.0
Panel Size (approx.) 188 mm × 117 mm × 10 mm
g
(including the Trim plate and Sleeve)
ENGLISH
Design and specifications are subject to change without notice.
69
Page 70

Herzlichen Glückwunsch zum Kauf dieses JVC-Produkts.
Bitte lesen Sie alle Bedienungsanweisungen vor dem Betrieb gründlich durch, um richtiges Verständnis des Geräts zu
gewährleisten und die beste Leistung mit dem Gerät zu erzielen.
WICHTIG FÜR LASER-PRODUKTE
1.
LASER-PRODUKT DER KLASSE 1
2. ACHTUNG: Die obere
Abdeckung nicht öffnen. Das
Gerät enthält keine Teile,
die vom Benutzer gewartet
werden können. War tungen nur von qualifziertem Fachpersonal durchführen lassen.
DEUTSCH
3. ACHTUNG: Sichtbare und/oder unsichtbare Laserstrahlung der Klasse 1M bei offenen Abdeckungen. Nicht direkt
mit optischen Instrumenten betrachten.
4. ANBRINGEN DES ETIKETTS: WARNHINWEIS-ETIKETT, AUSSEN AM GERÄT ANGEBRACHT.
Benutzerinformationen zur Entsorgung alter Geräte und Batterien
[Nur Europäische Union]
Diese Symbole zeigen an, dass das damit gekennzeichnete Produkt bzw. die Batterie nicht als
normaler Haushaltsabfall entsorgt werden sollen.
Wenn Sie dieses Produkt und die Batterie entsorgen möchten, halten Sie sich dabei bitte an die
entsprechenden Landesgesetze und andere Regelungen in Ihrem Land bzw. Ihrer Gemeinde.
Die korrekte Entsorgung dieses Produkts dient dem Umweltschutz und verhindert mögliche
Schäden für die Umwelt und die menschliche Gesundheit.
Hinweis:
Das Zeichen Pb unterhalb des Batteriesymbols gibt an, dass diese Batterie Blei enthält.
Produkte
Batterie
WARNUNGEN: (Um Unfälle und Schäden zu vermeiden)
• Installieren Sie keine Komponenten und verdrahten
Sie Kabel NICHT an den folgenden Orten;
– die Handhabung von Lenkrad und Schalthebel
kann behindert werden.
– die Funktion von Sicherheitseinrichtungen wie
etwa Airbags kann behindert werden.
– die Sicht kann behindert werden.
• NICHT das Gerät beim Fahren bedienen.
Wenn Sie das Gerät beim Fahren bedienen müssen,
dürfen Sie nicht den Blick von der Straße nehmen.
• Der Fahrer darf während der Fahrt auf keinen Fall auf
den Monitor sehen.
• Der Fahrer darf während der Fahrt keine Kopfhörer
tragen.
2
Page 71

Achtungshinweise am Monitor:
• Das in diesem Receiver eingebaute Displayfenster
wurde mit hoher Präzision hergestellt, aber es lässt
sich nicht ausschließen, dass fehlerhafte Bildpunkte
vorhanden sind. Dies ist unvermeidbar und wird nicht
als Defekt betrachtet.
• Setzen Sie den Monitor keiner direkten
Sonneneinstrahlung aus.
• Drücken Sie keinesfalls mit einem Kugelschreiber
oder ähnlich spitz zulaufenden Gegenstand auf den
Sensorschirm.
Berühren Sie die Sensordisplay-Symbole direkt mit
dem Finger (immer ohne Handschuhe).
• Bei extrem niedrigen oder hohen Temperaturen...
– Chemische Veränderungen im Geräteinneren
führen zu Fehlfunktionen.
– Unter Umständen ist die Bildwiedergabe
verschwommen oder verlangsamt. Unter solchen
Umständen sind Bild- und Tonwiedergabe
asynchron oder die Bildqualität beeinträchtigt.
Zur Sicherheit...
• Stellen Sie die Lautstärke nicht zu hoch ein, da
dadurch das Fahren gefährlich werden kann, indem
Außengeräusche blockiert werden; außerdem
besteht die Gefahr von Gehörschäden.
• Stoppen Sie das Fahrzeug, bevor Sie komplizierte
Vorgänge ausführen.
Temperatur im Fahrzeug...
Wenn ein Fahrzeug längere Zeit in heißem oder
kaltem Wetter geparkt wurde, warten Sie, bis sich die
Temperatur im Innenraum normalisiert hat, bevor Sie
das Gerät betreiben.
Zurücksetzen des Geräts
• Ihre aktuellen Voreinstellungen werden ebenfalls
gelöscht (mit Ausnahme der registrierten BluetoothGeräte).
Zwangsweises Ausschieben einer Disc
Drücken Sie SRC/ und 0 gleichzeitig.
+
• Achten Sie darauf, die ausgeschobene Disc nicht fallen
zu lassen.
• Wenn das nicht funktioniert, führen Sie einen Reset am
Gerät aus. (☞ oben)
DEUTSCH
Aus Sicherheitsgründen wird eine nummerierte
ID-Karte mit diesem Receiver mitgeliefert, und die
gleiche ID-Nummer ist auf dem Chassis des Receivers
aufgedruckt. Die Karte muss an sicherer Stelle
aufbewahrt werden, da sie den Behörden bei der
Identifikation des Geräts im Falle eines Diebstahls
helfen kann.
Wie Sie diese Anleitung lesen:
• In den Abbildungen dieser Anleitung wird im Wesentlichen das Modell KW-AV60BT zur Erklärung dargestellt.
• Diese Anleitung erläutert vor Allem die Bedienung über die Sensortasten am Monitorschirm und auf dem
Sensordisplay. Für Bedienung mit der Fernbedienung (RM-RK252P: getrennt gekauft), ☞ Seite 57.
• < > zeigt die variablen Bildschirmbilder/Menüs/Vorgänge/Einstellungen an, die auf dem Sensordisplay
erscheinen.
• [ ] zeigt die Tasten am Sensordisplay an.
• Anzeigesprache:Englischsprachige Anzeigen werden zur Erklärung verwendet. Sie können die
Anzeigesprache im <Settings>-Menü wählen. (☞ Seite 43)
3
Page 72

Inhalt
Zurücksetzen des Geräts ........................................ 3
Zwangsweises Ausschieben einer Disc ................... 3
EINLEITUNGEN
Abnehmen/Anbringen des Monitorfelds
Komponentennamen und -funktionen ....6
Anfängliche Einstellungen ......................7
Einstellung der Uhr .................................8
Gemeinsame Bedienvorgänge.................9
DEUTSCH
Einschalten ........................................................... 9
Ausschalten ........................................................... 9
Einstellen der Lautstärke ......................................9
Ausschalten des Bildschirms ................................. 9
Ein-/Ausschalten der AV-Quelle .......................... 10
Sensordisplay-Bedienung.................................... 10
Umschalten von Bildschirmbildern ....... 11
AV-QUELLENBEDIENUNGEN
Wählen der Wiedergabequelle ..............12
Rundfunkempfang ...............................13
Disc-Bedienungen ................................18
Wiedergabe einer Disc ......................................... 18
Geeignete Discs ...................................................19
Wiedergabebetrieb .............................................20
Einstellungen für die Disc-Wiedergabe ................ 24
USB-Bedienungen ................................25
Wiedergabe von einem USB-Gerät ...................... 25
Von iPod/iPhone Geräten hören ............27
Vorbereitung .......................................................27
Einstellen des iPod-Steuermodus ........................ 28
Wählen von Vorzugseinstellungen für Wiedergabe
vom iPod/iPhone ................................................. 28
iPod/iPhone-Wiedergabebedienungen für
<Head>-Modus ................................................. 29
iPod/iPhone-Wiedergabebedienungen für
<iPod Out>-Modus ............................................30
Verwendung einer App von iPod touch/iPhone ... 31
Verwenden anderer externer
Komponenten ...............................33
Front AUX ............................................................33
AV-IN ...................................................................33
Klangeinstellungen ..............................34
Verwendung der Klang-Entzerrung ..................... 34
Anpassen der Übergangsfrequenz ....................... 35
Ändern des Display-Designs .................. 36
...5
Einstellung für Video-Wiedergabe .........38
Anpassen des Bildes ............................................38
Ändern des Bildseitenverhältnisses ..................... 39
Zoomen des Bildes .............................................. 39
Verwendung einer Rückfahrkamera ......40
Einstellung der Menüelemente .............41
Speichern/Abrufen der Einstellungen ................. 44
Aktualisierung des Systems ................................45
Justieren der Berührungsposition ....................... 45
BLUETOOTHBEDIENUNGEN
Information zur Verwendung von
Bluetooth®-Geräten .......................46
Bluetooth-Bedienungen für
KW-AV60BT ...................................46
Anschließen von Bluetooth-Geräten ...................47
Verwendung des Bluetooth-Handys .................... 49
Verwendung des Bluetooth-Audioplayers ........... 54
Bluetooth-Geräteeinstellung ...............................55
Bluetooth-Bedienungen für KW-AV60 ....56
Verwendung des Bluetooth-Handys ................... 56
Verwendung des Bluetooth-Audioplayers .......... 56
ZUR BEZUGNAHME
Verwendung der Fernbedienung ...........57
Bedienungen mit der Fernbedienung ................. 57
Wartung ............................................. 60
Weitere Informationen zu Ihrem Gerät
Störungssuche .....................................64
Technische Daten .................................68
...61
4
Page 73

EINLEITUNGEN
Abnehmen/Anbringen des Monitorfelds
Vorsichtsmaßregeln
• Halten Sie das Monitorfeld sicher, damit es nicht versehentlich herunterfällt.
• Setzen Sie das Monitorfeld an die Anbringplatte, bis es fest verriegelt ist.
AnbringenAbnehmen
Vor dem Abnehmen des Monitorfelds die
Stromversorgung ausschalten. (☞ Seite 9)
1
2
DEUTSCH
3
Weiche Tasche
(mitgeliefert)
5
Page 74

Komponentennamen und -funktionen
DEUTSCH
MonitorfeldBildschirm (Sensordisplay)
1 Ladeschlitz
2 0 (Auswurf )-Taste
Zum Auswerfen der Disc.
3 MENU/DISP OFF-Taste
• Zeigt das Bildschirmbild <AV Menu> an.
(Drücken) (☞ Seite 11)
• Schaltet den Bildschirm aus/ein.
(Gedrückthalten) (☞ Seite 9)
4 SRC /
-Taste
• Schaltet die Stromversorgung aus.
(Gedrückthalten) (☞ Seite 9)
• Einschalten. (☞ S eite 9)
• Wählt die AV-Quelle. (Drücken) (☞ Seite 12)
Achtung bei der
Lautstärkeeinstellung:
Digitale Geräte (CD/USB/iPod) erzeugen im
Vergleich mit anderen Tonträgern sehr geringes
Rauschen. Senken Sie die Lautstärke vor
dem Abspielen solcher digitalen Quellen, um
Beschädigung der Lautsprecher durch plötzliche
Tonspitzen zu vermeiden.
5 VOLUME/ATT-Regler (☞ Seite 9)
• Dämpft den Klang. (Drücken)
• Stellt die Audio-Lautstärke ein. (Drehen)
6 Fernbedienungssensor
7 Rückstelltaste
Setzt das Gerät zurück. (☞ Seite 3)
8 AUX Eingangsbuchse
9
(Abnehmen)-Taste
Zum Abnehmen des Monitorfelds. (☞ Seite 5)
Sie können die Farbe der Tasten auf dem
Monitorfeld ändern. (☞ Seite 36)
6
Page 75

Anfängliche Einstellungen
Wenn Sie die Einheit zum ersten Mal einschalten oder
rücksetzen, erscheint der anfängliche EinstellungBildschirm.
• Sie können auch die Einstellungen über den
Bildschirm <Settings> ändern. (☞ Seite 41)
1 Für KW-AV60BT
Für KW-AV60
Language Wählen Sie die Textsprache
für die Bildschirminformation.
(☞ Seite 43)
AV Input Wählen Sie eine externe
Tonquelle zur Wiedergabe.
(☞ Seite 42)
Camera Input Wählen Sie <On> wenn
Sie die Rückfahrkamera
anschließen. (☞ Seite 43)
Display
Design
Demonstration
Wählen Sie den Hintergrund
und die Farben von Text,
Sensordisplaytasten und
Monitorfeld-Tasten.
(☞ Seite 36)
Aktivieren oder deaktivieren
Sie die Displaydemonstration.
(☞ Seite 42)
2 Beenden Sie den Vorgang.
DEUTSCH
<AV Menu> Bildschirmbild erscheint.
• <AV Off> ist anfänglich gewählt. Wählen Sie
die Wiedergabequelle. (☞ Seite 12)
7
Page 76
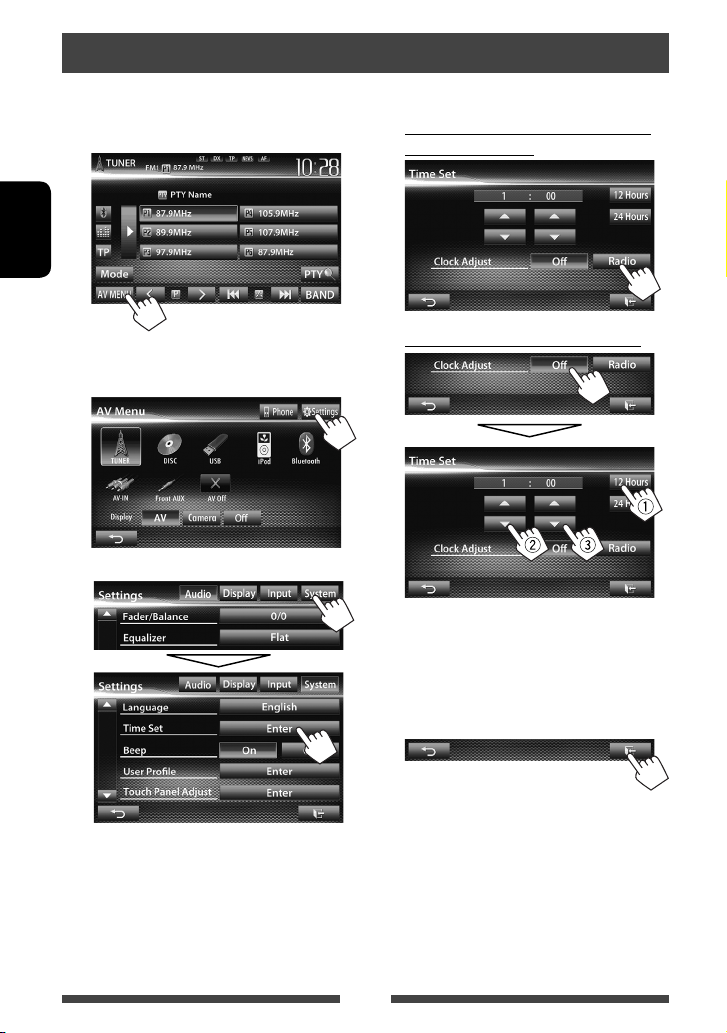
Einstellung der Uhr
1 Zeigen Sie das Bildschirmbild <AV
Menu> an.
Auf dem Quell-Steuerbildschirm:
DEUTSCH
2 Zeigen Sie das Bildschirmbild
<Settings> an.
3
4 Stellen Sie die Uhrzeit ein.
Zum Syncronisieren die Uhrzeit mit
Radio Data System
Zum manuellen Einstellen der Uhr
Wählen Sie das Zeitanzeige-Format
1
Stellen Sie die Uhrzeit ein
2
Stellen Sie die Minute ein
3
5 Beenden Sie den Vorgang.
8
Page 77

Gemeinsame Bedienvorgänge
Einschalten
Ausschalten
(Gedrückthalten)
Einstellen der Lautstärke
Zum Einstellen der Lautstärke (00 bis 50)
Senken
• Auf dem Quell-Steuerbildschirm, können Sie die
Lautstärke auch einstellen, indem Sie einfach Ihren
Finger weiter auf dem Sensordisplay bewegen, wie
gezeigt.
Senken Steigern
Steigern
Ausschalten des Bildschirms
(Gedrückthalten)
Der Bildschirm ist ausgeschaltet.
• Sie können auch das Bildschirmbild im <AV Menu>
Bildschirmbild ausschalten.
Zum Einschalten des Bildschirmbildes
oder
Berühren Sie den Bildschirm zur Anzeige des
<AV Menu>-Bildschirmbildes.
DEUTSCH
Zum Dämpfen des Klangs
Die Anzeige ATT leuchtet auf.
Zum Abbrechen der Dämpfung drücken Sie den
VOLUME/ATT-Regler.
9
Page 78
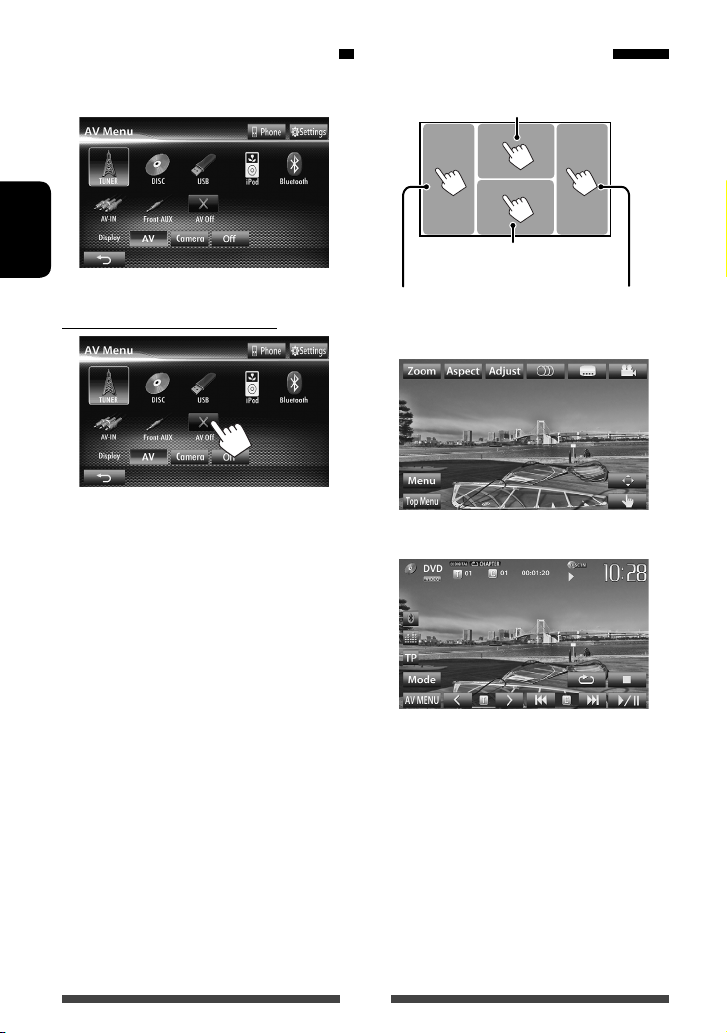
Ein-/Ausschalten der AV-Quelle
Sie können die AV-Funktion durch Wählen einer Quelle
im Bildschirmbild <AV Menu> aktivieren.
Sensordisplay-Bedienung
A Zeigt das Video-Steuermenü an,
während ein Video abgespielt wird.
DEUTSCH
Zum Ausschalten der AV-Quelle
AV-Quelle ist ausgeschaltet.
B Zeigt den Quell-Steuerbildschirm an,
während ein Video abgespielt wird.
Geht zum vorherigen
Kapitel/Track.*
A Videosteuermenü
B Quelle-Steuerbildschirm für Videowiedergabe
• Die Bedientasten verschwinden durch Berühren des
Bildschirms oder wenn wenn etwa 10 Sekunden lang
keine Bedienung vorgenommen wird.
* Nicht für Video von einer externen Komponente
verfügbar.
Entlangziehen Ihres Fingers nach links oder rechts
funktioniert in der gleichen Weise wie Berühren.
Geht zum nächsten
Kapitel/Track.*
10
Page 79

Umschalten von Bildschirmbildern
Quelle-Steuerbildschirm
Gemeinsame Bedientasten
1
Zeigt das Bildschirmbild einer App vom
angeschlossen iPod touch/iPhone an.
(☞ Seite 31)
2*3
• Zeigt den Telefon-Steuerbildschirm an.
]*
]
(Drücken)
• Schaltet auf das zuletzt angeschlossene
Handy um. (Gedrückthalten) (☞ Seite 48)
Zeigt den Klang-Einstellbildschirm an.
(
☞ Seite 34)
Empfangsmodus. (
• Durch Drücken MENU am Monitorfeld
zeigt auch <AV Menu> an.
[ ] *
[
[
[TP] Aktiviert/deaktiviert den TA-Standby-
DEUTSCH
☞ Seite 16)
<AV Menu>-Bildschirmbild
Zeigt Quell-Steuerbildschirm/Einstellbildschirme an
und ändert die Bildquelle.
☞ Seite 12
Wählen Sie einen Punkt zur Anzeige auf dem
Bildschirm.
[AV] Zeigt den Quell-Steuerbildschirm
an. (☞ oben)
[Camera] Zeigt das Bild von der
Rückfahrkamera an. (
1
[Apps]*
[Off] Schaltet den Bildschirm aus.
Zeigt das Bildschirmbild einer App
vom angeschlossen iPod touch/
iPhone an. (☞ Seite 31)
☞ Seite 9)
(
Zeigt den TelefonSteuerbildschirm an *
☞ Seite 40)
Bildschirmbild <Settings>
Wechselt die Detaileinstellungen. (☞ Seite 41)
Ändert die die Seite
2
*1 Erscheint nur, wenn <Input> im Bildschirmbild
<Navigation Input> auf <iPhone> gestellt ist.
(☞ Seite 31)
2
*
Nur für KW-AV60BT.
3
*
Das Symbol unterscheidet sich je nach dem
Verbindungsstatus am Bluetooth-Gerät (☞ Seite 46).
• Drücken Sie [ ] zum Zurückschalten zum
vorhergehenden Schirmbild.
• Drücken Sie [
], um den aktuellen Q uell-
Steuerbildschirm anzuzeigen.
11
Page 80

AV-QUELLENBEDIENUNGEN
Wählen der Wiedergabequelle
KW-AV60BT KW-AV60
DEUTSCH
• Durch wiederholtes Drücken von SRC am Monitorfeld wird ebenfalls die Wiedergabequelle gewählt.
TUNER
(☞ Seite 13)
DISC
(☞ Seite 18)
USB
(☞ Seite 25)
iPod
(☞ S eite 27)
Bluetooth
KW-AV60: ☞ Seite 56)
AV-IN
Apps
*1 (KW-AV60BT: ☞ Seite 54/
*2 (☞ Seite 33)
*3 (☞ Seite 31)
Schaltet auf Rundfunksendung um.
Spielt eine Disc ab.
Spielt Dateien auf einem USB-Gerät ab.
Spielt einen iPod/iPhone ab.
• KW-AV60BT: Spielt einen Bluetooth-Audioplayer ab.
• KW-AV60: Steuert ein Bluetooth-Gerät.
Schaltet auf eine externe Komponente um, die an die LINE IN/VIDEO
IN-Buchsen an der Rückseite angeschlossen ist.
Schaltet auf das Bildschirmbild einer App vom angeschlossen iPod
touch/iPhone um.
Front AUX
AV Off
1
*
2
*
3
*
(☞ Seite 33)
(☞ Seite 10)
Für KW-AV60: Erscheint nur, wenn <AV Input> auf <BT> gestellt ist. (☞ Seite 42)
Erscheint nur, wenn <AV Input> auf <AV-IN> gestellt ist. (☞ Seite 42)
Erscheint nur, wenn <AV Input> auf <iPod> gestellt ist. (☞ Seite 42)
Schaltet auf eine externe Komponente um, die an die AUX
Eingangsklemme am Monitorfeld angeschlossen ist.
Schaltet die AV-Quelle aus.
12
Page 81

Rundfunkempfang
DX/LO-Anzeige
ST/MO-Anzeige
Wellenbereich
Vorwahl-Nr.
☞ Seite 16
• Die ST-Anzeige leuchtet auf, wenn eine UKW-Stereo-Sendung mit ausreichender Signalstärke empfangen wird.
[P1] – [P6] • Stimmt auf den Festsender ab.
(Drücken)
• Programmiert den aktuell
abgestimmten Sender.
(Gedrückthalten)
[TP]* Aktiviert/deaktiviert den TA-
Standby-Empfangsmodus.
(
☞ Seite 16)
[3] Zeigt/löscht die Information des
aktuellen Senders (
[PTY
Startet den UKW-Radio Data
]*
System-Programm-Suchmodus.
(
☞ Seite 15)
Standby-Empfangsanzeigen
☞ unten).
AF-Anzeige
[BAND] Wählt das Frequenzband.
[4] [¢] Sucht nach einem Sender.
[
] [ ]
[Mode]* Zeigt den Tuner-
[AV MENU] Zeigt das Bildschirmbild <AV
Die häufig eingestellte
Senderfrequenz/PS (Sendername) für
UKW-Radio Data System, wenn ein
PS-Signal anliegt
PTY-Code für UKW-Radio Data System
Festsenderliste
• Automatischer Suchlauf
(Drücken)
• Manueller Suchlauf
(Gedrückthalten)
Wählt einen Festsender.
Einstellungsbildschirm an.
(☞ Seite 14 – 17)
Menu> an.
DEUTSCH
* Erscheint nur, wenn UKW als Quelle gewählt ist.
Die Information des aktuellen Senders wird angezeigt
Löscht die
Textinformation
13
Textinformation (nur für
Radio Text Plus)
Scrollt die Textinformation
Page 82
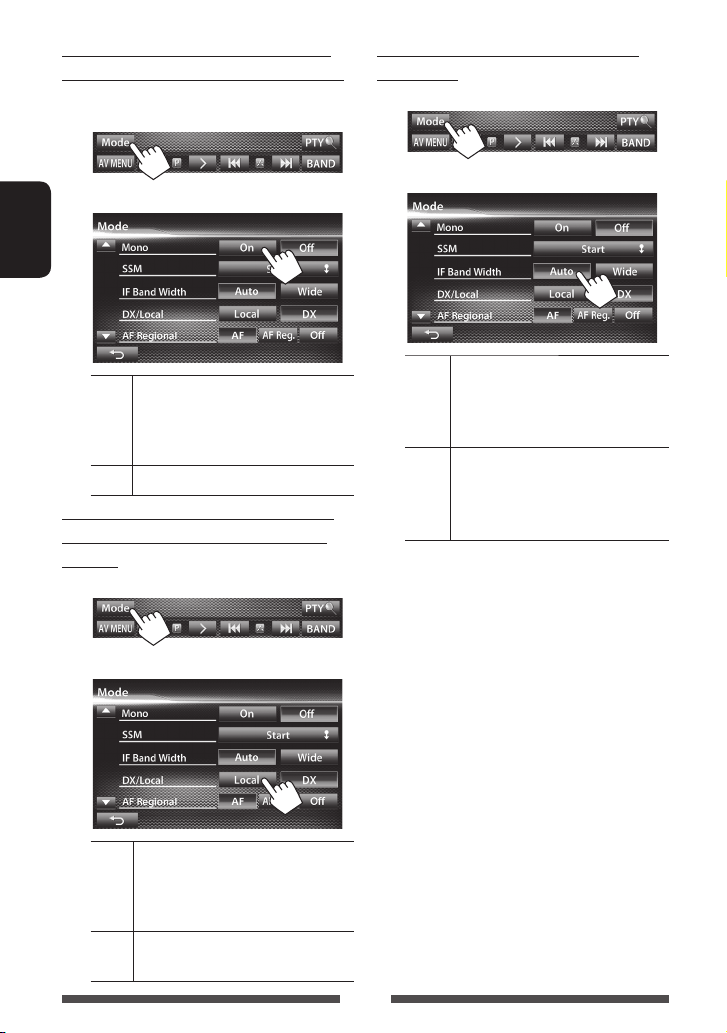
Wenn Sie Schwierigkeiten haben, eine
UKW-Sendung in Stereo zu empfangen...
Aktivieren Sie den Mono-Modus für besseren Empfang.
1
2
DEUTSCH
On Aktivieren Sie den Mono-Modus zum
Verbessern des UKW-Empfangs, aber
der Stereoeffekt geht verloren. Die MOAnzeige leuchtet auf.
Off Stellen Sie den Stereoeffekts wieder her.
Zum Abstimmen von UKW-Sendern mit
starken Signalen—LO/DX (Lokal/Fernextrem)
1
Wenn Störungen beim UKW-Empfang
auftreten...
1
2
Auto Steigert die Tuner-Empfindlichkeit, um
Störgeräusche zwischen benachbarten
Sendern zu verringern. (Stereo-Effekt
kann verlorengehen.)
Wide Ist Interferenzen von benachbarten
Sendern ausgesetzt, aber die
Klangqualität wird nicht verringert, und
der Stereoeffekt bleibt erhalten.
2
Local Wählen Sie dies, um nur auf Sendern
mit ausreichender Signalstärke
abzustimmen. Die LO-Anzeige leuchtet
auf.
DX Deaktivieren Sie die Funktion. Die DX-
Anzeige leuchtet auf.
14
Page 83

Speichern von Sendern
Sie können für jedes Frequenzband bis zu sechs Sender
voreinstellen.
Automatische Voreinstellung —
SSM (Sequentieller Speicher für starke
Sender) (Nur für UKW)
1
2
Wahl eines Festsenders
Ändert auch die Festsender
DEUTSCH
Die folgenden Merkmale stehen nur für UKWRadio Data System-Sender zur Verfügung.
(Gedrückthalten)
Das Gerät sucht nach den Ortssendern mit den stärksten
Einfallssignalen und speichert sie automatisch als
Festsender ab.
Manuelle Voreinstellung
1 Stimmen Sie einen als Festsender
einzugebenden gewünschten Sender
ab.
(☞ Seite 13)
2 Wählen Sie eine Festsendernummer.
(Gedrückthalten)
Der in Schrit 1 gewählte Sender wird gespeichert.
Suchen nach UKW-Radio Data
System-Programm—PTY-Suchlauf
Sie können Ihre ausgestrahlten Lieblingsprogramme
suchen, indem Sie den PTY-Code Ihrer
Lieblingsprogramme wählen.
1
2 Wählen Sie einen PTY-Code.
(Gedrückthalten)
Ändert die die Seite
Der PTY-Suchlauf beginnt.
Wenn ein Sender eine Sendung mit dem PTY-Code
ausstrahlt, den Sie gewählt haben, wird dieser
Sender eingestellt.
15
Page 84

Aktivieren/Deaktivieren von TA/Nachrichten-Standbyempfang
TA-Standbyempfang
TP-Anzeige
DEUTSCH
TP-Anzeige TA-Standbyempfang
Leuchtet auf Das Gerät schaltet kurzzeitig
auf Verkehrsansagen (TA), falls
verfügbar.
Blinkt Noch nicht aktiviert. Stimmen Sie
auf einen anderen Sender, der Radio
Data System-Signale ausstrahlt, um.
Erlischt Deaktivier t.
• Die Lautstärkeeinstellung für Verkehrsansagen wird
automatisch gespeichert. Beim Nächsten Umschalten
der Einheit auf Verkehrsansagen wird die Lautstärke
auf den vorher eingestellten Pegel eingestellt.
Nachrichten-Standbyempfang
1
2
NEWS-Anzeige Nachrichten-Standbyempfang
Leuchtet auf Das Gerät schaltet kurzzeitig auf
das Nachrichtenprogramm, falls
verfügbar.
Blinkt Noch nicht aktiviert. Stimmen
Sie auf einen anderen Sender,
der Radio Data System-Signale
ausstrahlt, um.
Erlischt Deaktiviert.
• Die Lautstärkeeinstellung beim Empfang von
Nachrichten wird automatisch gespeichert. Beim
nächsten Umschalten der Einheit auf Nachrichten
wird die Lautstärke auf den vorher eingestellten
Pegel eingestellt.
16
Page 85

Verfolgen des gleichen Programms
—Network-Tracking-Empfang
Wenn Sie in einem Bereich unterwegs sind, in dem kein
guter UKW-Empfang möglich ist, sucht dieser Receiver
automatisch nach anderen Frequenzen, auf denen das
UKW-Radio Data System-Programm möglicherweise
besser empfangen werden kann.
Programm A wird in unterschiedlichen
Frequenzbereichen ausgestrahlt (01 – 05)
Bei Versand ab Werk ist der Netzwerk-Tracking-Empfang
aktiviert.
Zum Ändern der Netzwerk-TrackingEmpfang-Einstellung
1
Automatische Senderauswahl—
Programmsuche
Normalerweise wird er aktuelle Sender abgestimmt,
wenn Sie Festsender wählen.
Wenn die Signale vom UKW- Radio Data SystemUKW-Festsender nicht mit ausreichender Signalstärke
empfangen werden können, wählt das Gerät mithilfe
der AF-(Alternativfrequenz-)Daten eine andere
Frequenz mit demselben Programm wie dem des
ursprünglichen Festsenders aus.
Zum Aktivieren der Programmsuche
1
2
DEUTSCH
2
AF Schaltet auf einen anderen Sender um.
Das Programm kann sich von dem aktuell
gewählten unterscheiden (AF-Anzeige
leuchtet auf).
AF Reg. Schaltet auf eine andere Frequenz mit
demselben Programm um (die AF-Anzeige
leuchtet auf).
Off Hebt auf.
• Das Gerät benötigt eine gewisse Zeit, um bei
Programm-Suchlauf auf einen anderen Sender
abzustimmen.
Zum Deaktivieren wählen Sie <Off>.
17
Page 86

Disc-Bedienungen
Wiedergabe einer Disc
• Wenn eine Disc kein Disc-Menü hat, werden alle Tracks darauf wiederholt abgespielt, bis Sie die Quelle umschalten
oder die Disc entnehmen.
Einsetzen einer Disc
Beschriftungsseite
DEUTSCH
Die Signalquelle schaltet auf „
Wiedergabe beginnt.
• Die DISC IN (
während eine Disc eingesetzt ist.
• Wenn „
• Bei der Wiedergabe einer mehrkanalig
“ auf dem Bildschirm erscheint, kann
das Gerät den gewünschten Bedienvorgang
nicht ausführen.
– In manchen Fällen wird zwar „
angezeigt, aber der Bedienvorgang ist
dennoch nicht möglich.
codierten Disc werden die Mehrkanalsignale in
Stereo abgemischt.
DISC
)-Anzeige leuchtet auf,
“ um, und die
“, nicht
So schieben Sie eine Disc aus
• Sie können eine Disc ausschieben, während eine
andere AV-Quelle wiedergegeben wird.
• Wenn die ausgeworfene Disc nicht innerhalb von
15 Sekunden entfernt wird, wird die Disc automatisch
wieder in den Ladeschlitz eingezogen, um sie vor
Staub zu schützen.
• Falls die Disc nicht ausgeworfen werden kann,
☞ Seite 3.
Ziehen Sie eine Disc beim Entfernen horizontal
heraus.
Zum Verhindern des Disc-Auswurfs
Drücken Sie SRC/ und 0 gleichzeitig.
+
Um die Sperre aufzuheben, wiederholen Sie das
gleiche Verfahren, und wählen Sie <Eject OK?>.
18
Page 87

Geeignete Discs
Disc-Typ Aufnahmeformat, Dateityp usw. Abspielbar
DVD
• DTS-Klang kann nicht von
diesem Gerät reproduziert oder
ausgegeben werden.
DVD Recordable/Rewritable
(DVD-R/-RW *
2
, +R/+RW *3)
• DVD-Video: UDF-Bridge
• DVD-VR
• DivX/MPEG1/MPEG2/JPEG/
MP3/WMA/WAV: ISO 9660 level
1, level 2, Romeo, Joliet
DVD-Video *
Regionalcode: 2
DVD-Audio/DVD-ROM
DVD-Video
DVD-VR *
DivX/MPEG1/MPEG2
JPEG
MP3/WMA/WAV
MPEG4/AAC/DVD+VR/DVD-RAM
Dual-Disc DVD Seite
Nicht-DVD-Seite
CD/VCD Audio-CD/CD-Text (CD-DA)
VCD (Video-CD)
DTS-CD/SVCD (Super Video CD)/CD-ROM/CD-I (CD-I Ready)
CD Recordable/Rewritable
(CD-R/-RW)
• ISO 9660 level 1, level 2,
Romeo, Joliet
CD-DA
VCD (Video-CD)
DivX/MPEG1/MPEG2
JPEG
MP3/WMA/WAV
MPEG4/AAC
*1 Wenn Sie eine DVD-Videodisc mit einem unzulässige Regionalcode einlegen, erscheint die Meldung „Region Code
Error“ auf dem Bildschirm.
2
*
Eine DVD-R, die in einem Format mit mehrfachen Rändern aufgenommen ist, ist ebenfalls abspielbar (außer DualLayer-Discs). Dual-Layer-DVD-RW-Discs können nicht abgespielt werden.
3
*
Es ist möglich, finalisierte +R/+RW-Discs (nur Videoformat) abzuspielen. „DVD“ wird als Disc-Typ gewählt, wenn
eine +R/+RW-Disc eingelegt wird. +RW-Doppel-Layer-Discs können nicht abgespielt werden.
4
*
Dieses Gerät kann nicht mit CPRM (Content Protection for Recordable Media) geschützte Inhalte abspielen.
Achtung bei DualDisc-Wiedergabe
Die Nicht-DVD-Seite einer „DualDisc“ entspricht nicht dem „Compact Disc Digital Audio“-Standard. Deshalb wird die
Verwendung der Nicht-DVD-Seite einer DualDisc auf diesem Produkt nicht empfohlen.
1
4
DEUTSCH
19
Page 88
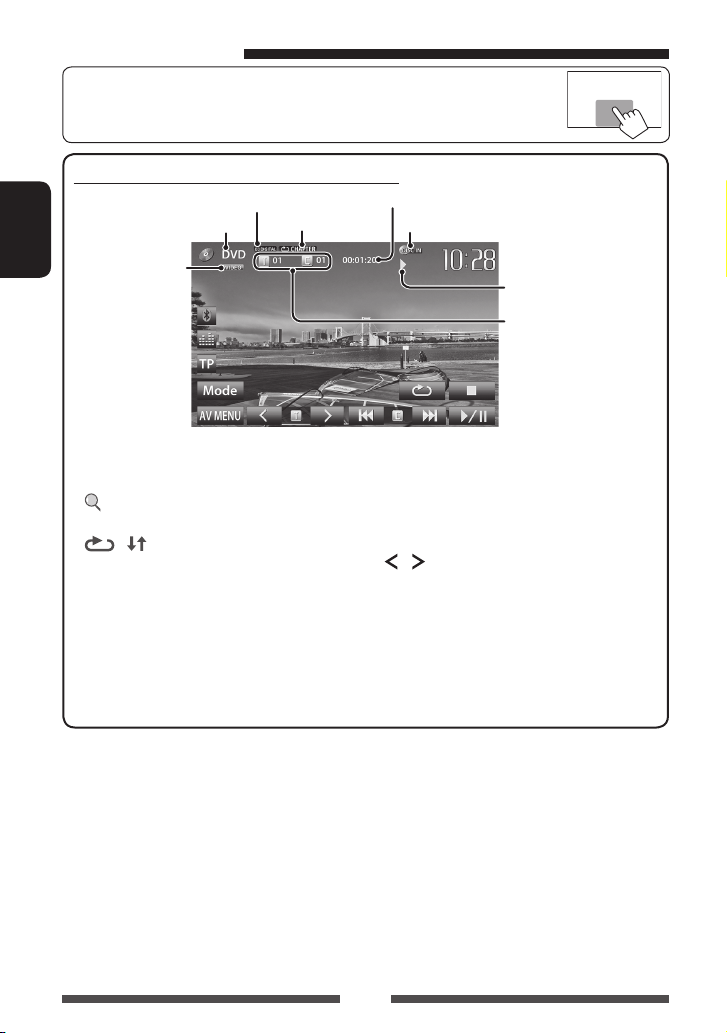
Wiedergabebetrieb
• Wenn die Bedientasten nicht im Bildschirm angezeigt werden, berühren Sie den in der
Abbildung gezeigten Bereich.
Für DVD/DVD-VR/VCD/DivX/MPEG1/MPEG2/JPEG
Audio-Format
Medientyp
Wiedergabemodus
(☞ Seite 23)
Spielzeit
DISC IN-Anzeige
DEUTSCH
Videoformat/
Videowiedergabemodus
—VIDEO/VR-PRG
(Programm)/VR-PLAY
(Playlist)/ DivX/MPEG/PBC
[7]*
[
[
2
3
]*
] [ ]*
Stoppt die Wiedergabe.
Zeigt die Ordner-/Track-Liste
an. (☞ Seite 21)
4
Wählt den Wiedergabe-Modus.
(☞ Seite 23)
[4] [¢]*5• Wählt Kapitel/Track.
[
] [ ]*5 *7
[6] Zum Starten/Pausieren der
Wiedergabe.
[Mode]*
7
[AV MENU] Zeigt das Bildschirmbild
1
*
Zum Anzeigen des Originalprogramm/Playlist-Schirmbilds, ☞ Seite 22.
2
*
Erscheint nur für DVD/DVD-VR/VCD.
3
*
Nicht erscheint für DVD/DVD-VR/VCD.
4
*
Nicht erscheint für DVD/DVD-VR/JPEG.
5
*
Das angezeigte Symbol ist zwischen den Tasten ist je nach Typ von Disc oder Datei unterschiedlich.
6
*
Die Suchgeschwindigkeit ist je nach Typ von Disc oder Datei unterschiedlich.
7
*
Nicht erscheint für VCD.
Wiedergabestatus
(3: Wiedergabe / 8: Pause /
7: Stopp)
• DVD-Video: Titel-Nr./Kapitel-Nr.
• DVD-VR: Programm-Nr. (oder
Playlist-Nr.)/Kapitel-Nr.*
• DivX/MPEG1/MPEG2: OrdnerNr./Track-Nr.
• JPEG: Ordner-Nr./Datei-Nr.
• VCD: Track-Nr.
(Drücken)
• Reverse-/Vorwärts-Suche.*
(Halten)
Wählt Titel (DVD)/Programm
oder Playlist (DVD-VR)/Ordner
(DivX/MPEG1/MPEG2/JPEG). *
Wechselt die Einstellungen für
die Disc-Wiedergabe.
(☞ Seite 24)
<AV Menu> an.
1
6
1
20
Page 89

Für CD/MP3/WMA/WAV
Wiedergabemodus (☞ Seite 23)
Audio-Format
Medientyp
Spielzeit
DISC IN-Anzeige
Wiedergabestatus
(3: Wiedergabe / 8: Pause )
• MP3/WMA/WAV: OrdnerNr./Track-Nr.
• CD: Track-Nr.
DEUTSCH
Während der Wiedergabe wird das
Umschlagbild angezeigt, wenn die Datei
Tag-Daten einschließlich Umschlagbild hat.
[ ]*
1
Zeigt die Ordner-/Track-Liste an.
Track/Datei-Information
• Durch Berührung eines Informationsbalkens wird der Text
gescrollt, wenn nicht der ganze Text gezeigt werden kann.
[4] [¢] • Zur Auswahl des Tracks.
(☞ unten)
] [ ]
[
Wählt den Wiedergabe-Modus.
(☞ Seite 23)
[6] Zum Starten/Pausieren der
Wiedergabe.
[
] [ ]*
[Mode]*
[AV MENU] Zeigt das Bildschirmbild
1
*
Nicht erscheint für CD.
2
*
Die Suchgeschwindigkeit ist je nach Typ von Disc oder Datei unterschiedlich.
Zum Wählen von Ordner/Track auf der
Liste
Ändert die Seite
Spielt Tracks/Dateien im Ordner
Schaltet zum Grundordner zurück
Schaltet zur höheren Ebene zurück
Abspielen von Recordable/
Rewritable-Discs
• Dieses Gerät kann insgesamt 5 000 Dateien und
250 Ordner (maximal 999 Dateien pro Ordner)
erkennen.
• Verwenden Sie nur „finalisier te“ Discs.
• Dieses Gerät kann Multi-Session-Discs
abspielen, nicht geschlossene Sessions werden
aber bei der Wiedergabe übersprungen.
• Manche Discs oder Dateien können sich auf
diesem Gerät aufgrund ihrer Eigenschaften oder
der jeweiligen Aufnahmebedingungen nicht
abspielen lassen.
21
(Drücken)
• Reverse-/Vorwärts-Suche.*
(Halten)
1
Zur Auswahl des Ordners.
1
Wechselt die Einstellungen für
die Disc-Wiedergabe.
(☞ Seite 24)
<AV Menu> an.
2
Page 90

Videomenü-Bedienungen
Sie können den Videomenü-Bildschirm anzeigen,
während das Wiedergabebild im Bildschirm betrachtet
wird.
• Verfügbare Elemente auf dem Bildschirm
hängen vom Typ der eingelegten Disc und der
Wiedergabedateien ab.
• Die Bedientasten verschwinden durch Berühren des
Bildschirms oder wenn etwa 10 Sekunden lang keine
Bedienung vorgenommen wird.
DEUTSCH
• Der Bildschirm für MPEG1/MPEG2 unterscheidet sich
von dem obigen.
[ ]
[Menu] Zeigt das Disc-Menü (DVD)/Playlist
[Top Menu] Zeigt das Disc-Menü (DVD)/
[
[
• Berühren einer anderen Position als die Bedientasten
bewirkt Anzeige des Quell-Steuerbildschirms.
Wählt den Betrachtungswinkel.
(DVD-VR) an.
Originalprogramm (DVD-VR) an.
Zeigt den Menü/Playlist/
]
Originalprogramm-/SzeneAuswahlschirmbild an. (☞ unten)
Schaltet auf den Direkt-Menüauswahl-
]
Modus um. Berühren Sie das
Zielelement zum Auswählen.
• Zum Beenden des MenüAuswahlschirmbilds drücken Sie
].
[
Verwendung des Menü/Playlist/
Originalprogramm-/SzeneAuswahlschirmbild
[Zoom] Zeigt den Bildgröße-
Auswahlbildschirm an. (☞ Seite 39)
[Aspect]
[Adjust] Zeigt den Bildeinstellung-Bildschirm
[
[
Wählt ein Bildverhältnis. (☞ Seite 39)
an. (☞ Seite 38)
] Wählt den Audio-Typ.
• Für DVD-VR: Wählt den Audiokanal
(ST: Stereo, L: links, R: rechts).
] Wählt den Untertiteltyp.
[5] [∞]
[2] [3]
[Enter] Bestätigt die Auswahl.
[Return] Schaltet zum Bildschirmbild der
[
• Nur für DivX
[2] [3] Springt um etwa 5 Minuten vor oder
[Return] Schaltet zum vorhergehenden
[
Wählen Sie einen Gegenstand.
vorherigen Ebene zurück.
Zeigt das Menü-Bildschirmbild der
]
obersten Ebene an, wenn mehrere
Menü-Bildschirmbilder auf der Disc
vorhanden sind.
zurück.
Bildschirmbild zurück.
Verlässt das Szene-Auswahlschirmbild.
]
22
Page 91

Nur für VCD
1
2
• Zu Deaktivieren der PBC-Funktion drücken Sie
[7] die Direktwahltasten zum Wählen einer
Tracknummer.
Auswählen des Wiedergabemodus
Für DVD/DVD-VR
Wählt den Wiederhol-Wiedergabemodus
Für VCD (ohne PBC)/CD/DivX/MPEG1/MPEG2/MP3/
WMA/WAV
DEUTSCH
Direktauswahl-Tasten (☞ unten)
[Zoom] Zeigt den Bildgröße-
Auswahlbildschirm an. (☞ Seite 39)
[Aspect]
[Adjust] Zeigt den Bildeinstellung-Bildschirm
[
[Return] Zeigt den vorherigen Schirmbild oder
[Menu] Zum Anzeigen des Disc-Menüs.
[
• So wählen Sie einen Track direkt
– Zum Umschalten zwischen Kapitel/Track-Eingabe
– Wenn Sie eine falsche Nummer eingeben, drücken
Wählt ein Bildverhältnis. (☞ Seite 39)
an. (☞ Seite 38)
] Wählt den Audiokanal (ST: Stereo,
L: links, R: rechts).
das Menü an.
Zeigt/löscht die Direktauswahl-Tasten.
]
(☞ unten)
und Titel/Ordner-Eingabe drücken Sie [Direct/
CLR].
Sie [Direct/CLR], um die letzte Eingabe zu
löschen.
Wählt den
Zufallswiedergabemodus*
* Sie können nicht den Wiederhol-Modus und den
Zufallsmodus gleichzeitig aktivieren.
• Bei jedem Drücken der Taste schaltet der
Wiedergabemodus um. (Die entsprechende Anzeige
leuchtet auf.)
– Verfügbare Gegenstände können sich je nach Typ
der eingelegten Disc und der Wiedergabedatei
unterscheiden.
Anzeige Wiedergabemodus
CHAPTER
TITLE
PROGRAM
SONGS
FOLDER
FOLDER
ALL
Zum Abbrechen drücken Sie die Taste wiederholt, bis
die Anzeige verschwindet.
Aktuelles Kapitel wiederholen.
Aktuellen Titel wiederholen.
Wiederholt das aktuelle Programm
(nicht verfügbar für PlaylistWiedergabe).
Wiederholt aktuellen Track.
Wiederholt alle Tracks des
aktuellen Ordners.
Spielt in zufälliger Reihenfolge
alle Tracks des aktuellen Ordners
ab, und dann Tracks der nächsten
Ordner.
Alle Tracks in zufälliger
Reihenfolge abspielen.
Wählt den Wiederhol-
Wiedergabemodus*
23
Page 92

Einstellungen für die Disc-Wiedergabe
Disc-Setup-
DEUTSCH
Gegenstände
Menu Language
(Menüsprache)
Audio Language
(Audio Sprache)
Subtitle
(Untertitel)
Down Mix
(Down Mix)
D. Range
Für DVD/DVD-VR/DivX
Compres.
(D.RangeCompres.)
Monitor Type
(Monitor-Typ)
Für Discs
außer VCD/CD
File Type
(Dateityp)
Bild-Dateien enthalten
Für Discs, die Audio-/Video/
Wählbare Einstellung/Gegenstand Anfänglich: Unterstrichen
Wählen Sie die anfängliche Disc-Menüsprache aus; Anfänglich English (☞ Seite 62).
Wählen Sie die anfängliche Audiosprache; Anfänglich English (☞ Seite 62).
Wählen Sie die anfängliche Untertitelsprache oder löschen Sie Untertitel (Off);
Anfänglich English (☞ Seite 62).
Bei der Wiedergabe einer Mehrkanal-Disc beeinflusst diese Einstellung die über die
Buchsen FRONT OUT/REAR OUT ausgegebenen Signale.
♦ Dolby Surround : Wählen Sie dies zum Genießen von Mehrkanal-Surround-
♦ Stereo : Wählen Sie im Normalbetrieb diese Einstellung.
Sie können den Dynamikumfang ändern, währen Sie Dolby Digital-Software abspielen.
♦ Off : Wählen Sie dies, um Sie können einen kraftvollen Klang
♦ On : Wählen Sie dies, um den Dynamikumfang leicht zu
♦ Dialog : Wählen Sie dies, um den Filmdialog deutlicher
Wählen Sie den Monitortyp zum Betrachten eines Breitbilds auf dem externen Monitor.
♦ 16:9
Wählen Sie den Wiedergabedateityp, wenn die eingelegte Disc unterschiedliche
Dateitypen enthält.
♦ Audio
♦ Still Picture
♦ Video
♦ Audio&Video
• Für abspielbare Dateitypen, ☞ Seite 19.
Wenn die Disc keine Dateien des gewählten Typs verwendet, werden die vorhandenen
•
Dateien in der folgenden Priorität abgespielt: Audio, Video und dann Standbild.
Audio durch Anschließen eines mit Dolby Surround
kompatiblen Verstärkers.
auch bei niedriger Lautstärke mit vollem Dynamikumfang
zu genießen.
verringern.
wiederzugeben.
♦ 4:3 LB (Letterbox) ♦ 4:3 PS (PanScan)
: Wiedergabe von Audio-Dateien.
: Wiedergabe von JPEG-Dateien.
: Wiedergabe von DivX/MPEG1/MPEG2-Dateien.
: Hierdurch werden Audio-Dateien, DivX-, MPEG1- und
MPEG2-Dateien wiedergegeben.
24
Page 93

USB-Bedienungen
Wiedergabe von einem USB-Gerät
• Dieses Gerät kann JPEG/MPEG1/MPEG2 */MP3/
WMA/WAV-Dateien abspielen, die in einem USBMassenspeichergerät abgelegt sind.
• Dieses Gerät kann insgesamt 5 000 Dateien und 250
Ordner (maximal 999 Dateien pro Ordner) erkennen.
• Stellen Sie sicher, dass alle wichtigen Daten gesichert
sind, um Datenverlust zu vermeiden.
* Ausgenommen für MPEG2-Dateien, aufgenommen von
JVC Everio-Camcordern (Erweiterungscode <.mod>).
Anschließen eines USB-Geräts
Sie können ein USB-Massenspeichergerät wie einen
USB-Speicher, digitalen Audioplayer , usw. ans Gerät
anschließen.
• Sie können keinen Computer oder eine portable
Festplatte über USB-Kabel an der Rückseite der
Einheit anschließen.
USB-Kabel von der
Rückseite der Einheit
Die Signalquelle schaltet auf „
Wiedergabe beginnt.
• Alle Tracks im USB-Gerät werden wiederholt
abgespielt, bis Sie die Quelle umschalten.
USB
“ um, und die
Vorsichtsmaßregeln:
• Diese Einheit kann möglicherweise Dateien in einem
USB-Gerät nicht korrekt abspielen, wenn ein USBVerlängerungskabel verwendet wird.
• USB-Geräte, die mit speziellen Funktionen wie
Datenschutzfunktionen ausgestattet sind, können
zusammen mit dem Gerät nicht verwendet werden.
• Verwenden Sie kein USB-Gerät mit 2 oder mehr
Partitionen.
• Je nach der Form der USB-Geräte und AnschlussPorts können manche USB-Geräte nicht richtig
angebracht werden, oder die Verbindung kann locker
sein.
• Dieses Gerät kann nicht ein USB-Gerät mit einer
anderen Bewertung als 5 V und mehr als 1 A
erkennen.
Diese Einheit erkennt möglicherweise nicht eine
•
Speicherkarte, die in den USB-Kartenleser eingesetzt ist.
• Schließen Sie jeweils ein USB-Gerät zur Zeit an die
Einheit an. Verwenden Sie keinen USB-Hub.
• Verwenden Sie im Fall eines Anschlusses über ein
USB-Kabel das USB-2.0-Kabel.
• Maximalzahl von Zeichen (wenn es sich um 1-ByteZeichen handelt) für:
– Ordnernamen: 50 Zeichen
– Dateinamen: 50 Zeichen
• Vermeiden Sie Ver wendung des USB-Geräts, wenn es
die Fahrsicherheit beeinträchtigen kann.
• Das USB-Gerät nicht wiederholt abnehmen und
anschließen, während „Now Reading“ (Lesen) im
Bildschirm erscheint.
• Elektrostatischer Schlag beim Anschließen eines
USB-Geräts kann anormale Wiedergabe am Gerät
verursachen. In diesem Fall trennen Sie das USBGerät ab und setzen dann diese Einheit und das USBGerät zurück.
• Betrieb und Stromversorgung arbeiten
möglicherweise nicht wie vorgesehen bei
bestimmten USB-Geräten.
• Lassen Sie nicht ein USB-Gerät im Fahrzeug, setzen
Sie es nicht direktem Sonnenlicht oder hohen
Temperaturen aus, um Verformung oder Schäden am
Gerät zu vermeiden.
25
DEUTSCH
Page 94

• Wenn die Bedientasten nicht im Bildschirm angezeigt werden, berühren Sie den in der
Abbildung gezeigten Bereich.
• Zum Ändern der Einstellungen für die Videowiedergabe ☞ Seite 38.
Wiedergabemodus (☞ unten)
Audio-Format
Videoformat—
MPEG/JPEG
DEUTSCH
Während der Wiedergabe wird das Umschlagbild angezeigt, wenn
die Datei Tag-Daten einschließlich Umschlagbild hat.
[ ]
[
[
Zeigt die Ordner-/Track-Liste an.
(☞ Seite 21)
Wählt den Wiederhol-
]
Wiedergabemodus. *
1 *2
• SONGS: Wiederholt aktuellen
Track.
FOLDER: Wiederholt alle Tracks
•
des aktuellen Ordners.
] Wählt den Zufallswiedergabemodus. *1 *
• FOLDER: Spielt in zufälliger
Reihenfolge alle Tracks auf dem Ordner.
ALL: Alle Tracks in zufälliger
•
Spielzeit
[
Wiedergabestatus
(3: Wiedergabe / 8: Pause)
• MP3/WMA/WAV: Ordner-Nr./
Track-Nr.
• JPEG: Ordner-Nr./Datei-Nr.
Track-/Datei-Information (für
MP3/WMA/WAV)
• Durch Berührung eines
Informationsbalkens wird der
Text gescrollt, wenn nicht der
ganze Text gezeigt werden
kann.
Schaltet zwischen interner und externer
]
Speicherquelle des angeschlossenen Geräts
(wie ein Mobiltelefon) um.
[6] Zum Star ten/Pausieren der Wiedergabe.
3
[4] [¢]*
• Zur Auswahl des Tracks. (Drücken)
• Reverse-/Vorwärts-Suche.*
[
] [ ]
[Mode] Wechselt die Einstellungen für <File
2
Zur Auswahl des Ordners.
Type> und <Monitor Type>.
(☞ unten)
[AV MENU] Zeigt das Bildschirmbild <AV Menu> an.
Reihenfolge abspielen.
• Verfügbare Gegenstände können sich je nach Typ der Wiedergabedatei unterscheiden.
1
*
Zum Abbrechen des Zufalls- oder Wiederholmodus drücken Sie die Taste wiederholt, bis die Anzeige verschwindet.
2
Sie können nicht den Wiederhol-Modus und den Zufallsmodus gleichzeitig aktivieren.
*
3
Das angezeigte Symbol ist zwischen den Tasten ist je nach Typ der Datei unterschiedlich.
*
4
Die Suchgeschwindigkeit ist je nach Dateityp unterschiedlich.
*
<File Type>-Einstellung
Audio
Still Picture
Video
Audio&Video
Wiedergabe von Audio-Dateien.
Wiedergabe von JPEG-Dateien.
Wiedergabe von MPEG1/MPEG2-Dateien.
Hierdurch werden Audio-Dateien und
<Monitor Type>-Einstellung
Wählen Sie den Monitortyp zum Betrachten eines
Breitbilds auf dem externen Monitor.
16:9 4:3 LB
(Letterbox)
MPEG1/MPEG2-Dateien wiedergegeben.
• Wenn das USB-Gerät keine Dateien des gewählten
Typs verwendet, werden die vorhandenen Dateien in
der folgenden Priorität abgespielt: Audio, Video und
dann Standbild.
26
4
(Halten)
4:3 PS
(PanScan)
Page 95

Von iPod/iPhone Geräten hören
• Zur Verwendung einer App von iPod touch/iPhone, ☞ Seite 31.
Vorbereitung
iPod/iPhone, das an dieses Gerät angeschlossen
werden kann:
Made for
– iPod with video (5th Generation)
– iPod classic
– iPod nano (6th Generation)
– iPod nano (5th Generation)
– iPod nano (4th Generation)
– iPod nano (3rd Generation)
– iPod nano (2nd Generation)
– iPod nano (1st Generation)
– iPod touch (4th Generation)
– iPod touch (3rd Generation)
– iPod touch (2nd Generation)
– iPod touch (1st Generation)
– iPhone 4
– iPhone 3GS
– iPhone 3G
– iPhone
Anschließen von iPod/iPhone
Schließen Sie Ihren iPod/iPhone mit dem geeigneten
Kabel je nach Verwendungszweck an.
• Zum Musikhören: USB-2.0-Kabel (Zubehör für den
iPod/iPhone)
An iPod/iPhone
Wählen Sie die geeignete Eingangseinstellung für
<AV Input> entsprechend dem Anschlussverfahren
von iPod/iPhone.
1 Schalten Sie die AV-Quelle aus.
2 Zeigen Sie das Bildschirmbild <Input>
Einstellung von <AV Input> für
Wiedergabe vom iPod/iPhone
DEUTSCH
Im Bildschirmbild <AV Menu>:
an.
USB-Kabel von der
Rückseite der Einheit
• Zum Betrachten von Video und Hören von
Musik: USB-Audio- und Videokabel für iPod/
iPhone—KS-U30 (getrennt gekauft) (☞ Einbau/
Anschlußanleitung)
Achtung:
• Video wird nicht auf dem Bildschirm angezeigt, wenn
die Verbindung über ein anderes Kabel als KS-U30
vorgenommen wurde.
3
AV-IN Wählen Sie dies, wenn der iPod/iPhone
über das USB 2.0-Kabel (Zubehör von
iPod/iPhone) angeschlossen wird.
iPod Wählen Sie dies, wenn der iPod/iPhone
über das KS-U30 (getrennt erhältlich)
angeschlossen wird.
27
Page 96

Einstellen des iPodSteuermodus
Wählen Sie das Gerät, das die Wiedergabe des iPod/
iPhone steuert.
Wenn die Quelle „
1
iPod
“ ist...
Wählen von
Vorzugseinstellungen für
Wiedergabe vom iPod/iPhone
Wenn die Quelle „
1
iPod
“ ist...
DEUTSCH
2
Head Steuert die Wiedergabe von diesem
Gerät. (☞ Seite 29)
iPod Steuert die Audio -/Video-
Wiedergabe vom iPod/iPhone.
• Die Wiedergabe-Information
wird angezeigt.
iPod
Out*
• Bei Verwendung eines iPod nano (1st Generation)
oder iPod with video (5th Generation) während
<iPod> für <iPod Control> gewählt ist wählen
Sie <iPod> für <AV Input> und schließen den
iPod mit KS-U30 an (getrennt gekauft). (☞ Seite 27)
* <iPod Out> ist bei den folgenden iPod/iPhone-
Modellen verfügbar:
– iPod nano (6th Generation)
– iPod touch (4th Generation)
– iPod touch (3rd Generation)
– iPod touch (2nd Generation)
– iPhone 4
– iPhone 3GS
– iPhone 3G
Zeigt das Menü und die
Wiedergabe-Bildschirmausgabe auf
dem iPod/iPhone an. (☞ Seite 30)
• Sie können die Wiedergabe
von dieser Einheit auf gleiche
Weise wie bei dem iPod/iPhone
steuern.
2
Audiobooks Wählen Sie die Geschwindigkeit von
Hörbüchern.
Artwork Zeigt/versteckt das iPod Cover.
Hinweis:
Beim Betrieb eines iPod/iPhone kann es sein, dass
manche Vorgänge nicht richtig oder nach Wunsch
ausgeführt werden. In diesem Fall besuchen
Sie folgende JVC-Website: <http://www3.
jvckenwood.com/english/car/> (nur englische
Website)
Bei manchen iPod/iPhone-Modellen kann die
Leistung anormal sein oder instabiler Betrieb
auftreten. In diesem Fall trennen Sie das iPod/
iPhone-Gerät ab und prüfen dessen Zustand.
Wenn die Leistung nicht verbessert wird oder
langsam ist, setzen Sie den/das iPod/iPhone
zurück.
28
Page 97
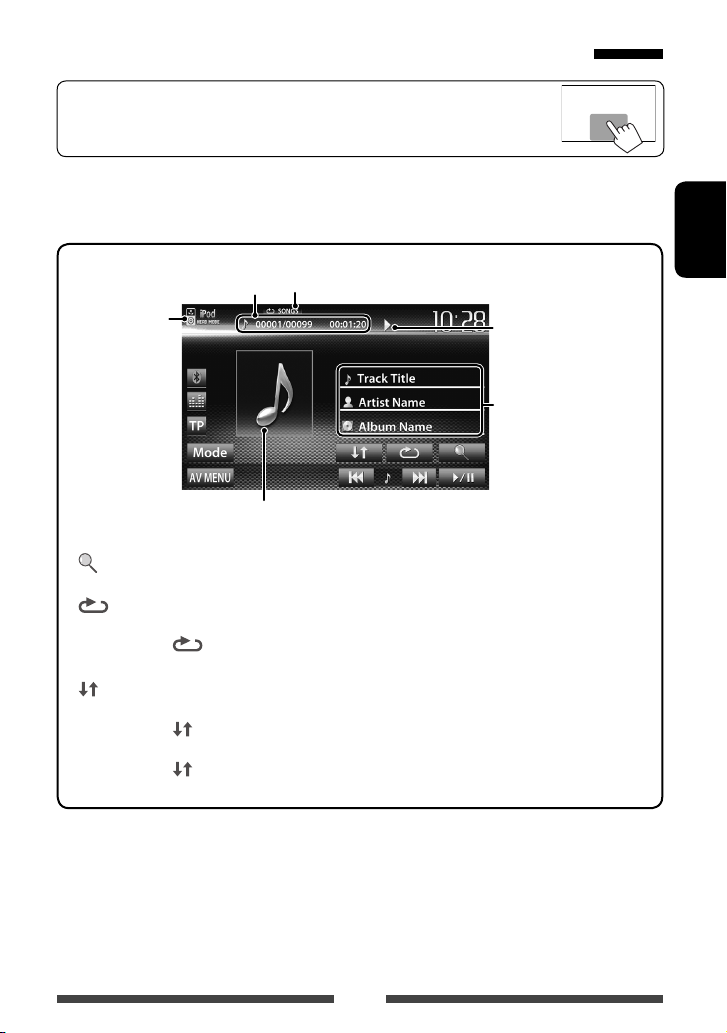
iPod/iPhone-Wiedergabebedienungen für <Head>-Modus
• Wenn die Bedientasten nicht im Bildschirm angezeigt werden, berühren Sie den in der
Abbildung gezeigten Bereich.
• Zum Ändern der Einstellungen für die Videowiedergabe ☞ Seite 38.
• Wählen Sie „
iPod
“ als Quelle. (☞ Seite 12)
• Stellen Sie sicher, dass <Head> für <iPod Control> gewählt ist. (☞ Seite 28)
• Wenn Sie dieses Gerät einschalten, wird der iPod/iPhone über das Gerät geladen.
Track-Nr./Gesamtzahl des
Tracks/Spielzeit
iPod-Steuermodus
(☞ Seite 28)
Während der Wiedergabe wird Cover (das auf dem Bildschirm des iPod/iPhone angezeigte Bild)
gezeigt, wenn der Song Cover enthält (☞ Seite 28).
[ ]
Zeigt das Musik/Video-Menü auf
dem iPod/iPhone an. (☞ Seite 30)
]
Wählt den Wiederhol-
[
Wiedergabemodus. *
• SONGS: Hat die gleiche
Funktion wie „Repeat One“.
] Wählt den
[
Zufallswiedergabemodus. *
• SONGS: Hat die gleiche
Funktion wie „Shuffle S ongs“.
ALBUMS: Hat die gleiche
•
Funktion wie „Shuffle Albums“.
Wiedergabemodus (☞ unten)
[6] Zum Starten/Pausieren der
1
1
[4] [¢]
[Mode] Wechselt die Einstellungen für die
[AV MENU] Zeigt das Bildschirmbild <AV
Wiedergabe.
• Wählt einen Track/Video. *2
(Drücken)
• Reverse-/Vorwärts-Suche.
(Gedrückthalten)
iPod-Wiedergabe. (☞ Seite 28)
Menu> an.
DEUTSCH
Wiedergabestatus (3:
Wiedergabe/8: Pause)
Song-/Video-Information
• Durch Berührung eines
Informationsbalkens wird
der Text gescrollt, wenn
nicht der ganze Text gezeigt
werden kann.
• Zum Betrachten des Videos wählen Sie einen Punkt in der Liste im Video-Menü. (☞ Seite 30)
1
Zum Abbrechen des Zufalls- und Wiederholmodus drücken Sie die Taste wiederholt, bis die Anzeige verschwindet.
*
2
*
Sie können die Wiedergabe für Videoquellen nicht fortsetzen.
29
Page 98

Wählen eines Tracks/Videos aus dem
Menü am iPod/iPhone
1
2
Wählen Sie das Menü (Musik oder Video)
(1), eine Kategorie (2) und dann
einen gewünschten Gegenstand (3).
• Wählen Sie den Gegenstand in der gewählten
DEUTSCH
Ebene, bis ein gewünschter Track zu spielen beginnt.
Musik-Menü:
Schaltet zwischen Musik ( ) und Video
( ) um
iPod/iPhoneWiedergabebedienungen für
<iPod Out>-Modus
• Schließen Sie den iPod/iPhone über das KSU30 (getrennt erhältlich) an. (☞ Einbau/
Anschlußanleitung)
• Wählen Sie <iPod> für <AV Input>-Einstellung.
(☞ Seite 27)
• Stellen Sie sicher, dass <iPod Out> für <iPod
Control> gewählt ist. (☞ Seite 28)
• Wählen Sie “
*
iPod
” als Quelle. (☞ Seite 12)
Wählen eines Tracks aus dem Menü
am iPod/iPhone
Schaltet zur Oberebene zurück
Video-Menü:
Schaltet zwischen Musik ( ) und Video
( ) um
• Verfügbare Kategorien hängen von dem Typ Ihres
iPod/iPhone ab.
* Sie können durch Drücken der entsprechenden
Markierung zum Anfang der Kategorie schalten:
Playlists (
Songs (
), Interpreten ( ), Alben ( ) oder
).
Schaltet zur
vorherigen Ebene
zurück
Spielt alle Punkte in der Ebene ab.
[5] [∞] Wählt eine Kategorie.
[Select/6] Bestätigt die Auswahl.
[iPod Menu] Schaltet zur vorherigen
Ebene zurück.
Bedienvorgänge während der
Wiedergabe
[2] [3]
[Select/6]
[iPod Menu] Zeigt das Menü an.
Springt zum vorherigen/nächsten Track.
Zum Starten/Pausieren der Wiedergabe.
30
Page 99

Verwendung einer App von iPod touch/iPhone
Sie können eine App vom angeschlossen iPod touch/iPhone auf diesem Gerät verwenden.
• Sie können bestimmte Funktionen einer App im Sensordisplay bedienen.
Vorbereitung
• Schließen Sie den iPod touch/iPhone über das KS-U30 (getrennt erhältlich) an. (☞ Einbau/Anschlußanleitung)
• Wählen Sie <iPod> für <AV Input>-Einstellung. (☞ Seite 27)
• Für auf diesem Gerät verwendbare Apps besuchen Sie <http://www3.jvckenwood.com/english/car/>.
1 Starten Sie die App auf Ihrem iPod
touch/iPhone.
2 Wählen Sie „
Im Bildschirmbild <AV Menu>:
• Sie können auch das Audio/Video mit dem iPod/
iPhone selber anstelle mit dem Gerät abspielen.
– Sie können die grundlegende Wiedergabe auf dem
Sensordisplay steuern.
Audio
Apps
“ als Quelle.
• Wenn Sie eine App von iPod touch oder
iPhone verwenden, siehe auch Seite 63 für
Sicherheitsanweisungen.
Anzeige des Bildschirmbildes der App,
während Sie eine andere Quelle hören
Sie können das Display auf das Bildschirmbild der App
vom angeschlossen iPod touch/iPhone umschalten,
während Sie eine andere Quelle hören.
Aktivieren des Eingangs von iPod touch/
iPhone um zur Anzeige von Taste zum
Umschalten des Displays
1 Schalten Sie die AV-Quelle aus.
Im Bildschirmbild <AV Menu>:
DEUTSCH
Video
2
Zeigen Sie das Bildschirmbild <Input> an.
31
Page 100

3 Wählen Sie <iPhone> für die
Einstellung <Input> im Bildschirmbild
<Navigation Input>.
DEUTSCH
• Wenn <Input> auf <iPhone> gestellt ist, wird
die Taste [Apps] im Bildschirmbild <AV Menu>
angezeigt, und die Taste [
Steuerbildschirm angezeigt. Sie können auch den
Bildschirm der App durch Drücken einer anderen
Taste anzeigen. (☞ unten)
• Bei Einstellung von <Input> auf <iPhone> wird
die Einstellung <AV Input> automatisch geändert
und auf <iPod> gestellt.
Zum Deaktivieren, wählen Sie <Off> für <Input>.
] wird im Quellen-
Zum Betrachten des Bildschirmbilds der
App
Im Bildschirmbild <AV Menu>:
oder
Auf dem Quell-Steuerbildschirm:
Zum Löschen des Bildschirmbilds der App
32
 Loading...