

Page 1

MONITOR WITH DVD RECEIVER
MONITOR CON RECEPTOR DE DVD
МОНИТОР С DVD-РЕСИВЕРОМ
KW-AV50
For canceling the display demonstration, see page 8.
Para cancelar la demostración en pantalla, consulte la página 8.
Информацию об отмене демонстрации функций дисплея см. на стр. 8.
ENGLISHESPAÑOLРУCCKИЙ
For installation and connections, refer to the separate manual.
Para la instalación y las conexiones, refiérase al manual separado.
Указания по установке и выполнению соединений приводятся в отдельной инструкции.
INSTRUCTIONS
MANUAL DE INSTRUCCIONES
ИНСТРУКЦИИ ПО ЭКСПЛУАТАЦИИ
LVT2287-001A
[EU]
Page 2

Thank you for purchasing a JVC product.
Please read all instructions carefully before operation, to ensure your complete understanding and to obtain the best
possible performance from the unit.
IMPORTANT FOR LASER PRODUCTS
1. CLASS 1 LASER PRODUCT
ENGLISH
2. CAUTION: Do not open the
top cover. There are no user
serviceable parts inside the
unit; leave all servicing to
qualified service personnel.
3. CAUTION: Visible and/or invisible class 1M laser radiation when open. Do not view directly with optical
instruments.
4. REPRODUCTION OF LABEL: CAUTION LABEL, PLACED OUTSIDE THE UNIT.
WARNINGS: (To prevent accidents and damage)
• DO NOT install any unit or wire any cable in a location
where;
– it may obstruct the steering wheel and gearshift
lever operations.
– it may obstruct the operation of safety devices
such as air bags.
– it may obstruct visibility.
[European Union only]
• DO NOT operate the unit while driving.
If you need to operate the unit while driving, be sure
to look around carefully.
• The driver must not watch the monitor while driving.
• The driver must not put on the headphones while
driving.
2
Page 3

Cautions on the monitor:
• The monitor built in this unit has been produced with
high precision, but it may have some ineffective dots.
This is inevitable and is not considered defective.
• Do not expose the monitor to direct sunlight.
• Do not operate the touch panel using a ball-point
pen or similar tool with the sharp tip.
Touch the buttons on the touch panel with your
finger directly (if you are wearing a glove, take it off ).
• When the temperature is very cold or very hot...
Chemical changes occur inside, causing malfunction.
–
– Pictures may not appear clearly or may move
slowly. Pictures may not be synchronized with
the sound or picture quality may decline in such
environments.
For safety...
• Do not raise the volume level too much, as this will
make driving dangerous by blocking outside sounds,
and may cause hearing loss.
• Stop the car before performing any complicated
operations.
Temperature inside the car...
If you have parked the car for a long time in hot or cold
weather, wait until the temperature in the car becomes
normal before operating the unit.
How to reset your unit
• Your preset adjustments will also be erased (except the
registered Bluetooth devices).
How to forcibly eject a disc
+
(Hold)
• Be careful not to drop the disc when it ejects.
• If this does not work, reset your unit. (☞ above)
(Hold)
ENGLISH
How to read this manual:
• This manual mainly explains operations using the buttons on the monitor panel and touch panel. For
operations using the remote controller (RM-RK252 ), ☞ page 50.
• < > indicates the variable screens/menus/operations/settings that appear on the touch panel.
• [ ] indicates the buttons on the touch panel.
• Indication language: English indications are used for the purpose of explanation. You can select the
indication language from the <Settings> menu. (☞ page 45)
3
Page 4

Contents
How to reset your unit ...........................................3
How to forcibly eject a disc .................................... 3
ENGLISH
INTRODUCTIONS
Detaching/attaching the monitor panel ...5
Component names and functions ............6
Initial Settings .......................................7
Canceling the display demonstration and
setting the clock ..............................8
Common operations .............................10
Turning on the power ......................................... 10
Adjusting the volume .........................................10
Turning off the screen ......................................... 10
Turning on the AV source ....................................11
Touch screen operation ........................................11
Switching screens ................................12
AV SOURCE OPERATIONS
Selecting the playback source ...............13
Listening to the radio ...........................14
Disc operations.....................................19
Playing a disc ......................................................19
Playable disc type ................................................20
Playback operations ........................................... 21
Settings for disc playback ...................................25
USB operations.....................................26
Playing a USB device ........................................... 26
Listening to the iPod/iPhone device ......28
Preparation .........................................................28
Setting iPod control mode ...................................29
Selecting preference settings for iPod/iPhone
playback .............................................................. 29
iPod/iPhone playback operations .......................30
Selecting a track/video from menu on the iPod/
iPhone ................................................................31
Using other external components .......... 32
AV-IN ...................................................................32
Front AUX ............................................................32
Using the external navigation unit .....................33
Sound adjustment ................................35
Using the sound equalization .............................35
Adjusting the cross over frequency ......................36
Changing display design .......................37
Setting for video playback ....................39
Picture adjustment ............................................. 39
Changing the aspect ratio ...................................40
Zooming picture .................................................. 40
Using a rear view camera ......................41
Setting menu items ..............................42
Memorizing/recalling the settings ..................... 46
Adjusting the touch position ...............................47
BLUETOOTH OPERATIONS
Operations on a Bluetooth device
(using JVC KS-BTA100, separately
purchased) ....................................48
Using the Bluetooth audio player .......................48
Using the Bluetooth mobile phone ..................... 49
REFERENCE
Using the remote controller ..................50
Operations using the remote controller
(RM-RK252) ........................................................50
Maintenance ........................................53
More about this unit .............................54
Troubleshooting ...................................57
Specifications.......................................60
4
Page 5
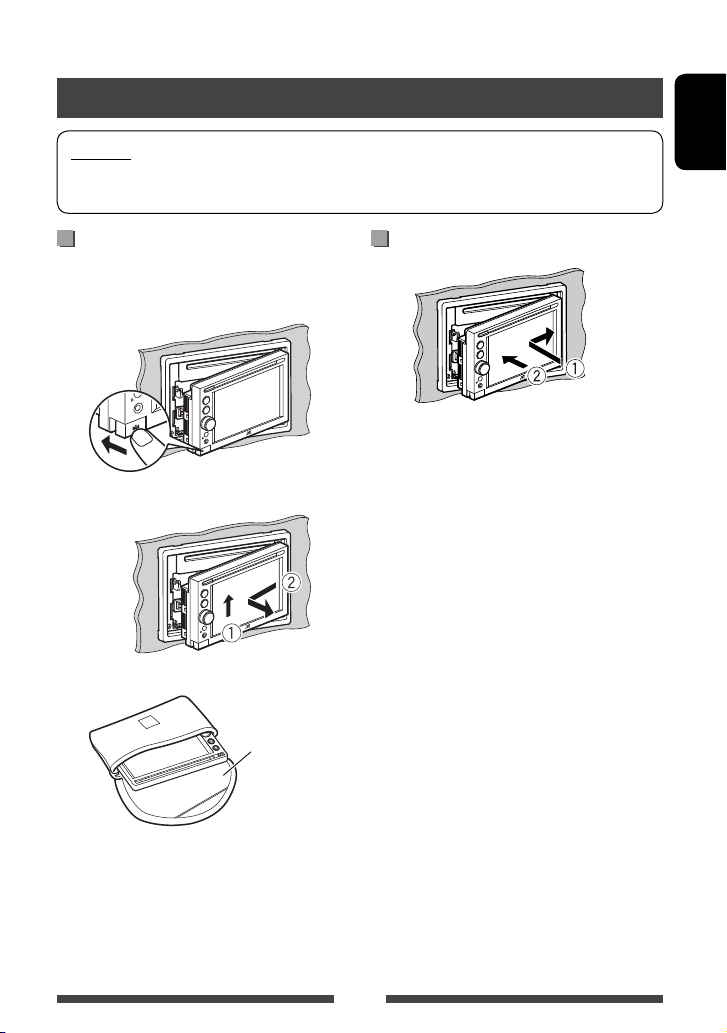
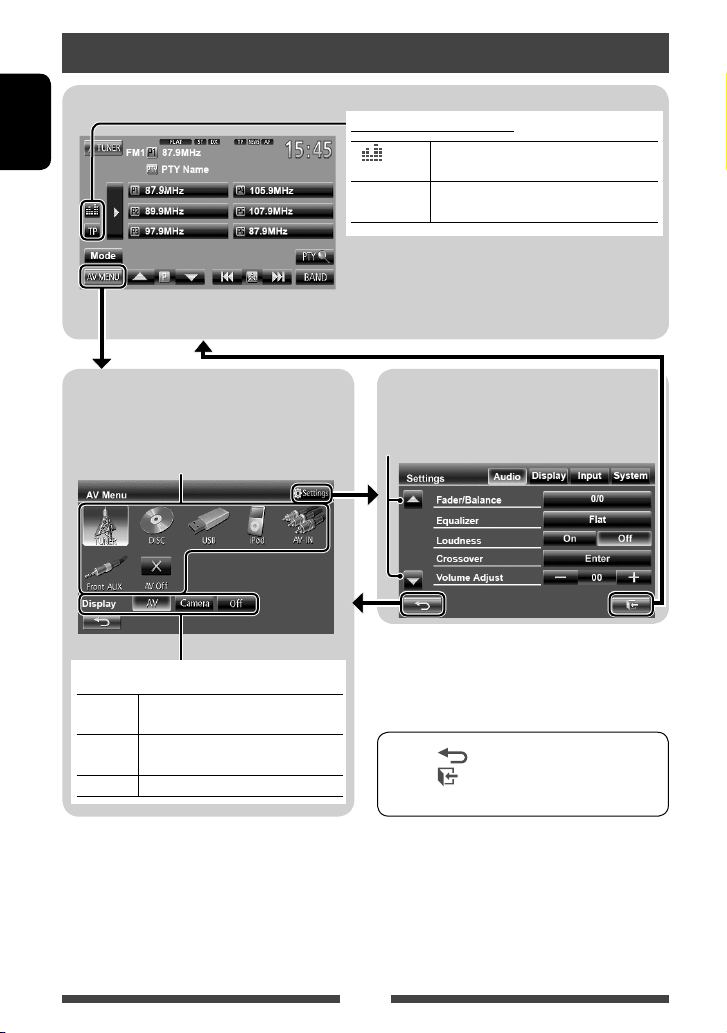
INTRODUCTIONS
Detaching/attaching the monitor panel
Cautions
• Hold the monitor panel securely so as not to drop it accidentally.
• Fit the monitor panel onto the attaching plate until it is firmly locked.
Turn off the ignition switch before detaching the
monitor panel.
1
2
3
ENGLISH
Attaching Detaching
Soft case (supplied)
5
Page 6
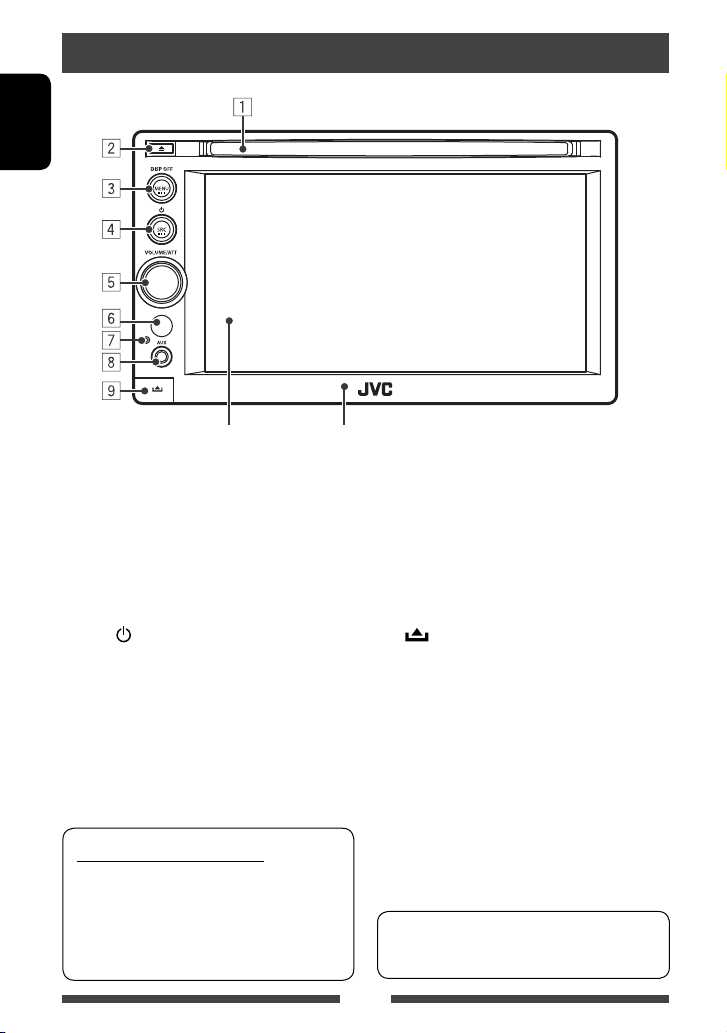
Component names and functions
ENGLISH
Screen (touch panel) Monitor panel
1 Loading slot
2 0 (Eject) button
Ejects the disc.
3 MENU/DISP OFF button
• Displays <AV Menu> screen. (Press)
(☞ page 12)
• Turns off/on the screen. (Hold) (☞ page 10)
4 SRC /
button
• Selects the AV source. (Press) (☞ page 13)
• Turns off the AV source. (Hold)
Caution on volume setting:
Digital devices (CD/USB) produce very little noise
compared with other sources. Lower the volume
before playing these digital sources to avoid
damaging the speakers by sudden increase of the
output level.
5 VOLUME/ATT knob (☞ page 10)
• Attenuates the sound. (Press)
• Adjusts the audio volume. (Turn)
6 Remote sensor
7 Reset button
Resets the unit. (☞ page 3)
8 AUX input terminal
(Detach) button
9
Detaches the monitor panel. (☞ page 5)
You can change the color of the buttons on the
monitor panel. (☞ page 37)
6
Page 7
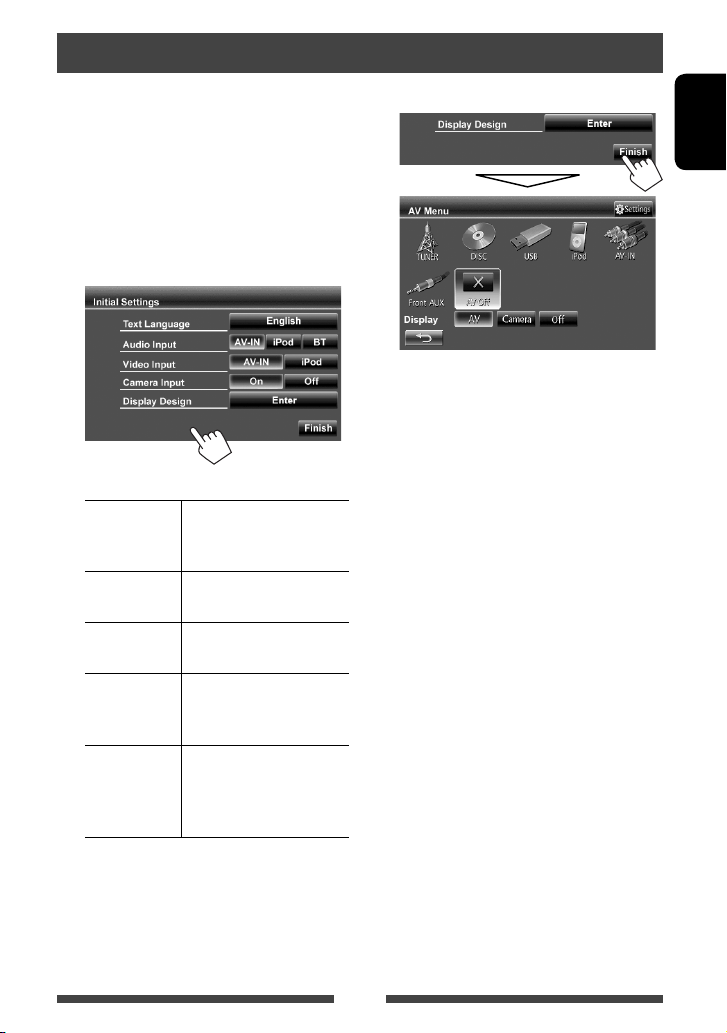
Initial Settings
When you power on the unit for the first time or reset
the unit, the initial setting screen appears.
• You can also change the settings on the <Settings>
screen. (☞ page 42)
1 Turn on the ignition switch.
The power is turned on, and the initial setting
screen appears.
2
Tex t
Language
Audio Input Select the use of the LINE IN
Video Input Select the use of the VIDEO IN
Camera Input Select <On> when
Display
Design
Select the text language used
for on-screen information.
(☞ page 45)
jacks. (☞ page 44)
jack. (☞ page 44)
connecting the rear view
camera. (☞ page 44)
Select the background and
the colors of the text and the
monitor panel buttons. (☞
page 37)
3 Finish the procedure.
ENGLISH
<AV Menu> is displayed.
• <AV Off> is selected initially. Select the
playback source. (☞ page 13)
7
Page 8

Canceling the display demonstration and setting the clock
Canceling the display
demonstration
ENGLISH
1 Display <AV Menu> screen.
2 Display <Settings> screen.
3
Select <Off>.
4 Finish the procedure.
Setting the clock
1 Display <AV Menu> screen.
2 Display <Settings> screen.
3
8
Page 9
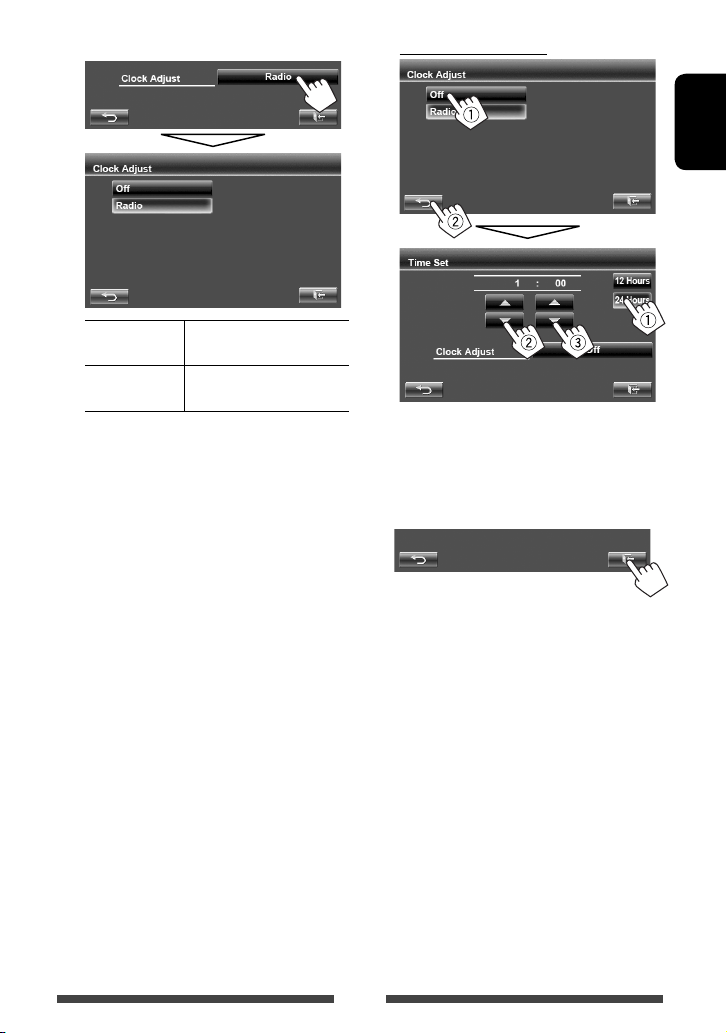
4 Set the clock time.
To set the clock manually
ENGLISH
<Off>
<Radio> Synchronizes the clock time
Sets the clock manually. (☞
right column)
with Radio Data System.
Select the time display format
1
Adjust the hour
2
Adjust the minute
3
5 Finish the procedure.
9
Page 10

Common operations
Turning on the power
Turn on the ignition switch.
• The power is turned off when the ignition switch is
ENGLISH
turned off.
Adjusting the volume
To adjust the volume
• About the adjustable volume range, ☞ page 42
(<Amplifier Gain>).
IncreaseDecrease
• On the control screen, you can also adjust the
volume by moving your finger on the touch panel as
illustrated.
To attenuate the sound
Turning off the screen
(Hold)
The screen is turned off.
• You can also turn off the screen on <AV Menu>
screen.
IncreaseDecrease
To return to the <AV Menu> screen
Touch the screen.
The ATT indicator lights up.
To cancel the attenuation, press the volume
adjustment knob.
10
Page 11

Turning on the AV source
You can activate the AV function by selecting source on
<AV Menu> screen.
To turn off the AV source
(Hold)
or
Touch screen operation
A Displays the video control menu while
playing a video.
B Displays the operation buttons
while playing a video.
Goes to the previous
chapter/track.*
A Video control menu
B S ource control screen for video playback
Goes to the next
ENGLISH
chapter/track.*
• The operation buttons disappear by touching the
screen or when no operation is done for about 10
seconds.
* Not available for video from an external component.
Dragging your finger to left or right functions in the
same way as touching.
11
Page 12
Switching screens
Source control screen
ENGLISH
Common operating buttons
[ ]
[TP] Activates/deactivates TA standby reception
Displays the sound adjustment screen.
☞ page 35)
(
☞ page 17 )
mode. (
<AV Menu>
• Changes the AV source.
• Displays the <Settings> screen.
☞ page 13
Select an item to display on the screen.
[AV] Displays the source control screen.
[Camera] Displays the picture from the rear view
[Off]
(☞ above)
camera. (☞ page 41)
Turns off the screen. (
☞ page 10)
<Settings>
Changes the detailed settings. (☞ page 42)
Changes the page
• Press [ ] to return to the previous screen.
• Press [
] to display the current source control
screen.
12
Page 13
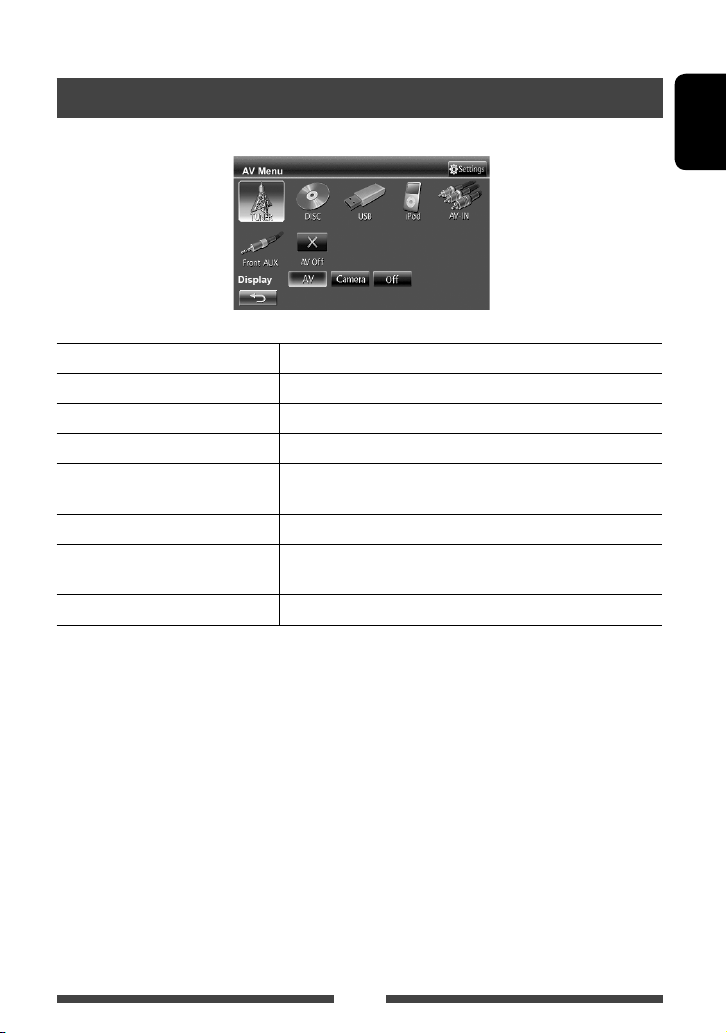
AV SOURCE OPERATIONS
Selecting the playback source
TUNER
(☞ page 14)
DISC
(☞ page 19)
USB
(☞ page 26)
iPod
(☞ page 28)
AV-IN
*1 (☞ page 32)
Bluetooth
Front AUX
AV Off
1
*
2
*
*2 (☞ page 48)
(☞ page 32)
Select an appropriate input setting on <Audio Input>. (☞ page 44)
“
Bluetooth
” is shown as the source instead of “
Switches to the radio broadcast.
Plays a disc.
Plays files on a USB device.
Plays an iPod/iPhone.
Switches to an external component connected to LINE IN/VIDEO IN jacks
on the rear panel.
Operates a Bluetooth device.
Switches to an external component connected to AUX input terminal on
the monitor panel.
Turns off the AV source.
AV-IN
” when <Audio Input> is set to <BT>. (☞ page 44)
ENGLISH
13
Page 14
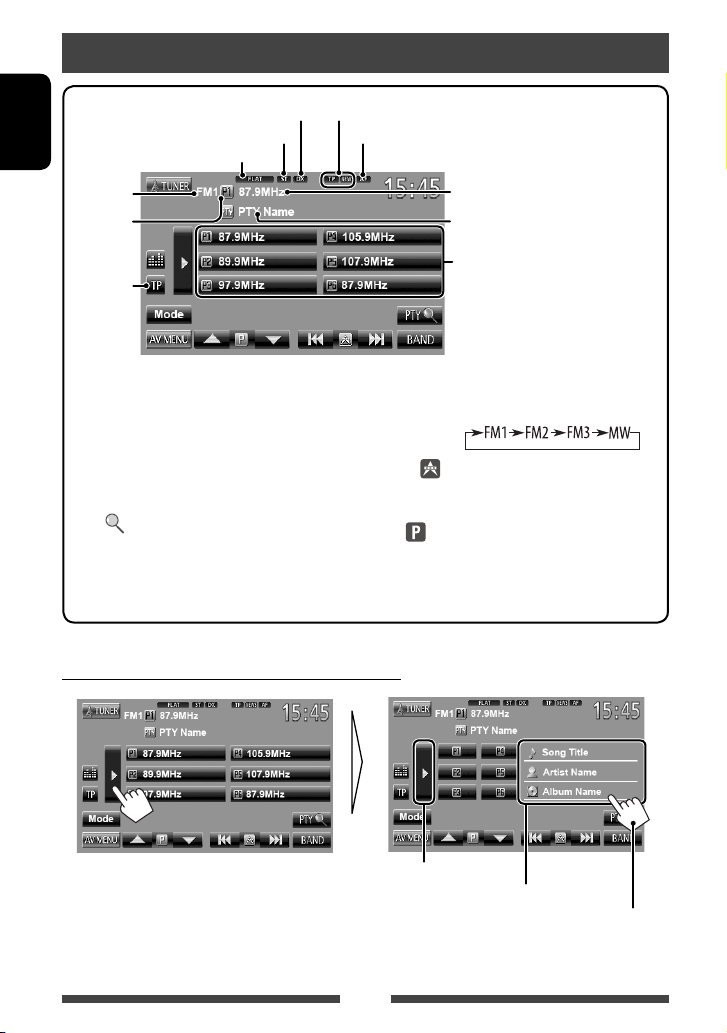
Listening to the radio
ENGLISH
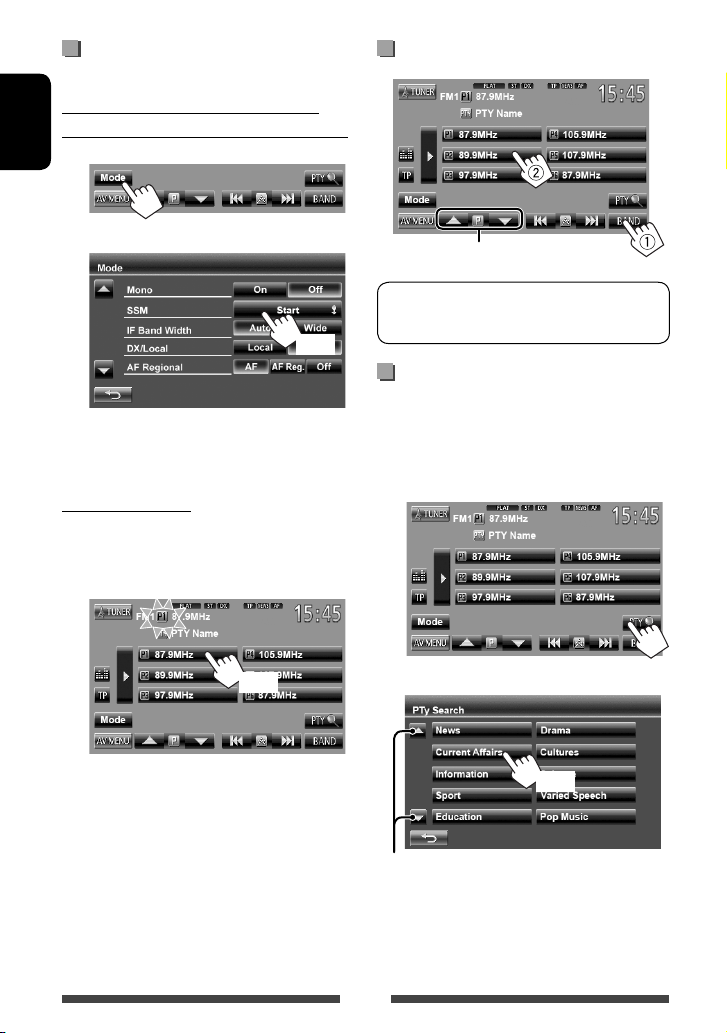
Preset no.
☞ page 17
DX/LO indicator
ST/MO indicator
Sound mode (☞ page 35)
Band
Standby reception indicators
AF indicator
The station frequency currently tuned
in/PS (station name) for FM Radio Data
System when PS signal is coming in
PTY code for FM Radio Data System
Preset list
• The ST indicator lights up when receiving an FM stereo broadcast with sufficient signal strength.
[P1] – [P6] • Tunes in the preset station. (Press)
[BAND] Selects the band.
• Presets the currently tuned
station. (Hold)
Activates/deactivates TA standby
reception mode. (
Enters FM Radio Data System
]*
program search mode. (
☞ page 17)
☞ page 16)
[TP]*
[PTY
[3] Displays/hides the information of the
current station (
☞ below).
[4]
[¢]
[5]
[Mode]*
[AV MENU] Displays <AV Menu> screen.
Searches for a station.
• Auto search (Press)
• Manual search (Hold)
Selects a preset station.
[∞]
Displays tuner setting screen.
(☞ pages 15 – 18)
* Appears only when FM is selected as the source.
Displaying the information of the current station
Hides the text information
14
Text information
Scrolls the text information
Page 15
When an FM stereo broadcast is hard to
receive...
Activate monaural mode for better reception.
1
2
On Activate monaural mode to improve FM
reception, but stereo effect will be lost.
The MO indicator lights up.
Off Restore the stereo effect.
To tune in FM stations only with strong
signals—LO/DX (Local/ Distance-extreme)
1
When the FM reception is interfered...
1
2
Auto Increases the tuner selectivity to reduce
interference noises between adjacent
stations. (Stereo effect may be lost.)
Wide Subject to the interference from
adjacent stations, but sound quality
will not be degraded and the stereo
effect will remain.
ENGLISH
2
Local Select this to tune in only to stations
with sufficient signal strength. The LO
indicator lights up.
DX Deactivate the function. The DX
indicator lights up.
15
Page 16
Storing stations in memory
You can preset six stations for each band.
Automatic presetting — SSM (Strongstation Sequential Memory) (For FM only)
ENGLISH
1
Selecting a preset station
2
(Hold)
Local stations with the strongest signals are searched
and stored automatically.
Manual presetting
1 Tune in to a station you want to preset.
(☞ page 14)
2 Select a preset number.
(Hold)
The station selected in step 1 is stored.
Also changes preset stations
The following features are available only for FM
Radio Data System stations.
Searching for FM Radio Data System
program—PTY Search
You can search for your favorite programs being
broadcast by selecting the PTY code for your favorite
programs.
1
2 Select a PTY code.
(Hold)
Changes the page
PTY Search starts.
If there is a station broadcasting a program of the
same PTY code as you have selected, that station
is tuned in.
16
Page 17
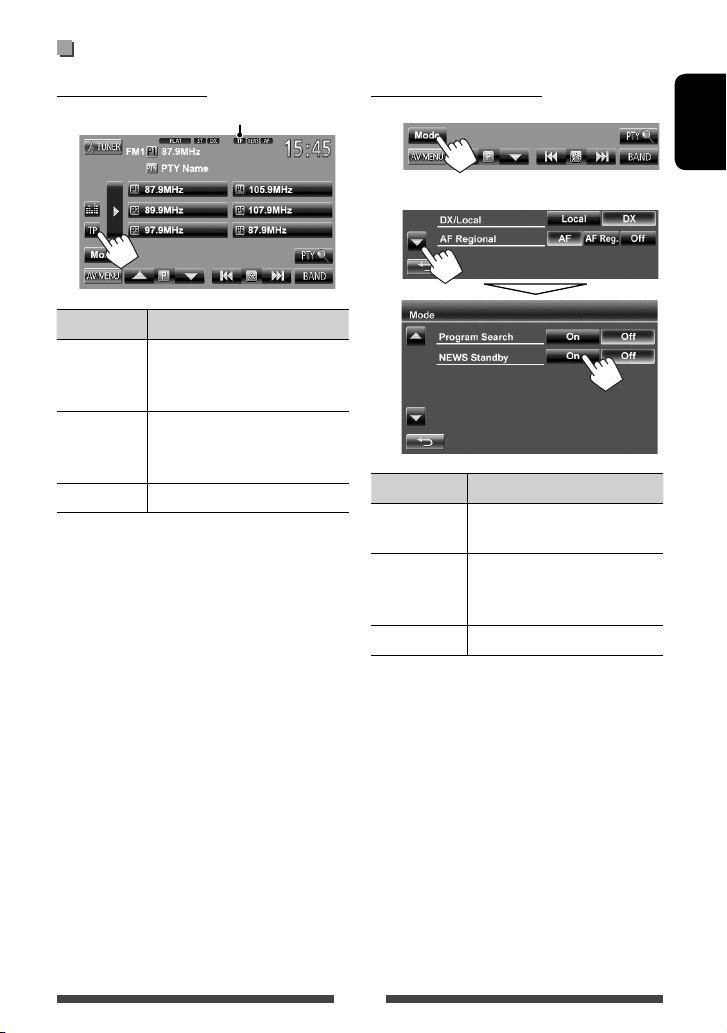
Activating/deactivating TA/News Standby Reception
TA Standby Reception
TP indicator
TP indicator TA Standby Reception
Lights up The unit will temporarily switch
to Traffic Announcement (TA) if
available.
Flashes Not yet activated. Tune in to another
station providing the Radio Data
System signals.
Goes off Deactivated.
• The volume adjustment for Traffic Announcement
is automatically memorized. The next time the unit
switches to Traffic Announcement, the volume is set
to the previous level.
News Standby Reception
1
ENGLISH
2
NEWS indicator News Standby Reception
Lights up The unit will temporarily switch to
News Program if available.
Flashes Not yet activated. Tune in to
another station providing the
Radio Data System signals.
Goes off Deactivated.
• The volume adjustment while receiving News is
automatically memorized. The next time the unit
switches to News, the volume is set to the previous
level.
17
Page 18
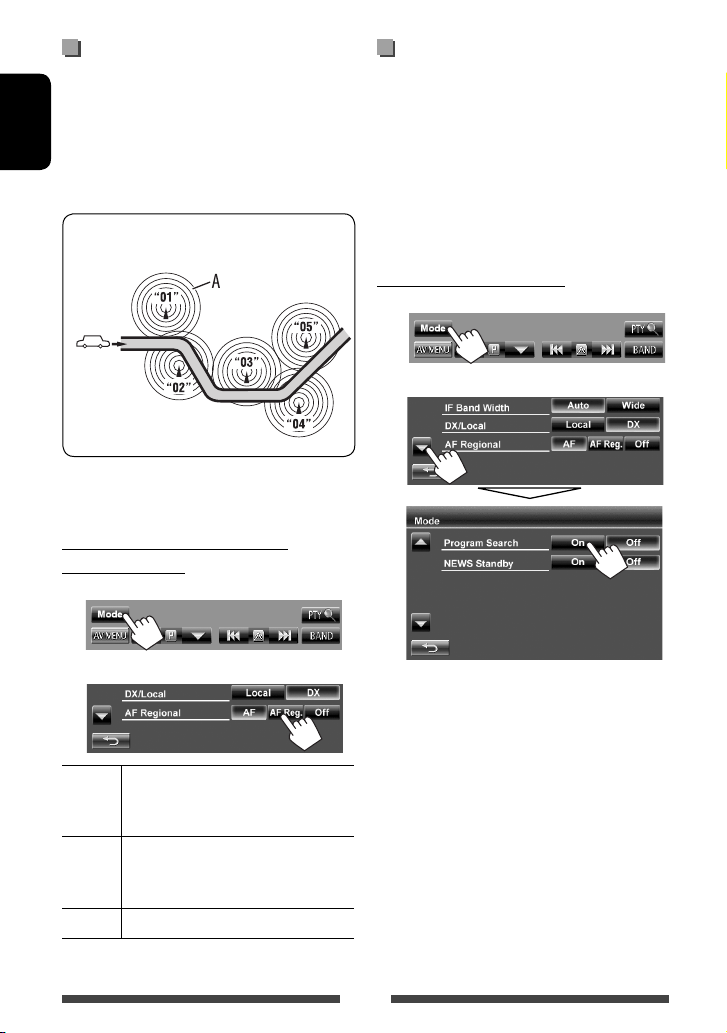
Tracing the same program
—Network-Tracking Reception
When driving in an area where FM reception is not
sufficient enough, this unit automatically tunes in to
another FM Radio Data System station of the same
ENGLISH
network, possibly broadcasting the same program with
stronger signals.
Program A broadcasting on different frequency
areas (01 – 05)
When shipped from the factory, Network-Tracking
Reception is activated.
To change the Network-Tracking
Reception setting
1
Automatic station selection—
Program Search
Usually when you select preset stations, the preset
station is tuned in.
If the signals from the preset FM Radio Data System
station are not sufficient for good reception, this
unit, using the AF data, tunes in to another station
broadcasting the same program as the original preset
station is broadcasting.
To activate Program Search
1
2
2
AF Switches to another station. The program
may differ from the one currently received
(the AF indicator lights up).
AF Reg. Switches to another station broadcasting
the same program (the AF indicator
lights up).
Off Cancels.
• The unit takes some time to tune in to another
station using program search.
To deactivate, select <Off>.
18
Page 19
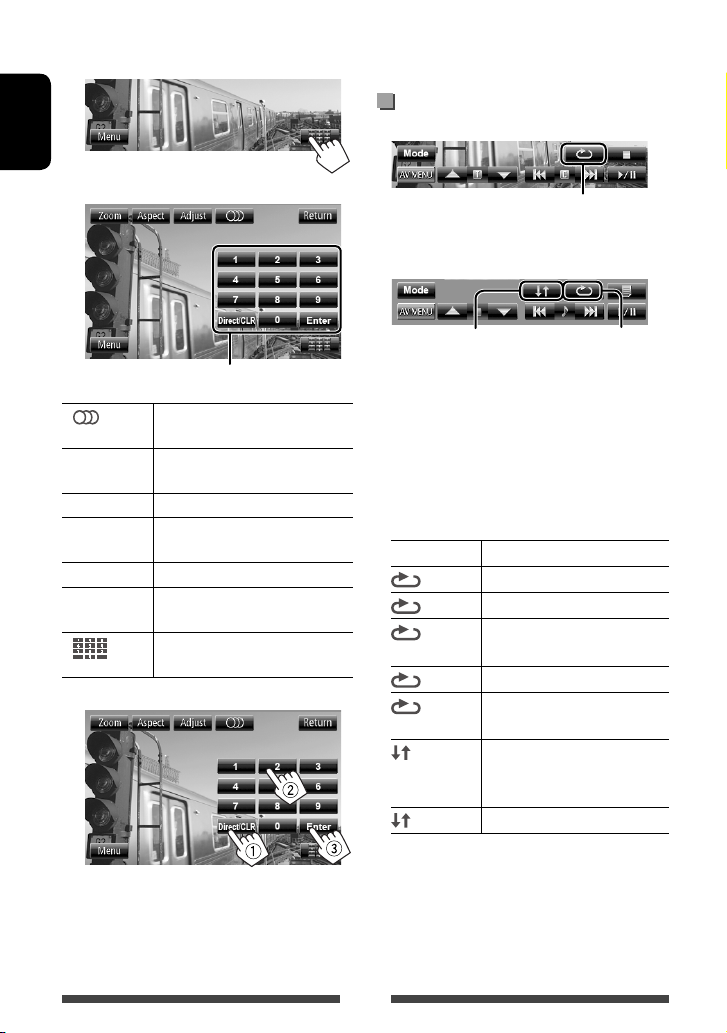
Disc operations
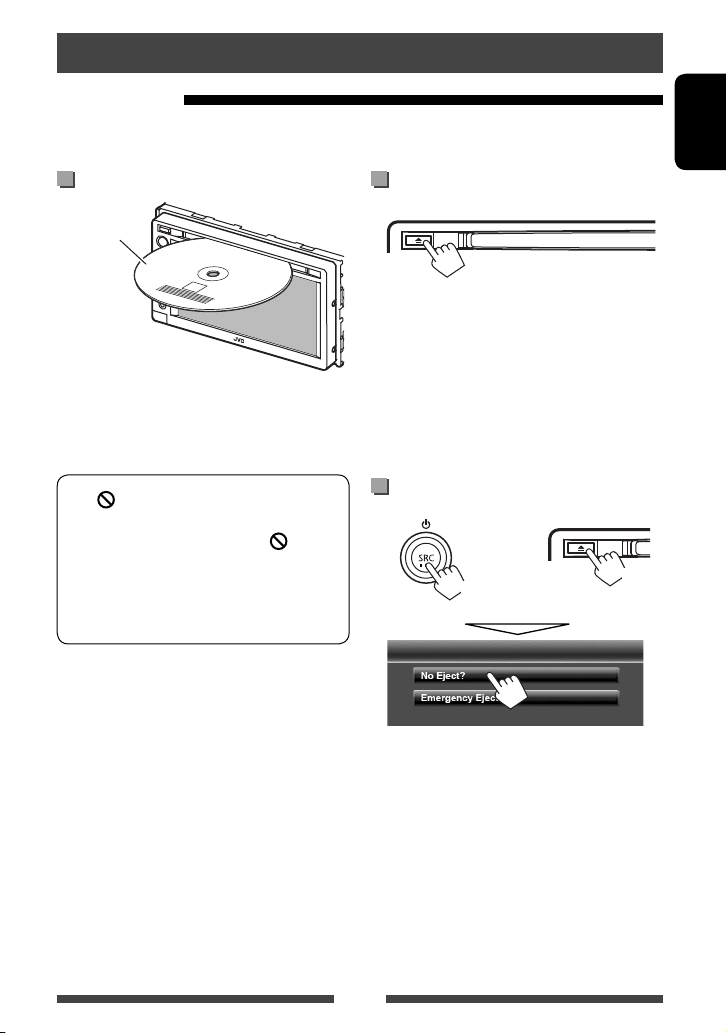
Playing a disc
• If a disc does not have any disc menu, all tracks on it will be played repeatedly until you change the source or eject
the disc.
Inserting a disc
Label side
The source changes to “
• The DISC IN indicator lights up while a disc is inserted.
DISC
” and playback starts.
To eject a disc
• You can eject a disc when playing another AV source.
• If the ejected disc is not removed within 15 seconds,
the disc is automatically inserted again into the
loading slot to protect it from dust.
• If the disc cannot be ejected, ☞ page 3.
When removing a disc, pull it horizontally.
ENGLISH
• If “
” appears on the screen, the unit cannot
accept the operation you have tried to do.
– In some cases, without showing “ ,”
operations will not be accepted.
• When playing back a multi-channel encoded
disc, the multi-channel signals are downmixed
to stereo.
To prohibit disc ejection
+
(Hold)
To cancel the prohibition, repeat the same procedure
to select <Eject OK?>.
19
(Hold)
Page 20
Playable disc type
Disc type Recording format, file type, etc Playable
DVD
• DTS sound cannot be
ENGLISH
reproduced or emitted from
this unit.
DVD Recordable/Rewritable
(DVD-R/-RW *
2
, +R/+RW *3)
• DVD Video: UDF bridge
• DVD-VR
/MPEG1/MPEG2/JPEG/
• DivX
MP3/WMA/WAV : ISO 9660 level
1, level 2, Romeo, Joliet
DVD-Video *
Region Code: 2
DVD-Audio/DVD-ROM
DVD-Video
DVD-VR *
DivX /MPEG1/MPEG2
JPEG
MP3/WMA/WAV
MPEG4/AAC/DVD+VR/DVD-RAM
Dual Disc DVD side
Non-DVD side
CD/VCD Audio CD/CD Text (CD-DA)
VCD (Video CD)
DTS-CD/SVCD (Super Video CD)/CD-ROM/CD-I (CD-I Ready)
CD Recordable/Rewritable
(CD-R/-RW)
• ISO 9660 level 1, level 2,
Romeo, Joliet
CD-DA
VCD (Video CD)
DivX
JPEG
MP3/WMA/WAV
MPEG4/AAC
*1 If you insert a DVD Video disc of an incorrect Region Code, “Region Code Error” appears on the screen.
2
DVD-R recorded in multi-border format is also playable (except for dual layer discs). DVD-RW dual layer discs are not
*
playable.
3
It is possible to play back finalized +R/+RW (Video format only) discs. “DVD” is selected as its disc type when a
*
+R/+RW disc is loaded. +RW double layer discs are not playable.
4
This unit cannot play back contents protected with CPRM (Content Protection for Recordable Media).
*
Caution for DualDisc playback
The Non-DVD side of a “DualDisc” does not comply with the “Compact Disc Digital Audio” standard. Therefore, the use
of Non-DVD side of a DualDisc on this product may not be recommended.
1
4
/MPEG1/MPEG2
20
Page 21
Playback operations
• When the operation buttons are not displayed on the screen, touch the area shown on
the illustration.
For DVD/DVD-VR/VCD/DivX/MPEG1/MPEG2/JPEG
Sound mode (☞ page 35)
Video format/
Media type
playback mode—
VIDEO/VR-PRG
(program)/VR-PLAY
(playlist)/ DivX/
MPEG/PBC
[ ] [ ]*
2
Selects playback mode. (☞
page 24)
[6] Starts playback/pauses.
3
[7]*
[4]
[¢]
Stops playback.
• Selects chapter. (Press)
• Reverse/forward search.*
(Hold)
• For VCD/DivX/MPEG1/MPEG2/JPEG, the following buttons also appear:
6
[
]*
Displays folder/track list. (☞
page 22)
Playback mode (☞ page 24)
[5] *5 [∞]
6
[Mode]*
[AV MENU] Displays <AV Menu> screen.
4
[4] * 5
[¢]
[∞]*
[5]
Selects title (DVD)/program or
playlist (DVD-VR). *
Changes the settings for disc
playback. (☞ page 25)
• Selects track. (Press)
• Reverse/forward search.*
(Hold)
6
Selects folder.
Playback status
(3: play / 8: pause / 7: stop)
Playing time
• DVD Video: Title no./
Chapter no.
• DVD-VR: Program no. (or
Playlist no.)/Chapter no.*
• DivX/MPEG1/MPEG2:
Folder no./Track no.
• JPEG: Folder no./File no.
• VCD: Track no.
1
4
ENGLISH
1
1
*
To display the Original Program/Playlist screen, ☞ page 23.
2
Does not appear for DVD/DVD-VR/JPEG.
*
3
Appears only for DVD/DVD-VR/VCD.
*
4
Search speed varies depending on the type of disc or file.
*
5
Displayed icon varies depending on the type of disc or file.
*
6
Does not appear for VCD.
*
21
Page 22
For CD/MP3/WMA/WAV
ENGLISH
Media type
Sound mode (☞ page 35)
Audio format
Playback mode (☞ page 24)
Playback status
(3: play / 8: pause )Playing time
• MP3/WMA/WAV: Folder no./
Track no.
• CD: Track no.
While playing, “Jacket picture” is
shown if the file has the tag data
including “Jacket picture.”
[ ] [ ]
[
]*
Selects playback mode. (☞ page 24)
1
Displays folder/track list.
(☞ below)
[6] Star ts playback/pauses.
[4]
[¢]
1
*
Does not appear for CD.
2
Search speed varies depending on the type of disc or file.
*
• Selects track. (Press)
• Reverse/forward search.*
Selecting folder/track on the list
Changes the page
Plays tracks/files in the folder
Returns to the root folder
Returns to the upper layer
Track/file information
• Touching an information bar scrolls the text if all the text is
not shown.
[5] [∞]*1
[Mode]*
Selects folder.
1
Changes the settings for disc
playback. (☞ page 25)
[AV MENU] Displays <AV Menu> screen.
2
(Hold)
Playing Recordable/Rewritable discs
• This unit can recognize a total of 5 000 files and
250 folders (a maximum of 999 files per folder).
• Use only “finalized” discs.
• This unit can play back multi-session discs;
however, unclosed sessions will be skipped
while playing.
• Some discs or files may not be played back due
to their characteristics or recording conditions.
22
Page 23
Video menu operations
You can display the video menu screen while watching
the playback pictures on the screen.
• Available items on the screen differ depending on the
types of the loaded disc and playback files.
• The operation buttons disappear by touching the
screen or when no operation is done for about 10
seconds.
• The screen for MPEG1/MPEG2 differs from the above.
[Menu] Displays the disc menu (DVD)/
playlist (DVD-VR).
[Top Menu] Displays the disc menu (DVD)/
original program (DVD-VR).
]
[
Displays the menu/playlist/original
program item selecting screen.
(☞ below)
]
[
Switches to the direct menu
selection mode. Touch the target
item to select.
• To exit from the menu selecting
screen, press [
].
[Adjust] Displays picture adjustment screen.
(☞ page 39)
[Aspect]
Selects aspect ratio. (☞ page 40)
[Zoom] Displays the picture size selecting
screen. (☞ page 40)
Using menu selecting screen
ENGLISH
[ ] Selects the audio type.
• For DVD-VR: Selects the audio
channel (ST: stereo, L: left, R:
right).
[
] Selects the subtitle type.
[ ]
Selects view angle.
[5] [∞]
Selects an item.
[2] [3]
[Enter] Confirms the selection.
[Return] Returns to the previous menu.
[
Exits from the menu selecting screen.
]
• For DivX only
[2] [3] Skips back or forward by about 5
minutes.
[Return] Returns to the previous screen.
[
Exits from the scene selecting screen.
]
23
Page 24
Only for VCD
1
ENGLISH
• To deactivate the PBC function, press [7] then the
direct selecting buttons to select a track number.
Selecting playback mode
For DVD/DVD-VR
2
Direct selecting buttons (☞ below)
[ ] Selects the audio channel (ST:
stereo, L: left, R: right).
[Return] Displays the previous screen or the
menu.
[Menu] Displays the disc menu.
[Adjust] Displays picture adjustment screen.
(☞ page 39)
[Aspect]
[Zoom] Displays the picture size selecting
[
• To select a track directly
Selects aspect ratio. (☞ page 40)
screen. (☞ page 40)
Displays/hides the direct selecting
]
buttons. (☞ below)
Selects Repeat playback mode
For VCD (without PBC)/CD/DivX/MPEG1/MPEG2/MP3/
WMA/WAV
Selects Random
playback mode*
* You cannot activate the repeat mode and the random
mode at the same time.
• Each time you press the button, the playback mode
changes. (The corresponding indicator lights up.)
– Available items differ depending on the types of
loaded disc and playback file.
Indicator Playback mode
CHAPTER
TITLE
PROGRAM
SONGS
FOLDER
FOLDER
DISC
Repeats current chapter.
Repeats current title.
Repeats current program (not
available for Playlist playback).
Repeats current track.
Repeats all tracks of the current
folder.
Randomly plays all tracks of
current folder, then tracks of next
folders.
Randomly plays all tracks.
Selects Repeat
playback mode*
– To switch between chapter/track entry and title/
folder entry, press [Direct/CLR].
– When you enter a wrong number, press [Direct/
CLR] to delete the last entry.
To cancel, press the button repeatedly until the
indicator disappears.
24
Page 25
Settings for disc playback
Disc Setup items Selectable setting/item Initial: Underlined
Menu Language
Audio Language
Subtitle
Down Mix When playing back a multi-channel disc, this setting affects the signals reproduced
For DVD/DVD-VR
D. (Dynamic)
Range Compres.
(Compression)
Monitor Type Select the monitor type to watch a wide screen picture on the external monitor.
VCD/CD
For discs except
File Type Select the playback file type when a disc contains different types of files.
video/picture files
For discs containing audio/
Select the initial disc menu language; Initial English (☞ page 55).
Select the initial audio language; Initial English (☞ page 55).
Select the initial subtitle language or erase the subtitle (Off) ; Initial English
(☞ page 55).
through the FRONT OUT/REAR OUT jacks.
♦ Dolby Sur : Selec t this to enjoy multi-channel surround audio by
connecting an amplifier compatible with Dolby Surround.
♦ Stereo : Normally selec t this.
You can change the dynamic range while playing Dolby Digital software.
♦ Off : S elect this to enjoy a powerful sound at a low volume
level with its full dynamic range.
♦ On : Select this to reduce the dynamic range a little.
♦ Dialog : Select this to reproduce the movie dialog more clearly.
♦ 16:9
♦ Audio
♦ Still Picture
♦ Video
♦ Audio&Video
• For playable file types, ☞ page 20.
• If the disc contains no files of the selected type, the existing files are played in the
following order: audio, video, then still picture.
♦ 4:3 LB (Letterbox) ♦ 4:3 PS (PanScan)
: Plays back audio files.
: Plays back JPEG files.
: Plays back DivX/MPEG1/MPEG2 files.
: Plays back audio files and DivX/MPEG1/MPEG2 files.
ENGLISH
25
Page 26
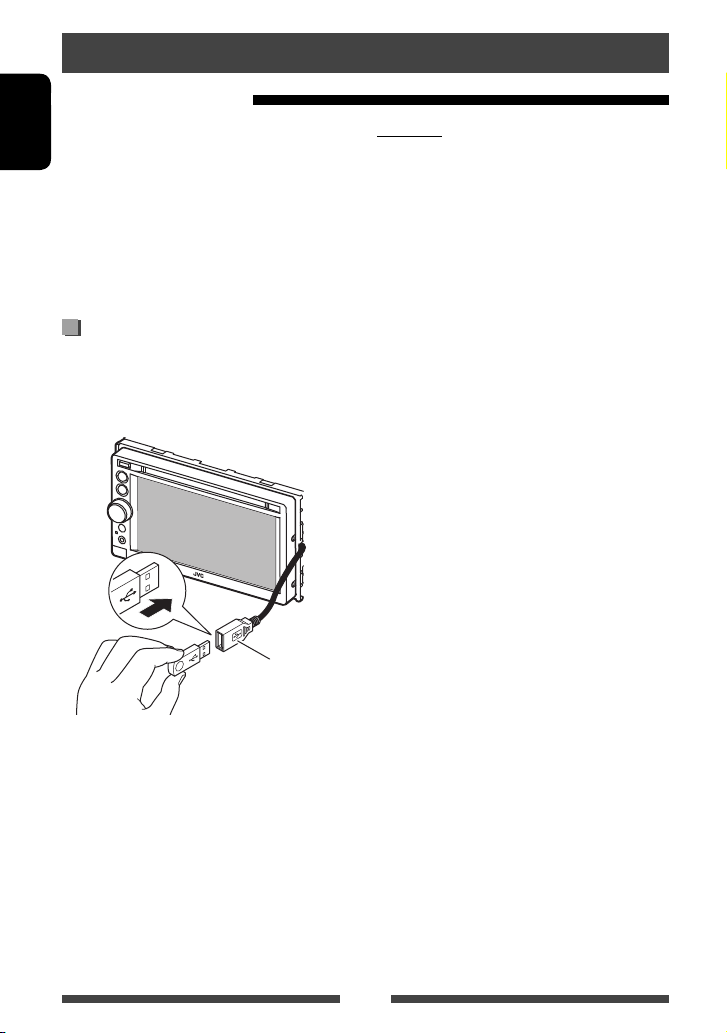
USB operations
Playing a USB device
• This unit can play JPEG/MPEG1/MPEG2 */MP3/WMA/
WAV files stored in USB mass storage class device.
ENGLISH
• This unit can recognize a total of 5 000 files and 250
folders (a maximum of 999 files per folder).
• Make sure all important data has been backed up to
avoid losing the data.
* Except for MPEG2 files recorded by JVC Everio
camcorder (extension code <.mod>).
Connecting a USB device
You can connect a USB mass storage class device such as
a USB memory, Digital Audio Player etc. to the unit.
• You cannot connect a computer or portable HDD to
the USB cable from the rear of the unit.
USB cable from the
rear of the unit
The source changes to “
• All tracks in the USB device will be played repeatedly
until you change the source.
USB
” and playback starts.
Cautions:
• This unit may not play back files in a USB device
properly when using a USB extension cord.
• USB devices equipped with special functions such as
data security functions cannot be used with the unit.
• Do not use a USB device with 2 or more partitions.
• Depending on the shape of the USB devices and
connection ports, some USB devices may not be
attached properly or the connection might be loose.
• This unit cannot recognize a USB device whose rating
is other than 5 V and exceeds 1 A.
• This unit may not recognize a memory card inserted
into the USB card reader.
• Connect only one USB device to the unit at a time. Do
not use a USB hub.
• When connecting with a USB cable, use the USB 2.0
cable.
• The maximum number of characters for (when the
characters are 1 byte):
– Folder names : 50 characters
– File names : 50 characters
• Avoid using the USB device if it might effect driving
safety.
• Do not pull out and attach the USB device repeatedly
while “Now Reading” is shown on the screen.
• Electrostatic shock at connecting a USB device may
cause abnormal playback of the device. In this case,
disconnect the USB device then reset this unit and
the USB device.
• Operation and power supply may not work as
intended for some USB devices.
• Do not leave a USB device in the car, expose to direct
sunlight, or high temperature to avoid deformation
or cause damaging to the device.
26
Page 27
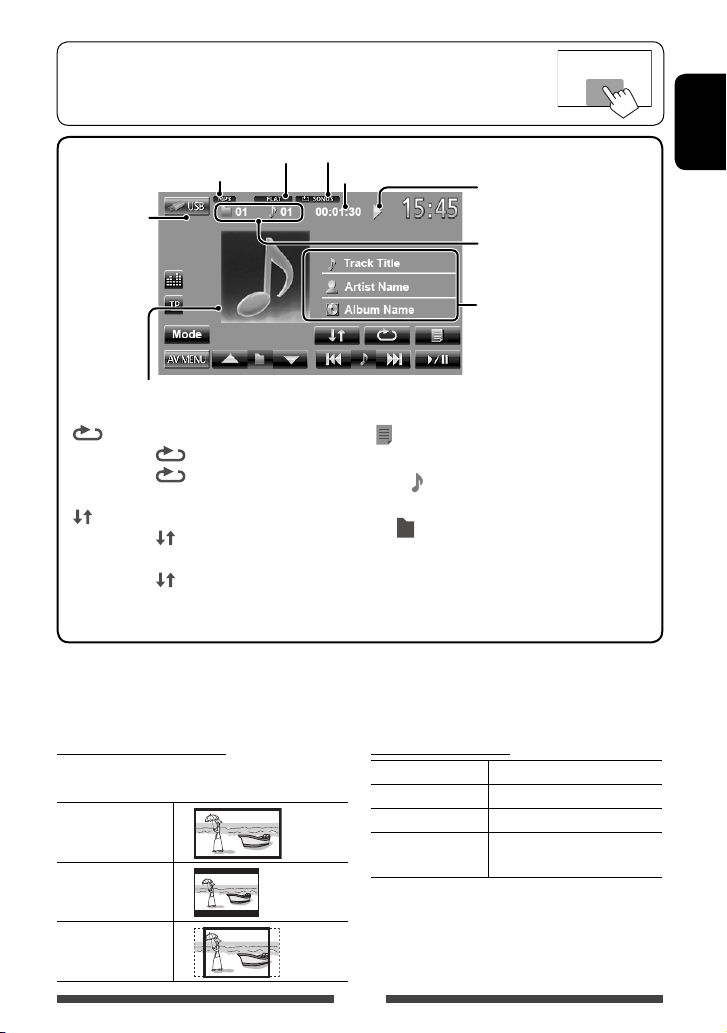
• When the operation buttons are not displayed on the screen, touch the area shown on
the illustration.
• To change settings for video playback, ☞ page 39.
Sound mode (☞ page 35)
Audio format
Video format:
MPEG/Still
image: JPEG
While playing, “Jacket picture” is shown if the file
has the tag data including “Jacket picture.”
[ ]
Selects repeat mode. *
• SONGS: Repeats current track.
FOLDER: Repeats all tracks of
•
the current folder.
[
] S elects random mode. *1 *
• FOLDER: Randomly plays all
tracks of the folder.
USB: Randomly plays all tracks.
•
Playback mode (☞ below)
1 *2
2
Playing time
[
]
Playback status
(3: play / 8: pause)
• MP3/WMA/WAV: Folder no./
Track no.
• JPEG: Folder no./File no.
Track/file information (for MP3/
WMA/WAV)
• Touching an information bar
scrolls the text if all the text is
not shown.
Displays folder/track list. (☞ page 22)
[6] Starts playback/pauses.
[4]
[¢]
[5] [∞]
• Selects track. (Press)
*3
• Reverse/forward search.*
Selects folder.
[Mode] Changes the settings for file playback.
(☞ below)
[AV MENU] Displays <AV Menu> screen.
• Available items differ depending on the types of playback file.
*1 To cancel random or repeat mode, press the button repeatedly until the indicator disappears.
2
You cannot activate the repeat mode and the random mode at the same time.
*
3
Displayed icon varies depending on the file type.
*
4
Search speed varies depending on the file type.
*
Setting <Monitor Type>
Select the monitor type to watch a wide screen picture
on the external monitor.
16:9
4:3 LB (Letterbox)
4:3 PS (PanScan)
Setting <File Type>
Audio Plays back audio files.
Still Picture Plays back JPEG files.
Video Plays back MPEG1/MPEG2 files.
Audio&Video Plays back audio files and
MPEG1/MPEG2 files.
• If the USB device contains no files of the selected
type, the existing files are played in the following
order: audio, video, then still picture.
4
(Hold)
ENGLISH
27
Page 28
Listening to the iPod/iPhone device
Preparation
iPod/iPhone that can be connected to this unit:
ENGLISH
– iPod with video (5th Generation)
– iPod classic
– iPod nano (5th Generation)
– iPod nano (4th Generation)
– iPod nano (3rd Generation)
– iPod nano (2nd Generation)
– iPod nano (1st Generation)
– iPod touch (3rd Generation)
– iPod touch (2nd Generation)
– iPod touch (1st Generation)
– iPhone 4
– iPhone 3G
– iPhone 3GS
– iPhone
Connecting iPod/iPhone
Connect your iPod/iPhone using the appropriate cable
according to your purpose.
• Use the following cables:
– To listen to the music (digital): USB 2.0 cable
(accessory of the iPod/iPhone)
To iPod/iPhone
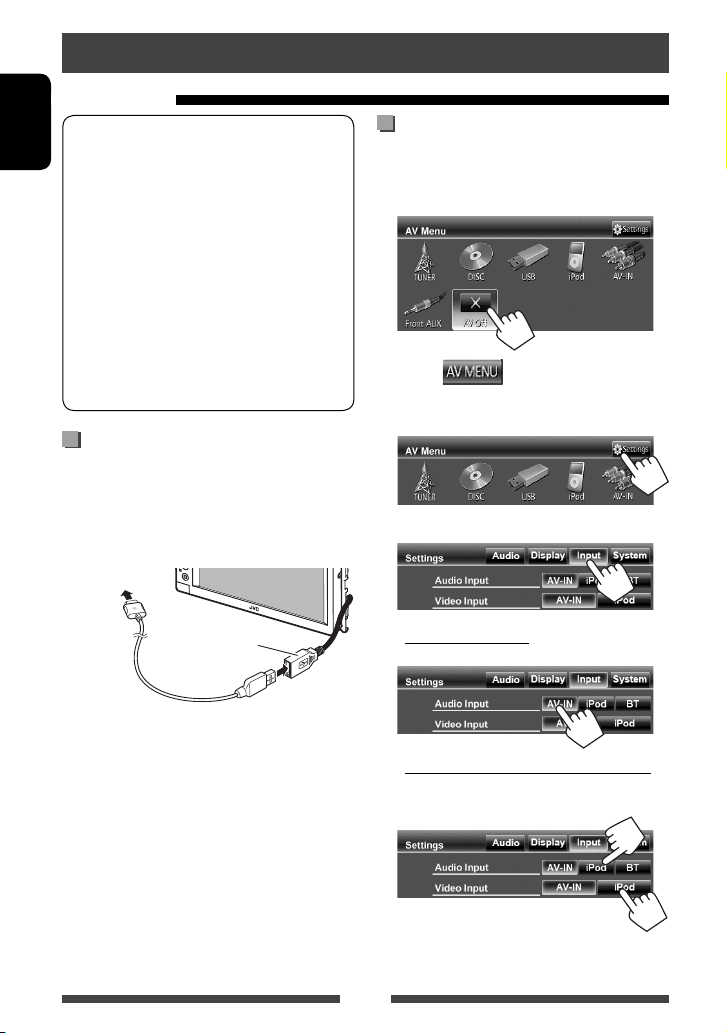
Setting <Input> for iPod/iPhone
playback
1 Turn off the AV source.
On <AV Menu>:
2 Press to display the <AV
Menu> screen.
3 Display the <Settings> screen.
4 Display the <Input> screen.
USB cable from the
rear of the unit
– To watch the video and to listen to the
music (analog): USB Audio and Video cable for
iPod/iPhone—KS-U30 (separately purchased)
(☞ Installation/Connection Manual)
Caution:
Video is not displayed on the screen if connected
with any cable other than KS-U30.
5 To listen to the music
Set <Audio Input> to <AV-IN>.
To watch the video and listen to the music
Set <Audio Input> and <Video Input> to
<iPod>.
• When KS-BTA100 is also connected, select
<BT> for <Audio Input>. (☞ page 48)
28
Page 29
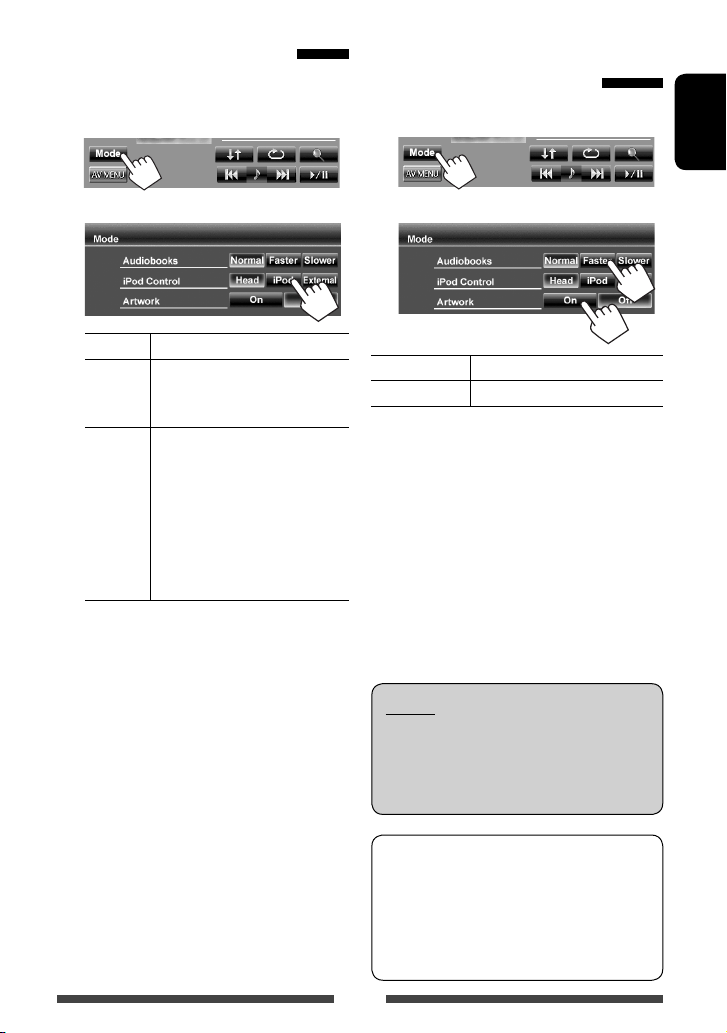
Setting iPod control mode
Select the unit controlling iPod/iPhone playback.
When the source is “
1
iPod
”...
Selecting preference settings for iPod/iPhone playback
When the source is “
1
iPod
”...
ENGLISH
2
Head Controls playback from this unit.
iPod Controls audio/video playback from
the iPod/iPhone.
• Playback information is shown.
External Allows any audio/video signals
from iPod/iPhone.
• No information is shown.
• When you turn on the power
and play back a video with
<External> selected, caution
message appears. Press [Accept]
to continue.
• When using iPod nano (1st Generation) or iPod with
video (5th Generation) with <AV-IN> selected for
<Audio Input> (☞ page 44), only <Head> mode
is available. <iPod> and <External> are not
selectable.
• When you use App of the iPod touch or iPhone, see
also page 56 for safety instructions.
2
Audiobooks Selec t the speed of audio books.
Artwork Shows/hides the iPod artwork.
Notice:
When operating an iPod/iPhone, some operations
may not be performed correctly or as intended. In
this case, visit the following JVC web site: <http://
www.jvc.jp/english/car/> (English website only)
For some iPod/iPhone models, the performance
may be abnormal or unstable during operation. In
this case, disconnect the iPod/iPhone device, then
check its condition.
If the performance is not improved or slow, reset
your iPod/iPhone.
29
Page 30
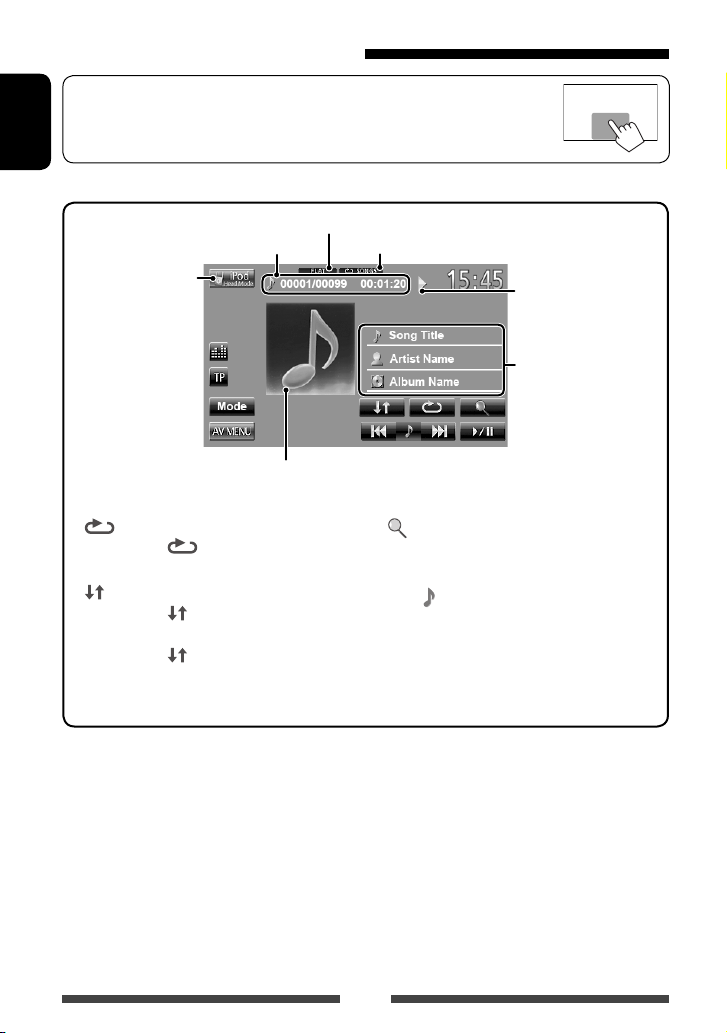
iPod/iPhone playback operations
• When the operation buttons are not displayed on the screen, touch the area shown on
the illustration.
• To change settings for video playback, ☞ page 39.
ENGLISH
• The operations explained in this manual are under <Head> mode (☞ page 29).
Track no./Total track number/
iPod control mode
(☞ page 29)
While playing, Artwork (the picture displayed on the screen of iPod/iPhone) is shown if the song
contains the Artwork.
[ ]
Selects Repeat playback mode. *
Playing time
• SONGS: Functions the same
as “Repeat One.”
] S elects Random playback mode. *
[
• SONGS: Functions the same as
“Shuffle Songs.”
ALBUMS: Functions the same
•
as “Shuffle Albums.”
Sound mode (☞ page 35)
Playback mode (☞ below)
1
[ ]
[6] Starts playback/pauses.
1
[4]
[¢]
[Mode] Changes the settings for iPod
[AV MENU] Displays <AV Menu> screen.
Playback status ( 3:
play/8: pause)
Song/video information
• Touching an information
Displays the Music/Video menu on
the iPod/iPhone. (☞ page 31)
• Selects a track/video. *
• Reverse/forward search. (Hold)
playback. (☞ page 29)
• To watch the video, select an item on the list of the Video menu. (
*1 To cancel random or repeat mode, press the button repeatedly until the indicator disappears.
2
You cannot resume playback for video sources.
*
☞ page 31)
bar scrolls the text if all
the text is not shown.
2
(Press)
• When you turn on this unit, the iPod/iPhone is charged through the unit.
– iPhone 4 can be charged only when connected through KS-U30.
• The text information may not be displayed correctly.
30
Page 31

Selecting a track/video from menu on the iPod/iPhone
1
Video menu:
Switches between Music ( ) and Video
( )
ENGLISH
2 Select the menu (Music or Video) (1), a
category (2), then a desired item (3).
• Select the item in the selected layer until a
desired track starts playing.
Music menu:
Switches between Music ( ) and Video
( )
Returns to the top layer
Returns to the
previous layer
Plays all items in the layer
• Available categories differ depending on the type of
your iPod/iPhone.
* You can switch to the top of the category by pressing
the corresponding tab: Playlist (
Albums (
*
) or Songs( ).
), Artist ( ),
31
Page 32

Using other external components
AV-IN
You can connect an external component to the LINE IN/VIDEO IN jacks. (☞ Installation/Connection Manual)
Preparation:
ENGLISH
• To listen to the music from the connected component, select <AV-IN> for <Audio Input> setting. (☞ page 44)
• To watch the video from the connected component, select <AV-IN> for <Video Input> setting. (☞ page 44)
1 Select “AV-IN” as the source. (☞ page 13)
2 Turn on the connected component and start playing the source.
• When the operation buttons are not displayed on the screen, touch the area shown on
the illustration.
• To change settings for video playback, ☞ page 39.
AV-IN name* ( ☞ below) Sound mode ( ☞ page 35)
Source type (“AV-IN” or
“Front AUX”)
*
[Mode]* Changes the AV-IN name.
• Press [2] or [3] to select an AV-IN name.
[AV MENU] Displays <AV Menu> screen.
* Appears when “
AV-IN
” is selected as the source.
Front AUX
1 Connect an external component
2 Select “FrontAUX” as the source. (☞ page 13)
3 Turn on the connected component and start playing the source.
.
32
3.5 mm stereo mini plug
(not supplied)
Page 33

Using the external navigation unit
You can connect a navigation unit (not supplied) to the RGB input terminal so that you can view the navigation
screen. (☞ the Installation/Connection Manual)
• Please contact your dealer to inquire about compatible navigation units.
Activating the navigation function
1 On <AV Menu>:
2
3
• When <Navigation Input> is set to <On>,
[
NAVI] and [Navi] buttons appear on the source
control screen and <AV Menu> screen.
On the source control screen:
On <AV Menu>:
ENGLISH
33
Page 34

To view the navigation screen
On the source control screen:
ENGLISH
or
On <AV Menu>:
• While the navigation screen is displayed, the
touch panel operations are available only for using
navigation function.
• The aspect ratio of the navigation screen is fixed to
<Full> regardless of the <Aspect> setting (☞
page 40).
AV-IN
• You can use the source “
audio source connected to the LINE IN jacks.
” for listening to an
To cancel the navigation screen
Settings for navigation unit
1 On <AV Menu>:
2
3
Navigation
Input
Output Select front speakers used for the
Volume Adjust the volume of the navigation
Navigation
Mute
Picture
Adjust
☞ page 33
navigation guidance.
guidance. (0 to 35)
Select <On> to attenuate the
sound coming through speakers
other than the front speakers during
navigation guidance.
Adjust the brightness and black.
(☞ page 39)
34
Page 35

Sound adjustment
Using the sound equalization
• The adjustment is memorized for each source until you adjust sound again. If the source is a disc, the adjustment is
stored for each of the following categories.
– DVD/DVD-VR
– VCD/CD
– DivX/MPEG1/MPEG2/MP3/WMA/WAV
• You cannot adjust the sound when the AV source is turned off.
ENGLISH
Selecting a preset sound mode
1 On <AV Menu>:
o r
On the source control screen:
2 Select a sound mode.
Storing your own adjustment
Customizing preset sound mode
1 Select a sound mode. (☞ “Selecting a preset
sound mode”)
2 Adjust the level of each band (1), then
select the subwoofer level (2).
The adjustments are stored and <User> is
activated.
• To finish the procedure, press [ ].
• To make precise adjustments, ☞ page 36.
Changes the page
35
Page 36

Adjusting the sound precisely
1 Perform steps 1 and 2 of “Selecting a
preset sound mode,” then...
ENGLISH
2 Select a band.
3 Adjust the sound .
Reset Changes level of Low/Mid/
High to 0.
Freq Selects frequency.
Q Adjusts the width of the
frequency.*
Bass Activates/deactivates bass.*
SW Level Adjusts subwoofer level.
The adjustments are overwritten if <User> is set
on previous page, and <User> is activated.
1
Adjusting the cross over frequency
1 On <AV Menu> :
2
3 Select the item to adjust, then make
adjustment.
Adjusts the cross over for front or rear speakers
(high pass filter).
2
Adjusts the cross over for subwoofer (low pass filter).
• The adjustments are memorized until you
adjust sound again.
• To make adjustment for other bands, repeat
steps
2 and 3.
1
Fixed for “High” band.
*
2
Only for “Low” band.
*
Adjusts the cross over frequency.
Selects the phase for the subwoofer.*
Adjusts the subwoofer level.
* Not selectable when <Freq> is set to <Through>.
36
Page 37

Changing display design
You can change the background, the color of text, touch panel buttons, and monitor panel buttons.
1 On <AV Menu>:
2
3 Select an item (<Backgrnd>, <Text> or
<Buttons>), then change the setting.
Background
Select a background
1
Basic image (default)
You can select a color on the color
palette or adjust the color on the user
color adjuster (☞ the right column)
For setting your favorite scene as the background,
☞ page 38
Select/
2
Dimmer setting: You can make selections for each
dimmer setting—< > (On) or < > (Off)
Text/Buttons
For setting the color, ☞ above.
Variable color illumination*
• Illumination color changes gradually.
* Appears only for button color selection screen.
When variable color illumination is selected, you
cannot adjust the color.
adjust the color
Color palette
User color adjuster: You can make your own
color adjustment stored in <User>
ENGLISH
37
Page 38

Using your favorite scene as the
background
While playing a video or JPEG, you can capture an image
and use the captured image as a background.
• You cannot capture copyrighted content and image
ENGLISH
from iPod/iPhone.
• When using JPEG file as the background, make sure
that the resolution is 800 x 600 pixels.
• The color of the captured image may look different
from that of the actual scene.
1 Play back a video or JPEG.
2 Display <Display Design>. (☞ page 37)
3
4 Adjust the image.
5 Capture the image displayed on the
screen.
Confirmation message appears. Press [Yes] to
store the newly captured image. (The existing
image is replaced with the new one.)
• Press [No] to return to the previous screen.
[6] * Starts playback/pauses.
[E] * Advances scenes frame-by-frame.
[3] Magnifies the scene.
(<Zoom1> – <Zoom3>)
[5] [∞]
[2] [3]
• To cancel the capture screen, press [
* Not displayed when playing an external
Moves the zooming frame.
component connected to LINE IN/VIDEO IN jacks.
].
38
Page 39

Setting for video playback
You can change the setting for video playback.
Picture adjustment
You can adjust the picture quality.
1 Display the adjustment menu.
2 Select Dimmer On (< >) or Off
(<
>).
3 Adjust the picture (–15 to +15).
ENGLISH
Adjusts the
brightness
Adjusts the contrast
Adjusts the black
Adjusts the color
Adjusts the tint *
Adjusts the detail
* Adjustable only when the incoming signal is
NTSC.
39
Page 40

Changing the aspect ratio
You can change the aspect ratio for video playback.
1
ENGLISH
2
4:3 signal 16:9 signal
Full*:
For 16:9 original
pictures
Panorama:
For viewing 4:3
pictures naturally
on the wide screen
Regular*:
For 4:3 original
pictures
Auto: • For “
* While DivX is played back with <Monitor Type>
set to <16:9> (☞ page 25), the aspect ratio is not set
correctly.
DISC
”/“
only: Aspect ratio is
automatically selected to
match to the incoming
signals.
USB
Zooming picture
You can zoom the picture (<Zoom1> to <Zoom3>).
• When <Aspect> is set to <Panorama> or
<Auto> (☞ left column), the picture is zoomed
with the aspect ratio of the <Full> setting.
1
2
[5] [∞] [2] [3] : Moves the zooming frame.
”
40
Page 41

Using a rear view camera
• To use a rear view camera, the REVERSE GEAR SIGNAL lead connection is required. For connecting a rear view
camera, see the Installation/Connection Manual.
Activating the rear view camera
1 On <AV Menu>:
2
To deactivate, select <Off>.
Displaying the picture from the rear
view camera
The rear view screen is displayed when you shift the
gear to the reverse (R) position.
To display the picture from the rear view
camera manually
On <AV Menu>:
When displaying the picture from the rear view
camera manually, you can change the setting of the
☞ page 39)
picture. (
To cancel the rear view screen
ENGLISH
41
Page 42

Setting menu items
ENGLISH
• You cannot change <Audio> settings (except <Amplifier Gain>) when the AV source is turned off.
Menu item Selectable setting/item Initial: Underlined
Fader/Balance Fader : Adjust the front and rear speaker output balance.
♦ F6 to R6; Initial 0
• When using a two-speaker system, set the fader to the center (0).
Balance : Adjust the left and right speaker output balance.
♦ L6 to R6; Initial 0
Press [ 5/∞/2/3 ] or drag [
• To clear the adjustment, press [Center].
Equalizer
Change the sound mode or adjust and store the equalization for each source.
(☞ page 35)
♦ Flat/Natural/Dynamic/Vocal Boost/Bass Boost/Vibrant/User
Loudness You can activate/deactivate the loudness function.
♦ Off
♦ On
: Cancels.
: B oost low and high frequencies to produce a well-
balanced sound at a low volume level.
Crossover
Audio
Volume Adjust
Adjust the cross over frequency. (☞ page 36)
Adjust and store the auto-adjustment volume level for each source. (For
discs, the adjustment is stored for each of the following categories: DVD/
DVD-VR, VCD/CD, and DivX/MPEG1/MPEG2/MP3/WMA/WAV.) The volume
level will automatically increase or decrease when you change the source.
♦ –15 to +06; Initial 00
Amplifier Gain * You can change the maximum volume level of this unit.
♦ High : VOL 00 to 50
♦ Low : VOL 00 to 30
(Select this if the peak power of the speakers is less
than 50 W.)
♦ Off : Deactivates the built-in amplifier.
• If you change this setting from <High>/<Off> to <Low> while the
volume level is set higher than the maximum level of <Low>, the unit
automatically lowers the volume level to “VOL 30”.
* To change these settings, turn off the AV source by pressing [AV Off] on <AV Menu> beforehand.
] to adjust.
42
Page 43

Menu item Selectable setting/item Initial: Underlined
Speaker Select Select the size of the connected speaker.
Audio
♦ Standard/Narrow/Middle/Wide
Dimmer ♦ Auto
: Dims the screen and button illumination when you turn
on the headlights.
• The ILLUMINATION CONTROL lead connection is
required. (☞ the Installation/Connection Manual)
♦ On
♦ Off
♦ Dimmer
Time Set
: Activates dimmer.
: Cancels.
: S ets the Dimmer On ( )/Off ( ) times.
• Press [5] or [∞] to set the time.
Display Design Change the display design (background, the color of text, touch panel
buttons, and monitor panel buttons). (☞ page 37)
OSD Clock
Demonstration
Display
Scroll
♦ On
♦ Off
♦ On
♦ Off
♦ Auto
♦ Once
♦ Off
: Displays the clock while video source is played back.
: Cancels.
: Activates the demonstration on the screen.
: Cancels. (☞ page 8 )
: Repeats scrolling.
: S crolls the displayed information once.
: Cancels.
• Touching an information bar scrolls the text regardless of this setting.
GUI Adjust Adjust the brightness and black color of the screen.
Select Dimmer On ( )/Off ( ), then change the following settings:
♦ –/ +
: Adjusts brightness (–15 to +15; Initial 00 for Dimmer
On/+15 for Dimmer Off).
♦ BL–/BL+ : Adjusts black (–15 to +15; Initial 00).
NTSC/PAL
Select the color system of the external monitor.
♦ NTSC, PAL
ENGLISH
43
Page 44

Menu item Selectable setting/item Initial: Underlined
Audio Input* ♦ AV-IN : Select to listen to the music from one of the followings:
– An audio component such as a portable audio player
connected to LINE IN jacks
ENGLISH
– iPod/iPhone connected using USB 2.0 cable
(accessory of the iPod/iPhone)
♦ iPod
: S elect when connecting the iPod/iPhone using JVC KS-
U30. (☞ page 28)
♦ BT
: S elect when playing back the Bluetooth audio player
using the Bluetooth adapter (KS-BTA100: separately
purchased, ☞ page 48).
Video Input*
Input
♦ AV-IN
: S elect to watch the video from an AV component such
as a camcorder connected to VIDEO IN jack.
• When you watch a video of an AV component, select
<AV-IN> for both <Audio Input> and <Video
Input>.
♦ iPod
: S elect to watch the video and listen to the music from
the iPod/iPhone connected using JVC KS-U30. (☞ page
28)
Camera Input
♦ On
: Displays the pic ture from rear view camera when you
shift the gear to the reverse (R) position.
Navigation
♦ Off
Change the navigation settings. (☞ page
: Cancels.
34)
* To change these settings, turn off the AV source by pressing [AV Off] on <AV Menu> beforehand.
44
Page 45

Menu item Selectable setting/item Initial: Underlined
Text Language Select the text language used for on-screen information.
♦ English /Spanish/French/German/Italian/Dutch/Swedish/Danish/
Russian /Portuguese/Chinese-Simplified/Chinese-Traditional/
Thai/Turkish/Arabic/Persian/Hebrew
• “Please Detach Front Panel” appears when the setting is changed. Detach
the monitor panel then attach it to enable the change.
GUI Language You can change the language displayed for operation buttons and menu
items when selecting any language other than <English> for <Tex t
Language>.
♦ English
♦ Local
Time Set
Beep Change the volume of the key-touch tone.
System
User Profile
Initialize Initialize all settings you have made. Hold [Enter] to initialize the settings.
Serial Number Displays the serial number.
Touch Panel Adjust
DivX(R) VOD
Adjust the clock time. (☞ page 8 )
♦ On
♦ Off
You can memorize, recall, or clear the settings you have made. (☞ page 46)
• When restoring the settings, adjust the settings on the <Initial
Settings> screen. (☞ page 7)
Adjust the touch position of the buttons on the screen. (☞ page 47)
This unit has its own Registration Code. Once you have played back a file
with which the Registration Code recorded, this unit’s Registration Code is
overwritten for copyright protection.
• Press [Enter] to display the information.
• To return to the previous screen, press [OK].
: English is used for the display of operation buttons and
menu items.
: The language selected for <Text Language> is used
for the display of operation buttons and menu items.
: Activates the key-touch tone.
: Cancels.
ENGLISH
45
Page 46

Memorizing/recalling the settings
You can memorize the following settings:
Fader/Balance, Equalizer, Loudness, Volume Adjust, Amplifier Gain, Speaker Select, Dimmer, Display
Design, Audio Input, Video Input, Camera Input, Navigation
ENGLISH
Memorizing your settings
1 On <Settings>:
Recalling your settings
1 On <Settings>:
2
3 Select an item (<User1>, <User2> or
<User3>) to memorize the settings.
A confirmation message appears. Press [Yes].
4 Finish the procedure.
2
A confirmation message appears. Press [Yes].
3 Finish the procedure.
46
Page 47

Clearing your settings
1 On <Settings>:
2
3
Clears all settings memorized in <User1>,
<User2> and < User3>
A confirmation message appears. Press [Yes].
4 Finish the procedure.
Adjusting the touch position
You can adjust the touch position on the touch panel if
the position touched and the operation performed do
not match.
1 On <Settings>:
2 Touch the center of the marks at the
lower left and at the upper right as
instructed.
ENGLISH
• To cancel current operation, press [Cancel].
• To reset to the initial setting, press [Reset].
47
Page 48

BLUETOOTH OPERATIONS
Operations on a Bluetooth device (using JVC KS-BTA100,
ENGLISH
separately purchased)
For Bluetooth operations, it is required to connect the Bluetooth adapter, KS-BTA100 (separately purchased) to the
LINE IN terminals on the rear of the unit. (☞ the Installation/Connection Manual)
• KS-BTA100 is not available in some countries. Please contact your dealer where you purchased this unit.
• For details, refer also to the instructions supplied with the Bluetooth adapter and the Bluetooth device.
• Operations may be different according to the connected device.
Caution
When JVC KS-U30 and JVC KS-BTA100 are connected at the same time, videos of iPod with video (5th
Generation) cannot be played.
Preparation
1 Register (pair) a Bluetooth device with KS-BTA100.
• Refer to the instructions manual supplied with KS-BTA100.
2 Select <BT> for <Audio Input> setting. (☞ page 44)
Bluetooth
• “
Using the Bluetooth audio player
1 Select “Bluetooth” as the source. (☞ page 13)
KS-BTA100
” is selectable as the source on <AV Menu>.
Starts playback/pauses.
• If playback does not start, operate the Bluetooth audio player to
start playback.
• Selects track. (Press)
• Fast-forwards or reverses the track. (Hold)
48
Page 49

Using the Bluetooth mobile phone
KS-BTA100
(Low) (High)
(Press)
Microphone
(Hold)
Adjusting the microphone volume
Volume level: High/Normal (initial)/Low
• Receiving a call
When a call comes in...
• Making a call
Making a call to the last connected number from your phone.
• Switching between handsfree and phone
While talking...
• Ends/rejects call
• Voice dialing
Voice dialing is available only when the connected mobile phone
has the voice recognition system.
About microphone volume:
• When you turn off the power of the unit, the volume level changes to Normal.
ENGLISH
49
Page 50

REFERENCE
Using the remote controller
Installing the batteries
ENGLISH
Insert the batteries into the remote controller by
matching the polarity (+ and –) correctly.
R03/LR03/AAA
Caution:
• Danger of explosion if battery is incorrectly replaced.
Replace only with the same or equivalent type.
• Battery shall not be exposed to excessive heat such as
sunshine, fire, or the like.
Operations using the remote controller (RM-RK252)
If the effectiveness of the remote controller
decreases, replace the batteries.
Before using the remote controller:
• Aim the remote controller directly at the remote
sensor on the unit.
• DO NOT expose the remote sensor to bright light
(direct sunlight or artificial lighting).
The unit is equipped with the steering wheel
remote control function.
• See the Installation/Connection Manual
(separate volume) for connection.
• Operations may differ depending on the types of
the steering wheel remote control.
Button Operations
Attenuates/restores the sound.
ATT /
DISP Does not function for this unit.
5 / ∞
/
• Selects the preset stations.
• S elects a title/item/folder.
• Searches for stations
automatically.
• Searches for stations manually.
(Hold)
• Selects track.
• Reverse search/forward search.
(Hold)
Button Operations
• Reverse search/forward search.
• DVD-Video/DVD-VR/VCD: Slow
1 / ¡
motion playback (during pause).
– DVD-VR/VCD: Reverse slow
50
motion does not work.
Page 51

Button Operations
• Adjusts the volume level.
VOL +/VOL –
SOURCE S elects the source.
6
PHONE /
BAND / 7/
0 – 9
(☞ page 52)
1 – 6
ASPECT
RETURN Returns to the previous screen.
TOP M
(☞ page 52)
MENU
(☞ page 52)
% / fi/@ / #
• “2nd VOL” function does not
work for this unit.
Starts/pauses playback.
Does not function for this unit.
• Selects the bands.
• Stops playback.
• Ends the call.
” does not work for this
• “
unit.
• Enters a number while holding
SHIFT.
• “SETUP” function does not work
for this unit.
Enters preset station number while
holding SHIFT.
Changes the aspect ratio.
• To check the current aspect ratio
setting, operate on the touch
panel. (☞ page 40)
• DVD-Video: Shows the disc
menu.
• DVD-VR: Shows the Original
Program screen.
• VCD: Resumes PBC playback.
• DVD-Video: Shows the disc
menu.
• DVD-VR: Shows the Playlist
screen.
• VCD: Resumes PBC playback.
• DVD-Video: Makes selection/
settings.
• DivX : Skips back or for ward by
about 5 minutes.
Button Operations
ENT Confirms selection.
OSD/
DUAL/
SHIFT Functions with other buttons.
DIRECT/CLR
Does not function for this unit.
Does not function for this unit.
• Enters direct search mode when
pressed with SHIFT button.
(☞ page 52)
• Erases the misentry when
pressed with SHIFT button.
• “SURROUND” function does not
work for this unit.
ENGLISH
51
Page 52

Searching for an item directly
Tuner frequency
1 Press DIRECT while holding SHIFT to enter the
search mode.
2 Press number buttons while holding SHIFT to enter
ENGLISH
a frequency.
• To erase a misentry, press CLR (clear) while
holding SHIFT.
3 Press ENT to confirm the entry.
DVD-Video/DVD-VR/DivX/MPEG1/MPEG2/JPEG/
MP3/WMA/WAV/VCD/CD
1 Press DIRECT while holding SHIFT to enter the
search mode.
• Each time you press DIRECT, the item to search
for changes.
2 Press a number button while holding SHIFT to
select a desired item.
• To erase a misentry, press CLR (clear) while
holding SHIFT.
3 Press ENT to confirm the selection.
Various disc operations
Using the disc menu
• DVD-Video/DVD-VR
1 For DVD Video, press TOP M or MENU.
For DVD-VR, press...
TOP M: To display Original Program
MENU: To display Playlist
2 Press % / fi/@ / # to select an item you want to
start play.
3 Press ENT to confirm the selection.
• VCD
During PBC playback...
1 Press DIRECT while holding SHIFT to enter the
search mode.
2 Press a number button while holding SHIFT to
select the item you want to play.
3 Press ENT to confirm the selection.
• To return to the previous screen, press RETURN.
To cancel PBC playback
1 Press 7 to stop PBC playback.
2 Press DIRECT while holding SHIFT.
3 Press a number button while holding SHIFT to
select a desired track.
4 Press ENT to confirm the selection.
• To resume PBC, press TOP M or MENU.
52
Page 53

Maintenance
Caution on cleaning the unit
Do not use any
solvent (for
example, thinner,
benzine, etc.),
detergent, or
insecticide. This may damage the monitor or the unit.
Recommended cleaning method:
Gently wipe the panel with a soft, dry cloth.
How to clean the connector
Frequent detachment
will deteriorate the
connectors.
To minimize this
possibility, periodically
wipe the connectors
with a cotton swab or cloth moistened with alcohol,
being careful not to damage the connectors.
Connectors
Moisture condensation
Moisture may condense on the lens inside the unit in
the following cases:
• After starting the heater in the car.
• If it becomes very humid inside the car.
Should this occur, the unit may malfunction. In this
case, eject the disc and leave the unit turned on for a
few hours until the moisture evaporates.
To keep discs clean
A dirty disc may not play correctly.
If a disc does become dirty, wipe it with a
soft cloth in a straight line from center to
edge.
• Do not use any solvents (for example, conventional
record cleaner, spray, thinner, benzine, etc.) to clean
discs.
To play new discs
New discs may have some rough spots
around the inner and outer edges. If
such a disc is used, this unit may reject
the disc.
To remove these rough spots, rub the edges with a
pencil or ball-point pen, etc.
Do not use the following discs:
8 cm CD Warped disc
Sticker and sticker
residue Stick-on label
ENGLISH
How to handle discs
When removing a disc from
its case, press down the center
holder of the case and lift the
disc out, holding it by the edges.
• Always hold the disc by the
edges. Do not touch its recording surface.
When storing a disc in its case, gently insert the
disc around the center holder (with the printed surface
facing up).
• Make sure to store discs in their cases after use.
Center holder
transparent parts on its
53
Unusual shape
Transparent or semi-
recording area
C-thru Disc (semi-
transparent disc)
Page 54

More about this unit
File playback
Playing DivX files (for discs only)
ENGLISH
• This unit can play back DivX files with the extension
code <.divx>, <.div>, or <.avi> (regardless of the
letter case—upper/lower).
• Audio stream should conform to MP3 or Dolby
Digital.
• The file encoded in the interlaced scanning mode
may not be played back correctly.
• The maximum bit rate for video signals (average) is
4 Mbps .
Playing MPEG1/MPEG2 files
• This unit can play back MPEG1/MPEG2 files with the
extension code <.mpg>, <.mpeg>, or <.mod>.
• The stream format should conform to MPEG system/
program stream.
The file format should be MP@ML (Main Profile at
Main Level)/SP@ML (Simple Profile at Main Level)/
MP@LL (Main Profile at Low Level).
• Audio streams should conform to MPEG1 Audio
Layer-2 or Dolby Digital.
• The maximum bit rate for video signals (average) is
4 Mbps .
Playing JPEG files
• This unit can play back JPEG files with the extension
code <.jpg>, or <.jpeg>.
• This unit can play back JPEG files that are at 32 x 32 to
8 192 x 7 680 resolution.
It may take time to display the file depending on its
resolution.
• This unit can play back baseline JPEG files.
Progressive JPEG files or lossless JPEG files cannot be
played.
Playing MP3/WMA/WAV files
• This unit can play back files with the extension code
<.mp3>, <.wma>, or <.wav> (regardless of the
letter case—upper/lower).
• This unit can play back the files meeting the
conditions below:
– Bit rate:
MP3/WMA: 32 kbps — 320 kbps
– Sampling frequency:
48 kHz, 44.1 kHz, 32 kHz (for MPEG1)
24 kHz, 22.05 kHz, 16 kHz (for MPEG2)
48 kHz, 44.1 kHz, 32 kHz, 22.05 kHz (for WMA)
44.1 kHz (for WAV)
• This unit can show ID3 Tag Version
1.0/1.1/2.2/2.3/2.4 (for MP3).
• This unit can also show WAV/WMA Tag.
• This unit can play back files recorded in VBR (variable
bit rate).
• Files recorded in VBR have a discrepancy in elapsed
time indication.
• This unit cannot play back the following files:
– MP3 files encoded with MP3i and MP3 PRO
format.
– MP3 files encoded with Layer 1/2.
– WMA files encoded with lossless, professional, and
voice format.
– WMA files which are not based upon Windows
Media® Audio.
– WMA files copy-protected with DRM.
We bear no responsibility for any loss of data
in an iPod/iPhone and USB mass storage
class device while using this unit.
54
Page 55

Sound signals emitted through the rear terminals
Through the analog terminals (Speaker out/REAR OUT /FRONT OUT )
2-channel signal is emitted. When playing multi-channel encoded disc, multi-channel signals are downmixed.
Language codes (for DVD/DivX language selection)
Code Language Code Language Code Language Code Language
AA Afar GL Galician MI Maori SO Somali
AB Abkhazian GN Guarani MK Macedonian SQ Albanian
AF Afrikaans GU Gujarati ML Malayalam SR Serbian
AM Ameharic HA Hausa MN Mongolian SS Siswati
AR Arabic HI Hindi MO Moldavian ST Sesotho
AS Assamese HR Croatian MR Marathi SU Sundanese
AY Aymara HU Hungarian MS Malay (MAY) SW Swahili
AZ Azerbaijani HY Armenian MT Maltese TA Tamil
BA Bashkir IA Interlingua MY Burmese TE Telugu
BE Byelorussian IE Interlingue NA Nauru TG Tajik
BG Bulgarian IK Inupiak NE Nepali TH Thai
BH Bihari IN Indonesian NO Norwegian TI Tigrinya
BI Bislama IS Icelandic OC Occitan TK Turkmen
BN B engali, Bangla IW Hebrew OM (Afan) Oromo TL Tagalog
BO Tibetan JA Japanese OR Oriya TN Setswana
BR Breton JI Yiddish PA Panjabi TO Tonga
CA Catalan JW Javanese PL Polish TR Turkish
CO Corsican KA Georgian PS Pashto, Pushto TS Tsonga
CS Czech KK Kazakh QU Quechua TT Tatar
CY Welsh KL Greenlandic RM Rhaeto-Romance TW Twi
DZ Bhutani KM Cambodian RN Kirundi UK Ukrainian
EL Greek KN Kannada RO Rumanian UR Urdu
EO Esperanto KO Korean (KOR) RW Kinyarwanda UZ Uzbek
ET Estonian KS Kashmiri SA Sanskrit VI Vietnamese
EU Basque KU Kurdish SD Sindhi VO Volapuk
FA Persian KY Kirghiz SG Sangho WO Wolof
FI Finnish LA Latin SH Serbo-Croatian XH Xhosa
FJ Fiji LN Lingala SI Singhalese YO Yoruba
FO Faroese LO Laothian SK Slovak ZU Zulu
FY Frisian LT Lithuanian SL Slovenian
GA Irish LV Latvian, Lettish SM Samoan
GD S cots Gaelic MG Malagasy SN Shona
ENGLISH
55
Page 56

• Manufactured under license from Dolby Laboratories. Dolby and the double-D symbol are trademarks of Dolby
Laboratories.
• “DVD Logo” is a trademark of DVD Format/Logo Licensing Corporation registered in the US, Japan and other
countries.
• DivX®, DivX Certified® and associated logos are trademarks of Rovi Corporation or its subsidiaries and are used
under license.
ENGLISH
ABOUT DIVX VIDEO: DivX® is a digital video format created by DivX, LLC, a subsidiary of Rovi Corporation. This is
an official DivX Certified® device that plays DivX video. Visit divx.com for more information and software tools to
convert your files into DivX videos.
ABOUT DIVX VIDEO-ON-DEMAND: This DivX Certified® device must be registered in order to play purchased DivX
Video-on-Demand (VOD) movies. To obtain your registration code, locate the DivX VOD section in your device
setup menu. Go to vod.divx.com for more information on how to complete your registration.
• Microsoft and Windows Media are either registered trademarks or trademarks of Microsoft Corporation in the
United States and/or other countries.
• “Made for iPod,” and “Made for iPhone” mean that an elec tronic accessory has been designed to connect
specifically to iPod, or iPhone, respectively, and has been certified by the developer to meet Apple performance
standards. Apple is not responsible for the operation of this device or its compliance with safety and regulatory
standards. Please note that the use of this accessory with iPod, or iPhone may affect wireless performance.
iPhone, iPod, iPod classic, iPod nano, and iPod touch are trademarks of Apple Inc., registered in the U.S. and other
countries.
• This item incorporates copy protection technology that is protected by U.S. patents and other intellectual property
rights of Rovi Corporation. Reverse engineering and disassembly are prohibited.
• Font for this product is designed by Ricoh.
SAFETY INSTRUCTIONS
Use of the iPhone Navigation App is only permitted if the traffic conditions are suitable and you are absolutely
sure that no risk, obstruction or injury will be incurred to you, your passengers or other road users. The
requirements of the Road Traffic Regulations must always be followed and may vary by state. The destination
must not be entered while the vehicle is in motion.
iPhone Navigation guidance may not be applicable to the current situation because of changes in traffic
conditions (e.g. changes in tollroads, principal roads, one-way traffic, or other traffic regulations). In this
case, observe the current traffic signs or regulations.
• Traffic signs should be observed carefully while driving using the iPhone Navigation App. iPhone Navigation
App is only an aid. Driver must always decide whether or not to heed the information provided. We do not
accept liability for erroneous data provided by the iPhone Navigation App.
• Do not operate the unit while driving.
56
Page 57

Troubleshooting
What appears to be trouble is not always serious. Check the following points before calling a service center.
• For operations with the external components, refer also to the instructions supplied with the adapters used for the
connections (as well as the instructions supplied with the external components).
• Messages (enclosed in “ ”) in the tables below are shown in the language selected on <Text Language>
(☞ page 45). Messages described here are in the language of this manual.
If the following messages appear
Message Remedy/Cause
“No Signal” • Start the playback on the external component connected to VIDEO IN jack.
• Check the cords and connections.
• Signal input is too weak.
• Rear view camera is not connected while <Camera> is selected for <Display>.
To restore the screen, press MENU/DISP OFF to display <AV Menu>, then press
[AV].
“Miswiring Check wiring
connection and then reset
unit”
“Warning Check wiring
connection and then reset
unit”
“Parking Brake” No playback picture is shown when the parking brake is not engaged.
“Eject Error”
“Loading Error”
“Restricted Device”
“USB Device Error” • The USB power voltage is abnormal.
A speaker cord has shorted or it has come in to contact with the car chassis. Wire or
insulate the speaker cord as appropriate, then reset the unit (☞ page 3). See also the
Installation/Connection Manual.
Eject the disc forcibly. (☞ page 3)
Check whether the connected iPod/iPhone is compatible with this unit. (☞ page 28)
• Turn off and turn on the unit.
• Connect another USB device.
ENGLISH
57
Page 58

If there seems to be a problem
No sound comes out of the speakers. • Adjust the volume to the optimum level.
ENGLISH
No picture is displayed on the screen.
The unit does not work at all.
General
The remote controller does not work. Replace the battery.
The screen does not appear. Press and hold the MENU button to change the display to
SSM automatic presetting does not work.
TUNER
Static noise while listening to the radio. Connect the aerial firmly.
Disc can be neither recognized nor played
back.
Disc cannot be ejected.
• Recordable/Rewritable discs cannot be
played back.
• Tracks on the Recordable/Rewritable discs
cannot be skipped.
Disc in general
Playback does not start. The format of files is not supported by the unit.
No picture appears on the external monitor. • Connect the video cord correctly.
Disc cannot be played back. • Record the tracks using a compliant application on the
Symptom Remedy/Cause
• Check the cords and connections.
Turn on the screen. (☞ page 10)
Reset the unit. (☞ page 3)
AV source screen.
Store stations manually. (☞ page 16 )
Eject the disc forcibly. (☞ page 3)
Unlock the disc. (☞ page 19)
• Insert a finalized disc.
• Finalize the discs with the component which you used
for recording.
• Select the correct input on the external monitor.
appropriate discs. (☞ page 20)
• Add appropriate extension codes to the file names.
Tracks are not played back as you have
intended them to play.
DivX/MPEG1/MPEG2/
JPEG/MP3/WMA/WAV
“Now Reading...” keeps flashing on the
screen.
USB
While playing a track, sound is sometimes
interrupted.
Playback order may differ from the one played back using
other players.
Turn off the power and on again.
The tracks are not properly copied into the USB device.
Copy tracks again, and try again.
58
Page 59

Symptom Remedy/Cause
No sound comes out of the speakers. • Disconnect the iPod, then connect it again.
• Select another source and then reselect “iPod”.
The iPod/iPhone does not turn on or does
not work.
Sound is distorted. Deactivate the equalizer either on this unit or the iPod/
A lot of noise is generated. Turn off (uncheck) the “VoiceOver” feature of the iPod. For
iPod/iPhone
No operations are available when playing
back a track containing Artwork.
• Sound does not synchronize with the
video.
• No sound of videos come out.
No picture appears on the screen. • Turn on the video component if it is not on.
AV-IN
• Check the connecting cable and its connection.
• Charge the battery.
• Check whether the iPod control mode is correctly
selected. (☞ page 29)
• Reset the iPod/iPhone.
iPhone.
details, visit <http://www.apple.com>.
Operate the unit after the Artwork is loaded. (☞ page 30)
• Connect with USB Audio and Video cable JVC KS-U30.
Other cables cannot be used.
• Select <iPod> for both <Audio Input> and <Video
Input>. (☞ page 44)
• Connect the video component correctly.
ENGLISH
59
Page 60

Specifications
Maximum Power Output Front/Rear 50 W per channel
Continuous Power Output
(RMS)
ENGLISH
Load Impedance 4
Equalizer Control Range Level ±10 dB
Signal-to-Noise Ratio 70 dB
Audio Output Level
FRONT OUT, REAR OUT,
AMPLIFIER
SUBWOOFER OUT
Video Output (composite)
VIDEO OUT
Other Terminals Input LINE IN, VIDEO IN, CAMERA IN, USB input,
Frequency Range FM 87.5 MHz to 108.0 MHz
FM Tuner Usable Sensitivity 9.3 dBf (0.8 μV/75
FM/AM TUNER
MW Tuner Sensitivity/Selectivity 20 μV/40 dB
LW Tuner Sensitivity 50 μV
Signal Detection System Non-contact optical pickup (semiconductor laser)
Frequency Response DVD, fs=48 kHz/96 kHz 16 Hz to 22 000 Hz
Dynamic Range 93 dB
DVD/CD
Signal-to-Noise Ratio 95 dB
Wow and Flutter Less than measurable limit
Front/Rear 20 W per channel into 4
Hz at no more than 0.8% total harmonic
distortion
Ω (4 Ω to 8 Ω allowance)
Line-Out Level/Impedance 4 V/20 k
Output Impedance 1 k
Color System PAL/NTSC
Video-Out Level/Impedance 1 Vp-p/75
Others OE REMOTE, RGB input
AM (MW) 531 kHz to 1 611 kHz
50 dB Quieting Sensitivity 16.3 dBf (1.8 μV/75
Alternate Channel Selectivity
(400 kHz)
Frequency Response 40 Hz to 15 000 Hz
Stereo Separation 40 dB
VCD/CD 16 Hz to 20 000 Hz
Ω load (full scale)
Ω
Ω
AUX, Aerial input
(LW) 153 kHz to 279 kHz
65 dB
Ω, 40 Hz to 20 000
Ω)
Ω)
60
Page 61

USB Standards USB 2.0 Full Speed
Data Transfer Rate Full Speed Maximum 12 Mbps
USB
Compatible Device Mass storage class
Compatible File System FAT 32/16/12
Max. Current DC 5 V
Screen Size 6.1 inch wide liquid crystal display
Number of Pixel 1 152 000 pixels: 800 (horizontal) × 3 (RGB) × 480 (vertical)
Drive Method TFT (Thin Film Transistor) active matrix format
MONITOR
Color System PAL/NTSC
Aspect Ratio 16:9 (wide)
Power Requirement Operating Voltage DC 14.4 V (11 V to 16 V allowance)
Grounding System Negative ground
Allowable Storage Temperature –10°C to +60°C
Allowable Operating Temperature 0°C to +40°C
GENERAL
Dimensions (W × H × D) Installation Size (approx.) 182 mm × 111 mm × 160 mm
Mass (approx.) 2.3 k
Design and specifications are subject to change without notice.
Low Speed Maximum 1.5 Mbps
1 A
Panel Size (approx.) 188 mm × 117 mm × 10 mm
g
(including the Trim plate and Sleeve)
ENGLISH
61
Page 62

Muchas gracias por la compra de un producto JVC.
Como primer paso, por favor lea detenidamente este manual para comprender a fondo todas las instrucciones y
obtener un máximo disfrute de esta unidad.
IMPORTANTE PARA PRODUCTOS LÁSER
1. PRODUCTO LÁSER CLASE 1
2. PRECAUCIÓN: No abra la tapa
superior. En el interior de la
unidad no hay piezas que pueda
reparar el usuario; encargue el
servicio a personal técnico cualificado.
ESPAÑOL
3. PRECAUCIÓN: Radiación láser de clase 1M visible y/o invisible cuando ésta abierto. No mirar directamente con
instrumental óptico.
4. REPRODUCCIÓN DE LA ETIQUETA: ETIQUETA DE PRECAUCIÓN, COLOCADA EN EL EXTERIOR DE LA UNIDAD.
ADVERTENCIAS: (Para evitar daños y accidentes)
• NO instale ningún receptor o tienda ningún cable en
una ubicación donde;
– puede obstaculizar las maniobras del volante de
dirección y de la palanca de cambios.
– puede obstaculizar la operación de los dispositivos
de seguridad, como por ejemplo, bolsas de aire.
– donde pueda obstruir la visibilidad.
[Sólo Unión Europea]
• NO opere la unidad mientras maneja.
Si es necesario operar la unidad mientras maneja,
asegúrese de mirar atentamente en todas las
direcciones.
• El conductor no debe mirar el monitor mientras
conduce.
• El conductor no deberá ponerse los auriculares
mientras conduce.
2
Page 63

Precauciones sobre el monitor:
• El monitor incorporado a esta unidad ha sido
fabricado con tecnología de alta precisión, pero
puede contener algunos puntos inefectivos. Estos es
inevitable y no es ningún signo de anomalía.
• No exponga el monitor a la luz directa del sol.
• No opere el panel táctil utilizando un bolígrafo o una
herramienta similar puntiaguda.
Toque los botones del panel táctil directamente con
su dedo (sáquese el guante, si lo tiene puesto).
• Cuando la temperatura sea muy baja o muy alta...
– Ocurren cambios químicos en el interior,
produciendo un mal funcionamiento.
– Puede suceder que las imágenes no aparezcan
claramente o que se muevan con lentitud. En tales
entornos, puede suceder que las imágenes no
estén sincronizadas con el sonido, o que la calidad
del sonido se deteriore.
Para fines de seguridad...
• No eleve demasiado el nivel de volumen, ya que
bloqueará los sonidos exteriores dificultando la
conducción pudiendo provocar también, pérdida de
audición.
• Detenga el automóvil antes de efectuar cualquier
operación complicada.
Temperatura dentro del automóvil...
Si ha dejado el automóvil estacionado durante largo
tiempo en un sitio cálido o frío, no opere la unidad hasta
que se normalice la temperatura del habitáculo.
Cómo reposicionar su unidad
• También se borrarán los ajustes preestablecidos
realizados por usted (excepto los dispositivos
Bluetooth registrados).
Cómo expulsar el disco por la fuerza
+
(Sostener)
• Tenga cuidado de no dejar caer el disco al ser
expulsado.
• Si esto no funciona, intente reposicionar su unidad.
(☞ arriba)
(Sostener)
ESPAÑOL
Cómo leer este manual:
• En este manual las operaciones se explican utilizando principalmente los botones del panel del monitor y del
panel táctil. Para las operaciones mediante el control remoto (RM-RK252), ☞ página 50.
• < > indica las diversas pantallas/menús/operaciones/ajustes que aparecen en el panel táctil.
• [ ] indica los botones del panel táctil.
• Idioma para las indicaciones: En este manual, se utilizan indicaciones en inglés para las explicaciones.
Puede seleccionar el idioma de indicación desde <Settings>. (☞ página 45)
3
Page 64

Contenido
Cómo reposicionar su unidad .............................. 3
Cómo expulsar el disco por la fuerza ...................3
INTRODUCCIÓN
Desmontaje/fijación del panel del monitor
....................................................... 5
Nombres y funciones de los componentes
ESPAÑOL
....................................................... 6
Configuraciones iniciales ......................... 7
Cancelación de la demostración en pantalla
y puesta en hora del reloj ................. 8
Operaciones comunes ............................10
Conexión de la alimentación ............................. 10
Ajuste del volumen ...........................................10
Apagado de la pantalla .....................................10
Activación de la fuente AV ................................11
Operación de la pantalla táctil ..........................11
Cambio de pantallas ..............................12
OPERACIONES DE LA
FUENTE AV
Selección de la fuente de reproducción ....13
Para escuchar la radio ............................14
Operaciones de los discos .......................19
Reproducción de un disco .................................19
Tipo de disco reproducible ................................20
Operaciones de reproducción ............................ 21
Ajustes de la reproducción de discos .................25
Operaciones de USB ................................26
Reproducción de un dispositivo USB .................26
Para escuchar dispositivo iPod/iPhone ....28
Preparativos .....................................................28
Configuración del modo de control de iPod ......29
Selección de los ajustes de preferencias para
reproducción del iPod/iPhone ..........................29
Operaciones de reproducción del iPod/iPhone
Selección de una pista/vídeo del menú del iPod/
iPhone ..............................................................31
Uso de otros componentes externos ........32
AV-IN ................................................................32
Front AUX .........................................................32
Uso de la unidad de navegación externa ..........33
Ajustes del sonido ..................................35
Utilizar la ecualización del sonido .....................35
Ajustar la frecuencia de cruce ...........................36
Cambiar el diseño de la pantalla .............37
Ajuste para reproducción de video ..........39
Ajuste de la imagen ..........................................39
Cambiar la relación de aspecto .........................40
Ampliar la imagen ............................................40
Uso de la cámara de retrovisión ..............41
Ajustar las opciones de menú ................. 42
Memorizar/llamar los ajustes ...........................46
Ajustar la posición de toque .............................. 47
OPERACIONES BLUETOOTH
Operaciones en un dispositivo Bluetooth
(con JVC KS-BTA100, adquirido por
separado) .......................................48
Uso del reproductor de audio Bluetooth ...........48
Uso del teléfono móvil Bluetooth .....................49
REFERENCIA
Uso del control remoto ...........................50
Operaciones mediante el control remoto
(RM-RK252).......................................................50
Mantenimiento .....................................53
Más sobre esta unidad ...........................54
Localización y solución de problemas ......57
Especificaciones ..................................... 60
...30
4
Page 65

INTRODUCCIÓN
Desmontaje/fijación del panel del monitor
Precauciones
• Sostenga firmemente el panel del monitor para no dejarlo caer accidentalmente.
• Ajuste el panel del monitor en la placa de fijación hasta que quede bloqueado firmemente.
Desmontaje
Desconecte el interruptor de encendido antes de
desmontar el panel del monitor.
1
2
3
Estuche blando
(suministrado)
Fijación
ESPAÑOL
5
Page 66

Nombres y funciones de los componentes
ESPAÑOL
Pantalla (panel táctil) Panel del monitor
1 Ranura de carga
2 Botón
Expulsa el disco.
3 Botón MENU/DISP OFF
4 Botón SRC /
0 (Expulsión)
• Visualiza la pantalla <AV Menu>. (Pulsar)
(☞ página 12)
• Enciende/apaga la pantalla. (Sostener)
(☞ página 10)
• Selecciona la fuente AV. (Pulsar) (☞ página 13)
• Desactiva la fuente AV. (Sostener)
Precaución sobre el ajuste de
volumen:
Los dispositivos digitales (CD/USB) producen muy
poco ruido al compararse con otras fuentes. Baje
el volumen antes de reproducir estas fuentes
digitales para evitar daños en los altavoces
resultantes de un repentino aumento del nivel
de salida.
5 Perilla VOLUME/ATT (☞ página 10)
• Atenúa el sonido. (Pulsar)
• Ajusta el volumen de audio. (Girar)
6 Sensor remoto
7 Botón de reinicialización
Reinicializa la unidad. (☞ página 3)
8 Terminal de entrada AUX
9 Botón
Desengancha el panel del monitor. (☞ página 5)
Puede cambiar el color de los botones en el panel
del monitor. (☞ página 37)
(Desenganchar)
6
Page 67

Configuraciones iniciales
La pantalla de ajuste inicial aparece al encender la
unidad por primera vez o al reinicializar la unidad.
• También puede cambiar los ajustes en la pantalla
<Settings>. (☞ página 42)
1 Conecte el interruptor de encendido.
La unidad se enciende y aparece la pantalla de
configuración inicial.
2
Text
Language
Audio Input Seleccione el uso de los jacks
Video Input Selecciona el uso del jack VIDEO IN.
Camera Input Seleccione <On> al conectar la
Display Design Selecciona el fondo de pantalla y
Selecciona el idioma utilizado para
la información en pantalla.
(☞ página 45)
LINE IN. (☞ página 44)
(☞ página 44)
cámara de retrovisión.
(☞ página 44)
los colores del texto y los botones
del panel del monitor.
(☞ página 37)
3 Finalice el procedimiento.
ESPAÑOL
Se visualiza <AV Menu>.
• Inicialmente se encuentra seleccionado <AV
Off>. Seleccione la fuente de reproducción.
(☞ página 13)
7
Page 68

Cancelación de la demostración en pantalla y
puesta en hora del reloj
Cancelación de la demostración en
pantalla
1 Visualice la pantalla <AV Menu>.
ESPAÑOL
2 Visualice la pantalla <Settings>.
3
Seleccione <Off>.
4 Finalice el procedimiento.
Puesta en hora del reloj
1 Visualice la pantalla <AV Menu>.
2 Visualice la pantalla <Settings>.
3
8
Page 69

4 Ponga el reloj en hora.
<Off> El reloj se ajusta
manualmente. (☞ en la
derecha)
<Radio> Sincroniza la hora del reloj con
la del sistema de radiodifusión
de datos.
Para ajustar el reloj manualmente
ESPAÑOL
1 Seleccione el formato de indicación de la
hora
2 Ajuste la hora
3 Ajuste los minutos
5 Finalice el procedimiento.
9
Page 70

Operaciones comunes
Conexión de la alimentación
Conecte el interruptor de encendido.
• Cuando se desconecta el interruptor de encendido, la
unidad se apaga.
Ajuste del volumen
Para ajustar el volumen
• Acerca del rango de volumen, ☞ página 42
ESPAÑOL
(<Amplifier Gain>).
Disminuir
• En la pantalla de control, el volumen también se
puede ajustar deslizando el dedo sobre el panel
táctil, tal y como se muestra en la ilustración.
Disminuir
Para atenuar el sonido
Aumentar
Aumentar
Apagado de la pantalla
(Sostener)
La pantalla está apagada.
• La pantalla también se puede ajustar desde la
pantalla <AV Menu>.
Para volver a la pantalla <AV Menu>
Toque la pantalla.
El indicador ATT se enciende.
Para cancelar la atenuación, pulse la perilla de
ajuste de volumen.
10
Page 71

Activación de la fuente AV
Puede activar la función AV seleccionando la fuente en
la pantalla <AV Menu>.
Para desactivar la fuente AV
(Sostener)
o
Operación de la pantalla táctil
A Visualiza el menú de control de video
mientras se reproduce un video.
B
Visualiza los botones de funcionamiento
mientras se reproduce un video.
Vuelve al capítulo/
pista anterior.*
A Menú de control de video
B Pantalla de control de fuente para la reproducción
de video
Vuelve al capítulo/
pista siguiente.*
ESPAÑOL
• Los botones de operación desaparecen cuando toca
la pantalla o tras un período de inactividad de unos
10 segundos.
* No disponible para video desde un componente
externo. El arrastre del dedo a izquierda o derecha
tiene el mismo efecto que el toque.
11
Page 72

Cambio de pantallas
Pantalla de control de fuente
ESPAÑOL
<AV Menu>
• Cambia la fuente AV.
• Visualiza la pantalla <Settings>.
☞ página 13
Seleccione la opción que desea mostrar en la
pantalla.
Botones de operación comunes
[ ]
[TP]
Visualiza la pantalla de ajuste de sonido.
(
☞ página 35)
Activa/desactiva el modo de recepción de
espera de TA. (
<Settings>
Cambia los ajustes detallados. (☞ página 42)
Cambia la página
☞ página 17)
[AV]
[Camera]
[Off]
Visualiza la pantalla de control de
fuente. (
☞ arriba)
Visualiza la imagen de la cámara de
retrovisión. (
Apaga la pantalla. (☞ página 10)
☞ página 41)
• Pulse [ ] para volver a la pantalla anterior.
• Pulse [
] para que se visualice la pantalla de
control de fuente.
12
Page 73

OPERACIONES DE LA FUENTE AV
Selección de la fuente de reproducción
ESPAÑOL
TUNER
(☞ página 14)
DISC
(☞ página 19)
USB
(☞ página 26)
iPod
(☞ página 28)
AV-IN
*1 (☞ página 32)
Bluetooth
AV Off
1
*
2
*
*2 (☞ página 48)
Front AUX
Seleccione un ajuste de entrada apropiado en <Audio Input>. (☞ página 44)
Cuando <Audio Input> está ajustado a <BT>, se indica “
(☞ página 32)
(☞ página 44)
Cambia a la transmisión de radio.
Se reproduce un disco.
Se reproducen los archivos de un dispositivo USB.
Se reproduce un iPod/iPhone.
Cambia a un componente externo conectado a los jacks LINE IN/VIDEO IN
en el panel trasero.
Controla un dispositivo Bluetooth
Cambia a un componente externo conectado al terminal de entrada AUX
en el panel del monitor.
Desactiva la fuente AV.
Bluetooth
” como fuente en lugar de “
AV-IN
”.
13
Page 74

Para escuchar la radio
Indicador DX/LO Indicadores de recepción en espera
Indicador ST/MO Indicador AF
Modo de sonido (
Banda
N° de
preajuste
☞ página 35)
ESPAÑOL
☞ página 17
• El indicador ST se enciende al recibir una radiodifusión FM estéreo con una intensidad de señal
suficientemente potente.
[P1] – [P6] • Sintoniza la emisora preajustada.
(Pulsar)
• Memoriza la emisora actualmente
seleccionada. (Sostener)
[TP]* Activa/desactiva el modo de recepción
de espera de TA. (☞ página 17)
[PTY
[
3]
Se ingresa en el modo de búsqueda de
]*
programa del sistema de radiodifusión
de datos FM. (☞ página 16)
Muestra/oculta la información de
pantalla de la emisora actual (☞ abajo).
[BAND] Selecciona la banda.
[4]
[
¢] • Búsqueda automática (Pulsar)
5] [∞]
[
[Mode]* Visualiza la pantalla de ajuste del
[AV MENU] Visualiza la pantalla <AV Menu>.
Frecuencia de la emisora actualmente
sintonizada/PS (nombre de la emisora)
para el sistema de radiodifusión de datos
FM cuando ingresa una señal PS
Código PTY para el sistema de
radiodifusión de datos FM
Lista de preajustes
Busca una emisora.
• Búsqueda manual (Sostener)
Selecciona una emisora preajustada.
sintonizador.
(☞ páginas 15 – 18)
* Aparece sólo cuando se ha seleccionado FM como fuente.
Muestra la información de pantalla de la emisora actual
Oculta la información de texto
14
Información de texto
Desplaza la información de texto
Page 75

Cuando una radiodifusión en FM estéreo
sea difícil de recibir...
Active el modo monoaural para mejorar la recepción.
1
2
On Activa el modo monoaural para
mejorar la recepción FM, pero se
perderá el efecto estéreo. El indicador
MO se enciende.
Off Restablece el efecto estéreo.
Para sintonizar sólo emisoras FM con
señales fuertes—LO/DX (local/distanciaextrema)
1
Cuando se interfiere la recepción de una
emisora FM...
1
2
ESPAÑOL
Auto Aumenta la selectividad del sintonizador
para reducir las interferencias entre
emisoras adyacentes. (El efecto
estereofónico puede perderse).
Wide Sujeto a interferencias de las emisoras
adyacentes, pero la calidad del sonido
no se degrada y no se pierde el efecto
estereofónico.
2
Local
Selecciónelo para sintonizar
solamente emisoras con una señal
suficientemente fuerte. El indicador
LO se enciende.
DX
Desactive la función. El indicador DX
se enciende.
15
Page 76

Cómo almacenar emisoras en la
memoria
Se pueden preajustar seis emisoras para cada banda.
Preajuste automático — SSM (Memoria
secuencial de las emisoras más fuertes)
(Sólo para FM)
1
Selección de una emisora preajustada
ESPAÑOL
2
Las emisoras locales con las señales más fuertes serán
exploradas y almacenadas automáticamente.
Preajuste manual
1 Sintonice la emisora que desea
preajustar.
(☞ página 14)
2 Seleccione un número de preajuste.
(Sostener)
La emisora seleccionada en el paso 1 ha sido
almacenada.
(Sostener)
También cambia las emisoras preajustadas
Las siguientes funciones se encuentran disponibles
sólo para emisoras del sistema de radiodifusión de
datos FM.
Búsqueda de programas del sistema
de radiodifusión de datos FM—
Búsqueda PTY
Si selecciona el código PTY de sus programas favoritos,
podrá efectuar la búsqueda de los programas favoritos
que se están difundiendo.
1
2 Seleccione un código PTY.
(Sostener)
Cambia la página
Se inicia la búsqueda PTY.
Si hay una emisora que esta difundiendo un
programa que tenga el mismo código PTY que el
seleccionado por usted, se sintonizará esa emisora.
16
Page 77

Activación/desactivación de la recepción de espera de TA/News
Recepción de espera de TA
Indicador TP
Espera de recepción de Noticias
1
2
Indicador TP Recepción de espera de TA
Se enciende Si estuviera disponible, la unidad
cambiará temporalmente a Anuncio
de tráfico (TA).
Parpadea Aún no está activada. Sintonice otra
emisora que transmita señales del
sistema de radiodifusión de datos.
Se apaga Desactivado.
• El ajuste de volumen para Anuncio de tráfico se
memoriza automáticamente. La próxima vez que la
unidad cambie a Anuncio de tráfico, el volumen se
ajustará al nivel previo.
Indicador
NEWS
Se enciende Si estuviera disponible, la unidad
Parpadea Aún no está activada. Sintonice otra
Se apaga Desactivado.
Espera de recepción de Noticias
cambiará temporalmente al
Noticiero.
emisora que transmita señales del
sistema de radiodifusión de datos.
ESPAÑOL
• El volumen ajustado durante la recepción de Noticias
se memoriza automáticamente. La próxima vez que
la unidad cambie a Noticias, el volumen se ajustará al
nivel anterior.
17
Page 78

Seguimiento del mismo programa—
Recepción de seguimiento de redes
de radio
Cuando conduce el automóvil en una zona donde la
recepción de FM no sea satisfactoria, este receptor
sintonizará automáticamente otra emisora del sistema
de radiodifusión de datos FM de la misma red, que
posiblemente esté transmitiendo el mismo programa
con señales más potentes.
Programa A transmitiendo en áreas de
ESPAÑOL
frecuencias diferentes (01 – 05)
La unidad se expide de fábrica con la Recepción de
seguimiento de redes de radio activada.
Para cambiar el ajuste de Recepción de
seguimiento de redes
1
Selección automática de
emisoras—Búsqueda de programa
Normalmente, cuando usted selecciona emisoras
preajustadas, se sintonizará una emisora preajustada.
Si las señales enviadas por la emisora preajustada
del sistema de radiodifusión de datos FM no son lo
suficientemente fuertes para una buena recepción,
esta unidad utilizará los datos AF para sintonizar otra
emisora que esté difundiendo el mismo programa que
la emisora preajustada original.
Para activar la Búsqueda de programa
1
2
2
AF Cambia a otra emisora. El programa puede
ser diferente del que se estaba recibiendo
(el indicador AF se enciende).
AF Reg. Cambia a otra emisora que está
difundiendo el mismo programa (el
indicador AF se enciende).
Off Se cancela.
• La unidad tarda un poco en sintonizar otra emisora
mediante la búsqueda de programa.
Para desactivar, seleccione <Off>.
18
Page 79

Operaciones de los discos
Reproducción de un disco
• Si el disco no dispone de ningún menú de disco, todas las pistas del mismo serán reproducidas repetidamente
hasta que usted cambie la fuente o expulse el disco.
Inserción del disco
Lado de la etiqueta
La fuente cambia a “
• Cuando hay un disco insertado, se enciende el
indicador DISC IN.
• Si aparece “ ” en la pantalla, significa que
la unidad no puede aceptar la operación que
intentó realizar.
– En algunos casos, puede suceder que no se
acepte la operación aunque no se visualice
“
• Cuando se reproduce un disco codificado
multicanal, las señales multicanal se
convierten en estéreo.
DISC
” y se inicia la reproducción.
”.
Para expulsar un disco
• Puede expulsar un disco cuando reproduce otra
fuente AV.
• Si no saca el disco expulsado en el lapso de 15
segundos, será reinsertado automáticamente en la
ranura de carga para protegerlo contra el polvo.
• Si no es posible expulsar el disco, ☞ página 3.
Al extraer un disco, hágalo horizontalmente.
Para impedir la expulsión de un
disco
+
(Sostener)
(Sostener)
ESPAÑOL
Para cancelar la prohibición, repita el mismo
procedimiento que para seleccionar <Eject OK?>.
19
Page 80

Tipo de disco reproducible
Tipo de disco Formato de grabación, tipo de archivo, etc. Reproducible
DVD
• El sonido DTS no se puede
reproducir ni emitir desde esta
unidad.
DVD Grabable/Reescribible
(DVD-R/-RW *
2
, +R/+RW *3)
• DVD Video: Puente UDF
ESPAÑOL
• DVD-VR
• DivX/MPEG1/MPEG2/JPEG/MP3/
WMA/WAV: ISO 9660 Nivel 1,
Nivel 2, Romeo, Joliet
DVD-Video *
Código de región: 2
DVD-Audio/DVD-ROM
DVD-Video
DVD-VR *
DivX/MPEG1/MPEG2
JPEG
MP3/WMA/WAV
MPEG4/AAC/DVD+VR/DVD-RAM
Dual Disc Lado DVD
Lado no-DVD
CD/VCD CD de audio/CD Text (CD-DA)
VCD (Vídeo CD)
DTS-CD/SVCD (Super Video CD)/CD-ROM/CD-I (CD-I Ready)
CD Grabable/reescribible
(CD-R/-RW)
• ISO 9660 Nivel 1, Nivel 2, Romeo,
Joliet
CD-DA
VCD (Vídeo CD)
DivX/MPEG1/MPEG2
JPEG
MP3/WMA/WAV
MPEG4/AAC
*1 Si inserta un disco DVD Video con un código de región incorrecto aparecerá “Region Code Error” en la pantalla.
2
*
Un DVD-R grabado en formato de múltiples bordes también es reproducible (excepto los discos de doble capa). Los
discos DVD-RW de doble capa no se pueden reproducir.
3
*
Es posible reproducir discos finalizados +R/+RW (sólo formato de vídeo). “DVD” se selecciona como tipo de disco
cuando se carga un disco +R/+RW. Los discos +RW de doble capa no se pueden reproducir.
4
*
Esta unidad no puede reproducir contenido protegido con CPRM (Protección del contenido para medios grabables).
1
4
Precaución sobre la reproducción de DualDisc
El lado no DVD de un “DualDisc” no es compatible con la norma “Compact Disc Digital Audio”. Por consiguiente, no se
recomienda usar el lado no DVD de un DualDisc en este producto.
20
Page 81

Operaciones de reproducción
• Toque el área mostrada en la ilustración cuando no hayan botones de funcionamiento
visualizados en la pantalla.
Para DVD/DVD-VR/VCD/DivX/MPEG1/MPEG2/JPEG
Modo de sonido (
Tipo de medios
Format vidéo/mode
de lecture—VIDEO/
VR-PRG (programa),
VR-PLAY (lista de
reproducción), DivX/
MPEG/PBC
2
[ ] [ ]*
Selecciona el modo de
reproducción. (☞ página 24)
6] Comienza la reproducción/pausa.
[
3
7]*
[
4]
[
[¢] • Búsqueda hacia atrás/
Detiene la reproducción.
•
Selecciona un capítulo. (Pulsar)
4
(Sostener)
adelante.*
• Para VCD/DivX/MPEG1/MPEG2/JPEG, también aparecerán los siguientes botones:
6
]*
[
Visualiza la lista de carpetas/
pistas. (☞ página 22)
☞ página 35)
Modo de reproducción (
[
5] *
☞ página 24)
5
Selecciona el título (DVD)/programa o
[∞]
la lista de reproducción (DVD-VR). *
6
[Mode]*
Cambia los ajustes de reproducción
de discos. (☞ página 25)
[AV MENU] Visualiza la pantalla <AV Menu>.
5
4] *
[
¢] • Búsqueda hacia atrás/
[
• Selecciona la pista. (Pulsar)
adelante.*
6
5] [∞]*
[
Selecciona la carpeta.
Estado de reproducción
(3: reproducción/8: pausa/
7: parada)
Tiempo de reproducción
• DVD Video: Nº de título/Nº de
capítulo
• DVD-VR: Nº de programa (o Nº
de lista de reproducción)/Nº de
1
capítulo*
• DivX/MPEG1/MPEG2: Nº de
carpeta/Nº de pista
• JPEG: Nº de carpeta/Nº de archivo
• VCD: N° de pista
1
4
(Sostener)
ESPAÑOL
*1 Para visualizar la pantalla de Programa original/Lista de reproducción, ☞ página 23.
2
*
No aparece para DVD/DVD-VR/JPEG.
3
*
Aparece sólo para DVD/DVD-VR/VCD.
4
*
La velocidad de búsqueda varía según el tipo de disco o archivo.
5
*
El icono visualizado varía según el tipo de disco o archivo.
6
*
No aparece para VCD.
21
Page 82

Para CD/MP3/WMA/WAV
ESPAÑOL
Modo de sonido (☞ página 35)
Formato de audio
Tipo de medios Tiempo de reproducción
Modo de reproducción (☞ página 24)
Estado de reproducción
(3: reproducción/8: pausa)
• MP3/WMA/WAV:
Nº de carpeta/Nº de
pista
• CD: N° de pista
Durante la reproducción, aparecerá “Jacket
picture” si el archivo cuenta con datos de
etiqueta que incluyan “Jacket picture”.
[ ] [ ]
Selecciona el modo de
reproducción. (☞ página 24)
1
[
]*
Visualiza la lista de carpetas/
pistas. (☞ debajo)
6] Comienza la reproducción/pausa.
[
4]
[
¢] • Búsqueda hacia atrás/
[
*1 No aparece para CD.
2
*
La velocidad de búsqueda varía según el tipo de disco o archivo.
• Selecciona la pista. (Pulsar)
2
adelante.*
(Sostener)
Selección de una carpeta/pista de la lista
Cambia la página
Reproduce pistas/archivos de la carpeta
Vuelve a la carpeta raíz
Vuelve a la capa de arriba
Información de la pista/archivo
• Al tocar una barra de información, el texto se
desplaza si no se muestra por completo.
1
5] [∞]*
[
[Mode]*
Selecciona la carpeta.
1
Cambia los ajustes de reproducción de
discos. (☞ página 25)
[AV MENU] Visualiza la pantalla <AV Menu>.
Reproducción de discos grabables/
reescribibles
• Esta unidad puede reconocer un total de 5 000
archivos y 250 carpetas (un máximo de 999
archivos por carpeta).
• Utilice sólo discos “finalizados”.
• Esta unidad puede reproducir discos multisesión;
no obstante, las sesiones no cerradas serán
omitidas durante la reproducción.
• Es posible que algunos discos o archivos no
se puedan reproducir debido a sus propias
características o condiciones de grabación.
22
Page 83

Operaciones del menú de video
Es posible mostrar la pantalla del menú de video
mientras mira las imágenes de reproducción en la
pantalla.
• Las opciones disponibles mostradas en la pantalla
difieren según los tipos de disco cargado y de
archivos de reproducción.
• Los botones de operación desaparecen cuando toca
la pantalla o tras un período de inactividad de unos
10 segundos.
• La pantalla del MPEG1/MPEG2 difiere de la anterior.
[Menu] Visualiza el menú de disco (DVD)/la
lista de reproducción (DVD-VR).
[Top Menu] Visualiza el menú de disco (DVD)/el
programa original (DVD-VR).
[
Visualiza la pantalla de selección
]
de elemento de menú/lista de
reproducción/programa original.
(☞ debajo)
[
]
Cambia al modo de selección directa
del menú. Toque la opción que desea
seleccionar.
• Para salir de la pantalla de
selección de menús, pulse [
[Adjust] Visualiza la pantalla de ajuste de
imagen. (☞ página 39)
[Aspect] Selecciona una relación de aspecto.
(☞ página 40)
[Zoom] Visualiza la pantalla de selección del
tamaño de imagen. (☞ página 40)
Uso de la pantalla de selección de menús
ESPAÑOL
].
[ ] Selecciona el tipo de audio.
• Para DVD-VR: Selecciona el canal
de audio (ST: estéreo, L: izquierdo,
R: derecha).
[
] Selecciona el tipo de subtítulo.
Selecciona el ángulo de visión.
]
[
[5] [∞]
[
2] [3]
[Enter]
[Return]
[ ]
• Sólo para DivX
2] [3]
[
[Return]
[ ]
23
Seleccione una opción.
Confirma la selección.
Vuelve al menú anterior.
Sale de la pantalla de selección de menús.
Salta aproximadamente 5 minutos hacia
atrás o adelante.
Vuelve a la pantalla anterior.
Sale de la pantalla de selección de la escena.
Page 84

Sólo para VCD
1
2
ESPAÑOL
• Pulse [7] para desactivar la función PBC y luego
los botones de selección directa para seleccionar un
número de pista.
Selección del modo de reproducción
Para DVD/DVD-VR
Selecciona el modo repetición de reproducción
Para VCD (sin PBC)/CD/DivX/MPEG1/MPEG2/MP3/
WMA/WAV
Botones de selección directa (☞ abajo)
[ ] Selecciona el canal de audio (ST:
estéreo, L: izquierdo, R: derecha).
[Return] Visualiza la pantalla anterior o el
menú.
[Menu] Visualiza el menú de disco.
[Adjust] Visualiza la pantalla de ajuste de
imagen. (☞ página 39)
[Aspect] Selecciona una relación de aspecto.
(☞ página 40)
[Zoom] Visualiza la pantalla de selección del
tamaño de imagen. (☞ página 40)
[
• Para seleccionar directamente una pista
– Para cambiar entre entrada de capítulo/pista y
– Si introduce un número incorrecto, pulse [Direct/
Muestra/oculta los botones de
]
selección directa. (☞ debajo)
entrada de título/carpeta, pulse [Direct/CLR].
CLR] para borrar la última entrada.
Selecciona el modo
aleatorio de reproducción*
* No puede activar el modo de repetición y el modo
aleatorio al mismo tiempo.
• Cada vez que pulsa el botón, el modo de
reproducción cambia. (El indicador correspondiente
se enciende.)
– Las opciones disponibles difieren según los tipos
de disco cargado y de archivo de reproducción.
Indicador Modo de reproducción
CHAPTER
TITLE
PROGRAM
SONGS
FOLDER
FOLDER Reproduce aleatoriamente
DISC Reproducir aleatoriamente
Para cancelar, pulse, repetidamente, el botón hasta
que desaparezca el indicador.
Selecciona el modo
repetición de reproducción*
Repite el capítulo actual.
Repite el título actual.
Repite el programa actual (no
disponible para la reproducción
de la lista de reproducción).
Repetir la pista actual.
Se repiten todas las pistas de la
carpeta actual.
todas las pistas de la carpeta
actual y luego las pistas de las
siguientes carpetas.
todas las pistas.
24
Page 85

Ajustes de la reproducción de discos
Opciones de configuración
de disco
Menu Language
(Idioma de Menu)
Audio Language
(Idioma de Audio)
Subtitle
(Subtítulos)
Down Mix
(Mezcla)
Para DVD/DVD-VR
D. (Dynamic)
Range Compres.
(Compression)
(Compres.
D.Range)
Monitor Type
(Tipo de Monitor)
VCD/CD
Para discos que no sean
File Type
(Tipo de
Archivo)
Para discos que contienen
archivos de audio/video/imagen
Ajuste/opción seleccionable Inicial: Subrayado
Selecciona el idioma inicial del menú de disco; Inicial English (☞ página 55).
Selecciona el idioma de audio inicial; Inicial English (☞ página 55).
Seleccione el idioma de subtítulos inicial o borre el subtítulo (Off); Inicial English
(☞ página 55).
Cuando se reproduce un disco multicanal, este ajuste afecta a las señales
reproducidas a través de los jacks FRONT OUT/REAR OUT.
♦ Dolby Sur : Selecciónelo para disfrutar del sonido envolvente multicanal
♦ Stereo : Normalmente seleccione este ajuste.
Es posible cambiar el rango dinámico mientras se reproduce un software Dolby Digital.
♦ Off : Selecciónelo para disfrutar de un sonido potente a bajos
♦ On : Selecciónelo para reducir ligeramente el rango dinámico.
♦ Dialog : Selecciónelo para reproducir los diálogos de la película con
Seleccione el tipo de monitor para ver la imagen en pantalla ancha en el monitor
externo.
♦ 16:9
Seleccione el tipo de archivo reproducido cuando el disco contenga diferentes
tipos de archivos.
♦ Audio : Reproduce archivos de audio.
♦ Still Picture : Reproduce archivos JPEG.
♦ Video : Reproduce archivos DivX/MPEG1/MPEG2.
♦ Audio&Video : Reproduce archivos de audio y archivos DivX/MPEG1/MPEG2.
• Para los tipos de archivos reproducibles, ☞ página 20.
• Si el disco no contiene ningún archivo del tipo seleccionado, los archivos
existentes se reproducen en el orden siguiente: audio, video, luego imagen fija.
conectando un amplificador compatible con Dolby Surround.
niveles de volumen con su rango dinámico total.
mayor claridad.
♦ 4:3 LB (Letterbox) ♦ 4:3 PS (PanScan)
ESPAÑOL
25
Page 86

Operaciones de USB
Reproducción de un dispositivo USB
• Esta unidad puede reproducir archivos JPEG/MPEG1/
MPEG2*/MP3/WMA/WAV almacenados en un
dispositivo de clase de almacenamiento masivo USB.
• Esta unidad puede reconocer un total de 5 000
archivos y 250 carpetas (un máximo de 999 archivos
por carpeta).
• Para evitar el borrado accidental, asegúrese de sacar
ESPAÑOL
copia de respaldo de todos los datos importantes.
* Excepto archivos MPEG2 grabados mediante la cámara
JVC Everio (código de extensión <.mod>).
Conexión de un dispositivo USB
Puede conectar a la unidad, un dispositivo de clase de
almacenamiento masivo USB tal como una memoria
USB, reproductor de audio digital, etc.
• No es posible conectar un computador o un HDD
(disco duro) portátil al cable USB desde la parte
trasera de la unidad.
Cable USB desde la parte
trasera de la unidad
La fuente cambia a “
• Todas las pistas del dispositivo USB se reproducirán
repetidamente hasta que usted cambie la fuente.
USB
” y se inicia la reproducción.
Precauciones:
• Puede suceder que esta unidad no pueda reproducir
correctamente archivos en un dispositivo USB cuando
se utilice un cable prolongador USB.
• Los dispositivos USB equipados con funciones
especiales, como por ejemplo, funciones de seguridad
de datos, no se pueden usar con esta unidad.
• No utilice un dispositivo USB con 2 o más particiones.
• Dependiendo la forma de los dispositivos USB y de los
puertos de conexión, puede suceder que algunos de
ellos no puedan conectarse correctamente o que haya
flojedad en la conexión.
• Esta unidad no puede reconocer ningún dispositivo
USB que tenga un régimen distinto de 5 V y que
exceda de 1 A.
• Esta unidad puede no reconocer una tarjeta de
memoria insertada en un lector de tarjetas USB.
• Conecte a la unidad un solo dispositivo USB por vez.
No utilice un hub USB.
• Al efectuar la conexión con un cable USB, utilice un
cable USB 2.0.
• El número máximo de caracteres (cuando son
caracteres de 1 byte) para:
– Nombres de las carpetas : 50 caracteres
– Nombres de los archivos : 50 caracteres
• No utilice el dispositivo USB cuando pueda afectar la
seguridad de conducción.
• No extraiga ni conecte repetidamente el dispositivo
USB mientras parpadea “Now Reading” en la
pantalla.
• La descarga electrostática en el momento de conectar
el dispositivo USB puede provocar que el dispositivo
no reproduzca de la manera normal. Si este fuera el
caso, desconecte el dispositivo USB y, a continuación,
reinicialice esta unidad y el dispositivo USB.
• El funcionamiento y la fuente de alimentación
pueden no funcionar como es deseado con algunos
dispositivos USB.
• No deje el dispositivo USB en el coche expuesto a
la luz directa del sol o a altas temperaturas pues se
podrá producir deformación o daños en el dispositivo.
26
Page 87

• Toque el área mostrada en la ilustración cuando no hayan botones de funcionamiento
visualizados en la pantalla.
• Para cambiar los ajustes de reproducción de video, ☞ página 39.
Modo de sonido (☞ página 35)
Formato de audio Tiempo de reproducción
Formato de
vídeo: MPEG/
imagen fija: JPEG
Durante la reproducción, aparecerá “Jacket picture” si el archivo cuenta con datos de
etiqueta que incluyan “Jacket picture”.
[ ]
Selecciona el modo de repetición. *1 *
• SONGS: Repetir la pista actual.
FOLDER: Se repiten todas las
•
pistas de la carpeta actual.
[ ]
Selecciona el modo aleatorio de
reproducción. *
1 *2
• FOLDER: Reproduce aleatoriamente
todas las pistas de la carpeta.
USB: Reproducir aleatoriamente
•
todas las pistas.
Modo de reproducción (☞ abajo)
Estado de reproducción
(3: reproducción/8: pausa)
• MP3/WMA/WAV: Nº de
carpeta/Nº de pista
• JPEG: Nº de carpeta/Nº de
archivo
Información de pista/archivo
(para MP3/WMA/WAV)
• Al tocar una barra de
información, el texto se
desplaza si no se muestra
por completo.
2
[ ]
6] Comienza la reproducción/pausa.
[
4] *
[
¢] • Búsqueda hacia atrás/adelante.*
[
Visualiza la lista de carpetas/pistas.
(☞ página 22)
3
• Selecciona la pista. (Pulsar)
(Sostener)
5] [∞]
[
Selecciona la carpeta.
[Mode] Cambia los ajustes de reproducción de
archivos. (☞ debajo)
[AV MENU] Visualiza la pantalla <AV Menu>.
4
• Las opciones disponibles difieren según los tipos de archivo de reproducción.
*1 Para cancelar el modo aleatorio o de repetición, pulse, repetidamente, el botón hasta que desaparezca el indicador.
2
No puede activar el modo de repetición y el modo aleatorio al mismo tiempo.
*
3
El icono visualizado varía según el tipo de archivo.
*
4
La velocidad de búsqueda varía según el tipo de archivo.
*
Ajuste <Monitor Type>
Seleccione el tipo de monitor para ver la imagen en
pantalla ancha en el monitor externo.
16:9
Ajuste <File Type>
Audio Reproduce archivos de audio.
Still Picture Reproduce archivos JPEG.
Video Reproduce archivos MPEG1/
MPEG2.
4:3 LB (Letterbox)
Audio&Video Reproduce archivos de audio y
Archivos MPEG1/MPEG2.
4:3 PS (PanScan)
• Si el dispositivo USB no contiene ningún archivo
del tipo seleccionado, los archivos existentes se
reproducen en el orden siguiente: audio, video, luego
imagen fija.
27
ESPAÑOL
Page 88

Para escuchar dispositivo iPod/iPhone
Preparativos
Dispositivos iPod/iPhone que se pueden conectar
a esta unidad:
– iPod con Vídeo (5ta. generación)
– iPod classic
– iPod nano (5ta. generación)
– iPod nano (4ta. generación)
– iPod nano (3ra. generación)
ESPAÑOL
– iPod nano (2da. generación)
– iPod nano (1ra. generación)
– iPod touch (3ra. generación)
– iPod touch (2da. generación)
– iPod touch (1ra. generación)
– iPhone 4
– iPhone 3G
– iPhone 3GS
– iPhone
Configuración de <Input> para la
reproducción de iPod/iPhone
1 Desactive la fuente AV.
En <AV Menu>:
2 Pulse para visualizar la
pantalla <AV Menu>.
3 Visualice la pantalla <Settings>.
Conexión del iPod/iPhone
Conecte su iPod/iPhone con el cable apropiado para su
propósito.
• Utilice los siguientes cables;
– Para escuchar la música (digital): Cable USB
2.0 (accesorio del iPod/iPhone)
Al iPod/iPhone
Cable USB desde la
parte trasera de la
unidad
– Para ver vídeo y escuchar la música
(analógico): Cable USB audio y video para iPod/
iPhone—KS-U30 (adquirido separadamente) (☞
Manual de Instalación/Conexión)
Precaución:
No aparece video en la pantalla si se efectúa la
conexión con un cable distinto de KS-U30.
4 Visualice la pantalla <Input>.
5 Para escuchar la música
Ajuste <Audio Input> a <AV-IN>.
Para ver vídeo y escuchar la música
Ajuste <Audio Input> y <Video Input> a <iPod>.
• Si también se ha conectado el KS-BTA100,
seleccione <BT> para <Audio Input>.
(☞ página 48)
28
Page 89

Configuración del modo de
control de iPod
Seleccione la unidad de control de reproducción del
iPod/iPhone.
iPod
Cuando la fuente es “
1
2
”...
Selección de los ajustes de
preferencias para reproducción
del iPod/iPhone
Cuando la fuente es “
1
2
iPod
”...
ESPAÑOL
Head Controla la reproducción con esta
unidad.
iPod Controla la reproducción de audio/
video mediante el iPod/iPhone.
• Muestra la información sobre
reproducción.
External Admite cualquier señal de audio/
video procedente del iPod/iPhone.
• No se muestra ninguna
información.
• Cuando usted enciende la unidad
y reproduce un video estando
seleccionado <External>,
aparece un mensaje de alerta.
Pulse [Accept] para continuar.
• Cuando se utiliza iPod nano (1ra. generación) o
iPod con video (5ta. generación) con <AV-IN>
seleccionado para <Audio Input> (☞ página 44),
sólo se puede elegir el modo <Head>. <iPod> y
<External> no se pueden seleccionar.
• Cuando utilice la aplicación (App) del iPod touch o
iPhone, consulte las instrucciones de seguridad de la
página 56.
Audiobooks Seleccione la velocidad de los
audio libros.
Artwork Muestra/oculta la ilustración
del iPod.
Nota:
Cuando opera un iPod/iPhone, algunas
operaciones pueden no funcionar correctamente o
como se desea. En tal caso, visite el siguiente sitio
web de JVC: <http://www.jvc.jp/english/car/>
(solamente en inglés)
Con algunos modelos de iPod/iPhone, el
desempeño podría ser anormal o inestable
durante la operación. En este caso, desconecte el
dispositivo iPod/iPhone, y verifique su condición.
Si el desempeño no mejora o se ha vuelto lento,
reinicialice su iPod/iPhone.
29
Page 90

Operaciones de reproducción del iPod/iPhone
• Toque el área mostrada en la ilustración cuando no hayan botones de funcionamiento
visualizados en la pantalla.
• Para cambiar los ajustes de reproducción de video, ☞ página 39.
• Las operaciones descritas en este manual corresponden al modo <Head> (☞ página 29).
Nº de pista/Número total de
pistas/Tiempo de reproducción
ESPAÑOL
Modo control iPod
(
☞ página 29)
Durante la reproducción, se mostrará la ilustración (la imagen visualizada en la
pantalla del iPod/iPhone) si la canción contiene una ilustración.
Selecciona el modo repetición de
[ ]
reproducción. *
1
• SONGS: Funciona de la misma
forma que “Repeat One”.
Selecciona el modo aleatorio de
]
[
reproducción. *
1
• SONGS: Funciona de la misma
forma que “Shuffle Songs”.
•
ALBUMS: Funciona de la misma
forma que “Shuffle Albums”.
Modo de sonido (☞ página 35)
Modo de reproducción (
[ ]
[
6] Comienza la reproducción/pausa.
4]
[
¢] • Búsqueda hacia atrás/adelante.
[
[Mode] Cambia los ajustes de reproducción de
[AV MENU] Visualiza la pantalla <AV Menu>.
☞ abajo)
Estado de reproducción
(3: reproducción/8: pausa)
Información sobre la canción/
video
• Al tocar una barra de
información, el texto se
desplaza si no se muestra por
completo.
Visualiza el menú Música/Vídeo del
iPod/iPhone. (☞ página 31)
• Selecciona una pista/video.*2
(Pulsar)
(Sostener)
iPod. (☞ página 29)
• Para ver video, seleccione una opción en la lista del menú Video. (☞ página 31)
1
Para cancelar el modo aleatorio o de repetición, pulse, repetidamente, el botón hasta que desaparezca el indicador.
*
2
*
No se puede reanudar la reproducción para fuentes de video.
• Al encender esta unidad, el iPod/iPhone se carga a través de la unidad.
– El iPhone 4 sólo se puede cargar cuando se conecta a través de KS-U30.
• La información de texto podría no visualizarse correctamente.
30
Page 91

Selección de una pista/vídeo del
menú del iPod/iPhone
1
Menú Video:
Cambia entre Música ( ) y Video
( )
2 Seleccione el menú (Música o Video)
(
1), una categoría (2), a continuación,
la opción deseada (
• Seleccione la opción en la capa seleccionada
hasta que comience la reproducción de la pista
deseada.
Menú de música:
Cambia entre Música ( ) y Video
( )
Vuelve a la capa superior
3).
Vuelve a la capa
anterior
Reproduce todas las opciones
de la capa
• Las categorías disponibles difieren según el tipo de
iPod/iPhone.
* Puede cambiar a la parte superior de la categoría
pulsando la pestaña correspondiente: Lista de
reproducción (
Canciones (
*
), Artista ( ), Álbumes ( ) o
).
ESPAÑOL
31
Page 92

Uso de otros componentes externos
AV-IN
Puede conectar un componente externo a los jacks LINE IN/VIDEO IN. (☞ Manual de Instalación/Conexión)
Preparativos:
•
Para escuchar música del componente conectado, seleccione <AV-IN> para el ajuste <Audio Input>. (☞ página 44)
• Para ver vídeo del componente conectado, seleccione <AV-IN> para el ajuste <Video Input>. (☞ página 44)
1 Seleccione “AV-IN” como fuente. (☞ página 13)
2 Encienda el componente conectado y comience a reproducir la fuente.
ESPAÑOL
• Toque el área mostrada en la ilustración cuando no hayan botones de funcionamiento
visualizados en la pantalla.
• Para cambiar los ajustes de reproducción de video, ☞ página 39.
Modo de sonido (☞ página 35)Nombre AV-IN* (☞ abajo)
Tipo de fuente (“AV-IN” o
“Front AUX”)
*
[Mode]* Cambia el nombre de AV-IN.
• Pulse [
2] o [3] para seleccionar un nombre de AV-IN.
[AV MENU] Visualiza la pantalla <AV Menu>.
* Aparece cuando se ha seleccionado “
AV-IN
” como fuente.
Front AUX
1 Conexión de un componente externo.
2 Seleccione “Front AUX” como fuente. (☞ página 13)
3 Encienda el componente conectado y comience a
reproducir la fuente.
32
Miniclavija estéreo de 3,5 mm
(no suministrado)
Page 93

Uso de la unidad de navegación externa
Puede conectar una caja de navegación (no suministrada) al terminal de entrada RGB para poder ver la pantalla de
navegación. (☞ Manual de Instalación/Conexión)
• Consulte con su distribuidor para obtener información sobre las unidades de navegación compatibles.
Activar la función de navegación
1 En <AV Menu>:
2
3
• Al ajustar <Navigation Input> a <On>, los
botones [
de control de fuente y la pantalla <AV Menu>.
En la pantalla de control de fuente:
En <AV Menu>:
NAVI] y [Navi] aparecen en la pantalla
ESPAÑOL
33
Page 94

Para ver la pantalla de navegación
En la pantalla de control de fuente:
Ajustes para la unidad de
navegación
1 En <AV Menu>:
o
En <AV Menu>:
ESPAÑOL
• Mientras se está visualizando la pantalla de
navegación, las operaciones del panel táctil se
encuentran restringidas solamente a la función de
navegación.
• La relación de aspecto de la pantalla de navegación
se fija en <Full> independientemente del ajuste
<Aspect> (☞ página 40).
• Puede usar la fuente “
fuente de audio conectada a los jacks LINE IN.
AV-IN
” para escuchar una
Para cancelar la pantalla de navegación
2
3
Navigation
Input
Output Selecciona los altavoces delanteros
Volume Ajusta el volumen de la guía de
Navigation
Mute
Picture Adjust Ajuste el brillo y el negro.
☞ página 33
utilizados para la guía de
navegación.
navegación. (0 a 35)
Seleccione <On> para atenuar el
sonido que sale por los altavoces,
a excepción de los delanteros,
durante la guía de navegación.
(☞ página 39)
34
Page 95

Ajustes del sonido
Utilizar la ecualización del sonido
• Se memoriza el ajuste para cada fuente hasta que vuelva a ajustar el sonido. Si la fuente es un disco, se guarda el
ajuste para cada una de las siguientes categorías.
– DVD/DVD-VR
– VCD/CD
– DivX/MPEG1/MPEG2/MP3/WMA/WAV
• No se puede ajustar el sonido cuando la fuente AV está desactivada.
Selección de un modo de sonido
preajustado
1 En <AV Menu>:
o
En la pantalla de control de fuente:
2 Seleccione un modo de sonido.
Cómo almacenar sus propios ajustes
Personalización del modo de sonido
preajustado
1 Seleccione un modo de sonido.
(☞ “Selección de un modo de sonido
preajustado”)
2 Ajuste el nivel de cada banda (1), a
continuación seleccione el nivel del
subwoofer (
Los ajustes se guardan y se activa <User>.
2).
ESPAÑOL
Cambia la página
• Para finalizar el procedimiento, pulse [ ].
• Para realizar ajustes de precisión, ☞ página 36.
35
Page 96

Ajustar con precisión el sonido
1 Efectúe los pasos 1 y 2 de “Selección
de un modo de sonido preajustado”
luego...
2 Seleccione una banda.
ESPAÑOL
3 Ajuste del sonido.
Reset Cambia el nivel de Bajo/Medio/
Alto a 0.
Freq Selecciona la frecuencia.
Q Ajusta el ancho de la
frecuencia.*
Bass Activa/desactiva los graves.*
SW Level Ajusta el nivel del subwoofer.
Los ajustes se sobrescriben si se ajusta a <User>
en la página anterior y se activa <User>.
1
Ajustar la frecuencia de cruce
1 En <AV Menu>:
2
3 Seleccione la opción que desea ajustar y
lleve a cabo el ajuste.
Ajusta el cruce para los altavoces delanteros o
traseros (filtro de paso alto).
2
Ajusta el cruce del subwoofer (filtro de paso bajo).
• Se memorizan los ajustes hasta que vuelva a
ajustar el sonido.
• Para ajustar otras bandas, repita los pasos
3.
1
Fijo para la banda “High”.
*
2
*
Sólo para la banda “Low”.
2 y
Ajusta la frecuencia de cruce.
Selecciona la fase del subwoofer.*
Ajusta el nivel del subwoofer.
* No se puede seleccionar cuando <Freq> está ajustado
a <Through>.
36
Page 97

Cambiar el diseño de la pantalla
Puede cambiar el fondo de pantalla, el color de texto, botones del panel táctil y botones del panel del monitor.
1 En <AV Menu>:
2
2 Seleccione/ajuste el color
Paleta de colores
Ajuste del atenuador de luz: Puede realizar selecciones
para cada ajuste del atenuador de luminosidad—<
(activación) o < > (desactivación)
Ajustador de color de usuario: Sólo puede ajustar su
propio color almacenado en <
ESPAÑOL
>
User>
3 Seleccione una opción(<Backgrnd>,
<Text> o <Buttons>) y luego cambie el
ajuste.
Fondo de pantalla
1 Seleccione un fondo de pantalla
Imagen básica (predeterminada)
Puede seleccionar un color de la
paleta de colores o ajustar el color en
el ajustador de color de usuario (
en la columna derecha)
Para definir su escena favorita como fondo de
pantalla, ☞ página 38
☞
Texto/Botones
Para el ajuste del color, ☞ arriba.
Iluminación de colores variables*
• El color de la iluminación cambia gradualmente.
* Aparece sólo para la pantalla de selección de color de
los botones. No es posible ajustar el color cuando se
selecciona una iluminación de colores variables.
37
Page 98

Usar su escena favorita como fondo de
pantalla
Mientras se está reproduciendo un video o JPEG, puede
capturar una imagen para utilizarla como fondo de
pantalla.
• No es posible capturar contenido e imágenes con
derechos de autor desde el iPod/iPhone.
• Cuando se utiliza un archivo JPEG como fondo de
pantalla, asegúrese de que la resolución sea de 800 x
600 píxeles.
• El color de la imagen capturada puede parecer
ESPAÑOL
diferente de la escena real.
1 Reproduzca un video o JPEG.
2
Visualice <Display Design>. (☞ página 37)
3
4 Ajuste la imagen.
5 Capture la imagen mostrada en la
pantalla.
Aparecerá el mensaje de confirmación. Pulse [Yes]
para guardar la imagen recién capturada. (La
imagen existente será reemplazada por la nueva.)
• Pulse [No] para volver a la pantalla anterior.
[6] * Comienza la reproducción/pausa.
[
E] * Avanza las escenas fotograma a
fotograma.
[
3] Amplía la escena.
(<Zoom1> – <Zoom3>)
[
5] [∞] Mueve el cuadro de ampliación.
[
2] [3]
• Para cancelar la pantalla de captura, pulse
[
].
* No se visualiza cuando se reproduce un
componente externo a los jacks LINE IN/VIDEO IN.
38
Page 99

Ajuste para reproducción de video
Puede cambiar el ajuste para la reproducción de video.
Ajuste de la imagen
Puede ajustar la calidad de la imagen.
1 Visualice el menú de ajuste.
2 Seleccione activación (< >) o
desactivación (<
luminosidad.
>) del atenuador de
3 Ajuste la imagen (−15 a +15).
Ajusta el brillo
Ajusta el contraste
Ajusta el negro
Ajusta el color
Ajusta el matiz*
Ajusta los detalles
* Se puede ajustar sólo cuando la señal entrante es
NTSC.
ESPAÑOL
39
Page 100

Cambiar la relación de aspecto
Puede cambiar la relación de aspecto para la
reproducción de video.
1
ESPAÑOL
2
Señal 4:3 Señal 16:9
Full*:
Para imágenes
originales 16:9
Panorama:
Para ver imágenes
4:3 naturalmente
en pantalla ancha
Regular*:
Para imágenes
originales 4:3
Auto: • Para “DISC”/“USB”
solamente: La relación
de aspecto se selecciona
automáticamente para que
corresponda con las señales
entrantes.
* Mientras se reproduce un DivX con <Monitor Type>
ajustado a <16:9> (☞ página 25), la relación de
aspecto no se ajusta correctamente.
Ampliar la imagen
Es posible ampliar la imagen (<Zoom1> a <Zoom3>).
• Si ajusta <Aspect> a <Panorama> o <Auto>
(☞ columna izquierda), la imagen se amplía de
acuerdo con el ajuste <Full>.
1
2
[5] [∞] [2] [3] : Mueve el cuadro de
ampliación.
40
 Loading...