

Page 1
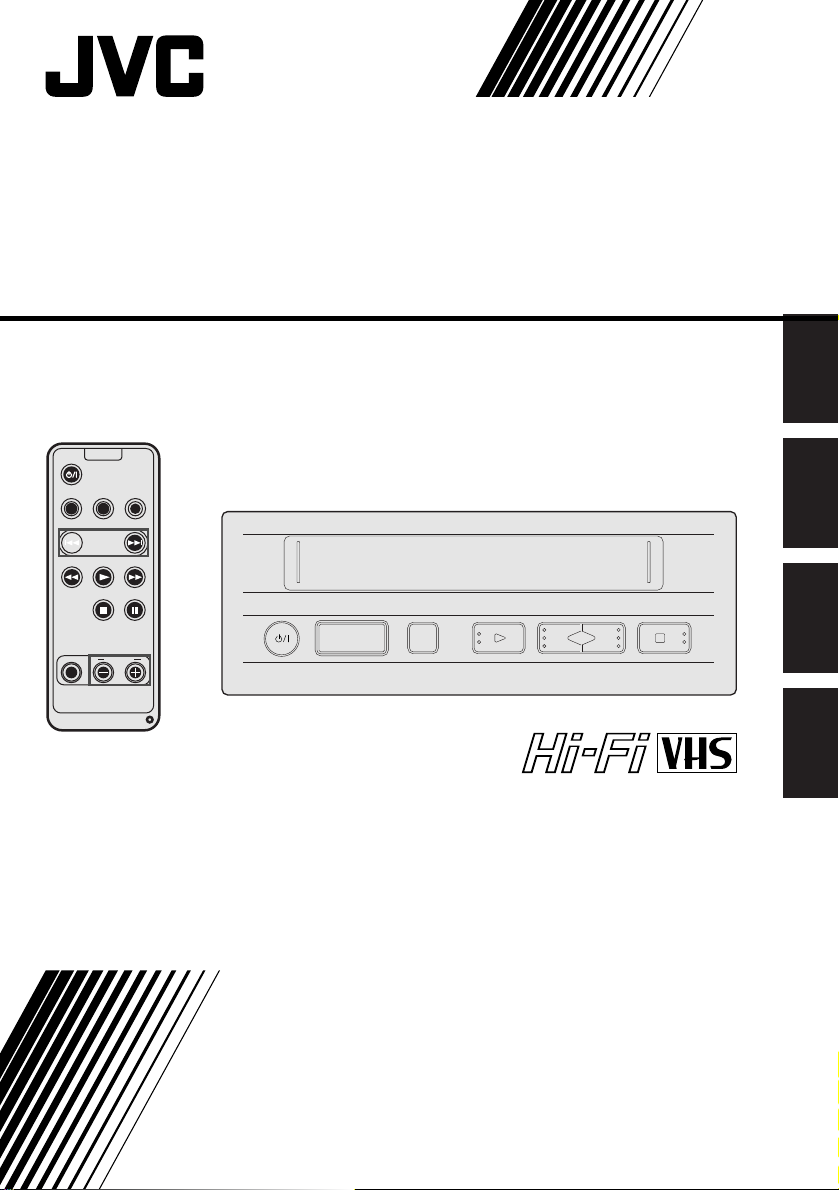
MOBILE VIDEO CASSETTE PLAYER
MOBILER VIDEOSPIELER
LECTEUR DE VIDEOCASSETTE PORTABLE
MOBIELE VIDEOCASSETTESPELER
KV-V8
VCP
AUDIO
AUXDISPLAY
INDEX
STEREO
MOBILE VIDEO CASSETTE PLAYER
KV-V8
PAUSE PLAY REW FF STOP / EJECT
TRACKING
MANUALAUTO
For installation and connections, refer to the separate manual.
Hinweise zu Installation und Anschlu§ entnehmen Sie bitte der seperaten Bedienungsanleitung.
Pour I’ installation et les raccordements, se r f rer au manuel s par .
Zie de aparte handleiding voor de installatie en de aansluitingen.
SQPB
PAL
ENGLISH
DEUTSCH
FRANÇAIS
NEDERLANDS
INSTRUCTIONS
BEDIENUNGSANLEITUNG
MANUEL D'INSTRUCTIONS
GEBRUIKSAANWIJZING
LVT0647-001A
Page 2

2
Dear Customer,
Thank you for purchasing the JVC VHS video cassette player. Before use, please read the safety information and precautions contained in the following pages to ensure safe use of your new player.
When discarding batteries, environmental problems must be
CAUTIONS
WARNING:
TO PREVENT FIRE OR SHOCK
HAZARD, DO NOT EXPOSE THIS
UNIT TO RAIN OR MOISTURE.
CAUTION:
This video cassette player should be used with DC 12V only.
To prevent electric shocks and fire hazards, DO NOT use
any other power source.
The button does not completely shut off
mains power from the unit, but switches operat-
ing current on and off. " " shows electrical
power standby and " " shows ON.
Caution on Replaceable lithium battery
The battery used in this remote controller may
present a fire or chemical burn hazard if
mistreated.
Do not recharge, disassemble, heat above 100°C
or incinerate.
Replace battery with Panasonic (Matsushita
Electric), Sanyo, Sony or Maxell CR2025.
Danger of explosion or Risk of fire if the battery
is incorrectly replaced.
䡲 Dispose of used battery promptly.
䡲 Keep away from children.
䡲 Do not disassemble and do not dispose of in
fire.
5
PAL
Cassettes marked ''VHS'' can be used with this video cassette player.
considered and the local rules or laws
governing the disposal of these batteries must be followed
strictly.
Failure to heed the following precautions may result in
damage to the player, remote control or video cassette.
1.
DO NOT place the player . . .
... in an environment prone to extreme temperatures or
humidity.
... in direct sunlight.
... in a dusty environment.
... in an environment where strong magnetic fields are
generated.
... on a surface that is unstable or subject to vibration.
DO NOT block the player's ventilation openings or holes.
2.
(If the ventilation openings or holes are blocked by a
newspaper or cloth, etc., the heat may not be able to get
out.)
DO NOT place heavy objects on the player or remote
3.
control.
4. DO NOT place anything which might spill on top of the
player or remote control.
(If water or liquid is allowed to enter this equipment, fire
or electric shock may be caused.)
DO NOT expose the apparatus to dripping or splashing.
5.
6.
DO NOT use this equipment in a bathroom or places
with water. Also DO NOT place any containers filled with
water or liquids (such as cosmetics or medicines, flower
vases, potted plants, cups, etc.) on top of this unit.
DO NOT place any naked flame sources, such as lighted
7.
candles, on the apparatus.
8. AVOID violent shocks to the player during transport.
**MOISTURE CONDENSATION
Moisture in the air will condense on the player when you move
it from a cold place to a warm place, or under extremely humid
conditions—just as water droplets form on the surface of a glass
filled with cold liquid. Moisture condensation on the head drum
will cause damage to the tape. In conditions where condensation may occur, keep the player’s power turned on for a few
hours to let the moisture dry before inserting a tape.
Cautions on operation
• When the car is parked under the blazing sun or in an
extremely cold place for a long time, wait a while to use
this unit after the temperature of the cabin drops to the
normal temperature.
• Use this unit as the engine is running. If this unit is used as
the engine is stopping, it depletes the car battery and, if
worst comes to worst, the battery fails in starting the engine.
• If this unit is disconnected during operation (playback, fast-
forward, rewind, etc.), it may cause a machine failure.
When disconnecting this unit, be sure to remove the video
cassette from the unit beforehand.
Page 3

3
Table of contents
CAUTIONS .......................................................... 2
Features ............................................................... 4
Dew sensor circuit ............................................ 4
High temperature sensor circuit ........................ 4
Abnormal voltage sensor circuit ........................ 4
Tape protection circuit ...................................... 4
ACCESSORIES ...................................................... 4
Inserting/removing cassette .................................. 5
Inserting cassette into the cassette
compartment .....................................................
Removing cassette from player ......................... 5
For protection of important recording ............... 5
How to playback VHS-C cassette tape
recorded by Video Movie ................................. 5
For playing back pictures clearly all the time
(Use of head cleaning cassette) ........................... 6
FRONT VIEW ...................................................... 7
REAR VIEW .......................................................... 8
REMOTE CONTROLLER ...................................... 9
How to set battery in the battery compartment . 10
Indications on the screen .................................... 11
Playback ............................................................ 12
Playing back ................................................... 12
Fast-forwarding/Rewinding ............................. 12
Fast-forwarding/Rewinding
while looking at picture .................................. 12
Still playback/Frame-to-frame playback
/Slow playback .................................................. 12
Repeated playback ............................................. 12
5
Search playback ................................................. 13
Playing back from the beginning of each
program-Search playback ............................... 13
How to choose (specify) the address (index)
of a program ................................................... 13
NTSC Playback ............................................... 13
Connection to other apparatus
Connection to Mobile Color TV System .......... 14
Connection to a video camera ........................ 15
Troubleshooting ................................................. 16
Specifications ..................................................... 16
Some Do's And Don'ts On The Safe Use Of Equipment
This equipment has been designed and manufactured to meet international safety standards but, like any
electrical equipment, care must be taken if you are to obtain the best results and safety is to be assured.
DO read the operating instructions before you attempt to use the equipment.
DO ensure that all electrical connections (including the POWER CONNECTOR, extension leads and interconnec-
tions between pieces of equipment) are properly made and in accordance with the manufacturer's instructions. Switch off and withdraw the POWER CONNECTOR when making or changing connections.
DO consult your dealer if you are ever in doubt about the installation, operation or safety of your equipment.
DO be careful with glass panels or doors on equipment.
DON'T continue to operate the equipment if you are in any doubt about it working normally, or if it is damaged in
DON'T remove any fixed cover as this may expose dangerous voltages.
DON'T leave equipment switched on when it is unattended unless it is specifically stated that it is designed for
DON'T use equipment such as personal stereos or radios so that you are distracted from the requirements of road
DON'T listen to headphones at high volume, as such use can permanently damage your hearing.
DON'T obstruct the ventilation of the equipment, for example with curtains or soft furnishings. Overheating will
DON'T use makeshift stands and NEVER fix legs with wood screws — to ensure complete safety always fit the
DON'T allow electrical equipment to be exposed to rain or moisture.
ABOVE ALL...
any way — switch off, withdraw the POWER CONNECTOR and consult your dealer.
unattended operation or has a standby mode. Switch off using the switch on the equipment and make sure
that your family knows how to do this. Special arrangements may need to be made for infirm or handicapped people.
safety. It is illegal to watch video whilst driving.
cause damage and shorten the life of the equipment.
manufacturer's approved stand or legs with the fixings provided according to the instructions.
— NEVER let anyone especially children push anything into holes, slots or any other opening in the case —
this could result in a fatal electrical shock;
— NEVER guess or take chances with electrical equipment of any kind — it is better to be safe than sorry!
Page 4
4
Features
5 4-heads stereo Hi-Fi video cassette player
5 Mountable in either vertical or horizontal posture
thanks to the highly reliable vibration-resistant
design
Protection circuits
(self-diagnosing circuits)
This video cassette player incorporates some protection circuits inside.
If this video cassette player is used as it is dewed, it
may damage the tape and video heads.
Dew sensor circuit
5 When the cabin whose temperature is consider-
ably low is rapidly heated or the humidity in the
cabin is considerably high, insides of the windscreen and cabin windows are sometimes fogged.
At the same time, inside of the video cassette player
mounted on the car is dewed.
5 In such the case (dewed condition), the dew sensor
circuit functions to stop machine operation with
indication of blinking indicator lamp in green,
and "DEW PLEASE WAIT" appears on the screen.
When the machine falls into such the status, wait
for several hours until the indicator lamp stops
blinking and lights continuously.
High temperature sensor circuit
5 When the temperature of the machine becomes con-
siderably high, the high temperature sensor circuit
functions to stop machine operation with indication
of blinking
TEMP PLEASE WAIT" appears on the screen. When
the machine falls into such the status, turn off the
machine and wait for a while until the indicator
lamp stops blinking while leaving it in a cool place
to lower the temperature. When turning on the machine again, make sure that the indicator lamp
does not blink before starting operation.
Abnormal voltage sensor circuit
5 When the source loop circuit of the machine
detects voltage out of the operation range, the
abnormal voltage sensor circuit functions to
turn off the machine with indication of blinking the
"VOLTAGE PLEASE CHECK" appears on the
screen.
In such a case, make sure that the machine is
connected properly or battery voltage is sufficient.
Note: This video cassette player should be used
Tape protection circuit
5 When the machine remains in the still playback or
slow playback mode for 5 minutes or longer, the tape
protection circuit functions to stop mode the machine for protecting the tape.
indicator lamp in red, and "HIGH
indicator lamp in orange, and
with DC12V only.
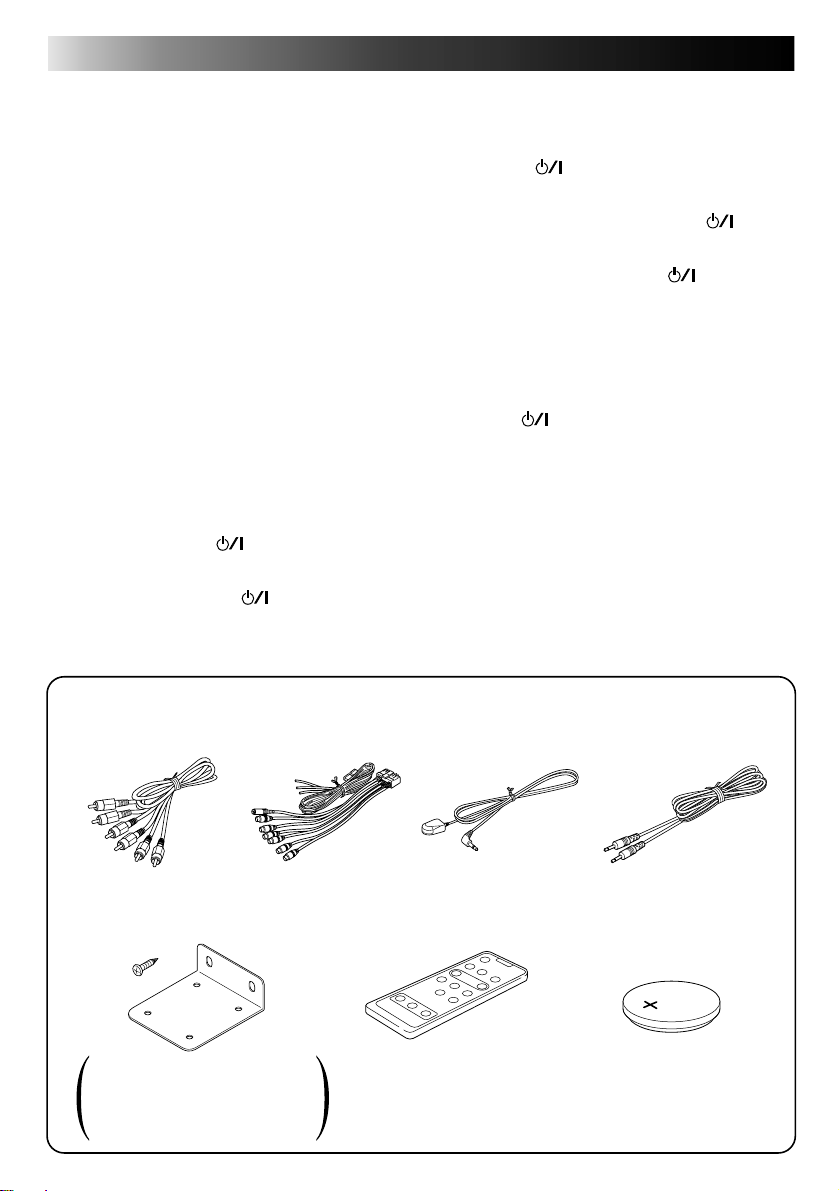
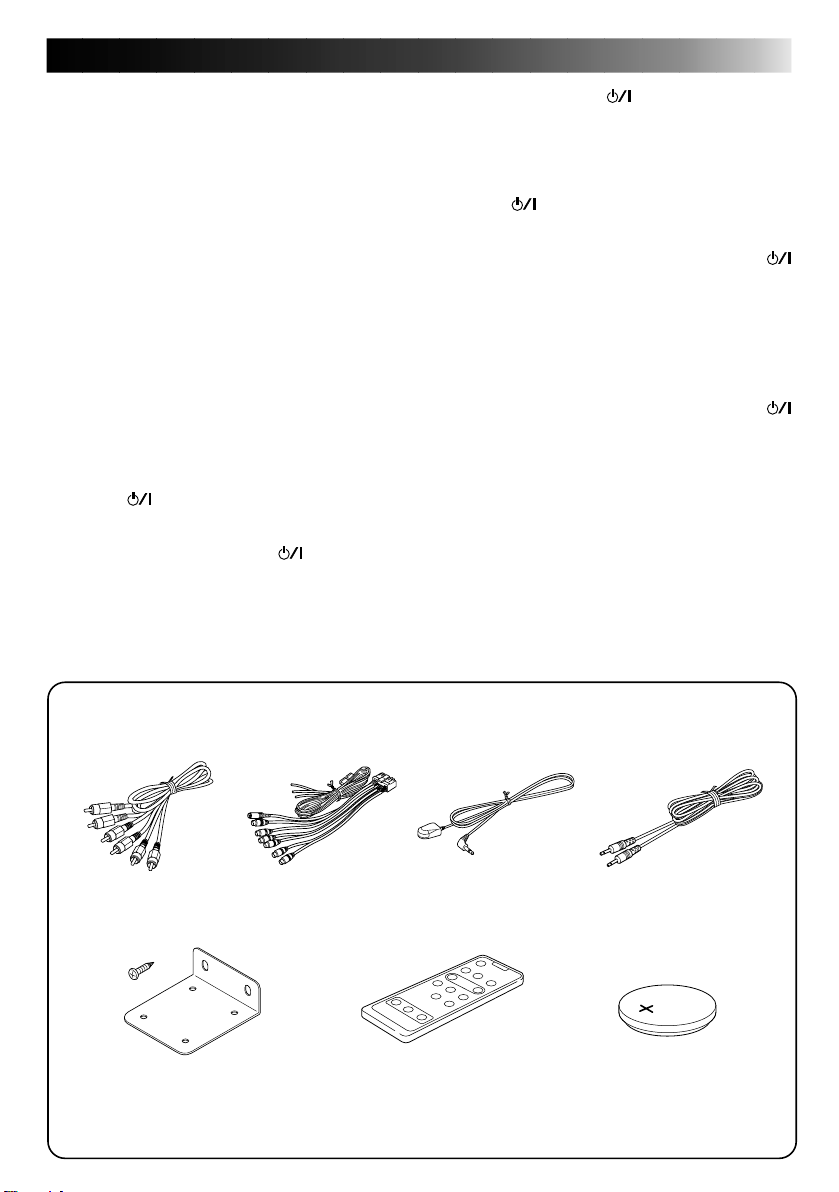
ACCESSORIES
• Check to see if the following accessories are supplied with the video cassette player.
AV cord
(5 m/16.7ft. long)
Mounting bracket x 2
Tapping screw (φ 5 x 20 mm) x 4
Screw (M5 x 8 mm) x 4
Velcro tape x 2 sets
Power cord
(5.5m/18.2ft. long)
Remote sensor unit
Remote controller Round battery
Remote control data cord
(5m/16.7ft. long)
(CR2025)
Page 5
Inserting/removing cassette
Inserting cassette into the cassette compartment
Removing cassette from player
5
Insert a video cassette with the label side up into the
cassette compartment by gently pressing the center
part.
•With insertion of a video cassette into the cassette
compartment, the player is automatically turned
on. (Automatic power on function)
•The tape counter is reset to 0:00:00. (Automatic
counter reset function)
•Inserting a cassette automatically starts playback.
(Automatic playback function)
•When the car is shaking, it is hard to insert a casette
because the machine is apt to hold the cassette firmly
to prevent the cassette from vibration. In such a case,
insert the cassette strongly or pull the cassette out of
the player once and again try to insert it.
STEREO
MOBILE VIDEO CASSETTE PLAYER
KV-V8
PAUSE PLAY REW FF STOP / EJECT
SQPB
•Don’t insert fingers or foreign substances into the
cassette compartment. When a little child is near
the video cassette player, pay heed to him/her not
to do so.
•If a video cassette is inserted in wrong posture, it is
automatically ejected by the function of the protection mechanism. If it happens, wait for a few seconds and try to insert it correctly once again.
For protection of important recording
Press the EJECT button while in the stop mode.
Break the recording protection tab of the cassette.
•If you want to use the cassette whose recording
protection tab was broken for recording, cover the
broken part with adhesive tape double.
Protection tab
How to play back VHS-C cassette tape recorded by Video Movie
•Use an optional VHS cassette adapter to play back
VHS-C cassette tape.
Page 6
6
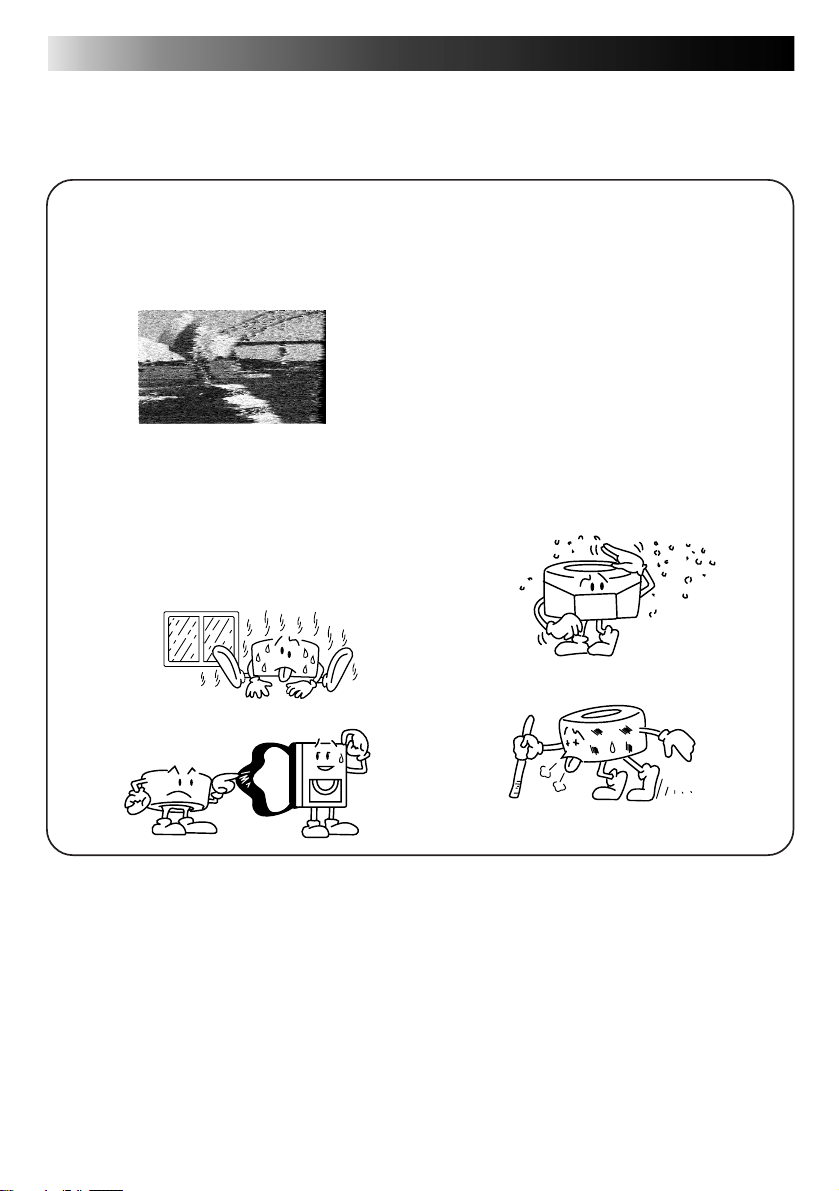
For playing back pictures clearly all the time (Use of head cleaning cassette)
5 If this video cassette player is used for a longtime, it makes playback pictures rough. In such a case, clean
the video heads with an optional head cleaning cassette.
5 When the following symptom is observed:
• Playback picture is rough.
• Playback picture is unclear or no picture is re-
produced on the screen.
• "USE CLEANING CASSETTE" appears on the
screen.
What to do on such the occasions.
• Clean the video heads with a dry type head cleaning cassette (TCL-2UX).
5 Factors to soil heads
• High temperature, high humidity (in the rainy
season, etc.)
• Damaged or soiled tape
5 If playback picture is still rough after the video
heads are cleaned by the head cleaning cassette, consult the store that you got this player
at or the nearest JVC dealer about the matter.
• Dust in air
• Long-time operation, etc.
Page 7

FRONT VIEW
1 2 3
STEREO
MOBILE VIDEO CASSETTE PLAYER
KV-V8
PAUSE PLAY REW FF STOP / EJECT
SQPB
5
4 6
7
1 button
Press this button to turn on or off this video cassette player.
2 PAUSE button
Press this button to suspend playback temporarily.
3 PLAY button
Press this button to play back a video cassette.
4 REW (rewind) button
Press this button to rewind the tape.
5 FF (fast-forward) button
Press this button to fast-forward the tape.
6 STOP/EJECT button
•Press this button to stop playback operation.
•Press this button to eject a video cassette while
in the stop mode.
Page 8

8
REAR VIEW
1 POWER CORD CONNECTOR
1
Page 9
REMOTE CONTROLLER
1
2
3
4
5
6
7
8
9
0
!
@
VCP
AUDIO
INDEX
TRACKING
9
AUXDISPLAY
MANUALAUTO
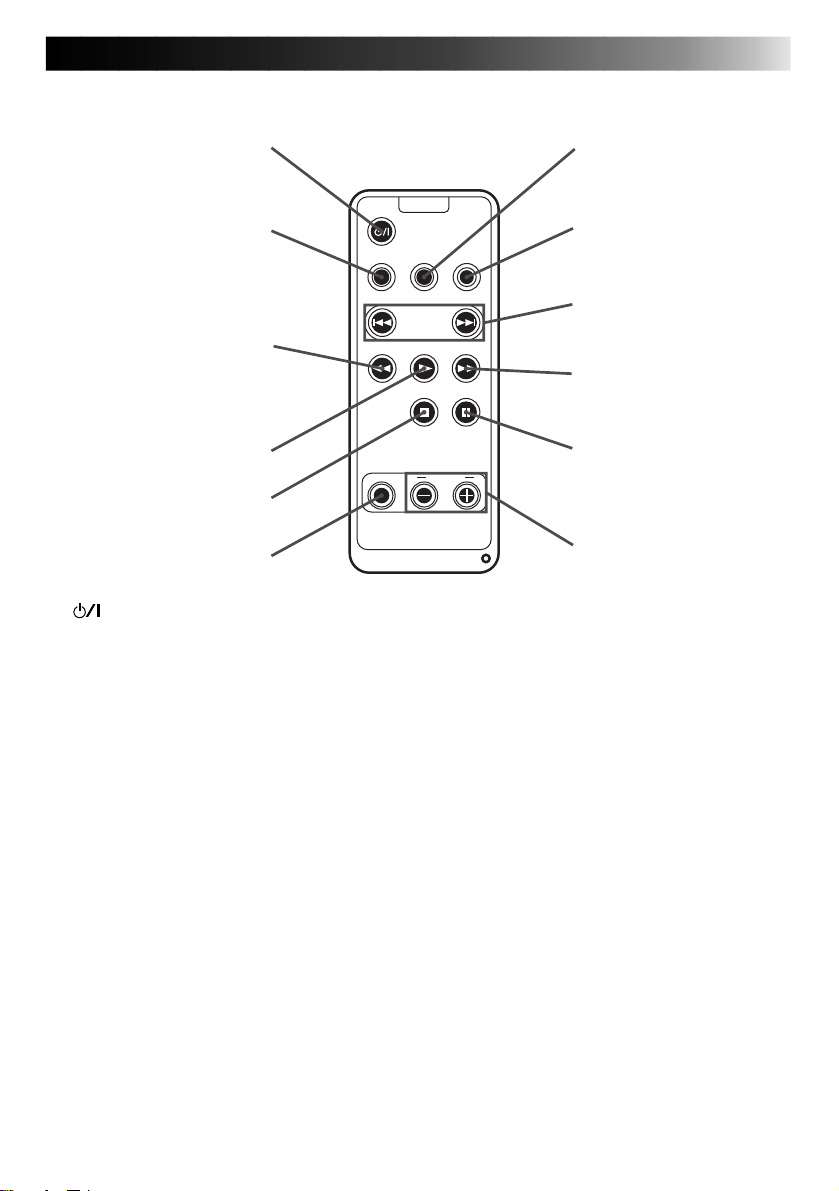
1 button
Press this button to turn on/off the video cassette
player.
2 DISPLAY button
Press this button to turn the tape counter on and
off.
3 REW (rewind) button
Press this button to rewind the tape.
4 PLAY button
Press this button to play back the tape.
5 STOP button
Press this button to stop playback.
6 AUTO (automatic tracking) button
Press this button to switch on/off automatic tracking
on or off.
7 AUDIO selector button
Press this button to select a desired audio output.
Selected audio output is shown on the screen.
HI-FI: Hi-Fi audio output
L: Audio output on left channel only
R: Audio output on right channel only
NORM: Normal audio output
MIX: Mixed audio output
8 AUX button
Press this button to select an external audio source.
9 INDEX buttons
Press these buttons to search the beginning of a
program.
0 FF (fast-forward) button
Press this button to fast-forward the tape.
! PAUSE button
Press this button to suspend playback temporarily.
@ TRACKING +/- buttons
Press these buttons for manual tape tracking. Before pressing these buttons, be sure to switch off
automatic tracking with the AUTO button.
Page 10
10
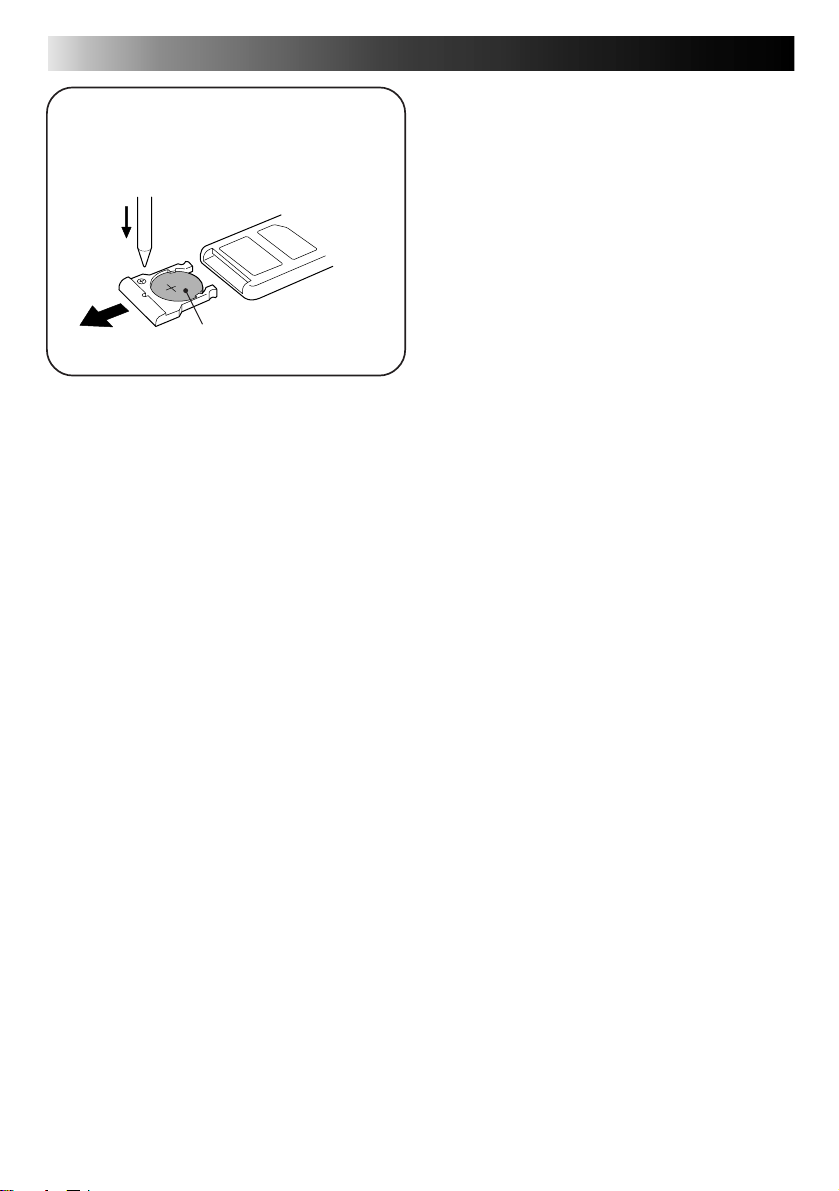
How to set battery in the battery holder
• Set the round battery into place.
Use a ballpoint pen to
remove it.
Round battery (CR2025)
5 Pull out the battery holder.
5 Insert the battery in the holder, and be sure to have
the "+" mark visible.
5 Slide the holder back in until you hear a click.
Page 11

11
2
1
4
5
6
7
Indications on the screen
Operation and status of the video cassette player can be checked by indications appearing on the screen.
Each time an operation button is pressed, operation of the video cassette player is shown for about 5 seconds.
AUX
0 : 00 : 00
BE
1 External input indication
2 Tape counter indication
3 Present tape position indication
4 Tape status indication
(PLAY/FF/REW/STOP)
5 Audio output indication
HI-FI: Hi-Fi audio output
L : Audio output on left channel only
R: Audio output on right channel only
NORM: Normal audio output
MIX: Mixed audio output
PLAY
HI-FI
INDEX –1
++ +
3
6 Cassette indication
7 Program index indication
Page 12

12
Playback
Playing back
Preparation: Turn on a Monitor set or TV set connected
with the video cassette player and set it to an external
input mode (VIDEO 1, VIDEO 2, etc.).
1 Press the button of the video cassette player
to turn it on.
2 Insert a video cassette into the video cassette player.
When a video cassette is inserted, the video cassette player automatically starts playback.
3 Tape tracking is automatically adjusted.
5 Press the STOP button to discontinue playback.
5 The tape is rewound automatically when the tape
comes to end in playing and fast-forwarding.
5 When noise is generated in playback, press the
AUTO button on the remote controller to switch
off the automatic tracking mode and manually
adjust tape tracking with the TRACKING + and buttons.
Fast-forwarding/Rewinding
Press the FF button or REW button when the tape
remains stopping.
• If the button is pressed within 2 seconds after
the REW button is pressed, the video cassette player
is turned off after the tape is completely rewound
to its beginning.
If the PLAY button is pressed within 2 seconds
after the REW button is presssed, the video cassette
player starts playback of the tape.
Fast-forwarding/Rewinding while looking at picture
Momentarily press the FF button or REW button in
playback.
• The video cassette player starts search playback.
• To playback the tape normally, press the PLAY but-
ton.
• For short searches, press and hold FF or REW for
over 2 seconds during playback or still picture.
When released, normal playback resumes.
Still playback/Frame-to-frame playback/Slow playback
Press the PAUSE button in playback.
• The playback picture becomes still.
• When the still picture fluctuates up and down,
adjust tracking with the TRACKING +/- button
on the remote controller so that the picture be
comes stable.
Press the PAUSE button in the still playback mode.
• Each time the PAUSE button is pressed in the still
playback mode, pictures are played back from
frame to frame.
Continuously press the PAUSE button in playback
for 2 seconds or longer.
• Playback speed goes down to 1/6 of the normal
speed (slow playback).
• When noise is generated in this operation, adjust
tracking with the TRACKING +/- button on the
remote controller so that noise is minimized.
• If the same operation is performed in the reverse
search, slow playback is operated in the reverse
direction.
5 To return to the normal playback from the slow
playback, press the PLAY button.
• In playback at a speed different from the normal
(in fast/slow playback), no sound is output from
the video cassette player.
• If noise is generated in the fast playback, or slow
search, it does not come from machine trouble.
• If still playback or slow playback is continuously
operated for 5 minutes or longer, the video cassette player automatically stops playback for protecting the tape.
• If a badly recorded video tape or tape on which
recording was performed by a different machine
is played back, tracking adjustment occasionally
results in failure.
• Automatic tracking is automatically activated the
moment the video cassette player is turned on or
a cassette is inserted.
ATTENTION
In the search, still, slow-motion or frame-by frame
playback mode,
•the picture will be distorted.
•the noise bars will appear.
•there will be a loss of colour.
Repeated playback
Press the PLAY button in playback for 5 seconds or
more.
(The PLAY indication blinks.)
• The tape is repeatedly played back from the beginning to the end 20 times, and the 20th playback ends at the end of the tape.
5 To discontinue repeated playback halfway, press
the STOP button.
Page 13
13
Search playback
Playing back from the beginning of each program – Search playback
To start playback from the beginning of a program, search the index recorded at the beginning point of each
program. Video cassette tapes recorded by JVC machine have automatically recorded the index marks.
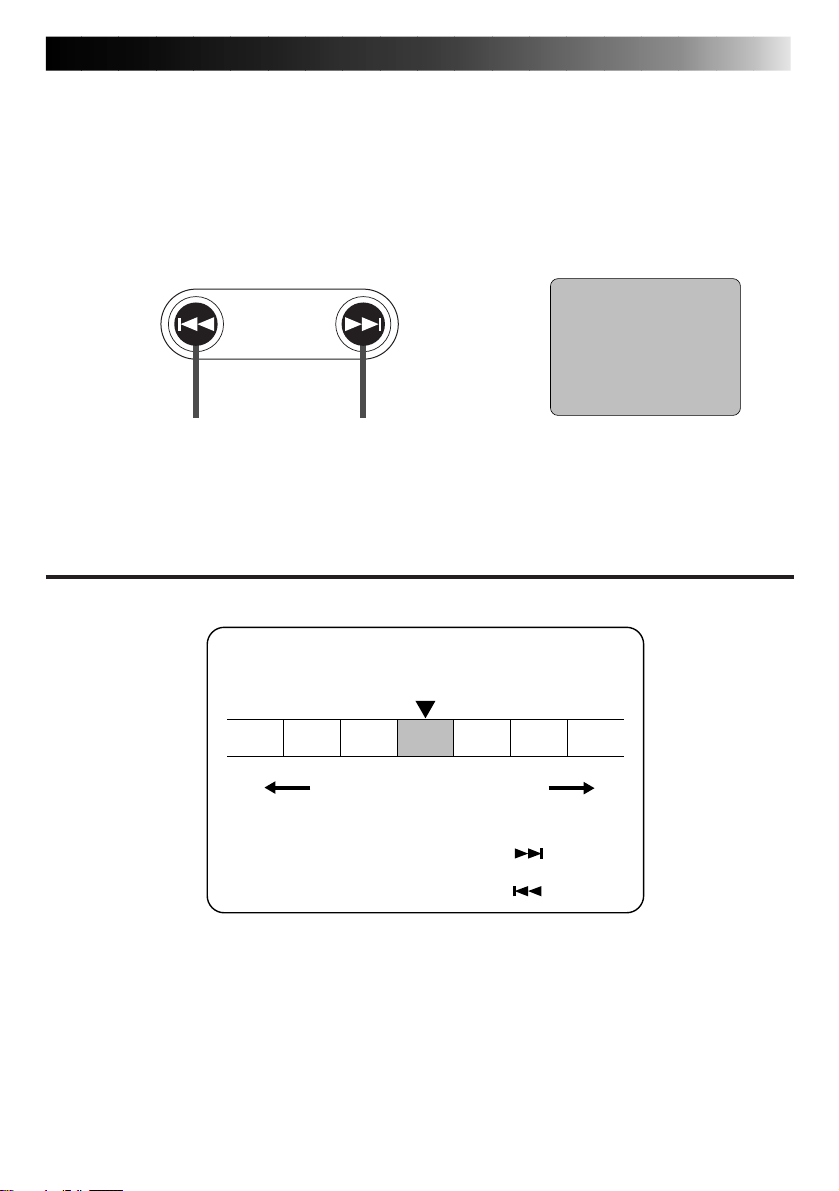
1 Choose a desired address (index) with the INDEX button on the remote control unit.
TV screen
INDEX
INDEX –2
Rewind direction
•
Search a desired address (index) for automatic playback of the program.
•
Each time the right button is pressed, the number of index increases. On the other hand, each time the left
button is pressed, the number of index decreases.
•
Maximum nine programs can be chosen at a time.
5 To discontinue search playback halfway, press the STOP button.
Forward direction
Choose an address (index)
two before the present program.
How to choose (specify) the address (index) of a program
Program played back at present
Address
Program
News
one before
Rewind direction Forward direction
[Example]
To choose the next program:
Press the INDEX button ( ) once.
To choose the program one before:
Press the INDEX button ( ) twice.
Drama
Next
Movie
program
1-1-2-3 2 3
NTSC Playback
You can play back NTSC tapes.
• Some TVs shrink the picture vertically and place black bars at the top or bottom of the screen. This is not a
malfunction on the part of either the video player or the TV.
• The picture may roll up and down. This can be corrected using the V-HOLD control found on some TVs.
(This cannot be corrected if the TV does not have a V-HOLD control.)
• The counter will be incorrect.
• During search, still, or frame-by-frame playback, the picture will be distorted, and there may be a loss of
colour.
• Depending on the type of TV, the top and bottom portions of superimposed displays may be cut off during
NTSC playback.
Page 14
14
Connection to other apparatus
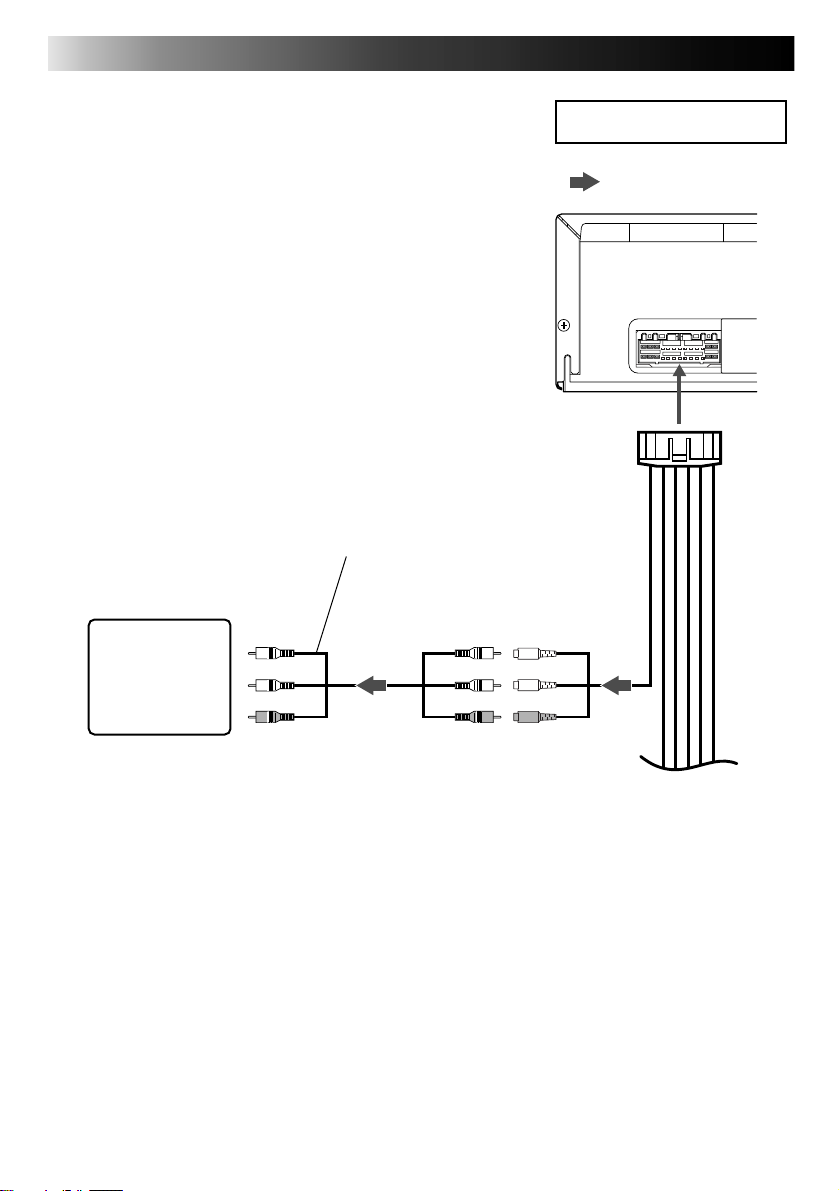
Connection to Mobile Color TV System
Connection to the commercially available Mobile Color
TV System.
Connect the video cassette player to the tuner unit of a
commercially available Mobile Color TV System.
1. Connect the output connector on the video cassette
player to video input connector 1 on the Mobile Color
TV System.
AV cord
(supplied as accessory)
Mobile Color TV System
Example of connection
Signal flow
To the power
cord connector
Power cord
(supplied as
accessory)
Tuner unit
L
R
To VIDEO input-1
terminal
LRL
R
VCP output
Page 15
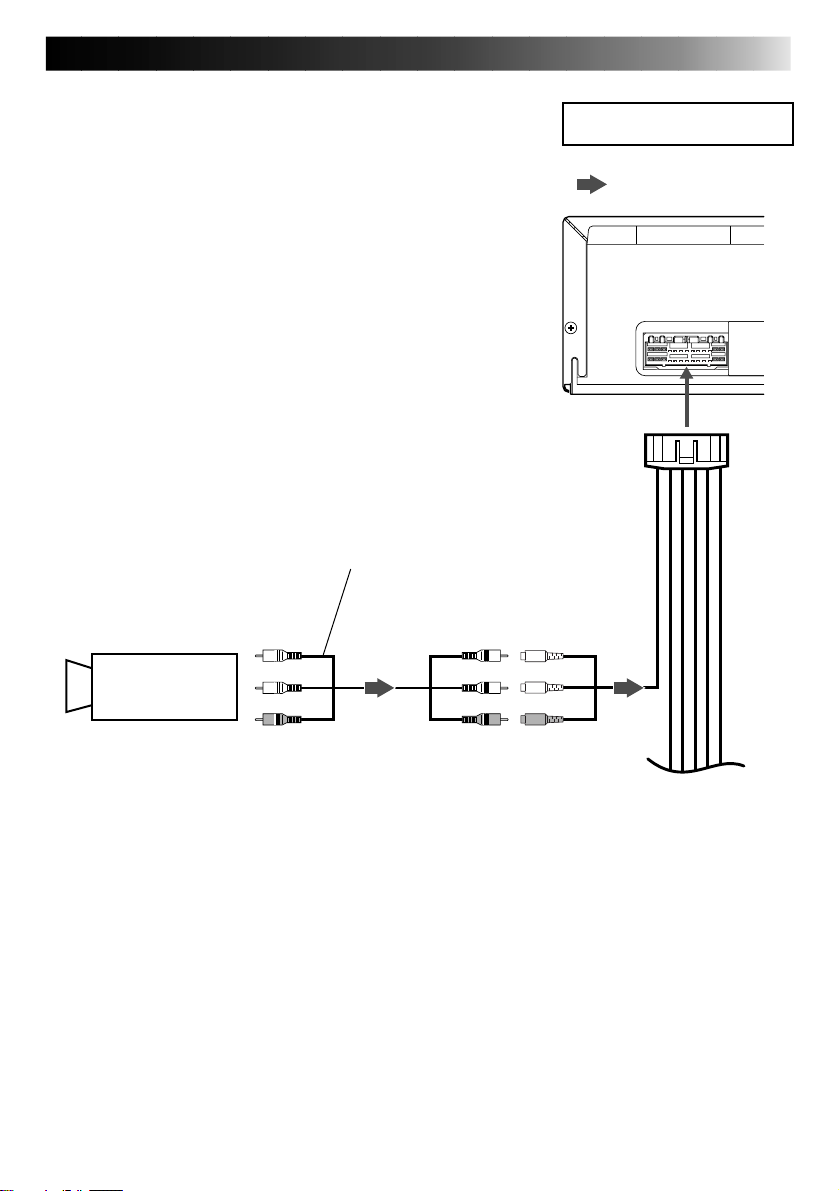
Connection to a video camera
Connecting to a video camera allows you to enjoy pictures and sound recorded with the video camera on the
mobile color TV set connected to this video cassette
player. Some video cameras, however, cannot be connected to the video cassette player. Refer to the instruction manual that comes with the video camera for more
information.
1. Connect the output connector of the video camera to
the input connector on the video cassette player.
15
Example of connection
Signal flow
To the power
cord connector
Video
camera
AV cord
(sold separately)
L
R
To VIDEO-AUDIO
output terminals
Power cord
(supplied as
accessory)
LRL
R
AUX input
Page 16

16
Troubleshooting
When you doubt if there is something wrong in the machine, check the symptom and cause referring to the following table.
No power supply
Power cord is disconnected.
Tightly plug the power cord into the jack.
Machine does not work though power is normally supplied. ( indicator lamp is blinking.)
Machine is dewed inside, or high temperature sensor circuit is in operation.
When the machine is dewed, wait for several hours until the inside becomes dry.
When the high temperature sensor circuit is functioning, cool the cabin to lower the machine temperature.
Indications don’t disappear from the screen.
Press the DISPLAY button on the remote controller.
Noise appears in a part (or some parts) of playback picture.
Abnormal tracking.
If noise appears in the same part of playback picture all the time, the tape is damaged by the part.
Press the AUTO button on the remote control unit to cancel automatic tracking and manually adjust tracking with the TRACKING + and - buttons.
Still picture fluctuates up and down.
Vertical hold is maladjusted.
Adjust tracking with the TRACKING + and - buttons on the remote control unit.
Abnormal color
No video output
No audio output
Carefully read the instructions of the TV set connected to the video cassette player.
Playback picture is rough or frosted.
Video heads are soiled.
Clean the video heads with the head cleaning cassette.
Specifications
General
•
Power supply : DC12 V (11V-16V allowable) Negative ground
•
Dimensions : 259 mm x 94 mm x 270 mm
(width x height x depth)
•
Mass : 3.2 kg
•
Allowable working temperature : 0°C to + 40°C
•
Allowable relative humidity : 35% to 80%
•
Allowable conservation temperature : -20°C to +60°C
Video
•
Playback system : VHS format, Hi-Fi 4-heads helical scan
•
Video signal : VHS PAL standard
Audio
•
Playback system : VHS stereo Hi-Fi audio
•
Audio track : 2 Hi-Fi audio channels and 1 normal audio channel
•
Remote control unit : A code
(A code and B code are switchable automatically in the main unit.)
Design and specifications subject to change without notice.
Page 17
2
Verehrter Kunde,
vielen Dank für den Kauf dieses JVC VHS Videospielers. Bevor Sie das Gerät in Betrieb nehmen, lesen Sie bitte die
Sicherheitsinformationen auf den folgenden Seiten, um einen sicheren Betrieb Ihres neuen Videospielers zu gewährleisten.
Beim Entsorgen der Batterien muss auf den Umweltschutz
Vorsicht
Warnung:
Um Feuer oder die Gefahr durch
Stromschlag auszuschließen, darf das
Gerät nicht Regen oder Feuchtigkeit
ausgesetzt werden.
Vorsicht:
Dieser Videospieler sollte nur mit 12 Volt Gleichstrom
betrieben werden.Um Feuer oder die Gefahr durch
Stromschlag auszuschließen, sollte keine andere Stromquelle
genutzt werden.
Mit der Taste wird nur die Betriebsspannung
des Geräts ein- und ausgeschaltet. " " bedeutet
"in Betriebsbereitschaft", " " bedeutet " in Betrieb".
Warnhinweise zur auswechselbaren
Lithium-Batterie
Die hier verwendete Batterie kann bei
unsachgemäßer Handhabung Brandgefahr oder
Ätzungen verursachen.
Die Batterie nicht wiederaufladen, zerlegen,
über 100°C erhitzen oder verbrennen.
Ausschließlich CR2025 (Panasonic, Sanyo, Sony,
Maxell) verwenden.
Bei unsachgemäßem Batteriewechsel kann es zu
Brandgefahr oder zum Platzen der Batterie
kommen.
䡲 Für schnelle und sachgemäße Entsorgung der
gebrauchten Batterie sorgen.
䡲 Vor dem Zugriff von Kindern schützen.
䡲 Nicht zerlegen oder verbrennen.
PAL
5
Kassetten, die als „VHS“ gekennzeichnet sind, können
mit diesem Videospieler benutzt werden.
geachtet werden, und die diesbezüglichen.
örtlich geltenden Gesetze und Vorschriften müssen strengstens
befolgt werden.
Bei Nichtbeachtung der folgenden Sicherheitshinweise können
Schäden am Video
Videocassette auftreten.
1. Den Video
... wo er extremen Temperaturen oder hoher Luftfeuchtigkeit
ausgesetzt ist.
... wo er direkter Sonneneinstrahlung ausgesetzt ist.
... wo er starker Staubentwicklung ausgesetzt ist.
... wo er starken Magnetfeldern ausgesetzt ist.
... wo keine stabile Aufstellung gewährleistet bzw. wo er
Vibrationen ausgesetzt ist.
2. Die Belüftungsöffnungen des Spielers
(Falls die Belüftungsöffnungen durch eine Zeitung oder ein
Tuch usw. blockiert werden, kann die abgestrahlte Wärme
nicht entweichen.)
3. Den Spieler und die Fernbedienung
Gewichtsbelastung aussetzen.
KEINE Flüssigkeitsbehälter auf den Spieler stellen, um das
4.
Verschütten von Flüssigkeit auf dem Spielers und auf der
Fernbedienung zu vermeiden.
(Falls Wasser oder andere Flüssigkeiten in dieses Gerät
eindringen, kann ein Brand oder ein elektrischer Schlag
ausgelöst werden.)
5. Das Gerät
6. Dieses Gerät NIEMALS in einem Badezimmer oder anderen
Orten mit Wasser verwenden. Außerdem auch NIEMALS mit
Wasser oder anderen Flüssigkeiten gefüllte Behälter (wie
Kosmetik oder Medikamentenfläschchen, Blumenvasen,
Pflanzentöpfe, Becher usw.) auf dem Gerät aufstellen.
NIEMALS Gegenstände mit offener Flammenentwicklung,
7.
wie etwa brennende Kerzen, auf diesem Gerät aufstellen.
8. Den Spieler beim Transportieren
Erschütterungen aussetzen.
**Kondensation von Feuchtigkeit
Wenn Sie den Videospieler von einem kalten Platz an einen
warmen bringen, kann bei extrem feuchten Verhältnissen
Luftfeuchtigkeit auf dem Videospieler kondensieren, ebenso wie
sich Wassertropfen auf der Oberfläche eines Glases bilden, das
mit einer kalten Flüssigkeit gefüllt ist. Eine Kondensation von
Luftfeuchtigkeit auf der Videokopftrommel führt zu einer
Beschädigung des Videobands. Lassen Sie den Videospieler in
Situationen, in denen es zu einer Kondensation kommen könnte,
deshalb besser für einige Stunden ausgeschaltet, damit die
Feuchtigkeit verdunsten kann, bevor sie ein Band einlegen.
Vorsichtsmaßnahmen beim Betrieb
• War das Auto für längere Zeit im starken Sonnenlicht oder an
einem sehr kalten Platz geparkt, sollten Sie solange mit der
Inbetriebnahme des Gerätes warten, bis die Temperatur im
Innenraum des Wagens wieder einen Normalwert erreicht hat.
• Schalten Sie das Gerät nur ein, wenn der Motor des Wagens
läuft. Bei stehendem Motor könnte der Betrieb des Videospielers
die Batterie zu sehr entladen. Im schlimmsten Fall könnte das
dazu führen, daß die Batterie des Wagens ganz leer und der
Motor nicht mehr zu starten ist.
• Wird die Stromzufuhr des Videospielers unterbrochen,
während er in Betrieb ist (Wiedergabe, Vorlauf, Rücklauf etc.)
könnte dies einen Geräteschaden verursachen. Nehmen Sie
deshalb immer zuerst die Videokassette aus dem Gerät, bevor
Sie den Anschluß ändern.
spieler
, an der Fernbedienung oder an der
spieler
NICHT aufstellen …
NIEMALS
blockieren.
NIEMALS einer hohen
NIEMALS Tropfenfall oder Spritzern aussetzen.
NIEMALS starken
Page 18

3
Inhaltsverzeichnis
Vorsicht................................................................ 2
Merkmale .......................................................... 4
Tau-Sensor-Schaltkreis ......................................... 4
Hochtemperatur-Sensor-Schaltkreis ....................... 4
Sensor-Schaltkreis für abnormale Stromspannung ... 4
Bandschutz-Schaltkreis ........................................ 4
Zubehörteile .......................................................... 4
Einlegen/entnehmen der Kassette ......................... 5
Einlegen der Kassette ins Kassettenfach ............. 5
Entnehmen der Kassette aus dem Videospieler .. 5
Schutz wichtiger Aufnahmen .................................
Wiedergabe von auf VHS-C Kassetten aufgezeichneten
„Video-Movie“-Aufnahmen .............................. 5
Garantie klarer Bildwiedergabe
(Benutzung der Videokopf-Reinigungskassette) .............
Front-Ansicht ....................................................... 7
Rück-Ansicht ....................................................... 8
Fernbedienung ..................................................... 9
Einsetzen der Batterie ins Batterienfach ........... 10
Anzeigen auf dem Bildschirm ............................. 11
Wiedergabe ....................................................... 12
Wiedergabe .................................................... 12
Vorlauf / Rücklauf ........................................... 12
Vorlauf / Rücklauf bei Bildwiedergabe ............ 12
Standbild / Einzelbild-Wiedergabe / Zeitlupe ................
Wiederholte Wiedergabe .................................. 12
Suchlauf ............................................................. 13
Wiedergabe ab Beginn jeder Aufzeichnung
5
- Suchlauf ....................................................... 13
Wahl des Index einer Aufzeichnung................ 13
NTSC-Wiedergabe .......................................... 13
Anschlüsse an andere Geräte
6
Anschluss an den mobilen Farbmonitor .............. 14
Anschluss an eine Videokamera ......................... 15
Fehlersuche ........................................................ 16
Systemangaben .................................................. 16
12
Page 19
Merkmale
5
4-Kopf Stereo Hi-Fi Videospieler.
5
Vertikal oder horizontal einbaubar dank des
hochverläßlichen vibrationsgeschützen Designs.
Schutz-Schaltkreise (Schaltkreise zur Selbstdiagnose)
Dieser Videospieler ist mit einigen Schutzschaltkreisen
ausgestattet.
Ein Betrieb des Geräts im feuchten Zustand kann zur
Beschädigung des Bands und der Videoköpfe führen.
Tau-Sensor-Schaltkreis
5 Wenn in einem relativ kühlen Wageninnenraum
sehr schnell aufgeheizt wird, oder wenn die
Luftfeuchtigkeit im Innenraum relativ hoch ist, dann
kann das ein Beschlagen der Frontscheibe und der
Seitenscheiben zur Folge haben. Gleichzeitig kann
Feuchtigkeit sich auch im Inneren des Videospielers
niederschlagen.
5
In diesem Fall bewirkt die Tau-Sensor-Funktion, dass
das Gerät abgeschaltet wird. Dabei beginnt die
Anzeige grün zu blinken und auf dem Bildschirm
erscheint die Meldung "DEW PLEASE WAIT". Befindet
sich das Gerät einmal in diesem Zustand, sollten Sie
einige Stunden warten, bis die Lampe aufhört
zu blinken und wieder ständig leuchtet.
Hochtemperatur-Sensor-Schaltkreis
5 Wenn die Temperatur des Geräts relativ hoch
ansteigt, bewirkt die Hochtemperatur-SensorFunktion, dass das Gerät abgeschaltet wird. Dabei
4
beginnt die Anzeige rot zu blinken und auf
dem Bildschirm erscheint die Meldung "HIGH
TEMP PLEASE WAIT". Befindet sich das Gerät
einmal in diesem Zustand, sollten Sie das Gerät
ausschalten, es an einen kühlen Platz stellen, um
für Abkühlung zu sorgen, und eine Weile warten,
bis die Lampe aufhört zu blinken und wieder
ständig leuchtet.
Vergewissern Sie sich vor einem erneuten
Einschalten des Videospielers, dass die
Anzeige nicht mehr blinkt.
Sensor-Schaltkreis für abnormale
Stromspannung
5 Wenn der Stromquellen-Schaltkreis des Geräts eine
Stromspannung registriert, die außerhalb der
Betriebsspannung liegt, bewirkt die Sensor-Funktion
für abnormale Stromspannung, dass das Gerät
abgeschaltet wird. Dabei beginnt die Anzeige
orange zu blinken und auf dem Bildschirm erscheint
die Meldung "VOLTAGE PLEASE CHECK". Befindet
sich das Gerät einmal in diesem Zustand, sollten
Sie sie überprüfen, ob das Gerät richtig an eine
Stromquelle angeschlossen ist, bzw. ob die BatterieSpannung ausreichend ist.
Hinweis: Dieser Videospieler sollte nicht
ausschließlich mit DC 12V Batterien betrieben
werden.
Bandschutz-Schaltkreis
5 Die Bandschutz-Funktion schaltet das Gerät ab,
wenn das Standbild oder die Zeitlupe länger als 5
Minuten dauert.
Zubehör
• Überprüfen Sie, ob folgende Zubehörteile mit dem Videorekorder mitgeliefert wurden.
AV-Kabel
(5 m lang)
2 Montierschienen
4 Schrauben (5 x 20 mm)
4 Schrauben (5 x 8 mm)
( )
2 Klebestreifen
Stromversorgungskabel
(5.5 m lang)
Fernbedienungs-
Sensoreinheit
Fernbedienung
Fernbedienungs-
Datenkabel
(5 m lang)
Runde Batterie
(CR2025)
Page 20

5
Einlegen/entnehmen der Kassette
Einlegen der Kassette ins Kassettenfach
Legen Sie eine Videokassette mit der Etikettseite
nach oben ins Kassettenfach, indem Sie die
Kassette mit leichtem Druck in der Mitte
hineinschieben.
Entnehmen der Kassette aus dem Videospieler
STEREO
MOBILE VIDEO CASSETTE PLAYER
KV-V8
PAUSE PLAY REW FF STOP / EJECT
SQPB
•
Mit dem Einlegen der Videokassette ins Kassettenfach
wird der Videospieler automatisch eingeschaltet.
(Automatische Einschaltfunktion)
•
Das Bandzählwerk wird auf 0:00:00 zurückgestellt.
(Automatische Zählwerk-Rückstellfunktion)
•
Wenn eine Kassette eingelegt wird, schaltet das Gerät
automatisch auf Wiedergabe. (Automatische
Wiedergabe-Funktion)
•
Wenn das Auto stark erschüttert wird, ist es schwer
eine Kassette einzuschieben, weil das Gerät zur
Vermeidung von störenden Vibrationen die Kassette
dann fest andrückt. In diesem Fall empfiehlt es sich,
die Kassette mit einem stärkeren Druck einzuschieben,
oder die Kassette noch einmal aus dem Kassettenfach
herauszuziehen und darauf erneut einzulegen.
Drücken Sie, wenn das Gerät im STOP-Modus ist, die
EJECT-Taste..
•
Stecken Sie weder Finger noch fremde Gegenstände
ins Kassettenfach. Achten Sie darauf, daß kleine Kinder
ebenfalls nichts in das Kassettenfach hineinstecken.
•
Falls eine Videokassette falschrum eingelegt wird, wird
sie durch die Funktion des Schutzschaltkreises
automatisch wieder ausgeworfen. Warten Sie in diesem
Fall einige Sekunden, bevor Sie die Kassette erneut und
diesmal richtig einschieben.
Schutz wichtiger Aufnahmen
Brechen Sie das Aufnahmeschutz-Plättchen aus dem
Kassettengehäuse.
•
Falls Sie eine Kassette mit herausgebrochenem
Aufnahmeschutz-Plättchen dennoch zur Aufnahme
benutzen wollen, müssen Sie das Loch, wo das
Aufnahmeschutz-Plättchen herausgebrochen wurde,
Aufnahmeschutz-Pl ttchen
mit Klebeband abdecken.
Wiedergabe von auf VHS-C Kassetten aufgezeichneten
„Video-Movie“-Aufnahmen
•
Benutzen Sie zur Wiedergabe von VHS-C Kassetten
den zusätzlich erhältlichen VHS-Kassettenadapter.
Page 21

Garantie klarer Bildwiedergabe (Benutzung der Videokopf-Reinigungskassette)
5
Nach längerer Benutzung des Videospielers nimmt die Bildwiedergabequalität ab. Reinigen Sie in diesem
Fall die Videoköpfe mit einer im Zubehörhandel erhältlichen Videokopf-Reinigungskassette.
5
Wenn folgende Anzeichen zu beobachten sind:
•
Die Bildwiedergabe ist rauh.
•
Das Bild ist unklar, oder es erscheint gar kein
Bild auf dem Bildschirm.
Die On-Screen-Anzeige "USE CLEANING CASSETTE" (REINIGUNGSCASSETTE) erscheint nur
Was in diesem Fall zu machen ist.
•
Reinigen Sie die Videoköpfe mit einer VideokopfTrocken-Reinigungskassette. (TCL-20X)
5
Faktoren, die zur Verschmutzung der Videoköpfe
führen:
•
Hohe Temperaturen und hohe Luftfeuchtigkeit
(z.B. in der Regenzeit)
5 Ist die Bildqualität auch nach Reinigung der
Videoköpfe mit der Reinigungskassette
beeinträchtigt, wenden Sie sich bitte an Ihren
Händler, bei dem Sie das Gerät gekauft haben,
oder an den nächsten JVC-Händler.
•
Staub in der Luft.
6
•
Ein beschädigtes oder verschmutztes Band.
•
Langer Betrieb
Page 22

7
Front-Ansicht
1 2 3
STEREO
MOBILE VIDEO CASSETTE PLAYER
KV-V8
PAUSE PLAY REW FF STOP / EJECT
SQPB
5
4 6
1 -Taste
Drücken Sie auf diese Taste, um das Gerät ein- oder
auszuschalten.
2 PAUSE-Taste
Drücken Sie diese Taste, um die Wiedergabe kurz
zu unterbrechen.
3 PLAY-Taste
Drücken Sie auf diese Taste, um das Gerät auf
Wiedergabe zu stellen.
4 REW (Rückspul-) Taste
Drücken Sie diese Taste, um die Kassette
zurückzuspulen.
5 FF- (Vorspul-) Taste
Drücken Sie diese Taste, um das Band schnell
vorzuspulen.
6 STOP-/EJECT(Ausgabe-) Taste
•Drücken Sie diese Taste, um die Wiedergabe zu
unterbrechen.
•Drücken Sie diese Taste, zur Ausgabe der Kassette
aus dem Gerät im Stopmodus.
Page 23

Rück-Ansicht
1 Stromkabel-Anschluß
8
1
Page 24

9
1
2
3
4
5
6
7
8
9
0
!
@
FERNBEDIENUNG
VCP
AUDIO
INDEX
TRACKING
AUXDISPLAY
MANUALAUTO
1 -Taste
Drücken Sie diese Taste, um den Videorekorder
ein- oder auszuschalten.
2 DISPLAY-Taste
Drücken Sie diese Taste, um das Bandz_hlwerk
ein- oder auszuschalten.
3 REW (Rückspul-) Taste
Drücken Sie diese Taste, um das Band
zurückzuspulen.
4 PLAY-Taste
Drücken Sie diese Taste zur Wiedergabe des
Bandes.
5 STOP-Taste
Drücken Sie diese Taste, um die Wiedergabe zu
stoppen.
6 AUTO (automatische Tracking-) Taste
Drücken Sie diese Taste, um die automatische
Tracking-Funktion ein- oder auszuschalten.
7 AUDIO-Auswahltaste
Drücken Sie diese Taste, um den gewünschten
Audio-Ausgang zu wählen. Der gewählte AudioAusgang wird dann auf dem Bildschirm angezeigt.
HI-FI: Hi-Fi Audioausgang
L: Audioausgang nur für den linken Kanal
R: Audioausgang nur für den rechten Kanal
NORM: Normaler Audioausgang
MIX: Gemischter Audioausgang
8 AUX-Taste
Drücken Sie diese Taste, um eine externe AudioQuelle zu wählen.
9 INDEX-Tasten
Drücken Sie diese Tasten, um den Beginn von
Aufzeichnungen zu suchen.
0 FF- (Vorspul-) Taste
Drücken Sie diese Taste, um das Band schnell
vorzuspulen.
! PAUSE-Taste
Drücken Sie diese Taste, um die Wiedergabe kurz
zu unterbrechen.
@ TRACKING +/- Tasten
Drücken Sie diese Tasten fürs manuelle
Bandtracking. Denken Sie davor daran, die
automatische Tracking-Funktion über die AUTOTaste auszuschalten.
Page 25

Einsetzen der Batterie ins Batterienfach
•
Legen Sie die runde Batterie in das Fach.
Verwenden Sie einen
Kugelschreiber, um
die Batterie zu
entfernen.
Runde Batterie (CR2025)
5
Ziehen Sie das Batterienfach heraus.
5
Die Lithium-Knopfzelle mit nach oben weisendem
Pluspol (+) in den Halter einlegen.
5
Den Batteriehalter in Pfeilrichtung einschieben, bis
er einrastet.
10
Page 26

11
2
1
4
5
6
7
Anzeigen auf dem Bildschirm
Der Betrieb und der Status des Videospielers kann über die Anzeigen auf dem Bildschirm überprüft werden.
Jedesmal wenn eine Bedienungstaste gedrückt wird, erscheint für ca. 5 Sekunden die entsprechende Anzeige
auf dem Bildschirm.
Å@
AUX
0 : 00 : 00
BE
3
1 Anzeige externer Eingänge
2 Bandzählwerk
3 Anzeige der gegenwärtigen Bandposition.
4 Bandstatus-Anzeige
(PLAY/FF/REW/STOP)
5 Audio-Ausgang-Anzeige
HI-FI : HI-FI Audioausgang
L : Audioausgang nur für den linken Kanal
R : Audioausgang nur für den rechten
Kanal
NORM : Normaler Audioausgang
MIX : Gemischter Audioausgang
PLAY
HI-FI
INDEX –1
++ +
6 Kassetten-Anzeige
7 Anzeige der Index-Markierung
Page 27

Wiedergabe
Wiedergabe einer Aufzeichnung
Vorbereitung: Schalten Sie einen an den Videospieler
angeschlossenen Monitor oder ein Fernsehgerät ein.
Dabei muß der externe Eingang (Video 1, Video 2,
etc.) gewählt sein.
1
Drücken Sie die -Taste des Videospielers, um das
Gerät einzuschalten.
2
Legen Sie eine Videokassette in den Videospieler ein.
Wenn eine Kassette eingelegt wird, schaltet der Spieler
sofort auf Wiedergabe.
3
Das Bandtracking wird automatisch angepaßt.
5
Drücken Sie die STOP-Taste, um die Wiedergabe zu
unterbrechen.
5
Wenn das Videoband bei der Wiedergabe oder beim
Vorspulen ans Ende kommt, wird automatisch das
Rückspulen gestartet.
5
Wenn bei der Wiedergabe Störgeräusche auftreten,
drücken Sie die AUTO-Taste auf der Fernbedienung,
um den automatischen Tracking-Modus auszuschalten.
Nehmen Sie die Tracking-Einstellung dann manuell vor
über die TRACKING + und die TRACKING - Tasten.
Vorlauf / Rücklauf
Drücken Sie die FF-Taste oder die REW-Taste, wenn das
Band weiter stillsteht.
•
Wenn Sie die -Taste innerhalb von 2 Sekunden
drücken, nachdem Sie die REW-Taste gedrückt haben,
schaltet sich der Videospieler aus, nachdem die Kassette
an den Anfang zurückgespult worden ist.
• Für kurzzeitigen Suchlauf halten Sie bei Wiedergabe
oder Standbild die Taste FF bzw. REW mindestens 2
Sekunden lang gedrückt. Nach Freigabe der jeweiligen
Taste wird die normale Wiedergabe fortgesetzt.
Vorlauf / Rücklauf bei Bildwiedergabe
Drücken Sie während der Wiedergabe kurz die FF-Taste
bzw. die REW-Taste.
•
Der Videospieler beginnt den Bildsuchlauf.
• Um wieder zur normalen Wiedergabe zurückzukehren, drücken Sie einfach erneut die PLAY-Taste.
• Wenn Sie die FF-Taste bzw. die REW-Taste dann wieder
loslassen, kehrt der Rekorder in den normalen
Wiedergabe-Modus zurück.
12
Standbild / Einzelbild-Wiedergabe / Zeitlupe
Drücken Sie während der Wiedergabe auf die PAUSE-Taste.
• Das Bild bleibt stehen.
• Wenn das Standbild nach oben und unten wackelt,
können sie das Bild über die +/- Tasten der
Fernbedienung für manuelles Tracking stabiler
einstellen.
Drücken Sie die PAUSE-Taste im Standbildmodus.
• Mit jedem Drücken der PAUSE-Taste im
Standbildmodus springt die Wiedergabe um ein
Bild weiter.
Drücken Sie im Wiedergabe-Modus die PAUSE-Taste
für 2 Sekunden oder länger.
•
Die Wiedergabegeschwindigkeit verlangsamt sich
auf ein Sechstel der normalen
Wiedergabegeschwindigkeit. (Zeitlupe)
• Wenn es dabei zu Störgeräuschen kommt, können
Sie diese Geräusche durch das manuelle Tracking
über die TRACKING +/- Taste der Fernbedienung
minimieren.
• Sie können die Funktion auch in umgekehrter
Richtung nutzen. Die Zeitlupe wird dann rückwärts
wiedergegeben.
5
Um von der Zeitlupe zur normalen Wiedergabe
zurückzukehren, drücken Sie einfach die PLAY-Taste.
•
Bei der Wiedergabe in einer anderen
Geschwindigkeit als der normalen (Zeitraffer/
Zeitlupe) gibt der Videospieler keinen Ton wieder.
•
Störgeräusche bei Zeitraffer oder Zeitlupe deuten
nicht auf einen Problem des Geräts hin.
•
Wird die Standbild- oder die Zeitlupenfunktion
länger als 5 Minuten genutzt, so schaltet sich der
Videospieler automatisch ab, um das Band zu
schützen.
•
Bei schlechten Aufnahmen oder bei Aufnahmen
anderer Geräte kann die Tracking-Anpassung erfolglos
bleiben.
•
Die automatische Tracking-Funktion wird
automatisch aktiviert, wenn der Videospieler
eingeschaltet, bzw. wenn eine Kassette in den
Spieler eingelegt wird.
wiederholte Wiedergabe
Drücken Sie im Wiedergabe-Modus die PLAY-Taste für 5
Sekunden oder länger. (Es blinkt dann die PLAY-Anzeige)
•
Das Band wird darauf 20mal von Anfang bis Ende
abgespielt. Das Band stoppt nach der zwanzigsten
Wiedergabe.
•
Drücken Sie die STOP-Taste, um die wiederholte
Wiedergabe zu unterbrechen.
ACHTUNG
Bei Bildsuchlauf, Standbild, Zeitlupe oder
Einzelbild- Fortschaltung:
• können Bildverzerrungen auftreten.
• können Störstreifen aufreten.
• kann ein Farbausfall auftreten.
Page 28

13
Suchlauf
Wiedergabe ab Beginn jeder Aufzeichnung–Suchlauf
Um mit der Wiedergabe einer Aufzeichung ab dem Anfang zu beginnen, kann das Gerät den am Anfang einer
Aufzeichnung gespeicherten Index suchen. Videokassetten die auf einem JVC-Gerät aufgenommen wurden,
haben diese Index-Markierung automatisch.
1 Wählen Sie über die INDEX-Taste der Fernbedienung die gewünschte Index-Markierung.
Bildschirm
INDEX
INDEX - 2
VorlaufrichtungRückspulrichtung
•
Suchen Sie die gewünschte Indexmarkierung für eine automatische Wiedergabe der Aufzeichnung.
•
Mit jedem Druck auf die rechte Taste steigt die Index-Zahl. Auf der anderen Seite sinkt die Index-Zahl mit
jedem Druck auf die linke Taste.
•
Maximal können neun verschiedene Aufzeichnungen gewählt werden.
5 Um den Suchlauf zu unterbrechen, drücken Sie einfach die STOP-Taste.
Wählen Sie Index -2 für frühere
Aufzeichnungen auf der Kassette.
Wahl des Index einer Aufzeichnung
Das Programm, das gerade wiedergegeben wird.
vorheriges
Nachrichten
Programm
Index-Adresse
Rückspul-Richtung Vorlauf-Richtung
[Beispiel]
Auswahl des nächsten Programms:
Drücken sie die INDEX-Taste ( ) einmal.
Auswahl der vorherigen Programms:
Drücken Sie die INDEX-Taste ( ) zweimal.
NTSC-Wiedergabe
Sie können NTSC-Kassetten abspielen.
• Einige TV-Geräte stauchen das Bild vertikal und fügen schwarze Balken am oberen und unteren Bildrand
ein. Dies ist keine Fehlfunktion des Spielers bzw. TV-Geräts.
• Das Bild kann vertikal rollen. Zur Beseitigung dieser Störung den Bildfangregler des TV-Geräts verwenden.
(Falls Ihr TV-Gerät keinen Bildfangregler besitzt, entfällt diese Störungsbeseitigungsmöglichkeit.)
• Zähler- und Bandrestanzeige sind nicht korrekt.
• Bei Bildsuchlauf, Standbild oder Einzelbildversetzung können Bildverzerrungen und/oder Farbausfall auftreten.
• Je nach TV-Geräte-Modellausführung kann bei NTSC-Wiedergabe die Bildschirmanzeige am oberen oder
unteren Ende beschnitten werden.
nächstes
Film
Programm
1-1-2-3 2 3
Spielfilm
Page 29

14
Anschlüsse an andere Geräte
Anschluss an den mobilen Farbmonitor.
Anschluss an das im Handel erhältliche mobile
Farbmonitor-System.
Schließen Sie den Videospieler an die Kontroll-Einheit
eines im Handel erhältlichen mobilen FarbmonitorSystems an.
1. Schließen Sie das Ausgangskabel des Video-spieler
an den Video-Eingang des mobilen FarbmonitorSystems an.
AV-Kabel
(mitgeliefert)
Mobiles Farbmonitor-System
Kontroll-
Einheit
L
R
Zum Video-Input -1
Anschluss
Beispiel für den Anschluss
Signal-Fluss
Zum PowerKabel-Anschluss
Power-Kabel
(mitgeliefert)
LRL
R
VCP-Output
Page 30

15
Anschluss an eine Videokamera
Wenn Sie an den Videospieler eine Kamera
anschließen, können Sie Bild und Ton aufzeichnen.
Es gibt allerdings einige Videokameras, die sich nicht
an dieses Gerät anschließen lassen. Einzelheiten
entnehmen Sie bitte den Gebrauchsanweisungen der
Videospieler.
1.
Schließen Sie die Audio-Video-Ausgänge der
Kamera an die Audio-Video-Eingänge des
Videospielers an.
AV-Kabel
(Kaufen Sie ein weiteres AV-Kabel
passend zur Videokamera.)
Beispiel für den Anschluss
Signal-Fluss
Zum PowerKabel-Anschluss
Power-Kabel
(mitgeliefert)
Videokamera
L
R
Zu den
Video-Audioausgängen
LRL
R
Zu den VideoAudioeingängen
Page 31

16
Fehlersuche
Wenn Sie Zweifel haben, ob an dem Gerät etwas nicht in Ordnung ist, schauen Sie bitte, ob Sie die Probleme
oder die möglichen Ursachen in der folgenden Liste finden.
Keine Stromversorgung
Stromkabel ist nicht angeschlossen
Stecken Sie das Stromkabel fest in den Anschluß
Gerät arbeitet trotz gesicherter Stromversorgung nicht. (Die -Anzeige blinkt.)
Das Gerät ist innen feucht geworden, oder der Hochtemperatur-Sensor-Schaltkreis ist in Betrieb.
Wenn sich im Gerät Tau niedergeschlagen hat, warten Sie einige Stunden, bis das Gerät wieder ganz getrocknet ist.
Wenn sich der Hochtemperatur-Sensor-Schaltkreis eingeschaltet hat, sollten Sie den Fahrzeuginnenraum auf normale Temperatur abkühlen.
Auf dem Bildschirm erscheinen keine Anzeigen
Drücken Sie die DISPLAY-Taste auf der Fernbedienung.
Bei einem Teil oder Teilen der Wiedergabe treten Störgeräusche auf.
Fehlerhaftes Tracking.
Wenn ein Geräusch immer an der selben Stelle einer Aufzeichnung auftritt, ist wahrscheinlich das Band an dieser Stelle beschädigt.
Drücken Sie die AUTO-Taste auf der Fernbedienung, um das automatische Tracking abzuschalten, und passen Sie das Tracking
stattdessen manuell an über die TRACKING +/- Tasten.
Das Standbild springt nach oben oder unten.
Der vertikale Halt ist schlecht eingestellt.
Passen Sie das Tracking manuell an über die TRACKING +/- Tasten der Fernbedienung an.
Abnormale Farbe
kein Bild
kein Ton
Überprüfen Sie aufmerksam die Bedienungsanweisungen des Fernsehers, an den Sie den Videospieler angeschlossen haben.
Die Bildwiedergabe ist schlechter Qualität.
Die Videoköpfe sind verschmutzt.
Reinigen Sie die Videoköpfe mit der Reinigungskassette.
Systemangaben
• Stromversorgung : DC12V (11V-16V zugelassen) negativ geerdet
• Abmessungen : Breite: 259mm, Höhe: 94mm, Tiefe: 270mm
• Gewicht : 3,2 kg
• zugelassene Arbeitstemperatur : 0°C bis 40°C
• zugelassene relative Luftfeuchtigkeit : 35% - 80%
• zugelassene Lagertemperatur : -20°C bis 60°C
Video
• Wiedergabesystem : VHS Format, Hi-Fi 4-köpfiges Helical-Scan-Verfahren.
• Video-Signal : VHS PAL Standard
Audio
• Wiedergabesystem : VHS Stereo HI-Fi Audio
• Audio-Kanal : 2 Hi-Fi Audiokanäle und 1 normaler Audiokanal
• Fernbedienung : A-code
(A und B-Code können im Gerät automatisch gewechselt werden.)
Design und Systemangaben können ohne weiteres geändert werden.
Page 32

2
Cher client,
Nous vous remercions pour l'achat du magnétoscope à cassette VHS JVC. Avant son utilisation, veuillez lire les
informations pour votre sécurité et les précautions de sécurité indiquées dans les pages suivantes pour assurer
une utilisation sûre de votre nouveau magnétoscope.
Pour jeter des piles, il faut prendre en compte les problèmes
liés à l’environnement et respecter strictement les
PRÉCAUTIONS
AVERTISSEMENT:
POUR ÉVITER LES RISQUES
D'INCENDIE OU D'ÉLECTROCUTION,
NE PAS EXPOSER L'APPAREIL À LA
PLUIE NI À L'HUMIDITÉ.
ATTENTION:
Ce magnétoscope ne doit être utilisé que sur du courant
alternatif en CC12V.
Afin d'éviter tout risque d'incendie ou d'électrocution,
NE PAS utiliser d'autres sources d'alimentation électrique.
La touche STANDBY/ON /I ne coupe pas complètement
l'alimentation de l'appareil, mais commute le courant de
fonctionnement. " " indique le mode d'attente de
l'alimentation et " I " correspond à marche.
Avertissement sur la pile au lithium
La pile utilisée dans cet appareil peut présenter des risques
d’incendie ou de brûlure chimique si elle est mal traitée.
Ne pas recharger, démonter, chauffer à plus de 100 °C ni
mettre au feu.
Changer la pile avec une CR2025 Panasonic (Matsushita
Electric), Sanyo, Sony ou Maxell.
Danger d’explosion ou risque d’incendie si la pile n’est
pas changée correctement.
䡲 Jeter immédiatement les piles usées.
䡲 Placer hors de la portée des enfants.
䡲 Ne pas démonter ni jeter au feu.
PAL
5
Les cassettes portant la marque "VHS" peuvent être
utilisées avec ce magnétoscope.
réglementations ou lois locales régissant la mise au rebut de
ces piles.
Ne pas respecter les précautions suivantes peut endommager
le magnétoscope, la télécommande ou la cassette.
NE PAS placer le magnétoscope ...
1.
... dans un endroit soumis à des températures ou à une
humidité extrêmes.
... en plein soleil.
... dans un endroit poussiéreux.
... dans un endroit où des champs magnétiques puissants
sont générés.
... sur une surface qui est instable ou soumise à des
vibrations.
NE PAS boucher les ouvertures ou trous d’aération du
2.
magnétoscope.
(Si les ouvertures ou trous d’aération sont bouchés par un
journal, du tissu, etc., la chaleur peut ne pas pouvoir se
dissiper.)
NE PAS poser d’objets lourds sur le magnétoscope ou la
3.
télécommande.
NE PAS poser d’objet susceptible de se renverser sur le
4.
dessus du magnétoscope ou de la télécommande.
(Un incendie ou une décharge électrique peut se produire
si de l’eau ou du liquide pénètre dans cet appareil.)
NE PAS exposer l’appareil à des gouttes ou à des
5.
projections.
NE PAS utiliser cet appareil dans une salle de bains ni des
6.
endroits où il y a de l’eau. Et NE PAS poser un récipient
rempli d’eau ou de liquide (comme des produits de beauté
ou médicaments, un vase de fleurs, une plante en pot,
une tasse, etc.) au-dessus de cet appareil.
NE PAS poser une source de flamme nue, comme une
7.
bougie allumée, sur l’appareil.
EVITER de faire subir des chocs violents au magnétoscope
8.
pendant son transport.
**CONDENSATION DE L'HUMIDITÉ
L'humidité dans l'air se condensera sur le magnétoscope quand
vous le transportez d'une pièce froide à une pièce chaude, ou
sous des conditions de très forte humidité comme des
gouttelettes d'eau qui se forment à la surface d'un verre rempli
d'un liquide froid. La condensation de l'humidité sur le tambour de têtes causera des dommages à la bande. Dans les cas
où la condensation de l'humidité peut se produire, laisser
l'alimentaiton mise pendant quelques heures pour que le
magnétoscope devienne sec avant d'introduire une cassette.
Précautions d'utilisation
• Lorsque la voiture est garée pendant longtemps en plein
soleil en été ou dans un endroit extrêmement froid attendez
que la tempêrature à l'intérieur de la voiture atteigne un
niveau normal avant d'utiliser l'appareil.
• Utilisez cez appareil pendant que le moteur tourne. Si vous
l'utilisez lorsque le moteur est coupé, la batterie de la voiture
se décharge et le moteur pourrait même ne démarrer du
tout.
• Si cet appareil est déconnecté pendant qu'il fonctionne (lec-
ture avance rapide rembobinage, etc.),cela peut provoquer
une défaillance de la machine. Pour déconnecter cet
appareil, retirez toujours auparavant la cassette vidéo.
Page 33

Sommaire
3
PRECAUTIONS .................................................... 2
Caractéristiques ................................................... 4
Circuit de détecteur de condensation ................ 4
Circuit de détecteur de haute température ........ 4
Circuit du détecteur de tension anormale.......... 4
Circuit de protection de bande.......................... 4
Accessoires .......................................................... 4
Introduction/retrait d’une cassette ........................ 5
Introduction de la cassette dans le compartiment de
cassette. ....................................................................
Retrait d’une cassette du magnétoscope ............ 5
Pour protéger des enregistrements importants ... 5
Comment lire une cassette VHS-C enregistrée
avec VideoMovie .............................................. 5
Pour que les images soient toujours claires à la lecture
(Utilisez une cassette de nettoyage de têtes) ......... 6
PANNEAU AVANT............................................... 7
PANNEAU ARRIÈRE............................................. 8
TÉLÉCOMMANDE ............................................... 9
Comment installer les pile dans le compartiment des pile ....
Indications sur l’écran .........................................11
10
Lecture ............................................................... 12
Lecture ........................................................... 12
Avance rapide/Rembobinage .......................... 12
Avance rapide/Rembobinage tout en regardant l’image..
Lecture à arrêt sur image/Lecture image par image/
Lecture au ralenti .................................................. 12
Lecture répétée .....................................................12
Lecture par recherche ........................................ 13
5
Lecture depuis le début d’un programme-
Lecture par recherche ..................................... 13
Comment choisir (spécifier) l’adresse (index)
d’un programme ............................................. 13
Sur la lecture NTSC ........................................ 13
Raccordement à d’autres appareils ..................... 14
Raccordement à un système d'écran couleur
portable .......................................................... 14
Raccordement à un caméscope ...................... 15
Dépistage des pannes ......................................... 16
Caractéristiques techniques ................................ 16
12
Page 34

4
Caractéristiques
5
Magnétoscope à cassette hi-fi stéréo à 4 têtes
5
Montable soit verticalement soit horizontalement
grâce à la conception anti-vibration très fiable
Circuits de protection (circuits d’auto-diagnostic)
Ce magnétoscope à cassette incorpore certains circuits de protection.
Si ce magnétoscope est utilisé alors que de la condensation s’est formée à l’intérieur, la bande et les
têtes vidéo peuvent être endommagées.
Circuit de détecteur de condensation
5
Si l’intérieur d’une voiture dont la température est
très basse est chauffé rapidement ou si l’humidité est
très élevée, le pare-brise et les vitres s’embuent
parfois. En même temps, de la condensation se forme
à l’intérieur du magnétoscope à cassette monté dans
la voiture.
5
Dans un tel cas (condition de condensation ), les
fonctions du circuit du détecteur de condensation
pour arrêter l'opération de l’appareil, ayant un
indicateur de lampe clignotant en vert, apparaissent
à l’écran. La mention "DEW PLEASE WAIT" apparaît
aussi à l'écran. Lorsque l’appareil indique ce statut,
veuillez attendre (plusieurs heures) jusqu’à ce que
l’indicateur de lampe s’arrête de clignoter et de
s’allumer continuellement.
Circuit du détecteur de haute température
5
Quand la température de l’appareil devient
considérablement élevée, les fonctions du circuit du
détecteur de haute température pour arrêter
l'opération de l’appareil, ayant un indicateur
de lampe clignotant en rouge, apparaissent à l’écran.
La mention "HIGH TEMP PLEASE WAIT" apparaît
aussi à l'écran. Lorsque l’appareil indique ce statut,
veuillez éteindre l’appareil, attendez jusqu’à ce que
l’indicateur de lampe s’arrête de clignoter, et,
veillez bien à aérer la pièce pour faire baisser la
température. Lors de la remise en fonction de
l’appareil, assurez-vous que l’indicateur de
lampe ne clignote plus.
Circuit du détecteur de tension anormale
5
Lorsque la source du circuit bouclé de l’appareil
détecte une tension hors du champs d’opération, les
fonctions du circuit du détecteur de tension anormale
pour mettre l’appareil hors service apparaîssent à
l’écran ainsi que la mention "VOLTAGE PLEASE
CHECK".
Dans de tel cas, assurez-vous que l’appareil est
raccordé correctement ou que la tension de la pile
est suffisante.
Remarque: Ce magnétoscope doit être utilisé avec
Circuit de protection de bande
5
Lorsque l’appareil est en mode de lecture à arrêt sur
image ou en mode de lecture au ralenti pendant 5
minutes ou plus, les fonctions du circuit de protection de la bande mettront en mode arrêt l’appareil
afin de protéger la bande.
un courant continu de 12v seulement.
Accessoires
• Vérifiez que les accessoires suivants sont bien fournis avec le magnétoscope à cassette.
Cordon audio vidéo
(long.5 m)
Vis autotaraudeuse (φ 5 x 20 mm) x 4
Bande Velcro x 2 jeux
Cordon d'alimentation
Support de montage
Plaque x 2
Vis (M5 x 8 mm) x 4
(long.5.5 m)
Unité de capteur
de télécommande
Télécommande
Cordon de données
de télécommande
Pile ronde
(CR2025)
(long.5 m)
Page 35

Introduction/retrait d’une cassette
Introduction de la cassette dans le compartiment de cassette.
Introduire une cassette, étiquette vers le haut, dans le
compartiment de cassette en appuyant doucement la
partie du centre.
•
Lors de l’introduction d’une cassette vidéo dans le
compartiment de cassette, le magnétoscope de met
automatiquement en circuit. (Fonction de mise en circuit automatique).
•
Le compteur de bande est réinitialisé à 0:00:00.
(Fonction de remise à zéro automatique du compteur).
•
L'introduction d'une cassette met automatiquement le
magnétoscope en circuit. (Fonction de mise en circuit
automatique).
•
Il est difficile d’introduire une cassette, lorsque la
voiture est secouée, parce que l’appareil est capable
de maintenir fermement la cassette pour l’empêcher
de vibrer. Dans ce cas, introduisez avec force la cassette ou retirez la cassette du magnétoscope et essayez
de nouveau de l’introduire.
Retrait d’une cassette du magnétoscope
Appuyez la touche EJECT pendant que vous êtes en mode
STEREO
MOBILE VIDEO CASSETTE PLAYER
KV-V8
PAUSE PLAY REW FF STOP / EJECT
SQPB
arrêt.
•
Ne mettez pas les doigts ni de substances étrangères
dans le compartiment de cassette. Lorsqu’un jeune
enfant se trouve près du magnétoscope, faites attention qu’il ne le fasse pas.
•
Si la cassette est mal introduite, elle sera éjectée par la
fonction de protection de mécanisme. Si vous avez
ce problème, attendez quelques secondes et essayez
d’introduire à nouveau la cassette.
5
Pour protéger des enregistrements importants
Cassez la languette de protection contre
l’enregistrement de la cassette.
•
Si vous voulez utiliser une cassette dont la languette
de protection contre l’enregistrement a été cassée pour
un enregistrement, recouvrez l’orifice de la partie
Protection tab
cassée avec un double ruban adhésif.
Comment lire une cassette VHS-C enregistrée avec VideoMovie
•
Utilisez un adaptateur de cassette VHS en option pour
lire des bandes cassettes VHS-C.
Page 36

6
Pour que les images soient toujours claires à la lecture
(Utilisez une cassette de nettoyage de têtes)
5
Si ce magnétoscope est utilisé pendant longtemps, les images perdent de leur qualité à la lecture. Dans ce
cas, nettoyez les têtes vidéo à l’aide d’une cassette de nettoyage de têtes en option.
5
Lorsque vous observez les symptômes suivants:
•
L’image n’est pas de bonne qualité.
•
L’image n’est pas claire ou aucune image n’est
reproduite sur l’écran.
•
“USE CLEANING CASSTTE” apparaît sur l’écran.
Que faire en pareille occasion
•
Nettoyez les têtes vidéo à l’aide d’une cassette
de nettoyage de têtes de type sec (TCL-2UX).
5
Facteurs contribuant à salir les têtes
•
Température élevée, forte humidité (pendant la
saison des pluies, etc.)
5
Si l’image n’est toujours pas de bonne qualité
après que les têtes vidéo ont été nettoyées avec
une cassette de nettoyage de têtes, prenez contact avec le magasin où vous avez acheté ce
magnétoscope ou le distributeur le plus proche.
•
Bande endommagée ou sale
•
Poussière dans l’air
•
Longue durée d’utilisation, etc.
Page 37

PANNEAU AVANT
1 2 3
STEREO
MOBILE VIDEO CASSETTE PLAYER
KV-V8
PAUSE PLAY REW FF STOP / EJECT
SQPB
5
4 6
7
1 Touche
Appuyez sur cette touche pour mettre le
magnétoscope en ou hors circuit.
2 Touche de PAUSE
Appuyez cette touche pour interrompre
momentanément la lecture.
3 Touche PLAY (lecture)
Appuyez sur cette touche pour lire une cassette
vidéo.
4 Touche REW (rembobinage)
Appuyez sur cette touche pour rembobiner la
bande.
5 Touche FF (avance rapide)
Appuyez sur cette touche pour faire avancer
rapidement la bande.
6 Touche d’arrêt STOP/EJECT (arrêt/ejecte)
• Appuyez cette touche pour arrêter les opérations
de lecture.
• Appuyez cette touche pour éjecter une cassette
pendant qu’elle est en mode arrêt.
Page 38

8
PANNEAU ARRIÉRE
1 Connecteur du cordon d'alimentation
1
Page 39

1
2
3
4
5
6
7
8
9
0
!
@
Télécommande
VCP
AUDIO
INDEX
TRACKING
MANUALAUTO
9
AUXDISPLAY
1 Touche
Appuyez sur cette touche pour mettre le
magnétoscope en et hors circuit.
2 Touche DISPLAY (affichage)
Appuyez sur cette touche pour activer et désactiver
le compteur de bande.
3 Touche REW (rembobinage)
Appuyez sur cette touche pour rembobiner la
bande.
4 Touche PLAY (lecture)
Appuyez sur cette touche pour lire une bande.
5 Touche STOP (arrêt)
Appuyez sur cette touche pour arrêter la lecture.
6 Touche AUTO
(suivi d’enregistrement automatique)
Appuyez sur cette touche pour activer et désactiver
la fonction de suivi automatique.
7 Touche de sélection AUDIO
Appuyez sur cette touche pour sélectionner la
sortie audio désirée.
La sortie audio sélectionnée est indiquée sur
l’écran.
HI-FI : Sortie audio hi-fi
L : Sortie audio seulement sur la voie gauche
R : Sortie audio seulement sur la voie droite
NORM : Sortie audio normale
MIX : Sortie audio mélangée
8 Touche AUX
Appuyez sur cette touche pour sélectionner une
source audio externe.
9 Touches d'index
Appuyez sur ces touches pour rechercher le début
d’un programme.
0 Touche FF (avance rapide)
Appuyez sur cette touche pour faire avancer
rapidement la bande.
! Touche PAUSE
Appuyez sur cette touche pour suspendre la
lecture temporairement.
@ Touches TRACKING +/- (suivi)
Appuyez sur ces touches pour activer la fonction
de suivi manuel de la bande. Avant d’appuyer sur
ces touches, désactivez toujours le suivi
automatique à l’aide de la touche AUTO.
Page 40

10
Comment installer les pile dans le compartiment des pile.
•
Mettez en place la pile ronde.
Utilisez une stylo
à bille pour
l'enlever.
Pile ronde (CR2025)
5
Tirez sur le compartiment des piles.
5
Introduire la pile dans le porte pile, et s’assurer
d’avoir la marque “+” visible.
5
Faire coulisser en arrière le porte pile jusqu’à
entendre un déclic.
Page 41

11
2
1
4
5
6
7
Indications sur l’écran
Le fonctionnement et l’état du magnétoscope peuvent être vérifiés par les indications apparaissant sur l’écran.Chaque
fois qu'ne touche de fonction est enfoncée, le fonctionnement du magnétoscope est indiqué pendant environ 5
secones.
AUX
0 : 00 : 00
BE
3
1 Indication de sortie externe
2 Indication du compteur de bande.
3 Indication de la position actuelle de la bande
4 Indication de l’état de la bande
(PLAY/FF/REW/STOP)
5 Indication de sortie audio
HI-FI : Sortie audio hi-fi
L : Sortie audio seulement sur la voie gauche
R : Sortie audio seulement sur la voie droite
NORM : Sortie audio normale
MIX : Sortie audio mélangée
PLAY
HI-FI
INDEX –1
++ +
6 Indication de cassette
7 Programme d’indicateur d’adresse (index)
Page 42

12
Lecture
Lecture
Préparatifs: Mettez sous tension le téléviseur raccordé
au magnétoscope et réglez-le sur un mode d’entrée
externe (VIDEO 1, VIDEO 2, etc.).
1
Appuyez sur la touche du magnétoscope pour
le mettre en circuit.
2
Introduisez une cassette dans le magnétoscope.
Lorsqu’une cassette est introduite, le magnétoscope se
met automatiquement en marche.
3
Le suivi de bande est automatiquement ajusté.
5
Appuyez sur la touche STOP pour arrêter la lecture.
5
La bande est automatiquement rembobinée lorsqu’elle
atteint la fin de la cassette lors de la lecture ou de
l’avance rapide.
5
Lorsque des parasites sont générés pendant la lecture,
appuyez sur la touche AUTO de la Télécommande
pour désactiver le mode de suivi d’enregistrement
automatique et ajustez manuellement le suivi à l’aide
des touches TRACKING + et –.
Avance rapide/Rembobinage
Appuyez sur la touche FF (avance rapide) ou REW
(rembobinage) lorsque la bande est dans le mode d’arrêt.
•
Si vous appuyez sur la touche moins de 2
secondes après avoir appuyé sur la touche REW, le
magnétoscope se met hors circuit après que la bande
est complètement enroulée jusqu’à son début. Si vous
appuyez sur la touche PLAY moins de 2 secondes après
avoir appuyé sur la touche , REW le magnétoscope
démarre la lecture de la bande.
Avance rapide/Rembobinage tout en regardant l’image
Appuyez momentanément sur la touche FF ou la touche REW pendant la lecture.
•
Le magnétoscope démarre la lecture par recherche.
•
Pour reprendre la lecture normale, appuyez sur la
touche PLAY.
• Pour des recherches courtes, pendant la lecture ou
l’arrêt sur image, maintenir pressé FF ou REW pendant plus de 2 secondes. En relâchant, la lecture
normale reprend.
Lecture à arrêt sur image/Lecture image
par image/Lecture au ralenti
Appuyez sur la touche PAUSE pendant une lecture.
•
L’image devient fixe.
•
Lorsque l’image fixe roule vers le haut et le bas, réglez
le suivi d’enregistrement à l’aide de la touche TRACKING +/- de la télécommande jusqu’à ce que l’image
soit stable.
Appuyez sur la touche PAUSE dans le mode de lecture à
arrêt sur image.
•
Chaque fois que vous appuyez sur la touche PAUSE
dans le mode de lecture à arrêt sur image, la bande est
reproduite image par image.
Appuyez sur la touche PAUSE pendant 2 secondes ou
plus dans le mode de lecture.
•
La vitesse de lecture passe à 1/6ème de la vitesse
normale (lecture au ralenti).
•
Si des parasites sont générés à cette vitesse de lecture,
réglez le suivi d’enregistrement à l’aide de la touche
TRACKING +/- de la télécommande jusqu’à ce que
les parasites soient réduits.
•
Si la même opération est effectuée dans le mode de
lecture par recherche en sens arrière, la lecture au ralenti
est activée dans le sens arrière.
5
Pour revenir à la lecture normale depuis la lecture au
ralenti, appuyez sur la touche PLAY.
•
Lors d’une lecture à une vitesse différente de la vitesse
normale (lecture rapide/au ralenti), aucun son n’est sorti
du magnétoscope.
•
Si des parasites sont générés lors d’une lecture rapide,
lecture en sens arrière ou lecture au ralenti, cela
n’indique pas qu’il y a un problème dans l’appareil.
•
Si la fonction de lecture à arrêt sur image ou de lecture
au ralenti est activée pendant 5 minutes ou plus, le
magnétoscope arrête automatiquement la lecture pour
protéger la bande.
•
Si une bande vidéo mal enregistrée ou une bande qui
a été enregistrée sur un autre appareil est lue, le réglage
du suivi d’enregistrement peut parfois ne pas
fonctionner.
•
Le suivi d’enregistrement automatique est activé
automatiquement au moment où le magnétoscope est
mis en circuit ou lorsqu’une cassette est introduite.
ATTENTION
En mode de recherche, d'arrêt sur image, de ralenti
ou d'avance image par image.
● l'image sera distordue.
● des barres parasites apparaîtront.
● il y aura une perte de couleur.
Lecture répétée
Appuyez sur la touche PLAY pendant 5 secondes ou plus
dans le mode de lecture.
(L’indication PLAY clignote).
•
La bande est répétée 20 fois depuis le début jusqu’à la
fin et la 20ème lecture se termine à la fin de la bande.
5
Pour interrompre une lecture répétée pendant qu’elle
est en cours, appuyez sur la touche STOP.
Page 43

13
Lecture par recherche
Lecture depuis le début d’un programme- Lecture par recherche
Pour démarrer la lecture depuis le début d’un programme, recherchez l’index enregistré au point de début de
ce programme. Des marques d'index ont été automatiquement enregistrées sur des bandes cassettes vidéo
enregistrées sur un appareil JVC.
1 Choisissez l’adresse (index) désirée avec la touche INDEX de la télécommande.
Ecran de télévision
INDEX
INDEX - 2
Sens avantSens arrière
•
Recherchez l’adresse (index) désiré pour la lecture automatique du programme.
•
Chaque fois que vous appuyez sur la touche droite, le numéro de l’index augmente et chaque fois que vous
appuyez sur la touche gauche, le numéro de l’index diminue.
•
Neuf programmes au maximum peuvent être choisis en une fois.
5 Pour interrompre la lecture par recherche pendant qu’elle est en cours, appuyez sur la touche STOP.
Comment choisir (spécifier) l’adresse (index) d’un programme
Programme actuellement en cours de lecture
Programme
Informations
Adresse
Sens arrière Sens avant
[Exemple]
Pour choisir le programme suivant:
Appuyez une fois sur la touche INDEX ( ).
Pour choisir le programme précédent:
Appuyez deux fois sur la touche INDEX ( ).
précédent
Drame
Choisissez une adresse (index) deux
adresses avant le programme actuel.
Programme
1-1-2-3 2 3
suivant
Film
Sur la lecture NTSC
Vous pouvez lire des bandes NTSC.
• Certains téléviseurs rétrécissent l'image verticalement et placent des barres noires en haut et en bas de
l'écran. Ce n'est pas un mauvais fonctionnement de la part du magnétoscope ni du téléviseur.
• L'image peut rouler verticalement. Ce qui peut être corrigé en utilisant la commande de stabilité verticale
sur le téléviseur. (Si le téléviseur ne dispose pas de cette commande, la correction n'est pas possible.)
• Les valeurs du compteur et de durée de bande restante seront incorrectes.
• Pendant la recherche, l'arrêt sur image ou la lecture image par image, l'image peut être distordue, et il peut
y avoir une perte de couleur.
• En fonction du type de téléviseur, le haut et le bas des affichages surimprimés peuvent être coupés pendant
la lecture NTSC.
Page 44

14
Raccordement à d'autres appareils
Raccordement à un système d'écran couleur portable.
Raccordement à un système de télévision couleur
portable disponible commercialement.
Raccordez le magnétoscope à l'unité syntoniseur du
système de télévision couleur portable disponible
commercialement.
1 Raccordez les bornes de sortie du magnétoscope
aux bornes de sortie vidéo 1 du système de
télévision couleur portable.
Cordon AV
(fourni en accessoine)
Système écran
couleur portable
Unité
syntoniseur
L
R
Vers borne d'entrée
VIDEO 1
Exemple de raccordement
Trajet du signal
Au raccord
du cordon
d'alimentation
Cordon
d'alimentation
(fourni en accessoine)
LRL
R
Sortie VCP
Page 45

Raccordement à un caméscope
Le raccordement du caméscope au magnétoscope
vous permet de profiter de l'image et du son, que vous
avez enregistrés avec le caméscope, sur votre
télévision couleur portable qui est aussi raccordée au
magnétoscope.
Cependant, certains caméscopes ne peuvent pas être
raccordés à ce magnétoscope à cassette. Pour plus
de détails, reportez-vous au mode d'emploi du
caméscope.
1. Raccordez les bornes de sortie du caméscope aux
bornes d'entrées du magnétoscope.
15
Exemple de raccordement
Trajet du signal
Au raccord
du cordon
d'alimentation
Caméscope
Cordon AV
(Vendu séparément)
L
R
Vers bornes
de sortie audio-vidéo
Cordon
d'alimentation
(fourni en accessoine)
LRL
R
Entrée AUX
Page 46

16
Dépistage des pannes
En cas de problème avec l’appareil, vérifiez le symptôme et la cause en vous référant au tableau suivant.
Pas d’alimentation
Le cordon d’alimentation est débranché.
Branchez fermement le cordon d’alimentation dans la fiche.
L’appareil ne fonctionne pas bien que l’alimentation soit normale. (Le témoin POWER clignote).
De la condensation s'est formée à l'intérieur de l'appareil ou le circuit du détecteur de température élevée fonctionne.
Lorsqu'il y a de la condensation à l'intérieur de l'appareil, attendez plusieurs heures jusqu'à ce qu'elle disparaisse.
Lorsque le circuit du détecteur de température élevée fonctionne, rafraîchissez l'intérieur de la voiture pour abaisser la température de l'appareil.
Les indications ne disparaissent pas de l'écran.
Appuyez sur la touche DISPLAY de la télécommande.
Des parasites apparaissent dans une partie (ou certaines parties) de l'image à la lecture.
Suivi d'enregistrement anormal.
Si des parasites apparaissent tout le temps dans la même partie de l'image à la lecture, cette partie de la bande est endommagée.
Appuyez sur la touche AUTO de la télécommande pour annuler le suivi automatique et réglez manuellement le suivi à l'aide des touches TRACKING + et -.
L'image fixe roule vers le haut et le bas.
La stabilité verticale est mal réglée.
Rélez le suivi à l'aide des touches TRACKING + et - de la télécommande.
Couleur anormale
Pas de sortie vidéo
Pas de sortie audio
Lisez attentivement le mode d'emploi du téléviseur raccordé au magnétoscope à cassette.
L'image n'est pas de bonne qualité ou présente un effet de neige
Les têtes vidéo sont sales.
Nettoyez les têtes vidéo à l'aide d'une cassette de nettoyage de têtes.
Caractéristiques techniques
•
Alimentation : CC 12 V (11 à 16 volts tolévés) Masse négative
•
Dimensions : 259mm x 94mm x 270 mm (largeur x hauteur x profondeur)
•
Masse : 3,2 kg
•
Température de fonctionnement admissible : 0° C à +40° C
•
Humidité relative admissible : 35% à 80%
•
Température de rangement admissible : -20° C à +60° C
Vidéo
•
Système lecture : Format VHS, balayage hélicoïdal 4 têtes hi-fi
•
Signal vidéo : Norme PAL VHS
Audio
•
Système lecture : Audio hi-fi stéréo VHS
•
Piste audio : 2 voies audio hi-fi et 1 voie audio normale
•
Télécommande : Code A
(Le code A et le code B sont commutables dans l’unité principale).
Les caractéristique techniques et la conception sont susceptibles de modification sans préavis.
Page 47

Geachte cliænt,
Onze hartelijke dank voor de aanschaf van deze JVC VHS-videocassettespeler. Lees, alvorens het apparaat
in gebruik te nemen, de voorzorgsmaatregelen en de veiligheidsvoorschriften op de volgende pagina’s
aandachtig door, zodat u uw nieuwe videospeler op een veilige manier kunt gebruiken.
Wanneer u batterijen wegdoet, moet u rekening houden met
VOORZORGSAMAATREGELEN
WAARSCHUWING:
STEL HET APPARAAT NIET BLOOT AAN
REGEN OF VOCHT, OM GEVAAR VAN
ELEKTRISCHE SCHOKKEN TE
VERMIJDEN.
LET OP:
Deze videocassettespdeler kan uitsluitend worden gebruikt
op 12 V gelijkstroom. GEBRUIK NOOIT EEN ANDERE
VOEDINGSBRON, om elektrische schokken en
brandgevaar te voorkomen.
Mit der Taste STANDBY/ON /I wird nur die
Betriebsspannung des Geräts ein- und ausgeschaltet.
" " bedeutet "in Betriebsbereitschaft", " I " bedeutet " in
Betrieb".
Voorzichtig bij het vervangen van de lithium
batterij
Bij verkeerd gebruik van de in dit toestel
gebruikte lithiumbatterij kan gevaar van brand of
chemische verbranding ontstaan.
Derhalve mag u de batterij nooit herladen,
uiteennemen, verhitten boven 100°C of
verbranden.
Vervang de batterij door een Panasonic
(Matsushita Electric), Sanyo, Sony of Maxell
CR2025 batterij.
Er bestaat explosie- of brandgevaar als de batterij
niet op de juiste manier vervangen wordt.
䡲 Gooi een gebruikte batterij onmiddellijk weg
(liefst op een milieuvriendelijke wijze,
bijvoorbeeld in een batterijbak of door hem terug
brengen naar de foto- of elektriciteitshandelaar).
䡲 Houd de batterij buiten het bereik van kinderen.
䡲 Neem de batterij niet uiteen en gooi hem niet in
een open vuur.
PAL
5
In deze videospeler kunt u cassettes met het merkteken
“VHS” gebruiken.
het milieuprobleem en de plaatselijke voorschriften of wetten
betreffende het wegdoen van batterijen strict in acht nemen.
Het niet opvolgen van de volgende voorzorgsmaatregelen
kan beschadiging van de videocassettespeler, de
afstandsbediening of de videocassette tot gevolg hebben.
1. Plaats de videocassettespeler
...in een omgeving die onderhevig is aan extreme
temperaturen of hoge vochtigheid.
... in het directe zonlicht.
... in een stoffige omgeving.
...in een omgeving waar sterke magnetische velden
worden opgewekt.
... op een onstabiel of aan trillingen onderhevig oppervlak.
2. Blokkeer de ventilatie-openingen van de videocassetteNIET.
speler
(Als de ventilatie-openingen door een krant of een doek
e.d. geblokkeerd zijn, zal de hitte niet kunnen ontsnappen
uit het apparaat.)
GEEN zware voorwerpen op de videocassettespeler
3. Plaats
of de afstandsbediening.
NIETS dat kan lekken of druppelen op de video-
4. Plaats
cassettespeler of de afstandsbediening.
(Als water of een andere vloeistof in dit apparaat
binnendringt, is er gevaar voor brand of een elektrische
schok.)
5. Stel het apparaat
6. Gebruik dit apparaat
plaatsen waar water wordt gebruikt. Plaats ook NOOIT
vaten gevuld met water of een andere vloeistof (zoals
schoonheidsmiddelen of geneesmiddelen, bloemvazen,
potplanten, kommen e.d.) bovenop het apparaat.
GEEN open vuur zoals brandende kaarsen, bovenop
7. Plaats
het apparaat.
VERMIJD heftige schokken tijdens het transporteren van
8.
de videocassettespeler.
**VOCHTCONDENSATIE
Vocht uit de lucht kan neerslaan op de videocassettespeler
als u deze verplaatst van een koude naar een warme
omgeving, of onder extreem vochtige omstandigheden - net
als er zich waterdruppels vormen op de buitenkant van een
glas dat is gevuld met een koude vloeistof. Vochtcondensatie
op de koptrommel zal de cassetteband beschadigen. Als er
vochtcondensatie optreedt of het apparaat bevindt zich onder
omstandigheden waar dit waarschijnlijk is, laat de
videocassettespeler dan enkele uren lang ingeschakeld staan,
voordat u een cassette plaats.
Voorzorgen bij de bediening
• Als uw auto gedurende langere tijd in de felle zon of in een
uiterst koude omgeving staat geparkeerd, wacht dan een
tijdje (totdat het apparaat weer een normale temperatuur
heeft bereikt) voordat u de videocassettespeler in gebruik
neemt.
• Gebruik dit apparaat alleen als de motor van uw auto loopt.
Als u het apparaat gebruikt met de motor van uw auto
uitgeschakeld, zal de accu snel zijn uitgeput, waardoor u in het ergste geval - uw auto niet meer zult kunnen starten.
• Als de verbinding tussen het apparaat en de stroombron
tijdens gebruik (weergave, snelspoelen, terugspoelen) wordt
verbroken, kan dit leiden tot problemen. Zorg altijd dat u
de videocassette verwijderd, alvorens de stroomtoevoer te
verbreken.
NIET bloot aan gedruppel of gespetter.
NIET ...
NIET in een badkamer of op andere
2
Page 48

3
Inhoudsopgave
VOORZORGSMAATREGELEN............................. 2
Kenmerken ........................................................ 4
Circuit van de vochtcondensatie-sensor ................. 4
Circuit van de sensor voor te hoge temperatuur ...... 4
Circuit van de sensor voor abnormaal voltage ........ 4
Circuit voor bescherming van de cassetteband ....... 4
ACCESSOIRES ...................................................... 4
Plaatsen/verwijderen van een cassette ...................... 5
Een cassette in het cassettevak plaatsen ................. 5
Verwijderen van een cassette uit videospeler.......... 5
Beschermen van belangrijke opnamen .................. 5
Weergave van een VHS-C-cassette
opgenomen met een videocamera ........................ 5
Voor een optimale weergave
(gebruik van een videokoppenreinigingscassette) 6
VOORPANEEL ..................................................... 7
ACHTERPANEEL .................................................. 8
AFSTANDSBEDIENING........................................ 9
De batterij in de batterijhouder plaatsen ............... 10
Aanduidingen op het scherm .............................. 11
Weergave........................................................... 12
Afspelen van een cassette ................................... 12
Snelspoelen/terugspoelen ................................... 12
Snelspoelen/terugspoelen en het beeld bekijken ....12
Weergave van een stilstaand beeld / beeld-voor-
beeld-weergave /vertraagde weergave................ 12
Herhaalde weergave .......................................... 12
Zoekfuncties ...................................................... 13
Weergave vanaf het begin van een programma-
weergave na zoeken .......................................... 13
Kiezen van een programma-adres (index) ............. 13
Meer over NTSC weergave .................................... 13
Aansluiten op andere apparatuur
Aansluiten op een mobiele kleurenmonitor-
systeem ........................................................... 14
Aansluiten van een videocamera .................... 15
Verhelpen van storingen..................................... 16
Specificaties ....................................................... 16
Page 49

Kenmerken
5
Hifi stereo-cassettespeler met 4 bandkoppen
5
Verticaal of horizontaal op te hangen dankzij het
uiterst betrouwbare trillingsbestendige ontwerp
Beveiligingscircuits
(zelfdiagnoserende circuits)
Deze videospeler is uitgerust met verschillende
beveiligingscircuits.
Gebruik deze videospeler niet als er vochtcondensatie
heeft plaatsgevonden. Dit kan leiden tot beschadiging
van de cassetteband.
Circuit van de vochtcondensatie-sensor
5
Als het interieur van de auto erg koud is en snel
wordt verwarmd of als de vochtigheidsgraad in de
auto bijzonder hoog is, beslaan de voorruit en de
ramen van de auto aan de binnenzijde. In
dergelijke gevallen zal ook in de binnenkant van
de videospeler vochtcondensatie optreden.
5
In een dergelijk geval (vochtcondensatie) wordt het
circuit van de condensatiesensor geactiveerd en
de machine wordt stopgezet. De indicator
knippert groen en de aanduiding “DEW PLEASE
WAIT” verschijnt op het scherm. Als dit zich
voordoet, wacht dan enkele uren totdat de
indicator van knipperen overgaat in continu
oplichten.
4
Circuit van de sensor voor te hoge temperatuur
5
Als de temperatuur van het apparaat extreem hoog
oploopt, wordt het circuit van de sensor voor te
hoge temperatuur geactiveerd en de machine
wordt stopgezet. De indicator knippert rood
en de aanduiding “HIGH TEMP PLEASE WAIT”
verschijnt op het scherm. Als dit zich voordoet,
plaats het apparaat dan op een koele plaats en
wacht enkele uren totdat de indicator stopt
met knipperen en continu oplicht. Als u het
apparaat daarna weer inschakelt, controleer dan
goed of de indicator niet knippert, alvorens
tot bediening van het apparaat over te gaan.
Circuit van de sensor voor abnormaal voltage
5
Als het bronluscircuit van het apparaat een volt-
age buiten het bedrijfsgebied detecteert, wordt de
sensor voor abnormaal voltage geactiveerd en het
apparaat wordt uitgeschakeld. De indicator
knippert oranje en de aanduiding “VOLTAGE
PLEASE CHECK” verschijnt op het scherm.
Als dit zich voordoet, controleer dan of het apparaat
goed is aangesloten en of de batterijspanning nog
hoog genoeg is.
Opmerking: Deze videocassettespeler kan alleen op
12 Volt gelijkstroom worden gebruikt.
Circuit voor bescherming van de cassetteband
5
Als het apparaat meer dan vijf minuten in de stand
voor stilstaande weergave of vertraagde weergave
blijft staan, wordt het cassettebandbeschermingscircuit ingeschakeld en de hierboven genoemde
stand wordt uitgeschakeld.
ACCESSOIRES
• Controleer of alle hier getoonde accessoires zijn meegeleverd bij de videospeler
Audio/video-snoer
(5 meter lang)
Montagebeugels (2x)
Zelftappende schroeven
(ø 5 x 200 mm) (4x)
Schroef (M3 x 8) (4x)
Klittenband (2 sets)
Spanningssnoer
(5.5 meter lang)
(g) Afstandsbediening Ronde batterij
Afstandssensor
Afstandbedieningssnoer
(5 meter lang)
(CR2025)
Page 50

5
Plaatsen/verwijderen van een cassette
Een cassette in het cassettevak plaatsen
Verwijderen van een cassette uit de videospeler
STEREO
MOBILE VIDEO CASSETTE PLAYER
KV-V8
PAUSE PLAY REW FF STOP / EJECT
SQPB
Plaats een videocassette met de labelkant naar boven in
het cassettevak door het midden van de cassette zachtjes
aan te drukken.
• Plaats een videocassette met de labelkant naar boven in het
cassettevak door het midden van de cassette zachtjes aan te
drukken.
•
De bandteller wordt teruggezet op 0:00:00
(automatische bandteller-nulstelfunctie).
•
Als er een cassette wordt geplaatst, start de weergave
ervan automatisch. (Automatische weergavefunctie)
•
Als er door het rijden te veel trillingen zijn, zal het
apparaat de cassette niet goed naar binnen kunnen
trekken. In een dergelijk geval dient u de cassette met
wat meer kracht naar binnen te duwen of de cassette
te verwijderen en nogmaals in te duwen.
Druk op de EJECT-toets terwijl het apparaat in de
stopstand staat.
• Steek nooit uw vingers of enig ander voorwerp in het
cassettevak. Let ook goed op dat kinderen niet in het
cassettevak steken.
• Als een videocassette op de verkeerde manier wordt
ingestoken, wordt deze automatisch weer
uitgeworpen door het beschermingsmechanisme. Als
dit zich voordoet, wacht u enkele minuten en u plaatst
de cassette opnieuw.
Beschermen van belangrijke opnamen
Breek het wispreventienokje van de cassette uit.
•
Als u deze cassette later toch weer voor opname wilt
gebruiken, dek de ontstane opening dan af met een
stukje plakband.
leng eta de protecci n
Weergave van een VHS-C-cassette opgenomen met een videocamera
•
Gebruik voor het weergeven van een VHS-C-cassette
de in de handel verkrijgbare VHS-cassetteadapter.
Page 51

6
Voor een optimale weergave (gebruik van een videokoppenreinigingscassette)
5
Als deze videospeler een lange tijd is gebruikt, kunnen de beelden iets aan kwaliteit verliezen. In dit geval
dient u de videokoppen van het apparaat te reinigen met een videokoppenreigingscassette.
5
Als de volgende symptomen zich voordoen:
•
Het weergavebeeld is slecht.
•
Het weergavebeeld is zeer onduidelijk of er is
in het geheel geen beeld.
“USE CLEANING CASSETTE” verschijnt op het
scherm
Wat te doen bij dergelijke problemen.
•
Reinig de bandkoppen met een
videokoppenreinigingscassette van het “droge”
type (TCL-2UX).
5
Omstandigheden die vervuilde videokoppen
veroorzaken
•
Hoge temperatuur, hoge vochtigheidsgraad
(regenseizoen, etc.)
5
Als het weergavebeeld nog steeds slecht is nadat
u de videokoppen heeft schoongemaakt met een
speciale reinigingscassette, ga dan terug naar
de winkel waar u deze videospeler heeft gekocht
of ga naar het dichtstbijzijnde JVC-onderhoudscentrum.
•
Stoffige omgeving
•
Beschadigde of vervuilde cassetteband
•
Langdurig ononderbroken gebruik, etc.
Page 52

7
VOORPANEEL
1 2 3
STEREO
MOBILE VIDEO CASSETTE PLAYER
KV-V8
PAUSE PLAY REW FF STOP / EJECT
SQPB
5
4 6
1 -toets (aan-/uittoets)
Druk deze toets in om het apparaat in of uit te
schakelen.
2 PAUSE-toets (pauzetoets)
Druk deze toets in om de weergave tijdelijk stop te
zetten.
3 PLAY-toets (weergavetoets)
Druk deze toets in om de weergave van een videocassette te starten.
4 REW-toets (terugspoeltoets)
Druk deze toets in om de band terug te spoelen.
5 FF-toets (snelspoeltoets)
Druk deze toets in om de band snel vooruit te
spoelen.
6 STOP/EJECT (uitwerp) toets
• Druk deze toets in om de weergave te stoppen.
• Druk deze toets in om de cassette te verwijderen
terwijl het apparaat in de stopstand staat.
Page 53

ACHTERPANEEL
1 NETSNOER-AANSLUITBUS
8
1
Page 54

9
1
2
3
4
5
6
7
8
9
0
!
@
AFSTANDSBEDIENING
VCP
AUDIO
INDEX
TRACKING
AUXDISPLAY
MANUALAUTO
1 -toets (aan-/uittoets)
Druk deze toets in om de videospeler in of uit te
schakelen.
2 DISPLAY-toets
Druk deze toets in om de bandteller in of uit te
schakelen.
3 REW-toets (terugspoeltoets)
Druk deze toets in om de cassette terug te spoelen.
4 PLAY-toets (weergavetoets)
Druk deze toets in om de weergave van een cassette te starten.
5 STOP-toest (stoptoets)
Druk deze toets in om de weergave te stoppen.
6 AUTO-toets (automatische spoorregelingstoets)
Druk deze toets in om de automatische spoorregeling in of uit te schakelen.
7 AUDIO-keuzetoets
Druk deze toets in om in te stellen op de gewenste
geluidsweergave.
HI-FI : hifi-geluid
L : alleen geluidsweergave van het
linkerkanaal
R : alleen geluidsweergave van het
rechterkanaal
NORM : normale geluidsweergave
MIX : gemengde geluidsweergave
8 AUX-toets
Gebruik deze toets om een externe geluidsbron
te selecteren.
9 INDEX-toets (indextoets)
Druk een van deze toetsen in om naar het begin
van een programma (indexpunt) te gaan.
0 FF-toets (snelspoeltoets)
Druk deze toets in om de band snel vooruit te
spoelen.
! PAUSE-toets (pauzetoets)
Druk deze toets in om de weergave tijdelijk stop
te zetten.
@ TRACKING +/- toetsen (+/- spoorregelingstoetsen)
Gebruik deze toetsen voor een handmatige
spoorregeling van de bandloop. Zorg dat u de
automatische spoorregelingsfunctie uitschakelt
met de AUTO-toets, voordat u deze toetsen
gebruikt.
Page 55

De batterij in de batterijhouder plaatsen
•
Plaats de ronde batterij in het batterijvak.
Gebruik een balpen
om de batterij te
verwijderen.
Ronde batterij (CR2025)
5
De batterijhouder uitnemen.
5
Steek de batterij in de houder. Controleer dat het
“+” teken zichtbaar is.
5
Schuif de houder weer terug totdat deze op zijn
plaats vastklikt.
Gebruikke batterijen:
Niet weggooien,
NL
maar inleveren
als
KCA.
10
Page 56

11
2
1
4
5
6
7
Aanduidingen op het scherm
Op het scherm verschijnen aanduidingen voor de status van de videospeler en de ingeschakelde functie.
Iedere keer dat u een bedieningstoets indrukt, verschijnt er 5 seconden lang een aanduiding op het scherm.
AUX
0 : 00 : 00
BE
3
1 Aanduiding voor externe invoer
2 Aanduiding van bandteller.
3 Aanduiding voor de positie van de cassetteband.
4 Aanduiding voor de ingeschakelde bandloopfunctie
(PLAY/FF/REW/STOP)
5 Aanduiding voor de geluidsweergave.
HI-FI : hifi-geluid
L
: alleen geluidsweergave van het linkerkanaal
R : alleen geluidsweergave van het rechterkanaal
NORM : normale geluidsweergave
MIX : gemengde geluidsweergave
PLAY
HI-FI
INDEX –1
++ +
6 Cassette-aanduiding
7 Programma-indexaanduiding
Page 57

Weergave
Afspelen van een cassette
Voorbereiding: schakel de TV of monitor die op de
videospeler is aangesloten, in en stel deze in op
weergave van het videobeeld (VIDEO 1, VIDEO 2, etc.).
1
Druk op de -toets van de videocassettespeler
om deze in te schakelen.
2
Plaats een videocassette in de videocassettespeler.
Als er een videocassette wordt geplaatst, wordt de
weergave ervan automatisch gestart.
3
De spoorregeling voor de cassetteband verloopt
automatisch.
5
Druk op de STOP-toets om de weergave te stoppen.
5
Als het einde van de cassette wordt bereikt tijdens
weergave of snelspoelen, wordt de band
automatisch teruggespoeld.
5
Als er tijdens de weergave veel bandruis is, drukt
u op de AUTO-toets van de afstandsbediening om
de automatische spoorregelingsfunctie uit te
schakelen en u gebruikt de TRACKING +/- toetsen
voor de spoorregeling.
Snelspoelen/terugspoelen
Druk, terwijl de band stilstaat, op de FF-toets of de
REW-toets.
•
Als u minder dan twee seconden nadat de REWtoets is ingedrukt, de -toets indrukt, wordt de
videocassettespeler uitgeschakeld nadat de cassette
helemaal is teruggespoeld.
Snelspoelen/terugspoelen en het beeld bekijken
Druk tijdens de weergave even kort op de FF-toets
of de REW-toets.
• De videocassettespeler start de versnelde weergave
voor het opzoeken van een gewenst beeld.
• Om weer terug te gaan naar normale weergave,
drukt u de PLAY-toets in.
• Houd voor het opzoeken van een dichtbij liggend
punt de FF of REW tijdens weergave of
stilbeeldweergave langer dan 2 seconden ingedrukt.
De normale weergave wordt voortgezet wanneer u
de toets weer loslaat.
12
Weergave van een stilstaand beeld / beeld-voor-beeld-weergave / vertraagde weergave
Druk tijdens de weergave op de PAUSE-toets.
• Het beeld wordt stopgezet.
• Als het stilstaande beeld op en neer beweegt, kunt
u met de TRACKING +/- toetsen van de
afstandsbediening de spoorregeling bijstellen om
een stabieler beeld te verkrijgen.
Druk tijdens weergave van het stilstaande beeld op
de PAUSE-toets.
• Iedere keer dat u tijdens stilstaand beeldweergave
op de PAUSE-toets drukt, verspringt de weergave
één beeldje verder.
Houd, tijdens de weergave, de PAUSE-toets 2
seconden of langer ingedrukt.
•
De weergavesnelheid zakt tot 1/6 van de normale
snelheid (vertraagde
weergave).
•
Als er tijdens deze vertraagde weergave storing
optreedt, stel de
spoorregeling dan bij met de TRACKING +/toetsen van de
afstandsbediening om de storing te onderdrukken.
•
Als u dezelfde handeling uitvoert tijdens zoeken
in achterwaartse richting, wordt de cassette
vertraagd weergegeven in achterwaartse richting.
5 Om vanuit vertraagde weergave terug te keren naar
normale weergave, drukt u op de PLAY-toets.
•
Bij weergave met een verschillende snelheid (snel/
vertraagd) is er geen geluidsweergave.
•
Als er tijdens versnelde of vertraagde weergave
storing optreedt, duidt dit niet op een fout in het
apparaat.
•
Als u het beeld meer dan vijf minuten stil laat staan
of vertraagd weergeeft, wordt de weergave
automatisch stopgezet, ter bescherming van de
cassetteband.
•
Bij het afspelen van een slecht opgenomen videocassette of een cassette die op een ander apparaat
is opgenomen, kan het gebeuren dat de
spoorregeling niet functioneert.
•
De automatische spoorregelingsfunctie wordt altijd
ingeschakeld als de videospeler wordt ingeschakeld
of als er een cassette wordt geplaatst.
LET OP
Tijdens zoeken, stilstaand beeldweergave,
vertraagde weergave of beeld-voor-beeld-weergave:
● kan het beeld vervormd worden weergegeven;
● kunnen er ruisbalken verschijnen;
● kunnen de kleuren slecht worden weergegeven.
Herhaalde weergave
Houd tijdens de weergave de PLAY-toets 5 seconden
of langer ingedrukt. (De aanduiding “PLAY” knippert.)
•
De band wordt nu 20 keer achter elkaar
weergegeven, van het begin tot aan het einde. Na
de 20ste keer stopt de weergave.
5
Om deze herhaalde weergave tussentijds te
stoppen, drukt u op de STOP-toets.
Page 58

13
Zoekfuncties
Weergave vanaf het begin van een programma - weergave na zoeken
Om de weergave te starten vanaf het begin van een programma, zoekt u de index op die is opgenomen aan het
begin van ieder programma. Op videocassettes die zijn opgenomen door een JVC-videospeler, wordt aan het
begin van een nieuwe opname automatisch een index aangebracht.
1 Kies het gewesnte adres (index) met de INDEX-toets van de afstandsbediening.
TV-scherm
INDEX
INDEX –2
VoorwaartsAchterwaarts
•
Kies het gewenste adres (index) voor automatische weergave van het gezochte programma.
•
Iedere keer dat u op de rechter INDEX-toets drukt, wordt het indexnummer met 1 verhoogd en iedere keer
dat u op de linker INDEX-toets drukt, wordt het indexnummer met 1 verlaagd.
•
U kunt maximaal 9 programma’s tegelijkertijd kiezen.
5 Om tussentijds met het zoeken te stoppen, drukt u op de STOP-toets.
Ga twee indexen (adressen)
terug.
Kiezen van een programma-adres (index)
Programma dat wordt weergegeven
Voorgaande
Nieuws
programma
Adres
Achterwaartse
richting
[Voorbeeld]
Kiezen van het volgende programma:
druk eenmaal op de INDEX-toets ( ).
Kiezen van het voorgaande programma:
druk tweemaal op de INDEX-toets ( ).
Meer over NTSC weergave
U kunt met dit apparaat NTSC-cassettes weergeven.
• Bij gebruik van bepaalde TV's zal het beeld mogelijk in verticale richting krimpen en zijn er zwarte balken
boven en onder op het scherm. Dit duidt niet op een defekt van de videospeler of TV.
• Het beeld rolt mogelijk omhoog en omlaag op het scherm. Dit kunt u corrigeren met de V-HOLD regelaar
van uw TV. (Het rollen kan niet worden gestopt indien uw TV geen V-HOLD regelaar of dergelijke regelaar
heeft.)
• De teller en resterende bandtijd zijn niet juist.
• Tijdens het zoeken, stilbeeld, of beeld-voor-beeld weergave, zal het beeld worden vervormd en zijn de
kleuren mogelijk niet optimaal.
• Afhankelijk van het TV type worden tijdens NTSC weergave mogelijk de bovenste en onderste gedeelten
van aanduidingen niet getoond.
Volgende
Toneelstuk
programma
1-1-2-3 2 3
Voorwaartse
Speelfilm
richting
Page 59

Aansluiten op andere apparatuur
Aansluiten op een mobiel kleurenmonitorsysteem
Aansluiting op een in de handel verkrijgbaar mobiel
kleuren-TV-systeem.
Sluit de videocassettespeler aan op het tunergedeelte
van een in de handel verkrijgbaar mobiel kleurenTV-systeem.
1. Verbind de uitgangsaansluiting van de video-
cassettespeler met videoingangsaansluiting 1 van
het mobiele kleuren-TV-systeem.
14
Aansluitvoorbeeld
Signaalstroom
Naar de
netvoedingsaansluiting
Mobiel kleurenmonitorsysteem
Tunergedeelte
L
R
Naar
videoingangsaansluiting
AV-kabel
(als accesooire
bijgeleverd)
Netsnoer
(als accesooire
bijgeleverd)
LRL
R
Videouitgangsaansluiting
Page 60

15
Aansluiten op een videocamera
Door aansluiten van een videocamera op dit apparaat,
kunt u via een op deze videocassettespeler
aangesloten mobiel kleuren-TV-systeem genieten van
beeld en geluid opgenomen met een videocamera.
Er zijn bepaalde videocamera's die niet op dit apparaat
kunnen worden aangesloten. Raadpleeg de
gebruiksaanwijzing van de videocamera voor meer
informatie hierover.
1
Verbind de uitgangsaansluiting van de videocamera
met de ingangsaansluiting van de videocassettespeler.
Aansluitvoorbeeld
Signaalstroom
Naar de
netvoedingsaansluiting
Videocamera
AV-kabel
(los verkrijgbaar)
L
R
Naar VIDEO-AUDIOuitgangsaansluiting
Netsnoer
(als accesooire
bijgeleverd)
LRL
R
AUX-aansluiting
Page 61

16
Verhelpen van storingen
Als er een probleem is met de videospeler, probeer dit dan te verhelpen aan de hand van de onderstaande lijst.
Geen stroomtoevoer
Het voedingssnoer is niet aangesloten.
Steek de stekker van het voedingssnoer stevig in de aansluiting.
Het apparaat werkt niet hoewel de stroomtoevoer in orde is (de indicator knippert).
Er is vocht gecondenseerd binnenin de videospeler of het circuit van de sensor voor te hoge temperatuur is in werking getreden.
Als er vocht is gecondenseerd, wacht dan enkele uren totdat de videospeler weer geheel droog is.
Als het circuit van de sensor voor te hoge temperatuur in werking is getreden, zorg dan dat de videospeler kan afkoelen.
De aanduidingen verdwijnen niet van het scherm.
Druk op de DISPLAY-toets van de afstandsbediening.
Er is storing in het beeld of in een gedeelte van het beeld.
Verkeerde spoorregeling.
Als de storing steeds in hetzelfde deel van het beeld verschijnt, duidt dit op een beschadiging van de cassetteband.
Druk de AUTO-toets van de afstandsbediening in om de automatische spoorregeling uit te schakelen en voer een handmatige
spoorregeling uit met de TRACKING +/- toetsen.
Het stilstaande beeld beweegt op en neer.
De instelling voor de verticale beeldweergave is verkeerd.
Voer een handmatige spoorregeling uit met de TRACKING +/- toetsen van de afstandsbediening.
Abnormale kleurenweergave
Geen videobeeld
Geen geluidsweergave
Raadpleeg de gebruiksaanwijzing van de TV die is aangesloten op de videospeler.
Het weergavebeeld is slecht of er is sneeuw.
De videokoppen zijn vuil.
Reinig de videokoppen met een videokoppenreinigingscassette.
Specificaties
Algemeen
• Voeding : 12 V gelijkstroom (11V-16 V toegestaan), negatieve aarde
• Afmetingen : 259 mm x 94 mm x 270 mm (breedte x hoogte x diepte)
• Gewicht : 3,2 kg.
• Bedrijfstemperatuur : 0°C tot +40°C
• Toegestane vochtigheidsgraad : 35% tot 80%
• Opslagtemperatuur : -20°C tot +60°C
Videogedeelte
• Weergavesysteem : VHS, hi-fi 4 koppen schuinspoorregistratie
• Videosignaal : VHS PAL-standaardsignaal
Audiogedeelte
• Weergavesysteem : VHS stereo hi-fi geluid
• Geluidsspoor : 2 hi-fi geluidskanalen en 1 normaal geluidskanaal
• Afstandsbediening : A-code
(In het apparaat zelf wordt er automatisch omgeschakeld
tussen de A-code en de B-code.)
Wijzigingen in ontwerp en specificaties voorbehouden zonder
voorafgaande kennisgeving.
Page 62

VICTOR COMPANY OF JAPAN, LIMITED
KV-V8
[EN/GE/FR/DU]
0101YSV*OZ*BJ
 Loading...