

JVC KV-PX9S - EXAD 20GB GPS Navigation System, KV-PX9B, KV-PX9SN, KV-PX9BN Update Instructions
Page 1
English
Française
KV-PX9S/KV-PX9B/KV-PX9SN/KV-PX9BN
Update Instructions
This is the instructions for updating the firmware and
software on KV-PX9, HDD Portable Navigation.
The items below will be updated by this update:
• KV-PX9 firmware
• Map data
–The U.S., U.S. Virgin Islands, Puerto Rico, Hawaii, Alaska and Canada consisting of
Detailed City and RNC totaling 6,139,994 miles of coverage
–15,298,684 POIs (Points of Interest)
* The “Recreation” → “Zoo” subcategory in POI (Point Of Interest) will be removed and all its entries
will be moved to “Recreation” → “Others” subcategory after this update is completed.
[Important]
• 2 GB free space is required on the AV Player area on the built-in HDD.
See page 3 for checking the free space.
Español
• The maximum space of the AV Player area will become 3 GB after the
update.
Table of Contents
Preparations ....................................................................2
Update ..............................................................................4
Step 1: firmware update ...............................................4
Step 2: map database update ......................................7
Confirming the software version of KV-PX9 ...............13
LVT1900-001A
Page 2
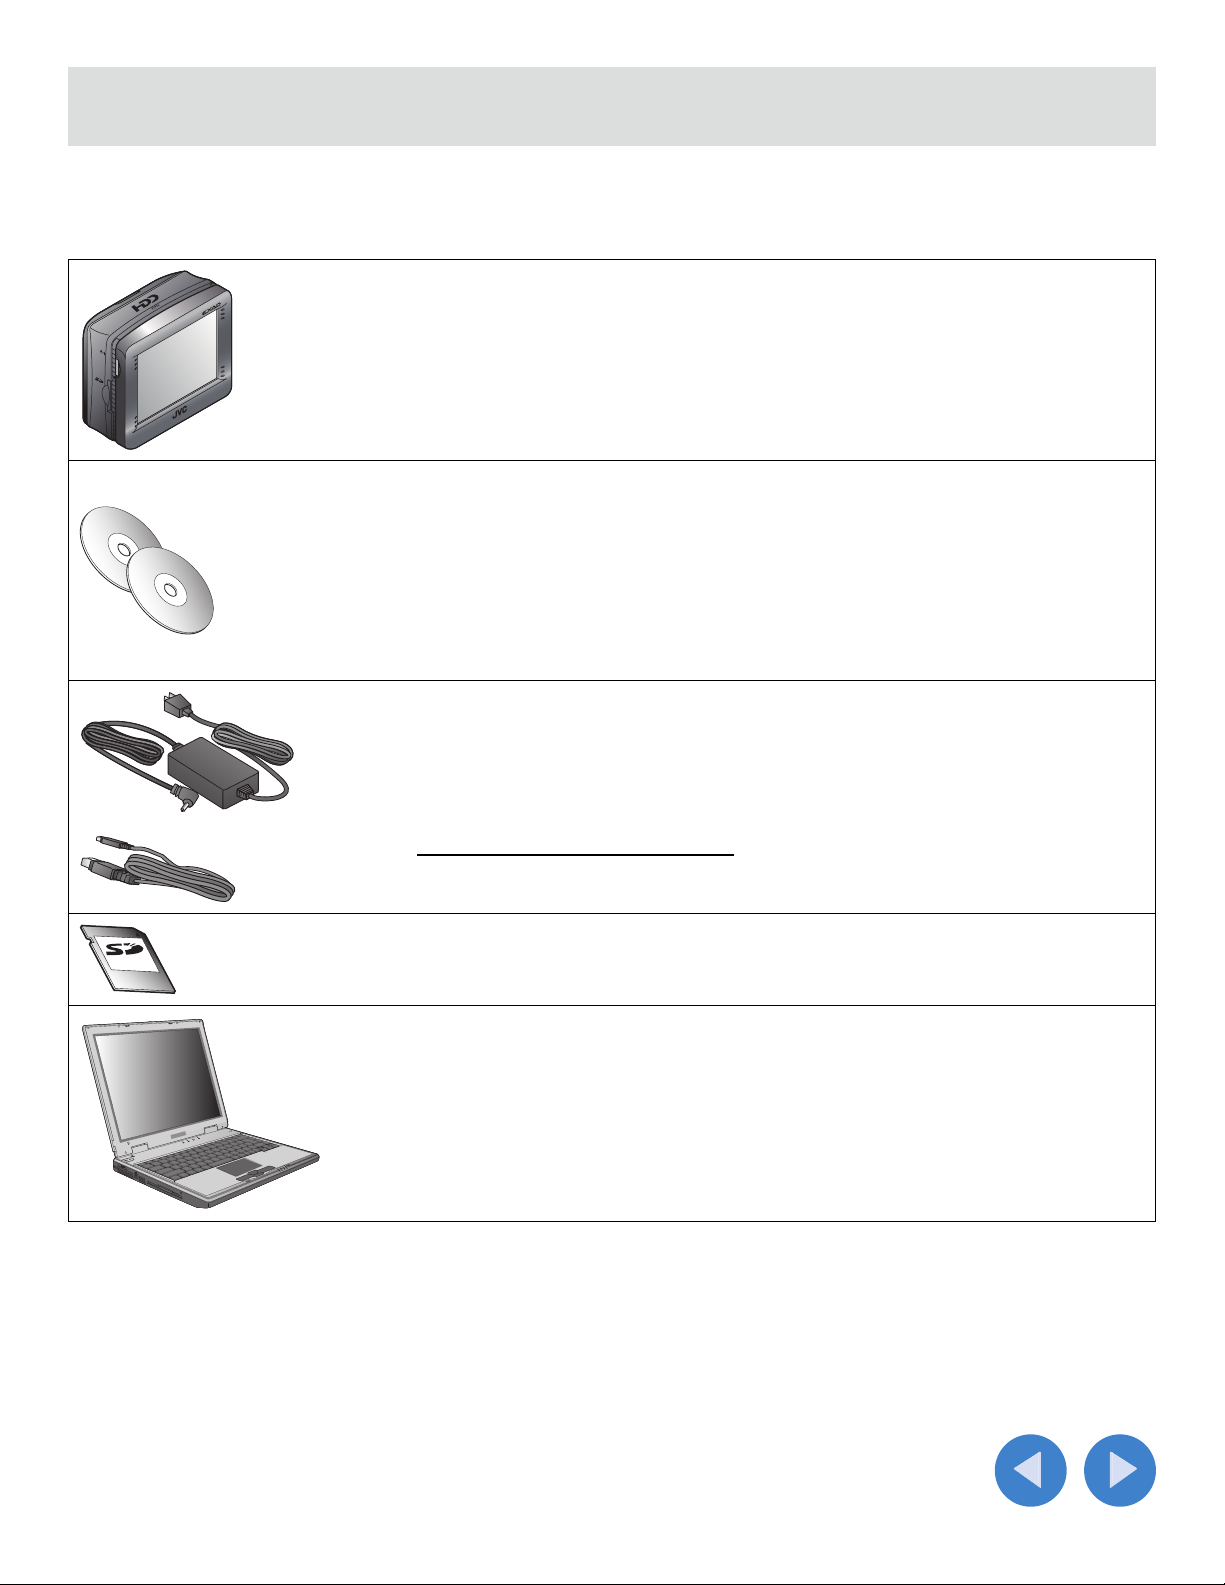
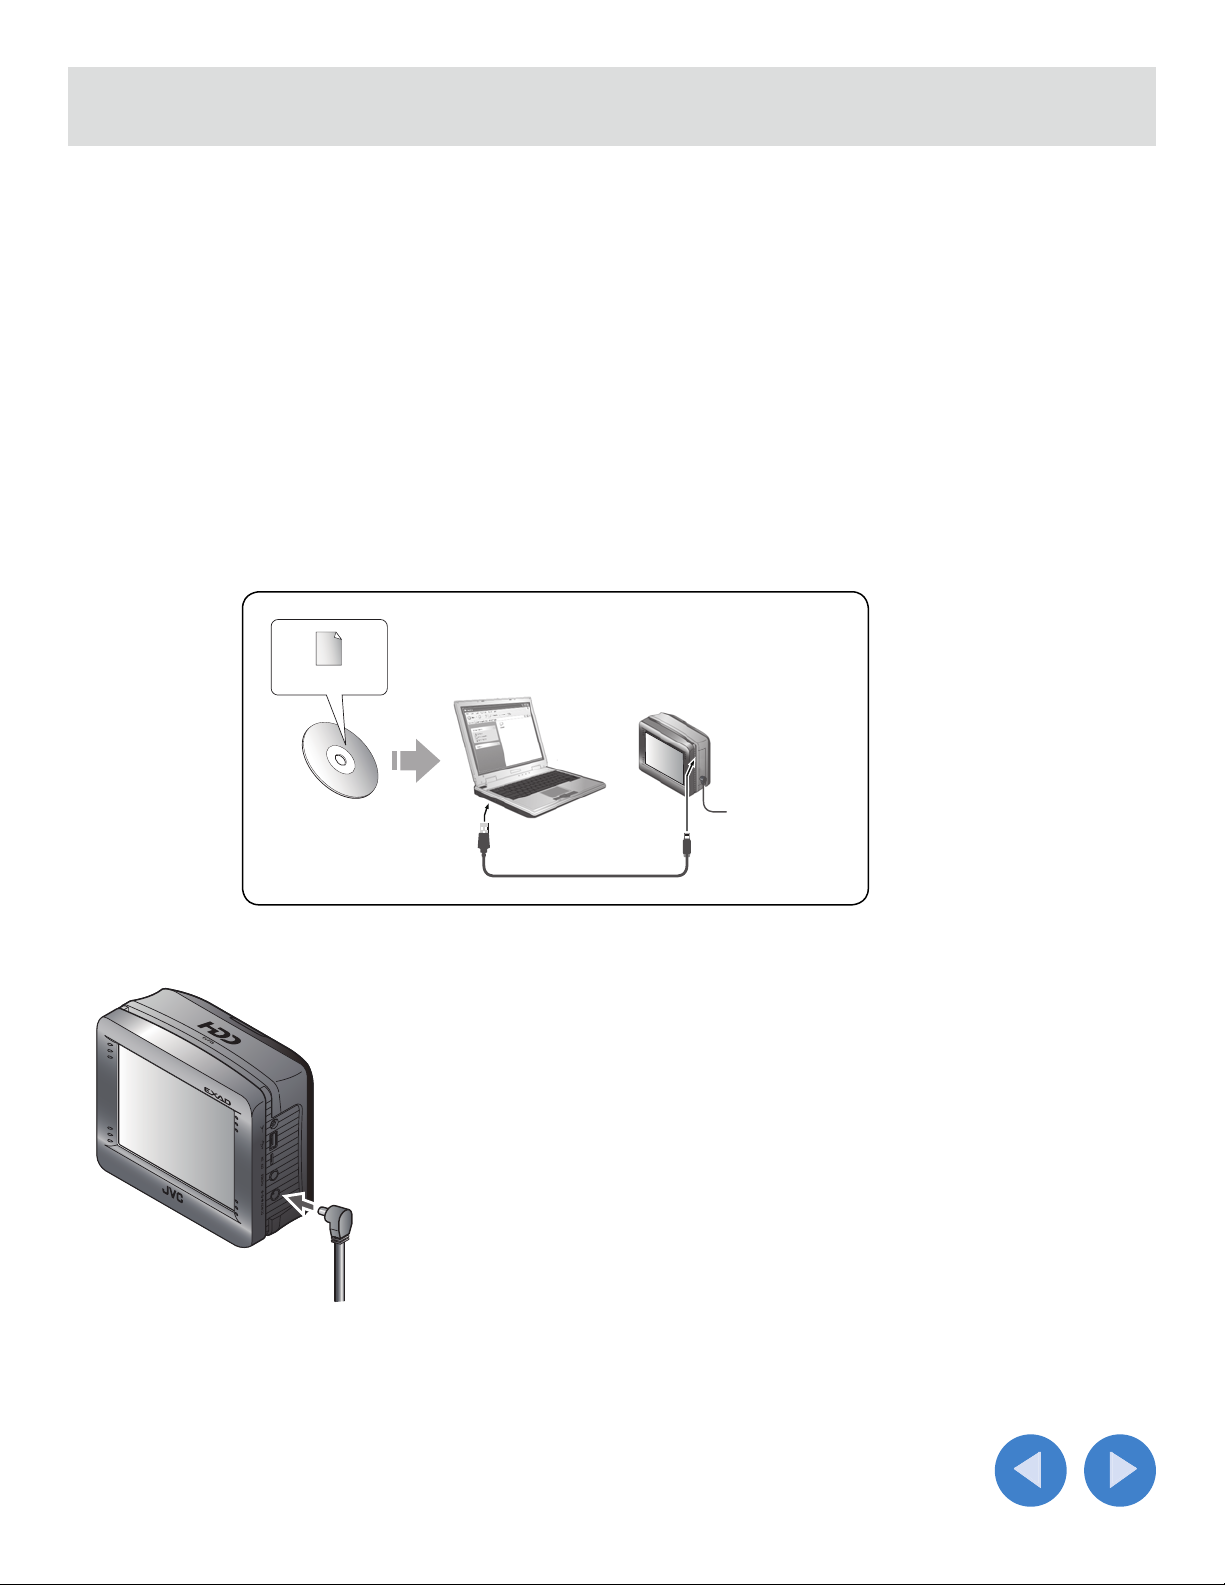
Preparations
To update the KV-PX9 firmware and software, the supplied two DVD-ROMs (KV-PD902) and the equipment
below are required.
KV-PX9
DVD-ROMs
(KV-PD902)
AC adapter
USB cable
2 GB (2000 MB) or more free space is required on the AV Player area on
the built-in HDD.
DISC 1:
/NKUS2000.NB0 (Update file for of the KV-PX9 firmware)
/DB/Px9hddSetup.exe (Update program for KV-PX9 map data)
/Manual/Manual.pdf (Instructions for the update (this pdf))
/DB/Parts/px9part_000.cab, ..., px9part_010.cab (11 files) (Map data)
DISC 2:
/DB/Parts/px9part_011.cab, px9part_012.cab (Map data)
/DB/poicab.cab (POI data).
To perform the update it is necessary to use an AC adapter (Output: DC
5V, 2A) and a USB cable (USB A plug – Mini USB plug).
USB cable and AC adapter may not be included with your model. In that
case you may use commercially available a USB cable and an AC adapter
or purchase JVC KV-K1016 POWER KIT by calling JVC Customer Care
Center at 1-800-252-5722 or at JVC web site
http://www.jvcservice.com/Store/.
SD card
PC
Microsoft, Windows, are either trademarks or registered trademarks of Microsoft Corporation in the United States and other
countries.
Other names of systems and products mentioned in these instructions are usually the registered trademark or trademarks of the
manufacturers who developed the system or product concerned.
Blank 128 MB, 256 MB or 512 MB, FAT formatted SD card (FAT 32 is NOT
compatible) and SD card reader/writer is also required on your PC.
OS: Microsoft® Windows® XP
CPU: Intel Pentium/Celeron family, AMD K6/Athron/Duron family, or their
compatible one (Pentium 4 2.02 GHz or higher is recommended)
Memory: 512 MB or more
HDD: 2.0 GB free space is required.
Others: DVD-ROM drive and USB terminals (USB 2.0 is strongly
recommended)
2
Page 3
Preparations (Continued)
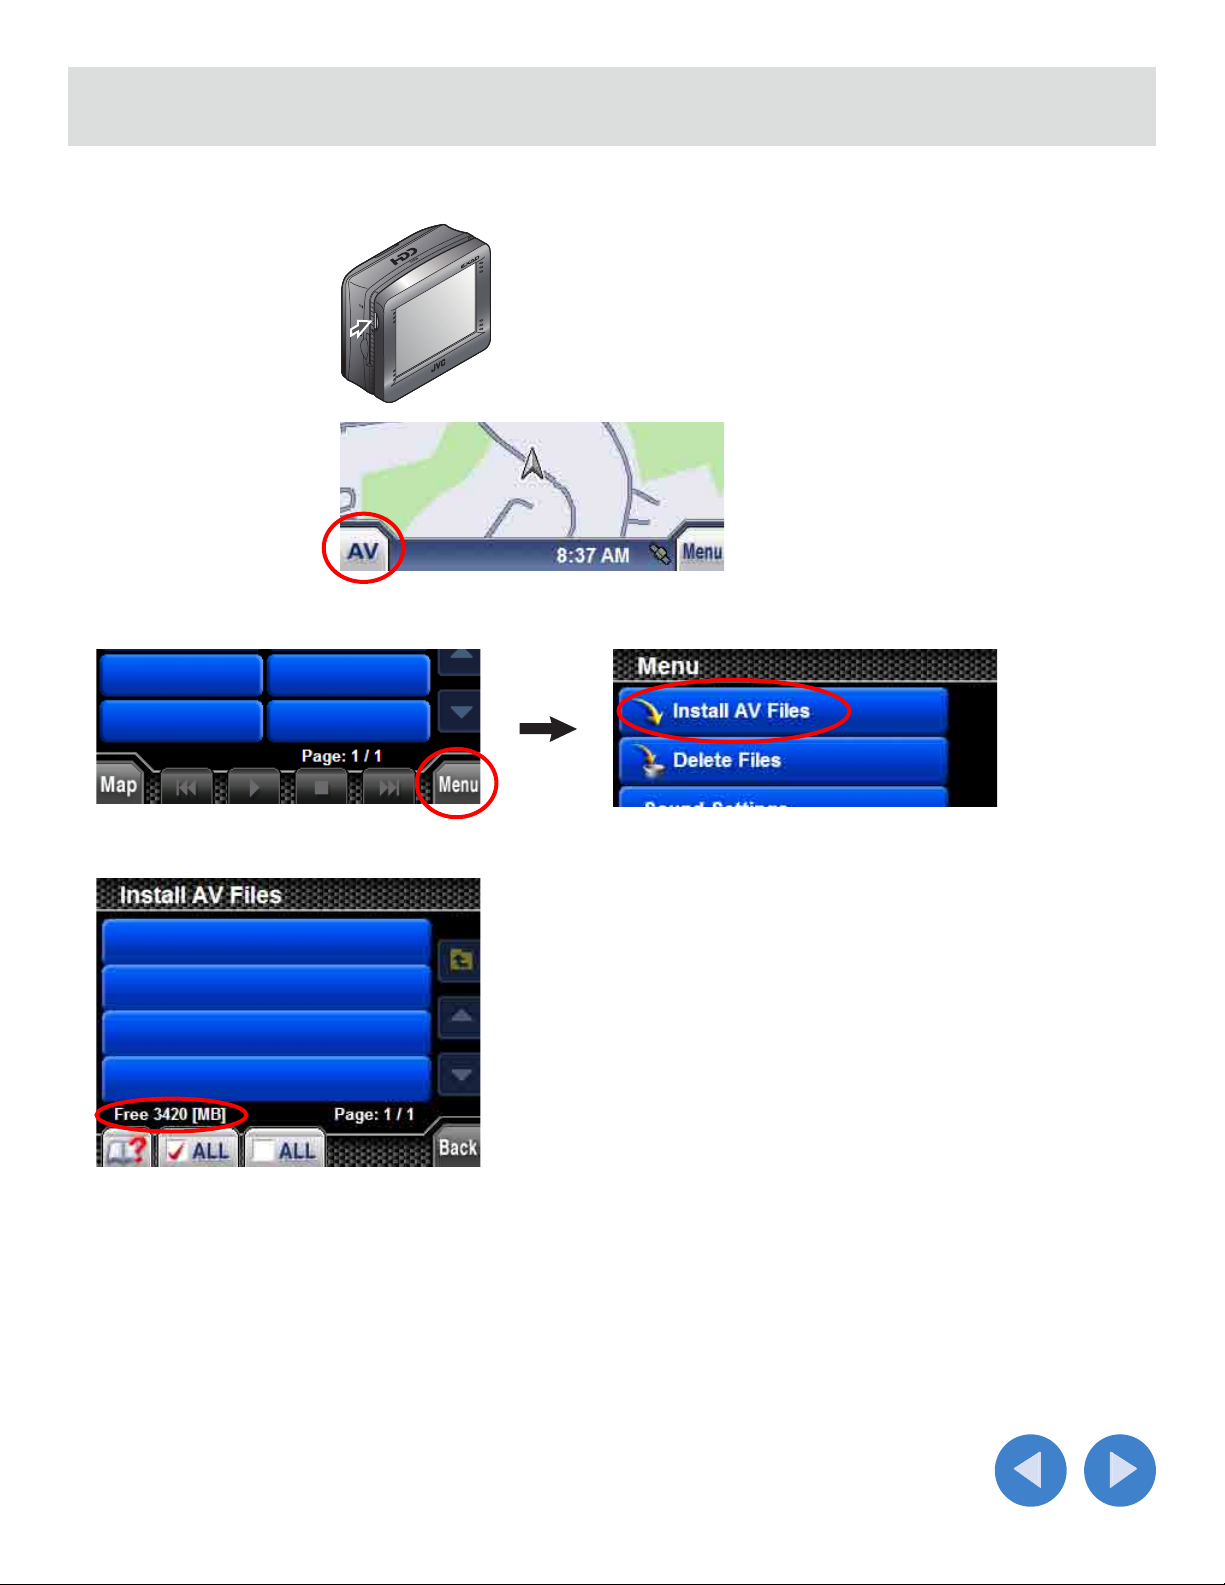
Checking the free space on the KV-PX9 built-in HDD
1.
Turn on the power.
2. Press AV button.
3. Press Menu to select “Install AV Files.”
4. Check the free space indication.
If the free space is smaller than 2 GB, delete files installed on the “Delete files” menu until the free space becomes larger
than 2 GB.
For the “Delete files” menu, refer to the on-screen help of KV-PX9.
3
Page 4

Update
Step 1: firmware update
[Important]
• Make sure that the format of the SD card is FAT. Refer to the Windows help for the detail of checking the format
and changing the format of the SD card.
• Delete all files and folders on the SD card.
• Refer also to the quick guide of KV-PX9 for the power supply and the handling of an SD card.
• Once the firmware update is started, the unit cannot be used until completing the update of the firmware
and map data.
Copy
NKUS2000.NB0
DISC 1
NKUS2000.NB0
1. Copy the file “NKUS2000.NB0” from DISC 1 on to the SD card on your PC.
2. Disconnect the AC adapter from the unit and insert the SD card into the SD card slot.
Continued to the next page
4
Page 5
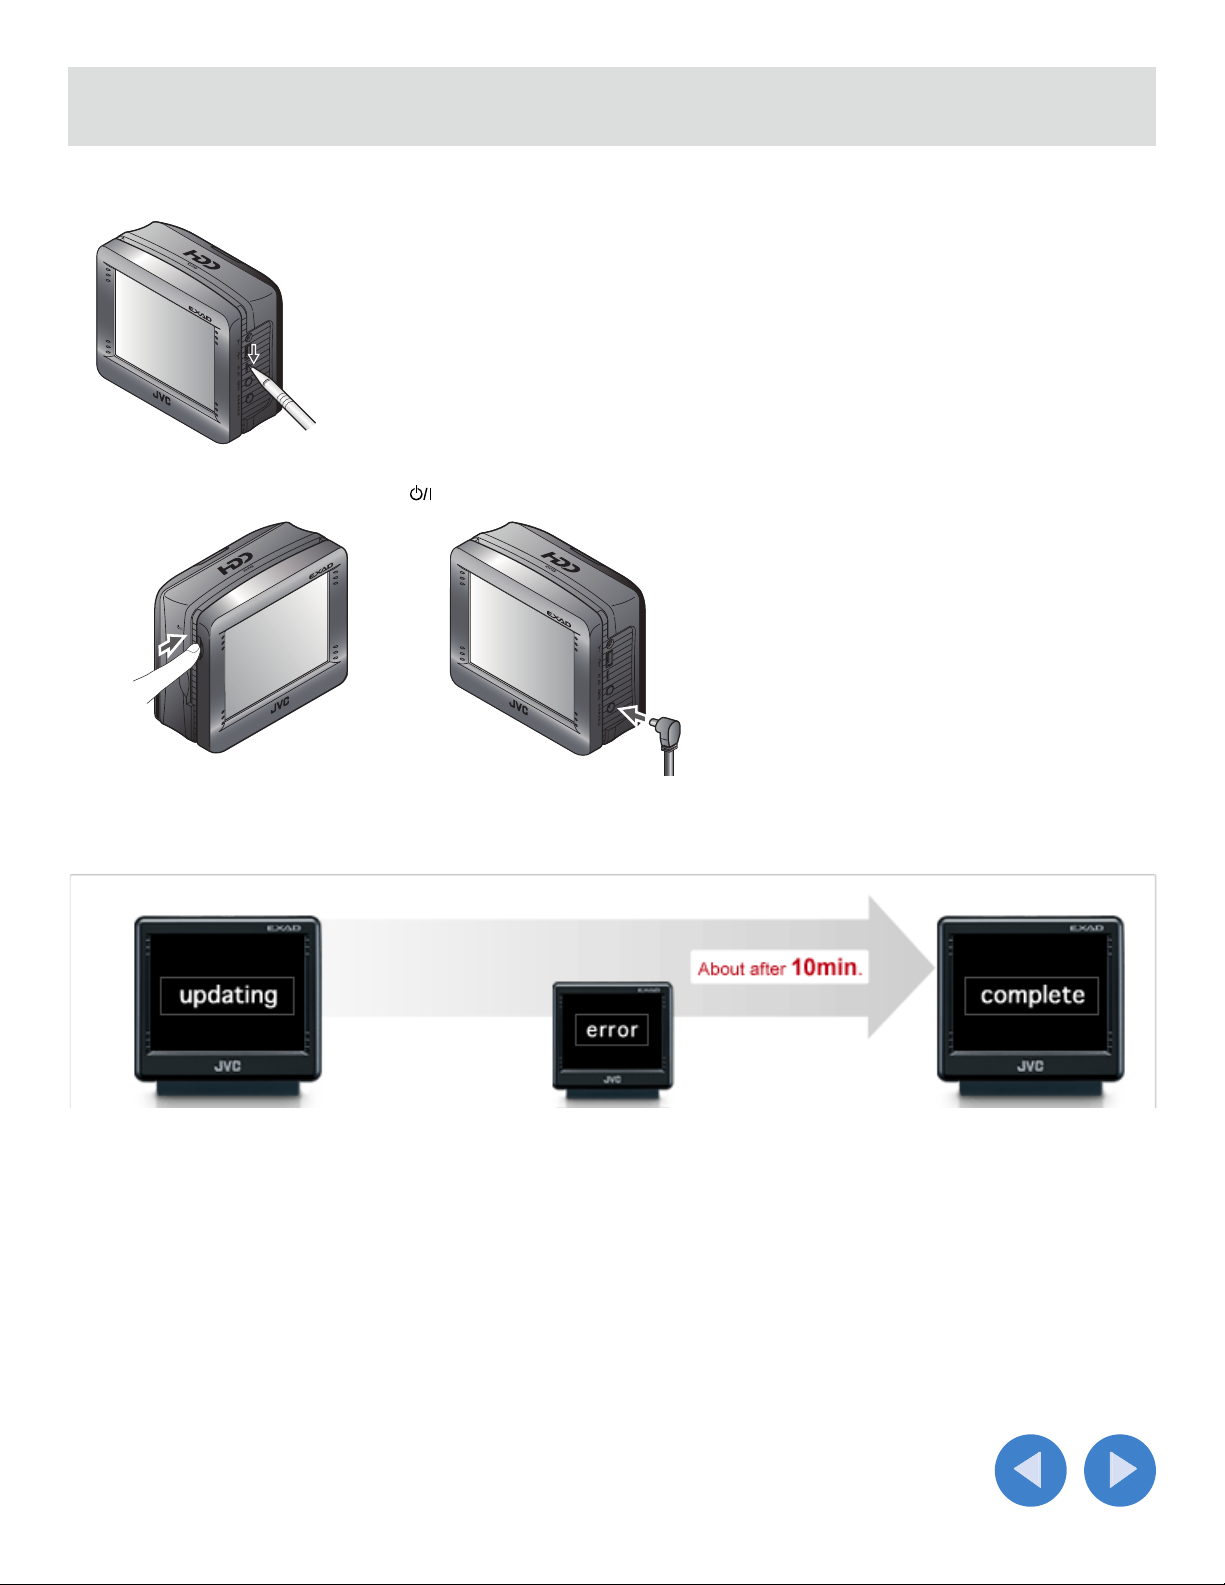
Update (continued)
3. Slide the battery switch to “OFF.”
OFF
4. While pressing and holding the button, connect the AC adapter.
Hold
Update starts. The power lamp flashes purple and red and the firmware update status is displayed on the screen as
follows. DO NOT do any operation while updating.
“updating” flashes on and off. If an error occurs. Update finished.
• It takes about 10 minutes to update the firmware. “complete” appears on the screen display as the update successfully
finished.
• If “error” appears on the display screen, disconnect the AC adapter and check whether the file you copied and the
format of the SD card are correct.
Please call JVC Customer Care Center at 1-800-252-5722 if you cannot update the firmware even after the checking.
Continued to the next page
5
Page 6

Update (continued)
5. After finishing the update, disconnect the AC adapter and eject the SD card.
1
2
6. Slide the battery switch to “ON.”
ON
6
Page 7
Update (continued)
Step 2: map database update
[Important]
• Make sure to update the KV-PX9 firmware before proceeding to the steps below.
• Make sure to disconnect any other USB device than KV-PX9 from your PC before starting update.
• Quit all programs on your PC before starting the update.
• The time for updating varies depending on the specification of your PC. It takes about 40 minutes when
updating on a PC with Pentium IV 2.02 GHz and 1 GB memory, for example.
• Make sure that the AC power is supplied to the Unit and your PC to avoid the accidental interruption of the
update process.
• DO NOT interrupt the update after starting the update program. If interrupted, try to update the database
again.
Px9hddSetup.exe
DISC 1
1. Connect the AC adapter to the unit.
AC adapter
Continued to the next page
7
Page 8
Update (continued)
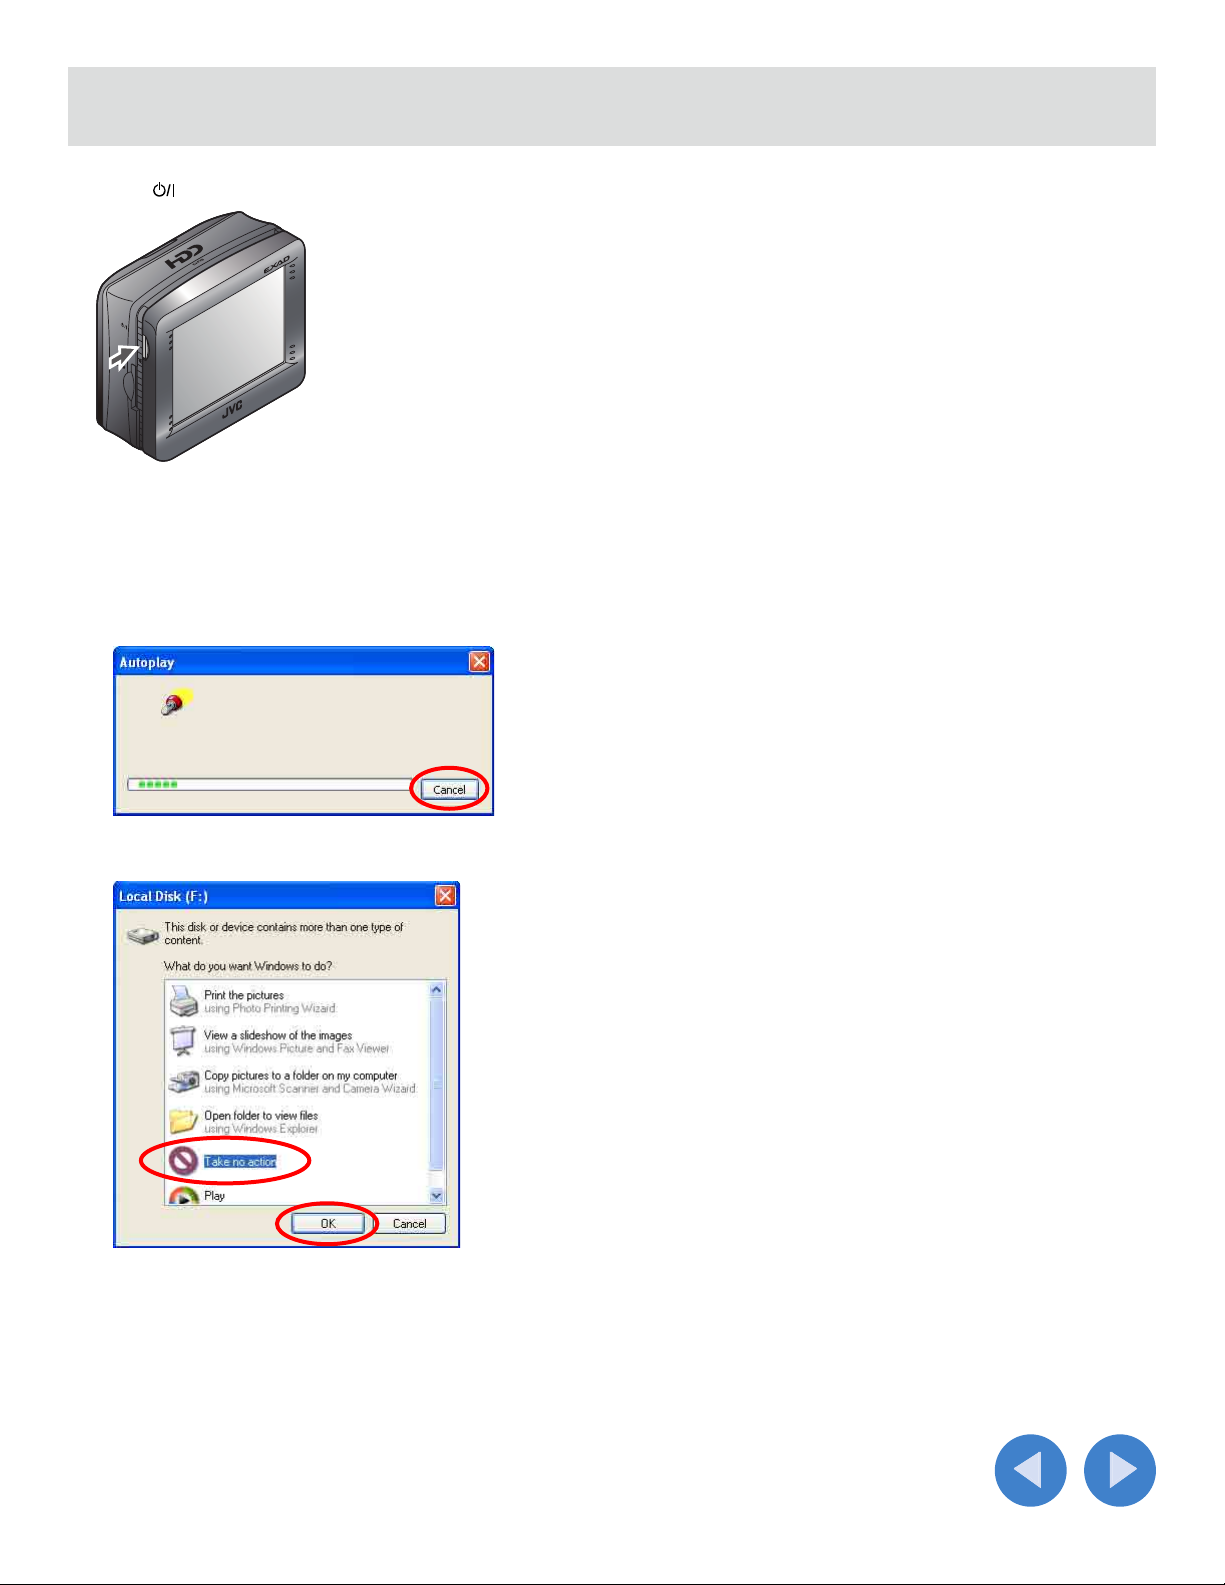
2. Press button to turn on the power.
“Information” appears on the display screen.
3. Connect the unit to your PC using a USB cable.
• Quit all programs on your PC.
• Cancel the autoplay window when it appeared on your PC after connecting the unit.
• Select “Take no action” and click “OK” on the window below.
Continued to the next page
8
Page 9
Update (continued)
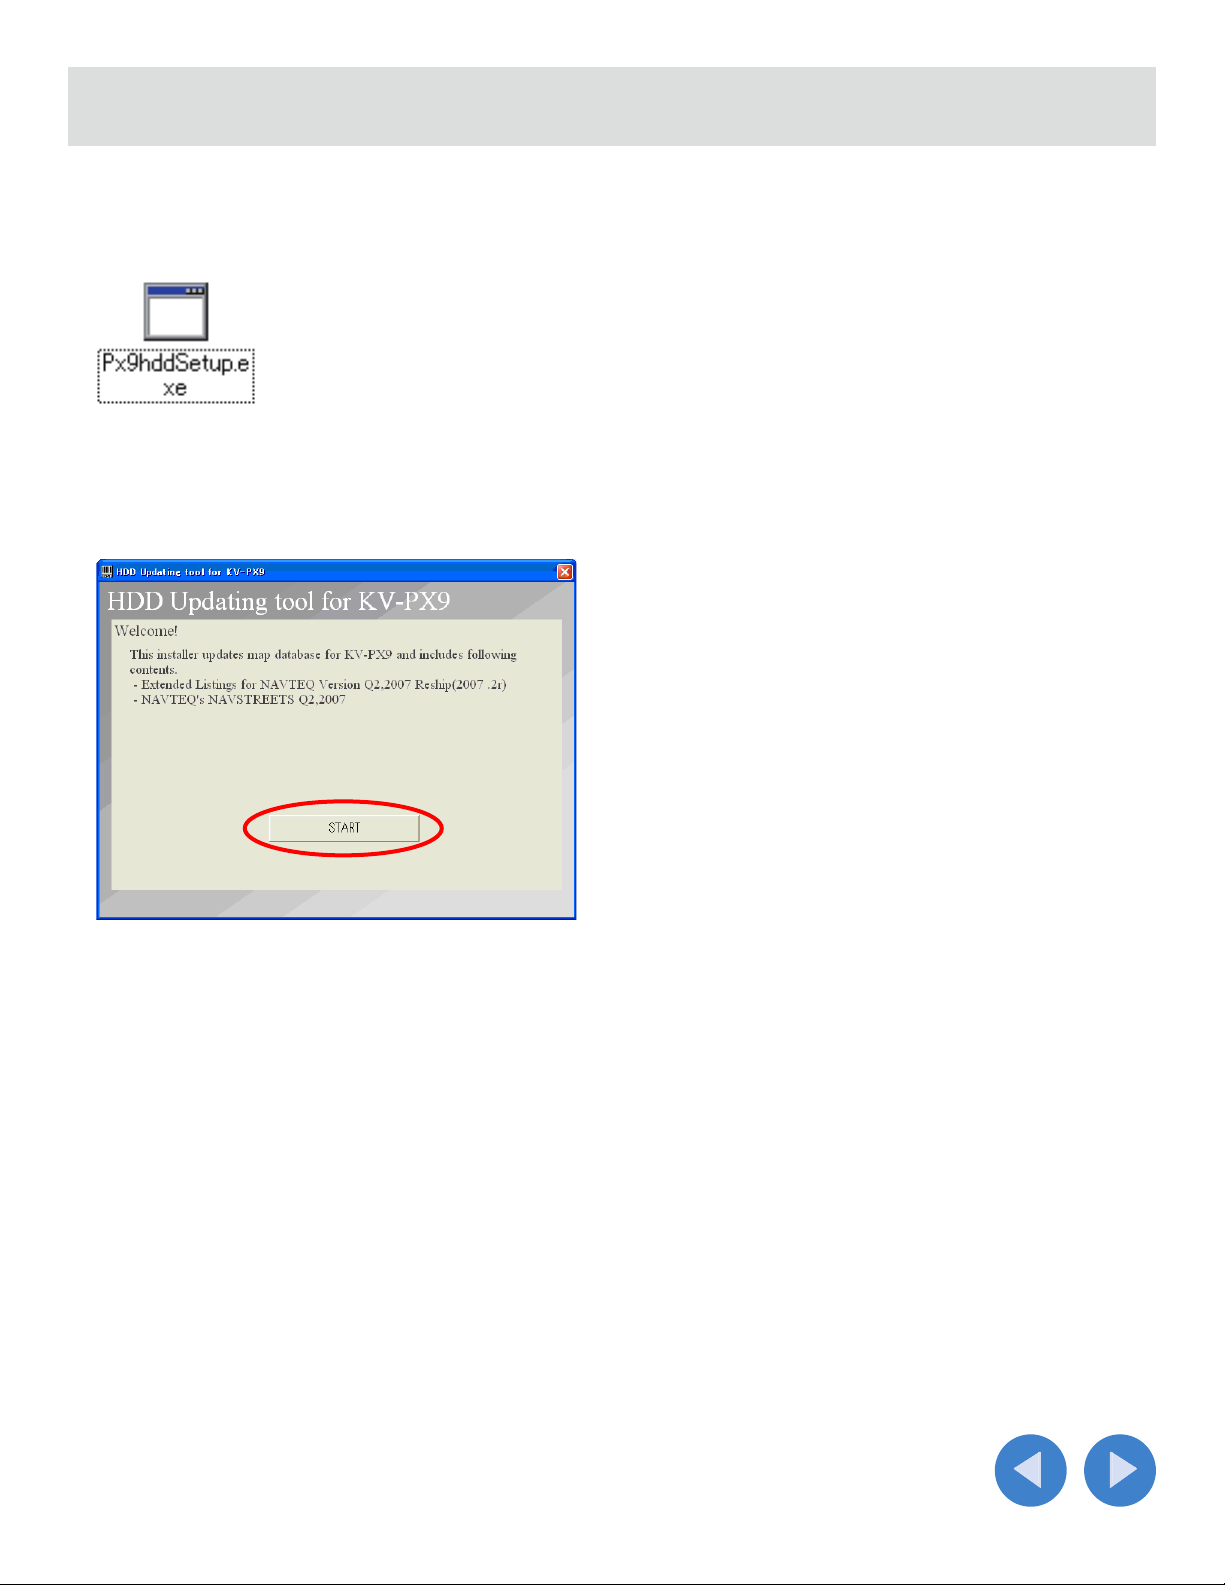
4. Insert the DISC 1 into your PC.
5. Open the “DB” folder and double-click “Px9hddSetup.exe.”
The update program window appears (its messages appear only in English).
6. Click “START.”
Continued to the next page
9
Page 10
Update (continued)
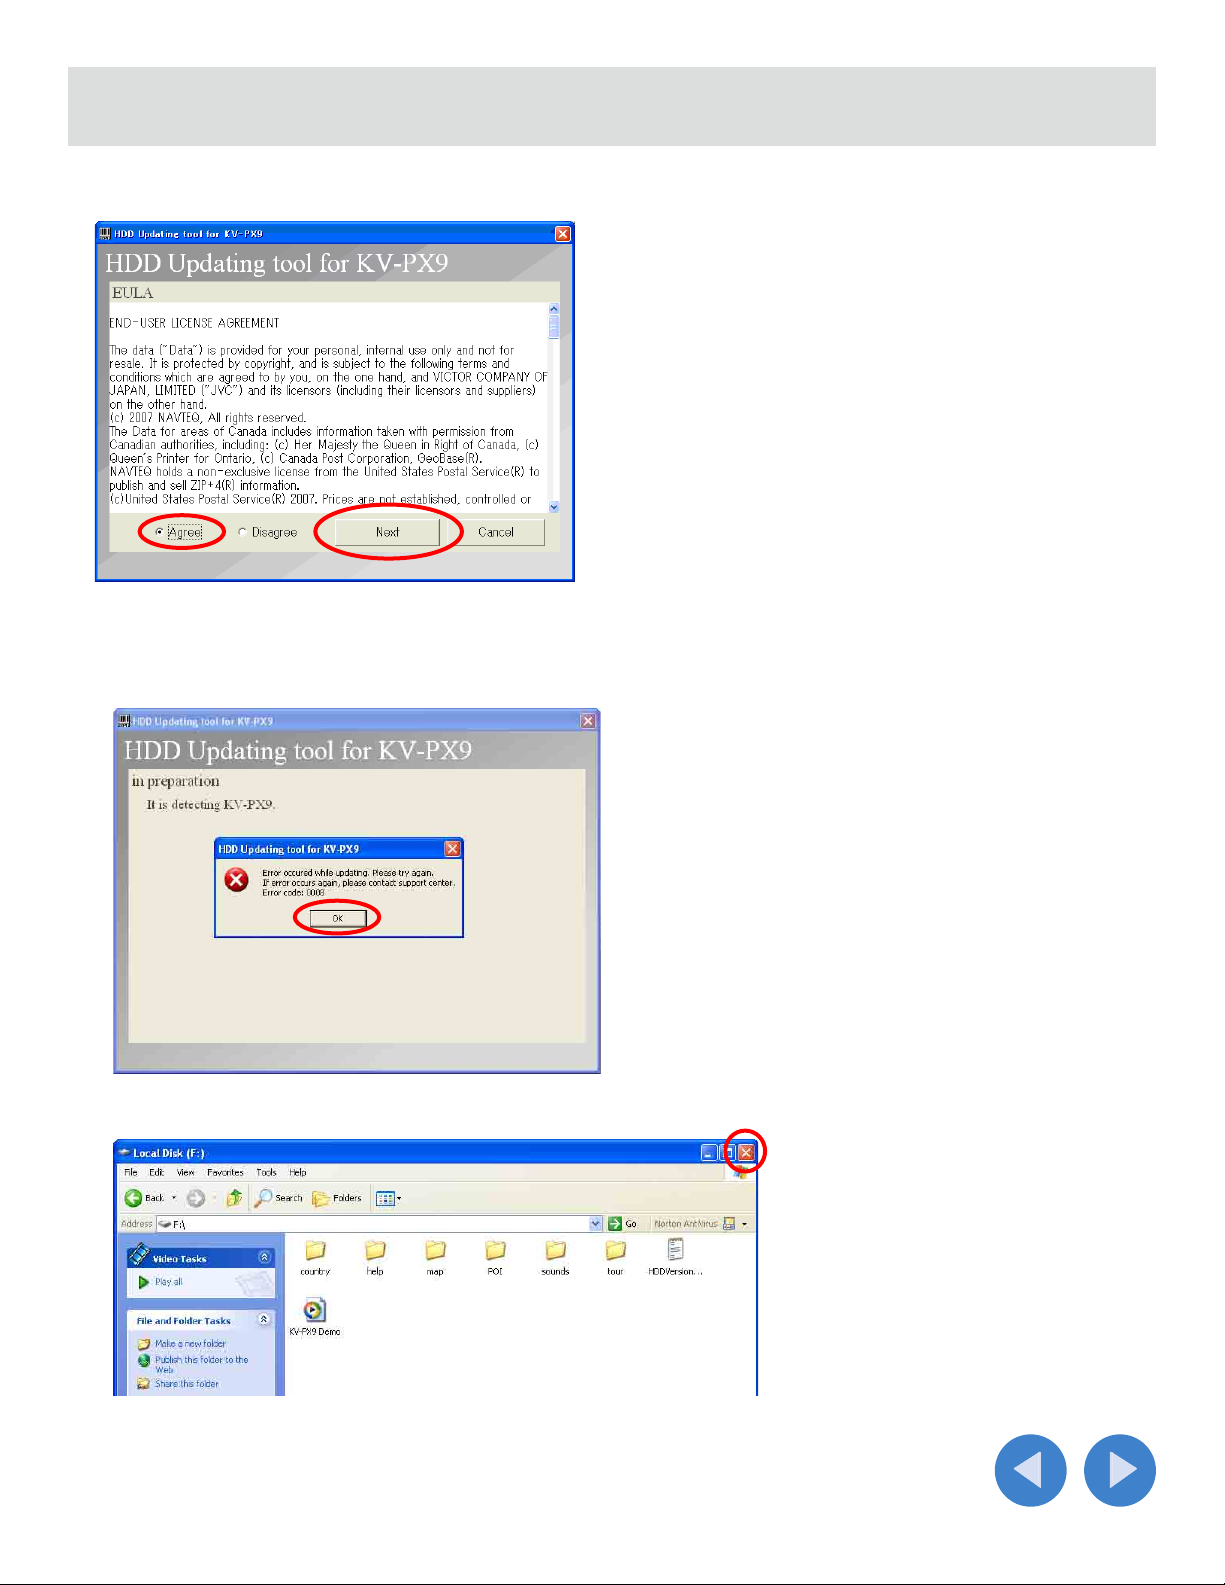
7. Confirm the end-user license agreement.
Check “Agree” and click “Next” to
continue the update.
• If the error screen (1 below) appears, click “OK” and close the window 2 below, then try from step 5 again.
1
2
Continued to the next page
10
Page 11
Update (continued)
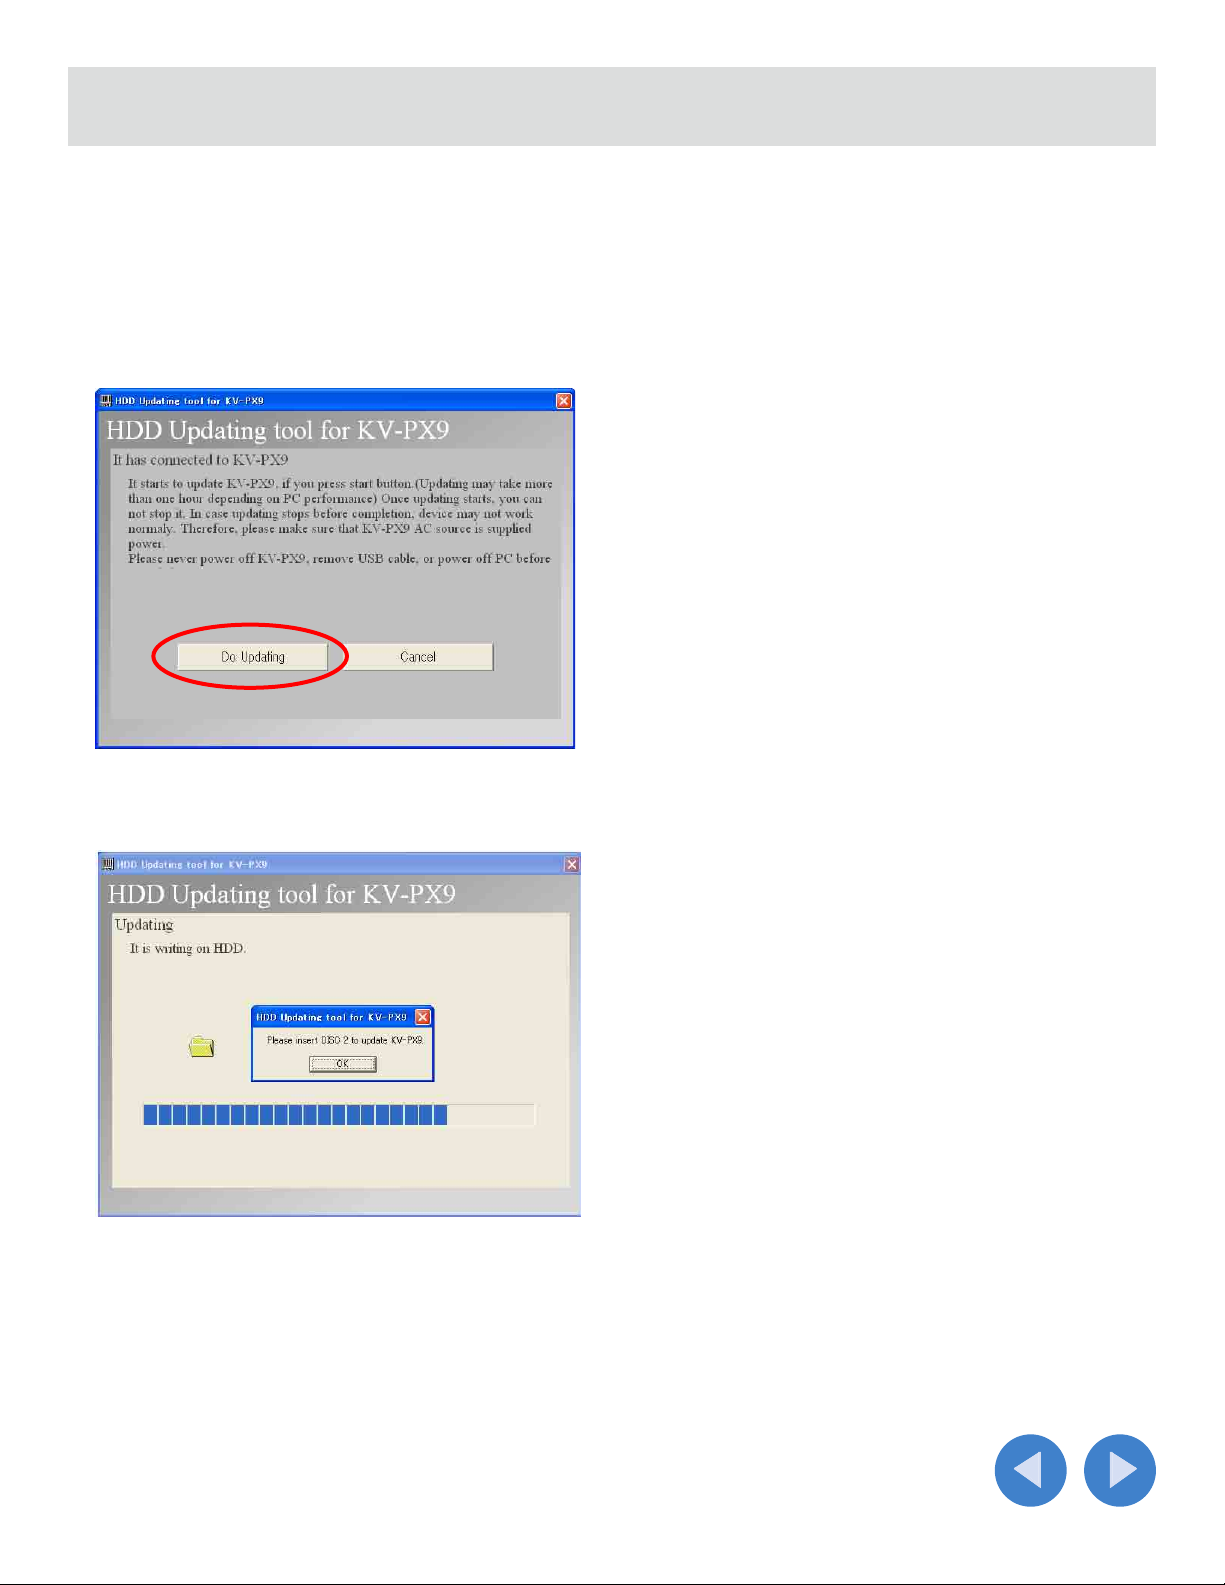
8. Click “Do Updating.”
The map data update starts.
• The time for updating varies depending on the specification of your PC. It takes about 40 minutes when updating on a
PC with Pentium IV 2.02 GHz and 1 GB memory, for example.
• DO NOT do any interruption or any disconnection while updating. The interruption may damage the unit.
• If the updat
252-5722 if you cannot finish the update even after retrying.
e is interrupted or failed, try to update the database again. Please call JVC Customer Care Center at 1-800-
9. Insert DISC 2 following the on-screen message below.
Continued to the next page
11
Page 12

Update (continued)
10. Click “END” after finishing the update.
11. Left-click the icon in the task bar, and follow the on-screen instructions.
Make sure to unmount the unit from the PC. Otherwise the unit may be damaged.
12. Disconnect the USB cable.
KV-PX9 will automatically restart after disconnection. After restarting, confirm the software version of the unit (see
“Confirming the software version of KV-PX9” on the next page).
12
Page 13

Confirming the software version of KV-PX9
1. Press Menu button.
2. Press “INFO.”
3. Press “Version.”
The version information of the unit appears. The information appears as below after the update was finished successfully.
13
Page 14

End-User License Agreement
The data (“Data”) is provided for your personal, internal use only and not for resale.
It is protected by copyright, and is subject to the following terms and conditions
which are agreed to by you, on the one hand, and VICTOR COMPANY OF JAPAN,
LIMITED (“JVC”) and its licensors (including their licensors and suppliers) on the
other hand.
© 2007 NAVTEQ, All rights reserved.
The Data for areas of Canada includes information taken with permission from
Canadian authorities, including: ©Her Majesty the Queen in Right of Canada, ©
Queen’s Printer for Ontario, ©Canada Post Corporation, GeoBase®.
NAVTEQ holds a non-exclusive license from the United States Postal Service® to
publish and sell ZIP+4® information.
©United States Postal Service® 2007. Prices are not established, controlled or approved
by the United States Postal Service®. The following trademarks and registrations are
owned by the USPS: United States Postal Service, USPS, and ZIP+4.
TERMS AND CONDITIONS
Personal Use Only. You agree to use this Data together with JVC MAP Car Navigation
Software for the solely personal, non-commercial purposes for which you were
licensed, and not for service bureau, time-sharing or other similar purposes.
Accordingly, but subject to the restrictions set forth in the following paragraphs,
you may copy this Data only as necessary for your personal use to (i) view it, and (ii)
save it, provided that you do not remove any copyright notices that appear and do
not modify the Data in any way. You agree not to otherwise reproduce, copy, modify,
decompile, disassemble or reverse engineer any portion of this Data, and may not
transfer or distribute it in any form, for any purpose, except to the extent permitted
by mandatory laws. Multi-disc sets may only be transferred or sold as a complete set
as provided by JVC and not as a subset thereof.
Restrictions. Except where you have been specifically licensed to do so by JVC,
and without limiting the preceding paragraph, you may not (a) use this Data with
any products, systems, or applications installed or otherwise connected to or in
communication with vehicles, capable of vehicle navigation, positioning, dispatch,
real time route guidance, fleet management or similar applications; or (b) with or in
communication with any positioning devices or any mobile or wireless-connected
electronic or computer devices, including without limitation cellular phones,
palmtop and handheld computers, pagers, and personal digital assistants or PDAs.
Warning. The Data may contain inaccurate or incomplete information due to the
passage of time, changing circumstances, sources used and the nature of collecting
comprehensive geographic data, any of which may lead to incorrect results.
No Warranty. This Data is provided to you “as is,” and you agree to use it at your own
risk. JVC and its licensors (and their licensors and suppliers) make no guarantees,
representations or warranties of any kind, express or implied, arising by law or
otherwise, including but not limited to, content, quality, accuracy, completeness,
effectiveness, reliability, fitness for a particular purpose, usefulness, use or results
to be obtained from this Data, or that the Data or server will be uninterrupted or
error-free.
ADVISED OF THE POSSIBILITY OF SUCH DAMAGES. Some States, Territories
and Countries do not allow certain liability exclusions or damages limitations, so to
that extent the above may not apply to you.
Export Control. You agree not to export from anywhere any part of the Data provided
to you or any direct product thereof except in compliance with, and with all licenses
and approvals required under, applicable export laws, rules and regulations.
Entire Agreement. These terms and conditions constitute the entire agreement
between JVC (and its licensors, including their licensors and suppliers) and you
pertaining to the subject matter hereof, and supersedes in their entirety any and
all written or oral agreements previously existing between us with respect to such
subject matter.
Governing Law. The above terms and conditions shall be governed by the laws of the
State of Illinois, without giving effect to (i) its conflict of laws provisions, or (ii) the
United Nations Convention for Contracts for the International Sale of Goods, which
is explicitly excluded. You agree to submit to the jurisdiction of the State of Illinois
for any and all disputes, claims and actions arising from or in connection with the
Data provided to you hereunder.
Government End Users. If the Data is being acquired by or on behalf of the United
States government or any other entity seeking or applying rights similar to those
customarily claimed by the United States government, “NAVTEQ Data” (hereinafter
“Data”) is a “commercial item” as that term is defined at 48 C.F.R. (“FAR”) 2.101,
is licensed in accordance with this END-USER LICENSE AGREEMENT, and each
copy of the Data delivered or otherwise furnished shall be marked and embedded
as appropriate with the following “Notice of Use,” and shall be treated in accordance
with such Notice:
NOTICE OF USE
CONTRACTOR (MANUFACTURER/ SUPPLIER) NAME: NAVTEQ
CONTRACTOR (MANUFACTURER/SUPPLIER) ADDRESS: 222 Merchandise
Mart Plaza, Suite 900, Chicago, Illinois 60654
This Data is a commercial item as defined in FAR 2.101 and is subject to this ENDUSER LICENSE AGREEMENT under which this Data was provided.
© 2007 NAVTEQ - All rights reserved.
If the Contracting Officer, federal government agency, or any federal official refuses
to use the legend provided herein, the Contracting Officer, federal government
agency, or any federal official must notify NAVTEQ prior to seeking additional or
alternative rights in the Data.
Disclaimer of Warranty: JVC AND ITS LICENSORS (INCLUDING THEIR
LICENSORS AND SUPPLIERS) DISCLAIM ANY WARRANTIES, EXPRESS OR
IMPLIED, OF QUALITY, PERFORMANCE, MERCHANTABILITY, FITNESS FOR
A PARTICULAR PURPOSE OR NON-INFRINGEMENT. Some States, Territories
and Countries do not allow certain warranty exclusions, so to that extent the above
exclusion may not apply to you.
Disclaimer of Liability: JVC AND ITS LICENSORS (INCLUDING THEIR
LICENSORS AND SUPPLIERS) SHALL NOT BE LIABLE TO YOU: IN RESPECT
OF ANY CLAIM, DEMAND OR ACTION, IRRESPECTIVE OF THE NATURE OF
THE CAUSE OF THE CLAIM, DEMAND OR ACTION ALLEGING ANY LOSS,
INJURY OR DAMAGES, DIRECT OR INDIRECT, WHICH MAY RESULT FROM
THE USE OR POSSESSION OF THE INFORMATION; OR FOR ANY LOSS OF
PROFIT, REVENUE, CONTRACTS OR SAVINGS, OR ANY OTHER DIRECT,
INDIRECT, INCIDENTAL, SPECIAL OR CONSEQUENTIAL DAMAGES
ARISING OUT OF YOUR USE OF OR INABILITY TO USE THIS INFORMATION,
ANY DEFECT IN THE INFORMATION, OR THE BREACH OF THESE TERMS
OR CONDITIONS, WHETHER IN AN ACTION IN CONTRACT OR TORT OR
BASED ON A WARRANTY, EVEN IF JVC OR ITS LICENSORS HAVE BEEN
Page 15

English
Française
KV-PX9S/KV-PX9B/KV-PX9SN/KV-PX9BN
Instructions de mise à jour
Ces instructions permettent la mise à jour du logiciel et du
micrologiciel du système de navigation portable à disque dur
KV-PX9.
La mise à jour concerne les éléments suivants :
• Micrologiciel KV-PX9
• Données de la carte
–Plan détaillé des villes et cartes de radionavigation pour les États-Unis, les Îles
Vierges américaines, Porto Rico, Hawaï, l’Alaska et le Canada, soit un total de
9 881 363 km (6 139 994 miles)
–15 298 684 points d’intérêt (POI)
* À la fin de la mise à jour, la sous-catégorie « Recreation » (Loisirs) / « Zoo » de la section « POI »
(Points d’intérêt) est supprimée et tous ses éléments sont transférés dans la sous-catégorie
« Recreation » / « Others » (Autres).
[Important]
Español
• Un espace libre de 2 Go est requis dans la zone du lecteur AV du
disque dur interne. Voir page 3 pour la vérification de l’espace libre.
• Une fois la mise à jour effectuée, l’espace maximal occupé par le
lecteur AV est de 3 Go.
Table des matières
Préparation ......................................................................2
Mise à jour........................................................................4
Étape 1 : mise à jour du micrologiciel ...........................4
Étape 3 :
mise à jour de la base de données de la carte
...7
Confirmation de la version du logiciel du KV-PX9 .....13
LVT1900-001A
Page 16

Préparation
Pour mettre à jour le micrologiciel et le logiciel du KV-PX9, vous avez besoin des deux DVD-ROM (KV-PD902)
fournis ainsi que de l’équipement suivant.
KV-PX9
DVD-ROM
(KV-PD902)
Câble USB
Adaptateur
secteur
Un espace libre d’au moins 2 Go (2 000 Mo) est requis dans la zone du
lecteur AV du disque dur interne.
DISC 1:
/NKUS2000.NB0 (Ficher de mise à jour pour le micrologiciel du KV-PX9)
/DB/Px9hddSetup.exe (Programme de mise à jour pour les données de la
carte du KV-PX9)
/Manual/Manual.pdf (Instructions de mise à jour (dans le PDF))
/DB/Parts/px9part_000.cab, ..., px9part_010.cab (11 fichiers) (Données de
la carte)
DISC 2:
/DB/Parts/px9part_011.cab, px9part_012.cab (Données de la carte)
/DB/poicab.cab (Données des POI).
Il est nécessaire lors de la mise à jour d’utiliser un adaptateur secteur
(sortie : 5 V CC, 2 A) et un câble USB (prise USB de type A – prise mini
USB).
Le câble USB et l’adaptateur secteur ne sont pas forcément fournis avec
votre modèle. Dans ce cas, vous pouvez vous procurer un câble USB et
un adaptateur secteur dans le commerce ou acheter un kit d’alimentation
JVC KV-K1016 POWER KIT en contactant le JVC Customer Care Center
(Service client JVC) au 1-800-252-5722 ou sur le site Web de JVC
http://www.jvcservice.com/Store/.
Carte SD
Ordinateur
Microsoft et Windows sont des marques de commerce et des marques de commerce déposées de Microsoft Corporation aux
États-Unis et dans d’autres pays.
Les noms des autres systèmes et produits figurant dans ces instructions sont en général des marques de commerce déposées des
entreprises qui les ont développés.
Carte SD format FAT vierge 128 Mo, 256 Mo ou 512 Mo (format FAT 32
NON pris en charge) et PC équipé de lecteur/graveur de carte SD.
Système d’exploitation : Microsoft® Windows® XP
Unité centrale : Intel Pentium/Celeron, AMD K6/Athlon/Duron ou modèles
compatibles (Pentium 4 2,02 GHz ou supérieur recommandé)
Mémoire : 512 Mo minimum
Disque dur : espace libre de 2,0 Go
Autre : Lecteur DVD-ROM et prises USB (USB 2.0 vivement recommandé)
2
Page 17

Préparation (suite)
Vérification de l’espace libre sur le disque dur interne du KV-PX9
1.
Mettez l’appareil sous tension.
2. Appuyez sur la touche AV.
3. Appuyez sur Menu pour sélectionner « Installer fichiers AV ».
4. Vérifiez l’espace libre indiqué.
Si l’espace libre est inférieur à 2 Go, supprimez les fichiers installés dans le menu « Delete files » (Supprimer les fichiers)
jusqu’à obtenir un espace libre suffisant.
En ce qui concerne le menu « Delete files » (Supprimer les fichiers), reportez-vous aux instructions d’aide apparaissant
sur l’écran du KV-PX9.
3
Page 18

Mise à jour
Étape 1 : mise à jour du micrologiciel
[Important]
• Assurez-vous que le format de la carte SD est bien FAT. Reportez-vous à l’aide Windows pour savoir comment
vérifier et modifier le format de la carte SD.
• Supprimez tous les fichiers et dossiers enregistrés sur la carte SD.
• Reportez-vous également au guide d’installation rapide du KV-PX9 pour plus d’informations sur l’alimentation
électrique et le maniement de la carte SD.
• Une fois la mise à jour du micrologiciel lancée, vous ne pouvez plus utiliser l’unité jusqu’à ce que le
micrologiciel et les données de la carte soient complètement mis à jour.
Copier
NKUS2000.NB0
DISC 1
NKUS2000.NB0
1. À l’aide de votre ordinateur, copiez le fichier « NKUS2000.NB0 » enregistré sur le DISC 1 sur la carte SD.
2. Débranchez l’adaptateur secteur de l’unité et insérez la carte SD dans la fente prévue à cet effet.
Suite à la page suivante
4
Page 19

Mise à jour (suite)
3. Placez l’interrupteur de la batterie sur « OFF ».
OFF
4. Branchez l’adaptateur secteur en maintenant la touche enfoncée.
Maintenir
enfoncé
La mise à jour démarre. Le voyant d’alimentation clignote (violet et rouge) et le statut de la mise à jour du micrologiciel
s’affiche comme illustré. N’utilisez PAS l’unité pendant la mise à jour.
Après environ
10 min
« updating » (mise à jour en
cours) clignote.
• La mise à jour du micrologiciel dure environ 10 minutes. Le mot « complete » (terminé) s‘affiche une fois la mise à jour
effectuée avec succès.
• Si le mot « error » (erreur) apparaît, débranchez l’adaptateur secteur et vérifiez que le fichier copié et le format de la
carte SD sont corrects.
Veuillez contacter JVC Customer Care Center (Service client JVC) au 1-800-252-5722 si vous n’arrivez pas à mettre à
jour le micrologiciel même après avoir effectué cette vérification.
En cas d’erreur. Mise à jour terminée.
Suite à la page suivante
5
Page 20

Mise à jour (suite)
5. Une fois la mise à jour terminée, débranchez l’adaptateur secteur et éjectez la carte SD.
1
2
6. Placez l’interrupteur de la batterie sur « ON ».
ON
6
Page 21

Mise à jour (suite)
Étape 2 : mise à jour de la base de données de la carte
[Important]
• Mettez à jour le micrologiciel du KV-PX9 avant d’effectuer les opérations suivantes.
• Assurez-vous qu’aucun périphérique USB autre que le KV-PX9 n’est connecté à votre ordinateur avant de lancer
la mise à jour.
• Fermez tous les programmes en cours sur votre ordinateur avant de démarrer la mise à jour.
• La durée de la mise à jour dépend de la configuration de votre ordinateur. Il faut par exemple compter environ
40 minutes pour un ordinateur Pentium IV, 2,02 GHz doté d’une mémoire de 1 Go.
• Assurez-vous que l’unité et votre ordinateur sont reliés au secteur pour éviter l’interruption inopinée du
processus de mise à jour.
• Une fois le programme de mise à jour lancé, ne l’interrompez PAS. En cas d’interruption, relancez la mise à jour
de la base de données.
Px9hddSetup.exe
DISC 1
1. Branchez l’adaptateur secteur sur l’unité.
Adaptateur
secteur
Suite à la page suivante
7
Page 22

Mise à jour (suite)
2. Appuyez sur la touche pour mettre l’unité sous tension.
L’écran affiche « Information ».
3.Connectez l’unité à votre ordinateur à l’aide d’un câble USB.
• Fermez tous les programmes en cours sur votre ordinateur.
• Fermez la fenêtre d’exécution automatique qui s’affiche lors du branchement de l’unité.
• Sélectionnez « Take no action » (Ne rien faire) et cliquez sur « OK » comme illustré ci-dessous.
Suite à la page suivante
8
Page 23

Mise à jour (suite)
4.Insérez DISC 1 dans le lecteur de votre ordinateur.
5. Ouvrez le dossier « DB » (Base de données) et cliquez deux fois sur « Px9hddSetup.exe ».
La fenêtre de mise à jour du programme s’affiche (messages disponibles uniquement en anglais).
6. Cliquez sur « START » (Démarrer).
Suite à la page suivante
9
Page 24

Mise à jour (suite)
7. Acceptez l’accord de licence à l’intention de l’utilisateur final.
Cochez la case « Agree » (J’accepte)
et cliquez sur « Next » (Suivant) pour
poursuivre la mise à jour.
• Si l’écran d’erreur (1 ci-dessous) s’affiche, cliquez sur « OK » et fermez la fenêtre 2 ci-dessous, puis reprenez à
l’étape 5.
1
2
10
Suite à la page suivante
Page 25

Mise à jour (suite)
8.Cliquez sur « Do Updating » (Effectuer la mise à jour).
La mise à jour des données de la carte commence.
• La durée de la mise à jour dépend de la configuration de votre ordinateur. Il faut par exemple compter environ
40 minutes pour un ordinateur Pentium IV, 2,02 GHz doté d’une mémoire de 1 Go.
• N’interrompez PAS la mise à jour et NE débranchez PAS les appareils pendant le processus. Toute interruption est
susceptible d’endommager l’
• En cas d’interruption ou d’échec de la mise à jour the update, relancez la mise à jour de la base de données. Contactez
JVC Customer Care Center (Service client JVC) au 1-800-252-5722 si la mise à jour échoue la deuxième fois.
unité.
9. Une fois que le message suivant apparaît, insérez le DISC 2.
Suite à la page suivante
11
Page 26

Mise à jour (suite)
10. Cliquez sur « END » (FIN) une fois la mise à jour terminée.
11. Avec le bouton gauche de la souris, cliquez sur l’icône située dans la barre des tâches et suivez les
instructions affichées à l’écran.
Assurez-vous à insensible l’unité de votre ordinateur. Sinon, l’unité peut être endommagé.
12. Débranchez le câble USB.
Le KV-PX9 redémarre alors automatiquement. Après le redémarrage, confirmez la version du logiciel (voir
« Confirmation de la version du logiciel du KV-PX9 », page suivante).
12
Page 27

Confirmation de la version du logiciel du KV-PX9
1. Appuyez sur le bouton Menu.
2. Sélectionnez « INFO ».
3.Sélectionnez « Version ».
Les informations concernant la version de l’unité s’affichent. Une fois la mise à jour effectuée, les informations s’affichent
comme illustré.
13
Page 28

English
Française
KV-PX9S/KV-PX9B/KV-PX9SN/KV-PX9BN
Instrucciones de actualización
Éstas son las instrucciones de actualización del firmware y
software del sistema de navegación portátil con unidad de
disco duro (HDD) KV-PX9.
Se actualizarán los elementos siguientes:
• Firmware del KV-PX9
• Datos de mapas
–EE.UU., Islas Vírgenes de Estados Unidos, Puerto Rico, Hawai, Alaska y Canadá,
que contiene mapas de ciudades detallados y cartas digitales de navegación (RNC),
con una covertura total de 9.881.363 km (6.139.994 millas)
–15.298.684 PDI (Puntos de interés)
* Una vez finalice la actualización, la subcategoría “Recreation” (Recreación) → “Zoo” de la sección
POI (Puntos de interés) se eliminará y todos sus elementos se desplazarán a la subcategoría
“Recreation” → “Others” (Otros).
[Importante]
Español
•
Se necesitan 2 GB de espacio libre en el área del reproductor de AV en
la HDD integrada. Consulte la página 3 para conocer el espacio libre.
• Una vez completada la actualización, el espacio máximo ocupado por
el reproductor de AV será de 3 GB.
Contenidos
Preparación......................................................................2
Actualización ...................................................................4
Paso 1: actualización de firmware ................................4
Paso 2: actualización de base de datos de mapas ......
7
Confirmación de la versión de software del KV-PX9
...13
LVT1900-001A
Page 29

Preparación
Para actualizar el firmware y software del KV-PX9, se necesitan los dos DVD-ROM (KV-PD902) suministrados y
el equipo siguiente.
KV-PX9
DVD-ROM
(KV-PD902)
Adaptador de CA
Cable USB
Se necesitan 2 GB (2000 MB) o más de espacio libre en el área del
reproductor de AV en la HDD integrada.
DISC 1:
/NKUS2000.NB0 (Archivo de actualización del firmware del KV-PX9)
/DB/Px9hddSetup.exe (Programa de actualización para los datos de
mapas del KV-PX9)
/Manual/Manual.pdf (Instrucciones para la actualización (este pdf))
/DB/Parts/px9part_000.cab, ..., px9part_010.cab (11 archivos) (Datos de
mapas)
DISC 2:
/DB/Parts/px9part_011.cab, px9part_012.cab (Datos de mapas)
/DB/poicab.cab (Datos de PDI).
Para llevar a cabo la actualización es necesario usar un adaptador de
CA (salida: 5 V CC, 2 A) y un cable USB (con conector USB de tipo A y
conector mini USB).
Es posible que el cable USB y el adaptador de CA no estén incluidos en
su modelo. En este caso, debe usar un cable USB de venta en todos los
comercios y un adaptador de CA o adquiera un kit de alimentación JVC
KV-K1016 POWER KIT llamando al JVC Customer Care Center (centro de
atención al cliente JVC) al número 1-800-252-5722 o visite el sitio Web de
JVC http://www.jvcservice.com/Store/.
Tarjetas SD
PC
Microsoft y Windows son marcas comerciales o marcas comerciales registradas de Microsoft Corporation en Estados Unidos y
otros países.
Otros nombres de sistemas y productos mencionados en estas instrucciones son normalmente marcas comerciales o marcas
comerciales registradas de los fabricantes que desarrollaron el sistema o producto en cuestión.
Tarjeta SD formato FAT virgen 128 MB, 256 MB o 512 MB,(FAT 32 NO es
compatible) y para su PC también se requiere un dispositivo de lectura/
escritura de tarjetas SD.
SO: Microsoft® Windows® XP
CPU: Familia Intel Pentium/Celeron, familia AMD K6/Athron/Duron o
compatible (se recomienda Pentium 4 a 2,02 GHz o superior)
Memoria: 512 MB o más
HDD: Se necesitan 2,0 GB de espacio libre
Otros: Unidad de DVD-ROM y terminales USB (se recomienda
preferiblemente USB 2.0)
2
Page 30

Preparación (continuación)
Comprobación del espacio libre en la HDD integrada del KV-PX9
1.
Activación de la alimentación.
2. Pulse el botón AV.
3. Pulse Menu (Menú) para seleccionar “Instalar archivos AV”.
4. Compruebe la indicación de espacio libre.
Si el espacio libre es inferior a 2 GB, elimine los archivos instalados en el menú “Delete files” (Eliminar archivos) hasta
que el espacio libre sea superior a 2 GB.
Para obtener más información sobre el menú “Delete files” (Eliminar archivos), consulte la ayuda en pantalla del KVPX9.
3
Page 31

Actualización
Paso 1: actualización de firmware
[Importante]
• Asegúrese de que el formato de la tarjeta SD sea FAT. Consulte la ayuda de Windows para obtener información
sobre la comprobación y cambio del formato de la tarjeta SD.
• Elimine todos los archivos y carpetas de la tarjeta SD.
• Consulte también la guía rápida del KV-PX9 para obtener información sobre la fuente de alimentación y la
manipulación de una tarjeta SD.
• Una vez iniciada la actualización del firmware, la unidad no se debe usar hasta que haya finalizado la
actualización del firmware y de los datos de mapas.
Copiar
NKUS2000.NB0
DISC 1
NKUS2000.NB0
1. Copie el archivo “NKUS2000.NB0” del DISC 1 en la tarjeta SD en el PC.
2. Desconecte el adaptador de CA de la unidad e introduzca la tarjeta SD en su ranura.
Continúa en la página siguiente
4
Page 32

Actualización (continuación)
3.Deslice el interruptor de la batería a “OFF”.
OFF
4. Pulse y mantenga pulsado el botón mientras conecta el adaptador de CA.
Pulsar
La actualización comienza. La luz parpadea cambiando del color púrpura al rojo y el estado de actualización del
firmware aparece en la pantalla como se ilustra. NO realice ninguna otra operación durante la actualización.
Tras 10 min.
“updating” (actualizando)
parpadea.
• La actualización del firmware tarda unos 10 minutos. Cuando la actualización haya finalizado correctamente,
aparecerá “complete” (completado) en la pantalla.
• Si aparece “error” en la pantalla, desconecte el adaptador de CA y compruebe si el archivo que copió y el formato de la
tarjeta SD son los correctos.
Llame a JVC Customer Care Center (centro de atención al cliente JVC) al número 1-800-252-5722 en caso de que no
pueda actualizar el firmware incluso después de haber comprobado si el archivo era correcto.
Si ocurre un error. Actualización completada.
Continúa en la página siguiente
5
Page 33

Actualización (continuación)
5. Después de terminar la actualización, desconecte el adaptador de CA y extraiga la tarjeta SD.
1
2
6. Deslice el interruptor de la batería a “ON”.
ON
6
Page 34

Actualización (continuación)
Paso 2: actualización de base de datos de mapas
[Importante]
• Asegúrese de actualizar el firmware del KV-PX9 antes de continuar con los siguientes pasos.
• Asegúrese de desconectar del PC cualquier otro dispositivo USB que no sea el KV-PX9 antes de iniciar la
actualización.
• Antes de empezar la actualización cierre todos los programas en el PC.
• El tiempo de actualización varía según la configuración de su PC. Por ejemplo, la actualización en un PC
Pentium IV 2.02 GHz y 1 GB de memoria tarda unos 40 minutos.
• Asegúrese de que se suministra alimentación de CA a la unidad y el PC para evitar la interrupción accidental
del proceso de actualización.
• NO interrumpa la actualización una vez iniciado el programa de actualización. Si se interrumpe, vuelva a
intentar actualizar la base de datos.
Px9hddSetup.exe
DISC 1
1. Conecte el adaptador de CA a la unidad.
Adaptador de
CA
Continúa en la página siguiente
7
Page 35

Actualización (continuación)
2. Pulse el botón para activar la alimentación.
Aparece en pantalla “Information”.
3. Conecte la unidad al PC mediante un cable USB.
• Cierre todos los programas del PC.
• Cancele la ventana “Autoplay” (Reproducción automática) cuando aparece en el PC tras conectar la unidad.
• Seleccione “Take no action” (No realizar ninguna acción) y haga clic en “OK” (Aceptar) en la ventana siguiente.
Continúa en la página siguiente
8
Page 36

Actualización (continuación)
4. Inserte el DISC 1 en el PC.
5. Abra la carpeta “DB” y haga doble clic en “Px9hddSetup.exe”.
Aparece la ventana del programa de actualización (los mensajes sólo aparecen en inglés).
6. Haga clic en “START” (Inicio).
Continúa en la página siguiente
9
Page 37

Actualización (continuación)
7. Confirme el acuerdo de licencia de usuario final.
Marque “Agree” (Acepto) y haga clic
en “Next” (Siguiente) para continuar
con la actualización.
• Si aparece la pantalla de error (1, a continuación), haga clic en “OK” (Aceptar) y cierre la ventana 2 siguiente y, a
continuación, vuelva a intentarlo a partir del paso 5.
1
2
10
Continúa en la página siguiente
Page 38

Actualización (continuación)
8. Haga clic en “Do Updating” (Actualizar).
Comienza la actualización de los datos de mapas.
• El tiempo de actualización varía según la configuración de su PC. Por ejemplo, la actualización en un PC Pentium IV
2.02 GHz y 1 GB de memoria tarda unos 40 minutos.
• NO realice ninguna interrupción ni desconecte durante la actualización. La interrupción podría dañar la unidad.
• Si la actualización se int
Care Center (centro de atención al cliente JVC) al número 1-800-252-5722 en caso de que no pueda finalizar la
actualización incluso después de haberlo intentado de nuevo.
errumpe o falla vuelva a intentar actualizar la base de datos. Llame a JVC Customer
9. Introduzca el DISC 2 cuando aparezca el siguiente mensaje en pantalla.
Continúa en la página siguiente
11
Page 39

Actualización (continuación)
10. Haga clic en “END” (Terminar) una vez completada la actualización.
11. Haga clic con el botón izquierdo del ratón en el símbolo que se encuentra en la barra de herramientas,
y siga las instrucciones que aparecen en pantalla.
Asegúrese de desmontar la unidad del PC. De lo contrario, la unidad podría dañarse.
12. Desconexión del cable USB.
El KV-PX9 se reiniciará automáticamente tras la desconexión. Después de reiniciar, confirme la versión de software de
la unidad (consulte “Confirmación de la versión de software del KV-PX9” en la página siguiente).
12
Page 40

Confirmación de la versión de software del KV-PX9
1. Pulse el botón Menu (Menú).
2. Pulse “INFO”.
3. Pulse “Versión”.
Aparecerá la información de versión de la unidad. Cuando la actualización haya finalizado correctamente, aparecerá la
información como se muestra a continuación.
13
 Loading...