

Page 1
ENGLISH ESPAÑOLITALIANO PORTUGUÊS
PORTABLE NAVIGATION
INSTRUCTIONS
KV-PX701
DEUTSCH
FRANÇAISSVENSKADANSK
LVT1819-001A
[E]
Page 2

Regulatory information
CE Marking
Portable Navigation with Bluetooth
0678
Bluetooth transmitter [2400,0 MHz – 2483,5 MHz]
This device is intended for use in the European countries.
Dieses Gerät ist für den Gebrauch in den europäischen Ländern vorgesehen.
Dit Apparaat is bedoeld voor gebruik in Europese Landen.
English Hereby, JVC declares that this KV-PX701 is in compliance with the
essential requirements and other relevant provisions of Directive
1999/5/EC.
Finnish JVC vakuuttaa täten että KV-PX701 tyyppinen laite on direktiivin
1999/5/EY oleellisten vaatimusten ja sitä koskevien direktiivin muiden
ehtojen mukainen.
Dutch Hierbij verklaart JVC dat het toestel KV-PX701 in overeenstemming
is met de essentiële eisen en de andere relevante bepalingen van
richtlijn 1999/5/EG.
French Par la présente JVC déclare que l'appareil KV-PX701 est conforme
aux exigences essentielles et aux autres dispositions pertinentes de
la directive 1999/5/CE.
Swedish Härmed intygar JVC att denna KV-PX701 står I överensstämmelse
med de väsentliga egenskapskrav och övriga relevanta
bestämmelser som framgår av direktiv 1999/5/EG.
Danish Undertegnede JVC erklærer herved, at følgende udstyr KV-PX701
overholder de væsentlige krav og øvrige relevante krav I direktiv
1999/5/EF.
German Hiermit erklärt JVC, dass sich das Gerät KV-PX701 in
Übereinstimmung mit den grundlegenden Anforderungen und
denübrigen einschlägigen Bestimmungen der Richtlinie 1999/5/EG
befindet. (BMWi)
Hiermit erklärt JVC die Übereinstimmung des Gerätes KV-PX701 mit
den grundlegenden Anforderungen und den anderen relevanten
Festlegungen der Richtlinie 1999/5/EG befindet. (Wien)
Greek ME THN ȆAPOYȈA JVC ǻHȁȍNEI OTI KV-PX701
ȈYMMOPĭȍNETAI ȆȇȅȈ ȉǿȈ OYȈǿȍǻEIȈ AȆAITHȈEIȈ KAI TIȈ
OIȆEȈȈXETIKEȈǻIATAȄEIȈ THȈ OǻHīIAȈ
1999/5/EK.
Italian Con la presente JVC dichiara che questo KV-PX701 è conforme ai
requisiti essenziali ed alle altre disposizioni pertinenti stabilite dalla
direttiva 1999/5/CE.
Czech JVC tímto prohlašuje, že tento KV-PX701 je ve shode se základními
požadavky a dalšími príslušnými ustanoveními smernice 1999/5/ES.
2
Page 3

Estonian Käesolevaga kinnitab JVC seadme KV-PX701 vastavust direktiivi
1999/5/EÜ põhinõuetele ja nimetatud direktiivist tulenevatele teistele
asjakohastele sätetele.
Spanish Por medio de la presente JVC declara que el KV-PX701 cumple con
los requisitos esenciales y cualesquiera otras disposiciones
aplicables o exigibles de la Directiva 1999/5/CE.
Latvian Ar šo JVC deklare, ka KV-PX701 atbilst Direktivas 1999/5/EK
butiskajam prasibam un citiem ar to saistitajiem noteikumiem.
Lithuanian Šiuo JVC deklaruoja, kad šis KV-PX701 atitinka esminius
reikalavimus ir kitas 1999/5/EB Direktyvos nuostatas.
Maltese Hawnhekk, JVC, jiddikjara li dan KV-PX701 jikkonforma mal- ƫtiƥijiet
essenzjali u ma provvedimenti oƫrajn relevanti li hemm fid-Dirrettiva
1999/5/EC.
Hungarian Alulírott, JVC nyilatkozom, hogy a KV-PX701 megfelel a vonatkozó
alapvetõ követelményeknek és az 1999/5/EC irányelv egyéb
elõírásainak.
Polish Niniejszym JVC oswiadcza, Īe KV-PX701 jest zgodny z
zasadniczymi wymogami oraz pozostaáymi stosownymi
postanowieniami Dyrektywy 1999/5/EC.
Portuguese JVC declara que este KV-PX701 está conforme com os requisitos
essenciais e outras disposições da Directiva 1999/5/CE.
Slovenian JVC izjavlja, da je ta KV-PX701 v skladu z bistvenimi zahtevami in
ostalimi relevantnimi dolocili direktive 1999/5/ES.
Slovak JVC týmto vyhlasuje, že KV-PX701 splna základné požiadavky a
všetky príslušné ustanovenia Smernice 1999/5/ES.
Icelandic Hér með lýsir JVC yfir því að KV-PX701 er í samræmi við grunnkröfur
og aðrar kröfur, sem gerðar eru í tilskipun 1999/5/EC.
Norwegian JVC erklærer herved at utstyret KV-PX701 er i samsvar med de
grunnleggende krav og øvrige relevante krav i direktiv 1999/5/EF.
ENGLISH
EN – English
Dear Customer,
This apparatus is in conformance with the valid European directives and
standards regarding electromagnetic compatibility and electrical safety.
European representative of Victor Company of Japan, Limited is:
JVC Technology Centre Europe GmbH
Postfach 10 05 52
61145 Friedberg Germany
ES – Español
Apreciado cliente,
Este aparato cumple con las normativas y normas europeas respecto a la
seguridad eléctrica y a la compatibilidad electromagnética.
El representante europeo de Victor Company of Japan, Limited es:
JVC Technology Centre Europe GmbH
Postfach 10 05 52
61145 Friedberg Alemania
3
Page 4

DE - Deutsch
Sehr geehrter Kunde, sehr geehrte Kundin,
dieses Gerät stimmt mit den gültigen europäischen Richtlinien und Normen
bezüglich elektromagnetischer Verträglichkeit und elektrischer Sicherheit überein.
Die europäische Vertretung für die Victor Company of Japan, Limited ist:
JVC Technology Centre Europe GmbH
Postfach 10 05 52
61145 Friedberg Deutschland
IT – Italiano
Gentile cliente.
Questa apparecchiatura è conforme alle direttive e alle norme europee relative
alla compatibilità elettromagnetica e alla sicurezza elettrica.
Il rappresentante europeo della Victor Company of Japan, Limited è:
JVC Technology Centre Europe GmbH
Postfach 10 05 52
61145 Friedberg Germania
FR – Français
Cher(e) client(e),
Cet appareil est conforme aux directives et normes européennes en vigueur
concernant la compatibilité électromagnétique et à la sécurité électrique.
Représentant européen de la société Victor Company of Japan, Limited :
JVC Technology Centre Europe GmbH
Postfach 10 05 52
61145 Friedberg Allemagne
PT – Português
Caro Cliente,
Este aparelho encontra-se em conformidade com as directivas Europeias válidas
e padrões referentes à compatibilidade magnética e segurança eléctrica.
O representante europeu da Victor Company of Japan, Limited é:
JVC Technology Centre Europe GmbH
Postfach 10 05 52
61145 Friedberg Alemanha
NL – Nederlands
Geachte klant,
Dit apparaat voldoet aan de geldende Europese normen en richtlijnen inzake
elektromagnetische compatibiliteit en elektrische veiligheid.
De Europese vertegenwoordiger van Victor Company of Japan, Limited is:
JVC Technology Centre Europe GmbH
Postfach 10 05 52
61145 Friedberg Duitsland
NO – Norsk
Kjære kunde,
Dette apparatet er i samsvar med gjeldende europeiske direktiver og standarder
for elektromagnetisk kompatibilitet og elektrisk sikkerhet.
4
Page 5

Den europeiske representanten for Victor Company of Japan, Limited, er:
JVC Technology Centre Europe GmbH
Postfach 10 05 52
61145 Friedberg Tyskland
FI – Suomi
Hyvä asiakas,
Tämä laite on yhdenmukainen niiden voimassa olevien eurooppalaisten
direktiivien ja standardien kanssa, jotka koskevat sähkömagneettista
yhteensopivuutta ja sähköturvallisuutta.
Victor Company of Japan, Limited:in Euroopan edustaja on:
JVC Technology Centre Europe GmbH
Postfach 10 05 52
61145 Friedberg Saksa
CZ – ýeština
Vážený zákazníku,
tento pĜístroj je v souladu s platnými evropskými smČrnicemi a normami ohlednČ
elektromagnetické kompatibility a bezpeþnosti elektrických pĜístrojĤ.
Evropský zástupce spoleþnosti Victor Company of Japan, Limited je:
JVC Technology Centre Europe GmbH
Postfach 10 05 52
61145 Friedberg NČmecko
DK – Dansk
Kære kunde
Dette apparat er i overensstemmelse med gældende europæiske direktiver og
standarder vedrørende elektromagnetisk kompatibilitet og elektrisk sikkerhed.
Europæisk repræsentant for Victor Company of Japan, Limited er:
JVC Technology Centre Europe GmbH
Postfach 10 05 52
61145 Friedberg Tyskland
ENGLISH
HU – Magyar
Tisztelt vásárló!
Ez a termék megfelel az Európai Unió elektromágneses kompatibilitásról, az
elektromos és elektronikus berendezések biztonságról szóló irányelveinek és
szabványainak.
A Victor Company of Japan, Limited európai képviselĘje:
JVC Technology Centre Europe GmbH
Postfach 10 05 52
61145 Friedberg Németország
SE- Svenska
Bästa kund!
Denna apparat överensstämmer med gällande EU-direktiv och standarder
beträffande elektromagnetisk kompatibilitet och elsäkerhet.
Europarepresentant för Victor Company of Japan, Limited är:
JVC Technology Centre Europe GmbH
5
Page 6

Postfach 10 05 52
61145 Friedberg Tyskland
RO – Română
Stimate client,
Acest aparat respectă directivele úi standardele europene privind compatibilitatea
electromagneticăúi siguranĠa produselor electronice.
Reprezentantul european al Victor Company of Japan, Limited este:
JVC Technology Centre Europe GmbH
Postfach 10 05 52
61145 Friedberg Germania
PL - Polski
Szanowny Kliencie,
Niniejsze urządzenie speánia wymogi obowiązujących europejskich dyrektyw i
standardów w zakresie kompatybilnoĞci elektromagnetycznej i bezpieczeĔstwa
urządzeĔ elektrycznych.
Europejskim przedstawicielem Victor Company of Japan, Limited jest:
JVC Technology Centre Europe GmbH
Postfach 10 05 52
61145 Friedberg Niemcy
GR - ǼȜȜȘȞȚțȐ
ǹȟȚȩIJȚȝİ ʌİȜȐIJȘ,
Ǿ ıȣıțİȣȒ ĮȣIJȒ İȓȞĮȚ ıİ ıȣȝȝȩȡijȦıȘ ȝİ IJȚȢ ȚıȤȪȠȣıİȢ ǼȣȡȦʌĮȧțȑȢ ȅįȘȖȓİȢ țĮȚ
ȆȡȩIJȣʌĮ ıȤİIJȚțȐ ȝİ IJȘȞ ȘȜİțIJȡȠȝĮȖȞȘIJȚțȒ ıȣȝȕĮIJȩIJȘIJĮ țĮȚ IJȘȞ ȘȜİțIJȡȚțȒ
ĮıijȐȜİȚĮ.
ȅ ĮȞIJȚʌȡȩıȦʌȠȢ IJȘȢ Victor Company of Japan Limited ıIJȘȞ ǼȣȡȫʌȘ İȓȞĮȚ:
JVC Technology Centre Europe GmbH
Postfach 10 05 52
61145 Friedberg īİȡȝĮȞȓĮ
TR - Türkçe
Saygi deger müsterimiz,
bu aleti Avrupa normalrina ve standartlara, ektronikmanyetik uguskanlik
ve elektronic güvence uymaktadir.
Victor Company of Japan, Limited’ti Avrupada sirketi temsil eden:
JVC Technology Centre Europe GmbH
Postfach 10 05 52
61145 Friedberg Almanya
6
Page 7

Safety Cautions
Please read this section carefully and follow all the instructions given.
This will help ensure reliable operation and extend the service life for your
appliance.
Keep the packaging and the user instructions for future reference or inquiries at a
later date. If you pass the article on to another person, you must pass on these
instructions.
Never allow children to play with electrical equipment unsupervised. Children
may not always correctly recognize possible danger.
Keep the packing materials, such as foil away from children.
The danger of suffocation could arise in the case of misuse.
ʳʳʳʳUsing this appliance at full volume for extended periods of time may
cause damage to the hearing capacity of the listener.
Never open up the housing of the appliance or the power adapter. These contain
no user-serviceable parts. If the housing is opened there is a danger to life from
electric shock.
Do not place any objects on the appliance and do not exert any pressure on the
display. Otherwise there is a danger that the screen will break.
To avoid damage, do not touch the screen with sharp objects. Use only the stylus
provided or another blunt implement. The device can also be operated with a
finger in many cases.
There is a risk of injury if the display breaks. If this should occur, use
protective gloves to pack the broken parts and contact customer support to
arrange for disposal. Then wash your hands with soap, since there is a
possibility that chemicals may have escaped.
Terminate the electricity supply (remove the electricity plug), switch the appliance
off immediately, or do not actually switch it on, and contact Customer Service
if the housing of the appliance or the power pack becomes damaged or fluids leak
into it. Components must be checked by Customer Service in order to avoid
damage!
ENGLISH
Operating Environment
Failure to follow these instructions may lead to damage to your appliance.
The guarantee will be excluded in such cases.
Keep your navigation System and all connected devices away from moisture and
avoid dust, heat and direct sunlight, especially in the car.
Make sure you protect your appliance from getting wet, e.g. from rain and hail, at
all times. Please pay attention that moisture can even build up in a protective
pouch because of condensation.
Avoid heavy vibrations and shaking, such as can arise, for example, in the case
of transverse field intrusions.
Avoid the device from releasing itself from its holder, for example when braking.
Install the device as vertically as possible.
7
Page 8

Electromagnetic Compatibility
When connecting additional or other components the “Electromagnetic
Compatibility Directive” (EMC) must be adhered to. Please also note that only
screened cable (maximum 10ft) should be used with this appliance.
For optimal performance, maintain a distance of at least 10 ft. from sources of
high-frequency and magnetic interference (televisions, loudspeaker systems,
mobile telephones and so on.
This will help avoid malfunctions and loss of data.
Electronic devices emit electromagnetic waves during operation.
These emissions are harmless, but can interfere with other devices operated in
close proximity.
While our devices are tested and optimized for electromagnetic compliance in our
laboratories, interference during operation may still occur in the device itself
and with other devices in its proximity.
Should such interference occur, try to eliminate it by adjusting the positions of and
the distances between the devices.
Before driving a car, please ensure that the electronic systems of the car are
working properly.
Data Security
Every time you update your data make backup copies on an external storage
medium. The supplier does not assume liability for data loss or damage to data
storage units, and no claims can be accepted for damages resulting from the
loss of data or for consequential damages.
Connection
Use the power adapter included with the package. Using other power adaptors
than the one provided will result in malfunction and could prove to be
dangerous.
The car adapter should only be connected to the lighter socket of a car (car
battery = DC 12V , truck battery = DC 24V !). If you are in any doubt about the
power source in your car, contact your car manufacturer.
Only use the mains adapter on grounded sockets at AC 100 – 240 V~, 50/60 Hz.
If you are unsure about the power supply to the place of use, ask the relevant
energy supplier.
The device should only be used with the supplied batteries.
About the power adaptor:
1. Do not use the power adaptor in a wet environment. When hands and feet are
wet, do not touch the power adaptor.
2. While using the power adaptor, ensure that the area is well ventilated. Do not
let paper or other material cover the power adaptor, as this will interfere with
cooling. Do not use the power adaptor whilst it is in a bag.
3. Do not attempt to repair the device. If device is damaged or is in a wet
environment, replace the device immediately.
4. It is not recommended to charge from a PC because the PC power voltage is
not enough to supply the device.
5. When installing the apparatus, ensure that the plug is easily accessible.
8
Page 9

About the battery:
1. Use only the original factory approved charger.
2. A Lithium battery is built into the device. To prevent fire or skin burns, do not
disassemble, pierce, impact, or expose the battery to fire. The battery will crack,
explode, or release dangerous chemicals if placed in a fire.
3.CAUTION
The Battery shall not be exposed to excessive heat such as sunshine , fire or the
like.
Important instructions
1. Note: Replacing with an incorrect battery may result in an explosion.
When disposing of the battery, follow the instructions. The replacement battery
must be a factory approved original.
2. Regulations must be observed when recycling or disposing of batteries.
3. The battery should only be used in this device.
4.CAUTION
To reduce the risk of electrical shocks ,fire,etc.:
1. Do not remove screws,covers or cabinet.
2. Do not expose this appliance to rain or moisture.
Information for Users on Disposal of Old Equipment
This symbol indicates that the product with this symbol should
not be disposed as general household waste at its end-of-life. If
you wish to dispose of this product,
please do so in accordance with applicable national legislation
or other rules in your country and municipality.
By disposing of this product correctly, you will help to conserve
natural resources and will help prevent potential negative
effects on the environment and human health.
ENGLISH
Navigation
Safety Instructions for Navigation
Do not manipulate the navigation system while driving to protect yourself and
others from accidents!
In the event that you do not understand the voice instruction or if you are in any
doubt about what to do at the next intersection,then the map or arrow display
will provide you with a quick orientation. Only look at the display when you are
in a safe driving situation!
Attention!
The road layout and driving rules take precedence over the instructions of the
navigation system. Only follow the instructions when circumstances and driving
rules permit it! The navigation system will guide you to your destination even
when you have to deviate from your planned route.
The direction statements of the navigation system given do not release the driver
of the vehicle from his or her duty of care or personal responsibility.
Plan routes before you leave. If you want to plan a new route whilst on the road
stop driving.
9
Page 10

In order to receive the GPS signal correctly, metal objects may not hinder
g
reception. Attach the navigation system onto the inside of the windscreen or
near the windscreen with the suction cup.
Try out different positions in your vehicle in order to find the best reception.
Important Notice
his system only provides a navigational reference. Do not use this system for any
directional, distance, and geographic precise measurements.
The first GPS positioning should be performed at a single set point in a wide-open
area without building shelters. The length of time it takes to position will depend
on the satellite signal strength, and cloud levels. It will possibly taking up to 10
minutes.
GPS (Global Positioning System) is the satellite system used by the United States
of America Department of Defense. All maintenance and operations are also
managed by the United States of America Department of Defense. Should the
system be modified and adjusted, the precision and operation of the GPS related
systems might be affected.
Any wireless communication products (mobile phone, radio, speed detection unit
etc) might affect the GPS signal and result in a poor signal.
For safety reasons, do not operate this system while driving a vehicle.
Do not leave this unit under your front windshield after you leave the vehicle.
Exposure to high temperatures might be dangerous and cause the battery to
overheat, resulting in malfunction of the device.
Window tinting might interfere with the reception of satellite signals. We
recommend that you install a vehicle antenna to strengthen and stabilize the
signal.
The planned navigational route is for reference only; changes in roadside
conditions (one way streets, no right turns) may happen so please respond
according to the situation and decide whether or not to follow the planned course.
When placing this system in the vehicle, please secure it on the car with brackets
to ensure safety. The recommended installation location is illustrated below.
X Do not block
driver’s view
X Do not secure in
front of airba
X Do not place on
unstable dashboard
X Do not secure in
front of airbag
10
Page 11

Differences between manufactured and shipped versions may be present; this
software may be updated frequently. If the descriptions in this manual are
different from your software version, please follow the software version
currently on hand.
Please thoroughly read this manual of operating instructions and explanations.
Only use original factory approved batteries and accessories to prevent
unexpected damage. If the correct procedures were not followed for operation
or incompatible accessories were connected, this is a violation of the warrantee
agreement and will automatically void the warrantee. This may also cause
personal safety issues.
First time use
Copyright
Without the written consent of JVC, Inc, this manual, including the product and
the software, may not be duplicated, transmitted, recorded or saved on storage
devices. Furthermore, it shall not be translated under any circumstances into any
other languages.
Copyright ©2007 JVC, Inc. All rights reserved.
ENGLISH
Microsoft and Windows are registered trademarks of Microsoft Corporation in the
United States and/or other Countries.
The Bluetooth word mark and logos ard owned by the Bluetooth SIG, Inc. and any
use of such marks by Victor Company of Japan, Limited (JVC) is under license.
SD logo is a trademark.
11
Page 12
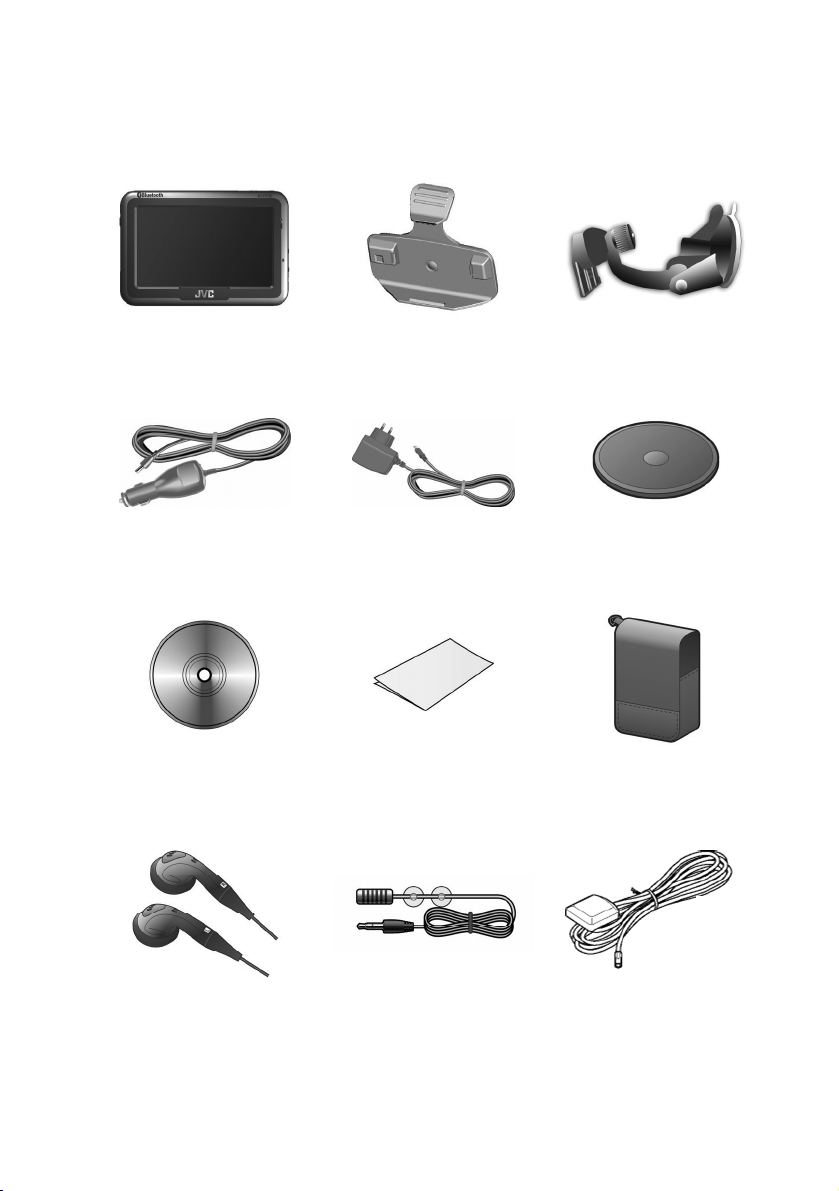
Package Contents
Your product should include the following accessories:
KV-PX701 Unit Cradle Suction Cup Mount
Cigarette Lighter Adaptor AC Adaptor Dashboard Disk
DVD-ROM
(Digital map/User
manual)
Stereo Earphone TMC Antenna
Instructions Carrying Case
12
External-GPS Antenna
(Optional)
Page 13
Basic Operation
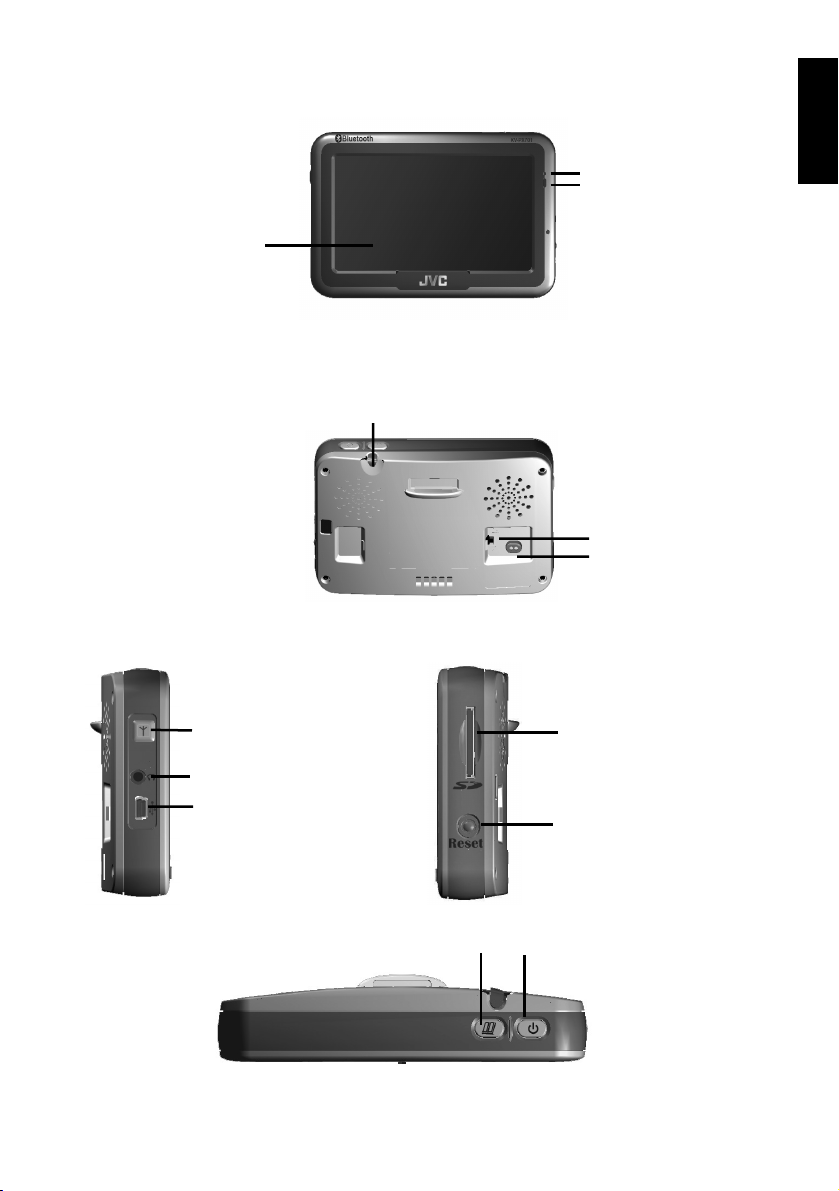
Introduction
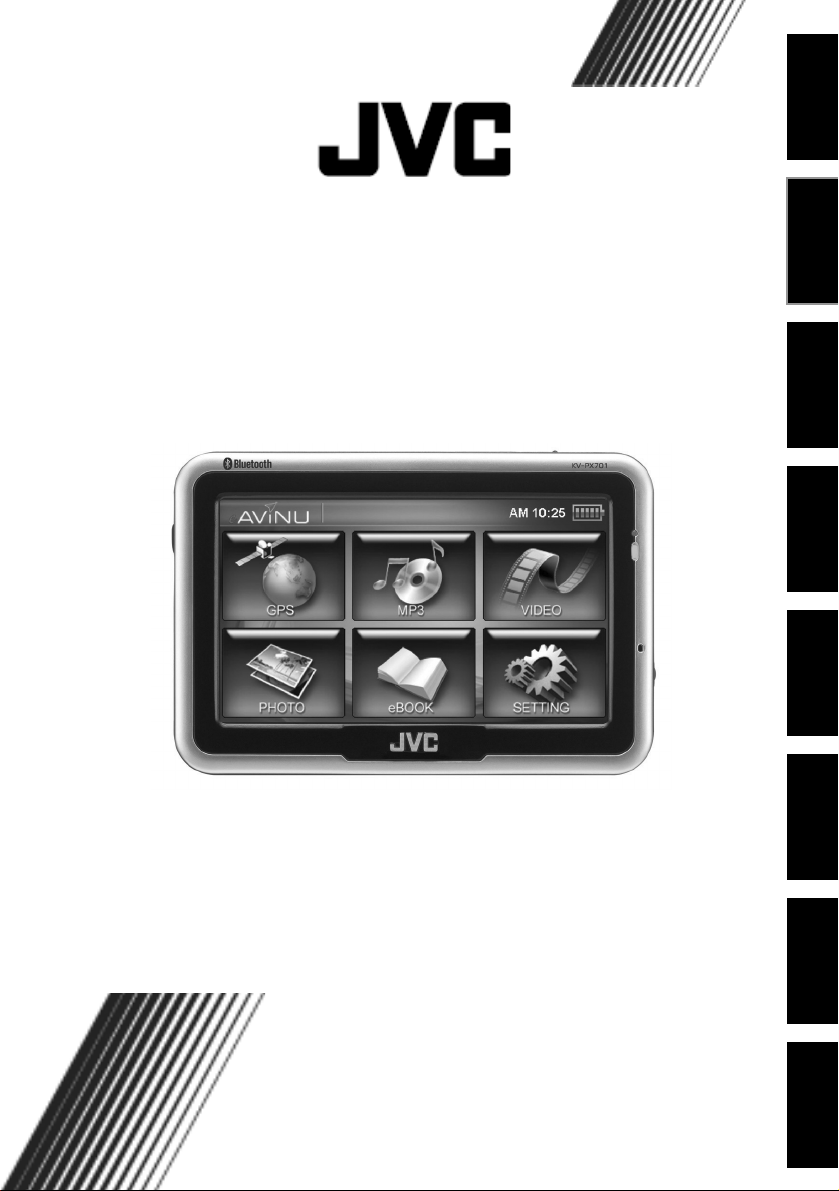
Front View
4.3” TFT LCD
with touch
screen
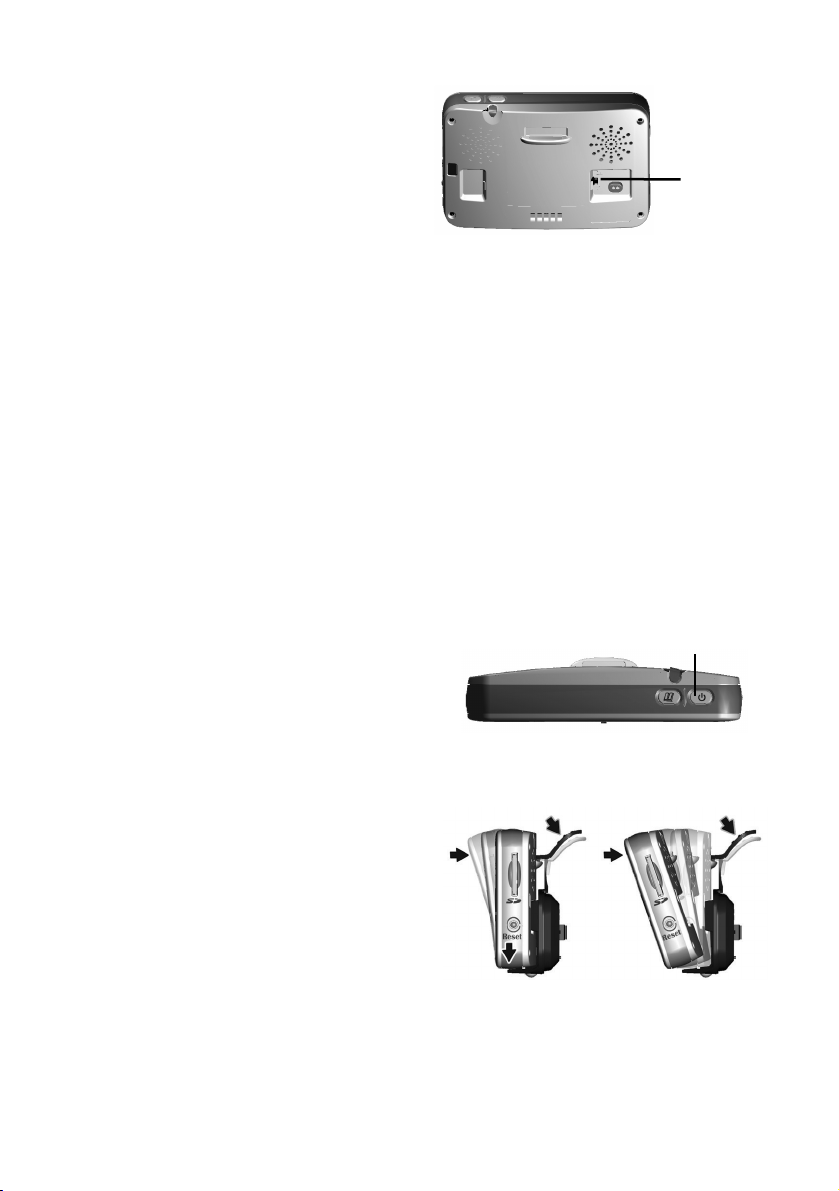
Rear View
Stylus
Bluetooth LED
Charging
indicator LED
Bluetooth LED:
Bluetooth ON: Blinking Blue
Bluetooth OFF: LED off
Charging indicator LED:
Charging: Orange
Full: Green
System power
switch
I/O interface
ENGLISH
Left Side
Top View
External Antenna port
Earphone port
/ TMC Antenna port
USB port
(used for battery
charging only
by AC Adaptor)
Right Side
Hot key
SD card slot
Reset key
Power button
13
Page 14
Operating Methods
Startup
1. For first time use, please turn
the system power switch at the
rear side On.
2. Press and hold the power button
for about two seconds to turn on the power.
Note: Before using for the first time, please switch the system power
It takes one minute.
on.
System Reset
It will only be required to rebootthe system under extremely few circumstances.
Reset your system if the following situations occur:
1. Heavy lag experienced when refreshing screens or operations, which result
in an inoperable system.
2. Cannot turn off the system with the power button.
3. No response after a selection is made on the screen.
If any of the above occurs, turn the system power switch at the rear side Off and
turn it back On to reboot the system.
Power button
Shutdown
1. While the power is on, press the
power button to turn the power off.
2. If the unit will not be used for a
long time, turn the system power switch at the rear side Off.
System
power
switch
Using the Vehicle Bracket
The included vehicle bracket set can be
securely mounted on the front
windshield, or secured on top of the
glove compartment using the adhesive
plate. This device will effectively secure
the GPS unit in the vehicle. Follow the
procedures below to secure the bracket:
1. Follow the arrows and slide the
unit into the in-vehicle bracket fitting holes to secure.
2. Gently push down until the unit is tightly fixed with the bracket.
14
Page 15

3. Bend the bracket support to a proper angle. Securely mount the vehicle
Note: Please note the directions of the
arrows. When secured, the assembly
bracket to the windshield,
ensuring its base is resting
firmly on the dashboard.
should be tight. If these directions are
not followed, a loose fit will result, and
components must be reassembled.
4. Follow the directions, insert the bracket into
the slots on the bracket, and slide to fix
the set (A Æ B).
5. The in-vehicle bracket assembly is complete.
9 When using the in-vehicle secure
bracket, do not install it in a location
that will block the view of the driver
9 Recommended installation
requirements:
The bracket base should rest securely on
the dashboard to prevent excessive shock.
ENGLISH
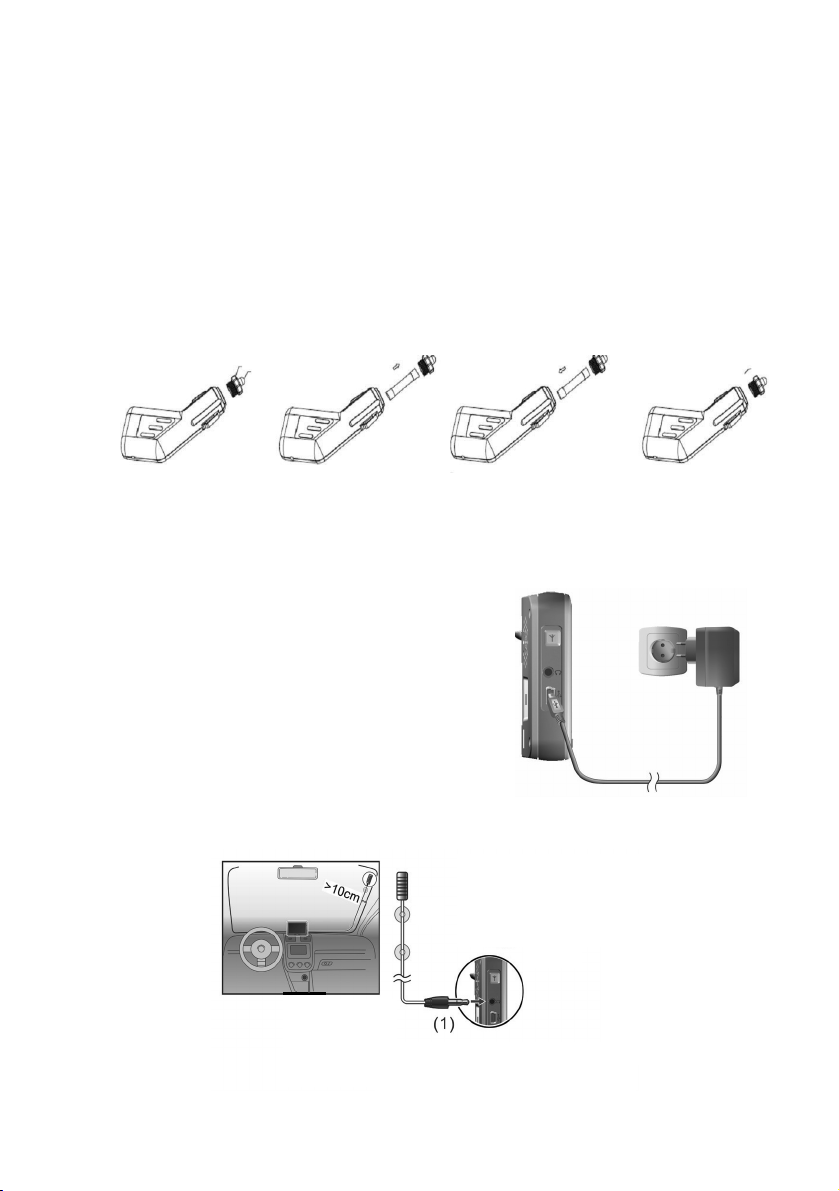
Using the Cigarette Lighter Adpator
While using the device in a vehicle, use
the included car charger for long periods
of usage.
1. Plug the small plug into the power
jack on the rear of the in-vehicle
bracket.
2. Insert the other end into the cigarette
lighter.
15
Page 16
Changing Fuse
Replace only with same type and ratings of fuse:FAST ACTING TYPE /ij6.35*32 /
250V / 1.5A
1. Turn right the front plastic cover to loosen it but leaves the positive metal part in
it.
2. Take out the fuse (Fuse: FAST ACTING TYPE /ij6.35*32/250V/1.5Aα
3. Replace the fuse (Fuse: FAST ACTING TYPE /ij6.35*32/250V/1.5Aα
4. Fasten the front plastic cover again. Then finished (Do not let the positive metal
part dropped during this process)
Using the AC Adaptor
Before using the device for the first time, we strongly suggest you use a fully
charged battery.
1. Insert the USB connector into the unit.
2. Plug the adaptor into a power outlet.
The USB connector is used for
battery charging only by AC Adaptor.
Using the TMC Antenna
Insert the TMC Antenna (1) into the unit.
16
Page 17
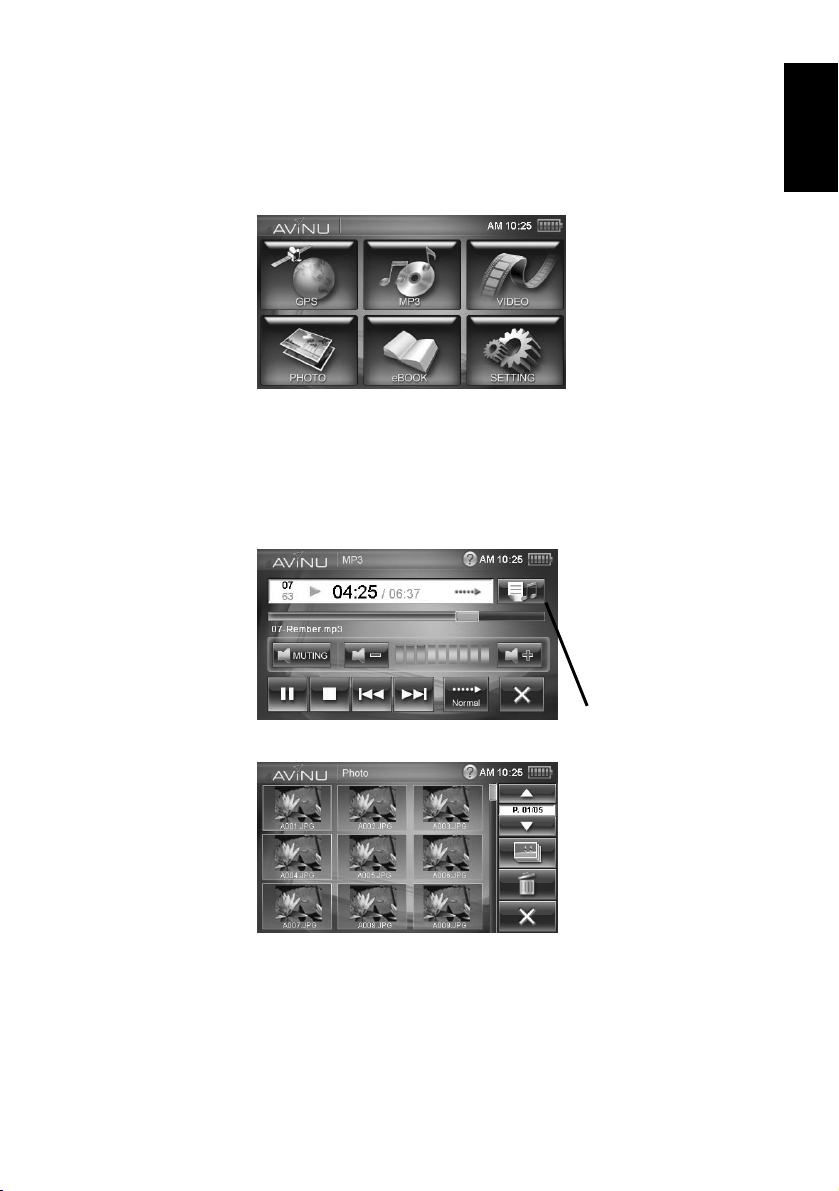
Main Menu
During the first startup, the screen will show the main screen consisting of four
functions: navigation, music, photo, and settings. Directly select an icon on the
screen to use that function.
ENGLISH
GPS
MP3
PHOTO
Loads the navigation program and navigation screen
Plays MP3/WMA music.
Need to create Folder "mp3" and Play list.
Play List
Plays images. Need to create Folder "image"
17
Page 18

VIDEO
Plays video. Need to create Folder "file"
eBOOK
SETTING
Can read file with __txt format.
Need to create Folder "ebook"
System setup
Note: Please read the user manual in the DVD-ROM.
z The contents of this manual will be modified without further notice.
z The operation temperature for the product is between -10ʚ~60к.
Operating or recharging in an environment with a temperature over 45к
might cause the system to stop functioning. However, this should be
considered a normal phenomenon. Please do not operate under extreme
temperatures.
18
Page 19
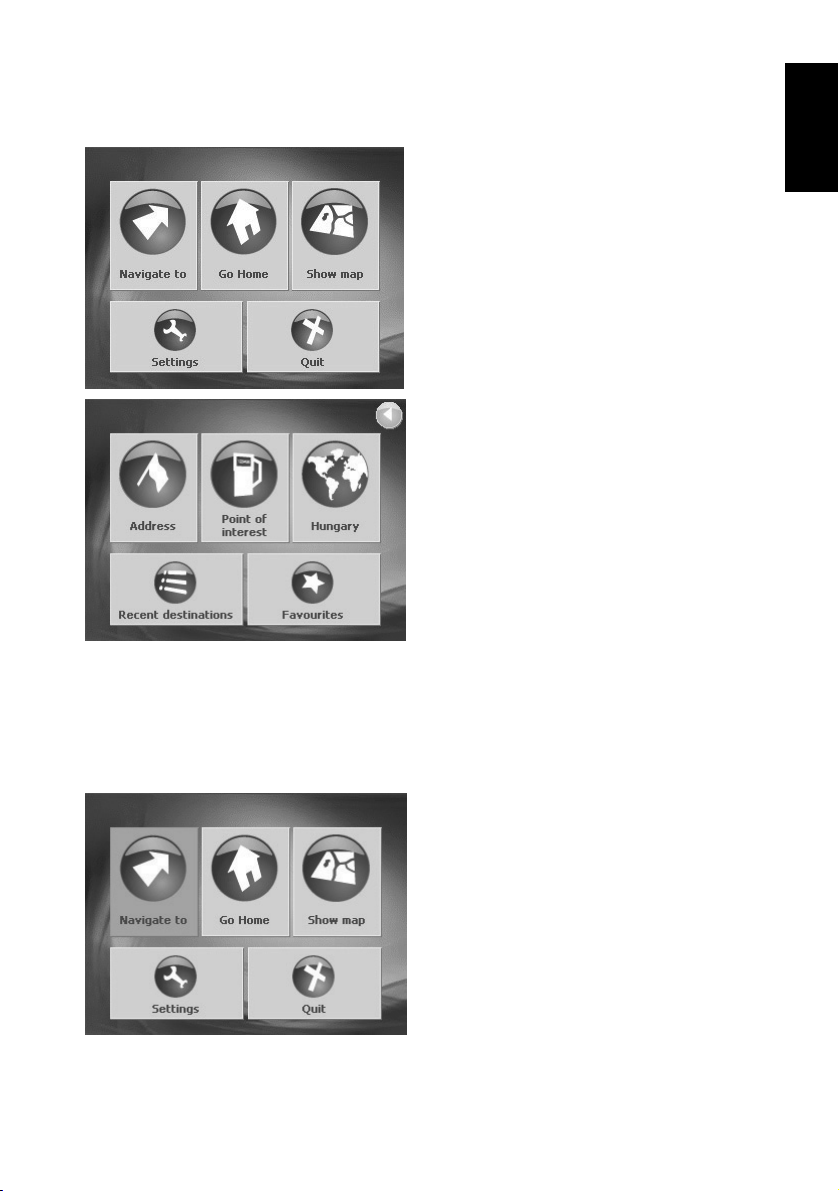
GPS Main Menu
Main menu
1 Opens the NAVIGATE TO window.
2 Starts navigation to home (the home
address must be entered beforehand).
3 Opens the map. The current location
is indicated during GPS-reception.
4 Opens the S
you can configure the navigation
system according to your own needs.
5 Switches the navigation system off.
ETTINGS window. Here
Window 'Navigate to'
1Opens the previous window.
2Opens the A
you can enter the address of the next
destination.
3Opens the P
There you can search for a point of
interest.
4Opens the R
can select the country in which your
destination lies.
5Opens the R
6Opens the F
contains all of your stored
destinations.
DDRESS window. There
OINT OF INTEREST window.
EGION window. There you
ECENT DESTINATIONS list.
AVORITES list that
ENGLISH
Specifying a destination for navigation
Tap in the main menu on Navigate to.
AVIGATE TO window opens.
The N
19
Page 20
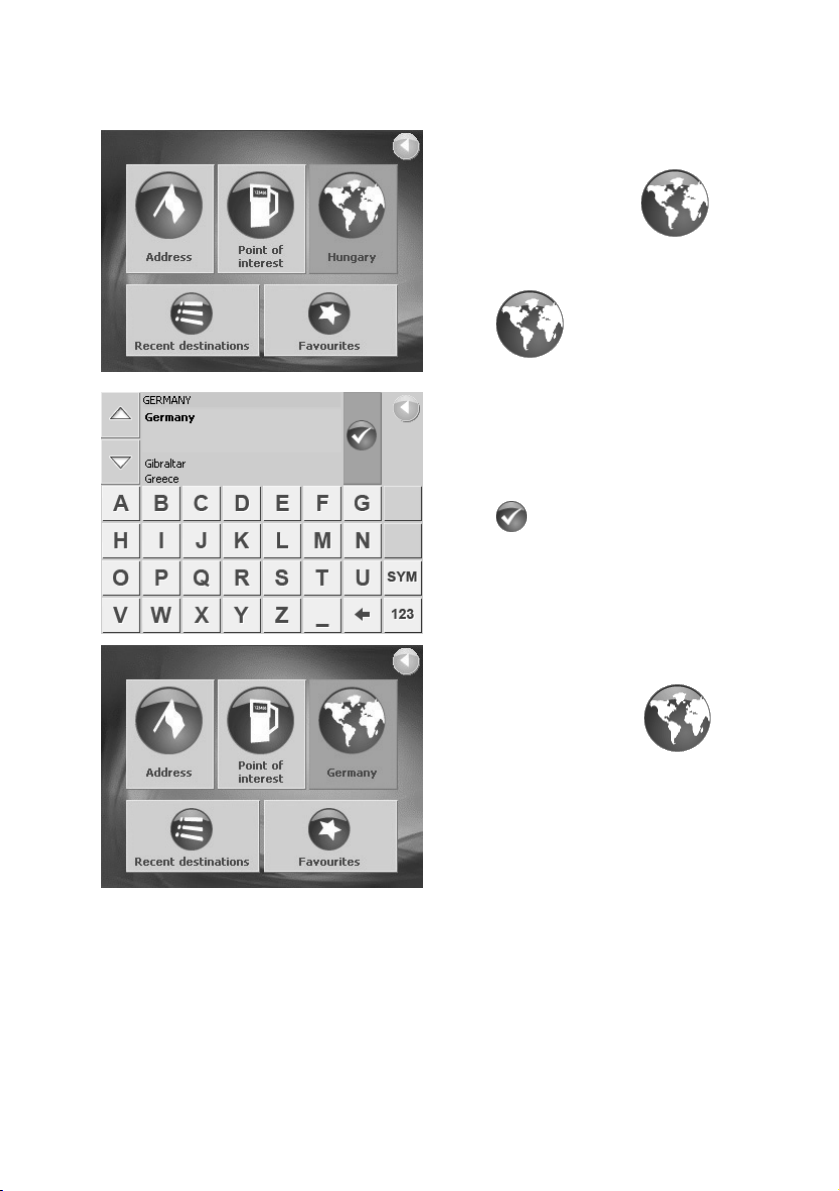
Specifying the destination country
The name of the country used for
specifying / selecting destinations is
located below the button
(Region) on the window N
Tap on
select a different country.
Enter the name of the destination
country.
You can use the Upward and
Downward buttons to mark the
desired country.
Tap on
The name of the selected country will
now appear on the N
window below the button
(Region).
(Region) in order to
(Ok).
AVIGATE TO.
AVIGATE TO
20
Page 21
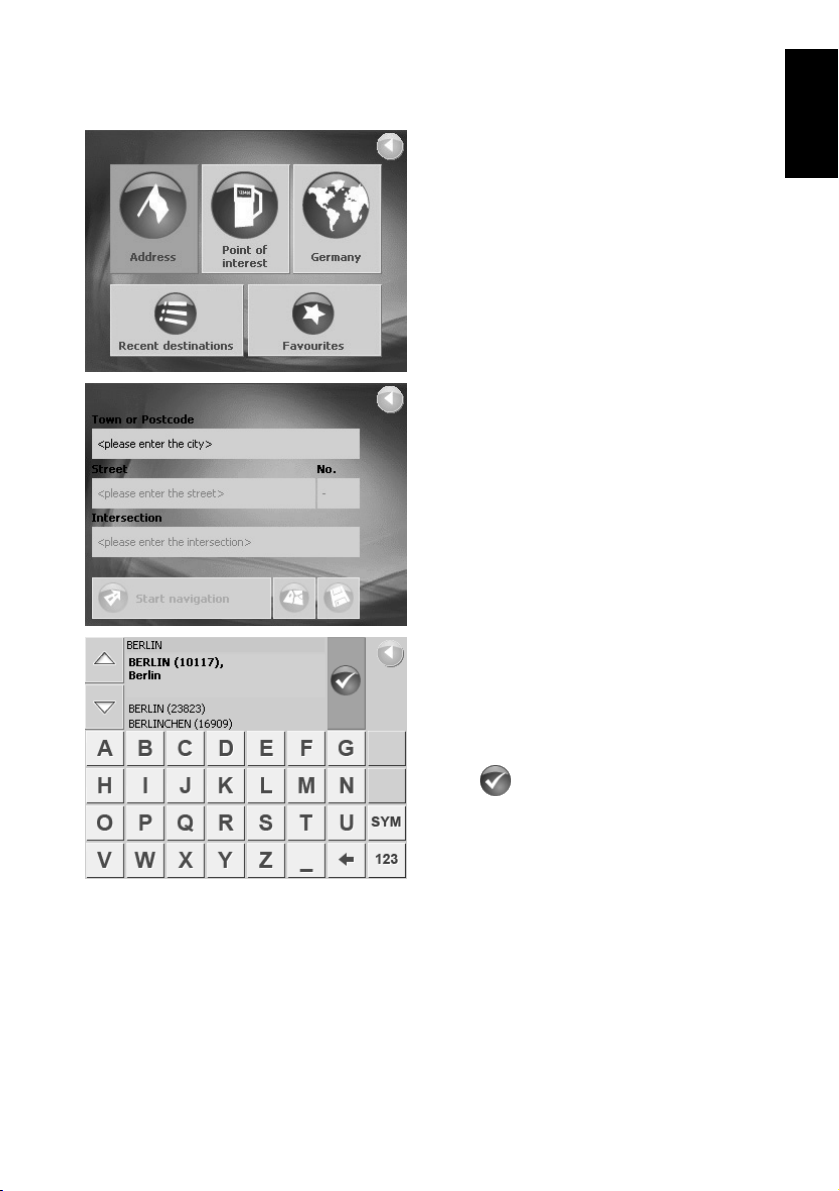
Specifying an address
Tap on the Address button in the
N
AVIGATE TO window.
DDRESS window opens.
The A
Tap on the City or ZIP field.
Enter the name of the destination city.
The zip codes are included in the list of
cities. If two or more cities have the
same name then tap on the Upward
and Downward buttons in order to
mark the correct entry.
ENGLISH
Tap on
(Ok).
21
Page 22
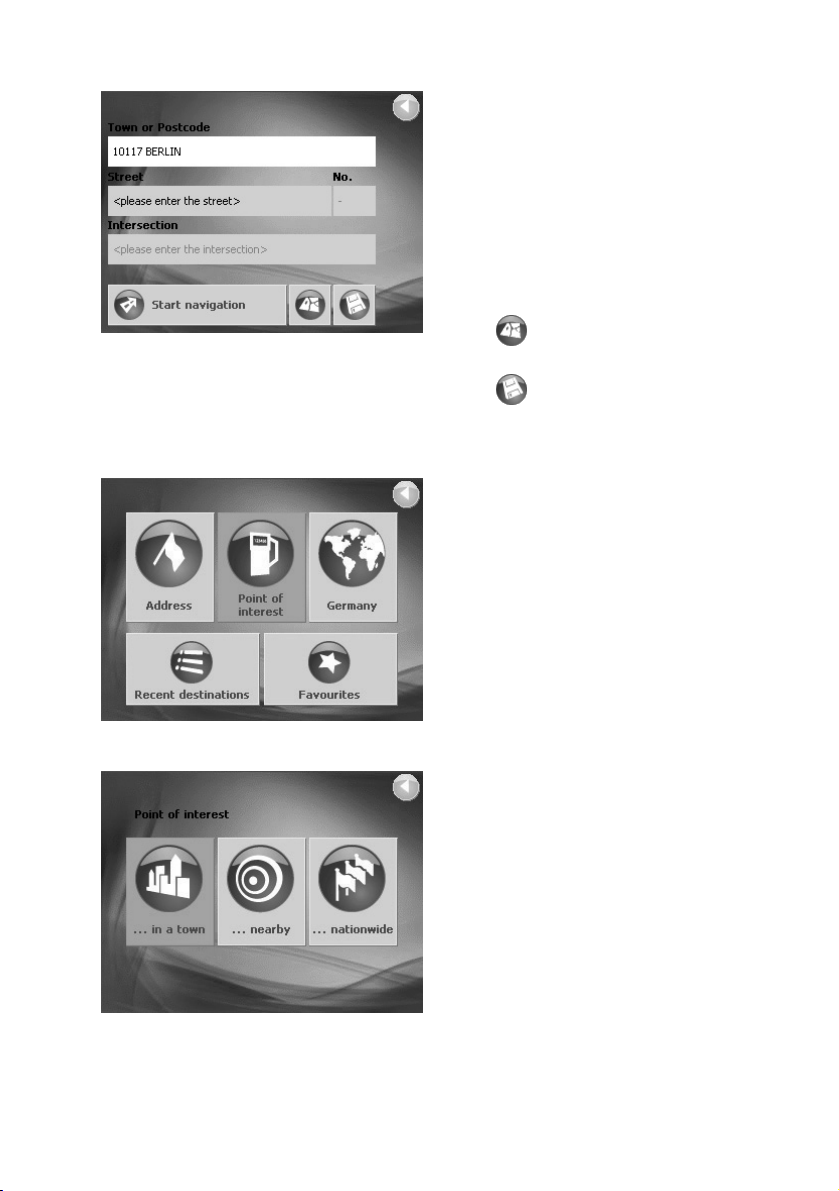
The street address for the destination
can be entered in the same way.
You can also enter the house address
or a side street.
Tap on the Start navigation button
after making the necessary entries.
The route is then calculated and
navigation starts.
Tap on
to see the destination on the map.
Tap on
the destination in the F
(Show on map) in order
(Save) in order to save
Selecting point of interest
Points of interest are for example gas
stations, hotels, restaurants, etc.
Tap on the Point of interest button in
the N
AVIGATE TO window.
OINT OF INTEREST window opens.
The P
Select a point of interest in a particular city.
Are you looking for a restaurant or a
hotel in a particular city?
Tap on the ... in a browsed city
button in the P
window.
OINT OF INTEREST IN A BROWSED
The P
CITY window opens.
OINT OF INTEREST
AVORITES list.
22
Page 23
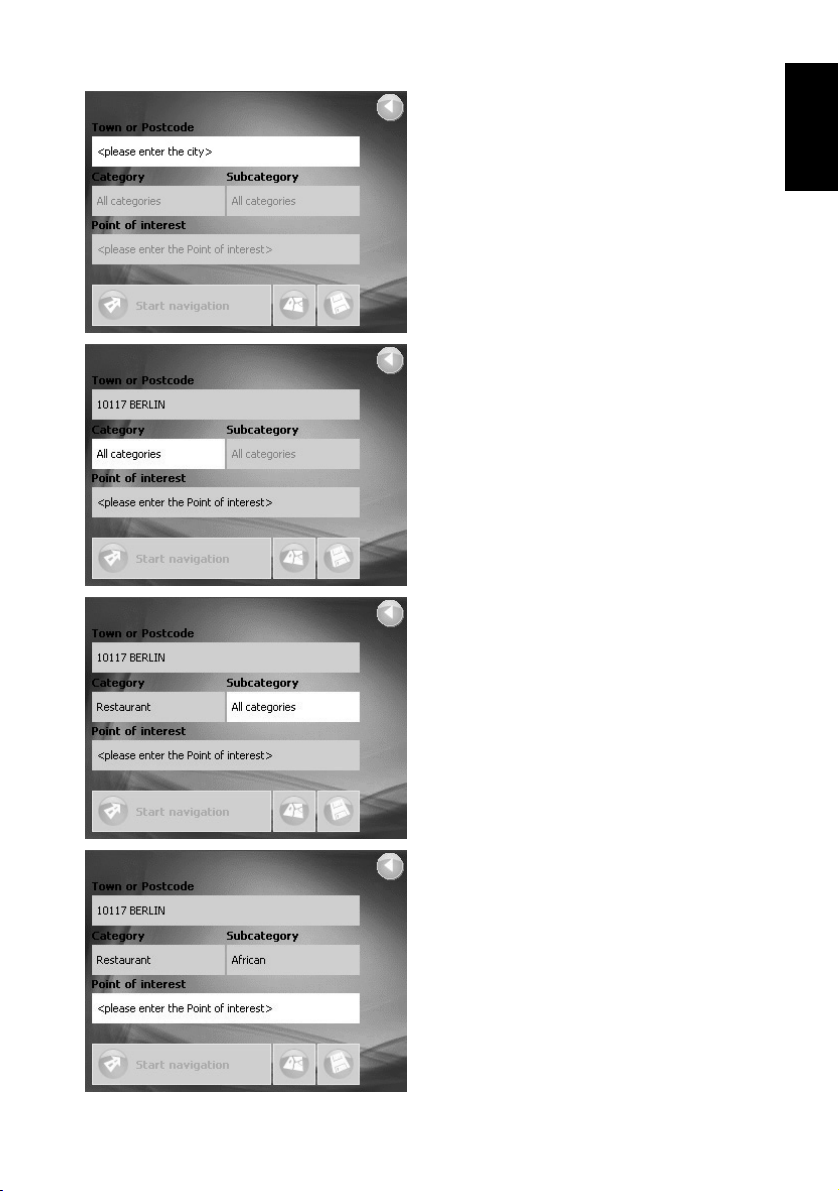
Tap on the City or ZIP field.
Enter the name of a city where you
would like to find a point of interest
(e.g. Berlin).
Tap on the Category field.
Select the type of point of interest that
you would like to find in Berlin (e.g.
restaurant).
Tap on the Subcategory field.
Select the type of restaurant that you
would like to find in Berlin (e.g.
African).
ENGLISH
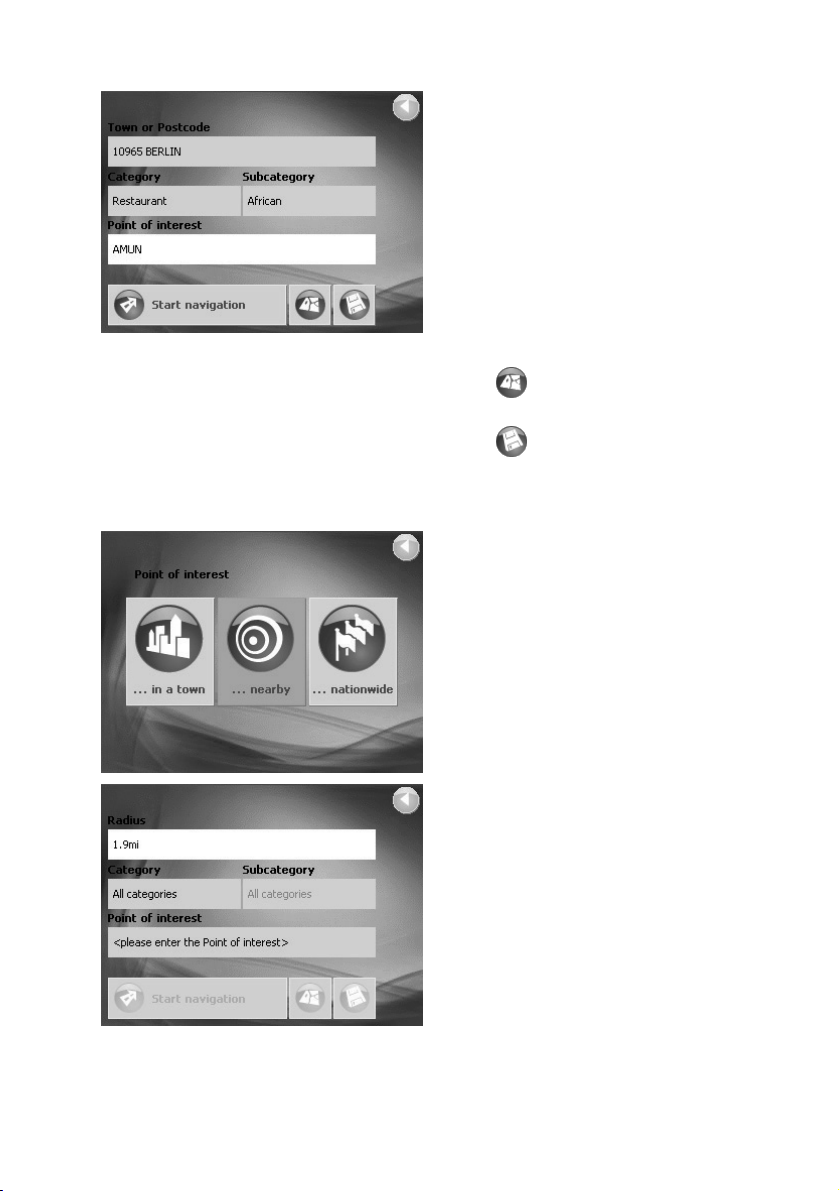
Tap on the Point of interest field.
Select the African restaurant that you
would like to navigate to in Berlin (e.g.
AMUN).
23
Page 24
You are not required to make a
selection in the Category and
Subcategory fields. There purpose is
to narrow down the list of points of
interest in the Point of interest field.
This list can be very comprehensive,
especially in the larger cities.
Tap on the Start navigation button
after you have selected the desired
destination. The route is then
calculated and navigation starts.
Selecting nearby point of interest
Tap on
to see the destination on the map.
Tap on
the destination in the F
Are you looking for a restaurant or a or
a hotel near your current location?
Tap on the ... nearby GPS position
button in the P
window.
The P
POSITION window opens.
Tap on the Radius field.
Select the radius in which you would
like to find a point of interest
(e.g. 3 km).
Then tap on the Category,
Subcategory, and Point of interest
fields and enter the appropriate
information.
(Show on map) in order
(Save) in order to save
AVORITES list.
OINT OF INTEREST
OINT OF INTEREST NEARBY GPS
24
Page 25

You are not required to make a
selection in the Category and
Subcategory fields. Their purpose is
to narrow down the list in the Point of
interest field. This list can be very
comprehensive, especially in the larger
cities.
Tap on the Start navigation button
after you have selected the desired
destination. The route is then
calculated and navigation starts.
ENGLISH
Tap on
to see the destination on the map.
Tap on
the destination in the F
(Show on map) in order
(Save) in order to save
AVORITES list.
Selecting a point of interest of nationwide importance
You would like to go to an airport or
visit a tourist attraction but do not
know the name of the city the
destination lies in?
Tap on the ... nationwide button in
the P
OINT OF INTEREST window.
OINT OF INTEREST NATIONWIDE
The P
window opens.
Tap on the Category field.
Select the type of point of interest that
you would like to find in Berlin (e.g.
tourism).
Tap on the Point of interest field.
Select the point of interest you would
like to navigate to (e.g. conservation
park Bavarian Forest).
25
Page 26
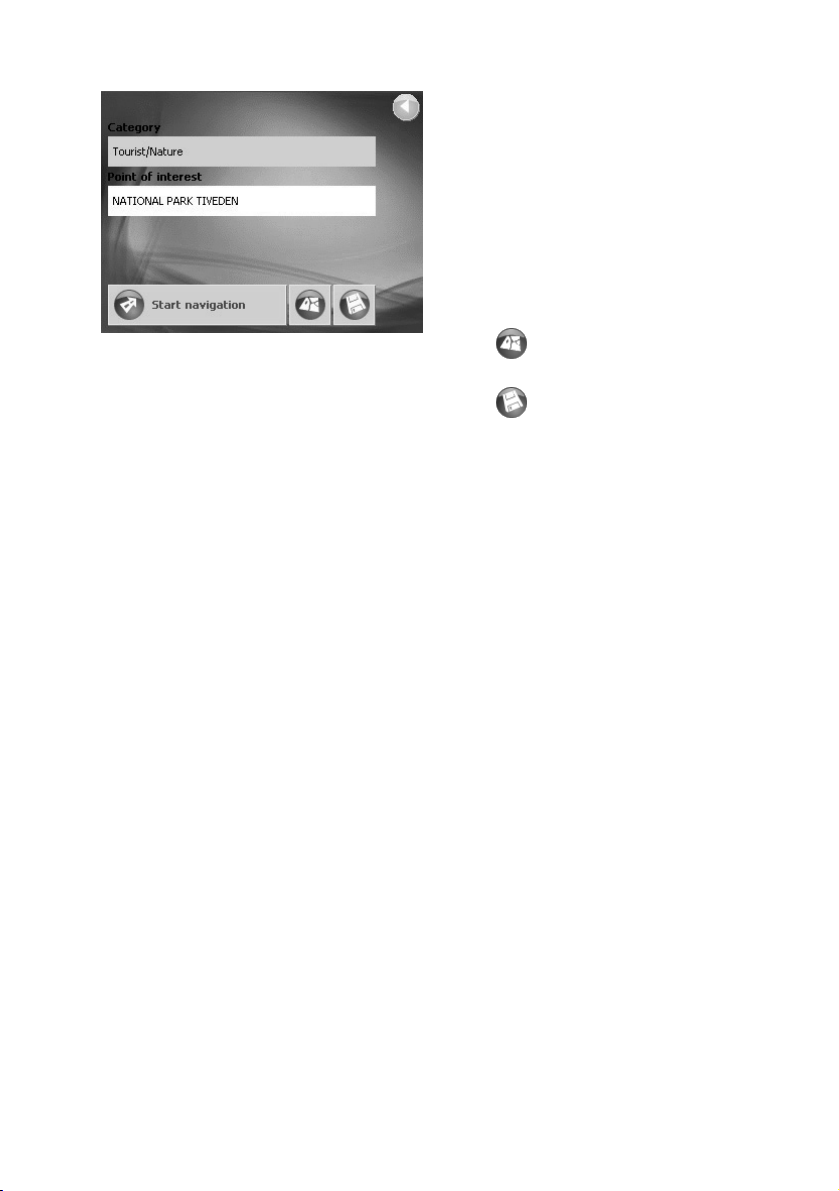
You are not required to make a
selection in the Category field. Its
purpose is to narrow down the list in
thePoint of interest field. This list can
be very comprehensive.
Tap on the Start navigation button
after you have selected the desired
destination. The route is then
calculated and navigation starts.
Tap on
to see the destination on the map.
Tap on
the destination in the F
(Show on map) in order
(Save) in order to save
AVORITES list.
26
Page 27
Navigating to home
Would you like to drive home?
Tap in the main menu on Take me
home. The route is then calculated
and navigation starts.
You will be requested to enter your
home address if you have not yet done
so.
ENGLISH
Tap on
The settings window HOME ADDRESS
opens.
Tap on Enter your home address.
The N
Enter your home address as if it were
your next destination.
Tap on Set as home address after
you have completely entered your
home address.
(Ok).
AVIGATE TO window opens.
27
Page 28
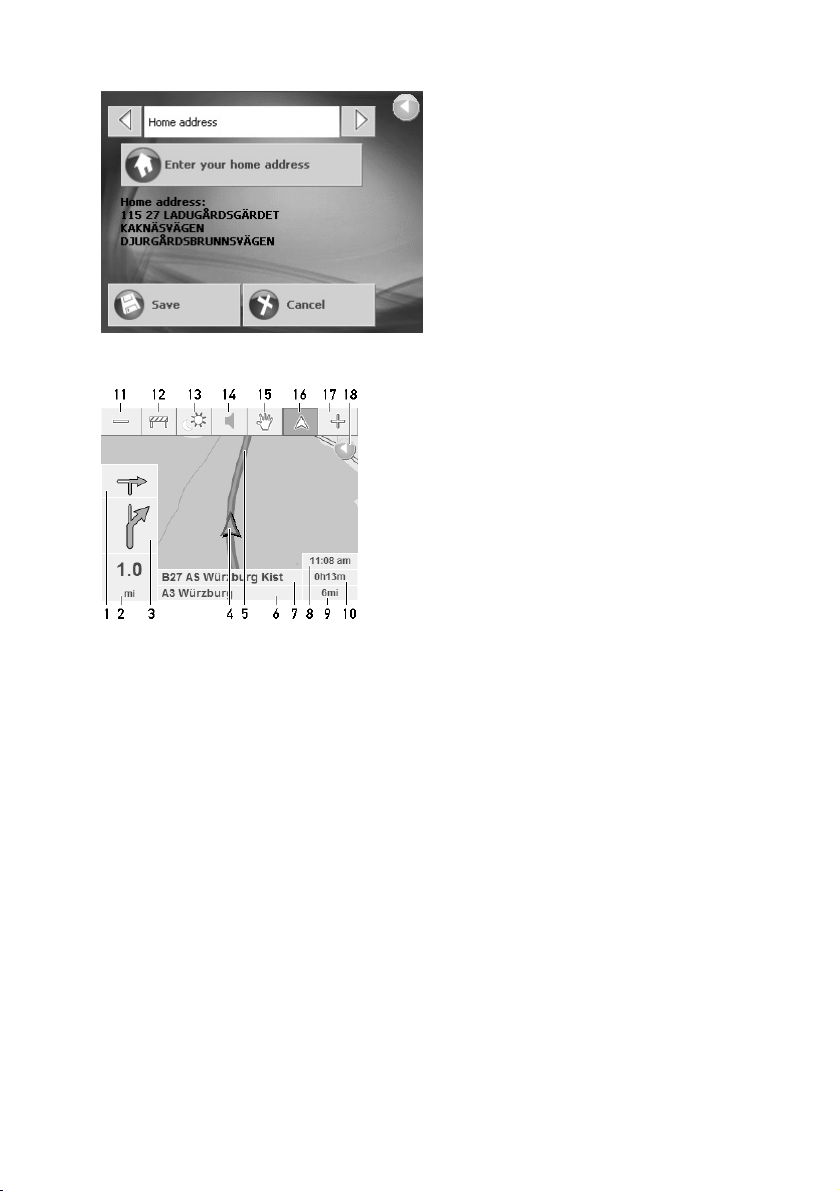
The map during navigation
The settings window HOME ADDRESS
opens.
Tap on Save.
The main window opens.
1 The driving
maneuver
after the next
2 The distance
up to the
next driving
maneuver
3 The next
driving
maneuver
4 Your current
location
5 Your route
6 Your current
street
location
7 The street
onto which
you must
turn
8Estimated
time of
arrival
9 Remaining
distance
10 Estimated
remaining
travel time
Tool bar
11 Increase scale
12 Blocking /
unblocking a
route stage
13 Day / night
mode
14 Volume
15 Move / enlarge
16 Freeze location
/ map section
17 Reduce scale
18 Exit navigation,
close map
Tap on any point
of the map to show
or hide the toolbar.
28
Page 29
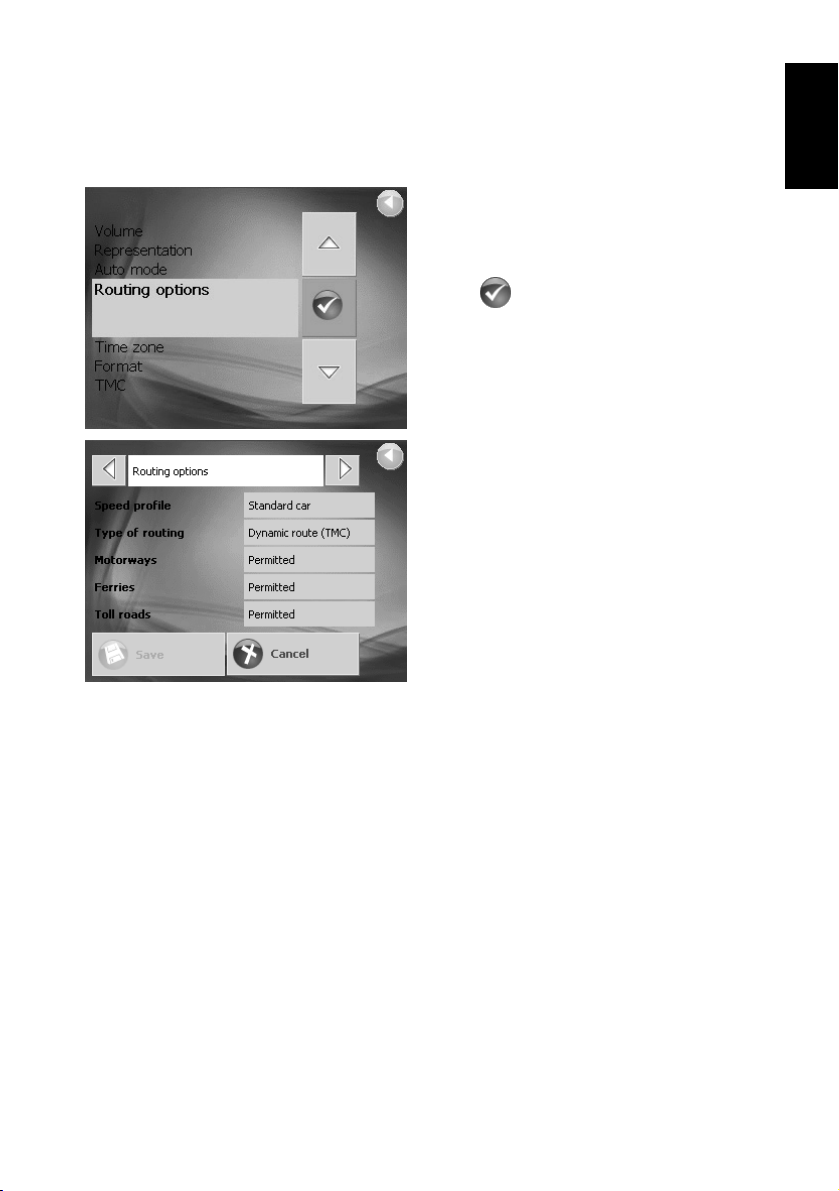
Settings
Tap in the main menu on Settings.
ETTINGS window opens.
The S
Use the Upward and Downward
buttons in order to mark the settings
window that you would like to open.
ENGLISH
Tap on
Change the settings according to your
needs.
You can use the button To the Right
and To the Left for opening other
setting windows.
Tap on Save if you want to save the
changes.
You will find further information on the
settings on the following pages.
(Ok).
Settings window
PRODUCT INFORMATION Take the time to learn the product version.
Run the product demo
AP INFORMATION Indicate whether points of interest or street
M
OUTE INFORMATION Specify whether you want the estimated time of
R
S
IGNPOST INFORMATION Specify whether you want the signposts you
names should be displayed on the map.
Select the navigation map that you would like
to load. Navigation destinations must be
recorded on the map.
arrival, the remaining time to destination, and /
or the remaining distance to destination to be
displayed during navigation.
should follow to be displayed during navigation.
29
Page 30

SPEED LIMIT Specify whether you want speed limits to be
displayed on the map. Configure acoustic and
visual warnings on exceeding these speed
limits.
V
OLUME Set the volume of the spoken driving
instructions.
R
EPRESENTATION Calibrate the touchscreen for contact
sensitivity.
Select the brightness level for day and night
mode.
A
UTO MODE Indicate whether the navigation should startup
with 2D- or a 3D-map section.
Indicate whether auto zoom should be active
(the faster you drive the larger the map scale
becomes).
Indicate whether the map should be configured
in a 2D-view driving direction or northern
direction.
R
OUTING OPTIONS Indicate your speed profile and the type of
route (dynamic, shortest route, fastest route)
Indicate whether you would like to use the
interstate, ferries, or toll ways during your trip.
TIME ZONE Indicate your time zone.
Indicate whether summer is the current time of
year.
F
ORMAT Indicate whether the time should be displayed
on a 12 hour or 24 hour clock.
Indicate whether distances should be displayed
in miles or in kilometers.
TMC Indicate whether if the route should be
recalculated if traffic Information affects the
route.
OME ADDRESS Enter your home address or change it.
H
Overview of the buttons for MN5|BASE
Main menu Point of interest
Navigate to: Enter the navigation
destination
Show map: Display the map
30
... in a browsed city:
Point of interest in a
city
... nearby GPS
position: Nearby point
of interest
Page 31

Take me home: Navigate to home
Settings: Change the settings Specifying the destination
Exit: Exit the navigation program
Return: Return to the previous
window
Navigate to
Address: Enter a address for the
navigation
Point of interest: Specify a point of
interest
Recent destinations: Select a
destination from the R
DESTINATIONS list.
Favorites: Select a destination from
the F
Region: Select a country or a region
Map section
No GPS: Insufficient GPS-reception Other buttons
TMC (optional): TMC-reception
available or not
Enlarge: Enlarge the scale (zoom out)
Block / unblock: Block a certain
route stage
Day / night mode: Switch between
the display modes
Entire route: Show the entire route
on the map
Move / zoom: Moving the map with
the pointing device instead of zooming
Freeze location / map: Center the
location and move the map section or
vice versa
Reduce: Reduce the scale (zoom in)
AVORITES list.
ECENT
... nationwide:
Nationwide point of
interest
Start navigation:
Start navigation to the
specified destination
Show on map: Show
the destination on the
map
Save: Save the
destination in the
F
AVORITES list
Edit favorites
Delete: Delete the
destination from the
F
AVORITES list
Edit: Edit the entry in
the F
AVORITES list
TMC
TMC-signal strength:
Quality of the TMCsignal
Update TMC: Update
the TMC-messages to
the latest version
Ok: Confirmation in a
dialog box
Terminate: Do not
confirm in a dialog box
Calibrate: Start the
touchscreen calibration
Upward: Scroll
upward in a list
Downward: Scroll
downward in a list
To the Left: Scroll to
the left
To the Right: Scroll to
the right
ENGLISH
31
Page 32

Specifications
ʳ
Integrated GPS Receiver
Processor
Operating System
Memory
Mass(Approx.)
Dimensions(W/H/D)
Car Cradle / Charger
AC Adaptor
Battery
Extension Slot
Display
LED
Audio
Temperature
Humidity
USB
Bluetooth profile
20 parallel channels.SiRF star III
Samsung S3C2440A 400 MHz.
Microsoft Windows CE. Net 5.0 Core Version
ϫ Built-in 2GB Flash
ϫ 64 MB SDRAM
200 ˺
121 (W) x 81 (H) x 19-27 (D) mm
ϫ Input voltage: 12-24V
ϫ Output voltage: 5V/2A
ϫInput voltage: 100-240V㨪50/60Hz 0.5A
ϫOutput voltage: 5V/ 2A
ϫ Rechargeable 1150 mAh Li-Ion Battery
SD
ϫ 4.3” ( 16:9 ) TFT LCD with touch screen
ϫ 95.04(H)*53.86(V) mm
480ϫ x 272 pixels
ϫ 16 M colors
Orange/Green LED for battery charging status
Blue LED for Bluetooth status
ϫ Built-in speaker.
ϫ Software volume control.
ϫ 3.5mm headphone jack
ϫ Operation: -10ʚ ~ 60к
ϫ Storage: -20C ~ 70C
Operationϫ : 0%~90%
ϫ Storage: 0%~90%
ϫ mini USB Connector for DC power in
Hands-Free calling, SMS, File Transfer
TM
32
Page 33

SISTEMA DI NAVIGAZIONE
PORTATILE PER AUTOMOBILE
ANWEISUNGEN
KV-PX701
DEUTSCH
33
Page 34

Sicherheitshinweise
Bitte lesen Sie sorgfältig diesen Abschnitt und befolgen alle Anweisungen.
Dies hilft, einen zuverlässigen Betrieb sicherzustellen und die Lebensdauer des
Gerätes zu verlängern.
Heben Sie das Verpackungsmaterial und das Benutzerhandbuch für einen
späteren Gebrauch auf. Wenn Sie das Produkt einer anderen Person
weitergeben, müssen Sie diese Anweisungen auch weitergeben.
Lassen Sie niemals Kinder ohne Aufsicht mit elektrischen Geräten spielen. Kinder
können nicht immer die möglichen Gefahren richtig einschätzen.
Halten Sie Verpackungsmaterialien wie z.B. Folien von Kindern fern.
Es besteht Erstickungsgefahr im Fall einer unsachgemäßen Verwendung.
Die dauerhafte Verwendung dieses Gerätes bei höchster Lautstärke
kann dem Hörvermögen schaden.
Öffnen Sie niemals das Gehäuse des Gerätes oder des Netzteils.
Es befinden sich keine vom Anwender zu reparierenden Teile innerhalb des
Gerätes. Es besteht Lebensgefahr beim Öffnen des Gehäuses durch einen
elektrischen Schlag.
Stellen Sie keine Gegenstände auf das Gerät und üben keinen Druck auf den
Bildschirm aus. Es besteht das Risiko, dass der Bildschirm bricht.
Berühren Sie niemals mit scharfen Gegenständen den Bildschirm, um Schäden
zu vermeiden. Verwenden Sie nur den mitgelieferten Stylus oder ein anderes
stumpfes, geeignetes Hilfsmittel. In vielen Fällen kann das Gerät auch mit
einem Finger bedient werden.
Es besteht ein Verletzungsrisiko, wenn der Bildschirm bricht. Falls dies geschieht,
verwenden Sie bitte Schutzhandschuhen, um die zerbrochenen Teile
wegzuräumen. Nehmen Sie anschließend für die Entsorgung mit dem
Kundendienst Kontakt auf. Waschen Sie sich Ihre Hände mit Seifen, da die
Möglichkeit besteht, dass Chemikalien ausgetreten sind.
Unterbrechen Sie die Stromversorgung (ziehen Sie den Netzstecker aus der
Steckdose heraus), schalten das Gerät unverzüglich aus bzw. schalten es nicht
an und nehmen mit dem Kundendienst Kontakt auf.
Falls das Gehäuse des Gerätes oder des Netzteils beschädigt wurde oder
Flüssigkeiten eingedrungen sind. Die Komponenten müssen vom Kundendienst
untersucht werden, um Schäden zu vermeiden!
Betriebsumgebung
Die Nichtbeachtung dieser Anweisungen kann zu Schäden an dem Gerät führen.
Die Garantie gilt in solchen Fällen nicht.
Halten Sie Ihr Navigationssystem und alle angeschlossenen Geräte von
Feuchtigkeiten fern, und vermeiden Sie Staub, Wärme und direkte
Sonneneinstrahlung vor allem im Auto.
Achten Sie immer darauf, das Gerät vor Nässen z.B. durch Regen oder Hagel zu
schützen. Denken Sie bitte daran, dass sich Feuchtigkeit innerhalb eines
Schutzbeutels durch Kondensation bilden kann.
Vermeiden Sie starke Schwingungen und Erschütterung, wie z.B. beim
Überqueren von Feldern.
Achten Sie darauf, dass sich das Gerät nicht z.B. durch Bremsen von seiner
Halterung löst. Installieren Sie das Gerät möglichst senkrecht.
Elektromagnetische Verträglichkeit
34
Page 35

Die EMV (elektromagnetische Verträglichkeit)-Richtlinien müssen eingehalten
werden, wenn zusätzliche bzw. andere Komponente angeschlossen werden.
Bitte achten Sie auch darauf, nur geschirmte Kabel (maximal 3m) mit diesem
Gerät zu verwenden.
Halten Sie bitte einen Abstand von mindestens 3 m von Quellen mit
hochfrequenten und magnetischen Störungen (z.B. Fernsehgeräten,
Lautsprechersystemen, Mobiltelefonen etc.) ein, um eine optimale Leistung zu
erhalten.
Dies hilft, Funktionsstörungen und Datenverluste zu vermeiden.
Elektronische Geräte geben während des Betriebs elektromagnetische Wellen ab.
Solche Absonderungen sind harmlos, können aber andere in der Nähe
betriebene Geräte stören.
Obwohl unsere Geräte in unseren Laboren getestet und für die
elektromagnetische Verträglichkeit optimiert wurden, kann trotzdem eine
Störung während des Betriebs in dem Gerät selbst und anderen Geräten in der
Nähe auftreten.
Falls eine solche Störung auftritt, versuchen Sie bitte, die Störung durch Ändern
der Positionen und der Abstände zwischen den Geräten zu beseitigen.
Stellen Sie bitte vor dem Fahren sicher, dass die elektronischen Systeme des
Autos richtig funktionieren.
Datensicherheit
Machen Sie immer Sicherungskopien auf einem externen Datenträger, wenn Sie
Ihre Daten aktualisieren. Der Lieferant haftet nicht für Datenverluste oder
Schäden an Datenspeichervorrichtungen. Es wird keinen Ansprüchen für
Schäden aus Datenverlusten oder für beiläufige Schäden entsprochen.
Verbindung
Verwenden Sie das mitgelieferte Netzteil. Die Verwendung anderer Netzteile
kann gefährlich sein und zu Funktionsstörungen des Gerätes führen.
Der Kfz-Adapter darf nur an den Zigarettenanzünder eines Kraftfahrzeugs
angeschlossen werden (PKW-Akku = DC 12V , LKW-Akku = DC 24V !). Sind
Sie sich nicht sicher hinsichtlich der Spannungsnennwerte Ihres Fahrzeugs,
wenden Sie sich bitte an Ihren Fahrzeughersteller.
Verbinden Sie das Netzteil nur mit einer geerdeten Steckdose mit einem Wert
zwischen 100 und 240 VAC, 50 Hz/60 Hz. Sind Sie sich nicht sicher hinsichtlich
der zu verwendenden Stromversorgung, wenden Sie sich bitte an den
jeweiligen Stromanbieter.
Verwenden Sie nur die dem Gerät beigefügten Akkus.
Über das Netzteil:
1. Verwenden Sie das Netzteil nicht in einer nassen Umgebung. Berühren Sie
das Netzteil nicht, wenn Ihre Hände und Füße nass sind.
2. Achten Sie auf eine gute Belüftung, wenn Sie das Netzteil verwenden. Lassen
Sie weder Papier noch sonstiges das Netzteil bedecken. Die Abkühlung kann
dadurch behindert werden. Verwenden Sie das Netzteil nicht, wenn es sich in
einer Tasche befindet.
3. Versuchen Sie niemals das Gerät zu reparieren. Lassen Sie unverzüglich das
Gerät ersetzen, wenn es beschädigt ist oder Nässen ausgesetzt wurde.
4. Wir `raten Ihnen ab, das Aufladen durch einen PC auszuführen. Die Spannung
eines PCs reicht nicht für die Stromversorgung des Gerätes.
DEUTSCH
35
Page 36

5. Achten Sie beim Installieren des Gerätes darauf, dass der Stecker leicht
zugänglich ist.
Über den Akku
1. Verwenden Sie nur das originale, werkseitig zugelassene Ladegerät.
2. Ein Lithium-Akku befindet sich in dem Gerät. Bauen Sie den Akku nicht
auseinander, stechen ihn nicht, schlagen ihn nicht und werfen ihn nicht ins
Feuer, um einen Brand oder Hautverbrennungen zu vermeiden. Der Akku
zerbirst oder explodieren und lässt gefährliche Chemikalien frei, wenn er ins
Feuer geworfen wird.
3. ACHTUNG
Der Akku darf keiner übermäßigen Wärme wie z.B. Sonnenstrahlen, Feuer oder
der gleichem ausgesetzt werden.
Wichtige Anweisungen
1. Hinweis: Es besteht ein Explosionsrisiko, wenn der Akku durch einen falschen
Typ ersetzt wird.
Entsorgen Sie gebrauchte Batterien/Akkus nach den Anweisungen. Der
Ersatzakku muss dem werkseitig zugelassenen Originalakku entsprechen.
2. Recyceln oder entsorgen Sie Batterien/Akkus nach den Vorschriften.
3. Der Akku darf nur mit diesem Gerät zusammen verwendet werden.
ACHTUNG
So vermindern Sie das Risiko von Stromschlägen, Brand etc.:
1. Entfernen Sie keine Schrauben, Abdeckungen oder Gehäuse.
2. Setzen Sie das Gerät keinem Regen oder Feuchtigkeit aus.
Information zur Entsorgung alter Geräte
Das Symbol bedeutet, dass das Produkt am Ende seiner
Lebensdauer nicht mit dem Hausmüll zusammen entsorgt
werden darf. Entsorgen Sie das Produkt gemäß den
einschlägigen Gesetzen oder sonstigen Regeln in Ihrem Land
bzw. in Ihrer Gemeinde.
Die richtige Entsorgung des Produkts hilft, natürliche
Ressourcen zu erhalten und potenzielle negative Einflusse auf
die Umwelt und die Gesundheit der Menschen zu vermeiden.
Navigation
Sicherheitshinweise zur Navigation
Bedienen Sie nicht während des Fahrens das Navigationssystem, um sich und
andere Leute vor Unfällen zu schützen!
Wenn Sie die Sprachanweisungen nicht verstehen oder sich nicht sicher sind,
was Sie an der nächsten Kreuzung machen sollen, dann kann Ihnen die Karte
oder die Pfeilanzeige eine schnelle Orientierung geben. Schauen Sie sich nur
dann die Anzeige an, wenn es die Umstände zulassen!
Achtung!
36
Page 37

Die Straßenauslegung und Fahrregeln haben Vorrang vor den Anweisungen des
Navigationssystems. Folgen Sie nur dann den Anweisungen, wenn die
Umstände und Fahrregeln es erlauben! Das Navigationssystem wird Sie zu
Ihrem Ziel führen, selbst wenn Sie von Ihrer geplanten Route abweichen
müssen.
Die vom Navigationssystem gegebenen Anweisungen befreien den Fahrer von
seiner Sorgfaltspflicht und persönlichen Verantwortung nicht.
Planen Sie die Routen, bevor Sie sich auf den Weg machen. Bitte parken Sie
zuerst, wenn Sie unterwegs eine neue Route planen möchten.
Lassen Sie keine Metallgegenstände den Empfang stören, um das GPS-Signal
richtig zu empfangen. Befestigen Sie das Navigationssystem mit Hilfe des
Saugnapfs an der Innenseite der Windschutzscheibe oder in der Nähe der
Windschutzscheibe. Probieren Sie verschiedene Positionen in Ihrem Fahrzeug,
um die beste Position für den Empfang zu finden.
Wichtiger Hinweis
Dieses System ist nur als Navigationhilfe gedacht. Verwenden Sie dieses System
nicht für ein genaues Abmessen der Richtung, der Entfernung und für eine
geografische, präzise Vermessung.
Die erste GPS-Positionierung sollte in einem weithin offenen Areal ohne Gebäude
an einer fixen Stelle vorgenommen werden. Die Positionierungszeit hängt von
der Stärke des Satellitensignals und der Bewölkung ab; sie kann bis zu 10
Minuten dauern.
GPS (Globales Positionierungssystem) ist ein Satellitensystem, das einzig vom
Verteidigungsministerium der Vereinigten Staaten verwendet, gewartet und
betrieben wird. Etwaige Modifizierungen und Justierungen des System können
sich nachteilig auf die Präzision und den Betrieb GPS-bezogener Systeme
auswirken.
Drahtlose Kommunikationsprodukte (Mobiltelefon, Radio, Gerät zur Feststellung
der Fahrgeschwindigkeit, etc.) können das GPS-Signal abschwächen.
Aus Sicherheitsgründen dürfen Sie dieses System nicht während des Lenkens
eines Fahrzeugs bedienen.
Lassen Sie dieses Gerät beim Aussteigen aus dem Fahrzeug nicht unter der
vorderen Windschutzscheibe liegen. Ist es hohen Temperaturen ausgesetzt,
könnten sich Gefahren ergeben; zudem könnte sich der Akku überhitzen und
den Betrieb des Geräts stark beeinträchtigen.
Getönte Scheiben können den Empfang von Satellitensignalen stören. Wir
empfehlen die Installation einer Fahrzeugantenne, um das Signal zu verstärken
und zu stabilisieren.
Die geplante Navigationsroute ist nur eine Bezugsquelle; Änderungen der
Straßenlage (Einbahnstraßen, kein Abbiegen nach rechts) können vorkommen,
so dass Sie der Situation entsprechend reagieren und entscheiden sollten, ob
Sie der geplanten Route folgen oder nicht.
Wenn Sie dieses System im Fahrzeug mitnehmen, müssen Sie es aus
Sicherheitsgründen mit dem beigefügten Halter im Fahrzeug befestigen. Die
DEUTSCH
37
Page 38

nachstehende Abbildung zeigt die empfohlenen Stellen für die Befestigung.
g
X Fahrersicht nicht blockieren
X Nicht vor Airba
anbringen
X Nicht vor Airbag
anbringen
X Nicht auf instabilem
Armaturenbrett
anbringen
Die Beschreibung des Produkts in diesem Dokument kann von Ihrem erworbenen
Produkt abweichen. Die Software wird gegebenenfalls häufig aktualisiert. Falls
die Beschreibungen in diesem Handbuch nicht mit Ihrer Softwareversion
übereinstimmen, gehen Sie bitte anhand Ihrer vorliegenden Softwareversion
vor.
Lesen Sie diese Anleitung mit Bedienungshinweisen und Beschreibungen
sorgfältig durch. Verwenden Sie nur ursprüngliche, werkseitig freigegebene
Akkus und Zubehörteile, um eine unerwartete Beschädigung zu verhindern.
Das Nichtbefolgen der richtigen Bedienungsabläufe oder der Anschluss von
inkompatiblem Zubehör stellt eine Verletzung des Garantievertrags dar und
setzt Ihre Garantieansprüche automatisch außer Kraft; abgesehen davon
gefährdet dies auch Ihre persönliche Sicherheit.
Erstmalige Verwendung
Copyright
Diese Anleitung, einschließlich Produkt und Software, darf ohne die schriftliche
Erlaubnis der JVC Inc. nicht kopiert, übertragen, aufgezeichnet oder auf
Speichergeräten gespeichert werden. Überdies darf sie unter keinen Umständen
in anderen Sprachen übersetzt werden.
Copyright © 2007 Victor Company of Japan, Limited Alle Rechte vorbehalten.
Microsoft und Windows sind eingetragene Handelsmarken der Microsoft
Corporation in den USA und/oder anderen Ländern.
Die Marke/ das Wort Bluetooth und die Bluetooth-Logos sind Eigentum der
Bluetooth SIG, Inc.. Die Victor Company of Japan, Limited (JVC) verwendet unter
Lizenz solche Marken.
Das Logo SD ist eine Marke.
38
Page 39

Inhalt des Produktkartons
Ihrem Produkt sollte folgendes Zubehör beigelegt sein:
KV-PX701-Einheit Dockingstation Saugnapf-Befestigung
Zigarrettenanzünderadapter Netzteil Armaturenbrett
DEUTSCH
DVD-ROM
(Digital Diagramm/
Benutzerhandbuch)
Stereo-Kopfhörer
Anweisungen Tragetasche
TMC-AntenneNTENNE
Externe GPS-Antenne
(optional)
39
Page 40

Grundlegende Bedienung
Einführung
Vorderseite
Bluetooth LED
4,3-Zoll
TFT-LCDTouchscreen
Rückseite
Stylus
Linke Seite Rechte Seite
Anschluss für externe
Antenne
Kopfhöreranschluss/
TMC-Antennenanschluss
(nur zum Aufladen
des Akkus über das
Netzteil)
LadeanzeigeLED
Bluetooth-LED:
Bluetooth EIN: Blinkt blau
Bluetooth AUS: Kein Licht
Ladeanzeige-LED:
Aufladen: Orange
Voll: Grün
System-Ein/Ausschalter
E/ASchnittstelle
SD-Kartensteckplatz
Rückstelltaste USB –Anschluss
Oberseite
40
Hotkey
Stromschalter
Page 41

Operating Methods
Startup
1. Bei erstmaliger Inbetriebnahme
setzen Sie den Ein/Ausschalter des
Systems auf der Rückseite auf Ein.
2. Drücken Sie den Ein/Ausschalter und
halten Sie ihn ca. zwei Sekunden lang
gedrückt, um das Gerät einzuschalten.
Hinweis: Vor der erstmaligen Inbetriebnahme stellen Sie bitte den
Systemstromschalter in die Position ON. Der Startvorgang dauert
ca. eine Minute.
System-Reset
Es gibt nur wenige, extreme Umstände, ie einen Neustart des Systems
erforderlich machen. Setzen Sie Ihr System zurück, wenn Folgendes vorkommt:
1. Starke Verzögerungen beim Aktualisieren des Anzeigebildes oder während des
Betriebs, so dass das System nicht mehr bedienbar ist.
2. Das System lässt sich mit dem Ein/Ausschalter nicht ausschalten.
3. Keine Reaktion beim Auswählen auf dem Bildschirm
Tritt eines der obigen Probleme auf, schalten Sie den Systemstromschalter auf
der Rückseite aus und wieder ein, um das System neu zu starten.
Ausschalten
1. Ist das Gerät eingeschaltet, drücken
Sie den Ein/Ausschalter, um es
auszuschalten.
2. Wird das Gerät längere Zeit nicht in Betrieb gesetzt, setzen Sie den
Ein/Ausschalter des Systems auf der Rückseite auf Off (Aus).
System
power
switch
Ein/Aus
schalter
DEUTSCH
Verwenden des Dockingstation
Der beigelegte Dockingstation kann
bequem mit einem Saugnapf an der
vorderen Windschutzscheibe oder mit
einer Klebeplatteam Handschuhfach
befestigt werden. Diese Vorrichtung
wird das GPS-Gerät im Fahrzeug gut
festhalten. Befestigen Sie den
Dockingstation anhand folgender
Schritte:
1. Schieben Sie das Gerät in Pfeilrichtung in die Befestigungslöcher des
Dockingstation, um es zu befestigen.
41
Page 42

2. Drücken Sie das Gerät vorsichtig in den Dockingstation hinein, bis es
festsitzt.
Hinweis: Achten Sie beim Anbringen
auf die Pfeilrichtung, so dass das
Gerät sicher befestigt wird. Wird diese
Richtung nicht eingehalten, wird das
Gerät zu locker befestigt und die
Komponenten müssen nochmals
montiert werden.
4. Stecken Sie den Dockingstation gemäß den Richtungen in die Schlitze im
Dockingstation und schieben Sie ihn fest an (A Æ B).
5. Der Dockingstation ist jetzt fertig
montiert.
9 Bringen Sie den Dockingstation
nicht an einer Stelle an, wo er die
Sicht des Fahrers beeinträchtigt.
9 Empfehlungen für die Installation:
Das Unterteil des Dockingstation
sollte fest auf dem Armaturenbrett
aufliegen, um eine übermäßige
Stoßeinwirkung abzufangen.
3. Biegen Sie die Halterstütze
passend abgewinkelt zurecht.
Befestigen Sie den
Dockingstation über einen
Saugnapf an der
Windschutzscheibe und
achten Sie dabei darauf, dass
sein Unterteil fest auf dem
Armaturenbrett aufliegt.
Verwenden des Kfz-Ladegeräts
Wenn Sie das Gerät in einem Fahrzeug verwenden, schließen Sie bei
längerer Nutzung das beigelegte Kfz-Ladegerät an.
1. Verbinden Sie den kleinen Stecker mit dem Stromanschluss auf
der Rückseite des Kfz-Halters.
2. Stecken Sie das andere Ende in den Zigarettenanzünder.
42
Page 43

Changing Fuse
Ersetzen Sie die Sicherung nur durch den selben Typ mit gleichen Nennwerten.
FLINKE SICHERUNG / ö6,35x32/250V/1,5A
1. Lösen Sie den Kunststoffdeckel durch Drehen nach rechts; achten Sie darauf,
dass das Metallteil nicht herausfällt.
2. Nehmen Sie die Sicherung heraus. (Nennwerten. FLINKE SICHERUNG /
ö6,35x32/250V/1,5Aα
3. Ersetzen Sie die Sicherung. (Nennwerten. FLINKE SICHERUNG /
ö6,35x32/250V/1,5Aα
4. Setzen Sie Deckel wieder auf, achten Sie darauf, dass das Metallteil nicht
herunterfällt.
Verwenden des Netzteil
Vor der erstmaligen Inbetriebnahme des Geräts empfehlen wir dringendst, dass
Sie den Akku voll aufladen.
1. Verbinden Sie den USB-Stecker mit dem Gerät.
2. Verbinden Sie den Adapter (das Netzteil) mit
einer Steckdose.
Der USB-Anschluss ist nur für das Aufladen
des Akkus über das Netzteil vorgesehen.
Verwenden der TMC-Antenne
Schließen Sie die TMC-Antenne (1) an das Gerät an.
DEUTSCH
43
Page 44

Verwenden von Funktionen
Beim erstmaligen Systemstart zeigt der Bildschirm das Hauptmenü mit
vier Funktionen: Navigation, Musik, Foto, Video, E-Buch und
Einstellungen. Wählen Sie ein Symbol direkt auf dem Bildschirm an, um
die betreffende Funktion zu verwenden.
44
GPS
MP3
Lädt das Navigationsprogramm und den bildschirm.
Hinweis: Ist die SD-Karte mit der
Navigatorsoftware eingefügt, ruft das System nach
dem Start automatisch die GPS-Funktion auf.
Spielt MP3-Musik ab.
der Bezeichnung "mp3" und eine Wiedergabeliste
erstellen.
Sie müssen einen Ordner mit
Wiedergabeliste
Page 45

Foto
Video
Zeigt Bilder an.
Bezeichnung "image" erstellen.
Gibt Video wieder.
Bezeichnung "file" erstellen.
Sie müssen einen Ordner mit der
Sie müssen einen Ordner mit der
DEUTSCH
eBook (EBuch)
Setting
Erlaubt Ihnen Dateien im Txt-Format zu lesen.
müssen einen Ordner mit der Bezeichnung "ebook"
erstellen.
Erlaubt Ihnen Systemeinstellungen vorzunehmen.
Sie
(Einstellungen)
Nota
Lesen Sie bitte das Benutzerhandbuch im DVD-ROM.
z I contenuti di questo manuale saranno modificati senta preavviso.
z La temperatura operativa del prodotto è compresa tra -10° e 60° C.
L’uso o la ricarica del prodotto in un ambiente con temperatura superiore a 45° C
provocherà la disattivazione del sistema. Tuttavia questo deve essere
considerato un fenomeno normale. Non usare il prodotto in ambienti con
temperature estreme.
45
Page 46

GPS Menú principale
Hauptmenü
1 Öffnet das Fenster NAVIGIEREN.
2 Startet die Navigation nach Hause (Die
Heimatadresse muss vorher einmal
angegeben werden).
3 Öffnet die Karte. Bei GPS-Empfang wird
der momentane Standpunkt angezeigt.
4 Öffnet das Fenster E
Dort können Sie das Navigationssystem
nach Ihren Vorstellungen konfigurieren.
5 Schaltet das Navigationssystem aus.
INSTELLUNGEN.
Fenster 'Navigieren'
1 Öffnet das vorige Fenster.
2 Öffnet das Fenster A
können Sie die Adresse des nächsten
Ziels eingeben.
3 Öffnet das Fenster S
können Sie nach einem Sonderziel
suchen.
4 Öffnet das Fenster L
Sie das Land wählen, in dem Ihr
nächstes Ziel liegt.
5 Öffnet die Liste L
6 Öffnet die Liste F
Ziele enthält, die von Ihnen gespeichert
wurden.
DRESSE. Dort
ONDERZIEL. Dort
AND. Dort können
ETZTE ZIELE.
AVORITEN, welche alle
Ein Ziel für die Navigation angeben
Tippen Sie im Hauptmenü auf Navigieren.
Das Fenster N
46
AVIGIEREN öffnet sich.
Page 47

Das Zielland angeben
Unterhalb der Schaltfläche (Land)
auf dem Fenster N
den Namen des Landes, aus dem Sie Ziele
angeben / auswählen können.
AVIGIEREN finden Sie
DEUTSCH
Tippen Sie auf
anderes Land auszuwählen.
Geben Sie den Namen des Ziellandes ein.
Sie können die Schaltflächen Nach oben
und Nach unten benutzen, um das
gewünschte Land zu markieren.
Tippen Sie auf
Der Name des ausgewählten Landes wird
nun auf dem Fenster N
unterhalb der Schaltfläche (Land)
angezeigt.
(Land), um ein
(Ok).
AVIGIEREN
47
Page 48

Eine Adresse angeben
Tippen Sie im Fenster NAVIGIEREN auf die
Schaltfläche Adresse.
Das Fenster A
Tippen Sie auf das Feld Ort oder PLZ.
Geben Sie den Namen des Zielortes ein.
In der Liste der Orte sind auch die
Postleitzahlen mit angegeben. Wenn es
zwei oder mehr Städte mit dem gleichen
Namen gibt, dann tippen Sie auf die
Schaltflächen Nach oben und Nach
unten, um den richtigen Eintrag zu
markieren.
DRESSE öffnet sich.
48
Tippen Sie auf
(Ok).
Page 49

Ein Sonderziel auswählen
In gleicher Weise können Sie auch die
Straße eingeben, in der das Ziel liegt.
Sie können auch die Hausnummer oder
eine Querstraße angeben.
Wenn Sie alle nötigen Angaben gemacht
haben, tippen Sie auf Navigation starten.
Die Route wird berechnet, und die
Navigation beginnt.
Um das Ziel auf der Karte zu sehen, tippen
Sie auf
Um das Ziel in den F
speichern, tippen Sie auf
Sonderziele sind z.B. Tankstellen, Hotels,
Restaurants und viele andere.
(In Karte anzeigen).
AVORITEN zu
(Speichern).
DEUTSCH
Tippen Sie im Fenster N
Schaltfläche Sonderziel.
Das Fenster S
ONDERZIEL öffnet sich.
AVIGIEREN auf die
Ein Sonderziel in einer bestimmten Stadt auswählen
Sie suchen ein Restaurant oder ein Hotel in
einer bestimmten Stadt?
Tippen Sie im Fenster S
Schaltfläche ... in einem Ort.
Das Fenster S
öffnet sich.
ONDERZIEL IN EINEM ORT
ONDERZIEL auf die
49
Page 50

Tippen Sie auf das Feld Ort oder PLZ.
Geben Sie den Ort ein, in dem Sie ein
Sonderziel finden möchten (z.B. Berlin).
Tippen Sie auf das Feld Kategorie.
Wählen Sie aus, welche Art von Sonderziel
Sie in Berlin finden möchten (z.B.
Restaurant).
Tippen Sie auf das Feld Unterkategorie.
Wählen Sie aus, welche Art von Restaurant
Sie in Berlin finden möchten (z.B.
Afrikanisch).
50
Tippen Sie auf das Feld Sonderziel.
Wählen Sie aus, zu welchem Afrikanischen
Restaurant in Berlin Sie navigieren
möchten (z.B. AMUN).
Page 51

Sie müssen in den Feldern Kategorie und
Unterkategorie keine Auswahl treffen. Sie
dienen nur dazu, die Liste der Sonderziele
im Feld Sonderziel einzuschränken. Diese
Liste kann, insbesondere in größeren
Orten, sehr umfangreich werden.
Tippen Sie auf Navigation starten, wenn
Sie das gewünschte Ziel ausgewählt haben.
Die Route wird berechnet, und die
Navigation beginnt.
Um das Ziel auf der Karte zu sehen, tippen
Sie auf
Um das Ziel in den F
speichern, tippen Sie auf
(In Karte anzeigen).
Ein Sonderziel in der Umgebung auswählen
Sie suchen ein Restaurant oder ein Hotel
nahe Ihres augenblicklichen Standortes?
DEUTSCH
AVORITEN zu
(Speichern).
Tippen Sie im Fenster S
Schaltfläche ... in der Nähe.
Das Fenster S
öffnet sich.
Tippen Sie auf das Feld Radius.
Wählen Sie den Radius, in dem Sie ein
Sonderziel finden möchten (z.B. 3 km).
Tippen Sie dann auf die Felder Kategorie,
Unterkategorie und Sonderziel, und
machen Sie dort die entsprechenden
Angaben.
ONDERZIEL IN DER NÄHE
ONDERZIEL auf die
51
Page 52

Sie müssen in den Feldern Kategorie und
Unterkategorie keine Auswahl treffen. Sie
dienen nur dazu, die Liste der Sonderziele
im Feld Sonderziel einzuschränken. Diese
Liste kann, insbesondere in größeren
Orten, sehr umfangreich werden.
Tippen Sie auf Navigation starten, wenn
Sie das gewünschte Ziel ausgewählt haben.
Die Route wird berechnet, und die
Navigation beginnt.
Um das Ziel auf der Karte zu sehen, tippen
Sie auf
Um das Ziel in den F
speichern, tippen Sie auf
(In Karte anzeigen).
AVORITEN zu
(Speichern).
Ein Sonderziel von überregionaler Bedeutung auswählen
Sie möchten einen Flughafen oder eine
Sehenswürdigkeit besuchen, wissen aber
nicht, zu welcher Stadt dieses Ziel gehört?
52
Tippen Sie im Fenster S
Schaltfläche ... im ganzen Land.
Das Fenster S
öffnet sich.
Tippen Sie auf das Feld Kategorie.
Wählen Sie aus, welche Art von Sonderziel
Sie in Berlin finden möchten (z.B.
Tourismus).
Tippen Sie auf das Feld Sonderziel.
Wählen Sie aus, zu welchem Sonderziel sie
navigieren möchten (z.B. Naturpark
Bayerischer Wald).
ONDERZIEL IM GANZEN LAND
ONDERZIEL auf die
Page 53

Nach Hause navigieren
Sie müssen im Feld Kategorie keine
Auswahl treffen. Es dient nur dazu, die
Liste der Sonderziele im Feld Sonderziel
einzuschränken. Diese Liste kann sehr
umfangreich werden.
Tippen Sie auf Navigation starten, wenn
Sie das gewünschte Ziel ausgewählt haben.
Die Route wird berechnet, und die
Navigation beginnt.
Um das Ziel auf der Karte zu sehen, tippen
Sie auf
Um das Ziel in den F
speichern, tippen Sie auf
Sie möchten nach Hause fahren?
Tippen Sie im Hauptmenü auf Nach
Hause . Die Route wird berechnet, und die
Navigation beginnt.
Wenn Sie Ihre Heimatadresse noch nicht
angegeben haben, dann werden Sie jetzt
aufgefordert, das zu tun.
(In Karte anzeigen).
AVORITEN zu
(Speichern).
DEUTSCH
Tippen Sie auf
Das Einstellungsfenster HEIMATADRESSE
öffnet sich.
Tippen Sie auf Heimatadresse eingeben.
Das Fenster N
Geben Sie Ihre Heimatadresse ein, als sei
sie das Ziel der nächsten Navigation.
(Ok).
AVIGIEREN öffnet sich.
53
Page 54

Tippen Sie auf Als Heimatadresse
setzen, wenn Sie Ihre Heimatadresse
vollständig angegeben haben.
Das Einstellungsfenster HEIMATADRESSE
öffnet sich. Ihre Heimatadresse wird darauf
angezeigt.
Tippen Sie auf Speichern.
Das Hauptmenü öffnet sich.
Die Karte während der Navigation
1 Das übernächste
Fahrmanöver
2 Die Entfernung zum
nächsten
Fahrmanöver
3 Das nächste
Fahrmanöver
4 Ihr momentaner
Standort
5 Ihre Route
6 Die Straße, in der
Sie sich befinden
7 Die Straße, in die
Sie einbiegen sollen
8 Voraussichtliche
Ankunftszeit
9 Verbleibende
Entfernung
10 Voraussichtliche
Restfahrtzeit
Werkzeugleiste (Tool
bar)
11 Maßstab vergrößern
12 Streckenabschnitt
sperren / entsperren
13 Tag- / Nachtmodus
14 Lautstärke
15 Verschieben /
Vergrößern
16 Standort /
Kartenauschnitt
fixieren
17 Maßstab verkleinern
18 Navigation beenden,
Karte schließen
Tippen Sie auf einen
beliebigen Punkt der
Karte, um die
Werkzeugleiste einbzw. auszublenden.
54
Page 55

Einstellungen
Tippen Sie im Hauptmenü auf
Einstellungen.
Das Fenster E
Benutzen Sie die Schaltflächen Nach oben
und Nach unten, um das
Einstellungsfenster zu markieren, das Sie
öffnen möchten.
INSTELLUNGEN öffnet sich.
DEUTSCH
Tippen Sie auf
Ändern Sie die Einstellungen nach Ihren
Wünschen.
Sie können die Schaltflächen Nach links
und Nach rechts benutzen, um andere
Einstellungsfenster zu öffnen.
Tippen Sie auf Speichern, um die
Änderungen zu speichern.
Eine Liste der Einstellungsfenster finden
Sie auf der folgenden Seite.
(Ok).
Einstellungsfenster
PRODUKT-INFORMATION Informieren Sie sich über die Produktversion.
Lassen Sie die Produktdemo laufen.
ARTENINFORMATION Geben Sie an, ob Sonderziele oder Straßennamen auf
K
R
OUTENINFORMATION Geben Sie an, ob während der Navigation die
der Karte angezeigt werden sollen.
Wählen Sie die Navigationskarte, die Sie laden
möchten. Ziele für die Navigation müssen auf der
geladenen Karte verzeichnet sein.
voraussichtliche Ankunftszeit, die voraussichtlich
verbleibende Fahrtzeit und / oder die verbleibende
Entfernung angezeigt werden sollen.
55
Page 56

BESCHILDERUNG Geben Sie an, ob während der Navigation die
Beschilderung angezeigt werden soll, der Sie folgen
müssen.
G
ESCHWINDIGKEIT Geben Sie an, ob Tempolimits auf der Karte angezeigt
werden sollen. Konfigurieren Sie die akustischen und
visuellen Warnungen bei Überschreitung dieser
Tempolimits.
L
AUTSTÄRKE Regeln Sie die Lautstärke der Fahranweisungen.
D
ARSTELLUNG Kalibrieren Sie den Touchscreen, wenn er ungenau auf
Berührungen reagiert.
Wählen Sie die Helligkeit für Tag- und Nachtmodus.
A
UTOMODUS Geben Sie an, ob die Navigation mit 2D- oder mit 3D-
Kartenansicht beginnen soll.
Geben Sie an, ob Auto-Zoom aktiv sein soll (je
schneller Sie fahren, desto größer wird der Maßstab
der Karte).
Geben Sie an, ob die Karte in 2D-Ansicht in
Fahrtrichtung oder nach Norden ausgerichtet sein soll.
R
OUTINGOPTIONEN Geben Sie Ihr Geschwindigkeitsprofil und den
gewünschten Routentyp an (Dynamisch, Kurz, Schnell)
Geben Sie an, ob Sie auf Ihrer Fahrt Autobahnen,
Fähren oder Mautstraßen benutzen möchten.
ZEITZONE Geben Sie Ihre Zeitzone an.
Geben Sie an, ob gerade Sommerzeit herrscht.
ORMAT Geben Sie an, ob Zeitangaben im 12h oder im 24h
F
Format gemacht werden sollen.
Geben Sie an, ob Entfernungsangaben in Meilen oder
in Kilometern gemacht werden sollen.
TMC Geben Sie an, ob eine automatische Neuberechnung
erfolgen soll, wenn eine Verkehrsmeldung die Route
betrifft.
H
EIMATADRESSE Geben Sie Ihre Heimatadresse an bzw. ändern Sie sie.
Schaltflächenübersicht
Hauptmenü Sonderziel
Navigieren: Das
Navigationsziel angeben
Karte anzeigen: Die Karte
anzeigen
Nach Hause : Nach Hause
navigieren
56
... in einem Ort: Sonderziel in
einer Stadt
... in der Nähe: Sonderziel in
der Nähe
... im ganzen Land:
Überregionales Sonderziel
Page 57

Einstellungen: Die
Einstellungen anpassen
Schließen: Das
Navigationsprogramm
schließen
Zurück: Zurück zum vorigen
Fenster
Navigieren
Adresse: Eine Adresse für die
Navigation eingeben
Sonderziel: Ein Sonderziel
angeben
Letzte Ziele: Ein Ziel aus der
Liste L
Favoriten: Ein Ziel aus der
Liste F
Land: Ein Land oder eine
Region wählen
Kartenansicht
Kein GPS: Kein ausreichender
GPS-Empfang
TMC (optional): TMCEmpfang vorhanden oder
nicht
Vergrößern: Den Maßstab
vergrößern (herauszoomen)
Sperren / Entsperren: Eine
gewisse Streckenlänge der
Route sperren
Tag- / Nachtmodus:
Zwischen den Displaymodi
umschalten
Ganze Route: Die ganze
Route auf der Karte anzeigen
Verschieben / Zoomen: Die
Karte mit dem Stift
verschieben statt zoomen
ETZTE ZIELE auswählen
AVORITEN auswählen
Zielangabe
Navigation starten: Die
Navigation zum angegebenen
Ziel starten
In Karte anzeigen: Das Ziel
auf der Karte zeigen
Speichern: Das Ziel in der Liste
F
AVORITEN speichern
Favoriten bearbeiten
Löschen: Das Ziel aus der Liste
AVORITEN löschen
F
Bearbeiten: Den Eintrag aus
der Liste F
AVORITEN bearbeiten
TMC
TMC-Signalstärke: Qualität des
TMC-Signals
TMC aktualisieren: Die TMC-
Meldungen auf den neuesten
Stand bringen
Andere Schaltflächen
Ok: Bestätigen in einem
Dialogfenster
Abbrechen: Nicht bestätigen in
einem Dialogfenster
Kalibrieren: Die Kalibrierung
des Touchscreens starten
Nach oben: In einer Liste nach
oben scrollen
Nach unten: In einer Liste nach
unten scrollen
Nach links: Nach links scrollen
DEUTSCH
57
Page 58

Standort / Karte fixieren:
Standort zentrieren und
Kartenausschnitt bewegen,
oder umgekehrt.
Verkleinern: Den Maßstab
verkleinern (hineinzoomen)
Spezifikationen
Integrierter GPSEmpfänger
Prozessor
Betriebssystem
Speicher
Gewicht (Ca.)
Maße
Kfz-Halter / Ladegerät
AC Adaptor (Netzteil)
Akku
Erweiterungssteckplatz
Bildschirmanzeige
LED
Audio
Temperatur
Feuchtigkeit
USB
Bluetooth-Profil
Nach rechts: Nach rechts
scrollen
20 parallele Kanäle , SiRF star III
Samsung S3C2440A 400 MHz.
Microsoft Windows CE. Net 5.0 Core Version
ϫ 2GB Flash
64 MB SDRAM
ϫ
200 g
121 (W) x 81 (H) x 19-27 (D) mm
Eingangsspannung: 12-24V,
Ausgangsspannung: 5V / 2A
ϫEingangsspannung: 100-240VД50/60Hz 0,5A
ϫAusgangsspannung: 5V/ 2A
1150 mAh Li-Ionen-Akku.
SD
ϫ 4,3” (16:9) TFT-LCD-Touchscreen
ϫ 95,04(H)*53,86(V) mm
ϫ 480 x 272 Pixel
16 M Farben
ϫ
Orange/grüne LED für Akkuladestatus
Blaue LED für den Bluetooth-Status
ϫ Eingebauter Lautsprecher.
ϫ Lautstärkesteuerung über Software.
3,5mm Kopfhöreranschluss
ϫ
ϫ In Betrieb: -10C ~ 60C
ϫ Lagerung: -20C ~ 70C
ϫ In Betrieb: 0%~90%
ϫ Lagerung: 0%~90%
ϫMini-USB-Anschluss für den Gleichstromeingang
Handfreie Anrufe, SMS, Dateiübertragung
58
Page 59

Sistema de navegação portátil
para automóveis
INSTRUCTIONS
KV-PX701
FRANÇAIS
59
Page 60

Précautions de sécurité
Veuillez lire attentivement cette section et suivre toutes les instructions qui y sont
données.
Cela vous aidera à garantir la fiabilité du fonctionnement et à prolonger la durée
de vie de votre appareil.
Conservez le paquet d’emballage et le guide de l’utilisateur pour pouvoir les
consulter ou effectuer des demandes ultérieurement. Si vous prêtez, donnez ou
vendez cet article à une autre personne, joignez-y ce guide.
Ne laissez jamais les enfants jouer avec des appareils électriques sans
surveillance. Les enfants n’ont pas toujours conscience des dangers existants.
Conservez les matériaux d’emballage, tels les papiers, hors de la portée des
enfants.
Il existe un danger de suffocation en cas d’utilisation erronée.
ʳʳʳʳL’utilisation de cet appareil à plein volume pendant de longues périodes
peut conduire à des pertes auditives de l’utilisateur.
N’ouvrez jamais le boîtier de l’appareil ou de l’adaptateur de courant.
Ils ne contiennent aucune pièce jetable. L’ouverture du boîtier peut entraîner des
risques d’électrocution.
Ne placez aucun objet sur l’appareil et n’exercez aucune pression sur l’écran.
Autrement l’écran pourrait se casser.
Pour éviter les dommages, ne touchez pas l’écran avec des objets pointus.
Utilisez uniquement le stylo fourni ou un autre outil émoussé. L’appareil peut
également être utilisé avec le doigt dans beaucoup de cas.
Il existe un risque de blessure en cas de cassure de l’écran. Si cela devait se
produire, utilisez des gants de protection pour emballer les pièces cassées et
contactez le service client pour prendre connaissance de la manière d’éliminer
le produit. Lavez ensuite vos mains avec du savon, car il est possible que des
substances chimiques se soient échappées de l’appareil.
Coupez l’alimentation électrique (débranchez la prise), éteignez immédiatement
l’appareil, ou ne l’allumez pas s’il est éteint, puis contactez le service client.
Si le boîtier de l’appareil ou le bloc d’alimentation est endommagé ou si du liquide
fuit, les composants doivent être vérifiés par le Service client afin d’éviter tout
risque!
Environnement de fonctionnement
Le manquement au respect de ces instructions peut vous conduire à
endommager l’appareil.
La garantie sera invalide dans de tels cas.
Tenez votre système de navigation et tous les appareils qui y sont reliés à l’abri
de l’humidité, de la chaleur et de la lumière directe du soleil, en particulier dans
les voitures.
Evitez que votre appareil ne se mouille; par exemple, protégez-le de la pluie ou
de la grêle en tout temps. Veuillez également faire attention à ce que l’humidité
ne pénètre pas à l’intérieur sous forme de condensation.
Evitez les fortes vibrations et secousses, comme celles qui peuvent être produites
par les intrusions de champ transversal.
Evitez que l’appareil ne tombe de son support, par exemple, lorsque vous freinez.
Installez l’appareil aussi verticalement que possible.
60
Page 61

Compatibilité électromagnétique
Lorsque vous reliez des composants supplémentaires à l’appareil, les Directives
sur la Compatibilité Electromagnétique (“Electromagnetic Compatibility
Directive” = EMC) doivent être respectées. Veuillez également remarquer que
seul les câbles blindés doivent être utilisés (maximum 10 pieds) avec cet
appareil.
Afin de garantir des performances optimales, conservez une distance d’au moins
10 pieds des sources de haute fréquence et d’interférences magnétiques
(télévisions, haut-parleurs, téléphones portables, etc.).
Cela vous permettra d’éviter les dysfonctionnements et les pertes de données.
Les appareils électroniques émettent des ondes électromagnétiques pendant
qu’ils fonctionnent.
Ces émissions sont inoffensives, mais elles peuvent interférer avec d’autres
appareils utilisés à proximité.
Bien que nos appareils soient testés et optimisés pour être conformes aux
normes de compatibilité électromagnétique dans nos laboratoires, des
interférences pendant le fonctionnement peuvent encore se produire au niveau
de l’appareil ou des autres appareils utilisés à proximité.
Si de telles interférences se produisent, essayez de les éliminer en réglant les
positions et les distances entre les appareils.
Avant de conduire, assurez-vous que les systèmes électroniques de la voiture
fonctionnent correctement.
Sécurité des données
Chaque fois que vous mettez à jour vos données, procédez à une sauvegarde
dans un appareil de stockage externe. Le fournisseur n’assume pas la
responsabilité de la perte de données ou les dommages des appareils de
stockage de données, et aucune plainte ne sera acceptée, concernant les
dommages résultant de la perte de données ou les dommages conséquents.
Connexion
Utilisez l’adaptateur de courant inclus dans le paquet. L’utilisation d’autres
adaptateurs de courant peut produire des dysfonctionnements et s’avérer
dangereuse.
L’adaptateur pour voiture doit être branché uniquement à l’allume-cigare du
véhicule (batterie auto = 12V CC , batterie de camion = 24V CC !). Si vous
avez des doutes concernant la source de courant de votre véhicule, contactez
votre concessionnaire.
Utilisez uniquement l’adaptateur de courant sur des prises de courant mises à la
terre faisant 100 – 240 V CA~, 50/60 Hz. Si vous n’êtes pas sûr de l’endroit de
l’alimentation à utiliser, demandez au fournisseur de courant approprié.
L’appareil doit être utilisé uniquement avec les batteries fournies.
A propos de l’adaptateur de courant:
1. N’utilisez pas l’adaptateur de courant dans un environnement humide. Ne
touchez pas l’adaptateur de courant lorsque vos pieds et vos mains sont
mouillés.
2. Lors de l’utilisation de l’adaptateur de courant, assurez-vous que le lieu dans
lequel vous vos trouvez est bien aéré. Ne laissez pas de papier ou d’autres
objets recouvrir l’adaptateur de courant, car cela pourrait en affecter le
FRANÇAIS
61
Page 62

refroidissement. N’utilisez pas l’adaptateur de courant quand il se trouve dans
un sac.
3. N’essayez pas de réparer l’appareil. Si l’appareil est endommagé ou s’il se
trouve dans un environnement humide, remplacez-le immédiatement.
4. Il est déconseillé de recharger l’appareil à partir d’un PC parce que la tension
du PC est insuffisante pour alimenter l’appareil.
5. Lors de l’installation de l’appareil, assurez-vous que la prise est facile d’accès.
A propos de la batterie: Lors de l'installation de l'appareil, assurez-vous que la
prise soit facile d'accés.
1. Utilisez uniquement le chargeur original agréé.
2. Une batterie au lithium est intégrée dans l’appareil. Pour éviter les incendies ou
les brûlures de la peau, ne désassemblez pas, ne percez pas, ne cognez pas,
ou n’exposez pas la batterie au feu. La batterie se fendra, explosera ou libérera
des substances chimiques dangereuses si elle est jetée au feu.
3. ATTENTION
La batterie ne doit pas être exposée à une chaleur excessive comme au soleil,
près d’un feu ou autre.
Instructions importantes
1. Remarque: le remplacement de la batterie par un autre modèle peut aboutir à
une explosion.
Lorsque vous voulez vous débarrasser de la batterie, suivez les instructions
données. La batterie de rechange doit être une batterie originale agréée.
2. Les règlements concernant l’élimination des déchets doivent être observés
lorsque vous vous débarrassez des batteries.
3. La batterie doit être utilisée uniquement sur cet appareil.
4. ATTENTION
Pour réduire les risques d’électrocution, d’incendie, etc.:
3. Ne retirez pas les vis, les couvercles ou le boîtier.
4. N’exposez pas cet appareil à la pluie ou à l’humidité.
Informations aux utilisateurs concernant l’élimination
des équipements usagés
ʳʳʳʳʳʳʳʳʳʳʳCe symbole indique que le produit portant ce
symbole ne doit pas être éliminé comme les
déchets domestiques ordinaires une fois usé. Si
vous souhaitez éliminer ce produit, veuillez le
faire conformément à la législation nationale
applicable ou aux autres règles en vigueur dans
le pays ou la municipalité dans laquelle vous
vous trouvez. En éliminant ce produit de manière
correcte, vous contribuerez à la protection des
ressources naturelles et à la prévention des
effets négatifs sur l’environnement et la santé
humaine.
62
Page 63

Navigation
Instructions de sécurité de navigation
Ne manipulez pas le système de navigation lorsque vous conduisez afin d’éviter
les accidents!
Au cas où vous ne comprendriez pas les instructions vocale ou si vous avez des
doutes sur la direction à prendre à la prochaine intersection, la carte ou la
flèche affichera une orientation rapide. Regardez seulement l’écran d’affichage
quand vous vous trouvez dans une situation de conduite non dangereuse!
Attention!
La situation de la voie et le code de la route passent toujours avant les
instructions du système de navigation. Suivez les instructions uniquement
quand les circonstances et le règlement le permettent! Le système de
navigation vous guidera jusqu’à votre destination même si vous vous êtes
écarté de la route prévue.
Les déclarations de direction du système de navigation n’affranchissent en aucun
cas le conducteur de ses responsabilités personnelles.
Programmez votre itinéraire avant le départ. Si vous souhaitez programmer une
nouvelle route alors que vous conduisez, arrêtez-vous.
Afin de recevoir correctement le signal GPS, ne perturbez pas la réception avec
des objets métalliques. Attachez le système de navigation à l’intérieur du parebrise ou près du pare-brise à l’aide de la ventouse.
Essayez différentes positions dans votre véhicule afin d’obtenir la meilleure
réception.
Remarque importante
Ce système fournit uniquement une référence pour la navigation. N’utilisez pas ce
système pour des mesures précises de direction, de distance et de
positionnement géographique précis.
La première position GPS doit être effectuée dans un point défini unique, dans un
lieu découvert sans bâtiment obstruant la visibilité. La durée du relevé de
position variera en fonction de la puissance du signal satellite et de la
couverture nuageuse. Cela peut prendre jusqu’à 10 minutes.
GPS (Global Positioning System) est le système de satellites utilisé par le
département de la défense des Etats-Unis d’Amérique. Toute la maintenance
et le fonctionnement sont aussi gérés par le département de la défense des
Etats-Unis d’Amérique. Si le système venait à être modifié ou ajusté, la
précision et le fonctionnement des systèmes liés au GPS pourraient être
affectés.
Tout appareil de communication sans fil (téléphone portable, radio, détecteur de
radar, etc.) peut affecter le signal GPS et avoir un impact négatif sur le signal.
Pour des raisons de sécurité, ne manipulez pas cet appareil lorsque vous
conduisez un véhicule.
Ne laissez pas cet appareil sous votre pare-brise lorsque vous quittez le véhicule.
Une exposition à de hautes températures peut être dangereuse et causer la
batterie de surchauffer, provoquant un dysfonctionnement de l'appareil.
Les vitres teintées risquent d’interférer avec la réception des signaux satellite.
Nous vous recommandons d’installer une antenne pour véhicule afin d'amplifier
et de stabiliser le signal.
FRANÇAIS
63
Page 64

La route de navigation proposée doit servir de référence seulement ; des
g
modifications des conditions sur la route (sens uniques, interdictions de tourner
à droite) peuvent se produire, veuillez réagir en fonction de la situation et
décider si vous devez ou non suivre le trajet conseillé.
Lorsque vous installez cet appareil dans un véhicule, veuillez le fixer à la voiture
avec les supports afin d’assurer la sécurité. L’emplacement d’installation
recommandé est présenté ci-dessous.
X Ne bloquez pas la
vue du conducteur
X Ne pas installer
devant l’airba
X Ne pas installer sur
un tableau de bord
instable
X Ne pas installer
devant l’airbag
Des différences peuvent exister entre les versions construites et expédiées, ce
logiciel peut être mis à jour fréquemment. Si les descriptions dans ce manuel
sont différentes de votre version de logiciel, veuillez suivre la version du logiciel
que vous avez entre les mains.
Veuillez lire complètement ce manuel d'instructions d'utilisations et d'explications.
Utilisez uniquement des batteries et accessoires d’origine approuvés pour
prévenir tout dommage inattendu. Si vous ne suivez pas les bonnes
procédures pour l’utilisation ou si vous connectez des accessoires
incompatibles, cela viole le contrat de garantie et la garantie sera
automatiquement annulée. Cela peut aussi poser des risques pour la sécurité
des personnes.
Première utilisation
Copyright
Sans le consentement écrit de JVC, Inc, ce manuel incluant le produit et le
logiciel ne doit pas être dupliqué, transmis, enregistré ou sauvegardé sur des
supports de stockage. De plus, il ne doit en aucun cas être traduit dans aucune
autre langue.
Copyright © 2007 Victor Company of Japan, Limited. Tous droits réservés.
Microsoft et Windows sont des marques déposées par la Microsoft Corporation
aux Etats-Unis et/ou dans les autres pays.
La marque du terme et les logos Bluetooth sont la propriété de Bluetooth SIG, Inc.
Toute utilisation de cette marque par la Victor Company of Japan, Limited (JVC)
est sous licence.
Le logo SD est une marque déposée.
64
Page 65

Package Contents
Your product should include the following accessories:
KV-PX701 Unit Socle de synchronisation Monture avec ventouse
FRANÇAIS
Adaptateur pour allume-
cigare
DVD-ROM
(Carte de Digital/ Manuel
d'utilisateur)
Ecouteurs stéréo Antenne TMC
Adaptateur CA
Instrucionts
Disque de tableau de bord
Boîtier de transport
Antenne GPS externe
(En option)
65
Page 66

Fonctionnement de base
g
t
Introduction
Vue de face
Ecran tactile
TFT LCD 4,3”
Vue de dos
Côté gauche Côté droit
Stylet
Bluetooth LED
Voyant de
emen
rechar
Voyant de rechargemen :
Rechargement : Orange
Plein : Vert
Bluetooth LED:
Bluetooth sur: Bleu de
clingnotement
Bluetooth outré de: LED outré de
Bouton d'alimentation
Interface E/S
Vue de dessus
66
Port pour antenne
Port casque/ Port d’antenne
Port USB
(utilisé pour le
chargement de la batterie
uniquement avec un
adaptateur CA)
Bouton raccourci
Emplacement
pour cartre
SD
Bouton de
réinitialisation
Bouton
Page 67

Funcionamento
Arranque
1. For first time use, please turn
the system power switch at the
rear side On.
2. Press and hold the power button
for about two seconds to turn on the power.
Nota: Antes de utilizar este dispositivo pela primeira vez, ligue a
alimentação do mesmo. Cela prend une minute.
System reset
It will only be required to reboot the system under extremely few circumstances.
Reset your system if the following situations occur:
1. You experience heavy lag while refreshing a screen or operations, which
results in an inoperable system.
2. Cannot turn off the system with the power button.
3. No response from a selection made on
the screen.
x Switch the system power off and then
switch it back on.
Encerramento
1. Quando tiver o dispositivo ligado, prima o botão de
alimentação para o desligar.
2. Se não pretender utilizar o dispositivo por um longo período de tempo,
defina o comutador de alimentação que se encontra na parte de trás para a
posição Off (Desligar).
Comutador
de
alimentação
Botão de
alimentação
FRANÇAIS
Utilização do suporte para
o carro
O suporte incluído para utilização no
carro pode ser fixado ao pára-brisas
utilizando uma ventosa ou fixado à
parte de cima do porta-luvas utilizando
a fita adesiva para o efeito. Desta
forma, o dispositivo GPS ficará fixo de
maneira segura ao carro. Siga os procedimentos a seguir descritos para colocar
o suporte:
67
Page 68

1. Siga as direcções
Nota: Tenha em atenção as direcções
indicadas pelas setas ao encaixar o
dispositivo. O dispositivo deverá ficar
bem encaixado. Se não seguir a
direcção das setas o dispositivo não
ficará devidamente encaixado no
suporte e terá de repetir esta
operação.
obter o ângulo pretendido. Fixe o suporte ao pára-brisas do carro certificando-se
de que a base está firmemente apoiada sobre o painel de instrumentos.
3. Siga as direcções indicadas pelas setas para introduzir o suporte nas
respectivas ranhuras e fixá-lo da
forma mostrada (A Æ B).
4. A montagem do dispositivo no suporte
fica assim concluída.
9 Ao utilizar o suporte, não o coloque
num local onde este obstrua o seu
campo de visão enquanto conduz.
9 Requisitos recomendados para a
instalação:
A base do suporte deve ficar
firmemente apoiada sobre o painel de instrumentos para evitar impactos
fortes.
indicadas pelas setas e
faça deslizar o dispositivo
para o interior do suporte.
2. Com cuidado, exerça
alguma pressão de forma a
que o dispositivo fique
devidamente preso no
suporte.
Dobre o braço do suporte até
Reposição do sistema
Ao utilizar este dispositivo dentro de um
veículo e por longos períodos de tempo, utilize
o carregador fornecido para o efeito.
1. Ligue a pequena ficha à tomada de
alimentação existente na parte de
trás do suporte.
68
Page 69

2. Introduza a outra extremidade do cabo no isqueiro do carro.
Mudar Fusível
Remplacez uniquement avec le même type de fusible : TYPE RAPIDE /
ij6,35x32/250V/1,5A
1. Rode a tampa frontal de plástico para a libertar mas deixe o pólo positivo lá
dentro.
2. Retire o fusvel (Fsible : TYPE RAPIDE / ij6,35x32/250V/1,5Aα.
3. Substitua o fusvel (Fsible : TYPE RAPIDE / ij6,35x32/250V/1,5Aα
4. Volte a colocar a tampa frontal de plástico. Terminado (Não deixe o pólo
positivo pendurado durante este processo).
Transformador para utilização em casa / em viagem
Antes de utilizar o dispositivo pela primeira
vez, recomendamos-lhe que utilize uma
bateria com a carga completa.
1. Introduza o conector USB no
dispositivo.
2. Ligue o transformador a uma
tomada eléctrica.
FRANÇAIS
Le connecteur USB est utilisé
uniquement pour le chargement
des batteries à l’aide d’un adaptateur CA.
Utilisation de l’antenne TMC
69
Page 70

Insérez l’antenne TMC (1) dans l’appareil.
Menu principal
Durante o arranque inicial do dispositivo, é apresentado no ecrã um menu
principal composto por quatro opções: opção de navegação, opção para
reprodução de música, opção para visualização de vídeos, de imagens e de
ficheiros eBook e definições. Seleccione o ícone pretendido para utilizar as
respectivas funções.
70
GPS
MP3
Carrega o programa de navegação e o ecrã de
navegação.
Reproduz ficheiros de música MP3
Créer Dossier "mp3" et Liste de lecture.
Liste de lecture
Page 71

Photo (Foto)
Permite-lhe ver imagens. Créer Dossier "image"
Video (Vídeo)
eBook
Setting
Reproduz ficheiros de vídeo. Créer Dossier "fichier"
Para ler ficheiros em formato _txt
Créer Dossier "ebook"
Para configuração do sistema
(Definições)
Nota Veuillez lire le manuel d'utilisateur dans le DVD-ROM.
zO conteúdo deste manual pode ser alterado sem aviso prévio.
zEste dispositivo apenas deve ser utilizado em temperaturas entre os -10 º~60 º.
A utilização ou carregamento deste dispositivo num local onde a temperatura
seja superior a 45 º pode provocar a paragem do mesmo, no entanto esta é uma
situação considerada normal. Não utilize este dispositivo em locais onde as
temperaturas sejam muito altas ou muito baixas.
FRANÇAIS
71
Page 72

GPS Menu principa
Menu principal
1Ouvre la fenêtre NAVIGUER.
2Démarre la navigation vers le domicile
(L'adresse du domicile doit être
indiquée avant).
3Ouvre la carte. En cas de réception
GPS, la position momentanée est
affichée.
4Ouvre la fenêtre C
cette fenêtre, vous pouvez configurer le
système de navigation à votre
convenance.
5Met à l'arrêt le système de navigation.
ONFIGURATION. Dans
Fenêtre 'Naviguer'
1Ouvre la fenêtre précédente.
2Ouvre la fenêtre A
y saisir l'adresse de la destination
suivante.
3Ouvre la fenêtre D
Vous pouvez y cherchez une destination
spéciale.
4Ouvre la fenêtre P
sélectionnez le pays dans lequel se situe
votre prochaine destination.
5Affiche la liste D
6Ouvre la liste F
toutes les destinations que vous y avez
sauvegardées.
DRESSE. Vous pouvez
ESTINATION SPÉCIALE.
AYS. Vous pouvez y
ESTINATIONS RÉCENTES.
AVORIS, contenant
Indiquer une destination pour la navigation
Dans le menu principal, tapez sur
Naviguer.
La fenêtre N
72
AVIGUER s'ouvre.
Page 73

Indiquer le pays de destination
Au-dessous du bouton de commande
N
à partir duquel vous pouvez indiquer /
sélectionner des destinations.
(Pays) dans la fenêtre
AVIGUER, vous trouvez le nom du pays
Tapez sur
sélectionner un autre pays.
Indiquez le nom du pays de destination.
Vous pouvez utiliser les boutons de
commande Vers le haut et Vers le bas
pour marquer le pays désiré.
Tapez sur
Le nom du pays sélectionné est indiqué
dans la fenêtre N
bouton de commande
(Pays) pour
(Ok).
AVIGUER au-dessous du
(Pays).
FRANÇAIS
73
Page 74

Indiquer une adresse
Dans la fenêtre NAVIGUER, tapez sur le
bouton de commande Adresse.
La fenêtre A
Tapez sur le champ Commune ou code
postal.
Entrez le nom du lieu de destination.
Dans la liste des localités, les codes
postaux figurent aussi. S'il existe
plusieurs villes du même nom, tapez
alors sur les boutons de commande Vers
le haut et Vers le bas pour marquer
l'option désirée.
DRESSE s'ouvre.
74
Tapez sur
(Ok)
Page 75

Vous pouvez entrer de la même façon
aussi la rue dans laquelle est située la
destination.
Vous pouvez indiquer aussi le numéro
d'adresse ou une intersection.
Quand vous avez effectué toutes les
entrées, tapez sur Démarrer la
navigation. L'itinéraire est calculé et la
navigation démarre.
Tapez sur le bouton de commande
(Représenter sur la carte) pour
visualiser la destination sur la carte.
Pour sauvegarder la destination dans les
AVORIS, tapez sur (Enregistrer).
F
Sélectionner une destination spéciale
Les destinations spéciales sont par ex.
les stations-services, hôtels, restaurants
et autres.
FRANÇAIS
Dans la fenêtre N
bouton de commande Destination
spéciale.
La fenêtre D
s'ouvre.
AVIGUER, tapez sur le
ESTINATION SPÉCIALE
Sélection d'une destination spéciale dans une ville précise
Vous recherchez un restaurant ou un
hôtel dans une ville précise ?
Dans la fenêtre D
tapez sur le bouton de commande ...
dans une ville.
La fenêtre D
UNE VILLE s'ouvre.
ESTINATION SPÉCIALE;
ESTINATION SPECIALE DANS
75
Page 76

Tapez sur le champ Commune ou code
postal.
Entrer la localité dans laquelle vous
recherchez une destination spéciale
(Berlin, par ex.).
Tapez sur le champ Catégorie.
Sélectionnez le type de destination
spéciale que vous désirez trouver à
Berlin (par ex. restaurant).
Tapez sur le champ Sous-catégorie.
Sélectionnez le type de restaurant que
vous désirez trouver à Berlin (africain,
par ex.).
76
Tapez sur le champ Destination
spéciale.
Sélectionnez le restaurant africain vers
lequel vous désirez naviguer à Berlin
(AMUN par ex).
Page 77

Ne procédez pas à une sélection dans les
champs, Catégorie et Sous-catégorie.
Ils sont seulement destinés à limiter la
liste des destinations spéciales dans le
champ Destination spéciale. Cette liste
peut être très longue, surtout dans des
communes majeures.
Tapez sur Démarrer la navigation,
après avoir sélectionné la destination
souhaitée. Le système calcule l'itinéraire
et la navigation commence.
Tapez sur
carte) pour visualiser la destination sur
la carte.
Pour sauvegarder la destination dans les
AVORIS, tapez sur (Enregistrer).
F
(Représenter sur la
Sélectionnez une destination spéciale à proximité
Vous cherchez un restaurant ou un hôtel
à proximité de votre position actuelle ?
Dans la fenêtre D
tapez sur la commande ... à proximité.
La fenêtre D
PROXIMITE s'ouvre.
Tapez sur le champ Rayon.
Sélectionnez le rayon dans lequel vous
désirez trouver une destination spéciale
(par ex. 3 km).
Tapez alors sur les champs, Catégorie,
Sous-catégorie et Destination
spéciale, et entrez les indications
correspondantes.
ESTINATION SPÉCIALE,
ESTINATION SPECIALE A
FRANÇAIS
77
Page 78

Ne procédez pas à une sélection dans les
champs, Catégorie et Sous-catégorie.
Ils sont seulement destinés à limiter la
liste des destinations spéciales dans le
champ Destination spéciale. Cette liste
peut être très longue, surtout dans des
communes majeures.
Tapez sur Démarrer la navigation,
après avoir sélectionné la destination
souhaitée. Le système calcule la route et
la navigation commence.
Pour représenter une destination sur la
carte, tapez sur le bouton de commande
(Représenter sur la carte).
Pour sauvegarder la destination dans les
F
AVORIS, tapez sur (Enregistrer).
Sélectionner une destination spéciale à échelle nationale
Vous désirez visiter un aéroport ou un
site touristique mais ne savez pas dans
quelle ville cette destination se situe ?
78
Dans la fenêtre D
tapez sur le bouton de commande ... au
niveau national.
La fenêtre D
NIVEAU NATIONAL s'ouvre.
Tapez sur le champ Catégorie.
Sélectionnez le type de destination
particulière que vous recherchez à Berlin
(tourisme, par ex.).
Tapez sur le champ Destination
spéciale.
Sélectionnez la destination particulière
vers laquelle vous désirez naviguer
(Gorges du Verdon, par ex).
ESTINATION SPÉCIALE,
ESTINATION SPECIALE AU
Page 79

Naviguer vers votre domicile
N'opérez pas de sélection dans le champ
Catégorie. Celui-ci est seulement
destiné à limiter la liste des destinations
particulières dans le champ Destination
spéciale. Cette liste peut être très
longue.
Tapez sur Démarrer la navigation,
après avoir sélectionné la destination
souhaitée. Le système calcule la route et
la navigation commence.
Tapez sur le bouton de commande
(Représenter sur la carte) pour
visualiser la destination sur la carte.
Pour sauvegarder la destination dans les
AVORIS, tapez sur (Enregistrer).
F
Vous désirez rentrer à la maison ?
Tapez sur Domicile dans le menu
principal. Le système calcule
l'itinéraire. et la navigation commence.
FRANÇAIS
Si vous n'avez pas encore entré
l'adresse de votre domicile, il vous est
alors demandé de le faire maintenant.
Tapez sur
La fenêtre de réglage ADRESSE DU
DOMICILE s'ouvre.
Tapez sur Entrez l'adresse.
La fenêtre N
Entrez votre adresse de domicile,
comme si celle-ci représentait la
destination de votre prochaine
navigation.
(Ok).
AVIGUER s'ouvre.
79
Page 80

Tapez sur Sauver comme domicile,
si vous avez entré votre adresse de
domicile entièrement.
La fenêtre de réglage ADRESSE DU
DOMICILE s'ouvre. L'adresse de votre
domicile y est indiquée.
Tapez sur Enregistrer.
Le Menu principal s'affiche.
La carte au cours de la navigation
1La manœuvre de
conduite suivant la
prochaine manœuvre
2La distance jusqu'à la
prochaine manœuvre
3La prochaine
manœuvre
4Votre position actuelle
5Votre itinéraire
6La route sur laquelle
vous vous trouvez
7La route dans laquelle
vous devez tourner
8Heure d'arrivée
présumée
9Distance restant
10Temps de trajet
restant
Barre outils (Tool
bar)
11Agrandir l'échelle
12Bloquer / débloquer
un tronçon
d'itinéraire
13Mode jour / nuit
14Volume sonore
15Déplacer / Agrandir
16Position / Fixer la
section de carte
17Diminuer l'échelle
18Quitter la
navigation, fermer
la carte
Tapez sur un point
quelconque de la
carte pour afficher
ou supprimer la
barre outils.
80
Page 81

Configuration
Dans le menu principal, tapez sur
Configuration.
La fenêtre C
Utilisez les boutons de commande
Vers le haut et Vers le bas pour
marquer la fenêtre de réglage que
vous désirez ouvrir.
ONFIGURATION s'ouvre.
Tapez sur
Modifier les configurations à votre
convenance.
Vous pouvez utiliser les boutons de
commande A gauche et A droite pour
ouvrir d'autres fenêtres de réglage.
Tapez sur Enregistrer pour
sauvegarder les modifications.
Une liste des fenêtres de réglage est
disponible à la page suivante.
(Ok).
Fenêtres de réglage
INFORMATIONS PRODUIT Veuillez vous informer de la version de produit.
Visualisez la démonstration de produit.
NFOS SUR LA CARTE Indiquez la représentation ou non des destinations
I
I
NFOS ITINERAIRE Sélectionner l'affichage ou non pendant la
spéciales ou des noms de rues sur la carte.
Sélectionner la carte de navigation que vous désirez
charger. Les destinations pour la navigation doivent
figurer sur la carte chargée.
navigation de l'heure d'arrivée présumée, de la
durée de trajet prévue restant, et / ou de la
distance restant.
FRANÇAIS
81
Page 82

PANNEAUX ROUTIERS Indiquez l'affichage ou non pendant la navigation
d'informations concernant la signalisation routière à
suivre.
L
IMITATIONS DE VITESSE Indiquez l'affichage ou non de limites de vitesses
sur la carte. Configurez les avertissements sonores
et visuels lors de dépassement de ces limites de
vitesse.
V
OLUME Réglez le volume sonore des informations de route.
R
EPRESENTATION Calibrer l'écran tactile, lorsqu'il ne réagit pas de
façon adéquate aux effleurements.
Sélectionnez la luminosité pour le mode jour et nuit.
M
ODE AUTOMATIQUE Sélectionner le démarrage de la navigation avec
une carte en vue 2D ou 3D.
Sélectionnez ou non, l'activation de l'auto-zoom
(plus vous roulez vite, plus grande sera l'échelle de
carte).
Sélectionnez l’orientation par défaut de la carte en
vue 2D pendant une navigation : vers le nord ou
dans le sens de la marche.
O
PTIONS DE ROUTE Indiquez votre profil de vitesse et le type d'itinéraire
souhaité (dynamique, court, rapide).
Sélectionnez l'utilisation ou non pendant votre trajet
d'autoroutes, ferrys ou routes à péage.
FUSEAU HORAIRE Indiquez votre fuseau horaire.
Indiquez, le cas échéant, l'horaire d'été.
ORMAT Sélectionnez l'indication de l'heure en format de
F
12h ou de 24h.
Indiquez votre choix pour l'affichage des distances :
en kilomètres ou en miles.
TMC Sélectionnez, si vous le désirez, un nouveau calcul
automatique, à l'annonce d'une information routière
concernant l'itinéraire.
DRESSE DU DOMICILE Indiquez ou modifiez vote adresse de domicile.
A
Aperçu des boutons de commande
Menu principal Destination spéciale
Naviguer : indiquer la destination
de navigation
Afficher la carte : afficher la
carte
82
... dans une ville :
destination particulière
dans une ville
... à proximité :
destination particulière à
proximité
Page 83

Domicile : naviguer à domicile
Configuration : adapter les
configurations
Fermer : fermer le programme de
navigation
Retour : retour à la fenêtre
précédente
Naviguer
Adresse : entrer une adresse
pour la navigation
Destination spéciale : indiquer
une destination spéciale
Destinations récentes :
sélectionner une destination dans
la liste D
ESTINATIONS RECENTES
Favoris : sélectionner une
destination dans la liste F
Pays : sélectionner un pays ou
une région
Visualisation de carte
Pas de GPS : réception GPS
insuffisante
TMC (optionnel) : réception TMC
disponible ou non
Agrandir : agrandir l'échelle
(zoomer plus grand)
Bloquer / Débloquer : bloquer
un certain tronçon de trajet
d'itinéraire
Mode jour / nuit : passer d'un
mode d'affichage à l'autre
Itinéraire complet : indiquer
tout l'itinéraire sur la carte
AVORIS
... au niveau national :
destination particulière à
échelle nationale
Indication de destinations
Démarrer la navigation :
démarrer la navigation vers
la destination indiquée
Représenter sur la
carte : indiquer la
destination sur la carte
Enregistrer : sauvegarder
la destination dans la liste
F
AVORIS
Editer les favoris
Supprimer : supprimer la
destination dans la liste
F
AVORIS
Modifier : éditer l'option
dans la liste F
AVORIS
TMC
Puissance du signal
TMC : qualité du signal
TMC
Actualisation TMC :
actualiser les messages
TMC
Autres boutons de commande
Ok : confirmer dans une
boîte de dialogue
Annuler : ne pas confirmer
dans une boîte de dialogue
Calibrage : démarrer le
calibrage de l'écran tactile
Vers le haut : faire défiler
vers le haut dans une liste
Vers le bas : faire défiler
vers le bas dans une liste
FRANÇAIS
83
Page 84

Déplacer / Zoomer : déplacer
ʳ
la carte avec la pointe au lieu de
zoomer
Position / Fixer la carte :
centrer la position et déplacer la
section de carte, ou le contraire
Diminuer : diminuer l'échelle
de carte (zoomer plus petit)
A gauche : faire défiler
vers la gauche
A droite : faire défiler vers
la droite
Specifications
Récepteur GPS intégré
Processeur
Système d’exploitation
Mémoire
Poids
(Approximativemen)
Taille
Support / chargeur de
voiture
AC Adaptor
(Adaptateur CA)
Batterie
Emplacement
d’extension
Ecran
DEL
Audio
Température
Humidité
USB
Profil bluetooth
20 canaux parallèles . SiRF star III
Samsung S3C2440A 400 MHz.
Microsoft Windows CE. Net 5.0 Core Version
ϫ 2G Flash
64 Mo SDRAM
ϫ
200 g
121 (W) x 81 (H) x 19-27 (D) mm
ϫ Tension d’entrée : 12-24V,
ϫ Tension de sortie: 5V/2A
ϫTension d’entrͼe : 100-240VД50/60Hz 0.5A
ϫTension de sortie : 5V/ 2A
ϫ Batterie rechargeable 1150 mAh Li-Ion
SD
ϫ Ecran tactile TFT LCD 4,3” (16:9)
ϫ 95,04(H) * 53,86(V) mm
ϫ 480 x 272 pixels
ϫ 16M couleurs
Voyant DEL orange/vert pour le rechargement de la
batterie DEL bleu d’état Bluetooth
ϫ Haut-parleur intégré
ϫ Contrôle du volume
ϫ Prise casque 3,5mm
ϫ Utilisation :-10C ~ 60C
ϫ Stockage : -20C ~ 70C
ϫ Utilisation : 0%~90%
ϫ Stockage : 0%~90%
ϫ Mini connecteur USB pour entrée de courant CC
Appel mains-libres, SMS, Transfert de fichiers
TM
84
Page 85

PORTABEL NAVIGATION
INSTRUCCIONES
KV-PX701
ESPAÑOL
85
Page 86

Precauciones de seguridad
Por favor, lea detenidamente esta sección y siga todas las instrucciones
proporcionadas.
Esto ayudará a asegurar un funcionamiento seguro y extender la vida útil del
producto.
Conserve el embalaje y las instrucciones de usuario para consulta futura. Si cede
el producto a otra persona, deberá incluir también estas instrucciones.
Nunca permita que los niños jueguen con este producto eléctrico sin la
supervisión de un adulto. Los niños no siempre pueden reconocer un posible
peligro.
Mantenga los materiales de embalaje, como bolsas de aluminio, alejadas de los
niños.
Podría originarse un peligro de asfixia causado por su uso indebido.
La utilización de este producto en su máximo volumen durante períodos
de tiempo extensos podría causar daños a la capacidad auditiva de la persona
que está escuchando.
Nunca abra la cubierta del producto o el adaptador de energía. No existen partes
que el usuario pueda reparar. Si se abre la cubierta, existe un riesgo de
pérdida de vida causado por una descarga eléctrica.
No coloque ningún objeto sobre el producto ni ejerza presión sobre la pantalla.
De lo contrario, existe el riesgo de dañar la pantalla.
Para evitar daños en la pantalla, no toque la pantalla con objetos puntiagudos.
Sólo utilice el lápiz óptico proporcionado u otro objeto despuntado. En algunos
casos, también se puede utilizar el producto con los dedos.
Existe un riesgo de lesión si se daña la pantalla. Si esto llegara a ocurrir, utilice
guantes de protección para juntar las partes dañadas y póngase en contacto
con Atención al Cliente para su desecho. Luego, lávese las manos con jabón,
debido a que existe la posibilidad de que haya ocurrido una fuga de químicos.
Corte el suministro de energía (retire el enchufe del tomacorriente), apague de
inmediato el producto o directamente no lo encienda y póngase en contacto
con Atención al Cliente.
Si la cubierta del producto o la batería llegaran a dañarse o ingresan fluidos a
través de estos, los componentes deberán ser revisados por Atención al
Cliente con el fin de evitar posibles daños.
Ambiente de funcionamiento
Si no se sigue estas instrucciones, el producto podría sufrir daños. En dichos
casos, la garantía quedará sin efecto.
Mantenga el sistema de navegación y todos los dispositivos conectados alejados
de la humedad y evite exponerlos a lugares polvorientos, al calor y a la luz
directa del sol, especialmente dentro de un automóvil.
Asegúrese siempre de evitar que el producto se moje, por ejemplo, durante
lluvias. Por favor, tenga en cuenta que la humedad podría incluso llegar a
acumularse en un bolso de protección debido a la condensación.
Evite exponer el producto a vibraciones o movimientos fuertes que podrían
originarse, por ejemplo, en el caso de interposiciones de campos magnéticos
transversales.
ESPAÑOL
86
Page 87

Evite que el dispositivo se suelte del soporte, por ejemplo, cuando se desee
frenar el automóvil. Instale el producto lo más verticalmente posible.
Compatibilidad electromagnética
Cuando se realice la conexión de componentes adicionales, se deberá cumplir
con la “Directiva de Compatibilidad Electromagnética” (EMC, por sus siglas en
inglés). Por favor, tenga en cuenta que sólo se debe utilizar con este producto
un cable apantallado (de 10 pies como máximo).
Para un rendimiento óptimo, mantenga una distancia de como mínimo 10 pies de
las fuentes de alta frecuencia e interferencia magnética (televisores, sistemas
de altavoces, teléfonos móviles, etc.). Esto ayudará a prevenir funcionamientos
defectuosos o pérdidas de datos.
Los dispositivos electrónicos emiten ondas electromagnéticas durante su
funcionamiento. Estas emisiones son inofensivas para los seres humanos,
pero pueden interferir con otros dispositivos que están siendo utilizados en un
radio cercano. A pesar de que nuestros dispositivos son analizados y
optimizados en nuestros laboratorios para lograr el cumplimiento
electromagnético, aún así durante su funcionamiento podría llegar a ocurrir una
interferencia en el dispositivo mismo o con otros dispositivos en un radio
cercano. En caso de que ocurra dicha interferencia, intente eliminarla
ajustando las posiciones y las distancias entre los dispositivos. Antes de
conducir un automóvil, asegúrese de que los sistemas electrónicos del mismo
funcionen en forma correcta.
Seguridad de datos
Cada vez que actualice sus datos, realice copias de respaldo en un medio de
almacenamiento externo. El distribuidor no asume responsabilidad alguna por
la pérdida de datos o por daños en las unidades de almacenamiento de datos,
y no se aceptan demandas por daños causados por la pérdida de datos o por
daños consecuentes.
Conexión
Utilice el adaptador de energía incluido en el embalaje. La utilización de otros
adaptadores de energía que no sea el proporcionado podría derivar en un
funcionamiento defectuoso y generar un peligro.
El adaptador para automóviles deberá ser conectado sólo al encendedor de un
automóvil. (Batería de un automóvil = DC 12V - Batería de un camión = ¡DC
24V!). Si posee alguna duda acerca de la fuente de energía del automóvil,
póngase en contacto con el fabricante del automóvil.
Sólo utilice el adaptador de energía en tomacorrientes con conexión a tierra de
CA 100 – 240 V~, 50/60 Hz. Si no está seguro acerca de la fuente de energía
del lugar donde se utilizará el producto, consulte al distribuidor de energía
pertinente.
Sólo se debe utilizar el producto con las baterías suministradas.
Acerca del adaptador de energía:
1. No utilice el adaptador de energía en un ambiente mojado. Cuando sus manos
y pies se encuentren mojados, no toque el adaptador de energía.
2. Cuando utilice el adaptador de energía, asegúrese de que el área posea la
ventilación adecuada. No permita que papeles u otro material tapen al
adaptador de energía debido a que esto podría afectar el proceso de
enfriamiento. No utilice el adaptador de energía dentro de una bolsa.
ESPAÑOL
87
Page 88

3. No intente reparar el producto. Si el producto se encuentra dañado o es
utilizado en un ambiente húmedo, reemplácelo de inmediato.
4. No se recomienda realizar la carga del producto desde una PC debido a que el
voltaje de energía de la PC no es el necesario para alimentar al producto.
5. Cuando se instale la unidad, asegúrese de que el enchufe sea de fácil acceso.
Acerca de la batería: Cuando se instale el dispositivo, asegúrese de que el
enchufe sea de fácil acceso.
1. Utilice sólo el cargador original aprobado de fábrica.
2. El producto posee una batería de litio. Para evitar incendios o quemaduras en
la piel, no desarme, perfore, golpee o exponga la batería a la llama. Si se
expone la batería a la llama, ésta podría reventar, explotar o liberar químicos
peligrosos.
3. PRECAUCIÓN
No se debe exponer la batería al calor excesivo como la luz del sol, la llama o
situaciones similares.
Instrucciones importantes
1. Nota: El reemplazo de la batería por una batería incorrecta podría causar una
explosión.
Cuando deseche la batería, siga las instrucciones. La batería de reemplazo debe
ser una batería original aprobada de fábrica.
2. Se debe acatar las regulaciones pertinentes cuando se recicle o deseche las
baterías.
3. Sólo se debe utilizar la batería en este producto.
4. PRECAUCIÓN
Para reducir el riego de descarga eléctrica, incendio, etc.:
No extraiga los tornillos, tapas o cubiertas.
No exponga el producto a la lluvia o humedad.
Información para los usuarios acerca del desecho de
productos usados
Este símbolo indica que el producto con este
símbolo no deberá ser desechado como residuo
doméstico general al final de su vida útil. Si desea
desechar este producto, realícelo de acuerdo con
la legislación nacional aplicable u otras
regulaciones de su país y municipalidad. Al
desechar este producto en forma correcta, ayudará
a conservar los recursos naturales y evitará causar
efectos potenciales negativos para el medio
ambiente y la la salud humana.
Navegación
Instrucciones de seguridad para la navegación
¡Con el fin de protegerse usted y proteger a otras personas de accidentes, no
utilice el sistema de navegación durante el manejo del vehículo!
88
Page 89

En caso de que no comprenda la instrucción por voz o posea alguna duda acerca
de qué hacer en la próxima intersección, la visualización del mapa o de la
flecha brinda una orientación rápida. ¡Sólo mire la pantalla cuando se
encuentre en una situación de manejo del vehículo segura!
¡Atención!
El trazado del camino y las leyes de tránsito tienen prioridad sobre las
instrucciones del sistema de navegación. ¡Sólo siga las instrucciones cuando
las circunstancias y las leyes de tránsito lo permitan! El sistema de navegación
lo guiará hacia su destino incluso cuando se haya desviado del trayecto
planeado.
Las instrucciones de dirección del sistema de navegación no exime al conductor
del vehículo de su deber de cuidado o responsabilidad personal.
Planifique los trayectos antes de emprender el viaje. Si desea planificar un
trayecto nuevo cuando se encuentra en camino, detenga el automóvil.
Con el fin de obtener la señal GPS en forma correcta, los objetos metálicos no
deben obstruir la recepción. Utilizando la ventosa, coloque el sistema de
navegación sobre la parte interna del parabrisas o cerca del parabrisas.
Pruebe diferentes posiciones en el vehículo para encontrar el lugar de mejor
recepción.
Aviso importante
Este sistema solamente proporciona una referencia para la navegación. No utilice
este sistema para realizar medidas geográficas, de dirección y de distancia
precisas.
La primera operación de posicionamiento del GPS se debe realizar en un solo
punto establecido en un área despejada sin obstáculos de edificios. El tiempo
que la unidad tardará en posicionarse dependerá de la intensidad de la señal
de los satélites y de la nubosidad. Es posible que tarde hasta 10 minutos.
GPS (Global Positioning System, es decir Sistema de posicionamiento global) es
el sistema de satélites utilizado por el Departamento de Defensa de los
Estados Unidos de América. Dicho departamento también administra todas las
tareas de mantenimiento y operaciones. Si el sistema se modifica y ajusta, la
precisión y el uso de los sistemas GPS relacionados puede verse afectada.
Cualquier producto de comunicación inalámbrica (teléfono móvil, radio, unidad de
detección de velocidad, etc.) podría afectar a la señal GPS, lo que provocaría
una señal débil.
Por razones de seguridad, no utilice este sistema mientras conduce un vehículo.
No deje esta unidad bajo el parabrisas delantero cuando salga del vehículo. La
exposición a altas temperaturas puede ser peligrosa y sobrecalentar la batería,
lo que puede provocar un mal funcionamiento en el dispositivo.
El tinte de las ventanas podría interferir en la recepción de las señales de satélite.
Es recomendable instalar una antena en el vehículo para intensificar y
estabilizar la señal.
89
ESPAÑOL
Page 90

La ruta de navegación programada únicamente sirve de referencia; se pueden
producir cambios en las condiciones de la carretera (calles de dirección única,
giros incorrectos) por lo que se ruega que responda en consecuencia y decida
si desea seguir o no el recorrido programado.
Cuando coloque este sistema en el vehículo, asegúrelo con los soportes en el
automóvil para garantizar la seguridad. A continuación se ilustra la ubicación
de instalación recomendada.
X No obstaculizar la visión
del conductor
X No colocar enfrente
del sistema "airbag"
X No colocar en el
salpicadero inestable
X No colocar enfrente
del sistema "airbag"
Puede haber diferencias entre las versiones fabricadas y comercializadas; este
software puede ser actualizado con frecuencia. Si las descripciones de este
manual son diferentes a las de la versión de software, siga la versión de
software que tiene en sus manos.
Primer uso
Derechos de autor
Este manual, el producto y el software no se pueden duplicar, transmitir, grabar o
guardar en dispositivos de almacenamiento sin el consentimiento por escrito de
JVC, Inc. Además, queda terminantemente prohibida su traducción a ningún otro
idioma.
Copyright © 2007 Victor Company of Japan, Limited. Reservados todos los
derechos.
Microsoft y Windows son marcas registradas de Microsoft Corporation en los
Estados Unidos y/u otros países.
La marca denominativa y los logos de Bluetooth son propiedad de Bluetooth SIG,
Inc. y cualquier utilización de dichas marcas por parte de Victor Company of
Japan, Limited (JVC) se encuentra bajo licencia.
El logo SD es una marca registrada.
90
Page 91

Contenido del paquete
El producto debe incluir los siguientes accesorios::
Unidad KV-PX701
Adaptador para el
automóvil
DVD-ROM
(Mapa de Digital/ Manual
de usuario)
Soporte para el interior
del vehículo
Adaptador doméstico o
de viaje
Instrucciones Estuche de transporte
Elemento de fijación del
soporte
Disco adhesivo para
tablero
ESPAÑOL
Auriculares estéreo Antena TMC
Antena GPS externa
(Opcional)
91
Page 92

Funcionamiento básico
Introducción
Vista frontal
Bluetooth LED
Pantalla LCD
TFT de 4,3”
con pantalla
Vista posterior
Estilógr
Lateral izquierdo Lateral derecho
LED indicador de carga
Charging indicator LED:
Charging: Orange
Full: Green
Bluetooth LED:
Bluetooth ON: Blinking Blue
Bluetooth OFF: LED off
Conmutador de
encendido
Interfaz de
Puerto para antena
Kopfhöreranschluss/
TMC Antenna port
USB –Anschluss
(nur zum Aufladen
des Akkus über das
Netzteil)
Vista superior
92
Ranura para
Botón de
Botón de encendido Tecla de acceso
Page 93

Hanteringsmetoder
Komma igång
1. Vid första användningen slå på
systemets strömbrytare på baksidan.
2. Tryck in och håll kvar strömbrytaren i
ungefär två sekunder för att slå på strömmen.
Notera: Innan du använder enheten för
första gången, slå på systemets ström.
Conmutador de
alimentación
del sistema
Systemåterställning
Det kommer endast att krävas omstart avsystemet vid några få extrema
omständigheter. Återställ ditt system om följande situationer uppstår:
1. Kraftig fördröjning vid uppdatering av skärmen eller driften vilket resulterar i
obrukbart system.
2. Systemet kan inte stängas av med strömbrytaren.
3. Inget svar efter att val gjort på skärmen.
Om något av ovanstående inträffar stäng av systemets strömbrytare på baksidan
och slå på den igen för att starta om systemet.
Stängning
1. När strömmen är på tryck på strömbrytaren för
att stänga av strömmen.
2. Om enheten inte ska användad under en
längre period stäng av med strömbrytaren på baksidan.
Botón de encendido
ESPAÑOL
Använda fordonskonsolen
Den medföljande fordonskonsolen
kan monteras säkert på vindrutan
eller säkert på ovansidan av
handskfacket med en självhäftande
plattan. Denna enhet kommer att
effektivt säkra GPS-enheten i fordonet.
Följ proceduren nedan för att säkra
konsolen:
1. Följ pilarna och låt enheten glida in på monteringshålen på fordonskonsolen.
2. Tryck försiktigt ned tills enheten är fast förankrad ihop med konsolen.
93
Page 94

3. Böj konsolstödet till lämplig vinkel. Montera fast fordonskonsolen på vindrutan,
se till att dess bas vilar fast mot instrumentbrädan.
Notera: Var uppmärksam på pilarnas riktning. När den är fastsatt bör
den vara åtsittande. Om dessa instruktioner inte följs kommer enheten
att sitta löst och komponenterna måste monteras om.
4. Följ anvisningarna och sätt in konsolen i skårorna på konsolen och låt den glida
för att fästa setet (A Æ B).
5. Moteringen av fordonskonsolen är
avslutad.
9 När fordonskonsolen används får den
inte installeras så att det blockerar
sikten för föraren.
9 Rekommenderade installationskrav:
Konsolbasen bör vila säkert mot
instrumetnbrädan för att förhindra
överdrivna stötar.
Använda billaddaren
Vid användning i ett fordon bör medföljande billaddare användas vid längre
användningsperioder.
1. Koppla in den lilla kontakten i
strömuttaget på baksidan av
fordonskonsolen.
2. Sätt ind en andra änden i
cigarettändarutaget
Byte av säkring
Reemplace el fusible por uno del
mismo tipo y clasificación:
94
Page 95

FUSIBLE DE ACTUACIÓN RÁPIDA / ij6,35x32/250V/1,5A
1. Gire hacia la derecha la cubierta frontal de plástico para aflojarla. La parte
metálica positiva deberá permanecer dentro de la cubierta.
2. Retire el fusible. (FUSIBLE DE ACTUACIÓN RÁPIDA / ij6,35x32/250V/1,5A.α
3. Coloque el fusible nuevo. (FUSIBLE DE ACTUACIÓN RÁPIDA /
ij6,35x32/250V/1,5Aα
4. Vuelva a colocar la cubierta frontal de plástico. Proceso finalizado. (No permita
que la parte metálica positiva se caiga durante todo este proceso.)
Använda strömadaptern
Innan enheten används för första gången rekommenderar vi starkt att du
använder ett fulladdat batteri.
1. Sätt in USB-kontakten i enheten.
2. Koppla i adaptern i strömuttaget.
ESPAÑOL
El conector USB sólo es utilizado
para la carga de la batería a través
del adaptador CA.
Utilización de la antena TMC
Inserte la antena TMC (1) en la unidad.
95
Page 96

Usar las funciones
Durante la primera puesta en marcha, la pantalla mostrará el menú
principal compuesto de seis funciones: navegación, música, fotografías,
vídeo, libro electrónico y configuración. Seleccione directamente el icono
en la pantalla para utilizar la función en cuestión.
GPS
MP3
Photo (Foto)
96
Carga el programa y la pantalla de navegación.
Reproduce música MP3.
carpeta "mp3" y la lista de reproducción.
reproducción
Reproduce imágenes.
carpeta "Imágenes"
Es necesario crear la
Lista de
Es necesario crear la
Page 97

Video (Vídeo)
Reproduce vídeos.
"Archivos"
Es necesario crear la carpeta
eBook (Libro
electrónico)
Setting
Puede leer archivos con el formato TXT. Folder
named"ebook"
"ebook"
Es necesario crear la carpeta
Configuración del sistema
(Configuración)
NotaΚ Lea por favor el manual de usuario en el DVD-ROM.
z El contenido de este manual se puede modificar sin previo aviso.
z La temperatura de funcionamiento adecuada del producto está
comprendida entre -10 ºC y 60 ºC.
Si utiliza o recarga el dispositivo en un entorno en el que la temperatura supera
los 45 ºC, el sistema podría dejar de funcionar. No obstante, este
comportamiento se considera un fenómeno normal. No utilice el aparato en un
entorno con temperaturas extremas.
ESPAÑOL
97
Page 98

GPS Menú principal
Menú principal
1 Abre la ventana NAVEGAR.
2 Inicia la navegación hacia casa (el
domicilio debe haberse establecido
antes).
3 Abre el mapa. Con recepción GPS se
muestra la posición actual.
4 Abre la ventana C
Aquí puede configurar el sistema de
navegación según sus necesidades.
5 Apaga el sistema de navegación.
ONFIGURACIÓN.
Ventana 'Navegar'
1 Abre la ventana anterior.
2 Abre la ventana D
puede escribir la dirección del
próximo destino.
3 Abre la ventana D
Aquí puede buscar un destino
especial.
4 Abre la ventana P
seleccionar el país donde se
encuentra el próximo destino.
5 Abre la lista Ú
6 Abre la lista F
todos los destinos guardados.
IRECCIÓN. Aquí
ESTINO ESPECIAL.
AÍS. Aquí puede
LTIMOS DESTINOS.
AVORITOS que contiene
Escribir un destino para la navegación
En el menú principal pulse sobre
Navegar.
Se abre la ventana N
98
AVEGAR.
Page 99

Escribir el país de destino
Debajo del botón (País)
encima de la ventana N
encuentra el nombre del país del que
seleccionar o introducir destinos.
AVEGAR se
Pulse sobre
seleccionar un país.
Escriba el nombre del país de destino.
Puede utilizar los botones Hacia arriba
y Hacia abajo para marcar el país
deseado.
Pulse sobre
El nombre del país seleccionado se
muestra en la ventana N
debajo del botón
(País) para
(Aceptar).
AVEGAR situada
(País).
ESPAÑOL
99
Page 100

Escribir una dirección
En la ventana NAVEGAR pulse sobre el
botón Dirección.
Se abre la ventana D
Pulse sobre el campo Localidad o CP.
Introduzca el nombre del destino.
En la lista de las poblaciones se indican
los códigos postales. Si hay dos o más
ciudades con el mismo nombre pulse
sobre el botón Hacia arriba y Hacia
abajo para marcarla entrada
correspondiente.
IRECCIÓN.
100
Pulse sobre
(Aceptar).
 Loading...