

Page 1
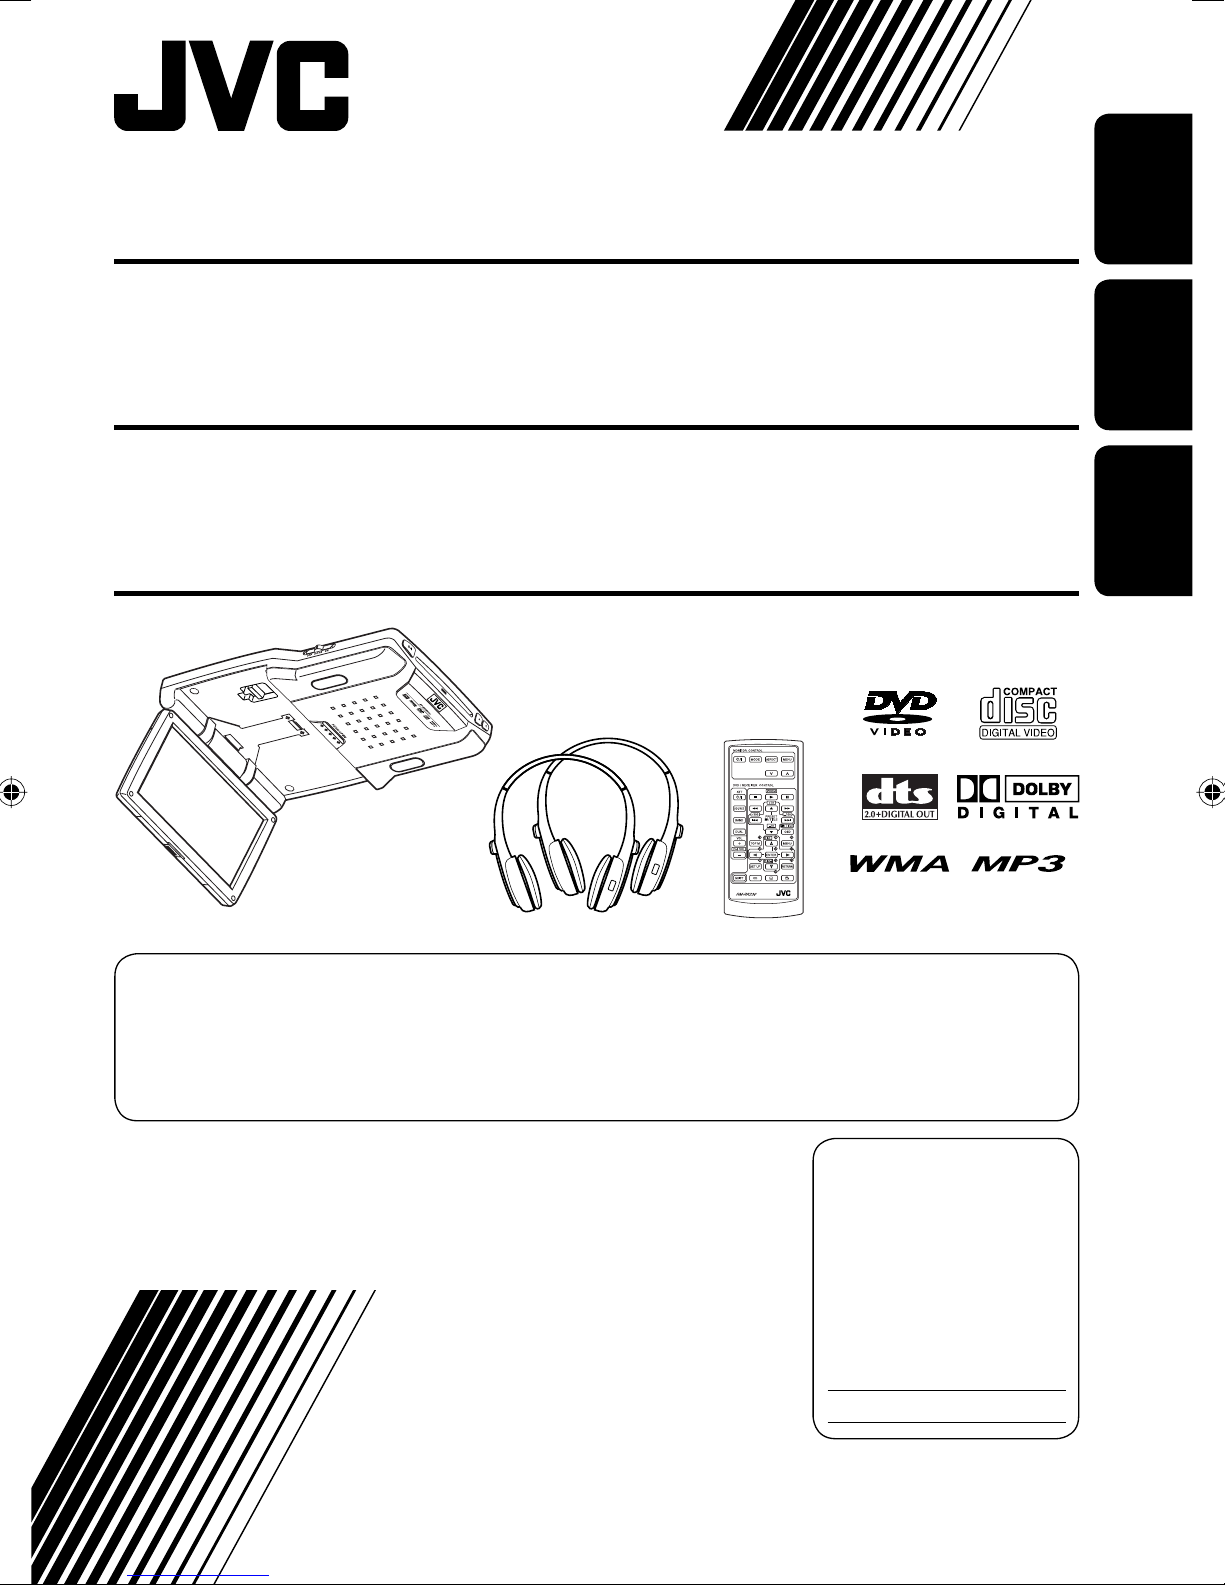
9-INCH WIDESCREEN MONITOR
WITH DVD PLAYER KV-MRD900
MONITOR DE PANTALLA ANCHA DE 9 PULGADAS
CON REPRODUCTOR DVD KV-MRD900
MONITEUR COULEUR A ECRAN LARGE DE 9 POUCES
AVEC LECTEUR DE DVD KV-MRD900
ENGLISH
ESPAÑOL
FRANÇAIS
• This system cannot receive television broadcasts. Use the separately sold TV tuner unit KV-C1000 for
optional television broadcast reception.
• Este sistema no puede recibir emisiones de televisión. Utilice la unidad de sintonizador de TV móvil
KV-C1000 vendido por separado para una recepción opcional de emisiones de televisión.
• Ce système ne peut pas recevoir les émissions de télévision. Utilisez le module de tuner de télévision
mobile KV-C1000 vendu séparément afin de pouvoir recevoir les émissions de télévision.
For installation and connections, refer to the separate manual.
Para la instalación y las conexiones, refiérase al manual separado.
Pour l’installation et les raccordements, référez-vous au manuel séparé.
INSTRUCTIONS
For customer Use:
Enter below the Model
No. and Serial No. which
are located on the top or
bottom of the cabinet.
Retain this information for
future reference.
MANUAL DE INSTRUCCIONES
MANUEL D’INSTRUCTIONS
Model No.
Serial No.
LVT1340-001A
[J]
Page 2
WARNINGS
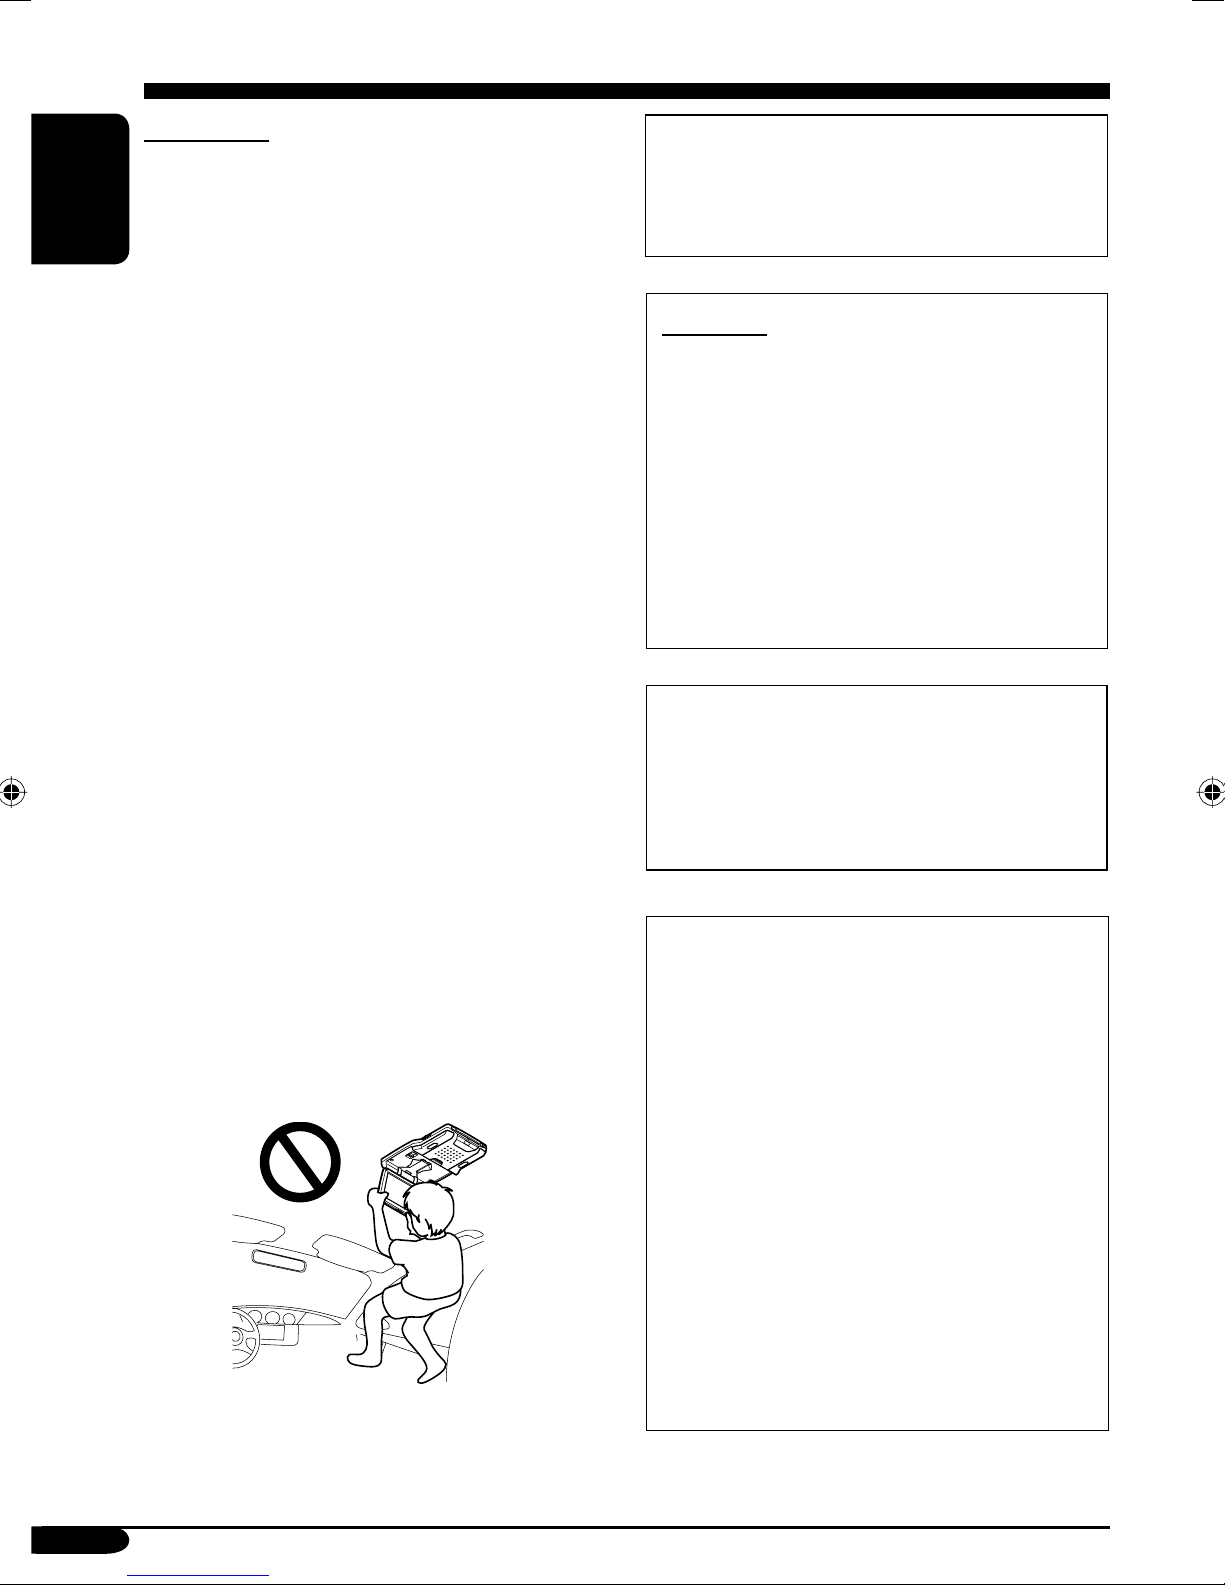
• DO NOT INSTALL THE MONITOR IN A
LOCATION WHICH OBSTRUCTS DRIVING,
VISIBILITY, SAFETY DEVICE FUNCTION
SUCH AS AIR BAGS OR WHICH IS
ENGLISH
PROHIBITED BY APPLICABLE LAWS AND
REGULATIONS.
• There may be legal regulations defining the
permissible installation locations for the monitor
which differ by country or by state. Be sure
to install the monitor in a correct location
according to such laws.
• The driver must not operate the monitor while
driving.
* Stop your vehicle in a safe location when
operating the monitor.
• The driver must not watch the television or
playback pictures while driving.
If the driver does it while driving, it may lead to
carelessness and cause an accident.
• Keep the monitor at an appropriate sound level
while driving.
Driving with the sound at a level that prevents
you from hearing sounds outside of and around
the vehicle may cause an accident.
• Be sure not to let the monitor fall or be strongly
impacted since this may cause a malfunction or
fire.
• Do not use the monitor with the engine off.
Doing so with the engine off will consume
battery power and may prevent the engine from
starting.
• When not in use, close the liquid crystal panel
and store it into the compartment.
• Do not touch the surface of the liquid crystal
panel directly.
• Do not hang any object on the monitor or hang
down, as this may damage the monitor.
CAUTION:
This monitor should be used on DC 12 V only. To
prevent electric shocks and fire hazards, DO NOT
use any other power source.
CAUTION:
This product has a fluorescent lamp that
contains a small amount of mercury. It
also contains lead in some components.
Disposal of these materials may be
regulated in your community due to
environmental considerations.
For disposal or recycling information
please contact your local authorities, or
the Electronics Industries Alliance:
http://www.eiae.org./
Installation requires some special
knowledge.
Do not install the monitor yourself.
Consult a dealer having special
knowledge of this kind for safe and
reliable installation.
CAUTIONS on the supplied headphones
—KS-HP2:
• DO NOT leave the headphones in a place
exposed to direct sunlight for a long
time, such as a dashboard, as they may be
damaged.
• Keep the headphones away from a cellular
phone to avoid interference.
• DO NOT turn off the power with the
volume set at high level, as the sudden
blast of sound can damage your hearing
and/or headphones next time you use the
headphones.
• If you experience a ringing in your
ears, reduce volume or stop using the
headphones.
2
Page 3

Thank you for purchasing a JVC product.
Please read all instructions carefully before operation, to ensure your complete understanding and to
obtain the best possible performance from the unit.
INFORMATION (For U.S.A.)
This equipment has been tested and found to comply with the limits for a Class B digital device,
pursuant to Part 15 of the FCC Rules. These limits are designed to provide reasonable protection
against harmful interference in a residential installation. This equipment generates, uses, and can
radiate radio frequency energy and, if not installed and used in accordance with the instructions,
may cause harmful interference to radio communications. However, there is no guarantee that
interference will not occur in a particular installation. If this equipment does cause harmful
interference to radio or television reception, which can be determined by turning the equipment
off and on, the user is encouraged to try to correct the interference by one or more of the
following measures:
– Reorient or relocate the receiving antenna.
– Increase the separation between the equipment and receiver.
– Connect the equipment into an outlet on a circuit different from that to which the receiver is
connected.
– Consult the dealer or an experienced radio/TV technician for help.
IMPORTANT FOR LASER PRODUCTS
1. CLASS 1 LASER PRODUCT
2. CAUTION: Do not open the top cover. There are no user serviceable parts inside the unit; leave
all servicing to qualified service personnel.
3. CAUTION : Visible and invisible laser radiation when open and interlock failed or defeated.
Avoid direct exposure to beam.
ENGLISH
This product incorporates copyright
protection technology that is protected
by U.S. patents and other intellectual
property rights. Use of this copyright
protection technology must be authorized
by Macrovision, and is intended for home
and other limited viewing uses only unless
otherwise authorized by Macrovision.
Reverse engineering or disassembly is
prohibited.
Caution on volume setting:
Discs produce very little noise compared
with other sources. Lower the volume
before playing a disc to avoid damaging
the speakers by the sudden increase of the
output level.
3
Page 4
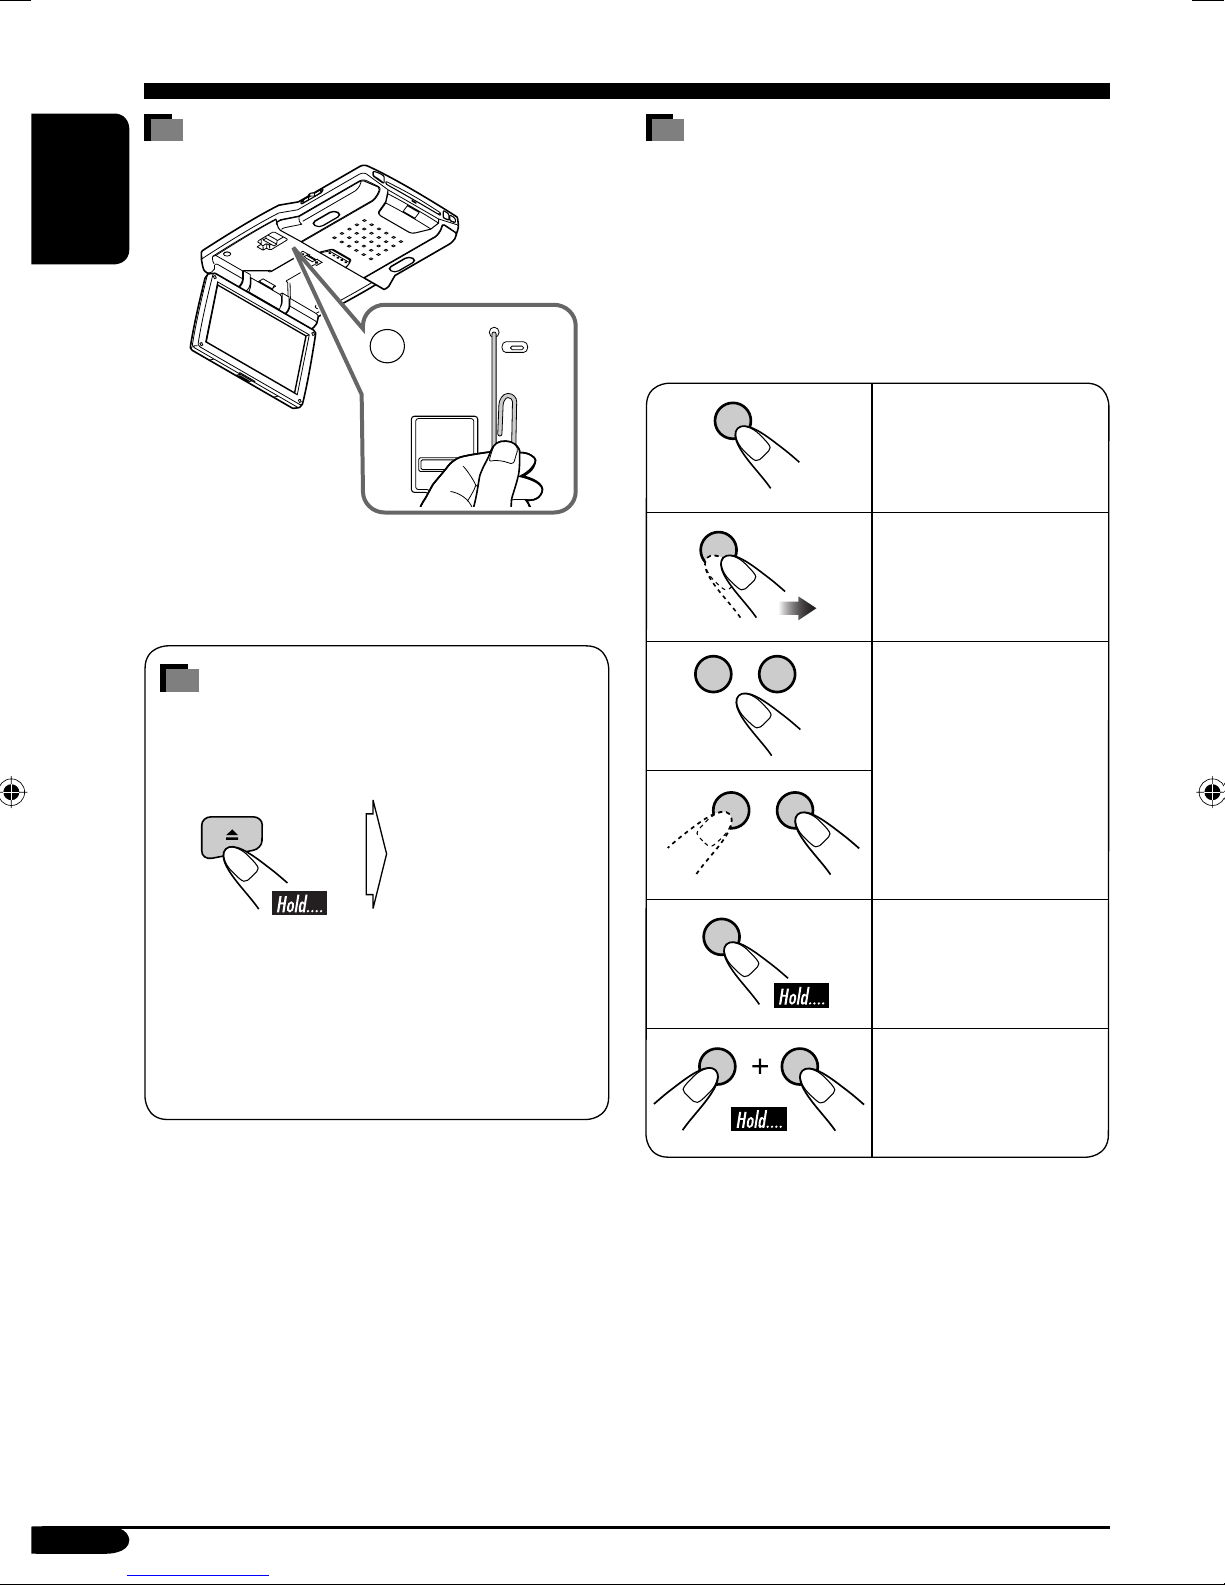
How to reset your monitor
ENGLISH
This will reset the microcomputer. Your preset
adjustments will also be erased.
How to forcibly eject a disc
How to read this manual
The following methods are used to make the
explanations simple and easy-to-understand:
• Some related tips and notes are explained in
“More about this monitor” (see pages
33 – 35).
• Button operations are mainly explained with
the illustrations as follows:
Press briefly.
Press repeatedly.
If a disc cannot be recognized by the monitor
or cannot be ejected...
Monitor
The disc comes
out.
(for about 5 seconds
while power is on)
• If this does not work, reset your monitor.
• Be careful not to drop the disc when it
ejects.
Press either one.
Press and hold until
your desired response
begins.
Press and hold both
buttons at the same
time.
4
Page 5

Contents
How to reset your monitor ..................... 4
How to forcibly eject a disc ................... 4
How to read this manual ........................ 4
Precautions .................................... 6
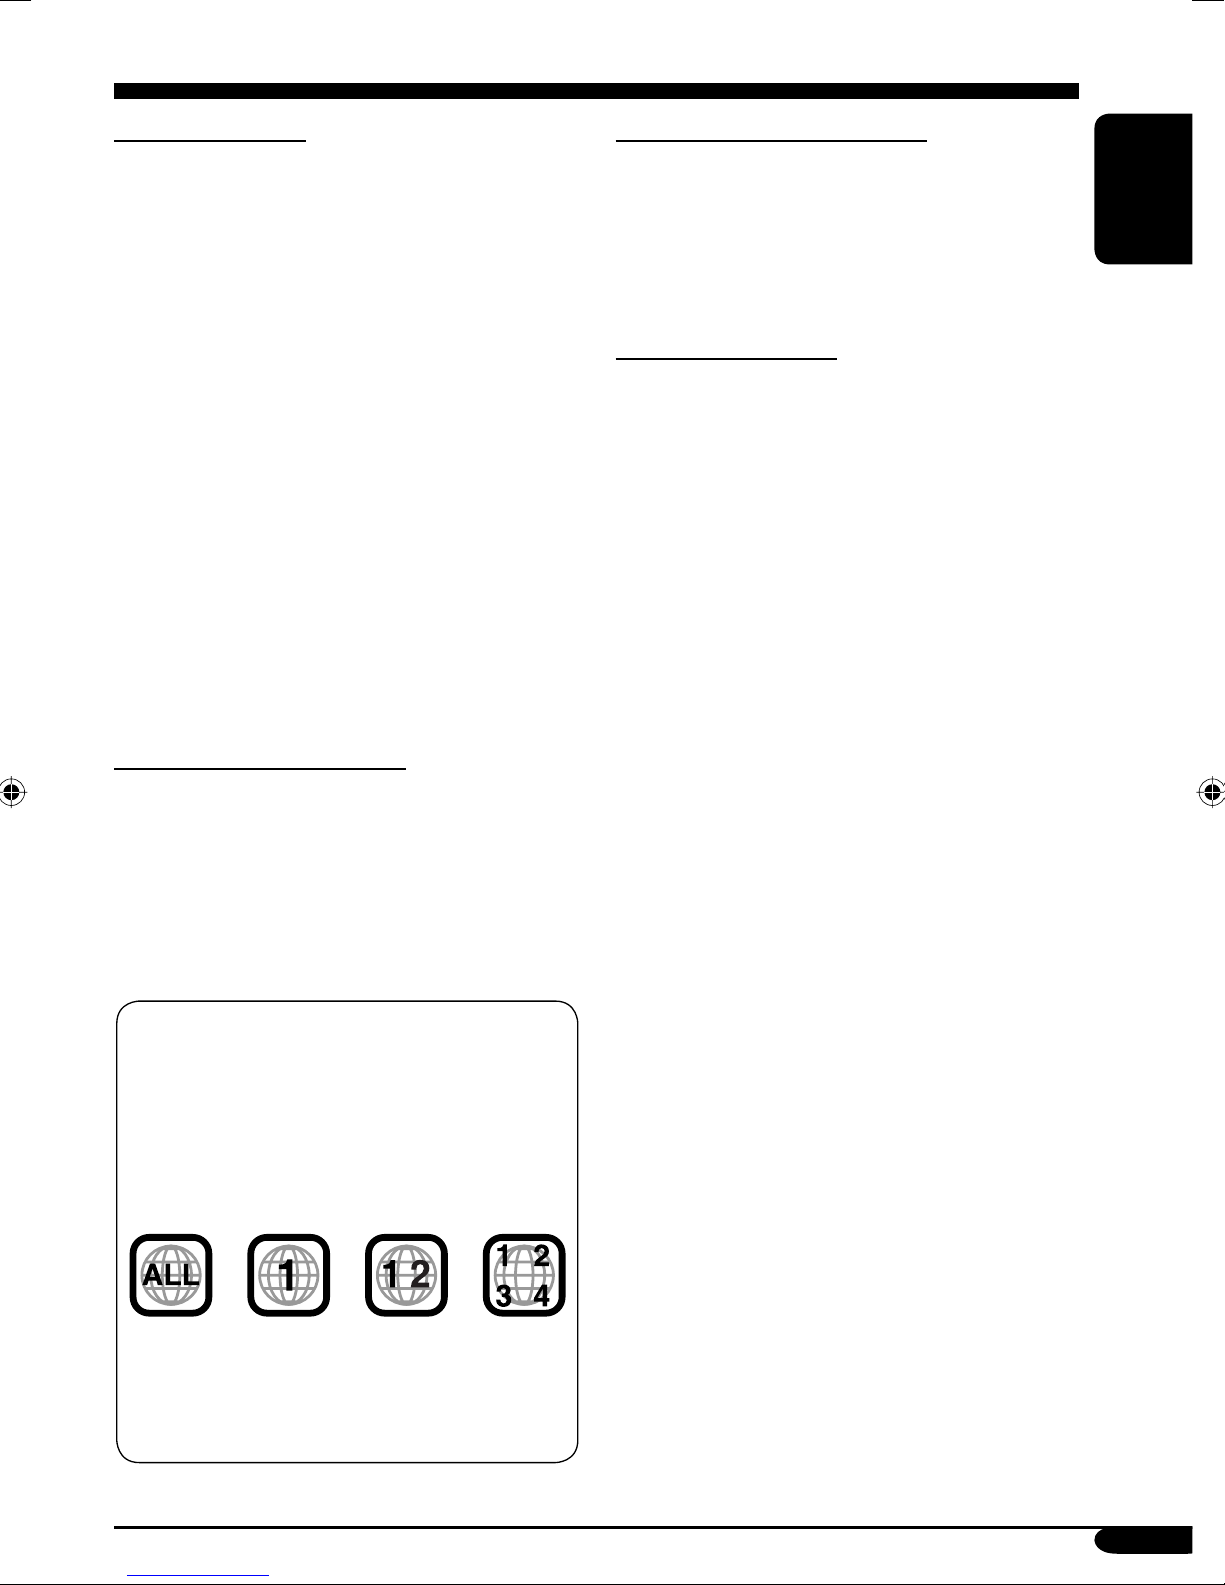
Widescreen monitor ....................... 7
Parts identification ................................. 7
Remote controller — RM-RK230
Main elements and features ................... 8
Headphones — KS-HP2
Main elements and features ................... 10
Basic operations
............................. 11
.................... 10
....... 8
Adjustments .................................. 13
Using the monitor menu ........................ 13
Changing the aspect ratio ...................... 15
DVD/VCD/JPEG special functions ... 21
Selecting audio languages ..................... 21
Selecting subtitles .................................. 21
Selecting the multi-angle views ............. 21
Disc menu operations ............................ 22
Zoom in .................................................. 22
On-Screen disc operations ............... 23
Basic on-screen bar operations .............. 24
Basic control screen operations ............. 26
List screen operations ............................ 27
DVD setup menu ............................ 28
Basic setting procedure .......................... 28
Maintenance .................................. 31
Language codes .............................. 32
More about this monitor ................. 33
ENGLISH
Playable discs ................................ 17
Disc operations .............................. 18
Playing a disc ................................. 18
Starting playback ................................... 18
Basic operations ..................................... 19
Troubleshooting ............................. 37
Specifications ................................. 39
For safety....
• Do not raise the volume level too much, as
this will block outside sounds, making driving
dangerous.
• Stop the car before performing any
complicated operations.
Temperature inside the car....
If you have parked the car for a long time in
hot or cold weather, wait until the temperature
in the car becomes normal before operating the
unit.
5
Page 6
Precautions
Cautions for handling the liquid crystal panel
Do not expose the liquid crystal panel to direct
sunlight.
ENGLISH
• Storage temperature range: –20°C to +80°C
(–4°F to 176°F)
+80°C
–20°C
–20°C to +80°C
During the summer,
temperatures can
reach as high as
100°C (212°F).
When the liquid crystal panel reaches high
temperatures or low temperatures, chemical
changes occur within the liquid crystal panel
which may cause it to malfunction.
The red spots, blue spots and green spots on
the panel surface are a normal characteristic of
liquid crystal panels, and not a problem.
Do not drop the liquid crystal panel or strike
it sharply.
When the temperature is very cold or very
hot, the image may not appear clearly or may
move slowly.
The image may not be synchronized with
the sound or the image quality may decline
in such environments. Note that this is not a
malfunction or problem.
• Usage temperature range: 0°C to +40°C
(32°F to 104°F)
Spots
Note:
The liquid crystal panel is built with very
high precision technology and has at least
99.99% effective image pixels. Be aware that
on 0.01% of the panel there may be missing or
constantly lit pixels.
6
0°C (32°F) or colder
40°C (104°F) or hotter
Page 7
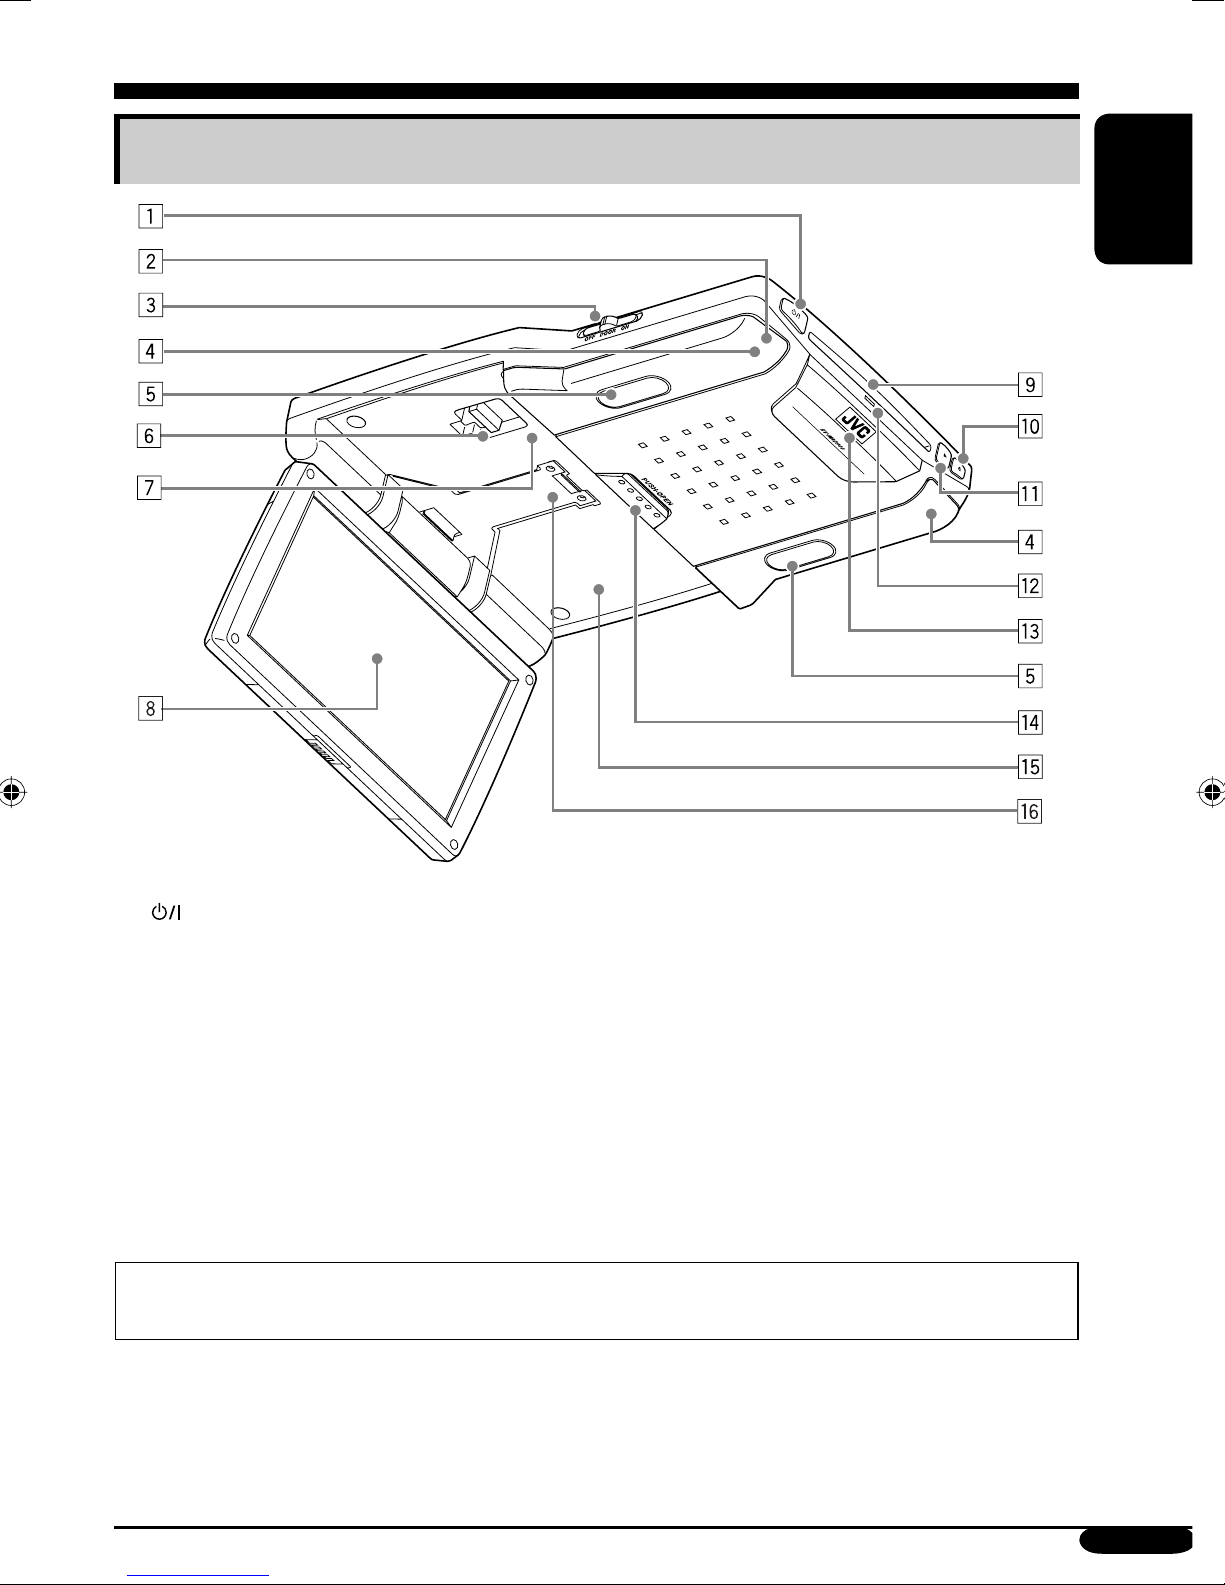
Widescreen monitor
Parts identification
ENGLISH
1 (standby/on) button
• Turns on the power if pressed.
• Turns off the power if pressed and held.
2 Remote sensor
3 Dome light switch
• See “To activate the door sensor” on page
12.
4 IR transmitters
5 Dome lights
6 Arm lock lever
7 Reset button
When you watch the screen at an angle, the picture might not be clear. This is not a malfunction.
The finest picture can be seen when you watch the screen straight-on.
8 Screen (Liquid crystal panel)
9 Disc loading slot
p 0 (eject) button
q 3 (play) button
w Disc loading lamp
e White LED
r PUSH-OPEN button
t Screen compartment
y Screen arm
7
Page 8
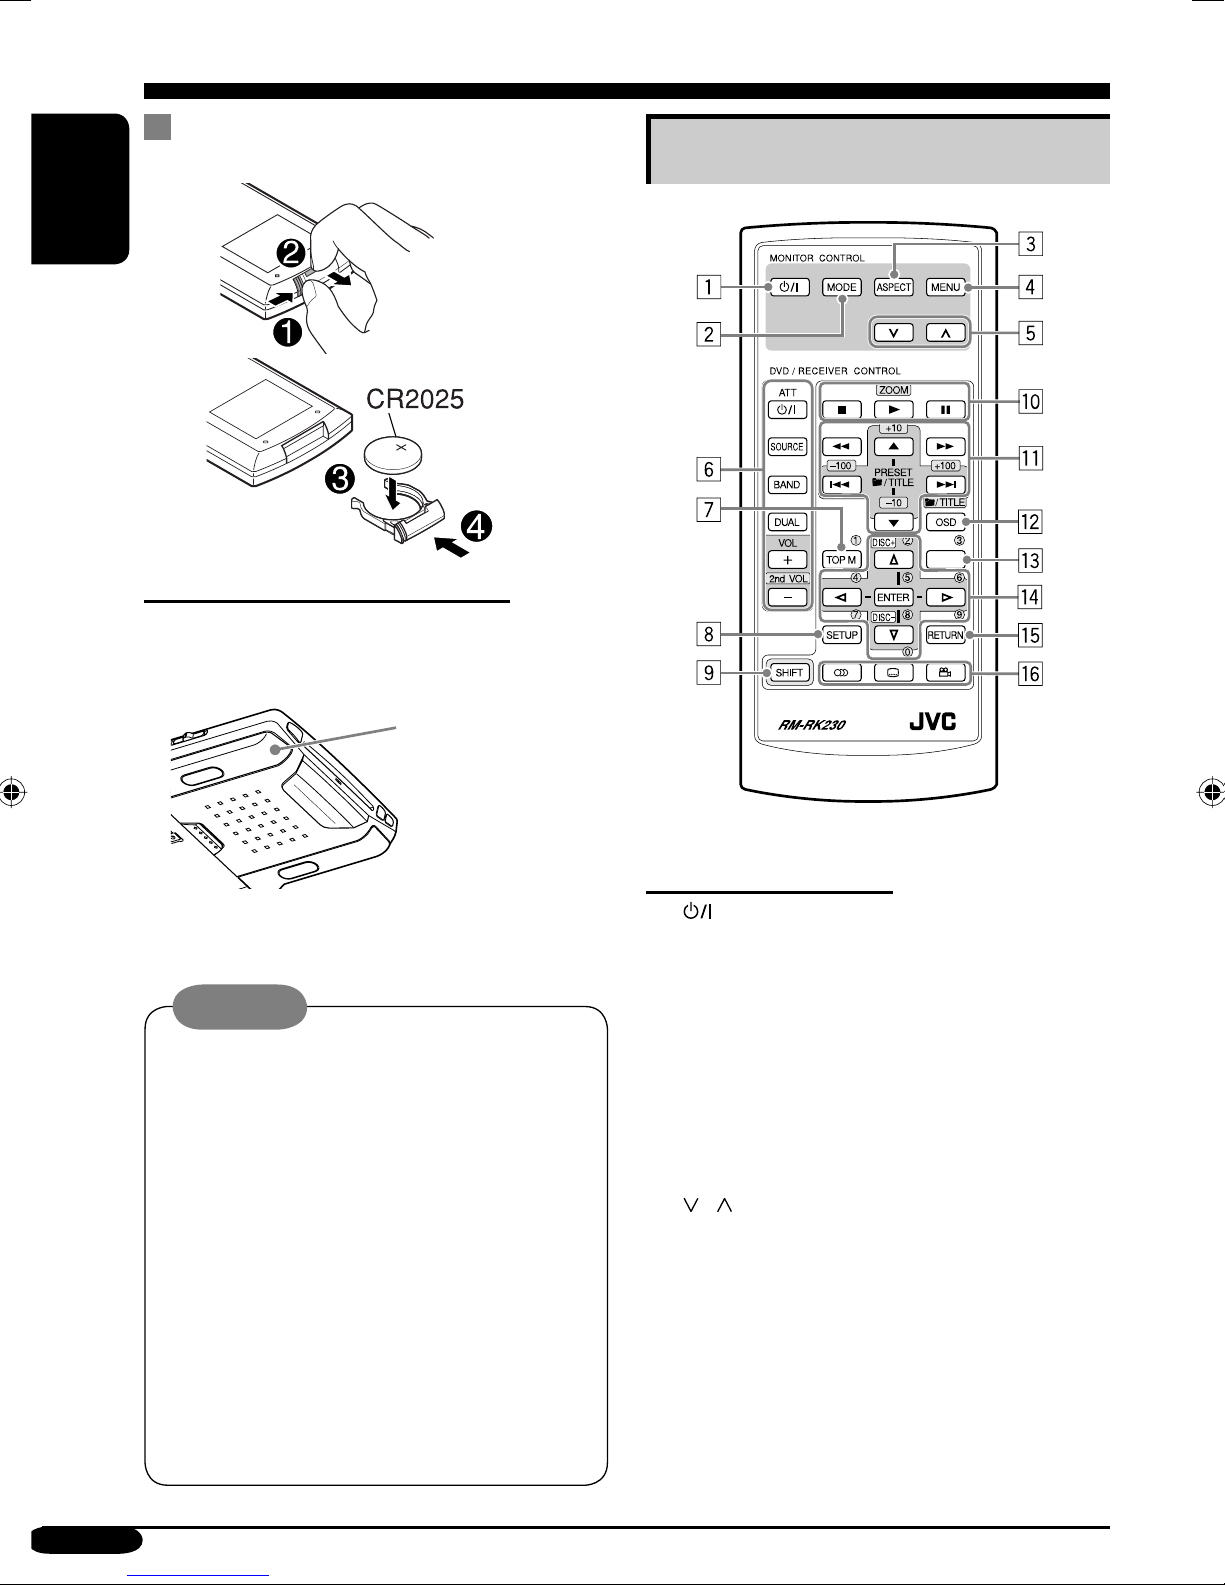
Remote controller — RM-RK230
Installing the lithium coin battery
(CR2025)
ENGLISH
Before using the remote controller:
• Aim the remote controller directly at the
remote sensor on the monitor. Make sure
there is no obstacle in between.
Main elements and features
MENU
Remote sensor
• Do not expose the remote sensor to strong
light (direct sunlight or artificial lighting).
Warning:
• Do not install any battery other than
CR2025 or its equivalent; otherwise, it
may explode.
• Store the battery in a place where children
cannot reach to avoid risk of accident.
• To prevent the battery from over-heating,
cracking, or starting a fire:
– Do not recharge, short, disassemble, or
heat the battery or dispose of it in a fire.
– Do not leave the battery with other
metallic materials.
– Do not poke the battery with tweezers or
similar tools.
– Wrap the battery with tape and insulate
when throwing away or saving it.
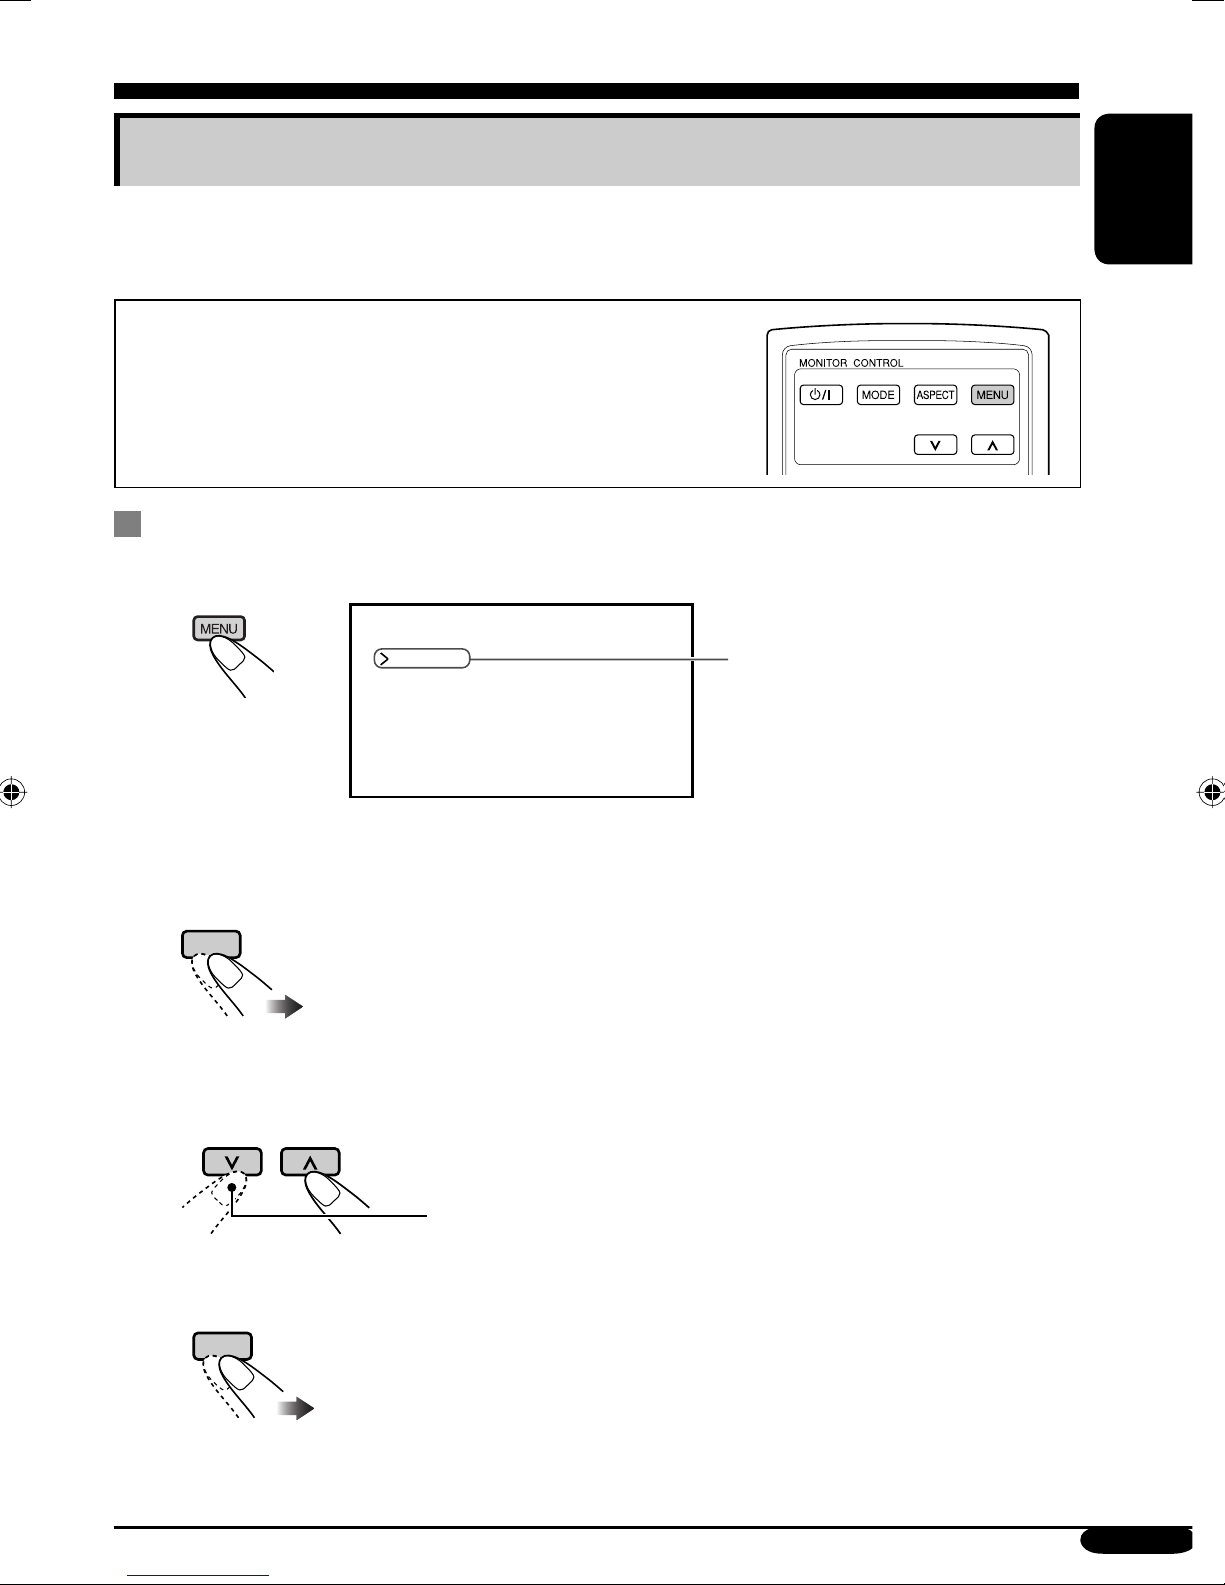
MONITOR CONTROL
1
• Turns on the power if pressed.
• Turns off the power if pressed and held.
2 MODE button
• Selects the playback source.
3 ASPECT button
• Changes the aspect ratio of the screen.
4 MENU button
• Calls up the menu, then selects the
5
• Adjust the level of the selected item or
(standby/on) button
adjustable menu items.
/ buttons
select an appropriate setting for selected
item.
8
Page 9
DVD/RECEIVER CONTROL
6 Receiver control buttons*
1
• (standby/on attenuator) button
• SOURCE button
• BAND button
• DUAL button
• VOL + / – (2nd VOL +/–) buttons
7 TOP M (menu) button*
2
• Displays the DVD and VCD*3 disc menu.
8 SETUP button*
2
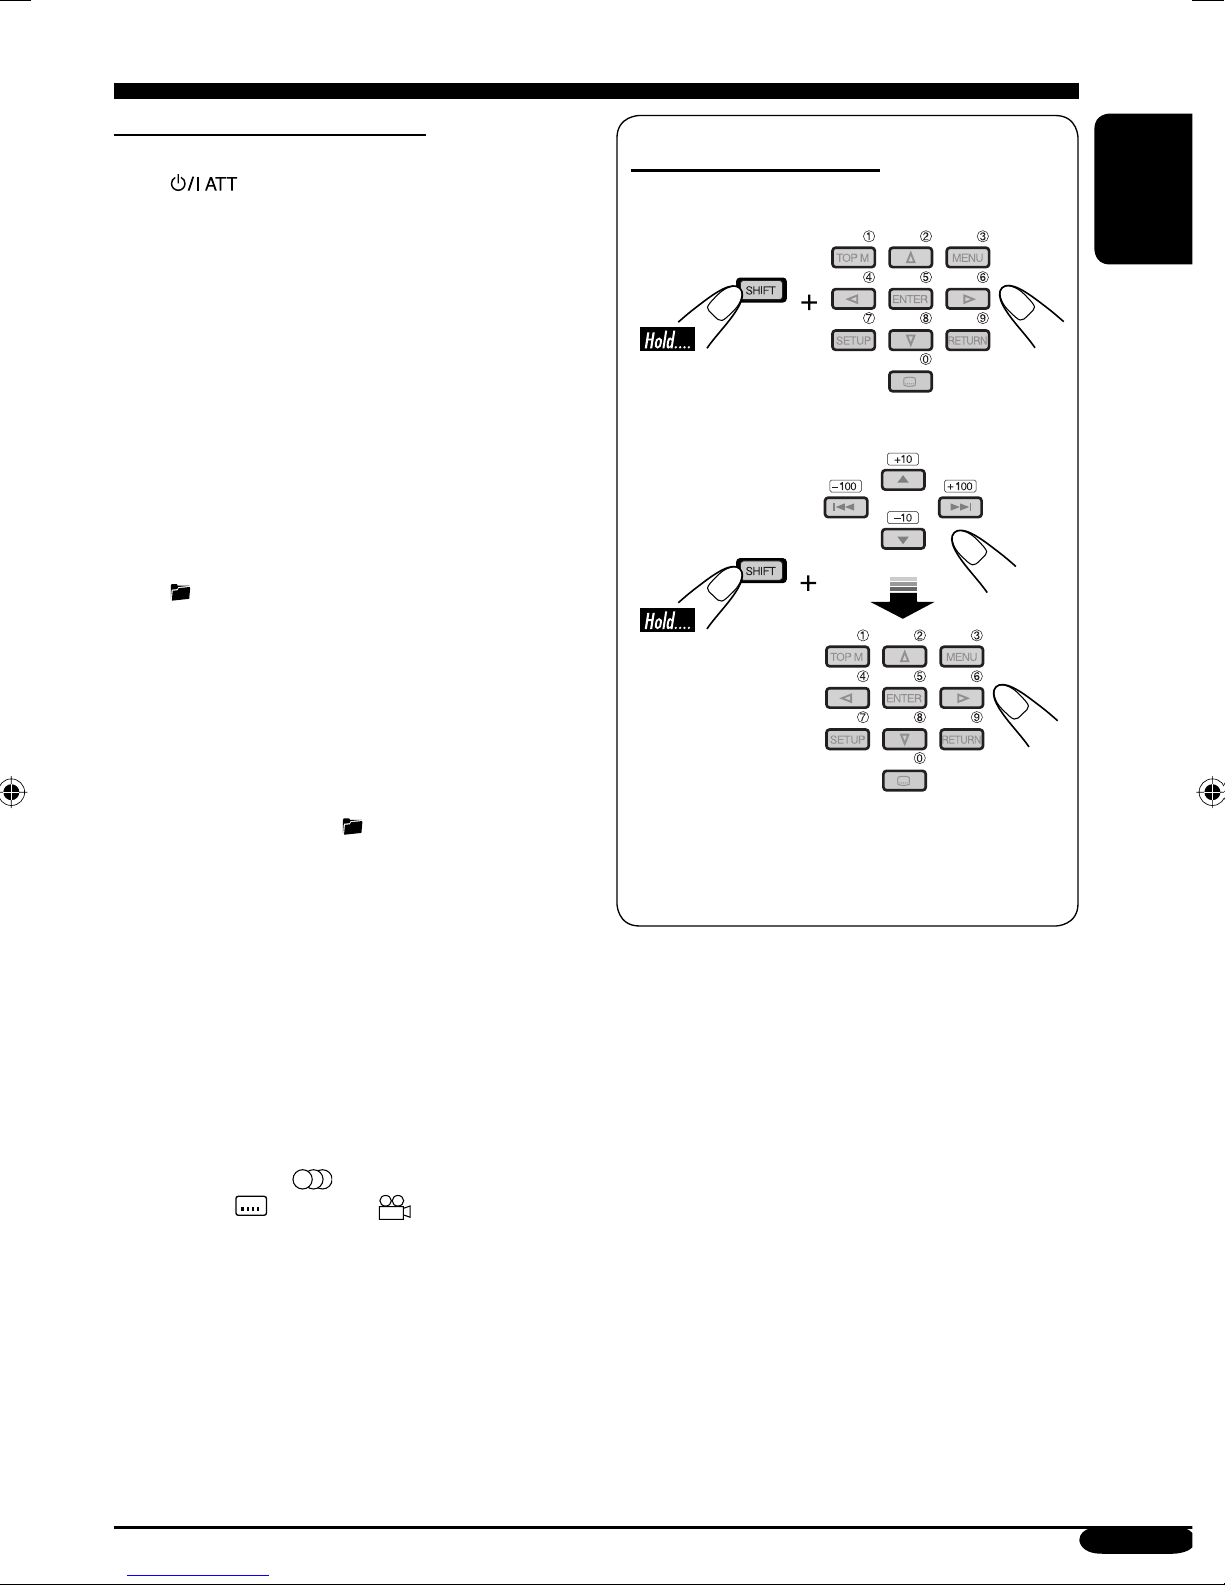
9 SHIFT button
p Disc basic operation buttons
7 (stop), 3 (play), 8 (pause)
• 3 (play) button functions as ZOOM
button when pressed with SHIFT button.
q Advanced disc operation buttons
•
/TITLE 5 / ∞*
4
– Select the titles (for DVD) or folders
(for MP3/WMA/JPEG)*
• 4 / ¢ (reverse skip/forward skip)*
5
.
6
• 1 / ¡ (reverse search/forward
search)*
7
w OSD button
• Displays the on-screen bar.
• Also functions as
/TITLE button when
pressed with SHIFT button.
– You can directly select folders (for
MP3/WMA/JPEG) or titles (for DVD)
using the number buttons (see right
column).
e MENU button*
2
• Displays the DVD and VCD*3 disc menu.
r Menu operation buttons*
2
• Cursor (% , fi , @ , #) and ENTER
t RETURN button*
2
y DVD/VCD special function buttons
• DVD/VCD:
• DVD:
(subtitle), (angle)
(audio)
How to select a number
• To select a number from 0 – 9:
ENGLISH
• To select a number greater than 9:
• +100/–100 buttons used only for searching
MP3/WMA/JPEG tracks number greater
than 99.
1
*
Controllable only if your car receiver which
is connected to this monitor is one of the
JVC receivers.
2
*
These buttons function as the number
buttons when pressed with SHIFT button.
3
*
Only when PBC is not in use.
4
These buttons do not function as PRESET
*
5 / ∞.
5
*
These buttons function as the +10/–10
buttons when pressed with SHIFT button.
6
*
These buttons function as the +100/–100
buttons when pressed with SHIFT button.
7
*
Not used for MP3/WMA/JPEG operations.
9
Page 10
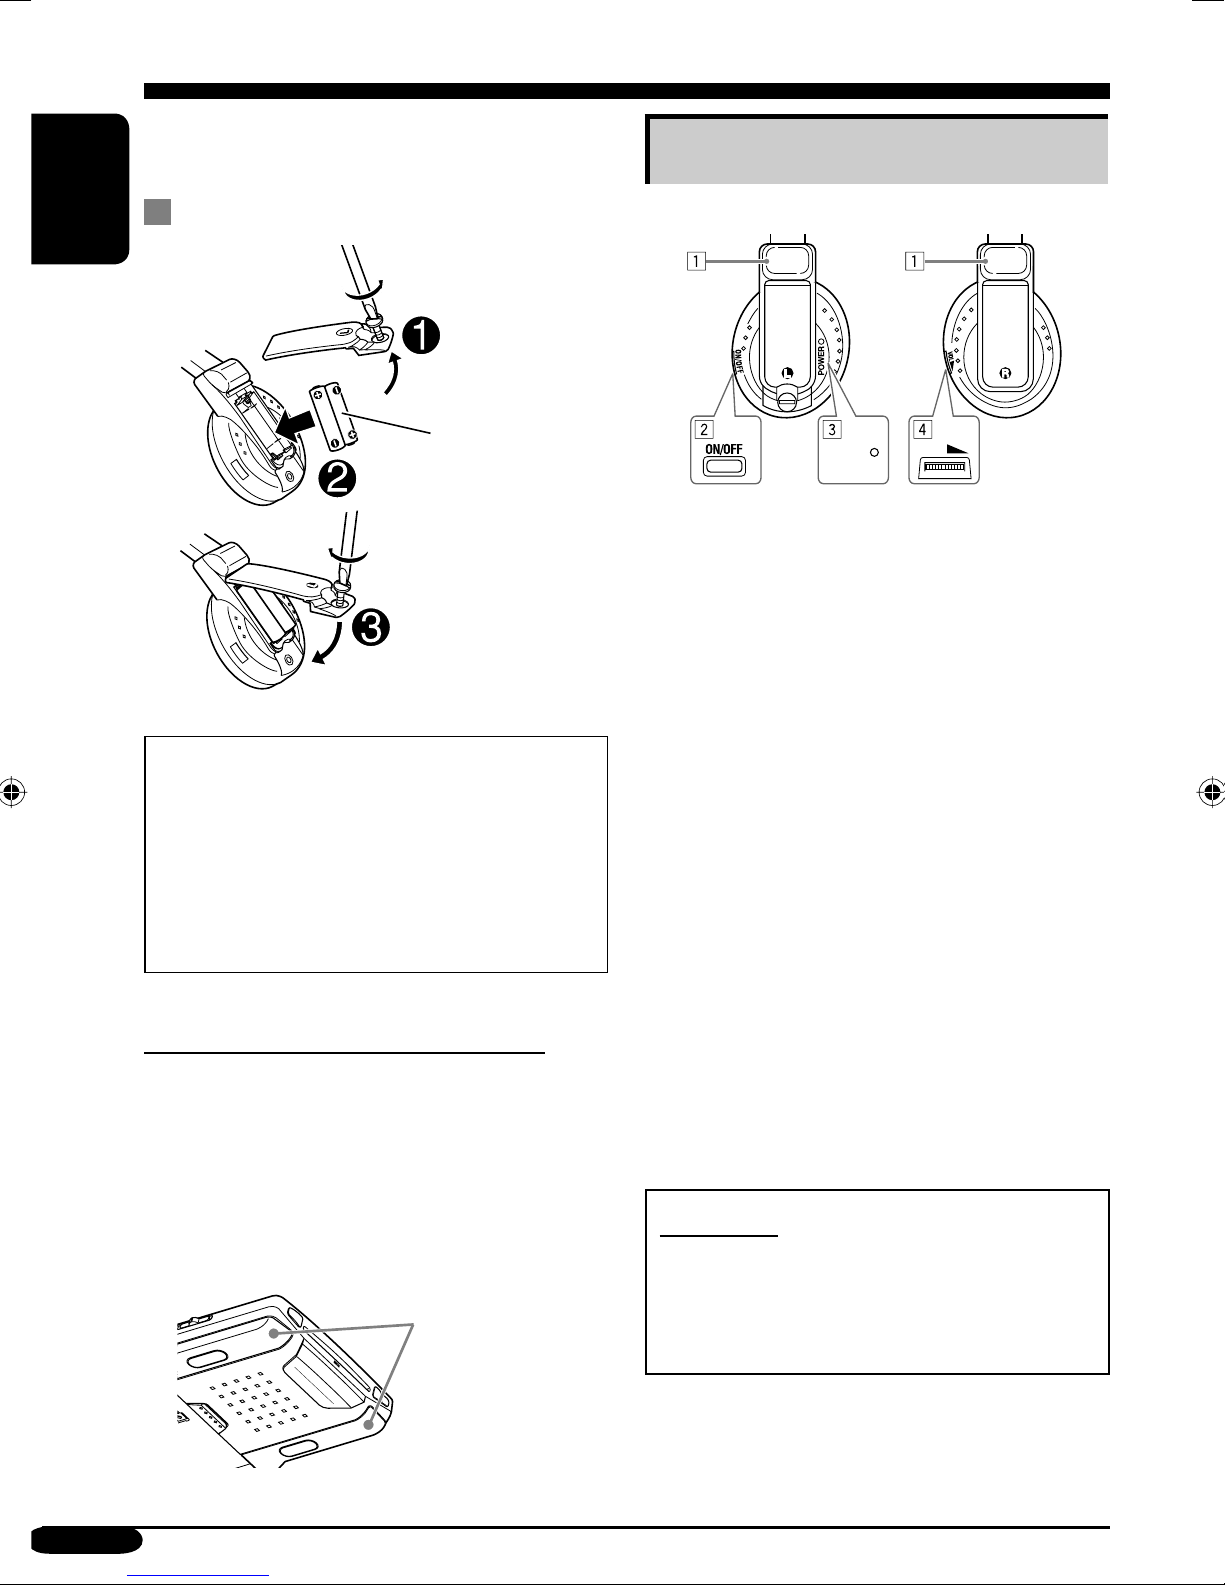
Headphones — KS-HP2
You can listen to the playback sounds with
cordless headphones—KS-HP2.
Main elements and features
Installing the batteries
ENGLISH
Batteries (R03/AAA)
— supplied only for
initial setup purpose
CAUTIONS:
• The supplied batteries are not rechargeable.
DO NOT recharge them; otherwise, battery
leakage or explosion may result.
• Insert the batteries with the correct polarity
“+” and “–” to prevent the battery leakage
or explosion.
Left side Right side
POWER
1 IR sensors
• DO NOT cover the IR sensors, as
reception will become poor.
2 ON/OFF button
• The power automatically shuts off in the
following cases:
– The headphones are used for about 4
hours.
– No signal is received for about 4
minutes.
• You can turn on the power again by
pressing the button.
3 POWER lamp
4 Volume control
VOL
Before using the cordless headphones:
The headphones give best results when used
within about 2 m (6.6 feet) from the transmitter.
These headphones need to receive infrared (IR)
signals sent from IR transmitters on the monitor.
Therefore, if you use the headphones where the
signals cannot be received in a straight line of
sight, noises may be generated.
10
IR transmitters
Playback sounds are transmitted through IR
transmitters to the cordless headphones.
When using the headphones, set the monitor
menu item “IR” to “ON.” (See page 14.)
WARNING:
DO NOT use the headphones while driving.
Shutting out all outside sounds while driving
is dangerous and may result in a traffic
accident.
Page 11
Basic operations
Preparation
Before operating the unit, make sure that all external components are correctly connected and
installed.
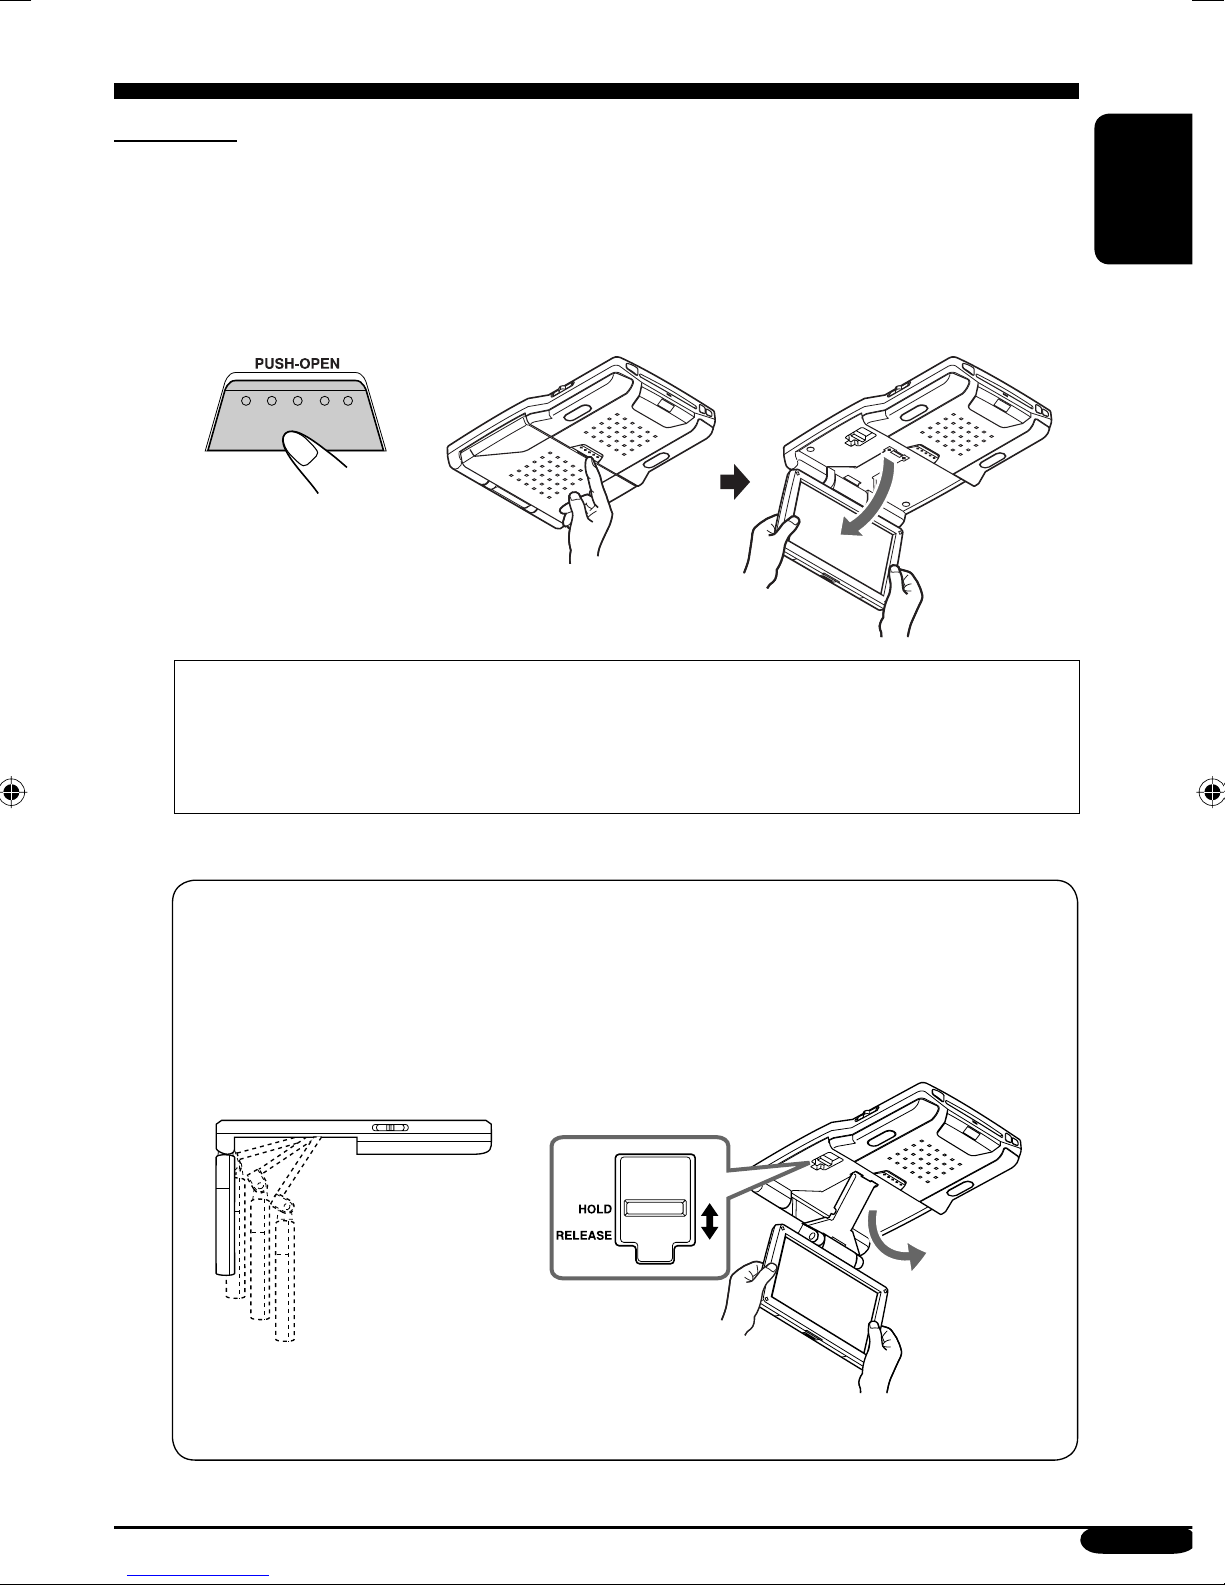
1 Open the liquid crystal panel.
Press PUSH-OPEN until the liquid crystal panel is unlocked, then open the liquid crystal
panel by both hands.
CAUTION:
• When not in use, close the liquid crystal panel and store it into the compartment;
otherwise, it may obstruct the visibility through the rearview mirror.
• Do not touch the surface of the liquid crystal panel directly.
ENGLISH
When closing the liquid crystal panel, store it in the screen compartment until it is locked.
To change the monitor position
You can select a monitor position from the four positions.
1 Slide the arm lock lever to RELEASE, then pull down or push up the monitor.
2 Slide the arm lock lever to HOLD, then remove the screen arm to the nearest locking
position.
When closing the liquid crystal panel, push up the monitor to the highest position.
To be continued....
11
Page 12

2 Turn on the power.
ENGLISH
Monitor Remote control
3 Select the playback source.
MODE
Each time you press the button, the playback source changes as follows:
AV 1 AV 2DISC
4 Operate the playback source you selected.
To operate the built-in DVD player, see “Disc operations” on page 18.
To operate the external components, refer to the manuals for the connected components.
5 Adjust the volume on the car receiver.
• When using the headphones, adjust its volume level.
To turn off the power
• When using the headphones, turn off the power after
turning off the headphones.
Monitor Remote control
To activate the door sensor
• OFF: Turns off the dome lights.
• DOOR: Activates the door sensor which turns on the dome lights when a door is open.
• ON: Turns on the dome lights.
12
Page 13
Adjustments
Using the monitor menu
You can make your own display or sound adjustments using the menu.
• For the adjustable items, see the next page.
The Remote controller—RM-RK230 has two MENU buttons.
In this section, using MENU button at MONITOR CONTROL.
Basic procedure
1
Call up the menu.
ENGLISH
BRIGHT
CONTRAST
TINT
COLOR
IR ON
DIMMER
DVD SURROUND OFF
WHITE LED ON
Current menu item
Menu selection goes off if other operations are done or no operation is done for about 5
seconds.
2 Select an item you want to adjust.
MENU
3 Adjust the level of the selected item (or select an appropriate setting for the
selected item).
Not used for changing the “DVD SURROUND” setting.
4 Exit from the menu.
Press the button repeatedly until the menu is erased.
MENU
13
Page 14

Adjustable items on the monitor menu
BRIGHT:
ENGLISH
CONTRAST:
TINT:
COLOR:
IR*:
Adjust this if the picture is too bright or too dark.
• Adjustable range: –10 to +11
• Initial level: 0 (center)
Control the degree of difference between the lightest and darkest parts
of the picture.
• Adjustable range: –10 to +11
• Initial level: 0 (center)
Adjust this if the human skin color is unnatural.
• Adjustable range: –10 to +11
• Initial level: 0 (center)
Adjust the color of the picture—lighter or darker.
• Adjustable range: –10 to +11
• Initial level: 0 (center)
Set to “ON” when you listen to the playback sounds using the cordless
headphones.
• Selectable settings: ON, OFF
• Initial setting: ON
DIMMER:
DVD SURROUND:
WHITE LED:
Adjust the light of the screen and the white LED when you turn on the
headlights.
• Adjustable range: –5 to +5
• Initial level: 0 (center)
This function allows you to get a surround effect from your stereo
system. When connecting a receiver incompatible with the multichannel sources, you can enjoy the virtual surround sound with your
2-channel stereo system.
If you turn off the monitor, the setting is initialized.
• Selectable settings: OFF, ACTION, DRAMA, THEATER
– ACTION: Suitable for action movies and sports programs.
– DRAMA: Creates natural and warm sound. Enjoy movies in a
relaxed mood.
– THEATER: Enjoy sound effects like in a major theater.
• Initial setting: OFF
Light on or off the white LED when you turn on the monitor.
• Selectable settings: ON, OFF
• Initial setting: ON
* Turn off the headphones before changing the “IR” setting.
14
Page 15
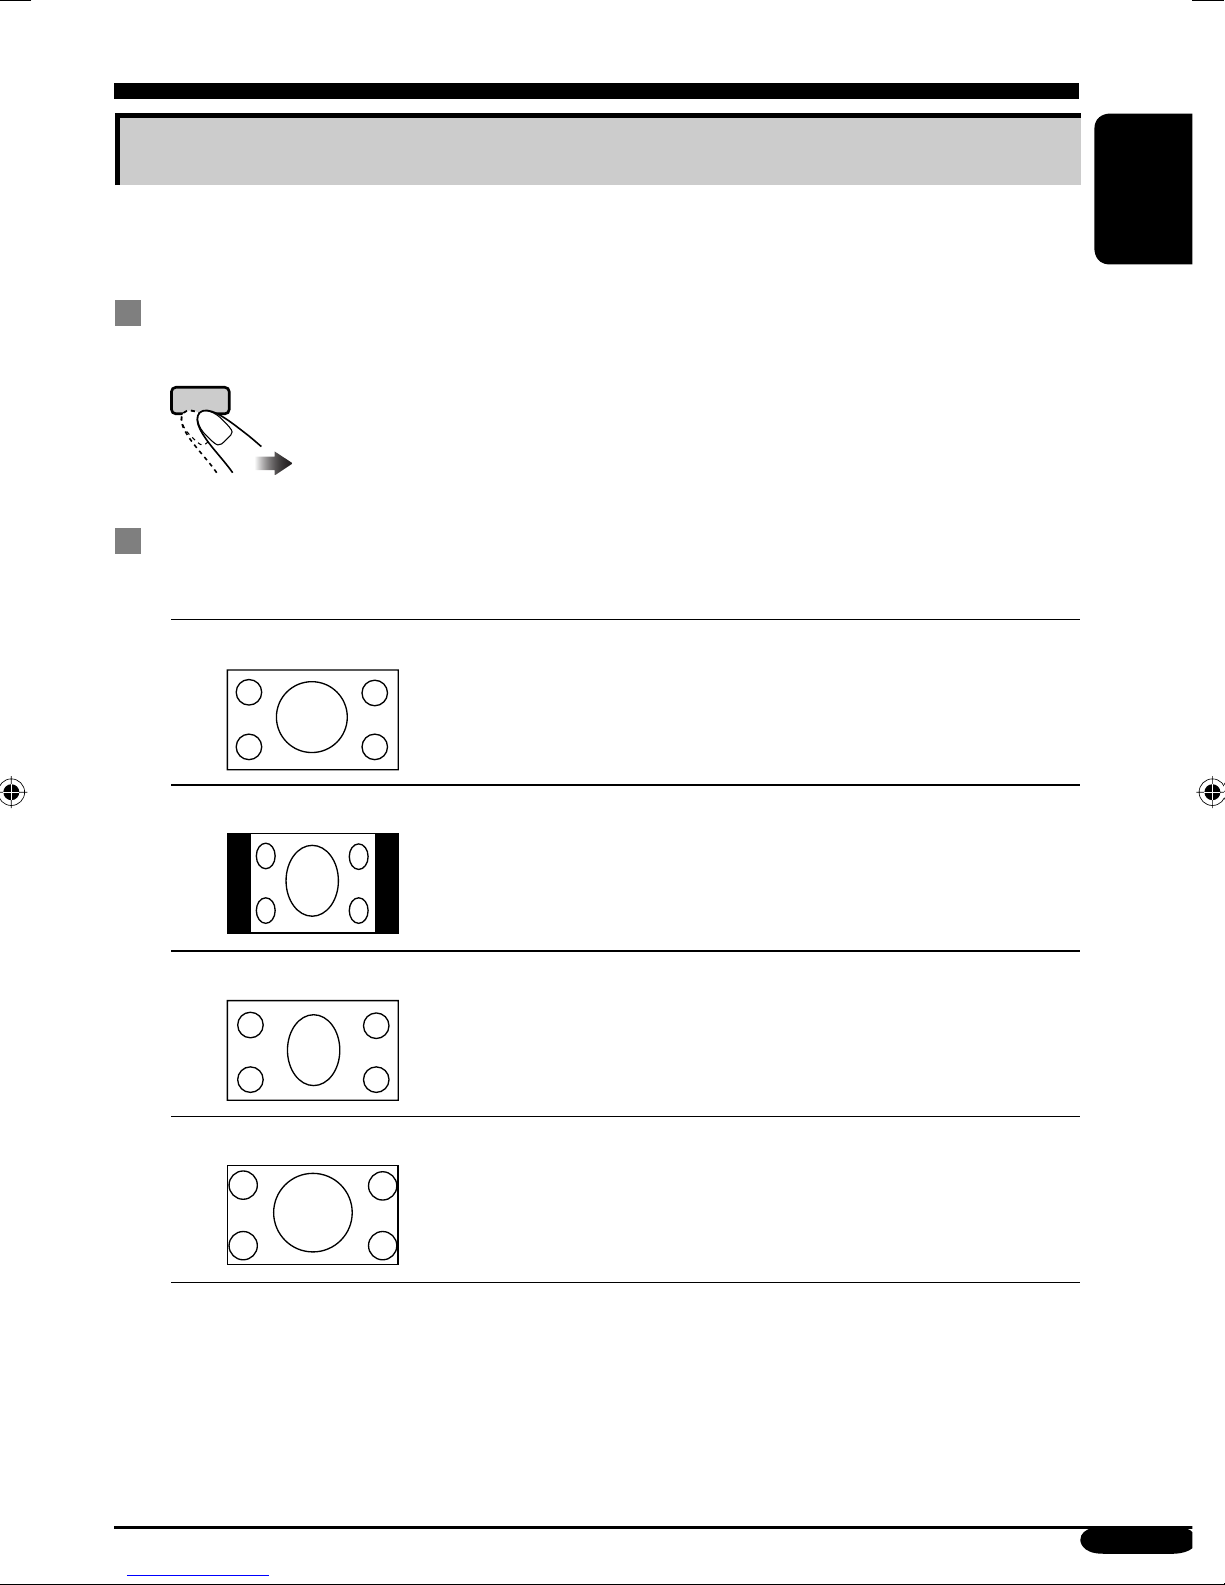
Changing the aspect ratio
You can select an appropriate aspect ratio for the playback video signals.
Basic procedure
Each time you press the button, aspect ratio change.
ASPECT
Changeable aspect ratio
When incoming 16:9 video signal:
ENGLISH
FULL:
NORMAL:
JUST:
ZOOM:
Pictures are fully shown on the screen.
• In some cases, the black bars may be shown at the top and
bottom sides of the screen.
Pictures are reduced horizontally.
• The black bars will be shown at the left and right sides of
the screen.
• In some cases, the black bars may be shown also at the top
and bottom sides of the screen.
The middle of pictures are reduced horizontally, and the left
and right side of the picture enlarged horizontally.
• In some cases, the black bars may be shown at the top and
bottom sides of the screen.
Pictures are enlarged on the screen so that no black bars will
be shown on the screen. (The entire picture cannot be shown
on the screen.)
To be continued....
15
Page 16
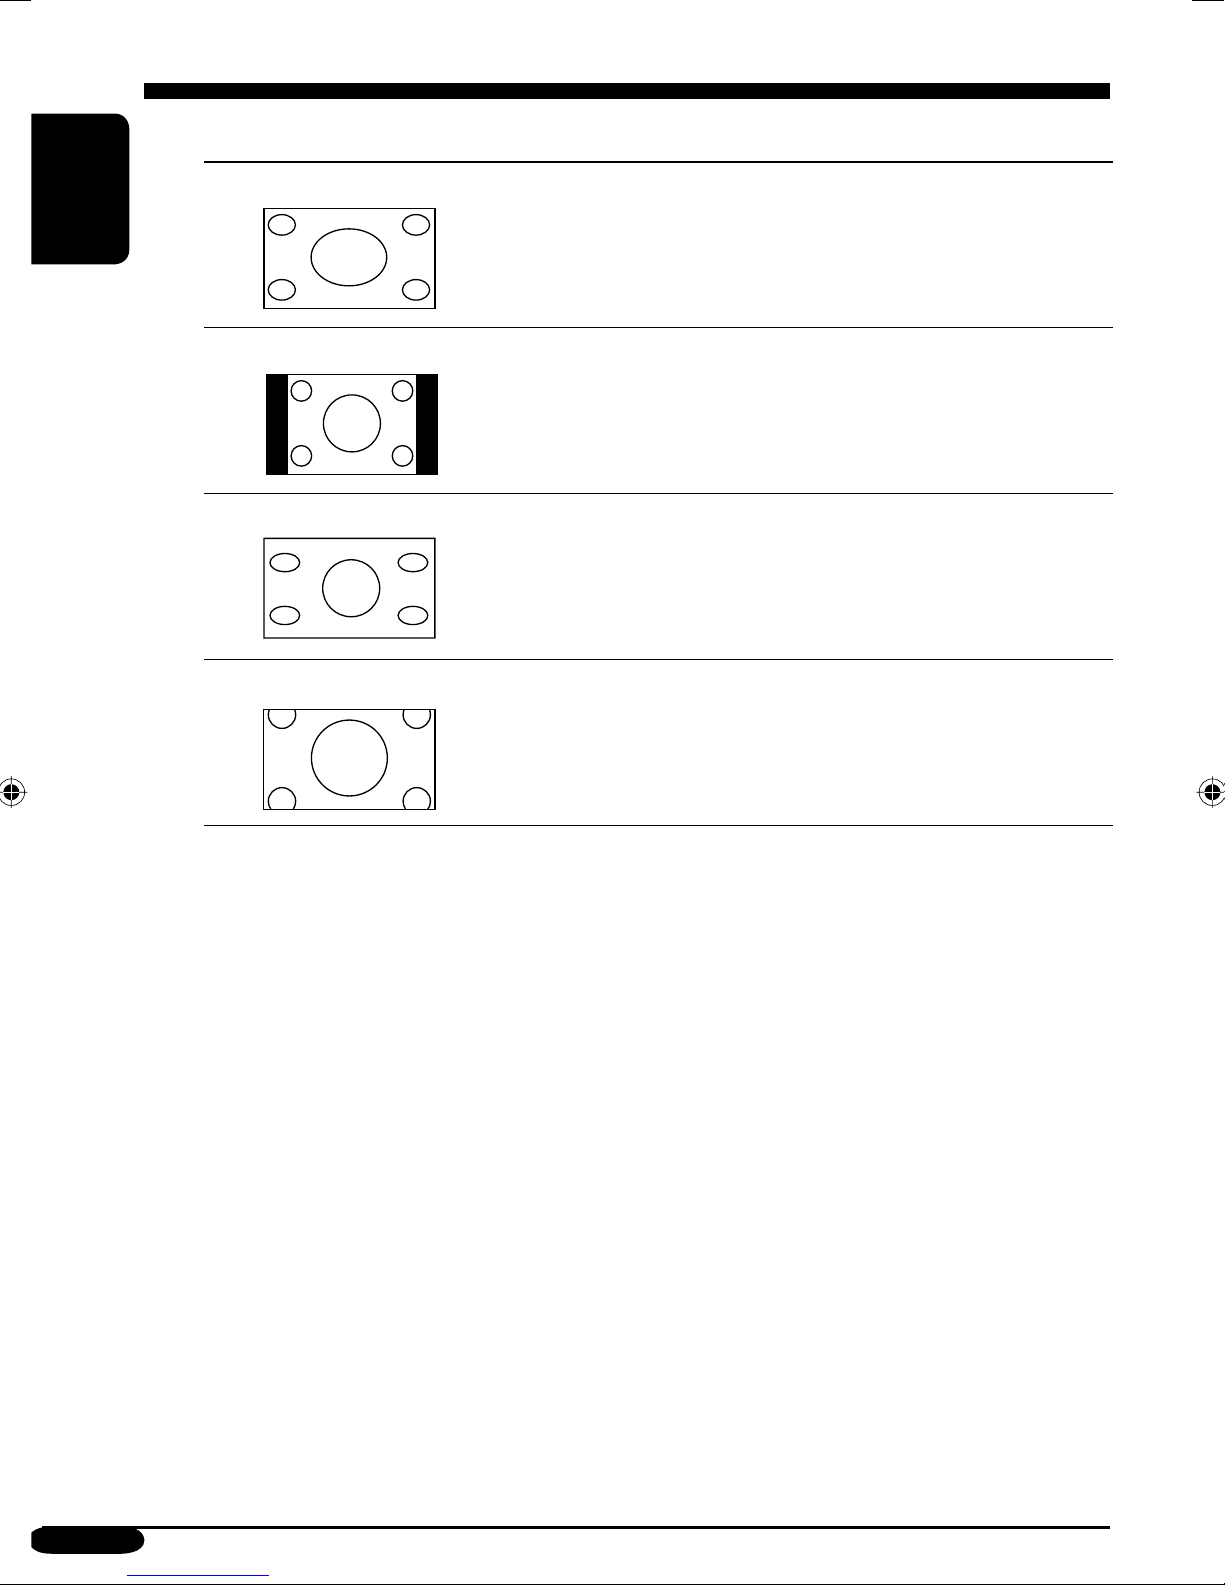
When incoming 4:3 video signal:
FULL:
ENGLISH
NORMAL:
JUST:
ZOOM:
Pictures are enlarged horizontally and are fully shown on the
screen.
Pictures are shown at the center of the screen.
• The black bars will be shown at the left and right sides of
the screen.
Pictures are enlarged horizontally. The extension ratio
increases toward the both sides of the screen.
Pictures are enlarged on the screen so that no black bars will
be shown on the screen. (The entire picture cannot be shown
on the screen.)
16
Page 17
Playable discs
Discs you can play
You can play back the following discs—12 cm
(4-3/4") and 8 cm (3-3/16")—on the built-in
DVD player:
• DVD Video: Recorded in NTSC color
system with Region Code “1” (see below).
– DVD-R/DVD-RW recorded in the DVD
Video format can also be played (see page
33).
• Video CD (VCD)/audio CD
• MP3/WMA/JPEG: Recorded either in CD-
R/CD-RW or DVD-R/DVD-RW/DVD-ROM.
– CD-R/CD-RW: Compliant with ISO 9660
Level 1, ISO 9660 Level 2, Romeo, and
Joliet.
– DVD-R/DVD-RW/DVD-ROM: Compliant
with UDF-Bridge Format*
1
.
On some discs, the actual operations may be
different from what is explained in this manual.
Discs cannot be played back
DVD-Audio, DVD-ROM (data), DVD-RAM,
DVD-R/DVD-RW recorded in the DVD-VR
format, CD-ROM, CD-I (CD-I Ready), Photo
CD, etc.
• Playing back these discs will generate noise
and damage the speakers.
Note on Region Code:
DVD players and DVD Video discs have
their own Region Code numbers. This unit
can only play back DVD discs whose Region
Code numbers include “1.”
Examples:
If you insert a DVD Video disc of an
incorrect Region Code
“REGION CODE ERROR!” appears on the
screen. The disc will eject automatically.
Caution for DualDisc playback
• The Non-DVD side of a “DualDisc” does
not comply with the “Compact Disc Digital
Audio” standard. Therefore, the use of NonDVD side of a DualDisc on this product may
not be recommended.
Digital audio formats
The unit can play back the following digital
audio formats.
Linear PCM: Uncompressed digital audio,
the same format used for CDs and most studio
masters.
Dolby Digital *
developed by Dolby Laboratories, which
enables multi-channel encode to create the
realistic surround sound.
DTS *
3
(Digital Theater Systems):
Compressed digital audio, developed by Digital
Theater Systems, Inc., which enables multichannel like Dolby Digital. As the compression
ratio is lower than for Dolby Digital, it provides
wider dynamic range and better separation.
MPEG Audio: Another compressed digital
audio which also enables multi-channel encode
to create the realistic surround sound. However,
this System downmix the multi-channel signals
into 2 channels (decoded PCM) and play it
back.
1
*
A hybrid file system used to provide
compatibility with ISO 9660 for accessing
any type of files on the disc. (UDF stands for
Universal Disk Format.)
2
*
Manufactured under license from Dolby
Laboratories. “Dolby” and the doubleD symbol are trademarks of Dolby
Laboratories.
3
*
“DTS” and “DTS 2.0 + Digital Out” are
trademarks of Digital Theater Systems, Inc.
“DVD Logo” is a trademark of DVD Format/
Logo Licensing Corporation registered in the
US, Japan and other countries.
2
: Compressed digital audio,
ENGLISH
17
Page 18
Disc operations
Playing a disc
The disc type is automatically detected, and
playback starts automatically (for DVD:
ENGLISH
automatic start depends on its internal program).
If the current disc is an audio CD, CD Text,
MP3/WMA, JPEG, or VCD without PBC,
all tracks will be played repeatedly until you
change the source or eject the disc.
• If a title list or disc menu appears while
playing a DVD or VCD with PBC, see “Disc
menu operations” on page 22.
The following marks are used to indicate
the playable discs....
DVD Video Video CD with PBC
If “ ” appears on the monitor when
pressing a button, the disc cannot accept an
operation you have tried to do.
• In some cases, without showing “
operations will not be accepted.
,”
Starting playback
1 Open the liquid crystal panel.
• You can play a disc even if the monitor is
closed.
2 Turn on the power.
Video CD
with/without PBC
MP3/WMA disc JPEG disc
All discs listed here
Before performing any operations, make
sure the following....
• For DVD playback, you can change the setup
menu setting as you like. (See pages 28 – 30.)
• For DVD/CD playback, using the remote
controller is more attractive. You can enjoy
more functions.
Audio CD/
CD Text
Monitor Remote control
3 Insert a disc into the loading slot.
Playback (shining) side facing down
• When a disc is inserted into the loading
slot, the power comes on, then “DISC”
is selected as the playback source
automatically.
18
Page 19
Basic operations
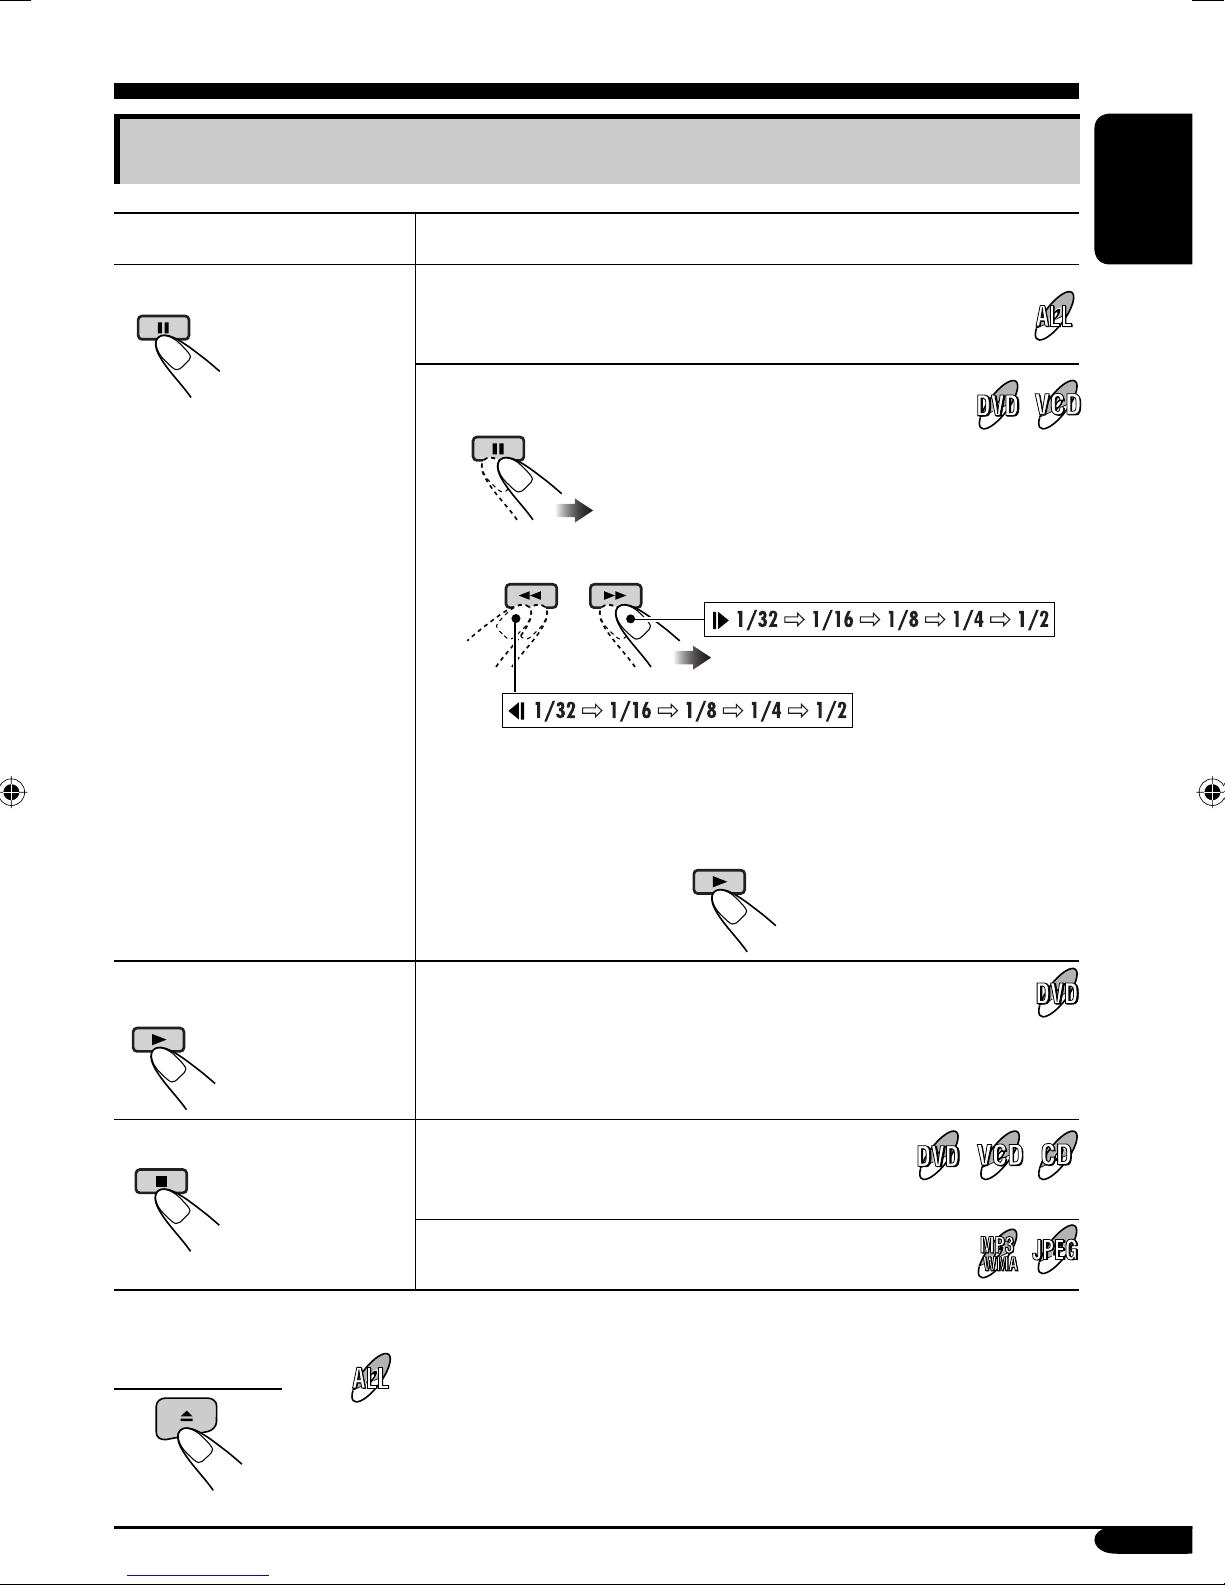
Operations Next operation
To stop play temporarily
Playback pauses.
• For JPEG discs: pressing ENTER will also pause the
picture on the monitor.
A still picture appears.
A Frame by frame playback
B Slow motion playback
• No sound comes out during Slow Motion Playback.
• When playing a VCD, Reverse Slow Motion Playback is
prohibited.
ENGLISH
To resume normal play:
To replay the previous
scenes—One Touch Replay
To stop playback
• During play, on-screen guide icons appear on the monitor for a while (see page 35).
The playback position moves back about 10 seconds before
the current position.
• This function works only within the same title.
• For some DVDs, this function does not work.
When you start playback again, playback
starts from where it has been stopped
(Resume play).
When you start playback again, playback starts from
the beginning of the last playing track.
To eject the disc
You can eject the disc even when the monitor is turned off.
To be continued....
19
Page 20
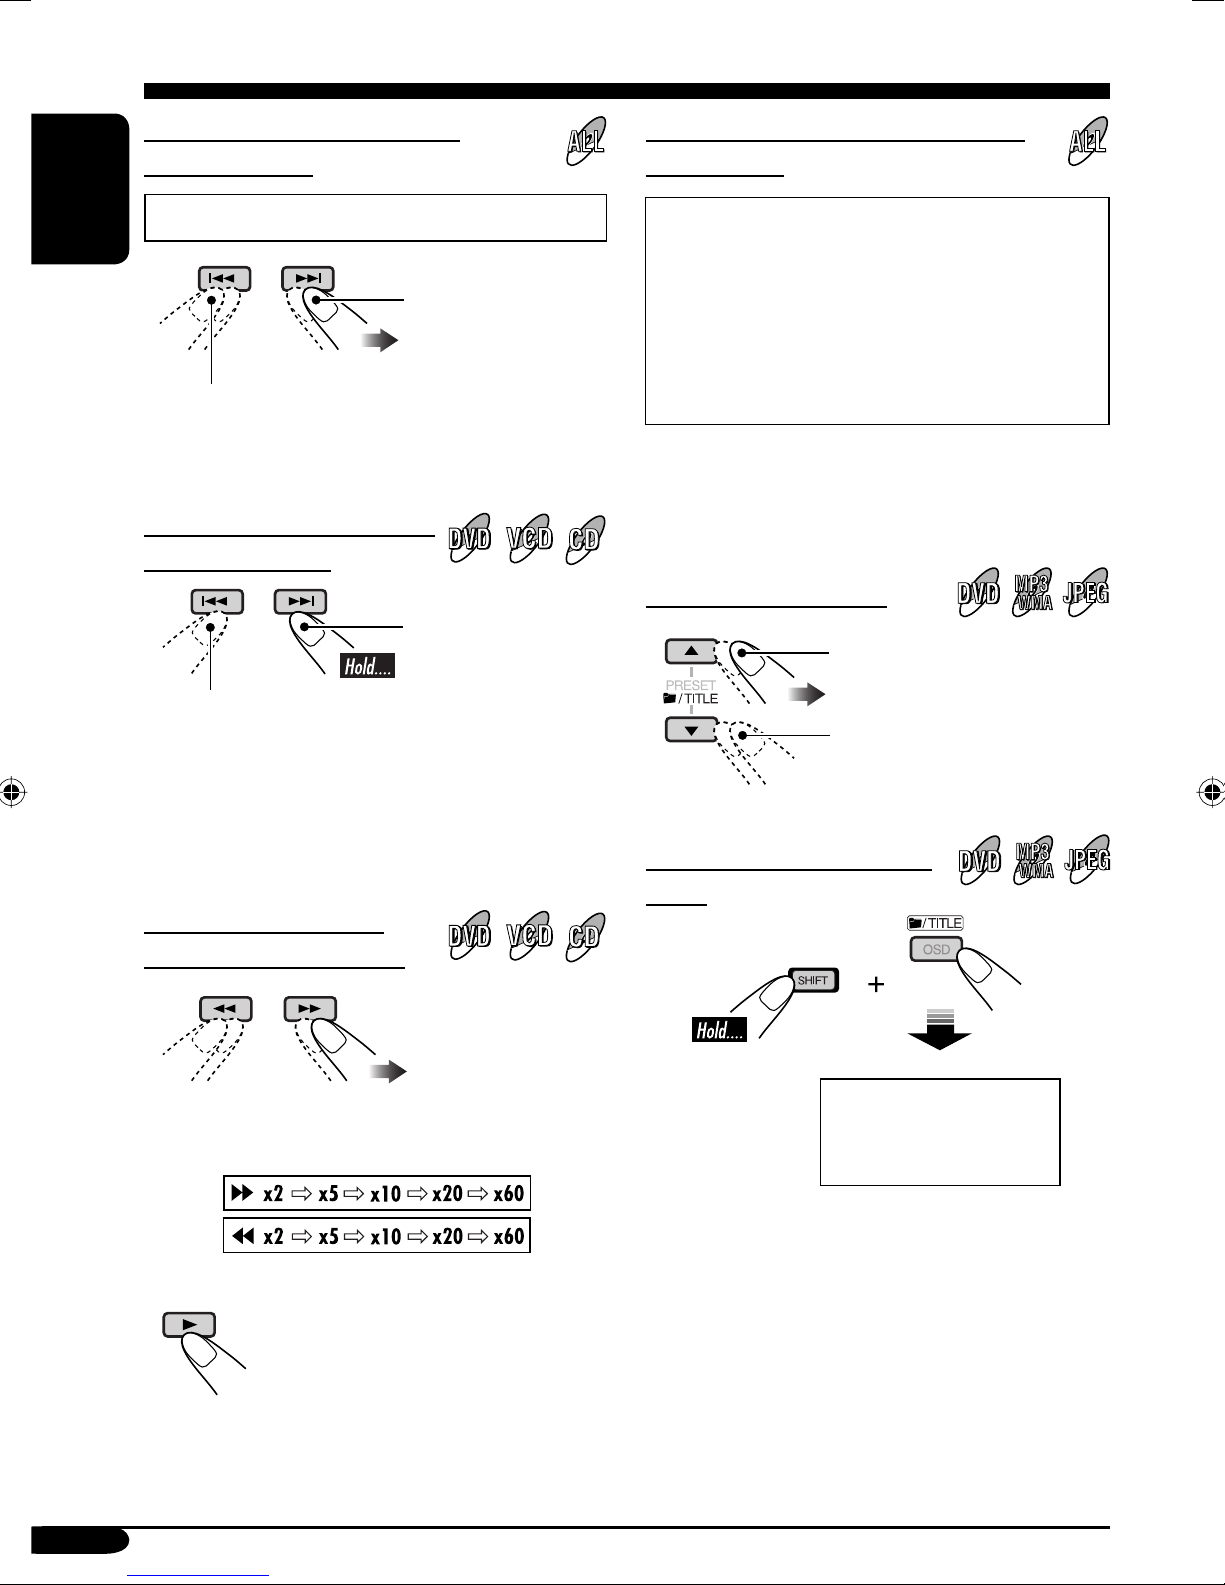
To go to the next or previous
To locate a particular title/chapter/
chapters/tracks
• For DVD: During play or pause
ENGLISH
To the following
chapters/tracks.
To go back to the beginning of the current
chapter/track, then the previous chapters/tracks.
To fast-forward or reverse
the chapter/track
Fast-forwards.
Reverses.
* The search speed changes to x2 ] x10 for all
discs (DVD, VCD, CD), but the information
shown on the monitor is only for DVD/VCD.
track directly
• For DVD: During play or pause—select a
chapter.
During stop—select a title.
• For VCD: While PBC (see page 22) is not
in use.
• For MP3/WMA/JPEG: Select a track
within the same folder.
Select the number corresponding to the item
you want (see page 9).
To locate a title/folder
To the next title/folder.
To the previous title/folder.
To locate a particular title/
To forward or reverse
search the chapter/track
The information shown is only for DVD/VCD:
• To resume normal speed
folder
Within 10 seconds,
press the number
buttons (see page 9).
• For MP3/WMA/JPEG discs: To directly
select the folders using the number button(s),
it is required that folders be assigned 2 digit
numbers at the beginning of their folder
names—01, 02, 03, and so on.
20
Page 21
DVD/VCD/JPEG special functions
Selecting audio languages
For DVD:
You can select the language to listen to if
the disc has multiple audio languages.
1/3
ENGLISH
Ex.: When the disc has 3 options
For VCD:
You can select the audio channel to
play. (This is convenient when playing a
Karaoke VCD.)
1/3
ENGLISH
Selecting subtitles
You can select the language of the subtitle
to be shown on the monitor.
• You can set the initial subtitle language
using the setup menu (see page 29).
1/3
ENGLISH
Ex.: When the disc has 3 options
1/3
ENGLISH
Selecting multi-angle views
ENGLISH
ST
ST
To listen to normal stereo (left/right)
ST:
playback.
To listen to the L (left) audio channel.
L:
To listen to the R (right) audio channel.
R:
You can view the same scene at different
angles if the disc has multi-angle views.
1/3
1
1/3
1
1/3
1
1/3
3
Ex.: When the disc has 3 multi-angle views
1/3
2
• For some DVDs and VCDs, changing the
subtitle language, audio language (or audio
channel) without using the disc menu is
prohibited.
21
Page 22
Disc menu operations
Menu-driven playback is possible while playing
back a DVD with menu-driven features or a
ENGLISH
VCD with the PBC (PlayBack Control).
Canceling the PBC playback
1
2 Select a track to start normal playback using
the number buttons (see page 9).
While playing a DVD
1
A title list or disc menu will appear on the
monitor.
2 Select the item you want on the
menu.
Selected item starts playback.
• On some discs, you can also select items
using the corresponding number buttons.
To resume the PBC function
Zoom in
1
ZOOM 1 ZOOM 2 ZOOM 3 ZOOM 4
ZOOM OFF
ZOOM 5ZOOM 6
While playing a VCD
• When a list of items is displayed on the
monitor.
• To select a number greater than 9, see “How
to select a number” on page 9.
To return to the previous menus
• For some discs, you can also move between
the menus by pressing 4 / ¢.
• For JPEG disc (effective only when
pausing):
ZOOM 1 ZOOM 2
ZOOM OFF
2 Move the zoomed-in portion.
• For JPEG files:
You cannot move the zoomed-in position
when the entire picture is displayed on the
monitor.
To cancel zoom, select “ZOOM OFF” in
step 1.
22
Page 23

On-Screen disc operations
About the On-Screen Bar
You can check the disc information and use
some functions through the on-screen bar.
• For audio CD, CD Text, and MP3/WMA/
JPEG disc you can also use the control
screen and list screen (see pages 26 and
27).
On-Screen bars
DVD
DVD -V
TIME TITLE CHAP
VCD
VCD
TIME
PBC
TRACK REPEAT
MP3/WMA
FILE
REPEAT
RANDOMINTRO
JPEG
FILE
REPEAT
CD Text/audio CD
2ch
T02-C03 TOTAL 1:25:58
OFF
TRACK 01 TIME 00:36
RANDOMINTRO
REPEAT TRACK
REPEAT FOLDER
TIME 00:00:36
1 Disc type
2 • Audio signal format type (for DVD and
DTS audio CD)
• PBC (only for VCD)
3 Playback information
T02-C03
TRACK 01
TOTAL
T. REM
Current title/chapter
Current track
Elapsed playing time of the disc
Remaining disc time (for VCD)/
remaining title time (for DVD)
TIME
Elapsed playing time of the
current chapter/track
REM
Remaining time of the current
chapter/track
4 Playback condition
Playback
Forward/reverse search
Forward/reverse slow-motion
Pause
Stop
5 Operation icons
Time indication
TIME
Time Search—Enter the elapsed
playing time of the current title
or of the disc.
TITLE
CHAP
TRACK
Title Search
Chapter Search
Track Search
Change the audio language or
audio channel.
Change the subtitle language.
Change the view angle.
Repeat play (for DVD)
OFF
REPEAT
INTRO
RANDOM
Repeat play (for other discs)
Intro play
Random play
6 Current playback mode
ENGLISH
*
CD
5. 1ch
REPEAT
REPEAT TRACK
RANDOMINTRO
* Only for DTS audio CD
TIME 00:36
To be continued....
23
Page 24
Basic on-screen bar operations
1 Display the on-screen bar.
ENGLISH
• For DVD/VCD:
(twice)
• For other discs:
To erase the on-screen bar
• The on-screen bar for a CD or MP3/WMA/
JPEG disc automatically disappears in a few
seconds after the last operation.
• The selectable options for Repeat/Intro/
Random plays:
DVD -V
TIME TITLE CHAP
2ch
T02-C03 TOTAL 1:25:58
OFF
When a JPEG disc is loaded, skip to step 3.
2 Select an item.
3 Make a selection.
• If pop-up menu appears....
1
OFF
You can repeat the current title or
chapter.
DVD (during play or pause):
OFF CHAP TITLE
REPEAT
You can repeat the current track
(except for JPEG) or the tracks in
the current folder (only for MP3/
WMA/JPEG).
VCD (while PBC is not in use):
REPEAT
MP3/WMA:
REPEAT TRACK
(Canceled)
REPEAT FOLDER
DVD -V
TIME TITLE CHAP
2ch
OFF
_ _
or
2
24
T02-C03 TOTAL 1:25:58
(Canceled)
JPEG:
REPEAT FOLDER
CD Text/audio CD:
REPEAT TRACK
(Canceled)
(Canceled)
Page 25
INTRO
You can play the first 15 seconds
of all tracks in the disc, or in the
current folder (only for MP3/
WMA).
VCD (while PBC is not in use):
INTRO
MP3/WMA:
(Canceled)
To search for a particular point by playing
time
• For VCD: while PBC is not in use.
1 Select
2 Enter the elapsed playing time of the current
title or of the disc.
.
ENGLISH
INTRO TRACK
(Canceled)
CD Text/audio CD:
INTRO TRACK
RANDOM
You can randomly play all tracks
in the disc, or in the current folder
(only for MP3/WMA).
VCD (while PBC is not in use):
RANDOM
MP3/WMA:
RANDOM FOLDER
(Canceled)
INTRO FOLDER
(Canceled)
(Canceled)
RANDOM DISC
Ex.: • To enter 1 (hours): 02 (minutes): 00
(seconds), press 1, 0, 2, 0, then 0.
• To enter 54 (minutes): 00 (seconds),
press 0, 5, 4, 0, then 0.
• It is always required to enter the hour
digit (even “0” hour), but it is not required
to enter trailing zeros (the last two digits
in the examples above).
• To correct a misentry, press...
• You can also specify the elapsed playing
time by using % / fi / @ / #.
3 Finish the procedure.
CD Text/audio CD:
RANDOM DISC
(Canceled)
Refer also page 24 for the following operations.
To change the time information
1 Select
2 Change the time information.
TIME
.
TIME 0:00:58
REM 0:11:23
TOTAL 1:01:58T. REM 0:35:24
To search for a particular title/chapter/track
1 Select
TITLE
2 Enter the number.
• To correct a misentry, press the number
button until the correct number is entered.
3 Finish the procedure.
CHAP
,
, or
TRACK
.
25
Page 26

Basic control screen operations
You can search for and play the desired items
through the control screen.
ENGLISH
For MP3/WMA/CD Text/audio CD:
To select a folder or track
1 Select “Folder” column or “Track” column
on the control screen.
The control screen automatically appears on the
monitor when you insert a disc.
JPEG:
Press TOP M (menu), MENU, or 7.
Playback stops and the control screen appears.
MP3/WMA/JPEG control
screen
TIME 00:00:14REPEAT TRACK
Folder : 2 / 3
01 Music
02 Music
03 Music
Track Information
Album
Weather
Artist
Robert M. Smith
Title
Rain
Track : 5 / 14 (Total 41)
Cloudy.mp3
Fair.mp3
Fog.mp3
Hail.wma
Indian summer.mp3
Rain.mp3
Shower.mp3
Snow.mp3
Thunder.wma
Typhoon.mp3
Wind.mp3
Winter sky.mp3
2 Select a folder or track.
• If playback does not start,
press 3 or ENTER.
• For JPEG discs: Pressing ENTER will pause
the selected picture on the monitor.
CD Text/audio CD control
screen
Track Information
Album
Four seasons
Artist
Robert M. Smith
Title
Rain
REPEAT TRACK
Track : 5 / 14
Cloudy
Fair
Fog
Hail
Indian summer
Rain
Shower
Snow
Thunder
Typhoon
Wind
Winter sky
TIME 00:14
Ex.: Control screen for MP3/WMA
1 Current folder
2 Current folder number/total folder number
3 Folder list
4 Selected playback mode
5 Elapsed playing time of the current track
(only for MP3/WMA)
6 Operation mode icon (only for MP3/WMA)
‰ (play), 7 (stop), 8 (pause)
7 Current track number/total number of tracks
in the current folder (total number of tracks
on the disc)
8 Track information (only for MP3/WMA)
9 Track list
p Current track (highlighted bar)
26
1 Selected playback mode
2 Elapsed playing time of the current track
3 Operation mode icon
‰ (play), 7 (stop), 8 (pause), ¡ (fast-
forward), 1 (reverse)
4 Current track number/total number of tracks
on the disc
5 Track information
6 Track list
7 Current track (highlighted bar)
To select a track
• If playback does not start,
press 3 or ENTER.
Page 27
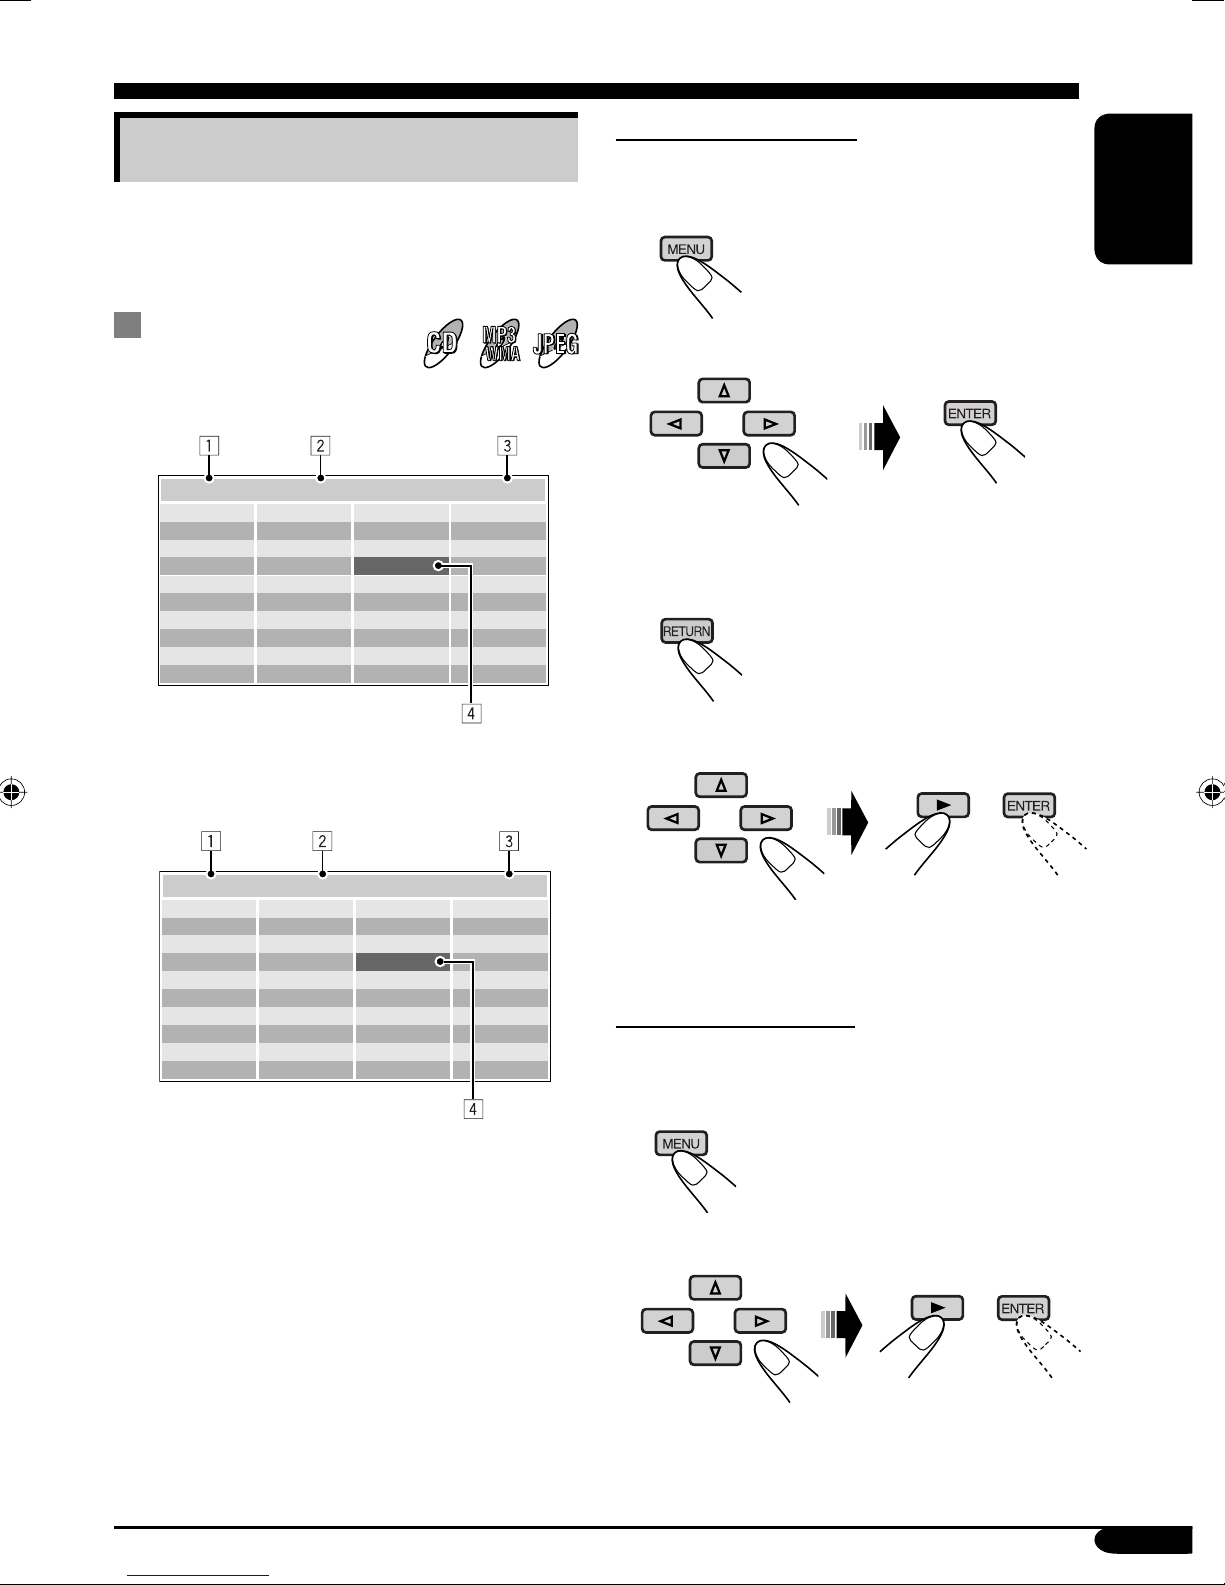
List screen operations
You can display the folder list/track list before
starting play. On this list, you can confirm the
contents and start playing a disc.
Folder/track list
screens
Folder list (MP3/WMA/JPEG)
Folder : 153/240 Track 154/198 Page : 4/6
fol130
fol131
fol132
fol133
fol134
fol135
fol136
fol137
fol138
fol139
fol140
fol141
fol142
fol143
fol144
fol145
fol146
fol147
fol148
fol149
fol150
fol151
fol152
fol153
fol154
fol155
fol156
fol157
fol158
fol159
fol160
fol161
fol162
fol163
fol164
fol165
fol166
fol167
fol168
fol169
For MP3/WMA/JPEG:
While stop...
1 Display the folder list.
Each time you press the button,
the list screen comes on and
goes off.
2 Select a folder on the list.
The track list of the selected folder appears.
To go back to the folder list
ENGLISH
Ex.: Folder list for MP3/WMA
Track list (MP3/WMA/JPEG/CD Text/audio
CD)
Folder : 153/240 Track 154/198 Page : 4/6
file0131.mp3
file0132.mp3
file0133.wma
file0134.mp3
file0135.mp3
file0136.wma
file0137.wma
file0138.mp3
file0139.mp3
file0140.wma
file0141.mp3
file0142.mp3
file0143.mp3
file0144.mp3
file0145.wma
file0146.mp3
file0147.wma
file0148.mp3
file0149.wma
file0150.wma
file0151.wma
file0152.mp3
file0153.wma
file0154.mp3
file0155.mp3
file0156.mp3
file0157.mp3
file0158.wma
file0159.wma
file0160.wma
file0161.wma
file0162.mp3
file0163.wma
file0164.mp3
file0165.wma
file0166.wma
file0167.wma
file0168.wma
file0169.mp3
file0170.wma
Ex.: Track list for MP3/WMA
1 Current folder number/total folder number
(only for MP3/WMA/JPEG)
2 Current track number/total number of tracks
in the current folder (for MP3/WMA/JPEG)
or in the disc (for CD Text/audio CD)
3 Current page/total number of the pages
included in the list
4 Current folder/track (highlighted bar)
3 Select a track on the list.
• For JPEG discs: Pressing ENTER will
pause the selected picture on the monitor.
For CD Text/audio CD:
While stop...
1 Display the track list.
Each time you press the button,
the list screen comes on and
goes off.
2 Select a track on the list.
27
Page 28
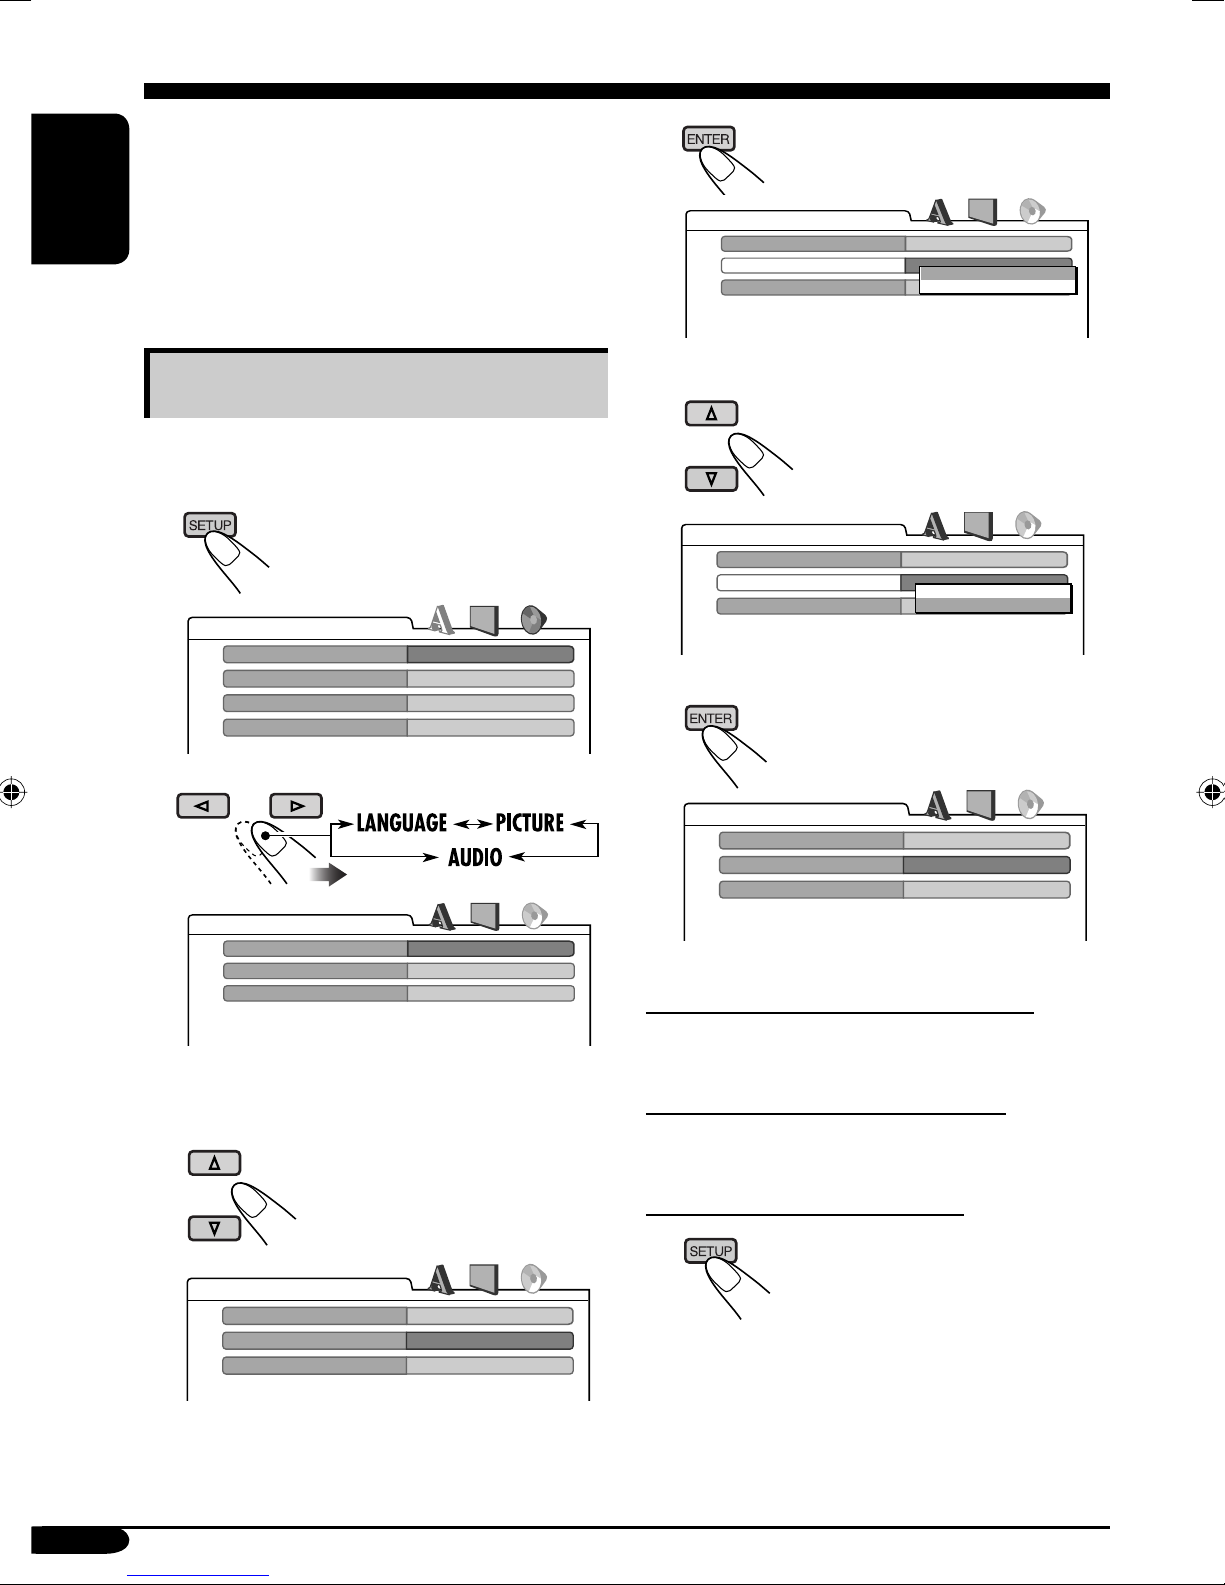
DVD setup menu
You can store the initial disc playback status.
• While playing, no change can be made on the
setup menu.
• When shipped from the factory, the on-screen
language is set to English. To change the
ENGLISH
language, see page 29.
Basic setting procedure
While stop...
1
LANGUAGE
MENU LANGUAGE
AUDIO LANGUAGE
SUBTITLE
ON SCREEN LANGUAGE
ENGLISH
ENGLISH
ENGLISH
ENGLISH
4
AUDIO
DIGITAL AUDIO OUTPUT
DOWN MIX
D. RANGE COMPRESSION
5 Select an option.
AUDIO
DIGITAL AUDIO OUTPUT
DOWN MIX
D. RANGE COMPRESSION
6
STREAM/PCM
STEREO
DOLBY SURROUND
STEREO
ON
STREAM/PCM
STEREO
DOLBY SURROUND
STEREO
ON
2
AUDIO
DIGITAL AUDIO OUTPUT
DOWN MIX
D. RANGE COMPRESSION
STREAM/PCM
STEREO
ON
Ex.: When selecting the “AUDIO” menu
3 Select an item you want to set up.
AUDIO
DIGITAL AUDIO OUTPUT
DOWN MIX
D. RANGE COMPRESSION
STREAM/PCM
STEREO
ON
AUDIO
DIGITAL AUDIO OUTPUT
DOWN MIX
D. RANGE COMPRESSION
STREAM/PCM
DOLBY SURROUND
ON
To set other items on the same menu
Repeat steps 3 to 6.
To set other items on other menus
Repeat steps 2 to 6.
To return to the normal screen
Ex.: When selecting “DOWN MIX”
28
Page 29

LANGUAGE menu
Item Contents
MENU LANGUAGE
Select the initial disc menu language.
ENGLISH
AUDIO LANGUAGE
SUBTITLE
ON SCREEN LANGUAGE
• For the LANGUAGE settings, see also the language codes list on page 32.
Select the initial audio language.
Select the initial subtitle language or erase the subtitle (OFF).
Select the language for the setup menu and some indications shown on
the monitor.
PICTURE menu
Item Contents
MONITOR TYPE
16:9 4:3 LETTER BOX
4:3 PAN SCAN
Select the monitor type to watch a wide screen picture on your
external monitor.
• 16:9 : Select this when the aspect ratio of your monitor is
16:9.
• 4:3 LETTER BOX : Select this when the aspect ratio of your
monitor is 4:3. While viewing a wide screen picture, the black
bars appear on the top and the bottom of the screen.
• 4:3 PAN SCAN : Select this when the aspect ratio of your
monitor is 4:3.
While viewing a wide screen picture, the black bars do not
appear; however, the left and right edges of the pictures will
not be shown on the screen.
OSD POSITION
Position 1 Position 2
MP3/JPEG
Select the on-screen bar position on the monitor.
• 1 : Higher position
• 2 : Lower position (Help screen under the DVD setup menu
disappears.)
If both MP3/WMA files and JPEG files are recorded on a disc,
you can select which files to play.
• MP3 : Select this for playing MP3/WMA files.
• JPEG : Select this for playing JPEG files.
Eject the disc and insert it again to make the new setting
effective.
To be continued....
29
Page 30
AUDIO menu
Item Contents
ENGLISH
DIGITAL AUDIO OUTPUT
DOWN MIX
D. (Dynamic) RANGE
COMPRESSION
Select the signal format to be emitted through the DIGITAL OUT
(Optical) terminal. For details, see page 36.
• PCM ONLY : Select this when connecting an amplifier or a
decoder incompatible with Dolby Digital, DTS, MPEG Audio, or
connecting to a recording device.
• DOLBY DIGITAL/PCM : Select this when connecting an
amplifier or a decoder compatible with Dolby Digital.
• STREAM/PCM : Select this when connecting an amplifier or a
decoder compatible with Dolby Digital, DTS, or MPEG Audio.
When playing back a multi-channel DVD disc, this setting affects
the signals reproduced through the analog terminals—AV-OUT and
cordless headphones (and through the DIGITAL OUT terminal when
“PCM ONLY” is selected for “DIGITAL AUDIO OUTPUT”).
• DOLBY SURROUND : Select this when you want to enjoy multi-
channel surround audio by connecting an amplifier compatible with
Dolby Surround to this monitor.
• STEREO : Normally select this.
You can enjoy a powerful sound at low or middle volume levels while
playing a Dolby Digital software.
• AUTO : Select this to apply the effect to multi-channel encoded
software (excluding 1-channel and 2-channel software).
• ON : Select this to always use this function.
30
Page 31

Maintenance
To prevent damage to the exterior
• Do not apply pesticides, benzine, thinner or
other volatile substances to the monitor.
The cabinet surface primarily consists of
plastic materials.
• Do not wipe with benzine, thinner or similar
substances because this will results in
discoloration or removal of the paint.
• When a cloth with a cleansing chemical is
used, follow the caution points.
– Do not leave the unit in contact with rubber
or vinyl products for long periods of time.
– Do not use cleansers which have polishing
granules because this could damage the
cabinet.
Clean off dirt by wiping lightly with
a soft cloth
When the cabinet is very dirty, wipe with a
well-wrung cloth dipped in a kitchen cleanser
(neutral) thinned by water and then go over the
same surface with a dry cloth.
(Since there is the possibility of water drops
getting inside of the unit, do not directly apply
cleanser to the surface.)
Moisture condensation
Moisture may condense on the lens inside the
DVD player in the following cases:
• After starting the heater in the car.
• If it becomes very humid inside the car.
Should this occur, the DVD player may
malfunction. In this case, eject the disc and
leave the unit turned on for a few hours until the
moisture evaporates.
How to handle discs
When removing a disc from
its case, press down the center
holder of the case and lift the
disc out, holding it by the edges.
• Always hold the disc by the
edges. Do not touch its recording surface.
When storing a disc into its case, gently insert
the disc around the center holder (with the
printed surface facing up).
• Make sure to store discs into the cases after
use.
Center holder
To keep discs clean
A dirty disc may not play correctly.
If a disc does become dirty, wipe
it with a soft cloth in a straight line
from center to edge.
• Do not use any solvent (for
example, conventional record cleaner, spray,
thinner, benzine, etc.) to clean discs.
To play new discs
New discs may have some rough
spots around the inner and outer
edges. If such a disc is used, this
unit may reject the disc.
To remove these rough spots, rub
the edges with a pencil or ball-point pen, etc.
Do not use the following discs:
Warped
disc
ENGLISH
Sticker
Disc
Sticker
residue
Stick-on
label
31
Page 32

Language codes
Code Language Code Language Code Language
AA
AB
AF
ENGLISH
AM
AR
AS
AY
AZ
BA
BE
BG
BH
BI
BN
BO
BR
CA
CO
CS
CY
DZ
EL
EO
ET
EU
FA
FI
FJ
FO
FY
GA
GD
GL
GN
GU
HA
HI
HR
HU
HY
IA
IE
Afar
Abkhazian
Afrikaans
Ameharic
Arabic
Assamese
Aymara
Azerbaijani
Bashkir
Byelorussian
Bulgarian
Bihari
Bislama
Bengali, Bangla
Tibetan
Breton
Catalan
Corsican
Czech
Welsh
Bhutani
Greek
Esperanto
Estonian
Basque
Persian
Finnish
Fiji
Faroese
Frisian
Irish
Scots Gaelic
Galician
Guarani
Gujarati
Hausa
Hindi
Croatian
Hungarian
Armenian
Interlingua
Interlingue
IK
IN
IS
IW
JI
JW
KA
KK
KL
KM
KN
KO
KS
KU
KY
LA
LN
LO
LT
LV
MG
MI
MK
ML
MN
MO
MR
MS
MT
MY
NA
NE
NO
OC
OM
OR
PA
PL
PS
PT
QU
RM
Inupiak
Indonesian
Icelandic
Hebrew
Yiddish
Javanese
Georgian
Kazakh
Greenlandic
Cambodian
Kannada
Korean (KOR)
Kashmiri
Kurdish
Kirghiz
Latin
Lingala
Laothian
Lithuanian
Latvian, Lettish
Malagasy
Maori
Macedonian
Malayalam
Mongolian
Moldavian
Marathi
Malay (MAY)
Maltese
Burmese
Nauru
Nepali
Norwegian
Occitan
(Afan) Oromo
Oriya
Panjabi
Polish
Pashto, Pushto
Portuguese
Quechua
Rhaeto-Romance
RN
RO
RW
SA
SD
SG
SH
SI
SK
SL
SM
SN
SO
SQ
SR
SS
ST
SU
SW
TA
TE
TG
TH
TI
TK
TL
TN
TO
TR
TS
TT
TW
UK
UR
UZ
VI
VO
WO
XH
YO
ZU
Kirundi
Rumanian
Kinyarwanda
Sanskrit
Sindhi
Sangho
Serbo-Croatian
Singhalese
Slovak
Slovenian
Samoan
Shona
Somali
Albanian
Serbian
Siswati
Sesotho
Sundanese
Swahili
Tamil
Telugu
Tajik
Thai
Tigrinya
Turkmen
Tagalog
Setswana
Tonga
Turkish
Tsonga
Tatar
Twi
Ukrainian
Urdu
Uzbek
Vietnamese
Volapuk
Wolof
Xhosa
Yoruba
Zulu
32
Page 33

More about this monitor
Basic operations
Turning off the power
• If you turn off the power while listening to a
disc, disc play will start automatically, next
time you turn on the power.
Disc operations
General
• In this manual, words “track” and “file” are
interchangeably used when referring to MP3/
WMA/JPEG files and their file names.
• This unit can also playback 8 cm
(3-3/16") discs.
• This unit can only playback audio CD (CDDA) files if different type of files are recorded
in the same disc.
– The first track will be skipped if a different
type of file is detected first.
• When a disc has been loaded, selecting
“DISC” for the playback source starts disc
play.
Starting playback
• When a disc is inserted upside down, “NO
DISC” appears on the screen, then the disc
will automatically eject.
• You can play a disc even if the monitor is
closed.
Basic operations
• No sound comes out during slow motion
playback. When playing a VCD, reverse slow
motion playback is prohibited.
• One Touch Replay works only within the
same title. (For some DVDs, this function
does not work.)
• When playing a DVD/VCD, no sound comes
out during Search.
• Reverse search stops automatically when it
reaches the beginning of the disc. Playback
resumes at normal speed.
DVD/VCD/JPEG special functions
• For some DVDs and VCDs, changing the
subtitle language, audio language (or audio
channel) without using the disc menu is
prohibited.
• While zoomed in, the picture may look
coarse.
Playing a DVD-R/DVD-RW or CD-R/CDRW
• Use only “finalized” discs.
• This unit can play back only the files of the
same type which is first detected if a disc
includes both audio CD (CD-DA) files and
MP3/WMA/JPEG files.
• This unit can play back either MP3/WMA
files or JPEG files if a disc includes both kind
of files. Set the playback file type on DVD
setup menu (page 29) before playing back a
disc containing both kind of files.
• Only for CD-R/CD-RW: This unit can play
back multi-session discs; however, unclosed
sessions will be skipped while playing.
• Some DVD-R/DVD-RW or CD-R/CDRW may not play back on this unit because
of their disc characteristics, and for the
following causes:
– Discs are dirty or scratched.
– Moisture condensation occurs on the lens
inside the unit.
– The pickup lens inside the unit is dirty.
– CD-R/CD-RW on which the files are
written with “Packet Write” method.
– DVD-R/DVD-RW which are not written
in UDF-Bridge Format (eg. UDF format or
ISO format).
– There are improper recording conditions
(missing data, etc.) or media conditions
(stain, scratch, warp, etc.).
• DVD-RW/CD-RW may require a longer
readout time since the reflectance of DVDRW/CD-RW is lower than that of regular
discs.
ENGLISH
To be continued....
33
Page 34

• Do not use the following DVD-R/DVD-RW
or CD-R/CD-RW:
– Discs with stickers, labels, or protective seal
stuck to the surface.
– Discs on which labels can be directly
ENGLISH
printed by an ink jet printer.
Using these discs under high temperatures or
high humidities may cause malfunctions or
damages to discs.
Playing an MP3/WMA disc
• This unit can play back MP3/WMA files
with the extension code <.mp3> or <.wma>
(regardless of the letter case—upper/lower)
recorded in either CD-R/CD-RW or in
DVD-R/DVD-RW.
• This unit can show the names of albums,
artists (performer), and ID3 Tag (Version 1.0,
1.1, 2.2, 2.3, or 2.4) for MP3 files and WMA
files.
• This unit can display only one-byte
characters. No other characters can be
correctly displayed.
• This unit can play back MP3/WMA files
meeting the conditions below:
– Bit rate: MP3: 32 kbps — 320 kbps
WMA: 32 kbps — 192 kbps
– Sampling frequency:
48 kHz, 44.1 kHz, 32 kHz (for MPEG-1)
24 kHz, 22.05 kHz, 16 kHz (for MPEG-2)
48 kHz, 44.1 kHz, 32 kHz (for WMA)
– Disc format: ISO 9660 Level 1/Level 2,
Romeo, Joliet, Windows long file name
• The maximum number of characters for file/
folder names vary among the disc format used
(includes 4 extension characters—<.mp3> or
<.wma>).
– ISO 9660 Level 1: up to 12 characters
– ISO 9660 Level 2: up to 31 characters
– Romeo: up to 128 characters
– Joliet: up to 64 characters
– Windows long file name: up to 128
characters
• This unit can recognize the total of
1100 files, 250 folders (maximum of 999 files
per folder).
• This unit can play back the files recorded in
VBR (variable bit rate).
The files recorded in VBR have a discrepancy
in elapsed time display, and do not show
the actual elapsed time. Especially, after
performing the search function, this
difference becomes noticeable.
• This unit cannot play back the following files:
–
MP3 files encoded with MP3i and MP3 PRO
format.
– MP3 files encoded in an unappropriated
format.
– MP3 files encoded with Layer 1/2.
– WMA files encoded with lossless,
professional, and voice format.
– WMA files which are not based upon
Windows Media
– WMA files copy-protected with DRM.
– WMA files recorded with MBR (Multiple
Bit Rate) format.
– Files which have the data such as WAVE,
ATRAC3, etc.
®
Audio.
Playing a JPEG disc
• This unit can play back JPEG files with the
extension code <.jpg> (regardless of the letter
case—upper/lower) recorded in either CD-R/
CD-RW or in DVD-R/DVD-RW.
• It is recommended that you record a file
at 640 x 480 resolution. (If a file has been
recorded at a resolution of more than 640 x
480, it will take a long time to be shown.)
• This System can play only baseline JPEG
files. Progressive JPEG files or lossless JPEG
files cannot be played.
Baseline JPEG format: Used for digital
cameras, web, etc.
Progressive JPEG format: Used for web.
Lossless JPEG format: An old type and rarely
used now.
• If progressive or lossless JPEG files are
played back, a black screen appears. In this
case, stop playback and select a baseline
JPEG file. Note that it may take a long time to
select another file.
34
Page 35

• Even if you try to pause the current picture,
it may be skipped, then the next picture will
pause.
• This unit can recognize the total of 1100
files, 250 folders (maximum of 999 files per
folder).
Changing the source
• If you change the source, playback also stops
(without ejecting the disc).
Next time you select “DISC” for the playback
source, disc play starts automatically.
Ejecting a disc
• If the ejected disc is not removed within
15 seconds, the disc is automatically inserted
again into the loading slot to prevent it from
dust. (Disc will not play this time.)
DVD setup menu
• When the language you have selected is not
recorded on a disc, the original language is
automatically used as the initial language. In
addition, for some discs, the initial languages
settings will not work as you set due to their
internal disc programming.
• While playing (or pausing), you cannot
change these languages.
After you change any of these language
settings, eject the disc and insert it (or another
disc) again so that your setting takes effect.
• When you select “16:9” for a picture whose
aspect ratio is 4:3, the picture slightly changes
due to the process for converting the picture
width.
• Even if “4:3 PAN SCAN” is selected, the
screen size may become
“4:3 LETTER BOX” with some DVDs. This
depends on how they are recorded.
On-screen guide icons
During play, the following guide icons may
appear for a while on the monitor.
: Appears at the beginning of a scene
containing multi-audio languages (for
DVD only).
: Appears at the beginning of a scene
containing multi-subtitle languages
(for DVD only).
: Appears at the beginning of a scene
containing multi-angle views (for
DVD only).
: Play
: Pause
: Forward slow motion playback
(for DVD and VCD only)
: Reverse slow motion playback
(for DVD only)
: Forward search
: Reverse search
ENGLISH
35
Page 36

About sounds reproduced through the terminals
• Through the analog terminals (AV-OUT/cordless headphones): 2-channel signal is emitted.
When playing a multi-channel encoded disc, multi-channel signals are downmixed.
(AUDIO—DOWN MIX: see page 30.)
ENGLISH
• Through DIGITAL OUT (optical):
Digital signals (Linear PCM, Dolby Digital, DTS, MPEG Audio) are emitted through this
terminal. (For more details, see table below.)
To reproduce multi-channel sounds such as Dolby Digital, DTS, and MPEG Audio, connect
an amplifier or a decoder compatible with these multi-channel sources to this terminal, and set
“DIGITAL AUDIO OUTPUT” correctly. (See page 30.)
Output signals through the DIGITAL OUT terminal
Output signals are different depending on the “DIGITAL AUDIO OUTPUT” setting on the setup
menu (see page 30).
DIGITAL AUDIO OUTPUT
Playback Disc
DVD
Audio CD, Video CD 44.1 kHz, 16 bits stereo Linear PCM
Audio CD with DTS DTS bitstream 44.1 kHz, 16 bits stereo Linear PCM
MP3/WMA
48 kHz, 16/20/24 bits Linear PCM
96 kHz, Linear PCM
with DTS DTS bitstream 48 kHz, 16 bits stereo Linear PCM
with Dolby Digital Dolby Digital bitstream
with MPEG Audio MPEG bitstream 48 kHz, 16 bits Linear PCM
STREAM/PCM DOLBY DIGITAL/PCM PCM ONLY
48 kHz, 16 bits stereo Linear PCM
32/44.1/48 kHz, 16 bits Linear PCM
Output Signals
48 kHz, 16 bits
stereo Linear PCM
36
Page 37

Troubleshooting
What appears to be trouble is not always serious. Check the following points before calling a service
center.
Symptoms Causes Remedies
• Colored spots (red, blue
and green) appear on the
screen.
• No picture appears and
sound is not heard.
• The unit does not work at
all.
General
• Remote controller does not
work.
• Cordless headphones do
not work.
This is a characteristic of
liquid crystal panels and is
not a malfunction.
The cord is not connected
correctly to the external
component.
Correct input mode is not
selected.
The built-in microcomputer
may have functioned
incorrectly due to noise, etc.
The battery has lost its
charge.
The sensor is exposed to
strong light.
ENGLISH
See “Note” on page 6.
Connect the cord correctly.
Select the correct input
mode.
Reset the unit (see page 4).
Install a new battery.
Do not expose the sensor to
strong light.
• Howling occurs from
the speakers or the
headphones.
• “NO DISC” appears on the
screen.
• CD-R/CD-RW or DVD-R/
DVD-RW cannot be played
back.
• Tracks on the CD-R/
CD-RW or DVD-R/
Disc playback
DVD-RW cannot be
skipped.
• The left and right edges of
the picture are missing on
the screen.
It may be caused by a
camcorder connected to the
monitor.
Disc is inserted upside
down.
CD-R/CD-RW or DVD-R/
DVD-RW is not finalized.
“4:3 PAN SCAN” is
selected when viewing on
a conventional TV (aspect
ratio 4:3).
Camcorder is now in
recording mode. Deactivate
the recording mode.
Insert the disc correctly.
• Insert a finalized CDR/CD-RW or DVD-R/
DVD-RW.
•
Finalize the
RW or DVD-R/DVD-RW
with the component which
you used for recording.
Select “4:3 LETTER BOX.”
(See page 29.)
CD-R/CD-
37
Page 38

Symptoms Causes Remedies
• Sound and picture are
ENGLISH
Disc playback
• Disc cannot be played
sometimes interrupted or
distorted.
back.
You are driving on rough
roads.
Disc is scratched. Change the disc.
Connections are incorrect. Check the cords and
No MP3/WMA/JPEG tracks
are recorded on the disc.
MP3/WMA/JPEG tracks do
not have the extension code
<.mp3>, <.wma>, or <.jpg>
in their file names.
MP3/WMA/JPEG tracks are
not recorded in a compliant
format.
MP3/WMA/JPEG tracks
are recorded in DVD+R/
DVD+RW media.
Stop playback while driving
on rough roads.
connections.
Change the disc.
Add the extension code
<.mp3>, <.wma>, or <.jpg>
to their file names.
Change the disc.
Record MP3/WMA/JPEG
tracks using a compliant
application (see page 17).
Change the disc.
Record MP3/WMA/JPEG
tracks using DVD-R/DVDRW media.
• Noise is generated. The track played back is not
an MP3/WMA file (although
it has the extension code
<.mp3> or <.wma>).
MP3/WMA/JPEG playback
• A longer readout time is
required.
• Tracks cannot be played
back as you have intended
them to play.
• Elapsed playing time is not
correct.
Readout time varies due to
the complexity of the folder/
file configuration.
Playback order is determined
when the files are recorded.
This sometimes occurs
during play. This is caused
by how the tracks are
recorded on the disc.
Skip to another track or
change the disc. (Do not add
the extension code <.mp3>
or <.wma> to non-MP3 or
WMA tracks.)
Do not use too many
hierarchies and folders.
38
Page 39

Specifications
WIDESCREEN MONITOR
Screen:
9 inch liquid crystal panel
Number of pixel:
336 960 pixels
(480 vertical × 234 horizontal × 3)
Drive method:
TFT (Thin Film Transistor) active matrix
format
Cordless audio:
Infrared audio transmitter
L-channel: 2.3 MHz
R-channel: 2.8 MHz
Effective listening angle: 30˚
Effective range: 2 m (6.6 ft)
Color system: NTSC
Input:
Video: RCA pin × 2 circuits
1 V(p-p), 75 Ω
Audio: RCA pin × 2 circuits
1.5 V(rms)
Output:
Video: RCA pin × 1 circuit
1 V(p-p), 75 Ω
Audio: RCA pin × 1 circuit
1.5 V(rms)
DIGITAL OUT: Optical
DVD/CD PLAYER SECTION
Signal detection system: Non-contact optical
pickup (semiconductor laser)
Number of channels: 2 channels (stereo)
Frequency response:
DVD, fs=48 kHz/96 kHz: 16 Hz to 22 000 Hz
VCD, CD: 16 Hz to 20 000 Hz
Dynamic range: 93 dB
Signal-to-noise ratio: 95 dB
Wow and flutter: Less than measurable limit
MP3 (MPEG Audio Layer 3):
Max. Bit Rate: 320 kbps
®
WMA (Windows Media
Max. Bit Rate: 192 kbps
Audio):
GENERAL
Power requirement:
Operating voltage:
DC 14.4 V (11 V to 16 V allowance)
Grounding system: Negative ground
Allowable operating temperature:
0°C to +40°C (32°F to 104°F)
Allowable storage temperature:
–20°C to +80°C (–4°F to 176°F)
Dimensions (W × H × D):
Installation size (approx.):
215 mm × 49 mm × 374 mm
(8-1/2
Mass (approx.):
2.9 kg (6.4 lbs) (excluding accessories)
" × 1-15/16" × 14-3/4")
CORDLESS HEADPHONES
Type: Open-air type
Driver unit:
30 mm Mylarcone dynamic speaker
Impedance: 16 Ω
Frequency response: 20 Hz to 20 000 Hz
Infrared wavelength: 850 nm ± 50 nm
Power requirements:
DC 3 V (2.4 V to 3.3 V allowance)
(R03/AAA battery × 2)
Mass (approx.):
170 g (0.38 lbs) (except batteries)
Allowable operating temperature:
–30°C to +65°C (–22°F to 149°F)
Design and specifications are subject to change
without notice.
• Microsoft and Windows Media are either
registered trademarks or trademarks of
Microsoft Corporation in the United States
and/or other countries.
ENGLISH
39
Page 40

Having TROUBLE with operation?
Please reset your unit
Refer to page of How to reset your unit
Still having trouble??
USA ONLY
Call 1-800-252-5722
http://www.jvc.com
We can help you!
EN, SP, FR
© 2005 Victor Company of Japan, Limited
0305MNMMDWJEIN
Page 41

KV-MRD900/KV-MR9010
Installation/Connection Manual
Manual de instalación/conexión
LVT1340-002A
ENGLISH
The illustrations of the widescreen monitor used in this manual
is of KV-MRD900, unless specified otherwise.
Manuel d’installation/raccordement
[J]
A menos que se especifique de otro modo, las ilustraciones
del monitor de pantalla ancha utilizadas en este manual son
del KV-MRD900.
0305MNMMDWJEIN
EN, SP, FR
FRANÇAISESPAÑOL
Les illustrations du moniteur à écran large utilisées dans ce
manuel sont du KV-MRD900, sauf spécification contraire.
WARNING
Installation requires some special knowledge.
Do not install the monitor yourself. Consult a dealer
having special knowledge of this kind for safe and
reliable installation.
• DO NOT INSTALL THE MONITOR IN A LOCATION WHICH
OBSTRUCTS DRIVING, VISIBILITY, SAFETY DEVICE
FUNCTION SUCH AS AIR BAGS OR WHICH IS
PROHIBITED BY APPLICABLE LAWS AND REGULATIONS.
If the monitor is installed in a location which obstructs forward
visibility or operation of the air bag or other safety equipment
or which interferes with operation of the vehicle, it may cause
an accident.
• NEVER USE BOLTS OR NUTS FROM THE VEHICLE’S
SAFETY DEVICES FOR INSTALLATION.
If bolts or nuts from the steering wheel, brakes or other safety
devices are used for installation of the monitor, it may cause
an accident.
• ATTACH THE WIRES CORRECTLY.
If the wiring is not correctly performed, it may cause a fire or
an accident. In particular, be sure to run and secure the lead
wire so that it does not get tangled with a screw or the moving
portion of a seat rail.
• USE WITH DC 12 V NEGATIVE GROUND VEHICLES.
This monitor is only for use in a DC 12 V negative ground
vehicle.
It cannot be used in large trucks or diesel vehicles which are
DC 24 V vehicles.
If it is used in the wrong type of vehicle, it may cause a fire or
accident.
• To prevent short circuits, we recommend that you
disconnect the battery’s negative terminal and make all
electrical connections before installing the unit. If you are not
sure how to install this unit correctly, have it installed by a
qualified technician.
• Avoid installing the monitor in the following places
– Where it would hinder your safe driving.
– Where it would be exposed to direct sunlight or heat directly
from the heater or placed in an extremely hot place.
– Where it would be subject to rain, water splashes or
excessive humidity.
– Where it would be subject to dust.
– Where it would be positioned on an unstable place.
– Where it could damage the car’s fittings.
– Where proper ventilation would not be maintained.
CAUTION
Since there may be legal regulations defining the
permissible installation locations for the monitor which differ
by country or by state, be sure to install the color monitor in
a location complying with any such laws.
Parts list for installation and connection
The following parts are provided with this unit.
After checking them, please set them correctly.
Cordless headphones (supplied only with KV-MRD900)
Auriculares inalámbricos (suministrados solamente con KV-MRD900)
Casque d’écoute sans fil (fourni uniquement avec le KV-MRD900)
KS-HP2
Widescreen monitor
Monitor de pantalla ancha
Moniteur à écran large
Paper template
Plantilla de papel
Gabarit en papier
Shroud
Refuerzo
Socle de montage au plafond
ADVERTENCIA
La instalación requiere cierto conocimiento especial.
No instale el sistema del monitor por sí mismo. Para
una instalación segura y confiable, consulte con un
concesionario que tenga conocimientos especiales en
esta área.
• NO INSTALE EL MONITOR EN UN LUGAR QUE IMPIDA EL
MANEJO, LA VISIBILIDAD, EL FUNCIONAMIENTO DE
DISPOSITIVOS DE SEGURIDAD COMO POR EJEMPLO
BOLSAS DE AIRE, O DONDE LO PROHÍBAN LAS LEYES
O REGLAMENTOS LOCALES.
Si el monitor se instala en un lugar que obstruye la visibilidad
hacia adelante o la operación de una bolsa de aire u otro
equipo de seguridad, o que interfiere con la operación del
vehículo, cerca de la palanca de cambios o pedal del freno
por ejemplo, podrá causarse un accidente.
• NUNCA UTILICE PERNOS O TUERCAS DE LOS
DISPOSITIVOS DE SEGURIDAD DEL VEHÍCULO PARA
HACER LA INSTALACIÓN.
Si los pernos o tuercas del volante, frenos u otros
dispositivos de seguridad se utilizan para instalar el monitor
podrá causarse un accidente.
• REALICE EL CABLEADO CORRECTAMENTE.
Si no se hace bien el cableado puede producirse un
incendio o un accidente. En particular, asegúrese de instalar
el cable conductor para que éste no quede enredado en un
tornillo ni en la parte móvil del raíl del asiento.
• UTILICE EL MONITOR EN VEHÍCULOS DE 12 V CC CON
PUESTA A TIERRA NEGATIVA.
Este monitor ha sido diseñado para ser utilizado solamente
en vehículos de 12 V CC con puesta a tierra negativa.
No puede utilizarse en camiones grandes ni vehículos diesel
de 24 V CC.
Si se utiliza en el tipo equivocado de vehículo se puede
causar un incendio o accidente.
• Para evitar cortocircuitos, se recomienda desconectar el
terminal negativo de la batería y realizar todas las
conexiones eléctricas antes de instalar la unidad. Si tiene
dudas sobre cómo realizar la instalación correctamente,
déjela en manos de un técnico cualificado.
• Evite instalar el monitor en los siguientes lugares
– Donde pueda constituir un obstáculo para la conducción.
– Donde pueda quedar expuesto a la luz solar directa o al
calor directo de un calefactor, o en un lugar muy caliente.
– Donde pueda mojarse debido a la lluvia, etc., o en un lugar
excesivamente húmedo.
– En un lugar polvoriento.
– En un sitio inestable.
– Donde pueda producir daños en los herrajes del automóvil.
– Donde no se pueda mantener una ventilación adecuada.
PRECAUCIÓN
Puesto que pueden haber normas legales que definen los
lugares de instalación permisibles para el monitor, que
difieren según los países o estados, asegúrese de instalar
el monitor color en un sitio que cumpla con los requisitos
establecidos por tales leyes.
Lista de piezas para instalación y conexión
Con esta unidad se suministran las siguientes piezas.
Después de inspeccionarlas, colóquelas correctamente.
Batteries
Base plate
Placa de base
Plaque de base
Slide plates
Placas deslizantes
Plaques latérales
Pilas
Piles
R03/AAA
Spacers: silver–9 mm (3/8"): x 2
Espaciadores: plateado–9 mm (3/8 pulgada): x 2
Intercalaire argent–9 mm (3/8 po.): x 2
Spacers: black–7 mm (5/16"): x 4
Espaciadores: negro–7 mm (5/16 pulgada): x 4
Intercalaire noire–7 mm (5/16 po.): x 4
Flat washer–ø 5 mm (1/4"): x 12
Arandela plana–ø 5 mm (1/4 pulgada): x 12
Rondelle plate–ø 5 mm (1/4 po.): x 12
– 1 –
Remote controller
Control remote
Télécommande
AVERTISSEMENT
L’installation nécessite certaines connaissances
spéciales.
N’installez pas le moniteur vous-même. Consultez un
revendeur possédant les connaissances spéciales
nécessaires pour une installation correcte et sûre.
•
N’INSTALLEZ PAS LE MONITEUR DANS UN ENDROIT OÙ IL
PEUT GÊNER LA VISIBILITÉ DU CONDUCTEUR OU LE
FONCTIONNEMENT D
QUE LES COUSSINS GONFLABLES, OU DANS UN ENDROIT
INTERDIT PAR LES LOIS ET RÈGLEMENTS EN PLACE.
Si le moniteur était installé à un emplacement gênant la visibilité
avant, ou le déploiement du sac à air, et autres dispositifs de
sécurité, ou à un emplacement gênant pour la conduite du
véhicule, comme près du levier des vitesses ou de la pédale du
frein, cela risquerait de provoquer des accidents.
• NE JAMAIS UTILISER POUR L’INSTALLATION DES
BOULONS OU DES ÉCROUS PROVENANT DES
DISPOSITIFS DE SÉCURITÉ DU VÉHICULE.
Si l’on utilisait pour l’utilisation du moniteur des boulons et des
écrous cannibalisés du volant, des freins ou autres dispositifs
de sécurités, cela risquerait de provoquer des accidents.
• ATTACHER LES CORDONS CORRECTEMENT.
Si le câblage n’est pas exécuté correctement, cela risque de
provoquer un incendie ou autre accident. Veiller, en particulier,
à tirer et attacher les fils en sorte qu’ils me s’accrochent pas à
une vis ou ne se coincent dans les parties mobiles des rails
des sièges.
• USAGE SUR LES VÉHICULES DE 12 V CC AVEC NÉGATIF
À LA MASSE.
Ce moniteur ne peut être utilisé que sur les véhicules de 12 V
CC avec négatif à la masse.
Il ne peut pas être utilisé sur les gros camions ou les
véhicules diesel de 24 V CC.
S’il était utilisé sur un type de véhicule inadéquat cela
risquerait de provoquer un incendie ou autres accidents.
• Pour éviter les courts-circuits,
déconnectiez la borne négative de la batterie et réalisiez toutes
les connexions électriques avant d’installer l’appareil. Si vous
n’êtes pas sûr de savoir comment installer cet appareil
correctement, faites-le installer par un technicien qualifié.
• Évitez d’installer le moniteur dans les endroits suivants
– Où il peut gêner la conduite de la voiture.
– Où il est exposé à la lumière directe du soleil, à la chaleur
directe du chauffage ou placé dans un endroit très chaud.
– Où il est sujet à la pluie, aux éclaboussures ou à une
humidité excessive.
– Où il est sujet à la poussière.
– Où il est positionné dans un endroit instable.
– Où il peut endommager les accessoires de la voiture.
– Où une ventilation correcte ne peut pas être maintenue.
ATTENTION
Puisqu’il peut y avoir des réglementations définissant les
emplacements d’installation autorisés pour un moniteur et
que celles-ci peuvent varier d’un pays ou d’une région à
l’autre, assurez-vous d’installer le moniteur couleur dans un
endroit conforme à ces lois.
Liste des pièces pour l’installation et
raccordement
Les pièces suivantes sont fournies avec cet appareil.
Après vérification, veuillez les placer correctement.
Battery
Pila
Pile
CR2025RM-RK230
’
UN DISPOSITIF DE SÉCURITÉ TEL
nous recommandons que vous
Joint cord
Cable de empalme
Cordon de raccordement
Power cord
Cordón de alimentación
Cordon d’alimentation
Nuts (M5): x 12
Tuercas (M5): x 12
Écrous (M5): x 12
Screws–M5 x 10 mm (7/16"): x 12
Tornillos–M5 x 10 mm (7/16 pulgada): x 12
Vis–M5 x 10 mm (7/16 po.): x 12
Screws–M5 x 14 mm (5/8"): x 6
Tornillos–M5 x 14 mm (5/8 pulgada): x 6
Vis–M5 x 14 mm (5/8 po.): x 6
Screws–M5 x 23 mm (15/16"): x 6
Tornillos–M5 x 23 mm (15/16 pulgada): x 6
Vis–M5 x 23 mm (15/16 po.): x 6
Page 42

INSTALLATION
1
2
1
• The following illustration shows a typical installation. However,
you should make adjustments corresponding to your specific
car. If you have any questions or require information regarding
installation kits, consult your JVC car audio dealer or a
company supplying kits.
INSTALACIÓN
• La siguiente ilustración muestra una instalación típica. Sin
embargo usted deberá efectuar los ajustes correspondientes
a su automóvil. Si tiene alguna pregunta o necesita
información acerca de las herramientas para instalación,
consulte con su concesionario de JVC de equipos de audio
para automóviles o a una compañía que suministra tales
herramientas.
INSTALLATION
•
L’illustration suivante est un exemple d’installation typique.
Cependant, vous devez faire les ajustements correspondant à
votre voiture particulière. Si vous avez des questions ou avez
besoin d’information sur des kits d’installation, consulter votre
revendeur d’autoradios JVC ou une compagnie
d’approvisionnement.
Detaching the dome light cover / Desmontaje de la cubierta de la luz del techo / Détachement du couvercle du plafonnier
To mount the widescreen monitor, detach the dome light covers.
As illustrated, depress the two portions on the cover indicated by
the marks 5 (1), then pull off the cover (2).
Para instalar el monitor de pantalla ancha, desmonte las cubiertas
de la luz del techo.
Tal como se muestra en la ilustración, haga presión sobre las dos
partes de la cubierta indicadas por las flechas 5 (1) y, a
continuación, retire la cubierta (2).
Pour monter le moniteur à écran large, détachez les couvercles du
plafonnier.
Comme montré sur l’illustration, faites pression sur les deux
parties sur le couvercle marquées par
2
couvercle (
).
5 (1
), puis retirez le
Mounting the widescreen monitor
Installation procedure varies among cars. The following is an
example. For detailed procedure, see the right page.
It is recommended to have the monitor system installed by
a qualified technician.
Widescreen monitor
Monitor de pantalla ancha
Moniteur à écran large
TV tuner, etc.
Sintonizador de TV, etc.
Tuner de télévision, etc.
Car receiver, etc.
Receptor de automóvil, etc.
Récepteur d’autoradio, etc.
Before mounting the monitor, make sure that the screws do not
reach the ceiling panel.
Antes de instalar el monitor, asegúrese de que los tornillos no
lleguen al panel del techo.
Avant de monter le moniteur, assurez-vous que les vis
n’atteignent pas le panneau du plafond.
These should not be used if the monitor position after
installed seems so low that it may interfere with visibility
through the rearview mirror.
No se deberán utilizar estos elementos si existe la
posibilidad de que el monitor, una vez instalado, quede en
una posición muy baja y obstaculice la visibilidad a través
del espejo retrovisor.
Cette partie ne doit pas être utilisée si la position du moniteur
après l’installation paraît si basse qu’elle pourrait gêner la
visibilité du conducteur dans le rétroviseur.
Montaje del monitor de pantalla ancha
El procedimiento de instalación varía según los diferentes
vehículos. Lo siguiente es sólo un ejemplo. Para los detalles
del procedimiento, consulte las páginas correspondientes.
Se recomienda que el sistema de monitor sea instalado
por un técnico cualificado.
1
*
*1Nuts (M5): x 12
Ceiling panel
Panel del techo
Panneau de plafond
1
*
*
2
*
2
*
3
*
5
*
4
*
Ceiling reinforcement crosspieces
Travesaños de refuerzo del techo
Traverses de renforcement du plafond
Slide plates
Placas deslizantes
Plaques latérales
2
*2Screws–M5 x 10 mm (7/16"): x 12
Base plate
Placa de base
Plaque de base
When NOT using the shroud/Cuando NO se utiliza el refuerzo/Lorsque
le socle de montage au plafond N’est PAS utilisé
*3Flat washer–ø 5 mm (1/4"): x 6
When using the shroud/Cuando se utiliza el refuerzo/Lors de
l’utilisation du socle de montage au plafond
*4Spacers: black–7 mm (5/16"): x 4
*5Spacers: silver–9 mm (3/8"): x 2
Shroud
Refuerzo
Socle de montage au plafond
Montage du moniteur à écran large
La procédure d’installation varie d’une voiture à l’autre. La
procédure qui suit est un exemple. Pour en savoir plus, référezvous à la page de droite.
Il est recommandé de faire installer le système de moniteur
par un technicien qualifié.
Tuercas (M5): x 12
Écrous (M5): x 12
Tornillos–M5 x 10 mm (7/16 pulgada): x 12
Vis–M5 x 10 mm (7/16 po.): x 12
Arandela plana–ø 5 mm (1/4 pulgada): x 6
Rondelle plate–ø 5 mm (1/4 po.): x 6
Espaciadores: negro–7 mm (5/16 pulgada): x 4
Intercalaire noire–7 mm (5/16 po.): x 4
Espaciadores: plateado–9 mm (3/8 pulgada): x 2
Intercalaire argent–9 mm (3/8 po.): x 2
Widescreen monitor
Monitor de pantalla ancha
Moniteur à écran large
– 2 –
*6Flat washer–ø 5 mm (1/4"): x 6
Arandela plana–ø 5 mm (1/4 pulgada): x 6
Rondelle plate–ø 5 mm (1/4 po.): x 6
*7Screws–M5 x 14 mm (5/8"): x 6
6
*
7
*
or M5 x 23 mm (15/16"): x 6–when using the shroud
Tornillos–M5 x 14 mm (5/8 pulgada): x 6
o M5 x 23 mm (15/16 pulgada): x 6–cuando se utiliza el refuerzo
Vis–M5 x 14 mm (5/8 po.): x 6
ou M5 x 23 mm (15/16 po.): x 6–lors de l’utilisation du socle de montage au
plafond
Page 43

7
1
3 42
5
678
Before mounting the monitor to the ceiling:
• Perform the required external connections first (see reverse
page).
• Wear goggles or protective eyewear to protect your eyes
especially while drilling the holes.
• Pay attention not to damage the car interior and its fittings and
the ceiling of your car.
Antes de instalar el monitor en el techo:
• Efectúe primero las conexiones externas requeridas (véase el
reverso).
• Utilice gafas o una máscara de protección para proteger sus
ojos, especialmente mientras taladra los orificios.
• Preste especial atención para no dañar el interior, los herrajes
y el techo de su vehículo.
Avant de fixer le moniteur au plafond:
• Réalisez d’abord les connexions extérieures nécessaires (voir
la page de dos).
• Portez des lunettes étanches ou un article de lunetterie
spécialisé pour protéger vos yeux, et plus spécialement
pendant le perçage des trous.
• Faites attention de ne pas endommager l’intérieur de la
voiture et ses garnitures, ainsi que son plafond.
Paper template
Plantilla de papel
Gabarit en papier
1 Remove the dome light and interior headliner
from the ceiling.
2 Assemble the slide plates and the base plate.
• Determine the monitor installation position and length of
combined slide panels first.
3 Attach the assembled plates to the ceiling
reinforcement crosspieces.
• Drill the four holes in the ceiling reinforcement crosspieces
to meet the mounting holes of the assembled plates.
4 Finish wiring then attach the interior headliner.
5 Cut off the headliner using the supplied paper
template.
6 Connect the harness and plugs from the ceiling to
the monitor.
• For wiring and connections, see the reverse side.
7 Attach the shroud and the monitor to the base
plate.
• When using the shroud, the supplied spacers should be
inserted to be kept the appropriate distance between the
base plate and the shroud.
If the supplied spacers and screws cannot keep the
appropriate distance between the headliner and the
monitor, modify the spacers and screws (or obtain those of
the appropriate length).
8 After mounting the monitor, attach the dome light
covers.
1 Retire del techo, la luz del techo y el revestimiento
interior.
2 Arme las placas laterales y la placa de base.
• Determine en primer lugar, la posición de instalación del
monitor y el largo de los paneles laterales combinados.
3 Fije las placas armadas a los travesaños de
refuerzo del techo.
• Taladre cuatro orificios en los travesaños de refuerzo del
techo, de manera que coincidan con los orificios de
montaje de las placas armadas.
4 Realice el cableado y coloque el revestimiento
interior.
5 Corte el revestimiento interior utilizando la
plantilla de papel suministrada.
6 Conecte el cableado preformado y las clavijas
entre el techo y el monitor.
• Para los detalles sobre el cableado y las conexiones,
véase al dorso.
7 Fije el refuerzo y el monitor a la placa de base.
• Cuando utilice el refuerzo, se deberán insertar los
espaciadores entregados para poder mantener una
distancia apropiada entre la placa de base y el refuerzo.
Si los espaciadores y tornillos suministrados no pueden
mantener la distancia apropiada entre el revestimiento
interior y el monitor, modifique los espaciadores y
tornillos (o consígase otros del largo apropiado).
8 Tras realizar el montaje del monitor, fije las
cubiertas de la luz del techo.
– 3 –
1 Retirez le plafonnier et la garniture intérieure du
plafond.
2 Assemblez les plaques latérales avec la plaque de
base.
• Déterminez d’abord la position d’installation du moniteur
et la longueur des panneaux latéraux combinés.
3 Attachez les plaques assemblées sur les
traverses de renforcement du plafond.
• Percez quatre trous dans les travers de renforcement du
plafond au niveau des trous de montage des plaques
assemblées.
4 Terminez le câblage puis attachez la garniture
intérieure.
5 Coupez la garniture en utilisant le gabarit en
papier fourni.
6 Connectez le harnais et les fiches du plafond au
moniteur.
• Pour le câblage et les connexions, référez-vous à la page
de dos.
7 Attachez le socle de montage au plafond et le
moniteur sur la plaque de base.
• Les intercalaires fournies peuvent être utilisées si une
certaine distance doit être maintenue entre la plaque de
base et le socle de montage au plafond.
Si les intercalaires et les vis fournies ne permettent pas de
maintenir la distance appropriée entre la garniture et le
moniteur, modifiez les intercalaires ou les vis (ou
munissez-vous d’intercalaires et de vis de la longueur
appropriée).
8 Après avoir monté le moniteur, attachez les
couvercles du plafonnier.
Page 44

4
1
2
3
5
6
7
2
1
ENGLISH
1
2
ESPAÑOL FRANÇAIS
ELECTRICAL CONNECTIONS
To prevent short circuits, we recommend that you disconnect the
battery’s negative terminal and make all electrical connections
before installing the unit. If you are not sure how to install this
unit correctly, have it installed by a qualified technician.
Note:
This unit is designed to operate on 12 V DC, NEGATIVE
ground electrical systems. If your vehicle does not have this
system, a voltage inverter is required, which can be purchased
at JVC car audio dealers.
• Replace the fuse with one of the specified ratings. If the fuse
blows frequently, consult your JVC car audio dealer.
Typical Connections / Conexiones tipicas / Raccordements typiques
Before connecting: Check the wiring in the vehicle carefully.
Incorrect connection may cause serious damage to this unit.
The leads of the power cord and those of the connector from
the car body may be different in color.
1
Connect the colored leads of the power cord to the car
battery, the car light control switch, and the door sensor in
the following sequence.
1 Black: ground
2 Yellow: to car battery (constant 12 V)
3 Red: to an accessory terminal
4 Orange: to car light control switch
DOMELIGHT
5 Gray with red stripe: to the door sensor (DOOR SW)
6 Black with red stripe: ground (DOMELIGHT)
7 Yellow with red stripe: to car battery (constant 12 V)
2
Finally connect the wiring harness to the unit.
• Using the joint cord makes the connection/disconnection
easier.
CONEXIONES ELECTRICAS
Para evitar cortocircuitos, recomendamos que desconecte el
terminal negativo de la batería y que efectúe todas las
conexiones eléctricas antes de instalar la unidad. Si usted no
está seguro de cómo instalar correctamente la unidad, hágala
instalar por un técnico cualificado.
Nota:
Esta unidad está diseñada para funcionar con 12 V de CC,
con sistemas eléctricos de masa NEGATIVA. Si su vehículo
no posee este sistema, será necesario un inversor de tensión,
que puede ser adquirido en los concesionarios de JVC de
equipos de audio para automóviles.
• Reemplace el fusible por uno con la corriente especificada.
Si el fusible se quemase frecuentemente, consulte con su
concesionario car audio de JVC.
Antes de la conexión: Verifique atentamente el conexionado
del vehículo. Una conexión incorrecta podría producir daños
graves en la unidad.
Los conductores del cordón de alimentación y el cordón de la
luz del techo y de los conectores procedentes de la
carrocería del vehículo podrían ser diferentes en color.
1
Conecte los conductores de color del cable de
alimentación a la batería del automóvil, al interruptor de
control de las luces del automóvil, y al sensor de la puerta,
en la secuencia siguiente.
1 Negro: a tierra
2 Amarillo: a la batería del automóvil (12 V constantes)
3 Rojo: a un terminal de accesorio
4 Naranja: al interruptor de control de las luces del
automóvil
DOMELIGHT
5 Gris con rayas rojas: al sensor de la puerta (DOOR SW)
6 Negro con rayas rojas: a tierra (DOMELIGHT)
7
Amarillo con rayas rojas: a la batería del automóvil (12 V
constantes)
2
Por último, conecte el cable de alimentación a la unidad.
• El uso del cable prolongador de alimentación facilita la
conexión/desconexión.
RACCORDEMENTS ELECTRIQUES
Pour éviter tout court-circuit, nous vous recommandons de
débrancher la borne négative de la batterie et d’effectuer tous
les raccordements électriques avant d’installer l’appareil. Si l’on
n’est pas sûr de pouvoir installer correctement cet appareil, le
faire installer par un technicien qualifié.
Remarque:
Cet appareil est conçu pour fonctionner sur des sources de
courant continu de
n’offre pas ce type d’alimentation, il vous faut un convertisseur
de tension, que vous pouvez acheter chez un revendeur
d’autoradios JVC.
•
Remplacer le fusible par un de la valeur précisée. Si le fusible
saute souvent, consulter votre revendeur d’autoradios JVC.
Avant de commencer la connexion:
câblage du véhicule. Une connexion incorrecte peut
endommager sérieusement l’appareil.
Les fils du cordon d’alimentation et du cordon du plafonnier et
ceux du connecteur provenant de la voiture peuvent être de
couleur différente.
1
Connectez les fils de couleur du cordon d’alimentation à la
batterie de la voiture, au commutateur d
porte, dans l
1
Noir: à la masse
2
Jaune: à la batterie de la voiture (12 V constant)
3
Rouge: à la prise accessoire
4
Orange: au commutateur d’éclairage de la voiture
DOMELIGHT
5
Gris à bande rouge: au capteur de porte (DOOR SW)
6
Noir à bande rouge: à la masse (DOMELIGHT)
7
Jaune à bande rouge: à la batterie de la voiture (12 V
constant)
2
Finalement, connectez le faisceau de fils à l’appareil.
• L’utilisation du cordon prolongateur d’alimentation rend la
connexion/déconnexion plus facile.
12 V à masse NEGATIVE
’
ordre suivant.
. Si votre véhicule
Vérifiez attentivement le
’
éclairage et capteur de
Joint cord
Cable de empalme
Cordon de raccordement
2
Black / Negro /
Yellow*
Amarillo*
Jaune*
Red
Rojo
Rouge
Orange
Naranja
Orange
Gray with red stripe
Gris con rayas rojas
Gris à bande rouge
Black with red stripe
Negro con rayas rojas
Noir à bande rouge
Yellow with red stripe
Amarillo con rayas rojas
Jaune à bande rouge
Noir
1
1
1
5 A fuse
Fusible de 5 A
Fusible 5 A
3 A fuse
Fusible de 3 A
Fusible 3 A
1 A fuse
Fusible de 1 A
Fusible 1 A
To metallic body or chassis of the car
A un cuerpo metálico o chasis del automóvil
Vers corps métallique ou châssis du véhicule
To a live terminal in the fuse block connecting to the car battery (bypassing the ignition switch)
A un terminal activo del bloque de fusibles conectado a la batería del automóvil (desviando el
interruptor de encendido)
A une borne sous tension du porte-fusible connectée à la batterie de la voiture (en dérivant
l’interrupteur d’allumage)
To an accessory terminal in the fuse block
A un terminal accesorio del bloque de fusibles
Vers borne accessoire du porte-fusible
To car light control switch
Al interruptor de control de las luces del automóvil
Au commutateur d’éclairage de la voiture
To the door sensor
Al sensor de la puerta
Au capteur de porte
To metallic body or chassis of the car
A un cuerpo metálico o chasis del automóvil
Vers corps métallique ou châssis du véhicule
To a live terminal in the fuse block connecting to the car battery (bypassing the ignition switch)
A un terminal activo del bloque de fusibles conectado a la batería del automóvil (desviando el
interruptor de encendido)
A une borne sous tension du porte-fusible connectée à la batterie de la voiture (en dérivant
l’interrupteur d’allumage)
*2Not included with this unit.
*2No suministrado con esta unidad.
*2Non fourni avec cet appareil.
*
2
*
2
*
2
*
Ignition switch
Interruptor de encendido
Interrupteur d’allumage
Fuse block
Bloque de fusibles
Porte-fusible
*1Before checking the operation of this
unit prior to installation, this lead must
be connected, otherwise power
cannot be turned on.
*1Antes de comprobar el
funcionamiento de esta unidad previa
a de la instalación, es necesario
conectar este cable, de lo contrario
no se podrá conectar la alimentación.
*1Pour vérifier le fonctionnement de cet
appareil avant installation, ce fil doit
être raccordé, sinon l’appareil ne peut
pas être mis sous tension.
To disconnect the harness, unlock the harness using the screw driver or a similar tool, then pull out
the harness. (Detach the dome light cover prior to this.)
Para desconectar el mazo de conductores, desbloquéelo con un destornillador o herramienta similar
y seguidamente, extráigalo. (Antes de realizar esto, retire la cubierta de la luz del techo).
Pour déconnecter le harnais,
puis tirez sur le harnais. (Détachez le plafonnier avant de le faire.)
déverrouillez le harnais en utilisant un tournevis ou un outil similaire,
– 4 –
Page 45
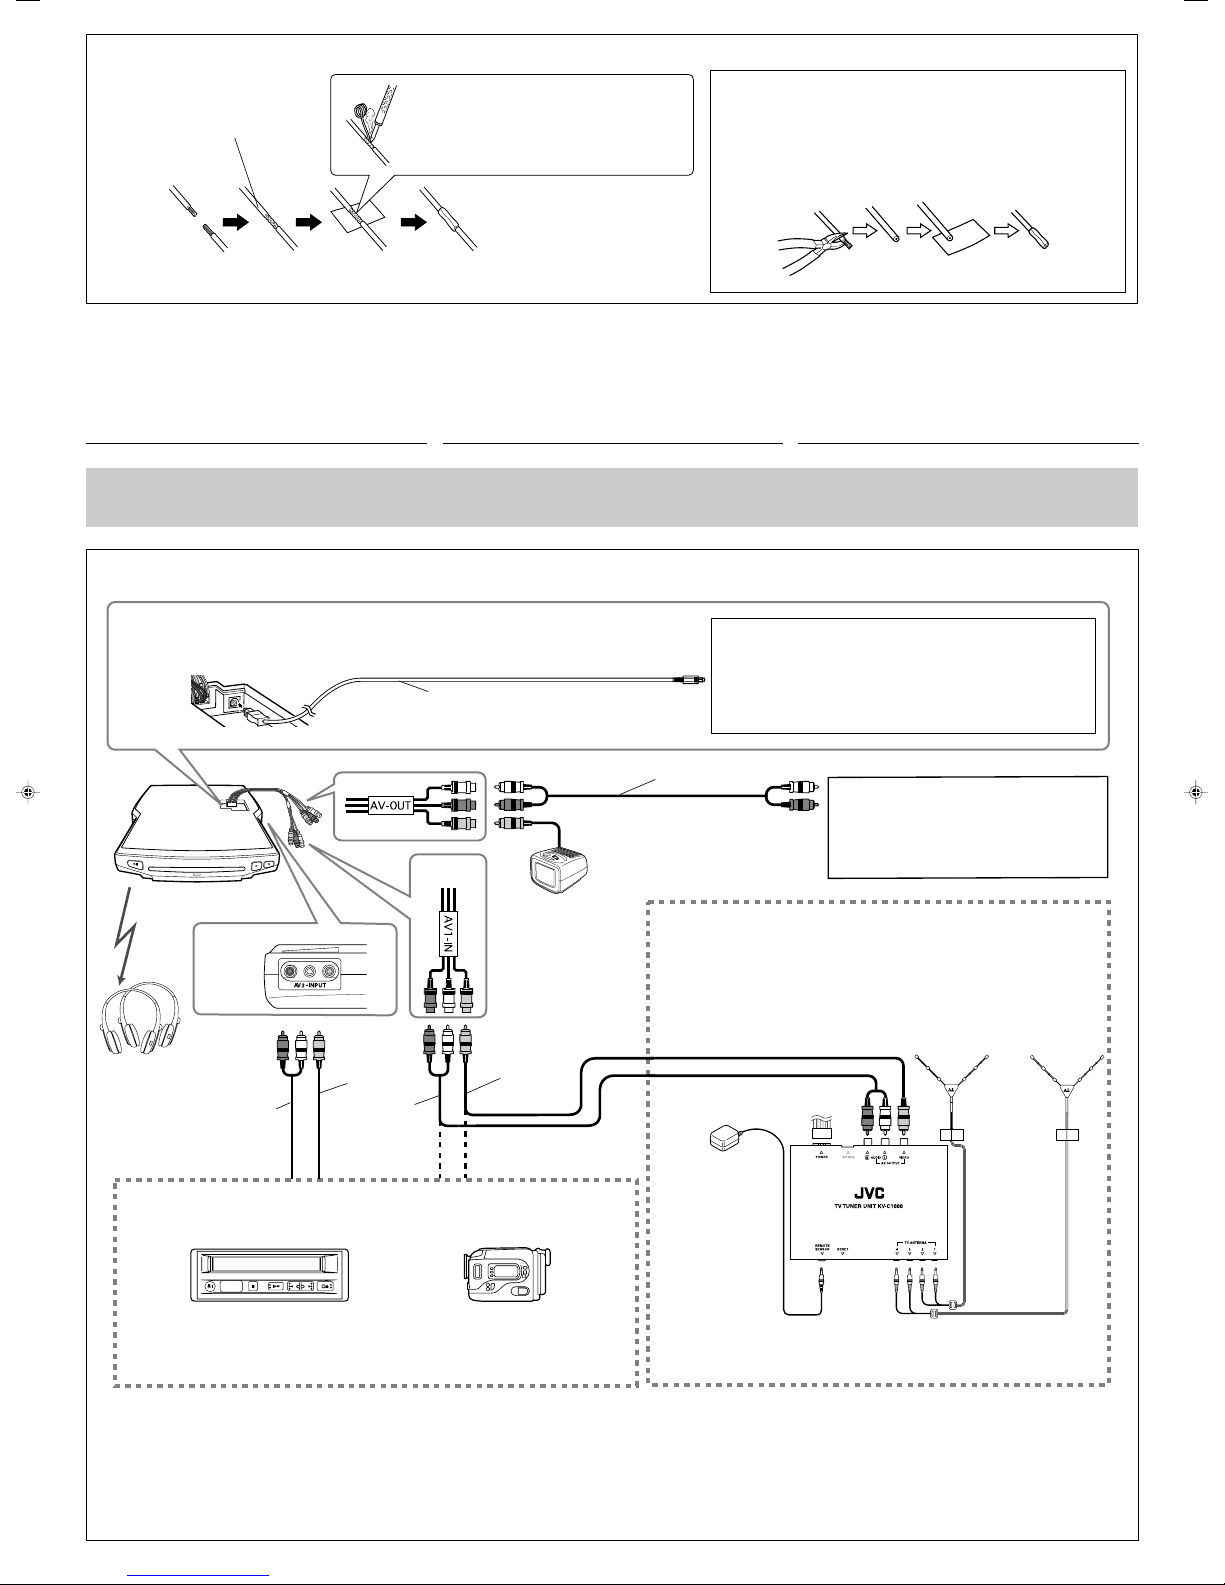
LINE IN
Connecting the leads / Conexión de los conductores / Raccordement des fils
Twist the core wires when connecting.
Retuerce los alambres de alma para
conectarlos.
Torsader les âmes des fils en les
raccordant.
Solder the core wires to connect them securely.
Suelde los alambres de alma para conectarlos con
firmeza.
Souder les âmes des fils pour les raccorder entre
eux de façon sûre.
CAUTION / PRECAUCIÓN / ATTENTION:
• To prevent short-circuit, cover the terminals of the UNUSED leads
with insulating tape.
• Para evitar cortocircuitos, cubra los cables NO UTILIZADOS con cinta
aislante.
• Pour éviter les court-circuits, couvrir les bornes des fils qui ne sont
PAS utilisés avec de la bande isolante.
CONNECTING TO THE RECEIVER AND
EXTERNAL COMPONENTS
DO NOT connect the AV1-IN and AV2-INPUT plugs on the
monitor to the LINE OUT or SUBWOOFER plugs of the car
receiver.
CONEXION AL RECEPTOR Y A LOS
COMPONENTES EXTERNOS
NO conecte las clavijas AV1-IN y AV2-INPUT del monitor a las
clavijas LINE OUT o SUBWOOFER del receptor para
automóvil.
For KV-MRD900 / Para KV-MRD900 / Pour le KV-MRD900
See also “About sounds reproduced through the terminals” on page 36 of the INSTRUCTIONS.
Consulte también “Acerca de los sonidos reproducidos a través de los terminales traseros” en la página 36 de las
MANUAL DE INSTRUCCIONES.
Référez-vous aussi à “À propos des sons reproduits par les prises” à la page 36 du MANUEL D’INSTRUCTIONS.
DIGITAL OUT
KV-MRD900
AV2-INPUT
Rear panel
Panel trasero
Panneau
arrière
AV-OUT
Digital optical cable (not supplied)
Cable óptico digital (no suministrado)
Câble optique numérique (non fourni)
AV1-IN
2nd monitor
2do. monitor
2d. moniteur
CONNEXION DE L’AUTORADIO ET DES
APPAREILS EXTÉRIEURS
NE CONNECTEZ PAS les fiches AV1-IN et AV2-INPUT du
moniteur aux fiches LINE OUT ou SUBWOOFER de
l’autoradio.
Audio/video control amplifier or the decoder compatible with the
multichannel digital sources
Amplificador de control de audio/vídeo o el decodificador compatibles
con las fuentes digitales multicanal
Amplificateur de commande audio/vidéo ou décodeur compatible avec les
sources numériques multicanaux
3
*
When using the TV tuner system KV-C1000
Cuando se utiliza el sistema de sintonizador de TV KV-C1000
Lors de l’utilisation du tuner de télévision KV-C1000
(or equivalent terminal)
(o terminal equivalente)
(ou prise équivalente)
Car receiver
Receptor para automóvil
Récepteur d’autoradio
Antenna elements (supplied with KV-C1000)
Elementos de antena (suministrados con KV-C1000)
Éléments d’antenne (fournis avec le KV-C1000)
KS-HP2
3
*
4
*
3
*
Playback source / Fuente de reproducción / Source de lecture
VCR (KV-V8 or KZ-V10)
VCR (KV-V8 o KZ-V10)
Magnétoscope (KV-V8 ou KZ-V10)
*3RCA pin plug cord (not supplied)
*4Video cord (not supplied)
4
*
Remote sensor unit
(supplied with KV-C1000)
Unidad de sensor remoto
(suministrada con
KV-C1000)
Capteur de télécommande
(fourni avec le KV-C1000)
Camcorder
Videocámera
Caméscope
*3Cable con clavija monopolar RCA (no suministrado)
*4Cordón de vídeo (no suministrado)
– 5 –
KV-C1000
3
*
Cordon à fiches cinch (non fourni)
4
*
Cordon vidéo (non fourni)
Page 46

2nd AUDIO OUT
VIDEO OUT
LINE IN
2nd AUDIO OUT
For KV-MR9010 / Para KV-MR9010 / Pour le KV-MR9010
2nd AUDIO OUT
VIDEO OUT
LINE IN
• When the receiver is equipped with the 2nd AUDIO OUT plug
AV-OUT
AV1-IN
• Cuando el receptor está equipado con la clavija 2nd AUDIO
OUT
KV-MR9010
•
Si l’autoradio est muni d’une fiche 2nd AUDIO OUT
3
*
2nd monitor
2do. monitor
4
*
2d. moniteur
3
*
Car receiver (ex. JVC KD-ADV6160)
Receptor para automóvil (ej. JVC KD-ADV6160)
Récepteur d’autoradio (ex. JVC KD-ADV6160)
AV2-INPUT
Rear panel
Panel trasero
Panneau
KS-HP2
(not supplied)
(no suministrados)
(non fourni)
arrière
Playback source / Fuente de reproducción / Source de lecture
VCR (KV-V8 or KZ-V10)
VCR (KV-V8 o KZ-V10)
Magnétoscope (KV-V8 ou KZ-V10)
When increasing the headphones level, first increase output
level of the 2nd AUDIO OUT on the receiver, then adjust the
headphones level on the headphones.
• Refer also to the INSTRUCTIONS of your car receiver.
• When the receiver is NOT equipped with the 2nd AUDIO OUT
plug
AV-O UT
AV1-IN
Camcorder
Videocámera
Caméscope
Cuando aumente el nivel de los auriculares, primero aumente
el nivel de salida de 2nd AUDIO OUT en el receptor y, a
continuación, ajuste el nivel de auriculares en los auriculares.
• Consulte también las MANUAL DE INSTRUCCIONES de su
receptor para automóvil.
• Cuando el receptor NO está equipado con la clavija 2nd AUDIO
OUT
KV-MR9010
AV2-INPUT
Rear panel
Panel trasero
Panneau
KS-HP2
(not supplied)
(no suministrados)
(non fourni)
arrière
When using the TV tuner system KV-C1000
4
*
3
*
Cuando se utiliza el sistema de sintonizador de TV KV-C1000
Lors de l’utilisation du tuner de télévision KV-C1000
KV-C1000
Si vous souhaitez augmenter le niveau du casque d’écoute,
augmentez d’abord le niveau de sortie de la prise 2nd AUDIO
OUT sur l’autoradio, puis ajustez le niveau du casque d’écoute
sur le casque.
• Référez-vous aussi au MANUEL D’INSTRUCTION de votre
autoradio.
• Si l’autoradio N’est PAS muni de fiches 2nd AUDIO OUT
3
*
2nd monitor
2do. monitor
4
*
2d. moniteur
When using the TV tuner system KV-C1000
Cuando se utiliza el sistema de sintonizador de TV KV-C1000
Car receiver (ex. JVC KD-DV5100)
Receptor para automóvil (ej. JVC KD-DV5100)
Récepteur d’autoradio (ex. JVC KD-DV5100)
Lors de l’utilisation du tuner de télévision KV-C1000
4
*
3
*
Playback source / Fuente de reproducción / Source de lecture
VCR (KV-V8 or KZ-V10)
VCR (KV-V8 o KZ-V10)
Magnétoscope (KV-V8 ou KZ-V10)
*3RCA pin plug cord (not supplied)
*4Video cord (not supplied)
TROUBLESHOOTING
• The fuse blows.
* Are the red and black leads connected correctly?
• Power cannot be turned on.
* Is the yellow lead connected?
• Picture does not come on screen.
* Is the correct input selected?
• Dome lights cannot be turned on.
* Is the yellow and red stripe lead connected?
• This unit does not work at all.
* Have you reset your unit?
Camcorder
Videocámera
Caméscope
*3Cable con clavija monopolar RCA (no suministrado)
*4Cordón de vídeo (no suministrado)
LOCALIZACION DE AVERIAS
• El fusible se quema.
* ¿Están los conductores rojo y negro correctamente conectados?
• No es posible conectar la alimentación.
* ¿Está el cable amarillo conectado?
• La imagen no aparece en la pantalla.
* ¿Se ha seleccionado la entrada correcta?
• Las luces del techo no se encienden.
* ¿Está conectado el conductor de rayas rojas y amarillas?
• La unidad no funciona para nada.
* ¿Reinicializó su unidad?
– 6 –
KV-C1000
3
*
Cordon à fiches cinch (non fourni)
4
*
Cordon vidéo (non fourni)
EN CAS DE DIFFICULTES
• Le fusible saute.
Les fils rouge et noir sont-ils racordés correctement?
*
• L’appareil ne peut pas être mise sous tension.
*
Le fil jaune est-elle raccordée?
• Aucune image n’apparaît sur l’écran.
L’entrée correcte est-elle choisie?
*
• Le plafonnier ne peut pas être allumé.
*
Le fil à bandes jaune et rouge est-il connecté?
• Cet appareil ne fonctionne pas du tout.
Avez-vous réinitialisé votre appareil?
*
Page 47

9-INCH WIDESCREEN MONITOR WITH DVD PLAYER
9-ZOLL-BREITBILDMONITOR MIT DVD-PLAYER
MONITEUR COULEUR A ECRAN LARGE DE 9 POUCES AVEC
LECTEUR DE DVD
ENGLISH
9-INCH BREEDBEELD-MONITOR MET DVD-SPELER
KV-MRD900
• This system cannot receive television broadcasts. Use the separately sold TV tuner unit KV-C1001 for
optional television broadcast reception.
• Dieses System kann keine Fernsehsignale empfangen. Verwenden Sie den separat erhältlichen
Fernsehtuner KV-C1001, um Fernsehsignale zu empfangen.
• Ce système ne peut pas recevoir les émissions de télévision . Utilisez le module de tuner de télévision
mobile KV-C1001 vendu séparément afin de pouvoir recevoir les émissions de télévision.
• Met dit systeem kunt u geen televisie-uitzendingen ontvangen. Gebruik de los verkrijgbare draagbare,
KV-C1001 TV-tuner voor ontvangst van televisie-uitzendingen.
DEUTSCH
FRANÇAIS
NEDERLANDS
For installation and connections, refer to the separate manual.
Für den Einbau und die Anschlüsse siehe das eigenständige Handbuch.
Pour l’installation et les raccordements, référez-vous au manuel séparé.
Bijzonderheden over de installatie en aansluiting van het apparaat vindt u in de desbetreffende handleiding.
INSTRUCTIONS
BEDIENUNGSANLEITUNG
MANUEL D’INSTRUCTIONS
GEBRUIKSAANWIJZING
LVT1341-001A
[E]
Page 48

WARNINGS
• DO NOT INSTALL THE MONITOR IN A
LOCATION WHICH OBSTRUCTS DRIVING,
VISIBILITY, SAFETY DEVICE FUNCTION
SUCH AS AIR BAGS OR WHICH IS
ENGLISH
PROHIBITED BY APPLICABLE LAWS AND
REGULATIONS.
• There may be legal regulations defining the
permissible installation locations for the monitor
which differ by country or by state. Be sure
to install the monitor in a correct location
according to such laws.
• The driver must not operate the monitor while
driving.
* Stop your vehicle in a safe location when
operating the monitor.
• The driver must not watch the television or
playback pictures while driving.
If the driver does it while driving, it may lead to
carelessness and cause an accident.
• Keep the monitor at an appropriate sound level
while driving.
Driving with the sound at a level that prevents
you from hearing sounds outside of and around
the vehicle may cause an accident.
• Be sure not to let the monitor fall or be strongly
impacted since this may cause a malfunction or
fire.
• Do not use the monitor with the engine off.
Doing so with the engine off will consume
battery power and may prevent the engine from
starting.
• When not in use, close the liquid crystal panel
and store it into the compartment.
• Do not touch the surface of the liquid crystal
panel directly.
• Do not hang any object on the monitor or hang
down, as this may damage the monitor.
CAUTION:
This monitor should be used on DC 12 V only. To
prevent electric shocks and fire hazards, DO NOT
use any other power source.
Installation requires some special
knowledge.
Do not install the monitor yourself.
Consult a dealer having special
knowledge of this kind for safe and
reliable installation.
CAUTIONS on the supplied headphones
—KS-HP2:
• DO NOT leave the headphones in a place
exposed to direct sunlight for a long
time, such as a dashboard, as they may be
damaged.
• Keep the headphones away from a cellular
phone to avoid interference.
• DO NOT turn off the power with the
volume set at high level, as the sudden
blast of sound can damage your hearing
and/or headphones next time you use the
headphones.
• If you experience a ringing in your
ears, reduce volume or stop using the
headphones.
2
Page 49

Thank you for purchasing a JVC product.
Please read all instructions carefully before operation, to ensure your complete understanding and to
obtain the best possible performance from the unit.
IMPORTANT FOR LASER PRODUCTS
1. CLASS 1 LASER PRODUCT
2. CAUTION : Do not open the top cover. There are no user serviceable parts inside the unit; leave
all servicing to qualified service personnel.
3. CAUTION: Visible and invisible laser radiation when open and interlock failed or defeated.
Avoid direct exposure to beam.
4. REPRODUCTION OF LABEL: CAUTION LABEL, PLACED OUTSIDE THE UNIT.
Caution on volume setting:
This product incorporates copyright
protection technology that is protected
by U.S. patents and other intellectual
property rights. Use of this copyright
protection technology must be authorized
by Macrovision, and is intended for home
and other limited viewing uses only unless
otherwise authorized by Macrovision.
Reverse engineering or disassembly is
prohibited.
Discs produce very little noise compared
with other sources. Lower the volume
before playing a disc to avoid damaging
the speakers by the sudden increase of the
output level.
ENGLISH
3
Page 50

How to reset your monitor
ENGLISH
This will reset the microcomputer. Your preset
adjustments will also be erased.
How to forcibly eject a disc
How to read this manual
The following methods are used to make the
explanations simple and easy-to-understand:
• Some related tips and notes are explained in
“More about this monitor” (see pages
33 – 35).
• Button operations are mainly explained with
the illustrations as follows:
Press briefly.
Press repeatedly.
If a disc cannot be recognized by the monitor
or cannot be ejected...
Monitor
The disc comes
out.
(for about 5 seconds
while power is on)
• If this does not work, reset your monitor.
• Be careful not to drop the disc when it
ejects.
Press either one.
Press and hold until
your desired response
begins.
Press and hold both
buttons at the same
time.
4
Page 51

Contents
How to reset your monitor ..................... 4
How to forcibly eject a disc ................... 4
How to read this manual ........................ 4
Precautions .................................... 6
Widescreen monitor ....................... 7
Parts identification ................................. 7
Remote controller — RM-RK230
Main elements and features ................... 8
Headphones — KS-HP2
Main elements and features ................... 10
Basic operations
............................. 11
.................... 10
....... 8
Adjustments .................................. 13
Using the monitor menu ........................ 13
Changing the aspect ratio ...................... 15
DVD/VCD/JPEG special functions ... 21
Selecting audio languages ..................... 21
Selecting subtitles .................................. 21
Selecting the multi-angle views ............. 21
Disc menu operations ............................ 22
Zoom in .................................................. 22
On-Screen disc operations ............... 23
Basic on-screen bar operations .............. 24
Basic control screen operations ............. 26
List screen operations ............................ 27
DVD setup menu ............................ 28
Basic setting procedure .......................... 28
Maintenance .................................. 31
Language codes .............................. 32
More about this monitor ................. 33
ENGLISH
Playable discs ................................ 17
Disc operations .............................. 18
Playing a disc ................................. 18
Starting playback ................................... 18
Basic operations ..................................... 19
Troubleshooting ............................. 37
Specifications ................................. 39
For safety....
• Do not raise the volume level too much, as
this will block outside sounds, making driving
dangerous.
• Stop the car before performing any
complicated operations.
Temperature inside the car....
If you have parked the car for a long time in
hot or cold weather, wait until the temperature
in the car becomes normal before operating the
unit.
5
Page 52

Precautions
Cautions for handling the liquid crystal panel
Do not expose the liquid crystal panel to direct
sunlight.
ENGLISH
• Storage temperature range: –20°C to +80°C
+80°C
–20°C
–20°C to +80°C
During the summer,
temperatures can
reach as high as
100°C.
When the liquid crystal panel reaches high
temperatures or low temperatures, chemical
changes occur within the liquid crystal panel
which may cause it to malfunction.
Do not drop the liquid crystal panel or strike
it sharply.
When the temperature is very cold or very
hot, the image may not appear clearly or may
move slowly.
The image may not be synchronized with
the sound or the image quality may decline
in such environments. Note that this is not a
malfunction or problem.
• Usage temperature range: 0°C to +40°C
The red spots, blue spots and green spots on
the panel surface are a normal characteristic of
liquid crystal panels, and not a problem.
Spots
Note:
The liquid crystal panel is built with very
high precision technology and has at least
99.99% effective image pixels. Be aware that
on 0.01% of the panel there may be missing or
constantly lit pixels.
0°C or colder
40°C or hotter
6
Page 53

Widescreen monitor
Parts identification
ENGLISH
1 (standby/on) buttons
• Turns on the power if pressed.
• Turns off the power if pressed and held.
2 Remote sensor
3 Dome light switch
• See “To activate the door sensor” on page
12.
4 IR transmitters
5 Dome lights
6 Arm lock lever
7 Reset button
When you watch the screen at an angle, the picture might not be clear. This is not a malfunction.
The finest picture can be seen when you watch the screen straight-on.
8 Screen (Liquid crystal panel)
9 Disc loading slot
p 0 (eject) button
q 3 (play) button
w Disc loading lamp
e White LED
r PUSH-OPEN button
t Screen compartment
y Screen arm
7
Page 54

Remote controller — RM-RK230
Installing the lithium coin battery
(CR2025)
ENGLISH
Before using the remote controller:
• Aim the remote controller directly at the
remote sensor on the monitor. Make sure
there is no obstacle in between.
Main elements and features
MENU
Remote sensor
• Do not expose the remote sensor to strong
light (direct sunlight or artificial lighting).
Warning:
• Do not install any battery other than
CR2025 or its equivalent; otherwise, it
may explode.
• Store the battery in a place where children
cannot reach to avoid risk of accident.
• To prevent the battery from over-heating,
cracking, or starting a fire:
– Do not recharge, short, disassemble, or
heat the battery or dispose of it in a fire.
– Do not leave the battery with other
metallic materials.
– Do not poke the battery with tweezers or
similar tools.
– Wrap the battery with tape and insulate
when throwing away or saving it.
MONITOR CONTROL
1
• Turns on the power if pressed.
• Turns off the power if pressed and held.
2 MODE button
• Selects the playback source.
3 ASPECT button
• Changes the aspect ratio of the screen.
4 MENU button
• Calls up the menu, then selects the
5
• Adjust the level of the selected item or
(standby/on) button
adjustable menu items.
/ buttons
select an appropriate setting for selected
item.
8
Page 55

DVD/RECEIVER CONTROL
6 Receiver control buttons*
1
• (standby/on attenuator) button
• SOURCE button
• BAND button
• DUAL button
• VOL + / – (2nd VOL + / –) buttons
7 TOP M (menu) button*
2
• Displays the DVD and VCD*3 disc menu.
8 SETUP button*
2
9 SHIFT button
p Disc basic operation buttons
7 (stop), 3 (play), 8 (pause)
• 3 (play) button functions as ZOOM
button when pressed with SHIFT button.
q Advanced disc operation buttons
•
/TITLE 5 / ∞*
4
– Select the titles (for DVD) or folders
(for MP3/WMA/JPEG)*
• 4 / ¢ (reverse skip/forward skip)*
5
.
6
• 1 / ¡ (reverse search/forward
search)*
7
w OSD button
• Displays the on-screen bar.
• Also functions as the
/TITLE button
when pressed with SHIFT button.
– You can directly select folders (for
MP3/WMA/JPEG) or titles (for DVD)
using the number buttons (see right
column).
e MENU button*
2
• Displays the DVD and VCD*3 disc menu.
r Menu operation buttons*
2
• Cursor (% , fi , @ , #) and ENTER
t RETURN button*
2
y DVD/VCD special function buttons
• DVD/VCD:
• DVD:
(subtitle), (angle)
(audio)
How to select a number
• To select a number from 0 – 9:
ENGLISH
• To select a number greater than 9:
• +100/–100 buttons used only for searching
MP3/WMA/JPEG tracks number greater
than 99.
1
*
Controllable only if your car receiver which
is connected to this monitor is one of the
JVC receivers.
2
*
These buttons function as the number
buttons when pressed with SHIFT button.
3
*
Only when PBC is not in use.
4
These buttons do not function as PRESET
*
5 / ∞.
5
*
These buttons function as the +10/–10
buttons when pressed with SHIFT button.
6
*
These buttons function as the +100/–100
buttons when pressed with SHIFT button.
7
*
Not used for MP3/WMA/JPEG operations.
9
Page 56

Headphones — KS-HP2
You can listen to the playback sounds with
cordless headphones—KS-HP2.
Main elements and features
Installing the batteries
ENGLISH
Batteries (R03/AAA)
— supplied only for
initial setup purpose
CAUTIONS:
• The supplied batteries are not rechargeable.
DO NOT recharge them; otherwise, battery
leakage or explosion may result.
• Insert the batteries with the correct polarity
“+” and “–” to prevent the battery leakage
or explosion.
Left side Right side
POWER
1 IR sensors
• DO NOT cover the IR sensors, as
reception will become poor.
2 ON/OFF button
• The power automatically shuts off in the
following cases:
– The headphones are used for about 4
hours.
– No signal is received for about 4
minutes.
• You can turn on the power again by
pressing the button.
3 POWER lamp
4 Volume control
VOL
Before using the cordless headphones:
The headphones give best results when used
within about 2 m from the transmitter.
These headphones need to receive infrared (IR)
signals sent from IR transmitters on the monitor.
Therefore, if you use the headphones where the
signals cannot be received in a straight line of
sight, noises may be generated.
10
IR transmitters
Playback sounds are transmitted through IR
transmitters to the cordless headphones.
When using the headphones, set the monitor
menu item “IR” to “ON.” (See page 14.)
WARNING:
DO NOT use the headphones while driving.
Shutting out all outside sounds while driving
is dangerous and may result in a traffic
accident.
Page 57
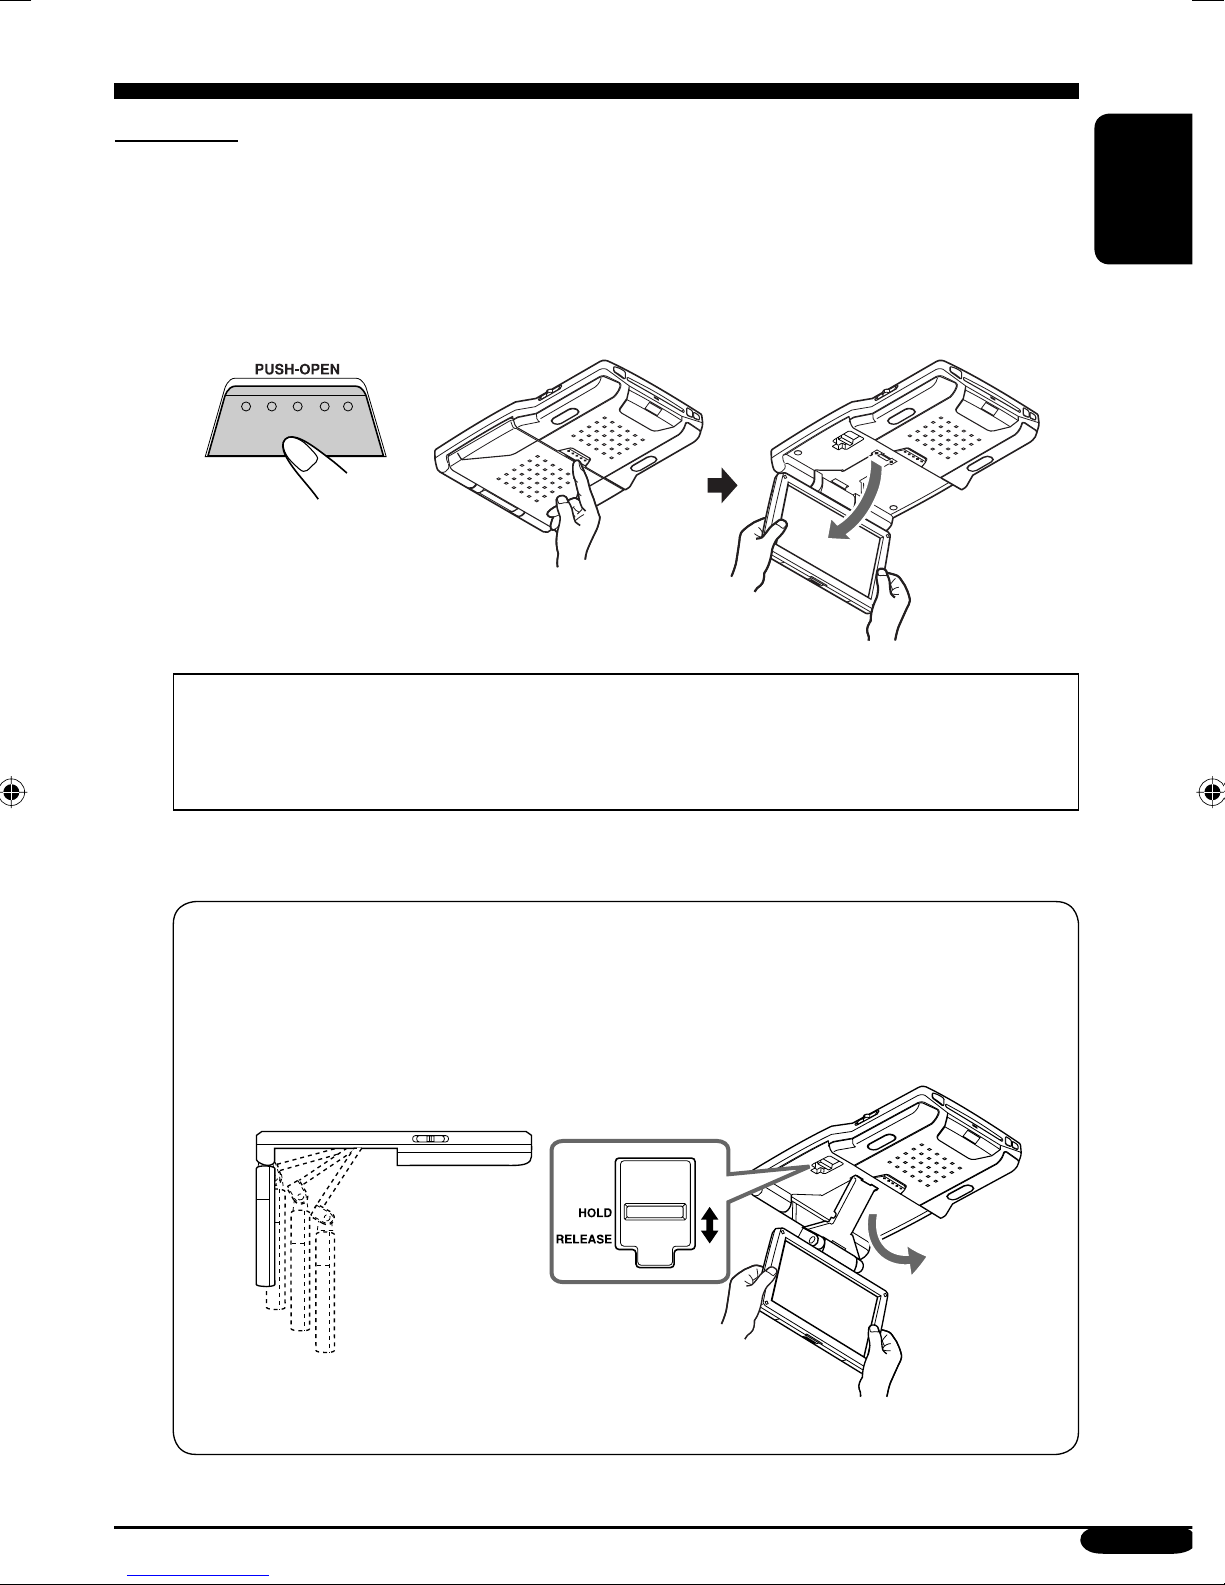
Basic operations
Preparation
Before operating the unit, make sure that all external components are correctly connected and
installed.
1 Open the liquid crystal panel.
Press PUSH-OPEN until the liquid crystal panel is unlocked, then open the liquid crystal
panel by both hands.
CAUTION:
• When not in use, close the liquid crystal panel and store it into the compartment;
otherwise it may obstruct the visibility through the rearview mirror.
• Do not touch the surface of the liquid crystal panel directly.
ENGLISH
When closing the liquid crystal panel, store it in the screen compartment until it is locked.
To change the monitor position
You can select a monitor position from the four positions.
1 Slide the arm lock lever to RELEASE, then pull down or push up the monitor.
2 Slide the arm lock lever to HOLD, then remove the screen arm to the nearest locking
position.
When closing the liquid crystal panel, push up the monitor to the highest position.
To be continued....
11
Page 58
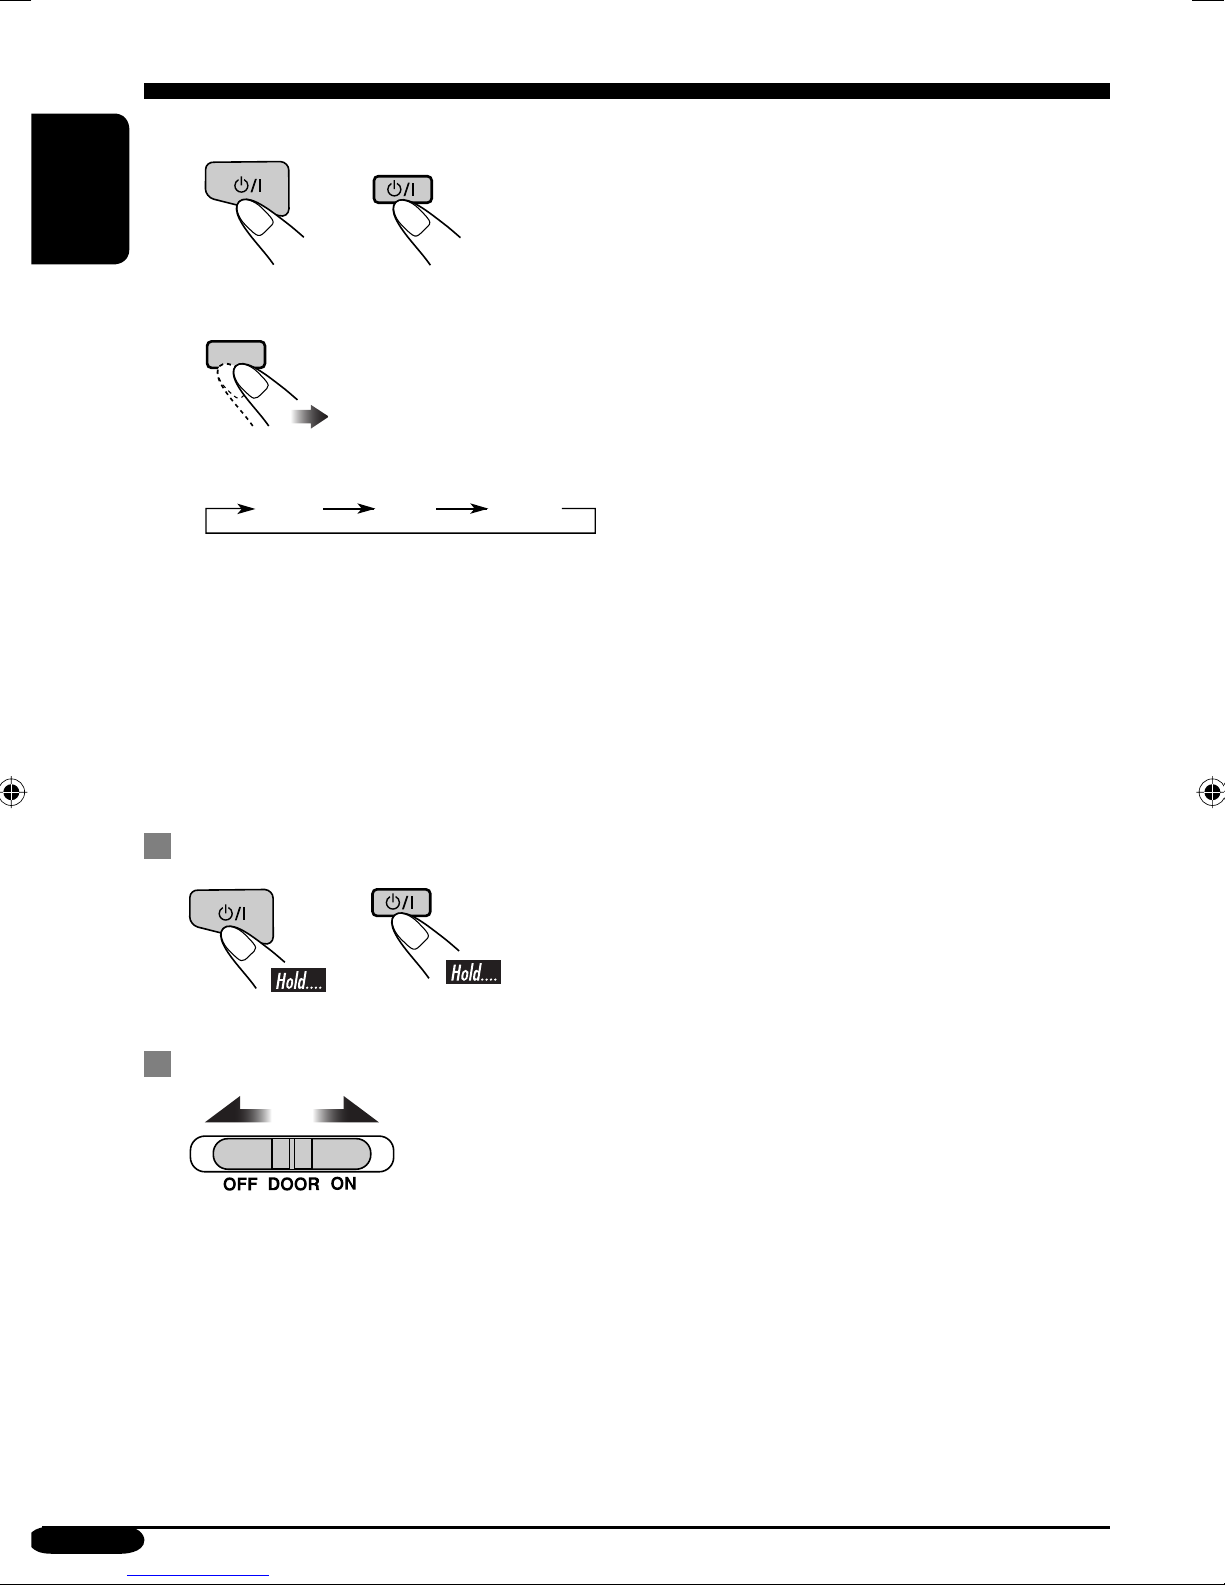
2 Turn on the power.
ENGLISH
Monitor Remote control
3 Select the playback source.
MODE
Each time you press the button, the playback source changes as follows:
AV 1 AV 2DISC
4 Operate the playback source you selected.
To operate the built-in DVD player, see “Disc operations” on page 18.
To operate the external components, refer to the manuals for the connected components.
5 Adjust the volume on the car receiver.
• When using the headphones, adjust its volume level.
To turn off the power
• When using the headphones, turn off the power after
turning off the headphones.
Monitor Remote control
To activate the door sensor
• OFF: Turns off the dome lights.
• DOOR: Activates the door sensor which turns on the dome lights when a door is open.
• ON: Turns on the dome lights.
12
Page 59

Adjustments
Using the monitor menu
You can make your own display or sound adjustments using the menu.
• For the adjustable items, see the next page.
The Remote controller—RM-RK230 has two MENU buttons.
In this section, using MENU button at MONITOR CONTROL.
Basic procedure
1
Call up the menu.
ENGLISH
BRIGHT
CONTRAST
TINT
COLOR
IR ON
DIMMER
DVD SURROUND OFF
NTSC / PAL PAL
WHITE LED ON
Current menu item
Menu selection goes off if other operations are done or no operation is done for about 5
seconds.
2 Select an item you want to adjust.
MENU
3 Adjust the level of the selected item (or select an appropriate setting for the
selected item).
Not used for changing the “DVD SURROUND” setting.
4 Exit from the menu.
Press the button repeatedly until the menu is erased.
MENU
13
Page 60

Adjustable items on the monitor menu
BRIGHT:
ENGLISH
CONTRAST:
TINT:
COLOR:
IR*:
DIMMER:
DVD SURROUND:
NTSC/PAL:
Adjust this if the picture is too bright or too dark.
• Adjustable range: –10 to +11
• Initial level: 0 (center)
Control the degree of difference between the lightest and darkest parts of
the picture.
• Adjustable range: –10 to +11
• Initial level: 0 (center)
Adjust this if the human skin color is unnatural.
• Adjustable range: –10 to +11
• Initial level: 0 (center)
Adjust the color of the picture—lighter or darker.
• Adjustable range: –10 to +11
• Initial level: 0 (center)
Set to “ON” when you listen to the playback sounds using the cordless
headphones.
• Selectable settings: ON, OFF
• Initial setting: ON
Adjust the light of the screen and the white LED when you turn on the
headlights.
• Adjustable range: –5 to +5
• Initial level: 0 (center)
This function allows you to get a surround effect from your stereo
system. When connecting a receiver incompatible with the multi-channel
sources, you can enjoy the virtual surround sound with your 2-channel
stereo system.
If you turn off the monitor, the setting is initialized.
• Selectable settings: OFF, ACTION, DRAMA, THEATER
– ACTION: Suitable for action movies and sports programs.
– DRAMA: Creates natural and warm sound. Enjoy movies in a
relaxed mood.
– THEATER: Enjoy sound effects like in a major theater.
• Initial setting: OFF
Select the color system to match to the incoming signals.
• Selectable settings: PAL, NTSC
• Initial setting: PAL
Turn off then on the power to activate a new setting when you change the
setting.
WHITE LED:
* Turn off the headphones before changing the “IR” setting.
14
Light on or off the white LED when you turn on the monitor.
• Selectable settings: ON, OFF
• Initial setting: ON
Page 61

Changing the aspect ratio
You can select an appropriate aspect ratio for the playback video signals.
Basic procedure
Each time you press the button, aspect ratio change.
ASPECT
Changeable aspect ratio
When incoming 16:9 video signal:
ENGLISH
FULL:
NORMAL:
JUST:
ZOOM:
Pictures are fully shown on the screen.
• In some cases, the black bars may be shown at the top and
bottom sides of the screen.
Pictures are reduced horizontally.
• The black bars will be shown at the left and right sides of
the screen.
• In some cases, the black bars may be shown also at the top
and bottom sides of the screen.
The middle of pictures are reduced horizontally, and the left
and right side of the picture enlarged horizontally.
• In some cases, the black bars may be shown at the top and
bottom sides of the screen.
Pictures are enlarged on the screen so that no black bars will
be shown on the screen. (The entire picture cannot be shown
on the screen.)
To be continued....
15
Page 62

When incoming 4:3 video signal:
FULL:
ENGLISH
NORMAL:
JUST:
ZOOM:
Pictures are enlarged horizontally and are fully shown on the
screen.
Pictures are shown at the center of the screen.
• The black bars will be shown at the left and right sides of
the screen.
Pictures are enlarged horizontally. The extension ratio
increases toward the both sides of the screen.
Pictures are enlarged on the screen so that no black bars will
be shown on the screen. (The entire picture cannot be shown
on the screen.)
16
Page 63

Playable discs
Discs you can play
You can play back the following discs—12 cm
and 8 cm—on the built-in DVD player:
• DVD Video: Recorded in the PAL color
system with Region Code “2” (see below).
– DVD-R/DVD-RW recorded in the DVD
Video format can also be played (see page
33).
• Video CD (VCD)/audio CD
• MP3/WMA/JPEG: Recorded either in CD-
R/CD-RW or DVD-R/DVD-RW/DVD-ROM.
– CD-R/CD-RW: Compliant with ISO 9660
Level 1, ISO 9660 Level 2, Romeo, and
Joliet.
– DVD-R/DVD-RW/DVD-ROM: Compliant
with UDF-Bridge Format*
1
.
On some discs, the actual operations may be
different from what is explained in this manual.
Discs cannot be played back
DVD-Audio, DVD-ROM (data), DVD-RAM,
DVD-R/DVD-RW recorded in the DVD-VR
format, CD-ROM, CD-I (CD-I Ready), Photo
CD, etc.
• Playing back these discs will generate noise
and damage the speakers.
Note on Region Code:
DVD players and DVD Video discs have
their own Region Code numbers. This unit
can only play back DVD discs whose Region
Code numbers include “2.”
Examples:
If you insert a DVD Video disc of an
incorrect Region Code
“REGION CODE ERROR!” appears on the
screen. The disc will eject automatically.
Caution for DualDisc playback
• The Non-DVD side of a “DualDisc” does
not comply with the “Compact Disc Digital
Audio” standard. Therefore, the use of NonDVD side of a DualDisc on this product may
not be recommended.
Digital audio formats
The unit can play back the following digital
audio formats.
Linear PCM: Uncompressed digital audio,
the same format used for CDs and most studio
masters.
Dolby Digital *
developed by Dolby Laboratories, which
enables multi-channel encode to create the
realistic surround sound.
DTS *
3
(Digital Theater Systems):
Compressed digital audio, developed by Digital
Theater Systems, Inc., which enables multichannel like Dolby Digital. As the compression
ratio is lower than for Dolby Digital, it provides
wider dynamic range and better separation.
MPEG Audio: Another compressed digital
audio which also enables multi-channel encode
to create the realistic surround sound. However,
this System downmix the multi-channel signals
into 2 channels (decoded PCM) and play it
back.
1
*
A hybrid file system used to provide
compatibility with ISO 9660 for accessing
any type of files on the disc. (UDF stands for
Universal Disk Format.)
2
*
Manufactured under license from Dolby
Laboratories. “Dolby” and the doubleD symbol are trademarks of Dolby
Laboratories.
3
*
“DTS” and “DTS 2.0 + Digital Out” are
trademarks of Digital Theater Systems, Inc.
“DVD Logo” is a trademark of DVD Format/
Logo Licensing Corporation registered in the
US, Japan and other countries.
2
: Compressed digital audio,
ENGLISH
17
Page 64
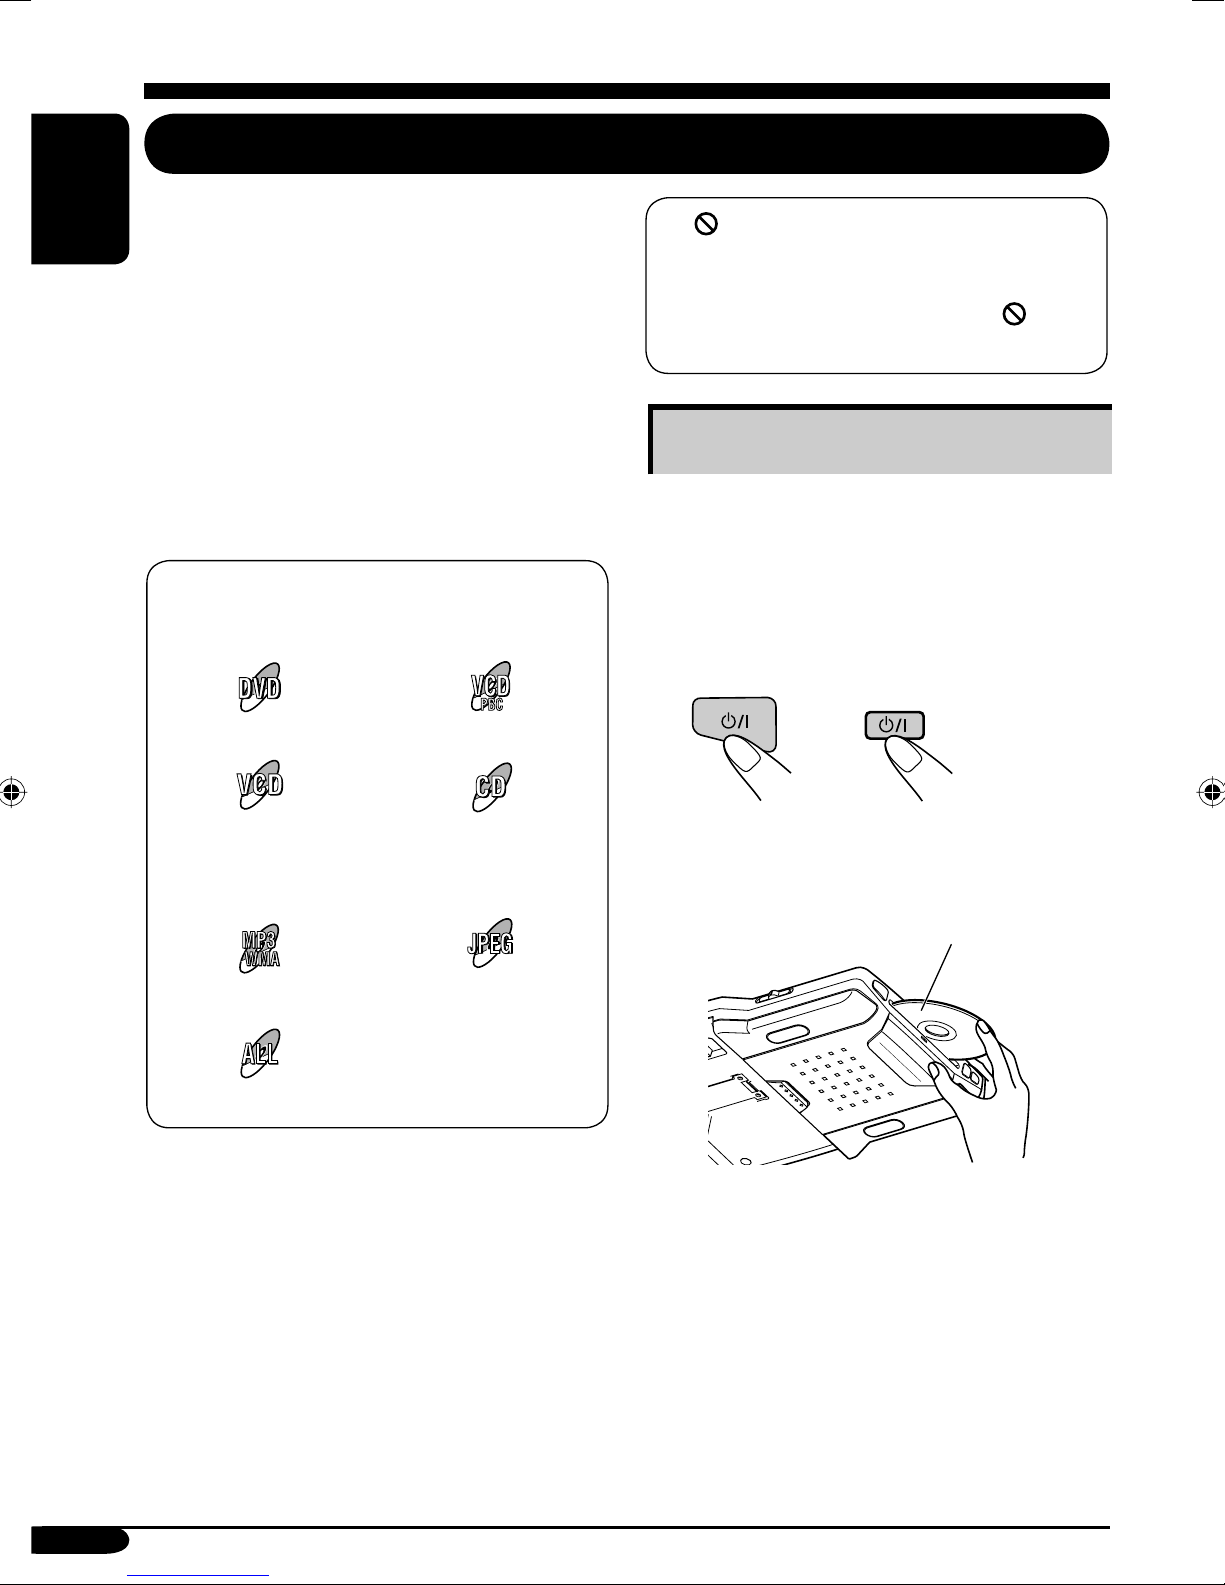
Disc operations
Playing a disc
The disc type is automatically detected, and
playback starts automatically (for DVD:
ENGLISH
automatic start depends on its internal program).
If the current disc is an audio CD, CD Text,
MP3/WMA, JPEG, or VCD without PBC,
all tracks will be played repeatedly until you
change the source or eject the disc.
• If a title list or disc menu appears while
playing a DVD or VCD with PBC, see “Disc
menu operations” on page 22.
The following marks are used to indicate
the playable discs....
DVD Video Video CD with PBC
If “ ” appears on the monitor when
pressing a button, the disc cannot accept an
operation you have tried to do.
• In some cases, without showing “
operations will not be accepted.
,”
Starting playback
1 Open the liquid crystal panel.
• You can play a disc even if the monitor is
closed.
2 Turn on the power.
Video CD
with/without PBC
MP3/WMA disc JPEG disc
All discs listed here
Before performing any operations, make
sure the following....
• For DVD playback, you can change the setup
menu setting as you like. (See pages 28 – 30.)
• For DVD/CD playback, using the remote
controller is more attractive. You can enjoy
more functions.
Audio CD/
CD Text
Monitor Remote control
3 Insert a disc into the loading slot.
Playback (shining) side facing down
• When a disc is inserted into the loading
slot, the power comes on, then “DISC”
is selected as the playback source
automatically.
18
Page 65

Basic operations
Operations Next operation
To stop play temporarily
Playback pauses.
• For JPEG discs: pressing ENTER will also pause the
picture on the monitor.
A still picture appears.
A Frame by frame playback
B Slow motion playback
• No sound comes out during Slow Motion Playback.
• When playing a VCD, Reverse Slow Motion Playback is
prohibited.
ENGLISH
To resume normal play:
To replay the previous
scenes—One Touch Replay
To stop playback
• During play, on-screen guide icons appear on the monitor for a while (see page 35).
The playback position moves back about 10 seconds before
the current position.
• This function works only within the same title.
• For some DVDs, this function does not work.
When you start playback again, playback
starts from where it has been stopped
(Resume play).
When you start playback again, playback starts from
the beginning of the last playing track.
To eject the disc
You can eject the disc even when the monitor is turned off.
To be continued....
19
Page 66

To go to the next or previous
To locate a particular title/chapter/
chapters/tracks
• For DVD: During play or pause
ENGLISH
To the following
chapters/tracks.
To go back to the beginning of the current
chapter/track, then the previous chapters/tracks.
To fast-forward or reverse
the chapter/track
Fast-forwards.
Reverses.
* The search speed changes to x2 ] x10 for all
discs (DVD, VCD, CD), but the information
shown on the monitor is only for DVD/VCD.
track directly
• For DVD: During play or pause—select a
chapter.
During stop—select a title.
• For VCD: While PBC (see page 22) is not
in use.
• For MP3/WMA/JPEG: Select a track
within the same folder.
Select the number corresponding to the item
you want (see page 9).
To locate a title/folder
To the next title/folder.
To the previous title/folder.
To locate a particular title/
To forward or reverse
search the chapter/track
The information shown is only for DVD/VCD:
• To resume normal speed
folder
Within 10 seconds,
press the number
buttons (see page 9).
• For MP3/WMA/JPEG discs: To directly
select the folders using the number button(s),
it is required that folders be assigned 2 digit
numbers at the beginning of their folder
names—01, 02, 03, and so on.
20
Page 67
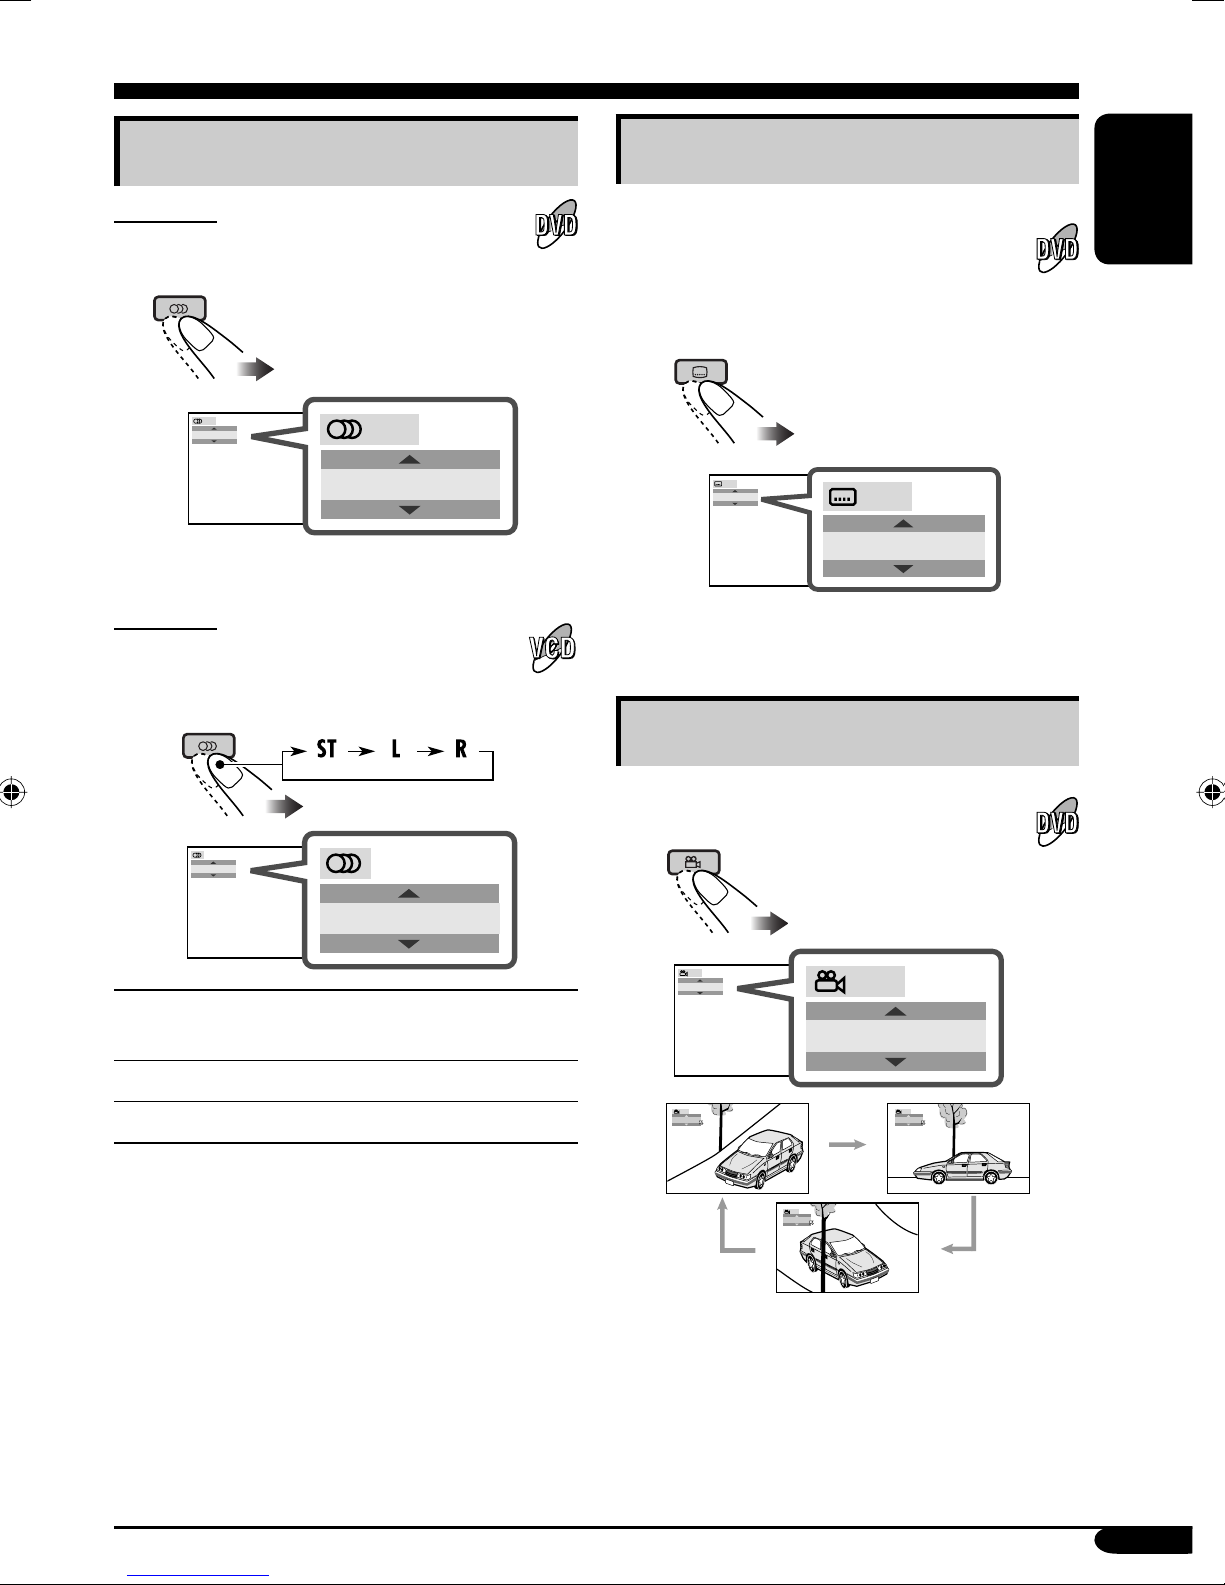
DVD/VCD/JPEG special functions
Selecting audio languages
For DVD:
You can select the language to listen to if
the disc has multiple audio languages.
1/3
ENGLISH
Ex.: When the disc has 3 options
For VCD:
You can select the audio channel to
play. (This is convenient when playing a
Karaoke VCD.)
1/3
ENGLISH
Selecting subtitles
You can select the language of the
subtitle to be shown on the monitor.
• You can set the initial subtitle
language using the setup menu (see
page 29).
1/3
ENGLISH
Ex.: When the disc has 3 options
1/3
ENGLISH
Selecting multi-angle views
ENGLISH
ST
ST
To listen to normal stereo (left/right)
ST:
playback.
To listen to the L (left) audio channel.
L:
To listen to the R (right) audio channel.
R:
You can view the same scene at different
angles if the disc has multi-angle views.
1/3
1
1/3
1
1/3
1
1/3
3
Ex.: When the disc has 3 multi-angle views
1/3
2
• For some DVDs and VCDs, changing the
subtitle language, audio language (or audio
channel) without using the disc menu is
prohibited.
21
Page 68

Disc menu operations
Menu-driven playback is possible while playing
back a DVD with menu-driven features or a
ENGLISH
VCD with the PBC (PlayBack Control).
While playing a DVD
Canceling the PBC playback
1
2 Select a track to start normal playback using
the number buttons (see page 9).
1
A title list or disc menu will appear on the
monitor.
2 Select the item you want on the
menu.
Selected item starts playback.
• On some discs, you can also select items
using the corresponding number buttons.
While playing a VCD
• When a list of items is displayed on the
monitor.
To resume the PBC function
Zoom in
1
ZOOM 1 ZOOM 2 ZOOM 3 ZOOM 4
ZOOM OFF
• For JPEG disc (effective only when
pausing):
ZOOM 1 ZOOM 2
ZOOM 5ZOOM 6
• To select a number greater than 9, see “How
to select a number” on page 9.
To return to the previous menus
• For some discs, you can also move between
the menus by pressing 4 / ¢.
22
ZOOM OFF
2 Move the zoomed-in portion.
• For JPEG files:
You cannot move the zoomed-in position
when the entire picture is displayed on the
monitor.
To cancel zoom, select “ZOOM OFF” in
step 1.
Page 69
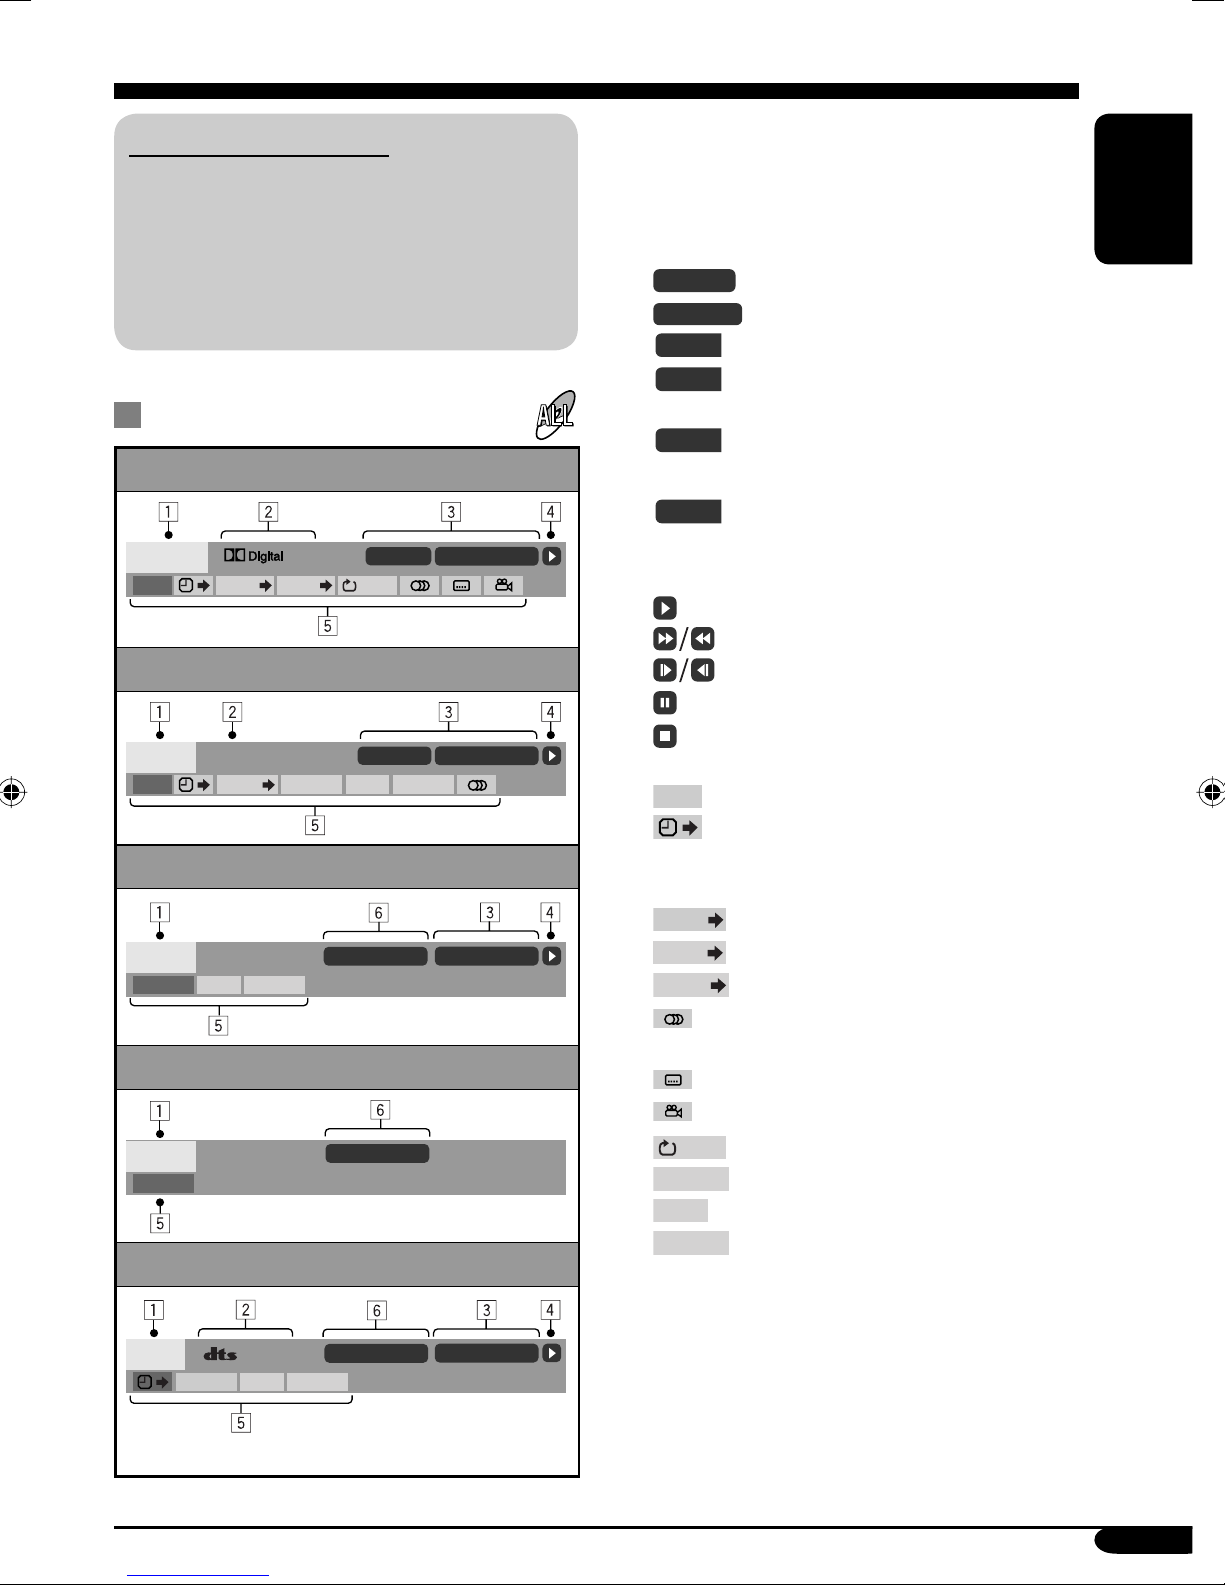
On-Screen disc operations
About the On-Screen Bar
You can check the disc information and use
some functions through the on-screen bar.
• For audio CD, CD Text, and MP3/WMA/
JPEG disc you can also use the control
screen and list screen (see pages 26 and
27).
On-Screen bars
DVD
DVD -V
TIME TITLE CHAP
VCD
VCD
TIME
PBC
TRACK REPEAT
MP3/WMA
FILE
REPEAT
RANDOMINTRO
JPEG
FILE
REPEAT
CD Text/audio CD
2ch
T02-C03 TOTAL 1:25:58
OFF
TRACK 01 TIME 00:36
RANDOMINTRO
REPEAT TRACK
REPEAT FOLDER
TIME 00:00:36
1 Disc type
2 • Audio signal format type (for DVD and
DTS audio CD)
• PBC (only for VCD)
3 Playback information
T02-C03
TRACK 01
TOTAL
T. REM
Current title/chapter
Current track
Elapsed playing time of the disc
Remaining disc time (for VCD)/
remaining title time (for DVD)
TIME
Elapsed playing time of the
current chapter/track
REM
Remaining time of the current
chapter/track
4 Playback condition
Playback
Forward/reverse search
Forward/reverse slow-motion
Pause
Stop
5 Operation icons
Time indication
TIME
Time Search—Enter the elapsed
playing time of the current title
or of the disc.
TITLE
CHAP
TRACK
Title Search
Chapter Search
Track Search
Change the audio language or
audio channel.
Change the subtitle language.
Change the view angle.
Repeat play (for DVD)
OFF
REPEAT
INTRO
RANDOM
Repeat play (for other discs)
Intro play
Random play
6 Current playback mode
ENGLISH
*
CD
5. 1ch
REPEAT
REPEAT TRACK
RANDOMINTRO
* Only for DTS audio CD
TIME 00:36
To be continued....
23
Page 70

Basic on-screen bar operations
1 Display the on-screen bar.
ENGLISH
• For DVD/VCD:
To erase the on-screen bar
• The on-screen bar for a CD or MP3/WMA/
JPEG disc automatically disappears in a few
seconds after the last operation.
(twice)
• For other discs:
DVD -V
TIME TITLE CHAP
2ch
When a JPEG disc is loaded, skip to step 3.
T02-C03 TOTAL 1:25:58
OFF
2 Select an item.
3 Make a selection.
• The selectable options for Repeat/Intro/
Random plays:
OFF
You can repeat the current title or
chapter.
DVD (during play or pause):
OFF CHAP TITLE
REPEAT
You can repeat the current track
(except for JPEG) or the tracks in
the current folder (only for MP3/
WMA/JPEG).
VCD (while PBC is not in use):
REPEAT
(Canceled)
• If pop-up menu appears....
1
DVD -V
TIME TITLE CHAP
or
2ch
OFF
_ _
2
24
T02-C03 TOTAL 1:25:58
MP3/WMA:
REPEAT TRACK
(Canceled)
JPEG:
REPEAT FOLDER
CD Text/audio CD:
REPEAT TRACK
REPEAT FOLDER
(Canceled)
(Canceled)
Page 71

INTRO
You can play the first 15 seconds
of all tracks in the disc, or in the
current folder (only for MP3/
WMA).
VCD (while PBC is not in use):
INTRO
MP3/WMA:
(Canceled)
To search for a particular point by playing
time
• For VCD: while PBC is not in use.
1 Select
2 Enter the elapsed playing time of the current
title or of the disc.
.
ENGLISH
INTRO TRACK
(Canceled)
CD Text/audio CD:
INTRO TRACK
RANDOM
You can randomly play all tracks
in the disc, or in the current folder
(only for MP3/WMA).
VCD (while PBC is not in use):
RANDOM
MP3/WMA:
RANDOM FOLDER
(Canceled)
INTRO FOLDER
(Canceled)
(Canceled)
RANDOM DISC
Ex.: • To enter 1 (hours): 02 (minutes): 00
(seconds), press 1, 0, 2, 0, then 0.
• To enter 54 (minutes): 00 (seconds),
press 0, 5, 4, 0, then 0.
• It is always required to enter the hour
digit (even “0” hour), but it is not required
to enter trailing zeros (the last two digits
in the examples above).
• To correct a misentry, press...
• You can also specify the elapsed playing
time by using % / fi / @ / #.
3 Finish the procedure.
CD Text/audio CD:
RANDOM DISC
(Canceled)
Refer also page 24 for the following operations.
To change the time information
1 Select
2 Change the time information.
TIME
.
TIME 0:00:58
REM 0:11:23
TOTAL 1:01:58T. REM 0:35:24
To search for a particular title/chapter/track
1 Select
TITLE
2 Enter the number.
• To correct a misentry, press the number
button until the correct number is entered.
3 Finish the procedure.
,
CHAP
, or
TRACK
.
25
Page 72

Basic control screen operations
You can search for and play the desired items
through the control screen.
ENGLISH
For MP3/WMA/CD Text/audio CD:
To select a folder or track
1 Select “Folder” column or “Track” column
on the control screen.
The control screen automatically appears on the
monitor when you insert a disc.
JPEG:
Press TOP M (menu), MENU, or 7.
Playback stops and the control screen appears.
MP3/WMA/JPEG control
screen
TIME 00:00:14REPEAT TRACK
Folder : 2 / 3
01 Music
02 Music
03 Music
Track Information
Album
Weather
Artist
Robert M. Smith
Title
Rain
Track : 5 / 14 (Total 41)
Cloudy.mp3
Fair.mp3
Fog.mp3
Hail.wma
Indian summer.mp3
Rain.mp3
Shower.mp3
Snow.mp3
Thunder.wma
Typhoon.mp3
Wind.mp3
Winter sky.mp3
2 Select a folder or track.
• If playback does not start,
press 3 or ENTER.
• For JPEG discs: Pressing ENTER will pause
the selected picture on the monitor.
CD Text/audio CD control
screen
Track Information
Album
Four seasons
Artist
Robert M. Smith
Title
Rain
REPEAT TRACK
Track : 5 / 14
Cloudy
Fair
Fog
Hail
Indian summer
Rain
Shower
Snow
Thunder
Typhoon
Wind
Winter sky
TIME 00:14
Ex.: Control screen for MP3/WMA
1 Current folder
2 Current folder number/total folder number
3 Folder list
4 Selected playback mode
5 Elapsed playing time of the current track
(only for MP3/WMA)
6 Operation mode icon (only for MP3/WMA)
‰ (play), 7 (stop), 8 (pause)
7 Current track number/total number of tracks
in the current folder (total number of tracks
on the disc)
8 Track information (only for MP3/WMA)
9 Track list
p Current track (highlighted bar)
26
1 Selected playback mode
2 Elapsed playing time of the current track
3 Operation mode icon
‰ (play), 7 (stop), 8 (pause), ¡ (fast-
forward), 1 (reverse)
4 Current track number/total number of tracks
on the disc
5 Track information
6 Track list
7 Current track (highlighted bar)
To select a track
• If playback does not start,
press 3 or ENTER.
Page 73
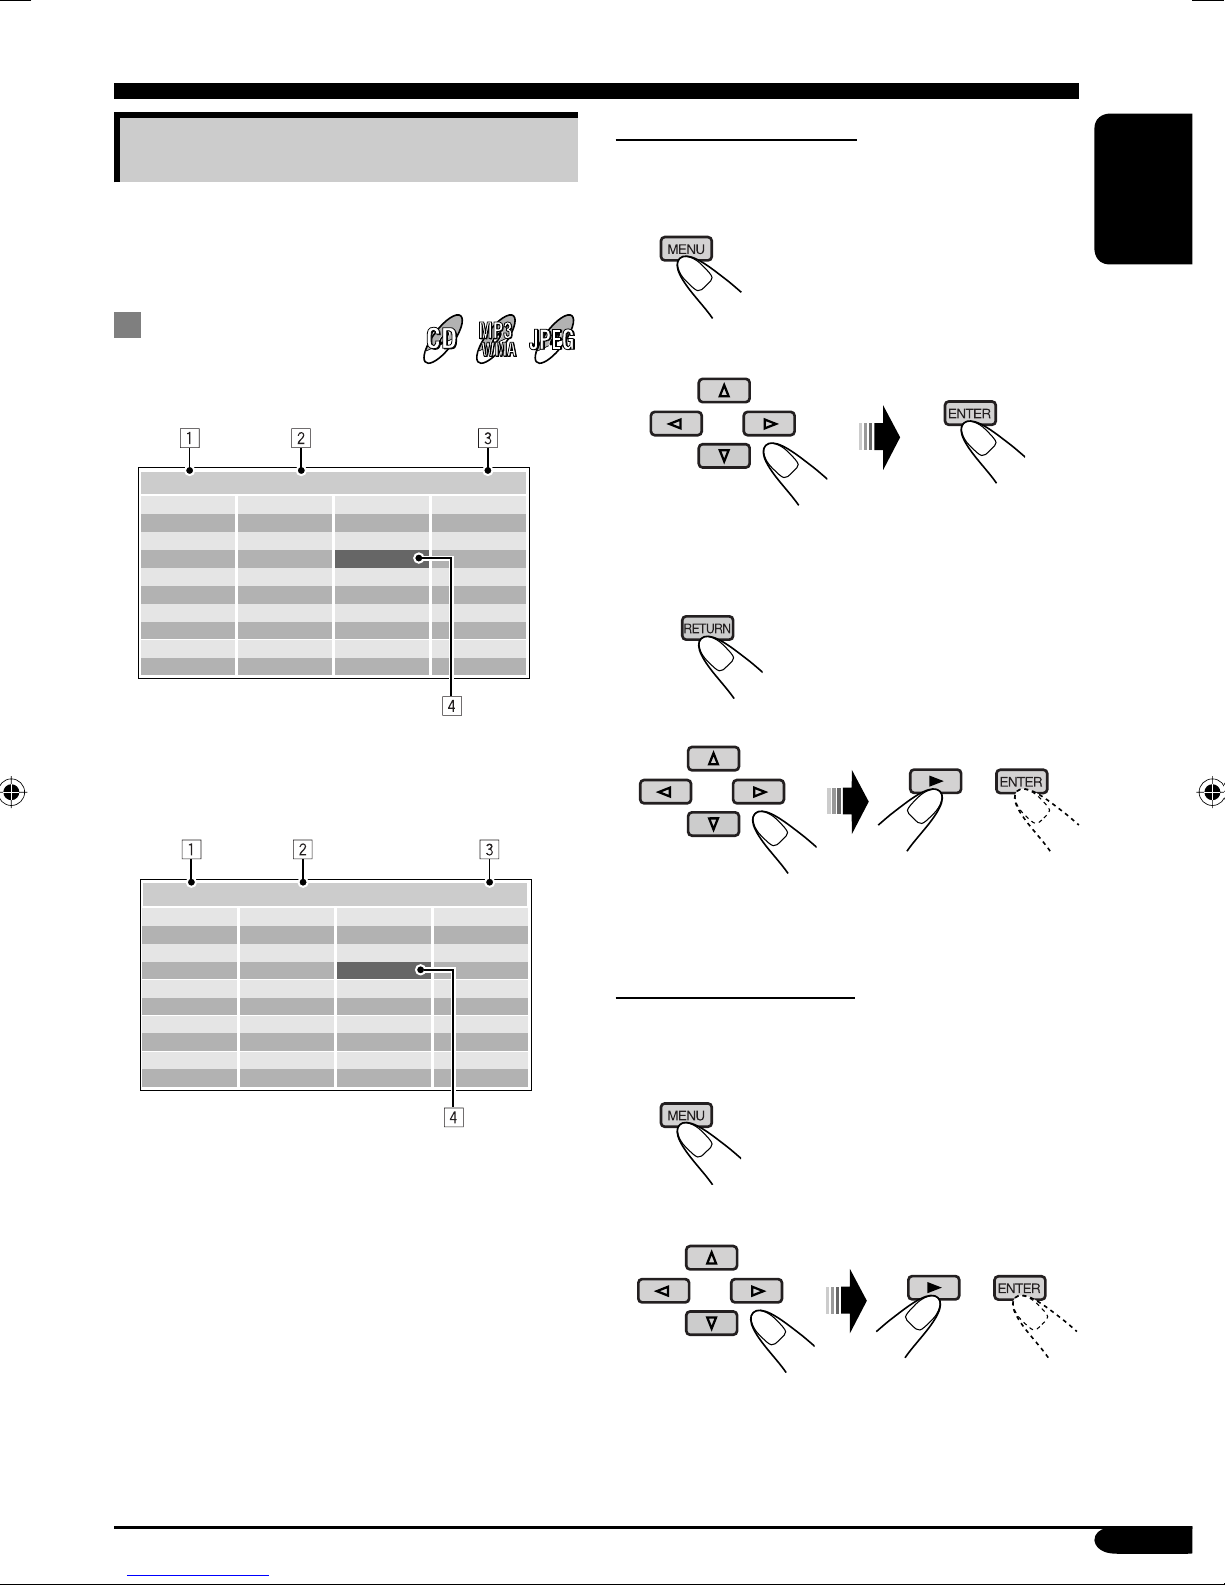
List screen operations
You can display the folder list/track list before
starting play. On this list, you can confirm the
contents and start playing a disc.
Folder/track list
screens
Folder list (MP3/WMA/JPEG)
Folder : 153/240 Track 154/198 Page : 4/6
fol130
fol131
fol132
fol133
fol134
fol135
fol136
fol137
fol138
fol139
fol140
fol141
fol142
fol143
fol144
fol145
fol146
fol147
fol148
fol149
fol150
fol151
fol152
fol153
fol154
fol155
fol156
fol157
fol158
fol159
fol160
fol161
fol162
fol163
fol164
fol165
fol166
fol167
fol168
fol169
For MP3/WMA/JPEG:
While stop...
1 Display the folder list.
Each time you press the button,
the list screen comes on and
goes off.
2 Select a folder on the list.
The track list of the selected folder appears.
To go back to the folder list
ENGLISH
Ex.: Folder list for MP3/WMA
Track list (MP3/WMA/JPEG/CD Text/audio
CD)
Folder : 153/240 Track 154/198 Page : 4/6
file0131.mp3
file0132.mp3
file0133.wma
file0134.mp3
file0135.mp3
file0136.wma
file0137.wma
file0138.mp3
file0139.mp3
file0140.wma
file0141.mp3
file0142.mp3
file0143.mp3
file0144.mp3
file0145.wma
file0146.mp3
file0147.wma
file0148.mp3
file0149.wma
file0150.wma
file0151.wma
file0152.mp3
file0153.wma
file0154.mp3
file0155.mp3
file0156.mp3
file0157.mp3
file0158.wma
file0159.wma
file0160.wma
file0161.wma
file0162.mp3
file0163.wma
file0164.mp3
file0165.wma
file0166.wma
file0167.wma
file0168.wma
file0169.mp3
file0170.wma
Ex.: Track list for MP3/WMA
1 Current folder number/total folder number
(only for MP3/WMA/JPEG)
2 Current track number/total number of tracks
in the current folder (for MP3/WMA/JPEG)
or in the disc (for CD Text/audio CD)
3 Current page/total number of the pages
included in the list
4 Current folder/track (highlighted bar)
3 Select a track on the list.
• For JPEG discs: Pressing ENTER will
pause the selected picture on the monitor.
For CD Text/audio CD:
While stop...
1 Display the track list.
Each time you press the button,
the list screen comes on and
goes off.
2 Select a track on the list.
27
Page 74
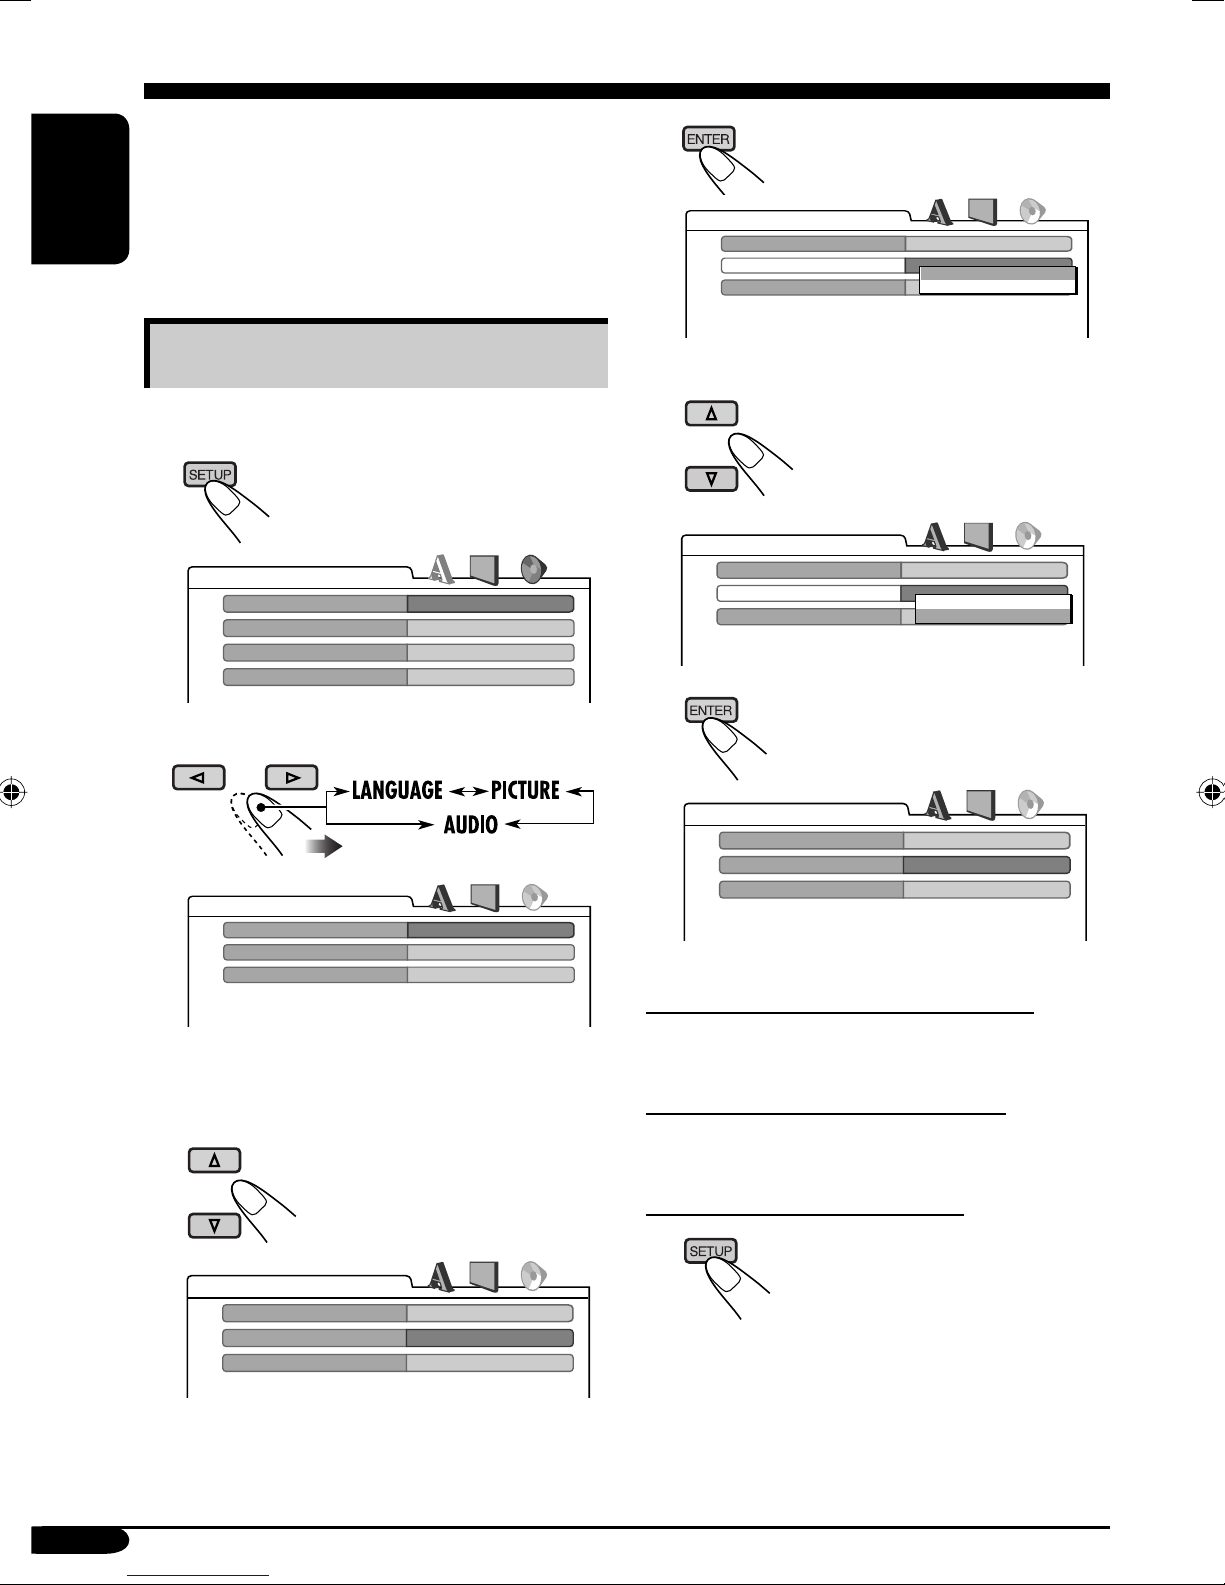
DVD setup menu
You can store the initial disc playback status.
• While playing, no change can be made on the
setup menu.
• When shipped from the factory, the on-screen
language is set to English. To change the
ENGLISH
language, see page 29.
Basic setting procedure
While stop...
1
LANGUAGE
MENU LANGUAGE
AUDIO LANGUAGE
SUBTITLE
ON SCREEN LANGUAGE
ENGLISH
ENGLISH
ENGLISH
ENGLISH
4
AUDIO
DIGITAL AUDIO OUTPUT
DOWN MIX
D. RANGE COMPRESSION
5 Select an option.
AUDIO
DIGITAL AUDIO OUTPUT
DOWN MIX
D. RANGE COMPRESSION
6
STREAM/PCM
STEREO
DOLBY SURROUND
STEREO
ON
STREAM/PCM
STEREO
DOLBY SURROUND
STEREO
ON
2
AUDIO
DIGITAL AUDIO OUTPUT
DOWN MIX
D. RANGE COMPRESSION
STREAM/PCM
STEREO
ON
Ex.: When selecting the “AUDIO” menu
3 Select an item you want to set up.
AUDIO
DIGITAL AUDIO OUTPUT
DOWN MIX
D. RANGE COMPRESSION
STREAM/PCM
STEREO
ON
AUDIO
DIGITAL AUDIO OUTPUT
DOWN MIX
D. RANGE COMPRESSION
STREAM/PCM
DOLBY SURROUND
ON
To set other items on the same menu
Repeat steps 3 to 6.
To set other items on other menus
Repeat steps 2 to 6.
To return to the normal screen
Ex.: When selecting “DOWN MIX”
28
Page 75
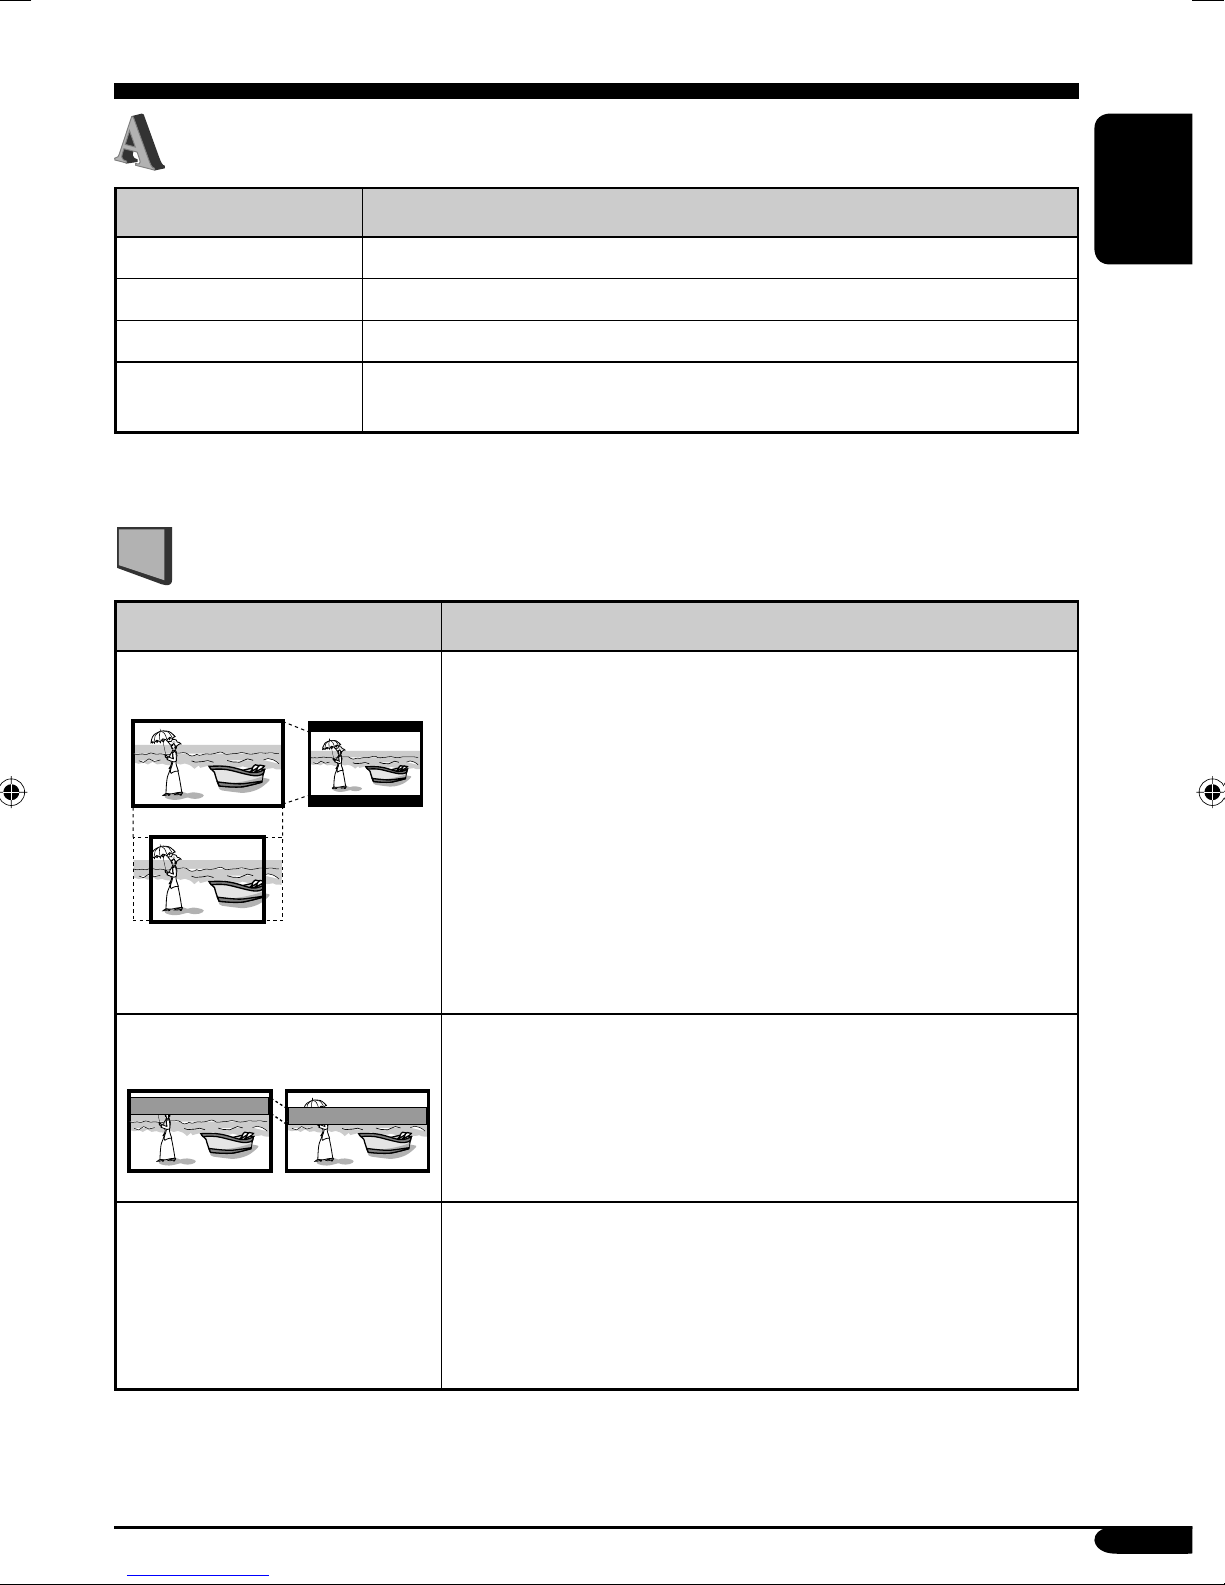
LANGUAGE menu
Item Contents
MENU LANGUAGE
Select the initial disc menu language.
ENGLISH
AUDIO LANGUAGE
SUBTITLE
ON SCREEN LANGUAGE
• For the LANGUAGE settings, see also the language codes list on page 32.
Select the initial audio language.
Select the initial subtitle language or erase the subtitle (OFF).
Select the language for the setup menu and some indications shown on
the monitor.
PICTURE menu
Item Contents
MONITOR TYPE
16:9 4:3 LETTER BOX
4:3 PAN SCAN
Select the monitor type to watch a wide screen picture on your
external monitor.
• 16:9 : Select this when the aspect ratio of your monitor is
16:9.
• 4:3 LETTER BOX : Select this when the aspect ratio of your
monitor is 4:3. While viewing a wide screen picture, the black
bars appear on the top and the bottom of the screen.
• 4:3 PAN SCAN : Select this when the aspect ratio of your
monitor is 4:3.
While viewing a wide screen picture, the black bars do not
appear; however, the left and right edges of the pictures will
not be shown on the screen.
OSD POSITION
Position 1 Position 2
MP3/JPEG
Select the on-screen bar position on the monitor.
• 1 : Higher position
• 2 : Lower position (Help screen under the DVD setup menu
disappears.)
If both MP3/WMA files and JPEG files are recorded on a disc,
you can select which files to play.
• MP3 : Select this for playing MP3/WMA files.
• JPEG : Select this for playing JPEG files.
Eject the disc and insert it again to make the new setting
effective.
To be continued....
29
Page 76

AUDIO menu
Item Contents
ENGLISH
DIGITAL AUDIO OUTPUT
DOWN MIX
D. (Dynamic) RANGE
COMPRESSION
Select the signal format to be emitted through the DIGITAL OUT
(Optical) terminal. For details, see page 36.
• PCM ONLY : Select this when connecting an amplifier or a
decoder incompatible with Dolby Digital, DTS, MPEG Audio, or
connecting to a recording device.
• DOLBY DIGITAL/PCM : Select this when connecting an
amplifier or a decoder compatible with Dolby Digital.
• STREAM/PCM : Select this when connecting an amplifier or a
decoder compatible with Dolby Digital, DTS, or MPEG Audio.
When playing back a multi-channel DVD disc, this setting affects
the signals reproduced through the analog terminals—AV-OUT and
cordless headphones (and through the DIGITAL OUT terminal when
“PCM ONLY” is selected for “DIGITAL AUDIO OUTPUT”).
• DOLBY SURROUND : Select this when you want to enjoy multi-
channel surround audio by connecting an amplifier compatible with
Dolby Surround to this monitor.
• STEREO : Normally select this.
You can enjoy a powerful sound at low or middle volume levels while
playing a Dolby Digital software.
• AUTO : Select this to apply the effect to multi-channel encoded
software (excluding 1-channel and 2-channel software).
• ON : Select this to always use this function.
30
Page 77

Maintenance
To prevent damage to the exterior
• Do not apply pesticides, benzine, thinner or
other volatile substances to the monitor.
The cabinet surface primarily consists of
plastic materials.
• Do not wipe with benzine, thinner or similar
substances because this will results in
discoloration or removal of the paint.
• When a cloth with a cleansing chemical is
used, follow the caution points.
– Do not leave the unit in contact with rubber
or vinyl products for long periods of time.
– Do not use cleansers which have polishing
granules because this could damage the
cabinet.
Clean off dirt by wiping lightly with
a soft cloth
When the cabinet is very dirty, wipe with a
well-wrung cloth dipped in a kitchen cleanser
(neutral) thinned by water and then go over the
same surface with a dry cloth.
(Since there is the possibility of water drops
getting inside of the unit, do not directly apply
cleanser to the surface.)
Moisture condensation
Moisture may condense on the lens inside the
DVD player in the following cases:
• After starting the heater in the car.
• If it becomes very humid inside the car.
Should this occur, the DVD player may
malfunction. In this case, eject the disc and
leave the unit turned on for a few hours until the
moisture evaporates.
How to handle discs
When removing a disc from
its case, press down the center
holder of the case and lift the
disc out, holding it by the edges.
• Always hold the disc by the
edges. Do not touch its recording surface.
When storing a disc into its case, gently insert
the disc around the center holder (with the
printed surface facing up).
• Make sure to store discs into the cases after
use.
Center holder
To keep discs clean
A dirty disc may not play correctly.
If a disc does become dirty, wipe
it with a soft cloth in a straight line
from center to edge.
• Do not use any solvent (for
example, conventional record cleaner, spray,
thinner, benzine, etc.) to clean discs.
To play new discs
New discs may have some rough
spots around the inner and outer
edges. If such a disc is used, this
unit may reject the disc.
To remove these rough spots, rub
the edges with a pencil or ball-point pen, etc.
Do not use the following discs:
Warped
disc
ENGLISH
Sticker
Disc
Sticker
residue
Stick-on
label
31
Page 78

Language codes
Code Language Code Language Code Language
AA
AB
AF
ENGLISH
AM
AR
AS
AY
AZ
BA
BE
BG
BH
BI
BN
BO
BR
CA
CO
CS
CY
DZ
EL
EO
ET
EU
FA
FI
FJ
FO
FY
GA
GD
GL
GN
GU
HA
HI
HR
HU
HY
IA
IE
Afar
Abkhazian
Afrikaans
Ameharic
Arabic
Assamese
Aymara
Azerbaijani
Bashkir
Byelorussian
Bulgarian
Bihari
Bislama
Bengali, Bangla
Tibetan
Breton
Catalan
Corsican
Czech
Welsh
Bhutani
Greek
Esperanto
Estonian
Basque
Persian
Finnish
Fiji
Faroese
Frisian
Irish
Scots Gaelic
Galician
Guarani
Gujarati
Hausa
Hindi
Croatian
Hungarian
Armenian
Interlingua
Interlingue
IK
IN
IS
IW
JI
JW
KA
KK
KL
KM
KN
KO
KS
KU
KY
LA
LN
LO
LT
LV
MG
MI
MK
ML
MN
MO
MR
MS
MT
MY
NA
NE
NO
OC
OM
OR
PA
PL
PS
PT
QU
RM
Inupiak
Indonesian
Icelandic
Hebrew
Yiddish
Javanese
Georgian
Kazakh
Greenlandic
Cambodian
Kannada
Korean (KOR)
Kashmiri
Kurdish
Kirghiz
Latin
Lingala
Laothian
Lithuanian
Latvian, Lettish
Malagasy
Maori
Macedonian
Malayalam
Mongolian
Moldavian
Marathi
Malay (MAY)
Maltese
Burmese
Nauru
Nepali
Norwegian
Occitan
(Afan) Oromo
Oriya
Panjabi
Polish
Pashto, Pushto
Portuguese
Quechua
Rhaeto-Romance
RN
RO
RW
SA
SD
SG
SH
SI
SK
SL
SM
SN
SO
SQ
SR
SS
ST
SU
SW
TA
TE
TG
TH
TI
TK
TL
TN
TO
TR
TS
TT
TW
UK
UR
UZ
VI
VO
WO
XH
YO
ZU
Kirundi
Rumanian
Kinyarwanda
Sanskrit
Sindhi
Sangho
Serbo-Croatian
Singhalese
Slovak
Slovenian
Samoan
Shona
Somali
Albanian
Serbian
Siswati
Sesotho
Sundanese
Swahili
Tamil
Telugu
Tajik
Thai
Tigrinya
Turkmen
Tagalog
Setswana
Tonga
Turkish
Tsonga
Tatar
Twi
Ukrainian
Urdu
Uzbek
Vietnamese
Volapuk
Wolof
Xhosa
Yoruba
Zulu
32
Page 79

More about this monitor
Basic operations
Turning off the power
• If you turn off the power while listening to a
disc, disc play will start automatically, next
time you turn on the power.
Disc operations
General
• In this manual, words “track” and “file” are
interchangeably used when referring to MP3/
WMA/JPEG files and their file names.
• This unit can also playback 8 cm discs.
• This unit can only playback audio CD (CD-
DA) files if different type of files are recorded
in the same disc.
– The first track will be skipped if a different
type of file is detected first.
• When a disc has been loaded, selecting
“DISC” for the playback source starts disc
play.
Starting playback
• When a disc is inserted upside down, “NO
DISC” appears on the screen, then the disc
will automatically eject.
• You can play a disc even if the monitor is
closed.
Basic operations
• No sound comes out during slow motion
playback. When playing a VCD, reverse slow
motion playback is prohibited.
• One Touch Replay works only within the
same title. (For some DVDs, this function
does not work.)
• When playing a DVD/VCD, no sound comes
out during Search.
• Reverse search stops automatically when it
reaches the beginning of the disc. Playback
resumes at normal speed.
DVD/VCD/JPEG special functions
• For some DVDs and VCDs, changing the
subtitle language, audio language (or audio
channel) without using the disc menu is
prohibited.
• While zoomed in, the picture may look
coarse.
Playing a DVD-R/DVD-RW or CD-R/CDRW
• Use only “finalized” discs.
• This unit can play back only the files of the
same type which is first detected if a disc
includes both audio CD (CD-DA) files and
MP3/WMA/JPEG files.
• This unit can play back either MP3/WMA
files or JPEG files if a disc includes both kind
of files. Set the playback file type on DVD
setup menu (page 29) before playing back a
disc containing both kind of files.
• Only for CD-R/CD-RW: This unit can play
back multi-session discs; however, unclosed
sessions will be skipped while playing.
• Some DVD-R/DVD-RW or CD-R/CDRW may not play back on this unit because
of their disc characteristics, and for the
following causes:
– Discs are dirty or scratched.
– Moisture condensation occurs on the lens
inside the unit.
– The pickup lens inside the unit is dirty.
– CD-R/CD-RW on which the files are
written with “Packet Write” method.
– DVD-R/DVD-RW which are not written
in UDF-Bridge Format (eg. UDF format or
ISO format).
– There are improper recording conditions
(missing data, etc.) or media conditions
(stain, scratch, warp, etc.).
• DVD-RW/CD-RW may require a longer
readout time since the reflectance of DVDRW/CD-RW is lower than that of regular
discs.
ENGLISH
To be continued....
33
Page 80

• Do not use the following DVD-R/DVD-RW
or CD-R/CD-RW:
– Discs with stickers, labels, or protective seal
stuck to the surface.
– Discs on which labels can be directly
ENGLISH
printed by an ink jet printer.
Using these discs under high temperatures or
high humidities may cause malfunctions or
damages to discs.
Playing an MP3/WMA disc
• This unit can play back MP3/WMA files
with the extension code <.mp3> or <.wma>
(regardless of the letter case—upper/lower)
recorded in either CD-R/CD-RW or in
DVD-R/DVD-RW.
• This unit can show the names of albums,
artists (performer), and ID3 Tag (Version 1.0,
1.1, 2.2, 2.3, or 2.4) for MP3 files and WMA
files.
• This unit can display only one-byte
characters. No other characters can be
correctly displayed.
• This unit can play back MP3/WMA files
meeting the conditions below:
– Bit rate: MP3: 32 kbps — 320 kbps
WMA: 32 kbps — 192 kbps
– Sampling frequency:
48 kHz, 44.1 kHz, 32 kHz (for MPEG-1)
24 kHz, 22.05 kHz, 16 kHz (for MPEG-2)
48 kHz, 44.1 kHz, 32 kHz (for WMA)
– Disc format: ISO 9660 Level 1/ Level 2,
Romeo, Joliet, Windows long file name
• The maximum number of characters for file/
folder names vary among the disc format used
(includes 4 extension characters—<.mp3> or
<.wma>).
– ISO 9660 Level 1: up to 12 characters
– ISO 9660 Level 2: up to 31 characters
– Romeo: up to 128 characters
– Joliet: up to 64 characters
– Windows long file name: up to 128
characters
• This unit can recognize the total of
1100 files, 250 folders (maximum of 999 files
per folder).
• This unit can play back the files recorded in
VBR (variable bit rate).
The files recorded in VBR have a discrepancy
in elapsed time display, and do not show
the actual elapsed time. Especially, after
performing the search function, this
difference becomes noticeable.
• This unit cannot play back the following files:
–
MP3 files encoded with MP3i and MP3 PRO
format.
– MP3 files encoded in an unappropriated
format.
– MP3 files encoded with Layer 1/2.
– WMA files encoded with lossless,
professional, and voice format.
– WMA files which are not based upon
Windows Media
– WMA files copy-protected with DRM.
– WMA files recorded with MBR (Multiple
Bit Rate) format.
– Files which have the data such as WAVE,
ATRAC3, etc.
®
Audio.
Playing a JPEG disc
• This unit can play back JPEG files with the
extension code <.jpg> (regardless of the letter
case—upper/lower) recorded in either CD-R/
CD-RW or in DVD-R/DVD-RW.
• It is recommended that you record a file
at 640 x 480 resolution. (If a file has been
recorded at a resolution of more than 640 x
480, it will take a long time to be shown.)
• This System can play only baseline JPEG
files. Progressive JPEG files or lossless JPEG
files cannot be played.
Baseline JPEG format: Used for digital
cameras, web, etc.
Progressive JPEG format: Used for web.
Lossless JPEG format: An old type and rarely
used now.
• If progressive or lossless JPEG files are
played back, a black screen appears. In this
case, stop playback and select a baseline
JPEG file. Note that it may take a long time to
select another file.
34
Page 81

• Even if you try to pause the current picture,
it may be skipped, then the next picture will
pause.
• This unit can recognize the total of 1100
files, 250 folders (maximum of 999 files per
folder).
Changing the source
• If you change the source, playback also stops
(without ejecting the disc).
Next time you select “DISC” for the playback
source, disc play starts automatically.
Ejecting a disc
• If the ejected disc is not removed within
15 seconds, the disc is automatically inserted
again into the loading slot to prevent it from
dust. (Disc will not play this time.)
DVD setup menu
• When the language you have selected is not
recorded on a disc, the original language is
automatically used as the initial language. In
addition, for some discs, the initial languages
settings will not work as you set due to their
internal disc programming.
• While playing (or pausing), you cannot
change these languages.
After you change any of these language
settings, eject the disc and insert it (or another
disc) again so that your setting takes effect.
• When you select “16:9” for a picture whose
aspect ratio is 4:3, the picture slightly changes
due to the process for converting the picture
width.
• Even if “4:3 PAN SCAN” is selected, the
screen size may become
“4:3 LETTER BOX” with some DVDs. This
depends on how they are recorded.
On-screen guide icons
During play, the following guide icons may
appear for a while on the monitor.
: Appears at the beginning of a scene
containing multi-audio languages (for
DVD only).
: Appears at the beginning of a scene
containing multi-subtitle languages
(for DVD only).
: Appears at the beginning of a scene
containing multi-angle views (for
DVD only).
: Play
: Pause
: Forward slow motion playback
(for DVD and VCD only)
: Reverse slow motion playback
(for DVD only)
: Forward search
: Reverse search
ENGLISH
35
Page 82

About sounds reproduced through the terminals
• Through the analog terminals (AV-OUT/cordless headphones): 2-channel signal is emitted.
When playing a multi-channel encoded disc, multi-channel signals are downmixed.
(AUDIO—DOWN MIX: see page 30.)
ENGLISH
• Through DIGITAL OUT (optical):
Digital signals (Linear PCM, Dolby Digital, DTS, MPEG Audio) are emitted through this
terminal. (For more details, see table below.)
To reproduce multi-channel sounds such as Dolby Digital, DTS, and MPEG Audio, connect
an amplifier or a decoder compatible with these multi-channel sources to this terminal, and set
“DIGITAL AUDIO OUTPUT” correctly. (See page 30.)
Output signals through the DIGITAL OUT terminal
Output signals are different depending on the “DIGITAL AUDIO OUTPUT” setting on the setup
menu (see page 30).
DIGITAL AUDIO OUTPUT
Playback Disc
DVD
Audio CD, Video CD 44.1 kHz, 16 bits stereo Linear PCM
Audio CD with DTS DTS bitstream 44.1 kHz, 16 bits stereo Linear PCM
MP3/WMA
48 kHz, 16/20/24 bits Linear PCM
96 kHz, Linear PCM
with DTS DTS bitstream 48 kHz, 16 bits stereo Linear PCM
with Dolby Digital Dolby Digital bitstream
with MPEG Audio MPEG bitstream 48 kHz, 16 bits Linear PCM
STREAM/PCM DOLBY DIGITAL/PCM PCM ONLY
48 kHz, 16 bits stereo Linear PCM
32/44.1/48 kHz, 16 bits Linear PCM
Output Signals
48 kHz, 16 bits
stereo Linear PCM
36
Page 83
Troubleshooting
What appears to be trouble is not always serious. Check the following points before calling a service
center.
Symptoms Causes Remedies
• Colored spots (red, blue
and green) appear on the
screen.
• No picture appears and
sound is not heard.
• The unit does not work at
all.
General
• Remote controller does not
work.
• Cordless headphones do
not work.
This is a characteristic of
liquid crystal panels and is
not a malfunction.
The cord is not connected
correctly to the external
component.
Correct input mode is not
selected.
The built-in microcomputer
may have functioned
incorrectly due to noise, etc.
The battery has lost its
charge.
The sensor is exposed to
strong light.
ENGLISH
See “Note” on page 6.
Connect the cord correctly.
Select the correct input
mode.
Reset the unit (see page 4).
Install a new battery.
Do not expose the sensor to
strong light.
• Howling occurs from
the speakers or the
headphones.
• “NO DISC” appears on the
screen.
• CD-R/CD-RW or DVD-R/
DVD-RW cannot be played
back.
• Tracks on the CD-R/
CD-RW or DVD-R/
Disc playback
DVD-RW cannot be
skipped.
• The left and right edges of
the picture are missing on
the screen.
It may be caused by a
camcorder connected to the
monitor.
Disc is inserted upside
down.
CD-R/CD-RW or DVD-R/
DVD-RW is not finalized.
“4:3 PAN SCAN” is
selected when viewing on
a conventional TV (aspect
ratio 4:3).
Camcorder is now in
recording mode. Deactivate
the recording mode.
Insert the disc correctly.
• Insert a finalized CDR/CD-RW or DVD-R/
DVD-RW.
•
Finalize the
RW or DVD-R/DVD-RW
with the component which
you used for recording.
Select “4:3 LETTER BOX.”
(See page 29.)
CD-R/CD-
37
Page 84

Symptoms Causes Remedies
• Sound and picture are
ENGLISH
Disc playback
• The playback pictures
• Disc cannot be played
sometimes interrupted or
distorted.
cannot be shown correctly.
back.
You are driving on rough
roads.
Disc is scratched. Change the disc.
Connections are incorrect. Check the cords and
The color system (NTSC/
PAL) is not correct.
No MP3/WMA/JPEG tracks
are recorded on the disc.
MP3/WMA/JPEG tracks do
not have the extension code
<.mp3>, <.wma>, or <.jpg>
in their file names.
MP3/WMA/JPEG tracks are
not recorded in a compliant
format.
Stop playback while driving
on rough roads.
connections.
Set it correctly (see page
14).
Change the disc.
Add the extension code
<.mp3>, <.wma>, or <.jpg>
to their file names.
Change the disc.
Record MP3/WMA/JPEG
tracks using a compliant
application (see page 17).
MP3/WMA/JPEG tracks
are recorded in DVD+R/
DVD+RW media.
• Noise is generated. The track played back is not
an MP3/WMA file (although
it has the extension code
<.mp3> or <.wma>).
MP3/WMA/JPEG playback
• A longer readout time is
required.
• Tracks cannot be played
back as you have intended
them to play.
• Elapsed playing time is not
correct.
Readout time varies due to
the complexity of the folder/
file configuration.
Playback order is determined
when the files are recorded.
This sometimes occurs
during play. This is caused
by how the tracks are
recorded on the disc.
Change the disc.
Record MP3/WMA/JPEG
tracks using DVD-R/DVDRW media.
Skip to another track or
change the disc. (Do not add
the extension code <.mp3>
or <.wma> to non-MP3 or
WMA tracks.)
Do not use too many
hierarchies and folders.
38
Page 85

Specifications
WIDESCREEN MONITOR
Screen:
9 inch liquid crystal panel
Number of pixel:
336 960 pixels
(480 vertical × 234 horizontal × 3)
Drive method:
TFT (Thin Film Transistor) active matrix
format
Cordless audio:
Infrared audio transmitter
L-channel: 2.3 MHz
R-channel: 2.8 MHz
Effective listening angle: 30˚
Effective range: 2 m
Color system: NTSC/PAL
Input:
Video: RCA pin × 2 circuits
1 V(p-p), 75 Ω
Audio: RCA pin × 2 circuits
1.5 V(rms)
Output:
Video: RCA pin × 1 circuit
1 V(p-p), 75 Ω
Audio: RCA pin × 1 circuit
1.5 V(rms)
DIGITAL OUT: Optical
DVD/CD PLAYER SECTION
Signal detection system: Non-contact optical
pickup (semiconductor laser)
Number of channels: 2 channels (stereo)
Frequency response:
DVD, fs=48 kHz/96 kHz: 16 Hz to 22 000 Hz
VCD, CD: 16 Hz to 20 000 Hz
Dynamic range: 93 dB
Signal-to-noise ratio: 95 dB
Wow and flutter: Less than measurable limit
MP3 (MPEG Audio Layer 3):
Max. Bit Rate: 320 kbps
®
WMA (Windows Media
Max. Bit Rate: 192 kbps
Audio):
GENERAL
Power requirement:
Operating voltage:
DC 14.4 V (11 V to 16 V allowance)
Grounding system: Negative ground
Allowable operating temperature:
0°C to +40°C
Allowable storage temperature:
–20°C to +80°C
Dimensions (W × H × D):
Installation size (approx.):
215 mm × 49 mm × 374 mm
Mass (approx.):
2.9 kg (excluding accessories)
CORDLESS HEADPHONES
Type: Open-air type
Driver unit:
30 mm Mylarcone dynamic speaker
Impedance: 16 Ω
Frequency response: 20 Hz to 20 000 Hz
Infrared wavelength: 850 nm ± 50 nm
Power requirements:
DC 3 V (2.4 V to 3.3 V allowance)
(R03/AAA battery × 2)
Mass (approx.):
170 g (except batteries)
Allowable operating temperature:
–30°C to +65°C
Design and specifications are subject to change
without notice.
• Microsoft and Windows Media are either
registered trademarks or trademarks of
Microsoft Corporation in the United States
and/or other countries.
ENGLISH
39
Page 86

Having TROUBLE with operation?
Please reset your unit
Refer to page of How to reset your unit
Haben Sie PROBLEME mit dem Betrieb?
Bitte setzen Sie Ihr Gerät zurück
Siehe Seite Zurücksetzen des Geräts
Vous avez des PROBLÈMES de fonctionnement?
Réinitialisez votre appareil
Référez-vous à la page intitulée Comment réinitialiser votre appareil
Hebt u PROBLEMEN met de bediening?
Zie de pagina met de paragraaf Het apparaat terugstellen
EN, GE, FR, NL
© 2005 Victor Company of Japan, Limited
Stel het apparaat terug
0305MNMMDWJEIN
Page 87
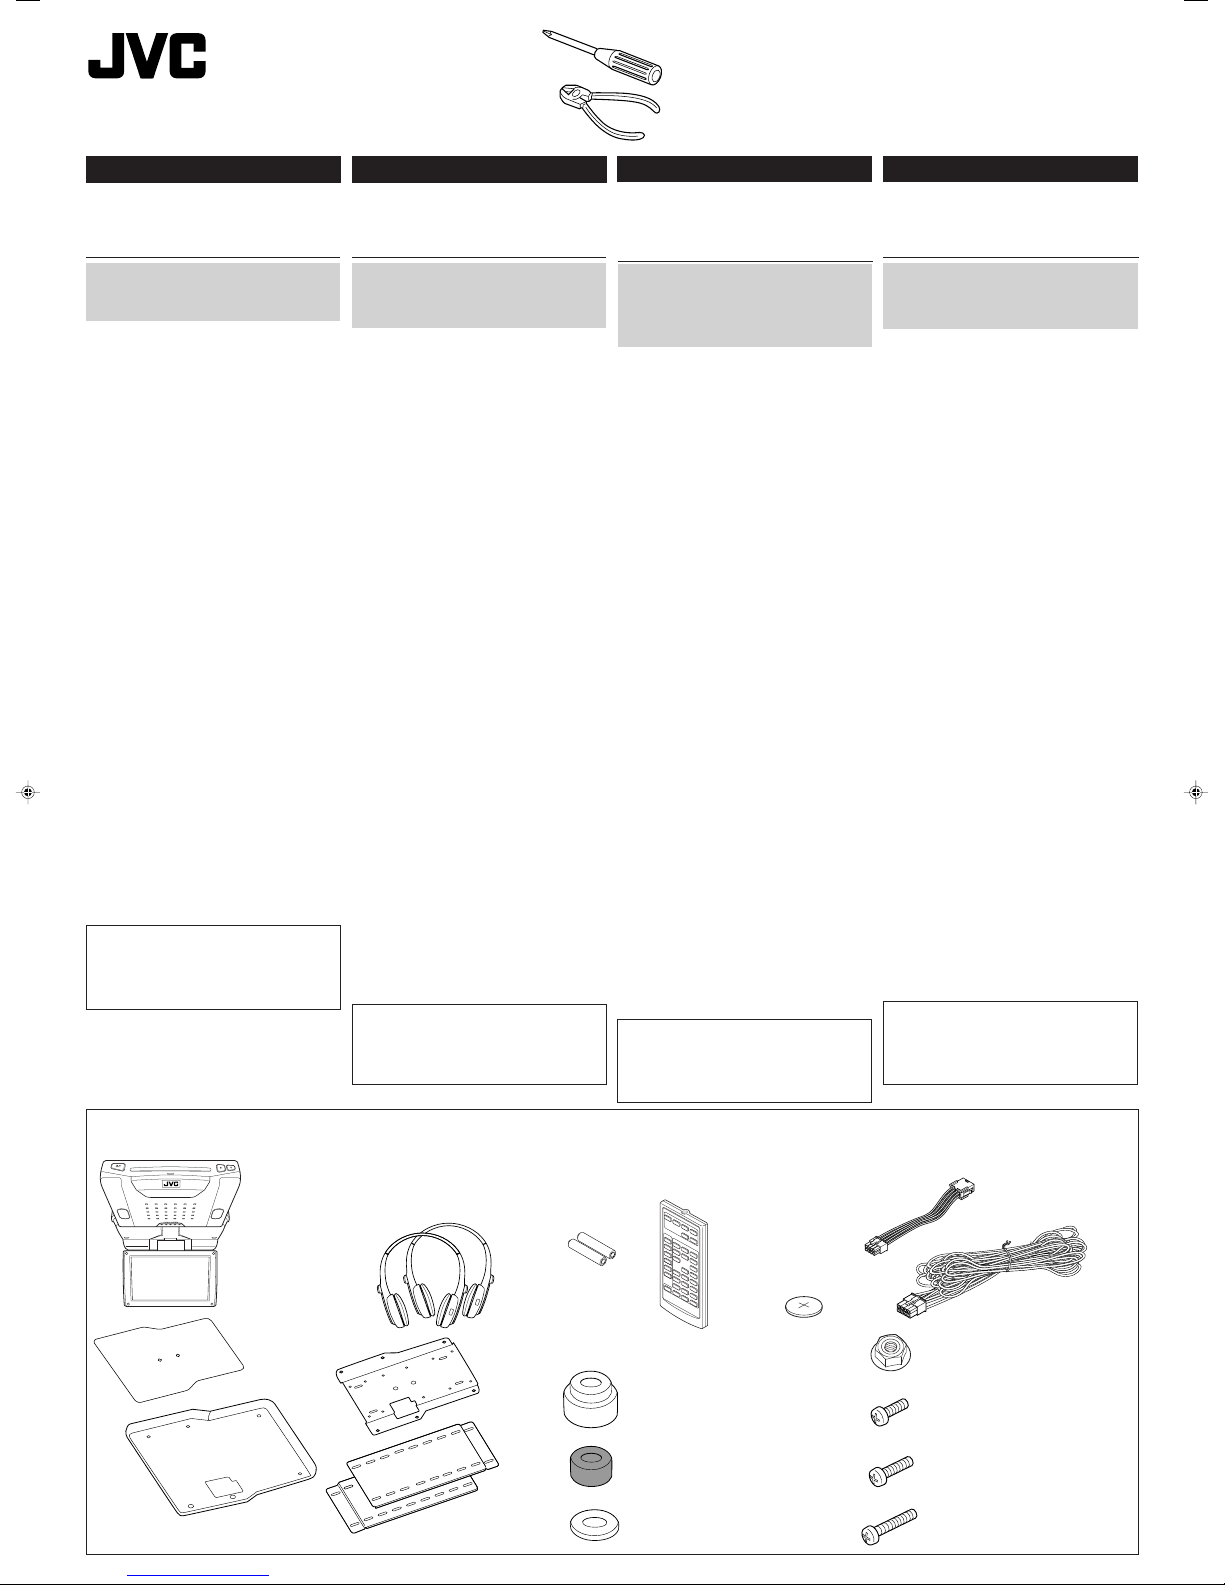
KV-MRD900/KV-MR9010
Installation/Connection Manual
Einbau/Anschlußanleitung
LVT1341-005A
[E]
ENGLISH
The illustrations of the widescreen monitor used in this
manual is of KV-MRD900, unless specified otherwise.
WARNING
Installation requires some special knowledge.
Do not install the monitor yourself. Consult a
dealer having special knowledge of this kind
for safe and reliable installation.
• DO NOT INSTALL THE MONITOR IN A LOCATION
WHICH OBSTRUCTS DRIVING, VISIBILITY,
SAFETY DEVICE FUNCTION SUCH AS AIR
BAGS OR WHICH IS PROHIBITED BY
APPLICABLE LAWS AND REGULATIONS.
If the monitor is installed in a location which
obstructs forward visibility or operation of the air
bag or other safety equipment or which interferes
with operation of the vehicle, it may cause an
accident.
• NEVER USE BOLTS OR NUTS FROM THE
VEHICLE’S SAFETY DEVICES FOR
INSTALLATION.
If bolts or nuts from the steering wheel, brakes or
other safety devices are used for installation of the
monitor, it may cause an accident.
• ATTACH THE WIRES CORRECTLY.
If the wiring is not correctly performed, it may cause
a fire or an accident. In particular, be sure to run
and secure the lead wire so that it does not get
tangled with a screw or the moving portion of a seat
rail.
• USE WITH DC 12 V NEGATIVE GROUND
VEHICLES.
This monitor is only for use in a DC 12 V negative
ground vehicle.
It cannot be used in large trucks or diesel vehicles
which are DC 24 V vehicles.
If it is used in the wrong type of vehicle, it may
cause a fire or accident.
• To prevent short circuits, we recommend that you
disconnect the battery’s negative terminal and make
all electrical connections before installing the unit. If
you are not sure how to install this unit correctly,
have it installed by a qualified technician.
• Avoid installing the monitor in the following
places
– Where it would hinder your safe driving.
– Where it would be exposed to direct sunlight or
heat directly from the heater or placed in an
extremely hot place.
– Where it would be subject to rain, water splashes
or excessive humidity.
– Where it would be subject to dust.
– Where it would be positioned on an unstable
place.
– Where it could damage the car’s fittings.
– Where proper ventilation would not be
maintained.
CAUTION
Since there may be legal regulations defining the
permissible installation locations for the monitor
which differ by country or by state, be sure to
install the color monitor in a location complying
with any such laws.
Parts list for installation and connection
The following parts are provided with this unit.
After checking them, please set them correctly.
Shroud
Abschirmung
Socle de montage au plafond
Versteviging
Manuel d’installation/raccordement
Handleiding voor installatie/aansluiting
DEUTSCH FRANÇAIS NEDERLANDS
Die Abbildungen des Breitbildmonitors in dieser
Anleitung zeigen den KV-MRD900, wenn nicht anders
angegeben.
WARNUNGEN
Die Installation erfordert entsprechende
Fachkenntnisse.
Installieren Sie das Monitorsystem nicht selbst.
Wenden Sie sich für eine sichere und fachgerechte
Installation an einen Vertragshändler.
• DEN MONITOR NICHT AN EINEM ORT
ANBRINGEN, WO ER BEIM FAHREN STÖRT
ODER DIE SICHT BESCHRÄNKT, DIE FUNKTION
VON SICHERHEITSEINRICHTUNGEN WIE
AIRBAGS BEHINDERT ODER WO ÖRTLICH
GELTENDE GESETZE ODER VORSCHRIFTEN
DEN EINBAU VERBIETEN.
Wenn Sie den Monitor an einem Ort installieren, an dem
die Voraussicht oder der Betrieb des Airbags oder
anderer Sicherheitseinrichtungen des Fahrzeugs
beeinträchtigt wird oder das Führen des Fahrzeugs
gestört wird, kann er die Ursache für einen Unfall sein.
• VERWENDEN SIE NIEMALS SCHRAUBEN ODER
MUTTERN DER SICHERHEITSEIN-RICHTUNGEN
DES FAHRZEUGS ZUR INSTALLATION.
Wenn Schrauben oder Muttern des Lenkrads, der
Bremsen oder anderer Sicherheitsein-richtungen
zur Installation des Monitors verwendet werden,
kann ein Unfall verursacht werden.
• BRINGEN SIE DIE DRÄHTE ORDNUNGSGEMÄSS AN.
Wenn die Verkabelung nicht richtig durchgeführt
wird, entsteht hierdurch möglicherweise ein Feuer
oder Unfall. Achten Sie insbesondere darauf, das
Kabel so zu verlegen und zu sichern, daß es sich
nicht mit einer Schraube oder dem beweglichen Teil
einer Sitzschiene verheddert.
• VERWENDEN SIE DAS GERÄT NUR IN
FAHRZEUGEN MIT 12-V-GLEICHSTROMSYSTEM UND NEGATIVER ERDUNG.
Dieser Monitor darf nur in Fahrzeugen mit einem
12-V-Gleichstromsystem und Negativer Erdung
verwendet werden.
Er darf nicht in großen Lkw oder Diesel-fahrzeugen
mit 24-V-Gleichstrom-systemen verwendet werden.
Wenn der Monitor im falschen Fahrzeugtyp
verwendet wird, kann er ein Feuer oder einen
Unfall verursachen.
• Um einen Kurzschluß zu vermeiden, empfiehlt es
sich, den negativen Pol der Batterie abzutrennen und
alle elektrischen Anschlüsse vorzunehmen, bevor der
Monitor installiert wird. Wenn Sie sich nicht sicher
sind, wie das Gerät installiert wird, lassen Sie es von
einem qualifizierten Techniker einbauen.
• Den Einbau des Monitors an den folgenden
Stellen vermeiden
– an denen die Fahrsicherheit gefährdet wäre.
– an denen es direkter Sonneneinstrahlung oder
Hitzeeinwirkung durch die Heizung ausgesetzt
wäre. Installieren Sie es auch nicht an einem
extrem heißen Ort.
– an denen es Regen, Wasserspritzern oder
übermäßiger Feuchtigkeit ausgesetzt wäre.
– an denen es Staub ausgesetzt wäre.
– die instabil sind.
– an denen die Fahrzeugarmaturen beschädigt
werden könnten.
– wo richtige Lüftung nicht gewährleistet werden
kann
VORSICHT
Da örtlich geltende gesetzliche Vorschriften die
zulässigen Stellen zur Anbringung des
Farbmonitors festlegen können, müssen Sie sich
zuerst über alle zutreffenden Vorschriften
informieren und diese befolgen.
Teileliste für den Einbau und Anschluß
Die folgenden Teile werden zusammen mit diesem
Gerät geliefert.
Nach ihrer Überprüfung, die Teile richtig einsetzen.
Cordless headphones (supplied only with KV-MRD900)
Schnurloser Kopfhörer (nur mit KV-MRD900 mitgeliefert)
Casque d’écoute sans fil (fourni uniquement avec le KV-MRD900)
Draadloze hoofdtelefoon (alleen bijgeleverd bij de KV-MRD900)
Widescreen monitor
Breitbildmonitor
Moniteur à écran large
Breedbeeld-monitor
Paper template
Papierschablone
Gabarit en papier
Papieren malletje
KS-HP2
Batteries
Batterien
Piles
Batterijen
Base plate
Basisplatte
Plaque de base
Basisplaat
Slide plates
Dia-Platten
Plaques latérales
Zijplaten
R03/AAA
Les illustrations du moniteur à écran large utilisées dans
ce manuel sont du KV-MRD900, sauf spécification
contraire.
AVERTISSEMENT
L’installation nécessite certaines connaissances
spéciales.
N’installez pas le moniteur vous-même. Consultez
un revendeur possédant les connaissances
spéciales nécessaires pour une installation correcte
et sûre.
•N’
INSTALLEZ PAS LE MONITEUR DANS UN
ENDROIT OÙ IL PEUT GÊNER LA VISIBILITÉ DU
CONDUCTEUR OU LE FONCTIONNEMENT D’UN
DISPOSITIF DE SÉCURITÉ TEL QUE LES COUSSINS
GONFLABLES, OU DANS UN ENDROIT INTERDIT
PAR LES LOIS ET RÈGLEMENTS EN PLACE.
Si le moniteur était installé à un emplacement gênant
la visibilité avant, ou le déploiement du sac à air, et
autres dispositifs de sécurité, ou à un emplacement
gênant pour la conduite du véhicule, comme près du
levier des vitesses ou de la pédale du frein, cela
risquerait de provoquer des accidents.
• NE JAMAIS UTILISER POUR L’INSTALLATION
DES BOULONS OU DES ÉCROUS PROVENANT
DES DISPOSITIFS DE SÉCURITÉ DU VÉHICULE.
Si l’on utilisait pour l’utilisation du moniteur des
boulons et des écrous cannibalisés du volant, des
freins ou autres dispositifs de sécurités, cela
risquerait de provoquer des accidents.
• ATTACHER LES CORDONS CORRECTEMENT.
Si le câblage n’est pas exécuté correctement, cela
risque de provoquer un incendie ou autre accident.
Veiller, en par ticulier, à tirer et attacher les fils en sorte
qu’ils me s’accrochent pas à une vis ou ne se coincent
dans les parties mobiles des rails des sièges.
• USAGE SUR LES VÉHICULES DE 12 V CC AVEC
NÉGATIF À LA MASSE.
Ce moniteur ne peut être utilisé que sur les véhicules
de 12 V CC avec négatif à la masse.
Il ne peut pas être utilisé sur les gros camions ou
les véhicules diesel de 24 V CC.
S’il était utilisé sur un type de véhicule inadéquat
cela risquerait de provoquer un incendie ou autres
accidents.
• Pour éviter les courts-circuits,
que vous déconnectiez la borne négative de la batterie
et réalisiez toutes les connexions électriques avant
d’installer l’appareil. Si vous n’êtes pas sûr de savoir
comment installer cet appareil correctement, faites-le
installer par un technicien qualifié.
• Évitez d’installer le moniteur dans les endroits
suivants
– Où il peut gêner la conduite de la voiture.
– Où il est exposé à la lumière directe du soleil, à la
chaleur directe du chauffage ou placé dans un
endroit très chaud.
– Où il est sujet à la pluie, aux éclaboussures ou à
une humidité excessive.
– Où il est sujet à la poussière.
– Où il est positionné dans un endroit instable.
– Où il peut endommager les accessoires de la
voiture.
– Où une ventilation correcte ne peut pas être
maintenue.
ATTENTION
Puisqu’il peut y avoir des réglementations définissant
les emplacements d’installation autorisés pour un
moniteur et que celles-ci peuvent varier d’un pays ou
d’une région à l’autre, assurez-vous d’installer le
moniteur couleur dans un endroit conforme à ces lois.
Liste des pièces pour l’installation et
raccordement
Les pièces suivantes sont fournies avec cet appareil.
Après vérification, veuillez les placer correctement.
RM-RK230
Spacers: silver–9 mm: x 2
Distanzstücke: Silber–9 mm: x 2
Intercalaire argent–9 mm: x 2
Tussenringen: zilver–9 mm: x 2
Spacers: black–7 mm: x 4
Distanzstücke: Schwarz–7 mm: x 4
Intercalaire noire–7 mm: x 4
Tussenringen: zwart–7 mm: x 4
Flat washer–ø 5 mm: x 12
Scheibe–ø 5 mm: x 12
Rondelle plate–ø 5 mm: x 12
Platte tussenringen–ø 5 mm: x 12
– 1 –
nous recommandons
Remote controller
Fernbedienung
Télécommande
Afstandsbediening
Battery
Batterie
Pile
Batterij
CR2025
0305MNMMDWJEIN
EN, GE, FR, NL
De afbeeldingen van de breedbeeld-monitor in deze
handleiding zijn gebaseerd op de KV-MRD900, tenzij anders
aangegeven.
WAARSCHUWING
Het installeren vereist een specifieke kennis.
Installeer het monitorsysteem derhalve niet
zelf. Raadpleeg de plaats van aankoop of een
vakman die deze speciale kennis heeft voor
het veilig en betrouwbaar installeren.
• INSTALLEER DE MONITOR NIET OP EEN
PLAATS DIE HET BESTUREN VAN DE AUTO,
HET ZICHT, DE WERKING VAN
VEILIGHEIDSVOORZIENINGEN ALS AIRBAGS
HINDERT OF OP PLAATSEN DIE DOOR
WETTELIJKE BEPALINGEN OF REGELS ZIJN
VERBODEN.
Als de monitor op een plaats is geïnstalleerd waar dit het
uitzicht op de weg belemmert, dit de werking van de
airbag of dit andere veiligheidsvoorzieningen hindert, of
waar het besturen van het voertuig in gevaar wordt
gebracht, kan dit tot een ongeval lijden.
• GEBRUIK NOOIT SCHROEVEN OF MOEREN
VOOR DE INSTALLATIE DIE NODIG ZIJN VOOR
DE VEILIGHEIDSVOORZIENINGEN VAN DE
AUTO.
Als schroeven of moeren van het stuur, de rem of andere
veiligheidsvoorzieningen worden gebruikt voor de
installatie van de monitor, kan dit tot een ongeval lijden.
• SLUIT DE BEDRADING OP DE JUISTE WIJZE
AAN.
Als de bedrading verkeerd wordt aangesloten, kan dit tot
brand of een ongeval lijden. Let er met name op dat de
stroomvoorzieningskabel nergens achter blijft steken of
in contact komt met de bewegende delen van de rails van
de stoelen.
• ALLEEN GEBRUIKEN IN COMBINATIE MET
VOERTUIGEN DIE WERKEN MET EEN
NEGATIEVE AARDING VAN 12 V
GELIJKSTROOM.
Dit monitorsysteem is alleen bedoeld voor voertuigen die
zijn gebaseerd op een negatieve aarding van 12 V
gelijkstroom. Het systeem kan niet worden gebruikt in
vrachtwagens of diesels, die met 24 V gelijkstroom werken.
Wanneer dit systeem in een verkeerd type voertuig wordt
gebruikt, kan dit tot brand of een ongeval lijden.
• Ter voorkoming van kortsluiting, raden we aan dat
u de negatieve aansluiting van de accu losmaakt en
daarna alle benodigde verbindingen tot stand brengt
alvorens de eenheid te installeren. Als u niet zeker weet
hoe u de eenheid moet installeren, kunt u dit beter door
een erkend vakman laten doen.
• Installeer de monitor niet op de volgende
plaatsen
– waar deze een gevaar vormt voor het besturen van de
auto.
– waar deze wordt blootgesteld aan direct zonlicht, een
verwarming of een andere hittebron.
– waar deze wordt blootgesteld aan regen, spatwater of
extreme vochtigheid.
– waar deze wordt blootgesteld aan stof.
– waar deze op een instabiele ondergrond komt te staan.
– waar deze de auto kan beschadigen.
– waar het toestel niet goed kan worden geventileerd.
LET OP!
Er zijn mogelijk bepaalde regels of bepalingen die de
installatieplaats voor de monitor bepalen, en deze
regels of bepalingen kunnen per land of gebied
verschillend. Plaats de kleurenmonitor beslist in
overeenstemming met dergelijke bepalingen.
Lijst van onderdelen die u bij installatie
en aansluiting nodig hebt
De volgende onderdelen worden bij het apparaat geleverd.
Installeer ze op de juiste wijze, nadat u ze hebt gecontroleerd.
Screws–M5 x 23 mm: x 6
Schrauben–M5 x 23 mm: x 6
Vis–M5 x 23 mm: x 6
Schroef–M5 x 23 mm: x 6
Joint cord
Verbindungskabel
Cordon de raccordement
Verlengsnoer
Power cord
Spannunsgversorgungskabel
Cordon d’alimentation
Nuts (M5): x 12
Muttern (M5): x 12
Écrous (M5): x 12
Moeren (M5): x 12
Screws–M5 x 10 mm: x 12
Schrauben–M5 x 10 mm: x 12
Vis–M5 x 10 mm: x 12
Schroef–M5 x 10 mm: x 12
Screws–M5 x 14 mm: x 6
Schrauben–M5 x 14 mm: x 6
Vis–M5 x 14 mm: x 6
Schroef–M5 x 14 mm: x 6
Electriciteitskabel
Page 88
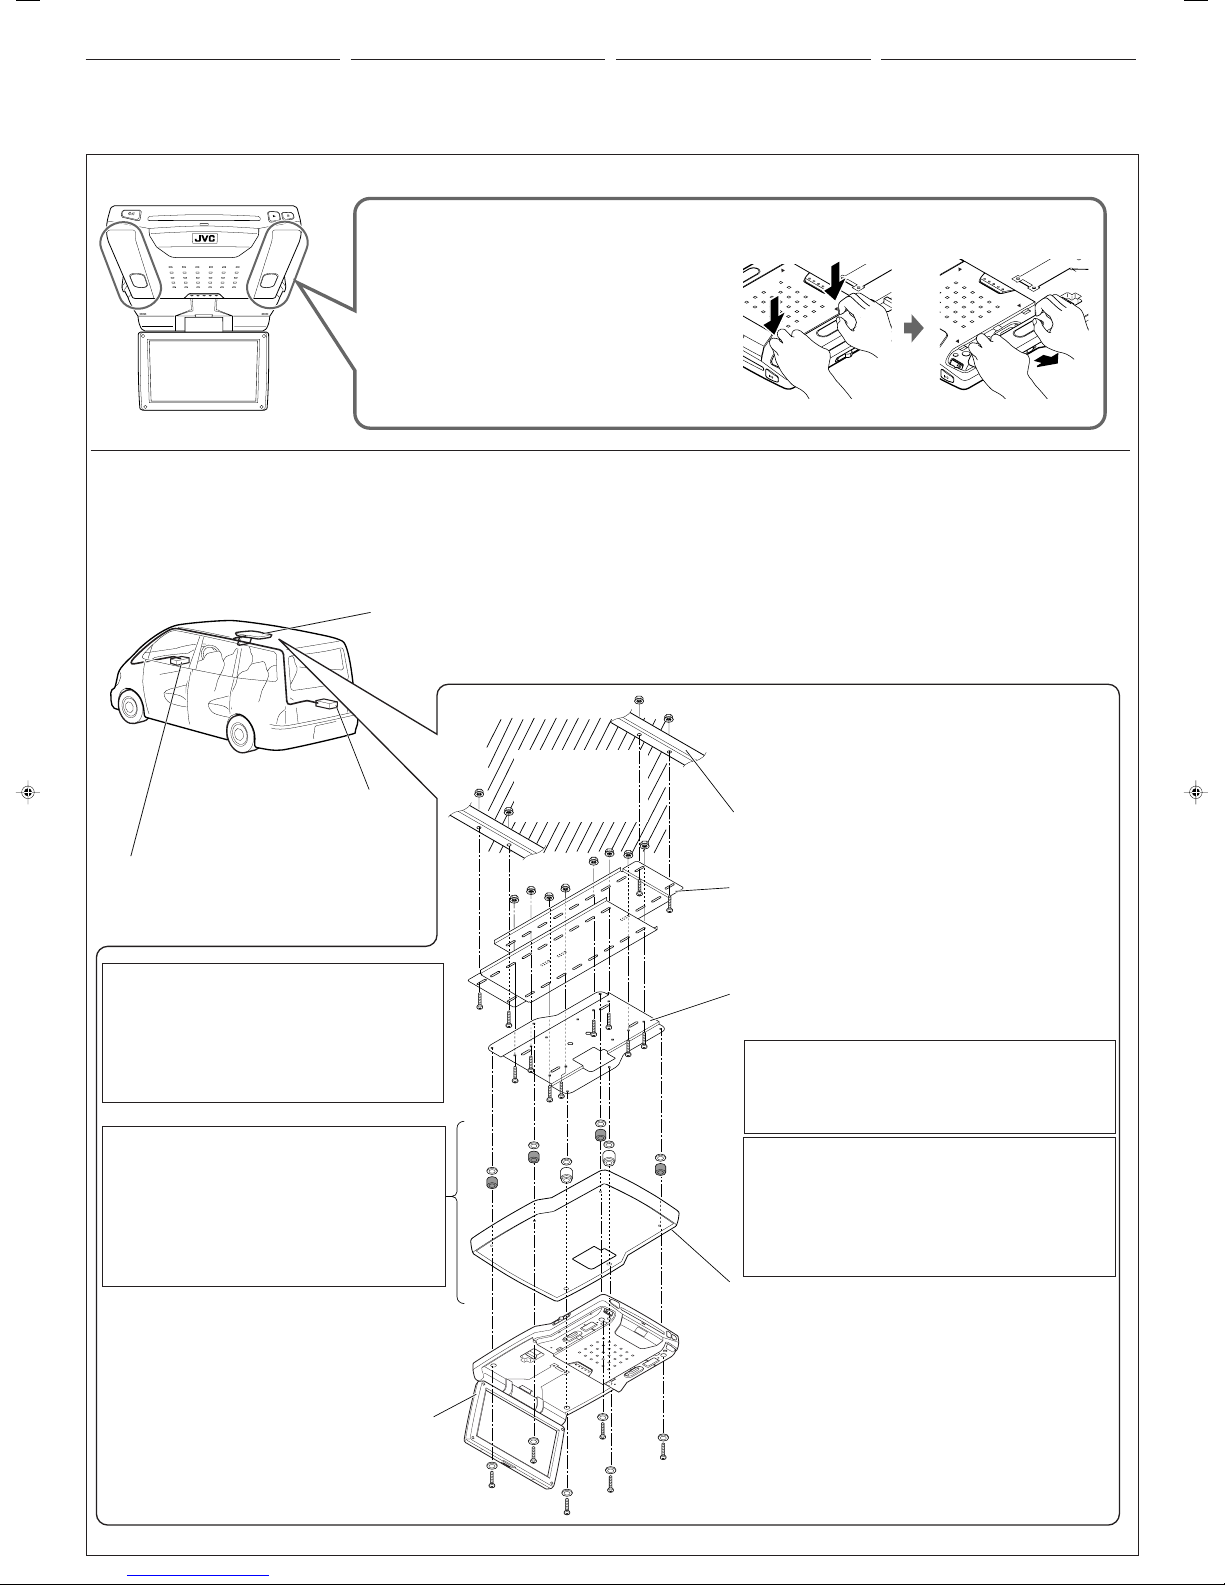
INSTALLATION
1
2
1
• The following illustration shows a typical installation.
However, you should make adjustments
corresponding to your specific car. If you have any
questions or require information regarding
installation kits, consult your JVC IN-CAR
ENTERTAINMENT dealer or a company supplying
kits.
Detaching the dome light cover / Abnehmen der Deckenleuchtenblende / Détachement du couvercle du plafonnier / Bevestigen van de afdekking
van de koepelverlichting
EINBAU
• Die folgende Abbildung zeigt einen typischen Einbau.
Dennoch müssen Sie entsprechend Ihrem jeweiligen
Auto Anpassungen vornehmen. Bei irgendwelchen
Fragen oder wenn Sie Informationen hinsichtlich des
Einbausatzes brauchen, wenden Sie sich an ihren
JVC-Autoradiofachhändler oder ein Unternehmen
das diese Einbausätze vertreibt.
To mount the widescreen monitor, detach the dome light covers.
As illustrated, depress the two portions on the cover indicated
by the marks 5 (1), then pull off the cover (2).
Zum Anbringen des Breitbildmonitors die Deckenleuchtenblenden abnehmen.
Wie in der Abbildung gezeigt drücken Sie die beiden Abdeckungsstellen ein,
die durch die Markierungen 5 (1) gekennzeichnet sind und ziehen dann die
Abdeckung (2) ab.
Pour monter le moniteur à écran large, détachez les couvercles du plafonnier.
Comme montré sur l’illustration, faites pression sur les deux parties sur le
couvercle marquées par 5 (1), puis retirez le couvercle (2).
Voor het installeren van de breedbeeld-monitor, moet u de afdekkingen van de
koepelverlichting verwijderen.
Druk zoals afgebeeld op de twee gedeeltes op de afdekking die met 5 zijn
gemarkeerd (1) en verwijder vervolgens de afdekking (2).
INSTALLATION
•
L’illustration suivante est un exemple d’installation
typique. Cependant, vous devez faire les
ajustements correspondant à votre voiture
particulière. Si vous avez des questions ou avez
besoin d’information sur des kits d’installation,
consulter votre revendeur d’autoradios JVC ou une
compagnie d’approvisionnement.
INSTALLATIE
• Op de volgende afbeelding kunt u zien hoe de installatie,
normaal gesproken, in zijn werk gaat. U moet echter bij
de installatie rekening houden met de bijzonderheden
van uw eigen auto. Neem bij vragen of voor meer
bijzonderheden over inbouwpakketten contact op met uw
JVC auto audiohandelaar of een dealer of een bedrijf dat
inbouwpakketten levert.
Mounting the widescreen monitor
Installation procedure varies among cars. The
following is an example. For detailed procedure, see
the right page.
It is recommended to have the monitor system
installed by a qualified technician.
Car receiver, etc.
Autoreceiver usw.
Récepteur d’autoradio, etc.
Autoradio-ontvanger, enz.
Before mounting the monitor, make sure that the screws do not reach
the ceiling panel.
Vor der Anbringung des Monitors sicherstellen, dass die Schrauben
nicht die Deckenplatte erreichen.
Avant de monter le moniteur, assurez-vous que les vis n’atteignent
pas le panneau du plafond.
Controleer alvorens de monitor te bevestigen dat de schroeven niet het
plafondpaneel raken.
These should not be used if the monitor position after installed seems
so low that it may interfere with visibility through the rearview mirror.
Diese sollen nicht verwendet werden, wenn die Monitorposition nach
dem Einbau so niedrig ist, dass sie die freie Sicht durch den
Rückspiegel behindern können.
Cette partie ne doit pas être utilisée si la position du moniteur après
l’installation paraît si basse qu’elle pourrait gêner la visibilité du
conducteur dans le rétroviseur.
Gebruik niet indien de positie van de monitor na het installeren dermate laag
is dat de monitor het zicht via de achteruitkijkspiegel zou kunnen hinderen.
Anbringen des Breitbildmonitors
Das Installationsverfahren hängt von dem jeweiligen
Fahrzeugtyp ab. Das folgende ist ein Beispiel.
Einzelheiten zum Verfahren siehe betreffende Seiten.
Es wird empfohlen, daß das Monitorsystem durch
einen qualifizierten Techniker installiert wird.
Widescreen monitor
Breitbildmonitor
Moniteur à écran large
Breedbeeld-monitor
TV tuner, etc.
TV-Tuner usw.
Tuner de télévision, etc.
TV-tuner, etc.
Widescreen monitor
Breitbildmonitor
Moniteur à écran large
Breedbeeld-monitor
Montage du moniteur à écran large
La procédure d’installation varie d’une voiture à
l’autre. La procédure qui suit est un exemple. Pour en
savoir plus, référez-vous à la page de droite.
Il est recommandé de faire installer le système de
moniteur par un technicien qualifié.
1
*
Ceiling panel
Deckenplatte
Panneau de plafond
Plafondpaneel
1
*
2
*
2
*
2
*
3
*
5
*
4
*
6
*
7
*
*1Nuts (M5): x 12
Muttern (M5): x 12
Écrous (M5): x 12
Moeren (M5): x 12
Ceiling reinforcement crosspieces
Deckenverstärkungsstreben
Traverses de renforcement du plafond
Kruisbalken plafondversteviging
Slide plates
Dia-Platten
Plaques latérales
Zijplaten
*2Screws–M5 x 10 mm: x 12
Schrauben–M5 x 10 mm: x 12
Vis–M5 x 10 mm: x 12
Schroef–M5 x 10 mm: x 12
Base plate
Basisplatte
Plaque de base
Basisplaat
When NOT using the shroud/Wenn das Schirmblech NICHT verwendet
wird/Lors que le socle de montage au plafond N’est PAS utilisé/Indien
de verstijving NIET wordt gebruikt
*3Flat washer–ø 5 mm: x 6
Scheibe–ø 5 mm: x 6
Rondelle plate–ø 5 mm: x 6
Versteviging–ø 5 mm: x 6
When using the shroud/Wenn das Schirmblech verwendet wird/Lors de
l’utilisation du socle de montage au plafond/Indien de verstijving wordt
gebruikt
*4Spacers: black–7 mm: x 4
Distanzstücke: Schwarz–7 mm: x 4
Intercalaire noire–7 mm: x 4
Tussenringen: zwart–7 mm: x 4
*5Spacers: silver–9 mm: x 2
Distanzstücke: Silber–9 mm: x 2
Intercalaire argent–9 mm: x 2
Tussenringen: zilver–9 mm: x 2
Shroud
Abschirmung
Socle de montage au plafond
Versteviging
*6Flat washer–ø 5 mm: x 6
Scheibe–ø 5 mm: x 6
Rondelle plate–ø 5 mm: x 6
Versteviging–ø 5 mm: x 6
*7Screws–M5 x 14 mm: x 6
or M5 x 23 mm: x 6–when using the shroud
Schrauben–M5 x 14 mm: x 6
oder M5 x 23 mm: x 6–Wenn das Schirmblech verwendet wird
Vis–M5 x 14 mm: x 6
ou M5 x 23 mm: x 6–lors de l’utilisation du socle de montage au plafond
Schroef–M5 x 14 mm: x 6
of M5 x 23 mm: x 6–Indien de verstijving wordt gebruikt
Installeren van de breedbeeld-monitor
De installatiewijze verschilt afhankelijk van het type auto.
Hier wordt slechts een voorbeeld gegeven. Zie de
rechterbladzijden voor details.
Laat bij voorkeur het monitorsysteem door een
erkend technicus installeren.
– 2 –
Page 89

7
1
3 42
5
678
Before mounting the monitor to the ceiling:
• Perform the required external connections first (see
reverse page).
• Wear goggles or protective eyewear to protect your
eyes especially while drilling the holes.
• Pay attention not to damage the car interior and its
fittings and the ceiling of your car.
Vor der Installation des Monitors an der
Decke:
• Schließen Sie die externen Anschlüsse zuerst an
(siehe Rückseite).
• Tragen Sie eine Schutzbrille zum Augenschutz,
besonders beim Bohren der Löcher.
• Achten Sie darauf, nicht das Fahrzeuginnere und
die Befestigungsteile und Decke Ihres Fahrzeugs
zu beschädigen.
Avant de fixer le moniteur au plafond:
• Réalisez d’abord les connexions extérieures
nécessaires (voir la page de dos).
• Portez des lunettes étanches ou un article de
lunetterie spécialisé pour protéger vos yeux, et plus
spécialement pendant le perçage des trous.
• Faites attention de ne pas endommager l’intérieur
de la voiture et ses garnitures, ainsi que son
plafond.
Alvorens de monitor aan het plafond te
bevestigen:
• Maak eerst de vereiste externe verbindingen (zie de
volgende bladzijde).
• Voorkom oogletsel en draag derhalve oogbescherming
of een veiligheidsbril, vooral tijdens het boren van
gaten.
• Wees voorzichtig zodat u het interieur van de auto, de
diverse auto-onderdelen en het dak en plafond niet
beschadigt.
Paper template
Papierschablone
Gabarit en papier
Papieren malletje
1 Nehmen Sie die Deckenleuchte und
Innendeckenverkleidung vom
Fahrzeughimmel ab.
2 Montieren Sie die Schiebeplatten
und Basisplatte.
• Bestimmen Sie zuerst die Monitoreinbauposition
und Länge der kombinierten Schiebeplatte.
3 Bringen Sie die montierten Platten
an den DeckenverstärkungQuerstreben an.
• Bohren Sie die vier Löcher in den
Deckenverstärkung-Querstreben, so dass sie
zu den Montagelöchern an den montierten
Platten passen.
4 Die Verdrahtung fertigstellen und
dann die Innendeckenverkleidung
anbringen.
5 Die Deckenverkleidung mit der
mitgelieferten Papierschablone
abschneiden.
6 Den Kabelbaum und die Stecker von
der Decke zum Monitor anschließen.
• Für Verdrahtung und Anschlüsse siehe
Rückseite.
7 Schirmblech und Monitor an der
Basisplatte anbringen.
• Bei Verwendung des Schirmblechs sollten die
mitgelieferten Distanzstücke eingesetzt werden,
um einen geeigneten Abstand zwischen
Basisplatte und Schirmblech einzuhalten.
Wenn die mitgelieferten Distanzstücke und
Schrauben nicht den geeigneten Abstand
zwischen Innendeckenverkleidung und
Monitor bewahren können, modifizieren Sie
die Distanzstücke oder Schrauben (oder
besorgen Sie solche geeigneter Länge).
8
Nach dem Anbringen des Monitors
bringen Sie die
Deckenleuchtenabdeckungen wieder an.
1 Remove the dome light and interior
headliner from the ceiling.
2 Assemble the slide plates and the
base plate.
• Determine the monitor installation position and
length of combined slide panels first.
3 Attach the assembled plates to the
ceiling reinforcement crosspieces.
• Drill the four holes in the ceiling reinforcement
crosspieces to meet the mounting holes of the
assembled plates.
4 Finish wiring then attach the interior
headliner.
5 Cut off the headliner using the
supplied paper template.
6 Connect the harness and plugs
from the ceiling to the monitor.
• For wiring and connections, see the reverse
side.
7 Attach the shroud and the monitor
to the base plate.
• When using the shroud, the supplied spacers
should be inserted to be kept the appropriate
distance between the base plate and the
shroud.
If the supplied spacers and screws cannot
keep the appropriate distance between the
headliner and the monitor, modify the spacers
and screws (or obtain those of the appropriate
length).
8 After mounting the monitor, attach
the dome light covers.
1 Retirez le plafonnier et la garniture
intérieure du plafond.
2 Assemblez les plaques latérales
avec la plaque de base.
• Déterminez d’abord la position d’installation
du moniteur et la longueur des panneaux
latéraux combinés.
3 Attachez les plaques assemblées
sur les traverses de renforcement
du plafond.
• Percez quatre trous dans les travers de
renforcement du plafond au niveau des trous de
montage des plaques assemblées.
4 Terminez le câblage puis attachez
la garniture intérieure.
5 Coupez la garniture en utilisant le
gabarit en papier fourni.
6 Connectez le harnais et les fiches
du plafond au moniteur.
• Pour le câblage et les connexions, référezvous à la page de dos.
7 Attachez le socle de montage au
plafond et le moniteur sur la plaque
de base.
• Les intercalaires fournies peuvent être
utilisées si une certaine distance doit être
maintenue entre la plaque de base et le socle
de montage au plafond.
Si les intercalaires et les vis fournies ne
permettent pas de maintenir la distance
appropriée entre la garniture et le moniteur,
modifiez les intercalaires ou les vis (ou
munissez-vous d’intercalaires et de vis de la
longueur appropriée).
8 Après avoir monté le moniteur,
attachez les couvercles du
plafonnier.
– 3 –
1 Verwijder de koepelverlichting en
interieur-voering van het plafond.
2 Monteer de zijplaten en basisplaat.
• Bepaal eerst de installatieplaat voor de monitor en
lengte van de gecombineerde zijpanelen.
3 Bevestig de gemonteerde platen
aan de versterking-kruisbalken van
het plafond.
• Boor vier gaten in de versterking-kruisbalken in
overeenstemming met de bevestigingsgaten in de
gemonteerde platen.
4 Voltooi de bedrading en bevestig
vervolgens de interieur-voering.
5 Gebruik het bijgeleverde papieren
malletje en snij het vereiste
gedeelte uit de interieur-voering.
6 Verbind de bundel en stekker van
het plafond met de monitor.
• Zie de achterkant van deze bladzijde voor details
aangaande de bedrading en verbindingen.
7 Bevestig de verstijving en de
monitor op de basisplaat.
• De bijgeleverde tussenringen kunnen worden
geplaatst indien er een vrije ruimte tussen de
basisplaat en de verstijving moet worden gehouden.
Indien u met de bijgeleverde tussenringen en
schroeven niet de juiste afstand tussen de interieurvoering en de monitor kunt krijgen, moet u de
tussenringen en schroeven aanpassen (of koop
nieuwe van een geschikte lengte).
8 Bevestig de afdekkingen van de
koepelverlichting weer nadat u de
monitor heeft bevestigd.
Page 90

4
1
2
3
5
6
7
2
1
ENGLISH DEUTSCH FRANÇAIS NEDERLANDS
1
2
ELECTRICAL CONNECTIONS
To prevent short circuits, we recommend that you
disconnect the battery’s negative terminal and make
all electrical connections before installing the unit. If
you are not sure how to install this unit correctly, have
it installed by a qualified technician.
Note:
This unit is designed to operate on 12 V DC,
NEGATIVE ground electrical systems. If your
vehicle does not have this system, a voltage inver ter
is required, which can be purchased at JVC IN-CAR
ENTERTAINMENT dealers.
• Replace the fuse with one of the specified ratings. If
the fuse blows frequently, consult your JVC IN-CAR
ENTERTAINMENT dealer.
ELEKTRISCHE ANSCHLÜSSE
Zur Vermeidung von Kurzschlüssen empfehlen wir, daß
Sie den negativen Batterieanschluß abtrennen und alle
elektrischen Anschlüsse herstellen, bevor das Gerät
eingebaut wird. Sind Sie sich über den richtigen Einbau
des Geräts nicht sicher, lassen Sie es von einem
qualifizierten Techniker einbauen.
Hinweis:
Dieses Gerät ist für den Betrieb in elektrischen
Anlagen mit 12 V Gleichstrom und (–) Erdung
ausgelegt. Verfügt Ihr Fahrzeug nicht über diese
Anlage, ist ein Spannungsinverter erforderlich, der
bei JVC-Autoradiofachhändler erworben werden
kann.
• Die Sicherung mit einer der entsprechenden
Nennleistung ersetzen. Brennt die Sicherung
häufig durch, wenden Sie sich an ihren JVCAutoradiofachhändler.
RACCORDEMENTS ELECTRIQUES
Pour éviter tout court-circuit, nous vous recommandons
de débrancher la borne négative de la batterie et
d’effectuer tous les raccordements électriques avant
d’installer l’appareil. Si l’on n’est pas sûr de pouvoir
installer correctement cet appareil, le faire installer par
un technicien qualifié.
Remarque:
Cet appareil est conçu pour fonctionner sur des
sources de courant continu de
NEGATIVE
. Si votre véhicule n’offre pas ce type
d’alimentation, il vous faut un convertisseur de
tension, que vous pouvez acheter chez un revendeur
d’autoradios JVC.
•
Remplacer le fusible par un de la valeur précisée. Si
le fusible saute souvent, consulter votre revendeur
d’autoradios JVC
12 V à masse
.
ELEKTRISCHE VERBINDINGEN
Om kortsluiting te voorkomen adviseren wij u om de minpool
van de accu los te maken en alle elektrische verbindingen tot
stand te brengen voordat u het apparaat in de auto installeert.
Als u niet zeker weet hoe u dit apparaat moet installeren,
kunt u dit beter door een daartoe gekwalificeerde technicus
laten doen.
Opmerking:
Dit apparaat mag worden gebruikt bij elektrische systemen
die werken op 12 V gelijkstroom met negatieve aarding.
Als uw auto niet is uitgerust met een dergelijk systeem, is
een spanningsomzetter vereist. Dit instrument kan worden
aangeschaft bij JVC auto audiohandelaar.
• Vervang de zekering door een exemplaar met het
aangegeven vermogen. Als de zekering vaak doorslaat, moet
u uw JVC auto audiohandelaar raadplegen.
Typical Connections / Typische Anschlüsse / Raccordements typiques / Normale verbindingen
Before connecting: Check the wiring in the vehicle
carefully. Incorrect connection may cause serious
damage to this unit.
The leads of the power cord and those of the
connector from the car body may be different in
color.
1
Connect the colored leads of the power cord to
the car battery, the car light control switch, and
the door sensor in the following sequence.
1 Black: ground
2 Yellow: to car battery (constant 12 V)
3 Red: to an accessory terminal
4 Orange: to car light control switch
DOMELIGHT
5 Gray with red stripe: to the door sensor
(DOOR SW)
6 Black with red stripe: ground (DOMELIGHT)
7 Yellow with red stripe: to car battery
(constant 12 V)
2
Finally connect the wiring harness to the unit.
• Using the joint cord makes the connection/
disconnection easier.
Black / Schwarz /
Yellow*
Gelb*
Jaune
Geel*
Red
Rot
Rouge
Rood
Orange
Orange
Orange
Oranje
Noir
/ Zwart
1
1
1
*
1
5 A fuse
5 A-Sicherung
Fusible 5 A
5 A zekering
3 A fuse
3 A-Sicherung
Fusible 3 A
3 A zekering
Gray with red stripe
Grau mit rotem Streifen
Gris à bande rouge
Grijs met rode streep
Black with red stripe
Schwarz mit rotem Streifen
Noir à bande rouge
Zwart met rode streep
Yellow with red stripe
Gelb mit rotem Streifen
Jaune à bande rouge
Geel met rode streep
1 A fuse
1 A-Sicherung
Fusible 1 A
1 A zekering
Vor dem Anschließen: Die Verdrahtung im Fahrzeug
sorgfältig überprüfen. Falsche Anschlüsse können
ernsthafte Schäden am Gerät hervorrufen.
Die Betriebsstrom- und Anschlussleitungen von der
Autokarosserie können sich in der Farbe unterscheiden.
1
Die farbigen Leitungen des Betriebsstromkabels an
die Autobatterie, den AutobeleuchtungssteuerungSchalter und den
Reihenfolge anschließen.
1 Schwarz: an Erde
2 Gelb: an die Autobatterie (12 V Gleichstrom)
3 Rot: an den Hilfsanschluß
4 Orange: Zum Autobeleuchtungssteuerung-
DOMELIGHT
5 Grau mit rotem Streifen: zum Türkontakt
6 Schwarz mit rotem Streifen: an Erde
7 Gelb mit rotem Streifen: an die Autobatterie
2
Schließen Sie zum Schluß den Kabelbaum an das
Gerät an.
• Durch Verwendung des Verbingungskabels wird
Anschluss/Abtrennung erleichtert.
Joint cord
Verbindungskabel
Cordon de raccordement
Verlengsnoer
To metallic body or chassis of the car
Zur Metallkarosserie oder zum Fahrwerk des Fahrzeugs
Vers corps métallique ou châssis du véhicule
Naar de metalen ombouw of chassis van de auto
To a live terminal in the fuse block connecting to the car battery (bypassing the ignition switch)
Zu einem stromführenden Anschluß im Sicherungsblock, der an die Autobatterie angeschlossen
ist (Umgehen des Zündschalters)
A une borne sous tension du porte-fusible connectée à la batterie de la voiture (en dérivant l’interrupteur
d’allumage)
Naar een aansluiting in het zekeringenblok die op de accu is aangesloten (waarbij de ontsteking wordt omzeilt)
To an accessory terminal in the fuse block
Zu einem Hilfsanschluß im Sicherungsblock
Vers borne accessoire du porte-fusible
Naar de aansluiting voor een accessoire in het zekeringenblok
To car light control switch
Zum Autobeleuchtungssteuerung-Schalter
Au commutateur d’éclairage de la voiture
Naar autoverlichtingschakelaar
To the door sensor
Zum Türkontakt
Au capteur de porte
Naar portiersensor
To metallic body or chassis of the car
Zur Metallkarosserie oder zum Fahrwerk des Fahrzeugs
Vers corps métallique ou châssis du véhicule
Naar de metalen ombouw of chassis van de auto
To a live terminal in the fuse block connecting to the car battery (bypassing the ignition switch)
Zu einem stromführenden Anschluß im Sicherungsblock, der an die Autobatterie angeschlossen
ist (Umgehen des Zündschalters)
A une borne sous tension du porte-fusible connectée à la batterie de la voiture (en dérivant
l’interrupteur d’allumage)
Naar een aansluiting in het zekeringenblok die op de accu is aangesloten (waarbij de ontsteking wordt omzeilt)
Türkontakt
Schalter
(DOOR SW)
(DOMELIGHT)
(12 V Gleichstrom)
in der folgenden
Avant de commencer la connexion:
attentivement le câblage du véhicule. Une connexion
incorrecte peut endommager sérieusement l’appareil.
Les fils du cordon d’alimentation et ceux du
connecteur provenant de la voiture peuvent être de
couleur différente.
1
Connectez les fils de couleur du cordon d’alimentation
à la batterie de la voiture, au commutateur d’éclairage
et capteur de porte, dans l’ordre suivant.
1
Noir: à la masse
2
Jaune: à la batterie de la voiture (12 V
constant)
3
Rouge: à la prise accessoire
4
Orange: au commutateur d’éclairage de la
voiture
DOMELIGHT
5
Gris à bande rouge: au capteur de porte
(DOOR SW)
6
Noir à bande rouge: à la masse
(DOMELIGHT)
7
Jaune à bande rouge: à la batterie de la
voiture (12 V constant)
2
Finalement, connectez le faisceau de fils à
l’appareil.
• L’utilisation du cordon prolongateur
d’alimentation rend la connexion/déconnexion
plus facile.
*2Not included with this unit.
Wird nicht mit Gerät mitgeliefert.
Non fourni avec cet appareil.
Niet bij het apparaat inbegrepen.
Vérifiez
Ignition switch
2
2
*
2
2
*
Zündschalter
Interrupteur d’allumage
Contactschakelaar
*
*
Alvorens de verbindingen tot stand te brengen:
Moet u de bedrading in de auto zorgvuldig. Het apparaat
kan door verkeerde verbindingen ernstige schade oplopen.
De draden van het stroomsnoer en van de auto zelf
kunnen verschillend zijn.
1
Verbind de gekleurde draden van het stroomsnoer met
de auto-accu, de autoverlichtingschakelaar en de
portiersensor in de volgende volgorde.
1 Zwart: aarde
2 Geel: naar de accu van de auto (constant 12 V)
3 Rood: naar het aansluitpunt van een accessoire
4 Oranje: naar autoverlichtingschakelaar
DOMELIGHT
5 Grijs met rode streep: naar portiersensor (DOOR SW)
6 Zwart met rode streep: aarde (DOMELIGHT)
7 Geel met rode streep: naar de accu van de auto
(constant 12 V)
2
Sluit tot slot de bedrading naar de eenheid aan.
• Gebruik het verlengsnoer voor het stroomsnoer om
het aansluiten/ontkoppelen te vergemakkelijken.
Fuse block
Sicherungsblock
Porte-fusible
Zekeringblok
*1Before checking the operation of this unit
prior to installation, this lead must be
connected, otherwise power cannot be
turned on.
Vor der Überprüfung der Funktionsfähigkeit
des Geräts vor dem Einbau, muß diese
Leitung angeschlossen werden, da sonst
die Stromversorgung nicht eingeschaltet
werden kann.
Pour vérifier le fonctionnement de cet
appareil avant installation, ce fil doit être
raccordé, sinon l’appareil ne peut pas être
mis sous tension.
Voordat u controleert of het apparaat werkt
(alvorens het te installeren), moet deze draad
aangesloten zijn. Als dit niet het geval is, kan de
stroom niet worden ingeschakeld.
To disconnect the harness, unlock the harness using the screw driver or a similar tool, then pull out the harness. (Detach the dome
light cover prior to this.)
Zum Abtrennen des Kabelbaums lösen Sie den Kabelbaum mit einem Schraubenzieher oder ähnlichen Werkzeug und ziehen den
Kabelbaum dann ab. (Nehmen Sie vorher die Deckenleuchtenblende ab.)
Pour déconnecter le harnais,
le plafonnier avant de le faire.)
Para desconectar el mazo de conductores, desbloquéelo con un destornillador o herramienta similar y seguidamente, extráigalo. (Antes de
realizar esto, retire la cubierta de la luz del techo).
déverrouillez le harnais en utilisant un tournevis ou un outil similaire, puis tirez sur le harnais. (Détachez
– 4 –
Page 91
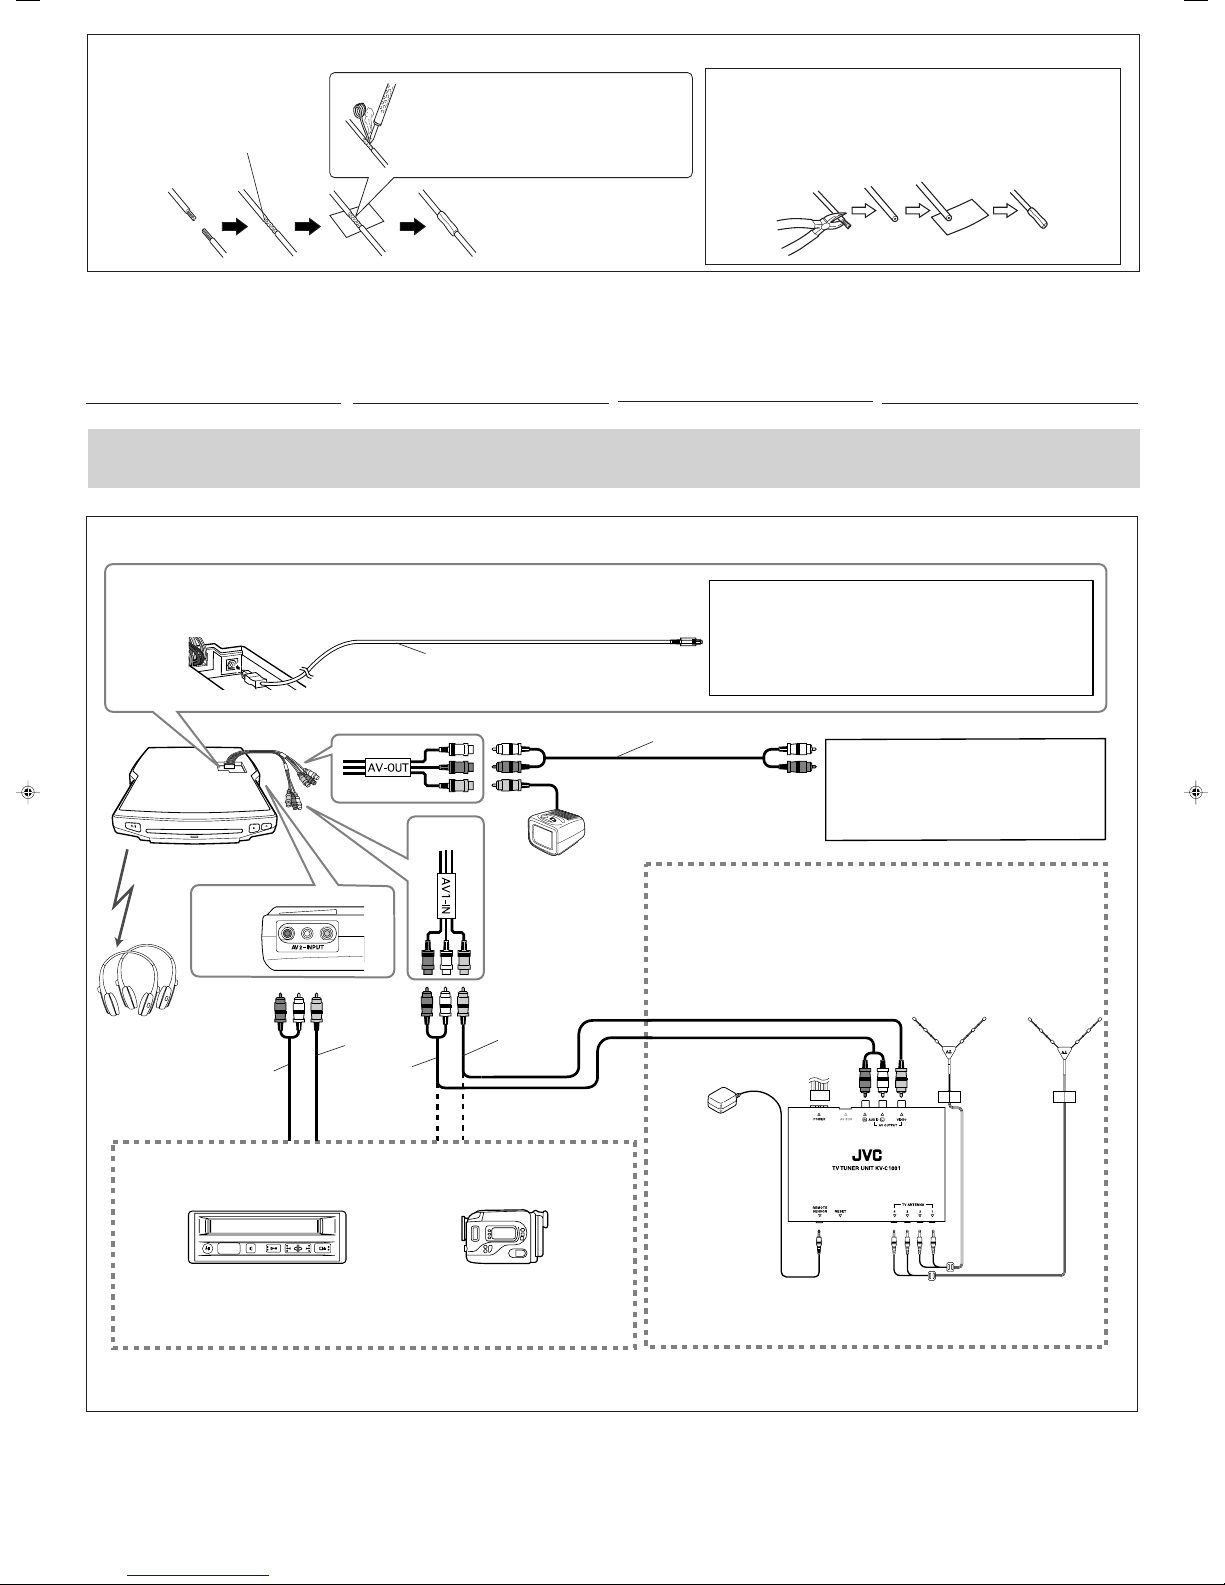
LINE IN
Connecting the leads / Anschließen der Leitungen / Raccordement des fils / Aansluiting van de gekleurde draden
CAUTION / VORSICHT / ATTENTION / LET OP!:
Twist the core wires when connecting.
Die Kerndrähte beim Anschließen verdrehen.
Torsader les âmes des fils en les raccordant.
Draai de kerndraden om elkaar heen wanneer u ze
wilt aansluiten.
Solder the core wires to connect them securely.
Die Kerndrähte anlöten, um sie fest anzuschließen.
Souder les âmes des fils pour les raccorder entre eux de
façon sûre.
Soldeer de kerndraden zodat ze stevig vast zitten.
• To prevent short-circuit, cover the terminals of the UNUSED leads with
insulating tape.
• Zur Vermeidung eines Kurzschlusses die Anschlußklemmen der NICHT
VERWENDETEN Leitungen mit Isolierklebeband umwickeln.
• Pour éviter les court-circuits, couvrir les bornes des fils qui ne sont PAS
utilisés avec de la bande isolante.
• Om kortsluiting te voorkomen, moet u de aansluitklemmen van
ONGEBRUIKTE gekleurde draden met isolatieband bedekken.
CONNECTING TO THE RECEIVER
AND EXTERNAL COMPONENTS
DO NOT connect the AV1-IN and AV2-INPUT plugs
on the monitor to the LINE OUT or SUBWOOFER
plugs of the car receiver.
ANSCHLIESSEN AN RECEIVER
UND EXTERNE KOMPONENTEN
Schließen Sie NICHT die Stecker AV1-IN und AV2INPUT am Monitor an die Stecker LINE OUT oder
SUBWOOFER am Fahrzeug-Receiver an.
For KV-MRD900 / Für KV-MRD900 / Pour la KV-MRD900 / Voor KV-MRD900
See also “About sounds reproduced through the terminals” on page 36 of the INSTRUCTIONS.
Siehe auch „Über von den Rückseitenbuchsen ausgegebenen Ton“ auf Seite 36 der BEDIENUNGSANLEITUNG.
Référez-vous aussi à “À propos des sons reproduits par les prises” à la page 36 du MANUEL D’INSTRUCTIONS.
Zie tevens “Meer over het geluid dat via de achter-aansluitingen wordt gereproduceerd” op bladzijde 36 van de
GEBRUIKSAANWIJZING.
DIGITAL OUT
KS-HP2
KV-MRD900
Rear panel
Geräterückseite
Panneau
arrière
Achterpaneel
AV2-INPUT
3
*
AV-O UT
4
*
Digital optical cable (not supplied)
Optisches Digitalkabel (nicht mitgeliefert)
Câble optique numérique (non fourni
Digitale optische kabel (niet meegeleverd)
AV1-IN
2nd monitor
Zweiter Monitor
2d. moniteur
2e monitor
4
*
3
*
)
CONNEXION DE L’AUTORADIO
ET DES APPAREILS EXTÉRIEURS
NE CONNECTEZ PAS les fiches AV1-IN et AV2INPUT du moniteur aux fiches LINE OUT ou
SUBWOOFER de l’autoradio.
Audio/video control amplifier or the decoder compatible with the multichannel
digital sources
Audio/Video-Verstärker oder mit Mehrkanalquellen kompatibler Decoder
Amplificateur de commande audio/vidéo ou décodeur compatible avec les
sources numériques multicanaux
Audio/videoregeling versterker of de decoder compatibel met meerkanaals digitale
bronnen
3
*
When using the TV tuner system KV-C1001
Bei Verwendung des TV-Tunersystems KV-C1001
Lors de l’utilisation du tuner de télévision KV-C1001
Bij gebruik van het KV-C1001 TV-tunersysteem
VERBINDEN MET EEN RECEIVER
EN EXTERNE COMPONENTEN
Verbind de AV1-IN en AV2-INPUT aansluitingen van de
monitor NIET met de LINE OUT of SUBWOOFER
aansluitingen van de auto-receiver.
(or equivalent terminal)
(oder entsprechende Buchse)
(ou prise équivalente)
Car receiver
Autoreceiver
Récepteur d’autoradio
Autoradio-ontvanger
(of gelijkwaardige aansluiting)
Antenna elements (supplied with KV-C1001)
Antennenelemente (mit KV-C1001 mitgeliefert)
Éléments d’antenne (fournis avec le KV-C1001)
Antenne-elementen (bijgeleverd bij de KV-C1001)
Playback source / Wiedergabesignalquelle / Source de lecture /
Afspeelbron
VCR (KV-V8 or KV-V10)
Videorecorder (KV-V8 oder KV-V10)
Magnétoscope (KV-V8 ou KV-V10)
Videorecorder (KV-V8 of KV-V10)
*3RCA pin plug cord (not supplied)
*4Video cord (not supplied)
*3RCA-Klinkensteckerkabel (nicht mitgeliefert)
*4Videokabel (nicht mitgeliefert)
Camcorder
Camcorder
Caméscope
Camcorder
Remote sensor unit
(supplied with KV-C1001)
Fernbedienungssensoreinheit
(mit KV-C1001 mitgeliefert)
Capteur de
télécommande (fourni
avec le KV-C1001)
Afstandsbedieningssensor
(bijgeleverd bij de KVC1001)
3
*
Cordon à fiches cinch (non fourni)
4
*
Cordon vidéo (non fourni)
– 5 –
KV-C1001
*3RCA-penstekkersnoer (niet meegeleverd)
*4Videosnoer (niet meegeleverd)
Page 92

2nd AUDIO OUT
VIDEO OUT
LINE IN
2nd AUDIO OUT
For KV-MR9010 / Für KV-MR9010 / Pour la KV-MR9010 / Voor KV-MR9010
2nd AUDIO OUT
VIDEO OUT
LINE IN
• When the receiver is equipped with the 2nd
AUDIO OUT plug
• Wenn der Receiver mit dem 2nd AUDIO OUT
Stecker ausgestattet ist
AV-O UT
AV1-IN
*
4
KV-MR9010
AV2-INPUT
Rear panel
Geräterückseite
Panneau
arrière
KS-HP2
(not supplied)
(nicht mitgeliefert)
(non fourni)
(niet bijgeleverd)
Playback source / Wiedergabesignalquelle / Source de lecture /
Afspeelbron
Achterpaneel
3
*
4
*
•
Si l’autoradio est muni d’une fiche 2nd AUDIO
OUT
3
*
2nd monitor
Zweiter Monitor
2d. moniteur
2e monitor
3
*
When using the TV tuner system KV-C1001
Bei Verwendung des TV-Tunersystems KV-C1001
Lors de l’utilisation du tuner de télévision KV-C1001
Bij gebruik van het KV-C1001 TV-tunersysteem
• Indien de receiver een 2nd AUDIO OUT
aansluiting heeft
Car receiver (ex. JVC KD-DV6101)
Autoreceiver (z.B. JVC KD-DV6101)
Récepteur d’autoradio (ex. JVC KD-DV6101)
Autoradio-ontvanger (bijv. JVC KD-DV6101)
VCR (KV-V8 or KV-V10)
Videorecorder (KV-V8 oder KV-V10)
Magnétoscope (KV-V8 ou KV-V10)
Videorecorder (KV-V8 of KV-V10)
When increasing the headphones level, first
increase output level of the 2nd AUDIO OUT on the
receiver, then adjust the headphones level on the
headphones.
• Refer also to the INSTRUCTIONS of your car
receiver.
• When the receiver is NOT equipped with the
2nd AUDIO OUT plug
Beim Höherstellen der Kopfhörerlautstärke steigern
Sie zunächst den Ausgangspegel des 2nd AUDIO
OUT am Receiver und stellen dann die
Kopfhörerlautstärke am Kopfhörer ein.
• Siehe auch BEDIENUNGSANLEITUNG des
Fahrzeug-Receivers.
• Wenn der Receiver NICHT mit dem 2nd AUDIO
OUT Stecker ausgestattet ist
AV-O UT
AV1-IN
Camcorder
Camcorder
Caméscope
Camcorder
KV-MR9010
AV2-INPUT
Rear panel
Geräterückseite
Panneau
arrière
KS-HP2
(not supplied)
(nicht mitgeliefert)
(non fourni)
(niet bijgeleverd)
Playback source / Wiedergabesignalquelle / Source de lecture /
Afspeelbron
Achterpaneel
KV-C1001
Si vous souhaitez augmenter le niveau du casque
d’écoute, augmentez d’abord le niveau de sortie de la
prise 2nd AUDIO OUT sur l’autoradio, puis ajustez le
niveau du casque d’écoute sur le casque.
• Référez-vous aussi au MANUEL D’INSTRUCTION
de votre autoradio.
• Si l’autoradio n’est PAS muni de fiches 2nd
AUDIO OUT
3
*
2nd monitor
Zweiter Monitor
4
*
2d. moniteur
2e monitor
When using the TV tuner system KV-C1001
Bei Verwendung des TV-Tunersystems KV-C1001
Lors de l’utilisation du tuner de télévision KV-C1001
Bij gebruik van het KV-C1001 TV-tunersysteem
4
*
3
*
Voor het verhogen van het niveau van de hoofdtelefoon,
moet u eerst het uitgangsniveau van de 2nd AUDIO OUT
aansluiting van de receiver verhogen.
• Zie tevens de GEBRUIKSAANWIJZING van uw
Autoradio-ontvanger
• Indien de receiver GEEN 2nd AUDIO OUT
aansluiting heeft
Car receiver (ex. JVC KD-DV5101)
Autoreceiver (z.B. JVC KD-DV5101)
Récepteur d’autoradio (ex. JVC KD-DV5101)
Autoradio-ontvanger (bijv. JVC KD-DV5101)
VCR (KV-V8 or KV-V10)
Videorecorder (KV-V8 oder KV-V10)
Magnétoscope (KV-V8 ou KV-V10)
Videorecorder (KV-V8 of KV-V10)
*3RCA pin plug cord (not supplied)
*4Video cord (not supplied)
TROUBLESHOOTING
• The fuse blows.
* Are the red and black leads connected correctly?
• Power cannot be turned on.
* Is the yellow lead connected?
• Picture does not come on screen.
* Is the correct input selected?
• Dome lights cannot be turned on.
* Is the yellow and red stripe lead connected?
• This unit does not work at all.
* Have you reset your unit?
*3RCA-Klinkensteckerkabel (nicht mitgeliefert)
*4Videokabel (nicht mitgeliefert)
FEHLERSUCHE
• Die Sicherung brennt durch.
* Sind das rote und das schwarze Kabel
ordnungsgemäß angeschlossen?
• Die Stromversorgung kann nicht eingeschaltet
werden.
* Ist das gelbe Kabel angeschlossen?
• Auf dem Bildschirm erscheint kein Bild.
* Wurde der richtige Eingang ausgewählt?
• Deckenleuchte lässt sich nicht einschalten.
* Ist der gelbe Draht mit rotem Streifen angeschlossen?
• Dieses Gerät funktioniert überhaupt nicht.
* Haben Sie Ihr Gerät zurückgesetzt?
Camcorder
Camcorder
Caméscope
Camcorder
3
*
Cordon à fiches cinch (non fourni)
4
*
Cordon vidéo (non fourni)
EN CAS DE DIFFICULTÉS
• Le fusible saute.
*
Les fils rouge et noir sont-ils racordés
correctement?
• L’appareil ne peut pas être mise sous tension.
*
Le fil jaune est-elle raccordée?
• Aucune image n’apparaît sur l’écran.
*
L’entrée correcte est-elle choisie?
• Le plafonnier ne peut pas être allumé.
*
Le fil à bandes jaune et rouge est-il connecté?
• Cet appareil ne fonctionne pas du tout.
*
Avez-vous réinitialisé votre appareil?
– 6 –
KV-C1001
*3RCA-penstekkersnoer (niet meegeleverd)
*4Videosnoer (niet meegeleverd)
PROBLEMEN OPLOSSEN
• De zekering brandt door.
* Zijn de rode en zwarte kabels goed aangesloten?
• De stroom kan niet worden ingeschakeld.
* Is de gele kabel aangesloten?
• Er is geen beeld op het scherm.
* Is de juiste ingang gekozen?
• Koepelverlichting kan niet worden ingeschakeld.
* Is het gele en rode gestreepte draad aangesloten?
• Toestel werkt geheel niet.
* Heeft u het toestel teruggesteld?
Page 93
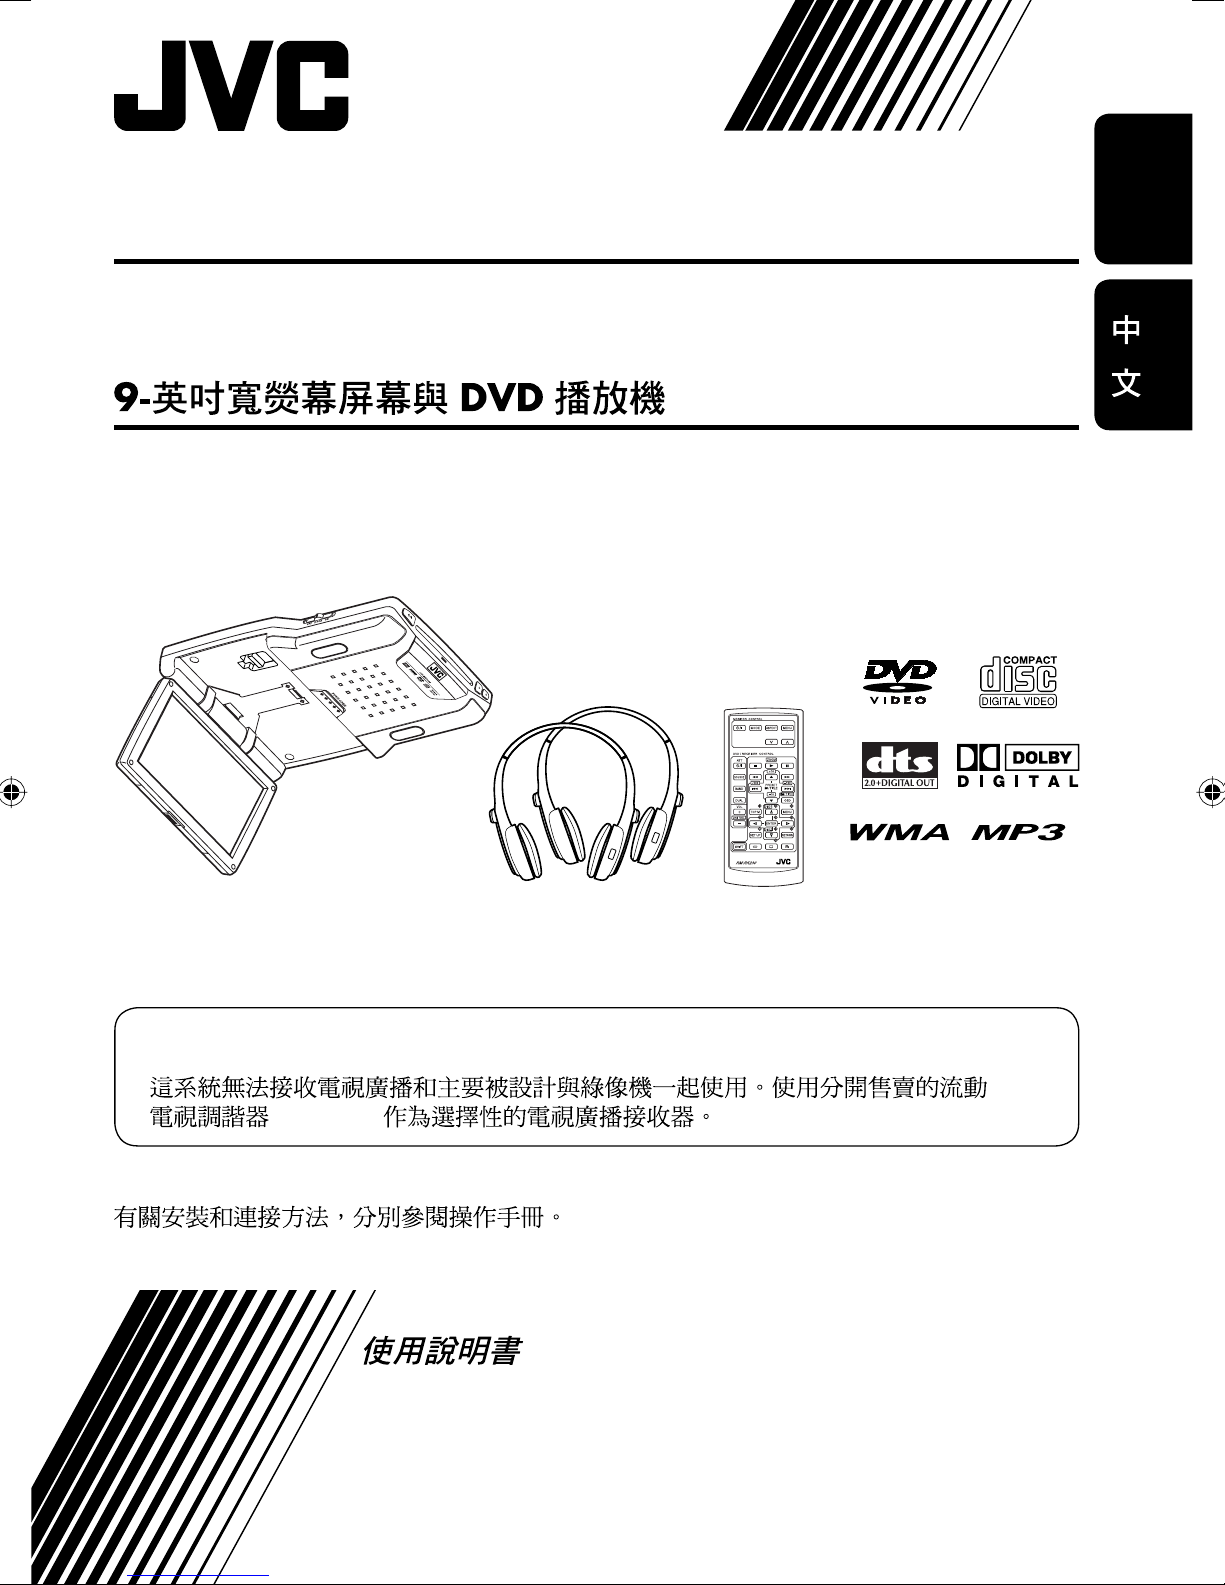
9-INCH WIDESCREEN MONITOR
WITH DVD PLAYER KV-MRD900
KV-MRD900
ENGLISH
???CT??
• This system cannot receive television broadcasts. Use the separately sold TV tuner unit KV-C1000 for
optional television broadcast reception.
•
KV-C1000
For installation and connections, refer to the separate manual.
INSTRUCTIONS
LVT1342-003A
[UT]
Page 94

WARNINGS
• DO NOT INSTALL THE MONITOR IN A
LOCATION WHICH OBSTRUCTS DRIVING,
VISIBILITY, SAFETY DEVICE FUNCTION
SUCH AS AIR BAGS OR WHICH IS
ENGLISH
PROHIBITED BY APPLICABLE LAWS AND
REGULATIONS.
• There may be legal regulations defining the
permissible installation locations for the monitor
which differ by country or by state. Be sure
to install the monitor in a correct location
according to such laws.
• The driver must not operate the monitor while
driving.
* Stop your vehicle in a safe location when
operating the monitor.
• The driver must not watch the television or
playback pictures while driving.
If the driver does it while driving, it may lead to
carelessness and cause an accident.
• Keep the monitor at an appropriate sound level
while driving.
Driving with the sound at a level that prevents
you from hearing sounds outside of and around
the vehicle may cause an accident.
• Be sure not to let the monitor fall or be strongly
impacted since this may cause a malfunction or
fire.
• Do not use the monitor with the engine off.
Doing so with the engine off will consume
battery power and may prevent the engine from
starting.
• When not in use, close the liquid crystal panel
and store it into the compartment.
• Do not touch the surface of the liquid crystal
panel directly.
• Do not hang any object on the monitor or hang
down, as this may damage the monitor.
CAUTION:
This monitor should be used on DC 12 V only. To
prevent electric shocks and fire hazards, DO NOT
use any other power source.
Installation requires some special
knowledge.
Do not install the monitor yourself.
Consult a dealer having special
knowledge of this kind for safe and
reliable installation.
CAUTIONS on the supplied headphones
—KS-HP2:
• DO NOT leave the headphones in a place
exposed to direct sunlight for a long
time, such as a dashboard, as they may be
damaged.
• Keep the headphones away from a cellular
phone to avoid interference.
• DO NOT turn off the power with the
volume set at high level, as the sudden
blast of sound can damage your hearing
and/or headphones next time you use the
headphones.
• If you experience a ringing in your
ears, reduce volume or stop using the
headphones.
2
Page 95

Thank you for purchasing a JVC product.
Please read all instructions carefully before operation, to ensure your complete understanding and to
obtain the best possible performance from the unit.
IMPORTANT FOR LASER PRODUCTS
1. CLASS 1 LASER PRODUCT
2. CAUTION : Do not open the top cover. There are no user serviceable parts inside the unit; leave
all servicing to qualified service personnel.
3. CAUTION: Visible and invisible laser radiation when open and interlock failed or defeated.
Avoid direct exposure to beam.
4. REPRODUCTION OF LABEL: CAUTION LABEL, PLACED OUTSIDE THE UNIT.
Caution on volume setting:
This product incorporates copyright
protection technology that is protected
by U.S. patents and other intellectual
property rights. Use of this copyright
protection technology must be authorized
by Macrovision, and is intended for home
and other limited viewing uses only unless
otherwise authorized by Macrovision.
Reverse engineering or disassembly is
prohibited.
Discs produce very little noise compared
with other sources. Lower the volume
before playing a disc to avoid damaging
the speakers by the sudden increase of the
output level.
ENGLISH
3
Page 96

How to reset your monitor
ENGLISH
This will reset the microcomputer. Your preset
adjustments will also be erased.
How to forcibly eject a disc
How to read this manual
The following methods are used to make the
explanations simple and easy-to-understand:
• Some related tips and notes are explained in
“More about this monitor” (see pages
33 – 35).
• Button operations are mainly explained with
the illustrations as follows:
Press briefly.
Press repeatedly.
If a disc cannot be recognized by the monitor
or cannot be ejected...
Monitor
The disc comes
out.
(for about 5 seconds
while power is on)
• If this does not work, reset your monitor.
• Be careful not to drop the disc when it
ejects.
Press either one.
Press and hold until
your desired response
begins.
Press and hold both
buttons at the same
time.
4
Page 97

Contents
How to reset your monitor ..................... 4
How to forcibly eject a disc ................... 4
How to read this manual ........................ 4
Precautions .................................... 6
Widescreen monitor ....................... 7
Parts identification ................................. 7
Remote controller — RM-RK230
Main elements and features ................... 8
Headphones — KS-HP2
Main elements and features ................... 10
Basic operations
............................. 11
.................... 10
....... 8
Adjustments .................................. 13
Using the monitor menu ........................ 13
Changing the aspect ratio ...................... 15
DVD/VCD/JPEG special functions ... 21
Selecting audio languages ..................... 21
Selecting subtitles .................................. 21
Selecting the multi-angle views ............. 21
Disc menu operations ............................ 22
Zoom in .................................................. 22
On-Screen disc operations ............... 23
Basic on-screen bar operations .............. 24
Basic control screen operations ............. 26
List screen operations ............................ 27
DVD setup menu ............................ 28
Basic setting procedure .......................... 28
Maintenance .................................. 31
Language codes .............................. 32
More about this monitor ................. 33
ENGLISH
Playable discs ................................ 17
Disc operations .............................. 18
Playing a disc ................................. 18
Starting playback ................................... 18
Basic operations ..................................... 19
Troubleshooting ............................. 37
Specifications ................................. 39
For safety....
• Do not raise the volume level too much, as
this will block outside sounds, making driving
dangerous.
• Stop the car before performing any
complicated operations.
Temperature inside the car....
If you have parked the car for a long time in
hot or cold weather, wait until the temperature
in the car becomes normal before operating the
unit.
5
Page 98

Precautions
Cautions for handling the liquid crystal panel
Do not expose the liquid crystal panel to direct
sunlight.
ENGLISH
• Storage temperature range: –20°C to +80°C
+80°C
–20°C
–20°C to +80°C
During the summer,
temperatures can
reach as high as
100°C.
When the liquid crystal panel reaches high
temperatures or low temperatures, chemical
changes occur within the liquid crystal panel
which may cause it to malfunction.
Do not drop the liquid crystal panel or strike
it sharply.
When the temperature is very cold or very
hot, the image may not appear clearly or may
move slowly.
The image may not be synchronized with
the sound or the image quality may decline
in such environments. Note that this is not a
malfunction or problem.
• Usage temperature range: 0°C to +40°C
The red spots, blue spots and green spots on
the panel surface are a normal characteristic of
liquid crystal panels, and not a problem.
Spots
Note:
The liquid crystal panel is built with very
high precision technology and has at least
99.99% effective image pixels. Be aware that
on 0.01% of the panel there may be missing or
constantly lit pixels.
0°C or colder
40°C or hotter
6
Page 99

Widescreen monitor
Parts identification
ENGLISH
1 (standby/on) button
• Turns on the power if pressed.
• Turns off the power if pressed and held.
2 Remote sensor
3 Dome light switch
• See “To activate the door sensor” on page
12.
4 IR transmitters
5 Dome lights
6 Arm lock lever
7 Reset button
When you watch the screen at an angle, the picture might not be clear. This is not a malfunction.
The finest picture can be seen when you watch the screen straight-on.
8 Screen (Liquid crystal panel)
9 Disc loading slot
p 0 (eject) button
q 3 (play) button
w Disc loading lamp
e White LED
r PUSH-OPEN button
t Screen compartment
y Screen arm
7
Page 100

Remote controller — RM-RK230
Installing the lithium coin battery
(CR2025)
ENGLISH
Before using the remote controller:
• Aim the remote controller directly at the
remote sensor on the monitor. Make sure
there is no obstacle in between.
Main elements and features
MENU
Remote sensor
• Do not expose the remote sensor to strong
light (direct sunlight or artificial lighting).
Warning:
• Do not install any battery other than
CR2025 or its equivalent; otherwise, it
may explode.
• Store the battery in a place where children
cannot reach to avoid risk of accident.
• To prevent the battery from over-heating,
cracking, or starting a fire:
– Do not recharge, short, disassemble, or
heat the battery or dispose of it in a fire.
– Do not leave the battery with other
metallic materials.
– Do not poke the battery with tweezers or
similar tools.
– Wrap the battery with tape and insulate
when throwing away or saving it.
MONITOR CONTROL
1
• Turns on the power if pressed.
• Turns off the power if pressed and held.
2 MODE button
• Selects the playback source.
3 ASPECT button
• Changes the aspect ratio of the screen.
4 MENU button
• Calls up the menu, then selects the
5
• Adjust the level of the selected item or
(standby/on) button
adjustable menu items.
/ buttons
select an appropriate setting for selected
item.
8
 Loading...