

Page 1
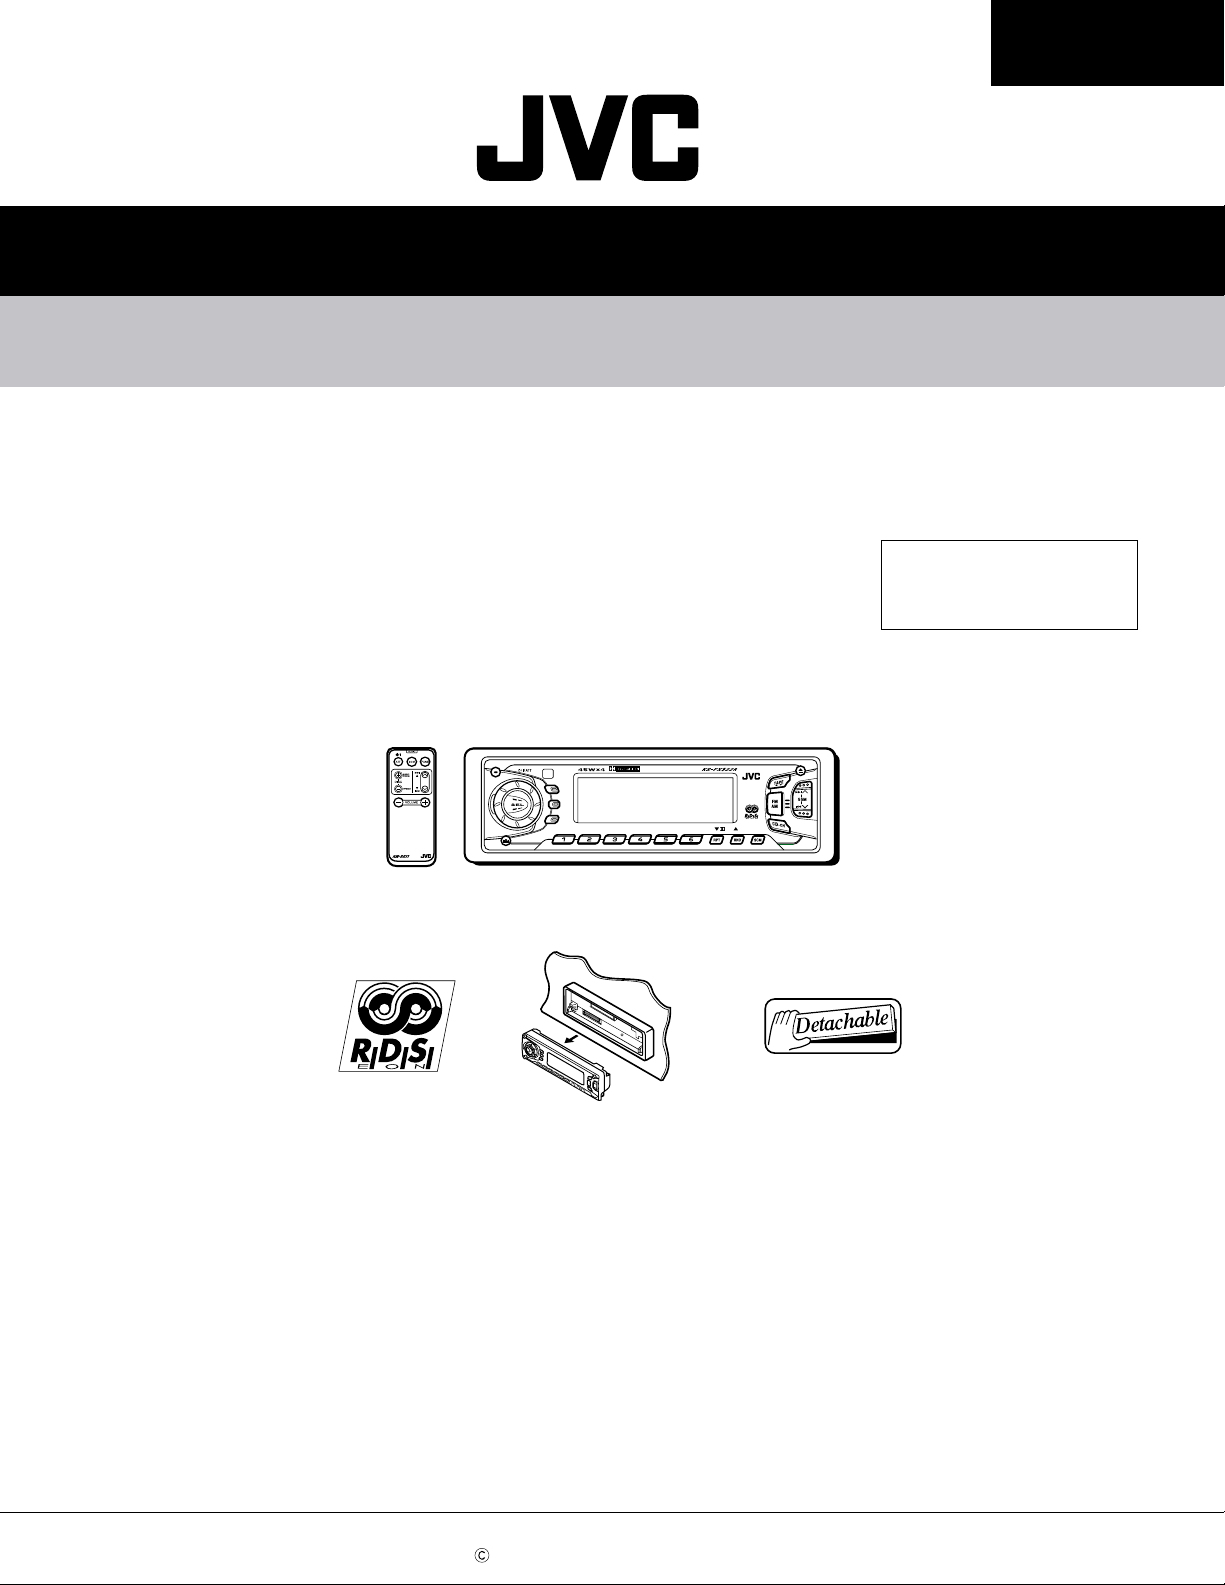
SERVICE MANUAL
CASSETTE RECEIVER
KS-FX922R
E... Continental Europe
KS-FX922R
Area Suffix
KS-FX922R
DISPDISP
TP TP
RDSRDS
PTYPTY
8 9 10 11 127
DAB
MO
Contents
Safety precaution------------------------------------- 1-2
Location of main parts-------------------------------
Disassembly method --------------------------------
Adjustment method ----------------------------------
Description of major ICs ----------------------------
1-3
1-4
1-11
1-15
COPYRIGHT 2001 VICTOR COMPANY OF JAPAN, LTD.
No.49596
Feb. 2001
Page 2
Adjustment method
KS-FX922R
Test Instruments reqired for adjustment
1.Digital osclloscope(100MHz)
2.Frequency Counter meter
3.Electric voltmeter
4.Wow & flutter meter
5.Test Tapes
VT724
VT739
VT712
VT703
6.Torque gauge
Power supply voltage
Load impedance
Line out
For playback frequency measurement
For wow flutter & tape speed measurement
Measuring conditions(Amplifier section)
for DOLBY level measurement
For head azimuth measurement
Cassette type for CTG-N
(mechanism adjustment)
DC14.4V(10.5~16V)
4 (2Speakers connection)
20k
Tuner section
BAND STEP
FM : 100kHz (Seek), 50kHz (Manual)
AM : 9kHz step
Preset Memory Initialization
Band
FM(MHz)
AM(kHz)
DUMMY LOAD
Exclusive dummy load should be used for AM
and FM dummy load,there is a loss of 6dB
between SSG output and antenna input. The
loss of 6dB need not be considered since
direct reading of figures are applied in this
working standard.
M1
87.5
153
Preset Memory
M2
M3
89.9
97.9
216
603
M4
105.9
999
M5
108.0
1404
M6
87.5
1620
Standard volume position
Balance and Bass,Treble volume .Fader
:Center(Indication"0")
Loudness,Dolby NR,Sound,Cruise:Off
Volume position is about 2V at speaker output with
following conditions.Playback the test tape VT721.
AM mode 999kHz/62dB,INT/400Hz,30%
modulation signal on receiving.
FM mono mode 97.9MHz/66dB,INT/400Hz,22.5kHz
deviation pilot off mono.
FM stereo mode 1kHz,67.5kHz dev. pilot7.5kHz dev.
Output level 0dB(1 V,50 /open terminal).
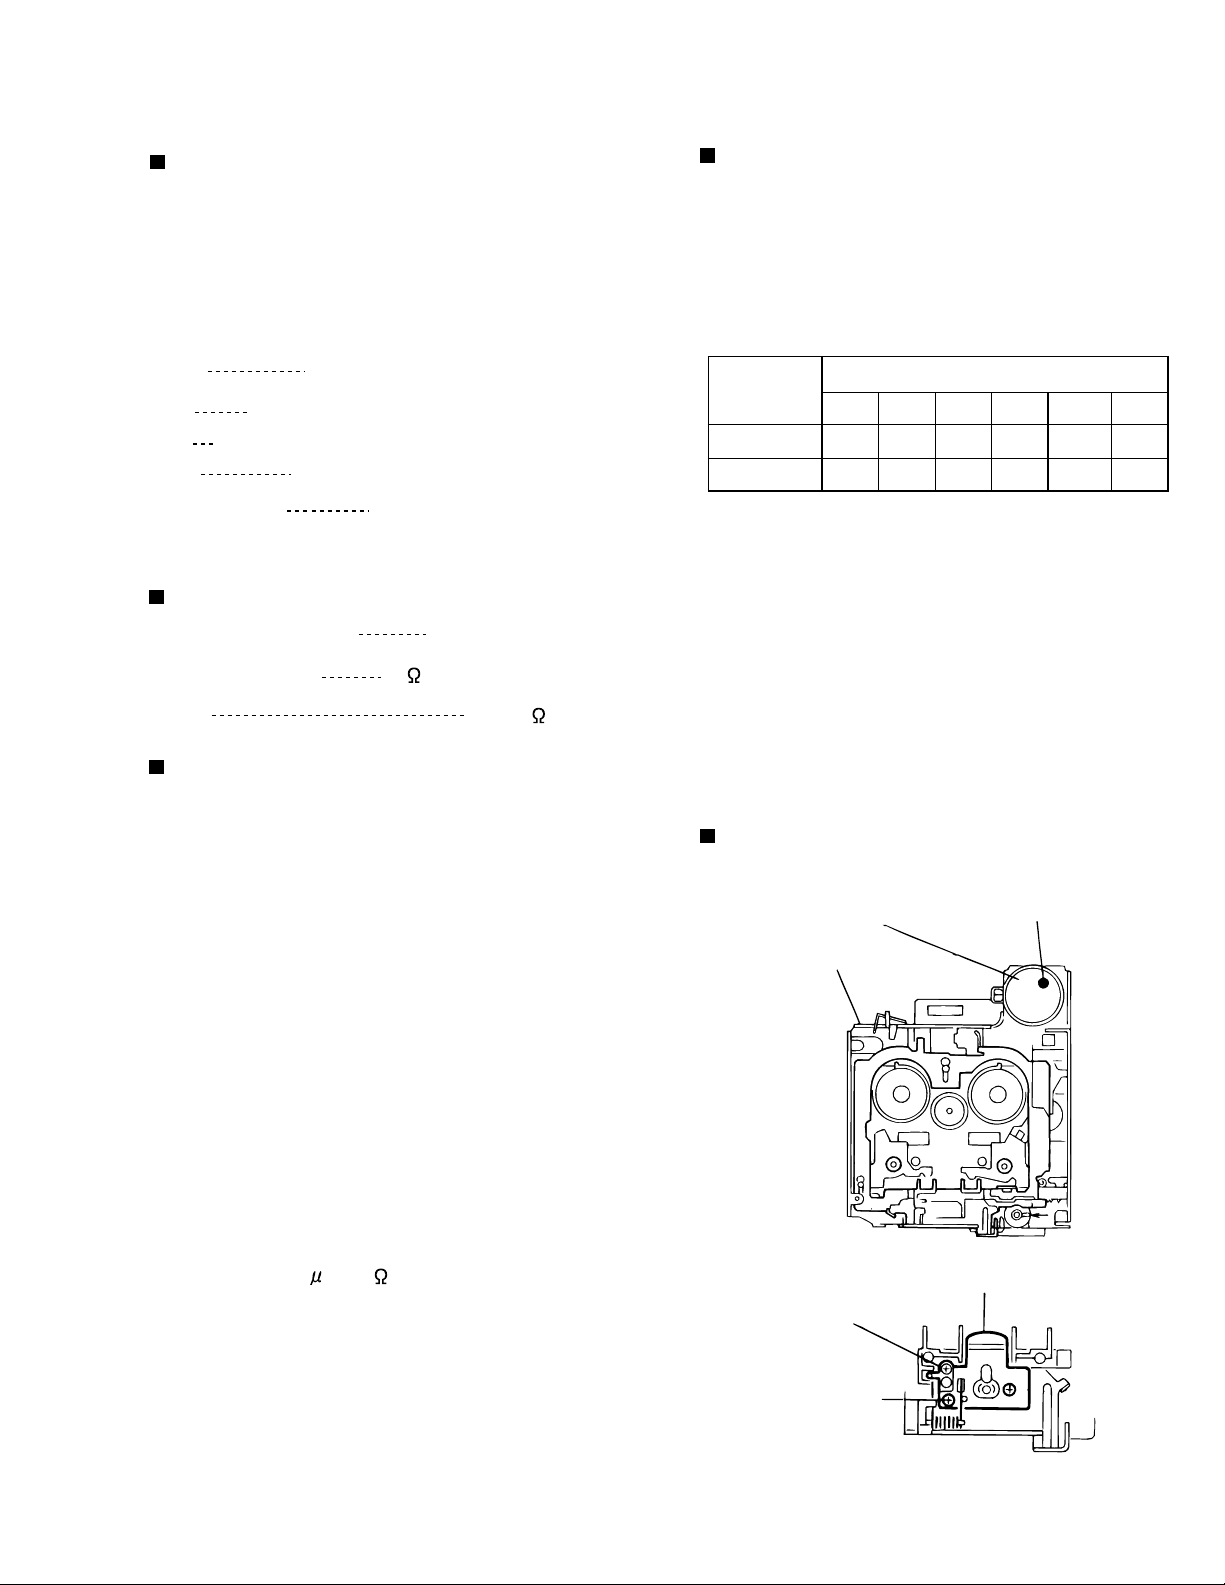
Arrangement of Adjusting
Cassette Mechanism Section
Capstan motor
Cassette mechanism
(Surface)
Azimuth screw
(Forward side)
Playback head
Tape speed adjust
Azimuth screw
(Reverse side)
1-11
Page 3
KS-FX922R
Main board
Arrangment of adjusting
Head amplifier board section (Reverse side)
VR402:Rch
(Dolby NR level adj)
VR401:Rch
(Dolby NR Frequency response adj)
B402
E
Q401
D401
B401
CP401
1
R420
B408
1
R423
R421
R422
Q402
B409
Q403
D402
FSMW1101A
VR402
C417
D403
C418
R424
IC402
R425
C419
C414
B403
B410
B404
C410
C412
C411
R413
1
C415
R416
R415
C416
R418
R419
CP403
C409
R411
B415
C413
1
11
B411
IC401
B412
17
VR401
B416
R412
R410
C405
R408
31
C407
21
C408
R417
R414
B413
R404
B406
B414
R409
C406
R407
R406
1
B405
TPP
C404
CP402
1
R402
C401
2
R405
C403
R401
R403
C402
B407
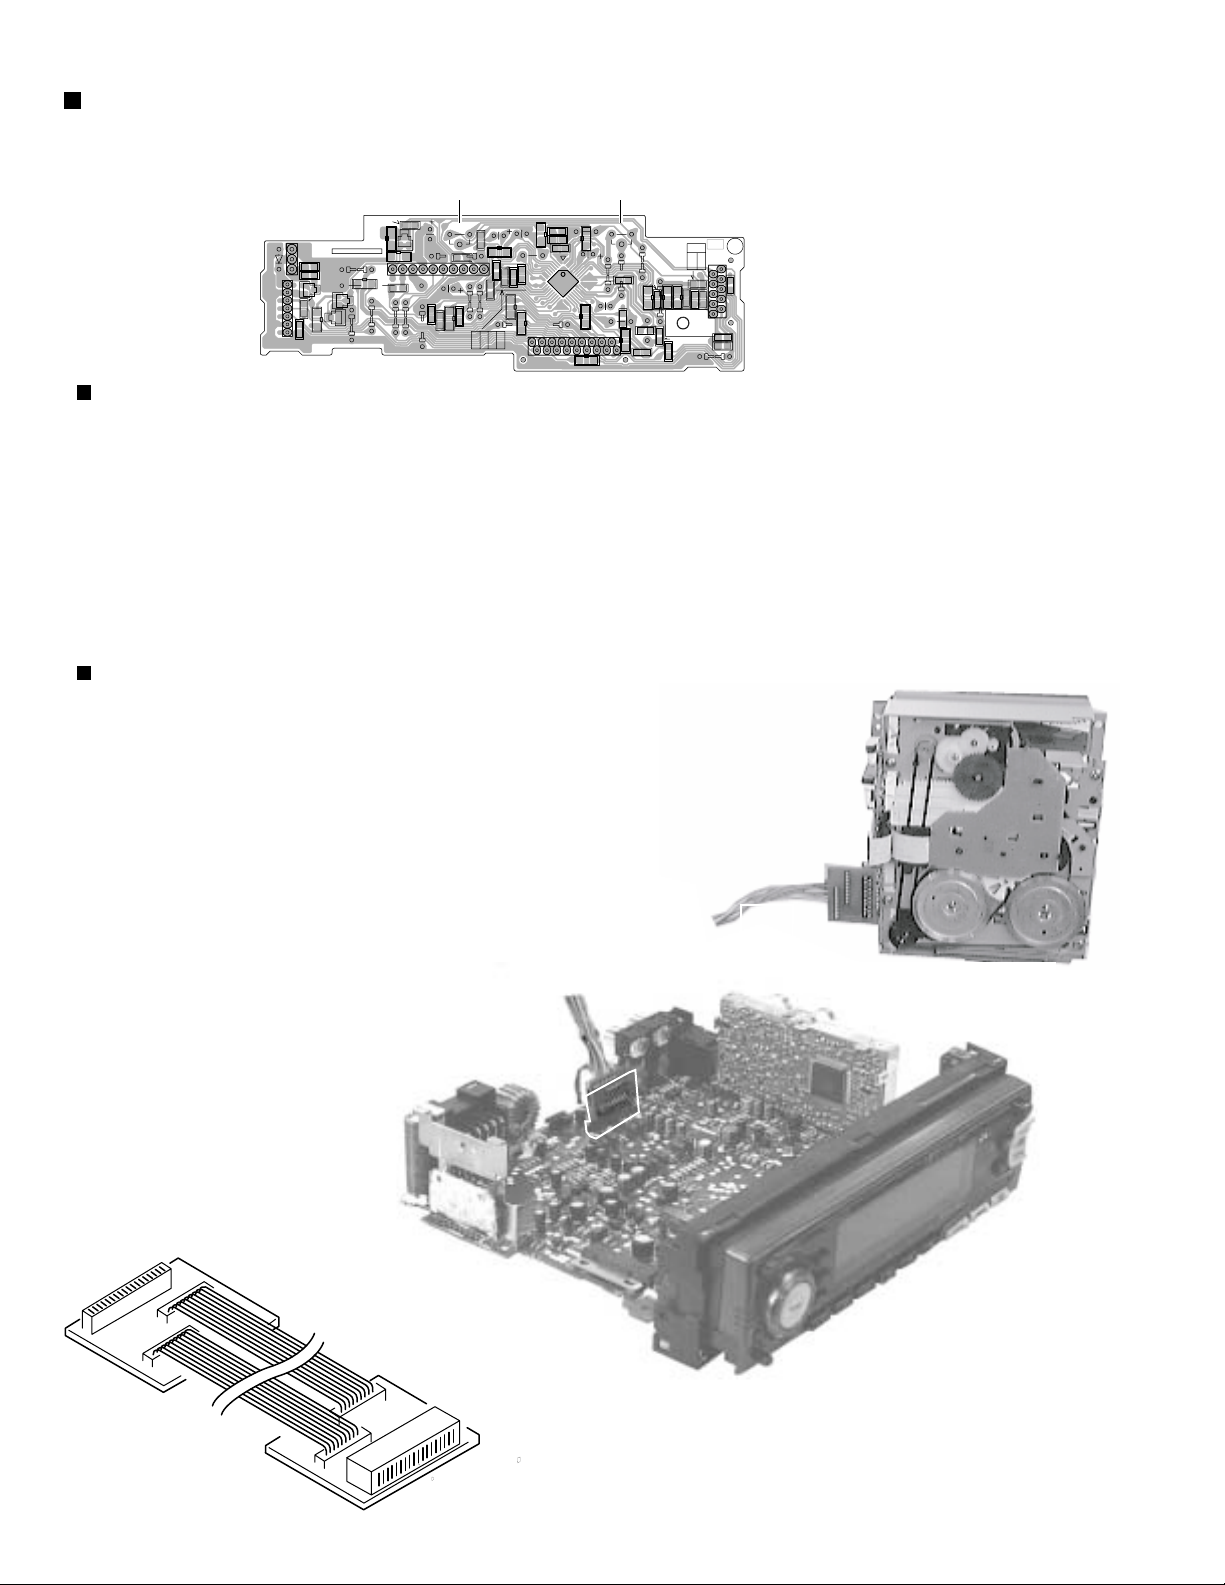
Information for using a car audio service jig
1. We're advancing efforts to make our extension cords common for all car audio products.
Please use this type of extension cord as follows.
2. As a U-shape type top cover is employed, this type of extension cord is needed to check operation of the
mechanism assembly after disassembly.
3. Extension cord : EXTKSRT002-18P ( 18 pin extension cord ) For connection between mechanism assembly
and main board assembly .
Check for mechanism driving section such as motor ,etc..
Cassette mechanism
Disassembly method
1. Remove the bottom cover.
2. Remove the front panel assembly.
3. Remove the top cover .
4. Install the front panel.
5. Confirm that current is being carried by connecting
an extension cord jig.
Note
Available to connect to the CP701 connector when installing the front panel.
Extension cord
EXTKSRT002-18P
to Cassette mechanism
1-12
EXTKSRT002-18P
to Main board
Main board
Front panel assembly
Page 4
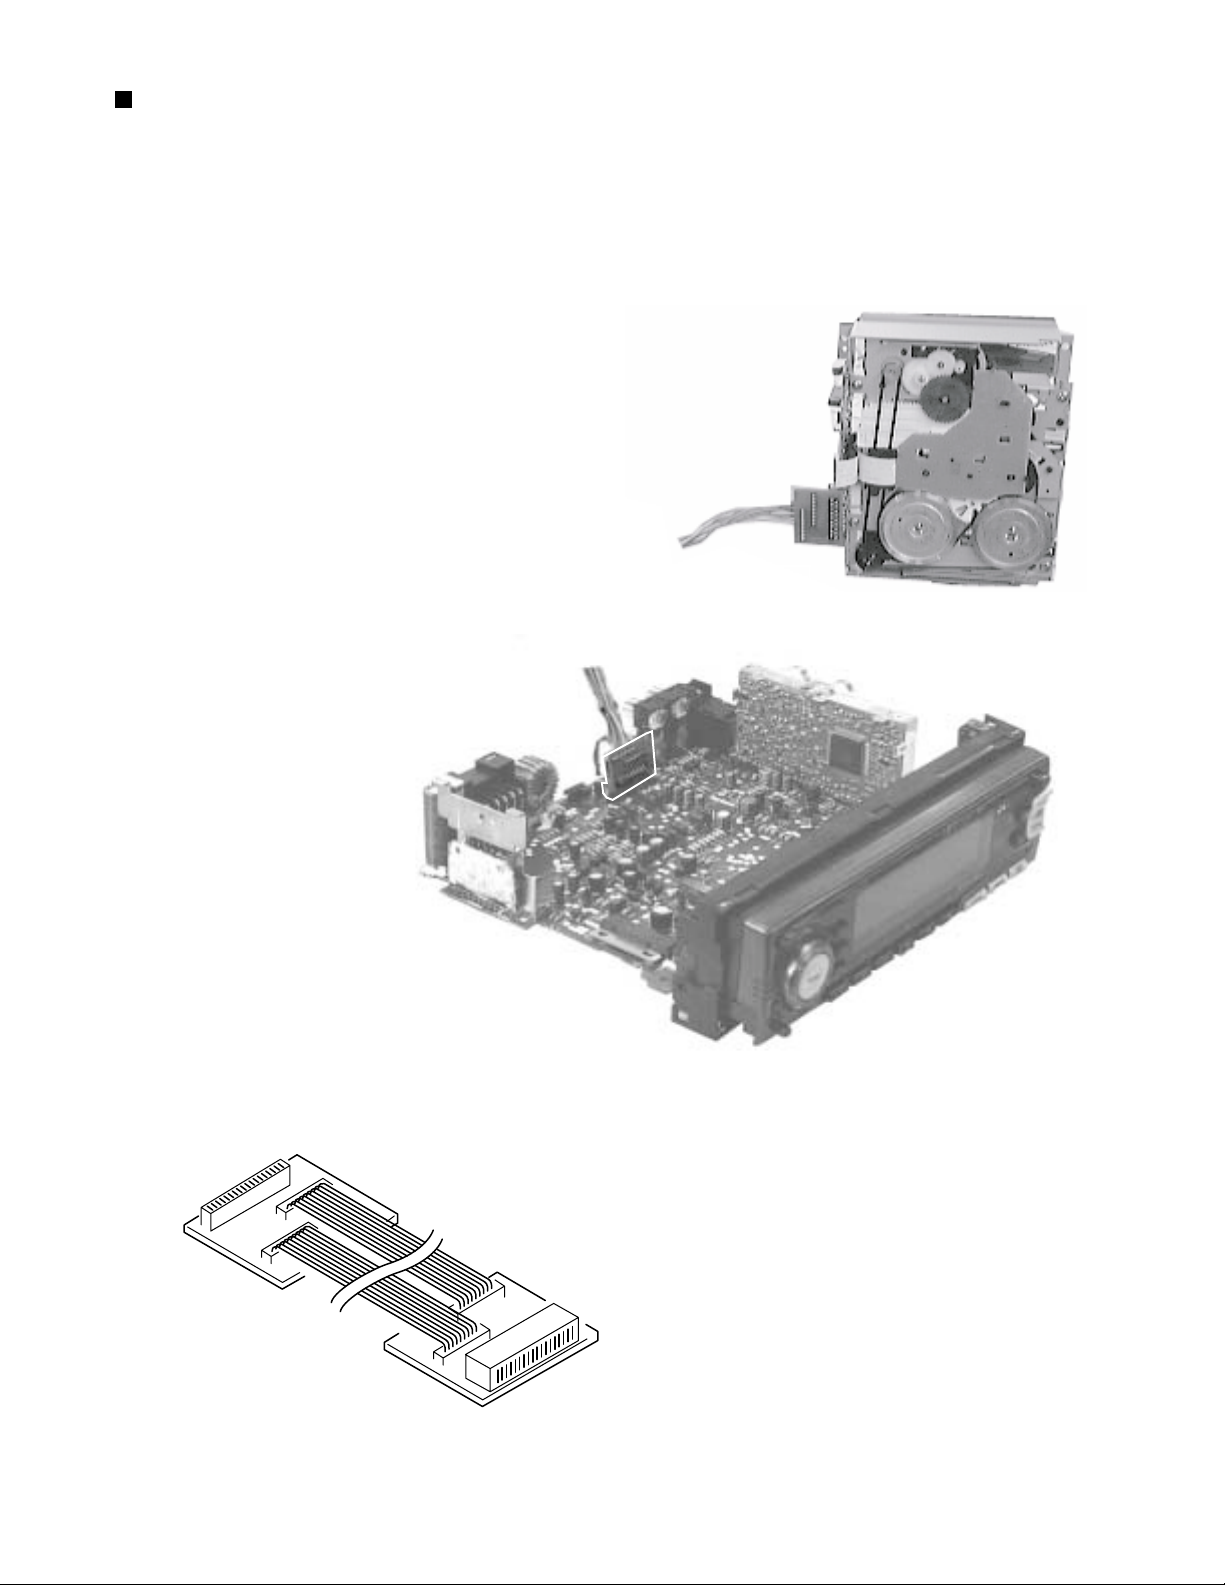
Extension cord
Main board
The mechanism should be directly connected to the board using the extension wire.
EXT-KSRT002-18P
Cassette mechanism
KS-FX922R
to Cassette mechanism
Extension cord
EXTKSRT002-18P
Main board
Front panel assembly
EXTKSRT002-18P
to Main board
1-13
Page 5

KS-FX922R
Item
Head
1.
azimuth
adjustment
Conditions
Test tape:
SCC-1659
VT703(10kHz)
Adjustment and Confirmation methods
Head height adjustment
Adjust the azimuth directly. When you
adjust the height using a mirror tape,
remove the cassette housing from the
mechanism chassis. After installing the
cassette housing, perform the azimuth
adjustment.
Load the SCC-1659 mirror tape. Adjust with
1.
height adjustment screw A and azimuth
adjustment screw B so that line A of the
mirror tape runs in the center between Lch
and Rch in the reverse play mode.
After switching from REV to FWD then to
2.
REV, check that the head position set in
procedure 1 is not changed. (If the position
has shifted, adjust again and check.)
Adjust with azimuth adjustment screw B so
3.
that line B of the mirror tape runs in the
center between Lch and Rch in the forward
play mode.
Head azimuth adjustment
Load VTT724 (VT724) (1kHz) and play it
1.
back in the reverse play mode. Set the Rch
output level to max.
Load VTT703 (VT703) (10kHz) and play it
2.
back in the forward play mode. Adjust the
Rch and Lch output levels to max, with
azimuth adjustment screw B. In this case,
the phase difference should be within 45 .
Engage the reverse mode and adjust the
3.
output level to max, with azimuth
adjustment screw C.
(The phase difference should be 45 or
more.)
When switching between forward and
4.
reverse modes, the difference between
channels should be within 3dB. (Between
FWD L and R, REV L and R.)
S.Values Adjust
A line
Head shield
The head is at low position
during.
B line
Head shield
The head is at High position
during REV.
Output
level:
Maximum
PBHead
FWD Adj B
REV Adj C
(0 ) (45 )
HEIGHT Adj A
phase
2.
3.
1-14
Tape speed
and wow
flutter
confirmation
Play back
frequency
response
confiramation
When VTT721 (VT721) (315Hz) is played
5.
back, the level difference between channels
should be within 1.5dB.
Test tape: VTT712
(3kHz)
Test tape: VTT724
(1kHz)
VTT739
(63Hz / 1kHz / 10kHz)
The tuner section is of an adjustment-freedesign. In case the tuner is in trouble, replace the tuner pack.
Check to see if the reading of the F, counter /
1.
wow flutter meter is within 3015 3045(FWD
/ REV), and less than 0.35% (JIS RMS).
In case of out of specification, adjust the
2.
motor with a built-in volume resistor.
Play test tape VTT724, and set the volume
1.
position at 2V.
Play test tape VTT739 and confirm.
2.
1kHz / 10kHz: -1 3dB,
1kHz / 63Hz: 0 3dB,
When 10kHz is out of specification, it will be
3.
necessary to read adjust the azimuth.
Tape speed:
3015
3045Hz
Wow
flutter: less
than 0.35%
Speaker out
1kHz / 63Hz
: 0 3db
1kHz / 10kHz
: -1 3db
Built-in volume
resistor
Page 6

Block Diagram
KS-FX922R
SUB
MOTOR
SWITCH
5
4
TO CD CHANGER
J801 CP901
SCK
SI/SO
IC801
3
CHANGER CONTROL
HD74HC126FP-X
JBUS SI
JBUS SO
JBUS I/O
J1
AM
2
FM
JBUS SCK
CD RCH
CD LCH
TO SPEAKER
CONNECTOR TO REAR LINE OUT
J321
L/R F
L/R R
IC301
POWER AMP.
LA4743K
OUT LR
OUT RR
OUT LF
OUT RF
IC161
E.VOLUME
TEA6320T-X
TUNER L/R
TAPE L/R
FRONT L/R
REAR L/R
TU1
AM/FM TUNER PACK
TAPE END.STANDBY
CN401
CP401
F/R
MODE
STANDBY
FF/REW
MOTOR
SUBMO
TAPE IN
DOLBY
MS
REEL
QAU0222-001
IC701
COMP OUT
IC71
RDS DETECTOR
1
Tuner.Power AMP.Changer/System Controller
SAA6579T-X
SEEK/STOP
SD/ST
SMETER
SYSTEM CONTROL MICON
UPD178018AGC-603
RDSDA
RDSCK
KEY 0 – 2
CJ601
CN601
MAIN
MOTOR
CN403
MOTOR
TAPE IN
MODE
STANDBY
TAPE END
REEL
DOLBY
F/R
MS
LCH
RCH
FF/REW
SUBMO+
SUBMO-
IC602
REMOTE SENSOR
RPM6938-SV4
REMOCON
LCDDA
LCDCK
LCDCE
LCD DRIVER/KEY SWITCH CIRCUT
HEAD
CN402
LCH
RCH
DC MOTOR DRIVER
MECHANISM CONTROL
LCD1
QNZ0450-001
S1 – S68
COM1 – COM3
IC601
LCD DRIVER
LC75873NW
KEY
– S619
S601
METAL
IC401
PB EQ
CXA2560Q
IC402
LB1641
AB C D E F G
2-1
Page 7

Standard schematic diagrams
Receiver & System control circuit section
5
4
KS-FX922R
3
2
FM Radio Signal/Radio Main Signal
1
AM Radio Signal
Tape PB/Main Signal
AB C D E F G
2-3
Page 8
KS-FX922R
KS-FX922R
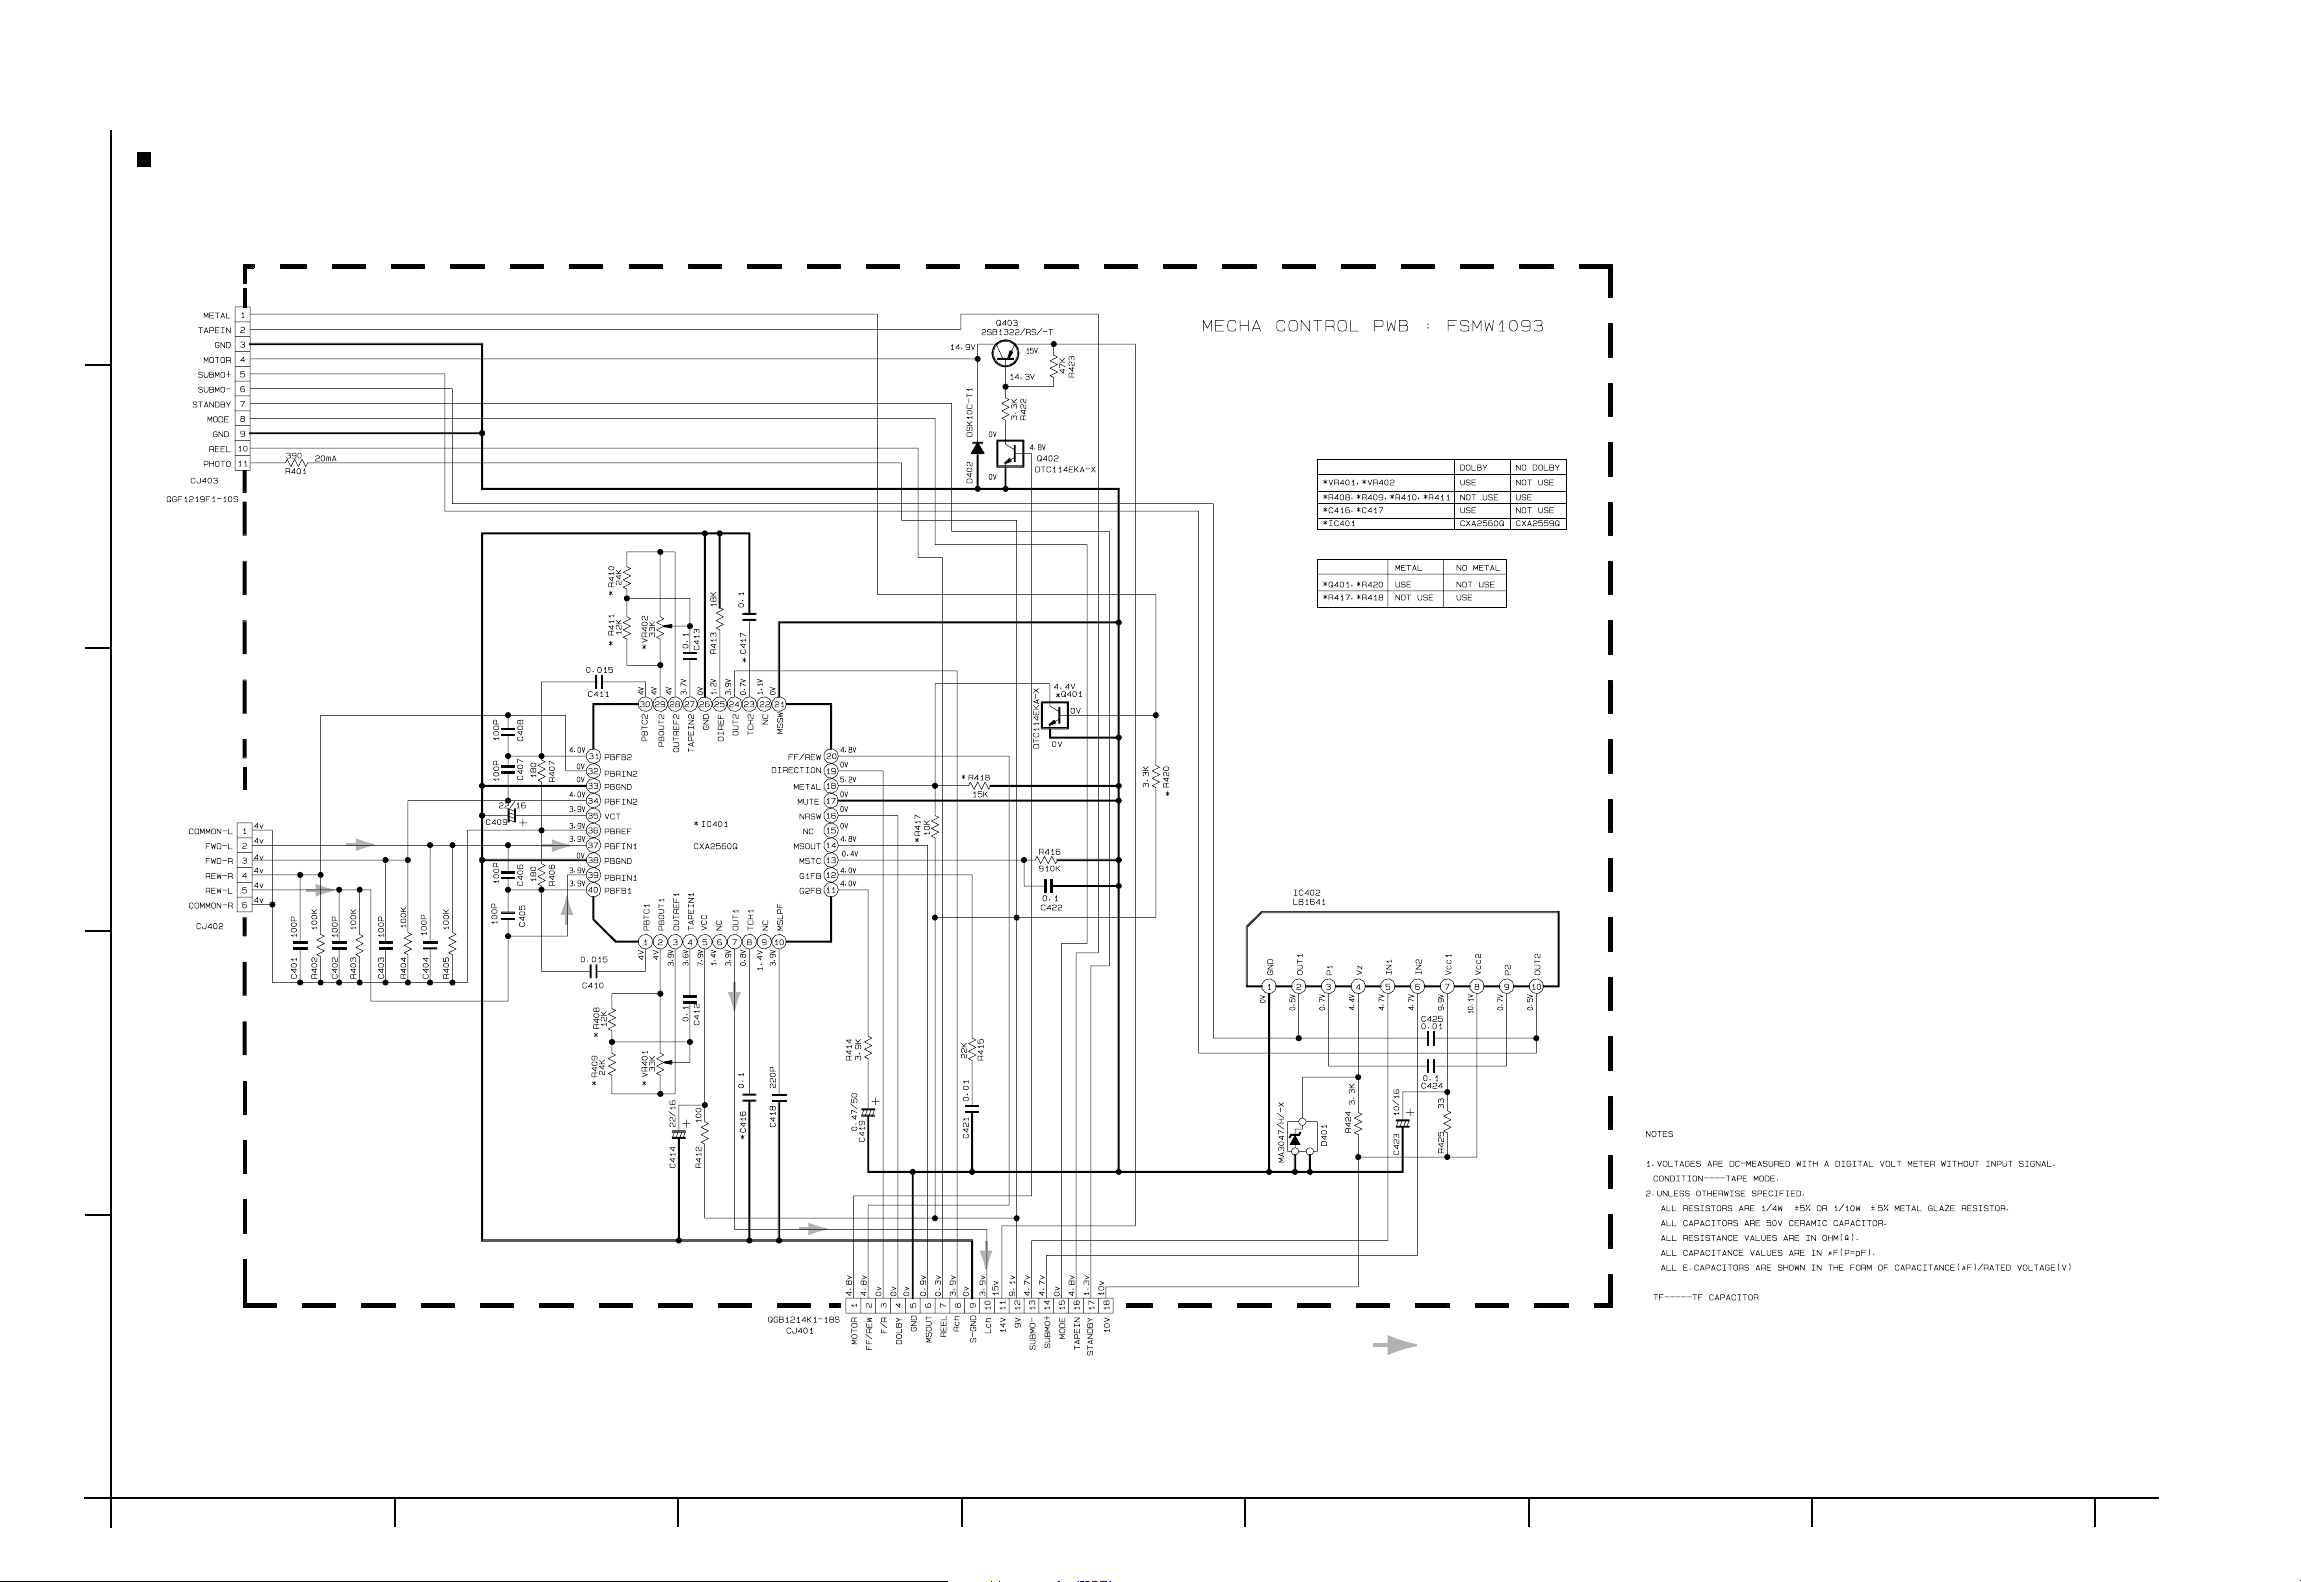
Mecha control circuit section
5
4
3
2
1
Tape PB/Main Signal
AB C D E F G
2-4
Page 9
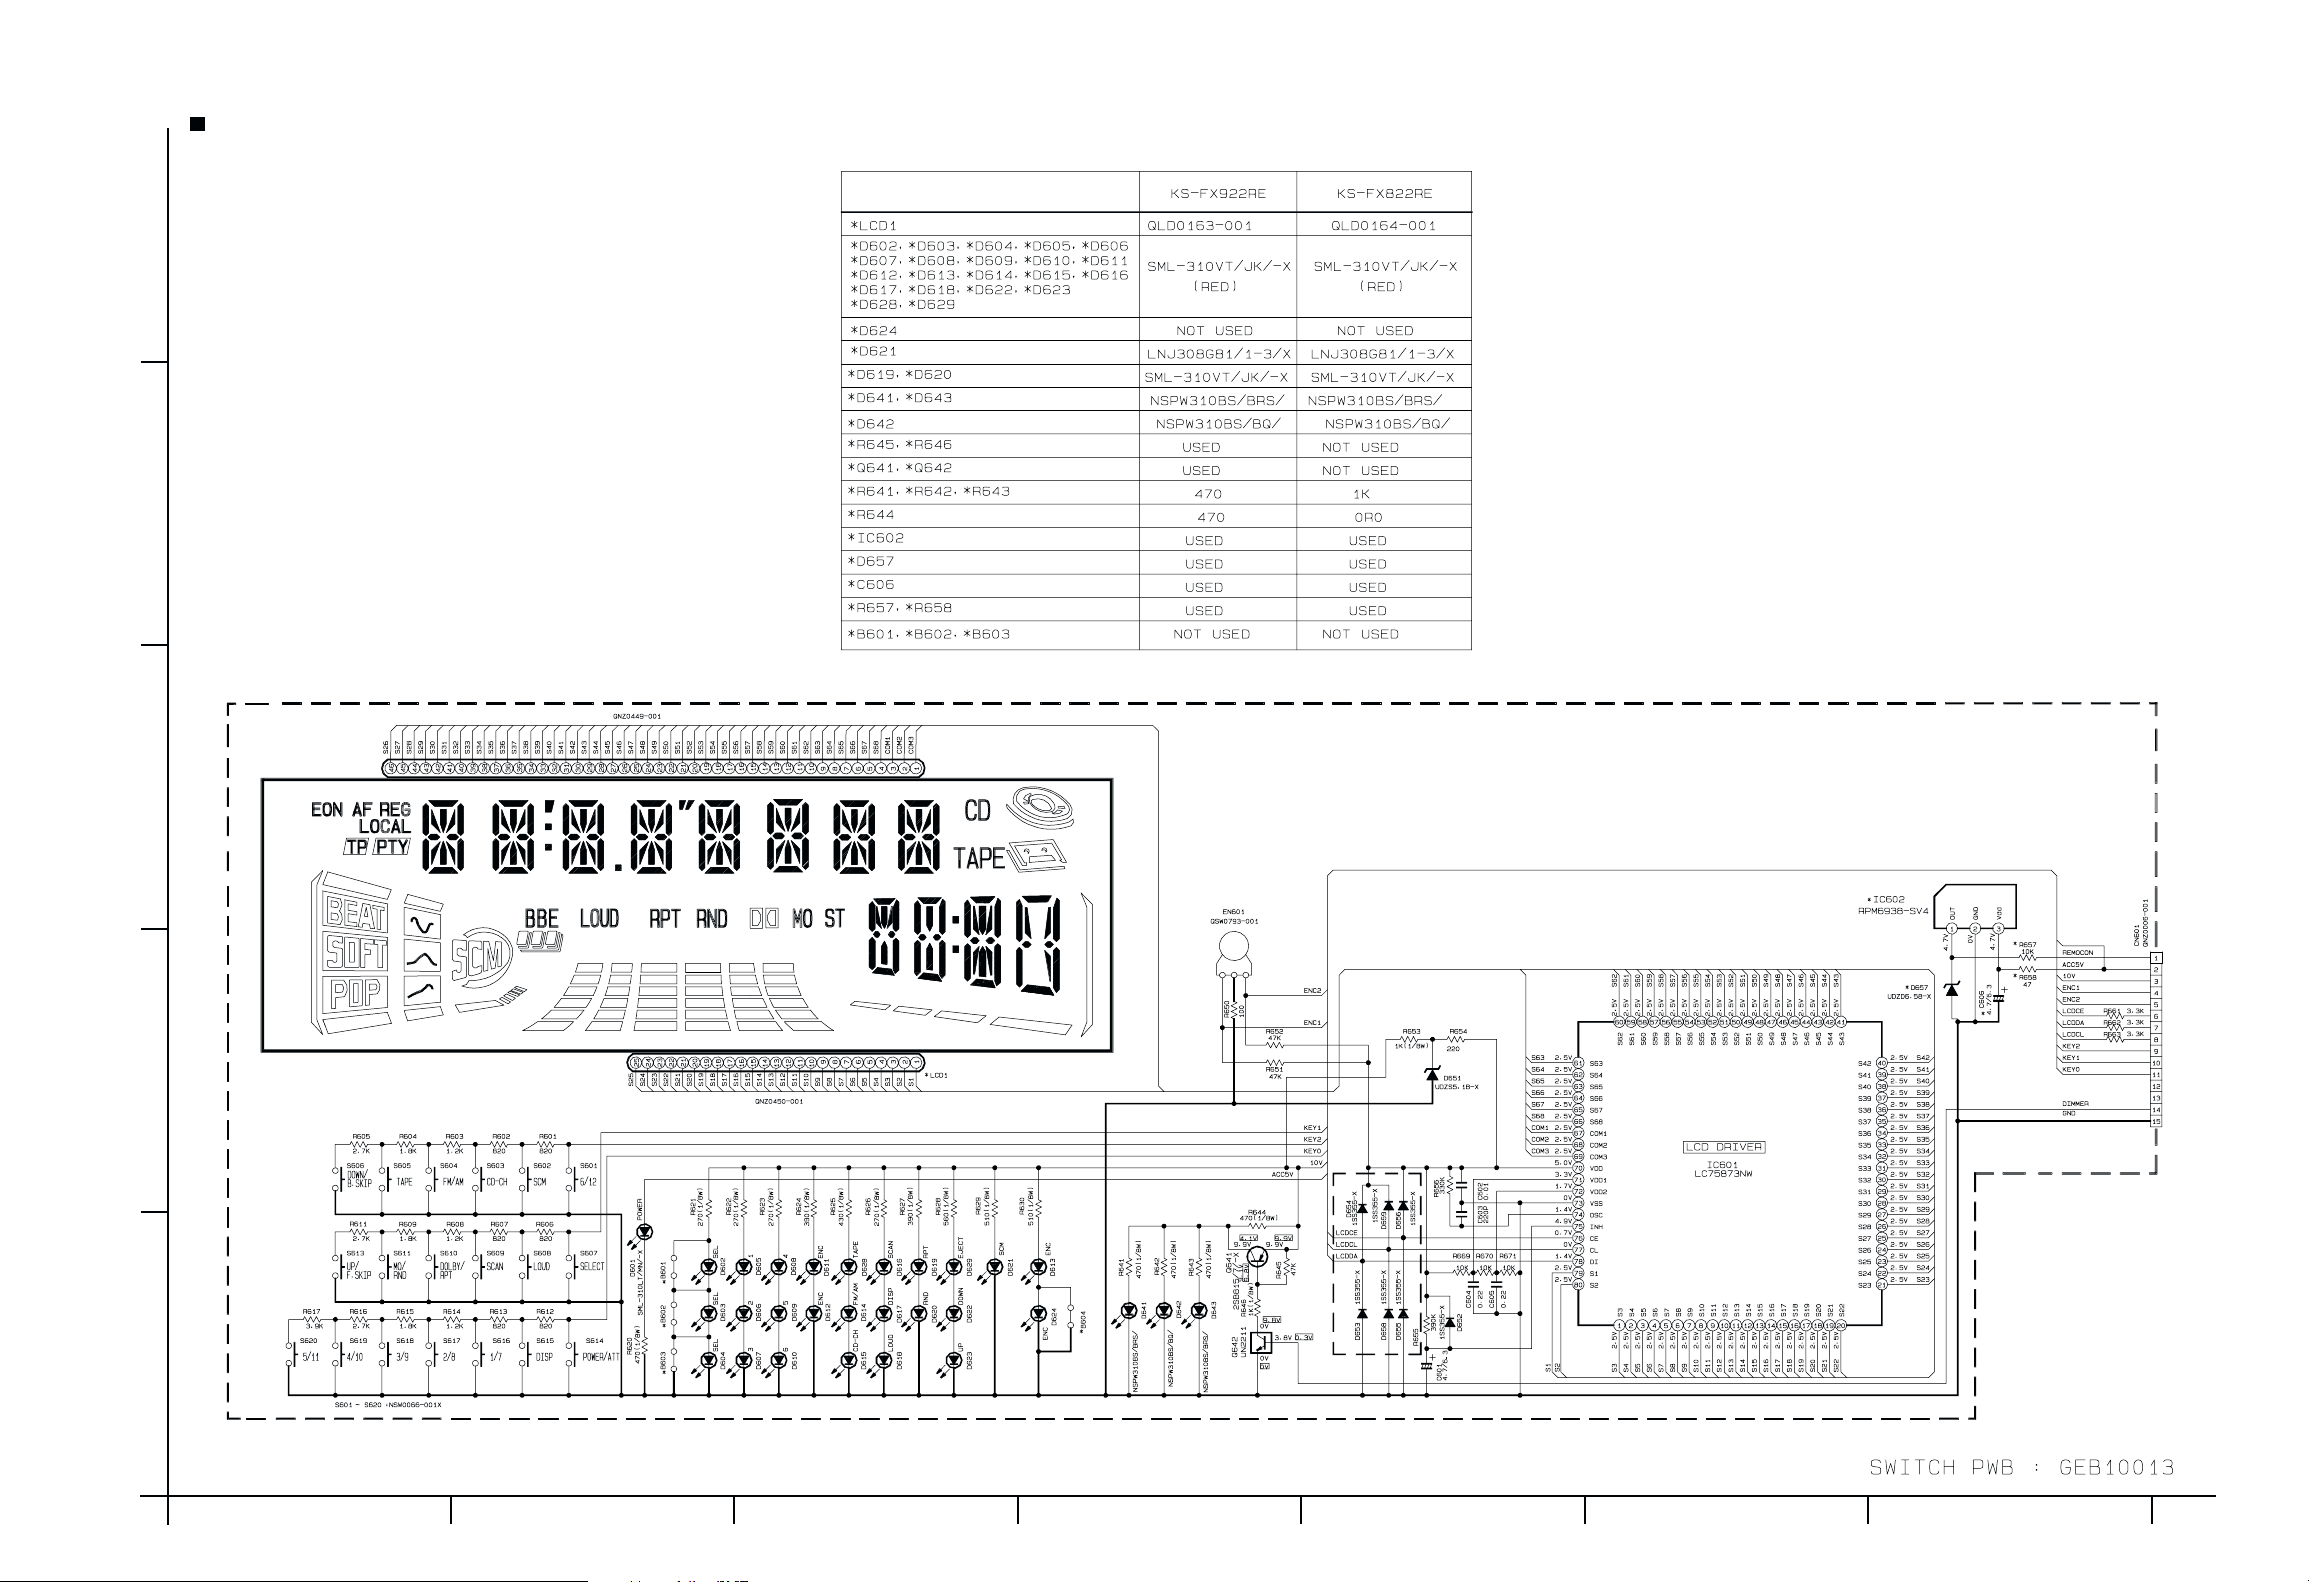
KS-FX922R
LCD driver & Operation switch circuit section
5
4
3
2
1
AB C D E F G
2-5
Page 10
SERVICE MANUAL
CASSETTE RECEIVER
KS-FX922R
KS-FX922R
DISP
TP
RDS
PTY
8 9 10 11 127
This model is KS-FX922RE EX that is added to the preceding model,
theKS-FX922R E . Therefore the service manual for this model is
consisting of Parts list only.
For others, please refer to the service manual of KS-FX922R E (issue No.49596).
DAB
MO
Area Suffix
EX Centeal Europe
COPYRIGHT 2001 VICTOR COMPANY OF JAPAN, LTD.
No.49631
Mar. 2001
Page 11

KS-FX922R
Parts list(Accessories)
A
Iten
Parts name
A 2 INST.BOOK
(LANGUAGE)
E
GET0017-002A
(SPA,ITA,SWE,FIN)
P3-17
Parts number
----------------------------
Block No.M4MM
EX
Q'ty
1
VICTOR COMPANY OF JAPAN, LIMITED
MOBILE ELECTRONICS DIVISION
PERSONAL & MOBILE NETWORK BUSINESS UNIT. 10-1,1Chome,Ohwatari-machi,Maebashi-city,371-8543,Japan
(No.49631)
200103
 Loading...