

Page 1

CD RECEIVER
KD-SX992R
EQ
TP
PTY
DAB
SOUND
VOL
VOL
SOURCE
R
F
U
D
ATT
KS-SX921R
EQ
TP
PTY
DAB
CD-RECEIVER
RECEPTEUR CD
CD-RECEIVER
KD-SX992R/KD-SX921R
KD-SX992R
KD-SX921R
ENGLISH
DEUTSCH
FRANÇAIS
NEDERLANDS
For installation and connections, refer to the separate manual.
Für den Einbau und die Anschlüsse siehe das eigenständige Handbuch.
Pour l’installation et les raccordements, se référer au manuel séparé.
Bijzonderheden over de installatie en aansluiting van het apparaat vindt u in de desbetreffende
handleiding.
INSTRUCTIONS
BEDIENUNGSANLEITUNG
MANUEL D’INSTRUCTIONS
GEBRUIKSAANWIJZING
GET0072-001A
[E/EX]
Page 2
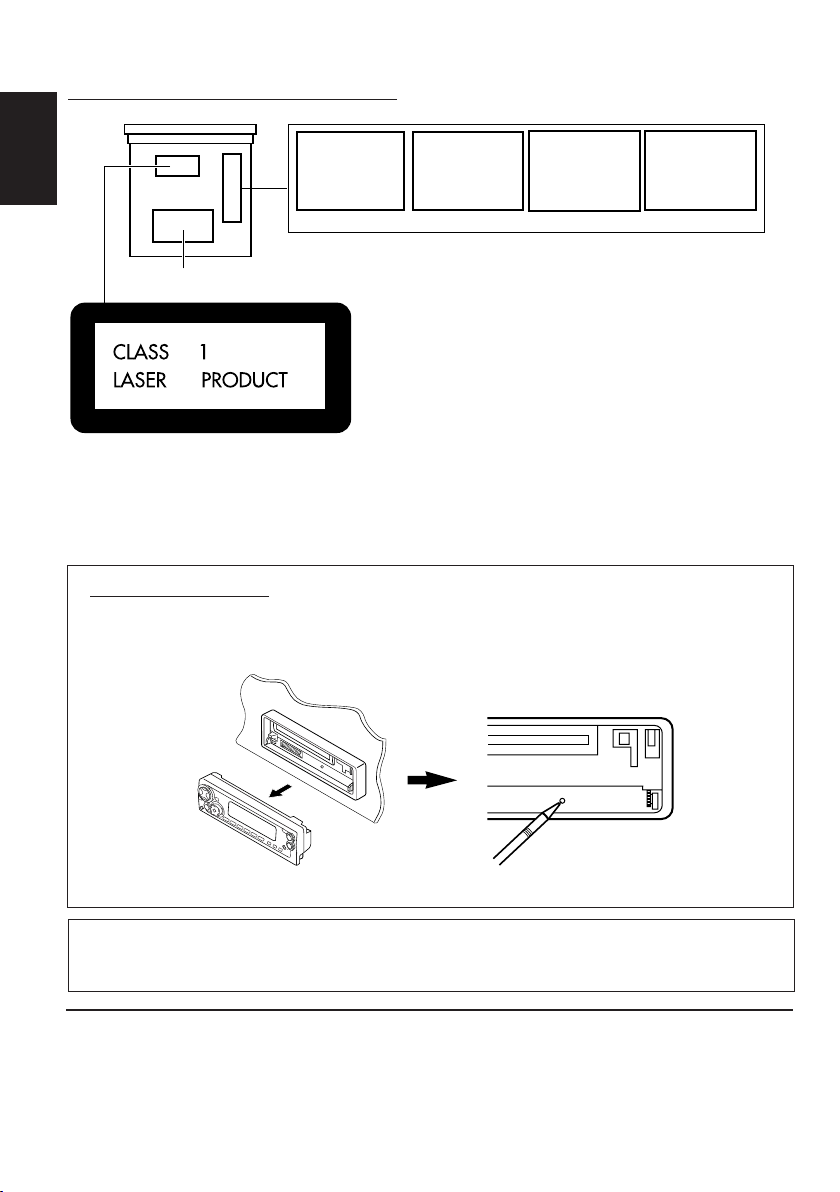
Position And Reproduction Of Labels
Bottom panel of the main unit
CAUTION: Invisible laser
radiation when open and
interlock failed or defeated.
ENGLISH
Name/Rating plate
Caution:
This product contains a laser component
of higher laser class than Class 1.
AVOID DIRECT EXPOSURE
TO BEAM. (e )
How to reset your unit
After detaching the control panel, press the reset button on the panel holder using a ball-point pen
or similar tool.
This will reset the built-in microcomputer.
ADVARSEL: Usynlig laserstråling ved åbning, når
sikkerhedsafbrydere er ude
af funkti on. Undgåudsættelse for stråling. (d)
VARNING: Osynlig laser-
strålning när denna del
är öppnad och spärren
urkopplad. Betrakta ej
strålen. (s)
VARO : Avattaessa ja suojalukitus ohitettaessa olet
är
alttiina näkymättömälle
lasersäteilylle. Älä katso
säteeseen. (f)
IMPORTANT FOR LASER PRODUCTS
Precautions:
1.CLASS 1 LASER PRODUCT
2.CAUTION: Invisible laser radiation when open and
interlock failed or defeated. Avoid direct exposure to
beam.
3.CAUTION: Do not open the top cover. There are no
user-serviceable parts inside. Leave all servicing to
qualified service personnel.
4.CAUTION: This CD player uses invisible laser
radiation and is equipped with safety switches to
prevent radiation emission when unloading CDs. It is
dangerous to defeat the safety switches.
5.CAUTION: Use of controls, adjustments or
performance of procedures other than those specified
herein may result in hazardous radiation exposure.
Note:
Your preset adjustments – such as preset channels or sound adjustments – will also be erased.
Note:
For security reasons, a numbered ID card is provided with this unit, and the same ID number is imprinted on
the unit’s chassis. Keep the card in a safe place, as it will help the authorities to identify your unit if stolen.
BEFORE USE
*
*
For safety....
• Do not raise the volume level too much, as this will
block outside sounds, making driving dangerous.
• Stop the car before performing any complicated
Temperature inside the car....
If you have parked the car for a long time in hot or
cold weather, wait until the temperature in the car
becomes normal before operating the unit.
operations.
2
Page 3

Thank you for purchasing a JVC product. Please read all instructions carefully before oper ation,
to ensure your complete understanding and to obtain the best possible performance from the unit.
CONTENTS
How to reset your unit............................... 2
How to use the MODE button................... 3
LOCATION OF THE BUTTONS............ 4
Control panel ........................................... 4
Preparing the remote controller ................. 5
Remote controller .................................... 6
BASIC OPERATIONS ...................... 7
Turning on the power ................................ 7
RADIO OPERATIONS...................... 8
Listening to the radio ................................ 8
Storing stations in memory ....................... 10
Tuning in to a preset station ..................... 11
RDS OPERATIONS ........................ 12
What you can do with RDS....................... 12
Other convenient RDS functions and
adjustments........................................... 16
CD OPERATIONS .......................... 19
Playing a CD............................................ 19
Locating a track or a particular portion
on a CD ................................................. 20
Selecting CD playback modes.................. 20
Prohibiting CD ejection.............................. 21
Playing a CD Text ..................................... 21
SOUND ADJUSTMENTS .................. 22
Adjusting the sound ................................. 22
Selecting preset sound modes
(C-EQ: custom equalizer) ...................... 23
Storing your own sound adjustments ....... 24
OTHER MAIN FUNCTIONS ............... 25
Setting the clock ...................................... 25
Changing the general settings (PSM) ...... 25
Detaching the control panel...................... 29
CD CHANGER OPERATIONS ............. 30
Playing CDs ............................................. 30
Selecting CD playback modes.................. 31
EXTERNAL COMPONENT OPERATIONS ... 32
Playing an external component ................ 32
DAB TUNER OPERATIONS ................ 33
Tuning in to an ensemble and one of the
services ................................................. 33
Storing DAB services in memory ............. 35
Tuning in to a preset DAB service ............ 36
What you can do more with DAB.............. 36
TROUBLESHOOTING...................... 37
MAINTENANCE ............................ 38
Handling CDs .......................................... 38
SPECIFICATIONS .......................... 39
ENGLISH
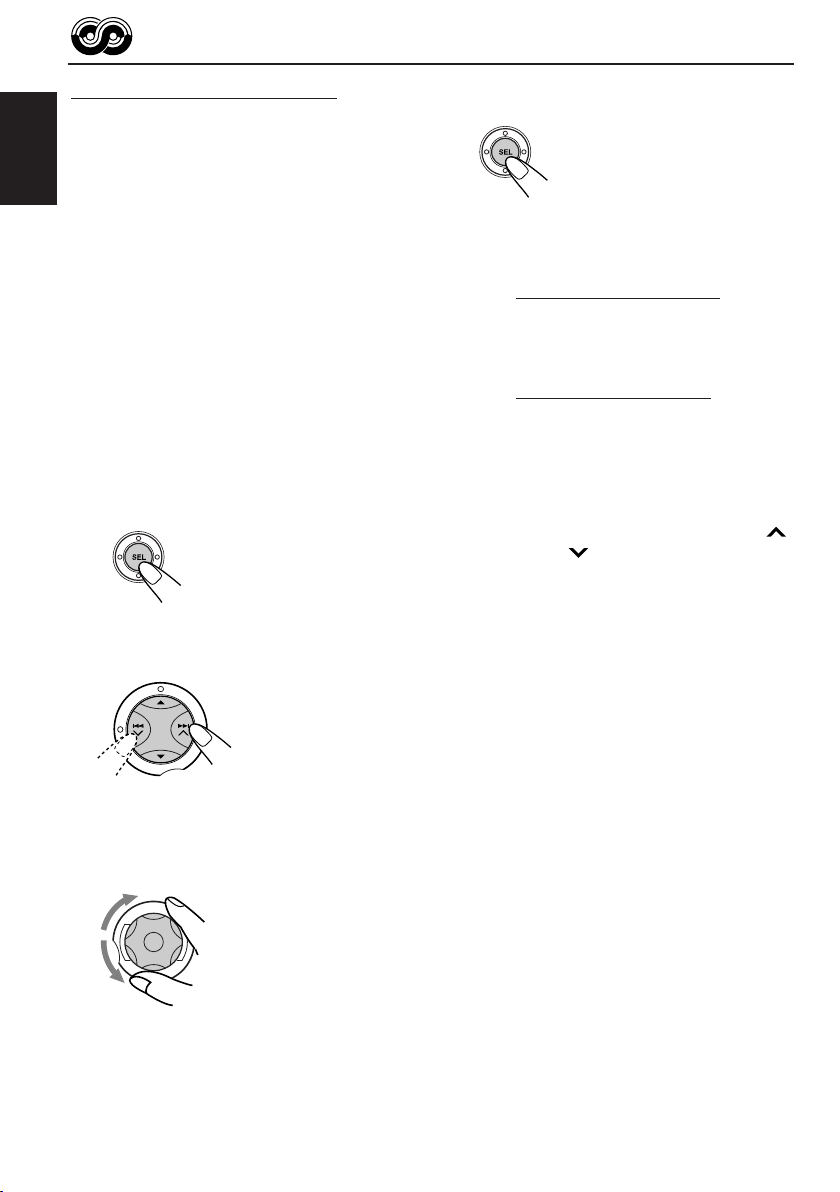
How to use the MODE button:
If you press MODE, the unit goes into functions mode and the number buttons work as different
function buttons.
To use these b uttons as number buttons again after pressing MODE, wait for 5 seconds without
pressing any number button until the functions mode is cleared.
• Pressing MODE again also clears the functions mode.
CAUTION on Volume Setting
CDs produce very little noise compared with other sources. If the volume level is adjusted for the tuner, for
volume example, the speakers may be damaged by sudden increase in the output level. Therefore, lower the
voice before playing a disc and adjust it as required during playback.
3
Page 4
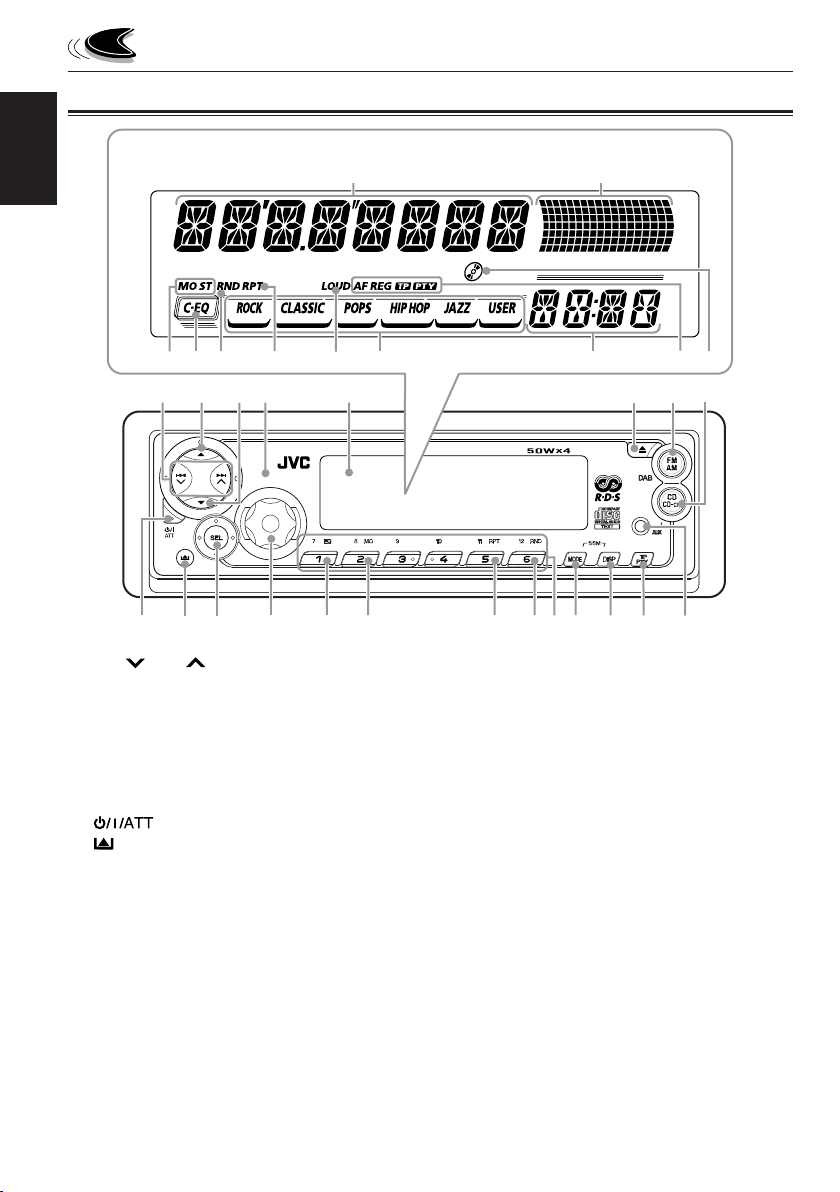
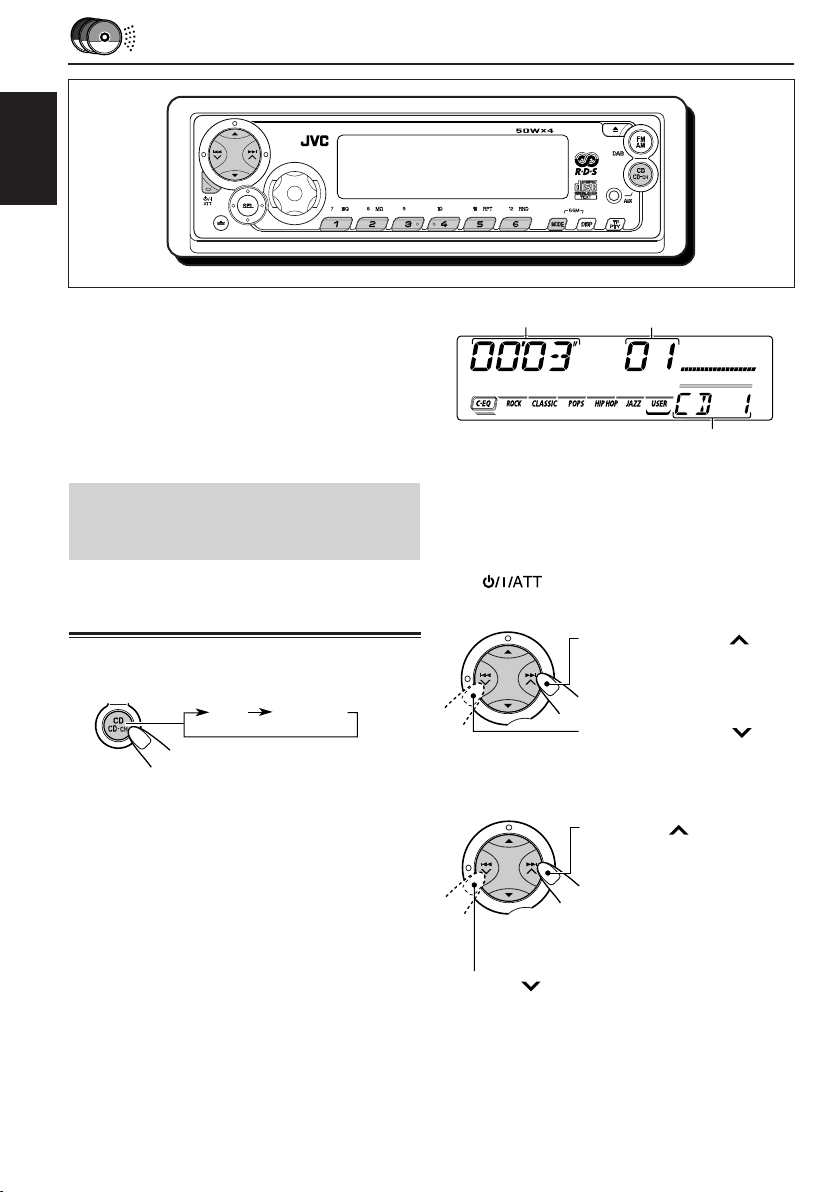
Control panel
Display window
ENGLISH
f
LOCATION OF THE BUTTONS
s
jk
hg
l
/
d
z
x
1
24
37
9
p
1 4 /¢ buttons
2 5 (up) button
3 ∞ (down) button
4 Remote sensor
5 Display window
6 0 (eject) button
7 FM AM button
8 CD CD-CH (AUX) button
9 (standby/on/attenuator) button
p (control panel release) button
q SEL (select) button
w Control dial
e EQ (equalizer) button
r MO (monaural) button
t RPT (repeat) button
y RND (random) button
u Number buttons
i MODE button
• Also functions as SSM buttons when pressed
together with DISP (display) button.
o DISP (display) button
• Also functions as SSM buttons when pressed
together with MODE button.
q
w
56
e
8
t yr
; TP PTY (traffic programme/programme type)
button
a AUX (auxiliary) input
i o ;
u
a
Display window
s Main display
d Volume (or audio) level indicator
Equalization pattern indicator
f Tuner reception indicators
MO (monaural), ST (stereo)
g C-EQ (custom equalizer) indicator
h RND (random) indicator
j RPT (repeat) indicator
k LOUD indicator
l Sound mode indicators
ROCK, CLASSIC, POPS, HIP HOP, JAZZ, USER.
/ Source/clock display
z RDS indicators
AF, REG, TP, PTY
x CD–in indicator
4
Page 5

Preparing the remote controller
This section is only for KD-SX992R.
KD-SX921R can also be remotely controlled with
an optionally purchased remote controller. We
recommend that you use remote controller
RM-RK50 with your unit.
Before using the remote controller:
• Aim the remote controller directly at the remote
sensor on the main unit. Make sure there is no
obstacle in between.
Remote sensor
• Do not expose the remote sensor to strong
light (direct sunlight or artificial lighting).
Installing the battery
When the controllable range or effectiveness of the
remote controller decreases, replace the battery.
1. Remove the battery holder.
1) Push out the battery holder in the direction
indicated by the arrow using a ball-point
pen or a similar tool.
2) Remove the battery holder.
(back side)
2. Place the battery.
Slide the battery into the holder with the + side
facing upwards so that the battery is fixed in
the holder.
Lithium coin battery
(product number:
CR2025)
3.Return the battery holder.
Insert again the battery holder pushing it until
you hear a clicking sound.
(back side)
WARNING:
• Store the battery in a place where children cannot
reach.
If a child accidentally swallows the battery,
consult a doctor immediately.
• Do not recharge, short, disassemble or heat the
battery or dispose it in a fire.
Doing any of these things may cause the battery to
give off heat, crack or start a fire.
• Do not leave the battery with other metallic
materials.
Doing this may cause the battery to give off heat,
crack or start a fire.
• When throwing away or saving the battery, wrap it
in tape and insulate; otherwise, the battery may
start to give off heat, crack or start a fire.
• Do not poke the battery with tweezers or similar
tools.
Doing this may cause the battery to give off heat,
crack or start a fire.
ENGLISH
CAUTION:
DO NOT leave the remote controller in a place
(such as the dashboard) exposed to direct sunlight
for a long time. Otherwise, it may be damaged.
5
Page 6

Remote controller
This section is only for KD-SX992R.
KD-SX921R can also remotely controlled with an
ENGLISH
optionally purchased remote controller. We
recommend that you use remote controller
RM-RK50 with your unit.
3 • Selects the preset stations while listening to
the radio (or the DAB tuner).
Each time you press the button, the preset
station (or service) number increases, and
the selected station (or service) is tuned in.
• Skips to the previous disc while listening to
the CD changer.
Each time you press the button, the disc
number decreases, and the selected disc
starts playing.
RM–RK50
SOUND
ATT
1
2
3
R
U
SOURCE
D
F
5
6
7
4
VOL
1 • Turns on the unit if pressed when the unit is
turned off.
• Turns off the unit if pressed and held until
“SEE YOU” appears on the display.
• Drops the volume level in a moment if
pressed briefly.
Press again to resume the volume.
VOL
4 Functions the same as the control dial on the
main unit.
NOTE:
This button does not function for the
preferred setting mode adjustment.
5 Selects the sound (C-EQ) mode.
Each time you press the button, the sound
(C-EQ) mode changes.
6 Selects the source.
Each time you press the button, the source
changes.
7 • Searches stations while listening to the
radio.
• Selects services while listening to the DAB
tuner if pressed briefly.
• Searches ensembles while listening to the
DAB tuner if pressed for more than 1
second.
• Fast-forwards or reverses the track if
pressed and held while listening to a disc.
• Skips to the beginning of the next track or
goes back to the beginning of the current (or
previous) tracks if pressed briefly while
listening to a disc.
2 • Selects the band while listening to the radio
(or the DAB tuner).
Each time you press the button, the band
changes.
• Skips to the next disc while listening to the
CD changer.
Each time you press the button, the disc
number increases, and the selected disc
starts playing.
6
Page 7

BASIC OPERATIONS
ENGLISH
12
3
Turning on the power
1
Turn on the power.
“HELLO” appears on the display.
Note on One-Touch Operation:
When you select a source in step 2 below, the
power automatically comes on. You do not have
to press this button to turn on the power.
2
Select the source.
To select the tuner, press FM AM
repeatedly.
FM1 FM2
AM
To select CD, CD changer (or “LINE IN”*),
press CD CD-CH (AUX) repeatedly.
CD-CH
(or LINE IN)*
* If “LINE IN” does not appear on the display
(see page 28), set the “EXT IN” setting to
“LINE IN.”
To select “AUX IN” (component connected
to the AUX IN jack on the control panel),
press and hold CD CD-CH (AUX).
FM3
CD
3
Adjust the volume.
To increase the volume.
To decrease the volume.
Volume or audio level
Volume level appears
4
Adjust the sound as you want.
(See pages 22 – 24.)
indicator (see page 27)
To drop the volume in a moment
Press briefly while listening to any
source. “ATT” starts flashing on the display, and
the volume level will drop in a moment.
To resume the previous volume level, press the
button briefly again.
• If you turn the control dial, you can also restore
the sound.
To turn off the power
Press for more than one second.
“SEE YOU” appears, then the unit turns off.
• If you turn off the power while listening to a
disc, CD play will start from where playback
has been stopped previously next time you turn
on the power.
Note:
When you use this unit for the first time, set the built-in
clock correctly, see page 25.
7
Page 8

RADIO OPERATIONS
ENGLISH
Listening to the radio
2
Start searching a station.
You can use either automatic searching or manual
searching to tune in to a particular station.
Searching a station automatically:
Auto search
1
Select the band (FM1 – 3, AM).
FM1 FM2 FM3 AM
(F1) (F2) (F3)
Selected band appears (then chages to
the clock time if “CLOCK” is “ON.”).
Note:
This receiver has three FM bands (FM1, FM2,
FM3). You can use any one of them to listen to an
FM broadcast.
Press ¢ to search
stations of higher
frequencies.
Press 4 to search
stations of lower
frequencies.
When a station is received, searching stops.
To stop searching before a station is received,
press the same button you have pressed for
searching.
8
Page 9
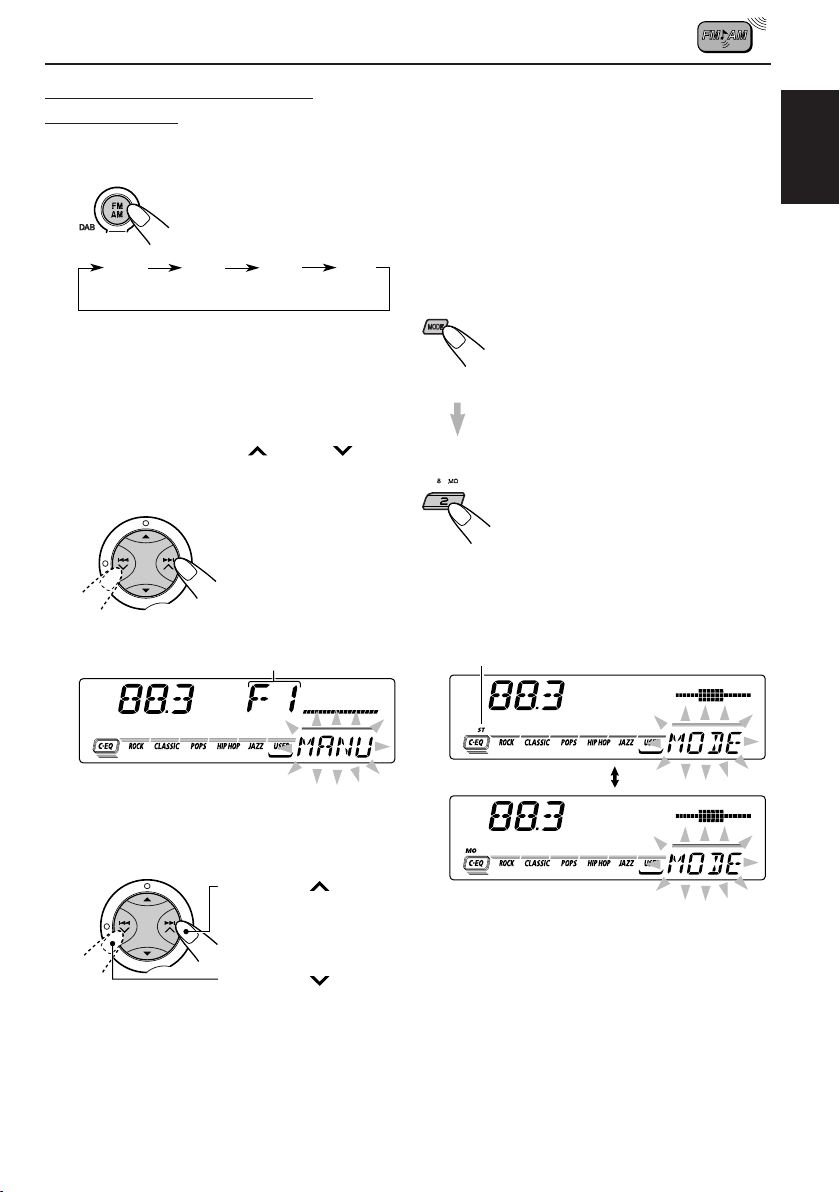
Searching a station manually:
Manual search
1
Select the band (FM1 – 3, AM).
• If you release your finger from the button,
the manual mode will automatically turn off
after 5 seconds.
• If you hold down the button, the frequency
keeps changing (in 50 kHz intervals for FM
and 9 kHz intervals for AM – MW/LW) until
you release the button.
ENGLISH
FM1 FM2 FM3 AM
(F1) (F2) (F3)
Note:
This receiver has three FM bands (FM1, FM2,
FM3). You can use any one of them to listen to an
FM broadcast.
2
Press and hold ¢ or 4 until
“MANU” (manual) starts flashing on
the display.
Selected band appears.
3
Tune in to a station you want while
“MANU” is flashing.
When an FM stereo broadcast is hard to
receive:
1 Press MODE to enter the functions
mode while listening to an FM
stereo broadcast.
“MODE” appears on the lower part
of the display, and the number
buttons work as different function
buttons.
2 Press MO (monaural), while
“MODE” is still on the display, so
that the MO indicator lights up on
the display.
Then, each time you press MO
(monaural), the MO indicator lights
up and goes off alternately.
Lights up when receiving an FM broadcast in stereo.
Press ¢ to tune
in to stations of higher
frequencies.
Press 4 to tune
in to stations of lower
frequencies.
When the MO indicator is lit on the display, the
sound you hear becomes monaural but the
reception will be improved (the ST indicator
goes off).
9
Page 10

Storing stations in memory
You can use one of the following two methods to
store broadcasting stations in memory.
• Automatic preset of FM stations: SSM (Strong-
ENGLISH
station Sequential Memory)
• Manual preset of both FM and AM stations
FM station automatic preset: SSM
Y ou can preset 6 local FM stations in each FM band
(FM1, FM2 and FM3).
1
Select the FM band (FM1 – 3) you want
to store FM stations into.
Each time you press the
button, the band changes
as follows:
FM1 FM2 FM3 AM
(F1) (F2) (F3)
2
Press and hold both buttons for more
than 2 seconds.
Manual preset
You can preset up to 6 stations in each band (FM1,
FM2, FM3 and AM) manually.
Ex.: Storing an FM station of 88.3 MHz into the
preset number 1 of the FM1 band
1
Select the band (FM1 – 3, AM) you
want to store stations into (in this
example, FM1).
Each time you press the
button, the band changes
as follows:
FM1 FM2 FM3 AM
(F1)
2
Tune in to a station (in this example,
of 88.3 MHz).
Press ¢ to tune
in to stations of higher
frequencies.
Press 4 to tune
in to stations of lower
frequencies.
“SSM” appears, then disappears when automatic
preset is over.
Local FM stations with the strongest signals are
searched and stored automatically in the band
number you have selected (FM1, FM2 or FM3).
These stations are preset in the number buttons —
No.1 (lowest frequency) to No .6 (highest frequency).
When automatic preset is over, the station stored
in number button 1 will be automatically tuned in.
10
Page 11
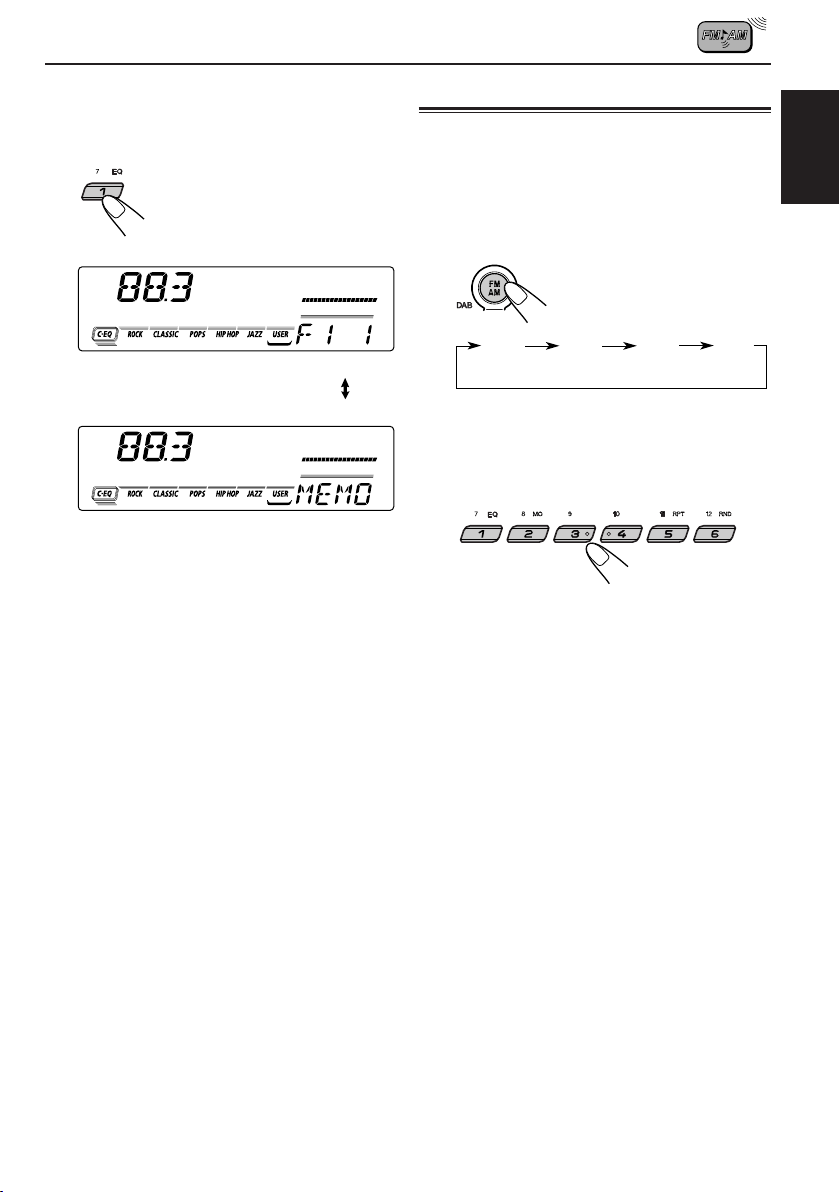
3
Press and hold the number button (in
this example, 1) for more than 2
seconds.
Selected band/preset number
and “MEMO” (memory) appear
alternately for a while.
4
Repeat the above procedure to store
other stations into other preset
numbers.
Notes:
• A previously preset station is erased when a ne w station
is stored in the same preset number.
• Preset stations are erased when the power supply to
the memory circuit is interrupted (for example, during
battery replacement). If this occurs, pr eset the stations
again.
Tuning in to a preset station
You can easily tune in to a preset station.
Remember that you must store stations first. If y ou
have not stored them yet, see “Stor ing stations in
memory” on pages 10 and 11.
1
Select the band (FM1 – 3, AM).
FM1 FM2 FM3 AM
(F1) (F2) (F3)
2
Select the number (1 – 6) for the preset
station you want.
ENGLISH
11
Page 12

RDS OPERATIONS
What you can do with RDS
RDS (Radio Data System) allows FM stations to
send an additional signal along with their regular
programme signals. For example , the stations send
ENGLISH
their station names, as well as information about
what type of programme they broadcast, such as
sports or music, etc.
Another advantage of the RDS function is called
“Enhanced Other Networks.” By using the
Enhanced Other Networks data sent from a
station, you can tune in to a different station of a
different network broadcasting your favourite
programme or traffic announcement while
listening to another programme or to another
source such as CD.
By receiving the RDS data, this unit can do the
following:
• Tracing the same programme automatically
(Network-Tracking Reception)
• Standby Reception of TA (Traffic Announcement)
or your favourite programme
• PTY (Programme Type) search
• Programme search
• And some other functions
Tracing the same programme
automatically (Network-Tracking
Reception)
When driving in an area where FM reception is not
good, the tuner built in this unit automatically tunes
in to another RDS station, broadcasting the same
programme with stronger signals. So, you can
continue to listen to the same programme in its
finest reception, no matter where you drive.
(See the illustration on the next page.)
Two types of the RDS data are used to make
Network-Tracking Reception work correctly — PI
(Programme Identification) and AF (Alternative
Frequency).
Without receiving these data correctly from the RDS
station you are listening to, Network-Tracking
Reception will not operate.
To use Network-Tracking Reception
You can select the different modes of networktracking reception to continue listening to the
same programme in its finest reception.
When shipped from the factory, “AF” is selected.
• AF: Network-Tracking Reception is
• AF REG: Network-Tracking Reception is
• OFF: Network-Tracking Reception is
Note:
If a DAB tuner is connected and Alternatively
Reception (for DAB services) is activated, NetworkTracing Reception is also activated automatically. On
the other hand, Network-Tracking Reception cannot be
deactivated without deactivating Alternative
Reception. (See page 36.)
activated with Regionalization set to
“off.”
With this setting, the unit switches to
another station within the same
network when the receiving signals
from the current station become
weak. (In this mode, the programme
may differ from the one currently
received.)
The AF indicator lights up but the
REG indicator does not.
activated with Regionalization set to
“on.”
With this setting, the unit switches to
another station, within the same
network, broadcasting the same
programme when the receiving
signals from the current station
become weak.
Both the AF indicator and the REG
indicator light up.
deactivated.
Neither the AF indicator nor the REG
indicator lights up.
AF indicator
REG indicator
12
Page 13

1
Press and hold SEL (select) for more
than 2 seconds so that one of the
PSM items appears on the display.
(PSM: see page 26.)
2
Select “AF-REG (alternative
frequency/regionalization
reception)” if not shown on the
display.
3
Select the desired mode–“AF,”
“AF REG” or “OFF.”
4
Finish the setting.
The same programme can be received on
different frequencies.
Programme 1
broadcasting
on frequency A
Programme 1
broadcasting
on frequency E
Using TA Standby Reception
TA Standby Reception allows the unit to switch
temporarily to Traffic Announcement (TA) from the
current source (another FM station, CD or other
connected components).
• TA Standby Reception will not work if you are listening
to an AM station.
7 When the current source is FM, the TP
indicator either lights up or flashes.
• If the TP indicator lights up, TA Standby
Reception is activated.
If a station starts broadcasting a traffic
announcement, “TRAFFIC” appears on the
display, and this unit automatically tunes in
to the station. The volume changes to the
preset TA volume level (see page 17) and
the traffic announcement can be heard.
• If the TP indicator flashes, TA Standb y
Reception is not yet activated since the
station being received does not provide the
signals used for TA Standby Reception.
To activate TA Standby Reception, you need
to tune in to another station providing these
signals. Press ¢ or 4 to search
for such a station.
When a station providing these signals is
tuned in, the TP indicator stops flashing and
remains lit. Now TA Standby Reception is
activated.
7 When the current source is other than FM,
the TP indicator lights up.
If a station starts broadcasting a traffic
announcement, “TRAFFIC” appears on the
display, and this unit automatically changes the
source and tunes in to the station.
To deactivate the TA Standby Reception, press
TP PTY again.
ENGLISH
Programme 1
broadcasting
on frequency B
Programme 1
broadcasting
on frequency C
Programme 1
broadcasting
on frequency D
13
Page 14
Using PTY Standby Reception
PTY Standby Reception allows the unit to switch
temporarily to your favourite programme (PTY:
Programme Type) from the current source (another
FM station, CD or other connected components).
ENGLISH
• PTY Standby Reception will not work if you are
listening to an AM station.
To select your favourite programme for
PTY Standby Reception
You can select your favourite programme type for
PTY Standby Reception.
When shipped from the factory, PTY Standby
Reception is turned off. (“OFF” is selected f or PTY
Standby Reception.)
1
Press and hold SEL (select) for more
than 2 seconds so that one of the
PSM items appears on the display.
(PSM: see page 26.)
2
Select “PTY STBY (standby)” if not
shown on the display.
3
Select one of the twenty-nine PTY
codes. (See page 18.)
Selected code name
appears on the display
and is stored into
memory.
• To cancel the PTY
Standby Reception,
select “OFF.”
4
Finish the setting.
7 When the current source is FM, the
PTY indicator either lights up or flashes.
• If the PTY indicator lights up, PTY
Standby Reception is activated.
If a station starts broadcasting the
selected PTY programme, this unit
automatically tunes in to the station.
• If the PTY indicator flashes, PTY
Standby Reception is not yet activated
since the station being received does
not provide the signals used for PTY
Standby Reception.
To activate PTY Standby Reception,
you need to tune in to another station
providing these signals. Press ¢
or 4 to search for such a station.
When a station providing these signals
is tuned in, the PTY indicator stops
flashing and remains lit. Now PTY
Standby Reception is activated.
7 When the current source is other than
FM, the PTY indicator lights up.
If a station starts broadcasting the
selected PTY programme, this unit
automatically changes the source and
tunes in to the station.
To deactivate the PTY Standby Reception,
select “OFF” in step 3 on the left column. The
PTY indicator disappears.
14
Page 15
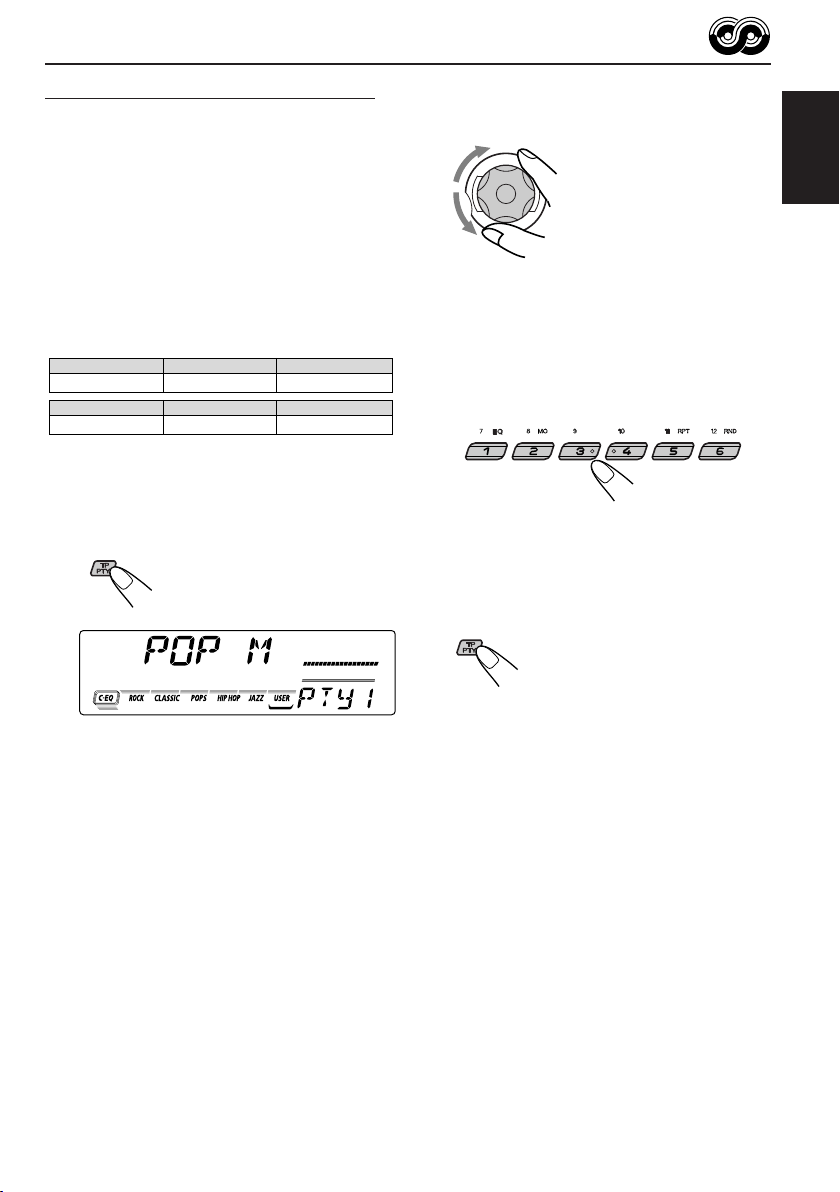
Searching your favourite programme
You can search any one of the PTY codes.
In addition, you can store your 6 favourite
programme types in the number buttons.
When shipped from the factory, the following 6
programme types have been stored in the number
buttons (1 to 6).
To store your favourite programme types, see
below.
To search your favourite programme type, see
page 16.
1
POP M
45
CLASSICS
2
ROCK M EASY M
AFFAIRS
To store your favourite programme types
1
Press and hold TP PTY for more than
2 seconds.
3
6
VARIED
2
Select one of the twenty-nine PTY
codes. (See page 18.)
Selected code name
appears on the display.
3
Press and hold the number button for
more than 2 seconds to store the PTY
code selected into the preset number
you want.
“MEMO” and PTY preset number alternate
on the display.
4
Press TP PTY again.
ENGLISH
The last selected PTY code appears.
15
Page 16

To search your favourite programme type
1
Press and hold TP PTY for more than
2 seconds while listening to an FM
station.
ENGLISH
The last selected PTY code appears.
2
Select one of the PTY codes.
OR
Other convenient RDS functions
and adjustments
Automatic selection of the station
when using the number buttons
Usually when you press the number button, the
preset station is tuned in.
However , when the preset station is an RDS station,
something different will happen. If the signals from
that preset station are not sufficient for good
reception, this unit, using the AF data, tunes in to
another frequency broadcasting the same
programme as the original preset station is
broadcasting. (Programme search)
• The unit takes some time to tune in to another
station using Programme search.
T o activate programme search, f ollow the procedure
below.
• See also “Changing the general settings (PSM)”
on page 25.
1 Press and hold SEL (select) for more than 2
seconds so that one of the PSM items appears
on the display.
2 Press ¢ or 4 to select
“P(Programme)-SEARCH.”
3 Turn the control dial clockwise to select “ON.”
Now programme search is activated.
4 Press SEL (select) to finish the setting.
Ex.: When “ROCK M” is selected
3
Press ¢ or 4 to start PTY
search for your favourite programme.
• If there is a station broadcasting a programme of
the same PTY code as you selected, that station
is tuned in.
• If there is no station broadcasting a programme
of the same PTY code as you selected, the
station will not change.
Note:
In some areas, the PTY search will not work correctly.
16
To cancel programme search, repeat the
same procedure and select “OFF” in step 3 by
turning the control dial counterclockwise.
Page 17

Changing the display mode while
listening to an FM station
You can change the initial indication on the display
to station name (PS NAME), station frequency
(FREQ) or while listening to an FM RDS station.
• See also “Changing the general settings (PSM)”
on page 25.
1 Press and hold SEL (select) for more than 2
seconds so that one of the PSM items appears
on the display.
2 Press ¢ or 4 to select “TU DISP
(tuner display).”
3 T urn the control dial to set to the desired indication
(“PS NAME,” or “FREQ”).
4 Press SEL (select) to finish the setting.
Note:
By pressing DISP (display), you can change the display
while listening to an FM RDS station.
Each time you press the button, the following information
appears on the display:
Station name
(PS NAME)
Station frequency
(FREQ)
Programme type
(PTY)
• Then, the display goes back to the original indication
in several seconds.
Setting the TA volume level
You can preset the volume level for TA Standby
Reception. When a traffic programme is received,
the volume level automatically changes to the preset
level.
• See also “Changing the general settings (PSM)”
on page 25.
1 Press and hold SEL (select) for more than 2
seconds so that one of the PSM items appears
on the display.
2 Press ¢ or 4 to select “TA VOL
(volume).”
3 T urn the control dial to set to the desired volume.
You can set it from “VOL 00” to “VOL 50.”
4 Press SEL (select) to finish the setting.
Automatic clock adjustment
When shipped from the factory, the clock built in
this unit is set to be readjusted automatically using
the CT (Clock Time) data in the RDS signal.
If you do not want to use automatic clock
adjustment, follow the procedure below.
• See also “Changing the general settings (PSM)”
on page 25.
1 Press and hold SEL (select) for more than 2
seconds so that one of the PSM items appears
on the display.
2 Press ¢ or 4 to select “AUTO ADJ
(adjustment).”
3 Tur n the control dial counterclockwise to select
“OFF.”
Now automatic clock adjustment is canceled.
4 Press SEL (select) to finish the setting.
To reactiv ate cloc k adjustment, repeat the same
procedure and select “ON” in step 3 by turning the
control dial clockwise.
ENGLISH
Note:
Y ou must stay tuned to the same station for more than 2
minutes after setting “AUTO ADJ” to “ON.” Otherwise,
the clock time will not be adjusted. (This is because the
unit takes up to 2 minutes to capture the CT data in the
RDS signal.)
17
Page 18

PTY codes
NEWS: News
AFFAIRS: Topical programmes expanding
ENGLISH
INFO: Programmes which impart advice
SPORT: Sport events
EDUCATE: Educational programmes
DRAMA: Radio plays
CULTURE: Programmes on national or
SCIENCE: Programmes on natural science
VARIED: Other programmes like comedies
POP M: Pop music
ROCK M: Rock music
EASY M: Easy-listening music
LIGHT M: Light music
CLASSICS: Classical music
OTHER M: Other music
WEATHER: Weather information
FINANCE: Reports on commerce, trading,
on current news or affairs
on a wide variety of topics
regional culture
and technology
or ceremonies
the Stock Market, etc.
CHILDREN: Entertainment programmes for
children
SOCIAL: Programmes on social activities
RELIGION: Programmes dealing with any
aspect of belief or faith, or the
nature of existence or ethics
PHONE IN: Programmes where people can
express their views either by
phone or in a public forum
TRAVEL: Programmes about travel
destinations, package tours, and
travel ideas and opportunities
LEISURE: Programmes concerned with
recreational activities such as
gardening, cooking, fishing, etc.
JAZZ: Jazz music
COUNTRY: Country music
NATION M: Current popular music from
another nation or region, in that
country’s language
OLDIES: Classic pop music
FOLK M: Folk music
DOCUMENT: Programmes dealing with factual
matters, presented in an
investigative style
18
Page 19

CD OPERATIONS
ENGLISH
Playing a CD
1
Open the control panel.
Note:
When an external component is connected to the AUX
jack in the control panel, be careful of handling a CD.
2
Insert a disc into the loading slot.
The unit turns on,
draws the disc and
starts playback
automatically.
3
Close the control panel by hand.
The CD–in indicator lights up.
Total playing time of
the inserted disc
Elapsed
playing time Current track
Source indication will change to the
clock time if “CLOCK” is set to “ON”.
(See page 27)
Notes:
• When a disc is already in the loading slot, selecting
“CD” as the source starts CD play.
• When a disc is inserted upside down, the disc
automatically ejects (if the control panel is open). If
the control panel is closed, “PLEASE” and
“EJECT” appear alternately.
• If you change the source, CD play also stops
(without ejecting the disc).
Next time you select “CD” as the source, CD play
starts from where playback has been stopped
previously.
Total track number
of the inserted disc
19
Page 20

To stop play and eject the disc
Press 0.
CD play stops, the control panel opens, then the
disc automatically ejects from the loading slot.
If you change the source, the CD play also stops
ENGLISH
(without ejecting the disc this time).
To go to a particular track directly
Notes:
• If the ejected disc is not removed for about 15
seconds, the disc is automatically inserted again
into the loading slot to protect it from dust.
(CD play will not start this time.)
• You can eject the disc even when the unit is turned
off.
Locating a track or a particular
portion on a CD
To fast-forward or reverse the track
Press and hold ¢ ,
while playing a disc, to
fast-forward the track.
Press and hold 4 ,
while playing a disc, to
reverse the track.
To go to the next or previous tracks
Press ¢ briefly, while
playing a disc, to go ahead
to the beginning of the next
track.
Each time you press the
button consecutively, the
beginning of the next tracks
is located and played back.
Press 4 briefly, while
playing a disc, to go back to
the beginning of the current
track. Each time you press
the button consecutively, the
beginning of the previous
tracks is located and played
back.
Press the number button corresponding to the
track number to start its playback.
• To select a track number from 1 – 6:
Press 1 (7) – 6 (12) briefly.
• To select a track number from 7 – 12:
Press and hold 1 (7) – 6 (12) for more than 1
second.
Selecting CD playback modes
To play back tracks at random (Random Play)
Y ou can pla y back all tracks on the disc at random.
1 Press MODE to enter the
functions mode while playing a
disc.
“MODE” appears on the lower
part of the display, and the
number buttons work as different
function buttons.
2 Press RND (random), while
“MODE” is still on the display, so
that the RND indicator lights up
on the display.
Then, each time you press RND
(random), the random play mode
turns on and off alternately.
RND indicator
When the random mode is turned on, the RND
indicator lights up on the display and a track
randomly selected starts playing.
20
Page 21
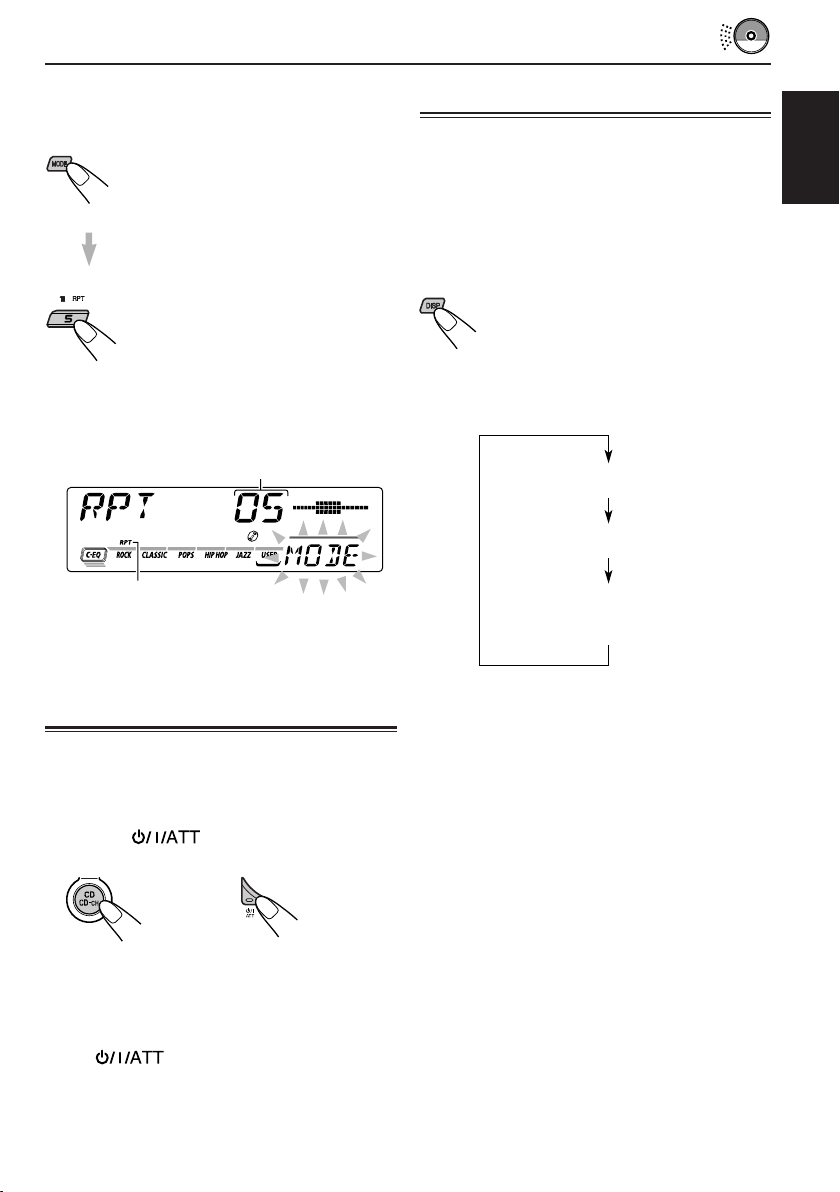
To play back tracks repeatedly (Repeat Play)
Disc Title / Performer
Track Title
Current track no. and
Elapsed playing time
You can play back the current track repeatedly.
1 Press MODE to enter the functions
mode while playing a disc.
“MODE” appears on the lower part
of the display, and the number
buttons work as different function
buttons.
2 Press RPT (repeat), while
“MODE” is still on the display, so
that the RPT indicator lights up on
the display.
Then, each time you press RPT
(repeat), the repeat play mode
turns on and off alternately.
Track number of the
currently playing track
RPT indicator
When the repeat mode is turned on, the RPT
indicator lights up on the display.
Playing a CD Text
In a CD Text, some information about the disc
(its disc title, performer and track title) is recorded.
You can show these disc information on the
display.
Select text display mode while playing a
CD Text.
Each time you press the button, the display
changes as follows:
ENGLISH
Prohibiting CD ejection
You can prohibit CD ejection and can lock a disc
in the loading slot.
While pressing CD CD-CH (AUX), press
and hold
seconds.
“NO EJECT” flashes on the display for about 5
seconds, and the disc is locked and cannot be
ejected.
To cancel the prohibition and unlock the disc,
press again for more than 2 seconds,
while pressing CD CD-CH.
“EJECT OK” flashes on the display for about 5
seconds, and the disc is unlocked.
for more than 2
Notes:
• The display shows up to 8 characters at one time
and scrolls if there are more than 8 characters.
See also “To select the scroll mode – SCROLL” on
page 28.
Some characters or symbols will not be shown (and
be blanked) on the display.
(Ex. “ABCå!d#” ]“ABCA D ”)
• W hen you press DISP (display) while playing a
conventional CD, “NO NAME” appears for the disc
title/performer and the track title.
21
Page 22

SOUND ADJUSTMENTS
Adjusting the sound
2
Adjust the level.
You can adjust the sound characteristics to your
preference.
ENGLISH
1
Select the item you want to adjust.
Each time you press the button,
the adjustable items change as
follows:
BAS
(bass)
VOL
(volume)
Indication To do: Range
BAS Adjust the bass. –06 (min.)
TRE Adjust the treble. –06 (min.)
FAD* Adjust the front R06 (Rear only)
BAL Adjust the left L06 (Left only)
LOUD Boost low and
WOOFER Adjust the 0 (min.)
(only for
KD-SX992R)
VOL Adjust the volume. 00 (min.)
TRE
(treble)
(only for KD-SX992R)
and rear speaker |
balance. F06 (Front only)
and right speaker |
balance. R06 (Right only)
high frequencies
to produce a
well-balanced
sound at low
volume level.
subwoofer output |
level. 8 (max.)
(fader)
WOOFER
FAD
|
+06 (max.)
|
+06 (max.)
LOUD ON
|
LOUD OFF
|
50 (max.)
BAL
(balance)
LOUD
(loudness)
To increase the level.
To decrease the level.
Equalization pattern
changes as you adjust
the bass or treble.
Note:
Normally, the control dial works as the volume
control. So you do not have to select “VOL” to adjust
the volume level.
* If you are using a two-speaker system, set the fader
level to “00.”
22
Page 23

Selecting preset sound modes
(C-EQ: custom equalizer)
You can select a preset sound mode
(C-EQ: custom equalizer) suitable to the music
genre.
• There is a time limit in doing the following
procedure. If the setting is canceled before you
finish, start from step 1 again.
1
Press MODE.
“MODE” appears on the lower
part of the display, and the
number buttons work as
different function buttons.
2
Press EQ (equalizer) while “MODE”
still on the display.
The last selected sound mode
is recalled and applied to the
current source.
Sound mode indicator flashes.
Ex.: If you have selected “USER” previously
3
Select the sound mode you want.
Each time you press the button,
the sound modes change as
follows:
USER
ROCK
CLASSIC
POPSHIP HOPJAZZ
Indication For: Preset values
BAS TRE LOUD
USER (Flat sound) 00 00 OFF
ROCK Rock or +03 +01 ON
disco music
CLASSIC Classical +01 –02 OFF
music
POPS Light music +04 +01 OFF
HIP HOP Funk or Rap +02 00 ON
music
JAZZ Jazz music +02 +03 OFF
Note:
• You can adjust each sound mode to your preference,
and store it in memory.
If you want to adjust and store your original sound
mode, see “Storing your own sound adjustments”
on page 24.
To store a sound mode separately for
each playback source (C-EQ Link)
You can select a sound mode and store it in
memory. It will be recalled every time you select
the same source and will be shown on the display .
A sound mode can be stored for each of the
following sources — FM1, FM2, FM3, AM, CD and
external components.
• See also “Changing the general setting (PSM)”
on page 25.
1 Press and hold SEL (select) for more than 2
seconds so that one of the PSM items
appears on the display.
2 Press ¢ or 4 to select “CEQ LINK
(custom equalizer link).”
3 Turn the control dial clockwise to select “LINK
ON.”
4 Press SEL (select) to finish the setting.
To cancel C-EQ Link, repeat the same
procedure and select “LINK OFF” in step 3.
ENGLISH
Sound mode indicator flashes.
Ex.: When you select “ROCK”
Note:
When you change the “CEQ LINK” setting, sound
mode (C-EQ) is automatically reset to “USER.”
23
Page 24

• When “CEQ LINK” is set to “LINK ON”
The selected sound mode can be stored in
memory for the current source.
Each time you change to the same source, the
same sound mode is also recalled and shown
ENGLISH
on the display. The C-EQ indicator also flashes.
• When “CEQ LINK” is set to “LINK OFF”
The selected sound mode effect applies to any
source.
4
Select the item you want to adjust.
• See page 22 for details.
5
Adjust the level.
To increase the level.
Storing your own sound
adjustments
Y ou can adjust the sound modes to y our preference
and store your own adjustments in memory.
• There is a time limit in doing the following
procedure. If the setting is canceled before you
finish, start from step 1 again.
1
Press MODE.
“MODE” appears on the lower
part of the display, and the
number buttons work as
different function buttons.
2
Press EQ (equalizer) while “MODE”
still on the display.
The last selected sound mode
is recalled and applied to the
current source.
To decrease the level.
Equalization pattern
changes as you adjust
the bass or treble.
Ex.: When you adjust “TRE”
6
Repeat steps 4 and 5 to adjust the
other items.
7
Repeat the same procedure to store
other sound modes.
To reset to the factory settings, repeat the
same procedure and reassign the preset values
listed in the table on page 23.
24
Sound mode indicator flashes.
Ex.: If you have selected “ROCK” previously
3
Select the sound mode you want to
adjust.
Page 25

OTHER MAIN FUNCTIONS
Setting the clock
1
Press and hold SEL (select) for more
than 2 seconds so that one of the PSM
items appears on the display.
(See page 26.)
2
Set the hour.
1 Select “CLOCK H (hour)” if not shown on
the display.
2 Adjust the hour.
1
3
Set the minute.
1 Select “CLOCK M (minute).”
2 Adjust the minute.
1
2
2
To check the current clock time while the unit
is turned off, press DISP (display).
The power turns on, the clock time is shown for 5
seconds, then the power turns off.
Changing the general settings
(PSM)
You can change the items listed on the next page
by using the PSM (Preferred Setting Mode) control.
Basic Procedure
1
Press and hold SEL (select) for more
than 2 seconds so that one of the PSM
items appears on the display.
(See page 26.)
2
Select the PSM item you want to
adjust. (See page 26.)
ENGLISH
4
Set the clock system.
1 Select “24H/12H.”
2 Select “24H” or “12H.”
1
5
Finish the setting.
3
Adjust the PSM item selected.
2
4
Repeat steps 2 and 3 to adjust the
other PSM items if necessary.
5
Finish the setting.
25
Page 26

Preferred Setting Mode (PSM) items
132
ENGLISH
Hold.
CLOCK H Hour adjustment
CLOCK M Minute adjustment
CEQ LINK Custom equalizer link
24H/12H 24/12-hour time display
AUTO ADJ Automatic clock setting
CLOCK Clock display
TU DISP Tuner display
AF-REG Alternative frequency/
Regionalization reception
PTY STBY PTY standby
Select.
Set.
Counterclockwise
Back Advance
Back Advance
LINK OFF LINK OFF 23, 27LINK ON
12H 24H 24H
OFF ON ON 17
OFF ON
FREQ PS NAME PS NAME 17
AF
OFF
29 programme types
Clockwise
AF REG
OFF*
(see page 18)
Factory-preset
settings
0:00 25
ON
AF
OFF 14
See
page
25
27
12
TA VOL Traffic announcement
P-SEARCH Programme search
DAB AF** Alternate frequency
DAB V OL** DAB volume adjustment
LEVEL Level indicator
DIMMER*** Dimmer mode
TEL Telephone muting
BEEP Key-touch tone
SCROLL Scroll mode
EXT IN**** External component
AUX ADJ Auxiliary input level
• Press SEL (select) to finish the setting.
* Not selectable when the DAB tuner is connected.
** Displayed only when the DAB tuner is connected.
*** Only for KD-SX992R.
**** Displayed only when one of the following sources is selected – FM, AM and CD.
volume
search
VOL 00 — VOL 50 VOL 20 17
OFF ON OFF
AF OFF AF ON AF ON 36
VOL –12 to VOL 12
OFF
AUTO
OFF MUTING 1
OFF ON
ONCE
CHANGER
A.ADJ 00 – A.ADJ 05
AUDIO 1
AUDIO 2
OFF
ON
MUTING 2
AUTO
OFF
LINE IN
VOL 00
AUDIO 2
AUTO
OFF 28
ON
ONCE
CHANGER
A.ADJ 002828
16
36
27
27
28
28
26
Page 27

To set Custom Equalizer Link – CEQ LINK
A different sound mode (C-EQ) can be stored in
memory for each source so that you can change
the sound modes simply by changing the sources.
When shipped from the factory, this mode is
deactivated.
• LINK ON: Different sound modes for different
• LINK OFF: One sound mode for all sources.
sources.
To set the clock display – CLOCK
You can set the clock to be shown on the display
when the unit is turned on.
When shipped from the factory, the clock is set to
be shown on the display.
• ON: Clock display is turned on.
• OFF: Clock display is turned off. When
“OFF” is selected, the current source
name or station band appears
instead of the clock
when
external component is selected
as the source)
display (except
.
To select the level meter – LEVEL
You can select the level display according to your
preference.
When shipped from the factory, “AUDIO 2” is
selected.
• AUDIO 1: Lev el meter illuminates from bottom
to top.
• AUDIO 2: Alternates level meter (moves from
bottom to top) and illumination
display.
• OFF: Erases the audio level indicator.
To select the dimmer mode – DIMMER
(only for KD-SX992R)
When you turn on the car head lights, the display
automatically dims (Auto Dimmer).
When shipped from the factory, Auto Dimmer
mode is activated.
• AUTO: Activates Auto Dimmer.
• OFF: Cancels Auto Dimmer.
• ON: Always dims the display.
Note:
Auto Dimmer equipped with this unit may not work
correctly on some vehicles, particularly on those
having a control dial for dimming.
In this case, set the dimmer mode to “ON” or “OFF.”
ENGLISH
27
Page 28

To select the telephone muting – TEL
This mode is used when a cellular phone system is
connected. Depending on the phone system used,
select either “MUTING 1” or “MUTING 2, ” whichever
mutes the sounds from this unit.
ENGLISH
When shipped from the factory, this mode is
deactivated.
• MUTING 1: Select this if this setting can mute the
• MUTING 2: Select this if this setting can mute the
• OFF: Cancels the telephone muting.
sounds.
sounds.
To turn on/off the key-touch tone – BEEP
You can deactivate the key-touch tone if you do not
want it to beep each time you press a button.
When shipped from the factory , the k ey-touch tone
is activated.
To select the external component to use
– EXT IN
You can connect the external component to the CD
changer jack on the rear using the Line Input Adaptor
KS-U57 (not supplied).
To use the external component as the playback
source through this unit, you need to select which
component – CD changer or external component
– to use.
When shipped from the factory, CD changer is
selected as the external component.
• LINE IN: T o use the external component other
than CD changer.
• CHANGER: To use the CD changer.
Note:
For connecting the Line Input Adaptor KS-U57 and the
external component, refer to the Installation/Connection
Manual (separate volume).
• ON: Activates the key-touch tone.
• OFF: Deactivates the key-touch tone.
To select the scroll mode – SCROLL
You can select the scroll mode for the disc
information if it consists of more than 8 characters.
When shipped from the factory, Auto Scroll mode
is set to “ONCE.”
• ONCE: Scrolls only once.
• AUTO: Repeats the scroll
(in 5-second intervals).
• OFF: Cancels Auto Scroll.
To adjust the auxiiliary input level
– AUX ADJ
Adjust the auxiliary input properly when an external
component is connected to the AUX input jack.
When shipped from the factory , the AUX input le vel
is set at level “00.”
If the level of the connected component is not high
enough, increase the input level properly. Without
adjusting the line input level, you ma y be surprised
at a loud sound when you change the source from
an external component to another source.
28
Page 29

Detaching the control panel
You can detach the control panel when leaving
the car.
When detaching or attaching the control panel,
be careful not to damage the connectors on the
back of the control panel and on the panel holder.
Detaching the control panel
Before detaching the control panel, be sure to turn
off the power.
1
Unlock the control panel.
2
Pull the control panel out of the unit.
Attaching the control panel
1
Insert the right side of the control panel
into the groove on the panel holder.
2
Press the left side of the control panel
to fix it to the panel holder.
Note on cleaning the connectors:
If you frequently detach the control panel, the
connectors will deteriorate.
T o minimize this possibility , periodically wipe the
connectors with a cotton swab or cloth moistened
with alcohol, being careful not to damage the
connectors.
ENGLISH
3
Put the detached control panel into the
provided case.
Connectors
29
Page 30
ENGLISH
CD CHANGER OPERATIONS
We recommend that you use one of the CH-X series
with your unit.
If you have another CD automatic changer , consult
your JVC IN-CAR ENTERTAINMENT dealer for
connections.
• For example, if your CD automatic changer is one of
the KD-MK series, you need a cord (KS-U15K) for
connecting it to this unit.
Before operating your CD automatic changer:
• Refer also to the Instructions supplied with your
CD changer.
Playing CDs
Select the CD automatic changer (CD-CH).
*
CD
* If you have changed the “EXT IN” setting to
“LINE IN” ( see page 28), you cannot select the
CD changer.
Playback starts from the first track of the first disc.
All tracks of all discs are played back.
CD-CH
Elapsed playing time
** When “CLOCK” is set to “ON” (see page 27),
disc number will soon change to clock time.
Note on One-Touch Operation:
When you press CD CD-CH (A UX), the pow er
automatically turns on. You do not have to
press to turn on the power.
Track number
Disc number**
To fast-forward or reverse the track
Press and hold ¢ ,
while playing a disc,
to fast-forward the tr ack.
Press and hold 4 ,
while playing a disc,
to reverse the track.
To go to the next or previous tracks
Press ¢ briefly, while
playing a disc, to go ahead to
the beginning of the next
track. Each time you press
the button consecutively, the
beginning of the next tracks
is located and played back.
30
Press 4 briefly, while playing a disc, to go
back to the beginning of the current track. Each
time you press the button consecutively, the
beginning of the previous tracks is located and
played back.
Page 31

RND1
Canceled
RND2
To go to the next discs or the previous discs
Selecting CD playback modes
Press 5, while playing a
disc, to go to the next disc.
Each time you press the
button consecutively, the
first track of the next disc is
located and played back.
Press ∞, while playing a disc, to go to the
previous disc. Each time you press the button
consecutively, the first track of the previous
disc is located and played back.
To go to a particular disc directly
Press the number button corresponding to the disc
number to start its playback (while the CD changer
is playing).
• To select a disc number from 1 – 6:
Press 1 (7) – 6 (12) briefly.
• To select a disc number from 7 – 12:
Press and hold 1 (7) – 6 (12) for more than 1
second.
Elapsed playing time
** When “CLOCK” is set to “ON” (see page 27),
disc number will soon change to clock time.
Track number
Disc number**
To show the CD Text information
This is possible only when connecting a JVC CD
automatic changer equipped with CD Text reading
capability.
See “Playing a CD Text” on page 21.
To play back tracks at random (Random Play)
1 Press MODE to enter the functions
mode while playing a disc.
“MODE” appears on the lower part
of the display, and the number
buttons work as different function
buttons.
2 Press RND (random), while
“MODE” is still on the display, so
that the RND indicator lights up
on the display.
Then, each time you press RND
(random), the random play mode
changes as follows:
Mode
RND1 Lights All tracks of the current
(random1) disc, then the tracks of
RND2 Flashes All tracks of all discs
(random2) inserted in the magazine.
RND
Indicator
Plays at random
the next disc and so on.
To play back tracks repeatedly (Repeat Play)
1 Press MODE to enter the functions
mode while playing a disc.
“MODE” appears on the lower part
of the display, and the number
buttons work as different function
buttons.
2 Press RPT (repeat), while
“MODE” is still on the display, so
that the RPT indicator lights up on
the display.
Then, each time you press RPT
(repeat), the repeat play mode
changes as follows:
RPT1
RPT2
Canceled
Mode
RPT1 Lights The current track
RPT2 Flashes All tracks of the current
(repeat2) disc (or specified disc).
RPT
Indicator
Plays repeatedly
(or specified track).
ENGLISH
31
Page 32

ENGLISH
EXTERNAL COMPONENT OPERATIONS
Portable MD player, etc.
AUX input
Playing an external component
You can connect two external components to this
unit.
Connect one to the CD changer jack on the rear
using the Line Input Adaptor KS-U57 (not supplied),
and the other to the AUX (auxiliary) input jack on
the control panel.
Preparations:
• For connecting the Line Input Adaptor KS-U57 and
the external component, refer to the Installation/
Connection Manual (separate volume).
• Before operating the external component using the
following procedure, select the external input
correctly. (See “To select the external component to
use – EXT IN” on page 28.)
• If the input level of the external component
connected to the AUX jack is not high enough,
increase the input level properly. (See “To adjust
the auiliary input level – AUX ADJ” on page 28.)
1
Select the external component (LINE
IN or AUX IN).
To select “LINE IN” (component
connected to the CD changer jack on
the rear), press CD CD-CH (AUX)
repeatedly.
• If “LINE IN” does not appear on the display, see
page 28 and select the external input (“LINE IN”).
• Displayed only when one of the following
sources is selected – FM, AM and CD.
To select “AUX IN” (component connected to
the AUX jack on the control panel), press and
hold CD CD-CH (AUX).
2
Turn on the connected component
and start playing the source.
3
Adjust the volume.
32
CD
LINE IN
4
Adjust the sound characteristics
you want. (See pages 22 – 24.)
Note on One-Touch Operation:
When you press CD CD-CH (AUX), the power
automatically comes on. You do not have to press
to turn on the power.
Page 33

DAB TUNER OPERATIONS
ENGLISH
We recommend that you use DAB (Digital Audio
Broadcasting) tuner KT-DB1500 with your unit.
If you have another DAB tuner, consult your JVC
IN-CAR ENTERTAINMENT dealer.
• Refer also to the Instructions supplied with your
DAB tuner.
What is DAB system?
DAB is one of the digital radio broadcasting
systems available toda y . It can deliver CD quality
sound without any annoying interference and
signal distortion. Furthermore, it can carry text,
pictures and data.
In contrast to FM broadcast, where each
programme is transmitted on its own frequency ,
DAB combines several programmes (called
“services”) to form one “ensemble.”
With the DAB tuner connected with this unit,
you can enjoy these DAB services.
Preparation:
If the input level of the DAB tuner is not high enough,
increase the input level properly. (See “DAB VOL” on
page 36.)
Tuning in to an ensemble and
one of the services
A typical ensemble has 6 or more programmes
(services) broadcast at the same time. After tuning
into an ensemble, you can select a service you
want to listen to.
Before you start....
Press DAB (FM AM) briefly if CD, CD changer or
external component is the current source.
1
Select the DAB tuner.
Each time you press and
hold the button, the DAB
tuner and the FM AM tuner
are alternately selected.
FM/AMDAB
2
Select the DAB band (DAB1, DAB2,
or DAB3).
Each time you press the
button, the DAB band
changes as follows:
DAB1 DAB2 DAB3
(D1) (D2) (D3)
Note:
This receiver has three D AB bands (D AB1, DAB2,
DAB3). You can use any of them to tune in to an
ensemble.
CONTINUED ON THE NEXT PAGE
33
Page 34

3
Ensemble name
Service name
Channel number
Frequency
Start searching an ensemble.
Press ¢ to search
ensembles of higher
ENGLISH
When an ensemble is received, searching
stops.
To stop searching before an ensemble is
received, press the same button you have
pressed for searching.
4
Select a service you want to listen to.
frequencies.
Press 4 to search
ensembles of lower
frequencies.
Press 5 (up) to select the
next service.
Press ∞ (down) to select
the previous service.
To change the display information while
tuning into an ensemble
Normally service name is shown on the display.
If you want to change the display information,
press DISP (display).
Each time you press the button, the
following information appears on the
display for a while.
To tune into a particular ensemble without
searching:
1 Press and hold DAB (FM AM) to select DAB
tuner as the source.
2 Press DAB (FM AM) repeatedly to select the
DAB band (DAB1, DAB2 or DAB3).
3 Press and hold ¢ or 4 for more
than 1 second.
4 Press ¢ or 4 repeatedly until the
ensemble you want is reached.
• If you hold down the button, the frequency
keeps changing until you release the button.
34
To restore the FM AM tuner
Press and hold DAB (FM AM) again.
Page 35

Storing DAB services in
memory
You can preset up to 6 DAB services in each
DAB band (DAB1, DAB2 and DAB3) manually.
1
Select the DAB tuner.
Each time you press and
hold the button, the DAB
tuner and the FM AM tuner
are alternately selected.
FM/AMDAB
2
Select the DAB band (DAB1, DAB2
or DAB3) you want.
Each time you press the
button, the DAB band
changes as follows:
DAB1 DAB2 DAB3
(D1) (D2) (D3)
3
Tune in to an ensemble you want.
4
Select a service of the ensemble you
want.
5
Press and hold the number button
(in this example, 1) you want to
store the selected service into for
more than 2 seconds.
Selected band/preset number
and “MEMO” (memory) appear
alternately for a while.
6
Repeat the above procedure to store
other DAB services into other preset
numbers.
Notes:
• A previously pr eset DAB service is erased when a ne w
DAB service is stored in the same preset number.
• Preset DAB services ar e erased when the power supply
to the memory circuit is interrupted (for example,
during battery replacement). If this occurs, pr eset the
DAB services again.
ENGLISH
Press 5 (up) to select the next
service.
Press ∞ (down) to select the
previous service.
35
Page 36

Tuning in to a preset DAB
service
You can easily tune in to a preset DAB service.
Remember that you must store services first. If
ENGLISH
you have not stored them yet, see page 35.
1
Select the DAB tuner.
2
Select the DAB band (DAB1, DAB2
Each time you press and
hold the button, the DAB
tuner and the FM AM tuner
are alternately selected.
FM/AMDAB
or DAB3) you want.
Each time you press the
button, the DAB band
changes as follows:
DAB1 DAB2 DAB3
(D1) (D2) (D3)
3
Select the number (1 – 6) for the
preset DAB service you want.
What you can do more with DAB
Tracing the same program automatically
(Alternative Reception)
You can keep listening to the same program.
• While receiving a DAB service:
When driving in an area where a service
cannot be received, this unit automatically
tunes in another ensemble or FM RDS station,
broadcasting the same program.
• While receiving an FM RDS station:
When driving in an area where a DAB service is
broadcasting the same program as the FM RDS
station is broadcasting, this unit automatically
tunes in to the DAB service.
36
Note:
When reception switches between DAB and FM, the
listening volume level may increase or decrease
inconveniently. This change in the volume level results
from unequal audio injection levels at br oadcaster site ,
but not from the malfunction of this unit.
To prevent this, set the DAB tuner input level properly
(see below).
To adjust the DAB volume level
You can adjust the input level of DAB tuner and
store it in memory. By adjusting the input level
properly to match it to the FM sound level, you will
not need to adjust the volume lev el each time you
change the source.
When shipped from the factory, DAB volume
level is set at “00.”
• See also “Changing the general settings (PSM)”
on page 25.
1 Press and hold SEL (select) for more than 2
seconds so that one of the PSM items appears
on the display.
2 Press ¢ or 4 to select “DAB VOL
(volume)”.
3 Turn the control dial to set to the desired volume.
You can set it from “–12” to “12.”
4 Press SEL (select) to finish the setting.
To use Alternative Reception
When shipped from the factory, Alternative
Reception is activated.
See also “Changing the general setting (PSM)” on
page 25.
1 Press and hold SEL (select) for more than 2
seconds so that one of the PSM items appears
on the display.
2 Press ¢ or 4 to select “DAB AF”
(alternative frequency).
3 Turn the control dial to select the desired mode.
• AF ON: Traces the program among DAB
services and FM RDS stations
— Alternative Reception. The AF
indicator lights up on the display (see
page 12).
• AF OFF:Deactivates Alternative Reception
Note:
When Alternative Reception (for DAB services) is
activated, Network-Tracking Reception (for RDS
stations: see page 12) is also activated automatically.
On the other hand, Network-Tracking Rece ption
cannot be deactivated without deactivating
Alternative Reception.
4 Press SEL (select) to finish the setting.
Page 37

TROUBLESHOOTING
What appears to be trouble is not always serious. Check the following points before calling a service
center.
Symptoms
• Sound cannot be heard from
the speakers.
• SSM (Strong-station
Sequential Memory) automatic
preset does not work.
• Static noise while listening to
the radio.
• Sound is sometimes
interrupted.
• “NO DISC” appears on the
display.
• Disc cannot be played back.
• Disc cannot be ejected.
• CD-R/CD-RW cannot be
played back.
• Tracks on the CD-R/CD-RW
cannot be skipped.
• “RESET 1” – “RESET 7”
appears on the display.
Causes
The volume is turned to the
minimum level.
Connections are incorrect.
Signals are too weak.
The antenna is not connected
firmly.
You are driving on rough roads.
The disc is scratched.
Connections are incorrect.
No disc is inserted.
Disc is inserted upside down.
Contents on the disc are not
compatible with the unit
Disc is locked.
CD-R/CD-RW is not finalized.
Remedies
Adjust it to the optimum level.
Check the cords and
connections.
Store stations manually.
Connect the antenna firmly.
Stop disc playback while driving
on rough roads.
Change the disc.
Check the cords and
connections.
Insert a disc correctly.
Insert the disc correctly.
Change the disc.
Unlock the disc. (See page 21.)
Insert a finalized CD-R/CD-RW
or finalize the CD-R/CD-RW with
the component which you used
for recording.
Press the reset button of the CD
changer.
ENGLISH
• “RESET 8” appears on the
display.
• This unit does not work at all.
• The CD changer does not work
at all.
This unit is not connected to a
CD changer correctly.
The built-in microcomputer may
function incorrectly due to noise,
etc.
Connect this unit and the CD
changer correctly and press the
reset button of the CD changer.
Press the reset button on the
panel holder. (The clock setting
and preset stations stored in
memory are erased.)
(See page 2.)
37
Page 38

MAINTENANCE
Handling CDs
This unit has been designed to reproduce CDs,
CD-Rs and CD-RWs.
ENGLISH
• You can also play back CD Text.
• This unit is not compatible with MP3.
How to handle discs
When removing a disc from
its case, press down the
center holder of the case
and lift the disc out,
holding it by the edges.
• Always hold the disc by
the edges. Do not touch its recording surface.
When storing a disc into its case, gently insert
the disc around the center holder (with the
printed surface facing up).
• Make sure to store discs into the cases after
use.
To keep discs clean
A dirty disc may not play
correctly. If a disc does
become dirty, wipe it with a
soft cloth in a straight line
from center to edge.
Center holder
Moisture condensation
Moisture may condense on the lens inside the
unit in the following cases:
• After starting the heater in the car.
• If it becomes very humid inside the car.
Should this occur, the unit may malfunction. In
this case, eject the disc and leave the unit turned
on for a few hours until the moisture evaporates.
When playing a CD-R or CD-RW
You can play back your original CD-Rs or CD-RWs
recorded in audio CD format. However, they may
not be played back depending on their char acteristics
or recording conditions.
• User-edited CD-Rs (Recordable) and CD-RWs
(Rewritable) can be played back only if they are
already “finalized.”
• Before playing back CD-Rs or CD-RWs, read
their instructions or cautions carefully.
• Some CD-Rs or CD-RWs may not be played
back on this unit because of their disc
characteristics, damage or stain on them, or if
the player’s lens is dirty.
• CD-Rs or CD-RWs are susceptible to high
temperatures or high humidity; so do not leave
them inside your car.
• CD-RWs may require a longer readout time.
(This is caused by the fact that the reflectance
of CD-RWs is lower than for regular CDs.)
To play new discs
New discs may have some
rough spots around the
inner and outer edges. If
such a disc is used, this
unit may reject the disc.
To remove these rough
spots, rub the edges with a
pencil or ball-point pen, etc.
About mistracking:
Mistracking may result from driving on extremely
rough roads. This does not damage the unit and the
disc, but will be annoying.
We recommend that you stop disc playback while
driving on such rough roads.
38
CAUTIONS:
• Do not insert 8 cm discs (single CDs) into the
loading slot. (Such discs cannot be ejected.)
• Do not insert any disc of unusual shape—like a
heart or flower; otherwise, it will cause a
malfunction.
• Do not expose discs to direct sunlight or any
heat source or place them in a place subject to
high temperature and humidity. Do not leave
them in a car.
• Do not use any solvent (for example,
conventional record cleaner, spray, thinner,
benzine, etc.) to clean discs.
Page 39

SPECIFICATIONS
AUDIO AMPLIFIER SECTION
Maximum Power Output:
Front: 50 W per channel
Rear: 50 W per channel
Continuous Power Output (RMS):
Front: 19 W per channel into 4 Ω, 40 Hz
to 20 000 Hz at no more than
0.8% total harmonic distortion.
Rear: 19 W per channel into 4 Ω, 40 Hz
to 20 000 Hz at no more than
0.8% total harmonic distortion.
Load Impedance: 4 Ω (4 Ω to 8 Ω allowance)
Tone Control Range:
Bass: ±11 dB at 100 Hz
Treble: ±11 dB at 10 kHz
Frequency Response: 40 Hz to 20 000 Hz
Signal-to-Noise Ratio: 70 dB
Auxiliary Input jack: (3.5 mm dia. stereo mini
jack) (analog)
Line-Out Level/Impedance:
KD-SX992R: 4.0 V/20 kΩ load
KD-SX921R: 2.0 V/20 kΩ load
Output Impedance: 1 kΩ
TUNER SECTION
Frequency Range:
FM: 87.5 MHz to 108.0 MHz
AM: (MW) 531 kHz to 1 620 kHz
(LW) 144 kHz to 279 kHz
CD PLAYER SECTION
Type: Compact disc player
Signal Detection System: Non-contact optical
pickup (semiconductor laser)
Number of channels: 2 channels (stereo)
Frequency Response: 5 Hz to 20 000 Hz
Dynamic Range: 96 dB
Signal-to-Noise Ratio: 98 dB
Wow and Flutter: Less than measurable limit
GENERAL
Power Requirement:
Operating Voltage: DC 14.4 V
(11 V to 16 V allowance)
Grounding System: Negative ground
Allowable Operating Temperature: 0°C to +40°C
Dimensions (W × H × D):
Installation Size: 182 mm × 52 mm × 150 mm
Panel Size: 188 mm × 58 mm × 14 mm
Mass: 1.4 kg (excluding accessories)
Design and specifications subject to change without
notice.
ENGLISH
[FM Tuner]
Usable Sensitivity: 11.3 dBf (1.0 µV/75 Ω)
50 dB Quieting Sensitivity: 16.3 dBf (1.8 µV/75 Ω)
Alternate Channel Selectivity (400 kHz): 65 dB
Frequency Response: 40 Hz to 15 000 Hz
Stereo Separation: 30 dB
Capture Ratio: 1.5 dB
[AM Tuner]
Sensitivity: 20 µV
Selectivity: 35 dB
39
Page 40

Abbildung und Position der am Gerät befindlichen Aufkleber
Geräteunterseite
CAUTION: Invisible laser
radiation when open and
interlock failed or defeated.
AVOID DIRECT EXPOSURE
TO BEAM. (e )
Typenschild
DEUTSCH
Achtung:
Caution:
Die Klassifikation der Laserkomponente in
This product contains a laser component
diesem Gerät liegt über Laser-Klasse 1.
of higher laser class than Class 1.
Zurücksetzen des Geräts
Nachdem Sie die Bedienungsblende abgenommen haben, drücken Sie die Rücksetztaste. Verwenden
Sie hierzu einen Kugelschreiber oder einen ähnlichen Gegenstand.
Dadurch wird der eingebaute Mikro-Computer zurückgesetzt.
ADVARSEL: Usynlig la serstråling ved åbning, når
sikkerhedsafbrydere er ude
af funkti on. Undgåudsættelse for stråling. (d)
VARNING: Osynlig laser-
strålning när denna del
är öppnad och spärren
urkopplad. Betrakta ej
strålen. (s)
VARO : Avattaessa ja suojalukitus ohitettaessa olet
är
alttiina näkymättömälle
lasersäteilylle. Älä katso
säteeseen. (f)
WICHTIG FÜR LASER-GERÄTE
Vorsichtsmaßregeln:
1.LASER-PRODUKT DER KLASSE 1
2.ACHTUNG: Unsichtbare Laserstrahlung bei Öffnung und
fehlerhafter oder beschädigter Sperre. Direkten Kontakt
mit dem Strahl vermeiden!
3.ACHTUNG: Das Gehäuseoberteil nicht abnehmen. Das
Gerät enthält keinerlei Teile, die vom Benutzer gewartet
werden können. Überlassen Sie Wartungsarbeiten
qualifizierten Kundendienst-Fachleuten.
4. ACHTUNG: Der Compact Disc-Player arbeitet mit
unsichtbaren Laserstrahlen und ist mit
Sicherheitsschaltern ausgestattet, die die Aussendung
von Strahlen verhindern, wenn bei Öffnen des CD-Halters
die Sicherheitssperren gestört oder beschädigt sind. Es ist
gefährlich, die Sicherheitsschaltung zu deaktivieren.
5.ACHTUNG: Falls die Verwendung der Regler,
Einstellungen oder Handhabung von den hierin
gegebenen Anleitungen abweichen, kann es zu einer
gefährlichen Strahlenfreisetzung kommen.
Hinweis:
Ihre Voreinstellungen – wie Vorwahlkanäle oder Klangeinstellungen – werden ebenfalls gelöscht.
Hinweis:
Zu diesem Gerät wird eine Identifikationskarte mitgeliefert, auf der die Gerätechassis-Nummer vermerkt ist. Heben
Sie diese Karte getrennt vom Gerät auf. Im Falle eines Diebstahls kann sie die Geräteidentifizierung erleichtern.
VOR DEM GEBRAUCH
*
*
Für die Sicherheit....
• Die Lautstärke nicht zu laut stellen, da dadurch
Außengeräusche überdeckt und das Autofahren
gefährlich wird.
• Das Auto vor dem Durchführen von komplizierten
Bedienschritten anhalten.
2
Temperatur im Auto....
Wenn Sie das Auto für lange Zeit in heißem oder kaltem
Wetter parken, bitte warten, bis sich die Temperatur im
Auto sich normalisiert hat, bevor Sie das Gerät
einschalten.
Page 41

Wir danken Ihnen für den Kauf eines JVC Produkts. Bitte lesen Sie die Anleitung vollständig durch,
bevor Sie das Gerät in Betrieb nehmen, um sicherzustellen, daß Sie alles vollständig verstehen und
die bestmögliche Leistung des Geräts erhalten.
INHALT
Zurücksetzen des Geräts ......................... 2
Verwenden der Taste MODE .................... 3
ANORDNUNG DER TASTEN .............. 4
Schalttafel ................................................ 4
Vorbereiten de Fernbedienung.................. 5
Fernbedieneinheit.................................... 6
GRUNDBEDIENUNGEN ................... 7
Einschalten der Stromversorgung ............ 7
RADIO-BETRIEB ........................... 8
Radiohören .............................................. 8
Speichern der Sender............................... 10
Anwahl eines vorabgestimmten Senders ... 11
RDS-BETRIEB ............................. 12
Betriebsmöglichkeiten mit der
Funktion RDS........................................ 12
Weitere praktische RDS-Funktionen und
-Einstellungsmöglichkeiten .................... 16
CD-BETRIEB ............................... 19
Abspielen einer CD.................................. 19
Finden eines Titels oder eines bestimmten
Abschnittes auf einer CD ....................... 20
Wählen der CD-Abspielbetriebsarten....... 20
Unterdrücken des CD-Auswurfs............... 21
Wiedergeben einer CD mit CD-Text ......... 21
KLANGEINSTELLUNG..................... 22
Klang-Einstellschritte ................................ 22
Auswählen der vorprogrammierten
Klangmodi (CEQ: Custom Equalizer) ..... 23
Speichern Ihrer eigenen
Klangeinstellungen................................. 24
ANDERE WICHTIGE FUNKTIONEN ...... 25
Stellen der Uhr......................................... 25
Ändern der allgemeinen Einstellungen
(PSM) .................................................... 25
Abnehmen der Schalttafel ........................ 29
CD-WECHSLERBETRIEB ................. 30
Abspielen der CDs................................... 30
Wählen der CD-Abspielbetriebsarten....... 31
BETRIEB EINER EXTERNEN
KOMPONENTE............................. 32
Wiedergabe von externen
Komponenten........................................ 32
BETRIEB DES DAB-TUNERS .............. 33
Einstellen eines Ensembles und eines
Dienstes ................................................ 33
Sichern von DAB-Diensten im Speicher.... 35
Einstellen eines gespeicherten
DAB-Dienstes ....................................... 36
Welche weiteren Möglichkeiten
bietet DAB? ........................................... 36
FEHLERSUCHE ............................ 37
WARTUNG ................................. 38
Handhaben der CDs................................. 38
TECHNISCHE DATEN...................... 39
DEUTSCH
Verwenden der Taste MODE:
Wenn die Taste MODE gedrückt wird, geht das Gerät in den Funktionsbetrieb und die Zifferntasten
dienen als verschiedene Funktionstasten.
Nach dem Drücken der Taste MODE etwa 5 Sekunden ohne Verwenden der Zifferntaste warten,
bis der Funktionsbetrieb wieder gelöscht ist und die Tasten können wieder als Zifferntasten
verwendet werden.
• Die Taste MODE nochmals drücken und der Funktionsbetrieb wird ebenfalls gelöscht.
ACHTUNG beim Einstellen der Lautstärke
CDs produzieren sehr w enig Geräusche im Vergleich zu anderen Signalquellen. W enn zum Beispiel die Lautstärk e
für den Tuner eingestellt wurde, können die Lautsprecher durch den plötzlichen Anstieg des Ausgangssignals
beschädigt werden. Verringern Sie daher die Lautstärke, bevor Sie eine CD abspielen, und justieren Sie die
Lautstärke dann während des Abspielens je nach Bedarf nach.
3
Page 42

Schalttafel
DEUTSCH
ANORDNUNG DER TASTEN
Displayfenster
s
f
jk
hg
l
/
d
z
x
1
24
37
9
p
1 Tasten 4 /¢
2 Taste 5 (Nach-oben)
3 Taste ∞ (Nach-unten)
4 Fernbediensensor
5 Displayfenster
6 Taste 0 (Auswerfen)
7 Taste FM AM
8 Taste CD CD-CH (AUX)
9 Taste (Bereitschaft/Netz/Dämpfer)
p Taste (Freigabe der Bedienungsblende)
q Taste SEL (Auswahl)
w Steuerregler
e Taste EQ (equalizer)
r Taste MO (Monophon)
t Taste RPT (Wiederholung)
y Taste RND (Zufall)
u Zifferntasten
i Taste MODE
• Dient auch als Tasten SSM, wenn sie zusammen
mit DISP (Display) gedrückt wird.
o Taste DISP (Display)
• Dient auch als Tasten SSM, wenn sie zusammen
mit MODE gedrückt wird.
q
w
56
e
8
t yr
; Taste TP PTY (Verkehrsinformationen/
Sendungstypen)
a Eingang AUX (Auxiliary)
i o ;
u
a
Displayfenster
s Hauptdisplay
d Anzeige des Lautstärkepegels (oder audio)
Anzeige der Entzerrungscharakteristik
f Anzeigen des Tunerempfangsmodus
MO (Monophon), ST (Stereo)
g Anzeige C-EQ (Custom Equalizer)
h Anzeige RND (Zufall)
j Anzeige RPT (Wiederholung)
k Anzeige LOUD (Lautstärkekontur)
l Anzeigen des Klangmodus
ROCK, CLASSIC, POPS, HIP HOP, JAZZ,
USER.
/ Anzeige Signalquelle/Uhrzeit
z Anzeigen RDS
AF, REG, TP, PTY
x Anzeige für eingelegte CDs
4
Page 43

Vorbereiten de Fernbedienung
Dieses Kapitel betrifft ausschliesslich Modell
KD-SX992R.
Das Modell KD-SX921R kann mit einer
zusätzlich erhältlichen Fernbedienung gesteuert
werden. Es wird empfohlen, für dieses Gerät die
Fernbedienung RM-RK50 zu verwenden.
Vor dem Gebrauch der Fernbedieneinheit:
• Die Fernbedieneinheit direkt auf den
Fernbediensensor am Gerät ausrichten.
Sicherstellen, daß keine störenden
Gegenstände den Fernbediensignalpfad
behindern können.
2. Legen Sie die Batterie ein.
Drücken Sie die Batterie so in den Halter, daß die
Seite mit dem eingeprägten Pluszeichen nach
oben weist und die Batterie fest in der Vertiefung
sitzt.
LithiumFlachbatterie
(Produktnummer:
CR2025)
3. Setzen Sie den Batteriehalter wieder ein.
Setzen Sie den Batteriehalter wieder ein, indem
Sie ihn in die Fernbedienung drücken, bis Sie ein
Klickgeräusch hören.
DEUTSCH
Fernbediensensor
• Den Fernbediensensor niemals einer starken
Lichtquelle aussetzen (z.B. Sonnenlicht oder
starke Lampe usw.).
Einlegen der Batterie
Wechseln Sie die Batterie, wenn der
Wirkungsbereich oder die Wirksamkeit der
Fernbedienung abnimmt.
1. Nehmen Sie den Batteriehalter heraus.
1) Schieben Sie den Halter in der
dargestellten Pfeilrichtung heraus, und
verwenden Sie hierzu einen
Kugelschreiber oder eine ähnliche
Vorrichtung.
2) Nehmen Sie den Batteriehalter heraus.
(rückseite)
(rückseite)
WARNUNG:
• Lagern Sie Batterie an einem Ort, zu dem Kinder
keinen Zugang haben.
Wenn ein Kind die Batterie verschluckt, konsultieren
Sie sofort einen Arzt.
• Laden Sie Batterie nicht auf, schließen Sie sie nicht
kurz, bauen Sie sie nicht auseinander, erhitzen Sie sie
nicht, und halten Sie sie auch nicht in eine offene Flamme.
Sollten Sie sich nicht an diese Vorschriften halten,
können die Batterie Wärme abgeben, können sich
Risse in den Batterie bilden, oder können sie ein
Feuer entzünden.
• Bringen Sie die Batterie nicht mit anderen Metallen
in Berührung.
Wenn Sie sich nicht an diese Vorschriften halten,
können Batterie Wärme abgeben, können sich Risse
in den Batterie bilden, oder können sie ein Feuer
entzünden.
• Wenn Sie Batterie wegwerfen oder aufbewahren,
wickeln Sie sie in Folie ein, und isolieren Sie sie.
Wenn Sie sich nicht an diese Vorschriften halten,
können Batterie Wärme abgeben, können sich Risse
in den Batterie bilden, oder können sie ein Feuer
entzünden.
• Stecken Sie nicht mit einem Metallstift oder
ähnlichem Werkzeug in die Batterie.
Wenn Sie sich nicht an diese Vorschriften halten,
können Batterie Wärme abgeben, können sich Risse
in den Batterie bilden, oder können sie ein Feuer
entzünden.
ACHTUNG:
Legen Sie die Fernbedienung nicht an Orten ab (z.
B. auf einem Armaturenbrett), die über einen
längeren Zeitraum direkter Sonneneinstrahlung
ausgesetzt sind. Anderenfalls kann das Gerät
beschädigt werden.
5
Page 44

Fernbedieneinheit
Dieses Kapitel betrifft ausschliesslich Modell
KD-SX992R.
Das Modell KD-SX921R kann mit einer zusätzlich
erhältlichen Fernbedienung gesteuert werden. Es
wird empfohlen, für dieses Gerät die
Fernbedienung RM-RK50 zu verwenden.
DEUTSCH
1
2
3
4
1 • Wenn diese Taste bei ausgeschaltetem
Gerät gedrückt wird, wird das Gerät
eingeschaltet.
• Das Gerät wird ausgeschaltet, wenn diese
Taste gedrückt gehalten wird, bis
„SEE YOU“ im Display erscheint.
• Die Lautstärke wird sofort abgesenkt, wenn
die Taste kurz gedrückt wird.
Drücken Sie diese Taste er neut, um die
Lautstärke wiederherzustellen.
2 • Wählt das Frequenzband aus, während Sie
Radiosendungen hören (oder der
DAB-Tuner eingestellt ist).
Mit jedem Antippen der Taste wechselt der
Empfangsbereich.
• Wechselt zur nächsten CD, während gerade
eine CD mit dem CD-Wechsler
wiedergegeben wird.
Mit jedem Antippen der Taste wechselt die
CD-Nummer in zunehmender Folge und die
6
Wiedergabe startet für die aufgerufene CD.
RM–RK50
ATT
U
SOURCE
R
D
VOL
SOUND
5
6
F
7
VOL
3 • Wählt der vorabgestimmten Senders,
während Sie Radiosendungen hören (oder
der DAB-Tuner eingestellt ist).
Wenn Sie diese Taste mehrfach
hintereinander drücken, wird die jeweilige
nächsthöhere Speicherplatznummer (oder
Dienstenummer) ausgewählt, und der
entsprechende Sender (oder Dienst) wird
eingestellt.
• Wechselt zur vorherigen CD, wenn gerade
eine CD mit dem CD-Wechsler
wiedergegeben wird.
Mit jedem Antippen der Taste wechselt die
CD-Nummer in abnehmender Folge und die
Wiedergabe startet für die aufgerufene CD.
4 Diese Taste hat dieselbe Funktion wie der
Steuerregler am Hauptgerät.
HINWEIS:
5 Wählt den Klangmodus (C-EQ) aus.
Wenn Sie die Taste mehrfach hintereinander
drücken, ändert sich der Klangmodus (C-EQ).
6 Dient der Signalquellenwahl.
Mit jedem Antippen der Taste wechselt die
Signalquelle.
7 • Arbeitet bei Radioempfang als
• Wählt bei aktiviertem DAB-Tuner Dienste
• Sucht bei aktiviertem DAB-Tuner
• Arbeitet bei CD-Wechsler-Wiedergabe als
• Arbeitet bei CD-Wechsler-Wiedergabe als
Die Taste arbeitet nicht für
Einstellungen im
Präferenzinstellungsmodus.
Sendersuchlauftaste.
aus, wenn Sie die Taste kurz drücken.
Ensembles, wenn Sie die Taste länger als 1
Sekunde drücken.
Suchlauftaste vorwärts oder rückwärts,
solange die Taste gedrückt gehalten wird.
Titelsprungaste vorwärts (nächster Titel)
order rückwärts (vorliegender order
vorheriger Titel), wenn die Taste kurz
gedrückt wird.
Page 45

GRUNDBEDIENUNGEN
12
3
Einschalten der Stromversorgung
1
Das Gerät einschalten.
„HELLO“ wird im Display angezeigt.
Hinweis zum Ein-Tastendruck-Betrieb:
Wenn Sie die Programmquelle Tuner in Schritt 2
unten wählen, wird das Gerät automatisch
eingeschaltet. Sie brauchen dafür nicht
zu drücken.
2
Die Programmquelle abspielen.
Wenn Sie den Tuner als Signalquelle
auswählen möchten, drücken Sie
wiederholt FM AM.
FM1 FM2
AM
Wenn Sie den CD-Spieler, CD-Wechsler
(oder „LINE IN“*) als Signalquelle
auswählen möchten, drücken Sie
wiederholt CD CD-CH (AUX).
CD-CH
(oder LINE IN)*
* Wenn „LINE IN“ nicht im Display angezeigt
wird (siehe Seite 28), aktivieren Sie unter
„EXT IN“ die Einstellung „LINE IN“.
Wenn Sie „AUX IN“ (die an die Buchse
AUX IN angeschlossene Komponente) als
Signalquelle auswählen möchten, halten
Sie CD CD-CH (AUX) gedrückt.
FM3
CD
3
Die Lautstärke einstellen.
So erhöhen Sie die
Lautstärke.
So verringern Sie die
Lautstärke.
Anzeige des Lautstärkepegels
Der Lautstärkepegel
wird angezeigt
4
Den Klang wie gewünscht einstellen.
oder audio
(siehe Seite 27)
(Siehe Seiten 22 – 24).
Für ein sofortiges Absenken der Lautstärke
Kurz beim Hören einer beliebigen
Programmquelle drücken. „ATT“ blinkt auf der
Anzeige und die Lautstärke fällt sofort ab.
Zur Wiederherstellung der vorherigen
Lautstärkepegel die Taste nochmals kurz drücken.
• Wenn Sie den Steuerregler drehen, können Sie
die Lautstärke auch wiederherstellen.
So schalten Sie die Stromversorgung aus
Drücken Sie die Taste länger als eine
Sekunde.
„SEE YOU“ wird angezeigt, und anschließend
schaltet sich das Gerät aus.
• Wenn Sie die Stromversorgung
ausschalten, während Sie eine CD hören,
wird die CD beim nächsten Einschalten an
derselben Stelle wiedergeben, an der Sie die
Stromversorgung ausgeschaltet haben.
Hinweis:
Wenn Sie das Gerät erstmals verwenden, stellen Sie
bitte die eingebaute Uhr korrekt ein, siehe Seite 25.
DEUTSCH
7
Page 46

RADIO-BETRIEB
DEUTSCH
Radiohören
Um einen Sender einzustellen, können Sie
entweder den automatischen Suchlauf
verwenden, oder Sie können den Sender
manuell einstellen.
2
Beginnen Sie mit der Suche nach
einem Sender.
Drücken Sie ¢ , um
Suchen von Sendern mit
höherer Frequenz.
Automatisches Suchen eines Senders:
Automatischer Suchlauf
1
Wählen Sie das Band (FM1 – 3, AM).
FM1 FM2 FM3 AM
(F1) (F2) (F3)
Das gewählte Frequenzband wird
angezeigt (anschließend wird
wieder die Uhrzeit angezeigt, sofern
unter „CLOCK“ die Einstellung „ON“
ausgewählt wurde).
Hinweis:
Dieser Receiver verfügt über drei UKWFrequenzbänder (FM1, FM2, FM3). Sie können
ein beliebiges Frequenzband wählen, um sich
eine UKW-Sendung anzuhören.
Drücken Sie 4 , um
Suchen von Sendern mit
niedrigerer Frequenz.
Wenn ein Sender empfangen wird, Stoppt
die Suche.
Zum Anhalten der Suche bevor ein Sender
empfangen wird, die gleiche Taste, die Sie für
die Suche gedrückt haben, nochmals drücken.
8
Page 47

Manuelles Suchen eines Senders:
Manueller Suchlauf
1
Wählen Sie das Band (FM1 – 3, AM).
• Wenn Sie die Taste loslassen, wird der
manuelle Betrieb automatisch nach 5
Sekunden deaktiviert.
• Wenn Sie die Taste gedrückt halten, ändert
sich die Frequenz (in 50 kHz Intervallen
bei UKW- und 9 kHz Intervallen bei AM –
MW-/LW-), bis Sie die Taste freigeben.
FM1 FM2 FM3 AM
(F1) (F2) (F3)
Hinweis:
Dieser Receiver verfügt über drei UKWFrequenzbänder (FM1, FM2, FM3). Sie können
ein beliebiges Frequenzband wählen, um sich
eine UKW-Sendung anzuhören.
2
Drücken Sie die Taste ¢ oder
, und halten Sie sie gedrückt,
4
bis „MANU (manuell)“ im Display zu
blinken beginnt.
Das gewählte Frequenzband wird angezeigt.
Schlechter Empfang einer UKWStereosendung:
1 Die Taste MODE drücken, um bei
laufender UKW-Stereosendung in
den Funktionsbetrieb zu gelangen.
„MODE“ wird im unteren Bereich
des Displays angezeigt, und die
Zifferntasten arbeiten als
Funktionstasten.
2 Drücken Sie MO (Monophon),
solange „MODE“ im Display
angezeigt wird, so dass die
Anzeige MO im Display erscheint.
Wenn Sie MO (Monophon)
mehrfach hintereinander drücken,
schaltet die Anzeige MO
abwechselnd ein und aus.
Leuchtet auf, wenn eine UKW-Sendung in Stereo
empfangen wird.
DEUTSCH
3
Stellen Sie den gewünschten Sender
ein, während „MANU“ blinkt.
Drücken Sie ¢ ,
um Sender
einzustellen, die auf
höheren Frequenzen
senden.
Drücken Sie 4 ,
um Sender
einzustellen, die auf
niedrigeren
Frequenzen senden.
Wenn die Anzeige MO im Display leuchtet,
erfolgt die Wiedergabe Monophon. Allerdings
verbessert sich dadurch der Empfang (die
Anzeige ST schaltet sich aus).
9
Page 48

Speichern der Sender
Sie können Rundfunksender auf zwei Arten
abspeichern.
• Automatisches Vorabstimmen der UKW-Sender:
SSM (Strong-station Sequential Memory =
Sequentialspeicher für starke Sender)
• Manuelles Vorabstimmen für UKW- und
MW-/LW-Sender
Automatische UKW-Vorabstimmung:
DEUTSCH
SSM
Sie können 6 lokale UKW-Sender pro UKWEmpfangsbereich (FM1, FM2 und FM3)
vorabstimmen.
1
Die gewünschte Empfangsbereichzahl
(FM1 – 3), in der UKW -Sender
gespeichert werden sollen, wählen.
Wenn Sie diese Taste
mehrfach hintereinander
drücken, ändert sich das
Band wie folgt:
Manuelles Vorabstimmen
Sie können bis zu 6 Sender pro Empfangsbereich
(FM1, FM2, FM3 und AM) von Hand vorabstimmen.
Beispiel: Speichern des UKW-Senders 88,3
1
2
MHz auf der numerischen Taste 1 des
FM1-Empfangsbereichs
Die gewünschte Empfangsbereichzahl
(FM1 – 3, AM), in der Sender
gespeichert werden sollen, wählen (in
diesem Beispiel FM1).
Wenn Sie diese Taste
mehrfach hintereinander
drücken, ändert sich das
Band wie folgt:
FM1 FM2 FM3 AM
(F1)
Auf den Sender (in diesem Beispiel
88,3 MHz abstimmen).
FM1 FM2 FM3 AM
(F1) (F2) (F3)
2
Drücken Sie beiden Tasten, und
halten Sie sie länger als 2 Sekunden
gedrückt.
„SSM“ erscheint und erlischt bei Abschluß der
automatischen Vorabstimmung wieder.
Die lokalen UKW-Sender mit den stärksten
Signalen werden gesucht und automatisch in der
Empfangsbereichszahl (FM1, FM2 oder FM3),
die Sie gewählt haben, gespeichert. Diese
vorabgestimmten Sender werden auf den
Nummerntasten abgespeichert — Nr. 1
(niedrigste Frequenz) bis Nr. 6 (höchste
Frequenz). Wenn die automatische
Vorabstimmung abgeschlossen ist, wird der
Sender der Taste 1 automatisch angewählt.
10
Drücken Sie ¢ , um
Sender einzustellen, die
auf höheren Frequenzen
senden.
Drücken Sie 4 , um
Sender einzustellen, die
auf niedrigeren
Frequenzen senden.
Page 49

3
Drücken Sie die Ziffertaste (in
diesem Beispiel 1), und halten Sie
sie länger als 2 Sekunden gedrückt.
Anwahl eines
vorabgestimmten Senders
Sie können einfach einen vorabgestimmten Sender
aufrufen.
Bedenken Sie, daß Sie zuerst Sender speichern
müssen. Wenn Sie das noch nicht getan haben,
siehe „Speichern der Sender“ auf Seiten 10 und
11.
Das ausgewählte Frequenzband
bzw. die ausgewählte
Speicherplatznummer und
„MEMO“ (Memory = Speicher)
wird im abwechselnd einen
Augenblick lang.
4
Das obige Verfahren zum Speichern
der anderen Sender auf andere
numerische T asten wiederholen.
Hinweise:
• Ein vorheriger vorabgestimmter Sender wird
gelöscht, wenn ein neuer Sender auf der gleichen
numerischen Taste abgespeichert wird.
• Vorabgestimmte Sender werden gelöscht, wenn die
Stromversorgung des Speicherstromkreises
unterbrochen wird (z.B. beim Wechseln der
Batterie). In diesem Fall die Sender nochmals
vorabstimmen.
1
Wählen Sie das Band (FM1 – 3, AM).
FM1 FM2 FM3 AM
(F1) (F2) (F3)
2
Die gewünschte Nummer (1 – 6) für
den vorabgestimmten Sender
wählen.
DEUTSCH
11
Page 50

RDS-BETRIEB
Betriebsmöglichkeiten mit der
Funktion RDS
Das Radiodatensystem (RDS) ermöglicht es
UKW-Sendern, zusammen mit den regulären
Sendesignalen ein zusätzliches Signal zu
übertragen. Beispielsweise können Sender ihren
Sendernamen sowie Informationen über die
aktuelle Sendung übermitteln, wie z. B. Sport
oder Musik etc.
Eine weitere Eigenschaft des RDS-Systems heißt
DEUTSCH
„Enhanced Other Networks“. Wenn Sie die
Enhanced Other Networks-Daten verwenden, die
von einem Sender übertragen werden, können
Sie einen anderen Sender eines anderen Netzes
einstellen, der Ihr Lieblingsprogramm oder
Verkehrsnachrichten überträgt, während Sie eine
andere Sendung hören oder eine andere
Signalquelle wiedergeben, wie beispielsweise
eine CD.
Wenn das Gerät RDS-Daten empfängt, sind
folgende Funktionen möglich:
• Automatisches Verfolgen derselben Sendung
(Empfang mit Sendernetzerfassung)
• Es kann auf Bereitschaftsempfang von
Verkehrsnachrichten (TA: Verkehrsnachrichten)
oder Ihrer Lieblingssendung geschaltet werden
• Ein Sendungstyp (PTY: Sendungstyp) kann
gesucht werden
• Sendungssuchlauf
• Einige weitere Funktionen sind möglich
Automatisches Verfolgen derselben
Sendung (Empfang mit
Sendernetzerfassung)
Wenn Sie in einem Bereich fahren, in dem der
UKW-Empfang schlecht ist, stellt der Tuner, der
in dieses Gerät integriert ist, automatisch einen
anderen RDS-Sender ein, der dieselbe Sendung
mit stärkeren Signalen ausstrahlt. So können Sie
dieselbe Sendung auf der gesamten Fahrtstrecke
mit bestem Empfang hören. (Sehen Sie sich die
Abbildung auf der nächsten Seite an).
Es werden zwei Arten von RDS-Daten
verwendet, damit der Empfang mit
Sendernetzerfassung richtig funktioniert: PI
(Sendungskenndaten) und AF
(Alternativfrequenzdaten).
Wenn diese Daten vom eingestellten RDSSender nicht richtig empfangen werden, ist ein
Empfang mit Sendernetzerfassung nicht möglich.
12
Wenn Sie den Empfang mit
Sendernetzerfassung verwenden wollen
Sie können die verschiedenen Modi des
Alternativfrequenzempfangs auswählen, um
weiterhin dasselbe Programm unter besten.
Empfangsbedingungen zu hören.
Werkseitig ist die Einstellung „AF“ aktiviert.
• AF: Die Sendernetzerfassung ist bei
aktivierter Regionalisierung
„ausgeschaltet“.
Wenn die Eingangssignale des
zurzeit eingestellten Senders zu
schwach werden, wechselt bei
dieser Einstellung das Gerät
innerhalb desselben Netzes von
diesem Sender zu einem anderen.
(In dieser Betriebsart kann die
Sendung von der aktuell
empfangenen Sendung abweichen).
Die Anzeige AF schaltet sich ein,
nicht jedoch die Anzeige REG.
• AF REG: Die Sendernetzerfassung ist bei
aktivierter Regionalisierung
„eingeschaltet“.
Wenn die Eingangssignale des
zurzeit eingestellten Senders zu
schwach werden, wechselt bei
dieser Einstellung das Gerät
innerhalb desselben Netzes von
diesem Sender zu einem anderen,
der dasselbe Programm ausstrahlt.
Sowohl die Anzeige AF als auch die
Anzeige REG schalten sich ein.
• OFF: Die Sendernetzerfassung ist
deaktiviert.
Weder die Anzeige AF noch die
Anzeige REG schaltet sich ein.
Anzeige AF Anzeige REG
Hinweis:
Wenn ein DAB-Tuner angeschlossen ist und der
Empfang von Alternativfrequenzen (für DAB-Dienste)
aktiviert ist, wird der Empfang mit
Sendernetzverfassung ebenfalls automatisch aktiviert.
Andererseits kann der Empfang mit
Sendernetzverfassung nicht deaktiviert werden, ohne
den Empfang von Alternativfrequenzen zu
deaktivieren. (Siehe Seite 36).
Page 51

1
Drücken Sie die Taste SEL
(Auswahl), und halten Sie sie länger
als 2 Sekunden gedrückt, bis eine
der PSM-Elemente im Display
angezeigt wird. (Informationen über
PSM siehe Seite 26).
Verwenden des TA-Bereitschaftsempfang
Mit Hilfe des TA-Bereitschaftsempfang können
Sie das Gerät vorübergehend von der aktuellen
Signalquelle (anderer UKW-Sender, CD oder
sonstige angeschlossene Komponente) auf
Verkehrsnachrichten (TA) umschalten.
• Der TA-Bereitschaftsempfang funktioniert nicht,
wenn Sie einen MW-/LW-Sender empfangen.
2
Wählen Sie „AF-REG“
(Alternativfrequenz-/
Regionalempfang) sofern nicht
bereits im Display angezeigt wird.
3
Wählen Sie den gewünschten Modus
– „AF“, „AF REG“ oder „OFF“.
4
Beenden Sie die Einstellung.
Dieselbe Sendung kann auf verschiedenen
Frequenzen empfangen werden.
Sendung 1 wird
auf Frequenz A
ausgestrahlt.
Sendung 1 wird
auf Frequenz B
ausgestrahlt.
Sendung 1 wird
auf Frequenz C
ausgestrahlt.
Sendung 1 wird
auf Frequenz E
ausgestrahlt.
Sendung 1 wird
auf Frequenz D
ausgestrahlt.
DEUTSCH
7 Wenn FM als aktuelle Signalquelle
ausgewählt ist, leuchtet die Anzeige
TP entweder kontinuierlich oder blinkt.
• Wenn die Anzeige TP leuchtet, ist der
TA-Bereitschaftsempfang aktiviert.
Wenn ein Sender eine Verkehrsdurchsage
überträgt, wird „TRAFFIC“ im Display
angezeigt, und das Gerät stellt den Sender
automatisch ein. Die Lautstärke wird auf den
voreingestellten TA-Lautstärkepegel
eingestellt (siehe Seite 17), und die
Verkehrsdurchsage wird wiedergegeben.
• Wenn die Anzeige TP blinkt, ist der
TA-Bereitschaftsempfang noch nicht
aktiviert, da der empfangene Sender keine
Signale überträgt, die für den TABereitschaftsempfang verwendet werden.
Um den TA-Bereitschaftsempfang zu
aktivieren, müssen Sie einen anderen
Sender einstellen, der diese Signale
überträgt. Drücken Sie ¢ oder 4 ,
um einen solchen Sender zu suchen.
Wenn ein Sender eingestellt ist, der diese
Signale bereitstellt, blinkt die Anzeige TP
nicht mehr, sondern leuchtet kontinuierlich.
Jetzt ist der TA-Bereitschaftsempfang
aktiviert.
7 Wenn zurzeit eine andere Signalquelle als
FM ausgewählt ist, leuchtet die Anzeige TP.
Wenn ein Sender eine Verkehrsdurchsage
überträgt, wird „TRAFFIC“ im Display angezeigt,
und das Gerät wechselt automatisch die
Signalquelle und stellt den Sender ein.
Wenn Sie den TA-Bereitschaftsempfang
deaktivieren möchten, drücken Sie die Taste
TP PTY erneut.
13
Page 52

Verwenden des PTY-Bereitschaftsempfang
Mit Hilfe des PTY-Bereitschaftsempfang können
Sie das Gerät vorübergehend von der aktuellen
Signalquelle (anderer UKW-Sender, CD oder
sonstige angeschlossene Komponente) auf
Lieblingssendung (PTY: Sendungstyp)
umschalten.
• Der PTY-Bereitschaftsempfang funktioniert nicht,
wenn Sie einen MW-/LW-Sender empfangen.
DEUTSCH
So wählen Sie Ihr Lieblingsprogramm für
den PTY-Bereitschaftsempfang aus
Sie können Ihr Lieblingsprogramm für den PTYBereitschaftsempfang auswählen.
Werksseitig ist der PTY-Bereitschaftsempfang
deaktiviert. („OFF“ ist für den PTYBereitschaftsempfang ausgewählt).
1
Drücken Sie die Taste SEL (A us wahl),
und halten Sie sie länger als 2
Sekunden gedrückt, bis eine der
PSM-Elemente im Display angezeigt
wird. (Informationen über PSM siehe
Seite 26).
2
Wählen Sie „PTY STBY
(PTY-Bereitschaftsbetrieb)“, sofern
nicht bereits im Display angezeigt
wird.
3
Wählen Sie einen der neunundzwanzig
PTY-Codes. (Siehe Seite 18).
Der gewählte Codename
wird im Display angezeigt
und im Speicher
gesichert.
• Wählen Sie „OFF“ aus,
um den PTYBereitschaftsempfang
14
zu deaktivieren.
4
Beenden Sie die Einstellung.
7 Wenn FM als aktuelle Signalquelle
ausgewählt ist, leuchtet die Anzeige PTY
entweder kontinuierlich oder blinkt.
• Wenn die Anzeige PTY leuchtet, ist der
PTY-Bereitschaftsempfang aktiviert.
Wenn ein Sender das ausgewählte
PTY-Programm überträgt, stellt das
Gerät den Sender automatisch ein.
• Wenn die Anzeige PTY blinkt, ist der
PTY-Bereitschaftsempfang noch nicht
aktiviert, da der empfangene Sender
keine Signale überträgt, die für den
PTY-Bereitschaftsempfang verwendet
werden.
Um den PTY-Bereitschaftsempfang zu
aktivieren, müssen Sie einen anderen
Sender einstellen, der diese Signale
überträgt. Drücken Sie ¢ oder
4 , um einen solchen Sender zu
suchen.
Wenn ein Sender eingestellt ist, der
diese Signale bereitstellt, blinkt die
Anzeige PTY nicht mehr, sondern
leuchtet kontinuierlich. Jetzt ist der PTYBereitschaftsempfang aktiviert.
7 Wenn zurzeit eine andere Signalquelle
als FM ausgewählt ist, leuchtet die
Anzeige PTY.
Wenn ein Sender das ausgewählte PTYProgramm überträgt, wechselt das Gerät
automatisch die Signalquelle und stellt den
Sender ein.
Wenn Sie den PTY-Bereitschaftsmodus
deaktivieren möchten, wählen Sie in der linken
Spalte in Schritt 3 die Einstellung „OFF“ aus. Die
Anzeige PTY erlischt.
Page 53

Suchen Ihrer Lieblingssendung
Sie können einen beliebigen PTY-Code suchen.
Darüber hinaus können Sie unter den
Zifferntasten 6 Lieblingsprogrammtypen
speichern.
Bei Auslieferung ab Wer k sind die folgenden 6
Sendungstypen unter den Ziffertasten (1 bis 6)
gespeichert.
Weiter unten finden Sie Informationen, wie Sie Ihre
Lieblingssendungstypen speichern können.
Hinweise zu Suche Ihres Lieblingssendung
finden Sie siehe Seite 16.
1
POP M
45
CLASSICS
2
ROCK M EASY M
AFFAIRS
So speichern Sie Ihre
Lieblingssendungstypen
1
Drücken Sie die Taste TP PTY, und
halten Sie sie länger als 2 Sekunden
gedrückt.
3
6
VARIED
2
Wählen Sie einen der neunundzwanzig
PTY-Codes. (Siehe Seite 18).
Der gewählte Codename
wird im Display angezeigt.
3
Drücken Sie die Ziffertaste und
halten länger als 2 Sekunden
gedrückt, um den gewählten
PTY-Code unter der gewünschten
Speichertaste zu speichern.
„MEMO“ und die PTY-Speicherplatznummer
werden abwechselnd im Display angezeigt.
4
Drücken Sie TP PTY erneut.
DEUTSCH
Der zuletzt gewählte PTY-Code wird
angezeigt.
15
Page 54

So suchen Sie Ihren Lieblingssendungstyp
1
Drücken Sie die Taste TP PTY, und
halten Sie sie länger als 2 Sekunden
gedrückt, während Sie einen UKWSender hören.
DEUTSCH
Der zuletzt gewählte PTY-Code wird angezeigt.
2
Wählen Sie einen der PTY-Codes.
ODER
Weitere praktische
RDS-Funktionen und
-Einstellungsmöglichkeiten
Automatische Auswahl des Senders
bei Verwenden der Ziffertasten
Wenn Sie die Ziffertaste drücken, wird im
allgemeinen der unter dieser Taste gespeicherte
Sender eingestellt.
Wenn es sich bei diesem gespeicherten Sender
um einen RDS-Sender handelt, geschieht jedoch
etwas anderes. Sollten die Signale des
gespeicherten Senders für einen guten Empfang
nicht ausreichen, sucht das Gerät mit Hilfe der
AF-Daten einen anderen Sender, der dieselbe
Sendung wie der ursprünglich ausgewählte
Sender ausstrahlt. (Sendungssuchlauf)
• Es dauert eine gewisse Zeit, bis das Gerät
einen anderen Sender mit Hilfe des
Sendersuchlaufs eingestellt hat.
Führen Sie das nachstehend beschriebene
Verfahren durch, um den Sendungssuchlauf zu
aktivieren.
• Weitere Informationen finden Sie unter „Ändern
der allgemeinen Einstellungen (PSM)“ siehe
Seite 25.
Beispiel: Wenn Sie „ROCK M“ auswählen.
3
Drücken Sie die Taste ¢ oder
, um die PTY-Suche nach
4
Ihrem Lieblingsprogramm zu starten.
• Wenn ein Sender eine Sendung mit dem PTYCode ausstrahlt, den Sie gewählt haben, wird
dieser Sender eingestellt.
• Wenn kein Sender eine Sendung mit dem
PTY-Code ausstrahlt, den Sie gewählt haben,
wird der aktuell eingestellte Sender weiterhin
wiedergegeben.
Hinweis:
In einigen Gebieten funktioniert die PTY-Suche
möglicherweise nicht richtig.
16
1 Drücken Sie die Taste SEL (Auswahl), und
halten Sie sie länger als 2 Sekunden gedrückt,
bis eine der PSM-Elemente im Display
angezeigt wird.
2 Drücken Sie die Taste ¢ oder 4
um die Funktion „P(Sendung)-SEARCH“
auszuwählen.
3 Drehen Sie den Steuerregler im Uhrzeigersinn,
um „ON“ auswählen.
Der Sendungssuchlauf ist jetzt aktiviert.
4 Drücken Sie die Taste SEL (Auswahl), um die
Einstellung abzuschließen.
Um den Sendungssuchlauf zu deaktivieren,
wiederholen Sie dasselbe Verfahren, und wählen
Sie in Schritt 3 die Einstellung „OFF“ aus, indem
Sie den Drehregler entgegen dem Uhrzeigersinn
drehen.
Page 55

Ändern der Anzeige bei der
Wiedergabe eines UKW-Senders
Während Sie einen UKW-RDS-Sender hören,
können Sie die Erstanzeige im Display so
ändern, daß der Sendername (PS NAME), die
Sendefrequenz (FREQ) anzeigt wird.
• Weitere Informationen finden Sie unter „Ändern
der allgemeinen Einstellungen (PSM)“ siehe
Seite 25.
1 Drücken Sie die Taste SEL (Auswahl), und
halten Sie sie länger als 2 Sekunden gedrückt,
bis eine der PSM-Elemente im Display
angezeigt wird.
2 Drücken Sie die Taste ¢ oder 4
um die Funktion „TU DISP
(Tuneranzeigefunktion)“ auszuwählen.
3 Drehen Sie den Steuerregler, um die
gewünschte Anzeige („PS NAME“, oder
„FREQ“) einzustellen.
4 Drücken Sie die Taste SEL (Auswahl), um die
Einstellung abzuschließen.
Hinweis:
Wenn Sie die Taste DISP (Display) drücken, können
Sie das Display auch ändern, während Sie einen
UKW-RDS-Sender hören.
Wenn Sie diese Taste mehrfach hintereinander
drücken, werden folgende Informationen im Display
angezeigt:
Sendername
(PS NAME)
Sendefrequenz
(FREQ)
Sendungstyp
(PTY)
• Nach ein paar Sekunden schaltet das Display auf
die vorherige Anzeige zurück.
Einstellen des Lautstärkepegels für
Verkehrsnachrichten
Sie können den Lautstärkepegel für den
Bereitschaftsempfang von Verkehrsnachrichten
speichern. Wenn Verkehrsnachrichten gesendet
werden, werden sie automatisch in der
gespeicherten Lautstärke wiedergegeben.
• Weitere Informationen finden Sie unter „Ändern
der allgemeinen Einstellungen (PSM)“ siehe
Seite 25.
1 Drücken Sie die Taste SEL (Auswahl), und
halten Sie sie länger als 2 Sekunden gedrückt,
bis eine der PSM-Elemente im Display
angezeigt wird.
2 Drücken Sie die Taste ¢ oder 4
um die Funktion „TA VOL (Lautstärke)“
auszuwählen.
3 Drehen Sie den Steuerregler, um die
gewünschte Lautstärke einzustellen.
Sie können die Lautstärke zwischen „VOL 00“
bis „VOL 50“ einstellen.
4 Drücken Sie die Taste SEL (Auswahl), um die
Einstellung abzuschließen.
Automatische Uhreinstellung
Bei Auslieferung ab Wer k ist die Uhr, die in
dieses Gerät integriert ist, so eingestellt, daß sie
die Uhrzeit automatisch unter Verwendung der im
RDS-Signal enthaltenen Uhrzeitdaten korrigiert.
Wenn Sie die automatische Uhreinstellung nicht
wünschen, befolgen Sie das nachstehende
Verfahren.
• Weitere Informationen finden Sie unter „Ändern
der allgemeinen Einstellungen (PSM)“ siehe
Seite 25.
1 Drücken Sie die Taste SEL (Auswahl), und
halten Sie sie länger als 2 Sekunden gedrückt,
bis eine der PSM-Elemente im Display
angezeigt wird.
2 Drücken Sie die Taste ¢ oder 4
um die Funktion „AUTO ADJ (Einstellung)“
auszuwählen.
3 Drehen Sie den Steuerregler entgegen dem
Uhrzeigersinn, um „OFF“ auswählen.
Die automatische Uhreinstellung ist jetzt
deaktiviert.
4 Drücken Sie die Taste SEL (Auswahl), um die
Einstellung abzuschließen.
Um die Einstellfunktion für die Uhr zu
reaktivieren, wiederholen Sie dasselbe
Verfahren, und wählen Sie in Schritt 3 die
Einstellung „ON“ aus, indem Sie den Drehregler
im Uhrzeigersinn drehen.
Hinweis:
Derselbe Sender muß mindestens 2 Minuten lang
eingestellt bleiben, nachdem „AUTO ADJ“ auf „ON“
gesetzt wurde. Anderenfalls kann die Uhrzeit nicht
eingestellt werden. (Das Gerät benötigt etwa 2
Minuten, um die CT-Daten im RDS-Signal zu erfassen).
DEUTSCH
17
Page 56

PTY-Codes
NEWS: Nachrichten
AFFAIRS: Nachrichtenmagazin/Aktuelle
INFO: Ratgeber aller Art
SPORT: Sport
EDUCA TE: Bildungsprogramme
DRAMA: Hörspiel
CULTURE: Kulturereignisse (regional/
DEUTSCH
SCIENCE: Wissenschaft und Technik
VARIED: Gemischte Programme
POP M: Popmusik
ROCK M: Rockmusik
EASY M: Leichte Unterhaltungsmusik
LIGHT M: Leichte Musik
CLASSICS: Klassische Musik
OTHER M: Sonstige Musik
WEATHER: Wettermeldungen
FINANCE: Finanz-Themen,
Themen
überregional)
(Komödien, Feiern usw.)
Wirtschaftsmeldungen usw.
CHILDREN: Kindersendungen
SOCIAL: Soziale Themen
RELIGION: Sendungen mit religiösen,
philosophischen Themen,
Gottesdienste usw.
PHONE IN: Hörermeinungen
(Telefonumfragen, Befragungen
usw.)
TRAVEL: Reisemagazine,
Reiseberichte,
Reiseangebote usw.
LEISURE: Sendungen für
Freizeitgestaltung und
Hobbies (Garten, Kochen,
Angeln usw.)
JAZZ: Jazzmusik
COUNTRY: Countrymusik
NATION M: Unterhaltungsprogramme in
einer Fremdsprache
OLDIES: Schlageroldies
FOLK M: Volksmusik
DOCUMENT: Dokumentationen und
Themenmagazine
18
Page 57

CD-BETRIEB
Abspielen einer CD
1
Das Bedienteil abklappen.
Hinweis:
Wenn eine externe Komponente an die Buchse AUX
auf der Bedienungsblende angeschlossen ist, gehen
Sie beim Einlegen einer CD besonders vorsichtig vor.
2
Eine CD in den Ladeschacht
einschieben.
Das Gerät schaltet sich
ein, zieht die CD ein
und startet die
Wiedergabe
automatisch.
3
Das Bedienteil wieder von Hand
nach oben klappen.
Die Anzeige für eingelegte CDs wird eingeschaltet.
Gesamtspielzeit
der eingelegten CD
Bisherige Spielzeit Derzeitiger Titel
Hinweise:
• Wenn sich bereits eine CD im Ladeschacht befindet,
wird die CD wiedergegeben, wenn „CD“ als
Signalquelle ausgewählt wird.
• Wenn Sie eine CD falsch herum einlegen, wird sie
automatisch ausgeworfen (sofern die
Bedienungsblende geöffnet ist). Wenn die
Bedienungsblende geschlossen ist, werden
abwechselnd „PLEASE“ und „EJECT“ angezeigt.
• Wenn Sie Signalquelle ändern, wird die wiedergabe
der CD ebenfalls gestoppt (allerdings wird die CD
nicht ausgeworfen).
Wenn Sie das nächste Mal „CD“ als Signalquelle
auswählen, wird die CD an derselben Stelle
wiedergegeben, an der Sie die Wiedergabe gestoppt
haben.
Gesamttitelzahl
der eingelegten CD
Nach der Signalquelle wird wieder
die Uhrzeit angezeigt, wenn unter
„CLOCK“ die Einstellung „ON“
aktiviert wurde. (Siehe Seite 27).
DEUTSCH
19
Page 58

Zum Beenden des Abspielens und
Auswerfen der CD
Drücken Sie die Taste 0.
Die CD-Wiedergabe wird gestoppt, und die
Steuerblende öffnet sich. Die CD wird
anschließend automatisch aus dem Ladeschlitz
ausgeworfen. Wenn Sie als Signalquelle wählen,
wird die CD-Wiedergabe ebenfalls gestoppt
(allerdings wird die CD hierbei nicht ausgeworfen).
Hinweise:
• Wird die ausgeworfene CD nicht innerhalb von 15
DEUTSCH
Sekunden entnommen, wird die CD automatisch
wieder in den Ladeschlitz eingefahren, um sie vor
Staub zu schützen. (Die CD wird diesmal jedoch
nicht abgespielt).
• Sie können die CD auswerfen lassen, indem Sie das
Gerät ausschalten.
Zum direkten Anwählen eines bestimmten
Titels
Die Ziffertaste, die der Titelnummer entspricht
drücken, um sein Abspielen zu beginnen.
• Zum Wählen einer Titelnummer von 1 – 6:
1 (7) – 6 (12) kurz drücken.
• Zum Wählen einer Titelnummer von 7 – 12:
1 (7) – 6 (12) drücken und länger als 1
Sekunde halten.
Wählen der CDAbspielbetriebsarten
Finden eines Titels oder eines
bestimmten Abschnittes auf
einer CD
Zum schnellen Vor- oder Rücklauf des Titels
Bei laufender CD ¢
drücken und halten, um den
Titel schnell vorzuspulen.
Bei laufender CD 4
drücken und halten, um den
Titel zurückzuspulen.
Weitergehen zu nächsten oder
vorhergehenden Titeln
¢ kurz bei laufender
CD drücken, um zum
nächsten Titelanfang zu
kommen.
Wenn Sie diese Taste
weiteren drücken, wird der
Anfang der jeweils nächsten
Titeln gesucht und abgespielt.
4 kurz bei laufender
CD drücken, um zum
derzeitigen Titelanfang zu
kommen.
Wenn Sie diese Taste
weiteren drücken, wird der
Anfang der jeweils
vorhergehenden Titeln
20
gesucht und abgespielt.
Zum Abspielen der Titel nach dem
Zufallsprinzip (Zufallswiedergabe)
Sie können alle Titel auf einer CD nach dem
Zufallsprinzip abspielen.
1 Die Taste MODE drücken, um bei
abspielender CD in den
Funktionsbetrieb zu gelangen.
„MODE“ wird im unteren Bereich
des Displays angezeigt, und die
Zifferntasten arbeiten als
Funktionstasten.
2 Drücken Sie RND (Zufall), solange
„MODE“ im Display angezeigt wird,
so dass die Anzeige RND im
Display erscheint.
Wenn Sie diese Taste RND (Zufall)
mehrfach hintereinander drücken,
wird die Wiedergabe in zufälliger
Reihenfolge abwechselnd ein- und
ausgeschaltet.
Anzeige RND
Ist die Zufallswiedergabe eingeschaltet, leuchtet
die RND-Anzeige auf der Anzeige auf und ein
Titel wird nach dem Zufallsprinzip ausgewählt
und abgespielt.
Page 59

Zum wiederholten Abspielen der Titel
(Wiederholung)
Sie können den derzeitigen wiederholt abspielen.
1 Die Taste MODE drücken, um bei
abspielender CD in den
Funktionsbetrieb zu gelangen.
„MODE“ wird im unteren Bereich
des Displays angezeigt, und die
Zifferntasten arbeiten als
Funktionstasten.
2 Drücken Sie RPT (Wiederholung),
solange „MODE“ im Display
angezeigt wird, so dass die
Anzeige RPT im Display erscheint.
Wenn Sie diese Taste RPT
(Wiederholung) mehrfach
hintereinander drücken, wird die
wiederholte Wiedergabe
abwechselnd ein- und
ausgeschaltet.
Titelnummer des derzeit
abspielenden Titels
Wiedergeben einer CD mit
CD-Text
Auf einer Disc mit CD-Text werden bestimmte
Informationen über die CD (Disc-Titel, Künstler
und Titelbezeichnungen) gespeichert.
Sie können diese Disc-Informationen im Display
anzeigen.
Wählen Sie den Textanzeigemodus,
während Sie eine CD mit CD-Text
wiedergeben.
Wenn Sie diese Taste mehrfach hintereinander
drücken, ändert sich die Anzeige zyklisch wie
folgt:
CD-Titel / Künstler
DEUTSCH
Anzeige RPT
Ist die Wiederholungsbetriebsart eingeschaltet,
leuchtet die RPT-Anzeige auf der Anzeige auf.
Unterdrücken des
CD-Auswurfs
Sie können den CD-Auswurf blockieren und eine
CD im Ladeschlitz verriegeln.
Drücken Sie die Taste CD CD-CH (AUX),
und halten Sie die Taste
gleichzeitig länger als 2 Sekunden
gedrückt.
„NO EJECT“ blinkt etwa 5 Sekunden lang im
Display. Die CD ist damit verriegelt und läßt sich
nicht auswerfen.
So deaktivieren Sie die Blockierung und
entriegeln die CD: Drücken Sie die Taste
länger als 2 Sekunden, während Sie
gleichzeitig die Taste CD CD-CH drücken.
„EJECT OK“ blinkt etwa 5 Sekunden lang im
Display, und die CD wird entriegelt.
Titelbezeichnung
Aktuelle Titelnummer und
verstrichene Spielzeit
Hinweise:
• Das Display zeigt maximal 8 Zeichen gleichzeitig
an. Es wird ein Bildlauf durchgeführt, wenn der Text
länger als 8 Zeichen ist. Weitere Informationen
finden Sie unter „Wählen des Bildlaufmodus –
SCROLL“ auf Seite 28.
Einige Zeichen oder Symbole werden im Display nicht
angezeigt (und durch Leerzeichen dargestellt).
(Beispiel: „ABCå!d#“ ] „ABCA D “)
• Wenn Sie die Taste DISP (Display) drücken,
während Sie eine konventionelle CD wiedergeben,
wird „NO NAME“ für den CD-Titel/Künstler und
Titelbezeichnung angezeigt.
21
Page 60

KLANGEINSTELLUNG
Klang-Einstellschritte
Sie können das Klangbild wie gewünscht einstellen.
1
Wählen Sie die Optionen aus, die
angepasst werden sollen.
Wenn Sie diese Taste
mehrfach hintereinander
drücken, ändern sich die
einstellbaren Funktionen
DEUTSCH
BAS
(Tiefen)
VOL
(Lautstärke)
Anzeige Zutun: Bereich
BAS Einstellen –06 (min.)
TRE Einstellen der –06 (min.)
FAD* Einstellen des
BAL Einstellen des
LOUD Tiefe und hohe
WOOFER Einstellen des
(ausschliesslich
Modell für den
KD-SX992R) Subwoofer.
VOL Einstellen der 00 (min.)
wie folgt:
TRE
(Höhen)
(
ausschliesslich
Modell
der Tiefen. |
Höhen. |
vorderen und R06 (Nur hinten)
hinteren |
Lautsprecheraus- F06 (Nur vorne)
gleichs.
linken und L06 (Nur links)
rechten |
Lautsprecheraus- R06 (Nur rechts)
gleichs.
Frequenzen
werden betont,
um bei niedriger |
Laustärke ein
ausgeglicheneres
Klangbild zu
erzielen.
Ausgangspegels
Lautstärke. |
(Fader)
WOOFER
KD-SX992R)
FAD
(Balance)
LOUD
(Lautstärkekontur)
+06 (max.)
+06 (max.)
LOUD ON (ein)
LOUD OFF (aus)
0 (min.)
|
8 (max.)
50 (max.)
BAL
2
Lautstärkekontur einstellen.
So erhöhen Sie den Pegel.
So verringern Sie den
Pegel.
Die Entzerrungscharakteristik
ändert sich, wenn Sie die Baßoder Höheneinstellung ändern.
Hinweis:
Im allgemeinen wird die Steuerregler zur Regelung der
Lautstärke verwendet. Sie brauchen also nicht „VOL“
zu wählen, um die Lautstärke einzustellen.
* Wenn Sie eine Anlage mit zwei Lautsprechern
verwenden, setzen Sie den Ausblender auf „00“.
22
Page 61

Auswählen der
vorprogrammierten Klangmodi
(C-EQ: Custom Equalizer)
Sie können einen vorprogrammierten
Klangmodus auswählen (C-EQ: Custom
Equalizer), der für das wiederzugebende
Musikgenre geeignet ist.
• Es besteht ein Zeitlimit für die Ausführung der
folgenden Schritte. Wenn die Einstellung
abgebrochen wird, bevor Sie sie fertiggestellt
haben, beginnen Sie erneut mit Schritt 1.
1
Drücken Sie die Taste MODE.
„MODE“ wird im unteren
Bereich des Displays
angezeigt, und die Zifferntasten
arbeiten als Funktionstasten.
2
Drücken Sie EQ (equalizer), solange
„MODE“ noch im Display angezeigt
wird.
Der zuletzt ausgewählte
Klangmodus wird abgerufen
und auf die aktuelle
Signalquelle angewendet.
Die Anzeige des Klangmodus blinkt.
Beispiel: Die Einstellung „USER“ wurde zuvor
ausgewählt.
3
Wählen Sie den gewünschten
Klangmodus aus.
Wenn Sie diese Taste mehrfach
hintereinander drücken, ändert
sich der Klangmodus wie folgt:
USER
Die Anzeige des Klangmodus blinkt.
Beispiel: „ROCK“ wird ausgewählt.
ROCK
CLASSIC
POPSHIP HOPJAZZ
Anzeige Verwendung für V orpr ogrammierte
Werte
BAS TRE LOUD
USER (lineare 00 00 OFF
Einstellung)
ROCK Rock- oder +03 +01 ON
Disco-Musik
CLASSIC klassische +01 –02 OFF
Musik
POPS Unterhaltungs- +04 +01 OFF
musik
HIP HOP Funk oder +02 00 ON
Rap
JAZZ Jazz +02 +03 OFF
Hinweis:
Sie können jeden Klangmodus nach Ihrem Geschmack
anpassen und im Speicher sichern. Wenn Sie den
Originalklang anpassen und speichern wollen, finden
Sie hierzu Anweisungen im Abschnitt „Speichern Ihrer
eigenen Klangeinstellungen“ auf Seite 24.
So speichern Sie für jede Signalquelle
einen Klangmodus (C-EQ Link-Funktion)
Sie können einen Klangmodus auswählen und im
Speicher sichern. Dieser Klangmodus wird
abgerufen, wenn Sie dieselbe Signalquelle
erneut aktivieren. Der Klangmodus wird im
Display angezeigt.
Ein Klangmodus kann für alle folgenden
Signalquellen gespeichert werden: FM1, FM2,
FM3, AM, CD und externe Komponenten:
• Weitere Informationen finden Sie unter „Ändern
der allgemeinen Einstellungen (PSM)“ auf Seite
25.
1 Drücken Sie die Taste SEL (Auswahl), und halten
Sie sie länger als 2 Sekunden gedrückt, bis eine
der PSM-Elemente im Display angezeigt wird.
2 Drücken Sie die Taste ¢ oder 4 ,
um „CEQ LINK (Custom Equalizer-Speicher)“
auszuwählen.
3 Drehen Sie den Steuerregler im Uhrzeigersinn,
um „LINK ON“ auswählen.
4 Drücken Sie die Taste SEL (Auswahl), um die
Einstellung abzuschließen.
Wenn Sie die C-EQ Link-Funktion deaktivieren
möchten, wiederholen Sie dasselbe Verfahren,
und wählen Sie in Schritt 3 die Einstellung „LINK
OFF“ aus.
Hinweis:
Wenn Sie die Einstellung „CEQ LINK“ ändern, wird
der Klangmodus (C-EQ) automatisch auf „USER“
zurückgesetzt.
DEUTSCH
23
Page 62

• Auswählen der Option „LINK ON“ unter
„CEQ LINK“
Der ausgewählte Klangmodus kann für die
aktuelle Signalquelle im Speicher gesichert
werden.
Wenn Sie dieselbe Signalquelle aktivieren, wird
auch derselbe Klangmodus abgerufen und im
Display angezeigt. Die Anzeige C-EQ blinkt
ebenfalls.
• Auswählen der Option „LINK OFF“ unter
„CEQ LINK“
Der ausgewählte Klangmodus wird auf alle
DEUTSCH
Signalquellen angewendet.
4
Wählen Sie die Optionen aus, die
angepasst werden sollen.
• Siehe Seite 22 für Einzelheiten.
5
Lautstärkekontur einstellen.
So erhöhen Sie den Pegel.
Speichern Ihrer eigenen
Klangeinstellungen
Sie können die Klangbetriebsarten nach eigenem
Geschmack anpassen und diese Einstellungen
im Speicher sichern.
• Es besteht ein Zeitlimit für die Ausführung der
folgenden Schritte. Wenn die Einstellung
abgebrochen wird, bevor Sie sie fertiggestellt
haben, beginnen Sie erneut mit Schritt 1.
1
Drücken Sie die Taste MODE.
„MODE“ wird im unteren
Bereich des Displays angezeigt,
und die Zifferntasten arbeiten
als Funktionstasten.
2
Drücken Sie EQ (equalizer), solange
„MODE“ noch im Display angezeigt
wird.
Der zuletzt ausgewählte
Klangmodus wird abgerufen
und auf die aktuelle
Signalquelle angewendet.
So verringern Sie den
Pegel.
Die Entzerrungscharakteristik
ändert sich, wenn Sie die Baßoder Höheneinstellung ändern.
Beispiel: „TRE“ wird eingestellt.
6
Wiederholen Sie Schritt 4 und 5, um
weitere Optionen zu ändern.
7
Wiederholen Sie dasselbe Verfahren,
um andere Klangmodi einzustellen.
So stellen Sie die Werkseinstellungen wieder
her Wiederholen Sie dasselbe Verfahren, und
weisen Sie die gespeicherten Werte wieder zu,
die in der Tabelle in der Siehe Seite 23 aufgelistet
sind.
24
Die Anzeige des Klangmodus blinkt.
Beispiel: Die Einstellung „ROCK“ wurde zuvor
ausgewählt.
3
Wählen Sie des Klangmodus aus,
die angepasst werden sollen.
Page 63

ANDERE WICHTIGE FUNKTIONEN
Stellen der Uhr
1
Drücken Sie die Taste SEL
(Auswahl), und halten Sie sie länger
als 2 Sekunden gedrückt, bis eine
der PSM-Elemente im Display
angezeigt wird. (Siehe Seite 26).
2
Stellen Sie die Stunden ein.
1 Wählen Sie „CLOCK H (Stunden)“, sofern
nicht bereits im Display angezeigt wird.
2 Stellen Sie die Stunden ein.
1 2
3
Stellen Sie die Minuten ein.
1 Wählen Sie „CLOCK M (Minuten)“.
2 Stellen Sie die Minuten ein.
Wenn Sie die aktuelle Uhrzeit prüfen wollen,
wenn das Gerät ausgeschaltet ist, drücken Sie
die Taste DISP (Display).
Die Stromversorgung wird eingeschaltet, und die
Uhrzeit wird 5 Sekunden lang angezeigt.
Anschließend wird die Stromversorgung wieder
ausgeschaltet.
Ändern der allgemeinen
Einstellungen (PSM)
Sie können die auf der folgenden Seite
aufgelisteten Elemente ändern, indem Sie den
Präferenzeinstellungsmodus (PSM) verwenden.
Grundverfahren
1
Drücken Sie die Taste SEL
(Auswahl), und halten Sie sie länger
als 2 Sekunden gedrückt, bis eine
der PSM-Elemente im Display
angezeigt wird. (Siehe Seite 26).
2
Wählen Sie das PSM-Element, das Sie
einstellen möchten. (Siehe Seite 26).
DEUTSCH
1
4
Stellen Sie das Uhrzeit system ein.
1 Wählen Sie „24H/12H“.
2 Wählen Sie „24H“ oder „12H“ ein.
12
5
Beenden Sie die Einstellung.
2
3
Stellen Sie die oben gewählte
PSM-Funktion ein.
4
Wiederholen Sie Schritt 2 und 3, um
gegebenenfalls weitere
PSM-Einstellungen zu ändern.
5
Beenden Sie die Einstellung.
25
Page 64

Präferenzeinstellungsmodus (PSM) punkt
132
Wählen...Halten.
CLOCK H Stundeneinstellung
CLOCK M Minuteneinstellung
DEUTSCH
CEQ LINK Verknüpfung mit dem
24H/12H 24/12-Std.-Einstellung
AUTO ADJ Automatische
CLOCK Anzeige der Uhrzeit
TU DISP Tuneranzeigefunktion
AF-REG Alternativfrequenz-/
PTY STBY PTY-Bereitschaftsbetrieb
Custom Equalizer-Speicher
Uhrzeiteinstellung
Regionalempfang
Einstellen...
Entgegen
dem
UhrzeigersinnImUhrzeigersinn
VorZurück
Zurück Vor
LINK OFF LINK OFF 23, 27LINK ON
12H 24H 24H 25
OFF ON ON 17
OFF ON 27ON
FREQ PS NAME PS NAME 17
AF AF REG
OFF*
OFF
29 Programmsparten
(siehe Seite 18)
Einstellung ab
Werk
0:00 25
AF
OFF 14
Siehe
Seite
12
TA VOL Verkehrsfunkmeldungs-
Lautstärke
P-SEARCH Sedungssuchlauf
DAB AF** Alternativfrequenzsuche
DAB V OL** DAB-Lautstärkeanpassung
LEVEL Pegelanzeige
DIMMER*** Dimmerfunktion
TEL T elefonstummschaltung
BEEP Tastensignalton
SCROLL Bildlaufmodus
EXT IN**** Externen Komponente
AUX ADJ Einstellung des
Zusatzgerät-Eingangspegels
• Drücken Sie die Taste SEL (Auswahl), um die Einstellung abzuschließen.
* Auswahl ist bei angeschlossenem DAB-Tuner nicht möglich.
** Wird nur bei angeschlossenem DAB-Tuner angezeigt.
*** Ausschliesslich Modell KD-SX992R.
**** Wird nur dann angezeigt, wenn eine der folgenden Signalquellen ausgewählt ist – FM, AM und CD.
VOL 00 — VOL 50 VOL 20 17
OFF ON OFF
AF OFF AF ON AF ON 36
VOL –12 bis VOL 12
OFF AUDIO 1
AUDIO 2
OFFAUTO
ON
OFF MUTING 1
MUTING 2
OFF ON 28ON
ONCE
OFF
CHANGER
A.ADJ 00 – A.ADJ 05
AUTO
LINE IN
VOL 00
AUDIO 2
CHANGER
A.ADJ 00
26
AUTO
OFF 28
ONCE
16
36
27
27
28
28
28
Page 65

So wählen Sie die Custom Equalizer LinkFunktion aus – CEQ LINK
Für alle Signalquellen kann ein separater
Klangmodus (C-EQ) gespeichert werden. Sie
können dann die Klangmodi ändern, indem Sie
einfach die Signalquellen wechseln.
Werksseitig ist dieser Modus deaktiviert.
• LINK ON: Es können verschiedene
Klangmodi für verschiedene
Signalquellen gespeichert werden.
• LINK OFF: Es kann ein Klangmodus für alle
Signalquellen gespeichert werden.
So wählen Sie den Pegelmesser – LEVEL
Sie können die Anzeige des Pegelmessers nach
Ihrem persönlichen Geschmack auswählen.
Werkseitig ist die Einstellung „AUDIO 2“
gespeichert.
• AUDIO 1: Anzeige des Pegelmessers von
unten nach oben.
• AUDIO 2: Pegelmesser (Anzeige von unten
nach oben) und
Displaybeleuchtung werden
abwechselnd aktiviert.
• OFF: Der Audiopegel werden gelöscht.
DEUTSCH
Wählen der Uhrzeit – CLOCK
Sie können das Gerät so einstellen, daß die
Uhrzeit im unteren Bereich des Displays
angezeigt wird, wenn das Gerät eingeschaltet
wird.
Entsprechend der werkseitigen Einstellung wird
die Uhrzeit im Display angezeigt.
• ON: Die Uhrzeit wird angezeigt.
• OFF: Die Uhrzeit wird nicht angezeigt.
Wenn „OFF“ aktiviert ist, wird der
Name der ausgewählten
Signalquelle oder des
ausgewählten Frequenzbands
anstelle der Uhrzeit angezeigt (es
sei denn, externe Komponente ist
als Signalquelle ausgewählt).
Wählen des Abblendmodus – DIMMER
(ausschliesslich Modell KD-SX992R)
Wenn Sie die Autoscheinwerfer einschalten, wird
das Display automatisch abgeblendet
(automatische Abblendung).
Werksseitig ist die automatische Abblendung
aktiviert.
• AUTO: Die automatische Abblendung wird
aktiviert.
• OFF: Die automatische Abblendung wird
deaktiviert.
• ON: Das Display wird immer
abgeblendet.
Hinweis:
Die automatische Abblendfunktion, mit der dieses
Gerät ausgestattet ist, funktioniert möglicherweise bei
einigen Fahrzeugen nicht korrekt, insbesondere bei
solchen, die einen Abblendregler besitzen.
Ist dies der Fall, stellen Sie den Abblendmodus auf
„ON“ oder „OFF“.
27
Page 66

So wählen Sie die Telefonstummschaltung
– TEL
Dieser Modus wird verwendet, wenn ein
Funktelefon angeschlossen ist. Wählen Sie in
Abhängigkeit vom verwendeten Telefonsystem
entweder die Einstellung „MUTING 1“ oder
„MUTING 2“.
Wählen Sie die Einstellung, bei der die
Lautstärke des Receivers stummgeschaltet wird.
Werkseitig ist dieser Modus deaktiviert.
DEUTSCH
• MUTING 1: Wählen Sie diese Einstellung,
wenn damit die Lautstärke des
Receivers stummgeschaltet
werden kann.
• MUTING 2: Wählen Sie diese Einstellung,
wenn damit die Lautstärke des
Receivers stummgeschaltet
werden kann.
• OFF: Die Telefonstummschaltung wird
deaktiviert.
Ein- oder Ausschalten des
Tastensignaltons – BEEP
Sie können den Tastensignalton deaktivieren,
wenn Sie nicht möchten, daß ein Signalton
ertönt, wenn Sie eine Taste drücken.
Werkseitig ist der Tastensignalton aktiviert.
• ON: Der Tastensignalton wird aktiviert.
• OFF: Der Tastensignalton wird
deaktiviert.
Wählen des Bildlaufmodus – SCROLL
Sie können den Bildlaufmodus für die
Namensanzeige und CD-Informationen wählen,
wenn deren Länge 8 Zeichen überschreitet.
Werkseitig ist der automatische Bildlaufmodus
auf „ONCE“ gesetzt.
So wählen Sie eine externen Komponente
aus – EXT IN
Sie können die externe Komponente an die
Buchse für den CD-Wechsler auf der
Geräterückseite mit Hilfe des Eingangsadapters
KS-U57 (der nicht zum Lieferumfang gehört)
anschließen.
Um die externe Komponente als
Wiedergabesignalquelle für dieses Gerät
verwenden zu können, müssen Sie auswählen,
welche Komponente – CD-Wechsler oder
externe Komponente – verwendet werden soll.
Werkseitig ist der CD-Wechsler als externe
Komponente ausgewählt.
• LINE IN: Es wird eine andere externe
Komponente als der CD-Wechsler
verwendet.
• CHANGER: Der CD-Wechsler wird verwendet.
Hinweis:
Im Installations-/Anschlusshandbuch (separaten)
finden Sie Informationen, wie der Eingangsadapter
KS-U57 und die externe Komponente angeschlossen
werden.
So passen Sie den Pegel des Eingangs
AUX an – AUX ADJ
Stellen Sie den Eingang AUX ordnungsgemäß
ein, wenn eine externe Komponente an die
Eingangsbuchse AUX angeschlossen ist.
Werkseitig ist der Pegel des Eingangs AUX auf
den Wert „00“ eingestellt.
Wenn der Pegel der angeschlossenen
Komponente nicht hoch genug ist, erhöhen Sie
den Eingangspegel entsprechend. Wenn der
Eingangspegel nicht angepasst wird, werden Sie
möglicherweise durch eine hohe Lautstärke
überrascht, wenn Sie von der externen
Komponente auf eine andere Signalquelle
umschalten.
• ONCE: Der Bildlauf erfolgt nur einmal.
• AUTO: Der Bildlauf wird wiederholt.
• OFF: Der automatische Bildlauf wird
(Dazwischenliegende 5-SekundenIntervalle).
deaktiviert.
28
Page 67

Abnehmen der Schalttafel
Sie können die Schalttafel abnehmen, wenn Sie
das Fahrzeug verlassen.
Wenn Sie die Schalttafel abnehmen oder wieder
einsetzen, achten Sie darauf, daß Sie die
Anschlüsse auf der Rückseite der Schaltafel und
am Schalttafelhalter nicht beschädigen.
Anbringen der Schalttafel
1
Führen Sie die rechte Seite der
Schalttafel in die Nut des
Schalttafelhalters ein.
Abnehmen der Schalttafel
Bevor Sie die Schalttafel abnehmen, schalten Sie
unbedingt die Stromversorgung aus.
1
Entriegeln Sie die Schalttafel.
2
Ziehen Sie die Schalttafel vom
Gerät ab.
3
Legen Sie die abgenommene
Schalttafel in das mitgelieferte Etui.
2
Drücken Sie auf die linke Seite der
Schalttafel, damit sie im
Schalttafelhalter einrastet.
Hinweis zum Reinigen der Anschlüsse:
Wenn Sie die Schalttafel häufig abnehmen, kann
sich der Zustand der Anschlüsse verschlechtern.
Um diese Möglichkeit zu minimieren, wischen Sie
die Anschlüsse in regelmäßigen Abständen mit
einem Wattestäbchen oder einem Tuch ab, die
zuvor mit Alkohol angefeuchtet wurden. Achten Sie
darauf, daß Sie die Anschlüsse nicht beschädigen.
DEUTSCH
Anschlüsse
29
Page 68

CD-WECHSLERBETRIEB
DEUTSCH
Wir empfehlen Ihnen, einen CD-Wechsler der Serie
CH-X zusammen mit diesem Gerät zu verwenden.
Wenn Sie einen anderen automatischen CDWechsler besitzen, fragen Sie JVC-Fachhändler
für Autostereoanlagen, wie die Anschlüsse
durchgeführt werden müssen.
• Handelt es sich bei Ihrem automatischen CDWechsler um einen einen CD-Wechsler der
Modellreihe KD-MK, benötigen Sie ein Kabel
(KS-U15K) zum Anschließen an dieses Gerät.
Hinweis zum Ein-Tastendruck-Betrieb:
Wenn Sie CD CD-CH (AUX) drücken, wird das Gerät
automatisch eingeschaltet. Sie brauchen dafür nicht
zu drücken.
Zum schnellen Vor- oder Rücklauf des Titels
Bei laufender CD ¢
drücken und halten, um den
Titel schnell vorzuspulen.
Vor dem Betreiben Ihres automatischen CDWechsler:
• Siehe auch die Anleitung, die Ihrem CDWechsler beiliegt.
Abspielen der CDs
Den automatischen CD-Wechsler wählen
(CD-CH).
CD
* Wenn Sie unter „EXT IN“ die Einstellung „LINE
IN“ ausgewählt haben (siehe Seite 28), können
Sie den CD-Wechsler nicht auswählen.
Die Wiedergabe beginnt mit dem ersten Titel der
ersten CD.
Sämtliche Titel aller CDs werden wiedergegeben.
Bisherige Spielzeit Titelnummer
** Wenn „CLOCK“ auf „ON“ gesetzt wurde (siehe
Seite 27), wird statt der CD-Nummer bald die
Uhrzeit angezeigt.
30
CD-CH
CD-Nummer**
Bei laufender CD 4
drücken und halten, um den
Titel zurückzuspulen.
Weitergehen zu nächsten oder
vorhergehenden Titeln
¢ kurz bei laufender
CD drücken, um zum
*
nächsten Titelanfang zu
kommen.
Wenn Sie diese Taste
weiteren drücken, wird der
Anfang der jeweils nächsten
Titeln gesucht und
abgespielt.
4 kurz bei laufender
CD drücken, um zum
derzeitigen Titelanfang zu
kommen.
Wenn Sie diese Taste
weiteren drücken, wird der
Anfang der jeweils
vorhergehenden Titeln
gesucht und abgespielt.
Page 69

Weitergehen zu nächsten oder
vorhergehenden CDs an
Drücken Sie 5, während
eine CD wiedergegeben
wird, um zur nächsten CD
zu gelangen. Wenn Sie
diese T aste mehrfach
hintereinander drücken,
wird jeweils der erste Titel
der nächsten CD gesucht
und wiedergegeben.
Drücken Sie ∞, während eine CD wiedergegeben
wird, um zur vorherigen CD zu gelangen. Wenn
Sie diese Taste mehrfach hintereinander drücken,
wird jeweils der erste Titel der vorherigen CD
gesucht und wiedergegeben.
Zum direkten Anwählen einer bestimmten CD
Die Nummerntaste der jeweiligen CD-Nummer
drücken, um diese abzuspielen (während der CDWechsler-Wiedergabe).
• Zum Wählen einer CD-Nummer von 1 – 6:
Kurz 1 (7) – 6 (12) drücken.
• Zum Wählen einer CD-Nummer von 7 – 12:
1 (7) – 6 (12) länger als 1 Sekunde drücken
und halten.
Bisherige Spielzeit
** Wenn „CLOCK“ auf „ON“ gesetzt wurde (siehe
Seite 27), wird statt der CD-Nummer bald die
Uhrzeit angezeigt.
Titelnummer
CD-Nummer**
So zeigen Sie CD-Textinformationen an
CD-Textinformationen können nur angezeigt
werden, wenn ein automatischer CD-Wechsler
von JVC angeschlossen wurde, der mit
CD-Textfunktionen ausgestattet ist.
SIm Abschnitt „Wiedergeben einer CD mit
CD-Text“ auf Seite 21 finden Sie hierzu nähere
Informationen.
Wählen der CDAbspielbetriebsarten
Zum Abspielen der Titel nach dem
Zufallsprinzip (Zufallswiedergabe)
1 Die Taste MODE drücken, um bei
abspielender CD in den
Funktionsbetrieb zu gelangen.
„MODE“ wird im unteren Bereich
des Displays angezeigt, und die
Zifferntasten arbeiten als
Funktionstasten.
2 Drücken Sie RND (Zufall), solange
„MODE“ im Display angezeigt wird,
so dass die Anzeige RND im
Display erscheint.
Wenn Sie diese Taste RND (Zufall)
mehrfach hintereinander drücken,
wird die Wiedergabe in zufälliger
Reihenfolge wie folgt:
RND1 RND2
Ausgeschaltet
Modus
RND1 Leuchtet Alle Titel der aktuellen
RND2 Blinkt Alle Titel aller CDs im
RND-Anzeige
Zum wiederholten Abspielen der Titel
(Wiederholung)
1 Die Taste MODE drücken, um bei
2 Drücken Sie RPT (Wiederholung),
Modus
RPT1 Leuchtet Vorliegender (oder
RPT2 Blinkt Alle Titel der vorliegenden
RPT-Anzeige
Zufallswiedergabe
CD, dann dieTitel der
nächsten CD usw.
Magazin.
abspielender CD in den
Funktionsbetrieb zu gelangen.
„MODE“ wird im unteren Bereich
des Displays angezeigt, und die
Zifferntasten arbeiten als
Funktionstasten.
solange „MODE“ im Display
angezeigt wird, so dass die
Anzeige RPT im Display erscheint.
Wenn Sie diese Taste RPT
(Wiederholung) mehrfach
hintereinander drücken, wird die
wiederholte Wiedergabe wie folgt:
RPT1 RPT2
Ausgeschaltet
Wiedergabe-Wiederholung
aufgerufener) Titel.
(oder aufgerufener) CD.
DEUTSCH
31
Page 70

BETRIEB EINER EXTERNEN KOMPONENTE
Tragbarer MD-Spieler usw.
Eingang AUX
DEUTSCH
Wiedergabe von externen
Komponenten
Sie können zwei externe Komponenten an
dieses Gerät anschließen.
Schließen Sie eine Komponente an die Buchse
für den CD-Wechsler auf der Rückseite mithilfe
des Line-Eingangsadapter KS-U57 (gehört nicht
zum Lieferumfang) und die andere Komponente
an die Eingangsbuchse AUX auf der
Bedienungsblende an.
Vorbereitungen:
• Im Installations-/Anschlusshandbuch (separater
Band) finden Sie Informationen, wie der
Eingangsadapter KS-U57 und die externe
Komponente angeschlossen werden.
• Bevor Sie die externe Komponente mit Hilfe des
nachstehend beschriebenen Verfahrens betreiben,
wählen Sie zuvor den richtigen externen Eingang
aus. (Weitere Informationen finden Sie siehe
Seite 28 unter „So wählen Sie eine externen
Komponente aus – EXT IN“).
• Wenn der Eingangspegel der externen Komponente,
die an die Buchse AUX angeschlossen ist, nicht
hoch genug ist, erhöhen Sie den Eingangspegel in
angemessener Weise. (Weitere Informationen finden
Sie im Abschnitt „So passen Sie den Pegel des
Eingangs AUX an - AUX ADJ“ auf Seite 28).
1
Die externe Komponente (LINE IN
oder AUX IN) auswählen.
Wenn Sie „LINE IN“ (die an die Buchse
für den CD-Wechsler angeschlossene
Komponente) als Signalquelle auswählen
möchten, drücken Sie wiederholt CD CD-
CH (AUX).
CD
LINE IN
32
• Wenn „LINE IN“ im Display nicht angezeigt
wird, lesen Sie siehe Seite 28 nach, und
aktivieren Sie den externen Eingang („LINE IN“).
• Wird nur dann angezeigt, wenn eine der
folgenden Signalquellen ausgewählt ist – FM,
AM und CD.
Wenn Sie „AUX IN“ (die an die Buchse AUX
angeschlossene Komponente) als
Signalquelle auswählen möchten, halten Sie
CD CD-CH (AUX) gedrückt.
2
Schalten Sie die angeschlossene
Komponente ein, und starten Sie die
Wiedergabe der Signalquelle.
3
Die Lautstärke einstellen.
4
Den Klang wie gewünscht einstellen.
(Siehe Seiten 22 – 24).
Hinweis zum Ein-Tastendruck-Betrieb:
Wenn Sie CD CD-CH (AUX) drücken, wird das Gerät
automatisch eingeschaltet. Sie brauchen dafür nicht
zu drücken.
Page 71

BETRIEB DES DAB-TUNERS
Wir empfehlen Ihnen, den DAB-Tuner
KT-DB1500 (DAB: Digital Audio Broadcasting =
digitaler Rundfunk) zusammen mit diesem Gerät
zu verwenden.
Wenn Sie einen anderen DAB-Tuner besitzen,
setzen Sie sich mit Ihrem Fachhändler für JVCFachhändler für Autostereoanlagen in
Verbindung.
• Lesen Sie auch die Bedienungsanleitung des
DAB-Tuner.
Was ist das DAB-System?
DAB ist eines der digitalen Rundfunksysteme,
die heute angeboten werden. Sie können
Übertragungen in CD-Qualität empfangen,
ohne daß sie durch Störungen und
Signalverzerrungen beeinträchtigt werden.
DIm Gegensatz zum UKW-Rundfunk, bei
dem jede Sendung auf einer eigenen
Frequenz übertragen wird, werden beim
DAB-System mehrere Sendungen („Dienste“
genannt) kombiniert, um ein „Ensemble“ zu
bilden. Wenn Sie einen DAB-Tuner an dieses
Gerät angeschlossen haben, können Sie
diese DAB-Dienste empfangen.
Vorbereitung:
Wenn der Eingangspegel des DAB-Tuners nicht hoch
genug ist, erhöhen Sie den Eingangspegel
entsprechend. (Siehe „DAB VOL“ auf Seite 36).
Einstellen eines Ensembles
und eines Dienstes
Ein typisches Ensemble enthält 6 oder mehr
Sendungen (Dienste), die gleichzeitig
ausgestrahlt werden. Nachdem Sie ein
Ensemble eingestellt haben, können Sie den
Dienst wählen, den Sie hören möchten.
Bevor Sie beginnen....
Drücken Sie kurz die Taste DAB (FM AM), wenn
der CD, der CD-Wechsler oder eine externe
Komponente als aktuelle Signalquelle
ausgewählt ist.
1
Wählen Sie den DAB-Tuner.
Wenn Sie diese Taste
mehrfach hintereinander
gedrückt halten, werden
abwechselnd DAB-Tuner
und UKW MW-LW-Tuner
(FM AM) aktiviert.
FM/AMDAB
2
Wählen Sie das DAB-Frequenzband
(DAB1, DAB2 oder DAB3).
Wenn Sie diese Taste
mehrfach hintereinander
drücken, ändert sich das
DAB-Frequenzband wie
folgt:
DAB1 DAB2 DAB3
(D1) (D2) (D3)
DEUTSCH
Hinweis:
Dieser Receiver verfügt über drei DAB-Bänder
(DAB1, DAB2, D AB3). Sie können alle drei Bänder
verwenden, um ein Ensemble einzustellen.
FORTSETZUNG AUF DER NÄCHSTEN SEITE
33
Page 72

3
Name des Dienstes
Kanalnummer
Name des Ensembles
Frequenz
Beginnen Sie mit der Suche nach
einem Sender.
Drücken Sie ¢ , um
Suchen von Ensembles mit
höherer Frequenz.
Drücken Sie 4 , um
Suchen von Ensembles mit
niedrigerer Frequenz.
DEUTSCH
Wenn ein Ensemble empfangen wird,
Stoppt die Suche.
Wenn Sie die Suche abbrechen wollen,
bevor ein Ensemble empfangen wird,
drücken Sie erneut die Taste, die Sie zum
Start der Suche gedrückt haben.
4
Wählen Sie einen Dienst, den Sie
hören möchten.
Drücken Sie die Taste 5
(Nach-oben), um den
nächsten Dienst
auszuwählen.
Drücken Sie die Taste ∞
(Nach-unten), um den
vorherigen Dienst
auszuwählen.
So ändern Sie die Displayinformationen,
während Sie ein Ensemble einstellen
Normalerweise wird der Name des Dienstes im
Display angezeigt.
Wenn Sie die Displayinformationen ändern
möchten, drücken Sie die Taste DISP (Display).
Wenn Sie diese Taste mehrfach
hintereinander drücken, werden
folgende Informationen einen
Augenblick lang im Display
angezeigt.
So stellen Sie ein bestimmtes Ensemble
ein, ohne es zu suchen:
1 Drücken Sie die Taste DAB (FM AM), und
halten um den DAB-Tuner als Signalquelle zu
wählen.
2 Drücken Sie wiederholt DAB (FM AM), um das
DAB-Frequenzband (DAB1, DAB2 oder DAB3)
zu wählen.
3 Drücken Sie die Taste ¢ oder 4 ,
und halten Sie sie länger als 1 Sekunde
gedrückt.
4 Drücken Sie gegebenenfalls Taste ¢
oder 4 , bis das gewünschte Ensemble
eingestellt worden ist.
• Wenn Sie die Taste gedrückt halten, ändert
sich die Frequenz, bis Sie die Taste
loslassen.
34
So schalten Sie den UKW MW-LW-Tuner
wieder ein
Halten Sie die Taste DAB (FM AM) erneut gedrückt.
Page 73

Sichern von DAB-Diensten im
Speicher
Sie können maximal 6 DAB-Dienste in jedem
DAB-Frequenzband (DAB1, DAB2 und DAB3)
manuell speichern.
1
Wählen Sie den DAB-Tuner.
Wenn Sie diese Taste
mehrfach hintereinander
gedrückt halten, werden
abwechselnd DAB-Tuner
und UKW MW-LW-Tuner
(FM AM) aktiviert.
FM/AMDAB
2
Wählen Sie das DAB-Frequenzband
(DAB1, DAB2 oder DAB3).
Wenn Sie diese Taste
mehrfach hintereinander
drücken, ändert sich das
DAB-Frequenzband wie
folgt:
DAB1 DAB2 DAB3
(D1) (D2) (D3)
3
Stellen Sie das gewünschte
Ensemble ein.
4
Wählen Sie den gewünschten Dienst
des Ensemble.
5
Drücken Sie die Zifferntaste (in
diesem Beispiel 1), unter der Sie den
gewählten Dienst speichern wollen,
und halten Sie sie länger als
2 Sekunden gedrückt.
Das ausgewählte Frequenzband
bzw. die ausgewählte
Speicherplatznummer und „MEMO“
(Memory = Speicher) wird im
abwechselnd einen Augenblick lang.
6
Wiederholen Sie das oben
beschriebene Verfahren, um weitere
DAB-Dienste in anderen Kanälen zu
speichern.
Hinweise:
• Ein zuvor gespeicherter DAB-Dienst wird gelöscht,
wenn ein neuer DAB-Dienst unter derselben
Kanalnummer gespeichert wird.
• DAB-Dienste werden gelöscht, wenn die
Stromversorgung der Speichereinheit unterbrochen
wird (beispielsweise beim Auswechseln von
Batterie). Wenn dieser Fall eintritt, speichern Sie
die DAB-Dienste erneut.
DEUTSCH
Drücken Sie die Taste 5
(Nach-oben), um den
nächsten Dienst
auszuwählen.
Drücken Sie die Taste ∞
(Nach-unten), um den
vorherigen Dienst
auszuwählen.
35
Page 74

Einstellen eines
gespeicherten DAB-Dienstes
Sie können einen gespeicherten DAB-Dienst
ganz einfach einstellen.
Denken Sie daran, daß Sie die Dienste zunächst
speichern müssen. Wenn Sie sie noch nicht
gespeichert haben, lesen Sie die Informationen
siehe Seite 35.
1
Wählen Sie den DAB-Tuner.
DEUTSCH
Wenn Sie diese Taste mehrfach
hintereinander gedrückt
halten, werden abwechselnd
DAB-Tuner und UKW MW-LWTuner (FM AM) aktiviert.
FM/AMDAB
2
Wählen Sie das DAB-Frequenzband
(DAB1, DAB2 oder DAB3).
Wenn Sie diese Taste mehrfach
hintereinander drücken, ändert
sich das DAB-Frequenzband
wie folgt:
DAB1 DAB2 DAB3
(D1) (D2) (D3)
3
Wählen Sie die Nummer (1 – 6),
unter der Sie den gewünschten
DAB-Dienst gespeichert haben.
Welche weiteren
Möglichkeiten bietet DAB?
Automatisches Erfassen identischer
Sendungstypen (Empfang von
Alternativfrequenzen)
In den folgenden Fällen können Sie denselben
Sendungstyp hören.
• Sie empfangen einen DAB-Dienst:
Wenn Sie in einem Gebiet fahren, in dem Sie
einen Dienst nicht empfangen können, stellt
dieses Gerät automatisch ein anderes
Ensemble oder einen anderen UKW-RDSSender ein, der eine identische Sendung
ausstrahlt.
• Sie empfangen einen UKW-RDS-Sender:
Wenn Sie in einem Bereich fahren, in dem ein
DAB-Dienst dieselbe Sendung ausstrahlt wie
der UKW-RDS-Sender, wird bei diesem Gerät
automatisch der DAB-Dienst eingestellt.
36
Hinweis:
Wenn der Empfang zwischen DAB und UKW
umgeschaltet wird, wird die Lautstärke möglicherweise
unangenehm erhöht oder gesenkt. Diese Änderung der
Lautstärke liegt an der unterschiedlichen
Lautstärkeeinspeisung bei den Sendern, ist aber keine
Fehlfunktion dieses Geräts.
Stellen Sie den Eingangspegel des DAB-Tuners
ordnungsgemäß ein, um dies zu verhindern (siehe unten).
So passen Sie die DAB-Lautstärke an
Sie können den Eingangspegel des DAB-Tuners
anpassen und im Speicher sichern. Wenn Sie den
Eingangspegel an den UKW-Lautstärkepegel
anpassen, brauchen Sie die Lautstärke nicht jedes
Mal zu ändern, wenn Sie die Signalquelle wechseln
Werksseitig ist die DAB-Lautstärke auf den Wert
„00“ eingestellt.
•
Weitere Informationen finden Sie unter „Ändern der
allgemeinen Einstellungen (PSM)“ auf Seite 25.
1 Drücken Sie die Taste SEL (Auswahl), und halten
Sie sie länger als 2 Sekunden gedrückt, bis eine
der PSM-Elemente im Display angezeigt wird.
2 Drücken Sie die Taste ¢ oder 4 , um
die Funktion „DAB VOL (Lautstärke)“ auszuwählen.
3 Drehen Sie den Steuerregler, um die gewünschte
Lautstärke einzustellen.
Sie können die Lautstärke zwischen „–12“ bis „12“
einstellen.
4 Drücken Sie die Taste SEL (Auswahl), um die
Einstellung abzuschließen.
So empfangen Sie Alternativfrequenzen
Werkseitig sind alle alternativen
Empfangsmöglichkeiten aktiviert.
Weitere Informationen finden Sie unter „Ändern
der allgemeinen Einstellungen (PSM)“ auf Seite 25.
1
Drücken Sie die Taste SEL (Auswahl), und halten
Sie sie länger als 2 Sekunden gedrückt, bis eine
der PSM-Elemente im Display angezeigt wird.
2 Drücken Sie die Taste ¢ oder 4 um
die Funktion „DAB AF (Alternativfrequenzen)“
auszuwählen.
3 Drehen Sie Steuerregler, um den gewünschten
Modus auszuwählen.
• AF ON: Die Sendung wird in den
• AF OFF: Der Empfang von
Hinweis:
Wenn der Empfang von Alternativfrequenzen (für
DAB-Dienste) aktiviert ist, wird der Empfang mit
Sendernetzverfassung (RDS-Sender: siehe Seite 12)
ebenfalls automatisch aktiviert. Andererseits kann der
Empfang mit Sendernetzverfassung nicht deaktiviert
werden, ohne den Empfang von Alternativfrequenzen
zu deaktivieren.
4 Drücken Sie die Taste SEL (Auswahl), um die
Einstellung abzuschließen.
DAB-Diensten und UKW-RDSSendern verfolgt — Empfang von
Alternativfrequenzen. Die Anzeige
AF im Display schaltet sich ein (siehe
Seite 12).
Alternativfrequenzen wird deaktiviert.
.
Page 75

FEHLERSUCHE
Was wie ein Problem aussieht, muß nicht immer eines sein. Die folgenden Punkte vor einem Anruf bei
einer Kundendienststelle überprüfen.
Symptome
• Die Lautsprecher geben
keinen T on wieder .
• Automatisches Zurückstellen
des SSM (Sequentialspeicher
für starke Sender) funktioniert
nicht.
• Störgeräusche beim
Radiohören.
• Die T onwiedergabe ist
manchmal unterbrochen.
• „NO DISC“ (keine DISC) wird
im Display angezeigt.
• CD kann nicht abgespielt
werden.
• Die CD kann nicht
ausgeworfen werden.
Ursachen
Die Lautstärkenregelung ist
ganz zurückgestellt.
Anschlüsse sind falsch.
Signale sind zu schwach.
Die Antenne ist nicht fest
angeschlossen.
Sie fahren auf einer holprigen
Straße.
CD ist verkratzt.
Anschlüsse sind falsch.
Es ist keine CD eingelegt.
CD ist falsch herum eingelegt.
Der Inhalt der CD ist nicht mit
diesem Gerät kompatibel.
Die CD ist gesperrt.
Abhilfen
Auf optimales Niveau
einstellen.
Die Kabel und Anschlüsse
überprüfen.
Die Sender von Hand speichern.
DEUTSCH
Die Antenne fest anschließen.
Beenden Sie die CDWiedergabe, wenn Sie auf
unebenen Straßen fahren.
Wechseln Sie die CD aus.
Die Kabel und Anschlüsse
überprüfen.
CD richtig herum einlegen.
CD richtig herum einlegen.
Wechseln Sie die CD aus.
Heben Sie die CD-Sperre auf.
(Siehe seite 21).
• Die CD-R/CD-RW wird nicht
wiedergegeben.
• Titel auf der CD-R/CD-RW
können nicht angesteuert
werden.
• „RESET 1“ – „RESET 7“
(zurückstellen 1 – 7) wird im
Display angezeigt.
• „RESET 8“ (zurücksetzen 8)
wird im Display angezeigt.
• Dieses Gerät arbeitet
überhaupt nicht.
• Der CD-Wechsler arbeitet
überhaupt nicht.
Die CD-R/CD-RW ist nicht
abgeschlossen.
Das Gerät ist nicht richtig am
CD-Wechsler angeschlossen.
Der eingebaute Mikro-Computer
funktioniert aufgrund von Lärm
usw. nicht richtig.
Legen Sie eine abgeschlossene
CD-R/CD-RW ein oder
schließen Sie die CD-R/CD-RW
in dem Gerät ab, mit dem Sie
die CD gebrannt haben.
Die Rücksetztaste des
CD-Wechsler drücken.
Sie richtig herum einlegen.
Das Gerät und den CDWechsler richtig miteinander
verbinden und die Rücksetztaste
des CD-Wechsler drücken.
Drücken Sie die Rücksetztaste
auf der Blendenhalterung. (Die
Einstellung der Uhr und die
gespeicherten Sender werden
gelöscht). (Siehe Seite 2).
37
Page 76

WARTUNG
Handhaben der CDs
Mit diesem Gerät können CDs, CD-Rs und CDRWs wiedergegeben werden.
• Es können auch CDs mit CD-Text
wiedergegeben werden.
• Das Gerät ist nicht mit MP3 kompatibel.
Umgehen mit CDs
Beim Entnehmen einer
DEUTSCH
CD aus ihrer Hülle den
mittleren Halter der Hülle
nach unten drücken und
die CD herausheben,
wobei sie an der
Außenkante festgehalten wird.
• Die CD immer an der Außenkante festhalten.
Niemals die Aufnahmeoberfläche berühren.
Beim Aufbewahren einer CD in ihrer Hülle, die
CD behutsam um den mittleren Halter der Hülle
legen (mit der bedruckten Seite nach oben).
• Die CDs nach dem Gebrauch immer in ihren
Hüllen aufbewahren.
Zum Sauberhalten der
CDs
Eine schmutzige CD kann
evtl. nicht richtig abspielen.
Ist eine CD verschmutzt,
den Schmutz mit einem
weichen Tuch in gerader
Linie von der Mitte aus zur Außenkante
abwischen.
Zum Abspielen neuer
CDs
Neue CDs können an der
Innen- und Außenkante
rauhe Stellen haben.
Wird eine solche CD
verwendet, kann das Gerät
ein Abspielen der CD verweigern.
Zum Entfernen dieser rauhen Stellen die
Kanten mit einem Bleistift
oder Kugelschreiber o.ä. nachfahren.
Sprunghaftes Abspielen:
Ein sprunghaftes Abspielen kann auf sehr
holprigen Straßen vorkommen. Dadurch wird das
Gerät und die CD nicht beschädigt, ist jedoch sehr
ärgerlich.
Wir empfehlen von einem Abspielen von CDs auf
holprigen Straßen abzusehen.
38
Mittlerer Halter
Feuchtigkeitskondensation
In den folgenden Fällen kann Feuchtigkeit im
Innern des Geräts auf der Linse kondensieren:
• Nach dem Einschalten der Autoheizung.
• Wenn es im Auto feucht wird.
Sollte Feuchtigkeit kondensieren, können
Fehlfunktionen im Gerät auftreten. nicht richtig
funktionieren. Daher die CD auswerfen und das
Gerät für einige Stunden eingeschaltet lassen,
bis die Feuchtigkeit verdampft ist.
Bei der Wiedergabe einer CD-R oder CD-RW
Sie können selbstgebrannte CD-Rs oder CDRWs wiedergeben, die im Audio-CD-F ormat
gebrannt wurden. Je nach ihren Eigenschaften
und Aufnahmezustand werden sie unter
Umständen nicht wiedergegeben.
• Vom Benutzer zusammengestellte gebrannte
CD-Rs und mehrfach brennbare CD-RWs
können nur abgespielt werden, wenn sie
bereits als „fertig“ markiert wurden.
• Die jeweilige Gebrauchsanweisung oder
Vorsichthinweise sorgfältig durchlesen, bevor
CD-Rs bzw. CD-RWs abgespielt werden.
• Einige CD-Rs bzw. CD-RWs lassen sich auf
diesem Gerät aufgrund ihrer
CD-Eigenschaften, einer Beschädigung oder
Flecken auf der CD oder einer schmutzigen
CD-Player-Linse nicht abspielen.
• CD-Rs bzw. CD-RWs reagieren empfindlich auf
hohe Temperaturen oder Luftfeuchtigkeit und
dürfen daher nicht im Wagen gelassen werden.
• CD-RWs brauchen unter Umständen mehr Zeit
zum Auslesen.
(Das liegt daran, dass das Reflexionsvermögen
der CD-RWs geringer als das von
herkömmlichen CDs ist).
VORSICHT:
• Keine Single-CDs (8 cm) im Ladeschlitz einlegen.
(Diese CDs können nicht ausgeworfen werden!)
• Keine CDs mit ungewöhnlicher Form einlegen —
z.B. Herz- oder Blumenform, da das Probleme
bereitet.
• CDs nicht dem direkten Sonnenlicht und einer
Wärmequelle aussetzen oder sie an einem Ort
aufbewahren, der hohen Temperaturen oder
Feuchtigkeit unterliegt. plattes nicht im Auto
lassen.
• Keine Lösungsmittel (z.B. konventionelle
Schallplattenreinger, -sprays, Verdünner, Benzin
usw.) zum Reinigen der CDs verwenden.
Page 77

TECHNISCHE DATEN
AUDIO-VERSTÄRKERTEIL
Max. Leistungsabgabe:
Vorne: 50 W pro Kanal
Hinten: 50 W pro Kanal
Kontinuierliche Leistungsabgabe (RMS):
Vorne: 19 W pro Kanal an 4 Ω, 40 Hz bis
20 000 Hz bei nicht mehr als 0,8%
Gesamtklirrfaktor.
Hinten: 19 W pro Kanal an 4 Ω, 40 Hz bis
20 000 Hz bei nicht mehr als 0,8%
Gesamtklirrfaktor.
Last-Impedanz: 4 Ω (4 Ω bis 8 Ω zulässig)
Tonregelbereich:
Baß: ±11 dB bei 100 Hz
Höhen: ±11 dB bei 10 kHz
Frequenzgang: 40 Hz bis 20 000 Hz
Signal/Störabstand: 70 dB
Zusatzgerät-Eingangsbuchse:
(3,5 mm Stereo-Minibuchse)
(analog)
Line-Ausgangspegel/Impedanz:
KD-SX992R: 4,0 V pro 20 kΩ Last
KD-SX921R: 2,0 V pro 20 kΩ Last
Ausgangsimpedanz: 1 kΩ
TUNER-TEIL
Frequenzbereich:
UKW: 87,5 MHz bis 108,0 MHz
MW-/LW-: (MW-) 531 kHz bis 1 620 kHz
(LW-) 144 kHz bis 279 kHz
CD-SPIELERTEIL
Typ: Kompakt-CD-Spieler
Signalerkennungssystem: kontaktlose,
optische Aufnahme (Halbleiterlaser)
Anz. der Kanäle: 2 Kanäle (Stereo)
Frequenzgang: 5 Hz bis 20 000 Hz
Dynamikbereich: 96 dB
Signal/Störabstand: 98 dB
Tonhöhenschwankung:
unter meßbarem Grenzwert
DEUTSCH
ALLGEMEIN
Spannungsversorgung:
Betriebsspannung: DC 14,4 V
(11 V bis 16 V zulässig)
Erdungssystem: Negative Masse
Zugelassene Arbeitstemperatur:
0°C bis +40°C
Abmessungen (B × H × T):
Einbaugröße:
182 mm × 52 mm × 150 mm
Bedienteilgröße:
188 mm × 58 mm × 14 mm
Gewicht: 1,4 kg (ausschließlich Zubehör)
Änderungen der Konstruktion und technischen Daten
ohne V or ankündigung möglich.
[UKW-Tuner]
Nutzbare Empfindlichkeit: 11,3 dBf (1,0 µV/75 Ω)
50 dB Geräuschberuhigung:
16,3 dBf (1,8 µV/75 Ω)
Ausweichkanalabstimmschärfe (400 kHz): 65 dB
Frequenzgang: 40 Hz bis 15 000 Hz
Stereotrennabstand: 30 dB
Einfangsverhältnis: 1,5 dB
[AM-Tuner]
Empfindlichkeit: 20 µV
Trennschärfe: 35 dB
39
Page 78

Emplacement et reproduction des étiquettes
Panneau inférieur de l’appareil principal
CAUTION: Invisible laser
radiation when open and
interlock failed or defeated.
AVOID DIRECT EXPOSURE
TO BEAM. (e )
Nom/plaque d’identification
FRANÇAIS
Caution:
Attention:
This product contains a laser component
Ce produit contient un composant laser
of higher laser class than Class 1.
de classe laser supérieure à la Classe 1.
Comment réinitialiser votre appareil
Après avoir détaché le panneau de commande, appuyez sur la touche de réinitialisation sur le
support du panneau en utilisant la pointe d’un stylo-bille ou un outil similaire.
Cela réinitialisera le microprocesseur intégré.
ADVARSEL: Usynlig la serstråling ved åbning, når
sikkerhedsafbrydere er ude
af funkti on. Undgåudsættelse for stråling. (d)
VARNING: Osynlig laser-
strålning när denna del
är öppnad och spärren
urkopplad. Betrakta ej
strålen. (s)
är
IMPORTANT POUR PRODUITS LASER
Précautions:
1.PRODUIT LASER CLASSE 1
2.ATTENTION: Radiation laser invisible quand l’appareil
est ouvert ou que le verrouillage est en panne ou
désactivé. Éviter une exposition directe au rayon.
3.ATTENTION: Ne pas ouvrir le volet supérieur. Il n’y a
pas de pièce réparable par l’utilisateur à l’intérieur.
Confier le service après-vente à un personnel qualifié.
4.ATTENTION: Ce lecteur CD utilise une radiation laser
invisible, toutefois, il est équipé de commutateurs de
sécurité qui empêchent l’émission de radiation en
retirant les disques. Il est dangereux de désactiver les
commutateurs de sécurité.
5.ATTENTION: L’utilisation des commandes des
réglages et effectuer des procédures autres que celles
spécifiées dans ce manuel peut provoquer une
exposition aux radiations dangereuses.
VARO : Avattaessa ja suojalukitus ohitettaessa olet
alttiina näkymättömälle
lasersäteilylle. Älä katso
säteeseen. (f)
Remarque:
Les ajustements que vous avez préréglés – tels que les canaux préréglés ou les ajustements sonores – seront
aussi effacés.
Remarque:
Pour des raisons de sécurité, une carte d’identification numérotée est fournie avec cet appareil, et le même
numéro d’identification est imprimé sur le châssis de l’appareil. Conserver cette carte dans un endroit sûr, elle
pourra aider les autorités pour identifier votre appareil en cas de vol.
AVANT D’UTILISER L’APPAREIL
*
*
Par sécurité....
• N’augmentez pas trop le volume car cela bloquerait
les sons de l’extérieur rendant la conduite danger euse.
• Arrêtez la voiture avant de réaliser toute opération
compliquée.
2
Température à l’intérieur de la voiture....
Si votre voiture est restée garée pendant longtemps dans
un climat chaud ou froid, attendez que la température à
l’intérieur de la voiture redevienne normale avant
d’utiliser l’appareil.
Page 79

Merci pour avoir acheté un produit JVC. Veuillez lire attentivement toutes les instr uctions avant
d’utiliser l’appareil afin de bien comprendre son fonctionnement et d’obtenir les meilleures
performances possibles.
TABLE DES MATIERES
Comment réinitialiser votre appareil......... 2
Comment utiliser la touche MODE ........... 3
EMPLACEMENT DES TOUCHES ......... 4
Panneau de commande ........................... 4
Préparation de la télécommande .............. 5
Télécommande ........................................ 6
FONCTIONNEMENT DE BASE ............ 7
Mise sous tension .................................... 7
FONCTIONNEMENT DE LA RADIO ...... 8
Ecoute de la radio.................................... 8
Mémorisation des stations........................ 10
Accord d’une station présélectionnée ...... 11
FONCTIONNEMENT RDS ................. 12
Présentation du RDS................................ 12
Autres fonctions RDS pratiques et
ajustements........................................... 16
FONCTIONNEMENT DU LECTEUR CD ... 19
Lecture d’un CD....................................... 19
Localisation d’une plage ou d’un point
particulier sur un CD .............................. 20
Sélection des modes de lecture de CD .... 20
Interdiction de l’éjection de CD................. 21
Lecture des CD Text ................................. 21
AJUSTEMENT DU SON ................... 22
Ajustement du son................................... 22
Sélection des modes sonores préréglés
(C-EQ: égaliseur personnalisé) ............. 23
Mémorisation de votre propre
ajustement sonore ................................. 24
AUTRES FONCTIONS PRINCIPALES .... 25
Réglage de l’horloge................................. 25
Modification des réglages généraux
(PSM) .................................................... 25
Détachement du panneau de
commande ............................................ 29
FONCTIONNEMENT DU CHANGEUR CD ... 30
Lecture de CD ......................................... 30
Sélection des modes de lecture de CD .... 31
FONCTIONNEMENT DE L’APPAREIL
EXTERIEUR ................................ 32
Reproduction d’un appareil extérieur ....... 32
FONCTIONNEMENT DU TUNER DAB.... 33
Accord d’un ensemble et d’un service ..... 33
Mémorisation de services DAB ................ 35
Accord d’un service DAB
présélectionné....................................... 36
Ce que vous pouvez faire avec le DAB.... 36
DEPANNAGE ............................... 37
ENTRETIEN ................................ 38
Manipulation des CD ................................ 38
SPECIFICATIONS .......................... 39
FRANÇAIS
Comment utiliser la touche MODE:
Si vous appuyez sur MODE, l’appareil entre en mode de fonctions et les touches numériques
peuvent être utilisées comme touches de fonction.
Pour utiliser de nouveau ces touches comme touches numériques après avoir appuyer sur
MODE, attendez 5 secondes sans appuyer sur aucune touche, jusqu’à ce que le mode de
fonctions soit annulé.
• Appuyer de nouveau sur MODE annule aussi le mode de fonctions.
ATTENTION sur le réglage du volume
Les CD produisent très peu de bruit comparé avec les autres sources. Si le niveau de volume est ajusté, par
exemple, pour le tuner, les enceintes risquent d’être endommagées par l’augmentation soudaine du niveau de
sortie. Par conséquent, diminuez le volume avant de reproduire un disque et ajustez-le comme vous le
souhaitez pendant la lecture.
3
Page 80

EMPLACEMENT DES TOUCHES
Panneau de commande
Fenêtre d’affichage
f
jk
hg
s
l
/
d
z
x
1
24
37
56
FRANÇAIS
e
9
p
1 Touches 4 /¢
2 Touche 5 (haut)
3 Touche ∞ (bas)
4 Capteur de télécommande
5 Fenêtre d’affichage
6 Touche 0 (éjection)
7 Touche FM AM
8 Touche CD CD-CH (AUX)
9 Touche (attente/en service/sourdine)
p Touche (déblocage du panneau de
commande)
q Touche SEL (sélection)
w Molette de commande
e Touche EQ (égalisation)
r Touche MO (monaural)
t Touche RPT (répétition)
y Touche RND (aléatoire)
u Touches numériques
i Touche MODE
• Fonctionne aussi comme touches SSM quand elle
est pressée avec la touche DISP (affichage).
o Touche DISP (affichage)
• Fonctionne aussi comme touches SSM quand elle
est pressée avec la touche MODE.
4
q
w
8
t yr
; Touche TP PTY (émission d’informations
routières/type de programme)
a Entrée AUX (auxiliaire)
i o ;
u
a
Fenêtre d’affichage
s Affichage principal
d Indicateur de niveau de volume (ou audio)
Indicateur de courbe d’égalisation
f Indicateurs de réception du tuner
MO (monaural), ST (stéréo)
g Indicateur C-EQ (égaliseur personnalisé)
h Indicateur RND (aléatoire)
j Indicateur RPT (répétition)
k Indicateur LOUD (contour)
l Indicateurs de mode sonore
ROCK, CLASSIC, POPS, HIP HOP, JAZZ,
USER.
/ Affichage de la source/horloge
z Indicateurs RDS
AF, REG, TP, PTY
x Indicateur de présence de CD
Page 81

Préparation de la télécommande
Cette section est seulement pour le KD-SX992R.
Le KD-SX921R peut être commandé à distance
avec une télécommande en vente séparément.
Nous recommandons que vous utilisiez la
télécommande RM-RK50 avec votre appareil.
Avant d’utiliser la télécommande:
• Pointez la télécommande directement sur le
capteur de télécommande de l’appareil
principal. Assurez-vous qu’il n’y a pas
d’obstacle entre les deux.
Capteur de télécommande
2. Placez la pile.
Insérez la pile dans le porte-pile avec le pole
+ dirigé vers le haut de façon que la pile soit
bien fixée dans le porte-pile.
Pile bouton au
lithium (Produit
référencé: CR2025)
3. Remettez le porte-pile en place.
Insérez le porte-pile en le poussant jusqu’à ce
que vous entendiez un déclic.
• Ne pas exposer la télécommande à un
éclairage puissant (en plein soleil ou un
éclairage artificiel).
Mise en place de la pile
Lorsque la portée ou l’efficacité de la
télécommande diminue, remplacez la pile.
1. Retirez le porte-pile.
1) Poussez le porte-pile dans la direction de
la flèche en utilisant la pointe d’un stylobille ou un objet similaire.
2) Retirez le porte-pile.
(face arrière)
(face arrière)
AVERTISSEMENT:
• Conservez la pile hors de la portée des enfants.
Si un enfant venait à avaler une pile, consultez
immédiatement un médecin.
• Ne rechargez pas, ne court-circuitez pas, de
démontez pas, ne chauffez pas la pile et ne les
jetez pas dans le feu.
Le faire, pourrait amener la pile à émettre de la
chaleur, se fragmenter ou causer un incendie.
• Ne mélangez pas la pile avec d’autres objets
métalliques.
Le faire, pourrait amener la pile à émettre de la
chaleur, se fragmenter ou causer un incendie.
• Pour vous débarrassez des pile ou les conserver,
entourez-les de ruban adhésif et isolez-les.
Ne pas le faire, pourrait amener la pile à émettre
de la chaleur, se fragmenter ou causer un
incendie.
• Ne piquez pas la pile avec une broche métallique
ou un objet similaire.
Le faire, pourrait amener la pile à émettre de la
chaleur, se fragmenter ou causer un incendie.
FRANÇAIS
ATTENTION:
NE laissez pas la télécommande pendant
longtemps dans un endroit exposé aux rayons
directs du soleil (tel que le tableau de bord).
Sinon, elle risque d’être endommagée.
5
Page 82

Télécommande
Cette section est seulement pour le KD-SX992R.
Le KD-SX921R peut être commandé à distance
avec une télécommande en vente séparément.
Nous recommandons que vous utilisiez la
télécommande RM-RK50 avec votre appareil.
RM–RK50
SOUND
ATT
1
FRANÇAIS
2
3
R
U
SOURCE
D
F
4
VOL
1 • Met l’appareil sous tension si vous appuyez
sur cette touche quand l’appareil est hors
tension.
• Maintenez pressée jusqu’à ce que
“SEE YOU” apparaisse sur l’affichage pour
mettre l’appareil hors tension.
• Appuyez brièvement sur cette touche pour
couper le volume momentanément.
Appuyez de nouveau le rétablir.
VOL
5
6
7
3 • Choisissez de station préréglée lors de
l’écoute de la radio (ou du tuner DAB).
Chaque fois que vous appuyez sur la
touche, le numéro de station préréglée
(ou service) augmente et la station choisie
(ou service) est accordée.
• Permet de sauter au disque précédent
pendant l’écoute du changeur de CD.
Chaque fois que vous appuyez sur la
touche, le numéro de disque diminue et le
disque sélectionné commence la lecture.
4 Fonctionne de la même façon que la molette
de commande de l’appareil principal.
REMARQUE:
5 Choisissez le mode sonore (C-EQ).
Chaque fois que vous appuyez sur la touche, le
mode sonore (C-EQ) change.
6 Choisissez la source.
Chaque fois que vous appuyez sur la touche, la
source change.
7 • Recherche des stations en écoutant la
radio.
• Choisit un service lors de l’écoute du tuner
DAB quand la touche est pressée
brièvement.
• Recherche un ensemble lors de l’écoute du
tuner DAB si la touche est maintenue
pressée pendant plus d’une seconde.
• Fait défiler rapidement en avant ou en
inverse la plage si elle est maintenue
pressée en écoutant le disque.
• Saute au début des plages suivantes ou
revient au début de la plage courante
(ou des plages précédentes) si elle est
brièvement pressée en écoutant le disque.
Cette touche ne fonctionne pas pour
l’ajustement du mode de réglage
préféré.
2 • Choisissez la bande lors de l’écoute de la
radio (ou du tuner DAB).
Chaque fois que vous appuyez sur la
touche, la bande change.
• Permet de sauter au disque suivant pendant
l’écoute du changeur de CD.
Chaque fois que vous appuyez sur la
touche, le numéro de disque augmente et le
disque sélectionné commence la lecture.
6
Page 83

FONCTIONNEMENT DE BASE
12
3
Mise sous tension
1
Mettez l’appareil sous tension.
“HELLO” apparaît sur l’affichage.
Remarque sur le fonctionnement monotouche:
Quand vous choisissez tuner comme source à
l’étape 2 ci-dessous, l’appareil se met
automatiquement sous tension. Vous n’avez donc
pas besoin d’appuyer d’abord sur cette touche
pour mettre l’appareil sous tension.
2
Choisissez la source.
Pour choisir le tuner, appuyez
répétitivement sur FM AM.
FM1 FM2
AM
Pour choisir le lecteur CD ou le changeur
de CD (ou “LINE IN”*), appuyez
répétitivement sur CD CD-CH (AUX).
CD-CH
(ou LINE IN)*
* Si “LINE IN” n’apparaît pas sur l’affichage
(voir page 28), réglez “EXT IN” sur “LINE
IN”.
Pour choisir “AUX IN” (appareil connecté
à prise AUX IN sur le panneau de
commande), maintenez pressée CD CD-CH
(AUX).
FM3
CD
3
Ajustez le volume.
Pour augmenter le volume.
Pour diminuer le volume.
Indicateur de niveau de volume
Le niveau de volume apparaît
4
Ajustez le son comme vous le
ou audio (voir la page 27)
souhaitez. (Voir les pages 22 – 24).
Pour baisser le son instantanément
Appuyez brièvement sur pendant
l’écoute de n’importe quelle source. “ATT”
commence à clignoter sur l’affichage, et le niveau
de volume est baissé instantanément.
Pour revenir au niveau de volume précédent,
appuyez de nouveau brièvement sur la touche.
• Si vous tournez la molette de commande, vous
pouvez aussi rétablir le son.
Pour mettre l’appareil hors tension
Appuyez sur pendant plus d’une
seconde. “SEE YOU” apparaît, puis l’appareil se
met hors tension.
• Si vous mettez l’appareil hors tension lors
de l’écoute d’un disque, la lecture du CD
débutera à partir de l’endroit où elle a été
interrompue la prochaine fois que vous mettez
l’appareil sous tension.
FRANÇAIS
Remarque:
Si vous utilisez cet appareil pour la premièr e fois, réglez
l’horloge intégrée en vous reportant à la page 25.
7
Page 84

FONCTIONNEMENT DE LA RADIO
Ecoute de la radio
Vous pouvez utiliser la recherche automatique ou
l’accord manuel pour accorder une station
particulière.
FRANÇAIS
Recherche d’une station
automatiquement:
Recherche automatique
1
Choisissez la bande (FM1 – 3, AM).
FM1 FM2 FM3 AM
(F1) (F2) (F3)
2
Commencez la recherche d’une
station.
Appuyez sur ¢
pour rechercher des
stations de fréquences
supérieures.
Appuyez sur 4
pour rechercher des
stations de fréquences
inférieures.
Quand une station est accordée, la
recherche s’arrête.
Pour arrêter la recherche avant qu’une station
ne soit accordée, appuyez sur la même touche
que vous avez utilisée pour la recherche.
La bande choisie apparaît (puis change
sur l’affichage de l’horloge si “CLOCK”
est réglé sur “ON”).
Remarque:
Cet appareil a trois bandes FM (FM1, FM2,
FM3). Vous pouvez utiliser n’importe laquelle
pour écouter une station FM.
8
Page 85

Recherche manuelle d’une station:
Recherche manuelle
1
Choisissez la bande (FM1 – 3, AM).
FM1 FM2 FM3 AM
(F1) (F2) (F3)
Remarque:
Cet appareil a trois bandes FM (FM1, FM2,
FM3). Vous pouvez utiliser n’importe laquelle
pour écouter une station FM.
2
Maintenez pressée ¢ ou 4
jusqu’à ce que “MANU” (manuel)
clignote sur l’affichage.
La bande choisie apparaît.
• Si vous relâchez la touche, le mode
manuel est mis automatiquement hors
service après 5 secondes.
• Si vous maintenez la touche pressée, la
fréquence continue de changer (par
intervalle de 50 kHz pour la bande FM et
par intervalle de 9 kHz pour la bande AM –
PO/GO) jusqu’à ce que vous la relâchez.
Quand une émission FM stéréo est difficile
à recevoir:
1 Appuyez sur MODE pour entrer en
mode de fonction pendant l’écoute
d’une émission FM stéréo.
“MODE” apparaît sur la partie
inférieure de l’affichage et les
touches numériques fonctionnent
comme touches de fonction.
2 Appuyez sur MO (monaural)
pendant que “MODE” est sur
l’affichage de façon que
l’indicateur MO s’allume sur
l’affichage.
Ensuite, chaque fois que vous
appuyez sur MO (monaural),
l’indicateur MO s’allume et s’éteint
alternativement.
FRANÇAIS
3
Accordez une station souhaitée
pendant que “MANU” clignote.
Appuyez sur ¢
pour accorder des
stations de fréquences
supérieures.
Appuyez sur 4
pour accorder des
stations de fréquences
inférieures.
S’allume lors de la réception d’une émission FM
stéréo.
Lorsque l’indicateur MO est allumé sur
l’affichage, le son que vous entendez est
monaural mais la réception est améliorée
(l’indicateur ST s’éteint).
9
Page 86

Mémorisation des stations
Vous pouvez utiliser l’une des deux méthodes
suivantes pour mémoriser les stations reçues.
• Présélection automatique des stations FM:
SSM (Strong-station Sequential Memory)
• Présélection manuelle des stations FM et AM
Présélection automatique des stations
FM: SSM
Vous pouvez présélectionner 6 stations locales
dans chaque bande FM (FM1, FM2 et FM3).
1
Choisissez le numéro de la bande
FM (FM1 – 3) où vous souhaitez
mémoriser la station.
FRANÇAIS
Chaque fois que vous
appuyez sur la touche, la
bande change comme suit:
Présélection manuelle
Vous pouvez présélectionner manuellement un
maximum de 6 stations pour chaque bande
(FM1, FM2, FM3 et AM).
Ex.: Mémorisation de la station FM située à
88,3 MHz sur le numéro de présélection 1
de la bande FM1
1
Choisissez le numéro de la bande
(FM1 – 3, AM) où vous souhaitez
mémoriser la station (dans cet
exemple, FM1).
Chaque fois que vous
appuyez sur la touche, la
bande change comme suit:
FM1 FM2 FM3 AM
(F1)
FM1 FM2 FM3 AM
(F1) (F2) (F3)
2
Maintenez pressées les deux
touches pendant plus de 2
secondes.
“SSM” apparaît, puis disparaît quand la
présélection automatique est terminée.
Les stations locales FM avec les signaux les plus
forts sont recherchées et mémorisées
automatiquement dans le numéro de bande que
vous avez choisi (FM1, FM2 ou FM3). Ces
stations sont mémorisées sur les touches de
présélection de station — No.1 (fréquence la plus
basse) à No.6 (fréquence la plus haute).
Quand la présélection est terminée, la station
mémorisée automatiquement sur la touche de
présélection de station 1 est accordée
automatiquement.
10
2
Accordez une station (dans cet
exemple à 88,3 MHz).
Appuyez sur ¢
pour accorder des
stations de fréquences
supérieures.
Appuyez sur 4
pour accorder des
stations de fréquences
inférieures.
Page 87

3
Maintenez pressée la touche
numérique (dans cet exemple, 1)
pendant plus de 2 secondes.
Le numéro de bande/préréglage et “MEMO”
(mémoire) choisi apparaît alternativement
pendant quelques instants.
Accord d’une station
présélectionnée
Vous pouvez accorder facilement une station
présélectionnée.
Rappelez-vous que vous devez d’abord
mémoriser les stations. Si vous ne les avez pas
encore mémorisées, référez-vous à
“Mémorisation des stations” à les pages 10 et 11.
1
Choisissez la bande (FM1 – 3, AM).
4
Répétez la procédure ci-dessus pour
mémoriser d’autres stations sur
d’autres numéros de présélection.
Remarques:
• La station précédemment présélectionnée est effacée
quand une nouvelle station est mémorisée sur le
même numéro de présélection.
• Les stations présélectionnées sont effacées si
l’alimentation du circuit mémoire est interrompue
(par exemple, pendant le changement de la batterie).
Si cela se produit, présélectionnez de nouveau les
stations.
FM1 FM2 FM3 AM
(F1) (F2) (F3)
2
Choisissez le numéro (1 – 6) de la
station présélectionnée souhaitée.
FRANÇAIS
11
Page 88

FONCTIONNEMENT RDS
Présentation du RDS
Le RDS (Radio Data System) permet aux
stations FM d’envoyer un signal supplémentaire
en même temps que les signaux de leurs
programmes ordinaires. Par exemple, les
stations envoient leur nom, de même que des
informations sur le type de programme qu’elle
diffusent, comme par exemple du sport, de la
musique, etc.
Un autre avantage de la fonction RDS est appelé
“Enhanced Other Networks”. En utilisant les
données Enhanced Other Networks envoyées
d’une station, vous pouvez accorder une station
différente d’un autre réseau diffusant votre
programme favori ou des informations routières
pendant que vous écoutez un autre programme
FRANÇAIS
ou une autre source, comme par exemple une
CD.
A l’aide des données RDS qu’il reçoit, c’est
appareil peut faire les choses suivantes:
• Localisation du même programme
automatiquement (Réception de suivi de
réseau)
• Attente de réception TA (Informations routières)
ou votre programme favori
• Recherche PTY (Type de programme)
• Recherche de programme
• Et quelques autres informations routières
Pour utiliser la réception de suivi de réseau
Vous pouvez choisir un des différents modes de
poursuite en réseau pour continuer d’écouter le
même programme avec la meilleure réception
possible.
À l’expédition de l’usine, “AF” est choisi.
• AF: Le suivi de réseau est en service
avec la régionalisation réglée sur
“éteint”.
Avec ce réglage, l’appareil passe sur
une autre station dans le même
réseau quand le signal de réception
de la station actuelle devient faible.
(Dans ce mode, le programme peut
être différent du programme
actuellement reçu).
L’indicateur AF s’allume mais pas
l’indicateur REG.
• AF REG: Le suivi de réseau est en service et
la régionalisation est réglée sur
“allume”.
Avec ce réglage, l’appareil passe sur
une autre station dans le même
réseau, diffusant le programme,
quand le signal de réception de la
station actuelle devient faible.
Les indicateurs AF et REG s’allument
tous les deux.
Localisation du même programme
automatiquement (Réception de suivi
de réseau)
Lorsque vous travaillez dans une région où la
réception FM n’est pas bonne, le tuner intégré
dans cet appareil accorde automatiquement une
autre station RDS diffusant le même programme
mais avec un signal plus fort. De cette façon,
vous pouvez continuer à écouter le même
programme avec la meilleure réception possible,
où que vous alliez. (Voir l’illustration à la page
suivante).
Deux types de données RDS sont utilisés pour
que la réception de suivi de réseau fonctionne
correctement — les données PI (Identification de
programme) et AF (Fréquence alternative).
Si vous ne recevez pas ces données
correctement de la station RDS que vous
écoutez, la réception de suivi de réseau ne
fonctionnera pas.
12
• OFF: Le suivi de réseau est hors service.
Aucun des indicateurs AF et REG ne
s’allume.
Indicateur AF
Remarque:
Si un tuner DAB est connecté et que la réception
alternée (pour les services DAB) est en service, la
réception de suivi de réseau est aussi mise en service
automatiquement. Inversement, la réception de suivi
de réseau ne peut pas être mise hors service sans
mettre hors service la réception alternée. (Voir la
page 36).
Indicateur REG
Page 89

1
Maintenez pressée SEL (sélection)
pendant plus de 2 secondes de
façon que l’un des éléments PSM
apparaisse sur l’affichage.
(PSM: voir la page 26).
2
Choisissez “AF-REG (fréquence
alternative/réception locale)” s’il
n’apparaît pas sur l’affichage.
3
Choisissez le mode – “AF”,
“AF REG” ou “OFF”.
4
Terminez le réglage.
Le même programme peut être reçu sur
différente fréquences.
Programme 1
émit sur la
fréquence A
Programme 1
émit sur la
fréquence B
Programme 1
émit sur la
fréquence C
Programme 1
émit sur la
fréquence E
Programme 1
émit sur la
fréquence D
Utilisation de l’attente de réception TA
L’attente de réception TA permet à l’appareil de
commuter temporairement sur des informations
routières (TA) à partir de la source actuelle (une
autre station FM, un CD ou un autre appareil
connecté).
• L’attente de réception TA ne fonctionnera pas si
vous écoutez une station AM.
7 Si la source actuelle est une station FM,
l’indicateur TP s’allume ou clignote.
• Si l’indicateur TP s’allume, l’attente de
réception TA est en service.
Si une station commence à diffuser des
informations routières, “TRAFFIC” apparaît
sur l’affichage et cet appareil accorde
automatiquement la station. Le volume
change sur le niveau de volume TA préréglé
(voir la page 17) et vous pouvez écouter les
informations routières.
• Si l’indicateur TP clignote, l’attente de
réception TA n’est pas encore en service car
la station reçue actuellement ne fourni pas de
signaux utilisés pour l’attente de réception TA.
Pour mettre en service l’attente de réception
TA, vous devez accorder une autre station
fournissant ces signaux. Appuyez sur ¢
ou 4 pour rechercher une telle station.
Quand une station fournissant ces signaux
est accordée, l’indicateur TP s’arrête de
clignoter et reste allumé. Maintenant,
l’attente de réception TA est en service.
7 Si la source actuelle n’est pas une station
FM, l’indicateur TP s’allume.
Si une station commence à diffuser des
informations routières, “TRAFFIC” apparaît sur
l’affichage, cet appareil change
automatiquement la source et accorde la
station.
Pour mettre hors service l’attente de
réception T A, appuyez de nouveau sur TP PTY.
FRANÇAIS
13
Page 90

Utilisation de l’attente de réception PTY
L’attente de réception PTY permet à l’appareil de
commuter temporairement sur votre programme
favori (PTY: Type de programme) à partir de la
source actuelle (une autre station FM, un CD ou
un autre appareil connecté).
• L’attente de réception PTY ne fonctionnera pas si
vous écoutez une station AM.
Pour choisir votre programme favori pour
l’attente de réception PTY
Vous pouvez choisir votre type de programme
préféré pour l’attente de réception PTY.
À l’expédition de l’usine, l’attente de réception
PTY est hors service. (“OFF” est choisi pour
l’attente de réception PTY).
FRANÇAIS
1
Maintenez pressée SEL (sélection)
pendant plus de 2 secondes de
façon que l’un des éléments PSM
apparaisse sur l’affichage.
(PSM: voir la page 26).
2
Choisissez “PTY STBY (attente)” s’il
n’apparaît pas sur l’affichage.
3
Choisissez l’un des 29 codes PTY.
(Voir la page 18).
Le nom du code choisi
apparaît sur l’affichage et
il est mémorisé.
• Pour annuler l’attente
de réception PTY,
choisissez “OFF”.
4
Terminez le réglage.
7 Si la source actuelle est une station FM,
l’indicateur PTY s’allume ou clignote.
• Si l’indicateur PTY s’allume, l’attente de
réception PTY est en service.
Si une station commence à diffuser le
programme PTY choisi, cet appareil
accorde automatiquement la station.
• Si l’indicateur PTY clignote, l’attente de
réception PTY n’est pas encore en
service car la station reçue actuellement
ne fourni pas de signaux utilisés pour
l’attente de réception PTY.
Pour mettre en service l’attente de
réception PTY, vous devez accorder
une autre station fournissant ces
signaux. Appuyez sur ¢ ou 4
pour rechercher une telle station.
Quand une station fournissant ces
signaux est accordée, l’indicateur PTY
s’arrête de clignoter et reste allumé.
Maintenant, l’attente de réception PTY
est en service.
7 Si la source actuelle n’est pas une
station FM, l’indicateur PTY s’allume.
Si une station commence à diffuser le
programme PTY choisi, cet appareil
change automatiquement la source et
accorde la station.
Pour mettre hors service l’attente de
réception PTY, choisissez “OFF” à l’étape 3 de
la colonne de gauche. L’indicateur PTY disparaît.
14
Page 91

Recherche de votre programme préférée
Vous pouv ez rechercher n’importe quel code PTY.
De plus, vous pouvez mémoriser vos 6 types de
programme préférés sur les touches numériques.
Lors de l’expédition de l’usine, les 6 types de
programme suivants ont été mémorisés sur les
touches numériques (1 à 6).
Pour mémoriser vos types de programme
préférés, référez-vous à la procédure ci-
dessous.
Pour rechercher votre type de programme
préféré, voir la page 16.
1
POP M
45
CLASSICS
2
ROCK M EASY M
AFFAIRS
Pour mémoriser vos types de programme
préférée
1
Maintenez pressée sur TP PTY
pendant plus de 2 secondes.
3
6
VARIED
2
Choisissez l’un des 29 codes PTY.
(Voir la page 18).
Le nom du code choisi
apparaît sur l’affichage.
3
Maintenez pressée la touche
numérique pendant plus de 2
secondes pour mémoriser le code
PTY choisi sur le numéro de
préréglage souhaité.
“MEMO” et le numéro de préréglage PTY
alternent sur l’affichage.
4
Appuyez de nouveau sur TP PTY.
FRANÇAIS
Le dernier code PTY choisi apparaît.
15
Page 92

Pour rechercher votre type de programme
préférée
1
Maintenez pressée sur TP PTY
pendant plus de 2 secondes pendant
l’écoute d’une station FM.
Le dernier code PTY choisi apparaît.
2
Choisissez l’un de codes PTY.
FRANÇAIS
OU
Ex.: Quand “ROCK M” est choisi
3
Appuyez sur ¢ ou 4 pour
démarrer la recherche PTY pour
votre programme préféré.
Autres fonctions RDS
pratiques et ajustements
Sélection automatique de la station
lors de l’utilisation des touches
numériques
Habituellement quand vous appuyez sur une
touche numérique, la station préréglée est
accordée.
Cependant si la station préréglée est une station
RDS, quelque chose de différent se produit. Si le
signal de la station préréglée n’est pas
suffisamment fort pour assurer une bonne
réception, cet appareil, en utilisant les données
AF, accorde une autre station diffusant le même
programme que la station préréglée originale.
(Recherche de programme)
• L’appareil met un certain temps pour accorder
une autre station en utilisant la recherche de
programme.
Pour mettre en service la recherche de
programme, suivez la procédure ci-dessous.
• Référez-vous aussi à “Modification des réglages
généraux (PSM)” à la page 25.
1 Maintenez pressée SEL (sélection) pendant
plus de 2 secondes de façon que l’un des
éléments PSM apparaisse sur l’affichage.
2 Appuyez sur ¢ ou 4 pour choisir
“P(Programme)-SEARCH”.
3 Tournez la molette de commande dans le sens
des aiguilles d’une montre pour choisir “ON”.
La recherche de programme est maintenant en
service.
4 Appuyez sur SEL (sélection) pour terminer le
réglage.
• S’il y a une station diffusant un programme du
code PTY que vous avez choisi, cette station
est accordée.
• S’il n’y a aucune station diffusant un
programme du code PTY que vous avez choisi,
la station ne change pas.
Remarque:
Dans certaines régions, la recherche PTY ne
fonctionnera pas correctement.
16
Pour annuler la recherche de programme,
répétez la même procédure et choisissez “OFF”
à l’étape 3 en tournant la molette de commande
dans le sens contraire des aiguilles d’une montre.
Page 93

Modification du mode d’affichage lors
de l’écoute d’une station FM
Vous pouvez changer l’indication originale de
l’affichage du nom de la station (PS NAME), sur
la fréquence de la station (FREQ) ou lors de
l’écoute d’une station FM RDS.
• Référez-vous aussi à “Modification des réglages
généraux (PSM)” à la page 25.
1 Maintenez pressée SEL (sélection) pendant
plus de 2 secondes de façon que l’un des
éléments PSM apparaisse sur l’affichage.
2 Appuyez sur ¢ ou 4 pour choisir
“TU DISP (affichage du tuner)”.
3 Tournez la molette de commande pour régler
l’indication souhaitée (“PS NAME” ou “FREQ”).
4 Appuyez sur SEL (sélection) pour terminer le
réglage.
Remarque:
En appuyant sur DISP (affichage), vous pouvez aussi
changer l’affichage pendant l’écoute d’une station
FM RDS.
Chaque fois que vous appuyez sur la touche,
l’information suivante apparaît sur l’affichage:
Nom de la station
(PS NAME)
Fréquence de la station
(FREQ)
Type de programme
(PTY)
• Puis, l’affichage retourne à l’indication d’origine
après quelques secondes.
Réglage du niveau de volume TA
Vous pouvez prérégler le niveau de volume pour
l’attente de réception TA. Quand un programme
d’informations routières est reçu, le niveau de
volume change automatiquement sur le niveau
préréglé.
• Référez-vous aussi à “Modification des
réglages généraux (PSM)” à la page 25.
1 Maintenez pressée SEL (sélection) pendant
plus de 2 secondes de façon que l’un des
éléments PSM apparaisse sur l’affichage.
2 Appuyez sur ¢ ou 4 pour choisir
“TA VOL (volume)”.
3 Tournez la molette de commande pour régler le
volume souhaité.
Vous pouvez le régler entre “VOL 00” et
“VOL 50”.
4 Appuyez sur SEL (sélection) pour terminer le
réglage.
Ajustement automatique de l’horloge
Lors de l’expédition de l’usine, l’horloge intégrée
à cet appareil est réglée pour être réajustée
automatiquement en utilisant les données CT
(Clock Time) du signal RDS.
Si vous ne souhaitez pas utiliser l’ajustement
automatique de l’horloge, suivez la procédure
ci-dessous.
• Référez-vous aussi à “Modification des
réglages généraux (PSM)” à la page 25.
1 Maintenez pressée SEL (sélection) pendant
plus de 2 secondes de façon que l’un des
éléments PSM apparaisse sur l’affichage.
2 Appuyez sur ¢ ou 4 pour choisir
“AUTO ADJ (ajustment)”.
3 Tournez la molette de commande dans le sens
contraire des aiguilles d’une montre pour
choisir “OFF”.
L’ajustement automatique de l’horloge est
maintenant annulé.
4 Appuyez sur SEL (sélection) pour terminer le
réglage.
Pour régler à nouveau l’horloge, répétez la
même procédure en choisissant “ON” à l’étape 3
en tournant la molette de commande dans le
sens des aiguilles d’une montre.
Remarque:
L’appareil doit rester accordé sur la même station
pendant plus de 2 minutes après le réglage de “AUTO
ADJ” sur “ON”. Sinon, l’horloge ne sera pas ajustée.
(Cela vient du fait qu’il faut 2 minutes à l’appareil
pour capturer les données CT dans un signal RDS).
FRANÇAIS
17
Page 94

Codes PTY
NEWS: Information
AFFAIRS: Programmes d’actualité sur les
INFO: Programmes qui communiquent
SPORT: Evénements sportifs
EDUCATE: Programmes éducatifs
DRAMA: Pièces radio
CULTURE: Programmes culturels au niveau
SCIENCE: Programmes sur les sciences
VARIED: Autres programmes comme des
POP M: Musique Pop
FRANÇAIS
ROCK M: Musique de rock
EASY M: Musique d’écoute facile ou
LIGHT M: Musique légère
CLASSICS: Musique classique
OTHER M: Autre musique
WEATHER: Informations météo
FINANCE: Rapports sur le commerce, les
affaires ou l’information courante
des conseils sur une grande
variété de sujets
régional ou national
naturelles et la technologie
comédies ou des cérémonies
musique douce
affaires, la bourse, etc.
CHILDREN: Programmes de loisirs pour
les enfants
SOCIAL: Programmes sur des activités
sociales
RELIGION: Programmes traitant des
aspects de la foi ou de la
croyance, de la nature de
la vie ou d’éthique
PHONE IN: Programmes où les gens
peuvent exprimer leurs
opinions par téléphone
ou dans un forum
TRAVEL: Programmes sur des
destinations de voyage,
des voyages en groupe et
des idées et opportunités
de voyage
LEISURE: Programmes concernés par
des activités récréatives
comme le jardinage, la cuisine,
la pêche, etc.
JAZZ: Musique de jazz
COUNTRY: Musique régionale
NATION M: Musique populaire actuelle
d’un autre pays ou d’une autre
région, dans la langue de ce
pays
OLDIES: Musique pop classique
FOLK M: Musique folklorique
DOCUMENT: Programmes traitant de faits
réels, présentés dans un style
d’enquête
18
Page 95

FONCTIONNEMENT DU LECTEUR CD
Lecture d’un CD
1
Ouvrez le panneau de commande.
Remarque:
Quand un appareil extérieur est connecté à la prise
AUX sur le panneau de commande, faites attention
lors de la manipulation des CD.
2
Insérez un disque dans la fente de
chargement.
L’appareil se met en
marche, tire le disque
et commence la lecture
automatiquement.
3
Fermez le panneau de commande à la
main.
L’indicateur de présence de CD s’allume.
Durée de lecture
totale du disque inséré
Durée de
lecture écoulée Plage actuelle
L’indication de la source change sur
l’affichage de l’horloge si “CLOCK”
est réglé sur “ON”. (Voir la page 27).
Remarques:
• Si un disque se trouve déjà dans la fente d’insertion,
choisir “CD” comme source démarre la lecture du
CD.
• Quand un disque est inséré à l’envers, le disque est
éjecté automatiquement (si le panneau de
commande est ouvert). Si le panneau de commande
est fermé, “PLEASE” et “EJECT” apparaissent
alternativement.
• Si vous changer la source, la lecture du CD s’arrête
aussi (mais le CD n’est pas éjecté).
La prochaine fois que vous choisissez “CD” comme
source, la lecture du CD commence à partir de
l’endroit où elle a été interrompue.
Nombre total de plages
du disque inséré
FRANÇAIS
19
Page 96

Pour arrêter la lecture et éjecter le disque
Appuyez sur 0.
La lecture CD s’arrête, le panneau de commande
s’ouvre, puis le disque est éjecté
automatiquement de la fente de chargement.
Si vous changez la source, la lecture du disque
s’arrête aussi (mais dans ce cas, le disque n’est
pas éjecté).
Remarques:
• Si le CD éjecté n’est pas retiré avant environ 15
secondes, le disque est automatiquement réinséré
dans la fente d’insertion pour le protégé de la
poussière. (Dans ce cas, la lecture du CD ne
commence pas).
• Vous pouvez éjecter le disque quand l’appareil est
hors tension.
Pour aller directement à une plage
particulière
Appuyez sur la touche numérique
correspondante au numéro de plage souhaité
pour commencer sa reproduction.
• Pour choisir un numéro de plage de 1 – 6:
Appuyez brièvement sur 1 (7) – 6 (12).
• Pour choisir un numéro de plage de 7 – 12:
Maintenez pressé 1 (7) – 6 (12) pendant plus
d’une seconde.
FRANÇAIS
Localisation d’une plage ou
d’un point particulier sur un CD
Pour avancer rapidement ou inverser une
plage
Maintenez pressé ¢ ,
pendant la reproduction d’un
disque, pour avancer
rapidement la plage.
Maintenez pressé 4 ,
pendant la reproduction d’un
disque, pour inverser la plage.
Pour aller aux plages suivantes ou
précédentes
Appuyez brièvement sur
¢ pendant la lecture
d’un disque pour avancer
au début de la plage
suivante.
Chaque fois que vous
appuyez répétitivement
sur la touche, le début de
la plage suivante est
localisé et reproduit.
Appuyez brièvement sur
4 pendant la lecture
d’un disque pour revenir au
début de la plage actuelle.
Chaque fois que vous
appuyez répétitivement sur
la touche, le début de la
plage précédente est
20
localisé et reproduit.
Sélection des modes de
lecture de CD
Pour reproduire les plages dans un ordre
aléatoire (Lecture aléatoire)
Vous pouvez reproduire toutes les plages du
disque dans un ordre aléatoire.
1 Appuyez sur MODE pour entrer en
mode de fonction pendant l’écoute
d’un CD.
“MODE” apparaît sur la partie
inférieure de l’affichage et les
touches numériques fonctionnent
comme touches de fonction.
2 Appuyez sur RND (aléatoire),
pendant que “MODE” est sur
l’affichage de façon que l’indicateur
RND s’allume sur l’affichage.
Ensuite, chaque fois que vous
appuyez sur la RND (aléatoire), le
mode de lecture aléatoire se met
alternativement en et hors service.
Indicateur RND
Quand le mode de lecture aléatoire est en
service, l’indicateur RND s’allume sur l’affichage
et une plage choisie aléatoirement est reproduite.
Page 97

Pour reproduire les plages répétitivement
(Lecture répétée)
Vous pouvez reproduire la plage actuelle
répétitivement.
1 Appuyez sur MODE pour entrer en
mode de fonction pendant l’écoute
d’un CD.
“MODE” apparaît sur la partie
inférieure de l’affichage et les
touches numériques fonctionnent
comme touches de fonction.
2 Appuyez sur RPT (répétée),
pendant que “MODE” est sur
l’affichage de façon que
l’indicateur RPT s’allume sur
l’affichage.
Ensuite, chaque fois que vous
appuyez sur la RPT (répétée), le
mode de lecture répétée se met
alternativement en et hors service.
Numéro de plage de la plage
actuellement reproduite
Indicateur RPT
Quand le mode de lecture répétée est en service,
l’indicateur RPT s’allume sur l’affichage.
Pour annuler l’interdiction et déverrouiller le
CD, appuyez de nouveau sur pendant
plus de 2 secondes, tout en maintenant pressée
CD CD-CH.
“EJECT OK” clignote sur l’affichage pendant
environ 5 secondes et le lecteur disque est
déverrouillé.
Lecture des CD Text
Dans un CD Text, certaines informations à
propos du disque (disque titre, l’interprète et le
titre de la plage) sont enregistrées.
Vous pouvez afficher certaines de ces
informations sur l’affichage.
Choisissez le mode d’affichage de texte
lors de la reproduction d’un CD Text.
Chaque fois que vous appuyez sur la touche,
l’affichage change comme suit:
Titre du disque / Interprète
Titre de la plage
FRANÇAIS
Interdiction de l’éjection de CD
Vous pouvez interdire l’éjection d’un CD et le
verrouiller dans la fente d’insertion.
Tout en maintenant pressée CD CD-CH
(AUX), appuyez sur
plus de 2 secondes.
“NO EJECT” clignote sur l’affichage pendant
environ 5 secondes, le CD est verrouillé et ne
peut plus être éjecté.
pendant
No de la plage actuelle et
durèe de lecture ècoulèe
Remarques:
• L’affichage montre un maximum de 8 caractères à la
fois et défile s’il y en a plus. Référez-vous aussi à
“Pour choisir le mode de défilement – SCROLL” à
la page 28.
Certains caractères ou symboles n’apparaîtront pas
(et seront laissés en blanc) sur l’affichage.
(Ex. “ABCå!d#” ]“ABCA D ”)
• Quand vous appuyez sur DISP (affichage) lors de la
lecture d’un CD ordinaire, “NO NAME” apparaît
pour le titre/interprète du disque et pour le titre de
la plage.
21
Page 98

AJUSTEMENT DU SON
Ajustement du son
Vous pouvez ajuster les caractéristiques du son à
votre préférence.
1
Choisissez l’élément que vous
souhaitez ajuster.
Chaque fois que vous
appuyez sur la touche,
l’élément ajustable change
comme suit:
BAS
(graves)
VOL
(volume)
FRANÇAIS
Indication Pour: Plage
BAS Ajuster les graves. –06 (min.)
TRE Ajuster les aigus. –06 (min.)
FAD* Ajuster l’équilibre R06 (Arrièrer
BAL Ajuster l’équilibre L06 (Gauche
LOUD Relève les
WOOFER Ajuste le niveau
(seulement de sortie du
pour le caisson de grave.
KD-SX992R)
VOL Ajuster le volume. 00 (min.)
TRE
(aigus)
(
seulement pour
le
entre les enceintes seulement)
avant et arrière. |
entre les enceintes seulement)
gauche et droite. |
fréquences
basses et élevées
pour produire un |
son bien équilibré
à faible niveau de
volume.
FAD
(fader)
WOOFER
KD-SX992R)
BAL
(balance)
LOUD
(contour)
|
+06 (max.)
|
+06 (max.)
F06 (Avant
seulement)
R06 (Droit
seulement)
LOUD ON
LOUD OFF
0 (min.)
|
8 (max.)
|
50 (max.)
2
Ajustez le niveau.
Pour augmenter le niveau.
Pour diminuer le niveau.
La courbe d’égalisation change quand
vous ajustez les graves ou les aigus.
Remarque:
Normalement la molette de commande fonctionne
pour ajuster le volume. Alors, vous n’avez pas besoin
de choisir “VOL” pour ajuster le niveau de volume.
* Si vous utilisez un système à deux enceintes, réglez
le niveau de fader sur “00”.
22
Page 99

Sélection des modes sonores
préréglés (C-EQ: égaliseur
personnalisé)
Vous pouvez choisir un mode sonore préréglé
(C-EQ: égaliseur personnalisé) convenant à votre
genre de musique.
• Il y a un temps limite pour effectuer les étapes
suivantes. Si le réglage est annulé avant que
vous ne terminiez, recommencez à partir de
l’étape 1.
1
Appuyez sur MODE.
“MODE” apparaît sur la partie
inférieure de l’affichage et les
touches numériques
fonctionnent comme touches
de fonction.
2
Appuyez sur EQ (égalisation)
pendant que “MODE” apparaît sur
l’affichage.
Le dernier mode sonore choisi
est rappelé et appliqué à la
source actuelle.
L’indicateur de mode sonore clignote.
Ex.: Si vous avez choisi “USER” précédemment.
3
Choisissez le mode sonore que vous
souhaitez.
Chaque fois que vous appuyez
sur la touche, le mode sonore
change comme suit:
USER
ROCK
CLASSIC
POPSHIP HOPJAZZ
Indication Pour: Valeurs préréglées
BAS TRE LOUD
USER (Son plat) 00 00 OFF
ROCK Musique +03 +01 ON
rock ou disco
CLASSIC Musique +01 –02 OFF
classique
POPS Musique +04 +01 OFF
légère
HIP HOP Musique +02 00 ON
funk ou rap
JAZZ Musique +02 +03 OFF
Jazz
Remarque:
Vous pouvez ajuster chaque mode sonore selon vos
préférences et les mémoriser.
Si vous souhaitez ajuster et mémoriser votre propre
mode sonore original, référez-vous à “Mémorisation
de votre propre ajustement sonore” à la page 24.
Pour mémoriser un mode sonore
séparément pour chaque source de
lecture (lien C-EQ)
Vous pouvez choisir un mode sonore et le
mémoriser. Il sera rappelé chaque fois que vous
choisirez la même source et apparaîtra sur
l’affichage.
Un mode sonore peut être mémorisé pour
chacune des sources suivantes — FM1, FM2,
FM3, AM, CD et sources extérieures.
• Référez-vous aussi à “Modification des
réglages généraux (PSM)” à la page 25.
1 Maintenez pressée SEL (sélection) pendant
plus de 2 secondes de façon que l’un des
éléments PSM apparaisse sur l’affichage.
2 Appuyez sur ¢ ou 4 pour choisir
“CEQ LINK (Lien d’égaliseur personnalisé)”.
3 Tournez la molette de commande dans le
sens des aiguilles d’une montre pour choisir
“LINK ON”.
4 Appuyez sur SEL (sélection) pour terminer le
réglage.
Pour annuler le lien C-EQ, répétez la même
procédure et choisissez “LINK OFF” à l’étape 3.
FRANÇAIS
L’indicateur de mode
sonore clignote.
Ex.: Quand vous choisissez “ROCK”.
Remarque:
Si vous changez le réglage “CEQ LINK”, le mode
sonore (C-EQ) est réinitialisé automatiquement sur
“USER”.
23
Page 100

• Quand “CEQ LINK” est réglé sur “LINK ON”
Le mode sonore choisi peut être mémorisé
pour la source actuelle.
Chaque fois que vous choisissez la même
source, le même mode sonore est rappelé et
apparaît sur l’affichage. L’indicateur C-EQ
clignote aussi.
• Quand “CEQ LINK” est réglé sur “LINK OFF”
Les effets du mode sonore choisi s’appliquent
à toutes les sources.
Mémorisation de votre propre
ajustement sonore
Vous pouvez ajuster les modes sonores comme
vous le souhaitez et mémoriser votre propre
ajustement.
• Il y a un temps limite pour effectuer les étapes
FRANÇAIS
suivantes. Si le réglage est annulé avant que
vous ne terminiez, recommencez à partir de
l’étape 1.
1
Appuyez sur MODE.
“MODE” apparaît sur la partie
inférieure de l’affichage et les
touches numériques
fonctionnent comme touches
de fonction.
2
Appuyez sur EQ (égalisation)
pendant que “MODE” apparaît sur
l’affichage.
Le dernier mode sonore choisi
est rappelé et appliqué à la
source actuelle.
4
Choisissez l’élément que vous
souhaitez ajuster.
• Référez-vous à la page
22 pour les détails.
5
Ajustez le niveau.
Pour augmenter le niveau.
Pour diminuer le niveau.
La courbe d’égalisation
change quand vous ajustez
les graves ou les aigus.
Ex.: Quand vous ajustez les “TRE”.
6
Répétez les étapes 4 et 5 pour
ajuster les autres éléments.
7
Répétez la même procédure pour
ajuster les autres modes sonores.
24
L’indicateur de mode
sonore clignote.
Ex.: Si vous avez choisi “ROCK” précédemment.
3
Choisissez le mode sonore que vous
souhaitez ajuster.
Pour réinitialiser l’appareil aux réglages de
l’usine, répétez la même procédure et
réattribuez les valeurs préréglées du tableau de
la colonne à la page 23.
 Loading...