

Page 1
VCD/CD RECEIVER KD-SV3305
ENGLISH
ALAT PENERIMA VCD/CD KD-SV3305
For canceling the display demonstration, see page 7.
Untuk membatalkan tampilan demonstrasi, lihat halaman 7.
For installation and connections, refer to the separate manual.
Untuk instalasi dan penyambungan, lihat buku pedoman terpisah.
INDONESIA
INSTRUCTIONS
BUKU PETUNJUK
GET0471-007A
[UN]
Page 2
Thank you for purchasing a JVC product.
Please read all instructions carefully before operation, to ensure your complete understanding and to obtain the best
possible performance from the unit.
IMPORTANT FOR LASER PRODUCTS
ENGLISH
1. CLASS 1 LASER PRODUCT
2. CAUTION: Do not open the top cover. There are no user serviceable parts inside the unit; leave all servicing to
qualified service personnel.
3. CAUTION: Visible and/or invisible class 1M laser radiation when open. Do not view directly with optical
instruments.
4. REPRODUCTION OF LABEL: CAUTION LABEL, PLACED OUTSIDE THE UNIT.
WARNINGS:
[European Union only]
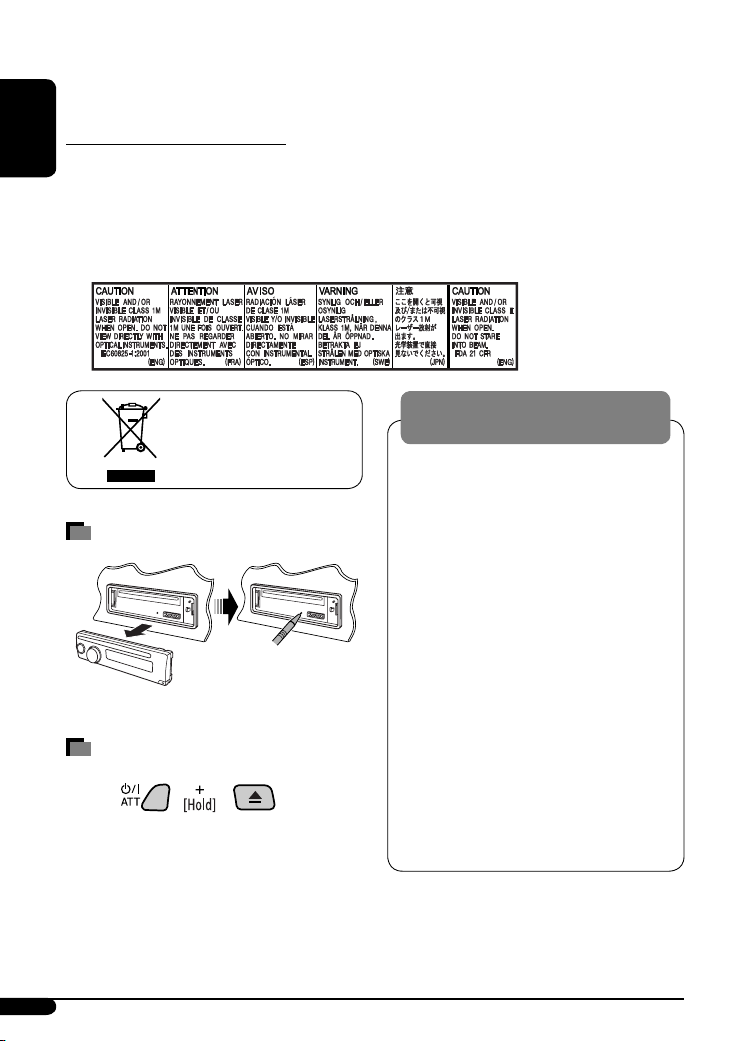
How to reset your unit
• Your preset adjustments will also be erased.
How to forcibly eject a disc
• Be careful not to drop the disc when it ejects.
• If this does not work, reset your unit.
To prevent accidents and damage
• DO NOT install any unit in locations where;
– it may obstruct the steering wheel and
gearshift lever operations.
– it may obstruct the operation of safety
devices such as air bags.
– it may obstruct visibility.
• DO NOT operate the unit while driving.
• If you need to operate the unit while
driving, be sure to look ahead carefully.
• The driver must not watch the monitor
while driving.
If the parking brake is not engaged,
“PARKING” flashes on the display, and
no playback picture will be shown on the
monitor.
– This warning appears only when the
parking brake wire is connected to the
parking brake system built in the car
(refer to the Installation/Connection
Manual).
2
Page 3
The following marks are used to indicate...
: Built-in VCD/CD player operations.
: External CD changer operations.
: Indicator displayed for the
corresponding operation.
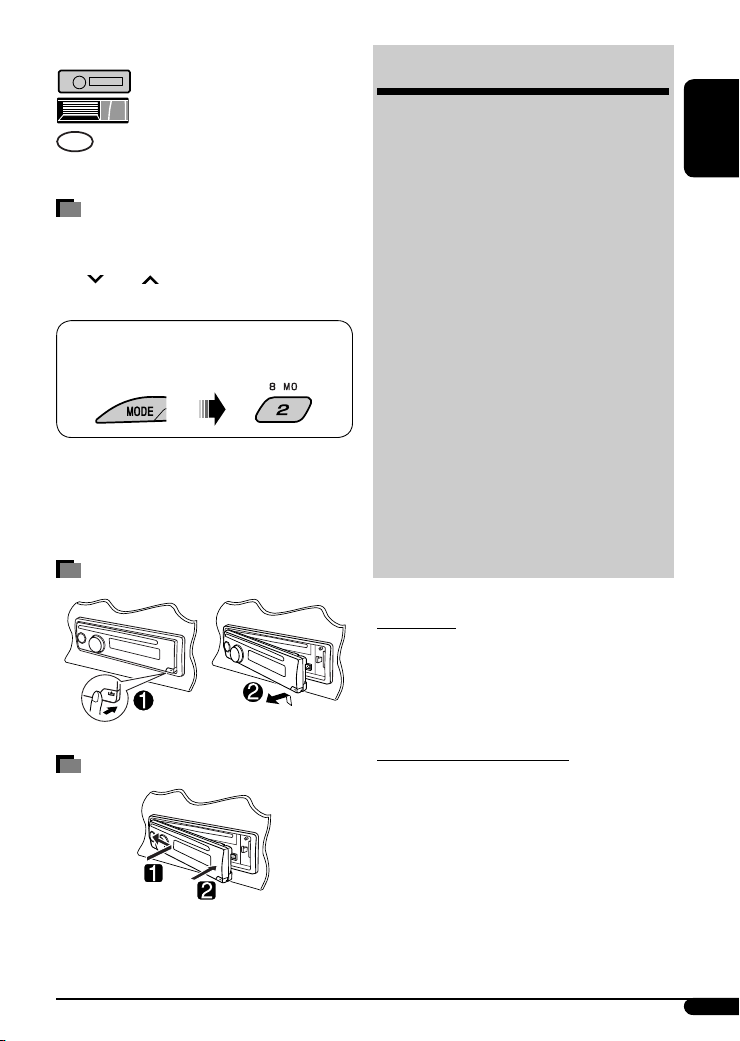
How to use the MODE button
If you press MODE, the unit goes into functions mode,
then the number buttons (except “1” and “4”) and
4 /¢ buttons work as different function
buttons.
Ex.: When number button 2 works as
MO (monaural) button.
To use these buttons for their original functions
again after pressing MODE, wait for 5 seconds
without pressing any of these buttons until the
functions mode is cleared or press MODE again.
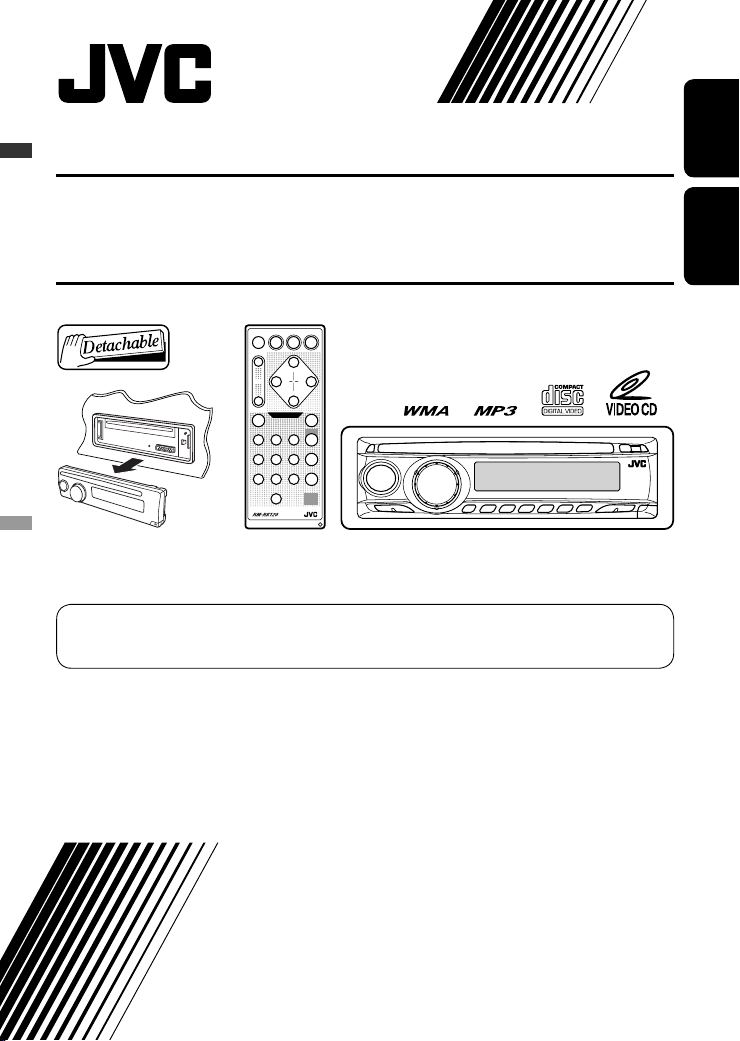
Detaching the control panel
CONTENTS
Control panel .................................. 4
Remote controller —
Getting started ................................ 7
Basic operations ................................................... 7
Radio operations ............................. 8
Disc operations ................................ 9
Playing a disc in the unit ..................................... 9
Playing discs in the CD changer ........................... 10
Sound adjustments .......................... 14
General settings — PSM ................... 15
iPod/D. player operations ................. 17
Other external component
operations ................................... 19
Maintenance ................................... 19
More about this unit ........................ 20
Troubleshooting .............................. 23
Specifications .................................. 25
For safety...
• Do not raise the volume level too much, as this will
block outside sounds, making driving dangerous.
• Stop the car before performing any complicated
operations.
RM-RK120 ............. 5
ENGLISH
Attaching the control panel
Temperature inside the car...
If you have parked the car for a long time in hot or cold
weather, wait until the temperature in the car becomes
normal before operating the unit.
3
Page 4
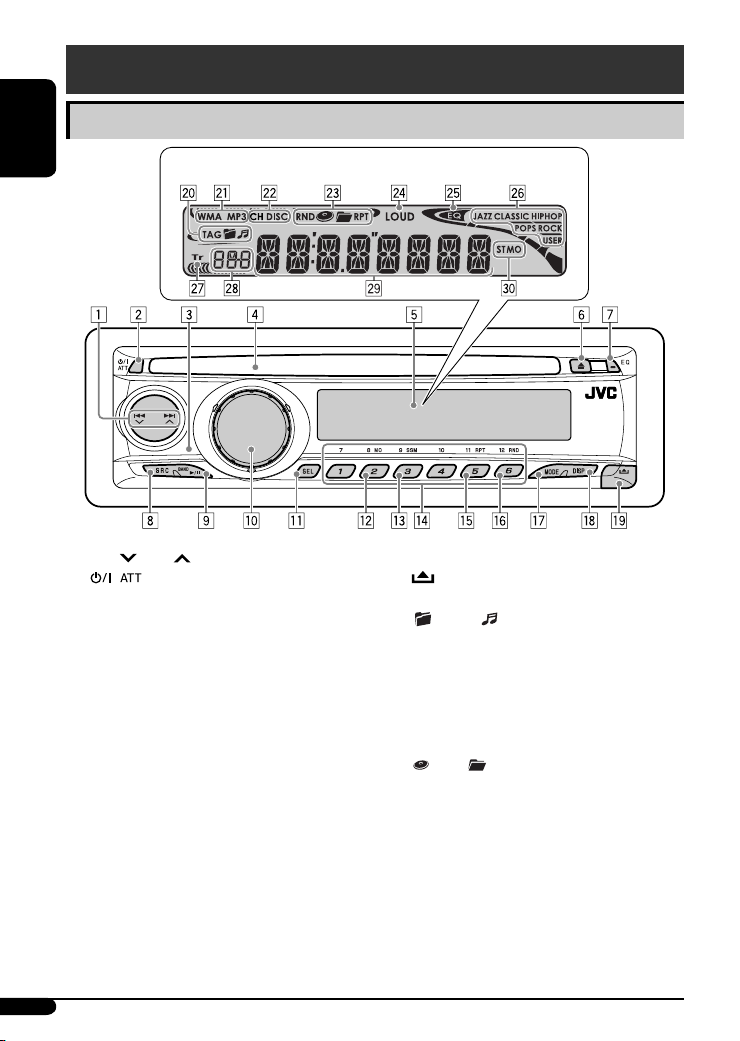
Control panel
Parts identification
ENGLISH
1 4 /¢ buttons
2 (standby/on attenuator) button
3 Remote sensor
Display window
DO NOT expose the remote sensor to strong light
(direct sunlight or artificial lighting).
4 Loading slot
5 Display window
6 0 (eject) button
7 EQ (equalizer) button
8 SRC (source) button
9 BAND button
6 (play/pause) button
p Control dial
q SEL (select) button
w MO (monaural) button
e SSM (Strong-station Sequential Memory) button
r Number buttons
t RPT (repeat) button
y RND (random) button
u MODE button
i DISP (display) button
o (control panel release) button
; Disc information indicators—TAG (ID3 Tag),
(folder), (track/file)
a Disc type indicators—WMA, MP3
s Playback source indicators—
CH: Lights up only when CD-CH is selected as the
playback source.
DISC: Lights up for the built-in CD player.
d Playback mode / item indicators— RND (random),
(disc), (folder), RPT (repeat)
f LOUD (loudness) indicator
g EQ (equalizer) indicator
h Sound mode (C-EQ: custom equalizer) indicators—
JAZZ, CLASSIC, HIP HOP, POPS, ROCK, USER
j Tr (track) indicator
k Source display / Volume level indicator
l Main display
/ Tuner reception indicators—ST (stereo),
MO (monaural)
4
Page 5
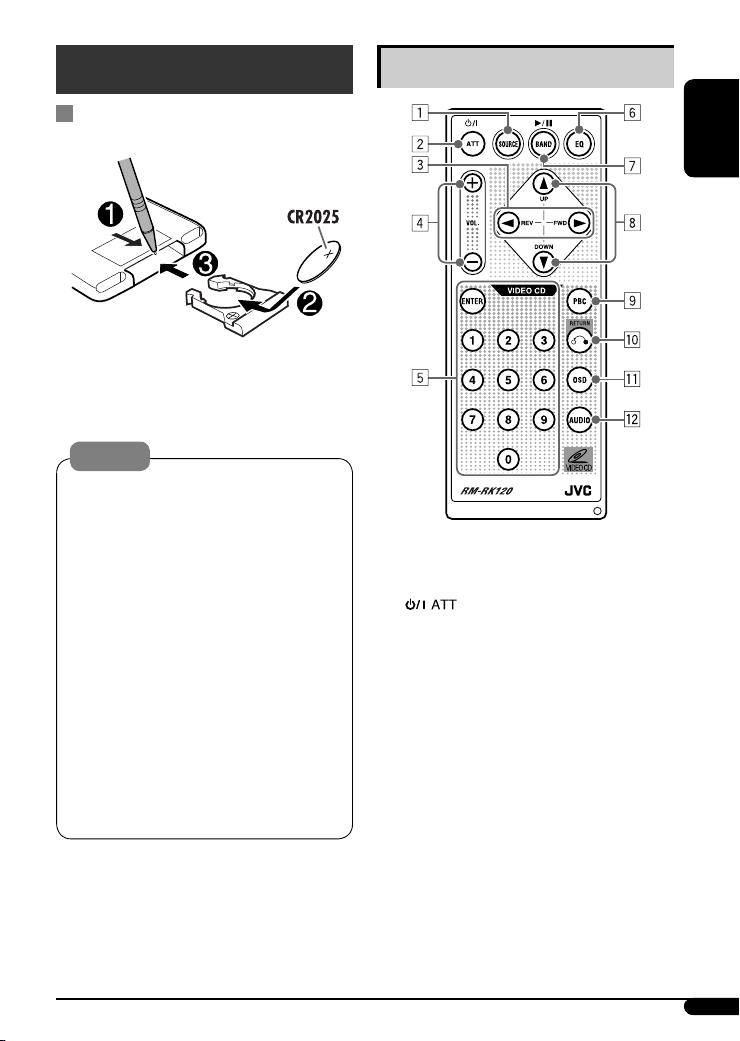
Remote controller — RM-RK120
Installing the lithium coin battery
(CR2025)
Aim the remote controller directly at the remote
sensor on the unit. Make sure there is no obstacle
in between.
Warning:
• Do not install any battery other than CR2025 or
its equivalent; otherwise, it may explode.
• Do not leave the remote controller in a place
(such as dashboards) exposed to direct sunlight
for a long time; otherwise, it may explode.
• Store the battery in a place where children
cannot reach to avoid risk of accident.
• To prevent the battery from over-heating,
cracking, or starting a fire:
– Do not recharge, short, disassemble, heat the
battery, or dispose of it in a fire.
– Do not leave the battery with other metallic
materials.
– Do not poke the battery with tweezers or similar
tools.
– Wrap the battery with tape and insulate when
throwing away or saving it.
Main elements and features
ENGLISH
1 SOURCE button
• Selects the playback source.
2 (standby/on attenuator) button
• Turns the power on if pressed briefly or
attenuates the sound when the power is on.
• Turns the power off if pressed and held.
3 2 REV (reverse) / FWD (forward) 3 buttons
• Searches for stations if pressed briefly.
• Fast-forwards or reverses the track if pressed and
held.
• Changes the tracks if pressed briefly.
• While listening to an Apple iPod or a JVC
D. player (in menu selecting mode):
– Selects an item if pressed briefly. (Then, press
DOWN ∞ to confirm the selection.)
– Skips 10 items at a time if pressed and held.
Continued on the next page
5
Page 6

4 VOL. + / – buttons
• Adjusts the volume level.
5 ENTER and number buttons
• Selects a track/file directly.
– Press the number button(s), then press ENTER.
– Not used for iPod/D. player operations.
ENGLISH
• Selects an item from the menu while playing
back a Video CD (VCD) in Playback Control (PBC)
function.
– Press the number button(s), then press ENTER.
• Selects the discs while operating the CD changer.
– To select disc number 1 – 6, press number
button 1 – 6 briefly.
– To select disc number 7 – 12, press and hold
number button 1 (7) – 6 (12).
6 EQ (equalizer) button
• Selects the sound mode (C-EQ: custom
equalizer).
7 BAND 6 button
• Changes the FM/AM bands.
• Stops disc playback temporarily. To resume
playback, press the button again.
– While playing a VCD, the playback scene at the
moment stops and remain still.
– Not used for CD changer, iPod, or D. player
operations.
8 5 UP / DOWN ∞ buttons
• Changes the preset stations.
• Changes the folder of the MP3/WMA discs if
pressed briefly.
• Changes the disc while operating the CD changer
if pressed and held.
• While listening to an iPod or a D. player:
– Pauses/stops or resumes playback with
DOWN ∞.
– Enters the main menu with 5 UP.
(Now 5 UP / DOWN ∞/2 REV / FWD 3 work
as the menu selecting buttons.)*
9 PBC (Playback Control) button
• Activates or deactivates the PBC function.
p RETURN button
• Returns to the previous menu while playing a
VCD in PBC function.
q OSD (On-Screen Display) button
• Turn on and off the OSD on the monitor.
w AUDIO button
• Selects the audio channel for VCD playback.
* 5 UP : Returns to the previous menu.
DOWN ∞ : Confirms the selection.
6
Page 7

Getting started
Basic operations
~ Turn on the power.
To drop the volume in a
moment (ATT)
To restore the sound, press the
button again.
To turn off the power
ENGLISH
Ÿ
* You cannot select these sources if they are not
ready or not connected.
! For FM/AM tuner
⁄ Adjust the volume.
Volume level appears.
@ Adjust the sound as you want. (See
page 14.)
Basic settings
• See also “General settings — PSM” on pages 15 and
16.
1
2
1 Canceling the display demonstrations
Select “DEMO,” then “DEMO OFF.”
2 Setting the clock
Select “CLOCK H” (hour), then adjust the hour.
Select “CLOCK M” (minute), then adjust the
minute.
3 Finish the procedure.
To check the current clock time while the
power is turned off
Caution on volume setting:
Discs produce very little noise compared with other
sources. Lower the volume before playing a disc
to avoid damaging the speakers by the sudden
increase of the output level.
7
Page 8

Radio operations
~
ENGLISH
When an FM stereo broadcast is hard to
receive
Ÿ
Lights up when receiving an FM stereo
broadcast with sufficient signal strength.
! Start searching for a station.
When a station is received, searching stops.
To stop searching, press the same button
again.
To tune in to a station manually
In step ! above...
1
2 Select a desired station frequency.
Lights up when monaural mode is activated.
Reception improves, but stereo effect will be lost.
To restore the stereo effect, repeat the same
procedure. “MONO OFF” appears and the MO indicator
goes off.
Storing stations in memory
You can preset six stations for each band.
FM station automatic presetting —
SSM (Strong-station Sequential
Memory)
1 Select the FM band (FM1 – FM3) you want to
store into.
2
3
“SSM” flashes, then disappears when automatic
presetting is over.
Local FM stations with the strongest signals are
searched and stored automatically in the FM band.
8
Page 9
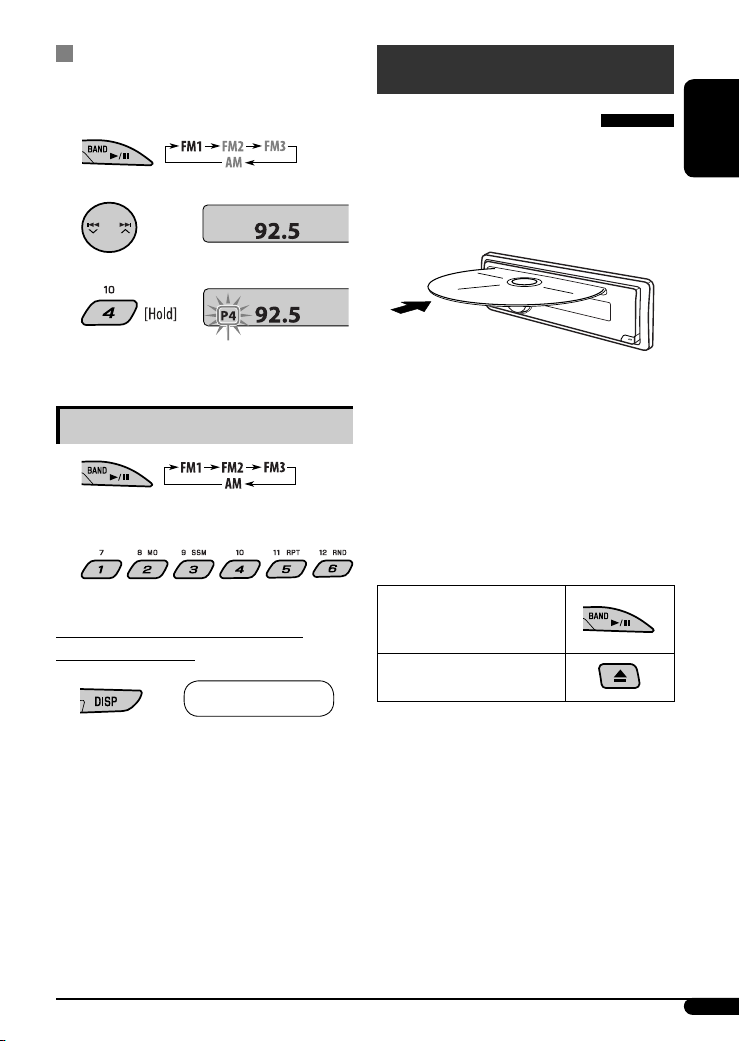
Manual presetting
Ex.: Storing FM station of 92.5 MHz into preset number
4 of the FM1 band.
1
2
3
Preset number flashes for a while.
Listening to a preset station
1
2 Select the preset station (1 – 6) you want.
To check the other information while
listening to the radio
Clock Ô Frequency
Disc operations
Playing a disc in the unit
All tracks will be played repeatedly until you change the
source or eject the disc.
• If a disc menu appears on the monitor while playing a
VCD with PBC, see page 11.
Before performing any operations, make sure the
following....
• Turn on the monitor and select the appropriate
monitor input before playing a VCD.
• If you turn on the monitor, you can also control the
MP3/WMA playback by referring to the monitor
screen (see page 12).
• Select the video system suitable for your monitor (see
page 16).
To stop play temporarily
To resume playback, press the
button again.
To stop play and eject the
disc
ENGLISH
Continued on the next page
9
Page 10
Playing discs in the CD changer
All discs in the magazine will be played repeatedly until
you change the source.
• Ejecting the magazine will also stop playing.
ENGLISH
~
* If you have changed the external input setting
to “EXT IN” (see page 16), you cannot select the
CD changer.
Ÿ Select a disc.
For disc number from 01 – 06:
To fast-forward or reverse the track
To go to the next or previous tracks
To go to the next or previous folders (only for
MP3 or WMA discs)
For MP3 discs:
For WMA discs:
For disc number from 07 – 12:
About MP3 and WMA discs
MP3 and WMA “tracks” (words “file” and “track” are
used interchangeably) are recorded in “folders.”
About the CD changer
It is recommended to use a JVC MP3-compatible CD
changer with your unit.
• You can also connect MP3-incompatible CD changers.
However, these units are not compatible with MP3
discs.
• You cannot use the CH-X99, CH-X100, and KD-MK
series CD changers with this unit.
• You cannot control and play any WMA or VCD disc in
the CD changer.
• Disc text information recorded in the CD Text can be
displayed when a JVC CD Text compatible CD changer
is connected.
• For connection, see Installation/Connection Manual
(separate volume).
1
2
To locate a particular track (for CD or VCD
with PBC set to “PBC OFF”) or folder (for MP3
or WMA discs) directly
To select a number from 01 – 06:
To select a number from 07 – 12:
• To use direct folder access on MP3/WMA discs, it
is required that folders are assigned with 2-digit
numbers at the beginning of their folder names—
01, 02, 03, and so on.
To select a particular track in a folder
(for MP3 or WMA discs):
10
Page 11
Playback Control (PBC) operations
On-Screen (OSD) information
This operation is only possible when using the
remote controller.
1 While playing a VCD....
PBC ON Ô PBC OFF
PBC ON : A menu appears on the monitor.
PBC OFF : Cancels.
• A menu may be a list of items, submenus, or
some moving pictures.
2 Select the item you want.
• To select an item from the submenus, repeat this
step.
The selected item starts playback automatically.
This operation is only possible when using the
remote controller.
You can check the track number and elapsed playing
time if the monitor is turned on.
While playing a disc....
• To turn off the On-Screen Display,
press the button again.
Current/total track number
Elapsed playing time
Selecting the audio channel
This operation is only possible when using the
remote controller.
You can select the audio channel to play. (This is
convenient when playing a Karaoke VCD.)
ENGLISH
To correct a mis-entry and to return to the
previous menu
STEREO : To listen to normal stereo (left/right)
playback.
MONO L : To listen to the L (left) audio channel.
MONO R : To listen to the R (right) audio channel.
• The audio channel is automatically set to “STEREO”
when you change the disc or source.
11
Page 12
MP3/WMA control screen operations
You can also control the playback of an MP3/WMA disc
ENGLISH
by referring to the monitor.
• The control screen automatically appears on the
monitor when you insert an MP3/WMA disc.
1 Artiste name* (only for MP3 discs)
• The artiste name will scroll on the monitor if it
cannot be shown at a time.
2 Operation mode—PLAY, PAUSE, FF (fast-forward),
FR (fast-reverse), SELECT (selected track number),
REPEAT TRACK, REPEAT FOLDER, REPEAT OFF,
RANDOM FOLDER, RANDOM DISC, RANDOM OFF
• Operation mode appears for a while on the
monitor.
3 Folder name*
4 Track title* (only for MP3 discs)
• The track title will scroll on the monitor if it
cannot be shown at a time.
5 Highlighted bar for the current file name*
6 OSD indication—Current/total track number,
Elapsed playing time
• Appears only if you turn on the OSD (see page
11).
7 Current list/total list number
8 Track list
• The monitor can show 12 tracks at a time and a
maximum of 239 tracks for a disc.
* Some symbols will not be shown (and will be
substituted or blanked) on the control screen.
To select a folder
To select a track
• Pressing these buttons repeatedly can also select
tracks from the previous/next folders.
• See also page 10 for using the buttons on the control
panel to select a folder or track.
Selecting the playback modes
You can use only one of the following playback modes
at a time.
• For VCD: While PBC (see page 11) is not in use.
1
2 Select your desired playback mode.
7 Repeat play
Mode Plays repeatedly
TRK RPT : The current track.
FLDR RPT*1 : All tracks of the current folder.
DISC RPT*2 : All tracks of the current disc.
RPT OFF : Cancels.
12
Page 13
7 Random play
Mode Plays at random
FLDR RND*
1
: All tracks of the current folder,
then tracks of the next folder and
so on.
DISC RND : All tracks of the current disc.
MAG RND*2 : All tracks of the inserted discs.
RND OFF : Cancels.
1
Only while playing an MP3 or a WMA disc.
*
*2 Only while playing discs in the CD changer.
Other main functions
Changing the display information
• For MP3 disc : When “TAG DISP” is set to “TAG OFF”
• For WMA disc :
: Clock with the current track number
: Elapsed playing time with the current track
number
1
*
If the current disc is an audio CD or a VCD, “NO NAME”
appears.
2
Only for the built-in CD player.
*
*3 If an MP3 file does not have Tag information, folder
name and file name appear. In this case, the TAG
indicator will not light up.
Prohibiting disc ejection
You can lock a disc in the loading slot.
ENGLISH
While playing an audio CD, a CD Text, or a VCD
with PBC set to “PBC OFF” (see page 11)
While playing an MP3 or a WMA*2 disc
• Only for MP3 disc : When “TAG DISP” is set to
“TAG ON” (see page 16)
To cancel the prohibition, repeat the same
procedure.
13
Page 14
Sound adjustments
You can select a preset sound mode suitable to the
music genre (C-EQ: custom equalizer).
ENGLISH
Adjusting the sound
You can adjust the sound characteristics to your
preference.
1
Preset values
Indication (For)
USER
(Flat sound)
ROCK
(Rock or disco music)
CLASSIC
(Classical music)
POPS
(Light music)
HIP HOP
(Funk or rap music)
JAZZ
(Jazz music)
BAS
TRE
LOUD
(bass)
(treble)
(loudness)
00 00 OFF
+03 +01 ON
+01 –02 OFF
+04 +01 OFF
+02 00 ON
+02 +03 OFF
2
Indication [Range]
1
(bass)
BAS*
Adjust the bass. [–06 to +06]
1
TRE*
(treble)
Adjust the treble. [–06 to +06]
2
(fader)
FAD*
Adjust the front and rear speaker balance. [R06 to F06]
BAL (balance)
Adjust the left and right speaker balance.
[L06 to R06]
1
(loudness)
LOUD*
Boost low and high frequencies to produce a wellbalanced sound at low volume level.
[LOUD ON or LOUD OFF]
VOL (volume)
Adjust the volume. [00 to 30 or 50*
1
*
When you adjust the bass, treble, or loudness, the
adjustment you have made is stored for the currently
selected sound mode (C-EQ) including “USER.”
*2 If you are using a two-speaker system, set the fader
level to “00.”
*3 Depending on the amplifier gain control setting. (See
page 16 for details.)
3
]
14
Page 15
General settings — PSM
You can change PSM (Preferred Setting Mode) items listed in the table that follows.
1
4 Repeat steps 2 and 3 to adjust other PSM
items if necessary.
ENGLISH
2 Select a PSM item.
3 Adjust the PSM item selected.
Indications Item
( : Initial)
DEMO
Display demonstration
CLOCK H
Hour adjustment
CLOCK M
Minute adjustment
DIMMER
Dimmer
TEL
Telephone muting
• DEMO ON
• DEMO OFF
1 – 12 [Initial: 1 (1:00)], [7]
00 – 59 [Initial: 00 (1:00)], [7]
• ON
• OFF
• MUTING 1/
MUTING 2:
• OFF
5 Finish the procedure.
Setting, [reference page]
: Display demonstration will be activated automatically if no
operation is done for about 20 seconds, [7].
: Cancels.
: Dims the display illumination of this unit.
: Cancels.
: Select either one which mutes the sounds while using a cellular
phone.
: Cancels.
Continued on the next page
15
Page 16

Indications Item
Setting, [reference page]
( : Initial)
SCROLL *
Scroll
ENGLISH
1
• ONCE
• AUTO
• OFF
: Scrolls the track information once.
: Repeats scrolling (at 5-second intervals).
: Cancels.
• Pressing DISP for more than one second can scroll the display
regardless of the setting.
TAG DISP
Tag display
AMP GAIN
Amplifier gain control
VIDEO
Video system
• TAG ON
• TAG OFF
• LOW PWR
• HIGH PWR
• PAL
• NTSC
: Shows the Tag information while playing MP3 tracks, [13].
: Cancels.
: VOL 00 – VOL 30 (Select this if the maximum power of the speaker
is less than 50 W to prevent damaging the speaker.)
: VOL 00 – VOL 50
: Select this if your monitor is of the PAL color system.
: Select this if your monitor is of the NTSC color system.
• Press SEL to activate the selection before you select the other PSM
items to adjust.
2
EXT IN *
External input
1
Some characters or symbols will not be shown correctly (or will be blanked) on the display.
*
• CHANGER
• EXT IN
: To use a JVC CD changer, [10], an Apple iPod or a JVC D. player,
[17].
: To use any other external component than the above, [19].
*2 Displayed only when one of the following sources is selected—FM, AM, DISC, or LINE IN.
16
Page 17

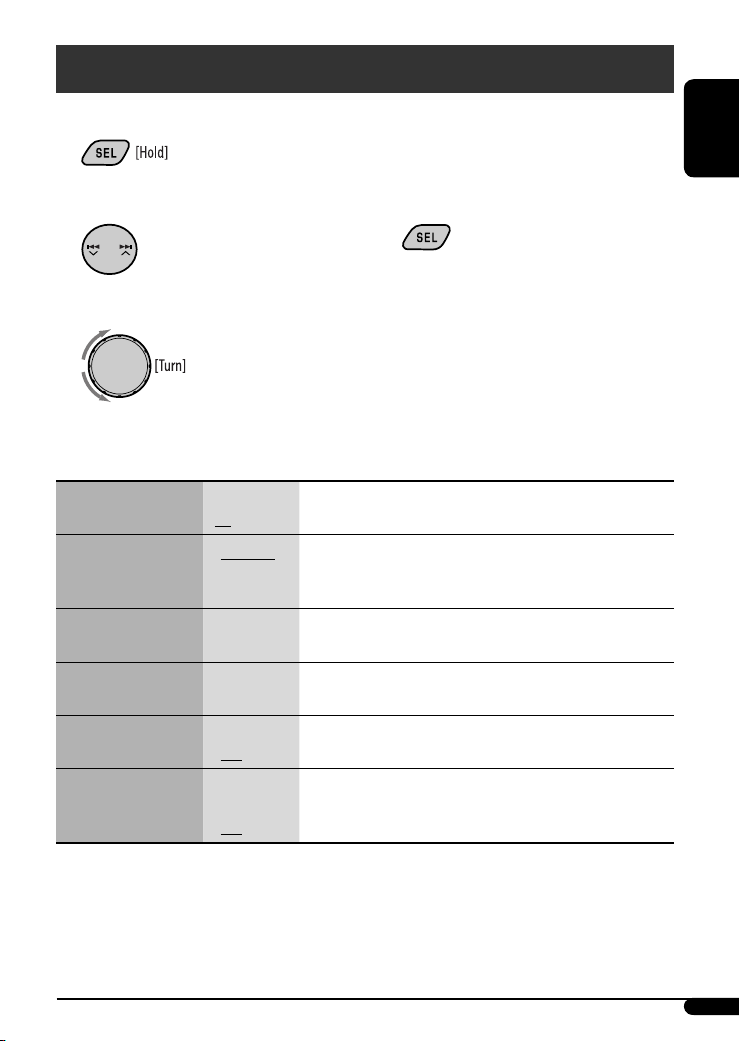
iPod / D. player operations
This unit is ready for operating an Apple iPod or a JVC
D. player from the control panel.
Before operating your iPod or D. player:
Connect either one of the following (separately
purchased) to the CD changer jack on the rear of this
unit.
• Interface adapter for iPod—KS-PD100 for
controlling an iPod.
• D. player interface adapter—KS-PD500 for
controlling a D. player.
• For connection, see Installation/Connection Manual
(separate volume).
• For details, refer also to the manual supplied with the
interface adapter.
Preparations:
Make sure “CHANGER” is selected for the external input
setting, see page 16.
~
Ÿ
To pause*1 or stop*2 playback
To resume playback, press 4 after pressing
MODE.
To fast-forward or reverse the track
To go to the next or previous tracks
*1 For iPod
*2 For D. player
ENGLISH
Playback starts automatically from where it has
been paused*
1
or stopped*2 previously.
! Adjust the volume.
⁄ Adjust the sound as you want. (See
page 14.)
Continued on the next page
17
Page 18

Selecting a track from the menu
1
Selecting the playback modes
1
ENGLISH
2 Enter the main menu.
Now the
4 /¢ buttons
work as the menu selecting buttons*.
3 Select the desired menu.
For iPod:
PLAYLIST Ô ARTISTS Ô ALBUMS Ô
SONGS Ô GENRES Ô COMPOSER Ô
(back to the beginning)
For D. player:
PLAYLIST
Ô ARTIST Ô ALBUM Ô
GENRE Ô TRACK Ô (back to the
beginning)
4 Confirm the selection.
To move back to the previous menu, press ¢
after pressing MODE.
• If a track is selected, playback starts
automatically.
• If the selected item has another layer, you will
enter the layer. Repeat steps 3 and 4 until the
desired track is played.
• Holding 4 /¢ can skip 10 items at
a time.
* The menu selecting mode will be canceled:
– If no operations are done for about 5 seconds.
– When you confirm the selection of a track.
2 Select your desired playback mode.
7 Repeat play
ONE RPT
Functions the same as “Repeat One” of the iPod or
“Repeat Mode = One” for the D. player.
ALL RPT
Functions the same as “Repeat All” of the iPod or
“Repeat Mode = All” for the D. player.
RPT OFF
Cancels.
7 Random play
ALBM RND*
Functions the same as “Shuffle Albums” of the
iPod.
SONG RND/RND ON
Functions the same as “Shuffle Songs” of the iPod
or “Random Play = On” of the D. player.
RND OFF
Cancels.
* For iPod: Functions only if you select “ALL” in
“ALBUMS” of the main “MENU.”
To check the other information while
listening to an iPod or a D. player
18
Page 19

Other external component
operations
You can connect an external component to the LINE IN
plugs on the rear, and another to the CD changer jack
on the rear using the Line Input Adapter—KS-U57
(not supplied) or AUX Input Adapter—KS-U58 (not
supplied).
• For connection, see Installation/Connection Manual
(separate volume).
• For listening to the iPod or D. player, refer to pages
17 and 18.
~
If “EXT IN” does not appear, see page 16 and
select the external input (“EXT IN”).
Ÿ Turn on the connected component and
start playing the source.
! Adjust the volume.
⁄ Adjust the sound as you want. (See
page 14.)
Maintenance
How to clean the connectors
Frequent detachment will deteriorate the connectors.
To minimize this possibility, periodically wipe the
connectors with a cotton swab or cloth moistened with
alcohol, being careful not to damage the connectors.
Connector
Moisture condensation
Moisture may condense on the lens inside the unit in
the following cases:
• After starting the heater in the car.
• If it becomes very humid inside the car.
Should this occur, the unit may malfunction. In this
case, eject the disc and leave the unit turned on for a
few hours until the moisture evaporates.
How to handle discs
When removing a disc from its
case, press down the center holder of
the case and lift the disc out, holding
it by the edges.
• Always hold the disc by the edges. Do not touch its
recording surface.
When storing a disc into its case, gently insert the
disc around the center holder (with the printed surface
facing up).
• Make sure to store discs into the cases after use.
Center holder
ENGLISH
To check the other information while
listening to an external component
Clock Ô EXT IN or LINE IN
Continued on the next page
19
Page 20

To keep discs clean
A dirty disc may not play correctly.
If a disc does become dirty, wipe it with
a soft cloth in a straight line from center
to edge.
ENGLISH
• Do not use any solvent (for example, conventional
record cleaner, spray, thinner, benzine, etc.) to clean
discs.
To play new discs
New discs may have some rough spots
around the inner and outer edges. If
such a disc is used, this unit may reject
the disc.
To remove these rough spots, rub the edges with a
pencil or ball-point pen, etc.
Do not use the following discs:
Warped disc
Sticker
Sticker residue
Stick-on label
More about this unit
Basic operations
Turning on the power
• By pressing SRC on the unit, you can also turn on the
power. If the source is ready, playback also starts.
Turning off the power
• If you turn off the power while listening to a disc, disc
play will start from where playback has been stopped
previously, next time you turn on the power.
• For MP3/WMA discs, playback will start from the
beginning of the last playing track.
Tuner operations
Storing stations in memory
• During SSM search...
– All previously stored stations are erased and
stations are stored newly.
– Received stations are preset in No. 1 (lowest
frequency) to No. 6 (highest frequency).
– When SSM is over, the station stored in No. 1 will
be automatically tuned in.
• When storing a station manually, the previously
preset station is erased when a new station is stored
in the same preset number.
20
Unusual shape
Single CD (8 cm disc)
Disc operations
Caution for DualDisc playback
• The Non-DVD side of a “DualDisc” does not comply
with the “Compact Disc Digital Audio” standard.
Therefore, the use of Non-DVD side of a DualDisc on
this product may not be recommended.
Page 21

General
• This unit has been designed to reproduce CDs/CD
Texts, and CD-Rs (Recordable)/CD-RWs (Rewritable)
in audio CD (CD-DA), MP3 and WMA formats.
• This unit cannot playback SVCD, DVDs, CD-Gs, or CD-I
discs.
• When a disc is inserted upside down, the disc
automatically ejects.
• While fast-forwarding or reversing on an MP3 or
WMA disc, you can only hear intermittent sounds.
Playing a CD-R or CD-RW
• Use only “finalized” CD-Rs or CD-RWs.
• This unit can play back only files of the same type
which are first detected if a disc includes both audio
CD (CD-DA) files and MP3/WMA files.
• This unit can play back multi-session discs; however,
unclosed sessions will be skipped while playing.
• Some CD-Rs or CD-RWs may not play back on this
unit because of their disc characteristics, or for the
following reasons:
– Discs are dirty or scratched.
– Moisture condensation occurs on the lens inside
the unit.
– The pickup lens inside the unit is dirty.
– CD-R/CD-RW on which the files are written with
“Packet Write” method.
– There are improper recording conditions (missing
data, etc.) or media conditions (stained, scratched,
warped, etc.).
• CD-RWs may require a longer readout time since the
reflectance of CD-RWs is lower than that of regular
CDs.
• Do not use the following CD-Rs or CD-RWs:
– Discs with stickers, labels, or a protective seal stuck
to the surface.
– Discs on which labels can be directly printed by an
ink jet printer.
Using these discs under high temperatures or high
humidities may cause malfunctions or damage to the
unit.
Playing a VCD disc
• The PBC function is not available for some VCDs.
• The PBC function is automatically canceled when you
change the source or turn off the unit. Playback starts
from the beginning of the dics when you play the
VCD again.
• The On-Screen Display (OSD) will automatically
canceled when you change the source or turn off the
unit.
Playing an MP3/WMA disc
• This unit can play back MP3/WMA files with the
extension code <.mp3> or <.wma> (regardless of
the letter case—upper/lower).
• This unit can show the names of albums, artists
(performer), and Tag (Version 1.0, 1.1, 2.2, 2.3, or
2.4) for MP3 files.
• This unit can display only one-byte characters. No
other characters can be correctly displayed.
• This unit can play back MP3/WMA files meeting the
conditions below:
– Bit rate: MP3: 32 kbps — 320 kbps
WMA: 48 kbps — 192 kbps
– Sampling frequency:
48 kHz, 44.1 kHz, 32 kHz (for MPEG-1)
24 kHz, 22.05 kHz, 16 kHz (for MPEG-2)
48 kHz, 44.1 kHz, 32 kHz (for WMA)
– Disc format: ISO 9660 Level 1/Level 2, Romeo,
Joliet, Windows long file name
• The maximum number of characters for file/folder
names vary among the disc format used (includes 4
extension characters—<.mp3> or <.wma>).
– ISO 9660 Level 1: up to 12 characters
– ISO 9660 Level 2: up to 31 characters
– Romeo: up to 40 characters
– Joliet: up to 40 characters
– Windows long file name: up to 40 characters
ENGLISH
Continued on the next page
21
Page 22

• This unit can play back files recorded in VBR (variable
bit rate).
Files recorded in VBR have a discrepancy in elapsed
time display, and do not show the actual elapsed
time. Especially, after performing the search function,
this difference becomes noticeable.
ENGLISH
• This unit can recognize a total of 512 files, of 200
folders, and of 8 hierarchies.
• This unit cannot play back the following files:
– MP3 files encoded with MP3i and MP3 PRO format.
– MP3 files encoded in an inappropriate format.
– MP3 files encoded with Layer 1.
– WMA files encoded with lossless, professional, and
voice format.
– WMA files which are not based upon Windows
Media® Audio.
– WMA files copy-protected with DRM.
– Files which have the data such as WAVE, ATRAC3,
etc.
• The search function works but search speed is not
constant.
Changing the source
• If you change the source, playback also stops
(without ejecting the disc).
Next time you select “DISC” for the playback source,
disc play starts from where it has been stopped
previously.
• For MP3/WMA discs, playback will start from the
beginning of the last playing track.
Ejecting a disc
• If the ejected disc is not removed within 15 seconds,
the disc is automatically inserted again into the
loading slot to protect it from dust. (Disc will not play
this time.)
General settings—PSM
• If you change the “AMP GAIN” setting from
“HIGH PWR” to “LOW PWR” while the volume level
is set higher than “VOL 30,” the unit automatically
changes the volume level to “VOL 30.”
iPod or D. player operations
• When you turn on this unit, the iPod or D. player is
charged through this unit.
• While the iPod or D. player is connected, all
operations from the iPod or D. player are disabled.
Perform all operations from this unit.
• The text information may not be displayed correctly.
• If the text information includes more than 8
characters, it scrolls on the display. This unit can
display up to 40 characters.
Notice:
When operating an iPod or a D. player, some
operations may not be performed correctly or as
intended. In this case, visit the following JVC web
site:
For iPod users: <http://www.jvc.co.jp/english/
car/support/ks-pd100/index.html>
For D. player users: <http://www.jvc.co.jp/
english/car/support/ks-pd500/index.html>
• Microsoft and Windows Media are either registered
trademarks or trademarks of Microsoft Corporation in
the United States and/or other countries.
• iPod is a trademark of Apple Inc., registered in the
U.S. and other countries.
22
Page 23

Troubleshooting
What appears to be trouble is not always serious. Check the following points before calling a service center.
Symptoms Remedies/Causes
• Sound cannot be heard from the speakers. • Adjust the volume to the optimum level.
• Check the cords and connections.
General
• The unit does not work at all. Reset the unit (see page 2).
• SSM automatic presetting does not work. Store stations manually.
• Static noise while listening to the radio. Connect the antenna firmly.
FM/AM
• Disc automatically ejects. Insert the disc correctly.
• CD-R/CD-RW cannot be played back.
• Tracks on the CD-R/CD-RW cannot be
skipped.
• Disc can be neither played back nor
ejected.
• Sound and pictures are sometimes
interrupted or distorted.
Disc playback
• “NO DISC” appears on the display. Insert a playable disc into the loading slot.
• No playback picture appears on the
monitor.
• No picture appears on the monitor at all. • Connect the video cord correctly.
• Disc cannot be played back. • Use a disc with MP3/WMA tracks recorded in the format
• Noise is generated. Skip to another track or change the disc. (Do not add the
MP3/WMA playback
• A longer readout time is required (“CHECK”
keeps flashing on the display).
• Insert a finalized CD-R/CD-RW.
• Finalize the CD-R/CD-RW with the component which you
used for recording.
• Unlock the disc (see page 13).
• Eject the disc forcibly (see page 2).
• Stop playback while driving on rough roads.
• Change the disc.
• Check the cords and connections.
Parking brake wire is not connected properly.
(See Installation/Connection manual.)
• Select a correct input on the monitor.
compliant with ISO 9660 Level 1, Level 2, Romeo, or Joliet.
• Add the extension code <.mp3> or <.wma> to the file
names.
extension code <.mp3> or <.wma> to non-MP3 or WMA
tracks.)
Do not use too many hierarchies and folders.
ENGLISH
Continued on the next page
23
Page 24

Symptoms Remedies/Causes
• Tracks do not play back in the order you
have intended them to play.
• Elapsed playing time is not correct. This sometimes occurs during play. This is caused by how the
ENGLISH
• “NO FILES” appears on the display. Insert a disc that contains MP3/WMA tracks.
• Correct characters are not displayed (e.g.
MP3/WMA playback
album name).
• “NO DISC” appears on the display. Insert a disc into the magazine.
• “NO MAG” appears on the display. Insert the magazine.
• “RESET 8” appears on the display. Connect this unit and the CD changer correctly and press the
CD changer
• “RESET 1” – “RESET 7” appears on the
display.
• The CD changer does not work at all. Reset the unit (see page 2).
• The iPod or D. player does not turn on or
does not work.
• Buttons do not work as intended. The functions of the buttons have been changed. Press MODE
• The sound is distorted. Deactivate the equalizer either on the unit or the iPod/
• “NO IPOD” or “NO DP” appears on the
display.
• Playback stops. The headphones are disconnected during playback. Restart
• No sound can be heard when
connecting an iPod nano.
• No sound can be heard.
iPod/D. player playback
• “ERROR 01” appears on the display
when connecting a D. player.
• “NO FILES” or “NO TRACK” appears on
the display.
• “RESET 1” – “RESET 7” appears on the
display.
• “RESET 8” appears on the display. Check the connection between the adapter and this unit.
• The iPod’s or D. player’s controls do not
work after disconnecting from this unit.
Playback order is determined when the files are recorded.
tracks are recorded on the disc.
This unit can only display letters (upper case), numbers, and a
limited number of symbols.
reset button of the CD changer.
Press the reset button of the CD changer.
• Check the connecting cable and its connection.
• Update the firmware version.
• Charge the battery.
before performing the operation.
D. player.
• Check the connecting cable and its connection.
• Charge the battery.
the playback operation using the control panel (see page 17).
• Disconnect the headphones from the iPod nano.
• Update the firmware version of the iPod nano.
Disconnect the adapter from the D. player. Then, connect it
again.
No tracks are stored. Import tracks to the iPod or D. player.
Disconnect the adapter from both the unit and iPod/D. player.
Then, connect it again.
Reset the iPod or D. player.
24
Page 25

Specifications
AUDIO AMPLIFIER SECTION
Maximum Power Output:
Front/Rear: 50 W per channel
Continuous Power Output (RMS):
Front/Rear: 19 W per channel into
4 Ω, 40 Hz to 20 000 Hz at
no more than 0.8% total
harmonic distortion.
Load Impedance: 4 Ω (4 Ω to 8 Ω allowance)
Tone Control Range:
Bass: ±10 dB at 100 Hz
Treble: ±10 dB at 10 kHz
Frequency Response: 40 Hz to 20 000 Hz
Signal-to-Noise Ratio: 70 dB
Line-Out Level/
Impedance:
Output Impedance: 1 kΩ
Other Terminal: LINE IN, CD changer
2.5 V/20 kΩ load (full
scale)
VIDEO SECTION
Color System: PAL/NTSC
Video Output (Composite):
1 Vp-p/75 Ω
TUNER SECTION
Frequency Range:
FM: 87.5 MHz to 108.0 MHz
AM: 531 kHz to 1 602 kHz
FM Tuner
Usable Sensitivity: 11.3 dBf (1.0 μV/75 Ω)
50 dB Quieting Sensitivity: 16.3 dBf (1.8 μV/75 Ω)
Alternate Channel
Selectivity (400 kHz):
Frequency Response: 40 Hz to 15 000 Hz
Stereo Separation: 30 dB
AM Tuner
Sensitivity/Selectivity: 20 μV/35 dB
65 dB
VCD/CD PLAYER SECTION
Type: Compact disc player
Signal Detection
System:
Number of Channels: 2 channels (stereo)
Frequency Response: 5 Hz to 20 000 Hz
Dynamic Range: 96 dB
Signal-to-Noise Ratio: 98 dB
Wow and Flutter: Less than measurable limit
MP3 Decoding Format: (MPEG1/2 Audio Layer 3)
Max. Bit Rate: 320 kbps
WMA (Windows Media® Audio) Decoding Format:
Max. Bit Rate: 192 kbps
Non-contact optical pickup
(semiconductor laser)
GENERAL
Power Requirement:
Operating Voltage: DC 14.4 V
(11 V to 16 V allowance)
Grounding System: Negative ground
Allowable Operating
Temperature:
Dimensions (W × H × D): (approx.)
Installation Size: 182 mm × 52 mm × 150 mm
Panel Size: 188 mm × 58 mm × 11 mm
Mass:
Design and specifications are subject to change without
notice.
0°C to +40°C
1.4 kg
(excluding accessories)
ENGLISH
25
Page 26

Terima kasih telah membeli produk JVC.
Harap membaca seluruh petunjuk dengan teliti sebelum mengoperasikan, untuk memastikan anda memahami
secara keseluruhan dan mendapatkan performansi terbaik dari unit ini.
PENTING UNTUK PRODUK-PRODUK LASER
1. PRODUK LASER KELAS 1
2. PERHATIAN: Jangan membuka penutup atas. Tidak ada bagian yang dapat diperbaiki oleh pengguna di dalam
unit tersebut; biarkanlah semua bagian yang diperbaiki untuk memenuhi syarat perbaikan teknis.
3. PERHATIAN: Apabila terbuka, radiasi laser kelas 1M dapat terlihat dan/atau tidak terlihat. Jangan langsung
melihatnya dengan alat optik.
4. REPRODUKSI DARI LABEL: LABEL PERHATIAN, TEMPATKAN DI LUAR UNIT TERSEBUT.
INDONESIA
PERINGATAN:
[Hanya Uni Eropa]
Bagaimana mereset unit anda
• Penyetelan-penyetelan pengaturan awal anda akan
terhapus juga.
Bagaimana secara paksa
mengeluarkan sebuah disk
• Hati-hati untuk tidak menjatuhkan disk tersebut ketika
dikeluarkan.
• Jika ini tidak bekerja, coba mengeset kembali (reset)
alat penerima anda.
Untuk mencegah kecelakaan dan
kerusakan
• JANGAN memasang unit pada tempattempat dimana;
– ini dapat menghalangi pengoperasian
roda kemudi dan tuas gigi persneling.
– ini dapat menghalangi pengoperasian
alat pengaman seperti kantung udara.
– mungkin menghalangi pandangan.
• JANGAN mengoperasikan unit sewaktu
mengemudi.
• Jika Anda harus mengoperasikan unit
sewaktu mengemudi, pastikan Anda
melihat ke depan dengan hati-hati.
• Pengemudi tidak boleh menonton monitor
selagi mengemudi.
Jika rem parkir tidak sedang dipakai,
“PARKING” berkedip pada display, dan tidak
ada gambar permainan-ulang yang akan
dipertunjukkan pada monitor.
– Peringatan ini muncul hanya jika kabel
rem parkir telah tersambung ke sistem
rem parkir yang terpasang tetap di dalam
mobil (lihat juga Manual Pemasangan/
Penyambungan).
2
Page 27

Tanda berikut digunakan untuk
mengindikasikan...
: Pengoperasian pemutar
VCD/CD yang terpasang tetap.
: Pengoperasian CD changer eksternal.
: Indikator ditampilkan untuk
pengoperasian yang bersangkutan.
Bagaimana menggunakan tombol
MODE
Jika Anda menekan MODE, unit akan masuk ke modus
fungsi, kemudian tombol angka (kecuali “1” dan “4”)
dan tombol 4 /¢ akan bekerja sebagai
tombol fungsi yang berbeda.
Contoh: Ketika tombol nomor 2 bekerja sebagai
tombol MO (mono).
Untuk menggunakan tombol-tombol ini untuk
fungsi aslinya setelah menekan MODE, tunggu 5
detik tanpa menekan tombol apa pun sampai mode
fungsi kosong atau tekan lagi MODE.
Melepaskan panel kontrol
DAFTAR ISI
Panel kontrol .................................. 4
Remote kontrol —
Memulai ......................................... 7
Pengoperasian dasar ............................................ 7
Pengoperasian radio ........................ 8
Pengoperasian disk ......................... 9
Memutar sebuah disk di dalam unit .................... 9
Memutar disk di dalam CD changer ..................... 10
Penyetelan suara-suara ................... 14
Pengaturan-pengaturan umum—
PSM ............................................. 15
Pengoperasian iPod/D. player .......... 17
Pengoperasian komponen eksternal
lainnya ........................................ 19
Perawatan ...................................... 19
Lebih lagi tentang alat penerima
ini ................................................ 20
Pemecahan Masalah ........................ 23
Spesifikasi-spesifikasi ...................... 25
RM-RK120 ............... 5
INDONESIA
Memasang panel kontrol
Untuk keselamatan...
• Jangan menaikkan level volume terlalu tinggi
karena akan menghalangi suara dari luar, dan
membahayakan perjalanan anda.
• Hentikan mobil sebelum melakukan pengoperasian
yang rumit.
Suhu dalam mobil...
Jika anda telah memarkir mobil terlalu lama dalam
cuaca yang panas atau dingin, tunggu hingga suhu
dalam mobil menjadi normal kembali sebelum
mengoperasikan unit ini.
3
Page 28

Panel kontrol
INDONESIA
Pengenalan bagian-bagian
Jendela tampilan
1 Tombol-tombol 4 /¢
2 Tombol (standby/hidup pelemah)
3 Sensor remote kontrol
JANGAN membiarkan sensor remote kontrol
pada cahaya kuat (sinar matahari langsung atau
pencahayaan buatan).
4 Celah pemuatan
5 Jendela tampilan
6 Tombol 0 (keluar)
7 Tombol EQ (equalizer)
8 Tombol SRC (sumber)
9 Tombol BAND
Tombol 6 (main/pause)
p Tombol kontrol
q Tombol SEL (pilih)
w Tombol MO (mono)
e Tombol SSM (Memori Urutan Stasiun-Kuat)
r Tombol-tombol nomor
t Tombol RPT (ulang)
y Tombol RND (acak)
u Tombol MODE
4
i Tombol DISP (tampilan)
o Tombol (pelepas panel kontrol)
; Indikator-indikator informasi disk—TAG (Ujung
ID3), (folder), (trek/file)
a Indikator tipe disk—WMA, MP3
s Indikator-indikator sumber putar ulang—
CH: Menyala hanya ketika CD-CH dipilih sebagai
sumber putar ulang.
DISC: Menyala untuk alat pemutar CD.
d Mode putar ulang / indikator item—RND (acak),
(disk), (folder), RPT (ulang)
f Indikator LOUD (kekerasan)
g Indikator EQ (equalizer)
h Indikator-indikator mode suara (C-EQ: kostum
equalizer)—JAZZ, CLASSIC, HIP HOP, POPS, ROCK,
USER
j Indikator Tr (trek)
k Tampilan sumber / Indikator level volume
l Tampilan utama
/ Indikator-indikator penerima tuner—ST (stereo),
MO (mono)
Page 29

Remote kontrol — RM-RK120
Memasang baterai koin litium
(CR2025)
Arahkan remote kontrol secara langsung ke
sensor remote kontrol pada unit. Pastikan tidak
ada halangan diantaranya.
Peringatan:
• Jangan memasang sesuatu baterai selain dari
CR2025 atau padanannya; sebaliknya, baterai
tersebut mungkin meledak.
• Jangan meninggalkan remote kontrol di tempat
(seperti dashbor) yang terpaparkan langsung ke
sinar matahari untuk waktu lama, karena dapat
meledak.
• Simpan baterai pada tempat dimana anak-anak
tidak dapat mencapainya untuk menghindari
resiko kecelakaan.
• Untuk mencegah baterai dari kelebihan panas,
keretakan, atau mulai terbakar:
– Jangan mengisi ulang, hubung pendek,
ambil bagian, memanaskan baterai atau
menempatkannya dalam api.
– Jangan meninggalkan baterai dengan bahan-
bahan dari logam.
– Jangan mendorong baterai dengan penjepit atau
alat yang sejenis.
– Bungkus baterai dengan pita atau isolasi ketika
membuang atau menyimpannya.
Elemen-elemen utama dan fitur-fitur
INDONESIA
1 Tombol SOURCE
• Pilih sumber permainan-ulang.
2 Tombol (standby/hidup pelemah)
• Menghidupkan daya jika ditekan sebentar atau
melemahkan bunyi suara apabila daya sedang
hidup.
• Mematikan daya jika ditekan dan ditahan.
3 Tombol-tombol 2 REV (balik) / FWD (maju) 3
• Mencari stasiun-stasiun jika ditekan secara
singkat.
• Memajukan-cepat atau memundurkan trek jika
ditekan dan ditahan.
• Mengubah trek-trek jika ditekan secara singkat.
• Sewaktu mendengarkan Apple iPod atau JVC D.
player (dalam mode pemilihan menu):
– Memilih item jika ditekan sekilas. (Kemudian,
tekan DOWN ∞ untuk mengkonfirmasi
pilihan.)
– Meloncati 10 item sekaligus jika ditekan terus.
Bersambung ke halaman berikutnya
5
Page 30

4 Tombol VOL. + / –
• Menyetel level volume.
5 Tombol ENTER dan nomor
• Memilih sebuah trek/file secara langsung.
– Tekan tombol nomor, kemudian tekan ENTER.
– Tidak digunakan untuk pengoperasian iPod/D.
player.
• Memilih sebuah item dari menu sementara
memainkan ulang sebuah video CD (VCD) di
dalam fungsi Kontrol Permainan-Ulang (PBC).
– Tekan tombol nomor, kemudian tekan ENTER.
INDONESIA
• Memilih disk-disk sementara mengoperasikan
CD changer.
– Untuk memilih nomor disk 1 – 6, tekan
tombol nomor 1 – 6 secara singkat.
– Untuk memilih nomor disk 7 – 12, tekan dan
tahan tombol nomor 1 (7) – 6 (12).
6 Tombol EQ (equalizer)
• Memilih mode suara (C-EQ: kostum equalizer)
7 Tombol BAND 6
• Mengubah jalur-jalur FM/AM.
• Menghentikan permainan ulang disk secara
sementara. Untuk melanjutkan permainan
ulang, tekan kembali tombol tersebut.
– Sementara memainkan sebuah VCD, adegan
permainan-ulang berhenti sekarang dan tetap
diam.
– Tidak digunakan untuk pengoperasian CD
changer, iPod atau D. player.
8 Tombol 5 UP / DOWN ∞
• Mengganti stasiun yang telah diatur
sebelumnya.
• Mengganti folder dari disk-disk MP3/WMA jika
ditekan secara singkat.
• Mengganti disk sementara mengoperasikan CD
changer jika ditekan dan ditahan.
• Sewaktu mendengarkan iPod atau D. player:
– Jeda/berhenti atau melanjutkan pemutaran
dengan DOWN ∞.
– Masuk ke menu utama dengan 5 UP.
(Sekarang, 5 UP / DOWN ∞/2 REV / FWD 3
berfungsi sebagai tombol pemilihan menu.)*
9 Tombol PBC (Kontrol Permainan-Ulang)
• Mangaktifkan atau menonaktifkan fungsi PBC.
p Tombol RETURN
• Mengembalikan ke menu sebelumnya
sementara memutar sebuah VCD dalam fungsi
PBC.
q Tombol OSD (Tampilan Pada-Layar)
• Menghidupkan dan mematikan OSD pada
monitor.
w Tombol AUDIO
• Memilih saluran audio untuk permainan ulang
VCD.
* 5 UP : Kembali ke menu sebelumnya.
DOWN ∞ : Mengkonfirmasi pemilihan.
6
Page 31

Memulai
Pengoperasian dasar
~ Menghidupkan power.
Untuk menurunkan volume
dalam sesaat (ATT)
Untuk mengembalikan suara,
tekan kembali tombol tersebut.
Untuk mematikan power
Ÿ
* Anda tidak dapat memilih beberapa
sumber jika mereka tidak siap atau tidak
disambungkan.
! Untuk radio FM/AM
⁄ Setel volume.
Level volume muncul.
@ Setel suara sesuai keinginan anda.
(Lihat halaman 14).
Pengaturan dasar
• Lihat juga “Pengaturan-pengaturan umum — PSM”
pada halaman 15 dan 16.
1
2
1 Membatalkan tampilan demonstrasi-
demonstrasi
Pilih “DEMO” kemudian “DEMO OFF”.
2 Pengaturan jam
Pilih “CLOCK H” (jam), kemudian setel jam.
Pilih “CLOCK M” (menit), kemudian setel menit.
3 Prosedur selesai.
Untuk mengecek waktu jam yang berlaku
sekarang sewaktu daya dimatikan
INDONESIA
Perhatian pada pengaturan volume:
Disk-disk menghasilkan sangat kecil noise (derau)
dibandingkan dengan sumber yang lain. Kecilkan
volume sebelum disk untuk menghindari kerusakan
speaker-speaker dengan penambahan mendadak
dari level keluaran.
7
Page 32

Pengoperasian radio
~
Ketika sebuah siaran stereo FM sulit
diterima
Ÿ
INDONESIA
Menyala ketika menerima sebuah siaran
stereo FM dengan kekuatan sinyal yang
cukup.
! Mulai mencari sebuah stasiun.
Ketika sebuah stasiun diterima, pencarian
berhenti.
Untuk menghentikan pencarian, tekan
tombol yang sama kembali.
Untuk menyetel ke sebuah stasiun secara
manual
Dalam langkah ! di atas...
1
Menyala ketika mode mono diaktifkan.
Penerimaan membaik, tetapi efek stereo akan hilang.
Untuk menyimpan ulang efek stereo, ulangi
prosedur yang sama. “MONO OFF” muncul dan indikator
MO hilang.
Menyimpan stasiun-stasiun dalam
memori
Anda dapat preset (mengatur awal) enam stasiun
untuk setiap jalur.
Mempreset (Mengatur awal) secara
otomatis stasiun FM—SSM (Memori
Urutan Stasiun-Kuat)
1 Pilih jalur FM (FM1 – FM3) yang anda ingin
simpan di dalamnya.
2
3
2 Pilih sebuah frekuensi stasiun yang
diinginkan.
8
“SSM” berkedip, kemudian hilang ketika
mempreset (mengatur awal) secara otomatis
selesai.
Stasiun-stasiun FM lokal dengan sinyal-sinyal terkuat
dicari dan disimpan secara otomatis dalam jalur FM
tersebut.
Page 33

Mempreset (Mengatur awal) secara
manual
Contoh: Menyimpan stasiun FM dari 92.5 MHz ke
dalam nomor prasetel 4 dari jalur FM1.
1
2
3
Nomor preset (pengaturan awal)
berkedip-kedip sesaat.
Pengoperasian disk
Memutar sebuah disk di dalam
unit
Semua trek akan diputar secara berulang sampai anda
mengganti sumber atau mengeluarkan disk.
• Jika sebuah menu disk muncul pada monitor
sementara memainkan sebuah VCD dengan PBC,
lihat halaman 11.
INDONESIA
Mendengarkan sebuah preset
(pengaturan awal) stasiun
1
2 Pilih preset (pengaturan awal) stasiun (1 – 6)
yang anda inginkan.
Untuk mengecek informasi lainnya sambil
mendengarkan memori radio
Jam Ô Frekuensi
Sebelum melakukan suatu pengoperasian,
pastikan hal-hal berikut....
• Hidupkan monitor dan pilih input monitor yang tepat
sebelum memainkan sebuah VCD.
• Jika Anda menghidupkan monitor, Anda juga dapat
mengontrol permainan-ulang MP3/WMA dengan
melihat pada layar monitor (lihat halaman 12).
• Pilih sistem video yang sesuai untuk monitor Anda
(lihat halaman 16).
Untuk menghentikan
pemutaran sementara
Untuk melanjutkan permainan
ulang, tekan kembali tombol
tersebut.
Untuk menghentikan putar
dan mengeluarkan disk
Bersambung ke halaman berikutnya
9
Page 34

Memutar disk di dalam CD
changer
Semua disk dalam magazine akan diputar berulangulang sampai Anda mengubah sumber.
• Mengeluarkan magazine juga akan menghentikan
pemutaran.
~
* Jika Anda sudah mengubah pengaturan input
INDONESIA
eksternal ke “EXT IN” (lihat halaman 16), Anda
tidak dapat memilih CD changer.
Ÿ Memilih sebuah disk.
Untuk nomor disk dari 01 – 06:
Untuk maju-cepat atau mundur trek
Pergi ke trek-trek sesudah atau sebelumnya
Untuk pergi ke folder-folder berikut atau
sebelumnya (hanya untuk disk-disk MP3
atau WMA)
Untuk disk-disk MP3 :
Untuk disk-disk WMA :
1
Untuk nomor disk dari 07 – 12:
Mengenai disk MP3/WMA
“Trek” (kata “file” dan “trek” digunakan secara
bergantian) MP3 dan WMA telah direkam di dalam
“folder”.
Mengenai CD changer
Disarankan untuk menggunakan JVC CD changer yang
kompatibel-MP3 dengan alat penerima anda.
• Anda juga dapat menghubungkan CD changer yang
tidak kompatibel dengan MP3. Namun, unit ini tidak
kompatibel dengan disk MP3.
• Anda tidak dapat menggunakan CD changer seri CHX99, CH-X100 dan KD-MK dengan unit ini.
• Anda tidak dapat mengontrol dan memainkan disk
WMA atau VCD apapun di dalam CD changer.
• Informasi teks disk yang direkam di dalam Teks CD
dapat ditampilkan ketika sebuah Teks CD JVC yang
kompatibel dengan CD changer telah dihubungkan.
• Untuk penyambungan, lihat Manual Pemasangan/
Penyambungan (bagian terpisah).
10
2
Menemukan sebuah trek tertentu (untuk CD
atau VCD dengan PBC diatur ke “PBC OFF”)
atau folder (untuk disk-disk MP3 atau WMA)
secara langsung
Untuk memilih sebuah nomor dari 01 – 06:
Untuk memilih sebuah nomor dari 07 – 12:
• Untuk memakai akses berkas langsung pada diskdisk MP3/WMA, diperlukan folder-folder yang sudah
ditetapkan dengan 2-digit nomor pada bagian
awal dari nama-nama foldernya—01, 02, 03 dan
seterusnya.
Untuk memilih sebuah trek khusus
dalam sebuah folder (untuk disk-disk
MP3 atau WMA):
Page 35

Pengoperasian Kontrol Permainan-
Ulang (PBC)
Informasi pada layar (On-Screen)
(OSD)
Pengoperasian ini hanya mungkin ketika
menggunakan remote kontrol.
1 Sementara memutar sebuah VCD....
PBC ON Ô PBC OFF
PBC ON : Sebuah menu muncul pada monitor.
PBC OFF : Batal.
• Sebuah menu mungkin sebuah daftar, item,
submenu, atau beberapa gambar bergerak.
2 Pilih item yang anda inginkan.
• Untuk memilih item dari submenu, ulangi
langkah ini.
Item yang dipilih mulai memainkan-ulang secara
otomatis.
Pengoperasian ini hanya mungkin ketika
menggunakan remote kontrol.
Anda dapat memeriksa nomor trek dan waktu main
yang sudah lewat jika monitornya hidup.
INDONESIA
Sementara memainkan sebuah disk....
• Untuk mematikan Tampilan PadaLayar, tekan kembali tombol tersebut.
Nomor trek yang sekarang/total jumlah trek
Waktu putar yang sudah lewat
Memilih saluran audio
Pengoperasian ini hanya mungkin ketika
menggunakan remote kontrol.
Anda dapat memilih saluran audio untuk diputar. (Hal
ini baik sekali ketika memutar sebuah VCD karaoke).
Untuk memperbaiki sebuah kesalahan
memasukkan data dan untuk kembali ke
menu sebelumnya
STEREO : Untuk mendengar putar ulang stereo
(kiri/kanan).
MONO L : Untuk mendengarkan saluran audio L
(kiri).
MONO R : Untuk mendengarkan saluran audio R
(kanan).
• Saluran audio secara otomatis diatur ke “STEREO”
ketika Anda mengganti disk atau sumber.
11
Page 36

Pengoperasian layar kontrol MP3/
WMA
Anda dapat juga mengontrol permainan-ulang dari disk
MP3/WMA dengan menunjuk ke monitor.
• Layar kontrol muncul secara otomatis pada monitor
ketika Anda memasukan disk MP3/WMA.
Untuk memilih sebuah folder
Untuk memilih sebuah trek
INDONESIA
1 Nama artis* (hanya untuk disk MP3)
• Nama artis akan bergulir pada monitor jika nama
artis tersebut tidak dapat dipertunjukkan pada
satu waktu.
2 Mode operasi—PLAY, PAUSE, FF (memajukan-
cepat), FR (memundurkan-cepat), SELECT (memilih
nomor trek), REPEAT TRACK, REPEAT FOLDER,
REPEAT OFF, RANDOM FOLDER, RANDOM DISC,
RANDOM OFF
• Mode operasi muncul untuk sementara pada
monitor.
3 Nama folder*
4 Judul Trek* (hanya untuk MP3)
• Judul trek akan bergulir pada monitor jika judul
trek tersebut tidak dapat dipertunjukkan pada
satu waktu.
5 Kotak yang disorot untuk nama file yang sekarang*
6 Indikasi OSD—Nomor trek yang sekarang/total
jumlah trek, Waktu main yang sudah lewat.
• Hanya muncul jika Anda menghidupkan OSD
(lihat halaman 11).
7 Daftar yang sekarang/total jumlah daftar
8 Daftar trek
• Monitor dapat mempertunjukkan 12 trek pada
satu waktu dan maksimum 239 trek untuk
sebuah disk.
* Beberapa simbol tidak akan dipertunjukkan (dan akan
digantikan atau dikosongkan) pada layar kontrol.
12
• Menekan tombol-tombol ini secara berulang-ulang
dapat juga memilih trek dari folder sebelumnya/
folder berikutnya.
• Lihat juga halaman 10 untuk menggunakan tomboltombol pada panel kontrol, untuk memilih sebuah
folder atau trek.
Memilih mode-mode putar ulang
Anda dapat menggunakan hanya satu dari mode putar
ulang berikut pada saat yang sama.
• Untuk VCD: Sementara PBC (lihat halaman 11) tidak
digunakan.
1
2 Pilih mode putar ulang yang anda inginkan.
7 Putar berulang
Mode Putar secara berulang-ulang
TRK RPT : Trek yang sekarang.
FLDR RPT*
DISC RPT*2 : Semua trek-trek dari disk yang
RPT OFF : Batal.
1
: Semua trek dari folder yang
sekarang.
sekarang.
Page 37

7 Putar acak
Mode Memutar secara acak
FLDR RND*
1
: Semua trek-trek dari folder yang
sekarang kemudian trek-trek dari
folder berikutnya dan seterusnya.
DISC RND : Semua trek-trek dari disk yang
sekarang.
MAG RND*2 : Semua trek dari disk-disk yang
telah disisipkan.
RND OFF : Batal.
1
Hanya sementara memutar sebuah disk MP3
*
atau WMA.
*2 Hanya sementara memutar disk di dalam CD
changer.
• Untuk disk MP3 : Ketika “TAG DISP” disetel ke “TAG
OFF”
• Untuk disk WMA :
: Jam waktu dengan nomor trek yang
sekarang diputar
: Waktu pemutaran yang sudah berlalu
dengan nomor trek yang sekarang diputar
1
Jika disk yang sekarang adalah sebuah CD audio atau
*
sebuah VCD, muncul “NO NAME”.
*2 Hanya untuk pemutar CD di dalam unit.
3
*
Jika sebuah file MP3 tidak mempunyai informasi tag,
nama folder dan nama file muncul. Dalam kasus ini
indikator TAG tidak akan menyala.
INDONESIA
Fungsi-fungsi utama yang lain
Mengganti tampilan informasi
Sementara memainkan sebuah CD audio, sebuah
Teks CD, atau sebuah VCD dengan PBC diatur ke
“PBC OFF” (lihat halaman 11)
Sementara memutar sebuah disk MP3 atau
2
WMA*
• Hanya untuk disk MP3 : Ketika “TAG DISP” disetel ke
“TAG ON” (lihat halaman 16)
Mencegah pengeluaran disk
Anda dapat mengunci sebuah disk dalam celah
pemuatan.
Untuk membatalkan larangan, ulangi prosedur
yang sama.
13
Page 38

Penyetelan suara-suara
Anda dapat memilih sebuah mode preset (pengaturan
awal) yang sesuai untuk jenis musik (C-EQ: kostum
equalizer).
Menyetel Suara
Anda dapat menyetel karakteristik-karakteristik suara
sesuai dengan kesukaan anda.
1
2
Nilai-nilai preset
INDONESIA
(pengaturan
Indikasi (Untuk)
USER
(Suara rata)
ROCK
(Musik rock atau disko)
CLASSIC
(Musik klasik)
POPS
(Musik ringan)
HIP HOP
(Musik funk atau rap)
JAZZ
(Musik jazz)
BAS
(bas)
awal)
00 00 OFF
+03 +01 ON
+01 –02 OFF
+04 +01 OFF
+02 00 ON
+02 +03 OFF
TRE
(trebel)
LOUD
(kekerasan)
Indikasi [Cakupan]
1
(bas)
BAS*
Setel bas. [–06 ke +06]
1
TRE*
(trebel)
Setel trebel. [–06 ke +06]
2
(feder (pemudar))
FAD*
Setel balance (keseimbangan suara) speaker depan
dan belakang. [R06 ke F06]
BAL (balance)
Setel balance (keseimbangan suara) speaker kiri dan
kanan.
[L06 ke R06]
1
(kekerasan)
LOUD*
Menguatkan frekuensi-frekuensi rendah dan tinggi
untuk menghasilkan keseimbangan suara yang baik
pada level volume rendah.
[LOUD ON atau LOUD OFF]
VOL (volume)
3
Setel volume. [00 ke 30 atau 50*
1
*
Ketika anda menyetel bas, trebel, atau kekerasan,
]
penyetelan yang anda lakukan disimpan untuk mode
suara terpilih yang sekarang (C-EQ) termasuk “USER”.
*2 Jika anda menggunakan sistem dua-speaker, atur
level pemudar pada “00”.
*3 Tergantung pada pengaturan penguatan dari
penguat. (Lihat halaman 16 untuk lebih rinci.)
14
Page 39

Pengaturan-pengaturan umum—PSM
Anda dapat mengganti bagian PSM (Mode Pengaturan yang Disukai)yang telah terdaftar dalam tabel berikut.
1
4 Ulangi langkah 2 dan 3 untuk menyetel
bagian-bagian PSM lain jika diperlukan.
2 Pilih sebuah bagian PSM.
3 Menyetel bagian PSM yang sudah dipilih.
Indikasi-indikasi Item
( :
Permulaan)
DEMO
Tampilan demonstrasi
CLOCK H
Penyetelan jam
CLOCK M
Penyetelan menit
DIMMER
Peredup
TEL
Telepon bungkam
• DEMO ON
• DEMO OFF
1 – 12 [Permulaan: 1 (1:00)], [7]
00 – 59 [Permulaan: 00 (1:00)], [7]
• ON
• OFF
• MUTING 1/
MUTING 2:
• OFF
Pengaturan, [halaman referensi]
: Tampilan demonstrasi akan diaktifkan secara otomatis jika tidak
: Batal.
: Meredupkan cahaya tampilan unit ini.
: Batal.
: Pilih salah satu yang membungkam suara sementara
: Batal.
5 Prosedur selesai.
INDONESIA
ada pengoperasian yang dilakukan untuk sekitar 20 detik, [7].
menggunakan telepon selular.
Bersambung ke halaman berikutnya
15
Page 40

Indikasi-indikasi Item
Pengaturan, [halaman referensi]
( :
Permulaan)
SCROLL *
Gulung
1
• ONCE
• AUTO
• OFF
: Menggulung informasi trek sekali.
: Mengulangi penggulungan (selang waktu 5-detik).
: Batal.
• Tekan DISP untuk lebih dari satu detik dapat menggulung tampilan
dengan mengabaikan pengaturan.
TAG DISP
Display tag
INDONESIA
AMP GAIN
Kontrol penguatan
penguat
VIDEO
Sistem video
• TAG ON
• TAG OFF
• LOW PWR
• HIGH PWR
• PAL
• NTSC
:
Menunjukkan informasi tag sementara memutar trek-trek MP3,
[13].
: Batal.
: VOL 00 – VOL 30 (Pilih ini jika power maksimum speaker kurang
dari 50 W untuk menghindari speaker dari kerusakan.)
: VOL 00 – VOL 50
: Pilih ini jika monitor anda adalah dari sistem warna PAL.
: Pilih ini jika monitor anda adalah dari sistem warna NTSC.
• Tekan SEL untuk mengaktifkan pemilihan sebelum Anda memilih
item-item PSM yang lain untuk disetel.
2
EXT IN *
Input eksternal
• CHANGER
• EXT IN
: Untuk menggunakan CD changer JVC, [10], Apple iPod atau
pemutar JVC D. , [17].
: Untuk menggunakan komponen eksternal lain apa pun selain yang
disebut di atas, [19].
1
Beberapa karakter atau simbol tidak akan diperlihatkan dengan tepat (atau akan dikosongkan) pada tampilan.
*
*2 Ditampilkan hanya ketika satu dari sumber-sumber berikut dipilih—FM, AM, DISC atau LINE IN.
16
Page 41

Pengoperasian iPod / D.
player
Untuk menunda*1 atau menghentikan*2
pemutaran
Unit ini siap untuk mengoperasikan Apple iPod atau JVC
D. player dari panel.
Sebelum mengoperasikan iPod atau D. player Anda:
Hubungkan salah satu dari yang berikut ini (dibeli
terpisah) ke jack CD changer di belakang unit.
• Adaptor antarmuka untuk iPod—KS-PD100
untuk mengontrol iPod.
• Adaptor antarmuka D. player—KS-PD500 untuk
mengontrol D. player.
• Untuk penyambungan, lihat Manual Pemasangan/
Penyambungan (bagian yang terpisah).
• Untuk rincian selengkapnya, lihat juga buku petunjuk
yang disertakan dengan adaptor antarmuka.
Persiapan:
Pastikan Anda memilih “CHANGER” untuk pengaturan
input eksternal, lihat halaman 16.
~
Ÿ
Pemutaran akan mulai secara otomatis dari titik
terakhir jeda pemutaran*1 atau penghentian
pemutaran*2 sebelumnya.
Untuk melanjutkan pemutaran, tekan 4 setelah
menekan MODE.
Untuk maju-cepat atau mundur trek
Pergi ke trek-trek sesudah atau sebelumnya
*1 Untuk iPod
2
Untuk D. player
*
INDONESIA
! Setel volume.
⁄ Setel suara sesuai keinginan anda.
(Lihat halaman 14).
Bersambung ke halaman berikutnya
17
Page 42

Memilih trek dari menu
1
Memilih mode-mode putar ulang
1
2 Masuk ke menu utama.
Sekarang, tombol
berfungsi sebagai tombol pemilihan
menu*.
3 Memilih menu yang dikehendaki.
INDONESIA
Untuk iPod:
PLAYLIST Ô ARTISTS Ô ALBUMS Ô
SONGS Ô GENRES Ô COMPOSER Ô
(kembali ke permulaan)
Untuk D. player:
PLAYLIST
Ô ARTIST Ô ALBUM Ô
GENRE Ô TRACK Ô (kembali ke
permulaan)
4 /¢
4 Mengkonfirmasi pemilihan.
Untuk kembali ke menu sebelumnya,tekan ¢
setelah menekan MODE.
• Jika trek sudah dipilih, pemutaran akan mulai
secara otomatis.
• Jika bagian yang dipilih memiliki lapisan lainnya,
Anda akan memasuki lapisan tersebut. Ulangi
langkah 3 dan 4 sampai trek yang dikehendaki
diputar.
• Dengan menahan tombol 4 /¢
Anda dapat meloncati 10 item sekaligus.
2 Pilih mode putar ulang yang anda inginkan.
7 Putar berulang
ONE RPT
Fungsinya sama seperti “Repeat One” untuk iPod
atau “Repeat Mode
ALL RPT
Fungsinya sama seperti “Repeat All” untuk iPod
atau “Repeat Mode = All” untuk D. player.
RPT OFF
Batal.
7 Putar acak
ALBM RND*
Fungsinya sama seperti “Shuffle Albums” untuk
iPod.
SONG RND/RND ON
Fungsinya sama seperti “Shuffle Songs” untuk iPod
atau “Random Play= On” D. player.
RND OFF
Batal.
*
iPod: Hanya berfungsi jika Anda memilih “ALL”
dalam “ALBUMS” dari “MENU” utama.
Untuk memeriksa informasi lain sewaktu
mendengarkan iPod atau D. player
= One” untuk D. player.
* Mode pemilihan menu akan dibatalkan:
– Jika tidak ada operasi sama sekali selama sekitar 5
detik.
– Jika Anda mengkonfirmasi pemilihan trek.
18
Page 43

Pengoperasian komponen
eksternal lainnya
Anda dapat menghubungkan sebuah komponen
eksternal ke steker LINE IN pada bagian belakang, dan
yang lain ke konektor CD changer pada bagian belakang
dengan menggunakan Adaptor Saluran Input—KSU57 (tidak disertakan) atau Adaptor AUX Input—KSU58 (tidak disertakan).
• Untuk penyambungan, lihat Manual Pemasangan/
Penyambungan (bagian yang terpisah).
• Untuk mendengarkan iPod atau D. player, rujuklah ke
halaman 17 dan 18.
Perawatan
Bagaimana membersihkan konektor-
konektor
Sering melepaskan akan memperburuk konektorkonektor.
Untuk meminimalkan kemungkinan ini, secara periodik
lap konektor-konektor dengan sebuah lap kapas atau
kain yang sudah di basahi dengan alkohol, hati-hati
untuk tidak merusak konektor-konektor.
Konektor
INDONESIA
~
Jika “EXT IN” tidak muncul, lihat halaman 16
dan pilih input eksternal (“EXT IN”).
Ÿ Hidupkan komponen yang telah
tersambung dan mulai memutar
sumber tersebut.
! Setel volume.
⁄ Setel suara sesuai keinginan anda.
(Lihat halaman 14).
Untuk mengecek informasi lain sewaktu
mendengarkan komponen eksternal
Jam Ô EXT IN atau LINE IN
Pengembunan uap air
Uap air mungkin mengembun pada lensa di dalam alat
penerima dalam kasus-kasus berikut:
• Setelah menyalakan pemanas di dalam mobil.
• Jika ini menjadi sangat lembab di dalam mobil.
Jika ini terjadi, alat penerima mungkin mengalami
kesalahan fungsi. Keluarkan disk atau biarkan alat
penerima hidup untuk beberapa jam sampai uap air
menguap.
Bagaimana menangani disk-disk
Ketika memindahkan sebuah
disk dari wadahnya, tekan ke
bawah penahan tengah dari wadah
tersebut dan angkat disk keluar,
pegang CD pada bagian pinggir.
• Selalu memegang disk pada bagian pinggir. Jangan
menyentuh permukaan yang terekamnya.
Ketika menyimpan sebuah disk ke dalam
wadahnya, dengan baik masukkan disk tersebut ke
sekeliling penahan tengah (dengan permukaan yang
tercetak menghadap ke atas).
• Pastikan untuk menyimpan disk-disk ke dalam
wadah-wadahnya setelah digunakan.
Bersambung ke halaman berikutnya
Penahan tengah
19
Page 44

Untuk menjaga disk-disk bersih
Sebuah disk yang kotor mungkin tidak
dapat diputar secara benar.
Jika sebuah disk menjadi kotor, lap
dengan sebuah kain lembut dalam satu
garis lurus dari tengah ke pinggir.
• Jangan menggunakan suatu pelarut (sebagai contoh
pembersih rekaman konvensional, semprotan, tiner,
bensin, dll) untuk membersihkan disk-disk.
Untuk memutar disk-disk baru
INDONESIA
Disk-disk baru mungkin mempunyai
bagian-bagian yang kasar di sekitar
bagian dalam dan luar pinggiran disk.
Jika disk seperti ini digunakan, alat
penerima ini mungkin menolak disk
tersebut.
Untuk menghilangkan bagian-bagian kasar ini, gosok
pinggiran-pinggiran dengan sebuah pensil atau pena,
dll.
Jangan gunakan disk-disk berikut:
Disk
melengkung
Stiker
Bekas stiker
Label yang
menonjol
Bentuk yang
aneh
CD single (disk 8 cm)
Lebih lagi tentang alat
penerima ini
Pengoperasian dasar
Menghidupkan daya
• Dengan menekan tombol SRC pada alat penerima,
anda dapat juga menghidupkan power. Jika sumber
sudah siap, pemutaran ulang akan mulai.
Mematikan daya
• Jika anda mematikan daya sementara mendengarkan
sebuah disk, disk akan mulai memutar dari mana
putar ulang sudah dihentikan sebelumnya, pada
waktu berikutnya anda menghidupkan power.
• Untuk disk-disk MP3/WMA, main-ulang akan mulai
dari awal dari trek terakhir yang sedang diputar.
Pengoperasian tuner
Menyimpan stasiun-stasiun dalam memori
• Selama pencarian SSM…
– Semua stasiun yang telah disimpan sebelumnya
dihapus dan stasiun-stasiun baru disimpan.
– Stasiun-stasiun yang diterima dipreset (diatur
awal) dalam No. 1 (frekuensi terendah) ke No. 6
(frekuensi tertinggi).
– Ketika SSM selesai, stasiun yang telah disimpan
dalam No. 1 akan secara otomatis diterima.
• Ketika menyimpan sebuah stasiun secara manual,
preset (pengaturan awal) stasiun ini terhapus ketika
sebuah stasiun yang baru disimpan dari dalam nomor
preset (pengaturan awal) yang sama.
Pengoperasian disk
Perhatian untuk putar ulang DualDisc
• Sisi yang non-DVD dari sebuah “DualDisc”, tidak
tunduk pada standar “Compact Disc Digital Audio”.
Oleh karena itu, penggunaan sisi Non-DVD dari
sebuah DualDisc pada produk ini tidak disarankan.
20
Page 45

Umum
• Alat penerima ini sudah didisain untuk memainkan
CD-CD/CD-CD Teks, dan CD-R (dapat direkam)/CDRWs (dapat ditulis ulang) dalam format CD audio
(CD-Digital Audio), MP3 dan WMA.
• Unit ini tidak dapat memainkan ulang
disk-disk SVCD, DVD, CD-G, atau CD-I.
• Ketika sebuah disk disisipkan terbalik, disk tersebut
secara otomatis dikeluarkan.
• Sementara memajukan dengan cepat atau
membalikkan pada sebuah disk MP3 atau WMA,
anda hanya dapat mendengar suara terputus-putus.
Memutar sebuah CD-R atau CD-RW
• Gunakan hanya CD-R atau CD-RW yang “sudah
selesai”.
• Alat penerima ini hanya dapat memutar ulang filefile dari tipe yang sama yang dideteksi pertama kali
jika sebuah disk berisi file-file CD Audio (CD-Digital
Audio) dan file-file MP3/WMA.
• Alat penerima ini dapat memutar ulang disk-disk
multisesi; bagaimanapun, sesi-sesi yang belum
ditutup akan dilewati sementara memutar.
• Beberapa CD-R atau CD-RW mungkin tidak diputar
ulang pada alat penerima ini karena karakteristikkarakteristik disk tersebut, atau untuk sebab-sebab
berikut:
– Disk-disk kotor atau tergores.
– Pengembunan uap air terjadi pada lensa di dalam
alat penerima.
– Lensa di dalam alat penerima kotor.
– CD-R/CD-RW dimana file telah ditulis dengan
metode “Packet Write”.
– Ada kondisi-kondisi rekaman yang tidak benar
(data hilang, dll) atau kondisi-kondisi media
(ternoda, tergores, melengkung, dll).
• CD-RW mungkin membutuhkan waktu pembacaan
yang lebih lama karena daya refleksi dari CD-RW
lebih rendah dari pada CD yang biasa.
• Jangan gunakan CD-R atau CD-RW berikut:
– Disk-disk dengan stiker-stiker, label-label
atau sebuah stiker segel perlindungan pada
permukaannya.
– Disk-disk dengan label-label dapat langsung
diprint dengan sebuah printer ink jet.
Menggunakan disk ini pada suhu tinggi atau
kelembaban tinggi dapat menyebabkan malfungsi
atau kerusakan pada unit.
Memainkan sebuah disk VCD
• Fungsi PBC tidak tersedia untuk beberapa VCD.
• Fungsi PBC secara otomatis dibatalkan ketika
Anda mengganti sumber atau mematikan unit.
Permainan-ulang mulai dari permulaan dari disk-disk
ketika Anda memainkan kembali VCD.
• Tampilan Pada-Layar (OSD) akan secara otomatis
dibatalkan ketika Anda mengganti sumber atau
mematikan unit.
Memutar sebuah disk MP3/WMA
• Alat penerima ini dapat memutar ulang file-file
MP3/WMA dengan kode perpanjangan <.mp3>
atau <.wma> (mengabaikan jenis huruf—huruf
besar/kecil).
• Alat penerima ini dapat mempertunjukkan namanama album, artis-artis (pemain) dan tag (versi 1.0,
1.1, 2.2, 2.3 atau 2.4) untuk file MP3.
• Alat penerima ini dapat menampil hanya 1 byte
karakter. Tidak ada karakter-karakter lain dapat
secara benar ditampilkan.
• Alat penerima ini dapat memutar ulang file MP3/
WMA bertemu kondisi di bawah ini:
– Kecepatan bit: MP3: 32 kbps — 320 kbps
WMA: 48 kbps — 192 kbps
– Frekuensi sampling:
48 kHz, 44.1 kHz, 32 kHz (untuk MPEG-1)
24 kHz, 22.05 kHz, 16 kHz (untuk MPEG-2)
48 kHz, 44.1 kHz, 32 kHz (untuk WMA)
– Format disk: ISO 9660 Level 1/Level 2, Romeo,
Joliet, nama panjang file Windows
• Maksimum jumlah karakter untuk nama-nama file/
folder bervariasi pada format disk yang digunakan
(termasuk 4 karakter perpanjangan—<.mp3> atau
<.wma>).
– ISO 9660 Level 1: sampai 12 karakter
– ISO 9660 Level 2: sampai 31 karakter
– Romeo: sampai 40 karakter
– Joliet: sampai 40 karakter
– Nama panjang file Windows: sampai 40 karakter
Bersambung ke halaman berikutnya
INDONESIA
21
Page 46

• Alat penerima ini dapat memutar ulang file yang
terekam dalam VBR (Kecepatan bit variabel).
File yang telah direkam dalam VBR memiliki
ketidaksesuaian display waktu yang telah lewat, dan
tidak mempertunjukkan waktu sebenarnya yang
telah lewat. Khususnya, setelah melakukan fungsi
pencarian, perbedaannya menjadi lebih jelas.
• Alat penerima ini dapat mengenali total 512 file, 200
folder, dan 8 hirarki.
• Alat penerima ini tidak dapat memutar ulang file
berikut:
INDONESIA
– File MP3 yang disandikan dengan format MP3i dan
MP3 PRO.
– File MP3 yang disandikan dalam format yang tidak
tepat.
– File MP3 disandikan dengan Lapisan 1.
– File WMA disandikan dengan format tanpa
kerugian, profesional dan suara.
– File WMA yang tidak berdasarkan Windows Media®
Audio.
– File WMA yang dilindungi dari pengcopyan dengan
DRM.
– File yang memiliki data seperti WAVE, ATRAC3, dll.
• Fungsi pencarian bekerja tetapi kecepatan pencarian
tidak konstan.
Mengganti sumber
• Jika anda mengganti sumber, putar ulang juga
berhenti (tanpa mengeluarkan disk).
Pada waktu berikutnya anda memilih “DISC” untuk
sumber putar ulang, disk mulai memutar dari tempat
dimana telah dihentikan sebelumnya.
• Untuk disk-disk MP3/WMA, main-ulang akan mulai
dari awal dari trek terakhir yang sedang diputar.
Mengeluarkan sebuah disk
• Jika disk yang dikeluarkan tidak dipindahkan dalam
15 detik, disk secara otomatis akan disisipkan
kembali ke dalam tempat pemuatan untuk
melindungnya dari debu. (Disk tidak diputar dalam
waktu ini.)
Pengaturan-pengaturan umum—PSM
• Jika anda mengganti pengaturan “AMP GAIN”
(PENAMBAH PENGUAT) dari “HIGH PWR” ke “LOW
PWR” sementara tingkat level volume diatur lebih
tinggi dari “VOL 30”, alat penerima secara otomatis
mengganti tingkat volume ke “VOL 30”.
Pengoperasian iPod/D. player
• Apabila Anda menghidupkan unit ini, iPod atau D.
player dialiri arus listrik melalui unit ini.
• Sewaktu iPod atau D. player terhubung, semua
pengoperasian dari iPod atau D. player dinonaktifkan.
Lakukan semua pengoperasian dari unit ini.
• Informasi teks mungkin tidak dapat ditampilkan
dengan benar.
• Jika informasi teks menyertakan lebih dari 8 karakter,
teks akan bergulir pada tampilan. Unit ini dapat
menampilkan hingga 40 karakter.
Pemberitahuan:
Sewaktu pengoperasian sebuah iPod atau sebuah
D.player, beberapa pengoperasian mungkin tidak
bisa dilakukan dengan benar atau sebagaimana
mestinya. Jika ini terjadi, kunjunglah situs web JVC
berikut:
Untuk pengguna iPod: <http://www.jvc.co.jp/
english/car/support/ks-pd100/index.html>
Untuk pengguna D. player: <http://www.jvc.
co.jp/english/car/support/ks-pd500/index.
html>
• Microsoft dan Windows Media adalah baik merek
dagang yang terdaftar maupun merek dagang dari
Badan Hukum Microsoft di Amerika Serikat dan/atau
negara-negara lain.
• iPod adalah merek dagang dari Apple Inc., terdaftar
di Amerika Serikat dan di negara-negara lain.
22
Page 47

Pemecahan Masalah
Apa yang muncul dan menjadi masalah tidak selalu serius. Cek poin-poin berikut sebelum memanggil sebuah pusat
layanan.
Gejala-gejala Perbaikan-perbaikan/Sebab-sebab
• Suara tidak dapat didengar dari speakerspeaker.
Umum
• Alat penerima tidak berfungsi sama sekali. Reset alat penerima (lihat halaman 2).
• Preset (pengaturan awal) SSM otomatis
tidak berfungsi.
• Noise (Derau) statis sementara
FM/AM
mendengarkan radio.
• Disk secara otomatis dikeluarkan. Sisipkan disk tersebut secara benar.
• CD-R/CD-RW tidak dapat diputar ulang.
• Trek pada CD-R/CD-RW tidak
dapat dilewati.
• Disk tidak dapat diputar maupun
dikeluarkan.
• Suara dan gambar kadang-kadang
diinterupsi atau didistorsi.
Pemutaran disk
• “NO DISC” muncul pada tampilan. Masukkan disk yang dapat diputar ke dalam slot
• Tidak ada gambar permainan-ulang yang
muncul di monitor
• Tidak ada gambar muncul pada monitor
sama sekali.
• Disk tidak dapat diputar ulang. • Gunakan disk yang berisi trek MP3/WMA yang direkam
• Derau dibangkitkan. Lewatkan ke trek yang lain atau ganti disk tersebut. (Jangan
Putar ulang MP3/WMA
• Waktu yang lama diperlukan (“CHECK”
tetap berkedip pada tampilan).
• Sesuaikan volume ke level optimum.
• Cek kabel-kabel dan penyambungan-penyambungan.
Simpan stasiun-stasiun secara manual.
Sambungkan antena secara rapat.
• Sisipkan sebuah CD-R/CD-RW yang sudah diselesaikan.
• Selesaikan CD-R/CD-RW dengan komponen yang anda
gunakan untuk merekam.
• Buka kunci disk (lihat halaman13).
• Keluarkan disk secara paksa (lihat halaman 2).
• Hentikan putar ulang sementara mengemudi pada jalan
yang kasar.
• Ganti disk tersebut.
• Cek kabel-kabel dan penyambungan-penyambungan.
pemuatannya.
Kabel rem parkir tidak terhubung dengan benar.
(Lihat Manual Pemasangan/Penyambungan.)
• Sambungkan kabel video dengan benar.
• Pilih sebuah input yang benar pada monitor.
dalam format yang sesuai ketentuan ISO 9660 Level 1, Level
2, Romeo, atau Joliet.
• Tambahkan kode perpanjangan <.mp3> atau <.wma>
pada nama-nama file.
tambahkan kode perpanjangan <.mp3> atau <.wma> ke
trek-trek bukan MP3 atau WMA.)
Jangan menggunakan terlalu banyak hirarki-hirarki dan
folder-folder.
Bersambung ke halaman berikutnya
INDONESIA
23
Page 48

Gejala-gejala Perbaikan-perbaikan/Sebab-sebab
• Trek tidak berputar ulang dalam
urutan yang Anda inginkan.
• Waktu putar yang sudah lewat
tidak benar.
• “NO FILES” muncul pada tampilan. Sisipkan sebuah disk yang berisi trek-trek MP3/WMA.
• Karakter-karakter yang benar tidak
Putar ulang MP3/WMA
ditampilkan (misalnya nama album).
• “NO DISC” muncul pada tampilan. Sisipkan disk ke dalam tempat disk.
INDONESIA
• “NO MAG” muncul pada tampilan. Sisipkan tempat CD.
• “RESET 8” muncul pada tampilan. Sambungkan alat penerima ini dan CD changer secara benar
CD changer
• “RESET 1” – “RESET 7” muncul pada
tampilan.
• CD changer tidak berfungsi sama sekali. Reset alat penerima (lihat halaman 2).
• iPod atau D.player tidak menyala atau
tidak berfungsi.
• Tombol-tombol tidak berfungsi seperti
yang dimaksudkan.
• Suara bercacat. Nonaktifkan equalizer pada unit atau iPod/D.player.
• “NO IPOD” atau “NO DP” muncul pada
tampilan.
• Pemutaran berhenti. Sambungan headphone terputus selama pemutaran. Mulai
• Tidak ada suara yang terdengar
sewaktu menghubungkan iPod nano.
• Tidak ada suara yang terdengar.
• “ERROR 01” muncul pada tampilan
sewaktu menghubungkan D.player.
Pemutaran iPod/ D. player
• “NO FILES” atau “NO TRACK” muncul
pada tampilan.
• “RESET 1” – “RESET 7” muncul pada
tampilan.
• “RESET 8” muncul pada tampilan. Periksa sambungan antara adaptor dan unit ini.
• Kontrol iPod atau D. player tidak
berfungsi setelah hubungan diputuskan
dari unit ini.
Urutan putar ulang ditentukan ketika file-file direkam.
Ini kadang-kadang terjadi selama putar. Hal ini disebabkan
dengan bagaimana trek-trek tersebut direkam pada disk.
Alat penerima ini hanya dapat menampilkan huruf (huruf
besar), nomor dan simbol dalam jumlah yang terbatas.
dan tekan tombol reset dari CD changer.
Tekan tombol reset dari CD changer.
• Periksalah kabel penghubung dan sambungannya.
• Mutakhirkan versi firmware.
• Isikan baterai.
Fungsi-fungsi tombol sudah bertukar. Tekan MODE sebelum
melaksanakan pengoperasian.
• Periksalah kabel penghubung dan sambungannya.
• Isikan baterai.
lagi operasi pemutaran dengan menggunakan panel kontrol
(lihat halaman 17).
• Lepaskan headphone dari iPod nano.
• Mutakhirkan versi firmware dari iPod nano.
Cabut adaptor dari D. player. Kemudian, hubungkan lagi.
Tidak ada trek yang disimpan. Impor trek ke iPod atau D.
player.
Lepaskan adaptor dari kedua-dua unit dan iPod/D.player.
Kemudian, sambung lagi.
Reset iPod atau D. player.
24
Page 49

Spesifikasi-spesifikasi
SEKSI PENGUAT AUDIO
Maksimum keluaran power:
Depan/Belakang: 50 W per saluran
Output Power Kontinu (RMS):
Depan/Belakang: 19 W per saluran dalam 4
Impedansi Beban: 4 Ω (4 Ω ke 8 Ω yang
Cakupan kontrol Nada:
Bas: ±10 dB pada 100 Hz
Trebel: ±10 dB pada 10 kHz
Respon Frekuensi:
Perbandingan Sinyal ke
derau:
Tingkat Line-Out/
Impedansi:
Impedansi Output: 1 kΩ
Terminal lain: LINE IN, CD changer
Ω, 40 Hz ke 20 000 Hz pada
tidak lebih dari 0.8% total
distorsi harmoni.
diizinkan)
40 Hz sampai 20 000 Hz
70 dB
2.5 V/20 kΩ beban (skala
penuh)
SESI VIDEO
Sistem warna: PAL/NTSC
Output video
(Composite)
:
1 Vp-p/75Ω
SEKSI TUNER
Cakupan Frekuensi:
FM:
AM: 531 kHz sampai 1 602 kHz
Tuner FM
Sensitivitas yang dapat
digunakan:
50 dB Sensitivitas
Peredaan:
Selektifitas Saluran
Alternatif (400 kHz):
Respon Frekuensi:
Pemisahan Stereo: 30 dB
Tuner AM
Sensitifitas/Selektifitas: 20 μV/35 dB
87.5 MHz sampai 108.0 MHz
1
1.3 dBf (1.0 µV/75 Ω)
16.3 dBf (1.8 µV/75 Ω)
65 dB
40 Hz sampai 15 000 Hz
SESI ALAT PEMUTAR VCD/CD
Tipe: Alat Pemutar CD kompak
Sistem Pendeteksi
Sinyal:
Jumlah Saluran: 2 saluran (stereo)
Respon Frekuensi: 5 Hz sampai 20 000 Hz
Cakupan Dinamik: 96 dB
Perbandingan Sinyal
ke derau:
Wow dan Flutter: Kurang dari batas ukuran
Format Penguraian Sandi MP3: (MPEG1/2 Lapisan
Audio 3)
Maksimum
Kecepatan Bit:
Format Penguraian Sandi WMA (Windows Media®
Audio):
Maksimum
Kecepatan Bit:
Optik non kontak terbuka
(laser semikonduktor)
98 dB
320 kbps
192 kbps
UMUM
Power yang Diperlukan:
Voltase
Pengoperasian:
Sistem Pertanahan: Tanah negatif
Temperatur
pengoperasian yang
diizinkan:
Dimensi (L × T × T): (kira-kira)
Ukuran instalasi: 182 mm × 52 mm × 150 mm
Ukuran panel: 188 mm × 58 mm × 11 mm
Massa:
Disain dan spesifikasi dapat berubah sewaktu-waktu
tanpa pemberitahuan.
DC 14.4 V
(kelonggaran 11 V sampai
16 V)
0°C sampai +40°C
1.4 kg
(tidak termasuk aksesoris)
INDONESIA
25
Page 50

Having TROUBLE with operation?
Please reset your unit
Refer to page of How to reset your unit
Ada MASALAH dengan cara
pengoperasian?
Setel kembali unit Anda
Lihat halaman mengenai Bagaimana mereset unit anda
EN, IN
© 2007 Victor Company of Japan, Limited
0207DTSMDTJEIN
 Loading...