

Page 1

CD RECEIVER KD-S620/S576/S570
ENGLISH
RECEPTOR CON CD KD-S620/S576/S570
RECEPTEUR CD KD-S620/S576/S570
KD-S620
KD-S620
31
For installation and connections, refer to the separate manual.
Para la instalación y las conexiones, refiérase al manual separado.
Pour l’installation et les raccordements, se référer au manuel séparé.
INSTRUCTIONS
MANUAL DE INSTRUCCIONES
MANUEL D’INSTRUCTIONS
KD-S576
KD-S576
KD-S570
KD-S570
COMPACT
DIGITAL AUDIO
For customer Use:
Enter below the Model No. and
Serial No. which are located on
the top or bottom of the cabinet.
Retain this information for future
reference.
Model No.
ESPAÑOL
FRANÇAIS
Serial No.
GET0003-001C
[J]
Page 2

INFORMATION (For USA)
This equipment has been tested and found to comply with the limits for a Class B digital device,
pursuant to Part 15 of the FCC Rules. These limits are designed to provide reasonable protection
against harmful interference in a residential installation. This equipment generates, uses, and can
radiate radio frequency energy and, if not installed and used in accordance with the instructions,
ENGLISH
may cause harmful interference to radio communications. However, there is no guarantee that
interference will not occur in a particular installation. If this equipment does cause harmful interference
to radio or television reception, which can be determined by turning the equipment off and on, the
user is encouraged to try to correct the interference by one or more of the following measures:
– Reorient or relocate the receiving antenna.
– Increase the separation between the equipment and receiver.
– Connect the equipment into an outlet on a circuit different from that to which the receiver is
connected.
– Consult the dealer or an experienced radio/TV technician for help.
IMPORTANT FOR LASER PRODUCTS
Precautions:
1. CLASS 1 LASER PRODUCT
2. DANGER: Invisible laser radiation when open and interlock failed or defeated. Avoid direct
exposure to beam.
3. CAUTION: Do not open the top cover. There are no user-serviceable parts inside. Leave all
servicing to qualified service personnel.
4. CAUTION: This CD player uses invisible laser radiation, however, is equipped with safety switches
to prevent radiation emission when unloading CDs. It is dangerous to defeat the safety switches.
5. CAUTION: Use of controls, adjustments or performance of procedures other than those specified
herein may result in hazardous radiation exposure.
How to reset your unit
Press and hold both the SEL (Select) and
(Standby/On/ATT) buttons at the same time for several
seconds.
This will reset the built-in microcomputer.
NOTES:
Your preset adjustments — such as preset channels or sound
adjustments — will also be erased.
If a CD is in the unit, it will eject when you reset the unit. Pay
attention not to drop the CD.
(Standby/On/ATT)
SEL (Select)
2
Page 3

Thank you for purchasing a JVC product. Please read all instructions carefully before operation,
to ensure your complete understanding and to obtain the best possible performance from the unit.
CONTENTS
How to reset your unit.................................. 2
LOCATION OF THE BUTTONS ...............4
Control panel ............................................... 4
Remote controller (only for KD-S620).......... 5
Preparing the remote controller
(only for KD-S620) ................................... 6
BASIC OPERATIONS..........................7
Turning on the power ................................... 7
RADIO BASIC OPERATIONS .................8
Listening to the radio ................................... 8
Storing station in memory ............................ 9
Tuning into a preset station........................ 10
Other convenient tuner functions............... 10
CD OPERATIONS............................ 11
Playing a CD.............................................. 11
Locating a track or a particular portion
on a CD.................................................. 12
Selecting CD playback modes................... 12
Prohibiting CD ejection .............................. 13
SOUND ADJUSTMENTS.................... 14
ENGLISH
Adjusting the sound ................................... 14
Turning on/off the loudness function ............. 14
Using the Sound Control Memory (SCM) .. 15
Storing your own sound adjustments......... 16
OTHER MAIN FUNCTIONS ................. 17
Setting the clock ........................................ 17
To cancel advanced SCM .......................... 17
Selecting the level display.......................... 18
Detaching the control panel ....................... 19
MAINTENANCE .............................. 20
Handling CDs ............................................ 20
TROUBLESHOOTING ....................... 21
SPECIFICATIONS............................ 22
BEFORE USE
*
For safety....
• Do not raise the volume level too much, as this
will block outside sounds, making driving
dangerous.
• Stop the car before performing any complicated
operations.
*
Temperature inside the car....
If you have parked the car for a long time in hot
or cold weather, wait until the temperature in the
car becomes normal before operating the unit.
3
Page 4
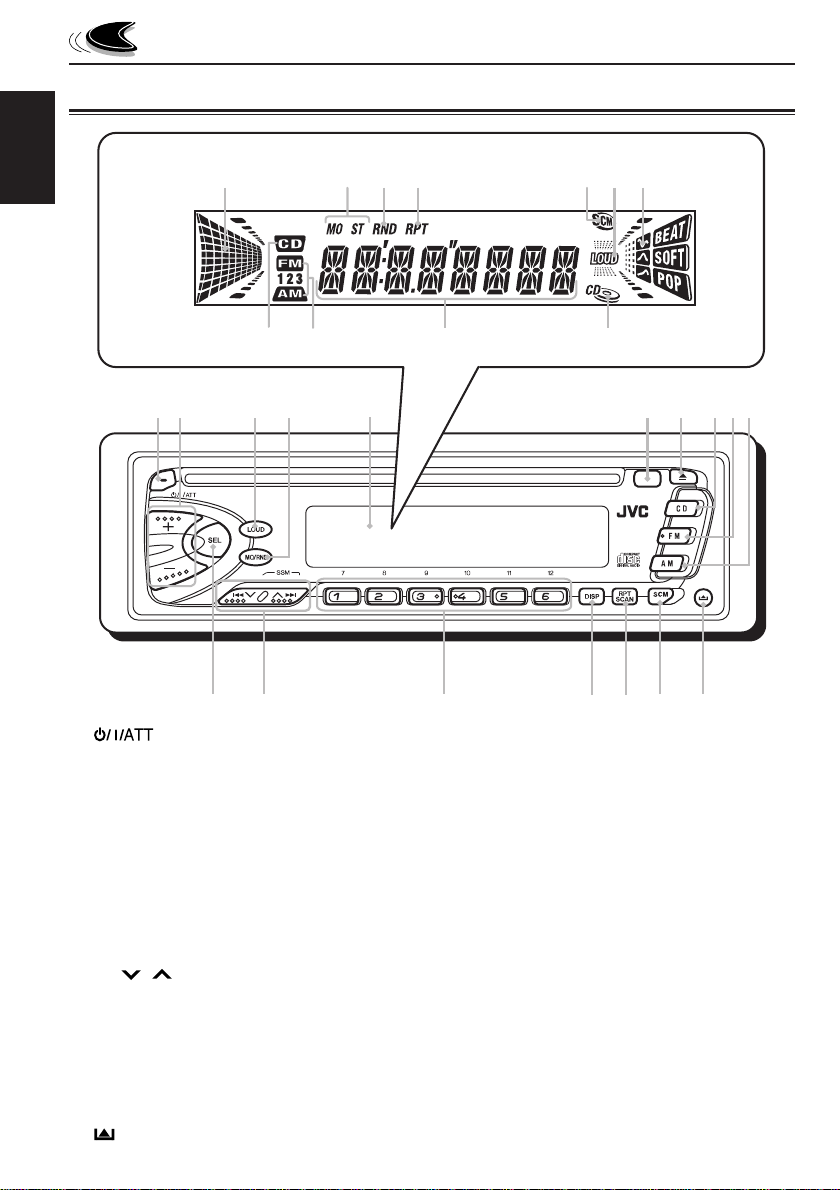
Control panel
Display window
ENGLISH
LOCATION OF THE BUTTONS
;a
i
o
sdf
g
h
12
1 (standby/on/attenuator) button
2 +/– button
3 LOUD button
4 MO (monaural) button
RND (random) button
5 Display window
6 Remote sensor (only for KD-S620)
7 0 (eject) button
8 CD button
9 FM button
p AM button
q SEL (select) button
w 4
e Number buttons
r DISP (display) button
t RPT (repeat) button
y SCM (sound control memory) button
u
4
/ ¢ buttons
• Also functions as SSM buttons when
pressed together.
SCAN button
(control panel release) button
34 5 6
q
w
j
e
k
rt y
Display window
i Volume (or audio) level indicator
Equalization Pattern indicator
o Tuner reception indicators
STEREO, MONO
; RND (random) indicator
a RPT (repeat) indicator
s "SCM" indicator
d LOUD indicator
f Sound mode indicators
BEAT, SOFT, POP
g CD indicator
h Band indicators
FM1, FM2, FM3
AM
j Main display
k CD IN indicator
789p
u
Page 5
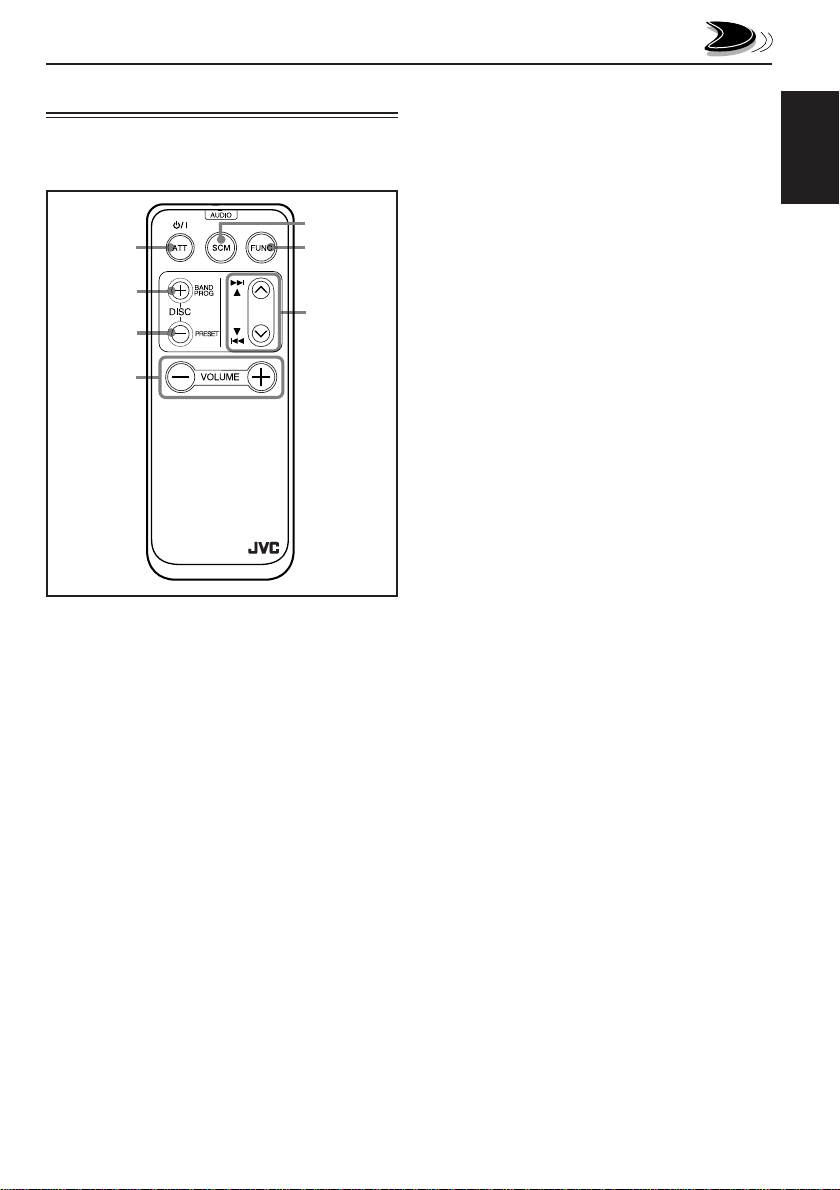
Remote controller
(only for KD-S620)
This section is only for KD-S620.
5
1
2
3
4
RM-RK31
1 • Turns on the unit if pressed when the unit is
turned off.
• Turns off the unit if pressed and held until
“SEE YOU” appears on the display.
• Drops the volume level in a moment if
pressed briefly.
Press again to resume the volume.
2 • Functions as the BAND button while listening
to the FM broadcast.
Each time you press the button, the band
changes.
• Does not function as the PROG/DISC +
button.
3 • Functions as the PRESET button while
listening to the radio.
Each time you press the button, the preset
station number increases, and the selected
station is tuned into.
• Does not function as the DISC – button.
6
7
4 Functions the same as the + and – buttons on
the main unit.
Note:
These buttons cannot be used for the clock
(CLOCK H, CLOCK M), SCM LINK and
5 Selects the sound mode.
6 Selects the source.
7 • Searches stations while listening to the radio.
LEVEL (see pages 17 and 18).
Each time you press the button, the mode
changes.
Each time you press the button, the source
changes.
• F ast -forwards or rev erses the track if pressed
and held while listening to a CD.
• Skips to the beginning of the next tracks or
goes back to the beginning of the current (or
previous tracks) if pressed briefly while
listening to a CD.
ENGLISH
5
Page 6
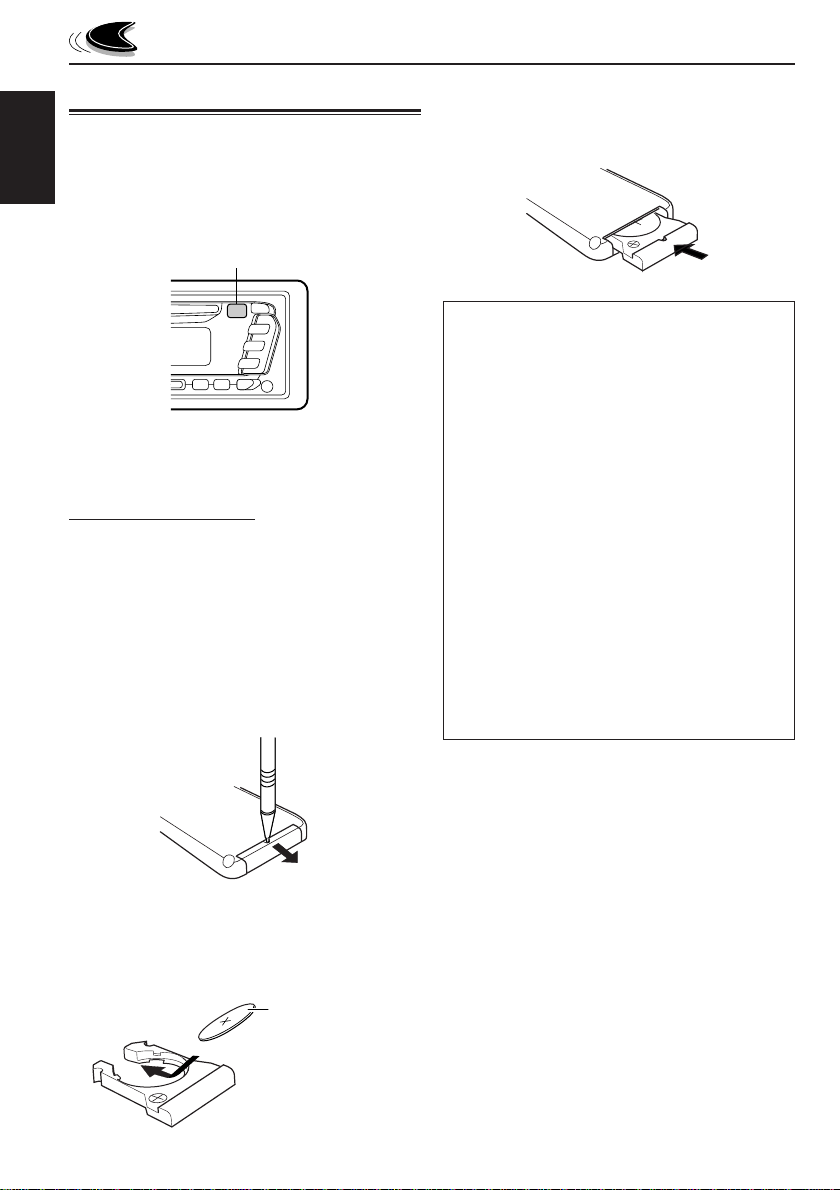
Preparing the remote controller
This section is ONLY FOR KD-S620.
Before using the remote controller:
ENGLISH
• Aim the remote controller directly at the remote
sensor on the main unit. Make sure there is no
obstacle in between.
Remote sensor
• Do not expose the remote sensor to strong light
(direct sunlight or artificial lighting).
Installing the battery
When the controllable range or effectiveness of
the remote controller decreases, replace the
battery.
1
Remove the battery holder.
1) Push out in the direction indicated by the
arrow using a ball point pen or a similar
tool.
2) Remove the battery holder.
3
Return the battery holder.
Insert again the battery holder pushing it until
you hear a clicking sound.
(back side)
WARNING:
• Store the batteries in a place which children
cannot reach.
If a child accidentally swallows the battery,
consult a doctor immediately.
• Do not recharge, short, disassemble or heat the
batteries or dispose it in a fire.
Doing any of these things may cause the
batteries to give off heat, crack or start a fire.
• Do not leave the batteries with other metallic
materials.
Doing this may cause the batteries to give off
heat, crack or start a fire.
• When throwing away or saving the batteries,
wrap it in tape and insulate; otherwise, the
batteries may start to give off heat, crack or start
a fire.
• Do not poke the batteries with tweezers or
similar tools.
Doing this may cause the batteries to give off
heat, crack or start a fire.
2
Place the battery.
Slide the battery into the holder with the +
side facing upwards so that the battery is fixed
in the holder.
6
(back side)
1)
2)
Lithium coin battery
(product number:
CR2025)
Page 7
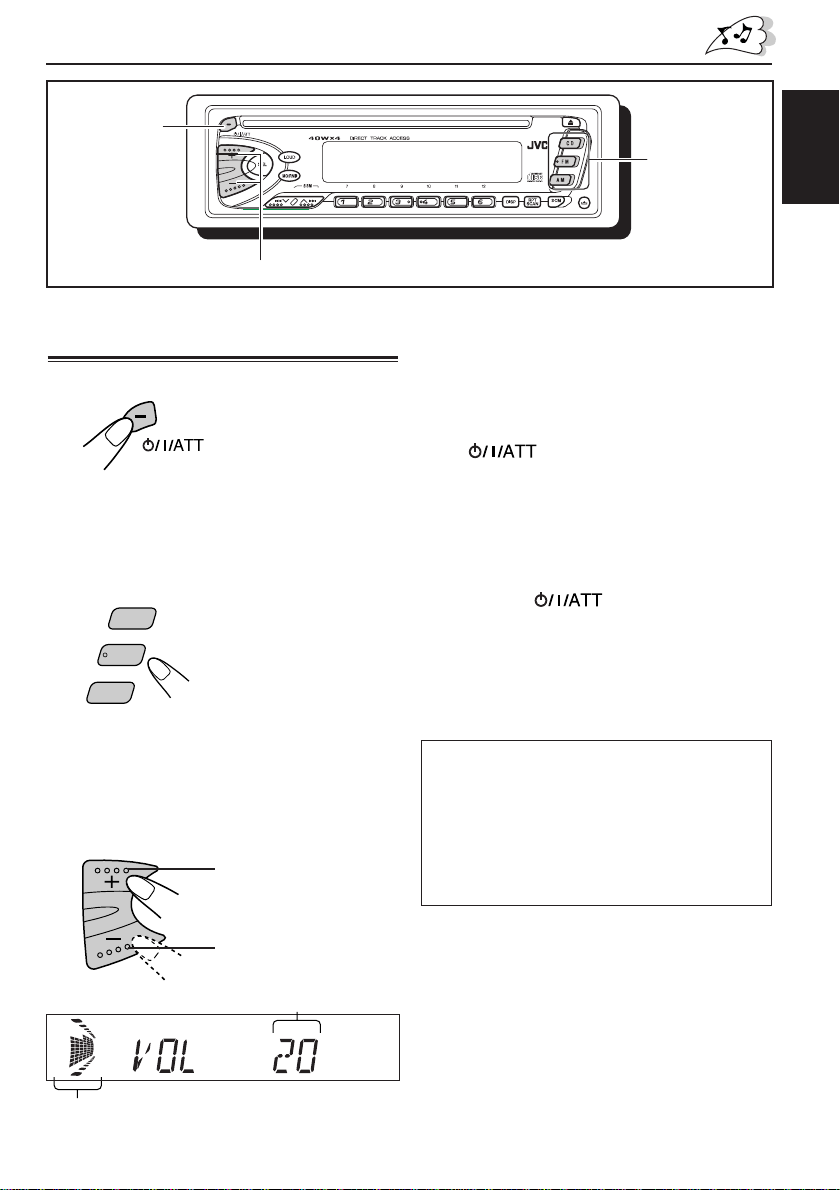
2
1
3
Turning on the power
1
Turn on the power.
Note on One-Touch Operation:
When you select a source in step 2 below, the
power automatically comes on. You do not have
to press this button to turn on the power.
2
Select the source.
C D
F M
A M
To operate the tuner (FM or AM),
see pages 8 – 10.
To operate the CD,
see pages 11 – 13.
3
Adjust the volume.
To increase the volume.
BASIC OPERATIONS
4
Adjust the sound as you want (see
page 14).
To drop the volume in a moment
Press briefly while listening to any
source. “ATT” starts flashing on the display, and
the volume level will drop in a moment.
To resume the previous volume level, press the
button briefly again.
To turn off the power
Press and hold until "SEE YOU"
appears on the display.
Note:
When you use this unit for the first time, set the builtin clock correctly, see page 17
CAUTION on volume setting
CDs produce very little noise compared with other
sources. If the volume level is adjusted for the tuner,
for example, the speakers may be damaged by the
sudden increase in the output level. Therefor e, lower
the volume before playing a disc and adjust it as
required during playback.
ENGLISH
To decrease the volume.
Volume or audio level indicator
(see page 18)
Volume level appears
7
Page 8
ENGLISH
RADIO BASIC OPERATIONS
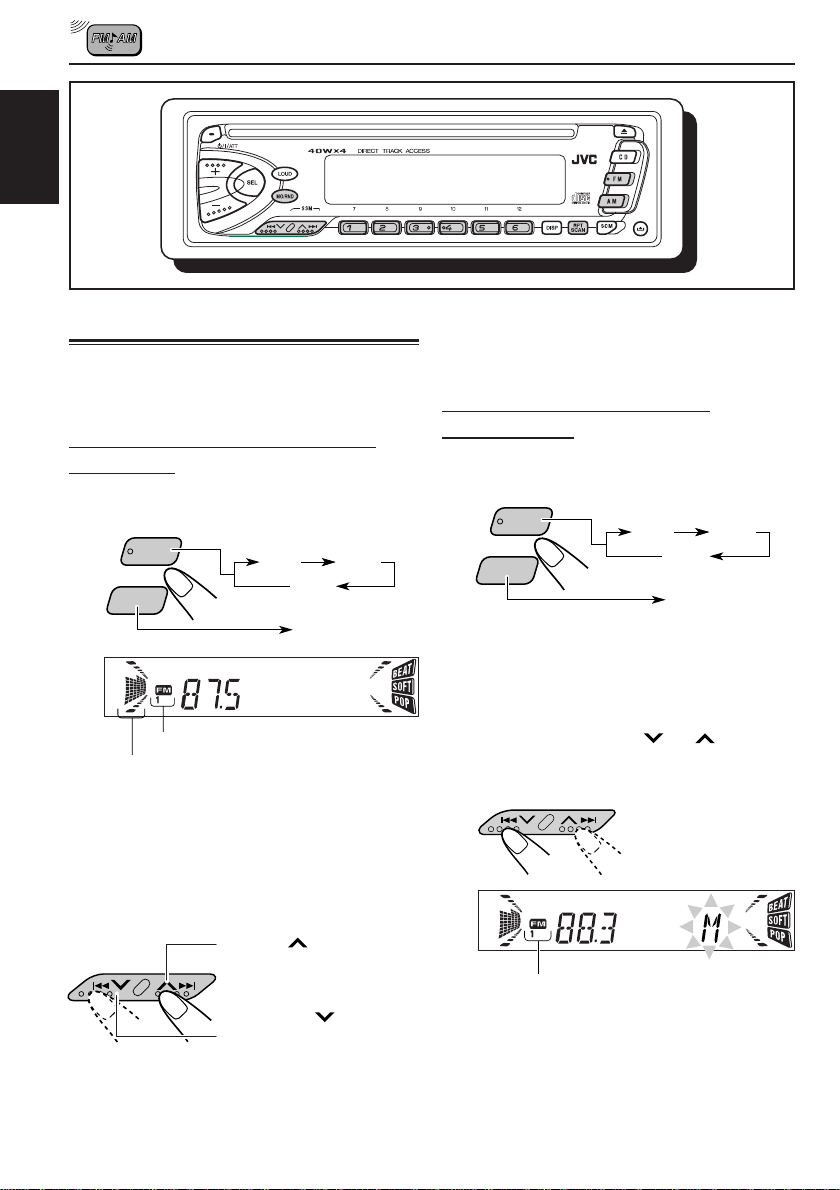
Listening to the radio
You can use either automatic searching or manual
searching to tune into a particular station.
Searching a station automatically:
Auto search
1
Select the band (FM 1 – 3, AM).
F M
A M
selected band appears
Volume or audio level (see page 18) indicator
Note:
This receiver has three FM bands (FM1, FM2,
FM3). Y ou can use any one of them to listen to an
FM broadcast.
FM1
FM2
FM3
AM
To stop searching before a station is received,
press the same button you have pressed for
searching.
Searching a station manually:
Manual search
1
Select the band (FM 1 – 3, AM).
F M
A M
Note:
This receiver has three FM bands (FM1, FM2,
FM3). You can use any one of them to listen to an
FM broadcast.
2
Press and hold 4 or ¢ until
“M” starts flashing on the display.
FM1
FM2
FM3
AM
2
Start searching a station.
Press
stations of higher
frequencies.
Press 4
stations of lower
frequencies.
When a station is received, searching stops.
8
¢ to search
to search
selected band appears
Page 9
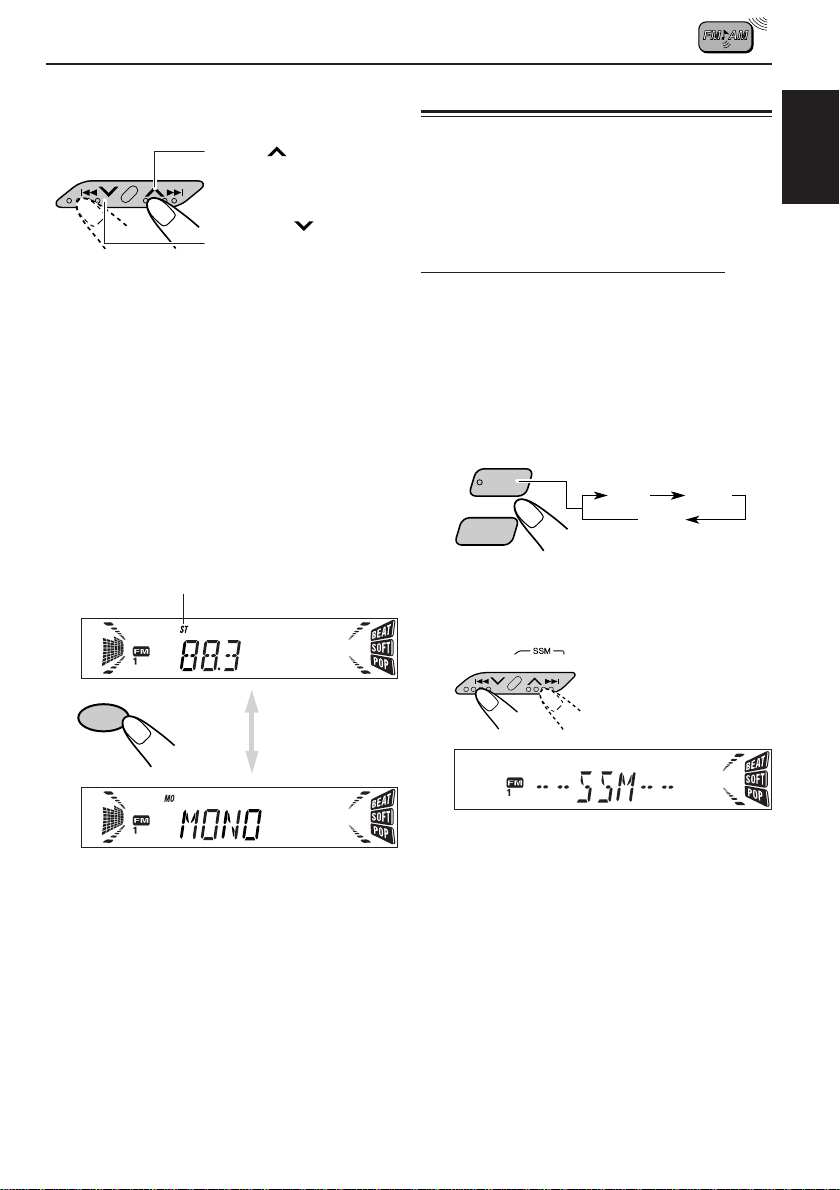
3
T une into a station you want while “M”
is flashing.
Press
stations of higher
frequencies.
Press 4
stations of lower
frequencies.
• If you release your finger from the button, the
manual mode will automatically turn off after 5
seconds.
• If you hold down the button, the frequency keeps
changing until you release the button.
¢ to search
to search
When an FM stereo broadcast is hard to
receive:
Press MO/RND (monaural/random) while listening
to an FM stereo broadcast.
• Each time you press the button, the MO indicator
lights up and goes off alternately.
Lights up when receiving an
FM broadcast in stereo.
Storing stations in memory
You can use one of the following two methods to
store broadcasting stations in memory.
• Automatic preset of FM stations: SSM (Strongstation Sequential Memory)
• Manual preset of both FM and AM stations
FM station automatic preset: SSM
Y ou can preset 6 local FM stations in each FM band
(FM1, FM2 and FM3).
1
Select the band (FM1 – 3) you want
to store FM stations into.
• Each time you press the button, the FM
band changes as follows:
F M
A M
2
Press and hold both buttons for
more than 2 seconds.
FM1 FM2
FM3
ENGLISH
MO/RND
When the MO indicator is lit on the display, the
sound you hear becomes monaural but the
reception will be improved (the ST indicator goes
off).
“SSM” appears, then disappears when automatic
preset is over.
Local FM stations with the strongest signals are
searched and stored automatically in the band
number you have selected (FM1, FM2 or FM3.)
These stations are preset in the number buttons –
No.1 (lowest frequency) to No.6 (highest frequency).
When automatic preset is over, the station stored
in number button 1 will be automatically tuned in.
9
Page 10
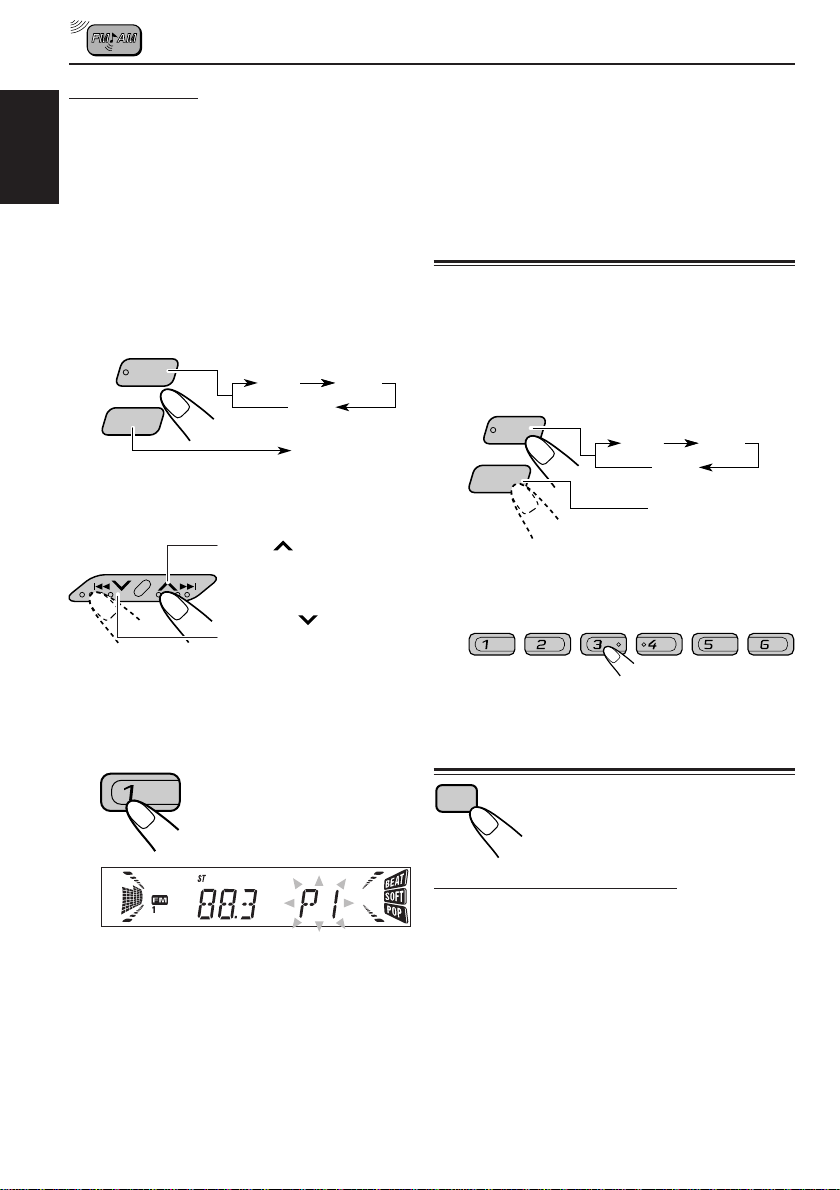
Manual preset
Y ou can preset up to 6 stations in each band (FM1,
FM2, FM3 and AM) manually.
Ex: Storing an FM station of 88.3 MHz into the
ENGLISH
preset number 1 of the FM1 band.
1
Select the band (FM1 – 3) you want
to store FM stations into (in this
example, FM1).
• Each time you press the button, the FM
band changes as follows:
F M
A M
2
Tune into a station of 88.3 MHz.
FM1
FM2
FM3
AM
Notes:
• A previously pr eset station is erased when a new station
is stored in the same preset number.
• Preset stations are erased whent the power supply to
the memory circuit is interrupted (for example, during
battery replacement). If this occurs, preset the stations
again.
Tuning into a preset station
You can easily tune into a preset station.
Remember that you must store stations first. If you
have not stored them yet, see ”Storing stations in
memory” on page 9 and 10.
1
Select the band (FM1 – 3, AM).
F M
A M
FM1 FM2
FM3
AM
Press
stations of higher
frequencies.
Press 4
stations of lower
frequencies.
3
Press and hold the number button (in
¢ to tune
to tune
this example, 1) for more than 2
seconds.
”P1” flashes for a few seconds.
4
Repeat the above procedure to store
other stations into other preset
numbers.
2
Select the number (1 – 6) for the preset
station you want.
7 8 9 10 11 12
Other convenient tuner functions
RPT
SCAN
Scanning broadcast station
When you press RPT/SCAN while listening to the
radio, station scanning starts. Each time a broadcast
is tuned in, scanning stops for about 5 seconds
(tuned frequency number flashes on the display), and
you can check what program is now being
broadcasted.
If you want to listen to that program, press the same
button again to stop scanning.
10
Page 11
CD OPERATIONS
ENGLISH
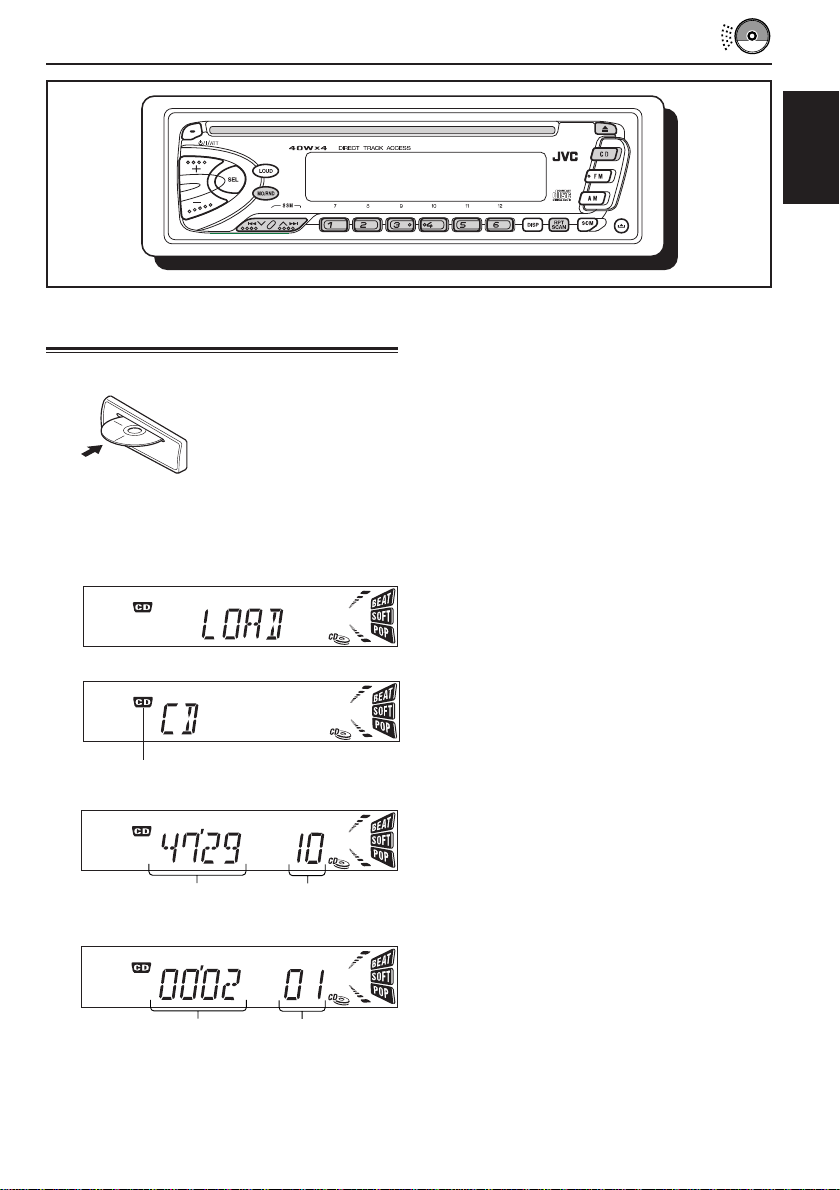
Playing a CD
1
Insert a disc into the loading slot.
The unit turns on,
draws a CD and starts
playback automatically.
Note:
When a CD is inserted
upside down, the CD
automatically ejects.
The CD IN indicator lights up
Total playing time of
the inserted disc
Total track number of
the inserted disc
To stop play and eject the CD
Press 0.
CD play stops and the CD automatically ejects
from the loading slot. The source changes to the
tuner (you will hear the last received station).
If you change the source to AM/FM, the CD play
also stops (without ejecting the CD this time).
Notes:
• If the ejected disc is not removed for about 15 seconds,
the disc is automatically inserted again into the
loading slot to protect it from dust. (CD play will not
start this time.)
• Y ou can eject the CD even when the unit is turned off.
Elapsed playing time
Note on One-Touch Operation:
When a CD is already in the loading slot, pressing CD
turns on the unit and starts playback automatically.
Current track
11
Page 12
Locating a track or a particular portion on a CD
To fast-forward or reverse the track
ENGLISH
Press and hold ¢,
while playing a CD, to fast
forward the track.
Press and hold 4 ,
while playing a CD, to
reverse the track.
Selecting CD playback modes
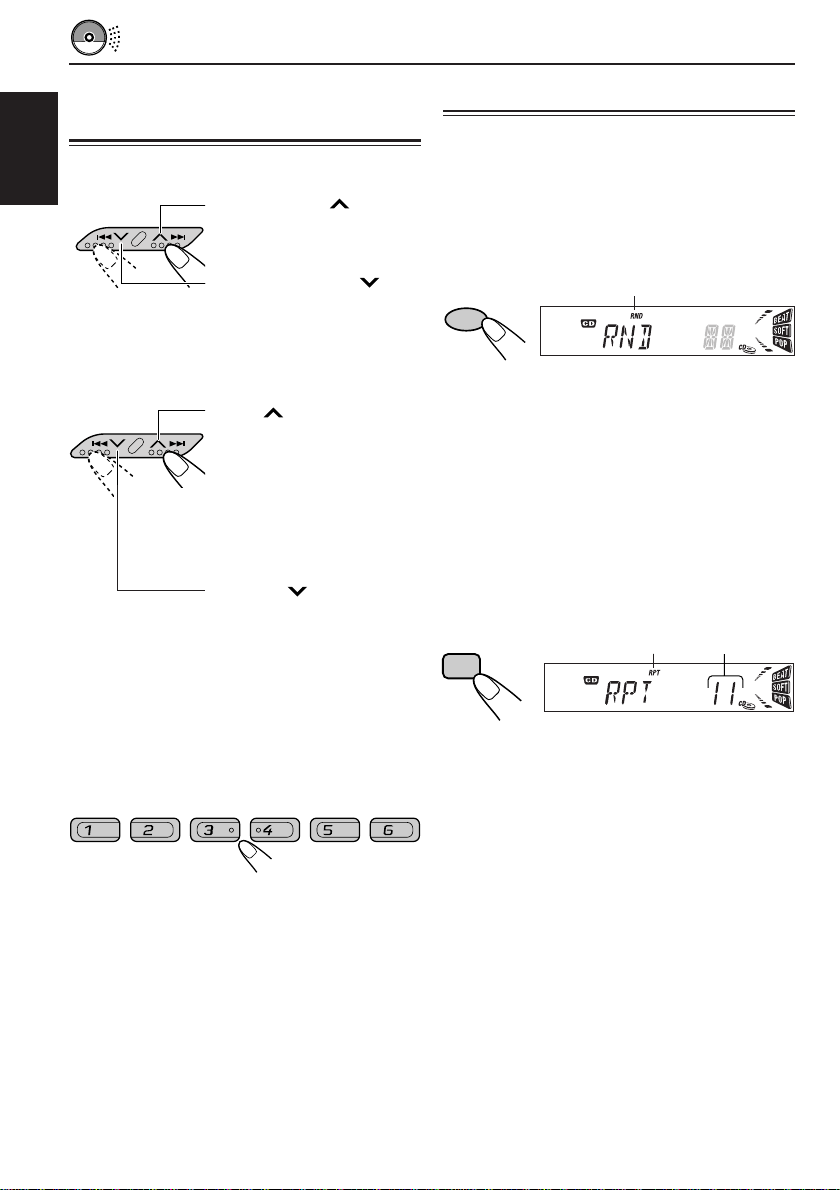
T o play back tracks at random (Random Play)
You can play back all tracks on the CD at random.
Each time you press MO/RND (Mono/Random)
while playing a CD, CD random play mode turns
on and off alternatively.
The RND
indicator
MO/RND
To go to the next tracks or the previous
tracks
Press ¢ briefly, while
playing a CD, to go ahead
to the beginning of the next
track. Each time you press
the button consecutively,
the beginning of the next
tracks is located and played
back.
Press 4 briefly, while
playing a CD, to go back to
the beginning of the current
track. Each time you press
the button consecutively, the
beginning of the previous
tracks is located and played
back.
To go to a particular track directly
7 8 9 10 11 12
Press the number button corresponding to the track
number to start its playback.
• To select a track number from 1 – 6:
Press 1 (7) – 6 (12) briefly.
• To select a track number from 7 – 12:
Press and hold 1 (7) – 6 (12) for more than 1
second.
When the random mode is turned on, the RND
indicator lights up on the display and a track
randomly selected starts playing.
T o play back tracks repeatedly (Repeat Play)
You can play back the current track repeatedly.
Each time you press RPT/SCAN (Repeat/Scan)
while playing a CD, CD repeat play mode turns on
and off alternatively.
The RPT
RPT
SCAN
When the repeat mode is turned on, the RPT
indicator lights up on the display.
indicator
Track number
of the currently
playing track
12
Page 13
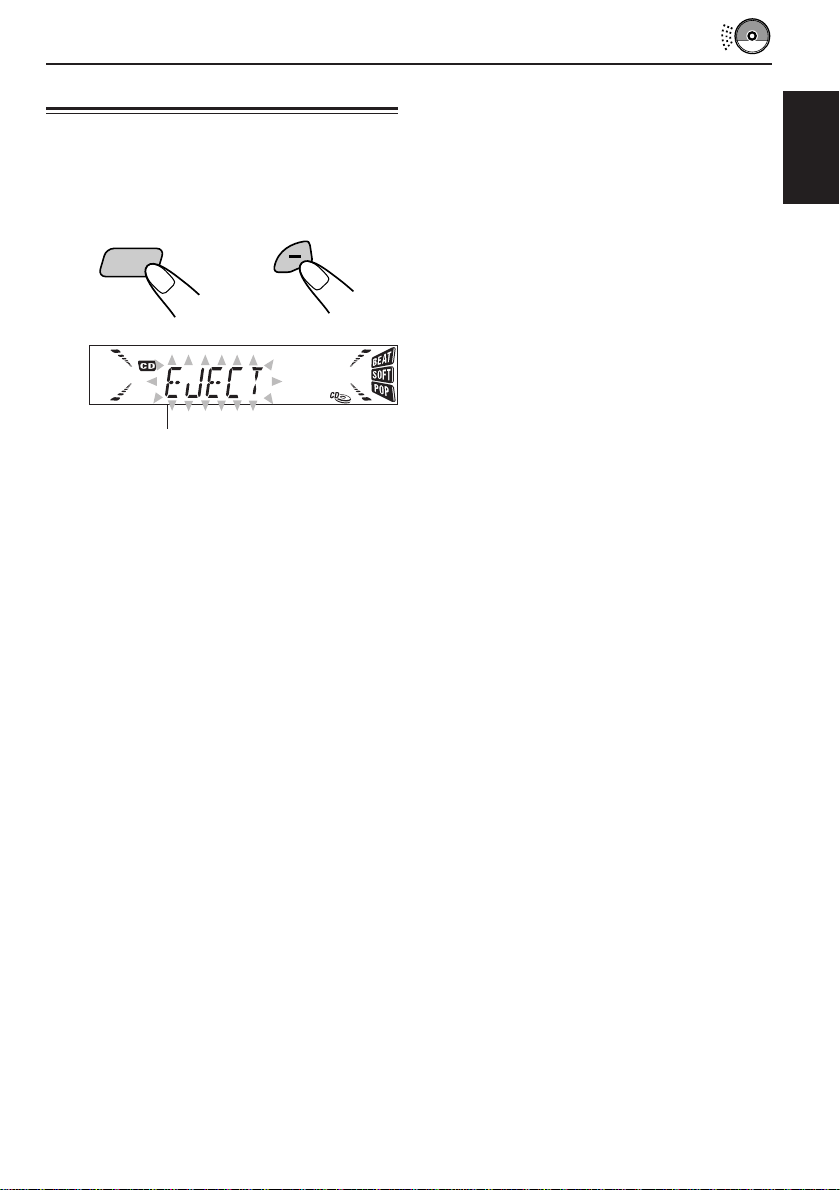
Prohibiting CD ejection
You can prohibit the CD ejection and can lock a
CD in the loading slot.
Press and hold CD and 0 for more than 2
seconds.
C D
“EJECT” flashes on the display for about 5
seconds, and the CD is locked and cannot be
ejected.
To cancel the prohibition and “unlock” the CD,
press and hold CD and 0 again for more than 2
seconds, when pressing CD. “EJECT” appears on
the display , and the CD ejects from the loading slot.
ENGLISH
13
Page 14
SOUND ADJUSTMENTS
Adjusting the sound
You can adjust the sound characteristics to your
preference.
ENGLISH
1
Select the item you want to adjust.
Each time you press the
button, the adjustable
items change as follows:
(treble)
(bass)
Indication To do: Range
BAS Adjust the bass. –06 (min.)
(Bass) |
TRE Adjust the treble. –06 (min.)
(Treble) |
FAD Adjust the front R06 (Rear only)
(Fader)* and rear speaker |
BAL Adjust the left L06 (Left only)
(Balance) and right speaker |
VOL Adjust the volume. 00 (min.)
(Volume) |
* If you are using a two-speaker system, set the fader
level to “00.”
balance. F06 (Front only)
balance. R06 (Right only)
level.
(fader)
(balance)
+06 (max.)
+06 (max.)
50 (max.)
(volume)
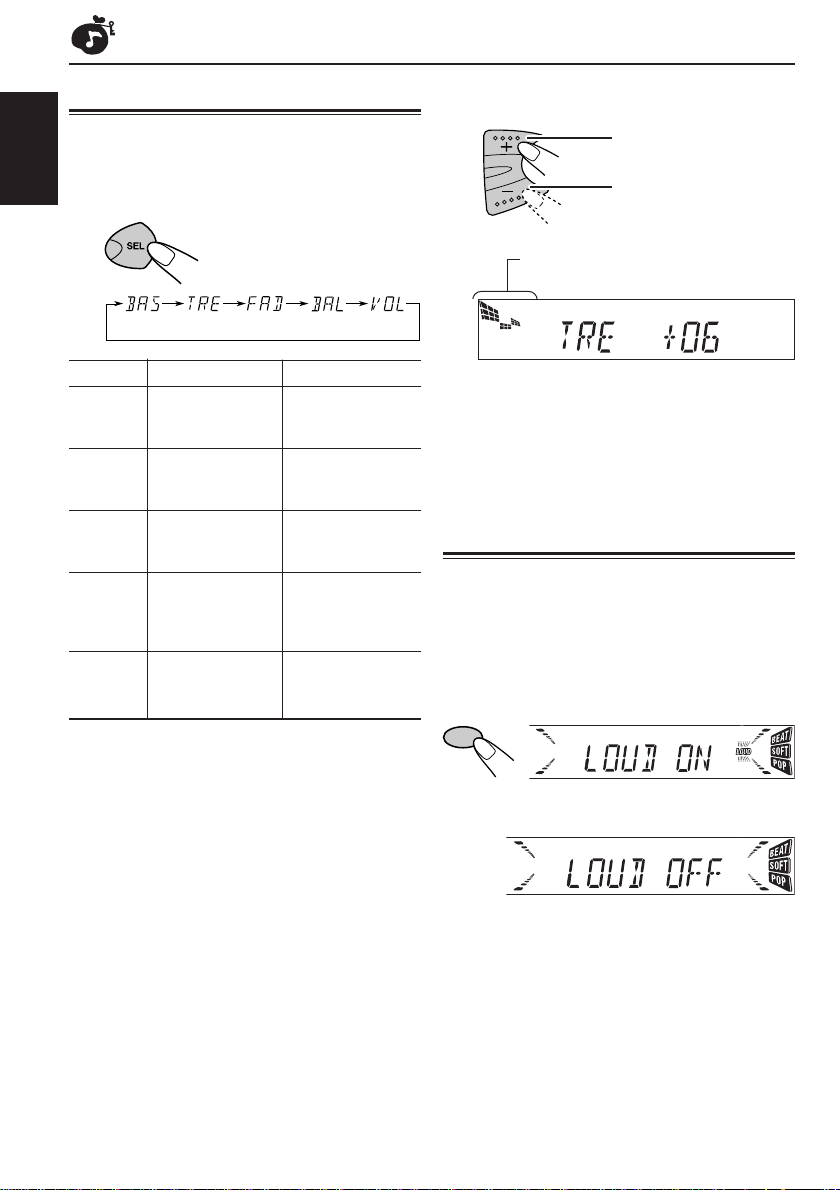
2
Adjust the level
To increase the level.
To decrease the level.
Equalization pattern changes as you
adjust the bass or treble.
Note:
Normally the + and – buttons works as the volume
control. So you do not have to select “VOL” to adjust
the volume level.
Turning on/off the loudness
function
The human ear is less sensitive to low and high
frequencies at low volumes.
The loudness function can boost these frequencies
to produce well-balanced sound at low volume level.
Each time you press LOUD, the loudness function
turns on and off alternatively.
LOUD
14
@A
Page 15
Using the Sound Control Memory (SCM)
Y ou can select and store a preset sound adjustment
suitable to each playback source. (Advanced SCM)
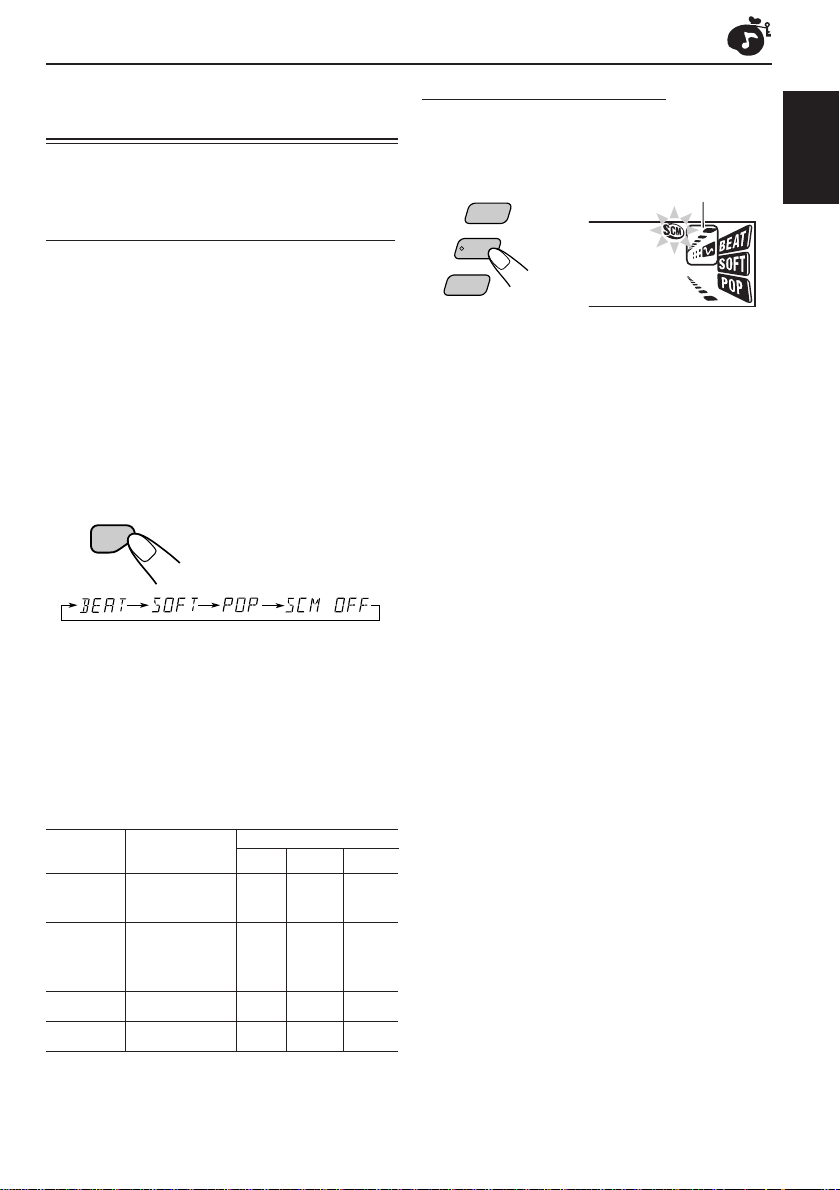
Selecting and storing the sound modes
Once you select a sound mode, it is stored in
memory. It will be recalled every time you select
the same source and will be shown on the display .
A sound mode can be stored for each of the
following sources — FM1, FM2, FM3, AM, CD.
• If you do not want to store the sound mode
separately for each playback source, but want
to use the same sound mode for all the sources,
see “To cancel Advanced SCM” on page 17.
Select the sound mode you want.
• Each time you press the button, the sound mode
changes as follows.
SCM
• When “SCM LINK” is set to “LINK ON”, the
selected sound mode can be stored in memory
for the current source and the effect applies only
to the current source. Each time you change the
playback source, the SCM indicator flashes on
the display.
• When “SCM LINK” is set to “LINK OFF”, the
selected sound mode effect applies to any source.
Recalling the sound modes
When “SCM LINK” is set to “LINK ON,”
select the source.
Sound mode
indicator
C D
F M
A M
Each time you change the playback
source, the SCM indicator flashes
on the display.
Notes:
• You can adjust each sound mode to your preference,
and store it in memory.
If you want to adjust and store your original sound
mode, see “Storing your own sound adjustments” on
page 16.
• To adjust the bass and treble reinforcement levels or
to turn on/off the loudness function temporarily, see
pages 14. (Your adjustments will be cancelled if
another source is selected.)
ENGLISH
Indication For: Preset values
Bass T reble
BEAT Rock or disco +02 00 On
music
SOFT Quiet +01 –03 Off
background
music
POP Light music +04 +01 Off
SCM OFF (Flat sound) 00 00 On
Loudness
15
Page 16

Storing your own sound
SCM
adjustment
You can adjust the sound modes (BEAT, SOFT,
ENGLISH
POP: see page 15) to your preference and store
your own adjustments in memory.
• There is a time limit in doing the following
procedure. If the setting is cancelled before you
finish, start from step 1 again.
1
Call up the sound mode you want to
adjust.
See page 15 for details.
3
Adjust the bass or treble level.
See page 14 for details.
4
Repeat steps 2 and 3 to adjust the
other items.
SCM
2
Select “BAS” (bass) or “TRE” (treble).
T o turn ON/OFF the loudness function.
See page 14 for details.
Each time you press LOUD, the loudness
function turns on and off alternatively. (→ go
to step 5)
LOUD
5
Press and hold SCM until the sound
mode you have selected in step 1
flashes on the display.
Your adjustment made for the selected sound
mode is stored in memory.
6
Repeat the same procedure to store
other sound modes.
To reset to the factory settings
Repeat the same procedure and reassign the preset
values listed in the table on page 15.
16
Page 17
OTHER MAIN FUNCTIONS
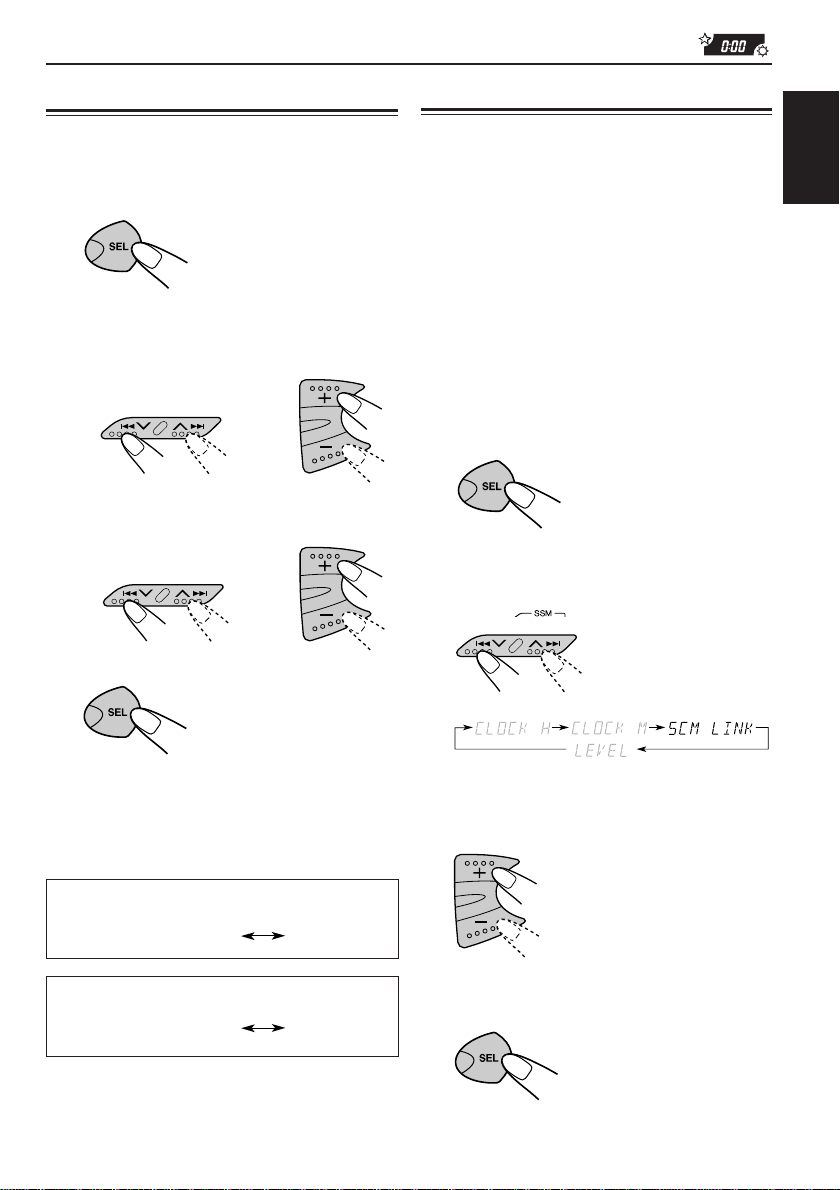
Setting the clock
1
Press and hold SEL (Select) for more
than 2 seconds.
“CLOCK H”, “CLOCK M”, “SCM LINK” or
“LEVEL” appears on the display.
2
Set the hour.
1 Select “CLOCK H” if not shown on the
display.
2 Adjust the hour.
1
3
Set the minute.
1 Select “CLOCK M.”
2 Adjust the minute.
1
4
Press SEL (select) to finish the setting.
2
2
To Cancel Advanced SCM
Y ou can cancel the Adv anced SCM (Sound Control
Memory), and unlink the sound modes and the
playback sources.
When shipped from the factory, a different sound
mode can be stored in memory for each source so
that you can change the sound modes simply by
changing the sources.
LINK ON: Advanced SCM (different SCM for
LINK OFF: Conventional SCM (one SCM for all
1
Press and hold SEL for more than 2
seconds.
“CLOCK H”, “CLOCK M”, “SCM LINK” or
“LEVEL” appears on the display.
2
Select "SCM LINK" if not shown on the
display .
different sources)
sources)
ENGLISH
To check the current clock time (changing
the display mode)
Press DISP repeatedly. Each time you press the
button, the display mode changes as follows.
During tuner operation:
Frequency
During CD operation:
Elapsed
playing time
• If the unit is not in use when you press DISP, the
power turns on, the clock time is shown for
5 seconds, then the power turns off.
Clock
Clock
3
Select the desire mode — "LINK ON"
on "LINK OFF".
4
Press SEL (select) to finish the setting.
17
Page 18

Selecting the level display
You can select the level display according to your
preference.
When shipped from the factory , “V OL 2” is selected.
ENGLISH
VOL 1: Shows the volume level indicator and the
VOL 2: Alternates “VOL 1” setting and illumination
OFF: Erase the volume level indicator and the
1
2
equalization pattern indicator.
display .
equalization pattern indicator.
Press and hold SEL for more than 2
seconds.
“CLOCK H”, “CLOCK M”, “SCM LINK” or
“LEVEL” appears on the displa y.
Select “LEVEL” if not shown on the
display.
“CLOCK H”, “CLOCK M”, “SCM LINK” or
“LEVEL” appears on the displa y.
3
Select the desired mode — “VOL 1”,
“VOL 2” or “OFF”.
4
Press SEL (select) to finish the setting.
18
Page 19
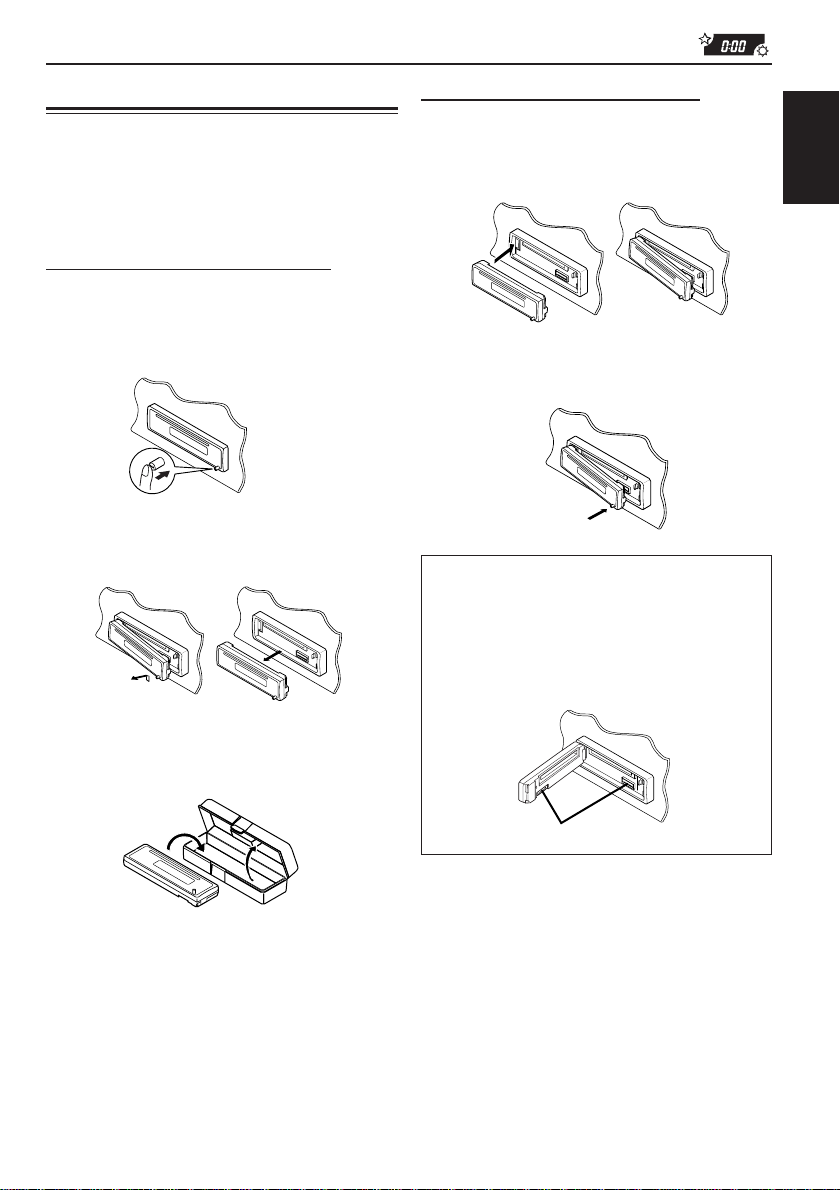
Detaching the control panel
How to attach the control panel
You can detach the control panel when leaving the
car.
When detaching or attaching the control panel, be
careful not to damage the connectors on the back
of the control panel and on the panel holder.
How to detach the control panel
Before detaching the control panel, be sure to
turn off the power.
1
Unlock the contorl panel.
2
Lift and pull the control panel out of
the unit.
1
Insert the left side of the control panel
into the groove on the panel holder.
2
Press the right side of the control
panel to fix it to the panel holder.
Note on cleaning the connectors:
If you frequently detach the control panel, the
connectors will deteriorate.
To minimize this possibility, periodically wipe the
connectors with a cotton swab or cloth moistened
with alcohol, being careful not to damage the
connectors.
ENGLISH
3
Put the detached control panel into
the case provided.
Connectors
19
Page 20
MAINTENANCE
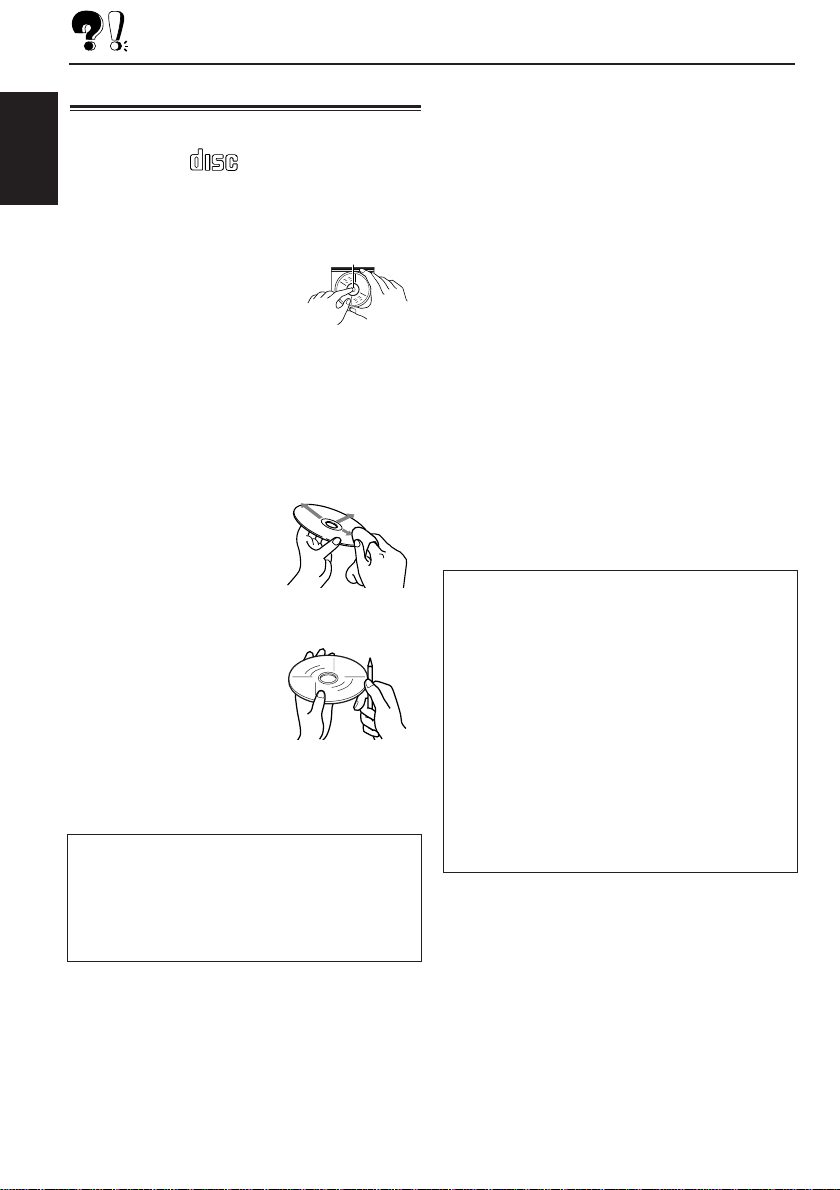
Handling CDs
This unit has been designed only to reproduce the
CDs bearing the mark.
ENGLISH
• Other discs cannot be played back.
How to handle CDs
When removing a CD from its
case, press down the center
holder of the case and lift the
CD out, holding it by the edges.
• Always hold the CD by the edges. Do not touch
its recording surface.
When storing a CD into its case, gently
insert the CD around the center holder (with the
printed surface facing up).
• Make sure to store CDs into the cases after
use.
To keep CDs clean
A dirty CD may not play
correctly. If a CD does
becomes dirty, wipe it with a
soft cloth in a straight line
from center to edge.
To play new CDs
New CDs may have some
rough spots around the
inner and outer edges. If
such a CD is used, this unit
may reject the CD.
To remove these rough spots, rub the edges with
a pencil or ball-point pen, etc.
About mistracking:
Mistracking may result from driving on extremely
rough roads. This does not damage the unit and the
CD, but will be annoying.
We recommend that you stop CD play while driving
on such rough roads.
COMPACT
DIGITAL AUDIO
Center holder
Moisture condensation
Moisture may condense on the lens inside the
CD player in the following cases:
• After starting the heater in the car.
• If it becomes very humid inside the car.
Should this occur, the CD player may
malfunction. In this case, eject the CD and leave
the unit turned on for a few hours until the
moisture evaporates.
When playing a CD-R (Recordable)
You can play back your original CD-Rs on this
recevier.
• Before playing back CD-Rs, read their
instructions or cautions carefully.
• Some CD-Rs recorded on CD recorders may not
be played back on this receiv er because of their
disc characteristics, and of the following reasons:
– Discs are dirty or scratched.
– Moisture condensation occurs on the lens
inside the unit.
– The pickup lens inside the CD player is dirty.
• Use only “finalized” CD-Rs.
• CD-RWs (Rewritable) cannot be play ed back on
this recevier.
CAUTIONS:
• Do not insert 8cm (3 3/16") CDs (single CDs)
into the loading slot. (Such CDs cannot be
ejected.)
• Do not insert any CD of unusual shape – like a
heart or flower; otherwise, it will cause a
malfunction.
• Do not expose CDs to direct sunlight or any
heat source or place them in a place subject to
high temperature and humidity. Do not leave
them in a car.
• Do not use any solvent (for example,
conventional record cleaner, spray, thinner,
benzine, etc.) to clean CDs.
20
Page 21

TROUBLESHOOTING
What appears to be trouble is not always serious. Check the following points before calling a service
center.
Symptoms
• CD cannot be played back.
• CD sound is sometimes
interrupted.
• “NO DISC” appears on the
display.
• Sound cannot be heard from
the speakers.
• SSM (Strong-station
Sequential Memory) automatic
preset does not work.
• Static noise while listening to
the radio.
Causes
CD is inserted upside down.
You are driving on rough roads.
CD is scratched.
Connections are incorrect.
No CD is in the loading slot.
CD is inserted incorrectly.
The volume control is turned to
the minimum level.
Connections are incorrect.
Signals are too weak.
The antenna is not connected
firmly.
Remedies
Insert the CD correctly.
Stop CD play while driving
rough roads.
Change the CD.
Check the cords and
connections.
Insert a CD into the loading slot.
Insert it correctly.
Adjust it to the optimum level.
Check the cords and
connections.
Store stations manually.
Connect the antenna firmly.
ENGLISH
• CD can be neither played back
nor ejected.
• The unit does not work at all.
The CD player may function
incorrectly.
The built-in microcomputer may
function incorrectly due to noise,
etc.
Press
same time for more than 2
seconds. Be careful not to drop
CD when it is ejected.
Press
same time for more than 2
seconds to reset the unit. (The
clock setting and preset stations
stored in memory are erased.)
(See page 2.)
and 0 at the
and SEL at the
21
Page 22

SPECIFICATIONS
AUDIO AMPLIFIER SECTION
Maximum Power Output:
Front: 40 watts per channel
Rear: 40 watts per channel
Continuous Power Output (RMS):
ENGLISH
Front: 16 watts per channel into 4 Ω,
40 Hz to 20 000 Hz at no more than
0.8% total harmonic distortion.
Rear: 16 watts per channel into 4 Ω,
40 Hz to 20 000 Hz at no more than
Load Impedance: 4 Ω (4 Ω to 8 Ω allowance)
Tone Control Range
Frequency Response: 40 Hz to 20 000 Hz
Signal-to-Noise Ratio: 70 dB
Line-Out Level/Impedance: 2.0 V/20 kΩ load (full
Output Impedance: 1 kΩ
0.8% total harmonic distortion.
Bass: ±10 dB at 100 Hz
Treble : ±10 dB at 10 kHz
scale)
TUNER SECTION
Frequency Range
FM: 87.5 MHz to 107.9 MHz
AM: 530 kHz to 1 710 kHz
[FM Tuner]
Usable Sensitivity: 11.3 dBf (1.0 µV/75 Ω)
50 dB Quieting Sensitivity:
16.3 dBf (1.8 µV/75 Ω)
Alternate Channel Selectivity (400 kHz):
65 dB
Frequency Response: 40 Hz to 15 000 Hz
Stereo Separation: 35 dB
Capture Ratio: 1.5 dB
CD PLAYER SECTION
Type: Compact disc player
Signal Detection System: Non-contact optical
pickup (semiconductor laser)
Number of channels: 2 channels (stereo)
Frequency Response: 5 Hz to 20 000 Hz
Dynamic Range: 96 dB
Signal-to-Noise Ratio: 98 dB
Wow and Flutter: Less than measurable limit
GENERAL
Power Requirement
Operating Voltage: DC 14.4 volts (11 volts to 16
volts allowance)
Allowable Working Temperature:
0°C to +40°C (32°F to 104°F)
Grounding System: Negative ground
Dimensions (W x H x D)
Installation Size:
182 mm x 52 mm x 150 mm
(7-3/16" x 2-1/16" x 5-15/16")
Panel Size: 188 mm x 58 mm x 14 mm
(7-7/16" x 2-5/16" x 5/8")
Mass: 1.3 kg (2.9 lbs) (excluding accessories)
Design and specifications subject to change
without notice.
If a kit is necessary for your car, consult your
telephone directory for the nearest car audio
speciality shop.
[AM Tuner]
Sensitivity: 20 µV
Selectivity: 35 dB
22
Page 23

IMPORTANTE (EE.UU.)
Este equipo se ha sometido a todo tipo de pruebas y cumple con las normas establecidas para
dispositivos de Clase B, de conformidad con la P arte 15 de las reglas de la FCC (Comisión Federal
de Comunicaciones). Estas reglas están diseñadas para asegurar una protección razonable contra
este tipo de interferencias en las instalaciones residenciales. Este equipo genera y utiliza energía de
radiofrecuencia. Si no se instala y utiliza debidamente,es decir , conf orme a las instrucciones, podrían
producirse interferencias en radiocomunicaciones. Sin embargo, no se garantiza que estas
interferencias no se produzcan en una instalación determinada. Si este equipo ocasiona interf erencias
en la recepción de radio o televisión, lo cual puede comprobarse mediante la conexión o descone xión
del equipo, el problema podrá corregirse mediante una o una combinación de las siguientes medidas:
– Reoriente la antena receptora o cámbiela de lugar.
– Aumente la separación entre el equipo y el aparato receptor.
ESPAÑOL
– Enchufe el equipo a una toma de corriente situada en un circuito distinto del aparato receptor.
– Consulte a su distribuidor o a un técnico experto en radio/televisión.
AVISO IMPORTANTE PARA PRODUCTOS LASER
Precauciones:
1. PRODUCTO LASER CLASE 1
2. PELIGRO: Radiación láser invisible cuando se abre o hay seguro de interbloqueo averiado o
defectuoso. Evite la exposición directa a los haces.
3. PRECAUCION:No abra la cubierta superior. En el interior no hay piezas que pueda reparar el
usuario. Solicite el servicio a personal de servicio debidamente cualificado.
4. PRECAUCION:Este reproductor de CD utiliza radiación láser invisible, sin embargo, está equipado
con interruptores de seguridad para no emitir radiación al descargar los CD. Es peligroso cancelar
los interruptores de seguridad.
5. PRECAUCION:El uso de controles, ajustes o procedimientos distintos de los especificados en el
presente manual puede producir una peligrosa exposición a la radiación.
Cómo reposicionar su unidad
Pulse y mantenga pulsado los botones SEL
(Selección) y
mismo tiempo durante varios segundos.
Esto hará que se reposicione el microcomputador
incorporado.
NOTA:
T ambién se borrarán los ajustes preestablecidos por usted
— como por ejemplo los canales preajustados o los ajustes
de sonido.
Si hay un CD insertado en la unidad, el mismo será
expulsado al reposicionar la unidad. Preste atención para
evitar que se caiga el CD.
(Espera/Conexión/ATT) al
(Espera/Conexión/ATT)
SEL (Selección)
2
Page 24

Muchas gracias por la compra de un producto JVC. Como primer paso, por favor lea detenidamente este
manual para comprender a fondo todas las instrucciones y obtener un máximo disfrute de esta unidad.
INDICE
Cómo reposicionar su unidad ...................... 2
UBICACION DE LOS BOTONES ..............4
Panel de control........................................... 4
Control remoto (solo para KD-S620) ........... 5
Preparación del controlador remoto
(solo para KD-S620) ................................ 6
OPERACIONES BASICAS.....................7
Conexión de la alimentación........................ 7
OPERACIONES BASICAS DE LA RADIO ....8
Para escuchar la radio................................. 8
Cómo almacenar emisoras en la memoria ...... 9
Cómo sintonizar una emisora
preajustada ............................................ 10
Otras convenientes funciones del
sintonizador ........................................... 10
OPERACION DEL REPRODUCTOR DE
CD ........................................ 11
Para reproducir un CD............................... 11
Cómo encontrar una pista o un punto
determinado de un CD........................... 12
Cómo seleccionarlos modos de
reproducción del CD .............................. 12
Prohibición de la expulsión del CD ............ 13
AJUSTES DEL SONIDO ..................... 14
Ajuste del sonido ....................................... 14
Activado/desactivado de la función
de sonoridad .......................................... 14
Utilización de la memoria de control
de sonido (SCM) .......................................
Cómo almacenar sus propios ajustes
de sonido ............................................... 16
15
OTRAS FUNCIONES PRINCIPALES ....... 17
Ajuste del reloj ........................................... 17
Cancelación del SCM avanzado................ 17
Selección de la indicación de nivel................
Desmontaje del panel de control ............... 19
18
MANTENIMIENTO ........................... 20
Manipulación de los CD............................. 20
LOCALIZACION DE AVERIAS .............. 21
ESPECIFICACIONES ........................ 22
ESPAÑOL
ANTES DE USAR
Para fines de seguridad....
*
• No aumente demasiado el nivel de volumen pues
es muy peligroso conducir si no se escuchan los
sonidos exteriores.
• Detenga el automóvil antes de efectuar
cualquier operación complicada.
Temperatura dentro del automóvil....
*
Si ha dejado el automóvil estacionado durante
largo tiempo en un sitio cálido o frío, no opere la
unidad hasta que se normalice la temperatura del
habitáculo.
3
Page 25

UBICACION DE LOS BOTONES
Panel de control
Ventanilla de visualización
ESPAÑOL
i
g
h
o
;a
j
sdf
k
12
1 Botón (en espera/encendido/
atenuador)
2 Botón +/–
3 Botón LOUD
4 Botón MO (monofónico)
Botón RND (aleatorio)
5 Ventanilla de visualización
6 Sensor remoto (solo para KD-S620)
7 Botón 0 (expulsión)
8 Botón CD
9 Botón FM
p Botón AM
q Botón SEL (selección)
w Botones 4
•
También funcionan como botones SSM cuando
se los pulsa conjuntamente.
e Botones numéricos
r Botón DISP (indicación)
t Botón RPT (repetición)
Botón SCAN
4
34 5 6
q
w
/ ¢
789p
e
y Botón SCM (memoria de control de sonido)
u Botón
Ventanilla de visualización
i Indicador de nivel de volumen (o de audio)
Indicador del patrón de ecualización
o Indicadores de recepción del sintonizador
STEREO (estéreo), MONO (monofónico)
; Indicador RND (aleatorio)
a Indicador RPT (repetición)
s Indicador "SCM"
d Indicador LOUD
f Indicadores del modo de sonido
BEAT, SOFT, POP
g Indicador CD
h Indicadores Banda
FM1, FM2, FM3
AM
j Indicación principal
k Indicador CD IN
rt y
(soltar panel de control)
u
Page 26

Control remoto
(solo para KD-S620)
Esta sección es solo para KD-S620.
5
1
2
3
4
RM-RK31
1 • La unidad se enciende si es pulsado estando
la unidad apagada.
• La unidad se apaga si pulsa y mantiene
pulsado hasta que aparezca “SEE YOU” en
la indicación.
• El nivel de volumen disminuye
instantáneamente si pulsa de manera breve.
Vuelva a pulsar volvar al volumen anterior.
2 • Funciona como el botón BAND mientras
escucha la emisora FM .
Cada vez que pulsa el botón, la banda
cambia.
• No funciona como el botón PROG/DISC +.
3 • Funciona como el botón PRESET mientras
escucha la radio.
Cada vez que pulsa el botón, el número de
la emisora preajustada aumenta, y se
sintoniza la emisora seleccionada.
• No funciona como el botón DISC –.
6
7
4 Funciona igual que los botones + y – de la
unidad principal.
Nota:
Estos botones no se pueden usar para los
ajustes del reloj (CLOCK H, CLOCK M),
SCM LINK y LEVEL (consulte las paginas
5 Seleccione la modo de sonido.
6 Seleccione la fuente.
7 • Busca estaciones mientras escucha la radio.
17 y 18).
Cada vez que pulsa el botón, la modo cambia.
Cada vez que pulsa el botón, la fuente cambia.
• Avanza o retrocede hasta la pista si lo
mantiene presionado mientras escucha el
CD.
• Salta al principio de la próxima pista o
retrocede al principio de la pista actual (o de
la anterior) si lo presiona brevemente
mientras escucha el CD.
ESPAÑOL
5
Page 27

Preparación del controlador
remoto
Esta sección es solo para KD-S620.
Antes de emplear el mando a distancia:
• Apunte el mando a distancia directamente hacia
el sensor remoto de la unidad principal.
Asegúrese de que no haya obstáculos en el
camino.
ESPAÑOL
• No exponga el sensor remoto a la luz intensa
(luz solar directa o iluminación artificial).
Instalación de la pila
Cuando los límites de alcance o la efectividad del
mando a distancia se reduce, reemplace la pila.
1
Retire el portapila.
1) Extráigalo en la dirección indicada por la
flecha utilizando un bolígrafo u otra
herramienta similar.
2) Retire el portapila.
Sensor remoto
3
Vuelva a colocar el portapila.
Inserte nuevamente el portapila empujándolo
hasta escuchar un chasquido.
(Lado posterior)
ADVERTENCIA:
• Guarde la pila fuera del alcance de los niños.
Si llega a ser ingerida, acuda inmediatamente
al médico.
• No recargue, cortocir cuite, desarme ni caliente
la pila, ni las arroje al fuego.
Cualquiera de estas acciones podrá hacer que
la pila desprenda calor, se agriete o provoque
un incendio.
• No mezcle pila con otros objetos de metal.
Si lo hace, la pila podrían desprender calor,
agrietarse o provocar un incendio.
• Cuando descarte o almacene la pila, envuélvalas
con una cinta y aíslelas.
Si lo hace, la pila podrían desprender calor,
agrietarse o provocar un incendio.
• No saque la pila con una aguja de metal.
Si lo hace, la pila podrían desprender calor,
agrietarse o provocar un incendio..
2
Coloque la pila.
6
(Lado posterior)
1)
2)
Introduzca la pila en el portapila con el lado
+ dirigido hacia arriba, de manera que
quede asegurada dentro del mismo.
Pila de litio
(Número del
producto: CR2025)
Page 28

OPERACIONES BASICAS
2
1
3
Conexión de la alimentación
1
Encienda la unidad.
Nota sobre la operación con pulsación única:
La unidad se enciende automáticamente cuando
usted selecciona el siutouzador como fuente en el
paso 2 de abajo. No necesitará presionar este botón
para encender la unidad.
2
Reproduzca la fuente.
C D
F M
A M
Para operar el sintonizador (FM o AM),
consulte las páginas 8 – 10.
Para operar el reproductor de CD, consulte
las páginas 11 – 13.
3
Ajuste el volumen.
Para aumentar el volumen.
Para reducir el volumen.
4
Ajuste el sonido según se desee
(consulte las página 14).
Para disminuir el volumen en un instante
Pulse por un tiempo brev e mientras está
escuchando cualquier fuente. “ATT” comienza a
destellar en la indicación, y el nivel de volumen
disminuirá en un instante.
Para regresar al nivel de volumen anterior, vuelva
a presionar brevemente el botón.
Para apagar la unidad
Pulse y mantenga pulsado hasta que
aparezca “SEE YOU” en la indicación.
Nota:
Cuando utilice esta unidad por primera vez, ponga el
reloj incorporado en hora; consulte la página 17.
PRECAUCION sobre el ajuste del volumen
Los CDs producen muy poco ruido al compararse
con otras fuentes. Si ajusta el nivel de volumen para
el sintonizador, por ejemplo, los altavoces podrían
dañarse debido a un repentino aumento del nivel de
salida.
Por lo tanto, antes de reproducir un disco, disminuya
el volumen y ajústelo al nivel deseado durante la
reproducción.
ESPAÑOL
Aparece el nivel de volumen
Indicador (consulte la página 18) de nivel
de volumen o de audio
7
Page 29

OPERACION BASICAS DE LA RADIO
ESPAÑOL
Para escuchar la radio
Podrá sintonizar una determinada emisora mediante
búsqueda automática o búsqueda manual.
Para buscar una emisora
automáticamente: Búsquede automática
1
Seleccione la banda (FM1 – 3, AM).
F M
A M
Aparece la banda seleccionada
Indicador de nivel de audio o volumen
(consulte pagina 18)
Nota:
Este receptor tiene tres bandas FM (FM1, FM2,
FM3). Podrá usar cualquiera de ellas para
escuchar un radiodifusión en FM.
FM1
FM2
FM3
AM
Para cancelar la búsqueda antes de recibir una
emisora, pulse el mismo botón que el pulsado para
la búsqueda.
Para buscar una emisora
manualmente: Búsquede manual
1
Seleccione la banda (FM1 – 3, AM).
F M
A M
Nota:
Este receptor tiene tres bandas FM (FM1, FM2,
FM3). Podrá usar cualquiera de ellas para
escuchar un radiodifusión en FM.
2
Pulse y mantenga pulsado 4 o
¢ hasta que “M” (manual)
comience a destellar en la indicación.
FM1
FM2
FM3
AM
2
Comience la búsqueda de la emisora.
Pulse ¢ para buscar
emisoras de frecuencias
más altas.
Pulse 4
emisoras de frecuencias
más bajas.
La búsqueda se interrumpe cada vez que se
recibe una emisora.
8
para buscar
Aparece la banda seleccionada
Page 30

3
Sintonice la emisora deseada mientras
“M” está destellando.
Pulse ¢ para
sintonizar emisoras de
frecuencias más altas.
Pulse 4
sintonizar emisoras de
frecuencias más bajas.
• Si aparta su dedo del botón, el modo manual se
desactivará automáticamente después de 5
segundos.
• Si mantiene el botón pulsado, la frecuencia
cambiará continuamente hasta soltario.
para
Cuando una radiofusión en FM estéreo sea
difícil de recibir:
Pulse MO RND (monofónico/aleatorio) mientras
escucha un programa en FM estéreo.
• Cada vez que pulsa el botón, el indicador MO
se enciende y apaga alternativamente.
Se enciende cuando se recibe
un programa FM en estéreo.
Cómo almacenar emisoras en
la memoria
Las emisoras podrán almacenarse en la memoria
mediante uno de los dos métodos siguientes.
• Preajuste automático de emisoras FM: SSM
(Memoria secuencial de las emisoras más
fuertes)
• Preajuste manual de ambas emisoras FM y AM
Preajuste automático de emisoras FM: SSM
Pueden preajustarse 6 emisoras FM locales en
cada banda FM (FM1, FM2 y FM3).
1
Seleccione la FM banda (FM1 – 3) en
que desea almacenar las emisoras FM.
• Cada vez que pulsa el botón, la banda FM
cambia de la siguiente manera:
F M
A M
2
Pulse y mantenga pulsado ambos
botones durante más de 2 segundos.
FM1 FM2
FM3
ESPAÑOL
MO/RND
Cuando el indicador MO se enciende en la
indicación, el sonido escuchado se vuelve
monofónico, pero se consigue mejorar la recepción
(el indicador ST se apaga).
Aparece y se mantiene visualizado “SSM” hasta
finalizar el preajuste automático.
Las emisoras FM locales con las señales más
intensas serán exploradas y almacenadas
automáticamente en el número de banda
seleccionado (FM1, FM2 o FM3). Estas emisoras
quedan preajustadas en los botones – No. 1
(frecuencia más baja) a No.6 (frecuencia más alta).
Cuando finalice el preajuste automático, se
sintonizará automáticamente la emisora almacenada
en el botón número 1.
9
Page 31

Preajuste manual
Podrá preajustar manualmente hasta 6
emisoras en cada banda (FM1, FM2, FM3 y
AM).
Ej.: Almacenamiento de una emisora FM de
88,3 MHz en el número de preajuste 1 de
la banda FM1
1
Seleccione la banda (FM1 – 3, AM)
en que desea almacenar las
emisoras (en este ejemplo, FM1).
ESPAÑOL
• Cada vez que pulsa el botón, la banda
FM cambia de la siguiente manera:
F M
A M
2
Sintonice la emisora de 88,3 MHz.
3
Pulse y mantenga pulsado el botón
numérico (en este ejemplo, 1),
durante más de 2 segundos.
FM1
FM3
AM
Pulse ¢ para
sintonizar emisoras de
frecuencias más altas.
Pulse 4
sintonizar emisoras de
frecuencias más bajas.
FM2
para
Notas:
• La emisora preajustada previamente se borra cuando
se almacena una emisora nueva en el mismo número de
preajuste.
• Si se deja de suministrar energía al circuito de la
memoria (por ejemplo, durante el reemplazo de la pila)
se borrarán todas las emisoras preajustadas. Si así
sucede, vuelva a preajustar las emisoras.
Cómo sintonizar una emisora
preajustada
Las emisoras preajustadas pueden sintonizarse
fácilmente.
Tenga presente que primero deberá almacenar las
emisoras. Si todavía no lo ha hecho, consulte “Cómo
almacenar emisoras en la memoria” en las página 9
y 10.
1
Seleccione la banda (FM1 – 3, AM).
F M
A M
FM1 FM2
FM3
AM
2
Seleccione el número (1 – 6) en que
desea preajustar la emisora.
7 8 9 10 11 12
Otras convenientes funciones del sintonizador
10
”P1” destella durante algunos
segundos.
4
Repita el procedimiento de arriba
para almacenar otras emisoras en
los otros números de preajuste.
RPT
SCAN
Exploración de emisoras
Si pulsa RPT/SCAN mientras está escuchando la
radio, se iniciará la explor ación de las emisoras. Cada
vez que se recibe una emisora, la exploración se
interrumpe durante aproximadamente 5 segundos
(el númerode la frecuencia sintonizada destella en
el visor) para que pueda verificar cuál es el programa
que se está transmitiendo.
Si desea escuchar ese programa, presione otra vez
el mismo botón para cancelar la exploración.
Page 32

OPERACION DEL REPRODUCTOR DE CD
Para reproducir un CD
1
Inserte un disco en la ranura de carga.
Se conecta la
alimentación de la
unidad, entra el CD y
comienza la reproducción
automáticamente.
Nota:
Si se inserta un CD del
revés, el CD es
automáticamente eyectado.
El indicador CD IN se enciende.
Para interrumpir la reproducción y expulsar
ESPAÑOL
el CD
Pulse 0.
Se interrumpe la reproducción del CD, que será
expulsado automáticamente de la ranura de carga.
La fuente queda ajustada al sintonizador (se
escuchará la última estación recibida).
EL CD también dejará de reproducirse si cambia
la fuente a AM/FM (esta vez, sin que el CD sea
expulsado).
Notas:
• Si no saca el disco expulsado en unos 15 segundos,
será reinsertado automáticamente en la ranura de
carga para protegerlo del polvo. (En este caso no se
reproduce el CD.)
• Podrá expulsar el CD cuando apague la unidad.
Tiempo de reproducción
total del disco insertado
Tiempo de reproducción
transcurrido
Nota sobre la operación de un solo toque:
Si pulsa CD cuando hay un CD introducido en la ranura
de carga, la unidad se enciende y empieza a reproducir
el disco automáticamente.
Número total de pistas
del disco insertado
Pista actual
11
Page 33

Cómo encontrar una pista o un
punto determinado de un CD
Cómo seleccionar los modos
de reproducción del CD
Para efectuar la búsqueda progresiva o
regresiva de las pistas
Pulse y mantenga pulsado
¢ mientras se está
reproduciendo el CD para
la búsqueda progresiva de
ESPAÑOL
las pistas.
Pulse y mantenga pulsado
4
mientras se está
reproduciendo el CD para
la búsqueda regresiva de
las pistas.
Para seleccionar la pista siguiente o anterior
Pulse ¢ por un tiempo
breve mientras se está
reproduciendo un CD para
saltar al comienzo de la pista
siquiente. Cada vez que
pulse el botón
consecutivamente, se
localiza el comienzo de las
pista siquientes y se efectúa
la reproducción.
Pulse 4
breve mientras se está
reproduciendo un CD para
regresar al comienzo de la
pista actual. Cada vez que
pulse el botón
consecutivamente, se
localiza el comienzo de la
pista anterior y se efectúa la
reproducción.
por un tiempo
Para reproducir las pistas de forma aleatoria
(Reproducción aleatoria)
Podrá reproducir todas las pistas del CD de forma
aleatoria.
Cada vez que pulsa MO/RND (Monofónico/
Aleatoria) mientras se está reproduciendo un CD,
el modo de reproducción aleatoria del CD cambiará
alternativamente entre activado y desactivado.
El indicador RND
MO/RND
Cuando esté activado el modo aleatorio, se
encenderá el indicador RND en el indicación y
comenzará a reproducirse la pista seleccionada al
azar.
Para reproducir las pistasrepetidamente
(Reproducción repetida)
Podrá escuchar la pista actual una y otra vez.
Cada vez que pulsa RPT/SCAN (Repetición/Scan)
mientras se está reproduciendo un CD, el modo de
reproducción repetida cambiará alternativamente
entre activado y desactivado .
Número de pista
que se está
RPT
SCAN
Indicador RPT
reproduciendo
Para seleccionar directamente una
determinada pista
7 8 9 10 11 12
Pulse el botón de número correspondiente al
número de pista que desea reproducir.
• Para seleccionar un número de pista del 1 – 6:
Pulse ligeramente 1 (7) – 6 (12) .
• Para seleccionar un número de pista del 7 – 12:
Pulse y mantenga pulsado 1 (7) – 6 (12) durante
más de 1 segundo.second.
12
Cuando esté activado del modo de reproducción,
se encenderá el indicador RPT en el indicación.
Page 34

Prohibición de la expulsión
del CD
Es posible inhibir la expulsión del CD y bloquear el
CD dentro de la ranura de carga.
Pulse y mantenga pulsado CD y
de 2 segundos.
C D
“EJECT” destella en el visor durante
aproximadamente 5 segundos y el CD queda
bloqueado para que no pueda expulsarse.
Para cancelar la prohibición y “desb loquear” el
CD, pulse y mantenga pulsado CD y 0 otra vez
durante más de 2 segundos mientras pulsa CD.
“EJECT” volv erá a destellar, y el CD será e xpulsado
de la ranura de carga.
00
0 durante más
00
ESPAÑOL
13
Page 35

ADJUSTES DEL SONIDO
Adjuste del sonido
Usted puede ajustar las características de sonido
a su preferencia.
1
Seleccione el ítem que desea ajustar.
Cada vez que pulsa el
botón, los items ajustables
cambian de la siguiente
manera:
ESPAÑOL
(graves)
Indication To do: Range
BAS Ajustar los graves –06 (mín.)
(Graves) |
TRE Ajustar los agudos –06 (mín.)
(Agudos) |
FAD Ajustar el balance R06
(Desvanecedor)*
BAL Ajustar el balance L06
(Balance) de los altavoces |
VOL Ajustar el volumen 00 (mín.)
(Volumen) |
*
Si está usando un sistema de dos altavoces, ajuste el
nivel del desvanecedor a “00”.
(agudos)
(desvanecedor)
de los altavoces |
delantero y trasero F06
izquierdo y R06
derecho
(balance)
(volumen)
+06 (máx.)
+06 (máx.)
(trasero solamente)
(delantero solamente)
(izquierdo solmente)
(derecho solamente)
50 (máx.)
2
Adjuste el nivel.
Para aumentar el nivel.
Para reducir el nivel.
El patrón de ecualización cambia mientras
usted ajusta los bajos o los agudos.
Nota:
Normalmente los botones + y – funcionan como botones
de control de volumen. Por consiguiente no es necesario
seleccionar “VOL” para ajustar el nivel de volumen.
Activado/desactivado de la
función de sonoridad
A volúmenes bajos, el oído humano es menos
sensible a las frecuencias bajas y altas.
La función de sonoridad puede reforzar estas
frecuencias para producir un sonido bien
equilibrado a bajos niveles de volumen.
Cada vez que pulsa LOUD , la función de sonoridad
se activa/desactiva alternativamente.
LOUD
14
@A
Page 36

Utilización de la memoria de
control de sonido (SCM)
Usted puede seleccionar y almacenar un ajuste de
sonido preestablecido para cada fuente de
reproducción. (SCM avanzado)
Selección y almacenamiento de los
modos de sonido
Una vez que seleccione un modo de sonido, será
almacenado en la memoria y llamado cada vez que
seleccione la misma fuente y se visualiza en la
indicación. El modo de sonido se puede almacenar
para cada una de las siguientes fuentes — FM1,
FM2, FM3, AM, CD.
• Si en lugar de almacenar separadamente el modo
de sonido para cada fuente de reproducción,
desea utilizar un mismo modo de sonido para
todas las fuentes, consulte “Cancelación del SCM
avanzado” en la página 17.
Seleccione el modo de sonido deseado.
• Cada vez que pulsa el botón, el modo de sonido
cambia de la siguiente manera.
SCM
Llamada de los modos de sonido
Cuando “SCM LINK” está ajustado a
“LINK ON”, seleccione la fuente.
Incador del
modo de sonido
C D
F M
A M
Cada vez que cambia la fuente de
reproducción, el indicador SCM
parpadea en la indicación.
Notas:
• Podrá ajustar el sonido preajustado para adaptarlo
a su gusto y almacenarlo en la memoria.
Si desea ajustar y almacenar su modo de sonido
original, consulte “Cómo almacenar sus propios
ajustes de sonido” en la página 16.
• Para ajustar los niveles de refuerzo de los graves y
agudos para activar/desactivar temporalmente la
función de sonoridad, consulte la página 14. (Los
ajustes realizados por usted se cancelan si selecciona
otra fuente.)
ESPAÑOL
• Cuando “SCM LINK” está a “LINK ON”, el modo
de sonido seleccionado podrá ser almacenado
en la memoria para la fuenta actual, y el efecto
será aplicado sólo a la fuenta actual. Cada vez
que cambia la fuenta de reproducción, el
indicador SCM parpadea en la pantalla.
• Cuando “SCM LINK” está ajustado a “LINK OFF”,
el efecto del modo de sonido seleccionado será
aplicado a cualquier fuente.
Indicación Para: Valores preajustados
BEAT Música de rock o +02 00 Activada
de discoteca
SOFT Música de fondo +01 –03
suave
POP Música liviana +04 +01
SCM OFF
(Sonido plano)
Graves Agudos
00 00 Activada
Sonorided
Desactivada
Desactivada
15
Page 37

Cómo almacenar sus propios
SCM
ajustes de sonido
Podrá ajustar los modos de sonido (BEAT, SOFT,
POP: consulte la página 15) adaptándolos a su
gusto y almacenar sus propios ajustes en la
memoria.
1
Llame el modo de sonido que desea
ajustar.
ESPAÑOL
Para los detalles, consulte la página 15.
SCM
2
Seleccione “BAS” (graves) o “TRE”
(agudos).
Para active/desactive (ON/OFF) la
función de sonorided.
Para los detalles, consulte la página 14.
Cada vez que pulsa LOUD, la función de
sonoridad se activa y desactiva alternativamente. (→ vaya al paso 5)
LOUD
3
Ajuste el nivel de los graves o agudos.
Para los detalles, consulte la página 14.
4
Repita los pasos 2 y 3 para ajustar los
otros ítems.
5
Pulse y mantenga pulsado SCM hasta
que en el modo de sonido seleccionado
por usted destelle en la indicación.
El ajuste del modo de control de sonido
seleccionado quedará almacenado en la
memoria.
6
Repita el mismo procedimiento para
almacenar los otros modos de sonido.
Para reposicionar a los ajustes de fábrica
Repita el mismo procedimiento y vuelva a asignar
los valores preajustados indicados en la tabla de
la página 15.
16
Page 38

OTRAS FUNCIONES PRINCIPALES
Ajuste del reloj
1
Pulse y mantenga pulsado SEL
(selección) durante más de 2
segundos.
En el visor aparece “CLOCK H”, “CLOCK M”,
“SCM LINK” o “LEVEL”
2
Ajuste la hora.
1 Seleccione “CLOCK H” si no está indicado
en el visor.
2 Ajuste la hora.
1
3
Ajuste los minutos.
1 Seleccione “CLOCK M”.
2 Adjuste los minutos.
1
2
2
Cancelación del SCM avanzado
Usted puede cancelar el SCM avanzado (memoria
de control de sonido) y desenlazar los modos de
sonido y las fuentes de reproducción. La unidad se
expide de fábrica para que pueda almacenar en la
memoria un modo de sonido diferente para cada
fuente, de manera que sea posible cambiar los
modos de sonido con sólo cambiar las fuentes.
LINK ON: SCM avanzado (modos de sonido
LINK OFF: SCM convencional (un modo de
1
2
diferentes para fuentes diferentes)
sonido para todas las fuentes)
Pulse y mantenga pulsado SEL
durante más de 2 segundos.
En el visor aparece “CLOCK H”, “CLOCK M”,
“SCM LINK” o “LEVEL”.
Seleccione “SCM LINK” si no está
visualizado en el visor.
ESPAÑOL
4
Pulse SEL (selección) para finalizar el
adjuste.
Para verificar la hora actual en el reloj
(cambio del modo de visualización)
Pulse DISP repetidas veces. Cada vez que pulsa
el botón, el modo de visualización cambia de la
siguiente manera.
Durante la operación del
sintonizador:
Frecuencia
Durante operación de CD:
• Si la unidad estaba desactivada al pulsar DISP, se
conecta la alimentación, se indica la hora durante 5
segundos, y a continuación se desconecta.
Tiempo de
reproducción
transcurrido
Hora
Hora
3
Seleccione el modo deseado — “LINK
ON” o “LINK OFF”.
4
Pulse SEL (selección) para finalizar el
adjuste.
17
Page 39

Selección de la indicación de
nivel
Usted puede seleccionar la indicación de nivel a
su gusto.
La unidad se expide de fábrica con “VOL 2”
seleccionado.
VOL 1: Muestra el indicador de nivel de
VOL 2: Aparecen alternativamente “VOL 1” y
ESPAÑOL
OFF: El indicador de nivel de volumen y el
1
2
volumen y el indicador del patrón de
ecualización.
la indicación de iluminación.
indicador del patrón de ecualización
desaparecen.
Pulse y mantenga pulsado SEL
durante más de 2 segundos.
En el visor aparece “CLOCK H”, “CLOCK M”,
“SCM LINK” o “LEVEL”.
Seleccione “LEVEL” si no está
visualizado en el visor.
En el visor aparece “CLOCK H”, “CLOCK M”,
“SCM LINK” o “LEVEL”.
3
Seleccione el modo deseado — “VOL
1”, “VOL 2” o “OFF”.
4
Pulse SEL (selección) para finalizar
el adjuste.
18
Page 40

Desmontaje del panel de control
Podrá desmontar el panel de control cuando salga
de su automóvil.
Al desmontar o instalar el panel de control, preste
atención para no dañar los conectores provistos al
dorso del panel de control y en el portapanel.
Cómo instalar el panel de control
1
Inserte el lado izquierdo del panel de
control en la ranura del portapanel.
Cómo desmontar el panel de control
Antes de desmontar el panel de control, asegúrese
de desconectar la alimentación.
1
Desbloquee el panel de control.
2
Eleve y extraiga el panel de control de
la unidad.
3
Ponga el panel de control desmontado
en el estuche suministrado.
2
Presione el lado derecho del panel de
control para fijarlo al portapanel.
Nota sobre la limpieza de los conectores:
Si acostumbra a desmontar frecuentemente el panel
de control, se podrán deteriorar los conectores.
Para reducir al mínimo esta posibilidad, limpie
periódicamente los conectores con un palillo de
algodón o con un lienzo humedecido con alcohol
teniendo cuidado de no dañar los conectores.
ESPAÑOL
Conectores
19
Page 41

MANTENIMIENTO
Manipulación de los CD
Esta unidad sólo ha sido diseñada para
reproducir CD’s que llevan las marca .
• No es posible reproducir ningún otro disco.
Cómo tratar los CD
Cuando saque el CD de
su caja, presione el
sujetador central de la
ESPAÑOL
caja y extraiga el CD
agarrándolo por los bordes.
• Siempre sujete el CD
por los bordes. No toque
su superficie de grabación.
Cuando guarde el CD en su caja, insértelo
suavemente alrededor del sujetador central (con
la superficie impresa hacia arriba).
• Asegúrese de guardar el CD en su caja
después de utilizarlo.
Rondje in het midden
Para mantener los CD impios
Un CD sucio podría no
reproducir correctamente.
Si llegara a ensuciarse,
utilice un lienzo suave y
limpie con movimientos
rectos desde el centro
hacia el borde.
Para reproducir un CD
nuevo
Algunos CD nuevos podrían
presentar ciertas
irregularidades en sus bordes
interior y exterior.
Si intenta introducir un CD en estas condiciones
podría suceder que la unidad rechace el CD.
Elimine las irregularidades raspando con un
lápiz, bolígrafo, etc.
Acerca del mal seguimiento:
El mal seguimiento es un defecto que podría
suceder cuando conduce por caminos muy
accidentados. Esto no produce daños a la unidad
ni al CD, pero resultará muy molesto.
Se recomienda detener la reproducción del CD
cuando conduzca por caminos accidentados.
COMPACT
DIGITAL AUDIO
Condensación de humedad
Podría condensarse humedad en la lente alojada
en el interior del reproductor de CD en los
siguientes casos:
• Después de encender el calefactor del
automóvil.
• Si hay mucha humedad en el habitáculo.
En estos casos el reproductor de CD podría no
funcionar correctamente. Haga expulsar el CD y
deje la unidad encendida durante algunas horas
hasta que se evapore la unidad.
Cuando reproduce un CD-R (grabable)
Usted puede reproducir sus CD-Rs originales en
esta unidad.
• Antes de reproducir los CD-Rs, lea
atentamente todas las instrucciones y
precauciones.
• Podría suceder que algunos CD-Rs grabados
con grabadoras de CD no se puedan
reproducir en esta unidad debido a las
características del disco o por los siguientes
motivos:
– Discos sucios o rayados.
– Condensación de humedad en el lente
interior de la unidad.
– Suciedad en el lente captor del interior.
• Utilice únicamente CD-Rs “finalizados”.
• Los CD-RWs (reescribibles) no se pueden
reproducir en este receptor.
• No utilice CD-Rs con etiquetas o rótulos
adhesivos pegados sobre su superficie.
Podrían producir fallos de funcionamiento.
PRECAUCIONES:
• No inserte un CD de 8cm (CD simples) en la
ranura de carga. (Estos tipos de CD no pueden
ser expulsados).
• No inserte ningún CD cuya forma no sea la
habitual — un corazón o una flor, por ejemplo,
pues se producirá una avería.
• No exponga los CD a los rayos directos del sol
ni a otra fuente de calor, ni en sitios sujetos a
temperatura y humedad elevadas. No los deje
dentro del automóvil.
• No utilice ningún solvente (por ejemplo,
limpiador de discos convenciona,
pulverizadores, diluyente, bencina, etc.) para
limpiar los CD.
20
Page 42

LOCALIZACION DE AVERIAS
Lo que aparenta ser una avería podría resolverse fácilmente. Verifique los siguientes puntos antes de
acudir al centro de servicio.
Síntomas
• No se puede reproducir el
CD.
• El sonido del CD se
interrumpe algunas veces.
• “NO DISC” aparece en el
visor.
• El sonido no sale por los
altavoces.
• El preajuste automático
SSM (Memoria secuencia
de las emisoras fuertes) no
funciona.
Causas
El CD está insertado boca
abajo.
Está conduciendo por
caminos accidentados.
El CD está rayado.
Las conexiones son
incorrectas.
No hay CD en la ranura de
carga.
El CD no está insertado
correctamente.
El control del volumen está
ajustado al mínimo.
Las conexiones son
incorrectas.
Las señales son muy débiles.
Remedios
Inserte el CD correctamente.
Deje de reproducir el CD
mientras conduce por
caminos accidentados.
Cambie el CD.
Verifique los cables y las
conexiones.
Insertar un CD en la ranura de
carga.
Insertarlo correctamente.
Ajustarlo al nivel óptimo.
V erificar los cables y las
conexiones.
Almacene las emisoras
manualmente.
ESPAÑOL
• Hay ruidos estáticos
mientras se escucha la radio.
• No se puede reproducir ni
expulsar el CD.
• La unidad no funciona para
nada.
La antena no está firmemente
conectada.
El reproductor de CD está
funcionando incorrectamente.
El microcomputador
incorporado podría no
funcionar correctamente
debido a los ruidos, etc.
Conecte la antena
firmemente.
Pulse
simultáneamente durante más
de 2 segundos. Tenga cuidado
de no dejar caer el CD cuando
sea expulsado.
Pulsar y SEL
simultáneamente durante más
de 2 segundos para
reposicionar la unidad. (Se
borrará el ajuste del reloj y de
las emisoras preajustadas
almacenadas en la memoria.)
(Consulte la página 2.)
y 0
21
Page 43

ESPECIFICACIONES
SECCION DEL AMPLIFICADOR DE
AUDIO
Máxima potencia de salida:
Delantera: 40 W por canal
Trasera: 40 W por canal
Potencia de salida continua (RMS):
Delantera: 16 W por canal en 4 Ω, 40 Hz a
Trasera: 16 W por canal en 4 Ω, 40 Hz a
ESPAÑOL
Impedancia de carga: 4 Ω
Gama de control de tonos:
Graves: ±10 dB a 100 Hz
Agudos: ±10 dB a 10 kHz
Respuesta de frecuencias: 40 Hz a 20000 Hz
Relación señal a ruido: 70 dB
Nivel de salida de línea/impedancia:
2,0 V/20 kΩ de carga (plena escala)
Impedancia de salida: 1 kΩ
20 000 Hz con una distorsión
armónica total no mayor de 0,8 %.
20 000 Hz con una distorsión
armónica total no mayor de 0,8 %.
(tolerancia de 4 Ω a 8 Ω )
SECCION DEL SINTONIZADOR
Gama de frecuencias:
FM: 87,5 MHz a 107,9 MHz
AM: 530 kHz a 1
[Sintonizador de FM]
Sensibilidad útil: 11,3 dBf (1,0 µV/75 Ω)
Umbral de silenciamiento de 50 dB:
16,3 dBf (1,8 µV/75 Ω)
Selectividad de canal alternativo (400 kHz):
65 dB
Respuesta de frecuencias: 40 Hz a 15000 Hz
Separación estereofónica: 35 dB
Relación de captura: 1,5 dB
710 kHz
SECCION DEL REPRODUCTOR DE CD
Tipo: Reproductor de discos compactos
Sistema de detección de la señal: Captor óptico
sin contacto (láser de semiconductor)
Número de canales: 2 canales (estéreo)
Respuesta de frecuencia: 5 Hz a 20 000 Hz
Gama dinámica: 96 dB
Relación señal a ruido: 98 dB
Lloro y trémolo: Inferior al límite medible
GENERALIDADES
Requisitos de potencia:
Voltaje de funcionamiento: DC 14,4 V
(tolerancia de 11 V a 16 V)
Sistema de puesta a tierra: Masa negativa
Temperatura de trabajo permisible: 0°C a +40°C
Dimensiones (An × Al × Pr):
Dimensiones de instalación:
182 mm × 52 mm × 150 mm
(7-3/16" x 2-1/16" x 5-15/16")
Dimensiones del panel:
188 mm × 58 mm × 14 mm
(7-7/16" x 2-5/16" x 5/8")
Peso: 1,3 kg ( 2.9 lbs) (excluyendo accesorios)
El diseño y las especificaciones se encuentran sujetos
a cambios sin previo aviso.
Si necesita un kit para su automóvil, busque
en la guía telefónica la tienda que vende
productos audio para automóviles más
cercana.
[Sintonizador de AM]
Sensibilidad: 20 µV
Selectividad: 35 dB
22
Page 44

http://www.jvcmobile.c
Visit us on-line for
Technical Support & Customer Satisfaction Survey .
US RESIDENTS ONLY
om
Having TROUBLE with operation?
Please reset your unit
Refer to page of How to Reset
Still having trouble??
USA ONLY
Call 1-800-252-5722
http://www.jvcservice.com
We can help you!
EN, SP, FR
VICTOR COMPANY OF JAPAN, LIMITED
0401KKSFLEJES
JVC
Page 45

IMPORTANT POUR PRODUITS LASER
Précautions:
1.PRODUIT LASER CLASSE 1
2.DANGER: Radiation laser invisible quand l’appareil est ouvert ou que le verrouillage est en panne
ou désactivé. Éviter une exposition directe au rayon.
3.ATTENTION: Ne pas ouvrir le volet supérieur. Il n’y a pas de pièce réparable par l’utilisateur à
l’intérieur. Confier le service après-vente à un personnel qualifié.
4.ATTENTION: Ce lecteur CD utilise une radiation laser invisible, toutefois, il est équipé de
commutateurs de sécurité qui empêchent l’émission de radiation en retirant les disques. Il est
dangereux de désactiver les commutateurs de sécurité.
5.ATTENTION: L’utilisation des commandes des réglages et effectuer des procédures autres que
celles spécifiées dans ce manuel peut provoquer une exposition aux radiations dangereuses.
Comment réinitialiser votre appareil
Après avoir détaché le panneau de commande,
appuyez sur la touche de réinitialisation sur le support
FRANÇAIS
du panneau en utilisant la pointe d’un stylo-bille ou un
outil similaire.
Cela réinitialisera le microprocesseur intégré.
Remarques:
Les ajustements que vous avez préréglés – tels que les
canaux préréglés ou les ajustements sonores – seront aussi
effacés.
Si un CD se trouve dans l'appareil, il est éjecté quand celuici est réinitialisé. Faites attention de ne pas faire tomber le
CD.
(Attente/En service/Sourdine)
SEL (Sélection)
2
Page 46

Merci pour avoir acheté un produit JVC. Veuillez lire attentivement toutes les instructions avant
d’utiliser l’appareil afin de bien comprendre son fonctionnement et d’obtenir les meilleures
performances possibles.
TABLE DES MATIERES
Comment réinitialiser votre appareil ........ 2
EMPLACEMENT DES TOUCHES ......... 4
Panneau de command............................. 4
Télécommande
(seulement pour le KD-S620)................. 5
Préparation de la télécommande
(seulement pour le KD-S620)................ 6
FONCTIONNEMENT DE BASE ........... 7
Mise sous tension .................................... 7
FONCTIONNEMENT DE BASE DE LA
RADIO..................................... 8
Ecoute de la radio .................................... 8
Mémorisation des stations ....................... 9
Accord d’une station présélectionnée ...... 10
Autres fonctions pratiques du tuner ......... 10
FONCTIONNEMENT DU LECTEUR CD ... 11
Lecture d’un CD ....................................... 11
Localisation d’une plage ou d’un point
particulier sur un CD ............................. 12
Sélection des modes de lecture de CD.... 12
Interdiction de l’éjection de CD ................ 13
AJUSTEMENT DU SON ................... 14
Ajustement du son ................................... 14
Mise en/hors service de la fonction
loudness ............................................... 14
Utilisation de la mémoire de commande
du son (SCM) ........................................ 15
Mémorisation de votre propre
ajustement sonore................................. 16
AUTRES FONCTIONS PRINCIPALES.... 17
Réglage de l’horloge ................................ 17
Annulation de SCM avancé...................... 17
Sélection de l'affichage du niveau............ 18
Détachement du panneau de
commande............................................. 19
ENTRETIEN ................................ 20
Manipulation des CDs.............................. 20
DEPANNAGE ............................... 21
SPECIFICATIONS.......................... 22
FRANÇAIS
AVANT D’UTILISER L’APPAREIL
*
Par sécurité....
• N’augmentez pas trop le volume car cela bloquerait
les sons de l’extérieur rendant la conduite
dangereuse.
• Arrêtez la voiture avant de réaliser toute opération
compliquée.
*
Température à l’intérieur de la voiture....
Si votre voiture est restée garée pendant longtemps
dans un climat chaud ou froid, attendez que la
température à l’intérieur de la voiture redevienne
normale avant d’utiliser l’appareil.
3
Page 47

EMPLACEMENT DES TOUCHES
Panneau de command
Fenêtre d’affichage
i
o
;a
sdf
g
h
12
34 5 6
FRANÇAIS
q
w
1 Touche (attente/en service/sourdine)
2 Touche +/–
3 Touche LOUD
4 Touche MO (monaural)
Touche RND (aléatoire)
5 Fenêtre d’affichage
6 Capteur de télécommande
(seulement pour le KD-S620)
7 Touche 0 (éjection)
8 Touche CD
9 Touche FM
p Touche AM
q Touche SEL (sélection)
w Touches 4
•
Fonctionnent aussi comme touches SSM quand
elles sont pressées en même temps.
e Touches numériques
r Touche DISP (affichage)
t Touche RPT (répétition)
Touche SCAN
y Touche SCM (mémoire de commande sonore)
u Touche
commande)
4
/ ¢
(déblocage du panneau de
j
k
789p
e
Fenêtre d’affichage
i Indicateur de niveau de volume (ou audio)
Indicateur de courbe d'égalisation
o Indicateurs de réception du tuner
STEREO (stéréo), MONO (monaural)
; Indicateur RND (aléatoire)
a Indicateur RPT (répétition)
s Indicateur "SCM"
d Indicateur LOUD
f Indicateurs de mode sonore
BEAT, SOFT, POP
g Indicateur CD
h Indicateurs Band
FM1, FM2, FM3
AM
j Affichage principal
k Indicateur CD IN (CD en place)
rt y
u
Page 48

Télécommande
(seulement pour le KD-S620)
Cette section est seulement pour le KD-S620.
5
1
2
3
4
RM-RK31
1 • Met l’appareil sous tension si vous
appuyez sur cette touche quand l’appareil
est hors tension.
• Maintenez pressée jusqu’à ce que
“SEE YOU” apparaisse sur l’affichage pour
mettre l’appareil hors tension.
• Appuyez brièvement sur cette touche pour
couper le volume momentanément.
Appuyez de nouveau le rétablir.
2 • Fonctionne comme la touche BAND en
écoutant la station FM (ou du tuner DAB).
Chaque fois que vous appuyez sur la
touche, la bande change.
• Ne f onctionne pas comme la touche PROG/
DISC +.
3 • Fonctionne comme la touche PRESET lors
de l’écoute de la radio.
Chaque fois que vous appuyez sur la
touche, le numéro de station préréglée
augmente et la station choisie est
accordée.
• Ne fonctionne pas comme la touche DISC –.
6
7
4 Fonctionne comme les touches + et – sur
l’appareil principal.
REMARQUE:
5 Sélectionne le mode sonore.
Chaque fois que vous appuyez sur la touche , le
mode change.
6 Sélectionner la source.
Chaque fois que vous appuyez sur la touche , la
source change.
7 • Recherche des stations en écoutant la
• F ait défiler rapidement en avant ou en inv erse
• Saute au début des plages suivantes ou
Ces touches ne peuvent pas être
utilisées pour l'ajustement de
l'horloge (CLOCK H, CLOCK M),
SCM LINK de LEVEL
(voir pages 17 et 18).
radio.
la plage si elle est maintenue pressée en
écoutant le CD.
revient au début de la plage courante (ou
des plages précédentes) si elle est
brièvement pressée en écoutant le CD.
FRANÇAIS
5
Page 49

Préparation de la
télécommande
(seulement pour le KD-SX991R)
Avant d’utiliser la télécommande:
• Pointez la télécommande directement sur le
capteur de télécommande de l’appareil principal.
Assurez-vous qu’il n’y a pas d’obstacle entre les
deux.
Capteur de télécommande
FRANÇAIS
• Ne pas exposer la télécommande à un éclairage
puissant (en plein soleil ou un éclairage artificiel).
Mise en place de la pile
Lorsque la portée ou l’efficacité de la télécommande
diminue, remplacez la pile.
1
Retirez le porte-pile.
1) Poussez le porte-pile dans la direction de
la flèche en utilisant la pointe d’un stylobille ou un objet similaire.
2) Retirez le porte-pile.
3
Remettez le porte-pile en place.
Insérez le porte-pile en le poussant jusqu’à
ce que vous entendiez un déclic.
(Face arrière)
AVERTISSEMENT :
• Conservez la pile hors de la portée des enfants.
Si un enfant venait à avaler une pile, consultez
immédiatement un médecin.
• Ne rechargez pas, ne court-circuitez pas, de
démontez pas, ne chauffez pas la pile et ne les
jetez pas dans le feu.
Le faire, pourrait amener la pile à émettre de la
chaleur, se fragmenter ou causer un incendie.
• Ne mélangez pas la pile avec d’autres objets
métalliques.
Le faire, pourrait amener la pile à émettre de la
chaleur, se fragmenter ou causer un incendie.
• Pour vous débarrassez des pile ou les conserver,
entourez-les de ruban adhésif et isolez-les.
Ne pas le faire, pourrait amener la pile à émettre
de la chaleur, se fragmenter ou causer un
incendie.
• Ne piquez pas la pile avec une broche métallique
ou un objet similaire.
Le faire, pourrait amener la pile à émettre de la
chaleur, se fragmenter ou causer un incendie.
(Face arrière)
1)
2
Placez la pile.
Insérez la pile dans le porte-pile avec le pole
+ dirigé vers le haut de façon que la pile soit
bien fixée dans le porte-pile.
Pile bouton au lithium
(Produit référencé:
CR2025)
6
2)
Page 50

FONCTIONNEMENT DE BASE
2
1
3
Mise sous tension
1
Mettez l’appareil sous tension.
Remarque sur le fonctionnement monotouche:
Quand vous choisissez tuner comme source à
l’étape 2 ci-dessous, l’appareil se met
automatiquement sous tension. Vous n’avez donc
pas besoin d’appuyer d’abord sur cette touche
pour mettre l’appareil sous tension.
2
Choisissez la source.
C D
F M
A M
Pour utiliser le tuner (FM ou AM),
voir les pages 8 – 10.
Pour utiliser le CD,
voir les pages 11 – 13.
3
Ajustez le volume.
Pour augmenter le
volume.
Pour diminuer le
volume.
Le niveau de volume apparaît.
4
Ajustez le son comme vous le
souhaitez. (Voir la page 14.)
Pour baisser le son instantanément
Appuyez brièvement sur pendant
l’écoute de n’importe quelle source. “ATT”
commence à clignoter sur l’affichage, et le niveau
de volume est baissé instantanément.
Pour revenir au niveau de volume précédent,
appuyez de nouveau brièvement sur la touche.
• Si vous tournez la molette de commande dans
le sens des aiguilles d’une montre, vous
pouvez aussi rétablir le son.
Pour mettre l’appareil hors tension
Maintenez pressée jusqu’à ce que
“SEE YOU” apparaît sur l’affichage.
Remarque:
Si vous utilisez cet appareil pour la première fois,
réglez l’horloge intégrée en vous reportant voir la
page 17.
PRECAUCION sur le réglage du volume
Les CDs produisent très peu de bruit comparé avec
les autres sources. Si le niveau de volume est ajusté,
par exemple, pour le tuner, les enceintes risquent
d’être endommagées par l’augmentation soudaine
du niveau de sortie.
Par conséquent, diminuez le volume avant de
reproduire un disque et ajustez-le comme vous le
souhaitez pendant la lecture.
FRANÇAIS
Indicateur (voir la page 18) du niveau
de volume ou audio
7
Page 51

FONCTIONNEMENT DE BASE DE LA RADIO
Ecoute de la radio
Vous pouvez utiliser la recherche automatique ou
l’accord manuel pour accorder une station
particulière.
FRANÇAIS
Recherche d’une station
automatiquement:
Recherche automatique
1
Choisissez la bande (FM1 – 3, AM).
F M
A M
La bande choisie apparaît.
Indicateur (voir page 18) du niveau de volume ou
audio
Remarque:
Cet appareil a trois bandes FM (FM1, FM2,
FM3). Vous pouvez utiliser n’importe laquelle
pour écouter une station FM.
FM1
FM2
FM3
AM
Pour arrêter la recherche avant qu’une
station ne soit accordée, appuyez sur la même
touche que vous avez utilisée pour la recherche.
Recherche manuelle d’une station:
Recherche manuelle
1
Choisissez la bande (FM1 – 3, AM).
F M
A M
Remarque:
Cet appareil a trois bandes FM (FM1, FM2,
FM3). Vous pouvez utiliser n’importe laquelle
pour écouter une station FM.
2
Maintenez pressée 4 ou ¢
jusqu’à ce que “M” (manuel) clignote
sur l’affichage.
FM1
FM2
FM3
AM
2
Commencez la recherche d’une station.
Appuyez sur ¢ pour
rechercher des stations de
fréquences supérieures.
Appuyez sur 4
rechercher des stations de
fréquences inférieures.
Quand une station est accordée, la recherche
8
s’arrête.
La bande choisie apparaît.
pour
Page 52

3
Accordez une station souhaitée
pendant que “M” clignote.
Appuyez sur
accorder des stations de
fréquences supérieures.
Appuyez sur 4 pour
accorder des stations de
fréquences inférieures.
• Si vous relâchez la touche, le mode
manuel est mis automatiquement hors
service après 5 secondes.
• Si vous maintenez la touche pressée, la
fréquence continue de changer jusqu’à ce
que vous la relâchiez.
¢ pour
Quand une émission FM stéréo est difficile
à recevoir:
Appuyez sur MO RND (monaural/aléatoire) lors
de l’écoute d’une station FM stéréo.
• Chaque fois que vous appuyez sur la touche,
l’indicateur MO s’allume et s’éteint
alternativement.
S’allume lors de la réception
d’une émission FM stéréo.
Mémorisation des stations
Vous pouvez utiliser l’une des deux méthodes
suivantes pour mémoriser les stations reçues.
• Présélection automatique des stations FM:
SSM (Strong-station Sequential Memory)
• Présélection manuelle des stations FM et AM
Présélection automatique des stations
FM: SSM
Vous pouvez présélectionner 6 stations locales
dans chaque bande FM (FM1, FM2 et FM3).
1
Choisissez le numéro de la bande
FM (FM1 – 3) où vous souhaitez
mémoriser la station.
• Chaque fois que vous appuyez sur la
touche, la bande FM change comme suit:
F M
A M
2
Maintenez pressées les deux touches
pendant plus de 2 secondes.
FM1 FM2
FM3
FRANÇAIS
MO/RND
Lorsque l’indicateur MO est allumé sur
l’affichage, le son que vous entendez est
monaural mais la réception est améliorée
(l’indicateur ST s’éteint).
“SSM” apparaît, puis disparaît quand la
présélection automatique est terminée.
Les stations locales FM avec les signaux les
plus forts sont recherchées et mémorisées
automatiquement dans le numéro de bande
que vous avez choisi (FM1, FM2 ou FM3).
Ces stations sont mémorisées sur les touches
de présélection de station — No. 1 (fréquence
la plus basse) à No. 6 (fréquence la plus haute).
Quand la présélection est terminée, la station
mémorisée automatiquement sur la touche de
présélection de station 1 est accordée
automatiquement.
9
Page 53

Présélection manuelle
Vous pouvez présélectionner manuellement un
maximum de 6 stations pour chaque bande (FM1,
FM2, FM3 et AM).
Ex.: Mémorisation de la station FM située à 88,3
MHz sur le numéro de présélection 1 de la
bande FM1
1
Choisissez le numéro de la bande
(FM1 – 3, AM) où vous souhaitez
mémoriser la station (dans cet
exemple, FM1).
• Chaque fois que vous appuyez sur la
touche, la bande FM change comme suit:
FRANÇAIS
A M
F M
FM1
FM2
FM3
AM
Remarques:
• La station précédemment présélectionnée est effacée
quand une nouvelle station est mémorisée sur le même
numéro de présélection.
• Les stations présélectionnées sont effacées si
l’alimentation du circuit mémoire est interr ompue (par
exemple, pendant le changement de la pile). Si cela se
produit, présélectionnez de nouveau les stations.
Accord d’une station
présélectionnée
Vous pouvez accorder facilement une station
présélectionnée.
Rappelez-vous que vous devez d’abord mémoriser
les stations. Si vous ne les avez pas encore
mémorisées, référez-vous à “Mémorisation des
stations” à les pages 9 et 10.
1
Choisissez la bande (FM1 – 3, AM).
10
2
Accordez une station à 88,3 MHz.
Appuyez sur ¢ pour
accorder des stations de
fréquences supérieures.
Appuyez sur 4
accorder des stations de
fréquences inférieures.
3
Maintenez pressée la touche
numérique (dans cet exemple, 1)
pendant plus de 2 secondes.
“P1” clignote pendant quelques secondes.
4
Répétez la procédure ci-dessus pour
mémoriser d’autres stations sur
d’autres numéros de présélection.
pour
F M
A M
FM1 FM2
FM3
AM
2
Choisissez le numéro (1 – 6) de la
station présélectionnée souhaitée.
7 8 9 10 11 12
Autres fonctions pratiques du tuner
RPT
SCAN
Balayage des stations diffusées
Si vous appuyez sur RPT/SCAN lors de l'écoute de
la radio, le balayage des stations commence.
Chaque fois qu'une émission est accordée, le
balayage s'arrête pendant environ 5 secondes (la
fréquence accordée clignote sur l'affichage), et vous
pouvez vérifier quel programme est en train d'être
diffusé.
Si vous souhaitez écouter ce programme, appuyez
de nouveau sur la même touche pour arrêter le
balayage.
Page 54

FONCTIONNEMENT DU LECTEUR CD
Lecture d’un CD
1
Ouvrez le panneau de commande.
L’appareil se met
en marche, tire le
CD et commence
la lecture
automatiquement.
Remarque:
Si un CD est inséré à
l’envers, le CD est éjecté
automatiquement.
L’indicateur CD s’allume.
Durée de lecture
totale du disque
inséré
Nombre total de
plages du disque
inséré
Pour arrêter la lecture et éjecter le CD
Appuyez sur 0.
La lecture CD s’arrête, le panneau de commande
s’ouvre, puis le CD est éjecté automatiquement
de la fente de chargement.
Si vous changez la source, la lecture du CD
s’arrête aussi (mais dans ce cas, le CD n’est pas
éjecté).
Remarques:
• Si le CD éjecté n’est pas retiré avant environ 15
secondes, le disque est automatiquement réinséré
dans la fente d’insertion pour le protégé de la
poussière. (Dans ce cas, la lecture du CD ne
commence pas.)
• Vous pouvez éjecter le CD quand l’appareil est hors
tension.
FRANÇAIS
Durée de
lecture écoulée
Remarque sur le fonctionnement monotouche:
Si un CD se trouve déjà dans la fente d’insertion,
appuyer sur CD met l’appareil sous tension et
commence la lecture automatiquement.
Plage actuelle
11
Page 55

Localisation d’une plage ou d’un point particulier sur un CD
Sélection des modes de
lecture de CD
Pour avancer rapidement ou inverser une
plage
Maintenez pressée ¢,
pendant la reproduction d’un
CD, pour avancer rapidement
la plage.
Maintenez pressée
pendant la reproduction d’un
CD, pour inverser la plage.
Pour aller aux plages suivantes ou aux
plages précédentes
FRANÇAIS
Appuyez brièvement sur
¢ lors de la
reproduction d’un CD, pour
avancer jusqu'au début de
la plage suivante.
Chaque fois que vous
appuyez répétitivement sur
la touche, le début des
plages suivantes est localisé
et celle-ci est reproduite.
Appuyez brièvement sur
4
lors de la
reproduction d’un CD, pour
revenir au début de la plage
actuelle.
Chaque fois que vous
appuyez répétitivement sur
la touche, le début des
plages précédentes est
localisé et celle-ci est
reproduite.
4 ,
Pour reproduire les plage aléatoirement
(Lecture aléatoire)
Vous pouvez reproduire toutes les plages du CD
dans un ordre aléatoire.
Chaque fois que vous appuyez sur MO RND
(monaural/aléatoire) pendant la reproduction d’un
CD, le mode de lecture aléatoire se met
alternativement en et hors service.
Indicateur RND
MO/RND
Quand le mode de lecture aléatoire est en
service, l’indicateur RND s’allume sur l’affichage
et une plage choisie aléatoirement est reproduite.
Pour reproduire les plages répétitivement
(Lecture répétée)
Vous pouvez reproduire la plage actuelle
répétitivement.
Chaque fois que vous appuyez sur RPT
(répétition) lors de la lecture d’un CD, le mode de
lecture répétée de CD se met alternativement
sous et hors service.
Numéro de plage
de la plage
actuellement
RPT
SCAN
Indicateur RPT
reproduite
Pour aller directement à une plage
particulière
7 8 9 10 11 12
Appuyez sur la touche numérique
correspondante au numéro de plage souhaité
pour commencer sa reproduction.
• Pour choisir un numéro de plage de 1 – 6:
Appuyez brièvement sur 1 (7) – 6 (12).
• Pour choisir un numéro de plage 7 – 12:
Maintenez pressé 1 (7) – 6 (12) pendant plus
d’une seconde.
12
Quand le mode de lecture répétée est en service,
l’indicateur RPT s’allume sur l’affichage.
Page 56

Interdiction de l’éjection de CD
Vous pouvez interdire l’éjection d’un CD et le
verrouiller dans la fente d’insertion.
Maintenez pressée CD et 0 pendant
plus de 2 secondes.
C D
“EJECT” clignote sur l’affichage pendant environ
5 secondes, le CD est verrouillé et ne peut plus
être éjecté.
Pour annuler l’interdiction et “déverrouiller”
le CD, maintenez de nouveau pressés CD et 0
pendant plus de 2 secondes. “EJECT” apparaît
sur l’affichage et le CD est éjecté de la fente
d'insertion.
FRANÇAIS
13
Page 57

AJUSTEMENT DU SON
Ajustement du son
Vous pouvez ajuster les caractéristiques du son à
votre préférence.
1
Choisissez l’élément que vous
souhaitez ajuster.
Chaque fois que vous appuyez
sur la touche, l’élément ajustable
change comme suit:
(graves)
Indication Pour: Plage
BAS Ajuster les graves. –06 (min.)
FRANÇAIS
(Graves) |
TRE Ajuster les aigus. –06 (min.)
(Aigus) |
FAD Ajuster l’équilibre R06 (Arrière
(Fader)* entre les enceintes seulement)
BAL Ajuster l’équilibre L06 (Gauche
(Balance) entre les enceintes seulement)
VOL Ajuster le volume. 00 (min.)
(Volume) |
(aigus)
avant et arrière.
gauche et droite.
(fader)
(balance)
(volume)
+06 (max.)
+06 (max.)
|
F06 (Avant
seulement)
|
R06 (Droite
seulement)
50 (max.)
2
Ajustez le niveau.
Pour augmenter le niveau.
Pour diminuer le niveau.
La courbe d’égalisation change quand vous
ajustez les graves ou les aigus.
Remarque:
Normalement, les touches + et – fonctionnent comme
touches de commande du volume. Alors, vous n'avez pas
besoin de choisir “VOL” pour ajuster le niveau de
volume.
Mise en/hors service de la fonction loudness
L'oreille humaine est moins sensible aux basses et
hautes fréquences à faible volume.
La fonction loudness peut accentuer ces
fréquences pour produire un son bien équilibré à
faible volume.
Chaque fois que vous appuyez sur LOUD, la
fonction loudness se met alternativement en/hors
service.
* Si vous utilisez un système à deux enceintes, réglez
le niveau de fader sur “00”.
14
LOUD
@A
Page 58

Utilisation de la mémoire de
commande du son (SCM)
Vous pouvez choisir et mémoriser un ajustement
du son spécifique pour chaque source de lecture
(SCM avancé).
Sélection et mémorisation des modes
sonores
Une fois que vous avez choisi un mode sonore, il
est mémorisé. Il est rappelé et apparaît sur l’affichage
chaque fois que vous choisissez la même source.
Un mode sonore peut être mémorisé pour chacune
des sources suivantes — FM1, FM2, FM3, AM, CD .
• Si vous ne souhaitez pas mémoriser le mode sonore
séparément pour chaque source de lecture, mais
souhaitez utiliser le même mode sonore pour toutes
les sources, référez-vous à “Annulation de SCM
avancé” à la page 17.
Choisissez le mode sonore souhaité.
• Chaque fois que vous appuyez sur la touche,
le mode sonore change comme suit:
SCM
Rappel des modes sonores
Quand “SCM LINK” est réglé sur
“LINK ON”, choisissez la sour ce.
Indicateurs du mode sonore
C D
F M
A M
Chaque fois que vous changez la
source de lecture, l’indicateur
SCM clignote sur l’affichage.
Remarques:
• Vous pouvez ajuster le mode sonore préréglé comme
vous le souhaitez et le mémoriser.
Si vous souhaitez ajuster et mémoriser votre propre
mode sonore, référez-vous à “Mémorisation de votr e
propre ajustement sonore” à la page 16.
• Pour ajuster les niveaux d’accentuation des graves
et des aigus ou pour mettre en/hors service
temporairement la fonction contour, référez-vous à
la page 14. (V os ajustements sont annulés si une autre
source est choisie.)
FRANÇAIS
• Quand “SCM LINK” est réglé sur “LINK ON”, le
mode sonore choisi peut être mémorisé pour la
source actuelle et l’effet ne s’applique qu’à la
source actuelle. Chaque fois que vous changez
la source de lecture, l’indicateur SCM clignote
sur l’affichage.
• Quand “SCM LINK” est réglé sur “LINK OFF”,
l’effet du mode sonore choisi s’applique à
toutes les sources.
Indication Pour: Valeurs préréglées
Graves Aigus Contour
BEAT Musique rock +02 00 On
ou disco
SOFT Musique +01 –03 OFF
de ond
POP Musique +04 +01 OFF
légère
SCM OFF (Son plat) 00 00 On
15
Page 59

SCM
Mémorisation de votre propre
ajustement sonore
Vous pouvez ajuster les modes sonore (BEAT,
SOFT, POP: voir la page 15) comme vous le
souhaitez et mémoriser votre propre ajustement.
• Il y a un temps limite pour effectuer les étapes
suivantes. Si le réglage est annulé avant que v ous
ne terminiez, recommencez à partir de l’étape 1.
1
Appelez le mode sonore que vous
souhaitez ajuster.
Référez-vous à la page 15 pour les détails.
SCM
3
Ajustez le niveau des graves ou des
aigus.
Référez-vous à la page 14 pour les détails.
4
Répétez les étapes 2 et 3 pour ajuster
d’autres éléments.
FRANÇAIS
2
Choisissez “BAS” (graves) ou “TRE”
(aigus).
Pour mettre la fonction contour en/
hors service.
Référez-vous à la page 14 pour les détails.
Chaque fois que vous appuyez sur LOUD, la
fonction loudness se met alternativement en
et hors service. (→ allez à l'étape 5)
LOUD
5
Maintenez pressé SCM jusqu’à ce que
le mode sonore que vous avez choisi
clignote sur l’affichage.
L’ajustement réalisé pour le mode sonore
choisi est mémorisé.
6
Répétez la même procédure pour
mémoriser d’autres modes sonores.
Pour réinitialiser l’appareil aux réglages de
l’usine
Répétez la même procédure et réattribuez les
valeurs préréglées du tableau à la page 15.
16
Page 60

AUTRES FONCTIONS PRINCIPALES
Réglage de l’horloge
1
Maintenez pressée la touche SEL
(sélection) pendant plus de 2 secondes.
“CLOCK H”, “CLOCK M”, “SCM LINK” ou
“LEVEL” apparaît sur l'affichage.
2
Réglez les heures.
1 Choisissez “CLOCK H” s’il n’apparaît pas
sur l’affichage.
2 Ajustez les heures.
1
3
Réglez les minutes.
1 Choisissez “CLOCK M”.
2 Ajustez les minutes.
1
2
2
Annulation de SCM avancé
Vous pouvez annuler les réglages SCM (mémoire de
commande sonore) avancés et annuler les liaisons des
modes sonores avec les sources de lecture.
À l’expédition de l’usine, un mode sonore différent peut
être mémorisé pour chaque source de façon à ce que
vous puissiez changer les modes sonores simplement
ne changeant de source.
LINK ON: Réglages SCM avancés (SCM différents
LINK OFF: Réglages SCM ordinaires (Un seul SCM
1
2
pour chaque source).
pour toutes les sources).
Maintenez pressée la touche SEL
pendant plus de 2 secondes.
“CLOCK H”, “CLOCK M”, “SCM LINK” ou
“LEVEL” apparaît sur l'affichage.
Choisissez “SCM LINK” s'il n'apparaît
pas.
FRANÇAIS
4
Appuyez sur SEL (sélection) pour
terminer le réglage.
Pour vérifier l'heure actuelle de l'horloge
(modification du mode d'affichage)
Appuyez sur DISP répétitivement. Chaque fois que
vous appuyez sur la touche, le mode d'affichage
change comme suit.
Pendant l'utilisation du tuner:
Fréquence
Pendant l'utilisation du lecteur CD:
Durée de
lecture écoulée
• Si l'appareil n'est pas utilisé quand vous appuyez
sur DISP, il se met sous tension, l'horloge est
affichée pendant 5 secondes, puis l'appareil se
remet hors tension.
Horloge
Horloge
3
Choisissez le mode souhaité —
“LINK ON” ou “LINK OFF”.
4
Appuyez sur SEL (sélection) pour
terminer le réglage.
17
Page 61

Sélection de l’affichage du
niveau
Vous pouvez choisir l’affichage du niveau en fonction
de vos préférences.
À l’expédition de l’usine, “VOL 2” est choisi.
VOL 1: Montre l’indicateur du niveau de volume et
VOL 2: Alterne entre le réglage “VOL 1” et l’affichage
OFF: Efface l’indicateur du niveau de volume et
1
FRANÇAIS
2
l’indicateur de la courbe d’égalisation.
de l’éclairage.
l’indicateur de la courbe d’égalisation.
Maintenez pressée la touche SEL
pendant plus de 2 secondes.
“CLOCK H”, “CLOCK M”, “SCM LINK” ou
“LEVEL” apparaît sur l'affichage.
Choisissez “LEVEL ” s'il n'apparaît pas.
“CLOCK H”, “CLOCK M”, “SCM LINK” ou
“LEVEL” apparaît sur l'affichage.
3
Choisissez le mode souhaité —
“VOL 1”, “VOL 2” ou “OFF”.
4
Appuyez sur SEL (sélection) pour
terminer le réglage.
18
Page 62

Détachement du panneau de
commande
Vous pouvez détacher le panneau de commande
quand vous quittez la voiture.
Lors du détachement ou de la remise en place du
panneau de commande, faites attention de ne pas
endommager les connecteurs situés à l'arrière du
panneau et sur le porte-panneau.
Comment détacher le panneau de
commande
Avant de détacher le panneau de commande,
assurez-vous de mettre l'appareil hors tension.
1
Déverrouillez le panneau de
commande.
Comment attacher le panneau de
commande
1
Insérez le côté gauche du panneau de
commande dans la rainure située du
côté droit du porte- panneau.
2
Appuyez sur le côté droit du panneau
de commande pour le fixer au portepanneau.
FRANÇAIS
2
Levez et tirez le panneau de
commande de l'appareil.
3
Mettez le panneau de commande
détaché dans la boîte fournie.
Remarque sur le nettoyage des connecteurs:
Si vous détachez fréquemment le panneau de
commande, les connecteurs se détérioreront.
Pour réduire cette détérioration, essuyez
périodiquement les connecteurs avec un coton-tige
ou un tissus imprégné d'alcool, en faisant attention
de ne pas endommager les connecteurs.
Connecteurs
19
Page 63

ENTRETIEN
Manipulation des CD
Cet appareil a été conçu pour reproduire les CD
portant la marque
• Les autres disques ne peuvent pas être
reproduits.
Manipulation des CD
Pour retirer un CD de son
boîtier, faites pression sur le
support central du boîtier et
retirez le CD en le tenant par ses
arêtes.
• T enez toujours le CD par ses arêtes . Ne touchez
pas la surface enregistrée.
Pour remettre un CD dans son boîtier, insérez
FRANÇAIS
délicatement le CD autour du support central (la
surface imprimée dirigée vers le haut).
• Remettez les CD dans leur boîtier après
utilisation.
Pour garder propre vos CD
Un CD sale peut ne pas être
reproduit correctement. Si un
CD devient sale, essuyez-le
avec un chiffon doux, en ligne
droite, du centre vers les arêtes.
Avant de reproduire un CD
neuf
Les CD neufs peuvent avoir
des ébarbures sur les arêtes
intérieures et extérieures. Si
un tel CD est utilisé, cet appareil risque de rejeter
le CD.
Pour retirer ces ébarbures , frottez les arête avec
un crayon, un stylo, etc.
A propos du désaligement:
Un désalignement peut être la conséquence d’une
conduite sur un terrain accidenté. Cela n’endommage
pas l’appareil ni le CD, mais cela peut être agaçant.
Nous vous recommandons d’arrêter la lecture de CD
lors d’une conduite sur un tel terrain.
COMPACT
DIGITAL AUDIO
.
Support central
Condensation d’humidité
De l’humidité peut se condenser sur la lentille à
l’intérieur du lecteur CD dans les cas suivant:
• Après avoir mis le chauffage dans la voiture.
• Si l’intérieur de la voiture devient très humide.
Si cela se produit, le lecteur CD peut ne pas
fonctionner correctement. Dans ce cas, éjectez le
CD et laissez l’appareil sous tension pendant
quelques heures, jusqu’à ce que l’humidité se soit
évaporée.
Lors de la reproduction d’un CD-R
(enregistrable)
Vous pouvez reproduire vos CD-R originaux dans
cet appareil.
• Avec de reproduire un CD-R, lisez attentiv ement
les instructions et les précautions qui
l’accompagnent.
• Certains CD-R enregistrés sur des enregistreurs
de CD ne peuvent pas être reproduits sur cet
appareil à cause de leurs caractéristiques ou des
raisons suivantes:
– Le disque est sale ou rayé.
– De la condensation d’humidité s’est produite
sur la lentille à l’intérieur de l’appareil.
– La lentille du capteur à l’intérieur du lecteur CD
est sale.
• Utilisez uniquement des CD-R “finalisés”.
• Les CD-RW (réinscriptibles) ne peuvent pas être
reproduits sur cet appareil.
ATTENTION:
• N'insérez pas des CD de 8cm (3 3/16") (CD single)
Dans la fente d'insertion. (De tels CD ne peuvent
pas être éjectés.)
• N'insérez pas des CD avec une forme inabituelle
– comme le cæur d'une fleur; Cela pourrait causer
un mauvais fonctionnement.
• N'exposez pas les CD à la lumière directe du soleil
ou à toute source de chaleur, ni ne les placez pas
dans un endroit soumis à des hautes température
ou à l'humidité. Ne les laissez pas dans la voiture.
• N'utilisez aucun solvant (comme par exemple: un
nettoyant pour disque analogique, un diluant en
bombe, du benzine, etc.) pour nettoyer les CD.
20
Page 64

DEPANNAGE
Ce qui apparaît comme une problème n'est pas toujours très sérieux. Vérifier les points suivants avant
d'appeler un centre de réparation.
Symptômes
• Le CD ne peut pas être
reproduit.
• Le son du CD est
interrompu par moment.
• “NO DISC” apparaît sur
l'affichage.
• Le son ne peut pas être
entendu des enceintes.
• La présélection
automatique SSM (Strongstation Sequential Memory)
ne fonctionne pas.
• Il y a du bruit statique lors
de l'écoute de la radio.
Causes
Le CD est inséré à l'envers.
Vous conduisez sur une route
accidentée.
Le CD est rayé.
Les connexions sont
incorrectes.
Il n'y a pas de CD dans la fente
d'insertion.
Le CD n'est pas inséré
correctement.
La commande du volume est
tournée sur le niveau minimum.
Les connexions sont
incorrectes.
Les signaux sont trop faibles.
L'antenne n'est pas connectée
fermement.
Remèdes
Insérez-le correctement.
Arrêtez la lecture du CD
quand vous conduisez sur une
route accidentée.
Changez le CD.
Vérifiez les cordons et les
connexions.
Insérez un CD dans la fente
d’insertion.
Insérez-le correctement.
Ajustez-le sur le niveau
optimum.
Vérifiez les cordons et les
connexions.
Mémorisez les stations
manuellement.
Connectez l'antenne
fermement.
FRANÇAIS
• Le CD ne peut être ni
reproduit ni éjecté.
• L'appareil ne fonctionne pas
du tout.
Le lecteur de CD fonctionne
peut-être incorrectement.
Le micro-ordinateur intégré
peut fonctionner
incorrectement à cause de
bruit, etc.
Appuyez sur
même temps pendant plus de
2 secondes. F aites attention de
ne pas faire tomber le CD
quand il est éjecté.
Appuyez sur
en même temps pendant plus
de 2 secondes pour réinitialiser
l'appareil. (Le réglage de
l'horloge et les stations
présélectionnées en mémoire
sont effacées.) (Voir page 2.)
et 0 en
et SEL
21
Page 65

SPECIFICATIONS
SECTION AMPLIFICATEUR AUDIO
Puissance de sortie maximum:
Avant: 40 watts par canal
Arrière: 40 watts par canal
Puissance de sortie en mode continu (efficace):
Av ant: 16 watts par canal pour 4 Ω, 40 Hz
à 20 000 Hz à moins de 0,8% de
Arrière: 16 watts par canal pour 4 Ω, 40 Hz
Impédance de charge: 4 Ω (4 Ω à 8 Ω tolérés)
Plage de commande de la tonalité
Graves: ±10 dB à 100 Hz
Aigus: ±10 dB à 10 kHz
Réponse en fréquence: 40 Hz à 20 000 Hz
Rapport signal sur bruit: 70 dB
FRANÇAIS
Niveau de sortie de ligne/Impédance: 2,0V/20 kΩ
en charge (pleine échelle)
Impédance de sortie: 1kΩ
distorsion harmonique totale.
à 20 000 Hz à moins de 0,8% de
distorsion harmonique totale.
SECTION TUNER
Plage de fréquence
FM: 87,5 à 107,9 MHz
AM: 530 à 1 710 kHz
[Tuner FM]
Sensibilité utilisable: 11,3 dBf (1,0 µV/75 Ω)
Sensibilité utile à 50 dB: 16,3 dBf (1,8 µV/75 Ω)
Sélectivité de canal alterné (400 kHz): 65 dB
Réponse en fréquence: 40 Hz à 15 000 Hz
Séparation stéréo: 35 dB
Rapport de synchronisation: 1,5 dB
[Tuner AM]
Sensibilité: 20 µV
Sélectivité: 35 dB
SECTION LECTEUR CD
Type: lecteur de disque compact
Système de détection de signal: capteur sans
contact optique (semiconduteur laser)
Nombre de canaux: 2 canaux (stéréo)
Réponse en fréquence: 5 Hz à 20 000 Hz
Plage dynamique: 96 dB
Rapport signal sur bruit: 98 dB
Pleurage et scintillement: inférieur à la limite
mesurable
GENERAL
Alimentation
Tension de fonctionnement: CC 14,4 volts
(11 volts à 16 volts tolérés)
Température de fonctionnement admissible:
0°C à +40°C (32°F à 104°F)
Système de mise à la masse: Masse négative
Dimensions (L x H x P)
Taille d'installation:
182 mm x 52 mm x 150 mm
Taille du panneau:
188 mm x 58 mm x 14 mm
Masse: 1,3 kg (sans les accessoires)
La conception et les spécifications sont sujettes à
changement sans notification.
Si un kit de montage est nécessaire pour
votre voiture, consultez votre annuaire
téléphonique pour trouver le magasin
spécialisé en autoradio le plus proche de
chez vous.
22
Page 66

http://www.jvcmobile.c
Visit us on-line for
Technical Support & Customer Satisfaction Survey .
US RESIDENTS ONLY
om
Having TROUBLE with operation?
Please reset your unit
Refer to page of How to Reset
Still having trouble??
USA ONLY
Call 1-800-252-5722
http://www.jvcservice.com
We can help you!
EN, SP, FR
VICTOR COMPANY OF JAPAN, LIMITED
0401KKSFLEJES
JVC
 Loading...