

Page 1
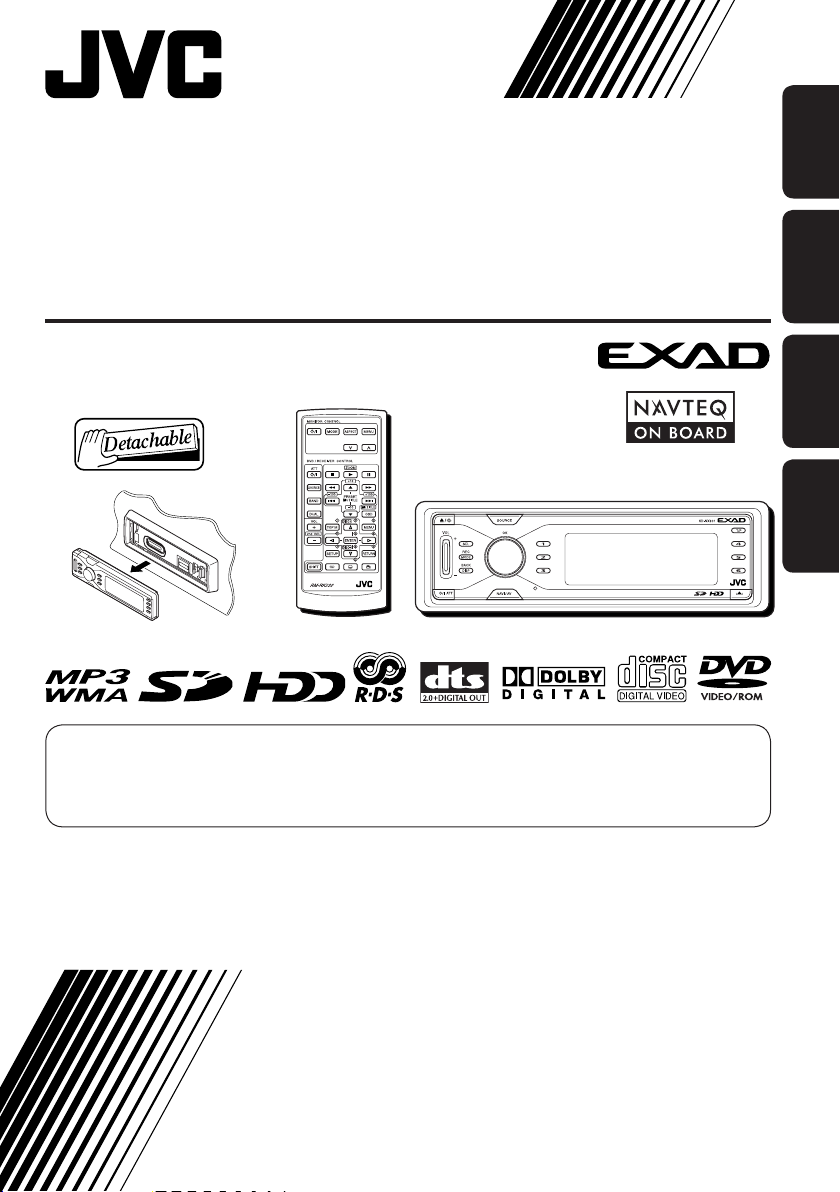
HDD NAVIGATION/DVD RECEIVER
FESTPLATTEN-NAVIGATIONSSYSTEM/DVD-RECEIVER
SYSTÈME DE NAVIGATION À DISQUE DUR/RECEPTEUR DVD
HDD NAVIGATIE/DVD-RECEIVER
KD-NX901
For cancelling the display demonstration, see page 14.
Zum Abbrechen der Displaydemonstration siehe Seite 14.
Pour annuler la démonstration des affichages, référez-vous à la page 14.
Zie bladzijde 14 voor het annuleren van de displaydemonstratie.
ENGLISH
DEUTSCH
FRANÇAIS
NEDERLANDS
For installation and connections, refer to the separate manual.
Für den Einbau und die Anschlüsse siehe das eigenständige Handbuch.
Pour l’installation et les raccordements, se référer au manuel séparé.
Bijzonderheden over de installatie en aansluiting van het apparaat vindt u in de desbetreffende
handleiding.
INSTRUCTIONS
BEDIENUNGSANLEITUNG
MANUEL D’INSTRUCTIONS
GEBRUIKSAANWIJZING
LVT1294-001B
[E]
Page 2
Thank you for purchasing a JVC product.
Please read all instructions carefully before operation, to ensure your complete understanding and to
obtain the best possible performance from the unit.
ENGLISH
IMPORTANT FOR LASER PRODUCTS
1. CLASS 1 LASER PRODUCT
2. CAUTION : Do not open the top cover.
There are no user serviceable parts inside
the unit; leave all servicing to qualified
service personnel.
3. CAUTION: Visible and invisible laser
radiation when open and interlock failed or
defeated. Avoid direct exposure to beam.
4. REPRODUCTION OF LABEL: CAUTION
LABEL, PLACED OUTSIDE THE UNIT.
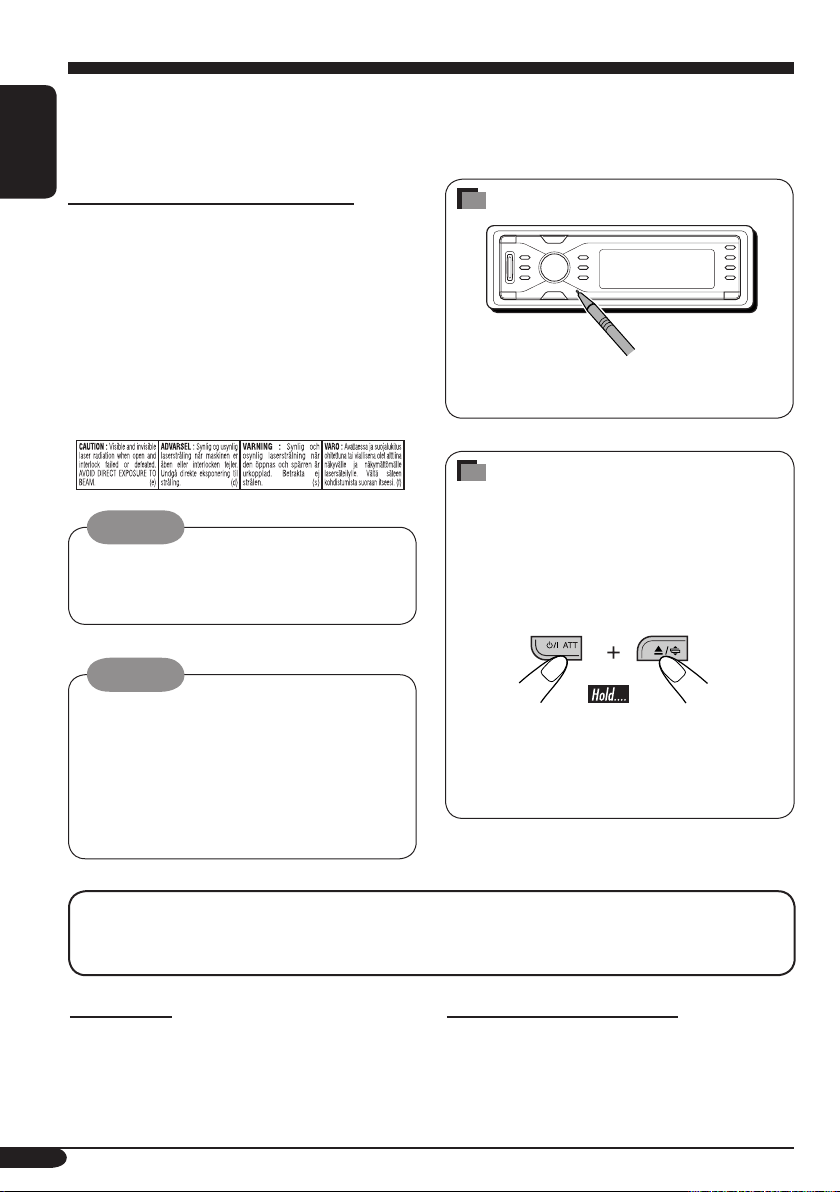
How to reset your unit
This will reset the microcomputer. Your
preset adjustments will also be erased.
How to forcibly eject a disc
If a disc cannot be recognized by the
Warning:
If you need to operate the receiver while
driving, be sure to look ahead carefully or
you may be involved in a traffic accident.
receiver or cannot be ejected, ejects the disc
as follows.
• While the source operation screen is
shown...
Caution
Never try to analyse or retrieve the data
stored in the Hard Disk Drive (HDD).
Otherwise, you may have your warranty
invalid, and be penalized by law.
The manufacturer assumes no liability for
any damage resulting from such conduct as
mentioned above.
For security reasons, a numbered ID card is provided with this receiver, and the same ID number
is imprinted on the receiver’s chassis. Keep the card in a safe place, as it will help the authorities
to identify your receiver if stolen.
For safety....
• Do not raise the volume level too much, as
this will block outside sounds, making driving
dangerous.
• Stop the car before performing any
complicated operations.
2
• If this does not work, try to reset your
receiver.
• Be careful not to drop the disc when it
ejects.
Temperature inside the car....
If you have parked the car for a long time in
hot or cold weather, wait until the temperature
in the car becomes normal before operating the
unit.
Page 3
WARNINGS
• DO NOT install any unit in locations
where;
– it may obstruct the steering wheel and
gearchange lever operations, as this may
result in a traffic accident.
– it may obstruct the operation of safety
devices such as air bags, as this may
result in a fatal accident.
– it may obstruct visibility.
• DO NOT operate the unit while
manipulating the steering wheel, as this
may result in a traffic accident.
• The driver must not watch the monitor
while driving.
If the driver does it while driving, it may
lead to carelessness and cause an accident.
• If the parking brake is not engaged, the
following messages appear...
– When you try to watch the playback
picture on the monitor, “DRIVER MUST
NOT WATCH THE MONITOR WHILE
DRIVING” appears, and no playback
picture will be shown.
– When you try to enter your destination
for the navigation guidance, “Function
not available while driving.” appears,
and you cannot enter the destination.
These warnings appear only when the
parking brake wire is not connected, or the
parking brake is not engaged (refer to the
Installation/Connection Manual).
SAFETY INSTRUCTIONS
Use of the Navigation System is only permitted
if the traffic conditions are suitable and you
are absolutely sure that no risk, obstruction
or inconvenience will be incurred to you,
your passengers or other road users. The
requirements of the Road Traffic Regulations
must always be followed. The destination
must not be entered while driving the car.
The Navigation System serves solely as an
aid to navigation. It never releases the driver
from his duties to drive carefully and to make
own judgement in road traffic. Inaccurate
or incorrect instructions may happen to be
given due to changing traffic conditions. The
actual road signs and traffic regulations must
therefore always be observed. In particular, the
Navigation System cannot be used as an aid to
orientation when visibility is poor.
This Navigation System must only be used for
its intended purpose. The volume of the car
radio/Navigation System must be adjusted so
that external noise is still audible.
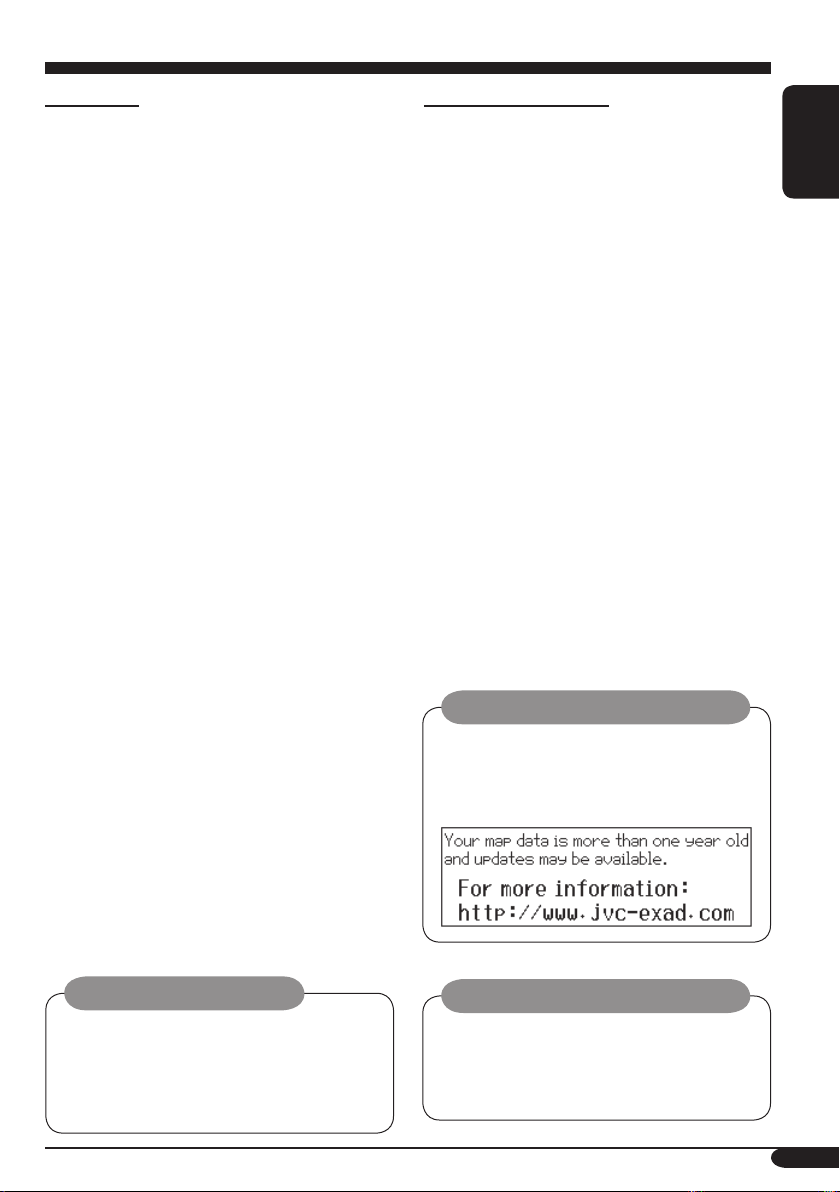
When to update the database:
If the following message appears on the
display when you turn on the power, visit
<http://www.jvc-exad.com>. You can
confirm the update information.
ENGLISH
Caution on volume setting:
Discs produce very little noise compared
with other sources. Lower the volume
before playing a disc to avoid damaging
the speakers by the sudden increase of the
output level.
When replacing/rotating the tires:
It is required to clear all the accumulated
learning data which is important for accurate
navigation. To clear the data, perform
“DELETE RUNTIME” on page 21.
3
Page 4

Contents
How to reset your unit ............................... 2
How to forcibly eject a disc ....................... 2
How to read this manual ............................ 5
Introduction ............................. 6
ENGLISH
Remote controller
— RM-RK230 ......................... 8
Main elements and features ....................... 8
Control panel — KD-NX901 .... 10
Parts identification ................................... 10
Preparations .......................... 11
Getting started ....................... 13
Basic operations .....................................13
Cancelling the display demonstration ...... 14
Setting the clock ...................................... 14
Navigation operations ........... 15
What is navigation .................................15
Basic navigation operations .....................16
Navigation operation menus .................... 17
Navigation setups ..................................19
Navigation setting menus ........................ 20
Basic navigation processes ......................22
Entering your destination ......................... 23
• By address ............................................ 23
• B
y postal code
• B
y town centre
• By destination lists ............................... 28
• By points of interests (P.O.I.) ............... 28
• By the coordinates ................................ 31
Storing addresses and routes .................... 32
Convenient features using the stored routes
Setting guidance options .......................... 36
Setting route options ................................ 37
Route guidance ........................................ 38
Display information during guidance ...... 39
Dynamic guidance ................................... 41
........................................ 26
........................................ 27
Radio operations ................... 42
Listening to the radio ..............................42
Storing stations in memory ...................... 43
Listening to a preset station ..................... 44
Changing the display information ........... 44
Searching for your favourite programme
Using the standby receptions ................... 46
Tracking the same programme ................ 47
... 34
.... 45
Disc operations ...................... 48
Playing a disc in the receiver ...................48
Basic operations ....................................... 50
DVD/VCD special functions ..... 52
Selecting subtitles .................................... 52
Selecting audio languages ....................... 52
Selecting multi-angle views ..................... 52
Disc menu operations .............................. 53
Zoom in .................................................... 53
On-screen disc operations ...... 54
On-screen bar basic operations ................ 55
Control screen basic operations ............... 57
List screen operations .............................. 58
DVD setup menu .................... 59
Basic setting procedure ............................ 59
Other disc operations ............. 62
Basic operations ....................................... 62
Selecting the playback modes .................. 64
Changing the display information ........... 65
HDD operations ..................... 66
Playing genre/album/track in the HDD ...66
Selecting the playback modes .................. 68
Changing the display information ........... 69
Playing playlists ....................................... 70
Recording audio CDs ............................... 70
Assigning the titles .................................. 72
Editing the HDD contents ........................ 72
• Erasing a track/album/genre ................. 73
• Moving a track/album .......................... 73
• Sorting an album/genre ........................ 74
• Creating/editing a playlist .................... 75
• Erasing a playlist .................................. 75
• Duplicating a playlist ............................ 76
• Storing tree information into SD .......... 77
• Confirming the HDD contents ............. 77
SD operations ........................ 78
Inserting the SD card ..............................78
Selecting the playback modes .................. 81
Changing display information ................. 82
Duplicating data into HDD ...................... 82
4
Page 5
Sound adjustments ................ 84
Selecting preset sound modes
(EQ: equalizer) ....................................84
Storing your own sound adjustments ....... 85
Adjusting the sound basic settings ........... 86
General settings — PSM ......... 87
Basic procedure ....................................... 87
Selecting the dimmer mode ..................... 90
Other main functions ............. 91
Assigning titles to the sources ................. 91
Changing the control panel angle ............ 92
Detaching the control panel ..................... 92
CD changer operations ........... 93
Playing discs in the CD changer ...............93
Selecting the playback modes .................. 96
Changing the display information ........... 97
External component operations
... 98
Playing an external component ...............98
DAB tuner operations ............. 99
Listening to the DAB service ....................99
Storing DAB services in memory .......... 100
Tuning in to a preset DAB service ........ 100
Searching for your favorite programme
Using the Standby Reception ................ 101
Tracking the same programme .............. 102
Changing the display information ......... 102
... 101
Maintenance ........................ 103
Language codes ................... 104
More about the functions ..... 105
Troubleshooting ................... 112
Specifications ....................... 118
END-USER TERMS .................. 120
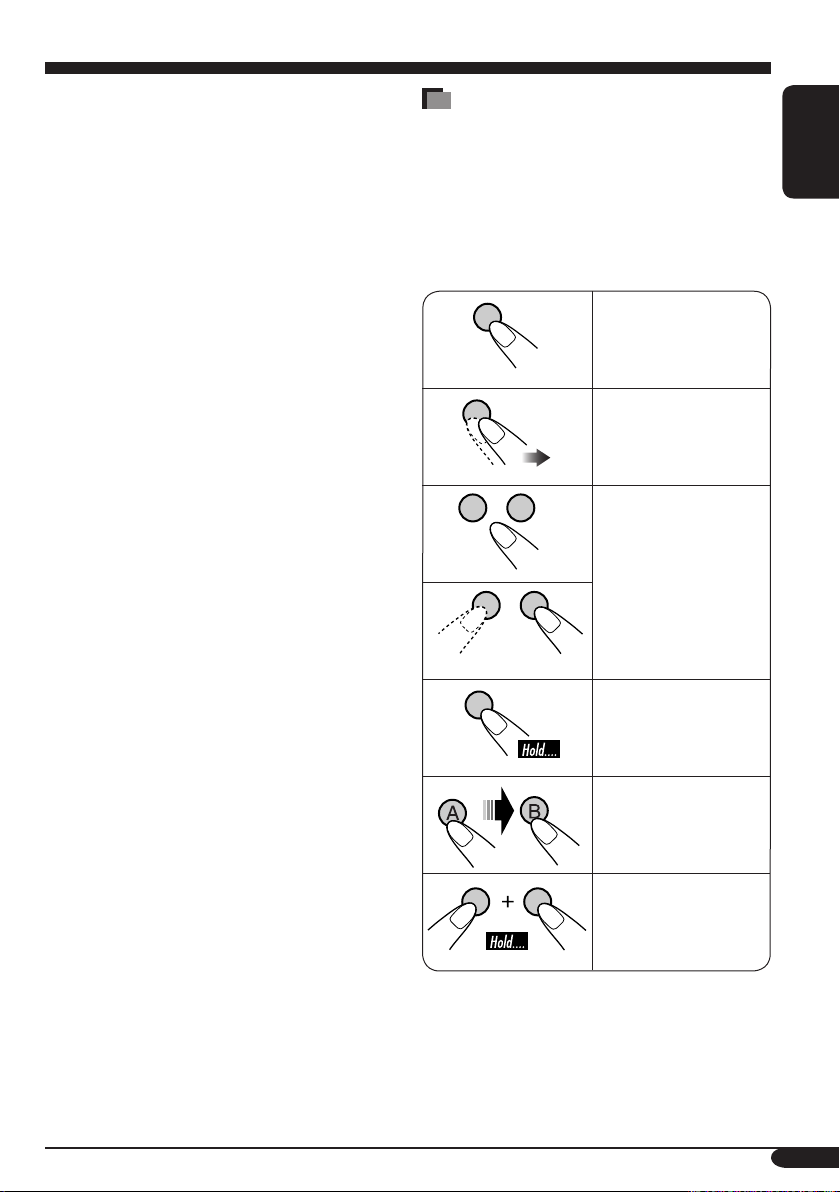
How to read this manual
The following methods are used to make the
explanations simple and easy-to-understand:
• Some related tips and notes are explained in
“More about the functions” (see pages 105
– 110).
• Button operations are mainly explained with
the illustrations as follows:
Press briefly.
Press repeatedly.
Press either one.
Press and hold until
your desired response
begins.
Press A, then press
B.
Press and hold both
buttons at the same
time.
ENGLISH
5
Page 6
Introduction
DVD/CD player
Discs you can play
ENGLISH
You can play back the following discs (12 cm
and 8 cm) on this receiver:
• DVD Video: Recorded in PAL color system
with Region Code “2” (see below).
– DVD-R/DVD-RW recorded in the DVD-
Video format can also be played.
• Video CD (VCD)/audio CD
• MP3/WMA: Recorded either in CD-R/
CD-RW or DVD-R/DVD-RW/DVD-ROM.
– CD-R/CD-RW: Compliant with ISO 9660
Level 1, ISO 9660 Level 2, Romeo, and
Joliet.
– DVD-R/DVD-RW/DVD-ROM: Compliant
with UDF-Bridge Format.
Discs cannot be played back
DVD-Audio, DVD-ROM (data), DVD-RAM,
DVD-R/DVD-RW recorded in the DVD-VR
format, CD-ROM, CD-I (CD-I Ready), Photo
CD, etc.
• Playing back these discs will generate noise
and damage the speakers.
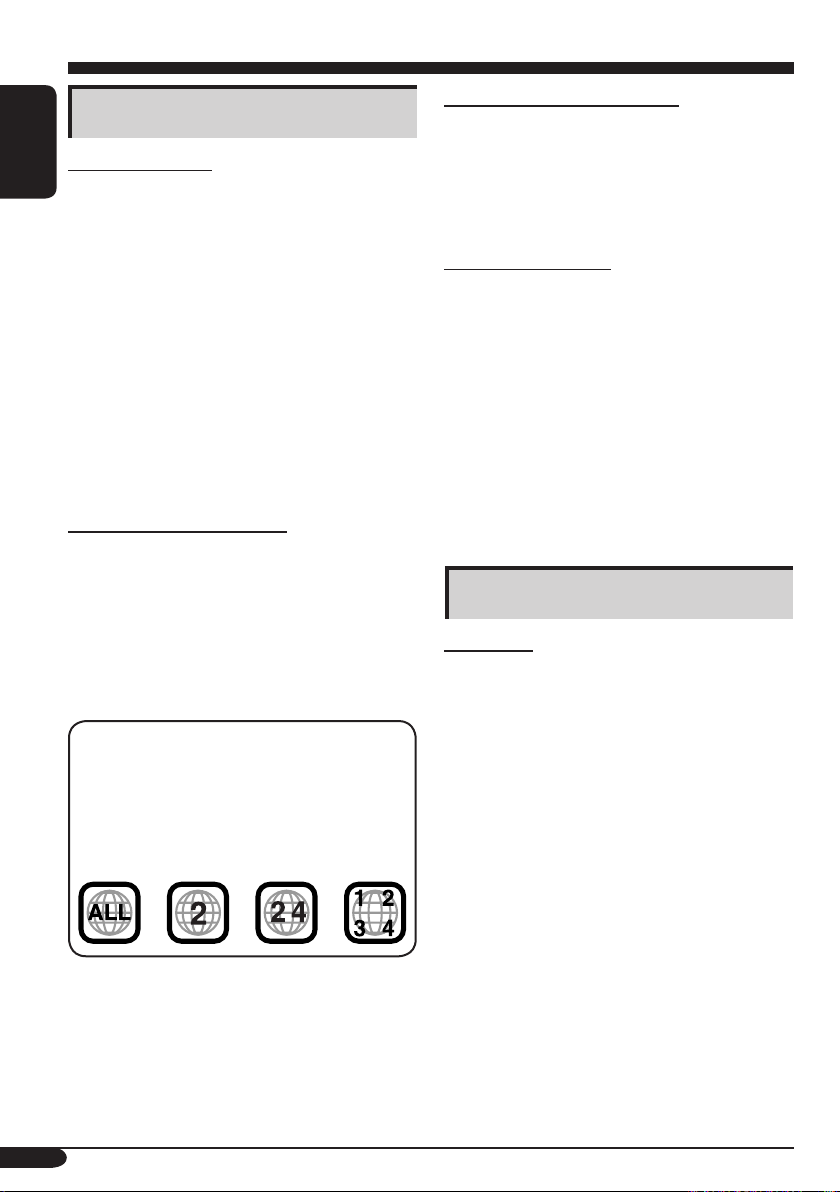
Note on Region Code:
DVD players and DVD Video discs have
their own Region Code numbers. This
receiver can only play back DVD discs
whose Region Code numbers include “2.”
Examples:
Caution for DualDisc playback
• The Non-DVD side of a “DualDisc” does
not comply with the “Compact Disc Digital
Audio” standard. Therefore, the use of NonDVD side of a DualDisc on this product may
not be recommended.
Digital audio formats
The System can play back the following digital
audio formats—Linear PCM/Dolby Digital*
2
DTS*
/MPEG Audio.
1
*
Manufactured under license from Dolby
Laboratories. “Dolby” and the doubleD symbol are trademarks of Dolby
Laboratories.
2
*
“DTS” and “DTS 2.0 + Digital Out” are
registered trademarks of Digital Theater
Systems, Inc.
1
/
Hard Disc Drive (HDD)
Installation
This unit has a built-in HDD, which is a device
to read minute magnetic changes. The inside of
the device is precision components, requiring
you to notice the following when installing the
unit:
Install the unit at a place where the following
conditions are satisfied:
• Level, dry and neither too hot nor too cold—
between 5°C and 35°C.
• At an altitude between –300 m below sea
level and +3000 m above sea level.
• With adequate ventilation to prevent internal
heat buildup in the unit.
“DVD Logo” is a trademark of DVD Format/
Logo Licensing Corporation registered in the
US, Japan and other countries.
6
Page 7
Before using HDD
While the unit is turned on, the hard disk
is constantly rotating at a high speed. This
requires you to notice the following:
• DO NOT impart vibration or shock.
• DO NOT allow anything having strong
magnetism or emitting strong electromagnetic
waves (cellular phones, etc.) near the unit.
• DO NOT disconnect the power cords from the
car battery when the unit is turned on. Failure
in following the above cautions may damage
the HDD (the stored data will be lost and be
never restored).
Display indications
This unit displays a variety of the screens.
• More detailed information is described in
each related sections.
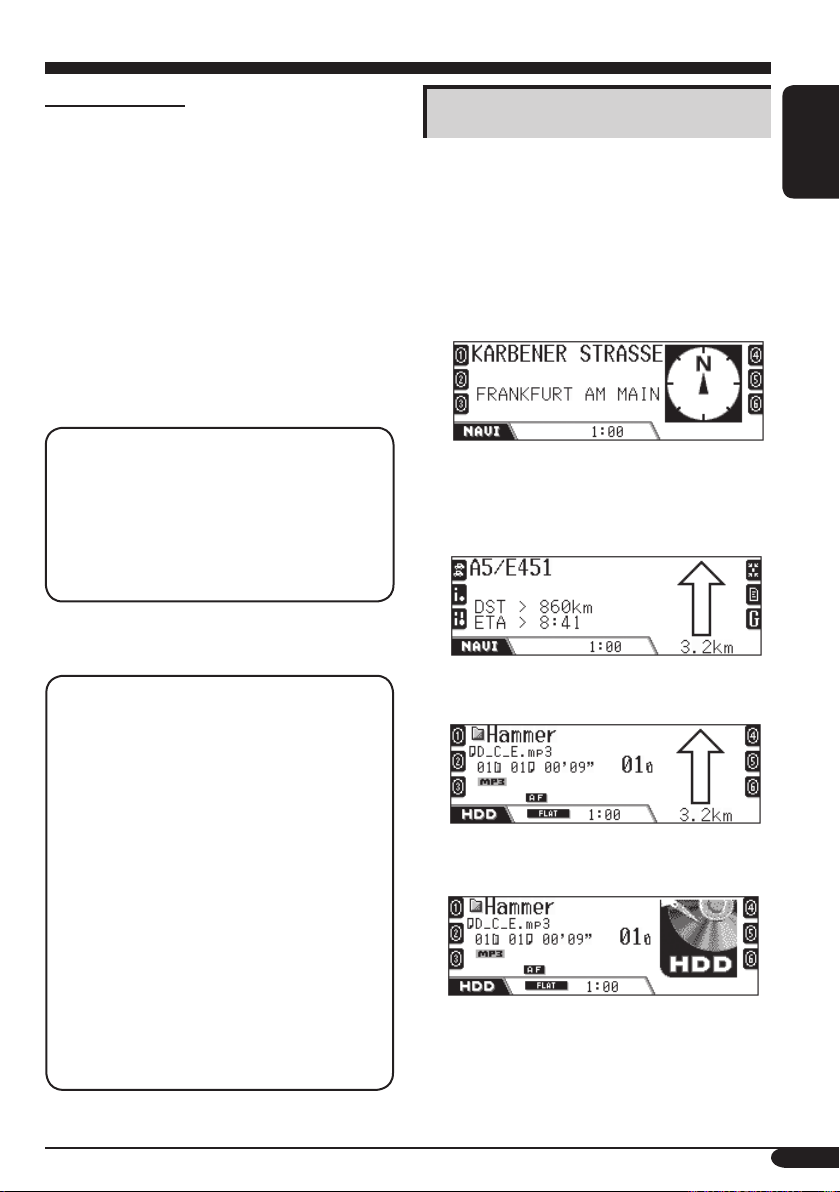
Navigation displays:
• Route guidance has not been started, but
the unit is in navigation mode:
The display shows the current position.
ENGLISH
Serial Copy Management System (SCMS)
This system uses SCMS which allows only
first-generation digital copies to be made of
premastered software such as regular CDs. If
you try to record from a duplicated CD-R/
RW, “SCMS Cannot Copy” may appear on
the display then recording will be cancelled.
IMPORTANT: The manufacturer assumes
no liability whatsoever for any damage
resulting from missed opportunity or
accidental erasure due to malfunctioning of
the unit or due to trouble in the unit, such as
fatal collapse of the hard disk drive itself.
• Since the HDD has its lifetime, it is
strongly recommended to make a copy
of your important recordings, and keep it
using other recording devices.
It should be noted that it may be unlawful
to re-record pre-recorded tapes, records, or
discs without the consent of the owner of
copyright in the sound or video recording,
broadcast or cable programme and in any
literary, dramatic, musical, or artistic work
embodied therein.
Compass is always shown even if
“Compass” is set to “Off” (see page 88).
• Route guidance has been started:
The display shows the navigation guidance.
While the guidance is performed, you can also
enjoy playing any source (ex. HDD).
Source playback displays:
Compass is shown if “Compass” is set to
“On.”
7
Page 8
Remote controller — RM-RK230
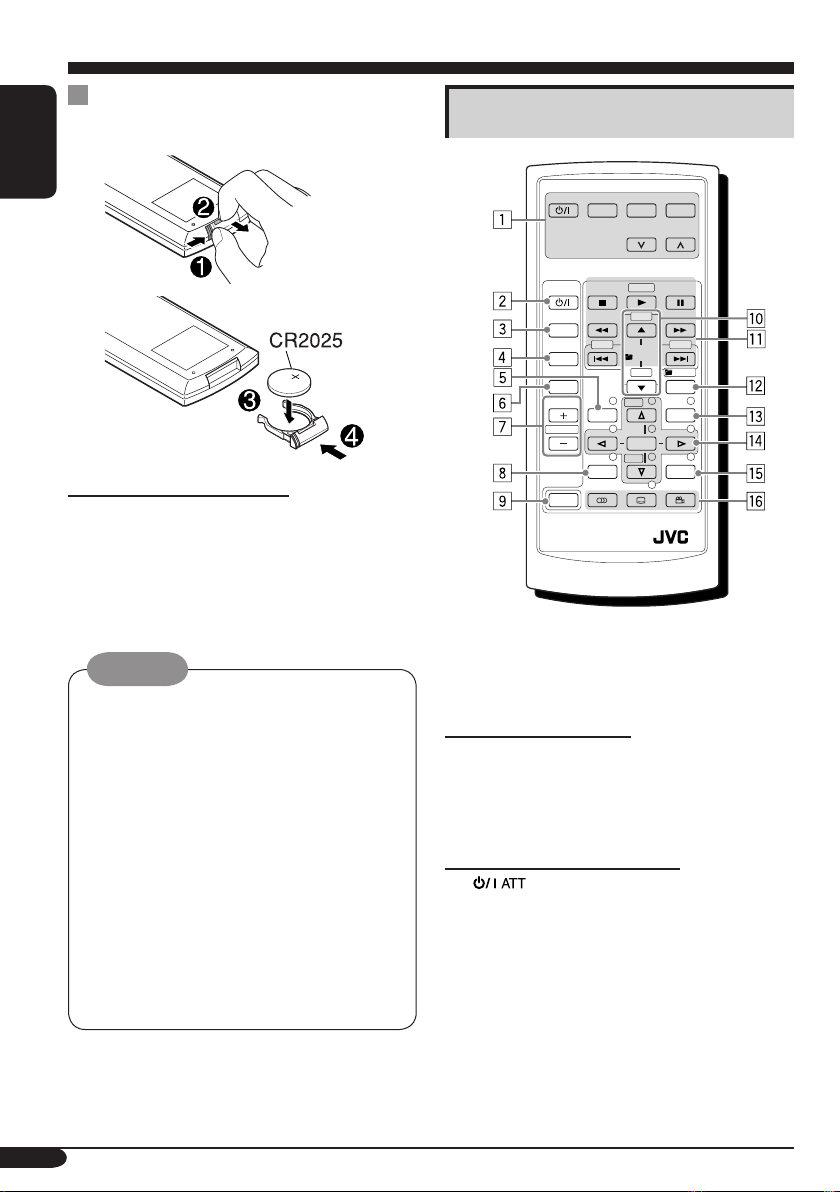
Installing the lithium coin battery
(CR2025)
ENGLISH
Using the remote controller:
• Aim the remote controller directly at the
remote sensor on the unit (see page 10). Make
sure there is no obstacle in between.
• Do not expose the remote sensor to strong
light (direct sunlight or artificial lighting).
Warning:
• Do not install any battery other than
CR2025 or its equivalent; otherwise, it
may explode.
• Store the battery in a place where children
cannot reach to avoid risk of accident.
• To prevent the battery from over-heating,
cracking, or starting a fire:
– Do not recharge, short, disassemble, or
heat the battery or dispose of it in a fire.
– Do not leave the battery with other
metallic materials.
– Do not poke the battery with tweezers or
similar tools.
– Wrap the battery with tape and insulate
when throwing away or saving it.
Main elements and features
MONITOR CONTROL
MODE MENU
ASPECT
DVD / RECEIVER CONTROL
ATT
SOURCE
BAND
DUAL
VOL
2nd VOL
SHIFT
RM-RK230
The remote controller can operate the playback
sources any time, even when you are using the
Navigation System.
MONITOR CONTROL
1 Monitor control buttons
• Controllable only if your monitor is one
of the JVC monitors—KV-MR9010 or
KV-MH6510.
DVD/RECEIVER CONTROL
2
(standby/on attenuator) button
• Turns on and off the power and also
attenuates the sound.
3 SOURCE button
• Selects the source.
4 BAND button
• Selects the FM/AM/DAB bands.
5 TOP M (menu) button*
• Displays the DVD disc menu.
ZOOM
+10
–100
PRESET
/ TITLE
–10
123
+
DISC
MENUTOP M
456
ENTER
7809
–
DISC
SETUP
RETURN
1
+100
/ TITLE
OSD
8
Page 9
6 DUAL button
• Does not function for this model.
7 VOL + / – buttons
• Adjusts the volume level.
• Does not function as 2nd VOL +/–
buttons for this model.
8 SETUP button*
1
9 SHIFT button
p For disc operations:
•
/TITLE 5 / ∞ — Selects the titles (for
DVD) or folders (for MP3/WMA, HDD,
and SD). *
For tuner operations:
2
• PRESET 5 / ∞ — Changes the preset
stations.
q For disc operations:
• 4 / ¢ (reverse skip/forward skip)*
3
• 1 / ¡ (reverse search/forward
search): Not used for CD-CH, HDD, and
SD.
• 7 (stop), 3 (play), 8 (pause): Not used
for CD-CH, HDD, and SD.
3 (play) also functions as ZOOM button
when pressed with SHIFT button.
For tuner operations:
• 4 / ¢ — Searches for stations*
3
w OSD button
• Displays the on-screen bar.
• Also functions as the
/TITLE button
when pressed with SHIFT button.
– You can directly select folders (for
MP3/WMA) or titles (for DVD) using
the number buttons (see the right
column).
e MENU button*
1
• Displays the DVD disc menu.
r Menu operation buttons*
1
• Cursor (% , fi , @ , #), and ENTER
• % / fi : Also functions as DISC+ / –
buttons when the source is “CD-CH.”
t RETURN button*
1
y DVD/VCD special function buttons
•
(audio), (subtitle), (angle)
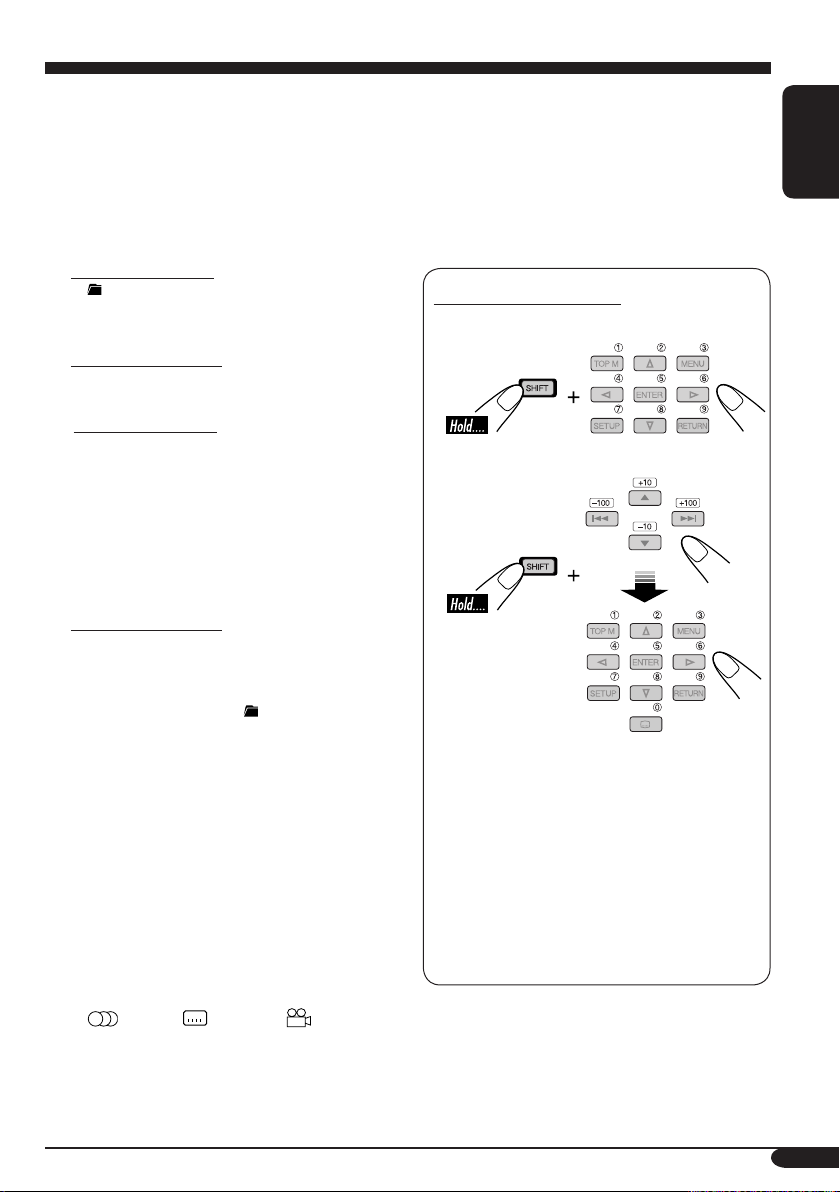
*1 These buttons function as the number
buttons when pressed with SHIFT button.
2
*
These buttons function as +10/–10 buttons
when pressed with SHIFT button.
3
*
These buttons function as the +100/–100
buttons when pressed with SHIFT button.
How to select a number
• To select a number from 1 – 9:
• To select a number greater than 9:
Ex:
To select 10, press +10, then 0.
To select 65, press +10 six times, then 5.
To select 104, press +100, 0 , then 4.
To select 236, press +100 twice, +10 three
times, then 6.
• –100 and –10 buttons are used to correct a
misentry. They reduce the corresponding
digit number before entering the last digit
number.
ENGLISH
9
Page 10
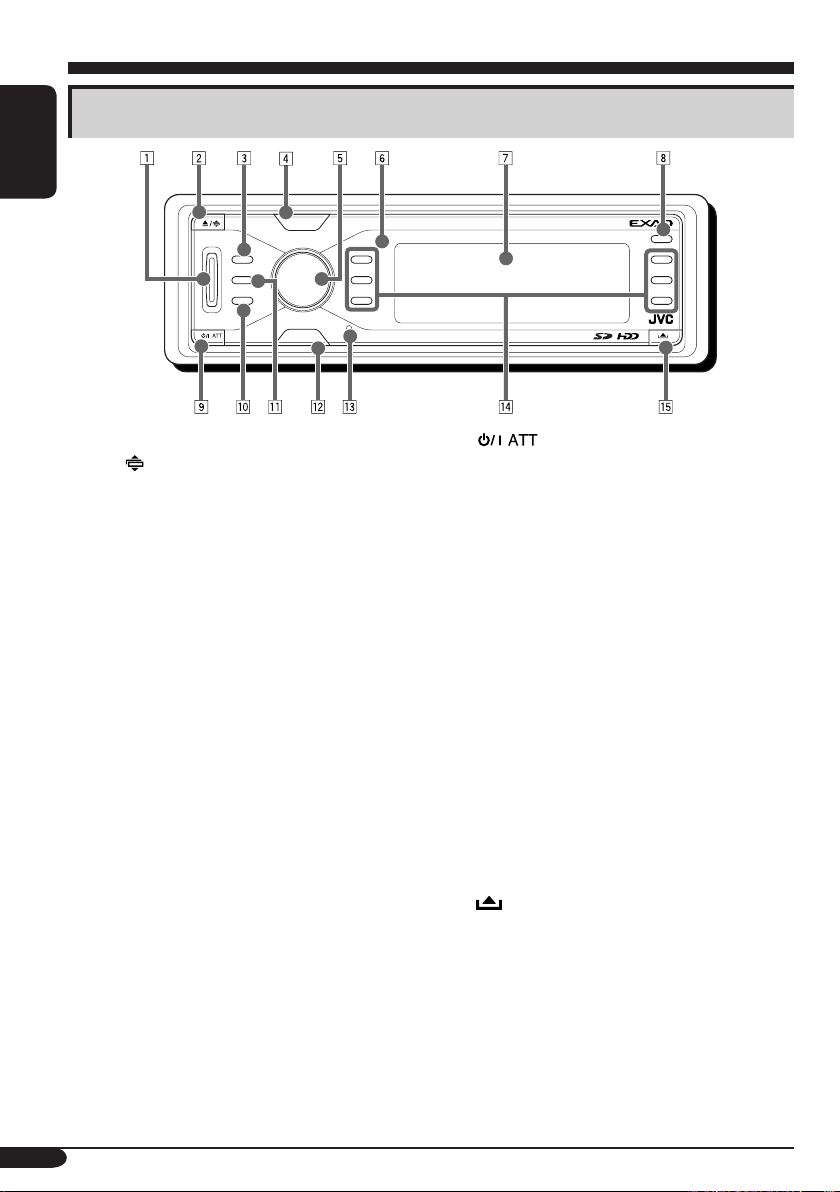
Control panel — KD-NX901
Parts identification
ENGLISH
SOURCE
VOL
+
SEL
REC
MODE
BACK
DISP
–
OK
1
2
3
NAVI / AV
1 VOL (volume) +/– button
2 0 /
(eject/angle) button
• Ejects the disc if pressed.
• Changes the control panel angle if pressed
repeatedly after held once.
3 SEL (select) button
For Navigation System:
• Displays the DESTINATION menu if
pressed.
• Displays the Setup Menu if pressed and
held.
For playback sources:
• Displays the “Select Preset EQ” screen
and sound setting screens if pressed
repeatedly.
• Displays the PSM menu if press and held.
4 SOURCE button
5 Control dial/OK button
• Control dial: Selects the items.
• OK button: Confirms the selection.
6 Remote sensor
7 Display window
8 T/P (traffic programme/programme
type) button
• Turns on/off TA Standby Reception if
pressed.
• Turns on/off PTY Standby Reception if
pressed and held.
• Displays the traffic information while in
the navigation mode.
KD-NX901
T/P
4
5
6
9 (standby/on attenuator) button
• Turns on the power when it is off.
• Attenuates the sound when the power is
on.
• Turns off the power if pressed and held.
p DISP (display)/BACK button
• DISP: Changes the display patterns.
• BACK: Goes back to the previous screen
or cancels the setting while operating the
menus.
q MODE/REC button
• MODE: Changes the functions of some
buttons.
• REC: Activates the recording mode if
pressed and held while playing a CD.
w NAVI/AV button
• Switches the display information between
navigation screen and source operation
screen.
e Reset button
r Number buttons
t
(control panel release) button
10
Page 11
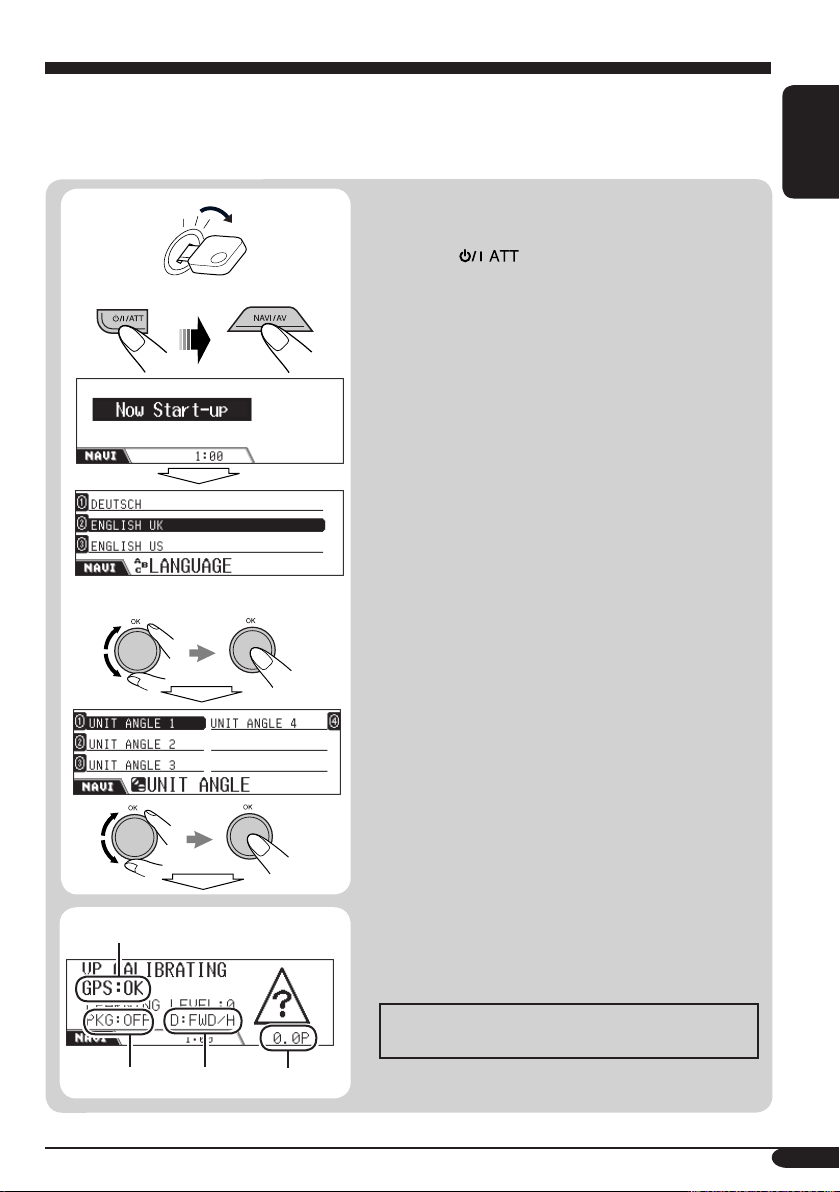
Preparations
Before using the Navigation System first time, it is required to calibrate the Navigation System.
• After deleting the run time (DELETE RUNTIME: see page 21) or changing the installation angle
(UNIT ANGLE: see page 21), calibration is also required.
4
1
2
3
A
1 Turn on the ignition switch (either to
ENGLISH
ON or to ACC).
2 Press to turn on the power, then
press NAVI/AV.
3 Select your preferred language and set
your measured angle.
• When shipped from the factory, navigation
language is set to UK English.
• See “Measuring the installation angle” on
the Installation/Connection Manual (and also
pages 20 and 21).
4 Confirm the following connections on
the screen.
GPS antenna A:
• GPS:OK \ Connection is OK.
• GPS:NG \ Antenna is disconnected or short-
circuited.
Parking brake lead B:
Step on the brake pedal, then disengage and
engage the parking brake repeatedly.
• If “PKG:OFF” appears when disengaged
and “PKG:ON” appears when engaged,
connection is OK.
Reversing signal lead C:
Engage the parking brake, step on the brake
pedal, then shift the gearchange lever.
• If “D:FWD/H” and “D:FWD/L” alternate
on the screen, connection is OK. (Only after
calibration is started, “REV” appears when
the gearchange lever is set to reverse.)
Speed signal lead D:
Drive the car for a while.
• If the number increases as you speed up the
car, connection is OK.
B
C
If connection is not good, check the connection.
D
To be continued....
11
Page 12
5
ENGLISH
E
F
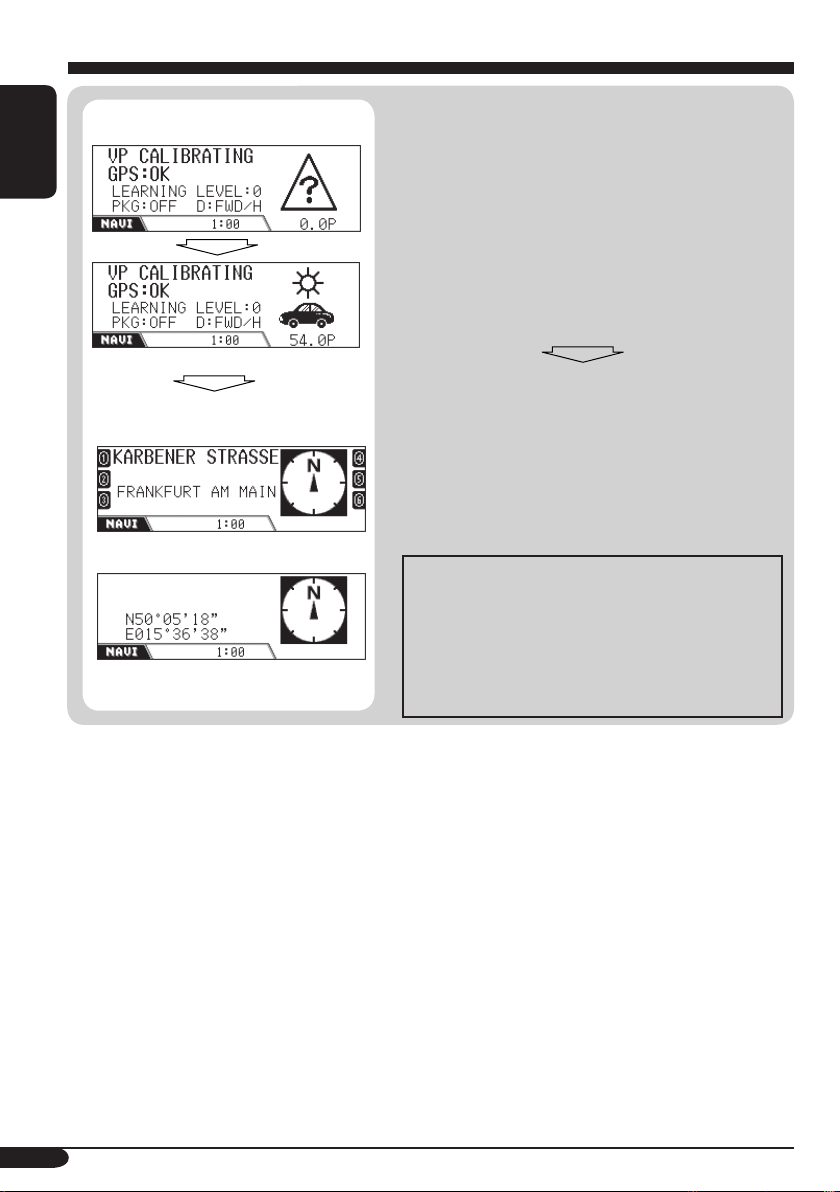
5 After confirming all the above
connections, drive the car to start
calibration.
• A certain speed is required for calibration.
• Calibration time differs among the cars.
• During calibrating, you can use the System as
the receiver (you can listen to the music, etc.)
• If you turn off the ignition switch, calibration
is temporarily stopped. When it is turned on,
calibration will restart.
Once calibration is finished (when the
learning level becomes “2”), the current
position information appears on the
display.
E: If you are on some road, the road name
appears.
F: If not, the latitude/longitude appear.
Navigation (functions such as guidance) cannot
be used until calibration is complete.
• “Function not available while driving.” appears
if you try to enter the destination without the
parking brake engaged (or without the parking
brake lead connected). You cannot enter the
destination.
12
Page 13

Getting started
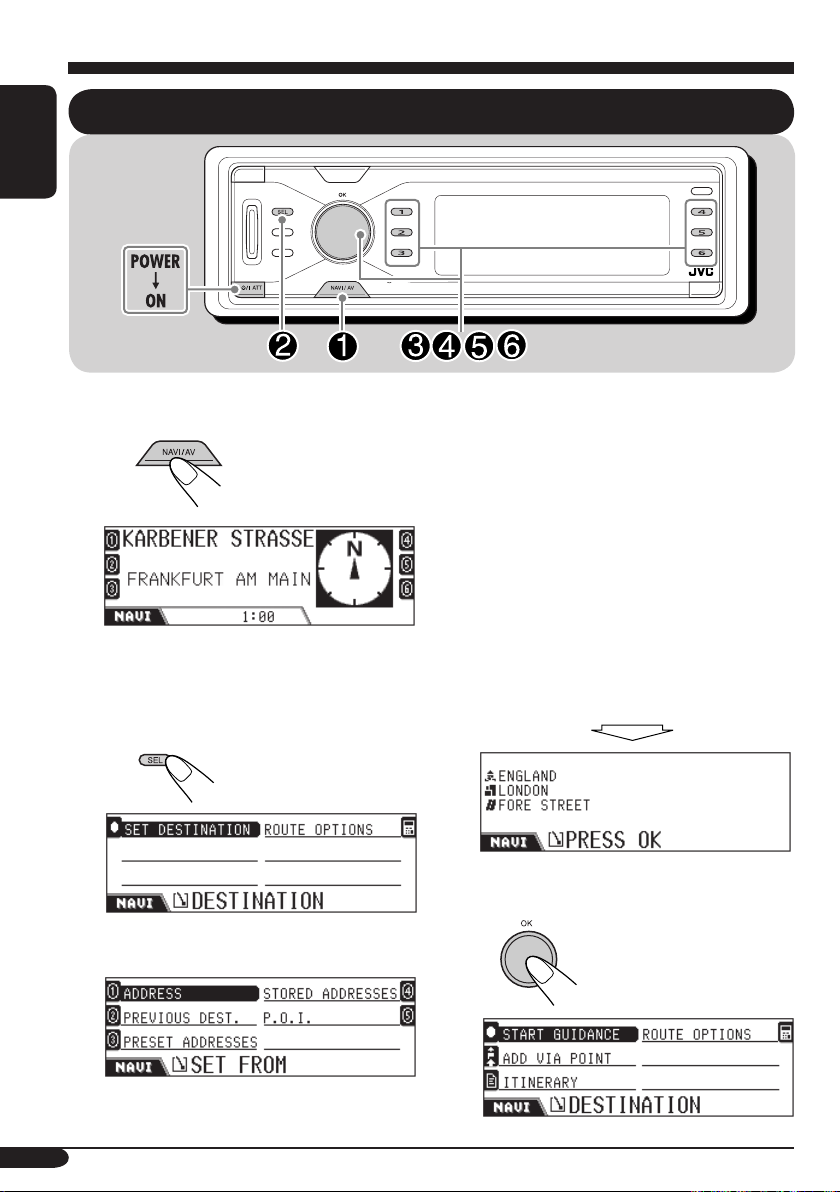
Basic operations
ENGLISH
To use the Navigation System
~
Ÿ
Each time you press
the button, navigation
and source screens
alternate.
! Operate navigation.
See page 22.
1 Set the destination.
2 Start guidance.
To adjust the guidance volume level, see page
20.
While using the Navigation System, you
can always confirm all available traffic
information on the display.
To enjoy source playback
~
Ÿ
You cannot select some sources if they
are not ready.
!
⁄ Operate the source as you like
(for operations, see the respective
pages).
@ Adjust the sound as you want.
(See page 84.)
To drop the volume in a moment (ATT)
To restore the sound,
press it again.
• For details, see page 41.
To turn off the power
13
Page 14
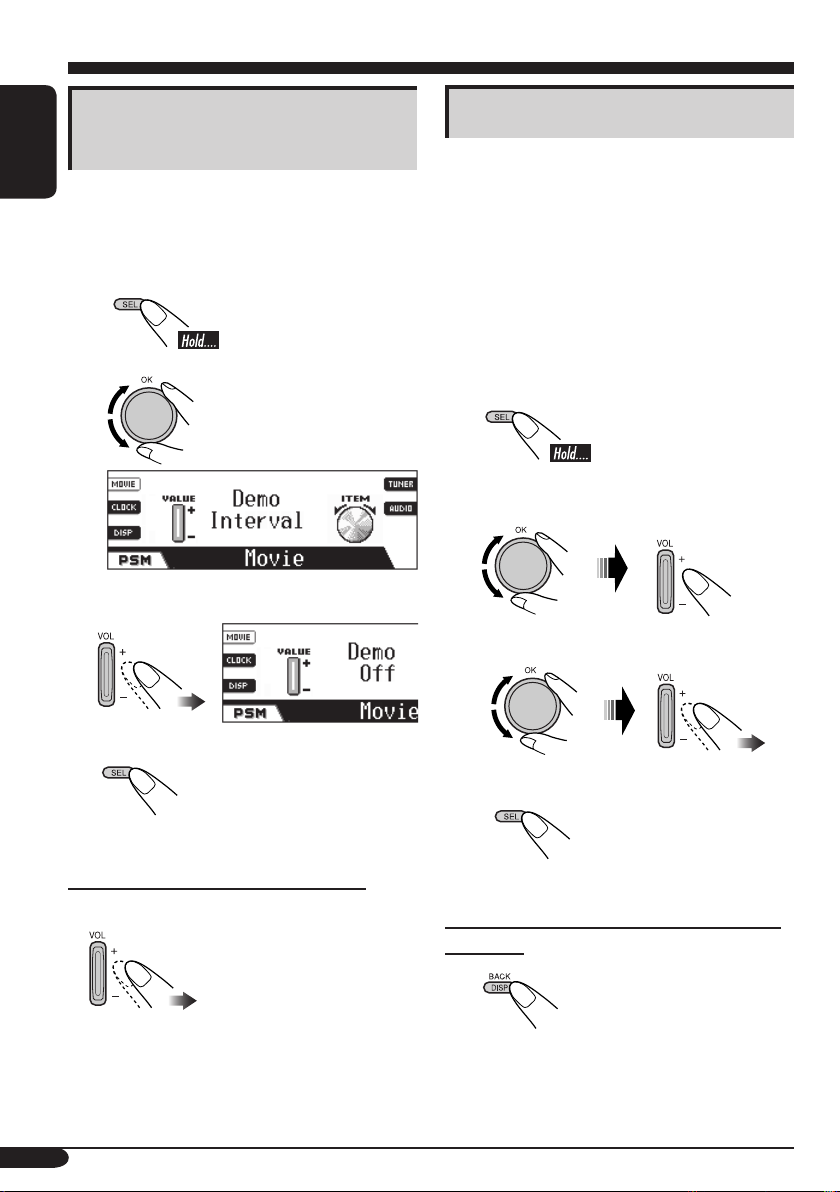
Cancelling the display
demonstration
ENGLISH
If no operations are done for about one minute,
display demonstration starts (except when the
Navigation System is in use).
[Initial: Interval]—see page 87.
1
2
3 Select “Off.”
Setting the clock
The built-in clock is automatically adjusted by
receiving the GPS signals. To obtain correct
time information, it is required to set the local
time.
• When the GPS signals are received first
time after calibration (see page 11), the
clock is automatically set to the Coordinated
Universal Time (UTC).
Adjust the clock to your local time only after
it has been set to UTC.
1
2 Select “24H/12H,” then select
“24Hours” or “12Hours.”
3 Select “Time,” then set the local time.
4 Finish the procedure.
To activate the display demonstration
In step 3 above...
• Select “All Time” or
“Interval.”
14
4 Finish the procedure.
To check the local time when the power is
turned off
Page 15
Navigation operations
What is navigation
With the KD-NX901, the location of the
car is determined via Global Positioning
System (GPS), the distance from the
desired destination and the required routes
are determined using a digital road map,
a navigation computer and sensors. A
speedometer signal and a reverse signal are
additionally used to calculate the estimated
time of arrival or the remaining travel time to
the destination.
For safety, navigation is predominantly in
spoken form (in various languages, in female
voice or in male voice) supported by a
direction indicator on the display.
Navigation guidance is performed, based on the database, therefore, it may not be applicable to
the current situation because of changes in traffic conditions (e.g. changes in tollroads, principal
roads, one-way traffic, or other traffic regulations). In this case, observe the current traffic signs
or regulations.
Safety instructions
• Traffic signs should be observed
carefully while driving using the
Navigation System. Navigation System
is only an aid. Driver must always decide
whether or not to heed the information
provided. JVC does not accept liability
for erroneous data provided by the
Navigation System.
• Traffic guidance is restricted to
passenger vehicles only. Special driving
recommendations and regulations for
other vehicles (e.g. commercial vehicles)
are not included.
• The destination cannot be entered
while driving the car.
ENGLISH
Terms of licence
You are granted a non-exclusive licence to
use the database for your personal purposes.
The present licence does not authorise the
granting of sublicenses.
Use of the data is only permitted in this
specific JVC system. It is forbidden to
extract or make further use of significant
parts of the database content, or to duplicate,
modify, adapt, translate, analyse, decompile
or reverse-engineer any part thereof.
IMPORTANT for dynamic guidance
Once “TMC” (see page 37) is set to “✓
(On),” you can use dynamic route guidance.
The traffic announcements sent by a TMC
radio station is received and analysed.
Navigation System can inform you of where
congestion exists, and how you can detour it.
For the users in Austria:
The location and event code were made
available by ASFINAG and BMVIT.
15
Page 16
ENGLISH
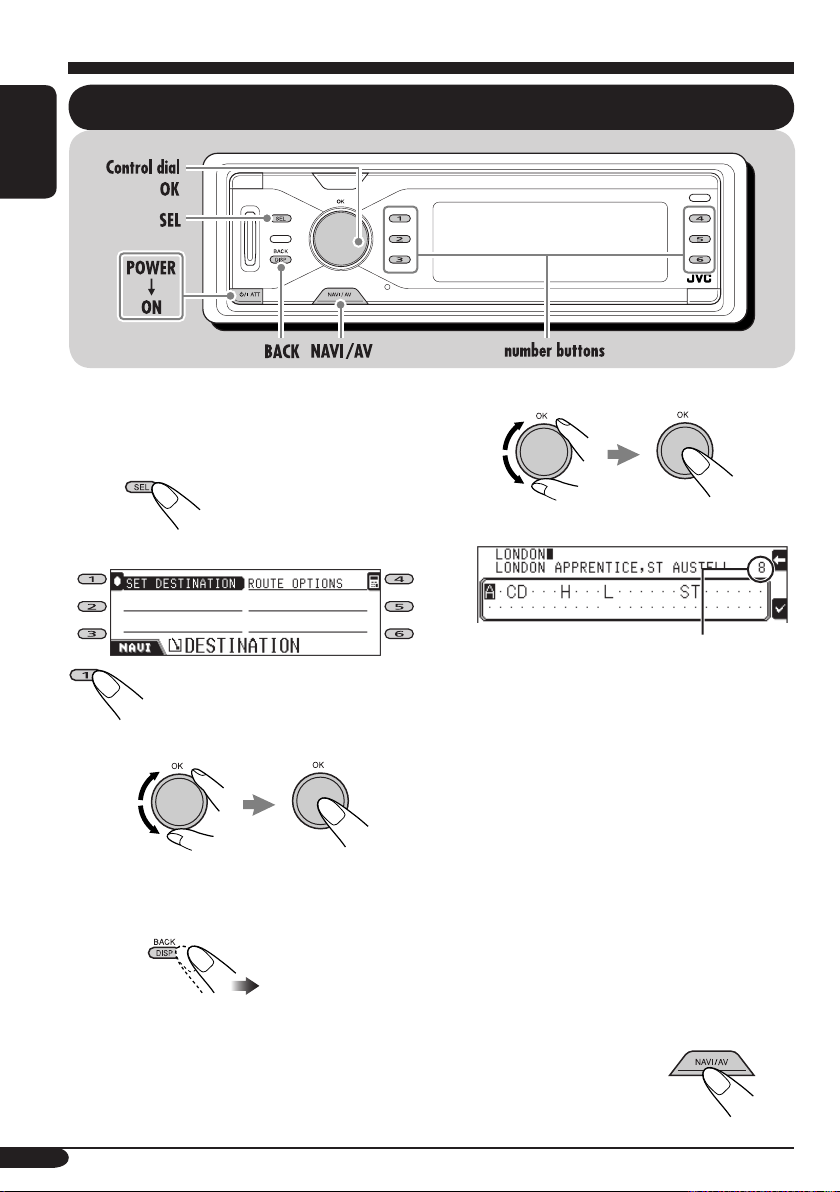
Basic navigation operations
The following buttons are used for navigation
operations.
To display the DESTINATION menu:
To select an item:
Select the number next to the item
shown on the display.
• You can also select an item by...
Select (reverse) the item, then confirm.
To return to the previous screens
To enter a character:
Select (reverse) a character, then enter.
Number of items matching to the current
entries
• Once you have entered a letter, the System
can show only the letters to be entered as the
next letter.
• The System will show a matching name
closest to the current entries. If the correct
location name is shown, press 6 to finish
entry.
To show the list of the matching names, press
and hold OK, then press the number buttons
to select (or rotate the dial to show other
lists).
• If no more letters can be entered, the System
automatically completes the entry.
• To erase the misentry, press 4.
16
To exit from navigation screens
Page 17
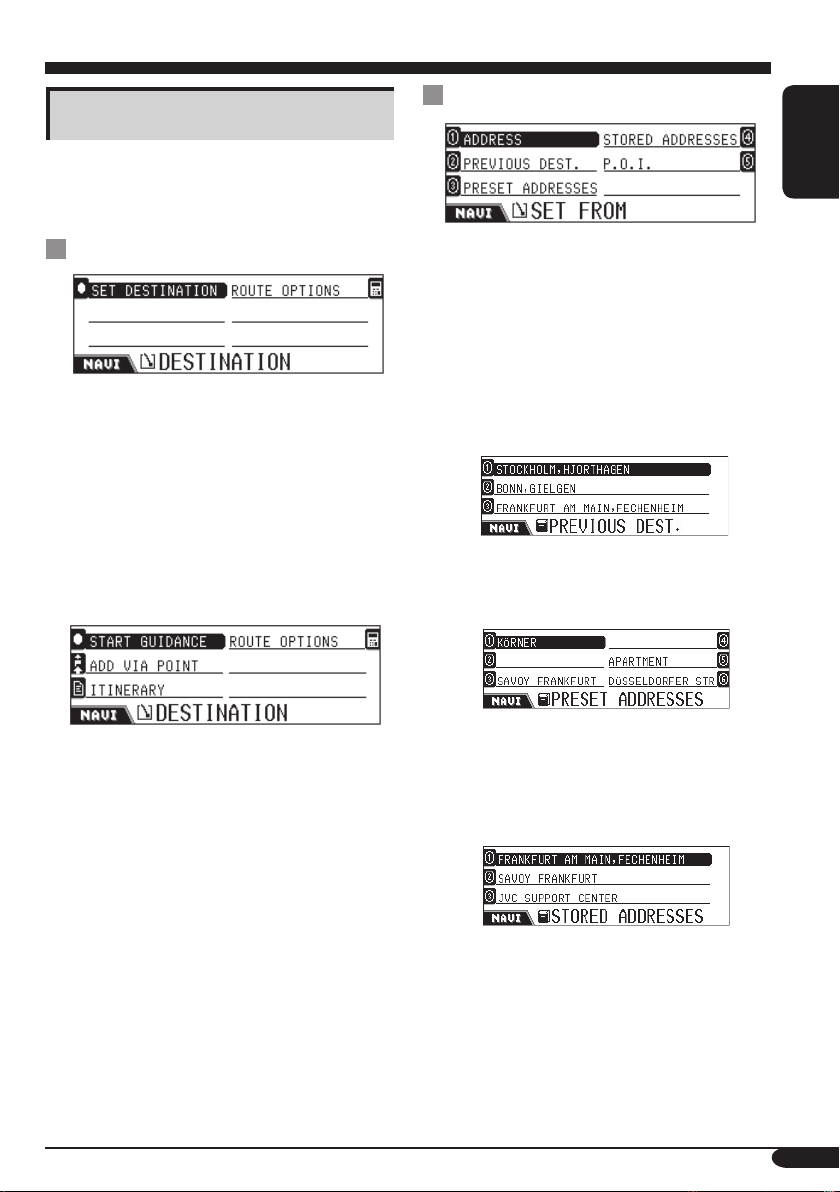
Navigation operation menus
Before operating navigation, be familiar with
the operation menus and setup menus.
SET FROM
ENGLISH
DESTINATION
This is the first menu displayed when pressing
SEL.
• SET DESTINATION: Display the SET
FROM menu—see page 22.
• ROUTE OPTIONS: Set your preferred
settings to reach your destination such
as availability of motorways, ferries, and
tollroads—see page 37.
This menu appears after you have set your
destination.
• START GUIDANCE: Start guidance to your
destination—see page 22.
• ADD VIA POINT: Set a place where you
want to stop by (Via Point) before reaching
your final destination—see page 36.
The SET FROM menu appears.
• ITINERARY: Confirm the destination where
you are going to be navigated through Via
Points.
• ROUTE OPTIONS: See page 37.
On this menu, you can select how to set your
destination.
• ADDRESS: Set your destination by entering
the address.
The SELECT menu appears—see page 23.
• PREVIOUS DEST.: Set your destination
by selecting from the last 50 guided
destinations—see page 28.
• PRESET ADDRESSES: Set your
destination by selecting from the six preset
addresses—see page 28.
To preset a new address (and name the
location)—see page 28.
• STORED ADDRESSES: Set your
destination by selecting from 50 stored
addresses—see page 28.
To store a new address (and name the
location), see page 32.
17
Page 18
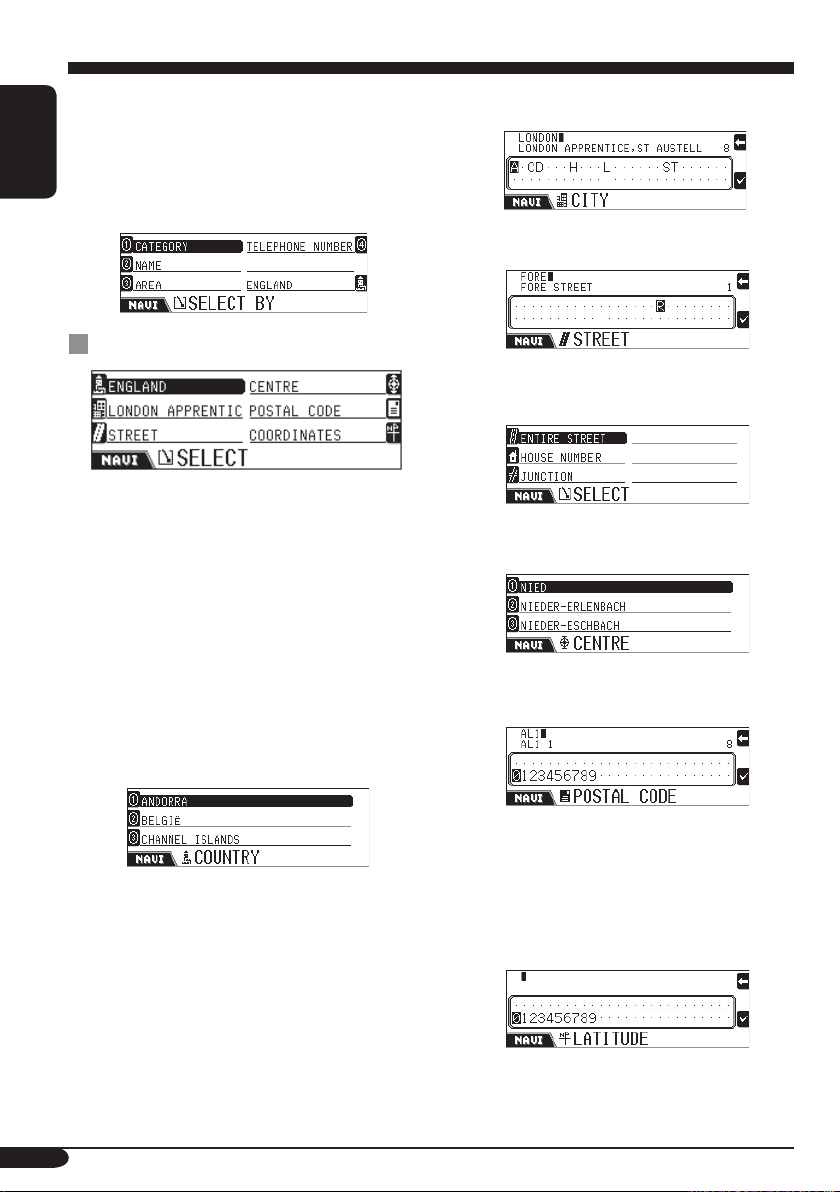
• P.O.I. : Set your destination (or Via Point) by
selecting from the P.O.I. (points of interests)
list. It includes petrol stations, restaurants,
hospitals, etc.—see page 28.
P.O.I. functions differently according to
ENGLISH
navigation status.
SELECT
On this menu, you can select your particular
destination by the country, city, street, town
centre, postal code, and its coordinates.
• When you use navigation for the first time,
only “COUNTRY” and “COORDINATES”
are displayed.
• Once you have set “COUNTRY/CITY,” the
previously set names are displayed.
• If the centres are listed for the currently
displayed city, “CENTRE” is displayed.
• COUNTRY: Select the country where your
destination exists—see page 24.
• CITY: Enter the city name of your
destination—see page 24.
• STREET: Enter the street name of your
destination—see page 25.
After you have entered the street name, you
can select one of the options.
• CENTRE: Enter the town centre for your
destination—see page 27.
• POSTAL CODE: Enter the postal code of
your destination—see page 26.
18
After you have entered the postal code, you
can enter the street name.
• COORDINATES: Enter the geographical
coordinates (LATITUDE/LONGITUDE) to
locate your destination—see page 31.
Page 19

Navigation setups
Before operating navigation, set up the
Navigation System to your preference.
~ While listening to any source...
Navigation screen
(current position)*
appears.
* If navigation is already started, the
guidance screen appears.
ENGLISH
! Change the setting.
1 Select the item to change.
• When selecting “VOICE GUIDANCE,”
the submenu appears. Select an item
again on submenu.
2 Select an option for the selected
item.
or
The numbers at the both sides are shown
only after the preset addresses are stored
(see page 33).
Ÿ Display SETTINGS menu.
• To exit from the VOICE GUIDANCE
submenu...
⁄ Repeat step ! to set up other
items.
@ Finish the setup.
19
Page 20
Navigation setting menus
ENGLISH
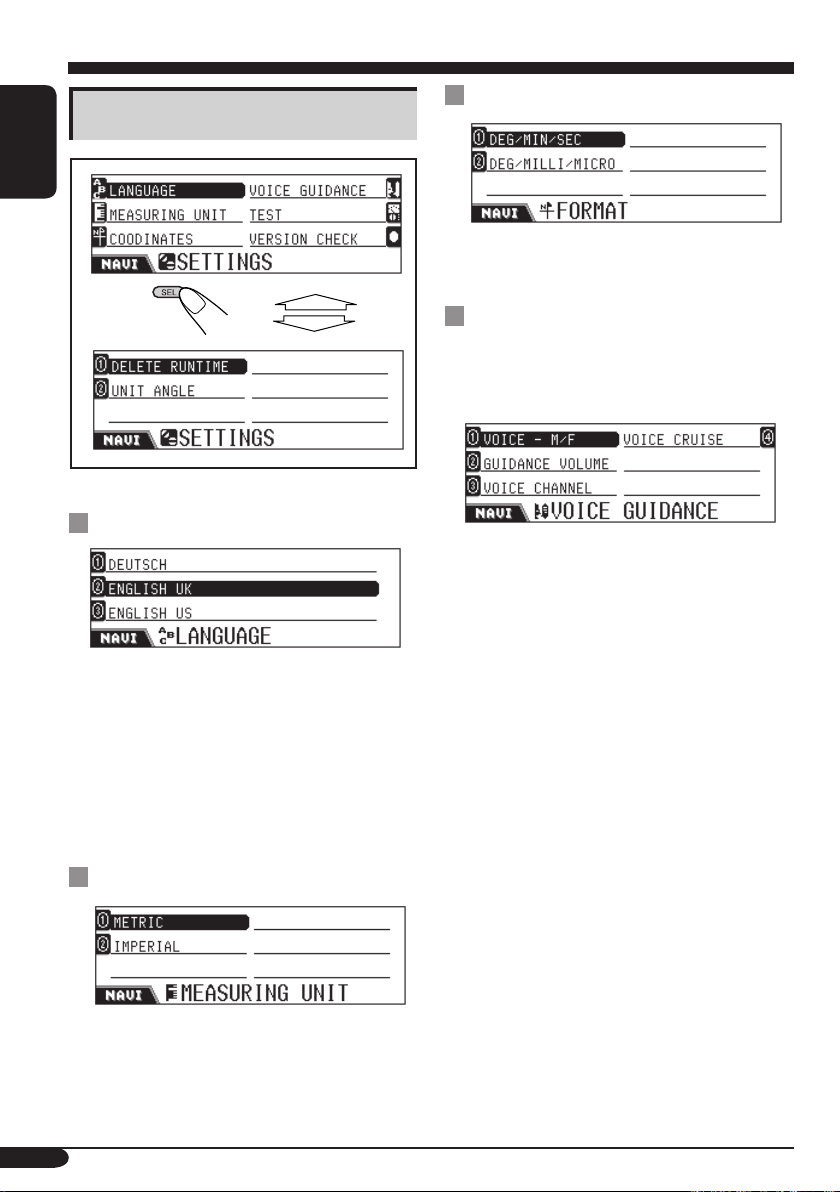
LANGUAGE
Set your preferred language:
DANSK, DEUTSCH, ENGLISH UK,
ENGLISH US, ESPAÑOL, FRANÇAIS,
ITALIANO, NEDERLANDS, SVENSKA
• Once you have selected the language, the
selected language is used for navigation—
spoken and displayed.
MEASURING UNIT
COORDINATES
Set your preferred unit:
DEG/MIN/SEC, DEG/MILLI/MICRO
VOICE GUIDANCE
Guidance voice comes out only through the
front speakers (and the front line out on the
rear).
You can set up the following on this sub menu:
• VOICE – M/F: Select MALE or FEMALE
voice for spoken navigation.
• GUIDANCE VOLUME: Adjust the guidance
volume level—0 to 8.
• VOICE CHANNEL: Select the guidance
output channel—Lch ONLY, Rch ONLY, or
Lch & Rch.
• VOICE CRUISE: —CRUISE: 0
(cancelled) to CRUISE: 10.
When this function is activated, the System
automatically increases the guidance volume
level as the car speeds up.
If you want to use the automatic volume
increase even at low speeds, set the level to
the lower numbers; on the other hand, if you
want to use it only at high speeds, set it to the
higher numbers.
Set your preferred measuring unit:
METRIC (km), IMPERIAL (yard)
20
Page 21
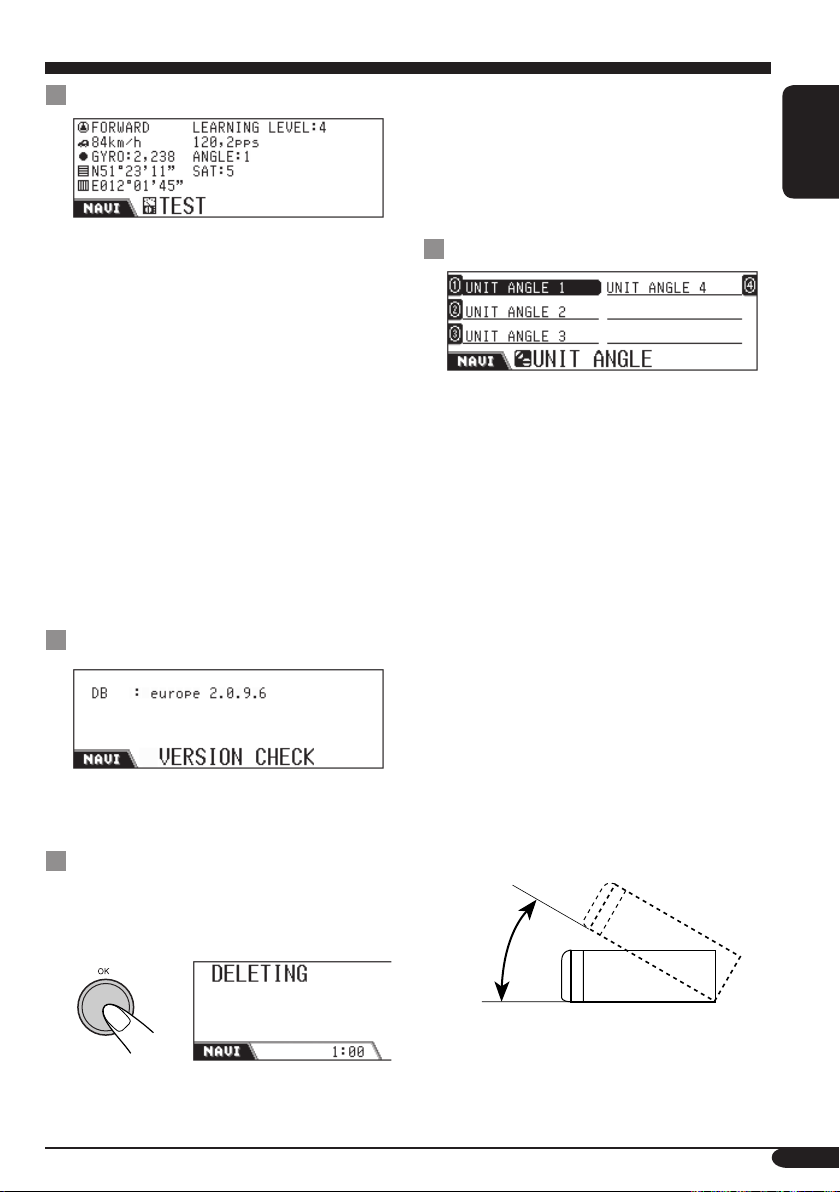
TEST
Once this is carried out, the learning data is
cleared. When you exit from the navigation
setting menu, the System will perform
calibration internally again.
• If the guidance has been activated, you cannot
use this function.
ENGLISH
You can confirm the following of the current
status:
• Direction/Learning level*
1
• Velocity/PPS (Pulse Per Second)
• Gyro sensor/Unit angle
• Latitude/Number of GPS satellite received*
• Longitude
1
*
Indicates the learning data level. The higher
the number is (the highest number is “4”),
the more accurate the learning data is.
(Learning data is the one the System
accumulates for accurate navigation—such
as velocity, Gyro output level with respect to
car’s movement.)
2
*
If “NG” is shown instead, the GPS antenna
is not connected, or short-circuited.
VERSION CHECK
You can confirm the software version of the
digital maps (DB).
DELETE RUNTIME
Reset the run time in the following cases:
• When you reinstall the unit to another car.
• When you replace or rotate the tires.
UNIT ANGLE
2
You can register the unit angle manually.
• Installation angle of the main unit is
automatically required to be preset when you
use the Navigation System for the first time
after installation or when you delete run time.
• If the guidance has been activated, you cannot
use this function.
Set one of the angles measured by the supplied
gauge:
• UNIT ANGLE 1: Select when the
installation angle is within the range of –5.0
to 17.0˚.
• UNIT ANGLE 2: Select when the
installation angle is within the range of 17.0
to 23.0˚
• UNIT ANGLE 3: Select when the
installation angle is within the range of 23.0
to 28.0˚.
• UNIT ANGLE 4: Select when the
installation angle is within the range of 28.0
to 32.0˚. *
30˚
* It is not recommended to install the main unit
at an angle of more than 30˚; otherwise, the
malfunction may result.
21
Page 22
ENGLISH
Basic navigation processes
~ While listening to any source...
Navigation screen
(current position)*
appears.
* If navigation is already started, the
guidance screen appears.
Ÿ Display the DESTINATION
menu.
! Select “SET DESTINATION.”
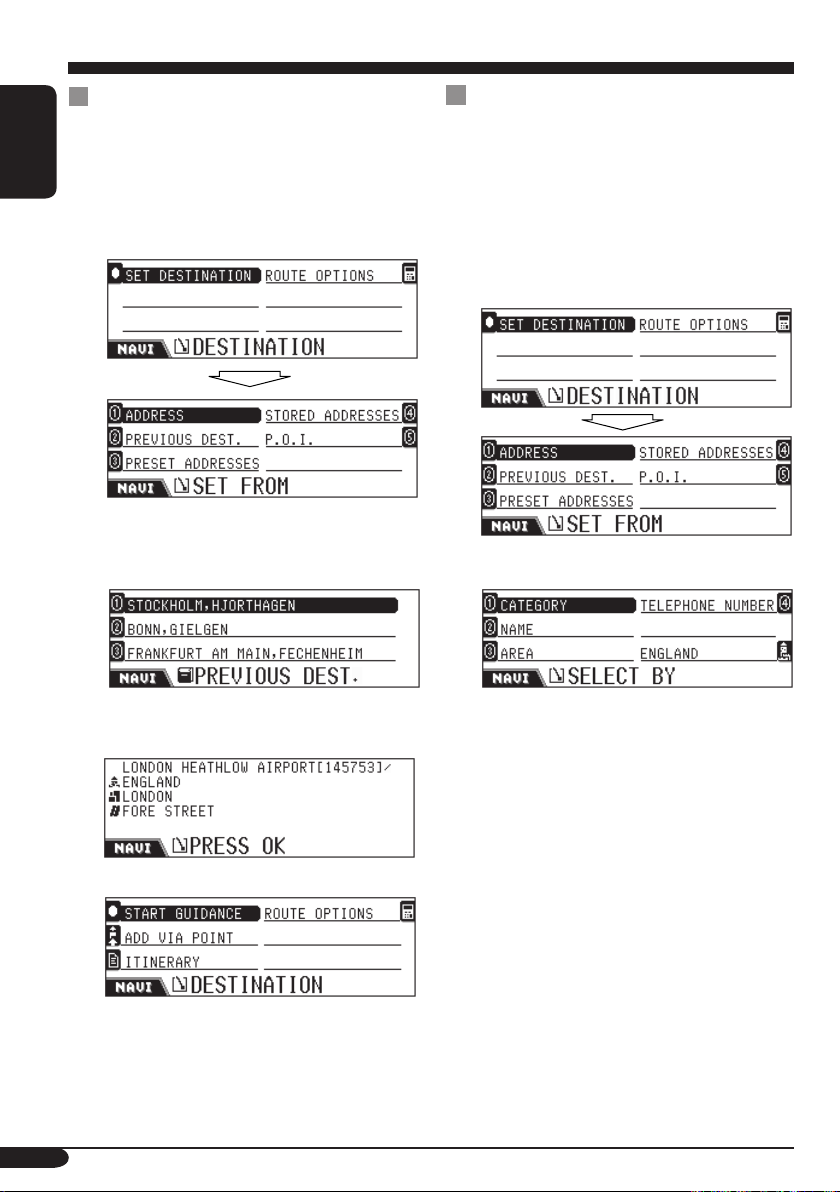
⁄ Select one of the options listed on
the display.
• ADDRESS: See page 23.
• PREVIOUS DEST.: See page 28.
• PRESET ADDRESSES: See page
28.
• STORED ADDRESSES: See page
28.
• P.O.I. : See page 28.
• You can also locate your destination by
entering the coordinates (see page 31)
and by selecting a stored route (see page
34).
@ Confirm the selected destination.
22
Page 23
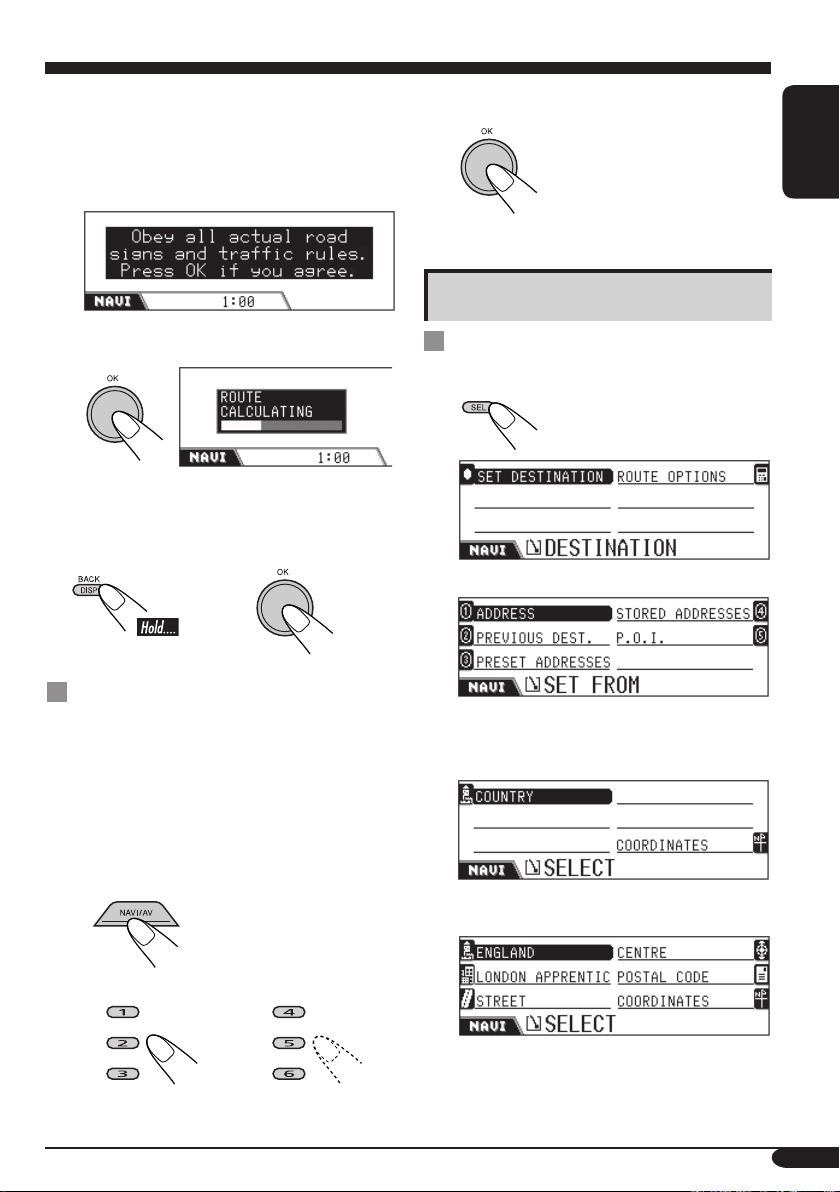
• Before (or after) starting guidance, you
can set “ADD VIA POINT” and “ROUTE
OPTIONS.”
3 Confirm the selected destination.
¤ Select “START GUIDANCE.”
# Confirm.
Route is calculated, then guidance starts.
To cancel the route guidance...
then
Starting navigation guidance to the
preset addresses
Once you have stored the PRESET
ADDRESSES (see page 33), starting guidance
to the addresses is very simple and easy.
• If the navigation is already started, you cannot
use this function.
Entering your destination
By address
1
Display the DESTINATION menu.
2 Select “SET DESTINATION.”
3 Select “ADDRESS.”
• When you use navigation for the first
time, the following screen appears.
ENGLISH
1 While listening to any source...
Navigation screen
(current position)
appears.
2 Select the preset address number.
• Once you have used navigation, your last
destination is shown.
To be continued...
23
Page 24
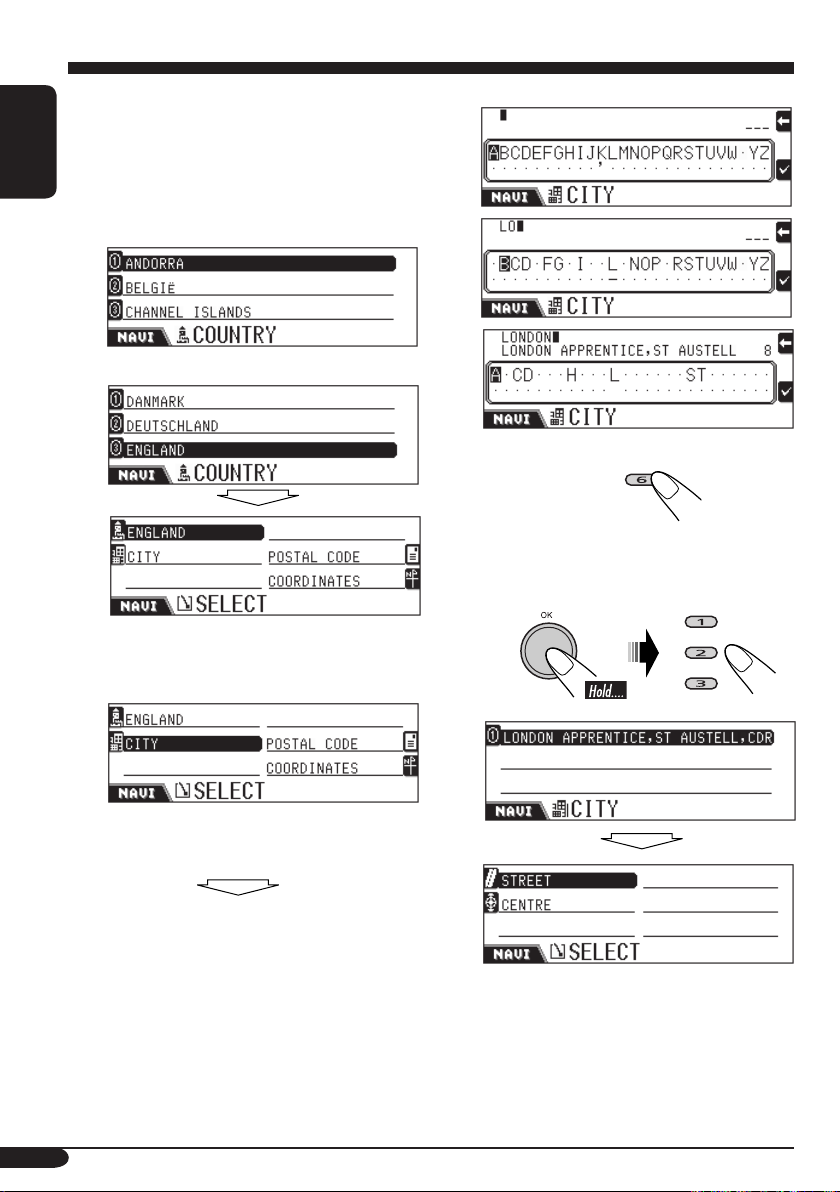
4 Locate your destination country.
• If the country name is shown in the
“COUNTRY” column, select the country
only when your destination is located in a
ENGLISH
different country.
1 Select “COUNTRY.”
2 Select your destination country.
5 Locate your destination city.
1 Select “CITY,” then enter the city
name.
Ex. Enter “LONDON.”
2 To select the city displayed on the
2nd line...
To display the list of the matching
names, then select the city on the
list...
24
• If the city name is shown in the “CITY”
column, select the city only when your
destination is located in a different city.
Page 25
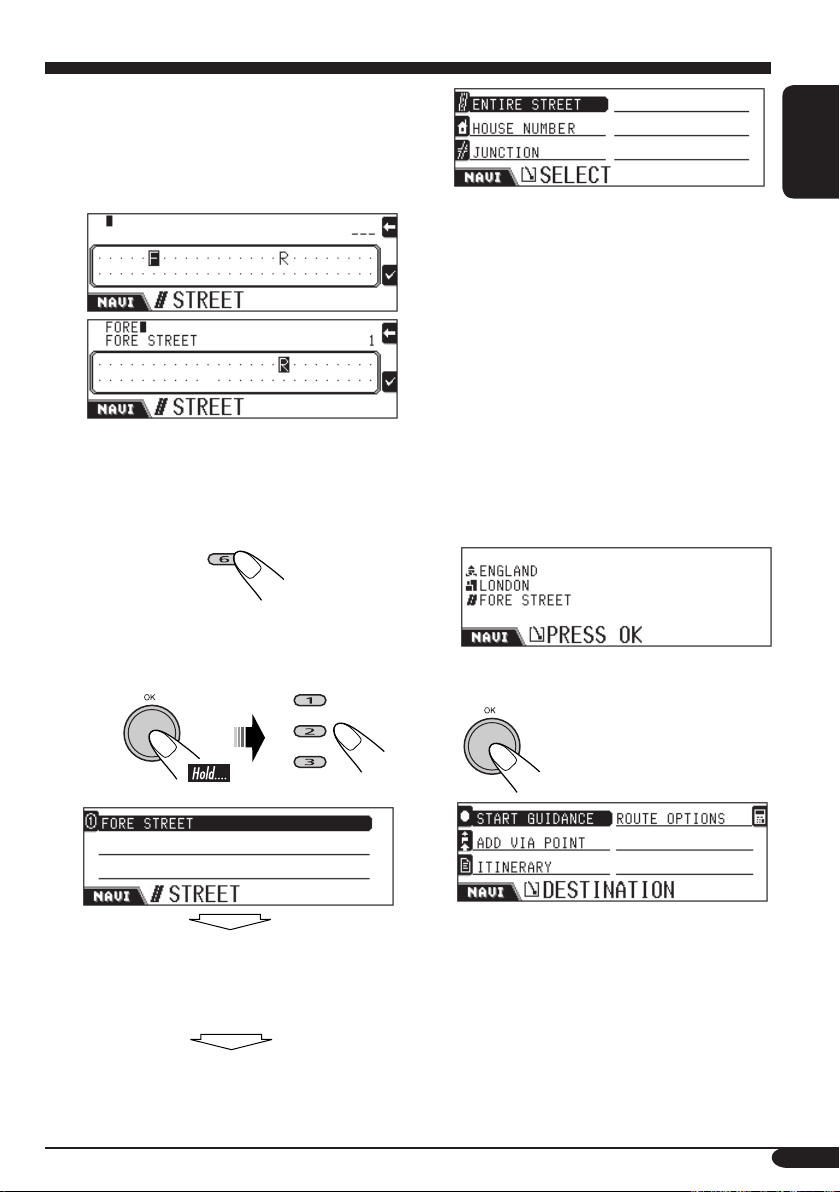
6 Locate your destination street in the
selected city.
1 Select “STREET,” then enter the
street name.
Ex. Enter “FORE.”
• To locate your destination by town
centres, select “CENTRE” (see page 27).
2 To select the street displayed on
the 2nd line...
To display the list of the matching
names, then select the street on
the list...
ENGLISH
7 Select either “ENTIRE STREET,”
“HOUSE NUMBER,” or
“JUNCTION.”
• ENTIRE STREET: Select if you do not
know the particular address.
• HOUSE NUMBER: Select if you know
the exact address, then enter the house
number. (If no data exist for the selected
street, this will not be displayed.)
• JUNCTION: Select to display the list
of the junctions, then select the junction
nearest to your destination. (If no data
exist for the selected street, this will not
be displayed.)
8 Confirm your destination.
If the same name is used for different
streets, STREET IN (area) entry menu
appears. Enter the area where your
destination street is located.
25
Page 26
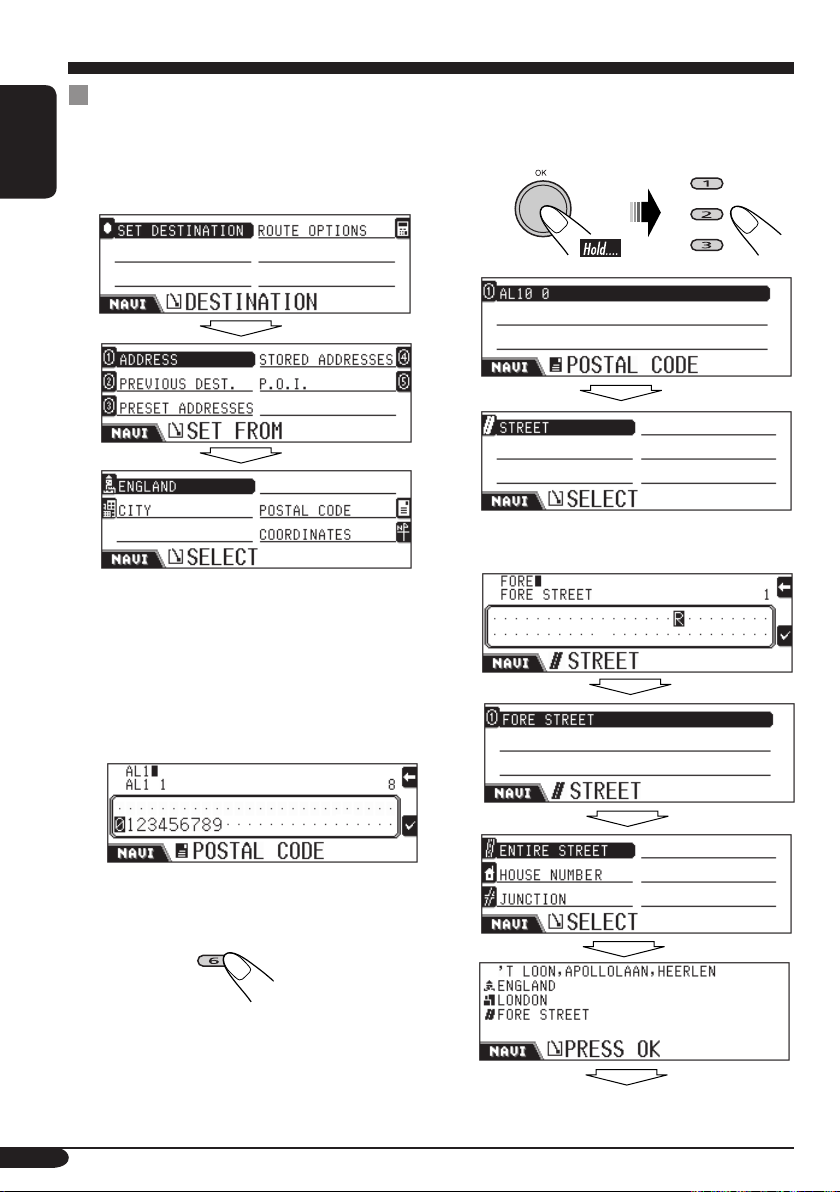
By postal code
You can locate your destination by postal code
after you have set the country.
ENGLISH
1 Display the SELECT menu.
• If the destination country has not been set,
set the country (see step 4 on page 24)
before going the next step.
To display the list of the
matching codes, then select the
code on the list...
3 Follow steps 6 and 7 on page 25.
2 Set the postal code.
1 Select “POSTAL CODE.”
2 Enter the postal code.
3 To select the postal code
displayed on the 2nd line...
26
Page 27
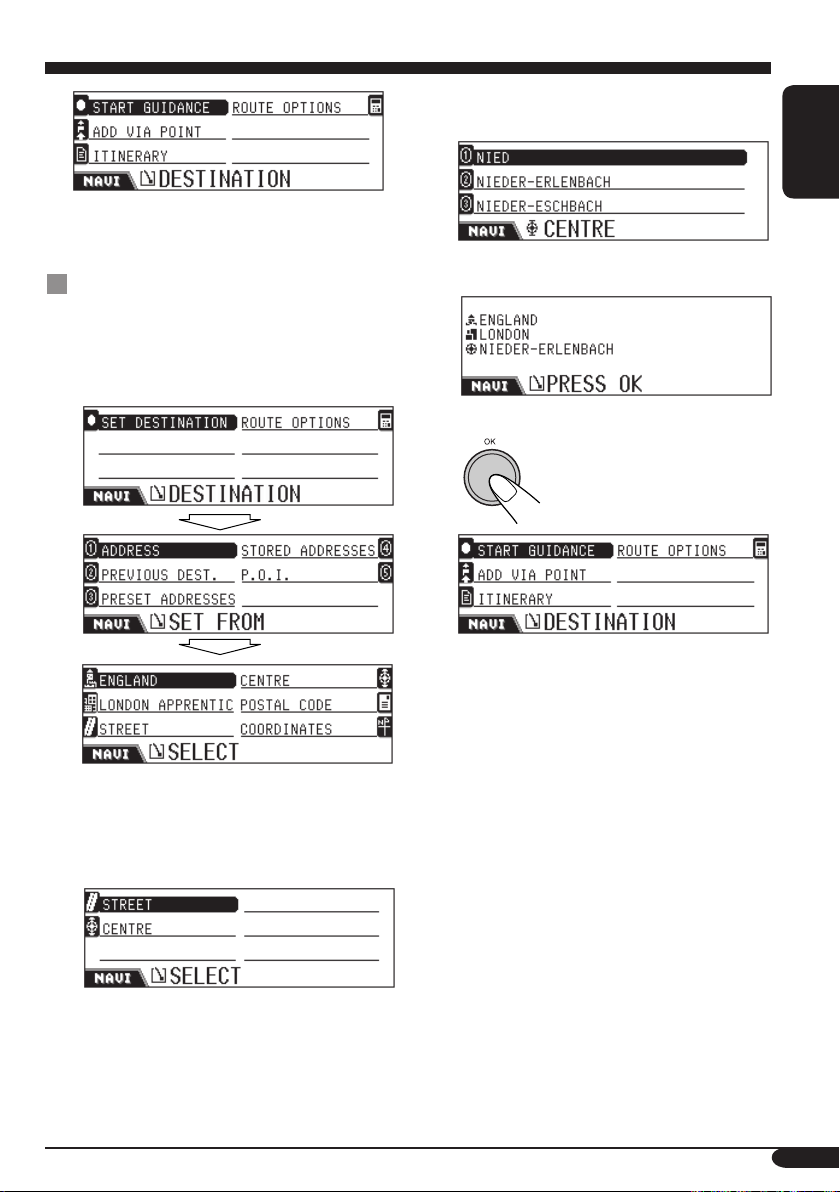
2 Select “CENTRE.”
Centre lists within the selected city appear.
ENGLISH
By town centre
You can locate your destination by town centre
once you set the country and the city.
1 Display the SELECT menu.
• If the city name has not been entered,
“CENTRE” will not be used. ] Enter the
city name (see step 5 on page 24), then
confirm your entry so that the following
screen appears.
3 Select your destination centre.
4 Confirm your destination.
• If the data for the centres within the city
does not exist, “CENTRE” will not be
used. ] Select another method to enter
your destination.
27
Page 28
By destination lists
You can locate your destination by selecting
from the following lists—PREVIOUS
DEST./PRESET ADDRESSES/STORED
ENGLISH
ADDRESSES.
1 Display the SET FROM menu.
Select “PREVIOUS DEST.,”
2
“PRESET ADDRESSES,” or
“STORED ADDRESSES.”
By points of interest (P.O.I.)
You can locate your destination by selecting
form the P.O.I.
• To use the P.O.I., enter the country in
advance; otherwise, the P.O.I. within the
previous settings (county) will be located. (To
set the country, see step 4 on page 24.)
1 Display the SET FROM menu.
2 Select “P.O.I.”
Ex. when selecting “PREVIOUS DEST.”
3 Select one of the listed item.
4 Confirm your destination.
28
• CATEGORY: Select from the categorized
locations.
• NAME: Enter the name of your P.O.I.
directly.
• AREA: Select the area where you want to
search for your P.O.I.
• TELEPHONE NUMBER: Enter the
telephone number of your P.O.I.
• Country (Ex. ENGLAND): Change the
country if necessary. ] Select the country
(see step 4 on page 24).
• If the country has not been selected, the
country selection is automatically requested
in this step.
Page 29
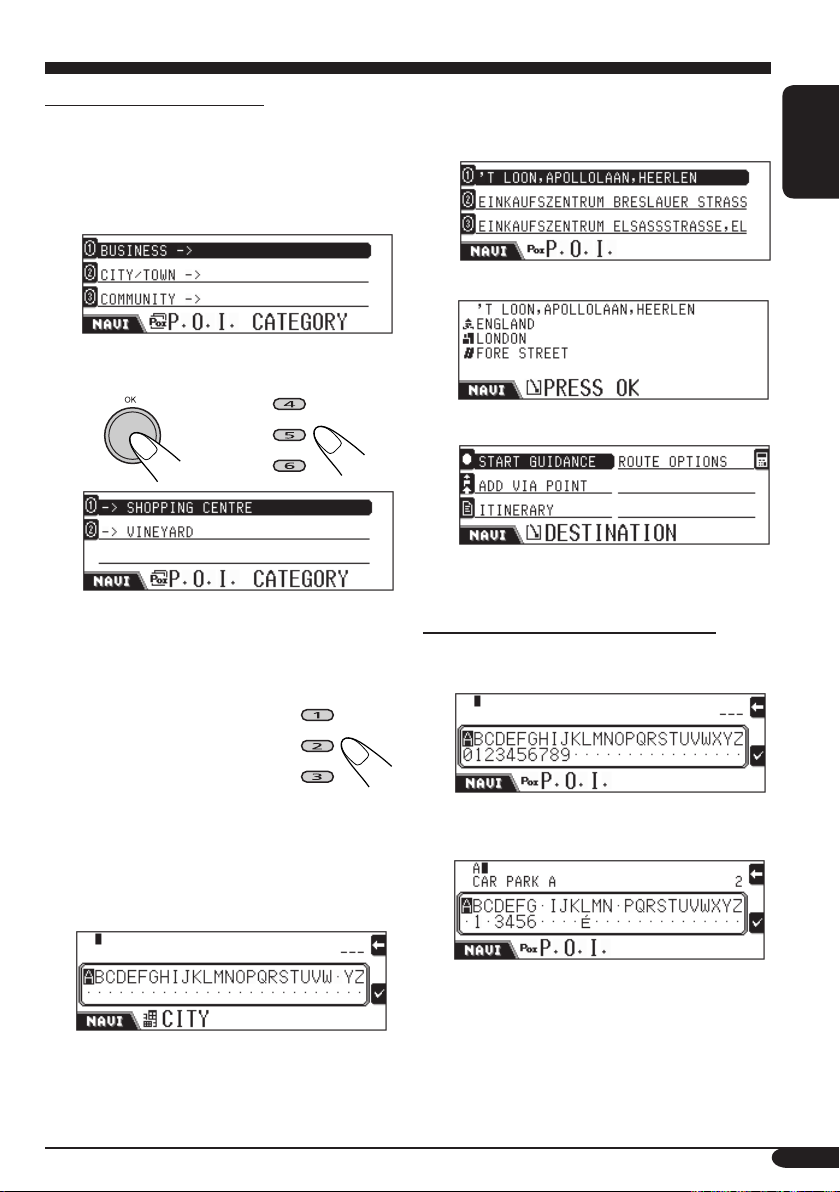
Selecting P.O.I. by category
P.O.I. are categorized and sub-categorized for
you to find easily.
6 Enter the city within which you want
to locate your P.O.I.
P.O.I. list appears.
3 Select “CATEGORY.”
Main categories list appears.
4 Select the main category you want.
• Then, display the sub-categories...
OR
Sub-categories list of the main category
selected appears. (Ex. when selecting
SHOPPING for the main category). ]
Go to step 5.
• If you want to search for
all the items in the main
category...
ENGLISH
7 Select (or confirm) your destination.
8 Confirm your destination.
Selecting P.O.I. by entering the name
3 Select “NAME.”
P.O.I. name entry menu appears.
CITY entry menu appears. ] Go to step
6.
5 Select the sub-category you want.
CITY entry menu appears.
4 Enter the name of your P.O.I.
1 Enter the name.
To be continued...
29
Page 30
2 To select the name displayed on
the 2nd line...
ENGLISH
To display the list of the matching
names, then select the name on
the list...
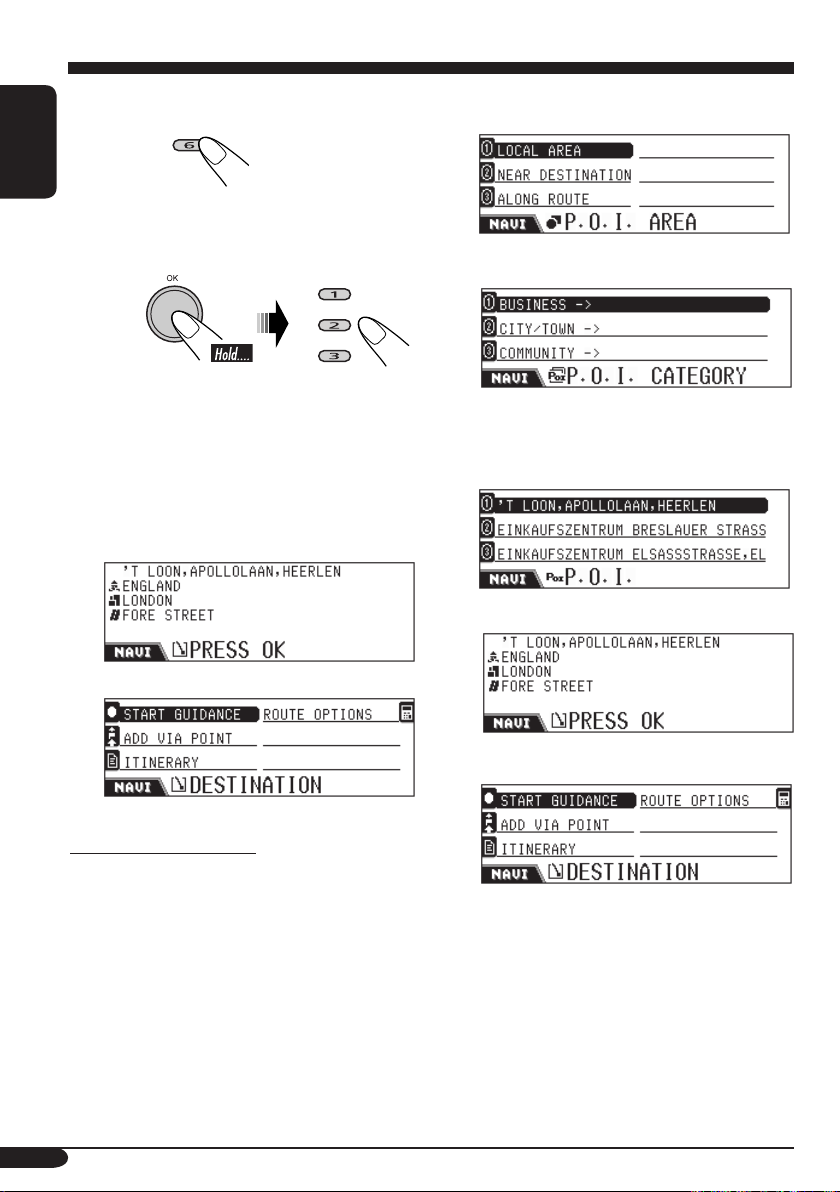
3 Select “AREA.”
P.O.I. AREA menu appears.
4 Select one of the options.
Main categories list appears.
• If the name you have entered exists in
many categories, P.O.I. CATEGORY
menu appears. ] Select the categories.
• If the name you have entered exists in
many cites, CITY entry menu appears. ]
Enter the city.
5 Select (or confirm) your destination.
6 Confirm your destination.
Selecting P.O.I. by area
You can locate P.O.I. from the following areas.
• LOCAL AREA: Select P.O.I. within the
distance of 5 km from the current position.
(Selectable anytime)
• NEAR DESTINATION: Select P.O.I. within
the distance of 5 km from your destination.
(Selectable after setting the destination)
• ALONG ROUTE: Select P.O.I. within the
distance of 2 km along the route. (Selectable
after starting the guidance)
5 Select the category you want.
• You can select your P.O.I. location either
from the main category or sub-category
(see page 29 for details).
6 Select (or confirm) your P.O.I.
7 Confirm your destination.
30
Page 31

Selecting P.O.I. by telephone number
3 Select “TELEPHONE NUMBER.”
Telephone number entry menu appears.
4 Enter telephone number (with its
area code), then confirm the location.
5 Confirm your destination.
ENGLISH
2 Select “COORDINATES.”
LATITUDE entry screen appears.
3 Enter the latitude, then select North
(N) or South (S).
LONGITUDE entry screen appears.
By the coordinates
You can locate your destination by entering its
latitude and longitude.
1 Display the SELECT menu.
4 Enter the longitude, then select East
(E) or West (W).
Geological position name of the entered
position is displayed.
5 Confirm your destination.
31
Page 32

Storing addresses and routes
You can store the addresses or routes in
memory.
ENGLISH
• To cancel editing during the process, press
BACK (DISP).
1 While the current position is shown...
• If navigation has been started, press DISP
(BACK) to display the current position
screen.
EDIT menu appears.
Saving addresses in STORED ADDRESS
2 Select “SAVE ADDRESS.”
SAVE AS menu appears.
3 Select “STORED ADDRESS.”
SAVE FROM menu appears.
• CURRENT ADDRESS: Save the current
address.
• ADDRESS: Save a new address by setting it
manually using the SELECT menu.
• PREVIOUS DEST.: Save an address by
selecting from the previous destinations.
• P.O.I . : Save a P.O.I. using P.O.I. menus.
4 Select (or confirm) the address to
store.
INPUT NAME menu appears.
• SAVE ADDRESS: Save addresses in
memory.
• DELETE ADDRESS: Delete memorized
addresses.
• RECORD ROUTE: Save the route in
memory. By storing the routes, you can use
the convenient features explained on page 34.
• DELETE ROUTE: Delete memorized route.
32
5 Name the address.
• You can enter the maximum of 32
characters. For character entry method,
see page 91.
6 Store the name.
EDIT menu appears again.
Page 33

Saving addresses in PRESET ADDRESS
You can preset an address into each number
buttons—total six addresses.
7 Store the name.
EDIT menu appears again.
2 Select “SAVE ADDRESS.”
SAVE AS menu appears.
3 Select “PRESET ADDRESS.”
Stored addresses list appears.
4 Select the address to store from the
list.
Preset addresses list appears.
5 Select the number you want to preset
the address into.
INPUT NAME menu appears.
ENGLISH
If the preset addresses have been stored, you
can directly select one by pressing the number
buttons while the current position screen is
shown.
Deleting memorized addresses
2 Select “DELETE ADDRESS.”
DELETE ADDRESS menu appears.
• PREVIOUS DEST.: Delete an unwanted
address from the PREVIOUS DEST. list.
• STORED ADDRESSES: Delete an
unwanted address from the STORED
ADDRESSES list.
• PRESET ADDRESSES: Delete an
unwanted address from the PRESET
ADDRESSES list.
• If an address has been preset in the
selected number, it will be overwritten.
6 Name the address.
• You can enter the maximum of 32
characters.
3 Select one of the options (listed
above).
4 Select an unwanted address.
“DELETE: PRESS OK” appears.
5 Confirm.
EDIT menu appears again.
To be continued...
33
Page 34

Saving new routes
You can save up to 20 routes in memory.
2 Select “RECORD ROUTE.”
ENGLISH
START RECORDING menu appears.
3 Start recording the route from the
current position.
To cancel the recording...
• Recording will also be cancelled if you switch
off the car ignition switch.
Deleting stored routes
2 Select “DELETE ROUTE.”
ROUTES menu appears.
4 Drive the car following the route
as you want to record, then stop
recording when you arrive at your
destination.
INPUT NAME menu appears.
5 Name the address.
• You can enter the maximum of 32
characters. For character entry methods,
see page 91.
6 Store the name.
EDIT menu appears again.
3 Select an unwanted route.
“DELETE: PRESS OK”
screen appears.
4 Confirm.
EDIT menu appears again.
Convenient features using the
stored routes
You can confirm your current position—
distance to the destination and estimated time
of arrival (ETA) if you are on at least one of
the stored routes, and set the route end as the
guidance destination.
• You can also display the traffic information
along the stored routes.
34
Page 35

Checking ETA and distance
1 While not using guidance...
2
If you now press the number button
corresponding the route number, you can set
its route end as the guidance destination. (To
start the guidance, see page 22).
ENGLISH
Checking traffic information along the
stored routes
If the number icon is highlighted on the
display as in the example below, some traffic
information is available along the route.
The display example below indicates that some
traffic information is available along the stored
route 1 (Home).
ROUTES menu appears.
3 Select the route you are now taking.
• You can select up to 3 routes in this step,
so that you can know the current position
on these route.
To move to another page
of the list (if any), rotate the
dial.
4 Display the information.
or
This means you are not on this route
now.
To check the traffic information, follow the
procedure below.
1 Select the stored route number (in
this example, 1).
The list of the available information
appears.
2 Select the one you want to confirm
the information in details.
35
Page 36

Setting guidance options
Entering the Via Points
ENGLISH
You can set five Via Points along the way to
your final destination.
• You can set Via Points even while you are
navigated to your destination.
Editing Via Point locations
1 Enter your destination to display the
following DESTINATION menu.
1 Enter your destination to display the
following DESTINATION menu.
2 Select “ADD VIA POINT.”
SET FROM menu appears.
3 Set a Via Point using the above menu
(and menus that follow).
• Operations are the same as explained for
“Entering your destination.”
*
* If you have already started guidance to the
destination, “RESTART GUIDANCE” is
shown.
4 Repeat steps 2 and 3 to set more Via
Points.
2 Select “ITINERARY.”
ITINERARY list appears.
• Via Points are listed in sequence, and the
final destination is at bottom.
3 To change the Via Point sequence
• Select a Via Point on the list, then press...
To erase a Via Point
• Select a Via Point on the list, then press...
• You cannot delete the final destination
once the guidance to it has been started.
4
36
Page 37

Setting route options
1 Enter your destination to display the
following DESTINATION menu.
2 Select “ROUTE OPTIONS.”
ROUTE OPTIONS menu appears.
• AUTO REROUTE/MANUAL REROUTE:
Set how you want the System to reroute
when it is required (for example, when some
congestion is expected on the route—judged
by received TMC information).
This function does not work when “TMC” is
set to “× (Off).”
AUTO REROUTE: The System re-calculates
the route whenever necessary.
MANUAL REROUTE: The System asks
you whenever re-calculation is required (see
example below).
ENGLISH
3 Set each option on the menu.
• For details on each option, see below.
4
ROUTE OPTIONS
On this menu, you can set some of the
important elements of route calculation.
• FASTEST (SHORTEST):
FASTE ST: The System calculates the
shortest journey time.
SHORTEST: The System calculates the
shortest route to the destination.
• TMC: Set the availability of Traffic Message
Channel (TMC) information.
✓: The System calculates (and re-calculates
whenever necessary) the route using
TMC information. Dynamic guidance
will become possible.
×: The System calculates the route without
using TMC information.
• Press OK to detour. If not, press BACK
(DISP).
• MOTORWAY:
✓: The System calculates the route including
the motorways.
×: The System calculates the route excluding
the motorways.
• FERRY:
✓: The System calculates the route including
availability of ferries.
×: The System calculates the route excluding
availability of ferries.
• TOLLROAD:
✓: The System calculates the route including
the tollroads.
×: The System calculates the route excluding
the tollroads.
37
Page 38

Route guidance
Once you start guidance, you will hear the
guidance in the selected language and voice.
ENGLISH
In addition to them, the display also shows the
guidance information on the display.
• Guidance voice comes out only through the
front speakers (and the front line out on the
rear).
The guidance information appears.
• By pressing NAVI/AV, you can return
to the playback source operation screen.
Yet, the guidance information to the
destination is displayed on the right of
the display.
The following are some of the example of the
voice guidance (and display information):
• Display examples below are the ones used in
the countries where the drivers should keep
right.
• “When possible, U-turn.”
• “Right turn 400 meters ahead.”
• “Take the first exit at the roundabout.”
• “Keep right 400 meters ahead.”
• “You have arrived at your destination.
Guidance ends at this point.”
WARNING: Road traffic regulations
always take priority when a vehicle is being
driven in traffic. Navigation System is
only an aid. Errors may occur in individual
data items/entries. At all times, the driver
must decide whether or not to heed the
information provided.
JVC does not accept liability for
erroneous data provided by the
Navigation System.
38
To return to the normal screen after reaching
the destination, press any button.
• When you come close to a Via Point (approx.
within 30 m), the following screen appears.
When you reach the Via Point, or move away
(approx. 30 m) from it, the normal guidance
screen will be resumed.
Page 39

Display information during
guidance
While being navigated, you can use the
following convenient functions using the
number buttons.
After starting guidance, the guidance
information appears on the display.
• When you are still far from the next
turning point:
• The current road name *
• DST: Distance to the destination
• ETA: Estimated time of arrival
• When you come close to the next
turning point:
• The next road name * you will take
• The distance to the turning point
* If the road is unnamed in the database,
“UNNAMED” appears for the road name.
ENGLISH
To return to the guidance screen (left) after you
use these functions...
Avoiding congestion
When you realize a congestion exists ahead...
1
AVOID SECTION menu appears.
2 Enter the length of the congestion to
avoid.
3 Start searching for the detour.
39
Page 40

Displaying traffic information
You can confirm the traffic information of the
place* nearest to your current position along the
route.
ENGLISH
* Within 100 km from the current position.
2 Select the one you want to confirm in
details.
Displaying the current position in
details
TRAFFIC INFO screen appears.
On this screen, you can confirm the following:
• Event: Shows the detailed traffic information.
(If “– – – – –” appears, no information is now
available.)
• Road: on what road it is happening.
• TAIL: up to where it continues.
• HEAD: from where it is happening
• Time: The period for which this information
is valid.
To confirm the available* traffic information
along the route...
* Within 200 km from the current position.
1 Display the traffic information list.
40
• 1st row: country
• 2nd row: city
• 3rd row: road
• 4th row: latitude
• 5th row: longitude
Displaying the turning points list
You can confirm the route you are taking to the
destination.
Page 41

Displaying the guidance details
DETAILS menu appears.
Using this menu, you can confirm the
following:
• JOURNEY INFO:
Dynamic guidance
Once “TMC” (see page 37) is set to “✓ (On),”
you can use dynamic route guidance.
The traffic announcements sent by a TMC
radio station is received and analysed by the
System. The System can inform you of where
congestion exists, and how you can detour it.
• Dynamic route guidance is not available in
some countries.
• The System can receive TMC information
without tuning in to such a station.
As the traffic announcements are transmitted
by TMC radio stations, JVC cannot assume
responsibility for the completeness or
accuracy of the announcements.
ENGLISH
• DESTINATION INFO:
• GUIDANCE MODE:
To confirm all available traffic information...
You can confirm it any time except when
the display is showing the playback source
information.
1 Display the traffic information list.
2 Select the one you want to confirm in
details.
41
Page 42

Radio operations
ENGLISH
Listening to the radio
~
Ÿ
Lights up when receiving an FM stereo
broadcast with sufficient signal strength.
1
4
5
2
9
8
76
p
we
q
! Start searching for a station.
When a station is received,
searching stops.
To stop searching, press OK.
To tune in to a station manually
In step !...
Within
5 seconds
FM/AM band
3
1
Station frequency
2
STEREO/MONO indicators
3
Station icon
4
PTY icon
5
TP indicator (see page 46)
6
PTY indicator (see page 47)
7
Sound mode (see page 85)
8
AF/REG indicator (see page 88)
9
Programme type (PTY: see page 45)
p
Station name (PS)
q
Preset number
w
DX/LOCAL indicators
e
42
Page 43

When an FM stereo broadcast is hard to
receive
1
2
MONO indicator lights up.
Reception improves, but stereo effect will
be lost.
To restore the stereo effect, repeat the same
procedure. “Mono Off” appears and the MONO
indicator goes off.
Storing stations in memory
You can preset six stations for each band.
FM station automatic presetting —
SSM (Strong-station Sequential
Memory)
1
2 Select the FM band (FM1 – FM3)
you want to store into.
ENGLISH
Tuning in FM stations only with
strong signals
If received signals are weak, you may only
hear noises. You can make this unit detect only
stations with sufficient signal strength while
searching for FM stations.
1
2
• DX: To tune in to all receivable stations.
The DX indicator lights up.
• Local: To tune in to only stations with
sufficient signal strength.
LOCAL indicator lights up.
3
4
“SSM” appears, then disappears when
automatic presetting is over.
Local FM stations with the strongest signals are
searched and stored automatically in the FM
band.
Manual presetting
Ex.: Storing FM station of 92.5 MHz into the
preset number 4 of the FM1 band.
1
To be continued...
43
Page 44

2
ENGLISH
3
4
Preset number flashes for a while.
To select a preset station on the list
1 Select “TUNER,” then the band.
2 Display the preset station list.
• For FM bands: Rotate the dial to display
the lists for the other bands.
Listening to a preset station
• If you cannot tune in to the preset FM RDS
station, Programme Search is working. For
details, see “P-Search” on page 89.
1
2
3 Select the preset station.
3 Select the preset station.
Changing the display information
Station name is enlarged.
44
Page 45

The following operations are only
possible while you are tuning in to
an FM RDS station.
2 Select one of your favourite
programme type.
What you can do with RDS
RDS (Radio Data System) allows FM
stations to send an additional signal along
with their regular programme signals.
By receiving the RDS data, this receiver can
do the following:
•
Programme Type (PTY) Search (see below)
• Standby Reception of Traffic
Announcement (TA: see the following)
or your favourite programme (PTY) (see
pages 46 and 47)
•
Tracking the same programme automatically
—Network-Tracking Reception (see page 47)
• Programme Search (see page 89)
PTY codes
News, Affairs, Info, Sport, Educate, Drama,
Culture, Science, Varied, Pop M (music),
Rock M (music), Easy M (music),
Light M (music), Classics, Other M
(music), Weather, Finance, Children, Social,
Religion, Phone In, Travel, Leisure, Jazz,
Country, Nation M (music), Oldies, Folk M
(music), Document
ENGLISH
• To select from all PTY
codes...
3 Start searching.
If there is a station broadcasting a
programme of the same PTY code as you
have selected, that station is tuned in.
To select a PTY code on the list
1
2
Searching for your favourite
programme
You can tune in to a station broadcasting your
favourite programme by searching for a PTY code.
1
The last selected PTY code appears.
Preset PTY codes list (see page 46) appears.
• To move to the other lists...
To be continued...
45
Page 46

3 Select a PTY code.
4 Repeat steps 2 and 3 to store
other PTY codes into other preset
numbers.
ENGLISH
4 Start searching.
S
toring your favourite programmes
You can store six favourite programme types.
Preset programme types in the number buttons
(1 to 6):
1
Select a PTY code.
2
Ex.: When “Rock M” is selected
3 Select the preset number (1 – 6) you
want to store into.
5 Finish the procedure.
Using the standby receptions
TA Standby Reception
TA Standby Reception allows the receiver to
switch temporarily to Traffic Announcement
(TA) from any source other than AM.
The volume changes to the preset TA volume
level (see page 89).
• If the DAB tuner is connected, Standby
Reception also works to search for a DAB
service broadcasting Traffic Announcement.
To activate TA Standby Reception
TP indicator either lights up
or flashes.
• If the TP indicator lights up, TA Standby
Reception is activated.
• If the TP indicator flashes, TA Standby
Reception is not yet activated.
To activate TA Standby Reception, tune in to
another station (or DAB service) providing
the signals. The TP indicator will stop
flashing and remain lit.
To deactivate the TA Standby Reception
TP indicator goes off.
46
Preset number flashes for a while.
Page 47

PTY Standby Reception
PTY Standby Reception allows the unit to
switch temporarily to your favourite programme
from any source other than AM.
• When shipped from the factory, “News” is
selected for your favourite programme type.
To change it to your favourite PTY code, see
page 88.
• If the DAB tuner is connected, Standby
Reception also works to search for a DAB
service.
To activate PTY Standby Reception
1
2
The PTY indicator either lights up or
flashes.
Tracking the same programme
When driving in an area where FM reception
is not sufficient enough, this receiver
automatically tunes in to another FM RDS
station of the same network, possibly
broadcasting the same programme with
stronger signals (see the illustration below)—
Networking-Track Reception.
When shipped from the factory, NetworkTracking Reception is activated.
To change the Network-Tracking Reception
setting, see “AF-Regn’l” on page 88.
Programme A broadcasting on different
frequency areas (01 – 05)
ENGLISH
• If the PTY indicator lights up, PTY
Standby Reception is activated.
• If the PTY indicator flashes, PTY Standby
Reception is not yet activated.
To activate PTY Standby Reception, tune
in to another station (or DAB service)
providing the signals. The PTY indicator
will stop flashing and remain lit.
To deactivate the PTY Standby Reception
Select “PTY Off.”
PTY indicator goes off.
47
Page 48

Disc operations
ENGLISH
Playing a disc in the receiver
The disc type is automatically detected, and
playback starts automatically (for DVD:
automatic start depends on its internal program).
• Turn on the monitor for playing a DVD or
VCD. You can also control the audio CD, CD
Text, and MP3/WMA playback by referring
to the monitor screen. (See pages 57 and 58.)
If the current disc is an audio CD, CD Text,
MP3/WMA, or VCD without PBC, all tracks
will be played repeatedly until you change the
source or eject the disc.
• If a title list or disc menu appears while
playing a DVD or VCD with PBC, see “Disc
menu operations” on page 53.
The following marks are used to indicate
the playable discs....
DVD Video Video CD with PBC
Video CD
(with/without PBC)
MP3/WMA disc All discs listed here
Audio CD/
CD Text
Before performing any operations, make
sure the following....
• For DVD playback, you can change the Setup
Menu setting as you like. (See pages 59 – 61.)
• For DVD/CD playback, using the remote
controller is more attractive. You can enjoy
more functions.
When you want to operate the DVD/CD
player using the buttons on the control
panel, see “Other disc operations” on pages
62 to 65.
If “
” appears on the monitor when
pressing a button, the disc cannot accept an
operation you have tried to do.
• In some cases, without showing “
operations will not be accepted.
When you play back a multi-channel DVD
software such as Dolby Digital and DTS,
signals are down converted into 2 channels,
and reproduced through the speakers and
LINE OUT jacks on the rear. (See also
“DOWN MIX” on page 61.)
• To fully enjoy multi-channel DVD
software, connect a multi-channel decoder
compatible with these sources to the
DIGITAL OUT terminal on the rear. (See
also “DIGITAL AUDIO OUTPUT” on
page 61.)
,”
48
Page 49

While playing DVD:
1
2
While playing MP3/WMA discs:
3
Title number
1
Chapter number
2
Playing time information
3
ENGLISH
1
3
2
4
While playing CD/VCD:
1
4
23
5
6
7
5
6
Folder name icon/Album title (Tag)
1
icon
Folder number
2
Track number
Elapsed playing time
Track name icon/Track title (Tag)
3
icon
MP3/WMA icon
4
Track title or track name
5
Album title/performer or folder
6
name
Disc title icon
1 *
Track number
2
Elapsed playing time
3
Track title icon
4 *
Track title
5 *
Disc title/performer or your assigned
6 *
disc name
PBC playback (for VCD with PBC)
7
* Only for CD Text/Audio CD
49
Page 50

Basic operations
Operations Display indication and/or next operation
ENGLISH
To stop play temporarily
“PAUSE” illuminates on the display.
A still picture appears.
A Frame by frame playback
B Slow motion playback
* Reverse slow motion playback is only for DVD.
To resume normal play:
*
To replay the previous
scenes—One Touch Replay
To stop playback
• During playback, on-screen guide icons appear on the monitor for a while (see page 111).
The playback position moves back about 10 seconds before
the current position.
When you start playback again, playback
starts from where it has been stopped
(Resume play).
When you start playback again, playback starts from
the beginning of the last track.
To eject the disc
50
Page 51

To go to the next or previous
chapters/tracks
To locate a particular title/chapter/
track directly
• For DVD: During play or pause.
• For VCD: While PBC (see page 53) is not
in use.
To fast-forward or reverse
the track—Forward/
Reverse Search
• You can also use the following buttons.
The search speed
changes to x2 ] x10.
• For DVD: During play or pause—Chapter
Before playback—Title
• For VCD: While PBC (see page 53) is not
in use.
• For MP3/WMA: Select a track within the
same folder.
• To select a number greater than 9, see “How
to select a number” on page 9.
To locate a title/folder
To locate a particular title/folder
directly
ENGLISH
To resume normal speed
Then, within 10 seconds,
press the number buttons
(see page 9).
• For MP3/WMA discs: To directly select
the folders using the number button(s), it
is required that folders be assigned 2 digit
numbers at the beginning of their folder
names—01, 02, 03, and so on.
51
Page 52

DVD/VCD special functions
Selecting subtitles
You can select the language of the subtitle to be
shown on the monitor.
ENGLISH
• You can also erase the subtitle if not
necessary.
1/3
ENGLISH
Ex. when the disc has 3 options
Selecting audio languages
1/3
ENGLISH
For VCD:
You can select the audio channel to
play. (This is convenient when playing a
Karaoke VCD.)
ST
ST
ST
ST
To listen to normal stereo (left/right)
ST:
playback.
To listen to the L (left) audio channel.
L:
To listen to the R (right) audio channel.
R:
For DVD:
You can select the language to listen to if the
disc has multiple audio languages.
1/3
ENGLISH
1/3
ENGLISH
Ex. when the disc has 3 options
Selecting multi-angle views
You can view the same scene at different angles
if the disc has multi-angle views.
1/3
1
1/3
1
1/3
3
Ex. when the disc has 3 multi-angle views
1/3
1
1/3
2
52
Page 53

Disc menu operations
Menu-driven playback is possible while playing
back a DVD with menu-driven features or a
VCD with PBC (PlayBack Control).
While playing a DVD
1
To return to the previous
menus
• For some discs, you can also move between
the menus by pressing 4 / ¢.
Cancelling the PBC playback
1
ENGLISH
A title list or disc menu will appear on the
monitor.
2 Select the item you want on the
menu.
Selected item starts playback.
• On some discs, you can also select items
using the corresponding number buttons.
While playing a VCD
• When a list of items is displayed on the
monitor.
• To select a number greater than 9, see “How
to select a number” on page 9.
2 Select a track number.
• To select a number greater than 9, see “How
to select a number” on page 9.
To resume PBC
Zoom in
1
ZOOM 1 ZOOM 2 ZOOM 3 ZOOM 4
ZOOM OFF
ZOOM 5ZOOM 6
2
Move the zoomed-in portion.
53
Page 54

On-screen disc operations
About the On-Screen Bar
You can check the disc information and use
some functions through the on-screen bar.
• For audio CD, CD Text, and MP3/WMA
ENGLISH
disc you can also use the control screen
(see pages 57 and 58).
On-Screen bars
DVD
DVD -V
TIME TITLE CHAP
VCD
VCD
TIME
PBC
TRACK REPEAT
MP3/WMA
FILE
REPEAT
RANDOMINTRO
CD Text/Audio CD
CD
5. 1ch
REPEAT
2ch
RANDOMINTRO
T02-C03 TOTAL 1:25:58
OFF
TRACK 1 TIME 00:36
RANDOMINTRO
TIME 00:00:36
TIME 00:36
1 Disc type
2 • Audio signal format type (for DVD and
DTS audio CD)
• PBC (only for VCD)
3 Playback information
Current title/chapter
T02-C03
TRACK 1
Current track
TOTAL
Elapsed playing time
T. REM
Remaining disc time (for VCD)
Remaining title time (for DVD)
TIME
Elapsed playing time of the
current chapter/track
REM
Remaining time of the current
chapter/track
4 Playback condition
Play
Forward/Reverse Search
Forward/Reverse Slow-motion
Pause
Stop
5 Operation icons
Time indication
TIME
Time Search *
TITLE
Title Search
CHAP
Chapter Search
Track Search *
TRACK
Change the audio language or
audio channel.
Change the subtitle language.
Change the view angle.
Repeat play (for DVD)
OFF
REPEAT
Repeat play (for other discs) *
INTRO
Intro play *
RANDOM
Random play *
* Not available during PBC playback.
54
Page 55

On-screen bar basic operations
4 Finish the procedure.
1 Display the on-screen bar.
• For DVD/VCD:
(twice)
• For other discs:
On-screen bar appears for
about 5 seconds.
DVD -V
TIME TITLE CHAP
2ch
T02-C03 TOTAL 1:25:58
OFF
2 Select an item.
• If pop-up menu does not appears, pressing
ENTER repeatedly changes the settings.
• If pop-up menu appears, go to steps 3 and
4.
DVD -V
TIME TITLE CHAP
2ch
T02-C03 TOTAL 1:25:58
OFF
– –
3 • Make a selection from the pop-up
menu.
To erase the on-screen bar
• The selectable options for Repeat/Intro/
Random plays:
OFF
DVD:
REPEAT
VCD:
Repeat play
OFF CHAP TITLE
Repeat play
ENGLISH
• Enter the number.
MP3/WMA:
CD Text/Audio CD:
To be continued....
55
Page 56

INTRO
VCD:
ENGLISH
MP3/WMA:
CD Text/Audio CD:
RANDOM
VCD:
MP3/WMA:
Intro play
Random play
To search for a particular point by playing
time
1 Select .
2 Enter the elapsed playing time of the current
title or of the disc.
Ex. • To enter 1 (hours): 02 (minutes): 00
(seconds), press 1, 0, 2, 0, then 0.
• To enter 54 (minutes): 00 (seconds), press
0, 5, 4, 0, then 0.
• It is always required to enter the hour digit
(even “0” hour), but it is not required to
enter trailing zeros (the last two digits in
the examples above).
• To correct a misentry, press...
3 Finish the procedure.
CD Text/Audio CD:
To change the time information
1 Select
2 Change the time information.
56
TIME
.
TIME 0:00:58
REM 0:11:23
TOTAL 1:01:58T.REM 0:35:24
To search for a particular title/chapter/
track
1 Select
TITLE
2 Enter the number.
• To correct a misentry, press the number
button until the correct number is entered.
3 Finish the procedure.
,
CHAP
or
TRACK
.
Page 57

Control screen basic operations
You can search for and play the desired items
through the control screen.
• The control screen automatically appears on
the monitor when you insert a disc.
MP3/WMA control screen
TIME : 00:00:14REPEAT TRACK
FOLDER : 2 / 3
01 Music
02 Music
03 Music
Track Information
Album
Weather
Artist
Robert M. Smith
Title
Rain
1 Current folder
2 Current folder number/total folder number
3 Folder list
4 Selected playback mode
5 Elapsed playing time of the current track
6 Operation mode icon
7 Current track number/total number of tracks
in the current folder (total number of tracks
in the disc)
8 Track information
9 Track list
p Current track (highlighted bar)
Track : 5 / 14 (Total 41)
Cloudy.mp3
Fair.mp3
Fog.mp3
Hail.wma
Indian summer.mp3
Rain.mp3
Shower.mp3
Snow.mp3
Thunder.wma
Typhoon.mp3
Wind.mp3
Winter sky.mp3
To select a folder or track
1 Select “Folder” list or “Track” list on the
control screen.
2 Select a folder or track.
CD Text/Audio CD control
screen
• While recording a CD into the HDD,
CD Text/Audio CD control screen is not
displayed.
TIME : 00:14
Track : 5 / 14
Cloudy
Fair
Fog
Hail
Track Information
Album
Four seasons
Artist
Robert M. Smith
Title
Rain
1 Elapsed playing time of the current track
2 Operation mode icon
3 Current track number/total number of tracks
4 Track information
5 Track list
6 Current track (highlighted bar)
Indian summer
Rain
Shower
Snow
Thunder
Typhoon
Wind
Winter sky
ENGLISH
To select a track
57
Page 58

List screen operations
You can display the folder list/track list while
playback is stopped. On this list, you can
ENGLISH
confirm the contents and start playback.
For MP3/WMA:
1 Display the folder list.
Each time you press the button,
the list screen comes on and
goes off.
Folder/track list screens
Folder list (MP3/WMA)
Folder : 153/440 Track 154/198 Page : 4/11
fol130
fol131
fol132
fol133
fol134
fol135
fol136
fol137
fol138
fol139
Track list (MP3/WMA/CD Text/Audio CD)
Folder : 169/220 Track 154/198 Page : 4/11
file0131.mp3
file0132.mp3
file0133.wma
file0134.mp3
file0135.mp3
file0136.wma
file0137.wma
file0138.mp3
file0139.mp3
file0140.wma
Ex. Track list for MP3/WMA
fol140
fol141
fol142
fol143
fol144
fol145
fol146
fol147
fol148
fol149
file0141.mp3
file0142.mp3
file0143.mp3
file0144.mp3
file0145.wma
file0146.mp3
file0147.wma
file0148.mp3
file0149.wma
file0150.wma
fol150
fol151
fol152
fol153
fol154
fol155
fol156
fol157
fol158
fol159
file0151.wma
file0152.mp3
file0153.wma
file0154.mp3
file0155.mp3
file0156.mp3
file0157.mp3
file0158.wma
file0159.wma
file0160.wma
fol160
fol161
fol162
fol163
fol164
fol165
fol166
fol167
fol168
fol169
file0161.wma
file0162.mp3
file0163.wma
file0164.mp3
file0165.wma
file0166.wma
file0167.wma
file0168.wma
file0169.mp3
file0170.wma
2 Select the folder on the list.
Track list of the selected folder appears.
3 Select the track on the list, and start
playback.
To go back to the folder list,
press...
For CD Text/Audio CD:
1 Display the track list.
Each time you press the button,
the list screen comes on and
goes off.
2 Select the track on the list, and start
playback.
1 Current folder number/total folder
number (only for MP3/WMA)
2 Current track number/total number of
tracks in the current folder (for MP3/
WMA) or in the disc (for CD Text/
Audio CD)
3 Current page/total number of the pages
included in the list
4 Current folder/track (highlighted bar)
58
Page 59

DVD setup menu
You can store the initial disc playback status.
• While playing, no change can be made on the
Setup Menus.
• When shipped from the factory, the on-screen
language is set to English. To change the
language, see page 60.
Basic setting procedure
1
LANGUAGE
MENU LANGUAGE
AUDIO LANGUAGE
SUBTITLE
ON SCREEN LANGUAGE
2
AUDIO
DIGITAL AUDIO OUTPUT
DOWN MIX
D. RANGE COMPRESSION
ENGLISH
ENGLISH
ENGLISH
ENGLISH
STREAM/PCM
STEREO
ON
4
AUDIO
DIGITAL AUDIO OUTPUT
DOWN MIX
D. RANGE COMPRESSION
5 select an option.
AUDIO
DIGITAL AUDIO OUTPUT
DOWN MIX
D. RANGE COMPRESSION
6
AUDIO
DIGITAL AUDIO OUTPUT
DOWN MIX
D. RANGE COMPRESSION
STREAM/PCM
STEREO
DOLBY SURROUND
STEREO
ON
STREAM/PCM
STEREO
DOLBY SURROUND
STEREO
ON
STREAM/PCM
DOLBY SURROUND
ON
ENGLISH
Ex.: When selecting the “AUDIO” screen
3 Select an item you want to set up.
AUDIO
DIGITAL AUDIO OUTPUT
DOWN MIX
D. RANGE COMPRESSION
Ex.: When selecting “DOWN MIX”
STREAM/PCM
STEREO
ON
To return to the normal screen
59
Page 60

LANGUAGE menu
Item Contents
ENGLISH
MENU LANGUAGE :
AUDIO LANGUAGE :
SUBTITLE :
ON SCREEN LANGUAGE :
Select the initial disc menu language.
ENGLISH, SPANISH, FRENCH, GERMAN, ITALIAN, DUTCH, SWEDISH,
DANISH, and others.
Select the initial audio language.
ENGLISH, SPANISH, FRENCH, GERMAN, ITALIAN, DUTCH, SWEDISH,
DANISH, and others.
Select the initial subtitle language or erase the subtitle (OFF).
OFF (no subtitles), ENGLISH, SPANISH, FRENCH, GERMAN, ITALIAN,
DUTCH, SWEDISH, DANISH, and others.
Select the language for the Setup Menu and some indications shown on the
monitor.
ENGLISH, SPANISH, FRENCH, GERMAN, ITALIAN, DUTCH, SWEDISH,
DANISH.
• For the LANGUAGE settings, see also the language codes list on page 104.
PICTURE menu
Item Contents
MONITOR :
16:9 4:3 LETTER BOX
4:3 PAN SCAN
Select the monitor type to watch a wide screen picture on your monitor.
• 16:9 : Select this when the aspect ratio of your monitor is 16:9.
• 4:3 LETTER BOX : Select this when the aspect ratio of your
monitor is 4:3. While viewing a wide screen picture, the black bars
appear on the top and the bottom of the screen.
• 4:3 PAN SCAN : Select this when the aspect ratio of your monitor is
4:3.
While viewing a wide screen picture, the black bars do not appear;
however, the left and right edges of the pictures will not be shown on
the screen.
OSD POSITION :
60
Position 1 Position 2
Select the on-screen bar position on the monitor.
• 1 : Higher position
• 2 : Lower position (Help screens under the Setup Menu also
disappear.)
Page 61

AUDIO menu
Item Contents
DIGITAL AUDIO OUTPUT :
DOWN MIX :
D. RANGE COMPRESSION :
Select the signal format to be emitted through the DIGITAL OUT (Optical)
terminal on the rear.
• PCM ONLY : Select this when connecting an amplifier or a decoder
incompatible with Dolby Digital, DTS, and MPEG Audio, or connecting to a
recording device.
• DOLBY DIGITAL/PCM : Select this when connecting an amplifier or a
decoder compatible with Dolby Digital.
• STREAM/PCM : Select this when connecting an amplifier or a decoder
compatible with Dolby Digital, DTS, and MPEG Audio.
When playing back a multi-channel DVD disc, this setting affects the signals
reproduced through the LINE OUT jacks (and thought DIGITAL OUT
terminal when “PCM ONLY” is selected for “DIGITAL AUDIO OUTPUT.”)
• DOLBY SURROUND : Select this when you want to enjoy multi-channel
surround audio by connecting an amplifier compatible with Dolby Surround
to this receiver.
• STEREO : Normally select this.
You can enjoy a powerful sound at low or middle volume levels while playing
a Dolby Digital software.
• AUTO : Select this to apply the effect to multi-channel encoded software
(excluding 1 channel and 2 channel software).
• ON : Select this to always use this function.
ENGLISH
61
Page 62

Other disc operations
In this section, you can learn how to use the
buttons on the control panel in order to operate
the DVD/CD player.
ENGLISH
Basic operations
To stop playback
To start playback again
• If you press the button
during pause, it is also
cancelled.
To replay the previous screens
—One Touch Replay
While playing...
To go to the next or previous
chapters/tracks
• For DVD: During play or pause.
• For VCD: While PBC (see page 53) is not
in use.
Using the control
dial:
Using the number
buttons:
To locate a particular title/chapter/
folder/track directly
• For DVD: During play or pause—Chapter
Before playback—Title
• For VCD: While PBC (see page 53) is not
in use.
To select a number from 1 – 6:
To eject a disc
To fast-forward or reverse
the chapter/track
The search speed changes to x2 ] x10.
62
To select a number from 7 – 12:
• To use folder search on MP3/WMA discs, it
is required that folders are assigned with a
2-digit number at the beginning of their folder
names—01, 02, 03, and so on.
• Number buttons can also use to select item on
the PBC menu.
Page 63

To skip chapters/tracks quickly
• For DVD: During play or pause.
• For VCD: While PBC (see page 53) is not
in use.
• For MP3/WMA: Select a track within the
same folder.
To select a folder/track on the list
You can confirm the title of each item and
select the item you want.
1
ENGLISH
As you rotate the dial, you can skip 10 chapters/
tracks at a time.
First time you rotate the dial, the chapter/track
skips to the nearest higher or lower chapter/
track with a chapter/track number of multiple
ten (ex. 10th, 20th, 30th). Then, each time you
rotate the dial, you can skip 10 chapters/tracks.
• After the last track, the first chapters/tracks
will be selected and vice versa.
To go to the next or previous folders
1
Folder icon is highlighted on the display.
Within
5 seconds
2
Folder list appears.
2
Select an item on the list.
3
To move to another page of
the list, rotate the dial.
Prohibiting disc ejection
You can lock a disc in the loading slot.
To cancel the prohibition, repeat the same
procedure. “Eject OK” flashes.
63
Page 64

Selecting the playback modes
You can use only one of the following playback modes at a time.
ENGLISH
1
*1 Only while playing a DVD disc.
2
*
2 Select your desired playback mode.
Only while playing an MP3 or WMA disc.
Repeat play
• For DVD: During play or pause.
• For VCD: While PBC (see page 53) is
not in use.
Random play
Intro scan
Mode Plays repeatedly
Chapter
•
Title *
•
Track: One track.
•
Folder *
•
Off: For DVD: Cancels Repeat play.
For other discs: All tracks of the disc.
*1: One chapter.
1
: One title.
2
: All tracks of the folder.
lights up.
lights up.
lights up.
lights up.
Mode Plays at random
Folder *2: All tracks of the folder, then tracks
of the next folder and so on.
•
Disc: All tracks of the disc.
•
Off: Cancels.
lights up.
lights up.
Mode Plays the first 15 seconds of
Trac k: All tracks of the disc.
•
Folder *
•
Off: Cancels.
2
: First track of every folder.
lights up.
lights up.
To cancel the playback mode
• You can also cancel it by selecting “Off” in step 2.
64
Page 65

Changing the display information
• For MP3/WMA discs
Album title/performer or folder name is
enlarged.
Track title or track name is enlarged.
• For CD Text/Audio CD
ENGLISH
Disc title/performer or your assigned disc
name is enlarged.
Track title is enlarged.
Icons Meanings
Folder name icon
Track name icon
Disc title icon
Album title (Tag) icon
Track title (Tag) icon
MP3 format
WMA format
65
Page 66

HDD operations
Playing genre/album/track in the HDD
ENGLISH
About the HDD
The built-in HDD works not only as storage
for navigation data, but as Music Server
where you can record 99 albums in each
genre folder (total 99 genre folders can be
made).
• Each album can include 999 tracks.
• Playlists can also be made and played.
To record CDs, see “Recording audio CDs”
on page 70.
To copy MP3/WMA files from an SD card
into the HDD, see page 82.
To edit the contents of the HDD, see
“Editing the HDD contents” on page 72.
23 41
5
6789
~
The last selected track starts playing.
• All tracks in the HDD will be played
repeatedly until you change the source.
• WMA Tag cannot be displayed during
HDD playback.
Album name icon/Album title (Tag)
1
icon
Album number
2
Track number
3
Elapsed playing time
4
Track name icon/Track title (Tag)
5
icon
Recording format—MP3/WMA/
6
CDC*
Track title or track name
7
Album title/performer or album
8
name
Genre number
9
* CDC:CD compression—format used for storing CD tracks into the HDD. Either <.llc> or <.bsc>
is used as an extension code (see page 71).
66
Page 67

To go to the next or previous track
Using the control
dial:
• By using the number buttons (1 – 6), you can
also go directly to tracks 1 – 12.
– For tracks 1 – 6: Press 1 – 6.
– Fro tracks 7 – 12: Press and hold 1 – 6.
Using the number
buttons:
To skip tracks quickly
You can skip tracks within the same album.
2
ENGLISH
To select a track/album/genre on the list
You can confirm the title of each item and select
the item you want.
• To select a playlist, see page 70.
1
Genre list appears.
2
As you rotate the dial, you can skip 10 tracks at
a time.
First time you rotate the dial, the track skips to
the nearest higher or lower track with a track
number of multiple ten (ex. 10th, 20th, 30th).
Then, each time you rotate the dial, you can
skip 10 tracks.
• After the last track, the first track will be
selected and vice versa.
To go to the next or previous albums/
genres
1
• The icon for the selected item is
highlighted on the display (except track
icon).
• During playlist playback, this does not
work. You can skip tracks only.
Within
5 seconds
*
* During playlist playback, the track
list included in the current playlist is
displayed.
3 Select an item on the list.
To move to another page of
the list, rotate the dial.
67
Page 68

Selecting the playback modes
You can use only one of the following playback modes at a time.
ENGLISH
1
2 Select your desired playback mode.
Repeat play
Random play
Intro scan
Mode Plays repeatedly
Trac k: One track.
•
Album: All tracks of the album.
•
Genre: All tracks in the genre.
•
Off: Cancels.
lights up.
lights up.
lights up.
Mode Plays at random
Album: All tracks of the album.
•
Genre: All tracks of the genre.
•
All: All tracks in the HDD.
•
Off: Cancels.
lights up.
lights up.
lights up.
Mode Plays the first 15 seconds of
Trac k: All tracks of the album.
•
Album: First track of every album.
•
Genre: First track of every genre.
•
Off: Cancels.
lights up.
lights up.
lights up.
To cancel the playback mode
68
• You can also cancel it by selecting “Off” in
step 2.
• HDD playback mode is also cancelled in the
following cases:
– When you record an audio CD into the
HDD (see page 70).
– When you duplicate the data in the SD into
the HDD (see page 82).
Page 69

Changing the display information
• For normal playback
Album title/performer or album name is
enlarged.
Track title or track name is enlarged.
• For playlist playback
ENGLISH
Playlist name is enlarged.
Track title or track name is enlarged.
Genre name is enlarged.
Icons Meanings
Genre name icon
Album name icon
Track name icon
Playlist name icon
Album title (Tag) icon
Track title (Tag) icon
MP3 format
WMA format
CDC format
69
Page 70

Playing playlists
Recording audio CDs
You can display the lists of the playlists stored,
then select the one you want to play.
ENGLISH
• To make your own playlists, see page 75.
1
Display the list of the playlists.
2
3 Select the playlist, and start
playback.
• If more than six playlists exist, rotate the
dial to show other playlists, then press...
To cancel the playlist playback, select a genre
or an album after displaying the list (see page
67).
You can only record audio CD (CD-DA) tracks
into the HDD.
• While the following recording/editing
process:
– To return to the previous screens, press
BACK (DISP) repeatedly.
– To cancel it, press and hold BACK (DISP).
1 While playing a CD...
*
* This appears only after you have
cancelled recording (but have neither
ejected the disc nor edited the HDD
contents).
2 Select the recording type.
• REC Album: Records the entire CD
from its first track.
• REC Track: Records the current track
from its beginning.
• REC Continue: Continues the
previously cancelled recording from the
track being recorded when cancelled.
\ Go to step 6.
70
Page 71

3 Select the genre to store the
recording into.
• If more than six genres exist, rotate the
dial to show other genres, then press...
• If you want to create a new genre folder,
select “New Genre.”
4 Select the album to store the
recording into.
• When you have selected “REC Album,”
this step is skipped.
• If more than six albums exist, rotate the
dial to show other albums, then press...
• To store the track into a new album, select
“New Album.”
6 Start recording.
ENGLISH
7 When the following screen appears,
stop recording.
• Recording is finished before playback is over.
Once you stop the recording, CD playback
resumes.
• Track names are automatically assigned with
the extension code <.llc> or <.bsc>.
• Even if you do not stop recording manually,
recording is automatically stored.
• When you have selected “New Genre” or
“New Album,” its title will be assigned
automatically such as <ge000001>,
<ge000002>, or <al000001>, <al000002>.
You can change the title later manually (see
page 72).
5 Select the recording mode.
or
• Compress (HQ): High quality lossless
recording, but data size is bigger—
extension code <.llc>.
• Compress: More compressed
recording, so data size becomes smaller—
extension code <.bsc>.
• Rectime: shows the total play time of the
recording.
To cancel the recording
Recording will be cancelled in the following
cases:
• If you turn off the power or switch off the car
ignition switch.
• If you detach the control panel.
To continue the recording, press REC
(MODE), then select “REC Continue” (see
page 70).
71
Page 72

Assigning the titles
You can assign (or change) the title to genres,
albums, and playlists.
ENGLISH
• You cannot assign titles to tracks.
1 While playing an HDD track...
• For assign the title to a playlist, play the
playlist you want.
Enlarge the indication (see also
page 69) to which you want
to assign a new name (ex. to
assign the title to a genre).
2 Enter the text entry mode.
and
• To move the character entry position...
or
(to left) (to right)
If you press and hold the button, the
character entry position moves the first
position or the last position.
• To erase a misentry, move the character
entry position to the one you want to
erase, then...
• To erase the entire
entries...
4 After entering the title...
• When you modify the genre or
album name, the current track
will restart from the beginning.
Editing the HDD contents
3 Assign the title (maximum 32
characters).
• To change the character set...
A – Z / a – z
(Upper case/ Lower case)
Accented letters
(Lower case)
• To enter a character...
72
0 – 9 & symbols
(Numbers)
Accented letters
(Upper case)
Edit Menus comprises of three main pages
(below) and sub-screens.
• When one of the Edit Menus is shown, the
current track will be played repeatedly.
• While editing the HDD contents, no sounds
come out.
• When editing is over, the current playback
mode is cancelled, and normal playback will
be resumed.
Page 73

To move between the
pages...
3 Select the one you want to erase.
To select the item shown on the display...
• If more than six items exist on the same
level, rotate the dial to display others.
To return to the previous
screen...
Erasing a track/album/genre
Ex. To erase an unwanted track
1 While playing an HDD track...
2 Select one of the “Erase” functions.
: To erase the track within the
current album
: To erase the album within
the current genre
ENGLISH
4 Confirm.
• Once editing is finished,
playback resumes (from the
current track. If the currently
playing one is erased, from the
track located either before or
after the erased one).
Moving a track/album
You can move the current track into another
album or current album into another genre.
Ex. To move the track
1 While playing an HDD track/album
you want to move...
: To erase the genre
2 Select one of the “Move” functions.
: To move the track
: To move the album
To be continued...
73
Page 74

3 Select an album to move the track
into.
• For “Move Album”: select the genre to
ENGLISH
move the album into.
4 Confirm.
• Once editing is finished,
playback resumes (from
the tracks in the currently
playing album/genre).
Sorting an album/genre
You can change the current album priority in
a genre and the current genre priority in the
HDD.
This is important since the tracks in the HDD
will be played back in the sequence of the listed
genre and album.
Ex. To sort the album
2 Select one of the “Sort” functions.
: To sort the album
: To sort the genre
The current album is reversed on the list.
3 Select the album the next to which
you move the current album.
• For “Sort Genre”: select the genre the
next to which you move the current
genre.
1 While playing an HDD track in an
album or genre you want to sort...
74
4 Confirm.
• Once editing is finished,
playback resumes (from
the tracks in the sorted
album/genre).
Page 75

Creating/editing a playlist
You can create a playlist by entering the
current track into a new playlist. You can also
add tracks into the existing playlist.
• You can create 99 playlists.
1 While playing an HDD track you
want to add in a playlist...
2 Select “Entry Tr to PL.”
4 Confirm.
• Once editing is finished,
playback resumes (from the
current track).
• When you have selected “New Playlist,”
its title will be assigned automatically
such as <pl000001.m3u>, <pl000002.
m3u>.
You can change the playlist name later
manually (see page 72).
5 Repeat the above steps until you
enter all tracks you want.
• You can include up to 99 tracks in a
playlist.
Erasing a playlist
1
While playing an HDD track...
ENGLISH
3 Select the playlist you want to add
the track into.
• To add the track into a new playlist, select
“New Playlist.”
2 Select “Erase Playlist.”
To be continued...
75
Page 76

3 Select an unwanted playlist.
ENGLISH
1 While playing an HDD track...
4 Confirm.
• Once editing is finished,
playback resumes (from the
current track).
Duplicating a playlist
You can copy playlists from the HDD to an
SD card or vice versa. By using this function,
you can edit the playlists stored in the HDD
using your own PC.
Basic procedure:
1 Insert an SD (see page 78).
2 Copy the playlists in the HDD into the SD—
using “Copy PL HDD–>SD.”
3 Copy the playlists from the SD into your
PC, edit them on your PC (see page 77 for
editing), then copy the edited playlist into the
SD.
4 Insert the SD again, then copy the edited
playlists into the HDD—using “Copy PL
SD–>HDD.”
2 Select one of the “Copy” functions.
: From HDD to SD
: From SD to HDD
3 Select a playlist you want copy.
4 Confirm.
• Once editing is finished,
playback resumes (from
the current track).
76
• If the same named playlist exists, it is
overwritten.
Page 77

Storing tree information into SD
You can export the tree information (folder
structure) of the HDD into an SD card.
This makes it easy for you to make a new
playlist when many genres/albums/tracks are
recorded in the HDD.
• Before starting, insert an SD card.
1 While playing an HDD track...
To make a playlist from this file, use a text
editor on your PC.
Start the first line with <#EXTM3U>, then
list the tracks in the playback sequence as the
example below.
#EXTM3U
/m_data/music/genre1/album1/track2.mp3
/m_data/music/genre2/album4/track11.mp3
/m_data/music/genre4/album5/track4.wma
..............
• Save a file with the extension code <.txt>,
then manually change the extension code to
<.m3u>.
To copy the file into the HDD, save it in
<list> folder under <JVCMS> folder as
described on page 78.
ENGLISH
2 Select “Store Treeinfo.”
3 Confirm.
• Once editing is finished,
playback resumes (from the
current track).
• Tree information is stored in the
loaded SD as <contents.txt>.
The <contents.txt> file will be displayed on
your PC as follows.
/m_data/music/genre1/album1/track1.mp3
/m_data/music/genre1/album1/track2.mp3
/m_data/music/genre1/album1/track3.wma
/m_data/music/genre1/album1/track4.wma
..............
Confirming the HDD contents
You can confirm the contents of the HDD.
1 While playing an HDD track...
2 Select “Disp HDD Info.”
To erase the HDD Info screen...
77
Page 78

SD operations
ENGLISH
Inserting the SD card
To play the tracks in an SD card, it must be
configured strictly as follows:
*
• Top folder must be titled <JVCMS> (JVC
Music Server), the folder including album
folder must be <music>.
– DO NOT store the files directly in <music>.
– DO NOT make any folders in album
folders.
• Album titles and track titles can be assigned
as you like; however, track must have their
extension code such as <.mp3> <.wma>.
• <music> folder can include up to 99 album,
and each album can include up to 999 tracks.
• SD cards are precision products. DO NOT
impact, bend, drop, or wet them.
You can play back MP3/WMA tracks recorded
in an SD card, and also copy the MP3/WMA
tracks in the SD into the HDD.
• WMA Tag cannot be displayed during SD
playback.
• Turn off the power before detaching the
control panel.
~ Detach the control panel.
Ÿ
* Playlists in the <list> folder cannot be
played, but can be copied into the HDD (see
page 77).
78
Press in SD until you hear a clicking
sound.
Page 79

To eject SD, press the SD as illustrated.
• Press the SD softly (do not release your
finger quickly); otherwise, the SD may
pop out from the unit.
• When you pull out the SD, pull it out
straightly from the loading slot.
! Attach the control panel.
⁄ • The control panel goes
back to the previous
position (see page 92).
@
ENGLISH
Playback starts automatically in the
alphabetical order of the album name/
track name.
5
23 41
678
1
2
3
4
5
6
7
8
Album name icon/Album title (Tag)
icon
Album number
Track number
Elapsed playing time
Track name icon/Track title (Tag)
icon
Recording format
Track title or track name
Album title/performer or album
name
79
Page 80

To go to the next or previous track
2
Using the control
dial:
Using the number
buttons:
ENGLISH
• By using the number buttons (1 – 6), you can
also go directly to tracks 1 – 12.
– For tracks 1 – 6: Press 1 – 6.
– Fro tracks 7 – 12: Press and hold 1 – 6.
To skip tracks quickly
You can skip tracks within the same album.
As you rotate the dial, you can skip 10 tracks at
a time.
First time you rotate the dial, the track skips to
the nearest higher or lower track with a track
number of multiple ten (ex. 10th, 20th, 30th).
Then, each time you rotate the dial, you can
skip 10 tracks
• After the last track, the first track will be
selected and vice versa.
To select a track/album on the list
You can confirm the title of each item and
select the item you want.
1
Album list appears.
2
3
Select an item on the list.
To go to the next or previous albums
1
The album icon is highlighted.
Within
5 seconds
80
To move to another page of
the list, rotate the dial.
Page 81

Selecting the playback modes
You can use only one of the following playback modes at a time.
1
2 Select your desired playback mode.
ENGLISH
Repeat play
Random play
Intro scan
Mode Plays repeatedly
Trac k: One track.
•
Album: All tracks of the album.
•
Off: Cancels.
lights up.
lights up.
Mode Plays at random
Album: All tracks of the album.
•
All: All tracks in the SD.
•
Off: Cancels.
lights up.
lights up.
Mode Plays the first 15 seconds of
Trac k: All tracks of the album.
•
Album: First track of every album.
•
Off: Cancels.
lights up.
lights up.
To cancel the playback mode
• You can also cancel it by selecting “Off” in
step 2.
81
Page 82

Changing display information
ENGLISH
Album title/performer or album name is
enlarged.
Track title or track name is enlarged.
Duplicating data into HDD
You can copy the data in the SD card into the
HDD.
• While copying the data into the HDD, no
sounds come out.
• It takes time to copy a data of much volume
(about 5 minutes for 100 MB data—this
is just an estimation). Actual time varies
depending on the album configuration and the
system condition.
• When you duplicate the data in the SD
into the HDD, the HDD playback mode is
cancelled (see page 68).
• While the following duplicating process:
– To return to the previous screens, press
BACK (DISP) repeatedly.
– To cancel it, press and hold BACK (DISP).
Copying the current track
1
Icons Meanings
82
2
Album name icon
Track name icon
Playlist name icon
Album title (Tag) icon
Track title (Tag) icon
MP3 format
WMA format
Page 83

3 Select the target genre you want to
copy the track into.
• If more than six genres exist, rotate the
dial to show other genres, then press...
• If you want to create a new genre folder,
select “New Genre.”
Album list of the selected genre appears.
4 Select the target album you want to
move the track into.
• If more than six albums exist, rotate the
dial to show other albums, then press...
Copying the current album/all
albums
1
ENGLISH
2
: To copy the current album
: To copy all albums at a
time
3 Select the target genre.
• If more than six genres exist, rotate the
dial to show other genres, then press...
• If you want to create a new album, select
“New Album.”
5 Confirm.
• Once editing is finished,
playback resumes (from the
current track).
• If you want to create a new genre folder,
select “New Genre.”
4 Confirm.
• Once editing is finished,
playback resumes (from the
current track).
83
Page 84

Sound adjustments
Selecting preset sound modes (EQ: equalizer)
ENGLISH
You can select a preset sound mode suitable to
the music.
~
Ÿ
or
Ex.: When “Hard Rock (H.ROCK)” is selected
• By using the number buttons, you can
only select the sound modes shown on the
display.
Sound modes (preset frequency level settings)
The list below shows the preset frequency level settings for 12 sound modes.
Sound mode
Flat 00 00 00 00 00 00 00
Hard Rock +03 +03 +01 00 00 +02 +01
R&B +03 +02 +02 00 +01 +01 +03
Pop 00 +02 00 00 +01 +01 +02
Jazz +03 +02 +01 +01 +01 +03 +02
DanceMusic +04 +02 00 –02 –01 +01 +01
84
60 Hz 150 Hz 400 Hz 1 kHz 2.4 kHz 6 kHz 12 kHz
Preset equalizing values
Page 85

Storing your own sound
adjustments
3 Adjust the level (–05 to +05).
You can adjust the sound modes and store your
own adjustments in memory.
1 Select one of the preset sound modes.
• Repeat steps ~ and Ÿ on page 84.
2 Enter the sound adjustment mode,
then select a frequency to adjust.
ENGLISH
4 Repeat steps 2 and 3 to adjust the
other frequency bands.
5 Select one of the user modes—
USER1/2/3.
Ex. when “USER1” is selected
Sound mode
Country +02 +01 00 00 00 +01 +02
Reggae +03 00 00 +01 +02 +02 +03
Classics +02 +03 +01 00 00 +02 00
User1 00 00 00 00 00 00 00
User2 00 00 00 00 00 00 00
User3 00 00 00 00 00 00 00
60 Hz 150 Hz 400 Hz 1 kHz 2.4 kHz 6 kHz 12 kHz
Preset equalizing values
85
Page 86

Adjusting the sound basic settings
You can adjust the sound characteristics to your
preference.
ENGLISH
1
2 Adjust the selected item.
Adjusting fader and balance
Adjusting subwoofer output
Select an appropriate cutoff frequency level
according to the subwoofer connected.
• 115 Hz/85 Hz/55 Hz
The frequencies higher than the selected level
are cut off to the subwoofer.
Adjust the subwoofer output level.
• 00 (min.) to 08 (max.)
You can also activate or deactivate the High
Pass Filter (HPF) by pressing 3.
When it is activated, “H” is displayed in
between the output level and the cutoff
frequency. Lower frequency signals will be sent
only to the subwoofer so that you can enjoy
the low frequency effect (LFE) of the DVD
software purely from the subwoofer.
Adjusting the input level of each
source
Adjust fader—speaker output balance between
the front and rear speakers.
• F06: Upmost—front only
• R06: Downmost—rear only
Adjust the balance—speaker output balance
between the left and right speakers.
• L06: Leftmost—left only
• R06: Rightmost—right only
86
This setting is required for each source except
FM. Before making an adjustment, select an
appropriate source for which you want to make
an adjustment.
Once you have made an adjustment, it
is memorized, and the volume level will
automatically increase or decrease by adjusted
level when you change the source.
Adjust to match the input level to the FM sound
level.
• –05 (min.) to +05 (max.)
• If you adjust it while recording a CD, the
input level of the HDD will be adjusted.
Page 87

General settings — PSM
Basic procedure
3 Adjust the PSM item selected.
You can change PSM (Preferred Setting Mode)
items listed in the table that follows.
1
2 Select a PSM item.
Ex.: When you select “Scroll”
Indications Selectable settings, [reference page]
4 Repeat steps 2 and 3 to adjust the
other PSM items if necessary.
5 Finish the procedure.
ENGLISH
Demo
Display demonstration
Movie
KeyIn CFM
Key-in confirmation
24H/12H
Clock system
Time
Time
Clock
Interval: [Initial]; Display demonstration is activated and shown in
one-minute intervals.
All Time: Display demonstration is activated.
Off: Cancels, [14].
• Display demonstration starts if no operation is done for about
one minute.
On: [Initial]; Power-on, power-off, source (or compass) animations
are activated.
Off: Cancels.
12Hours O 24Hours, [14]
[Initial: 24Hours]
Set the local time (in one-hour intervals).
It is not required to set the minute since it is automatically adjusted
by referring to the received GPS signals.
[Initial: 00:00]
To be continued...
87
Page 88

Indications Selectable settings, [reference page]
Scroll
ENGLISH
Scroll
Dimmer
Dimmer
From– To
Dimmer time
Contrast
Contrast
Display
LCD Type
Display type
Tag
Tag display
Compass
Compass
The entire text information can be shown by scrolling if it cannot be
shown at a time.
Once: [Initial]; Scrolls only once.
Auto: Repeats scrolling (in 5-second intervals).
Off: Cancels. (For DAB: only shows the headline)
• Holding DISP (BACK) can scroll the display regardless of the
setting.
Auto: [Initial]; Dims the display when you turn on the
headlights.
Off: Cancels.
On: Activates dimmer.
Time Set: Sets the timer for dimmer, [90].
1
*
Any hour – Any hour, [90]
[Initial: 18– 07]
1 – 10
[Initial: 5]
Auto: [Initial]; Positive pattern will be selected during the
day time
the night time
2
*
; while negative pattern will be used during
2
*
.
Positive: Positive pattern of the display.
Negative: Negative pattern of the display.
On: [Initial]; To show the Tag while playing MP3/WMA
tracks.
• WMA Tag cannot be shown during HDD/SD playback.
Off: Cancels.
On: [Initial]; Display the compass (indicating the direction
of the north).
Off: Display the source animation when “KeyIn CFM” is
set to “On.”
PTY Stnby
PTY Standby
AF-Regn’l
Alternate frequency/
You can select one of the PTY codes for the PTY Standby
Reception, [47]. [Initial: News]
When the received signals from the current station become weak....
AF: [Initial]; Switches to another station (the programme may
regionalization
Tune r
reception
• AF indicator lights up.
AF Reg: Switches to another station broadcasting the same
• REG indicator lights up.
Off: Cancels (not selectable when “DAB AF” is set to “On”).
1
Displayed only when “Dimmer” is set to “Time Set.”
*
2
*
Determined by the “Dimmer” setting.
88
differ from the one currently received), [47].
programme.
Page 89

Indications Selectable settings, [reference page]
TA Volum e
Traffic
announcement
volume
P-Search
Programme search
IF Filter
Intermediate
frequency filter
Tune r
4
DAB AF
*
Alternative
frequency reception
Announce
*
Announcement
standby reception
Beep
Beep
5
ExtInput
*
External Input
Telephone
Telephone muting
Audio
Amp Gain
Amplifier gain
control
When a Traffic Announcement is tuned in by TA Standby
Reception, the volume level automatically changes to the preset
level.
[Initial: 15]; Volume 0 – Volume 30 or Volume 50*
3
ENGLISH
On: The receiver tunes in to another frequency broadcasting the
same programme as the original preset RDS station is if the
preset station signals are not sufficient.
Off: [Initial]; Cancels.
Auto: [Initial]; Increases the tuner selectivity to reduce
interference noises between the stations. (Stereo effect will
be degraded.)
Wide: Subject to the interference noises from adjacent stations, but
sound quality will not be degraded. (Stereo effect will not
be degraded.)
On: [Initial]; Tracks the programme among DAB services and FM
RDS stations, [102].
• AF indicator lights up.
Off: Cancels.
4
Select one of the 9 announcement types for Announcement Standby
Reception, [102].
Travel [Initial]/Warning/News/Weather/Event/Special/
Rad Inf/Sports/Finance
On: [Initial]; Beep sounds when you operate the unit.
Off: Cancels.
Changer: [Initial]; To use a JVC CD changer.
Ext In: To use any external component.
Muting1/Muting2: Select either one which mutes the sounds
while using the cellular phone. (This does not affect
the route guidance.)
Off: [Initial]; Cancels.
You can change the maximum volume level of the unit.
High Pwr: [Initial]; Volume 0 – Volume 50
Low Pwr: Volume 0 – Volume 30 (Select this if the maximum
power of the speaker is less than 50 W to avoid
damaging the speaker.)
Off: Deactivates the built-in amplifier.
3
Depends on the amplifier gain control.
*
4
Displayed only when the DAB tuner is connected.
*
5
Not display when CD changer or external component is selected for the source.
*
89
Page 90

Selecting the dimmer mode
You can dim the display at night or as you set
the timer.
ENGLISH
1
Select “Dimmer.”
2
3 Select one of the following options.
4 Select “From– To.”
5 Set the dimmer start time.
6 Move the flashing point to the end
time.
90
Auto:
Off:
On:
Time Set:
Dims the display when you
turn on the headlights.
\ Go to step 8.
Cancels.
\ Go to step 8.
Always dims the display.
\ Go to step 8.
Set the timer for dimmer.
\ Go to step 4.
7 Set the dimmer end time.
8
Exit from the setting.
Page 91

Other main functions
Assigning titles to the sources
You can assign titles to CDs (both in this
receiver and in the CD changer), and external
component.
• To assign the titles to the HDD contents, see
page 72.
Sources
CDs/CD-CH Up to 32 characters (up
External component Up to 16 characters
• You cannot assign a title to DVD, VCD,
CD Text or an MP3/WMA disc.
1 Select the source.
• For a CD in this receiver: Insert a CD.
• For CDs in the CD changer: Select
“CD-CH,” then select a disc number.
• For external component: Select “LINE
IN.”
2 Enter the title assignment screen.
Maximum number of
characters
to 30 discs)
3 Assign a title.
1 Select a character set.
A – Z / a – z
(Upper case/ Lower case)
Accented letters
(Lower case)
2 Select a character.
3 Move to the next (or previous)
character position.
• If you press and hold the button,
the character position moves to the
beginning (or the last).
• To erase a misentry, move the
character entry position to the one you
want to erase, then...
0 – 9 & symbols
(Numbers)
Accented letters
(Upper case)
ENGLISH
Ex. when you select CD as the source
4 Repeat steps 1 to 3 until you
finish entering the title.
4 Finish the procedure.
To erase the entire title
In step 2...
91
Page 92

Changing the control panel angle
ENGLISH
Detaching the control panel
When detaching or attaching the control panel,
be careful not to damage the connectors on
the back of the control panel and on the panel
holder.
Detaching the control panel
Before detaching the control panel, be sure to
turn off the power.
92
Warning:
Attaching the control panel
Page 93

CD changer operations
Playing discs in the CD changer
ENGLISH
About the CD changer
It is recommended to use the JVC MP3compatible CD changer with your receiver.
• You can also connect other CH-X series
CD changers (except CH-X99 and
CH-X100). However, they are not
compatible with MP3 discs, so you cannot
play back MP3 discs.
• You cannot use the KD-MK series CD
changers with this receiver.
• Disc text information recorded in the CD
Text can be displayed when a JVC CD
Text compatible CD changer is connected.
Before operating your CD changer:
• Refer also to the Instructions supplied
with your CD changer.
• You cannot control and play any DVD,
VCD, and WMA disc in the CD changer.
~
All tracks of the inserted discs will be
played repeatedly.
Ÿ Select a disc.
For disc number from 1 – 6:
For disc number from 7 – 12:
93
Page 94

While playing MP3 discs:
23 41
ENGLISH
5
6789
While playing CD Text/Audio CD:
1
23
Folder name icon/Album title (Tag)
1
icon
Folder number
2
Track number
3
Elapsed playing time
4
Track name icon/Track title (Tag)
5
icon
MP3 icon
6
Track title or track name
7
Album name/performer or folder
8
name
Disc number
9
Disc title icon
1
Track number
2
Elapsed playing time
3
Track title icon
4
Track title
5
Disc title/performer or your assigned
6
disc name
Disc number
7
94
4
5
67
Page 95

To go to the next or previous tracks
To fast-forward or reverse the track
Using the control
dial:
Using the number
buttons:
To skip tracks quickly
This operation is only possible when using JVC
MP3-compatible CD changer.
As you rotate the dial, you can skip 10 tracks at
a time.
First time you rotate the dial, the track skips to
the nearest higher or lower track with a track
number of multiple ten (ex. 10th, 20th, 30th).
Then, each time you rotate the dial, you can
skip 10 tracks.
• After the last track, the first track will be
selected and vice versa.
• For MP3: You can skip tracks only within the
same folder.
To go to the next or previous folders (only
for MP3)
ENGLISH
To select a track/folder/disc on the list
You can confirm the title of each item and
select the item you want.
• For CD Text/Audio CD: You can only display
the disc list.
1
Disc list appears.
2 For MP3 discs only: Change to the
list you want to use.
3 Select an item on the list.
1
2
Within
5 seconds
To move to another page of
the list, rotate the dial.
95
Page 96

Selecting the playback modes
You can use only one of the following playback modes at a time.
ENGLISH
1
2 Select your desired playback mode.
Repeat play
Random play
Intro scan
1
*
Only while playing an MP3 disc.
Mode Plays repeatedly
Trac k : One track.
•
Folder *
•
Disc: All tracks of the disc.
•
Off: Cancels.
1
: All tracks of the folder.
lights up.
lights up.
lights up.
Mode Plays at random
Folder *1: All tracks of the folder, then tracks
of the next folder and so on.
•
Disc: All tracks of the disc.
•
All: All tracks of the inserted discs.
•
Off: Cancels.
lights up.
lights up.
lights up.
Mode Plays the first 15 seconds of
Trac k : All tracks of the current disc.
•
Folder *
•
Disc: First track of every inserted disc.
•
Off: Cancels.
1
: First track of every folder.
lights up.
lights up.
lights up.
To cancel the playback mode
• You can also cancel it by selecting “Off” in
step 2.
96
Page 97

Changing the display information
• For MP3 discs
Album name/performer or folder name is
enlarged.
Track title or track name is enlarged.
• For CD Text/Audio CD
ENGLISH
Disc title/performer or your assigned disc
name is enlarged.
Track title is enlarged.
Icons Meanings
Folder name icon
Track name icon
Disc title icon
Album title (Tag) icon
Track title (Tag) icon
MP3 format
97
Page 98

External component operations
Playing an external component
ENGLISH
You can connect an external component to the
CD changer jack on the rear using the Line
Input Adapter KS-U57 (not supplied) or Aux
Input Adapter KS-U58 (not supplied).
• For connection, see Installation/Connection
Manual (separate volume).
! Adjust the volume.
~
• If you cannot select “LINE IN,” select
“Ext In” for “ExtInput” in the PSM
setting (see page 89).
Ÿ Turn on the connected component
and start playing the source.
⁄ Adjust the sound as you want.
(See page 84.)
98
Page 99

DAB tuner operations
Listening to the DAB service
It is recommended to use DAB (Digital
Audio Broadcasting) tuner KT-DB1000
with your receiver. If you have another
DAB tuner, consult your JVC IN-CAR
ENTERTAINMENT dealer.
ENGLISH
! Start searching for an ensemble.
~
Ÿ
1
4
5
6 7
2
8 9 pq w
When an ensemble is received,
searching stops.
To stop searching, press OK.
⁄ Select a service (either primary or
secondary) to listen to.
DAB band
1
3
Ensemble frequency
2
Channel (ensemble) number
3
Channel (ensemble) icon
4
PTY icon
5
TP indicator
6
PTY indicator
7
AF indicator (see page 89)
8
ANN indicator
9
DRC indicator
p
Programme type (PTY: see page 45)
q
Channel (ensemble) name
w
99
Page 100

To tune in to an ensemble manually
In step !...
ENGLISH
Storing DAB services in memory
You can preset six DAB services (primary) for
each band.
1 Perform steps ~ to ⁄ on page 99, to
select a service you want.
2
3 Select the preset DAB service
(primary) number (1 – 6) you want.
If the selected primary service has some
secondary services, press the same button
repeatedly will tune in to the secondary
services.
2 Select the preset number (1 – 6) you
want to store into.
Preset number flashes for a while.
Tuning in to a preset DAB service
1
To select a preset service on the list
1 Select “DAB,” then the band.
2 Display the preset station list.
• Rotate the dial to display the lists for the
other bands.
3 Select the preset service.
100
 Loading...