

Page 1

CD RECEIVER
РЕСИВЕР С ПРОИГРЫВАТЕЛЕМ КОМПАКТ-ДИСКОВ
ПРИЙМАЧ З ПРОГРАВАЧЕМ КОМПАКТ-ДИСКІВ
KD-G737
В соответствии с Законом Российской Федерации “О защите прав потре бителей” срок службы (годности) данного
товара “по истечении которого он может представлять опасность для жизни, здоровья потребителя, причинять вред
его имуществу или окружающей среде” составляет семь (7) лет со дня производства. Этот срок является временем,
в течение которого потребитель данного товара может безопасно им пользоваться при условии соблюдения
ин струк ции по эксплуатации данного товара, проводя необходимое обслуживание, включающее замену расходных
материалов и/или соответствующее ремонтное обеспечение в специализированном сервисном центре.
Дополнительные косметические материалы к данному товару, поставляе мые вместе с ним, могут храниться в
течение двух (2) лет со дня его производства.
Срок службы (годности), кроме срока хранения дополнительных космети ческих материалов, упомянутых
в предыдущих двух пунктах, не затрагивает никаких других прав потребителя, в частности, гарантийного
свидетельства JVC, которое он может получить в соответствии с законом о правах потребителя или других законов,
связанных с ним.
For canceling the display demonstration, see page 4.
Информацию об отмене демонстрации функций дисплея см. на стр. 4.
Інформацію щодо відміни демонстрації функцій дисплею див. на стор. 4.
For installation and connections, refer to the separate manual.
Указания по установке и выполнению соединений приводятся в отдельной инструкции.
Вказівки по встановленню та виконанню підключень наведені у окремій інструкції.
ENGLISHРУCCKИЙУКРАЇНА
INSTRUCTIONS
ИНСТРУКЦИИ ПО ЭКСПЛУАТАЦИИ
ІНСТРУКЦІЇ
GET0432-001A
[EE]
Page 2
Thank you for purchasing a JVC product.
Please read all instructions carefully before operation, to ensure your complete understanding and to obtain the best
possible performance from the unit.
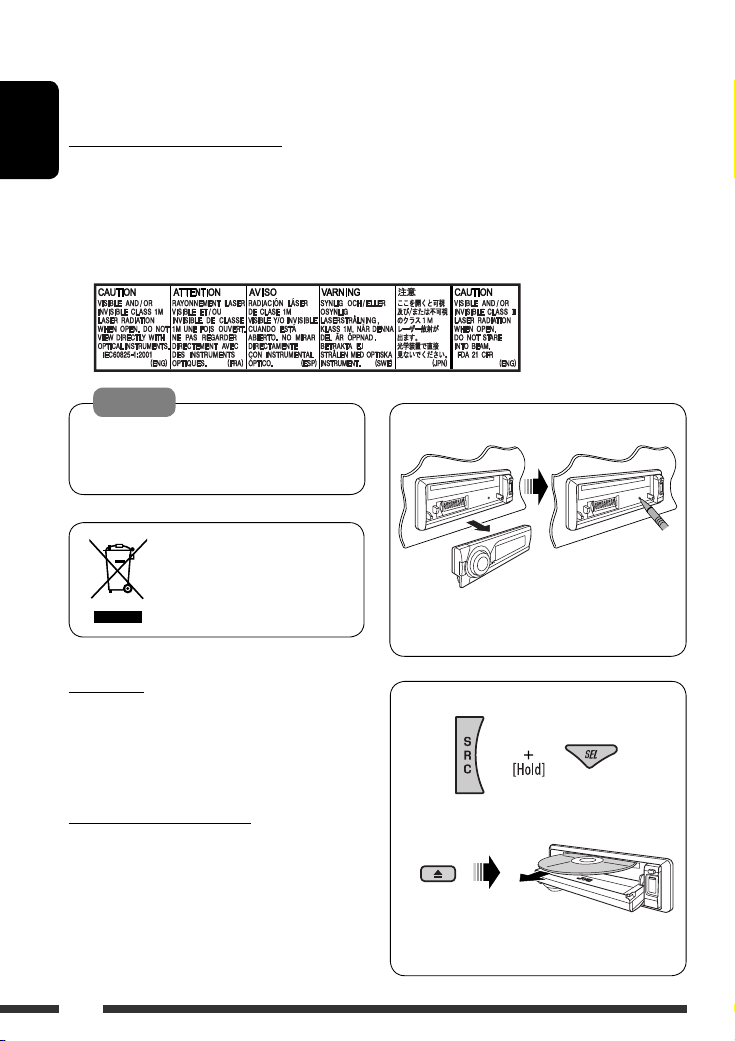
IMPORTANT FOR LASER PRODUCTS
ENGLISH
1. CLASS 1 LASER PRODUCT
2. CAUTION: Do not open the top cover. There are no user serviceable parts inside the unit; leave all servicing to
qualified service personnel.
3. CAUTION: Visible and/or invisible class 1M laser radiation when open. Do not view directly with optical
instruments.
4. REPRODUCTION OF LABEL: CAUTION LABEL, PLACED OUTSIDE THE UNIT.
Warning:
If you need to operate the unit while driving, be
sure to look around carefully or you may be involved
in a traffic accident.
[European Union only]
For safety...
• Do not raise the volume level too much, as this will
block outside sounds, making driving dangerous.
• Stop the car before performing any complicated
operations.
Temperature inside the car...
If you have parked the car for a long time in hot or cold
weather, wait until the temperature in the car becomes
normal before operating the unit.
How to reset your unit
• Your preset adjustments will also be erased (except
the registered Bluetooth device, see page 14).
How to forcibly eject a disc
“PLEASE” and “EJECT” appear alternately on the
display.
• Be careful not to drop the disc when it ejects.
• If this does not work, reset your unit.
2
Page 3
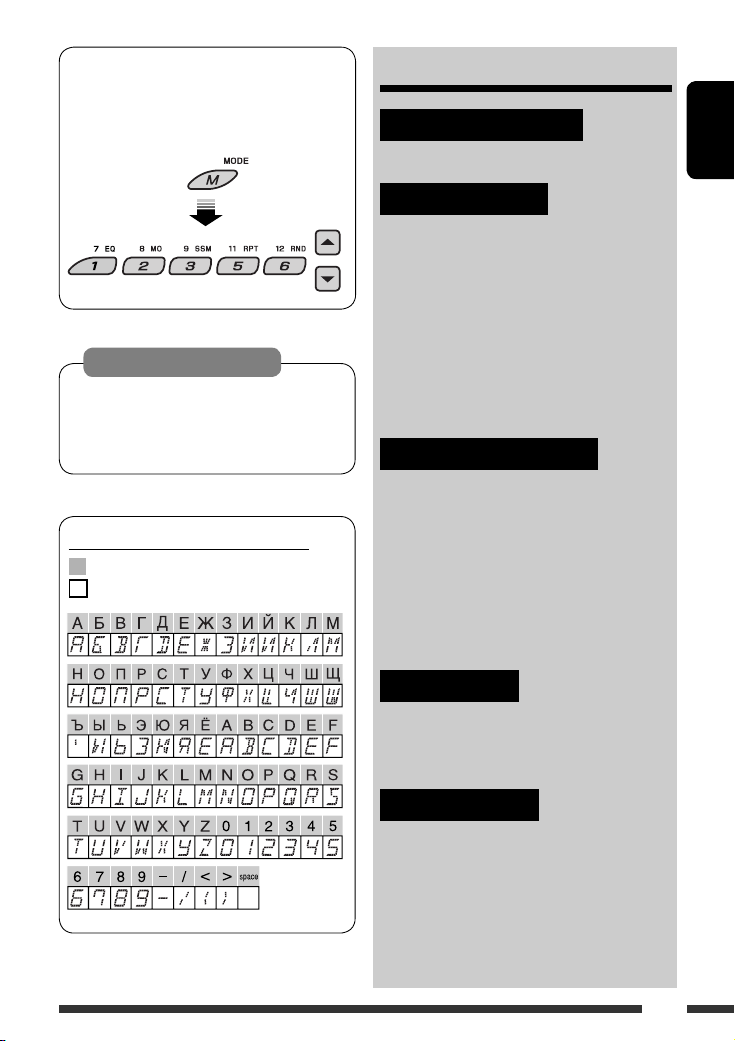
How to use functions mode
If you press M MODE, the unit goes into functions
mode, then the number buttons (except “4”) and
5/∞ buttons work as different function buttons.
CONTENTS
INTRODUCTIONS
Preparation ............................................ 4
ENGLISH
[Within 5 seconds...]
Caution on volume setting:
Discs and connected USB devices produce very
little noise compared with other sources. Lower
the volume before playing to avoid damaging the
speakers by the sudden increase of the output level.
Available characters on the display
Available characters
Display indications
OPERATIONS
Basic operations ...................................... 5
• Using the control panel ....................... 5
• Using the remote controller
(RM-RK50) ......................................... 6
Listening to the radio ............................... 8
Searching for FM RDS programme
— PTY Search ....................................... 9
Disc operations ........................................ 11
Listening to the USB device ....................... 12
EXTERNAL DEVICES
Using the Bluetooth® devices .................... 14
• Using the Bluetooth cellular phone ..... 16
• Using the Bluetooth audio player ........ 18
Listening to the CD changer ...................... 18
Listening to the DAB tuner ........................ 20
Listening to the iPod / D. player ................. 21
Listening to the other external
components ......................................... 22
SETTINGS
Selecting a preset sound mode .................. 24
General settings — PSM ........................... 25
Bluetooth settings ................................... 28
REFERENCES
Maintenance ........................................... 29
More about this unit ................................ 30
Troubleshooting ...................................... 34
Specifications .......................................... 38
3
Page 4
Preparation
Cancel the display demonstration and set the clock
• See also page 26.
ENGLISH
When the power is turned off: Check the current clock time
When the power is turned on: Change the display information
~ Turn on the power.
Ÿ Enter the PSM settings.
! ] ⁄ Cancel the display demonstrations
Select “DEMO,” then “DEMO OFF.”
Set the clock
Select “CLOCK H” (hour), then adjust the hour.
Select “CLOCK M” (minute), then adjust the minute.
Select “24H/12H,” then “24H” (hour) or “12H” (hour).
@ Finish the procedure.
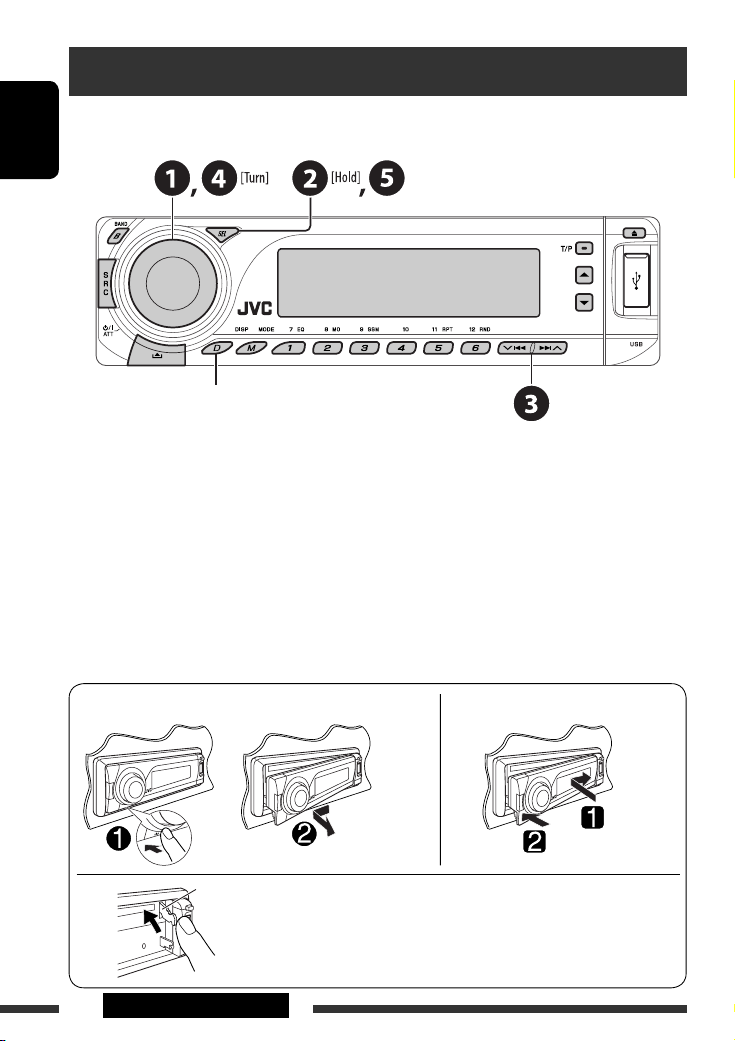
Detaching the control panel Attaching the control panel
Lever
CAUTION:
The lever comes out if you pressed the 0 button while the panel
is detached. If this happens, push the lever back into lock position
before attaching the panel.
4 INTRODUCTIONS
Page 5
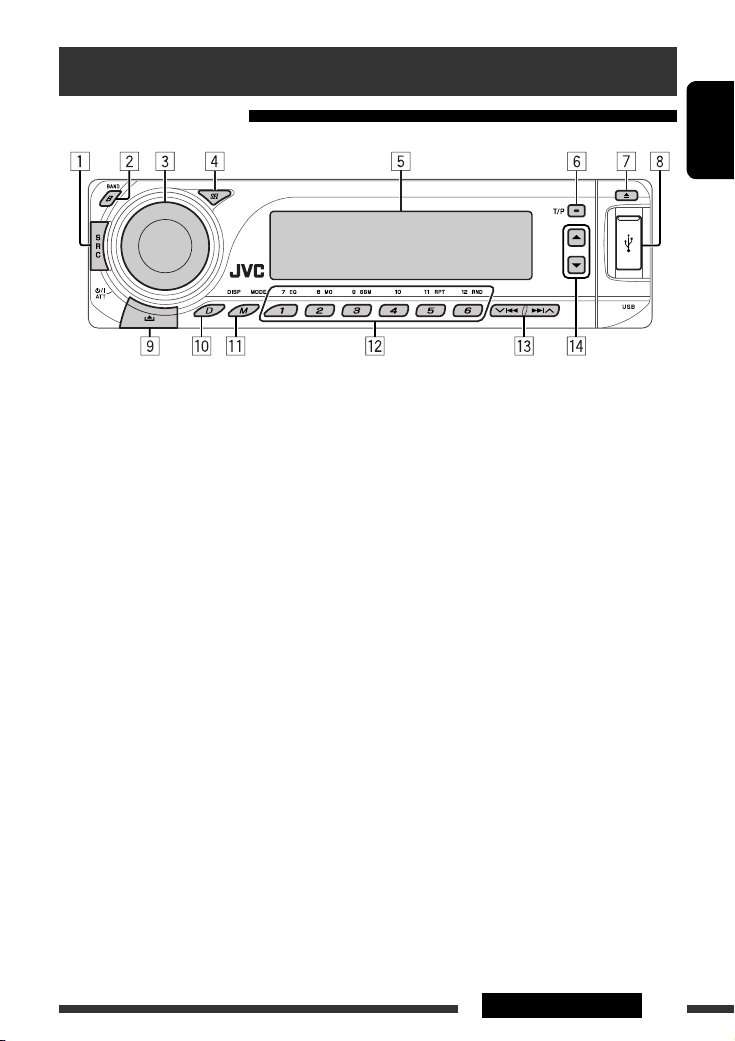
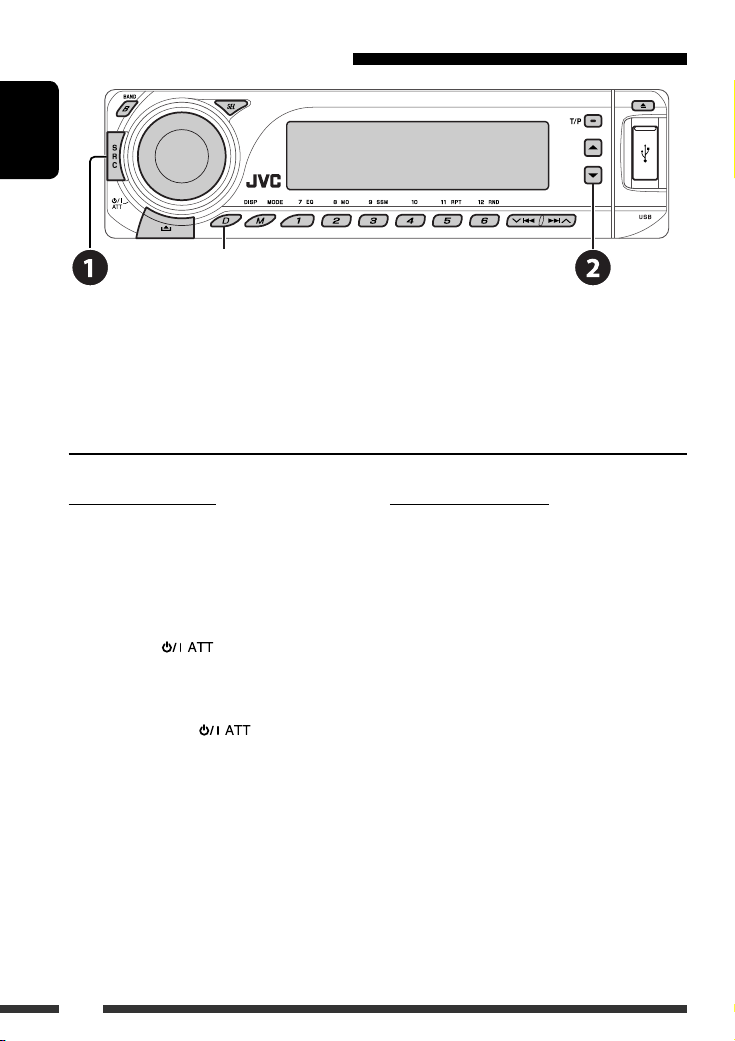
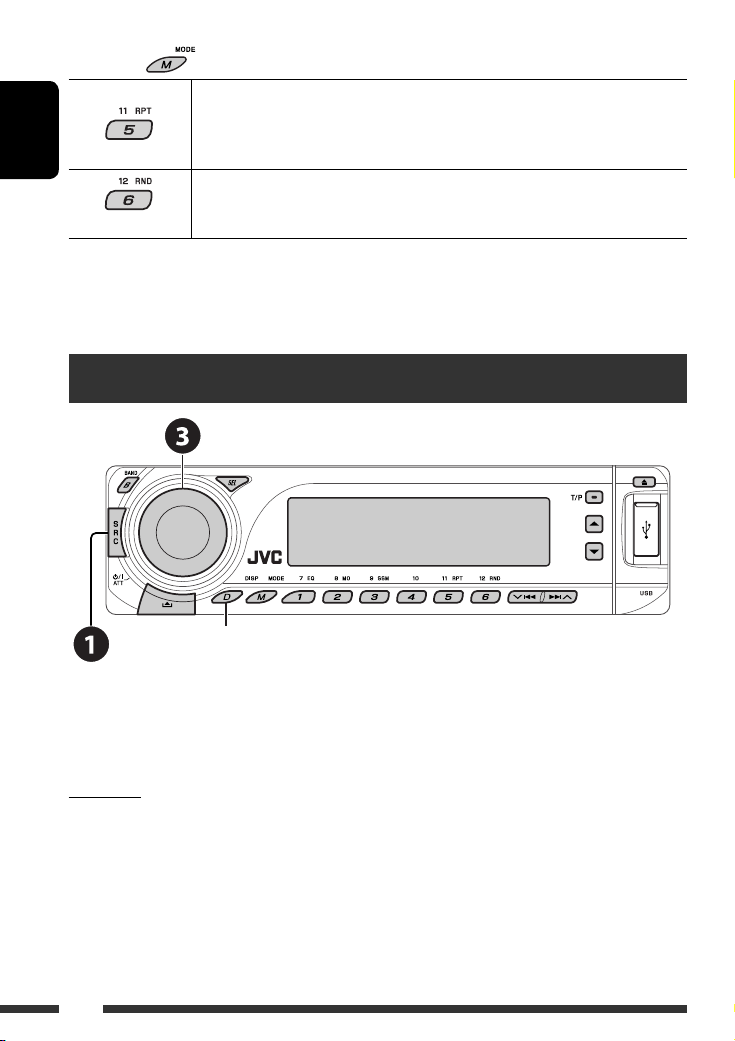
Basic operations
Using the control panel
ENGLISH
1 Select the source.
FM/AM = DAB * = CD * = USB * = CD-CH */
IPOD */D.PLAYER * (or EXT IN) = BT-PHONE
(Bluetooth Phone)* = BT-AUDIO (Bluetooth
Audio)* = (back to the beginning)
* You cannot select these sources if they are not
ready or not connected.
2 Select the bands.
3 • Turn on the power.
• Turn off the power [Hold].
• Attenuate the sound (if the power is on).
• Volume control [Turn].
4 • Adjust the sound mode.
• Enter the PSM settings [Hold].
5 Display window
6 • Activate/deactivate TA Standby Reception.
• Enter RDS programme search [Hold].
7 Eject disc.
8 USB (Universal Serial Bus) input terminal
9 Detach the panel.
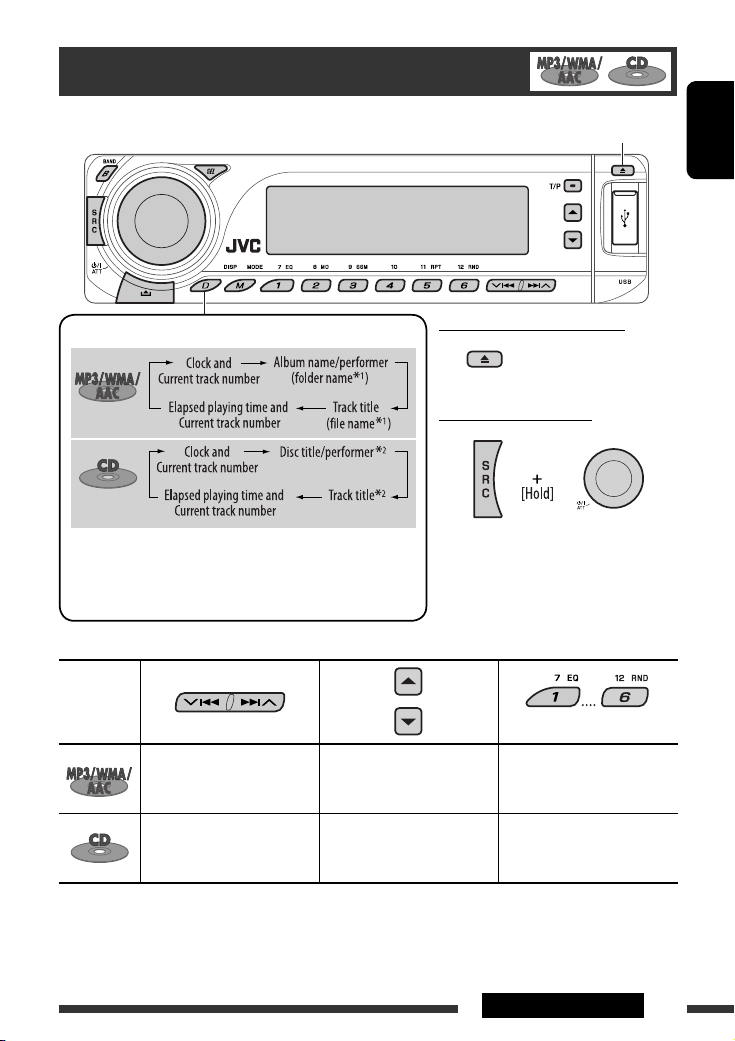
p Change the display information.
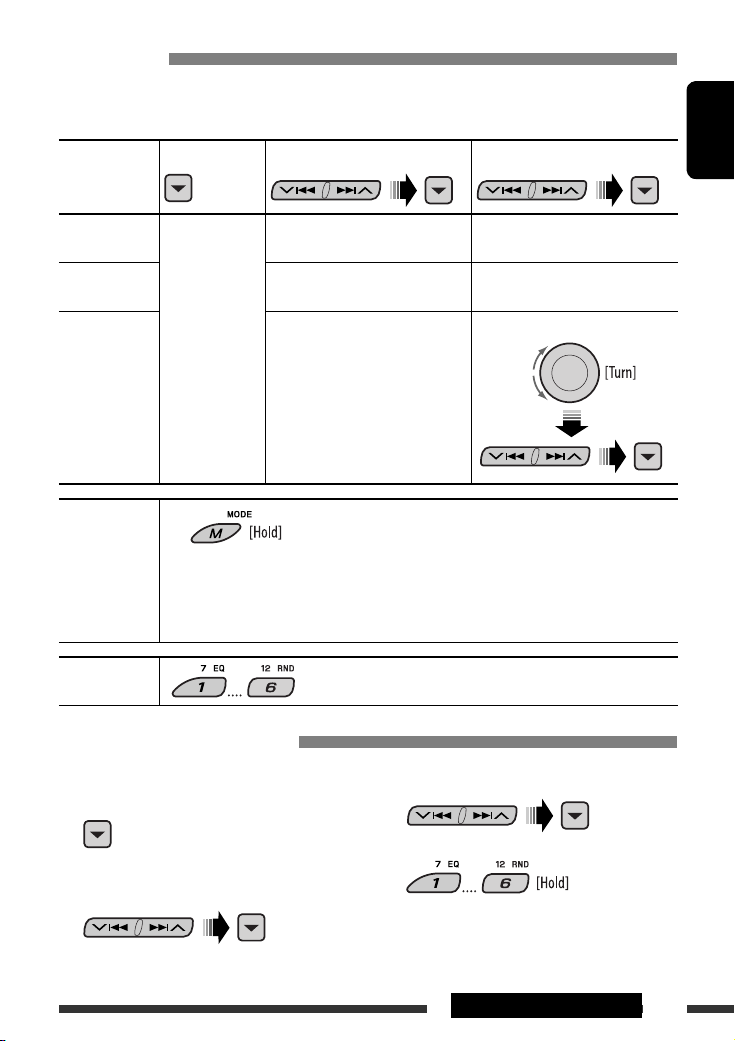
q Enter functions mode.
Press M MODE, then one of the following buttons
(within 5 seconds)...
EQ : Select the sound mode.
MO : Turn on/off monaural reception.
SSM : Automatic station presetting [Hold].
RPT : Select repeat play.
RND : Select random play.
5 / ∞ : Skip 10 tracks.
w • FM/AM/DAB: Select preset station/DAB service.
• CD/USB: Select folder/track/disc (for CD
changer).
• BT-PHONE: Select preset phone number.
e • FM/AM/DAB: Search for station/DAB ensemble.
• CD/USB: Select track.
• IPOD/D.PLAYER: Select track.
• BT-PHONE/BT-AUDIO: Select setting item/
Select a registered device.
r • DAB: Select DAB service.
• CD/USB: Select folder.
• IPOD/D.PLAYER: Enter the main menu/Pause or
stop playback/Confirm selection.
• BT-PHONE/BT-AUDIO: Enter setting menu/
Confirm selection.
5OPERATIONS
Page 6
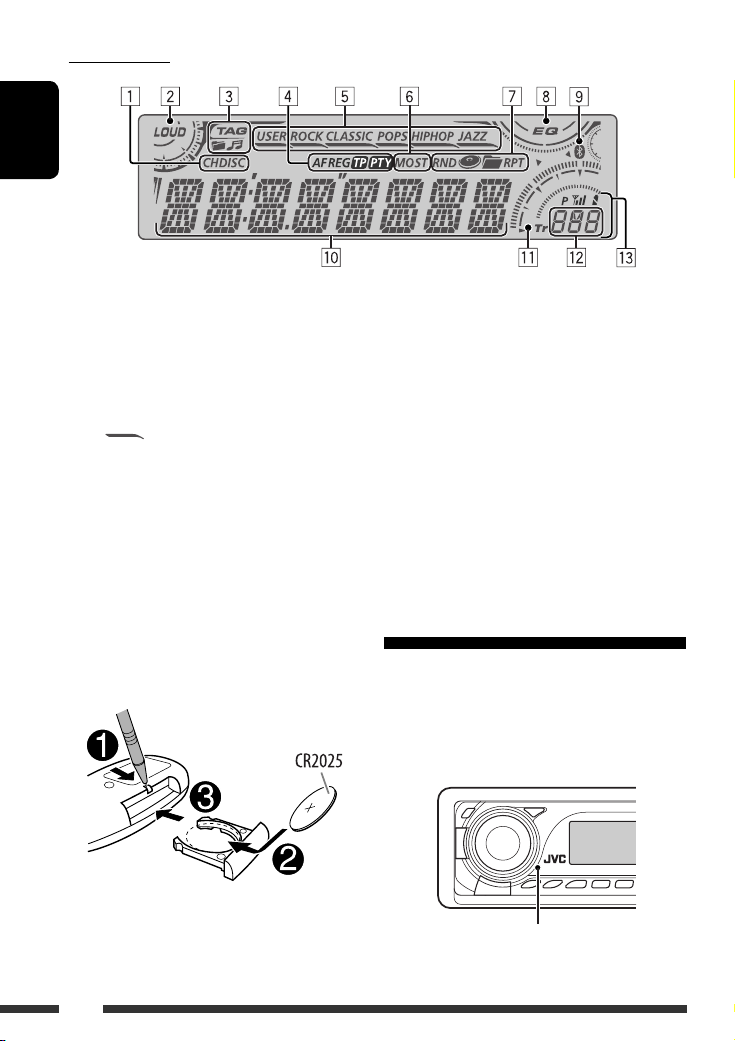
Display window
ENGLISH
1 Playback source indicators
2 Loudness indicator
3 Track information indicators
4 RDS indicators
5 Sound mode indicators
• lights up for the selected item.
6 Tuner reception indicators
7 Playback mode/item indicators
(Random/Repeat)
8 Equalizer indicator
Using the remote controller (RM-RK50)
Installing the lithium coin battery (CR2025)
9 Bluetooth indicator
p Main display
(Time, menu, playback information)
q Track indicator
w Source display/Preset No./Track No./Folder No./
Disc No.
e Status of Bluetooth device
(Device number, [1 – 5]; signal strength, [0 – 3]*;
battery reminder, [0 – 3]*)
* As the number increases, the signal/battery
strength becomes stronger.
Before using the remote controller:
• Aim the remote controller directly at the remote
sensor on the unit.
• DO NOT expose the remote sensor to bright light
(direct sunlight or artificial lighting).
Remote sensor
6
Page 7

Warning:
To prevent accidents and damage
• Do not install any battery other than CR2025 or
its equivalent.
• Do not leave the remote controller in a place
(such as dashboards) exposed to direct sunlight
for a long time.
• Store the battery in a place where children
cannot reach.
• Do not recharge, short, disassemble, heat the
battery, or dispose of it in a fire.
• Do not leave the battery with other metallic
materials.
• Do not poke the battery with tweezers or similar
tools.
• Wrap the battery with tape and insulate when
throwing away or saving it.
• While playing an MP3 disc on an
MP3-compatible CD changer:
– Changes the disc if pressed briefly.
– Changes the folder if pressed and held.
• While listening to an Apple iPod or a JVC
D. player:
– Pauses/stops or resumes playback with D
∞.
– Enters the main menu with 5 U.
(Now 5 U/D ∞/2 R/F 3 work as the menu
selecting buttons.)*
3 Adjusts the volume level.
4 Selects the sound mode (iEQ: intelligent equalizer).
5 Selects the source.
6 For Bluetooth cellular phone:
– Answers calls if pressed briefly.
– Rejects calls if pressed and held.
7 • Searches for stations (or DAB services) if pressed
briefly.
• Searches for DAB ensembles if pressed and held.
• Fast-forwards or reverses the track if pressed and
held.
• Changes the tracks if pressed briefly.
• While listening to an iPod or a D. player (in menu
selecting mode):
– Selects an item if pressed briefly. (Then, press
D ∞ to confirm the selection.)
– Skips 10 items at a time if pressed and held.
• Reverse skip/forward skip for Bluetooth audio.
ENGLISH
1 • Turns the power on if pressed briefly or
attenuates the sound when the power is on.
• Turns the power off if pressed and held.
2 • Changes the FM/AM/DAB bands with 5 U.
• Changes the preset stations (or DAB services)
with D ∞.
• Changes the folder of the MP3/WMA/AAC/WAV.
* 5 U : Returns to the previous menu.
D ∞ : Confirms the selection.
7OPERATIONS
Page 8
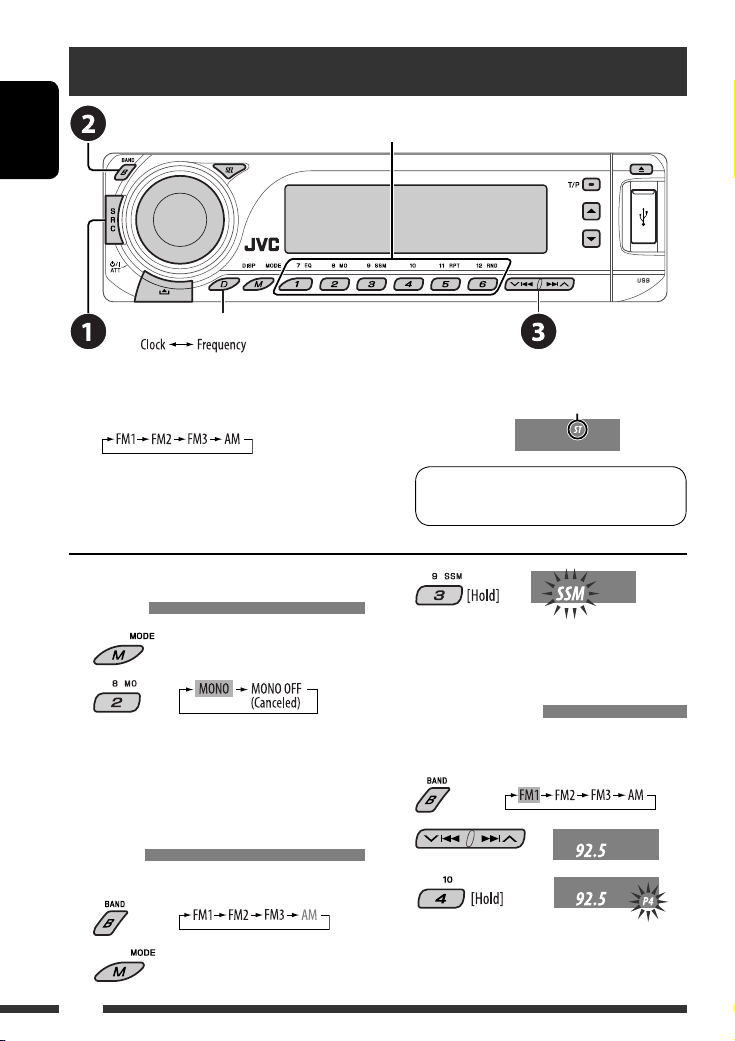
Listening to the radio
ENGLISH
Change the display information
Select preset station.
~ Select “FM/AM.”
Ÿ Select the bands.
! Search for a station to listen—Auto Search.
Manual Search: Hold either one of the buttons until “M”
flashes on the display, then press it repeatedly.
When an FM stereo broadcast is hard
to receive
1
2
Reception improves, but stereo effect will be lost.
• MO indicator lights up.
FM station automatic presetting —
SSM (Strong-station Sequential
Memory)
You can preset up to six stations for each band.
1
2
Lights up when receiving an FM stereo
broadcast with sufficient signal strength.
Note: FM1 and FM2: 87.5 MHz – 108.0 MHz
FM3: 65.00 MHz – 74.00 MHz
3
Local FM stations with the strongest signals are
searched and stored automatically in the FM band.
Manual presetting
Ex.: Storing FM station of 92.5 MHz into preset number
4 of the FM1 band.
1
2
3
8
Page 9
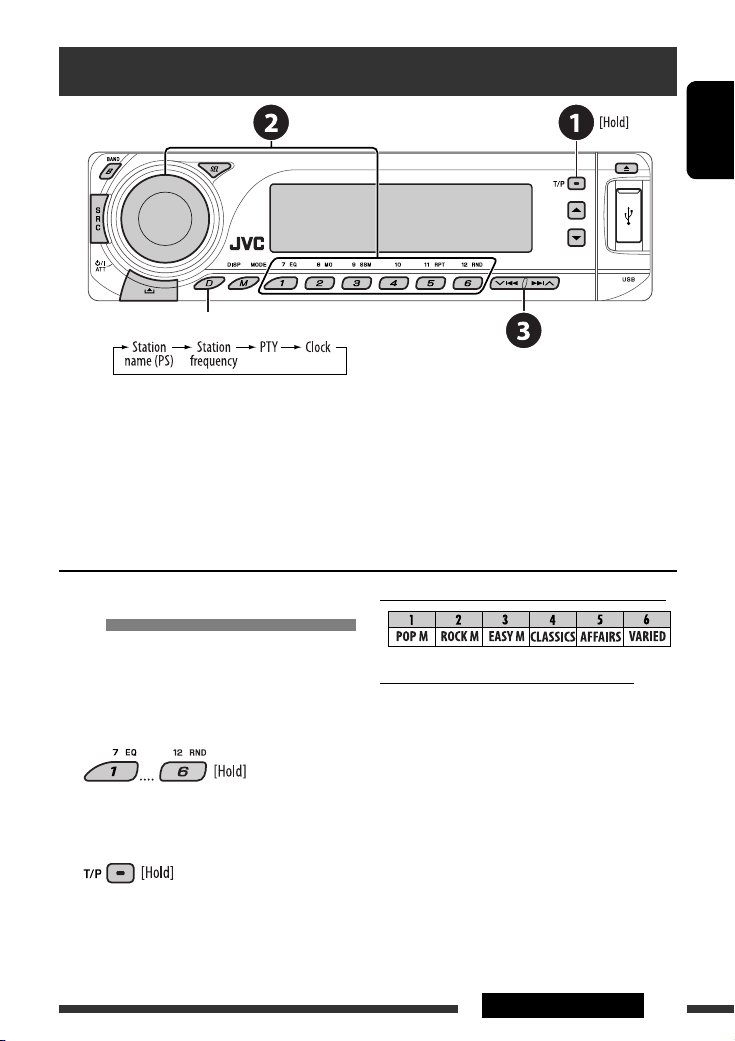
Searching for FM RDS programme — PTY Search
Change the display information
~ Activate PTY Search.
Ÿ Select one of the PTY codes (programme types).
See the following for details.
! Start searching.
If there is a station broadcasting a programme of the same PTY code as you have selected, that station is tuned
in.
ENGLISH
Storing your favorite programme
types
You can store your favorite PTY codes into the number
buttons.
1 Select a PTY code (see right column).
2 Select a preset number.
3 Repeat steps 1 and 2 for storing other
PTY codes.
4
Preset PTY codes in the number buttons (1 to 6):
PTY codes (available with the control dial):
NEWS, AFFAIRS, INFO, SPORT, EDUCATE, DRAMA,
CULTURE, SCIENCE, VARIED, POP M (music), ROCK M
(music), EASY M (music), LIGHT M (music), CLASSICS,
OTHER M (music), WEATHER, FINANCE, CHILDREN,
SOCIAL, RELIGION, PHONE IN, TRAVEL, LEISURE, JAZZ,
COUNTRY, NATION M (music), OLDIES, FOLK M (music),
DOCUMENT
9OPERATIONS
Page 10
Activating/deactivating TA/PTY Standby Reception
TA Standby Reception Indicator PTY Standby Reception Indicator
Press
to activate. See page 26.
The unit temporarily will switch to Traffic
ENGLISH
Announcement (TA), if available, from any
source other than AM and FM3*.
The volume changes to the preset TA
volume level if the current level is lower
than the preset level (see page 26).
Not yet activated. Tune in to another
station providing the RDS signals.
Press
• When a DAB tuner is connected, TA/PTY Standby Reception also searches for services. (See also pages 20 and 26.)
* The unit will not switch to Traffic Announcement or PTY programme when a call connection is established through the
to deactivate. Goes off Select “OFF” for the PTY code (see page 26)
“BT-PHONE.”
Lights up The unit temporarily will switch to your
favorite PTY programme from any source
other than AM and FM3*.
Flashes Not yet activated. Tune in to another
station providing the RDS signals.
to deactivate.
Lights up
Flashes
Goes off
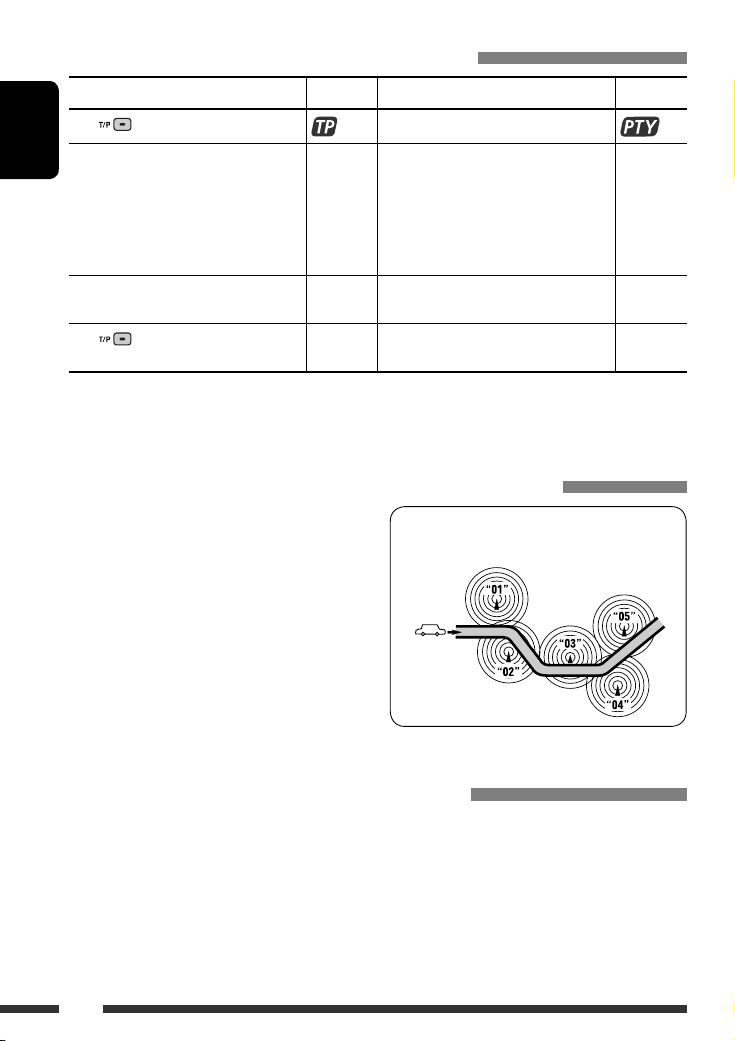
Tracing the same programme—Network-Tracking Reception
When driving in an area where FM reception is not
sufficient enough, this unit automatically tunes in to
another FM RDS station of the same network, possibly
broadcasting the same programme with stronger
signals (see the illustration on the right).
To change the Network-Tracking Reception
setting, see “AF-REG” on page 26.
• When the DAB tuner is connected, refer to “Tracing
the same programme—Alternative Frequency
Reception” on page 20.
Programme A broadcasting on different frequency
areas (01 – 05)
Automatic station selection—Programme Search
Usually when you press the number buttons, the preset station is tuned in.
If the signals from the FM RDS preset station are not sufficient for good reception, this unit, using the AF data, tunes
in to another frequency broadcasting the same programme as the original preset station is broadcasting.
• The unit takes some time to tune in to another station using programme search.
• See also page 26.
10
Page 11
Disc operations
Open the control panel and insert the disc.
Playback starts automatically.
ENGLISH
Change the display information
To stop play and eject the disc
• Press SRC to listen to
another playback source.
Prohibiting disc ejection
1
If the file does not have Tag information or “TAG DISP” is set to
*
“TAG OFF” (see page 27), folder name and file name appear.
To cancel the prohibition, repeat the
same procedure.
TAG indicator will not light up.
2
*
“NO NAME” appears for an audio CD.
Pressing (or holding) the following buttons allows you to...
Disc type*
3
Press: Select track
Hold: Reverse/fast-forward
(Number buttons) *
Select folder Locate particular folder
5
directly *
4
track
Press: Select track
Hold: Reverse/fast-forward
—
Locate particular track directly
track
3
*
This unit can playback AAC files encoded using iTunes.
*4 Press to select number 1 to 6; hold to select number 7 to 12.
*5 It is required that folders be assigned with 2-digit numbers at the beginning of their folder names—01, 02, 03, and
so on.
Continued on the next page
11OPERATIONS
Page 12
After pressing , press the following buttons to...
Disc type
ENGLISH
Skip 10 tracks (within
the same folder)
Skip 10 tracks TRK RPT:
• To cancel repeat play or random play, select “RPT OFF” or “RND OFF.”
TRK RPT:
Repeat current track
FLDR RPT:
Repeat current folder
Repeat current track
FLDR RND:
Randomly play all tracks of
current folder, then tracks of
next folders
DISC RND:
Randomly play all tracks
DISC RND:
Randomly play all tracks
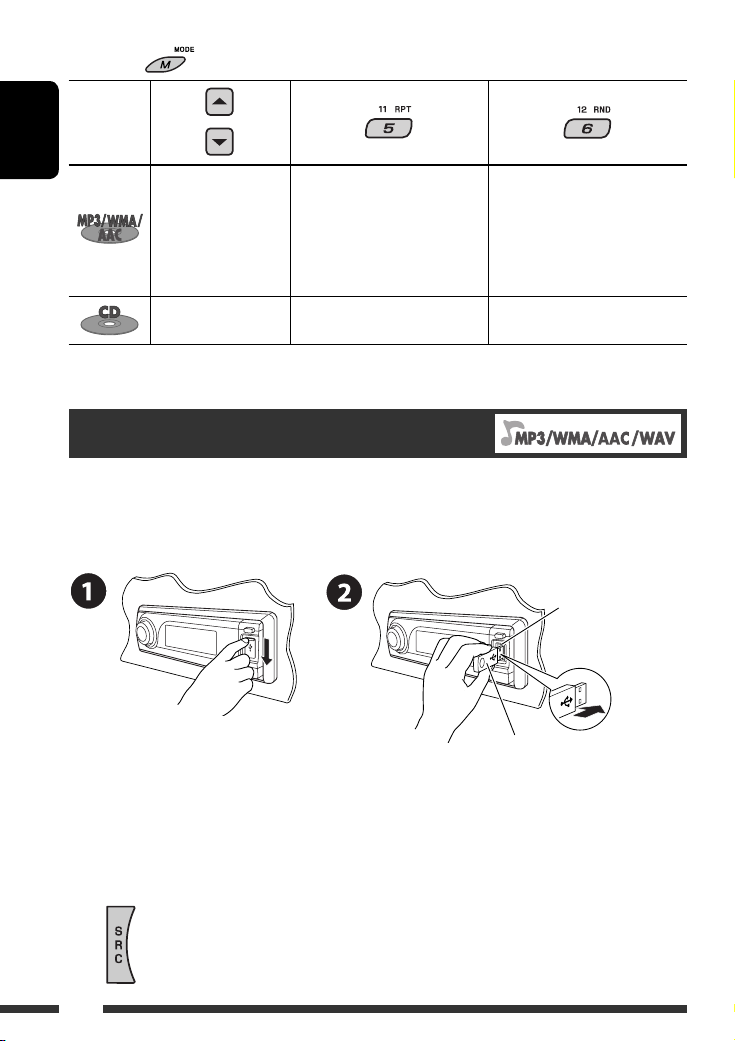
Listening to the USB device
You can connect a USB mass storage class device such as a USB memory, Digital Audio Player *1, portable HDD, etc. to
the unit.
*1 You can connect both MTP (Media Transfer Protocol) devices and USB mass storage class devices.
Attaching a USB memory
USB input terminal
USB memory
This unit can play MP3/WMA/WMA-DRM10 *1/AAC*2/WAV tracks stored in a USB device.
*1 See page 32.
*2 This unit can play back AAC files encoded using iTunes. This unit cannot play back AAC files purchased from iTunes
Store.
If a USB device has been attached...
Playback starts from where it has been stopped previously.
• If a different USB device is currently attached, playback starts from the beginning.
12
Page 13

To stop play and detach the USB device
Straightly pull it out from the unit.
• Press SRC to listen to another playback source.
Cautions:
• Avoid using the USB device if it might hinder your safety driving.
• Do not pull out and attach the USB device repeatedly while “CHECK” is flashing on the display.
• Do not start the car engine if a USB device is connected.
• Stop play back before disconnecting a USB device.
• This unit may not be able to play the files depending on the type of USB device.
• You cannot connect a computer to the USB input terminal of the unit.
• Make sure all important data has been backed up to avoid losing the data.
• Do not leave a USB device in the car, expose to direct sunlight, or high temperature to avoid deformation or
cause damages to the device.
Pressing (or holding) the following buttons allows you to...
Press: Select track
Hold: Reverse/fast-forward track
Select folder
(Number buttons)
After pressing
• To cancel repeat play or random play, select “RPT OFF” or “RND OFF.”
, press the following buttons to...
Skip 10 tracks (within the same folder)
TRK RPT: Repeat current track
FLDR RPT: Repeat all tracks of current folder
FLDR RND: Randomly play all tracks of current folder, then tracks of next folders
DISC RND: Randomly play all tracks
Locate particular folder directly
• See also *
4
and *5 on page 11.
ENGLISH
Change the display information
* If the file does not have Tag information
or “TAG DISP” is set to “TAG OFF” (see
page 27), folder name and file name
appear. TAG indicator will not light up.
13OPERATIONS
Page 14
Using the Bluetooth® devices
For Bluetooth operations, it is required to connect the Bluetooth Adapter (KS-BTA200) to the CD changer jack on
the rear of this unit. See also page 23.
• Refer also to the instructions supplied with the Bluetooth adapter and the Bluetooth device.
ENGLISH
• Refer to the list (included in the box) to see the countries where you may use the Bluetooth® function.
To use a Bluetooth device through the unit (“BT-PHONE” and “BT-AUDIO”) for the first time, you need to establish
Bluetooth wireless connection between the unit and the device.
• Once the connection is established, it is registered in the unit even if you reset your unit. Up to five devices can be
registered in total.
• Only one device can be connected at a time for each source (“BT-PHONE” and “BT-AUDIO”).
Registering a Bluetooth device
Registration (Pairing) methods
Use either of the following items in the Bluetooth menu
to register and establish the connection with a device.
• Select “BT-PHONE” or “BT-AUDIO” as the source to
operate the Bluetooth menu.
OPEN Make the unit ready to establish a new
Bluetooth connection.
Connection is established by operating the
Bluetooth device.
SEARCH Make the unit ready to establish a new
Bluetooth connection.
Connection is established by operating
the unit.
Registering using “OPEN”
Preparation
Operate the device to turn on its Bluetooth function.
1 Select “BT-PHONE” or “BT-AUDIO.”
2 Select “NEW.”
3 Select “OPEN.”
4 Enter a PIN (Personal Identification
Number) code to the unit.
• You can enter any number you like (1-digit to
16-digit number). [Initial: 0000]
* Some devices have their own PIN code. Enter the
specified PIN code to the unit.
1 Move to the next (or previous) number
position.
2 Select a number or blank space.
14
3 Repeat steps 1 and 2 until you finish
entering a PIN code.
4 Confirm the entry.
“OPEN...” flashes on the display.
Page 15
5 Use the Bluetooth device to search and
connect.
On the device to be connected, enter the same PIN
code you have just entered for this unit. “CONNECT”
flashes on the display.
Now connection is established and you can use the
device through the unit.
The device remains registered even after you
disconnect the device. Use “CONNECT“ (or activate
“AUTO CNT”) to connect the same device from next
time. (See the right column and page 28.)
2 Select a device you want to connect.
3 Use “OPEN’ or “SEARCH’ to connect.
ENGLISH
To connect/disconnect a registered device
1 Select “BT-PHONE” or “BT-AUDIO.”
To search for available devices
Perform steps 1 and 2 on page 14, then...
1 Select “SEARCH.”
The unit searches and displays the list of the
available devices.
• If no available device is detected, “UNFOUND”
appears.
2 Select a device you want to connect.
3 Enter the specific PIN code of the device to
the unit.
• Refer to the instructions supplied with the device
to check the PIN code.
4 Use the Bluetooth device to connect.
Now connection is established and you can use the
device through the unit.
To connect a special device
Perform steps 1 and 2 on page 14, then...
1 Select “SPECIAL.”
The unit displays the list of the preset devices.
2 Select a registered device you want to
connect/disconnect.
3 Select “CONNECT” or “DISCNNCT” to connect/
disconnect the selected device.
You can set the unit to connect a Bluetooth device
automatically when the unit is turned on. (See
“AUTO CNT” on page 28.)
To delete a registered device
1 Select “BT-PHONE” or “BT-AUDIO.”
2 Select a registered device you want to delete.
3 Select “DELETE,” then “YES” to delete the
selected device.
15EXTERNAL DEVICES
Page 16
Using the Bluetooth cellular phone
ENGLISH
Change the display information
Select “BT-PHONE.”
~
Ÿ Enter Bluetooth menu.
! Make a call or settings using the Bluetooth menu. (See pages 17 and 28.)
When a call comes in....
The source is automatically changed to “BT-PHONE.”
When “AUTO ANS” (answer) is activated....
The unit answers the incoming calls automatically, see
page 28.
• When “AUTO ANS” (answer) is deactivated, press any
button (except /control dial) to answer the
incoming call.
To end the call
Hold any button (except /control dial).
• You can adjust the microphone volume level (see
page 28).
16
When an SMS comes in....
If the cellular phone is compatible with SMS (Short
Message Service) and “MSG-INFO” (message info) is set
to “AUTO” (see page 28), the unit rings and “RCV MSG”
(receiving message) appears on the display to inform
you the arrival of the message.
Page 17
Making a call
You can make a call using the following methods.
Select “BT-PHONE,” then follow the following steps to make a call:
1 2
3 (unless mentioned otherwise)
ENGLISH
Call history Display the Dial
Menu.
Phone book Select “PH BOOK.”
Direct dialing Select “NUMBER.” Enter the phone number.
Voice command
1 “SAY NAME” appears on the display.
Select a call history.
REDIAL, RECEIVED, MISSED
The list of phone number appears.
Select a name (if it is acquired) or
phone number.
Select a name from the list.
2 Speak the name you want to call.
• You can also use voice command from the Dial Menu. Select “VOICE” from the Dial Menu.
• If your cellular phone does not support the voice recognition system, “ERROR” appears on the
display.
Preset phone
number
See the following for settings.
Presetting the phone number
You can preset up to six phone numbers.
3 Select a phone number.
1 Display the Dial Menu.
2 Select “PH BOOK,“ “MISSED,” or
“RECEIVED” whichever you want to use.
4
17EXTERNAL DEVICES
Page 18

Using the Bluetooth audio player
ENGLISH
Pause/start play back
Enter setting menu
(Device list)
Change the display information
Reverse skip/forward skip
~ Select “BT-AUDIO.”
If playback did not start automatically, operate the Bluetooth audio player to start playback.
• Refer also to page 15 for connecting/disconnecting/deleting a registered device.
Bluetooth Information:
If you wish to receive more information about Bluetooth, visit our JVC web site.
Listening to the CD changer
Change the display information
(see page 11)
It is recommended to use a JVC MP3-compatible CD changer with your unit. You can connect a CD changer to the CD
changer jack on the rear of the unit. See also page 23.
• You can only play conventional CDs (including CD Text) and MP3 discs.
18
Page 19

Preparation
Make sure “CHANGER” is selected for the external input setting, see page 27.
~ Select “CD-CH.”
Ÿ Select a disc to start playing.
Press: For selecting disc number 1 – 6.
Hold: For selecting disc number 7 – 12.
Pressing (or holding) the following buttons allows you to...
Disc type
ENGLISH
Press: Select track
Hold: Reverse/fast-forward track
Press: Select track
Hold: Reverse/fast-forward track
After pressing
Disc type
• To cancel repeat play or random play, select “RPT OFF” or “RND OFF.”
, press the following buttons to...
Skip 10 tracks (within
the same folder)
Skip 10 tracks TRK RPT:
TRK RPT:
Repeat current track
FLDR RPT:
Repeat all tracks of current folder
DISC RPT:
Repeat all tracks of the current
disc
Repeat current track
DISC RPT:
Repeat all tracks of the current
disc
Select folder
—
FLDR RND:
Randomly play all tracks of
current folder, then tracks of
next folders
DISC RND:
Randomly play all tracks of
current disc
MAG RND:
Randomly play all tracks of the
inserted discs
DISC RND:
Randomly play all tracks of
current disc
MAG RND:
Randomly play all tracks of the
inserted discs
19EXTERNAL DEVICES
Page 20
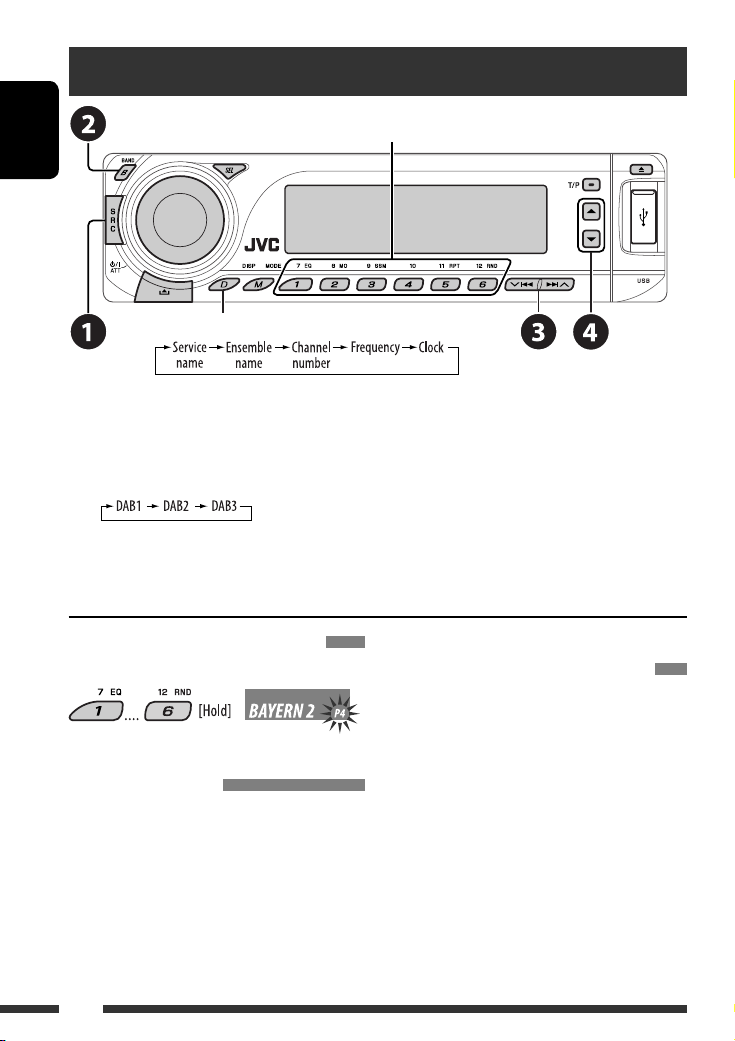
Listening to the DAB tuner
Select preset service.
ENGLISH
Change the display information
You can connect a JVC DAB tuner to the CD changer jack on the rear of the unit. See also page 23.
~ Select “DAB.”
Ÿ Select the bands.
! Searching for an ensemble.
Manual Search: Hold either one of the buttons until “MANU” flashes on the display, then press it repeatedly.
⁄ Select a service (either primary or secondary) to listen to.
Storing DAB services in memory
While listening to a DAB service...
Activating/deactivating TA/PTY
Standby Reception
• Operations are exactly the same as explained on page
10 for FM RDS stations.
• You cannot store PTY codes separately for the DAB
tuner and for the FM tuner.
20
Tracing the same programme—
Alternative Frequency Reception
• While receiving a DAB service:
When driving in an area where a service cannot be
received, this unit automatically tunes in to another
ensemble or FM RDS station, broadcasting the same
programme.
• While receiving an FM RDS station:
When driving in an area where a DAB service is
broadcasting the same programme as the FM RDS
station is broadcasting, this unit automatically tunes
in to the DAB service.
To deactivate the Alternative Frequency
Reception, see page 27.
Page 21
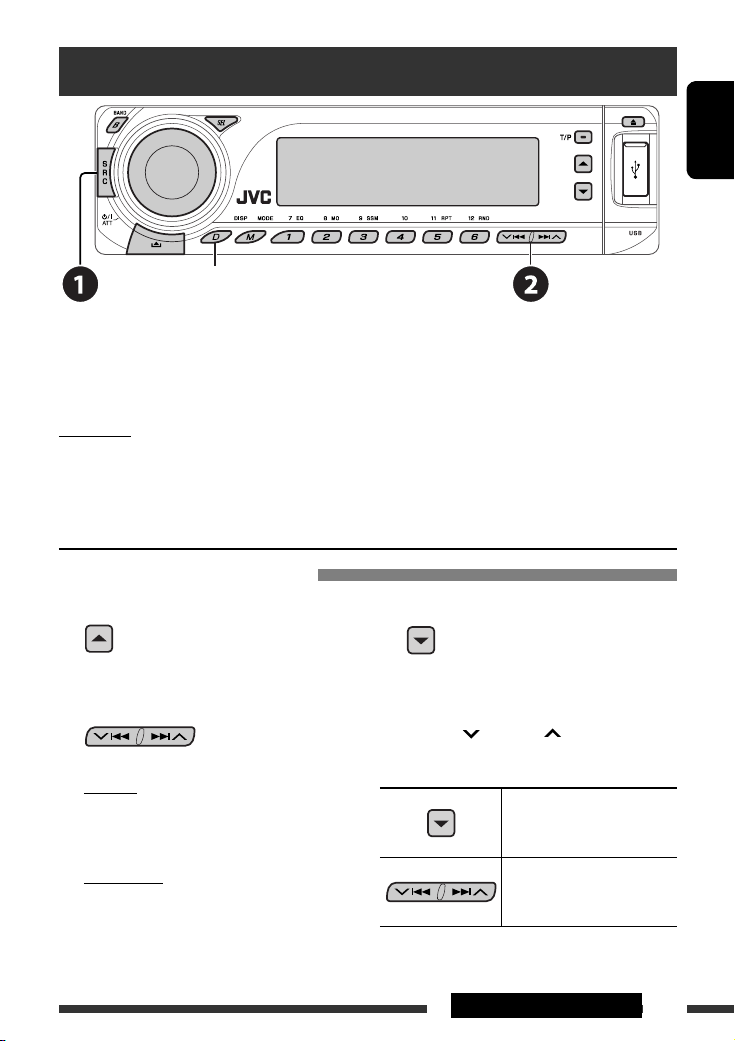
Listening to the iPod / D. player
Change the display information
Before operating, connect either one of the following (separately purchased) to the CD changer jack on the rear of
the unit. See also page 23.
• Interface adapter for iPod—KS-PD100 for controlling an iPod.
• D. player interface adapter—KS-PD500 for controlling a D. player.
Preparation
Make sure “CHANGER” is selected for the external input setting, see page 27.
~ Select “IPOD” or “D. PLAYER.”
Ÿ Select a song to start playing.
Selecting a track from the menu
1 Enter the main menu.
This mode will be canceled if no
operations are done for about
5 seconds.
2 Select the desired menu.
For iPod:
PLAYLIST Ô ARTISTS Ô ALBUMS Ô SONGS
Ô GENRES Ô COMPOSER Ô (back to the
beginning)
For D. player:
PLAYLIST Ô ARTIST Ô ALBUM Ô GENRE
Ô TRACK Ô (back to the beginning)
3 Confirm the selection.
• To move back to the previous menu, press 5.
• If a track is selected, playback starts
automatically.
• Holding 4/¢ can skip 10 items at
a time.
Pause/stop playback
• To resume playback, press
the button again.
Press: Select tracks
Hold: Reverse/fast-forward
track
ENGLISH
Continued on the next page
21EXTERNAL DEVICES
Page 22
After pressing
ENGLISH
• To cancel repeat play or random play, select “RPT OFF” or “RND OFF.”
* iPod: Functions only if you select “ALL” in “ALBUMS” of the main “MENU.”
, press the following buttons to...
ONE RPT: Functions the same as “Repeat One” of the iPod or “Repeat Mode =
One” of the D. player.
ALL RPT: Functions the same as “Repeat All” of the iPod or “Repeat Mode
All” of the D. player.
ALBM RND*: Functions the same as “Shuffle Albums” of the iPod.
SONG RND/RND ON: Functions the same as “Shuffle Songs” of the iPod or “Random Play
= On” of the D. player.
Listening to the other external components
Change the display information
=
You can connect an external component using the following adapters (separately purchased) to the CD changer jack
on the rear of the unit. See also page 23.
• Line Input Adapter—KS-U57
• AUX Input Adapter—KS-U58
Preparation
Make sure “EXT IN” is selected for the external input setting, see page 27.
~ Select “EXT IN.”
Ÿ Turn on the connected component and start playing the source.
! Adjust the volume.
⁄ Adjust the sound as you want (see pages 24 and 25).
22
Page 23

Concept diagram of the external device connection
For connection, see Installation/Connection manual (separate volume).
• Connection 1 (integrated connection)
Unit
CD changer jack
(see pages 14 – 18)
or
(see page 27 of the
”EXT IN” setting)
ENGLISH
JVC CD changer, [18]
Apple iPod, [21]
JVC D. player, [21]
JVC DAB tuner, [20]
(see page 27 of the
”EXT IN” setting)
• Connection 2 (alternative connection)
Unit
CD changer jack
(see page 27 of the
”EXT IN” setting)
(see page 27 of the
”EXT IN” setting)
: Adapter (separately purchased)
MD player, etc., [22]
MD player, etc., [22]
(see pages 14 – 18)
JVC DAB tuner, [20]
JVC CD changer, [18]
Apple iPod, [21]
JVC D. player, [21]
MD player, etc., [22]
MD player, etc., [22]
23EXTERNAL DEVICES
Page 24

Selecting a preset sound mode
ENGLISH
Preset values
Indication (For)
USER (Flat sound) 00 00 00 OFF
ROCK (Rock or disco music) +03 00 +02 ON
CLASSIC (Classical music) +01 00 +03 OFF
POPS (Light music) +02 +01 +02 OFF
HIP HOP (Funk or rap music) +04 –02 +01 ON
JAZZ (Jazz music) +03 00 +03 OFF
BAS
(bass)
MID
(mid-range)
TRE
(treble)
LOUD
(loudness)
24
Page 25
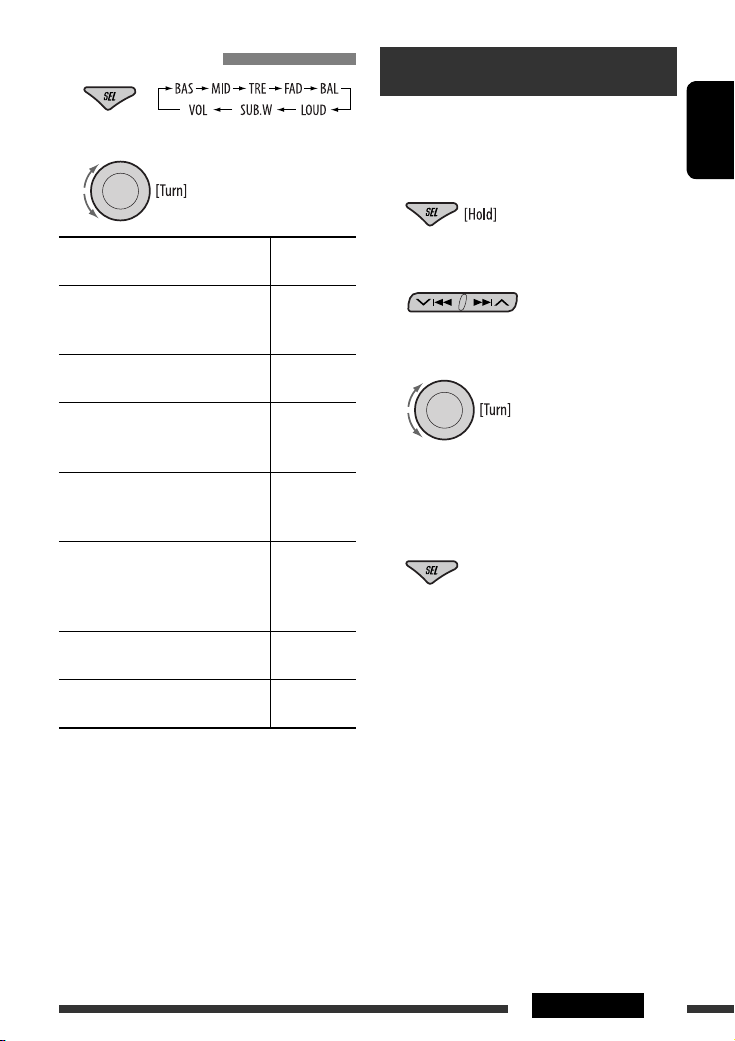
Adjusting the sound
1
2 Adjust the level.
General settings — PSM
You can change PSM (Preferred Setting Mode) items
listed in the table on pages 26 and 27.
ENGLISH
1 Enter the PSM settings.
BAS *1 (bass)
Adjust the bass.
1
MID *
(mid-range)
Adjust the mid-range frequencies
sound level.
1
(treble)
TRE *
Adjust the treble.
2
FAD *
(fader)
Adjust the front and rear speaker
balance.
3
(balance)
BAL *
Adjust the left and right speaker
balance.
1
LOUD *
(loudness)
Boost low and high frequencies to
produce a well-balanced sound at low
volume level.
SUB.W (subwoofer)
Adjust the subwoofer output level.
VOL (volume)
Adjust the volume.
*1 When you adjust the bass, mid-range, treble, or
loudness, the adjustment you have made is stored
for the currently selected sound mode (iEQ) including
“USER.”
*2 If you are using a two-speaker system, set the fader
level to “00.”
*3 The adjustment will not affect the subwoofer output.
*4 Depending on the amplifier gain control setting. (See
page 27 for details.)
–06 to +06
–06 to +06
–06 to +06
R06 to F06
L06 to R06
LOUD ON or
LOUD OFF
00 to 08,
initial: 04
00 to 30
4
(or 50) *
2 Select a PSM item.
3 Select or adjust the selected PSM item.
4 Repeat steps 2 and 3 to adjust other PSM
items if necessary.
5 Finish the procedure.
Continued on the next page
25SETTINGS
Page 26
Indication Item
Setting, [reference page]
( : Initial)
DEMO
Display demonstration
ENGLISH
CLK DISP *
Clock display
1
• DEMO ON
• DEMO OFF
• ON
• OFF
: Display demonstration will be activated automatically if no
operation is done for about 20 seconds, [4].
: Cancels.
: Clock time is shown on the display at all times when the power is
turned off.
: Cancels; pressing D DISP will show the clock time for about 5 seconds
when the power is turned off, [4].
CLOCK H
0 – 23 (1 – 12) : Initial: 0 (0:00), [4].
Hour adjustment
CLOCK M
00 – 59 : Initial: 00 (0:00), [4].
Minute adjustment
24H/12H
Time display mode
CLK ADJ
Clock adjustment
2
AF-REG *
Alternative frequency/
regionalization
reception
• 12H
• 24H
• AUTO
• OFF
• AF
• AF REG
: See also page 4 for setting.
: The built-in clock is automatically adjusted using the CT (clock time)
data in the RDS signal.
: Cancels.
: When the currently received signals become weak, the unit switches
to another station or service (the programme may differ from the
one currently received), [10].
: When the currently received signals become weak, the unit switches
to another station broadcasting the same programme.
PTY-STBY
PTY standby
TA VOL
Traffic announcement
• OFF
OFF, PTY codes
(see page 9)
VOL 00 —
VOL 30 or 50 *
: Cancels (not selectable when “DAB AF” is set to “AF ON”).
: Activates PTY Standby Reception with one of the PTY codes, [9, 10].
: Initial: VOL 15, [10].
3
volume
P-SEARCH *
Programme search
1
*
If the power supply is not interrupted by turning off the ignition key of your car, it is recommended to select “OFF” to
2
• ON
• OFF
: Activates Programme Search, [10].
: Cancels.
save the car’s battery.
*2 Only for RDS FM stations.
3
Depending on the “AMP GAIN” setting.
*
26
Page 27
Indication Item
Setting, [reference page]
( : Initial)
4
DAB AF *
Alternative frequency
reception
4
DAB VOL *
DAB volume
• AF ON
• AF OFF
VOL –12
— VOL +12
: Traces the programme among DAB services and FM RDS stations,
[20].
: Cancels.
: Initial: VOL 00; You can adjust the volume level of DAB tuner to
match the FM sound level and store it in memory.
adjustment
DIMMER
Dimmer
TEL
Telephone muting
5
SCROLL *
Scroll
• AUTO
• ON
• OFF
• MUTING 1/
MUTING 2
• OFF
• ONCE
• AUTO
• OFF
: Dims the display when you turn on the headlights.
: Dims the display illumination.
: Cancels.
: Select either one which mutes the sounds while using a cellular
phone.
: Cancels.
: Scrolls the track information once.
: Repeats scrolling (at 5-second intervals).
: Cancels. (Holding D DISP can scroll the display regardless of the
setting.)
WOOFER
Subwoofer cutoff
frequency
6
EXT IN *
External input
TAG DISP
Tag display
AMP GAIN
Amplifier gain control
IF BAND
Intermediate
frequency band
• LOW
• MID
• HIGH
• CHANGER
• EXT IN
• TAG ON
• TAG OFF
• LOW PWR
• HIGH PWR
• AUTO
• WIDE
: Frequencies lower than 90 Hz are sent to the subwoofer.
: Frequencies lower than 135 Hz are sent to the subwoofer.
: Frequencies lower than 180 Hz are sent to the subwoofer.
: To use a JVC CD changer, [18], or an Apple iPod/a JVC D. player, [21].
: To use any other external component, [22].
: Shows the tag while playing MP3/WMA/AAC/WAV tracks.
: Cancels.
: VOL 00 – VOL 30 (Select if the maximum power of each speaker is
less than 50 W to prevent damaging the speaker.)
: VOL 00 – VOL 50
: Increases the tuner selectivity to reduce interference noises between
adjacent stations. (Stereo effect may be lost.)
: Subject to interference noises from adjacent stations, but sound
quality will not be degraded and the stereo effect will remain.
4
*
Displayed only when DAB tuner is connected.
*5 Some characters or symbols will not be shown correctly (or will be blanked) on the display.
*6 Displayed only when one of the following sources is selected—FM, AM, DAB, CD, USB, or Bluetooth.
ENGLISH
27SETTINGS
Page 28

Bluetooth settings
You can change the settings listed on the right column
according to your preference.
ENGLISH
1 Select “BT-PHONE” or “BT-AUDIO.”
2 Enter the Bluetooth menu.
3 Select “SETTING.”
4 Select a setting item.
5 Change the setting accordingly.
Setting menu ( : Initial)
AUTO CNT (connect)
When the unit is turned on, the connection is
established automatically with....
OFF: No Bluetooth device.
LAST: The last connected Bluetooth device.
ORDER: The available registered Bluetooth device
found at first.
AUTO ANS (answer)
Only for the device being connected for “BT-PHONE.”
ON: The unit answers the incoming calls
automatically.
OFF: The unit does not answer the calls
automatically. Answer the calls manually.
REJECT: The unit rejects all incoming calls.
MSG-INFO (message info)
Only for the device being connected for “BT-PHONE.”
AUTO: The unit informs you of the arrival of
a message by ringing and displaying
“RCV MSG” (receiving message).
MANUAL: The unit does not inform you of the arrival of
a message.
MIC SET (microphone setting)
Only for the device being connected for “BT-PHONE.”
Adjust microphone volume connected to the Bluetooth
adapter, [LEVEL 01/02/03].
28 SETTINGS
VERSION
The Bluetooth software and hardware versions are
shown.
Page 29
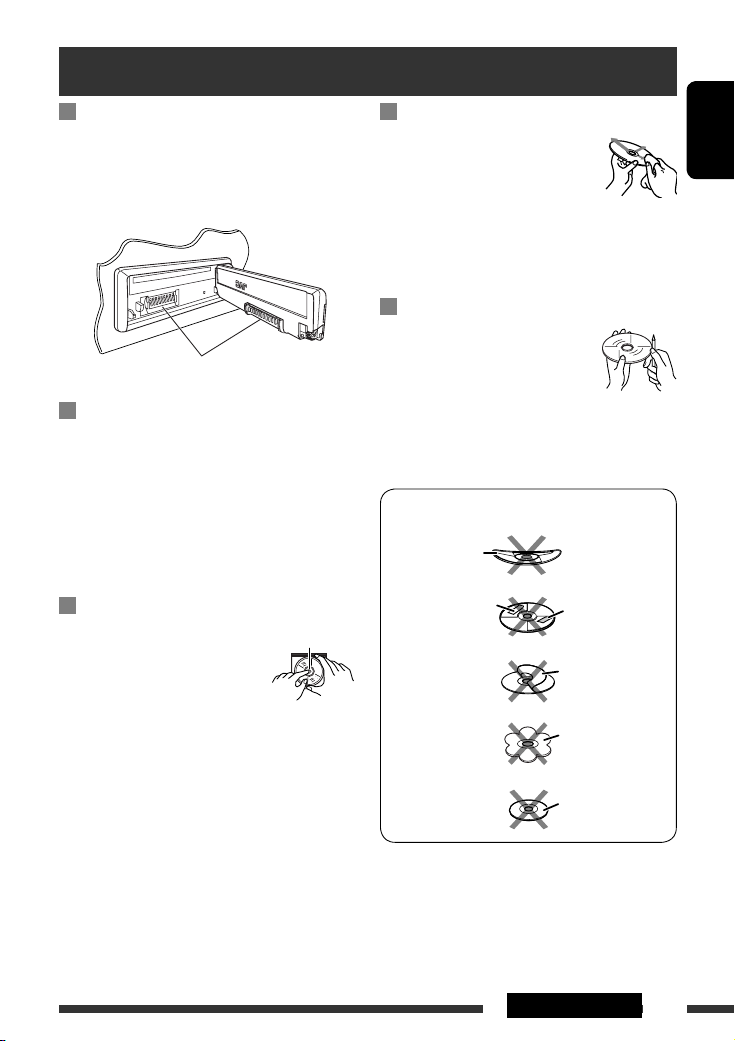
Maintenance
How to clean the connectors
Frequent detachment will deteriorate the connectors.
To minimize this possibility, periodically wipe the
connectors with a cotton swab or cloth moistened with
alcohol, being careful not to damage the connectors.
Connector
Moisture condensation
Moisture may condense on the lens inside the unit in
the following cases:
• After starting the heater in the car.
• If it becomes very humid inside the car.
Should this occur, the unit may malfunction. In this
case, eject the disc and leave the unit turned on for a
few hours until the moisture evaporates.
How to handle discs
When removing a disc from its
case, press down the center holder
of the case and lift the disc out,
holding it by the edges.
• Always hold the disc by the edges. Do not touch its
recording surface.
When storing a disc into its case, gently insert the
disc around the center holder (with the printed surface
facing up).
• Make sure to store discs into the cases after use.
Center holder
To keep discs clean
A dirty disc may not play correctly.
If a disc does become dirty, wipe it with
a soft cloth in a straight line from center
to edge.
• Do not use any solvent (for example, conventional
record cleaner, spray, thinner, benzine, etc.) to clean
discs.
To play new discs
New discs may have some rough spots
around the inner and outer edges. If
such a disc is used, this unit may reject
the disc.
To remove these rough spots, rub the edges with a
pencil or ball-point pen, etc.
Do not use the following discs:
Warped disc
Sticker
Sticker residue
Stick-on label
Unusual shape
Single CD (8 cm disc)
ENGLISH
29REFERENCES
Page 30

More about this unit
General
Turning on the power
ENGLISH
• By pressing SRC on the unit, you can also turn on the
power. If the source is ready, playback also starts.
Turning off the power
• If you turn off the power while listening to a disc, disc
play will start from where playback has been stopped
previously, next time you turn on the power.
FM/AM/RDS
Storing stations in memory
• During SSM search...
– Received stations are preset in No. 1 (lowest
frequency) to No. 6 (highest frequency).
– When SSM is over, the station stored in No. 1 will
be automatically tuned in.
• When storing stations, the previously preset stations
are erased and stations are stored newly.
FM RDS operations
• Network-Tracking Reception requires two types of
RDS signals—PI (Programme Identification) and AF
(Alternative Frequency) to work correctly. Without
receiving these data correctly, Network-Tracking
Reception will not operate correctly.
• If a Traffic Announcement is received by TA Standby
Reception, the volume level automatically changes to
the preset level (TA VOL) if the current level is lower
than the preset level.
• When Alternative Frequency Reception is activated
(with AF selected), Network-Tracking Reception is
also activated automatically. On the other hand,
Network-Tracking Reception cannot be deactivated
without deactivating Alternative Frequency
Reception. (See pages 26 and 27.)
• If you want to know more about RDS, visit
<http://www.rds.org.uk>.
Disc
Caution for DualDisc playback
• The Non-DVD side of a “DualDisc” does not comply
with the “Compact Disc Digital Audio” standard.
Therefore, the use of Non-DVD side of a DualDisc on
this product may not be recommended.
General
• This unit has been designed to reproduce CDs/CD
Texts, and CD-Rs (Recordable)/CD-RWs (Rewritable)
in audio CD (CD-DA), MP3/WMA/AAC formats.
• When a disc is inserted upside down, “PLEASE” and
“EJECT” appear alternately on the display. Press 0 to
eject the disc.
• While fast-forwarding or reversing on an MP3/WMA/
AAC disc, you can only hear intermittent sounds.
Ejecting a disc
• If the ejected disc is not removed within 15 seconds,
the disc is automatically inserted again into the
loading slot to protect it from dust. Playback starts
automatically.
• After ejecting a disc, “NO DISC” appears and you
cannot operate some of the buttons. Insert another
disc or press SRC to select another playback source.
Playing a CD-R or CD-RW
• Use only “finalized” CD-Rs or CD-RWs.
• This unit can play back only files of the same type
which are first detected if a disc includes both audio
CD (CD-DA) files and MP3/WMA/AAC files.
• This unit can play back multi-session discs; however,
unclosed sessions will be skipped while playing.
• Some CD-Rs or CD-RWs may not play back on this
unit because of their disc characteristics, or for the
following reasons:
30
Page 31

– Discs are dirty or scratched.
– Moisture condensation occurs on the lens inside
the unit.
– The pickup lens inside the unit is dirty.
– CD-R/CD-RW on which the files are written with
“Packet Write” method.
– There are improper recording conditions (missing
data, etc.) or media conditions (stained, scratched,
warped, etc.).
• CD-RWs may require a longer readout time since the
reflectance of CD-RWs is lower than that of regular
CDs.
• Do not use the following CD-Rs or CD-RWs:
– Discs with stickers, labels, or a protective seal stuck
to the surface.
– Discs on which labels can be directly printed by an
ink jet printer.
Using these discs under high temperatures or high
humidities may cause malfunctions or damage to the
unit.
Playing an MP3/WMA/AAC disc
• This unit can play back MP3/WMA/AAC files with
the extension code <.mp3>, <.wma>, or <.m4a>
(regardless of the letter case—upper/lower).
• This unit can show the names of albums, artists
(performer), ID3 Tag (Version 1.0, 1.1, 2.2, 2.3, or 2.4)
for MP3, and show WMA/AAC Tag.
• This unit can display only one-byte characters. No
other characters can be correctly displayed.
• This unit can play back MP3/WMA/AAC files meeting
the conditions below:
– Bit rate of MP3: 8 kbps — 320 kbps
– Sampling frequency of MP3:
48 kHz, 44.1 kHz, 32 kHz (for MPEG-1)
24 kHz, 22.05 kHz, 16 kHz (for MPEG-2)
12 kHz, 11.025 kHz, 8 kHz (for MPEG-2.5)
– Bit rate of WMA: 16 kbps — 32 kbps
(Sampling frequency: 22.05 kHz)
32 kbps — 320 kbps
(Sampling frequency: 48 kHz,
44.1 kHz, 32 kHz)
– Bit rate of AAC: 16 kbps — 320 kbps
– Sampling frequency of AAC: 48 kHz, 44.1 kHz
– Disc format: ISO 9660 Level 1/Level 2, Romeo,
Joliet, Windows long file name
• The maximum number of characters for file/folder
names vary among the disc format used (includes
4 extension characters—<.mp3>, <.wma>, or
<.m4a>).
– ISO 9660 Level 1: up to 12 characters
– ISO 9660 Level 2: up to 31 characters
– Romeo*: up to 128 (60) characters
– Joliet*: up to 64 (30) characters
– Windows long file name*: up to 128 (60)
characters
* The parenthetic figure is the maximum number of
characters for file/folder names in case the total
number of files and folders is 271 or more.
• This unit can recognize a total of 512 files, of 200
folders, and of 8 hierarchies.
• This unit can play back files recorded in VBR (variable
bit rate).
Files recorded in VBR have a discrepancy in elapsed
time display, and do not show the actual elapsed
time. Especially, after performing the search function,
this difference becomes noticeable.
• This unit cannot play back the following files:
– MP3 files encoded with MP3i and MP3 PRO format.
– MP3 files encoded in an inappropriate format.
– MP3 files encoded with Layer 1/2.
– WMA files encoded with lossless, professional, and
voice format.
– WMA files which are not based upon Windows
Media® Audio.
– WMA files copy-protected with DRM.
– AAC files created by any other application than
iTunes.
– AAC files encoded with Apple lossless format.
– Files which have the data such as AIFF, ATRAC3,
etc.
• The search function works but search speed is not
constant.
ENGLISH
Continued on the next page
31REFERENCES
Page 32

Playing MP3/WMA/AAC/WAV tracks from a USB
device
• Connecting a USB device automatically changes the
source to “USB.”
• While playing from a USB device, the playback order
ENGLISH
may differ from other players.
• This unit may be unable to play back some USB
devices or some files due to their characteristics or
recording conditions.
• Depending on the shape of the USB devices and
connection ports, some USB devices may not be
attached properly or the connection might be loose.
• When connecting a USB mass storage class device,
refer also to its instructions.
• Connect one USB mass storage class device to the unit
at a time. Do not use a USB hub.
• You can connect two types of USB device to this
unit—MTP device and Mass storage class device.
If you connect an MTP device featuring “USB digital
media streaming” to this unit (except JVC D. Player
XA-HD500), you can play back the WMA-DRM10
(Digital Right Management) files purchased through
the music distributing web sites, through this unit.
• This unit is compatible with the USB Full-Speed.
• If the connected USB device does not have the correct
files, “NO FILE” appears.
• This unit can show ID3 Tag (Version 1.0, 1.1, 2.2, 2.3,
or 2.4) for MP3 and show WMA/AAC/WAV Tag.
• This unit can play back MP3/WMA/AAC/WAV files
meeting the conditions below:
MP3:
– Bit rate: 8 kbps — 320 kbps
– Sampling frequency:
48 kHz, 44.1 kHz, 32 kHz (for MPEG-1)
24 kHz, 22.05 kHz, 16 kHz (for MPEG-2)
WMA:
– Bit rate: 5 kbps — 320 kbps
– Sampling frequency: 8 kHz — 48 kHz
– Channel: Mono/stereo
AAC:
– Bit rate: 16 kbps — 320 kbps
– Sampling frequency: 48 kHz — 44.1 kHz
– Channel: 1 ch/2 ch
WAV:
– Bit rate: Linear PCM at 705 kbps and 1 411 kbps
– Sampling frequency: 44.1 kHz
– Channel: 1 ch/2 ch
• This unit can play back MP3 files recorded in VBR
(variable bit rate).
• The maximum number of characters for folder and
file names is 25 characters; 128 characters for MP3/
WMA/AAC/WAV Tag.
• This unit can recognize a total of 50 000 files and
5 000 folders (999 files per folder). However, the
display can shows until 9 999 folders/files.
• The unit cannot recognize a USB mass storage class
device whose rating is other than 5 V and does not
exceed 500 mA.
• This unit may not recognized a USB device connected
through a USB card reader.
• This unit may not play back files in a USB device
properly when using a USB extension cord.
• This unit cannot assure proper functions or supply
power to all types of USB devices.
• This unit cannot play back the following files:
– MP3 files encoded with MP3i and MP3 PRO format.
– MP3 files encoded in an inappropriate format.
– MP3 files encoded with Layer 1/2.
– WMA files encoded with lossless, professional, and
voice format.
– WMA files which are not based upon Windows
Media® Audio.
– AAC files created by any other application than
iTunes.
– AAC files encoded with Apple lossless format.
– WAV files encoded using MS-ADPCM.
– Files which have the data such as AIFF, ATRAC3,
etc.
Changing the source
• If you change the source, playback also stops.
Next time you select the same source again, playback
starts from where it has been stopped previously.
32
Page 33

Detaching a USB device
• After removing a USB device, “NO USB“ appears and
you cannot operate some of the buttons. Reattach a
USB device or press SRC to select another playback
source.
Bluetooth operations
General
• While driving, do not perform complicated operation
such as dialing the numbers, using phone book, etc.
When you perform these operations, stop your car in
a safe place.
• Some Bluetooth devices may not be connected to
this unit depending on the Bluetooth version of the
device.
• This unit may not work for some Bluetooth devices.
• Connecting condition may vary depending on the
circumstances around you.
• When the unit is turned off, the device is
disconnected.
Warning messages for Bluetooth operations
ERR CNCT
(Error
Connection)
ERROR Try the operation again. If “ERROR”
UNFOUND No available Bluetooth device is
LOADING The unit is updating the phone book
WAIT The unit is preparing to use the
RESET 8 Check the connection between the
The device is registered but the
connection has failed. Use “CONNECT”
to connect the device again. (See page
15.)
appears again, check if the device
supports the function you have tried.
detected by “SEARCH.”
and/or text messages.
Bluetooth function. If the message does
not disappear, turn off and turn on the
unit, then connect the device again (or
reset the unit).
adapter and this unit.
DAB
• Only the primary DAB service can be preset even
when you store a secondary service.
• A previously preset DAB service is erased when a new
DAB service is stored in the same preset number.
ENGLISH
iPod or D. player
• When you turn on this unit, the iPod or D. player is
charged through this unit.
• While the iPod or D. player is connected, all
operations from the iPod or D. player are disabled.
Perform all operations from this unit.
• The text information may not be displayed correctly.
• If the text information includes more than 8
characters, it scrolls on the display. This unit can
display up to 40 characters.
Notice:
When operating an iPod or a D. player, some
operations may not be performed correctly or as
intended. In this case, visit the following JVC web
site:
For iPod users: <http://www.jvc.co.jp/english/
car/support/ks-pd100/index.html>
For D. player users: <http://www.jvc.co.jp/
english/car/support/ks-pd500/index.html>
General settings—PSM
• “AUTO” setting for “DIMMER” may not work correctly
on some vehicles, particularly on those having a
control dial for dimming.
In this case, change the “DIMMER” setting to any
other than “AUTO.”
• If you change the “AMP GAIN” setting from
“HIGH PWR” to “LOW PWR” while the volume level
is set higher than “VOL 30,” the unit automatically
changes the volume level to “VOL 30.”
33REFERENCES
Page 34
Troubleshooting
What appears to be trouble is not always serious. Check the following points before calling a service center.
ENGLISH
Symptom Remedy/Cause
• Sound cannot be heard from the speakers. • Adjust the volume to the optimum level.
• Check the cords and connections.
General
• The unit does not work at all. Reset the unit (see page 2).
• SSM automatic presetting does not work. Store stations manually.
FM/AM
• Static noise while listening to the radio. Connect the aerial firmly.
• Disc cannot be played back. Insert the disc correctly.
• CD-R/CD-RW cannot be played back.
• Tracks on the CD-R/CD-RW cannot be skipped.
• Disc can neither be played back nor ejected. • Unlock the disc (see page 11).
• Disc sound is sometimes interrupted. • Stop playback while driving on rough roads.
Discs in general
• “NO DISC” appears on the display. Insert a playable disc into the loading slot.
• “PLEASE” and “EJECT” appear alternately on
the display.
• Disc cannot be played back. • Use a disc with MP3/WMA/AAC tracks recorded in
• Noise is generated. Skip to another track or change the disc. (Do not add
MP3/WMA/AAC
• A longer readout time is required (“CHECK”
keeps flashing on the display).
• Insert a finalized CD-R/CD-RW.
• Finalize the CD-R/CD-RW with the component which
you used for recording.
• Eject the disc forcibly (see page 2).
• Change the disc.
• Check the cords and connections.
This occurs sometimes due to over-heating. Eject the disc
or change to another playback source.
the format compliant with ISO 9660 Level 1, Level 2,
Romeo, or Joliet.
• Add the extension code <.mp3>, <.wma>, or
<.m4a> to the file names.
the extension code <.mp3>, <.wma>, or <.m4a> to
non-MP3/WMA/AAC tracks.)
Do not use too many hierarchies and folders.
34
Page 35

Symptom Remedy/Cause
• Tracks do not play back in the order you have
intended them to play.
• Elapsed playing time is not correct. This sometimes occurs during play. This is caused by how
• “PLEASE” and “EJECT” appear alternately on
the display.
MP3/WMA/AAC
• Correct characters are not displayed (e.g.
album name).
• Noise is generated. The track played back is not an MP3/WMA/AAC/WAV
• “CHECK” keeps flashing on the display. • Readout time varies depending on the USB device.
• “NO FILE” flashes on the display.
USB device
• “NO USB” appears on the display.
• “READ” and “FAILED” appear alternately on
the display.
• Correct characters are not displayed (e.g.
album name).
• While playing a track, sound is sometimes
interrupted.
Playback order is determined when files are recorded.
the tracks are recorded on the disc.
Insert a disc that contains MP3/WMA/AAC tracks.
This unit can only display letters (Roman and Cyrillic
alphabets—upper case), numbers, and a limited number
of symbols.
track. Skip to another file. (Do not add the extension code
<.mp3>, <.wma>, <.m4a>, or <.wav> to non-MP3/
WMA/AAC/WAV tracks.)
• Do not use too many hierarchy, folders, and empty
folders*.
• Turn off the power then on again.
* Folder that is physically empty or folder that contains
data but does not contain valid MP3/WMA/AAC/WAV
track.
Attach a USB device that contains tracks encoded in an
appropriate format.
The total number of tracks could not be accessed properly.
This unit can only display letters (upper case), numbers,
and a limited number of symbols.
MP3/WMA/AAC/WAV tracks have not been properly
copied into the USB device.
Copy MP3/WMA/AAC/WAV tracks again into the USB
device, and try again.
ENGLISH
Continued on the next page
35REFERENCES
Page 36

Symptom Remedy/Cause
• Bluetooth device does not detect the unit. The unit can be connected with one Bluetooth cellular
phone and one Bluetooth audio device at a time.
While connecting a device, this unit cannot be detected
ENGLISH
• The unit does not detect the Bluetooth device. • Check the Bluetooth setting of the device.
• The unit does not make pairing with the
Bluetooth device.
• Echo or noise occurs. Adjust the microphone unit position.
Bluetooth *
• Phone sound quality is poor. • Reduce the distance between the unit and the
• The sound is interrupted or skipped during
playback of a Bluetooth audio device.
• The connected audio device cannot be
controlled.
• “NO DISC” appears on the display. Insert a disc into the magazine.
• “NO MAG” appears on the display. Insert the magazine.
• “RESET 8” appears on the display. Connect this unit and the CD changer correctly and press
CD changer
• “RESET 1” – “RESET 7” appears on the display. Press the reset button of the CD changer.
• The CD changer does not work at all. Reset the unit (see page 2).
from another device. Disconnect currently connected
device and search again.
• Search from the Bluetooth device. After the device
detects the unit, select “OPEN” on the unit to connect
the device. (See page 14.)
• Enter the same PIN code for both the unit and target
device.
• Select the device name from “SPECIAL,” then try to
connect again. (See page 15.)
Bluetooth audio device.
• Move the car to a place where you can get a better
signal reception.
• Reduce the distance between the unit and the
Bluetooth audio device.
• Disconnect the device connected for “BT-PHONE.”
• Turn off, then turn on the unit.
• (When the sound is not yet restored,) connect the
device again.
Check whether the connected audio device supports
AVRCP (Audio Video Remote Control Profile).
the reset button of the CD changer.
* For Bluetooth operations, refer also to the instructions supplied with the Bluetooth Adapter.
36
Page 37

Symptom Remedy/Cause
• “noSIGNAL” appears on the display. Move to an area with stronger signals.
• “RESET 08” appears on the display. Connect this unit and the DAB tuner correctly and reset
the unit (see page 2).
DAB
• The DAB tuner does not work at all. Reconnect this unit and the DAB tuner correctly. Then,
reset the unit (see page 2).
• “ANTENANG” appears on the display. Check the cords and connections.
• The iPod or D. player does not turn on or does
not work.
• The sound is distorted. Deactivate the equalizer either on this unit or the
• “NO IPOD” or “NO DP” appears on the display. • Check the connecting cable and its connection.
• Playback stops. The headphones are disconnected during playback.
• No sound can be heard when connecting an
iPod nano.
• No sound can be heard.
iPod/D. player
• “ERROR 01” appears on the display when
connecting a D. player.
• “NO FILE” or “NO TRACK” appears on the
display.
• “RESET 1” – “RESET 7” appears on the display. Disconnect the adapter from both the unit and iPod/
• “RESET 8” appears on the display. Check the connection between the adapter and this unit.
• The iPod’s or D. player’s controls do not work
after disconnecting from this unit.
• Check the connecting cable and its connection.
• Update the firmware version.
• Charge the battery.
iPod/D. player.
• Charge the battery.
Restart the playback operation (see page 21).
• Disconnect the headphones from the iPod nano.
• Update the firmware version of the iPod nano.
Disconnect the adapter from the D. player. Then, connect
it again.
No tracks are stored. Import tracks to the iPod or D. player.
D. player. Then, connect it again.
Reset the iPod or D. player.
ENGLISH
• Microsoft and Windows Media are either registered trademarks or trademarks of Microsoft Corporation in the
United States and/or other countries.
• iPod is a trademark of Apple Computer, Inc., registered in the U.S. and other countries.
• The Bluetooth word mark and logos are owned by the Bluetooth SIG, Inc. and any use of such marks by Victor
Company of Japan, Limited (JVC) is under license. Other trademarks and trade names are those of their respective
owners.
37REFERENCES
Page 38

Specifications
AUDIO AMPLIFIER SECTION
Maximum Power Output: Front and rear: 50 W per channel
ENGLISH
Continuous Power Output (RMS): Front and rear: 19 W per channel into 4 Ω, 40 Hz to 20 000 Hz at no more
than 0.8% total harmonic distortion.
Load Impedance: 4 Ω (4 Ω to 8 Ω allowance)
Tone Control Range: Bass: ±12 dB at 60 Hz
Mid-range: ±12 dB at 1 kHz
Treble: ±12 dB at 10 kHz
Frequency Response: 40 Hz to 20 000 Hz
Signal-to-Noise Ratio: 70 dB
Line-Out Level/Impedance: 2.5 V/20 kΩ load (full scale)
Output Impedance: 1 kΩ
Subwoofer-Out Level/Impedance: 2.5 V/20 kΩ load (full scale)
Other Terminal: CD changer, USB input terminal
TUNER SECTION
Frequency Range:
FM Tuner
Usable Sensitivity: 11.3 dBf (1.0 μV/75 Ω)
50 dB Quieting Sensitivity: 16.3 dBf (1.8 μV/75 Ω)
Alternate Channel Selectivity (400 kHz): 65 dB
Frequency Response: 40 Hz to 15 000 Hz
Stereo Separation: 30 dB
MW Tuner
Sensitivity: 20 μV
Selectivity: 35 dB
LW Tuner
Sensitivity: 50 μV
FM1/FM2: 87.5 MHz to 108.0 MHz
FM3: 65.00 MHz to 74.00 MHZ
AM: MW: 522 kHz to 1 620 kHz
LW: 144 kHz to 279 kHz
38
Page 39

CD PLAYER SECTION
Type: Compact disc player
Signal Detection System: Non-contact optical pickup (semiconductor laser)
Number of Channels: 2 channels (stereo)
Frequency Response: 5 Hz to 20 000 Hz
Dynamic Range: 96 dB
Signal-to-Noise Ratio 98 dB
Wow and Flutter: Less than measurable limit
MP3 Decoding Format: (MPEG1/2 Audio Layer 3) Max. Bit Rate: 320 kbps
WMA (Windows Media® Audio) Decoding Format: Max. Bit Rate: 320 kbps
AAC (Advanced Audio Coding) Decoding Format: Max. Bit Rate: 320 kbps
USB SECTION
USB Standard: USB 1.1
Data Transfer Rate: Full Speed: Max. 12 Mbytes
Low Speed: Max. 1.5 Mbytes
Compatible Device: Mass storage class, MTP
Compatible File System: FAT 12/16/32
Playable Audio Format: MP3/WMA/AAC/WAV
Max. Current: 500 mA
GENERAL
Power Requirement: Operating Voltage: DC 14.4 V (11 V to 16 V allowance)
Grounding System: Negative ground
Allowable Operating Temperature: 0°C to +40°C
Dimensions (W × H × D):
(approx.)
Mass:
Installation Size: 182 mm × 52 mm × 158 mm
Panel Size: 188 mm × 58 mm × 12 mm
1.4 kg (excluding accessories)
ENGLISH
Design and specifications are subject to change without notice.
39REFERENCES
Page 40

Перед тем, как приступать к эксплуатации, пожалуйста, внимательно прочитайте все инструкции с тем,
чтобы полностью изучить и обеспечить оптимальную работу этого устройства.
Благодарим Вас за приобретение изделия JVC.
ВАЖНО ДЛЯ ЛАЗЕРНОЙ АППАРАТУРЫ
1. ЛАЗЕРНАЯ АППАРАТУРА КЛАССА 1
2. ПРЕДУПРЕЖДЕНИЕ: Не открывайте верхнюю крышку. Внутри устройства нет частей, которые
пользователь может отремонтировать. Ремонт должен осуществляться квалифицированным
обслуживающим персоналом.
3. ПРЕДУПРЕЖДЕНИЕ: В открытом состоянии происходит видимое и/или невидимое излучение лазера
класса 1M. Не смотрите непосредственно в оптические инструменты.
4. ЭТИКЕТКА: ПРЕДУПРЕЖДАЮЩАЯ ЭТИКЕТКА, РАЗМЕЩЕННАЯ НА НАРУЖНОЙ СТОРОНЕ УСТРОЙСТВА.
РУCCKИЙ
Предупреждение:
Если данное устройство используется во время
поездки на автомобиле, следует, не отвлекаясь,
следить за дорогой, иначе может произойти
дорожно-транспортное происшествие.
[только Европейсий Союз]
Для Вашей безопасности...
• Не повышайте слишком сильно громкость,
поскольку в результате этого заглушаются
внешние звуки, что делает опасным управление
автомобилем.
• Остановите автомобиль перед тем, как выполнять
любые сложные операции.
Температура внутри автомобиля...
Если Вы припарковали Ваш автомобиль на
длительное время в жаркую или холодную погоду,
перед тем, как включать это устройство, подождите
до тех пор, пока температура в автомобиле не
придет в норму.
2
Как перенастроить Ваше устройство
•
Запрограммированные настройки будут также
удалены (за исключением зарегистрированного
устройства Bluetooth, см. стр. 14).
Принудительное извлечение диска
На дисплее поочередно появляются надписи
“PLEASE” и “EJECT”.
• Будьте осторожны, не уроните диск при
извлечении.
• Если это не поможет, попробуйте
перенастроить приемник.
Page 41
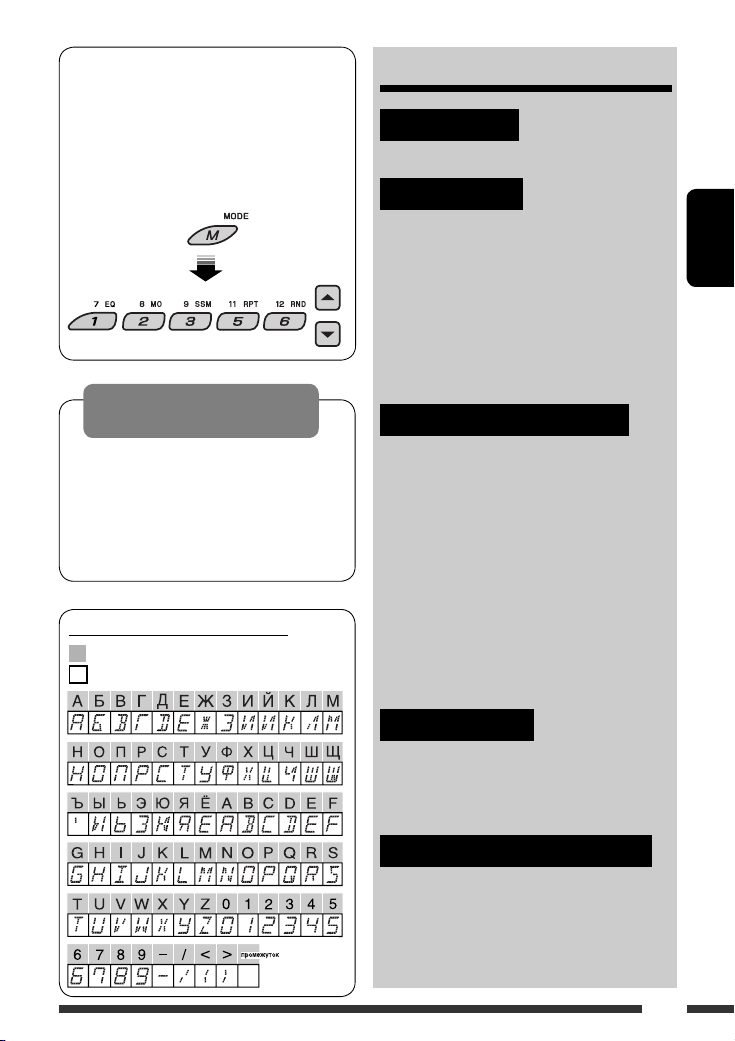
Использование режима настройки
функций
При нажатии кнопки M MODE приемник
переходит в режим функций, после чего
нумерованные кнопки (за исключением кнопок
“4”) и кнопки 5/∞ работают как кнопки вызова
различных функций.
[В течение 5 секунд...]
Предостережение, касающееся
настройки громкости:
По сравнению с другими источниками
воспроизведения диски и подключенные
устройства USB создают незначительный шум.
Уменьшите громкость перед воспроизведением,
чтобы предотвратить повреждение динамиков
из-за внезапного повышения уровня громкости
на выходе.
Доступные символы дисплея
Допустимые символы
Отображение индикаторов
CОДЕРЖАНИЕ
ВВЕДЕНИЕ
Подготовка ........................................... 4
ОПЕРАЦИИ
Основные операции ............................... 5
•
Использование панели управления
• Использование пульта
дистанционного управления
(RM-RK50) ......................................... 6
Прослушивание радио ........................... 8
Поиск программы FM RDS—поиск PTY ... 9
Операции с дисками ............................... 11
Прослушивание устройства USB .......... 12
ВНЕШНИЕ УСТРОЙСТВА
Использование устройств Bluetooth® ... 14
• Использование сотового телефона
Bluetooth .......................................... 16
Использование аудиопроигрывателя
•
Bluetooth
........................................... 18
Прослушивание с устройства
автоматической смены компакт-
дисков ................................................ 18
Прослушивание тюнера DAB ................. 20
Прослушивание с проигрывателя
iPod или D. .......................................... 21
Прослушивание с других внешних
устройств ......................................... 22
.... 5
РУCCKИЙ
НАСТРОЙКИ
Выбор запрограммированного режима
звучания ............................................ 24
Общие настройки—PSM ....................... 25
Настройки Bluetooth ............................. 28
СПРАВОЧНАЯ ИНФОРМАЦИЯ
Обслуживание ....................................... 29
Дополнительная информация о
приемнике ......................................... 30
Устранение проблем ............................. 34
Технические характеристики ............... 38
3
Page 42
Подготовка
Отмена демонстрации функций дисплея и настройка часов
• См. также стр. 26.
РУCCKИЙ
Если питание выключено: Просмотр текущего времени на часах
Если питание включено: Изменение отображаемой информации
~ Включение питания.
Ÿ Войдите в настройки PSM.
! ] ⁄ Отмена демонстрации функций дисплея
Выберите “DEMO”, затем “DEMO OFF”.
Настройка часов
Выберите “CLOCK H” (час) и настройте час.
Выберите “CLOCK M” (минута) и настройте минуту.
Выберите “24H/12H”, затем “24H” (час) или “12H” (час).
@ Завершите процедуру.
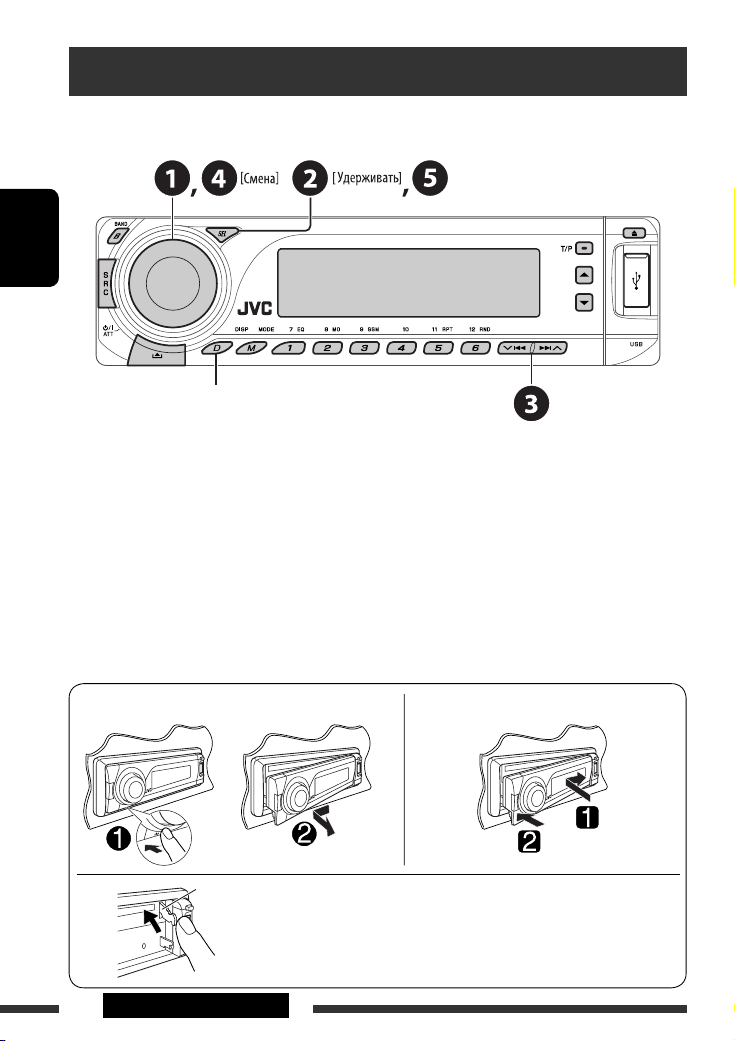
Отсоединение панели управления Подключение панели управления
Рычаг
ПРЕДУПРЕЖДЕНИЕ:
Рычаг появляется при нажатии кнопки 0, если панель
снята. В этом случае нажмите на рычаг для его установки в
заблокированное положение перед присоединением панели.
4 ВВЕДЕНИЕ
Page 43

Основные операции
Использование панели управления
РУCCKИЙ
1 Осуществляет выбор источника звука.
FM/AM = DAB * = CD * = USB * = CD-CH */
IPOD */D.PLAYER * (или EXT IN) = BT-PHONE
(Телефон Bluetooth)* = BT-AUDIO (Bluetooth
аудио)* = (возврат в начало)
* Если эти источники не готовы или не
подключены, их невозможно выбрать.
2 Выберите диапазон частот.
3 • Включение питания.
• Выключение питания [Удерживать].
• Ослабление звука (при включенном питании).
• Регулятор громкости [смена].
4 • Настройка режима звучания.
• Войдите в настройки PSM [Удерживать].
5 Окно дисплея
6 • Включение или выключение функции
резервного приема TA.
• Поиск программы RDS [Удерживать].
7 Изменение отображаемой информации
8 Вход USB (универсальная последовательная
шина)
9 Отсоединение панели.
p Изменение отображаемой информации.
q Вход в режим настройки функций.
Нажмите кнопку M MODE, а затем одну из
следующих кнопок (в течение 5 секунд)...
EQ : Выбор режимов звучания.
MO : Включение или выключение
SSM : Автоматическое программирование
RPT : Выбор повторного воспроизведения.
RND :
5 / ∞ : Пропуск 10 дорожек.
w • FM/AM/DAB: Выбор запрограммированной
• CD/USB: Выбор папки/дорожки/диска (для
• BT-PHONE: Выбор запрограммированного
e • FM/AM/DAB: Поиск радиостанции или
• CD/USB: Выберите дорожку.
• IPOD/D.PLAYER: Выберите дорожку.
• BT-PHONE/BT-AUDIO: Выбор элемента
r • DAB: Выбор службы DAB.
• CD/USB: Выберите папку.
• IPOD/D.PLAYER: Вход в главное меню/
• BT-PHONE/BT-AUDIO: Меню ввода настроек/
монофонического приема.
радиостанции [Удерживать].
Выбор произвольного воспроизведения.
радиостанции или службы DAB.
устройства автоматической смены компактдисков).
номера телефона.
службы DAB.
настройки/выбор зарегистрированного
устройства.
Пауза или останов воспроизведения/
Подтверждение выбора.
подтверждение выбора.
5ОПЕРАЦИИ
Page 44

Окно дисплея
РУCCKИЙ
1 Индикаторы источников воспроизведения
2 Индикатор громкости
3 Индикаторы информации дорожек
4 Индикаторы RDS
5 Индикаторы режимов звучания
• загорается для выбранного элемента.
6 Индикаторы приема тюнера
7 Режим воспроизведения или индикаторы
элементов (произвольное/повторное)
8 Индикатор эквалайзера
9 Индикатор Bluetooth
p Основной дисплей
(Время, меню, информация о воспроизведении)
q Индикатор дорожки
w Дисплей источника/запрограммированный
№/№ дорожки/№ папки/№ диска
e Состояние устройства Bluetooth
(Номер устройства, [1 – 5]; мощность
сигнала, [0 – 3]*; индикатор уровня зарядки
аккумулятора, [0 – 3]*)
* Чем больше числовое значение, тем больше
мощность сигнала и уровень зарядки
аккумулятора.
Использование пульта дистанционного управления (RM-RK50)
Установка литиевой батареи-таблетки
(CR2025)
Перед использованием пульта
дистанционного управления выполните
следующие действия:
• Направьте пульт дистанционного управления
непосредственно на телеметрический датчик
приемника.
• НЕ подвергайте телеметрический датчик
воздействию яркого света (прямых солнечных
лучей или искусственного освещения).
Телеметрический датчик
6
Page 45
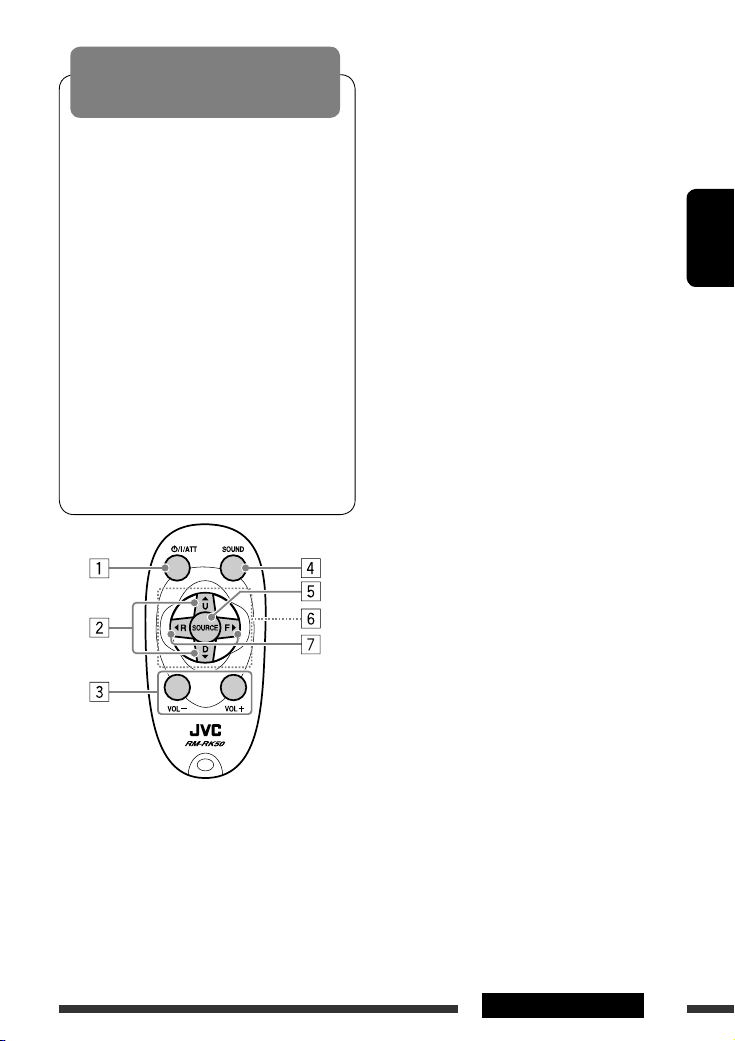
Предупреждение:
Предотвращение несчастных
случаев и повреждений
• Устанавливайте только аккумуляторную
батарею CR2025 или эквивалентную ей.
• Не оставляйте пульт дистанционного
управления в местах, подверженных
длительному воздействию прямых солнечных
лучей (например на приборной панели).
• Храните аккумуляторную батарею в
недоступном для детей месте.
• Не перезаряжайте, не укорачивайте, не
разбирайте и не нагревайте батарею, а также
не подвергайте ее воздействию огня.
• Не оставляйте аккумуляторную батарею
рядом с другими металлическими
материалами.
• Не разбирайте аккумуляторную батарею
с помощью пинцета или аналогичного
инструмента.
• При утилизации батареи или помещении ее
на хранение оберните батарею изоляционной
лентой и изолируйте ее полюса.
1 • Включение питания при кратковременном
нажатии или ослабление звука при
включенном питании.
• Отключение питания при нажатии и
удерживании.
2 • Смена диапазонов FM/AM/DAB с помощью
5 U.
• Смена запрограммированных радиостанций
(или служб DAB) с помощью D ∞.
• Изменение папки MP3/WMA/AAC/WAV.
• При воспроизведении диска MP3 с помощью
устройства автоматической смены компактдисков, поддерживающего формат MP3:
– Смена диска при кратковременном
нажатии.
– Смена папки при нажатии и удерживании
нажатой.
• При прослушивании проигрывателя Apple
iPod или JVC D.:
– С помощью кнопки D
∞ можно
приостановить/остановить или
возобновить воспроизведение.
– Войдите в главное меню с помощью кнопки
5 U.
(Теперь меню можно выбрать с помощью
кнопок 5 U/D ∞/2 R/F 3.)*
3 Настройка уровня звука.
4 Выбор режимов звучания (iEQ:
программируемый эквалайзер).
5 Выбор источников.
6 Для сотового телефона Bluetooth:
– Ответ на вызовы при кратковременном
нажатии.
– Отклонение вызовов при нажатии и
удерживании.
7 • Поиск радиостанций (или служб DAB) при
кратковременном нажатии.
• При нажатии и удержании выполняется
поиск блоков трансляции DAB (цифрового
радиовещания).
• Быстрая перемотка дорожки вперед
или назад при нажатии и удерживании
нажатыми.
•
Смена дорожек при кратковременном нажатии.
• При прослушивании проигрывателя
iPod или D. (в режиме выбора меню для
воспроизведения):
– Выбор элемента при кратковременном
нажатии. (Затем нажмите D ∞ для
подтверждения выбора).
– Пропуск сразу 10 элементов при нажатии и
удерживании нажатой.
• Возврат назад/переход вперед для аудио
Bluetooth.
* 5 U : Возврат к предыдущему меню.
D ∞ : Подтверждение выбора.
7ОПЕРАЦИИ
РУCCKИЙ
Page 46
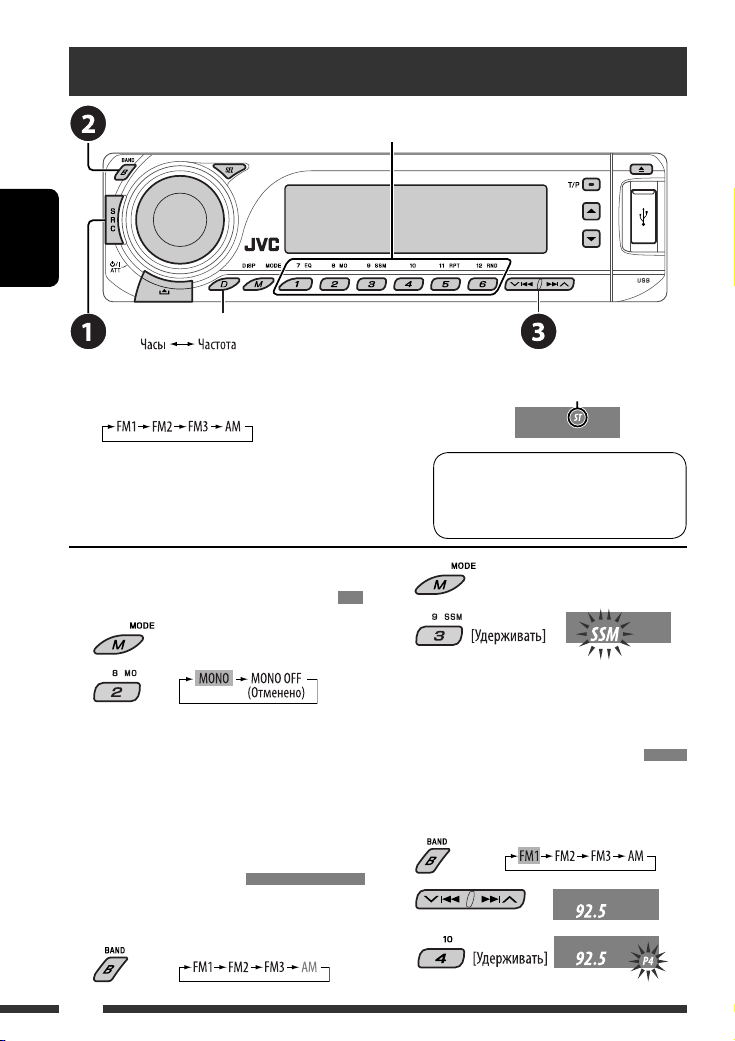
Прослушивание радио
Выбор запрограммированной радиостанции.
РУCCKИЙ
Изменение отображаемой информации
~ Выбор “FM/AM”.
Ÿ Выберите диапазон частот.
! Поиск радиостанции—автоматический поиск.
Поиск вручную: Удерживайте нажатой одну из кнопок,
пока на дисплее не замигает индикатор “M”, а затем
неоднократно нажмите кнопку.
При слабом стереофоническом
2
радиовещании на частоте FM
3
1
2
Прием улучшается, но стереоэффект будет потерян.
• Загорается индикатор MO.
Автоматическое программирование
Программирование вручную
Пример: Сохранение FM-радиостанции с частотой
FM-радиостанций—SSM (Strong-station
Sequential Memory—последовательная
память для радиостанций с
устойчивым сигналом)
Для каждого диапазона частот можно
запрограммировать до шести радиостанций.
1
1
2
3
Данный индикатор отображается при приеме
стереосигнала FM-передачи достаточной силы.
Примечание: FM1 и FM2: От 87,5 МГц
до 108,0 МГц
FM3: От 65,00 МГц
до 74,00 МГц
Осуществляется поиск местных FMрадиостанций с наиболее сильными сигналами и
их автоматическое сохранение в диапазоне FM.
92,5 МГц для запрограммированного
канала с номером 4 диапазона FM1.
8
Page 47

Поиск программы FM RDS—поиск PTY
Изменение отображаемой информации
~ Включите поиск PTY.
Ÿ Выберите один из кодов PTY (типов программ).
Дополнительную информацию см. далее.
! Начните поиск.
Если есть радиостанция, передающая в эфир программу того же кода PTY, что был Вами выбран,
осуществляется настройка на эту радиостанцию.
РУCCKИЙ
Сохранение любимых программ
Предпочитаемые коды PTY можно назначить
нумерованным кнопкам.
1 Выберите код PTY (см. столбец
справа).
2 Выберите запрограммированный
номер.
3 Повторите действия 1 и 2 для
назначения других кодов PTY.
4
Запрограммированные коды PTY для
нумерованных кнопок (от 1 до 6):
Коды PTY (изменение с помощью диска
управления):
NEWS, AFFAIRS, INFO, SPORT, EDUCATE, DRAMA,
CULTURE, SCIENCE, VARIED, POP M (музыка), ROCK
M (музыка), EASY M (музыка), LIGHT M (музыка),
CLASSICS, OTHER M (музыка), WEATHER, FINANCE,
CHILDREN, SOCIAL, RELIGION, PHONE IN, TRAVEL,
LEISURE, JAZZ, COUNTRY, NATION M (музыка), OLDIES,
FOLK M (музыка), DOCUMENT
9ОПЕРАЦИИ
Page 48

Включение или выключение функции резервного приема сообщений о
движении на дорогах (TA) или PTY
Резервный прием TA Индикатор Резервный прием PTY Индикатор
Индикатор
Устройство временно переключается в
режим приема сообщений о движении на
дорогах (TA) (если он доступен) с любого
источника,отличного от AM и FM3*.
Громкость устанавливается на
РУCCKИЙ
запрограммированный уровень
TA, если текущий уровень ниже
запрограммированного (см. стр. 26).
Еще не активировано. Настройтесь на
другую радиостанцию, передающую
сигналы RDS.
Нажмите
• Если подключен тюнер DAB, функция резервного приема сообщений о движении на дорогах (TA) или PTY
также выполняет поиск служб. (См. также стр. 20 и 26.)
* Устройство не будет переключаться на прием сообщений о движении на дорогах (Traffic Announcement) или
программу PTY, если для соединения вызова используется “BT-PHONE”.
для включения. См. стр. 26.
Индикатор
загорается
Мигает Еще не активировано. Настройтесь на
для выключения. Гаснет Выберите “OFF” для выключения кода
Устройство временно переключается
на любимую программу PTY с любого
источника, отличного от AM и FM3*.
другую радиостанцию, передающую
сигналы RDS.
PTY (см. стр. 26).
Индикатор
загорается
Мигает
Гаснет
Отслеживание той же программы (сеть-отслеживающий прием)
При поездке по региону, где невозможен
качественный прием в диапазоне FM, данное
устройство автоматически настраивается на другую
радиостанцию FM RDS в той же сети, которая может
передавать в эфир ту же программу с помощью
более сильных сигналов (см. иллюстрацию справа).
Радиовещание программы А в других
диапазонах частот (01 – 05)
Для получения информации об изменении
параметров сеть-отслеживающего приема см.
“AF-REG” на стр. 26.
• Если подключен тюнер DAB, см. раздел
“Отслеживание той же программы—Поиск
альтернативной частоты” на стр. 20.
Автоматический выбор радиостанции—поиск программы
Обычно при нажатии нумерованных кнопок производится настройка на запрограммированную
радиостанцию.
Если уровень сигналов от запрограммированной радиостанции FM RDS является недостаточным для
качественного приема, данное устройство с помощью данных AF настраивается на другую частоту, по
которой может передаваться та же программа, что передает первоначальная запрограммированная
радиостанция.
• Настройка устройства на другую радиостанцию с помощью поиска программы занимает некоторое время.
• См. также стр. 26.
10
Page 49

Операции с дисками
Откройте панель управления и вставьте диск.
Воспроизведение начинается автоматически.
РУCCKИЙ
Изменение отображаемой информации
Останов воспроизведения и
извлечение диска
• Нажмите кнопку SRC
для прослушивания
другого источника
воспроизведения.
Запрещение извлечения диска
1
Если файл не содержит информацию тегов или для
*
настройки “TAG DISP” установлено значение “TAG OFF”
(см. стр. 27), появляется имя папки и имя файла.
Индикатор TAG не загорится.
2
*
Для звукового компакт-диска отображается “NO NAME”.
Нажатие (или удерживание нажатыми) следующих кнопок позволяет выполнять следующие операции...
Тип
3
диска*
Нажать: Выберите дорожку
Выберите папку Непосредственный поиск
Удерживать: Перемотка дорожки
назад или вперед
Нажать: Выберите дорожку
Удерживать: Перемотка дорожки
—
назад или вперед
3
*
Данное устройство может воспроизводить файлы AAC, кодированные с помощью iTunes.
4
Нажмите для выбора номеров от 1 до 6, удерживайте для выбора номеров от 7 до 12.
*
*5 Имена папок должны начинаться с двухзначного номера: 01, 02, 03 и т.д.
Для отмены блокировки повторите эту
же процедуру.
(Нумерованные кнопки) *
определенной папки *
Непосредственный поиск
определенной дорожки
Продолжение не следующей странице
4
5
11ОПЕРАЦИИ
Page 50

После нажатия нажмите следующие кнопки для выполнения следующих операций...
Тип диска
Пропуск 10 дорожек
(внутри одной папки)
TRK RPT:
Повтор текущей дорожки
FLDR RPT:
Повтор текущей папки
FLDR RND:
Произвольное воспроизведение
всех дорожек текущей папки, а
затем дорожек других папок
DISC RND:
РУCCKИЙ
Произвольное воспроизведение
всех дорожек
Пропуск 10 дорожек TRK RPT:
Повтор текущей дорожки
DISC RND:
Произвольное воспроизведение
всех дорожек
• Чтобы отключить повторное или произвольное воспроизведение, выберите “RPT OFF” или “RND OFF”.
Прослушивание устройства USB
К приемнику можно подключить запоминающее устройство USB большой емкости, например USB-память,
цифровой аудиопроигрыватель *
1
Можно подключать как устройства MTP (Media Transfer Protocol – протокол обмена данными
*
мультимедиа), так и запоминающие устройства USB большой емкости.
Подключение USB-памяти
Приемник может воспроизводить дорожки MP3/WMA/WMA-DRM10 *
устройстве USB.
*1 См. стр. 32.
*2 Данное устройство может воспроизводить файлы AAC, кодированные с помощью iTunes. Оно не может
воспроизводить файлы AAC, приобретенные в iTunes Store.
1
, съемный жесткий диск и т.д.
Вход USB
USB-память
1
/AAC*2/WAV, сохраненные на
Если устройство USB подключено...
Воспроизведение начинается с того места, где оно ранее было остановлено.
• При подключении другого устройства USB воспроизведение начинается с начала.
12
Page 51

Останов воспроизведения и отключение устройства USB
Выньте его из устройства.
• Нажмите кнопку SRC для прослушивания другого источника воспроизведения.
Внимание:
• Не используйте устройство USB, если это может помешать безопасному вождению.
• Не отключайте и не подключайте повторно устройство USB, когда на дисплее мигает надпись “CHECK”.
• Не запускайте двигатель автомобиля, если подключено устройство USB.
• Перед отключением устройства USB необходимо остановить воспроизведение.
• Способность приемника воспроизводить файлы зависит от типа устройства USB.
• Вам не удастся соединить компьютер со входным USB-разъемом устройства.
• Во избежание потери данных убедитесь в том, что создана резервная копия всех важных данных.
• Во избежание повреждения не оставляйте устройство USB в автомобиле, не подвергайте его
воздействию прямых солнечных лучей или высокой температуры.
Нажатие (или удерживание нажатыми) следующих кнопок позволяет выполнять следующие операции...
Нажать: Выберите дорожку
Удерживать: Перемотка дорожки назад или вперед
Выберите папку
(Нумерованные кнопки)
Непосредственный поиск
определенной папки
• См. также *4 и *5 на стр. 11.
РУCCKИЙ
После нажатия
• Чтобы отключить повторное или произвольное воспроизведение, выберите “RPT OFF” или “RND OFF”.
Изменение отображаемой информации
* Если файл не содержит информацию
нажмите следующие кнопки для выполнения следующих операций...
Пропуск 10 дорожек (внутри одной папки)
TRK RPT: Повтор текущей дорожки
FLDR RPT: Повтор всех дорожек из текущей папки
FLDR RND: Произвольное воспроизведение всех дорожек текущей папки, а затем
дорожек других папок
DISC RND: Произвольное воспроизведение всех дорожек
тегов или для настройки “TAG DISP”
установлено значение “TAG OFF” (см.
стр. 27), появляется имя папки и имя
файла. Индикатор TAG не загорится.
13ОПЕРАЦИИ
Page 52

Использование устройств Bluetooth®
Для работы с устройствами Bluetooth необходимо подключить адаптер Bluetooth (KS-BTA200) к разъему
устройства автоматической смены компакт-дисков, расположенному на задней панели устройства. См.
также стр. 23.
• См. также инструкции, прилагаемые к адаптеру Bluetooth и устройству Bluetooth.
• См. список стран (входит в комплект поставки), в которых возможно использование функции Bluetooth®.
При первом использовании устройства Bluetooth с помощью данного устройства (режимы “BT-PHONE” и
“BT-AUDIO”) необходимо установить беспроводное соединение Bluetooth между этими устройствами.
• После установления соединения оно регистрируется в приемнике, даже если выполняется сброс
РУCCKИЙ
приемника. Всего можно зарегистрировать до пяти устройств.
Для каждого источника (“BT-PHONE” и “BT-AUDIO”) можно одновременно подключить только одно устройство.
•
Регистрация устройства Bluetooth
Методы регистрации (сопряжения)
Для регистрации и установления соединения с
устройством используйте один из приведенных
ниже пунктов меню “Bluetooth”.
• Для работы с меню “Bluetooth” выберите
“BT-PHONE” или “BT-AUDIO” в качестве источника.
OPEN Подготовьте приемник к установлению
нового соединения Bluetooth.
Соединение устанавливается с
устройства Bluetooth.
SEARCH Подготовьте приемник к установлению
нового соединения Bluetooth.
Соединение устанавливается с
приемника.
Регистрация с помощью функции “OPEN”
Подготовка
Включите функцию Bluetooth на устройстве.
1 Выберите “BT-PHONE” или “BT-AUDIO”.
2 Выберите “NEW”.
3 Выберите “OPEN”.
4 Введите PIN-код (Personal
Identification Number – личный
идентификационный номер) на
приемнике.
• Можно ввести любой номер (от 1 до 16 цифр).
[По умолчанию: 0000]
* Некоторые устройства имеют собственный
PIN-код. Введите указанный PIN-код в
приемник.
1 Перейдите к положению следующей
(предыдущей) цифры.
2 Выберите цифру или пробел.
14
3 Повторяйте действия 1 и 2 до тех
пор, пока не завершите ввод PIN-кода.
4 Подтвердите ввод.
На дисплее мигает надпись
“OPEN...”.
Page 53

5 Используйте устройство Bluetooth для
поиска и установления соединения.
На подключенном устройстве введите тот же
PIN-код, который был введен для приемника. На
дисплее мигает надпись “CONNECT”.
Соединение установлено, теперь можно
использовать устройство с помощью приемника.
2 Выберите устройство для установления
соединения.
3 Для подключения используйте функции
“OPEN” или “SEARCH”.
Устройство остается зарегистрированным
даже после его отключения. Для следующего
подключения этого же устройства выберите
“CONNECT” (или включите функцию “AUTO CNT”).
(См. правую колонку и стр. 28.)
Поиск доступных устройств
Выполните действия 1 и 2 на стр. 14, затем...
1 Выберите “SEARCH”.
Приемник осуществляет поиск списка
доступных устройств и их отображение.
• Если доступные устройства не обнаружены,
отображается сообщение “UNFOUND”.
2 Выберите устройство для установления
соединения.
3 Введите на приемнике PIN-код данного
устройства.
• Информацию о PIN-коде см. в инструкциях,
поставляемых с устройством.
4 Используйте устройство Bluetooth для
установления соединения.
Соединение установлено, теперь можно
использовать устройство с помощью
приемника.
Установление соединения со специальным
устройством
Выполните действия 1 и 2 на стр. 14, затем...
1 Выберите “SPECIAL”.
На дисплее приемника отображается список
запрограммированных устройств.
Подключение и отключение
зарегистрированного устройства
1 Выберите “BT-PHONE” или “BT-AUDIO”.
2 Выберите зарегистрированное устройство,
которое необходимо подключить или
отключить.
3 Для подключения или отключения
выбранного устройства выберите
“CONNECT” или “DISCNNCT”.
Можно настроить автоматическое подключение
устройства Bluetooth при включении питания
приемника. (См. раздел “AUTO CNT” на стр. 28.)
Удаление зарегистрированного устройства
1 Выберите “BT-PHONE” или “BT-AUDIO”.
2 Выберите зарегистрированное устройство,
которое необходимо удалить.
3 Для удаления выбранного устройства
выберите “DELETE”, затем “YES”.
РУCCKИЙ
15ВНЕШНИЕ УСТРОЙСТВА
Page 54

Использование сотового телефона Bluetooth
РУCCKИЙ
~
Изменение отображаемой информации
Выберите “BT-PHONE”.
Ÿ Выберите меню “Bluetooth”.
! Выполните вызов или настройку с помощью меню “Bluetooth”. (См. стр. 17 и 28.)
При входящем вызове....
Источник автоматически меняется на “BT-PHONE”.
При включенной функции “AUTO ANS” (ответ)....
Приемник автоматически отвечает на входящие
вызовы, см. стр. 28.
• При отключенной функции “AUTO ANS” (ответ)
ответ на входящий вызов осуществляется
нажатием любой клавиши (кроме /диска
управления).
Завершение вызова
Удерживайте любую кнопку (за исключением
или диска управления).
• Можно настроить уровень громкости микрофона
(см. стр. 28).
При получении сообщения SMS....
Если сотовый телефон поддерживает функцию
работы с SMS-сообщениями (Short Message Service
– служба коротких сообщений) и настройка “MSGINFO” (информация о сообщении) имеет значение
“AUTO” (см. стр. 28), при получении сообщения
звучит сигнал, а на дисплее появляется надпись
“RCV MSG” (прием сообщения).
16
Page 55
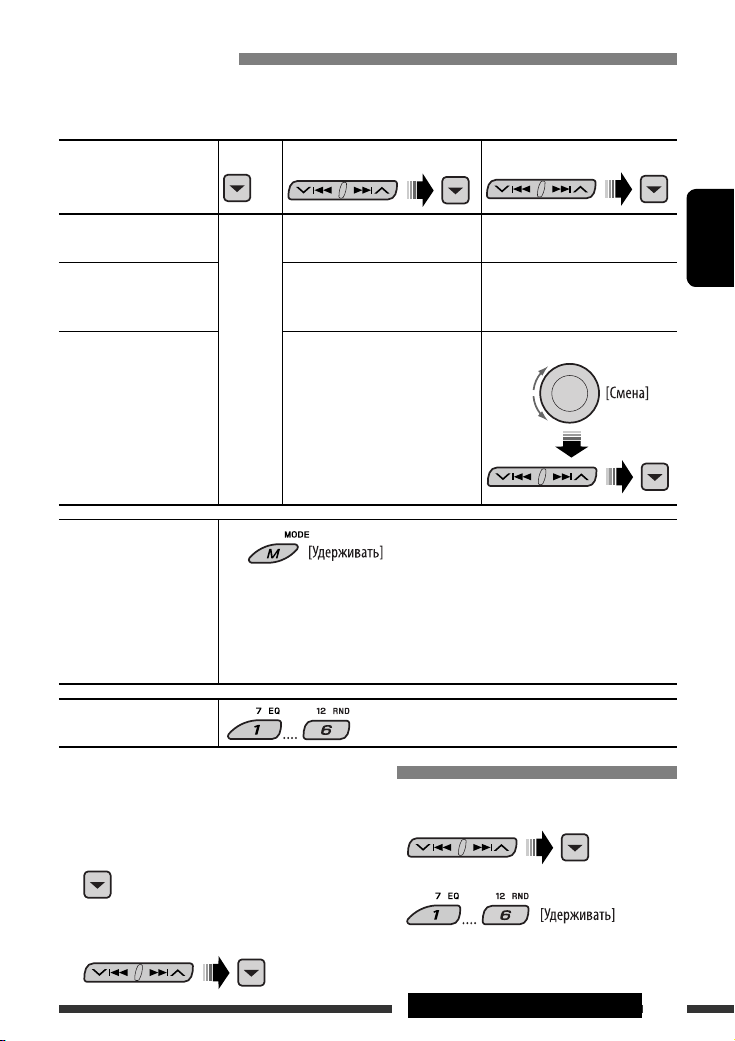
Выполнение вызова
Для выполнения вызова можно использовать следующие способы.
Для выполнения вызова выберите “BT-PHONE”, затем выполните следующие действия:
1 2
3 (если не указано другое)
Журнал вызовов Откройте
меню
Телефонная книга Выберите “PH BOOK”.
Набор номера Выберите “NUMBER”. Введите номер телефона.
Голосовая команда
набора.
1 На дисплее появляется надпись “SAY NAME”.
Выберите журнал вызовов:
REDIAL, RECEIVED, MISSED
Отображается список номеров
телефонов.
Выберите имя (если получено)
или номер телефона.
Выберите имя из списка.
2 Произнесите имя вызываемого абонента.
• Можно также использовать голосовую команду из меню набора. Выберите
“VOICE” из меню набора.
• Если сотовый телефон не поддерживает функцию распознавания голоса,
появляется надпись “ERROR”.
Запрограммированный
номер телефона
Информацию о настройках см. далее.
Программирование номера телефона
Можно запрограммировать до шести номеров
телефонов.
3 Выберите номер телефона.
1 Откройте меню набора.
РУCCKИЙ
2 Выберите необходимую настройку:
“PH BOOK”, “MISSED” или “RECEIVED”.
4
17ВНЕШНИЕ УСТРОЙСТВА
Page 56

Использование аудиопроигрывателя Bluetooth
Меню ввода настроек
Приостанов или запуск воспроизведения
(список устройств)
РУCCKИЙ
Изменение отображаемой информации
Прокрутка назад/прокрутка вперед
~ Выберите “BT-AUDIO”.
Если воспроизведение не начинается автоматически, активируйте его с помощью элементов
управления аудиопроигрывателя Bluetooth.
• Информацию о подключении, отключении и удалении зарегистрированного устройства см. на стр. 15.
Информация о Bluetooth:
Дополнительные сведения о функциях Bluetooth можно найти на веб-узле JVC.
Прослушивание с устройства
автоматической смены компакт-дисков
Изменение отображаемой информации
(см. стр. 11)
Для подключения к данному приемнику рекомендуется использовать устройство автоматической смены
компакт-дисков компании JVC, совместимое с MP3. Можно подключить устройство автоматической смены
компакт-дисков к разъему устройства автоматической смены компакт-дисков на задней панели приемника.
См. также стр. 23.
• Можно воспроизводить только обычный компакт-диск (включая CD-текст) и диски MP3.
18
Page 57

Подготовка
Убедитесь в том, что для настройки внешнего входа выбрано значение “CHANGER” (см. стр. 27).
~ Выберите “CD-CH”.
Ÿ Выберите диск для воспроизведения.
Нажать: Выбор диска с номером от 1 до 6.
Удерживать: Выбор диска с номером от 7 до 12.
Нажатие (или удерживание нажатыми) следующих кнопок позволяет выполнять следующие операции...
Тип диска
Нажать: Выберите дорожку
Удерживать: Перемотка дорожки назад или
вперед
Нажать: Выберите дорожку
Удерживать: Перемотка дорожки назад или
вперед
После нажатия
Тип диска
• Чтобы отключить повторное или произвольное воспроизведение, выберите “RPT OFF” или “RND OFF”.
нажмите следующие кнопки для выполнения следующих операций...
Пропуск 10 дорожек
(внутри одной папки)
Пропуск 10 дорожек TRK RPT:
TRK RPT:
Повтор текущей дорожки
FLDR RPT:
Повтор всех дорожек из
текущей папки
DISC RPT:
Повтор всех дорожек
текущего диска
Повтор текущей дорожки
DISC RPT:
Повтор всех дорожек
текущего диска
Выберите папку
—
FLDR RND:
Произвольное воспроизведение
всех дорожек текущей папки, а
затем дорожек других папок
DISC RND:
Произвольное воспроизведение
всех дорожек текущего диска
MAG RND:
Произвольное воспроизведение
всех дорожек вставленных дисков
DISC RND:
Произвольное воспроизведение
всех дорожек текущего диска
MAG RND:
Произвольное воспроизведение
всех дорожек вставленных дисков
РУCCKИЙ
19ВНЕШНИЕ УСТРОЙСТВА
Page 58

Прослушивание тюнера DAB
Выбор запрограммированной службы.
РУCCKИЙ
Изменение отображаемой информации
К разъему устройства автоматической смены компакт-дисков, расположенному на задней панели
устройства, можно подключить тюнер DAB компании JVC. См. также стр. 23.
~ Выберите “DAB”.
Ÿ Выберите диапазон частот.
! Поиск блока трансляции.
Поиск вручную: Удерживайте нажатой одну из кнопок, пока на дисплее не замигает индикатор “MANU”,
а затем неоднократно нажмите кнопку.
⁄ Выберите службу (основную или дополнительную) для прослушивания.
Сохранение служб DAB в памяти
При прослушивании службы DAB...
Включение или выключение
функции резервного приема
сообщений о движении на дорогах
(TA) или PTY
• Операции в точности соответствуют описанию для
радиостанций FM RDS на стр.10.
• Невозможно сохранять коды PTY отдельно для
тюнера DAB и для тюнера FM.
20
Отслеживание той же
программы—Поиск
альтернативной частоты
• Во время приема службы DAB:
Если автомобиль находится в регионе, где прием
службы невозможен, приемник автоматически
настраивается на другой блок трансляции или
радиостанцию FM RDS, транслирующую ту же
программу.
• Во время приема радиостанции FM RDS:
При поездке по региону, где служба DAB
транслирует ту же программу, что и радиостанция
FM RDS, приемник автоматически настраивается
на службу DAB.
Информацию о деактивации приема на
альтернативных частотах см. на стр. 27.
Page 59

Прослушивание с проигрывателя iPod или D.
Изменение отображаемой информации
Перед использованием подключите один из следующих адаптеров (приобретаются отдельно) к разъему
устройства автоматической смены компакт-дисков, расположенному на задней панели устройства. См.
также стр. 23.
• Интерфейсного адаптера для iPod—KS-PD100 для управления iPod.
• Интерфейсного адаптера для проигрывателя D.—KS-PD500 для управления проигрывателем D.
Подготовка
Убедитесь в том, что для настройки внешнего входа выбрано значение “CHANGER” (см. стр. 27).
~ Выберите “IPOD” или “D. PLAYER”.
Ÿ Выберите песню для воспроизведения.
Выбор дорожки из меню
1 Перейдите главное меню.
Данный режим отключается, если
в течение 5 секунд не выполнено
ни одного действия.
2 Выберите необходимое меню.
Для iPod:
PLAYLIST Ô ARTISTS Ô ALBUMS Ô SONGS
Ô GENRES Ô COMPOSER Ô (возврат на
начало)
Для проигрывателя D.:
PLAYLIST Ô ARTIST Ô ALBUM Ô GENRE
Ô TRACK Ô (возврат на начало)
3 Подтвердите выбор.
•
Для возврата в предыдущее меню нажмите 5.
• Если выбрана дорожка, воспроизведение
начинается автоматически.
• Удерживая
пропустить сразу 10 элементов.
4/¢ , можно
Пауза или останов
воспроизведения
• Повторное нажатие
кнопки возобновляет
воспроизведение.
Нажать: Выбор дорожек
Удерживать: Перемотка
дорожки назад
или вперед
Продолжение не следующей странице
РУCCKИЙ
21ВНЕШНИЕ УСТРОЙСТВА
Page 60
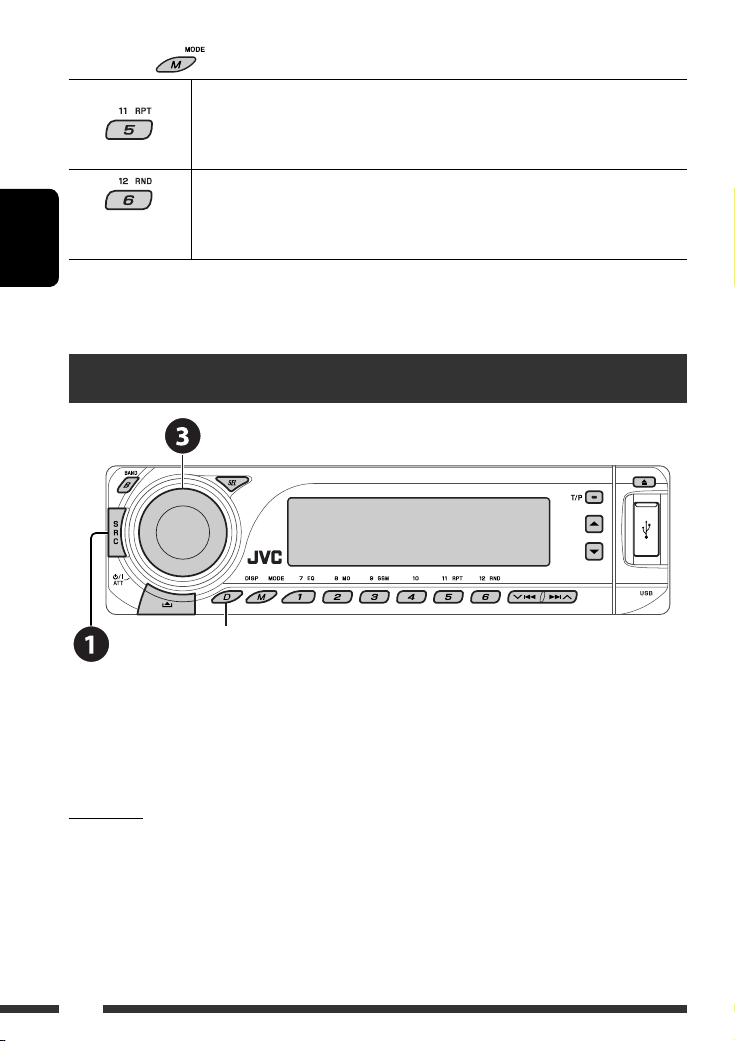
После нажатия
РУCCKИЙ
• Чтобы отключить повторное или произвольное воспроизведение, выберите “RPT OFF” или “RND OFF”.
* iPod: Работает только при выборе значения “ALL” в элементе “ALBUMS” главного меню “MENU”.
нажмите следующие кнопки для выполнения следующих операций...
ONE RPT: Функции, аналогичные функциям “Repeat One” проигрывателя
iPod или “Режим повтора
ALL RPT: Функции, аналогичные функциям “Repeat All” проигрывателя
iPod или “Режим повтора = Все” проигрывателя D.
ALBM RND*: Функции, аналогичные функции “Shuffle Albums” проигрывателя
iPod.
SONG RND/RND ON: Функции, аналогичные функциям “Shuffle Songs” проигрывателя
iPod или “Произв. Воспроизв.
= Один трек” проигрывателя D.
= Включить” проигрывателя D.
Прослушивание с других внешних устройств
Изменение отображаемой информации
Внешнее устройство можно подключить к разъему устройства автоматической смены компакт-дисков,
расположенному на задней панели приемника, с помощью следующих адаптеров (приобретаются отдельно).
См. также стр. 23.
• Адаптер линейного входа—KS-U57
• Адаптер дополнительного входа (AUX)—KS-U58
Подготовка
Убедитесь в том, что для настройки внешнего входа выбрано значение “EXT IN” (см. стр. 27).
~ Выберите “EXT IN”.
Ÿ Включите подключенное устройство и начните воспроизведение звука с его
помощью.
! Настройте громкость.
⁄ Настройка необходимого звука (См. страницы 24 и 25).
22
Page 61

Концептуальная схема подключения внешних устройств
Информацию о подключении см. в Руководство по установке/подключению (в отдельном издании).
• Соединение 1 (интегрированное соединение)
Устройство
Разъем устройства автоматической смены
компакт-дисков
(см. страницы 14 до 18)
или
Тюнер DAB JVC, [20]
(см. о настройке
“EXT IN” на стр. 27)
(см. о настройке
“EXT IN” на стр. 27)
• Соединение 2 (альтернативное соединение)
Устройство
Разъем устройства автоматической
смены компакт-дисков
Устройство автоматической
смены компакт-дисков JVC, [18]
Apple iPod, [21]
проигрывателя JVC D. [21].
MD-проигрыватель и т.п., [22]
MD-проигрыватель и т.п., [22]
(см. страницы 14 до 18)
Тюнер DAB JVC, [20]
РУCCKИЙ
(см. о настройке
“EXT IN” на стр. 27)
(см. о настройке
“EXT IN” на стр. 27)
: Адаптер (приобретается отдельно)
Устройство автоматической
смены компакт-дисков JVC, [18]
Apple iPod, [21]
проигрывателя JVC D. [21].
MD-проигрыватель и т.п., [22]
MD-проигрыватель и т.п., [22]
23ВНЕШНИЕ УСТРОЙСТВА
Page 62

Выбор запрограммированного режима звучания
РУCCKИЙ
Запрограммированные
настройки
Индикатор (Для)
USER (Бемольный звук) 00 00 00 OFF
ROCK (Музыка в стиле рок или диско) +03 00 +02 ON
CLASSIC (Классическая музыка) +01 00 +03 OFF
POPS (Легкая музыка) +02 +01 +02 OFF
HIP HOP (Музыка в стиле фанк или рэп) +04 –02 +01 ON
JAZZ (Джазовая музыка) +03 00 +03 OFF
BAS
(низкие
частоты)
MID
(средний
диапазон частот)
TRE
(верхние
частоты)
LOUD
(громкость)
24
Page 63

Настройка звучания
1
2 Настройте уровень.
Общие настройки—PSM
Можно изменять параметры PSM (предпочитаемый
режим настройки), которые перечислены в таблице
на стр. 26 и 27.
1 Войдите в настройки PSM.
BAS *1 (низкие частоты)
Настройте низкие частоты.
1
MID *
(средний диапазон частот)
Настройте уровень звука для
средних частот.
1
(верхние частоты)
TRE *
Настройте верхние частоты.
2
FAD *
(микшер)
Настройка баланса передних и
задних динамиков.
3
(баланс)
BAL *
Настройка баланса левых и правых
динамиков.
1
LOUD *
(громкость)
Увеличьте низкие и высокие
частоты для получения хорошо
сбалансированного звучания при
низком уровне громкости.
SUB.W (низкочастотный динамик)
Настройте уровень выходного
сигнала низкочастотного динамика.
VOL (громкость)
Настройте громкость.
*1 При настройке верхних, средний диапазон
частот, нижних частот или громкости
выполненная настройка сохраняется для
текущего выбранного режима звучания (iEQ),
включая режим “USER”.
*2
При использовании системы с двумя динамиками
установите для уровня баланса значение “00”.
*3 Эта настройка не влияет на выходной сигнал
сабвуфера.
*4 В зависимости от настройки регулятора
усиления. (Подробнее см. на стр. 27).
от –06 до +06
от –06 до +06
от –06 до +06
от R06 до F06
от L06 до R06
LOUD ON или
LOUD OFF
от 00 до 08, по
умолчанию: 04
от 00 до 30
(или 50) *
2 Выберите параметр PSM.
3 Выберите или настройте выбранный
элемент PSM.
4 Повторите действия 2 и 3 для
настройки других параметров PSM,
если необходимо.
5 Завершите процедуру.
4
Продолжение не следующей странице
РУCCKИЙ
25НАСТРОЙКИ
Page 64

Индикатор Элемент
Настройки, [страница для справки]
( : По
умолчанию)
DEMO
Демонстрация
функций дисплея
CLK DISP *
1
Отображение часов
• DEMO ON
• DEMO OFF
• ON
• OFF
: Если в течение 20 секунд не будет выполнено операций,
начнется демонстрация функций дисплея, [4].
: Отмена.
: Когда устройство выключено, время постоянно отображается на
дисплее.
: Отмена; Если устройство выключено, при нажатии “D DISP”
время отображается примерно в течение 5 секунд, [4].
РУCCKИЙ
CLOCK H
0 – 23 (1 – 12) : По умолчанию: 0 (0:00), [4].
Настройка часа
CLOCK M
00 – 59 : По умолчанию: 00 (0:00), [4].
Настройка минуты
24H/12H
Формат отображения
• 12H
• 24H
: Описание настройки см. на стр. 4.
времени
CLK ADJ
Настройка часов
2
AF-REG *
Прием на
альтернативных
частотах/прием
региональных
передач
• AUTO
• OFF
• AF
• AF REG
• OFF
: Встроенные часы автоматически настраиваются с помощью
данных CT (время на часах) в сигнале RDS.
: Отмена.
:
Если принимаемые сигналы ослабевают, устройство переключается
на другую радиостанцию или службу (программа может отличаться
от принимаемой в текущий момент программы), [10].
: Если принимаемые сигналы ослабевают, устройство
переключается на другую радиостанцию, передающую в эфир ту
же программу.
: Отмена (нельзя выбрать, если для “DAB AF” установлено
значение “AF ON”).
PTY-STBY
Резервный PTY
TA VOL
Громкость передачи
OFF, кодов PTY
(см. стр. 9)
VOL 00 —
VOL 30 или 50 *
: Включение функции резервного приема PTY с помощью одного
из кодов PTY, [9, 10].
: По умолчанию: VOL 15, [10].
3
сообщений о
движении на дорогах
P-SEARCH *
Поиск программ
1
Если подача питания не прекращается при выключении зажигания автомобиля, рекомендуется выбрать
*
2
• ON
• OFF
: Активация поиска программы, [10].
: Отмена.
“OFF” для сохранения заряда аккумулятора автомобиля.
*2 Только для радиостанций RDS FM.
*3 В зависимости от настройки “AMP GAIN”.
26
Page 65

Индикатор Элемент
Настройки, [страница для справки]
( : По
умолчанию)
4
DAB AF *
Поиск
альтернативной
• AF ON
• AF OFF
: Oтслеживание программы среди служб DAB и радиостанций FM
RDS, [20].
: Отмена.
частоты
4
DAB VOL *
Настройка громкости
DAB
DIMMER
Затемнение
TEL
Отключение звука
телефона
5
SCROLL *
Прокрутка
VOL –12
— VOL +12
• AUTO
• ON
• OFF
• MUTING 1/
MUTING 2
• OFF
• ONCE
• AUTO
• OFF
: По умолчанию: VOL 00; Можно настроить уровень громкости
тюнера DAB в соответствии с уровнем звучания FMрадиостанции и сохранить это в памяти.
: Затемнение дисплея при включении фар.
: Затемнение подсветки дисплея.
: Отмена.
: Выберите любой из параметров, обеспечивающий отключение
звука при использовании сотового телефона.
: Отмена.
: Однократная прокрутка информации дорожки.
: Повторная прокрутка (через 5-секундные интервалы).
: Отмена. (Независимо от настройки прокрутку экрана можно
осуществлять, удерживая нажатой кнопку D DISP.)
WOOFER
Предельная частота
низкочастотного
• LOW
• MID
• HIGH
: Низкочастотный динамик воспроизводит частоты ниже 90 Гц.
: Низкочастотный динамик воспроизводит частоты ниже 135 Гц.
: Низкочастотный динамик воспроизводит частоты ниже 180 Гц.
динамика
6
EXT IN *
Ввод внешних
сигналов
TAG DISP
Отображение тегов
AMP GAIN
Регулятор усиления
• CHANGER
• EXT IN
• TAG ON
• TAG OFF
• LOW PWR
: Использование устройства автоматической смены компакт-
дисков JVC, [18], Apple iPod или проигрывателя JVC D. [21].
: Использование любого внешнего устройства, [22].
: Отображение метки во время воспроизведения дорожек MP3/
WMA/AAC/WAV.
: Отмена.
: VOL 00 – VOL 30 (Если максимальная мощность динамика
меньше 50 Вт, выберите этот параметр, чтобы предотвратить
повреждение динамика.)
IF BAND
Полоса
промежуточных
частот
• HIGH PWR
• AUTO
• WIDE
: VOL 00 – VOL 50
: Повышение избирательности тюнера для устранения
интерференционных помех от соседних радиостанций.
(Сопровождается потерей стереоэффекта).
: Могут возникать интерференционные помехи от соседних
радиостанций, но качество звучания при этом не ухудшается и
сохраняется стереоэффект.
4
Отображается только при подключении тюнера DAB.
*
*5
Некоторые буквы или символы не будут отображаться правильно (или не будут отображаться) на дисплее.
*6 Отображается только при выборе одного из следующих источников: FM, AM, DAB, CD, USB или Bluetooth.
РУCCKИЙ
27НАСТРОЙКИ
Page 66

Настройки Bluetooth
Приведенные в правом столбце настройки можно
изменить в соответствии с предпочтениями
пользователя.
1 Выберите “BT-PHONE” или “BT-AUDIO”.
РУCCKИЙ
2 Выберите меню “Bluetooth”.
3 Выберите “SETTING”.
4 Выберите элемент настройки.
5 Измените настройку.
Меню настроек ( : По умолчанию)
AUTO CNT (подключение)
При включении устройства автоматически
устанавливается соединение с....
OFF: Ни с одним из устройств Bluetooth.
LAST: устройством Bluetooth, подключенным
последним.
ORDER: Найденное первым
зарегистрированное устройство
Bluetooth.
AUTO ANS (ответ)
Только для устройства, подключаемого в режиме
“BT-PHONE”.
ON: Устройство автоматически отвечает на
входящие вызовы.
OFF: Устройство не отвечает автоматически
на вызовы. Ответ необходимо
выполнять вручную.
REJECT: Все входящие вызовы отклоняются.
MSG-INFO (информация о сообщении)
Только для устройства, подключаемого в режиме
“BT-PHONE”.
AUTO: Приемник информирует пользователя
о получении сообщения с помощью
звукового сигнала и отображения
сообщения “RCV MSG” (прием
сообщения).
MANUAL: Приемник не информирует
пользователя о принятии сообщения.
28 НАСТРОЙКИ
MIC SET (настройка микрофона)
Только для устройства, подключаемого в режиме
“BT-PHONE”.
Настройка громкости микрофона, подключенного к
адаптеру Bluetooth, [LEVEL 01/02/03].
VERSION
Отображаются версии программного и аппаратного
обеспечения Bluetooth.
Page 67

Обслуживание
Очистка разъемов
При частом отсоединении разъемы загрязняются.
Чтобы снизить уровень загрязнения, периодически
проводите очистку разъемов с помощью ватных
валиков или ткани, смоченных спиртом, соблюдая
при этом меры предосторожности во избежание
повреждения разъемов.
Разъем
Конденсация влаги
Влага может конденсироваться на линзе внутри
устройства в следующих случаях:
• После включения автомобильного обогревателя.
• При повышении влажности внутри автомобиля.
Это может привести к неисправной работе
устройства. В этом случае извлеките диск и оставьте
приемник включенным на несколько часов, чтобы
испарилась влага.
Как обращаться с дисками
При извлечении диска из
футляра, нажмите на
центральный держатель футляра
и снимите диск, удерживая его за
края.
• Всегда удерживайте диск за края. Не
прикасайтесь к поверхности, на которой
находится запись.
Чтобы поместить диск в футляр, аккуратно
установите диск на центральный держатель
(стороной с изображением вверх).
• После прослушивания обязательно помещайте
диски в футляры.
Центральный держатель
Хранение дисков в чистом виде
Воспроизведение грязного диска
может быть некорректным.
Если диск загрязнится, протрите его
мягкой тканью по прямой линии от
центра к краю.
• Не используйте растворитель (например, обычное
средство для чистки кассет, распыляемые
средства, разбавитель, бензин и т.д.) для чистки
дисков.
Прослушивание новых дисков
Вблизи внутреннего и внешнего
краев новых дисков иногда бывают
грубые выступы. Такой диск не
может быть загружен в приемник.
Чтобы удалить такие пятна, потрите их карандашом
или шариковой ручкой и т.д.
Не используйте следующие диски:
Изогнувшийся
диск
Диск с
наклейкой
Диски с остатками
наклейки
Диск с наклеиваемой
этикеткой
Необычная форма
Один компакт-диск
(диаметром 8 см)
РУCCKИЙ
29СПРАВОЧНАЯ ИНФОРМАЦИЯ
Page 68

Дополнительная информация о приемнике
Общие сведения
Включение питания
• Для включения питания приемника также можно
использовать кнопку SRC. Если источник готов,
воспроизведение также начинается.
Выключение питания
• Если питание отключается во время
прослушивания диска, при последующем
РУCCKИЙ
включении питания воспроизведение диска
начнется с того места, где оно было остановлено.
FM/AM/RDS
Сохранение радиостанций
• Во время поиска SSM...
– Выполняется программирование принимаемых
радиостанций для кнопок № 1 (наименьшая
частота) - № 6 (наибольшая частота).
– По завершении использования функции SSM
будет выполнена автоматическая настройка на
радиостанцию, сохраненную под номером 1.
• При сохранении радиостанций предыдущие
запрограммированные радиостанции удаляются,
и сохраняются новые радиостанции.
Операции с FM RDS
•
Для правильной работы функции сетьотслеживающего приема требуется два типа
сигналов RDS—PI (идентификация программы) и
AF (альтернативная частота). Если прием указанных
данных осуществляется неправильно, функция сетьотслеживающего приема не будет работать.
•
Если осуществляется прием сообщений о движении
на дорогах с помощью резервного приема TA,
уровень громкости автоматически меняется на
запрограммированный (TA VOL), когда текущий
уровень ниже запрограммированного.
• Когда функция приема на альтернативных
частотах включена (выбрано AF), автоматически
включается сеть-отслеживающий прием. С другой
стороны, функцию сеть-отслеживающего приема
невозможно отключить, не отключая режим
альтернативного приема. (См. страницы 26 и 27).
• Дополнительную информацию об услуге RDS см.
на стран ице <http://www.rds.org.uk>.
30
Disc
Предостережение для воспроизведения
дисков DualDisc
• Сторона диска DualDisc, отличная от DVD, не
совместима со стандартом “Compact Disc Digital
Audio”. Поэтому не рекомендуется использовать
сторону диска DualDisc, отличную от DVD, на
данном устройстве.
Общие сведения
• Данный приемник предназначен для
воспроизведения компакт-дисков/CD-текста, а
также дисков однократной или многократной
записи в формате звукового компакт-диска
(CD-DA), MP3/WMA/AAC.
•
Если диск вставляется верхней стороной вниз, на
дисплее поочередно появляются надписи “PLEASE” и
“EJECT”. Нажмите 0 для извлечения диска.
• При быстрой перемотке дорожки MP3/WMA/
AAC вперед или назад можно услышать лишь
прерывистый звук.
Извлечение диска
•
Если в течение 15 секунд извлеченный диск не будет
вынут, он автоматически помещается обратно в
загрузочный отсек в целях защиты от загрязнения.
Воспроизведение начинается автоматически.
• После извлечения диска появляется надпись
“NO DISC” и невозможно использовать некоторые
кнопки. Вставьте другой диск или нажмите
кнопку SRC для выбора другого источника
воспроизведения.
Воспроизведение компакт-дисков
однократной и многократной записи
• Используйте только “завершенные” компактдиски однократной и многократной записи.
• Данный приемник может воспроизводить только
файлы одного типа, который первым будут
распознан, если на диске содержатся файлы как в
ф ормате звукового компакт-диска (CD-DA), так и
в формате MP3/WMA/AAC.
• На данном приемнике возможно
воспроизведение дисков с несколькими сеансами
записи; однако, незавершенные сеансы будут
пропускаться при воспроизведении.
• Некоторые компакт-диски однократной или
многократной записи не воспроизводятся на
данном устройстве в связи с их особенностями, а
также по следующим причинам:
Page 69

– Диски загрязнены или поцарапаны;
– На линзе внутри приемника присутствует
конденсат влаги;
– Линза звукоснимателя загрязнена;
– При записи файлов на компакт-диск
однократной или многократной записи
использовался метод пакетной записи;
– Некорректное состояние записи (отсутствие
данных и т.д.) или носителя (пятна, царапины,
деформация и т.д.).
• Для считывания дисков многократной записи
может потребоваться больше времени, так как
они имеют меньшую отражательную способность
по сравнению с обычными компакт-дисками.
• Не используйте следующие компакт-диски
однократной или многократной записи:
– Диски с наклейками, этикетками или
защитными пленками на поверхности;
– Диски, на которых можно печатать этикетки с
помощью струйного принтера.
Использование этих дисков при высоких
температурах или высокой влажности может
привести к неисправности или повреждению
устройства.
Воспроизведение диска MP3/WMA/AAC
• Данный приемник может воспроизводить файлы
MP3/WMA/AAC с расширением <.mp3>, <.wma>
или <.m4a> (не зависит от регистра).
• Данный приемник может отображать названия
альбомов, артистов (исполнителей), тег ID3
(версия 1,0, 1,1, 2,2, 2,3 или 2,4) для MP3 и тег
WMA или AAC.
• Данный приемник может обрабатывать только
однобайтовые символы. Все остальные символы
отображаются неправильно.
• Файлы MP3/WMA/AAC отображаются на данном
приемнике в соответствии со следующими
характеристиками:
– Битрейт для МР3: 8 кбит/с — 320 кбит/с
– Частота передачи данных для МР3:
48 кГц, 44,1 кГц, 32 кГц (для MPEG-1)
24 кГц, 22,05 кГц, 16 кГц (для MPEG-2)
12 кГц, 11,025 кГц, 8 кГц (для MPEG-2,5)
– Битрейт для WMA: 16 кбит/с — 32 кбит/с
(Частота дискретизации:
22,05 кГц)
32 кбит/с — 320 кбит/с
(Частота дискретизации:
48 кГц, 44,1 кГц, 32 кГц)
– Битрейт для AAC: 16 кбит/с — 320 кбит/с
– Частота передачи данных для AAC: 48 кГц,
44,1 кГц
– Формат диска: ISO 9660 Level 1/Level 2, Romeo,
Joliet, длинное имя файла Windows
•
Максимальное количество символов для названий
файлов или папок зависит от используемого
формата диска (включая 4 символа расширения
<.mp3>, <.wma> или <.m4a>).
– ISO 9660 Level 1: до 12 символов
– ISO 9660 Level 2: до 31 символов
– Romeo*: до 128 (60) символов
– Joliet*: до 64 (30) символов
–
Длинное имя файла Windows*: до 128 (60) символов
*
Значение в скобках представляет собой
максимально допустимое число символов для имен
файлов/папок в случае, если суммарное количество
файлов и папок составляет 271 или больше.
• Данное устройство может распознать всего 512
файлов, 200 папок и 8 иерархий.
• Данный приемник может воспроизводить файлы,
записанные в режиме VBR (переменная скорость
в битах).
Для файлов, записанных в режиме VBR, по разному
отображается время от начала воспроизведения,
и это время не соответствуют действительности.
Эта разница становится особенно заметной после
выполнения функции поиска.
• Данный приемник не может воспроизводить
следующие файлы:
– файлы MP3, закодированные в форматах MP3i
и MP3 PRO;
– файлы MP3, закодированные в
непредусмотренном формате;
– файлы MP3, закодированные в формате Layer
1/2;
– файлы WMA, закодированные в формате
“без потерь”, профессиональном и голосовом
форматах;
– файлы WMA, основой которых служит формат,
отличный от формата Windows Media® Audio;
– файлы WMA, защищенные от копирования по
методу DRM;
– Файлы AAC, созданные каким-либо другим
приложением, кроме iTunes.
– Файлы AAC, кодированные в формате Apple без
потерь.
– файлы, содержащие данные, например, AIFF,
ATRAC3 и т.д.
• Функция поиска выполняется, но скорость поиска
не является постоянной.
Продолжение не следующей странице
31СПРАВОЧНАЯ ИНФОРМАЦИЯ
РУCCKИЙ
Page 70

Воспроизведение дорожек MP3, WMA, AAC
или WAV с устройства USB
• При подключении устройства USB источник
автоматически меняется на “USB”.
•
Порядок воспроизведения с устройства USB может
отличаться от других устройств воспроизведения.
• Приемник может не воспроизводить некоторые
устройства USB или некоторые файлы из-за их
характеристик или условий записи.
• В зависимости от конфигурации устройств USB и
коммуникационных портов некоторые устройства
USB могут быть подключены неправильно, или
соединение может быть потеряно.
РУCCKИЙ
• Информацию о подключении запоминающего
устройства USB большой емкости см. также в
руководстве по его эксплуатации.
•
К приемнику можно одновременно подключить
только одно запоминающее устройство USB большой
емкости. Не используйте концентратор USB.
•
К приемнику можно подключить USB-устройства
двух типов: устройство MTP и запоминающее
устройство большой емкости.
Если подключить к приемнику устройство MTP
с функцией “цифровая потоковая передача
медиаданных через USB” (кроме проигрывателя
D. JVC XA-HD500), можно воспроизводить
файлы WMA-DRM10 (управление цифровыми
правами), приобретенные через веб-узлы,
специализирующиеся на распространении музыки.
• Приемник совместим со спецификацией USB
высокоскоростного режима передачи данных.
• Если подключенное устройство USB не содержит
файлов требуемого формата, появляется надпись
“NO FILE”.
•
Устройство может отображать тег ID3 (версии 1,0, 1,1,
2,2, 2,3 или 2,4) для MP3 и тег WMA, AAC или WAV.
• Файлы MP3/WMA/AAC/WAV отображаются
на данном приемнике в соответствии со
следующими характеристиками:
MP3:
Cкорость передачи данных: 8 кбит/с — 320 кбит/с
–
– Частота дискретизации:
48 кГц, 44,1 кГц, 32 кГц (для MPEG-1)
24 кГц, 22,05 кГц, 16 кГц (для MPEG-2)
WMA:
–
Cкорость передачи данных: 5 кбит/с — 320 кбит/с
– Частота дискретизации: 8 кГц — 48 кГц
– Канал: моно или стерео
AAC:
–
Cкорость передачи данных: 16 кбит/с — 320 кбит/с
– Частота дискретизации: 48 кГц — 44,1 кГц
– Канал: 1/2
WAV:
– Cкорость передачи данных: линейная PCM при
32
705 кбит/с и 1 411 кбит/с
– Частота дискретизации: 44,1 кГц
– Канал: 1/2
• Данное устройство может воспроизводить файлы
MP3, записанные в режиме VBR (переменная
скорость в битах).
• Максимальное количество символов для имен
папок и файлов — 25, для тега MP3, WMA, AAC
или WAV — 128.
• Данное устройство может распознавать до
50 000 файлов и 5 000 папок (999 файлов в папке).
Однако на дисплее может отображаться до 9 999
папок или файлов.
• Приемник не распознает запоминающие
устройства USB большой емкости с номинальным
напряжением, отличным от 5 В, и не допускает
превышение 500 мА.
• Данный приемник может не распознать
устройство USB, подключенное через USBустройство чтения карт.
• Приемник может неправильно воспроизводить
файлы с устройства USB при использовании
удлинителя USB.
• При использовании данного приемника
невозможно гарантировать правильное
функционирование и обеспечение надлежащего
питания для всех типов устройств USB.
• Данный приемник не может воспроизводить
следующие файлы:
– файлы MP3, закодированные в форматах MP3i
и MP3 PRO;
– файлы MP3, закодированные в
непредусмотренном формате;
– файлы MP3, закодированные в формате Layer
1/2;
– файлы WMA, закодированные в формате
“без потерь”, профессиональном и голосовом
форматах;
– файлы WMA, основой которых служит формат,
отличный от формата Windows Media® Audio;
– Файлы AAC, созданные каким-либо другим
приложением, кроме iTunes.
– Файлы AAC, кодированные в формате Apple без
потерь.
– Файлы WAV, кодированные с помощью
MS-ADPCM.
– файлы, содержащие данные, например, AIFF,
ATRAC3 и т.д.
Смена источника звука
• При смене источника звука воспроизведение
прекращается.
При повторном выборе того же источника звука
воспроизведение начнется с того места, где оно
было остановлено.
Page 71

Отсоединение устройства USB
•
После удаления устройства USB появляется
надпись “NO USB”, и становится невозможным
использование некоторых кнопок. Снова
подключите устройство USB или нажмите кнопку SRC
для выбора другого источника воспроизведения.
Операции Bluetooth
Общие сведения
• Во время управления автомобилем не следует
выполнять сложные операции (набор номеров,
использование телефонной книги и т.д.).
При выполнении этих операций остановите
автомобиль в безопасном месте.
• В зависимости от версии Bluetooth устройства, не
все устройства Bluetooth могут быть подключены
к приемнику.
• Приемник может не работать с некоторыми
устройствами Bluetooth.
• Качество соединения может зависеть от условий
окружающей среды.
• При выключении приемника устройство
отключается.
Предупреждающие сообщения при работе
с Bluetooth
ERR CNCT
(Ошибка
соединения)
ERROR Попытайтесь выполнить операцию
UNFOUND Функция “SEARCH” не обнаружила ни
LOADING Приемник выполняет обновление
WAIT Приемник выполняет подготовку к
RESET 8 Проверьте соединение между
Устройство зарегистрировано, но
установить соединение не удается.
Используйте “CONNECT” для
повторного подключения устройства.
(См. стр. 15.)
еще раз. Если сообщение “ERROR”
отображается снова, проверьте,
поддерживает ли устройство
запрашиваемую функцию.
одного устройства Bluetooth.
телефонной книги и/или текстовых
сообщений.
использованию функции Bluetooth.
Если сообщение не исчезает,
выключите и снова включите
приемник, после чего выполните
повторное подключение устройства
Bluetooth (или выполните сброс
приемника).
адаптером и этим устройством.
DAB
• Даже при сохранении дополнительной службы
запрограммировать можно только основную
службу DAB.
•
При сохранении новой службы DAB с тем же
запрограммированным номером происходит
удаление ранее запрограммированной службы DAB.
Проигрыватель iPod или D.
• При включении этого устройства проигрыватель
iPod или D. заряжается через него.
• При подключении проигрывателя iPod или
D. все операции из проигрывателя iPod или
D. запрещаются. Все операции выполняйте с
устройства.
• Текстовая информация может отображаться
неправильно.
• Если текстовая информация содержит более 8
символов, она прокручивается на дисплее. Это
устройство может отображать до 40 символов.
Примечание:
При управлении проигрывателем iPod или
D. некоторые операции могут выполняться
неправильно. В этом случае см. веб-узел
компании JVC:
Для пользователей iPod: <http://www.jvc.
co.jp/english/car/support/ks-pd100/index.
html>
Для пользователей проигрывателя D.:
<http://www.jvc.co.jp/english/car/support/
ks-pd500/index.html>
Общие настройки—PSM
• Настройка “AUTO” для функции “DIMMER” может
работать некорректно в некоторых автомобилях,
в частности, в тех, которые оснащены диском
управления затемнением.
В этом случае измените значение настройки
“DIMMER” на любое другое, отличное от “AUTO”.
• Если для элемента “AMP GAIN” настройка “HIGH
PWR” меняется на “LOW PWR” и при этом для
уровня громкости установлено значение больше
“VOL 30”, приемник автоматически меняет
уровень громкости на “VOL 30”.
РУCCKИЙ
33СПРАВОЧНАЯ ИНФОРМАЦИЯ
Page 72

Устранение проблем
Не всякое нарушение в работе устройства является результатом его неисправности. Перед обращением в
сервисный центр проверьте следующее.
Симптомы Способы устранения/Причины
• Не слышен звук динамиков. • Установите оптимальный уровень громкости.
• Приемник не работает. Перенастройте приемник (см. стр. 2).
РУCCKИЙ
Общие сведения
• Автоматическое программирование SSM не
работает.
• Статические помехи при прослушивании
FM/AM
радио.
• Диск не воспроизводится. Вставьте диск правильно.
• Не воспроизводятся компакт-диски
однократной и многократной записи.
• Не осуществляется переход на дорожки
компакт-дисков однократнойи
многократной записи.
• Диск не может быть воспроизведен и или
извлечен.
• Звук, записанный на диске, иногда
Все диски
прерывается.
• На дисплее появляется надпись “NO DISC”. Вставьте в загрузочный отсек диск, который можно
• На дисплее поочередно появляются
надписи “PLEASE” и “EJECT”.
• Диск не воспроизводится. • Используйте диск с дорожками MP3/WMA/AAC,
• Слышен шум. Перейдите к другой дорожке или смените диск.
MP3/WMA/AAC
• Для чтения требуется более длительное
время (на дисплее продолжает мигать
надпись “CHECK”).
• Проверьте кабели и соединения.
Сохраните радиостанции вручную.
Плотно подсоедините антенну.
• Вставьте компакт-диск однократной или
многократной записи с закрытым сеансом.
• Закройте сеанс компакт-диска однократной или
многократной записи с помощью устройства,
которое использовалось для записи.
• Снимите блокировку с диска (см. стр. 11).
• Принудительно извлеките диск (см. стр. 2).
• Остановите воспроизведение на время езды по
неровной дороге.
• Смените диск.
• Проверьте кабели и соединения.
воспроизвести.
Это происходит иногда при перегревании. Извлечение
диска или смена источника воспроизведения.
записанными в формате, совместимом с ISO 9660
Level 1, Level 2, Romeo или Joliet.
• Добавьте к именам файлов расширение <.mp3>,
<.wma> или <.m4a>.
(Не добавляйте расширение <.mp3>, <.wma>
или <.m4a> к файлам, не являющимся файлами
MP3/WMA/AAC.)
Не используйте слишком сложную иерархию с
большим количеством папок.
34
Page 73

Симптомы Способы устранения/Причины
• Порядок воспроизведения дорожек
отличается от заданного.
• Время от начала воспроизведения
неправильное.
• На дисплее поочередно появляются
надписи “PLEASE” и “EJECT”.
MP3/WMA/AAC
• Не отображаются правильные символы
(т.е. название альбома).
• Слышен шум. Воспроизводимая дорожка не является дорожкой
• На дисплее продолжает мигать надпись
“CHECK”.
Устройство USB
• На дисплее мигает надпись “NO FILE”.
• На дисплее появляется надпись “NO USB”.
• На дисплее поочередно появляются
надписи “READ” и “FAILED”.
• Не отображаются правильные символы
(т.е. название альбома).
• Звук иногда прерывается во время
воспроизведения дорожки.
Порядок воспроизведения определяется при записи
файлов.
Это иногда происходит во время воспроизведения.
Причиной является способ записи дорожек на диск.
Вставьте диск, содержащий дорожки MP3/WMA/AAC.
Данное устройство может отображать только буквы
(латинские и кириллицу верхнего регистра), цифры и
ограниченное число символов.
MP3/WMA/AAC/WAV. Перейдите к другому файлу. (Не
добавляйте расширение <.mp3>, <.wma>, <.m4a>
или <.wav> к дорожкам, отличным от MP3/WMA/
AAC/WAV.)
• Время считывания меняется в зависимости от
устройства USB.
• Не пользуйтесь большим количеством
иерархических уровней, папок, в том числе пустых*.
• Выключите питание, а затем снова его включите.
* Папка, которая физически пуста, либо папка,
которая содержит данные, но среди них нет
звуковых дорожек MP3/WMA/AAC/WAV в нужном
формате.
Подключите устройство USB, которое содержит
дорожки, кодированные в соответствующем формате.
Получить правильный доступ к такому количеству
звуковых дорожек невозможно.
Приемник может отображать только буквы (верхнего
регистра), цифры и ограниченное число символов.
Дорожки MP3/WMA/AAC/WAV не были должным
образом скопированы на устройство USB.
Еще раз скопируйте дорожки MP3/WMA/AAC/WAV на
устройство USB и повторите попытку
РУCCKИЙ
Продолжение не следующей странице
35СПРАВОЧНАЯ ИНФОРМАЦИЯ
Page 74

Симптомы Способы устранения/Причины
• Устройство Bluetooth не обнаруживает
приемник.
• Приемник не обнаруживает устройство
Bluetooth.
РУCCKИЙ
• Приемник не выполняет сопряжение с
устройством Bluetooth.
• Возникает эхо или шум. Отрегулируйте положение микрофона.
Bluetooth *
• Плохое качество звука телефона. • Уменьшите расстояние между приемником и
• Во время воспроизведения с помощью
аудиоустройства Bluetooth происходит
прерывание звука.
• Невозможно управление подключенным
аудиоустройством.
• На дисплее появляется надпись “NO DISC”. Вставьте диск в загрузочное отверстие.
• На дисплее появляется надпись “NO MAG”. Вставьте загрузочный механизм.
• На дисплее появляется надпись “RESET 8”. Правильно подключите приемник к устройству
• На дисплее появляется надпись “RESET 1”
– “RESET 7”.
• Устройство автоматической смены
компакт-дисков не работает.
Приемник может быть подключен в определенный
момент времени только к одному сотовому телефону
или аудиоустройству Bluetooth.
В процессе установления соединения приемник
не может быть обнаружен другим устройством.
Отключите подключенное в настоящий момент
устройство и повторите поиск.
• Проверьте настройку Bluetooth устройства.
• Выполните поиск с устройства Bluetooth. После того,
как устройство Bluetooth обнаружит приемник,
выберите “OPEN” на приемнике для подключения
устройства Bluetooth. (См. стр. 14.)
• Введите одинаковый PIN-код для приемника и
целевого устройства.
• Выберите имя устройства в меню “SPECIAL”, затем
повторите попытку подключения. (См. стр. 15.)
аудиоустройством Bluetooth.
• Переместите автомобиль в место с более сильным
уровнем сигнала сотовой сети.
• Уменьшите расстояние между приемником и
аудиоустройством Bluetooth.
Отключите устройство, подключенное для “BT-PHONE”.
•
• Выключите, а затем включите приемник.
• Если звук по-прежнему не работает должным
образом, подключите устройство еще раз.
Проверьте, поддерживает ли подключенное
аудиоустройство профиль AVRCP (Audio Video Remote
Control Profile – профиль удаленного управления
аудио- и видеоустройствами).
автоматической смены компакт-дисков и нажмите
кнопку сброса устройства автоматической смены
компакт-дисков.
Нажмите кнопку сброса устройства автоматической
смены компакт-дисков.
Перенастройте приемник (см. стр. 2).
Устройство автоматической смены компакт-дисков
* Информацию о работе с устройствами Bluetooth см. в руководстве по эксплуатации адаптера Bluetooth.
36
Page 75

Симптомы Способы устранения/Причины
• На дисплее появляется надпись “noSIGNAL”. Перейдите в область с более сильным сигналом.
• На дисплее появляется надпись “RESET 08”. Правильно подключите устройство к тюнеру DAB и
• Тюнер DAB совсем не работает. Отключите и вновь подключите устройство к тюнеру
DAB
• На дисплее появляется надпись
“ANTENANG”.
• Проигрыватель iPod или D. не включается
или не работает.
• Звук искажается. Отключите эквалайзер на устройстве или на
• На дисплее появляется надпись “NO IPOD”
или “NO DP”.
• Воспроизведение останавливается. Наушники отключаются в процессе воспроизведения.
• Звук не слышен при подключении с iPod
nano.
• Звук не слышен.
• При подключении проигрывателя D. на
дисплее появляется сообщение “ERROR 01”.
Проигрыватель iPod или D.
• На дисплее появляется надпись “NO FILE”
или “NO TRACK”.
• На дисплее появляется надпись “RESET 1”
– “RESET 7”.
• На дисплее появляется надпись “RESET 8”. Проверьте соединение между адаптером и этим
• Элементы управления проигрывателя iPod
или D. не работают после отключения от
устройства.
• Microsoft и Windows Media являются либо зарегистрированными торговыми марками или торговыми
марками корпорации Microsoft в США и/или других странах.
• iPod является торговой маркой Apple Computer, Inc., зарегистрированной в США и других странах.
• Текстовый товарный знак Bluetooth и соответствующие логотипы являются собственностью компании
Bluetooth SIG, Inc. и используются компанией Victor Company of Japan, Limited (JVC) по соответствующей
лицензии. Прочие товарные знаки и торговые марки являются собственностью соответствующих
владельцев.
выполните перенастройку устройства (см. стр. 2).
DAB и выполните перенастройку устройства (см.стр.2).
Проверьте кабели и соединения.
• Проверьте соединительный кабель и подключение.
• Обновите версию микропрограммы.
• Зарядите батарею.
проигрывателе iPod или D.
• Проверьте соединительный кабель и подключение.
• Зарядите батарею.
Перезапустите операцию воспроизведения с помощью
панели управления (см.стр. 21).
• Отключите наушники от iPod nano.
• Обновите версию встроенного программного
обеспечения iPod nano.
Отключите адаптер от проигрывателя D. Затем
подключите его снова.
Нет сохраненных дорожек. Импортируйте дорожки в
проигрыватель iPod или D.
Отключите адаптер как от устройства, так и от
проигрывателя iPod или D. Затем подключите его
снова.
устройством.
Выполните сброс проигрывателя iPod или D.
РУCCKИЙ
37СПРАВОЧНАЯ ИНФОРМАЦИЯ
Page 76
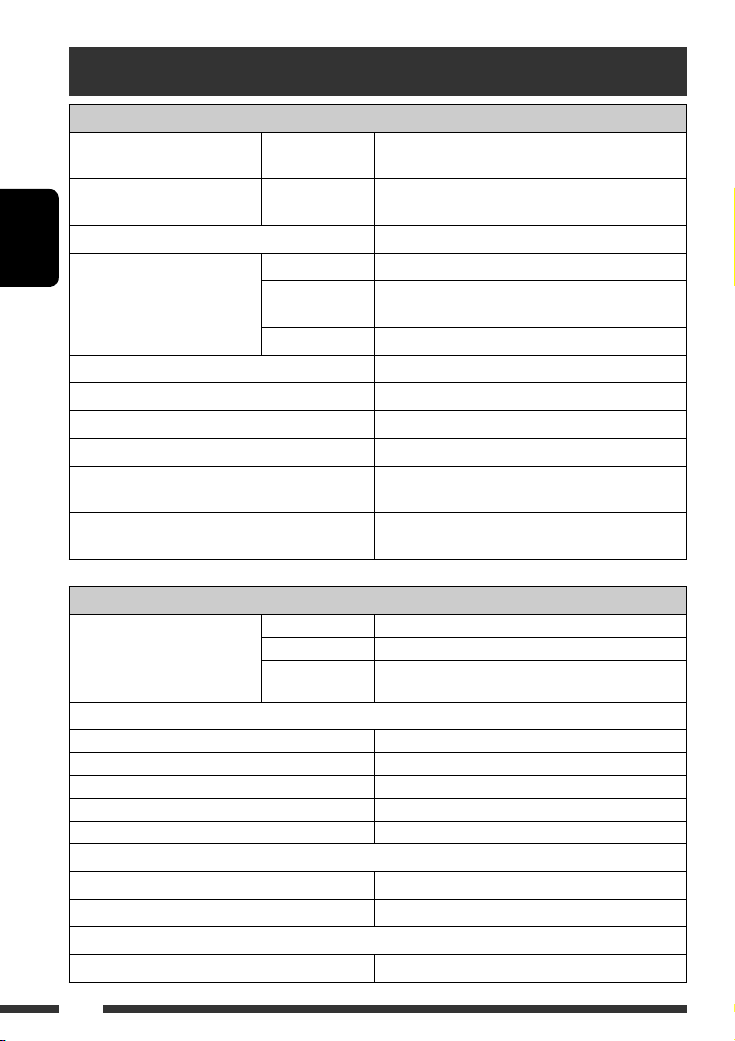
Технические характеристики
БЛОК УСИЛИТЕЛЕЙ ЗВУКА
Максимальная выходная
мощность:
Длительная выходная
мощность (RMS):
Импеданс нагрузки: 4 Ω (допустимо от 4 Ω до 8 Ω)
Диапазон настройки тембра: Низкие частоты: ±12 дБ при 60 Гц
РУCCKИЙ
Частотная характеристика: от 40 Гц до 20 000 Гц
Отношение сигнал/помеха: 70 дБ
Уровень линейного выхода/полное сопротивление: нагрузка 2,5 В/20 kΩ (полная шкала)
Импеданс выходного сигнала: 1 kΩ
Уровень выхода низкочастотного динамика/полное
сопротивление:
Другой терминал: Устройство автоматической смены компакт-дисков,
БЛОК РАДИОПРИЕМНИКА
Диапазон частот:
Радиоприемник в диапазоне FM
Полезная чувствительность: 11,3 dBf (1,0 μВ/75 Ω)
50 дБ пороговая чувствительность: 16,3 dBf (1,8 μВ/75 Ω)
Альтернативная отстройка (400 кГц): 65 дБ
Частотная характеристика: от 40 Гц до 15 000 Гц
Разделение стереоканалов: 30 дБ
Радиоприемник в диапазоне CB
Чувствительность: 20 μВ
Избирательность: 35 дБ
Радиоприемник в диапазоне ДB
Чувствительность: 50 μВ
Передние и
задние:
Передние и
задние:
Средний диапазон
частот:
Верхние частоты: ±12 дБ при 10 кГц
FM1/FM2: от 87,5 МГц до 108,0 МГц
FM3: от 65,00 МГц до 74,00 МГц
AM: CB: от 522 кГц до 1 620 кГц
50 Вт на каждый канал
19 Вт на канал в при 4 Ω, от 40 Гц до 20 000 Гц и не
более чем 0,8% общего гармонического искажения.
±12 дБ при 1 кГц
нагрузка 2,5 В/20 kΩ (полная шкала)
вход USB
ДB: от 144 кГц до 279 кГц
38
Page 77

БЛОК ПРОИГРЫВАТЕЛЯ КОМПАКТ-ДИСКОВ
Тип: проигрыватель компакт-дисков
Система обнаружение сигнала: бесконтактное оптическое считывание
Число каналов: 2 канала (стерео)
Частотная характеристика: от 5 Гц до 20 000 Гц
Динамический диапазон: 96 дБ
Отношение сигнал/помеха 98 дБ
Коэффициент детонации: в пределах допусков измерительной
Формат декодирования MP3: (MPEG1/2 Audio Layer 3) Макс. скорость передачи битов: 320 кбит/с
Формат декодирования WMA (Windows Media® Audio): Макс. скорость передачи битов: 320 кбит/с
Формат декодирования AAC (перспективное звуковое
кодирование):
БЛОК USB
Стандартный USB: USB 1,1
Скорость передачи данных: Высокая скорость: максимум 12 Мб
Низкая скорость: максимум 1,5 Мб
Совместимое устройство: запоминающее устройство большой емкости,
Совместимая файловая система: FAT 12/16/32
Формат воспроизводимого звука: MP3/WMA/AAC/WAV
Максимальный ток: 500 мA
(полупроводниковый лазер)
аппаратуры
Макс. скорость передачи битов: 320 кбит/с
MTP
РУCCKИЙ
ОБЩИЕ ТРЕБОВАНИЯ
Электрическое питание: Рабочее напряжение: постоянное напряжение 14,4 В (допустимо от
Система заземления: отрицательное заземление
Допустимая рабочая температура: от 0°C до +40°C
Габариты, мм (Ш × В × Г)
(прибл.)
Масса: 1,4 кг (без дополнительных принадлежностей)
Конструкция и технические требования могут быть изменены без уведомления.
Монтажный размер: 182 мм × 52 мм × 158 мм
Размер панели: 188 мм × 58 мм × 12 мм
11 В до 16 В)
39СПРАВОЧНАЯ ИНФОРМАЦИЯ
Page 78

Перед роботою уважно ознайомтеся з усіма інструкціями; досягти найкращої роботи пристрою можна тільки
Дякуємо за придбання продукції JVC.
добре розуміючи їх.
ВАЖЛИВО ДЛЯ ЛАЗЕРНИХ ПРИСТРОЇВ
1. ЛАЗЕРНИЙ ПРИСТРІЙ КЛАСУ 1
2. УВАГА: Не відкривайте верхню кришку. В пристрої немає частин, які міг би обслуговувати користувач;
будь-яке обслуговування має виконуватися кваліфікованим сервісним спеціалістом.
3. УВАГА: У відкритому вигляді існує небезпека видимого та/або невидимого випромінювання,
притаманного лазерним продуктам класу 1М. Не вдивляйтеся безпосередньо або за допомогою
оптичних інструментів.
4. РОЗТАШУВАННЯ МАРКУВАННЯ: ЗАПОБІЖНЕ МАРКУВАННЯ ЗЗОВНІ ПРИСТРОЮ.
УКРАЇНА
Обережно:
Якщо вам потрібно скористатися пристроєм
під час руху, уважно стежте за рухом, щоб не
потрапити в аварію.
[Тільки для Європейського
Союзу]
Як повторно налаштувати пристрій
Для безпеки...
• Не слід занадто підвищувати рівень гучності,
оскільки при цьому приглушуються зовнішні
звуки і керування машиною стає небезпечним.
• Зупиняйте машину перед виконанням будь-яких
складних операцій.
Температура в автомобілі...
Залишивши машину на тривалий час у жарку
чи холодну погоду, перед роботою з пристроєм
зачекайте, доки температура в автомобілі не стане
нормальною.
Kомпанія JVC встановлює термін служби виробів JVC,
що дорівнює 7 рокам, за умови дотримання правил
експлуатаціЇ. Eксплуатацію даного виробу може бути
продовжено після закінчення терміну служби.
Aле ми радимо Bам звернутись до найближчого
уповноваженого сервісного центру JVC для
перевірки стану даного виробу. Tакож, якщо є
потреба утилізації цього виробу, зверніться за
консультацією до найближчого уповноваженого
сервісного центру JVC.
2
•
Всі зроблені вами налаштування будуть також
стерті (за виключенням зареєстрованих
Bluetooth-пристроїв, див. стор. 14).
Примусове виймання диску
На дисплеї по черзі з’являються написи “PLEASE”
та “EJECT” (“будь ласка” та “вийміть”).
• Виймаючи диск, не впустіть його на підлогу.
• Якщо цей спосіб не спрацьовує,
перезавантажте пристрій.
Page 79

Користування режимом функцій
При натисканні кнопки M MODE пристрій
переходить у функціональний режим, в якому
цифрові кнопки (за виключенням кнопки “4”)
та кнопки 5/∞ працюватимуть в якості кнопок
для різних функцій.
[За 5 секунд...]
Попередження щодо налаштувань
гучності:
Шум при роботі дисків та підключених USBпристроїв є дуже незначним порівняно з іншими
джерелами. Щоб запобігти пошкодженню
гучномовців при раптовому збільшенні рівня
вихідного сигналу, уменшіть гучність перед
початком відтворення.
Доступні символи на екрані
Доступні символи
Символи, що з’являються на екрані.
ЗМІСТ
ПЕРЕДМОВА
Підготовка ............................................ 4
РОБОТА
Основні функції ...................................... 5
• Використання панелі керування ..... 5
• Використання пульту
дистанційного керування
(RM-RK50) ......................................... 6
Прослуховування радіо .......................... 8
Пошук програми FM RDS
— PTY-пошук ..................................... 9
Робота з дисками .................................. 11
Прослуховування USB-пристроїв .......... 12
ЗОВНІШНІ ПРИСТРОЇ
Використання Bluetooth®-пристроїв .... 14
• Використання мобільного
телефону з Bluetooth ....................... 16
• Використання Bluetooth-
аудіопрогравача .............................. 18
Прослуховування пристрою зміни CD-
дисків ................................................. 18
Прослуховування тюнера DAB
(цифрового радіомовлення) .............. 20
Прослуховування програвачів iPod/D.
player .................................................. 21
Прослуховування інших зовнішніх
компонентів ...................................... 22
УКРАЇНА
НАЛАШТУВАННЯ
Вибір запрограмованих режимів
звучання ............................................ 24
Загальні параметри — PSM ................. 25
Налаштування Bluetooth ...................... 28
ДОВІДКОВА ІНФОРМАЦІЯ
Обслуговування ..................................... 29
Додаткова інформація про пристрій ... 30
Пошук та усунення несправностей ....... 34
Характеристики ................................... 38
3
Page 80

Підготовка
Відміна демонстрації функцій дисплею та встановлення часу на годиннику
• Див. також стор. 26.
УКРАЇНА
При вимкненому живленні: Перевірка поточного часу
При увімкненому живленні: Зміна інформації, що відображається
на дисплеї
~ Вмикання живлення.
Ÿ Увійдіть у режим налаштування PSM.
! ] ⁄ Відмініть демонстрацію функцій дисплею
Виберіть “DEMO”, а потім “DEMO OFF”.
Встановіть час на годиннику
Виберіть “CLOCK H” (години) і встановіть години.
Виберіть “CLOCK M” (хвилини) і встановіть хвилини.
Виберіть “24H/12H”, а потім “24H” (години) або “12H” (години).
@ Кінець процедури.
Від’єднання панелі управління Приєднання панелі управління
Важіль
УВАГА:
При натисненні кнопки 0 з від’єднаною панеллю висовується
важіль. У такому разі перед приєднанням панелі натисніть
важіль назад ув заблоковане положення.
4 ПЕРЕДМОВА
Page 81

Основні функції
Використання панелі керування
1 Вибір джерела.
FM/AM = DAB * = CD * = USB * =
CD-CH */IPOD */D.PLAYER * (або EXT IN) =
BT-PHONE (Телефон Bluetooth)* = BT-AUDIO
(Аудіопристрій Bluetooth)* = (назад до
початку)
* Якщо ці джерела не готові або не підключені,
вибрати їх не можна.
2 Вибір діапазонів.
3 • Вмикання живлення.
• Вимикання живлення [Утримувати].
• Приглушення звуку (при увімкненому
живленні).
• Налаштування гучності [Повернути].
4 • Вибір режиму звучання.
• Ввести налаштування PSM [Утримувати].
5 Вікно дисплея
6 • Вмикання та вимикання прийому
повідомлень про стан дорожнього руху у
режимі очікування.
• Пошук програм RDS [Утримувати].
7 Висування диску.
8 Вхід USB (універсальної послідовної шини)
9 Від’єднання панелі.
p Зміна інформації, що відображається на
дисплеї.
q Увійдіть у режим функцій.
Натисніть кнопку M MODE, потім одну з
наступних кнопок (не пізніше, ніж за 5 секунд)...
EQ : Вибрати режим звучання.
MO : Вмикання та вимикання
монофонічного прийому.
SSM : Автоматичне запам’ятовування
станцій [Утримувати].
RPT : Вибрати відтворення з повтором.
RND : Вибрати відтворення у випадковому
порядку.
5 / ∞ : Пропустити 10 доріжок.
w • FM/AM/DAB: Вибір запрограмованої станції/
сервісу DAB.
• CD/USB: Вибір папки/доріжки/диску (для
пристрою зміни CD-дисків).
• BT-PHONE: Вибір запрограмованого
телефонного номеру.
e • FM/AM/DAB: Пошук станції/блоку DAB-
радіостанцій.
• CD/USB: Вибір доріжки.
• IPOD/D.PLAYER: Вибір доріжки.
• BT-PHONE/BT-AUDIO: Вибір параметру
налаштування/Вибір зареєстрованого
пристрою.
r • DAB: Вибір сервісу DAB.
• CD/USB: Вибір папки.
• IPOD/D.PLAYER: Вхід до головного меню/
Призупинення або зупинка відтворення/
Підтвердження вибору.
• BT-PHONE/BT-AUDIO: Вхід до меню
налаштувань/Підтвердження вибору.
УКРАЇНА
5РОБОТА
Page 82

Вікно дисплея
1 Індикатори джерела програвання
2 Індикатор гучності
3 Індикатори інформації про доріжки
УКРАЇНА
4 Індикатори RDS
5 Індикатори звукового режиму
• підсвічування вибраного пункту.
6 Індикатори прийому на тюнері
7 Режим програвання та індикатори компонентів
(у випадковому порядку/з повтором)
8 Індикатор еквалайзера
9 Індикатор Bluetooth
p Головний дисплей
(Показ часу, пунктів меню, інформації стосовно
відтворення)
q Індикатор доріжки
w Джерело відтворення/ № запрограмованої
станції/№ доріжки/№ папки/№ диску
e Стан Bluetooth-пристрою
(Номер пристрою, [1 – 5]; потужність сигналу,
[0 – 3]*; сповіщення про заряд батареї, [0 – 3]*)
* Чим більше число, тим потужніший сигнал/
заряд батареї.
Використання пульту дистанційного керування (RM-RK50)
Встановлення літієвої таблеткової батареї
(CR2025)
Перед використанням пульту дистанційного
керування:
• Націльте пульт прямо на дистанційний датчик
пристрою.
• НЕ ЗАЛИШАЙТЕ дистанційний датчик при
сильному освітленні (під прямими променями
сонця або штучного освітлення).
Дистанційний датчик
6
Page 83

Обережно:
Щоб запобігти нещасним
випадкам та пошкодженням,
• Не встановлюйте ніякі інші батареї, окрім
CR2025 або її еквіваленту.
• Не залишайте пульт дистанційного
керування у місцях дії прямого сонячного
випромінювання (таких як приладова дошка)
на тривалий час.
• Зберігайте батареї в місцях, недоступних для
дітей.
• Не перезаряджайте батарею, не замикайте її
на коротко, не розбирайте, не нагрівайте й не
піддавайте дії вогню.
• Не зберігайте батарею разом з іншими
металевими предметами.
• Не тикайте в батарею пінцетом або іншими
інструментами.
• Викидаючи батарею або зберігаючи її,
обгорніть її ізоляційною стрічкою.
1 • При короткочасному натисканні – увімкнення
живлення, а при увімкненому живленні
– зменшення звуку.
• При натисканні та утриманні – вимкнення
живлення.
2 • Перехід між діапазонами FM, AM та DAB за
допомогою 5 U.
• Зміна заданих станцій (або сервісів DAB) за
допомогою D ∞.
• Зміна папки MP3/WMA/AAC/WAV.
• При програванні диску MP3 на MP3-сумісному
пристрої для заміни компакт-дисків:
– При короткочасному натисканні
перемінюється диск.
– При натисканні та утриманні відбувається
перехід до іншої папки.
• При прослуховуванні програвача Apple iPod
або JVC D.:
– Пауза (зупинка) або відновлення
програвання за допомогою D
∞.
– Ввійти до головного меню за допомогою
5 U.
(тепер
5 U/D ∞/2 R/F 3 працюють як
кнопки вибору меню.)*
3 Регулювання рівня гучності.
4 Вибір звукового режиму (iEQ:
мікропроцесорний еквалайзер).
5 Вибір джерела.
6 Для мобільного телефону з Bluetooth:
– При короткому натисканні – відповідь на
виклики.
– При натисканні та утриманні – відхилення
вхідних викликів.
7 • При короткочасному натисненні - пошук
станцій (або сервісів DAB - цифрового
радіомовлення).
• Якщо натиснути та утримувати система
починає пошук блоків радіостанцій для DAB
(цифрового радіомовлення).
• При натисканні та утриманні – швидкий
перехід вперед або назад.
• При короткому натисканні – переміна
доріжки.
• При прослуховуванні програвача iPod або D.
(в режимі вибору меню):
– При короткочасному натисканні
– вибір пункту. (потім натисніть D ∞ для
підтвердження вибору).
– При натисканні та утриманні – перехід
через 10 пунктів за один раз.
• Пропуск елементу у прямому/зворотному
напрямку для роботи з Bluetoothаудіопристроєм.
* 5 U : Повернення до попереднього меню.
D ∞ : Підтвердження вибору.
УКРАЇНА
7РОБОТА
Page 84

Прослуховування радіо
Вибрати запрограмовану станцію.
Зміна інформації, що відображається на дисплеї
УКРАЇНА
~ Вибрати “FM/AM”.
Ÿ Вибір діапазонів.
! Пошук станції для прослуховування—Auto Search.
Пошук у ручному режимі: Утримуйте натиснутою
одну з кнопок доки “M” блимає на дисплеї, після
чого повторно натисніть ту саму кнопку.
Коли прийом радіостанції FM-
3
стерео утруднений
1
Пошук та занесення у пам’ять локальних
2
Прийом покращується, але стереоефект буде
втрачено.
• Загорається індикатор МО.
Автоматичне запам’ятання
FM-станцій — SSM (Послідовна
Занесення в пам’ять у ручному
режимі
Напр.: FM-станції на частоті 92,5 МГц у ділянку
1
пам’ять гучних станцій)
Для кожного діапазону можна занести в пам’ять не
більше шести станцій.
1
2
3
Загорається, коли від радіостанції FMстерео є прийом сигналу достатньої
потужності.
Примітка: FM1 і FM2: 87,5 МГц – 108,0 МГц
FM3: 65,00 МГц – 74,00 МГц
FM-станцій з найсильнішими сигналами
виконується у FM-діапазоні автоматично.
пам’яті під номером 4 для діапазону FM1.
2
8
Page 85

Пошук програми FM RDS — PTY-пошук
Зміна інформації, що відображається на дисплеї
~ Вмикання PTY-пошуку.
Ÿ Виберіть один з PTY-кодів (типів програм).
Для більш детального ознайомлення дивіться наступне.
! Почати пошук.
Якщо буде знайдена станція, що транслює програму з тим самим PTY-кодом, що обраний вами,
відбудеться налаштування на цю станцію.
УКРАЇНА
Занесення у пам’ять улюблених
типів програм
Коди ваших улюблених PTY програм можна
зберігати на цифрових кнопках.
1 Виберіть код PTY (дивіться стовпець
праворуч).
2 Виберіть цифрову кнопку.
3 Повторіть етапи 1 і 2 для збереження
інших кодів PTY.
4
Занесення кодів PTY на цифрові кнопки (1 – 6):
Коди PTY (вибір за допомогою ручки
керування):
NEWS, AFFAIRS, INFO, SPORT, EDUCATE, DRAMA,
CULTURE, SCIENCE, VARIED, POP M (музика), ROCK
M (музика), EASY M (музика), LIGHT M (музика),
CLASSICS, OTHER M (музика), WEATHER, FINANCE,
CHILDREN, SOCIAL, RELIGION, PHONE IN, TRAVEL,
LEISURE, JAZZ, COUNTRY, NATION M (музика), OLDIES,
FOLK M (музика), DOCUMENT
9РОБОТА
Page 86

Активація/деактивація прийому вибраних програм/повідомлень про
стан дорожнього руху у режимі очікування
Прийом повідомлень про
стан дорожнього руху у
режимі очікування
Натисніть
Пристрій тимчасово
переключиться у режим
ТА - повідомлень про стан
дорожнього руху, які можуть
поступати з будь-якого джерела,
крім радіо діапазонів АМ та FM3*.
Рівень гучності змінюється на
запрограмований у режимі
ТА-прийому, якщо поточний
рівень буде нижчим від
запрограмованого (див. стор. 26).
УКРАЇНА
Щ не активовано. Налаштуйтесь
на іншу станцію, яка транслює
RDS-сигнали.
Натисніть
• У разі підключення тюнера DAB, режим прийому програм TA/PTY у режимі очікування також виконує
пошук сервісів. (Див. також стор. 20 і 26.)
* На цьому головному блоці не виконується перемикання на повідомлення про стан дорожнього руху (ТА) або
на PTY-програму у разі встановлення з’єднання через “BT-PHONE”.
для вмикання. див. стор. 26.
для вимикання. Гасне Виберіть “OFF” для коду PTY (див. стор. 26),
Індикатор
Загорається Пристрій тимчасово переключиться на
Блимає Щ не активовано. Налаштуйтесь на іншу
Прийом вибраних програм у режимі
очікування Індикатор
вашу улюблену PTY-програму, яка буде
транслюватись будь-яким джерелом, окрім
радіо
діапазонів АМ та FM3
станцію, яка транслює RDS-сигнали.
щоби вимикнути.
*.
Загорається
Блимає
Гасне
Відстеження однієї програми—Прийом з мережевим відстеженням
При перетинанні місцевості, де FM-прийом
недостатньо якісний, система автоматично
налаштовується на іншу FM-станцію з послугою
RDS тієї ж радіомережі, яка, можливо, транслює ту
ж саму програму, але з більш потужним сигналом
(див. ілюстрацію праворуч).
Транслювання програми А у різних місцевостях
на різних частотних діапазонах (01 – 05)
Щоб змінити параметри режиму прийому з
мережним відстеженням, див. “AF-REG” на стор.
26.
При підключеному тюнері DAB - зверніться до
•
розділу “Відстеження тієї ж самої програми—
”Приймання альтернативної частоти” на сторінці 20.
Автоматичний вибір радіостанції—Пошук програми
Зазвичай при натисненні цифрових кнопок відбувається налаштування на запрограмовану на них станцію.
Якщо сигнали від запрограмованої FM-станції з RDS-прийомом недостатньо потужні для якісного прийому, то
ця система, користуючись AF-даними, налаштовується на іншу частоту, яка транслює ту ж саму програму, що
й первісно запрограмована станція.
• Системі потрібен деякий час для налаштування на іншу станцію за допомогою функції пошуку програми.
• Див. також стор. 26.
10
Page 87

Робота з дисками
Відкрийте панель керування та вставте диск.
Відтворення почнеться автоматично.
Зміна інформації, що відображається на дисплеї
Щоби припинити
програвання та висунути
диск
• Натисніть “SRC”,
Блокування висування диску
1
Якщо файл не містить інформації у своєму тегові, або коли параметр
*
“TAG DISP” встановлено на “TAG OFF” (див. стор. 27), з’являються ім’я
папки та ім’я файлу. Індикатор тегу TAG не загориться.
2
*
Коли відтворюється аудіо компакт-диск, виводиться напис “NO NAME”
Щоби виконати наступні дії, потрібно натиснути (або утримувати) наступні кнопки...
Щоби відмінити блокування,
повторіть ту ж саму процедуру.
УКРАЇНА
щоб змінити
джерело
прослуховування.
Тип диску*
3
(Цифрові кнопки) *
Натисніть: Вибір доріжки
Утримувати: Швидкий перехід
вперед або назад до
потрібної доріжки
Натисніть: Вибір доріжки
Утримувати: Швидкий перехід
вперед або назад до
Вибір папки Безпосередній перехід до
потрібної папки *
Безпосереднє знаходження
—
потрібної доріжки
потрібної доріжки
3
Пристрій може відтворювати AAC-файли, кодовані за допомогою програми iTunes.
*
*4 Натисніть для вибору номеру від 1 до 6; утримуйте для вибору номеру від 7 до 12.
*5 Папкам необхідно присвоїти імена, що починаються з 2-значних номерів: 01, 02, 03 і т.д.
Продовження на наступній сторінці
4
5
11РОБОТА
Page 88

Після натиснення , натисніть наступні кнопки, щоби...
Тип диску
Пропустити 10 доріжок
(в межах однієї папки)
Пропустити 10 доріжок TRK RPT :
УКРАЇНА
• Щоби скасувати відтворення з повтором або відтворення у випадковому порядку, виберіть “RPT OFF” або
“RND OFF”.
TRK RPT :
Повторити відтворення
поточної доріжки
FLDR RPT:
Повторити відтворення
поточної папки
Повторити відтворення
поточної доріжки
FLDR RND:
Відтворити у випадковому
порядку всі доріжки з поточної
папки, потім - доріжки з
наступної папки
DISC RND :
Відтворити у випадковій
послідовності всі доріжки
DISC RND :
Відтворити у випадковій
послідовності всі доріжки
Прослуховування USB-пристроїв
До системи можна підключити такі запам’ятовуючі USB-пристрої, як пам’ять USB , цифровий аудіопрогравач *1, переносний жорсткий диск и т.і.
*1 Підключати можна як MTP-пристрої (MTP - Media Transfer Protocol, Протокол передачі аудіо/відео даних),
так і запам’ятовуючі USB-пристрої.
Підключення пам’яті USB
Вхід для підключення
USB-пристроїв
Пам’ять USB
Пристрій може відтворювати доріжки форматів MP3/WMA/WMA-DRM10 *
USB-пристрої.
*1 див. стор. 32.
*2 Пристрій може відтворювати AAC-файли, кодовані за допомогою програми iTunes. Пристрій не може
відтворювати AAC-файли, які було придбано у музичному магазині iTunes Store.
Якщо USB-пристрій було підключено…
Відтворення почнеться з того місця, де було зупинене попереднього разу.
• Якщо в даний момент підключено інший USB-пристрій, відтворення розпочнеться з
початку.
1
/AAC*2/WAV, які зберігаються на
12
Page 89

Щоб припинити відтворення та від’єднати USB-пристрій
Витягніть його з гнізда головного блоку.
• Натисніть “SRC”, щоб змінити джерело прослуховування.
Застереження:
• Не використовуйте USB-пристрої в умовах, в яких вони можуть заважати керуванню і створювати
небезпеку.
• Від’єднавши USB-пристрій, не підключайте його знову, доки на дисплеї блимає напис “CHECK”.
• Не заводьте двигун авто при підключеному USB-пристрої.
• Перед відключенням USB-пристрою зупиніть відтворення.
• Дана система може не відтворювати файли, які знаходяться на USB-пристроях певних типів.
• Підключити комп’ютер до входу, який використовується для підключення USB-пристроїв, неможливо.
• Щоб запобігти втраті інформації, впевніться в тому, що для всіх важливих даних було створено резервні
копії.
• Щоб запобігти деформаціям та пошкодженням USB-пристрою, не залишайте його у машині, а також у
місцях дії прямого сонячного випромінювання або високих температур.
Щоби виконати наступні дії, потрібно натиснути (або утримувати) наступні кнопки...
Натисніть: Вибір доріжки
Утримувати: Швидкий перехід вперед або назад до потрібної доріжки
Вибір папки
(Цифрові кнопки)
Після натиснення
• Щоби скасувати відтворення з повтором або відтворення у випадковому порядку, виберіть “RPT OFF” або
“RND OFF”.
Зміна інформації, що відображається на дисплеї
* Якщо файл не містить інформації
, натисніть наступні кнопки, щоби...
Пропустити 10 доріжок (в межах однієї папки)
TRK RPT: Повторити відтворення поточної доріжки
FLDR RPT: Повторюється відтворення усіх доріжок з поточної папки
FLDR RND: Відтворити у випадковому порядку всі доріжки з поточної папки,
потім - доріжки з наступної папки
DISC RND: Відтворити у випадковій послідовності всі доріжки
Безпосередній перехід до
потрібної папки
• Див. також *
у своєму тегові, або коли параметр
“TAG DISP” встановлено на “TAG OFF”
(див. стор. 27), з’являються ім’я
папки та ім’я файлу. Індикатор тегу
TAG не загориться.
4
та *5 на стор. 11.
УКРАЇНА
13РОБОТА
Page 90

Використання Bluetooth®-пристроїв
Для роботи з Bluetooth необхідно приєднати Bluetooth-адаптер (модель KS-BTA200) до гнізда пристрою
зміни CD-дисків на тильному боці цього пристрою. Див. також стор. 23.
• Також дивіться інструкції, що входять до комплектів постачання інтерфейсного Bluetooth-адаптеру та
Bluetooth-пристрою.
• Зверніться до списку країн (включено у комплект) де дозволяється використовувати функцію Bluetooth®.
При первинному підключенні Bluetooth-пристрою (за допомогою меню “BT-PHONE” /Bluetooth-телефон/
або “BT-AUDIO” /Bluetooth-аудіопристрій/) до головного блоку, необхідно встановити між ними безпровідне
Bluetooth-з’єднання.
• Успішно встановлене з’єднання реєструється у пам’яті блоку навіть після перезавантаження пристрою.
Всього може бути зареєстровано не більше п’яти таких пристроїв.
• Водночас можна підключити не більше одного джерела кожного з типів (типу “BT-PHONE” або “BT-AUDIO”).
Реєстрація Bluetooth-пристрою
Методи реєстрації (з’єднання)
УКРАЇНА
Можна вибрати один з наступних пунктів меню
Bluetooth для реєстрації і встановлення з’єднання с
пристроєм.
• Для роботи з меню Bluetooth виберіть в якості
джерела пристрій “BT-PHONE” або “BT-AUDIO”.
2
Виберіть “NEW”.
3 Виберіть “OPEN”.
OPEN Підготуйте головний блок до
встановлення нового Bluetoothз’єднання.
З’єднання встановлюється при
застосуванні Bluetooth-пристрою.
SEARCH Підготуйте головний блок до
встановлення нового Bluetoothз’єднання.
З’єднання встановлюється при
застосуванні цього пристрою.
Реєстрація за допомогою пункту “OPEN”
Підготовка
Включіть пристрій і налаштуйте функцію Bluetooth.
1 Виберіть пункт “BT-PHONE” або “BT-
AUDIO”.
14
4 Введіть PIN-код (особистий код
доступу) у пристрій.
• Можна ввести будь-яке число (від 1 до 16
цифр). [первісне: 0000]
* Деякі пристрої мають свій власний PIN-код.
Введіть вказаний PIN-код у головний блок.
1 Перехід до наступної (попередньої) за
номером позиції.
2 Виберіть номер або пропуск.
3 Повторюйте етапи 1 і 2, поки
повністю не введете PIN-код.
4 Введіть підтвердження введеного
коду.
На дисплеї блимає транспарант
“OPEN...”.
Page 91

5 Налаштуйте Bluetooth-пристрій на
пошук та встановлення з’єднання.
Введіть на пристрої, який потрібно підключити,
той самий PIN-код, що був щойно введений
на головному блоці. На дисплеї блимає
транспарант “CONNECT”.
З’єднання встановлено успішно, можна
керувати Bluetooth-пристроєм з головного
блоку.
Пристрій залишається зареєстрованим навіть
після його від’єднання. Для підключення того
самого пристрою наступного разу скористайтеся
функцією “CONNECT” (Підключити), або
активуйте функцію “AUTO CNT” (Автоматичне
підключення). (Див. праву колонку цієї сторінки,
а також стор. 28.)
2 Вибір пристрою, який потрібно
підключити.
3 Для встановлення з’єднання
скористайтесь пунктами “OPEN’ або
“SEARCH’.
Для підключення/від’єднання
зареєстрованого пристрою
1 Виберіть пункт “BT-PHONE” або “BT-AUDIO”.
Для пошуку доступних пристроїв
Виконайте кроки 1 та 2 зі стор. 14, після чого...
1 Виберіть “SEARCH”.
Головний блок виконає пошук усіх доступних
пристроїв і відобразить їхній список.
• Якщо не знайдено жодного пристрою,
з’явиться надпис “UNFOUND”.
2 Вибір пристрою, який потрібно
підключити.
3 Введіть заданий раніше PIN-код пристрою
у головний блок.
• Для перевірки PIN-коду зверніться до
інструкції, що входить до комплекту
постачання пристрою.
4 Налаштуйте Bluetooth-пристрій на
з’єднання.
З’єднання встановлено успішно, можна
керувати Bluetooth-пристроєм з головного
блоку.
Підключення спеціальних пристроїв
Виконайте кроки 1 та 2 зі стор. 14, після чого...
1 Виберіть “SPECIAL”.
На головному блоку з’явиться список
запрограмованих пристроїв.
2 Виберіть зареєстрований пристрій, який
потрібно підключити/від’єднати.
3 Для підключення/від’єднання вибраного
пристрою виберіть пункт “CONNECT” або
“DISCNNCT” відповідно.
Встановлення автоматичного з’єднання з
Bluetooth-пристроєм при включенні головного
блоку. (Див. “AUTO CNT” на стор. 28.)
Для видалення зареєстрованого пристрою
1 Виберіть пункт “BT-PHONE” або “BT-AUDIO”.
2 Виберіть зареєстрований пристрій, який
потрібно видалити.
3 Для видалення пристрою послідовно
виберіть пункти “DELETE” та “YES”.
УКРАЇНА
15ЗОВНІШНІ ПРИСТРОЇ
Page 92
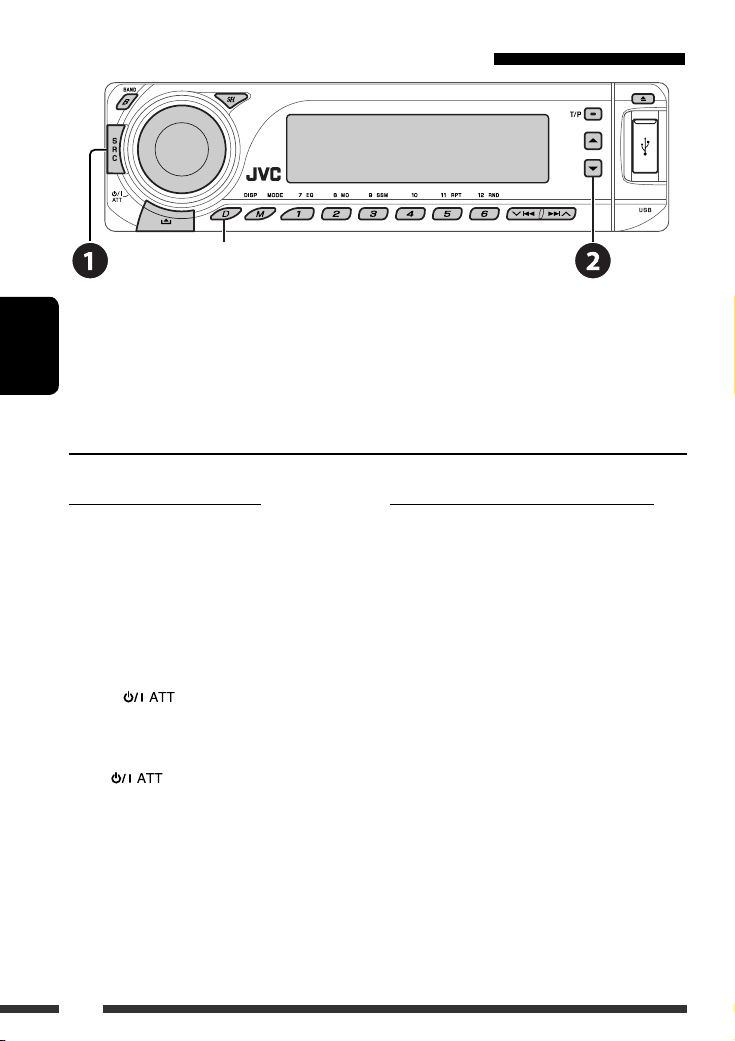
Використання мобільного телефону з Bluetooth
Зміна інформації, що відображається на дисплеї
Виберіть пункт “BT-PHONE”.
~
Ÿ Вхід до меню Bluetooth.
УКРАЇНА
! Зробіть виклик або задайте параметри в меню Bluetooth. (Див. стор.17 і 28).
При надходженні виклику....
Джерело автоматично змінюється на “BT-PHONE”.
Коли функція “AUTO ANS” (Автоматична
відповідь) є активною....
Пристрій автоматично відповідає на вхідні виклики,
див. стор. 28.
• Для того, щоб відповісти на вхідний виклик при
відключеній функції “AUTO ANS” (Автоматична
відповідь), натисніть будь-яку кнопку (окрім
кнопок
Для того, щоб завершити виклик
Утримуйте натиснутою будь-яку кнопку (окрім
кнопок
• Можна встановити рівень гучності мікрофону
(див. стор. 28).
/ручки керування).
/ручки керування).
16
При надходженні SMS-повідомлення....
Якщо мобільний телефон підтримує передачу SMSповідомлень, а параметр “MSG-INFO” (інформація
про повідомлення) встановлено у значення “AUTO”
(див. стор. 28), то при отриманні повідомлення
пристрій почне дзвонити і на моніторі з’явиться
напис “RCV MSG” (прийом повідомлення).
Page 93

Виклик
Зробити виклик можна одним з наступних методів.
Для того, щоб зробити виклик, виберіть пункт меню “BT-PHONE” та виконуйте наступні кроки:
1 2
Журнал викликів Виведіть
Телефонна книга Виберіть “PH BOOK”.
Прямий набір Виберіть “NUMBER”. Ввести телефонний номер.
на екран
меню набору
номеру.
Виберіть журнал дзвінків.
REDIAL, RECEIVED, MISSED
З’явиться список телефонних
номерів.
3 (якщо не вказано інакше)
Виберіть ім’я (за наявності такої
інформації) або номер телефону.
Виберіть ім’я зі списку.
УКРАЇНА
Голосовий набір
1 На дисплеї з’являється “SAY NAME”.
2 Промовте ім’я абонента, якого потрібно викликати.
• Функцію голосового набору можна також вибрати з меню набору номера. В меню
набору номера виберіть пункт “VOICE”.
• Якщо мобільний телефон не має функції розпізнавання голосу, на екрані з’явиться
напис “ERROR”.
Запрограмований
телефонний
номер
Процедуру занесення у пам’ять див. далі.
Занесення телефонного номеру у пам’ять
Ви можете занести в пам’ять не більше шести
номерів телефонів.
1 Виведіть на екран меню набору
номеру.
2 Виберіть одну з категорій “PH BOOK“,
“MISSED” або “RECEIVED”, до якої
належить той номер, який потрібно
занести у пам’ять.
3 Виберіть номер телефону.
4
17ЗОВНІШНІ ПРИСТРОЇ
Page 94

Використання Bluetooth-аудіопрогравача
Призупинити/
розпочати
відтворення
Вхід до меню налаштувань
(Список пристроїв)
Зміна інформації, що відображається
на дисплеї
~ Виберіть пункт “BT-AUDIO”.
УКРАЇНА
Якщо відтворення не розпочинається автоматично, запустіть його безпосередньо з Bluetooth-
аудіопрогравача.
• Інформацію щодо підключення/від’єднання/видалення зареєстрованого пристрою див. також на стор. 15.
Інформація від Bluetooth:
Якщо ви бажаєте отримати більше інформації про Bluetooth, відвідайте веб-сайт компанії
JVC.
Пропустити елемент у прямому/
зворотному напрямку
Прослуховування пристрою зміни CD-дисків
Зміна інформації, що
відображається на дисплеї
(див. стор. 11)
Для вашого пристрою рекомендовано користуватися пристроєм зміни CD-дисків виробництва компанії JVC,
-що є сумісним з дисками формату MP3. Можна підключити пристрій зміни CD-дисків до відповідного гнізда,
яке розташоване на тильному боці головного блоку. Див. також стор. 23.
• Можна відтворювати звичайні CD-диски (включаючи CD Text) та MP3-диски.
18
Page 95

Підготовка
Переконайтесь, що обрано функцію “CHANGER” (пристрій зміни CD-дисків) для зовнішнього вхідного сигналу,
дивись сторінку 27.
~ Виберіть пункт “CD-CH”.
Ÿ Оберіть диск, який потрібно відтворити.
Натисніть: Для вибору номера диску 1 – 6.
Утримувати: Для вибору номера диску 7 – 12.
Щоби виконати наступні дії, потрібно натиснути (або утримувати) наступні кнопки...
Тип диску
Натисніть: Вибір доріжки
Утримувати:
Натисніть: Вибір доріжки
Утримувати: Швидкий перехід вперед або
Після натиснення
Тип диску
Пропустити 10 доріжок
(в межах однієї папки)
Пропустити 10 доріжок TRK RPT:
• Щоби скасувати відтворення з повтором або відтворення у випадковому порядку, виберіть “RPT OFF” або
“RND OFF.”
Швидкий перехід вперед або
назад до потрібної доріжки
назад до потрібної доріжки
, натисніть наступні кнопки, щоби...
Вибір папки
—
TRK RPT:
Повторити відтворення
поточної доріжки
FLDR RPT:
Повторюється відтворення усіх
доріжок з поточної папки
DISC RPT:
Повторюється відтворення усіх
доріжок з поточного диску
Повторити відтворення
поточної доріжки
DISC RPT:
Повторюється відтворення усіх
доріжок з поточного диску
FLDR RND:
Відтворити у випадковому
порядку всі доріжки з поточної
папки, потім - доріжки з
наступної папки
DISC RND:
У випадковому порядку
відтворюються всі доріжки з
поточного диску
MAG RND:
У випадковому порядку
відтворюються всі доріжки
встановлених дисків
DISC RND:
У випадковому порядку
відтворюються всі доріжки з
поточного диску
MAG RND:
У випадковому порядку
відтворюються всі доріжки
встановлених дисків
19ЗОВНІШНІ ПРИСТРОЇ
УКРАЇНА
Page 96

Прослуховування тюнера DAB (цифрового
радіомовлення)
Вибір сервісу, який було занесено у пам’ять.
Зміна інформації, що відображається на дисплеї
УКРАЇНА
До гнізда пристрою зміни CD-дисків, яке розташоване на тильному боці головного блоку, можна підключити
DAB-тюнер JVC. Див. також стор. 23.
~ Виберіть пункт “DAB”.
Ÿ Вибір діапазонів.
! Починайте пошук блоку радіостанцій.
Пошук у ручному режимі: Утримуйте натиснутою одну з кнопок доки “MANU” блимає на дисплеї, після
чого повторно натисніть ту саму кнопку.
⁄ Виберіть сервіс для прослуховування (первинний чи вторинний).
Зберігання сервісів DAB у пам’яті
системи
Під час прослуховування сервісів DAB...
Активація/деактивація прийому
вибраних програм/повідомлень
про стан дорожнього руху у
режимі очікування
• Послідовність дій є повністю аналогічною тій, що
була викладена на стор. 10 для станцій FM RDS.
• Заносити у пам’ять PTY-коди окремо для DAB- та
FM-тюнера не можна.
Відстеження тієї ж самої
програми—”Приймання
альтернативної частоти”
• Під час приймання DAB-сервісу:
При перетині місцевості, в якій прийом даного
сервісу неможливий, пристрій автоматично
перемикається на інший блок радіостанцій або FM
RDS станцію, що передає ту ж саму програму.
• Під час приймання FM RDS станції:
Коли ви їдете у місцевості, де DAB-сервіс транслює
ту ж саму програму, що й FM RDS станція, система
автоматично налаштовується на DAB-сервіс.
Процедуру вимкнення функції “Прийом
альтернативної частоти” наведено на стор. 27.
20
Page 97

Прослуховування програвачів iPod/D. player
Зміна інформації, що
відображається на дисплеї
Перед роботою приєднайте один з наступних пристроїв (який було придбано окремо) до гнізда пристрою
зміни CD-дисків на тильному боці головного блоку. Див. також стор. 23.
• Інтерфейсний адаптер для iPod—KS-PD100 для керування iPod.
• Інтерфейсний адаптер для D. програвача—KS-PD500 для керування D. програвачем.
Підготовка
Переконайтесь, що обрано функцію “CHANGER” (пристрій зміни CD-дисків) для зовнішнього вхідного сигналу,
дивись сторінку 27.
~ Виберіть “IPOD” або “D. PLAYER”.
Ÿ Оберіть пісню, яку потрібно відтворити.
Обирання треку з меню
1 Увійдіть у головне меню.
Система вийде з даного режиму,
якщо з боку користувача не буде
ніяких дій впродовж 5 секунд.
2 Оберіть бажане меню.
Для iPod:
PLAYLIST Ô ARTISTS Ô ALBUMS Ô SONGS Ô
GENRES Ô COMPOSER Ô (назад до початку)
Для програвача D.:
PLAYLIST Ô ARTIST Ô ALBUM Ô GENRE
Ô TRACK Ô (назад до початку)
3 Підтвердіть вибір.
• Для переходу до попереднього меню,
натисніть 5.
• Якщо трек обрано, відтворення почнеться
автоматично.
• Утримуючи 4 /¢ ви можете за
один раз пропускати 10 пунктів.
Пауза/зупинка відтворення
• Для поновлення
відтворення знову
натисніть кнопку.
Натиснення: Вибір
доріжок
Утримування: Швидкий
перехід вперед або
назад до потрібної
доріжки
Продовження на наступній сторінці
21ЗОВНІШНІ ПРИСТРОЇ
УКРАЇНА
Page 98

Після натиснення
• Щоби скасувати відтворення з повтором або відтворення у випадковому порядку, виберіть “RPT OFF” або
“RND OFF.”
* iPod: Функціонує тільки, якщо ви оберете “ALL” (усе) у опції “ALBUMS” (альбоми) головного “MENU” (меню).
УКРАЇНА
Прослуховування інших зовнішніх компонентів
Зміна інформації, що відображається на дисплеї
, натисніть наступні кнопки, щоби...
ONE RPT: Ці функції схожі на функції “Repeat One” для iPod або “Repeat
= One” для D. програвача.
Mode
ALL RPT: Ці функції схожі на функції “Repeat All” для iPod або “Repeat Mode
= All” для D. програвача.
ALBM RND*: Відповідає функції “Shuffle Albums” програвача iPod.
SONG RND/RND ON: Ці функції схожі на функції “Shuffle Songs” для iPod або “Random
Play = On” для D. програвача.
За допомогою наступних адаптерів (які потрібно придбати окремо) до гнізда пристрою зміни CD-дисків на
тильному боці головного блоку можна підключити зовнішній компонент. Див. також стор. 23.
• Адаптер лінійного входу—KS-U57
• Адаптер входу зовнішнього сигналу—KS-U58
Підготовка
Переконайтесь, що обрано функцію “EXT IN” для зовнішнього вхідного сигналу, дивись сторінку 27.
~ Виберіть пункт “EXT IN”.
Ÿ Ввімкніть приєднаний пристрій та почніть відтворення треків з обраного джерела.
! Регулювання гучності.
⁄ Відрегулюйте звук за потребою (див. стор. 24 і 25).
22
Page 99
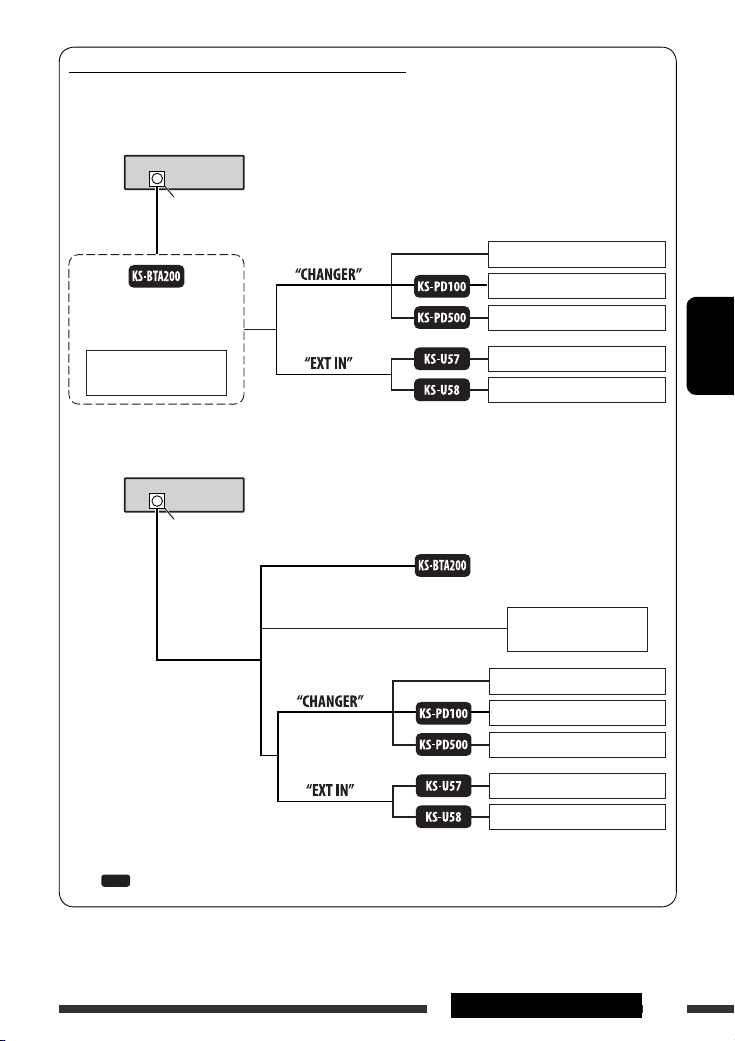
Враховуйте схему з’єднання зовнішніх пристроїв
Для з’єднання, дивіться “Керівництво зі встановлення та з’єднання” (окрема книга).
• З’єднання 1 (інтегроване з’єднання)
Пристрій
Гніздо пристрою зміни
CD-дисків
Пристрій зміни CD-дисків JVC, [18]
(див. стор. 14 – 18)
або
Тюнер цифрового
радіомовлення JVC, [20]
• З’єднання 2 (альтернативне з’єднання)
Гніздо пристрою зміни
CD-дисків
(див. стор. 27 для
налаштування
”EXT IN”)
(див. стор. 27 для
налаштування
”EXT IN”)
Пристрій
Програвач JVC D. player, [21]
Програвач MD, та ін., [22]
Програвач MD, та ін., [22]
(див. стор. 14 – 18)
радіомовлення JVC, [20]
Apple iPod, [21]
УКРАЇНА
Тюнер цифрового
(див. стор. 27 для
налаштування
”EXT IN”)
(див. стор. 27 для
налаштування ”EXT
IN”)
: Адаптер (придбаний окремо)
П
ристрій зміни CD-дисків JVC, [18]
Apple iPod, [21]
Програвач JVC D. player, [21]
Програвач MD, та ін., [22]
Програвач MD, та ін., [22]
23ЗОВНІШНІ ПРИСТРОЇ
Page 100

Вибір запрограмованих режимів звучання
Запрограмовані
УКРАЇНА
Індикація (для)
USER (приглушений звук) 00 00 00 OFF
ROCK (музика рок або диско) +03 00 +02 ON
CLASSIC (класична музика) +01 00 +03 OFF
POPS (легка музика) +02 +01 +02 OFF
HIP HOP (фанк або реп) +04 –02 +01 ON
JAZZ (джаз) +03 00 +03 OFF
значення
BAS
(низькі частоти)
MID
(середній
діапазон)
TRE
(високі частоти)
LOUD
(гучність)
24
 Loading...