

Page 1
JVC HR-DVS3U
Quick Reference Guide
Dubbing an Entire Tape
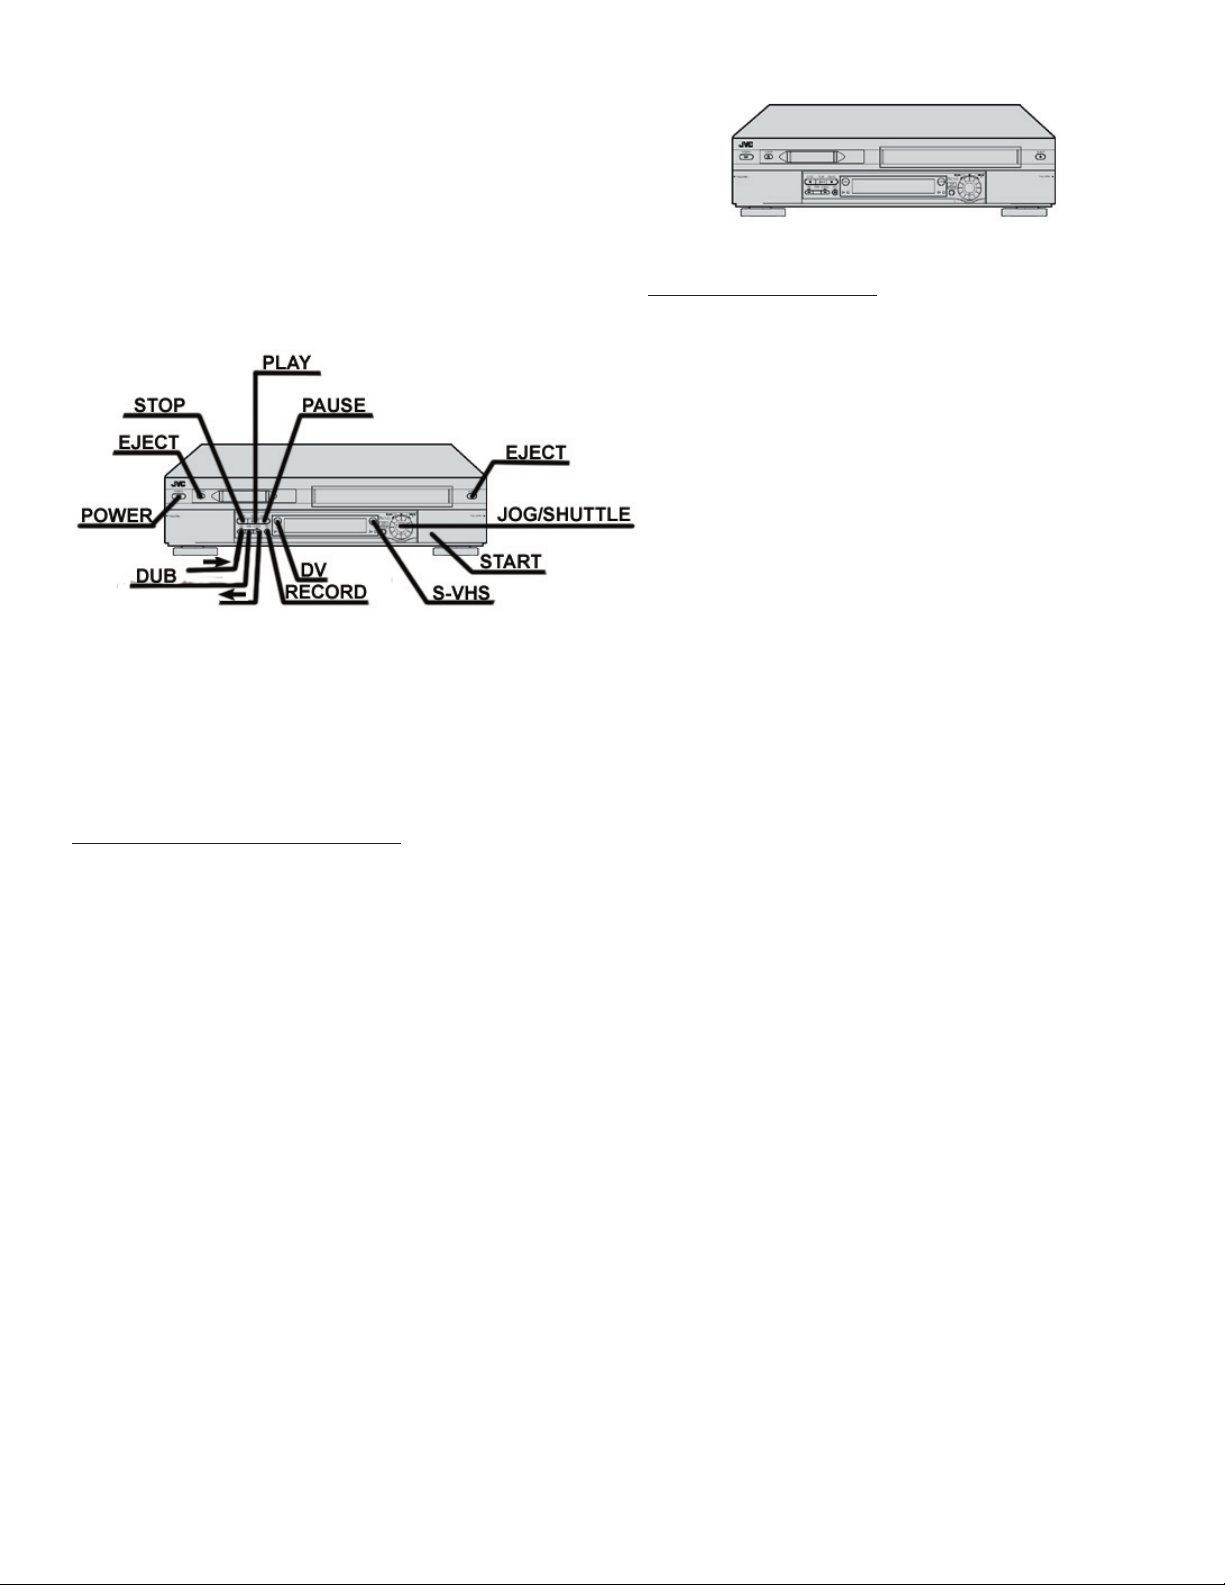
1. SELECT DUBBING DIRECTION:
Press --> when you want playback on the DV deck and recording on the S-VHS deck. Insert a blank VHS/S-VHS cassette
and a mini-DV cassette with content. A green arrow by the
word DV will illuminate.
OR
Press <-- when you want playback on the S-VHS deck and
recording on the DV deck. Insert a VHS/S-VHS cassette with
content and a blank mini-DV cassette. A green arrow by the
word S-VHS will illuminate.
2. Press DUB for two seconds.
NOTE: If the tapes have not been rewound, both decks will rewind automatically.
1
When both decks have fi nished rewinding, dubbings begins automatically.
After either tape has reached the end the decks will rewind both tapes automatically and eject them. The VCR then shuts off.
Dubbing a Scene or Part of a Tape
You can dub selected scenes on a tape, starting and stopping wherever you wish.
1. Insert a VHS/S-VHS cassette and a mini-DV cassette.
2. SELECT DUBBING DIRECTION:
Press --> when you want playback on the DV deck and recording on the S-VHS deck.
OR
Press <-- when you want playback on the S-VHS deck and recording on the DV deck.
3. LOCATE START POINT:
For the playing deck:
Press S-VHS or DV to select the side you’re playing.
Press PLAY to start playback of the tape in the play deck and press PAUSE to pause playback when you fi nd the point where you
want to start dubbing.
NOTE: To fast-forward or rewind the tape, turn the jog/shuttle wheel on the bottom right hand side of the deck. To jog through the
tape frame by frame, press the wheel once while the tape is playing, then turn the wheel.
Page 2

JVC HR-DVS3U
Quick Reference Guide
For the recording deck:
Press S-VHS or DV to select the record deck. Press and hold
PAUSE and press REC so that the recording deck enters the
RECORD-PAUSE mode.
Press START.
4. To stop, press STOP and recording will cease. Then press SVHS or DV to select the playing deck and press STOP again.
Importing from a Mini-DV Tape into a Computer
2
When you insert your mini-DV tape, make sure that DV is selected so you will get device control. Other than that, when importing a
DV tape, this deck should be treated just like any DV camera into programs like iMovie, Final Cut Pro, Premiere, and VideoStudio.
For information and instructions on importing in a certain program, please look in the program’s own quick reference guide.
When a DV tape is in the deck, your editing software will automatically control that tape.
Importing from a VHS/S-VHS Tape into a Computer
1. Insert the VHS or S-VHS tape.
2. Open your editing program.
NOTE: If you are using Final Cut Pro, go to
drop down menu, choose Non-Controllable Device.
If you are using Premiere, go to
If you are using iMovie or VideoStudio, there are no necessary changes to make before importing.
Make sure that any DV tape is ejected from the deck. Also, computers will not control the S-VHS side of the deck. To play, rewind,
fast-forward, etc., you must use the controls on the deck itself.
3. Select S-VHS.
4. Once you fi nd the clip you wish to import by using the jog/shuttle wheel, press play and set the dubbing direction from S-VHS to
DV by pressing <--. The signal is now being converted into a digital signal so your computer can read it. It should appear on your
computer screen.
File --> Capture. Click on the Settings tab, and under Device Control drop down menu, select None.
File --> Log and Capture. Click the Capture Settings tab, and in the Device Control
5. Capture the footage as per usual with your editing program of choice.
Page 3

JVC HR-DVS3U
Quick Reference Guide
Using the Deck as a Media Converter
This section explains how to connect other studio equipment
to the deck and feed the signal to and from that equipment into
or out of a computer connected to the deck.
Remove all mini-DV cassettes before proceeding.
NOTE: To change the channel, turn the jog/shuttle wheel.
However, if a tape is in the deck, stop the tape, press the
jog/shuttle wheel once, and now you can change the channel. Turning the wheel left will channel down and turning the
wheel right will channel up.
3
USING THE INPUT JACKS ON THE FRONT OF THE DECK (F-1):
1. Using the channel wheel, as mentioned in the above note, channel
down below CH 2 until the readout on the front window displays F-1.
2. The default input of this VCR is “VIDEO.” In this mode, the yellow
input jack on the front is expecting a signal.
3. If you are connecting a composite source, skip to step 4. If you are
connecting an S-VHS source, use your remote to do the following:
a. Press MENU.
b. Using the up or down arrow, move the highlight bar to
“VHS MODE SET” and select it with the OK button.
c. Move the highlight bar to “FRONT AUX INPUT” and then
press OK to set “S-VIDEO.”
d. Press MENU when done to exit out of the menu.
4. Open your editing program.
5. The signal from your other studio equipment which is feeding the
front input jack on the front of the deck should now appear in your
capture window as well as on the monitor on the deck.
NOTE: If you can see the input on your monitor, but not in your capture, try restarting the editing program or unplugging your fi rewire and
plugging it back in.
Page 4

JVC HR-DVS3U
Quick Reference Guide
Using the Deck as a Media Converter (cont’d)
This section explains how to connect other studio equipment
to the deck and feel the signal to and from that equipment into
or out of a computer connected to the deck.
Remove all mini-DV cassettes before proceeding.
NOTE: To change the channel, turn the jog/shuttle wheel.
However, if a tape is in the deck, stop the tape, press the
jog/shuttle wheel once, and now you can change the channel. Turning the wheel left will channel down and turning the
wheel right will channel up.
4
USING THE INPUT JACKS ON THE BACK OF THE DECK (L-1):
1. Using the channel wheel, as mentioned in the above note, channel
down below CH 2 until the readout on the front window displays L-1.
2. The default input of this VCR is “VIDEO.” In this mode, the yellow
input jack on the front is expecting a signal.
3. If you are connecting a composite source, skip to step 4. If you are
connecting an S-VHS source, use your remote to do the following:
a. Press MENU.
b. Using the up or down arrow, move the highlight bar to
“MODE SET” and select it with the OK button.
c. Move the highlight bar to “REAR AUX INPUT” and then
press OK to set “S-VIDEO.”
d. Press MENU when done to exit out of the menu.
4. Open your editing program.
5. The signal from your other studio equipment which is feeding the
rear input jack on the front of the deck should now appear in your capture window as well as on the monitor on the deck.
NOTE: If you can see the input on your monitor, but not in your capture, try restarting the editing program or unplugging your fi rewire and
plugging it back in.
Page 5

JVC HR-DVS3U
Quick Reference Guide
Exporting
TO DV TAPE:
1. Make sure the channel is on F-1.
2. Select -->.
3. Select DV.
4. Tell your editing program to put your video to tape:
In iMovie, select “Export movie.”
In Final Cut Pro, select “Print to video.”
In Premiere, select “Export” to tape.
NOTE: For details on exporting, see the program’s own quick
reference guide.
TO VHS/S-VHS TAPE:
5
1. Make sure the channel is on F-1.
2. Select S-VHS.
3. Press --> and the word DV will illuminate. The video should now show up in the monitor.
4. Cue your VHS/S-VHS tape using the controls on the deck.
5. Press REC on the deck and then press play on the computer. The video should play through to the deck.
6. When the video is done, press STOP on the deck.
NOTE: When using Final Cut Pro or Premiere, the video automatically plays through to the deck. When using iMovie, you will need
to set the program up to “play through to camera” in your preference menu. See the iMovie quick reference guide for more information.
Also, this will work if you need to export a video to another output device that is hooked up to this deck in your studio. Use steps 1-4.
Doing a Live Show Without Using a Computer
When not using a computer, the directions are the same as if you are importing your show into the computer. The input devices feeding the deck will go straight out the back of the deck to your CCTV system.
 Loading...