

Page 1
CARD READER/WRITER
LECTEUR/GRAVEUR DE CARTES
LECTOR/GRABADOR DE TARJETAS
KARTENLESER/SCHREIBER
LETTORE/SCRITTORE DI SCHEDE
KAARTLEZER/SCHRIJVER
KORTLÄSARE/SKRIVARE
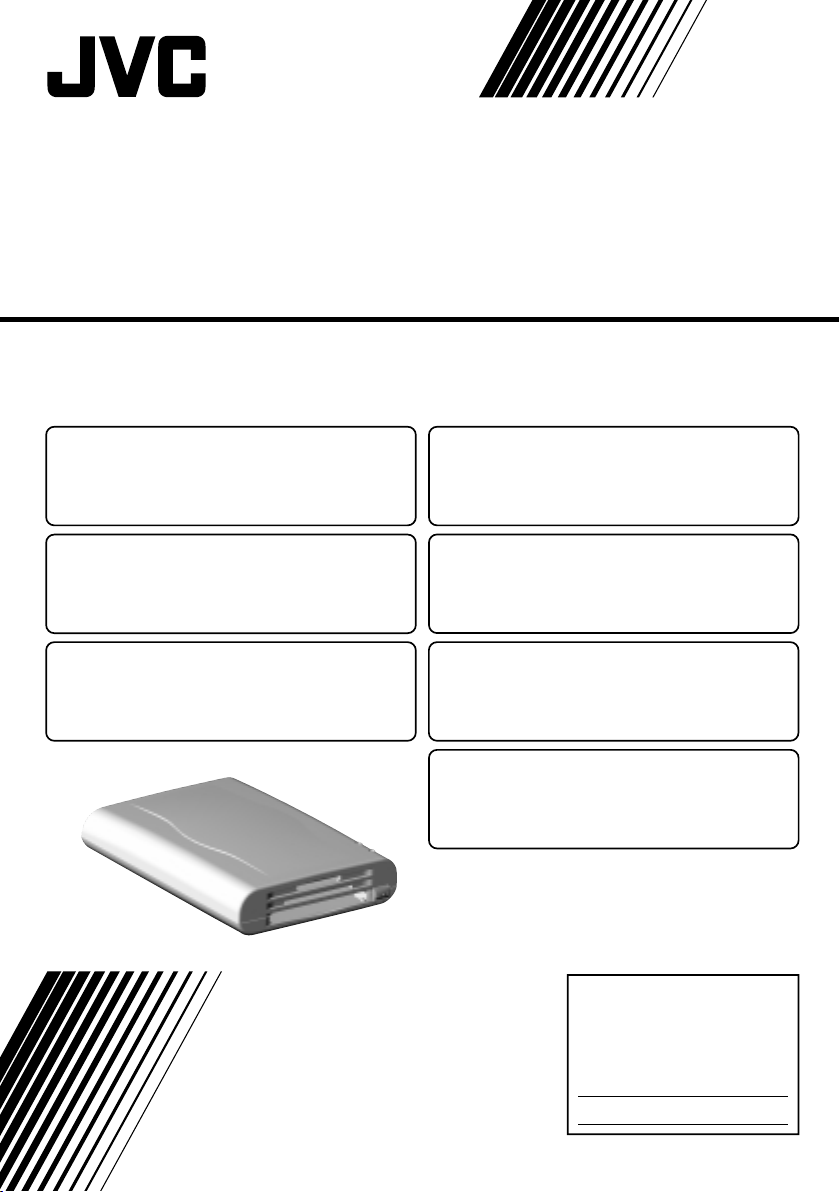
HC-CW1F
Compatible Models
Models with either preinstalled Windows® 98/98SE/
ME/2000, preinstalled MAC OS 8.6 or later and having
a USB interface. Operation may not be possible on
some models.
Modèles compatibles
Modèles avec Windows® 98/98SE/Me/2000, MAC OS
8.6 ou ultérieurs installés d’origine et possédant une
interface USB. Certains modèles peuvent ne pas
fonctionner.
Modelos compatibles
Modelos con Windows® 98/98SE/ME/2000 o
MAC OS 8.6 o versión posterior ya instalado, y que
dispongan de una interfaz USB. El funcionamiento
podrá no ser posible en algunos modelos.
Kompatible Modelle
Modelle, bei denen entweder Windows® 98/98SE/Me/2000, MAC
OS 8.6 oder neuere Version installiert ist, und die mit einer USBSchnittstelle ausgestattet sind. Mit einigen Geräten kann dieser
Kartenleser/Schreiber möglicherweise nicht betrieben werden.
Modelli compatibili
I modelli con Windows® 98/98SE/ME/2000
preinstallato oppure MAC OS 8.6 o superiore
preinstallato, dotati d'interfaccia USB. Il funzionamento
potrebbe risultare impossibile con certi modelli.
Compatibele modellen
Modellen met voorgeïnstalleerde Windows® 98/98SE/
ME/2000 of voorgeïnstalleerde MAC OS 8.6 of
recenter en met een USB-interface. Het is mogelijk dat
de HC-CW1F op bepaalde modellen niet werkt.
Kompatibla modeller
Modeller med antingen förinstallerat Windows® 98/
98SE/ME/2000, förinstallerat MAC OS 8.6 eller senare
och med USB-gränssnitt. Det kan hända att drift inte
är möjlig på vissa modeller.
INSTRUCTIONS
MODE D’EMPLOI
MANUAL DE INSTRUCCIONES
BEDIENUNGSANLEITUNG
ISTRUZIONI
HANDLEIDING
BRUKSANVISNING
For Customer Use:
Enter below the Model No. and
Serial No. which is located on
the bottom of cabinet. Retain this
information for future reference.
Model No.
Serial No.
J5500-106A
Page 2

FCC INFORMATION
This device complies with Part 15 of the FCC Rules. Operation is subject to the
following two conditions:
(1) This device may not cause harmful interference.
(2) This device must accept any interference received, including interference that
may cause undesired operation.
Note: This equipment has been tested and found to comply with the limits for a
Class B digital device, pursuant to Part 15 of the FCC rules. These limits
are designed to provide reasonable protection against harmful interference
in a residential installation. This equipment generates, uses and can radiate
radio frequency energy and, if not installed and used in accordance with the
instructions, it may cause harmful interference to radio communications.
However, there is no guarantee that interference will not occur in a
particular installation. If this equipment does cause harmful interference to
radio or television reception, which can be determined by turning the
equipment off and on, the user is encouraged to try to correct the
interference by one or more of the following measures:
● Reorient or relocate the receiving antenna.
● Increase the separation between the equipment and receiver.
● Connect the equipment into an outlet on a circuit different from that to which the
receiver is connected.
● Consult the dealer or an experienced radio/TV technician for help.
CAUTION ––– Changes or modifications not approved by JVC could void user’s
authority to operate the equipment.
Contact
Address: JVC AMERICAS CORP.
1700 Valley Road Wayne, N.J. 07470
Telephone: (973) 315-5000
2
Page 3

WARNING:
TO REDUCE THE RISK OF FIRE OR ELECTRIC SHOCK, DO
NOT EXPOSE THIS APPLIANCE TO RAIN OR MOISTURE.
AVERTISSEMENT:
POUR RÉDUIRE LES RISQUES D’INCENDIE OU DE CHOC
ÉLECTRIQUE, NE PAS EXPOSER CET APPAREIL À LA
PLUIE NI À L’HUMIDITÉ.
INFORMATION (for CANADA)
This Class B digital apparatus meets all requirements of the Canadian
Interference-causing Equipment Regulations.
RENSEIGNEMENT (pour CANADA)
Cet appareil numérique de la classe B respecte toutes les exigences du
Réglement sur le matériel brouilleur du Canada.
3
Page 4

“SOME DO’S AND DON’TS ON THE SAFE USE OF EQUIPMENT”
This equipment has been designed and manufactured to meet international safety
standards but, like any electrical apparatus, care must be taken if you are to obtain the
best results and safety is to be assured.
Do read the operating instructions before you attempt to use the equipment.
Do ensure that all electrical connections (including the plug, extension cord and inter-
connections between pieces of equipment) are properly made and in accordance
with the manufacturer’s instructions. Switch off and withdraw the plug when
making or changing connections.
Do consult your dealer if you are ever in doubt about the installation or operation or
safety of your equipment.
Do be careful with glass panels or doors on equipment.
DON’T continue to operate the equipment if you are in any doubt about it working
normally, or if it is damaged in any way—switch off—withdraw the plug and
consult your dealer.
DON’T remove any fixed cover as this may expose dangerous voltages.
DON’T leave equipment switched on when it is unattended unless it is specifically
stated that it is designed for unattended operation or has a standby mode.
Switch off using the switch on the equipment and make sure that your family
know how to do this.
Special arrangements may need to be made for infirm or handicapped
people.
DON’T use equipment such as personal stereos or radios so that you are distracted
from the requirements of road safety. It is illegal to watch television when
driving.
DON’T listen to headphones at high volume as such use can permanently damage
your hearing.
DON’T obstruct the ventilation of the equipment, for example with curtains or on soft
furnishings.
Overheating will cause damage and shorten the life of the equipment.
DON’T use makeshift stands and NEVER fix legs with wood screws. To ensure
complete safety always fit the manufacturer’s approved stand or legs with the
fixing screws supplied according to the instructions.
DON’T allow electrical equipment to be exposed to rain or moisture.
ABOVE ALL
4
NEVER let anyone especially children push anything into holes, slots or any
other opening in the case. This could result in a fatal electrical shock.
NEVER guess or make changes with electrical equipment of any kind. It is
better to be safe than sorry!
Page 5
Thank you for purchasing this JVC product.
Before you begin operating this unit, please read the instructions carefully to be
sure you get the best possible performance.
If you have any questions, consult your JVC dealer.
ENGLISH INSTRUCTIONS .................................................. Page 6 – 21
Nous vous félicitons d’avoir acquis ce produit JVC.
Avant de vous en servir, lisez attentivement le mode d’emploi pour en obtenir les
meilleures performances.
Si vous avez d’autres questions, interrogez votre revendeur JVC.
INSTRUCTIONS EN FRANÇAIS ....................................... Page 22 – 37
Gracias por adquirir este producto JVC.
Antes de utilizar la unidad, lea cuidadosamente estas instrucciones para obtener el
máximo rendimiento.
Si tiene cualquier duda, póngase en contacto con su distribuidor de productos JVC.
INSTRUCCIONES EN ESPAÑOL ................................... Página 38 – 53
Mit dem Kauf dieses JVC Produkts haben Sie eine gute Wahl getroffen.
Um lhr Gerät optimal nutzen zu können, sollten Sie die vorliegende Anleitung vor
lnbetriebnahme sorgfältig durchlesen.
Falls Fragen offen bleiben, wenden Sie sich bitte an lhren JVC-Händler.
DEUTSCHE BEDIENUNGSANLEITUNG .......................... Seite 54 – 69
Win
ENGLISH
Mac
Win
FRANÇAIS
Mac
Win
ESPAÑOL
Mac
Win
DEUTSCH
Mac
Grazie per aver acquistato un prodotto JVC.
Prima di cominciare a utilizzare questo prodotto, vi preghiamo di leggere
attentamente le istruzioni per impiegarlo nel miglior modo possibile.
Per eventuali domande, rivolgetevi al rivenditore JVC.
ISTRUZIONI IN ITALIANO .............................................. Pagine 70 – 85
Dank u voor uw aankoop van dit JVC-produkt.
Voor u met dit systeem begint te werken, verzoeken wij u de instructies zorgvuldig
door te lezen om zeker te zijn dat u de best mogelijke prestaties bekomt.
Mocht u nog vragen hebben, raadpleeg dan uw JVC-dealer.
NEDERLANDSE GEBRUIKSAANWIJZING ...................... Biz. 86 – 101
Tack för att du köpt denna JVC-produkt.
För att få bästa möjliga ljudkvalitet, bör du läsa bruksanvisningen noggrant, innan
du börjar använda enheten.
Kontakta din JVC-försäljare om du har några frågor.
SVENSK BRUKSANVISNING .................................. Sidorna 102 – 116
Win
ITALIANO
Mac
Win
Mac
NEDERLANDS
Win
SVENSKA
Mac
5
Page 6

CAUTION
To reduce the risk of electrical shocks, fire, etc.:
1. Do not remove screws, cover or cabinet.
2. Do not expose this appliance to rain or moisture.
IMPORTANT
1. Installation
● Select a place which is level, dry and neither too hot nor too cold (between 0°C
and 40°C/32°F and 104°F).
● Keep away from direct sunlight.
● Do not put it too close to a heater.
2. Malfunctions, etc.
● Do not insert any metallic object.
● Do not allow water to get inside.
FEATURES
● Three different types of memory card slots compatible with SD Memory Card/
MultiMediaCard, SmartMedia, PC Card/CompactFlash (using PCMCIA TYPE II
adapter)
● Available for Memory Stick by using PCMCIA adapter (not provided)
● USB Interface for high-speed image transfer (1.5 MB/sec.)
● Hot-Swap for inserting/ejecting a card without having to turn off the PC power
● PCMCIA adapter for CompactFlash card provided
● Compatible OS: IBM PC/AT ......... Windows 98/98SE/2000/Me
Macintosh ........... Mac OS 8.6 or later
* Microsoft and Windows are either registered trademarks or trademarks of Microsoft
Corporation in the United States and/or other countries.
* Macintosh is a registered trademark of Apple Computers, Inc.
* Other trademarks are the property of their respective owners.
Notes
• Cannot be used to read copy-protected audio data.
• Cards other than a memory card such as a modem card and LAN card cannot be
used.
• Compatible with preinstalled OS only.
• iMac firmware update version 3.0 or later is required. Please make sure that you
have the correct version of iMac firmware.
• JVC accepts no liability for any damages or data loss that may arise from
operating this unit.
6
Page 7
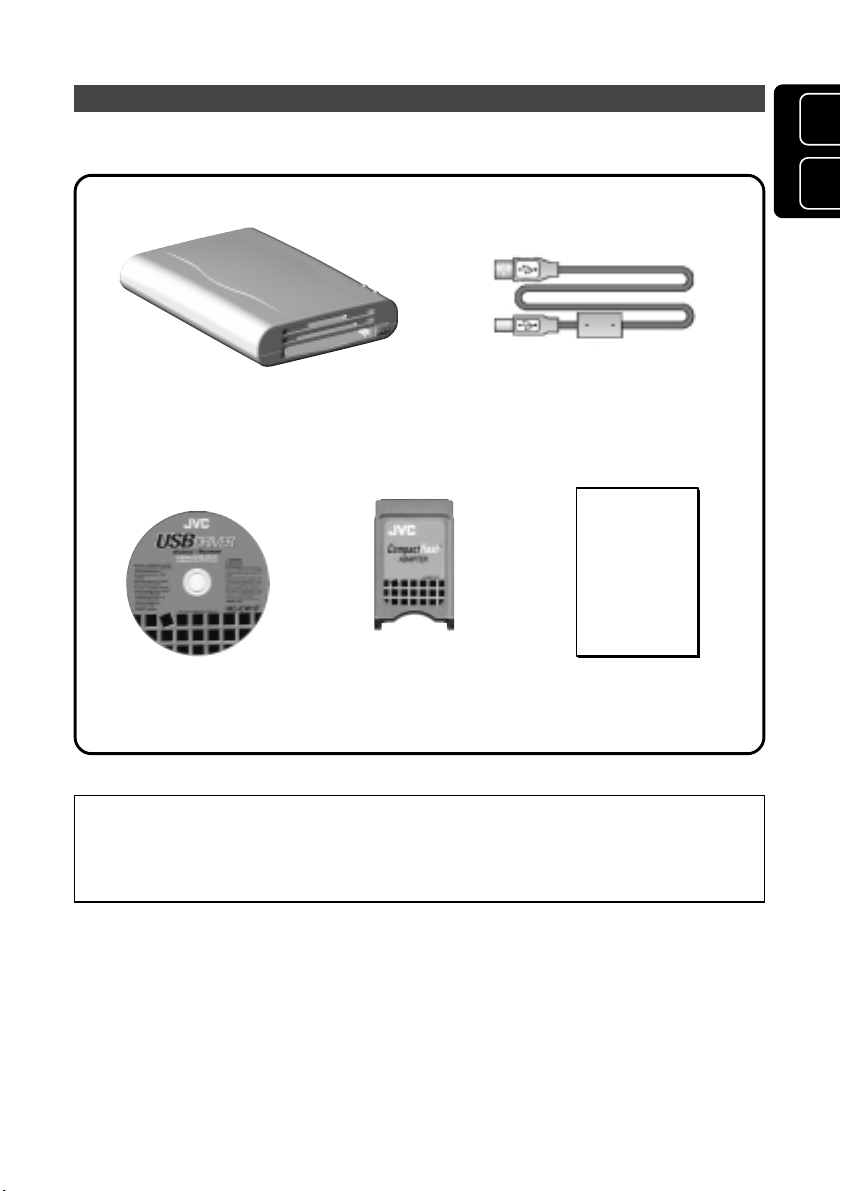
PACKAGE CONTENTS
The following accessories are included with the HC-CW1F card reader/writer.
USB cable (1.5 m)
Main unit (HC-CW1F)
CompactFlash
CD-ROM
card adapter
(PCMCIA TYPE II)
(in the soft case)
Instructions
(this booklet)
Win
ENGLISH
Mac
Note
The CompactFlash card adapter provided with this unit is compatible with standard
3.3-mm CompactFlash cards. It is not compatible with large-capacity 5-mm
CompactFlash cards.
7
Page 8

NAMES OF PARTS AND THEIR FUNCTIONS
2 5
6
1
3 4
USB cable connector
1
Connect the provided USB cable.
2
SD Memory Card/MultiMediaCard insertion slot
Insert the SD Memory Card or MultiMediaCard with the metal terminal downward.
3
SmartMedia insertion slot
Insert the SmartMedia with the metal terminal upward.
Note
SmartMedia accepts both 5 V and 3.3 V.
4
PC Card/CompactFlash insertion slot
Insert the PC Card/CompactFlash with the face up. Before inserting the
CompactFlash, first attach the provided PCMCIA TYPE II adapter.
Note
When a commercially available Memory Stick Adapter (PCMCIA TYPE II) is
used, a Memory Stick can be inserted into this slot.
7
5
POWER LAMP
Lights green when this unit is connected to a PC and is ready for use. The unit
cannot be used if the green light goes out.
6
ACCESS LAMP
Lights/blinks red when the Memory Card is being accessed. Do not remove the
card while this lamp lights/blinks. Doing so may damage the data on the card
and may also cause the unit to malfunction.
7
PC Card Eject button
Press to remove the card from the PC Card/CompactFlash insertion slot. The card
is ejected about halfway. Remove the card completely by hand.
8
Page 9

OPERATION
Operating procedures differ depending on the computer operating system you are
using. Refer to the section that applies to your system (see below).
● IBM PC/AT Windows 98/98SE/2000/Me ................................. Page 10 – 14
● Macintosh Mac OS 8.6 or later............................................... Page 15 – 20
ATTENTION:
• This unit may not operate correctly when connected to a USB hub or a PC with a
built-in USB hub (more than one USB connector). If possible, always connect this
unit directly to your computer.
• When the same memory card is used in both Mac OS and Windows, the card’s
memory capacity may not be displayed correctly, or an error message may be
displayed while a file is being written.
In this case, it is recommended that you do not use the same card in both
systems and that you format the card with the OS you are going to use it with.
Win
ENGLISH
Mac
9
Page 10

Windows 98/98SE/2000/Me
SOFTWARE INSTALLATION
Before you can use this unit with your PC, you must first install the driver software.
Perform the following installation
1. Close all open applications.
2. Insert the provided USB driver CD-
ROM into your PC’s CD-ROM drive.
3. The installation software will start up
automatically in a few seconds. If it
does not start up, try one of the
following.
Method 1
• Click the [START] button and select
[RUN] from the displayed menu.
• Enter (CD-ROM drive name):
\SETUP.EXE in the displayed dialog
box. (e.g.: D: \SETUP.EXE)
• Click the [OK] button.
Method 2
• Double-click [My Computer].
• Double-click the CD-ROM icon.
• The installation software starts up.
If it does not start up and the CDROM window opens, double-click
[SETUP.EXE].
4. When the installation software starts
up, the operation in Fig. 1 is
performed and then the window in
Fig. 2 is displayed.
In Fig. 2, click [Next]. To stop
installation, click [Cancel].
5. In Fig. 2, click [Next] to start
installation of the driver software
(Fig. 3).
6. When the installation is complete, the
window in Fig. 4 is shown. To activate
the installed driver software, restart
the PC. Select [Yes] and click
[Finish] to restart the PC
automatically. To restart after closing
the installation software, select [No]
and click [Finish]. In this case, do not
connect this unit to the PC until
restarting the PC.
before connecting this unit to the PC.
Fig. 1
Fig. 2
Fig. 3
Fig. 4
10
Page 11

USING THIS UNIT
Once the driver software has been installed and the PC has been restarted, you can
connect this unit to the PC and start using it.
1. Connect the provided USB cable to the USB cable connector of this unit.
• The plugs at either end of the USB cable are different. Connect the appropriate
plug to the connector.
2. Connect the other end of the USB cable to the USB port on the PC.
The operating system will automatically recognize this unit and three removable
disk icons are displayed in My Computer (Fig. 5).
Fig. 5
The displayed removable disk drives are assigned drive letters in alphabetical
order, excluding (B:).
The drives are assigned to the three memory slots for SmartMedia, PC Card/
CompactFlash and SD Memory Card/MultiMediaCard in order.
(e.g. 1: A: FDD, C: HDD, G: CD-ROM)
D: SmartMedia
E: PC Card/CompactFlash
F: SD Memory Card/MultiMediaCard
(e.g. 2: A: FDD, C: HDD, F: CD-ROM)
D: SmartMedia
E: PC Card/CompactFlash
G: SD Memory Card/MultiMediaCard
Win
ENGLISH
Mac
Notes
• The first time you use this unit after installing the driver software, you will see
the OS recognition process on-screen. Once this unit has been recognized,
this process display goes out automatically.
• If the unit is connected to a PC and the PC does not recognize it, check to see
if the USB port is set to [Disable].
If the port is disabled, do either of the following:
1. Set all devices in the [universal serial bus control] to [Enable] with the OS
device manager.
2. With the PC BIOS setting, set the USB port to [Enable]. For device manager
and BIOS setting, refer to the PC’s instruction manual.
11
Page 12

Windows 98/98SE/2000/Me
3. Insert memory cards in the memory card slots.
• With CompactFlash, first insert the card into the provided CompactFlash card
adapter, then into the slot in this unit.
Note
Insert the memory card firmly with the correct orientation. If the card is not
inserted properly, it will not be recognized.
4. Double-click the Removable Disk in My Computer corresponding to the inserted
memory card to display the contents of the memory card.
5. You can write or erase data on the memory card in the same way as with a floppy
disk or hard disk.
Notes
• Formatting the memory card is also performed in the same way as with a
floppy disk. However, if the card is formatted in the PC, it may not work in the
device in which you plan to use it (digital camera, etc.).
It is recommended that you format the memory card with the device in which
you are going to use it.
• Memory cards feature a lever or seal which can be used to prohibit writing. If
the memory card is write-protected, you cannot write or erase data on the card.
For details, refer to the card’s instruction manual.
• Cannot be used for reading copy-protected audio data.
6. To remove the card, do one of the following:
• SD Memory Card/MultiMediaCard, SmartMedia
Pull out the card by hand.
• PC Card/CompactFlash
Press the PC Card Eject button to pop out the card partway. Then pull out
the card by hand.
Note
Do not try to remove a card or disconnect the USB cable when the ACCESS
LAMP on this unit lights/blinks. Doing so may damage the data on the card and
may also cause the unit to malfunction.
7. Before disconnecting this unit from the PC, always make sure no card inserted in
the unit.
12
Page 13

UNINSTALLATION OF SOFTWARE
To uninstall the driver software if it is no longer required, first disconnect the unit
from the PC, then do the following procedure.
1. Close all open applications.
2. Insert the provided USB driver CD-
ROM into the PC’s CD-ROM drive.
3. The installation software starts up
automatically in a few seconds. If it
does not start up, try one of the
following.
Method 1
• Click the [START] button and select
[RUN] from the displayed menu.
• Enter (CD-ROM drive name):
\SETUP.EXE in the displayed dialog
box. (e.g.: D: \SETUP.EXE)
• Click the [OK] button.
Method 2
• Double-click [My Computer].
• Double-click the CD-ROM icon.
• The installation software starts up.
If it does not start up and the CDROM window opens, double-click
[SETUP.EXE].
4. When the installation software starts
up, the operation in Fig. 6 is shown
and then the window in Fig. 7 is
displayed.
In Fig. 7, click [OK]. To stop
uninstallation, click [Cancel].
Note
If the driver software for this unit is
not installed in the PC, the
installation screen for the driver
software is shown (page 10).
Fig. 6
Fig. 7
Fig. 8
Win
ENGLISH
Mac
5. In Fig. 7, click [OK] to start the
uninstallation of the driver software
(Fig. 8).
6. When the uninstallation is complete,
Fig. 9 is shown. Click [Finish] to end
the installation software.
Note
If you want to use this unit after the
driver software has been
uninstalled, you will have to reinstall the driver software (page 10).
Fig. 9
13
Page 14

Windows 98/98SE/2000/Me
TROUBLESHOOTING
If you’re having problems with this unit, check this section to see if you can find a
remedy before contacting a service center for repairs.
Pages
Symptoms
Even though
this unit is
connected to a
PC, the PC
does not
recognize this
unit.
The POWER
LAMP does not
light.
The removable
disk icons are
not shown in My
Computer.
The inserted
memory card is
not open.
The memory
card cannot be
used with a
digital camera,
etc.
Causes
The USB port is set to
Disable.
The USB cable is not
connected correctly.
The driver software is not
installed correctly.
The memory card is not
correctly inserted.
When you use this unit,
memory card is formatted
by the PC.
Remedies
1.Set all devices in the
[universal serial bus
controller] to [Enable]
with the device manager
of OS.
2.Set the USB port to
[Enable] with the PC’s
BIOS setting. For details
of the device manager
and BIOS setting, refer
to the PC’s instruction
manual.
Connect the USB plugs
correctly again by
checking the connector
form and direction.
Install the driver software
correctly again.
Take out the memory card
and insert it again
correctly.
Format the memory card
again with the device in
which the card will be
used.
to be
referred
11
11
10
12
12
14
Page 15

Mac OS 8.6 or later
SOFTWARE INSTALLATION
Before you can use this unit with your PC, you must first install the driver software.
Perform the following installation before connecting this unit to the PC.
1. Close all open applications.
2. Insert the provided USB driver CD-
ROM into your PC’s CD-ROM drive.
3. The CD-ROM icon will appear on the
desktop in a few seconds (Fig. 1).
4. Double-click the displayed icon. The
CD-ROM window appears (Fig. 2).
5. Double-click the icon for the [CARD
READER&WRITER Installer]. The
installation software will start up
automatically.
6. When the installation software starts
up, Read Me is shown first (Fig. 3).
Read the text then click the
[Continue] button. The main screen
of the installation software appears
(Fig. 4).
Fig. 1
Fig. 2
Win
ENGLISH
Mac
Fig. 3
Fig. 4
15
Page 16

Mac OS 8.6 or later
7. As shown in Fig. 5, select the driver
[CARD READER&WRITER] to be
installed.
To change the target for installation,
select [Select Folder] as shown in
Fig. 6 and select the target folder in
the displayed folder select window
(Fig. 7).
8. When you have selected a target
folder, click the [Install] button. To
stop the installation, click the [Quit]
button.
Fig. 5
9. When the Install button is clicked in
Fig. 4, a message window appears
informing you that all other open
applications will be closed by the
installation software (Fig. 8). If you do
not want the installation software to
close open applications, click the
[Cancel] button to end the
installation. Then, close the open
applications yourself and restart the
installation procedure.
Click the [Continue] button to
automatically close open applications
and start the installation.
10
. When the installation is complete, a
message asking you to restart your
computer appears (Fig. 9). To activate
the installed driver software, restart
the PC. Click the [Restart] button to
restart the PC automatically. If you
want to restart the PC later, click the
[Quit] button. In this case, do not
connect this unit to the PC until
restarting the PC.
Fig. 6
Fig. 7
Fig. 8
Fig. 9
16
Page 17

USING THIS UNIT
Once the driver software has been installed and the PC has been restarted, you can
connect this unit to the PC and start using it.
1. Connect the provided USB cable to the USB cable connector of this unit.
• The plugs at either end of the USB cable are different. Connect the appropriate
plug to the connector.
2. Connect the other end of the USB cable to the USB port on the PC. The operating
system will automatically recognize this unit and you can start using it.
• If you are using an iMac and the warning window (Fig. 10) appears, please check
to see if you have the latest version of Mac OS and the required iMac firmware
update. Refer to Notes in FEATURES (page 6).
Fig. 10
3. Insert memory cards in the memory card slots.
• With CompactFlash, first insert the card into the provided CompactFlash card
adapter, then into the slot in this unit.
Note
Insert the memory card firmly with the correct orientation. If the card is not
inserted properly, it will not be recognized.
4. The hard disk icon is shown on the desktop in a few seconds (Fig. 11). Double-click
the displayed icon to display the contents of the memory card.
Fig. 11
Win
ENGLISH
Mac
Smart Media PC Card/
CompactFlash
SD Memory Card/
MultiMediaCard
5. You can write or erase data on the memory card in the same way as with a floppy
disk or hard disk.
Notes
• Formatting the memory card is also performed in the same way as with a
floppy disk. However, if the card is formatted in the PC, it may not work in the
device in which you plan to use it (digital camera, etc.).
It is recommended that you format the memory card with the device in which
you are going to use it.
• Memory cards feature a lever or seal which can be used to prohibit writing. If
the memory card is write-protected, you cannot write or erase data on the card.
For details, refer to the card’s instruction manual.
• Cannot be used for reading copy-protected audio data.
17
Page 18

Mac OS 8.6 or later
6. To remove the card, be sure to move the hard disk icon on the desktop to the
trash icon. Then, remove the card with the following procedure.
• SD Memory Card/MultiMediaCard, SmartMedia
Pull out the card by hand.
• PC Card/CompactFlash
Press the PC Card Eject button to pop out the card partway. Then pull out
the card by hand.
Notes
• Do not try to remove a card or disconnect the USB cable when the ACCESS
LAMP on this unit lights/blinks. Doing so may damage the data on the card and
may also cause the unit to malfunction.
• If you take out the card before moving the hard disk icon on the trash icon, the
PC will freeze.
7. Before disconnecting this unit from the PC, always make sure that no card is
inserted in the unit.
18
Page 19

UNINSTALLATION OF SOFTWARE
To uninstall the driver software if it is no longer required, first disconnect the unit
from the PC, then do the following procedure.
1. Close all open applications.
2. Insert the provided USB driver CD-
ROM into the PC’s CD-ROM drive.
3. The CD-ROM icon on the desktop is
shown in a few seconds (Fig. 12).
4. Double-click the displayed icon. The
CD-ROM window is shown (Fig. 13).
5. Double-click the [CARD READER&
WRITER Installer] icon. The
installation software starts up
automatically in a few seconds.
6. When the installation software starts
up, Read Me is shown first (Fig. 14).
Click the [Continue] button to
proceed. The main screen of the
installation software appears (Fig.
15).
7. Select [Uninstall] from the items in
Fig. 16.
8. When the selection is complete, click
the [Uninstall] button. To stop
uninstallation, click the [Quit] button.
9. When uninstallation is complete, a
message appears telling you that
uninstallation is complete. Under
some conditions, you may get a
message telling you that some files
could not be deleted as shown in
Fig. 17. This is normal and is not a
problem. Click the [OK] button, then
the [Quit] button in Fig. 16 to end
uninstallation.
Note
If you want to use this unit after
the driver software has been
uninstalled, you will have to reinstall the driver software
(page 15).
Fig. 12
Fig. 13
Fig. 14
Fig. 15
Fig. 16
Win
ENGLISH
Mac
Fig. 17
19
Page 20

Mac OS 8.6 or later
TROUBLESHOOTING
If you’re having problems with this unit, check this section to see if you can find a
remedy before contacting a service center for repairs.
Pages
Symptoms
Even though
this unit is
connected to a
PC and the
memory card is
inserted, the
hard disk icon is
not shown.
The POWER
LAMP does not
light.
PC operation is
not possible
(the PC
freezes).
The warning
window appears
when you
connect the
USB cable to
the USB port.
The memory
card cannot be
used with a
digital camera,
etc.
Causes
The driver software is not
installed correctly.
The memory card is not
inserted correctly.
The File Exchange is not
installed.
The USB cable is not
connected correctly.
The memory card is taken
out before the hard disk
icon is moved to the trash
icon.
If you are using an iMac,
the version of iMac
firmware is not correct.
When you use this unit,
the memory card is
formatted by the PC.
Remedies
Install the driver software
again correctly.
Take out the memory card
and insert it again
correctly.
To use the DOS/Windows
format memory card, the
File Exchange control
panel is necessary. Select
Control Panels in the
Apple menu and check
whether or not File
Exchange is installed. For
details, refer to the Mac
OS Help.
Connect the USB plugs
correctly again by
checking the connector
form and direction.
First move the hard disk
icon on the desktop to the
trash icon, then take out
the memory card.
Please check to see if you
have the latest version of
Mac OS and the required
iMac firmware update.
Refer to Notes in
FEATURES.
Format the memory card
again with the device in
which the card will be
used.
to be
referred
15
17
—
17
18
6
17
20
Page 21

SPECIFICATIONS
䡵 Card slot: SD Memory Card (MultiMeiaCard)
SmartMedia Card
CompactFlash Card (with provided PCMCIA adapter)
䡵 USB Interface: Version 1.1 (up to 1.5 MB/sec.)
䡵 Hot-Swap
䡵 DC +5 V directly from USB port
䡵 Operating temperature: 0°C to 40°C/32°F to 104°F
䡵 Available for Memory Stick by using PCMCIA adapter (not provided)
䡵 System requirements
IBM PC/AT
*Microsoft Windows 98/98SE/Me/2000 (preinstalled model)
*Intel Pentium processor or higher
*Free USB port
*CD-ROM drive
Macintosh
*iMac (iMac/DV/DV+/DV SE), iBook (iBook/SE)
*Power Mac G4 (G4 Cube), PowerBook, Power Mac G3 (with USB port)
*Mac OS 8.6 or later
䡵 Dimensions: 92 mm (W) x 27 mm (H) x 126 mm (D) (3-5/8” x 1-1/16” x 4-31/32”)
(including feet and PC Card Eject button)
䡵 Weight: 143 g (5 oz) (without USB cable)
Win
ENGLISH
Mac
Notes
• Cannot be used to read copy-protected audio data.
• Compatible with preinstalled OS only.
• iMac firmware update version 3.0 or later is required. Please make sure that you
have the correct version of iMac firmware.
• JVC accepts no liability for any damages or data loss that may arise from
operating this unit.
21
Page 22

VICTOR COMPANY OF JAPAN, LIMITED
HC-CW1F
CARD READER/WRITER
© 2001 VICTOR COMPANY OF JAPAN, LTD.
Printed in TAIWAN R.O.C
J5500-106A
 Loading...