

Page 1

HARD DISK CAMERA
GZ-MG750
Basic User Guide
Dear Customers
Thank you for purchasing this JVC product.
Before use, please read the Safety Precautions and Cautions on P.2 and P.28 to ensure safe
use of this product.
This product comes with a “Basic User Guide” (this manual) and a “Detailed User Guide”.
Detailed User Guide
Explains the ways of shooting in various situations and the
useful features.
Getting StartedRecordingPlaybackCopying
Access the following website on your PC
.
■
http://manual.jvc.co.jp/index.html/
Further
Information
Page 2
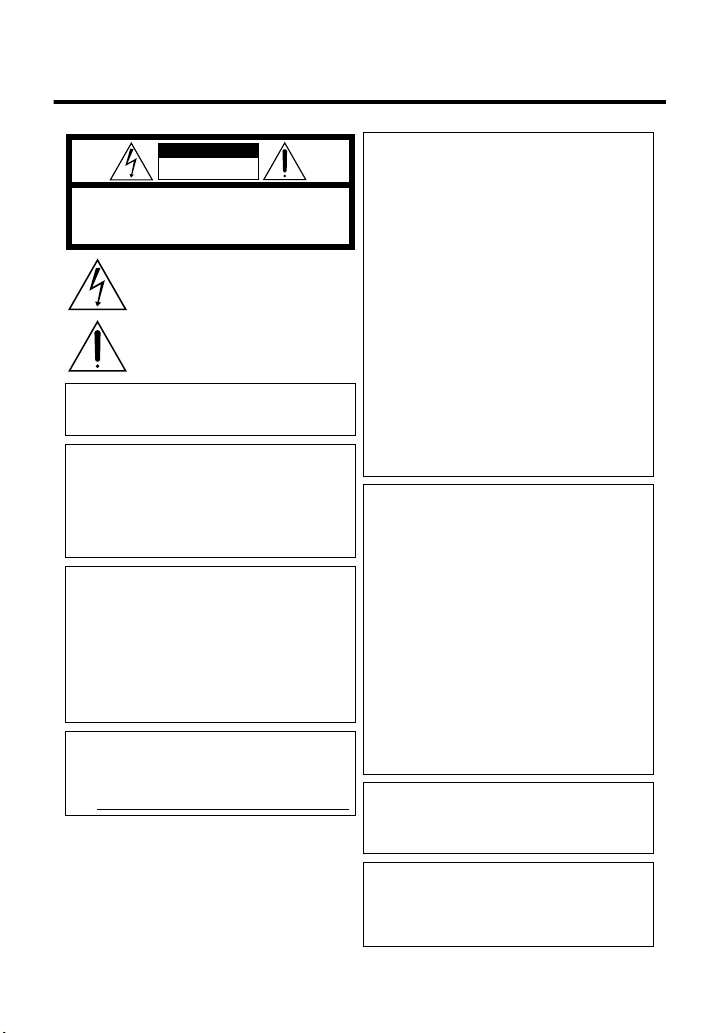
Safety Precautions
CAUTION
RISK OF ELECTRIC SHOCK
DO NOT OPEN
CAUTION: TO REDUCE THE RISK OF ELECTRIC SHOCK,
DO NOT REMOVE COVER (OR BACK).
NO USER-SERVICEABLE PARTS INSIDE.
REFER SERVICING TO QUALIFIED SERVICE PERSONNEL.
The lightning flash with arrowhead symbol, withinan
equilateral triangle, is intended to alert the user to the
presence of uninsulated "dangerous voltage" within the
product's enclosure that may be of sufficient magnitude
to constitute a risk of electric shock to persons.
The exclamation point withinan equilateral triangle is
intended to alert the user to the presence of important
operating and maintenance (servicing) instructions in
the literature accompanying the appliance.
WARNING: TO PREVENT FIRE OR SHOCK
HAZARD, DO NOT EXPOSE THIS UNIT TO
RAIN OR MOISTURE.
NOTES:
The rating plate and safety caution are on the
•
bottom and/or the back of the main unit.
The serial number plate is on the battery pack
•
mount.
The rating information and safety caution of the
•
AC adapter are on its upper and lower sides.
Caution on Replaceable lithium battery
The battery used in this device may present a fire
or chemical burn hazard if mistreated.
Do not recharge, disassemble, heat above 100°C
or incinerate.
Danger of explosion or Risk of fire if the battery is
incorrectly replaced.
Dispose of used battery promptly.
•
Keep away from children.
•
Do not disassemble and do not dispose of in fire.
•
For USA-California Only
This product contains a CR Coin Cell Lithium
Battery which contains Perchlorate Material
– special handling may apply.
See www.dtsc.ca.gov/hazardouswaste/perchlorate
.
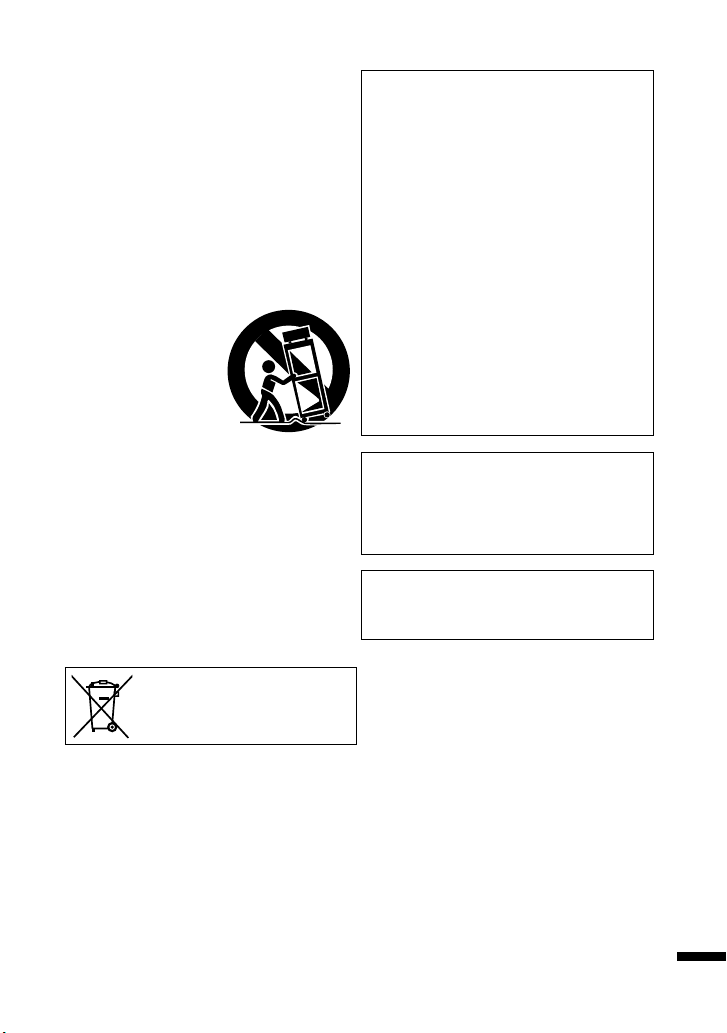
When the equipment is installed in a cabinet or on
a shelf, make sure that it has sufficient space on all
sides to allow for ventilation (10 cm (3-15/16") or
more on both sides, on top and at the rear).
Do not block the ventilation holes.
(If the ventilation holes are blocked by a
newspaper, or cloth etc. the heat may not be able
to get out.)
No naked flame sources, such as lighted candles,
should be placed on the apparatus.
When discarding batteries, environmental
problems must be considered and the local rules or
laws governing the disposal of these batteries must
be followed strictly.
The apparatus shall not be exposed to dripping or
splashing.
Do not use this equipment in a bathroom or places
with water.
Also do not place any containers filled with water
or liquids (such as cosmetics or medicines, flower
vases, potted plants, cups etc.) on top of thisunit.
(If water or liquid is allowed to enter this
equipment, fire or electric shock may be caused.)
Do not point the lens directly into the sun. This
can cause eye injuries, as well as lead to the
malfunctioning of internal circuitry. There is also a
risk of fire or electric shock.
CAUTION!
The following notes concern possible physical
damage to the camcorder and to the user.
Carrying or holding the camcorder by the LCD
monitor can result in dropping the unit, or in a
malfunction.
Do not use a tripod on unsteady or unlevel surfaces.
It could tip over, causing serious damage to the
camcorder.
CAUTION!
Connecting cables (Audio/Video, S-Video, etc.) to
the camcorder and leaving it on top of the TV is not
recommended, as tripping on the cables will cause
the camcorder to fall, resulting in damage.
CAUTION:
The mains plug shall remain readily operable.
Remove the mains plug immediately if the
•
camcorder functions abnormally.
.
For more information, refer to the Detailed User Guide
2
http://manual.jvc.co.jp/index.html/
.
WARNING:
The battery pack, the camcorder with battery
installed, and the remote control with battery
installed should not be exposed to excessive heat
such as direct sunlight, fire or the like.
Page 3
IMPORTANT SAFETY INSTRUCTIONS
1. Read these instructions.
2. Keep these instructions.
3. Heed all warnings.
4. Follow all instructions.
5. Do not use this apparatus near water.
6. Clean only with dry cloth.
7. Do not block any ventilation openings. Install in
accordance with the manufacturer’s instructions.
8. Do not install near any heat sources such
as radiators, heat registers, stoves, or other
apparatus (including amplifiers) that produce heat.
Protect the power cord from being walked on
9.
or pinched particularly at plugs, convenience
receptacles, and the
point where they exit
from the apparatus.
10.Only use attachments/
accessories specified by
the manufacturer.
11.Use only with the cart,
stand, tripod, bracket,
or table specified by the
manufacturer, or sold with the apparatus. When
a cart is used, use caution when moving the
cart/apparatus combination to avoid injury from
tip-over.
12.Unplug this apparatus during lightning storms or
when unused for long periods of time.
13
.Refer all servicing to qualified service personnel.
Servicing is required when the apparatus has
been damaged in any way, such as power-supply
cord or plug is damaged, liquid has been spilled
or objects have fallen into the apparatus, the
apparatus has been exposed to rain or moisture,
does not operate normally, or has been dropped.
Remember that this camcorder is intended for
private consumer use only.
Any commercial use without proper permission
isprohibited. (Even if you record an event such
as a show, performance or exhibition for personal
enjoyment, it is strongly recommended that you
obtain permission beforehand.)
Trademarks
Manufactured under license from Dolby
•
Laboratories. Dolby and the double-D symbol
are trademarks of Dolby Laboratories.
Windows® is either registered trademark or
•
trademark of Microsoft Corporation in the United
States and/or other countries.
Macintosh is a registered trademark of Apple
•
Inc.
iTunes, iMovie, iPhoto are trademarks of Apple
•
Inc., registered in the U.S. and other countries.
YouTube and the YouTube logo are trademarks
•
and/or registered trademarks of YouTube LLC.
Other product and company names included in
•
this instruction manual are trademarks and/or
registered trademarks of their respective holders.
CAUTION:
Fire or injury may result if batteries NOT
•
approved by JVC are used.
Only use the batteries specified on page 27.
Please do not pull or bend the AC adapter plug
•
and cable. This may damage the AC adapter.
Make a backup of important recorded data
It is recommended to copy your important recorded
data to a DVD or other recording media for storage.
JVC will not be responsible for any lost data.
If thissymbol is shown, it is only valid
in the European Union.
.
For more information, refer to the Detailed User Guide
http://manual.jvc.co.jp/index.html/
3
Page 4

Index
Safety Precautions ............................ 2
Index ................................................. 4
Verifying the Accessories .................. 4
Names of Parts and Functions .......... 5
▶Getting Started ........................ 6
Charging the Battery Pack ................ 6
Grip Adjustment ................................ 7
Clock Setting ..................................... 8
▶Recording .............................. 10
Video Recording .............................. 10
Still Image Recording ...................... 11
Recording on a microSD card ......... 12
▶Playback ................................ 14
Playing Back/Deleting Files on this Unit
......................................................... 14
▶Learning About Advanced Operations
Use the “Detailed User Guide” on your PC to find out more about the advanced
operations.
Access the following address on your PC
■
http://manual.jvc.co.jp/index.html/
Playing Back on TV ......................... 15
▶Copying ................................. 16
Copying Files .................................. 16
Creating Discs with a DVD Writer ... 17
Dubbing Files by Connecting to a DVD
Recorder or VCR ............................. 20
Copying to Computer ...................... 21
▶Further Information ................ 24
Using the Menu ............................... 24
Recordable Time/Number of Images
......................................................... 25
Troubleshooting .............................. 26
Cautions .......................................... 28
Specifications .................................. 30
Verifying the Accessories
AC Adapter
AP-V30U*
.
CD-ROM
.
●
microSD cards are sold separately.
Battery Pack
BN-VG107U
.
Basic User Guide
(this manual)
.
USB Cable
(Type A - Mini Type B)
.
AV Cable
.
For details on the types of cards that can be used on this unit, refer to P.12.
* When using the AC adapter overseas, please prepare a commercially available
converter plug for the country or region of visit.
For more information, refer to the Detailed User Guide
4
http://manual.jvc.co.jp/index.html/
Page 5
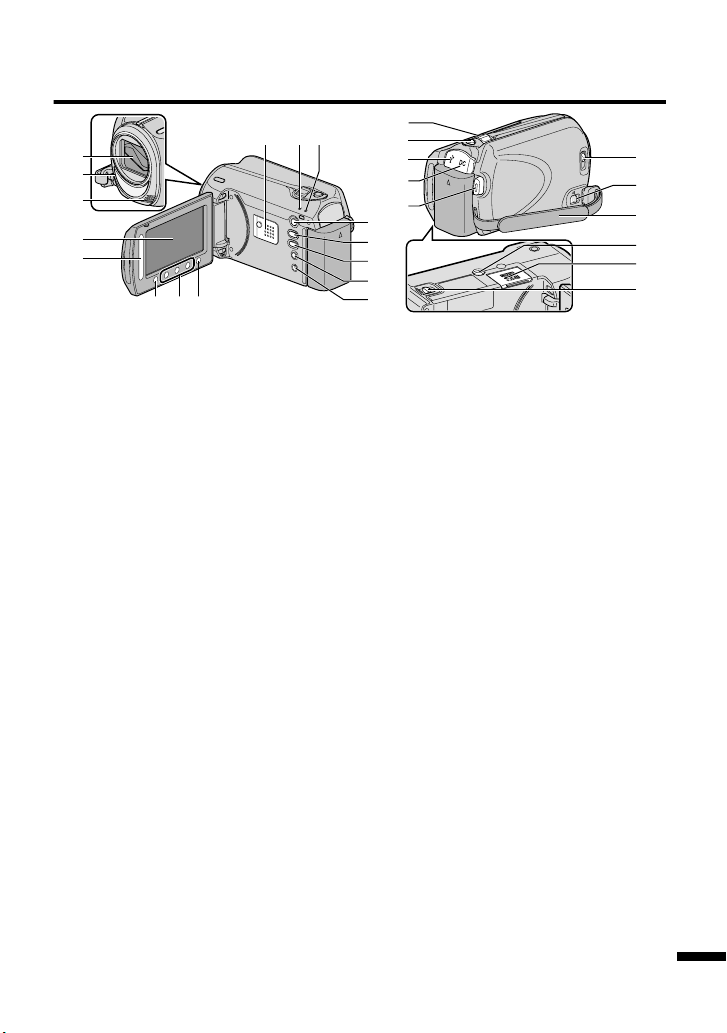
Names of Parts and Functions
1
90a
2
3
4
5
.
Lens/Lens Cover
A
Light
B
Stereo Microphone
C
LCD Monitor
D
Turns the power on/off by opening and
closing.
Slider
E
Selects an image or item.
OK Button
F
Confirms the selected image or item.
Operation Buttons
G
Functions differently according to the
operation.
Menu (menu) Button ( P.24)
H
Speaker
I
ACCESS (Access) Lamp
J
Lights up/blinks during recording or
playback.
POWER/CHARGE (Power/Charge)
K
Lamp ( P.6)
+ (Play) Button
L
Switches between recording and
playback modes.
/ (Video/Still Image) Button
M
Switches between video and still
image modes.
UPLOAD/EXPORT
N
(Upload/Export to iTunes) Button
Recording:Takes videos in YouTube or
Playback:Changes the video to
678
iTunes format.
YouTube or iTunes* format.
A
V
g
h
i
j
k
b
c
d
e
f
, (Power/Information) Button
O
Recording:Displays the remaining time as
Playback:Displays file information.
Press and hold to turn the power on/off
while the LCD monitor is opened.
AV Terminal ( P.15, P.20)
P
Zoom/Volume Lever ( P.10, P.14)
Q
SNAPSHOT (Still Image Recording)
R
Button ( P.11)
USB Terminal ( P.23)
S
DC Terminal ( P.6)
T
START/STOP (Video Recording)
U
Button ( P.10)
Lens Cover Switch ( P.10)
V
Grip Belt Release Lever
W
Grip Belt ( P.7)
X
Tripod Mounting Hole
Y
microSD Card Slot ( P.12)
Z
Battery Release Lever ( P.6)
a
well as the battery power during
continuous recording.
l
m
n
o
p
q
For more information, refer to the Detailed User Guide
http://manual.jvc.co.jp/index.html/
5
Page 6
Getting Started
Charging the Battery Pack
Attach the battery pack.
1
The battery pack is not
*
charged at the time of
purchase.
Align the top of the battery
•
with the mark on this unit,
and slide in until the battery
clicks into place.
To detach the battery pack
■
(Base)
.
CAUTION
Be sure to use JVC battery packs.
●
If you use any other battery packs besides JVC battery packs, safety and
performance cannot be guaranteed.
●
Charging time: Approx. 1 h 50 m (using supplied battery pack)
* If the battery pack is charged outside the room temperature range of 10°C to
35°C, charging may take a longer time or it may not start.
Charging Lamp
Plug in the power.
3
Charging Lamp
Connect the DC
2
terminal.
Charging in progress:
Blinks
Charging finished:
Goes out
Cover
AC Adapter
To AC Outlet
(110V to 240V)
For more information, refer to the Detailed User Guide
6
http://manual.jvc.co.jp/index.html/
Page 7
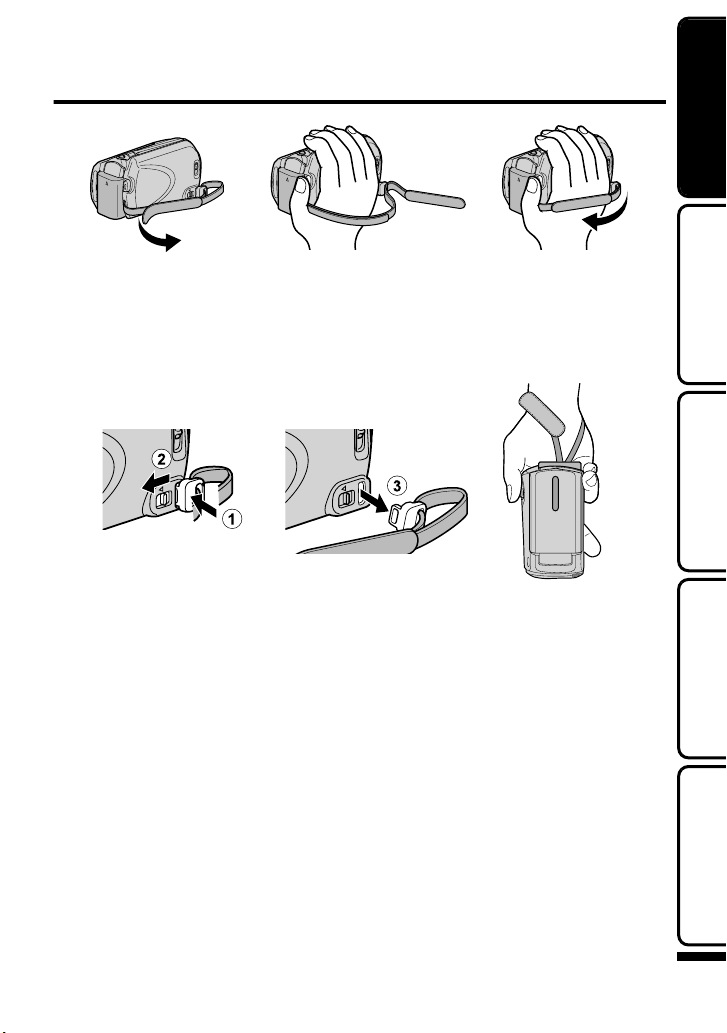
Grip Adjustment
Getting StartedRecordingPlaybackCopying
Pull back the belt
1
.
Adjust the length
2
Using as a Hand Strap
Remove the strap and loop it around your wrist.
While pressing A, pull B and remove the strap.
Press and hold
.
●
When attaching the hand strap, insert C until it clicks into place.
Attach the belt
3
For more information, refer to the Detailed User Guide
http://manual.jvc.co.jp/index.html/
Further
Information
7
Page 8
Clock Setting
Open the LCD monitor.
1
A
V
.
●
The unit turns on. When the LCD
monitor is closed, the unit turns off.
Select “YES” and touch when
2
“SET DATE/TIME!” is displayed.
Select
.
●
Touch
Slide along the slider to select, then
Slider
SET DATE/TIME!
YES
NO
SET
Operation Buttons
touch the operation buttons to set.
Set the date and time.
3
Cursor
CLOCK SETTING
DATE TIME
JAN
Select the region where you live
5
and touch .
●
The city name and time difference is
displayed.
CLOCK/AREA SETTING
GMT
SAVE
.
JAN 1. 2009 10:00 AM
QUIT
NOTE
●
Touch the slider and buttons
around the screen with your
fingers.
●
The slider and buttons do not
function if you touch them with
your fingernails or with gloves
on.
●
The displays on the screen do
not work even if you touch them.
●
“SET DATE/TIME!” is displayed
when you turn on this unit after it
has not been used for a
prolonged period.
Charge this unit for more than 24
hours before setting the clock.
( P.6)
AM10 0020091
SET QUIT
.
●
Use the slider to adjust the year,
month, day, hour and minute.
●
Touch the operation buttons “&” /
“'” to move the cursor.
After setting the date and time,
4
touch .
For more information, refer to the Detailed User Guide
8
http://manual.jvc.co.jp/index.html/
Page 9
To reset the clock
■
Set the clock with “CLOCK ADJUST”
from the menu.
① Display the menu.
To change the display
■
language
The language on the display can be
changed.
① Display the menu.
Getting StartedRecordingPlaybackCopying
Tou c h
.
② Select “CLOCK ADJUST” and
touch .
VIDEO
DISPLAY SETTINGS
CLOCK ADJUST
BASIC SETTINGS
CONNECTION SETTINGS
.
MEDIA SETTINGS
SET
QUIT
?
③ Select “CLOCK SETTING” and
touch .
CLOCK ADJUST
CLOCK SETTING
AREA SETTING
SET FOR DAYLIGHTSAVING TIME
SET QUIT
.
●
The subsequent setting operations
?
are the same as steps 3 - 5 on the
previous page.
Touch
.
② Select “DISPLAY SETTINGS”
and touch .
VIDEO
#76159+6%*4'%/'&+#
DISPLAY SETTINGS
CLOCK ADJUST
BASIC SETTINGS
.
CONNECTION SETTINGS
SET
?
QUIT
③ Select “LANGUAGE” and touch
.
DISPLAY SETTINGS
LANGUAGE
DATE DISPLAY STYLE
MONITOR BRIGHTNESS
LCD BACKLIGHT
SET QUIT
.
?
④ Select the desired language and
touch .
⑤
Touch .
For more information, refer to the Detailed User Guide
http://manual.jvc.co.jp/index.html/
Further
Information
9
Page 10
Recording
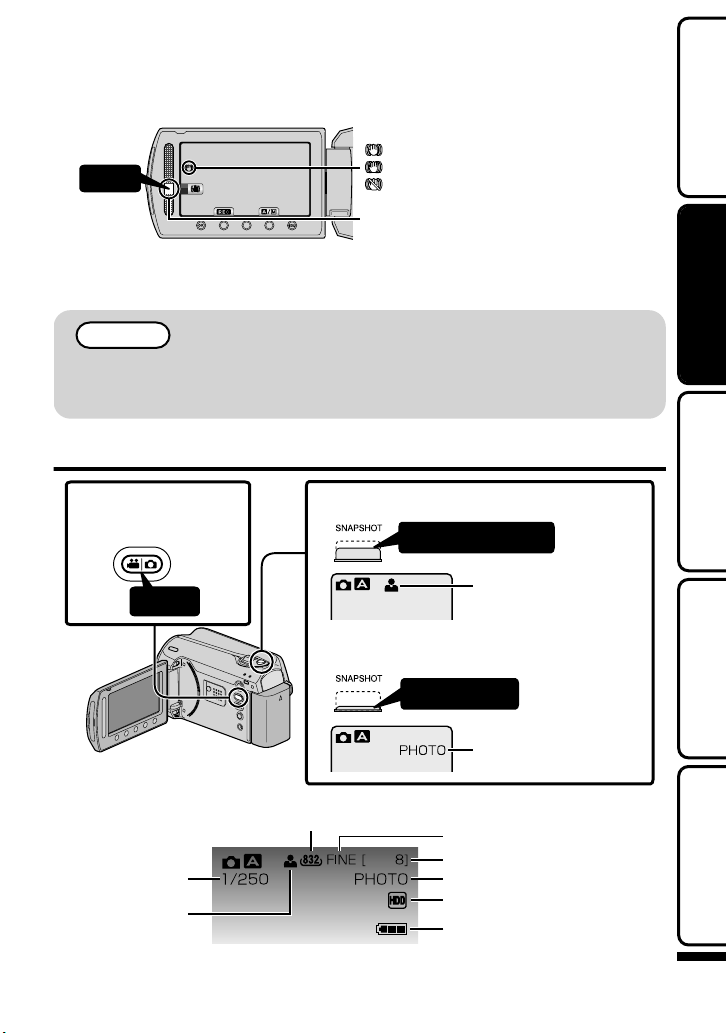
Video Recording
You can record without worrying about the setting details by using the auto mode.
Before recording an important scene, it is recommended to conduct a trial
recording.
Open the lens
1
cover.
Start recording.
4
Press again to stop.•
Press
.
Indications during video recording
■
Scene Counter
.
Select video
2
mode.
Video Quality
Press
Check if the recording mode is
3
Auto.
the mode is Manual, touch
•
the button to switch.
The mode changes between auto
•
and manual with every touch.
A
V
Zooming
(Wide angle) (Telephoto)
Remaining Recording Time
:Record-Standby
:Recording in Progress
Recording Media
Battery Indicator
Tou c h
NOTE
●
The estimated recording time of the supplied battery pack is approximately 1
h 10 m. ( P.25)
For more information, refer to the Detailed User Guide
10
http://manual.jvc.co.jp/index.html/
Page 11
Reducing Camera Shake (Video Recording)
When the image stabilizer is set, camera shake during recording can be effectively reduced.
(White):Imagestabilizer①
Touch
.
A
Reduces camera shake.
:
B
Reduces camera shake at wide angle effectively. It is also effective for recording
:
while walking.
(Green):Imagestabilizer②
(White):OFF
Thesettingswitcheswitheverytouch.
NOTE
●
It is recommended to set the image stabilizer to off when shooting a subject
of little movement with the unit on a tripod.
●
Complete stabilization may not be possible if camera shake is excessive.
Still Image Recording
Getting StartedRecordingPlaybackCopying
Select still image
1
mode.
Set the focus on the subject.
2
Press
Take a still image.
3
A
V
.
Indications during still image recording
■
Image Size
Shutter Speed
Focus
.
For more information, refer to the Detailed User Guide
Press halfway
Lights up in green
when focused
Press fully
Lights up during still
image recording
Image Quality
Remaining Number of Shots
Recording in Progress
Recording Media
Battery Indicator
http://manual.jvc.co.jp/index.html/
Further
Information
11
Page 12
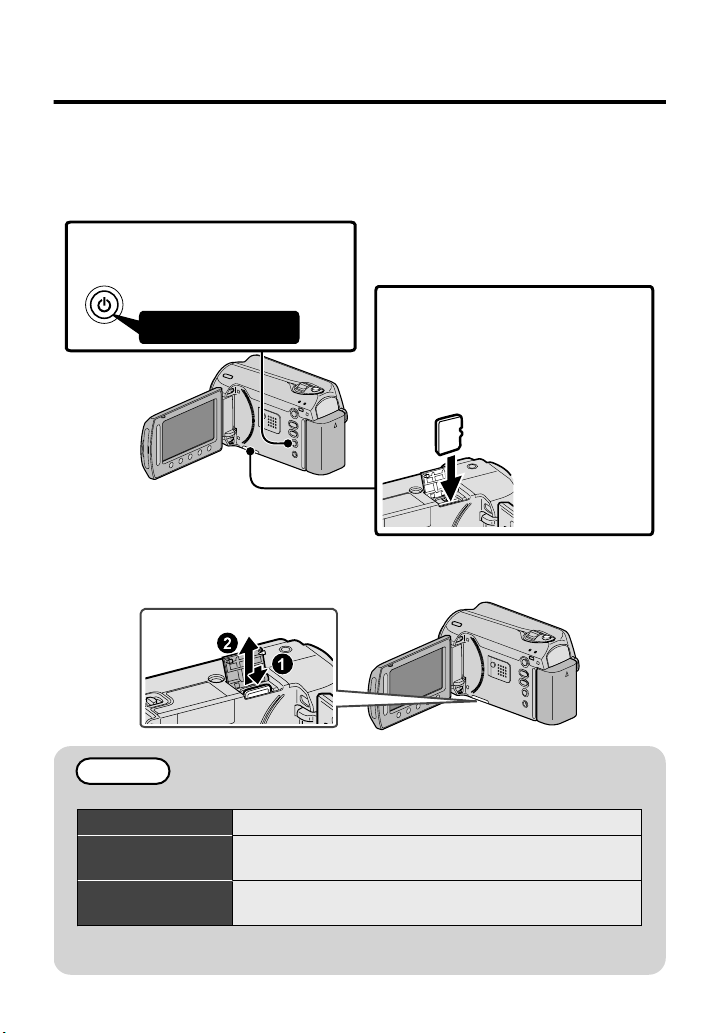
Recording on a microSD card
When a commercially available microSD card is inserted, recordings can still be made
to the card without stopping when the remaining recording time on the hard disk
(HDD) runs out.
* To record to the card, it is necessary to perform media settings. ( P.13)
When no card is available, set media settings to “HDD” for recording.
Press the Power button for more than
1
2 seconds to turn off this unit.
Open the cover.
Press and hold
A
V
Turn off the power of the unit before
*
inserting or removing a card.
.
To remove the card
■
Push the card inward once, then pull it out straight.
(Base)
2
Insert a microSD card.
3
(Base)
A
.
V
NOTE
Operations are confirmed on the following microSD cards.
Manufacturer Panasonic, TOSHIBA, SanDisk, ATP
Video Class 4 or higher compatible microSDHC card (4 GB
Still Image microSD card (256 MB to 2 GB), microSDHC card (4
●
Using cards other than those specified above may result in recording failure
or data loss.
For more information, refer to the Detailed User Guide
12
http://manual.jvc.co.jp/index.html/
to 8 GB)
GB to 8 GB)
Page 13
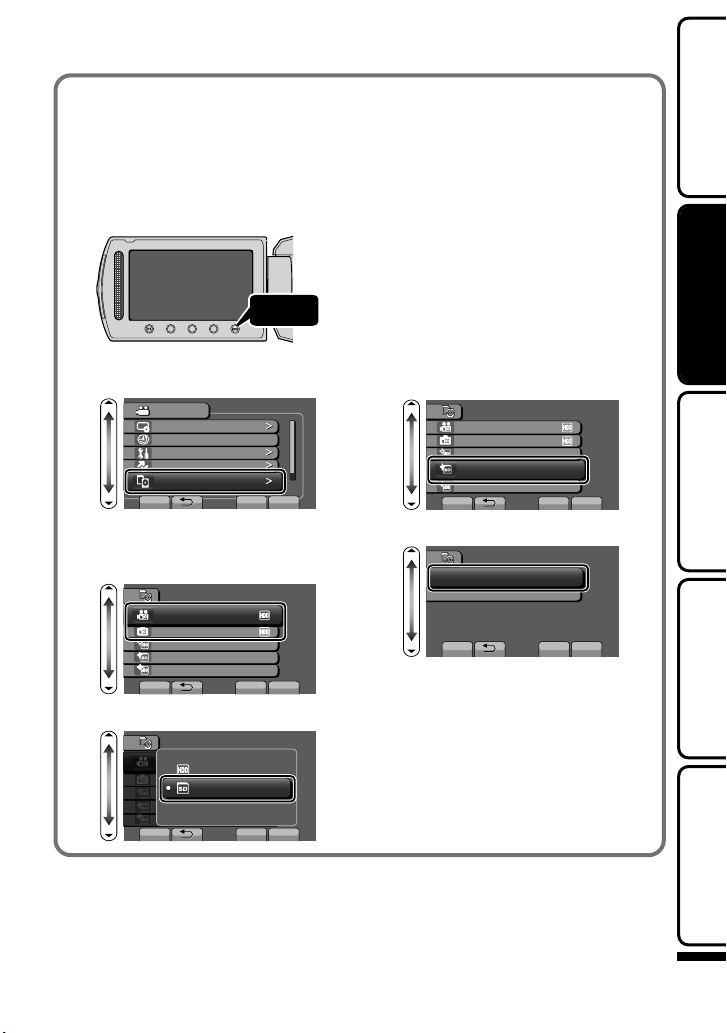
To use a microSD card
■
Recording and playback can be
performed on a card when “REC
MEDIA FOR VIDEO” or “REC MEDIA
FOR IMAGE” of media settings is set
to “SD”.
① Display the menu.
Tou c h
.
② Select “MEDIA SETTINGS” and
touch .
VIDEO
DISPLAY SETTINGS
CLOCK ADJUST
BASIC SETTINGS
CONNECTION SETTINGS
MEDIA SETTINGS
SET QUIT
.
?
③ Select “REC MEDIA FOR
VIDEO” or “REC MEDIA FOR
IMAGE”, and touch .
MEDIA SETTINGS
REC MEDIA FOR VIDEO
REC MEDIA FOR IMAGE
FORMAT HDD
FORMAT SD CARD
DELETE DATA ON HDD
SET QUIT
.
④
Select “SD” and touch .
MEDIA SETTINGS
?
*&&
SD
To use microSD cards that
■
have been used on other
devices
Format (initialize) the card using
“FORMAT SD CARD” from media
settings.
All data on the card will be deleted
when it is formatted. Copy all files
on the card to a PC before
formatting.
①
Touch to display the menu.
② Select “MEDIA SETTINGS” with
the slider and touch .
③ Select “FORMAT SD CARD”
and touch .
MEDIA SETTINGS
REC MEDIA FOR VIDEO
REC MEDIA FOR IMAGE
FORMAT HDD
FORMAT SD CARD
DELETE DATA ON HDD
SET
.
④
Select “FILE” and touch .
FORMAT SD CARD
FILE
FILE + MANAGEMENT NO
SET QUIT
.
⑤
Select “YES” and touch .
⑥
After formatting, touch .
?
QUIT
?
Getting StartedRecordingPlaybackCopying
SET QUIT
.
?
For more information, refer to the Detailed User Guide
http://manual.jvc.co.jp/index.html/
Further
Information
13
Page 14
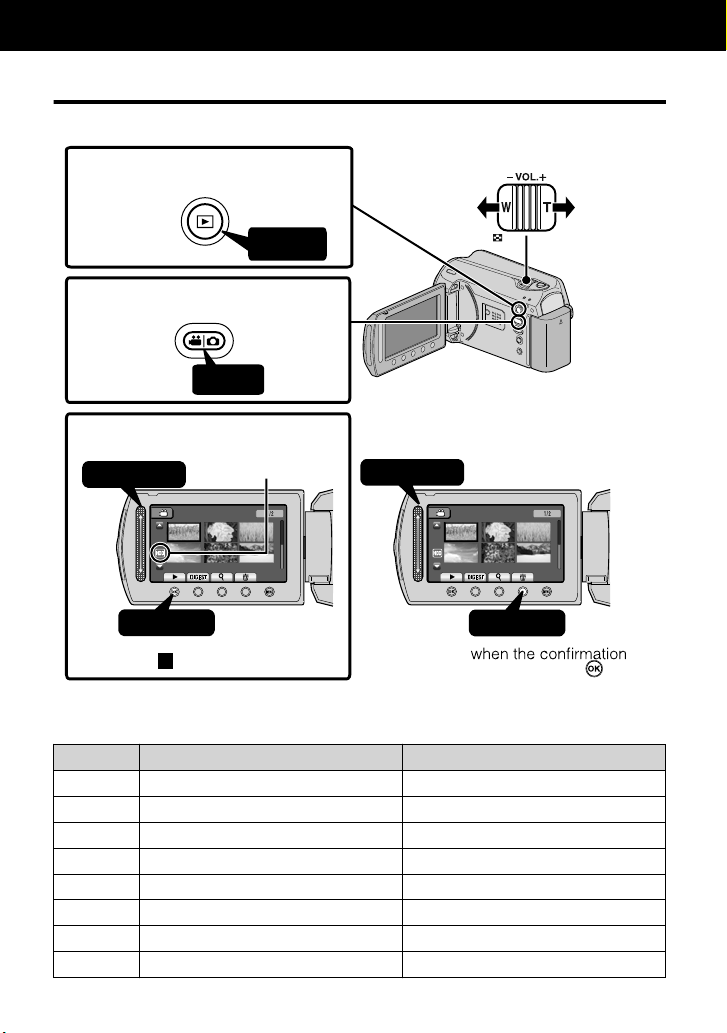
Playback
Playing Back/Deleting Files on this Unit
Select and play back the recorded videos or still images from an index screen (thumbnail display).
The contents of the media selected in media settings ( P.13) are displayed on the index screen.
Select the playback mode.
1
Press
Select video or still image mode.
2
Press
Play back a file.
3
1
Select
Media being
played back
VIDEO PLAYBACK VIDEO PLAYBACK
JAN. 1.2009 10: 00 AM JAN. 1.2009 10: 00 AM
To delete unwanted files
■
1
Select
Volume adjustment
Turn down
the volume
A
V
Turn up
the volume
2
Tou c h
•
Touch
.
To capture a still image during playback
■
Pause the playback and press the SNAPSHOT button.
Usable operation buttons during playback
■
Display During video playback During still image playback
/
!
"
$
%
For more information, refer to the Detailed User Guide
14
http://manual.jvc.co.jp/index.html/
to stop.•
Playback/pause Start/pause slideshow
Stop (returns to thumbnail display) Stop (returns to thumbnail display)
Advances to the next video Advances to the next still image
Returns to the beginning of the scene Returns to the previous still image
Forward search Reverse search Forward slow-motion Reverse slow-motion -
Select
message appears and touch .
“YES”
2
Tou c h
Page 15
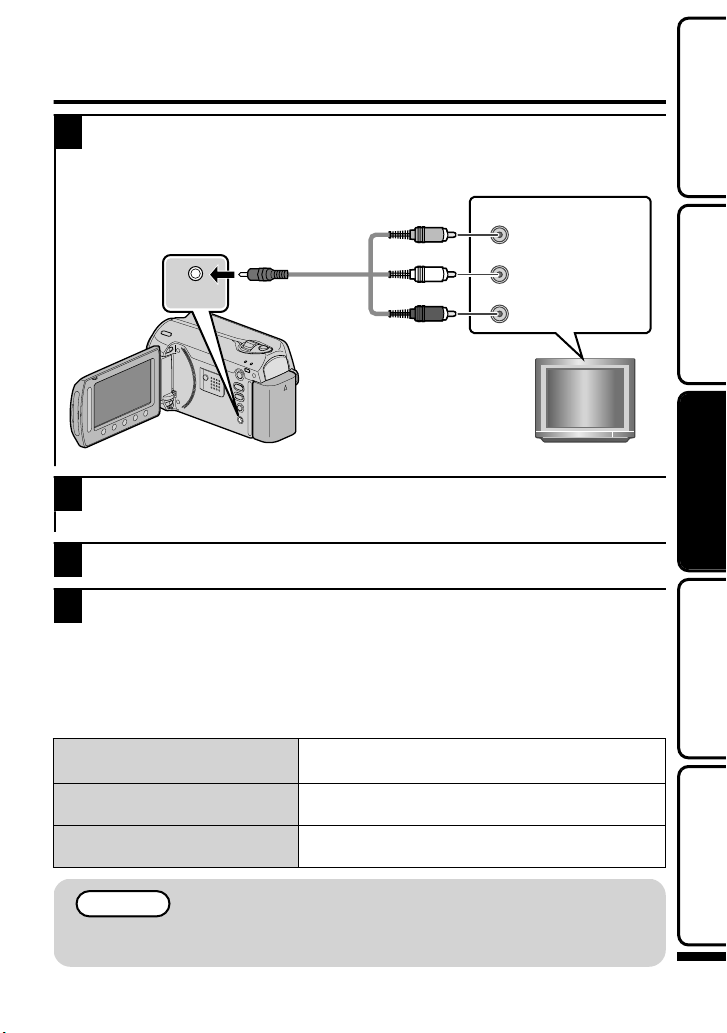
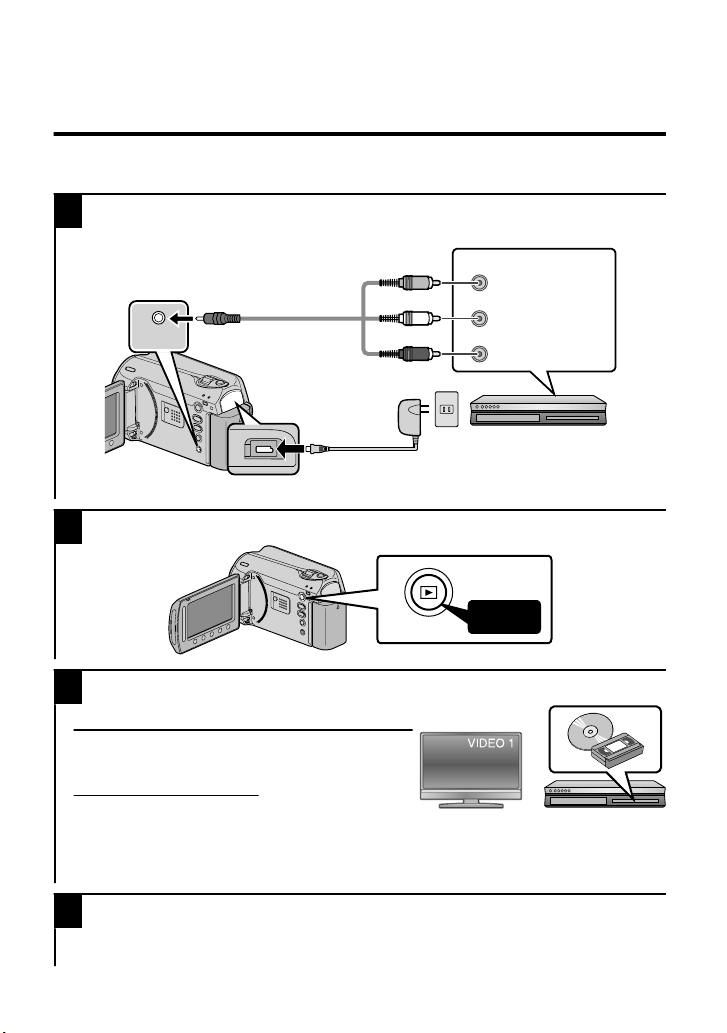
Playing Back on TV
Connect to a TV.
1
* Refer also to the instruction manual of the TV.
●
Press the Power button for more than 2 seconds to turn off this unit.
Yellow
To AV Terminal
AV
.
Connect the AC adapter. ( P.6)
2
●
This unit powers on automatically when the AC adapter is connected.
Select the TV input switch.
3
Play back a file. ( P.14)
4
To play back with date/time display
■
Set “DISPLAY ON TV” in the connection settings menu to “ON”.
Alternatively, set “ON-SCREEN DISPLAY” in the playback menu to “DISPLAY ALL”
or “DISPLAY DATE ONLY”.
When images look unnatural on the TV
■
Images do not appear on the TV
properly.
Images are projected vertically
on the TV.
Images are projected
horizontally on the TV.
A
V
AV Cable
(Provided)
●
Disconnect the cable and connect again.
●
Restart this unit by turning off and on.
Set “VIDEO OUTPUT” in the connection settings
menu to “4:3”.
Adjust the TV's screen accordingly.
White
NOTE
●
Please contact the TV manufacturer on questions or problems with setting
the TV to the correct mode.
Video Input
Video Input
Audio Input (L)
Red
Audio Input (R)
TV
Getting StartedRecordingPlaybackCopying
Further
Information
For more information, refer to the Detailed User Guide
http://manual.jvc.co.jp/index.html/
15
Page 16
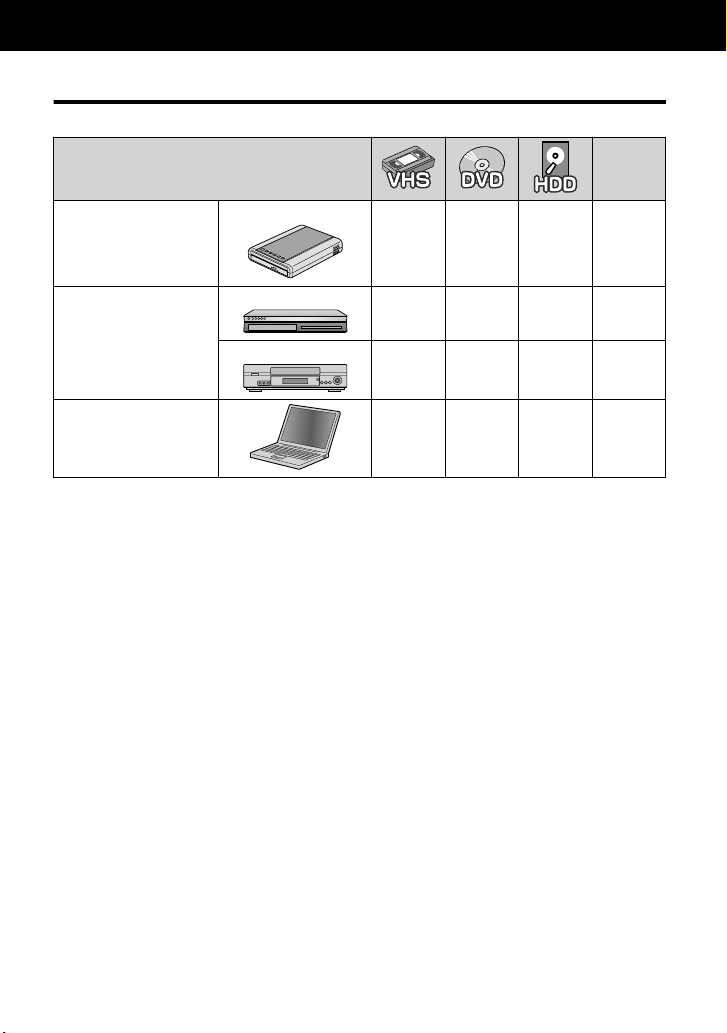
Copying
Copying Files
You can create discs or copy the files on this unit by connecting it to various devices.
Device
.
.
.
Referen
ce Page
DVD Writer
Creating Discs with a
DVD Writer
Dubbing Files by
Connecting to a DVD
Recorder or VCR
Copying to PC
.
DVD Recorder
.
VCR
.
.
-
333
3
- 3*
3
- P.17
- - P.20
3
* For details on how to create a disc using a computer, refer to the Detailed User
Guide.
P.20
P.21
For more information, refer to the Detailed User Guide
16
http://manual.jvc.co.jp/index.html/
Page 17
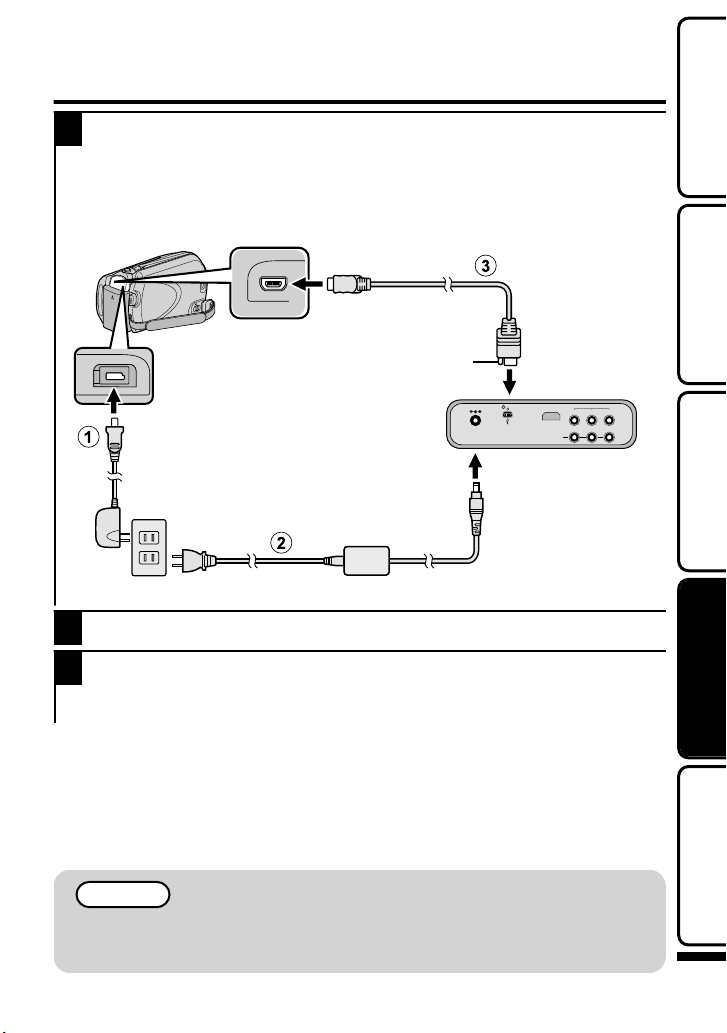
Creating Discs with a DVD Writer
Close the LCD monitor and connect.
1
① Connect the AC adapter of this unit.
② Connect the AC adapter of the DVD writer.
③ Connect the USB cable provided with the DVD writer.
To USB Terminal
Getting StartedRecordingPlaybackCopying
To DC Terminal
.
* Refer also to the instruction manual of the DVD writer.
Turn on the DVD writer and insert a new disc.
2
Open the LCD monitor.
3
●
This unit turns on and the “CREATE DVD” menu appears.
●
While the USB cable is connected, the “CREATE DVD” menu is displayed.
To play back the created disc
■
Play back on a commercially available DVD player, etc.
Compatible DVD writer
■
●
CU-VD50U
●
CU-VD3U
Protrusion
DVD Writer
(When using CU-VD50)
NOTE
●
The recordable time on the DVD varies according to the way of recording.
●
When connected to this camera, all buttons on the DVD writer (CU-VD50U),
other than the power and eject buttons, will not work.
Further
Information
For more information, refer to the Detailed User Guide
http://manual.jvc.co.jp/index.html/
17
Page 18
Copying All Files
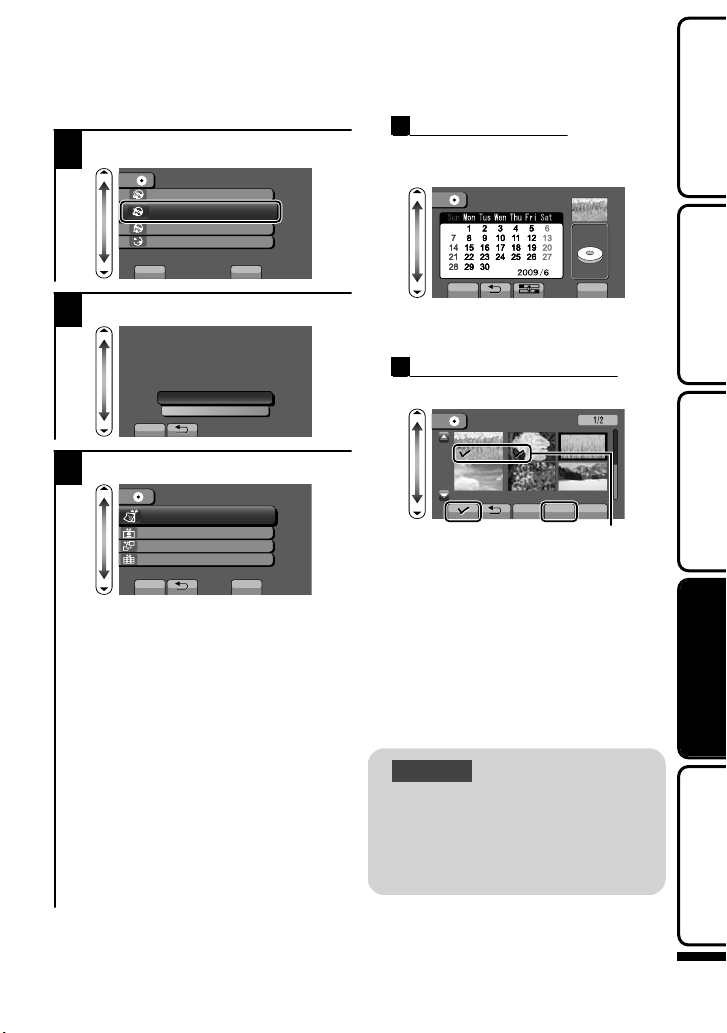
Select “CREATE FROM ALL” and
1
touch .
CREATE DVD
CREATE FROM ALL
SELECT AND CREATE
CREATE DUPLICATE
PLAYBACK
HDD
?
SD
?
SET
.
Select the media to copy to.
2
SELECT THE MEDIA TO BACK UP
SET
.
Select the desired method and
3
touch .
CREATE FROM ALL
ALL SCENES
UNSAVED SCENES
SET
.
“ALL SCENES”
All videos in the camera are copied.
“UNSAVED SCENES”
Videos that have never been copied
are automatically selected and copied.
Select “ALL” and touch .
4
DVD CREATION LIST
ALL
(TOTAL: 1)
&8&
SET
CHECK
.
Select “YES” or “NO”, and touch
5
.
.
:Displays the videos with similar
YES
Number of discs required
DO YOU WANT AN AUTOMATIC
HEADLINE ON THE TOP MENU
SET QUIT
CREATED?
YES
NO
QUIT
recording dates by groups.
:Displays the videos by
NO
recording dates.
Select “EXECUTE” and touch .
6
●
When “INSERT NEXT DISC”
appears, change the disc.
After creating, touch .
7
Close the LCD monitor, then
8
disconnect the USB cable.
For more information, refer to the Detailed User Guide
18
http://manual.jvc.co.jp/index.html/
Page 19
Selecting Files to Copy
Select “SELECT AND CREATE”
1
and touch .
CREATE DVD
CREATE FROM ALL
SELECT AND CREATE
CREATE DUPLICATE
PLAYBACK
HDD
?
SD
?
SET
.
Select the media to copy to.
2
SELECT THE MEDIA TO BACK UP
SET
.
Select the desired menu and touch :
3
SELECT AND CREATE
CREATE BY DATE
CREATE BY EVENT
CREATE BY PLAYLIST
SELECT FROM SCENES
SET
.
“CREATE BY DATE”
Videos are sorted and copied
according to the date on which they
were recorded.
¨ To A
“CREATE BY EVENT”*
Videos are sorted and copied
according to the date on which they
were recorded.
“CREATE BY PLAYLIST”*
Select and copy the created playlist.
“SELECT FROM SCENES”
Select and copy the desired videos.
¨ To B
“CREATE DUPLICATE”*
Create a disc identical to the disc
created previously.
For more information, refer to the
*
Detailed User Guide.
ACREATE BY DATE
① Select a recording date and touch
.
CREATE BY DATE
TOTAL
JO
SET QUIT
.
●
The subsequent setting operations
&8&
are the same as steps 4 - 8 on the
previous page.
BSELECT FROM SCENES
① Select a file.
SELECT FROM SCENES
CHECK SAVE
.
●
Touch (() to append a check
mark.
② After selecting the files, touch
“SAVE”.
●
The subsequent setting operations
are the same as steps 4 - 8 on the
previous page.
To check the disc created
■
Select “PLAYBACK” in step 1.
CAUTION
●
Do not turn off the power or
remove the USB cable until
creating is complete.
●
Files that are not on the index
screen during playback cannot
be copied.
QUIT
Check Mark
Getting StartedRecordingPlaybackCopying
Further
Information
For more information, refer to the Detailed User Guide
http://manual.jvc.co.jp/index.html/
19
Page 20
Dubbing Files by Connecting to a DVD
Recorder or VCR
You can dub videos in standard quality by connecting to a DVD recorder or VCR.
Refer also to the instruction manual of the TV, DVD recorder, VCR, etc.
Connect to a VCR/DVD recorder.
1
●
Press the Power button for more than 2 seconds to turn off this unit.
Video Input
Video Input
Audio Input (L)
Red
Audio Input (R)
To AV Terminal
AV
Yellow
White
AV Cable
(Provided)
AC Adapter
A
.
●
This unit powers on automatically when the AC adapter is connected.
Select the playback mode.
2
V
To DC Terminal
A
V
VCR/DVD Recorder
Press
.
Prepare to record.
3
Preparation on TV and VCR/DVD recorder
●
Switch to a compatible external input.
●
Insert compatible blank DVD or VHS to dub.
Preparation on this unit
●
Set “VIDEO OUTPUT” in the connection
settings menu to the aspect ratio (“4:3” or “16:9”) of the connecting TV.
●
To include the date during dubbing, set “DISPLAY ON TV” in the connection
settings menu to “ON”. Alternatively, set “ON-SCREEN DISPLAY” in the playback
menu to “DISPLAY DATE ONLY”.
Start recording.
4
●
Start playback on this unit ( P.14) and press the record button on the recorder.
●
After playback is complete, stop the recording.
For more information, refer to the Detailed User Guide
20
http://manual.jvc.co.jp/index.html/
Page 21

Copying to Computer
Verifying System Requirements (Guideline)
Windows PC
You can copy files to a PC using the provided software.
Right-click on “Computer” (or “My Computer”) in the “Start” menu and select
“Properties” to check the following items.
Windows Vista
■
Windows Vista
Home Basic or Home Premium
(
Pre-installed versions only)
Service Pack 2
:
Processor
Intel Core Duo CPU 1.5 GHz or higher
Intel Pentium 4 CPU 1.6 GHz or higher
Intel Pentium M CPU 1.4 GHz or higher
Memory
: At least 1 GB (1024 MB)
Windows XP
■
.
System type
Windows XP
Home Edition or Professional
(Pre-installed versions only)
Service Pack 3
Processor
Intel Core Duo CPU 1.5 GHz or higher
Intel Pentium 4 CPU 1.6 GHz or higher
Intel Pentium M CPU 1.4 GHz or higher
Memory
: 32-bit / 64-bit
:
: At least 512 MB
Getting StartedRecordingPlaybackCopying
.
NOTE
●
If your PC does not meet the above system requirements, the provided
software cannot be used. It is recommended to use a DVD writer (optional).
●
Still images cannot be recorded to discs using the provided software.
●
For more information, contact your PC's manufacturer.
●
Mac users may use the software provided with the Mac computer
For more information, refer to the Detailed User Guide
http://manual.jvc.co.jp/index.html/
Further
Information
21
Page 22

Mac Computer
Copy the video and still image files to a computer using the following method.
①
Close the LCD monitor and connect to a computer. ( P.23)
②
Open the LCD monitor and display the USB menu.
③
Select “PLAYBACK ON PC” and touch .
④
Double-click on the "EVERIO_MEM" or "EVERIO_SD" icon on the desktop.
⑤
Click on the column display icon.
⑥
Copy the files to any folder in the computer (desktop, etc).
column display icon Copy the files
●
●
.
When the folders or files are deleted/moved/renamed in the computer, they
cannot be played back on this unit anymore.
When removing this unit from the computer, drag & drop the "EVERIO_MEM"
or "EVERIO_SD" icon on the desktop to the trash bin.
Installing the Provided Software
You can display the recorded images in
calendar format and perform simple
editing using the provided software.
Load the provided CD-ROM into
1
your PC.
(Windows Vista only)
① Click “Run INSTALL.EXE” in the
auto play dialog box.
② Click “Continue” on the user
account control screen.
●
“Software Setup” appears after a
while.
●
If it doesn't appear, double-click
the CD-ROM icon in “My
Computer”.
Click “Easy Installation”.
2
Read Detailed User Guide
.
●
Follow the on-screen instructions.
NOTE
Viewing the web user guide
●
Connect to the internet and click
“Read Detailed User Guide”.
Click “Finish”.
3
Click “Quit”.
4
●
Exits installation of Everio
MediaBrowser and icons are
created on the desktop.
For more information, refer to the Detailed User Guide
22
http://manual.jvc.co.jp/index.html/
Page 23

Backing Up All Files
Before making backup, make sure that there
is enough free space in the PC's HDD.
Connect the USB cable and AC
1
adapter.
To USB Terminal
Select the volume.
4
1
Click
2
Getting StartedRecordingPlaybackCopying
Click
To DC Terminal
USB Cable
(Provided)
AC Adapter
.
Open the LCD monitor.
2
Select “BACK UP” and touch .
3
USB MENU
CREATE DVD
DIRECT DVD
UPLOAD
EXPORT TO LIBRARY
BACK UP
SET QUIT
.
●
The provided software Everio
MediaBrowser starts up on the PC.
The subsequent operations are to be
performed on the PC.
To USB Terminal
?
.
Start backup.
5
Saving destination (PC)
Click
.
After backup is complete, click
6
“OK”.
If you encounter any problems with
the provided software Everio
MediaBrowser, please consult the
"Pixela User Support Center".
To disconnect this unit from the PC
■
① Click “Safely Remove Hardware”.
.
② Click “Safely Remove USB Mass
Storage Device”.
③ (For Windows Vista) Click “OK”.
④ Disconnect the USB cable and
close the LCD monitor.
Further
Information
For more information, refer to the Detailed User Guide
http://manual.jvc.co.jp/index.html/
23
Page 24

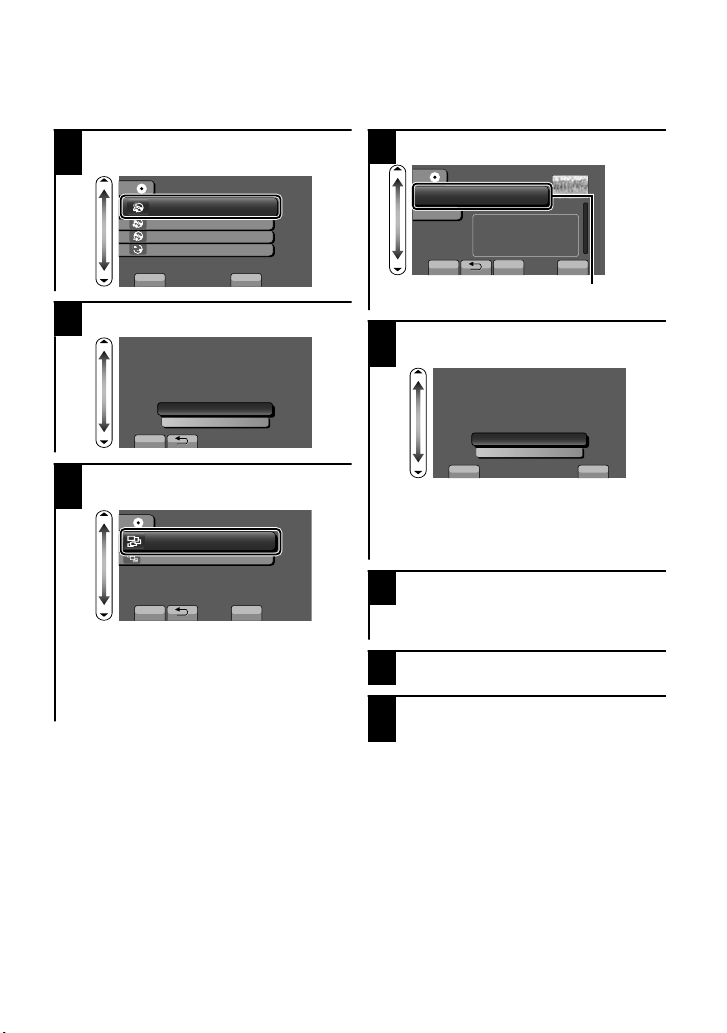
Further Information
Using the Menu
You can configure various settings using
the menu.
Display the menu.
1
Touch
.
●
The menu differs according to the
mode in use.
Select the desired menu and
2
touch .
VIDEO
REGISTER EVENT
VIDEO QUALITY
ZOOM
GAIN UP
TIME-LAPSE RECORDING
SET QUIT
?
.
Customer Support Information
Use of this software is authorized according to the terms of the software license.
JVC
(for inquires regarding this unit)
When contacting the nearest JVC office or agency in your country (refer to the JVC Worldwide Service
Network at http://www.jvc-victor.co.jp/english/worldmap/index-e.html) about this software, please have the
following information ready.
• Product Name, Model, Serial Number, Problem, Error Message
• PC (Manufacturer, Model (Desktop/Laptop), CPU, OS, Memory (MB/GB), Available Hard Disk Space (GB))
Please note that it may take sometime to respond to your questions, depending on their subject matter.
JVC cannot answer questions regarding basic operation of your PC, or questions regard
or performance of the OS, other applications or drivers.
Pixela
(for inquires regarding the provided software)
Region Language Phone #
USA and Canada English +1-800-458-4029 (toll-free)
Europe (UK, Germany, France,
and Spain)
Other Countries in Europe English/German/French/Spanish +44-1489-564-764
Asia (Philippines) English +63-2-438-0090
Homepage: http://www.pixela.co.jp/oem/jvc/mediabrowser/e/
Please check our website for latest information and downloading.
.
English/German/French/Spanish +800-1532-4865 (toll-free)
Select the desired setting and
3
touch .
VIDEO
OFF
AGC
AUTO
SET QUIT
?
.
To exit the screen
■
Touch (quit).
To return to the previous
■
screen
Touch “)”.
To display the help file
■
Touch “*”.
●
For more information on the
settings, refer to the Detailed
User Guide.
.
ing specifications
nihCanihC ese 10800-163-0014 (toll-free)
For more information, refer to the Detailed User Guide
24
http://manual.jvc.co.jp/index.html/
Page 25

Recordable Time/Number of Images
You can check the video recording time by pressing the , (Power/Information) Button.
Approximate Video Recording Time
Quality
ULTRA FINE 19 h 56 m 1 h 50 m
FINE 28 h 20 m 1 h 20 m 2 h 50 m
NORMAL 37 h 40 m 1 h 45 m 3 h 45 m
ECONOMY 100 h 4 h 55 m 10 h
●
The approximate recording time is only a guide. The actual recording time may
shorten depending on the shooting environment.
Approximate Number of Still Images (Unit: Number of Shots)
/
Still
Image
Video
●
Up to 9999 still images may be recorded on the internal memory and SD cards
with at least 4 GB capacity (regardless of image size and quality).
Approximate Recording Time (Using Battery)
Battery Pack Actual Recording Time Continuous Recording Time
BN-VG107U 40 m 1 h 10 m
BN-VG114U 1 h 25 m 2 h 30 m
BN-VG121U 2 h 5 m 3 h 50 m
●
The above are values when “LIGHT” is set to “OFF” and “LCD BACKLIGHT” is
set to “STANDARD”.
●
The actual recording time may be shorter if zooming is used or if recording is
stopped repeatedly. (It is recommended to prepare battery packs ready for three
times the expected recording time.)
●
When the battery life is reached, the recording time becomes shorter even if the
battery pack is fully charged. (Replace the battery pack with a new one.)
Image Size Quality
832×624 (4:3)
640×480 (4:3)
640×360 (16:9)
HDD
(80 GB)
512 MB
FINE 1960 3970 7600 9999
STANDARD 2940 5950 9999 9999
FINE 2940 5950 9999 9999
STANDARD 4210 8510 9999 9999
FINE 3680 7440 9999 9999
STANDARD 4910 9930 9999 9999
microSD Card
4 GB 8 GB
microSD Card
1 GB 2 GB 4 GB
Getting StartedRecordingPlaybackCopying
Further
Information
For more information, refer to the Detailed User Guide
http://manual.jvc.co.jp/index.html/
25
Page 26

Troubleshooting
Before requesting service, consult the following chart or the "Troubleshooting" section
in the Detailed User Guide.
If the solutions indicated in the chart do not solve the problem, consult your nearest
JVC dealer or JVC service center for instructions. Refer also to the FAQ of new
products on JVC’s website. Refer also to the Q&A information of new products on
JVC’s website (http://www.jvc.com).
This unit is a microcomputer-controlled device. Electrostatic discharge, external noise
and interference (from a TV, a radio, etc.) might prevent it from functioning properly. In
such a case, reset this unit.
Reset this unit when it does not function properly or when “...
■
Error” appears on the screen.
①
Turn off the power. (Close the LCD monitor.)
②
Remove the AC adapter and battery pack from this unit, reattach them,
and turn on the power again.
Trouble
Trouble Action Page
Power
POWER/CHARGE lamp
starts blinking when the
monitor is closed.
●
The battery pack is being charged. P.6
●
Recording cannot be
performed.
Recording
Recording stops by itself.
No date/time display.
Playback
Sound or video is
interrupted.
For more information, refer to the Detailed User Guide
26
http://manual.jvc.co.jp/index.html/
Check the / button.
●
Set to the recording mode with the + button.
●
Turn off this unit, wait for a while, and turn it on
again. (This unit stops automatically to protect
the circuit when the temperature rises.)
●
Move this unit away from loud or shaky places. -
●
Insert a commercially available microSD card,
and set “REC MEDIA FOR VIDEO” and “REC
MEDIA FOR IMAGE” in the media settings
menu to “SD”. (There may be a malfunction
with the HDD.)
●
Recording stops automatically after 12 hours of
continuous recording.
●
Set “ON-SCREEN DISPLAY” in the playback
menu accordingly.
●
Sometimes playback is interrupted at the
connecting section between two scenes. This
is not a malfunction.
P.10
P.14
-
P.13
-
-
-
Page 27

●
Check the remaining battery power. (When the
battery pack is fully charged, the lamp does not
The lamp does not flash
during battery pack
charging.
Other problems
The slider and operation
buttons do not work.
This unit heats up.
flash.)
●
When charging in either a hot or cold
environment, ensure that battery is being
charged within the permitted temperature
range. (Otherwise, charging may stop to
protect the battery pack.)
●
Remove any gloves. -
●
Touch the slider and buttons with your fingers
to operate. (They do not function if you touch
them with your fingernails or pen tips.)
●
This is not a malfunction. (This unit may
become warm when used for a long time.)
Warning Indications
Warning Indications Action Page
●
Turn off and on this unit again.
●
Set “REC MEDIA FOR VIDEO” in the media
settings menu to “SD”. (Records on the microSD
RECORDING FAILURE
card.)
●
Make use of a file recorded with this unit. (Files
recorded with other devices may not be playable. If
the file was recorded with this unit, then it is
corrupted.)
P.10
P.6
Getting StartedRecordingPlaybackCopying
-
-
-
P.13
-
UNSUPPORTED SCENE!
(Video)
UNSUPPORTED FILE!
(Still image)
DATA RECORDED IS
TOO LITTLE UNABLE TO
SAVE
CAMERA TEMPERATURE
IS TOO COLD KEEP
CAMERA POWER ON
PLEASE WAIT
●
Make use of a file recorded with this unit. (Files
recorded with other devices may not be playable. If
the file was recorded with this unit, then it is
corrupted.)
●
If a video recording is stopped with the actual
recording time displayed at “0:00:00:17” and below,
the video cannot be saved.
●
Leave this unit turned on for a while.
If the warning still does not disappear, turn off the
power and move the unit to a warm place while
taking care to avoid a sudden temperature change.
Turn on the power again after a while.
For more information, refer to the Detailed User Guide
http://manual.jvc.co.jp/index.html/
-
-
-
Further
Information
27
Page 28

Cautions
.
AC Adapter
When using the AC adapter in areas other
than the USA
The provided AC adapter features automatic voltage
selection in the AC range from 110 V to 240 V.
USING HOUSEHOLD AC PLUG ADAPTER
In case of connecting the unit’s power cord to
an AC wall outlet other than American National
Standard C73 series type use an AC plug
adapter, called a “Siemens Plug”, as shown.
For this AC plug adapter, consult your nearest
JVC dealer.
Battery Pack
The supplied battery pack is a
lithium-ion battery. Before using
the supplied battery pack or an
optional battery pack, be sure
to read the following cautions:
To avoid hazards
•
...
do not burn.
...
do not short-circuit the terminals. Keep it away
from metallic objects when not in use. When
transporting, carry the battery in a plastic bag.
...
do not modify or disassemble.
...
do not expose the battery to temperatures
exceeding 60°C (140°F), as this may cause the
battery to overheat, explode or catch fire.
... use only specified chargers.
To prevent damage and prolong service life
•
... do not subject to unnecessary shock.
... charge within the temperature range of 10°C
to 35°C (50°F to 95°F). Cooler temperatures
require longer charging time, or in some cases
stop charging at all.
Warmer temperatures prevent complete
charging, or in some cases stop charging at all.
... store in a cool, dry place. Extended exposure
to high temperatures will increase natural
discharge and shorten service life.
... fully charge and then fully discharge the battery
every 6 months when storing the battery pack
over a long period of time.
... remove from charger or powered un
in use, as some machines use current even
when switched off.
.
For more information, refer to the Detailed User Guide
28
http://manual.jvc.co.jp/index.html/
Plug Adapter
Terminals
it when not
.
ATTENTION:
The product you have purchased
is powered by a rechargeable
battery that is recyclable.
Please call 1-800-8-BATTERY for
information on how to recycle this
battery.
(USA and Canada only)
Recording Medium
Be sure to follow the guidelines below
•
to prevent corruption or damage to your
recorded data.
Do not bend or drop the recording medium,
•
or subject it to strong pressure, jolts or
vibrations.
Do not splash the recording medium with water.
•
Do not use, replace, or store the recording
•
medium in locations that are exposed to
strong static electricity or electrical noise.
Do not turn off the camcorder power or
•
remove the battery or AC adapter during
shooting, playback, or when otherwise
accessing the recording medium.
Do not bring the recording medium near
•
objects that have a strong magnetic field or
that emit strong electromagnetic waves.
Do not store the recording medium in locations
•
with high temperature or high humidity.
Do not touch the metal parts.
•
When formatting or erasing data using
•
the camcorder, only the file administration
information is changed. The data is not
completely erased from the hard disk. If you
want to completely erase all of the data,
we recommend either using commercially
available software that is specially designed for
that purpose, or by physically destroying the
camcorder with a hammer etc.
Hard Disk
Do not use the unit where it is subject to
•
vibrations or loud sounds.
If you move the unit suddenly, the drop
•
detection function may operate and the power
may be turned off.
LCD Monitor
To prevent damage to the LCD monitor,
•
DO NOT
... push it strongly or apply any shocks.
... place the camcorder with LCD monitor on the
bottom.
To prolong service life
•
... avoid rubbing it with coarse cloth.
Page 29

Main Unit
For safety, DO NOT
•
... open the camcorder’s chassis.
... disassemble or modify the unit.
... allow inflammables, water or metallic objects
to enter the unit.
... remove the battery pack or disconnect the
power supply while the power is on.
... leave the battery pack attached when the
camcorder is not in use.
... place naked fl ame sources, such as lighted
candles, on the apparatus.
... expose the apparatus to dripping or splashing.
... leave dust or metal objects adhered to the
power plug or an AC wall outlet.
... insert any objects in the camcorder.
Avoid using the unit
•
... in places subject to excessive humidity or dust.
... in places subject to soot or steam such as near
a cooking stove.
...
in places subject to excessive shock or vibration.
... near a television set.
... near appliances generating strong magnetic
or electric fields (speakers, broadcasting
antennas, etc.).
... in places subject to extremely high (over 40°C
or 104°F) or extremely low (under 0°C or 32°F)
temperatures.
... in places where air pressure is low (more than
3000 m (9870 ft) above the sea level).
DO NOT leave the unit
•
... in places of over 50°C (122°F).
... in places where humidity is extremely low
(below 35%) or extremely high (above 80%).
... in direct sunlight.
... in a closed car in summer.
... near a heater.
... in high places such as on a TV. Leaving the
unit in high places while a cable is connected
may result in a malfunction if the cable is
caught and the unit falls onto the floor.
To protect the unit, DO NOT
•
... allow it to become wet.
... drop the unit or strike it against hard objects.
... subject it to shock or excessive vibration
during transportation.
... keep the lens directed at extremely bright
objects for long periods.
... expose the lens to direct sunlight.
... swing it excessively when using the hand strap.
... swing the soft camcorder case excessively
when the camcorder is inside it.
... place the camcorder in dusty or sandy areas,
such as on a beach.
.
To prevent the unit from dropping,
•
Fasten the grip belt securely.
•
When using the camcorder with a tripod,
•
attach the camcorder to the tripod securely.
If the camcorder drops, you may be injured
and the camcorder may be damaged.
When a child uses the unit, there must be
parental guidance.
Declaration of Conformity
Model Number : GZ-MG750AU/BU/RU
Trade Name : JVC
Responsible party : JVC AMERICAS CORP.
Address : 1700 Valley Road Wayne, N. J. 07470
Telephone Number : 973-317-5000
This device complies with Part 15 of FCC
Rules. Operation is subject to the following
two conditions: (1) This device may not cause
harmful interference, and (2) this device must
accept any interference received, including
interference that may cause undesired operation.
Changes or modifications not approved by
JVC could void the user’s authority to operate
the equipment. This equipment has been
tested and found to comply with the limits for
a Class B digital device, pursuant to Part 15 of
the FCC Rules. These limits are designed to
provide reasonable protection against harmful
interference in a residential installation. This
equipment generates, uses, and can radiate
radio frequency energy and, if not installed
and used in accordance with the instructions,
may cause harmful i
communications. However, there is no guarantee
that interference will not occur in a particular
installation. If this equipment does cause harmful
interference to radio or television reception,
which can be determined by turning the
equipment off and on, the user is encouraged
to try to correct the interference by one or more
of the following measures: Reorient or relocate
the receiving antenna. Increase the separation
between the equipment and receiver.
Connect the equipment into an outlet on a
circuitdifferent from that to which the receiver is
connected.
Consult the dealer or an experienced radio/
TV technician for help.
This Class B digital apparatus complies with
Canadian ICES-003.
Cet appareil numérique de la classe B est
conforme à la norme NMB-003 du Canada.
nterference to radio
Getting StartedRecordingPlaybackCopying
For more information, refer to the Detailed User Guide
http://manual.jvc.co.jp/index.html/
Further
Information
29
Page 30

Specifications
Camera
Power supply Using AC adapter: DC 5.2 V, Using battery pack: DC 3.6 V
Power consumption 1.8 W (when light is set to “OFF” and LCD backlight is set to
Dimensions (mm) 53 × 63 × 110 (2-1/8" × 2-1/2" × 4-3/8") (W × H × D: excluding grip
Mass Approx. 250 g (0.55 lbs) (camera only), Approx. 280 g (0.61 lbs)
Operating environment Allowable operating temperature: 0°C to 40°C (32°F to 104°F)
Image pickup device 1/6" 800,000 pixels
Recording area (Video) 410,000 pixels (optical zoom), 410,000 pixels to 550,000 pixels
Recording area (Still
image)
Lens F1.8 to F4.3, f= 2.2 mm to 85.8 mm
Zoom (Video) Optical zoom: Up to 39x
Zoom (Still image) Optical zoom: Up to 39x
Video recording format SD-VIDEO standard, Video: MPEG-2, Audio: Dolby Digital (2 ch)
Still image recording
format
Recording media Internal HDD (80 GB),
Clock battery Rechargeable battery
AC Adapter (AP-V30U)*
Power supply AC 110 V to 240 V, 50 Hz/60 Hz
Output DC 5.2 V, 1.8 A
Allowable operating
temperature
Dimensions (mm) 78 × 34 × 46 (3-1/8" × 1-3/8" × 1-13/16") (W × H × D: excluding cord
Mass Approx. 107 g (0.24 lbs)
* When using the AC adapter overseas, please prepare a commercially available
converter plug for the country or region of visit.
●
The specifications and appearance of this product are subject to changes for
further improvement without prior notice.
“STANDARD”), Rated Current Consumption: 1.8 A
belt)
(including supplied battery pack)
Allowable storage temperature: -20°C to 50°C (-4°F to 122°F)
Allowable operating humidity: 35 % to 80 %
(dynamic zoom)
550,000 pixels
(35 mm conversion: 41.5 mm to 1619 mm)
Dynamic zoom: Up to 45x
Digital zoom: Up to 800x
JPEG standard
microSD/microSDHC card (commercially available)
0°C to 40°C (32°F to 104°F) (10°C to 35°C (50°F to 95°F) during
charging)
and AC plug)
For more information, refer to the Detailed User Guide
30
http://manual.jvc.co.jp/index.html/
Page 31

MEMO
Getting StartedRecordingPlaybackCopying
.
For more information, refer to the Detailed User Guide
http://manual.jvc.co.jp/index.html/
31
Information
Further
Page 32

Terms
A
AC adapter ................................ 6, 30
Apple ............................................. 22
AV Connection ......................... 15, 20
B
Battery Pack .............................. 6, 30
C
CD-ROM ........................................ 22
Clock Adjust ..................................... 9
Copy (Back Up) ................. 16, 17, 18
D
Date/Time Setting ............................ 8
Deleting Files ................................. 14
Dubbing (Duplicate) ....................... 23
L
Language Setting ............................ 9
LCD Monitor .................................. 28
M
Mac ................................................ 22
Menu Settings ................................ 24
N
Number of Images ......................... 25
R
Recordable Time ........................... 25
Recording Media for Image ........... 12
S
SD Card ................................... 12, 25
Software ........................................ 21
U
USB Cable ..................................... 23
V
Viewing Files on TV ....................... 15
W
Windows ........................................ 21
Z
Zoom ............................................. 10
.
© 2009 Victor Company of Japan, Limited
UC
1109MNH-SW-VM
Page 33

CAMÉSCOPE
GZ-MG750
Guide de l’utilisateur
Chers clients,
Merci d’avoir acheté ce produit JVC.
Avant toute utilisation, veuillez lire les précautions de sécurité et les mises en garde sur P.2 et
P.28 pour pouvoir utiliser le produit en toute sécurité.
Ce produit s’accompagne d’un “Guide de l’utilisateur” (ce manuel) et d’un “Manuel d’utilisation”.
Manuel d’utilisation
Explique les prises de vue possibles dans différentes
situations ainsi que les fonctions utiles.
DémarrerEnregistrementLectureCopie
Accéder au site Web suivant sur votre ordinateur
.
■
http://manual.jvc.co.jp/index.html/
Informations
supplémentaires
Page 34

Précautions de sécurité
.
Si le matériel est installé dans un coffret ou sur une
étagère, s’assurer qu’il y a un espace suffisant sur
tous les côtés pour permettre la ventilation (10 cm
ou plus sur les deux côtés, au dessus et à l’arrière).
Ne pas boucher les orifices de ventilation.
(Si les orifices de ventilation sont bouchés par un
journal, un tissu, etc., la chaleur peut ne pas
s’éliminer.)
Aucune source à flamme nue, telle que des
bougies allumées, ne doit être placée sur l’appareil.
En jetant des batteries aux ordures, les problèmes
d’environnement doivent être pris en considération
et les réglementations locales ou la législation
concernant le rebut de ces batteries doivent être
str
ictement respectées.
L’appareil ne doit pas être exposé à l’égouttage ni
aux éclaboussements.
Ne pas utiliser cet appareil dans une salle de bain,
AVERTISSEMENT : POUR ÉVITER
LES RISQUES D’INCENDIE OU
D’ÉLECTROCUTION, NE PAS EXPOSER
L’APPAREIL À LA PLUIE NI À L’HUMIDITÉ.
REMARQUES :
La plaque d’identification et l’avertissement de
•
sécurité se trouvent sous l’appareil et/ou au dos.
La plaque de numéro de série se trouve sur le
•
logement de la batterie.
Les informations d’identification et
•
l’avertissement de sécurité de l’adaptateur
secteur sont situés sur ses côtés supérieur et
inférieur.
Avertissement sur la pile au lithium
remplaçable
La pile utilisée dans cet appareil peut présenter
des risques d’incendie ou de brûlure chimique si
elle est mal traitée.
Ne pas recharger, démonter, chauffer à plus de
100°C ni mettre au feu.
Danger d’explosion ou risque d’incendiesi la pile
n’est pas changée correctement.
Jeter immédiatement les piles usées.
•
Placer hors de la portée des enfants.
•
Ne pas démonter ni jeter au feu.
•
Pour Californie des États-Unis seulement
Cet appareil contient une pile-bouton CR au lithium
qui contient du perchlorate
– une manipulation spéciale peut être requise.
Voir www.dtsc.ca.gov/hazardouswaste/perchlorate
ni dans des endroits avec de l’eau.
Aussi, ne pas placer de récipient rempli d’eau ou
de liquides (tels des produits cosmétiques, des
médicaments, des vases de fleurs, des plantes en
pot, des tasses, etc.) sur le dessus de cet appareil.
(Si de l’eau ou un liquide entre dans ce matériel,
un incendie ou un choc électrique risque de se
produire.)
Ne dirigez pas l’objectif directement vers le soleil.
Vous pourriez vous abîmer la vue et l’appareil
pourrait être endommagé. Il y a aussi risque
d’incendie ou d’électrocution.
PRÉCAUTION !
Les remarques suivantes sont destinées à protéger
l’utilisateur et le caméscope contre des dommages
éventuels.
Ne pas transporter ou saisir le caméscope
par l’écran LCD, car il pourraittomber ou
s’endommager.
Ne pas utiliser de trépied photographique sur
des surfaces irrégulières et inclinées. Il pourrait
tomber et le caméscope pourrait être sérieusement
endommagé.
PRÉCAUTION !
Avec des câbles (Audio/Vidéo, etc.) raccordés, il
est recommandé de ne pas laisser le caméscope
sur le dessus du téléviseur, car tirer sur les câbles
pourraitfaire tomber le caméscope, causant des
dommages.
PRÉCAUTION :
La prise secteur doit être opérationnelle.
Débranchez immédiatement la fi che secteur si le
•
caméscope ne fonctionne pas normalement.
AVERTISSEMENT :
Éviter d’exposer la batterie, le caméscope avec
la batterie insérée ou la télécommande avec la
batterie insérée à une chaleur excessive, telle que
celle des rayons directs du soleil, d’un feu ou autre
.
Pour plus d'informations, veuillez vous rapporter au Manuel d'utilisation
2
http://manual.jvc.co.jp/index.html/
source de chaleur.
.
Page 35

C
ONSIGNES DE SÉCURITÉ
IMPORTANTES
1. Lire ces instructions.
2. Conserver ces instructions.
3. Ten ir compte de tous les avertissements.
4. Respecter toutes les instructions.
5. Ne pas utiliser cet appareil à proximité de l’eau.
6. Ne nettoyer qu’avec un chiffon sec.
7. Ne pas boucher les ouvertures de ventilation.
Installer selon les instructions du fabricant.
8. Ne pas installer à proximité de sources
de chaleur telles que des radiateurs, des
accumulateurs de chaleur, des poêles,
ou d’autres appareils (comprenant les
amplificateurs) qui produisent de la chaleur.
9. Protéger le cordon d’alimentation pour éviter
qu’ilne soit piétiné ou ne se coince, tout
particulièrement au
niveau de la fiche, de
la prise de courant et
du point où il sort de
l’appareil.
10.N’utiliser que des
accessoires spécifiés
par le fabricant.
11.N’utiliser qu’avec le
chariot, le stand, le trépied, le support ou la
table spécifié par le fabricant, ou vendu avec
l’appareil. Lorsqu’un chariot est utilisé, faire
attention pour déplacer la combinaison chariot/
apparei
l pour éviter des blessures causées par
un basculement.
12.Débrancher cet appareil pendant un orage ou
quand il n’est pas utilisé pendant une longue
durée.
13.Confier toutes les réparations à du personnel
de service qualifié. Un dépannage est
nécessaire lorsque l’appareil a été endommagé
d’une façon ou d’une autre, telle que lorsque
le cordon d’alimentation ou la fiche est
endommagé, si du liquide a été renversé
ou si des objets sont tombés à l’intérieur de
l’appareil, si l’appareil a été exposé à la pluie ou
à l’humidité, ne fonctionne pas normalement ou
afait une chute.
Noter que ce caméscope est destiné à un
usage privé uniquement.
Toute utilisation commerciale sans autorisation est
interdite. (Même si vous enregistrez un spectacle
ou une exposition pour votre plaisir personnel,
il est vivement recommandé de demander au
préalable l’autorisation de filmer.)
Marques commerciales
Fabr iqué sous licence de Dolby Laboratories.
•
Dolby et le symbole double D sont des marques
de commerce de Dolby Laboratories.
Windows® est une marque déposée ou une
•
marque de commerce de Microsoft Corporation
aux États-Unis et/ou dans d’autres pays.
Macintosh est une marque déposée d’Apple Inc.
•
iTunes, iMovie, iPhoto sont des marques
•
déposées d’Apple Inc. aux États-Unis et dans
d’autres pays.
YouTube et le logo YouTube sont des marques
•
déposées de YouTube LLC.
Les autres noms de produit et d’entreprise cités
•
dans ce mode d’emploi sont des marques de
commerce et/ou des marques déposées de leurs
détenteurs respectifs.
CAUTION:
Évitez de tirer sur ou de plier la fiche et le cordon
•
de l'adaptateur secteur. Cela pourrait endommager
l'adaptateur secteur.
Effectuez une sauvegarde des données
enregistrées importantes
Il est recommandé de les copier sur un DVD ou un
autre support d'enregistrement pour stockage.
JVC décline toute responsabilité pour toute perte
de données.
Si ce symbole est montré, il
n’est reconnu que dans l’Union
.
européenne.
Pour plus d'informations, veuillez vous rapporter au Manuel d'utilisation
http://manual.jvc.co.jp/index.html/
3
Page 36

Index
Précautions de sécurité ..................... 2
Index ................................................. 4
Vérification des accessoires .............. 4
Noms des pièces et des fonctions
........................................................... 5
▶Démarrer ................................. 6
Charger la batterie ............................ 6
Ajuster la poignée ............................. 7
Réglage de l’horloge ......................... 8
▶Enregistrement ...................... 10
Enregistrer des vidéos .................... 10
Enregistrer des photos .................... 11
Enregistrer sur une carte microSD
......................................................... 12
▶Lecture ................................... 14
Lire/Supprimer des fichiers sur cette
unité ................................................ 14
▶En savoir plus sur les opérations avancées
Utilisez le “Manuel d’utilisation” depuis votre ordinateur pour en savoir plus
concernant les opérations avancées.
Accéder à l’adresse suivante depuis votre ordinateur
■
http://manual.jvc.co.jp/index.html/
Lecture sur poste TV ....................... 15
▶Copie ..................................... 16
Copie des fichiers ............................ 16
Créer des disques avec un graveur de
DVD ................................................. 17
Copier des fichiers en connectant
l’appareil à un magnétoscope/
enregistreur DVD ............................ 20
Copie vers l’ordinateur .................... 21
▶Informations supplémentaires
................................................ 24
Via le menu ..................................... 24
Durée d’enregistrement/Nombre de
photos ............................................. 25
Dépannage ...................................... 26
Mises en garde ................................ 28
Caractéristiques techniques ............ 30
Vérification des accessoires
Adaptateur secteur
AP-V30U*
.
CD-ROM
.
●
Les cartes microSD sont vendues séparément.
Batterie
BN-VG107U
.
Guide de l’utilisateur
(ce manuel)
.
Câble USB
(Type A - Mini Type B)
.
Câble AV
.
Pour plus de détails concernant les types de cartes utilisables avec cette unité,
veuillez vous reportez à P.12.
Pour utiliser un adaptateur secteur à l’étranger, pensez à préparer une prise
*
convertisseur disponible dans le commerce pour le pays ou la région visité(e).
Pour plus d'informations, veuillez vous rapporter au Manuel d'utilisation
4
http://manual.jvc.co.jp/index.html/
Page 37

Noms des pièces et des fonctions
678
1
90a
2
3
4
5
.
Objectif/Volet de protection de l’objectif
A
Lumière
B
Microphone stéréo
C
Écran LCD
D
Allume ou éteint l’appareil en s’ouvrant
et se fermant.
Curseur
E
Permet de sélectionner une image ou
un objet.
Touche OK
F
Permet de confirmer la sélection d’une
image ou d’un objet.
Touches de fonctionnement
G
Fonctionne différemment selon l’opération.
Touche Menu (menu) ( P.24)
H
Haut-parleur
I
Voyant ACCESS (Accès)
J
S’allume ou clignote lors d’un
enregistrement ou d’une lecture.
Voyant POWER/CHARGE
K
(Alimentation/Recharge) ( P.6)
Touche + (Lecture)
L
Bascule entre les modes
d’enregistrement et de lecture.
Touche / (Vidéo/Photo)
M
Bascule entre les modes vidéo et photo.
Touche UPLOAD/EXPORT
N
(Télécharger/Exporter vers iTunes)
Enregist
rement
Lecture
Filme des vidéos au format
:
YouTube ou iTunes.
Fait passer la vidéo au
:
format YouTube ou iTunes*.
A
g
h
i
j
k
b
c
V
d
e
f
Touche , (Alimentation/Information)
O
Enregist
rement
Lecture:Affiche les informations de
Appuyez et maintenez enfoncée la touche
marche/arrêt avec l’écran LCD ouvert.
Terminal AV ( P.15, P.20)
P
Commande de Zoom/Volume ( P.10, P.14)
Q
Touche SNAPSHOT (Enregistrer des
R
photos) ( P.11)
Terminal USB ( P.23)
S
Terminal CC ( P.6)
T
Touche START/STOP (Enregistrer des
U
vidéos) ( P.10)
Bouton curseur du volet de protection
V
de l’objectif ( P.10)
Commande de libération de la dragonne
W
Dragonne ( P.7)
X
Orifice pour trépied
Y
Emplacement pour carte microSD ( P.12)
Z
Commande de libération de la batterie ( P.6)
a
Affiche le temps restant
:
ainsi que la charge restante
de la batterie durant
l’enregistrement continu.
fichier.
l
m
n
o
p
q
Pour plus d'informations, veuillez vous rapporter au Manuel d'utilisation
http://manual.jvc.co.jp/index.html/
5
Page 38

Démarrer
Charger la batterie
Fixez la batterie.
1
La batterie n’est pas
*
chargée lors de l’achat.
Alignez le haut de la batterie avec le repère
sur cette unité et faites coulisser jusqu'à ce
que la batterie soit en place et que vous
entendiez un petit déclic.
Pour retirer la batterie
(Basique)
.
ATTENTION
Assurez-vous d’utiliser des batteries de JVC.
●
Si vous utilisez des batteries d’autres fabricants JVC, les performances et la
sécurité ne seront pas garanties.
●
Durée de recharge: Environ 1 h 50 m (avec la batterie fournie)
Si la batterie n’est pas chargée à une température ambiante comprise entre
*
10°C et 35°C, le chargement peut prendre plus de temps voire ne pas démarrer.
Voyant de chargement
Branchez le courant.
3
Voyant de chargement
Branchez le terminal
2
CC.
Adaptateur secteur
Sur une prise secteur
(110 V à 240 V)
Chargement en cours:
Clignote
Chargement terminé:
S’éteint
Volet de
protection
Pour plus d'informations, veuillez vous rapporter au Manuel d'utilisation
6
http://manual.jvc.co.jp/index.html/
Page 39

Ajuster la poignée
Tirez la dragonne Ajustez la longueur Attachez la dragonne
.
Utiliser comme dragonne
Enlevez la dragonne et passez-la autour de votre poignet.
En appuyant sur A, tirez sur B et enlevez la dragonne.
Appuyez sur et maintenez
la touche enfoncée
.
●
Lorsque vous attachez la dragonne, insérez C jusqu’à ce qu’il soit enclenché.
DémarrerEnregistrementLectureCopie
Pour plus d'informations, veuillez vous rapporter au Manuel d'utilisation
http://manual.jvc.co.jp/index.html/
Informations
supplémentaires
7
Page 40

Réglage de l’horloge
Ouvrez l’écran LCD.
1
A
V
.
●
L’unité s’allume. Lorsque l’écran
LCD est fermé, l’unité s’éteint.
Sélectionnez “OUI” et appuyez
sur lorsque “REGLER DATE/
2
HEURE !” est affiché.
Sélectionnez
.
Appuyez
●
Déplacez le curseur pour sélectionner puis
Curseur
REGLER DATE/HEURE !
OUI
NON
REGLER
Touches de fonctionnement
appuyez sur les touches de fonctionnement
pour procéder au réglage.
Réglez la date et l’heure.
3
Curseur
REGLAGE DE L'HORLOGE
DATE HEURE
JAN
10 00 AM20091
Sélectionnez votre région puis
5
appuyez sur .
●
Le nom de la ville et le décalage
horaire s’affichent alors.
REGLAGE HORLOGE/ZONE
GMT
ENREG.
.
JAN 1. 2009 10:00 AM
REMARQUE
●
Appuyez sur le curseur et sur les
touches autour de l’écran avec
vos doigts.
●
Le curseur et les touches ne
fonctionnent pas si vous les
touchez avec vos ongles ou
avec des gants.
●
Les affichages à l’écran ne
fonctionnent pas, même si vous
appuyez dessus.
●
“REGLER DATE/HEURE !” est affiché
lrosque vous mettez en marche cette
unité après qu’elle n’ait pas été utilisée
pendant une période prolongée.
Rechargez cette unité pendant plus de
24 heures avant de régler l’horloge.
( P.6)
FIN
REGLER FIN
.
●
Utilisez le curseur pour ajuster l’année, le
mois, la journée, l’heure et les minutes.
●
Appuyez sur les touches de
fonctionnement “&” / “'” pour
déplacer le curseur.
Une fois l’heure et la date réglées,
4
appuyez sur .
Pour plus d'informations, veuillez vous rapporter au Manuel d'utilisation
8
http://manual.jvc.co.jp/index.html/
Page 41

Pour réinitialiser l’horloge
■
Réglez l’horloge avec “REGLER
L'HEURE” dans le menu.
① Affichez le menu.
Pour modifier la langue
■
d’affichage
Vous pouvez modifier la langue de
l’affichage sur l’écran.
① Affichez le menu.
DémarrerEnregistrementLectureCopie
Appuyez
.
② Sélectionnez “REGLER
L'HEURE” et appuyez sur .
VIDEO
REGLAGES AFFICHAGE
REGLER L'HEURE
REGLAGES DE BASE
REGLAGES CONNEXIONS
.
REGLAGES DES MEDIA
REGLER
FIN
?
③ Sélectionnez “REGLAGE DE
L'HORLOGE” et appuyez sur .
REGLER L'HEURE
REGLAGE DE L'HORLOGE
REGLAGE ZONE
ETABLI POUR L'HEURE D'ETE
REGLER
.
●
Les opérations de réglage
FIN
?
suivantes sont les mêmes que
celles mentionnées dans les étapes
3 à 5 de la page précédente.
Appuyez
.
② Sélectionnez “REGLAGES
AFFICHAGE” et appuyez sur .
VIDEO
COMMUT. AUTO ENR.
REGLAGES AFFICHAGE
REGLER L'HEURE
REGLAGES DE BASE
.
REGLAGES CONNEXIONS
REGLER
?
FIN
③ Sélectionnez “LANGUAGE” et
appuyez sur .
REGLAGES AFFICHAGE
LANGUAGE
STYLE D'AFF. DE DATE
LUMINOSITE MONITEUR
RETROECL. MONITEUR
REGLER
.
?
FIN
④ Sélectionnez la langue
souhaitée puis appuyez sur .
⑤
Appuyez sur .
Pour plus d'informations, veuillez vous rapporter au Manuel d'utilisation
http://manual.jvc.co.jp/index.html/
Informations
supplémentaires
9
Page 42

Enregistrement
Enregistrer des vidéos
Vous pouvez enregistrer des vidéos sans avoir à vous préoccuper des détails de
réglage. Pour ce faire, utilisez le mode auto.
Avant d’enregistrer une scène importante, il est recommandé d’effectuer un
enregistrement test.
Ouvrez le volet
1
de protection
de l'objectif.
Sélectionnez
2
le mode vidéo.
Appuyez
Vérifiez si le mode d'enregistrement
3
est Auto.
Si le mode est Manuel, appuyez
sur la touche pour basculer.
Le mode bascule entre les mode
auto et manuel à chaque sélection.
A
V
Effectuer un zoom
Lancez l'enregistrement.
4
Appuyez à nouveau
pour arrêter
l'enregistrement.
Appuyez
.
Indications apparaissant à l’écran pendant l’enregistrement de vidéos
■
Qualité vidéo
Compteur de
scènes
.
(Grand angle) (Téléobjectif)
Durée d'enregistrement restante
:Pause
Enregistrement en cours
:
Supports d'enregistrement
Indicateur de la batterie
Appuyez
REMARQUE
●
La durée d’enregistrement restante de la batterie fournie est d’environ 1 h 10 m. ( P.25)
Pour plus d'informations, veuillez vous rapporter au Manuel d'utilisation
10
http://manual.jvc.co.jp/index.html/
Page 43

Réduire les secousses de la caméra (Enregistrer des vidéos)
Le réglage du stabilisateur d’image permet de réduire les secousses de la caméra lors
de l’enregistrement.
(Blanc)
:
Stabilisateur d'image
(Vert)
:
Appuyez
Le réglage est modifié à chaque
.
A
:Réduit les secousses de la caméra.
B
:Réduit les secousses de la caméra efficacement sur un grand-angle. Ceci permet
aussi d’enregistrer tout en marchant.
sélection.
Stabilisateur d'image
(Blanc)
: ARRET
REMARQUE
●
Il est recommandé d’enlever le stabilisateur d’image lorsque vous filmez un
sujet qui se déplace peu en ayant l’unité sur un trépied.
●
Une stabilisation complète est impossible si la caméra bouge trop.
Enregistrer des photos
DémarrerEnregistrementLectureCopie
Sélectionnez le
1
mode photos.
Appuyez
î
.
Indications apparaissant à l’écran lors de l’enregistrement d’une photo
■
Taille d'image
Vitesse
d’obturation
Mise au point
.
Pour plus d'informations, veuillez vous rapporter au Manuel d'utilisation
Effectuez la mise au point de l'objet.
2
Appuyez sur la touche à mi-course
Le voyant devient vert
lorsque la mise au point
est terminée
Prenez une photo.
3
Appuyez entièrement
Le voyant s'allume lors
de l'enregistrement
d'une photo
Qualité de l'image
832
Nombre de prises de vue restantes
Enregistrement en cours
Supports d'enregistrement
Indicateur de la batterie
http://manual.jvc.co.jp/index.html/
Informations
supplémentaires
11
Page 44

Enregistrer sur une carte microSD
Lorsqu’une carte microSD provenant du commerce est insérée, les enregistrements
peuvent continuer à être effectués sur la carte sans avoir à arrêter lorsque le temps
d’enregistrement restant sur le disque dur a expiré.
* Pour enregistrer sur la carte, il est nécessaire d’effectuer des réglages pour les
paramètres du média. ( P.13)
Lorsqu’il n’y a pas de carte disponible, réglez les paramètres du média sur “HDD”
pour enregistrer.
Appuyez sur la touche marche/arrêt pendant
1
plus de 2 secondes pour éteindre cette unité.
Appuyez sur et maintenez
la touche enfoncée
Éteignez l'unité avant d'insérer ou
*
de retirer une carte.
.
Pour retirer la carte
■
Poussez la carte vers l’intérieur puis tirez-la vers vous.
(Basique)
.
Ouvrez le volet de protection.
2
Insérez une carte microSD.
3
REMARQUE
Le fonctionnement est confirmé sur les cartes microSD suivantes.
Fabricant Panasonic, TOSHIBA, SanDisk, ATP
Vidéo
Photo
●
Toute utilisation de cartes autres que celles indiquées ci-dessus risque de
causer des problèmes lors de l’enregistrement ou la perte de données.
Carte microSDHC compatible Classe 4 ou supérieur (4 Go à 8 Go)
Carte microSD (256 Mo à 2 Go) ou carte microSDHC (4 Go à 8 Go)
(Basique)
A
V
Pour plus d'informations, veuillez vous rapporter au Manuel d'utilisation
12
http://manual.jvc.co.jp/index.html/
Page 45
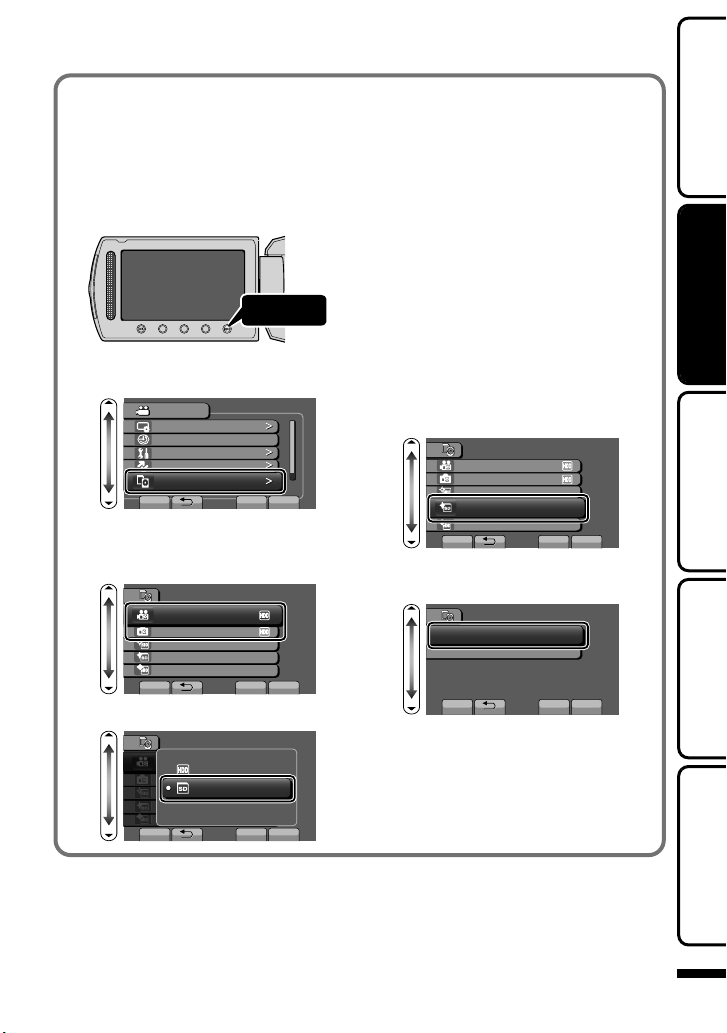
Pour utiliser une carte microSD
■
L’enregistrement et la lecture peuvent
être effectués sur une carte si “SUPPORT
ENREG. VIDEO” ou “SUPPORT ENREG.
PHOTO” des paramètres de support sont
réglés sur “SD”.
① Affichez le menu.
Appuyez
.
② Sélectionnez “REGLAGES DES
MEDIA” et appuyez sur .
VIDEO
REGLAGES AFFICHAGE
REGLER L'HEURE
REGLAGES DE BASE
REGLAGES CONNEXIONS
REGLAGES DES MEDIA
REGLER
.
③
Sélectionnez “SUPPORT ENREG.
?
FIN
VIDEO” ou “SUPPORT ENREG.
PHOTO”, et appuyez sur .
REGLAGES DES MEDIA
SUPPORT ENREG. VIDEO
SUPPORT ENREG. PHOTO
FORMATER DISQUE DUR
FORMATER LA CARTE SD
EFFACER LES DONNEES
REGLER
.
④
Sélectionnez “SD” et appuyez sur .
REGLAGES DES MEDIA
HDD
SD
?
FIN
Pour utiliser des cartes
■
microSD qui ont servi pour
d’autres appareils
Formatez (initialisez) la carte via
“FORMATER LA CARTE SD” à partir
des paramètres de support.
Toutes les données de la carte
seront supprimées lors du
formatage. Avant de formater la
carte, copiez sur un ordinateur
tous les fichiers contenus dessus.
①
Appuyez sur pour afficher le menu.
② Sélectionnez “REGLAGES DES
MEDIA” avec le curseur et
appuyez sur .
③ Sélectionnez “FORMATER LA
CARTE SD” et appuyez sur .
REGLAGES DES MEDIA
SUPPORT ENREG. VIDEO
SUPPORT ENREG. PHOTO
FORMATER DISQUE DUR
FORMATER LA CARTE SD
.
EFFACER LES DONNEES
REGLER
?
FIN
④ Sélectionnez “FICHIER” et
appuyez sur .
FORMATER LA CARTE SD
FICHIER
FICHIER + GESTION NO
REGLER
.
⑤
Sélectionnez “OUI” et appuyez sur .
FIN
?
⑥ Une fois le formatage terminé,
appuyez sur .
DémarrerEnregistrementLectureCopie
REGLER
.
Pour plus d'informations, veuillez vous rapporter au Manuel d'utilisation
?
FIN
http://manual.jvc.co.jp/index.html/
Informations
supplémentaires
13
Page 46

Lecture
Lire/Supprimer des fichiers sur cette unité
Sélectionner et lire les vidéos ou photos enregistrées à partir d’un écran d’index
(affichage miniature). Le contenu des supports sélectionnés dans les paramètres de
support ( P.13) s’affiche sur l’écran d’index.
Réglage du volume pendant la
Sélectionner le mode de lecture.
1
Appuyez
Sélectionner le mode vidéo ou
2
photo.
Appuyez
lecture de la vidéo
Baisser le
volume
AV
Augmenter
le volume
Lire un fichier.
3
Sélectionnez
Support lu
LECTURE VIDEO
JAN. 1. 2009 10:00 AM
Appuyez
Appuyez sur pour arrêter.
.
Pour capturer une photo durant la lecture
■
Arrêtez la lecture et appuyez sur la touche SNAPSHOT.
Touches de fonctionnement utilisables lors de la lecture
■
Affichage Pendant la lecture vidéo Pendant la lecture de photos
/
!
"
14
Lecture/pause Lancement/Pause du diaporama
Arrêt (retourne à l’affichage miniature) Arrêt (retourne à l’affichage miniature)
Passe à la vidéo suivante Passe à la photo suivante
Retourne au début de la scène Retourne à la photo précédente
Recherche avant Recherche arrière Ralenti avant -
$
Ralenti arrière -
%
Pour plus d'informations, veuillez vous rapporter au Manuel d'utilisation
http://manual.jvc.co.jp/index.html/
Pour supprimer des fichiers inutiles
Sélectionnez
LECTURE VIDEO
JAN. 1. 2009 10:00 AM
Appuyez
Sélectionnez "OUI" lorsque le
message de confirmation
apparaît et appuyez sur .
Page 47

Lecture sur poste TV
Branchez l’appareil à la TV.
1
* Pour plus de détails, consultez le manuel d’utilisation de votre TV.
●
Appuyez sur la touche marche/arrêt pendant plus de 2 secondes pour éteindre cette unité.
Jaune
Vers terminal AV
A
V
Câble AV
(fourni)
●
Déconnectez le câble et reconnectez-le.
●
Redémarrez cette unité en l’éteignant et en la rallumant.
Réglez “SORTIE VIDEO” dans le menu de réglage
des branchements sur “4:3”.
Ajustez correctement l’écran de la TV.
AV
.
Connecter l’adaptateur secteur. ( P.6)
2
●
Cette unité s’allume automatiquement lorsque l’adaptateur CA est branché.
Sélectionner l’entrée d’alimentation de la TV.
3
Lire un fichier. ( P.14)
4
Lire avec l’heure/la date affichée(s)
■
Réglez “AFFICHER SUR TV” dans le menu de réglage des branchements sur “MARCHE”.
Vous pouvez également régler “AFFICHAGE SUR ECRAN” dans le menu lecture sur
“AFFICHER TOUT” ou “AFFICHER SEUL. DATE”.
Lorsque les photos ne rendent pas un aspect naturel sur la TV
■
Les photos ne s’affichent pas
correctement sur la TV.
Les images sont projetées
verticalement sur la TV.
Les images sont projetées
horizontalement sur la TV.
Blanc
Rouge
Entrée vidéo
Entrée vidéo
Entrée audio (G)
Entrée audio (D)
TV
DémarrerEnregistrementLectureCopie
REMARQUE
●
Pour toute question ou tout problème concernant les réglages de la TV dans
le mode approprié, veuillez vous adresser au fabricant de la TV.
Pour plus d'informations, veuillez vous rapporter au Manuel d'utilisation
http://manual.jvc.co.jp/index.html/
Informations
supplémentaires
15
Page 48

Copie
Copie des fichiers
Vous pouvez créer des disques ou copier des fichiers sur cette unité en la connectant
à divers appareils.
Appareil
.
.
.
Page de
référence
Graveur DVD
Créer des disques avec
un graveur de DVD
Copier des fichiers en
connectant l’appareil
à un magnétoscope/
enregistreur DVD
Copier vers un ordinateur
.
Enregistreur DVD
.
Magnétoscope
.
-
333
3
- 3*
3
- P.17
P.20
- - P.20
3
P.21
.
* Pour plus de détails concernant la création d’un disque via un ordinateur, veuillez
vous référer au Manuel d’utilisation.
Pour plus d'informations, veuillez vous rapporter au Manuel d'utilisation
16
http://manual.jvc.co.jp/index.html/
Page 49

Créer des disques avec un graveur de DVD
Fermez l’écran LCD et branchez.
1
① Connectez l’adaptateur CA de cette unité.
② Connectez l’adaptateur CA du graveur de DVD.
③ Connectez le câble USB fourni avec le graveur de DVD.
Vers un terminal USB
DémarrerEnregistrementLectureCopie
Vers un terminal CC
.
* Consultez également le manuel d’utilisation du graveur de DVD.
Mettez le graveur de DVD en marche et insérez un nouveau disque.
2
Ouvrez l’écran LCD.
3
●
L’unité s’allume et le menu “CREER DVD” apparaît.
●
Lorsque le câble USB est connecté, le menu “CREER DVD” est affiché.
Pour lire le disque créé
■
Lire sur un lecteur de DVD disponible dans le commerce, etc.
Lecteur de DVD compatible
■
●
CU-VD50U
●
CU-VD3U
Saillie
Graveur DVD
(en utilisant CU-VD50)
REMARQUE
●
Le temps d’enregistrement sur le DVD varie en fonction de la façon dont
l’enregistrement a été effectué.
●
Lorsqu’il est connecté à cette caméra, toutes les touches sur le lecteur de
DVD (CU-VD50U), autres que les touches de mise en marche et d’éjection
ne fonctionneront pas.
Informations
supplémentaires
Pour plus d'informations, veuillez vous rapporter au Manuel d'utilisation
http://manual.jvc.co.jp/index.html/
17
Page 50

Copier tous les fichiers
Sélectionnez “CREER AVEC
1
TOUT” et appuyez sur .
CREER DVD
CREER AVEC TOUT
CHOISIR ET CREER
CREER COPIE
LECTURE
A SAUVEGARDER
HDD
SD
?
?
REGLER
.
Sélectionnez le média sur lequel
2
effectuer la copie.
SELECTIONNEZ LE MEDIA
REGLER
.
Sélectionnez le menu souhaité
3
puis appuyez sur .
CREER AVEC TOUT
TOUTE LES SCENES
SCENES NON ENREG.
REGLER
.
“TOUTE LES SCENES”
Toutes les vidéos sur la caméra sont
copiées.
“SCENES NON ENREG.”
Les vidéos qui n’ont jamais été copiées
sont automatiquement sélectionnées et
copiées.
Sélectionnez “TOUS” et appuyez sur .
4
LISTE DE CREAT. DVD
TOTAL:
TOUS
DVD1
REGLER
.
Sélectionnez “OUI” ou “NON”, et
5
appuyez sur .
.
OUI
VERIF.
Nombre de disques requis
APPLIQUER UN TITRE
AUTOMATIQUE SUR LE MENU
PRINCIPAL DU DISQUE ?
REGLER
:Affiche les vidéos avec des
NON
FIN
OUI
FIN
dates d’enregistrement
similaires par groupes.
NON
:Affiche les vidéos par dates
d’enregistrement.
Sélectionnez “EXECUTER” et
6
appuyez sur .
●
Lorsque “INTRODUIRE NOUVEAU
DISQUE” apparait, changez le disque.
Une fois la création terminée,
7
appuyez sur .
Fermez l’écran LCD, puis
8
débranchez le câble USB.
Pour plus d'informations, veuillez vous rapporter au Manuel d'utilisation
18
http://manual.jvc.co.jp/index.html/
Page 51

Sélectionner les fichiers à copier
Sélectionnez “CHOISIR ET
1
CREER” et appuyez sur .
CREER DVD
CREER AVEC TOUT
CHOISIR ET CREER
CREER COPIE
LECTURE
A SAUVEGARDER
HDD
SD
?
?
REGLER
.
Sélectionnez le média sur lequel
2
effectuer la copie.
SELECTIONNEZ LE MEDIA
REGLER
.
Sélectionnez le menu souhaité puis
3
appuyez sur:
CHOISIR ET CREER
CREER PAR DATE
CREER PAR EVENEMENT
CREER PAR L.L.
SELECTION VIA SCENES
REGLER
.
“CREER PAR DATE”
Les vidéos sont triées et copiées en
fonction de la date à laquelle elles ont
été enregistrées.
¨ Vers A
“CREER PAR EVENEMENT”*
Les vidéos sont triées et copiées en
fonction de la date à laquelle elles ont
été enregistrées.
“CREER PAR L.L.”*
Sélectionner et copier sur la liste de
lecture souhaitée.
“SELECTION VIA SCENES”
Sélectionner et copier sur les vidéos
souhaitées.
¨ Vers B
“CREER COPIE”*
Créez un disque identique à celui créé
précédemment.
Pour plus d’informations, veuillez vous
*
rapporter au Manuel d’utilisation.
ACRÉER PAR DATE
①
Sélectionnez une date
d’enregistrement et appuyez sur .
.
●
Les opérations de réglage suivantes
sont les mêmes que celles
mentionnées dans les étapes 4 à 8
de la page précédente.
BSÉLECTIONNER À PARTIR
DE SCÈNES
① Sélectionnez un fichier.
.
●
Appuyez sur (() pour ajouter un repère.
② Après avoir sélectionné les
fichiers, appuyez sur “ENREG.”.
●
Les opérations de réglage suivantes
sont les mêmes que celles
mentionnées dans les étapes 4 à 8
de la page précédente.
Vérification d’un disque créé
■
Sélectionnez “LECTURE” à l’étape 1.
ATTENTION
●
Ne coupez pas le courant ni
retirez le câble USB jusqu’à ce
que la création soit terminée.
●
Les fichiers qui ne sont pas sur
l’écran d’index pendant la lecture
ne peuvent être copiés.
CREER PAR DATE
REGLER
SELECTION VIA SCENES
00h10m
VERIF. ENREG. FIN
Coche apparaît
DémarrerEnregistrementLectureCopie
TOTAL
DVD1
FIN
Informations
supplémentaires
Pour plus d'informations, veuillez vous rapporter au Manuel d'utilisation
http://manual.jvc.co.jp/index.html/
19
Page 52

Copier des fichiers en connectant l’appareil à un
magnétoscope/enregistreur DVD
Vous pouvez copier des vidéos en qualité standard en connectant l’appareil à magnétoscope ou à un enregistreur DVD.
Pour plus de détails, consultez le manuel d’utilisation de la TV, du magnétoscope, de l’enregistreur DVD, etc.
Connectez l’appareil à un magnétoscope/enregistreur DVD.
1
●
Appuyez sur la touche marche/arrêt pendant plus de 2 secondes pour éteindre cette unité.
Entrée vidéo
Entrée vidéo
Entrée audio (G)
Entrée audio (D)
Vers terminal AV
AV
Câble AV (fourni)
Adaptateur secteur
Jaune
Blanc
Rouge
A
.
●
Cette unité s’allume automatiquement lorsque l’adaptateur CA est branché.
Sélectionner le mode de lecture.
2
Préparez l’enregistrement.
3
V
.
Vers un terminal CC
AV
Magnétoscope/Enregistreur DVD
Appuyez
Préparation de la TV et du magnétoscope/
enregistreur DVD
●
Basculez vers une entrée externe compatible.
●
Insérez un DVD ou une cassette VHS vierge compatible à copier.
Préparation de cette unité
●
Réglez “SORTIE VIDEO” dans le menu des réglages des branchement sur le
rapport hauteur/largeur (“4:3” ou “16:9”) de la TV concernée.
●
Pour inclure la date lors de la copie des fichiers, réglez “AFFICHER SUR TV”
dans le menu des réglages des branchements sur “MARCHE”. Vous pouvez
également régler “AFFICHAGE SUR ECRAN” dans le menu de lecture sur
“AFFICHER SEUL. DATE”.
Lancez l’enregistrement.
4
●
Lancez la lecture sur l’unité ( P.14) puis appuyez sur la touche d’enregistrement du lecteur.
●
Une fois la lecture terminée, arrêtez l’enregistrement.
Pour plus d'informations, veuillez vous rapporter au Manuel d'utilisation
20
http://manual.jvc.co.jp/index.html/
Page 53

Copie vers l’ordinateur
Vérification de la configuration requise (directives)
Ordinateur Windows
Vous pouvez copier les fichiers vers un ordinateur via le logiciel fourni.
Cliquez avec le bouton droit de la souris sur “Ordinateur” (ou “Poste de travail”) dans
le “démarrer” menu et sélectionnez “Propriétés” pour vérifier les éléments suivants.
Windows Vista
■
Windows Vista
Home Basic ou Home Premium
(versions préinstallées uniquement)
Service Pack 2
Processeur :
UC Intel Core Duo 1,5 GHz ou plus
UC Intel Pentium 4 1,6 GHz ou plus
UC Intel Pentium M 1,4 GHz ou plus
Windows XP
■
Mémoire :
.
Type de système :
Windows XP
Home Edition ou Professional
(versions préinstallées uniquement)
Service Pack 3
Processeur :
UC Intel Core Duo 1,5 GHz ou plus
UC Intel Pentium 4 1,6 GHz ou plus
UC Intel Pentium M 1,4 GHz ou plus
Mémoire :
Au moins 1 Go (1024 Mo)
32-bit / 64-bit
Au moins 512 Mo
DémarrerEnregistrementLectureCopie
.
REMARQUE
●
Si votre PC n’a pas la configuration requise mentionnée ci-dessus, le logiciel fourni ne
peut pas être utilisé. L’utilisation d’un graveur DVD est recommandée (optionnel).
●
Vous ne pourrez pas enregistrer de photos sur disque à partir du logiciel fourni.
●
Pour plus d’informations, veuillez contacter le fabricant de votre ordinateur.
●
Les utilisateurs de Mac peuvent utiliser le logiciel fourni avec l’ordinateur Mac
Pour plus d'informations, veuillez vous rapporter au Manuel d'utilisation
http://manual.jvc.co.jp/index.html/
Informations
supplémentaires
21
Page 54

Ordinateur Mac
Copiez les vidéos et les photos vers un ordinateur en suivant la méthode suivante.
①
Fermez le moniteur LCD et branchez la caméra à un ordinateur. ( P.23)
②
Ouvrez l’écran LCD et afficher le menu USB.
③
Sélectionnez “LECTURE SUR PC” et appuyez sur .
④
Double-cliquez sur l’icône "EVERIO_MEM" ou "EVERIO_SD" du bureau.
⑤
Cliquez sur l’icône d’affichage de la colonne.
⑥
Copiez les fichiers dans n’importe quel autre dossier de l’ordinateur
(bureau, etc.).
Icône d’affichage colonne
Copier des fichiers
●
●
.
Les dossiers ou fichiers supprimés/déplacés/renommés sur l’ordinateur ne
pourront plus être lus sur ce unité.
Lorsque vous débranchez ce caméscope de l’ordinateur, déplacez l’icône
"EVERIO_MEM" ou "EVERIO_SD" du bureau vers la poubelle.
Installation du logiciel fourni
Vous pouvez afficher les photos enregistrées
au format calendrier et les modifier avec le
logiciel qui vous a été fourni.
Chargez le CD-ROM fourni dans
1
votre PC.
(Windows Vista uniquement)
① Cliquez sur “Exécuter
INSTALL.EXE” dans la boîte de
dialogue de lecture automatique.
Cliquez sur “Continuar” sur l’écran
②
de contrôle du compte d’utilisateur.
●
“Installation dulogiciel” apparaît alors à
l’écran après quelques instants.
●
S’il n’apparaît pas, double-cliquez
sur l’icône du CD-ROM dans
“Poste de travail”.
Cliquez sur “Installation standard”.
2
.
●
Suivez les instructions qui s’affichent à l’écran.
REMARQUE
Viewing the web user guide
●
Se connecter à Internet et cliquer
sur “Lire le manuel d'utilisation”.
Cliquez sur “Terminer”.
3
Cliquez sur “FIN”.
4
●
Quitte l’installation de Everio
MediaBrowser et les icônes
sont créées sur le bureau.
Pour plus d'informations, veuillez vous rapporter au Manuel d'utilisation
22
http://manual.jvc.co.jp/index.html/
Page 55

Sauvegarde de tous les fichiers
Avant de procéder à la sauvegarde, assurezvous de disposer de suffisamment d’espace
libre sur le disque dur de votre ordinateur.
Connectez le câble USB et
1
l’adaptateur secteur.
Vers un terminal USB
Sélectionnez le volume.
4
Cllquez
1
Cllquez
2
DémarrerEnregistrementLectureCopie
Vers un terminal CC
Câble USB
(fourni)
Adaptateur secteur
.
Ouvrez l’écran LCD.
2
Sélectionnez “SAUVEGARDER”
3
et appuyez sur .
/'0775$
%4''4&8&
&+4'%6'574&8&
64#05('4'4
5+05%4574.+$4#4;
5#78')#4&'4
4').'4 (+0
.
●
Le logiciel fourni Everio MediaBrowser se
lance sur votre ordinateur.
Les opérations suivantes doivent être
effectuées sur l’ordinateur.
Vers un terminal USB
?
Pour plus d'informations, veuillez vous rapporter au Manuel d'utilisation
.
Lancez la sauvegarde.
5
Destination d'enregistrement (ordinateur)
Cllquez
.
Une fois la sauvegarde terminée,
6
cliquez sur “OK”.
En cas de problème avec le logiciel
Everio MediaBrowser fourni, veuillez
consulter le "Centre de support
client Pixela".
Débrancher cette unité de l’ordinateur
■
① Cliquez sur “Retirer le matériel”.
.
② Cliquez sur “Retirer Périphérique
de stockage de masse USB en
toute sécurité”.
③
(sous Windows Vista) Cliquez sur “OK”.
④ Débranchez le câble USB et
fermez l’écran LCD.
http://manual.jvc.co.jp/index.html/
Informations
supplémentaires
23
Page 56

Informations supplémentaires
Via le menu
Vous pouvez configurer différents
réglages via le menu.
Affichez le menu.
1
Appuyez
.
●
Le menu varie en fonction du mode
que vous utilisez.
Sélectionnez le menu souhaité
2
puis appuyez sur .
VIDEO
ENREG. EVENEMENT
QUALITE VIDEO
ZOOM
LUMINOSITE
ENREG. ACCELERE
REGLER
FIN
?
.
Informations du support client
L’utilisation de ce logiciel est autorisée selon les termes de sa licence.
JVC (pour toutes questions concernant cette unité)
Préparez les informations suivantes avant de contacter l’agence ou le bureau JVC local le plus proche
à propos de ce logiciel (réseau de service après-vente mondial JVC : http://www.jvc-victor.co.jp/english/
worldmap/index-e.html).
Nom du produit, modèle, numéro de série, problème, message d’erreur
•
Ordinateur (fabricant, modèle (bureau/portable), UC, SE, mémoire (Mo), espace disque disponible (Go))
•
Veu illez noter que la réponse à vos questions peut prendre un certain temps en fonction de leur nature.
JVC ne peut pas répondre aux questions concernant le fonctionnement de base de votre ordinateur,
ou aux questions concernant les spécifications ou les performances du système d’exploitation, d’autres
applications ou pilotes.
Pixela (pour toutes questions concernant le logiciel fourni)
Région Langue N° de téléphone
États-Unis et Canada Anglais +1-800-458-4029 (numéro gratuit)
Europe (Royaume-Uni,
Allemagne, France et Espagne)
Autres pays en Europe
Asie (Philippines) Anglais +63-2-438-0090
Chine Chinois 10800-163-0014 (numéro gratuit)
Page d’accueil : http://www.pixela.co.jp/oem/jvc/mediabrowser/e/
Veu illez visiter notre si
.
Pour plus d'informations, veuillez vous rapporter au Manuel d'utilisation
24
http://manual.jvc.co.jp/index.html/
te Web pour obtenir les dernières informations et télécharger des fichiers.
Anglais/Allemand/Français/
Espagnol
Anglais/Allemand/Français/
Espagnol
Sélectionnez le réglage souhaité
3
puis appuyez sur .
VIDEO
ARRET
AGC
AUTO
REGLER
?
.
Pour quitter l’écran
■
Appuyez sur (quitter).
Pour retourner à l’écran
■
précédent
Appuyez sur “)”.
Pour afficher le fichier d’aide
■
Appuyez sur “*”.
●
Pour plus d’informations
concernant les réglages, veuillez
vous référer au Manuel
d’utilisation.
.
+800-1532-4865 (numéro gratuit)
+44-1489-564-764
FIN
Page 57

Durée d’enregistrement/Nombre de photos
Vous pouvez vérifier la durée d’enregistrement de vos vidéos en cliquant sur la touche
, (Alimentation/Information).
Durée d’enregistrement vidéo approximative
Qualité
ULTRA FIN 19 h 56 m 1 h 50 m
FIN 28 h 20 m 1 h 20 m 2 h 50 m
NORMAL 37 h 40 m 1 h 45 m 3 h 45 m
ECONOMIE 100 h 4 h 55 m 10 h
●
La durée d’enregistrement vidéo approximative est juste indicative. La durée
d’enregistrement réelle peut être raccourcie en fonction de l’environnement de
prise de vue.
Nombre approximatif de photos (unité: Nombre de prises de vue)
/
Photo
Vidéo
●
Vous pouvez enregistrer jusqu’à 9.999 photos sur les mémoire interne et cartes
SD d’au moins 4 Go (quelles que soient la taille et la qualité de la photo).
Durée d’enregistrement approximative (avec batterie)
BN-VG107U 40 m 1 h 10 m
BN-VG114U 1 h 25 m 2 h 30 m
BN-VG121U 2 h 5 m 3 h 50 m
●
Les valeurs mentionnées ci-dessus se rapportent à celles figurant lorsque “TORCHE” est
réglé sur “ARRET” et “RETROECL. MONITEUR” sur “STANDARD”.
●
La durée d’enregistrement réelle peut être plus courte si le zoom est utilisé ou si
l’enregistrement est arrêté à plusieurs reprises. (Il est recommandé de préparer la
batterie pour trois fois la durée d’enregistrement prévue.)
●
Lorsque la durée de vie de la batterie est atteinte, la durée d’enregistrement
raccourcit, même si la batterie est entièrement chargée. (Remplacez la batterie
par une nouvelle.)
Taille d’image Qualité
832×624 (4:3)
640×480 (4:3)
640×360 (16:9)
Batterie
Pour plus d'informations, veuillez vous rapporter au Manuel d'utilisation
Durée d’enregistrement
Disque dur
(80 Go)
FIN 1960 3970 7600 9999
STANDARD 2940 5950 9999 9999
FIN 2940 5950 9999 9999
STANDARD 4210 8510 9999 9999
FIN 3680 7440 9999 9999
STANDARD 4910 9930 9999 9999
réelle
http://manual.jvc.co.jp/index.html/
Carte microSD
4 Go 8 Go
Carte microSD
512 Mo
1 Go 2 Go 4 Go
Durée d’enregistrement
continue
25
DémarrerEnregistrementLectureCopie
Informations
supplémentaires
Page 58

Dépannage
Avant de demander du service, consultez le tableau suivant ou la section "Dépannage" du
Manuel d’utilisation.
Si les solutions proposées dans le tableau ne résolvent pas votre problème, consultez votre
revendeur JVC ou le centre de services JVC le plus proche pour plus d’instruction. Veuillez aussi
consulter le fichier FAQ des nouveaux produits sur le site Web de JVC. Veuillez aussi consulter
le fichier Q&A des nouveaux produits sur le site Internet de JVC (http://www.jvc.com).
Cette unité est un périphérique contrôlé par micro-ordinateur. Les décharges électrostatiques,
les bruits externes et les interférences (provenant d’une TV ou d’une radio par exemple) peuvent
empêcher la caméra de fonctionner correctement. Si tel est le cas, réinitialisez cette unité.
Réinitialisez cette unité si elle ne fonctionne pas correctement ou
■
si “... Erreur” apparaît à l’écran.
①
Coupez l’alimentation. (fermez l’écran LCD.)
Enlevez l’adaptateur secteur et la batterie de l’unité, replacez-les puis
②
rallumez le courant.
Problème
Alimentation
Problème Action Page
●
POWER/CHARGE le voyant
se met à clignoter lorsque
l’écran LCD est fermé.
La batterie est en train de charger. P.6
●
Aucun enregistrement ne
peut être réalisé.
Enregistrement
L’enregistrement s’arrête de
lui-même.
La date/l’heure ne s’affiche
(nt) pas.
Lecture
Le son ou la vidéo est
interrompu(e).
Pour plus d'informations, veuillez vous rapporter au Manuel d'utilisation
26
http://manual.jvc.co.jp/index.html/
Vérifiez la touche /.
●
Définissez le mode d’enregistrement avec la
touche +.
●
Éteignez l’unité, patientez quelques minutes,
puis rallumez-la. (Cette unité s’arrête
automatiquement pour protéger le circuit en
cas d’augmentation de la température.)
●
Déplacez cette unité dans un endroit moins
bruyant ou plus stable.
●
Insérez une carte microSD, et réglez
“SUPPORT ENREG. VIDEO” ainsi que
“SUPPORT ENREG. PHOTO” dans le menu
de paramétrage du média sur “SD”. (Il peut y
avoir un dysfonctionnement du disque dur.)
●
L’enregistrement s’arrête automatiquement
après 12 heures d’enregistrement continu.
●
Régler en conséquence “AFFICHAGE SUR
ECRAN” dans le menu de lecture.
●
La lecture est parfois interrompue aux
sections qui connectent deux scènes. Il ne
s’agit pas d’un dysfonctionnement.
P.10
P.14
-
-
P.13
-
-
-
Page 59

●
Vérifiez la charge restante de la batterie.
(Lorsque la batterie est complètement
Le voyant ne clignote pas
lors du chargement de la
batterie.
Autres problèmes
La curseur et les touches de
fonctionnement ne
fonctionnent pas.
L’unité surchauffe.
chargée, le voyant ne clignote pas.)
●
En cas de charge dans des endroits chauds
ou froids, assurez-vous que la batterie est
chargée dans la plage de température
requise. (Sans quoi, la batterie risque de ne
plus être protégée pendant la charge.)
●
Retirez vos gants, le cas échéant. -
●
Touchez le curseur et les touches avec
vos doigts pour les faire fonctionner. (Si
malgré cela ils ne fonctionnent toujours
pas, touchez-les avec vos ongles ou la
pointe d’un stylo.)
●
Il ne s’agit pas d’un dysfonctionnement.
(L’unité peut chauffer lorsqu’elle est utilisée
pendant un certain temps.)
Messages d’avertissement
Messages d’avertissement Action Page
●
Éteignez et rallumez l’unité.
●
Réglez “SUPPORT ENREG. VIDEO” dans le menu
de réglage du média sur “SD”. (Pour retirer la carte
ERREUR
D'ENREGISTREMENT
microSD.)
●
Utilisez un fichier enregistré avec cette unité. (Les
fichiers enregistrés avec d’autres périphériques
peuvent ne pas être lus correctement. Si le fichier a
été enregistré avec cette unité, il est certainement
corrompu.)
P.10
P.6
-
-
-
P.13
-
DémarrerEnregistrementLectureCopie
SCENE INCOMPATIBLE
(Vidéo)
FICHIER IMCOMPATIBLE
(Photo)
TROP PEU DE DONNEES
ENREGISTREES
SAUVEGARDE
IMPOSSIBLE
DISQUE DUR EN COURS
DE RECHAUFFEMENT,
VEUILLEZ PATIENTER
Pour plus d'informations, veuillez vous rapporter au Manuel d'utilisation
●
Utilisez un fichier enregistré avec cette unité. (Les
fichiers enregistrés avec d’autres périphériques
peuvent ne pas être lus correctement. Si le fichier a
été enregistré avec cette unité, il est certainement
corrompu.)
●
Si un enregistrement vidéo est arrêté et que le
temps actuel d’enregistrement affiché est de
“0:00:00:17” ou moins, la vidéo ne pourra être
enregistrée.
●
Laissez cet appareil sous tension pendant un
moment.
Si l’avertissement ne disparait toujours pas,
coupez le courant et déplacez l’appareil à un
endroit chaud tout en faisant attention d’éviter un
brusque changement de température. Remettez
l’appareil sous tension après un moment.
http://manual.jvc.co.jp/index.html/
-
-
-
Informations
supplémentaires
27
Page 60

Mises en garde
.
Adaptateur secteur
UTILISATION DE L’ADAPTATEUR DE PRISE DE
SECTEUR
Lors du branchement du cordon d’alimentation
de l’appareil à une prise de secteur différente
du standard national américain C73, utiliser un
adaptateur de prise nommé “Siemens Plug”,
comme indiqué ci-dessous.
Pour cet adaptateur de prise secteur, consulter
votre revendeur JVC le plus proche.
Adaptateur de prise
Batteries
La batterie fournie est
une batterie au lithiumion. Avant d’utiliser
la batterie fournie ou
une batterie en option,
bien lire les consignes
suivantes :
Pour éviter tout accident
•
ne pas brûler.
...
... ne pas
court-circuiter les bornes. Maintenir celleci éloignée de tout objet métallique lorsqu’elle
n’est pas utilisée. En cas de transport, s’assurer
que le cache de la batteriefournie est en place.
Si vous avez égaré le cache de la batterie, placer
celle-ci dans un sac plastique.
... ne pas modifier ni démonter.
... ne pas exposer la batterie à des températures
supérieures à 60 °C car celle-ci risquerait de
surchauffer, d’exploser ou de prendre feu.
... utiliser uniquement les chargeurs spécifiés.
Pour éviter tout endommagement et
•
prolonger la durée de vie utile
... ne pas soumettre à un choc inutile.
...
recharger à l’intérieur d’une plage de température
de 10°C à 35°C. Des températures basses peuvent
prolonger la durée de charge, ou même dans certains
cas arrêter la recharge. Des températures élevées
peuvent empêcher une charge complète, ou même
dans certains cas arrêter la recharge.
... entreposer dans un endroit frais et sec. Toute
exposition prolongée à de températures
élevées accélérera la décharge naturelle et
diminuera la durée de vie utile.
... charger et décharger complètement la batterie
tous les 6 mois lors d’un entreposage pendant
une période de temps prolongée.
... retirer l’appareil du chargeur ou le débrancher
lorsque vous ne vous en servez pas ; certains
appareils, même éteints, continuent de
consommer du courant.
.
Pour plus d'informations, veuillez vous rapporter au Manuel d'utilisation
28
http://manual.jvc.co.jp/index.html/
Bornes
ATTENTION:
La batterie que vous vous êtes
procurée est recyclable.
Pour des renseignements sur le
recyclage de cette batterie, veuillez
composer le 1-800-8-BATTERY.
(États-Unis et Canada seulement)
Support d’enregistrement
Veiller à suivre les directives ci-dessous
•
pour éviter d’altérer ou d’endommager les
données enregistrées.
Ne pas déformer ou laisser tomber le support
•
d’enregistrement, ou le soumettre à une forte
pression, des secousses ou des vibrations.
Ne pas éclabousser le support d’enregistrement
•
avec de l’eau.
Ne pas utiliser, remplacer ou entreposer le support d’
•
enregistrement dans des endroits fortement exposés à
de l’électricité statique ou à des parasites électriques.
Ne pas mettre le caméscope hors tension ou retirer
•
la batterie ou l’adaptateur secteur pendant la prise de
vue, la lecture ou l’accès au support d’enregistrement.
Ne pas placer le support d’enregistrement à proximité
•
d’objets possédant un fort champ magnétique ou
émettant de fortes ondes électromagnétiques.
Ne pas ranger le support d’enregistrement dans
•
des endroits exposés à une température élevée
ou à une forte humidité.
Ne pas toucher les pièces métalliques.
•
Quando si formattano o si cancellano i dati utilizzando
•
la Media camera, solo le informazioni di gestione dei
file vengono modifi cate. I dati non vengono cancellati
del tutto dal supporto di registrazione. Qualora si
desideri cancellare completamente tutti i dati, si
consiglia di utilizzare software disponibile i
progettato specifi camente a tale scopo, oppure di
distruggere fi sicamente la Media camera con un
martello, ecc.
Disque dur
Ne pas utiliser l’appareil là où il sera exposé à des
•
vibrations ou à des bruits élevés.
Si vous déplacez soudainement l’appareil, il se
•
peut que la fonction de détection de chute s’active
et que l’appareil se mette hors tension.
Écran LCD
Pour éviter tout endommagement de l’écran
•
LCD, NE PAS
...
le pousser trop fortement ou lui fa ire subir des chocs.
...
placer le caméscope avec l’écran LCD en dessous.
Pour prolonger sa durée de vie utile
•
... éviter de le frotter à l’aide d’un chiffon rugueux.
.
n commercio
Page 61

Appareil principal
Pour votre sécurité, NE PAS
•
... ouvrir le boîtier du caméscope.
... démonter ou modifier l’appareil.
... laisser pénétrer des substances inflammables, de
l’eau ou des objets métalliques dans l’appareil.
... retirer la batterie ou débrancher l’appareil
pendant que celui-ci est sous tension.
... laisser la batterie à l’intérieur du caméscope
lorsque celui-ci n’est pas utilisé.
... placer des sources de flammes nues, telles que
... exposer l’appareil à l’égouttage ou aux
... laisser s’accumuler de la poussière ou
... insérer des objets dans le caméscope.
•
... dans des endroits trop humides ou poussiéreux.
... dans des lieux exposés à de la suie ou à de la
...
... près d’un téléviseur.
... près d’appareils générant des champs
... dans des lieux exposés à des températures
...
•
... dans des lieux exposés à des températures
...
... en plein soleil.
... dans une voiture hermétiquement fermée en
... près d’un radiateur.
... en hauteur, sur un téléviseur par exemple. Si
•
... le mouiller.
...
... le soumettre à trop de chocs ou vibrations
...
... exposer l’objectif à la lumière directe du soleil.
... le balancer inutilement par la dragonne.
... trop balancer l’étui souple lorsque le
... placer le caméscope dans des endroits
.
es allumées, sur l’appareil.
des bougi
éclaboussements.
placer des objets métalliques sur la prise
d’alimentation ou une prise de courant murale.
Éviter d’utiliser l’appareil
vapeur (par exemple, près d’une cuisinière).
dans des endroits trop exposés aux chocs ou vibrations.
magnétiques ou électriques intenses (hautparleurs, antennes de diffusion, etc.).
extrêmement élevées (au-delà de 40°C) ou
extrêmement basses (en deçà de 0°C).
dans les endroits où la pression d’air est basse (plus
de 3000 m au-dessus du niveau de la mer).
NE PAS laisser l’appareil
supérieures à 50°C.
dans des lieux exposés à des taux d’humidité
extrêmes (en deçà de 35 % ou au-delà de 80 %).
période estivale.
l’appareil est placé en hauteur alors que le
câble est raccordé, celui-ci peut être coincé et
l’appareil peut tomber. Dans ce cas, il risque de
ne plus fonctionner.
Pour protéger l’appareil, NE PAS
le faire tomber ou le cogner contre des objets durs.
durant le transport.
maintenir l’objectif orienté vers des objets
extrêmement lumineux pendant trop longtemps.
caméscope est à l’intérieur.
poussiéreux ou avec du sable, comme une
plage.
Pour éviter une chute de l’appareil,
•
Serrer la ceinture de la poignée fermement.
•
Lors de l’utilisation du caméscope avec un
•
trépied, fixer fermement l’appareil sur le trépied.
Si le caméscope se détache et tombe, il peut
causer des blessures ou être endommagé.
Si un enfant utilise l’appareil, un adulte doit être
présent.
Déclaration de conformité
Numéro de modèle : GZ-MG750AU/BU/RU
Nom de marque : JVC
Personne responsable : JVC AMERICAS CORP.
Adresse : 1700 Valley Road Wayne, N. J. 07470
Numéro de téléphone : 973-317-5000
Cet ensemble se conforme à la partie 15 des
règles de la FCC (Federal Communications
Commission). Le fonctionnement est sujet aux
deux conditions suivantes : (1) Cet appareil ne
peut pas causer d’interférences nuisibles, et
(2) cet appareil doit accepter toute interférence
reçue, comprenant des interférences qui
peuvent causer un mauvais fonctionnement.
Des changements ou modifications non
approuvés par JVC peuvent annuler le droit de
l’utilisateur de faire fonctionner l’appareil. Cet
appareila été testé et il a été reconnu qu’il se
conforme aux limites concernant l’appareillage
informatique de classe B correspondant à la
partie 15 des règles de la FCC. Ces limites sont
conçues pour garantir une protection raisonnable
contre des interférences nuisibles dans les
installations résidentielles. Cet appareil gé
utilise et peut émettre de l’énergie des fréquences
radio et, s’iln’estpas installé et utilisé selon
les instructions du fabricant, peut causer des
interférences nuisibles en communications radio.
Cependant, il ne peut pas être garanti que des
interférences ne se produiront pas dans certaines
installations particulières. Si cet appareil provoque
des interférences avec la réception radio ou de
ision, ce qui peut être vérifié en alimentant
télév
l’appareil et en coupant son alimentation, nous
conseillons à l’utilisateur d’essayer d’éliminer ces
interférences par l’un ou plusieurs des moyens
suivants :
Réorienter ou déplacer l’antenne de réception.
Augmenter la séparation entre l’appareil et le
récepteur.
Brancher l’appareil sur une prise de courant d’un
circuitdifférent de celui sur lequel le récepteur est
branché.
Consulter le revendeur ou un technicien radio/TV
mpétent pour vous aider.
co
ppareil numérique de la classe B est
Cet a
conforme à la norme NMB-003 du Canada.
nère,
DémarrerEnregistrementLectureCopie
Pour plus d'informations, veuillez vous rapporter au Manuel d'utilisation
http://manual.jvc.co.jp/index.html/
Informations
supplémentaires
29
Page 62

Caractéristiques techniques
Caméra
Alimentation
Consommation 1,8 W (lorsque la lumière est réglée sur “ARRET” et que le
Dimensions (mm)
Masse
Environnement
d’exploitation
Périphérique de
capture d’image
Zone d’enregistrement
(vidéo)
Zone d’enregistrement
(photo)
Objectif F1,8 à F4,3, f= 2,2 mm à 85,8 mm
Zoom (Vidéo) Zoom optique: Jusqu’à 39x
Zoom (Photo) Zoom optique: Jusqu’à 39x
Format
d’enregistrement vidéo
Format d’enregistrement
photos
Supports
d’enregistrement
Horloge batterie Batterie rechargeable
Adaptateur secteur (AP-V30U)*
Alimentation 110 V CA à 240 V, 50 Hz/60 Hz
Sortie 5,2 V CC, 1,8 A
Température
d’opération autorisée
Dimensions (mm) 78 × 34 × 46 (3-1/8" × 1-3/8" × 1-13/16") (L × H × D: sans le cordon
Masse Environ 107 g (0,24 lbs)
Pour utiliser un adaptateur secteur à l’étranger, pensez à préparer une prise
*
convertisseur disponible dans le commerce pour le pays ou la région visité(e).
●
Les caractéristiques et l’apparence de ce produit sont susceptibles d’être
modifiées sans préavis pour d’éventuelles améliorations.
Utiliser un adaptateur secteur: 5,2 V CC, Utiliser une batterie: 3,6 V CC
rétroéclairage de l’écran est réglé sur “STANDARD”), Consommation
de courant nominal: 1,8 A
53 × 63 × 110 (2-1/8" × 2-1/2" × 4-3/8") (L × H × D: sans la dragonne)
Environ 250 g (0,55 lbs) (caméra uniquement), environ 280 g (0,61 lbs)
(avec la batterie fournie)
Température d’opération autorisée: 0°C à 40°C (32°F à 104°F)
Température de stockage autorisée: -20°C à 50°C (-4°F à 122°F)
Humidité de fonctionnement autorisée: 35 % à 80 %
1/6" 800 000 pixels
410 000 pixels (zoom optique),
410 000 pixels à 550 000 pixels (zoom dynamique)
550 000 pixels
(conversion 35 mm: 41,5 mm à 1619 mm)
Zoom dynamique: Jusqu’à 45x
Zoom numérique: Jusqu’à 800x
SD-VIDEO standard, vidéo: MPEG-2, audio: Dolby Digital (2 can.)
JPEG standard
Lecteur de disque dur interne (80 Go),
carte microSD/microSDHC (disponible dans le commerce)
0°C à 40°C (32°F à 104°F) (10°C à 35°C (50°F à 95°F) pendant la charge)
et la prise secteur)
Pour plus d'informations, veuillez vous rapporter au Manuel d'utilisation
30
http://manual.jvc.co.jp/index.html/
Page 63

MEMO
DémarrerEnregistrementLectureCopie
.
Informations
supplémentaires
Pour plus d'informations, veuillez vous rapporter au Manuel d'utilisation
http://manual.jvc.co.jp/index.html/
31
Page 64

Termes
A
Adaptateur secteur .................... 6, 30
Apple ............................................. 22
B
Batterie ...................................... 6, 30
Branchement secteur .............. 15, 20
C
Carte SD .................................. 12, 25
CD-ROM ........................................ 22
Configurations du menu ................ 24
Copier (Sauvegarde) ......... 16, 17, 18
D
Copier (Dupliquer) ......................... 23
Durée d’enregistrement ................. 25
E
Écran LCD ..................................... 28
M
Mac ................................................ 22
N
Nombre d’images .......................... 25
R
Régler l’horloge ............................... 9
Régler la date et l’heure .................. 8
Régler la langue .............................. 9
S
Logiciel .......................................... 21
Supports d’enregistrement pour image
........................................................ 12
Supprimer des fichiers ................... 14
U
Câble USB ..................................... 23
V
Visualiser des fichiers sur une TV
W
Windows ........................................ 21
Z
Zoom ............................................. 10
.
.... 15
© 2009 Victor Company of Japan, Limited
UC
1109MNH-SW-VM
 Loading...