

Page 1
STOP
PLEASE DO NOT IMMEDIATELY RETURN THIS
PRODUCT TO YOUR PLACE OF PURCHASE.
ASSISTANCE IN PRODUCT HOOK-UP AND USE
IS AVAILABLE AT:
www.jvc.com or by phone at 1-800-252-5722
ALTO
NO DEVUELVA INMEDIATAMENTE, POR FAVOR,
ESTE PRODUCTO AL LUGAR DE ADQUISICIÓN.
ASISTENCIA PARA CONEXIÓN Y UTILIZACIÓN
DEL PRODUCTO DISPONIBLE EN:
www.jvc.com o por tel. al 1-800-252-5722
INSTRUCTIONS
MANUAL DE INSTRUCCIONES
HARD DISK CAMERA
VIDEOCÁMARA
SPEN
GZ-MG670
Please read the instruction manual prior to
connecting or operating this product.
Por favor, lea el manual de instrucciones
antes de conectar u operar este producto.
U
Dear Customers
Thank you for purchasing this camcorder.
Before use, please read the safety
information and precautions contained
in pages 2 and 3 to ensure safe use of
this product.
For Future Reference:
Enter the Model No. (located on the
bottom of the camcorder) and Serial No.
(located on the battery pack mount of the
camcorder) below.
Model No.
Serial No.
Apreciado cliente
Muchas gracias por haber adquirido
esta cámara con disco duro integrado.
Antes de usarla, lea la información de
seguridad y las precauciones contenidas
en las páginas 2 y 3 para garantizar un
uso seguro de este producto.
Para futuras consultas:
Escriba a continuación el número
de modelo (situado en la base de la
cámara) y el número de serie (situado
en el compartimiento de la batería de la
cámara).
Número de modelo
Número de serie
ENGLISH
ESPAÑOL
Page 2
2
EN
Safety Precautions
CAUTION
RISK OF ELECTRIC SHOCK
DO NOT OPEN
CAUTION: TO REDUCE THE RISK OF ELECTRIC SHOCK,
DO NOT REMOVE COVER (OR BACK).
NO USER-SERVICEABLE PARTS INSIDE.
REFER SERVICING TO QUALIFIED SERVICE PERSONNEL.
The lightning flash with arrowhead symbol, within an
equilateral triangle, is intended to alert the user to the
presence of uninsulated "dangerous voltage" within the
product's enclosure that may be of sufficient magnitude
to constitute a risk of electric shock to persons.
The exclamation point within an equilateral triangle is
intended to alert the user to the presence of important
operating and maintenance (servicing) instructions in
the literature accompanying the appliance.
WARNING: TO PREVENT FIRE OR SHOCK
HAZARD, DO NOT EXPOSE THIS UNIT TO
RAIN OR MOISTURE.
NOTES:
The rating plate and safety caution are on the
•
bottom and/or the back of the main unit.
The serial number plate is on the battery pack
•
mount.
The rating information and safety caution of the
•
AC adapter are on its upper and lower sides.
Caution on Replaceable lithium battery
The battery used in this device may present a fire
or chemical burn hazard if mistreated.
Do not recharge, disassemble, heat above 100°C
or incinerate.
Replace battery with Panasonic, Sanyo, Sony or
Maxell CR2025.
Danger of explosion or Risk of fire if the battery is
incorrectly replaced.
Dispose of used battery promptly.
•
Keep away from children.
•
Do not disassemble and do not dispose of in fire.
•
For USA-California Only
This product contains a CR Coin Cell Lithium
Battery which contains Perchlorate Material
– special handling may apply.
See www.dtsc.ca.gov/hazardouswaste/perchlorate
SAFETY1
When the equipment is installed in a cabinet or on
a shelf, make sure that it has sufficient space on all
sides to allow for ventilation (10 cm (3-15/16") or
more on both sides, on top and at the rear).
Do not block the ventilation holes.
(If the ventilation holes are blocked by a
newspaper, or cloth etc. the heat may not be able
to get out.)
No naked flame sources, such as lighted candles,
should be placed on the apparatus.
When discarding batteries, environmental
problems must be considered and the local rules or
laws governing the disposal of these batteries must
be followed strictly.
The apparatus shall not be exposed to dripping or
splashing.
Do not use this equipment in a bathroom or places
with water.
Also do not place any containers filled with water
or liquids (such as cosmetics or medicines, flower
vases, potted plants, cups etc.) on top of this unit.
(If water or liquid is allowed to enter this
equipment, fire or electric shock may be caused.)
Do not point the lens directly into the sun. This
can cause eye injuries, as well as lead to the
malfunctioning of internal circuitry. There is also a
risk of fire or electric shock.
CAUTION!
The following notes concern possible physical
damage to the camcorder and to the user.
Carrying or holding the camcorder by the LCD
monitor can result in dropping the unit, or in a
malfunction.
Do not use a tripod on unsteady or unlevel
surfaces. It could tip over, causing serious damage
to the camcorder.
CAUTION!
Connecting cables (Audio/Video, S-Video, etc.) to
the camcorder and leaving it on top of the TV is not
recommended, as tripping on the cables will cause
the camcorder to fall, resulting in damage.
CAUTION:
The mains plug shall remain readily operable.
WARNING:
The battery pack, the camcorder with battery
installed, and the remote control with battery
installed should not be exposed to excessive heat
such as direct sunshine, fire or the like.
Page 3
3
EN
IMPORTANT SAFETY INSTRUCTIONS
1. Read these instructions.
2. Keep these instructions.
3. Heed all warnings.
4. Follow all instructions.
5. Do not use this apparatus near water.
6. Clean only with dry cloth.
7. Do not block any ventilation openings. Install in
accordance with the manufacturer’s instructions.
8. Do not install near any heat sources such
as radiators, heat registers, stoves, or other
apparatus (including amplifiers) that produce heat.
9. Only use attachments/accessories specified by the
manufacturer.
10. Use only with the cart,
stand, tripod, bracket,
or table specified by
the manufacturer, or
sold with the apparatus.
When a cart is used,
use caution when
moving the cart/
apparatus combination
to avoid injury from tip-over.
11. Unplug this apparatus during lightning storms or
when unused for long periods of time.
12. Refer all servicing to qualified service personnel.
Servicing is required when the apparatus has
been damaged in any way, such as power-supply
cord or plug is damaged, liquid has been spilled
or objects have fallen into the apparatus, the
apparatus has been exposed to rain or moisture,
does not operate normally, or has been dropped.
Remember that this camcorder is intended for
private consumer use only.
Any commercial use without proper permission
is prohibited. (Even if you record an event such
as a show, performance or exhibition for personal
enjoyment, it is strongly recommended that you
obtain permission beforehand.)
Trademarks
Manufactured under license from Dolby
•
Laboratories. Dolby and the double-D symbol
are trademarks of Dolby Laboratories.
HDMI is a trademark of HDMI
•
Licensing, LLC.
Windows® is either registered
•
trademark or trademark of Microsoft Corporation
in the United States and/or other countries.
Macintosh is a registered trademark of Apple Inc.
•
iTunes, iMovie, iPhoto are trademarks of Apple Inc.,
•
registered in the U.S. and other countries.
YouTube and the YouTube logo are trademarks
•
and/or registered trademarks of YouTube LLC.
Other product and company names included in
•
this instruction manual are trademarks and/or
registered trademarks of their respective holders.
If this symbol is shown, it is only valid
in the European Union.
SAFETY2
Page 4
4
EN
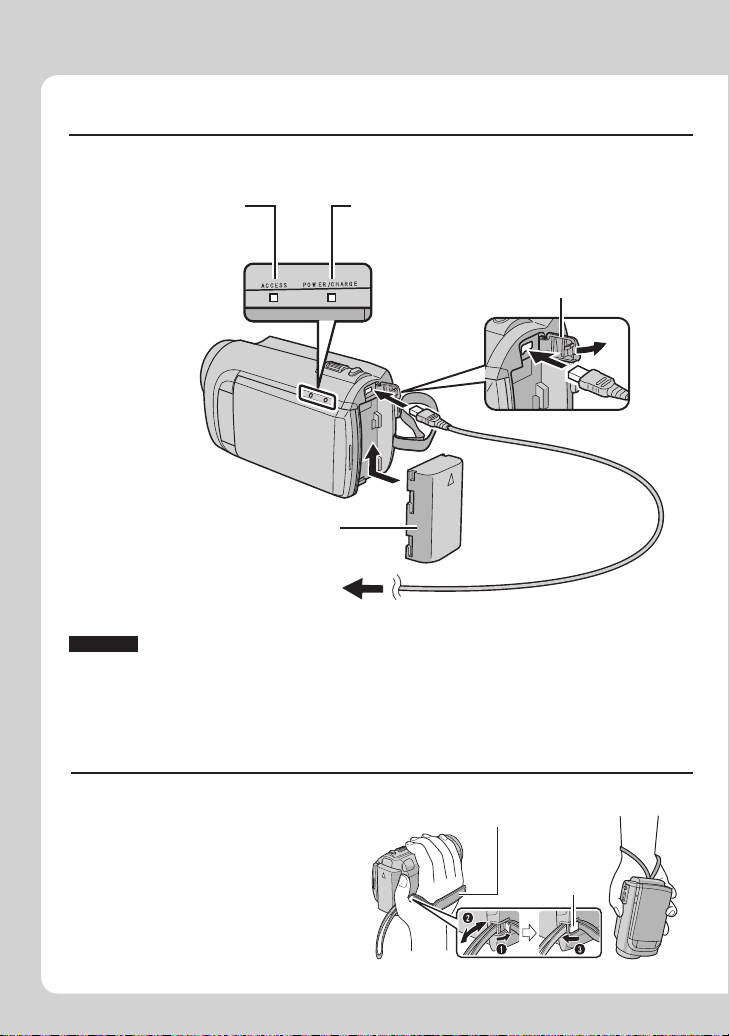
Easy Start Guide
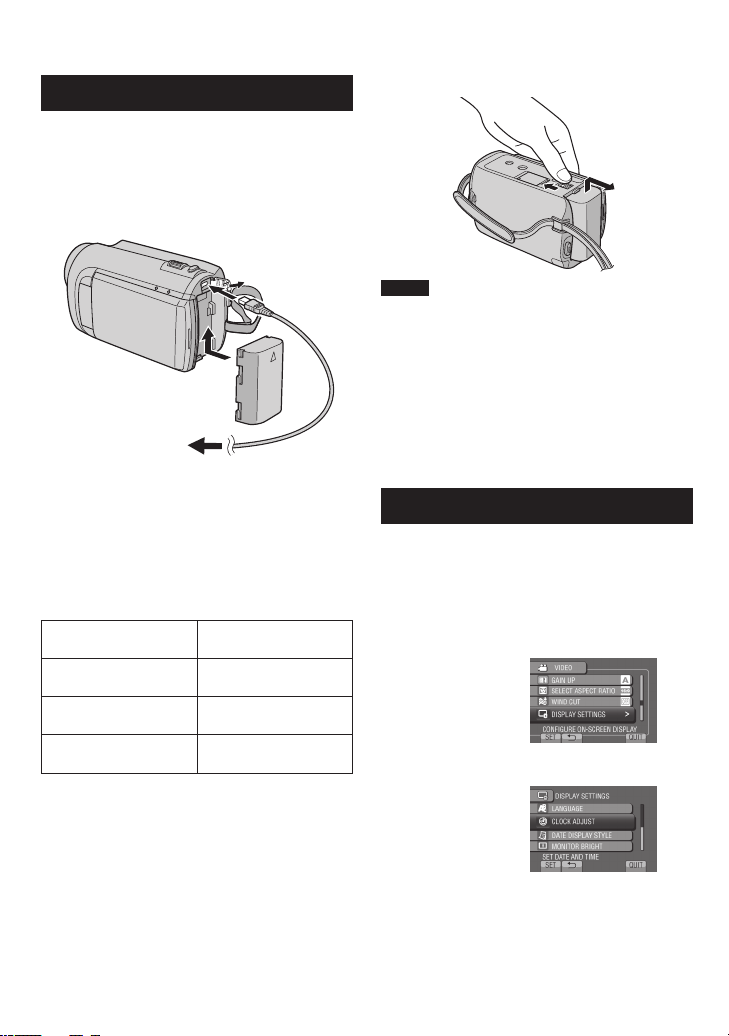
Charge the battery before recording
Turn off the camcorder and attach the battery pack.
Access lamp
blinks: Accessing files
Do not remove the
AC adapter, the
battery pack or the
microSD card when
the lamp is blinking.
Battery Pack
AC Adapter
To AC Outlet
(110V to 240V)
CAUTION
Be sure to use JVC battery packs. If you use any other battery packs besides
•
JVC battery packs, safety and performance can not be guaranteed.
Power/charge lamp
blinks: Charging
goes out: Charging finished
Open the cover
The battery pack is not
charged at the time of
purchase.
Grip Adjustment
Adjust the strap and fasten.
Fasten the strap when you grip the
•
camcorder.
When carrying the camcorder,
•
please be careful not to drop it.
Grip Strap
Fasten
Page 5
5
EN
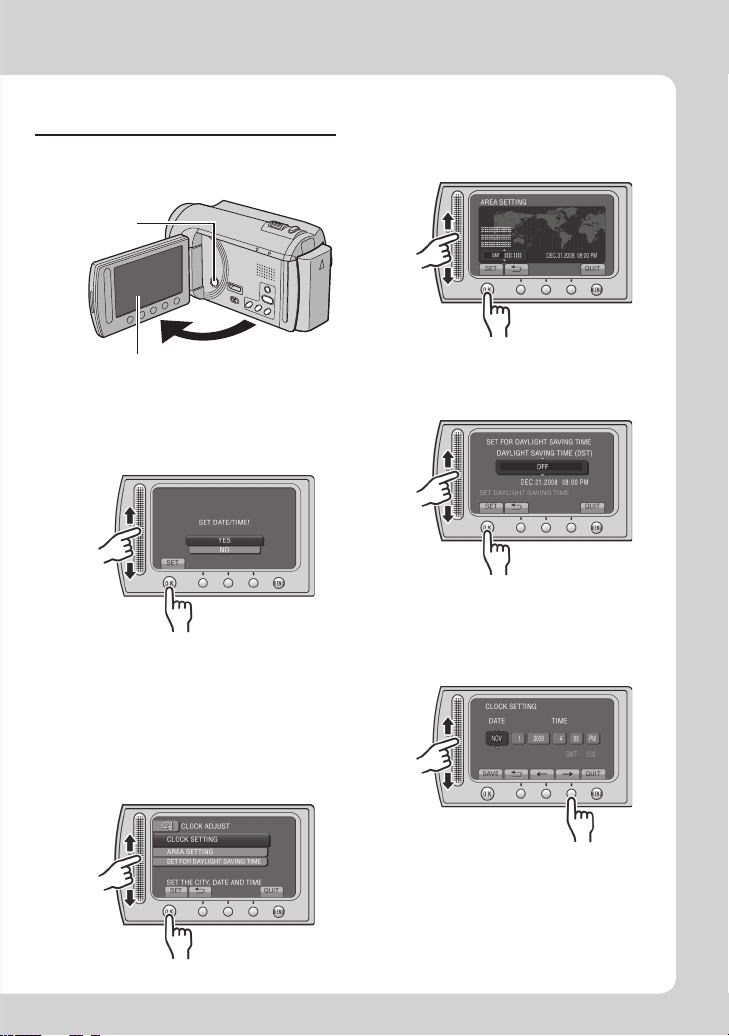
Date/Time Setting
Open the LCD monitor to
Q
turn on the camcorder
Power button
Select the city closest to
T
the area where you use
the camcorder
LCD monitor
Select [YES] within
R
10 seconds
Slide your finger up and down on the
sensor. Then touch OK.
When the message disappears, press the
•
power button for at least 2 seconds to turn
off the power, and then press it again for at
least 2 seconds.
Touch the sensors with your finger. The
•
sensors do not function if you touch them
with your finger nail or with gloves on.
Select [CLOCK SETTING]
S
Select [ON] if daylight
U
saving time is effective
Set the date and time
V
Touch sensor: Sets the date and time
: Moves the cursor to the right
&
OK: Clock starts
Page 6

6
EN
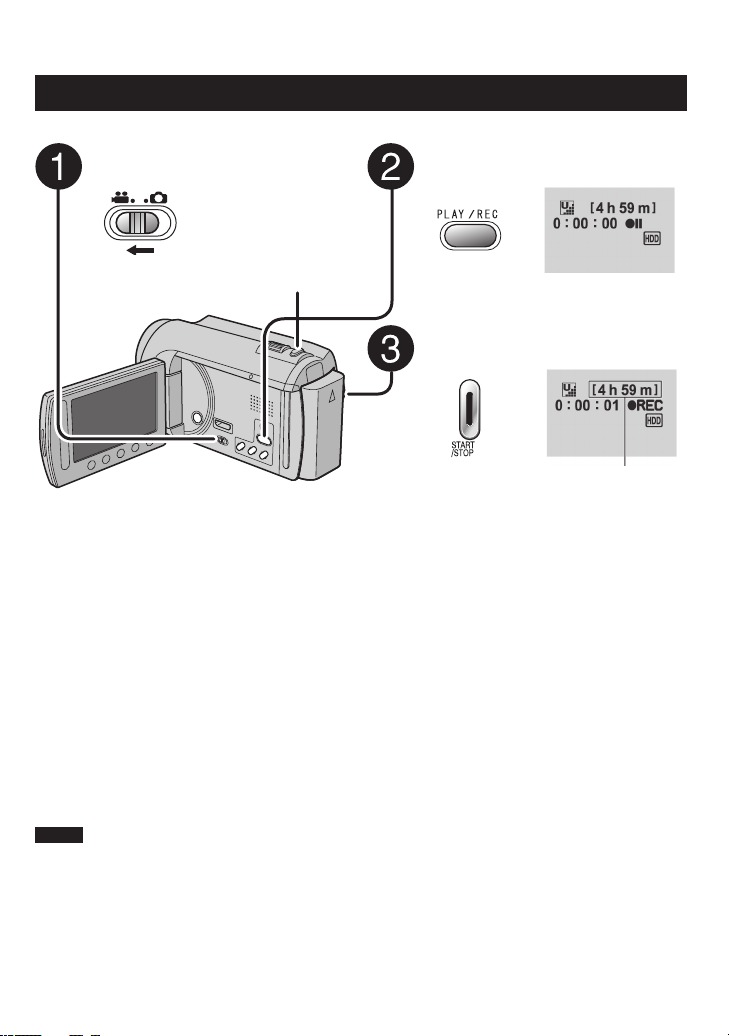
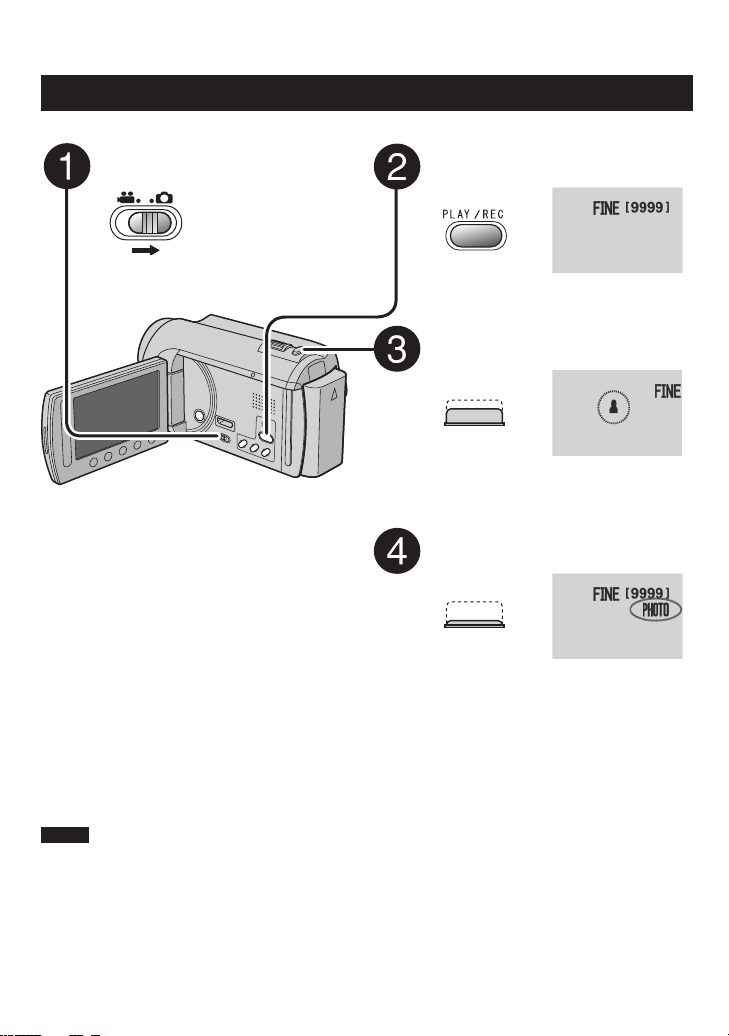
Video recording
CAUTION
Before recording an important scene, it is recommended to conduct a trial
recording.
Slide the mode switch to select ! (video) mode
Q
Select recording mode
R
The mode changes when
you press the button.
The auto recording
indicator appears.
Start recording
S
Press the START/STOP
button to start recording,
and press it again to stop.
Remaining space on
the hard disk
Video Quality
Record-standby
Recording
Page 7

7
EN
Playing back
Select playback mode
Q
The mode changes when
you press the button.
Select the desired file
R
Select F (Touch OK)
S
Index screen
Playback screen
To perform operations such as forward search or reverse search (Z p. 22)
To view files on TV (Z p. 25)
CAUTION
Do not forget to make copies after recording!
To copy files onto DVD discs (Z p. 27)
•
To dub files to a VCR/DVD recorder (Z p. 34)
•
To play back a created disc (Z p. 28)
•
To edit files on your computer (Z p. 29)
•
Page 8

8
EN
Contents
GETTING STARTED
Accessories ............................................10
Preparing the Remote Control ...................... 11
Attaching the Core Filter to the USB Cable ... 11
Index ........................................................12
Tripod Mounting ............................................ 13
Indications on LCD Monitor ...................14
Necessary Settings before Use .............16
Charging the Battery Pack ............................ 16
Date/Time Setting ......................................... 16
Language Setting ......................................... 17
Other Settings .........................................18
Using a microSD Card .................................. 18
RECORDING/PLAYBACK
Recording Files .......................................19
Video Recording ........................................... 19
Still Image Recording ................................... 20
Zooming ........................................................ 21
LED Light ...................................................... 21
Checking the Remaining Battery Power ....... 21
Checking the Remaining Space on the
Recording Media ......................................... 21
Playing Back Files ..................................22
Video Playback ............................................ 22
Still Image Playback ..................................... 23
Manual Recording ..................................24
Changing to Manual Recording Mode .......... 24
Backlight Compensation ............................... 24
Manual Setting in Menu ................................ 24
EDITING
Managing Files ........................................26
Capturing a Still Image from a Video ............ 26
Deleting Files ................................................ 26
COPYING
Copying Files ..........................................27
Using a DVD Burner ..................................... 27
Creating a DVD using a PC .......................... 29
Dubbing Files to a VCR/DVD Recorder ........34
Using with a Portable Media Player ......35
Turning on the Export Mode ......................... 35
Changing the Export Setting ........................ 35
Transferring the Files to PC ..........................35
Uploading Files to Websites ..................36
Turning on the Upload Mode ........................ 36
Uploading Files ............................................. 36
FURTHER INFORMATION
Changing the Menu Settings .................37
Troubleshooting ......................................37
Warning Indications ...............................39
Specifications .........................................40
Cautions ..................................................42
Terms .......................................................44
USING WITH TV
Viewing Files on TV ................................25
Connection with TV....................................... 25
Playback Operation ...................................... 25
Page 9
9
EN
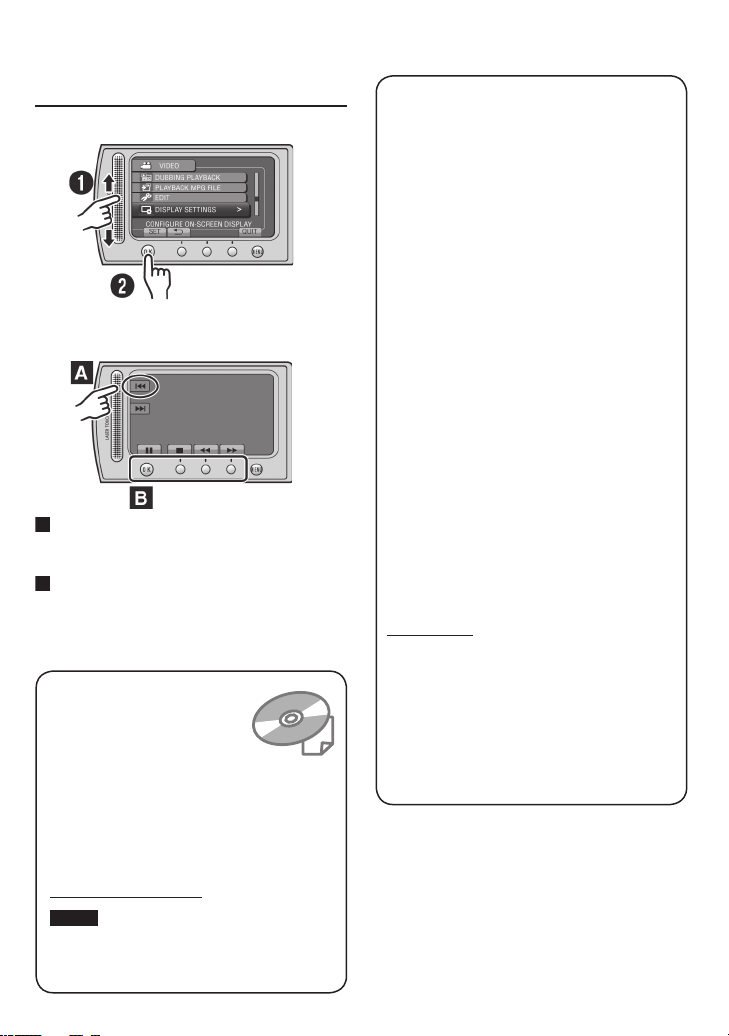
How to use the Touch Sensor
A
B
After the menu is displayed on the LCD monitor:
Q
Slide your finger up and down on the sensor.
R Select [SET]. (Touch OK.)
To select an on-screen button appearing on
the left side, touch the portion of the sensor
next to the on-screen button.
To select an on-screen button appearing at
the bottom of the screen, touch the buttons
underneath them.
Read these INSTRUCTIONS
to enjoy your CAMCORDER.
For more details on the
operations, refer to the
GUIDEBOOK in the supplied
CD-ROM.
In order to view the GUIDEBOOK, Adobe®
Acrobat® ReaderTM or Adobe® Reader®
must be installed.
Adobe® Reader® can be loaded from
Adobe’s web site:
http://www.adobe.com/
NOTE
Select your desired language with a single click.
The model name is indicated on the bottom of your
camcorder.
Read This First!
Make a backup of important recorded data
It is recommended to copy your important
recorded data to a DVD or other recording
media for storage. JVC will not be responsible
for any lost data.
Make a trial recording
Before the actual recording of important data,
make a trial recording and play back the
recorded data to check that the video and
sound have been recorded correctly.
Reset the camcorder if it does not operate
correctly
Close the LCD monitor and remove the
power supply (battery pack or AC adapter)
from the camcorder, then reattach it.
Precautions on handling batteries
Be sure to use the JVC BN-VF808U/
•
VF815U/VF823U battery packs. This product
includes patented and other proprietary
technology and is made to be used with the
JVC battery and not with other batteries.
JVC cannot guarantee safety or
performance of this product when it is
operated by other batteries.
If the camcorder is subjected to electrostatic
•
discharge, turn off the power before using it
again.
If a malfunction occurs, stop using the
camcorder immediately and contact
www.jvc.com or by phone at 1-800-252-5722
Recorded data may be erased while the
•
camcorder is being repaired or inspected.
Back up all data before requesting repairs or
inspections.
Because camcorders may be used
for demonstration in a shop, the
demonstration mode is set to on by default
To deactivate the demonstration mode, set
[DEMO MODE] to [OFF].
Page 10
10
EN
GETTING STARTED
AP-V20U
BN-VF808U
RM-V751U
CR2025
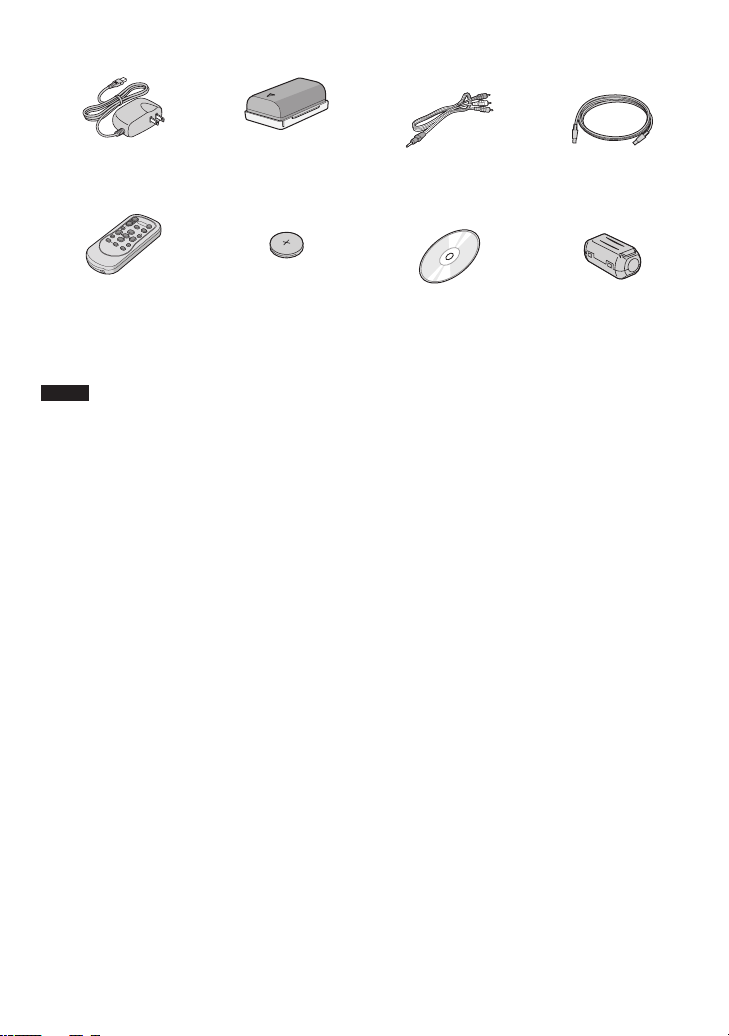
Accessories
AC Adapter Battery Pack AV Cable USB Cable
Remote Control Lithium Battery
Pre-installed in the
remote control.
NOTE
Make sure to use the provided cables for connections. Do not use any other cables.
CD-ROM Core Filter
Page 11
11
EN
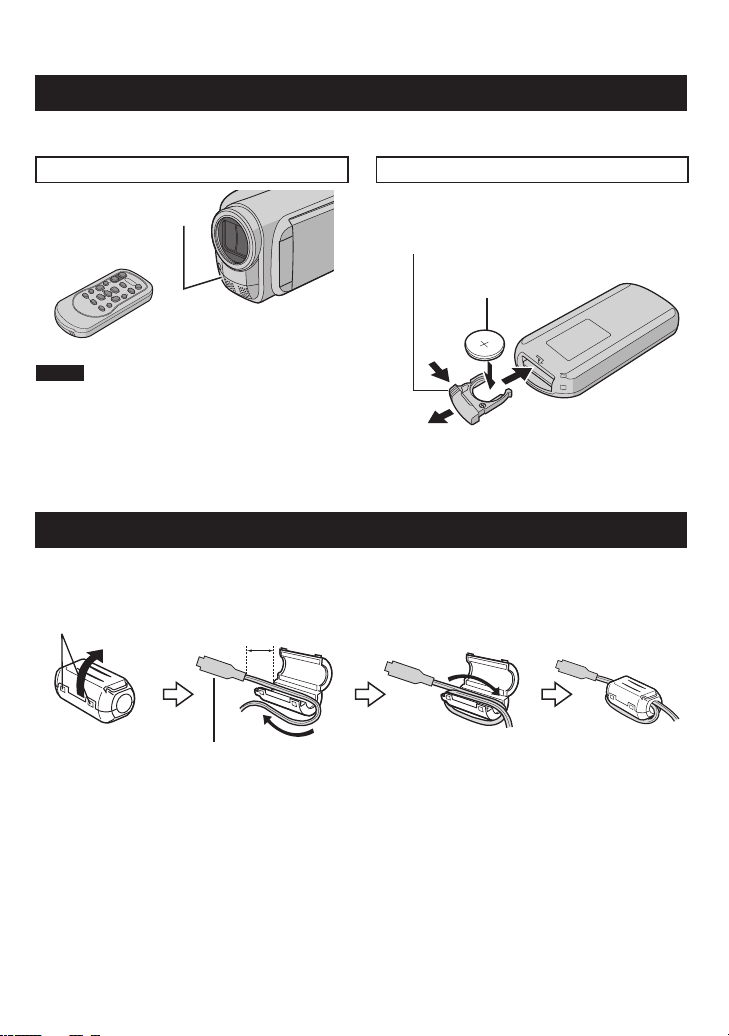
Preparing the Remote Control
A battery is included inside the remote control at the time of purchase.
Remove the insulation sheet before use.
Beam Effective Area To Reinsert the Battery
Remote Sensor
Pull out the battery holder by pressing the lock
tab.
Lock Tab
Lithium Battery
(CR2025)
Effective distance:
Max. 5 m (16 ft)
NOTE
The transmitted beam may not be effective
or may cause incorrect operation when the
remote sensor is directly exposed to sunlight
or powerful lighting.
Attaching the Core Filter to the USB Cable
The core filter reduces interference caused when connecting to other devices. Connect the end of
the cable with the core filter to the camcorder.
Release the stopper. 3 cm (1-3/16") Wind once.
To be connected to
the camcorder
Page 12
12
EN
Index
NOTE
Be careful not to cover 1, 2, 3, and 4
•
during shooting.
The LCD monitor can rotate 270°.
•
Page 13
13
EN
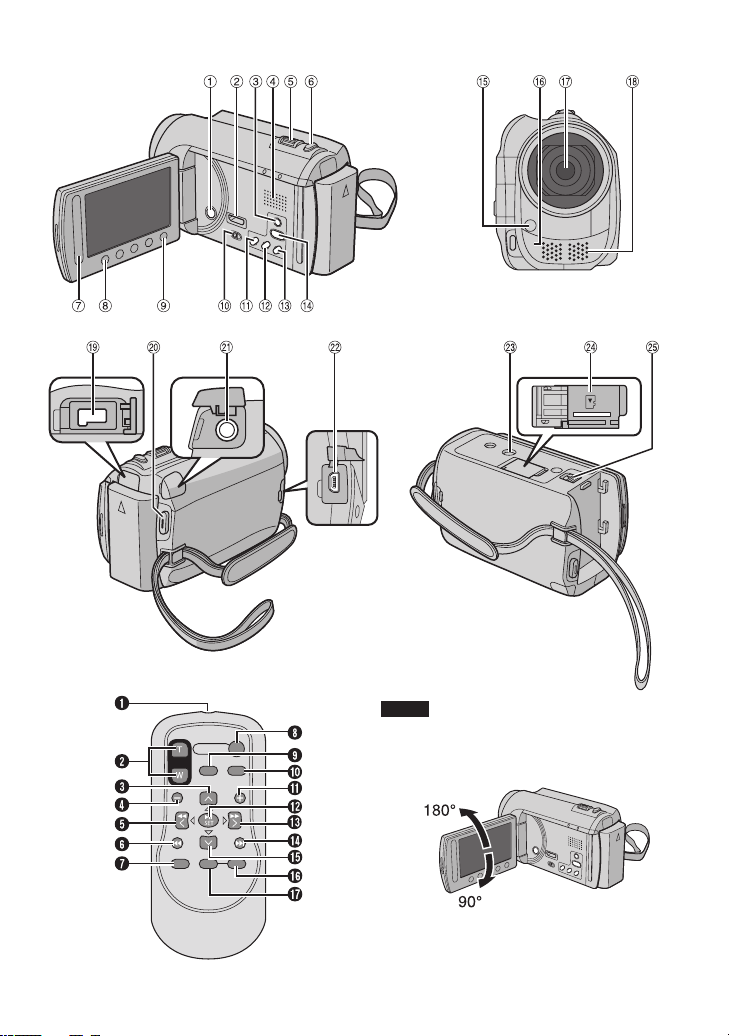
Camcorder
Remote Control
! Power Button
# HDMI Mini Connector (Z p. 25)
$ DISPLAY Button (Z p. 15)
% Speaker
& Zoom Lever (Z p. 21)
Speaker Volume Control
( SNAPSHOT Button (Z p. 20)
) Touch Sensor
* OK Button
+ MENU Button
, Mode Switch [!, #]
- UPLOAD Button (Z p. 36)
TITLE Button
. EXPORT Button (Z p. 35)
/ DIRECT DVD Button (Z p. 28)
INFO Button (Z p. 21)
0 PLAY/REC Button (Z p. 19, 20, 22, 23)
1 LED Light (Z p. 21)
2 Remote Sensor
3 Lens
4 Stereo Microphone
5 DC Connector
6 START/STOP Button (Z p. 19)
7 AV Connector (Z p. 25, 34)
8 USB Connector (Z p. 27, 30)
9 Tripod Mounting Socket
: microSD Card Slot
; Battery Release Button
Q Infrared Beam Transmitting Window
R ZOOM (T/W) Buttons (Zoom in/Out)
S Up Button
T Skip Backward Button
U Left Button
V Back Button
W PLAYLIST Button
X START/STOP Button
Y S.SHOT(SNAPSHOT) Button
Z INFO Button
a Skip Forward Button
b PLAY/PAUSE/SET Button
c Right Button
d Next Button
e Down Button
f INDEX Button*
g DISP Button
* Each time you press INDEX, the screen
switches as shown below:
! mode:
Index Screen « Group Index Screen
# mode:
Index Screen « Date Index Screen
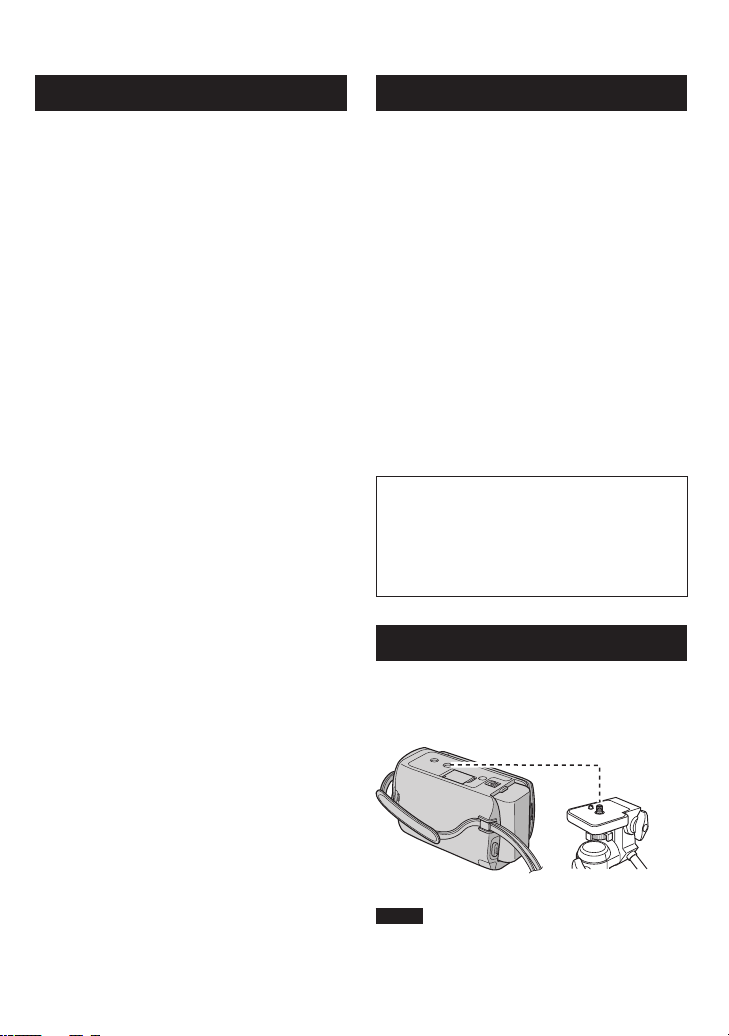
Tripod Mounting
Align the camcorder stud hole with the tripod
stud, and the mounting socket with the screw,
and then rotate the camcorder clockwise to
mount it to the tripod.
NOTE
Do not use a tripod on unsteady or unlevel
surfaces. It could tip over, causing serious
damage to the camcorder.
Page 14
14
EN
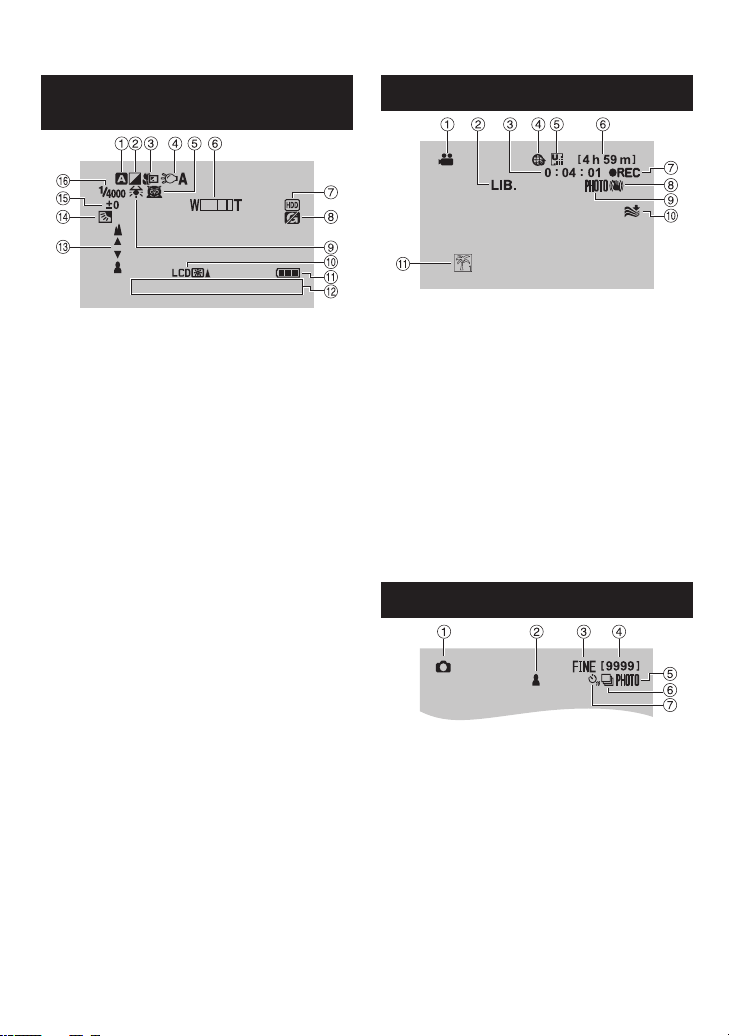
Indications on LCD Monitor
4: 55 PM
NO V. 1. 2 0 0 9
STD
During both Video and Still Image
Recording
! Selected Recording Mode Indicator
(Z p. 24)
@: Auto Mode
3: Manual Mode
# Effect Mode Indicator
$ Tele Macro Mode Indicator
% LED Light Indicator (Z p. 21)
& Scene Select Indicator
( Zoom Indicator (Z p. 21)
) Recording Medium Indicator
* Drop Detection Indicator (Appears when
[DROP DETECTION] is set to [OFF].)
+ White Balance Indicator
, Monitor Backlight Indicator
- Battery Indicator
. Date/Time (Z p. 16)
/ Manual Focus Adjustment Indicator
0 Backlight Compensation Indicator (Z p. 24)
1 Brightness Control Indicator
.: Photometry Area Control Indicator
2 Shutter Speed
During Video Recording Only
! Mode Indicator
# EXPORT Mode Indicator (Z p. 35)
$ Counter
% Upload Mode Indicator (Z p. 36)
A: Analog Input Indicator
& Video Quality:
(NORMAL), E (ECONOMY)
D
( Remaining Time
) MREC: (Appears during recording.)
: (Appears during record-standby
MQ
mode.)
* Digital Image Stabilizer (DIS) Indicator
(Appears when [DIS] is set to [OFF].)
+ Shooting Indicator (Z p. 19)
, Wind Cut Indicator
- Event Indicator
(ULTRA FINE), C (FINE),
B
During Still Image Recording Only
! Mode Indicator
# Focus Indicator (Z p. 20)
$ Image Quality:
(standard)
% Remaining Number of Shots
& Shooting Indicator (Z p. 20)
( Shutter Mode Indicator
) Self-Timer Indicator
(fine) or
Page 15
15
EN
During Video Playback
8
4: 55 PM
NO V. 1. 2 0 0 9
4: 55 PM
NO V. 1. 2 0 0 9
During Still Image Playback
! Mode Indicator
# Playlist Playback Indicator (Appears when
playing back a playlist.)
$ Quick Review Indicator (Z p. 19)
% Video Quality:
(NORMAL), E (ECONOMY)
D
& Counter
( Playback Mode
Playback
:
F
Pause
:
Q
Forward Search
:
K
Reverse Search
:
J
Forward Slow-Motion
:
QF
Reverse Slow-Motion
:
PQ
(The number on the left shows speed.)
) Battery Indicator
* Date/Time (Z p. 16)
+ Volume Level Indicator
, Output with 1080p
(ULTRA FINE), C (FINE),
B
! Mode Indicator
# Quick Review Indicator (Z p. 20)
$ Folder/File Number
% Slide Show Playback Indicator
& Battery Indicator
( Date/Time (Z p. 16)
) Output with 1080p
Switching indication modes on LCD
monitor
Each time you touch DISPLAY, indications
on LCD monitor switch as shown below;
In recording mode:
All indications/Indications for selected
functions
In playback mode:
All indications/Only date and time/No
indications
Page 16
16
EN
Necessary Settings before Use
To detach the battery pack
Charging the Battery Pack
1 Close the LCD monitor to turn off the
camcorder.
2 Attach the battery pack, then connect
the AC adapter.
AC Adapter
To AC Outlet
(110V to 240V)
The power/charge lamp blinks to
•
indicate charging has started.
When the lamp goes out, charging is
•
finished.
To check the remaining battery power
See page 21.
Battery pack Charging time
BN-VF808U
(Provided)
BN-VF815U 2 h 40 m
1 h 50 m
NOTE
You can also use the camcorder with just the
•
AC adapter.
The actual recording time may shorten
•
depending on the recording environment,
such as when recording scenes with fast
moving subject.
Please do not pull or bend the AC adapter
•
plug and cable. This may damage the AC
adapter.
Date/Time Setting
1 Open the LCD monitor to turn on the
camcorder.
2 Touch MENU.
3 Select [DISPLAY SETTINGS].
BN-VF823U 3 h 40 m
4 Select [CLOCK ADJUST].
Page 17
17
EN
5 Select [CLOCK SETTING].
6 Select the city closest to the area you
are traveling.
6 Select the city closest to the area
where you use the camcorder.
Selected area is highlighted
Principal city of the
selected area
Time difference to
GMT
7 Select [ON] if daylight saving time is
effective.
8 Set the date and time.
Change the setting by using the touch
sensor and select [&] to set.
9 Select [SAVE].
To reset the setting, select [QUIT].
Setting the clock to local time when
traveling
After performing steps 1-4 (Z p. 16)
5 Select [AREA SETTING].
To return to the previous screen
Select @.
To quit the screen
Select [QUIT].
Language Setting
The language on the display can be changed.
1 Open the LCD monitor to turn on the
camcorder.
2 Touch MENU.
3 Select [DISPLAY SETTINGS].
4 Select [LANGUAGE].
5 Select the desired language.
To return to the previous screen
Select @.
To quit the screen
Select [QUIT].
Page 18
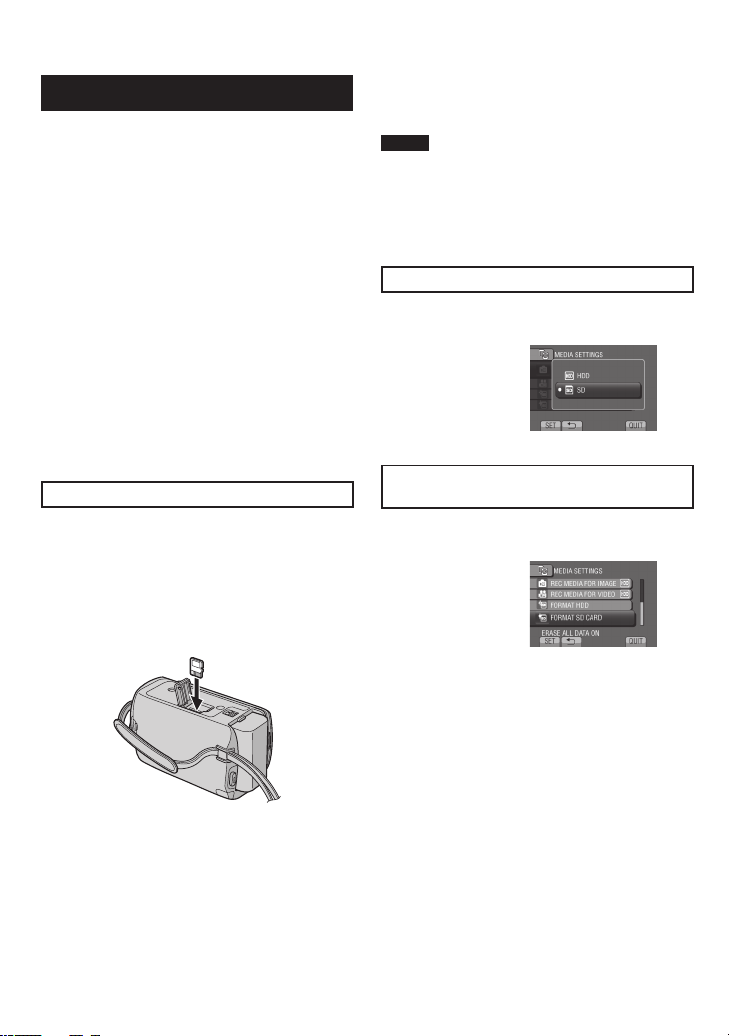
Other Settings
Using a microSD Card
The camcorder is programmed to record on
the built-in hard disk when it is shipped from
the factory. You can change the recording
medium to microSD card.
Operations are confirmed on the following
•
microSD cards.
- Panasonic
- TOSHIBA
- SanDisk
- ATP
Video recording:
Class 4 or higher compatible microSDHC
card (4 GB to 8 GB)
Still image recording:
microSD card (256 MB to 2 GB) or
microSDHC card (4 GB to 8 GB)
If other media are used, they may fail to
•
record data correctly, or they may lose data
that had already been recorded.
MultiMediaCards are not supported.
•
Insert a microSD card
Preparation:
Close the LCD monitor to turn off the
camcorder.
1 Open the microSD card cover.
To remove a microSD card
Push the microSD card once.
After the card comes out a little, pull it out.
NOTE
Insert and remove the microSD card only
•
while the power is turned off. Otherwise, data
on the card may be corrupted.
Do not touch the terminal on the reverse side
•
of the label.
Change the recording medium
Set [REC MEDIA FOR VIDEO] and [REC
MEDIA FOR IMAGE] to [SD].
Format a microSD card when using it for
the first time
Select [FORMAT SD CARD] to format the
card.
2 Firmly insert the card with its clipped
edge first.
3 Close the microSD card cover.
18
EN
Page 19
RECORDING/PLAYBACK
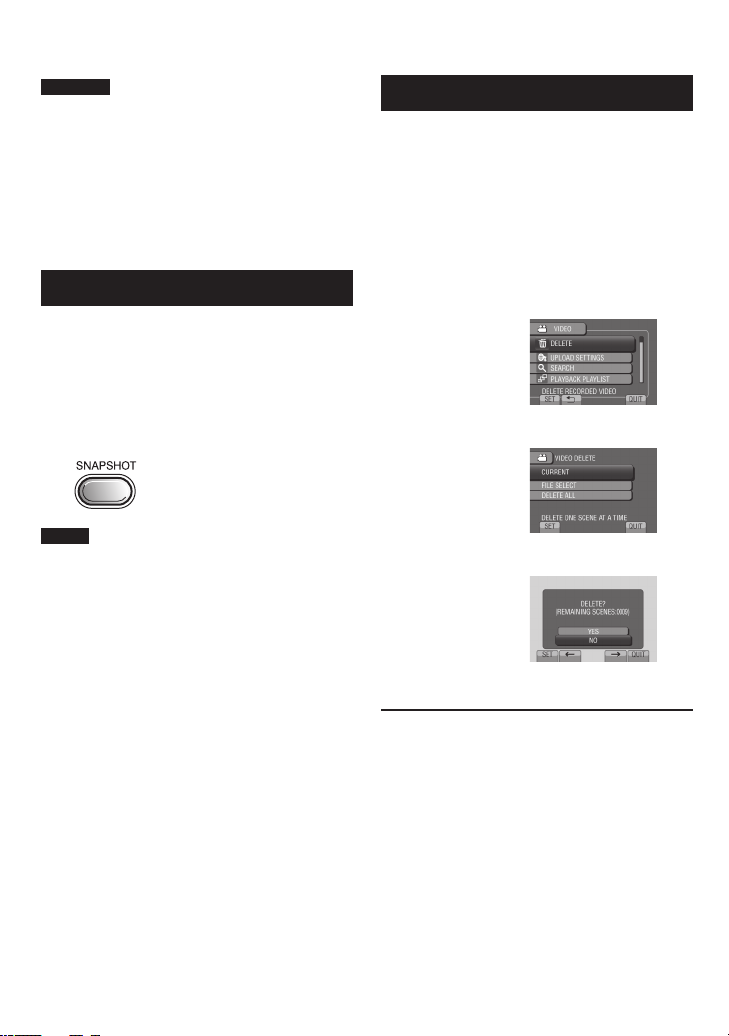
SNAPSHOT
Recording Files
Video Recording
Slide the mode switch to select
! (video) mode.
To stop recording
Press START/STOP again.
To view the last recorded scene
Select A while recording is paused.
Selecting $ during playback deletes that
scene.
To record a still image during video
recording
Press SNAPSHOT.
Press PLAY/REC to select the
recording mode.
Press START/STOP to start
recording.
Approximate remaining
time for recording
You can also start/stop recording by
selecting [REC] on the LCD monitor.
(On-screen recording control)
To change the video quality
Change the settings in [VIDEO QUALITY].
To change the aspect ratio of the image
(16:9/4:3)
Change the settings in [SELECT ASPECT
RATIO].
NOTE
The video recording mode is automatically selected when you turn off the camcorder and then
•
turn on again.
If the camcorder is not operated for 5 minutes while the power is on, it turns itself off
•
automatically to conserve power.
Do not move or shake the camcorder suddenly during recording.
•
If you do so, the driving sound (hum) of the hard disk may be recorded.
19
EN
Page 20
20
EN
Recording Files (Continued)
Still Image Recording
Slide the mode switch to select
# (still image) mode.
To view the last recorded image
Select A after shooting.
Selecting $ during playback deletes that
image.
To change the image quality
Change the settings in [IMAGE QUALITY].
To record still images continuously
Set to [CONTINUOUS SHOOTING] in
[SHUTTER MODE].
Press PLAY/REC to select the
recording mode.
Press and hold SNAPSHOT
halfway.
The ? indicator becomes green when
the captured image is focused.
Press SNAPSHOT fully to take a
still image.
NOTE
DIS (Digital Image Stabilizer) does not function during still image recording.
•
If the camcorder is not operated for 5 minutes while the power is on, it turns itself off
•
automatically to conserve power.
Page 21

21
EN
Zooming
Preparation:
Select ! or # mode.
•
Select the recording mode.
•
Zoom out Zoom in
W: Wide angle T: Telephoto
You can also zoom out/zoom in by selecting
[W] or [T] on the LCD monitor. (On-screen
zoom control)
Zoom ratio (factory-preset)
! mode # mode
[80X/DIGITAL] [35X/OPTICAL]
To change the maximum zoom ratio
(! mode only)
Change the settings in [ZOOM].
NOTE
Macro shooting is possible as close as approx.
5 cm (2") to the subject when the zoom lever is
set all the way to W.
LED Light
Preparation:
Select ! or # mode.
•
Select the recording mode.
•
1 Touch MENU.
2 Select [LIGHT].
3 Select the desired setting.
The LED light remains on
ON
AUTO
OFF
regardless of the surrounding
conditions.
The LED light turns on
automatically when shooting in
insufficient light conditions.
Deactivates this function.
Checking the Remaining Battery Power
! mode:
Press INFO twice or INFO and then select
.
;
# mode:
Press INFO.
To quit the screen
Select [QUIT] or press INFO.
NOTE
The recordable time display should only be
used as a guide. It is displayed in 10 minute
units.
Checking the Remaining Space on the Recording Media
Preparation:
Select ! mode.
•
Select the recording mode.
•
Press INFO.
The maximum recording time is displayed for
each video quality mode.
To change the video quality
1) Select the video quality.
2) Select [SET].
To quit the screen
Select [QUIT].
Page 22
22
EN
Playing Back Files
Video Playback
Slide the mode switch to select !
(video) mode.
To move to the previous or next page
Touch [ ] or [ ] for over a second.
To play back a few seconds from the
beginning of each video
Touch [ ].
NOTE
In some cases, parts of video other than the
•
beginning may be played back.
Some video may not be played back at all.
•
Press PLAY/REC to select the
playback mode.
The index screen appears.
Select the desired file.
To delete a video
Select $ when playback is stopped.
To change the number of thumbnails
(6 thumbnails/20 thumbnails)
Move the zoom lever to [W].
Operations during Video Playback
On-screen buttons
Return to the first scene of the file
:
N
Go to the first scene of the next file
:
O
Return to the index screen
:
L
Reverse search (during playback)
:
J
Frame-by-frame playback in reverse
:
E
direction (during pause)*
Playback
:
F
Pause
:
Q
Forward search (during playback)
:
K
Frame-by-frame playback in forward
:
G
direction (during pause)*
* Slow playback starts when you keep touching the
sensor button under E / G for a while.
Speaker volume
— : Turn down the
volume
+ : Turn up the
volume
Page 23
23
EN
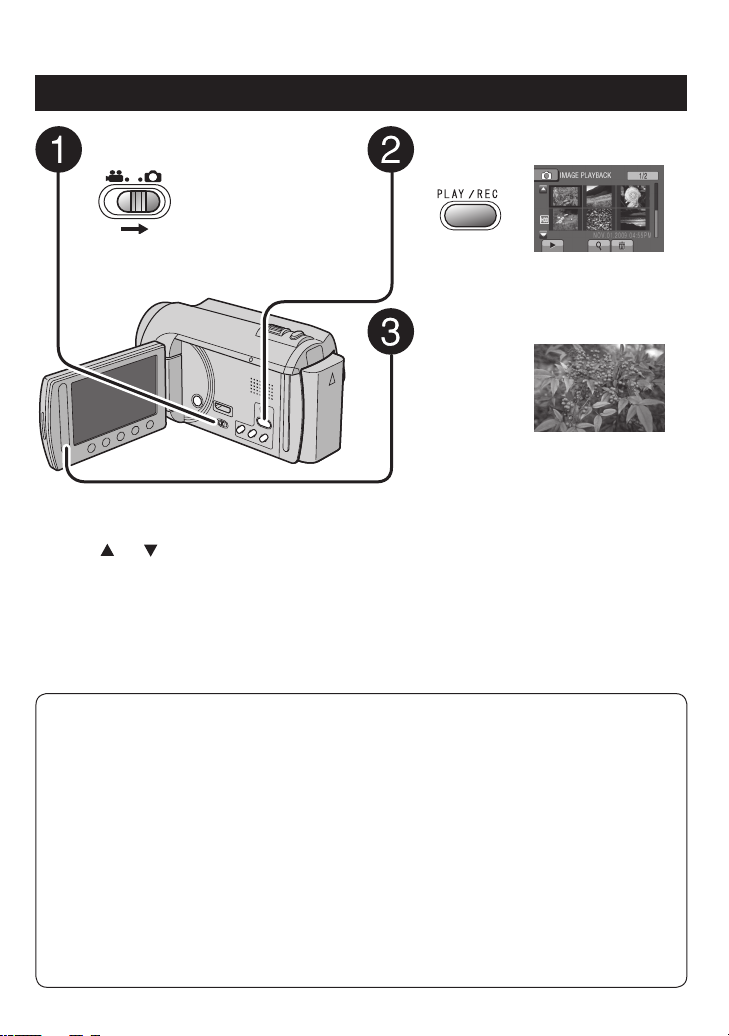
Still Image Playback
Slide the mode switch to select #
(still image) mode.
To move to the previous or next page
Touch [ ] or [ ] for over a second.
To delete a still image
Select $.
To change the number of thumbnails
(6 thumbnails/20 thumbnails)
Move the zoom lever to [W].
Press PLAY/REC to select the
playback mode.
The index screen appears.
Select the desired file.
Operations during Still Image Playback On-screen buttons
Change playback order of slide show in reverse direction
:
P
Change playback order of slide show in forward direction
:
F
Return to the index screen
:
L
Display the previous file
:
N
Start the slide show
:
F
End the slide show
:
Q
Display the next file
:
O
Page 24
24
EN
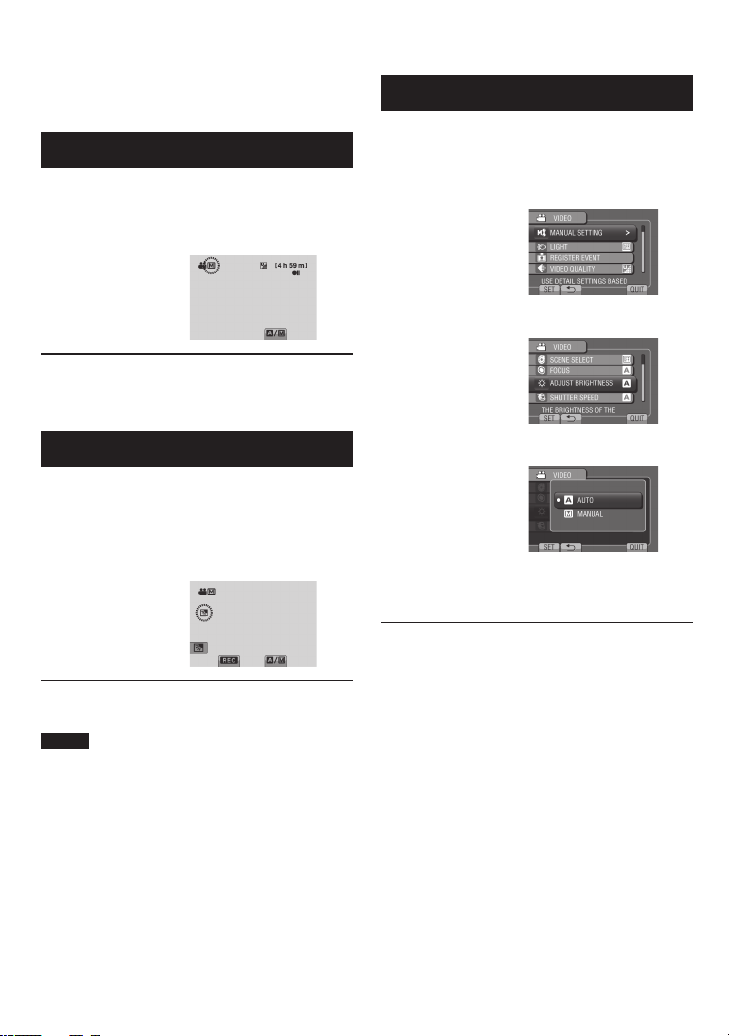
Manual Recording
Manual recording mode enables you to set the
focus and screen brightness, etc. manually.
Changing to Manual Recording Mode
Preparation:
Select ! or # mode.
•
Select the recording mode.
•
Select [A/M] twice.
To return to the auto recording mode
Select [A/M] so that the 4 indicator
appears.
Backlight Compensation
Backlight compensation brightens the subject
by increasing the exposure.
In the manual recording mode:
Select -.
To cancel backlight compensation
Select - again.
NOTE
If the LCD monitor is turned upside down, - is
not displayed. Change the setting when the
LCD monitor is in the normal position.
Manual Setting in Menu
In the manual recording mode:
1 Touch MENU.
2 Select [MANUAL SETTING].
3 Select the desired menu.
4 Select the desired setting.
Depending on the kind of settings you
select, you can set the value by using the
touch sensor.
To return to the previous screen
Select @.
To quit the screen
Select [QUIT].
Page 25
25
EN
USING WITH TV
Viewing Files on TV
This camcorder is designed to be used with
high-definition or NTSC-type color television
signals. It cannot be used with a television of a
different standard.
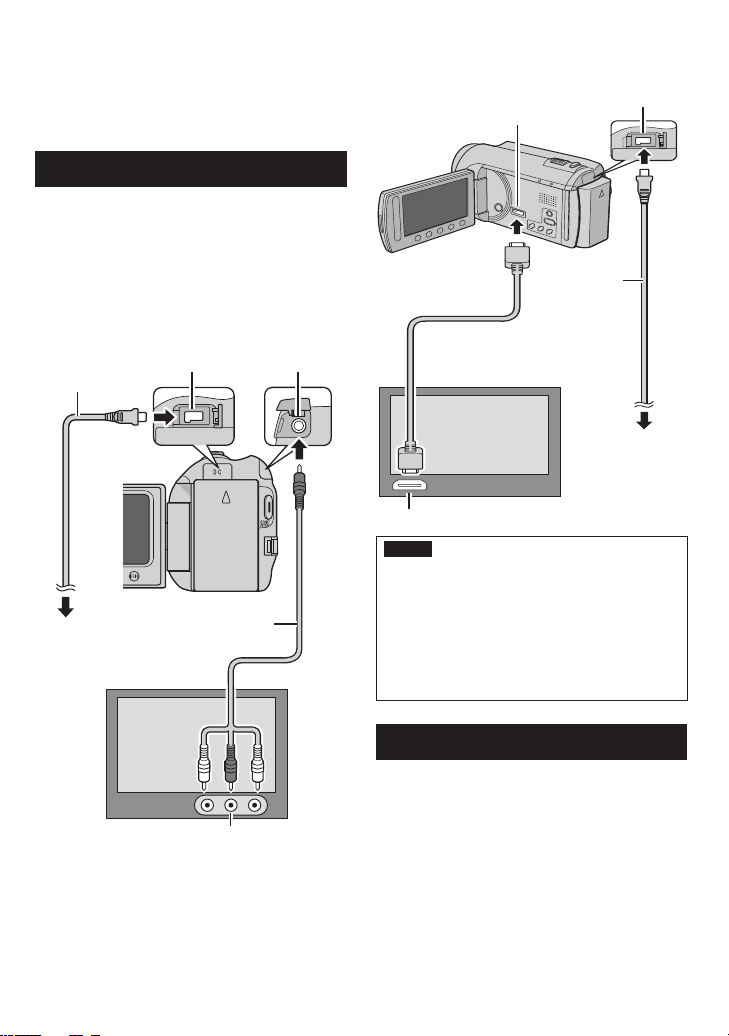
Connection with TV
You can output videos from the AV connector
or the HDMI mini connector.
To connect using the AV connector
Preparation:
Set [SWITCH TO ANALOG I/O] to
•
[OUTPUT].
Turn off all units.
•
AC Adapter
DC Connector
To AC Outlet
AV Connector
AV Cable
Preparation: Turn off all units.
HDMI Mini Connector
HDMI Cable (optional)
(Mini to full-sized HDMI cable)
HDMI Connector
NOTE
When connecting to the HDMI cable, the
•
image or sound may not appear on the TV
properly depending on the TV connected.
In such cases, perform the following
operations.
1) Disconnect the HDMI cable and connect
it again.
2) Turn off and on the camcorder again.
DC Connector
AC Adapter
To AC Outlet
AV Input Connector
To connect using the HDMI mini
connector
We recommend using the Category 2 HDMI
cable (High Speed cable).
Playback Operation
After the connection with TV is completed
1 Turn on the camcorder and the TV.
2 Set the TV to its VIDEO mode.
3 (Only when connecting the camcorder to
the VCR/DVD recorder)
Turn on the VCR/DVD recorder, and
set the VCR/DVD recorder to its AUX
input mode.
4 Start playback on the camcorder.
(Z p. 22, 23)
Page 26
26
EN
EDITING
Managing Files
CAUTION
Do not remove the recording medium or
perform any other operation (such as turning
off the power) while accessing files. Also,
be sure to use the provided AC adapter, as
the data on the recording medium may be
corrupted if the battery becomes exhausted
during operation. If the data on the recording
medium becomes corrupted, format the
recording medium to use the medium again.
Capturing a Still Image from a Video
You can capture the desired scene from a
recorded video, and store it as a still image.
Preparation:
Select ! mode.
•
Select the playback mode.
•
Press SNAPSHOT when playback is
paused.
NOTE
Captured still images are stored at a
•
resolution of 640 x 360 (if the video was
recorded in 16:9) or 640 x 480 (if the video
was recorded in 4:3). The image can be
elongated in the horizontal or vertical
directions depending on the quality of the
source video file.
The continuous shooting function cannot be
•
used to capture images.
You cannot capture video during playback.
•
Deleting Files
Protected files cannot be deleted. To delete
•
them, release the protection first.
Once files are deleted, they cannot be
•
restored. Check files before deleting.
Preparation:
Select ! or # mode.
•
Select the playback mode.
•
1 Touch MENU.
2 Select [DELETE].
3 Select [CURRENT].
4 Select [YES].
You can select the previous or next file by
selecting { or }.
To quit the screen
Select [QUIT].
Page 27
27
EN
COPYING
Copying Files
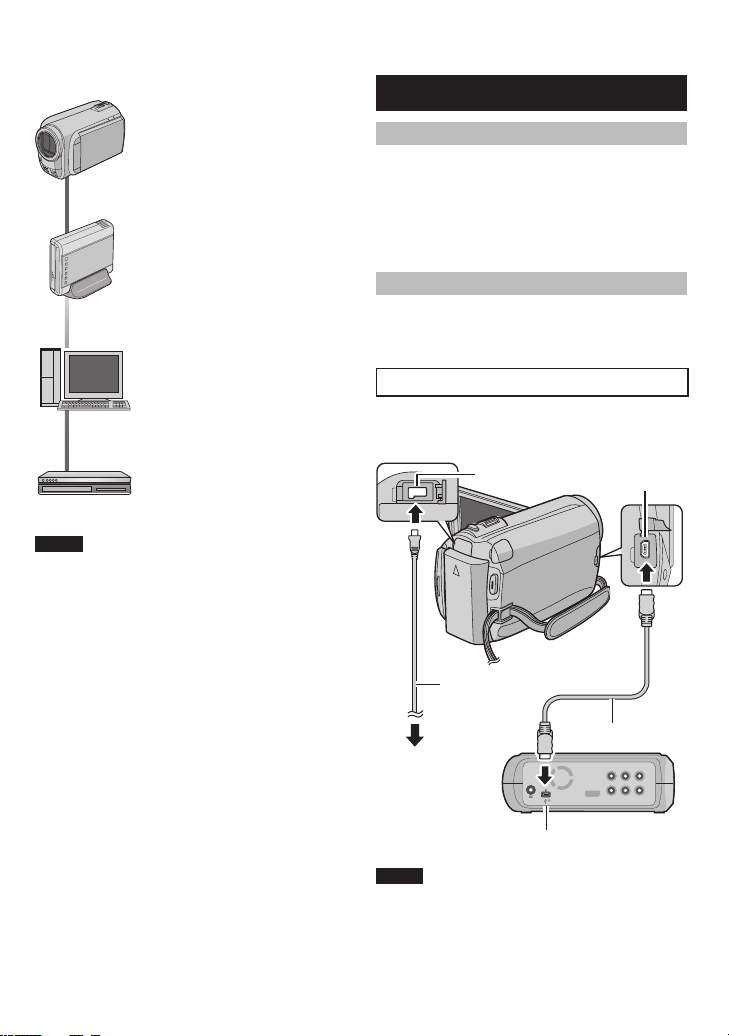
Types of Copying and Connectable Device
The Camcorder
You can copy files between
the HDD and microSD card
with this camcorder alone.
DVD Burner
(CU-VD50/CU-VD3)
You can copy files recorded
on this camcorder onto DVD
discs.
PC
You can copy files from the
camcorder to a DVD using
a PC.
VCR/DVD Recorder
You can dub video recorded
on this camcorder onto
VCR/DVD recorder.
NOTE
It is recommended to use the JVC DVD burner
(CU-VD50/CU-VD3). When using CU-VD20 or
CU-VD40, the recording time may take approx.
2 times longer than the time that is described
in the instruction manual of DVD burner.
Using a DVD Burner
Supported discs: 12cm DVD-R, DVD-RW
Regarding DVD-R discs, only unused DVD-R
•
discs can be used. Regarding DVD-RW discs,
used DVD-RW discs can also be used, but
they need to be formatted before recording.
Formatting a disc deletes all content recorded on
the disc up until that time.
Dual-layer discs cannot be used.
•
Regarding finalization after copying
The disc is automatically finalized so that it can be
played on other devices. After finalizing, the disc is
a play-only disc, so no more files can be added.
Connection with a DVD Burner
Preparation:
Turn on the camcorder first, then turn on the
DVD burner.
DC Connector
USB Connector
AC Adapter
USB Cable*
To AC Outlet
USB Connector
NOTE
Refer also to the optional DVD burner’s
•
instruction manual.
* Use the USB cable that came with the DVD
burner.
DVD Burner
Page 28

28
EN
Copying Files (Continued)
Backup All Files
Preparation:
Connect the camcorder to the DVD burner.
•
Select ! mode.
•
1 Select [CREATE FROM ALL].
2 Select the desired menu.
[ALL SCENES]:
•
All files in the recording medium are
copied.
[UNSAVED SCENES]:
•
Files that have never been copied to a
DVD disc are automatically selected and
copied.
3 Select the desired disc number.
If you select [ALL], all discs in the list are
•
created.
To preview scenes, select [CHECK].
•
mark shows that the disc is created
•
already.
4 Select [YES] or [NO].
[YES]: Displays the thumbnails by group.
•
[NO]: Displays the thumbnails by date.
•
5 Select [EXECUTE].
The files are copied on the disc. When
•
[COMPLETED] appears, touch OK.
When [INSERT NEXT DISC PRESS
•
[STOP] TO EXIT CREATE] appears,
change the disc. Remaining files are
copied on the second disc.
To cancel copying, select [STOP].
•
Copying Video Files that Have Never
Been Copied
Files that have never been copied to the DVD
discs are automatically selected and copied.
1 Open the LCD monitor to turn on the
camcorder.
2 Press DIRECT DVD.
3 Select [EXECUTE].
The DVD disc begins to be created.
•
When [COMPLETED] appears, touch
OK.
When [INSERT NEXT DISC PRESS
•
[STOP] TO EXIT CREATE] appears,
change the disc. Remaining files are
copied on the second disc.
To cancel the DVD creation, select
•
[CANCEL].
To quit the screen
1) Select [QUIT].
2) When [QUIT?] appears, select [YES].
To play back the created disc using the
camcorder
1) Connect the camcorder to the DVD
burner.
2) Turn on the camcorder first, then turn on
the DVD burner.
3) Select [PLAYBACK].
4) Select the desired folder.
5) Select the creation date of the disc.
6) Select the desired file. To return to the
previous screen, select @.
Page 29

29
EN
Creating a DVD using a PC
Please read the “JVC SOFTWARE LICENCE
AGREEMENT” in the CD-ROM instruction
before you install software.
You can copy the data from the camcorder and
create a DVD using a PC.
Installing the software to the PC
Q
System Requirements
Windows Vista
OS: Windows Vista®
Home Basic (SP1)
Home Premium (SP1)
(32-bit, pre-installed)
CPU: Either one of the following:
Intel® Pentium® 4, 1.6 GHz or higher
•
Intel® Pentium® M, 1.4 GHz or higher
•
Intel® CoreTM Duo, 1.5 GHz or higher
•
RAM: At least 1 GB
Windows XP
OS: Windows® XP
Home Edition (SP2/SP3)
Professional (SP2/SP3)
(pre-installed)
CPU: Either one of the following:
Intel® Pentium® 4, 1.6 GHz or higher
•
Intel® Pentium® M, 1.4 GHz or higher
•
Intel® CoreTM Duo, 1.5 GHz or higher
•
RAM: At least 512 MB
Preparation:
Load the provided CD-ROM into the PC.
In Windows Vista, the auto play dialog box
appears.
1 Click [Easy Installation].
Follow the on-screen instructions.
2 Click [Next].
3 Click [Finish].
Everio MediaBrowser icon is created on the
desktop.
To check the PC specification
Right-click on [Computer] (or [My
Computer]) in the [Start] menu and select
[Properties].
NOTE
Make sure your PC has a recordable DVD
•
drive.
If your system does not meet the
•
requirements, it is recommended to copy
files using the DVD burner. (Z p. 27)
Macintosh users may use the software
•
included with their Macintosh (iMovie ’08,
iPhoto) to copy files to their computer.
To see the Instruction Guide for Everio
MediaBrowser
1) Double-click the icon of the Everio
MediaBrowser.
2)
Click [Help], and click [MediaBrowser Help].
Click
Click
Page 30

30
EN
Copying Files (Continued)
Making Backup on the PC
R
Preparation:
Install the software to the PC.
•
Make sure that enough free space is left in
•
the PC’s HDD.
Close the LCD monitor to turn off the
•
camcorder.
USB Connector
USB Cable
USB Connector
1 Open the LCD monitor to turn on the
camcorder.
2 Select [BACK UP].
3 Click [All volume in camcorder] and
click [Next].
4 Click [Start].
Backup starts.
To disconnect the camcorder from the
PC
1) Right-click the icon (Safely Remove
Hardware) on the task bar and select
[Safely remove USB Mass Storage
Device].
2) Follow the on-screen instructions and
make sure that the device can be safely
removed.
3) Disconnect the USB cable and close the
LCD monitor.
NOTE
It takes time to back up many videos.
Everio MediaBrowser starts on the PC.
Page 31

31
EN
Making User Lists to Arrange the
S
Files
You can make a user list of a certain subject
(such as Travel, Athletic meet) and put the files
related to the subject into the user list.
Preparation:
Make backup on the PC.
1 Double-click the icon and open the
calendar.
2 Select [Movies only].
3 Click [+].
5 Double-click the recording date.
The files recorded on the day are displayed.
6 Drag the file and drop into the user
list.
To add other files into the user list, repeat
steps 5 and 6.
4 Input the name of the new user list
and click [OK].
Page 32

32
EN
Copying Files (Continued)
Copying Files to a DVD
T
Preparation:
Use a recordable DVD disc. (It is
recommended to use a DVD-R disc.)
1 Select the user list and click [Create
Disc].
2 Click [Select files individually] and
click [Next].
To add all the files onto DVD discs, click
[Select all files displayed], then go to
step
4.
3 Drag the file, and drop into the part at
the bottom and click [Next].
4 Input the disc name, select the top
menu style and click [Next].
5 Click [Start].
NOTE
For detail on operating Everio MediaBrowser,
•
click [Help] and refer to [MediaBrowser Help].
Adobe® Reader® must be installed to read
•
[MediaBrowser Help]. Adobe® Reader® can
be loaded from Adobe’s web site:
http://www.adobe.com
For assistance in operating the provided
•
software, refer to the support information.
(Z p. 33)
Page 33

33
EN
Folder Structure and Extensions
[DCIM]
[SD_VIDEO]
[EXTMOV]
[PRIVATE]
[MGR_INFO]
[PRGXXX]
[PRGXXX]
[PRGXXX.PGI]
[MOVXXX.MOI]
[MOV_XXX.MOD]
[DEM_XXX.MPG]
[XXXJVCSO]
[MOVXXX.MOD]
Recording medium
Contains the still image folders.
Contains the video file folders.
Management information* for the media as a whole
Management information*
Video file
Management information* for the video files
Video file which management information is corrupted.
Demo video file
Contains management information files of event and/or DVD
creation information for the files taken with the camcorder.
* Information such as the date and time of recording, recorded with the video file.
X = number
Customer Support Information
Use of this software is authorized according to the terms of the software license.
JVC
When contacting the nearest JVC office or agency in your country (refer to the JVC Worldwide Service
Network at http://www.jvc-victor.co.jp/english/worldmap/index-e.html) about this software, please have the
following information ready.
Product Name, Model, Problem, Error Message
•
PC (Manufacturer, Model (Desktop/Laptop), CPU, OS, Memory (MB), Available Hard Disk Space (GB))
•
Please note that it may take some time to respond to your questions, depending on their subject matter.
JVC cannot answer questions regarding basic operation of your PC, or questions regarding specifications
or performance of the OS, other applications or drivers.
Pixela
Region Language Phone #
USA and Canada English +1-800-458-4029 (toll-free)
Europe (UK, Germany, France,
Homepage: http://www.pixela.co.jp/oem/jvc/mediabrowser/e/
Please check our website for latest information and downloading.
and Spain)
Other Countries in Europe
Asia (Philippines) English +63-2-438-0090
China Chinese +86-21-5385-3786
English/German/French/Spanish +800-1532-4865 (toll-free)
English/German/French/Spanish/
Italian/Dutch
+44-1489-564-764
Page 34

34
EN
Copying Files (Continued)
Dubbing Files to a VCR/DVD Recorder
Preparation:
Create a playlist.
•
Set [SWITCH TO ANALOG I/O] to
•
[OUTPUT].
Turn off all units.
•
To connect using the AV connectors
(analog dubbing)
DC Connector
AC Adapter
To AC Outlet
VCR/DVD Recorder
AV Connector
AV Cable
AV Connector
(Input)
1 Open the LCD monitor to turn on the
camcorder.
2 Set the VCR/DVD recorder to its AUX
input mode.
Check that the images from the camcorder
are input correctly to the VCR/DVD
recorder.
3 Play back playlists on the camcorder.
1) Touch MENU.
2) Select [DUBBING PLAYBACK].
3) Select the desired playlist.
4) Select [YES]. (A black screen is
displayed for 5 seconds at the first and
the last scene.)
4 At the point you want to start
dubbing, start recording on the VCR/
DVD recorder.
Refer to the VCR/DVD recorder’s
instruction manual.
To stop dubbing
Stop recording on the VCR/DVD recorder.
To hide the date or icons on the screen
Change the settings in [DISPLAY ON TV].
Switching indication modes on LCD
monitor
Each time you touch DISPLAY, indications
on LCD monitor switch as shown below;
In recording mode:
All indications/Indications for selected
functions
In playback mode:
All indications/Only date and time/No
indications
Page 35

35
EN
Using with a Portable Media Player
Turning on the Export Mode
You can easily transfer videos recorded in
export mode to iTunes®. All the files with the
export setting turned on are transferred to
PC. For details on transferring, refer to the
operation guide of MediaBrowser in the CDROM.
Preparation:
Select ! mode.
•
Select the recording mode.
•
Press EXPORT twice.
To turn off the export mode
Press EXPORT twice.
Changing the Export Setting
You can set the recorded videos to the export
setting.
Preparation:
Select ! mode.
•
Select the playback mode.
•
1 Press EXPORT.
To cancel the export setting
Select the file and select [ ] again.
To quit the screen
1) Select [DONE].
2) Select [YES].
To confirm the export setting
Press EXPORT on the index screen.
Transferring the Files to PC
Preparation:
Install iTunes® on a PC.
•
http://www.apple.com/itunes/
1 Connect the camcorder to the PC
with the USB cable.
2 Select [EXPORT TO LIBRARY].
All the files with the export setting turned
on are transferred to PC.
2 Select the file and set [ ].
To check the content of the file, select
•
[CHECK].
3 Select [DONE].
If you cannot export the file to iTunes
Refer to “Q&A”, “Latest Information”,
“Download Information”, etc. in [Click for
Latest Product Info] in the help of the
provided Everio MediaBrowser software.
®
Page 36

Uploading Files to Websites
Turning on the Upload Mode
You can upload the file to video sharing
websites (YouTubeTM) quickly after recording.
Preparation:
Select ! mode.
•
Select the recording mode.
•
Press UPLOAD twice.
If you record a file with the upload mode
set on, the recording stops automatically
10 minutes after the recording is started.
The remaining time is displayed on the
LCD monitor.
NOTE
The upload mode turns off each time recording
is finished.
Uploading Files
For details on uploading files, refer to the
operation guide of MediaBrowser in the CDROM.
1 Connect the camcorder to the PC
with the USB cable.
2 Select [UPLOAD].
If you cannot upload the file to
YouTube™
You need your YouTube™ account to upload
•
files to YouTube™. Create your account.
Refer to “Q&A”, “Latest Information”, “Download
•
Information”, etc. in [Click for Latest Product
Info] in the help of the provided Everio
MediaBrowser software.
36
EN
Page 37

FURTHER INFORMATION
Changing the Menu Settings
1 Touch MENU.
3 Select the desired setting.
2 Select the desired menu.
To return to the previous screen
Select @.
To quit the screen
Select [QUIT].
Troubleshooting
Before requesting service, consult the following chart. If the solutions indicated in the chart do not
solve the problem, consult your nearest JVC dealer or JVC service center for instructions.
Refer also to the FAQ of new products on JVC’s website.
The following phenomena are not malfunctions.
The camcorder heats up when it is used for a long time.
•
The battery heats up during charging.
•
When playing back a video, the image stops momentarily or the sound is interrupted at junctions
•
between scenes.
LCD monitor momentarily become red or black when sunlight is recorded.
•
Black spots, or red, green, or blue spots appear on the LCD monitor.
•
(The LCD monitor contains 99.99% effective pixels, but 0.01% of fewer pixels may be ineffective.)
Power
Display
Recording
Trouble Action
Connect the AC adapter correctly.
No power is supplied.
The remaining battery
display is not correct.
The LCD monitor is
difficult to see.
Recording cannot be
performed.
Recording stops by
itself.
•
Recharge the battery pack.
•
Fully charge the battery pack, run it down, and then recharge it again.
•
If the camcorder is used for long periods of time in high or low
•
temperatures, or if the battery pack is repeatedly charged, the
amount of remaining battery may not be displayed correctly.
The LCD monitor may be difficult to see if used in bright areas
•
such as under direct sunlight.
Slide the mode switch to select the desired mode (! or #).
•
If the camcorder temperature increases, REC flashes in the LCD
•
monitor and recording stops automatically to protect the HDD.
Turn off the camcorder, wait for a while, and start recording again.
Move away from a place where the camcorder is affected by
•
excessive sound or vibration (such as a concert hall).
A malfunction may occur in the HDD of the camcorder. In this
•
case, record to a microSD card.
Insert a commercially available microSD card, and set each of the
•
[REC MEDIA FOR VIDEO] and [REC MEDIA FOR IMAGE] to [SD].
Recording stops automatically after 12 hours of continuous recording.
•
37
EN
Page 38

38
EN
Troubleshooting (Continued)
Trouble Action
Sound or video are
interrupted.
Playback
Cannot find a recorded
video.
The lamp does not flash
during battery pack
charging.
When connecting to
Other problems
the HDMI cable, the
image or sound does
not appear on the TV
properly.
HDMI-CEC functions do
not work properly, and
the TV does not work
in conjunction with the
camcorder.
Cannot upload the file to
YouTube™
Cannot export the file to
®
iTunes
If a malfunction occurs in the HDD
!
Perform [FORMAT HDD]. (All data is deleted.)
# If this does not solve the problem, contact the JVC customer service for repairs.
Sometimes playback is interrupted at the connecting section
•
between two scenes. This is not a malfunction.
Select [PLAYBACK MPG FILE] then search the video on the index
•
screen.
(Video files that have damaged management information can be
played back.)
Cancel group display and date search functions.
•
Change the setting in [REC MEDIA FOR VIDEO] or [REC MEDIA
•
FOR IMAGE]. (Files on other media are not displayed.)
Check the remaining battery pack charge.
•
(When the battery pack is fully charged, the lamp does not flash.)
When recharging in either a hot or cold environment, ensure that
•
battery is being charged within the permitted temperature range.
(If the battery pack is being recharged outside the permitted
temperature range, recharging may stop to protect the battery pack.)
When connecting to the HDMI cable, the image or sound
•
may not appear on the TV properly depending on the TV
connected. In such cases, perform the following operations.
1) Disconnect the HDMI cable and connect it again.
2) Turn off and on the camcorder again.
TVs may operate differently depending on the specifications,
•
even if they are HDMI-CEC compliant. Therefore, the HDMI-CEC
functions of the camcorder cannot be guaranteed to operate in
combination with all the TVs. In such cases, set [HDMI CONTROL]
to [OFF].
Refer to “Q&A”, “Latest Information”, “Download Information”, etc.
•
in [Click for Latest Product Info] in the help of the provided Everio
MediaBrowser software.
To reset the camcorder when it does not operate normally
! Close the LCD monitor and remove the power supply (battery pack or AC adapter) from the
camcorder, then reattach it.
# Execute [FACTORY PRESET].
Page 39

39
EN
Warning Indications
Indication Action
Set the clock. If the message still appears after setting the
•
SET DATE/TIME!
clock, the battery for the clock has been depleted. Consult your
nearest JVC dealer.
COMMUNICATING ERROR
CANNOT USE IN
VIDEO MODE
NOT FORMATTED
FORMAT ERROR!
DATA DELETION ERROR
HDD ERROR!
MEMORY CARD ERROR!
CANNOT TAKE MORE STILL
IMAGES AT THE MOMENT
DROP DETECTION WORKED AND
THE POWER IS TURNED OFF
RECORDING CANCELLED
RECORDING FAILURE
PLAYBACK FAILED
Be sure to use JVC battery packs.
•
Set [REC MEDIA FOR VIDEO] to [HDD].
•
Replace the microSD card.
•
Select [OK] and select [YES] to perform formatting.
•
Check the operating procedure, and perform once again.
•
Turn off the camcorder, and turn it on again.
•
Perform formatting. (All data is deleted.)
•
Turn off the camcorder, and turn it on again.
•
Perform formatting. (All data is deleted.)
•
Remove and re-insert the microSD card. (MultiMediaCard
•
cannot be used.)
Remove any dirt from the microSD card terminals.
•
Insert the microSD card before switching the power on.
•
Turn off the camcorder, and turn it on again.
•
Stop video recording, and then record a still image. (If an
•
microSD card is removed or inserted during video recording, a
still image cannot be recorded.)
Set [REC MEDIA FOR VIDEO] to [SD], then record to a
•
microSD card.
Turn off the camcorder and turn it on again.
•
Prevent the camcorder from vibration and shock.
•
microSD card:
Remove and re-insert the microSD card. (MultiMediaCard
•
cannot be used.)
Remove any dirt from the microSD card terminals.
•
Insert the microSD card before switching the power on.
•
HDD:
Do not allow the camcorder to be subject to impact/vibrations.
•
Page 40

40
EN
Specifications
General
Power supply
DC 11 V (Using AC adapter)
DC 7.2 V (Using battery pack)
Power consumption
Approx. 2.3 W*
* When the LED light is off and the monitor
backlight is set to [STANDARD] mode.
Rated Current Consumption: 1A
Dimensions (W x H x D)
53 mm x 68 mm x 113 mm
(2-1/8" x 2-11/16" x 4-1/2")
Weight
Approx. 305 g (0.68 lbs)
Approx. 350 g (0.78 lbs) (incl. battery pack)
Operating temperature
0°C to 40°C (32°F to 104°F)
Storage temperature
–20°C to 50°C (–4°F to 122°F)
Operating humidity
35% to 80%
Camera/LCD monitor
Pickup
1/6" (800,000 pixels) CCD
Lens
F 1.8 to 4.0, f = 2.2 mm to 77.0 mm,
35:1 power zoom lens
Filter diameter
ø30.5 mm
LCD monitor
2.7" diagonally measured,
LCD panel/TFT active matrix system
LED Light
Within 1.5 m (4.9 ft)
(recommended shooting distance)
Connectors
AV input/output
Video input: 0.8 V (p-p) to 1.2 V (p-p), 75
Video output: 1.0 V (p-p), 75
Audio input: 300 mV (rms), 50 k
Audio output: 300 mV (rms), 1 k
HDMI
HDMI Mini Connector
USB
Mini USB type A and type B,
USB 2.0 compliant
W
W
W
AC Adapter
Power requirement
AC 110 V to 240 V$, 50 Hz/60 Hz
Output
DC 11 V § , 1 A
Remote Control
Power supply
DC 3 V
Battery life
Approx. 1 year
(depending on the frequency of use)
Operating distance
Within 5 m (16.4 ft)
Operating temperature
0°C to 40°C (32°F to 104°F)
Dimensions (W x H x D)
42 mm x 14.5 mm x 91 mm
(1-11/16" x 5/8" x 3-5/8")
Weight
Approx. 30 g (0.07 lbs)
(incl. battery)
Still image
Format
JPEG
Image size
832 x 624
Image quality
FINE / STANDARD
Video
Signal format
NTSC standard
Recording/Playback format
Video:
Audio: Dolby Digital (2ch)
Recording mode (video)
W
ULTRA FINE:720 x 480 pixels, 8.5 Mbps (VBR)
FINE: 720 x 480 pixels, 5.5 Mbps (VBR)
NORMAL: 720 x 480 pixels, 4.2 Mbps (VBR)
ECONOMY: 352 x 240 pixels, 1.5 Mbps (VBR)
Recording mode (audio)
ULTRA FINE:48 kHz, 384 kbps
FINE: 48 kHz, 384 kbps
NORMAL: 48 kHz, 256 kbps
ECONOMY: 48 kHz, 128 kbps
Design and specifications subject to change
without notice.
MPEG-2
Page 41

41
EN
Approximate recordable time (for video)
h: hour/m: minute
Recording medium
Quality
ULTRA FINE 19 h 00 m 57 m 1 h 54 m
FINE 28 h 20 m 1 h 25 m 2 h 50 m
NORMAL 37 h 40 m 1 h 53 m 3 h 46 m
ECONOMY 100 h 00 m 4 h 58 m 9 h 56 m
HDD microSD Card
80 GB
4 GB 8 GB
Approximate number of images (for still image)
The HDD can record up to 9999 still images in either mode.
Recording medium
Image size/Quality
4:3
832 x 624 / FINE 990 1960 3980 7600 9999 9999
832 x 624 / STANDARD 1490 2940 5970 9999 9999 9999
256 MB 512 MB 1 GB 2 GB 4 GB 8 GB
microSD Card
Required charging/recording time (approx.)
h: hour/m: minute
Battery pack Charging time Recording time
BN-VF808U
(Provided)
BN-VF815U 2 h 40 m 4 h 15 m*
BN-VF823U 3 h 40 m 6 h 25 m*
1 h 50 m 2 h 5 m*
* When the LED light is off and the monitor backlight is set to [STANDARD] mode.
Page 42

42
EN
Cautions
AC Adapter
When using the AC adapter in areas other than
the USA
The provided AC adapter features automatic voltage
selection in the AC range from 110 V to 240 V.
USING HOUSEHOLD AC PLUG ADAPTER
In case of connecting the unit’s power cord to
an AC wall outlet other than American National
Standard C73 series type use an AC plug adapter,
called a “Siemens Plug”, as shown.
For this AC plug adapter, consult your nearest
JVC dealer.
Plug Adapter
Battery Pack
The supplied battery pack is a
lithium-ion battery. Before using
the supplied battery pack or an
optional battery pack, be sure
to read the following cautions:
To avoid hazards
•
...
do not burn.
...
do not short-circuit the terminals. Keep it away
from metallic objects when not in use. When
transporting, make sure the provided battery
cap is attached to the battery. If the battery cap
is misplaced, carry the battery in a plastic bag.
...
do not modify or disassemble.
...
do not expose the battery to temperatures
exceeding 60°C (140°F), as this may cause the
battery to overheat, explode or catch fire.
... use only specified chargers.
To prevent damage and prolong service life
•
... do not subject to unnecessary shock.
... charge within the temperature range of 10°C
to 35°C (50°F to 95°F). Cooler temperatures
require longer charging time, or in some cases
stop charging at all. Warmer temperatures
prevent complete charging, or in some cases
stop charging at all.
... store in a cool, dry place. Extended exposure
to high temperatures will increase natural
discharge and shorten service life.
... fully charge and then fully discharge the battery
every 6 months when storing the battery pack
over a long period of time.
... remove from charger or powered unit when not
in use, as some machines use current even
when switched off.
Terminals
ATTENTION:
The product you have purchased is
powered by a rechargeable battery
that is recyclable.
Please call 1-800-8-BATTERY for
information on how to recycle this
battery.
Recording Medium
Be sure to follow the guidelines below
•
to prevent corruption or damage to your
recorded data.
Do not bend or drop the recording medium,
•
or subject it to strong pressure, jolts or
vibrations.
Do not splash the recording medium with water.
•
Do not use, replace, or store the recording
•
medium in locations that are exposed to
strong static electricity or electrical noise.
Do not turn off the camcorder power or
•
remove the battery or AC adapter during
shooting, playback, or when otherwise
accessing the recording medium.
Do not bring the recording medium near
•
objects that have a strong magnetic field or
that emit strong electromagnetic waves.
Do not store the recording medium in locations
•
with high temperature or high humidity.
Do not touch the metal parts.
•
When formatting or erasing data using
•
the camcorder, only the file administration
information is changed. The data is not
completely erased from the hard disk. If you
want to completely erase all of the data,
we recommend either using commercially
available software that is specially designed for
that purpose, or by physically destroying the
camcorder with a hammer etc.
Hard Disk
Do not use the unit where it is subject to
•
vibrations or loud sounds.
If you move the unit suddenly, the drop
•
detection function may operate and the power
may be turned off.
LCD Monitor
To prevent damage to the LCD monitor, DO
•
NOT
... push it strongly or apply any shocks.
... place the camcorder with LCD monitor on the
bottom.
To prolong service life
•
... avoid rubbing it with coarse cloth.
Page 43

43
EN
Main Unit
For safety, DO NOT
•
... open the camcorder’s chassis.
... disassemble or modify the unit.
... allow inflammables, water or metallic objects to
enter the unit.
... remove the battery pack or disconnect the
power supply while the power is on.
... leave the battery pack attached when the
camcorder is not in use.
... place naked flame sources, such as lighted
candles, on the apparatus.
... expose the apparatus to dripping or splashing.
... leave dust or metal objects adhered to the
power plug or an AC wall outlet.
... insert any objects in the camcorder.
Avoid using the unit
•
... in places subject to excessive humidity or dust.
... in places subject to soot or steam such as near
a cooking stove.
... in places subject to excessive shock or vibration.
... near a television set.
... near appliances generating strong magnetic
or electric fields (speakers, broadcasting
antennas, etc.).
... in places subject to extremely high (over 40°C
or 104°F) or extremely low (under 0°C or 32°F)
temperatures.
... in places where air pressure is low (more than
3000 m (9870 ft) above the sea level).
DO NOT leave the unit
•
... in places of over 50°C (122°F).
... in places where humidity is extremely low
(below 35%) or extremely high (above 80%).
... in direct sunlight.
... in a closed car in summer.
... near a heater.
... in high places such as on a TV. Leaving the unit
in high places while a cable is connected may
result in a malfunction if the cable is caught and
the unit falls onto the floor.
To protect the unit, DO NOT
•
... allow it to become wet.
... drop the unit or strike it against hard objects.
... subject it to shock or excessive vibration during
transportation.
... keep the lens directed at extremely bright
objects for long periods.
... expose the lens to direct sunlight.
... swing it excessively when using the hand strap.
... swing the soft camcorder case excessively
when the camcorder is inside it.
... place the camcorder in dusty or sandy areas,
such as on a beach.
To prevent the unit from dropping,
•
Fasten the grip belt securely.
•
When using the camcorder with a tripod,
•
attach the camcorder to the tripod securely.
If the camcorder drops, you may be injured and
the camcorder may be damaged.
When a child uses the unit, there must be
parental guidance.
Declaration of Conformity
Model Number : GZ-MG670U
Trade Name : JVC
Responsible party : JVC AMERICAS CORP.
Address : 1700 Valley Road Wayne, N. J. 07470
Telephone Number : 973-317-5000
This device complies with Part 15 of FCC
Rules. Operation is subject to the following
two conditions: (1) This device may not cause
harmful interference, and (2) this device must
accept any interference received, including
interference that may cause undesired operation.
Changes or modifications not approved by
JVC could void the user’s authority to operate
the equipment. This equipment has been
tested and found to comply with the limits for
a Class B digital device, pursuant to Part 15 of
the FCC Rules. These limits are designed to
provide reasonable protection against harmful
interference in a residential installation. This
equipment generates, uses, and can radiate
radio frequency energy and, if not installed
and used in accordance with the instructions,
may cause harmful interference to radio
communications. However, there is no guarantee
that interference will not occur in a particular
installation. If this equipment does cause harmful
interference to radio or television reception,
which can be determined by turning the
equipment off and on, the user is encouraged
to try to correct the interference by one or more
of the following measures: Reorient or relocate
the receiving antenna. Increase the separation
between the equipment and receiver.
Connect the equipment into an outlet on a
circuit different from that to which the receiver is
connected.
Consult the dealer or an experienced radio/
TV technician for help.
This Class B digital apparatus complies with
Canadian ICES-003.
Cet appareil numérique de la classe B est
conforme à la norme NMB-003 du Canada.
Page 44

Terms
A
AC Adapter .................................................. 16, 42
AV Connection .............................................25, 34
B
Backlight Compensation ....................................24
Battery Pack ................................................16, 42
C
CD-ROM ......................................................10, 29
Clock Adjust ......................................................16
D
Date/Time Setting ...............................................5
Daylight Saving Time .........................................16
Deleting Files ....................................................26
Digest Playback .................................................22
Dubbing Playback ..............................................34
DVD Backup ...................................................... 27
DVD Burner .......................................................27
E
Export to Library Mode ......................................35
F
Finalize ..............................................................27
H
Hard Disk ..........................................................42
HDMI ................................................................. 25
I
iTunes ................................................................35
L
Language Setting .............................................. 17
LCD Monitor ................................................ 14, 42
LED Light ..........................................................21
M
Manual Recording ............................................. 24
Menu Settings ...................................................37
microSD Card .................................................... 18
N
Number of Images ............................................. 41
O
On-screen Recording Control ............................19
On-screen Zoom Control ................................... 21
P
Portable Media Player .......................................35
Q
Quick Review ...............................................19, 20
R
Recordable Time ...............................................41
Recording Medium ............................................ 42
Remaining Battery Power ..................................21
Remaining Recording Time ............................... 21
Remote Control ........................................... 11, 13
S
Speaker volume ................................................22
U
Uploading Files .................................................36
USB Cable ...................................................27, 30
V
Viewing Files on TV ...........................................25
Y
YouTube .............................................................36
Z
Zoom ................................................................. 21
44
EN
Page 45

MEMO
Page 46

2
SP
Precauciones de seguridad
ADVERTENCIA: PARA EVITAR RIESGO
DE INCENDIOS O ELECTROCUCIONES,
NO EXPONGA ESTE APARATO A LA
LLUVIA O HUMEDAD.
NOTAS:
La placa de valores nominales y la precaución de
•
seguridad se encuentran en la parte inferior y/o
en la parte posterior de la unidad principal.
La placa del número de serie se encuentra en el
•
compartimiento de la batería.
La información sobre los valores nominales y las
•
precauciones de seguridad del adaptador de CA
se encuentran en la parte superior e inferior del
mismo.
Precaución relacionada con la batería de
litio recambiable
La batería utilizada en este dispositivo presenta
riesgos de incendio y de quemaduras químicas
si no se usa correctamente.
No la recargue, ni la desmonte, ni la caliente
por encima de los 100°C, ni la incinere.
Cambie la batería por una Panasonic, Sanyo,
Sony o Maxell CR2025.
Hay peligro de explosión o riesgo de incendio si
la batería se cambia de manera incorrecta.
Deshágase de la batería usada sin demora.
•
Manténgala lejos del alcance de los niños.
•
No la desmonte ni la eche al fuego.
•
Sólo para EE.UU.-California
Este producto contiene una batería de litio CR
de tipo botón que contiene perclorato (puede
requerirse una manipulación especial). Visite
www.dtsc.ca.gov/hazardouswaste/perchlorate
No apunte el objetivo directamente hacia el sol.
Esto puede causarle lesiones en los ojos así
como también fallas en los circuitos internos de
la cámara. Esto también puede producir riesgo
de incendio o de choque eléctrico.
¡PRECAUCIÓN!
Las siguientes notas indican posibles daños a la
cámara o lesiones al usuario.
El transportar o sostener la cámara por el
monitor LCD puede resultar en la caída o en
fallas de la unidad.
No utilice el trípode sobre superficies inestables
o desniveladas ya que la cámara puede caerse,
produciendo graves daños a la misma.
¡PRECAUCIÓN!
Evite conectar los cables (audio/video, S-video,
etc.) a la cámara y dejar la unidad sobre el TV,
ya que el tropezar con uno de los cables puede
derribar la cámara resultando ésta dañada.
PRECAUCIÓN:
El enchufe de red siempre debe estar
fácilmente disponible.
ADVERTENCIA:
Las baterías, incluidas las baterías de litio
instaladas en la cámara y en el mando a
distancia, no deben dejarse expuestas a un
calor excesivo, como la luz solar directa, el
fuego o una condición similar.
Cuando el equipo se encuentra instalado en
un gabinete o en un estante, asegúrese que
tenga suficiente espacio en todos los lados para
permitir la ventilación (10 cm o más en cada lado,
en la parte superior y en la parte trasera).
No bloquee los orificios de ventilación.
(Si los orificios de ventilación están bloqueados
por un periódico, o paño, etc., el calor no podrá
salir.)
No deberá ser colocada en el aparato ninguna
fuente de llama sin protección, tales como velas
encendidas.
Cuando descarte las pilas, deberá considerar los
problemas ambientales y respetar estrictamente
las normas locales o leyes vigentes para la
eliminación de estas pilas.
La unidad no deberá ser expuesta a goteos ni
salpicaduras.
No use esta unidad en un cuarto de baño o en
lugares con agua.
Tampoco coloque ningún envase lleno de agua
o líquidos (tales como cosméticos o medicinas,
floreros, macetas, vasos, etc.) en la parte
superior de la unidad.
(Si penetra agua o líquidos en la unidad, pueden
producirse electrocuciones o incendios.)
Page 47

3
SP
INSTRUCCIONES IMPORTANTES DE
SEGURIDAD
1. Lea estas instrucciones.
2. Conserve estas instrucciones.
3. Preste atención a las advertencias.
4. Siga todas las instrucciones.
5. No utilice este aparato cerca del agua.
6. Limpie sólo con paño seco.
7. No bloquee ninguna abertura de ventilación.
Instale de acuerdo con las instrucciones del
fabricante.
8. No lo instale cerca de ninguna fuente de calor
tales como, radiadores, calefactores, cocinas,
u otros aparatos (incluyendo amplificadores)
que produzcan calor.
9. Sólo utilice dispositivos/accesorios
especificados por el fabricante.
10. Utilice sólo con la
carretilla, estante,
trípode, soporte o
mesa especificado
por el fabricante
o vendido con el
aparato. Cuando
utilice una carretilla,
sea cauteloso al
mover el conjunto de carretilla/aparato para
evitar lesiones provocadas por caídas.
11. Desenchufe este aparato durante estruendos
de relámpagos o cuando esté fuera de uso por
largo tiempo.
12. Refiera toda reparación a personal de servicio
calificado. Se requiere de reparación cuando el
aparato ha sido dañado de alguna manera, por
ejemplo, si el cable o enchufe de alimentación
está dañado, si ocurrió derrame de líquidos
o caída de objetos dentro del aparato, si el
aparato fue expuesto a la lluvia o humedad, si
no funciona normalmente, o sufrió caídas.
Recuerde que esta cámara debe usarse
únicamente para fines privados.
Está prohibido cualquier uso comercial sin la
autorización correspondiente. (Aunque grabe
acontecimientos, tales como espectáculos
o exhibiciones, para su disfrute personal, se
recomienda que obtenga una autorización previa.)
Marcas comerciales
Fabricado bajo licencia de Dolby Laboratories.
•
Dolby y el símbolo de la doble D son marcas
comerciales de Dolby Laboratories.
HDMI es una marca comercial
•
de HDMI Licensing, LLC.
Windows® es una marca
•
registrada o una marca comercial de Microsoft
Corporation en los Estados Unidos y/o en otros
países.
Macintosh es una marca registrada de Apple Inc.
•
iTunes, iMovie, iPhoto son las marcas
•
comerciales de Apple Inc., registrada en los E.U.
y otros países.
YouTube y el logotipo de YouTube son marcas
•
comerciales y/o marcas comerciales registradas
de YouTube LLC.
El resto de los nombres de productos y
•
de compañías incluidos en este manual
de instrucciones son marcas comerciales
y/o marcas registradas de sus respectivos
propietarios.
Si este símbolo aparece, sólo es
válido en la Unión Europea.
Page 48

4
SP
Guía de inicio rápido
Cargue la batería antes de grabar
Apague la videocámara e inserte la batería.
Luz de acceso
Parpadea: acceso a los
archivos
Cuando esta
luz parpadea,
no extraiga el
adaptador de CA, la
batería ni la tarjeta
microSD.
Batería
Adaptador de CA
A la toma de CA
(de 110 V a 240 V)
PRECAUCIÓN
Asegúrese de utilizar baterías JVC. Si utiliza alguna otra batería que no sea de
•
JVC, no se puede garantizar la seguridad ni el rendimiento.
Luz de alimentación/carga
Parpadea: carga en curso
Se apaga: carga terminada
Abrir la cubierta
La videocámara se
suministra con la
batería descargada.
Ajuste de la correa de mano
Ajuste la correa y apriétela.
Fije la correa mientras sostiene la
•
videocámara.
Cuando lleve la videocámara,
•
procure que no se le caiga.
Correa de sujeción
Apretar
Page 49

5
SP
Ajuste de la fecha/hora
Abra la pantalla LCD para
Q
encender la videocámara
Botón de
alimentación
Seleccione la ciudad más
T
cercana a la zona donde
vaya a usar la videocámara
Pantalla LCD
Seleccione [SÍ] en
R
10 segundos
Deslice el dedo arriba y abajo por el
sensor. A continuación, toque
Cuando desaparezca el mensaje, pulse el
•
botón de alimentación durante al menos 2
segundos para apagar la cámara y vuelva
a pulsarlo durante al menos 2 segundos.
Toque los sensores con el dedo. Los
•
sensores no funcionan si los toca con la
uña o con guantes puestos.
Seleccione [CONF. RELOJ]
S
OK.
Seleccione [ON] si el
U
horario de verano está
activado
Ajuste la fecha y la hora
V
Sensor táctil: Ajusta la fecha y la hora
: Mueve el cursor hacia la derecha
&
OK: Se pone en marcha el reloj
Page 50

6
SP
Grabación de vídeo
PRECAUCIÓN
Antes de grabar una escena importante se recomienda realizar una grabación
de prueba.
Deslice el interruptor de modo para seleccionar el modo !
Q
(vídeo)
Seleccione el modo de grabación
R
El modo cambia al pulsar
el botón.
Aparece el indicador de
grabación automática.
Inicie la grabación
S
Pulse el botón START/
STOP para iniciar la
grabación y vuelva a
pulsarlo para detenerla.
Espacio restante en
el disco duro
Calidad de vídeo
Espera de
grabación
Grabación
Page 51

7
SP
Reproducción
Seleccione el modo de reproducción
Q
El modo cambia al pulsar
el botón.
Seleccione el archivo que desee
R
Seleccione F (Toque OK)
S
Pantalla de índice
Pantalla de reproducción
Para realizar operaciones como búsqueda hacia adelante o búsqueda hacia
atrás (Z p. 22)
Para visualizar archivos en un televisor (Z p. 25)
PRECAUCIÓN
¡No olvide realizar copias tras la grabación!
Para copiar archivos en discos DVD (Z p. 27)
•
Para copiar archivos en una grabadora de vídeo/DVD (Z p. 34)
•
Para reproducir un disco creado (Z p. 28)
•
Para editar archivos en el equipo (Z p. 29)
•
Page 52

8
SP
Contenido
PREPARATIVOS
Accesorios ..............................................10
Preparación del mando a distancia .............. 11
Colocación del filtro de núcleo en
el cable USB ...............................................
11
Índice .......................................................12
Instalación en trípode ................................... 13
Indicaciones en la pantalla LCD ............14
Ajustes preliminares necesarios ..........16
Carga de la batería ....................................... 16
Ajuste de la fecha/hora .................................
Ajuste del idioma ..........................................
16
17
Otros ajustes ...........................................18
Uso de una tarjeta microSD ......................... 18
GRABACIÓN/REPRODUCCIÓN
Grabación de archivos ...........................19
Grabación de vídeo ...................................... 19
Grabación de imágenes fijas ........................
Zoom ............................................................ 21
Luz LED ........................................................
Comprobación de la carga restante de la
batería ......................................................... 21
Comprobación del espacio restante en el
soporte de grabación ..................................
20
21
21
Reproducción de archivos .....................22
Reproducción de vídeo ................................ 22
Reproducción de imágenes fijas ..................
23
Grabación manual ..................................24
Cambio al modo de grabación manual ......... 24
Compensación de contraluz .........................
Ajuste manual en el menú ............................
24
24
USO CON EL TELEVISOR
Visualización de archivos en
un televisor ...........................................25
Conexión con el televisor .............................. 25
Operación de reproducción ..........................
25
EDICIÓN
Gestión de archivos ...............................26
Captura de una imagen fija de un vídeo ....... 26
Eliminación de archivos ................................
26
COPIA
Copia de archivos ...................................27
Uso de una grabadora de DVD..................... 27
Creación de un DVD mediante un PC ..........
Copia de archivos en una grabadora
de vídeo/DVD ..............................................
29
34
Utilización con un reproductor
multimedia portátil ...............................35
Activación del modo de exportación ............. 35
Cambio del ajuste de exportación ................
Transferencia de los archivos al PC .............
35
35
Carga de archivos a sitios Web .............36
Activación del modo de carga ...................... 36
Carga de archivos ........................................
36
INFORMACIÓN ADICIONAL
Cambio de las configuraciones de
menús ....................................................37
Solución de problemas ..........................37
Indicaciones de advertencia ..................39
Especificaciones ....................................40
Precauciones ..........................................42
Términos .................................................44
Page 53

9
SP
Cómo utilizar el sensor táctil
A
B
Una vez que aparezca el menú en la pantalla LCD:
Q Deslice el dedo arriba y abajo por el sensor.
R Seleccione [AJUSTE]. (Toque OK.)
Para seleccionar un botón en pantalla que
aparezca en el lado izquierdo, toque la
parte del sensor que se encuentre junto al
botón en pantalla.
Para seleccionar un botón en pantalla que
aparezca en la parte inferior de la pantalla,
toque el botón que se encuentre debajo
de él.
Lea este MANUAL
DE INSTRUCCIONES
para disfrutar de su
VIDEOCÁMARA. Para
obtener más información
sobre las operaciones, consulte la GUÍA
incluida en el CD-ROM suministrado.
Para poder ver la GUÍA, tiene que haber
instalado el programa Adobe
Reader™ o Adobe
®
Adobe® Reader® se puede descargar
desde el sitio Web de Adobe:
http://www.adobe.com/
NOTA
Seleccione el idioma deseado con un
solo clic.
El nombre del modelo viene indicado en
la parte inferior de la videocámara.
Reader®.
®
Acrobat®
¡No olvide leer esta
información!
Realice una copia de seguridad de los
datos importantes que ha grabado
Se recomienda que guarde los datos importantes
que haya grabado copiándolos en un DVD o
cualquier otro soporte de grabación. JVC no se
responsabilizará de cualquier pérdida de datos.
Realice una grabación de prueba
Antes de grabar los datos importantes, realice
una grabación de prueba y reproduzca los
datos grabados para comprobar si el vídeo y
el sonido se han grabado correctamente.
Reinicie la videocámara si no funciona
correctamente
Cierre la pantalla LCD y quite la fuente
de alimentación (batería o adaptador de
CA) de la videocámara y, a continuación,
colóquela de nuevo.
Precauciones sobre el uso de baterías
Asegúrese de utilizar baterías JVC
•
BN-VF808U/VF815U/VF823U. Este
producto incorpora tecnología patentada y
otras tecnologías de marca, y está hecho
para utilizarse con la batería JVC y ninguna
otra.
JVC no puede garantizar la seguridad o el
rendimiento de este producto si se utiliza
con otras bate
Si la videocámara sufre una descarga
•
electrostática, apague la videocámara antes
de utilizarla de nuev
Si se produce un fallo de funcionamiento, deje de
usar inmediatamente la videocámara y contacte
www.jvc.com o por tel. al 1-800-252-5722
Durante la reparación o la revisión de la
•
videocámara, es posible que se borren
datos grabados. Antes de realizar una
reparación o revisión, haga una copia de
seguridad de todos los datos.
Como las videocámaras se pueden
utilizar en un punto de venta para realizar
demostraciones, el modo de demostración
está activado de forma predeterminada
Para desactivar el modo de demostración,
ajuste [MODO DEMO] en [OFF].
rías.
o.
Page 54

10
SP
PREPARATIVOS
AP-V20U
BN-VF808U
RM-V751U
CR2025
Accesorios
Adaptador de CA Batería Cable AV Cable USB
Mando a distancia Pila de litio
Preinstalada en el
mando a distancia.
NOTA
Asegúrese de utilizar los cables suministrados para las conexiones. No utilice ningún otro cable.
CD-ROM Filtro de núcleo
Page 55

11
SP
Preparación del mando a distancia
El mando a distancia se suministra con una pila instalada.
Antes de su uso, retire el plástico de aislamiento.
Área efectiva del haz de infrarrojos Para volver a insertar la pila
Sensor remoto
Presione la pestaña de cierre para extraer el
soporte de la pila.
Pestaña de cierre
Pila de litio
(CR2025)
Distancia efectiva:
Máx. 5 m
NOTA
El haz transmitido no será efectivo o puede
provocar un funcionamiento incorrecto si el
sensor remoto está expuesto a la luz directa
del sol o a un foco de luz muy potente.
Colocación del filtro de núcleo en el cable USB
El filtro de núcleo reduce las interferencias causadas al conectar los otros dispositivos. Conecte el
extremo del cable con el filtro de núcleo a la videocámara.
Libere el retén. 3 cm Dé una vuelta.
Conectar a la
videocámara
Page 56

12
SP
Índice
NOTA
Procure no tapar 1, 2, 3 y 4 durante la
•
filmación.
La pantalla LCD puede girar 270°.
•
Page 57

13
SP
Videocámara
Mando a distancia
! Botón de alimentación
# Miniconector HDMI (Z p. 25)
$ Botón DISPLAY (Z p. 15)
% Altavoz
& Palanca del zoom (Z p. 21)
Control de volumen del altavoz
( Botón SNAPSHOT (Z p. 20)
) Sensor táctil
* Botón OK
+ Botón MENU
, Interruptor de modo [!, #]
- Botón UPLOAD (Z p. 36)
Botón
TITLE
. Botón EXPORT (Z p. 35)
/ Botón DIRECT DVD (Z p. 28)
Botón
INFO (Z p. 21)
0 Botón PLAY/REC (Z p. 19, 20, 22, 23)
1 Luz LED (Z p. 21)
2 Sensor remoto
3 Objetivo
4 Micrófono estéreo
5 Conector de CC
6 Botón START/STOP (Z p. 19)
7 Conector AV (Z p. 25, 34)
8 Conector USB (Z p. 27, 30)
9 Zócalo de fijación del trípode
: Ranura para la tarjeta microSD
; Botón de liberación de la batería
Q Ventana de transmisión del haz de infrarrojos
R Botones ZOOM (T/W) (ampliación/reducción)
S Botón arriba
T Botón de salto hacia atrás
U Botón izquierda
V Botón atrás
W Botón PLAYLIST
X Botón START/STOP
Y Botón S.SHOT(SNAPSHOT)
Z Botón INFO
a Botón de salto hacia adelante
b Botón PLAY/PAUSE/SET
c Botón derecha
d Botón siguiente
e Botón abajo
f Botón INDEX*
g Botón DISP
* Cada vez que se presiona INDEX, la pantalla
cambia del siguiente modo:
mode
!:
Pantalla de índice
mode #:
Pantalla de índice
«
Pantalla de índice de grupos
«
Pantalla de índice de fechas
Instalación en trípode
Encaje el orificio para perno de la
videocámara con el perno del trípode
y el zócalo de fijación con el tornillo; a
continuación, gire la videocámara a la derecha
para montarla en el trípode.
NOTA
No utilice el trípode en superficies inestables
o desniveladas. La videocámara podría caer y
sufrir una avería grave.
Page 58

14
SP
Indicaciones en la pantalla LCD
4: 55 PM
NO V. 1. 2 0 09
STD
Durante la grabación de vídeo e
imágenes fijas
! Indicador de modo de grabación
seleccionado (
: Modo automático
@
3: Modo manual
# Indicador de modo de efectos especiales
$ Indicador de modo telemacro
% Indicador de luz LED (Z p. 21)
& Indicador de selección de escena
( Indicador de zoom (Z p. 21)
) Indicador de soporte de grabación
* Indicador de detección de caída (Aparece
si [SENSOR DE GRAVEDAD] está ajustado
en [OFF].)
+ Indicador de balance de blancos
, Indicador de retroiluminación de la pantalla
- Indicador de batería
. Fecha/hora (Z p. 16)
/ Indicador de ajuste de enfoque manual
0 Indicador de compensación de contraluz
(Z p. 24)
1 Indicador de control de brillo
Z p. 24)
.: Indicador de control de área de
fotometría
2 Velocidad de obturación
Sólo durante la grabación de vídeo
! Indicador de modo
# Indicador de modo EXPORT (Z p. 35)
$ Contador
% Indicador de modo de carga (Z p. 36)
: Indicador de entrada analógica
A
& Calidad de vídeo:
(FINA), D (NORMAL), E (ECONÓMICA)
C
( Tiempo restante
) MREC : (Aparece durante la grabación.)
: (Aparece durante el modo de espera
MQ
de grabación.)
* Indicador de Estabilizador de imagen digital
(DIS) (Aparece si [DIS] está ajustado en
[OFF].)
+ Indicador de disparo (Z p. 19)
, Indicador de reducción de viento
- Indicador de evento
(ULTRAFINA),
B
Sólo durante la grabación de
imágenes fijas
! Indicador de modo
# Indicador de enfoque (Z p. 20)
$ Calidad de imagen:
(estándar)
% Número restante de tomas
& Indicador de disparo (Z p. 20)
( Indicador de modo de obturación
) Indicador de temporizador
(fina) o
Page 59

15
SP
Durante la reproducción de vídeo
8
4: 55 PM
NO V. 1. 2 0 0 9
4: 55 PM
NO V. 1. 2 0 09
! Indicador de modo
# Indicador de reproducción de lista de
reproducción (Aparece al reproducir una
lista de reproducción.)
$ Indicador de revisión rápida (Z p. 19)
% Calidad de vídeo:
(FINA), D (NORMAL), E (ECONÓMICA)
C
& Contador
( Modo de reproducción
Reproducción
:
F
Pausa
:
Q
Búsqueda hacia adelante
:
K
Búsqueda hacia atrás
:
J
Cámara lenta hacia adelante
:
QF
Cámara lenta hacia atrás
:
PQ
(El número de la izquierda indica la
velocidad.)
) Indicador de batería
* Fecha/hora (Z p. 16)
+ Indicador de nivel de volumen
, Salida con 1080p
(ULTRAFINA),
B
Durante la reproducción de imágenes
fijas
! Indicador de modo
# Indicador de revisión rápida (Z p. 20)
$ Número de carpeta o archivo
% Indicador de reproducción automática de
las imágenes
& Indicador de batería
( Fecha/hora (Z p. 16)
) Salida con 1080p
Cambio de modo de indicación en la
pantalla LCD
Cada vez que se toca
indicaciones de la pantalla LCD cambian
del siguiente modo:
En modo de grabación:
Todas las indicaciones/Indicaciones de las
funciones seleccionadas
En modo de reproducción:
Todas las indicaciones/Sólo la fecha y la
hora/Sin indicaciones
DISPLAY, las
Page 60

16
SP
Ajustes preliminares necesarios
Para extraer la batería
Carga de la batería
1 Cierre la pantalla LCD para apagar la
videocámara.
2 Instale la batería y conecte el
adaptador de CA.
Adaptador de CA
A la toma de CA
(de 110 V a 240 V)
La luz de alimentación/carga parpadea
•
para indicar que la carga se ha iniciado.
La carga finaliza cuando la luz se
•
apaga.
Para comprobar la carga restante de la
batería
Vea la página 21.
Batería Tiempo de carga
BN-VF808U
(suministrada)
BN-VF815U 2 h 40 m
1 h 50 m
NOTA
La videocámara también se puede usar con
•
sólo el adaptador de CA.
El tiempo de grabación real puede reducirse
•
en función del entorno de grabación, como
cuando se graban escenas de movimiento
rápido.
No estire ni doble el enchufe o el cable
•
del adaptador de CA. Se podría dañar el
adaptador de CA.
Ajuste de la fecha/hora
1 Abra la pantalla LCD para encender la
videocámara.
2 Toque MENU.
3 Seleccione [CONFIG. PANTALLA].
BN-VF823U 3 h 40 m
4 Seleccione [AJUS.RELOJ].
Page 61

17
SP
5 Seleccione [CONF. RELOJ].
6 Seleccione la ciudad más cercana
a la zona donde vaya a usar la
videocámara.
El área seleccionada destaca.
Ciudad principal del
área seleccionada
Horas de diferencia
GMT
7 Seleccione [ON] si el horario de
verano está activado.
6 Seleccione la ciudad más cercana a
la zona del viaje.
Para volver a la pantalla anterior
Seleccione
Para salir de la pantalla
Seleccione [SALIR].
Ajuste del idioma
El idioma en el que se muestra la información
de la pantalla puede cambiarse.
@.
1 Abra la pantalla LCD para encender la
videocámara.
2 Toque MENU.
8 Ajuste la fecha y la hora.
Cambie el ajuste utilizando el sensor táctil
y seleccione [
] para ajustar.
&
9 Seleccione [GUARD].
Para reiniciar el ajuste, seleccione [SALIR].
Ajuste del reloj a la hora local durante los viajes
Después de realizar los pasos 1-4 (Z p. 16)
5 Seleccione [CONF. ÁREA].
3 Seleccione [CONFIG. PANTALLA].
4 Seleccione [LANGUAGE].
5 Seleccione un idioma.
Para volver a la pantalla anterior
Seleccione
Para salir de la pantalla
Seleccione [SALIR].
@.
Page 62

Otros ajustes
Uso de una tarjeta microSD
La videocámara está preajustada de fábrica
para grabar en el disco duro integrado. El
soporte de grabación se puede cambiar por
una tarjeta microSD.
Se ha confirmado el funcionamiento con las
•
siguientes tarjetas microSD:
- Panasonic
- TOSHIBA
- SanDisk
- ATP
Grabación de vídeo:
Tarjeta microSDHC compatible de clase 4 o
superior (de 4 GB a 8 GB)
Grabación de imágenes fijas:
Tarjeta microSD (de 256 MB a 2 GB) o
tarjeta microSDHC (de 4 GB a 8 GB)
Si se utilizan otros soportes, pueden
•
producirse errores en la grabación de datos
o pueden perderse datos ya grabados.
Las MultiMediaCards no son compatibles.
•
Para extraer la tarjeta microSD
Presione la tarjeta microSD una vez.
Cuando la tarjeta se expulse parcialmente,
extráigala.
NOTA
La tarjeta microSD sólo se puede insertar
•
y extraer con la cámara apagada. De lo
contrario, los datos de la tarjeta podrían
dañarse.
No toque el terminal de la parte posterior de
•
la etiqueta.
Cambio del soporte de grabación
Ajuste [SOPORTE GRAB. VÍDEO] y
[SOPORTE GRAB. IMAGEN] en [SD].
Inserte una tarjeta microSD
Preparativos:
Cierre la pantalla LCD para
videocámara.
apagar la
1 Abra la tapa de la tarjeta microSD.
2 Inserte firmemente la tarjeta por su
lado recortado.
3 Cierre la tapa de la tarjeta microSD.
18
SP
Formateo de una tarjeta microSD cuando
se utiliza por primera vez
Seleccione [FORMATEAR TARJETA SD]
para formatear la tarjeta.
Page 63

SNAPSHOT
GRABACIÓN/REPRODUCCIÓN
Grabación de archivos
Grabación de vídeo
Deslice el interruptor de modo
para seleccionar el modo !
(vídeo).
Para detener la grabación
Pulse
START/STOP de nuevo.
Para ver la última escena grabada
Seleccione
en pausa. Si selecciona
reproducción, se elimina la escena.
Para grabar una imagen fija durante la
grabación de vídeo
Pulse
mientras la grabación está
A
SNAPSHOT.
$ durante la
Pulse PLAY/REC para seleccionar
el modo de grabación.
Pulse START/STOP para empezar
la grabación.
Tiempo restante aproximado
para la grabación
También puede iniciar/detener la
grabación seleccionando [REC] en la
pantalla LCD.
(Control de grabación en pantalla)
Para cambiar la calidad de vídeo
Cambie los ajustes de [CALIDAD DE
VÍDEO].
Para cambiar la relación de aspecto de la
imagen (16:9/4:3)
Cambie los ajustes de [SELECC. REL.
ASPECTO].
NOTA
El modo de grabación de vídeo se selecciona automáticamente al apagar la videocámara y
•
volverla a encender.
Si no se realiza ninguna operación durante 5 minutos cuando la videocámara está encendida,
•
ésta se apaga automáticamente para ahorrar energía.
No mueva ni sacuda la videocámara bruscamente durante la grabación.
•
De lo contrario, puede que se grabe el sonido (zumbido) de la unidad de disco duro.
19
SP
Page 64

20
SP
Grabación de archivos (continuación)
Grabación de imágenes fijas
Deslice el interruptor de modo
para seleccionar el modo #
(imagen fija).
Para ver la última imagen grabada
Seleccione
tras la toma. Si selecciona
A
$ durante la reproducción, se elimina la
imagen.
Para cambiar la calidad de la imagen
Cambie los ajustes de [CALIDAD DE
IMAGEN].
Para grabar imágenes fijas
continuamente
Ajuste [TOMA CONTINUA] en [MODO DE
CAPTURA].
Pulse PLAY/REC para seleccionar
el modo de grabación.
Mantenga pulsado SNAPSHOT
hasta la mitad de su recorrido.
El indicador ? se vuelve verde cuando
la imagen capturada queda enfocada.
Pulse SNAPSHOT hasta el fondo
para tomar una imagen fija.
NOTA
El Estabilizador de imagen digital (DIS) no funciona durante la grabación de imágenes fijas.
•
Si no se realiza ninguna operación durante 5 minutos cuando la videocámara está encendida,
•
ésta se apaga automáticamente para ahorrar energía.
Page 65

21
SP
Zoom
Preparativos:
Seleccione el modo ! o #.
•
Seleccione el modo de grabación.
•
Reducción Ampliación
W: Gran angular T: Telefoto
También puede reducir/ampliar seleccionando
[W] o [T] en la pantalla LCD. (Control de zoom
en pantalla)
Porcentaje de zoom (preajuste de fábrica)
modo ! modo #
[80X/DIGITAL] [35X/ÓPTICA]
Para cambiar el porcentaje de zoom
máximo (sólo modo !)
Cambie los ajustes de [ZOOM].
NOTA
La filmación en macro (acercándose hasta
unos 5 cm del sujeto) es posible cuando la
palanca del zoom está totalmente ajustada
en
W.
Luz LED
Preparativos:
Seleccione el modo ! o #.
•
Seleccione el modo de grabación.
•
1 Toque MENU.
2 Seleccione [ILUMINACIÓN].
3 Seleccione el ajuste que desee.
La luz LED permanece
ON
AUTO
OFF
encendida independientemente
de las condiciones del entorno.
La luz LED se enciende
automáticamente cuando la
luminosidad es insuficiente.
Desactiva esta función.
Comprobación de la carga restante de la batería
Modo !:
Pulse INFO dos veces o pulse INFO y
seleccione ;.
Modo #:
Pulse INFO.
Para salir de la pantalla
Seleccione [SALIR] o pulse
NOTA
El tiempo de grabación restante sólo debe
utilizarse a modo orientativo. Se muestra en
unidades de 10 minutos.
INFO.
Comprobación del espacio restante en el soporte de grabación
Preparativos:
Seleccione el modo !.
•
Seleccione el modo de grabación.
•
Pulse INFO.
El tiempo máximo de grabación se muestra
para cada modo de calidad de vídeo.
Para cambiar la calidad de vídeo
1) Seleccione la calidad de vídeo.
2) Seleccione [AJUSTE].
Para salir de la pantalla
Seleccione [SALIR].
Page 66

22
SP
Reproducción de archivos
Reproducción de vídeo
Deslice el interruptor de modo
para seleccionar el modo !
(vídeo).
Para pasar a la página anterior o siguiente
Toque [
] o [ ] durante más de un segundo.
Para repruducir por unos segundos
desde la escena inicial de cada vídeo
Toque [
NOTA
En algunos casos, partesdel vídeo que no ondel
•
comienzo son reproducidos.
Alugunos videos no podrán reproducirsedeltodo.
•
Operaciones durante la reproducción de
vídeo, botones en pantalla
Volver a la primera escena del archivo
:
N
Ir a la primera escena del siguiente archivo
:
O
Volver a la pantalla de índice
:
L
Búsqueda hacia atrás (durante la reproducción)
:
J
Reproducción hacia atrás fotograma a
:
E
fotograma (durante la pausa)*
Reproducción
:
F
Pausa
:
Q
Búsqueda hacia adelante (durante la
:
K
reproducción)
Reproducción hacia adelante fotograma a
:
G
fotograma (durante la pausa)*
* La reproducción en cámara lenta empieza al
tocar continuamente el botón del sensor que hay
debajo de
].
/ G un rato.
E
Pulse PLAY/REC para seleccionar
el modo de reproducción.
Aparece la pantalla de índice.
Seleccione el archivo que desee.
Para eliminar un vídeo
Seleccione
reproducción.
Para cambiar el número de miniaturas
(6 miniaturas/20 miniaturas)
Mueva la palanca del zoom hacia [W].
$ cuando se detenga la
Volumen del altavoz
— : Bajar el
volumen
+ : Subir el
volumen
Page 67

23
SP
Reproducción de imágenes fijas
Deslice el interruptor de modo
para seleccionar el modo #
Pulse PLAY/REC para seleccionar
el modo de reproducción.
(imagen fija).
Aparece la pantalla de índice.
Seleccione el archivo que desee.
Para pasar a la página anterior o siguiente
Toque [ ] o [ ] durante más de un
segundo.
Para eliminar una imagen fija
Seleccione
Para cambiar el número de miniaturas
(6 miniaturas/20 miniaturas)
Mueva la palanca del zoom hacia [W].
P
F
L
N
F
Q
O
$.
Operaciones durante la reproducción de imágenes fijas, botones en pantalla
Cambiar el orden de la reproducción automática hacia atrás
:
Cambiar el orden de la reproducción automática hacia adelante
:
Volver a la pantalla de índice
:
Ver el archivo anterior
:
Iniciar la reproducción automática
:
Finalizar la reproducción automática
:
Ver el archivo siguiente
:
Page 68

24
SP
Grabación manual
El modo de grabación manual permite ajustar
manualmente el enfoque, el brillo de la
pantalla, etc.
Cambio al modo de grabación manual
Preparativos:
Seleccione el modo ! o #.
•
Seleccione el modo de grabación.
•
Seleccione [A/M] dos veces.
Para regresar al modo de grabación
automático
Seleccione [A/M] para que aparezca el
indicador
Compensación de contraluz
La compensación de contraluz proporciona
más claridad al sujeto aumentando la
exposición.
En el modo de grabación manual:
Seleccione -.
4.
Ajuste manual en el menú
En el modo de grabación manual:
1 Toque MENU.
2 Seleccione [AJUSTE MANUAL].
3 Seleccione el menú que desee.
4 Seleccione el ajuste que desee.
Según los ajustes que seleccione, podrá
ajustar el valor mediante el sensor táctil.
Para volver a la pantalla anterior
Seleccione
Para salir de la pantalla
Seleccione [SALIR].
@
.
Para cancelar la compensación de
contraluz
Seleccione
NOTA
Si se pone la pantalla LCD al revés, no se
muestra
pantalla LCD se encuentre en la posición
normal.
- de nuevo.
-. Cambie el ajuste cuando la
Page 69

25
SP
USO CON EL TELEVISOR
Visualización de archivos en un televisor
Esta videocámara está diseñada para ser
utilizada con señales de televisión en color de
tipo NTSC o de alta definición. No se puede
usar con un televisor de otra norma.
Conexión con el televisor
Los vídeos se pueden emitir por el conector
AV o el miniconector HDMI.
Para realizar la conexión con el conector
AV
Preparativos:
Ajuste [CAMBIAR E/S ANALG] en [SALIDA].
•
Apague todas las unidades.
•
Adaptador
de CA
A la toma de
CA
Conector de CC
Conector AV
Cable AV
Preparativos: Apague todas las unidades.
Miniconector HDMI
Cable HDMI (opcional)
(Cable HDMI de tamaño mini a
tamaño completo)
Conector HDMI
NOTA
Al realizar la conexión con el cable HDMI,
•
la imagen o el sonido podrían no emitirse
correctamente en el televisor según
el televisor conectado. En tales casos,
realice las siguientes operaciones.
1) Desconecte el cable HDMI y vuelva a
conectarlo.
2) Apague la videocámara y vuelva a
encenderla.
Conector de CC
Adaptador
de CA
A la toma de CA
Conector de entrada AV
Para realizar la conexión con el
miniconector HDMI
Le recomendamos utilizar el cable HDMI de
categoría 2 (cable de alta velocidad).
Operación de reproducción
Una vez realizada la conexión con el televisor
1
Encienda la videocámara y el televisor.
2
Ajuste el televisor en el modo de vídeo.
3 (Sólo cuando se conecta la videocámara
a la grabadora de vídeo/DVD)
Encienda la grabadora de vídeo/DVD
y ajuste la grabadora de vídeo/DVD
en el modo de entrada AUX.
4 Inicie la reproducción en la
videocámara. (Z p. 22, 23)
Page 70

26
SP
EDICIÓN
Gestión de archivos
PRECAUCIÓN
No extraiga el soporte de grabación ni
realice ninguna otra operación (por ejemplo,
apagar la alimentación) mientras se accede
a los archivos. Asimismo, asegúrese de
utilizar el adaptador de CA suministrado, ya
que los datos del soporte de grabación se
pueden dañar si la batería se agota durante
la operación. Si los datos del soporte de
grabación se dañan, deberá formatear el
soporte de grabación para volver a usarlo.
Captura de una imagen fija de un
vídeo
Puede capturar la escena deseada de un
vídeo grabado y guardarla como imagen fija.
Preparativos:
Seleccione el modo !.
•
Seleccione el modo de reproducción.
•
Pulse SNAPSHOT cuando la
reproducción esté en pausa.
NOTA
Las imágenes fijas capturadas se guardan
•
con una resolución de 640 x 360 (si el vídeo
se ha grabado en 16:9) o 640 x 480 (si el
vídeo se ha grabado en 4:3). La imagen se
puede alargar en sentido horizontal o vertical
dependiendo de la calidad del archivo de
vídeo de origen.
La función de toma continua no se puede
•
utilizar para capturar imágenes.
No es posible capturar vídeo durante la
•
reproducción.
Eliminación de archivos
Los archivos protegidos no se pueden
•
eliminar. Para eliminarlos, primero debe
anular la protección.
Una vez eliminados, los archivos no se
•
pueden restaurar. Compruebe los archivos
antes de eliminarlos.
Preparativos:
Seleccione el modo ! o #.
•
Seleccione el modo de reproducción.
•
1 Toque MENU.
2 Seleccione [ELIMINAR].
3 Seleccione [ACTUAL].
4 Seleccione [SÍ].
Se puede seleccionar el archivo anterior o
siguiente seleccionando
Para salir de la pantalla
Seleccione [SALIR].
{ o }.
Page 71

27
SP
COPIA
Copia de archivos
Tipos de copia y dispositivos conectables
La videocámara
Se pueden copiar archivos
entre la unidad de disco
duro y la tarjeta microSD en
la propia videocámara.
Grabadora de DVD
(CU-VD50/CU-VD3)
Se pueden copiar en discos
DVD archivos grabados en
esta videocámara.
PC
Puede copiar archivos de
la videocámara a un DVD
mediante un PC.
Grabadora de vídeo/DVD
Se pueden copiar en una
grabadora de vídeo/DVD
vídeos grabados en esta
videocámara.
NOTA
Se recomienda utilizar la grabadora de DVD
JVC (CU-VD50/CU-VD3). Si se utiliza el
modelo CU-VD20 o CU-VD40, el tiempo
de grabación puede tardar aprox. 2 veces
más que el tiempo indicado en el manual de
instrucciones de la grabadora de DVD.
Uso de una grabadora de DVD
Discos compatibles: DVD-R, DVD-RW de 12 cm
En cuanto a los discos DVD-R, sólo pueden
•
utilizarse discos DVD-R vírgenes. En cuanto a
los discos DVD-RW, pueden emplearse también
discos DVD-RW usados, pero es necesario
formatearlos antes de grabar. Al formatear un
disco se elimina todo el contenido grabado en el
disco hasta ese momento.
No pueden utilizarse discos de doble capa.
•
En cuanto a la finalización después de la copia
El disco se finaliza automáticamente para que
pueda reproducirse en otros dispositivos. Tras
finalizarse, el disco sólo puede reproducirse y no
pueden añadirse más archivos.
Conexión con una grabadora de DVD
Preparativos:
Primero encienda la videocámara y luego
encienda la grabadora de DVD.
Conector de CC
Conector USB
Adaptador de
CA
Cable USB*
A la toma de CA
Conector USB
NOTA
Consulte también el manual de instrucciones de
•
la grabadora de DVD opcional.
* Utilice el cable USB suministrado con la
grabadora de DVD.
Grabadora de DVD
Page 72

28
SP
Copia de archivos (continuación)
Copia de seguridad de todos los archivos
Preparativos:
Conecte la videocámara a la grabadora de DVD.
•
Seleccione el modo !.
•
1 Seleccione [SELECC. ENTRE TODO].
2 Seleccione el menú que desee.
[TODAS LAS ESCENAS]:
•
Se copian todos los archivos del soporte
de grabación.
[ESCENAS SIN GUARDAR]:
•
Los archivos que nunca se han copiado
en un disco DVD se seleccionan y copian
automáticamente.
3
Seleccione el número de disco que desee.
Si selecciona [TODO], se crearán todos
•
los discos de la lista.
Para previsualizar escenas, seleccione
•
[CHECK].
La marca indica que el disco ya está creado.
•
4 Seleccione [SÍ] o [NO].
[SÍ]: Muestra las miniaturas por grupo.
•
[NO]: Muestra las miniaturas por fecha.
•
5 Seleccione [EJECUTAR].
Los archivos se copian en el disco.
•
Cuando aparezca [HECHO], toque
Si aparece [INSERTAR SIGUIENTE
•
DISCO PULSAR [CANCELAR] PARA
ABANDONAR LA CREACIÓN], cambie
de disco. Los archivos restantes se
copiarán en el segundo disco.
Para cancelar la copia, seleccione
•
[CANCELAR].
OK.
Copia de archivos de vídeo que nunca
se han copiado
Los archivos que nunca se han copiado
en un disco DVD se seleccionan y copian
automáticamente.
1 Abra la pantalla LCD para encender la
videocámara.
2 Pulse DIRECT DVD.
3 Seleccione [EJECUTAR].
Se inicia la creación del disco DVD.
•
Cuando aparezca [HECHO], toque
Si aparece [INSERTAR SIGUIENTE
•
DISCO PULSAR [CANCELAR] PARA
ABANDONAR LA CREACIÓN], cambie
de disco. Los archivos restantes se
copiarán en el segundo disco.
Para cancelar la creación del DVD,
•
seleccione [CANCEL].
Para salir de la pantalla
1) Seleccione [SALIR].
2) Cuando aparezca [¿SALIR?], seleccione
[SÍ].
Para reproducir el disco creado con la
videocámara
1) Conecte la videocámara a la grabadora
de DVD.
2) Primero encienda la videocámara y luego
encienda la grabadora de DVD.
3) Seleccione [REPRODUCCIÓN].
4) Seleccione la carpeta que desee.
5) Seleccione la fecha de creación del disco.
6) Seleccione el archivo que desee. Para
volver a la pantalla anterior, seleccione
@.
OK.
Page 73

29
SP
Creación de un DVD mediante un PC
Lea el “Convenio de licencia del software de
JVC” del CD-ROM de instrucciones antes de
instalar el software.
Es posible copiar los datos de la videocámara
y crear un DVD utilizando un PC.
Instalación de software en el PC
Q
Requisitos del sistema
Windows Vista
Sistema
operativo:
CPU: Cualquiera de las siguientes:
RAM: 1 GB como mínimo
Windows Vista
Home Basic (SP1)
Home Premium (SP1)
(32 bits, preinstalados)
Intel® Pentium® 4, 1,6 GHz o superior
•
Intel® Pentium® M, 1,4 GHz o superior
•
Intel® CoreTM Duo, 1,5 GHz o superior
•
®
Preparativos:
Inserte el CD-ROM suministrado en el PC.
En Windows Vista aparece el cuadro de
diálogo de reproducción automática.
1 Haga clic en [Easy Installation].
Siga las instrucciones que aparecen en
pantalla.
2 Haga clic en [Siguiente].
Windows XP
Sistema
operativo:
CPU: Cualquiera de las siguientes:
RAM: 512 MB como mínimo
•
•
•
Windows® XP
Home Edition (SP2/SP3)
Professional (SP2/SP3)
(preinstalado)
Intel® Pentium® 4, 1,6 GHz o superior
•
Intel® Pentium® M, 1,4 GHz o superior
•
Intel® CoreTM Duo, 1,5 GHz o superior
•
Para comprobar las especificaciones del PC
Haga clic con el botón secundario del ratón
en [Equipo] (o [Mi PC]) en el menú [Inicio] y
seleccione [Propiedades].
NOTA
Asegúrese de que el PC tenga una unidad
de DVD grabable.
Si el sistema no cumple los requisitios,
se recomienda copiar los archivos con la
grabadora de DVD.
Usuarios de Macintosh pueden utilizar
el software incluído con dicho Macintosh
(iMovie ’08, iPhoto) para copiar archivos a la
computadora.
(Z p. 27)
3 Haga clic en [Finalizar].
Se crea un icono de Everio MediaBrowser
en el escritorio.
Para ver la guía de instrucciones de
Everio MediaBrowser
1) Haga doble clic en el ícono de Everio
MediaBrowser.
2)
Haga clic en [Ayuda], y clic en [Ayuda de
MediaBrowser].
Clic
Clic
Page 74

30
SP
Copia de archivos (continuación)
Copia de seguridad en un PC
R
Preparativos:
Instale el software en el PC.
•
Asegúrese de que dispone de suficiente
•
espacio libre en el disco duro del PC.
Cierre la pantalla LCD para apagar la videocámara.
•
Cable USB
Conector USB
Conector USB
1 Abra la pantalla LCD para encender la
videocámara.
2 Seleccione [HACER COPIA DE
SEGURIDAD].
3 Haga clic en [Todo el volumen en la
videocamara] y en [Proximo].
4 Haga clic en [Comienzo].
Se inicia la copia de seguridad.
Para desconectar la videocámara del PC
1)
Haga clic con el botón secundario del ratón
en el icono (Quitar hardware con seguridad)
en la barra de tareas y seleccione
[Extracción segura de Dispositivo de
almacenamiento masivo USB].
2) Siga las instrucciones en pantalla y
asegúrese de que el dispositivo se pueda
quitar de forma segura.
3) Desconecte el cable USB y cierre la
pantalla LCD.
NOTA
Se tardará un tiempo en realizar una copia de
seguridad de muchos vídeos.
El programa Everio MediaBrowser se inicia
en el PC.
Page 75

31
SP
Creación de listas personalizadas
S
para organizar los archivos
Puede elaborar una lista personalizada de
ciertos temas (por ejemplo, viajes, certámenes
deportivos) e incluir los archivos relacionados
con estos temas en la lista personalizada.
Preparativos:
Realice una copia de seguridad en el PC.
1 Haga doble clic en el icono y abra el
calendario.
2 Seleccione [Solo filmes].
3 Haga clic en [+].
5 Haga doble clic en la fecha de
grabación.
Se muestran los archivos grabados en esa
fecha.
6 Arrastre y suelte los archivos en la
lista personalizada.
Para agregar más archivos a la lista
personalizada, repita los pasos
5 y 6.
4 Escriba el nombre de la nueva
lista personalizada y haga clic en
[Aceptar].
Page 76

32
SP
Copia de archivos (continuación)
Copia de archivos en DVD
T
Preparativos:
Utilice un disco DVD grabable. (Se recomienda
utilizar un disco DVD-R.)
1 Seleccione la lista personalizada y
haga clic en [Crear disco].
2 Haga clic en [Selecciona los archivos
individualmente] y haga clic en
[Proximo].
Para añadir todos los archivos en discos
DVD, haga clic en [Seleccionar todos los
archivos visualizados] y vaya al paso
4.
3 Arrastre y suelte el archivo en la parte
inferior y haga clic en [Proximo].
4 Escriba el nombre del disco,
seleccione el estilo del menú superior
y haga clic en [Proximo].
5 Haga clic en [Comienzo].
NOTA
Para obtener información detallada sobre
•
el funcionamiento de Everio MediaBrowser,
haga clic en [Ayuda] y consulte [Ayuda de
MediaBrowser].
Adobe® Reader® debe estar instalado para
•
poder leer [Ayuda de MediaBrowser]. Adobe
Reader® puede cargarse desde el sitio web
de Adobe:
Para obtener ayuda sobre el funcionamiento
•
del software, consulte la información de
soporte. (
http://www.adobe.com
Z p. 33)
®
Page 77

33
SP
Estructura de carpetas y extensiones
[DCIM]
[SD_VIDEO]
[EXTMOV]
[PRIVATE]
[MGR_INFO]
[PRGXXX]
[PRGXXX]
[PRGXXX.PGI]
[MOVXXX.MOI]
[MOV_XXX.MOD]
[DEM_XXX.MPG]
[XXXJVCSO]
[MOVXXX.MOD]
Soporte de grabación
Contiene las carpetas de imágenes fi jas.
Contiene las carpetas de archivos de vídeo.
Información de gestión* del soporte en conjunto
Información de gestión*
Archivo de vídeo
Información de gestión* de los archivos de vídeo
El archivo de vídeo con información de gestión está dañado.
Archivo de vídeo de demostración
Contiene los archivos de información de gestión
relativos a la información de eventos y/o a la creación de
DVD de los archivos obtenidos con la videocámera.
* Información como la fecha y la hora de grabación, grabada con el archivo de vídeo.
X = número
Información de asistencia al cliente
El uso de este software está autorizado de acuerdo con las condiciones de la licencia de software.
JVC
Cuando se ponga en contacto con la oficina o agencia JVC más cercana de su país (consulte la Red de
servicios internacionales JVC en
consultas sobre este software, tenga a mano la siguiente información.
Nombre del producto, modelo, problema, mensaje de error
•
PC (fabricante, modelo (sobremesa/portátil), CPU, sistema operativo, memoria (MB), espacio
•
disponible en el disco duro (GB))
Tenga en cuenta que puede tardar un poco responder a sus preguntas según cuál sea el asunto.
JVC no puede responder a preguntas relativas al funcionamiento básico del PC o a las especificaciones
o el rendimiento del sistema operativo, otras aplicaciones o controladores.
http://www.jvc-victor.co.jp/english/worldmap/index-e.html) para hacer
Pixela
Europa (Reino Unido, Alemania,
Página web: http://www.pixela.co.jp/oem/jvc/mediabrowser/e/
Consulte en nuestro sitio web la información y las descargas más recientes.
Región Idioma Nº de teléfono
EE.UU. y Canadá
Francia y España)
Otros países de Europa
Asia (Filipinas)
China Chino +86-21-5385-3786
Inglés/alemán/francés/español +800-1532-4865 (gratuito)
Inglés/alemán/francés/español/
Inglés +1-800-458-4029 (gratuito)
italiano/holandés
Inglés +63-2-438-0090
+44-1489-564-764
Page 78

34
SP
Copia de archivos (continuación)
Copia de archivos en una grabadora de vídeo/DVD
Preparativos:
Cree una lista de reproducción.
•
Ajuste [CAMBIAR E/S ANALG] en [SALIDA].
•
Apague todas las unidades.
•
Para realizar la conexión con los
conectores AV (copia analógica)
Adaptador de CA
A la toma de
CA
Grabadora de vídeo/DVD
Conector de CC
Conector AV
Cable AV
1 Abra la pantalla LCD para encender la
videocámara.
2 Ajuste la grabadora de vídeo/DVD en
el modo de entrada AUX.
Asegúrese de que las imágenes de
la videocámara se hayan introducido
correctamente en la grabadora de vídeo/
DVD.
3 Reproduzca las listas de
reproducción en la videocámara.
1) Toque MENU.
2) Seleccione [REPROD. COPIA].
3) Seleccione la lista de reproducción que
desee.
4) Seleccione [SÍ]. (Aparece una pantalla
negra durante 5 segundos en la primera
y en la última escena.)
4 En el punto donde desee iniciar
la copia, inicie la grabación en la
grabadora de vídeo/DVD.
Consulte el manual de instrucciones de la
grabadora de vídeo/DVD.
Para detener la copia
Detenga la grabación en la grabadora de
vídeo/DVD.
Para ocultar la fecha o los iconos de la
pantalla
Cambie los ajustes de [VER EN TV].
Cambio de modo de indicación en la
pantalla LCD
Cada vez que se toca
Conector AV
(Entrada)
indicaciones de la pantalla LCD cambian
del siguiente modo:
En modo de grabación:
Todas las indicaciones/Indicaciones de las
funciones seleccionadas
En modo de reproducción:
Todas las indicaciones/Sólo la fecha y la
hora/Sin indicaciones
DISPLAY, las
Page 79

35
SP
Utilización con un reproductor multimedia portátil
Activación del modo de exportación
Los vídeos grabados en el modo de
exportación se pueden transferir fácilmente a
iTunes®. Todos los archivos con el ajuste de
exportación activado se transferirán al PC.
Para obtener más información sobre como
realizar la transferencia, consulte la guía de
funcionamiento de MediaBrowser que aparece
en el CD-ROM.
Preparativos:
Seleccione el modo !.
•
Seleccione el modo de grabación.
•
Pulse EXPORT dos veces.
Para desactivar el modo de exportación
Pulse
EXPORT dos veces.
Cambio del ajuste de exportación
Los vídeos grabados se pueden asignar al
ajuste de exportación.
Preparativos:
Seleccione el modo !.
•
Seleccione el modo de reproducción.
•
1 Pulse EXPORT.
Para cancelar el ajuste de exportación
Seleccione el archivo y elija [
Para salir de la pantalla
1) Seleccione [SALIR].
2) Seleccione [SÍ].
Para confirmar el ajuste de exportación
Pulse EXPORT en la pantalla de índice.
Transferencia de los archivos al PC
Preparativos:
Instalar iTunes® en un PC.
•
http://www.apple.com/itunes/
] de nuevo.
1 Conecte la videocámara al PC con el
cable USB.
2 Seleccione [INSCR. EN LIBRARY].
Todos los archivos con el ajuste de
exportación activado se transferirán al PC.
Si no puede exportar el archivo a iTunes
Consulte “Q&A”, “Información más reciente”,
“Información de descarga”, etc., en [Clic para
Ultima Info de Producto] en la ayuda del
software Everio MediaBrowser suministrado.
®
2 Seleccione el archivo y elija [ ].
Para comprobar el contenido del archivo,
•
seleccione [CHECK].
3 Seleccione [SALIR].
Page 80

Carga de archivos a sitios Web
Activación del modo de carga
Tras la grabación se puede cargar el archivo
rápidamente a sitios Web (YouTube
para compartir vídeos.
Preparativos:
Seleccione el modo !.
•
Seleccione el modo de grabación.
•
Pulse UPLOAD dos veces.
Si graba un archivo con el modo de
carga activado, la grabación se detiene
automáticamente 10 minutos después de
su inicio.
El tiempo restante se muestra en la
pantalla LCD.
NOTA
El modo de carga se desactiva cada vez que
termina la grabación.
TM
) creados
Carga de archivos
Para obtener más información sobre
cómo cargar archivos, consulte la guía de
funcionamiento de MediaBrowser que aparece
en el CD-ROM.
1 Conecte la videocámara al PC con el
cable USB.
2 Seleccione [CARGAR].
Si no puede cargar el archivo en
YouTube™
Necesita tener una cuenta en YouTube™
•
para cargar archivos en YouTube™. Cree su
cuenta.
Consulte “Q&A”, “Información más reciente”,
•
“Información de descarga”, etc., en [Clic para
Ultima Info de Producto] en la ayuda del
software Everio MediaBrowser suministrado.
36
SP
Page 81

INFORMACIÓN ADICIONAL
Cambio de las configuraciones de menús
1 Toque MENU.
3 Seleccione el ajuste que desee.
2 Seleccione el menú que desee.
Para volver a la pantalla anterior
Seleccione
Para salir de la pantalla
Seleccione [
@.
SALIR].
Solución de problemas
Antes de solicitar asistencia técnica, consulte la siguiente tabla. Si las soluciones indicadas en la
tabla no ayudan a solucionar el problema, póngase en contacto con el distribuidor JVC o servicio
técnico JVC más cercano para obtener ayuda. También puede consultar el apartado de preguntas
más frecuentes de productos nuevos en el sitio web de JVC.
Los siguientes fenómenos no son fallos de funcionamiento.
La videocámara se calienta cuando se utiliza de forma prolongada.
•
La batería se calienta durante la carga.
•
Cuando se reproduce un vídeo, la imagen se detiene momentáneamente o el sonido se interrumpe
•
en las uniones entre escenas.
La pantalla LCD se muestra roja o negra momentáneamente cuando se graba la luz solar.
•
Aparecen puntos negros, rojos, verdes o azules en la pantalla LCD.
•
(La pantalla LCD tiene un porcentaje de píxeles efectivos del 99,99%, pero puede que un 0,01% o
menos no lo sean.)
Problema Acción
Alimentación
No hay alimentación.
Conecte bien el adaptador de CA.
•
Recargue la batería.
•
Visualización
El indicador de batería
restante no es correcto.
Es difícil ver la imagen
de la pantalla LCD.
Cargue la batería por completo, descárguela totalmente y vuelva
•
a cargarla.
Si la videocámara se utiliza durante un periodo de tiempo
•
prolongado en condiciones de temperatura alta o baja, o si la
batería se carga con mucha frecuencia, puede que no se muestre
correctamente la cantidad de batería restante.
Puede que sea difícil ver la imagen de la pantalla LCD si la
•
cámara se utiliza en lugares muy iluminados, como, por ejemplo,
bajo la luz solar directa.
37
SP
Page 82

38
SP
Solución de problemas (continuación)
Problema Acción
La grabación no puede
realizarse.
Grabación
La grabación se detiene.
El vídeo o el sonido se
Reproducció
interrumpe.
No se encuentra un
vídeo grabado.
La luz no parpadea
durante la carga de la
batería.
Otros problemas
Al realizar la conexión con
el cable HDMI, la imagen
o el sonido no se emiten
correctamente en el
televisor.
Las funciones HDMICEC no funcionan
correctamente y el televisor
no funciona en conjunción
con la videocámara.
No se puede cargar el
archivo en YouTube™
No se puede exportar el
archivo a iTunes
Si se produce un fallo de funcionamiento en la unidad de disco duro
! Ejecute [FORMATEAR HDD]. (Se borrarán todos los datos.)
# Si esto tampoco soluciona el problema, póngase en contacto con el servicio de atención al
cliente JVC para solicitar su reparación.
Para reiniciar la videocámara cuando no funciona correctamente
! Cierre la pantalla LCD y quite la fuente de alimentación (batería o adaptador de CA) de la
videocámara y, a continuación, colóquela de nuevo.
# Ejecute [CONFIG. DE FÁBRICA].
®
Deslice el interruptor de modo para seleccionar el modo deseado
•
(! o #).
Si la temperatura de la videocámara sube, el indicador REC parpadea en
•
la pantalla LCD y la grabación se detiene automáticamente para proteger
el disco duro. Apague la videocámara, espere unos instantes y reanude
la grabación.
Aléjese de lugares en los que la videocámara pueda estar expuesta a
•
vibraciones o ruidos excesivos (por ejemplo, una sala de conciertos).
Puede producirse un fallo de funcionamiento en el disco duro de la
•
videocámara. En tal caso, realice la grabación en una tarjeta microSD.
Inserte una tarjeta microSD de venta en comercios, y ajuste
•
[SOPORTE GRAB. VÍDEO] y [SOPORTE GRAB. IMAGEN] en [SD].
La grabación se detiene automáticamente tras 12 horas de grabación
•
continua.
A veces la reproducción se interrumpe en el cambio de una
•
escena a otra. Esto no es un fallo de funcionamiento.
Seleccione [REPR. ARCHIVO MPG] y busque el vídeo en la pantalla de índice.
•
(Los archivos de vídeo con información de gestión dañada se pueden
reproducir.)
Cancele las funciones de visualización por grupo y búsqueda por fecha.
•
Cambie el ajuste en [SOPORTE GRAB. VÍDEO] o [SOPORTE GRAB.
•
IMAGEN]. (No se mostrarán archivos en otros soportes.)
Compruebe la carga restante de la batería.
•
(Si la batería ya está totalmente cargada, la luz no parpadea.)
Si realiza una carga en un entorno con unas condiciones de
•
temperatura elevada o baja, asegúrese de que la batería se esté
cargando dentro del intervalo de temperaturas permitido.
(Si la batería se está cargando fuera del intervalo de temperaturas
permitido, puede que la carga se detenga para protegerla.)
Al realizar la conexión con el cable HDMI, la imagen o el
•
sonido podrían no emitirse correctamente en el televisor
según el televisor conectado. En tales casos, realice las
siguientes operaciones.
1) Desconecte el cable HDMI y vuelva a conectarlo.
2) Apague la videocámara y vuelva a encenderla.
Los televisores pueden funcionar de forma distinta en función de
•
las especificaciones, incluso si son compatibles con HDMI-CEC.
Por lo tanto, no se puede garantizar que las funciones HDMICEC de la videocámara funcionen en combinación con todos los
televisores. En tales casos, ajuste [CONTROL HDMI] en [OFF].
Consulte “Q&A”, “Información más reciente”, “Información de
•
descarga”, etc., en [Clic para Ultima Info de Producto] en la ayuda
del software Everio MediaBrowser suministrado.
Page 83

39
SP
Indicaciones de advertencia
Indicación Acción
Ajuste el reloj. Si sigue apareciendo el mensaje tras ajustar el
•
¡AJUSTE FECHA/HORA!
ERROR DE COMUNICACIÓN
NO SE PUEDE UTILIZAR EN
MODO DE VÍDEO
NO FORMATEADO
¡ERROR DE FORMATEO!
ERROR ELIMIN. DATOS
¡ERROR EN HDD!
¡ERROR EN TARJETA
DE MEMORIA!
NO SE PUEDEN TOMAR MÁS
FOTOS DE MOMENTO
reloj, significa que se ha agotado la pila del reloj. Consulte con
su distribuidor JVC más próximo.
Asegúrese de utilizar baterías JVC.
•
Ajuste [SOPORTE GRAB. VÍDEO] en [HDD].
•
Reemplace la tarjeta microSD.
•
Seleccione [ACEPTAR] y seleccione [SÍ] para realizar el
•
formateo.
Compruebe el procedimiento operativo y vuelva a intentarlo.
•
Apague la videocámara y vuélvala a encender.
•
Realice un formateo. (Se borrarán todos los datos.)
•
Apague la videocámara y vuélvala a encender.
•
Realice un formateo. (Se borrarán todos los datos.)
•
Extraiga la tarjeta microSD y vuelva a insertarla. (No se pueden
•
utilizar tarjetas MultiMediaCard.)
Elimine la suciedad de los terminales de la tarjeta microSD.
•
Inserte la tarjeta microSD antes de encender la videocámara.
•
Apague la videocámara y vuélvala a encender.
•
Detenga la grabación de vídeo y grabe una imagen fija. (Si se
•
retira o inserta una tarjeta microSD durante la grabación de
vídeo, no se podrá grabar ninguna imagen fija.)
EL SENSOR DE GRAVEDAD
SE HA ACTIVADO Y SE HA
DESCONECTADO LA ALIMENTACIÓN
GRABACIÓN CANCELADA
ERROR DE GRABACIÓN
ERROR DE
REPRODUCCIÓN
Ajuste [SOPORTE GRAB. VÍDEO] en [SD] y luego grabe en una
•
tarjeta microSD.
Apague la videocámara y vuelva a encenderla.
•
Evite someter la videocámara a vibraciones y golpes.
•
Tarjeta microSD:
Extraiga la tarjeta microSD y vuelva a insertarla. (No se pueden
•
utilizar tarjetas MultiMediaCard.)
Elimine la suciedad de los terminales de la tarjeta microSD.
•
Inserte la tarjeta microSD antes de encender la videocámara.
•
Unidad de disco duro:
Evite someter la videocámara a vibraciones o golpes.
•
Page 84

40
SP
Especificaciones
Generalidades
Fuente de alimentación eléctrica
CC 11 V (con adaptador de CA)
CC 7,2 V (con batería)
Consumo eléctrico
Aprox. 2,3 W*
* Cuando la luz LED está apagada y la luz de
fondo de la pantalla está ajustada en modo
[ESTÁNDAR].
Consumo de corriente nominal: 1 A
Dimensiones (anchura x altura x fondo)
53 mm x 68 mm x 113 mm
Peso
Aprox. 305 g
Aprox. 350 g (con batería)
Temperatura de funcionamiento
0°C a 40°C
Temperatura de almacenamiento
–20°C a 50°C
Humedad de funcionamiento
35% a 80%
Cámara/pantalla LCD
Fotocaptor
CCD de 1/6" (800.000 píxeles)
Objetivo
F 1,8 a 4,0, f = 2,2 mm a 77,0 mm,
objetivo con capacidad de zoom 35:1
Diámetro del filtro
ø 30,5 mm
Pantalla LCD
Con medida diagonal de 2,7",
panel LCD/sistema de matriz activa TFT
Luz LED
Dentro de 1,5 m
(distancia de filmación recomendada)
Conectores
Entrada/salida AV
Entrada de vídeo: 0,8 V (p-p) a 1,2 V (p-p),
75
W
Salida de vídeo: 1,0 V (p-p), 75
Entrada de audio: 300 mV (rms), 50 k
Salida de audio: 300 mV (rms), 1 k
HDMI
Miniconector HDMI
USB
Mini USB tipo A y B,
compatible con USB 2.0
W
W
W
Adaptador de CA
Requisito de alimentación eléctrica
CA 110 V a 240 V
Salida
CC 11 V
§
Mando a distancia
Fuente de alimentación eléctrica
CC 3 V
Duración de la batería
1 año aproximadamente
(dependiendo de la frecuencia de uso)
Distancia de funcionamiento
Dentro de 5 m
Temperatura de funcionamiento
0°C a 40°C
Dimensiones (anchura x altura x fondo)
42 mm x 14,5 mm x 91 mm
Peso
Aprox. 30 g
(con batería)
Imagen fija
Formato
JPEG
Tamaño de imagen
832 x 624
Calidad de imagen
FINA / ESTÁNDAR
Vídeo
Formato de señal
Estándar NTSC
Formato de grabación/reproducción
Vídeo:
Audio: Dolby Digital (2 canales)
Modo de grabación (vídeo)
ULTRAFINA: 720 x 480 píxeles, 8,5 Mbps
FINA: 720 x 480 píxeles, 5,5 Mbps
NORMAL: 720 x 480 píxeles, 4,2 Mbps
ECONÓMICA: 352 x 240 píxeles, 1,5 Mbps
Modo de grabación (audio)
ULTRAFINA: 48 kHz, 384 kbps
FINA: 48 kHz, 384 kbps
NORMAL: 48 kHz, 256 kbps
ECONÓMICA: 48 kHz, 128 kbps
El diseño y las especificaciones están sujetas a
modificaciones sin previo aviso.
$
, 1 A
MPEG-2
(VBR)
(VBR)
(VBR)
(VBR)
, 50 Hz/60 Hz
Page 85

41
SP
Tiempo de grabación aproximado (para vídeo)
Soporte de grabación
Unidad de disco duro Tarjeta microSD
h: hora/m: minuto
Calidad
ULTRAFINA 19 h 00 m 57 m 1 h 54 m
FINA 28 h 20 m 1 h 25 m 2 h 50 m
NORMAL 37 h 40 m 1 h 53 m 3 h 46 m
ECONÓMICA 100 h 00 m 4 h 58 m 9 h 56 m
80 GB 4 GB 8 GB
Número aproximado de imágenes (para imágenes fijas)
La unidad de disco duro puede grabar hasta 9999 imágenes fijas en cualquiera de los dos modos.
Soporte de grabación
Tamaño de imagen/Calidad
4:3
832 x 624 / FINA 990 1960 3980 7600 9999 9999
832 x 624 / ESTÁNDAR
256 MB 512 MB 1 GB 2 GB 4 GB 8 GB
1490 2940 5970 9999 9999 9999
Tarjeta microSD
h: hora/m: minuto
Tiempo de carga/grabación necesario (aprox.)
Batería Tiempo de carga Tiempo de grabación
BN-VF808U
(suministrada)
BN-VF815U 2 h 40 m 4 h 15 m*
BN-VF823U 3 h 40 m 6 h 25 m*
1 h 50 m 2 h 5 m*
* Cuando la luz LED está apagada y la luz de fondo de la pantalla está ajustada en modo
[ESTÁNDAR].
Page 86

42
SP
Precauciones
Adaptador de CA
Si utiliza el adaptador de CA en países fuera
de los EE.UU.
El adaptador de CA suministrado tiene una
función de selección automática de tensión en la
escala de corriente alterna de 110 V a 240 V.
USO DEL ENCHUFE ADAPTADOR DE CA
En caso de conectar el cable de alimentación
de la unidad a un tomacorriente de CA que no
sea de la serie American National Standard
C73, emplee un enchufe adaptador de CA,
denominado “Siemens Plug”, como el mostrado.
Consulte con su distribuidor JVC más cercano
para obtener este enchufe adaptador.
Enchufe adaptador
Baterías
La batería suministrada
es una batería de iones
de litio. Antes de utilizar la
batería suministrada o una
batería opcional, lea las
precauciones siguientes:
Para evitar riesgos
•
... no queme la batería.
...
no provoque cortocircuitos en los terminales.
Manténgala alejada de objetos metálicos cuando
no se utilice. Durante el transporte, asegúrese
de que la tapa de la batería está colocada. Si la
tapa de la batería está mal colocada, guarde la
batería en una bolsa de plástico.
... no modifique ni desmonte la batería.
... no exponga la batería a temperaturas
superiores a 60°C, puesto que la batería podría
calentarse en exceso, explotar o incendiarse.
... utilice solamente los cargadores especificados.
Para evitar daños y prolongar la vida útil
•
... no la someta a sacudidas innecesarias.
... cárguela dentro del margen de temperatura
de 10°C a 35°C. A temperaturas más bajas se
requiere más tiempo de carga, y en algunos
casos puede que incluso se detenga la carga.
A temperaturas más altas puede resultar
imposible terminar la carga, y en algunos
casos puede que incluso se detenga.
...
guárdela en lugar fresco y seco. La exposición
prolongada a temperaturas elevadas aumentará la
descarga natural y reducirá el periodo de vida útil.
...
se debe cargar totalmente y luego descargar
totalmente la batería cada seis meses cuando se
guarde durante un periodo de tiempo prolongado.
...
cuando no se utilice, se debe retirar del cargador
o dispositivo eléctrico, ya que algunas máquinas
utilizan corriente incluso estando apagadas.
Terminales
ATENCIÓN:
La batería que ha adquirido es
reciclable. Por favor comunicarse
al 1-800-8-BATTERY para
información sobre como reciclar
dicha batería.
Soporte de grabación
Asegúrese de seguir las siguientes pautas
•
para evitar corromper o dañar los datos
grabados.
No doble ni tire el soporte de grabación, ni
•
lo someta a una fuerte presión, sacudidas o
vibraciones.
No salpique el soporte de grabación con agua.
•
No utilice, reemplace o almacene el soporte
•
de grabación en lugares expuestos a una
fuerte electricidad estática o a perturbaciones
eléctricas.
No apague la alimentación de la cámara ni
•
retire la batería o el adaptador de CA durante
la filmación o la reproducción, o al acceder de
algún otro modo al soporte de grabación.
No acerque el soporte de grabación a objetos
•
que tengan un fuerte campo magnético o que
emitan fuertes ondas electromagnéticas.
No almacene el soporte de grabación en
•
ubicaciones expuestas a altas temperaturas o a
un alto grado de humedad.
No toque las partes metálicas.
•
Cuando formatea o borra los datos con
•
la cámara, sólo se cambia la información
de administración. Los datos no se borran
completamente del disco duro. Si desea
eliminar por completo todos los datos, le
recomendamos que utilice algún software
disponible comercialmente diseñado para esta
finalidad o que destruya físicamente la cámara
con un martillo o procedimiento similar.
Disco duro
No utilice la unidad cuando esté sujeta a
•
vibraciones o sonidos fuertes.
Si mueve la unidad bruscamente, la función
•
de detección de caídas puede activarse y la
alimentación se puede desconectar.
Pantalla LCD
Para prevenir daños a la pantalla LCD, NO
•
...
presione con demasiada fuerza y evite los golpes.
...
coloque la cámara con la pantalla LCD hacia abajo.
Para prolongar la vida útil
•
... evite frotarla con un trapo basto.
Page 87

43
SP
Equipo principal
Por seguridad, NO DEBE
•
... abrir el chasis de la cámara.
... desmontar o modificar el equipo.
... permitir que productos inflamables, agua u
objetos metálicos entren en el equipo.
... extraer la batería ni desconectar el suministro
de energía con el aparato encendido.
... dejar la batería colocada cuando la cámara no
se utilice.
... colocar sobre el aparato ninguna fuente de llama
sin protección, tales como velas encendidas.
... exponer el equipo a goteos o salpicaduras.
... dejar que polvo u objetos metálicos se
adhieran al enchufe de alimentación o al
tomacorriente de CA.
... insertar ningún objeto en la cámara.
Evite utilizar este aparato
•
... en lugares sometidos a excesiva humedad o
demasiado polvo.
... en lugares con hollín o vapor, por ejemplo,
cerca de una cocina.
... en lugares sometidos a sacudidas o
vibraciones excesivas.
... cerca de un televisor.
... cerca de aparatos que generen campos
magnéticos o eléctricos fuertes (altavoces,
antenas de emisión, etc.).
... en lugares sometidos a temperaturas
extremadamente altas (superiores a 40°C) o
extremadamente bajas (inferiores a 0°C).
...
en lugares donde la presión atmosférica sea baja
(más de 3000 m por encima del nivel del mar).
NO deje el aparato
•
... en lugares donde la temperatura supera los 50°C.
... en lugares con humedad extremadamente
baja (inferior al 35%) o extremadamente alta
(superior al 80%).
... bajo luz solar directa.
... en un coche cerrado en verano.
... cerca de una calefacción.
... en lugares elevados, como encima de un
televisor. La colocación del aparato en un lugar
elevado mientras un cable está conectado
puede provocar averías si alguien tropieza con
el cable y el aparato cae al suelo.
Para proteger el aparato, NO DEBE
•
... permitir que se moje.
...
dejar caer el aparato ni golpearlo contra objetos duros.
... someterlo a sacudidas o vibración excesiva
durante su transporte.
... mantener el objetivo dirigido hacia objetos
demasiado brillantes durante largos periodos.
... exponer el objetivo a la luz solar directa.
... balancearlo excesivamente cuando utilice la
correa de mano.
... balancear demasiado la bolsa de la cámara
con la cámara dentro.
... deje la cámara en áreas donde haya polvo o
arena, como en la playa.
Para evitar que la unidad se caiga:
•
Ajuste bien la correa de mano.
•
Si utiliza la cámara con un trípode, fije bien la
•
cámara en el trípode.
Si se le cae la cámara, puede herirse usted y
dañarse la cámara.
Si un niño utiliza la unidad, un adulto deberá guiarle.
Declaración de conformidad
Número de modelo :
Nombre comercial : JVC
Parte responsable : JVC AMERICAS CORP.
Dirección :
Número de teléfono : 973-317-5000
Este dispositivo cumple con el Apartado 15 de la
reglamentación FCC. La operación está sujeta a las
dos condiciones siguientes: (1) Este dispositivo no
debe causar interferencias perjudiciales y (2) este
dispositivo debe aceptar cualquier interferencia
recibida, incluyendo la interferencia que pueda
causar errores de funcionamiento.
Los cambios o modificaciones no aprobados por
JVC podrian anular la autoridad del usuario para
utilizar el equipo. Este equipo ha sido examinado
y cumple con los límites de dispositivos
digitales Clase B, segun el Apartado 15 de la
reglamentacion FCC.
Estos limites estan diseñados para suministrar
una protección razonable contra interferencias
perjudiciales en una instalacion residencial.
Este equipo genera, usa y puede irradiar
radiofrecuencia y si no se instala y emplea de
acuerdo con las instrucciones puede causar
interferencias perjudiciales a las comunicaciones
por radio. Sin embargo, no se garantiza que no
se produzcan interferencias en una instalacion
en particular. Si este equipo causa interferencias
perjudiciales a la recepcion de radio o televisión,
que pueden determinarse desconectando y
conectando la alimentacion del equipo, el usuario
puede intentar corregir la interferencia por medio
de una o mas de las siguientes medidas:
Reoriente o recoloque la antena de recepción.
Aumente la separación entre el equipo y el
receptor. Conecte el equipo a un tomacorriente en
un circuito diferente al del receptor conectado.
Consulte con su distribuidor o con un tecnico
experimentado de radio/TV.
GZ-MG670U
1700 Valley Road Wayne, N. J. 07470
Page 88

Términos
A
Adaptador de CA ......................................... 16, 42
Ajuste de la fecha/hora ........................................
Ajuste del idioma ...............................................
Ajuste del reloj ...................................................
B
Batería ......................................................... 16, 42
C
Cable USB ...................................................27, 30
Carga de archivos .............................................
Carga restante de la batería .............................
CD-ROM ......................................................
Compensación de contraluz ..............................
Conexión AV ................................................
Configuraciones de menús
Control de grabación en pantalla ......................
Control de zoom en pantalla .............................
Copia de seguridad en DVD ..............................
D
Disco duro ......................................................... 42
E
Eliminación de archivos .....................................26
F
Finalización .......................................................27
G
Grabación manual .............................................24
Grabadora de DVD ............................................
H
HDMI ................................................................. 25
Horario de verano ..............................................
................................37
10, 29
25, 34
I
iTunes ................................................................35
5
L
17
16
36
21
24
19
21
27
27
16
Luz LED ............................................................21
M
Mando a distancia ....................................... 11, 13
Modo de exportar a la libería ............................
N
Número de imágenes ........................................41
P
Pantalla LCD ............................................... 14, 42
R
Reproducción de copia .....................................34
Reproducción de extracto .................................
Reproductor multimedia portátil ........................
Revisión rápida ............................................
S
Soporte de grabación ........................................42
T
Tarjeta microSD ................................................. 18
Tiempo de grabación .........................................
Tiempo restante de grabación ...........................
V
Visualización de archivos en un televisor ..........25
Volumen del altavoz ..........................................
Y
YouTube .............................................................36
Z
Zoom ................................................................. 21
19, 20
35
22
35
41
21
22
© 2008 Victor Company of Japan, Limited
Printed in Malaysia
US
1208FOH-AL-VM
 Loading...