

ENGLISH
INSTRUCTIONS
MANUEL D’UTILISATION
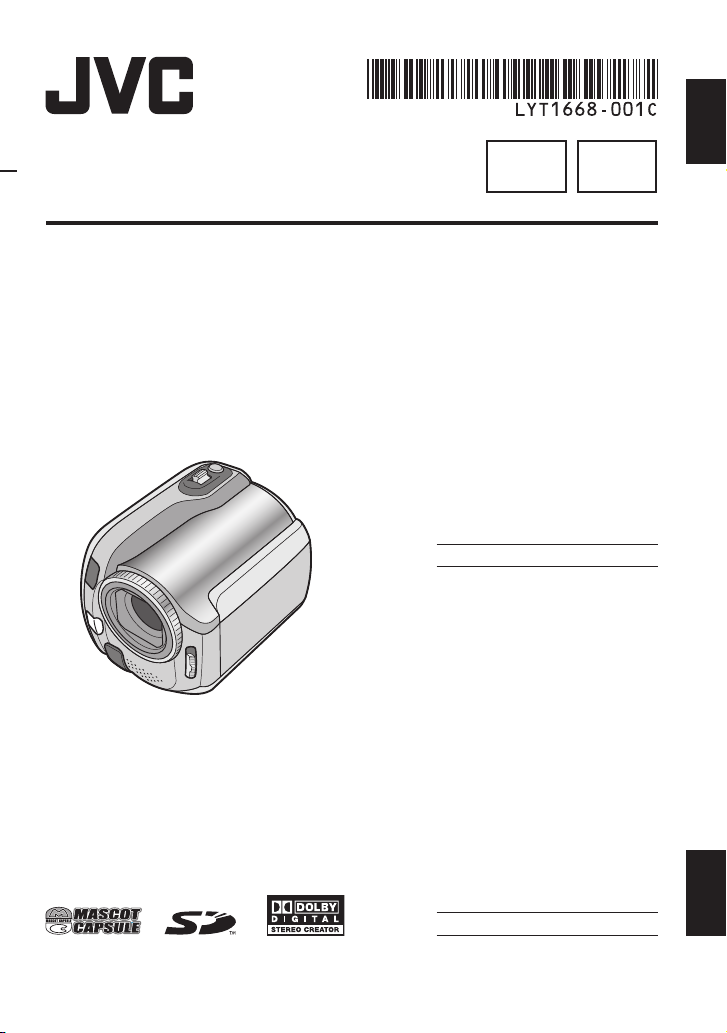
HARD DISK CAMCORDER
CAMÉSCOPE À DISQUE DUR
GZ-MG255U
GZ-MG155U
GZ-MG130U
The camera illustrations appearing in this
instruction manual are of the GZ-MG130.
Les illustrations de l’appareil photo qui apparaît
dans ce manuel d’instructions sont celles du
modèle GZ-MG130.
EN FR
Dear Customer
Thank you for purchasing
this hard disk camera. Before
use, please read the safety
information and precautions
contained in pages 2 and 3 to
ensure safe use of this product.
For Future Reference:
Enter the Model No. (located on
the bottom of the camera) and
Serial No. (located on the battery
pack mount of the camera)
below.
Model No.
Serial No.
Cher client,
Nous vous remercions d’avoir
acheté cet appareil photo à
disque dur. Avant utilisation,
veuillez lire les informations
et les précautions de sécurité
présentées dans les pages 2 et 3
pour utiliser cet appareil en toute
sécurité.
Pour consultation ultérieure :
Noter ci-dessous le N° de
modèle (fi gurant sous l’appareil
photo) et le N° de série (fi gurant
sur le logement de la batterie de
l’appareil photo).
N° de modèle
N° de série
FRANÇAIS
Safety Precautions
CAUTION
RISK OF ELECTRIC SHOCK
DO NOT OPEN
CAUTION: TO REDUCE THE RISK OF ELECTRIC SHOCK,
DO NOT REMOVE COVER (OR BACK).
NO USER-SERVICEABLE PARTS INSIDE.
REFER SERVICING TO QUALIFIED SERVICE PERSONNEL.
The lightning flash with arrowhead symbol, within an
equilateral triangle, is intended to alert the user to the
presence of uninsulated "dangerous voltage" within the
product's enclosure that may be of sufficient magnitude
to constitute a risk of electric shock to persons.
The exclamation point within an equilateral triangle is
intended to alert the user to the presence of important
operating and maintenance (servicing) instructions in
the literature accompanying the appliance.
WARNING: TO PREVENT FIRE OR
SHOCK HAZARD, DO NOT EXPOSE THIS
UNIT TO RAIN OR MOISTURE.
NOTES:
The rating plate and safety caution are on the
•
bottom and/or the back of the main unit.
The serial number plate is on the battery pack
•
mount.
The rating information and safety caution of the
•
AC adapter are on its upper and lower sides.
Caution on Replaceable lithium battery
The battery used in this device may present a fi re
or chemical burn hazard if mistreated.
Do not recharge, disassemble, heat above 100°C
or incinerate.
Replace battery with Panasonic (Matsushita
Electric), Sanyo, Sony or Maxell CR2025.
Danger of explosion or Risk of fi re if the battery is
incorrectly replaced.
Dispose of used battery promptly.
•
Keep away from children.
•
Do not disassemble and do not dispose of in
•
fi re.
For USA-California Only
This product contains a CR Coin Cell Lithium
Battery which contains Perchlorate Material
– special handling may apply.
See www.dtsc.ca.gov/hazardouswaste/perchlorate
When the equipment is installed in a cabinet or on
a shelf, make sure that it has suffi cient space on
all sides to allow for ventilation (10 cm (3-15/16
or more on both sides, on top and at the rear).
Do not block the ventilation holes.
(If the ventilation holes are blocked by a
newspaper, or cloth etc. the heat may not be able
to get out.)
No naked fl ame sources, such as lighted candles,
should be placed on the apparatus.
When discarding batteries, environmental
problems must be considered and the local rules
or laws governing the disposal of these batteries
must be followed strictly.
The apparatus shall not be exposed to dripping
or splashing.
Do not use this equipment in a bathroom or
places with water.
Also do not place any containers fi lled with water
or liquids (such as cosmetics or medicines, fl ower
vases, potted plants, cups etc.) on top of this unit.
(If water or liquid is allowed to enter this
equipment, fi re or electric shock may be caused.)
Do not point the lens directly into the sun. This
can cause eye injuries, as well as lead to the
malfunctioning of internal circuitry. There is also a
risk of fi re or electric shock.
CAUTION!
The following notes concern possible physical
damage to the camera and to the user.
Carrying or holding the camera by the LCD monitor
can result in dropping the unit, or in a malfunction.
Do not use a tripod on unsteady or unlevel surfaces.
It could tip over, causing serious damage to the
camera.
CAUTION!
Connecting cables (Audio/Video, S-Video, etc.)
to the camera and leaving it on top of the TV is
not recommended, as tripping on the cables will
cause the camera to fall, resulting in damage.
CAUTION:
The mains plug shall remain readily operable.
WARNING:
Batteries shall not be exposed to excessive heat
such as direct sunshine, fi re or the like.
″
)
2
IMPORTANT SAFETY INSTRUCTIONS
1. Read these instructions.
2. Keep these instructions.
3. Heed all warnings.
4. Follow all instructions.
5. Do not use this apparatus near water.
6. Clean only with dry cloth.
7. Do not block any ventilation openings. Install
in accordance with the manufacturer’s instructions.
8. Do not install near any heat sources such
as radiators, heat registers, stoves, or other
apparatus (including amplifi ers) that produce
heat.
9. Only use attachments/accessories specifi ed by
the manufacturer.
10. Use only with the cart,
stand, tripod, bracket,
or table specifi ed by
the manufacturer,
or sold with the apparatus. When a cart
is used, use caution
when moving the
cart/apparatus combination to avoid injury from
tip-over.
11. Unplug this apparatus during lightning storms
or when unused for long periods of time.
12. Refer all servicing to qualifi ed service personnel. Servicing is required when the apparatus
has been damaged in any way, such as
power-supply cord or plug is damaged, liquid
has been spilled or objects have fallen into the
apparatus, the apparatus has been exposed to
rain or moisture, does not operate normally, or
has been dropped.
Remember that this camera is intended for
private consumer use only.
Any commercial use without proper permission
is prohibited. (Even if you record an event such
as a show, performance or exhibition for personal
enjoyment, it is strongly recommended that you
obtain permission beforehand.)
Trademarks
Manufactured under license from Dolby
•
Laboratories. Dolby and double-D symbol are
trademarks of Dolby Laboratories.
•
MascotCapsule is a registered trademark of HI
CORPORATION in Japan.
Copyright © 2001 HI CORPORATION. All rights
reserved.
Other product and company names included
•
in this instruction manual are trademarks
and/or registered trademarks of their respective
holders.
ENGLISH
3

Read This First!
Make a backup of important recorded data
JVC will not be responsible for any lost data. It is recommended to copy your important
recorded data to a DVD or other recording media for storage. ( pg. 40)
Make a trial recording
Before the actual recording of important data, make a trial recording and play back the
recorded data to check that the video and sound have been recorded correctly.
Reset the camera if it does not operate correctly
This camera uses a microcomputer. Factors such as background noise and interference
can prevent it from operating correctly. If the camera does not operate correctly, reset
the camera. ( pg. 51)
Precautions on handling batteries
Be sure to use the JVC BN-VF808U/VF815U/VF823U battery packs.
•
If the camera is subjected to electrostatic discharge, turn the power off before using it
•
again.
If a malfunction occurs, stop using the camera immediately
and consult your local JVC dealer
If a problem occurs when using the SD card, take the card together with the camera
•
for repair. If one of them is not included, the cause of the malfunction cannot be
diagnosed, and the camera cannot be repaired.
Recorded data may be erased while the camera is being repaired or inspected. Back
•
up all data before requesting repairs or inspections.
Because the camera may be used for demonstration in a
shop, the demonstration mode is set to on by default
To deactivate the demonstration mode, set [DEMO MODE] to [OFF]. ( pg. 48)
This operating instruction is applicable to models
GZ-MG255, GZ-MG155 and GZ-MG130
Unless otherwise indicated, illustrations in this operating instructions are of
•
GZ-MG130.
Icons such as indicate that the feature is applicable to the specifi ed model only.
•
When connecting the camera to other device
using a DV cable, make sure to follow the procedure below.
Connecting the cable incorrectly may cause malfunctions to
the camera and/or other device.
Connect the DV cable fi rst to other device, and then to the camera.
•
Connect the DV cable (plugs) correctly according to the shape of the DV connector.
•
4

Contents
GETTING STARTED
Accessories ............................................ 6
How to Use the Everio Dock .........................6
Attaching the Shoulder Strap ........................7
Preparing the Remote Control ....................... 7
Index ........................................................ 8
Indications on LCD Monitor ................ 10
Necessary Settings before Use .......... 12
Charging the Battery Pack ..........................12
Language Setting .......................................13
Date/Time Setting ....................................... 13
Other Settings ...................................... 14
Grip Adjustment .......................................... 14
Lens Cover ................................................. 14
Checking the Remaining Battery Power ..... 14
Tripod Mounting .......................................... 14
When Using an SD Card ............................ 15
RECORDING
Recording Files ..................................... 16
Video Recording .........................................16
Still Image Recording .................................17
Zooming ......................................................18
LED Light .................................................... 18
Flash ........................................................... 18
Registering Files to Events ......................... 19
Checking the Remaining Space on the
Recording Media ........................................19
Manual Recording ............................... 20
To Change to Manual Recording Mode ...... 20
Program AE ................................................20
Nightalive .................................................... 21
Backlight Compensation ............................. 21
Spot Exposure Control ...............................21
Manual Setting in Function Menu ...............22
PLAYBACK
Playing Back Files ................................ 24
Video Playback ........................................... 24
Still Image Playback ................................... 25
File Search Function ...................................26
To Play Back Demonstration Files
Playback with Special Effects ..................... 28
................. 27
Watching Images on TV ....................... 29
EDITING/PRINTING
Managing Files ..................................... 30
Deleting/Protecting Files .............................30
Viewing File Information ............................. 32
Changing the Event Registration of
Video Files after Recording ........................ 32
Partial Delete (EDITED COPY) ................... 33
Playlists ................................................ 34
Creating Playlists ........................................ 34
Playing Back Playlists .................................35
Other Operations of Playlists ...................... 36
Print Setting ......................................... 37
DPOF Print Setting .....................................37
Direct Printing with PictBridge Printer ........38
COPYING
Copying Files ....................................... 40
Using a DVD Burner to Copy Files from
the Camera (DVD Creation Function) .........40
Using a VCR/DVD Recorder to Dub
Files from the Camera .................................44
Using the Camera to Dub Files from a VCR/
DVD Player ..................................................44
Copying/Moving Still Image Files ................45
MENU SETTINGS
Changing the Menu Settings .............. 46
FURTHER INFORMATION
Troubleshooting ................................... 51
Warning Indications ............................ 54
Cleaning ............................................... 55
Specifi cations ...................................... 55
Cautions ............................................... 58
Terms ................................................... 60
ENGLISH
5
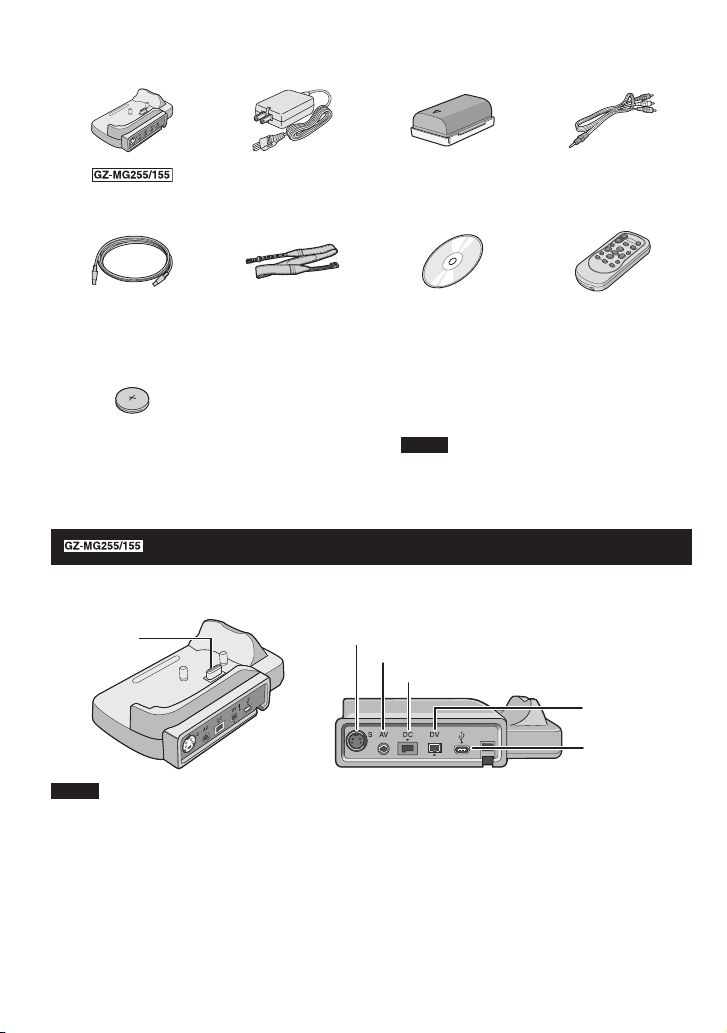
Accessories
Everio Dock
AC Adapter
AP-V18U/14U
Battery Pack
BN-VF808U
Audio/Video Cable
CU-VC3U ( below)
USB Cable
( pg. 38, 40 and
PC OPERATION
Shoulder Strap
( pg. 7)
CD-ROM
( PC OPERATION
GUIDE)
Remote Control Unit
RM-V750U ( pg. 7)
GUIDE)
Lithium Battery
CR2025
Pre-installed in the
remote control unit.
NOTE
Make sure to use the provided cables for
connections. Do not use any other cables.
How to Use the Everio Dock
You can connect cables to the connectors of the Everio dock. The connection is completed when
you place the camera on the dock.
Camera
Connection
Terminal
NOTE
For the connection using the S connector and DV Connector, an optional S-Video cable and DV cable
are needed. To purchase these cables, consult the JVC Service Center described on the sheet included
in the package for details on its availability. Make sure to connect the end with a core fi lter to the
camera. The core fi lter reduces interference.
The S-Video cable (optional) enables even higher quality playback on TV. ( pg. 29) Be sure to use
•
the YTU94146A S-Video cable.
When dubbing fi les from the camera using a VCR/DVD recorder ( pg. 44), using the DV cable
•
enables even higher quality dubbing. Be sure to use the VC-VDV204U DV cable. Operation using the
DV cable is not guaranteed on all of the devices.
S Connector
AV Connector
DC Connector
DV Connector
USB
Connector
6
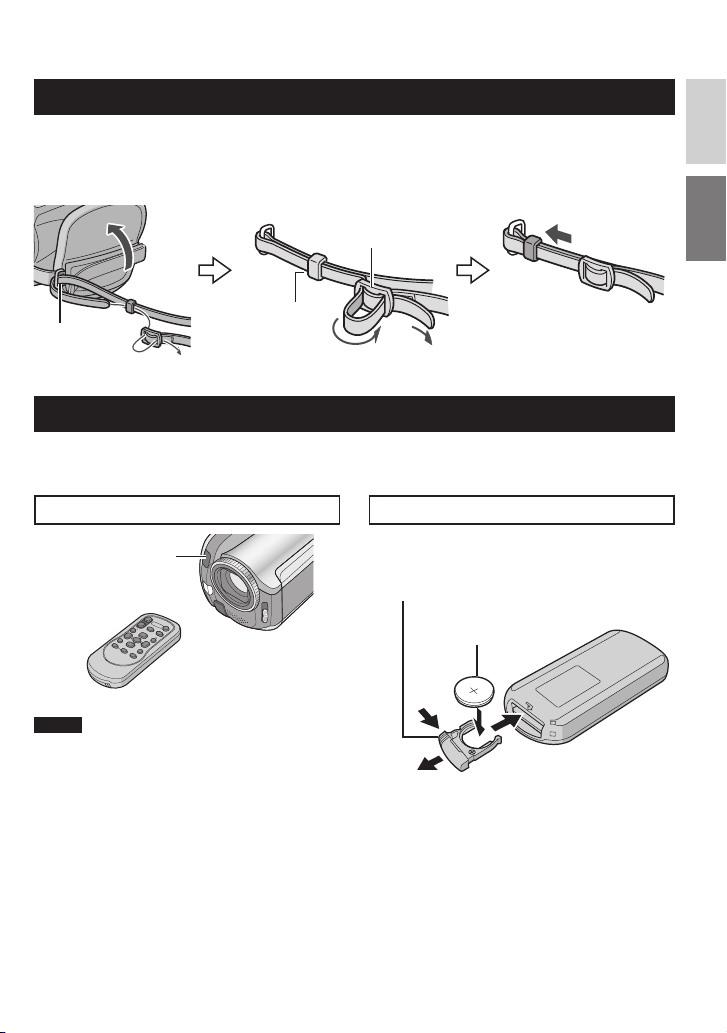
Attaching the Shoulder Strap
ENGLISH
Peel off the pad and thread
the end of the strap through
the eyelet.
Eyelet
Thread the strap through the
buckle, adjust its length, and
use the strap guide to fi x it
in place.
Buckle
Strap Guide
Position the buckle near the
eyelet and reattach the pad.
Preparing the Remote Control
A battery is included inside the remote control at the time of purchase.
Remove the insulation sheet before use.
Beam Effective Area
Remote Sensor
Effective distance:
5 m (16 ft)
To Reinsert the Battery
Pull out the battery holder by pressing the
lock tab.
Lock Tab
Lithium Battery
(CR2025)
NOTE
The transmitted beam may not be effective
or may cause incorrect operation when the
remote sensor is directly exposed to sunlight
or powerful lighting.
7
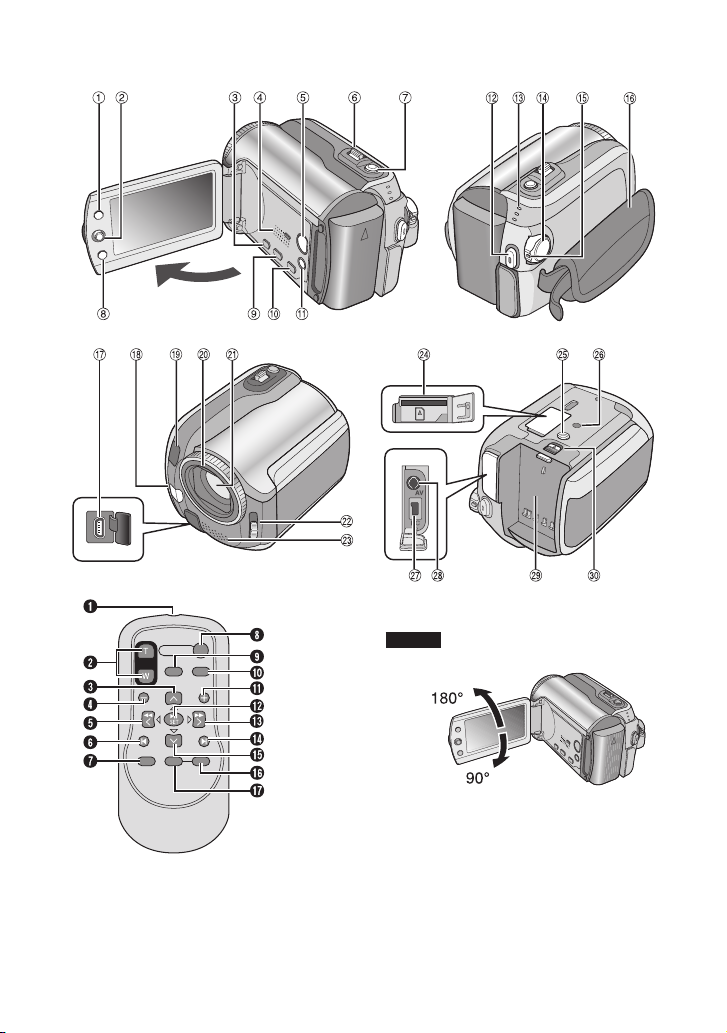
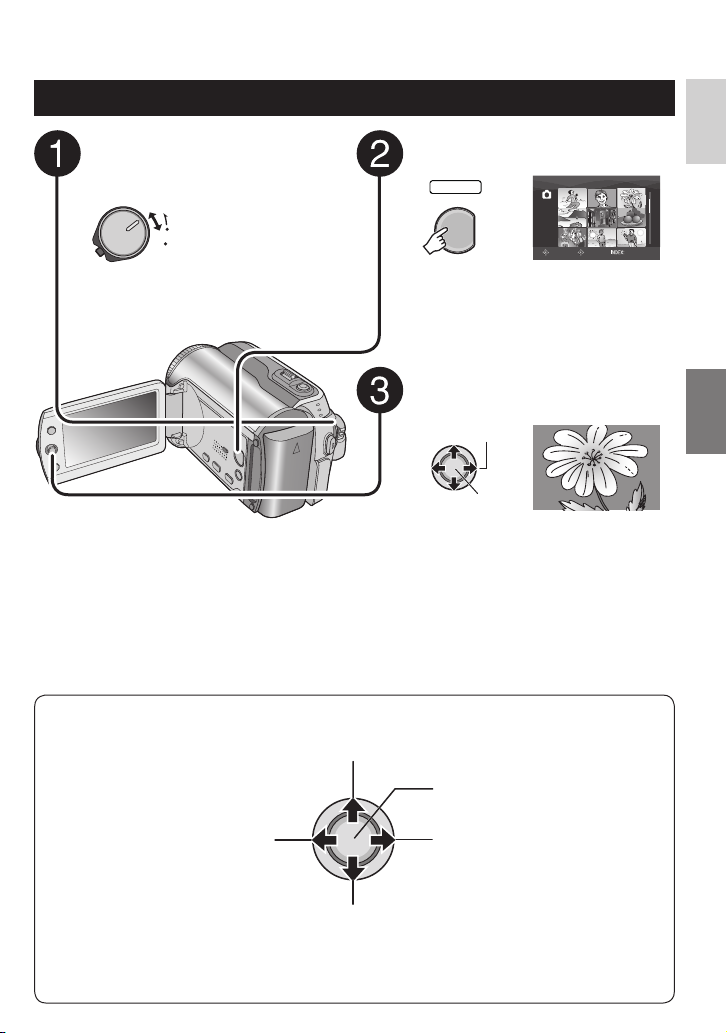
Index
NOTES
The LCD monitor can rotate 270°.
•
• Power-linked operation
You can also turn the camera on/off by
opening/closing the LCD monitor during the
recording mode.
Be careful not to cover 4, 5, 7 and 9
•
during shooting.
8
Camera
! Index Button [INDEX] ( pg. 26)/
Remaining Space Button/Data Battery
Button [ 0/ 1 ] ( pg. 14, 19)
# Set Lever
Move to ¡ :
Reverse Skip ( pg. 24)/Up/Backlight
Compensation [ - ] ( pg. 21)/Spot
Exposure Control [ . ] ( pg. 21)
Move to ¢ :
Forward Skip ( pg. 24)/Down/
Change Flash Setting [FLASH]
( pg. 18)/
[LIGHT] ( pg. 18)
Move to £ :
Reverse Search ( pg. 24)/Left/
Nightalive [NIGHT] ( pg. 21)
Move to ¤ :
Forward Search ( pg. 24)/Right/
Program AE [PROGRAM AE] ( pg. 20)
Press down:
Play/Pause ( pg. 24)
$ Menu Button [MENU] ( pg. 46)
% Speaker ( pg. 24)
& Playback/Recording Mode Switching
Button [SELECT PLAY/REC] ( pg. 16)
( Zoom Lever [W 7 , T
Speaker Volume Control [–VOL+]
( pg. 24)
) Still Image Shooting Button [SNAPSHOT]
( pg. 17)
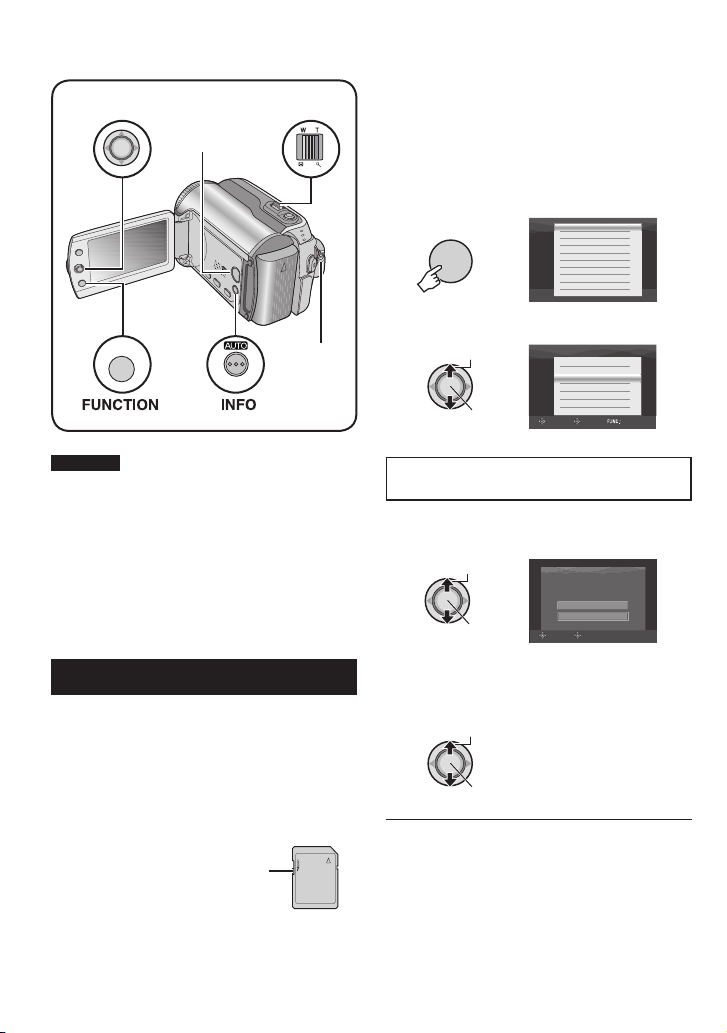
* Function Button [FUNCTION] ( pg. 22)
+ Direct DVD Button [DIRECT DVD]
( pg. 41 and PC OPERATION GUIDE)
, Direct Backup Button [DIRECT BACK UP]
( PC OPERATION GUIDE)/Event Button
[EVENT] ( pg. 19)
- Auto/Manual Mode Button [AUTO]
( pg. 20)/ Information Button [INFO]
( pg. 32)
. Video Recording Start/Stop Button [REC]
( pg. 16)
/ Access/Charge Lamp [ACCESS/CHARGE]
( pg. 12)
(Blinks when you access fi les or charge
the battery. Do not turn off the power or
remove the battery pack/AC adapter while
accessing fi les.)
Video/Still Image Mode Lamp [ !, # ]
( pg. 16, 17)
Change LED Light Setting
] ( pg. 18)
,
0 Power/Mode Switch [OFF (CHARGE), ON,
MODE] ( pg. 12)
1 Lock Button ( pg. 12)
2 Grip Strap ( pg. 14)
3 USB (Universal Serial Bus) Connector
[
] ( pg. 38, 40 and PC OPERATION
2
GUIDE)
4
5 Camera Sensor
Remote Sensor ( pg. 7)
6 Lens Cover ( pg. 14)
7 Lens
8 Lens Cover Switch [ =, > ] ( pg. 14)
9 Stereo Microphone
: SD Card Slot ( pg. 15)
; Tripod Mounting Socket ( pg. 14)
< Stud Hole ( pg. 14)
= DC Input Connector [DC] ( pg. 12)
> Audio/Video Connector [AV]
? Battery Pack Mount ( pg. 12)
@ Battery Release Button [BATT.] ( pg. 12)
Flash ( pg. 18)/
LED Light ( pg. 18)
Remote Control
Q Infrared Beam Transmitting Window
R ZOOM (T/W) Buttons
Zoom In/Out ( pg. 18)
S Up Button
Rotate Button (counterclockwise)
( pg. 25)
T Skip Backward Button
U Left Button
V Back Button
W PLAYLIST Button ( pg. 34)
X START/STOP Button
Y SNAPSHOT Button ( pg. 17)
Z INFO Button ( pg. 32)
a Skip Forward Button
b PLAY/PAUSE Button
c Right Button
d Next Button
e Down Button
Rotate Button (clockwise) ( pg. 25)
f INDEX Button
g DATE Button
ENGLISH
9
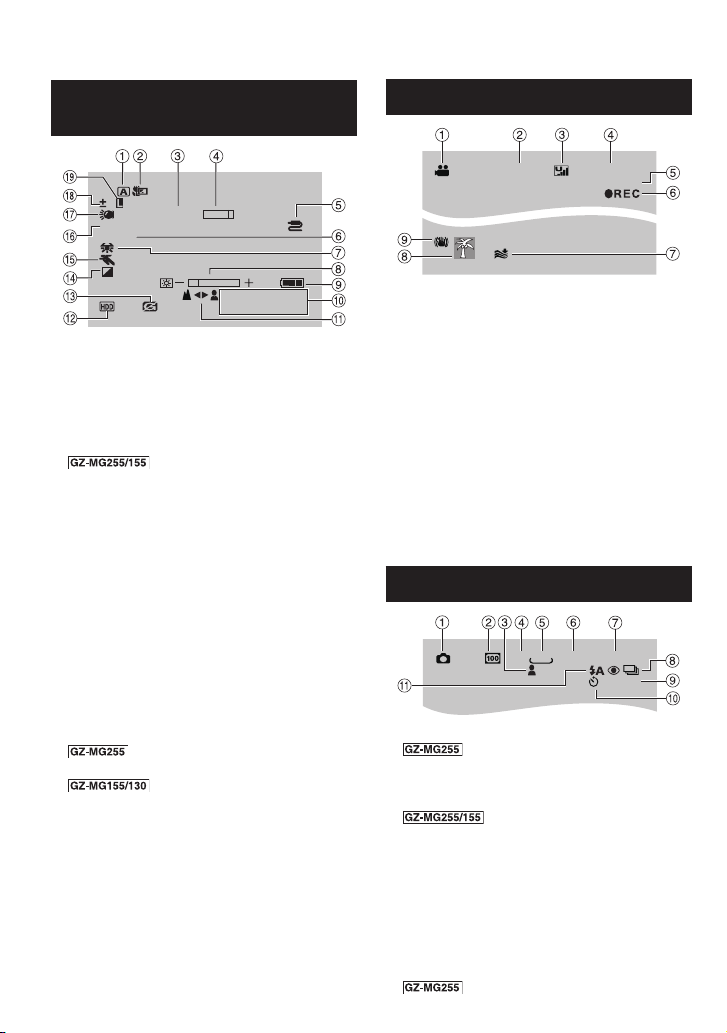
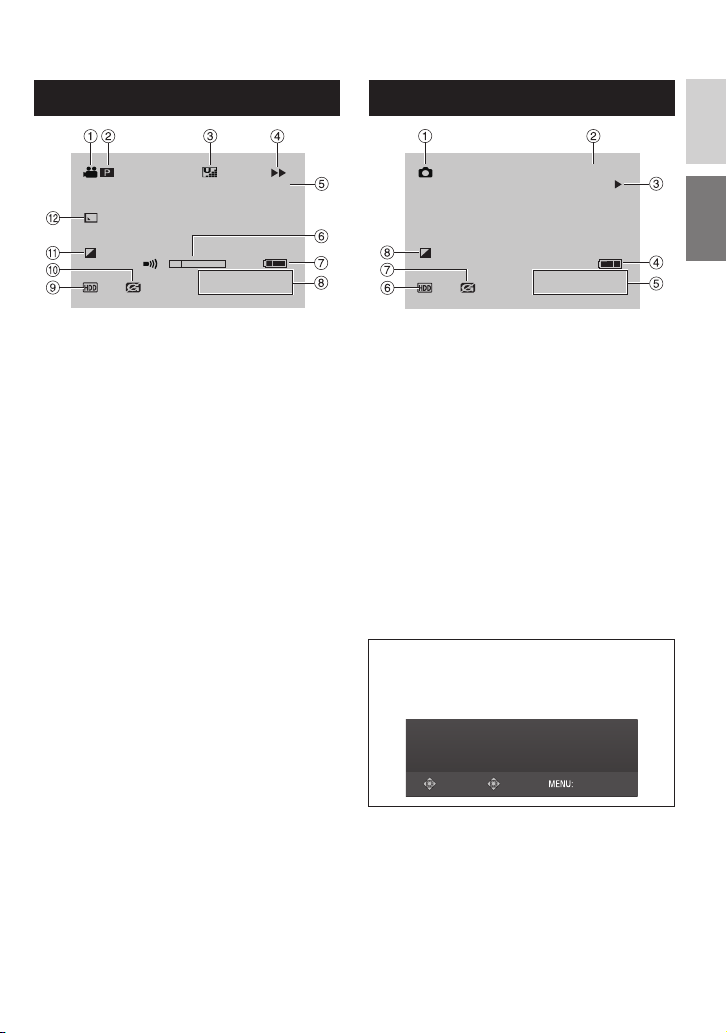
Indications on LCD Monitor
During both Video and Still Image
Recording
0
200X
A
F5.6
1/250
WT
4:55
JAN.20.20 07
! Selected Operation Mode Indicator
( pg. 20)
4 : Auto Mode
3 : Manual Mode
# Tele Macro Mode Indicator ( pg. 23)
$ Approximate Zoom Ratio ( pg. 18)
% Zoom Indicator ( pg. 18)
&
AV/S Connector Input
Indicator ( pg. 49)
( Shutter Speed ( pg. 23)
) White Balance Indicator ( pg. 23)
* Brightness Control Indicator ( pg. 48)
+ Battery Indicator ( pg. 54)
, Date/Time ( pg. 13)
- Manual Focus Adjustment Indicator
( pg. 22)
. Selected Medium Indicator
( pg. 47, 48)
/ Drop Detection Indicator (Appears when
[DROP DETECTION] is set to [OFF].)
( pg. 48)
0 Effect Mode Indicator ( pg. 23)
1 Program AE Mode Indicator ( pg. 20)/
5
: Nightalive Indicator ( pg. 21)
2 Aperture Value (F-number)
( pg. 23)
3
LED Light Indicator ( pg. 18)
4 ± : Exposure Adjustment Indicator
( pg. 22)
- : Backlight Compensation Indicator
( pg. 21)
. : Spot Exposure Control Indicator
( pg. 21)
5 Iris Lock Indicator ( pg. 21)
10
PM
During Video Recording Only
16:9
[5h56m]
0:04:01
! Mode Indicator ( pg. 16)
# Aspect Ratio of the Image (16:9/4:3)
( pg. 47)
$ Picture Quality: B (ultra fi ne), C (fi ne),
(normal), E (economy) ( pg. 46)
D
% Remaining Time ( pg. 16, 57)
& Counter ( pg. 47)
( 7REC: (Appears during recording.)
( pg. 16)
79: (Appears during record-standby
mode.)
) Wind Cut Indicator ( pg. 47)
* Event Indicator ( pg. 19)
+ Digital Image Stabilizer (DIS) Indicator
(Appears when [DIS] is set to [OFF].)
( pg. 47)
During Still Image Recording Only
640
FINE
[9999]
PHOTO
10
4:3
! Mode Indicator ( pg. 17)
#
ISO Sensitivity
(GAIN): When set to [AUTO], there is no
indication. ( pg. 47)
$ Focus Indicator ( pg. 22)
%
Aspect Ratio of the Image
(16:9/4:3)
& Image Size ( pg. 47)
( Picture Quality: FINE (fi ne) or STD
(standard) ( pg. 47)
) Remaining Number of Shots ( pg. 57)
* Continuous Shooting Mode Indicator
( pg. 48)
+ Shooting Indicator ( pg. 17)
, Self-Timer Recording Indicator ( pg. 48)
-
Flash Mode Indicator ( pg. 18)
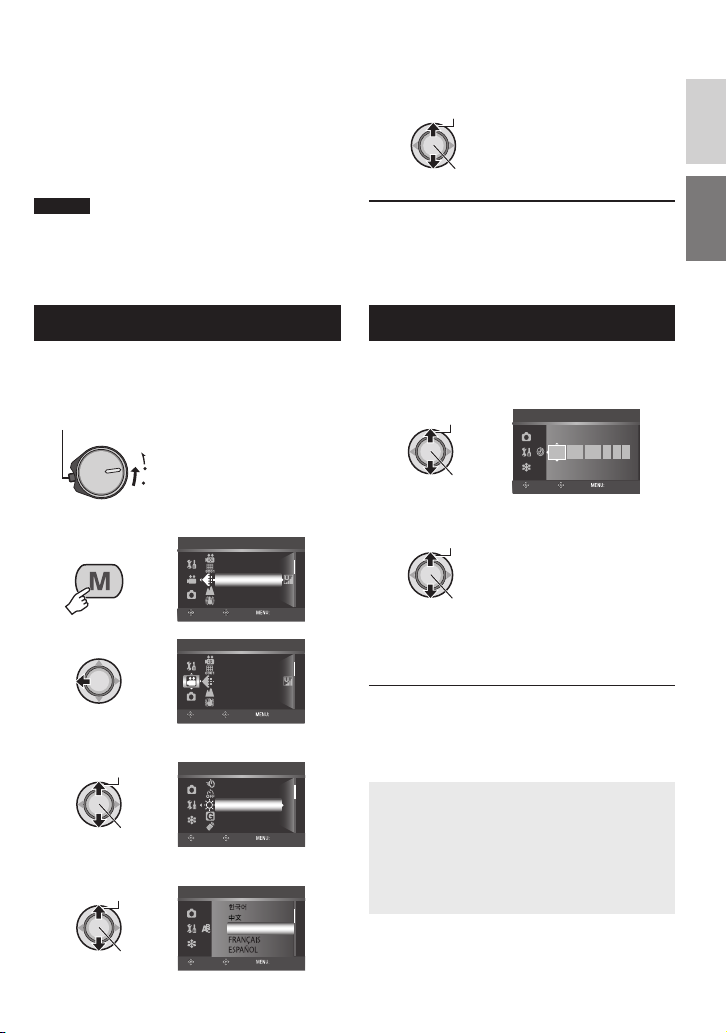
During Video Playback
During Still Image Playback
ENGLISH
X-60
9:55:01
4:55
JAN.20.2007
PM
! Mode Indicator ( pg. 24)
#
: Playlist Playback Indicator (Appears
6
when playing back a playlist.) ( pg. 35)
¨ª : Event Search Playback Indicator
(Appears when playing back a video fi le
from the event search.) ( pg. 27)
¨© : Date Search Playback Indicator
(Appears when playing back a video fi le
from the date search.) ( pg. 26)
$ Picture Quality: B (ultra fi ne), C (fi ne),
(normal), E (economy) ( pg. 46)
D
% Playback Mode ( pg. 24)
U : Playback
9 : Pause
5
: Forward Search
3
: Reverse Search
9U : Forward Slow-Motion
Y9 : Reverse Slow-Motion
(The number on the left shows speed.)
& Counter ( pg. 47)
( Volume Level Indicator
) Battery Indicator ( pg. 54)
* Date/Time ( pg. 13)
+ Selected Medium Indicator ( pg. 47, 48)
, Drop Detection Indicator (Appears when
[DROP DETECTION] is set to [OFF].)
( pg. 48)
- Effect Mode Indicator ( pg. 28)
. Wipe/Fader Effect Indicator ( pg. 28)
101-0098
4:55
JAN.20.2007
PM
! Mode Indicator ( pg. 25)
# Folder/File Number
$ Slide Show Playback Indicator ( pg. 25)
% Battery Indicator ( pg. 54)
& Date/Time ( pg. 49)
( Selected Medium Indicator ( pg. 47, 48)
) Drop Detection Indicator (Appears when
[DROP DETECTION] is set to [OFF].)
( pg. 48)
* Effect Mode Indicator ( pg. 28)
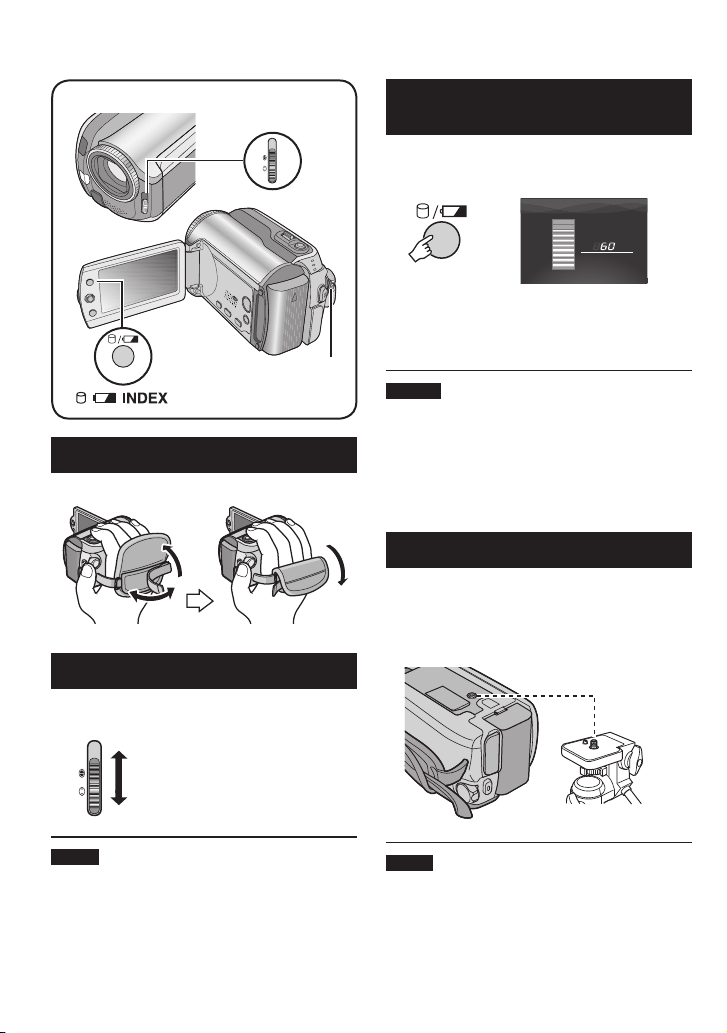
Operation guide display
The operation guide is displayed at the
bottom of the screen during menu display
etc.
SELECT
SET QUIT
11

Necessary Settings before Use
Access/Charge Lamp
MENU
Set Lever
Be sure to confi gure the following three
settings before use.
Power/Mode Switch
Charging the Battery Pack
1 Set the power/mode switch to OFF.
Slide while pressing down the lock button.
MODE
ON
(CHARGE)
OFF
2 Attach the battery pack.
Slide the battery pack down until it locks
in place.
Bottom of the Camera
BATT.
3 Connect the AC adapter.
DC Connector
AC Adapter
Open the cover.
You can also connect the AC
•
adapter using the Everio dock connector.
( pg. 6)
The access/charge lamp blinks to indicate
•
charging has started.
When the lamp goes out, charging is
•
fi nished. Unplug the AC adapter from the
AC outlet and disconnect the AC adapter
from the camera.
To AC Outlet
(110V to 240V)
Required charging / recording time (approx.)
The values within ( ) are the times when the LED light is on.
Battery pack Charging time
BN-VF808U
(Provided)
BN-VF815U 2 hr. 40 min. 2 hr. 35 min.
BN-VF823U 3 hr. 50 min. 3 hr. 50 min.
1 hr. 30 min. 1 hr. 15 min.
GZ-MG255 GZ-MG155 GZ-MG130
12
Recording time
1 hr. 30 min.
(1 hr. 25 min.)
3 hr. 5 min.
(2 hr. 55 min.)
4 hr. 35 min.
(4 hr. 20 min.)
1 hr. 35 min.
(1 hr. 30 min.)
3 hr. 15 min.
(3 hr. 5 min.)
4 hr. 55 min.
(4 hr. 35 min.)
8 To detach the battery pack
Slide and hold BATT. (
step 2), then
remove the battery pack.
8 To check the remaining battery power
See page 14.
NOTES
You can also use the camera with just the AC
•
adapter.
Please do not pull or bend the AC adapter plug
•
and cable. This may damage the AC adapter.
6 Select the desired language.
Select
Set
8 To return to the previous screen
Move the set lever to £.
8 To exit the screen
Press MENU.
ENGLISH
Language Setting
The language on the display can be changed.
1 Set the power/mode switch to ON.
Slide while pressing down the lock button.
MODE
ON
(CHARGE)
OFF
2
3
MENU
VIDEO
REC MEDIA FOR VIDEO
SCENE COUNTER
QUALITY
ZOOM
DIS
SELECT SET QUIT
VIDEO
REC MEDIA FOR VIDEO
SCENE COUNTER
QUALITY
ZOOM
DIS
SELECT SET QUIT
4 Select [GENERAL].
Select
Set
GENERAL
QUICK RESTART
AUTO POWER OFF
BRIGHT
DROP DETECTION
REMOTE
SELECT SET QUIT
5 Select [LANGUAGE].
Select
Set
GENERAL
ENGLISH
SELECT SET QUIT
Date/Time Setting
After performing steps 1-4 ( left column)
5 Select [ CLOCK ADJUST].
Select
Set
GENERAL
SELECT SET QUIT
DATE TIME
2007
JAN 31
11
07
AM
6 Set the date and time.
Select
Set
Repeat this step to input the month, day,
year, hour and minute.
8 To return to the previous screen
Move the set lever to £.
8 To exit the screen
Press MENU.
You have now fi nished confi guring the
necessary settings.
8 To use the camera right away
See page 16.
8 To confi gure other settings
See page 14.
13
Other Settings
Lens Cover
Switch
INDEX
Power/Mode
Switch
Grip Adjustment
Open the pad and make grip adjustments.
Lens Cover
When not using the camera, close the lens
cover to protect the lens.
Close the lens cover
Checking the Remaining Battery
Power
Preparation:
Set the power/mode switch to OFF.
•
Attach the battery pack.
•
INDEX
BATTERY CONDITION
100%
MAX TIME
50%
0%
min
Battery information is displayed for approx. 5
seconds if the button is pressed and released
quickly, and for approx. 15 seconds if the
button is pressed and held for several seconds.
NOTES
If “COMMUNICATING ERROR” appears,
•
there may be a problem with your battery.
In such a case, consult your nearest JVC
dealer.
The recordable time display should only be
•
used as a guide. It is displayed in 10 minute
units.
Tripod Mounting
Align the camera stud hole with the tripod
stud, and the mounting socket with the screw,
and then rotate the camera clockwise to
mount it to the tripod.
Bottom of the
Camera
Open the lens cover
NOTE
Do not push the lens cover strongly. Doing so
may cause damage to the lens.
14
NOTE
Do not use a tripod on unsteady or unlevel
surfaces. It could tip over, causing serious
damage to the camera.
When Using an SD Card
If you want to record to an SD card, the
following three operations need to be
performed.
Compatible SD cards:
Panasonic, TOSHIBA and SanDisk.
128 MB to 4 GB.
If other media are used, they may fail to
•
record data correctly, or they may lose data
that had already been recorded.
For video recording, use a high-speed SD
•
card (at least 10 MB/s).
MultiMediaCards are not supported.
•
Q Insert an SD card
Preparation:
Set the power/mode switch to OFF.
1 Open the SD card cover.
Bottom of the
Camera
2 Firmly insert the card with its clipped
edge fi rst.
NOTES
Insert and remove the SD card only while
•
the power is turned off. Otherwise, data on
the card may be corrupted.
Do not touch the terminal on the reverse
•
side of the label.
R Change the recording medium
The camera is programmed to record on the
built-in hard disk when it is shipped from the
factory. You can change the recording medium
to SD card.
Set [REC MEDIA FOR VIDEO] and [REC
MEDIA FOR IMAGE] to [SD]. (墌 pg. 47,
48)
S Format an SD card when using it for
the fi rst time
This will also ensure stable speeds and
operation when accessing the SD card.
Select [EXECUTE] in [FORMAT SD
CARD] to format the card. (墌 pg. 50)
ENGLISH
Clipped Edge
3 Close the SD card cover.
8 To remove an SD card
Push the SD card once.
After the card comes out a little, pull it out.
15
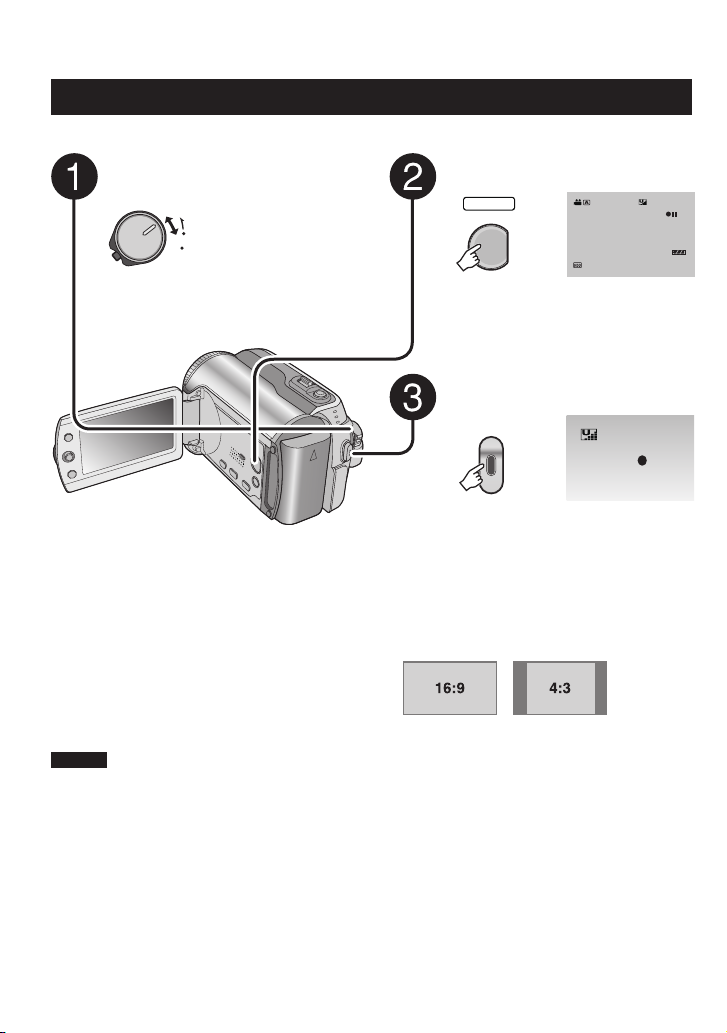
Recording Files
REC
[5h56m]
Video Recording
Preparation: Set the power/mode switch to ON.
Slide the power/mode switch to
MODE to select ! (video) mode.
The switch returns to
MODE
the original position
ON
when it is released.
OFF
The ! lamp on the camera lights up.
Press the PLAY/REC button to
select recording mode.
[5h56m]
SELECT
PLAY/REC
16:9
Press the REC button to start
recording.
REC
Approximate remaining time for
recording appears.
8 To stop recording
Press the REC button again.
8 To change the picture quality
Change the settings in [QUALITY].
(
pg. 46)
8 To change the aspect ratio of the image
(16:9/4:3)
Change the settings in [16:9 WIDE
RECORDING]. (
pg. 47)
8 To register a fi le to an event
See page 19.
NOTES
The video recording mode is automatically selected when you turn the camera’s power off and then
•
on again.
If the camera is not operated for 5 minutes while the power is on, it turns itself off automatically to
•
conserve power. To turn the camera on again when using the battery pack, set the power/mode switch
to OFF, then to ON. When using the AC adapter, perform any operation such as zooming.
Video fi les are given the names MOV_001.MOD to MOV_009.MOD, MOV_00A.MOD to
•
MOV_00F.MOD, and MOV_010.MOD in order of recording.
After recording video for 12 consecutive hours, recording stops automatically.
•
A new fi le will be created for every 4 GB of continuous shooting.
•
This camera records video in MPEG2 format compliant with SD-VIDEO format. Remember that this
•
camera is not compatible with other digital video formats.
Do not move or shake the camera suddenly during recording. If you do so, the sound of the hard disk
•
drive may be recorded.
16
Still Image Recording
[
Preparation: Set the power/mode switch to ON.
Slide the power/mode switch to
MODE to select # (still image)
mode.
The switch returns
MODE
to the original
ON
position when it is
OFF
released.
The
lamp on the camera lights up.
#
Press the PLAY/REC button to
select recording mode.
640
[9999]
SELECT
PLAY/REC
FINE
Press and hold the SNAPSHOT
button halfway.
640
FINE
The ? indicator becomes green when
the captured image is focused.
ENGLISH
8 To change the picture quality
Change the settings in [QUALITY].
(
pg. 47)
8 To record still images continuously
Press the SNAPSHOT button to
start recording.
0
[9999]
FINE
Set [CONTINUOUS SHOOTING] to
[ON]. (
8
pg. 48)
To change the image size
Change the settings in [IMAGE SIZE].
(
pg. 47)
NOTE
If the camera is not operated for 5 minutes while the power is on, it turns itself off automatically to
conserve power. To turn the camera on again when using the battery pack, set the power/mode switch
to OFF, then to ON. When using the AC adapter, perform any operation such as zooming.
17
Recording Files (Continued)
Zoom Lever
PLAY/REC
INDEX
Set Lever
Button
Power/Mode
Switch
Zooming
Preparation:
Slide the power/mode switch to MODE to
•
select
Press the PLAY/REC button to select
•
recording mode.
or # mode.
!
Zoom out Zoom in
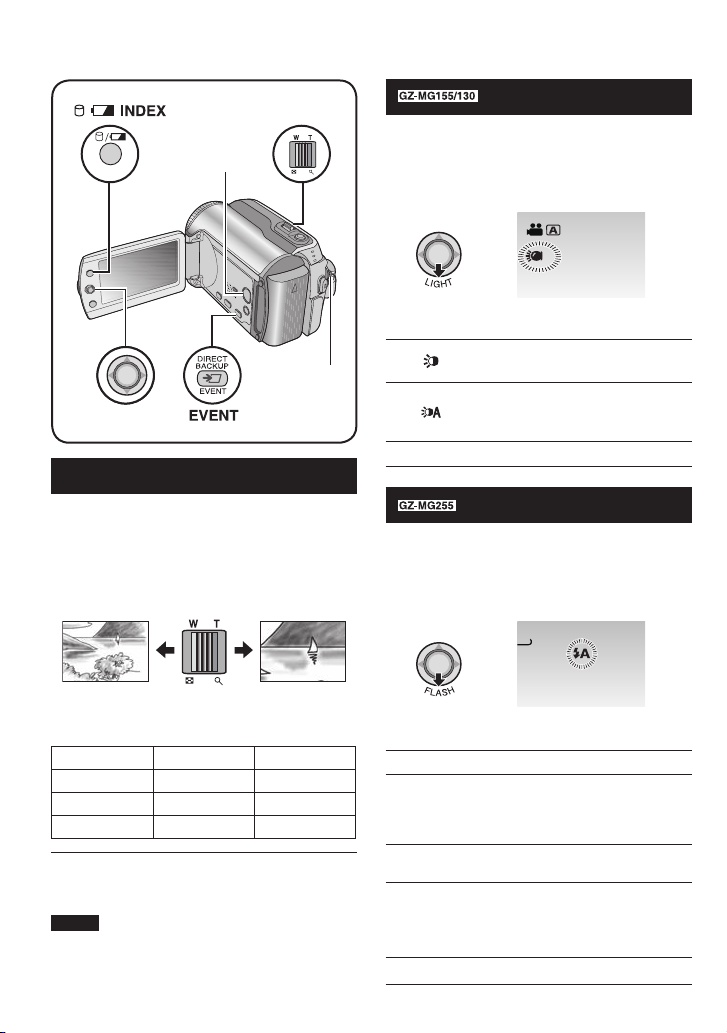
LED Light
Preparation:
Slide the power/mode switch to MODE to
•
select
Press the PLAY/REC button to select
•
recording mode.
Each time you move the set lever to ¢,
setting changes.
No display
or # mode.
!
A
The light remains on regardless
of the surrounding conditions.
The light turns on automatically
when shooting in insuffi cient
light conditions.
Disables this function.
Flash – # mode only
Preparation:
Slide the power/mode switch to MODE to
•
select
Press the PLAY/REC button to select
•
recording mode.
#
mode.
0
[9999]
FINE
W: Wide angle T: Telephoto
Maximum Zoom Ratio (Factory-preset)
Model
GZ-MG255 40X 10X
GZ-MG155 64X 27X
GZ-MG130 68X 34X
8 To change the maximum zoom ratio (for
! mode only)
Change the settings in [ZOOM]. ( pg. 46)
NOTE
Macro shooting is possible as close as
approx. 5 cm (2
zoom lever is set all the way to W.
! mode # mode
″
) to the subject when the
18
Each time you move the set lever to ¢,
setting changes.
()
()*
(+
No display
The fl ash fi res automatically.
The fl ash fi res automatically
but reduces the red-eye
phenomenon of the subject’s
eyes.
The fl ash fi res regardless of the
(
shooting condition.
The fl ash fi res. The shutter
speed becomes slower, so
the background can also be
brightened.
Disables this function.

Registering Files to Events
– ! mode only
If you select an event to register the fi le to
before starting recording, the fi le will be
registered to the selected event, thus making
the fi le easy to fi nd at playback. There are up
to 3 different destinations within each event
(for example: BABY1, BABY2, BABY3).
Preparation:
Slide the power/mode switch to MODE to
•
select
Press the PLAY/REC button to select
•
recording mode.
!
mode.
1
CHANGE EVENT REG.
ON/SELECT
OFF
2 Select [ON/SELECT].
Select
VACATION
1/ 3
NOTE
Once you select to register a fi le to a certain
event, the setting will remain even if you turn
the power off. Unless you change the setting,
you will register a fi le to the same event that
you had previously selected.
Checking the Remaining Space on
the Recording Media
– ! mode only
Preparation:
Slide the power/mode switch to MODE to
•
select
Press the PLAY/REC button to select
•
recording mode.
!
INDEX
mode.
MAX RECORDING TIME
7h30m
11h15m
22h30m
45h00m
HDD
FREE
USED
The maximum recording time is displayed for
each picture quality mode ( B
: ULTRA FINE,
C : FINE, D : NORMAL, E : ECONOMY).
ENGLISH
Set
NON SECTION NEXT PAGE
SET QUIT
SELECT
3 Select the event that you want to
register the fi le to.
To select a different destination, select
•
[NEXT PAGE].
To cancel the event registration, select
•
[NON SECTION].
Select
Set
The selected event is displayed on the
screen. Press the REC button to start
recording.
8 To exit the screen
Press EVENT.
8 To search by event for a fi le to play back
See page 26.
8 To return to the normal screen
Press the 0 button again.
19
OFF
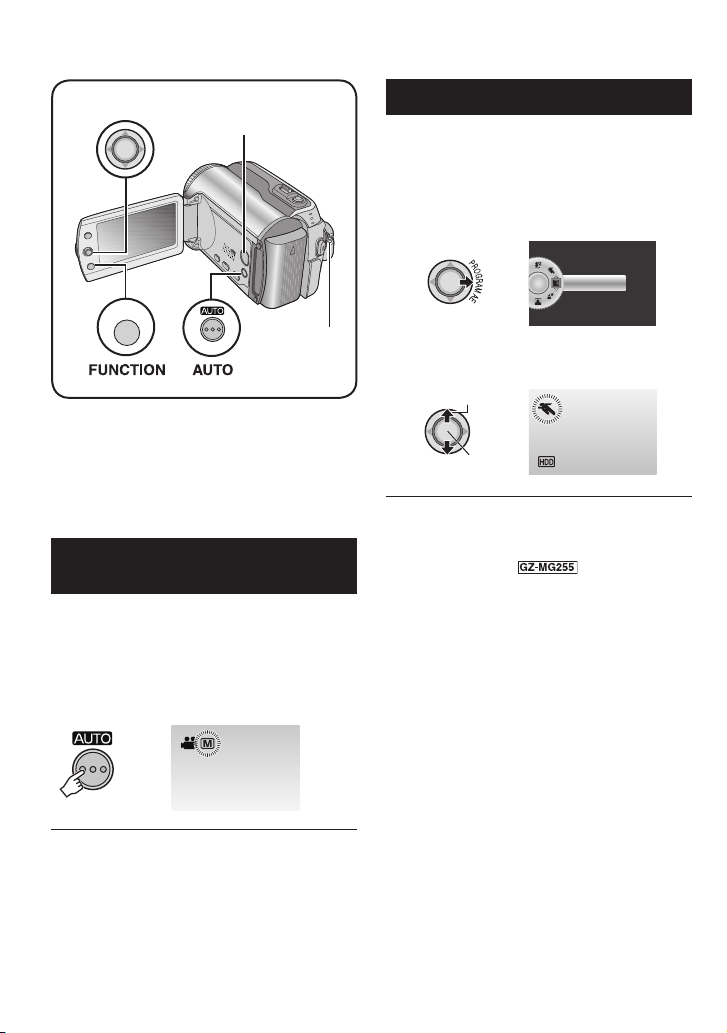
Manual Recording
Set Lever
FUNCTION
Manual recording mode enables you to set
the focus and screen brightness etc. manually.
You need to switch to this mode because auto
recording mode, which adjusts these settings
automatically, is selected by default.
To Change to Manual Recording
Mode
Preparation:
Slide the power/mode switch to MODE to
•
select
Press the PLAY/REC button to select
•
recording mode.
Press twice.
INFO
or # mode.
!
PLAY/REC Button
Power/Mode
INFO
Switch
Program AE
You can record videos or still images with
optimum brightness by adjusting the exposure
and shutter speed to suit your surroundings or
the subject.
After performing “To Change to Manual
Recording Mode” ( left column)
1
2 Select the desired setting.
For details on each setting, see below.
Select
Set
8 To cancel the program AE
Select [OFF] in step 2.
8 Items for program AE setting
6 PORTRAIT:
•
The subject in the foreground is
accentuated by blurring the background.
H SPORTS :
•
Records fast moving subjects clearly.
G SNOW :
•
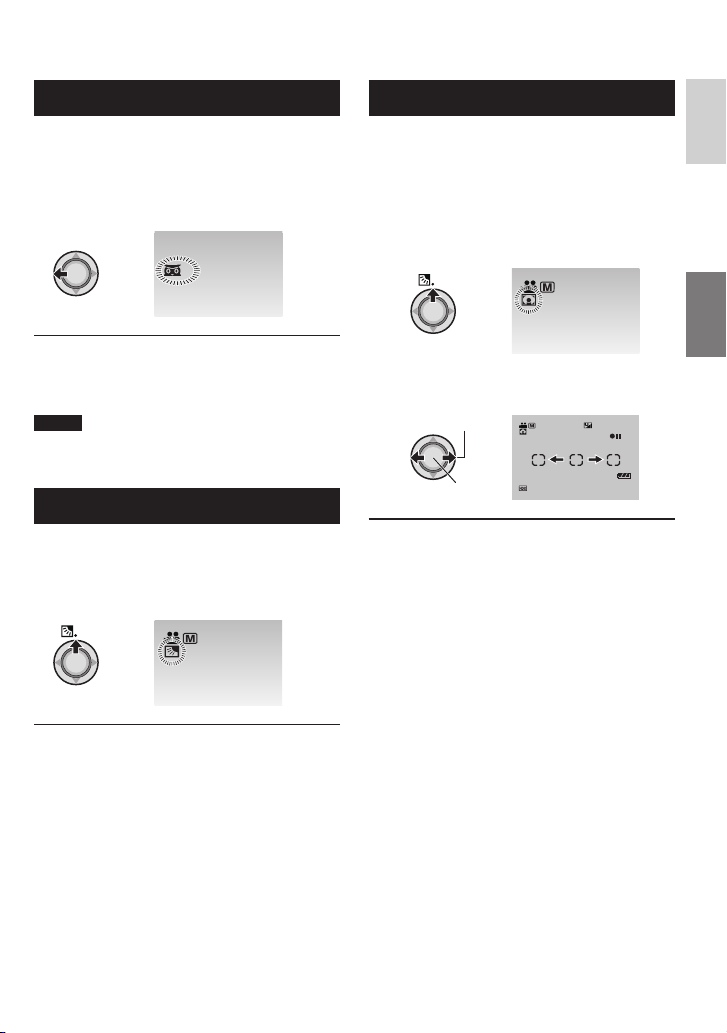
Compensates for subjects that may
appear too dark when shooting in
extremely bright surroundings, such as in
snow.
/ SPOTLIGHT :
•
Select this when a spotlight makes a
subject appear too bright.
I TWILIGHT :
•
Makes evening scenes look more natural.
8 To return to the auto recording mode
Press the AUTO button so that the 4
indicator appears.
20
Nightalive
A
Spot Exposure Control
ENGLISH
The shutter speed is automatically adjusted
from 1/2 to 1/250 seconds. It enables
recording with low light levels in dim locations.
After performing “To Change to Manual
Recording Mode” ( pg. 20)
T
H
G
I
N
8 To cancel nightalive
Move the set lever to £ (NIGHT) so that the
indicator disappears.
5
NOTE
It is recommended to use the tripod ( pg. 14)
when recording with a slow shutter speed.
Backlight Compensation
Backlight compensation brightens the subject
by increasing the exposure.
After performing “To Change to Manual
Recording Mode” ( pg. 20)
Use this function when backlight
compensation does not work well, or to adjust
the brightness in the desired spot.
After performing “To Change to Manual
Recording Mode” ( pg. 20)
1 Move twice.
2 Select the desired spot metering area
frame.
Select
Set
8 To lock the exposure
After you fi nish confi guring the setting,
press and hold the set lever for more than 2
seconds. The
indicator appears.
C
8 To cancel spot exposure control
Move the set lever to ¡ (
the
. indicator disappears.
[5h56m]
16:9
- ) once so that
8 To cancel backlight compensation
Move the set lever to ¡ ( - ) twice so that
the - indicator disappears.
21
Manual Recording (Continued)
Manual Setting in Function Menu
You can use manual recording functions
easily by selecting items in the function
menus.
After performing “To Change to Manual
Recording Mode” ( pg. 20)
1
FUNCTION
FOCUS
ADJUST BRIGHTNESS
SHUTTER SPEED
APERTURE PRIORITY
WB
EFFECT
TELE MACRO
2 Select the desired menu.
For details on each menu, see below.
Select
Set
Menus Settings: [ ] = Factory-preset
FOCUS
Adjusts the focus.
ADJUST BRIGHTNESS
Adjusts the brightness.
ADJUST BRIGHTNESS
AUTO
0
[AUTO] : The focus is adjusted automatically.
@ 9 : A : Adjusts the focus manually. Move the set lever to £ / ¤
to set the focus. (When zooming, the subject will not go out of
focus if you adjust the focus at the telephoto (T) side before
zooming to the wide-angle (W) side.)
For ! mode
[AUTO] : The brightness is adjusted automatically.
–6 to +6 : Corrects the brightness within this range in increments
of 1. Move the set lever to ¡ / ¢ to set the value.
For
# mode
[±0] : The brightness is not adjusted.
–2.0 to +2.0 (EV) : Corrects the brightness within this range in
increments of 1/3EV. Move the set lever to ¡ / ¢ to set the
value.
8 To lock the exposure
When the menu disappears after you fi nish confi guring the
setting, press and hold the set lever for more than 2 seconds.
The
indicator appears.
C
3 Select the desired setting.
Select
Set
Depending on the kind of settings you
select, you can set the value by moving the
set lever to ¡ / ¢ after selecting.
4
FUNCTION
The menu disappears and the indicator for
the set function appears.
8 To return to the previous screen
Move the set lever to £.
8 To exit the screen
Press FUNCTION.
ADJUST BRIGHTNESS
AUTO
0
2
16:9
22
Menus Settings: [ ] = Factory-preset
SHUTTER SPEED
A fast shutter speed can
freeze the motion of a
fast-moving subject, and
a slow shutter speed can
blur the subject to give the
impression of motion.
APERTURE PRIORITY
You can add a blurring
effect to the background by
setting the aperture value
(F-number).
WB
Adjusts the white balance
to achieve the optimum
colors for the amount of
light in your surroundings
during recording.
EFFECT
Enables you to record
videos or still images with
special effects.
TELE MACRO
Enables you to shoot
a subject as large as
possible at a distance of
approx. 40 cm (1.32 ft).
[AUTO] : The shutter speed is adjusted automatically.
1/2 to 1/4000 (For
1/2 to 1/500 (For
! mode) /
# mode):
The smaller the value, the faster the shutter speed. Move the
set lever to ¡ / ¢ to set the value.
NOTE
It is recommended to use the tripod ( pg. 14) when recording
with a slow shutter speed.
[AUTO] : The aperture value is adjusted automatically.
F1.2 to F16:
The lower the F-number (larger aperture value), the more
blurred the background will become. The higher the Fnumber (smaller aperture value), the clearer the focus will be
for both near and far objects. Move the set lever to ¡ / ¢ to
set the value.
NOTE
If the image is too bright, set to a larger F-number. If the image is
too dark, set to a smaller F-number.
[AUTO] : White balance is adjusted automatically.
@
B MWB : Adjusts the white balance manually depending on the
light source.
1) Hold a sheet of plain white paper in
front of the subject so that the white
paper fi lls the screen.
2) Press and hold the set lever until the
B indicator starts blinking then stops
blinking.
D FINE : When shooting outdoors on a sunny day.
E CLOUD : When shooting outdoors on a cloudy day.
F HALOGEN : When a video light or similar type of lighting is
used.
[OFF] : No effect is used.
1
J SEPIA : The image has a brownish tint like old photos.
K MONOTONE : The image becomes black and white like old
movies.
L CLASSIC FILM* : This effect skips frames to give images of an
old movie atmosphere.
M STROBE* : The image looks like a series of consecutive
snapshots.
* Not available in
[OFF] : Disables the function.
1
t ON : Activates the function.
# mode.
ENGLISH
23
Playing Back Files
Video Playback
Slide the power/mode switch to
MODE to select ! (video) mode.
The switch returns to
MODE
the original position
ON
when it is released.
OFF
The ! lamp on the camera lights up.
8 To return to the index screen
Press INDEX.
8 To watch on TV
See page 29.
8 To turn the date display on/off
Change the settings in [DATE/TIME]. ( pg. 49)
8 To check the fi le information
Press INFO when playback is paused. ( pg. 32)
Operations during Playback
Return to the fi rst scene
of the fi le
Play/Pause
Reverse search/
Frame-by-frame
playback
(during pause)
Forward search/
Frame-by-frame
playback (during
pause)
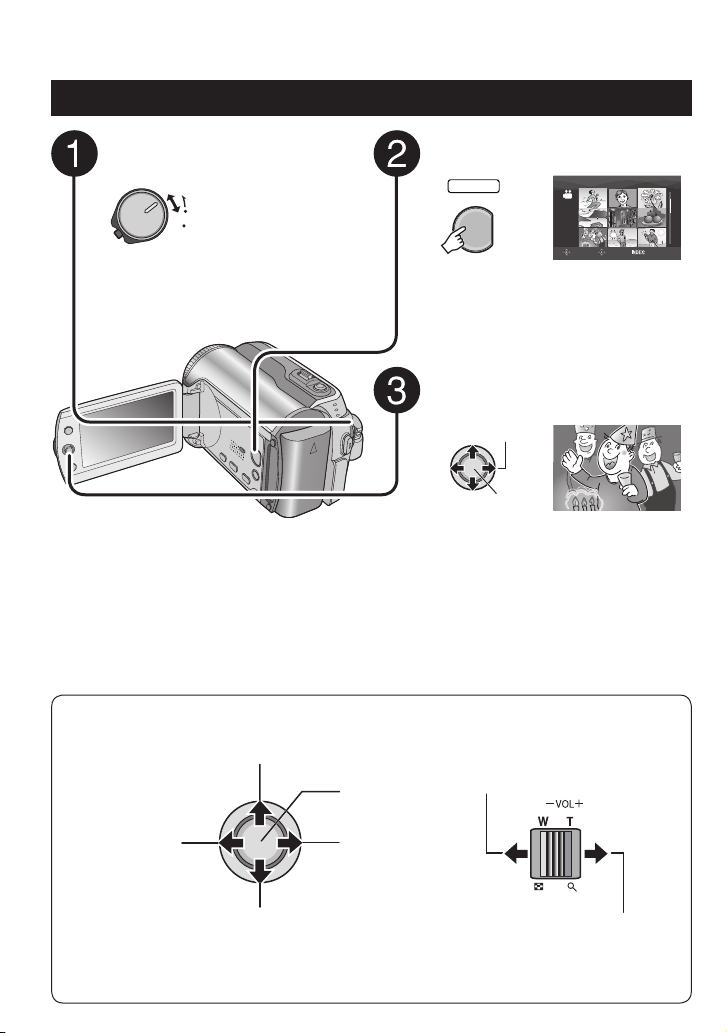
Press the PLAY/REC button to
select playback mode.
SELECT
PLAY/REC
VIDEO
SELECT
8/8
SET SORT
The index screen for videos appears.
Move the set lever to ¡ / ¢ / £ / ¤
to select the desired fi le, then
press down.
Select
Set
J J : Turn down the
volume
Go to the fi rst scene of
the next fi le
During forward reverse search, moving the set lever to £ / ¤
alters the search speed (maximum 60x).
24
I I : Turn up the
volume
Still Image Playback
ENGLISH
Slide the power/mode switch to
MODE to select # (still image)
mode.
The switch returns
MODE
to the original
ON
position when it is
OFF
released.
The
lamp on the camera lights up.
#
8 To return to the index screen
Press INDEX.
8 To watch on TV
See page 29.
8 To turn the date display on/off
Change the settings in [DATE/TIME]. ( pg. 49)
8 To check the fi le information
Press INFO. ( pg. 32)
Operations during Playback
Rotate 90 degrees
(counterclockwise)
Press the PLAY/REC button to
select playback mode.
SELECT
PLAY/REC
IMAGE
SELECT
8/8
SET SORT
The index screen for still images
appears.
Move the set lever to ¡ / ¢ / £ / ¤
to select the desired fi le, then
press down.
Select
Set
Start/end the slide
show
Display the previous fi le
Rotate 90 degrees
(clockwise)
During the slide show, moving the set lever to ¡ /
playback order.
Display the next fi le
¢ changes the
25
Playing Back Files (Continued)
2 Select the recording date.
Power/Mode Switch
INDEX
3 Select the fi le you want to play back.
FUNCTION
Set Lever
File Search Function
You can switch the index screen to the
date index screen or event screen for the
convenient fi le search.
The event screen can be used in
cannot be used in
#
mode.
Date Index Screen
You can search the desired fi le by the
recording date.
Preparation:
Slide the power/mode switch to MODE to
•
select
Press the PLAY/REC button to select
•
playback mode.
or # mode.
!
1
INDEX
SEARCH DATE
JAN 31 2007
JAN 25 2007
JAN 22 2007
DEC 22 2006DEC 22 2006
DEC 19 2006
DEC 01 2006
SELECT
PLAY/REC
Button
mode. It
!
SET SORT
8 To return to the index screen
Press the INDEX button.
Event Screen –
You can search the desired fi le by the event
that you registered the fi le to when recording.
( pg. 19) After searching by the event, you
can search by the recording date to narrow
down the search.
Preparation:
Slide the power/mode switch to MODE to
•
select
!
Press the PLAY/REC button to select the
•
playback mode.
1 Press twice.
INDEX
Select
Set
Select
Set
mode.
JAN 07 2007
SET SORT
SELECT
! mode only
VACATION
SET SORT
SELECT
1/3
1/ 3
NEXT PAGE
26
2 Select the event.
To move to the next page, select [NEXT
PAGE].
Select
Set
SEARCH EVENT
ALL SCENES
JAN 25 2007
JAN 22 2007
SELECT
SET SORT
3 Select the recording date.
To display all the fi les, select [ALL
SCENES].
Select
Set
VACATION
SELECT
1/3
SET SORT
4 Select the fi le you want to play back.
Select
Set
To Play Back Demonstration Files
– ! mode only
Video fi les that are used for demonstration
in a shop may be recorded on the camera
you purchased. These fi les are saved to the
[EXTMOV] folder and can be played back by
the following operations.
Preparation:
Slide the power/mode switch to MODE to
•
select
Press the PLAY/REC button to select
•
playback mode.
1
mode.
!
FUNCTION
DELETE
PROTECT
EDITED COPY
CHANGE EVENT REG.
EFFECT
WIPE/FADER
PLAYBACK PLAYLIST
EDIT PLAYLIST
PLAYBACK MPG FILE
PLAYBACK NORMAL FILE
2 Select [PLAYBACK MPG FILE].
Select
VIDEO [MPG]
8/8
ENGLISH
8 To return to the index screen
Press the INDEX button.
8 To change the event registration of a fi le
See page 32.
Set
SELECT
SET QUIT
3 Select the fi le you want to play back.
Select
Set
8 To exit the screen
Press FUNCTION.
8 To return to the normal fi le playback
mode
Select [PLAYBACK NORMAL FILE] in
step 2.
27
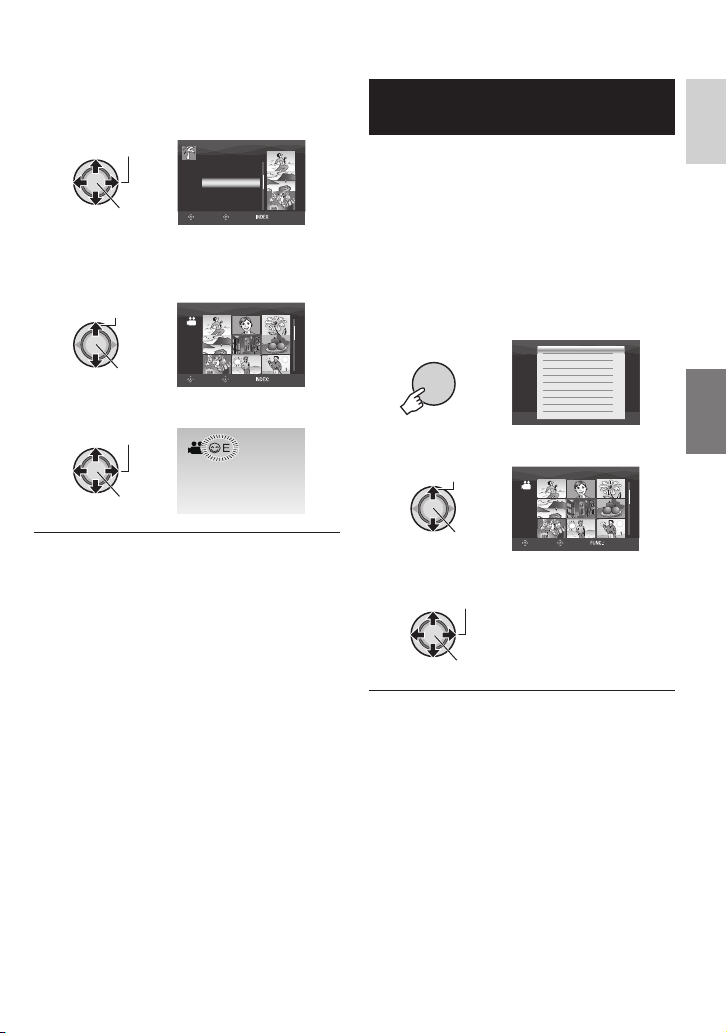
Playing Back Files (Continued)
Playback with Special Effects
Wipe or fader effects
Add effects at the beginning and end of
videos. These effects cannot be set for still
images.
Playback effects
Add effects that, for example, alter the color
tones of images.
Preparation:
Slide the power/mode switch to MODE to
•
select
Press the PLAY/REC button to select the
•
playback mode.
or # mode.
!
ex.) Set [EFFECT] to [SEPIA].
1
FUNCTION
DELETE
PROTECT
EDITED COPY
CHANGE EVENT REG.
EFFECT
WIPE/FADER
PLAYBACK PLAYLIST
EDIT PLAYLIST
PLAYBACK MPG FILE
PLAYBACK NORMAL FILE
2 Select [WIPE/FADER] (! mode only)
or [EFFECT].
Select
Set
SELECT
EFFECT
OFF
SEPIA
MONOTONE
CLASSIC FILM
STROBE
SET QUIT
3 Select a desired effect.
For details on each effect, see right
column.
Select
Set
VIDEO
SELECT
SET SORT
4 Select the fi le you want to play back.
Select
Set
8 To exit the screen
Press FUNCTION.
8 To turn off the effect
Select [OFF] in step 3.
28
8 Items for WIPE/FADER setting
O FADER:WHITE:
•
Fade in or out with a white screen.
P FADER:BLACK:
•
Fade in or out with a black screen.
Q FADER:B.W:
•
Fade in to a color screen from a black
and white screen, or fade out in the
opposite way.
R WIPE:CORNER:
•
Wipe in on a black screen from the upper
right to the lower left corner, or wipe out
in the opposite way.
S WIPE:WINDOW:
•
The scene starts in the center of a black
screen and wipes in toward the corners,
or wipes out in the opposite way.
T WIPE:SLIDE:
•
Wipe in from right to left, or wipe out in
the opposite way.
U WIPE:DOOR:
•
Wipe in as the two halves of a black
screen open to the left and right revealing
the scene, or wipe out in the opposite
way.
V WIPE:SCROLL:
•
The scene wipes in from the bottom to
the top of a black screen, or wipes out in
the opposite way.
W WIPE:SHUTTER:
•
Wipe in from the center of a black screen
toward the top and bottom, or wipe out in
the opposite way.
8 Items for EFFECT setting
8/8
J SEPIA:
•
The image is given a brownish tint like an
old photo.
K MONOTONE:
•
The image becomes black and white like
an old movie.
L CLASSIC FILM*:
•
The image is given an old movie
atmosphere by the effect of skipping
frames.
M STROBE*:
•
The image looks like a series of
consecutive snapshots.
* Not available in # mode.
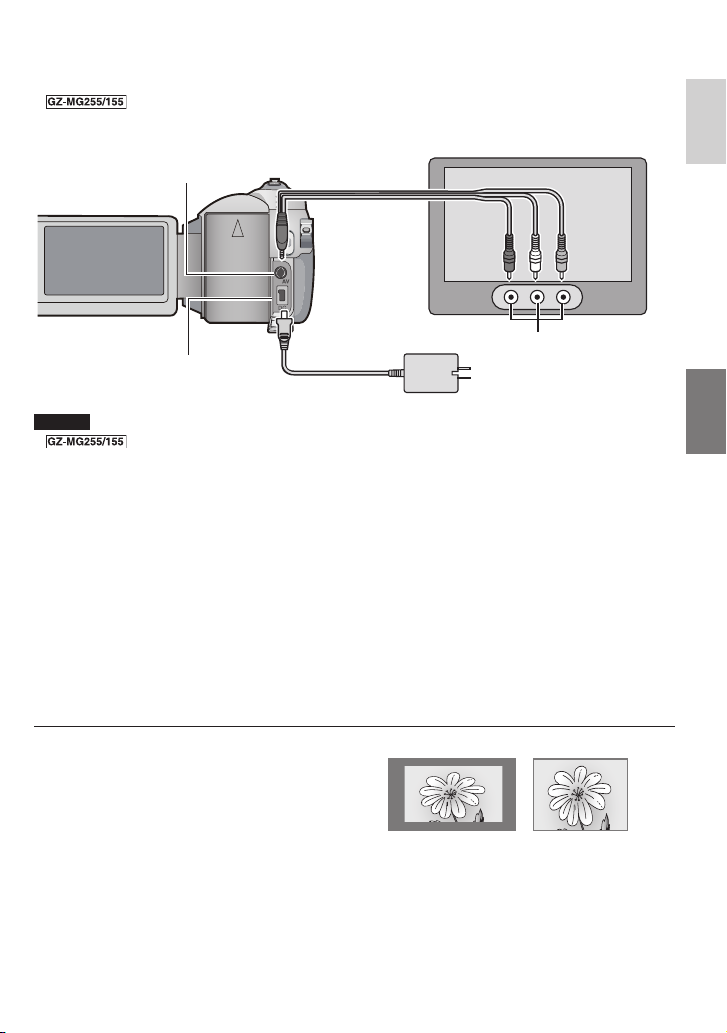
Watching Images on TV
Preparation:
Make sure that [ANALOG INPUT] is set to [OFF]. (Factory-preset = [OFF])
•
( pg. 49)
Turn off all units.
•
AV Connector
DC Connector
NOTES
You can also connect the cables using the Everio dock connectors. The S-Video
•
cable (optional) enables even higher quality playback. ( pg. 6) When other devices such as a
DVD burner are connected to the Everio dock, switch off these devices power.
This camera is designed to be used with NTSC-type color television signals. It cannot be used
•
with a television of a different standard.
AV Cable
AC Adapter
AV Input Connector
To AC Outlet
1 Turn on the camera and the TV.
2 Set the TV to its VIDEO mode.
3 (Only when connecting the camera to the VCR/DVD recorder)
Turn on the VCR/DVD recorder, and set the VCR/DVD recorder to its AUX input
mode.
ENGLISH
4 Start playback on the camera. ( pg. 24, 25)
8 If the aspect ratio of the image is not correct
as shown right
Change the settings in [SELECT TV TYPE].
( pg. 49)
8 To display camera’s on-screen display on TV
Set [DISPLAY ON TV] to [ON]. ( pg. 49)
16:9 TV 4:3 TV
29
Managing Files
Set Lever
PLAY/REC
Zoom Lever
Button
FUNCTION
INFO
CAUTION
Power/
Mode
Switch
Do not remove the recording medium or
perform any other operation (such as turning
off the power) while accessing fi les. Also,
be sure to use the provided AC adapter, as
the data on the recording medium may be
corrupted if the battery becomes exhausted
during operation. If the data on the recording
medium becomes corrupted, format the
recording medium. ( pg. 50)
Deleting/ Protecting Files
Protected fi les cannot be deleted. To delete
•
them, release the protection fi rst.
Once fi les are deleted, they cannot be
•
restored. Check fi les before deleting.
For an SD card, you can use the write/erase
•
protection tab to set protection. To protect
all the fi les, slide the tab to the “LOCK”
position.
Write/erase protection tab
Preparation:
Slide the power/mode switch to MODE to
•
select
Press the PLAY/REC button to select
•
playback mode.
or # mode.
!
ex.) Performing [DELETE].
1
FUNCTION
DELETE
PROTECT
EDITED COPY
CHANGE EVENT REG.
EFFECT
WIPE/FADER
PLAYBACK PLAYLIST
EDIT PLAYLIST
PLAYBACK MPG FILE
PLAYBACK NORMAL FILE
2 Select [DELETE] or [PROTECT].
Select
Set
Deleting/Protecting the Currently
Displayed File
After performing steps 1-2
SELECT
DELETE
CURRENT
FILE SELECT
DELETE ALL
SET QUIT
3 Select [CURRENT].
Select
Set
You can select the previous or next fi le by
moving the set lever to £ / ¤.
SELECT
DELETE?
EXECUTE
CANCEL
SET
0008Remaining files:
4 Select [EXECUTE].
Select
Set
8 To exit the screen
Press FUNCTION.
30

Selecting and Deleting/Protecting Files
After performing steps 1-2 ( pg. 30)
Deleting/Protecting All Files
After performing steps 1-2 ( pg. 30)
ENGLISH
3 Select [FILE SELECT].
Select
Set
VIDEO DELETE
SELECT
8/8
SET QUIT
4 Select the desired fi le.
Select
Set
The $ or x mark appears on the fi le. To
•
select other fi les, repeat this step.
If you slide the zoom lever towards T,
•
the preview screen is displayed. Sliding
the zoom lever towards W returns to the
index screen.
5
FUNCTION
VIDEO DELETE
SELECT SET
EXECUTE AND QUIT
SELECT
DELETE?
QUIT
CANCEL
SET
8/8
QUIT
6 Select [EXECUTE AND QUIT] (when
performing [DELETE]) or [QUIT]
(when performing [PROTECT]).
Select
Set
3 Select [DELETE ALL] or [PROTECT
ALL].
Select
Set
DELETE ALL?
EXCEPT PROTECTED FILE
EXECUTE
CANCEL
SET
SELECT
4 Select [EXECUTE].
Select
Set
8 To exit the screen
Press FUNCTION.
8 To release protection
Select the protected fi le in step 4
(“Selecting and Deleting/Protecting Files”
left column).
8 To release protection of all fi les
1) In step 3, select [CANCEL ALL], then
press down the set lever.
2) Move the set lever to ¡ / ¢ to select
[EXECUTE], then press down.
8 To exit the screen
Press FUNCTION.
31

Managing Files (Continued)
Viewing File Information
Preparation:
For ! mode: Pause the playback.
•
Alternatively, select the fi le on the index
screen.
For # mode: Play back the still image.
•
Alternatively, select the fi le on the index
screen.
FILE
: MOV005.MOD
FOLDER
: PRG001
DATE/TIME
: JAN 1 06 10:56 AM
PB TIME
: 00:30:02
QUALITY
: ULTRA FINE
PROTECT
INFO
FILE:
•
File name
FOLDER:
•
Folder name
DATE/TIME:
•
Date and time of the recording
PB TIME (for video fi les):
•
Playback time (length of the fi le)
SIZE (for still images):
•
Image size ( pg. 47)
QUALITY:
•
Image quality ( pg. 46, 47)
PROTECT:
•
File protection status ( pg. 30)
: OFF
8 To turn off the fi le information display
Press INFO again.
Changing the Event Registration of
Video Files after Recording
–
! mode only
Preparation:
Slide the power/mode switch to MODE to
•
select
Press the PLAY/REC button to select playback
•
mode.
1
mode.
!
FUNCTION
DELETE
PROTECT
EDITED COPY
CHANGE EVENT REG.
EFFECT
WIPE/FADER
PLAYBACK PLAYLIST
EDIT PLAYLIST
PLAYBACK MPG FILE
PLAYBACK NORMAL FILE
2 Select [CHANGE EVENT REG.].
Select
Set
NON SECTION NEXT PAGE
SELECT
VACATION
REGISTER
1/ 3
QUIT
3 Select a new event to register the fi le
to.
To move to the next page, select [NEXT
•
PAGE].
To cancel the event registration, select
•
[NON SECTION].
Select
VIDEO
8/8
32
Set
SELECT
SET QUIT
4 Select the fi le you want to register.
Select
Set
The s mark appears on the fi le. To select
•
other fi les, repeat this step.
If you slide the zoom lever towards T,
•
the preview screen is displayed. Sliding
the zoom lever towards W returns to the
index screen.

5
FUNCTION
EVENT RE-REGISTRATION ENDS
DO YOU WANT TO SAVE?
SAVE AND QUIT
DELETE AND QUIT
CANCEL
SELECT
SET
6 Select [SAVE AND QUIT].
Select
Set
8 To exit the screen
Press FUNCTION.
Partial Delete (EDITED COPY)
– ! mode only
You can divide the selected video fi le into two,
and make a copy of the desired section as a
new video fi le.
Preparation:
Slide the power/mode switch to MODE to
•
select
Press the PLAY/REC button to select
•
playback mode.
1
mode.
!
FUNCTION
DELETE
PROTECT
EDITED COPY
CHANGE EVENT REG.
EFFECT
WIPE/FADER
PLAYBACK PLAYLIST
EDIT PLAYLIST
PLAYBACK MPG FILE
PLAYBACK NORMAL FILE
4 Set the point at which you want to
divide the fi le.
COPY 1st SECTION
COPY 2nd SECTION
CANCEL
00 : 24 : 18
SET QUIT
SELECT
5 Select the fi le you want to copy.
[COPY 1st SECTION]:
•
Copy the section before the division
point.
[COPY 2nd SECTION]:
•
Copy the section after the division point.
Select
Set
When copying is fi nished, the copied fi le is
added to the index screen.
8 To exit the screen
Press FUNCTION.
NOTE
When playing back the copied fi le, the
recording date of the original fi le is displayed.
Meanwhile, the date when you copied is
displayed on the fi le information display.
( pg. 32)
ENGLISH
2 Select [EDITED COPY].
Select
Set
EDITED COPY
SELECT
3 Select the desired fi le.
Select
Set
Playback starts.
RETURN
SET QUIT
EDITED COPY
SET QUIT
8/8
00 : 00 : 03
33

Playlists –
mode only
!
Power/Mode
Switch
INDEX
FUNCTION
PLAY/REC
Button
Set Lever
It is a list that enables you to organize
recorded videos in order of preference.
Preparation:
Slide the power/mode switch to MODE to
•
select
Press the PLAY/REC button to select
•
playback mode.
!
mode.
Creating Playlists
1
FUNCTION
DELETE
PROTECT
EDITED COPY
CHANGE EVENT REG.
EFFECT
WIPE/FADER
PLAYBACK PLAYLIST
EDIT PLAYLIST
PLAYBACK MPG FILE
PLAYBACK NORMAL FILE
2 Select [EDIT PLAYLIST].
Select
Set
SELECT
EDIT PLAYLIST
NEW LIST
EDIT
RENAME
DELETE
SET QUIT
3 Select [NEW LIST].
Select
Set
NEW LIST
IMPORT FROM EVENT
IMPORT FROM DATE
ALL SCENES
SET QUIT
SELECT
4 Select an item and display fi les.
Select
Set
[IMPORT FROM EVENT]:
•
Search for an event and display the
corresponding fi les listed by recording
date.
Move the set lever to ¡ / ¢ / £ / ¤ to
select the event, then press down.
[IMPORT FROM DATE]:
•
Display all the fi les in the medium listed
by recording date.
[ALL SCENES]:
•
Display all fi les individually.
EDIT
SELECT
TOTAL
00h00m
REGISTER
8/8
5 Select the fi le to add to playlist.
Select
Set
To preview scenes, move the set lever to ¡
/ ¢ to select the fi le and press the INDEX
button. When the index screen of individual
scenes appears, move the set lever to ¡ /
/ £ / ¤ to select the fi le, then press down.
¢
To return to previous screen, press INDEX.
EDIT
TOTAL
00h00m
8/8
34

6 Select the insertion point.
Select
Set
To add other fi les, repeat steps 5 and 6.
•
To delete a registered scene, move the
•
set lever to ¡ / ¢ to select the registered
fi le, then press down.
7
FUNCTION
EDIT
TOTAL
30h15m
REGISTER
SELECT
QUIT PLAYLIST
SAVE EDITED CONTENTS?
SAVE AND QUIT
DELETE AND QUIT
CANCEL
SELECT
SET
8 Select [SAVE AND QUIT].
Select
8/8
Playing Back Playlists
1
FUNCTION
DELETE
PROTECT
EDITED COPY
CHANGE EVENT REG.
EFFECT
WIPE/FADER
PLAYBACK PLAYLIST
EDIT PLAYLIST
PLAYBACK MPG FILE
PLAYBACK NORMAL FILE
ENGLISH
2 Select [PLAYBACK PLAYLIST].
Select
Set
PLAYBACK PLAYLIST
ALL SCENES
01 2007 JAN.07 04:45PM
02 2007 JAN.07 09:25PM
03 2007 JAN.07 09:55PM
SET QUIT
SELECT
3 Select the playlist that you want to
play back.
Select
Set
8 To exit the screen
Press FUNCTION.
NOTES
A maximum of 99 playlists can be created.
•
Each playlist can consist of a maximum of
•
99 scenes.
If you delete the original fi les, the
•
corresponding fi les are also deleted from
the playlist.
Set
8 To exit the screen
Press FUNCTION.
8 To stop playback
Press down the set lever.
8 To return to the normal fi le playback
mode
Select [PLAYBACK NORMAL FILE] in
step 2.
8 To play back from the desired scene
1) In step 2, press the INDEX button. (The
index screen for playlist appears.)
2) Move the set lever to ¡ / ¢ / £ / ¤ to
select the desired scene, then press
down.
8 When dubbing playlists using a
VCR/DVD recorder ( pg. 44)
Play back playlists by performing the
following operations.
1) After performing steps 1-2, move the set
lever to ¤.
2) Move the set lever to ¡ / ¢ to select
[START PLAYBACK], then press down.
(A black screen is displayed for fi ve
seconds at the fi rst and the last scene.)
35

Playlists –
mode only (Continued)
!
Other Operations of Playlists
You can perform additional editing and delete
fi les in a created playlist.
Preparation:
Perform steps 1-2. ( pg. 34)
Adding/Deleting Files in Playlist
3 Move the set lever to
[EDIT], then press down.
4 Move the set lever to
the playlist you want to edit, then
press down.
To add or delete fi les, follow the steps 5 to
8 in “Creating Playlists”. ( pg. 34)
Changing Playlist Names
The default name of a playlist is its creation
date and time.
3 Move the set lever to
[RENAME], then press down.
4 Move the set lever to
the desired playlist, then press down.
5 Move the set lever to
select the desired letter, then press
down.
Repeat this process to complete the name.
•
You can change the character types (capital
•
letters, small letters or marks) by selecting
[A/a/@].
To correct a letter, select [}] or []] and
•
press down the set lever to move the cursor
to the letter, then select [CLEAR] and press
down the set lever.
/ ¢ to select
¡
/ ¢ to select
¡
/ ¢ to select
¡
/ ¢ to select
¡
/ ¢ / £ / ¤ to
¡
Deleting Playlist
Original fi les are not deleted even if you
delete the playlist.
3 Move the set lever to
[DELETE], then press down.
4 Move the set lever to
playlist you want to delete.
To delete all playlists at once, select
[DELETE ALL].
/ ¢ to select
¡
/ ¢ to select a
¡
5 Press down the set lever.
6 Move the set lever to
[EXECUTE], then press down.
/ ¢ to select
¡
6 Move the set lever to
select [¯], then press down.
36
/ ¢ / £ / ¤ to
¡

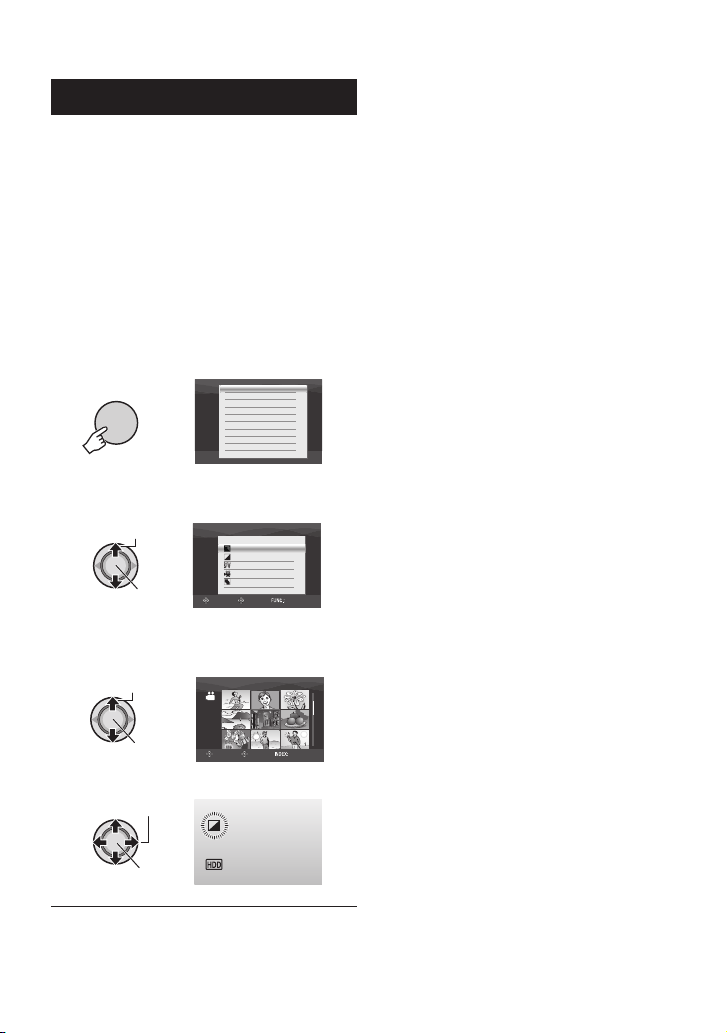
Print Setting –
mode only
#
Set Lever
FUNCTION
Power/Mode Switch
PLAY/REC
Button
DPOF Print Setting
This camera is compatible with DPOF (Digital
Print Order Format). You can set which
images to be printed and the number of prints
with this camera. This feature is useful to
print with a DPOF-compatible printer or for
taking the recording medium to a photo lab
for printing.
Preparation:
Slide the power/mode switch to MODE to
•
select
Press the PLAY/REC button to select
•
playback mode.
1
mode.
#
FUNCTION
DELETE
PROTECT
COPY
MOVE
DPOF
EFFECT
2 Select [DPOF].
Select
Set
SELECT
DPOF
SELECT IMAGES
ALL 1
CHECK SETTINGS
RESET
SET QUIT
Setting Files Individually
After performing steps 1-2
3 Select [SELECT IMAGES].
Select
Set
DPOF TOTAL: 0
SELECT
8/8
SET QUIT
4 Select the desired fi le.
Select
Set
If you slide and hold the zoom lever
towards T, the preview screen of the still
image is displayed.
5 Select the number of prints. (max. 15
prints)
Select
Set
To set print information for other images, repeat
steps 4 and 5. (You can set up to 999 fi les.)
6
FUNCTION
8 To exit the screen
Press FUNCTION.
8 To cancel the selection
Set the number of prints to “00” in step 5.
8 To confi rm DPOF settings
In step 3, move the set lever to ¡ / ¢ to
select [CHECK SETTINGS], then press down.
If necessary, change the number of
•
prints for the desired fi le by following
steps 4 and 5.
8 To reset DPOF settings
1) In step 3, move the set lever to ¡ / ¢ to
select [RESET], then press down.
2) Move the set lever to ¡ / ¢ to select
[EXECUTE], then press down.
ENGLISH
37

Print Setting –
mode only (Continued)
#
Setting All Files Together (One Print for
Each)
After performing steps 1-2 ( pg. 37)
3 Select [ALL1].
Select
Set
SELECT
ALL1
EXECUTE
CANCEL
SET
4 Select [EXECUTE].
Select
Set
8 To exit the screen
Press FUNCTION.
8 To confi rm DPOF settings
In step 3, move the set lever to ¡ / ¢ to
select [CHECK SETTINGS], then press
down.
If necessary, change the number of
•
prints for the desired fi le by following
steps 4 and 5. ( pg. 37)
8 To reset DPOF settings
1) In step 3, move the set lever to ¡ / ¢ to
select [RESET], then press down.
2) Move the set lever to ¡ / ¢ to select
[EXECUTE], then press down.
Direct Printing with PictBridge Printer
If your printer is compatible with PictBridge,
still images can be printed easily by
connecting the camera directly to the printer
with the USB cable. DPOF setting can also be
used. ( pg. 37)
Preparation:
Set the power/mode switch to OFF.
DC
Connector
PictBridge
Printer
AC Adapter
To AC Outlet
USB Connector
USB Cable
USB
Connector
You can also connect the cables
using the Everio dock connectors.
1 Set the power/mode switch to ON.
MODE
ON
OFF
PLAYBACK ON PC
CONNECT TO DEVICE
CREATE DVD
BACK UP
DIRECT PRINT
SELECT
SET
QUIT
38
2 Select [DIRECT PRINT].
Select
Set
SELECT
DIRECT PRINT
SELECTED PRINT
DPOF PRINT
CANCEL
SET

To Print by Selecting a Still Image
After performing steps 1-2 ( pg. 38)
3 Select [SELECTED PRINT].
Select
Set
PRINT THIS IMAGE
SET
4 Select the desired Image.
Select
NUMBER OF PRINTS
DATE1OFF
PRINT
Set
CANCEL
To Print Using the DPOF Settings
If the printer is compatible with DPOF, you
can use the DPOF settings. ( pg. 37)
After performing steps 1-2 ( pg. 38)
3 Select [DPOF PRINT].
Select
Set
SELECT
DPOF PRINT
CHECK SETTINGS
PRINT
CANCEL
SET
4 Select [PRINT].
Select
ENGLISH
5 Move the set lever to
/ ¢ to select
¡
menus and £ / ¤ to select settings.
[NUMBER OF PRINTS]:
•
The number of prints can be set from 1
to 99.
[DATE]:
•
Set whether to print the date and time.
6 Select [PRINT].
Select
Set
8 To stop printing after printing starts
1) Press down the set lever.
2) Move the set lever to ¡ / ¢ to select
[EXECUTE], then press down.
Set
8 To stop printing after printing starts
1) Press down the set lever.
2) Move the set lever to ¡ / ¢ to select
[EXECUTE], then press down.
8 To confi rm the DPOF setting
In step 4, move the set lever to ¡ / ¢ to
select [CHECK SETTINGS], then press
down. To return to the previous screen,
press FUNCTION.
NOTES
If the printer is not recognised, disconnect
•
the USB cable, then reconnect it.
You cannot return to the previous screen
•
while operating Direct print. If you want to
redo the operation, remove the USB cable,
switch off the camera’s power, and start the
operation again from the beginning.
39

Copying Files
Set Lever
INDEX
FUNCTION
Power/Mode
Switch
PLAY/REC
Button
DIRECT DVD
Types of Copying and Connectable Device
The Camera
You can copy still images
between the HDD and
SD card with this camera
alone. ( pg. 45)
DVD Burner
(CU-VD10/CU-VD20)
You can copy video fi les
recorded on this camera
onto DVD discs. ( right
column)
VCR/DVD Recorder
You can dub video fi les
recorded on this camera
onto DVD discs. ( pg. 44)
Using a DVD Burner to Copy Files
from the Camera (DVD Creation
Function)
Supported discs: 12cm DVD-R, DVD-RW
Regarding DVD-R discs, only unused
•
DVD-R discs can be used. Regarding
DVD-RW discs, used DVD-RW discs can
also be used, but they need to be formatted
before recording. Formatting a disc deletes
all content recorded on the disc up until that
time.
Dual-layer discs cannot be used.
•
Regarding fi nalization after copying
The disc is automatically fi nalized so that
it can be played on other devices. After
fi nalizing, the disc is a play-only disc, so no
more fi les can be added.
Preparation:
Set the power/mode switch to OFF.
DC
Connector
AC Adapter
To AC Outlet
USB Connector
NOTE
using the Everio dock connectors.
You can also connect the cables
USB
Connector
USB Cable
DVD
Burner
40
VCR/DVD Player
Videos from a VCR/DVD
player can be dubbed
onto the camera’s HDD.
( pg. 44)

Copying Only the Newly Taken Video
Files
Files that have never been copied to the DVD
discs are automatically selected and copied.
1 Set the power/mode switch to ON.
ON
OFF
CREATE DVD
SELECT FROM SCENES
ALL SCENES
SELECT FROM EVENT
SELECT FROM DATE
SELECT FROM PLAYLIST
SET
SELECT
ALL WILL
BE CREATED
TIME REQUIRED: 45 MIN.
DVD-RW
EXECUTE
CANCEL
SET QUIT
SELECT
QUIT
MODE
2
3 Select [EXECUTE].
Select
Set
The DVD disc begins to be created.
•
When [COMPLETED] appears, press
down the set lever to complete the
operation.
When [COMPLETED. CHANGE DISC]
•
appears, change the disc. The second
DVD disc begins to be created.
To cancel the DVD creation, select
•
[CANCEL].
8 To exit the screen
Press MENU, then move the set lever to
/ ¢ to select [EXECUTE] and press
¡
down.
Selecting and Copying Video Files
After performing step 1 ( left column)
2 Select an item and display the DVD
Creation List for the fi les to be
copied.
Select
Set
[SELECT FROM EVENT]:
•
Search for an event and display the
corresponding fi les listed by recording
date.
Move the set lever to ¡ / ¢ / £ / ¤ to
select the event, then press down.
[SELECT FROM DATE]:
•
Display the fi les recorded on selected
dates listed by recording date.
Move the set lever to ¡ / ¢ to select the
recording date, then press down.
[SELECT FROM PLAYLIST]:
•
Register a created playlist. ( pg. 34)
Playlists are displayed in a list in the
selection order.
1) Move the set lever to ¡ / ¢ to select
the desired list, then press down. To
select other lists, repeat this process.
2) Move the set lever to ¤ twice.
[CREATE DUPLICATE]:
•
Create a DVD disc identical to the one
created last time. The last creation date
is displayed. (Up to 20 fi les)
Move the set lever to ¡ / ¢ to select the
date, then press down.
[SELECT FROM SCENES]:
•
Register a fi le individually. Files are
displayed in a list in the selection order.
1) Move the set lever to ¡ / ¢ to select
the desired fi le, then press down. To
select other fi les, repeat this process.
2) Move the set lever to ¤ twice.
[ALL SCENES]:
•
Display all fi les individually.
Make sure to read “Disc number”
( pg. 42) before proceeding to the next
procedure.
DVD CREATION LIST
ALL
DVD1 JAN.01.2007 12:04
JAN.01.2007 12:15
DVD2 FEB.01.2007 12:04
FEB.01.2007 12:15
SET QUIT
SELECT
ENGLISH
Continued on next page
41

Copying Files (Continued)
3 Select the desired disc number.
If you select [ALL], all discs in the list are
•
created.
To preview scenes, move the set lever
•
to ¡ / ¢ to select the fi le and press the
INDEX button. When the index screen
of individual scenes appears, move the
set lever to ¡ / ¢ / £ / ¤ to select the fi le,
then press down.
To return to previous screen, press
INDEX.
mark shows that the disc is created
•
already.
4
ALL WILL
BE CREATED
TIME REQUIRED: 45 MIN.
DVD-RW
EXECUTE
CANCEL
SET QUIT
SELECT
5 Select [EXECUTE].
Select
Set
The DVD disc begins to be created.
•
When [COMPLETED] appears, press
down the set lever to complete the
operation.
When [COMPLETED. CHANGE DISC]
•
appears, change the disc. The second
DVD disc begins to be created.
To cancel the DVD creation, select
•
[CANCEL].
8 To check whether the DVD disc was
created properly
In step 2 ( pg. 41), move the set lever
to ¡ / ¢ to select [PLAY DVD], then press
down. To return to the previous screen,
press the INDEX button.
8 Disc number
Disc number shows the number of DVD
discs you can create. The dubbing range
of each disc is automatically allocated,
presuming that all the fi les are to be
dubbed from the fi rst one on the list. This
dubbing range cannot be changed.
ex.) “DVD1” records 2 fi les, “JAN.01.2007”
and “JAN.15.2007”.
ALL
DVD1 JAN.01.2007 12:04
JAN.15.2007 12:15
DVD2 FEB.01.2007 12:04
FEB.08.2007 12:15
8 To exit the screen
Press MENU, then move the set lever to
/ ¢ to select [EXECUTE] and press
¡
down.
42

8 Title and chapter of created DVD
Each recording date becomes one title in a
created DVD and each scene recorded in a
same day becomes one chapter in the title.
Jan. 10, 2007: records fi le 1 and 2.
File 1
Jan. 11, 2007: records fi le 3 and 4.
File 3
Title
1
File 1 File 2 File 3 File 4
12 3 4
Chapter
File 2
File 4
Create a DVD
2
8 Menu for disc playback
When you play back the created DVD
disc on a DVD player or other devices, the
following top menu will be displayed.
JAN.25.2007
JAN.11.2007JAN.09.2007JAN.07.2007
! Disc title: Creating date of the disc
# DVD number ( pg. 42)
$ Title thumbnail: First scene of the title
% Title name: Recording date/Playlist name
ENGLISH
43

Copying Files (Continued)
Using a VCR/DVD Recorder to Dub
Files from the Camera
Preparation:
•
set to [OFF]. (Factory-preset = [OFF]) (墌 pg. 49)
Turn off all units.
•
VCR/DVD Recorder
using the Everio dock connectors.
or DV cable (optional) enables even higher quality
dubbing.
as a DVD burner are connected to the Everio
dock, switch off these devices power.
Make sure that [ANALOG INPUT] is
AV Connector
DC Connector
To AC
Outlet
AV Input Connector
You can also connect the cables
(墌 pg. 6) When other devices such
AC Adapter
AV Cable
The S-Video
1 Set the VCR/DVD recorder to its AUX
input mode.
2 Start playback on the camera.
To play back videos (墌 pg. 24)
•
To play back playlists (“When dubbing
•
playlists using a VCR/DVD recorder”
墌 pg. 35)
3
At the point you want to start dubbing,
start recording on the VCR/DVD recorder.
Refer to the VCR/DVD recorder’s
instruction manual
8 To stop dubbing
Stop recording on the VCR/DVD recorder,
then press the REC button again.
44
.
NOTE
To make the fi le to record only the date
information among the display indications,
set [DISPLAY] to [OFF], [DISPLAY ON TV]
to [ON], and [DATE/TIME] to [ON] or [AUTO].
(墌 pg. 49)
Using the Camera to Dub
Files from a VCR/DVD Player
Preparation:
Set [ANALOG INPUT] to [ON]. (墌 pg. 49)
•
Turn off all units.
•
AV Connector
DC Connector
To AC
Outlet
VCR/DVD Player
AV Output Connector
using the Everio dock connectors. The SVideo cable (optional) enables even higher
quality dubbing. (墌 pg. 6) When other devices
such as a DVD burner are connected to the
Everio dock, switch off these devices power.
You can also connect the cables
AC Adapter
AV Cable
1 Start playback on the VCR/DVD
player.
2 Press the REC button at the scene
where you want to start recording.
8 To stop recording
Press the REC button again.
NOTES
If “COPY PROTECTED CONTENT”
•
appears, the fi le is protected and cannot be
recorded.

If the videos you want to record contain both
•
16:9 and 4:3 screen size, recording stops
where the aspect ratio switches. To record
such videos, you need to perform recording
operation at every switching point.
Copying/Moving Still Image Files
You can copy or move still image fi les
between the HDD and SD card using the onscreen display.
Preparation:
Slide the power/mode switch to MODE to
•
select
Press the PLAY/REC button to select
•
playback mode.
Make sure that SD card is inserted in the
•
SD slot.
Make sure that enough free space is left in
•
the copy/move destination medium.
1
mode.
#
FUNCTION
DELETE
PROTECT
COPY
MOVE
DPOF
EFFECT
2 Select [COPY] or [MOVE].
[COPY]:
•
Files are copied to the destination
medium while leaving original fi les in the
source medium.
[MOVE]:
•
Files are moved to the destination
medium while deleting original fi les
(except read-only fi les) in the source
medium.
Select
Set
IMAGE COPY
HDD SDMEDIA
EXECUTE
CANCEL
ALL
FILE UNIT
NUMBER OF FILE
SELECT SET QUIT
0059
3 Set the direction of copy/move.
(HDD ] SD or SD ] HDD)
4
5 Set the fi le unit ([ALL] or [FILE]) to
copy/move.
[FILE]:
•
Select when you want to transfer the
selected fi les.
1) Move the set lever to ¡ / ¢ / £ / ¤
to select the desired fi le, then press
down.
The s mark appears on the fi le. To
•
select other fi les, repeat this step.
2) Press FUNCTION.
[ALL]:
•
Select when you want to transfer all fi les
in the recording medium.
6 Select [EXECUTE].
Select
Set
File transfer starts. When [COPYING/
MOVING COMPLETED] appears, press
down the set lever.
8 To exit the screen
Press MENU, then move the set lever to
¡ /
to select [EXECUTE] and press
¢
down.
8 To stop the fi le transfer
1) Press down the set lever.
2) Select [EXECUTE] and press down the
set lever.
ENGLISH
45

Changing the Menu Settings
ex.) Set [DEMO MODE] to [OFF].
1
2
MENU
VIDEO
REC MEDIA FOR VIDEO
SCENE COUNTER
QUALITY
ZOOM
DIS
SELECT
VIDEO
REC MEDIA FOR VIDEO
SCENE COUNTER
QUALITY
ZOOM
DIS
SELECT
SET QUIT
SET QUIT
3 Select the desired menu from the fi rst
menu item.
[VIDEO]:
•
Display menus related to ! mode.
[IMAGE]:
•
Display menus related to # mode.
[GENERAL]:
•
Display menus common to ! and #
modes.
[MEDIA]:
•
Display menus related to recording
media (HDD and SD cards).
Select
Set
GENERAL
SELECT
QUICK RESTART
AUTO POWER OFF
BRIGHT
DROP DETECTION
REMOTE
SET QUIT
4 Select the desired menu from the
second menu item.
For details on each menu, see below.
Select
Set
GENERAL
SELECT
ON
OFF
SET QUIT
5 Select the desired setting from the
third menu item.
Select
Set
8 To return to the previous screen
Move the set lever to £.
8 To exit the screen
Press MENU.
46
Menus Settings: [ ] = Factory-preset
n QUALITY
Enables you to set the picture
quality for videos.
! VIDEO
@ ZOOM
Enables you to set the maximum
zoom ratio.
ULTRA FINE / [FINE] / NORMAL / ECONOMY
10X / [40X] / 300X
32X / [64X] / 800X
34X / [68X] / 800X
NOTE
When the smallest value is set, the optical zoom is used.
When one of the larger values is set, the digital zoom is
used.

Menus Settings: [ ] = Factory-preset
q DIS
Compensates for hand shake.
16:9 WIDE RECORDING
!
Records videos in 16:9 size.
! VIDEO
p GAIN UP
Makes the subject appear bright
automatically when you record in
dark places. However, the overall
color tones appear grayish.
o WIND CUT
Reduces noise caused by wind.
REC MEDIA FOR VIDEO
/
Enables you to set the recording
medium for videos.
h SCENE COUNTER
Enables you to set whether to
display the scene counter.
n QUALITY
Enables you to set the picture
quality for still images.
# IMAGE
y IMAGE SIZE
Enables you to select the picture
size for still images.
OFF : Disables the function.
[ON] : Activates the function.
NOTES
Accurate stabilization may not be possible if hand shake
•
is excessive, or depending on the shooting conditions.
Switch off this mode when recording with the camera on a
•
tripod.
OFF : Records videos in 4:3 size.
[ON] : Records videos in 16:9 size. The 16:9 indicator
lights up on the LCD monitor.
NOTES
If the recording mode is set to ECONOMY, you cannot
•
record in 16:9 size (the
If you want to burn the recorded videos onto DVD discs,
•
it is recommended not to mix 16:9 size videos and 4:3
size videos.
If you record videos in 16:9 size, the aspect ratio of the
•
video may be incorrect when watching the videos on
your TV. If this occurs, change the settings in [SELECT
TV TYPE]. (墌 pg. 49)
OFF : Disables the function.
[ON] : Activates the function.
[OFF] : Disables the function.
ON : Activates the function.
[HDD] / SD
[OFF] : Disables the function.
ON : Activates the function.
[FINE] / STANDARD
[1632 x 1224] / 1280 x 960 / 1024 x 768 / 640 x 480 /
1632 x 912 / 1280 x 720
[1152 x 864] / 640 x 480
16:9 indicator lights up blue).
ENGLISH
2 GAIN
You can set the ISO setting to
increase the sensitivity in dark
conditions.
[AUTO] / 100 / 200
47

Changing the Menu Settings (Continued)
Menus Settings: [ ] = Factory-preset
p GAIN UP
Makes the subject appear bright
automatically when you record in
dark places. However, the overall
color tones appear grayish.
# IMAGE
{ CONTINUOUS SHOOTING
Records still images continuously
while the SNAPSHOT button is
pressed.
z SELF-TIMER
Starts recording when the
set time elapses after the
SNAPSHOT button is pressed.
REC MEDIA FOR IMAGE
3
Enables you to set the recording
medium for still images.
g BRIGHT
Enables you to set the brightness
of the LCD monitor.
^ DROP DETECTION
Prevents damage to the
HDD by turning off the power
automatically when the camera
detects that it has been dropped.
Y GENERAL
] REMOTE
Turns reception of the operation
signal from the remote control
on/off.
[ DEMO MODE
Introduces special features of the
camera at the following cases.
When the menu screen is
•
closed.
When there is no operation
•
for about 3 minutes during
recording mode.
\ OPERATION SOUND
Enables you to set the operation
sound or turn the operation
sound on/off.
OFF : Disables the function.
[ON] : Activates the function.
[OFF] : Disables the function.
ON : Activates the function.
NOTES
The interval between recording still images is approx. 0.3
•
seconds.
Continuous shooting may not work well depending on the
•
recording medium.
The continuous shooting speed will drop if this function is
•
used repeatedly.
[OFF] / 2SEC / 10SEC
[HDD] / SD
Adjust the brightness of the display moving the set lever
to £ / ¤, then press down.
OFF : Disables the function.
[ON] : Activates the function.
To turn the unit on when the drop detection worked, set
the power/mode switch to OFF, and to ON again.
CAUTION
Setting this function to off increases the chances of
damaging the built-in hard disk if the camera is accidentally
dropped.
OFF : The camera does not receive the signal from the
remote control.
[ON] : Enables operation with the remote control.
OFF : Disables the function.
[ON] : Activates the function.
NOTES
The demonstration only works when the DC cord is
•
connected, not with the battery.
If an SD card is in the camera, demonstration will not take
•
place even if this mode is set to [ON].
OFF : Turns off the operation sound.
[MELODY] : The melody sounds when any operation is
performed.
48

Menus Settings: [ ] = Factory-preset
SELECT TV TYPE
#
Enables you to select the TV type
when watching fi les recorded on
the camera on your TV.
$ ANALOG INPUT
Switches input and output for the
AV/S connector of the camera.
l DISPLAY
Enables you to set whether to
display the on-screen display.
DISPLAY ON TV
%
Used for displaying camera’s onscreen display on a TV screen.
LANGUAGE
9
Y GENERAL
Enables you to set the display
language. ( pg. 13)
CLOCK ADJUST
:
Enables you to set the time.
( pg. 13)
DATE DISPLAY STYLE
;
Enables you to set the date and
time display format.
DATE/TIME
<
Enables you to set whether to
display the current time on the
LCD monitor.
Z PRESET
Returns all the camera settings
to their default values.
QUICK RESTART
&
Enables the camera to start up
quickly when you turn the power
off and then on again within fi ve
minutes by closing and opening
the LCD monitor. (“Power-linked
operation” pg. 8)
4:3 / [16:9]
[OFF] : Switches to output.
ON : Switches to input. The A indicator lights up on the
LCD monitor.
OFF : Turns off the on-screen display.
[ON] : Turns on the on-screen display.
[OFF] : Does not display on TV.
ON : Displays on TV.
NOTE
connected with the AV/S-Video cables. If connected with the
DV cable, camera’s on-screen display will not be displayed
on TV.
This setting is available only if the TV is
[ENGLISH] / FRANÇAIS / ESPAÑOL /
PORTUGUÊS /
/ /
DATE / TIME
DATE STYLE:
year.month.day / [month.day.year] / day.month.year
TIME:
24h / [12h]
OFF : The date/time does not appear.
[AUTO] : The date/time appears for approx. 5 seconds in
the following cases.
When the power/mode switch is set from OFF to ON
•
When playback starts
•
When the date is changed during playback
•
ON : The date/time is always displayed.
EXECUTE : Performs this function.
[CANCEL] : Returns to the menu screen without
executing reset.
OFF : Disables the function.
[ON] : Activates the function. The ! or # lamp fl ashes
when closing the LCD monitor.
NOTE
This function is not available during charging.
ENGLISH
49

Changing the Menu Settings (Continued)
Y
GENERAL
(
If the camera is not operated for
5 minutes while the power is on,
it turns itself off automatically to
conserve power.
)
Writing speed to HDD tends to
become slow after long periods
of repeated use. Execute cleanup
periodically to regain the writing
speed.
*
This will ensure stable speeds
and operation when accessing
the hard disk drive.
+
This will make it more diffi cult to
MEDIA
recover data on the HDD which
has already been erased. It is
recommended that you do this
when disposing of the camera
to prevent illegal data recovery
(using commercially available
software).
,
You have to format newly
purchased SD cards with this
camera before using them.
This will also ensure stable
speeds and operation when
accessing the SD card.
.
By resetting the fi le number
(name), a new folder will be
made. The new fi les you are
going to make will be stored in
the new folder.
It is convenient to separate
the new fi les from previously
recorded fi les.
Menus Settings: [ ] = Factory-preset
AUTO POWER OFF
CLEAN-UP HDD
FORMAT HDD
DELETE DATA ON HDD
FORMAT SD CARD
VIDEO NO. RESET
IMAGE NO. RESET
OFF : Disables the function.
[ON] : Activates the function.
To turn the camera on again, set the power/mode
switch to OFF, then to ON when using the battery
pack. When using the AC adapter, perform any
operation such as zooming.
Connect the AC adapter.
EXECUTE : Performs this function. Select [OK] when
completed.
[CANCEL] : Cancels this function.
NOTE
Depending on the condition of the HDD, it may take several
minutes for the cleanup process to be completed.
EXECUTE : Performs this function. Select [OK] when
completed.
[CANCEL] : Cancels this function.
NOTES
Be aware that all fi les and data including protected fi les
•
will be erased by the formatting process.
Do not format the recording medium on your PC.
•
Connect the AC adapter.
EXECUTE : Performs this function. Select [OK] when
completed.
[CANCEL] : Cancels this function.
EXECUTE : Performs this function. Select [OK] when
completed.
[CANCEL] : Cancels this function.
NOTES
Be aware that all fi les and data including protected fi les
•
will be erased by the formatting process.
Do not format the recording medium on your PC.
•
EXECUTE : Performs this function. Select [OK] when
completed.
[CANCEL] : Cancels this function.
50

Troubleshooting
The camera is a microcomputer-controlled
device. External noise and interference (from
a TV, a radio, etc.) might prevent it from
functioning properly.
The following phenomena are not
malfunctions.
The camera heats up when it is used for a
•
long time.
The battery heats up during charging.
•
When playing back a video fi le, the
•
image stops momentarily or the sound is
interrupted at junctions between scenes.
Trouble Action
Connect the AC adapter securely.
•
No power is supplied.
No display appears.
The power was turned
off accidentally.
Power
The displayed amount
of remaining battery
power differs from the
actual operating time.
The power does not
turn on, or the battery
operation time is
extremely short even
after the battery is
fully charged.
The access/charge
lamp on the camera
does not light during
charging.
Detach the battery pack once again and re-attach it fi rmly.
•
Replace the dead battery with a fully charged one.
•
If the camera is not operated for 5 minutes while
•
the power is on, it turns itself off automatically to
conserve power.
using the battery pack, set the power/mode switch to
OFF, then to ON. When using the AC adapter, perform
any operation such as zooming.
Adjust the brightness of the LCD monitor.
•
Move to a place where no vibration or excessive sound.
•
The drop detection function operated. Set the power/
•
mode switch to OFF, and to ON again. To turn off this
function, set [DROP DETECTION] to [OFF].
Fully charge the battery, and then run it down. If the
•
problem persists, the battery is worn out and needs to be
replaced. Please purchase a new one.
Make sure to use the camera under appropriate operating
•
temperatures.
The battery is worn out and needs to be replaced. Please
•
purchase a new one.
Charging is diffi cult in places subject to extremely
•
high/low temperatures. To protect the battery, it is
recommended to charge it in places with a temperature
of 10°C to 35°C (50°F to 95°F).
When the battery is already fully charged, the lamp does
•
not light. Check the remaining battery power.
To solve the problem, fi rst follow the
•
instructions below.
If the problem is not solved, reset the
•
camera. ( below)
If the problem persists, please consult your
•
nearest JVC dealer.
8 To reset the camera
1) Set the power/mode switch to OFF and
remove the power supply (battery pack
or AC adapter) from the camera, then
reattach it.
2) Execute [PRESET] from the menu.
( pg. 49)
To turn the camera on again when
ENGLISH
12
12
–
–
48
–
48
12
55
–
–
14
51

Troubleshooting (Continued)
52
Trouble Action
Images on the LCD
monitor appear dark
or whitish.
Colored bright spots
Displays
appear on the LCD
monitor.
Aspect ratio of the
image is strange
when watching
images on your TV.
Recording cannot be
performed.
Vertical lines appear
on recorded images.
The LCD monitor
becomes red or black
for an instant.
During recording, the
date/time does not
appear.
During video
Recording
recording, the 7REC
indicator fl ashes.
The LCD monitor
indications blink.
Digital zoom does not
work.
The focus is not
adjusted automatically.
The color of the
image looks strange.
Adjust the brightness and angle of the LCD monitor.
•
When the LCD monitor’s LED light reaches the end of
•
its service life, images on the LCD monitor become dark.
Consult your nearest JVC dealer.
The LCD monitor is made with high precision technology.
•
However, black spots or bright spots of light (red, green
or blue) may appear constantly on the LCD monitor.
These spots are not recorded on the picture. This is not
due to any defect of the unit.
(Effective dots: more than 99.99 %)
Change the settings in [SELECT TV TYPE] so that it
•
matches the screen size of the connected TV.
Recording medium is full. Delete unnecessary fi les or
•
replace the SD card.
Select the recording medium properly.
•
Such a phenomenon occurs when shooting a subject
•
illuminated by bright light. This is not a malfunction.
Such a phenomenon occurs when shooting under direct
•
sunlight. This is not a malfunction.
Set [DATE/TIME] to [ON]. 49
•
The temperature of the camera is increasing. If the
•
camera continues to heat up, recording may be stopped
to protect the recording medium. In this case, turn off the
power, and then wait until the camera cools down.
Certain modes of program AE, effect, DIS, and other
•
functions that cannot be used together are selected at
the same time.
Change the settings in [ZOOM].
•
Digital zoom is not available in the still image recording
•
mode.
Set focus to the automatic mode.
•
Clean the lens and check the focus again.
•
Wait to become natural color. The camera adjusts the
•
white balance automatically but it takes a time.
Try manual white balance adjustment.
•
In bright places, setting “Nightalive” or a slow speed is
•
not recommended.
When the recorded image is too dark, try backlight
•
compensation or adjust brightness.
When the recorded image is too bright, try adjust
•
brightness.
墌
48
–
–
49
30
47, 48
–
–
–
–
46
–
22
55
–
23
–
21, 22
22

Recording
Playback
Other problems
Trouble Action
White balance setting
cannot be activated.
The continuous
shooting speed is
slow.
Playback cannot be
performed.
The same image is
displayed for a long
time during video
playback, or motion is
choppy.
The black & white
fader does not work.
There is a noise
during playback.
During video
playback, the U
indicator fl ashes.
Files cannot be
deleted.
When the image
is printed from the
printer, a black bar
appears at the bottom
of the screen.
The data process is
too slow after the
power is switched
on or the mode is
changed.
The SD card cannot
be removed from the
camera.
The CREATE DVD
screen is displayed in
the LCD monitor, and
no other operations
can be performed.
Do not select the sepia (SEPIA) or monotone
•
(MONOTONE) mode before setting white balance.
The continuous shooting speed will drop when
•
repeatedly making continuous shots, when using certain
recording media, or under certain recording conditions.
Select the recording medium properly.
•
To watch images on a TV, set the TV’s input mode or
•
channel that is appropriate for video playback.
The surface of the disk or card is damaged. It is
•
recommended to run check disk regularly on the PC,
providing that there is no data on the hard disk of the
camera.
Do not select the sepia (SEPIA) or monotone
•
(MONOTONE) mode before setting white balance.
The sound of the hard disk drive may have been
•
recorded if the camera was moved suddenly during
recording. Do not move or shake the camera suddenly
during recording.
The temperature of the camera is increasing. If the
•
camera continues to heat up, playback may be stopped
to protect the recording medium. In this case, turn off the
power, and then wait until the camera cools down.
Remove protection from the fi les and delete them. 31
•
This is not a malfunction. This can be avoided by
•
recording with DIS activated.
There is a large number of still images (approx. 1,000
•
or more) stored in the recording medium. Copy the
stored fi les to a PC, and delete them from the recording
medium.
Push the SD card in a few more times. 15
•
Another operation is being attempted while a DVD burner
•
that is switched on is connected. Switch off the DVD
burner power, and switch the camera’s power off and
back on again.
23
–
47, 48
29
–
28
–
–
47
30
–
ENGLISH
53

Warning Indications
Indication Meaning/Action
Displays the remaining battery power. –
•
(Battery indicator)
SET DATE/TIME!
LENS COVER
HDD ERROR!
MEMORY CARD
ERROR!
CHECK CARD’S WRITE
PROTECTION SWITCH
VIDEO MANAGEMENT
FILE IS BROKEN. TO
RECORD/PLAYBACK
VIDEO, RECOVERY IS
REQUIRED. RECOVER?
CAN NOT READ EVENT
INFORMATION
RECORDING FAILURE
INCOMPATIBLE USB
DEVICE
High Exhausted
As the battery power comes close to nil, the battery
•
indicator blinks. When the battery power is exhausted,
power turns off automatically.
Appears when the date/time is not set.
•
The built-in clock’s rechargeable lithium battery is
•
discharged, so the previously set date/time is erased.
Connect the camera to an AC outlet using the AC adapter
for over 24 hours to charge the clock’s lithium battery. Then
set the date/time.
Appears for 5 seconds after power is turned on in recording
•
mode if the lens cover is closed or when it is dark.
Remove the card once and insert it again. If the error is
•
not cancelled, replace the card with one that has been
guaranteed for correct operation.
Perform clean up to restore the capacity of the recording media.
•
It is recommended to run check disk regularly on the PC,
•
providing that there is no data on the hard disk of the camera
Appears when you attempt recording when the write/erase
•
protection tab on the SD card is set to the “LOCK” position.
The video management fi le is broken. Recovery is required
•
to record or play back video fi les. Move the set lever to ¡ /
to select [YES], then press down to recover the video
¢
management fi le.
Appears when the event information cannot be read. –
•
Performance of recording medium is poor. Use the Cleanup
•
function.
The writing speed of recording medium is slow, or the
•
recording medium is corrupted. Use an SD card that is
guaranteed to operate.
The recording medium was subjected to vibrations or jolts.
•
Be careful not to subject the recording medium to vibrations
or jolts.
Appears when the recording medium is full and recording
•
is not possible. Delete unnecessary fi les, or replace the SD
card.
Appears when an incompatible USB device is connected to
•
the camera.
Appears when a DVD burner that is switched off is
•
connected. If you want to use the DVD burner, switch the
power on.
–
13
12
–
15
50
.
–
30
–
50
15
–
30
–
–
54

Indication Meaning/Action
RECORDING MAY NOT
BE CORRECT ON THE
MEMORY CARD
DROP DETECTION
WORKED AND THE
POWER IS TURNED
OFF
The data may not be recorded on the recording medium
•
correctly. Try recording again.
Otherwise, clean up the recording medium.
•
To turn the unit on again, set the power/mode switch to
•
OFF, and to ON again.
Cleaning
Before cleaning, turn off the camera and remove the battery pack and AC adapter.
8 To clean the exterior
Wipe gently with a soft cloth. If the camera is particularly dirty, dip the cloth into diluted mild
soap and wring it out well before wiping. Then wipe again with a dry cloth.
8 To clean the LCD monitor
Wipe gently with a soft cloth. Be careful not to damage the monitor.
8 To clean the lens
Wipe gently with lens cleaning paper.
NOTES
Avoid using strong cleaning agents such as benzine or alcohol.
•
Mold may form if the lens is left dirty.
•
When using a cleaner or chemically treated cloth, refer to the cautions for each product.
•
Specifi cations
ENGLISH
墌
–
50
–
Camera
8 For general
Power supply
DC 11 V (Using AC adapter)
DC 7.2 V (Using battery pack)
Power consumption
Approx. 3.8 W
Approx. 3.2 (3.4)* W
*When using the LED light
Approx. 3 (3.2)* W
*When using the LED light
Approx. 6.8 W (Maximum; when charging a
battery)
Dimensions (W x H x D)
66 mm x 71 mm x 110 mm
″
x 2-13/16″ x 4-3/8 ″)
(2-5/8
Weight
Approx. 355 g (0.79 lbs)
(incl. strap)
Approx. 400 g (0.89 lbs)
(incl. battery and strap)
Approx. 330 g (0.73 lbs)
(incl. strap)
Approx. 375 g (0.83 lbs)
(incl. battery and strap)
Approx. 320 g (0.71 lbs)
(incl. strap)
Approx. 365 g (0.81 lbs)
(incl. battery and strap)
Operating temperature
0°C to 40°C (32°F to 104°F)
Operating humidity
35% to 80%
Storage temperature
–20°C to 50°C (–4°F to 122°F)
55

Specifi cations (Continued)
Pickup
1/3.9 ″ (2,180,000 pixels) CCD
1/6 ″ (1,070,000 pixels) CCD
1/6 ″ (680,000 pixels) CCD
Lens
F 1.2 to 2.0, f = 3.8 mm to 38 mm, 10:1 power
zoom lens
Video: F 1.8 to 4.5, f = 2.5 mm to 80 mm, 32:1
power zoom lens
Still image: F 1.9 to 4.5, f = 2.9 mm to 80 mm,
27:1 power zoom lens
F 2.0 to 4.7, f = 2.3 mm to 78.2 mm, 34:1
power zoom lens
Filter diameter
ø30.5 mm
LCD monitor
2.7
″
diagonally measured, LCD panel/TFT
active matrix system
Speaker
Monaural
Flash
Within 2 m (6.6 ft)
(recommended shooting distance)
Within 1.5 m (4.9 ft)
(recommended shooting distance)
Language
English/French/Spanish/Portuguese/
Japanese/Korean/Traditional Chinese
LED Light
8 For video/Audio
Format
SD-VIDEO
Recording/Playback format
Video: MPEG-2
Audio: Dolby Digital (2 ch)
Signal format
NTSC standard
Recording mode (video)
ULTRA FINE: 720 x 480 pixels, 8.5 Mbps (VBR)
FINE: 720 x 480 pixels, 5.5 Mbps (VBR)
NORMAL: 720 x 480 pixels, 4.2 Mbps (VBR)
ECONOMY: 352 x 240 pixels, 1.5 Mbps (VBR)
Recording mode (audio)
ULTRA FINE: 48 kHz, 384 kbps
FINE: 48 kHz, 384 kbps
NORMAL: 48 kHz, 256 kbps
ECONOMY: 48 kHz, 128 kbps
8 For still image
Format
JPEG
Image size
6 modes (1632 x 1224 / 1280 x 960 /
1024 x 768 / 640 x 480 / 1632 x 912 /
1280 x 720)
2 modes (1152 x 864 / 640 x 480)
1 mode (640 x 480)
Picture quality
2 modes (FINE/STANDARD)
8 For connectors
4-pin (I.LINK/IEEE1394 compliant)
Input:
Y: 0.8 V (p-p) ~ 1.2 V (p-p), 75 Ω
C: 0.2 V (p-p) ~ 0.4 V (p-p), 75 Ω
Output:
Y: 1.0 V (p-p), 75 Ω
C: 0.29 V (p-p), 75 Ω
AV input/output
(p-p), 75 Ω
Video output: 1.0 V (p-p), 75 Ω
50 kΩ
Audio output: 300 mV (rms), 1 kΩ
USB
Mini USB type A and type B, USB 2.0
compliant
DV output
S input/output
Video input: 0.8 V (p-p) ~ 1.2 V
Audio input: 300 mV (rms),
AC Adapter
Power requirement
AC 110 V to 240 Vd, 50 Hz/60 Hz
Output
DC 11 V
§
, 1 A
56

Remote Control
Power supply
DC 3 V
Battery life
Approx. 1 year (depending on the frequency of
use)
Operating distance
Within 5 m (16.4 ft)
Dimensions (W x H x D)
42 mm x 14.5 mm x 91 mm
″
x 5/8 ″ x 3-5/8 ″)
(1-11/16
Weight
Approx. 30 g (0.07 lbs)
(incl. battery)
Design and specifi cations subject to change
without notice.
Operating temperature
0°C to 40°C (32°F to 104°F)
Approximate recording time (minutes) (for video)
Quality
Recording medium
HDD
128 MB 256 MB 512 MB 1 GB 2 GB 4 GB
SD Card
ULTRA FINE 430 1 3 7 14 29 57
FINE 640 2 5 10 22 43 85
NORMAL 850 3 7 14 29 57 113
ECONOMY 2250 9 19 38 77 152 298
Approximate number of storable images (for still image)
Image size/
Quality
1632 x 1224 / FINE*
Recording medium
1
HDD
128 MB 256 MB 512 MB 1 GB 2 GB 4 GB
9999 140 280 560 1135 2195 4310
SD Card
1632 x 1224 / STANDARD*19999 235 470 935 1890 3615 7095
1
1280 x 960 / FINE*
1280 x 960 / STANDARD*
1152 x 864 / FINE*
4:3
1152 x 864 / STANDARD*29999 410 820 1625 3285 6145 9999
1024 x 768 / FINE*
1024 x 768 / STANDARD*
640 x 480 / FINE*
2
9999 215 430 855 1735 3415 6700
1
9999 355 705 1405 2835 5585 9999
2
9999 270 535 1065 2150 4095 8045
1
9999 325 650 1285 2600 5120 9999
1
9999 520 1040 2060 4160 7680 9999
9999 780 1560 3090 6245 9999 9999
640 x 480 / STANDARD*29999 1115 2225 4420 8920 9999 9999
640 x 480 / FINE*
3
640 x 480 / STANDARD*
1632 x 912 / FINE*
16:9
1632 x 912 / STANDARD*19999 285 575 1145 2310 4390 8620
1280 x 720 / FINE*
1280 x 720 / STANDARD*
9999 521 1040 2062 4164 7683 9999
3
9999 1118 2229 4420 8923 9999 9999
1
9999 185 370 735 1485 2925 5745
1
9999 285 575 1145 2310 4390 8620
1
9999 430 865 1715 3470 6830 9999
*1 GZ-MG255 / *2 GZ-MG155 / *3 GZ-MG130
ENGLISH
57

Cautions
AC Adapter
When using the AC adapter in areas other
than the USA
The provided AC adapter features automatic
voltage selection in the AC range from 110 V to
240 V.
USING HOUSEHOLD AC PLUG ADAPTER
In case of connecting the unit’s power cord to
an AC wall outlet other than American National
Standard C73 series type use an AC plug
adapter, called a “Siemens Plug”, as shown.
For this AC plug adapter, consult your nearest
JVC dealer.
Plug Adapter
Battery Packs
The supplied battery
pack is a lithium-ion
battery. Before using
the supplied battery
pack or an optional
battery pack, be sure
to read the following
cautions:
To avoid hazards
•
... do not burn.
... do not short-circuit the terminals. Keep it away
from metallic objects when not in use. When
transporting, make sure the provided battery
cap is attached to the battery. If the battery
cap is misplaced, carry the battery in a plastic
bag.
... do not modify or disassemble.
... do not expose the battery to temperatures
exceeding 60°C, as this may cause the battery
to overheat, explode or catch fi re.
... use only specifi ed chargers.
To prevent damage and prolong service life
•
... do not subject to unnecessary shock.
... charge within the temperature range of 10°C
to 35°C (50°F to 95°F). This is a chemical
reaction type battery — cooler temperatures
impede chemical reaction, while warmer
temperatures can prevent complete charging.
... store in a cool, dry place. Extended exposure
to high temperatures will increase natural
discharge and shorten service life.
... fully charge and then fully discharge the
battery every 6 months when storing the
battery pack over a long period time.
... remove from charger or powered unit when
not in use, as some machines use current
even when switched off.
58
Terminals
Recording Medium
Be sure to follow the guidelines below
•
to prevent corruption or damage to your
recorded data.
Do not bend or drop the recording medium, or
•
subject it to strong pressure, jolts or vibrations.
Do not splash the recording medium with water.
•
Do not use, replace, or store the recording
•
medium in locations that are exposed to strong
static electricity or electrical noise.
Do not turn off the camera power or remove
•
the battery or AC adapter during shooting,
playback, or when otherwise accessing the
recording medium.
Do not bring the recording medium near objects
•
that have a strong magnetic fi eld or that emit
strong electromagnetic waves.
Do not store the recording medium in locations
•
with high temperature or high humidity.
Do not touch the metal parts.
•
When formatting or erasing data using the
•
camera, only the fi le administration information
is changed. The data is not completely erased
from the hard disk. If you want to completely
erase all of the data, we recommend either
using commercially available software that
is specially designed for that purpose, or
by physically destroying the camera with a
hammer etc.
LCD Monitor
To prevent damage to the LCD monitor, DO
•
NOT
... push it strongly or apply any shocks.
... place the camera with LCD monitor on the
bottom.
To prolong service life
•
... avoid rubbing it with coarse cloth.
Main Unit
For safety, DO NOT
•
... open the camera’s chassis.
... disassemble or modify the unit.
... allow infl ammables, water or metallic objects
to enter the unit.
... remove the battery pack or disconnect the
power supply while the power is on.
... leave the battery pack attached when the
camera is not in use.
... place naked fl ame sources, such as lighted
candles, on the apparatus.
... expose the apparatus to dripping or splashing.

Avoid using the unit
•
... in places subject to excessive humidity or dust.
... in places subject to soot or steam such as
near a cooking stove.
... in places subject to excessive shock or
vibration.
... near a television set.
... near appliances generating strong magnetic
or electric fi elds (speakers, broadcasting
antennas, etc.).
... in places subject to extremely high (over 40°C)
or extremely low (under 0°C) temperatures.
... in places subject to the air pressure is low
(more than 3000 m (9870 ft) above the sea
level).
DO NOT leave the unit
•
... in places of over 50°C.
... in places where humidity is extremely low
(below 35%) or extremely high (above 80%).
... in direct sunlight.
... in a closed car in summer.
... near a heater.
... in high places such as on a TV. Leaving the
unit in high places while a cable is connected
may result in a malfunction if the cable is
caught and the unit falls onto the fl oor.
To protect the unit, DO NOT
•
... allow it to become wet.
... drop the unit or strike it against hard objects.
... subject it to shock or excessive vibration
during transportation.
... keep the lens directed at extremely bright
objects for long periods.
... expose the lens to direct sunlight.
... swing it excessively when using the hand
strap.
... swing the soft camera case excessively when
the camera is inside it.
How to Handle a CD-ROM
Take care not to soil or scratch the mirror
•
surface (opposite to the printed surface). Do
not write anything or put a sticker on either the
front or back surface. If the CD-ROM gets dirty,
gently wipe it with a soft cloth outward from the
center hole.
Do not use conventional disc cleaners or
•
cleaning spray.
Do not bend the CD-ROM or touch its mirror
•
surface.
Do not store your CD-ROM in a dusty, hot or
•
humid environment. Keep it away from direct
sunlight.
Declaration of Conformity
Model Number : GZ-MG255U/GZ-MG155U/
GZ-MG130U
Trade Name : JVC
Responsible party : JVC AMERICAS CORP.
Address : 1700 Valley Road Wayne, N. J.
07470
Telephone Number : 973-317–5000
This device complies with Part 15 of FCC
Rules. Operation is subject to the following
two conditions: (1) This device may not cause
harmful interference, and (2) this device must
accept any interference received, including
interference that may cause undesired
operation.
Changes or modifi cations not approved
by JVC could void the user’s authority to
operate the equipment. This equipment has
been tested and found to comply with the
limits for a Class B digital device, pursuant
to Part 15 of the FCC Rules. These limits are
designed to provide reasonable protection
against harmful interference in a residential
installation. This equipment generates, uses,
and can radiate radio frequency energy and, if
not installed and used in accordance with the
instructions, may cause harmful interference
to radio communications. However, there is
no guarantee that interference will not occur
in a particular installation. If this equipment
does cause harmful interference to radio or
television reception, which can be determined
by turning the equipment off and on, the
user is encouraged to try to correct the
interference by one or more of the following
measures: Reorient or relocate the receiving
antenna. Increase the separation between the
equipment and receiver.
Connect the equipment into an outlet on a
circuit different from that to which the receiver
is connected.
Consult the dealer or an experienced radio/
TV technician for help.
This Class B digital apparatus complies with
Canadian ICES-003.
Cet appareil numérique de la classe B est
conforme à la norme NMB-003 du Canada.
ENGLISH
59

Terms
A AC Adapter ................................................ 12, 58
Adjust Brightness ............................................22
Analog Input .................................................... 49
Aperture Priority ..............................................23
Auto Power Off ................................................50
B Backlight Compensation .................................. 21
Battery Pack ........................................ 12, 14, 58
Brightness Control (LCD Monitor) ................... 48
C Clean-up HDD ................................................. 50
Clock Adjust ..............................................13, 49
Continuous Shooting ....................................... 48
Copying (Moving) Still Images ......................... 45
Copying Video Files ................................... 41, 44
D Date/Time ........................................................ 49
Date Display Style ........................................... 49
Date Index Screen ........................................... 26
Deleting Files ............................................ 30, 50
Deleting Playlist ............................................... 36
Demonstration Mode ....................................... 48
Digital Image Stabilizer (DIS) .......................... 47
Direct Printing .................................................. 38
Display on TV .................................................. 49
DPOF ..............................................................37
Drop Detection ................................................48
DVD Burner ..................................................... 40
DVD Player ......................................................44
DVD Recorder ................................................. 44
E Effect ......................................................... 23, 28
Event Registration ..................................... 19, 32
Event Screen ................................................... 26
Everio Dock ....................................................... 6
F File Information ................................................ 32
Flash ............................................................... 18
Focus ............................................................... 22
Formatting a Recording Medium ..................... 50
G Gain ................................................................. 47
Gain Up ..................................................... 47, 48
H Hard Disk ........................................................ 58
I Image Rotation ................................................ 25
Image Size ......................................................47
L Language Setting ......................................13, 49
LCD Monitor .......................................... 8, 10, 58
LED Light ........................................................ 18
Lens Cover ...................................................... 14
M Manual Recording ........................................... 20
Menu Settings .................................................46
N Nightalive ......................................................... 21
O On-Screen Display ..........................................49
Operation Sound ............................................. 48
P Partial Delete ................................................... 33
PictBridge ........................................................ 38
Picture Quality ........................................... 46, 47
Playlist ............................................................. 34
Power-Linked Operation .................................... 8
Preset .............................................................. 49
Printer .............................................................. 38
Program AE ..................................................... 20
Protecting Files ............................................... 30
Q Quick Restart .................................................. 49
R Recordable Time/Number of Images ............... 57
Recording Medium ........................ 19, 47, 48, 58
Remote Control ....................................... 7, 8, 48
Resetting the Camera .....................................51
Resetting the File Number ............................... 50
S Scene Counter ................................................ 47
Screen Size (16:9/4:3) ..................................... 47
SD Card .......................................................... 15
Select TV Type ................................................ 49
Self-Timer ........................................................ 48
Shutter Speed .................................................23
Slide Show ......................................................25
Speaker Volume ..............................................24
Spot Exposure Control .................................... 21
Still Image ................................................. 17, 25
T Tele Macro ....................................................... 23
Tripod Mounting ............................................... 14
TV .................................................................... 29
V VCR ................................................................. 44
Video ......................................................... 16, 24
W White Balance ................................................. 23
Wind Cut ......................................................... 47
Wipe or Fader Effects ...................................... 28
Z Zooming .................................................... 18, 46
60

MEMO

Précautions de sécurité
AVERTISSEMENT : POUR ÉVITER LES
RISQUES D’INCENDIE OU D’ÉLECTROCUTION, NE PAS EXPOSER L’APPAREIL
À LA PLUIE NI À L’HUMIDITÉ.
REMARQUES :
La plaque d’identifi cation et l’avertissement de
•
sécurité se trouvent sous l’appareil et/ou au dos.
La plaque de numéro de série se trouve sur le
•
logement de la batterie.
Les informations d’identifi cation et
•
l’avertissement de sécurité de l’adaptateur
secteur sont situés sur ses côtés supérieur et
inférieur.
Avertissement sur la pile au lithium
remplaçable
La pile utilisée dans cet appareil peut présenter
des risques d’incendie ou de brûlure chimique si
elle est mal traitée.
Ne pas recharger, démonter, chauffer à plus de
100°C ni mettre au feu.
Changer la pile avec une CR2025 Panasonic
(Matsushita Electric), Sanyo, Sony ou Maxell.
Danger d’explosion ou risque d’incendie si la pile
n’est pas changée correctement.
Jeter immédiatement les piles usées.
•
Placer hors de la portée des enfants.
•
Ne pas démonter ni jeter au feu.
•
Pour Californie des États-Unis seulement
Cet appareil contient une pile-bouton CR au
lithium qui contient du perchlorate
– une manipulation spéciale peut être requise.
Voir www.dtsc.ca.gov/hazardouswaste/perchlorate
Si le matériel est installé dans un coffret ou sur
une étagère, s’assurer qu’il y a un espace suffi sant
sur tous les côtés pour permettre la ventilation
(10 cm ou plus sur les deux côtés, au dessus et à
l’arrière).
Ne pas boucher les orifi ces de ventilation.
(Si les orifi ces de ventilation sont bouchés par
un journal, un tissu, etc., la chaleur peut ne pas
s’éliminer.)
Aucune source à fl amme nue, telle que des
bougies allumées, ne doit être placée sur l’appareil.
En jetant des batteries aux ordures, les problèmes
d’environnement doivent être pris en considération
et les réglementations locales ou la législation
concernant le rebut de ces batteries doivent être
strictement respectées.
L’appareil ne doit pas être exposé à l’égouttage ni
aux éclaboussements.
Ne pas utiliser cet appareil dans une salle de bain,
ni dans des endroits avec de l’eau.
Aussi, ne pas placer de récipient rempli d’eau ou
de liquides (tels des produits cosmétiques, des
médicaments, des vases de fl eurs, des plantes en
pot, des tasses, etc.) sur le dessus de cet appareil.
(Si de l’eau ou un liquide entre dans ce matériel,
un incendie ou un choc électrique risque de se
produire.)
Ne dirigez pas l’objectif directement vers le soleil.
Vous pourriez vous abîmer la vue et l’appareil
pourrait être endommagé. Il y a aussi risque
d’incendie ou d’électrocution.
PRÉCAUTION !
Les remarques suivantes sont destinées à
protéger l’utilisateur et l’appareil photo contre des
dommages éventuels.
Ne pas transporter ou saisir l’appareil photo
par l’écran LCD, car il pourrait tomber ou
s’endommager.
Ne pas utiliser de trépied photographique sur des
surfaces irrégulières et inclinées. Il pourrait tomber
et l’ appareil photo pourrait être sérieusement
endommagé.
PRÉCAUTION !
Avec des câbles (Audio/Vidéo, S-Vidéo, etc.)
raccordés, il est recommandé de ne pas laisser
l’appareil photo sur le dessus du téléviseur, car
tirer sur les câbles pourrait faire tomber l’appareil
photo, causant des dommages.
PRÉCAUTION:
La prise secteur doit être opérationnelle.
AVERTISSEMENT:
Ne pas exposer les batteries à une source de
chaleur excessive telle que le rayonnement solaire
direct, un feu, etc.
2

CONSIGNES DE SÉCURITÉ
IMPORTANTES
1. Lire ces instructions.
2. Conserver ces instructions.
3. Tenir compte de tous les avertissements.
4. Respecter toutes les instructions.
5. Ne pas utiliser cet appareil à proximité de
l’eau.
6. Ne nettoyer qu’avec un chiffon sec.
7. Ne pas boucher les ouvertures de ventilation.
Installer selon les instructions du fabricant.
8. Ne pas installer à proximité de sources
de chaleur telles que des radiateurs, des
accumulateurs de chaleur, des poêles,
ou d’autres appareils (comprenant les
amplifi cateurs) qui produisent de la chaleur.
9. N’utiliser que des accessoires spécifi és par le
fabricant.
10. N’utiliser qu’avec le
chariot, le stand, le
trépied, le support
ou la table spécifi é
par le fabricant, ou
vendu avec l’appareil.
Lorsqu’un chariot est
utilisé, faire attention
pour déplacer la combinaison chariot/appareil
pour éviter des blessures causées par un
basculement.
11. Débrancher cet appareil pendant un orage ou
quand il n’est pas utilisé pendant une longue
durée.
12. Confi er toutes les réparations à du
personnel de service qualifi é. Un dépannage
est nécessaire lorsque l’appareil a été
endommagé d’une façon ou d’une autre,
tel que lorsque le cordon d’alimentation
ou la fi che est endommagé, si du liquide a
été renversé ou si des objets sont tombés
à l’intérieur de l’appareil, si l’appareil a été
exposé à la pluie ou à l’humidité, ne fonctionne
pas normalement ou a fait une chute.
Noter que cet appareil photo est destiné à un
usage privé uniquement.
Toute utilisation commerciale sans autorisation
est interdite. (Même si vous enregistrez un
spectacle ou une exposition pour votre plaisir
personnel, il est vivement recommandé de
demander au préalable l’autorisation de fi lmer.)
Marques commerciales
Fabriqué sous licence de Dolby Laboratories.
•
Dolby et le symbole double D sont des marques
de commerce de Dolby Laboratories.
•
MascotCapsule est une marque déposée de HI
CORPORATION au Japon.
Copyright © 2001 HI CORPORATION. Tous
droits réservés.
Les autres noms de produit et d’entreprise cités
•
dans ce mode d’emploi sont des marques de
commerce et/ou des marques déposées de
leurs détenteurs respectifs.
FRANÇAIS
3

À lire impérativement !
Faire une sauvegarde des données enregistrées importantes
JVC décline toute responsabilité pour toute perte de données. Il est recommandé de les
copier sur un DVD ou un autre support d’enregistrement pour stockage. ( p. 40)
Faites un enregistrement test
Avant d’enregistrer des données importantes, faites un enregistrement test et lisez les
données enregistrées afi n de vérifi er que la vidéo et le son ont été enregistrés correctement.
Réinitialiser l’appareil photo s’il ne fonctionne pas correctement
Cet appareil photo utilise un micro-ordinateur. Des facteurs tels qu’un bruit de fond ou
les interférences peuvent l’empêcher de fonctionner correctement. Si l’appareil photo ne
fonctionne pas correctement, le réinitialiser. ( p. 51)
Précautions à prendre lors de la manipulation de la batterie
Vous devez utiliser les bloc-piles JVC BN-VF808U/VF815U/VF823U.
•
Si l’appareil photo est soumis à une décharge électrostatique, le mettre hors tension
•
avant de l’utiliser à nouveau.
En cas de dysfonctionnement, cesser immédiatement d’utiliser
l’appareil photo et consulter le revendeur JVC le plus proche
En cas de problème lors de l’utilisation de la carte SD, apportez la carte avec l’appareil photo
•
pour réparation. Si vous ne fournissez pas ces deux éléments, la cause du dysfonctionnement
ne pourra pas être déterminée et il ne sera pas possible de réparer l’appareil photo.
Il se peut que les données enregistrées soient effacées lors de la réparation ou du
•
contrôle de l’appareil photo. Sauvegarder toutes les données avant de faire une
demande de réparation ou de contrôle.
Comme il se peut que l’appareil photo soit utilisé pour des démonstrations
en magasin, le mode de démonstration est activé par défaut
Pour désactiver le mode de démonstration, régler [MODE DEMO] sur [ARRET]. ( p. 48)
•
Ce mode d’emploi s’applique aux modèles
GZ-MG255, GZ-MG155 et GZ-MG130
Sauf indication contraire, les illustrations de ce mode d’emploi sont celles du modèle GZ-MG130.
•
Les icônes telles que indiquent que la fonction s’applique uniquement au
•
modèle spécifi é.
Lors du raccordement de l’appareil photo à un autre
appareil à l’aide d’un câble DV, s’assurer de suivre la procédure
ci-dessous. Un raccordement incorrect du câble peut provoquer
un dysfonctionnement de l’appareil photo et/ou de l’autre appareil.
Raccorder en premier le câble DV à l’autre appareil, puis à l’appareil photo.
•
Raccorder le câble DV (à broches) correctement selon la forme du connecteur DV.
•
4

Table des matières
PRISE EN MAIN
Accessoires ............................................ 6
Comment utiliser la station d’accueil Everio
Fixation de la dragonne ................................7
Préparation de la télécommande ...................7
.....6
Index ........................................................ 8
Indications sur l’écran LCD ................ 10
Réglages nécessaires avant
utilisation .............................................. 12
Charge de la batterie ..................................12
Sélection de la langue ................................ 13
Réglage de la date et de l’heure .................13
Autres réglages ................................... 14
Réglage de la poignée ................................14
Couvre-objectif ...........................................14
Vérifi er l’énergie restante de la batterie ......14
Montage sur un trépied ...............................14
Utilisation d’une carte SD ........................... 15
ENREGISTREMENT
Enregistrer des fi chiers ....................... 16
Enregistrement vidéo ..................................16
Enregistrement de photos ..........................17
Zoom ..........................................................18
Lumière à DEL ............................................18
Flash ........................................................... 18
Enregistrement de fi chiers dans des
événements ................................................19
Vérifi cation de l’espace restant sur le
support d’enregistrement ............................ 19
Enregistrement manuel ....................... 20
Pour sélectionner le mode d’enregistrement
manuel ........................................................ 20
Exposition automatique programmée ......... 20
Nightalive .................................................... 21
Compensation de contre-jour ..................... 21
Commande d’exposition spot ..................... 21
Réglage manuel du menu Fonction ............22
LECTURE
Lecture de fi chiers ................................ 24
Lecture vidéo ..............................................24
Lecture de photos ....................................... 25
Fonction de recherche de fi chiers ..............26
Pour lire les fi chiers de démonstration
Lecture avec effets spéciaux ......................28
Visualisation de photos sur le téléviseur
..........27
.... 29
ÉDITION/IMPRESSION
Gestion des fi chiers ............................ 30
Suppression/Protection de fi chiers ............. 30
Affi chage d’informations sur un fi chier ........ 32
Modifi cation de l’enregistrement des
événements des fi chiers vidéo après
l’enregistrement ..........................................32
Suppression partielle
(COPIE DE SECTION) ................................33
Listes de lecture .................................. 34
Création d’une liste de lecture ....................34
Lecture de listes de lecture .........................35
Autres opérations liées aux listes de
lecture ......................................................... 36
Réglage des tirages ............................. 37
Réglage DPOF
(Informations d’impression) ........................ 37
Impression directe à l’aide d’une imprimante
PictBridge ................................................... 38
COPIE
Copier des fi chiers .............................. 40
Utiliser un graveur DVD pour copier des
fi chiers de l’appareil photo
(Fonction de création DVD) ........................40
Utiliser un magnétoscope ou un enregistreur
DVD pour copier les fi chiers de l’appareil
photo ........................................................... 44
Utiliser l’appareil photo pour copier les
fi chiers d’un magnétoscope ou d’un
lecteur DVD ................................................. 44
Copie et transfert de fi chiers de photos ......45
MENUS DE RÉGLAGE
Modifi cation des réglages à l’aide des
menus ................................................... 46
AUTRES INFORMATIONS
Dépannage ........................................... 51
Messages d’avertissement ................. 54
Nettoyage ............................................. 55
Caractéristiques techniques .............. 55
Consignes de sécurité ........................ 58
Lexique ................................................ 60
FRANÇAIS
5

Accessoires
Station d’accueil
Everio
CU-VC3U
( ci-dessous)
Adaptateur secteur
AP-V18U/14U
Batterie
BN-VF808U
Câble audio/vidéo
Câble USB
( p. 38, 40
et GUIDE
D’UTILISATION DE
Dragonne
( p. 7)
CD-ROM
( GUIDE
D’UTILISATION DE
L’ORDINATEUR)
Télécommande
RM-V750U ( p. 7)
L’ORDINATEUR)
Pile au Lithium
CR2025
Préinstallée dans la
télécommande.
REMARQUE
Veiller à utiliser les câbles fournis pour les
raccordements. Ne pas utiliser d’autres câbles.
Comment utiliser la station d’accueil Everio
Vous pouvez connecter des câbles aux connecteurs de la station d’accueil Everio. La connexion
s’établit lorsque vous posez l’appareil photo sur la station.
Borne de
connexion de
l’appareil photo
REMARQUE
Pour la connexion à l’aide d’un connecteur S et d’un connecteur DV, un câble S-Vidéo et un câble DV
en option sont nécessaires. Pour acheter ces câbles, contacter le centre d’entretien JVC indiqué sur
la fi che incluse dans l’emballage pour en savoir plus sur sa disponibilité. Veiller à raccorder l’extrémité
munie du fi ltre à noyau de ferrite à l’appareil photo. Le fi ltre à noyau de ferrite réduit les parasites.
Le câble S-Vidéo (en option) permet une lecture de qualité encore plus élevée sur le téléviseur.
•
( p. 29) Veiller à utiliser le câble S-Vidéo YTU94146A.
Lors de la copie de fi chiers de l’appareil photo à l’aide d’un magnétoscope ou d’un enregistreur DVD
•
( p. 44), l’utilisation du câble DV pemet une copie de qualité encore plus élevée. Veiller à utiliser le câble
DV VC-VDV204U. Le fonctionnement à l’aide du câble DV n’est pas garanti sur tous les appareils.
Connecteur S
Connecteur AV
Connecteur CC
Connecteur DV
Connecteur
USB
6

Fixation de la dragonne
Ouvrir la bande velcro et
faire passer l’extrémité de la
courroie dans l’œillet.
Œillet
Faire passer la courroie dans
la boucle, régler sa longueur
et utiliser le guide de la
courroie pour la fi xer.
Boucle
Guide de
courroie
Préparation de la télécommande
La télécommande est dotée d’une pile lors de son achat.
Enlever la feuille isolante avant toute utilisation.
Portée de la télécommande
Capteur infrarouge
Portée effective:
5 m
Pour réinsérer la pile
Extraire le logement de la pile en poussant
sur le bouton de verrouillage.
Bouton de
verrouillage
Positionner la boucle à
proximité de l’œillet et fermer
la bande velcro.
Pile au lithium
(CR2025)
REMARQUE
Le rayon transmis peut manquer d’effi cacité
ou engendrer des dysfonctionnements si le
capteur infrarouge est directement exposé à la
lumière du soleil ou à des éclairages puissants.
FRANÇAIS
7

Index
REMARQUES
L’écran LCD peut pivoter sur 270°.
•
Fonctionnement avec alimentation
•
couplée
Vous pouvez également mettre l’appareil
photo sous/hors tension en ouvrant/fermant
l’écran LCD en mode d’enregistrement.
Veiller à ne pas obstruer 4, 5, 7 et 9
•
pendant la prise de vue.
8

Appareil photo
! Touche Index [INDEX] ( p. 26)/Touche
Espace restant/Touche Batterie intelligente
[ 0/ 1 ] ( p. 14, 19)
# Commande de réglage
Déplacer vers ¡ :
Saut arrière ( p. 24)/Vers le haut/
Compensation de contre-jour [ - ]
( p. 21)/Commande d’exposition spot
[ . ] ( p. 21)
Déplacer vers ¢ :
Saut en avant ( p. 24)/Vers le bas/
Changer le réglage du fl ash
[FLASH] ( p. 18)/
lumière à DEL [LIGHT] ( p. 18)
Déplacer vers £ :
Recherche en arrière ( p. 24)/Vers la
gauche/Nightalive [NIGHT] ( p. 21)
Déplacer vers ¤ :
Recherche avant ( p. 24)/Vers
la droite/Exposition automatique
programmée [PROGRAM AE] ( p. 20)
Pression vers le bas :
Lecture/Pause ( p. 24)
$ Touche Menu [MENU] ( p. 46)
% Haut-parleur ( p. 24)
&
Commutateur de mode Lecture/Enregistrement
[SELECT PLAY/REC]
( Commande de zoom [W 7 , T
Commande de volume du haut-parleur
[–VOL+] ( p. 24)
)
Touche Prise de photo [SNAPSHOT] ( p. 17)
* Touche Fonction [FUNCTION] ( p. 22)
+
Touche DVD direct [DIRECT DVD] ( p. 41 et
GUIDE D’UTILISATION DE L’ORDINATEUR)
,
Touche Sauvegarde directe [DIRECT BACK UP]
( GUIDE D’UTILISATION DE L’ORDINATEUR)/
Touche Événement [EVENT] ( p. 19)
- Touche de mode Auto/Manuel [AUTO]
( p. 20)/ Touche d’information [INFO]
( p. 32)
. Touche de marche/arrêt d’enregistrement
vidéo [REC] ( p. 16)
/ Témoins d’accès/charge [ACCESS/
CHARGE] ( p. 12)
(Clignote lors d’un accès aux fi chiers ou
pendant la recharge de la batterie. Ne pas
mettre l’appareil hors tension ni retirer la
batterie ou l’adaptateur secteur lors d’un
accès aux fi chiers.)
Témoin de mode Vidéo/Photo [ !, # ]
( p. 16, 17)
Changer le réglage de la
( p. 16)
] ( p. 18)
,
0 Commutateur Alimentation/Mode [OFF
(CHARGE), ON, MODE] ( p. 12)
1 Touche de verrouillage ( p. 12)
2 Poignée ceinturée ( p. 14)
3 Connecteur USB (Universal Serial Bus)
[
] ( p. 38, 40 et GUIDE D’UTILISATION
2
DE L’ORDINATEUR)
4
5 Capteur de l’appareil photo
Capteur infrarouge ( p. 7)
6 Couvre-objectif ( p. 14)
7 Objectif
8 Commutateur de couvre-objectif [ =, > ]
( p. 14)
9 Microphone stéréo
: Emplacement à carte SD ( p. 15)
; Trou fi leté pour montage du trépied
( p. 14)
< Orifi ce de taquet ( p. 14)
= Connecteur d’entrée CC [DC] ( p. 12)
> Connecteur audio/vidéo [AV]
? Logement de la batterie ( p. 12)
@ Touche de libération de la batterie [BATT.]
( p. 12)
Flash ( p. 18)/
Lumière à DEL ( p. 18)
Télécommande
Q Fenêtre de transmission du rayon
infrarouge
R Touches ZOOM (T/W)
Zoom avant/arrière ( p. 18)
S Touche de déplacement vers le haut
Touche de rotation (sens antihoraire)
( p. 25)
T Touche de saut en arrière
U Touche de déplacement vers la gauche
V Touche Précédent
W Touche PLAYLIST ( p. 34)
X Touche START/STOP
Y Touche SNAPSHOT ( p. 17)
Z Touche INFO ( p. 32)
a Touche de saut en avant
b Touche PLAY/PAUSE
c Touche de déplacement vers la droite
d Touche Suivant
e Touche de déplacement vers le bas
Touche de rotation (sens horaire) ( p. 25)
f Touche INDEX
g Touche DATE
FRANÇAIS
9

Indications sur l’écran LCD
Pendant l’enregistrement de vidéos et
de photos
0
200X
A
F5.6
1/250
WT
4:55
JAN.20.20 07
PM
! Témoin du mode de fonctionnement
sélectionné ( p. 20)
4 : Mode Auto
3 : Mode Manuel
# Témoin de mode Tele macro ( p. 23)
$ Rapport de zoom approximatif ( p. 18)
% Témoin de Zoom ( p. 18)
&
Témoin d’entrée de
connecteur AV/S ( p. 49)
( Vitesse d’obturation ( p. 23)
) Témoin de balance des blancs ( p. 23)
* Témoin de commande de luminosité
( p. 48)
+ Témoin de batterie ( p. 54)
, Date/Heure ( p. 13)
- Témoin de mise au point manuelle
( p. 22)
. Témoin de support sélectionné
( p. 47, 48)
/ Témoin de détection de chute (apparaît
lorsque [DETECTION DE CHUTE] est
réglé sur [ARRET].) ( p. 48)
0 Témoin de mode d’effet ( p. 23)
1 Témoin de mode d’exposition automatique
programmée (AE) ( p. 20)/
5
: Témoin Nightalive ( p. 21)
2 Valeur de diaphragme (numéro-F)
( p. 23)
3
Témoin de lumière à DEL
( p. 18)
4 ± : Témoin de réglage d’exposition
( p. 22)
- : Témoin de compensation de contre-
jour ( p. 21)
. : Témoin de commande d’exposition spot
( p. 21)
5 Témoin de verrouillage du diaphragme
( p. 21)
10
Pendant l’enregistrement vidéo uniquement
16:9
[5h56m]
0:04:01
! Témoin de mode ( p. 16)
#
Rapport de format de la photo (16:9/4:3) ( p. 47)
$ Qualité de l’image : B (ultra fi ne), C (fi ne),
(normale), E (économie) ( p. 46)
D
% Temps restant ( p. 16, 57)
& Compteur ( p. 47)
( 7REC : (Apparaît pendant l’enregistrement.)
( p. 16)
79 : (Apparaît pendant le mode d’attente
d’enregistrement.)
)
Témoin d’atténuation des bruits du vent ( p. 47)
* Témoin d’événement ( p. 19)
+ Témoin Stabilisateur d’image numérique
(STABILISATEUR) (apparaît lorsque
[STABILISATEUR] est réglé sur [ARRET].)
( p. 47)
Pendant l’enregistrement de photos
uniquement
640
FINE
[9999]
PHOTO
10
4:3
! Témoin de mode ( p. 17)
#
Sensibilité ISO
(LUMINOSITE +) : Lorsqu’il est réglé sur
[AUTO], il n’y a aucune indication. ( p. 47)
$ Témoin de mise au point ( p. 22)
%
Rapport de format de la photo
(16:9/4:3)
& Taille de l’image ( p. 47)
( Qualité de l’image : FINE (fi ne) ou STD
(standard) ( p. 47)
) Nombre de clichés restants ( p. 57)
*
Témoin du mode de prise de vues en rafale ( p. 48)
+ Témoin de prise de vue ( p. 17)
,
Témoin d’enregistrement par retardateur ( p. 48)
- Témoin de mode de fl ash ( p. 18)

Pendant la lecture vidéo
Pendant la lecture de photos
X-60
9:55:01
4:55
JAN.20.2007
PM
! Témoin de mode ( p. 24)
#
: Témoin de lecture d’une liste de
6
lecture (apparaît lors de la lecture d’une
liste de lecture.) ( p. 35)
¨ª : Témoin de lecture de la recherche
d’événement (apparaît pendant la lecture
d’un fi chier vidéo à partir de la recherche
d’événement.) ( p. 27)
¨© : Témoin de lecture de la recherche
de date (apparaît pendant la lecture d’un
fi chier vidéo à partir de la recherche de
date.) ( p. 26)
$ Qualité de l’image : B (ultra fi ne), C (fi ne),
(normale), E (économie) ( p. 46)
D
% Mode de lecture ( p. 24)
U : Lecture
9 : Pause
5
: Recherche avant
3
: Recherche en arrière
9U : Ralenti avant
Y9 : Ralenti arrière
(Le nombre à gauche indique la vitesse.)
& Compteur ( p. 47)
( Témoin de niveau de volume
) Témoin de batterie ( p. 54)
* Date/Heure ( p. 13)
+ Témoin de support sélectionné
( p. 47, 48)
, Témoin de détection de chute (apparaît
lorsque [DETECTION DE CHUTE] est
réglé sur [ARRET].) ( p. 48)
- Témoin de mode d’effet ( p. 28)
. Témoin d’effet de fondu/volet ( p. 28)
101-0098
4:55
JAN.20.2007
PM
! Témoin de mode ( p. 25)
# Numéro de dossier/fi chier
$ Témoin de lecture de diaporama ( p. 25)
% Témoin de batterie ( p. 54)
& Date/Heure ( p. 49)
( Témoin de support sélectionné
( p. 47, 48)
) Témoin de détection de chute (apparaît
lorsque [DETECTION DE CHUTE] est
réglé sur [ARRET].) ( p. 48)
* Témoin de mode d’effet ( p. 28)
Affi chage du guide d’utilisation
Le guide d’utilisation s’affi che au bas de
l’écran pendant l’affi chage du menu, etc.
SELECT.
DEFINIR QUITTER
FRANÇAIS
11

Réglages nécessaires avant utilisation
Témoin d’accès/
recharge
MENU
Commande
de réglage
Veiller à confi gurer les trois réglages suivants
avant utilisation.
Molette Alimentation/
Mode
Charge de la batterie
1 Régler la molette Alimentation/Mode
sur OFF.
Faire glisser la touche de verrouillage tout
en appuyant dessus.
MODE
ON
(CHARGE)
OFF
2 Fixer la batterie.
Faire coulisser la batterie vers le bas
jusqu’à ce qu’elle se verrouille.
Partie inférieure de l’appareil
photo
BATT.
3 Brancher l’adaptateur secteur.
Connecteur
CC
Adaptateur
secteur
Ouvrir le volet.
Vous pouvez aussi brancher
•
l’adaptateur secteur à l’aide du connecteur
de station d’accueil Everio. ( p. 6)
Le témoin d’accès/recharge clignote pour
•
indiquer que la recharge a commencé.
Lorsque le témoin s’éteint, la recharge est
•
terminée. Débrancher l’adaptateur secteur
de la prise de courant et de l’appareil photo.
Sur une prise
secteur
(110 V à 240 V)
Temps de recharge / d’enregistrement requis (approx.)
Les valeurs entre ( ) correspondent aux durées lorsque la lumière à DEL est allumée.
Batterie
BN-VF808U
(Fourni)
BN-VF815U 2 h 40 min. 2 h 35 min.
BN-VF823U 3 h 50 min. 3 h 50 min.
Temps de
recharge
1 h 30 min. 1 h 15 min.
GZ-MG255 GZ-MG155 GZ-MG130
Durée de l’enregistrement
1 h 30 min.
(1 h 25 min.)
3 h 5 min.
(2 h 55 min.)
4 h 35 min.
(4 h 20 min.)
12
1 h 35 min.
(1 h 30 min.)
3 h 15 min.
(3 h 5 min.)
4 h 55 min.
(4 h 35 min.)

8 Pour retirer la batterie
Faire coulisser tout en maintenant BATT.
( étape 2), puis retirer la batterie.
8 Pour vérifi er la charge restante de la
batterie
Voir page 14.
REMARQUES
Vous pouvez également utiliser l’appareil
•
photo avec uniquement l’adaptateur secteur.
Éviter de tirer sur ou de plier la fi che et le
•
cordon de l’adaptateur secteur. Cela pourrait
endommager l’adaptateur secteur.
Sélection de la langue
Il est possible de modifi er la langue de l’écran.
1
Régler la molette Alimentation/Mode sur ON.
Faire glisser la touche de verrouillage tout
en appuyant dessus.
MODE
ON
(CHARGE)
OFF
2
3
MENU
VIDEO
SUPPORT ENREG. VIDEO
COMPTEUR DE SCENE
QUALITE
ZOOM
STABILISATEUR
SELECT. DEFINIR QUITTER
VIDEO
SUPPORT ENREG. VIDEO
COMPTEUR DE SCENE
QUALITE
ZOOM
STABILISATEUR
SELECT. DEFINIR QUITTER
4 Sélectionner [GENERAL].
Sélectionner
Régler
GENERAL
REDÉMARRAGE RAPIDE
ARRET AUTOMATIQUE
LUMINOSITE
DETECTION DE CHUTE
TELECOMMANDE
SELECT. DEFINIR QUITTER
5 Sélectionner [LANGUAGE].
Sélectionner
GENERAL
6 Sélectionner la langue appropriée.
Sélectionner
Régler
8 Pour revenir à l’écran précédent
Déplacer la commande de réglage vers £.
8 Pour quitter l’écran
Appuyer sur MENU.
Réglage de la date et de l’heure
Après avoir exécuté les étapes 1-4
( colonne de gauche)
5
Sélectionner [ REGLAGE DE l HEURE].
Sélectionner
Régler
GENERAL
SELECT. DEFINIR QUITTER
DATE TEMPS
2007
JAN 31
11
AM
07
6 Régler la date et l’heure.
Sélectionner
Régler
Procéder de même pour entrer le mois, le
jour, l’année, l’heure et les minutes.
8 Pour revenir à l’écran précédent
Déplacer la commande de réglage vers £.
8 Pour quitter l’écran
Appuyer sur MENU.
Vous avez confi guré les réglages
appropriés.
8 Pour utiliser l’appareil photo
immédiatement
Voir page 16.
8 Pour confi gurer d’autres réglages
Voir page 14.
FRANÇAIS
Régler
ENGLISH
SELECT. DEFINIR QUITTER
13

Autres réglages
Commutateur de
couvre-objectif
INDEX
Réglage de la poignée
Ouvrir la bande velcro et régler la poignée.
Couvre-objectif
Après l’utilisation de l’appareil photo, fermer le
couvre-ojbectif pour protéger l’objectif.
Molette
Alimentation/
Mode
Vérifi er l’énergie restante de la batterie
Préparatif :
Régler la molette Alimentation/Mode sur
•
OFF.
Fixer la batterie.
•
INDEX
ETAT DE LA BATTERIE
100%
TEMPS MAXIMUM
50%
0%
MIN
Les informations sur la batterie restent
affi chées pendant environ 5 secondes si la
touche est enfoncée puis relâchée rapidement,
et pendant environ 15 secondes si la touche
est maintenue enfoncée pendant plusieurs
secondes.
REMARQUES
Si “ERREUR DE COMMUNICATION”
•
apparaît, il y a peut-être un problème
de batterie. Dans ce cas, contacter le
revendeur JVC le plus proche.
Le temps d’enregistrement affi ché ne
•
devrait être utilisé qu’à titre indicatif. Il est
exprimé par tranches de 10 minutes.
Montage sur un trépied
Aligner l’orifi ce de taquet sur l’orifi ce du
trépied, et le trou fi leté de montage sur la vis,
puis faire pivoter l’appareil photo dans le sens
horaire pour le monter sur le trépied.
Partie inférieure de
l’appareil photo
Fermer le couvre-objectif
Ouvrir le couvre-objectif
REMARQUE
N’appuyez pas trop fort sur le couvre-objectif.
Vous risqueriez d’endommager l’objectif.
14
REMARQUE
Ne pas utiliser de trépied photographique
sur des surfaces irrégulières ou inclinées. Il
pourrait tomber et l’appareil photo pourrait
être sérieusement endommagé.

Utilisation d’une carte SD
Si vous souhaitez enregistrer sur une carte
SD, les trois opérations suivantes doivent être
exécutées.
Cartes compatibles SD :
Panasonic, TOSHIBA et SanDisk.
128 Mo à 4 Go.
Sur d’autres supports, les données risquent
•
de ne pas être enregistrées correctement
ou des données déjà enregistrées risquent
d’être perdues.
Pour l’enregistrement vidéo, utiliser une
•
carte mémoire SD rapide (au moins
10 Mo/s).
Les cartes MultiMediaCards ne sont pas
•
prises en charge.
Q Insérer une carte SD
Préparatif :
Régler la molette Alimentation/Mode sur OFF.
1 Ouvrir le volet de la carte SD.
Partie inférieure
de l’appareil
photo
REMARQUES
L’alimentation doit être coupée pour
•
l’insertion et le retrait de la carte SD. Sinon,
les données de la carte risquent d’être
altérées.
Ne pas toucher la borne sur le côté opposé
•
de l’étiquette.
R Changer le support
d’enregistrement.
L’appareil photo est programmé en usine pour
enregistrer sur le disque dur intégré. Vous
pouvez changer le support d’enregistrement
pour la carte SD.
Régler [SUPPORT ENREG. VIDEO] et
[SUPPORT ENREG. PHOTO] sur [SD].
( p. 47, 48)
S Formater une carte SD lors de sa
première utilisation
Le formatage procure des vitesses et un
fonctionnement stables lors des accès à la
carte SD.
Sélectionner [EXECUTER] dans
[FORMATER LA CARTE SD] pour
formater la carte. ( p. 50)
2 Introduire la carte fermement, le bord
biseauté en premier.
Bord biseauté
3 Fermer le volet de la carte SD.
8 Pour retirer une carte SD
Pousser sur la carte SD une fois.
Lorsqu’elle sort de l’appareil, la retirer.
FRANÇAIS
15

Enregistrer des fi chiers
REC
[5h56m]
Enregistrement vidéo
Préparatif : Régler la molette Alimentation/Mode sur ON.
Glisser la molette Alimentation/
Mode sur MODE pour
sélectionner le mode
La molette retourne
MODE
en position originale
ON
lorsqu’elle est
OFF
libérée.
Le témoin ! s’allume sur l’appareil
photo.
(vidéo).
!
Appuyer sur la touche PLAY/
REC pour sélectionner le mode
d’enregistrement.
[5h56m]
SELECT
PLAY/REC
Appuyer sur la touche REC pour
démarrer l’enregistrement.
REC
Le temps d’enregistrement restant
s’affi che (valeur approximative).
16:9
8 Pour arrêter l’enregistrement
Appuyer de nouveau sur la touche REC.
8 Pour modifi er la qualité d’image
Modifi er les réglages dans [QUALITE].
(
p. 46)
8 Pour enregistrer un fi chier dans un
événement
Voir page 19.
REMARQUES
Le mode d’enregistrement vidéo est automatiquement sélectionné lorsque l’on met l’appareil photo
•
hors tension et puis le sous tension.
Si l’appareil reste inutilisé pendant 5 minutes alors qu’il est sous tension, il se met de lui-même
•
hors tension pour économiser l’énergie. Pour remettre l’appareil sous tension lors de l’utilisation
de la batterie, régler la molette Alimentation/Mode sur OFF, puis sur ON. Pendant l’utilisation de
l’adaptateur secteur, effectuer une opération quelconque, telle qu’un zoom.
Les noms MOV_001.MOD à MOV_009.MOD, MOV_00A.MOD à MOV_00F.MOD et MOV_010.MOD
•
sont attribués aux fi chiers vidéo dans leur ordre d’enregistrement.
Un enregistrement vidéo de 12 heures consécutives s’arrête automatiquement à l’issue de ce délai.
•
Un nouveau fi chier est créé à chaque prise de vues en rafale de 4 Go.
•
Cet appareil photo enregistre de la vidéo au format MPEG2 compatible avec le format SD-VIDEO.
•
Notez que cet appareil photo n’est pas compatible avec les autres formats vidéo numériques.
Ne pas déplacer ni secouer brusquement l’appareil photo pendant l’enregistrement. Dans ce cas, le
•
bruit du disque dur risque d’être enregistré.
16
8 Pour modifi er le rapport de format de
l’image (16:9/4:3)
Modifi er les réglages dans
[ENREGISTREMENT 16:9]. (
p. 47)

Enregistrement de photos
[
Préparatif : Régler la molette Alimentation/Mode sur ON.
Glisser la molette Alimentation/
Mode sur MODE pour
sélectionner le mode
La molette retourne
MODE
en position
ON
originale lorsqu’elle
OFF
est libérée.
Le témoin
photo.
s’allume sur l’appareil
#
(photo).
#
Appuyer sur la touche PLAY/REC
pour sélectionner le mode
d’enregistrement.
640
[9999]
SELECT
PLAY/REC
FINE
Enfoncer la touche SNAPSHOT à
mi-course sans la relâcher.
640
FINE
Le témoin ? devient vert lorsque
l’image capturée est au point.
8 Pour modifi er la qualité d’image
Modifi er les réglages dans [QUALITE].
( p. 47)
8 Pour enregistrer des photos en rafale
Régler [PRISE VUES EN RAFALE] sur
Appuyer sur la touche
SNAPSHOT pour démarrer
l’enregistrement.
0
[9999]
FINE
[MARCHE]. ( p. 48)
8
Pour modifi er la taille de
l’image
Modifi er les réglages dans [TAILLE IMG].
( p. 47)
REMARQUE
Si l’appareil reste inutilisé pendant 5 minutes alors qu’il est sous tension, il se met de lui-même hors
tension pour économiser l’énergie. Pour remettre l’appareil sous tension lors de l’utilisation de la
batterie, régler la molette Alimentation/Mode sur OFF, puis sur ON. Pendant l’utilisation de l’adaptateur
secteur, effectuer une opération quelconque, telle qu’un zoom.
FRANÇAIS
17

Enregistrer des fi chiers (Suite)
Commande de
zoom
Molette
Alimentation/
Mode
INDEX
Commande de
réglage
Touche
PLAY/REC
Zoom
Préparatif :
Glisser la molette Alimentation/Mode sur
•
MODE pour sélectionner le mode
Appuyer sur la touche PLAY/REC pour
•
sélectionner le mode d’enregistrement.
Zoom arrière Zoom avant
W : Grand angle T : Téléobjectif
Rapport de zoom maximal (préréglage d’usine)
Modèle
GZ-MG255 40X 10X
GZ-MG155 64X 27X
GZ-MG130 68X 34X
8 Pour modifi er le rapport de zoom
maximal (pour le mode ! uniquement)
Modifi er les réglages dans [ZOOM].
( p. 46)
REMARQUE
La prise de vue macro jusqu’à environ 5 cm
du sujet est possible lorsque la commande de
zoom est réglée à fond sur W.
! mode # mode
18
!
ou #.
Lumière à DEL
Préparatif :
Glisser la molette Alimentation/Mode sur
•
MODE pour sélectionner le mode
Appuyer sur la touche PLAY/REC pour
•
sélectionner le mode d’enregistrement.
A
Chaque déplacement de la commande de
réglage sur ¢ modifi e le réglage.
La lumière reste allumée
indépendamment des
conditions environnantes.
La lumière s’allume
automatiquement lorsque
l’éclairage est insuffi sant.
Pas
d’affi chage
Désactive cette fonction.
!
ou #.
Flash – Mode # uniquement
Préparatif :
Glisser la molette Alimentation/Mode sur
•
MODE pour sélectionner le mode
Appuyer sur la touche PLAY/REC pour
•
sélectionner le mode d’enregistrement.
0
[9999]
FINE
Chaque déplacement de la commande de
réglage sur ¢ modifi e le réglage.
()
()*
(+
Pas
d’affi chage
Le fl ash s’allume
automatiquement.
Le fl ash s’allume automatiquement
mais atténue le phénomème des
yeux rouges sur les yeux du sujet.
Le fl ash s’allume quelles que soient
(
les conditions de prise de vue.
Le fl ash s’allume. La vitesse
d’obturation diminue de sorte que
l’arrière-plan soit aussi plus éclairé.
Désactive cette fonction.
#
.

Enregistrement de fi chiers dans des
événements – Mode ! uniquement
Si vous sélectionnez un événement en vue
d’y enregistrer le fi chier avant de démarrer
l’enregistrement proprement dit, le fi chier sera
enregistré dans l’événement sélectionné. Ainsi,
il sera plus facile de rechercher le fi chier au
moment de la lecture. Chaque événement
comporte jusqu’à 3 destinations différentes
(par exemple : BEBE1, BEBE2, BEBE3).
Préparatif :
Glisser la molette Alimentation/Mode sur
•
MODE pour sélectionner le mode
Appuyer sur la touche PLAY/REC pour
•
sélectionner le mode d’enregistrement.
!
.
1
REORGAN. LES ENR.
ACTIF/SELECTIONNER
ARRET
REMARQUE
Lorsque vous choisissez d’enregistrer un
fi chier dans un événement, le réglage est
conservé même si vous éteignez l’appareil.
Par la suite, vous enregistrerez un fi chier
dans l’événement préalablement sélectionné,
sauf si vous modifi ez le réglage.
Vérifi cation de l’espace restant sur le
support d’enregistrement
– Mode ! uniquement
Préparatif :
Glisser la molette Alimentation/Mode sur
•
MODE pour sélectionner le mode
Appuyer sur la touche PLAY/REC pour
•
sélectionner le mode d’enregistrement.
TEMPS ENREGIST. MAX
7h 30m
11h 15m
22h 30m
INDEX
45h 00m
HDD
LIBRE
UTILISE
!
.
2 Sélectionner [ACTIF/SELECTIONNER].
Sélectionner
Régler
TEMPS LIBRE
SANS SECTION
SELECT.
PAGE SUIVANTE
DEFINIR
1/ 3
QUITTER
3 Sélectionner l’événement dans lequel
vous voulez enregistrer le fi chier.
Pour sélectionner une autre destination,
•
sélectionner [PAGE SUIVANTE].
Pour annuler l’enregistrement de
•
l’événement, sélectionner
[SANS SECTION].
Sélectionner
Régler
L’événement sélectionné s’affi che sur
l’écran. Appuyer sur la touche REC pour
démarrer l’enregistrement.
8 Pour quitter l’écran
Appuyer sur EVENT.
8 Pour rechercher un événement pour un
fi chier à lire
Voir page 26.
Le temps d’enregistrement maximum est
affi ché pour chaque mode de qualité d’image
( B
: ULTRA FIN, C : FIN, D : NORMAL,
E : ECONOMIE).
8 Pour revenir à l’écran normal
Appuyer de nouveau sur la touche 0.
FRANÇAIS
19

Enregistrement manuel
Commande de
réglage
FUNCTION
Le mode d’enregistrement manuel permet
de défi nir manuellement la mise au point,
la luminosité de l’écran, etc. Vous devez
choisir ce mode car le mode d’enregistrement
automatique, qui règle ces paramètres
automatiquement, est sélectionné par défaut.
Touche PLAY/REC
Molette
INFO
Alimentation/
Mode
Pour sélectionner le mode
d’enregistrement manuel
Préparatif :
Glisser la molette Alimentation/Mode sur
•
MODE pour sélectionner le mode
Appuyer sur la touche PLAY/REC pour
•
sélectionner le mode d’enregistrement.
!
ou #.
Appuyer deux fois.
INFO
8 Pour repasser en mode
d’enregistrement automatique
Appuyer sur la touche AUTO pour faire
apparaître le témoin 4.
Exposition automatique programmée
Vous pouvez enregistrer des vidéos ou des
photos avec une luminosité optimale en
réglant l’exposition et la vitesse d’obturation
en fonction de l’environnement ou du sujet.
Après avoir exécuté “Pour sélectionner le
mode d’enregistrement manuel”
( colonne de gauche)
1
ARRET
2 Sélectionner le réglage approprié.
Pour plus de détails sur les réglages, voir
ci-dessous.
Sélectionner
Régler
8 Pour annuler l’exposition automatique
programmée
Sélectionner [ARRET] à l’étape 2.
8 Options du réglage d’exposition
automatique programmée
6 PORTRAIT :
•
Le sujet au premier plan est accentué en
estompant l’arrière-plan.
H SPORTS :
•
Enregistre clairement des sujets se
déplaçant vite.
G NEIGE :
•
Compense les sujets qui risqueraient
d’être trop sombres dans une prise de
vue effectuée dans un environnement
très lumineux, par exemple dans la neige.
/ PROJECTEUR :
•
Sélectionner cette option lorsqu’une
tache lumineuse rend le sujet trop
lumineux.
I CREPUSCULE :
•
Rend les prises de vue au crépuscule
plus naturelles.
20

Nightalive
A
Commande d’exposition spot
La vitesse d’obturation est réglée
automatiquement sur une valeur de 1/2 à
1/250 seconde. Elle permet d’enregistrer
avec un éclairage faible dans des endroits
sombres.
Après avoir exécuté “Pour sélectionner le
mode d’enregistrement manuel” ( p. 20)
T
H
G
I
N
8 Pour annuler nightalive
Déplacer la commande de réglage sur £
(NIGHT) pour faire disparaître le témoin
.
5
REMARQUE
Il est recommandé d’utiliser le trépied
( p. 14) lors de l’enregistrement avec une
vitesse d’obturation lente.
Compensation de contre-jour
La fonction de compensation de contre-jour
éclaircit le sujet en augmentant l’exposition.
Après avoir exécuté “Pour sélectionner le
mode d’enregistrement manuel” ( p. 20)
Utiliser cette fonction lorsque la compensation
de contre-jour est ineffi cace, ou pour régler la
luminosité du point désiré.
Après avoir exécuté “Pour sélectionner le
mode d’enregistrement manuel” ( p. 20)
1 Déplacer deux fois.
2 Sélectionner le cadre de mesure spot
désiré.
Sélectionner
Régler
8 Pour verrouiller l’exposition
Une fois le réglage terminé, appuyer sur
la commande de réglage et la maintenir
enfoncée pendant plus de 2 secondes. Le
témoin
s’affi che.
C
8 Pour annuler la commande d’exposition
spot
Déplacer la commande de réglage sur
¡ (
- ) une fois pour faire disparaître le
témoin
..
[5h56m]
16:9
8 Pour annuler la compensation de
contre-jour
Déplacer la commande de réglage sur ¡
( - ) deux fois pour faire disparaître le
témoin -.
FRANÇAIS
21

Enregistrement manuel (Suite)
Réglage manuel du menu Fonction
Les fonctions d’enregistrement manuel sont
simples à utiliser. Il suffi t de sélectionner
les options appropriées dans les menus de
fonction.
Après avoir exécuté “Pour sélectionner le
mode d’enregistrement manuel” ( p. 20)
1
FUNCTION
MISE AU POINT
REGLAGE LUMINOSITE
VITESSE OBTURATEUR
PRIORITE DIAPHRAGM
WB
EFFET
TELE MACRO
2 Sélectionner le menu approprié.
Pour plus de détails sur les menus, voir
ci-dessous.
Sélectionner
Régler
Menus Réglages : [ ] = Préréglage d’usine
MISE AU POINT
Règle la mise au point.
REGLAGE LUMINOSITE
Règle la luminosité.
REGLAGE LUMINOSITE
AUTO
0
[AUTO] : La mise au point est réglée automatiquement.
@ 9 : A : Permet de régler manuellement la mise au point.
Déplacer la commande de réglage sur £ / ¤ pour régler la
mise au point. (Lors du zoom, le sujet ne sortira pas de la
mise au point si vous réglez celle-ci sur téléobjectif (T) avant
d’effectuer un zoom grand angle (W).)
Pour le mode !
[AUTO] : La luminosité est réglée automatiquement.
–6 à +6 : Corrige une valeur de luminosité comprise dans cette
plage, par incréments de 1. Déplacer la commande de
réglage sur ¡ / ¢ pour défi nir cette valeur.
Pour le mode
[±0] : La luminosité n’est pas réglée.
–2.0 à +2.0 (EV) : Corrige une valeur comprise dans cette plage,
par incréments de 1/3EV. Déplacer la commande de réglage
sur ¡ / ¢ pour défi nir la valeur.
8 Pour verrouiller l’exposition
Lorsque le menu disparaît une fois que vous avez confi guré le
réglage, appuyer sur la commande de réglage et la maintenir
enfoncée pendant plus de 2 secondes. Le témoin
3 Sélectionner le réglage approprié.
Sélectionner
Régler
Selon le type de réglages sélectionné,
vous pouvez défi nir la valeur en déplaçant
la commande de réglage sur ¡ / ¢ après
la sélection.
4
FUNCTION
Le menu disparaît et le témoin de la
fonction sélectionnée s’affi che.
8 Pour revenir à l’écran précédent
Déplacer la commande de réglage vers £.
8 Pour quitter l’écran
Appuyer sur FUNCTION.
#
REGLAGE LUMINOSITE
AUTO
0
2
16:9
s’affi che.
C
22

Menus Réglages : [ ] = Préréglage d’usine
VITESSE
OBTURATEUR
Une vitesse d’obturation
rapide peut geler le
mouvement d’un sujet se
déplaçant vite, et une vitesse
d’obturation lente peut
rendre le sujet quelque peu
fl ou et donner l’impression
d’un mouvement.
PRIORITE DIAPHRAGM
Vous pouvez ajouter un
effet de fl ou à l’arrière-plan
en réglant la valeur de
diaphragme (numéro-F).
WB
Permet de régler la
balance des blancs afi n
d’optimiser les couleurs en
fonction de la lumière de
l’environnement pendant
l’enregistrement.
EFFET
Permet d’enregistrer des
vidéos ou des photos avec
des effets spéciaux.
TELE MACRO
Vous pouvez effectuer une
prise de vue sur un sujet
aussi gros que possible
à une distance de 40 cm
environ.
[AUTO] : La vitesse d’obturation est réglée automatiquement.
1/2 à 1/4000 (Pour le mode
1/2 à 1/500 (Pour le mode
!) /
#):
Plus la valeur est réduite, plus la vitesse d’obturation est rapide.
Déplacer la commande de réglage sur ¡ / ¢ pour défi nir la valeur.
REMARQUE
Il est recommandé d’utiliser le trépied ( p. 14) lors de
l’enregistrement avec une vitesse d’obturation lente.
[AUTO] : La valeur de diaphragme est réglée automatiquement.
F1.2 à F16 :
Plus le numéro-F est bas (plus grande valeur de diaphragme),
plus l’arrière-plan sera fl ou. Plus le numéro-F est élevé (plus
petite valeur de diaphragme), plus la mise au point sera nette
à la fois pour les objets proches et éloignés. Déplacer la
commande de réglage sur ¡ / ¢ pour défi nir la valeur.
REMARQUE
Si l’image est trop claire, régler sur un numéro-F plus grand.
Si l’image est trop sombre, régler sur un numéro-F plus petit.
[AUTO] : La balance des blancs est réglée automatiquement.
@
B BAL. B MANUEL : Permet de régler manuellement la balance
des blancs en fonction de la source de lumière.
1) Placer une feuille de papier blanc uni
devant le sujet de sorte que le papier
blanc occupe tout l’écran.
2)
Appuyer sur la commande de réglage et la
maintenir enfoncée jusqu’à ce que le témoin
B
se mette à clignoter puis s’arrête.
D ENSOLEILLE : destiné aux prises de vues extérieures par
temps ensoleillé.
E NUAGEUX :
F HALOGENE :
[ARRET] : Aucun effet spécial n’est utilisé.
1
J SEPIA : l’image prend une teinte brune rappelant celle des
destiné aux prises de vues extérieures par temps couvert.
destiné à être utilisé avec un éclairage vidéo ou similaire
anciennes photographies.
K NOIR ET BLANC : Comme dans les vieux fi lms, l’image est
en noir et blanc.
L FILM ANCIEN* : Cet effet donne aux images un effet
stroboscopique rappelant celui des vieux fi lms.
M STROBOSCOPE* : L’enregistrement ressemble à une série
de clichés consécutifs.
* Non disponible en mode
[ARRET] : Désactive la fonction.
1
t MARCHE : Active la fonction.
#.
.
FRANÇAIS
23

Lecture de fi chiers
Lecture vidéo
Glisser molette Alimentation/
Mode sur MODE pour
sélectionner le mode ! (vidéo).
La molette retourne
MODE
en position originale
ON
lorsqu’elle est
OFF
libérée.
Le témoin ! s’allume sur l’appareil
photo.
8 Pour revenir à l’écran d’index
Appuyer sur INDEX.
8 Pour visualiser sur le téléviseur
Voir page 29.
8 Pour activer/désactiver l’affi chage de la date
Modifi er les réglages dans [DATE/HEURE]. ( p. 49)
8 Pour vérifi er les informations de fi chiers
Appuyer sur INFO alors que la lecture est suspendue. ( p. 32)
Opérations pendant la lecture
Revenir à la première
scène du fi chier
Recherche en
arrière/Lecture
image par image
(pendant une
pause)
Lecture/Pause
Recherche
avant/Lecture
image par image
(pendant une
pause)
Aller à la première
scène du fi chier suivant
Pendant la recherche avant ou en arrière, le déplacement
de la commande de réglage sur £ / ¤ change la vitesse de
recherche (maximum 60x).
24
Appuyer sur la touche PLAY/REC
pour sélectionner le mode de
lecture.
SELECT
PLAY/REC
VIDEO
SELECT.
8/8
DEFINIR CLASSER
L’écran d’index pour les vidéos
apparaît.
Déplacer la commande de réglage
sur ¡ / ¢ / £ / ¤ pour sélectionner
le fi chier désiré, puis enfoncer.
Sélectionner
Régler
J J : Pour baisser le
volume
I I : Pour monter
le volume

Lecture de photos
Glisser la molette Alimentation/
Mode sur MODE pour
sélectionner le mode # (photo).
La molette retourne
MODE
en position originale
ON
lorsqu’elle est
OFF
libérée.
Le témoin
photo.
s’allume sur l’appareil
#
8 Pour revenir à l’écran d’index
Appuyer sur INDEX.
8 Pour visualiser sur le téléviseur
Voir page 29.
8 Pour activer/désactiver l’affi chage de la date
Modifi er les réglages dans [DATE/HEURE]. ( p. 49)
8 Pour vérifi er les informations de fi chiers
Appuyer sur INFO. ( p. 32)
Opérations pendant la lecture
Faire pivoter de 90
degrés
(sans antihoraire)
Appuyer sur la touche PLAY/REC
pour sélectionner le mode de
lecture.
SELECT
PLAY/REC
PHOTO
SELECT.
8/8
DEFINIR CLASSER
L’écran d’index pour les photos
apparaît.
Déplacer la commande de réglage
sur ¡ / ¢ / £ / ¤ pour sélectionner
le fi chier désiré, puis enfoncer.
Sélectionner
Régler
Lancer/arrêter le
diaporama
Affi cher le fi chier précédent
Affi cher le fi chier suivant
Faire pivoter de 90
degrés (sans horaire)
Pendant l’affi chage du diaporama, le déplacement de la commande de
réglage sur ¡ /
¢ change l’ordre de lecture.
FRANÇAIS
25

Lecture de fi chiers (Suite)
Molette
Alimentation/
Mode
INDEX
FUNCTION
Touche
PLAY/REC
Commande
de réglage
Fonction de recherche de fi chiers
Vous pouvez commuter l’écran d’index vers
l’écran d’index des dates ou l’écran des
événements pour la recherche de fi chiers.
L’écran des événements peut être utilisé en
mode
#
. Il ne peut pas être utilisé en mode
!
.
Écran d’index des dates
Vous pouvez rechercher le fi chier voulu par
date d’enregistrement.
Préparatif :
Glisser la molette Alimentation/Mode sur
•
MODE pour sélectionner le mode
Appuyer sur la touche PLAY/REC pour
•
sélectionner le mode de lecture.
1
INDEX
RECHERCHE PAR DATE
JAN 31 2007
JAN 25 2007
JAN 22 2007
DEC 22 2006DEC 22 2006
DEC 19 2006
DEC 01 2006
DEFINIR CLASSER
SELECT.
!
ou #.
2 Sélectionner la date
d’enregistrement.
Sélectionner
Régler
JAN 07 2007
SELECT.
1/3
DEFINIR CLASSER
3 Sélectionner le fi chier à lire.
Sélectionner
Régler
8 Pour revenir à l’écran d’index
Appuyer sur la touche INDEX.
Écran des événements – Mode
!
uniquement
Vous pouvez rechercher le fi chier désiré par
le biais de l’événement dans lequel vous avez
enregistré le fi chier lors de l’enregistremenent.
(p. 19) Après la recherche par événement,
vous pouvez effectuer une recherche par date
d’enregistrement afi n de la limiter.
Préparatif :
Glisser la molette Alimentation/Mode sur
•
MODE pour sélectionner le mode
Appuyer sur la touche PLAY/REC pour
•
sélectionner le mode de lecture.
!
.
1 Appuyer deux fois.
1/ 3
PAGE SUIVANTE
DEFINIR CLASSER
INDEX
TEMPS LIBRE
SELECT.
26

2 Sélectionner l’événement.
Pour passer à la page suivante,
sélectionner [PAGE SUIVANTE].
Sélectionner
Régler
RECHERCHE EVENEMENT
TOUTE LES SCENES
JAN 25 2007
JAN 22 2007
DEFINIR CLASSER
SELECT.
3 Sélectionner la date
d’enregistrement.
Pour affi cher tous les fi chiers, sélectionner
[TOUTE LES SCENES].
Sélectionner
Régler
TEMPS LIBRE
SELECT.
1/3
DEFINIR CLASSER
4 Sélectionner le fi chier à lire.
Sélectionner
Régler
Pour lire les fi chiers de démonstration
– Mode ! uniquement
Il se peut que des fi chiers vidéo utilisés
pour la démonstration en magasin soient
enregistrés sur l’appareil photo que vous avez
acheté. Ces fi chiers sont sauvegardés dans le
dossier [EXTMOV] et ils peuvent être lus en
procédant comme suit.
Préparatif :
Glisser la molette Alimentation/Mode sur
•
MODE pour sélectionner le mode
Appuyer sur la touche PLAY/REC pour
•
sélectionner le mode de lecture.
1
FUNCTION
SUPPRIMER
PROTEGER
COPIE DE SECTION
REORGAN. LES ENR.
EFFET
FONDU / VOLET
LIRE LISTE DE LECT.
MODIFIER LISTE LECT.
LECTURE FICHIER MPEG
LECTURE FICHIER
!
.
2 Sélectionner [LECTURE FICHIER
MPEG].
Sélectionner
VIDEO [MPG]
8/8
8 Pour revenir à l’écran d’index
Appuyer sur la touche INDEX.
8 Pour modifi er l’enregistrement des
événements d’un fi chier
Voir page 32.
Régler
SELECT.
DEFINIR QUITTER
3 Sélectionner le fi chier à lire.
Sélectionner
Régler
8 Pour quitter l’écran
Appuyer sur FUNCTION.
8 Pour revenir au mode de lecture de
fi chier normal
Sélectionner [LECTURE FICHIER] à
l’étape 2.
FRANÇAIS
27

Lecture de fi chiers (Suite)
Lecture avec effets spéciaux
Effets de fondu ou de volet
Ajouter des effets au début et à la fi n des
vidéos. Ces effets ne peuvent pas être défi nis
pour les photos.
Effets de lecture
Ajouter des effets qui, par exemple, modifi ent
les tonalités des images.
Préparatif :
Glisser la molette Alimentation/Mode sur
•
MODE pour sélectionner le mode
Appuyer sur la touche PLAY/REC pour
•
sélectionner le mode de lecture.
ex.) Régler [EFFET] sur [SEPIA].
1
FUNCTION
SUPPRIMER
PROTEGER
COPIE DE SECTION
REORGAN. LES ENR.
EFFET
FONDU / VOLET
LIRE LISTE DE LECT.
MODIFIER LISTE LECT.
LECTURE FICHIER MPEG
LECTURE FICHIER
2 Sélectionner [FONDU / VOLET] (mode
! uniquement) ou [EFFET].
Sélectionner
Régler
EFFET
SELECT.
ARRET
SEPIA
NOIR ET BLANC
FILM ANCIEN
STROBOSCOPE
DEFINIR QUITTER
3 Sélectionner l’effet désiré.
Pour plus de détails sur les effets, voir la
colonne de droite.
Sélectionner
Régler
VIDEO
SELECT.
DEFINIR CLASSER
4 Sélectionner le fi chier à lire.
Sélectionner
Régler
8 Pour quitter l’écran
Appuyer sur FUNCTION.
8 Pour désactiver un effet
Sélectionner [ARRET] à l’étape 3.
28
!
8/8
ou #.
8 Options de réglage FONDU / VOLET
O FONDU-BLANC :
•
Entrée ou sortie en fondu sur un écran
blanc.
P FONDU-NOIR :
•
Entrée ou sortie en fondu sur un écran
noir.
Q FONDU NOIR & BLANC :
•
Passe d’un écran noir et blanc à un écran
couleur lors de l’entrée en fondu, ou
l’inverse lors de la sortie en fondu.
R VOLET EN COIN :
•
Le volet s’ouvre sur un écran noir depuis
l’angle supérieur droit vers l’angle
inférieur gauche, ou se ferme en sens
inverse.
S VOLET FENETRE :
•
La scène démarre au centre d’un
écran noir avec le volet qui s’ouvre en
s’élargissant vers les coins, ou l’inverse
lorsqu’il se ferme.
T VOLET HORIZONTAL :
•
Ouverture du volet de droite à gauche,
ou fermeture en sens inverse.
U VOLET A PORTES :
•
Ouverture du volet en deux moitiés d’un
écran noir, l’une vers la gauche et l’autre
vers la droite, pour révéler la scène, ou
fermeture du volet en sens inverse.
V VOLET VERTICAL :
•
La scène s’ouvre du bas vers le haut
sur un écran noir, ou se ferme en sens
inverse.
W VOLET A PORTES VERT. :
•
Ouverture du volet au centre d’un écran
noir allant en s’élargissant vers le haut
et vers le bas, ou fermeture du volet en
sens inverse.
8 Options de réglage EFFET
J SEPIA :
•
L’image prend une teinte brune rappelant
celle des anciennes photographies.
K NOIR ET BLANC :
•
L’image est en noir et blanc comme dans
les vieux fi lms.
L FILM ANCIEN* :
•
Donne aux images un effet
stroboscopique rappelant celui des vieux
fi lms.
M STROBOSCOPE* :
•
L’enregistrement ressemble à une série
de clichés consécutifs.
* Non disponible en mode #.

Visualisation de photos sur le téléviseur
Préparatif :
Vérifi er que [ENTREE ANALOGIQUE] est réglé sur [ARRET]. (Réglage d’usine =
•
[ARRET]) ( p. 49)
Mettre tous les appareils hors tension.
•
Connecteur AV
Connecteur CC
REMARQUES
Vous pouvez aussi brancher les câbles à l’aide des connecteurs de station
•
d’accueil Everio. Le câble S-Vidéo (en option) permet une lecture de qualité encore plus
élevée. ( p. 6) Si d’autres appareils tels qu’un graveur de DVD sont raccordés à la station
d’accueil Everio, les mettre hors tension.
Cet appareil photo est conçu pour être utilisé avec les signaux de télévision couleur de type
•
NTSC. Il ne peut pas être utilisé sur un téléviseur de standard différent.
Câble AV
Adaptateur secteur
Connecteur d’entrée AV
Sur une prise secteur
1 Mettre sous tension l’appareil photo et le téléviseur.
2 Régler le téléviseur en mode VIDÉO.
3 (Uniquement lors du raccordement de l’appareil photo à un magnétoscope/graveur de DVD)
Mettre sous tension le magnétoscope/graveur de DVD et défi nir le mode d’entrée
AUX pour ces appareils.
4 Lancer la lecture sur l’appareil photo. ( p. 24, 25)
8 Si le raport de format de l’image est
incorrect, tel qu’illustré ci-contre à droite.
Modifi er les réglages dans [SELECT. FORMAT
ECRAN]. ( p. 49)
8 Pour affi cher l’affi chage sur écran de
l’appareil photo sur le téléviseur.
Régler [AFFICHER SUR TV] sur [MARCHE].
( p. 49)
Téléviseur 16:9 Téléviseur 4:3
FRANÇAIS
29

Gestion des fi chiers
Commande de
réglage
Commande
de zoom
Touche
PLAY/REC
FUNCTION
PRÉCAUTION
INFO
Molette
Alimentation/
Mode
Ne pas ôter le support d’enregistrement et
veiller à n’effectuer aucune autre opération
(comme mettre l’appareil hors tension) lors
de l’accès aux fi chiers. Veiller également
à utiliser l’adaptateur secteur fourni car
le support d’enregistrement des données
risque d’être endommagé si la batterie venait
à se décharger complètement pendant le
fonctionnement. En cas d’altération des
données du support d’enregistrement, il faut
formater le support. ( p. 50)
Suppression/ Protection de fi chiers
Les fi chiers protégés ne peuvent pas être
•
supprimés. Si vous souhaitez les supprimer,
vous devez d’abord annuler la protection.
Il n’est pas possible de restaurer des fi chiers qui
•
ont été supprimés. Vérifi ez donc soigneusement
les fi chiers avant de les supprimer.
Pour une carte SD, vous pouvez utiliser
•
le loquet de protection contre l’écriture/
l’effacement pour défi nir la protection. Pour
protéger tous les fi chiers, faire glisser le
loquet en position “LOCK”.
Loquet de protection contre
l’écriture et l’effacement
Préparatif :
Glisser la molette Alimentation/Mode sur
•
MODE pour sélectionner le mode
Appuyer sur la touche PLAY/REC pour
•
sélectionner le mode de lecture.
!
ex.) Exécuter [SUPPRIMER].
1
FUNCTION
SUPPRIMER
PROTEGER
COPIE DE SECTION
REORGAN. LES ENR.
EFFET
FONDU / VOLET
LIRE LISTE DE LECT.
MODIFIER LISTE LECT.
LECTURE FICHIER MPEG
LECTURE FICHIER
2 Sélectionner [SUPPRIMER] ou
[PROTEGER].
Sélectionner
Régler
SUPPRIMER
ACTUEL
SELECTION FICHIER(S)
TOUT SUPPRIMER
DEFINIR QUITTER
SELECT.
Supprimer/Protéger le fi chier affi ché
Après avoir exécuté les étapes 1-2
3 Sélectionner [ACTUEL].
Sélectionner
Régler
Vous pouvez sélectionner le fi chier
précédent ou suivant en déplaçant la
commande de réglage sur £ / ¤.
SELECT.
SUPPRIMER ?
EXECUTER
ANNULER
DEFINIR
0008FICHIERS RESTANTS :
4 Sélectionner [EXECUTER].
Sélectionner
Régler
8 Pour quitter l’écran
Appuyer sur FUNCTION.
ou #.
30

Sélection et suppression/protection des
fi chiers
Après avoir exécuté les étapes 1-2
( p. 30)
Suppression/Protection de tous les
fi chiers
Après avoir exécuté les étapes 1-2
( p. 30)
3 Sélectionner [SELECTION
FICHIER(S)].
Sélectionner
Régler
SUPPRESSION DE VIDEO
DEFINIR QUITTER
SELECT.
8/8
4 Sélectionner le fi chier approprié.
Sélectionner
Régler
Le symbole $ ou x apparaît sur
•
le fi chier. Répéter cette étape pour
sélectionner d’autres fi chiers.
Si l’on déplace la commande de zoom
•
vers T, l’écran d’aperçu de la photo
s’affi che. Déplacer la commande de
zoom vers W permet de revenir à l’écran
d’index.
5
FUNCTION
SUPPRESSION DE VIDEO
SELECT. DEFINIR
SUPPRIMER ?
EXECUTER ET QUITTER
QUITTER
ANNULER
DEFINIR
SELECT.
8/8
QUITTER
6 Sélectionner [EXECUTER ET
QUITTER] (lors de l’exécution de
[SUPPRIMER]) ou [QUITTER] (lors de
l’exécution de [PROTEGER]).
Sélectionner
3 Sélectionner [TOUT SUPPRIMER] ou
[TOUT PROTEGER].
Sélectionner
Régler
TOUT SUPPRIMER ?
(SAUF FICHIERS PROTEGES)
EXECUTER
ANNULER
DEFINIR
SELECT.
4 Sélectionner [EXECUTER].
Sélectionner
Régler
8 Pour quitter l’écran
Appuyer sur FUNCTION.
8 Pour annuler la protection
Sélectionner le fi chier protégé à l’étape
4 (“Sélection et suppression/protection
des fi chiers” colonne de gauche).
8 Pour annuler la protection de tous les
fi chiers
1) À l’étape 3, sélectionner [TOUT
ANNULER], puis enfoncer la
commande de réglage.
2) Déplacer la commande de réglage sur
/ ¢ pour sélectionner [EXECUTER],
¡
puis l’enfoncer.
Régler
8 Pour quitter l’écran
Appuyer sur FUNCTION.
FRANÇAIS
31

Gestion des fi chiers (Suite)
Affi chage d’ informations sur un
fi chier
Préparatif :
Pour le mode ! : Interrompre la lecture.
•
Sélectionner le fi chier dans l’écran d’index.
Pour le mode # : Lire la photo. Sélectionner
•
le fi chier dans l’écran d’index.
FICHIER
: MOV005.MOD
DOSSIER
: PRG001
DATE/HEURE
: JAN.01.2006 10:56AM
DUREE
: 00:30:02
QUALITE
: ULTRA FIN
PROTEGER
INFO
FICHIER :
•
Nom de fi chier
DOSSIER :
•
Nom de dossier
DATE/HEURE :
•
Date et heure de l’enregistrement
DUREE (pour les fi chiers vidéo) :
•
Heure de lecture (longueur du fi chier)
TAILLE (pour les photos) :
•
Taille de l’image ( p. 47)
QUALITE :
•
Qualité de l’image ( p. 46, 47)
PROTEGER :
•
État de protection des fi chiers ( p. 30)
: ARRET
8 Pour désactiver l’affi chage
d’informations sur les fi chiers
Appuyer de nouveau sur INFO.
Modifi cation de l’enregistrement des
événements des fi chiers vidéo après
l’enregistrement – Mode
!
uniquement
Préparatif :
Glisser la molette Alimentation/Mode sur
•
MODE pour sélectionner le mode
Appuyer sur la touche PLAY/REC pour
•
sélectionner le mode de lecture.
1
FUNCTION
SUPPRIMER
PROTEGER
COPIE DE SECTION
REORGAN. LES ENR.
EFFET
FONDU / VOLET
LIRE LISTE DE LECT.
MODIFIER LISTE LECT.
LECTURE FICHIER MPEG
LECTURE FICHIER
!
.
2 Sélectionner [REORGAN. LES ENR.].
Sélectionner
Régler
TEMPS LIBRE
SANS SECTION
SELECT.
PAGE SUIVANTE
ENREG.
1/ 3
QUITTER
3 Sélectionner un nouvel événement
dans lequel le fi chier sera enregistré.
Pour passer à la page suivante,
•
sélectionner [PAGE SUIVANTE].
Pour annuler l’enregistrement de
•
l’événement, sélectionner [SANS
SECTION].
Sélectionner
VIDEO
8/8
32
DEFINIR QUITTER
Régler
SELECT.
4 Sélectionner le fi chier à enregistrer.
Sélectionner
Régler
Le symbole s apparaît sur le fi chier.
•
Répéter cette étape pour sélectionner
d’autres fi chiers.
Si l’on déplace la commande de zoom
•
vers T, l’écran d’aperçu de la photo
s’affi che. Déplacer la commande de
zoom vers W permet de revenir à l’écran
d’index.

5
FUNCTION
RE-ENREGMT EVENEMT. TERMINE
SAUVEGARDER ?
ENREGISTRER ET QUITTER
EFFACER & QUITTER
ANNULER
SELECT.
DEFINIR
6 Sélectionner [ENREGISTRER ET
QUITTER].
Sélectionner
Régler
8 Pour quitter l’écran
Appuyer sur FUNCTION.
4 Spécifi er le point où l’on désire
diviser le fi chier.
COPIER SECTION 1
COPIER SECTION 2
ANNULER
00 : 24 : 18
DEFINIR QUITTER
SELECT.
5 Sélectionner le fi chier à copier.
[COPIER SECTION 1] :
•
Copier la section qui précède le point de
division.
[COPIER SECTION 2] :
•
Copier la section qui suit le point de
division.
Sélectionner
Suppression partielle (COPIE DE
SECTION) – Mode ! uniquement
Vous pouvez diviser en deux le fi chier vidéo
sélectionné, et faire une copie de la partie
désirée en tant que nouveau fi chier vidéo.
Préparatif :
Glisser la molette Alimentation/Mode sur
•
MODE pour sélectionner le mode
Appuyer sur la touche PLAY/REC pour
•
sélectionner le mode de lecture.
1
FUNCTION
SUPPRIMER
PROTEGER
COPIE DE SECTION
REORGAN. LES ENR.
EFFET
FONDU / VOLET
LIRE LISTE DE LECT.
MODIFIER LISTE LECT.
LECTURE FICHIER MPEG
LECTURE FICHIER
!
.
2 Sélectionner [COPIE DE SECTION].
Sélectionner
Régler
COPIE DE SECTION
DEFINIR QUITTER
SELECT.
8/8
3 Sélectionner le fi chier approprié.
Sélectionner
Régler
La lecture commence.
COPIE DE SECTION
DEFINIR QUITTER
RETOUR
00 : 00 : 03
Régler
Une fois la copie terminée, le fi chier copié
est ajouté à l’écran d’index.
8 Pour quitter l’écran
Appuyer sur FUNCTION.
REMARQUE
Lors de la lecture du fi chier copié, la date
d’enregistrement du fi chier original s’affi che.
En même temps, la date d’exécution de la
copie apparaît dans l’affi chage d’informations
sur les fi chiers. ( p. 32)
FRANÇAIS
33

Listes de lecture – Mode
uniquement
!
Molette
Alimentation/
Mode
INDEX
FUNCTION
Touche
PLAY/REC
Commande de
réglage
Il s’agit d’une liste qui permet d’organiser les
vidéos enregistrées dans l’ordre choisi.
Préparatif :
Glisser la molette Alimentation/Mode sur
•
MODE pour sélectionner le mode
Appuyer sur la touche PLAY/REC pour
•
sélectionner le mode de lecture.
!
.
Création d’une liste de lecture
1
FUNCTION
SUPPRIMER
PROTEGER
COPIE DE SECTION
REORGAN. LES ENR.
EFFET
FONDU / VOLET
LIRE LISTE DE LECT.
MODIFIER LISTE LECT.
LECTURE FICHIER MPEG
LECTURE FICHIER
3 Sélectionner [NOUVELLE LISTE].
Sélectionner
Régler
NOUVELLE LISTE
IMPORTER VIA EVENEMENT
IMPORTER VIA DATE(S)
TOUTE LES SCENES
DEFINIR QUITTER
SELECT.
4 Sélectionner une option et affi cher
les fi chiers.
Sélectionner
Régler
[IMPORTER VIA EVENEMENT] :
•
Rechercher un événement et affi cher les
fi chiers correspondants répertoriés par
date d’enregistrement.
Déplacer la commande de réglage sur ¡
/ ¢ / £ / ¤ pour sélectionner l’événement,
puis l’enfoncer.
[IMPORTER VIA DATE(S)] :
•
Affi cher tous les fi chiers du support,
répertoriés par date d’enregistrement.
[TOUTE LES SCENES] :
•
Affi cher tous les fi chiers individuellement.
MODIFIER
SELECT.
TOTAL
00h00m
ENREG.
8/8
5 Sélectionner le fi chier à ajouter à la
liste de lecture.
Sélectionner
MODIFIER
TOTAL
00h00m
8/8
2 Sélectionner [MODIFIER LISTE
LECT.].
Sélectionner
Régler
34
MODIFIER LISTE LECT.
NOUVELLE LISTE
MODIFIER
RENOMMER
SUPPRIMER
SELECT.
DEFINIR QUITTER
Régler
Pour affi cher un aperçu des scènes,
déplacer la commande de réglage sur ¡ /
pour sélectionner le fi chier et appuyer
¢
sur la touche INDEX. Lorsque l’écran
d’index de scènes individuelles apparaît,
déplacer la commande de réglage sur ¡ /
/ £ / ¤ pour sélectionner le fi chier, puis
¢
l’enfoncer.
Pour revenir à l’écran précédent, appuyer
sur INDEX.

6 Sélectionner le point d’insertion.
Sélectionner
Régler
Pour ajouter d’autres fi chiers, répétez les
•
étapes 5 et 6.
Pour supprimer une scène enregistrée,
•
dépacer la commande de réglage sur ¡ /
pour sélectionner le fi chier enregistré,
¢
puis l’enfoncer.
7
FUNCTION
MODIFIER
SELECT.
QUITTER LA LISTE DE LECTURE
ENREGISTRER CONTENUS MODIFIES ?
ENREGISTRER ET QUITTER
EFFACER & QUITTER
SELECT.
TOTAL
30h15m
ENREG.
ANNULER
DEFINIR
8/8
8 Sélectionner [ENREGISTRER ET
QUITTER].
Sélectionner
Régler
8 Pour quitter l’écran
Appuyer sur FUNCTION.
REMARQUES
Il est possible de créer jusqu’à 99 listes de
•
lecture.
Chaque liste de lecture peut comporter
•
jusqu’à 99 scènes.
Si vous supprimez les fi chiers originaux,
•
les fi chiers correspondants sont également
supprimés de la liste de lecture.
Lecture de listes de lecture
1
FUNCTION
SUPPRIMER
PROTEGER
COPIE DE SECTION
REORGAN. LES ENR.
EFFET
FONDU / VOLET
LIRE LISTE DE LECT.
MODIFIER LISTE LECT.
LECTURE FICHIER MPEG
LECTURE FICHIER
2 Sélectionner [LIRE LISTE DE LECT.].
Sélectionner
Régler
LIRE LISTE DE LECT.
TOUTE LES SCENES
01 2007 JAN.07 04:45PM
02 2007 JAN.07 09:25PM
03 2007 JAN.07 09:55PM
DEFINIR QUITTER
SELECT.
3 Sélectionner la liste de lecture à lire.
Sélectionner
Régler
8 Pour quitter l’écran
Appuyer sur FUNCTION.
8 Pour arrêter la lecture
Enfoncer la commande de réglage.
8 Pour revenir au mode de lecture de
fi chier normal
Sélectionner [LECTURE FICHIER] à
l’étape 2.
8 Pour lire à partir de la scène désirée
1) À l’étape 2, appuyer sur la touche
INDEX. (L’écran d’index pour les listes
de lecture apparaît.)
2) Déplacer la commande de réglage sur
/ ¢ / £ / ¤ pour sélectionner la scène
¡
désirée, puis l’enfoncer.
8 Lors de la copie des listes de lecture
à l’aide d’un magnétoscope ou d’un
enregistreur DVD ( p. 44)
Lire les listes de lecture en exécutant les
opérations suivantes.
1) Après avoir exécuté les étapes 1-2,
déplacer la commande de réglage sur ¤.
2) Déplacer la commande de réglage sur
/ ¢ pour sélectionner [DEBUTER LA
¡
LECTURE], puis l’enfoncer. (Un écran
noir s’affi che pendant cinq secondes à la
première et à la dernière scène.)
FRANÇAIS
35

Listes de lecture – Mode
uniquement (Suite)
!
Autres opérations liées aux listes de lecture
Vous pouvez effectuer des opérations
d’édition supplémentaires et supprimer des
fi chiers dans une liste de lecture existante.
Préparatif :
Exécuter les étapes 1-2. ( p. 34)
Ajout et suppression de fi chiers dans
une liste de lecture
3 Déplacer la commande de réglage
sur ¡ / ¢ pour sélectionner
[MODIFIER], puis l’enfoncer.
4 Déplacer la commande de réglage
sur ¡ / ¢ pour sélectionner la liste
de lecture à modifi er, puis l’enfoncer.
Pour ajouter ou supprimer des fi chiers,
suivre les étapes 5 à 8 dans “Création
d’une liste de lecture”. ( p. 34)
Modifi cation des noms de liste de lecture
Par défaut, le nom d’une liste de lecture est
constitué de la date et de l’heure de sa création.
3 Déplacer la commande de réglage
sur ¡ / ¢ pour sélectionner
[RENOMMER], puis l’enfoncer.
4 Déplacer la commande de réglage
sur ¡ / ¢ pour sélectionner la liste
de lecture désirée, puis l’enfoncer.
Suppression d’une liste de lecture
Les fi chiers d’origine ne sont pas supprimés
même lorsque la liste de lecture l’est.
3 Déplacer la commande de réglage
sur ¡ / ¢ pour sélectionner
[SUPPRIMER], puis l’enfoncer.
4 Déplacer la commande de réglage
sur ¡ / ¢ pour sélectionner la liste
de lecture à supprimer.
Pour supprimer toutes les listes de
lecture simultanément, sélectionner
[TOUT SUPPRIMER].
5 Enfoncer la commande de réglage.
6 Déplacer la commande de réglage
sur ¡ / ¢ pour sélectionner
[EXECUTER], puis l’enfoncer.
5 Déplacer la commande de réglage
sur ¡ / ¢ / £ / ¤ pour sélectionner la
lettre désirée, puis l’enfoncer.
Répéter ce processus jusqu’à l’obtention du
•
nom complet.
Vous pouvez modifi er le type de caractères
•
(majuscules, minuscules ou signes) en
sélectionnant [A/a/@].
Pour corriger une lettre, sélectionner [}] ou []] et
•
enfoncer la commande de réglage pour déplacer
le curseur jusqu’à la lettre, puis sélectionner
[CLEAR] et enfoncer la commande de réglage.
6 Déplacer la commande de réglage
sur ¡ / ¢ / £ / ¤ pour sélectionner [¯],
puis l’enfoncer.
36

Réglage des tirages – Mode
uniquement
#
Commande de
réglage
FUNCTION
Molette
Alimentation/Mode
Touche
PLAY/REC
Réglage DPOF (Informations
d’impression)
Cet appareil photo est compatible avec la
norme DPOF (Digital Print Order Format).
Vous pouvez défi nir, sur l’appareil photo, les
images à imprimer et le nombre d’impressions
à réaliser. Cette fonctionnalité s’avère utile
avec une imprimante compatible DPOF ou en
cas de remise d’un support d’enregistrement
à un laboratoire en vue d’un tirage photo.
Préparatif :
Glisser la molette Alimentation/Mode sur
•
MODE pour sélectionner le mode
Appuyer sur la touche PLAY/REC pour
•
sélectionner le mode de lecture.
1
FUNCTION
SUPPRIMER
PROTEGER
COPIER
DEPLACER
DPOF
EFFET
#
.
2 Sélectionner [DPOF].
Sélectionner
Régler
DPOF
IMAGE SELECTIONNEE
1 TIRAGE DE CHAQUES
VERIFIER PARAMETRES
REMISE A ZERO
DEFINIR QUITTER
SELECT.
Régler les fi chiers individuellement
Après avoir exécuté les étapes 1-2
3 Sélectionner [IMAGE SELECTIONNEE].
Sélectionner
Régler
DPOF TOTAL: 0
DEFINIR QUITTER
SELECT.
8/8
4 Sélectionner le fi chier approprié.
Sélectionner
Régler
Si l’on déplace la commande de zoom vers
T, et qu’on la maintient à cette position,
l’écran d’aperçu de la photo s’affi che.
5 Sélectionner le nombre de tirages.
(max. 15 tirages)
Sélectionner
Régler
Pour défi nir les informations d’impression pour
d’autres images, répéter les étapes 4 et 5.
(Vous pouvez confi gurer jusqu’à 999 fi chiers.)
6
FUNCTION
8 Pour quitter l’écran
Appuyer sur FUNCTION.
8 Pour annuler la sélection
Régler le nombre de tirages sur “00” à l’étape 5.
8 Pour vérifi er les réglages DPOF
À l’étape 3, déplacer la commande de
réglage sur ¡ / ¢ pour sélectionner
[VERIFIER PARAMETRES], puis
Au besoin, modifi er le nombre de tirages pour
•
le fi chier souhaité en suivant les étapes 4 et 5.
8 Pour réinitialiser les réglages DPOF
1) À l’étape 3, déplacer la commande de
réglage sur ¡ / ¢ pour sélectionner
[REMISE A ZERO], puis l’enfoncer.
2) Déplacer la commande de réglage sur
/ ¢ pour sélectionner [EXECUTER],
¡
puis l’enfoncer.
l’
enfoncer.
FRANÇAIS
37

Réglage des tirages – Mode
uniquement (Suite)
#
Régler tous les fi chiers ensemble (un
tirage pour chacun)
Après avoir exécuté les étapes 1-2
( p. 37)
3
Sélectionner [1 TIRAGE DE CHAQUES].
Sélectionner
Régler
1 TIRAGE DE CHAQUES
EXECUTER
ANNULER
DEFINIR
SELECT.
4 Sélectionner [EXECUTER].
Sélectionner
Régler
8 Pour quitter l’écran
Appuyer sur FUNCTION.
8 Pour vérifi er les réglages DPOF
À l’étape 3, déplacer la commande de
réglage sur ¡ / ¢ pour sélectionner
[VERIFIER PARAMETRES], puis
l’
enfoncer.
Au besoin, modifi er le nombre de tirages
•
pour le fi chier souhaité en suivant les
étapes 4 et 5. ( p. 37)
8 Pour réinitialiser les réglages DPOF
1) À l’étape 3, déplacer la commande de
réglage sur ¡ / ¢ pour sélectionner
[REMISE A ZERO], puis
2) Déplacer la commande de réglage sur ¡
/ ¢ pour sélectionner [EXECUTER], puis
l’
enfoncer.
l’
enfoncer.
Impression directe à l’aide d’une
imprimante PictBridge
Si vous disposez d’une imprimante compatible
PictBridge, il est facile d’imprimer des photos
en raccordant directement l’appareil photo
à l’imprimante au moyen du câble USB. Le
réglage DPOF peut aussi être utilisé. ( p. 37)
Préparatif :
Régler la molette Alimentation/Mode sur OFF.
Connecteur
CC
Adaptateur secteur
Imprimante
PictBridge
Sur une prise
secteur
Connecteur USB
Vous pouvez aussi brancher les câbles
Câble USB
Connecteur
USB
à l’aide des connecteurs de station d’accueil Everio.
1
Régler la molette Alimentation/Mode sur ON.
MODE
ON
OFF
LECTURE SUR PC
CONNECTER L'APPAREIL
CREER DVD
SAUVEGARDER
IMPRESSION DIRECTE
DEFINIR
SELECT.
QUITTER
38
2
Sélectionner [IMPRESSION DIRECTE].
Sélectionner
Régler
IMPRESSION DIRECTE
TIRAGE SELECT.
TIRAGE DPOF
ANNULER
DEFINIR
SELECT.

Pour imprimer une photo sélectionnée
Après avoir exécuté les étapes 1-2
( p. 38)
3 Sélectionner [TIRAGE SELECT.].
Sélectionner
IMPRIMER CETTE PHOTO
Pour imprimer à l’aide des réglages
DPOF
Si l’imprimante est compatible avec DPOF,
vous pouvez utiliser les réglages DPOF.
( p. 37)
Après avoir exécuté les étapes 1-2
( p. 38)
Régler
PARAMETRER
4 Sélectionner l’image appropriée.
Sélectionner
NOMBRE DE TIRAGE
Régler
DATE
IMPRESSION
ANNULER
1
ARRET
5 Déplacer la commande de réglage
sur ¡ / ¢ pour sélectionner les
menus et sur £ / ¤ pour sélectionner
les réglages.
[NOMBRE DE TIRAGE] :
•
Le nombre de tirages peut aller de 1 à
99.
[DATE] :
•
Indiquer si la date et l’heure doivent être
imprimées.
6 Sélectionner [IMPRESSION].
Sélectionner
Régler
8 Pour arrêter l’impression alors qu’elle a
déjà démarré
1) Enfoncer la commande de réglage.
2) Déplacer la commande de réglage sur
/ ¢ pour sélectionner [EXECUTER],
¡
puis l’enfoncer.
3 Sélectionner [TIRAGE DPOF].
Sélectionner
Régler
SELECT.
TIRAGE DPOF
DEFINIR PARAM.
IMPRESSION
ANNULER
DEFINIR
4 Sélectionner [IMPRESSION].
Sélectionner
Régler
8 Pour arrêter l’impression alors qu’elle a
déjà démarré
1) Enfoncer la commande de réglage.
2) Déplacer la commande de réglage sur
/ ¢ pour sélectionner [EXECUTER],
¡
puis l’enfoncer.
8 Pour vérifi er le réglage DPOF
À l’étape 4, déplacer la commande de
réglage sur ¡ / ¢ pour sélectionner
[DEFINIR PARAM.], puis l’enfoncer. Pour
revenir à l’écran précédent, appuyer sur
FUNCTION.
REMARQUES
Si l’imprimante n’est pas reconnue,
•
débrancher le câble USB puis le rebrancher.
Il n’est pas possible de revenir à l’écran
•
précédent pendant l’utilisation de
l’impression directe. Pour refaire l’opération,
déconnectez le câble USB, éteignez
l’appareil photo et reprenez l’opération du
début.
FRANÇAIS
39

Copier des fi chiers
Commande
de réglage
INDEX
FUNCTION
Molette
Alimentation/
Mode
DIRECT DVD
Types de copie et d’appareil raccordable
L’appareil photo
Vous pouvez copier des
photos entre le disque dur
et la carte SD en utilisant
seulement cet appareil
photo. ( p. 45)
Graveur DVD
(CU-VD10/CU-VD20)
Vous pouvez copier des
fi chiers vidéo enregistrés
sur cet appareil photo sur
des disques DVD.
( colonne de droite)
Magnétoscope/
enregistreur DVD
Vous pouvez copier des
fi chiers vidéo enregistrés
sur cet appareil photo sur
des disques DVD. ( p. 44)
Magnétoscope/Lecteur DVD
Les vidéos d’un
magnétoscope ou d’un
lecteur DVD peuvent être
copiées sur le disque dur de
l’appareil photo.
40
Touche
PLAY/REC
( p. 44)
Utiliser un graveur DVD pour copier
des fi chiers de l’appareil photo
(Fonction de création DVD)
Disques pris en charge : DVD-R,
DVD-RW de 12 cm
Pour ce qui est des disques DVD-R, seuls
•
les disques DVD-R inutilisés sont reconnus.
Quant aux disques DVD-RW, les disques
DVD-RW déjà utilisés sont reconnus,
mais ils doivent être formatés avant
l’enregistrement. Le formatage d’un disque
permet d’effacer tout le contenu enregistré
jusqu’à l’exécution de cette opération.
Il n’est pas possible d’utiliser les disques à
•
double couche.
À propos de la fi nalisation après la copie
Le disque est fi nalisé automatiquement pour
qu’il puisse être lu sur les autres appareils.
Après la fi nalisation, le disque est un disque
en lecture seule. Aucun fi chier supplémentaire
ne peut être ajouté.
Préparatif :
Régler la molette Alimentation/Mode sur OFF.
Connecteur
CC
Connecteur USB
REMARQUE
Adaptateur secteur
Sur une prise
secteur
Connecteur
USB
Câble USB
Graveur
DVD
Vous pouvez aussi brancher les
câbles à l’aide des connecteurs de station
d’accueil Everio.
 Loading...