

Page 1
4K MEMORY CARD CAMERA RECORDER
*The illustration shows the GY-HMQ10U/GY-HMQ10E with the supplied
audio unit attached. (Microphone is optional.)
INSTRUCTIONS
GY-HMQ10U/
GY-HMQ10E
For Future Reference:
Enter the Model No. (located on the bottom of
the camera) and Serial No.
(located on the battery pack mount of the
camera) below.
Model No. GY-HMQ10
Serial No.
Please read the following before getting started:
Thank you for purchasing this JVC product.
Before operating this unit, please read the instructions carefully to ensure the
best possible performance.
In this manual, each model number is described without the last letter (U/E)
which means the shipping destination. (U: for USA and Canada, E: for Europe)
Only “U” models (GY-HMQ10U) have been evaluated by UL.
LYT2468-001A-M
Page 2

Contents
Contents
Introduction
Main Features ......................................................................... 3
Safety Precautions .................................................................. 4
Precautions for Proper Use ................................................... 10
Accessories .......................................................................... 12
Names of Parts ..................................................................... 13
LCD Screen Display .............................................................. 18
Using the Touch Screen ........................................................ 21
Preparations
Preparation and Adjustment Before Use ............................... 22
Attaching the Audio Unit .................................................... 22
Attaching an External Microphone ..................................... 22
Adjusting the Grip Belt ....................................................... 23
Setting up the Remote Control .......................................... 23
Attaching the Tripod .......................................................... 23
Removing the Hood ........................................................... 23
Opening the Lens Cover .................................................... 23
Charging the Battery Pack .................................................... 24
Turning On/Off the Power ..................................................... 25
Clock Setting ......................................................................... 26
Assigning Functions to the USER Buttons ............................ 27
Tally Settings ........................................................................ 27
Adjusting the Touch Panel Button Position ............................ 27
Changing the Display Language ........................................... 28
Inserting an SDHC/SDXC Card ............................................. 29
Write-Protect Switch on the SDHC/SDXC Card ................ 29
Estimated Recordable Time of SDHC/SDXC Cards .......... 30
Formatting (Initializing) SDHC/SDXC Cards ...................... 30
Viewing the Viewfinder/LCD Monitor ..................................... 31
Shooting
Selecting a Shooting Mode ................................................... 32
Selecting the Full Auto / Manual Shooting Mode ............... 32
Selecting a Focusing Mode ............................................... 32
Selecting a Video Recording Format or Recording Mode ..... 33
Selecting a Video Recording Format ................................. 33
Selecting a Video Recording Mode (HD Recording Only) . 33
Shooting ................................................................................ 33
Checking Image on Monitor before Shooting ..................... 34
Zoom Operation ................................................................ 35
Adjusting the Focus Manually ............................................... 35
Using the Focus Assist Function ....................................... 36
Using the Magnifying Function .......................................... 36
Using the Tele Macro Feature ............................................... 37
Displaying the Zebra Pattern ................................................. 37
Adjusting the Exposure Manually .......................................... 38
Adjusting Manual Gain .......................................................... 38
Adjusting the Shutter Speed ................................................. 39
Adjusting the Aperture ........................................................... 40
Adjusting the White Balance ................................................. 41
Adjusting Automatic White Balance ................................... 41
Using the Full Auto White (FAW) Function ........................ 42
Adjusting the Camera Image ................................................. 42
Using the Image Stabilizer Feature ....................................... 43
Setting Backlight Compensation
Setting Touch Priority AE/AF ................................................. 43
Setting the Grid ..................................................................... 43
Setting Time-lapse Recording ............................................... 44
Checking the Remaining Recording Time ............................. 44
Audio Recording ................................................................... 45
Setting the Reference Audio Recording Level ................... 45
Using the Built-in Microphone ............................................ 45
Using an External Microphone Connected to the [INPUT1/
INPUT2] Terminal .......................................................... 45
Reducing Wind Noise ........................................................ 46
Monitoring Audio Sound Using a Headphone ....................... 46
........................................... 43
Playback
Playing Back Videos ............................................................. 47
Playing Back in Magnified Display ..................................... 48
Adjusting the Volume of Videos ......................................... 48
Checking the Recording Date and Other Information ........ 49
Index Screen Display ......................................................... 49
Screen Display During Playback ....................................... 50
Playing a Video with Defective Management Information ...... 50
Viewing Images on a Monitor ................................................ 51
Playing Videos Recorded in 4K2K Mode ........................... 52
Playing Videos Recorded in 1920 Mode ............................ 53
Deleting Unwanted Files ....................................................... 54
Protecting Files ..................................................................... 55
Copy
Copying to Computer ............................................................ 57
List of Files and Folders ..................................................... 58
Settings Menu
Operating the Menu .............................................................. 59
Operating the Main Menu .................................................. 59
Operating the Common Menu ........................................... 59
Recording Menu .................................................................... 60
Playback Menu ..................................................................... 63
Common Menu ..................................................................... 63
Further Information
Error Displays and Actions .................................................... 65
Trouble .................................................................................. 66
Specifications ........................................................................ 69
2
Page 3
Introduction
Main Features
This camera recorder enables recording of 4K2K/HD format images
to an SDHC/SDXC card, and also playback of these images.
Recording in 4K2K Mode
You can record videos in the super fine 4K2K quality (3840 x 2160),
which is equivalent to about four times the resolution of the full high
definition quality.
Recording in HD Mode
You can also record videos in the full high definition quality (1920 x
1080) of the AVCHD format.
Recording on SDHC/SDXC Cards (Class 6/10)
The absence of mechanisms with the use of SDHC/SDXC cards
(Class 6/10) as recording media brings about increased operation
reliability.
Supports 60Hz/50Hz HD Signals in Both 4K2K
and HD Modes
White Balance Adjustment Feature
Enables white balance to be adjusted automatically or manually.
Slow Shutter
Makes it possible to brightly shoot video of dark subjects with little
motion by accumulating the images.
Two Audio Input Terminals
This camera recorder comes with two XLR terminals, which can be
used as audio input terminals for the built-in or external microphone.
Supports Wired Remote Control
Connection to PCs via USB Port
Files stored on an SDHC/SDXC card can be retrieved to a PC.
About This Manual
Symbols
o
Caution : Describes precautions to be taken during
operation.
Memo : Describes information for user’s reference,
such as functions and usage restrictions.
A
: Indicates the page or item to refer to.
Focus Assist Function
Enables easy and accurate focusing during shooting.
Wide Variety of User Buttons Added
Enables you to switch camera settings instantly to suit the shooting
conditions.
Built-in Viewfinder and Color LCD Monitor
Displays the status screens, menu screens for settings, and alarm
indications, in addition to the camera image and playback image.
Built-in Monitor Speaker for Audio Checking
Zebra Pattern Video Level Indication
Full Auto Shooting Mode
Eliminates the need for troublesome switch operations by
automatically providing a wide range of compatibility with shooting
conditions that change as you move between indoors and outdoors
or between bright and dark locations.
Image Stabilizer Feature
Reduces blurring of images due to camera shake.
Contents of This Manual
o
0
The copyright of this manual belongs to JVC. Unauthorized
reprint, duplication, etc. of this manual, wholly or partially, is
strictly prohibited.
0
The designs, specifications, and other contents of this manual
are subject to change for further improvement without prior
notice.
0
AVCHD Progressive/AVCHD and the AVCHD Progressive/
AVCHD logo are trademarks of Panasonic Corporation and
Sony Corporation.
0
HDMIT(High-Definition Multimedia Interface) and
are trademarks or registered trademarks of HDMI Licensing,
LLC.
0
This product is manufactured under license from Dolby
Laboratories.
0
Dolby and the double-D symbol are trademarks of Dolby
Laboratories.
0
Microsoft、Windows and Windows Vista are the registered
trademark of USA Microsoft Corporation, in USA and other
countries.
0
Other company and product names in this manual are
trademarks or registered trademarks of the respective
companies. Marks such as E and W have been omitted in this
manual.
3
Page 4
This product contains a CR Coin Cell Lithium Battery which
contains Perchlorate Material – special handling may apply.
See www.dtsc.ca.gov/hazardouswaste/perchlorate
For USA-California Only
When the equipment is installed in a cabinet or on a shelf, make
sure that it has sufficient space on all sides to allow for ventilation
(10 cm (3-15/16")or more on both sides, on top and at the rear).
Do not block the ventilation holes.
(If the ventilation holes are blocked by a newspaper, or cloth etc.
the heat may not be able to get out.)
No naked flame sources, such as lighted candles, should be
placed on the apparatus.
When discarding batteries, environmental problems must be
considered and the local rules or laws governing the disposal of
these batteries must be followed strictly.
The apparatus shall not be exposed to dripping or splashing.
Do not use this equipment in a bathroom or places with water.
Also do not place any containers filled with water or liquids
(such as cosmetics or medicines, flower vases, potted plants,
cups etc.) on top of this unit.
(If water or liquid is allowed to enter this equipment, fire or
electric shock may be caused.)
■ For GY-HMQ10U
WARNING:
The battery pack, the camera with battery installed, and
the remote control with battery installed should not be exposed
to excessive heat such as direct sunlight, fire or the like.
NOTES:
•
The rating plate and safety caution are on the bottom and/or
the back of the main unit.
The serial number plate is on the bottom of the unit.
The rating information and safety caution of the AC adapter
are on it supper and lower sides.
•
•
REMARQUES :
•
La plaque d’identification et l’avertissement de sécurité se
trouvent sous l’appareil et/ou au dos.
La plaque du numéro de série est située sur la partie inférieure
de l’appareil.
Les informations d’identification et l’avertissement de sécurité
de l’adaptateur secteur sont situés sur ses côtés supérieur et
inférieur.
•
•
CAUTION
RISK OF ELECTRIC SHOCK
DO NOT OPEN
CAUTION: TO REDUCE THE RISK OF ELECTRIC SHOCK,
DO NOT REMOVE COVER (OR BACK).
NO USER-SERVICEABLE PARTS INSIDE.
REFER SERVICING TO QUALIFIED SERVICE PERSONNEL.
The lightning flash with arrowhead symbol, with in an
equilateral triangle, is intended to alert the user to the
presence of uninsulated "dangerousvoltage" with in the
product's enclosure that may be of sufficient magnitude
to constitute a risk of electric shock to persons.
The exclamation point with in an equilateral triangle is
intended to alert the user to the presence of important
operating and maintenance (servicing) instructions in
the literature accompanying the appliance.
WARNING: TO PREVENT FIRE OR SHOCK
HAZARD, DO NOT EXPOSE THIS UNIT TO
RAIN OR MOISTURE.
FOR USA AND CANADA
POUR CANADA
AVERTISSEMENT : POUR ÉVITER
LES RISQUES D’INCENDIE OU
D’ÉLECTROCUTION, NE PAS EXPOSER
L’APPAREIL À LA PLUIE NI À L’HUMIDITÉ.
ATTENTION
RISQUE D'ÉLECTROCUTION
NE PAS OUVRIR
ATTENTION:
POUR ÉVITER TOUT RISQUE D'ÉLECTROCUTION,
NE PAS OUVRIR LE BOÎTIER.
AUCUNE PIÉCE INTÉRIEURE N'EST À RÉGLER PAR L'UTILISATEUR.
SE RÉFÉRER À UN AGENT QUALIFIÉ EN CAS DE PROBLÉME.
Le symbole de I'éclair à I'intérieur d'un triangle
équilatéral est destiné à alerter I'utilisateur sur la
présence d'une "tension dangereuse" non isolée dans
le boîtier du produit. Cette tension est suffisante pour
provoquer I'électrocution de personnes.
Le point d'exclamation à I'intérieur d'un triangle
équilatéral est destiné à alerter I'utilisateur sur la
présence d'opérations d'entretien importantes au
sujet desquelles des renseignements se trouvent
dans le manuel d'instructions.
Caution on Replaceable lithium battery
The battery used in this device may present a fire or chemical
burn hazard if mistreated.
Do not recharge,disassemble,heat above 100°C (212°F) or
incinerate.
Replace battery with Panasonic, Sanyo, Sony or Maxell CR2025.
Danger of explosion or Risk of fire if the battery is in correctly
replaced.
•
Dispose of used battery promptly.
•
Keep away from children.
•
Do not disassemble and do not dispose of in fire.
CAUTION:
The mains plug shall remain readily operable.
•
Remove the mains plug immediately if the camera functions
abnormally.
Introduction
Safety Precautions
.
4
Page 5
INFORMATION (FOR CANADA)
RENSEIGNEMENT (POUR CANADA)
This Class A digital apparatus complies with Canadian ICES-003.
Cet appareil numérique de la classe A est conforme à la norme
NMB-003 du Canada.
This device complies with Part 15 of FCC Rules. Operation is
subject to the following two conditions: (1) This device may not
cause harmful interference, and (2) this device must accept any
interference received, including interference that may cause
undesired operation.
Changes or modifications not approved by JVC could void
the user’s authority to operate the equipment. This equipment
has been tested and found to comply with the limits for a Class A
digital device, pursuant to Part 15 of the FCC Rules.
These limits are designed to provide reasonable protection
against harmful interference when the equipment is operated
in a commercial environment.
This equipment generates, uses, and can radiate radio
frequency energy and, if not installed and used in accordance
with the instructions, may cause harmful interference to radio
communications. Operation of this equipment in a residential
area is likely to cause harmful interference in which case the
user will be required to correct the interference at his own
expense.
If this symbol is shown, it is only valid in
the European Union.
•
Remove the AC adapter from the AC wall outlet when not in use.
•
Do not leave dust or metal objects adhered to the AC wall outlet
or AC adapter (power/DC plug).
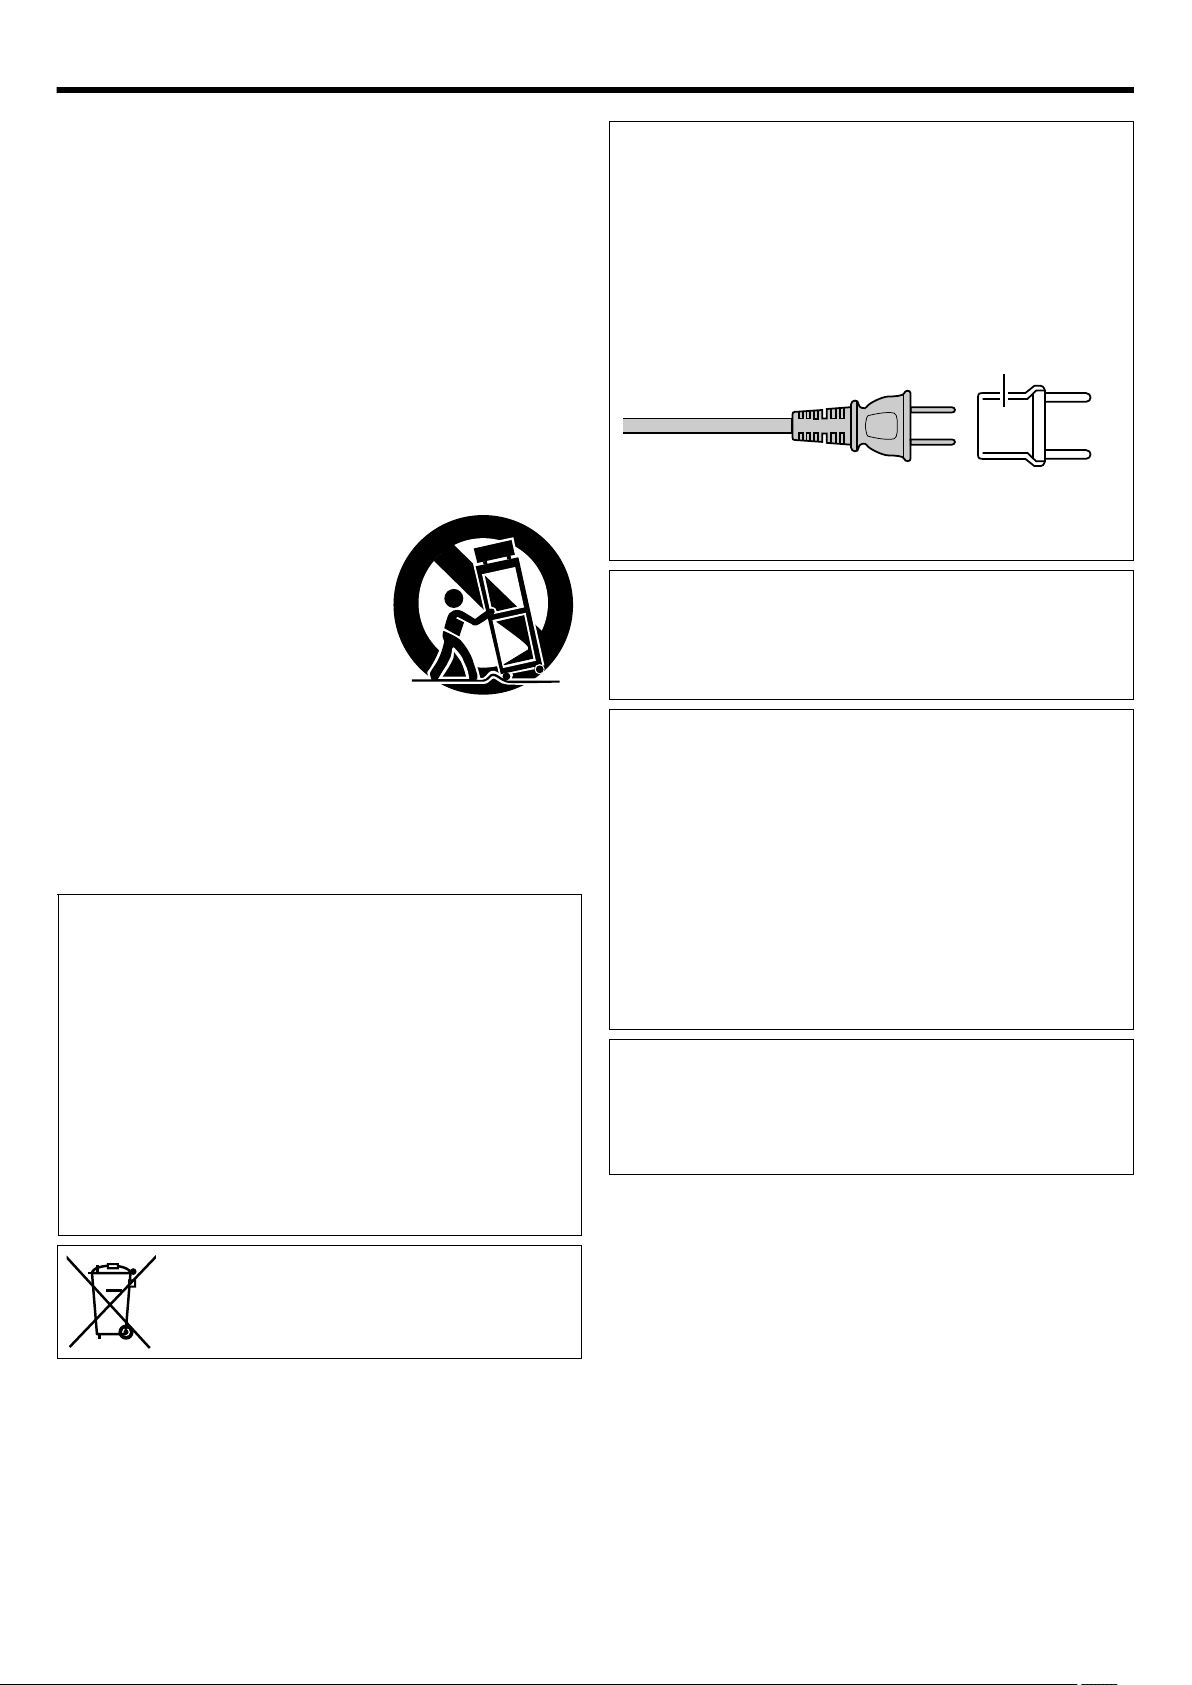
When using the AC adapter in areas other than
the USA
The provided AC adapter features automatic voltage selection
in the AC range from 110 V to 240 V.
USING HOUSEHOLD AC PLUG ADAPTER
In case of connecting the unit’s power cord to an AC wall outlet
other than American National Standard C73 series type use
an AC plug adapter, called a “Siemens Plug”, as shown.
For this AC plug adapter, consult your nearest JVC dealer.
Plug Adapter
Do not point the lens directly into the sun. This can cause eye
injuries, as well as leadto the malfunctioning of internal circuitry.
There is also a risk of fire or electric shock.
CAUTION!
The following notes concern possible physical damage to this
unit and to the user.
Carrying or holding this unit by the LCD monitor can result in
dropping the unit, or in a malfunction.
Do not use a tripod on unsteady or unlevel surfaces.
It could tip over, causing serious damage to the unit.
CAUTION!
Connecting cables (Audio/Video, etc.) to this unit and leaving it
on top of the TV is not recommended, as tripping on the cables
will cause the unit to fall, resulting in damage.
IMPORTANT SAFETY INSTRUCTIONS
1. Read these instructions.
2. Keep these instructions.
3. Heed all warnings.
4. Follow all instructions.
5. Do not use this apparatus near water.
6. Clean only with dry cloth.
7. Do not block any ventilation openings. Install in accordance
with the manufacturer’s instructions.
8. Do not install near any heat sources such as radiators,
heat registers, stoves, or other apparatus (including amplifi ers)
that produce heat.
9. Protect the power cord from being walked on or pinched
particularly at plugs, convenience receptacles, and the point
where they exit from the apparatus.
10. Only use attachments/accessories specified by
the manufacturer.
11. Use only with the cart, stand, tripod,
bracket, or table specified by
the manufacturer, or sold with
the apparatus.
When a cart is used, use caution
when moving the cart/apparatus
combination to avoid injury
from tip-over.
12. Unplug this apparatus during lightning storms or when unused
for long periods of time.
13. Refer all servicing to qualified service personnel. Servicing is
required when the apparatus has been damaged in any way,
such as power-supply cord or plug is damaged, liquid has
been spilled or objects have fallen into the apparatus, the
apparatus has been exposed to rain or moisture, does not
operate normally, or has been dropped.
Introduction
.
5
Page 6
■ For GY-HMQ10E
CAUTIONS:
•
To prevent shock, do not open the cabinet. No user
serviceable parts inside. Refer servicing to qualified personnel.
When you are not using the AC adapter for a long period of
time, it is recommended that you disconnect the power cord
from AC outlet.
•
WARNING: TO PREVENT FIRE OR SHOCK HAZARD,
DO NOT EXPOSE THIS UNIT TO RAIN OR MOISTURE.
IMPORTANT (for owners in the U.K.)
Connection to the mains supply in the United
Kingdom.
DO NOT cut off the mains plug from this equipment.
If the plug fitted is not suitable for the power points in your home
or the cable is too short to reach a power point, then obtain an
appropriate safety approved extension lead or consult your dealer.
BE SURE to replace the fuse only with an identical approved
type, as originally fitted, and to replace the fuse cover.
If nonetheless the mains plug is cut off be sure to remove the fuse
and dispose of the plug immediately, to avoid possible shock
hazard by inadvertent connection to the mains supply.
If this product is not supplied fitted with a mains plug then follow
the instructions given below:
DO NOT make any connection to the Larger Terminal coded E
or Green.
The wires in the mains lead are coloured in accordance with
the following code:
Blue to N
(Neutral) or Black
Brown to L (Live)
or Red
If these colours do not correspond with the terminal identifications
of your plug, connect as follows:
Blue wire to terminal coded N (Neutral) or coloured black.
Brown wire to terminal coded L (Live) or coloured Red.
If in doubt — consulta competent electrician.
NOTES:
•
The rating plate and safety caution are on the bottom and/or
the back of the main unit.
The serial number plate is on the bottom of the unit.
The rating information and safety caution of the AC adapter
are on its upper and lower sides.
•
•
CAUTION:
To avoid electric shock or damage
to the unit, first firmly insert the small
end of the power cord into the AC
Adapter until it is no longer wobbly,
and then plug the larger end of
the power cord in to an AC outlet.
Do not point the lens directly into the sun. This can cause eye
injuries, as well as lead to the malfunctioning of internal circuitry.
There is also a risk of fire or electric shock.
CAUTION!
The following notes concern possible physical damage to the
unit and to the user.
Carrying or holding the unit by the LCD monitor can result in
dropping the unit, or in a malfunction.
Do not use a tripod on unsteady or unlevel surfaces. It could tip
over, causing serious damage to the unit.
CAUTION!
Connecting cables(Audio/Video, etc.) to the unit and leaving it
on top of the TV is not recommended,as tripping on the cables
will cause the unit to fall, resulting in damage.
When the equipment is installed in a cabinet or on a shelf, make
sure that it has sufficient space on all sides to allow for ventilation
(10 cm or more on both sides, on top and at the rear).
Do not block the ventilation holes.
(If the ventilation holes are blocked by a newspaper, or cloth etc.
the heat may not be able to get out.)
No naked flame sources, such as lighted candles, should be
placed on the apparatus.
When discarding batteries, environmental problems must be
considered and the local rules or laws governing the disposal of
these batteries must be followed strictly.
The apparatus shall not be exposed to dripping or splashing.
Do not use this equipment in a bathroom or places with water.
Also do not place any containers filled with water or liquids (such
as cosmetics or medicines, flower vases, potted plants, cups
etc.) on top of this unit.
(If water or liquid is allowed to enter this equipment, fire or
electric shock may be caused.)
CAUTION:
The mains plug shall remain readily operable.
•
Remove the mains plug immediately if the camera functions
abnormally.
WARNING:
The battery pack, the camera with battery installed, and
the remote control with battery installed should not be exposed
to excessive heat such as direct sunlight, fire or the Iike.
Caution on Replaceable lithium battery
The battery used in this device may present a fire or chemical
burn hazard if mistreated.
Do not recharge,disassemble,heat above 100°C or incinerate.
Replace battery with Panasonic, Sanyo, Sony or Maxell CR2025.
Danger of explosion or Risk of fire if the battery is incorrectly
replaced.
•
Dispose of used battery promptly.
•
Keep away from children.
•
Do not disassemble and do not dispose of in fire.
Introduction
.
6
Page 7
Information for Users on Disposal of Old Equipment
and Batteries
Products
Battery
Notice:
The sign Pb below the symbol
for batteries indicates that this
battery contains lead.
[European Union]
These symbols indicate that the electrical and electronic
equipment and the battery with this symbol should not be
disposed of as general household waste at its end-of-life.
Instead, the products should be handed over to the applicable
collection points for the recycling of electrical and electronic
equipment as well as batteries for proper treatment, recovery
and recycling in accordance with your national legislation and
the Directive 2002/96/EC and 2006/66/EC.
By disposing of these products correctly, you will help to
conserve natural resources and will help to prevent potential
negative effects on the environment and human health which
could otherwise be caused by inappropriate waste handling of
these products.
For more information about collection points and recycling of
these products, please contact your local municipal office, your
household waste disposal service or the shop where you
purchased the product.
Penalties may be applicable for incorrect disposal of this waste,
in accordance with national legislation.
[Business users]
If you wish to dispose of this product, please visit our web page
http://www.jvc.eu to obtain information about the take-back of
the product.
[Other Countries outside the European Union]
These symbols are only valid in the European Union.
If you wish to dispose of these items, please do so in accordance
with applicable national legislation or other rules in your country
for the treatment of old electrical and electronic equipment and
batteries.
Dear Customer, [European Union]
This apparatusis in conformance with the valid European
directives and standards regarding electromagnetic
compatibility and electrical safety.
European representative of JVC KENWOOD Corporation is:
JVC Technical Services Europe GmbH
Postfach 10 05 04
61145 Friedberg
Germany
SOME DO’S AND DON’TS ON THE SAFE USE OF
EQUIPMENT
This equipment has been designed and manufactured to meet
international safety standards but, like any electrical equipment,
care must be taken if you are to obtain the best results and
safety is to be assured.
DO read the operating instructions before you attempt to use
the equipment.
DO ensure that all electrical connections (including the mains
plug, extension leads and interconnections between pieces of
equipment) are properly made and in accordance with
the manufacturer’s instructions. Switch off and with draw
the mains plug when making or changing connections.
DO consult your dealer if you are ever in doubt about
the installation, operation or safety of your equipment.
DO be careful with glass panels or doors on equipment.
DON’T continue to operate the equipment if you are in any
doubt about it working normally, or if it is damaged in any way
— switch off, withdraw the mains plug and consult your dealer.
DON’T remove any fixed cover as this may expose dangerous
voltages.
DON’T leave equipment switched on when it is unattended
unless it is specifically stated that it is designed for unattended
operation or has a standby mode. Switch off using the switch
on the equipment and make sure that your family knows how to
do this.
Special arrangements may need to be made for infirm or
handicapped people.
DON’T use equipment such as personal stereos or radios so
that you are distracted from the requirements of road safety.
It is illegal to watch television whilst driving.
DON’T listen to headphones at high volume, as such use can
permanently damage your hearing.
DON’T obstruct the ventilation of the equipment, for example
with curtains or soft furnishings. Overheating will cause damage
and shorten the life of the equipment.
DON’T use makeshift stands and NEVER fix legs with wood
screws — to ensure complete safety always fit the manufacturer’s
approved stand or legs with the fixings provided according to
the instructions.
DON’T
allow electrical equipment to be exposed to rain or
moisture.
ABOVE ALL
•
NEVER let anyone especially children push anything into
holes, slots or any other opening in the case — this could
result in a fatal electrical shock;
•
NEVER guess or take chance swith electrical equipment of
any kind — it is better to be safe than sorry!
Introduction
.
7
Page 8
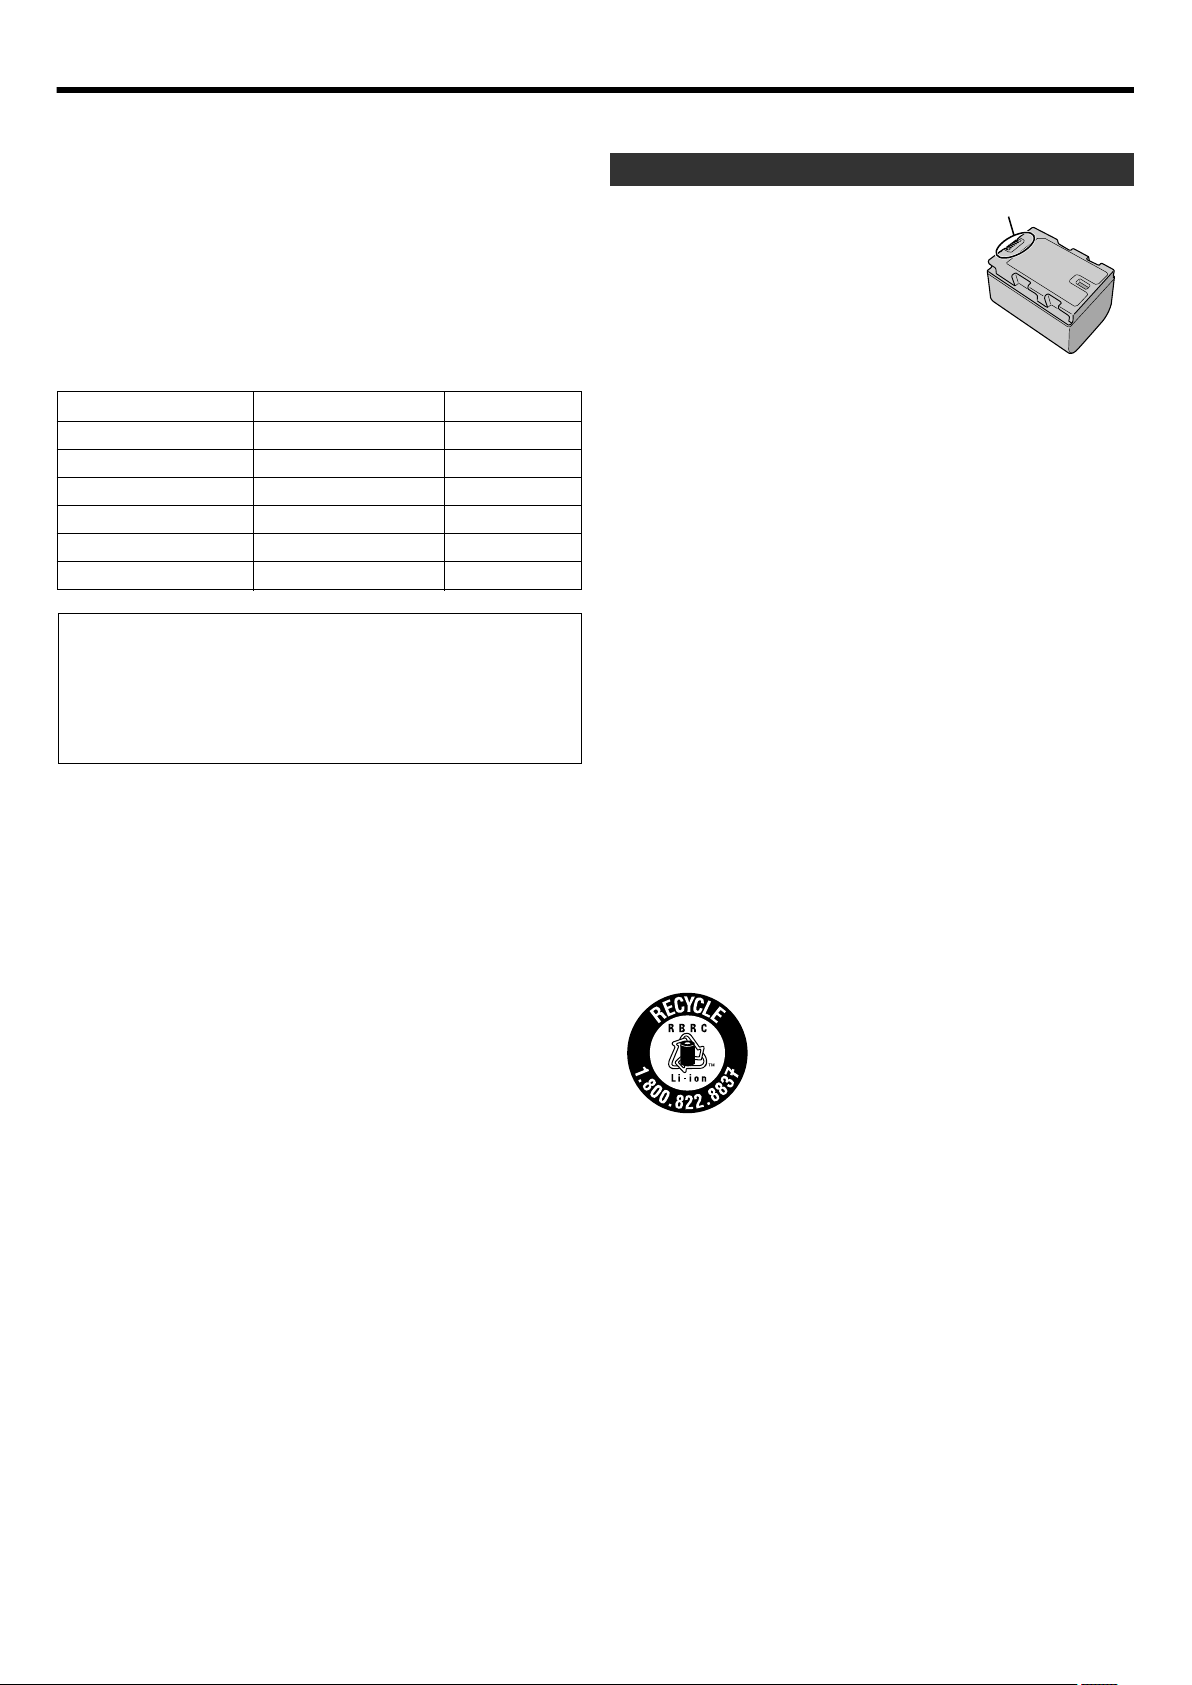
ATTENTION:
The product you have purchased is powered
by a rechargeable battery that is recyclable.
Please call 1-800-8-BATTERY for information
on how to recycle this battery.
(USA and Canada only)
Battery Pack
The supplied battery pack is a lithium-ion
battery. Before using the supplied battery
pack or an optional battery pack, be sure
to read the following cautions:
•
To avoid hazards
...
do not burn.
do not short-circuit the terminals. Keep it
away from metallic objects when not in use.
When transporting, carry the battery in
a plastic bag.
do not modify or disassemble.
do not expose the battery to temperatures exceeding
60°C (140°F), as this may cause the battery to overheat,
explode or catch fire.
use only specified chargers.
...
...
...
...
...
...
...
...
...
...
•
To prevent damage and prolong service life
do not subject to unnecessary shock.
charge within the temperature range of 10°C to 35°C
(50°F to 95°F). Cooler temperatures require longer charging
time, or in some cases stop charging at all.
Warmer temperatures prevent complete charging, or in some
cases stop charging at all.
store in a cool, dry place. Extended exposure to high
temperatures will increase natural discharge and shorten
service life.
keep a 30% battery level (
X
) if the battery pack is not to be
used for a long period of time.
In addition, fully charge and then fully discharge the battery
pack every 6 months, then continue to store it at a 30%
battery level (
X
).
remove from charger or powered unit when not in use, as
some machines use current even when switched off.
do not drop or subject to strong impact.
Terminals
■ Common
This equipment is in conformity with the provisions and protection
requirements of the corresponding European Directives.
This equipment is designed for professional video appliances and
can be used in the following environments:
●
Controlled EMC environment (for example, purpose-built
broad-casting or recording studio), and rural outdoors
environments.
In order to keep the best performance and furthermore for
electromagnetic compatibility we recommend to use cables not
exceeding the following lengths:
Port Cable Length
[DC INPUT]
[AUDIO INPUT 1/2] 3 m
[HDMI OUT 1-4]
[PHONES] 3 m
[REMOTE]
[USB]
Exclusive Cable
Shielded Cable
Shielded Cable
Exclusive Cable
Exclusive Cable
1.8 m
3 m
5 m
Shielded Cable 3 m
Caution:
Where there are strong electromagnetic waves or magnetism,
for example near a radio or TV transmitter, transformer, motor,
etc., the picture and the sound may be disturbed. In such case,
please keep the apparatus away from the sources of the
disturbance.
Introduction
.
8
Page 9

Main Unit
•
For safety, DO NOT
...
open the
camera
’s chassis.
disassemble or modify the unit.
allow inflammables, water or metallic objects to enter the unit.
leave the battery pack attached when the
camera
is not in
use.
...
...
...
place naked flame sources, such as lighted candles, on
the apparatus.
...
expose the apparatus to dripping or splashing.
leave dust or metal objects adhered to the power plug or
an AC wall outlet.
...
...
insert any objects in the
camera
.
...
...
...
...
...
...
...
•
Avoid using the unit
in places subject to excessive humidity or dust.
in places subject to soot or steam such as near a cooking
stove.
in places subject to excessive shock or vibration.
near a television set.
near appliances generating strong magnetic or electric fields
(speakers, broadcasting antennas, etc.).
in places subject to extremely high (over 40°C or 104°F) or
extremely low (under 0°C or 32°F) temperatures.
...
...
...
...
...
...
•
DO NOT leave the unit
in places of over 50°C (122°F).
in places where humidity is extremely low (below 35%) or
extremely high (above 80%).
in direct sunlight.
in a closed car in summer.
near a heater.
in high places such as on a TV. Leaving the unit in high
places while a cable is connected may result in a malfunction
if the cable is caught and the unit falls onto the floor.
remove the battery pack or disconnect the power supply
while the power is on.
...
...
...
...
...
...
...
•
To protect the unit, DO NOT
allow it to become wet.
drop the unit or strike it against hard objects.
subject it to shock or excessive vibration during transportation.
keep the lens directed at extremely bright objects for long
periods.
expose the lens to direct sunlight.
swing it excessively when using the hand strap.
...
...
swing the soft
camera
case excessively when the
camera
is
inside it.
store the
camera
in a dusty or sandy area.
•
To prevent the unit from dropping,
•
Fasten the grip belt securely.
•
When using the
camera
with a tripod, attach the
camera
to
the tripod securely.
If the
camera
drops, you may be injured and the
camera
may
be damaged.
When a child uses the unit, there must be parental guidance.
Make a backup of important recorded data
Make a backup of important recorded data JVC will not be
responsible for any lost data.
It is recommended to copy your important recorded data to
a disc or other recording media for storage once every 3 months.
While the LCD monitor screen has more than 99.99% effective
pixels, 0.01% of the pixels may be bright spots (red, blue, green)
or dark spots. This is not a malfunction. The spots will not be
recorded.
•
Be sure to follow the guidelines below to prevent
corruption or damage to your recorded data.
•
Do not bend or drop the recording medium, or subject it to
strong pressure, jolts or vibrations.
•
Do not splash the recording medium with water.
•
Do not use, replace, or store the recording medium in
locations that are exposed to strong static electricity or
electrical noise.
•
Do not turn off the camera power or remove the battery
or AC adapter during shooting, playback, or when otherwise
accessing the recording medium.
•
Do not bring the recording medium near objects that have
a strong magnetic field or that emit strong electromagnetic
waves.
•
Do not store the recording medium in locations with high
temperature or high humidity.
•
Do not touch the metal parts.
•
When formatting or erasing data using the
camera
, only
the file administration information is changed. The data is not
completely erased from the recording medium.
If you want to completely erase all of the data, we recommend
either using commercially available software that is specially
designed for that purpose, or by physically destroying
the
camera
with a hammer etc.
Recording Medium
•
To prevent damage to the LCD monitor, DO NOT
LCD Monitor
...
...
push it strongly or apply any shocks.
place the
camera
with LCD monitor on the bottom.
•
To prolong service life
...
avoid rubbing it with coarse cloth.
Introduction
9
Page 10

Introduction
Precautions for Proper Use
Storage and Usage Locations
Allowable ambient temperature and humidity
o
Be sure to use this unit within the allowable temperature range of
0°C to 40°C (32°F to 104°F) and a relative humidity of 35 % to 80
%. Using this unit beyond the allowable temperature range may
cause it to malfunction.
Strong electromagnetic waves or magnetism
o
Noise may appear in the picture or audio and/or the colors may be
incorrect if this unit is used near a radio or television transmitting
antenna, in places where strong magnetic fields are generated by
transformers, motors, etc., or near devices emitting radio waves,
such as transceivers or cellular phones.
Use of wireless microphone near this unit
o
When a wireless microphone or wireless microphone tuner is used
near this unit during recording, the tuner could pick up noise.
Avoid using or placing this unit in the following
o
places.
0
Places subject to extreme heat or cold
0
Places with excessive dirt or dust
0
Places with high humidity or moisture
0
Places subject to smoke or vapor such as near a cooking stove
0
Places subject to strong vibrations or unstable surfaces
0
In a parked car under direct sunlight or near a heater for long
hours.
Do not place this unit at places that are subject to
o
radiation or X-rays, or where corrosive gases occur.
Protect this unit from being splashed with water.
o
(Especially when shooting in the rain)
Protect this unit from getting wet when shooting on
o
a beach. In addition, salt and sand may adhere to the
body. Be sure to clean the unit after use.
Protect this unit against penetration of dust when
o
using it in a place subject to sandy dust.
Do not expose this device and the remote control to
o
excessive heat, such as direct sunlight or fire. The
built-in battery may explode if it gets heated up.
Transportation
Do not drop or hit this unit against a hard object
o
when transporting.
Power Saving
When this unit is not in use, be sure to turn off the
o
power in order to reduce power consumption.
Maintenance
Turn off the power before performing any
o
maintenance.
Wipe the external cabinet of the unit with a soft cloth.
o
Do not wipe the body with benzene or thinner. Doing
so may cause the surface to melt or turn cloudy.
When it is extremely dirty, soak the cloth in a solution
of neutral detergent, wipe the body with it, and then
use a clean cloth to remove the detergent.
Rechargeable Batteries
Be sure to use the only batteries specified by us.
o
We do not guarantee the safety and performance of
this device if an unspecified battery is used.
The battery is not charged when purchased.
o
When using the battery in a low temperature
o
environment (10°C (50°F) or below), the operating
time may be shortened, or it may not function
properly. When using this unit outdoors in the winter
weather, warm the battery, such as by placing it in
the pocket, before attaching it.
Do not expose the battery to excessive heat, such as
o
direct sunlight or fire.
If the battery is not to be used for a long time,
o
A To prevent deterioration of this unit, store it at a 30% battery
level.
B Fully charge and then fully discharge the battery pack every six
months, then continue to store it at a 30 % battery level.
After removing the battery, store it in a dry place
o
between 15°C to 25°C (59°F to 77°F).
Do not leave the card slot cover open for a long
o
period of time. Dirt entering the interior of the slot
may cause it to malfunction.
10
Page 11
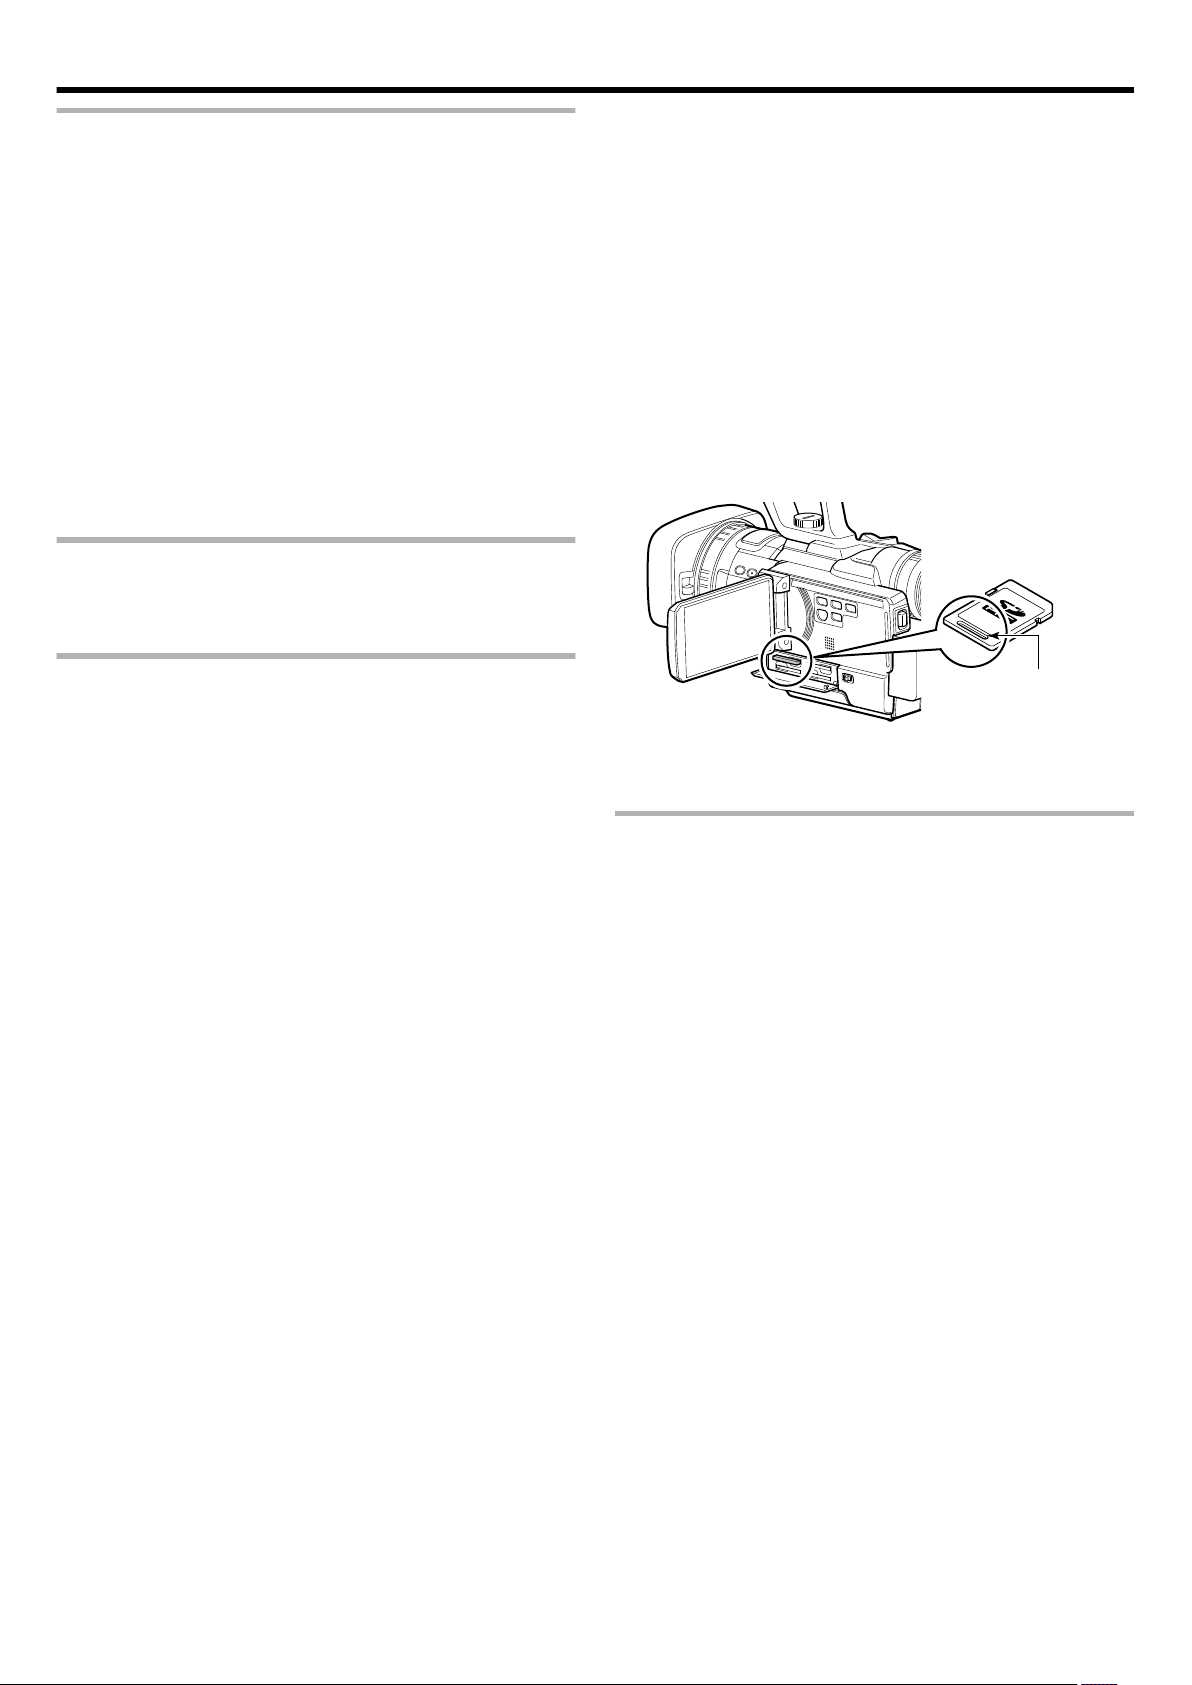
SDHC/SDXC Cards
Groove
This camera recorder saves the recorded images
o
and audio sound on the SDHC/SDXC card (sold
separately) in the card slot.
Use an SDHC/SDXC card (4 GB to 64 GB) with Class
o
6 or higher performance and formatted using this
camera recorder.
0
Using cards other than those from Panasonic, TOSHIBA or
SanDisk may result in recording failure or data loss.
0
When this unit is used in 4K2K mode, it is recommended that the
4 of the SD cards for recording be the same.
If the SDHC/SDXC card contains files recorded by
o
devices other than this camera recorder or files that
are saved from a PC, the recordable time may be
shorter or data may not be properly recorded. In
addition, the remaining space on the card may not
increase even when files are deleted using a PC.
UHS-I SDHC/SDXC cards can be used in the
same manner as standard SDHC/SDXC cards.
UHS Speed Class is not supported.
o
Introduction
If you format (initialize) the SDHC/SDXC card, all
o
data recorded on the card, including video data and
setup files, will be deleted.
If you want to wipe out all information by completely
o
erasing the data, we recommend either using
commercially available software that is specially
designed for that purpose, or by physically
destroying the SDHC/SDXC card with a hammer, etc.
When formatting or erasing data using the camera
recorder, only the file administration information is
changed. The data is not completely erased from the
SDHC/SDXC card.
Some commercially available SDHC/SDXC cards
o
may be harder to be removed from this unit. Remove
them by hooking onto the groove on the cards.
0
It will be easier to remove the cards after serveral times.
0
Do not stick any stickers on the cards.
Handling of SDHC/SDXC Cards
The access lamp and status indicator blink in green
o
when data on the SDHC/SDXC card is being
accessed. Do not remove the SDHC/SDXC card
during data access (such as recording, playback, or
formatting). Do not turn off the power or remove the
battery and AC adapter during access either.
Do not use or store the SDHC/SDXC card in a place
o
that is subject to static electricity or electrical noise.
Do not place the SDHC/SDXC card near locations
o
that are exposed to strong magnetic fields or radio
waves.
Inserting the SDHC/SDXC card incorrectly may
o
result in damage of this unit or the SDHC/SDXC card.
We are not liable for any accidental loss of data
o
stored on the SDHC/SDXC card. Please back up any
important data.
Make use of the SDHC/SDXC card within the
o
prescribed conditions of use.
Do not use it at the following locations.
Places that are subject to direct sunlight, high
humidity or corrosion, places near thermal
equipment, sandy or dusty places, or in a car under
the sun with the doors and windows closed.
Do not bend or drop the SDHC/SDXC card, or subject
o
it to strong impact or vibration.
Do not splash the SDHC/SDXC card with water.
o
Do not dismantle or modify the SDHC/SDXC card.
o
Do not touch the terminals with your hands or with
o
a metal object.
Do not allow dust, dirt, water, or foreign objects to
o
adhere to the terminals.
.
The SDHC/SDXC card may pop out when it is being
o
removed. Be careful not to lose the card.
Further Information
Do not insert objects other than the memory card
o
into the card slot.
Do not turn off the power, or remove the battery or
o
AC adapter during recording or playback.
The camera recorder may not show stable pictures
o
for a few seconds immediately after the power is
turned on, but this is not a malfunction.
Do not drop this unit or subject it to strong impact or
o
vibration as it is a precision equipment.
Optical performance of lens
o
Due to the optical performance of the lens, color
divergence phenomena (magnification chromatic
aberration) may occur at the periphery of the image.
This is not a camera malfunction.
Noise may appear on the screen when you switch
o
from one mode to another.
If placed on its side, heat release efficiency will
o
deteriorate.
Use the supplied AC adapter as the power supply.
o
Do not use the supplied AC adapter on other
devices.
When the connectors that come with connector
o
covers are not in use, put on the covers to prevent
damage to the connectors.
Do not remove the labels or stick other labels or
o
stickers on the SDHC/SDXC cards.
Do not use pencils or ballpoint pens to write on the
o
SDHC/SDXC cards. Always use oil-based pens.
11
Page 12
Introduction
LCD Monitor/Viewfinder
The LCD monitor and viewfinder screens are
o
manufactured using high-precision technology.
Black spots may appear on the LCD monitor and
viewfinder screens, or red, blue, and/or white spots
may not disappear. However, this is not a
malfunction and these spots are not recorded on the
SDHC/SDXC card.
If you use this unit continuously for a long period of
o
time, the characters displayed in the viewfinder may
temporarily remain on the screen. This is not
recorded on the SDHC/SDXC card. They will not
appear after you turn the power off and then on
again.
If you use this unit in a cold place, the images may
o
appear to lag on the screen, but this is not a
malfunction. Retained images are not recorded on
the SDHC/SDXC card.
Do not press against the surface with force or
o
subject it to strong impact. Doing so may damage or
break the screens.
Due to the characteristic of the viewfinder display
o
device, colors may appear on the images when you
blink your eyes. This is not a malfunction. It does not
affect the recorded images or HDMI output.
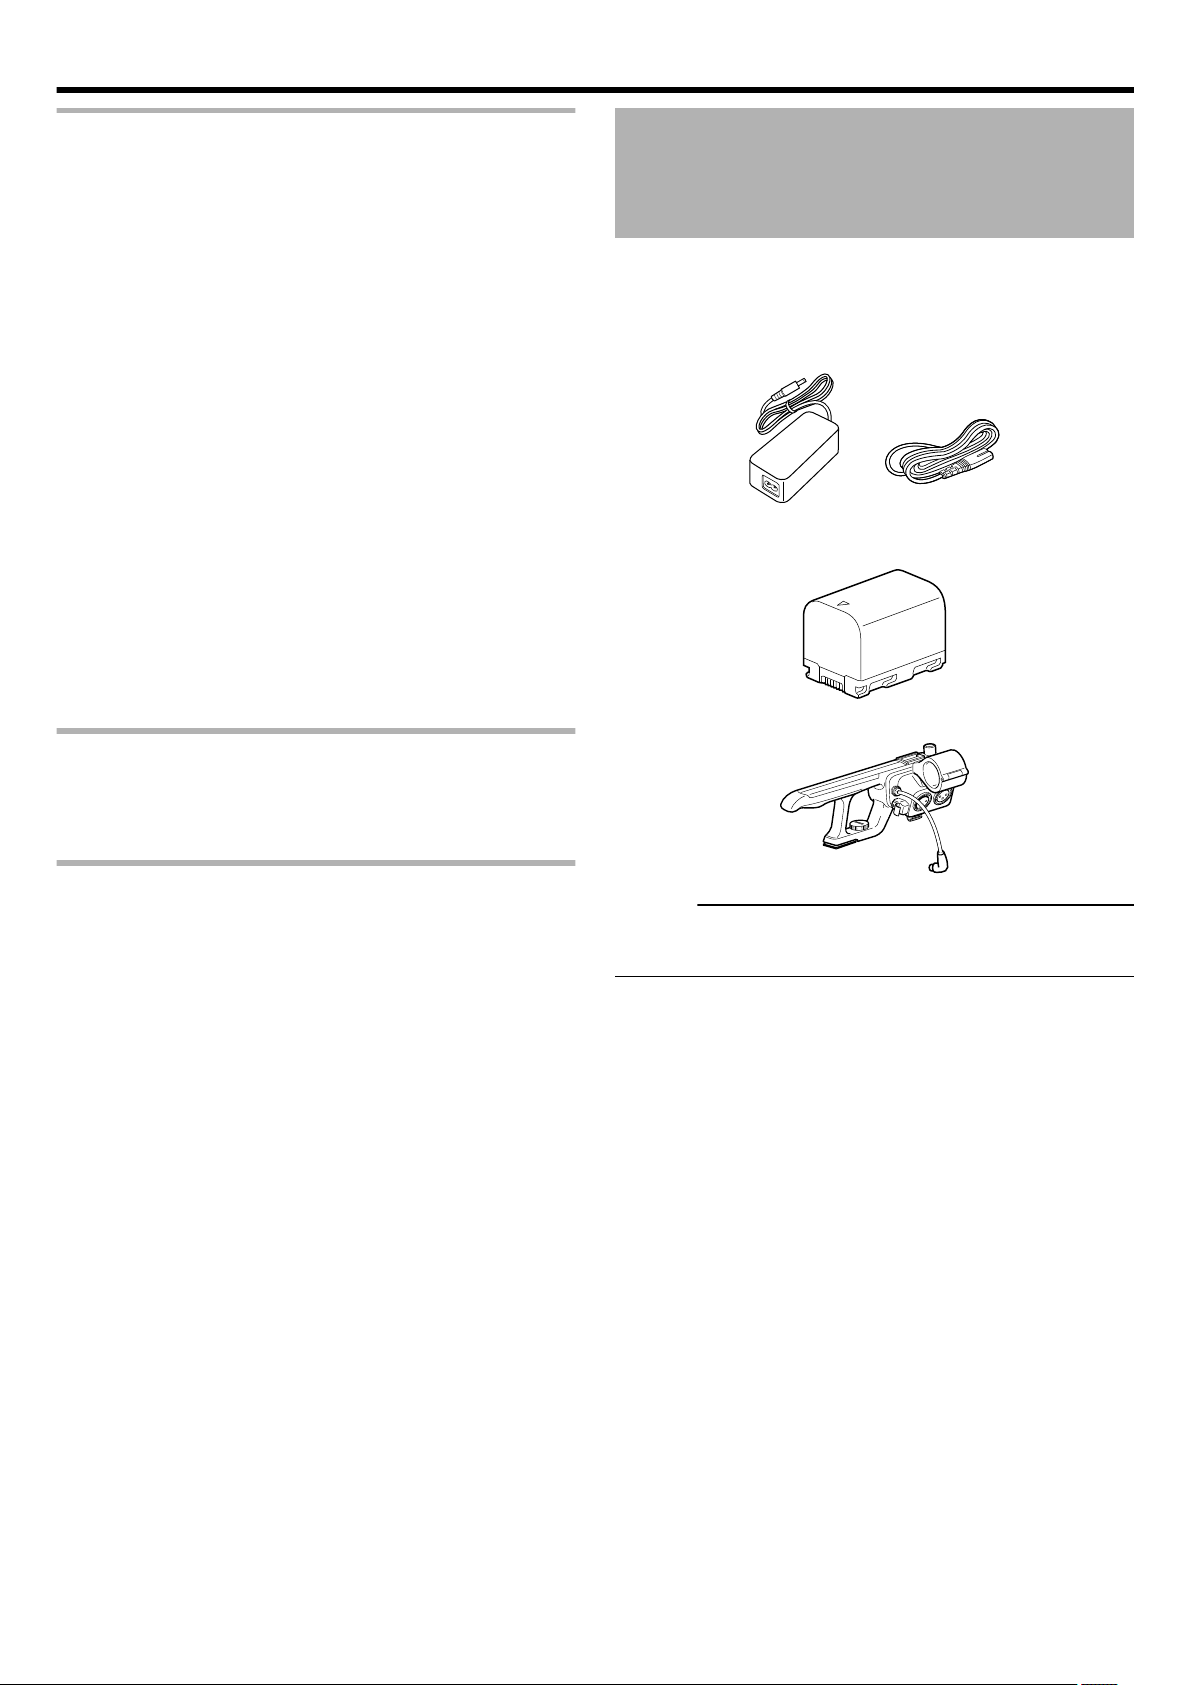
Accessories
This camera recorder comes bundled with the following
accessories.
0
AC Adapter
UIA336-12 / UIA336-1230 (For GY-HMQ10U)
UIA336-1230 (For GY-HMQ10E)
.
0
Battery Pack
SSL-JVC50
.
0
Audio Unit
Characteristic Lens Phenomena
When shooting an extremely bright light source,
o
ghosting may occur. This is a characteristic of the
lens and not a malfunction.
Copyright
Any recordings made on this camera recorder that
o
are played back for profit or public preview may
infringe on the rights of the owner of the recordings.
Do not use the recordings for purpose other than
o
personal enjoyment without prior consent from the
owner.
.
Memo :
0
To purchase a spare battery or battery charger, please visit a
nearby JVC dealer.
12
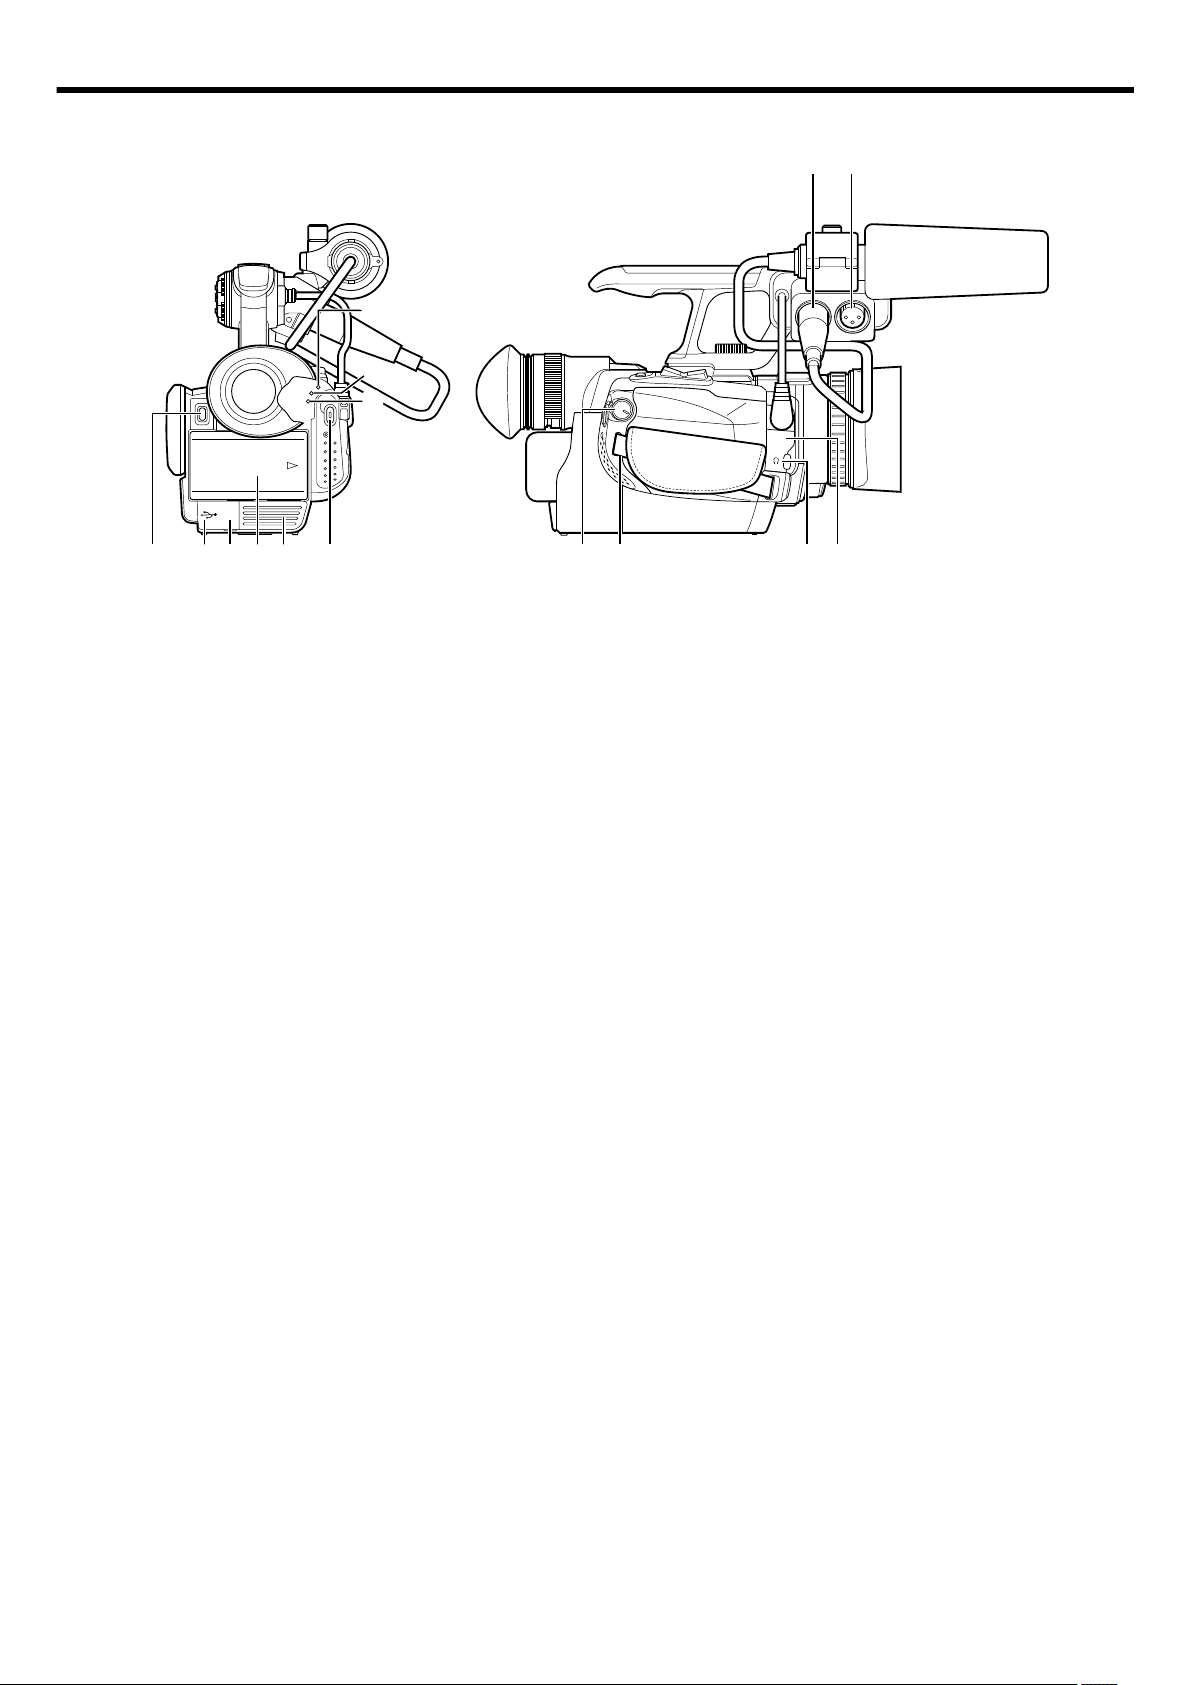
Page 13
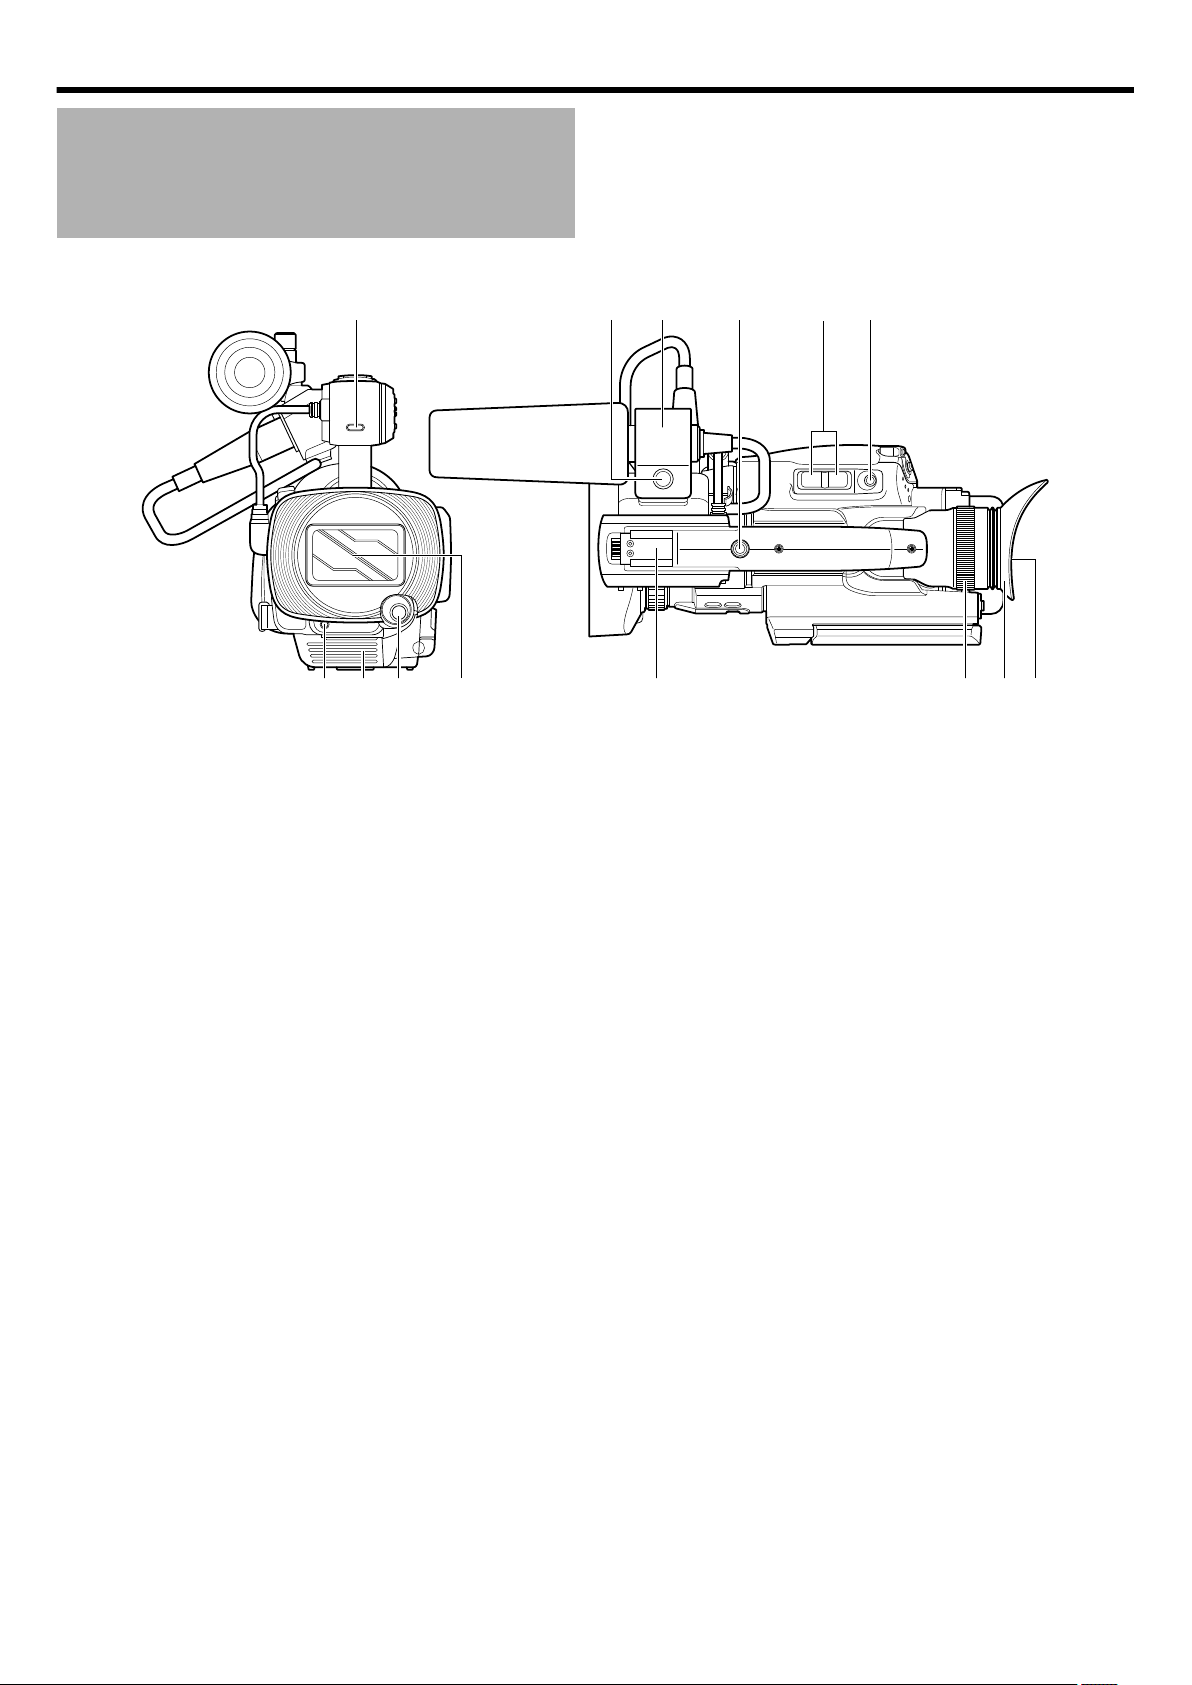
Names of Parts
AWB
REC
TW
MNK
B
A
DCE
J
FGHI
L
Introduction
Front
o
.
* Microphone is optional.
A Tally lamp
“Tally Settings” (A p. 27)
B Tally lamp
“Tally Settings” (A p. 27)
C Vent
Do not cover the vent.
D [AWB]Auto White Balance button
“Adjusting Automatic White Balance” (A p. 41)
E Lens/Lens cover
“Opening the Lens Cover” (A p. 23)
Top
o
F Shoe
For mounting separately sold lights and accessories.
G Eyepiece focus lever
Lever for adjusting the visibility. It is found on the under side.
H Eyepiece
I Viewfinder
“Viewing the Viewfinder/LCD Monitor” (A p. 31)
J REC (Record) button
For starting or stopping recording.
“Shooting” (A p. 33)
K Zoom lever
For zooming to the Tele (T) or Wide (W) end.
“Zoom Operation” (A p. 35)
L Screw hole for installing accessories
M Microphone holder
For mounting an external microphone.
“Attaching an External Microphone” (A p. 22)
N Knob
Knob for locking the microphone in place.
13
Page 14
CH-2 INPUT
CH-1
3
4
5
2
1
2
3
0
CH-2
AUDIO INPUT
AUTO MANUAL
AUTO MANUAL
FULL AUTO
DOOR LOCK
SD
A E
SET
GAIN
ADJ.
IRISWHT. BAL
SHUTTER
A F
M F
4321
C
A
D
B
AUDIO
SELECT
INPUT1
INPUT2
- LINE -
- MIC MIC+48V
INPUT1
INPUT2
LMH-
B A -
PRST
C
B
DEFG H J
A
SR Q
P
O
N
M
L
K
I
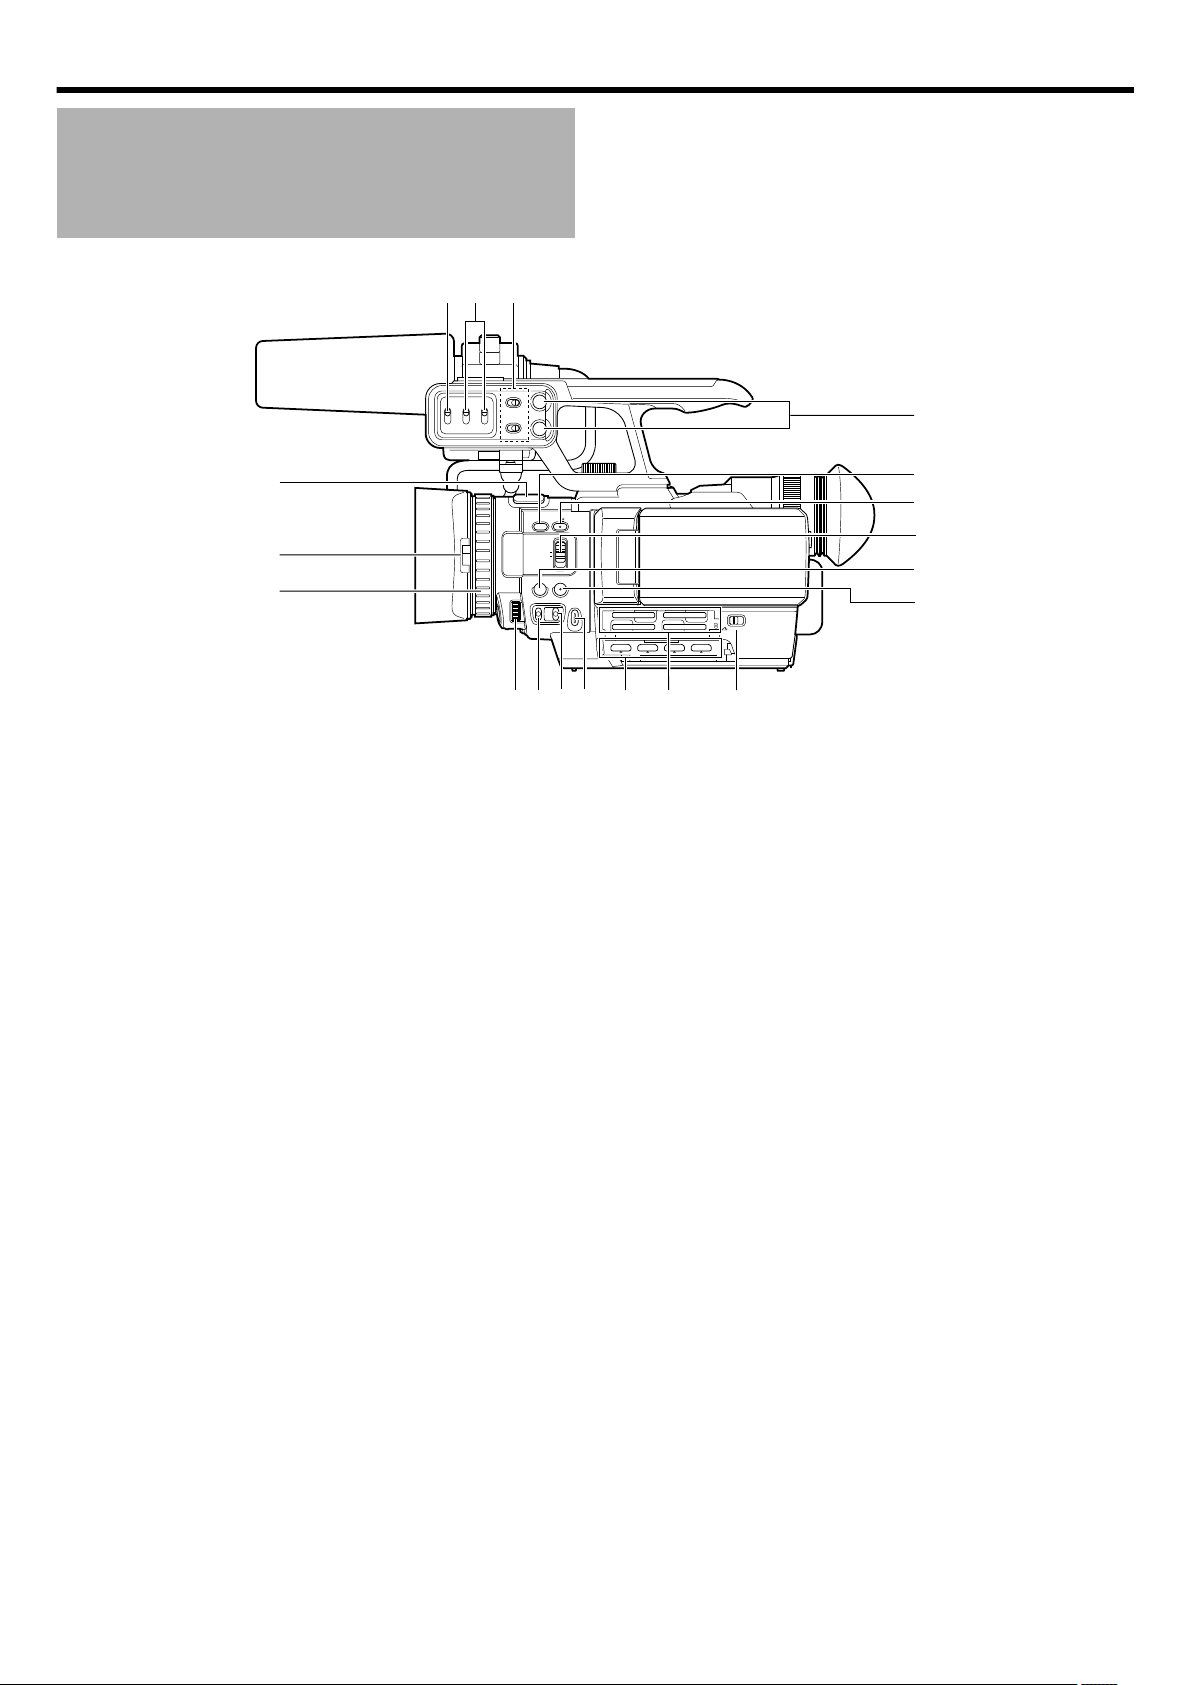
Introduction
Names of Parts (Continued)
Side (LCD Monitor)
o
.
* Microphone is optional.
A Built-in microphone
“Using the Built-in Microphone” (A p. 45)
B Lens cover switch
C Manual ring
“Adjusting the Focus Manually” (A p. 35)
D [ADJ.] Knob
For adjusting the shutter speed (A p. 39), aperture
(A p. 40), exposure (A p. 38), and volume level of the
headphone or built-in speaker (A p. 46).
E [GAIN] Gain switch
For selecting one of the three sensitivity levels.
“Adjusting Manual Gain” (A p. 38)
F [WHT.BAL] White balance selection switch
For selecting one of the three types of white balance.
“Adjusting the White Balance” (A p. 41)
G [IRIS] Iris button
Press this button to adjust the aperture manually.
“Adjusting the Aperture” (A p. 40)
H [HDMI] terminals 1 to 4
You can play back the recorded video by connecting this unit to
the monitor with HDMI terminal.
“Viewing Images on a Monitor” (A p. 51)
I Card slots A to D
Slot for SDHC/SDXC cards. Open the door to insert the SDHC/
SDXC card.
“Inserting an SDHC/SDXC Card” (A p. 29)
J [DOOR LOCK] lever
Locks/unlocks the door cover.
K [SHUTTER] Shutter speed button
Press this button to set the shutter speed manually.
“Adjusting the Shutter Speed” (A p. 39)
L [SET] Button
For confirming the adjustments made for exposure, shutter
speed, etc.
M [AF/MF] Focus switch
For setting the focusing mode to the Auto or Manual mode.
“Selecting a Focusing Mode” (A p. 32)
N [AE±] Exposure button
Press this button to set the exposure manually.
“Adjusting the Exposure Manually” (A p. 38)
O [FULL AUTO] Full Auto mode selection button
For setting the shooting mode to the Full Auto or Manual mode.
“Selecting the Full Auto / Manual Shooting Mode” (A p. 32)
14
Page 15

P [CH-1/CH-2] CH-1/CH-2 recording level adjustment
knob
For adjusting the audio input level for CH-1 or CH-2.
“Adjusting the audio recording level” (A p. 46)
Q [CH1/CH2 AUDIO SELECT]
CH-1/CH-2 audio selection switch
For setting the method of adjusting the audio recording level for
CH-1 or CH-2 to the Auto or Manual mode.
“Adjusting the audio recording level” (A p. 46)
R [AUDIO INPUT 1/2]
INPUT1/INPUT2 audio input signal selection switch
For selecting the input signal for the [INPUT1] or [INPUT2]
terminal.
“Using an External Microphone Connected to the [INPUT1/
INPUT2] Terminal” (A p. 45)
S [CH-2 INPUT] CH-2 audio input terminal selection
switch
For selecting whether to input audio signals to CH-2 audio from
the [INPUT1] or [INPUT2] terminal.
“Selecting [CH-2] audio” (A p. 45)
Introduction
15
Page 16
CH-2 INPUT
CH-1
3
4
5
2
1
2
3
0
CH-2
AUDIO INPUT
AUTO MANUAL
AUTO MANUAL
FULL AUTO
DOOR LOCK
SD
A E
SET
GAIN
ADJ.
IRISWHT. BAL
SHUTTER
A F
M F
4321
C
A
D
B
AUDIO
SELECT
INPUT1
INPUT2
- LINE -
- MIC MIC+48V
INPUT1
INPUT2
LMH-
B A -
PRST
CAM/MEDIA
INFO
USER2 USER3USER1
C
D
B
A
GFEH
I
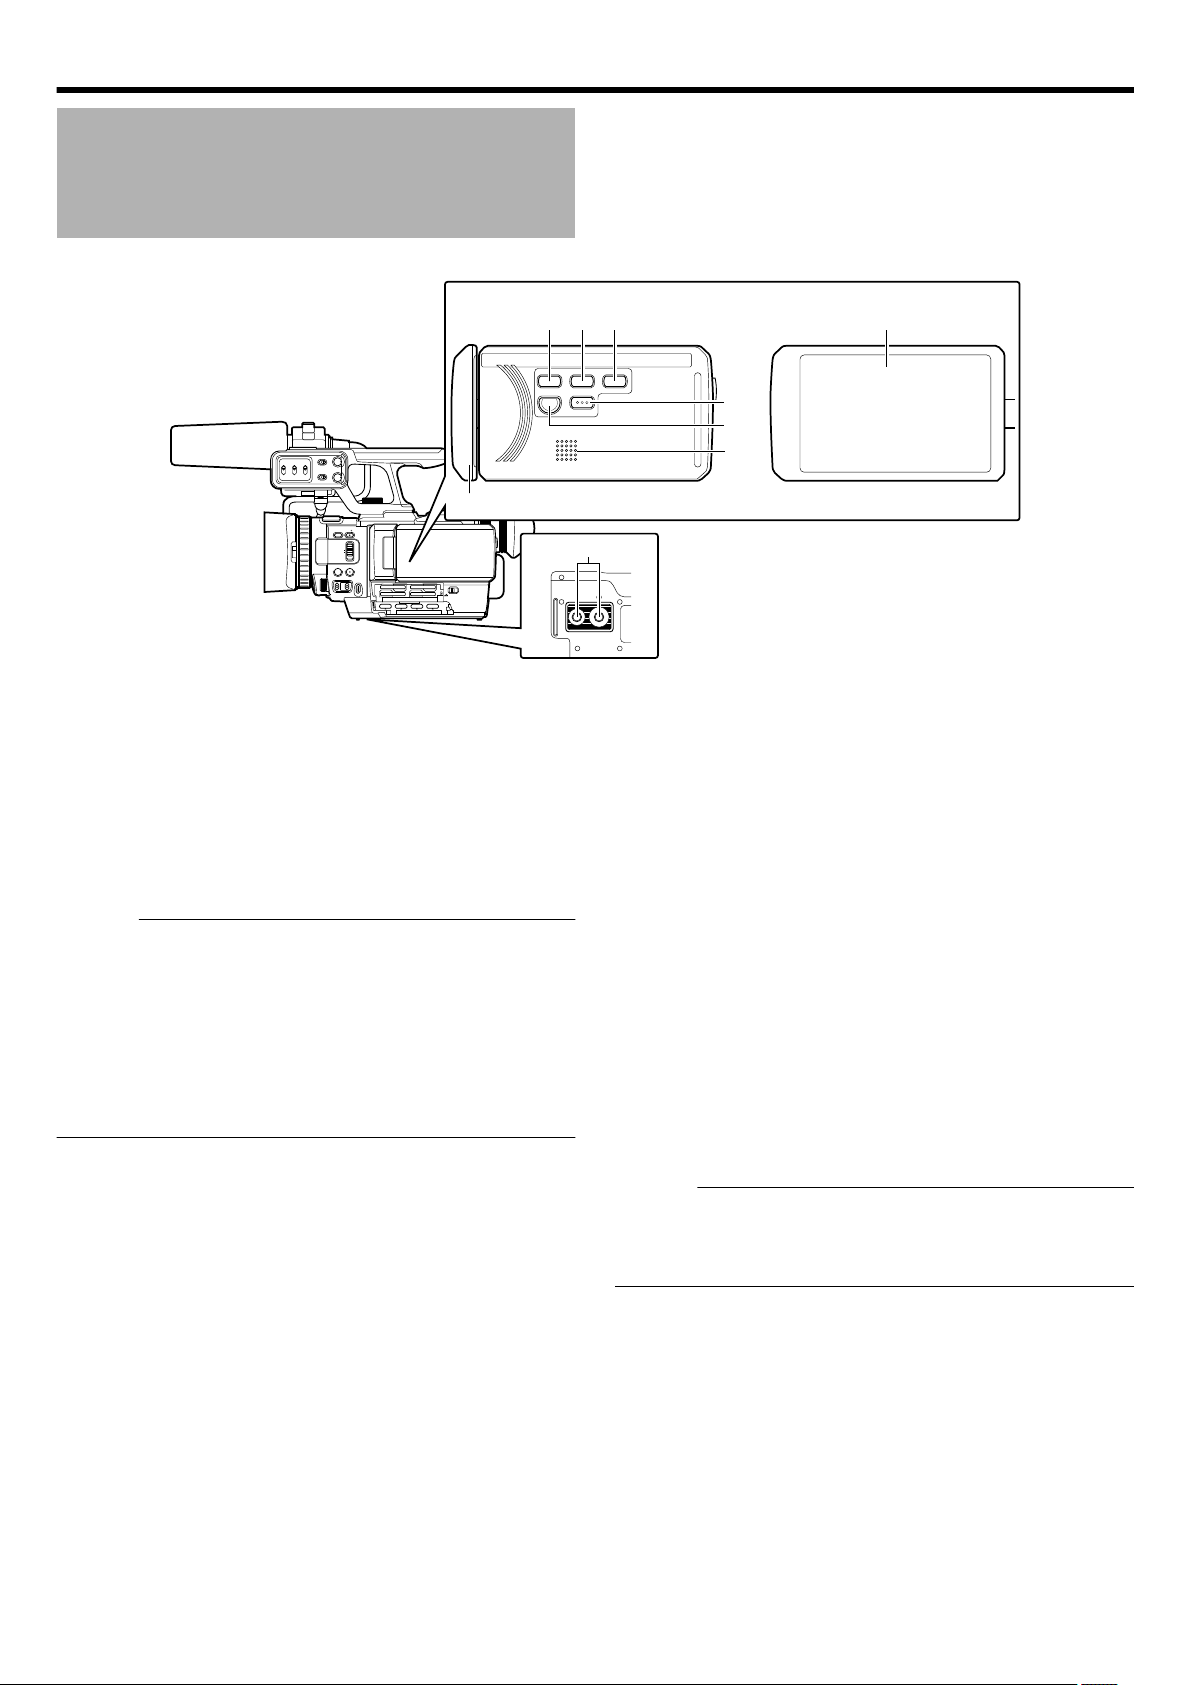
Introduction
Names of Parts (Continued)
LCD Monitor Unit
o
.
* Microphone is optional.
A Monitor cover
B Built-in speaker
You can adjust the volume level using the [ADJ.] knob on the
same side as the LCD monitor.
Audio from the built-in speaker can be monitored using a
headphone.
“Monitoring Audio Sound Using a Headphone” (A p. 46)
Memo :
0
The built-in speaker is usable only in the Media mode. Audio
is not output from the built-in speaker during Camera mode.
0
Audio level in the Camera mode and Media mode can be
adjusted separately.
0
When in the Media mode, the volume of the headphone and
speaker are adjusted at the same time.
0
When the headphone connector is not connected to this unit,
the audio is always output from the built-in speaker.
C [CAM]/[MEDIA] button
Pressing the button each time switches between the Camera
mode and Media mode.
D [INFO] button
You can check the remaining recording time on the SDHC/
SDXC card as well as the remaining battery power.
“Checking the Remaining Recording Time” (A p. 44)
E [USER1] button
A specific feature in the menu setting can be assigned to this
button according to the user’s preference.
“Assigning Functions to the USER Buttons” (A p. 27)
F [USER2] button
A specific feature in the menu setting can be assigned to this
button according to the user’s preference.
“Assigning Functions to the USER Buttons” (A p. 27)
G [USER3] button
A specific feature in the menu setting can be assigned to this
button according to the user’s preference.
“Assigning Functions to the USER Buttons” (A p. 27)
H LCD monitor
“Viewing the Viewfinder/LCD Monitor” (A p. 31)
I Tripod mounting holes
“Attaching the Tripod” (A p. 23)
Memo :
0
To prevent the camera recorder from falling, attach securely
using the rotation prevention hole.
0
Use screws with a screw length 5 mm or below.
16
Page 17
REC
ACCESS
CAM
MEDIA
BATT
DC
G
ABCEDF
H
I
JK LM
ON
Introduction
Rear
o
.
* Microphone is optional.
A Battery lock release button
“Removing the Battery” (A p. 24)
B USB Connector
“Copying to Computer” (A p. 57)
C [DC] input terminal
“Charging the Battery Pack” (A p. 24)
D Battery Mount
“Attach the supplied battery.” (A p. 24)
E Vent
Do not cover the vent.
F [REC] Record button
“Shooting” (A p. 33)
For starting or stopping recording.
G [MEDIA] Media mode indicating lamp
Lights up in red during the Media mode.
H [CAM] Camera mode indicating lamp
Lights up in red during the Camera mode.
I [ACCESS] Access indicating lamp
Lights up or blinks during recording or playback.
Also blinks during battery charging.
Side (Grip Belt)
o
J [STANDBY/ON OFF]/[CAM/MEDIA]
Power/Operation mode selection switch
STANDBY/
: Turns the power On/Off.
ON OFF
CAM/
MEDIA
: Sets this camera recorder to the Camera or
Media mode.
K Grip belt
L Headphone jack
“Monitoring Audio Sound Using a Headphone” (A p. 46)
M [REMOTE] Remote terminal
For connecting a separately sold wired remote control.
“Setting up the Remote Control” (A p. 23)
N [INPUT1] Audio input 1 terminal
For connecting an XLR microphone.
“Attaching an External Microphone” (A p. 22)
O [INPUT2] Audio input 2 terminal
For connecting an XLR microphone.
“Attaching an External Microphone” (A p. 22)
17
Page 18
10X
10X
60P
UXP
4K
0:00:00:00
0:00:00[000:00]
WT
Overlap
AF
40SEC
≪PLAY
REC
MENU
10:45AM
12dB
FAW
CH1
CH2
1/4000
±0.0
F3.4
u
t
s
r
q
p
o
n
12 3 4 56 7 8 9 0 a b
c
d
e
f
g
h
i
mlkj
Introduction
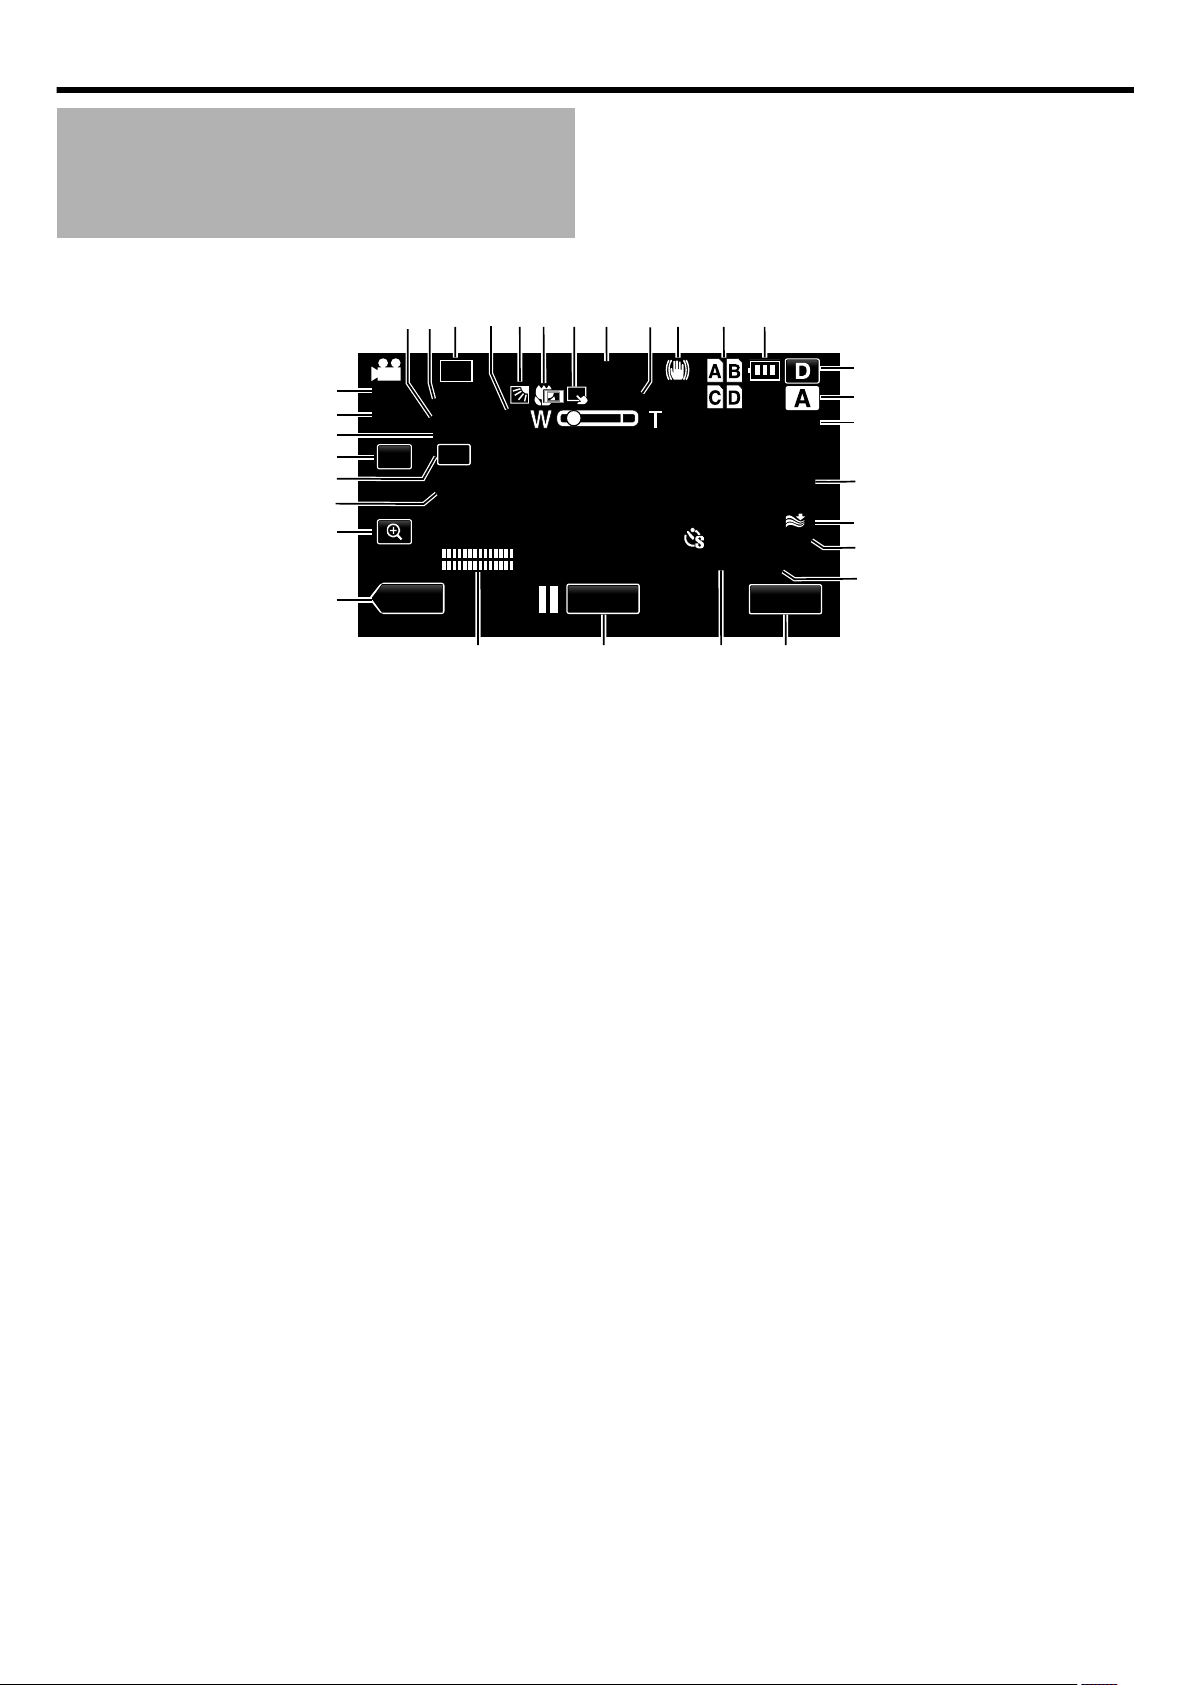
LCD Screen Display
LCD Screen Display Information (During Recording)
o
All the items are displayed in the illustration for explanatory purposes.
A Exposure compensation
“Adjusting the Exposure Manually” (A p. 38)
B Shutter speed
“Adjusting the Shutter Speed” (A p. 39)
C Record mode
“Selecting a Video Recording Mode (HD Recording Only)”
(A p. 33)
D Zoom
“Zoom Operation” (A p. 35)
E Backlight compensation
“Setting Backlight Compensation” (A p. 43)
F TELE MACRO
“Using the Tele Macro Feature” (A p. 37)
G Touch Priority AE/AF
“Setting Touch Priority AE/AF” (A p. 43)
H Time
“Clock Setting” (A p. 26)
I Time-lapse recording
“Setting Time-lapse Recording” (A p. 44)
J Image Stabilizer
“Using the Image Stabilizer Feature” (A p. 43)
K Slot display
4K2K mode: lights up when SDHC/SDXC cards are inserted into
L Battery indicator
all the slots.
1920 mode: E lights up when an SDHC/SDXC card is inserted
into slot A.
“Checking the Remaining Recording Time” (A p. 44)
18
.
M Display button
Some displays disappear after approximately 3 seconds. Press
this button to show the displays again.
The displays appear for approximately 3 seconds with every
press. Press and hold this button to fix the displays.
Press this button again to release the displays.
N Recording mode button
“Selecting the Full Auto / Manual Shooting Mode” (A p. 32)
O Focus mode
“Selecting a Focusing Mode” (A p. 32)
P Overlap
Appears when “EDGE BLENDING” in the recording menu is set
to “16 PIXEL”.
“EDGE BLENDING” (A p. 62)
Q Wind cut
“Reducing Wind Noise” (A p. 46)
R Time-lapse recording counter
“Setting Time-lapse Recording” (A p. 44)
S Remaining recording time
“Checking the Remaining Recording Time” (A p. 44)
T Menu button
“Operating the Menu” (A p. 59)
U Scene counter
V Recording start/stop button
“Shooting” (A p. 33)
W Volume level
X Mode button
Switches between the Recording/Playback mode.
Page 19

Y Magnify button
“Using the Magnifying Function” (A p. 36)
Z FAW
“Using the Full Auto White (FAW) Function” (A p. 42)
a Gain level
“Adjusting Manual Gain” (A p. 38)
b Zoom button
“Zoom Operation” (A p. 35)
c Aperture value
“Adjusting the Aperture” (A p. 40)
d 4K2K mode
“Selecting a Video Recording Format or Recording Mode”
(A p. 33)
e Frame rate
“SYSTEM SELECT” (A p. 61)
Introduction
19
Page 20
60P
MENU
≪REC
UXP
4K
0:01:23 0:12:34
Overlap
40SEC
1
a
0
23 4 5 6
7
8
9
Introduction
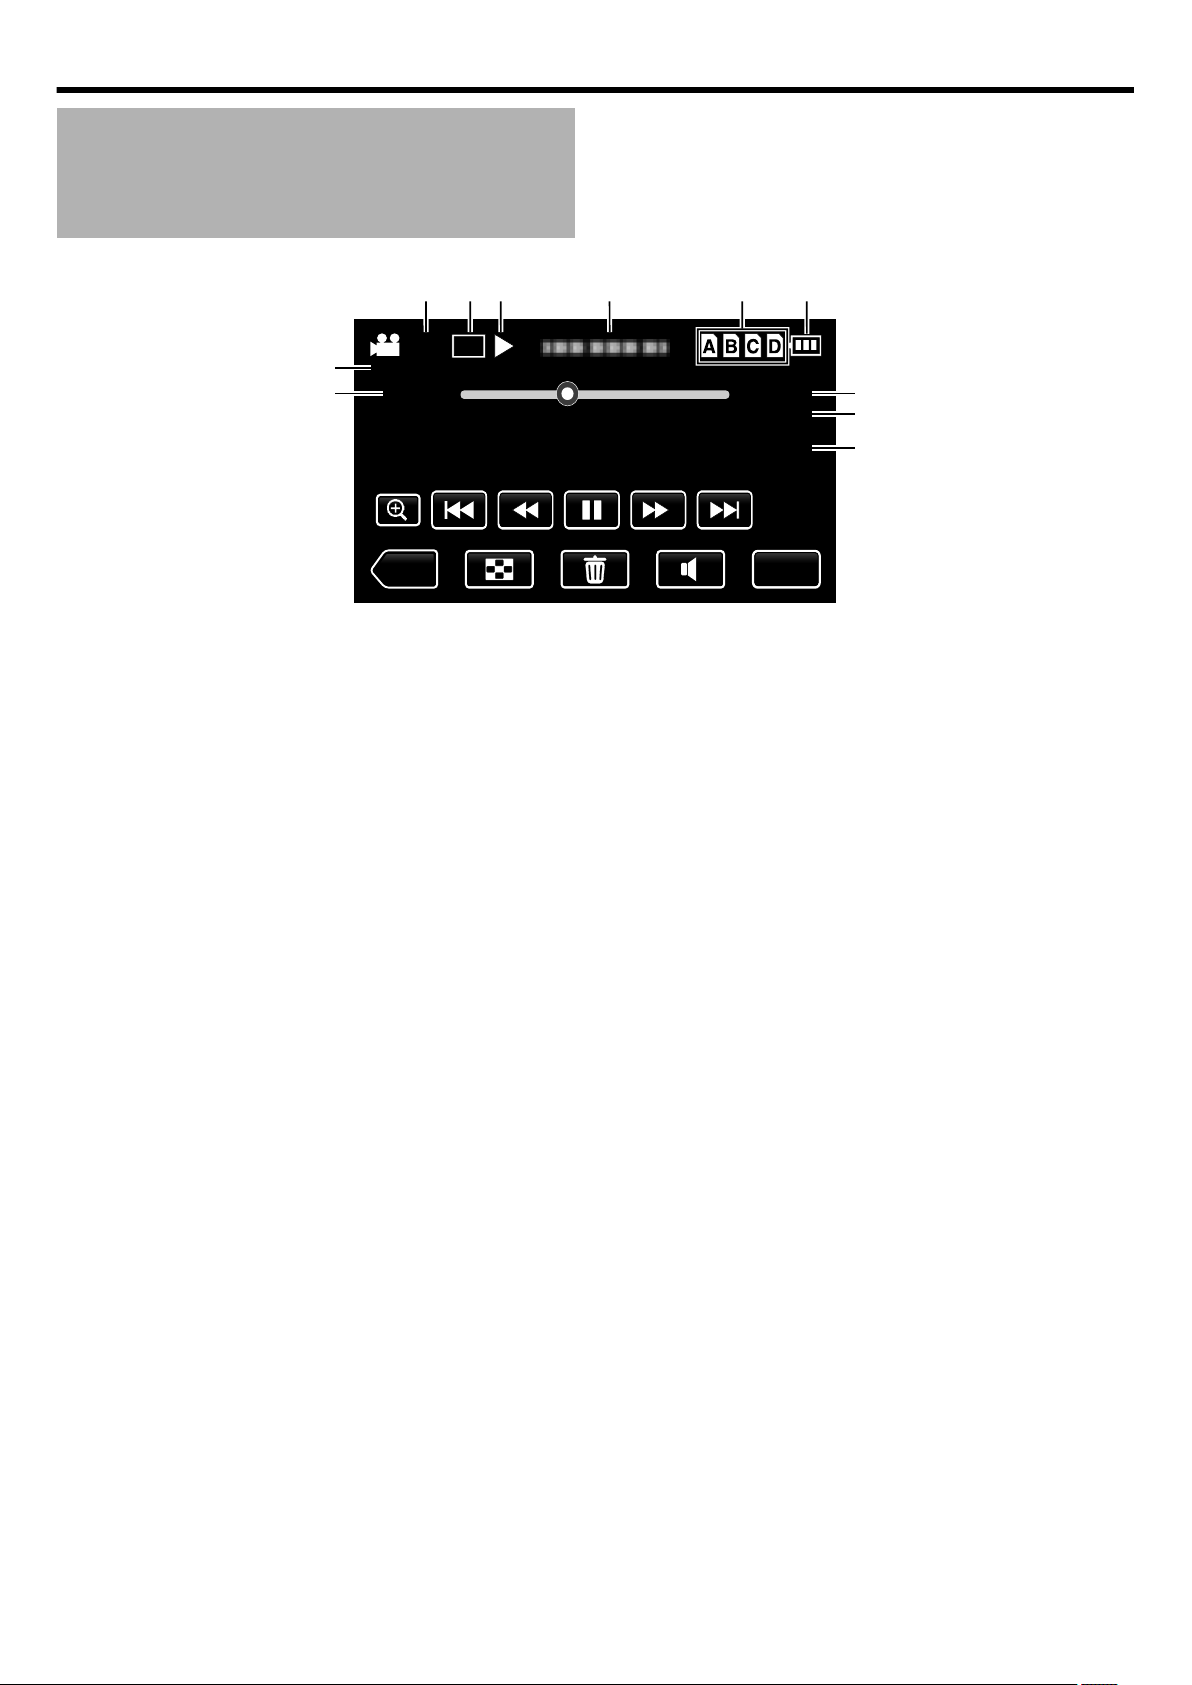
LCD Screen Display (Continued)
LCD Screen Display Information (During Playback)
o
.
A 4K2K mode
“Selecting a Video Recording Format or Recording Mode”
(A p. 33)
B Record mode
“Selecting a Video Recording Mode (HD Recording Only)”
(A p. 33)
C Operation indicator
“Screen Display During Playback” (A p. 50)
D Date/time
“Clock Setting” (A p. 26)
E Slot display
4K2K mode: lights up when SDHC/SDXC cards are inserted into
all the slots.
1920 mode: E lights up when an SDHC/SDXC card is inserted
into slot A.
F Battery indicator
“Checking the Remaining Recording Time” (A p. 44)
G Playback time
“Playing Back Videos” (A p. 47)
H Time-lapse playback
“TIME-LAPSE RECORDING” (A p. 62)
I Overlap playback
“EDGE BLENDING” (A p. 62)
J Scene counter
K Frame rate
“SYSTEM SELECT” (A p. 61)
20
Page 21
4K
WT
AF
≪PLAY
REC
MENU
10:45AM
60P
4K
0:01:23 0:12:34
Overlap
40SEC
ABCD
60P
60P
4K
4K
≪REC
MENU
Introduction
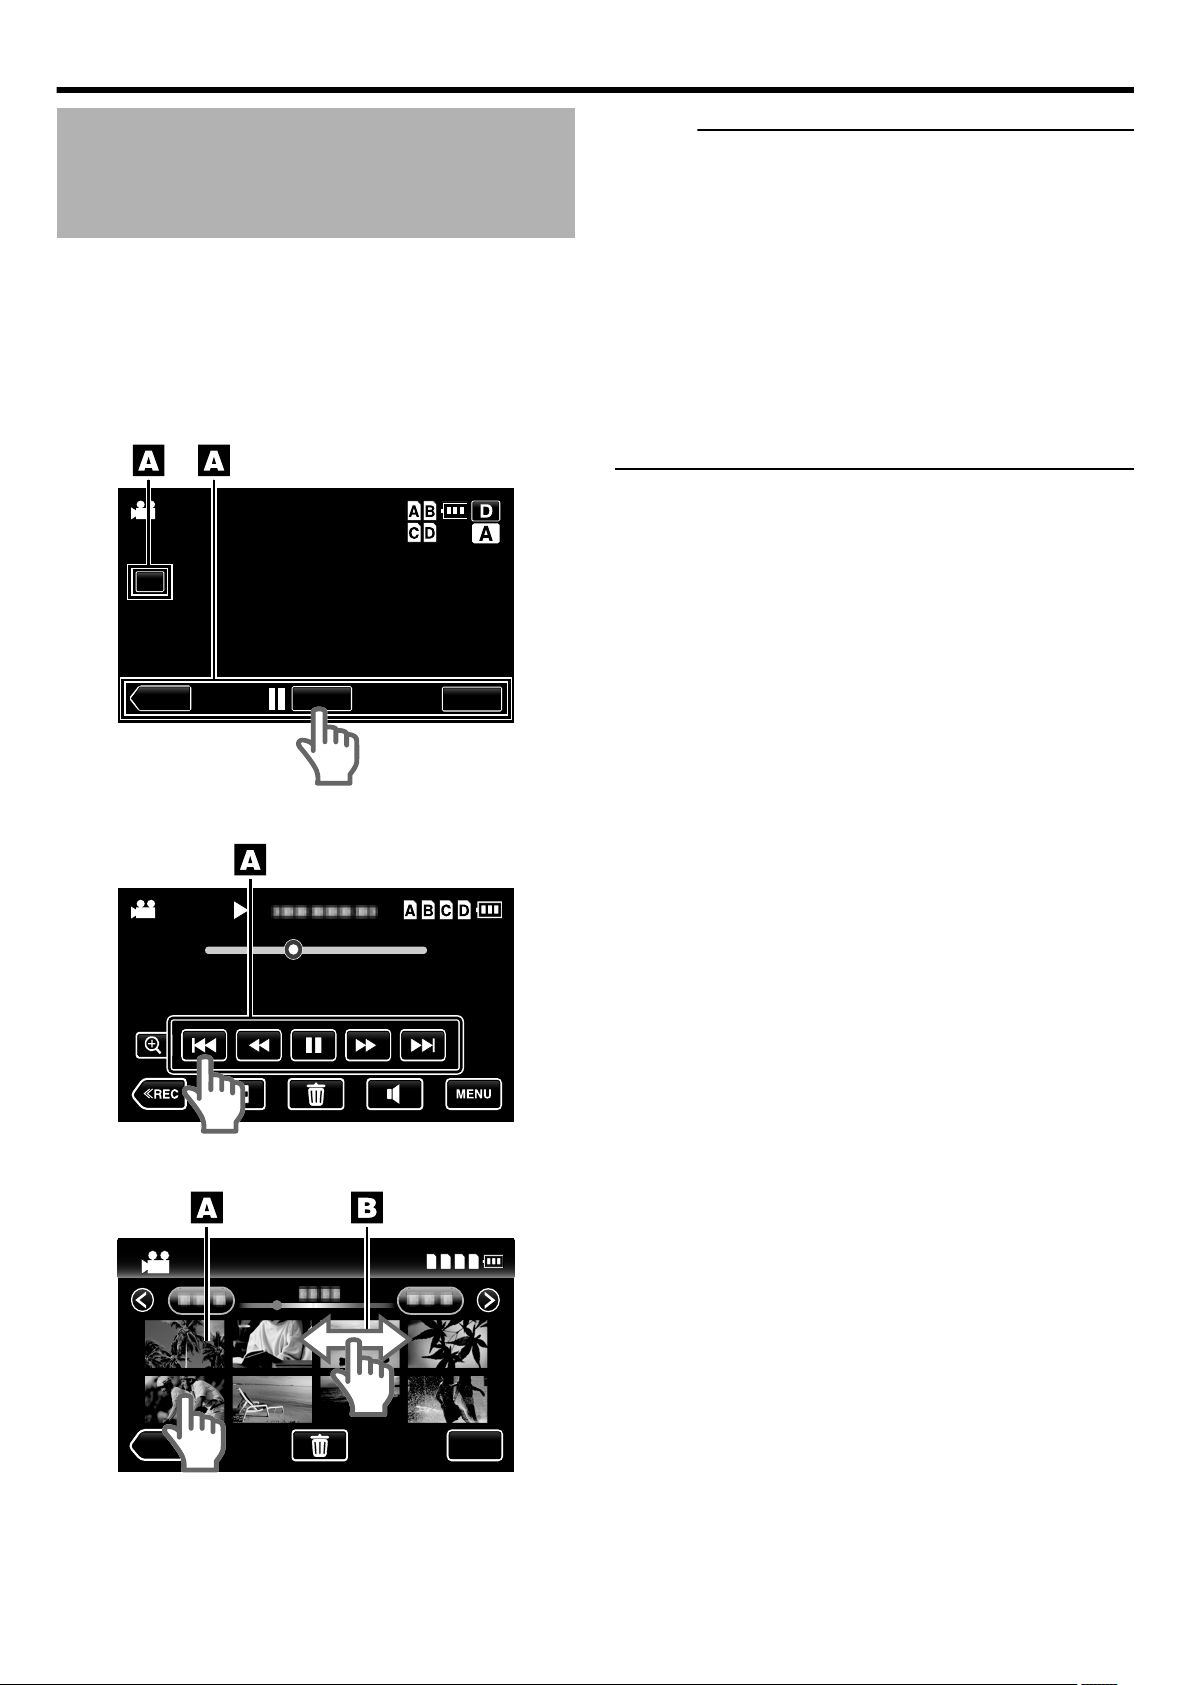
Using the Touch Screen
There are two ways to operate the touch screen, namely “tap” and
“drag”. The following are some examples.
A Tap the displayed button (icon) or thumbnail (file) on the touch
screen to make a selection.
B Drag the thumbnails on the touch screen to search for the desired
file.
Recording Screen
o
Memo :
0
The touch screen of this unit is pressure-sensitive. When the
touch screen does not respond smoothly, apply slightly more
force to your fingertip.
0
Do not press or rub with excessive force.
0
Do not operate the touch screen using an object with a sharp tip.
0
Pressing two or more places at a time may cause a malfunction.
0
Tap the buttons (icons) on the touch screen accurately. The
buttons may not respond if they are not tapped on the right area.
0
Perform “TOUCH SCREEN ADJUST” (A p. 27) if the reactive
area of the screen is misaligned with the touched area. (Adjust
by lightly tapping with objects such as the corner of an SD card.
Do not press using an object with a sharp tip, and do not press
hard.)
.
Playback Screen
o
.
Index Screen
o
.
21
Page 22
MIC
[AUDIO IN] terminal
Open the cover
Shoe
Screw
Clamp
Cable
AU
D
IO
I
M
IC
N
O
P
EN
Clamp
[INPUT1/INPUT2]
Terminal
Microphone
Holder
Microphone (Optional)
Knob
Preparations
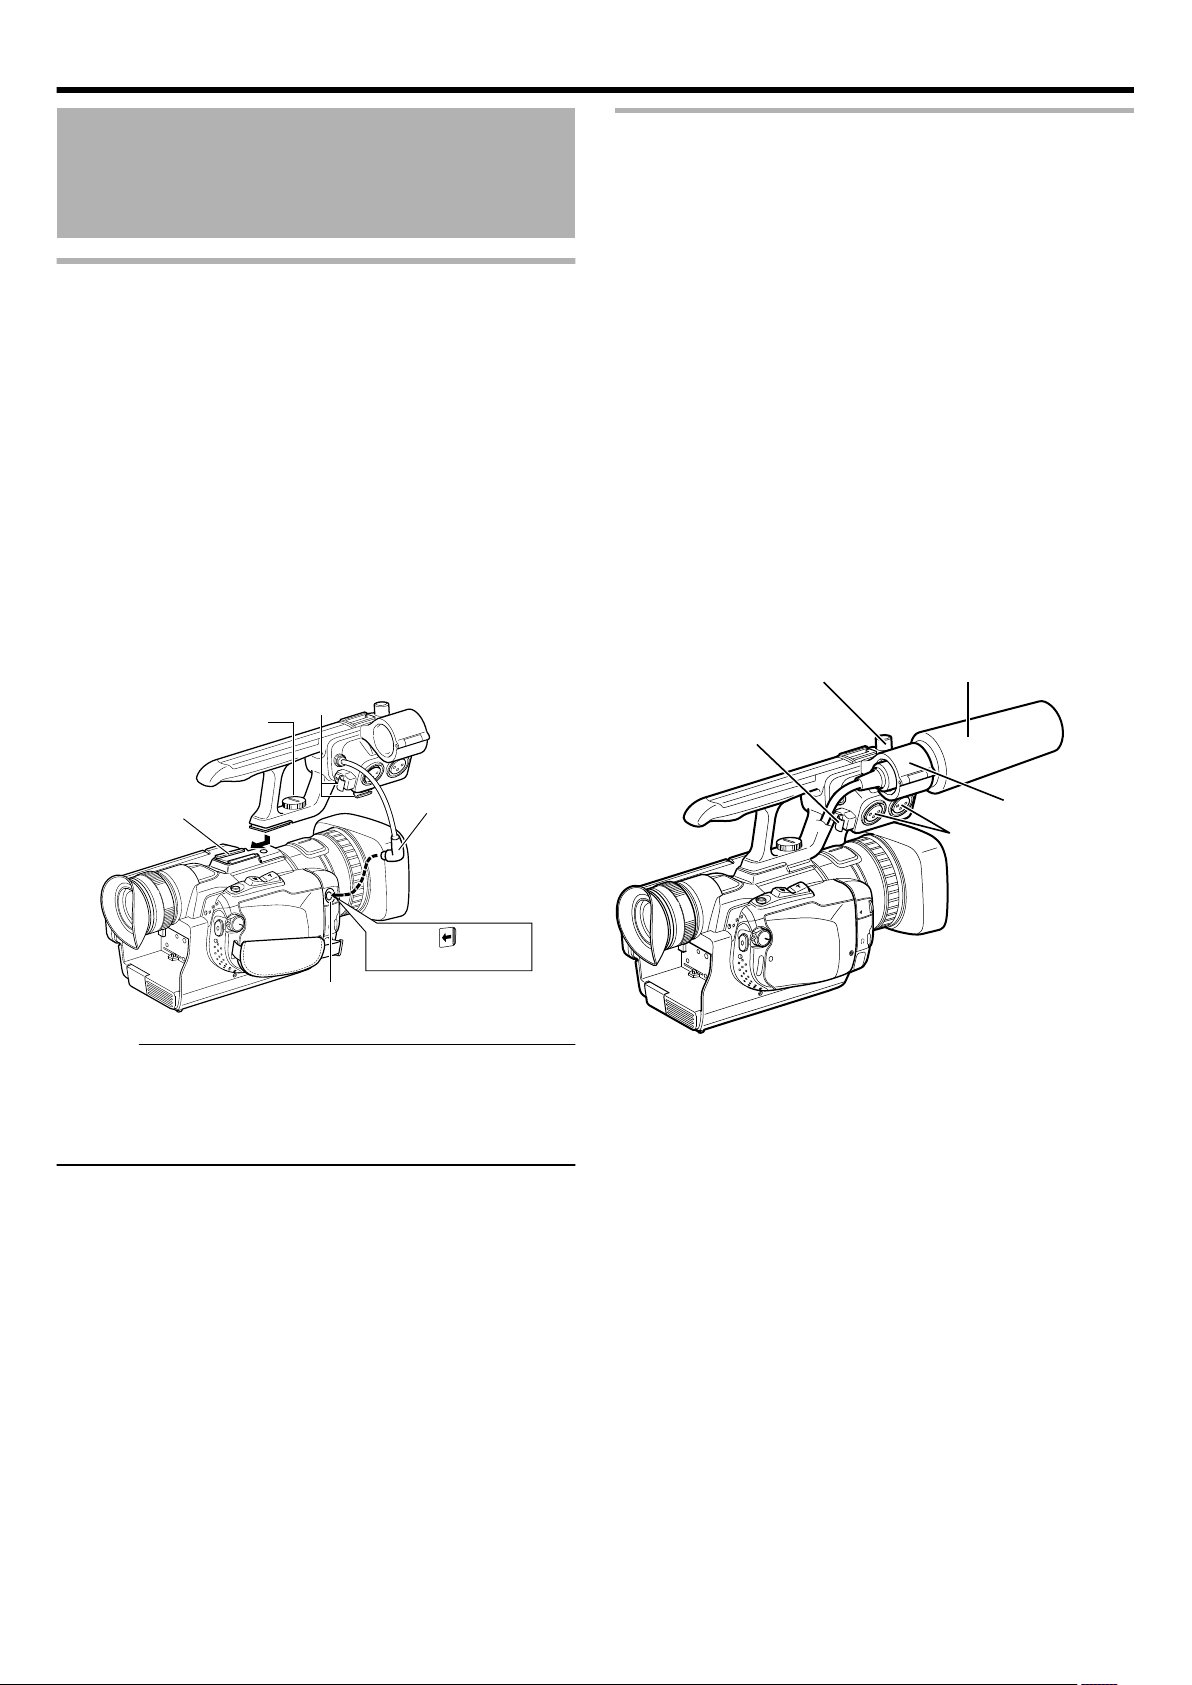
Preparation and Adjustment Before Use
Attaching the Audio Unit
The audio unit (with handle) is not attached to the camera recorder
unit when purchased.
Attach the audio unit according to the following procedure.
1
Attach the audio unit by sliding it all the way
into the shoe on the top of the camera recorder.
2
Turn the screw on the audio unit clockwise to
fasten it fully and securely to the camera
recorder.
0
If the audio unit is not fully and securely tightened, it will be
loose and may drop off from the camera recorder during
use.
3
Connect the audio unit cable to the [AUDIO IN]
terminal of the camera recorder.
Attaching an External Microphone
You can attach a microphone (optional) to the microphone holder.
1
Turn the knob on the microphone holder
anticlockwise to loosen and open the
microphone holder.
2
Place the microphone in the microphone
holder.
3
Turn the knob on the microphone holder
clockwise to secure the microphone.
4
Connect the microphone to the [INPUT1] or
[INPUT2] (XLR) terminal according to the type
of microphone cable terminal you are using.
5
Attach the microphone cable to the clamp.
6
Specify the audio input settings correctly.
0
For details on the method of audio input, refer to “Audio
Recording” (A p. 45).
.
Memo :
0
The cable of the audio unit cannot be fastened using a clamp.
The clamp is intended for fastening the microphone cable.
0
For details on mounting an external microphone and its settings,
refer to “Attaching an External Microphone”.
.
22
Page 23

A
UDIO I
MIC
N
OPE
N
Connect the wired remote control
[REMOTE] Terminal
Hood
Lens cover switch
Preparations
Adjusting the Grip Belt
Open the pad and adjust the position of the grip belt accordingly.
.
Caution :
0
If the grip belt is loose, this unit may drop and result in injuries or
damages.
0
Parents should take extra care when your child is using the
camera recorder.
Setting up the Remote Control
The functions of the camera recorder can be configured using a
wired remote control.
1
Connect a wired remote control to the camera
recorder.
Connect the wired remote control (sold separately) to the
[REMOTE] terminal of this camera recorder.
Attaching the Tripod
To prevent the camera recorder from falling off, which may result in
injuries or damages, read the instruction manual of the tripod to be
used and make sure that it is securely attached.
To attach a tripod to this unit, use the “tripod mounting holes
(bottom)”.
“Tripod mounting holes” (A p. 16)
.
Caution :
0
Use the tripod on a stable surface.
Removing the Hood
Remove the hood when attaching a filter (with external diameter 50
mm and below), teleconverter or wide converter to the front of the
lens.
0
Turn the hood in an anti-clockwise direction to remove it.
.
2
Turn on the power of the camera recorder.
Caution :
0
Turn off the power of the camera recorder when connecting a
wired remote control.
.
0
To attach a hood, press it against the lens, and turn it in the
clockwise direction.
Opening the Lens Cover
Use the lens cover switch to open or close the lens cover.
Before shooting, open the lens cover.
.
Memo :
0
When this camera recorder is not in use, close the lens cover to
protect the lens.
0
Do not press against the lens cover with force. Doing so may
damage the lens or the cover.
23
Page 24

[STANDBY/ON OFF] switch
Battery Pack
Battery Lock Release
Button
A
U
D
IO
I
M
IC
N
O
P
E
N
[DC] Terminal
AC Adapter
To AC Outlet
(110 V to 240 V)
Preparations
Charging the Battery Pack
Charge the battery pack immediately after purchase and when the
remaining battery power is low.
0
The battery pack is not charged at the time of purchase.
1
Set the [STANDBY/ON OFF] switch to [OFF].
.
2
Attach the supplied battery.
Removing the Battery
1
Set the [STANDBY/ON OFF] switch to [OFF].
2
Press the battery lock release button and slide
the battery to the left.
Charging time and continuous recording time
(approximate)
Battery Pack Charging Time
SSL-JVC50 (Provided) Approx. 4 hrs
Battery Pack Continuous Recording Time
4K2K mode 1920 mode
SSL-JVC50 (Provided) Approx. 1 hrs 45
mins
Caution :
0
Recording time is the value when “MONITOR BRIGHTNESS” is
set to “3” during the use of LCD monitor.
0
Recording time may differ depending on the age of the battery,
charging condition, and operating environment.
0
Under the high-temperature environment, the power of this unit
may be turned off to protect the battery.
The use of an AC adapter is recommended when this unit is used
in such places.
0
Recording time is shortened in cold environments.
0
Recording time is shortened when the zoom lens and LCD
screen are frequently used.
0
Recording time is shortened when the HDMI cable is connected.
Approx. 2 hrs 45
mins
.
0
Align the top of the battery with the mark on this unit, and
slide in until the battery clicks into place.
3
Connect the AC adapter to the [DC] terminal
.
4
Plug in the power.
0
When charging is in progress, [ACCESS] access indicating
lamp blinks.
It goes out when charging is finished.
0
After charging is complete, disconnect the AC adapter.
Memo :
0
To purchase a spare battery or battery charger, please visit a
nearby JVC dealer.
24
Page 25

Turning On/Off the Power
A
U
D
IO
I
M
IC
N
O
P
E
N
AC Adapter
To AC Outlet
(110 V to 240 V)
[DC] Terminal
[STANDBY/ON OFF] switch
[CAM/MEDIA] switch
[STANDBY/ON OFF] switch
Preparations
[CAM/MEDIA] operation mode and indicating lamp
o
status
Use the [CAM/MEDIA] operation mode selection switch to switch
to a different mode. The [CAM] indicating lamp and [MEDIA]
indicating lamp change as below.
Turning On the Power
Preparation: Attach a charged battery or connect the AC adapter.
0
To make use of a battery, refer to “Charging the Battery Pack”
(A p. 24).
When the AC adapter is connected
o
1
Connect the AC adapter to the [DC] terminal
.
2
Set the [STANDBY/ON OFF] switch to [ON].
Mode [CAM] Indicating
Lamp
During Camera
Lights up in red Light goes out
[MEDIA] Indicating
Lamp
mode
During Media
Light goes out Lights up in red
mode
.
0
To switch to the Media mode, turn the [CAM/MEDIA] selection
switch, or press the [CAM/MEDIA] button.
In other words, you can make a [CAM]/[MEDIA] selection at one
of the two locations.
Turning Off the Power
.
0
The camera recorder starts up in Camera mode.
0
The camera recorder always start up in Camera mode
when the power is turned on.
1
Set the [STANDBY/ON OFF] switch to [OFF].
.
Auto power off feature
o
If the unit is running using the battery only, and “AUTO POWER
OFF” in the common menu is set to “ON”, the power will turn off
automatically if the unit is not operated or does not operate for five
minutes.
“ AUTO POWER OFF ” (A p. 64)
Memo :
0
When both the battery and AC adapter are connected, power
from the AC adapter connection will be used. As such, the “AUTO
POWER OFF” function will not have any effect.
25
Page 26

NOYES
SET DATE/TIME!
1
201211000
SET
TIMEDATE
CLOCK SETTING
GMT
SAVE
CLOCK/AREA SETTING
Preparations
Clock Setting
The “SET DATE/TIME!” screen appears when you turn on this unit
for the first time after purchase, when it has not been used for a long
time, or when the clock is not set yet.
Set the clock before recording.
1
Set the [STANDBY/ON OFF] switch to [ON].
6
Select the region where you live and tap
“SAVE”.
2
Open the LCD monitor.
3
Tap “YES” when “SET DATE/TIME!” is
displayed.
.
4
Set the date and time.
.
0
When the year, month, day, hour, or minute item is tapped,
∧ or ∨ will be displayed.
0
Tap ∧ or ∨ to adjust the year, month, day, hour, and minute.
.
0
The city name and time difference are displayed.
0
Tap <or> to select the city name.
Memo :
0
The configured date/time data can be displayed on the LCD
monitor and viewfinder and be recorded to the SDHC/SDXC
card.
0
The value of the year can be set between the range from “2001”
to “2099”.
0
The clock can be reset again later.
“ CLOCK ADJUST ” (A p. 63)
0
“SET DATE/TIME!” is displayed when you turn on this unit after
it has not been used for a prolonged period.
Connect the AC adapter for more than 24 hours to charge the
internal clock battery of this unit before setting the clock.
“Charging the Battery Pack” (A p. 24)
Changing the date/time display style
o
You can change the display style of the date/time on the menu.
“DATE DISPLAY STYLE” (A p. 63)
Date/Time Display in Different Operation Modes
o
During Camera
mode
During Media
mode
Date/time of the built-in clock is displayed.
Shooting date/time of the file (image) being
played back is displayed.
5
After setting the date and time, tap “SET”.
26
Page 27

CH-2 INPUT
CH-1
3
4
5
2
1
2
3
0
CH-2
AUDIO INPUT
AUTO MANUAL
AUTO MANUAL
FULL AUTO
DOOR LOCK
A E
SET
GAIN
ADJ.
IRISWHT. BAL
SHUTTER
A F
M F
AUDIO
SELECT
INPUT1
INPUT2
- LINE -
- MIC MIC+48V
INPUT1
INPUT2
LMH-
B A -
PRST
CAM/MEDIA
INFO
USER2 USER3USER1
[USER3] button
[USER2] button
[USER1] button
AWB
Tally Lamp
Tally Lamp
TOUCH SCREEN ADJUST
COMMON
1/3
PRESS THE + MARK
1/3
PRESS + MARK AGAIN
CONFIRM THE ADJUSTMENT
Preparations
Assigning Functions to the USER Buttons
This unit comes with three user buttons, [USER1], [USER2], and
[USER3].
A specific function can be assigned to each button according to your
preference.
.
Memo :
0
You can assign “FOCUS ASSIST”, “TELE MACRO”, and
“ZEBRA” respectively to the three user buttons, “USER1”,
“USER2”, and “USER3” in the recording menu. You can also
leave them unassigned. (A p. 63)
Adjusting the Touch Panel Button Position
If the reactive area of the screen is misaligned with the touched area,
adjust the alignment between the button display position and the
reactive area.
0
Select “TOUCH SCREEN ADJUST” in the common menu.
1
Tap “MENU”.
2
Tap “Q” (Common).
3
Tap “TOUCH SCREEN ADJUST”.
.
0
The touch screen adjustment screen appears.
4
Tap “+”. (3 times in total)
Tally Settings
You can select whether to enable the illumination of the tally lamp.
Set using “TALLY” in the common menu. (A p. 64)
When this is set to “ON”, the tally lamp lights up in the recording
mode.
.
.
0
Keep tapping “+” as its position changes with every tap.
5
Tap “+” again to confirm the adjusted
positions. (3 times in total)
.
0
Keep tapping “+” as its position changes with every tap.
0
If areas on the adjustment screen other than the “+” mark
are tapped, errors will occur. In this case, try again from step
4.
27
Page 28

OK
COMPLETED
LANGUAGE
COMMON
ENGLISH
LANGUAGE
Preparations
6
Tap “OK”.
.
0
Setting ends and returns to the menu screen.
Caution :
0
Do not tap areas other than the “+” mark during touch screen
adjustment (steps 4 - 5). Doing so may cause the touch screen
to malfunction.
Memo :
0
Adjust by lightly tapping with a corner of an SD card, etc.
0
Do not press using an object with a sharp tip, and do not press
hard.
Changing the Display Language
The language on the display can be changed.
1
Tap “MENU”.
2
Tap “Q” (Common).
3
Tap “LANGUAGE”.
.
0
Tap ∧ or ∨ to move upward or downward for more selection.
4
Tap to the desired language.
.
28
Page 29

[DOOR LOCK] Lever
Door
Notched
Corner
Face label upward
Write-Protect Switch
Write/Delete Enabled Write/Delete Disabled
Preparations
Inserting an SDHC/SDXC Card
This camera recorder comes with four SDHC/SDXC card slots.
(Slots A, B, C, and D)
1
Set the [STANDBY/ON OFF] switch to [OFF].
2
Open the door.
0
Slide the [DOOR LOCK] lever to the right, and pull the door
toward you.
3
Insert an SDHC/SDXC card with the notched
corner first.
0
To record in the 4K2K mode, insert four SD cards into slots
A to D.
The four media icons light up when SD cards are inserted
into all the slots.
0
When recording in HD quality (1920 mode), insert an SD
card into slot A.
After an SD card is inserted, the media icon for slot A will
light up.
4
Close the door.
0
After closing the door, slide the [DOOR LOCK] lever to the
left, and make sure that the door does not open up by itself.
SDHC/SDXC cards to use
See “SDHC/SDXC Cards” (A p. 11).
Slot Display
The icon of the slot will appear blinking in the following cases.
0
When the card is write-protected
0
When the card in use does not support Class 6 or higher
0
When the card is faulty
0
When there is no card in the slot
When in the 4K2K mode, the four slot display icons will appear
blinking in the following cases.
0
When there is a slot with no card inserted
0
When the combination of the four cards is incorrect
0
When there is an unformatted card
Removing the SDHC/SDXC Card
1
Set the [STANDBY/ON OFF] switch to [OFF].
2
Open the door.
0
Slide the [DOOR LOCK] lever to the right, and pull the door
toward you.
3
Push the SDHC/SDXC card and remove it
from the slot.
.
Caution :
0
The memory card needs to be formatted in advance if it has not
been used for recording in the 4K2K mode before.
See “Formatting (Initializing) SDHC/SDXC Cards” (A p. 30).
0
When you insert the formatted cards, ensure that the
combination and sequence of the four cards are matching
correctly. If the combination or sequence is incorrect, cards
cannot be used.
In order not to forget, take notes on the combination and
sequence of the cards when formatted.
4
Close the door.
0
After closing the door, slide the [DOOR LOCK] lever to the
left, and make sure that the door does not open up by itself.
Memo :
0
Do not touch the metal part of the SDHC/SDXC card when
inserting or removing the SDHC/SDXC card.
Write-Protect Switch on the SDHC/SDXC Card
A Slide the write-protect switch upward to enable writing or
deleting.
B Slide the write-protect switch downward to prevent writing
or deleting. (Recorded data in the card are protected.)
.
29
Page 30

FORMAT SD CARD
COMMON
Preparations
Estimated Recordable Time of SDHC/SDXC Cards
The estimated recordable time is only a guide. Differences may occur depending on the SDHC/SDXC card in use and the battery condition.
Recording
Format
4K2K mode 15 m 30 m 1 h 2 h 3 h 4 h
1920 mode 60p/50p 15 m 35 m 1 h 10 m 2 h 30 m 3 h 50 m 5 h
Quality 4 GB 8 GB 16 GB 32 GB 48 GB 64 GB
UXP 20 m 40 m 1 h 20 m 2 h 50 m 4 h 10 m 5 h 40 m
XP 30 m 1 h 2 h 4 h 6 h 8 h 10 m
SP 40 m 1 h 20 m 2 h 50 m 5 h 50 m 8 h 30 m 11 h 30 m
EP 1 h 40 m 3 h 30 m 7 h 10 m 14 h 40 m 21 h 30 m 28 h 50 m
Memo :
0
If the SDHC/SDXC card contains files recorded by devices other than this camera recorder or files that are saved from a PC, the recordable
time may be shorter or data may not be properly recorded.
4
Select “FILE” or “FILE + MANAGEMENT NO”.
Formatting (Initializing) SDHC/SDXC Cards
The memory card needs to be formatted in advance if it has not
been used for recording in the 4K2K mode before. Format the card
using the camera recorder menu.
Caution :
0
Be sure to format the SDHC/SDXC card on this camera recorder.
SDHC/SDXC cards formatted on a PC and other peripheral
equipment cannot be used on this camera recorder.
0
The cards cannot be used if their combination of the four cards
is incorrect, or when they are not inserted into the correct
positions. Make sure that you remember the combination of the
formatted cards and the positions they should be inserted into.
1
Tap “MENU”.
2
Tap “Q” (Common).
3
Tap “FORMAT SD CARD”.
5
Caution :
Setting Details
FILE Deletes all files on the SD card.
FILE +
MANAGEMENT NO
Deletes all files on the SD card and resets
the folder and file numbers to “1”.
Check the confirmation message, and tap
“YES”.
0
Formatting starts.
0
After formatting is complete, tap “OK”.
0
Not available for selection when no SD card is inserted.
0
All data on the card will be deleted when it is formatted.
Copy all files on the card to a computer before formatting.
0
Make sure that the battery pack is fully charged or connect the
AC adapter as the formatting process may take some time.
.
30
Page 31

Viewing the Viewfinder/LCD
Eyepiece Focus
Lever
Monitor
You can monitor video images on this camera recorder using the
viewfinder or LCD monitor.
Viewing with the viewfinder
o
1
Pull out the viewfinder.
2
Incline the viewfinder vertically to a position
that enables easy viewing.
3
Turn the eyepiece focus lever to adjust the
focus.
Preparations
Relationship between the viewfinder and LCD
o
monitor displays
When “PRIORITY SETTING” (A p. 64) in the common menu is
set to “VIEWFINDER”
VF Status LCD Status Video Output
OFF OFF VF
OFF ON LCD
ON OFF VF
ON ON VF
When “PRIORITY SETTING” in the common menu is set to “LCD
MONITOR”
VF Status
OFF OFF VF
OFF ON LCD
ON OFF VF
LCD Status Video Output
.
Viewing on LCD monitor
o
1
Open the monitor cover
2
Incline the monitor cover to a position that
enables easy viewing.
ON ON LCD
Adjusting the brightness of LCD monitor
o
Set using “MONITOR BRIGHTNESS” in the common menu.
“ MONITOR BRIGHTNESS ” (A p. 64)
.
31
Page 32

Manual Shooting Mode
Full Auto Shooting Mode
2
3
AUTO MAN UAL
FULL AUTO
DOOR LOCK
A E
SET
GAIN
ADJ.
IRISWHT. BAL
SHUTTER
A F
M F
LM-
H-
B A -
PRST
[FULL AUTO] Button
AF
“MF” : Manual Focus Mode
“AF” : Auto Focus Mode
2
3
AUTO MAN UAL
FULL AUTO
DOOR LOCK
A E
SET
GAIN
ADJ.
IRISWHT. BAL
SHUTTER
A F
M F
LM-
H-
B A -
PRST
Focus Switch ([AF/MF])
Shooting
Selecting a Shooting Mode
Selecting the Full Auto / Manual Shooting Mode
There are two adjustment modes for shooting, namely the Full Auto
and Manual modes.
Setting to the Full Auto shooting mode
o
When [FULL AUTO] button is pressed once, the current adjustment
mode is displayed. Pressing [FULL AUTO] button while the mode
is displayed changes the setting.
1
Press the [FULL AUTO] button to display the
Full Auto shooting mode icon (A) at the top of
the screen.
0
Exposure, aperture, shutter speed, and white balance are
adjusted automatically.
Setting to the Manual shooting mode
o
Selecting a Focusing Mode
There are two focusing modes, namely Auto and Manual.
Setting to the Auto Focus mode
o
1
Set the focus switch to [AF] to display the Auto
Focus icon (AF) on the screen.
0
Focus is adjusted automatically.
Setting to the Manual Focus mode
o
1
Set the focus switch to [MF] to display the
Manual Focus icon (MF) on the screen.
0
Adjust the focus manually. (A p. 35)
1
Press [FULL AUTO] button to display the
Manual shooting mode icon (M) at the top of
the screen.
0
Even when the Manual shooting mode is set, the aperture
and shutter speed are adjusted automatically if their icons
are not displayed.
0
To adjust the shutter speed manually, press the
[SHUTTER] button, and change the value using the [ADJ.]
knob.
“Adjusting the Shutter Speed” (A p. 39)
0
To adjust the aperture manually, press the [IRIS] button,
and change the value using the [ADJ.] knob.
“Adjusting the Aperture” (A p. 40)
.
.
.
.
32
Page 33

REC
BATT
REC
W
REC
[REC] Button
[REC] Button
[REC] Button
Shooting
Selecting a Video Recording Format or Recording Mode
This camera recorder supports both 4K2K recording (4K2K mode)
and HD recording (1920 mode).
0
4K2K recording:
Super fine 4K2K video quality (3840 x 2160), which is equivalent
to about four times the resolution of the full high definition quality
0
HD recording:
Full high definition quality (1920 x 1080)
Selecting a Video Recording Format
You can select a video recording format.
0
Select “SYSTEM SELECT” in the recording menu.
Item
3840X2160/60p 4K2K mode
3840X2160/24p
3840X2160/50p
(Select this mode to perform 4K2K
recording.)
Recording Mode
Shooting
Preparation: “Selecting a Shooting Mode” (A p. 32)
Preparation: “Selecting a Video Recording Format or Recording
Mode” (A p. 33)
There is a total of three recording buttons on this camera recorder,
two [REC] buttons (back and top), and one “REC” button on the
touch panel.
You can operate with any of the three buttons.
1
Press the [REC] button.
0
Recording starts.
2
Press the [REC] button.
0
Recording stops.
1920X1080/60i * 1920 mode
1920X1080/60p
1920X1080/50i *
1920X1080/50p
* Setting can be performed in “REC MODE” of the recording menu.
(Select this mode to perform HD recording.)
Memo :
0
The 1920 mode does not allow you to have both the 60i/p and
50i/p frame rates on the same SDHC/SDXC card.
Selecting a Video Recording Mode (HD Recording Only)
You can select a recording quality for HD recording.
0
Select “REC MODE” in the recording menu.
Item
UXP Enables recording in the best picture quality.
XP Enables recording in high picture quality.
SP Enables recording in standard quality.
EP Enables long recordings.
Details
.
Memo :
0
The fan is turned on to protect inside of this unit.
0
Since the operating sounds may incur, the use of an external
microphone is recommended.
0
For long recordings, the file is split into two or more files if the
size exceeds 4GB.
0
Recording stops when there is no more space left on the SDHC/
SDXC card.
0
When the temperature rises during recording, b turns
yellow to alert.
About 4K2K recording (4K2K mode)
o
0
Insert an SDHC/SDXC card into each of slots A to D.
“Inserting an SDHC/SDXC Card” (A p. 29)
0
The memory card needs to be formatted in advance if it has not
been used for recording in the 4K2K mode before.
“Formatting (Initializing) SDHC/SDXC Cards” (A p. 30)
0
If you want to eliminate any seam between two images during
playback, set “EDGE BLENDING” to “16 PIXEL” (default setting).
“EDGE BLENDING” (A p. 62)
About HD recording (1920 mode)
o
0
Insert an SDHC/SDXC card into slot A. (A p. 29)
33
Page 34

1 2 3 4
To [HDMI] Terminal
HDMI Mini Cable
(Sold Separately)
Monitor
1
3
To [HDMI] Terminal
HDMI Mini Cable (Sold
Separately)
Monitor
Shooting
Checking Image on Monitor before Shooting
Recording in 4K2K mode
o
1
Connect to a monitor.
Recording in 1920 mode
o
1
Connect to a monitor.
.
0
Connect all the four [HDMI] terminals to a monitor that
supports 4K2K output.
4K2K output is not possible unless all the four [HDMI]
terminals are connected.
0
If only the [HDMI 1] terminal is connected, images are
output in the 1920 mode.
Memo :
0
When recorded in 4K2K mode, menu won’t be displayed on the
monitor.
0
When the temperature rises during recording, I mark may be
displayed.
Recording is continued even after this mark is displayed, but the
output from [HDMI] terminal will be stopped to protect inside of
this unit.
To play back videos from the monitor again, wait for a while after
recording is completed to connect the HDMI Mini cable, or turn
off and on this unit.
.
0
Connect the [HDMI 1] terminal to the monitor.
Video is not output if the monitor is connected to a terminal
other than [HDMI 1].
34
Page 35

FULL AUTO
DOOR LOCK
A E
SET
GAIN
ADJ.
IRISWHT. BAL
SHUTTER
A F
M F
L-
M-
H-
B -
A -
PRST
TW
WT
Zoom button
Zoom lever
1X
1X
AF
2X
2X
AF
TW
MF
“MF” : Manual Focus Mode
FULL AUTO
DOOR LOCK
A E
SET
GAIN
ADJ.
IRISWHT. BAL
SHUTTER
A F
M F
LMH-
B A -
PRST
Manual Ring
Focus Switch
Shooting
Zoom Operation
Applicable to: Full Auto shooting mode A, Manual shooting mode
M
Adjusts the angle of view.
0
Use the W end (wide angle end) to shoot a wider field of view.
0
Use the T end (telephoto end) to magnify the subject for shooting.
0
Zoom ratio:
10x, optical
20x, dynamic (1920 mode only)*
* Set using “ZOOM” in the recording menu.
“ ZOOM ” (A p. 62)
0
Zooming can be operated using any of the 2 below.
A Camera recorder’s zoom lever on the top surface
B Zoom button on touch panel (W/T)
Adjusting the Focus Manually
Applicable to: Full Auto shooting mode A, Manual shooting mode
M
Setting to the Manual Focus mode
o
1
Set the focus switch to [MF] to display the
Manual Focus icon (MF) on the screen.
.
.
A zoom bar appears during zoom operation.
o
.
2
Turn the manual ring to adjust the focus.
0
Using the Focus Assist function helps to enable easy
focusing.
.
35
Page 36

CH-2 INPUT
CH-1
3
4
5
2
1
2
3
0
CH-2
AUDIO INPUT
AUTO MANUAL
AUTO MANUAL
FULL AUTO
DOOR LOCK
A E
SET
GAIN
ADJ.
IRISWHT. BAL
SHUTTER
A F
M F
AUDIO
SELECT
INPUT1
INPUT2
- LINE -
- MIC MIC+48V
INPUT1
INPUT2
LMH-
B A -
PRST
CAM/MEDIA
INFO
USER2 USER3USER1
Manual Ring
User Buttons
4K
WT
AF
≪PLAY
REC
MENU
10:45AM
4K
REC
4K
REC
Shooting
Using the Focus Assist Function
This feature temporarily switches the screen to black-and-white,
and adds color to the contour of the focused image.
There are two ways to activate the Focus Assist function.
A Set “FOCUS ASSIST” in the recording menu to “ON”.
“ FOCUS ASSIST ” (A p. 60)
B Assign the Focus Assist function to a user button and
press the button.
0
Set any one of “USER1”/“USER2”/“USER3” in the recording
menu to “FOCUS ASSIST”. (A p. 63)
.
Turn the manual ring to add color to where you want to focus.
Using the Magnifying Function
You can ease focusing by magnifying the display of the area you
want to focus.
1
Tap A.
.
2
Tap on the area to magnify.
Disabling Focus Assist
o
Set “FOCUS ASSIST” in the recording menu to “OFF”.
“ FOCUS ASSIST ” (A p. 60)
Alternatively, press the user button that is assigned the Focus Assist
function.
Memo :
0
To change the contour color, set “FOCUS ASSIST COLOR” in
the recording menu.
(“MULTICOLOR”/“RED”/“GREEN”/“BLUE”)
0
Selecting “MULTICOLOR” changes the contour color in
sequence from red to green, and then blue according to the
sharpness of the focus.
0
When using the Focus Assist function at a dark place, the point
where color is added may appear grainy, making the contour
color unclear.
0
Regardless of the setting at “DISPLAY ON TV” in common menu,
the Focus Assist display won’t be output to a monitor that
supports 4K2K output.
“ DISPLAY ON TV ” (A p. 64)
.
0
The “+” mark moves to the tapped position.
3
Tap C.
.
0
The display is magnified with the “+” mark as the center.
0
You can tap the screen to move the display position.
0
Tap D to return to step 2.
Tapping D again at step 2 restores the normal screen.
Memo :
0
Magnified display is only supported in the 4K2K mode.
0
Displays on the monitor that supports 4K2K output will not be
magnified.
36
Page 37

Tele Macro Icon
Zebra Pattern
Shooting
Using the Tele Macro Feature
Applicable to: Full Auto shooting mode A, Manual shooting mode
M
Shortens the closeup distance at the telephoto (T) end of the zoom.
(1 m B approx. 60 cm)
There are two ways to set this feature.
A Set “TELE MACRO” in the recording menu to “ON”.
0
You can only select this setting from the menu in the Manual
mode.
“ TELE MACRO ” (A p. 61)
B Assign the tele macro function to a user button and press
the button.
0
Set any one of “USER1”/“USER2”/“USER3” in the recording
menu to “TELE MACRO”. (A p. 27)
0
When the tele macro feature is turned “ON”, a tele macro icon
appears on the screen.
Displaying the Zebra Pattern
Applicable to: Full Auto shooting mode A, Manual shooting mode
M
During shooting, diagonal lines (zebra pattern) are displayed only
at areas with the specified luminance levels. You can specify the
luminance level range for displaying the zebra pattern.
There are two ways to display the zebra pattern.
A Set “ZEBRA” in the recording menu to “70-80%” or
“OVER100%”.
“ ZEBRA ” (A p. 60)
B Assign the zebra function to a user button and press the
button.
0
Set any one of “USER1”/“USER2”/“USER3” in the recording
menu to “ZEBRA”. (A p. 27)
0
Pressing the user button each time switches the setting in
order of “OFF”, “70-80%”, and “OVER100%”.
Setting Values
o
0
70-80%:
Sections that are close to be over-exposed are displayed in
striped pattern.
0
OVER100%:
Sections that are over-exposed are displayed in striped pattern.
.
.
Clearing the zebra pattern display
o
There are two ways to clear the zebra pattern display.
0
Set “ZEBRA” in the recording menu to “OFF”.
0
Press the user button that is set as “ZEBRA” in the recording
menu.
37
Page 38

AE Value
FULL AUTO
DOOR LOCK
A E
SET
GAIN
ADJ.
IRISWHT. BAL
SHUTTER
A F
M F
LMH-
B A -
PRST
[ADJ.] Knob
[SET] Button
[AE ±] Button
12dB
Gain Value
FULL AUTO
DOOR LOCK
A E
SET
GAIN
ADJ.
IRISWHT. BAL
SHUTTER
A F
M F
LMH-
B A -
PRST
[GAIN] Switch
Shooting
Adjusting the Exposure Manually
Applicable to: Full Auto shooting mode A, Manual shooting mode
M
Generally, the brightness of the subject that is being shot is
automatically adjusted according to the reference values of the
camera. However, the brighter or darker areas of an image may
appear unclear depending on the shooting conditions. To prevent
this from occurring, you can correct the exposure manually.
1
Set to the Manual Exposure mode.
0
Press the [AE ±] button on the recorder unit.
0
The AE value appears on the screen, and the adjustment
mode is enabled.
Adjusting Manual Gain
Applicable to: Manual shooting mode M
You can select the gain of the video amplifier using the [GAIN]
switch on the camera recorder. The default positions of the switch
are as follows.
The light sensitivity can be electrically boosted using the [GAIN]
switch when there is insufficient illumination on the object. (3
positions)
[GAIN] Switch
L 0 dB (No boosting is applied.)
M 9 dB (Boosts sensitivity by about 3 times.)
H 18 dB (Boosts sensitivity by about 8 times.)
Details
.
2
Adjust the exposure.
0
Operate with the [ADJ.] knob on the recorder unit.
0
Turn upward to increase the value and make the image
brighter.
0
Turn downward to decrease the value and make the image
darker.
3
Confirm the setting value.
0
Press the [SET] button on the recorder unit.
0
The manual setting value is set.
(The setting value (-6 to +6) is displayed on the screen.)
.
Setting exposure compensation to Auto
o
1
Press the [AE ±] button several times until the
AE value display disappears.
38
.
.
Memo :
0
The gain value of each position can be set to “GAIN L”/“GAIN M”
/“GAIN H” in the recording menu within the range of “0dB” to
“18dB” (in increments of 3 dB), as well as to “AGC” or “AUTO
SLOW-SHUTTER”. (A p. 61)
0
Boosting the sensitivity causes the screen to appear grainier.
Automatic Gain Mode (Automatic Gain
Adjustment)
Set the camera recorder to the Full Auto shooting mode to activate
the Auto Gain Control mode. The gain of the video amplifier is
automatically set according to the brightness of the object.
(Selecting “AUTO SLOW-SHUTTER” switches to slow shutter,
while selecting any setting other than “AUTO SLOW-SHUTTER”
switches to “AGC”.)
Page 39

Adjusting the Shutter Speed
1/250
Shutter speed
FULL AUTO
DOOR LOCK
A E
SET
GAIN
ADJ.
IRISWHT. BAL
SHUTTER
A F
M F
LMH-
B A -
PRST
[ADJ.] Knob
[SET] Button
[SHUTTER] Button
Applicable to: Manual shooting mode M
The shutter speed can be set to a value according to the user’s
preference. When this is set to Auto, the shutter speed is
automatically controlled.
1
Set to the Manual shooting mode.
2
Set to the shutter speed adjustment mode.
0
Press the [SHUTTER] button to set to the shutter speed
adjustment mode.
0
The last shutter speed setting in the Manual mode is
displayed.
3
Select a shutter speed value.
0
Operate with the [ADJ.] knob.
0
The selected value is displayed.
Shooting
Setting Values
o
0
Frame rate 60/50
1/2, 1/2.5, 1/3, 1/4, 1/5, 1/6, 1/8, 1/10, 1/13, 1/15, 1/20, 1/25, 1/30,
1/40, 1/50, 1/60, 1/80, 1/100, 1/120, 1/160, 1/200, 1/250, 1/320,
1/400, 1/500, 1/640, 1/800, 1/1000, 1/1250, 1/1600, 1/2000,
1/2500, 1/3200, 1/4000
0
Frame rate 24
1/24, 1/32, 1/40, 1/48, 1/60, 1/80, 1/100, 1/120, 1/160, 1/200,
1/250, 1/320, 1/400, 1/500, 1/640, 1/800, 1/1000, 1/1250,
1/1600, 1/2000, 1/2500, 1/3200, 1/4000
Setting shutter speed to Auto
o
1
Press the [SHUTTER] button several times
until the shutter speed value display
disappears.
.
4
Confirm the shutter speed value.
0
Press the [SET] button.
0
Doing so exits the adjustment mode and the shutter speed
is displayed.
.
39
Page 40

F2.8
Aperture value
FULL AUTO
DOOR LOCK
A E
SET
GAIN
ADJ.
IRISWHT. BAL
SHUTTER
A F
M F
LMH-
B A -
PRST
[IRIS] Button
[ADJ.] Knob
[SET] Button
Shooting
Adjusting the Aperture
Applicable to: Manual shooting mode M
The aperture value (F-number) of the lens can be set as follows.
F-number Details
Decrease The subject appears brighter.
The focused range becomes sharper, while the
background is blurred to produce a soft image.
Setting Values
o
0
F2.8 - F5.6 (7 steps)
The open F-number of the aperture varies according to the zoom
position.
Wide-angle (W) end: F2.8
Telephoto (T) end: F4.5
Memo :
0
When zooming to the Tele end, the aperture value is set
according to the zoom and indicated in yellow.
Set the zoom to the wide angle end to enable the smallest Fnumber to be set.
Setting aperture to Auto
o
Increase The subject appears darker.
Background of image becomes focused as well.
1
Set to the Manual shooting mode.
2
Set to the aperture adjustment mode.
0
Press the [IRIS] button to set to the aperture adjustment
mode.
0
The current F-number is displayed.
3
Set the F-number.
0
Operate with the [ADJ.] knob.
0
The selected F-number is displayed.
.
1
Press the [IRIS] button several times until the
F-number display disappears.
4
Confirm the F-number.
0
Press the [SET] button.
0
Doing so exits the adjustment mode and the F-number is
displayed.
.
40
Page 41

WB A
White Balance Icon
FULL AUTO
DOOR LOCK
A E
SET
GAIN
ADJ.
IRISWHT. BAL
SHUTTER
A F
M F
LMH-
B A -
PRST
[WHT.BAL] Switch
AWB
[AWB] Button
Result Display
[AWB] Activated
AUTO WHITE A
AUTO WHITE A
OPERATION
OK
Shooting
Adjusting the White Balance
Applicable to: Manual shooting mode M
1
Set to the Manual shooting mode.
0
Select a white balance type using the [WHT.BAL] switch.
0
You can select one of the three white balance types using the
[WHT.BAL] switch.
[WHT.BAL]
switch
B Switches to the white balance type that is
stored in Position [B]. If automatic white
balance adjustment is performed at this
position, the adjusted white balance is
saved to Position [B].
A Switches to the white balance type that is
stored in Position [A]. If automatic white
balance adjustment is performed at this
position, the adjusted white balance is
saved to Position [A].
PRST(PRESET) Switches to the white balance setting
(“3200K” or “5200K”) in “PRESET TEMP.”
of the recording menu.
“ PRESET TEMP. ” (A p. 60)
Details
Adjusting Automatic White Balance
As the color of the light (color temperature) varies according to the
light source, it is necessary to readjust the white balance when the
main light source illuminating the object changes. You can store two
white balance types in memories [A] and [B].
1
Setting to the Manual shooting mode.
2
Set the [WHT.BAL] switch to [A] or [B].
3
Locate a place with similar lighting conditions
as the object to be shot, place a white object
near the center of the screen and zoom in to fill
the screen with white.
4
Press the [AWB] button.
.
0
“AUTO WHITE *OPERATION” appears when Auto White
Balance is activated.
0
When the correct white balance is achieved, “AUTO
WHITE *OK” appears for about 3 seconds.
.
.
Memo :
0
You can assign the FAW (Full Auto White Balance) mode to the
[WHT.BAL] switch.
“ FAW ” (A p. 61)
.
Caution :
0
Do not use highly reflective objects, such as metals. Doing so
may result in improper white balance adjustment.
0
The Auto White function cannot provide optimum white balance
with an object outside the adjustment range, for example when
it contains only a single color or not enough white color.
41
Page 42

Shooting
Error Message
o
If the auto white balance adjustment is not correctly completed, one
of the following messages will appear for about 5 seconds.
Error Message Status
Adjusting the Camera Image
NG:OBJECT The object used is defective.
Displayed when there is not enough white
color on the object, or when the color
temperature is not suitable.
Use another white object and adjust the
white balance again.
ERROR:LOW
LIGHT
ERROR:OVER
LIGHT
Insufficient illumination.
Displayed when the lighting is dark.
Increase the lighting and adjust the white
balance again.
Excessive illumination.
Displayed when the lighting is too bright.
Decrease the lighting and adjust the white
balance again.
Using the Full Auto White (FAW) Function
The FAW function adjusts the white balance value automatically as
the lighting condition changes.
This mode is convenient when you have no time to adjust the white
balance or when the camera recorder is moved frequently in and
out of places with different lighting conditions.
1
Set to the Manual shooting mode.
Applicable to: Full Auto shooting mode A, Manual shooting mode
M
The picture quality of the camera can be set using the recording
menu below. As the adjustments are shown on the screen, you can
adjust the values while checking the picture quality on the camera.
0
“GAMMA” (A p. 60)
0
“GAMMA LEVEL” (A p. 60)
0
“COLOR MATRIX” (A p. 60)
For details of the respective items, refer to the recording menu.
2
Set “FAW” in the recording menu.
“ FAW ” (A p. 61)
You can assign FAW (Fulltime Auto White balance) to any of
the three positions on the [WHT.BAL] switch ([A], [B],
[PRST(PRESET)]).
3
Set the [WHT.BAL] switch to the position that
is assigned the FAW function.
Memo :
0
Set the camera recorder to the Full Auto shooting mode to
activate the FAW mode. White balance is automatically adjusted
according to the color temperature of the lighting on the object.
0
In these cases, white balance switching with the [WHT.BAL]
selection switch is disabled.
Caution :
0
The FAW function cannot provide optimum white balance with a
subject outside the FAW adjustment range, for example when it
contains only a single color or not enough white color.
0
The accuracy of FAW is inferior to that of Auto White Balance.
0
When the power of the camera recorder is turned on with the
FAW mode selected, it takes about 10 seconds for the FAW
adjustment to complete. Do not start recording during this
interval.
42
Page 43

Image Stabilizer Icon
Backlight Compensation Icon
Touch Priority AE/AF Icon
Shooting
Using the Image Stabilizer Feature
Applicable to: Full Auto shooting mode A, Manual shooting mode
M
Reduces blurring of images due to camera shake.
0
Set “OIS” in the recording menu to “ON”.
“ OIS ” (A p. 61)
.
Memo :
0
When the image appears significantly blurry, correction by the Image
Stabilizer may not be sufficient.
Setting Touch Priority AE/AF
Applicable to: Full Auto shooting mode A, Manual shooting mode
M
Adjusts the focus and brightness automatically based on
information of the touched area.
0
Set “TOUCH PRIORITY AE/AF” in the recording menu to “ON”.
“TOUCH PRIORITY AE/AF” (A p. 61)
.
Setting the Grid
Setting Backlight Compensation
Applicable to: Full Auto shooting mode A, Manual shooting mode
M
You can correct the image when the subject appears too dark due
to backlight.
0
Set “BACKLIGHT COMP.” in the recording menu to “ON”.
“BACKLIGHT COMP.” (A p. 60)
.
Applicable to: Full Auto shooting mode A, Manual shooting mode
M
Displays gridlines to make it easier to detect when the subject
appears slanted.
0
Set “GRID” in the recording menu to “ON”.
“GRID” (A p. 62)
.
43
Page 44

0:00:00:00
0:00:00[000:00]
40SEC
①
②
③
④
CH-2 INPUT
CH-1
3
4
5
2
1
2
3
0
CH-2
AUDIO INPUT
AUTO MANUAL
AUTO MANUAL
FULL AUTO
DOOR LOCK
A E
SET
GAIN
ADJ.
IRISWHT. BAL
SHUTTER
A F
M F
AUDIO
SELECT
INPUT1
INPUT2
- LINE -
- MIC MIC+48V
INPUT1
INPUT2
LMH-
B A -
PRST
CAM/MEDIA
INFO
USER2 USER3USER1
[INFO] Button
0h46m
0h46m
USED
FREE
MAX RECORDING TIME
MIN
MAX TIME
REMAINING BATTERY
Shooting
Setting Time-lapse Recording
Applicable to: Full Auto shooting mode A, Manual shooting mode
M
Enables the changes of a scene that occur slowly over a long period
to be shown within a short time by taking frames of it at a certain
interval.
This is useful for making observations such as the opening of a
flower bud.
0
Set “TIME-LAPSE RECORDING” in the recording menu to “1SEC
INTERVAL”, “5SEC INTERVAL”, or“40SEC INTERVAL”.
(A p. 62)
Memo :
0
A frame is taken at intervals of the selected period.
Indications During Time-Lapse Recording
o
Checking the Remaining Recording Time
Applicable to: Full Auto shooting mode A, Manual shooting mode
M
You can check the remaining recording time on the SDHC/SDXC
card as well as the remaining battery power.
1
Press the [INFO] button.
.
0
Remaining recording time is displayed.
.
NO
A
Display Description
Speed Indicator Displays the recording interval that is
set.
B
Recorded Time Displays the actual recorded time of
the video. Recorded time increases in
units of frames.
C
Remaining
Recording Time
D
Actual Elapsed
Time
Remaining time left to record with the
currently selected video quality.
Displays the actual elapsed time after
recording starts.
.
0
l will not be displayed when the AC adapter is
connected.
0
Remaining recording time is displayed if [INFO] is pressed
one more time.
.
0
Remaining battery power is not displayed while the AC
adapter is connected.
44
Page 45

[INPUT1/INPUT2] terminal
Audio Unit Cable
Built-in microphone
Shooting
Audio Recording
Applicable to: Camera mode
There are two ways to input audio sound.
A Built-in microphone
B [INPUT1] terminal / [INPUT2] terminal
0
The priority order of the input is in the sequence of B>A.
0
When you want to use the built-in microphone, remove the audio
unit cable from the [AUDIO IN] terminal.
0
To use the [INPUT1/INPUT2] terminal, an optional microphone
is needed.
Using the Built-in Microphone
Applicable to: Full Auto shooting mode A, Manual shooting mode
M
Setting the input level.
o
Set “INTERNAL MIC LEVEL” in the recording menu (“-2” to “+2”).
(A p. 62)
Using an External Microphone Connected to the [INPUT1/INPUT2] Terminal
* Microphone is optional.
Applicable to: Full Auto shooting mode A, Manual shooting mode
M
Preparation: Connect a microphone to the [INPUT1/INPUT2]
terminal.
Terminals
INPUT1 Input to [CH1(L)] at all times. Input to [CH2(R)] can
be enabled using the [CH-2 INPUT] switch.
INPUT2 Input to [CH2(R)] can be enabled using the [CH-2
INPUT] switch.
Audio Input
.
Setting the Reference Audio Recording Level
Applicable to: Full Auto shooting mode A, Manual shooting mode
M
Menu setting
o
Set “AUDIO REF. LEVEL” in the recording menu.
(“-20dB”/“-12dB”) (A p. 62)
Selecting [CH-2] audio
o
Configure the [CH-2 INPUT] switch.
0
INPUT1: Inputs audio from the [INPUT1] connector to [CH-2].
0
INPUT2: Inputs audio from the [INPUT2] connector to [CH-2].
Memo :
0
Audio from the [INPUT1] connector is also input to [CH-1]
regardless of the setting.
Selecting the audio input to the [INPUT1] or [INPUT2]
o
terminal
Configure the [AUDIO INPUT 1/2] switch.
Item
LINE Use this setting when connecting to an audio device
or other equipment.
MIC Use this setting when connecting to a dynamic
microphone.
MIC+48V Use this setting when connecting to a microphone
that requires a +48V power supply (phantom
microphone).
Details
Caution :
0
When connecting a device that does not require a +48 V power
supply, make sure that it is not set to the [MIC+48V] position.
45
Page 46

CH-2 INPUT
CH-1
3
4
5
2
1
2
3
0
CH-2
AUDIO INPUT
AUTO MANUAL
AUTO MANUAL
FULL AUTO
DOOR LOCK
A E
SET
GAIN
ADJ.
IRISWHT. BAL
SHUTTER
A F
M F
AUDIO
SELECT
INPUT1
INPUT2
- LINE -
- MIC -
MIC+48V
INPUT1
INPUT2
LMH-
B A -
PRST
CH-2 INPUT
CH-1
3
4
5
2
1
2
3
0
CH-2
AUDIO INPUT
AUTO MANUAL
AUTO MANUAL
AUDIO
SELECT
INPUT1
INPUT2
- LINE -
- MIC MIC+48V
INPUT1
INPUT2
[CH1/CH2 AUDIO SELECT ] Switch
[CH-2 INPUT ]
Switch
[CH1/CH2] recording level adjustment knob
[AUDIO INPUT 1/2 ] Switch
Headphone jack
FULL AUTO
DOOR LOCK
A E
SET
GAIN
ADJ.
IRISWHT. BAL
SHUTTER
A F
M F
LMH-
B A -
PRST
[ADJ.] Knob
Shooting
Adjusting the audio recording level
o
Select a method for adjusting the audio recording level.
0
Set the [CH1/CH2 AUDIO SELECT] switch.
0
Select whether to set each channel to the [AUTO] or [MANUAL]
mode.
AUTO:
Use this setting to enable the auto adjustment mode.
MANUAL:
Use this setting to enable the manual adjustment mode.
Adjust the audio recording level using the [CH1/CH2] recording
level adjustment knob.
.
Monitoring Audio Sound Using a Headphone
Applicable to: Camera mode and Media mode
1
Connect the headphone.
0
Connect the headphone to the headphone jack.
Reducing Wind Noise
Wind noise for each microphone can be reduced.
Menu setting
o
Set each of the items on “WIND CUT” in the recording menu to “ON”.
“WIND CUT” (A p. 62)
.
2
Set the headphone sound to mixed sound or
stereo sound.
0
Set “AUDIO MONITOR” in the recording menu.
(“MIX”/“STEREO”) (A p. 63)
3
Adjust the volume level of the headphones.
0
Operate with the [ADJ.] knob.
.
Memo :
0
The built-in speaker is usable only in the Media mode. Audio is
not output from the built-in speaker during Camera mode.
0
Audio level in the Camera mode and Media mode can be
adjusted separately.
0
When in the Media mode, the volume of the headphone and
speaker are adjusted at the same time.
0
The built-in speaker cannot be used when the headphone jack
is connected.
46
Page 47

Playing Back Videos
4K
WT
AF
≪PLAY
REC
MENU
10:45AM
ABCD
60P
60P
4K
4K
≪REC
MENU
WT
AF
≪PLAY
REC
MENU
10:45AM
A
60P
60P
≪REC
MENU
You can select and play back the recorded videos from an index
screen (thumbnail display).
Playback in 4K2K mode
o
Preparation: Insert into slots A to D the four SDHC/SDXC cards that
are used for recording in the 4K2K mode
“Inserting an SDHC/SDXC Card” (A p. 29)
1
Tap “<<PLAY” to select the playback mode.
Playback
Playback in 1920 mode
o
Preparation: Insert into slot A an SDHC/SDXC card used for
recording in the 1920 mode.
“Inserting an SDHC/SDXC Card” (A p. 29)
1
Tap “<<PLAY” to select the playback mode.
.
0
While in the Camera mode, you can turn the [CAM/MEDIA]
switch or press the [CAM/MEDIA] button to switch this unit
to the Media mode and start playback.
2
Tap on the file to start playback.
.
0
While in the Camera mode, you can turn the [CAM/MEDIA]
switch or press the [CAM/MEDIA] button to switch this unit
to the Media mode and start playback.
2
Tap on the file to start playback.
.
0
Tap e during playback to pause.
0
Tap u during playback to return to the index screen.
Caution :
0
A message showing “INCORRECT COMBINATION OF
CARDS” appears if the SDHC/SDXC card combination is
incorrect. Insert the right SDHC/SDXC card combination.
0
A message showing “CARD NOT INSERTED IN THE
CORRECT SLOT” appears if an SDHC/SDXC card is not
inserted into the correct slot. Insert the card again into the correct
slot.
.
47
Page 48

60P
4K
0:01:23 0:12:34
Overlap
60P
4K
0:01:23 0:12:34
Overlap
60P
4K
0:01:23 0:12:34
Overlap
60
P
0:01:23
0:12:34
O
verla
p
FULL AUTO
DOOR LOCK
A E
SET
GAIN
ADJ.
IRISWHT. BAL
SHUTTER
A F
M F
LMH-
B A -
PRST
[ADJ.] Knob
Playback
Playing Back in Magnified Display
You can play back in magnified display to view the details.
1
Tap A.
.
2
Tap on the area to magnify.
Adjusting the Volume of Videos
The volume level of the playback video can be adjusted.
1
Tap U.
.
2
Adjust the volume level
.
0
The “+” mark moves to the tapped position.
3
Tap C.
.
0
The display is magnified with the “+” mark as the center.
0
You can tap the screen to move the display position.
0
Tap D to return to step 2.
Return to the playback screen by tapping D again in the
step 2 screen.
Memo :
0
Magnified display is only supported in the 4K2K mode.
0
Displays on the monitor that supports 4K2K output will not be
magnified.
.
.
0
Raise volume: turn the [ADJ.] knob in the “+” direction, or
tap “+”
0
Lower volume: turn the [ADJ.] knob in the “-” direction, or
tap “-”
0
Tap Ð to exit volume adjustment.
Memo :
0
The built-in speaker is usable only in the Media mode. Audio is
not output from the built-in speaker during Camera mode.
0
When in the Media mode, the volume of the headphone and
speaker are adjusted at the same time.
0
The built-in speaker cannot be used when the headphone jack
is connected.
48
Page 49

CH-2 INPUT
CH-1
3
4
5
2
1
2
3
0
CH-2
AUDIO INPUT
AUTO MANUAL
AUTO MANUAL
FULL AUTO
DOOR LOCK
A E
SET
GAIN
ADJ.
IRISWHT. BAL
SHUTTER
A F
M F
AUDIO
SELECT
INPUT1
INPUT2
- LINE -
- MIC MIC+48V
INPUT1
INPUT2
LMH-
B A -
PRST
CAM/MEDIA
INFO
USER2 USER3USER1
[INFO] Button
60P
4K
0:01:23 0:12:34
Overlap
:
:
:
:
:
:
:
EDGE BLENDING
FOLDER
FILE
PROTECT
QUALITY
PB TIME
DATE/TIME
ABCD
60P
60P
4K
4K
≪REC
MENU
JAN.14JAN.12
Playback
Checking the Recording Date and Other Information
You can view the recording information of the recorded videos.
A Press the INFO button while playback of the video is
paused.
.
0
You can display the recording date and duration of the
selected file.
Index Screen Display
.
Display
A
Date Moves to the previous/next date
B
< Displays the previous index screen
(thumbnail display)
0
You can perform the same operation with
the zoom lever.
C
> Displays the next index screen (thumbnail
display)
0
You can perform the same operation with
the zoom lever.
Description
D
Thumbnail
(File)
.
Tap on thumbnail - Starts playback
Drag to right - Scrolls to the right to show the
previous index screen (thumbnail display)
Drag to left - Scrolls to the left to show the
next index screen (thumbnail display)
E
<<REC Switches to the recording mode.
F
A
Displays the index screen (thumbnail
display) to perform deletion
G
MENU Displays the menu screen
49
Page 50

60P
4K
0:01:23 0:12:34
Overlap
WT
AF
≪PLAY
REC
MENU
10:45AM
A
60P
60P
≪REC
MENU
PLAYBACK OTHER FILE
VIDEO
Playback
Screen Display During Playback
.
Display
A
Timeline Bar Enables to change the playback position
by tapping the desired scene.
B
Pointer Displays the current estimated playback
position within the scene
C
D
A
h
Magnifies the display.
Returns to the beginning of the scene
Description
Playing a Video with Defective Management Information
The management information of a video may be damaged if
recording is not performed correctly, such as turning off the power
in the middle of recording. You can perform the following operations
to play back the videos with defective management information.
1
Tap “<<PLAY” to select the playback mode.
.
2
Tap “MENU”.
E
j
E
l
F
d / e Playback/pause
G
i
G
k
H
g
I
<<REC Switches to the recording mode.
J
u
K
A
L
U
M
MENU Displays the menu screen
Starts reverse search.
Reverse slow-motion/Press and hold to
start reverse slow playback (1920 mode
only)
Starts forward search.
Forward slow-motion/Press and hold to
start slow playback (1920 mode only)
Advances to the next scene.
Stop (returns to index screen)
Deletes the selected scene.
Adjusts the volume.
Memo :
0
Tap or drag on the operation area of the touch screen.
0
Operations buttons on the touch screen disappear if the unit is
not operated for about 5 seconds. Tap on the screen to display
the buttons again.
Caution :
0
This unit is a microcomputer-controlled device. Electrostatic
discharge, external noise and interference (from a TV, a radio,
etc.) might prevent it from functioning properly.
In such a case, turn off the power, then remove the AC adapter
and battery pack. This unit will be reset.
.
3
Tap “PLAYBACK OTHER FILE”.
.
50
Page 51

4
A
60P
60P
MENU
≪REC
OTHER FILE
Tap on the file to start playback.
.
Memo :
0
An MTS file is created in the EXTMOV folder when management
information is corrupted.
0
Depending on the condition of the damaged file, playback might
fail or may not run smoothly.
0
Files recorded in the 4K2K mode are not displayed.
Playback
Viewing Images on a Monitor
You can connect this camera recorder to a monitor that is equipped
with an HDMI terminal.
0
Use a High Speed HDMI Mini Cable for the HDMI mini cable.
0
Refer also to the instruction manual of the monitor in use.
Caution :
0
Do not remove the SD card or perform any other operation (such
as turning off the power) while accessing files. Also, be sure to
use the provided AC adapter, as the data on the recording
medium may be corrupted if the battery becomes exhausted
during operation. If the data on the SD card becomes corrupted,
format the SD card..
“Formatting (Initializing) SDHC/SDXC Cards” (A p. 30)
Memo :
0
Change the settings in “HDMI OUTPUT” of the common menu
as necessary.
“ HDMI OUTPUT ” (A p. 64)
0
When connected to the monitor via an HDMI cable, images and
sounds may not be output properly depending on the monitor
connected. In such cases, perform the following operations.
- Disconnect the HDMI cable and connect it again.
- Turn off and on this unit again.
0
For questions about the monitor or method of connection,
contact your monitor’s manufacturer.
51
Page 52

1 2 3 4
To [HDMI] Terminal
HDMI Mini Cable
(Sold Separately)
Monitor
A
U
D
IO
I
M
IC
N
O
P
E
N
AC Adapter
To AC Outlet
(110 V to 240 V)
[DC] Terminal
HDMI
HDMI
ABCD
60P
60P
4K
4K
≪REC
MENU
Playback
Playing Videos Recorded in 4K2K Mode
1
Connect to a monitor.
0
Set the [STANDBY/ON OFF] switch to [OFF].
2
Connect the AC adapter to the [DC] terminal
.
3
Turn on the power and set to the Playback
mode.
0
“Turning On the Power” (A p. 25)
0
“Select the playback mode.” (A p. 47)
4
Press the external input button on the monitor
to switch to the input from this unit via the
connected connector.
.
0
Connect all the four [HDMI] terminals to a monitor that
supports 4K2K output.
4K2K output is not possible unless all the four [HDMI]
terminals are connected.
0
If only the [HDMI 1] terminal is connected, images are
output in the 1920 mode.
.
5
Play back a file.
.
0
Displayed on the top left (1/4 of the monitor) when the index
screen for the 4K2K mode is displayed on the monitor
corresponding to the 4K2K output.
“Playing Back Videos” (A p. 47)
Memo :
0
Buttons are displayed on the top left (1/4 of the monitor) when
the 4K2K video is displayed on the monitor corresponding to the
4K2K output.
52
Page 53

1
3
To [HDMI] Terminal
HDMI Mini Cable (Sold
Separately)
Monitor
A
U
D
IO
I
M
IC
N
O
P
E
N
AC Adapter
To AC Outlet
(110 V to 240 V)
[DC] Terminal
HDMI
HDMI
A
60P
60P
≪REC
MENU
Playback
Playing Videos Recorded in 1920 Mode
1
Connect to a monitor.
0
Set the [STANDBY/ON OFF] switch to [OFF].
2
Connect the AC adapter to the [DC] terminal
.
3
Turn on the power and set to the Playback
mode.
0
“Turning On the Power” (A p. 25)
0
“Select the playback mode.” (A p. 47)
4
Press the external input button on the monitor
to switch to the input from this unit via the
connected connector.
.
0
Connect the [HDMI 1] terminal to the monitor.
Video is not output if the monitor is connected to a terminal
other than [HDMI 1].
.
5
Play back a file.
.
“Playing Back Videos” (A p. 47)
53
Page 54

60P
4K
0:01:23 0:12:34
Overlap
NOYES
(REMAINING SCENES: 0030)
DELETE?
4K
WT
AF
≪PLAY
REC
MENU
10:45AM
ABCD
60P
60P
4K
4K
≪REC
MENU
ABCD
60P
60P
4K
4K
QUITSETREL ALLSEL ALL
DELETE
ABCD
60P
60P
4K
4K
SETREL ALLSEL ALL
DELETE
RETURN
QUITEXECUTE
(REMAINING SCENES: 0030)
DELETE?
Playback
Deleting Unwanted Files
If the remaining space on the SD card is running low, erase any
unwanted videos.
Memo :
0
Deleted files cannot be restored.
0
Files that are protected cannot be deleted.
0
Be sure to back up important files on a PC.
Deleting the Currently Displayed File
Deletes the currently displayed file.
1
Tap A.
2
Tap A.
.
3
Tap on the files to delete.
.
2
Tap “YES”.
.
0
Tap h / g to select the previous or next file.
0
When no file remains, the screen returns to the index
screen.
Deleting Selected Files
Deletes the selected files.
.
0
P appears on the selected files.
To remove P from a file, tap on the file again.
0
Tap “SEL ALL” to select all files.
0
Tap “REL ALL” to release all selections.
4
Tap “SET”.
.
5
Tap “EXECUTE” to confirm the deletion.
1
Tap “<<PLAY” to select the playback mode.
.
54
.
0
After deleting is complete, tap “OK”.
0
To cancel the deletion, tap “QUIT”.
Page 55

60P
4K
0:01:23 0:12:34
Overlap
PROTECT/CANCEL
VIDEO
NOYES
PROTECT?
4K
WT
AF
≪PLAY
REC
MENU
10:45AM
ABCD
60P
60P
4K
4K
≪REC
MENU
PROTECT/CANCEL
VIDEO
ABCD
60P
60P
4K
4K
PROTECT/CANCEL
SETREL ALLSEL ALL
Playback
Protecting Files
Protect important videos to prevent them from being deleted
accidentally.
Caution :
0
When an SD card is formatted, even the protected files will be
deleted.
Protecting/Releasing Protection of the
Currently Displayed File
Protects or releases protection of the currently displayed file.
1
Tap “MENU”.
Protecting/Releasing Protection of Selected
Files
Protects or releases protection of the selected files.
1
Tap “<<PLAY” to select the playback mode.
.
2
Tap “MENU”.
.
2
Tap “PROTECT/CANCEL”.
.
3
Tap “YES”.
.
0
Tap h / g to select the previous or next file.
0
After protection is complete, tap “OK”.
.
3
Tap “PROTECT/CANCEL”.
.
4
Tap on the files to protect or release protection
of.
.
0
P appears on the selected files.
To remove P from a file, tap on the file again.
0
P is displayed on the files that are already protected. To
release protection of a file, tap on the file such that P is
removed.
0
Tap “SEL ALL” to select all files.
0
Tap “REL ALL” to release all selections.
55
Page 56

ABCD
60P
60P
4K
4K
PROTECT/CANCEL
SETREL ALLSEL ALL
Playback
5
Tap “SET” to complete the setting.
.
0
Protect marks I appear on the selected files. Protect
marks I disappear from the deselected files.
56
Page 57

Copying to Computer
A
U
D
IO
I
M
IC
N
O
P
E
N
[USB] Terminal
USB Cable (Sold Separately)
Computer
A
U
D
IO
I
M
IC
N
O
P
E
N
AC Adapter
To AC Outlet
(110 V to 240 V)
[DC] Terminal
You can read and copy the files on the SD card by connecting this
unit to a computer using a USB cable.
1
Connect to a computer.
3
Windows
From the “Start” menu, select “Computer”
(Windows 7/Windows Vista)/“My Computer”
(Windows XP), and click the [JVCCAM_SDA]/
[JVCCAM_SDB]/[JVCCAM_SDC]/
[JVCCAM_SDD] (4K2K mode) or the
[JVCCAM_SD] (1920 mode) icon.
Mac
Double-click the “No Name” icon, and click the
[JVCCAM_SDA]/[JVCCAM_SDB]/
[JVCCAM_SDC]/[JVCCAM_SDD] (4K2K
mode) or the [JVCCAM_SD] (1920 mode)
icon.
0
Open the folder with the desired files.
“List of Files and Folders” (A p. 58)
4
Copy the files to any folder in the computer
(desktop, etc).
Caution :
0
When the folders or files are deleted/moved/renamed in the
computer, they cannot be played back on this unit anymore.
Copy
.
0
Set the [STANDBY/ON OFF] switch to [OFF].
2
Connect the AC adapter to the [DC] terminal
.
0
Turn on the power. (A p. 25)
0
The subsequent operations are to be performed on the
computer.
Memo :
0
Files cannot be written to the SD card.
0
To edit/view the files, use a software that supports AVCHD
(video)/MP4 (video) files.
0
The above operations on computer may vary with the system
used.
Disconnecting this Unit from Computer
Windows
o
1
Click “Safely Remove Hardware and Eject
Media”.
2
Click “Safely Remove USB Mass Storage
Device”.
3
(For Windows Vista) Click “OK”.
4
Disconnect the USB cable and close the LCD
monitor.
Mac
o
1
Throw the “No Name” icon into the trash can.
57
Page 58

[JVCCAM_SDA]~
[JVCCAM_SDD]
[JVCCAM_SD]
[DCIM]
[JVC] [JMAV]
[EXTMOV]
[DCIM]
[PRIVATE]
MOV_0001.MTS
MOV_0002.MTS
MOV_0003.MTS
…
…
…
[**A_0000]
[**B_0000]
[**C_0000]
[**D_0000]
[CLPEXT]
[MP4]
[THINF]
INDEX.NPL
**A_0001.MP4
**A_0002.MP4
**A_0003.MP4
…
…
**000.MTS
**001.MTS
**002.MTS
[100JVCSO]
[101JVCSO]
[102JVCSO]
[AVCHD] [BDMV]
[STREAM]
[BACKUP]
[CLIPINF]
[PLAYLIST]
INDEX.BDM
MOVIEOBJ.BDM
[AVCHDTN]
(Slot D Directory)
(Slot C Directory)
(Slot B Directory)
(Slot A Directory)
(Management File)
(Video file recorded in the
4K2K mode. (Extension
is MP4.))
(Formatting in 4K2K
mode)
(Formatting in 1920
mode)
**: Unique Number (Last 2 Digits of
Unit Serial Number)
(Files recorded in 1920 mode with
defective management information)
(Video file recorded in the 1920 mode.
(Extension is MTS.))
(Slot A)
Copy
List of Files and Folders
Folders and files are created in the SD card as shown below.
They are created only when necessary.
.
Caution :
0
When the folders or files are deleted/moved/renamed in the computer, they cannot be played back on this unit anymore.
58
Page 59

4K
WT
AF
≪PLAY
REC
MENU
10:45AM
FOCUS ASSIST
VIDEO
ON
OFF
FOCUS ASSIST
4K
WT
AF
≪PLAY
REC
MENU
10:45AM
CLOCK ADJUST
COMMON
Settings Menu
Operating the Menu
There are two types of menus in this unit.
0
Main menu:
Menu that contains all the items specific to the video recording
and video playback respectively.
0
“Q” (Common) menu in main menu:
Menu that contains all common settings related to the video
recording and playback modes.
Operating the Main Menu
You can configure various settings using the menu.
1
Tap “MENU”.
0
The menu differs according to the mode in use.
Operating the Common Menu
You can configure common setting items regardless of the mode
using the common menu.
1
Tap “MENU”.
0
The menu differs according to the mode in use.
.
2
Tap “Q” (Common).
.
2
Tap the desired menu.
.
0
Tap ∧ or ∨ to move upward or downward for more selection.
3
Tap the desired setting.
.
3
Tap the desired setting.
.
0
Tap ∧ or ∨ to move upward or downward for more selection.
Memo :
0
To exit setting: tap “Д (quit).
0
To return to the previous screen: tap “J” (return)
0
To display Help: tap “K” (help), and tap the item.
0
Help file may not be available for some items.
Memo :
0
0
0
0
.
To exit setting: tap “Д (quit).
To return to the previous screen: tap “J” (return)
To display Help: tap “K” (help), and tap the item.
Help file may not be available for some items.
59
Page 60

Settings Menu
Recording Menu
You can change the recording settings in this menu.
Setting Details
FOCUS ASSIST When this is set to “ON”, the focused subject is outlined in color for easier focusing.
Memo :
0
When FOCUS ASSIST is enabled, the image becomes black and white, while the outline of the focused
object is displayed in the selected color. Change outline color if it becomes difficult to see.
FOCUS ASSIST COLOR For setting the color of the outline of the focused object when “FOCUS ASSIST” is used.
0
Select “MULTICOLOR”, “RED”, “GREEN”, or “BLUE”.
ZEBRA Diagonal lines (zebra pattern) are displayed only at areas with the specified luminance levels. You can use
GAMMA For adjusting the gamma curve that determines the gradation expression.
GAMMA LEVEL For adjusting the GAMMA LEVEL.
COLOR MATRIX For setting the COLOR MATRIX.
BACKLIGHT COMP. Set this to “ON” to correct the subject that appears dark under backlight.
this to check the bright areas (blowout) and adjust the brightness.
OFF: Deactivates the function.
70-80%: Sections that are close to be over-exposed are displayed in striped pattern.
OVER100%: Sections that are over-exposed are displayed in striped pattern.
OFF: Deactivates the function.
STANDARD: shows a standard gamma curve.
CINEMA: Sets to a gamma curve with similar gradation to the screen characteristics of movies.
0
This item can be specified separately when “GAMMA” is set to “STANDARD” or “CINEMA”.
0
Tap ∧ or ∨, or turn the [ADJ.] knob to set the level (MIN (-5) - NORMAL (0) - MAX (+5)).
Increase value: enhances the gradation of black. However, the gradation of bright areas deteriorates.
Decrease value: enhances the gradation of bright areas. However, the gradation of black deteriorates.
OFF: turns off the COLOR MATRIX feature.
STANDARD: sets to the standardCOLOR MATRIX.
CINEMA VIVID COLOR: Sets to a vivid COLOR MATRIX that is similar to the screen characteristics of movies.
CINEMA SUBDUED COLOR: Sets to a subdued COLOR MATRIX that is similar to the screen characteristics
of movies.
PRESET TEMP. For setting the basic color temperature during manual shooting when the [WHT.BAL.] switch is set to
[PRST(PRESET)].
3200K: sets the basic color temperature to3200K. (For use in a low color temperature environment, such as
under a halogen lamp.)
5200K: sets the basic color temperature to5200K. (For use in a high color temperature environment, such as
under sunlight.)
Memo :
0
This feature is not available during auto shooting.
0
This feature is not available when “FAW” is set to “PRESET”.
60
Page 61

Setting Details
Settings Menu
FAW For setting the [WHT.BAL.] switch position to assign the FAW (Full Auto White Balance) function to during
manual shooting.
Not set: FAW function is not assigned.
A: assigns FAW to the A position.
B: assigns FAW to the B position.
PRESET: assigns FAW to the PRESET position.
Memo :
0
This is fixed at FAW during auto shooting.
GAIN L
GAIN M
GAIN H
For setting the gain value of each position on the [GAIN] switch during manual shooting.
0dB/3dB/6dB/9dB/12dB/15dB/18dB: fixes gain value at the set value.
AGC: sets gain automatically.
AUTO SLOW-SHUTTER: sets gain automatically with the combined use of AUTO SLOW-SHUTTER.
Memo :
0
During auto recording, this is set to AGC or AUTO SLOW-SHUTTER.
TOUCH PRIORITY AE/AF
When this is set to “ON”, recording is performed while automatically adjusting the tapped area (fixed position)
with appropriate focus and brightness. In addition, a white frame appears around the tapped area.
0
To reset, tap the desired position (face/color/area) again.
0
To cancel the Area Select, tap the white frame.
Memo :
0
Settings are canceled when zoom operation is performed.
0
Subjects near the sides of the LCD monitor may not respond or be recognized when tapped. In this case,
move the subject to the center and tap again.
TELE MACRO Zooms to the telephoto (T) end during manual shooting for a closeup shot.
OFF: This is the normal setting. Enables closeup shots up to about 1 m.
ON: enables theTELE MACRO setting. You can take closeup shots from up to a distance of about 60 cm.
Memo :
0
This setting is not available in the menu during auto recording.
0
When you are not taking close-up shots, set to “OFF”.
Shooting in the “ON” setting may cause the image to turn out blurry.
OIS When this is set to “ON”, camera shake during recording can be effectively reduced.
SYSTEM SELECT For setting the recording resolution and frame rate.
4K2K recording (4K2K mode)
3840X2160/60p: resolution 3840 x 2160, frame rate 60p
3840X2160/24p: resolution 3840 x 2160, frame rate 24p
3840X2160/50p: resolution 3840 x 2160, frame rate 50p
HD recording (1920 mode)
1920X1080/60i: resolution 1920 x 1080, frame rate 60i
1920X1080/60p: resolution 1920 x 1080, frame rate 60p
1920X1080/50i: resolution 1920 x 1080, frame rate 50i
1920X1080/50p: resolution 1920 x 1080, frame rate 50p
0
The camera reboots each time this setting is altered.
61
Page 62

Settings Menu
Setting Details
REC MODE For setting the image quality when “SYSTEM SELECT” is in the 1920 mode.
UXP: Enables recording in the best picture quality.
0
Applies to Blu-ray discs only. Videos taken in high-definition quality cannot be saved to DVDs.
XP: Enables recording in high picture quality.
SP: Enables recording in standard quality.
EP: enables long recording.
Memo :
0
This setting is not available when “SYSTEM SELECT” is set to the 4K2K mode.
0
This setting is not available when the frame rate is 60p or 50p.
EDGE BLENDING Overlaps the seam of four images when “SYSTEM SELECT” is set to the 4K2K mode.
0 PIXEL: does not overlap the seam of the images during recording.
16 PIXEL: record with the borders overlapped. (A black band will appear on up, down, left and right).
ZOOM Sets the maximum zoom ratio.
10x/OPTICAL: Enables recording with 1 - 10x optical zoom. Set this when dynamic zoom is not desired.
20x/DYNAMIC: Enables recording with 1 - 10x optical zoom and 11 - 20x digital zoom.
Memo :
0
This setting is not available when “SYSTEM SELECT” is set to the 4K2K mode.
WIND CUT Setting this to “ON” reduces any noise caused by the wind.
Memo :
0
You can specify a setting for each of the [INPUT1] (microphone), [INPUT2] (microphone), and [MIC]
(microphone/built-in microphone) terminals.
GRID Setting this to “ON” displays gridlines (GRID) to make it easier to detect when the subject appears slanted.
TIME-LAPSE
RECORDING
This function enables the changes of a scene that occur slowly over a long period to be shown within a short
time by taking frames of it at a certain interval.
OFF: disables TIME-LAPSE RECORDING.
1SEC INTERVAL: records a frame at 1-second intervals. Recorded videos are played back at a 30x speed
(when recorded at 60i).
5SEC INTERVAL: records a frame at 5-second intervals. Recorded videos are played back at a 150x speed
(when recorded at 60i).
40SEC INTERVAL: records a frame at 40-second intervals. Recorded videos are played back at a 1200x
speed (when recorded at 60i).
Memo :
0
Audio cannot be recorded during TIME-LAPSE RECORDING.
0
DuringTIME-LAPSE RECORDING, zooming and image stabilizer are not available.
0
When recording is stopped with the recorded time less than “0:00:00:17”, the video will not be saved.
0
Settings of TIME-LAPSE RECORDING are reset when the power is turned off. To start time-lapse recording
again, it is necessary to make the selection once more.
0
Recording stops automatically 99 hours after it is started.
0
Make use of a tripod and AC adapter for TIME-LAPSE RECORDING with long intervals.
It is also recommended to fix the focus and white balance manually.
AUDIO REF. LEVEL For setting the audio reference level.
-20dB: Outputs signals of the reference level when the meter is at -20 dBFS.
-12dB: Outputs signals of the reference level when the meter is at -12 dBFS.
INTERNAL MIC LEVEL For setting the input level of the built-in microphone (-2 (low sensitivity) ~ 0 (standard) ~ +2 (high sensitivity)).
62
Page 63

Setting Details
AUDIO MONITOR For setting the audio sound of the headphone.
MIX: Outputs mixed sound.
STEREO: Outputs stereo sound.
MIC LEVEL METER Setting this to “ON” displays the microphone level screen.
Settings Menu
USER1
USER2
USER3
You can assign any one of the following functions to each of the [USER1], [USER2], and [USER3] buttons.
0
“FOCUS ASSIST”, “TELE MACRO”, “ZEBRA”, “NONE”.
The functions are assigned as follows in the default setting.
USER1: FOCUS ASSIST
USER2: TELE MACRO
USER3: ZEBRA
Playback Menu
You can change the playback settings in this menu.
Setting
PROTECT/CANCEL Protects files from being deleted accidently.
Memo :
0
When the recording media is formatted, even the protected files will be deleted.
PLAYBACK OTHER
FILE
Plays videos recorded in the HD mode with defective management information.
Memo :
0
Files recorded in the 4K2K mode are not shown.
0
Depending on the condition of the damaged file, playback might fail or may not run smoothly.
Details
K2 TECHNOLOGY Setting this to “ON” reproduces small or high-pitched sounds that cannot be recorded during recording, and
plays back with a sound quality close to the original.
Common Menu
Setting Details
CLOCK ADJUST Resets the current time or sets to the local time when using this unit overseas.
DATE DISPLAY STYLE Sets the order of year, month, day and the time display format (24H/12H).
Memo :
0
Tap the bottom of “DATE STYLE”, then tap ∧ or ∨ to set the order of year, month, and day.
0
Tap the bottom of time, then tap ∧ or ∨ to set the time display format.
0
For date display, set to any format from “year.month.day”, “month.day.year”, and “day.month.year”.
0
For time display, set to any format from “12h” and “24h”.
LANGUAGE For setting the language used for screen displays such as menus.
“Changing the Display Language” (A p. 28)
63
Page 64

Settings Menu
Setting Details
MONITOR
BRIGHTNESS
OPERATION SOUND When this is set to “ON”, a sound is generated during operation.
AUTO POWER OFF Setting this to “ON” turns off the power (when using battery) or sets to the standby mode (when using AC
TALLY Setting this to “ON” turns on the tally lamp.
PRIORITY SETTING For setting whether to show the display on the LCD screen or viewfinder if both are set to ON.
TOUCH SCREEN
ADJUST
DISPLAY ON TV Set to “ON” to displays icons and date/time on a TV screen.
Sets the brightness of the LCD monitor.
AUTO: Sets the brightness automatically to “4” when using outdoors and to “3” when using indoors.
4: Brightens the backlight of the monitor regardless of the surrounding conditions.
3: Sets to the standard brightness.
2: Darkens the backlight of the monitor regardless of the surrounding conditions.
1: Sets to dim brightness. Helps conserve the battery life when selected.
adapter) if this unit is not operated for five minutes.
LCD MONITOR: assigns priority to LCD MONITOR.
VIEWFINDER: assigns priority to viewfinder.
For making adjustments when the response position of the buttons on the touch screen is misaligned.
“Adjusting the Touch Panel Button Position” (A p. 27)
Memo :
0
When “HDMI OUTPUT” is set to “480p/576p”, or connected to the monitor that supports only 480p/576p
output, the monitor display is the same as the LCD monitor, regardless of the setting at “DISPLAY ON TV”.
HDMI OUTPUT Sets the output from the HDMI terminal of this unit when it is connected to a HDMI terminal of the monitor.
AUTO: Resolution is automatically set according to the connected monitor. Use this setting under normal
circumstances.
480p/576p: select this when the video is not output in “AUTO” correctly.
HDMI ENHANCE
SETTING
RESET ALL MENU Returns all the settings to their default values.
UPDATE Updates the functions of this unit to the latest version.
FORMAT SD CARD Deletes all files on the SD card.
Sets the output from the HDMI terminal of this unit when it is connected to a DVI terminal of the monitor.
OFF: set this to connect to a normal TV. The color gradation is ranged from 16 to 235.
ON: select this setting when you are connecting to a PC monitor, etc. The color range is from 0 to 255.
This unit will reboot when the settings are restored to their default values.
For details, refer to the JVC Professional homepage.
(When no program to update the software of this unit is available, nothing will be provided on the homepage.)
http://pro.jvc.com/ or http://www.jvcpro.co.uk/
FILE: Deletes all files on the SD card.
FILE + MANAGEMENT NO: Deletes all files on the SD card and resets the folder and file numbers to “1”.
Memo :
0
Not available for selection when no SD card is inserted.
0
All data on the SD card will be deleted when it is formatted. Copy all files on the SD card to a computer
before formatting.
0
Make sure that the battery pack is fully charged or connect the AC adapter as the formatting process may
take some time.
64
Page 65

Error Displays and Actions
Error Message Action
Further Information
FORMAT ERROR!
MEMORY CARD
ERROR!
NOT FORMATTED
RECORDING FAILURE
UNSUPPORTED
SCENE!
UNSUPPORTED FILE!
THIS FILE IS
PROTECTED
CHECK CARD'S WRITE
PROTECTION SWITCH
0
Check the operating procedure, and perform once again.
“Formatting (Initializing) SDHC/SDXC Cards” (A p. 30)
0
Turn off and on this unit again.
0
Check that the card is supported by this unit.
“SDHC/SDXC Cards” (A p. 11)
0
Turn off and on this unit again.
0
Remove and re-insert the SD card.
0
Remove any dirt from the SD card terminals.
0
If the above does not solve the problem, back up your files and execute “FORMAT SD CARD” in the
recording menu. (All data will be deleted.)
“Formatting (Initializing) SDHC/SDXC Cards” (A p. 30)
0
Select “YES”, then select “YES” on the “DO YOU WANT TO FORMAT?” screen.
0
Turn off and on this unit again.
0
Use files recorded with this unit.
(Files recorded using other devices may not be playable.)
0
Use files recorded with this unit.
(Files recorded using other devices may not be playable.)
0
Cancel protection using “PROTECT/CANCEL” in the common menu.
“Protecting Files” (A p. 55)
0
Set the write protect switch of the SD card to off.
INSUFFICIENT
AVAILABLE SPACE
SCENE QUANTITY
EXCEEDED LIMIT
NUMBER OF FOLDERS
OVERFLOW
FILE QUANTITY LIMIT
EXCEEDED
THIS CARD CANNOT
BE USED FOR
RECORDING OR
EDITING ON THIS
CAMERA
THIS CARD CANNOT
BE USED FOR
RECORDING ON THIS
CAMERA
0
Delete files, or move files to a PC or other devices.
0
Replace the SD card with a new one.
0
Move the files or folders to a computer or other device.
(Back up your files.)
0
Select “FILE + MANAGEMENT NO” in “FORMAT SD CARD” of the common menu.
(All data on the SD card will be deleted.)
0
Move the files or folders to a computer or other device.
(Back up your files.)
0
Select “FILE + MANAGEMENT NO” in “FORMAT SD CARD” of the common menu.
(All data on the SD card will be deleted.)
0
Move the files or folders to a computer or other device.
(Back up your files.)
0
Select “FILE + MANAGEMENT NO” in “FORMAT SD CARD” of the common menu.
(All data on the SD card will be deleted.)
The frame rate of this unit is different from the frame rate recorded on the card.
Change the frame rate in “SYSTEM SELECT” of the recording menu.
The number of MP4 files on each card is different in the 4K2K mode.
Use a computer to adjust the files on the four cards to a consistent number.
65
Page 66

Further Information
Error Message Action
RECOVERY OF FILE
FAILED UNABLE TO
RECORD FURTHER
WITH THIS
COMBINATION OF
CARDS
0
Adjust the number of files on the four cards to a consistent number by using a computer to delete the
maximum file number in the folder with the maximum number.
Alternatively, copy all the files to a computer, and format the SD cards.
Memo :
0
This unit is a microcomputer-controlled device. Electrostatic discharge, external noise and interference (from a TV, a radio, etc.) might
prevent it from functioning properly.
In such a case, turn off the power, then remove the AC adapter and battery pack. This unit will be reset.
Trouble
Before sending for repair, check the camera recorder’s problem according to the table below.
If the problem persists, consult your nearest JVC dealer or JVC service center.
Trouble
SDHC/SDXC card
cannot be inserted.
0
Check that the SDHC/SDXC card is facing the right direction.
Action
Power does not turn
on.
Unable to start
recording.
Camera image is not
output on the LCD
monitor or
viewfinder screen.
0
Is the AC adapter properly connected?
0
Is the battery charged?
0
Is the power turned on immediately after it is turned off? Make sure to wait for an interval of at least 5 seconds
before turning on the power again.
0
Is the SDHC/SDXC card properly set?
4K2K recording (4K2K mode):
Are the combination and sequence of the four SDHC/SDXC cards correct?
Insert the cards into the slots according to the combination and sequence during formatting.
HD recording (1920 mode):
Is an SDHC/SDXC card inserted into slot A?
“Inserting an SDHC/SDXC Card” (A p. 29)
0
Is the write protection switch of the SDHC/SDXC card turned on?
Turn off write protection if it is on.
“Write-Protect Switch on the SDHC/SDXC Card” (A p. 29)
0
Is the unit in the Camera mode?
If the [CAM] indicating lamp does not light up in red, camera images are not output.
Set the [CAM/MEDIA] switch to the [CAM] side to set to the Camera mode.
“[CAM] Camera mode indicating lamp” (A p. 17)
0
Is the camera recorder set to the Camera mode?
If the [CAM] indicating lamp does not light up in red, camera images are not output.
Set the [CAM/MEDIA] switch to the [CAM] side to switch to the Camera mode.
“[CAM] Camera mode indicating lamp” (A p. 17)
0
Is the viewfinder used with “PRIORITY SETTING” in the common menu set to “VIEWFINDER” and without pulling
out the viewfinder?
Pull out the viewfinder if this setting is used.
“Viewing the Viewfinder/LCD Monitor” (A p. 31)
66
Page 67

Trouble Action
Further Information
Shooting stops by itself.
Images on the LCD monitor and
viewfinder screens appear dark
or blurred.
The subject is too dark.
The color of the subject looks
unnatural. (Reddish, bluish,
etc.)
0
Shooting may stop halfway due to the nature of the SDHC/SDXC card.
B Check whether the card is a recommended SD card (Class 6 or higher).
“SDHC/SDXC Cards” (A p. 11)
BErase the contents of the SDHC/SDXC card (Delete, Format).
“Formatting (Initializing) SDHC/SDXC Cards” (A p. 30)
0
Readjust the brightness of the LCD monitor screen.
“ MONITOR BRIGHTNESS ” (A p. 64)
0
Is the aperture setting too large?
0
Is the shutter speed setting too high?
0
Set exposure to the “+” side.
“Adjusting the Exposure Manually” (A p. 38)
0
Set to the manual shooting mode and increase the sensitivity using the [GAIN] switch.
“Setting to the Manual shooting mode” (A p. 32)
0
Set “GAIN L”, “GAIN M”, and “GAIN H” in the recording menu to “AGC” or “AUTO SLOW-SHUTTER”.
(A p. 61)
0
Set the shutter speed to a slower value.
“Adjusting the Shutter Speed” (A p. 39)
0
Set to open up the aperture.
“Adjusting the Aperture” (A p. 40)
0
Depending on the lighting conditions or when there are numerous light sources in the background,
set to the manual shooting mode and perform auto white balance adjustment.
“Adjusting the White Balance” (A p. 41)
Focus is not adjusted
automatically.
White balance cannot be
adjusted.
Screen appears dark or whitish.0Adjust the angle and brightness of the screen.
Screen display is difficult to see.0The screen may be difficult to see if used in bright areas, such as under direct sunlight.
The remaining battery power is
not correctly displayed.
Screen display is uneven.
No display on the monitor.
0
Clean any dirt or water droplets from the lens.
0
If you are shooting at a dark place or shooting a subject that has no contrast between dark and light,
adjust the focus manually.
0
Is the camera recorder in the Full Auto shooting mode?
“Viewing the Viewfinder/LCD Monitor” (A p. 31)
0
When used in cold places, the screen may appear darker.
0
The screen may be reaching the end of its service life. Consult your nearest JVC dealer.
0
Charge the battery fully, use it up, and then charge again.
“Charging the Battery Pack” (A p. 24)
0
If the camera recorder is used for long periods of time in high or low temperatures, or if the battery is
repeatedly charged, the remaining battery level may not be displayed correctly.
0
If the screen or surrounding parts have been pressed, remove your hands and leave the camera for
a short while.
(Applying pressure causes image unevenness.)
0
Connect all the four [HDMI] terminals to the monitor during output of video in the 4K2K mode.
0
[HDMI2] to [HDMI4] terminals can only be used for 4K2K video output.
0
For output of Full HD (1920) or lower, connect only the [HDMI1] terminal to the monitor.
File (image) does not play back
when its thumbnail is selected.
The actual recording time is
shorter than the estimated time.
0
Is the selected file (image) a playable file (image)?
A file with a different video format setting cannot be played back.
0
The recording time may be shorter depending on the environment, such as when shooting a fastmoving subject.
67
Page 68

Further Information
Trouble Action
The [CH-1/CH-2] recording level
adjustment knob does not work.
SDHC/SDXC card cannot be initialized
(formatted).
Battery alarm appears even after loading a
charged battery.
The built-in microphone does not work.
Unable to adjust the built-in microphone
using the [CH-1/CH-2] recording level
adjustment knob
Unable to switch from the Camera mode to
Media mode.
Sound or video is interrupted.
Recorded files (images) cannot be found
on the thumbnail screen.
0
Is the [CH1/CH2 AUDIO SELECT] switch set to [AUTO]?
0
Is the write protection switch of the SDHC/SDXC card turned on?
Turn off write protection if it is on.
“Write-Protect Switch on the SDHC/SDXC Card” (A p. 29)
0
Replace the battery with a new one.
0
To purchase a new battery, please visit a nearby JVC dealer.
0
Remove the audio unit cable from the [AUDIO IN] terminal of the camera recorder.
“Using an External Microphone Connected to the [INPUT1/INPUT2] Terminal” (A p. 45)
0
The recording level of the built-in microphone cannot be adjusted using the recording level
knob.
[CH-1/CH-2] recording level adjustment knob can be used for the [INPUT1/INPUT2]
terminal. Set the volume of the built-in microphone using “INTERNAL MIC LEVEL” in the
recording menu.
“ INTERNAL MIC LEVEL ” (A p. 62)
0
You cannot switch to the Media mode while recording is in progress. To switch to the
Media mode, stop the recording operation.
0
Sometimes playback is interrupted at the connecting section between two scenes.
0
Check the file format or video format.
“Selecting a Video Recording Format” (A p. 33)
The camera recorder heats up.
The camera recorder operates slowly
when turning the power on or off.
The remote control does not work.
Operations do not work when this unit is
connected to the USB devices.
The following phenomena are not malfunctions.
o
0
The screen momentarily turns red or black when the sun enters the field of view.
0
Black dots, or shiny red, blue, or green spots appear on the screen.
The LCD screen contains 99.99% or more effective pixels, but 0.01% or fewer pixels may be inactive or lit at all times.
Reset the camera recorder when it does not function properly.
o
1
Turn off the power.
2
Remove the battery and AC adapter from the camera recorder, reattach them, and turn on the power.
3
Execute “RESET ALL MENU” in the common menu. (A p. 64)
0
The camera recorder may become warm when used for a long time. This is not a
malfunction.
0
If there are many videos files on the SDHC/SDXC card, it takes time for the camera
recorder to process the files. Copy the files on the SDHC/SDXC card to a PC, and delete
them from the SDHC/SDXC card.
0
Replace the battery.
0
Files recorded in the 1920 mode cannot be found.
0
This unit may not be recognized by the devices that don’t support the USB Hub. Use a
card reader that is commercially available.
68
Page 69

Further Information
Specifications
Camera
Item Details
Power supply Using AC adapter: DC 12 V
Using SSL-JVC50 battery pack: DC 7.4 V
Power
Consumption
* When the HDMI
cable is not
connected
Dimensions (W x
H x D)
0
4K2K mode
Approx. 17.5 W (when “MONITOR
BRIGHTNESS” is set to “3” during the use
of LCD monitor)
Approx. 16.9 W (during the use of view
finder)
0
1920 mode
Approx. 11.5 W (when “MONITOR
BRIGHTNESS” is set to “3” during the use
of LCD monitor)
Approx. 10.9 W (during the use of view
finder)
Rated Current Consumption: 3 A
118 mm x 121 mm x 271 mm (4-5/8" x 4-3/4"
x 10-5/8") (without audio unit)
139 mm x 198 mm x 271 mm (5-1/2" x 7-3/4"
x 10-5/8") (with audio unit)
Item Details
LCD monitor 3.5", 920,000 pixels, polysilicon color LCD
Viewfinder 0.24", 260,000 pixels
Recording media Commercially available SDHC/SDXC card
(Class 6 or higher)
“Estimated Recordable Time of SDHC/
SDXC Cards” (A p. 30)
Clock Battery Rechargeable battery
Terminals
Item
HDMI output
connector
USB Connector Mini USB Type B, USB 2.0 compliant
Headphones
output
Remote terminal R 3.5 mm mini jack (4-pole)
Audio [INPUT1/
INPUT2] terminal
HDMI mini connector x 4
(Built-in USB Hub)
R 3.5 mm mini jack (stereo)
MIC: -60dBu, 3 kK, XLR (balanced), +48 V
output (phantom power supply)
LINE: +4 dBu, 10 KK, XLR (balanced)
Details
Mass Approx. 1,120 g (2.47 lbs) (without audio unit
attached, camera only)
Approx. 1,620 g (3.57 lbs) (including
supplied battery pack)
Operating
Environment
Image Pickup
Device
Recording Area
Lens
Allowable operating temperature: 0°C to
40°C (32°F to 104°F)
Allowable storage temperature: -20°C to
50°C (-4°F to 122°F)
Allowable relative humidity: 35 % to 80 %
1/2.3" 12,760,000 pixels (CMOS)
0
4K2K mode
8,290,000 pixels
0
1920 mode
8,290,000 pixels
0
4K2K mode
F2.8 - F4.5, f= 6.7 mm to 67 mm
35 mm conversion: 42.4 mm to 424 mm
0
1920 mode
F2.8 - F4.5, f= 6.7 mm to 67 mm
35 mm conversion: 42.4 mm to 424 mm
(dynamic zoom OFF)
35 mm conversion: 42.4 mm to 848 mm
(dynamic zoom ON)
Zoom Optical zoom: up to 10x
Dynamic zoom: up to 20x
69
Page 70

Further Information
Video (4K2K mode)
Item Details
Recording/
Playback format
Extension .MP4
Signal system Digital HD system
Quality 3840 x 2160 pixels
Sound quality
(Audio)
MP4 standard
Video: MPEG-4 AVC/H.264
Audio: AAC 2ch
2160/60p, 2160/50p, 2160/24p
Maximum approx. 144 (36 x 4) Mbps
48 kHz, 384 kbps (Max 480 kbps, Average
384 kbps)
Video (1920 mode)
Item
Recording/
Playback format
Extension .MTS
Signal system Digital HD system
AVCHD standard
Video: MPEG-4 AVC/H.264
Audio: Dolby Digital 2ch
1080/60i (NTSC), 1080/50i (PAL)
1080/60p (NTSC), 1080/50p (PAL)
Details
AC Adapter UIA336-12 / UIA336-1230
Item Details
Power supply AC 100 V to 240 V, 50 Hz/60 Hz
Output DC 12 V, 3 A
Allowable
Operating
Temperature
Dimensions (W x
H x D)
Mass Approx. 175 g (0.39 lbs)
0°C to 40°C (32°F to 104°F)
(10°C to 30°C (50°F to 86°F) during
charging)
43.8 mm x 28.5 mm x 95.9 mm (1-3/4" x
1-1/8" x 3-3/4") (excluding cord and AC plug)
Battery SSL-JVC50
Item
Power voltage 7.4 V
Capacity 4900 mAh
Dimensions (W x
H x D)
Mass Approx. 225 g (0.5 lbs)
43 mm x 47 mm x 70.4 mm (1-3/4" x 1-7/8" x
2-3/4")
Details
Quality 60p/50p
1920 x 1080 pixels
Average Approximate 27 Mbps
UXP
1920 x 1080 pixels
Average Approximate 24 Mbps
XP
1920 x 1080 pixels
Average Approximate 17 Mbps
SP
1920 x 1080 pixels
Average Approximate 12 Mbps
EP
1920 x 1080 pixels
Average Approximate 4.8 Mbps
Sound quality
(Audio)
48 kHz, 256 kbps
70
Page 71

Dimensional Outline Drawing (Unit: mm)
AWB
CH-2 INPUT
CH-1
3
4
5
2
1
2
3
0
CH-2
AUDIO INPUT
AUTO MANUAL
AUTO MANUAL
FULL AUTO
DOOR LOCK
SD
A E
SET
GAIN
ADJ.
IRISWHT. BAL
SHUTTER
A F
M F
4321
C
A
D
B
AUDIO
SELECT
INPUT1
INPUT2
- LINE -
- MIC -
MIC+48V
INPUT1
INPUT2
LMH-
B A -
PRST
REC / 6
TW
139
118
121
172
198
232
233
271
Further Information
.
* Microphone is optional.
The specifications and appearance of this product are subject to changes for further improvement without prior notice.
71
Page 72

GY-HMQ10U/GY-HMQ10E
4K MEMORY CARD CAMERA RECORDER
Q 2012 JVC KENWOOD Corporation
LYT2468-001A-M
 Loading...