

Page 1
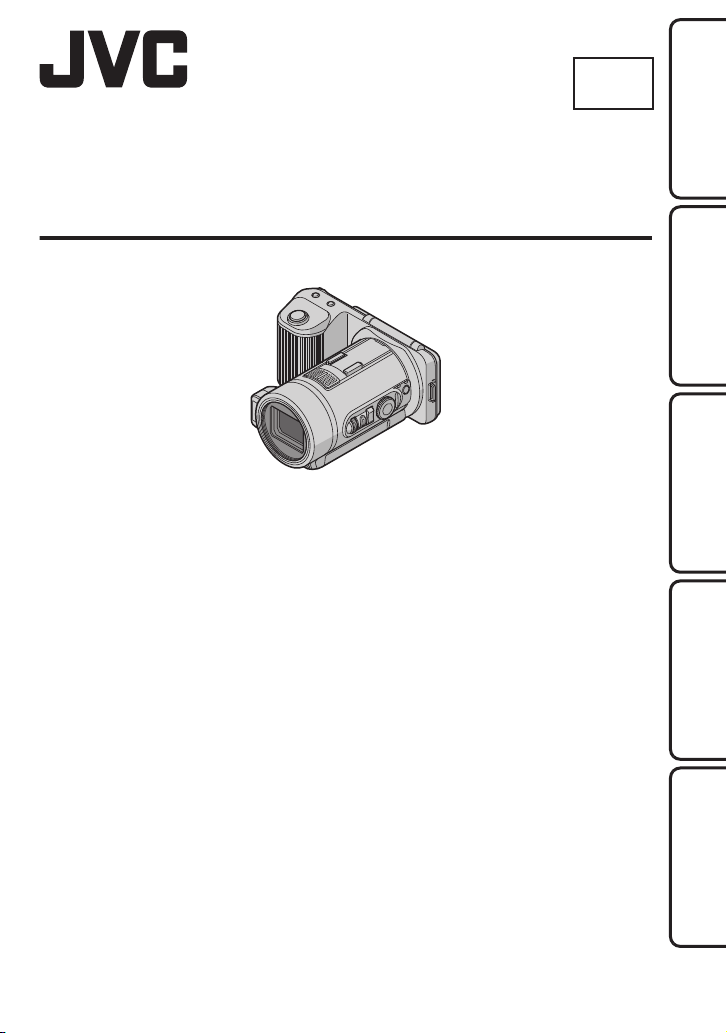
HD MEMORY CAMERA
GC-PX10U
Detailed User Guide
LYT2382-002A
EN
Preparations
Playback
Recording/
EditingComputer
Further
Information
Page 2

Contents
Attaching the Shoulder Strap ................... 3
Names of Parts and Functions ................. 4
Names of Buttons and Functions on the LCD
Monitor ..................................................... 6
Preparations
Charging the Battery Pack ....................... 9
Using the Touch Screen ......................... 10
Clock Setting .......................................... 11
Using this Unit Overseas ........................ 12
Inserting an SD Card .............................. 14
Recording/Playback
Taking Still Images in Intelligent Auto Mode
................................................................ 17
Taking Group Shots (Self-timer) ............ 20
Continuous Shooting/Recording with
Varying Brightness (Bracketing) ............. 21
Adjusting Focus Manually ...................... 22
Taking Videos in Intelligent Auto Mode
................................................................ 23
Playing Back Still Images ....................... 26
Playing Back Videos .............................. 28
Checking the Exposure of Still Images
(Histogram) ............................................ 30
Slow-motion (High-speed) Recording .... 31
Shooting According to Location and
Condition ............................................... 32
Capturing Subjects Clearly (TOUCH
PRIORITY AE/AF) .................................. 34
Manual Recording .................................. 36
Connecting to and Viewing on TV .......... 38
Editing
Capturing a Required Part in the Video
(TRIMMING) .......................................... 41
Copying Files to an SD Card .................. 42
Deleting Unwanted Files ........................ 43
Computer
Copying to Computer ............................. 44
Using an Eye-Fi Card ............................. 45
Verifying System Requirements (Guideline)
................................................................ 46
Installing the Provided Software ............. 48
Further Information
Operating the Menu ............................... 49
Recording Menu (Still Image) ................. 50
Recording Menu (Video) ........................ 54
Playback Menu (Still Image) .................. 58
Playback Menu (Video) .......................... 58
Common Menu ...................................... 59
Troubleshooting ..................................... 61
Specifications ........................................ 68
Index ...................................................... 74
2
Page 3
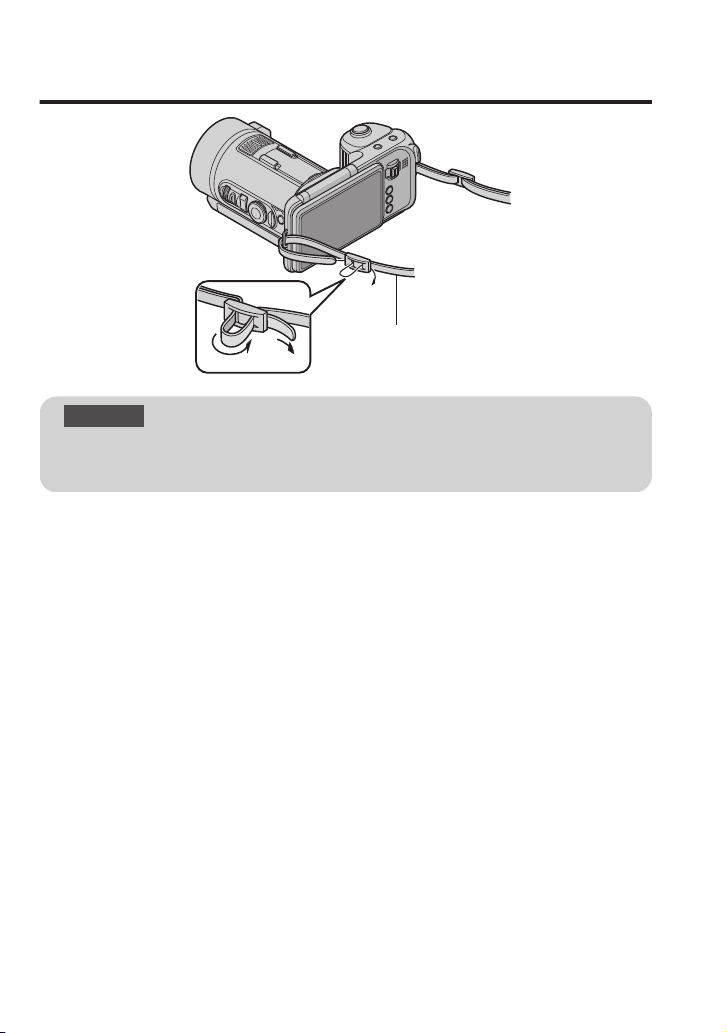
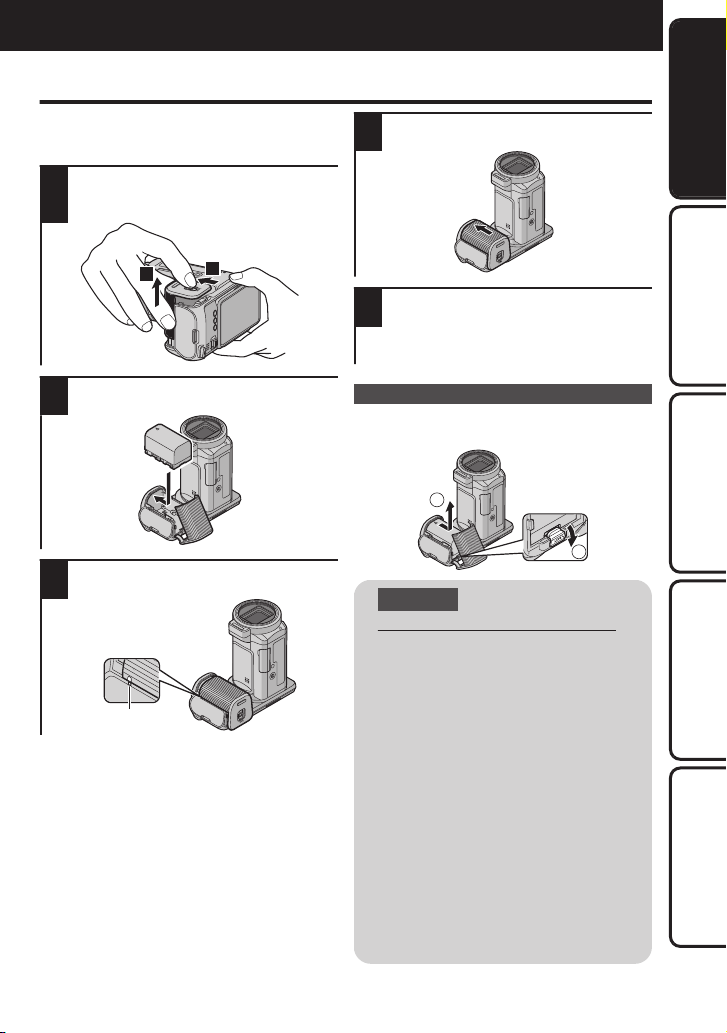
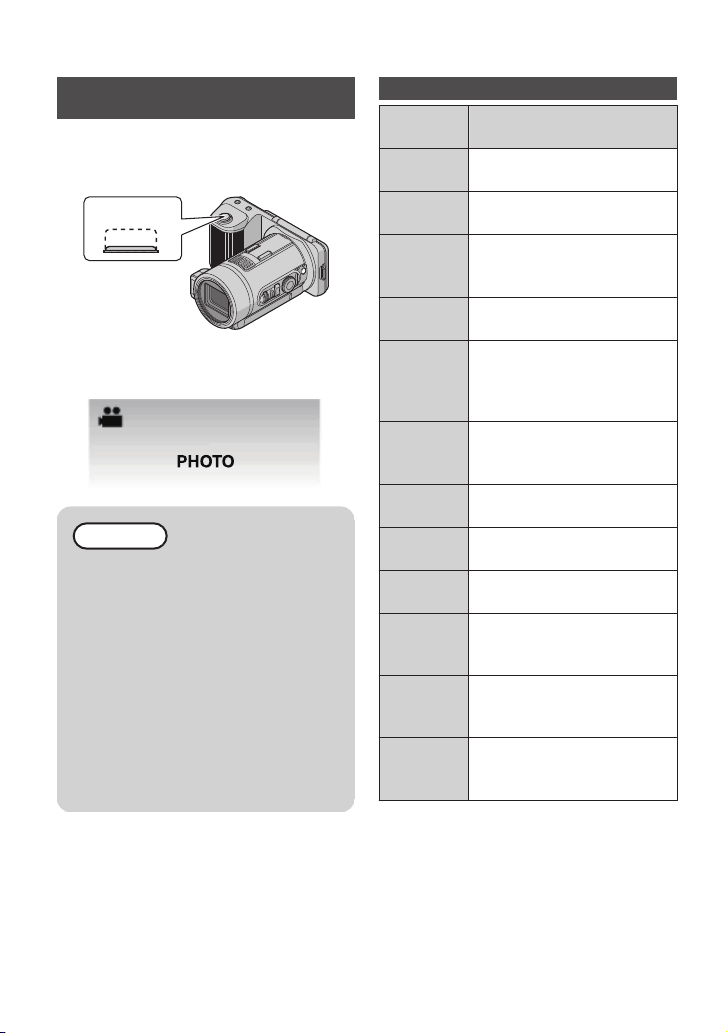
Attaching the Shoulder Strap
Shoulder Strap
.
Caution
Be careful not to drop this unit during transportation.
0
Do not place the shoulder strap within the reach of young children.
0
Guardians should pay close attention when this unit is being used by children.
0
3
Page 4
Names of Parts and Functions
.
A
Stereo Microphone
B
Shoe
Enables an optional external microphone
0
to be attached.
C
LCD Monitor
D
L (Recording/Playback) Button
Switches between recording and
0
playback modes.
E
A / B (Video/Still Image) Button
Switches between video and still image
0
modes.
F
MENU Button
G
Zoom / Volume / Forward Lever
(p. 17, p. 23, p. 26, p. 28)
H
Shoulder Strap Hook (p. 3)
I
START/STOP (Video Recording) Button
(p. 23)
J
y (Continuous Shooting) Button
(p. 21)
K
O (High-speed Recording) Button
(p. 31)
L
SNAPSHOT (Still Image Recording)
Button (p. 17)
4
M
Speaker
N
AF Assist Beam (p. 52)
O
SD Card Slot (p. 14)
P
Tripod Mounting Hole
Q
Battery Release Lever (p. 9)
Page 5
.
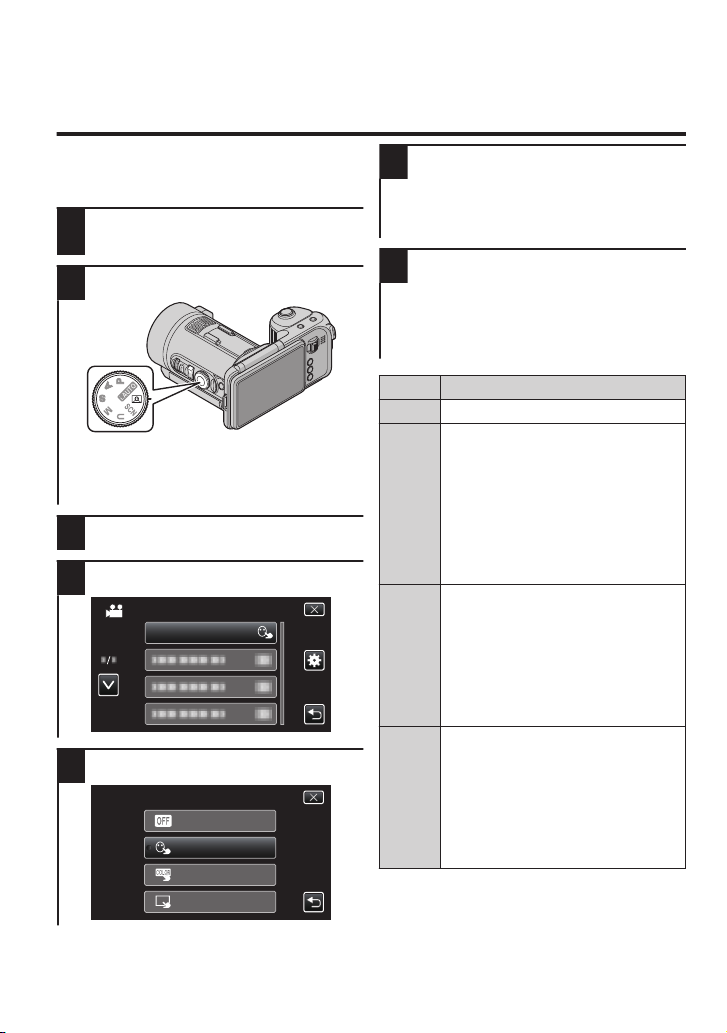
Aperture Priority (p.36)
Shutter Speed Priority (p.37)
User Settings (p.37)
Manual (p.36)
Scene Select (p.32)
Face Priority/Touch Priority (p.34)
Align here
Intelligent Auto (p.17,p.23)
Program Auto (p.36)
A
Flash (p. 19)
B
Lens/Electric Lens Cover
C
Control Dial (p. 36)
D
EXPOSURE (Exposure) Button (p. 36)
E
Recording Dial (p. 17, p. 23)
F
ACCESS (Access) Lamp
Lights up/blinks during recording or
0
playback.
G
POWER/CHARGE (Power/Charge)
Lamp
Lights up: Power “ON”
0
Blinks: Charging in progress
0
Goes out: Charging finished or power
0
“OFF”
H
SET (Set) Button (p. 36)
I
FOCUS (Focus) Button (p. 22)
J
E (Flash) Button (p. 19)
K
M (Power) Button
L
Microphone Connector (p. 57)
M
Headphones Connector/AV Connector
(p. 57, p. 39)
N
USB Connector (p. 44)
O
HDMI Mini Connector (p. 38, p. 40)
P
DC Connector
Selecting Recording Modes for Different Purposes (Recording Dial)
.
5
Page 6

Names of Buttons and Functions on the
32 41
5
6
7
8
9 10
12 13 14 1511 16 17 18
19
20
LCD Monitor
o
Recording Screen (A / B)
.
.
Continuous Shooting Speed (p. 21)
Time (p. 11)
A
Image Stabilizer (p. 53, p. 55)
B
Recording Media (p. 60)
C
I: Built-in memory
G: SD card
Battery Indicator
D
g h i
Shutter Speed (p. 37)
E
Exposure (p. 36)
F
Aperture (p. 36)
G
Manual Focus (p. 22)
H
Monitor Brightness (p. 59)
I
Still Image Recording in Progress
J
K
Backlight Compensation (p. 50)/
L
Touch Priority AE/AF (p. 51)
Tele Macro (p. 51)
M
Scene Select (p. 32)
N
White Balance (p. 50)
O
Smile Shot (p. 35)
P
Auto REC (p. 56)
Q
Intelligent Auto (p. 17, p. 23)
R
Zoom (p. 55)
S
Zoom Position
T
Memo
When G is blinking, insert an SD
0
card or set the recording media to
“BUILT-IN MEMORY”. (p. 60)
6
Page 7

o
21 3 4 75 6
10
9
11
8
1 2 3 4 5 6 7
Recording Screen (B)
o
Playback Screen (B)
.
Bracketing (p. 21)
A
Still Image Recording (p. 17)
B
Image Size (p. 52)
C
Image Quality (p. 52)
D
FINE : FINE
STD : STANDARD
Metering Area/Type (p. 51)
E
Gain (p. 53)
F
Display Button (p. 18)
G
m: Full display
n: Simplified display
AF Point (p. 52)
H
Flash (p. 19)
I
Remaining Number of Shots
J
Self-Timer (p. 20)
K
.
Still Image Playback (p. 26)
A
Slideshow (p. 27)
B
Folder Number (p. 44)
C
File Number (p. 44)
D
Date/Time (p. 11)
E
Playback Media (p. 27)
F
I: Built-in memory
G: SD card
Battery Indicator
G
g h i
7
Page 8

o
1 2 3 54
7
6
8
9
11
8
1 2 3 4 5 6 7
9 10
Recording Screen (A)
o
Playback Screen (A)
.
Video Recording (p. 23)
A
Video Quality (p. 54)/
B
High-speed Recording (p. 31)
Time-Lapse Recording (p. 56)
C
Gain Up (p. 55)
D
Display Button (p. 25)
E
m: Full display
n: Simplified display
Time-lapse Recording Icon/Actual
F
Recording Time (p. 56)
Wind Cut (p. 56)
G
Remaining Recording Time
H
Scene Counter
I
.
Video Playback (p. 28)
A
Video Quality (p. 54)/
B
High-speed Recorded Video (p. 31)
Forward/Reverse Search Speed
C
Playback Operation
D
d: Playback
i: Forward search
j: Reverse search
m: Reverse playback
k: Forward slow-motion
l: Reverse slow-motion
e: Pause
Date/Time (p. 11)
E
Playback Media (p. 29)
F
I: Built-in memory
G: SD card
Battery Indicator
G
g h i
Playback Position (Time)
H
Playback Position (Relative Position)
I
Time-lapse Recorded Video (p. 56)
J
Video Length (Time)
K
8
Page 9
A
B
(Base)
Align here
1
2
Preparations
Charging the Battery Pack
Charge the battery pack immediately after
purchase and when the remaining battery
power is low.
Slide the switch in the direction of A
and slide open the cover in the
1
direction of B.
.
Push and slide the battery in until it
2
clicks into place.
.
Align the mark on the cover with this
3
unit.
.
4
5
Charging starts and the POWER/
0
CHARGE appears blinking. (p. 5)
Detaching the Battery Pack
Press and hold the lever.
A
Slide out the battery.
B
Be sure to use JVC battery packs.
0
0
0
0
Slide the cover in until it clicks into
place.
.
Connect the AC adapter to the DC
connector.
.
Caution
If you use any other battery packs
besides JVC battery packs, safety
and performance cannot be
guaranteed.
Charging cannot be performed
while the power is turned on. Turn
off the power before charging the
battery.
Charging time: Approx. 2 h 40 m
(using supplied battery pack)
The charging time is when the unit
is used at 25 °C (77°F). If the
battery pack is charged outside the
room temperature range of 10°C to
35°C (50°F to 95°F), charging may
take a longer time or it may not
start. The recordable and playable
time may also be shortened under
some usage conditions such as at
low temperature.
Preparations
Playback
Recording/
EditingComputer
Further
Information
9
Page 10
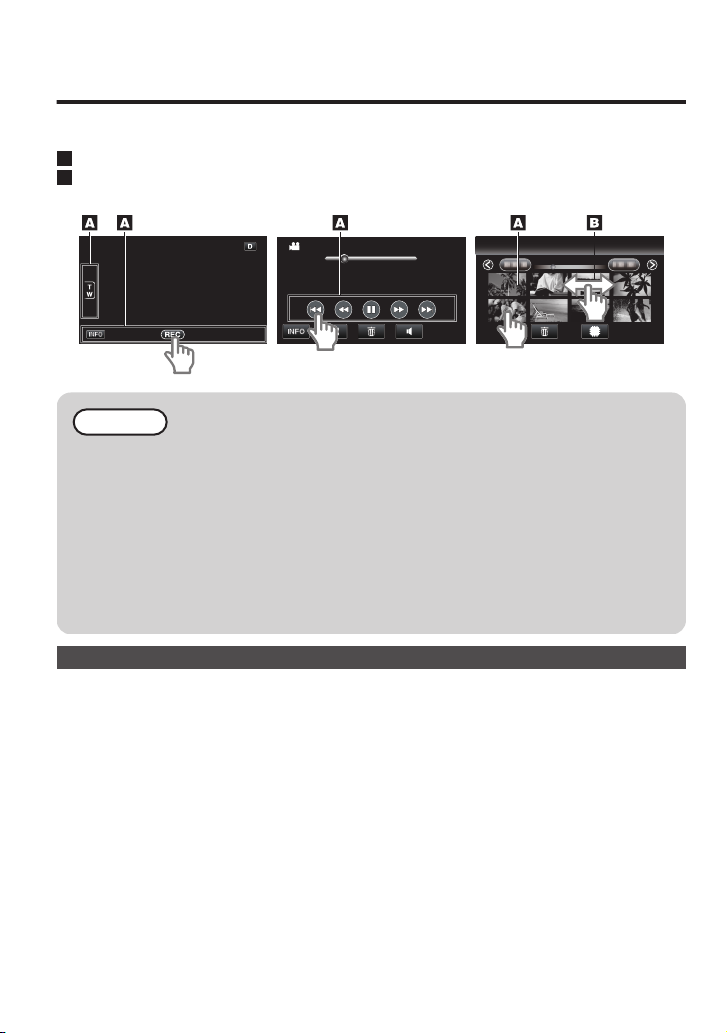
Using the Touch Screen
00:01:23 00:12:34
2011
2011
Index ScreenPlayback ScreenRecording Screen
There are two ways to operate the touch screen, namely “tap” and “drag”. The following are
some examples.
A
Tap the displayed button (icon) or thumbnail (file) on the touch screen to make selection.
B
Drag the thumbnails on the touch screen to search for the desired file.
.
Memo
The touch screen of this unit is pressure-sensitive. When the touch screen does not
0
respond smoothly, apply slightly more force to your fingertip.
Tap the buttons (icons) on the touch screen accurately. The buttons may not respond
0
if they are not tapped on the right area.
Do not press or rub with excessive force.
0
If you apply a protect sheet or a sticker, the touch screen may not respond smoothly.
0
Do not operate the touch screen using an object with a sharp or hard tip.
0
Pressing two or more places at a time may cause a malfunction.
0
Perform “TOUCH SCREEN ADJUST” if the reactive area of the screen is misaligned
0
with the touched area. (Adjust by lightly tapping with a corner of an SD card, etc. Do
not press with an object with a sharp tip or do not press hard.)
Adjusting the Touch Screen
Press the MENU button.
A
B
Tap “Q”.
Tap “TOUCH SCREEN ADJUST”.
C
Tap “+”. (3 times in total)
D
Keep tapping “+” as its position changes with every tap.
0
Tap “+” again to confirm the adjusted positions. (3 times in total)
E
Keep tapping “+” as its position changes with every tap.
0
If areas on the adjustment screen other than the “+” mark are tapped, errors will occur.
0
In this case, try again from step 4.
Tap OK.
F
Setting ends and returns to the menu screen.
0
10
Page 11
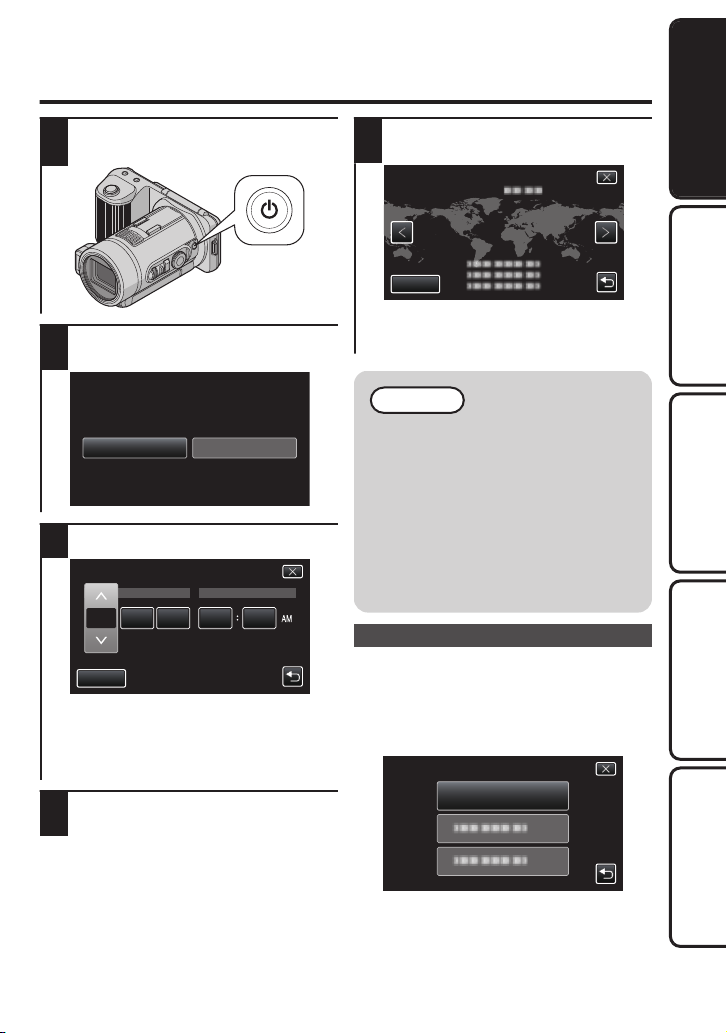
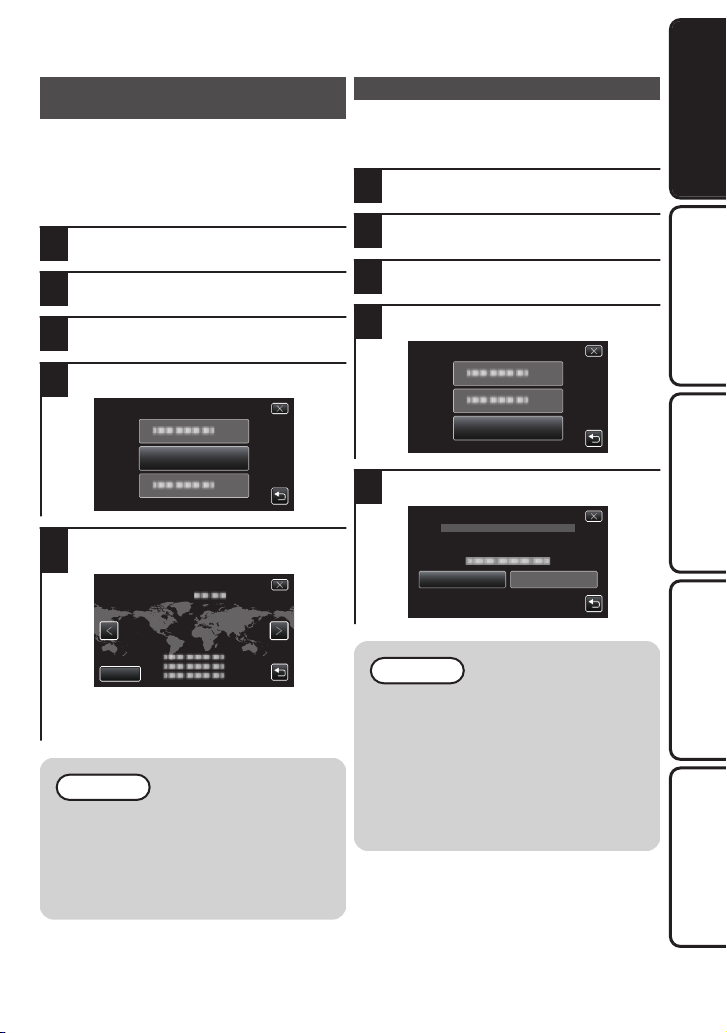
Clock Setting
NOYES
SET DATE/TIME!
2011JAN 1 10 00
SET
TIMEDATE
CLOCK SETTING
GMT
SAVE
CLOCK/AREA SETTING
CLOCK SETTING
CLOCK ADJUST
Press the M button to turn on the
1
power.
.
Tap “YES” when “SET DATE/
2
TIME!” is displayed.
.
Set the date and time.
3
.
When the year, month, day, hour, or
0
minute item is tapped, “∧” and “∨” will
be displayed.
Tap “∧” or “∨” to adjust the year, month,
0
day, hour, and minute.
After setting the date and time, tap
4
“SET”.
Select the region where you live
5
and tap “SAVE”.
.
The city name and time difference are
0
displayed.
Tap “<” or “>” to select the city name.
0
Memo
When using this unit overseas, you
0
can set it to the local time for
recording.
“SET DATE/TIME!” is displayed
0
when you turn on this unit after it has
not been used for a prolonged
period.
Connect the AC adapter for more
than 24 hours to charge the internal
clock battery of this unit before
setting the clock.
Resetting the Clock
Press the MENU button.
A
B
Tap “Q”.
Tap “CLOCK ADJUST”.
C
Tap “CLOCK SETTING”.
D
Preparations
Playback
Recording/
EditingComputer
.
The subsequent setting operations
0
are the same as steps 3 - 5 on the left.
Further
Information
11
Page 12
Using this Unit Overseas
CO
ABBF
North America
United States
Canada
Mexico
A
A
A
India
Indonesia
Singapore
Sri Lanka
Thailand
South Korea
China
Japan
Nepal
Pakistan
Bangladesh
Philippines
Vietnam
Hong Kong Special
Administrative Region
Macau Special
Administrative Region
Malaysia
$.C.$(
C
$.$(
$.C.$(
A.BF.C
A.C
A.B.BF.C.O
A
C
B.C
C
A.BF.O
A.C
B.BF
B.C
B.BF.C
Europe
Iceland
Ireland
United Kingdom
Italy
Austria
Netherlands
Canary Islands
Greece
Switzerland
Sweden
Spain
Denmark
Germany
Norway
Hungary
Finland
France
Belgium
Poland
Portugal
Romania
C
C
B.BF
C
C
C
C
C
C
C
A.C
C
C
C
C
C
C
C
B.C
B.C
C
Asia
Oceania
Australia
Guam
Tahiti
Tonga
New Zealand
Fiji
O
A
C
O
O
O
Argentina
Colombia
Jamaica
Chile
Haiti
Panama
Bahamas
Puerto Rico
Brazil
Venezuela
Peru
O
A
A
B.C
A
A
A
A
A.C
A
A.C
Latin
Middle East
Israel
Iran
Kuwait
Jordan
C
C
B.C
B.BF
Algeria
Egypt
Guinea
Kenya
Zambia
Tanzania
Republic of South Africa
Mozambique
Morocco
A.B.BF.C
B.BF.C
C
B.C
B.BF
B.BF
B.C.BF
C
C
Africa
MENU
MENU
LANGUAGE
COMMON
ENGLISH
LANGUAGE
Charging the Battery Pack Overseas
The shape of the power outlet varies
according to countries and regions.
To charge the battery pack, you need a
converter plug that matches the shape of the
outlet.
12
.
Changing the Display Language
Press the MENU button.
1
.
Tap “Q”.
2
.
Tap “LANGUAGE”.
3
.
Tap to the desired language.
4
.
Page 13
Setting the Clock to Local Time when
CLOCKADJUST
AREASETTING
GMT
SAVE
AREA SETTING
CLOCK ADJUST
DST SETTING
CURRENT SETTING: OFF
DAYLIGHT SAVING TIME (DST)
DST SETTING
OFFON
Traveling
Change the date and time display to the local
time by selecting your travel destination in
“AREA SETTING” of “CLOCK ADJUST”.
Restore the region settings after you
returned from the trip.
Press the MENU button.
1
Tap “Q”.
2
Tap “CLOCK ADJUST”.
3
Tap “AREA SETTING”.
4
.
Select the area you are traveling to
5
and tap “SAVE”.
Setting Daylight Saving Time
When “ON” is selected in “DST SETTING” of
“CLOCK ADJUST”, the time is set 1 hour
ahead.
Press the MENU button.
1
Tap “Q”.
2
Tap “CLOCK ADJUST”.
3
Tap “DST SETTING”.
4
.
Tap “ON”.
5
.
Preparations
Playback
Recording/
EditingComputer
.
The city name and time difference are
0
displayed.
Tap “<” or “>” to select the city name.
0
Memo
Setting “AREA SETTING” changes
0
the clock time such that time
difference is accounted for.
After returning to your country, reselect the region that was set initially
to restore the original clock settings.
Memo
What is daylight saving time?
0
Daylight saving time is the system of
setting the clock 1 hour ahead for a
fixed period in summer.
It is used mainly in the Western
countries.
Restore the daylight saving time
0
settings after you returned from the
trip.
Further
Information
13
Page 14
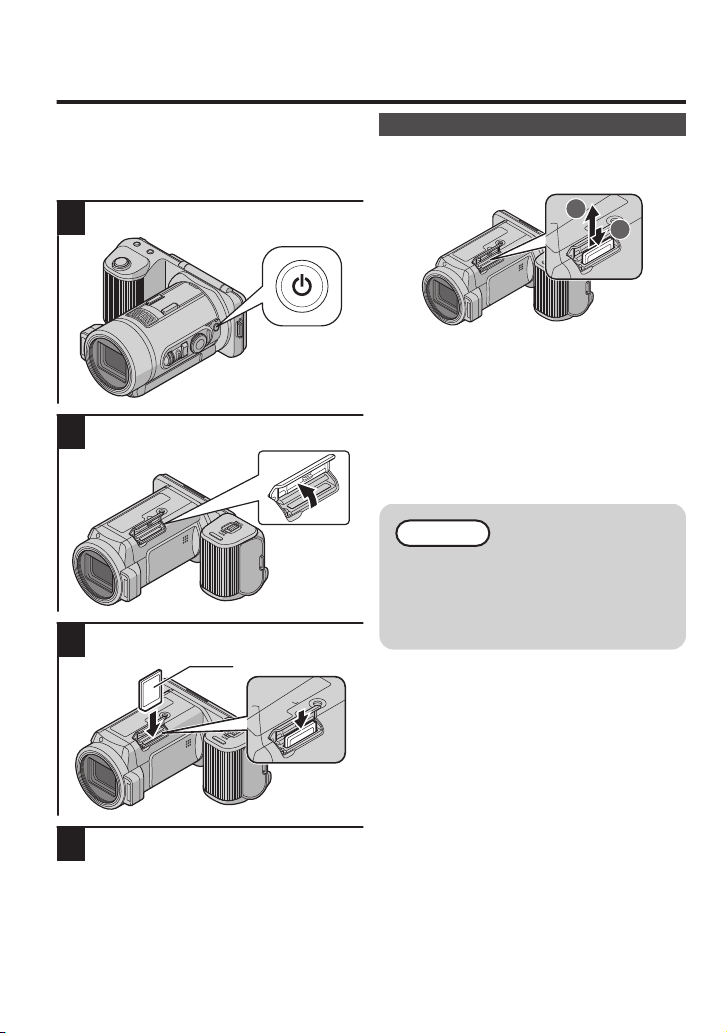
Inserting an SD Card
(Base)
Label
1
2
Precautions with SD Cards
Make use of an SD card with operations
0
confirmed. (p. 15)
Turn off the power of this unit before
0
inserting or removing a card.
Turn off the power if it is turned on.
1
.
Open the cover.
2
.
Insert an SD card.
3
Removing the Card
Push the SD card inward once, then pull it out
straight.
.
To record to the card, it is necessary to
0
perform media settings.
When no card is available, set media
settings to “BUILT-IN MEMORY” for
recording.
REC MEDIA FOR IMAGE(p. 60)
REC MEDIA FOR VIDEO(p. 60)
When using an SDXC card, refer to
0
p. 16.
Memo
Make sure not to insert the card in the
0
wrong direction. It may cause
damage to the unit and card.
To protect the data, do not touch the
0
terminals of the SD card.
.
Close the cover.
4
14
Page 15

SD Cards with Operations Confirmed
FORMAT SD CARD
COMMON
FILE + MANAGEMENT NO
FILE
FORMAT SD CARD
NOYES
MEMORY CARD?
DO YOU WANT TO FORMAT
ERASED
ALL DATA RECORDED WILL BE
Using cards from manufacturers other than
those specified below may result in recording
failure or data loss.
Manufacturer
Panasonic,
TOSHIBA,
SanDisk,
ATP *1,
Eye-Fi *2
VideoAClass 4 or higher compatible SD
card (2 GB),
Class 4 or higher compatible
SDHC card (4 GB to 32 GB),
Class 4 or higher compatible
SDXC card (48 GB to 64 GB)
(When recording with image
quality “UHR”, a card of Class 6
or higher is required.)
Still
Image B
SD card (256 MB to 2 GB),
SDHC card (4 GB to 32 GB),
SDXC card (48 GB to 64 GB)
Eye-Fi Eye-Fi Connect X2,
Eye-Fi Explore X2,
Eye-Fi Pro X2
*1 Cards other than SDHC are not confirmed
for ATP.
*2 Eye-Fi is an SD memory card with wireless
LAN function.
Memo
When recording to an SD card, it
0
takes time for still images captured
by continuous shooting to be saved.
UHS compatible cards, except UHS
0
Speed Class, may be used too.
To use SD cards that have been used on
other devices
Format (initialize) the card using “FORMAT
SD CARD” from “COMMON”.
All data on the card will be deleted when it is
formatted. Copy all files on the card to a
computer before formatting.
A
Press the M button to turn on the
power.
Press the MENU button.
B
C
Tap “Q”.
Tap “FORMAT SD CARD”.
D
.
Tap “FILE”.
E
.
Tap “YES”.
F
Preparations
Playback
Recording/
EditingComputer
.
To cancel, tap d.
0
Tap “OK”.
G
Further
Information
15
Page 16

When your computer cannot recognize the SDXC card
Confirm and update the OS of your computer.
Windows XP /
Windows XP SP1
Windows XP SP2 /
Windows XP SP3
Windows Vista Necessary to update to SP1 or higher.
Windows Vista SP1 /
Windows Vista SP2
Windows 7 Necessary to download the update software. (KB976422)
Mac OS X 10.4 Tiger /
Mac OS X 10.5
Leopard
Mac OS X 10.6 Snow
Leopard
Necessary to update to SP2 or higher.
Necessary to download the update software. (KB955704)
http://www.microsoft.com/downloads/details.aspx?
FamilyID=1cbe3906-ddd1-4ca2-b727c2dff5e30f61&displaylang=en
Necessary to download the update software. (KB975823)
32 bit version
0
http://www.microsoft.com/downloads/en/details.aspx?
FamilyID=2d1abe01-0942-4f8a-abb2-2ad529de00a1
64 bit version
0
http://www.microsoft.com/downloads/en/details.aspx?
FamilyID=7d54c53f-017c-4ea5-ae08-34c3452ba315
32 bit version
0
http://www.microsoft.com/downloads/en/details.aspx?
FamilyID=3ee91fc2-a9bc-4ee1-aca3-2a9aff5915ea
64 bit version
0
http://www.microsoft.com/downloads/en/details.aspx?
FamilyID=73f766dd-7127-4445-b860-47084587155f
Not compatible.
Necessary to update to 10.6.5 or later.
16
Page 17

MENU
Press halfway
TelephotoWide Angle
Recording/Playback
Taking Still Images in Intelligent Auto Mode
You can record without worrying about the
setting details by using the Intelligent Auto
mode.
Before recording an important scene, it is
recommended to conduct a trial recording.
Press the M button to turn on the
1
power.
Press the A/B button to select the
2
still image mode.
.
Memo
To return to the recording mode
0
from the playback mode, press the
SNAPSHOT button during still
image playback.
This unit turns on immediately if the
0
power button is pressed within 5
minutes after the power is turned
off. (when “QUICK RESTART” is
set to “HIGH SPEED 2”)
When “AUTO POWER OFF” is set
0
to “ON”, this unit turns itself off
automatically to conserve power
when it is not operated for 5
minutes. (only when using the
battery pack)
Preparations
Playback
Recording/
Set the recording dial to “i.AUTO”.
3
.
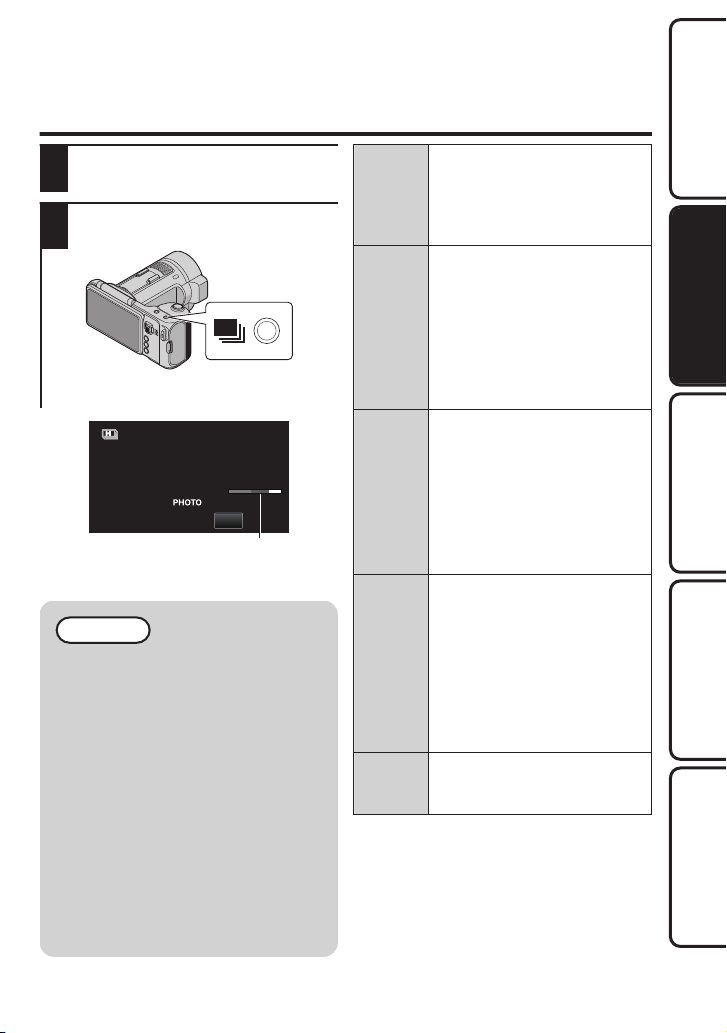
Press the SNAPSHOT button
4
halfway.
.
Press the SNAPSHOT button fully.
5
PHOTO lights up when a still image is
0
being captured.
To check the captured still image
0
immediately, press and hold the
SNAPSHOT button.
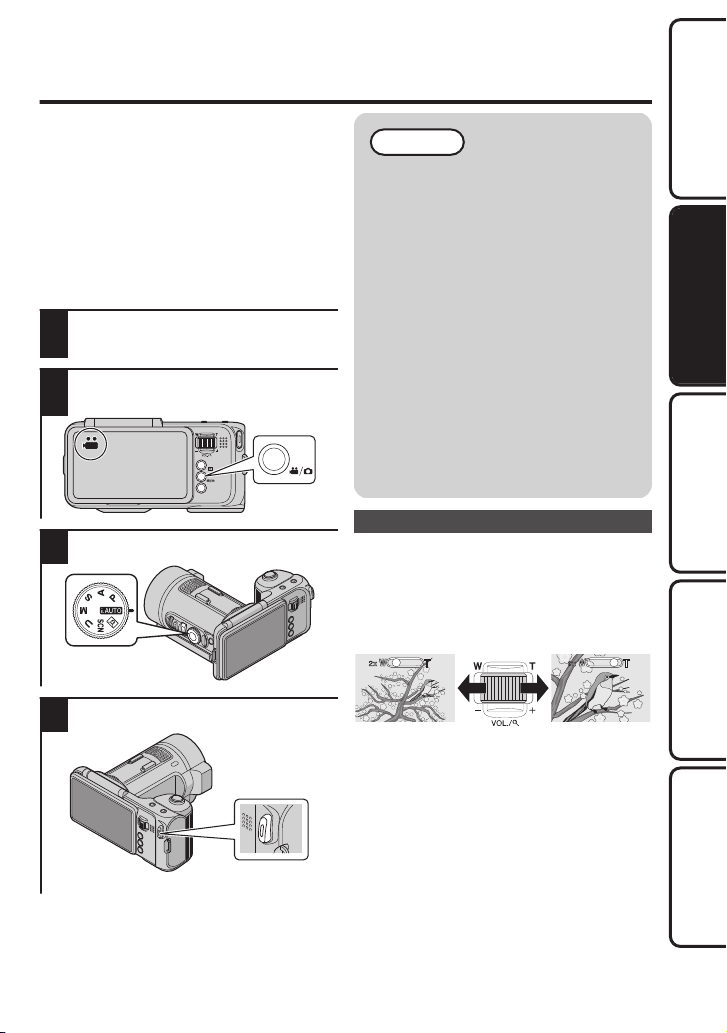
Zooming
The angle of view can be adjusted using
zoom.
Use the W end (wide angle end) to shoot
0
a wider field of view.
Use the T end (telephoto end) to
0
magnify the subject for shooting.
.
EditingComputer
Memo
The following zoom options are
0
available:
- Optical Zoom (1 - 10x)
Only optical zoom is available in the
0
still image recording mode.
Further
Information
17
Page 18
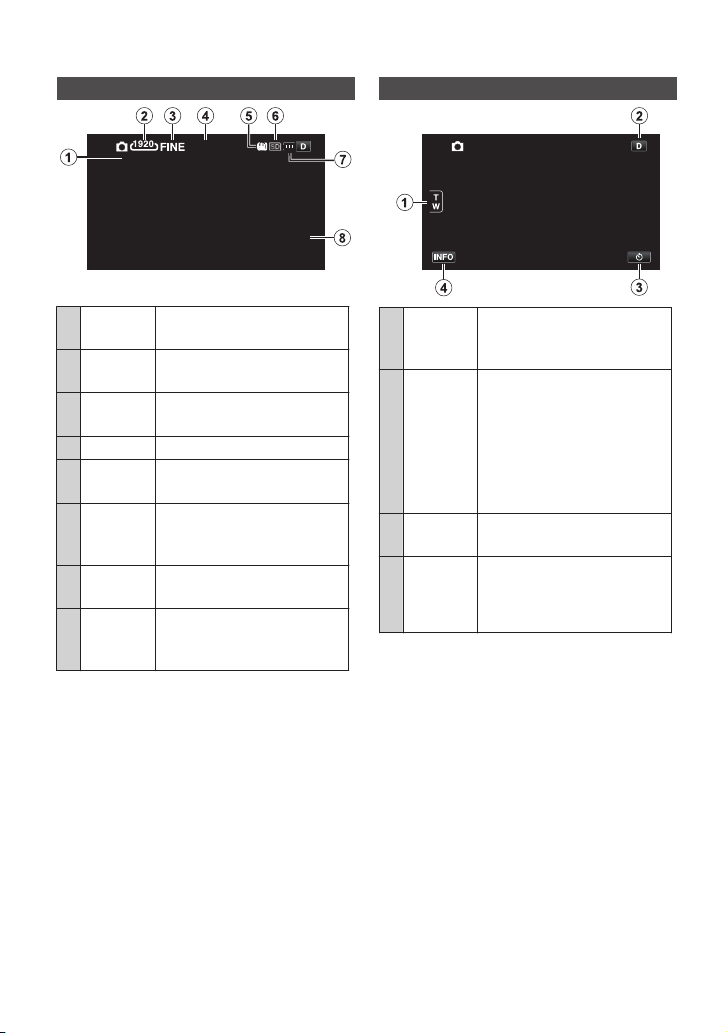
Indications During Still Image Recording
[6630]
1/125
10:10
.
Shutter
A
Speed
Image
B
Size
Image
C
Quality
Time Displays the current time.
D
Image
E
Stabilizer
Recording
F
Media
Displays the shutter speed.
(p. 37)
Displays the icon of the
image size. (p. 52)
Displays the icon of the
image quality. (p. 52)
Sets whether to reduce
camera shake. (p. 53)
Displays the icon of the
media where still images
are recorded to.
Battery
G
Indicator
Remaining
H
Number of
Shots
Displays the approximate
remaining battery power.
Displays the remaining
number of shots for still
image recording.
Operation Buttons for Still Image Recording
.
A
T/W
Zoom
Allows the same functions
as the zoom lever to be
performed.
Display
B
Button
m: Full display
n: Simplified display
To show the simplified
0
display, tap m such
that n is displayed.
To show the full display,
0
tap n such that m is
displayed.
C
0
Tap this to record using the
self-timer. (p. 20)
D
1
Displays the approximate
remaining battery power.
To turn off the display,
0
tap 1 or “X”.
18
Page 19
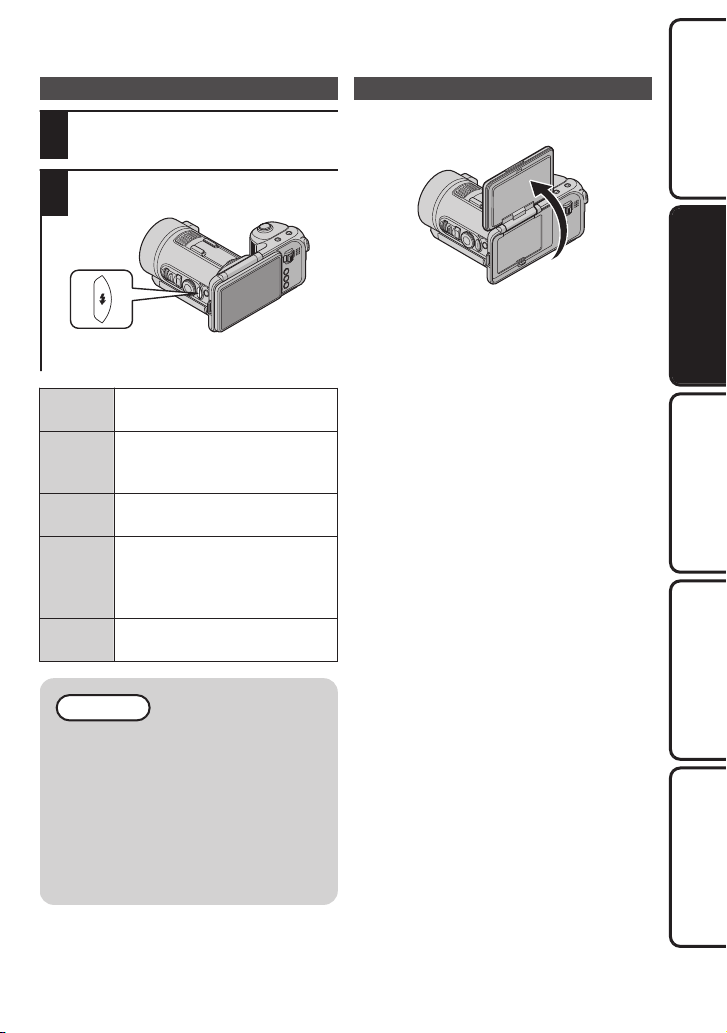
Setting the Flash
Press the A/B button to select the
1
still image mode.
Change the setting with the E
2
button.
Capturing Yourself (Face-to-face Recording)
You can rotate the screen 180 degrees to
capture images of yourself easily.
Preparations
.
The setting changes with every press
0
of the E button.
A
AUTO
B
AUTO
RED-EYE
E
ON
C
SLOW
SYNCHRO
D
OFF
Flash fires automatically when
the surrounding is dark.
Fires a pre-flash to reduce redeye effects.
Fires flash at all times.
Fires flash at all times, and
slows down the shutter speed to
capture both the subject and
background brightly.
Flash does not fire.
Memo
During continuous shooting,
0
bracketing, or charging of the flash,
E appears blinking.
If the image is still too dark even
0
when flash is used, set “GAIN” to
“800” or higher. (p. 53)
When the recording dial is set to
0
“SCN”, the firing of flash will be
automatically determined by this
unit according to the settings.
Raise the screen in the direction as shown.
To restore the screen, lower it in the
opposite direction.
o
A
B
C
D
E
.
Usage Example
Mount this unit on a tripod.
Set the self-timer to “10SEC” or
“FACE DETECTION”. (p. 20)
Raise the screen.
Press the SNAPSHOT button.
The photographer enters the frame.
Playback
Recording/
EditingComputer
Further
Information
19
Page 20
Taking Group Shots (Self-timer)
Photographer
The 10-second self-timer and Face
Detection self-timer are convenient functions
for taking group photos.
The 2-second self-timer is useful for
preventing camera shake caused by
pressing the shutter button.
Press the A/B button to select the
1
still image mode.
Tap 0 to select a setting.
2
.
The setting changes with every tap of
0
0.
F
2SEC
G
10SEC
I
FACE
DETECTION
No
display
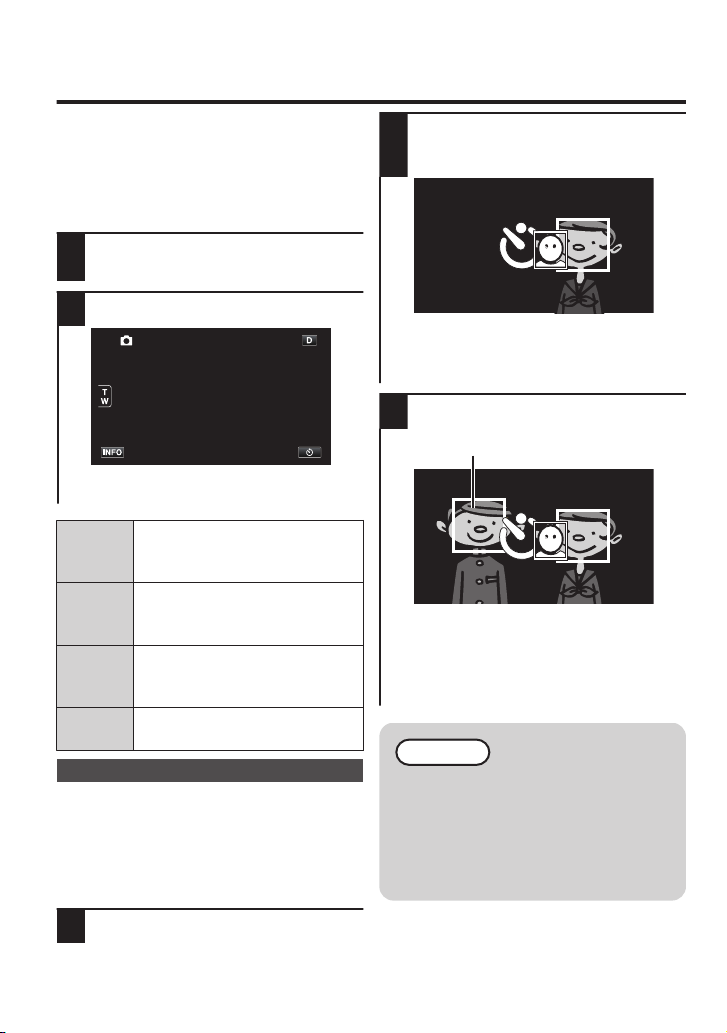
Using the Face Detection Self-timer
Pressing the SNAPSHOT button starts face
detection, and shooting is performed 3
seconds after another person enters the
frame.
This function is useful when you want to
include the photographer in the group photo.
1
Captures a still image 2 seconds
after the SNAPSHOT button is
pressed.
Captures a still image 10
seconds after the SNAPSHOT
button is pressed.
Use this function to take a group
shot.
No self-timer is set.
Tap 0 until I is displayed.
After making sure that everyone is
facing the camera, press the
2
SNAPSHOT button.
.
Frames appear around the faces of the
0
subjects.
Pressing the SNAPSHOT button again
0
starts the 10-second self-timer.
The photographer enters the frame.
3
.
The shutter is released 3 seconds after
0
the photographer enters the frame.
If shooting does not start when face
0
detection is used, press the
SNAPSHOT button. Shooting will be
performed after 10 seconds.
Memo
When shooting a photo using the
0
self-timer function, use of a tripod is
recommended.
To stop the self-timer, press the
0
SNAPSHOT button again.
Continuous shooting is not available
0
when the self-timer is being used.
20
Page 21
Continuous Shooting/Recording with
Red: Capacity for continuous shooting
Green: Capacity for saving images
*Does not appear when set to M.
CANCEL
Varying Brightness (Bracketing)
Press the A/B button to select the
1
video or still image mode.
Change the setting with the y
2
button.
.
The setting changes with every press
0
of the y button.
.
Memo
Shooting speed slows down gradually as
0
continuous shooting goes on in the M
mode.
Performing continuous shooting while
0
video recording is in progress sets the
mode to M temporarily.
When the recording dial is set to “SCN”,
0
the setting changes from “BRACKETING”
to “RECORD ONE SHOT”.
Do not remove the battery pack or AC
0
adapter while the continuously shot
images are being saved.
By pressing the SNAPSHOT button
0
halfway in the still image mode before
recording, you can reduce the occurrence
of moments being missed while the
SNAPSHOT button is pressed (up to 0.5
second). (NL only)
M
LOW
SPEED
N
MEDIUM
SPEED
L
HIGH
SPEED
K
BRACKETING
(B only)
No display
RECORD
ONE SHOT
Records still images
continuously while the
SNAPSHOT button is pressed.
Shoots continuously until the
recording media is full.
Records still images
continuously while the
SNAPSHOT button is pressed.
Maximum number of shots:
B 100 images, A 130 images
Continuous shooting speed:
B 7 images/second,
A 15 images/second
Records still images
continuously while the
SNAPSHOT button is pressed.
Maximum number of shots:
B 100 images, A 130 images
Continuous shooting speed:
B 30 images/second,
A 60 images/second
Records 5 images with varying
brightness continuously when
the SNAPSHOT button is
pressed.
- Normal brightness
- Dark (-0.6EV)
- Slightly dark (-0.3EV)
- Slightly bright (+0.3EV)
- Bright (+0.6EV)
Records one still image.
21
Preparations
Playback
Recording/
EditingComputer
Further
Information
Page 22
Adjusting Focus Manually
MENU
Set this when the focus is not clear in
Intelligent Auto or when manual focusing is
desired.
Focused subject can be outlined in color for
more precise focus by using Focus Assist.
(p. 50)
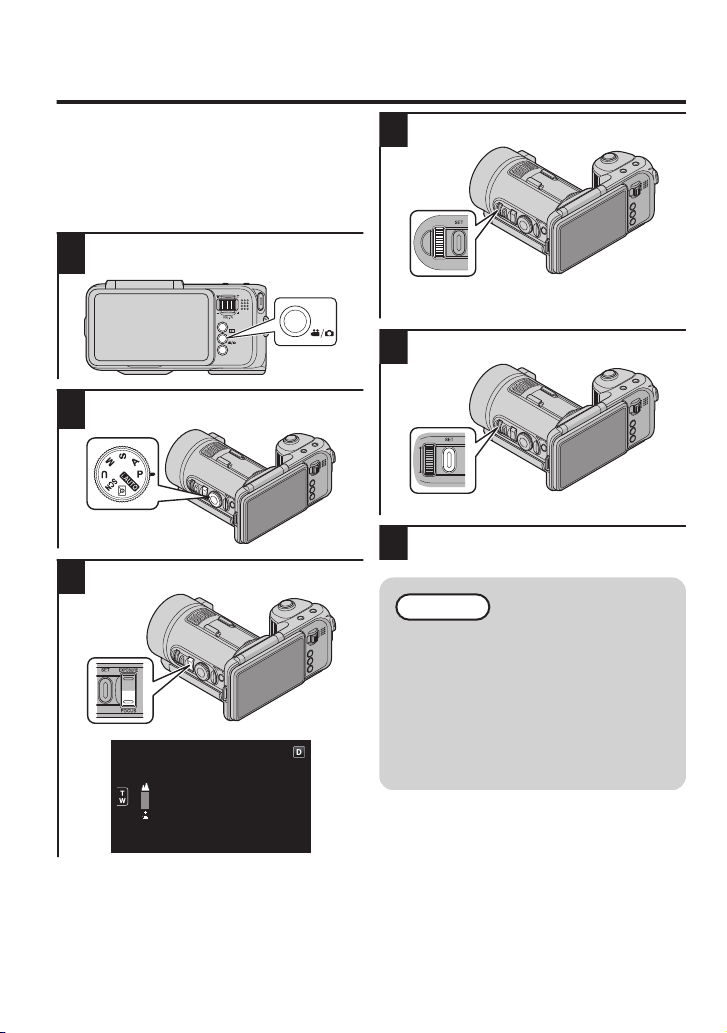
Press the A/B button to select the
1
video or still image mode.
.
Set the recording dial to
2
“P,A,S,M,U,SCN”.
.
Press the FOCUS button.
3
.
Adjust the focus with the control dial.
4
.
E: Focuses on a distant subject.
0
0
p: Focuses on a near subject.
Press the SET button.
5
.
The focus is fixed.
0
Start recording.
6
Memo
To readjust the setting, try again from
0
step 3.
To return to auto focus, press the
0
“FOCUS” button in step 5 such that
E and p disappear.
A subject that is focused at the
0
telephoto (T) end remains in focus
when it is zoomed out to the wide
angle (W) end.
22
.
Page 23
Taking Videos in Intelligent Auto Mode
MENU
TelephotoWide Angle
You can record without worrying about the
setting details by using the Intelligent Auto
mode. Settings such as exposure and focus
will be adjusted automatically to suit the
shooting conditions.
In case of specific shooting scenes such
0
as person etc., its icon is displayed on
the screen.
Before recording an important scene, it
0
is recommended to conduct a trial
recording.
Press the M button to turn on the
1
power.
Press the A/B button to select the
2
video mode.
Memo
This unit turns on immediately if the
0
power button is pressed within 5
minutes after the power is turned
off. (when “QUICK RESTART” is
set to “HIGH SPEED 2”)
When “AUTO POWER OFF” is set
0
to “ON”, this unit turns itself off
automatically to conserve power
when it is not operated for 5
minutes. (only when using the
battery pack)
Recording stops automatically as it
0
cannot be performed for 12 or more
consecutive hours according to
specifications.
Long periods of continuous
0
shooting are automatically split into
files of 30 minutes or up to 4 GB.
Do not remove the battery pack
0
while recording is in progress.
Preparations
Playback
Recording/
.
Set the recording dial to “i.AUTO”.
3
.
Start recording.
4
.
Press again to stop.
0
Zooming
The angle of view can be adjusted using
zoom.
Use the W end (wide angle end) to shoot
0
a wider field of view.
Use the T end (telephoto end) to
0
magnify the subject for shooting.
.
EditingComputer
Further
Information
23
Page 24
Capturing Still Images During Video
Press fully
Recording
Still images can be captured by pressing
the SNAPSHOT button while in the video
mode (standby or recording).
.
“PHOTO” lights up on the screen when
0
a still image is being captured.
.
Memo
The still images captured during
0
video recording are saved to the
destination set in “REC MEDIA
FOR IMAGE”.
The size of still images captured in
0
the video mode is fixed at 3840 x
2160 (aspect ratio 16:9).
For continuous shooting, refer to
0
p. 21.
This function is not available when
0
dynamic or digital zoom is being
used.
Functions exclusive to the still
0
image mode, such as flash and selftimer, are not available.
Scenes of Intelligent Auto
Display
E
A
D
I
B
J
G
H
F
C
K
L
Icon
Captures one’s skin
beautifully.
Allows people to be captured
naturally.
Focuses at a far distance and
captures a sharp image with
vivid colors.
Records with minimal noise in
the overall image.
Allows night scenes to be
captured accurately with
minimal noise in the overall
image.
Prevents colors from fading
even when recording in a
bright environment.
Records while focusing on a
near object.
Reproduces the green color
of trees vividly.
Reproduces the colors of
sunset naturally.
Adjusts settings so that the
subject does not appear too
dark due to backlight.
Allows people to be captured
naturally with minimal noise in
the overall image.
Records while focusing on a
near object even in a dark
environment.
Description
24
Page 25

Indications During Video Recording
0:00:00 [2:04]
10:10
Operation Buttons for Video Recording
Preparations
.
Video
A
Quality
Time Displays the current time.
B
Image
C
Stabilizer
Recording
D
Media
Battery
E
Indicator
Remaining
F
Recording
Time
Scene
G
Counter
(Recorded
Time)
Displays the icon of the
video quality. (p. 54)
Sets whether to reduce
camera shake. (p. 55)
Displays the icon of the
media where videos are
recorded to. (p. 60)
Displays the approximate
remaining battery power.
Displays the remaining
time for video recording.
Displays the elapsed time
of the video that is currently
being recorded.
.
T/W Zoom Allows the same functions
A
Display
B
Button
Recording
C
Start:
6
RecordStandby:
7
D
1
as the zoom lever to be
performed.
m: Full display
n: Simplified display
To show the simplified
0
display, tap m such
that n is displayed.
To show the full display,
0
tap n such that m is
displayed.
Functions as the START/
STOP button.
Displays the approximate
remaining battery power.
To turn off the display,
0
tap “X”.
Playback
Recording/
EditingComputer
Further
Information
25
Page 26

Playing Back Still Images
MENU
MENU
2011
2011
You can select and play back the recorded
still images from an index screen (thumbnail
display).
Press the A/B button to select the
1
still image mode.
.
Press the L button to select the
2
playback mode.
.
The last captured image appears.
0
Use the zoom lever to move to the
0
previous/next image.
Tap u.
3
.
The index screen appears.
0
Tap on the file to start playback.
4
Use the zoom lever to switch pages.
0
Tap I/J to select the media for
0
playback.
0
Tap u to return to the index screen.
0
The W button on the index screen is
only displayed during still image
playback. Still images that are recorded
continuously within 2 seconds or with
the continuous shooting mode will be
grouped together and displayed with a
green frame on a separate index
screen.
The index screen changes between the
normal index screen and group index
screen with every tap of the W
button.
Magnifying an Image (Playback Zoom)
Tap 2 during still image playback.
1
.
Tap on the area to magnify.
2
Tap 4 to zoom in.
3
You can perform the same operation
0
with the zoom lever (T).
To zoom out, tap 5.
0
You can perform the same operation
with the zoom lever (W).
Tap up, down, left, or right to move the
0
magnified image.
To cancel the setting, tap 5 repeatedly.
0
You can perform the same operation
with the zoom lever (W).
26
.
Page 27

Operation Buttons for Still Image Playback
2011
During Index Screen Display
.
Date Moves to the previous/next
A
</> Displays the previous index
B
Thumbnail
C
(File)
D
W
E
A
I/J
F
date
screen (thumbnail display)
You can perform the
0
same operation with the
zoom lever.
Tap on thumbnail - Starts
playback
Drag to left/right - Scrolls to
show the previous/next
index screen (thumbnail
display)
Changes between the
normal index screen and
group index screen with
every tap of the button
Displays the index screen
(thumbnail display) to
perform deletion
Switches between the index
screen of the built-in
memory and SD card
Memo
When the buttons on the screen
0
disappear, tap on the screen to
display them again. To hide the
buttons, tap on the areas outside
the buttons.
During Still Image Playback
.
A
B
C
D
E
F
G
H
I
J
K
L
T
R
S
h
m
d / e
d
g
1
u
A
2
Continuous playback of
grouped files (such as still
images captured by
continuous shooting)
Rotates to the left (rotates by
-90° with each tap)
Rotates to the right (rotates
by 90° with each tap)
Returns to the previous still
image
Reverse playback during
slideshow
Starts/pauses slideshow
Normal playback during
slideshow
Advances to the next still
image
Displays file information
such as recording date or
histogram
Returns to index screen
Displays the index screen
(thumbnail display) to
perform deletion
Magnifies the image
Preparations
Playback
Recording/
EditingComputer
Further
Information
27
Page 28

Playing Back Videos
MENU
MENU
2011
Press fully
Press the A/B button to select the
1
video mode.
.
Press the L button to select the
2
playback mode.
.
Tap on the file to start playback.
3
.
Tap I/J to select the media for
0
playback.
0
Tap e to pause.
0
Tap u to return to the index screen.
Capturing a Still Image in the Video During
Playback
You can capture still images of the scenes
you like in the recorded videos.
During video playback, press the
START/STOP button at the scene to
1
capture a still image.
.
Playback pauses.
0
(You can perform the same operation
by tapping e on the screen.)
To continue playback, press the
0
START/STOP button again.
(You can perform the same operation
by tapping d on the screen.)
Use the zoom lever (T/W) to play back
0
in forward/reverse slow-motion.
(You can perform the same operation
by tapping l / k on the screen.)
Press the SNAPSHOT button.
2
28
.
Still images are captured with a size of
0
“1920x1080”.
Captured still images are stored in the
0
media where the video is being played
back from.
Page 29

Operation Buttons for Video Playback
0:01:23 0:12:34
During Index Screen Display
.
Date Moves to the previous/next
A
</> Displays the previous index
B
Thumbnail
C
(File)
D
A
I/J
E
date
screen (thumbnail display)
You can perform the
0
same operation with the
zoom lever.
Tap on thumbnail - Starts
playback
Drag to left/right - Scrolls to
show the previous/next
index screen (thumbnail
display)
Displays the index screen
(thumbnail display) to
perform deletion
Switches between the index
screen of the built-in
memory and SD card
Memo
When the buttons on the screen
0
disappear, tap on the screen to
display them again. To hide the
buttons, tap on the areas outside
the buttons.
During Video Playback
.
Timeline
A
Bar
Pointer Displays the current
B
C
h
D
j
l
E
d / e
F
i
k
G
g
H
1
I
u
J
A
K
U
Tap on a random position - Moves
to the tapped position
Drag playback point to the left or
right - Starts playback from the
new position
estimated playback position
within the scene
Returns to the beginning of
the scene
Reverse search
Reverse slow-motion/Press and
hold to start reverse slow
playback
Playback/pause
Forward search
Forward slow-motion/Press and
hold to start slow playback
Advances to the next video
Displays file information such as
recording date when tapped
while the video is paused
Stop (returns to index screen)
Displays the index screen
(thumbnail display) to
perform deletion
Volume adjustment
Volume can also be
adjusted using the zoom
lever during playback.
Preparations
Playback
Recording/
EditingComputer
Further
Information
29
Page 30

Checking the Exposure of Still Images (Histogram)
MENU
DB
D
B
U
(
+5
Recording Information
Horizontal axis: Exposure
Vertical axis: Number of pixels
Histogram
DB
D
B
DB
BrightDark
About the Histogram
Press the A/B button to select the
1
still image mode.
.
Play back a still image. (p. 26)
2
Tap 1 2 times.
3
.
The histogram appears.
0
Tap 1 again.
4
The histogram disappears.
0
o
A still image with an evenly-distributed graph
indicates balanced exposure.
If the pixels tend toward the right side, the
0
image is too bright (overexposed).
.
If the pixels tend toward the left side, the
0
image is too dark (underexposed).
.
Memo
Perform the following operations if the
amount of exposure is inappropriate.
For manual correction, press the
0
EXPOSURE button (p. 36).
For automatic correction, set the
0
recording dial to “i.AUTO”.
30
Page 31

Slow-motion (High-speed) Recording
High-speed Recording Icon
HI-SPEED
You can record videos in slow-motion by
increasing the recording speed to
emphasize the movements, and play back
the slow-motion video smoothly.
This is a handy function for checking
movements, such as golf swings.
Press the A/B button to select the
1
video mode.
Press the O button.
2
.
.
Start recording.
3
Returning to Normal Recording
o
Press the O button again such that the
0
high-speed recording icon O
disappears.
Memo
The playback time is 5 times of the
0
actual recorded time.
(Example: If the recorded time is 1
minute, the playback time will be 5
minutes.)
Videos are recorded at a size of
0
“ 640x360/60p” regardless of the
“VIDEO QUALITY” setting (p. 54).
To record slow-moving scenes
0
such as the blooming of a flower,
set to “TIME-LAPSE RECORDING”
in the menu. (p. 56)
Images may appear grainier than
0
other videos due to the low
resolution for recording.
Audio sound is not recorded
0
together with the video.
As images may appear darker than
0
usual, it is recommended that a
tripod be used, and recording be
performed in a bright location with
the subject magnified as much as
possible.
Preparations
Playback
Recording/
EditingComputer
.
Recording starts at a speed of 300
0
frames in 1 second.
Press the START/STOP button again
0
to stop recording.
Further
Information
31
Page 32

Shooting According to Location and Condition
MENU
PORTRAIT
SCENE MODE
SPORTS
SCENE MODE
Press the A/B button to select the
1
video or still image mode.
.
Set the recording dial to “SCN”.
2
.
.
The current setting appears.
0
Press the SET button.
3
Tap the appropriate scene.
4
.
Tap “∧” or “∨” to move upward or
0
downward for more selection.
Tap L to exit the menu.
0
Start recording.
5
.
.
A list of scene modes is displayed.
0
32
Page 33

Setting Effect
PORTRAIT Blurs the background to bring out the people in the picture.
SOFT SKIN Captures one’s skin beautifully.
LANDSCAPE Focuses at a far distance and captures a sharp image.
LANDSCAPE &
PORTRAIT
NIGHT (*) Captures night scenes naturally.
NIGHT & PORTRAIT (*)
(B only)
NIGHTALIVE (*) Captures the subject without using flash by increasing
SNOW Prevents the subject from appearing too dark when recording
BEACH Prevents the subject from appearing too dark when recording
SPORTS Captures fast-moving subjects clearly in every single frame.
SPOTLIGHT (*) Prevents the human subject from appearing too bright under
FIREWORKS (*) Captures the scene of fireworks illuminating the night sky.
SUNSET Reproduces the colors of sunset naturally.
Focuses on both the subject and background when the zoom
lever is set to the wide angle (W) end.
Uses flash so that a person appears clearly while capturing
the night scene in the background vividly.
sensitivity when the surrounding is dark.
snow scenes on a sunny day.
on a sunny beach and reproduces the blue color of the sky
and sea naturally.
light.
Memo
* It is recommended to use a tripod when recording still images to prevent camera
shake.
If continuous shooting is performed, the speed will be set to M. (p. 21)
It is also recommended to use a tripod when recording videos using “NIGHTALIVE”
to prevent camera shake.
For “PORTRAIT”, “SOFT SKIN”, “NIGHT & PORTRAIT”, and “SPORTS”, flash
0
may be fired according to the brightness. For other scenes, no flash will be fired.
Preparations
Playback
Recording/
EditingComputer
33
Further
Information
Page 34
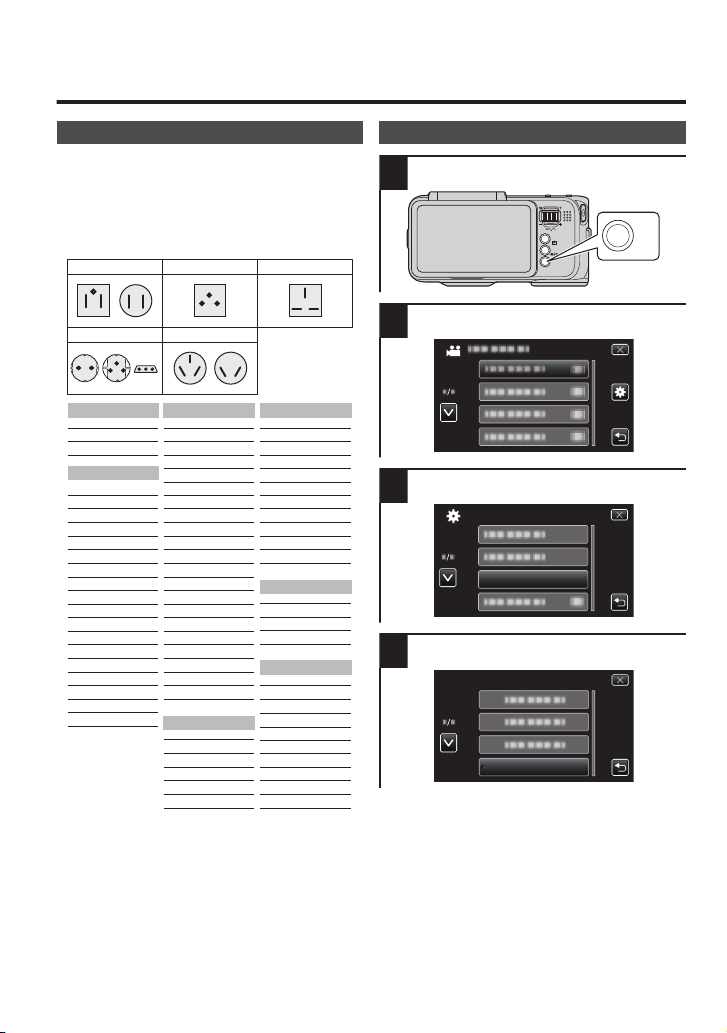
Capturing Subjects Clearly (TOUCH
TOUCH PRIORITY AE/AF
VIDEO
OFF
AREA SELECT
COLOR TRACKING
FACE TRACKING
TOUCH PRIORITY AE/AF
PRIORITY AE/AF)
“TOUCH PRIORITY AE/AF” is a function that
adjusts focus and brightness based on a
tapped position.
Press the A/B button to select the
1
video or still image mode.
Set the recording dial to P.
2
.
P appears on the screen, and frames
0
appear around the faces of the
subjects.
Up to 16 frames may be displayed.
0
Press the MENU button.
3
Tap “TOUCH PRIORITY AE/AF”.
4
.
Tap the desired setting.
5
Tap on the subject.
6
Focus and brightness will be adjusted
0
automatically based on the tapped
position (face/color/area).
Start recording.
7
Recording starts with focus and
0
brightness automatically adjusted
based on the conditions within the
frame.
Setting Details
OFF Deactivates the function.
FACE
TRACKING
COLOR
TRACKING
AREA
SELECT
e appears on the screen.
Recording is performed while
tracking and automatically
adjusting the tapped face (subject)
with appropriate focus and
brightness. In addition, a blue
frame appears around the tapped
face (subject).
f appears on the screen.
Recording is performed while
tracking and automatically
adjusting the tapped color
(subject) with appropriate focus. In
addition, a blue frame appears
around the tapped color (subject).
g appears on the screen.
Recording is performed while
automatically adjusting the tapped
area (fixed position) with
appropriate focus and brightness.
In addition, a white frame appears
around the tapped area.
.
34
Page 35

Memo
SMILE LEVEL
IMAGE
SMILE SHOT
IMAGE
To reset, tap the desired position
0
(face/color/area) again.
When “FACE TRACKING” is set,
0
some faces may not be detected
depending on the shooting
environment. If faces are not
detected after step 5, the camera
returns to the condition in step 2.
If appropriate results cannot be
0
obtained when “FACE TRACKING”
is set, set the recording dial to “SCN”
and make a selection from
“PORTRAIT”, “SOFT SKIN”,
“LANDSCAPE & PORTRAIT”,
“NIGHT & PORTRAIT”, etc.
When “COLOR TRACKING” is set,
0
the targeted subject (color) may
change if similar colors are detected.
In this case, tap on the subject again.
The targeted subject (color) may
also be tracked back again if it
appears in the center of the screen
within a specific time.
Depending on the shooting
0
environment, subjects may not be
tracked successfully even when
“COLOR TRACKING” is set.
Settings are canceled when zoom
0
operation is performed. (“AREA
SELECT” only) Tap on the subject
again.
Subjects near the sides of the LCD
0
monitor may not respond or be
recognized when tapped. In this
case, move the subject to the center
and tap again.
Tap “SMILE LEVEL”.
3
.
Tap “ON”.
4
Smile levels are displayed in numerical
0
values. (Up to 3)
To turn off the display, set “SMILE
0
LEVEL” to “OFF”.
Capturing Smiles Automatically (SMILE
SHOT)
“SMILE SHOT” automatically captures a still
image upon detection of a smile.
Press the A/B button to select the
1
still image mode.
Press the MENU button.
2
Tap “SMILE SHOT”.
3
Preparations
Playback
Recording/
EditingComputer
Displaying the Smile Level
This item is only displayed when “TOUCH
PRIORITY AE/AF” is set to “FACE
TRACKING”.
Press the A/B button to select the
1
still image mode.
Press the MENU button.
2
.
Tap “ON”.
4
A still image is automatically captured
0
when smiles are detected.
Further
Information
35
Page 36

Manual Recording
SET Button
EXPOSURE Button
Control Dial
Recording Dial
F2.8
F2.8
.
Correcting the Exposure (Brightness)
(Program Auto)
By adjusting the exposure, aperture and
shutter speed will also be automatically
adjusted according to the brightness of the
subject.
Set the recording dial to “P”.
1
.
The exposure will be corrected
0
automatically.
Correcting the Exposure
o
Manually
Press the EXPOSURE button.
A
Change the value with the control dial
B
and press the SET button.
Adjusting Aperture and Shutter Speed
Simultaneously (Manual)
By adjusting the aperture and shutter speed,
the exposure (brightness) will be set
automatically.
Set the recording dial to “M”.
1
Change the shutter speed value with
the control dial and press the SET
2
button.
Change the aperture value with the
control dial and press the SET
3
button.
Memo
Appropriate exposure may not be set
0
even after adjusting the aperture and
shutter speed.
Adjusting the Aperture (Aperture Priority)
Shutter speed will be automatically adjusted,
and appropriate exposure will be set.
Set the recording dial to “A”.
1
Change the value with the control
2
dial.
.
Correcting the Exposure
o
Press the EXPOSURE button.
A
Change the value with the control dial
B
and press the SET button.
Memo
When the aperture value is smaller,
0
the background becomes blurrer
and subjects appear clearer.
36
Page 37

Adjusting the Shutter Speed (Shutter Speed
1/4000
1/4000
VIDEO
USER DIAL
CLOUD
AUTO
MWB
FINE
Priority)
Aperture will be automatically adjusted, and
appropriate exposure will be set.
Set the recording dial to “S”.
1
Change the value with the control
2
dial.
.
Correcting the Exposure
o
Press the EXPOSURE button.
A
Change the value with the control dial
B
and press the SET button.
Memo
When the shutter speed value is
0
smaller, fast-moving subjects can be
captured without blurring.
When the shutter speed is set to
0
1/160 or higher in the still image
mode, no flash will be fired. (E
appears blinking.)
Tap “USER DIAL”.
3
.
Select the desired function.
4
Functions that can be selected
0
- SHUTTER SPEED
- APERTURE
- WHITE BALANCE
- GAIN (B mode only)
- GAIN UP (A mode only)
Perform the following operations if
0
“SHUTTER SPEED” or “APERTURE” is
selected.
Tap “MANUAL”, then select a setting
with “∧” or “∨”, and tap “SET”.
Tap to select a setting.
5
Example: White Balance
0
.
Preparations
Playback
Recording/
EditingComputer
Saving Settings of Frequently Used
Functions (User Settings)
You can save and reproduce the same
settings easily if the same values are used
repeatedly during adjustments of aperture,
shutter speed, etc.
Settings can be saved separately for videos
and still images in user settings (U) of the
recording dial.
Press the A/B button to select the
1
video or still image mode.
Press the MENU button.
2
To set other items, repeat steps 4 -
6
5.
Tap L to exit the menu.
7
Set the recording dial to “U”.
8
Further
Information
37
Page 38

Connecting to and Viewing on TV
AC Adapter To AC Outlet
TV
HDMI
HDMI Mini Cable (Optional) *
To DC
Connector
To HDMI Mini
Connector
Connecting via the HDMI Mini Connector
If you are using an HDTV, you can play back in HD quality by connecting to the HDMI
connector.
Refer also to the instruction manual of the TV in use.
0
Connect to a TV.
1
.
0
Press the M button to turn off the power of this unit.
* Use a High Speed HDMI mini cable.
Connect the AC adapter to this unit.
2
Press the external input button on the TV to switch to the input from this unit via the
3
connected connector.
Play back a file.
4
Unnatural Displays on TV
o
Images do not appear on the TV properly.
0
- Disconnect the HDMI mini cable and connect it again.
- Turn off and on this unit again.
Images are projected horizontally on the TV.
0
- Adjust the TV’s screen accordingly.
38
Page 39

Connecting via the AV Connector
AC Adapter To AC Outlet
Audio Input (R)
Audio Input (L)
Video Input
TV
AV Cable (Provided)
To DC
Connector
To AV
Connector
By connecting the supplied AV cable to the AV connector, videos can be played back on
a TV.
Refer also to the instruction manual of the TV in use.
0
Connect to a TV.
1
.
0
Press the M button to turn off the power of this unit.
Connect the AC adapter to this unit.
2
Press the external input button on the TV to switch to the input from this unit via the
3
connected connector.
Play back a file.
4
Preparations
Playback
Recording/
EditingComputer
Unnatural Displays on TV
o
Images are projected vertically on the TV.
0
- Set “VIDEO OUTPUT” in the “COMMON” menu to “4:3”. (p. 60)
Further
Information
39
Page 40

Operating in Conjunction with TV via HDMI
Connecting this unit to an HDMI-CECenabled TV using the HDMI cable allows
linked operations with the TV to be
performed.
HDMI-CEC (Consumer Electronics
0
Control) is an industry standard that
enables interoperability between HDMICEC compliant devices that are
connected via HDMI cables.
Preparations
Connect an HDMI cable between this unit
0
and the TV.
Turn on the TV and set the HDMI-CEC
0
related setting to “ON”. (For details, refer
to the instruction manual of the TV.)
Turn on this unit and set “HDMI
0
CONTROL” in the “COMMON” menu to
“ON”.
Operation Method 1
Turn on this unit.
1
Select the playback mode.
2
Connect the HDMI cable.
3
TV turns on automatically and switches
0
to HDMI input mode when this unit is
turned on.
Operation Method 2
Turn off the TV.
1
This unit turns off automatically.
0
Memo
Depending on the TV connected, the
0
display language of this unit will
automatically switch to the language
that is selected for the TV when this
unit is turned on.
(This is applicable only if this unit
supports the language selected for
the TV.) To use this unit with a
language that differs from the display
language of the TV, set “HDMI
CONTROL” to “OFF”.
The display language of the TV will
0
not switch automatically, even if the
display language of this unit is
changed.
These functions may not work
0
correctly when devices such as
amplifier and selector are
connected.
Set “HDMI CONTROL” to “OFF”.
If HDMI-CEC does not work
0
properly, turn off and on this unit
again.
Memo
This unit is not guaranteed to operate
0
with all HDMI-CEC-enabled devices.
Depending on the specifications of
0
each HDMI-CEC-enabled device,
some functions may not work with
this unit. (For details, refer to the
instruction manual of the TV.)
Unintended operations may occur
0
with some connected devices. In
these cases, set “HDMI CONTROL”
to “OFF”.
40
Page 41
TRIMMING
VIDEO
2011
2011
TRIMMING
QUIT
0:01:23 0:12:34
TRIMMING
STOP
0:01:23
A 0:00:23
0:12:34
TRIMMING
STOP
0:01:23
A 0:00:23 B 0:12:34
0:12:34
TRIMMING
SET
STOP
Editing
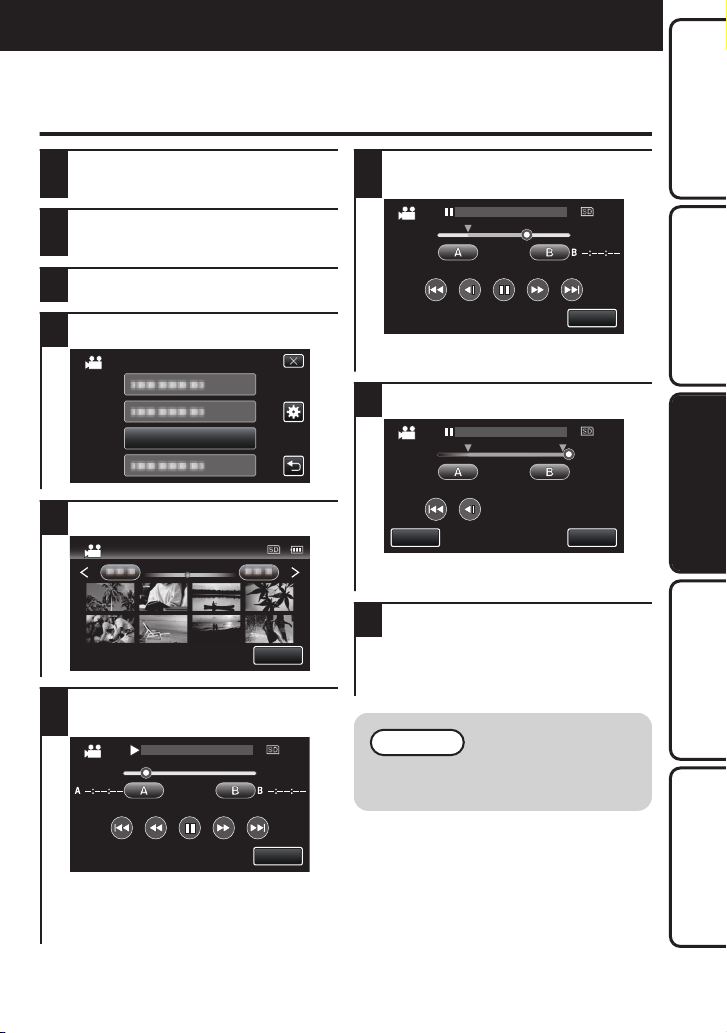
Capturing a Required Part in the Video (TRIMMING)
Press the A/B button to select the
1
video mode.
Press the L button to select the
2
playback mode.
Press the MENU button.
3
Tap “TRIMMING”.
4
.
Tap the video to edit.
5
.
Tap e to pause playback at the
6
desired start point, then tap “A”.
Tap e to pause playback at the
7
desired end point, then tap “B”.
.
When “B” is tapped, the end point is
0
set.
Tap “SET”.
8
.
When “SET” is tapped, the trimming
0
area is confirmed.
Tap “YES”.
9
After copying, tap “OK”.
0
When copying finishes, the copied file
0
is added to the index screen.
Memo
The division point may deviate
0
slightly from the selected scene.
Preparations
Playback
Recording/
EditingComputer
.
When “A” is tapped, the start point is
0
set.
0
After setting the start point, tap d to
continue playback.
Further
Information
41
Page 42

Copying Files to an SD Card
COPY
VIDEO
2011
REL ALLSEL ALL
QUANTITY:
QUIT
SET
XX
2011
REL ALLSEL ALL
QUANTITY:
QUIT
SET
XX
NOYES
START COPY?
COPY QUANTITY:
COPY
XX
Make sure that there is enough space left in
the destination medium.
Press the A/B button to select the
1
video or still image mode.
Press the L button to select the
2
playback mode.
Press the MENU button.
3
Tap “COPY”.
4
.
Tap on the files to copy.
5
.
P appears on the selected files.
0
To remove P from a file, tap on the file
again.
Tap “SEL ALL” to select all files.
0
Tap “REL ALL” to release all selections.
0
“SET” is deactivated when no file is
0
selected.
Tap “SET”.
6
.
Tap “YES”.
7
.
Copying starts.
0
After copying, tap “OK”.
0
Caution
Videos and still images in the SD
0
card cannot be copied to the built-in
memory.
42
Page 43

Deleting Unwanted Files
2011
2011
2011
REL ALL
SEL ALL
DELETE
SET
REL ALLSEL ALL
DELETE
2011
SET
RETURN
QUITEXECUTE
DELETE?
REMAINING SCENES:XX
Delete unwanted videos and still images
when the space in the recording media is
running out. Deleted files cannot be
restored.
Press the A/B button to select the
1
video or still image mode.
Press the L button to select the
2
playback mode.
Tap A.
3
.
Tap on the files to delete.
4
.
P appears on the selected files.
0
To remove P from a file, tap on the file
again.
Tap “SEL ALL” to select all files.
0
Tap “REL ALL” to release all
0
selections.
Still images that are recorded
0
continuously within 2 seconds or with
the continuous shooting mode will be
grouped together. Only the first
recorded file is shown and the group is
displayed with a green frame. When
this is tapped, an index screen of the
grouped files appears. Tap on the files
to delete, then tap “J”.
Tap “SET”.
5
.
Tap “EXECUTE” to confirm the
6
deletion.
.
After deleting is complete, tap “OK”.
0
To cancel the deletion, tap “QUIT”.
0
Deleting the Currently Displayed
o
File
0
Tap A, then tap “YES”.
Protecting Files
o
Tap “PROTECT/CANCEL” in the
A
menu.
Tap on the files to protect or release
B
protection of.
P appears on the selected files.
0
To remove P from a file, tap on the file
again.
Tap “SET” to complete the setting.
C
0
Protect marks I appear on the
selected files.
Protect marks I disappear from the
deselected files.
43
Preparations
Playback
Recording/
EditingComputer
Further
Information
Page 44

AC Adapter To AC Outlet
Computer
USB Cable (Provided)
DCUSB
USB
[JVCCAM_MEM]
[JVCCAM_SD]
[DCIM] [100JVCSO]
[101JVCSO]
[102JVCSO]
…
PIC_0001.JPG
PIC_0002.JPG
PIC_0003.MP4
PIC_0004.MP4
…
(Built-In Memory)
(SD Card)
(Folder Number)
(Video File)
(Still Image File)
Computer
Copying to Computer
Before making backup, make sure that
enough free space is left in the computer’s
hard disk (HDD).
Connect the USB cable and the AC
1
adapter.
.
Turn on this unit.
2
The built-in memory and SD card of this
0
unit appear on the computer.
Double-click the built-in memory
(JVCCAM_MEM) or SD card
3
(JVCCAM_SD) of this unit on the
computer.
Windows: Displayed in “Computer” (or
0
“My Computer”)
Mac Computer: Displayed on the
0
desktop (or the Finder sidebar)
Copy the folders and files (videos
and still images) in the “DCIM” folder
4
to the computer.
When the folders or files are deleted/
0
moved/renamed in the computer, they
cannot be played back on this unit
anymore.
Disconnecting this Unit from Computer
Click “Safely Remove Hardware and
1
Eject Media” (8).
Click “Safely Remove USB Mass
2
Storage Device”.
(For Windows Vista) Click “OK”.
3
Disconnect the USB cable from the
4
computer.
Disconnecting from Mac
o
Computer
Drag and drop the “JVCCAM_MEM”
A
and “JVCCAM_SD” icons on the
desktop to the trash bin.
(Alternatively, click P on the Finder
sidebar.)
Disconnect the USB cable from the
B
computer.
Memo
When your computer cannot
0
recognize the SDXC card, confirm
and update the OS. (p. 16)
.
44
Page 45

Using an Eye-Fi Card
Eye-Fi is an SD memory card with wireless
LAN function.
Using an Eye-Fi card, you can transfer
videos and still images to a computer or the
web. (A broadband wireless LAN
environment is required.)
Use of Eye-Fi card may be illegal and
prohibited in countries and regions where it
has not been approved by competent
authorities. Please contact Eye-Fi support
for the details of approved countries and
regions.
Make settings on the Eye-Fi card
1
with Eye-Fi Center.
For how to install and operate the Eye-
0
Fi Center, refer to its instruction
manual.
Insert the Eye-Fi card into the SD
2
card slot of this unit. (p. 14)
Turn on the power and display the
index screen in the playback mode.
3
(p. 26, p. 28)
Tap the playback media and set it
to SD card (Eye-Fi card). (p. 27,
4
p. 29)
The playback media icon changes to
0
Eye-Fi card.
Transferring Selected Files
Connect Eye-Fi card to the computer,
A
and set the provided software such
that only selected files will be
transferred (select and transfer
mode).
B
Add I marks to the files to transfer
using “PROTECT/CANCEL” in the
menu of this unit. (p. 43)
When transferring is ready to start, only
0
files with the I marks will be
transferred.
Memo
Recorded videos and still images
0
are automatically transferred. (The
files already transferred earlier are
not transferred again.)
0
M: Identifying the Eye-Fi card
O: Ready for transfer from the Eye-
Fi card
O: Transferring from the Eye-Fi
card (animated)
You cannot transfer video files
0
larger than 2 GB. (as of June, 2011)
It is not possible to identify the files
0
that have been transferred and
those that have not from the screen
of this unit.
Files cannot be transferred in the
0
recording mode. Switch to the
playback mode after recording.
If it doesn’t operate properly, first
0
make use of Eye-Fi Helper to
confirm that the settings of the EyeFi card are correct. In addition, try
the data transfer by inserting the
Eye-Fi card into other equipment
such as a computer.
You cannot transfer files during the
0
recording mode, editing and
formatting of the card.
Transfer may take long or be
0
interrupted depending on the
connection conditions.
We recommend using the AC
0
adapter when transferring files of
large size.
Do not use the camcorder in places
0
where wireless use is prohibited
such as on a plane.
For the latest information on the
0
Eye-Fi card, refer to the website of
Eye-Fi, Inc.
http://www.eye.fi/
Preparations
Playback
Recording/
EditingComputer
Further
Information
45
Page 46
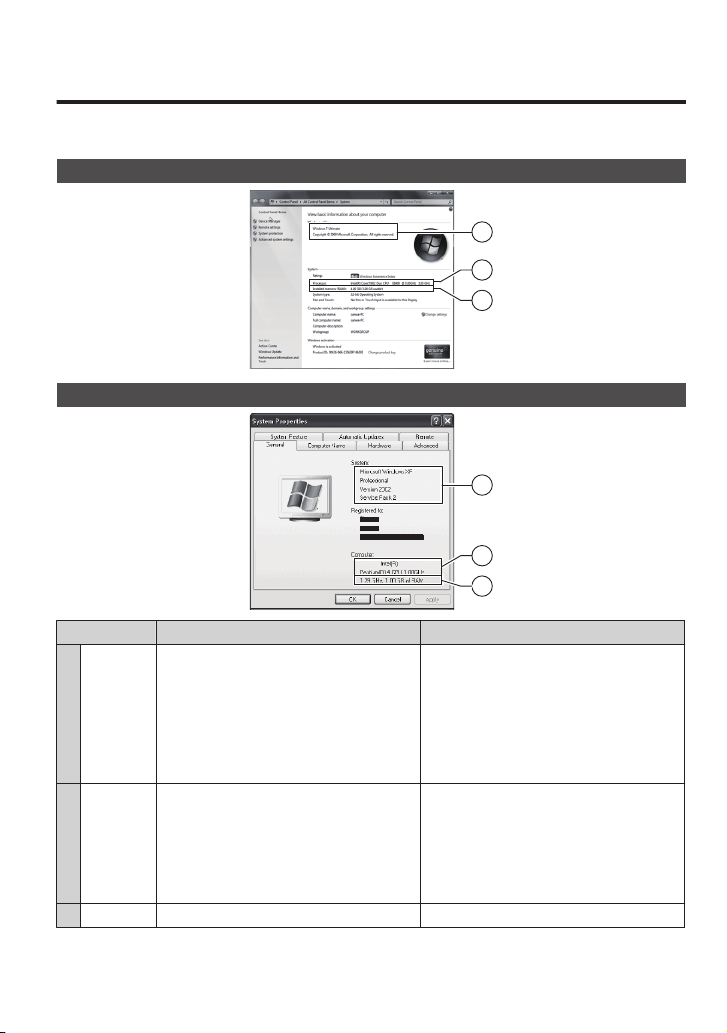
Verifying System Requirements (Guideline)
1
3
2
1
3
2
Right-click on “Computer” (or “My Computer”) in the “Start” menu and select “Properties” to
check the following items.
Windows Vista/Windows 7
.
Windows XP
.
OS Windows Vista 32/64-bit
A
CPU Intel Core 2 Duo CPU 2 GHz or higher
B
RAM At least 2 GB At least 2 GB
C
46
Windows Vista/Windows 7 Windows XP
Windows XP
Home Basic or Home Premium
(Pre-installed versions only) Service
Pack 2
Home Edition or Professional
(Pre-installed versions only) Service
Pack 3
Windows 7 32/64-bit
Home Premium
(Pre-installed versions only)
Intel Core 2 Duo CPU 2 GHz or higher
(Intel Core 2 Duo CPU 3 GHz or
higher, or Intel Core 2 Quad CPU 2
GHz or higher recommended.
Required for 1080/60p playback and
editing.)
(Intel Core 2 Duo CPU 3 GHz or
higher, or Intel Core 2 Quad CPU 2
GHz or higher recommended.
Required for 1080/60p playback and
editing.)
Page 47

Operating Conditions for Graphics
o
Intel G45 or higher
NVIDIA GeForce 8000 series or higher (except 8800GTX, 8300)
ATI Radeon HD2000 series or higher (except 2900)
Memo
If your computer does not meet the system requirements, operations of the
0
provided software cannot be guaranteed.
Graphic cards with H.264 video playback support functions are supported.
0
(except Windows XP)
For multi-touch operations, Windows 7 and a multi-touch display are required.
0
For more information, contact your computer’s manufacturer.
0
For more information on the operating conditions, refer to the support page.
0
http://loilo.tv/product/15
Preparations
Playback
Recording/
Copying to DVD Video
Windows Vista Home Premium / Windows 7
Perform editing using the provided
0
software LoiLoScope FX, and create
the DVD Video with Windows DVD
Maker.
Windows XP / Windows Vista Home
Basic
Use a commercially available DVD
0
making software.
Caution
Videos and still images cannot be dubbed via USB connection to a DVD writer,
0
DVD recorder, or Blu-ray recorder.
Memo
For details on how to use
0
LoiLoScope FX, refer to the help
file.
Files cannot be saved to DVD
0
Video in HD quality. They will be
saved in standard quality.
EditingComputer
Further
Information
47
Page 48

Installing the Provided Software
Load the provided CD-ROM into
1
your computer.
Windows Vista / Windows 7
Click “LoiLoScope FX Install and
A
User Guide” in the auto play dialog
box.
Click “Continue” on the user
B
account control screen.
“Software Setup” appears after a
0
while.
If it doesn’t appear, double-click
0
the CD-ROM icon in “Computer”.
Windows XP
Go to step 2.
0
Click “LoiLoScope FX”.
2
.
Follow the on-screen instructions.
0
Memo
To view the “Detailed User Guide”,
0
click “Detailed User Guide” in step 2.
For details on how to use
0
LoiLoScope FX, refer to the help file.
You can also refer to the support
page.
http://loilo.tv/product/15
Copying to Mac Computer
You can play back and edit videos and still
images using Apple’s iMovie’11 (video) or
iPhoto (still image).
For the latest information on iMovie or
0
iPhoto, refer to the Apple website.
For details on how to use iMovie or
0
iPhoto, refer to the help file of the
respective softwares.
There is no guarantee that the operations
0
will work with all computer environments.
48
Page 49

DIS
VIDEO
ON(A.I.S.)
ON
OFF
DIS
LANGUAGE
COMMON
ENGLISH
LANGUAGE
Further Information
Operating the Menu
Operating the Menu
Press the MENU button.
1
.
The menu differs according to the
0
mode in use.
Tap the desired menu.
2
.
Tap the desired setting.
3
Operating the Common Menu
Press the MENU button.
1
Tap “Q”.
2
.
Tap the desired menu.
3
.
Tap the desired setting.
4
Preparations
Playback
Recording/
EditingComputer
.
Memo
To exit the screen
0
Tap “L” (quit).
To return to the previous screen
0
Tap “J” (return).
.
Memo
To return all the settings to their
0
default values, select “FACTORY
PRESET” in the common menu.
(p. 60)
Further
Information
49
Page 50

Recording Menu (Still Image)
Setting
(Position of Recording
Dial)
FOCUS ASSIST
(M, S, A, P, U, SCN)
FOCUS ASSIST COLOR
(M, S, A, P, U, SCN)
WHITE BALANCE
(M, S, A, P)
BACKLIGHT COMP.
(S, A, P)
Focused subject is outlined in color for more precise focus.
Adjust the focus with the control dial.
A
E: Focuses on a distant subject.
0
0
p: Focuses on a near subject.
Press SET to confirm.
B
The image becomes black and white while the outline of
0
the focused object is displayed in the selected color.
Change outline color if it becomes difficult to see.
Sets the color of the outline of a focused object when Focus
Assist is used.
qRED: Outlines the focused object in red.
rGREEN: Outlines the focused object in green.
sBLUE: Outlines the focused object in blue.
GAUTO: Adjusts automatically to the natural colors.
jMWB: Use this when the problem of unnatural colors is not
resolved.
RFINE: Set this when shooting outdoors on a sunny day.
QCLOUD: Set this when shooting on a cloudy day or inside a
shade.
SHALOGEN:
Set this when shooting under illumination such as a video light.
TFLUORESCENT 1:
Set this to shoot naturally under a neutral white fluorescent
lamp.
UFLUORESCENT 2:
Set this to shoot naturally under a daylight fluorescent lamp.
Using MWB
o
Hold a sheet of plain white paper in front of the lens so
A
that the white paper fills the screen.
Tap “MWB” and keep touching while the icon appears
B
and blinks.
C
Release your touch after the menu disappears and j
lights up.
fOFF: Deactivates the function.
eON: Corrects the image when the subject appears dark due
to backlight.
Details
50
Page 51

Setting
(Position of Recording
Dial)
METERING AREA/ TYPE
(M, S, A, P, U)
TELE MACRO
(M, S, A, P, U)
TOUCH PRIORITY AE/
AF
(P)
SMILE SHOT
(P)
SMILE LEVEL
(P)
Details
XMULTI-PATTERN
Adjusts the overall brightness of the screen to achieve the
optimum level.
VSPOT
Adjusts the brightness in the center of the screen to achieve
the optimum level.
WCENTER-WEIGHTED
Adjusts the brightness in the center of the screen and the
surrounding area to achieve the optimum level.
Enables close-up shots when using the telephoto (T) end of
the zoom.
fOFF: Enables close-up shots up to 1 m at the telephoto (T)
end.
Enables close-up shots up to 5 cm at the wide angle (W) end.
eON: Enables close-up shots up to 60 cm at the telephoto
(T) end.
Enables close-up shots up to 5 cm at the wide angle (W) end.
When you are not taking close-up shots, set “TELE
0
MACRO” to “OFF”.
Otherwise, the image may be blur.
fOFF: Adjusts focus and brightness based on a selected
face automatically.
bFACE TRACKING: Adjusts focus and brightness based on
a specified face. (p. 34)
cCOLOR TRACKING: Adjusts focus and brightness based
on a specified color. (p. 34)
aAREA SELECT: Adjusts focus and brightness based on a
specified area. (p. 34)
fOFF: Deactivates the function.
eON: Automatically captures a still image upon detection of
a smile. (p. 35)
When “TOUCH PRIORITY AE/AF” is set to “COLOR
0
TRACKING” or “AREA SELECT”, “SMILE SHOT” does not
work.
fOFF: Does not display smile levels.
eON: Displays smile levels (%) beside the detected smiling
faces. (p. 35)
Preparations
Playback
Recording/
EditingComputer
51
Further
Information
Page 52

Setting
(Position of Recording
Dial)
IMAGE SIZE
IMAGE QUALITY
AF POINT
(M, S, A, P, U)
AF ASSIST BEAM
AF MOVEMENT
(M, S, A, P, U, SCN)
Details
w4000x3000(12M)
g2976x2232(6.6M)
d1600x1200(1.9M)
r640x480(0.3M)
v4000x2248(9M)
f2976x1672(4.9M)
e1920x1080(2M)
The sides of still images recorded in 16:9 aspect ratio may
0
be cut off when printed.
kFINE: Enables recording in high picture quality. The number
of recordable shots is lesser.
jSTANDARD: Enables recording in standard quality. The
number of recordable shots is more.
ZMULTI: Performs auto focus and displays a frame around the
focused area.
YSELECT: Performs auto focus at the specified area.
When “SELECT” is selected, 9 frames to specify the area to
0
focus will be displayed. Tap on the desired area to focus.
fOFF: Turns off the assist beam.
eON: Turns on the assist beam when the SNAPSHOT button
is pressed halfway, and turns it off when focus is fixed.
Beam is turned off in manual focus.
0
Beam may not turn on depending on the surrounding
0
brightness.
mSINGLE AF:
For shooting stationary objects. (Focus is usually fixed and
adjustment starts when the SNAPSHOT is pressed halfway)
lCONTINUOUS AF:
For normal shootings. (Focus is usually adjusted automatically
and becomes fixed when the SNAPSHOT button is pressed
halfway)
nFULL-TIME AF:
For shooting moving objects. (Focus is usually adjusted
automatically)
52
Page 53

Setting
(Position of Recording
GAIN
(M, S, A, P)
DIS
AUTO REC
GRID
(linked to video mode)
USER DIAL Saves the settings of shutter speed, aperture, white balance,
Dial)
GAUTO: Adjusts the ISO level automatically according to the
brightness of the subject.
oISO100: Uses a sensitivity equivalent to ISO100 film
pISO200: Uses a sensitivity equivalent to ISO200 film
qISO400: Uses a sensitivity equivalent to ISO400 film
sISO800: Uses a sensitivity equivalent to ISO800 film
tISO1600: Uses a sensitivity equivalent to ISO1600 film
uISO3200: Uses a sensitivity equivalent to ISO3200 film
vISO6400: Uses a sensitivity equivalent to ISO6400 film
The flash cannot be used when “ISO6400” is set.
0
The higher the ISO level, the grainier the image becomes
0
due to noise.
0OFF: Deactivates image stabilizer.
1ON: Reduces camera shake under normal shooting
conditions.
Image stabilization starts when the SNAPSHOT button is
0
pressed halfway.
It is recommended to set the image stabilizer to “OFF”
0
when shooting a subject of little movement with the unit on
a tripod.
Complete stabilization may not be possible if camera
0
shake is excessive.
fOFF: Deactivates the function.
wRECORD ONE SHOT: Records automatically by detecting
the subject.
xCONTINUOUS SHOOTING: Performs continuous
shooting for 3 seconds about 1 second before the subject is
detected. (fixed at medium speed)
Recording starts each time a subject is detected.
0
A frame appears on the screen, and the subject is detected
0
based on the changes in brightness within the frame. As
such, recording may also start due to changes in
brightness that are not caused by the subject (reflection of
light, etc.).
Digital zoom, self-timer, and image stabilizer are not
0
available. Shutter speed, aperture, and brightness cannot
be adjusted.
fOFF: Turns off grid display.
eON: Displays gridlines to make it easier to detect when the
subject appears slanted.
Hold this unit such that the subject is parallel to the grid so
0
that it can be recorded without appearing slanted.
The grid will not be recorded.
0
and gain so that recording can be performed with the same
values by simply setting the recording dial to “U”. (p. 37)
Details
Preparations
Playback
Recording/
EditingComputer
Further
Information
53
Page 54

Recording Menu (Video)
Setting
(Position of Recording
FOCUS ASSIST
(M, S, A, P, U, SCN)
FOCUS ASSIST COLOR
(M, S, A, P, U, SCN)
WHITE BALANCE
(M, S, A, P)
BACKLIGHT COMP.
(S, A, P)
TELE MACRO
(M, S, A, P, U)
ZEBRA
(M, S, A, P, U)
TOUCH PRIORITY AE/AF(P)
VIDEO QUALITY
Dial)
For details, refer to “FOCUS ASSIST” in the recording menu
(still image). (p. 50)
For details, refer to “FOCUS ASSIST COLOR” in the recording
menu (still image). (p. 50)
For details, refer to “WHITE BALANCE” in the recording menu
(still image). (p. 50)
For details, refer to “BACKLIGHT COMP.” in the recording
menu (still image). (p. 50)
For details, refer to “TELE MACRO” in the recording menu (still
image). (p. 51)
fOFF: Deactivates the function.
u70%: Sections that are close to be over-exposed are
displayed in striped pattern.
t100%: Sections that are over-exposed are displayed in
striped pattern.
Correct the brightness such that the striped pattern
0
disappears by using the shutter speed or aperture priority
setting function.
For details, refer to “TOUCH PRIORITY AE/AF” in the recording
menu (still image). (p. 51)
8HD 1080/60p(UHR): Enables recording in the best picture
quality.
6HD 1080/60p(HR): Enables recording in high picture quality.
5HD 720/60p: Enables recording in standard quality.
7iFrame: Set this when using Apple’s iMovie ’11. (540/30p)
Details
54
Page 55

Setting
(Position of Recording
ZOOM Zoom ratio varies according to the video quality.
DIS
GAIN UP
(M, S, A, P)
Dial)
VIDEO QUALITY : HD 1080/60p(UHR), HD 1080/60p(HR)
210x/OPTICAL: 1 - 10x
319(18)x/DYNAMIC: 11 - 19x*
464x/DIGITAL: 20 - 64x
* Up to 18x when DIS is set to ON(A.I.S.).
VIDEO QUALITY : HD 720/60p
210x/OPTICAL: 1 - 10x
327x/DYNAMIC: 11 - 27x
464x/DIGITAL: 28 - 64x
“ZOOM” is not available when video quality is set to
0
“iFrame”.
All zoom options come with an optical zoom of up to 10x.
0
Dynamic zoom is available even when “64x/DIGITAL” is
0
selected.
When digital zoom is used, the picture quality may drop.
0
While dynamic zoom also involves digital processing, the
picture quality does not drop like in digital zoom.
0OFF: Deactivates image stabilizer.
1ON: Reduces camera shake under normal shooting
conditions.
ION(A.I.S.): Reduces camera shake more effectively when
shooting bright scenes on the wide angle end.
It is recommended to set the image stabilizer to “OFF”
0
when shooting a subject of little movement with the unit on
a tripod.
Complete stabilization may not be possible if camera
0
shake is excessive.
When “ON(A.I.S.)” is set, the maximum zoom ratio of
0
dynamic zoom is reduced.
fOFF: Deactivates the function.
D+6dB: Brightens the subject in dark places (amount of
increase: very small)
E+12dB: Brightens the subject in dark places (amount of
increase: small)
F+18dB: Brightens the subject in dark places (amount of
increase: medium)
GAGC: Brightens the subject in dark places (amount of
increase: big)
HAUTO: Brightens the subject in dark places (amount of
increase: very big)
When “AUTO” is set, a shutter speed of 1/30 (auto slow)
0
will be used in dark places. As such, movements of the
subject may become unnatural.
Details
Preparations
Playback
Recording/
EditingComputer
Further
Information
55
Page 56

Setting
(Position of Recording
TIME-LAPSE
RECORDING
AUTO REC
WIND CUT
GRID
(linked to still image mode)
USER DIAL Saves the settings of shutter speed, aperture, white balance,
Dial)
fOFF: Deactivates the function.
A1SEC INTERVAL: Takes a frame at 1-second intervals.
B5SEC INTERVAL: Takes a frame at 5-second intervals.
C40SEC INTERVAL: Takes a frame at 40-second intervals.
During time-lapse recording, video quality is set to “HD
0
1080/60p(UHR)” temporarily.
This function enables the changes of a scene that occur
0
slowly over a long period to be shown within a short time by
taking frames of it at a certain interval.
Audio sound cannot be recorded and zooming is not
0
available.
When recording is stopped with the recorded time less than
0
“0:00:00:17”, the video will not be saved.
Recording stops automatically 99 hours after it is started.
0
Make use of a tripod and AC adapter for time-lapse
0
recordings with long intervals.
fOFF: Deactivates the function.
eON: Records automatically by detecting the subject.
Recording starts each time a subject is detected.
0
A frame appears on the screen, and the subject is detected
0
based on the changes in brightness within the frame. As
such, recording may also start due to changes in brightness
that are not caused by the subject (reflection of light, etc.).
Digital zoom, image stabilizer, high-speed recording, and
0
time-lapse recording are not available. Shutter speed,
aperture, and brightness cannot be adjusted.
fOFF: Deactivates the function.
eON: Reduces the noise caused by wind.
For details, refer to “GRID” in the recording menu (still image).
(p. 53)
and gain up so that recording can be performed with the same
values by simply setting the recording dial to “U”. (p. 37)
Details
56
Page 57

Setting
(Position of Recording
MIC LEVEL
MIC LEVEL SETTING
HEADPHONE VOL. ADJ. Turns up or down the volume of headphones.
Dial)
fOFF: Hides the display.
eON: Shows the display of microphone input level.
Appropriate volume can be set by adjusting “MIC LEVEL
0
SETTING” such that the display does not turn red.
N +2: Increases the microphone input level.
M +1: Increases the microphone input level slightly.
J 0: The microphone input level is not changed.
K -1: Decreases the microphone input level slightly.
L -2: Decreases the microphone input level.
When connected to an external microphone, the sensitivity
0
of the microphone can be adjusted.
Tap “+” or “-” on the screen.
0
Adjustments can be made using the zoom lever during
0
playback.
Setting can be made in advance before connecting the
0
headphones.
Details
Preparations
Playback
Recording/
EditingComputer
57
Further
Information
Page 58

Playback Menu (Still Image)
Setting Details
COPY Copies files from the built-in memory to the SD card. (p. 42)
PROTECT/CANCEL Protects files from being deleted accidently. (p. 43)
When using an Eye-Fi card, this item can be used to specify
0
the files to transfer. (p. 45)
Playback Menu (Video)
Setting Details
COPY Copies files from the built-in memory to the SD card. (p. 42)
PROTECT/CANCEL Protects files from being deleted accidently. (p. 43)
TRIMMING Select the required part of a video and save it as a new video
K2 TECHNOLOGY
When using an Eye-Fi card, this item can be used to specify
0
the files to transfer. (p. 45)
file. (p. 41)
fOFF: Plays back the sounds as recorded in a video file.
eON: Improves and plays back clearly the small or high-
pitched sounds that cannot be heard easily during recording.
58
Page 59

Common Menu
Setting Details
CLOCK ADJUST Resets the current time or sets to the local time when using
DATE DISPLAY STYLE Sets the order of year, month, day and the time display format
LANGUAGE The language on the display can be changed.
MONITOR
BRIGHTNESS
AUTO POWER OFF
OPERATION SOUND
QUICK RESTART
TOUCH SCREEN
ADJUST
this unit overseas.
Clock Setting (p. 11)
0
Setting the Clock to Local Time when Traveling (p. 13)
0
Setting Daylight Saving Time (p. 13)
0
(24H/12H).
R4: Sets the monitor to the brightest.
Q3: Sets the monitor to standard brightness.
P2: Sets the monitor to slightly dark.
O1: Sets the monitor to the darkest.
GAUTO: Sets the brightness automatically to 4 when using
outdoors and to 3 when using indoors.
Upon moving outdoors, “LCDcJ” is displayed for about 3
0
seconds and J appears blinking.
Upon moving indoors, “LCDcK” is displayed for about 3
0
seconds and K appears blinking.
fOFF: Power is not turned off even if this unit is not operated
for 5 minutes.
eON: Turns off the power (when using battery) or sets to the
standby mode (when using AC adapter) if this unit is not
operated for 5 minutes.
fOFF: Does not produce sound during operation or when the
SNAPSHOT button is pressed.
USHUTTER: Produces sound when the SNAPSHOT button
is pressed.
VALL: Produces sound during operation and when the
SNAPSHOT button is pressed.
fOFF: Deactivates the function.
SHIGH SPEED 1: Helps to save battery life. (Zoom position
changes when the power is turned off.)
THIGH SPEED 2: Enables this unit to turn on immediately
when the power button is pressed within 5 minutes after the
power is turned off.
Adjusts the response position of the buttons on the touch
screen. (p. 10)
Preparations
Playback
Recording/
EditingComputer
Further
Information
59
Page 60

Setting Details
UPDATE Updates the functions of this unit to the latest version. For
FACTORY PRESET Restarts the unit and returns all settings to their default values.
DISPLAY ON TV
VIDEO OUTPUT
HDMI OUTPUT
HDMI CONTROL
REC MEDIA FOR IMAGE
REC MEDIA FOR VIDEO
FORMAT BUILT-IN MEM. FILE: Deletes all files on the built-in memory.
FORMAT SD CARD Deletes all files on the SD card.
ERASE ALL DATA Execute this process when disposing of this unit or passing it to
details, refer to the JVC homepage.
(When no program to update the software of this unit is
available, nothing will be provided on the homepage.)
(except “CLOCK ADJUST”)
fOFF: Does not display icons and date/time on TV.
eON: Displays the icons and date/time that appear on the
screen of this unit on TV.
X4:3: Select this when connecting to a conventional TV (4:3).
Y16:9: Select this when connecting to a widescreen TV (16:9).
GAUTO: It is recommended to select “AUTO” usually.
W480p: Select this when the video is not output in “AUTO”
correctly.
When a 1080p compatible TV is connected via the HDMI
0
cable, the optimum image (1080p signal) can be output by
setting to “AUTO”.
fOFF: Turns off linked operations.
eON: Sets whether to link operations with an HDMI-CEC
compliant TV. (p. 40)
IBUILT-IN MEMORY: Records still images to this unit’s built-
in memory.
GSD CARD: Records still images to the SD card.
IBUILT-IN MEMORY: Records videos to this unit’s built-in
memory.
GSD CARD: Records videos to the SD card.
FILE + MANAGEMENT NO: Deletes all files on the built-in
memory and resets the folder number to “100”.
Not available for selection when no SD card is inserted.
another person.
Repeat the process to make data restoration even more
0
difficult.
Connect the AC adapter when erasing all data on the built-
0
in memory. Erasing cannot be performed if the AC adapter
is not connected.
60
Page 61

Troubleshooting
If you encounter problems with this unit, check the following before requesting service.
1 Refer to “Trouble” below.
2 This unit is a microcomputer-controlled device. Electrostatic discharge, external
noise and interference (from a TV, a radio, etc.) might prevent it from functioning
properly.
In such a case, reset the unit.
Turn off the power.
A
Remove the AC adapter and battery pack from this unit, reattach them, and
B
turn on this unit.
3 If the above do not solve the problem, consult your nearest JVC dealer or JVC
service Center.
Trouble
Trouble
Action Page
Preparations
Playback
Recording/
Cannot insert the SD
card.
The computer cannot
Card
recognize the SDXC
card.
Unable to turn on the
power.
Power
The POWER/CHARGE
lamp appears blinking.
Recording cannot be
performed.
Digital zoom does not
Recording
work.
Make sure not to insert the card in the
0
wrong direction.
Confirm and update the OS of your
0
computer.
Be sure to use an original AC adapter.
0
Recharge the battery pack.
0
The battery pack is being charged.
0
0
Check the A/B button.
0
Press the L button to select the
recording mode.
Set “ZOOM” in the menu to “64x/
0
DIGITAL”.
Digital zoom is not available in the still
0
image mode and when video quality is
set to “iFrame”.
14
16
EditingComputer
-
9
-
17, 23
-
55
-
Further
Information
61
Page 62

The focus is not
adjusted automatically.
Wipe the lens with a lens cleaning cloth.
0
Set the focus from manual to auto.
0
If you are recording in a dark place or a
0
subject that has no contrast between
dark and light, adjust the focus
manually.
22
22
Recording stops
automatically.
The recorded subject is
too dark.
Recording
The recorded subject is
too bright.
The color looks strange.
(Too bluish, too reddish,
etc.)
The subject appears
distorted.
Turn off this unit, wait for a while, and
0
turn it on again. (This unit stops
automatically to protect the circuit when
the temperature rises.)
Recording stops automatically after 12
0
hours of continuous recording.
For videos, use “GAIN UP” in the menu.
0
For still images, set “GAIN” in the menu
0
to “800”.
For still images, use the flash.
0
Set the recording dial to “SCN” and use
0
“NIGHTALIVE”.
(For still images, “NIGHT” is also
effective.)
Use backlight compensation when the
0
background is bright and the subject is
dark.
Set the exposure (brightness) to the “+”
0
side.
Set “BACKLIGHT COMP.” to “OFF”.
0
Set the recording dial to “SCN” and use
0
“SPOTLIGHT”.
Set the exposure (brightness) to the “-”
0
side.
Adjust the setting of “WHITE
0
BALANCE” in the menu.
- Select an appropriate setting
according to the light source.
- Select “MWB” and adjust accordingly.
As this unit uses a CMOS image sensor,
0
subjects may appear distorted when
they move across the screen quickly,
but this is not a malfunction.
-
23
55
53
19
32
50
36
50
32
36
50
-
62
Page 63

Flickering and
horizontal stripes
appear under
fluorescent lights.
White spots are
captured on the image.
This is a feature of the CMOS sensor
0
and not a malfunction.
White, round spots may be captured
0
due to reflection of the flash on the dust
particles in the air, but this is not a
malfunction.
-
Preparations
-
A band or a ball of bright
light appears on the
LCD monitor.
Images appear grainy
and no sound is
recorded in high-speed
Recording
recording.
The continuous
shooting speed of still
images is slow.
The actual recording
time is shorter than the
estimated value.
Frames do not appear
around the faces even
when the recording dial
is set to P.
Change the direction of this unit to
0
prevent the light source from coming
into view. (A band or a ball of bright light
may appear when there is a bright light
source near this unit, but this is not a
malfunction.)
Images appear grainier in high-speed
0
recording.
Audio sound is not recorded in high-
0
speed recording.
The continuous shooting speed will
0
drop if this function is used repeatedly.
Continuous shooting speed may drop
0
depending on the SD card or under
certain recording conditions.
The recording time may be shorter
0
depending on the environment, such as
when shooting a fast-moving subject.
Set “TOUCH PRIORITY AE/AF” in the
0
menu to “FACE TRACKING”.
When “COLOR TRACKING” or “AREA
SELECT” is set, frames do not appear
around the faces.
31
31
21
34
-
Playback
Recording/
EditingComputer
-
-
63
Further
Information
Page 64

The remaining battery
display is not correct.
Fully charge and fully discharge the
0
battery pack, then recharge it again.
Remaining battery power is not
0
displayed when the AC adapter is
connected.
If this unit is used for long periods of time
0
in high or low temperatures, or if the
battery pack is repeatedly charged, the
amount of remaining battery may not be
displayed correctly.
-
-
-
Screen
The LCD monitor is
difficult to see.
No date/time display.
Sound or video is
interrupted.
Cannot find a recorded
file.
Mosaic-type noise
occurs when recording
scenes with fast
movements or extreme
changes in brightness.
The unit operates slowly
Playback
when switching
between video mode
and still image mode, or
when switching the
power on or off.
The LCD monitor may be difficult to see
0
if used in bright areas such as under
direct sunlight.
Set “MONITOR BRIGHTNESS” in the
0
“COMMON” menu to “4”.
When playing back on a TV, set
0
“DISPLAY ON TV” in the “COMMON”
menu to “ON”.
Sometimes playback is interrupted at
0
the connecting section between two
scenes. This is not a malfunction.
Change the playback media by tapping
0
I/G on the index screen.
(Files on the other media will not be
displayed.)
Change the video quality for recording
0
if “iFrame” is used.
It is recommended that you copy all
0
videos and still images onto your
computer, and erase the files from this
unit. (If there are many recorded files on
this unit, it takes time for the unit to
respond.)
-
59
60
-
27, 29
54
-
When connected to the
TV via the HDMI mini
cable, proper images
and sounds are not
output.
64
Images and sounds may not be output
0
properly depending on the TV
connected. In such cases, perform the
following operations.
- Disconnect the HDMI mini cable and
connect it again.
- Turn off and on this unit again.
38
Page 65

The lamp does not flash
during battery pack
charging.
Check the remaining battery power.
0
(When the battery pack is fully charged,
the lamp does not flash.)
When charging in either a hot or cold
0
environment, ensure that battery is
being charged within the permitted
temperature range. (Otherwise,
charging may stop to protect the battery
pack.)
18, 25
68
Preparations
The buttons on the
touch screen do not
work.
This unit heats up.
Other Problems
Cannot upload the file to
YouTube, Facebook, or
Vimeo.
Cannot export the file to
iTunes.
There are bright or dark
spots on the screen.
When the touch screen does not
0
respond smoothly, apply slightly more
force to your fingertip.
If you apply a protect sheet or a sticker,
0
the touch screen may not respond
smoothly.
Perform “TOUCH SCREEN ADJUST” if
0
the reactive area of the screen is
misaligned with the touched area.
This is not a malfunction. (This unit may
0
become warm when used for a long
time.)
Create an account with the service
0
(YouTube, Facebook, or Vimeo) that
you would like to use.
(You need an account with the
respective services to upload files.)
Refer to “Manual”, “FAQ”, etc. on the
0
support page “http://loilo.tv/product/15”
of the provided software.
Install iTunes.
0
Refer to “Manual”, “FAQ”, etc. on the
0
support page “http://loilo.tv/product/15”
of the provided software.
When sunlight is reflected, the LCD
0
monitor may turn red or black
momentarily.
While the LCD monitor screen has more
0
than 99.99% effective pixels, 0.01% of
the pixels may be bright spots (red,
blue, green) or dark spots. This is not a
malfunction.
10
10
10
Playback
Recording/
-
-
-
-
-
-
-
EditingComputer
65
Further
Information
Page 66

Warning Indications
Warning Indications Action Page
SET DATE/TIME!
COMMUNICATION
ERROR
CANNOT USE IN VIDEO
MODE
INSUFFICIENT
AVAILABLE SPACE
Warning Indications
THIS FILE IS PROTECTED
CHECK CARD'S WRITE
PROTECTION SWITCH
NO FILES
Connect the AC adapter, charge the
0
battery for more than 24 hours and set
the clock.
If you use any other battery packs
0
besides JVC battery packs, safety and
performance cannot be guaranteed. Be
sure to use JVC battery packs.
Set “REC MEDIA FOR VIDEO” in the
0
“COMMON” menu to “BUILT-IN
MEMORY”.
Replace the SD card with a new one.
0
If the above does not solve the problem,
0
back up your files and execute
“FORMAT SD CARD” in the
“COMMON” menu. (All data will be
deleted.)
Delete files, or move files to a computer
0
or other devices.
Replace the SD card with a new one.
0
Switch off the “PROTECT/CANCEL”
0
function in the menu.
Set the write protect switch of the SD
0
card to off.
0
Switch the mode with the A/B button.
Tap the playback media on the index
0
screen, and check if files are recorded
to the other media.
11
9
60
14
15
43, 44
14
43
-
26, 28
27, 29
NOT FORMATTED
66
Select “OK”, then select “YES” on the
0
“DO YOU WANT TO FORMAT?”
screen. (All data will be deleted.)
15
Page 67

FORMAT ERROR!
DATA DELETION ERROR
Check the operating procedure, and
0
perform once again.
Turn off and on this unit again.
0
-
-
RECORDING FAILURE
MEMORY CARD ERROR!
ERROR IN BUILT-IN
MEMORY!
THIS CARD CANNOT BE
USED FOR RECORDING
OR EDITING ON THIS
CAMERA
UNSUPPORTED SCENE!
UNSUPPORTED FILE!
NUMBER OF FOLDERS
OVERFLOW
SCENE QUANTITY
EXCEEDED LIMIT
FILE QUANTITY LIMIT
EXCEEDED
Turn off and on this unit again.
0
Remove the AC adapter and battery
0
pack, then remove and re-insert the SD
card.
Remove any dirt from the SD card
0
terminals.
If the above does not solve the problem,
0
back up your files and execute
“FORMAT SD CARD” in the
“COMMON” menu. (All data will be
deleted.)
If the above does not solve the problem,
0
back up your files and execute
“FORMAT BUILT-IN MEM.” in the
“COMMON” menu. (All data will be
deleted.)
Use cards recorded with this unit. (Files
0
recorded with other devices may not be
playable.)
If the file is recorded with this unit, then
0
the file is damaged.
Move the files or folders to a
A
computer or other device. (Back
up your files.)
Select “FILE + MANAGEMENT
B
NO” in “FORMAT BUILT-IN
MEM.” or “FORMAT SD CARD” of
the “COMMON” menu. (All data
on the built-in memory or SD card
will be deleted.)
-
9, 14
-
60
60
-
-
44
60
Preparations
Playback
Recording/
EditingComputer
67
Further
Information
Page 68

Specifications
General
Power Supply Using AC adapter: DC 11 V
Power Consumption 4.8 W (when MONITOR BRIGHTNESS is set to “3”)
Dimensions (mm) 131 x 67 x 122 (5-3/16” x 2-11/16” x 4-13/16”) (W x H x D)
Mass
Operating Environment Allowable operating temperature: 0°C to 40°C (32°F to 104°F)
Camera/Lens
Image Pickup Device 1/2.3” 12,750,000 pixels
Recording Area Video 1080/60p:
Lens F2.8 - F4.5
Filter Diameter 46 mm (screw pitch 0.75 mm)
Lowest Illumination 4 lux (SHUTTER SPEED: 1/30)
LCD Monitor 3” wide, 230,000 pixels, polysilicon color LCD
Flash Recommended shooting distance: Within 2 m
Focus AUTO, MANUAL, TELE MACRO,
Metering MULTI-PATTERN, SPOT, CENTER-WEIGHTED
Using battery pack: DC 7.2 V
(excluding shoulder strap)
Camera: Approx. 435 g (0.96 lbs)
During recording: Approx. 520 g (1.2 lbs) (including supplied battery
pack)
Allowable storage temperature: -20°C to 50°C (-4°F to 122°F)
Allowable relative humidity: 35 % to 80 %
7,950,000 pixels (optical zoom)
2,070,000 to 7,950,000 pixels (dynamic zoom)
Video 720/60p:
6,970,000 pixels (optical zoom)
920,000 to 6,970,000 pixels (dynamic zoom)
Video iFrame:
6,970,000 pixels (optical zoom)
Still image 12,000,000 pixels
f= 6.7 mm - 67.0 mm
35 mm conversion:
(Video) 1080/60p: 43.3 mm to 433 mm
(Video) 720/60p, iFrame: 46.3 mm to 463 mm
(Still image) 37.4 mm to 374 mm
1 lux (NIGHTALIVE mode, SHUTTER SPEED: 1/2)
9-point MULTI, 9-point SELECT,
Face recognition, FACE TRACKING, COLOR TRACKING,
AREA SELECT
68
Page 69

GAIN Still image: AUTO, MANUAL (100, 200, 400, 800, 1600, 3200,
Exposure Intelligent Auto (i.A), Program Auto (P), Aperture Priority AE
Shutter
Speed
Zoom During
Continuous
Shooting
Speed
* During video recording, continuous shooting speed changes to “LOW SPEED”
temporarily.
Connectors
HDMI Connector HDMI Mini Connector
AV Connector Video: Analog output
Microphone Connector φ3.5 mm mini jack: Stereo, analog input
Headphones Connector φ3.5 mm mini jack: Stereo, analog output
USB Connector Mini USB Type B, USB 2.0
During
video
recording
During still
image
recording
video
recording
During still image
recording
During still image
playback
Still image
recording in
video
mode*
During still
image
recording
6400)
(A), Shutter Speed Priority AE (S), Manual Exposure (M)
Exposure correction
Video: 13 step, -6 to +6 level
Still image: 1/3 EV step, -2 EV to +2 EV
Auto: 1/60 to 1/4000
Auto slow shutter: 1/30 to 1/4000
NIGHTALIVE: 1/2 to 1/4000
PORTRAIT: 1/60 to 1/8000
Manual: 1/2 to 1/4000
Auto: 1/2 to 1/125 (with flash), 1/2 to 1/4000 (without flash)
Manual: 1/2 to 1/4000, 2(FIREWORKS mode), 1/8000
(PORTRAIT mode, without flash)
Optical zoom: Up to 10x
Dynamic zoom: Up to 18/19x (p. 55)
Digital zoom: Up to 64x
Optical zoom: Up to 10x
Up to 4x
HIGH SPEED: Approx. 60 images/second (up to 130 images per recording)
MEDIUM SPEED: Approx. 15 images/second (up to 130 images per recording)
LOW SPEED: Approx. 2 images/second (during video record-standby) (maximum:
no limit)
Approx. 1.5 images/second (during video recording) (maximum: no limit)
HIGH SPEED: Approx. 30 images/second (up to 100 images per recording)
MEDIUM SPEED: Approx. 7 images/second (up to 100 images per recording)
LOW SPEED: Approx. 2 images/second (maximum: no limit)
Audio: Stereo, analog output
Preparations
Playback
Recording/
EditingComputer
Further
Information
69
Page 70

Clock Battery
Type Rechargeable battery
Still Image
Recording Format JPEG standard
Extension .JPG
Image Size (p. 52)
Quality FINE / STANDARD
Recording Media Built-in memory (32 GB),
Video
Signal System Digital HD system
Recording/Playback
Format
Quality/Resolution (p. 72)
Sound Quality 48 kHz, 128 kbps VBR
Recording Media Built-in memory (32 GB),
The specifications and appearance of this product are subject to changes for further
0
improvement without prior notice.
SD/SDHC/SDXC card (commercially available),
Eye-Fi card (commercially available)
MPEG-4 standard
Video: MPEG-4 AVC/H.264
Audio: AAC (2ch)
SD/SDHC/SDXC card (commercially available),
Eye-Fi card (commercially available)
70
Page 71

Recordable Time/Number of Images
The approximate recording time and number of shots is only a guide. Values may vary
depending on the shooting environment, SD card in use, and the battery condition.
Approximate Number of Still Images (Unit: Number of Shots)
Still Image Size with
Aspect Ratio 4:3
4000x3000
(12M)
2976x2232
(6.6M)
1600x1200
(1.9M)
640x480
(0.3M)
Still Image Size with
Aspect Ratio 16:9
4000x2248
(9M)
2976x1672
(4.9M)
1920x1080
(2M)
3840x2160 (8.29M)
(during video mode)
The IMAGE SIZE of still images captured in the video mode is fixed at “3840x2160”.
0
Approximate Video Recording Time
Quality
HD 1080/60p(UHR) 10 m 2 h 4 h 2 h
HD 1080/60p(HR) 20 m 3 h 6 h 3 h
HD 720/60p 40 m 5 h 50 m 11 h 30 m 5 h 40 m
iFrame 20 m 2 h 50 m 5 h 50 m 2 h 50 m
High-speed Recording* 20 m 3 h 20 m 6 h 40 m 3 h 20 m
* Playback time of recorded scenes is 5 times of the recording time.
Each recording stops at 144 minutes. (Playback time: 12 hours)
Quality
FINE 700 1400 5800 9999 5700
STANDARD 800 1800 7300 9999 7100
FINE 1000 2000 8400 9999 8100
STANDARD 1600 3300 9999 9999 9999
FINE 3500 7100 9999 9999 9999
STANDARD 5600 9999 9999 9999 9999
FINE 9999 9999 9999 9999 9999
STANDARD 9999 9999 9999 9999 9999
Quality
FINE 900 1900 7800 9999 7600
STANDARD 1100 2400 9800 9999 9500
FINE 1300 2700 9999 9999 9999
STANDARD 2100 4400 9999 9999 9999
FINE 3200 6700 9999 9999 9999
STANDARD 5200 9999 9999 9999 9999
FINE 1000 2000 8400 9999 8200
STANDARD 1300 2600 9999 9999 9999
SDHC Card SDXC
4 GB 32 GB 64 GB
SDHC Card SDXC
4 GB 8 GB 32 GB 64 GB
SDHC Card SDXC
4 GB 8 GB 32 GB 64 GB
Built-in
Memory
Built-in
Memory
Built-in
Memory
Preparations
Playback
Recording/
EditingComputer
Further
Information
71
Page 72

Approximate Number of Still Images (Using Battery)
Number of Recordable Images with Supplied Battery Pack
The above value is obtained under the following conditions based on the CIPA standard.
(CIPA: Camera & Imaging Products Association)
Temperature: 25 °C (77°F)
0
Uses supplied battery pack
0
Uses built-in memory
0
IMAGE QUALITY: FINE
0
QUICK RESTART in menu: OFF
0
Uses auto focus
0
Approximate Recording Time (Using Battery)
Battery Pack Actual Recording Time Continuous Recording Time
BN-VF815U 1 h 2 h
The above are values when “MONITOR BRIGHTNESS” in the recording menu is set to
0
“3”.
The actual recording time may be shorter if zooming is used or if recording is stopped
0
repeatedly. (It is recommended to prepare battery packs ready for three times the
expected recording time.)
When the battery life is reached, the recording time becomes shorter even if the battery
0
pack is fully charged.
(Replace the battery pack with a new one.)
Video Quality and Resolution
Quality
HD 1080/60p(UHR) 35 Mbps VBR 1920×1080p 60
HD 1080/60p(HR) 23 Mbps VBR 1920×1080p 60
HD 720/60p 12 Mbps VBR 1280×720p 60
iFrame 24 Mbps VBR 960×540p 30
High-speed Recording* 4 Mbps VBR 640×360p 60
* The above shows the values of bit rate during playback. During recording, the bit rate is
20 Mbps VBR.
Fully Charged
Bit Rate
(Average)
Records at 30-second intervals
0
Flashes once every 2 times
0
Turns power on/off once every 10
0
times
Zooms from T to W or W to T with each
0
recording (10x)
Resolution
270 images
Frame Transmission
(frames/second)
Optional Accessories
Product Name
Battery Pack
BN-VF815U
Battery Charger
AA-VF8
For more information, refer to the catalog.
0
Suitable for use as a spare battery pack.
0
Enables the battery pack to be charged without using this
0
unit.
72
Description
Page 73

Memo
73
Page 74

Index
A
Adjusting Brightness ...................... 36
AF Assist Beam .............................. 52
AF Movement ................................. 52
AF Point ......................................... 52
Aperture Priority ............................. 36
Area Select ..................................... 34
Auto Power Off ............................... 59
Auto Rec ........................................ 56
B
Backlight Comp. ............................. 50
Battery Charging Time ..................... 9
Battery Indicator ....................... 18, 25
Bracketing ...................................... 21
C
Clock Adjust ................................... 11
Color Tracking .......................... 34, 51
Common Menu ......................... 49, 59
Computer ....................................... 44
Continuous Shooting ...................... 21
Copy ............................................... 42
D
Date Display Style .......................... 59
Delete ............................................. 43
Display on TV ................................. 60
Focus ............................................. 22
Focus Assist ................................... 50
Focus Assist Color ......................... 50
Format ............................................ 60
G
Gain ............................................... 53
Gain Up .......................................... 55
Grid ................................................ 53
H
HDMI Control ................................. 60
HDMI Output .................................. 60
Headphones .................................. 57
High-speed Recording ................... 31
Histogram ....................................... 30
I
Image Quality ................................. 52
Image Size ..................................... 52
Image Stabilizer ........................ 53, 55
Installation ...................................... 48
Intelligent Auto .......................... 17, 23
K
K2 Technology ............................... 58
L
Language ................................. 12, 59
E
Erase All Data ................................ 60
Exposure ........................................ 36
Eye-Fi Card .................................... 45
F
Face Detection ............................... 20
Face Tracking .......................... 34, 51
Face-to-face Recording ................. 19
Factory Preset ................................ 60
Flash .............................................. 19
74
M
Manual Focus ................................. 22
Menu .............................................. 49
Metering Area/Type ........................ 51
Mic Level ........................................ 57
Monitor Brightness ......................... 59
O
Operation Sound ............................ 59
P
Program Auto ................................. 36
Page 75

Protect ............................................ 43
Q
Quick Restart ................................. 59
R
Rec Media For Image ..................... 60
Rec Media For Video ..................... 60
Recordable Time/Number of Images
Recording Dial ................................. 5
Reset .............................................. 61
Rotate ............................................ 27
S
Scene Select .................................. 32
SD Card ......................................... 14
Self-Timer ...................................... 20
Shutter Speed ................................ 37
Slideshow ....................................... 27
Smile Shot ................................ 35, 51
T
Tele Macro ..................................... 51
Time-Lapse Recording ................... 56
Touch Priority AE/AF ................ 34, 51
Touch Screen Adjust ................ 10, 59
Trimming ........................................ 41
... 71
U
Update ........................................... 60
User Dial ........................................ 37
User Settings .................................. 37
V
Video Output .................................. 60
Video Quality .................................. 54
Volume Adjustment ........................ 29
W
White Balance ................................ 50
Wind Cut ........................................ 56
Z
Zoom .................................. 17, 23, 55
75
Page 76

.
© 2011 Victor Company of Japan, Limited
0911AJH-SW-VM
C1P
 Loading...