

Page 1

Basic User Guide
Verifying the Accessories
AC Adapter
AP-V20U
Battery Pack
BN-VF815U
HDMI Mini
Cable
USB Cable
(Type A - Mini Type B)
CD-ROM
AV Cable
QAM1322-001
Please consult your JVC dealer or the nearest JVC service center when purchasing
a new AV cable.
Lens Hood Shoulder Strap Monitor Hood Lens Cap Core Filter
BC mark means complies with Energy Efficiency Law.
BC
HD MEMORY CAMERA
GC-PX100 A
LYT2592-001A-M
EN
Detailed User Guide
.
For more details on operating this
product, please refer to the “Detailed
User Guide” at the following website.
http://manual3.jvckenwood.com/
o
index.html/
Mobile User Guide
.
When you are outside, refer to the
“Mobile User Guide”. Mobile User Guide
can be viewed with standard browser for
Android tablet and iPhone.
http://manual3.jvckenwood.com/mobile/
o
us/
Dear Customers
Thank you for purchasing this JVC product.
Before use, please read the Safety Precautions
and Cautions on p. 2 and p. 18 to ensure
safe use of this product.
For Future Reference:
Enter the Model No. (located on the bottom of the camera)
and Serial No.
(located on the battery pack mount of the camera) below.
Model No.
Serial No.
Page 2

Safety Precautions
CAUTION
RISK OF ELECTRIC SHOCK
DO NOT OPEN
CAUTION: TO REDUCE THE RISK OF ELECTRIC SHOCK,
DO NOT REMOVE COVER (OR BACK).
NO USER-SERVICEABLE PARTS INSIDE.
REFER SERVICING TO QUALIFIED SERVICE PERSONNEL.
The lightning flash with arrowhead symbol, within an
equilateral triangle, is intended to alert the user to the
presence of uninsulated "dangerous voltage" within the
product's enclosure that may be of sufficient magnitude
to constitute a risk of electric shock to persons.
The exclamation point within an equilateral triangle is
intended to alert the user to the presence of important
operating and maintenance (servicing) instructions in
the literature accompanying the appliance.
WARNING: TO PREVENT FIRE OR SHOCK
HAZARD, DO NOT EXPOSE THIS UNIT TO
RAIN OR MOISTURE.
NOTES:
•
The rating plate and safety caution are on the
bottom and/or the back of the main unit.
•
The serial number plate is on the bottom of the
main unit.
•
The rating information and safety caution of the
AC adapter are on its upper and lower sides.
Caution on Replaceable lithium battery
The battery used in this device may present a fire
or chemical burn hazard if mistreated.
Do not recharge, disassemble, heat above 100°C
(212°F) or incinerate.
Replace battery with Panasonic, Sanyo, Sony or
Maxell CR2025.
Danger of explosion or Risk of fire if the battery is
incorrectly replaced.
•
Dispose of used battery promptly.
•
Keep away from children.
•
Do not disassemble and do not dispose of in fire.
For USA-California Only
This product contains a CR Coin Cell Lithium
Battery which contains Perchlorate Material
– special handling may apply.
See www.dtsc.ca.gov/hazardouswaste/perchlorate
When the equipment is installed in a cabinet or on
a shelf, make sure that it has sufficient space on all
sides to allow for ventilation (10 cm (3-15/16") or
more on both sides, on top and at the rear).
Do not block the ventilation holes.
(If the ventilation holes are blocked by a
newspaper, or cloth etc. the heat may not be able
to get out.)
No naked flame sources, such as lighted candles,
should be placed on the apparatus.
When discarding batteries, environmental
problems must be considered and the local rules or
laws governing the disposal of these batteries must
be followed strictly.
The apparatus shall not be exposed to dripping or
splashing.
Do not use this equipment in a bathroom or places
with water.
Also do not place any containers filled with water
or liquids (such as cosmetics or medicines, flower
vases, potted plants, cups etc.) on top of this unit.
(If water or liquid is allowed to enter this
equipment, fire or electric shock may be caused.)
Do not point the lens directly into the sun. This
can cause eye injuries, as well as lead to the
malfunctioning of internal circuitry. There is also a
risk of fire or electric shock.
CAUTION!
The following notes concern possible physical
damage to this unit and to the user.
Carrying or holding this unit by the LCD monitor
can result in dropping the unit, or in a malfunction.
Do not use a tripod on unsteady or unlevel surfaces.
It could tip over, causing serious damage to the unit.
CAUTION!
Connecting cables (Audio/Video, etc.) to
this unit
and leaving it on top of the TV is not recommended,
as tripping on the cables will cause
this unit
to fall,
resulting in damage.
CAUTION:
The mains plug shall remain readily operable.
•
Remove the mains plug immediately if the
camcorder functions abnormally.
WARNING:
The battery pack, the camcorder with battery
installed, and the remote control with battery
installed should not be exposed to excessive heat
such as direct sunlight, fire or the like.
CAUTION:
To maintain compliance with FCC’s RF exposure
guidelines, use only the supplied antenna.
Unauthorized antenna, modification, or attachments
could damage the transmitter and may violate FCC
regulations.
This device complies with Part 15 of the FCC Rules.
Operation is subject to the following two conditions:
(1) This device may not cause harmful interference.
(2) This device must accept any interference
received, including interference that may Cause
undesired operation.
Make a backup of important recorded data
JVC will not be responsible for any lost data.
It is recommended to copy your important recorded
data to a disc or other recording media for storage
once every 3 months.
.
2
Page 3

IMPORTANT SAFETY INSTRUCTIONS
1. Read these instructions.
2. Keep these instructions.
3. Heed all warnings.
4. Follow all instructions.
5. Do not use this apparatus near water.
6. Clean only with dry cloth.
7. Do not block any ventilation openings. Install in
accordance with the manufacturer’s instructions.
8. Do not install near any heat sources such
as radiators, heat registers, stoves, or other
apparatus (including amplifi ers) that produce heat.
9. Protect the power cord from being walked on or
pinched particularly at plugs, convenience
receptacles, and the point where they exit from
the apparatus.
10. Only use attachments/accessories specifi ed by
the manufacturer.
11. Use only with the cart,
stand, tripod, bracket,
or table specifi ed by
the manufacturer, or
sold with the apparatus.
When a cart is used,
use caution when
moving the cart/
apparatus combination
to avoid injury from tip-over.
12. Unplug this apparatus during lightning storms or
when unused for long periods of time.
13. Refer all servicing to qualifi ed service personnel.
Servicing is required when the apparatus has
been damaged in any way, such as power-supply
cord or plug is damaged, liquid has been spilled
or objects have fallen into the apparatus, the
apparatus has been exposed to rain or moisture,
does not operate normally, or has been dropped.
If this symbol is shown, it is only valid
in the European Union.
Remember that this unit is intended for
private consumer use only.
Any commercial use without proper permission
is prohibited. (Even if you record an event such
as a show, performance or exhibition for personal
enjoyment, it is strongly recommended that you
obtain permission beforehand.)
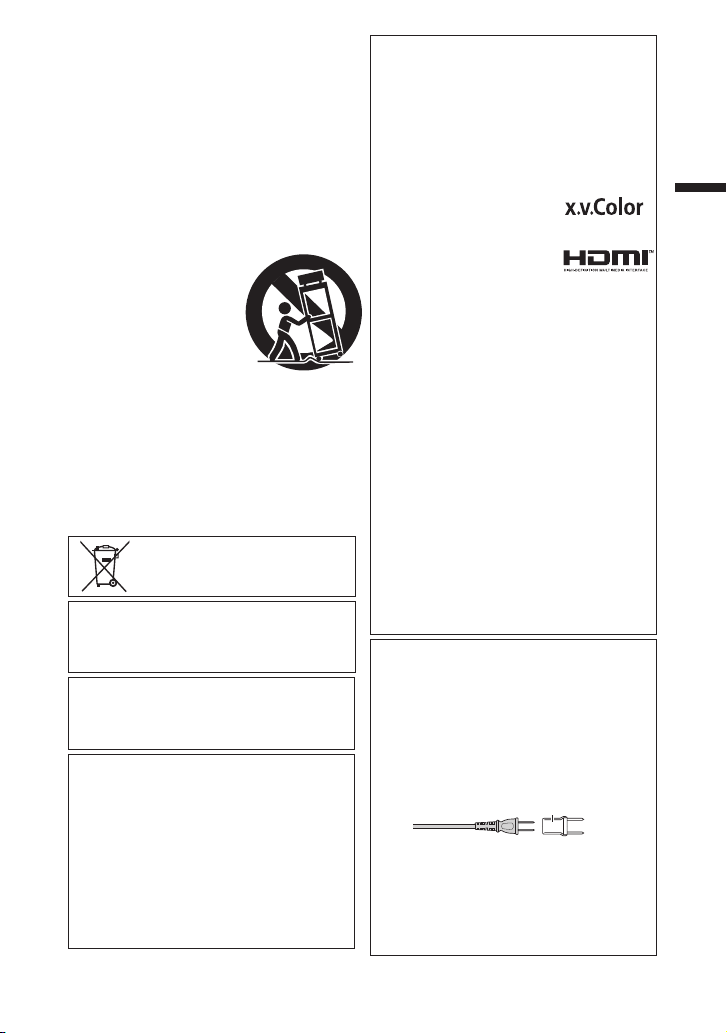
Trademarks
•
AVCHD Progressive/AVCHD and AVCHD
Progressive/AVCHD logo are trademarks of
Panasonic Corporation and Sony Corporation.
•
x.v.Color™ is a trademark of
Sony Corporation.
•
HDMI (High-Definition Multimedia Interface) and
HDMI logo are either registered trademarks or
trademarks of HDMI Licensing, LLC in the
United States and/or other
countries.
•
Manufactured under license from Dolby
Laboratories. Dolby and the double-D symbol
are trademarks of Dolby Laboratories.
•
SDXC logo is a trademark of SD-3C, LLC.
•
Windows® is either registered trademark or
trademark of Microsoft Corporation in the
United States and/or other countries.
•
Macintosh is a registered trademark of Apple Inc.
•
iMovie, iPhone and iPhoto are trademarks of Apple Inc.,
registered in the U.S. and other countries.
•
YouTube™ and the YouTube logo are trademarks
and/or registered trademarks of Google Inc.
•
Intel, Intel Core, and Pentium are trademarks or
registered trademarks of Intel Corporation or its
subsidiaries in the United States and other countries.
•
Android
™ is a trademark of Google Inc.
•
The iFrame logo and iFrame symbol are trademarks
of Apple Inc.
•
Wi-Fi, Wi-Fi logo, Wi-Fi CERTIFIED, Wi-Fi
CERTIFIED logo, Wi-Fi Protected Setup, Wi-Fi
Protected Setup logo, WPA, and WPA2 are
trademarks or registered trademarks of Wi-Fi Alliance.
•
Other product and company names included in
this instruction manual are trademarks and/or
registered trademarks of their respective holders.
•
Marks such as ™ and ® have been omitted in this manual.
When using the AC adapter in areas other
than the USA
The provided AC adapter features automatic
voltage selection in the AC range from 110 V to 240 V.
USING HOUSEHOLD AC PLUG ADAPTER
In case of connecting the unit’s power cord to
an AC wall outlet other than American National
Standard C73 series type use an AC plug
adapter, called a “Siemens Plug”, as shown.
For this AC plug adapter, consult your nearest
JVC dealer.
Plug Adapter
Remove the AC adapter from the AC wall outlet
when not in use.
Do not leave dust or metal objects adhered to
the AC wall outlet or AC adapter (power/DC plug).
•
•
Be sure to use the supplied AC adapter.
Do not use the supplied AC adapter with other
devices.
•
•
This product is licensed under the AVC Patent
Portfolio License for the personal use of a
consumer or other uses in which it does not receive
remuneration to
(i) encode video in compliance with the AVC
standard (“AVC Video”) and/or
(ii) decode AVC Video that was encoded by a
consumer engaged in a personal activity and/or
was obtained from a video provider licensed to
provide AVC Video. No license is granted or shall
be implied for any other use. Additional information
may be obtained from MPEG LA, L.L.C.
See http://www.mpegla.com
.
3
Page 4

Contents
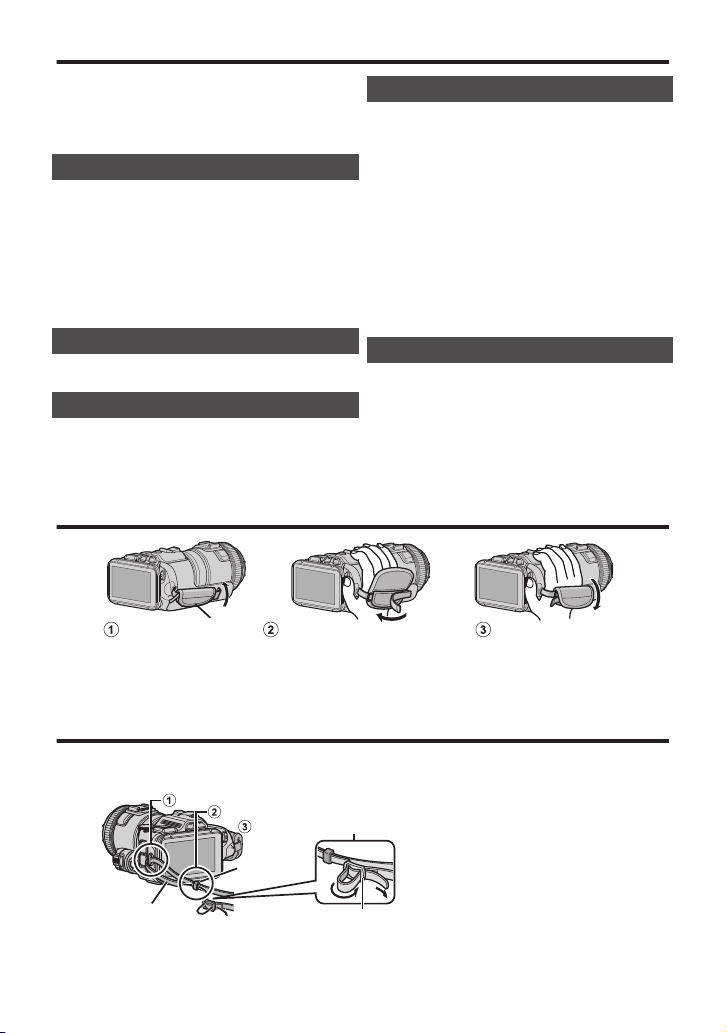
Close the pad
Adjust the length of the belt
Open the pad
Pad
Insert the tip of shoulder strap into the attachment part of this unit.
Strap Lock
Shoulder Strap
Adjust the length of the belt, and then fix with the strap lock.
Insert the shoulder strap into the ring.
Ring
Safety Precautions ................................. 2
Grip Belt Adjustment .............................. 4
Attaching the Accessories ...................... 4
Getting Started
Charging the Battery Pack ..................... 6
Inserting an SD Card .............................. 7
Using the Icon Buttons/Thumbnails ........ 7
Changing Menu Settings ........................ 8
Clock Setting .......................................... 8
Recording
Video Recording .................................... 9
Playback
Playing Back/Deleting Files on this Unit
Playing Back on TV .............................. 11
.... 10
Copying
Install MediaBrowser (Windows) .......... 12
USB Menu Operations ......................... 13
File Backup (Windows) ........................ 14
View Your Video (Windows) ................. 14
AVCHD Disc Creation (Windows) ........ 15
Record to a DVD or VHS Recorder ...... 15
How to Upload a File (Video Clip) to
YouTube (Windows) ............................ 16
Simple File Backup with a Mac ............ 17
Further Information
Troubleshooting/Cautions .................... 18
Recordable Time/Specifications .......... 20
Grip Belt Adjustment
.
Wi-Fi antenna is located inside the pad.
0
Do not pull out the Wi-Fi antenna when adjusting the belt.
Attaching the Accessories
Attaching the Shoulder Strap
o
.
Be careful not to drop this unit during transportation.
0
Guardians should pay close attention when this unit is being used by children.
0
4
Page 5

Attaching the Lens Cap
o
Attach the lens cap when this unit is not being used or during transportation.
Attach the lens cap to the grip belt while shooting.
.
Attaching the Lens Hood
o
Use of the lens hood is recommended for shooting outdoors with exposure to direct
sunlight.
Attach to the main unit by aligning the indicator of the main unit and lens hood.
0
Attaching the Monitor Hood
o
.
Attach the monitor hood if the monitor screen is difficult to see due to the sunlight.
Attach the claw located at the upper part of the monitor hood to insertion point at the
0
upper part of the LCD monitor. Then attach the claw at the bottom part of the monitor
.
hood.
5
Page 6

Charging the Battery Pack
Attach the battery pack.
The battery pack is not charged
at the time of purchase.
Charging finished:
Goes out
Charging in progress:
Blinks
Charging Lamp
Plug in the power.
Connect the DC connector.
AC Adapter To
AC Outlet
Detaching the Battery Pack
Cover
To remove the battery,
press the battery lock
lever ( ) and slide the
battery ( ) .
Open the battery cover ( ) after
opening the LCD monitor ( ).
Place the battery toward the right
side. Push the battery into the main
unit, and slide in until the battery
clicks into place.
.
CAUTION
Be sure to use JVC battery packs.
If you use any other battery packs besides JVC battery packs, safety and
0
performance cannot be guaranteed.
If malfunctions (overcurrent, overvoltage, transmission error, etc) occur, or if any
0
battery manufactured other than JVC is attempted for battery charge, charging
stops. In these cases, the CHARGE lamp blinks quickly for notification.
You can record or play back videos while the AC adapter is connected. (Battery
0
charging cannot be performed during recording or playback.)
Remove the battery when the unit is to be used for a long time. Performance
of the battery may drop if it is left attached to the unit.
The estimated charging time of the supplied battery pack is approximately 2
0
hour 10 minutes.
The charging time is when the unit is used at 25°C (77°F). If the battery pack is
0
charged outside the room temperature range of 10°C to 35°C (50°F to 95°F),
charging may take a longer time or it may not start. CHARGE lamp blinks 2 times
in a slow cycle for notification if the battery charge does not start. Also, please
note that the recordable and playable time may be shortened under some usage
conditions, such as at low temperature.
6
Page 7

Inserting an SD Card
*
Label
Insert an SD card.
Turn off the power of this unit
before inserting or removing an SD
card.
Open the battery cover
after opening the LCD
monitor.
0:01:23 0:12:34
Index screen (thumbnail display)
Playback ScreenRecording Screen
MENUREC
4
0:01:23 0:12:34
MENU
≪MARK
Insert a commercially available SD card before recording.
.
To remove the SD card
o
Push the SD card inward once, then pull it out straight.
NOTE
Operations are confirmed on the following SD cards.
Manufacturer Panasonic, TOSHIBA, SanDisk
Video A
Still Image B
Using SD cards (including SDHC/SDXC cards) other than those specified
0
above may result in recording failure or data loss.
This unit is not guaranteed to operate with all SD cards, even when using the ones
0
specified above. Some SD cards may not work due to specification changes, etc.
To protect the data, do not touch the terminals of the SD card.
0
When using an SDXC card, check its compatibility with the OS of your computer
0
by referring to the Detailed User Guide.
Class 4 or higher compatible SD card (2 GB)/
Class 4 or higher compatible SDHC card (4 GB to 32 GB)/
Class 4 or higher compatible SDXC card (48 GB to 128 GB)
To select [MOV 1080p LPCM], [MP4 1080p] or [iFrame
0
720p] in [VIDEO QUALITY], use a Class 6 or higher
compliant SDHC/SDXC card.
To select [60p] in [SYSTEM SELECT], use a Class 6 or
0
higher compliant SDHC/SDXC card.
SD card (256 MB to 2 GB) / SDHC card (4 GB to 32 GB) /
SDXC card (48 GB to 128 GB)
Using the Icon Buttons/Thumbnails
A
Tap the displayed button (icon) or thumbnail (file) on the touch screen to make selection.
B Drag the thumbnails on the touch screen to search for the desired file.
.
7
Page 8

Changing Menu Settings
MENU
REC
NO
YES
SET DATE/TIME!
AM
201324 10 00
TIMEDATE
CLOCK SETTING
DEC
SET
To change camera settings, tap [MENU] and
select the item which you want to change.
Tap [MENU].
1
.
Tap the desired item in the menu.
2
.
Clock Setting
Turn on the power.
1
Tap the desired item to change the
3
settings.
(Icon type screen)
.
0
Tap 0 or 1 to scroll the screen.
0
Tap 3 or 2 to scroll the screen.
To exit the screen
o
Tap L (quit).
To return to the previous screen
o
Tap J (return).
3
(List type screen)
.
Set the date and time.
.
Tap [YES] when [SET DATE/TIME!]
2
is displayed.
.
8
.
0
3 and 2 are displayed when items in
[DATE] and [TIME] are tapped.
0
Set [DATE] and [TIME] by tapping 3 or 2.
Repeat this step to enter [DATE] and
0
[TIME].
After setting the date and time, tap [SET].
4
Select the region where you live and
5
tap [SAVE].
Time difference between the selected
0
city and the GMT (Greenwich Mean
Time) is displayed.
0
Tap 0 or 1 to select the city name.
Page 9

Video Recording
A
Zooming
Start recording.
Press again to stop.
Check if the
recording mode is
A video.
(Wide angle)
(Telephoto)
Check if the
recording mode is
P Intelligent Auto.
If the mode is other
than P, set the
shooting dial to
i.AUTO.
Turn on the
power.
If the mode is B still
image, press A/B to
switch.
MENUREC
0:00:00 [0:54]
Recording in Progress
Recording-Standby
Battery Indicator
Recording Media
Image Stabilizer
Video Quality
Remaining Recording Time
Scene Counter
MARK button
You can record without worrying about the setting details by using the Intelligent Auto mode. Settings
such as exposure and focus will be adjusted automatically to suit the shooting conditions.
In case of specific shooting scenes such as person etc., its icon is displayed on the screen.
0
Before recording an important scene, it is recommended to conduct a trial recording.
.
You can also tap 6 on the touch screen to record. To stop recording, tap 7.
0
By tapping the [MARK] button to switch to the mark mode, different types of marks can
0
be put onto the scenes while recording, to make it easier to find the marked scene later.
Indications during video recording
o
NOTE
The estimated recording time of the supplied battery pack is approximately 60
0
minutes.
Do not remove the battery pack, AC adapter, or SD card when the access lamp
0
is lighted. The recorded data may become unreadable.
This unit turns itself off automatically to conserve power when it is not operated
0
for 5 minutes.
The angle of view may change when the image stabilizer is turned on or off.
0
.
9
Page 10

Playing Back/Deleting Files on this Unit
Ta p R.
Tap on the file to play back.
Ta p e to pause playback.
Ta p u to return to the video index
screen.
L appears on the last image
played back.
To delete unwanted files
Tap [SET].
Tap [OK].
Tap [EXECUTE] when the
confirmation message appears.
Volume adjustment during playback
Turn up the volume
Turn down the volume
Press the Playback/Recording
button to select the playback
mode.
Press the Playback/Recording
button again to select the recording
mode.
Press the A/B (still image/video)
button to select still image or
video mode.
I
appears on the selected files.
To re mo ve I display, tap on the file
again.
Tap on the files to delete.
To be connected to this unit
Release the
stopper.
3 cm (1-3/16”) Wind once
Select and play back the recorded videos or still images from an index screen (thumbnail display).
.
To capture a still image during playback
o
Pause the playback and press the SNAPSHOT button.
NOTE
The power may turn off to protect the circuit if the temperature of this unit rises too much.
0
Attaching the Core Filter
o
Attach the core filter to the external microphone (sold separately) as shown in the
illustration. The core filter reduces interference when this unit is connected to other
devices.
10
.
Page 11

Playing Back on TV
HDMI Mini Cable
(Provided)
To HDMI Mini Connector
HDMI Connector
Input
TV
AV Cable (Provided)
To AV Connector
TV
Audio Input (R)
Audio Input (L)
Video Input
Video Input
Red
White
Ye l l o w
Preparation:
Turn off both camera and TV.
0
To connect using the HDMI mini connector
When connecting to a 1080p compatible TV, set [HDMI OUTPUT] in [CONNECTION
SETTINGS] to [AUTO].
.
NOTE
Use a High Speed HDMI mini cable.
0
To connect using the AV connector
Change the settings of [VIDEO OUTPUT] in [CONNECTION SETTINGS] according to
the connection.
.
Playback Operation
After the connection with TV is completed
Turn on the camera and the TV.
A
0
Turn on the camera by pressing the M button.
Select the TV input switch.
B
Start playback on the camera.
C
11
Page 12

Install MediaBrowser (Windows)
MediaBrowser is included with your
camera. It lets you archive and organize
your videos. It also lets you create discs and
upload video to YouTube, and other
popular web sites.
Load the provided CD-ROM into your
1
computer.
In Windows Vista / Windows 7, the auto
0
play dialog box appears.
Click “MediaBrowser SE for JVC”.
2
.
Follow the on-screen instructions.
0
“Windows installer” appears after a
0
while. If it doesn't appear, double-click
the CD-ROM icon in “My Computer”.
Click “Finish”.
3
Click “Quit”.
4
MediaBrowser uses a calendar based
interface that makes it easy to find any
video you have recorded by selecting the
appropriate date.
.
.
Installation ends and icons are created
0
on the desktop.
12
Page 13

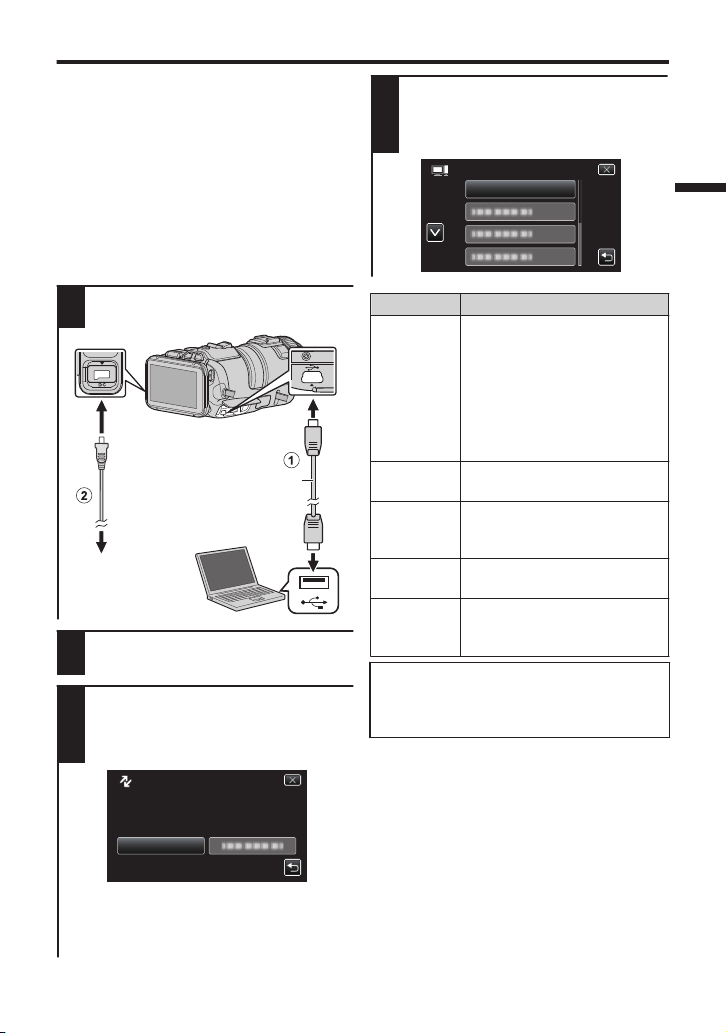
USB Menu Operations
To USB Connector
To AC Outlet
(110 V to 240 V)
AC Adapter
USB Cable
(Provided)
To DC
Connector
To USB
Connector
CONNECT TO PC
TYPE TO CONNECT
SELECT DEVICE
SELECT DEVICE
PLAYBACK ON PC
CONNECT TO PC
By connecting a USB cable between this
unit and your computer, you can perform
operations such as file backups to
computer/disc or file uploads to file-sharing
site using your computer.
Preparation:
Install the MediaBrowser software onto
0
the computer.
Disconnect the power supply.
0
Connect the camera to the
1
computer with the USB cable.
.
Turn on the camera by pressing the
2
M button.
The [SELECT DEVICE] menu appears.
Tap [CONNECT TO PC] on the camera’s
3
touch screen.
The [CONNECT TO PC] menu appears.
4
Tap an option that best suits your needs.
.
Option Usage
PLAYBACK
ON PC
CREATE
DISC
DIRECT
DISC
UPLOAD
BACK UP0To back up recordings on
For detailed operations on the above options,
refer to the other sections in this guide or the
“Detailed User Guide”.
To play back your
0
recordings on the
computer.
To back up your
0
recordings on the
computer without using
the provided software.
To save your recordings
0
on a disc.
To save all unsaved
0
recordings on a disc.
To upload videos to file-
0
sharing sites.
the computer.
0
.
Tap [CONNECT TO OTHER] if the camera
is connected to a device other than a
computer.
13
Page 14

File Backup (Windows)
To USB Connector
To AC Outlet
(110 V to 240 V)
AC Adapter
USB Cable
(Provided)
To DC
Connector
To USB
Connector
BACK UP
CONNECT TO PC
2
1
Click
Click
Saving destination (PC)
Click
Preparation:
Install the MediaBrowser software onto
0
the computer.
Make sure that enough space is left in the
0
HDD of computer.
Disconnect the power supply.
0
Connect the camera to the computer
1
with the USB cable.
.
On the camera:
o
Turn on the camera by pressing the
2
M button.
Tap [CONNECT TO PC] on the
3
camera’s touch screen.
Tap [BACK UP] on the camera’s
4
touch screen.
.
MediaBrowser starts on the computer.
0
On the computer:
o
Select files to backup.
5
.
Start backup.
6
.
NOTE
File backup is only supported by
0
the provided software.
View Your Video (Windows)
To view video that is still on your camera, click on Device>Camcorder
0
in the left side panel of MediaBrowser.
To view video that has already been archived to the computer, click
0
on Library>Calendar and then choose the date the video was
recorded.
NOTE
14
0
Choose Settings/Preferences to see the folder where
MediaBrowser stores your videos. You can also play back
your videos from this folder in most popular media players.
Page 15

AVCHD Disc Creation (Windows)
AV Cable (Provided)
To AV Connector
Audio Input (R)
Audio Input (L)
Video Input
Video Input
Red
White
Ye l l o w
DVD/VHS Recorder
To DC Connector
To AC Outlet
(110 V to 240 V)
AC Adapter
MediaBrowser makes it possible to
0
create AVCHD discs to archive your
recordings in their original high definition
quality.
You can use any standard DVD-R, DVD-
0
RW, DVD+R or DVD+RW disc.
A standard 4.7 GB disc will hold
0
approximately 35 minutes of video in the
highest quality setting.
AVCHD discs can be played back in any
0
Blu-ray player that is AVCHD compatible.
Just look for the AVCHD logo.
.
Preparation:
Install the software on your computer.
0
Click on the “Create Disc” button.
1
.
Select the video clips you wish to
2
include.
Choose a menu background and
3
enter a menu title.
Create the AVCHD disc.
4
NOTE
For details on how to create a disc by computer, refer to the help page of the
0
provided software.
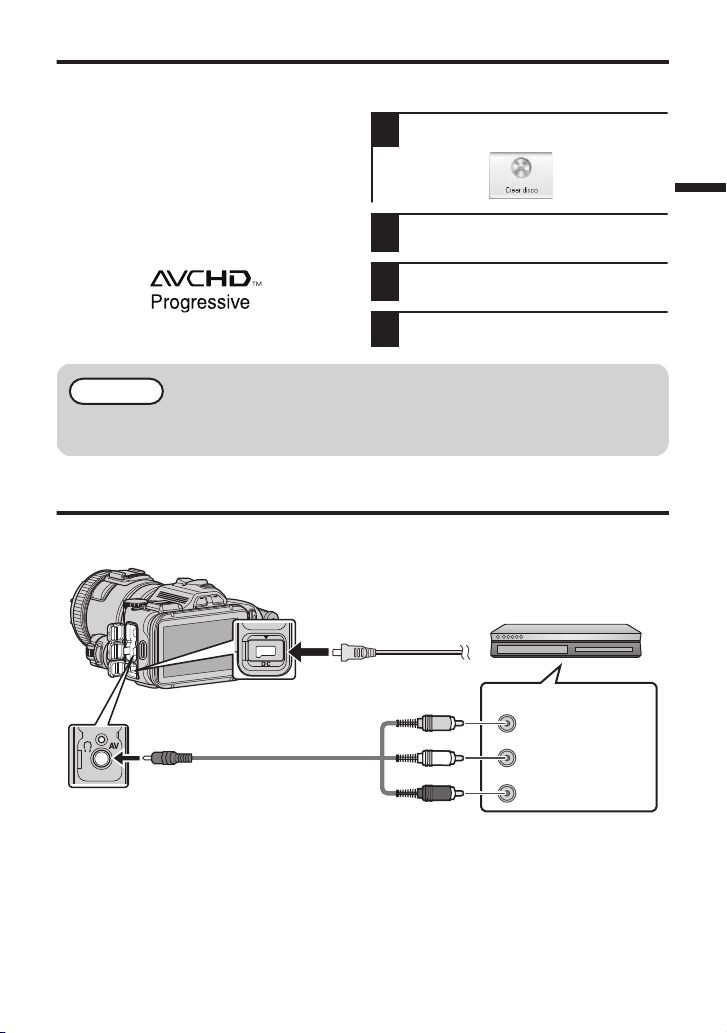
Record to a DVD or VHS Recorder
It is also possible to record to a DVD or VHS recorder. Please note that this will create a
standard definition recording with standard definition picture quality.
.
Preparation:
Use the supplied AV cable. The yellow connection is video. The white connection is left
0
channel audio. The red connection is right channel audio. Connect this cable to the AV
input on your DVD or VHS recorder.
Follow your DVD/VHS recorder instructions to copy (dub) the video.
0
15
Page 16

How to Upload a File (Video Clip) to
Customer Support Information
Use of this software is authorized according to the terms of the software license.
Pixela
(for inquires regarding the provided software)
Region Language Phone #
USA and Canada English +1-800-458-4029 (toll-free)
Europe (UK, Germany, France,
and Spain)
English/German/French/Spanish +800-1532-4865 (toll-free)
Other Countries in Europe English/German/French/Spanish +44-1489-564-764
Asia (Philippines) English +63-2-438-0090
nihCanihC ese 10800-163-0014 (toll-free)
Homepage: http://www.pixela.co.jp/oem/jvc/mediabrowser/e/
Please check our website for latest information and downloading.
YouTube (Windows)
Uploading Videos
You can upload your videos to YouTube
using the provided software
“MediaBrowser”.
Preparation:
Install the software on your computer.
0
Click on the “YouTube” button.
1
.
Select the video clips you wish to
2
include.
Enter account and upload
3
information.
Start upload to YouTube.
4
For details on how to upload to YouTube, refer
to “MediaBrowser Help”.
.
Trouble with Uploading Videos
o
Check if you have created an account
0
with YouTube.
Trouble with Using the Provided
o
Software “MediaBrowser”
Consult the customer service center
0
below.
.
16
Page 17

Simple File Backup with a Mac
USB cable
(Provided)
To USB
port
To USB
Connector
PLAYBACK ON PC
CONNECT TO PC
Preparation:
Make sure that enough space is left in the
0
Mac’s HDD.
Disconnect the power supply.
0
Connect the camera to the
1
computer with the USB cable.
.
Turn on the camera by pressing the
0
M button.
Tap [CONNECT TO PC] on the
2
camera’s touch screen.
Tap [PLAYBACK ON PC] on the
3
camera’s touch screen.
.
Copy and paste the files to the Mac
4
Computer for backup.
17
Page 18

Troubleshooting/Cautions
Battery Pack
Troubleshooting
The supplied battery pack is a
lithium-ion battery. Before using
the supplied battery pack or an
optional battery pack, be sure
to read the following cautions:
Terminals
•
To avoid hazards
...
do not burn.
do not short-circuit the terminals. Keep it away
from metallic objects when not in use. When
transporting, make sure the provided battery
cap is attached to the battery. If the battery cap
is misplaced, carry the battery in a plastic bag.
do not modify or disassemble.
do not expose the battery to temperatures
exceeding 60°C (140°F), as this may cause the
battery to overheat, explode or catch fire.
use only specified chargers.
...
...
...
...
...
...
...
...
...
...
•
To prevent damage and prolong service life
do not subject to unnecessary shock.
charge within the temperature range of 10°C
to 35°C (50°F to 95°F). Cooler temperatures
require longer charging time, or in some cases
stop charging at all.
Warmer temperatures prevent complete
charging, or in some cases stop charging at all.
store in a cool, dry place. Extended exposure
to high temperatures will increase natural
discharge and shorten service life.
keep a 30% battery level (X) if the battery pack
is not to be used for a long period of time.
In addition, fully charge and then fully discharge
the battery pack every 6 months, then continue
to store it at a 30% battery level (
X).
remove from charger or powered unit when not
in use, as some machines use current even
when switched off.
do not drop or subject to strong impact.
While the LCD monitor screen has more than
99.99% effective pixels, 0.01% of the pixels
may be bright spots (red, blue, green) or dark
spots. This is not a malfunction. The spots will
not be recorded.
ATTENTION:
The product you have purchased
is powered by a rechargeable
battery that is recyclable.
Please call 1-800-8-BATTERY for
information on how to recycle this
battery.
(USA and Canada only)
Recording Medium
•
Be sure to follow the guidelines below
to prevent corruption or damage to your
recorded data.
•
Do not bend or drop the recording medium,
or subject it to strong pressure, jolts or
vibrations.
•
Do not splash the recording medium with water.
•
Do not use, replace, or store the recording
medium in locations that are exposed to
strong static electricity or electrical noise.
•
Do not turn off the camcorder power or
remove the battery or AC adapter during
shooting, playback, or when otherwise
accessing the recording medium.
•
Do not bring the recording medium near
objects that have a strong magnetic field or
that emit strong electromagnetic waves.
•
Do not store the recording medium in locations
with high temperature or high humidity.
•
Do not touch the metal parts.
•
When formatting or erasing data using
the camcorder, only the file administration
information is changed. The data is not
completely erased from the recording medium.
If you want to completely erase all of the data,
we recommend either using commercially
available software that is specially designed
for that purpose, or by physically destroying
the camcorder.
LCD Monitor
•
To prevent damage to the LCD monitor,
DO NOT
... push it strongly or apply any shocks.
... place the camcorder with LCD monitor on the
bottom.
•
To prolong service life
... avoid rubbing it with coarse cloth.
If the above do not solve the problem, consult
your nearest JVC dealer or JVC service center.
Remove the AC adapter and battery pack from
this unit, reattach them, open the LCD monitor
and this unit powers on automatically.
Turn off the power. (Close the LCD monitor.)
In such a case, reset the unit.
This unit is a microcomputer-controlled device.
Electrostatic discharge, external noise and
interference (from a TV, a radio, etc.) might
prevent it from functioning properly.
If you have difficulties operating the unit, refer
to the detailed descriptions in the “Detailed
User Guide”.
Refer to the “Troubleshooting” section in the
“Detailed User Guide”.
If you encounter problems with this unit, check the
following before requesting service.
http://manual3.jvckenwood.com/index.html/
1.
A
B
2.
3.
.
18
Page 19

•
To prevent the unit from dropping,
•
Fasten the grip belt securely.
•
When using the camcorder with a tripod,
attach the camcorder to the tripod securely.
If the camcorder drops, you may be injured
and the camcorder may be damaged.
When a child uses the unit, there must be
parental guidance.
Declaration of Conformity
Changes or modifications not approved by
JVC could void the user’s authority to operate
the equipment. This equipment has been
tested and found to comply with the limits for
a Class B digital device, pursuant to Part 15 of
the FCC Rules. These limits are designed to
provide reasonable protection against harmful
interference in a residential installation. This
equipment generates, uses, and can radiate
radio frequency energy and, if not installed
and used in accordance with the instructions,
may cause harmful interference to radio
communications. However, there is no guarantee
that interference will not occur in a particular
installation. If this equipment does cause harmful
interference to radio or television reception,
which can be determined by turning the
equipment off and on, the user is encouraged
to try to correct the interference by one or more
of the following measures: Reorient or relocate
the receiving antenna. Increase the separation
between the equipment and receiver.
Connect the equipment into an outlet on a
circuit different from that to which the receiver is
connected.
Consult the dealer or an experienced radio/
TV technician for help.
This Class B digital apparatus complies with
Canadian ICES-003.
Cet appareil numérique de la classe B est
conforme à la norme NMB-003 du Canada.
Main Unit
•
For safety, DO NOT
... open the camcorder’s chassis.
... disassemble or modify the unit.
... allow inflammables, water or metallic objects
to enter the unit.
... remove the battery pack or disconnect the
power supply while the power is on.
... leave the battery pack attached when the
camcorder is not in use.
... place naked fl ame sources, such as lighted
candles, on the apparatus.
... expose the apparatus to dripping or splashing.
... leave dust or metal objects adhered to the
power plug or an AC wall outlet.
... insert any objects in the camcorder.
•
Avoid using the unit
... in places subject to excessive humidity or dust.
... in places subject to soot or steam such as near
a cooking stove.
... near appliances generating strong magnetic
or electric fields (speakers, broadcasting
antennas, etc.).
... in places subject to extremely high (over 40°C
or 104°F) or extremely low (under 0°C or 32°F)
temperatures.
•
DO NOT leave the unit
... in places of over 50°C (122°F).
... in places where humidity is extremely low
(below 35%) or extremely high (above 80%).
... in direct sunlight.
... in a closed car in summer.
... near a heater.
... in high places such as on a TV. Leaving the
unit in high places while a cable is connected
may result in a malfunction if the cable is
caught and the unit falls onto the floor.
•
To protect the unit, DO NOT
... allow it to become wet.
... drop the unit or strike it against hard objects.
... subject it to shock or excessive vibration
during transportation.
... keep the lens directed at extremely bright
objects for long periods.
... expose the lens to direct sunlight.
... swing it excessively when using the hand strap.
... swing the soft camcorder case excessively
when the camcorder is inside it.
... store the camcorder in a dusty or sandy area.
Model Number : GC-PX100U
Trade Name : JVC
Responsible party : JVC AMERICAS CORP.
Address : 1700 Valley Road Wayne, N. J. 07470
Telephone Number : 973-317-5000
This device complies with Part 15 of FCC
Rules. Operation is subject to the following
two conditions: (1) This device may not cause
harmful interference, and (2) this device must
accept any interference received, including
interference that may cause undesired operation.
... cover camcorder with a towel, cloth and so on.
...
in places subject to excessive shock or vibration.
... near a television set.
.
19
Page 20
Recordable Time/Specifications
Approximate Video Recording Time
VIDEO REC FORMAT:AVCHD
o
Quality 4 GB 8 GB 16 GB 32 GB 48 GB 64 GB 128 GB
60p 15 m 35 m 1 h 10 m 2 h 30 m 3 h 50 m 5 h 10 h 10 m
XP 30 m 1 h 2 h 4 h 6 h 8 h 10m 16 h 20m
EP 1 h 40 m 3 h 30 m 7 h 10 m 14 h 40 m 21 h 30 m 28 h 50 m 57 h 50 m
VIDEO REC FORMAT:MP4/MOV
o
Quality 4 GB 8 GB 16 GB 32 GB 48 GB 64 GB 128 GB
MOV 1080p LPCM
MP4 1080p 10 m 25 m 55 m 2 h 2 h 50 m 3 h 50 m 7 h 50 m
MP4 720p 40 m 1 h 20 m 2 h 50 m 5 h 40 m 8 h 30 m 11 h 20 m 22 h 50 m
iFrame 720p 10 m 30 m 1 h 2 h 3 h 4 h 8 h
The approximate recording time is only a guide. The actual recording time may shorten
0
depending on the shooting environment.
Camera
Power supply Using AC adapter: DC 11 V, Using battery pack: DC 7.2 V
Power consumption 4.4 W (when [LIGHT] is set to [OFF] and [MONITOR
Dimensions 110 mm x 76 mm x 183 mm (4-3/8" x 3" x 7-1/4")
Weight Approx. 500 g (1.1 lbs) (camera only),
10 m 25 m 50 m 1 h 40 m 2 h 30 m 3 h 30 m 7 h
BRIGHTNESS] is set to [3] (standard))
Rated Current Consumption: 1A
(W x H x D: excluding grip belt, viewfinder and protrusion)
Approx. 585 g (1.3 lbs) (including supplied battery pack)
The specifications and appearance of this product are subject to changes for further
improvement without prior notice.
For more information, please refer to the Detailed User Guide.
http://manual3.jvckenwood.com/index.html/
*LYT2592-001A-M*
©2013 JVC KENWOOD Corporation
20
US
0213AJH-SW-VM
Page 21

Guía básica del usuario
Verificar los accesorios
Adaptador de CA
AP-V20U
Batería
BN-VF815U
Mini cable
HDMI
Cable USB
(Tipo A - Tipo B Mini)
CD-ROM
Cable de AV
QAM1322-001
Consulte con su distribuidor de JVC o con el centro de servicios JVC más cercano cuando
compre un nuevo cable AV.
Capucha para
lente
Correa para
hombro
Parasol para
monitor
Tapa de lente Filtro central
VIDEOCÁMARA
GC-PX100 A
LYT2592-001A-M
SP
Guía detallada del
.
usuario
Para más detalles sobre el
funcionamiento de este producto,
consulte el “Guía detallada del usuario”
en el siguiente sitio web.
http://manual3.jvckenwood.com/
o
index.html/
Estimados clientes
Gracias por haber adquirido este producto JVC.
Antes de su uso, lea las precauciones de
seguridad y advertencias en p. 2 y p. 18
para garantizar un uso seguro de este producto.
Guía Usuario Móvil
.
Cuando se encuentre fuera, consulte la
“Guía Usuario Móvil”. La Guía Usuario
Móvil puede visualizarse con un buscador
estándar para la tableta Android y iPhone.
http://manual3.jvckenwood.com/mobile/
o
us/
Para futuras consultas:
Introduzca el número de modelo (ubicado en la parte
inferior de la cámara) y el número de serie (ubicado en el
compartimiento de la batería de la cámara) a continuación.
Número de modelo
Número de serie
Page 22
Precauciones de seguridad
ADVERTENCIA: PARA EVITAR RIESGO
DE INCENDIOS O ELECTROCUCIONES,
NO EXPONGA ESTE APARATO A LA
LLUVIA O HUMEDAD.
NOTAS:
•
•
•
Precaución relacionada con la batería de
litio recambiable
•
•
•
Sólo para EE.UU.-California
PRECAUCIÓN:
•
Retire de inmediato el enchufe de corriente si la
videocámara funciona anormalmente.
ATENCION
PELIGRO DE ELECTROCUCION
NO ABRA
ATENCION: PARA EVITAR RIESGOS DE ELECTROCUCION,
NO EXTRAIGA LA CUBIERTA (O LA PARTE POSTERIOR).
NO HAY PARTES REPARABLES POR USUARIO EN EL INTERIOR.
EN CASO DE REPARACIONES, ACUDA AL PERSONAL
DE SERVICIO AUTORIZADO.
EI rayo con punta de flecha dentro de un triángulo
equilátero alerta al usuario sobre la presencia de
"tensión peligrosa" sin aislación dentro del gabinete de
la unidad, cuya magnitud constituye un riesgo de
electrocución de personas.
EI signo de exclamación dentro de un triángulo
equilátero indica al usuario que existen importantes
instrucciones de mantenimiento (servicio) y operación
en el manual que acompaña al aparato.
La placa de valores nominales y la precaución de
seguridad se encuentran en la parte inferior y/o
en la parte posterior de la unidad principal.
La placa del número de serie se encuentra en la
unidad principal.
La información sobre los valores nominales y las
precauciones de seguridad del adaptador de CA
se encuentran en la parte superior e inferior del
mismo.
La batería utilizada en este dispositivo presenta
riesgos de incendio y de quemaduras químicas
si no se usa correctamente.
No la recargue, ni la desmonte, ni la caliente
por encima de los 100°C (212°F), ni la incinere.
Reemplazar batería con Panasonic, Sanyo, Sony
o Maxell CR2025.
Hay peligro de explosión o riesgo de incendio si
la batería se cambia de manera incorrecta.
Deshágase de la batería usada sin demora.
Manténgala lejos del alcance de los niños.
No la desmonte ni la eche al fuego.
Este producto contiene una batería de litio CR
de tipo botón que contiene perclorato (puede
requerirse una manipulación especial). Visite
www.dtsc.ca.gov/hazardouswaste/perchlorate
Cuando el equipo se encuentra instalado en un
gabinete o en un estante, asegúrese que tenga
suficiente espacio en todos los lados para permitir
la ventilación (10 cm (3-15/16") o más en cada lado,
en la parte superior y en la parte trasera).
No bloquee los orificios de ventilación.
(Si los orificios de ventilación están bloqueados por
un periódico, o paño, etc., el calor no podrá salir.)
No deberá ser colocada en el aparato ninguna
fuente de llama sin protección, tales como velas
encendidas.
Cuando descarte las pilas, deberá considerar los
problemas ambientales y respetar estrictamente
las normas locales o leyes vigentes para la
eliminación de estas pilas.
La unidad no deberá ser expuesta a goteos ni
salpicaduras.
No use esta unidad en un cuarto de baño o en
lugares con agua.
Tampoco coloque ningún envase lleno de agua
o líquidos (tales como cosméticos o medicinas,
floreros, macetas, vasos, etc.) en la parte
superior de la unidad.
(Si penetra agua o líquidos en la unidad, pueden
producirse electrocuciones o incendios.)
Esto puede causarle lesiones en los ojos así como
también fallas en los circuitos internos de la cámara.
Esto también puede producir riesgo de incendio o
de choque eléctrico.
Las siguientes notas indican posibles daños a la
cámara o lesiones al usuario.
El transportar o sostener la cámara por el monitor
LCD puede resultar en la caída o en fallas de
la unidad.
No utilice el trípode sobre superficies inestables
o desniveladas ya que la cámara puede caerse,
produciendo graves daños a la misma.
Evite conectar los cables (audio/video, etc.) a la
cámara y dejar la unidad sobre el TV, ya que el
tropezar con uno de los cables puede derribar
la cámara resultando ésta dañada.
¡PRECAUCIÓN!
¡PRECAUCIÓN!
El enchufe de red siempre debe estar fácilmente
disponible.
La operación de este equipo está sujeta a las
siguientes dos condiciones: (1) es posible que este
equipo o dispositivo no cause interferencia
perjudicial y (2) este equipo o dispositivo debe
aceptar cualquier interferencia, incluyendo la que
pueda causar su operación no deseada.
¡PRECAUCIÓN!
Para acatar las líneas directrices RF de la FCC, use
únicamente la antena suministrada. El uso de una
antena no autorizada, la modificación o el uso de
accesorios podría dañar el transmisor y podría violar
las regulaciones de la FCC.
Este dispositivo cumple con los estándares de la
Parte 15 de las Reglas de la FCC. Su uso está sujeto
a las siguientes dos condiciones:
(1) Este dispositivo no puede causar interferencia
perjudicial.
(2) Este dispositivo debe aceptar cualquier
interferencia recibida, inclusive aquella interferencia
que pudiera causar un funcionamiento no deseado.
.
2
Page 23
INSTRUCCIONES IMPORTANTES DE SEGURIDAD
1.
Lea estas instrucciones.
2.
Conserve estas instrucciones.
3.
Preste atención a las advertencias.
4.
Siga todas las instrucciones.
5.
No utilice este aparato cerca del agua.
6.
Limpie sólo con paño seco.
7.
No bloquee ninguna abertura de ventilación.
Instale de acuerdo con las instrucciones del
fabricante.
8.
No lo instale cerca de ninguna fuente de calor
tales como, radiadores, calefactores, cocinas,
u otros aparatos (incluyendo amplificadores)
que produzcan calor.
9.
Evite pisar o apretar el cable de alimentación,
especialmente en los enchufes, conectores y
en el punto de salida del aparato.
10.
Sólo utilice dispositivos/
accesorios especificados
por el fabricante.
11.
Utilice sólo con la
carretilla, estante, trípode,
soporte o mesa especificado
por el fabricante o vendido
con el aparato. Cuando utilice
una carretilla, sea cauteloso al mover
el conjunto de carretilla/ aparato para evitar
lesiones provocadas por caídas.
12.
Desenchufe este aparato durante estruendos de
relámpagos o cuando esté fuera de uso por largo tiempo.
13. Refiera toda reparación a personal de servicio
calificado. Se requiere de reparación cuando el
aparato ha sido dañado de alguna manera, por
ejemplo, si el cable o enchufe de alimentación
está dañado, si ocurrió derrame de líquidos
o caída de objetos dentro del aparato, si el
aparato fue expuesto a la lluvia o humedad, si
no funciona normalmente, o sufrió caídas.
Recuerde que esta cámara debe usarse
únicamente para fines privados.
Está prohibido cualquier uso comercial sin la
autorización correspondiente. (Aunque grabe
acontecimientos, tales como espectáculos
o exhibiciones, para su disfrute personal, se
recomienda que obtenga una autorización previa.)
Si utiliza el adaptador de CA en países fuera de los EE.UU.
El adaptador de CA suministrado tiene una
función de selección automática de tensión en la
escala de corriente alterna de 110 V a 240 V.
USO DEL ENCHUFE ADAPTADOR DE CA
En caso de conectar el cable de alimentación
de la unidad a un tomacorriente de CA que no
sea de la serie American National Standard
C73, emplee un enchufe adaptador de CA,
denominado “Siemens Plug”, como el mostrado.
Consulte con su distribuidor JVC más cercano
para obtener este enchufe adaptador.
Enchufe adaptador
•
Retire el adaptador de CA del enchufe de pared
de CA cuando no lo utilice.
•
•
No deje polvo ni objetos de metal adheridos al
enchufe de pared de CA o al adaptador de CA
(alimentación/enchufe de CC).
•
•
Asegúrese de utilizar el adaptador de CA provisto.
No utilice el adaptador de CA provisto con otros
dispositivos.
Marcas comerciales
•
AVCHD Progressive/
AVCHD y el logotipo de
AVCHD Progressive/
AVCHD son marcas comerciales
de Panasonic Corporation y Sony Corporation.
x.v.Color es una marca
comercial de
Sony Corporation.
HDMI (Interfaz multimedia de alta definición) y el logo de
HDMI son marcas registradas o marcas comerciales de
HDMI Licensing, LLC en los Estados
Unidos y/u otros países.
Fabricado bajo licencia de Dolby Laboratories.
Dolby y el símbolo de la doble D son marcas
comerciales de Dolby Laboratories.
El logo SDXC es una marca comercial de SD-3C, LLC.
Windows® es una marca registrada o una marca
comercial de Microsoft Corporation en los
Estados Unidos y/o en otros países.
Macintosh es una marca registrada de Apple Inc.
iMovie, iPhone y iPhoto son marcas comerciales de Apple
Inc., registradas en Estados Unidos y otros países.
YouTube™ , el logo de YouTube y Android™ son marcas
comerciales y/o marcas registradas de Google Inc.
Intel, Intel Core, y Pentium son marcas registradas
o marcas comerciales de Intel Corporation o de
sus filiales en los Estados Unidos y otros países.
Android es una marca comercial de Google Inc.
El logo iFrame y el símbolo iFrame son marcas
registradas de Apple Inc.
Wi-Fi, Wi-Fi logo, Wi-Fi CERTIFIED, Wi-Fi CERTIFIED logo,
Wi-Fi Protected Setup, Wi-Fi Protected Setup logo, WPA, y
WPA2 son marcas comerciales o marcas comerciales
registradas de Wi-Fi Alliance.
El resto de los nombres de productos y de
compañías incluidos en este manual de
instrucciones son marcas comerciales y/o marcas
registradas de sus respectivos propietarios.
Marcas tales como ™ y ® han sido omitidas en
este manual.
•
•
•
•
•
•
•
•
•
•
•
•
•
Realice una copia de seguridad de los datos importantes.
JVC no se responsabiliza por las pérdidas de datos.
Se recomienda copiar todos los datos importantes
grabados a un disco u otro medio de grabación de
almacenamiento una vez cada 3 meses.
Este producto está licenciado bajo la Licencia de
Cartera de Patentes AVC para el uso personal de un
consumidor u otros usos por los cuales no se reciba
remuneración para
(i) codificar vídeo conforme al estándar de AVC
(“Vídeo AVC”) y/o
(ii) codificar vídeo AVC que fue codificado por un
consumidor en el ejercicio de sus actividades
personales y/o obtenido de un proveedor de vídeo
con licencia para ofrecer vídeoAVC. Ninguna
licencia se otorga y ninguna licencia es implícita
para ningún otro uso.
Podrá obtener información adicional en MPEG LA, L.L.C.
Visite http://www.mpegla.com
•
Si este símbolo aparece, sólo es
válido en la Unión Europea.
ADVERTENCIA:
Las baterías, incluidas las baterías de litio instaladas
en la cámara y en el mando a distancia, no deben
dejarse expuestas a un calor excesivo, como la luz
solar directa, el fuego o una condición similar.
.
3
Page 24
Contenido
Cierre el panel
Regule la longitud de la correa
Abra el panel
Pane l
Inserte la punta de la correa para hombro en la pieza de ajuste de esta unidad.
Traba de correa
Correa para hombro
Regule la longitud del cinturón, y luego fije con el cierre de la correa.
Inserte la correa de hombro en el interior de la anilla.
Anilla
Precauciones de seguridad ................... 2
Ajuste de la correa de mano .................. 4
Ajuste de los accesorios ........................ 4
Introducción
Cargar la batería .................................... 6
Insertar una tarjeta SD ........................... 7
Utilizar de los botones de los íconos/vistas
en miniatura ........................................... 7
Cambiar los ajustes del menú ................ 8
Ajuste del reloj ....................................... 8
Grabación
Grabación de vídeo ................................ 9
Reproducción
Reproducir/eliminar archivos en esta unidad
Reproducción en televisor ................... 11
..... 10
Copiar
Instale MediaBrowser (Windows)
Operaciones de Menú USB ................. 13
Copia de seguridad de archivo (Windows)
Vea su video (Windows) ...................... 14
Creación de disco AVCHD (Windows)
Grabar a una grabadora de DVD o VHS
Cómo descargar un Archivo (Clip de video)
en YouTube (Windows) ....................... 16
Copia de seguridad de archivos simples
con una Mac ........................................ 17
Información adicional
Resolución de problemas/Precauciones
Tiempo de grabación/Especificaciones
Ajuste de la correa de mano
.
La antena Wi-Fi se encuentra dentro del panel.
0
No extraiga la antena Wi-Fi cuando esté ajustando el cinturón.
...................... 12
........ 14
.......... 15
........ 15
.... 18
..... 20
Ajuste de los accesorios
Ajuste de la correa para hombro
o
.
Tenga cuidado de no dejar caer esta unidad durante su traslado.
0
Los padres deben prestar especial atención cuando los niños utilizan esta unidad.
0
4
Page 25

Ajuste de la tapa del lente
o
Ajuste la tapa del lente cuando no esté usándose la unidad o durante su transporte.
Sujete la tapa del lente a la correa de mano mientras filmación.
.
Ajuste de la capucha del lente
o
Se recomienda el uso de la capucha del lente para exteriores con exposición directa a la
luz del sol.
Ajuste en la unidad principal alineando el indicador de la unidad principal y la capucha
0
de la lente.
Ajuste del parasol del monitor
o
.
Ponga el parasol del monitor si la pantalla del mismo resulta difícil de ver debido a la luz
del sol.
Acople la garra ubicada en la parte superior del parasol del monitor al punto de inserción
0
que se encuentra en la parte superior del monitor de LCD. A continuación, acople la
.
garra a la parte inferior del parasol del monitor.
5
Page 26

Cargar la batería
Sujete la batería.
La cámara se suministra con la
batería descargada.
Carga terminada: Se
apaga
Carga en curso:
Parpadea
Luz indicadora de carga
Encienda la alimentación.
Conecte el conector de CC.
Adaptador de
CA a la salida
de CA
Extracción de la batería
Cubierta
Para quitar la batería,
presione la palanca de
cierre de la batería ( )
y deslice la batería ( ) .
Abra la cubierta de la batería ( )
después de abrir el monitor de LCD
( ).
Ponga la batería hacia el lado
derecho. Ponga la batería en la
unidad principal, y deslícela hasta
que se ajuste en su lugar.
.
PRECAUCIÓN
Asegúrese de utilizar baterías JVC.
Si utiliza alguna otra batería que no sea JVC, no se pueden garantizar la
0
seguridad ni el rendimiento del producto.
En caso de desperfectos (sobrecorriente, sobrevoltaje, error de transmisión,
0
etc.), o si se intenta utilizar otra batería que no sea la fabricada por JVC para
cargar la batería, la carga se detendrá. En estos casos, la luz CHARGE titila
rápido para dar aviso.
Usted puede grabar o reproducir vídeos mientras el adaptador de CA está conectado.
0
(No se puede cargar la batería durante la grabación o reproducción.)
Retire la batería cuando la unidad se utilizará por un largo período de tiempo. El
rendimiento de la batería puede verse afectado si se mantiene conectada a la unidad.
El tiempo estimado de carga del paquete de batería suministrado es
0
aproximadamente 2 horas y 10 minutos.
El tiempo de carga aplica cuando la unidad se utiliza a 25°C (77ºF). Si se carga
0
la batería en un rango de temperatura ambiente que no se encuentre entre
10°C y 35°C (50°F y 95°F), la carga puede tardar más tiempo en realizarse o
puede que no se inicie. La luz de CHARGE titila 2 veces en un ciclo lento para
notificar que la carga de la batería no se inicia. Asimismo, tenga en cuenta que
el tiempo de grabación y reproducción también se puede acortar en
determinadas condiciones de uso como por ejemplo a temperaturas bajas.
6
Page 27

Insertar una tarjeta SD
*
Etiqueta
Introduzca una tarjeta SD.
Apague la alimentación de esta
unidad antes de introducir o extraer
una tarjeta SD.
Abra la cubierta de la
batería después de abrir el
monitor LCD.
0:01:23 0:12:34
Pantalla de índice
Pantalla de reproducciónPantalla de grabación
MENUREC
4
0:01:23 0:12:34
MENU
≪MARK
Introduzca una tarjeta SD comercialmente disponible antes de iniciar la grabación.
.
Para extraer la tarjeta SD
o
Presione la tarjeta SD hacia adentro y luego retírela hacia arriba.
NOTA
Se ha confirmado el funcionamiento con las siguientes tarjetas SD.
Fabricante Panasonic, TOSHIBA, SanDisk
Vídeo A
Imagen fija B
El uso de otras tarjetas SD (incluyendo las tarjetas SDHC/SDXC) que no sean las indicadas
0
anteriormente puede provocar una falla en la grabación o la pérdida de datos.
No se garantiza que este equipo funcione con todas las tarjetas SD, incluso al usar
0
las especificadas anteriormente. Algunas tarjetas SD podrían no funcionar debido a
cambios de especificación, etc.
Para proteger los datos, no toque las terminales de la tarjeta SD.
0
Cuando utilice una tarjeta SDXC, verifique su compatibilidad con el sistema
0
operativo de su computadora consultando Guía detallada del usuario.
Tarjeta SD compatible Clase 4 o superior (2 GB)/
Tarjeta SDHC compatible Clase 4 o superior (4 GB a 32 GB)/
Tarjeta SDXC compatible Clase 4 o superior (48 GB a 128 GB)
Para seleccionar [MOV 1080p LPCM], [MP4 1080p] o
0
[iFrame 720p] en [CALIDAD DE VÍDEO], utilice una
tarjeta compatible con SDHC/SDXC Clase 6 o superior.
Para seleccionar [60p] en [SELECCIÓN FORMATO],
0
utilice una tarjeta compatible con SDHC/SDXC Clase 6
o superior.
Tarjeta SD (256 MB a 2 GB) / tarjeta SDHC (4 GB a 32 GB) /
tarjeta SDXC (48 GB a 128 GB)
Utilizar de los botones de los íconos/vistas en miniatura
A
Pulse el botón (ícono) o la vista en miniatura (archivo) que aparece en la pantalla táctil para realizar la selección.
B Arrastre las vistas en miniatura en la pantalla táctil para buscar el archivo deseado.
.
7
Page 28

Cambiar los ajustes del menú
MENU
REC
NO
SÍ
¡AJUSTE FECHA/HORA!
AM
201324 10 00
HORAFECHA
CONF. RELOJ
DEC
AJUSTE
Para cambiar los ajustes de la cámara,
pulse [MENU] y seleccione la opción que
desea cambiar.
Pulse [MENU].
1
.
Pulse la opción que desea en el menú
2
de accesos directos.
.
Ajuste del reloj
Encienda la cámara.
1
.
Pulse [SÍ] cuando se visualice
2
[¡AJUSTE FECHA/HORA!].
.
Pulse la opción que desea para
3
cambiar los ajustes.
(Pantalla de tipo ícono)
.
0
Pulse 0 o 1 para desplegar la pantalla.
(Pantalla de tipo lista)
.
0
Pulse 3 o 2 para desplegar la pantalla.
Para salir de la pantalla
o
Pulse L (salir).
Para volver a la pantalla anterior
o
Pulse J (regresar).
Ajuste la fecha y la hora.
3
.
0
3 y 2 aparecen en pantalla cuando se
pulsan las opciones en [FECHA] y
[HORA].
Ajuste [FECHA] y [HORA] pulsando
0
3 o 2.
Repita este paso para introducir
0
[FECHA] y [HORA].
Después de ajustar la fecha y hora, pulse [AJUSTE].
4
8
Seleccione la región en la que vive y
5
pulse [GUARDA].
Aparece la diferencia horaria entre la
0
ciudad seleccionada y el GMT
(Tiempo Medio de Greenwich).
0
Pulse 0 o 1 para seleccionar el nombre
de la ciudad.
Page 29

Grabación de vídeo
A
Zoom
Inicie la
grabación.
Presione nuevamente
para detener la grabación.
Compruebe si el
modo de vídeo es
A.
(gran angular)
(telefoto)
Compruebe que el
modo de grabación
sea P Auto
Inteligente.
Si el modo no es P,
establezca el dial de
filmación en i.AUTO.
Encienda la
cámara.
Si el modo es de
imagen fija B, presione
A/B para cambiar.
MENUREC
0:00:00 [0:54]
Grabación en curso
Espera de grabación
Indicador de batería
Grabación de soportes
Estabilizador de imágenes
Calidad de vídeo
Tiempo restante de grabación
Contador de escenas
Botón MARK
Si se utiliza el modo Auto Inteligente, se pueden realizar grabaciones sin tener en cuenta
los ajustes. Los ajustes tales como exposición y foco se ajustarán en forma automática
para adecuarse a las condiciones de grabación.
En caso de escenas específicas de filmación, tales como, personas etc., su ícono aparecerá en la pantalla.
0
Antes de grabar una escena importante, se recomienda realizar una grabación de prueba.
.
También puede pulsar 6 en la pantalla táctil para grabar. Para dejar de grabar,
0
pulse 7.
Al pulsar el botón [MARK] para cambiar al modo de marcas, podrá poner diferentes
0
tipos de marcas en las escenas mientras graba, lo que facilitará poder encontrar la
escena marcada más tarde.
Indicaciones durante la grabación de vídeo
o
NOTA
El tiempo estimado de grabación de la batería suministrada es
0
aproximadamente 60 minutos.
Cuando la luz de acceso se ilumina, no extraiga la batería, el adaptador de CA
0
ni la tarjeta SD. Es posible que los datos grabados no puedan leerse.
Esta unidad se apaga automáticamente para conservar energía cuando no se
0
utiliza durante 5 minutos.
El ángulo de vista puede cambiar cuando el estabilizador de imagen se enciende o apaga.
0
.
9
Page 30

Reproducir/eliminar archivos en esta unidad
Pulse R.
Pulse sobre el archivo que desea reproducir.
Pulse e para pausar la
reproducción.
Pulse u para regresar a la
pantalla de índice de vídeo.
L aparece en la última imagen
reproducida.
Para eliminar archivos no deseados
Ajuste del volumen durante la reproducción
Suba el volumen
Baje el volumen
Presione el botón de
grabación/reproducción para
seleccionar el modo de reproducción.
Presione el botón de
grabación/reproducción otra vez para
seleccionar el modo de grabación.
Presione el botón A/B (imagen
fija/video) para seleccionar el
modo de imagen fija o video.
I aparece sobre los archivos seleccionados.
Para eliminar la pantalla I, pulse en el
archivo nuevamente.
Pulse sobre los archivos para eliminar.
Pulse "ACEPTAR".
Pulse "EJECUTAR" cuando aparezca
el mensaje de confirmación.
Pulse "AJUSTE".
Para conectar a esta unidad
Abra el cierre.
3 cm (1-3/16”)
Enrosque una vez
Seleccione y reproduzca los vídeos grabados o imágenes fijas desde la pantalla de índice
(pantalla de vistas en miniatura).
.
Para capturar una imagen fija durante una reproducción
o
Ponga la reproducción en pausa y presione el botón SNAPSHOT.
NOTA
Es posible que la alimentación se apague para proteger el circuito si la
0
temperatura de esta unidad aumenta demasiado.
Ajuste del filtro central
o
Sujete el filtro central a el micrófono externo (vendida por separado), como se muestra
en la ilustración. El filtro central reduce la interferencia cuando se conecta esta unidad
a otros dispositivos.
10
.
Page 31

Reproducción en televisor
Mini cable HDMI
(proporcionado)
A mini conector HDMI
Entrada del
conector HDMI
TV
Cable AV
(proporcionado)
A conector AV
TV
Entrada de audio
(R, derecha)
Entrada de audio
(L, izquierda)
Entrada de vídeo
Entrada de vídeo
Rojo
Blanco
Amarillo
Preparación:
Apague la cámara y el televisor.
0
Para conectar la unidad utilizando un mini conector HDMI
Cuando se conecta a una TV compatible con 1080p, ponga [SALIDA HDMI] en [CONFIG.
DE CONEXIÓN] a [AUTO].
.
NOTA
Utilice un mini cable HDMI de alta velocidad.
0
Conexión utilizando un conector AV
Cambie los ajustes de [SALIDA DE VÍDEO] en [CONFIG. DE CONEXIÓN] según la
conexión.
.
Funcionamiento de la reproducción
Después de que la conexión con el televisor ha finalizado
Encienda la cámara y el televisor.
A
0
Encienda la cámara presionando el botón M.
Seleccione el interruptor de entrada del televisor.
B
Inicie la reproducción en la cámara.
C
11
Page 32

Instale MediaBrowser (Windows)
MediaBrowser viene incluido con la
cámara. Le permite archivar y organizar sus
videos. También le permite crear discos y
descargar video en YouTube y otros
conocidos sitios web.
Cargue el CD-ROM suministrado
1
en su computadora.
En Windows Vista / Windows 7,
0
aparece el cuadro de diálogo de
reproducción automática.
Haga clic en “MediaBrowser SE for
2
JVC”.
.
Siga las instrucciones que aparecen
0
en pantalla.
“El instalador de Windows” aparece
0
después de unos momentos. En caso
de que no aparezca, haga doble clic en
el ícono de CD-ROM en “Mi PC”.
Haga clic en “Finalizar”.
3
MediaBrowser usa una interfaz basada
en calendario que facilita encontrar
cualquier video que haya grabado
seleccionando la fecha correspondiente.
.
Haga clic en “Quit”.
4
.
Finaliza la instalación y se crean los
0
iconos en el escritorio.
12
Page 33
Operaciones de Menú USB
A conector USB
A la salida de CA
(110 V a 240 V)
Adaptador de CA
Cable USB
(proporcionado)
A conector de
CC
A conector USB
CONECTAR A PC
DISPOSITIVO PARA CONECTAR
SELECCIONAR TIPO DE
SELECCIONAR DISPOSITIVO
REPRODUCIR EN PC
CONECTAR A PC
Al conectar un cable USB entre esta unidad
y su computadora, usted puede realizar
operaciones tales como copias de
seguridad de archivos a una computadora/
disco o cargar archivos a un sitio de
intercambio de archivos utilizando su
computadora.
Preparación:
Instale el software MediaBrowser en la
0
computadora.
Desconecte el suministro de energía.
0
Conecte la cámara a la
1
computadora con el cable USB.
.
Encienda la cámara presionando el
2
botón M.
Aparece el menú [SELECCIONAR
DISPOSITIVO].
3
Pulse [CONECTAR A PC] en la
pantalla táctil de la cámara.
Aparece el menú [CONECTAR A
PC].
4
Pulse la opción que mejor se ajuste
a sus necesidades.
.
Opción Uso
REPRODUCIR
EN PC
CREAR
DISCO
DISCO
DIRECTO
CARGAR
HACER
COPIA DE
SEGURIDAD
Para obtener operaciones detalladas de las
opciones anteriores, consulte las demás
secciones en esta guía o en el “Guía detallada
del usuario”.
Para reproducir sus
0
grabaciones en la
computadora.
Para realizar una copia de
0
seguridad de sus
grabaciones en la
computadora sin utilizar el
software provisto.
Para guardar sus
0
grabaciones en un disco.
Para guardar todas las
0
grabaciones no
guardadas en un disco.
Para cargar vídeos a sitios
0
de intercambio de archivos.
Para realizar copias de
0
seguridad de grabaciones
en la computadora.
Pulse [CONECTAR A OTROS] si la
0
cámara está conectada a un
dispositivo que no sea una
computadora.
.
13
Page 34
Copia de seguridad de archivo (Windows)
A conector USB
A la salida de CA
(110 V a 240 V)
Adaptador de CA
Cable USB
(proporcionado)
A conector de
CC
A conector USB
HACER COPIA DE SEGURIDAD
CONECTAR A PC
2
1
Haga clic
Haga clic
Haga clic
Destino de almacenamiento (PC)
Preparación:
Instale el software MediaBrowser en la
0
computadora.
Asegúrese de que haya suficiente espacio
0
en el disco duro de la computadora.
Desconecte el suministro de energía.
0
Conecte la cámara a la computadora
1
con el cable USB.
.
En la cámara:
o
Encienda la cámara presionando el
2
botón M.
Pulse [CONECTAR A PC] en la
3
pantalla táctil de la cámara.
Pulse [HACER COPIA DE SEGURIDAD]
4
en la pantalla táctil de la cámara.
.
MediaBrowser inicia la computadora.
0
En la computadora:
o
Seleccione los archivos para realizar
5
la copia de seguridad.
.
Inicie la copia de seguridad.
6
.
NOTA
La copia de seguridad de
0
archivos sólo es soportada por el
software provisto.
Vea su video (Windows)
Para ver video que todavía se encuentre en la cámara, haga clic en
0
Dispositivo>Videocámara en el panel lateral izquierdo de
MediaBrowser.
Para ver vídeos que ya han sido archivados en la computadora, haga clic en
0
Biblioteca>Calendario y luego seleccione la fecha del vídeo que fue grabado.
14
NOTA
Seleccione Ajustes/Preferencias para ver la carpeta donde
0
MediaBrowser almacena sus videos. También puede
reproducir sus videos desde esta carpeta en la mayoría de los
reproductores multimedia.
Page 35
Creación de disco AVCHD (Windows)
Cable AV (proporcionado)
A conector AV
Entrada de audio (R, derecha)
Entrada de audio (L, izquierda)
Entrada de vídeo
Entrada de vídeo
Rojo
Blanco
Amarillo
A conector de CC
A la salida de CA
(110 V a 240 V)
Adaptador de CA
Grabadora de DVD/VHS
MediaBrowser hace posible crear discos
0
AVCHD para archivar sus grabaciones
en su formato original de alta definición.
Puede utilizar cualquier disco estándar
0
DVD-R, DVD-RW, DVD+R o DVD+RW.
Un disco estándar de 4,7 GB tiene capacidad
0
para aproximadamente 35 minutos de vídeo
en el ajuste de calidad más alto.
Los discos AVCHD pueden reproducirse
0
en cualquier reproductor de Blu-ray
compatible con AVCHD. Simplemente
busque el logo AVCHD.
.
Preparación:
Instale el software en su computadora.
0
Haga clic en el botón “Crear disco”.
1
.
Seleccione los vídeo clips que desea
2
incluir.
Escoja un fondo de menú e ingrese
3
un título de menú.
Cree el disco AVCHD.
4
NOTA
Para obtener más información sobre cómo crear un disco por computadora,
0
consulte la página de ayuda del software provisto.
Grabar a una grabadora de DVD o VHS
También es posible grabar a una grabadora de DVD o VHS. Tenga en cuenta que esto creará
una grabación de definición estándar con calidad de imagen de definición estándar.
.
Preparación:
Utilice el cable de AV provisto. La conexión amarilla es vídeo. La conexión blanca es
0
audio del canal izquierdo. La conexión blanca es audio del canal derecho. Conecte
este cable a la entrada de AV en su grabadora de DVD o VHS.
Siga las instrucciones de su grabadora de DVD/VHS para copiar el vídeo.
0
15
Page 36
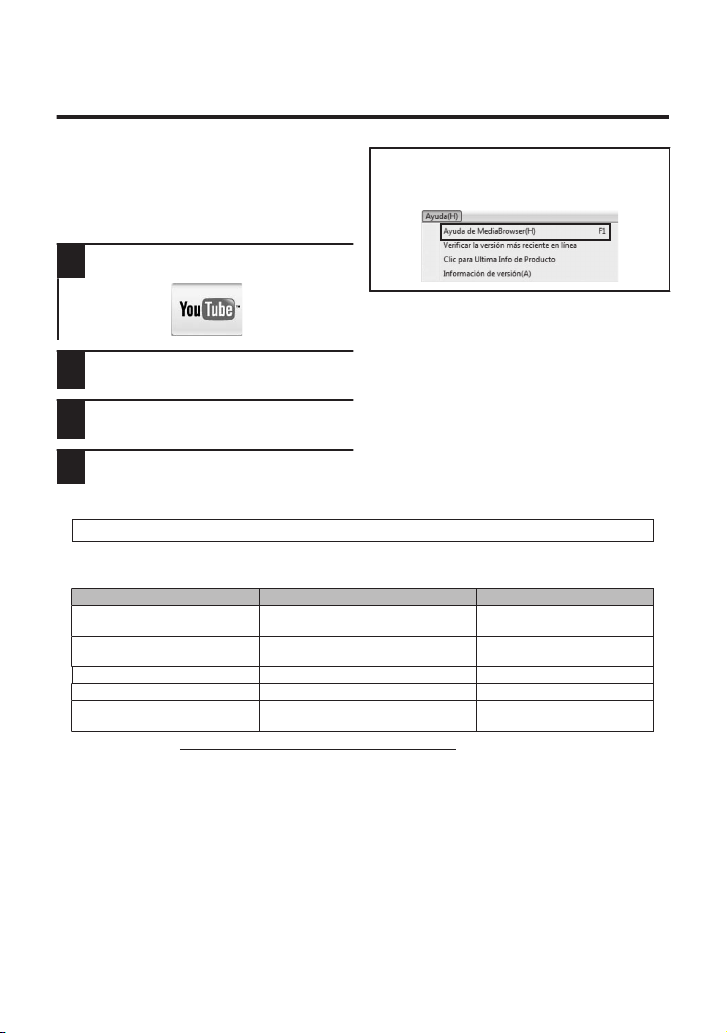
Cómo descargar un Archivo (Clip de
Información de asistencia al cliente
El uso de este software está autorizado de acuerdo con las condiciones de la licencia de software.
Pixela (para información sobre el software proporcionado)
Región
Idioma
EE.UU. y Canadá
Número de teléfono
Europa (Reino Unido,
Alemania, Francia y España)
Otros países de Europa
Asia (Filipinas)
China
Inglés
Inglés/alemán/francés/español
Inglés/alemán/francés/español
Inglés
Chino
+800-1532-4865
(línea gratuita)
+1-800-458-4029
(línea gratuita)
+44-1489-564-764
+63-2-438-0090
10800-163-0014
(línea gratuita)
Página principal: http://www.pixela.co.jp/oem/jvc/mediabrowser/e/
Consulte en nuestro sitio Web la información y las descargas más recientes.
video) en YouTube (Windows)
Carga de vídeos
Puede cargar vídeos en YouTube
utilizando el software proporcionado
“MediaBrowser”.
Preparación:
Instale el software en su computadora.
0
Haga clic en el botón “YouTube”.
1
.
Seleccione los vídeo clips que desea
2
incluir.
Ingrese a la cuenta y cargue la
3
información.
Comience la carga a YouTube.
4
Para obtener detalles de cómo realizar
cargas a YouTube, consulte “Ayuda de
MediaBrowser”.
.
Problemas con la carga de vídeos
o
Compruebe si ha creado una cuenta con
0
YouTube.
Problemas con el uso del software
o
proporcionado “MediaBrowser”
Consulte con el centro de servicio al
0
cliente a continuación.
.
16
Page 37

Copia de seguridad de archivos simples con una Mac
Cable USB
(proporcionado)
A puerto
USB
A conector USB
REPRODUCIR EN PC
CONECTAR A PC
Preparación:
Asegúrese de que haya suficiente espacio en el
0
disco duro de la computadora Mac.
Desconecte el suministro de energía.
0
Conecte la cámara a la
1
computadora con el cable USB.
.
Encienda la cámara presionando el
0
botón M.
Pulse [CONECTAR A PC] en la
2
pantalla táctil de la cámara.
Pulse [REPRODUCIR EN PC] en la
3
pantalla táctil de la cámara.
.
Copie y pegue los archivos a la computadora
4
Mac para realizar la copia de seguridad.
17
Page 38

Resolución de problemas/Precauciones
Resolución de problemas
Baterías
La batería suministrada es
una batería de iones de litio.
Antes de utilizar la batería
suministrada o una batería opcional,
lea las precauciones siguientes:
Terminales
•
Para evitar riesgos
...
no queme la batería.
...
...
no modifique ni desmonte la batería.
...
...
...
...
no exponga la batería a temperaturas superiores
a 60°C (140°F), puesto que la batería podría
calentarse en exceso, explotar o incendiarse.
utilice solamente los cargadores especificados.
•
Para evitar daños y prolongar la vida útil
no la someta a sacudidas innecesarias.
no deje caer ni exponga a fuertes impactos.
cárguela dentro del margen de temperatura
de 10°C a 35°C (50°F to 95°F). A temperaturas
más bajas se requiere más tiempo de carga,
y en algunos casos puede que incluso se detenga
la carga. A temperaturas más altas puede resultar
imposible terminar la carga, y en algunos
casos puede que incluso se detenga.
...
guárdela en lugar fresco y seco. La exposición
prolongada a temperaturas elevadas aumentará la
descarga natural y reducirá el periodo de vida útil.
...
mantenga un 30 % del nivel de batería (X) si las baterías
no serán utilizadas por largo tiempo. Asimismo, cárguelas
por completo y luego descárguelas por completo cada 6
meses; luego continúe guardándolas con un nivel de
batería de 30 % (
X).
...
...
cuando no se utilice, se debe retirar del cargador
o dispositivo eléctrico, ya que algunas máquinas
utilizan corriente incluso estando apagadas.
ATENCIÓN:
La batería que ha adquirido es
reciclable. Por favor comunicarse
al 1-800-8-BATTERY para
información sobre como reciclar
dicha batería.
(Sólo para EE.UU. y Canadá)
Soporte de grabación
•
•
Asegúrese de seguir las siguientes pautas
para evitar corromper o dañar los datos
grabados.
•
No doble ni tire el soporte de grabación, ni
lo someta a una fuerte presión, sacudidas o
vibraciones.
•
No salpique el soporte de grabación con agua.
•
No utilice, reemplace o almacene el soporte
de grabación en lugares expuestos a una
fuerte electricidad estática o a perturbaciones
eléctricas.
•
No apague la alimentación de la cámara ni
retire la batería o el adaptador de CA durante
la filmación o la reproducción, o al acceder de
algún otro modo al soporte de grabación.
•
No acerque el soporte de grabación
a objetos que tengan un fuerte campo
magnético o que emitan fuertes ondas
electromagnéticas.
•
No almacene el soporte de grabación en
ubicaciones expuestas a altas
temperaturas o a un alto grado de humedad.
•
No toque las partes metálicas.
Cuando se vayan a formatear o borrar datos
usando la videocámara, solo se cambiará la
información de administración del archivo. Los
datos no se borran completamente del medio de
grabación. Si desea borrar completamente todos
los datos, recomendamos usar software
comercial diseñado especialmente para ese
propósito, o destruir físicamente la videocámara.
Pantalla LCD
•
Para prevenir daños a la pantalla LCD, NO
...
presione con demasiada fuerza y evite los golpes.
...
...
coloque la cámara con la pantalla LCD hacia abajo.
•
Para prolongar la vida útil
evite frotarla con un trapo basto.
1.Consulte la sección “Resolución de problemas”
del“Guía detallada del usuario”.
Si tiene dificultades para operar la unidad, consulte
las descripciones detalladas del “Guía detallada
del usuario”.
http://manual3.jvckenwood.com/index.html/
Si tiene problemas con esta unidad, corrobore lo
siguiente antes de solicitar servicio técnico.
3.Si lo mencionado anteriormente no resuelve el
problema, póngase en contacto con su distribuidor
JVC o centro de servicios JVC más cercanos.
2.Esta unidad es un dispositivo controlado por
microordenador. La descarga electrostática, el
ruido exterior y la interferencia (de un televisor,
radio, etc.)pueden provocar que la unidad no
funcione correctamente.
En este caso, reinicie la unidad.
ޓAApague la unidad. (cierre el monitor LCD).
ޓB
Retire el adaptador de CA y la batería de esta
unidad, colóquelos nuevamente, abra el monitor
LCD, y la unidad de encenderá automáticamente.
Si bien la pantalla del monitor LCD tiene más de
99,99 % píxeles efectivos, es posible que el 0,01 %
de los píxeles sean manchas brillantes (rojas,
azules, verdes) o manchas oscuras. Esto no debe
considerarse un mal funcionamiento. Las manchas
no se grabarán.
no acorte el circuito de las terminales.
Mantener alejado de objetos metálicos cuando no
se utilice. Cuando transporte la unidad, asegúrese
de que la tapa de batería provista esté colocada.
Si la tapa de la batería no está colocada, lleve la
batería en una bolsa de plástico.
.
18
Page 39

Equipo principal
•
Por seguridad, NO DEBE
...
abrir el chasis de la cámara.
...
desmontar o modificar el equipo.
...
permitir que productos inflamables, agua u
objetos metálicos entren en el equipo.
...
extraer la batería ni desconectar el suministro
de energía con el aparato encendido.
...
dejar la batería colocada cuando la cámara no
se utilice.
...
colocar sobre el aparato ninguna fuente de llama
sin protección, tales como velas encendidas.
...
exponer el equipo a goteos o salpicaduras.
...
dejar que polvo u objetos metálicos se
adhieran al enchufe de alimentación o al
tomacorriente de CA.
...
insertar ningún objeto en la cámara.
•
Evite utilizar este aparato
...
en lugares sometidos a excesiva humedad o
demasiado polvo.
...
en lugares con hollín o vapor, por ejemplo,
cerca de una cocina.
...
en lugares sometidos a sacudidas o
vibraciones excesivas.
...
cerca de un televisor.
...
cerca de aparatos que generen campos
magnéticos o eléctricos fuertes (altavoces,
antenas de emisión, etc.).
...
en lugares sometidos a temperaturas
extremadamente altas (superiores a 40°C (104°F)) o
extremadamente bajas (inferiores a 0°C (32°F)).
•
NO deje el aparato
en lugares donde la temperatura supera los 50°C. (122°F).
...
...
en lugares con humedad extremadamente
baja (inferior al 35%) o extremadamente alta
(superior al 80%).
...
bajo luz solar directa.
...
en un coche cerrado en verano.
...
cerca de una calefacción.
...
...
en lugares elevados, como encima de un
televisor. La colocación del aparato en un lugar
elevado mientras un cable está conectado
puede provocar averías si alguien tropieza con
el cable y el aparato cae al suelo.
•
Para proteger el aparato, NO DEBE
...
permitir que se moje.
...
dejar caer el aparato ni golpearlo contra objetos duros.
...
someterlo a sacudidas o vibración excesiva
durante su transporte.
...
mantener el objetivo dirigido hacia objetos
demasiado brillantes durante largos periodos.
...
exponer el objetivo a la luz solar directa.
...
balancearlo excesivamente cuando utilice la
correa de mano.
...
balancear demasiado la bolsa de la cámara
con la cámara dentro.
... almacene la videocámara en un lugar con
polvo o arena.
•
Para evitar que la unidad se caiga:
•
Ajuste bien la correa de mano.
•
Si utiliza la cámara con un trípode, fije bien la
cámara en el trípode.
Si se le cae la cámara, puede herirse usted y
dañarse la cámara.
Si un niño utiliza la unidad, un adulto deberá guiarle.
Los cambios o modificaciones no aprobados por
JVC podrian anular la autoridad del usuario para
utilizar el equipo. Este equipo ha sido examinado
y cumple con los límites de dispositivos
digitales Clase B, segun el Apartado 15 de la
reglamentacion FCC.
Estos limites estan diseñados para suministrar
una protección razonable contra interferencias
perjudiciales en una instalacion residencial.
Este equipo genera, usa y puede irradiar
radiofrecuencia y si no se instala y emplea de
acuerdo con las instrucciones puede causar
interferencias perjudiciales a las comunicaciones
por radio. Sin embargo, no se garantiza que no
se produzcan interferencias en una instalacion
en particular. Si este equipo causa interferencias
perjudiciales a la recepcion de radio o televisión,
que pueden determinarse desconectando y
conectando la alimentacion del equipo, el usuario
puede intentar corregir la interferencia por medio
de una o mas de las siguientes medidas:
Reoriente o recoloque la antena de recepción.
Aumente la separación entre el equipo y el
receptor. Conecte el equipo a un tomacorriente en
un circuito diferente al del receptor conectado.
Consulte con su distribuidor o con un tecnico
experimentado de radio/TV.
Declaración de conformidad
Número de modelo :
GC-PX100U
Nombre comercial : JVC
Parte responsable : JVC AMERICAS CORP.
Dirección : 1700 Valley Road Wayne, N. J. 07470
Número de teléfono : 973-317-5000
Este dispositivo cumple con el Apartado 15 de la
reglamentación FCC. La operación está sujeta a las
dos condiciones siguientes: (1) Este dispositivo no
debe causar interferencias perjudiciales y (2) este
dispositivo debe aceptar cualquier interferencia
recibida, incluyendo la interferencia que pueda
causar errores de funcionamiento.
cubra la videocámara con una toalla, paño o
similar.
... cubrir una cámara con una toalla, ropa y así
sucesivamente.
.
19
Page 40
Tiempo de grabación/Especificaciones
Tiempo estimado de grabación de vídeo
VÍDEO FORMAT.GRAB:AVCHD
o
Calidad 4 GB 8 GB 16 GB 32 GB 48 GB 64 GB 128 GB
60p 15 m 35 m 1 h 10 m 2 h 30 m 3 h 50 m 5 h 10 h 10 m
XP 30 m 1 h 2 h 4 h 6 h 8 h 10m 16 h 20m
EP 1 h 40 m 3 h 30 m 7 h 10 m 14 h 40 m 21 h 30 m 28 h 50 m 57 h 50 m
VÍDEO FORMAT.GRAB:MP4/MOV
o
Calidad
MOV 1080p LPCM
MP4 1080p 10 m 25 m 55 m 2 h 2 h 50 m 3 h 50 m 7 h 50 m
MP4 720p 40 m 1 h 20 m 2 h 50 m 5 h 40 m 8 h 30 m 11 h 20 m 22 h 50 m
iFrame 720p 10 m 30 m 1 h 2 h 3 h 4 h 8 h
El tiempo estimado de grabación es solo una guía. El tiempo real de grabación puede
0
ser menor, dependiendo del entorno de filmación.
Cámara
Fuente de alimentación eléctrica
Consumo eléctrico 4,4 W (cuando [ILUMINACIÓN] se encuentre en [OFF] y [BRILLO
Dimensiones 110 mm x 76 mm x 183 mm (4-3/8" x 3" x 7-1/4")
Peso Aprox. 500 g (1,1 lbs) (solo la cámara),
Las especificaciones y el aspecto de este producto están sujetos a cambios sin previo aviso.
4 GB 8 GB 16 GB 32 GB 48 GB 64 GB 128 GB
10 m 25 m 50 m 1 h 40 m 2 h 30 m 3 h 30 m 7 h
Con un adaptador de CA: CC 11 V, Con baterías: CC 7,2 V
PANTALLA] se encuentre en [3] (estándar))
Consumo promedio: 1A
(An x Al x L: excluyendo la correa de mano, visor y protuberancia)
Aprox. 585 g (1,3 lbs) (incluida la batería suministrada)
Para obtener más información, consulte la Guía detallada del usuario.
http://manual3.jvckenwood.com/index.html/
*LYT2592-001A-M*
©2013 JVC KENWOOD Corporation
20
US
0213AJH-SW-VM
Page 41

Guide de l’utilisateur
Vérifier les accessoires
Adaptateur secteur
AP-V20U
Batterie
BN-VF815U
Mini câble
HDMI
Câble USB
(Type A - Mini Type B)
CD-ROM
Câble AV
QAM1322-001
Veuillez consulter votre revendeur JVC ou le centre de service JVC le plus proche lorsque vous
achetez un nouveau câble AV.
Pare-soleil de
l’objectif
Dragonne
Pare-soleil du
moniteur
Capuchon
d’objectif
Filtre à noyau de
ferrite
CAMÉSCOPE
GC-PX100 A
LYT2592-001A-M
FR
Manuel d’utilisation
.
Pour de plus amples détails sur le
fonctionnement de ce produit, veuillez
consulter le “Manuel d’utilisation” sur le
site Web à l’adresse suivante.
http://manual3.jvckenwood.com/
o
index.html/
Chers clients et chères clientes
Merci d’avoir acheté ce produit JVC.
Avant toute utilisation, veuillez lire les
précautions de sécurité et les mises en garde
sur p. 2 et p. 18 pour pouvoir utiliser le
produit en toute sécurité.
Mode D'emploi Mobile
.
Lorsque vous êtes à l’extérieur, consultez le
“Mode D'emploi Mobile”. Mode D'emploi
Mobile peut être visionné avec un navigateur
standard pour tablette androïde et iPhone.
http://manual3.jvckenwood.com/mobile/
o
us/
Pour consultation ultérieure :
Entrez le numéro de modèle (situé sur la partie
inférieur de la caméra) et le No de série (situé sur
la batterie chargée sur la caméra) en-dessous.
N° de modèle
N° de série
Page 42

Précautions de sécurité
AVERTISSEMENT : POUR ÉVITER
LES RISQUES D’INCENDIE OU
D’ÉLECTROCUTION, NE PAS EXPOSER
L’APPAREIL À LA PLUIE NI À L’HUMIDITÉ.
REMARQUES :
•
La plaque d’identification et l’avertissement de
sécurité se trouvent sous l’appareil et/ou au dos.
•
La plaque du numéro de série est en bas de
l’unité principale.
•
Les informations d’identification et
l’avertissement de sécurité de l’adaptateur
secteur sont situés sur ses côtés supérieur et
inférieur.
Avertissement sur la pile au lithium
remplaçable
La pile utilisée dans cet appareil peut présenter La pile utilisée dans cet appareil peut présenter
des risques d’incendie ou de brûlure chimique si
elle est mal traitée.
Ne pas recharger, démonter, chauffer à plus de
100°C (212°F) ni mettre au feu.
Remplacez la pile avec Panasonic, Sanyo, Sony
ou Maxell CR2025.
Danger d’explosion ou risque d’incendie si la pile
n’est pas changée correctement.
•
Jeter immédiatement les piles usées.
•
Placer hors de la portée des enfants.
•
Ne pas démonter ni jeter au feu.
Pour Californie des États-Unis seulement
Cet appareil contient une pile-bouton CR au lithium
qui contient du perchlorate
– une manipulation spéciale peut être requise.
Voir www.dtsc.ca.gov/hazardouswaste/perchlorate
Ne dirigez pas l’objectif directement vers le soleil.
Vous pourriez vous abîmer la vue et l’appareil
pourrait être endommagé. Il y a aussi risque
d’incendie ou d’électrocution.
PRÉCAUTION !
Les remarques suivantes sont destinées à protéger
l’utilisateur et le caméscope contre des dommages
éventuels.
Ne pas transporter ou saisir le caméscope
par l’écran LCD, car il pourrait tomber ou
s’endommager.
Ne pas utiliser de trépied photographique sur
des surfaces irrégulières et inclinées. Il pourrait
tomber et le caméscope pourrait être sérieusement
endommagé.
PRÉCAUTION !
Avec des câbles (Audio/Vidéo, etc.) raccordés, il
est recommandé de ne pas laisser le caméscope
sur le dessus du téléviseur, car tirer sur les câbles
pourrait faire tomber le caméscope, causant des
dommages.
PRÉCAUTION :
La prise secteur doit être opérationnelle.
•
Débranchez immédiatement la fi che secteur si le
caméscope ne fonctionne pas normalement.
ATTENTION
RISQUE D'ÉLECTROCUTION
NE PAS OUVRIR
ATTENTION:
POUR ÉVITER TOUT RISQUE D'ÉLECTROCUTION,
NE PAS OUVRIR LE BOÎTIER.
AUCUNE PIÉCE INTÉRIEURE N'EST À RÉGLER PAR L'UTILISATEUR.
SE RÉFÉRER À UN AGENT QUALIFIÉ EN CAS DE PROBLÉME.
Le symbole de I'éclair à I'intérieur d'un triangle
équilatéral est destiné à alerter I'utilisateur sur la
présence d'une "tension dangereuse" non isolée dans
le boîtier du produit. Cette tension est suffisante pour
provoquer I'électrocution de personnes.
Le point d'exclamation à I'intérieur d'un triangle
équilatéral est destiné à alerter I'utilisateur sur la
présence d'opérations d'entretien importantes au
sujet desquelles des renseignements se trouvent
dans le manuel d'instructions.
Si le matériel est installé dans un coffret ou sur une
étagère, s’assurer qu’il y a un espace suffisant sur tous
les côtés pour permettre la ventilation (10 cm (3-15/16")
ou plus sur les deux côtés, au dessus et à l’arrière).
Ne pas boucher les orifices de ventilation.
(Si les orifices de ventilation sont bouchés par un journal,
un tissu, etc., la chaleur peut ne pas s’éliminer.)
Aucune source à flamme nue, telle que des bougies
allumées, ne doit être placée sur l’appareil.
En jetant des batteries aux ordures, les problèmes
d’environnement doivent être pris en considération
et les réglementations locales ou la législation
concernant le rebut de ces batteries doivent être
strictement respectées.
L’appareil ne doit pas être exposé à l’égouttage ni
aux éclaboussements.
Ne pas utiliser cet appareil dans une salle de bain,
ni dans des endroits avec de l’eau.
Aussi, ne pas placer de récipient rempli d’eau ou
de liquides (tels des produits cosmétiques, des
médicaments, des vases de fleurs, des plantes en pot,
des tasses, etc.) sur le dessus de cet appareil.
(Si de l’eau ou un liquide entre dans ce matériel,
un incendie ou un choc électrique risque de se produire.)
Pour conserver la conformité avec les directives
FCC relatives à l'exposition aux radiofréquences,
utilisez uniquement l'antenne fournie. Toute
utilisation d'une antenne non autorisée, modification
ou fixation d'un dispositif auxiliaire peut endommager
l'émetteur et violer les réglementations FCC.
Cet appareil est conforme à l'article 15 des
règlements FCC. Son utilisation est soumise aux
deux conditions suivantes:
(1) Cet appareil ne doit pas causer d'interférence nuisible.
(2) Cet appareil doit accepter toute interférence reçue,
y compris les interférences qui pourraient entraîner
un fonctionnement indésirable.
PRÉCAUTION !
AVERTISSEMENT :
Éviter d’exposer la batterie, le caméscope avec
la batterie insérée ou la télécommande avec la
batterie insérée à une chaleur excessive, telle que
celle des rayons directs du soleil, d’un feu ou autre
source de chaleur.
.
2
Page 43

Noter que ce caméscope est destiné à un
usage privé uniquement.
Toute utilisation commerciale sans autorisation est
interdite. (Même si vous enregistrez un spectacle ou
une exposition pour votre plaisir personnel, il est
vivement recommandé de demander au préalable
l’autorisation de filmer.)
CONSIGNES DE SÉCURITÉ IMPORTANTES
1. Lire ces instructions.
2. Conserver ces instructions.
3. Tenir compte de tous les avertissements.
4. Respecter toutes les instructions.
5. Ne pas utiliser cet appareil à proximité de l’eau.
6. Ne nettoyer qu’avec un chiffon sec.
7.
Ne pas boucher les ouvertures de ventilation.
Installer selon les instructions du fabricant.
8.
Ne pas installer à proximité de sources
de chaleur telles que des radiateurs, des
accumulateurs de chaleur, des poêles,
ou d’autres appareils (comprenant les
amplificateurs) qui produisent de la chaleur.
9.
Protéger le cordon d’alimentation pour éviter
qu’il ne soit piétiné ou ne se coince, tout
particulièrement au
niveau de la fiche, de
la prise de courant et
du point où il sort de
l’appareil.
10.
N’utiliser que des
accessoires spécifiés
par le fabricant.
11.
N’utiliser qu’avec le
chariot, le stand, le trépied, le support ou la
table spécifié par le fabricant, ou vendu avec
l’appareil. Lorsqu’un chariot est utilisé, faire
attention pour déplacer la combinaison chariot/
appareil pour éviter des blessures causées par
un basculement.
12.
Débrancher cet appareil pendant un orage ou
quand il n’est pas utilisé pendant une longue durée.
13.
Confier toutes les réparations à du personnel
de service qualifié. Un dépannage est
nécessaire lorsque l’appareil a été endommagé
d’une façon ou d’une autre, telle que lorsque
le cordon d’alimentation ou la fiche est
endommagé, si du liquide a été renversé
ou si des objets sont tombés à l’intérieur de
l’appareil, si l’appareil a été exposé à la pluie ou
à l’humidité, ne fonctionne pas normalement ou
a fait une chute.
Si ce symbole est montré, il
n’est reconnu que dans l’Union
européenne.
UTILISATION DE L’ADAPTATEUR DE PRISE
DE SECTEUR
Lors du branchement du cordon d’alimentation de
l’appareil à une prise de secteur différente du standard
national américain C73, utiliser un adaptateur de prise
nommé “Siemens Plug”,comme indiqué ci-dessous.
Pour cet adaptateur de prise secteur, consulter votre
revendeur JVC le plus proche.
Adaptateur de prise
Utilisation de l’adaptateur secteur en
dehors des États-Unis.
L’adaptateur secteur fourni dispose d’une selection
automatique de la tension dans la gamme 110 V à
240 V CA.
Enlevez l’adaptateur secteur de la prise d’alimentation
lorsqu’il n’est pas utilisé.
Ne pas laisser de la poussière ou des objets
métalliques adhérer sur la prise d'alimentation murale
ou l’adaptateur secteur (alimentation/prise CC).
•
•
•
•
N’utiloisez pas l’adaptateur secteur fourni pour
d’autres périphériques.
Assurez-vous d’utiliser l’adaptateur secteur fourni.
Marques commerciales
•
AVCHD Progressive/AVCHD et le logotype
AVCHD Progressive/AVCHD sont des marques
commerciales de Panasonic Corporation et de
Sony Corporation.
x.v.Color est une marque de
commerce de Sony Corporation.
HDMI (High-Definition Multimedia Interface) et le
logo HDMI sont soit des marques de commerce
déposées, soit des marques de
commerce de HDMI Licensing,
LLC aux États-Unis et/ou dans d’autres pays.
Fabriqué sous licence de Dolby Laboratories.
Dolby et le symbole double D sont des marques
de commerce de Dolby Laboratories.
Le logo SDXC est une marque de commerce de SD-3C, LLC.
Windows® est une marque déposée ou une
marque de commerce de Microsoft Corporation
aux États-Unis et/ou dans d’autres pays.
Macintosh est une marque déposée d’Apple Inc.
iMovie, iPhone et iPhoto sont des marques de commerce
de Apple Inc., enregistrées aux É.-U. et d’autres pays.
YouTube™ et le logo YouTube sont des marques
déposées de Google Inc.
Intel, Intel Core et Pentium sont des marques de
commerce ou des marques de commerce
enregistrées de Intel Corporation ou ses filiales
aux États-Unis et dans d’autres pays.
Android est une marque de commerce de Google Inc.
Le iFrame logo et iFrame le symbole sont des marques
de commerce de Apple Inc.
Wi-Fi, le logo Wi-Fi, Wi-Fi CERTIFIED, le logo
Wi-Fi CERTIFIED, Wi-Fi Protected Setup et le
logo Wi-Fi Protected Setup, WPA et WPA2 sont
des marques de commerce ou des marques de
commerce enregistrées de Wi-Fi Alliance.
Les autres noms de produit et d’entreprise cités
dans ce mode d’emploi sont des marques de
commerce et/ou des marques déposées de leurs
détenteurs respectifs.
Les marques telles que ™ et ® ont été omises
dans ce manuel.
•
•
•
•
•
•
•
•
•
•
•
•
Faites une sauvegarde des données
importantes enregistrées.
JVC ne sera pas responsable des données perdues.
Il est recommandé de copier vos données importantes
enregistrées sur un disque ou tout autre support
d’enregistrement une fois tous les 3 mois pour les stocker.
•
Ce produit est sous licence AVC du portefeuille de brevet
pour l’utilisation personnelle d’un consommateur ou
d’autres utilisations qui ne permettent pas de générer une
rémunération pour
(i) l’encodage de vidéo conformément à la norme AVC
(“AVC Video”) et/ou
(ii) le décodage AVC de vidéo qui a été encodée par un
consommateur engagé dans une activité personnelle et/ou
qui a été obtenue auprès d’un fournisseur vidéo autorisé à
fournir AVC la vidéo. Aucune licence est accordée ou est
implicite pour toute autre utilisation.
Il est possible d’obtenir des informations supplémentaires à
partir de MPEG LA, L.L.C. Voir http://www.mpegla.com
•
.
3
Page 44

Contenu
Cierre el panel
Ajustez la longueur de la dragonne
Ouvrez la tablette
Tablette
Insérez l’extrémité de la dragonne dans la pièce de fixation de cet appareil.
Blocage de la lanière
Dragonne
Ajustez la longueur de la dragonne, et fixez ensuite la sangle de blocage.
Insérez la dragonne dans l’anneau.
Anneau
Précautions de sécurité .......................... 2
Ajustement de la dragonne .................... 4
Fixation des accessoires ........................ 4
Démarrer
Charger la batterie ................................. 6
Insérer une nouvelle carte SD ................ 7
Utiliser les icônes touches/miniatures
Changer les paramètres du menu .......... 8
Régler l’horloge ...................................... 8
............. 7
Enregistrement
Enregistrer des vidéos ........................... 9
Lecture
Lecture/suppression de fichiers sur cet appareil
Lire sur le téléviseur ............................. 11
..... 10
Copier
Installez MediaBrowser (Windows)
Opérations du menu USB .................... 13
Sauvegarde de fichier (Windows) ........ 14
Visionnez vos vidéos (Windows) .......... 14
Création de disque AVCHD (Windows)
Enregistrer sur un DVD ou un enregistreur VHS
Comment charger un fichier (clip vidéo) sur
YouTube (Windows) ............................ 16
Simple sauvegarde de fichiers avec un Mac
Détails complémentaires
Dépannage/mises en garde ................. 18
Durée d’enregistrement/spécifications
Ajustement de la dragonne
.
L’antenne Wi-Fi est située à l’intérieur de la tablette.
0
Ne tirez pas sur l’antenne Wi-Fi lors de l’ajustement de la ceinture.
.................... 12
...... 15
..... 15
...... 17
..... 20
Fixation des accessoires
Fixation de la dragonne
o
.
Attention à ne pas faire tomber l’appareil en le transportant.
0
Les tuteurs doivent faire attention lorsque l’appareil est utilisé par des enfants.
0
4
Page 45

Fixation du capuchon d’objectif
o
Fixez le capuchon d’objectif lorsque l’appareil n’est pas utilisé ou pendant le transport.
Attachez le capuchon d’objectif à la dragonne pendant la prise de vue.
.
Fixation du pare-soleil de l’objectif
o
L’utilisation du pare-soleil est recommandée pour les prises de vues extérieures avec
exposition directe au soleil.
Fixez à l’unité principale en alignant l’indicateur de l’unité principale et le pare-soleil.
0
Fixation du pare-soleil du moniteur
o
.
Fixez le pare-soleil du moniteur si l’écran est difficile à voir à cause de la lumière du soleil.
Fixez la griffe située sur la partie supérieure du pare-soleil du moniteur au point
0
d’insertion sur la partie supérieure de l’écran LCD. Ensuite fixez la griffe sur la partie
.
inférieure du pare-soleil du moniteur.
5
Page 46

Charger la batterie
Fixez la batterie.
La batterie n’est pas chargée
lors de l’achat.
Chargement terminé :
S’éteint
Chargement en cours :
Clignote
Voyant de chargement
Branchez le courant.
Branchez le connecteur CC.
Adaptateur
secteur vers
prise secteur
Détacher la batterie
Volet de
protection
Pour retirer la batterie,
appuyez sur le levier de
verrouillage de la
batterie ( ) et faites
glisser la batterie ( ) .
Ouvrez le volet de protection de la
batterie ( ) après avoir ouvert le
moniteur LCD ( ).
Placez la batterie vers le côté droit.
Poussez la batterie dans l’appareil
principal et faites glisser jusqu’à ce
que la batterie se loge en place en
émettant un déclic.
.
ATTENTION
Assurez-vous d’utiliser des batteries de JVC.
Si vous utilisez des batteries d’autres fabricants JVC, les performances et la sécurité ne
0
seront pas garanties.
Si des dysfonctionnements (surintensité, surtension, erreur de transmission, etc) se
0
produisent ou si n’importe quelle batterie manufacturée autre que JVC est utilisée pour la
charge de la batterie, la charge est interrompue. Dans ces cas, le voyant CHARGE clignote
rapidement pour notification.
Vous pouvez enregistrer ou lire des vidéos pendant que l’adaptateur secteur est connecté.
0
(Le chargement de la batterie ne peut être effectué pendant l’enregistrement ou la lecture.)
Enlevez la batterie lorsque l’appareil ne va pas être utilisé pendant une longue période. La
performance de la batterie peut chuter si elle reste dans l’appareil.
La durée de charge estimée de la batterie fournie est d’environ 2 heure 10 minutes.
0
Le temps de chargement est lorsque l’appareil est utilisé à 25°C (77 °F). Si la batterie n’est
0
pas chargée à une température ambiante comprise entre 10°C et 35°C (50 °F et 95 °F), le
chargement peut prendre plus de temps voire ne pas démarrer du tout. CHARGE voyant
clignote 2 fois dans un cycle lent pour notification si la charge de la batterie ne démarre pas.
Aussi, veuillez noter que le temps d’enregistrement et de lecture peut être réduit dans
certaines circonstances d’utilisation comme à basse température.
6
Page 47

Insérer une nouvelle carte SD
*
É
tiquette
Insérez une carte SD.
Coupez le courant de l’appareil
avant d’insérer ou de retirer une
carte SD.
Ouvrez le volet de protection
de la batterie après avoir
ouvert le moniteur LCD.
0:01:23 0:12:34
Écran d’index
Écran de lectureÉcran d’enregistrement
MENUREC
4
0:01:23 0:12:34
MENU
≪MARK
Insérez une carte SD disponible dans le commerce avant tout enregistrement.
.
Pour retirer la carte SD
o
Poussez la carte SD vers l’intérieur puis tirez-la vers vous.
REMARQUE
Les cartes SD confirmées sont:
Fabricant Panasonic, TOSHIBA, SanDisk
Vidéo A
Photo B
Toute utilisation de cartes SD (y compris des cartes SDHC/SDXC) autres que celles indiquées
0
ci-dessus risque de causer des problèmes lors de l’enregistrement ou la perte de données.
Le fonctionnement de cette unité avec toutes les cartes SD n’est pas garanti, même
0
avec les cartes SD indiquées précédemment. Il est possible que certaines cartes SD
ne fonctionnent pas en raison de changements des spécifications, etc.
Pour protéger les données, ne touchez pas aux contacts de la carte SD.
0
Lorsque vous utilisez une carte SDXC, vérifiez sa compatibilité avec le système
0
d’exploitation de votre ordinateur avant de consulter le Manuel d’utilisation.
Carte SD compatible Classe 4 ou supérieure (2 Go)/
Carte SDHC compatible Classe 4 ou supérieure (de 4 Go à 32 Go)/
Carte SDXC compatible Classe 4 ou supérieure (de 48 Go à 128 Go)
Pour sélectionner [MOV 1080p LPCM], [MP4 1080p] ou
0
[iFrame 720p] dans [QUALITE VIDEO], utilisez une carte
compatible SDHC/SDXC de Classe 6 ou supérieure.
Pour sélectionner [60p] dans [SELECT. SYSTEME], utilisez
0
une carte compatible SDHC/SDXC de Classe 6 ou supérieure.
Carte SD (256 Mo à 2 Go) / carte SDHC (4 Go à 32 Go) / carte
SDXC (48 Go à 128 Go)
Utiliser les icônes touches/miniatures
A
Tapez sur la touche affichée (icône) ou la miniature (fichier) sur l’écran tactile pour faire une sélection.
B Tirez les miniatures sur l’écran tactile pour rechercher le fichier désiré.
.
7
Page 48
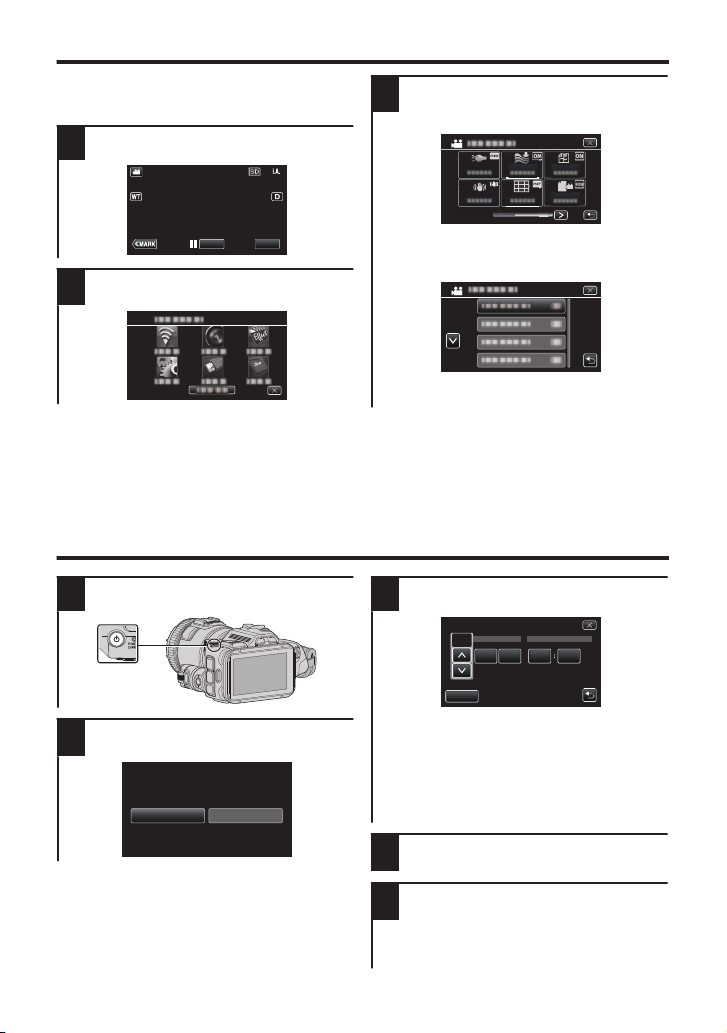
Changer les paramètres du menu
MENU
REC
NON
OUI
REGLER DATE/HEURE !
AM
201324 10 00
HEUREDATE
REGLAGE DE L'HORLOGE
DEC
REGLER
Pour modifier la configuration de la caméra,
tapez [MENU] et sélectionnez l’article que
vous souhaitez changer.
Tapez sur [MENU].
1
.
Tapez sur l’article désiré dans le
2
menu de raccourcis.
.
Régler l’horloge
Allumez l’appareil.
1
Tapez l’article désiré pour modifier la
3
configuration.
(Écran type icône)
.
0
Tapez sur 0 ou 1 pour faire défiler
l’écran.
0
Tapez sur 3 ou 2 pour faire défiler
l’écran.
Pour quitter l’écran
o
Tapez sur L (quitter).
Pour revenir à l’écran précédent
o
Tapez sur J (retour).
3
(Écran type liste)
.
Réglez la date et l’heure.
2
8
.
Tapez sur [OUI] lorsque [REGLER
DATE/HEURE !] est affiché.
.
.
0
3 et 2 sont affichés lorsque les
articles dans [DATE] et [HEURE] sont
touchés.
Réglez [DATE] et [HEURE] en tapant
0
sur 3 ou2.
Répétez cette étape pour entrer
0
[DATE] et [HEURE].
Une fois l’heure et la date réglées,
4
tapez sur [REGLER].
Sélectionnez votre région puis tapez
5
sur [ENREG.].
Le décalage horaire entre la ville sélectionnée et
0
l’heure GMT (temps universel coordonné) est affiché.
0
Tapez sur 0 ou 1 pour régler le nom de la ville.
Page 49
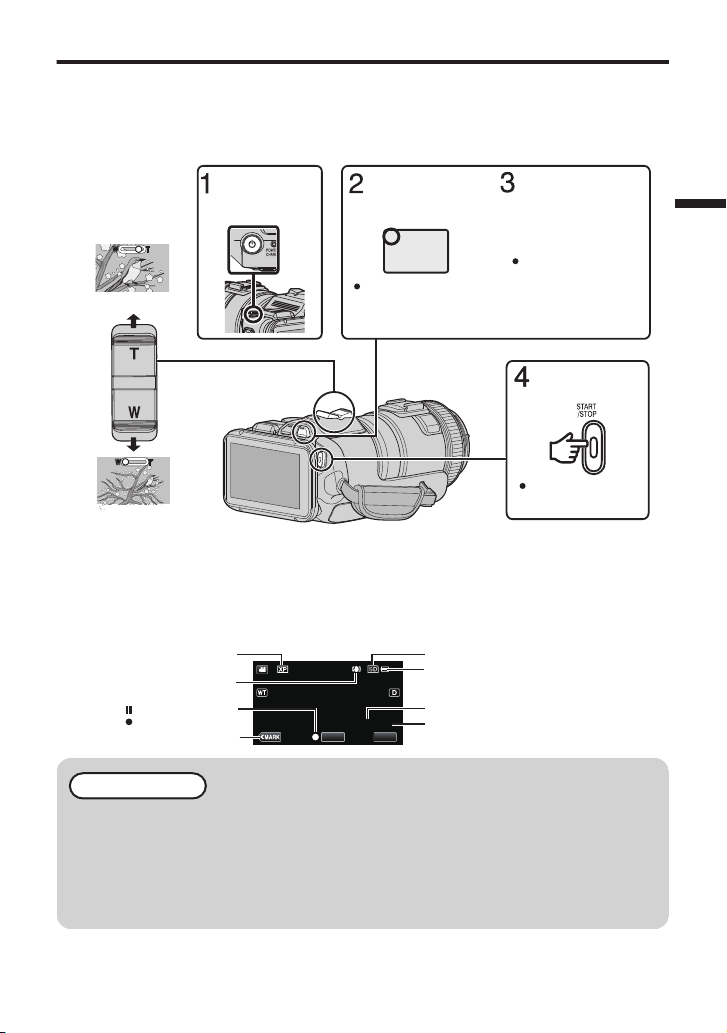
Enregistrer des vidéos
A
Effectuer un zoom
Lancez
l’enregistrement.
Appuyez à nouveau pour
arrêter l’enregistrement.
Vérifiez si le mode
d’enregistrement est bien
sur la touche A vidéo.
(Grand angle)
(Téléobjectif)
Vérifiez si le mode
d’enregistrement
est P Auto
Intelligent.
Si le mode est autre
que P, réglez le
cadran de prise de
vue sur i.AUTO.
Allumez
l’appareil.
Si le mode est B
photo, appuyez sur
A/B pour changer.
MENUREC
0:00:00 [0:54]
Enregistrement en cours
Attente-enregistrement
Indicateur de batterie
Supports d’enregistrement
Stabilisateur d’image
Qualité vidéo
Durée d’enregistrement restante
Compteur de scènes
Touche MARK
Vous pouvez enregistrer des vidéos sans avoir à vous préoccuper des détails de réglage.
Pour ce faire, utilisez le mode Auto Intelligent. Les réglages comme l’exposition et la mise
au point seront ajustés automatiquement pour s’adapter aux conditions de prises de vue.
Dans le cas de prises de vue spécifiques comme une personne etc. son icône est affichée à l’écran.
0
Avant d’enregistrer une scène importante, il est recommandé d’effectuer un enregistrement test.
.
Vous pouvez également taper sur 6 sur l’écran tactile pour enregistrer. Pour arrêter
0
l’enregistrement, tapez 7.
En appuyant sur la touche [MARK] pour passer en mode de marque, différents types
0
de marques peuvent être mis sur les scènes pendant l’enregistrement, pour que ce soit
plus facile de trouver la scène marquée ultérieurement.
Indications apparaissant à l’écran pendant l’enregistrement de vidéos
o
REMARQUE
0
0
0
0
.
La durée d’enregistrement estimée de la batterie fournie est d’environ 60
minutes.
Ne retirez pas la batterie, l’adaptateur secteur ou la carte SD lorsque le voyant
d’accès est allumé. Les données enregistrées peuvent devenir illisibles.
Cet appareil s’éteint automatiquement s’il n’est pas utilisé pendant 5 minutes,
afin d’économiser de l’énergie.
L’angle de vue peut changer lorsque le stabilisateur d’image est activé ou désactivé.
9
Page 50
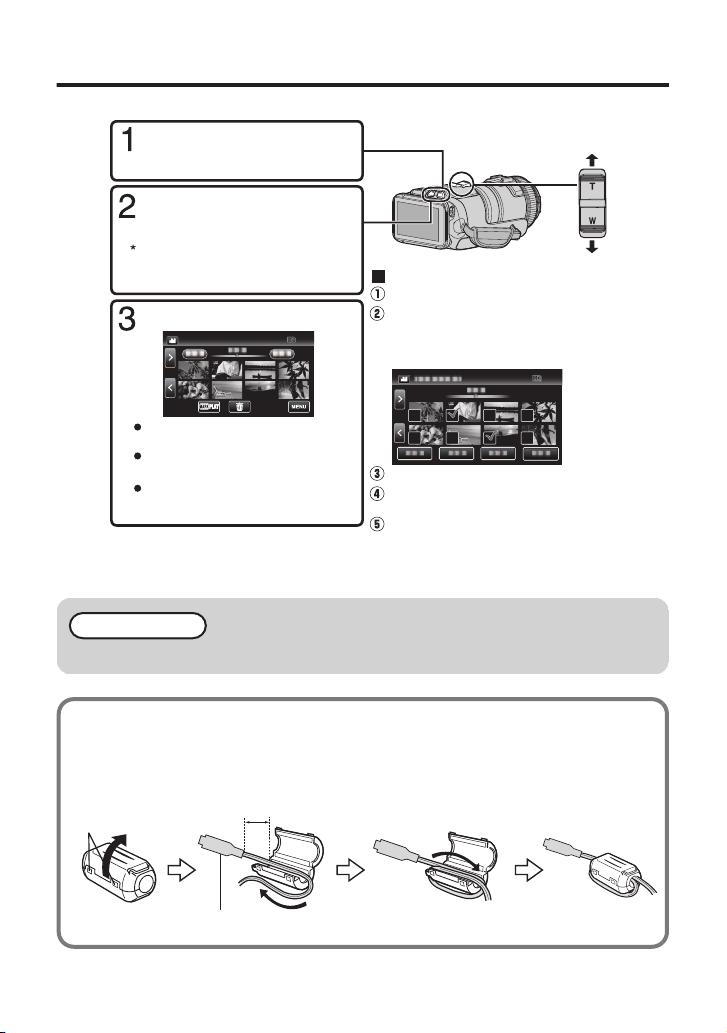
Lecture/suppression de fichiers sur cet appareil
Tapez R.
Tapez sur le fichier à lire.
Appuyez sur e pour interrompre la
lecture.
Appuyez sur u pour retourner à
l’écran d’index vidéo.
L apparaît sur la dernière image
lue.
Pour supprimer des fichiers inutiles
Réglage du volume pendant la lecture
Augmenter le volume
Baisser le volume
Appuyez sur la touche de
lecture/d’enregistrement pour
sélectionner le mode de lecture.
Appuyez sur la touche de
lecture/d’enregistrement à nouveau pour
sélectionner le mode d’enregistrement.
Appuyez sur la touche A/B
(photo/vidéo) pour sélectionner le
mode photo ou vidéo.
I apparaît sur les fichiers sélectionnés.
Pour supprimer l’affichage I, tapez à
nouveau sur le fichier.
Tapez sur les fichiers à effacer.
Tapez sur "OK".
Appuyez sur "EXECUTER" lorsque le
message de confirmation apparaît.
Tapez sur "REGLER".
Il doit être connecté à cette unité
Ouvrez le fermoir.
3 cm (1-3/16")
Faire un tour
Sélectionner et lire les vidéos ou photos enregistrées à partir d’un écran d’index (affichage miniature).
.
Pour capturer une photo durant la lecture
o
Arrêtez la lecture et appuyez sur la touche SNAPSHOT.
REMARQUE
L’appareil peut se mettre hors tension pour protéger le circuit si sa température s’élève trop.
0
Fixer le filtre à noyau de ferrite
o
Attachez le filtre à noyau au microphone externe (vendu séparément) tel qu’il est
illustré. Le filtre à noyau de ferrite diminue l’interférence lorsque cet appareil est
connecté à d’autres périphériques.
10
.
Page 51
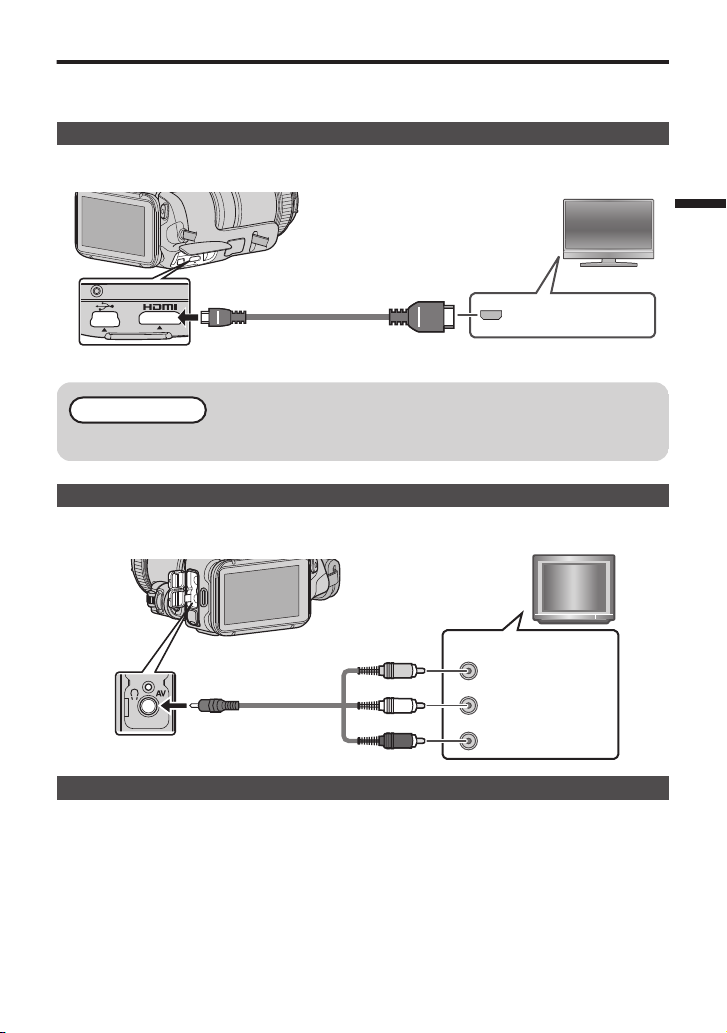
Lire sur le téléviseur
Mini câble HDMI
(fourni)
Vers mini connecteur HDMI
Entrée connecteur
HDMI
Téléviseur
Câble AV (fourni)
Vers connecteur AV
Téléviseur
Entrée audio (D)
Entrée audio (G)
Entrée vidéo
Entrée vidéo
Rouge
Blanc
Jaune
Préparation :
Mettez la caméra et le téléviseur hors tension.
0
Pour se connecter à l’aide du mini connecteur HDMI
Pour se connecter à un téléviseur compatible 1080p, réglez [SORTIE HDMI] dans
[REGLAGES CONNEXION] sur [AUTO].
.
REMARQUE
Utilisez un mini câble HDMI à haute vitesse.
0
Connecter à l’aide du connecteur AV
Changez les réglages dans [SORTIE VIDEO] dans [REGLAGES CONNEXION] selon la
connexion.
.
Fonctions de lecture
Une fois la connexion avec le téléviseur terminée
A
Mettez la caméra et le téléviseur sous tension.
0
Allumez la caméra en appuyant sur la touche M.
B
Sélectionner l’entrée d’alimentation de la TV.
C
Commencez la lecture sur la caméra.
11
Page 52
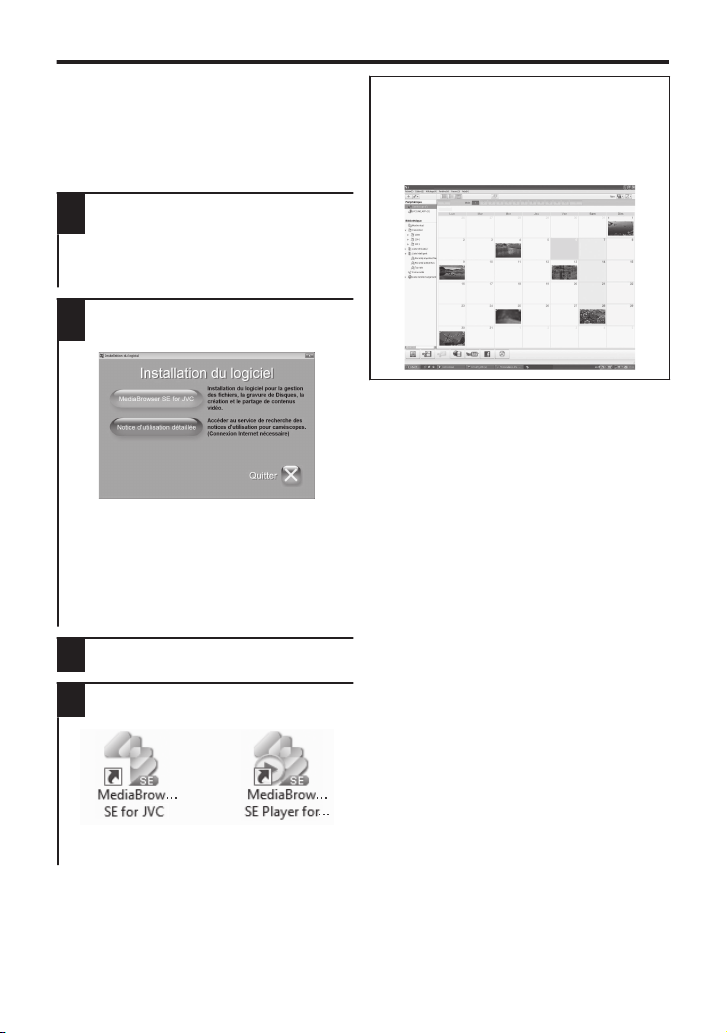
Installez MediaBrowser (Windows)
MediaBrowser est inclus avec votre
caméra. Il vous permet d’archiver et
d’organiser vos vidéos. Il vous permet
également de créer des disques et
télécharger des vidéos sur YouTube, et
d’autres sites Web populaires.
Chargez le CD-ROM fourni dans
1
votre ordinateur.
Dans Windows Vista / Windows 7 la
0
boîte de dialogue de lecture
automatique apparaît.
Cliquez sur “MediaBrowser SE for
2
JVC”.
.
Suivez les instructions qui s’affichent à
0
l’écran.
“Windows Installer” apparaît alors à
0
l’écran après quelques instants. S’il
n’apparaît pas, cliquez deux fois sur
l’icône CD-ROM dans “Poste de
travail”.
Cliquez sur “Terminer”.
3
MediaBrowser utilise une interface
basée sur un calendrier qui permet de
trouver facilement n’importe quelle vidéo
que vous avez enregistrée en
sélectionnant la date appropriée.
.
Cliquez sur “Quitter”.
4
.
L’installation est terminée et les icônes
0
sont créées sur le bureau.
12
Page 53

Opérations du menu USB
Vers connecteur
USB
À la prise de
l’adaptateur secteur
(110 V à 240 V)
Adaptateur secteur
Câble USB (fourni)
Ver s
connecteur CC
Vers connecteur
USB
CONNECTER AU PC
POUR CONNEXION
SELECTIONNER TYPE APPAREIL
SELECTIONNER APPAREIL
LECTURE SUR PC
CONNECTER AU PC
En connectant un câble USB entre cet appareil
et votre ordinateur, vous pouvez effectuer des
opérations telles que des sauvegardes de
fichiers sur un ordinateur/disque ou des
chargements de fichiers sur un site de partage
de fichiers à l’aide de votre ordinateur.
Préparation :
Installez le logiciel MediaBrowser sur
0
l’ordinateur.
Débranchez l’alimentation.
0
Connectez la caméra à un PC avec
1
le câble USB.
.
Allumez la caméra en appuyant sur
2
la touche M.
Le menu [SELECTIONNER
APPAREIL] apparait.
3
Tapez sur [CONNECTER AU PC]
sur l’écran tactile de la caméra.
Le menu [CONNECTER AU PC]
apparait.
4
Tapez sur une option qui vous
convient le mieux.
.
Option Usage
LECTURE
SUR PC
CREER
DISQUE
DIRECT
SUR
DISQUE
TRANSFERER0Pour charger des vidéos sur
SAUVEGARDER0Pour sauvegarder des
Pour les opérations détaillées sur les options
ci-dessus, reportez-vous aux autres sections
de ce guide ou au “Manuel d’utilisation”.
Pour lire vos
0
enregistrements sur
l’ordinateur.
Pour sauvegarder vos
0
enregistrements sur
l’ordinateur sans utiliser le
logiciel fourni.
Pour sauvegarder vos
0
enregistrements sur un disque.
Pour sauvegarder tous les
0
enregistrements qui n’ont pas
été sauvegardés sur un disque.
des sites de partage de fichiers.
enregistrements sur
l’ordinateur.
Tapez sur [CONNECTER A UN
0
AUTRE] si la caméra est connectée à
un périphérique autre qu’un ordinateur.
.
13
Page 54
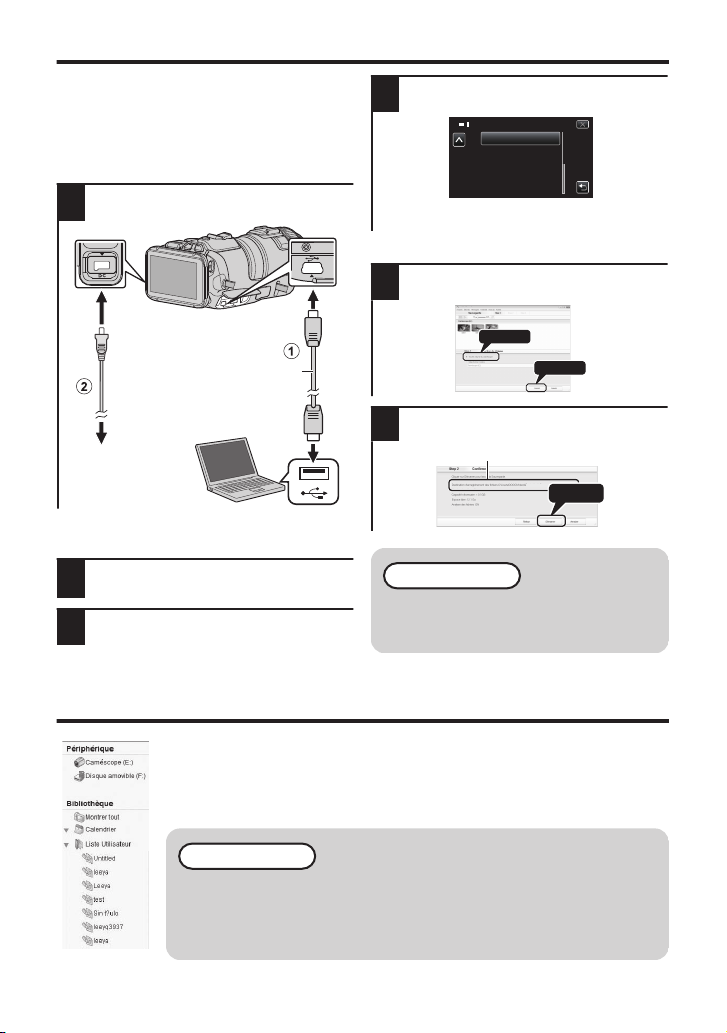
Sauvegarde de fichier (Windows)
Vers connecteur
USB
À la prise de
l’adaptateur secteur
(110 V à 240 V)
Adaptateur secteur
Câble USB (fourni)
Ver s
connecteur CC
Vers connecteur
USB
SAUVEGARDER
CONNECTER AU PC
2
1
Cliquez
Cliquez
Cliquez
Destination d’enregistrement (ordinateur)
Préparation :
Installez le logiciel MediaBrowser sur
0
l’ordinateur.
Assurez-vous qu’il y a suffisamment
0
d’espace sur le disque dur de
l’ordinateur.
Débranchez l’alimentation.
0
Connectez la caméra à un PC avec le
1
câble USB.
.
Sur la caméra :
o
Allumez la caméra en appuyant sur la
2
touche M.
Tapez sur [CONNECTER AU PC] sur
3
l’écran tactile de la caméra.
Tapez sur [SAUVEGARDER] sur
4
l’écran tactile de la caméra.
.
MediaBrowser démarre sur
0
l’ordinateur.
Sur l’ordinateur :
o
Sélectionnez les fichiers à
5
sauvegarder.
.
Lancez la sauvegarde.
6
.
REMARQUE
La sauvegarde de fichiers est
0
uniquement prise en charge par
le logiciel fourni.
Visionnez vos vidéos (Windows)
Pour visualiser la vidéo qui est toujours sur votre caméra, cliquez sur
0
Périphérique>Caméscope dans le panneau latéral gauche de
MediaBrowser.
Pour visionner la vidéo qui a déjà été archivée à l’ordinateur, cliquez sur
0
Bibliothèque>Calendrier, puis choisissez la date à laquelle la vidéo a été enregistrée.
14
REMARQUE
Choisissez Paramètres/Préférences pour voir le dossier dans
0
lequel MediaBrowser stocke vos vidéos. Vous pouvez
également lire vos vidéos à partir de ce dossier dans les
lecteurs multimédias les plus populaires.
Page 55
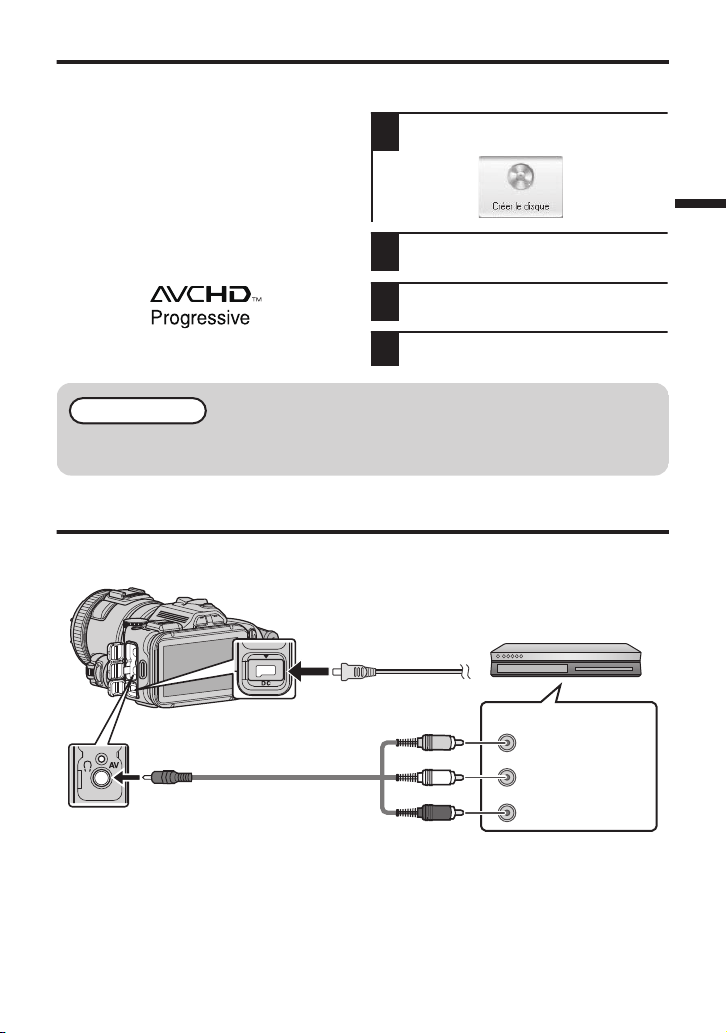
Création de disque AVCHD (Windows)
Câble AV (fourni)
Vers connecteur AV
Entrée audio (D)
Entrée audio (G)
Entrée vidéo
Entrée vidéo
Rouge
Blanc
Jaune
Vers connecteur CC
À la prise de l’adaptateur
secteur (110 V à 240 V)
Adaptateur secteur
Enregistreur DVD/VHS
MediaBrowser permet de créer des
0
disques AVCHD pour archiver vos
enregistrements dans leur qualité haute
définition originale.
Vous pouvez utiliser n’importe quel DVD-R,
0
DVD-RW, DVD+R ou DVD+RW standard.
Un disque standard de 4,7 Go peut
0
contenir environ 35 minutes de vidéo
dans la qualité optimale.
Les disques AVCHD peuvent être lus
0
dans n’importe quel lecteur Blu-ray qui
est compatible AVCHD. Il vous suffit de
chercher le logo AVCHD.
.
Préparation :
Installez le logiciel sur votre ordinateur.
0
Cliquez sur la touche “Créer le
1
disque”.
.
Sélectionnez les clips vidéo que vous
2
souhaitez inclure.
Choisissez un fond de menu et entrez
3
un titre de menu.
Créer le disque AVCHD.
4
REMARQUE
Pour plus de détails sur la façon de créer un disque par ordinateur, reportez-
0
vous à la page d’aide du logiciel fourni.
Enregistrer sur un DVD ou un enregistreur VHS
Il est également possible d’enregistrer sur un DVD ou un magnétoscope VHS. Veuillez noter que cela va
créer un enregistrement en définition standard avec une qualité d’image standard.
.
Préparation :
Utilisez le câble AV fourni. La connexion jaune est la vidéo. La connexion blanche est
0
le canal audio à gauche. La connexion rouge est le canal audio à droite. Connectez ce
câble à l’entrée AV de votre enregistreur de DVD ou VHS.
Suivez votre enregistreur DVD/VHS les instructions pour copier (dupliquer) la vidéo.
0
15
Page 56

Comment charger un fichier (clip vidéo)
Informations du support client
L’utilisation de ce logiciel est autorisée selon les termes de sa licence.
Pixela (pour toutes questions concernant le logiciel fourni)
Page d’accueil : http://www.pixela.co.jp/oem/jvc/mediabrowser/e/
Veuillez visiter notre site Web pour obtenir les dernières informations et télécharger des fichiers.
N° de téléphoneLangueRégion
États-Unis et Canada Anglais
+1-800-458-4029 (numéro gratuit)
Europe (Royaume-Uni,
Allemagne, France et Espagne)
Anglais/Allemand/Français/
Espagnol
+800-1532-4865 (numéro gratuit)
Autres pays en Europe
Anglais/Allemand/Français/
Espagnol
+44-1489-564-764
Asie (Philippines) Anglais
+63-2-438-0090
ChinoisChine
10800-163-0014 (numéro gratuit)
sur YouTube (Windows)
Charger des vidéos
Vous pouvez charger vos vidéos sur
YouTube via le logiciel “MediaBrowser”
fourni.
Préparation :
Installez le logiciel sur votre ordinateur.
0
Cliquez sur la touche “YouTube”.
1
Pour de plus amples détails sur la façon
de charger sur YouTube, consultez le
“Aide MediaBrowser”.
.
.
Sélectionnez les clips vidéo que vous
2
souhaitez inclure.
Entrez sur le compte et chargez des
3
informations.
Commencez le chargement sur
4
YouTube.
.
16
Problèmes pour charger des vidéos
o
Assurez-vous d’avoir créé un compte
0
avec YouTube.
Problèmes d’utilisation du logiciel
o
“MediaBrowser” fourni
Consultez le centre de service à la
0
clientèle ci-dessous.
Page 57

Simple sauvegarde de fichiers avec un Mac
Câble USB
(fourni)
Vers port
USB
Vers connecteur
USB
LECTURE SUR PC
CONNECTER AU PC
Préparation :
Assurez-vous qu’il y a suffisamment
0
d’espace sur le disque dur du Mac.
Débranchez l’alimentation.
0
Connectez la caméra à un PC avec
1
le câble USB.
.
Allumez la caméra en appuyant sur la
0
touche M.
Tapez sur [CONNECTER AU PC]
2
sur l’écran tactile de la caméra.
Tapez sur [LECTURE SUR PC] sur
3
l’écran tactile de la caméra.
.
Copiez et collez les fichiers sur
4
l’ordinateur Mac pour la sauvegarde.
17
Page 58

Dépannage/mises en garde
Dépannage
Batteries
La batterie fournie est une
batterie au lithiumion. Avant
d’utiliser la batterie fournie ou
une batterie en option,
bien lire les consignes suivantes :
Bornes
•
Pour éviter tout accident
...
ne pas brûler.
...
...
ne pas modifier ni démonter.
...
...
...
ne pas exposer la batterie à des températures
supérieures à 60 °C (140°F) car celle-ci risquerait
de surchauffer, d’exploser ou de prendre feu.
utiliser uniquement les chargeurs spécifiés.
•
Pour éviter tout endommagement et
prolonger la durée de vie utile
ne pas soumettre à un choc inutile.
...
...
...
...
...
recharger à l’intérieur d’une plage de température
de 10°C à 35°C (50°F to 95°F). Des températures
basses peuvent prolonger la durée de charge, ou
même dans certains cas arrêter la recharge.
Des températures élevées peuvent empêcher une
charge complète, ou même dans certains cas
arrêter la recharge.
entreposer dans un endroit frais et sec. Toute
exposition prolongée à de températures
élevées accélérera la décharge naturelle et
diminuera la durée de vie utile.
garde le niveau de la batterie à 30 % (X) si la
batterie n’est pas utilisée pendant longtemps. De plus,
chargez complètement et ensuite déchargez la batterie
complètement tous les 6 mois, puis continuez à la
stocker à un niveau de 30 % de charge (X).
retirer l’appareil du chargeur ou le débrancher
lorsque vous ne vous en servez pas ; certains
appareils, même éteints, continuent de
consommer du courant.
ne pas laisser tomber ou soumis à des chocs violents.
ATTENTION:
La batterie que vous vous êtes
procurée est recyclable.
Pour des renseignements sur le
recyclage de cette batterie, veuillez
composer le 1-800-8-BATTERY.
(États-Unis et Canada seulement)
Support d’enregistrement
•
•
Veiller à suivre les directives ci-dessous
pour éviter d’altérer ou d’endommager les
données enregistrées.
•
Ne pas déformer ou laisser tomber le support
d’enregistrement, ou le soumettre à une forte
pression, des secousses ou des vibrations.
•
Ne pas éclabousser le support d’enregistrement
avec de l’eau.
•
Ne pas utiliser, remplacer ou entreposer le
support d’ enregistrement dans des endroits
fortement exposés à de l’électricité statique ou à
des parasites électriques.
•
Ne pas mettre le caméscope hors tension ou
retirer la batterie ou l’adaptateur secteur pendant
la prise de vue, la lecture ou l’accès au support
d’enregistrement.
•
Ne pas placer le support d’enregistrement à
proximité d’objets possédant un fort champ
magnétique ou émettant de fortes ondes
électromagnétiques.
•
Ne pas ranger le support d’enregistrement dans
des endroits exposés à une température élevée
ou à une forte humidité.
Ne pas toucher les pièces métalliques.
•
Lors du formatage ou de l’effacement des données
du caméscope, seules les informations de gestion
des fichiers sont modifiées. Les données ne sont pas
complètement effacées du support d’enregistrement.
Si vous souhaitez effacer complètement toutes les
données, nous vous recommandons soit d’utiliser un
logiciel disponible dans le commerce, spécialement
conçu à cet effet, soit de détruire physiquement le
caméscope.
Écran LCD
•
Pour éviter tout endommagement de l’écran
LCD, NE PAS
...
le pousser trop fortement ou lui faire subir des chocs.
...
...
placer le caméscope avec l’écran LCD en dessous.
•
Pour prolonger sa durée de vie utile
éviter de le frotter à l’aide d’un chiffon rugueux.
1.Veuillez consulter la section “Dépannage” dans le
“Manuel d’utilisation”.
Si vous éprouvez des difficultés à utiliser cet
appareil,veuillez consulter les descriptions
détaillées dans le “Manuel d’utilisation”.
http://manual3.jvckenwood.com/index.html/
En cas de problème avec cet appareil, veuillez vérifier
les points suivants avant de demander une réparation.
2.Cette unité est un périphérique contrôlé par
micro-ordinateur. Les décharges électrostatiques,
les bruits externes et les interférences (provenant
d’une TV ou d’une radio par exemple) peuvent
empêcher la caméra de fonctionner correctement.
Si tel est le cas, réinitialisez
ACoupez l’alimentation. (fermez l’écran LCD.)
BEnlevez l’adaptateur secteur et la batterie de
l’unité,replacez-les, ouvrez l’écran LCD et cet
appareil se rallume automatiquement.
3.Si les points ci-dessus ne peuvent résoudre le
problème, consultez votre revendeur JVC ou le
centre de services JVC le plus proche.
Bien que l’écran LCD ait plus de 99,99 % de pixels
effectifs, 0,01 % des pixels peuvent être des points
lumineux (rouge, bleu, vert) ou des taches foncées.
Ce n’est pas un dysfonctionnement. Les points ne
seront pas enregistrés.
ne pas court-circuiter les terminaux.
Garder à bonne distance d’objets métalliques
lorsqu’il n’est pas utilisé. Pour le transport, vérifiez
que le capuchon de la batterie fourni est bien fixé à
la batterie. Si le capuchon de la batterie est mal
placé, portez la batterie dans un sac en plastique.
.
18
Page 59

Appareil principal
•
Pour votre sécurité, NE PAS
... ouvrir le boîtier du caméscope.
... démonter ou modifier l’appareil.
...
laisser pénétrer des substances inflammables, de
l’eau ou des objets métalliques dans l’appareil.
...
retirer la batterie ou débrancher l’appareil
pendant que celui-ci est sous tension.
...
laisser la batterie à l’intérieur du caméscope
lorsque celui-ci n’est pas utilisé.
...
placer des sources de flammes nues, telles que
des bougies allumées, sur l’appareil.
...
exposer l’appareil à l’égouttage ou aux
éclaboussements.
...
laisser s’accumuler de la poussière ou
placer des objets métalliques sur la prise
d’alimentation ou une prise de courant murale.
... insérer des objets dans le caméscope.
•
Éviter d’utiliser l’appareil
... dans des endroits trop humides ou poussiéreux.
... dans des lieux exposés à de la suie ou à de la
vapeur (par exemple, près d’une cuisinière).
...
dans des endroits trop exposés aux chocs ou vibrations.
... près d’un téléviseur.
... près d’appareils générant des champs
magnétiques ou électriques intenses (hautparleurs,
antennes de diffusion, etc.).
... dans des lieux exposés à des températures
extrêmement élevées (au-delà de 40°C (104°F)) ou
extrêmement basses (en deçà de 0°C(32°F)).
•
NE PAS laisser l’appareil
...
...
...
...
...
...
...
dans des lieux exposés à des températures
supérieures à 50°C (122°F).
dans des lieux exposés à des taux d’humidité
extrêmes (en deçà de 35 % ou au-delà de 80 %).
en plein soleil.
dans une voiture hermétiquement fermée en
période estivale.
près d’un radiateur.
en hauteur, sur un téléviseur par exemple. Si
l’appareil est placé en hauteur alors que le
câble est raccordé, celui-ci peut être coincé et
l’appareil peut tomber. Dans ce cas, il risque de
ne plus fonctionner.
•
Pour protéger l’appareil, NE PAS
...
...
...
...
...
...
...
...
le mouiller.
le faire tomber ou le cogner contre des objets durs.
le soumettre à trop de chocs ou vibrations
durant le transport.
maintenir l’objectif orienté vers des objets
extrêmement lumineux pendant trop longtemps.
exposer l’objectif à la lumière directe du soleil.
le balancer inutilement par la dragonne.
trop balancer l’étui souple lorsque le
caméscope est à l’intérieur.
stocker le caméscope dans un endroit
poussiéreux ou avec du sable.
•
Pour éviter une chute de l’appareil,
•
Serrer la ceinture de la poignée fermement.
•
Lors de l’utilisation du caméscope avec un
trépied, fixer fermement l’appareil sur le trépied.
Si le caméscope se détache et tombe, il peut
causer des blessures ou être endommagé.
Si un enfant utilise l’appareil, un adulte doit être présent.
Des changements ou modifications non
approuvés par JVC peuvent annuler le droit de
l’utilisateur de faire fonctionner l’appareil. Cet
appareil a été testé et il a été reconnu qu’il se
conforme aux limites concernant l’appareillage
informatique de classe B correspondant à la
partie 15 des règles de la FCC. Ces limites sont
conçues pour garantir une protection raisonnable
contre des interférences nuisibles dans les
installations résidentielles. Cet appareil génère,
utilise et peut émettre de l’énergie des fréquences
radio et, s’il n’est pas installé et utilisé selon
les instructions du fabricant, peut causer des
interférences nuisibles en communications radio.
Cependant, il ne peut pas être garanti que des
interférences ne se produiront pas dans certaines
installations particulières. Si cet appareil provoque
des interférences avec la réception radio ou de
télévision, ce qui peut être vérifié en alimentant
l’appareil et en coupant son alimentation, nous
conseillons à l’utilisateur d’essayer d’éliminer ces
interférences par l’un ou plusieurs des moyens
suivants :
Réorienter ou déplacer l’antenne de réception.
Augmenter la séparation entre l’appareil et le
récepteur.
Brancher l’appareil sur une prise de courant d’un
circuit différent de celui sur lequel le récepteur est
branché.
Consulter le revendeur ou un technicien radio/TV
compétent pour vous aider.
Cet appareil numérique de la classe B est
conforme à la norme NMB-003 du Canada.
Déclaration de conformité
Numéro de modèle :
GC-PX100U
Nom de marque : JVC
Personne responsable : JVC AMERICAS CORP.
Adresse : 1700 Valley Road Wayne, N. J. 07470
Numéro de téléphone : 973-317-5000
Cet ensemble se conforme à la partie 15 des
règles de la FCC (Federal Communications
Commission). Le fonctionnement est sujet aux
deux conditions suivantes : (1) Cet appareil ne
peut pas causer d’interférences nuisibles, et
(2) cet appareil doit accepter toute interférence
reçue, comprenant des interférences qui
peuvent causer un mauvais fonctionnement.
couvrir le caméscope avec une serviette, un drap
et ainsi de suite.
... couvrir caméscope avec une serviette, drap et
ainsi de suite.
.
19
Page 60

Durée d’enregistrement/spécifications
Durée d’enregistrement vidéo approximative
FORMAT ENR. VIDÉO:AVCHD
o
Qualité 4 Go 8 Go 16 Go 32 Go 48 Go 64 Go 128 Go
60p 15 m 35 m 1 h 10 m 2 h 30 m 3 h 50 m 5 h 10 h 10 m
XP 30 m 1 h 2 h 4 h 6 h 8 h 10 m 16 h 20 m
EP 1 h 40 m 3 h 30 m 7 h 10 m 14 h 40 m 21 h 30 m 28 h 50 m 57 h 50 m
FORMAT ENR. VIDÉO:MP4/MOV
o
Qualité 4 Go 8 Go 16 Go 32 Go 48 Go 64 Go 128 Go
MOV 1080p LPCM
MP4 1080p 10 m 25 m 55 m 2 h 2 h 50 m 3 h 50 m 7 h 50 m
MP4 720p 40 m 1 h 20 m 2 h 50 m 5 h 40 m 8 h 30 m 11 h 20 m 22 h 50 m
iFrame 720p 10 m 30 m 1 h 2 h 3 h 4 h 8 h
La durée d’enregistrement vidéo approximative est juste indicative. La durée d’enregistrement
0
réelle peut être raccourcie en fonction de l’environnement de prise de vue.
Caméra
Alimentation
Consommation 4,4 W (lorsque [TORCHE] est réglé sur [ARRET] et [LUMINOSITE
Dimensions 110 mm x 76 mm x 183 mm (4-3/8" x 3" x 7-1/4")
Poids Environ 500 g (1,1 lbs) (caméra seulement),
Les caractéristiques et l’apparence de ce produit sont susceptibles d’être modifiées
sans préavis pour d’éventuelles améliorations.
10 m 25 m 50 m 1 h 40 m 2 h 30 m 3 h 30 m 7 h
Avec un adaptateur secteur : CC 11 V, Avec une batterie : CC 7,2 V
MONITEUR] sur [3] (standard))
Consommation de courant nominal : 1A
(L x H x P : sans la dragonne, viewfinder et la protubérance)
environ 585 g (1,3 lbs) (avec la batterie fournie)
Pour de plus amples informations, veuillez consulter le Manuel d’utilisation.
http://manual3.jvckenwood.com/index.html/
*LYT2592-001A-M*
©2013 JVC KENWOOD Corporation
20
US
0213AJH-SW-VM
 Loading...