

Page 1
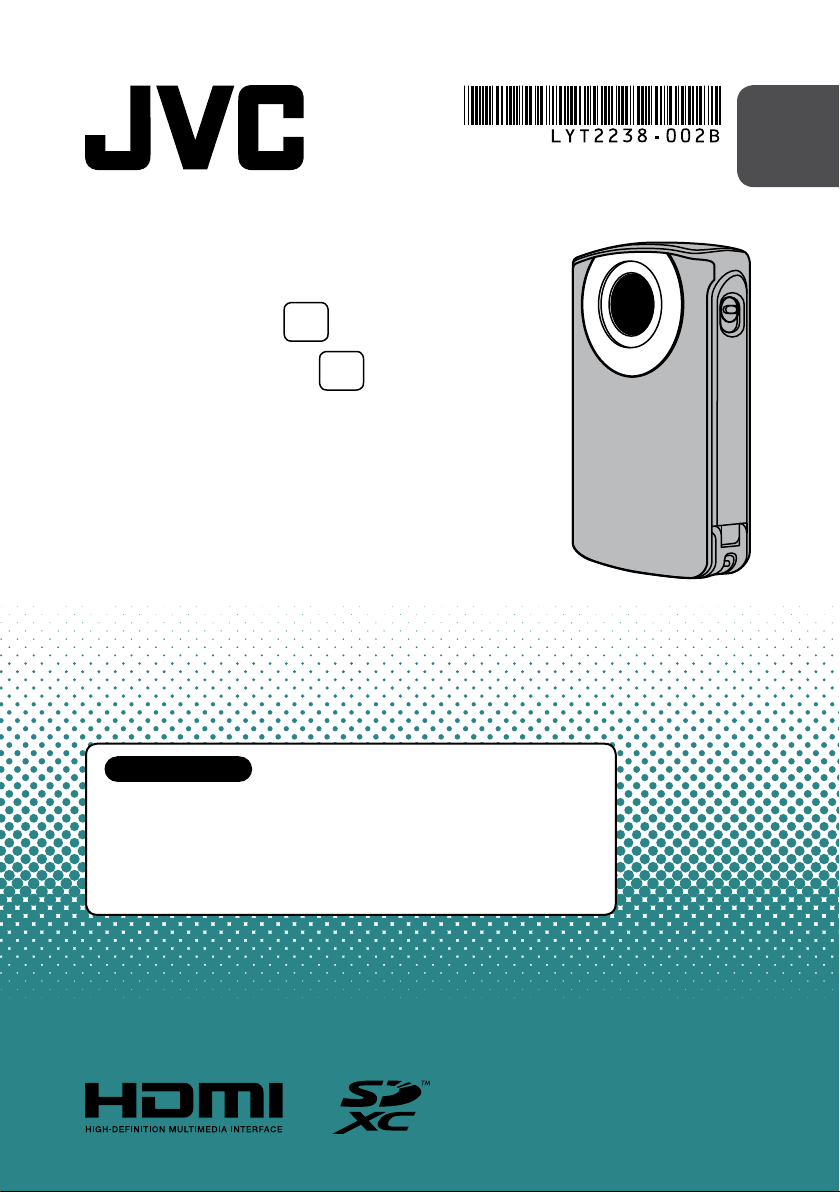
HD MEMORY CAMERA
®
EN
GC-FM2
GC-WP10
U
Waterproof with
U
Audio Recording
Detailed User Guide
Read this first
Before use, be sure to read “Safety Precautions” (P.2) and
“Cautions” (P.3) to use the product correctly.
GC-WP10 is waterproof. Before use in water, be sure to read
"Using the Camcorder in Water" (P.25).
ENGLISH
Page 2
Safety Precautions
CAUTION
RISK OF ELECTRIC SHOCK
DO NOT OPEN
CAUTION: TO REDUCE THE RISK OF ELECTRIC SHOCK,
DO NOT REMOVE COVER (OR BACK).
NO USER-SERVICEABLE PARTS INSIDE.
REFER SERVICING TO QUALIFIED SERVICE PERSONNEL.
The lightning flash with arrowhead symbol, within an
equilateral triangle, is intended to alert the user to the
presence of uninsulated "dangerous voltage" within the
product's enclosure that may be of sufficient magnitude
to constitute a risk of electric shock to persons.
The exclamation point within an equilateral triangle is
intended to alert the user to the presence of important
operating and maintenance (servicing) instructions in
the literature accompanying the appliance.
WARNING: TO PREVENT FIRE OR SHOCK
HAZARD, DO NOT EXPOSE THIS UNIT TO RAIN
OR MOISTURE. (GC-FM2 only)
NOTES:
• The rating plate and safety caution are on the
bottom of the unit.
• The serial number plate is on the side of the
unit.
Do not point the lens directly into the sun. This
can cause eye injuries, as well as lead to the
malfunctioning of internal circuitry. There is also
a risk of re or electric shock.
CAUTION!
The following notes concern possible physical
damage to the camcorder and to the user.
Do not use a tripod on unsteady or unlevel
surfaces. It could tip over, causing serious
damage to the camcorder.
CAUTION!
Connecting cables (Audio/Video etc.) to the
camcorder and leaving it on top of the TV is not
recommended, as tripping on the cables will
cause the camcorder to fall, resulting in damage.
CAUTION:
The mains plug shall remain readily operable.
• Remove the mains plug immediately if the
camcorder functions abnormally.
WARNING:
The camcorder should not be exposed to
excessive heat such as direct sunshine, re or
the like.
— Read Before Use —
If this symbol is shown, it is only valid
in the European Union.
IMPORTANT SAFETY INSTRUCTIONS
1. Read these instructions.
2. Keep these instructions.
3. Heed all warnings.
4. Follow all instructions.
5. Do not use this apparatus near water. (GC-FM2
only)
6. Clean only with dry cloth.
7. Do not block any ventilation openings.
Install in accordance with the manufacturer’s
instructions.
8. Do not install near any heat sources such
as radiators, heat registers, stoves, or other
apparatus (including ampliers) that produce
heat.
9. Protect the power cord from being walked on
or pinched particularly at plugs, convenience
receptacles, and the point where they exit from
the apparatus.
10. Only use attachments/accessories specied by
the manufacturer.
11. Use only with the cart,
stand, tripod, bracket,
or table specied by the
manufacturer, or sold with
the apparatus. When a
cart is used, use caution
when moving the cart/
apparatus combination to
avoid injury from tip-over.
12. Unplug this apparatus during lightning storms
or when unused for long periods of time.
13. Refer all servicing to qualied service personnel.
Servicing is required when the apparatus has
been damaged in any way, such as powersupply cord or plug is damaged, liquid has been
spilled or objects have fallen into the apparatus,
the apparatus has been exposed to rain or
moisture, does not operate normally, or has
been dropped.
2
Page 3

Cautions
— Read Before Use —
Recording Medium
• Be sure to follow the guidelines below
to prevent corruption or damage to your
recorded data.
- Do not bend or drop the recording medium,
or subject it to strong pressure, jolts or
vibrations.
- Do not splash the recording medium with
water.
- Do not use, replace, or store the recording
medium in locations that are exposed to
strong static electricity or electrical noise.
- Do not bring the recording medium near
objects that have a strong magnetic eld or
that emit strong electromagnetic waves.
- Do not store the recording medium in
locations with high temperature or high
humidity.
- Do not touch the metal parts.
• When formatting or erasing data using
the camcorder, only the le administration
information is changed. The data is not
completely erased from the recording
medium. If you want to completely erase
all of the data, we recommend either using
commercially available software that is
specially designed for that purpose, or by
physically destroying the camcorder with a
hammer etc.
LCD Monitor
• To prevent damage to the LCD monitor,
DO NOT
... push it strongly or apply any shocks.
... place the camcorder with LCD monitor on the
bottom.
• To prolong service life
... avoid rubbing it with coarse cloth.
• Do not press the LCD monitor with a
sharp-pointed object or press against the
surface of the LCD monitor with force when
operating the touchscreen.
This may damage or break the LCD monitor.
If you press the LCD monitor at the same time,
it may cause a malfunction.
Main Unit
• For safety, DO NOT
... open the camcorder’s chassis.
... disassemble or modify the unit.
... allow inammables, water or metallic objects
to enter the unit.
... place naked ame sources, such as lighted
candles, on the apparatus.
... expose the apparatus to dripping or splashing.
(GC-FM2 only)
... insert any objects in the camcorder.
• Avoid using the unit
... in places subject to excessive humidity or
dust.
... in places subject to soot or steam such as near
a cooking stove.
... in places subject to excessive shock or
vibration.
... near a television set.
... near appliances generating strong magnetic
or electric elds (speakers, broadcasting
antennas, etc.).
... in places subject to extremely high (over 40 °C
or 104 °F) or extremely low (under 0 °C or
32 °F) temperatures.
• DO NOT leave the unit
... in places of over 50 °C (122 °F).
... in places where humidity is extremely low
(below 35%) or extremely high (above 80%).
... in direct sunlight.
... in a closed car in summer.
... near a heater.
... in high places such as on a T V. Leaving the unit
in high places while a cable is connected may
result in a malfunction if the cable is caught
and the unit falls onto the oor.
• To protect the unit, DO NOT
... allow it to become wet. (GC-FM2 only)
... drop the unit or strike it against hard objects.
... subject it to shock or excessive vibration
during transportation.
... keep the lens directed at extremely bright
objects for long periods.
... expose the lens to direct sunlight.
... swing it excessively when using the hand
strap.
... swing the soft camcorder case excessively
when the camcorder is inside it.
... store the camcorder in a dusty or sandy area.
• To prevent the unit from dropping,
- When using the camcorder with a tripod,
attach the camcorder to the tripod securely.
If the camcorder drops, you may be injured
and the camcorder may be damaged.
When a child uses the unit, there must be
parental guidance.
3
Page 4
Cautions (Continued)
®
Battery
• When using the unit in a low temperature
environment (10°C (50°F) or below), the
operating time may be shortened, or it may
not function properly.
Keep the unit warm by keeping it in a pocket
when using the unit out of doors in winter.
(Do not expose the unit to heat directly such
as a pocket warmer.)
• When you leave the unit unused for a long
period of time, run down the battery to
prevent the battery from being depleted.
(Leave the unit recording or playing until
the unit is turned o automatically.)
Recharge the battery, and then run it down
about every 6 months.
ATTENTION:
Remember that this camcorder is intended for private consumer use only.
Any commercial use without proper permission is prohibited. (Even if you record an event such as a show,
performance or exhibition for personal enjoyment, it is strongly recommended that you obtain permission
beforehand.)
Trademarks
The product you have purchased is
powered by a rechargeable battery
that is recyclable.
Please call 1-800-8-BATTERY for
information on how to recycle this
battery. (USA and Canada only)
Waterproof Function
(GC-WP10 only)
• Before using the camcorder in water, be
sure to read “Using the Camcorder in Water”
(P.25) and to use the product correctly.
• Malfunction due to misuse by the customer is
not covered by warranty.
• Do not use this product in water deeper than
3 m (10 ft) or for longer than 30 minutes.
Video Function
• The unit records video in Mpeg-4 AVC/H.264
format for video and AAC (2ch) format (GCWP10: stereo, GC-FM2: monaural) for audio.
You cannot play back the recorded video using
a component which does not support these
formats.
Audio Function
• Audio cannot be played back on HD Media
Player CU-VS100/JVC.
• HDMI is a trademark of HDMI Licensing, LLC.
• Microsoft, Windows and Windows Vista are registered trademarks of Microsoft Corporation in the United
States and/or other countries.
• Intel, Intel Core, and Pentium are trademarks or registered trademarks of Intel Corporation or its
subsidiaries in the United States and other countries
• Macintosh, QuickTime are registered trademark of Apple Inc. registered in the U.S. and other countries.
• Eye-Fi is a trademark of Eye-Fi, Inc.
• Other product and company names included in this instruction manual are trademarks and/or registered
trademarks of their respective holders.
Key features of camcorder
1.
Full HD (1920 x 1080 / 30 fps) video recording
2. 3 inch touch screen
3. Electronic camera shake correction
4. Easy uploading to YouTube with the supplied software LoiLoScope EX
5. Eye-Fi card compatible: Uploading videos & still images via Wi-Fi network
6. iFrame video format recording (ideal for video editing with iMovie)
7. HDMI output connector
8. Waterproof design within 3 m/10 ft, 30 minutes (GC-WP10 only)
9. MP3 voice recorder (GC-WP10 only)
4
Page 5

Daily Maintenance
Be sure to turn off the power and detach the cables before performing any
maintenance.
Wipe this unit with a dry, soft cloth to remove any dirt.
When it is extremely dirty, soak the cloth in a solution of neutral
detergent, wipe the body with it, and then use a clean cloth to remove
the detergent.
CAUTION
Camcorder
Lens/LCD
Monitor
See page 27 for maintenance after recording in water. (GC-WP10 only)
Do not use benzene or thinner. (Cause of damage to or
•
malfunction of the unit)
When using a chemical cloth or other products, be sure to observe
•
the instructions of the product.
Do not leave the device in contact with rubber or plastic products
•
for a long time.
Use a lens blower (commercially available) to remove any dust, and a
cleaning cloth (commercially available) to wipe o any dirt. (Mold may
form if the lens is left dirty.)
Perform [TOUCH SCREEN ADJUST] (P.45) if the reactive area of the screen
is misaligned with the touched area.
(Adjust by lightly tapping with a corner of an SD card, etc. Do not press
with an object with a sharp tip or do not press hard.)
5
Page 6

Table of Contents
Safety Precautions .....................................2
Cautions ......................................................... 3
Daily Maintenance ..................................... 5
Table of Contents ....................................... 6
Names and Functions of
Components ............................................ 7
Indications on LCD Monitor ....................8
Getting Started
Accessories .................................................11
Attaching the Core Filter to the
USB Cable ................................................11
Attaching the
Hand Strap
Inserting an SD Card ...............................12
Charging the Battery ...............................14
Using the Touchscreen ...........................16
Clock Setting ..............................................18
(GC-WP10 only)
....................11
Recording
Recording Video/Still Images ...............20
Useful Functions for Recording ...........23
Using the Camcorder in
Water (GC-WP10 only) ..................25
Playback
Playing Back on the Camcorder ..........28
Deleting Files .............................................30
Copying a Part in the
Video
(Trimming)
Viewing Files on TV ..................................32
......................................31
Audio Recording
Recording Audio
(GC-WP10 only)
.............33
Audio Playback
Playing Back Audio on the
Camcorder
Delete Audio Files
Copying a Part in the
Audio
(GC-WP10 only)
(GC-WP10 only)
.....................34
(GC-WP10 only)
...............................38
...........37
Connecting with a Computer
Make a Backup on Computer...............39
Using the Supplied Software ...............40
Using an Eye-Fi Card................................42
Menu
Using the Menu ........................................44
Further Information
Troubleshooting .......................................46
Specifications .............................................49
Approximate Time/Number of
Recording ................................................50
Customer Support Information ..........52
Index .............................................................53
6
Page 7
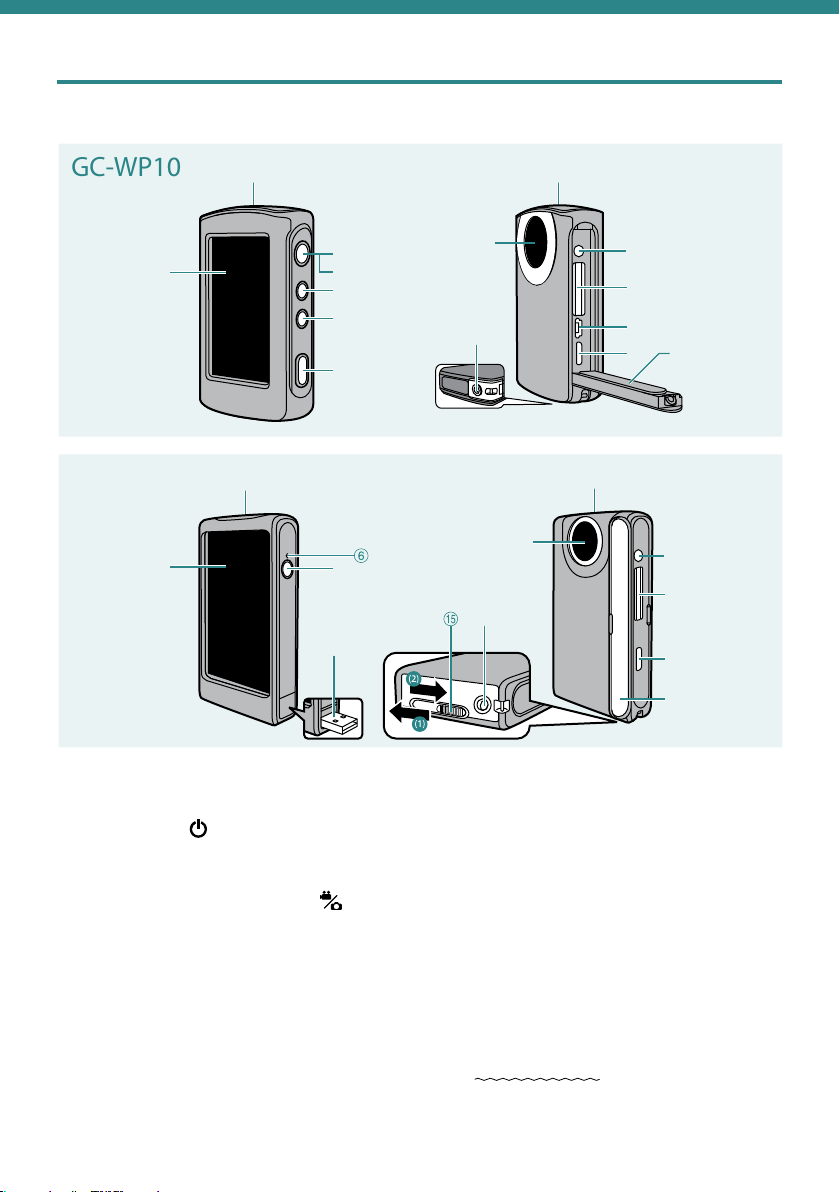
Names and Functions of Components
#
+
.
!
$
-
0
,
2
/
*
#
!
$
(
%
&
)
*
,
-
.
/
0
+
2
GC-WP10
GC-FM2
LCD Monitor
!
Speaker
#
Power Button [ ]
$
SCREEN LOCK Button (P.26)
%
(GC-WP10 only)
Video/Still Image Select Button [ ]
&
(GC-WP10 only)
POWER/CHARGE Lamp
(
Recording Button (P.20)(GC-WP10 only)
)
Tripod Mounting Socket
*
Lens
+
Microphone
,
GC-WP10: Stereo
GC-FM2: Monaural
AV Connector (P.32)
-
GC-WP10: also serves as Headphones
Connector
SD Card Slot (P.12)
.
USB Connector (P.14, 39)
/
HDMI Mini Connector (P.32)
0
USB Connector Lever (GC-FM2 only)
1
(1): Push the connector out
(2): Retract the connector
Press-and-hold the lever and slide
•
Cover
2
7
Page 8
Indications on LCD Monitor
!
#
$
%
&
(
+
*
-
,
%
/
(
*
) )
.
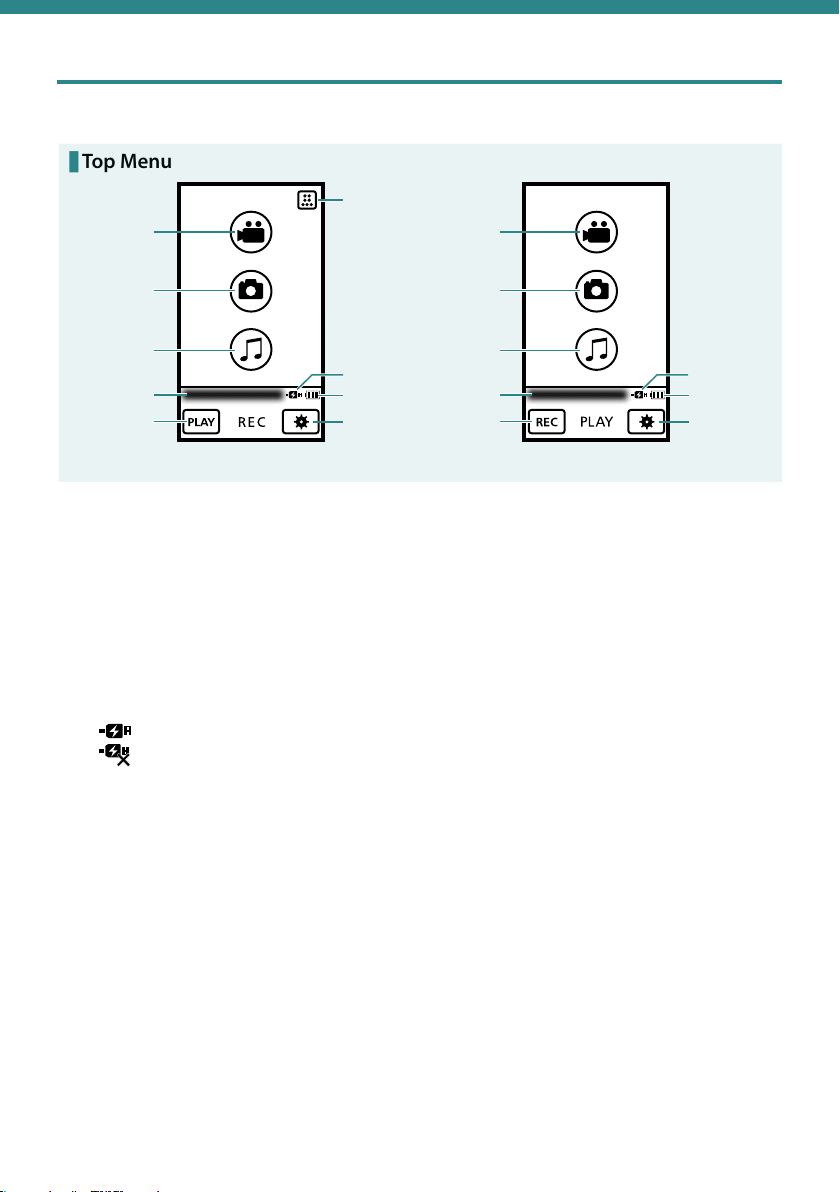
Top Menu
Recording Mode Playback Mode
Video Recording Button (P.20)
!
Still Image Recording Button (P.20)
#
Audio Recording Button (P.33)
$
(GC-WP10 only)
Time
%
Play Select Button
&
Basic Settings Button (P.44)
(
Battery Indicator (P.15)
)
AC Adapter
*
When connected
When inoperative
When both of the Battery indicator and AC
adapter icons are displayed, the power is
supplied through the both.
Video Recording Mode Select Button (P.21)
+
Video Playback Button
,
Still image Playback Button
-
Audio Playback Button (GC-WP10 only)
.
Recording Select Button
/
8
Page 9
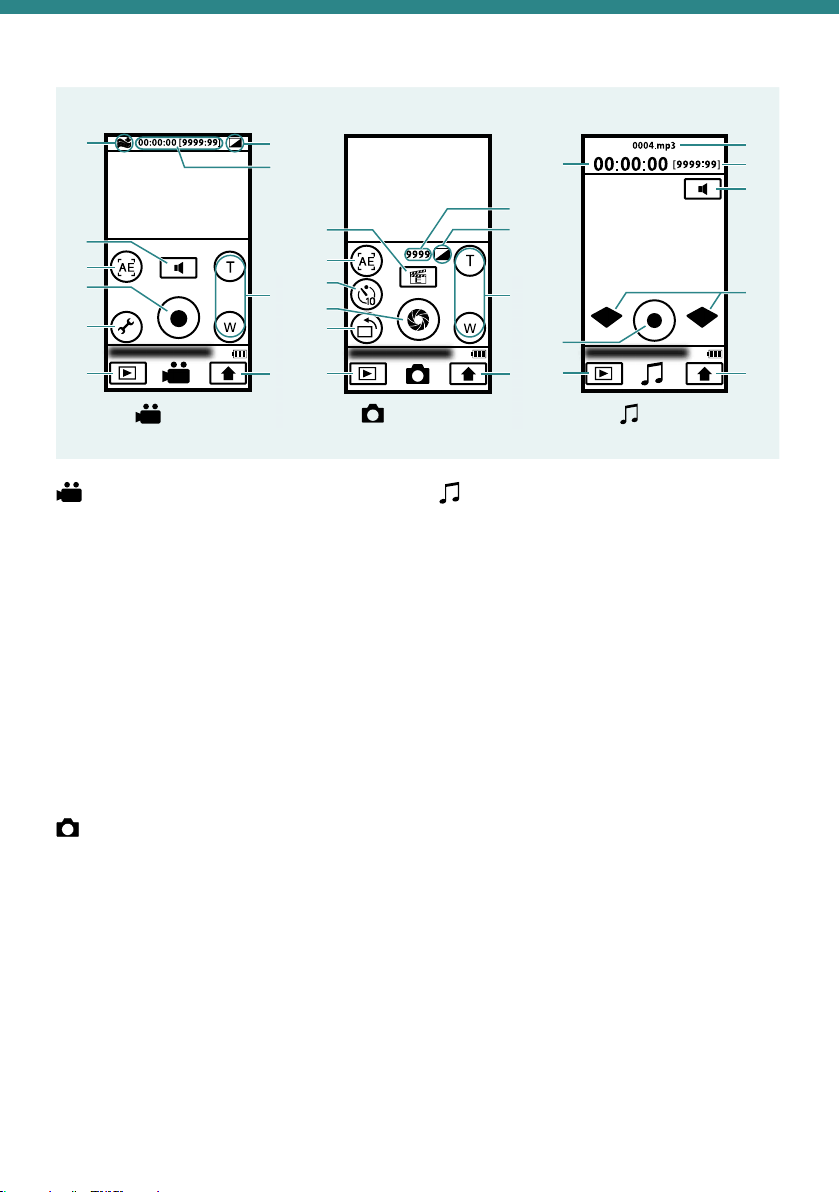
!
$
%
(
#
$
%
&
(
)
)
*
#
$
&
(
*
)
!
*
+
,
!
%
+
,
L R
#
&
During Recording
Videos
Videos
WIND CUT [ON] (P.45)
!
Headphones Volume Button
#
(GC-WP10 only)
AE Select Button (P.23)
$
(GC-WP10 only)
Recording Start/Stop Button
%
Menu Settings Button (P.44)
&
Play Select Button
(
Top Menu Button
)
Zoom Buttons
*
EFFECT (P.45)
+
Counter/Remaining Time
,
Still images
Menu Settings Button (P.44)
!
AE Select Button (P.23)
#
(GC-WP10 only)
Self Timer (10 Seconds/OFF) Select Button
$
Recording Button
%
Recording Direction Select Button (P.22)
&
Play Select Button
(
Top Menu Button
)
Zoom Buttons
*
EFFECT (P.45)
+
Remaining Number of Shots
,
Still images
Audio (GC-WP10 only)
Counter
!
Audio Recording Start/Stop Button (P.33)
#
Play Select Button
$
Top Menu Button
%
Microphone Input Level
&
Headphones Volume Buttons
(
Remaining Time
)
Audio Recording File Name
*
Audio
(GC-WP10 only)
9
Page 10

!
#
$
%
!
#
%
& ( ) *
+
&
(
)
*
-/
,
+
01
$
.
Playback Index Screen
Videos/ Still Images
Videos/ Still Images
Video (MP4)/ Still Image (JPG)
!
Previous Page Button
#
Recorded Date
$
Recording Select Button
%
Eye-Fi SETTING Button (P.42, only when
&
using Eye-Fi card)
Zoom Display Button (P.28)
(
Delete Button (P.30)
)
Volume Button (P.28)
*
Top Menu Button
+
Next Page Button
,
Battery Indicator (P.15)
-
Recording Media
.
SD card
Next Date Button
/
Recorded Year
0
Previous Date Button
1
Audio
(GC-WP10 only)
Audio (GC-WP10 only)
Playback Operation
!
External File Button (P.36)
#
Delete Button (P.37)
$
Recording Select Button
%
Top Menu Button
&
Next Page Button
(
Previous Page Button
)
Volume Button (P.34)
*
File in Playback
+
10
Page 11
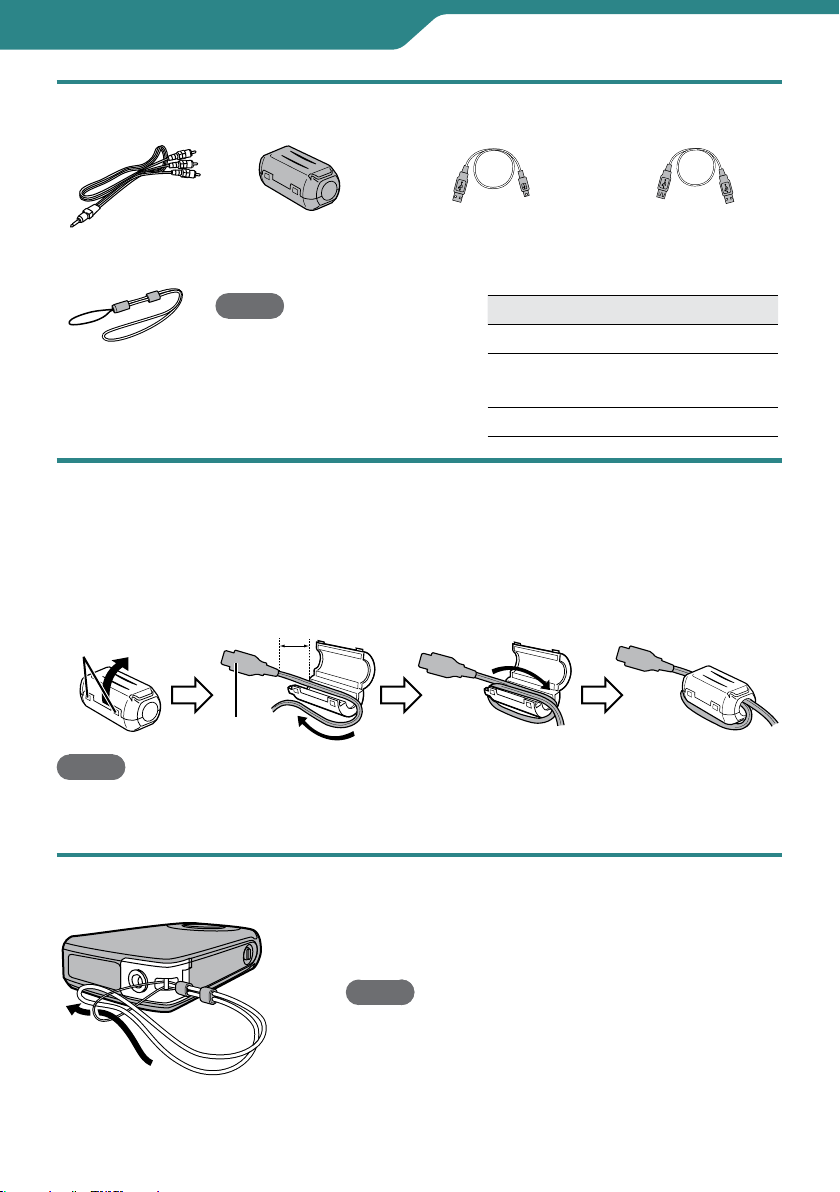
Getting Started
Accessories
USB Extension Cable
(GC-FM2 only)Dedicated AV Cable
(P.12)
Hand Strap
(GC-WP10 only)
Core Filter
NOTE
You can use the hand strap
•
attached to the camcorder
under water.
(Type A – Type B Mini)
USB Cable
(GC-WP10 only)
Optional accessory Page
AC adapter (AC-V10LU) (P.15)
SD card / SDHC card /
SDXC card
Eye-Fi card (P.42)
Attaching the Core Filter to the USB Cable
GC-WP10: Attach the core filter to the USB cable.
GC-FM2: Attach the core filter to the USB extension cable.
The core filter reduces noise generated when connecting the camcorder to an external
component. Connect the end of the cable with the core filter to the camcorder.
Release the both
stoppers.
To be connected
NOTE
• BesuretousetheUSBcableortheUSBextensioncablewiththecorefilterattached
when connecting the camcorder to the AC adapter or a computer.
to the camcorder.
Wind once.3 cm (1-3/16")
Attaching the Hand Strap
To guard against dropping the camcorder, we
recommend attaching the hand strap.
NOTE
When carrying the camcorder, please be careful
•
not to drop it. Dropping it may cause injury or a
malfunction of your camcorder.
When a child uses the camcorder, there must be
•
parental guidance.
11
(GC-WP10 only)
Page 12
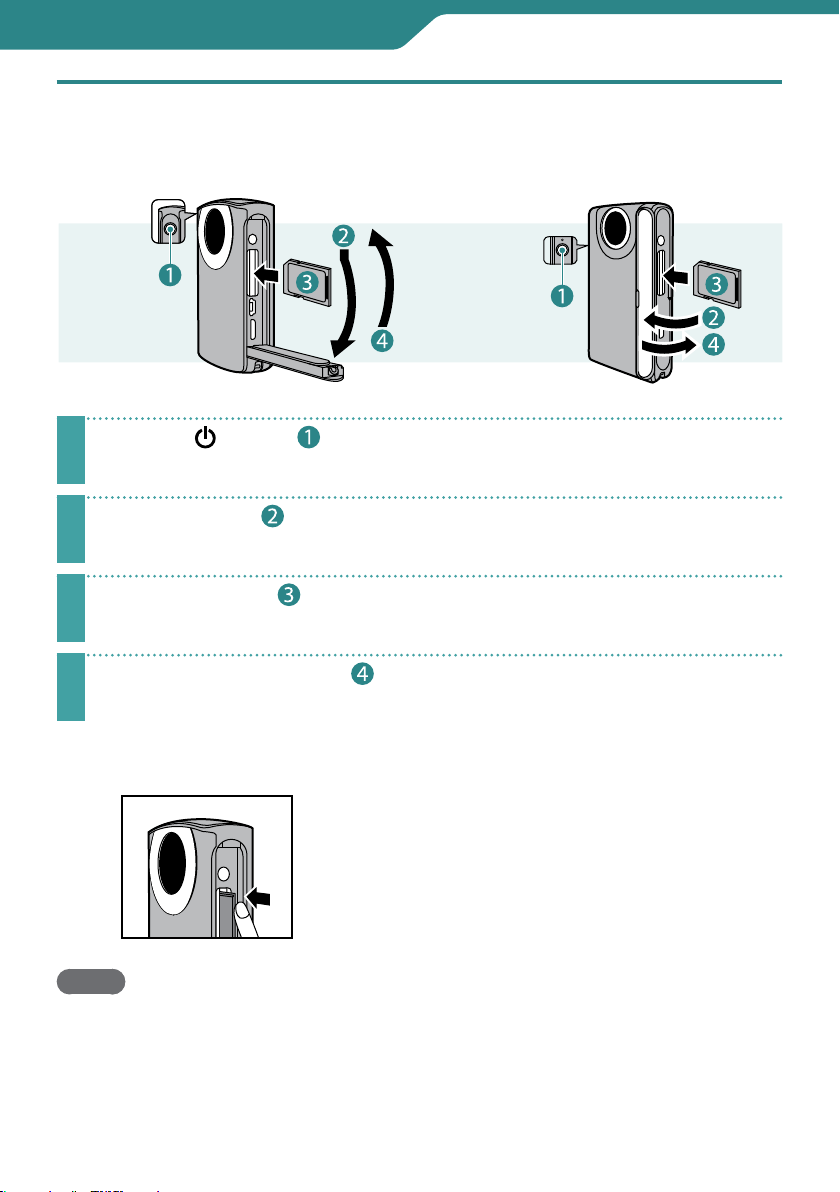
Getting Started
Inserting an SD Card
GC-WP10
Press the button( ) for about 1 second to turn off the camcorder.
1
The power lamp goes out.
Open the cover( ).
GC-FM2
2
Insert an SD card( ).
3
Turn off the power of this unit before inserting or removing a card.
Close the terminal cover( ) firmly.
4
To remove an SD card
Push the card inward once, then pull it out
straight.
Be sure to insert the SD card with the power
turned off.
NOTE
To protect data, do not touch the terminals of the SD card.
•
Operations are confirmed on the following SD cards. (P.13)
•
12
Page 13

Getting Started
Manufacturer Panasonic, TOSHIBA, SanDisk, ATP, Eye-Fi
Class 4 or higher compatible SD card (2 GB)
Video recording
Still image recording/
Audio recording
If other SD cards, SDHC cards or SDXC cards than the above are used, they may fail to
•
record data correctly, or they may lose data that had already been recorded.
The Eye-Fi card is a SD type memory card with built-in wireless LAN. You can transfer
•
videos and still images to a computer or the Web via the Eye-Fi card. (An Internet
accessible environment and a wireless LAN router are separately required.)
See page 42 to use an Eye-Fi card.
When your computer cannot recognize the SDXC card
Confirm and upgrade the OS of your computer.
Class 4 or higher compatible SDHC card (4 GB to 32 GB), or Class 4 or
higher compatible SDXC card (48 GB to 64 GB)
For ATP, only Class 4 or higher compatible SDHC card (up to 16GB)
SD card (256 MB to 2 GB), SDHC card (4 GB to 32 GB), or SDXC card (48
GB to 64 GB)
For ATP, only SD card or SDHC card (up to 16GB)
Windows XP /
Windows XP SP1
Windows XP SP2 /
Windows XP SP3
Windows Vista
Mac OS Not compatible.
Not compatible.
Necessary to upgrade to SP2 or higher.
Necessary to download the upgrade software. (KB955704)
http://www.microsoft.com/downloads/details.
aspx?FamilyID=1cbe3906-ddd1-4ca2-b727c2dff5e30f61&displaylang=en
Not compatible.
Necessary to upgrade to SP1 or higher.
13
Page 14
Getting Started
CHARGE STATUS
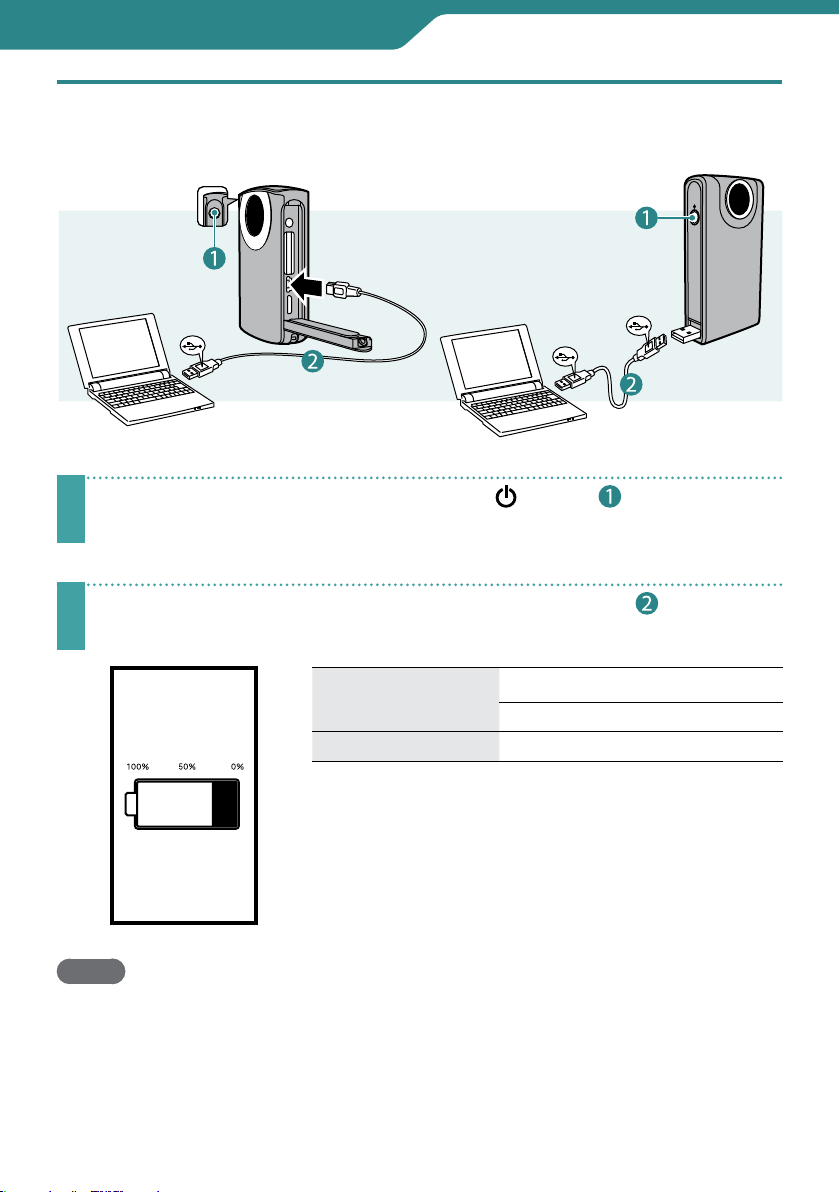
Charging the Battery
GC-WP10
Turn off the camcorder by pressing the button( ) for about
1 second.
1
The power lamp goes out.
Turn on the computer and connect to the camcorder( ).
GC-FM2
2
Charge Lamp
Charging Time Approx. 3 h
You can confirm the remaining battery level by touching
the screen (for about 1 second) during charging. (You
cannot confirm the level when the battery is extremely
low.)
When the charging is finished, disconnect the
camcorder from the computer.
Blinks: Charging
Goes out: Charging finished
NOTE
The charging time is when the camcorder is charged at 25°C (77 °F).
•
If the battery is charged outside the room temperature range of 10 °C (50 °F) to 35 °C
(95 °F), charging may take a longer time or it may not start. The recordable and
playable time may also be shortened under some usage conditions such as at low
temperature.
Charging is not possible while the camcorder is turned on.
•
14
Page 15
Getting Started
The battery is not charged at the time of purchase. Charge before starting to use the
•
camcorder.
When the battery level is extremely low, the camcorder does not turn on until it is
•
charged even if it is connected to the computer or AC adapter.
Do not turn the computer off or into the sleep mode during charging (the charging
•
will stop).
With some types of computers, charging is possible even when the computer is
•
turned off. Refer to instruction manual of the computer or consult with the
manufacturer of your computer.
You cannot record or play back video/still image/audio while the camcorder is
•
connected to a computer. You can record or play back video/still image/audio while
the AC adapter is connected to the camcorder.
Indication when using the battery
Fully charged
Medium
Very low
Recharge the battery at an early opportunity.
Indication when using the AC Adapter
(When connected)
(When inoperative)
When both of the Battery indicator and AC
adapter icons are displayed, the power is
supplied through the both.
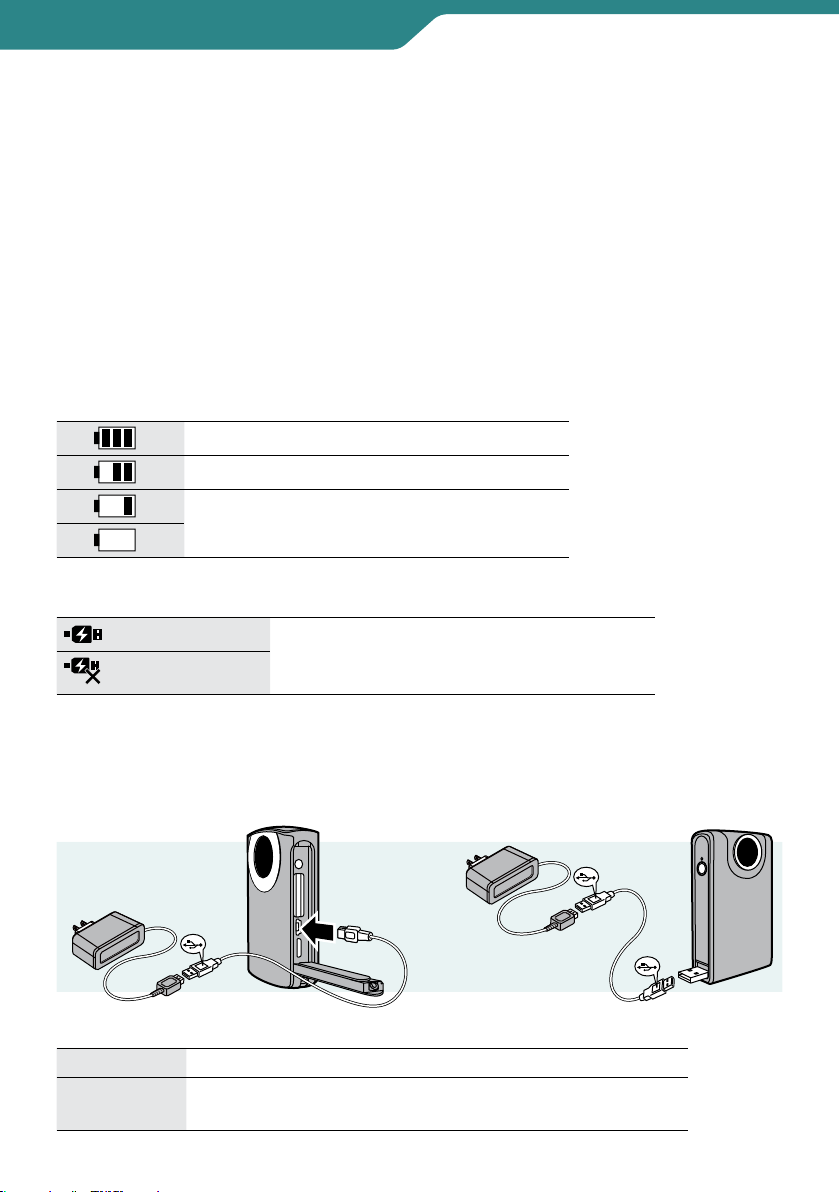
Charging with the AC Adapter (optional)
Optional accessory: AC-V10LU/JVC
GC-WP10
GC-WP10 Connect with the AC adapter using the supplied USB cable.
GC-FM2
Connect the USB connector of this unit with the AC adapter.
(You can connect also using the supplied USB extension cable.)
GC-FM2
15
Page 16
Getting Started
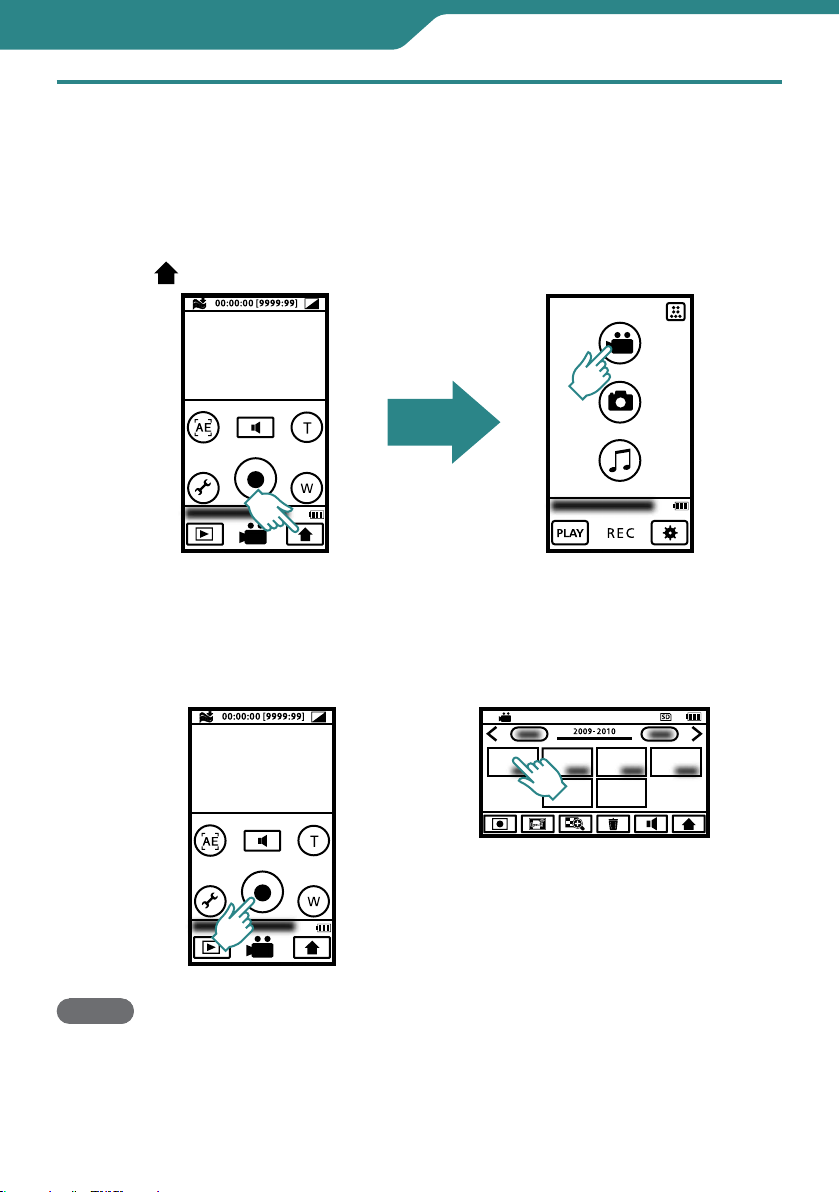
Using the Touchscreen
The following are some examples.
Touch to Select
To select Video/Still Image/Audio on the Top Menu (Audio is for GC-WP10 only.)
Touch to return to the Top Menu and select the mode.
Recording
Touch to start/stop recording.
MEMO
The touchscreen of this unit is pressure-sensitive. When the touchscreen does not
•
respond smoothly, apply slightly more force to your fingertip.
16
Playback
Touch the thumbnail of the desired
scene to play back.
Page 17
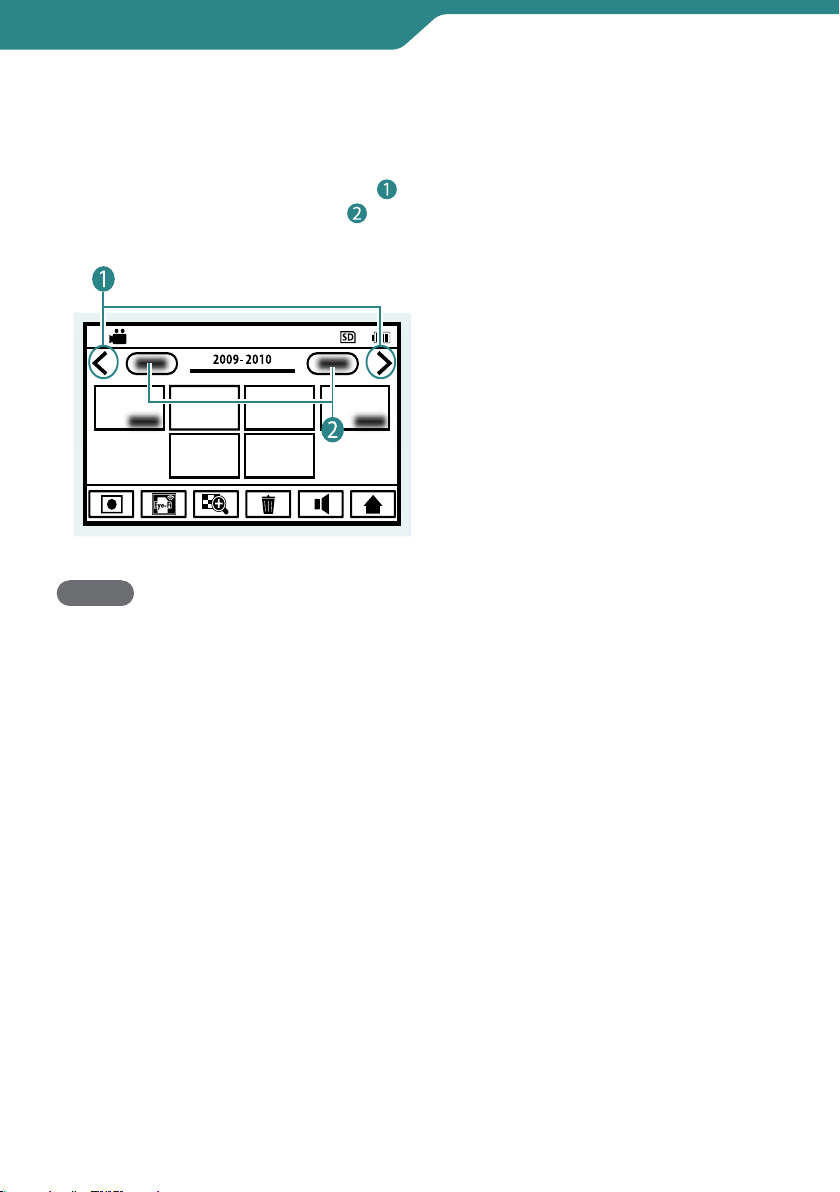
Getting Started
To search for the desired scene
Press the page switching button ( )
or the date switching button ( ) to
search for the desired scene.
MEMO
The touchscreen of this unit is pressure-sensitive. When the touchscreen does not
•
respond smoothly, apply slightly more force to your fingertip.
Do not press or rub with excessive force.
•
If you apply a protect sheet or a sticker, the touchscreen may not respond smoothly.
•
Do not operate the touchscreen using an object with a sharp or hard tip.
•
Touching two or more places at a time may cause a malfunction.
•
Perform [TOUCH SCREEN ADJUST] (P.45) if the reactive area of the screen is misaligned
•
with the touched area. (Adjust by lightly tapping with a corner of an SD card, etc. Do
not press with an object with a sharp tip or do not press hard.)
17
Page 18

Getting Started
SET DATE/TIME!
YES
RETURN QUIT
SET
CLOCK SETTING
NO
Clock Setting
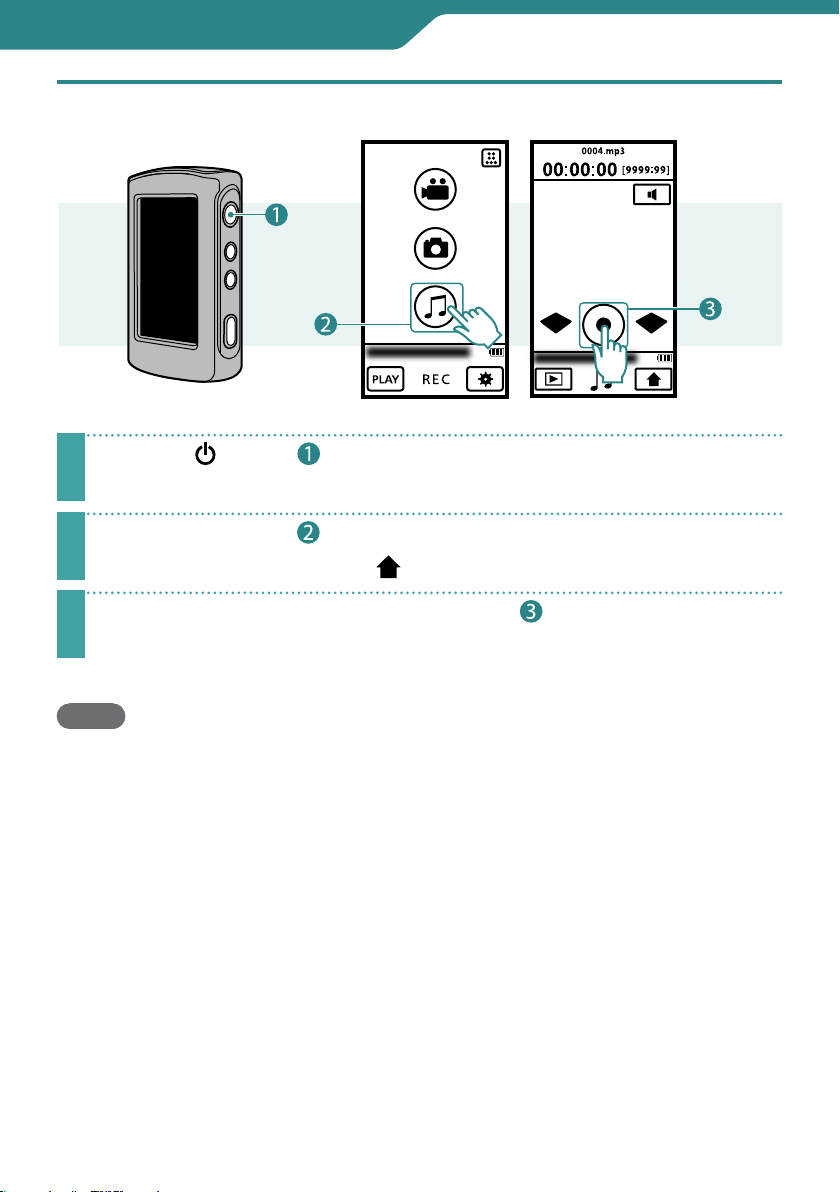
Press the button( ) for about 1 second to turn on the camcorder.
1
The power lamp turns on.
Touch [YES( )] when the [SET DATE/TIME!] screen appears.
2
Set the date and time( ).
3
Touch the month, day, year, hour and minute to select it.
•
Touch to make adjustments.
•
After setting the date and time, touch [SET].
•
Set the region where you live and touch [SAVE].
4
The city name and time difference are displayed.
Touch
To reset the clock
Set the clock with [CLOCK ADJUST] from the Basic Settings. (P.45)
1
Press the button to turn on the camcorder.
2
Touch on the top menu.
3
Touch [CLOCK ADJUST].
4
Touch [CLOCK SETTING].
The subsequent procedure is same as in the Steps
to make adjustments.
18
3
and 4 of “Clock Setting”.
Page 19

Getting Started
NOTE
The [SET DATE/TIME!] screen does not appear when the date and time are already set.
•
The [SET DATE/TIME!] screen appears when the camcorder has not been used for a
•
long time. Charge the battery before setting the clock. (P.14)
When using this unit abroad, change the date and time display to the local time by
•
simply selecting your travel destination in [AREA SETTING]. (P.45)
19
Page 20
Recording
Recording Video/Still Images
Before recording an important scene, it is recommended to conduct a trial recording.
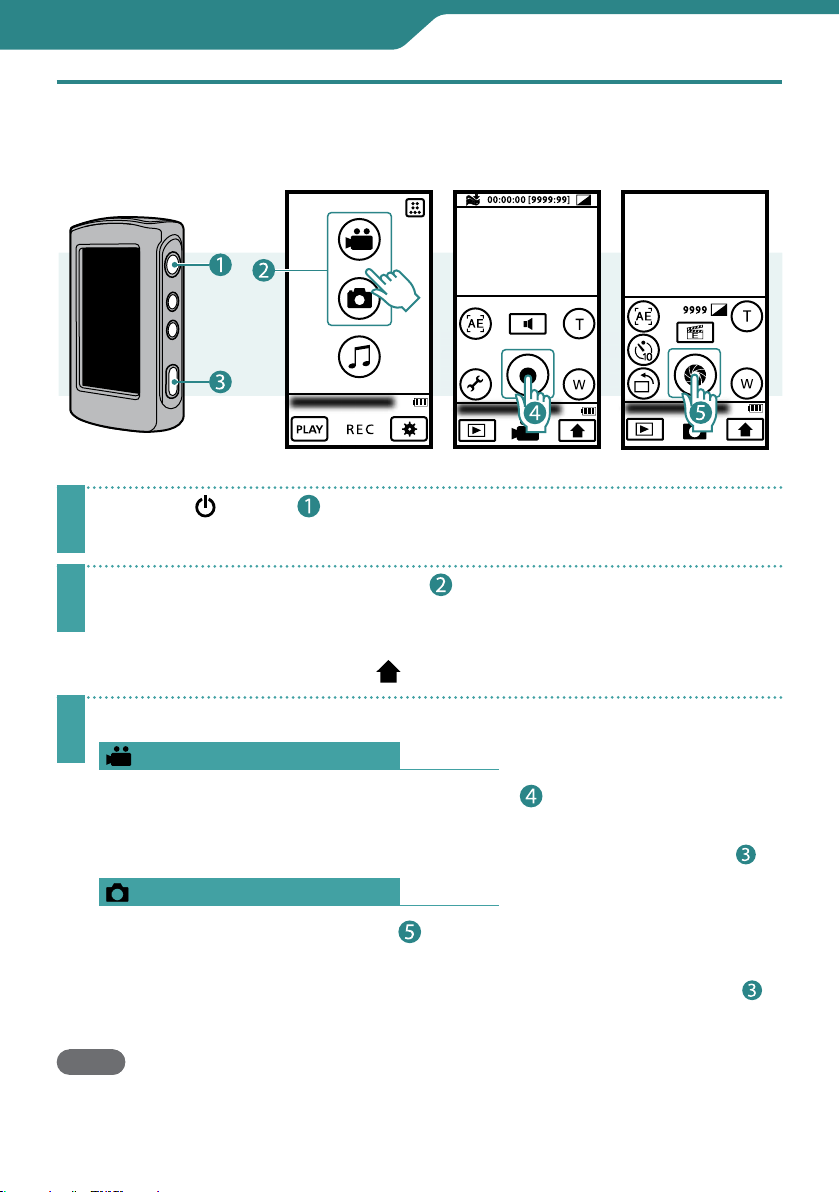
Press the button( ) for about 1 second to turn on the camcorder.
1
Select video or still image mode( ) from the Top Menu.
2
When you turn on the power, the Top Menu appears only for the first time after
purchasing the camcorder.
To return to the Top Menu, touch
during video or still image recording.
Start recording.
3
NOTE
After video recording for 12 consecutive hours, recording automatically stops.
•
For Videos
Touch the Recording START/STOP button( ).
Touch it again to stop recording.
GC-WP10: You can make recording also with a press of the Recording button(
For Still Images
Touch the SNAPSHOT button( ).
To shoot continuously, keep touching the button.
GC-WP10: You can shoot still image also with a press of the Recording button(
To shoot in landscape mode, follow the same procedure.
20
).
).
Page 21

Recording
For continuous video recordings of long consecutive hours, the file is split into pieces
•
automatically either in every 30 minutes or if the size exceeds 4 GB.
Using the AC adapter (optional), you can record for long consecutive hours.
•
To prevent the situation of forgetting to turn off the power, if this unit is not operated
•
for 5 minutes, the power is turned off automatically.
Brightness of the LCD monitor increases when recording in bright light. The LCD
•
monitor increases brightness when the AC adapter is connected to the camcorder.
However, it returns to normal brightness when you do not operate the camcorer
during video recording for 5 minutes. ( / is displayed for about
3 seconds at the moment of switching.)
Change the Recording Quality ( video only)
Preparation: Video recording
Touch .
1
Touch .
2
Select the recording quality.
3
HD 1080
HD 720
iFrame
QHD
Recording at Intervals (TIME-LAPSE RECORDING) (P.24)
•
When you place priority on Video Quality
1920 × 1080 / 30p
When you place priority on motion of the video
1280 × 720 / 60p
When you use the video in Apple iMovie '09
960 × 540 / 30p
When you make a long-duration recording
960 × 540 / 30p
21
Page 22
Recording
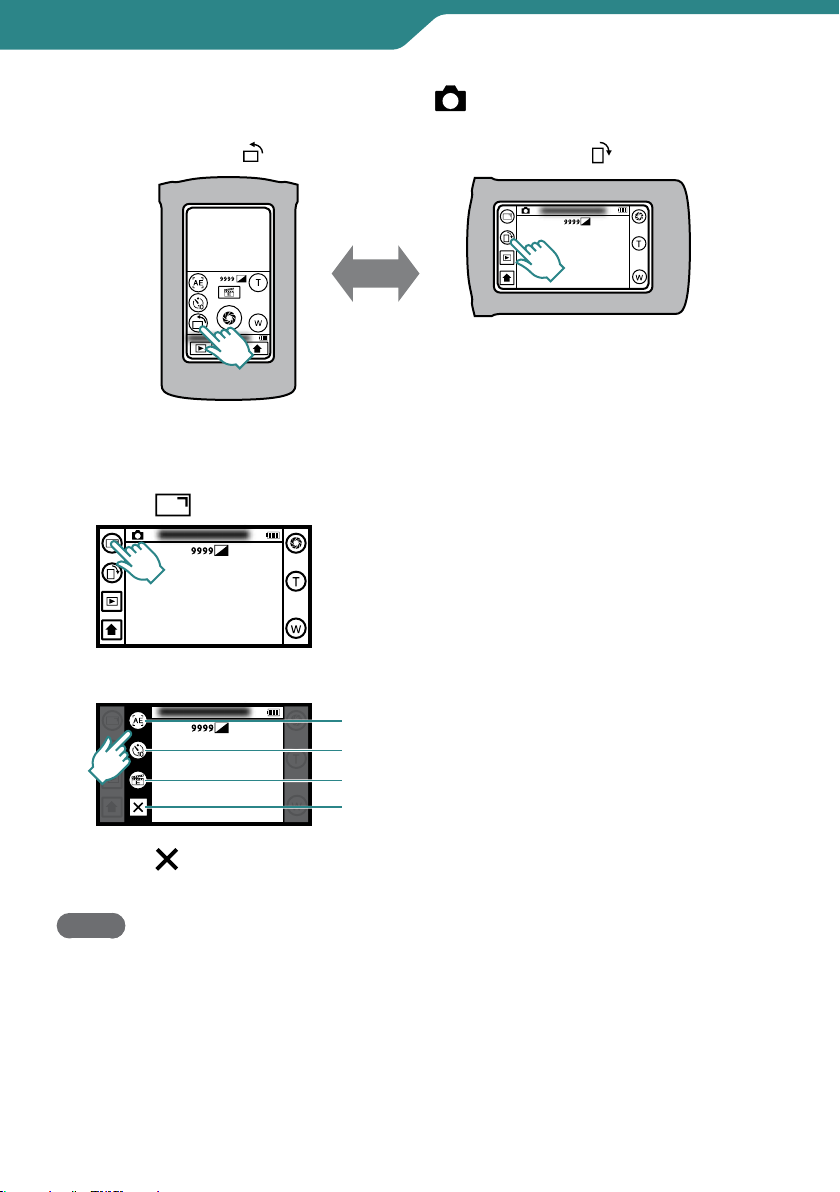
Switching the Image Orientation ( Still Image Recording only)
Touch .
Image orientation can be changed to correspond to
Portrait
To use functions in landscape mode
1
Touch .
2
Select the function to use.
the camera’s orientation.
Touch
Landscape
Touch AE, Face Priority AE Switching (P.23)
SELF-TIMER
Menu Settings (P.45)
QUIT
.
3
Touch .
Quit.
NOTE
The size of still images differs between the portrait and the landscape modes.
•
Portrait mode: 2592 × 1944 (5M)
Landscape mode: 1440 × 1920 (2.7M)
The image orientation do not switch automatically. Switch it according to the actual
•
orientation of the camcorder.
Video is not output through the AV cable when the Image Orientation is set to Portrait.
•
Video is not output at 480i or 480p through the HDMI cable when the Image
•
Orientation is set to Portrait.
22
Page 23
Recording
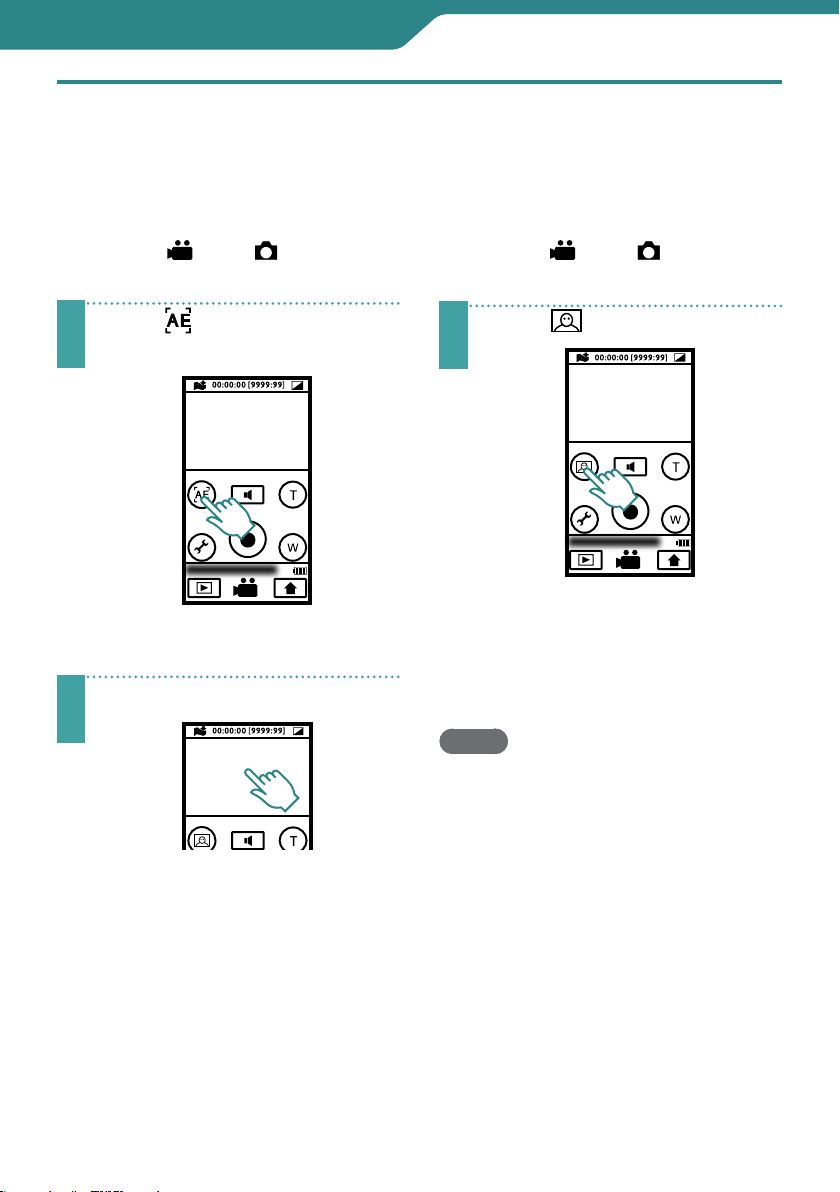
Useful Functions for Recording
Adjusting the brightness
based on the touched area
(Touch AE)
Preparation: Video/ Still image
recording
Touch .
(GC-WP10 only)
1
With every touch, Touch AE and
Face Priority AE alternate.
Touch the area to adjust.
2
With the touch, a frame appears in
which exposure is adjusted.
The frame disappears if you touch
the frame or if you use zoom
function.
Shooting Human Subjects
(Face Priority AE)
(GC-WP10 only)
Preparation: Video/ Still image
recording
Touch .
1
With every touch, Touch AE and
Face Priority AE alternate.
Frames appear on human faces in
which exposure is automatically
adjusted.
NOTE
Up to 16 frames on faces can be
•
displayed in total. You cannot choose
the frame to adjust exposure arbitrarily.
Depending on the condition, faces may
•
not be detected.
If you cannot get proper effect, turn off
•
the Face Priority AE.
23
Page 24
Recording
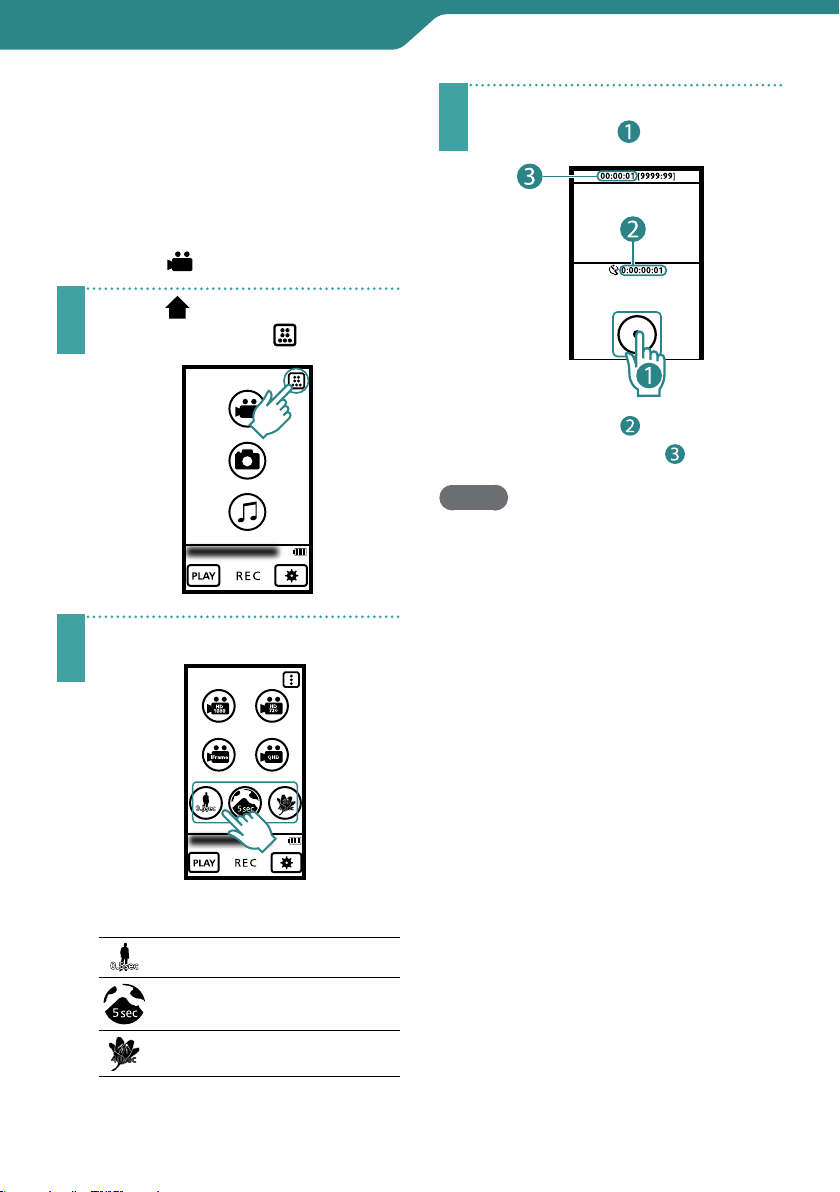
Recording at Intervals
(TIME-LAPSE RECORDING)
This function enables the changes of a
scene that occur slowly over a long
period to be shown within a short time
by taking frames of it at a certain interval.
Preparation: Video recording
Touch to display the Top
Menu and touch
1
Select a recording interval.
.
2
Touch the Recording START/
STOP button(
3
Recorded Time ( )
Actual Elapsed Time (
NOTE
Audio cannot be recorded during
•
time-lapse recording.
Zooming is not available in time-lapse
•
recording.
When recording is stopped with the
•
recorded time less than "0:00:00:17",
the video will not be saved.
Recording stops automatically 99 hours
•
after it is started.
Make use of a tripod and optional AC
•
adapter for time-lapse recordings with
long intervals. (optional: AC-V10LU/JVC)
The recording quality during time-lapse
•
recording is the same as that of HD 720
(P.50).
).
)
Recording interval/Playback speed
0.5 second/30 times
5 seconds/300 times
40 seconds/2400 times
24
Page 25

Recording
Using the Camcorder in Water
After use in water, rinse the camcorder with fresh water, then wipe off and dry it
well in a well-ventilated place out of direct sunlight as soon as possible. (P.27)
Before use
Confirm that there is no foreign material inside the terminal cover. (Foreign material
causes ingress of water.)
Make sure that there is no damage to and no
•
foreign material (hair, lint, sand, dust, fluid etc.)
adhered to the packing inside the cover, the SD
card slot, or the parts around the connectors.
If you find damage, do Not use the unit.
•
Consult your JVC dealer or the nearest JVC service
center.
Close the terminal cover firmly.
Close the cover firmly until it clicks into place.
•
Confirm that the red sign completely goes off.
•
(GC-WP10 only)
CAUTION
This camcorder is equipped with a waterproof function corresponding to JIS (Japanese
•
Industrial Standards) IPX8. This camcorder can make recordings in marine water and
fresh water not deeper than 3 m (10 ft) or for not more than 30 minutes. (The waterproof
capability is tested in accordance with JVC test standard and it does not assure damagefree or trouble-free operation. Waterproof function not evaluated by UL.)
Do not soak the camera in hot springs or water of 40 °C (104 °F) or higher.
•
Do not subject the camcorder to high water pressure such as in torrent or fall, or to
•
excessive pressure or impact such as by diving with the camcorder in hand.
The waterproof capability cannot be guaranteed if the camcorder is subject to impact
•
such as dropping. Consult with the dealer if the camcorder is subject to impact.
The camcorder sinks in water. Use the strap to prevent it from falling.
•
Open and close the cover in a dry place, after wiping moisture off the camcorder.
•
Wipe off immediately if such liquids as detergent solution, soap water, hot spring
•
water, bath agent, oil, sunscreen lotion or chemical liquid are spilled on the camcorder.
When used in water, at first, air bubbles may come out of the unit but it is not a
•
malfunction.
25
Page 26

Recording
Press the button( ) for about 1 second to turn on the camcorder.
1
Select Video or Still Image mode( ) on the Top Menu.
2
Press the SCREEN LOCK button( ) for more than 1 second.
3
When using this unit in water, temporarily disable the touchscreen so that it will
•
not malfunction with the water pressure.
is displayed on the screen.
•
Press the Recording button(
•
Press the SCREEN LOCK button again, for more than 1 second, to turn off
•
and activate the touchscreen.
) to record.
To select video recording/still image recording in water
Pressing the button( ) will toggle the operation between Video Recording and
Still Image Recording.
Audio recording is not selectable in water.
26
Page 27

Recording
After use
After use in water or when dusted with sandy dust, rinse the camcorder with fresh
water and dry it well as soon as possible.
1
Press the button for about 1 second to turn off the camcorder.
Make sure that the connector cover is closed tightly.
2
Rinse with fresh water.
Soak and wash in an appropriate depth of still fresh water in basin.
Push aside the buttons to wash off the dirt in the gap.
Do not rinse with chemicals, soap, neutral detergent or alcohol.
Do not apply current of water such as
tap water directly to this unit.
3
D ry.
Wipe off with a dry soft cloth and dry in a well-ventilated place out of direct sunlight. There may
be water near the microphone. Therefore, aim the camcorder downward and remove the water.
Wiping with some sand remaining can cause a scratch. Wipe after rinsing the sand off.
Also, wipe off strange materials and water drops inside the cover.
CAUTION
Do not dry with heat such as by using a hairdryer. The waterproof capability will deteriorate.
•
Do not leave the camcorder for long time in low temperature environment in cold
•
climates or in heat of 40 °C (104 °F) or higher (such as under sun light, in a sun-heated
car or near the heater). The waterproof capability will deteriorate.
After use in marine water, soak in adequate amount of fresh water approximately 10
•
minutes and rinse with fresh water in order to clean off the salt.
Do not leave the camcorder soaked in or wet with salt water. It may cause corrosion,
•
tarnish, or deterioration of water resistance.
Remove the strap from camera and rinse the strap with fresh water.
•
Do not connect cables or charge with water drops remaining.
•
JVC cannot be held responsible of any loss of data due to ingress of water into the unit.
•
It is recommended to replace the packing (optional) once a year to maintain the
•
waterproof capability. Consult your nearest JVC service center. (P.52)
27
Page 28

Playback
Playing Back on the Camcorder
Select a video or still image to play back
from the index screen.
Preparation: Video recording/ Still
image recording
Touch .
1
The camcorder turns to play back
mode.
Select a file.
2
Play back a file.
3
Touch the screen to display screen
messages and operation buttons ( ).
(They will disappear if touched
again.)
Operation modes ( )
Playback
Reverse playback
Pause
Forward search
Reverse search
Forward slow-motion
Reverse slow-motion
If you touch , the thumbnail
images will enlarge.
Touch and drag the thumbnail
display left and right or touch
to move to another page.
If a shooting duration of still images
is within 2 seconds, they are
displayed as one thumbnail (group).
28
Touch
Operation Buttons ( ) (P.29)
Adjust the volume (
Touch +/– to make adjustments and
touch
Video quality ( )
to stop playback.
)
to quit.
Page 29

Playback
Operation Buttons (during Video
Playback)
Playback
Pause
Advances to the next video
Returns to the beginning of the
scene
Forward search
Reverse search
Forward slow-motion
Reverse slow-motion
Operation Buttons (during Still
Image Playback)
Start slideshow
Stop slideshow
Advances to the next still image
Returns to the previous still image
Play back a group continuously
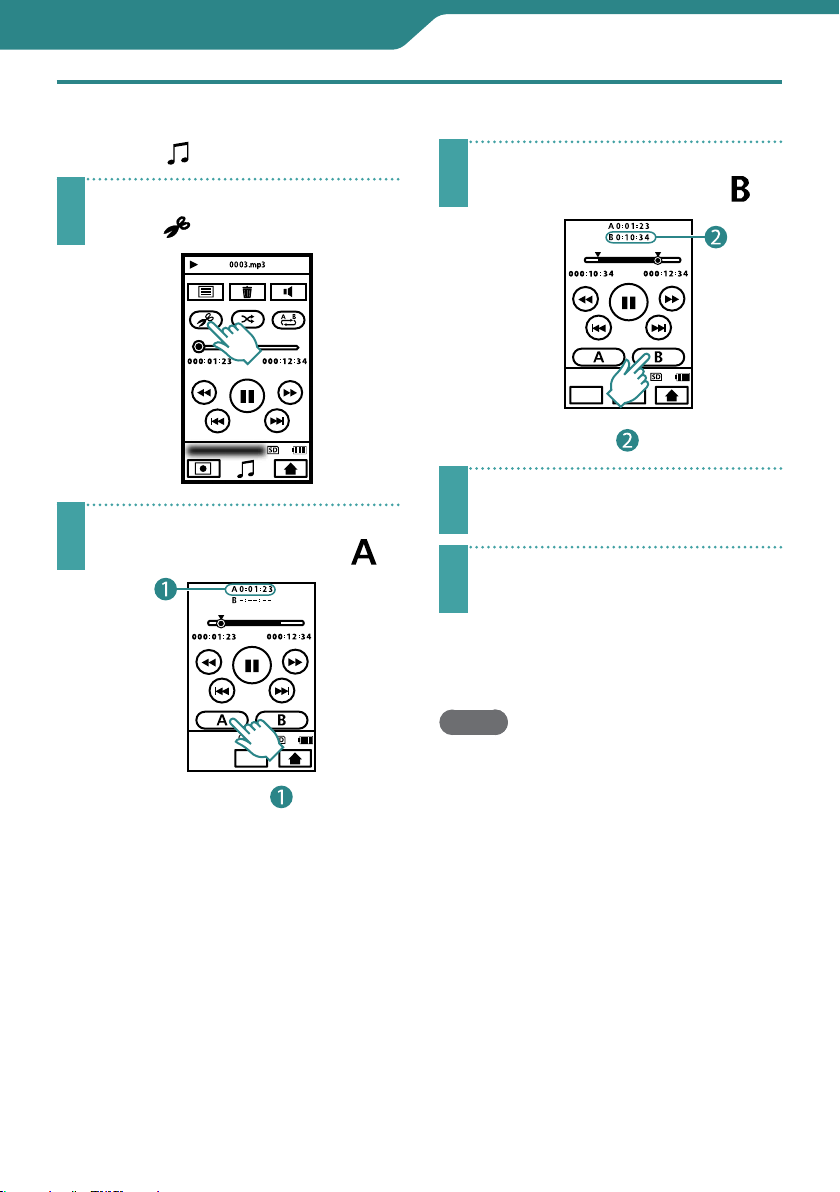
Repeated Playback of a Part
(A-B Repeat)
Preparation: Video playback
Play back the video, then
touch
1
points.
With every touch, the setting
toggles as shown below.
at the starting/end
Set starting point
Set end point
No setting
(normal playback)
NOTE
A-B repeat is possible only within one
•
scene.
The setting is canceled if Stop is
•
selected after the end point is set.
29
Page 30

Playback
Deleting Files
Preparation: Video/ Still image
playback
Touch .
1
Touch the video/still image
file to delete.
2
A check mark( ) appears on the
selected video/still image.
If you touch the video/still image
with a check mark, the selection is
cancelled.
Touch [SEL ALL] to select all the
video/still image files.
Touch [REL ALL] to cancel all the
selection.
NOTE
You can delete the files by touching
•
during video/still image playback.
Touch [SET].
3
Touch [DELETE] when the
confirmation message
4
appears.
30
Page 31

Playback
TRIMMING
QUIT
TRIMMING
SET QUIT
Copying a Part in the Video
Preparation: Video playback
Play back the video, then
touch
1
Pause playback at the
starting point and touch
2
Copy starting point ( )
.
.
Touch [YES] when the
5
NOTE
When you copy a part of the video, the
•
division point may not be accurate
within a 1 second margin of error.
(Trimming)
confirmation message
appears.
When copying finishes, the copied
file is added to the index screen.
Resume playback, pause at
the end point and touch
3
Copy end point ( )
Touch [SET].
4
.
31
Page 32

Playback
Yellow
Video Input
Video Input
Audio Input (L)
Audio Input (R)
White
Red
HDMI Terminal Input
Viewing Files on TV
Preparation:
Turn on the TV.
•
Turn on the power( ) of the camcorder and select the playback mode.
•
To connect using the dedicated AV cable (provided)( )
To connect using the HDMI mini cable (optional)( )
1
Connect the camcorder to a TV.
2
Switch to the TV’s external input connector.
3
Start the playback. (P.28)
NOTE
Use the supplied AV cable. Otherwise, image and sound cannot be output.
•
If the AV cable or HDMI cable is disconnected during playback, the playback will be
•
paused.
When an AV cable and an HDMI cable are connected, output to the HDMI cable is prioritized.
•
Also refer to instruction manual of the TV.
•
We recommend using the Category 2 HDMI cable (High Speed cable).
•
Insert the connector in the right direction. Forcing the connector into the terminal
•
may cause damage.
If you connect the camcorder using the AV cable, image is output only when playing
•
back video. If you connect the camcorder using the HDMI Mini connector, image is
output when both playing back and recording video. However, if you connect the
camcorder to a TV with 480p or 480i resolution, image is output only when playing
back video.
Image is not output during the audio recording and audio playback.
•
32
Page 33
Audio Recording
L R
Recording Audio
Press the button( ) for about 1 second to turn on the camcorder.
(GC-WP10 only)
1
Touch Audio mode( ) on the Top Menu.
2
To return to the Top Menu, touch in the audio recording screen.
Touch the Recording START/STOP button( ).
3
Audio recording starts.
Touch again to stop audio recording.
NOTE
If you record audio 12 hours continuously, it will stop recording automatically.
•
33
Page 34

Audio Playback
L R
Playing Back Audio on the Camcorder
You can select and play back the
recorded audio from an index screen.
Preparation:
Touch the PLAY button.
Audio recording
Play back the audio.
3
1
Operation modes ( )
Playback
Pause
The camcorder turns to play back
mode.
Select audio to play back.
2
Forward search
Reverse search
Adjust the volume ( )
Touch +/– to make adjustments and
touch
to quit.
(GC-WP10 only)
Touch to move to another
page.
To the recorded audio files, serial
numbers 0001-9999 will be given.
Operation buttons ( )
Playback
Pause
Advances to the next audio
Returns to the beginning of the
Audio currently playing
Forward search
Reverse search
Changes the playback order
(Random Playback)
Touch
34
to return to the audio index screen.
Page 35

Audio Playback
Repeated Audio Playback of a
Part (A-B Repeat)
Preparation: Audio playback
Play back the audio, then
touch
1
points.
With every touch, the setting
toggles as shown below.
at the starting/end
Set starting point
NOTE
A-B repeat is possible only within one
•
scene.
The setting is canceled if Stop or
•
Random Playback is selected after the
end point is set.
Set end point
No setting
(normal playback)
35
Page 36
Audio Playback
[PICSIO_SD] [MUSIC] [1234]
[ABCDE]
SAMPLE.MP3
TEST.MP3
[ZZZ]
SOUND.MP3
Play External Audio Files
You can play audio files (MP3) recorded
with other devices such as computer.
Preparation:
Touch on the audio index
screen.
1
Select audio to play back.
2
Touch to return to the normal
audio playback.
NOTE
You can create up to 3 levels of folders
•
under [MUSIC].
You can create up to 50 subfolders per
•
folder.
You can create up to 999 files per folder.
•
Display of tags and the Album Art are
•
not supported.
Audio playback
Folders and files with double-byte
•
characters (such as Japanese) cannot
be played.
Folders and files with more than
•
8 single-byte characters cannot be
played.
(You cannot edit file name with the
camcorder. Use a computer and other
devices to edit file names.
You cannot delete external audio files
•
with the camcorder.
You can play only stereo audio files.
•
You can play audio at 44.1 kHz and
•
48 kHz. (Playback of not all the files is
guaranteed.)
You cannot play back Mpeg2 and
•
Mpeg2.5 audio files.
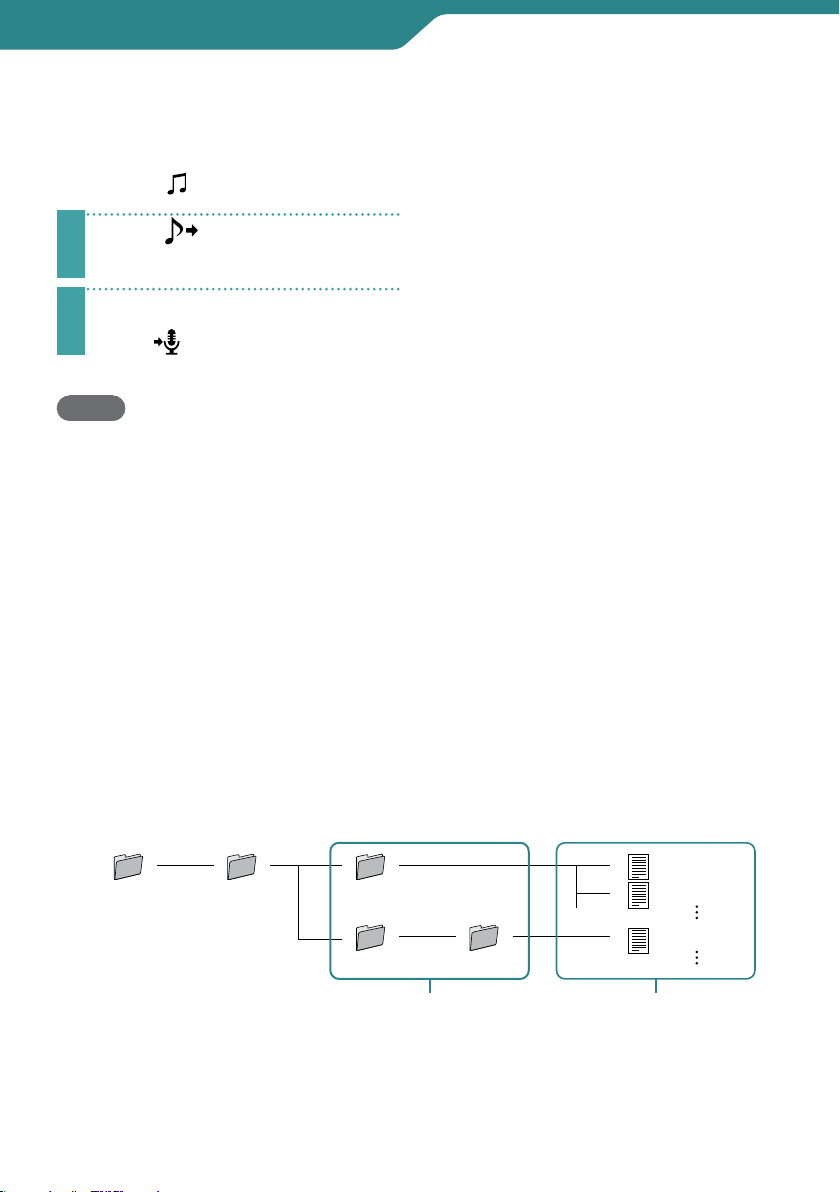
Structure of folders and files
Using computer or other devices, copy the audio to play back (folders and files) to an
SD card under [MUSIC] folder.
Folders Files
The name is arbitrary (8 or
less single-byte
alphanumeric characters).
The extension is [MP3].
The name is arbitrary (8 or
less single-byte
alphanumeric characters).
36
Page 37
Audio Playback
SEL ALL REL ALL
SET
DELETE
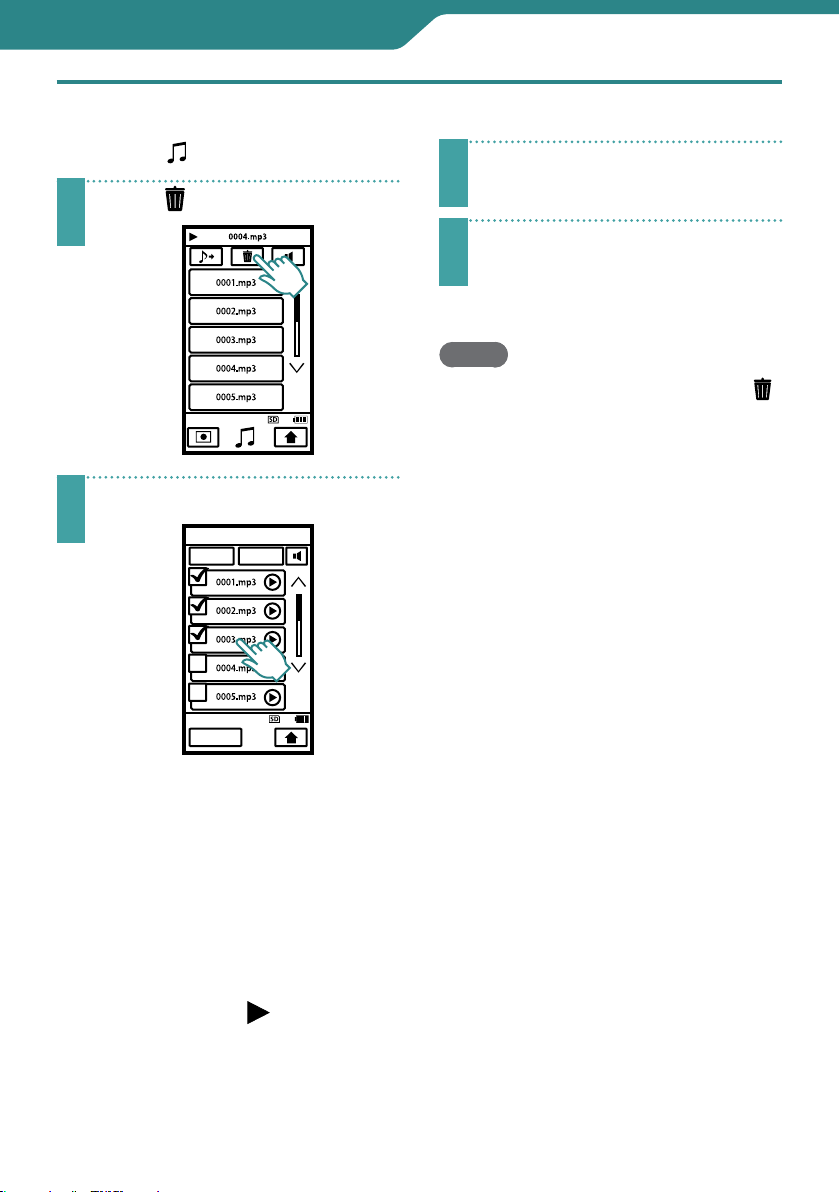
Delete Audio Files
Preparation: Audio playback
Touch .
1
Touch the audio file to delete.
2
(GC-WP10 only)
Touch [SET].
3
Touch [DELETE] when the
confirmation message
4
appears.
NOTE
You can delete the files by touching
•
during audio playback.
You cannot delete external audio files.
•
A check mark appears on the
selected audio.
If you touch the audio with a check
mark, the selection is cancelled.
You can select all the audio files by
touching [SEL ALL].
You can cancel all the selection by
touching [REL ALL].
You can confirm the audio to play
back by touching
Playback).
(Confirm
37
Page 38
Audio Playback
TRIMMING
QUIT
TRIMMING
QUITSET
Copying a Part in the Audio
Preparation: Audio playback
Play back the audio file, then
touch
1
Pause playback at the
starting point and touch
2
.
.
Resume playback, pause at
3
Touch [SET].
4
Touch [YES] when the
5
(GC-WP10 only)
the end point and touch
Copy end point( ).
confirmation message
appears.
When copying finishes, the copied
file is added to the index screen.
.
Copy starting point ( ).
NOTE
The starting and end points of the
•
copied audio may not exactly match
the selected points.
38
Page 39

Connecting with a Computer
[PICSIO_SD] [DCIM]
[100JVCSO]
[101JVCSO]
[102JVCSO]
PIC_XXXX.MP4
PIC_XXXX.MP4
PIC_XXXX.JPG
PIC_XXXX.JPG
PIC_XXXX.MP3
PIC_XXXX.MP3
Make a Backup on Computer
Preparation: Turn on the camcorder and the computer.
You can save the recorded videos, still images or audio files on a computer.
Connect the camcorder to a computer.
1
See page 7 for the position of the USB connector on GC-FM2.
If the camcorder is not charged, it will not turn on when connected to the
computer.
Windows: Double-click [PICSIO_SD] in [Computer] (or [My
Computer]).
2
Mac: Double-click [PICSIO_SD] on the desktop.
GC-WP10
Copy video/still image/audio files from the [DCIM] folder.
3
Videos
Still Image
Audio
To disconnect the camcorder from a computer (Windows)
1
Click the icon in the task tray on the computer screen.
The [Safely Remove Hardware] window appears.
2
Select [USB Mass Storage Device] and then click [Stop].
To disconnect the camcorder from a computer (Mac)
Drag and drop [PICSIO_SD] and [PICSIO_APP] on the desktop to the Trash. When they
disappear from the desktop, disconnect the USB cable.
39
Page 40

Connecting with a Computer
!
#
$
%
&
%
$
!
#
Using the Supplied Software
For Windows PC Users
You can edit videos and still images, or transfer them to iPod or the sharing site
(YouTube, etc.) using the supplied software. (Please use another software for DVD or
BD creation and buring.)
Right click [Computer] (or [My Computer]) in the Start Menu, then select [Properties]
and confirm the following items.
For Windows Vista/Windows 7
Windows Vista: Home Basic or Home Premium
!
(Pre-installed edition only for both)
Windows 7: Home Premium
(Pre-installed edition only)
Service Pack 2 (Windows Vista only)
#
Processor:
$
Intel Core 2 Duo CPU 2 GHz or higher
Intel Core 2 Duo CPU 3 GHz or higher recommended
Intel Core 2 Quad CPU 2 GHz or higher recommended
Memory: 2 GB or more
%
System type: 32 bit/64 bit
&
For Windows XP
Windows XP: Home Edition or Professional
!
(Pre-installed edition only for both)
Service Pack 3
#
Processor:
$
Intel Core 2 Duo CPU 2 GHz or higher
Intel Core 2 Duo CPU 3 GHz or higher recommended
Intel Core 2 Quad CPU 2 GHz or higher recommended
Memory: 2 GB or more
%
Other Conditions
Graphic:
NOTE
The system configuration described above is required in order to use the supplied
•
software.
Microsoft .NET Framework 3.5sp1 must be installed on your computer.
•
The camcorder is compatible to the graphic cards equipped with the playback
•
support function of H.264 video.
Intel 945 or later, NVIDIA Geforce 6000 series or later, ATI Radeon 9600 or later
40
Page 41

Connecting with a Computer
To enable MultiTouch control, Windows 7 and the display compatible to MultiTouch is
•
required.
For details, consult with the manufacturer of your computer.
•
For details on hardware requirements and customer support information, refer to the
•
following web site.
http://loilo.tv/product/15
To start the supplied software
Preparation:
Turn on the camcorder and the computer.
•
Connect the camcorder to the computer. (P.39)
•
1
[Auto Play] window appears.
If [Auto Play] window does not appear, double-click the [PICSIO_APP] icon in [My
Computer] then double-click the LoiLoScope EX (LoiLoScopeEX.exe).
2
Select [LoiLoScope EX] and click [OK].
If [LoiLoScope EX] does not appear in the [Auto Play] window; select [Open folder
to view files], click [OK] and double-click the LoiLoScope EX (LoiLoScopeEX.exe)
icon in the window.
NOTE
For details about operations in LoiLoScope EX, see its Help.
•
For Mac Computer Users
You can import files from this unit to a computer using Apple's iMovie '09 (video) or
iPhoto (still image).
To verify the system requirements, select "About This Mac" from the Apple menu. You
can determine the operating system version, processor and amount of memory.
For the latest information on iMovie or iPhoto, refer to the Apple website.
•
For details on how to use iMovie or iPhoto, refer to the help file of the respective
•
software.
There is no guarantee that the operations will work with all computer environments.
•
41
Page 42

Connecting with a Computer
Using an Eye-Fi Card
What is Eye-Fi?
Eye-Fi is an SD memory card with wireless LAN function.
Using an Eye-Fi card, you can transfer videos and still images to a computer or the web.
(An Internet accessible environment and a wireless LAN router are separately required.)
Use of Eye-Fi card may be illegal and prohibited in countries and regions where it has
not been approved by competent authorities. Please contact Eye-Fi support for the
details of approved countries and regions.
Types of cards
Product name Video Transfer Still Image Transfer
Eye-Fi Home/ Eye-Fi Share/
Eye-Fi Geo
Eye-Fi Share Video/
Eye-Fi Explore Video/ Eye-Fi Pro/
Eye-Fi Connect X2/ Eye-Fi Geo X2/
Eye-Fi Explore X2/ Eye-Fi Pro X2
Audio files cannot be transferred.
To use the Eye-Fi card
–
1
Make settings on the Eye-Fi card with Eye-Fi Center.
For how to install and operate the Eye-Fi Center, refer to its instruction manual.
2
Set the [Eye-Fi SETTING] to [ON] in the Basic Settings. (P.45)
When the [Eye-Fi SETTING] is set to [ON] recorded videos and still images are
•
automatically transferred.
(The files already transferred earlier are not transferred again.)
To abort Eye-Fi transfer, turn off the camcorder or set the [Eye-Fi SETTING] to [OFF] in
•
the Basic Settings.
To transfer selected videos and still images, see page 43.
•
The Eye-Fi Center with the default setting transfers all videos/still images.
Change the settings for the Eye-Fi Center beforehand to transfer selected videos/still
images.
NOTE
You cannot transfer files during the recording mode, editing and formatting of the
•
card.
You cannot transfer video files larger than 2 GB. (as of July, 2010)
•
Depending on the connection conditions, transfer may be interrupted or take time long
•
due to passing the Eye-Fi server, even if it is displayed that the transfer has been completed.
42
Page 43

Connecting with a Computer
TRANSFER SELECTION
SEL ALL REL ALL SET
TRANSFER SELECTION
SEL ALL REL ALL SET
We recommend using the AC adapter (optional: AC-V10LU/JVC) when transferring
•
files of large size.
If it doesn't operate properly, first confirm that the settings of the Eye-Fi card are
•
correct and try the data transfer using other equipment.
Do not use the camcorder in places where wireless use is prohibited such as on a
•
plane.
For the latest information on the Eye-Fi card, refer to the website of Eye-Fi, Inc.
•
(http://www.eye.fi/).
To transfer selected videos/still images
Preparation: Video/ Still image playback
1
Touch .
Eye-Fi Setting [OFF]
Eye-Fi Setting [ON]
Ready for Transfer from the Eye-Fi card
Transferring from the Eye-Fi card (animated)
2
Touch the video/still image to transfer.
A check mark( ) appears on the selected video/still
image.
If you touch the video/still image with a check mark, the
selection is cancelled.
Touch [SEL ALL] to select all the video/still image files.
Touch [REL ALL] to cancel all the selection.
( ) appears on the transferred files.
3
Touch [SET].
4
Touch [SAVE] when the confirmation message appears.
43
Page 44

Menu
UPDATE
PC SOFTWARE UPDATE
HDMI OUTPUT
Eye-Fi SETTING
AUTO
480p
WIND CUT
EFFECT
Using the Menu
You can make various settings using the
menu.
Basic Settings
1
Touch and display the Top
Menu.
2
Touch the Basic Settings button.
The Basic Settings screen appears.
3
Touch the desired settings.
4
Touch the item to set.
Touch to return to the previous
screen.
Touch
Menu Settings (during Video/Still
to quit the setting.
Image recording)
1
Video recording: Touch the Menu
Settings button.
Still image recording: Touch the
Effect button. (P.9)
Touch to move to another page.
44
The Menu Settings screen appears.
2
Touch the item to set.
With every touch, the setting will
change.
Touch
to quit the setting.
Page 45

Menu
Basic Settings
indicates the default setting.
CLOCK ADJUST
CLOCK SETTING:
Resets the current time or changes the
settings.
AREA SETTING:
Sets to the local time when using this
unit abroad simply by selecting the
destination.
DST SETTING:
Sets whether daylight saving time is
observed at the travel destination.
LANGUAGE
The language on the display can be
changed.
FORMAT SD CARD
FILE:
Deletes all files on the SD card.
FILE & MGMT NUMBER:
Deletes all the files on the SD card and
resets the folder and file numbers.
Not available for selection when no SD
•
card is inserted.
UPDATE
PC SOFTWARE UPDATE
Updates the functions of this unit and
built-in software for PC to the latest
versions. For details, refer to the JVC
website. (Details will be available only after
the [UPDATE] and [PC SOFTWARE UPDATE]
are ready.)
HDMI OUTPUT
AUTO:
It is recommended to select [AUTO]
normally.
480p:
Select this when the video is not output
in [AUTO] correctly.
Eye-Fi SETTING
OFF:
Does not transfer the files.
ON:
Transfers video/still image files
automatically.
TOUCH SCREEN ADJUST
Adjust if the reactive area of the screen is
misaligned with the touched area.
Menu Settings (during Video/Still
Image recording)
EFFECT
OFF:
No effect.
MONOTONE:
Records in black and white.
SEPIA:
Gives images a brownish tint like old
photographs.
SOLARIZATION:
Records with some of the tones
reversed.
NEGATIVE:
Reverses the brightness.
CLASSIC FILM: (Video mode only)
Skips frames to give images of the effect
of an old video.
STROBE: (Video mode only)
Enables the image to look like a series of
consecutive snapshots by skipping
frames.
WIND CUT (Video mode only)
OFF:
Does not reduce the noise.
ON:
Reduces the noise caused by wind.
45
Page 46

Further Information
Troubleshooting
Before requesting service, consult the following chart. If the solutions indicated in the
chart do not solve the problem, consult your nearest JVC dealer or JVC service center
for instructions.
Refer also to the FAQ section on JVC’s website (http://www.jvc.com).
The following phenomena are not malfunctions.
LCD monitor momentarily becomes red or black when sunlight is recorded.
•
Black spots, or red, green, or blue spots appear on the LCD monitor.
•
(The LCD monitor contains 99.99% effective pixels, but 0.01% or fewer pixels may be
ineffective.)
The camera is a microcomputer-controlled device. Electrostatic discharge, external
noise and interference (from a TV, a radio, etc.) might prevent it from functioning
properly. In such a case, reset the camcorder by pressing and holding the Power
button for more than 10 seconds. If you reset the camcorder, reset the clock. (P.18)
Troubles
Trouble Action Page
Unable to turn on the
power.
Unable to charge the
Battery
battery.
The battery depletes
even when connected
to AC adapter.
Charging takes a long
time.
Recharge the battery.
•
When the battery level is extremely low, the
•
camcorder does not turn on until it is charged even
if it is connected to the computer or AC adapter.
Check the remaining battery power. (When the
•
battery is fully charged, the lamp does not flash.)
If you were charging the battery in a low or high
•
temperature environment, charge in an
environment within the allowable operating
temperature. (Charging may stop in an environment
out of the allowable operating temperature for the
protection of the battery.)
When charging using the computer, turn on the
•
computer.
Please use a JVC AC adapter (optional: AC-V10LU).
•
(Depending on the AC adapter you use, battery will
deplete due to insufficient power supply from the
adapter.)
Please use a JVC AC adapter (optional: AC-V10LU). 15
•
14
15
14, 15
–
–
15
46
Page 47

Further Information
Trouble Action Page
Recording video/still
image/audio cannot be
performed.
During recording
Recording stops
automatically.
The continuous
shooting speed of still
images is slow.
Sound or video is
interrupted.
The same image is
During playback
displayed for a long
time during video
playback, or motion is
choppy.
Image is stretched up
and down on the TV.
When connecting to
the HDMI mini cable,
the image does not
appear on the TV
properly.
Computer
Unable to copy files to
the computer's HDD.
The computer cannot
recognize the SDXC
card.
Check the video/still image/audio recording mode.
•
Select recording mode.
•
Turn off the power, wait for a while, and start
•
recording again. (This unit stops automatically to
protect the circuit when the temperature rises.)
Recording stops automatically as it cannot be
•
performed for 12 or more consecutive hours
according to specifications.
The continuous shooting speed will drop if this
•
function is used repeatedly.
Continuous shooting speed may drop depending
•
on the SD card or under certain recording
conditions.
Sometimes playback is interrupted at the
•
connecting section between two scenes. This is not
a malfunction.
Replace the SD card with a new one.
•
Perform [FORMAT SD CARD] in Basic Settings. (All
data will be deleted.)
On the TV with aspect ratio of 4:3, images are
•
projected vertically.
Disconnect the HDMI mini cable and connect it
•
again.
Turn off and on this unit again. (The image or sound
•
may not appear on the TV properly depending on
the TV connected.)
Connect the USB cable correctly.
•
Before copying files, make sure that enough free
•
space is left in the computer's hard disk (HDD).
Confirm and upgrade the OS of your computer. 13
•
20, 33
20
–
–
–
–
–
–
–
–
32
39
–
47
Page 48

Further Information
Trouble Action Page
The LCD monitor is
difficult to see.
A band of bright light
Other Problems
appears on the LCD
monitor.
The unit operates
slowly when switching
between video mode
and still image mode,
or when switching the
power on or off.
The unit heats up.
Warning Indications
Indication Action Page
SET DATE/TIME!
FORMAT ERROR!
MEMORY CARD ERROR!
NOT FORMATTED
RECORDING FAILURE
UNSUPPORTED SCENE
(FILE)!
CHECK CARD'S WRITE
PROTECTION SWITCH
INSUFFICIENT
AVAILABLE SPACE
FILE QUANTITY LIMIT
EXCEEDED
NUMBER OF FOLDERS
OVERFLOW
The LCD monitor may not be clearly visible if used in
•
bright areas such as under direct sunlight.
Change the direction of this unit to prevent the light
•
source from coming into view. (A band of bright
light may appear when there is a bright light source
near this unit, but this is not a malfunction.)
It is recommended that you copy all video/still
•
image/audio files onto your computer, and erase the
files from this unit. (If there are many recorded files
on this unit, it takes time for the unit to respond.)
This is not a malfunction. (This unit may become
•
warm when used for a long time.)
Charge the battery before setting the clock. 18
•
Check the operating procedure, and perform once again.
•
Turn off this unit, and turn it on again.
•
Turn off this unit, and turn it on again.
•
Re-insert the SD card.
•
Remove any dirt from the SD card terminals.
•
If the above does not solve the problem, back up your
•
files and execute [FORMAT SD CARD] in the Basic Settings.
(All data will be deleted.)
Select [OK] then select [YES] on the [DO YOU WANT TO
•
FORMAT MEMORY CARD?] screen.
deleted.)
Turn off this unit, and turn it on again. –
•
Use files recorded with this unit. (Files recorded with
•
other devices than this unit may not be playable.)
Release the write protection switch of the SD card. –
•
Delete files, or move files to a computer or other devices.
•
Replace the SD card with a new one.
•
Move the files or folders to a computer or other
!
device. (Back up your files.)
Select [FILE & MGMT NUMBR] in [FORMAT SD CARD]
#
of the Basic Settings. (All data on the SD card will be
deleted.)
(All data will be
–
–
30, 39
–
45
–
–
12
–
45
–
–
–
–
39
45
48
Page 49

Further Information
Specifications
Camera
Power consumption
2.2 W
Dimensions (W × H × D)
GC-WP10:
60 mm × 101 mm × 25 mm
(2-3/8" × 4" ×1")
GC-FM2 :
53 mm × 102 mm × 22 mm
(2-1/8" × 4-1/16" × 7/8")
Weight
GC-WP10:
147 g (0.33 lbs)
152 g (0.34 lbs) (Including hand
strap and SD card)
GC-FM2:
113 g (0.25 lbs)
115 g (0.26 lbs) (Including SD card)
Operating environment
Operating temperature:
0 °C to 40 °C (32 °F to 104 °F)
Storage temperature:
–20 °C to 50 °C (–4 °F to 122 °F)
Operating humidity: 35 % to 80 %
Image pickup device
1/3.2" 5,130,000 pixels (progressive CMOS)
Recording area (Video)
(HD 1080) 2,090,000 pixels
(HD 720) 3,400,000 pixels
(QHD, iFrame) 2,090,000 pixels
Recording area (Still Image)
(Portrait) 5,030,000 pixels
(Landscape) 2,760,000 pixels
Lens
F2.8, f=3.9 mm
35 mm conversion:
(HD 1080) f=43.6 mm
(HD 720) f=34.2 mm
(QHD, iFrame) f=43.6 mm
(Still image: Portrait) f=29.8 mm
(Still image: Landscape) f=40.3 mm
LCD monitor
3.0" diagonally measured,
LCD panel/TFT active matrix system
Zoom
Digital zoom: Up to 4x
Video recording format
Video: Mpeg-4 AVC/H.264
Audio: AAC 48 kHz 16 bit
256 kbps (2ch)
GC-WP10: stereo sound
GC-FM2: monaural sound
Still image recording format
JPEG standard
Continuous shooting speed:
approx. 1.5 shots/second
Audio recording format (GC-WP10 only)
Mpeg-1 Audio Layer 3 standard
Playable software:
Windows: LoiLoScope EX (supplied)
Mac: QuickTime
Recording media
SD/SDHC/SDXC card (commercially available)
Eye-Fi card (commercially available)
Connectors
HDMI
HDMI® mini connector
AV output
Video output: 1.0 V (p-p), 75 Ω
Audio output:
GC-WP10: 300 mV (rms), 220 Ω
GC-FM2 : 300 mV (rms), 1 kΩ
Headphones output (GC-WP10 only.
Also serves as AV output.)
USB
GC-WP10:
Mini USB Type B, USB 2.0 compliant
GC-FM2 :
USB Type A, USB 2.0 compliant
Waterproof (GC-WP10 only)
Condition
Depth 3 m (10 ft)/30 minutes
Operation
Power on/off
Video recording/stop
Still image shooting
The specifications and appearance of this
•
product are subject to changes for further
improvement without prior notice.
49
Page 50

Further Information
Approximate Time/Number of Recording
Approximate Video Recording Time
SDHC
Type Quality
4 GB 16 GB 64 GB
1920 × 1080
HD 1080
HD 720
iFrame
QHD
The above recording time is approximate. The actual recording time may shorten
•
depending on the shooting environment.
Approximate Number of Still Images (Unit: Number of Shots)
Recording mode
(Image size)
Portrait
(2592 × 1944)
Landscape
(1440 × 1920)
30 frames/second
(Average 12 Mbps VBR)
1280 × 720
60 frames/second
(Average 12 Mbps VBR)
960 × 540
30 frames/second
(Average 24 Mbps VBR)
960 × 540
30 frames/second
(Average 5 Mbps VBR)
SD
Card
1 GB 2 GB 4 GB 8 GB 32 GB 64 GB
300 600 1300 2700 9999 9999
600 1200 2300 4700 9999 9999
40 m 2 h 50 m 11 h 40 m
40 m 2 h 50 m 11 h 40 m
20 m 1 h 20 m 5 h 50 m
1 h 40 m 6 h 40 m 27 h 30 m
Card
SDHC
Card
SDXC
Card
SDXC
Card
The above number of shots is approximate. The number of recordable still images
•
may be less depending on the scene to record.
50
Page 51

Further Information
Approximate Audio Recording Time (GC-WP10 only)
SDHC
Sound quality
4 GB 16 GB 64 GB
MP3 44.1 kHz
16 bit Stereo
(128 kbps CBR)
The above recording time is approximate.
•
Approximate Recording Time (Using Battery)
Battery
Built-in Battery
The actual recording time may be shorter if zooming is used or if recording is stopped
•
repeatedly.
When the battery life is reached, the recording time becomes shorter even if the
•
battery is fully charged.
Approximate
Charging Time
When using the
computer:
3 h 00 m
When using the
AC adapter:
2 h 00 m
66 h 40 m 135 h 40 m 1093 h
Card
Actual Recording
Time
40 m 1 h 20 m
SDXC
Card
Continuous
Recording Time
51
Page 52

Further Information
Customer Support Information
Use of this software is authorized according to the terms of the software license.
JVC
When contacting the nearest JVC office or agency in your country (refer to the JVC
Worldwide Service Network at http://www.jvc-victor.co.jp/english/worldmap/index.html)
about this software, please have the following information ready.
Product Name, Model, Problem, Error Message
•
PC (Manufacturer, Model (Desktop/Laptop), CPU, OS, Memory (MB/GB), Available Hard
•
Disk Space (GB))
Please note that it may take some time to respond to your questions, depending on
their subject matter.
JVC cannot answer questions regarding basic operation of your PC, or questions
regarding specifications or performance of the OS, other applications or drivers.
LoiLo inc
Homepage: http://loilo.tv/product/15
52
Page 53

Index
A
A-B repeat . . . . . . . . . . . . . . . . . . . . . . .29, 35
Audio mode . . . . . . . . . . . . . . . . . . . . . . . . 33
B
Basic settings . . . . . . . . . . . . . . . . . . . . . . . 45
Battery indicator ....................15
C
Charging . . . . . . . . . . . . . . . . . . . . . . . . . . . 14
Clock adjust . . . . . . . . . . . . . . . . . . . . . . . . 18
Clock setting ........................18
Computer . . . . . . . . . . . . . . . . . . . . . . . . . . 39
Copy . . . . . . . . . . . . . . . . . . . . . . . . . . . . 31, 38
D
Delete ...........................30, 37
E
Eect ...............................45
External audio le ...................36
Eye-Fi card ..........................42
F
Face priority AE . . . . . . . . . . . . . . . . . . . . . 23
Folder number ......................36
I
Index screen/thumbnail display . . . . . 10
M
Menu settings . . . . . . . . . . . . . . . . . . . . . . 45
O
Operation mode . . . . . . . . . . . . . . . . .28, 34
R
Recording in water ..................25
Recording mode ....................20
Recording time/number of recordable
still images . . . . . . . . . . . . . . . . . . . . . . . . . 50
S
SCREEN LOCK button . . . . . . . . . . . . . . . . 26
SD card .............................12
Self timer . . . . . . . . . . . . . . . . . . . . . . . . . . . 22
Size of still image . . . . . . . . . . . . . . . . . . . 22
Still image mode .................... 20
T
Time-lapse recording . . . . . . . . . . . . . . . 24
Touch AE . . . . . . . . . . . . . . . . . . . . . . . . . . . 23
Trimming ...........................31
V
Video image quality .................21
Video mode . . . . . . . . . . . . . . . . . . . . . . . . 20
Viewing on TV . . . . . . . . . . . . . . . . . . . . . . 32
53
Page 54

© 2010 Victor Company of Japan, Limited
0810YMH-AL-OT
US
 Loading...