

Page 1
DR-MV100B
QUICK
DVD VIDEO RECORDER
Basic Operation
START
GUIDE
Need Help? Please call the JVC Customer Service
TOLL FREE CUSTOMER CARE HOTLINE: 1(800)252-5722
http://www.jvc.com
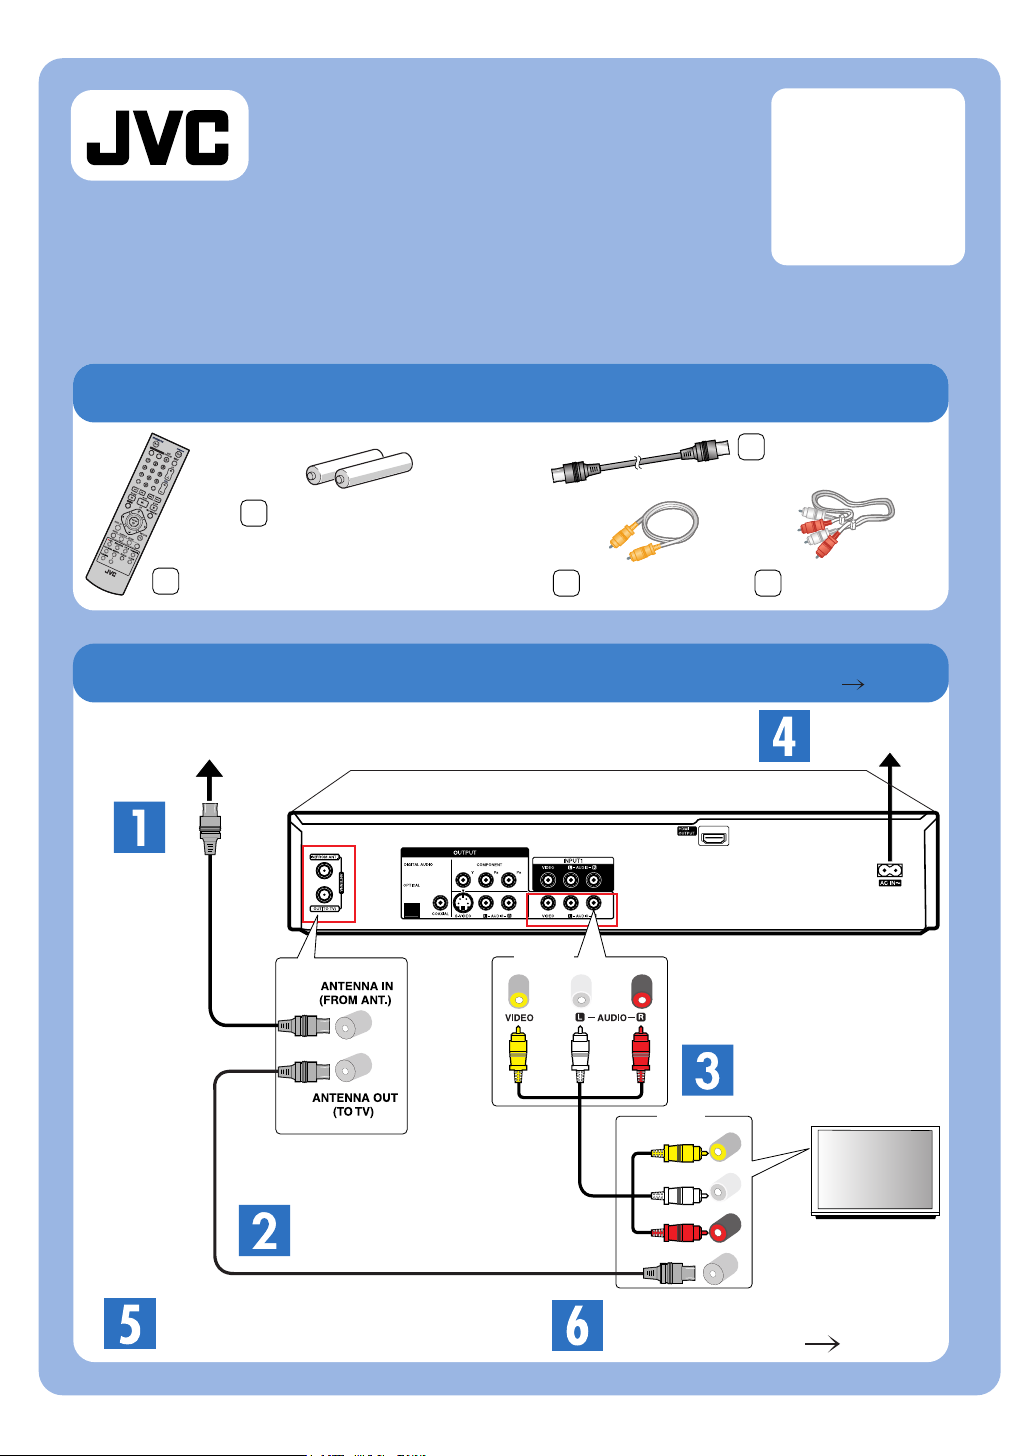
Included Accessories
RF cable
"AAA" battery x 2
(For remote control)
Remote control
Video cable
Connection : Antenna or Wall jack (Cable TV)
Antenna or cable
Audio cable
INSTRUCTIONS
pg. 10
AC Outlet
DR-MV100B
Connect
the arial.
DVD/VCR
OUT
Connect with
your TV
INPUT
Video
Connect your TV
After connections,
Power On.
- 1 -
Audio (L)
Audio (R)
TV
Go to " Initial Setup Wizard"
(INSTRUCTIONS pg. 14)
LVT1877-001A
0208SKMLGEEGL
Page 2
INSTRUCTIONS
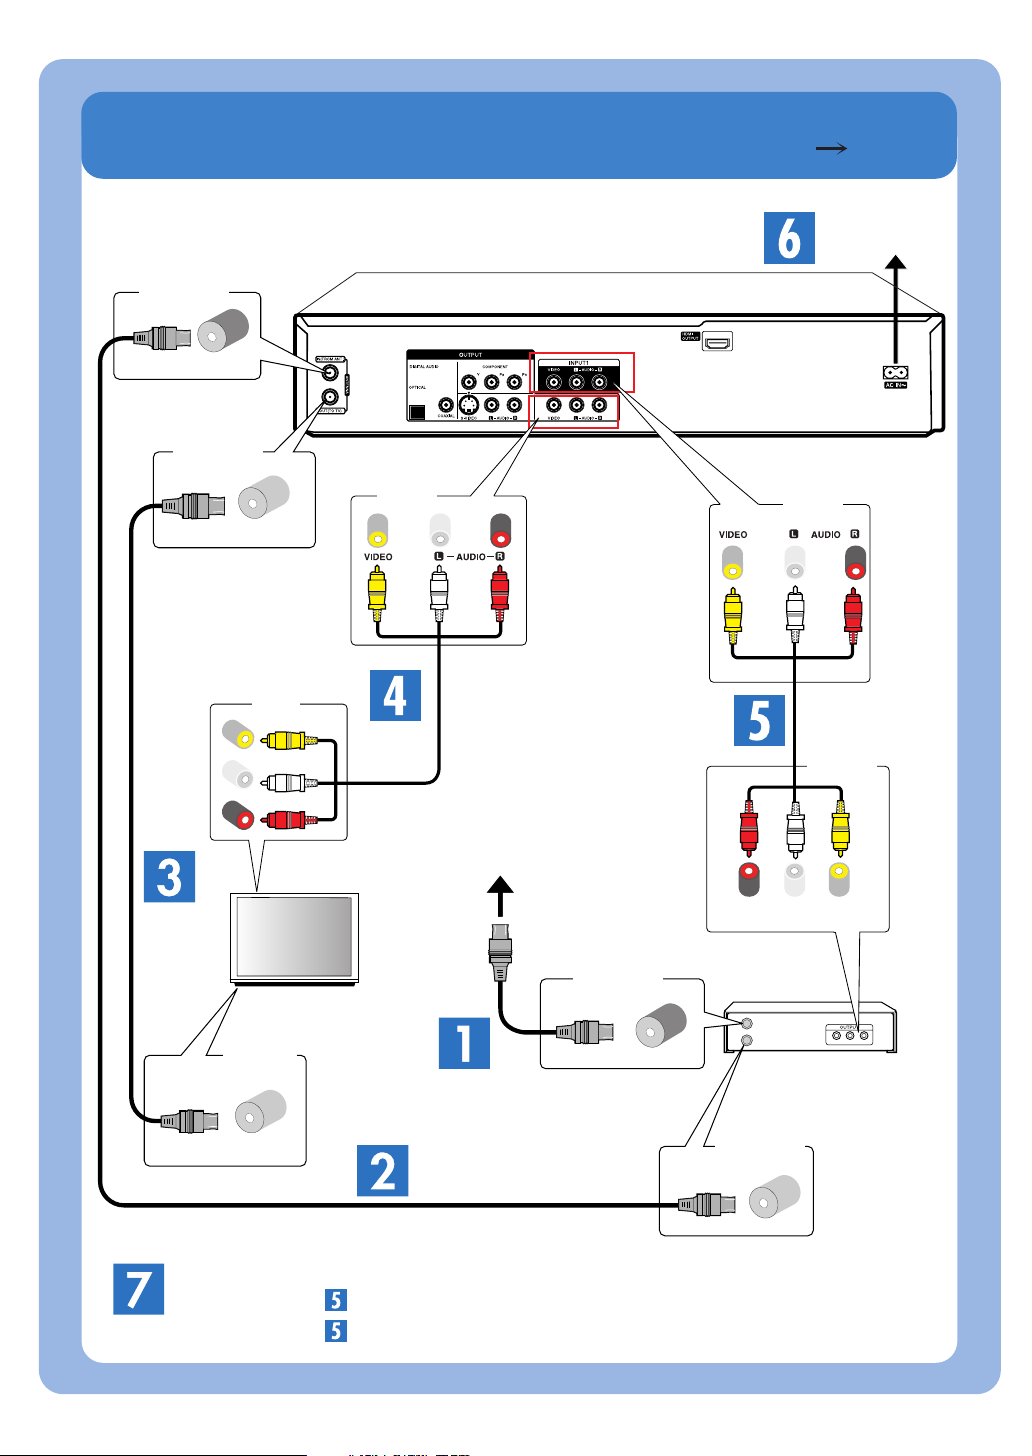
Connection: With Cable Box Or DBS Receiver
pg. 9
AC Outlet
DR-MV100B
ANTENNA IN
(RF. IN)
ANTENNA OUT
(RF. OUT)
DVD/VCR
OUT
INPUT
Video
INPUT 1
Audio (L)
Audio (R)
OUTPUT
(AV OUT)
Antenna
or cable
Video (R) - Audio - (L)
ANTENNA IN
(RF. IN)
TV
Video
ANTENNA IN
(RF. IN)
Cable or Satellite Box
Connect the arial.
ANTENNA OUT
(RF. OUT)
After connections, Power On.
When STEP is connectted: Select Input "AV1" of your recorder.
When STEP is disconnectted: Select "Ch 3 or 4" of your recorder.
(R) - Audio - (L)
- 2 -
Page 3

Initial Setup Wizard
INSTRUCTIONS
pg. 14
STANDBY/ON
TV
Select Language
2
Move next step
3
Select "Tuning Band"
4
Press "ENTER"
5
Press
"STANDBY/ON"
1
Set the "Date, Year
and Time"
6
Moves the cursor to the previous or
next column.
Changes the setting at the current
cursor position.
Press "ENTER"
Finish
7
- 3 -
Page 4

BASIC PLAYBACK
INSTRUCTIONS
pg. 24
DVD
Select "DVD"
1
Start Playback
2
Stop Playback
3
Playable Discs: DVD-Video, DVD-R, DVD+R, DVD-RW, DVD+RW, DVD-RAM, CD-R, CD-RW,
Video CD, Audio CD
BASIC RECORDING
(One-Touch Recording)
INSTRUCTIONS pg. 34
1
2
3
VHS
Select "VCR"
Start Playback
Stop Playback
Select "DVD or VCR"
or
1
Select Input
(AV1, AV2, DV IN or Ch)
Channel
or
2
Select Mode
3
DVD: XP, SP, LP or EP
VCR: SP or SLP
Recordable Discs: DVD-R, DVD+R, DVD-RW, DVD+RW, DVD-RAM
3
Note:
To playback the recorded disc
with other DVD players, it is
necessary to finalize the disc.
(INSTRUCTIONS pg. 21)
- 4 -
Start Recording
4
Stop Recording
5
Page 5

TIMER RECORDING
(Munual Timer Programming)
INSTRUCTIONS
pg. 35
Select "HOME"
1
STANDBY/ON
Select "Timer
Record"
2
Press "ENTER"
TV
3
Select "NEW" and
Press "ENTER"
4
5
Enter the necessary information for you timer
recording(s).
Changes the setting at the current cursor position.
Press "ENTER"
to check on the
Timer Record List
6
Press "RETURN"
Finish
7
- 5 -
Note:
To playback the recorded disc
with other DVD players, it is
necessary to finalize the disc.
(INSTRUCTIONS pg. 21)
Page 6

Dubbing from VCR to DVD
INSTRUCTIONS
pg. 37
VHS
You can copy the contents of a VHS tape to a DVD using the DUBBING
button. This allows you to archive your old VHS tapes to DVD.
Preparation : Set the resolution to 480i using the OUTPUT STATUS button before dubbing.
Press VCR button to set the VCR mode.
Insert Blank Disc
1
and Cassette
Find the place
on the VHS tape
2
from which you
DVD
Select the desired
4
Record Mode.
Select XP, SP, LP or EP
want to start
dubbing.
Select [Dubbing].
5
Start Dubbing.
Access the
Dubbing
3
menu screen.
6
Stop Dubbing.
7
Note:
To playback the recorded disc with other DVD players, it is necessary to finalize the disc.
(INSTRUCTIONS pg. 21)
- 6 -
 Loading...