

Page 1
INSTRUCTIONS
DR-MH300SAA
HDD & DVD VIDEO RECORDER
h
LPT1062-001A
EN
Page 2
Safety Precautions
The rating plate and the safety caution are on the
side of the unit.
IMPORTANT:
* Please read the various precautions on this and
next pages before installing or operating the unit.
* It should be noted that it may be unlawful to re-
record prerecorded tapes, DVDs, or discs without
the consent of the owner of copyright in the sound or
video recording, broadcast or cable programme and
in any literary, dramatic, musical, or artistic work
embodied therein.
WARNING:
DANGEROUS VOLTAGE INSIDE
TO PREVENT FIRE OR SHOCK HAZARD, DO NOT
EXPOSE THIS UNIT TO RAIN OR MOISTURE.
CAUTION:
A UNIT IS A CLASS 1 LASER PRODUCT. HOWEVER
THIS UNIT USES A VISIBLE LASER BEAM WHICH
COULD CAUSE HAZARDOUS RADIATION EXPOSURE
IF DIRECTED. BE SURE TO OPERATE THE UNIT
CORRECTLY AS INSTRUCTED.
WHEN THIS UNIT IS PLUGGED INTO THE WALL
OUTLET, DO NOT PLACE YOUR EYES CLOSE TO THE
OPENING OF THE DISC TRAY AND OTHER OPENINGS
TO LOOK INTO THE INSIDE OF THIS UNIT.
USE OF CONTROLS OR ADJUSTMENTS OR
PERFORMANCE OF PROCEDURES OTHER THAN
THOSE SPECIFIED HEREIN MAY RESULT IN
HAZARDOUS RADIATION EXPOSURE.
DO NOT OPEN COVERS AND DO NOT REPAIR
YOURSELF.
REFER SERVICING TO QUALIFIED PERSONNEL.
CLASS 1 LASER PRODUCT
REPRODUCTION OF LABELS
WARNING LABEL INSIDE OF THE UNIT
CLASS 3B VISIBLE AND INVISIBLE LASER RADIATION WHEN OPEN.
CAUTION
AVOID EXPOSURETO THE BEAM.
KLASSE 3B SYNLIG OG USYNLIG LASERSTRÅLING VED ÅBNING.
ADVARSEL
UNDGÅ UDSAETTELSE FOR STRÅLING.
KLASSE 3B SYNLIG OG USYNLIG LASERSTRÅLING NÅR DEKSEL ÅPENS.
ADVARSEL
UNNGÅ EKSPONERING FOR STRÅLEN.
KLASS 3B SYNLIG OCH OSYNLIG LASERSTRÅLNING NÄR DENNA DEL ÄR ÖPPNAD.
VARNING
STRÅLEN ÄR FARLIG.
KURSSI 3B NÄKYVÄ JA NÄKYMÄTÖN AVATTAESSA OLET ALTTIINA LASERSÄTEILYLLE.
VAR O!
ÄLÄ KATSO SÄTEESEN.
PRECAUTION:
Failure to heed the following precautions may result in
damage to the unit, remote control or disc.
1. DO NOT place the unit -
• in an environment prone to extreme temperatures
or humidity.
• in direct sunlight.
• in a dusty environment.
• in an environment where strong magnetic fields
are generated. In addition, do not place TVs or
other appliances which tend to generate strong
magnetic fields on top of the unit as it may cause
picture disturbance.
• on a surface that is unstable or subject to
vibration.
2. DO NOT block the unit’s ventilation openings or
holes.
If the ventilation openings or holes are blocked by
a newspaper or cloth, etc., the heat may not be
able to get out.
When installing the equipment, make sure there is
a space allowance of 10 cm or more on both
sides, on top and at the rear of the equipment.
3. DO NOT place heavy objects on the unit or remote
control.
4. DO NOT place anything which might spill on top of
the unit or remote control.
(If water or liquid is allowed to enter this
equipment, fire or electric shock may be caused.)
5. DO NOT expose the apparatus to dripping or
splashing.
6. DO NOT use this equipment in a bathroom or
places with water. Also DO NOT place any
containers filled with water or liquids (such as
cosmetics or medicines, flower vases, potted
plants, cups, etc.) on top of this unit.
7. DO NOT place any naked flame sources, such as
lighted candles, on the apparatus.
8. AVOID violent shocks to the unit during transport.
2
OR
H EN
Page 3

CAUTION:
0 When you are not using the unit for a long period
of time, it is recommended that you disconnect
the power cord from the mains outlet.
0 Dangerous voltage inside. Refer internal
servicing to qualified service personnel. To
prevent electric shock or fire hazard, remove the
power cord from the mains outlet prior to
connecting or disconnecting any signal lead or
aerial.
0 The mains plug shall remain readily operable.
ATTENTION:
This unit contains microcomputers. External
electronic noise or interference could cause
malfunctioning. In such cases, switch the unit off
and unplug the mains power cord. Then plug it in
again and turn the unit on. Take out the disc. After
checking the disc, operate the unit as usual.
MOISTURE CONDENSATION
Moisture in the air will condense on the unit when you
move it from a cold place to a warm place, or under
extremely humid conditions ^ just as water droplets
form on the surface of a glass filled with cold liquid. In
conditions where condensation may occur,
disconnect the unit’s power plug from the wall and
keep it disconnected for a few hours to let the
moisture dry, then turn on the unit.
DISCLAIMER OF LIABILITY
JVC shall not be liable for any loss relating to the
unit’s failure to properly record, store or playback any
content (video, audio or otherwise) for any reason
whatsoever. Any applicable warranties shall only
cover replacement or repair of the effected unit, and
shall not apply to recovery or replacement of lost
content.
Precautions during Operation
Getting Started
ATTENTION:
0 The STANDBY/ON button does not completely shut
off mains power from the unit, but switches
operating current on and off.
0 When moving the product, press STANDBY/ON to
turn off the power, and wait at least 30 seconds
before unplugging the power cord. Then, wait at
least 2 minutes before moving the product.
0 When discarding batteries, environmental problems
must be considered and the local rules or laws
governing the disposal of these batteries must be
followed strictly.
The HDD will be spinning at high speed whenever
this unit is on. So note especially the following points
before use.
0 Do not subject to vibration or impact.
Subjecting to excessive impact can cause not only
recorded data to be corrupted but also damage to
the HDD.
Scratches or dirt on the recording side of a disc
may prevent proper playback and recording.
0 Do not pull out the power plug from the socket while
this unit is operating.
Cutting off the power suddenly while the HDD is
operating can cause not only data corruption but
also damage to the HDD. Be sure to turn off the unit
before pulling out the power plug.
Effects from mobile phones
Using a mobile phone in the vicinity of the unit may
cause picture vibration on the TV screen or change
the screen to a blue back display.
Do not place objects that generate magnetic fields on
top of this unit
Some TVs or other appliances generate strong
magnetic fields. Do not place such appliances on top
of the unit as it may cause picture disturbance.
EN I
3
Page 4

Precautions
If any of the following abnormalities occur, pull out the
power plug immediately.
0 When smoke or any strange odour is emitted.
0 When water or any foreign substance enters the
interior.
0 When dropped or damaged.
0 When the power cord is worn.
Switch off the power immediately, then pull out the
power plug from the socket. Contact the nearest
dealer or service centre. Do not attempt any repairs
by yourself.
Do not use with dust or metal particles adhering to the
power plug or socket.
0 Heat generation or a short circuit can cause fire or
an electric shock.
0 Pull out the plug and wipe it with a dry cloth every
six months.
Insert the power plug into a socket that is easy to plug
into and pull out from.
0 Make sure that if abnormalities should occur in this
unit, the power plug can be pulled out immediately.
Insert the power plug firmly all the way in.
0 Heat generation or a short circuit can cause fire or
an electric shock.
Do not mishandle batteries as follows.
0 Mistaking plus F and minus G.
0 Mixing different types of batteries or those used
before.
0 Short-circuiting the electrodes.
0 Subjecting to heat, dismantling, or putting into
water or fire.
0 Charging.
Misuse can result in injury or fire due to leakage, heat
generation, combustion, cracks, etc.
When not using the remote control for an extended
period, remove the batteries.
In the event of leakage, wipe the liquid on the battery
case off completely. If the liquid gets onto the body or
clothes, rinse it off thoroughly with water.
Avoid sticking your hands into the disc tray.
0 It can result in injury. Be careful especially with
small children.
Do not place objects in front of the disc tray.
0 Placing a cup containing hot water in front of the
tray may result in injury or scalds when the tray is
opened.
Keep all plastic bags and other packaging out of the
reach of small children.
0 Covering over the head with these can cause
suffocation.
Do not place in unstable locations.
0 If placed on a shaky platform or an incline, or where
there is vibration or impact, it can drop or topple
over and cause injury.
0 This unit cannot be installed vertically.
Do not put anything into the interior.
0 If something enters the equipment’s interior, it can
result in fire or an electric shock.
Do not dismantle/modify.
0 The interior has high voltage parts, which can
cause fire or an electric shock.
Request an inspection of the interior once a year from
the dealer.
0 Using with dust accumulated can result in fire.
0 Conducting it before the rainy season, where
humidity rises, will be more effective.
4
H EN
Page 5

Copyrights
0 Recordings from TV broadcasts or pre-recorded
material cannot be used without the consent of the
right-holder under copyright law, except for
personal enjoyment.
0 Software or broadcasts containing copyright
protection signals cannot be recorded or dubbed.
0 Note that broadcasting for profit or public viewing,
material recorded/edited using this unit even in
miniaturised screens, may infringe on authors’
rights protected by copyright law.
Backup of Recorded Contents
0 It is advisable to back up discs containing
important recordings regularly (every few years).
Although digital signals do not deteriorate, failure to
play back or record may arise from the effects of
aging on the disc depending on its storage
environment.
0 Recorded data may be corrupted if an outage
occurs while this unit is operating. Programmes
recorded on the HDD should be dubbed to DVD
early as a safeguard against HDD failure.
0 Recorded programmes or data cannot be restored
once the DVD disc or HDD is damaged.
TRADEMARK AND LICENSE INFORMATION
Manufactured under license from
Dolby Laboratories. ADolbyB and the
double-D symbol are trademarks of
Dolby Laboratories.
ADTSB and ADTS DIGITAL OUTB are
trademarks of Digital Theater
Systems, Inc.
This product incorporates copyright protection
technology that is protected by U.S. patents and
other intellectual property rights. Use of this copyright
protection technology must be authorized by
Macrovision. Reverse engineering or disassembly is
prohibited.
G-
CODE is a registered trademark of
Gemstar Development Corporation.
The G-
CODE system is manufactured
under license from Gemstar Development
Corporation.
i-LINK is a trademark of Sony Corp.
h
Getting Started
b
d
b
d
EN I
5
Page 6
Check Out These Capabilities
Feel at ease even on long business trips
Fully recordable max. 300 hours
(HDD Capacity: 160 GB) (with recording mode at FR480)
Equipped with a high capacity hard disk (HDD) to record more of your favourite
programmes. [ P70]
Dub DV tapes
(Equipped with DV input terminal)
Connect with a DV camcorder, and you
can dub DV tapes to the HDD/DVD on this
unit. [ P56]
Even I can programme a timer
Easy programming simply by
entering the G-
CODE number of the
programme
(G-CODE Timer Programming)
Simply enter the G-CODE number that corresponds
to the programme you wish to record (found in
most TV listings), and this unit’s timer is
automatically programmed. You can save the trouble of setting the recording
details such as date and time. [ P38]
H EN
6
Page 7
Doing this and that is a breeze!
It’s okay if you don’t know how to operate
Help is available
(Help Guide)
View simple explanations using the button on the remote control when you
have difficulty operating this unit. [ P69]
Record copy-once
programmes on DVD-R
Getting Started
Supports DVD-R (VR mode) recording.
[ P53]
Even I can play back
Record and play back using DVD-RAM/-RW/-R discs
(Equipped with DVD Multi Drive)
Choose from DVD-RAM, DVD-RW and DVD-R discs to match your purpose. [ P12]
Play a variety of discs
(Super Multi Playback)
In addition to DVD-RAM, DVD-RW and DVD-R, +RW and +R discs are
also playable. [ P12]
EN I
7
Page 8
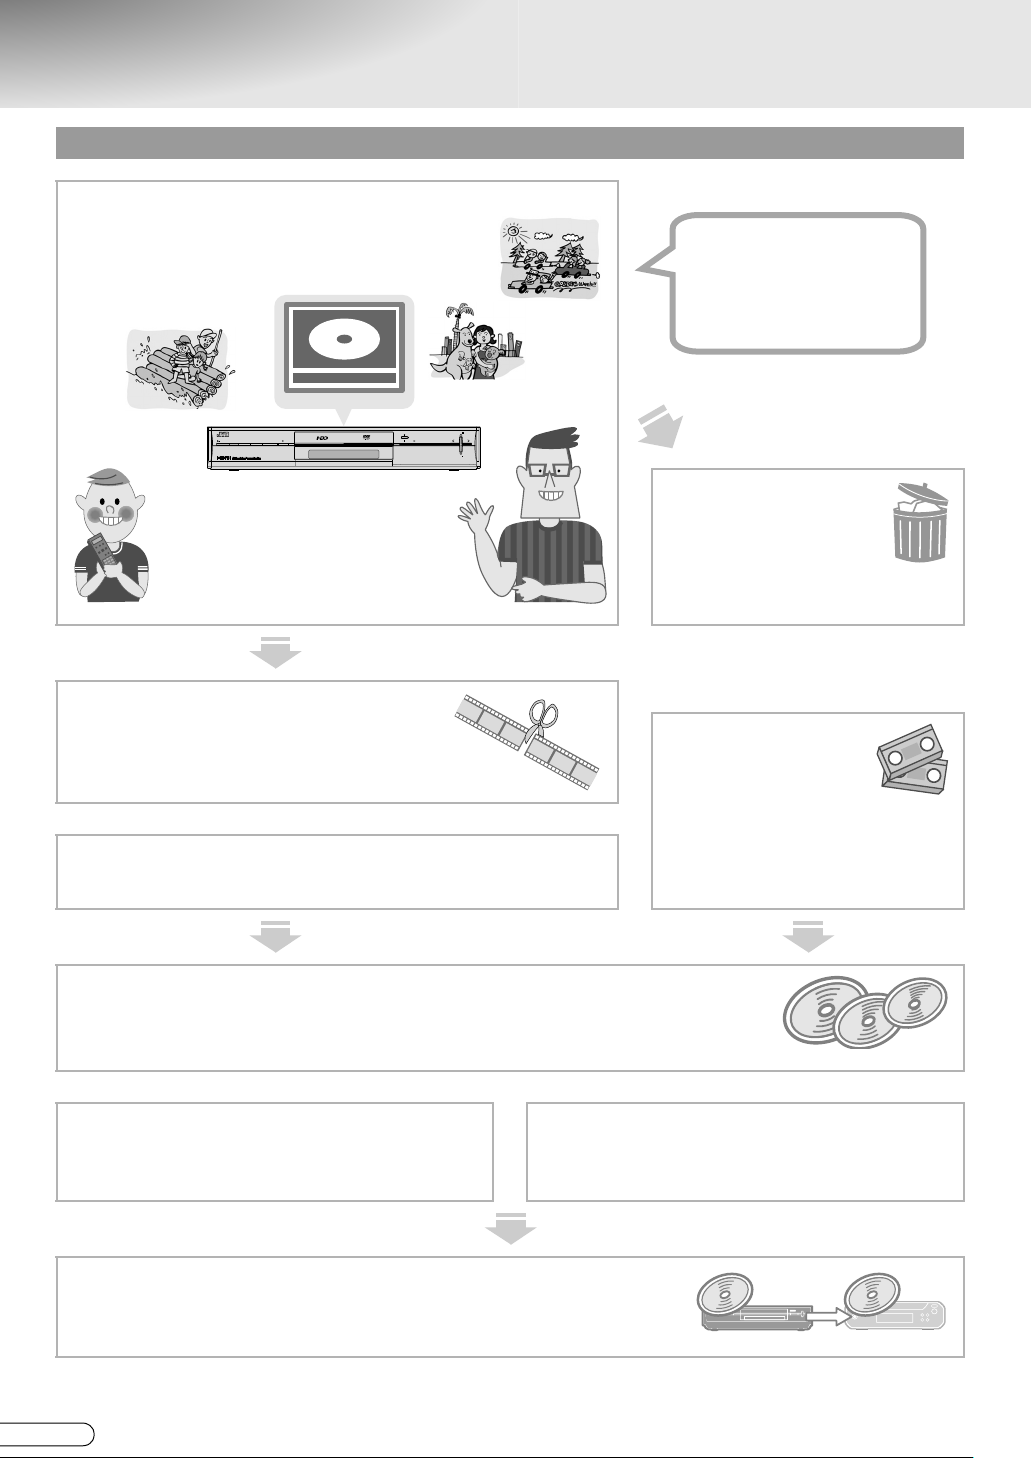
Common Ways to Use
Recommended ways of using this unit!
Start off by recording to the HDD
Fully recordable
Max. 300 hours
(with recording mode at
FR480) [ P70]
HDD
NAVIGATION
S-VIDEO VIDEO L(MONO) AUDIO R
PR
ENTER
PROG
PUSH-OPEN
DV
DVIN
PR
HDD DVD
STANDBY/ON
RAM/RW
ABasic RecordingB [ P32]
F-1
To cut away excess portions
or commercials
ADeleting ScenesB [ P67]
To watch only favourite scenes
AGathering Favourite Scenes (Play List Creation)B [ P62]
Dub to DVD discs for long-term storage
Delete unwanted
programmes
watched
ADeleting/Protecting a
ProgrammeB [ P66]
To transfer VHS
tape contents
to DVD discs
ADubbing from DV Camcorder/
Video Cassette RecorderB
[ P56]
ADubbingB [ P52]
ADubbing between HDD and DVD DeckB [ P54]
Which discs to use?
AAbout DiscsB [ P12]
To watch on other DVD players
AWatching on Other DVD Players (Finalising)B [ P51]
H EN
8
How much can be recorded onto one
disc?
ARecording ModeB [ P70]
Page 9
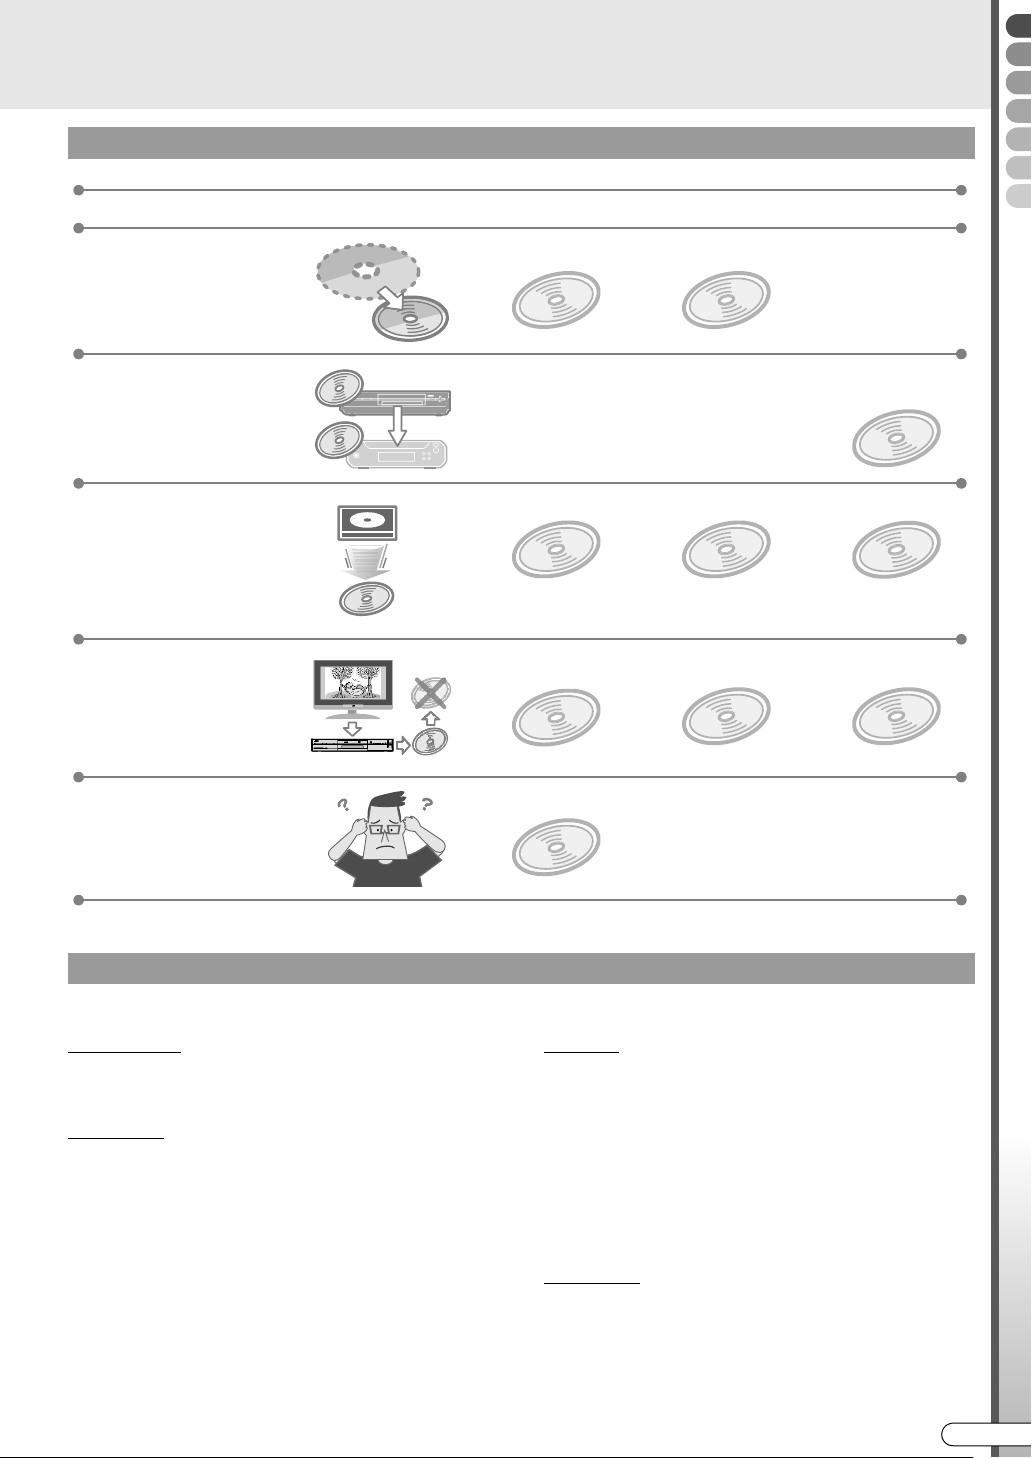
How to choose a DVD disc
C
At times like these Usable DVD discs
To record repeatedly
To play on other units
To perform high speed
dubbing from the HDD
To record programmes
that are only recordable
once
Getting Started
DVD-RAM
Approx. 100K
times
Recording on DVD-R (Video mode) is
recommended.
DVD-RW
Approx. 1000
times
DVD-R
(Video mode)
0 Be sure to finalise after recording.
[ P51]
DVD-RAM
HDD
Max. approx.
3x speed
DVD
CH
RAM/RW
HDD DVD
ENTER
NAVIGATION
STANDBY/ON
TVGUIDE
PUSH-OPEN
F-1
CH
S-VIDEOVIDEO L(MONO)AUDIOR
0 When performing high speed dubbing, choose a high speed
DVD disc. [ P54]
PRM-compliant
DVD-RAM
DVD-RW
Max. approx.
4x speed
CPRM-compliant
DVD -RW (VR m od e)
(Formatting [ P50])
DVD -R
Max. approx.
8x speed
CPRM-compliant
DVD-R (VR mode)
Not sure which disc to use
For details on the types of discs, see AAbout DiscsB [ P12].
When using DVD-RW, DVD-R
Formatting is necessary. [ P50]
With DVD-RW
0 Format in either VR mode or Video mode.
0 Able to format as many times as desired.
With DVD-R
0 Format using new discs only for VR mode.
0 It will be in Video mode when not formatted.
0 Unable to reformat.
DVD-RAM
DVD-RAM is recommended.
0 Does not require formatting.
0 Able to record repeatedly, or edit such as
deleting unwanted parts.
VR mode
0 When you wish to record repeatedly or edit such as
deleting unwanted parts.
(Unable to record repeatedly with DVD-R.)
0 Deleting recorded programmes will increase the disc
remaining time.
(Does not increase for DVD-R.)
0 When you wish to record programmes that are only
recordable once.
(Use a CPRM-compliant disc.)
Video mode
0 When you wish to play back on other DVD players.
0 Unable to edit such as deleting unwanted parts.
0 Deleting recorded programmes will not increase the
disc remaining time.
EN I
9
Page 10

Contents
DR-MH300SAA
HDD & DVD VIDEO RECORDER
Getting Started 2
Safety Precautions ....................................................... 2
Precautions during Operation ............................................ 3
Precautions ................................................................... 4
Copyrights ......................................................................... 5
Check Out These Capabilities ..................................... 6
Common Ways to Use .................................................. 8
Contents ...................................................................... 10
About Discs................................................................. 12
Recordable/Playable Discs............................................... 12
Discs for Playback Only .................................................. 12
Unplayable Discs ............................................................ 13
Care of Discs ................................................................... 13
Handling of Discs ............................................................ 13
Cartridge-enclosed DVD-RAM......................................... 13
Caution for DualDisc Playback........................................ 13
Disc Storage .................................................................... 13
When the Recording/Playback Lens is Dirty..................... 13
How to Use this Manual ............................................. 14
About this Manual ........................................................... 14
Operation of the Menu Screen......................................... 14
Functions of Each Part............................................... 15
Remote Control ............................................................... 16
Preparations 17
Selecting Devices to Connect ................................... 17
Receiving via Antenna ............................................... 18
Receiving via External Receiver................................ 19
Connect Using Video/Audio Cable or S-video Cable ....... 19
Connect Using Component Video Cable ......................... 20
Dubbing from DV Camcorder/Video Cassette
Recorder ............................................................ 21
Listening with Digital Audio (Theatre Surround)..... 21
Setup Procedures ....................................................... 22
Auto Setup................................................................... 23
Setting On-screen Language..................................... 24
Setting TV Screen Size............................................... 25
Input/Output Setting ................................................... 26
Clock Setting............................................................... 27
Setting Receiving Channels ...................................... 28
G-
CODE Guide Channel Set ........................................ 30
Screen Display ............................................................ 31
On-Screen Display .......................................................... 31
10
H EN
Basic Operations 32
Basic Recording ......................................................... 32
Basic Playback (Library Database Navigation)........ 34
Usable Buttons during Playback............................... 36
Timer Programming Guide ........................................ 37
G-
CODE Timer Programming ...................................... 38
Calendar Timer Programming................................... 40
Checking, Changing or Cancelling a Timer
Programme ........................................................ 42
Automatic Satellite Programme Recording (HDD)............ 43
CH
HDD DVD
STANDBY/ON
RAM/RW
ENTER
NAVIGATION
TVGUIDE
PUSH-OPEN
DV
DVIN
F-1
CH
S-VIDEO VIDEOL(MONO)AUDIO R
Watching While Recording ........................................ 44
Programme Playback during Recording
(HDD & DVD-RAM) ................................................. 44
Play Back Other Programmes While Recording
(HDD & DVD-RAM/-RW/-R) ..................................... 45
Page 11
Watching DVD Videos................................................. 46
Watching DVD Videos.....................................................46
Audio, Subtitle and Angle Selection .................................47
Switching the Image Output Format .........................48
Playing Back MP3 & JPEG Files................................49
Formatting ................................................................... 50
Watching on Other DVD Players (Finalising) ...........51
Dubbing 52
Dubbing........................................................................ 52
Recordable Once Only Programmes (Copy-once)...53
Dubbing between HDD and DVD Deck......................54
Dubbing from DV Camcorder/Video Cassette
Recorder.............................................................56
Dubbing from DV Camcorder ..........................................56
Dubbing from Video Cassette Recorder (VCR)..................57
Editing 58
Modifying Thumbnail/Category .................................58
Modify Thumbnail............................................................59
Modify Category...............................................................59
Creating Programme Title .......................................... 60
Creating/Deleting Chapters (Marks)..........................61
Gathering Favourite Scenes (Play List Creation).....62
Editing Play List ..........................................................64
Modify Scene ...................................................................64
Move Scenes ....................................................................65
Add Scenes ......................................................................65
Deleting/Protecting a Programme ............................. 66
Deleting a Programme......................................................66
Deleting Scenes .......................................................... 67
Dividing Scenes .......................................................... 68
Useful Features 69
Help Guide ...................................................................69
Recording Mode ..........................................................70
FR (Free Rate) Mode.........................................................70
DV Mode .........................................................................71
Weekly/Daily Timer Programming............................. 72
Temporary Recording .................................................74
Setting Time Range for Temporary Recording................... 74
Using the Temporary Recording Function ........................74
Timer Recording ..........................................................75
Managing DVDs (Library) ...........................................76
To Register to Library .......................................................76
To Delete from Library .....................................................77
To Search for Recorded Programmes from Library............ 77
Sound ...........................................................................78
Avoiding Misuse..........................................................79
To Disable Operation (Child Lock)...................................79
To Lock the Disc Tray (Tray Lock) ....................................79
Changing Remote Control Settings...........................80
Operating a TV from Other Manufacturers .......................80
Using Multiple JVC Recorders ..........................................80
Playback Setting Menu Operations ...........................81
How to Use the Playback Setting Menu ...........................81
Description of Each Setting ..............................................82
Setup Menu ..................................................................84
Language Code List ....................................................90
Glossary ....................................................................... 91
Troubleshooting/Appendix 92
Q&A ..............................................................................92
Troubleshooting ..........................................................94
On-screen Message ....................................................96
Specifications ..............................................................98
List of Terms................................................................99
Getting Started
Verify the Accessories
RF cable
D
DV
3
D
D
H
2
6
1
5
9
4
8
7
0
R
E
T
N
E
L
O
R
T
N
O
C
E
T
O
M
E
R
R
E
D
R
O
C
E
R
D
V
D
Infrared remote control unit
Audio/Video cable
R6 Battery x 2
Input cable adapter
Output cable adapter
EN I
11
Page 12
About Discs
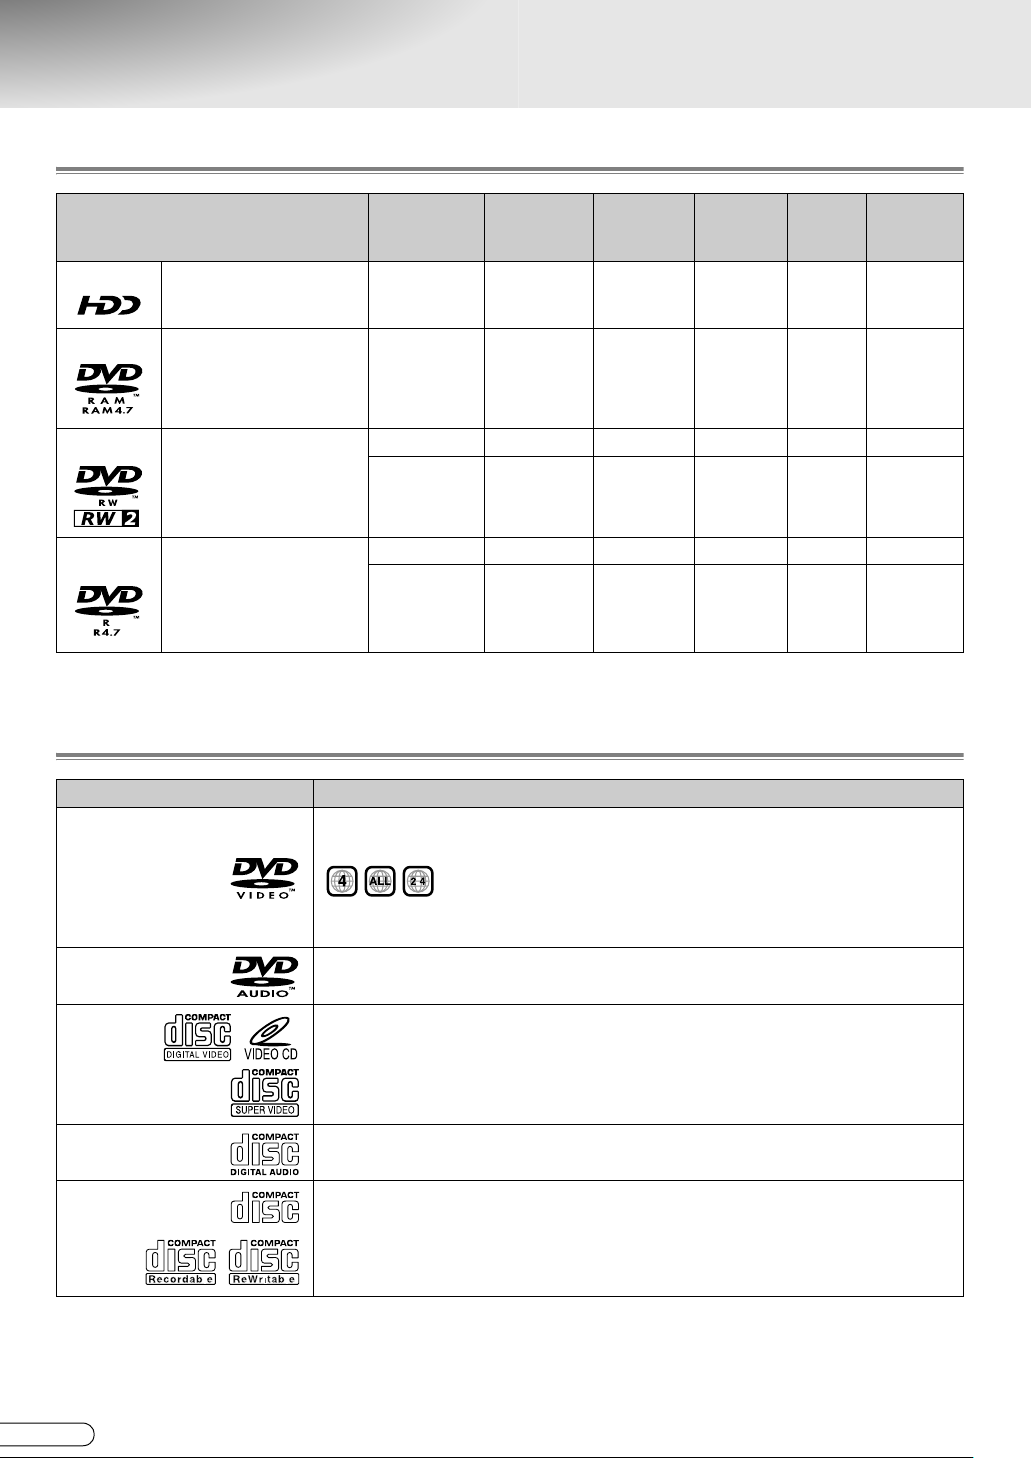
Recordable/Playable Discs
Disc type
HDD
DVD-RAM 12 cm: 4.7 GB/9.4 GB (*1)
DVD-RW
DVD-R
*1 The 9.4 GB and 2.8 GB DVD-RAM discs stated in the table refers to double-sided discs, not double-layered
discs.
Built-in 333
8 cm: 1.4 GB/2.8 GB (*1)
Ver . 2 .0
Ver . 2 .1
Ver. 2.1/3x
12 cm: 4.7 GB
8 cm: 1.4 GB
Ver . 1 .1
Ver. 1.1/2x
Ver. 1.2/4x
12 cm: 4.7 GB
8 cm: 1.4 GB
General
Ver . 2 .0
Ver. 2.0/4x/8x
Ver. 2.1/16x
Recording
mode
VR mode
VR mode
Video mode
VR mode
Video mode
Formatting
3333
33 33
33 3
333
Repeated
recording
Live
Memory
Playback
Editing Finalising
3
Discs for Playback Only
Disc type Description
Commercially available video disc (e.g. movies, music)
DVD Vide o
DVD Au dio
Video CD
Super
Video CD
CD-DA
CD-ROM
CD-R/
RW
The region number playable on this unit is A4B.
(example of playable region number indications)
Converts discs in TV formats other than PAL format (e.g. NTSC format), to PAL
format for playback.
Commercially available music DVD
Discs marked as playable with DVD player can be played.
Commercially available video disc
Music CD
DTS music CDs can also be played. (Decoder required separately.)
MP3 and JPEG files in music CD format as well as AISO9660B or Joliet format can
be played.
JPEG files playable on this unit must conform to JFIF/Baseline process, and the
maximum resolution is 2,812 pixels in width by 2,112 pixels in height.
(Includes CD-R or CD-RW recorded in Video CD/Super Video CD format.)
0 +R/+RW discs recorded and finalised in Video mode can be played. ADVDB will be displayed on the front display
panel.
0 CDs recorded in Packet Write format cannot be played.
0 The performance of CDs that do not conform to CD-DA standards (e.g. copy control CDs) cannot be guaranteed.
12
H EN
Page 13
Unplayable Discs
Cartridge-enclosed DVD-RAM
0 DVD-RAM (2.6 GB/5.2 GB)
0 DVD-R DL (single-sided double-layered)
0 +R DL (single-sided double-layered)
0 DVD-R for Authoring
0 CD-ROM/R/RW (including PhotoCD, CD-G)
0 DDCD (1.3 GB Double Density CD)
0 HDCD (High Density CD)
Never use discs with their seals or labels peeled off;
discs in unusual shapes rather than circular ones; badly
warped discs; cracked discs and others.
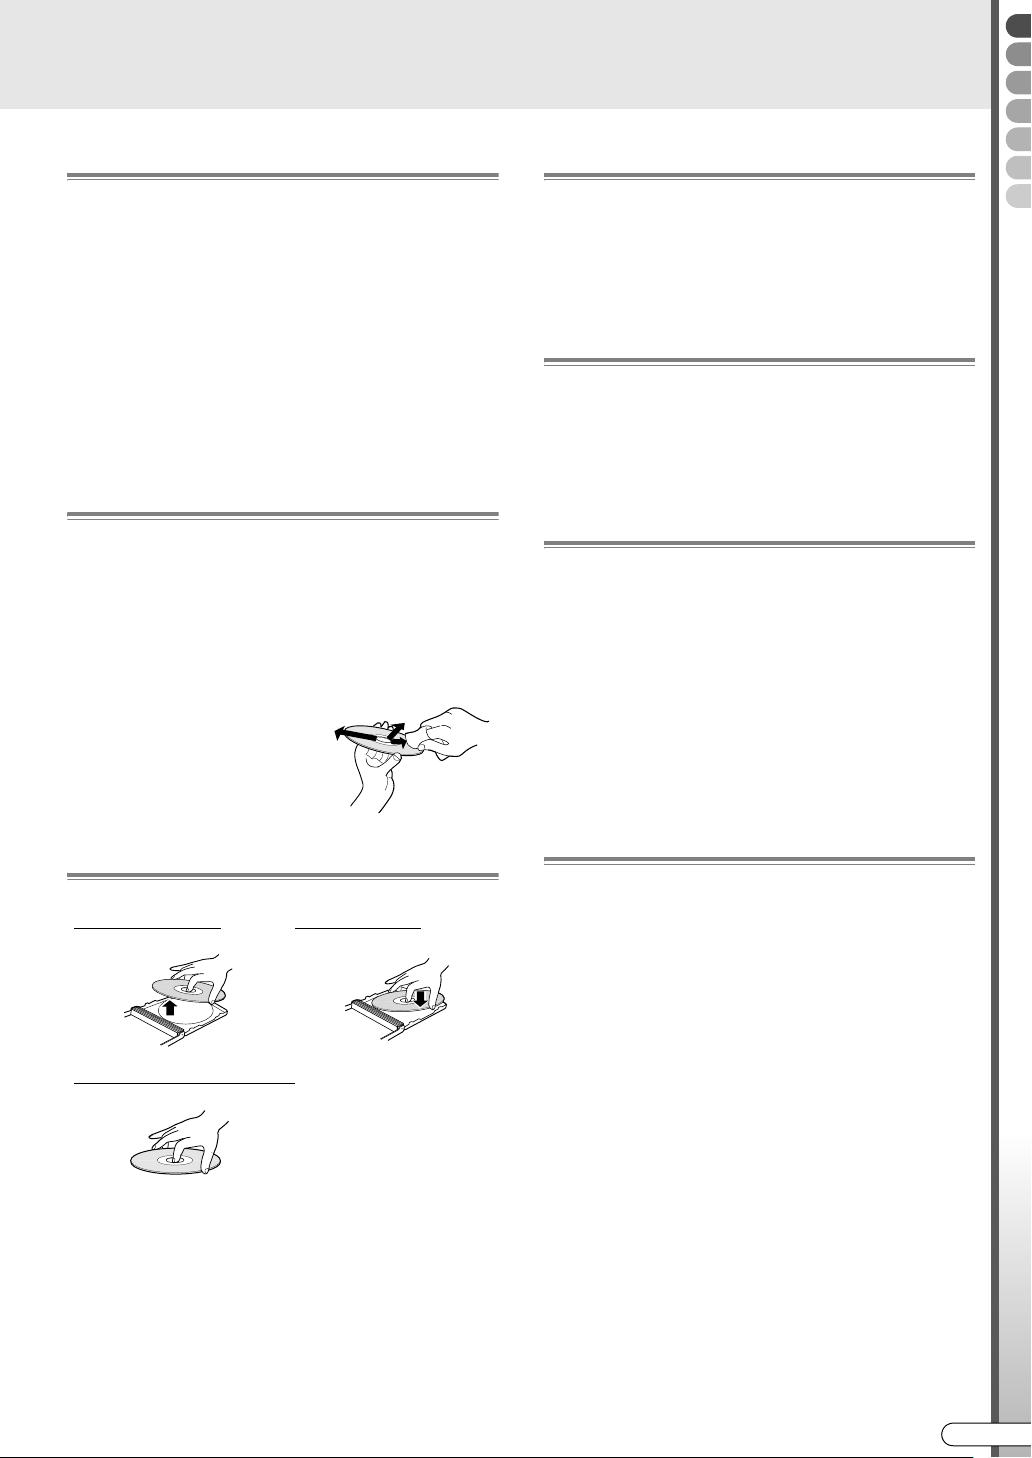
Care of Discs
0 Dirt such as fingerprints or dust on the disc may result
in distortions in images or sounds. Always keep clean
with a soft cloth.
0 Gently wipe from the centre of the disc towards the
edge with a soft cloth.
0 For stubborn stains, wipe using a cloth dampened
with a little water, then finish with a dry cloth.
0 Never use thinner or
benzene, alcohol,
conventional record cleaners
or anti-static sprays. It may
damage the disc.
Handling of Discs
0 Cartridge-enclosed DVD-RAM is not supported.
Remove the disc from its cartridge before use. For
details on removable discs (TYPE2, TYPE4), refer to
their manuals.
Caution for DualDisc Playback
The non-DVD side of a DualDisc does not comply with
the Compact Disc Digital Audio standard. Therefore,
the use of non-DVD side of a DualDisc on this unit is
not recommended.
Disc Storage
0 Avoid storing in the following places.
• Humid or dusty places and places prone to fungus.
• Places exposed to direct sunlight or near heaters.
• Inside a vehicle in summer.
0 Do not drop or subject to impact.
0 Put into the case and store upright.
0 Stacking, propping or dropping without putting it in a
case may result in deformation and cracks.
When the Recording/Playback Lens is Dirty
Getting Started
Removing the disc
Correct way to hold the disc
Placing the disc
0 Avoid touching the recording/playback surface.
0 Extended use may lead to dust or dirt adhering to the
recording/playback lens and preventing normal
recording or playback.
0 Cleaning with a commercially available DVD lens
cleaner every six months is recommended, although
it also depends on the frequency of use and the
installation environment.
0 Refer to the lens cleaner manual on how to clean.
EN I
13
Page 14
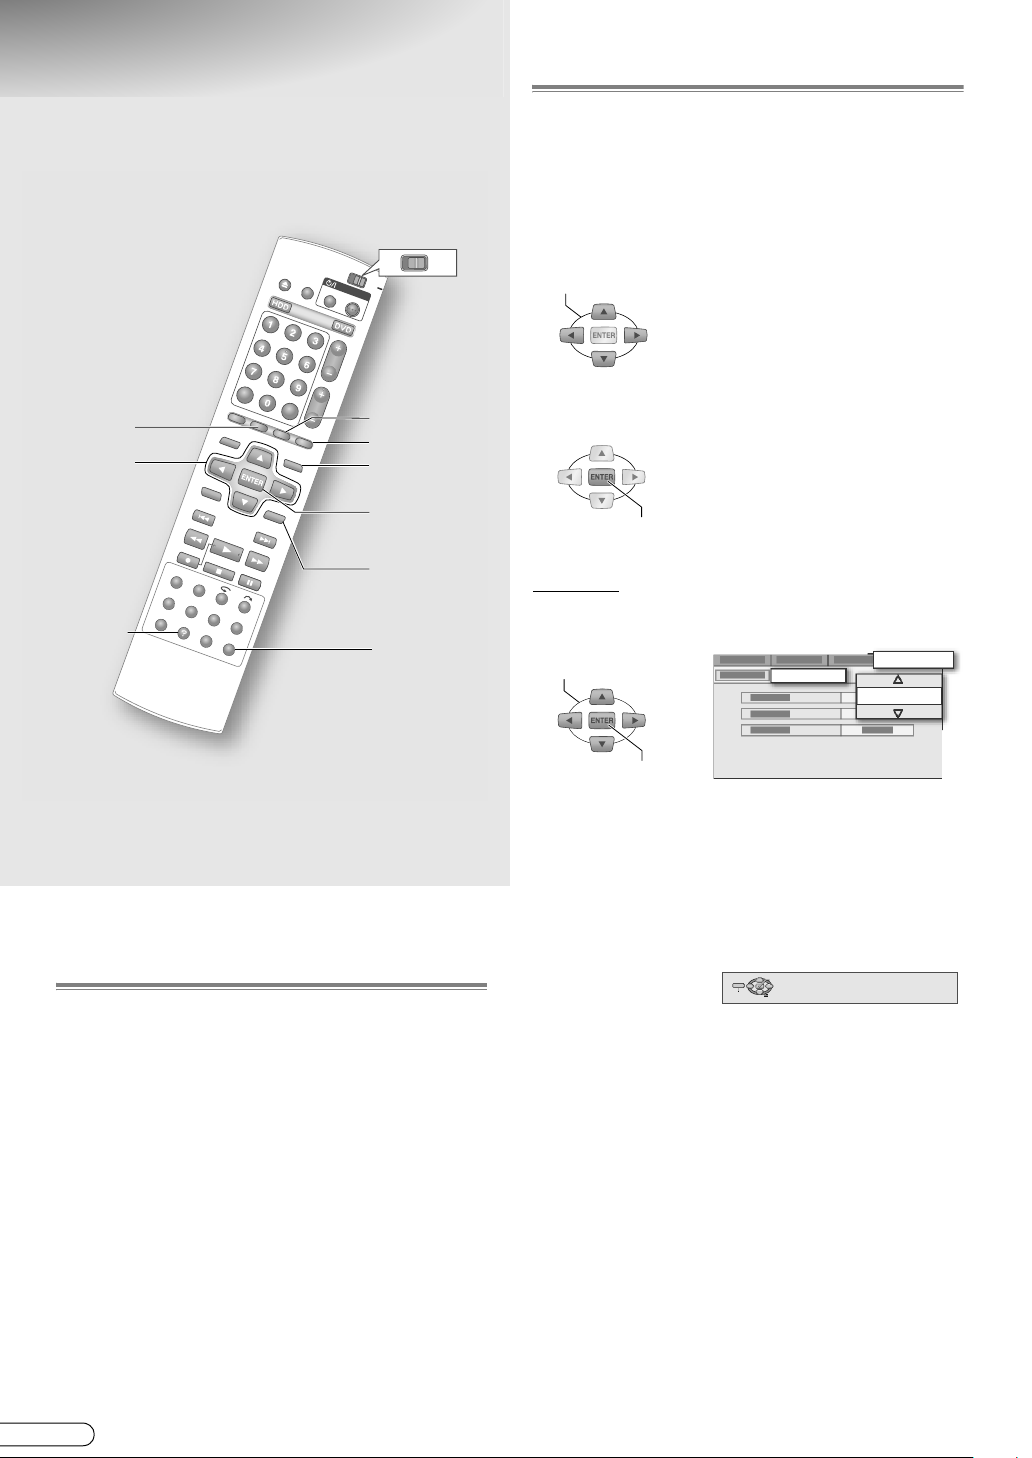
How to Use this Manual
Operation of the Menu Screen
ABCDEFGHIJK
0 Applicable media are highlighted on the above icons.
DVD
TV
DUBBING
Selection
Keys
(FGDE)
HELP
EDIT
PROG
NAVIGATION
A
RETURN
SET UP
0 The menu screen will be displayed when any of the
following buttons is pressed.
SET UP, NAVIGATION, EDIT, PROG, DUBBING,
HELP
0 Select options using the Selection Keys (FGDE) on
the remote control.
SELECT
0 Option
A light green item with a small
arrow, on the menu screen.
0 Confirm using ENTER.
CONFIRM
Example
A Select an item.
SELECT
CLOCK SET
INITIAL SET UP
2005
0 Buttons to use in each step are denoted by step
numbers.
0 Other buttons to use are denoted by button names.
About this Manual
The text in this manual mainly describes operations
that use the remote control.
0 Remote control buttons are expressed as button
names.
0 Options on the menu screen are enclosed in double
inverted commas as in AoptionB.
Supplementary descriptions in this manual.
0 NOTE: Describes relevant information.
0 IMPORTANT: Describes limitations on functions or
operation.
0 CAUTION: Indicates a cause of malfunction or the
possibility of recordings being erased.
0 : Denotes the relevant page.
0 A - k : Numbers attached to items in the setup
menu.
CONFIRM
0 Options are prominently shown as pop-ups in the
screen illustration on this manual.
0 Press RETURN to return to the previous menu screen
or the broadcast screen.
0 Simple operations are displayed on the left or bottom
in most menu screens.
(Bottom screen display)
ENTER
SET UP
EXIT SELECT
SELECT WITH @
THEN PRESS [ENTER]
PRESS [SETUP] TO EXIT
0 Verify the settings, then press the initial button again
to exit the menu screen and return to the broadcast
screen.
14
H EN
Page 15
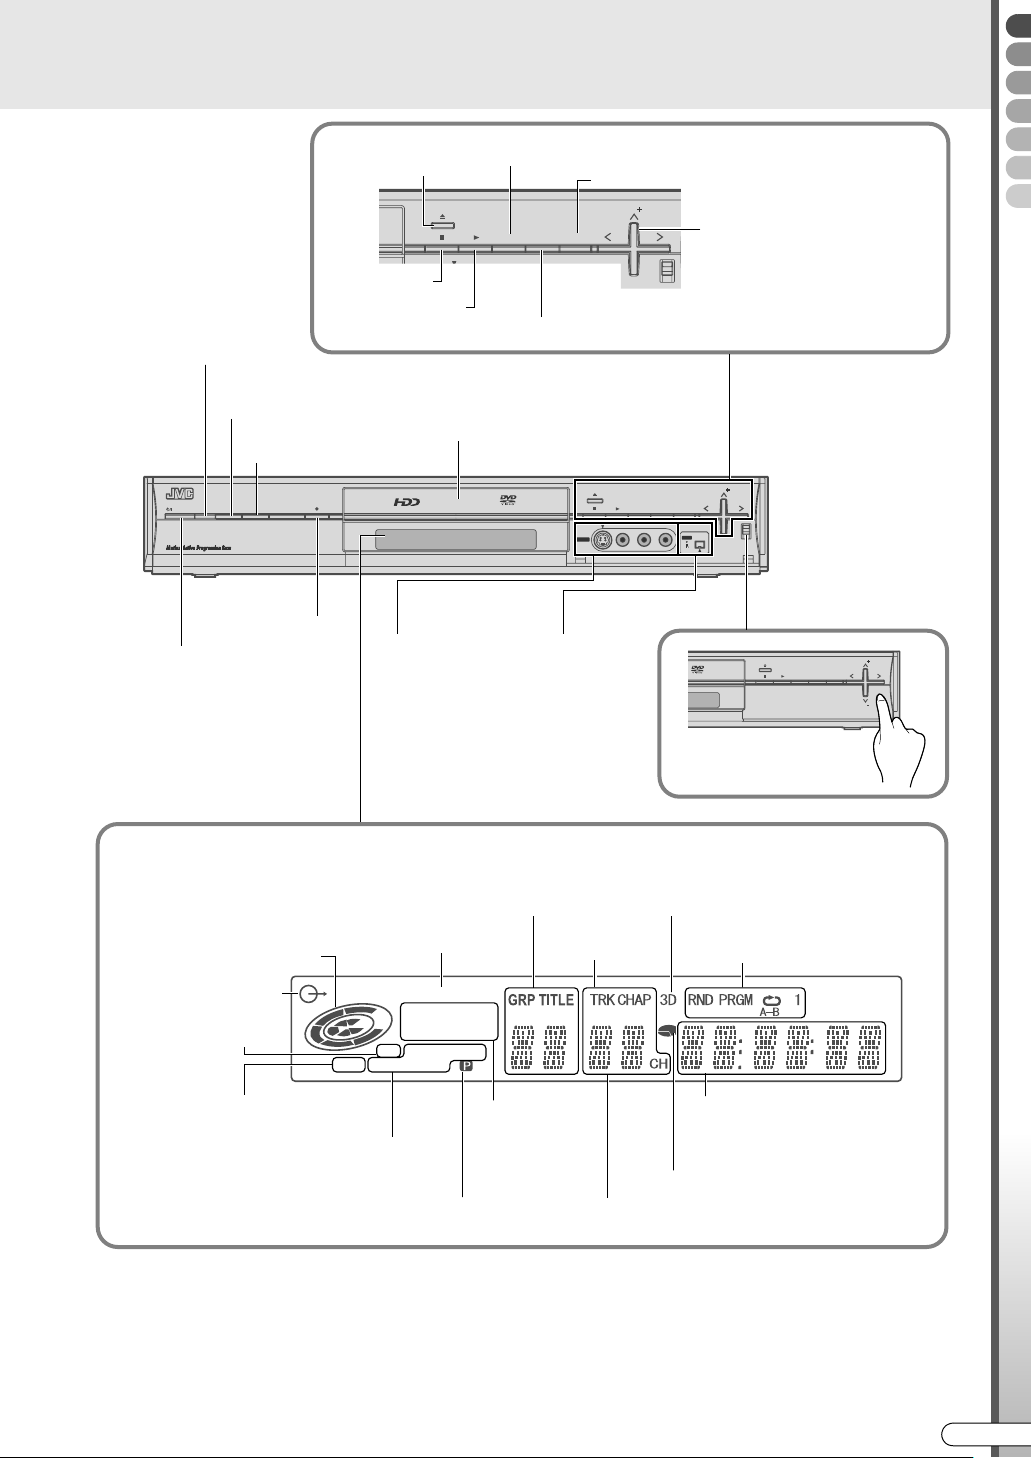
Functions of Each Part
F-1
DV
DV IN
PR
ENTER
NAVIGATION
PROG
Front View
Infrared receptor
Power (On/Off)
STANDBY/ON
Operate HDD
Operate DVD
HDD DVD
Recording
Open/Close
Stop
Connect video
cassette
recorder, etc.
[ P21]
Display the Library Database Navigation screen
Confirm
Change channels
(Up/Down)
Select
Play
(Up/Down/Left/Right)
Show programme navigation
Disc tray
RAM/RW
F-1
S-VIDEO VIDEO L(MONO) AUDIO R
NAVIGATION
PROG
PR
ENTER
DV
DV
IN/OUT
Dubbing
Connect DV
camcorder
[ P21]
RAM/RW
F-1
S-VIDEO VIDEO L(MONO) AUDIO R
NAVIGATION
Getting Started
PR
ENTER
PROG
PUSH-OPEN
DV
DVIN
PR
Press at PUSH - OPEN
to open the cover.
Front Display Panel
Disc operation indicator
Video indicator
VR mode disc
indicator
HDD mode indicator
Disc type indicator
Linear PCM indicator
LPCM
FR
XP SP LP EP
+
-
HDD DVDVR-
RW VCD
RAM
Image output indicator
Progressive Output
Information Display during Disc Playback
Group
Title
Surround indicator
Tr a ck
Chapter
Recording mode
indicator
Indicates the rate
during FR.
Playback mode indicator
Recording/Playback time/Clock
display
With information display in alphabet.
Disc remaining time indicator
Receiving channel display
CH lights up.
0 There are 4 levels of brightness that can be set for the front display panel. Setup Menu ADIMMER (DURING POWER
ON)B [ P88] c
0 Messages may be displayed depending on the operation.
• When the power plug is inserted: Alternating display of APLEASEB and AWAITB.
• When a disc is loaded: AREADINGB
EN I
15
Page 16
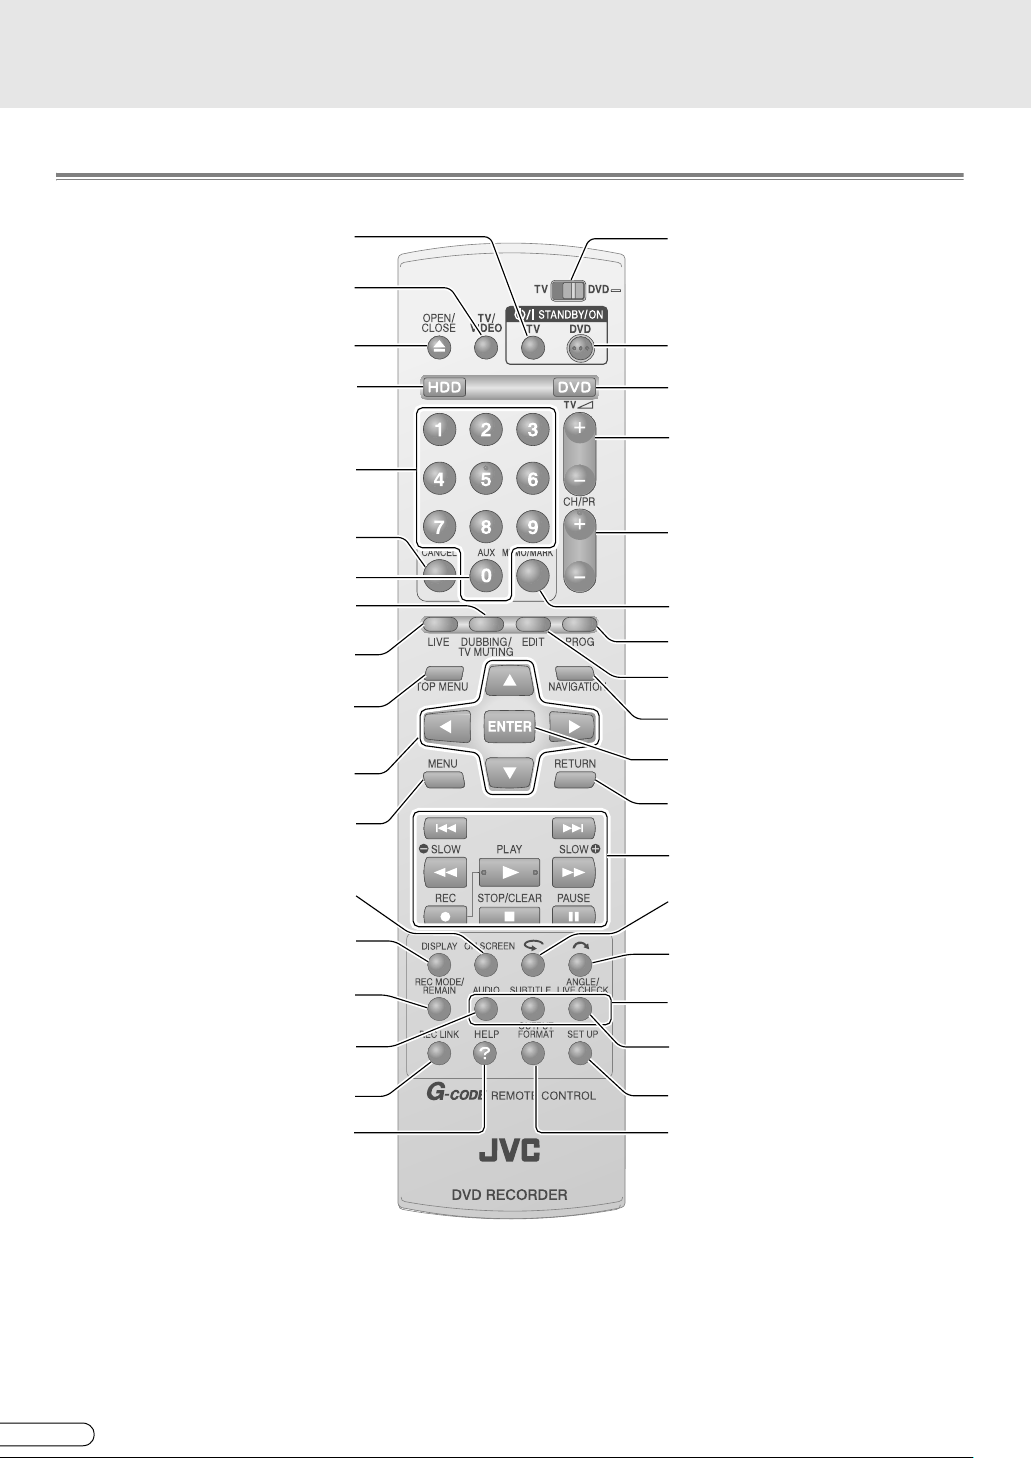
Functions of Each Part (continued)
Remote Control
Power (On/Off) TV
TV input switch
Open/Close disc tray
Operate HDD
Enter numbers (Number Keys)
Switch channels
Cancel [ P29, 55]
Auxiliary
Switch to external input channel
Dubbing [ P54]
(TV mute)
Switch to broadcast screen [ P45]
Display TOP menu [ P46]
During DVD Video playback
Select
Display the menu [ P46]
Display screen information [ P31, 81]
TV/DVD remote control selector
Usually set to DVD
Power (On/Off) DVD
Operate DVD
TV volume
Channel Up/Down
Enter into memory/marking [ P35, 55]
Programming the timer [ P38, 40]
Editing [ P58]
Watch recorded programme [ P34]
Confirm
Return to previous screen
Basic recording/playback operations
[ P33, 36, 47]
Shift back a little and replay [ P36]
Switch time display [ P36]
Set recording mode [ P70]
Check disc remaining time
Switch bilingual sound
Automatic Satellite Programme
NOTES: (Regarding batteries)
......................................................................................................................
[ P47, 78]
Recording [ P43]
View Help [ P69]
Skip forward a little [ P36]
DVD Video playback settings [ P47]
Sound/Subtitles/Camera Angle
View recording screen [ P45]
During Live Memory Playback
Perform basic setup [ P84]
Switch image output [ P48]
0 If the remote control’s functional distance becomes shorter, the batteries are depleted. At times like this, replace
with new batteries. Insert them correctly in the directions indicated for F and G.
0 If problems occur while using the remote control, remove the batteries, then re-insert them after more than 5
minutes and try again.
H EN
16
Page 17
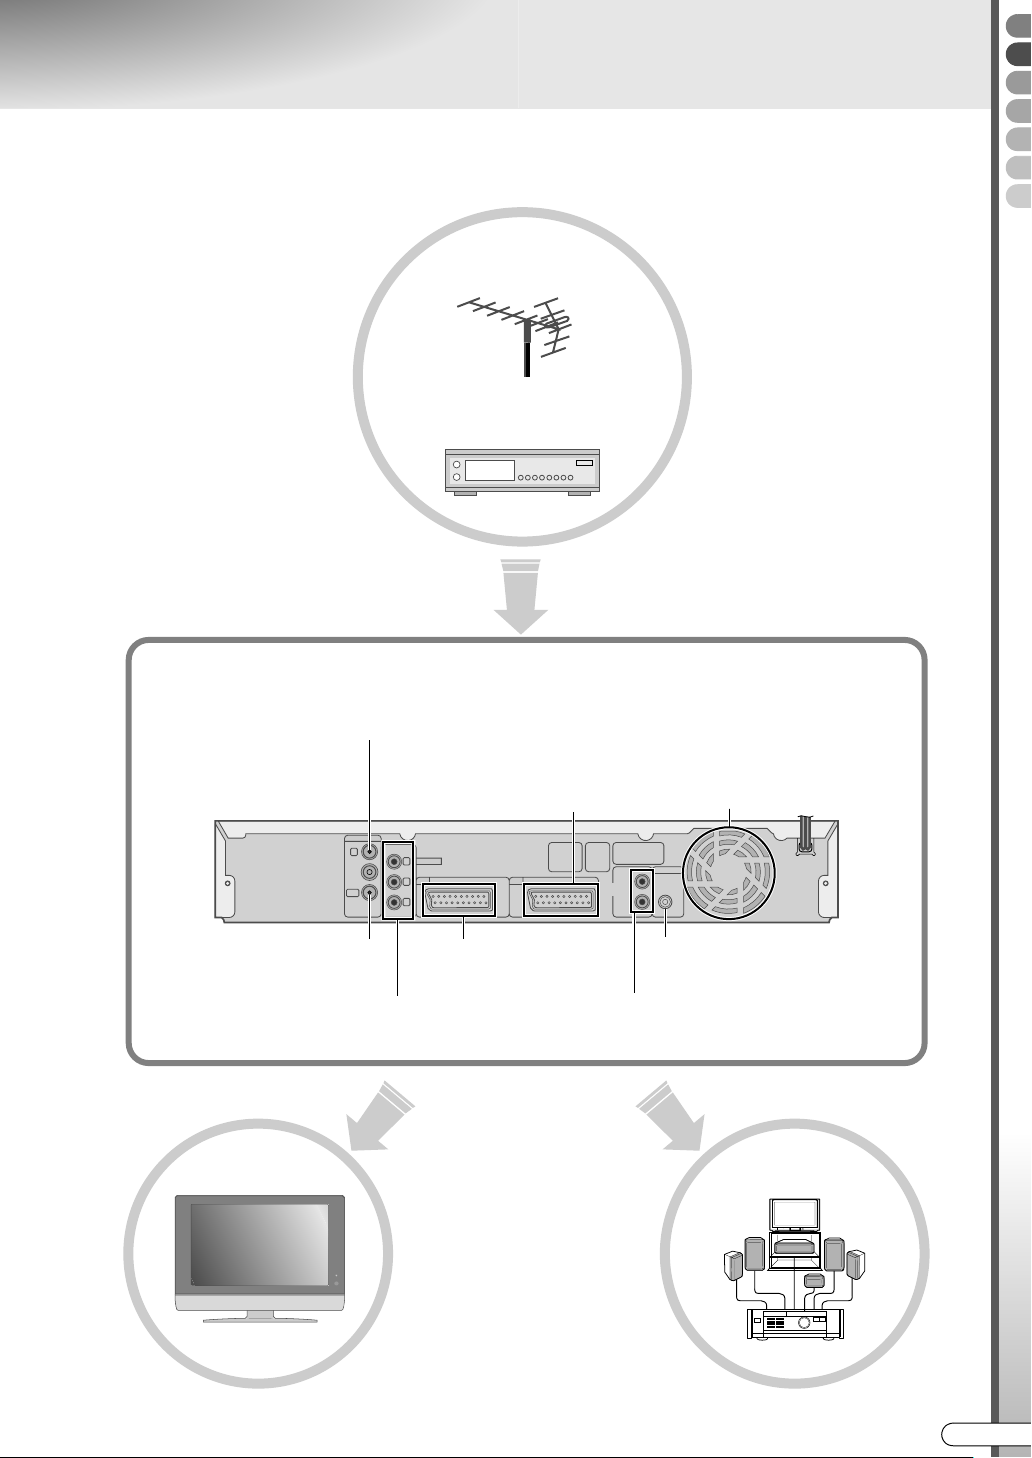
Selecting Devices to Connect
9 Connection methods vary with the devices used. Refer also to the manuals of the devices to be
connected.
9 Turn off the devices before connecting.
Antenna
Cable, satellite broadcast
External receiver
Preparations
Rear View
Connect with antenna or cable
Connect with TV’s antenna
TV
Connect with video output of
Or with input of external receiver
ANTENNA
COMPONENT
IN
OUT
VIDEO OUT
Y
L-1 L-2
P
B
P
R
terminal
Connect with TV input
Via Component video
external device
IN/OUT
Connect with TV input
Via SCART connector
Cooling fan Power cord
IN/DECODER
AUDIO
COAXIAL
OUT
TIGHT
DIGITALOUT
PCM/STREAM
LEFT
Connect with amplifier’s digital input
Via Digital Audio (Coaxial)
Connect with TV or amplifier input
Using Audio cable
Amplifier
JVC
EN I
17
Page 18
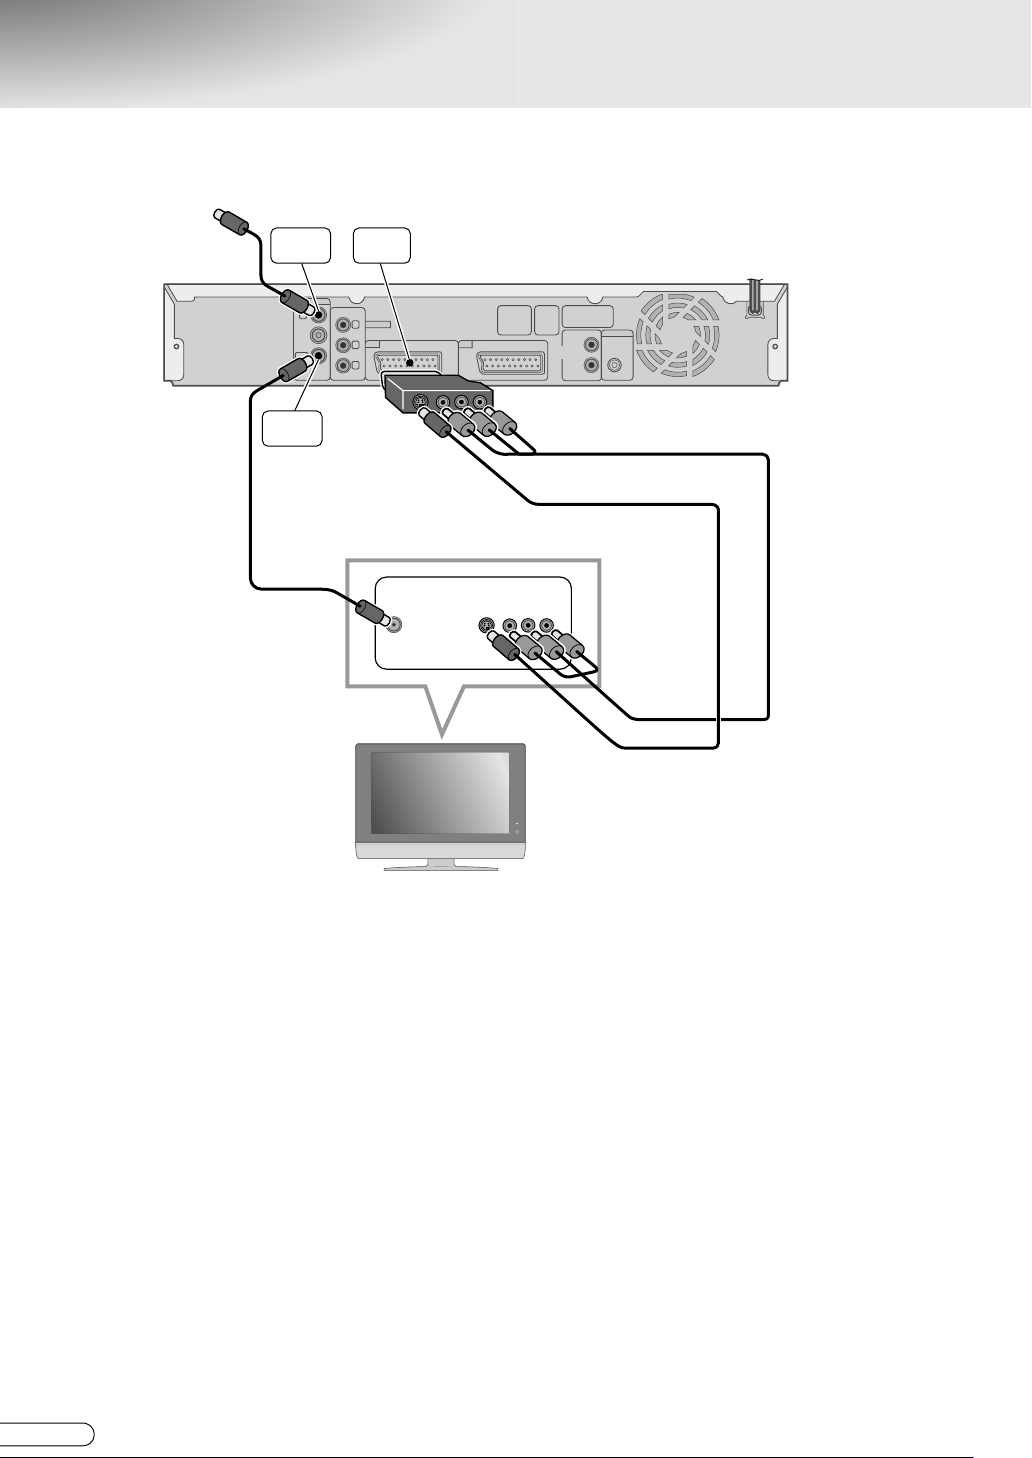
Receiving via Antenna
TO CABLE OR ANTENNA
ANTENNA
IN
ANTENNA
IN
OUT
ANTENNA
OUT
RF cable
(supplied)
L-1
IN/OUT
COMPONENT
VIDEO OUT
Y
L-1 L-2
P
B
P
R
ANT IN
IN/OUT
IN/DECODER
EXT IN
DIGITALOUT
PCM/STREAM
LEFT
COAXIAL
AUDIO
OUT
TIGHT
Audio/Video cable
(supplied)
S-video cable
(not supplied)
JVC
IMPORTANT:
......................................................................................................................
TV
0 When connecting this unit’s output terminal [L-1 IN/OUT] to the external input of the TV, set the switch on the
output cable adapter according to the connection you wish to make, as follows:
S-video connection: Set to Y/C.
Composite video connection: Set to CVBS.
18
H EN
Page 19
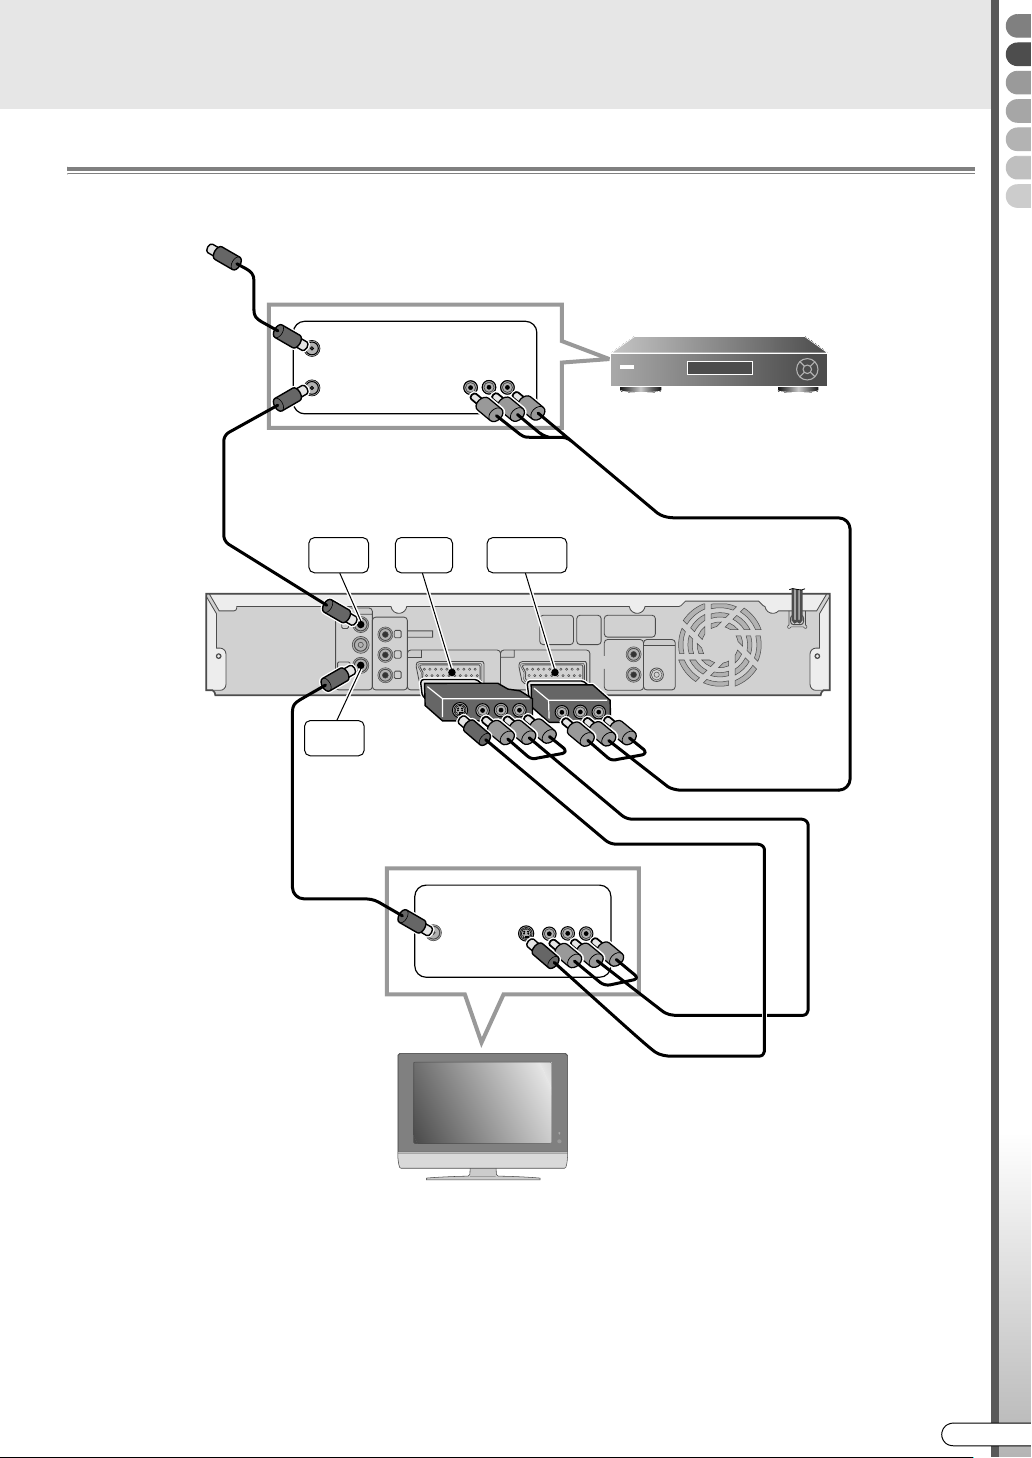
Receiving via External Receiver
Connect Using Video/Audio Cable or S-video Cable
TO CABLE OR ANTENNA
ANT IN
TO TV
RF cable
(not supplied)
ANTENNA
ANTENNA
OUT
RF cable
(supplied)
IN
ANTENNA
OUT
Preparations
External receiver
OUTPUTOUTPUT
Audio/Video cable
(not supplied)
L-1
IN/OUT
COMPONENT
IN
VIDEO OUT
Y
L-1 L-2
P
B
P
R
L-2
IN/DECODER
IN/OUT
IN/DECODER
AUDIO
OUT
DIGITALOUT
PCM/STREAM
LEFT
COAXIAL
TIGHT
ANT IN
EXT IN
Audio/Video cable
(supplied)
S-video cable
(not supplied)
JVC
IMPORTANT:
......................................................................................................................
TV
0 When connecting this unit’s output terminal [L-1 IN/OUT] to the external input of the TV, set the switch on the
output cable adapter according to the connection you wish to make, as follows:
S-video connection: Set to Y/C.
Composite video connection: Set to CVBS.
0 Leave the external receiver on during timer recording standby.
EN I
19
Page 20
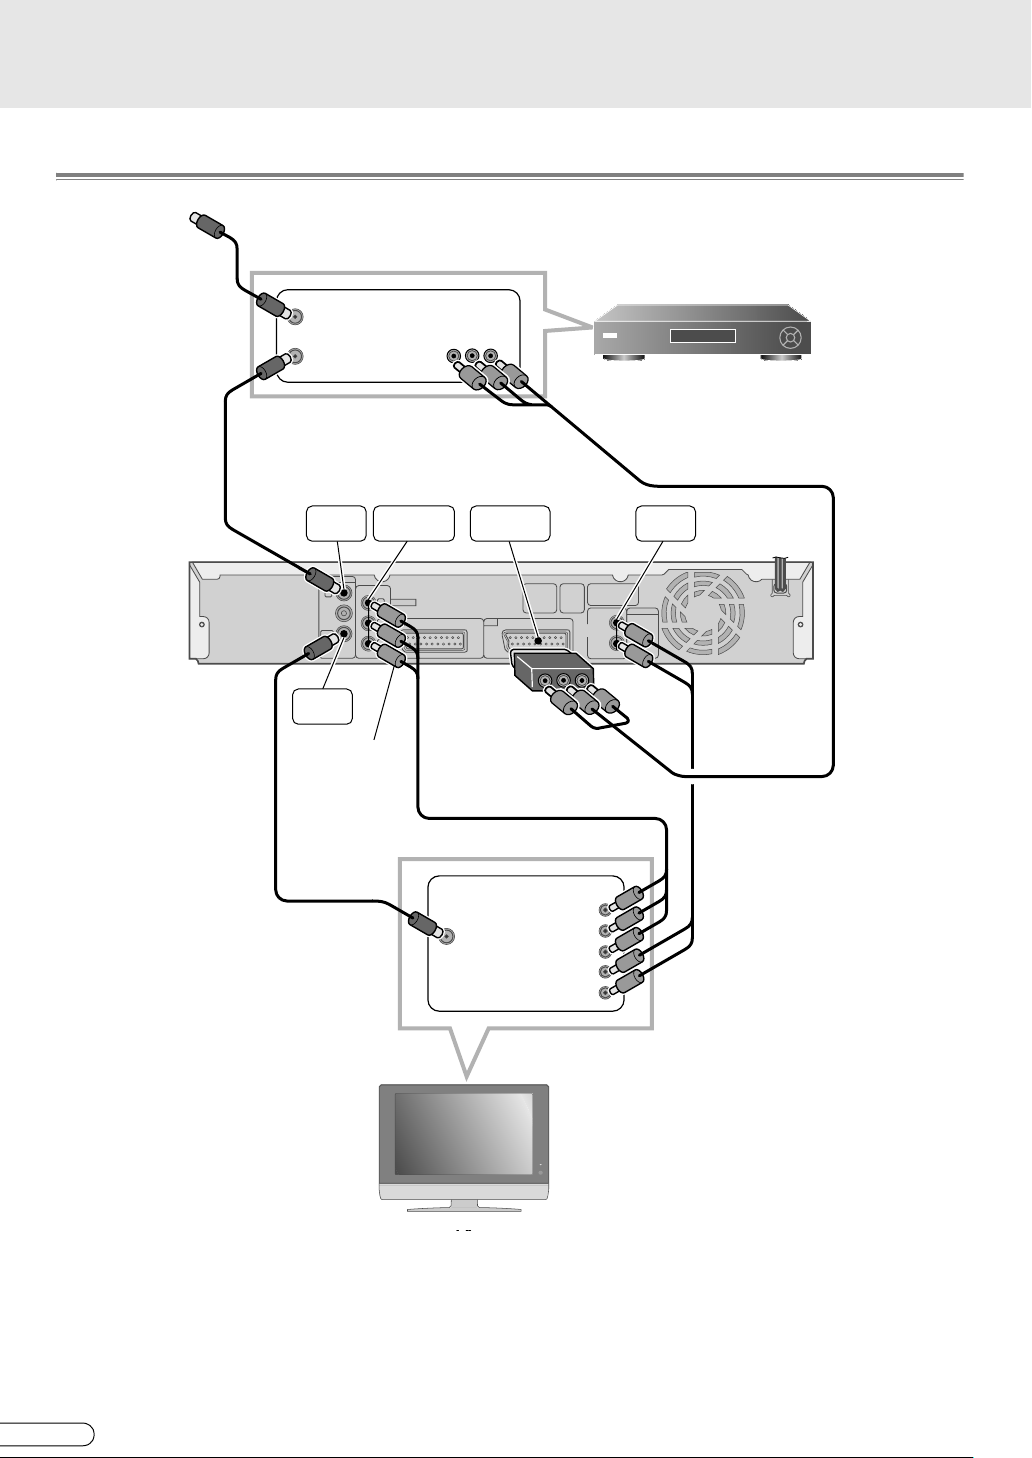
Receiving via External Receiver (continued)
Connect Using Component Video Cable
TO CABLE OR ANTENNA
RF cable
(not supplied)
RF cable
(supplied)
ANT IN
ANT IN
TO TV
TO TV OUTPUT
ANTENNA
ANTENNA
ANTENNA
OUT
ANTENNA
ANTENNA
OUT
OUT
IN
IN
IN
VIDEO OUT
COMPONENT
COMPONENT
COMPONENT
Y
P
B
P
R
Green: Y
Blue: P
Red: P
-OUT PUT-
VIDEO
AUDIO L
AUDIO R
OUTPUT
VIDEO OUT
L-1 L-2
OUTPUT
AUDIO
INPUT L-1
VIDEO, AUDIO
IN/DECODER
IN/OUT
Component video cable
(not supplied)
B
R
COMPONENT Y
COMPONENT Y
ANT IN
ANT IN
L-2
IN/DECODER
G-LINK
-IN PUT-
-IN PUT-
PB
PR
AUDIO L
AUDIO L
AUDIO R
AUDIO R
PB
PR
AUDIO
External receiver
Audio/Video cable
(supplied)
AUDIO
OUT
DIGITALOUT
PCM/STREAM
LEFT
COAXIAL
OUT
TIGHT
DBS CTL
Audio cable
(not supplied)
JVC
JVC
TV
IMPORTANT:
......................................................................................................................
0 To use the component output, be sure to set the following. Setup Menu AL-1 OUTPUTB = ACOMPONENTB
[ P89] i
Otherwise, the proper image will not be displayed.
0 Leave the external receiver on during timer recording standby.
H EN
20
Page 21

Dubbing from DV Camcorder/Video Cassette Recorder
.
.
F-1
S-VIDEO VIDEO
L(MONO) -AUDIO- R
DV
IN/OUT
HDD DVD
STANDBY/ON
S-video cable
(not supplied)
Audio/Video cable
(supplied)
-OUTPUTS-VIDEO
Video Recorder/Player
VIDEO
AUDIO L
AUDIO R
IMPORTANT:
........................................................
0 When connecting the unit to a device equipped with
a DV input connector, be sure to use the optional DV
cable (VC-VDV204U).
RAM/RW
F-1
S-VIDEO VIDEO L(MONO) AUDIO R
NAVIGATION
PROG
PR
ENTER
DV
DV
IN/OUT
Open the connector
cover.
DV cable (VC-VDV204U)
(not supplied)
DV IN/OUT
DV camcorder
NOTE:
........................................................
0 The [DV IN/OUT] terminal works bidirectionally.
Preparations
Listening with Digital Audio (Theatre Surround)
ANTENNA
COMPONENT
IN
OUT
DIGITAL IN
DIGITAL IN
COAXIAL
COAXIAL
IMPORTANT:
......................................................................................................................
0 See ASoundB [ P78].
0 It is not possible to switch the audio for bilingual programmes recorded on DVD-RAM, DVD-RW (VR mode) or
DVD-R (VR mode).
In such cases, set the following. Setup Menu ADIGITAL AUDIO OUTB = APCM ONLYB [ P84] D.
VIDEO OUT
Y
L-1 L-2
P
B
P
R
IN/OUT
IN/DECODER
Digital Audio coaxial cable
(not supplied)
Audio/Video Amplifier
AUDIO
LEFT
OUT
TIGHT
DIGITALOUT
PCM/STREAM
COAXIAL
INPUT L-1
PCM/STREAM
VIDEO, AUDIO
COAXIAL
EN I
21
Page 22
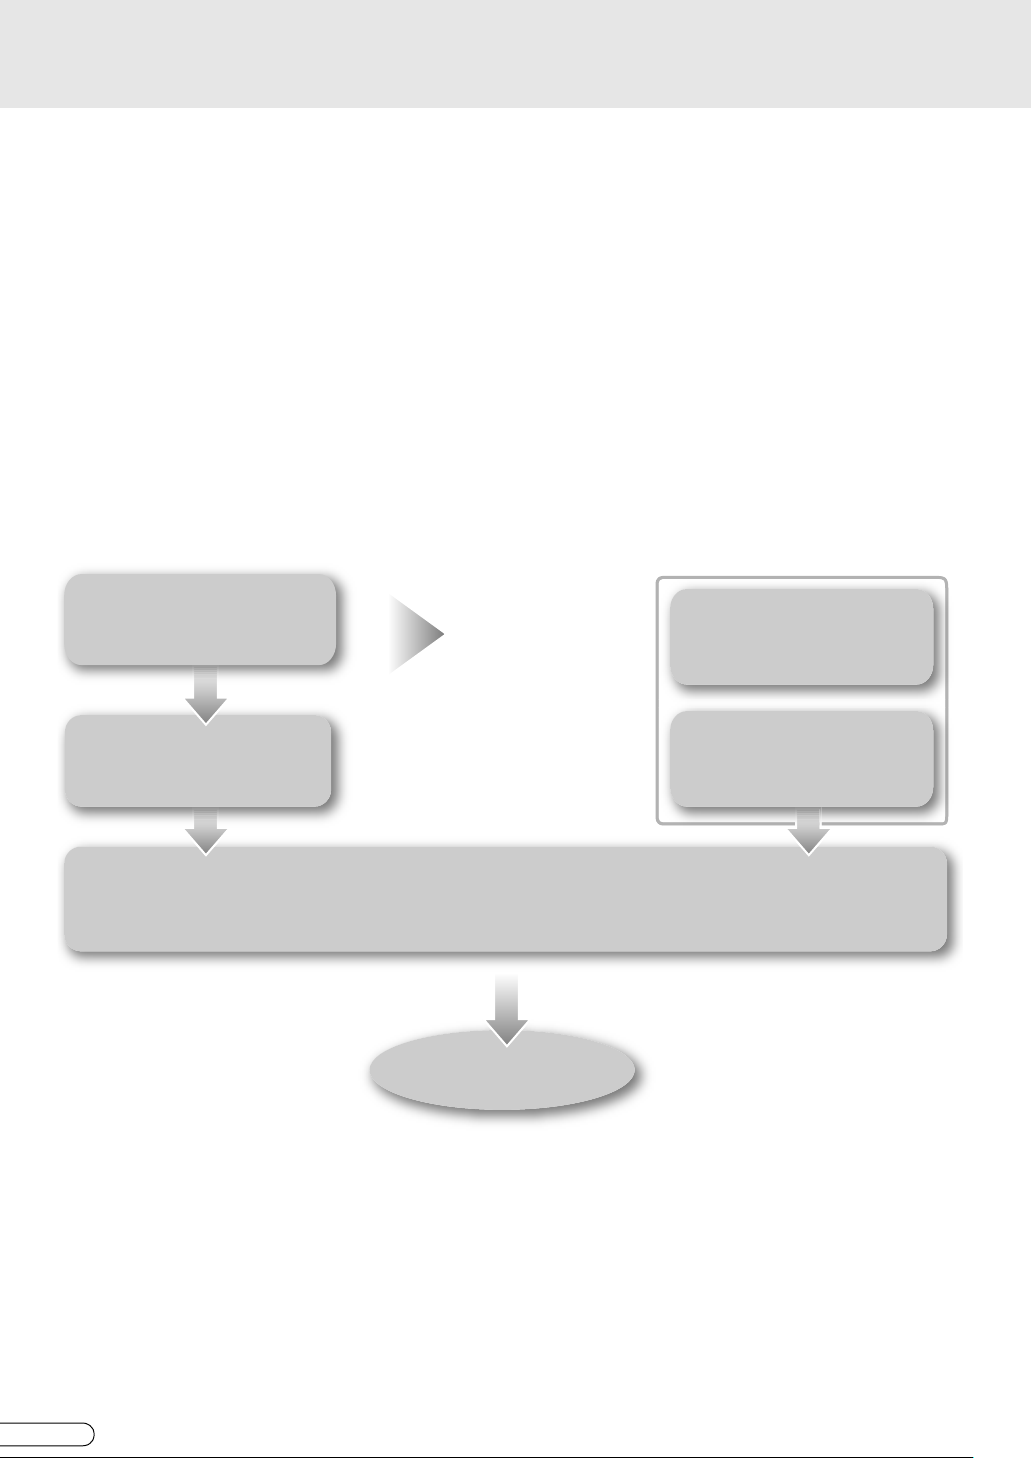
Setup Procedures
9 In order to use this unit correctly, set each item in the following steps.
When connecting an antenna and TV,
A Turn on the TV.
B Switch the TV to the input (EXT-1, EXT-2, etc.) connected with this unit.
C Insert the unit’s power plug into the socket.
0 APLEASEB and AWAITB blink alternately on the front display panel as the unit starts up. (Takes around 40
seconds.)
D When “PLEASE” and “WAIT” go off, turn on the unit.
0 Auto setup begins automatically, and the clock set screen is displayed.
E Set the clock.
AClock SettingB [ P27]
AAuto SetupB [ P23]
ASetting On-screen LanguageB [ P24]
ASetting TV Screen SizeB [ P25]
properly
Exit
ASetting Receiving
ChannelsB [ P28]If unable to receive
AG-
CODE Guide Channel
SetB [ P30]
22
H EN
Page 23

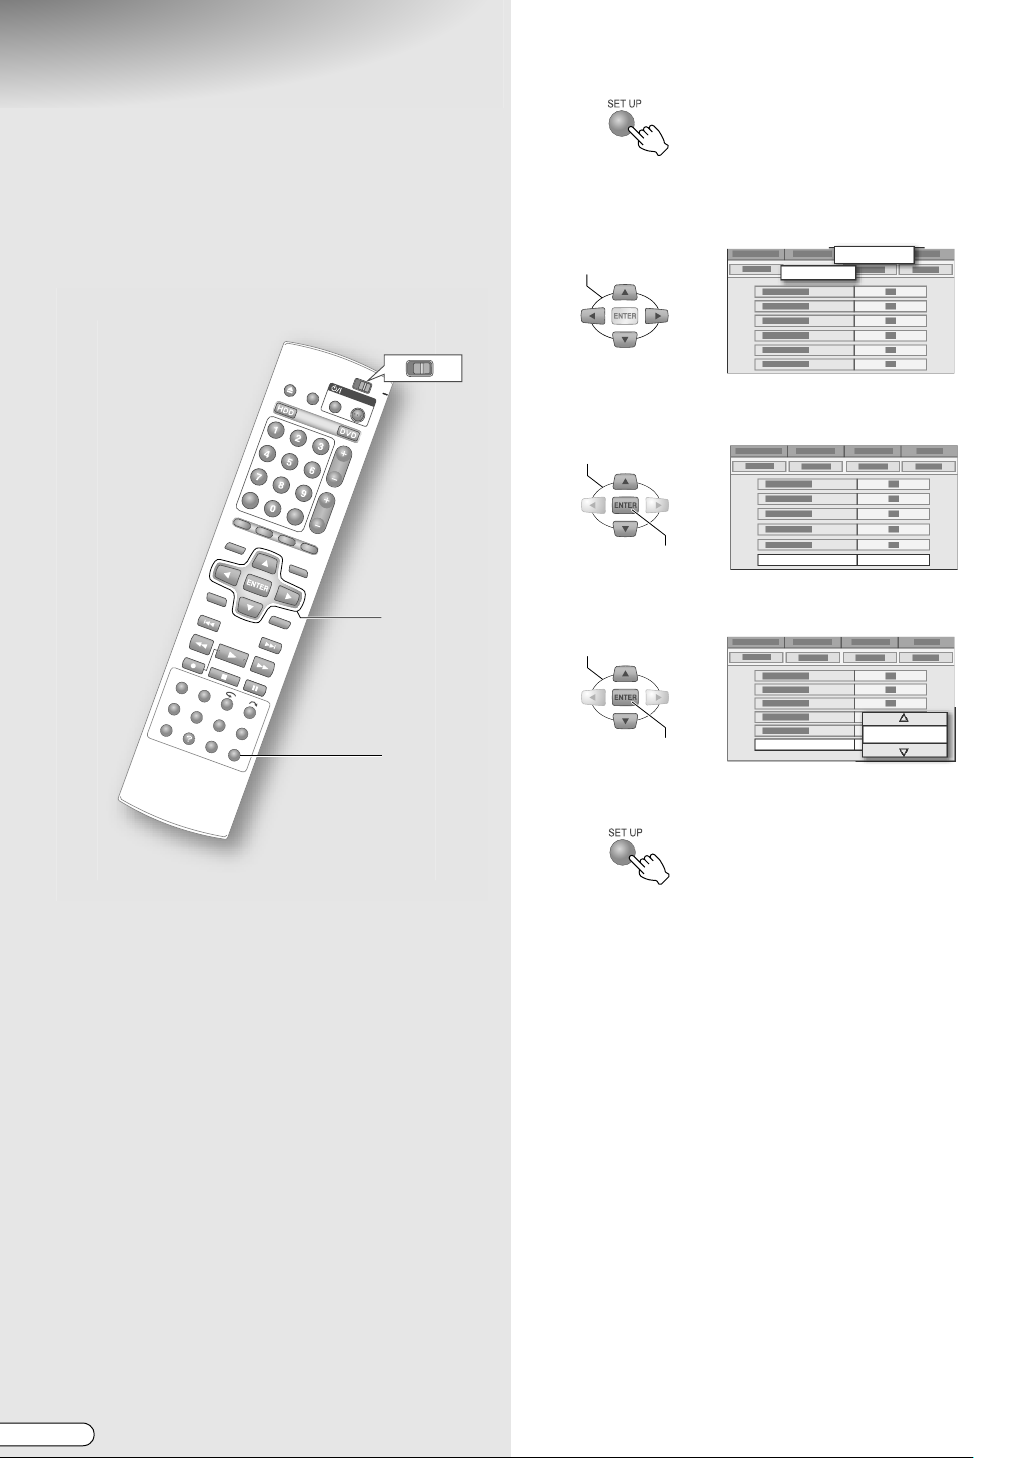
Auto Setup
.
9 Performs channel setting automatically after
the clock and TV system has been set.
PREPARATION:
........................................................
0 Switch TV/DVD on the remote control to DVD.
DVD
TV
A
CH/PR(+/-)
C Select “B/G”.
SELECT
TV SYSTEM
B/G
D/K
CONFIRM
0 The AUTO SET screen will be displayed, and
auto setup is performed.
CONFIRM
0 While AUTO SET is in progress, AAUTOB will be
displayed on the front display panel. Do NOT
press any button on the unit or the remote control
during this time. To cancel, press ENTER.
The ASCAN COMPLETEDB screen will be displayed
when AUTO SET is completed.
I
AUTO SET
PLEASE WAIT ...
CANCEL
Preparations
B - D
A Turn on the unit.
STANDBY/ON
STANDBY/ON
0 To turn on using the unit, press STANDBY/ON.
0 The area selection screen will be displayed
automatically.
D Exit setup.
CONFIRM
If auto setup was successful
Receivable channels in your area are automatically
assigned to the programme numbers. You can tuned
to these channels with CH/PR(+/-).
If auto setup was unsuccessful
ASCAN COMPLETED - NO SIGNAL -B will be
HDD
displayed.
0 Check the antenna cable connection, switch off the
power, then perform auto setup all over again.
0 Set channels manually for broadcast stations with
poor reception.
See ASetting Receiving ChannelsB [ P28].
B Set the clock.
0 See AClock SettingB [ P27].
EN I
23
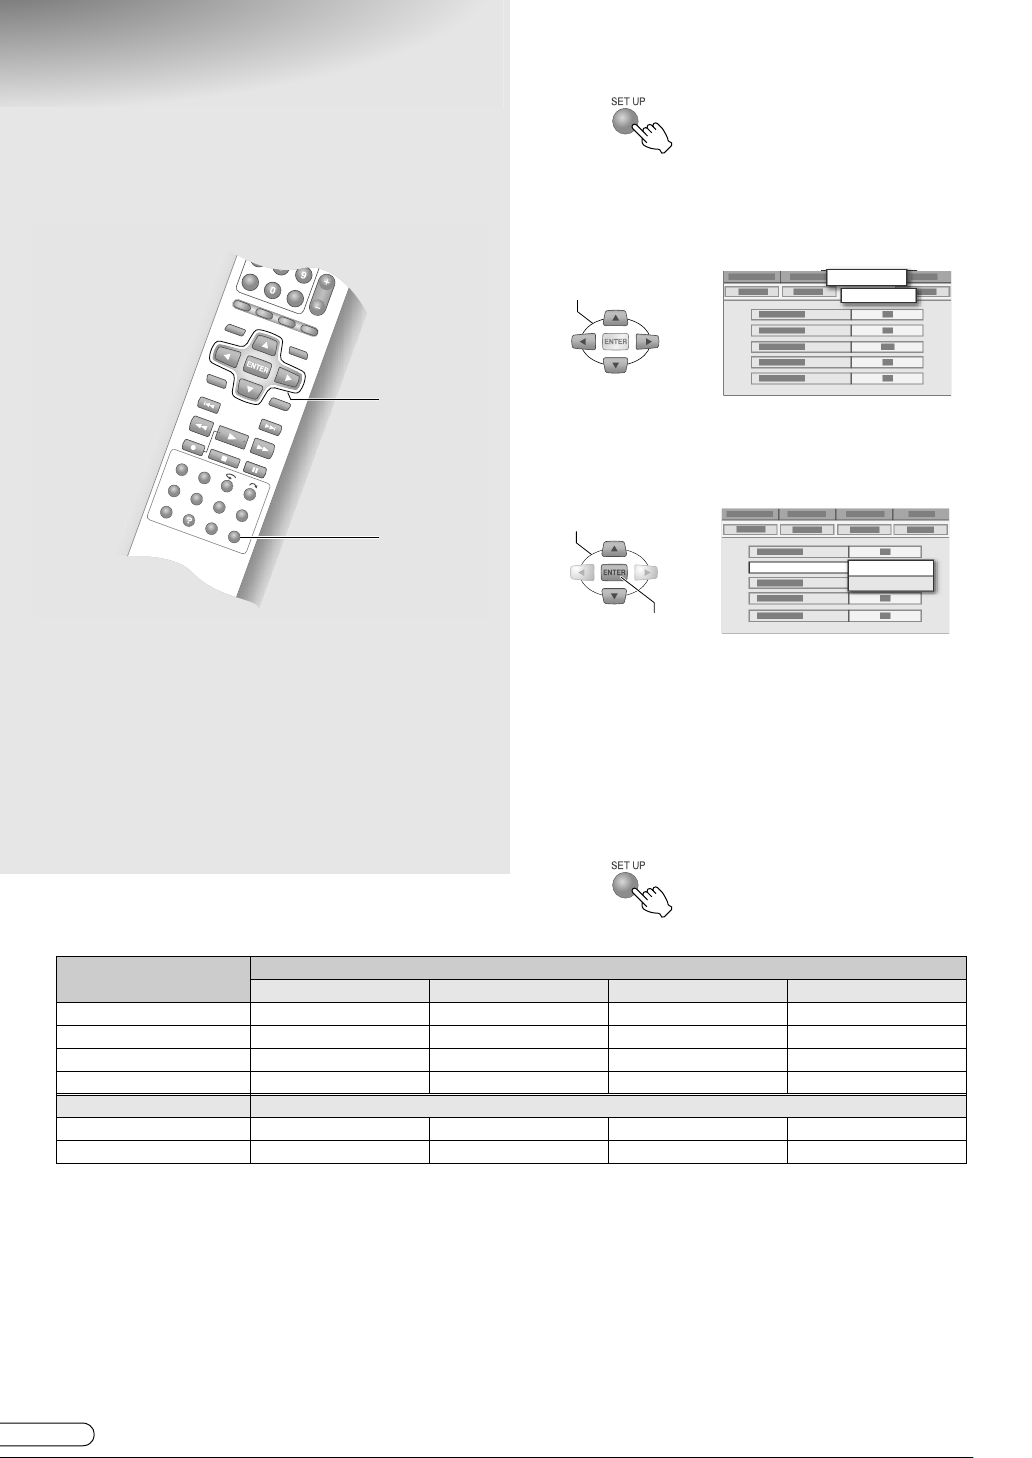
Page 24
Setting On-screen
.
Language
9 Set the language for menu display on the
screen.
A Access the setup menu.
B Select “FUNCTION SET UP” .
PREPARATION:
........................................................
0 Switch TV/DVD on the remote control to DVD.
DVD
TV
B - E
A, F
C Select “DISPLAY SET”.
SELECT
FUNCTION SET UP
DISPLAY SET
D Select “ON SCREEN LANGUAGE”.
SELECT
CONFIRM
ON SCREEN LANGUAGE ENGLISH
E Select the desired language.
SELECT
CONFIRM
ON SCREEN LANGUAGE
ENGLISH
F Exit setup.
24
H EN
Page 25

Setting TV Screen Size
9 Set in accordance with the monitor type of
the connected TV and others.
A Access the setup menu.
B Select “FUNCTION SET UP”.
C Select “VIDEO IN/OUT”.
Preparations
B - E
A, F
MONITOR TYPE
A4:3LBB (Letterbox conversion)
Select this if the aspect ratio of your TV is 4:3
(conventional TV). When displaying a 16:9 wide image,
it is displayed in full screen with a black band at the top
and bottom.
A4:3PSB (Pan & Scan)
Select this if the aspect ratio of your TV is 4:3
(conventional TV). When displaying a wide image, it is
displayed with the left and right cropped.
A16:9AUTOB (Wide television conversion)
Select this if the aspect ratio of your TV is 16:9 (wide
TV). When displaying a 4:3 image, the TV will adjust
accordingly.
A16:9FIXB (Wide television conversion)
Select this if the aspect ratio of your TV is 16:9 (wide
TV). When displaying a 4:3 image, this unit will adjust
accordingly.
SELECT
FUNCTION SET UP
VIDEO IN/OUT
D Select “MONITOR TYPE”.
SELECT
MONITOR TYPE 4:3LB
CONFIRM
E Select the monitor type of your TV.
SELECT
MONITOR TYPE
CONFIRM
4:3LB
4:3LB
4:3PS
16:9AUTO
16:9FIX
F Exit setup.
EN I
25
Page 26
Input/Output Setting
.
9 The SCART connector supports the
connection of composite video signals.
Settings must correspond with the type of
video signal to use and the device to
connect.
B - D
A Access the setup menu.
B Select “FUNCTION SET UP” .
C Select “VIDEO IN/OUT”.
SELECT
FUNCTION SET UP
VIDEO IN/OUT
D Set the input/output terminal.
A Select and confirm on AF-1 INPUTB.
A, E
SELECT
F-1 INPUT
CONFIRM
IMPORTANT:
........................................................
0 For normal use, you can leave the default settings as
they are.
0 See the following page regarding each setting. Setup
Menu AF-1 INPUTB, AL-1 OUTPUTB, AL-1 INPUTB,
AL-2 SELECTB [ P88, 89] h - k
B Select and confirm on AL-1 OUTPUTB.
C Select and confirm on AL-1 INPUTB.
D Select and confirm on AL-2 SELECTB.
0 See the description below for the combinations
of settings.
0 For image output format other than A576iB (during
progressive scan), viewing is not possible as the
images are distorted.
Possible combinations
AL-2 SELECTB (*1)
AVIDEO/RGBB 3 3 3 3
AS-VIDEO/RGBB 3 3 3 3
ASAT VIDEO/RGBB 3 3 3 (*3)
ASAT S-VIDEO/RGBB 3 3 (*3)
AL-1 INPUTB
AVIDEOB 3 3 3 3
AS-VIDEOB 3 (*4) 3 (*4)
*1 Switching to RGB signals is automatic.
*2 Component videos will be output from the [COMPONENT] terminal. Be sure to set to ACOMPONENTB if viewing via component
video.
*3 With this setting, signals from the [L-2 IN/DECODER] terminal will be output to the [L-1 IN/OUT] terminal even if this unit is
turned off.
*4 This setting cannot be made if AL-2 SELECTB is set to ASAT VIDEO/RGBB.
ASCART VIDEOB ASCART S-VIDEOB ASCART RGBB ACOMPONENTB (*2)
E Exit setup.
AL-1 OUTPUTB
VIDEO
S-VIDEO
26
H EN
Page 27
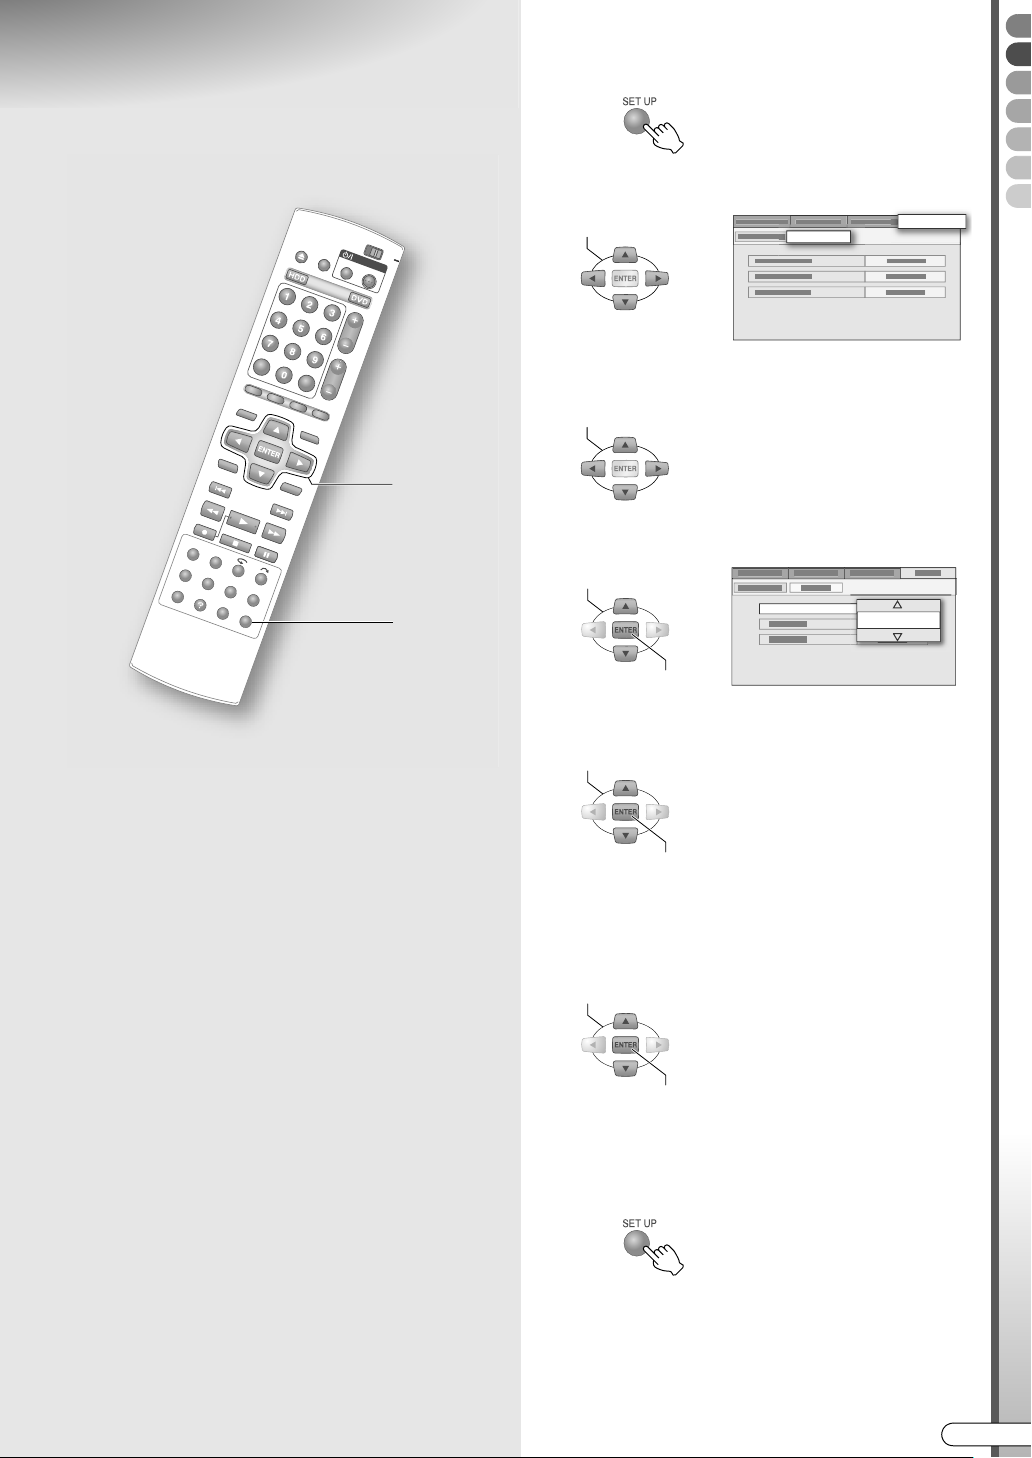
Clock Setting
9 Clock setting is necessary in order to perform
timer programming on this unit.
A Access the setup menu.
B Select “INITIAL SET UP”.
B - F
A, G
SELECT
CLOCK SET
C Select “CLOCK SET”.
SELECT
D Select and confirm on “YEAR”.
SELECT
YEAR
CONFIRM
2005
E Select and confirm on “DATE”.
SELECT
INITIAL SET UP
Preparations
CONFIRM
0 Press and hold the Selection Keys (FG) to
change the ADATEB in 15-day intervals.
F Select and confirm on “TIME”.
SELECT
CONFIRM
0 Press and hold the Selection Keys (FG) to
change the ATIMEB in 30-minute intervals.
G Exit setup.
EN I
27
Page 28
Setting Receiving
.
Channels
9 Usually performed automatically using auto
setup. If cannot be set automatically, set them
manually.
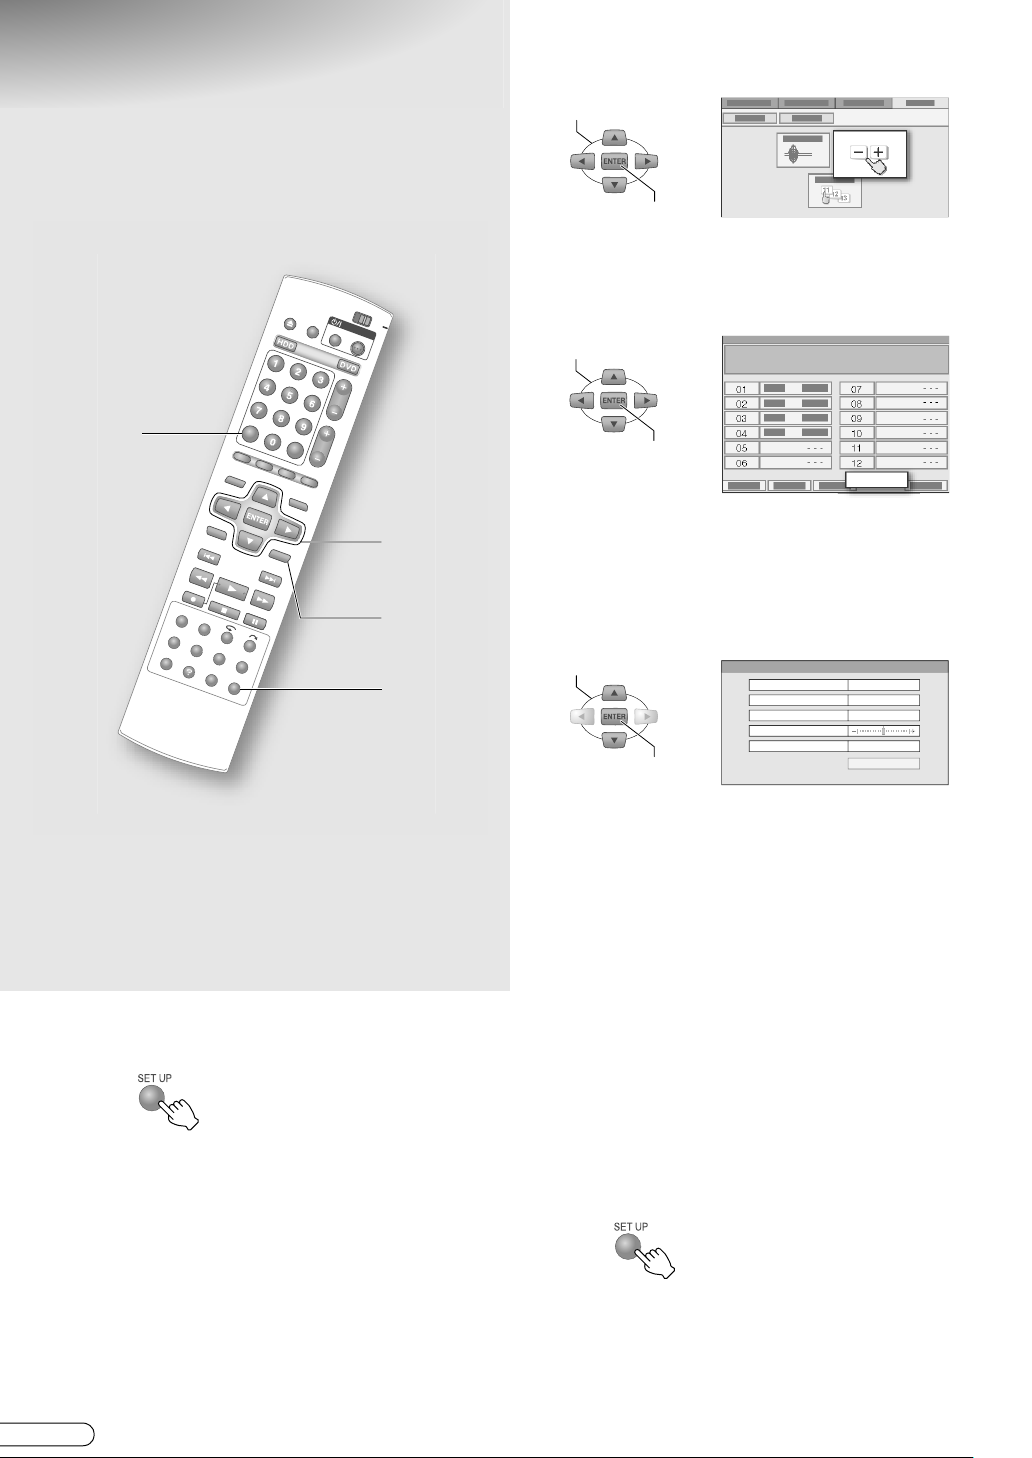
D Select “MANUAL CH SET”.
SELECT
MANUAL CH SET
CONFIRM
0 The AMANUAL CH SETB screen will be
displayed.
E Select “EDIT”.
SELECT
G
B - G
F
F - H
RETURN
A, H
IMPORTANT:
........................................................
0 If channel settings are performed manually, the
CODE guide channel will not be set. See AG-CODE
GGuide Channel SetB [ P30].
A Access the setup menu.
B Select “INITIAL SET UP”.
C Select “TUNER SET”.
CONFIRM
EDIT
F Select a channel that you want to set.
0 A confirmation screen will be displayed.
G Set the channel.
A Select and confirm on ABANDB.
SELECT
CONFIRM
BAND
CH
ID
FINE
TV SYSTEM
----
RETURN
CH
2
B/G
0 ACHB is a regular broadcast band, and ACCB is
a cable broadcast band.
B Select and confirm on ACHB.
0 Select a receiving channel.
C Select and confirm on AIDB.
0 Set for the purpose of identifying the broadcast
stations.
0 See AEntering the Station IDB [ P29].
D Select and confirm on AFINEB.
0 If the reception is poor, press the Selection
Keys (FG) to fine-tune.
E Select and confirm on ATV SYSTEMB.
0 Set to AB/GB.
H Exit setup.
28
H EN
0 If RETURN is pressed, you will return to the
previous screen, and other channels can also be
set.
Page 29
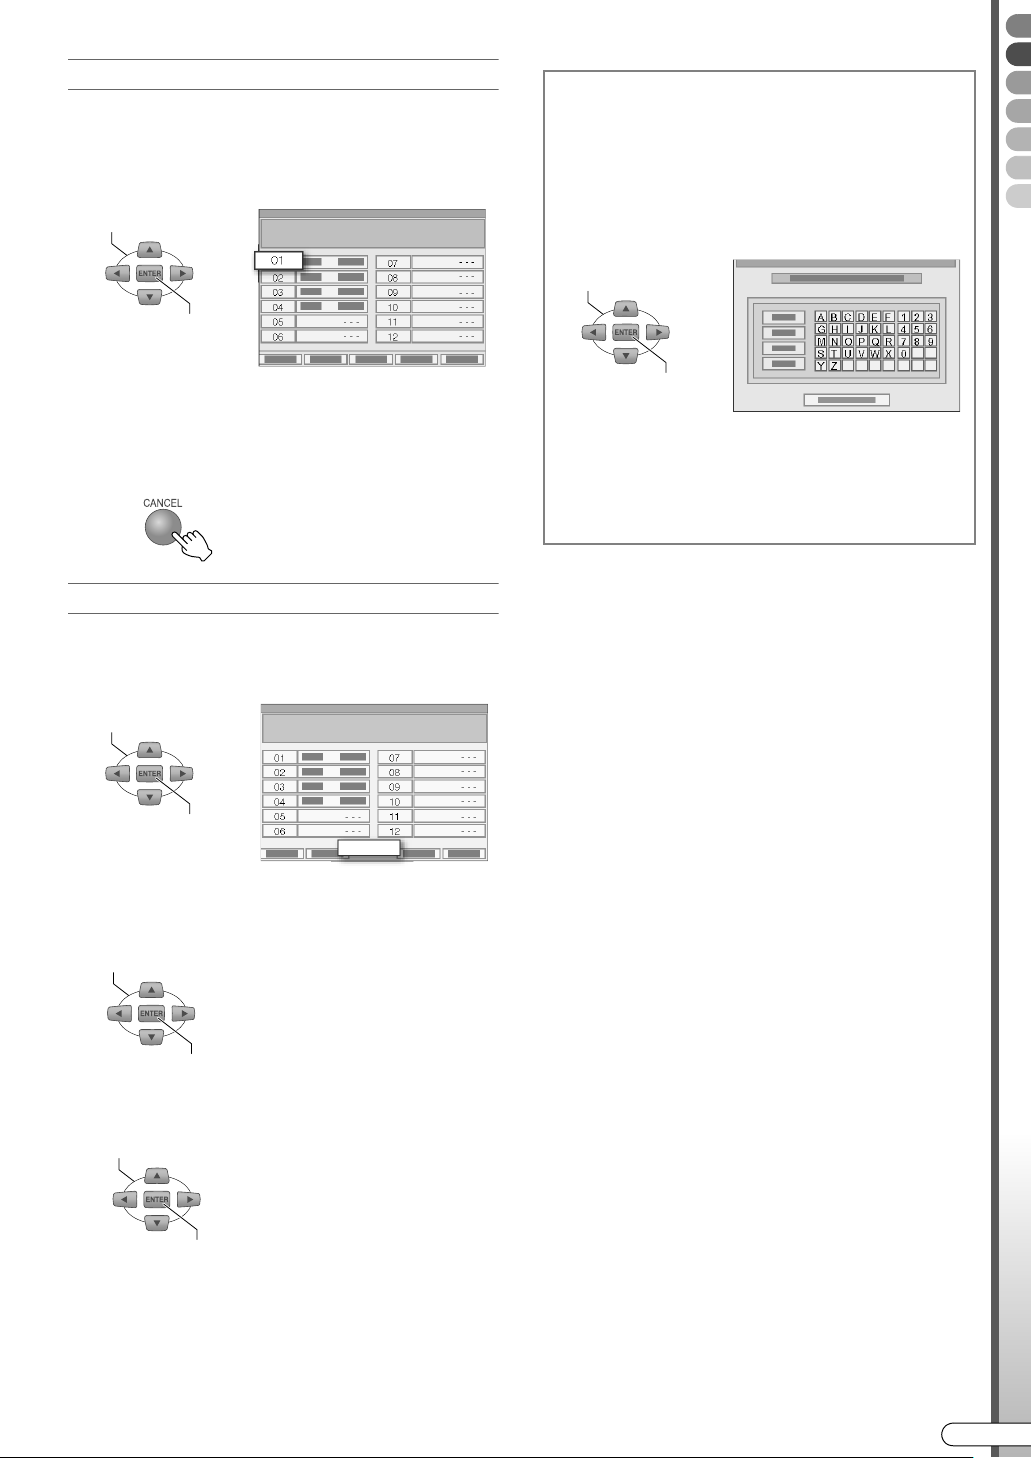
Deleting a channel
Operate up to step E.
F Select a channel that you want to
delete.
SELECT
01
CONFIRM
- - -
- - -
G Delete.
0 If the channel is deleted, subsequent channels
will move forward one by one.
Shifting the channel position
Operate up to step E.
- - -
- - -
- - -
- - -
---
---
Entering the Station ID
Select and confirm on AIDB on the
A
confirmation screen.
0 The entry screen for Station ID will be
displayed.
B Enter your desired ID name.
SELECT
CONFIRM
0 Registered Station ID names on this unit are
not available in your country.
0 A maximum of 4 characters can be entered.
C Select and confirm on AOKB.
Preparations
F Select “MOVE”.
SELECT
CONFIRM
01
02
03
04
05
06
- - -
- - -
MOVE
07
08
09
10
11
12
G Select a channel that you want to
move.
SELECT
CONFIRM
H Select the destination channel.
SELECT
CONFIRM
- - -
- - -
---
---
- - -
- - -
0 If the channel is moved, other channels will
move one by one.
EN I
29
Page 30
G-CODE Guide Channel Set
.
9 It is necessary to perform Guide Channel Set
to set the guide programme numbers before
using the G-
CODE timer programming.
B - E
A Access the setup menu.
B Select “INITIAL SET UP”.
C Select “TUNER SET”.
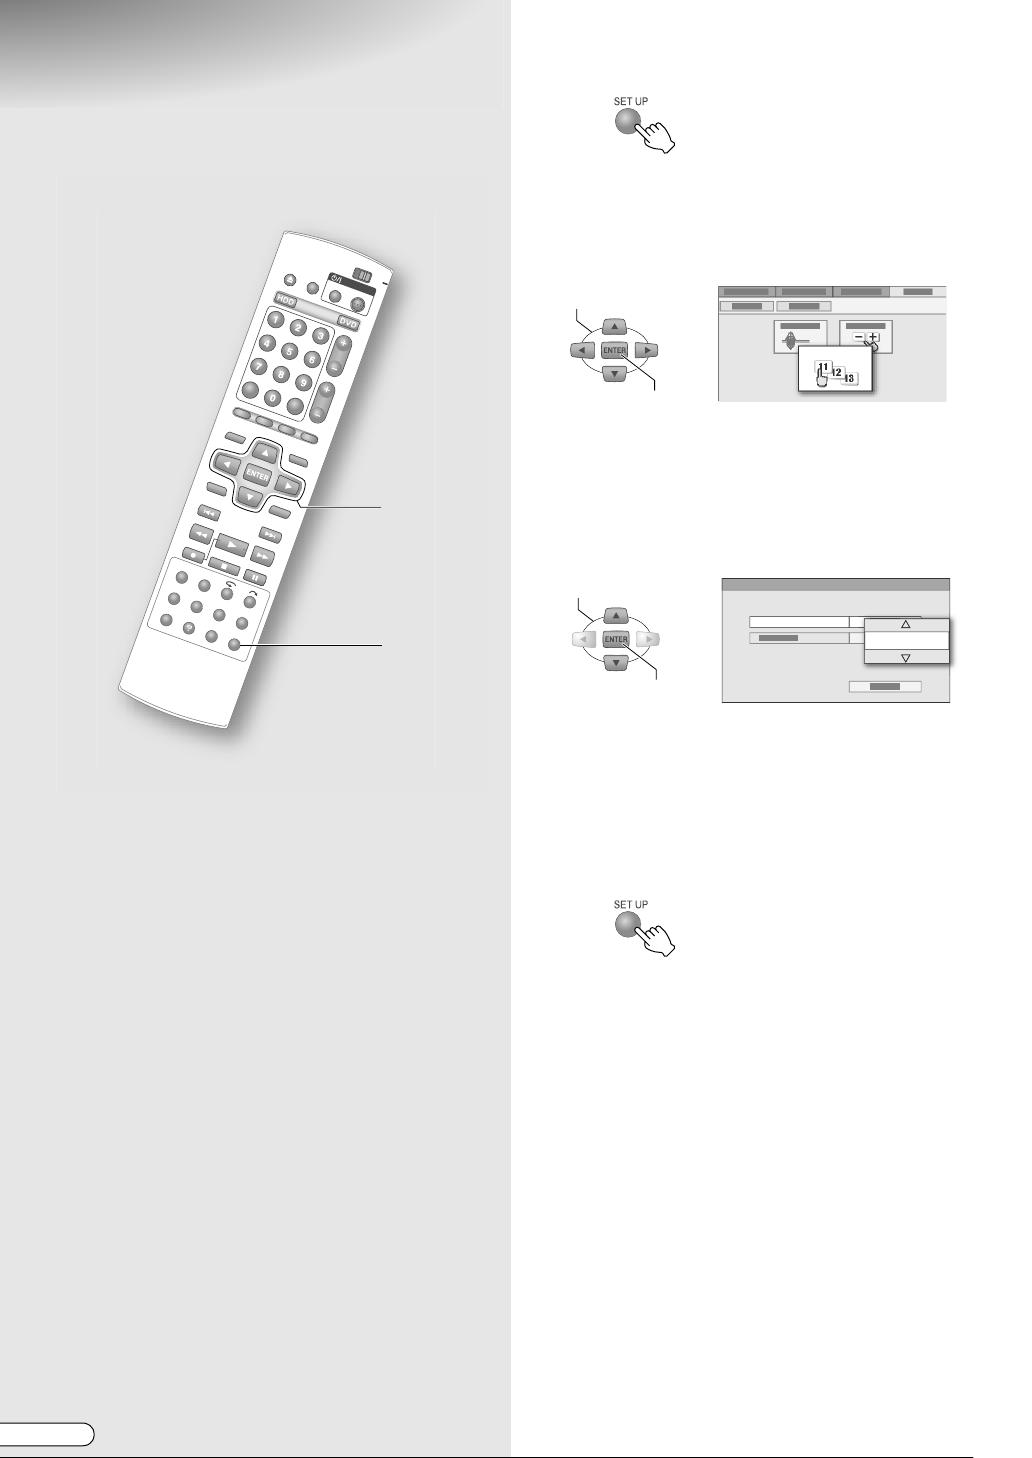
D Select “GUIDE PROG SET”.
SELECT
GUIDE PROG SET
11
12
13
CONFIRM
0 The AGUIDE PROG SETB screen will be
displayed.
E Set the guide channel.
A Select and confirm on AGUIDE PROGB.
SELECT
A, F
NOTE:
........................................................
0 Guide programme numbers are assigned to the TV
stations of the respective broadcast areas, for Gtimer programming. These numbers can be found in
most TV listings.
CODE
GUIDE PROG
1
CONFIRM
0 Select the TV station’s guide programme
number from the TV listings.
B Select and confirm on ATV PROGB.
0 Select the channel number of the TV station set
on this unit.
F Exit setup.
30
H EN
Page 31

Screen Display
On-Screen Display
9 Displays on the TV screen when ON SCREEN is pressed.
Display during recording
0 During on air, when ON SCREEN is pressed or when the channel is changed, the programme title is displayed for
approximately 5 seconds.
Recording deck
DVD
FR360
Current recording mode
Recording deck
TITLE99
Chapter numberTitle number
CHAPTER999
Recording length
T.REMAIN0:29:29
Disc remaining time
Current time
Current operating status
1:0012:0011:00
Receiving channel
22:30
Receiving channel
22:30
PR.12
Sound mode
PR.12
HDD
FR360
Current recording mode
Display during playback
Recording length
Current operating status
Current time
Sound mode
Preparations
TITLE99
CHAPTER999
DVD
FISHING WORLD
Programme title
(Will not be displayed for finalised
DVD-RW/-R (Video mode) disc.)
HDD
001
Programme number
(Play list)
Playback position
FISHING WORLD
Programme title
Chapter numberTitle number
Playback position
Disc remaining time or elapsed time
(Switch using DISPLAY)
Sound coding mode
T.REMAIN0:29:29
XP
Recorded mode
Current operating status
Counter
2:00 01:16:481:000:00
FR360
Recorded mode
Current operating status
Sound mode
Sound
coding
mode
Recording channel
(Display during Simultaneous
Recording and Playback)
Digital
Recording channel
(Display during Simultaneous
Recording and Playback)
Digital
Sound mode
PR.8
PR.8
EN I
31
Page 32

Basic Recording
.
.
HDD DVD
NAVIGAT
R
A
M
/
R
W
P
R
+
C
H
-
P
U
S
H
-
O
PE
N
D
I
G
I
T
A
L
D
I
R
E
C
T
P
R
O
G
R
E
S
S
I
V
E
FR360
7: 00 XP
2: 30 DV
10: 00 SP
20: 00 LP
28: 00
36: 00
EP
FR480
ABCDEFGHIJK
9 TV programmes can be recorded to the HDD
or a DVD disc with ease.
9 You can record up to 500 programmes on the
HDD, and 99 programmes on one DVD disc.
Simultaneous recording on HDD and DVD
cannot be done.
PREPARATION:
........................................................
0 Switch TV/DVD on the remote control to DVD.
DVD
TV
OPEN/CLOSE
A
B
A Select the recording deck.
OR
Recording deck’s LED lights up
0 When HDD is selected, proceed to step B.
When DVD is selected
A Press OPEN/CLOSE on the remote
control, or the unit.
OPEN/CLOSE
B Load a recordable disc.
Face the label side upwards
D
E
C
IMPORTANT:
........................................................
0 When using a brand-new DVD-RW/-R disc,
formatting may be required. [ P50]
0 The maximum continuous recording time at the HDD
is 48 hours.
0 See the following page if recording a bilingual
programme using DVD-RW/-R (Video mode).
ASoundB [ P78]
C Press OPEN/CLOSE to close the disc
tray.
0 It takes some time to read the disc.
B Select a channel.
Receiving channel
1:35
0 Press ON SCREEN if the information screen is not
displayed.
C Select the recording mode.
A Display the recording mode.
Recorded capacity
Free space
Current recording mode
Disc remaining time and recording
mode
PR.12
H EN
32
Page 33

B Select the recording mode.
0 Usually select SP (standard) mode.
0 The recording mode changes each time REC
MODE/REMAIN is pressed.
0 Pressing the Selection Keys (FG) also changes
it.
0 See ARecording ModeB [ P70].
0 Recordable time for each recording mode.
The shorter the recordable time, the higher the
image quality.
Recording
mode
DV - 11 hours
XP 1 hour 34 hours
SP 2 hours 69 hours
LP 4 hours 138 hours
EP 6 hours 209 hours
FR480 8 hours 300 hours
(The numbers shown are estimates.)
DVD HDD
C Confirm.
CONFIRM
D Start recording.
1:35
REC MARK
PR.12
Possible operations during recording
To pause
WHILE HOLDING
0 The pause function for HDD is possible only
during external input (L-1/L-2/F-1/dv)
recording.
To resume recording
WHILE HOLDING
To specify recording stop time (Instant
Timer Recording)
Unit’s record button
Display on bottom right
screen
ITR 2 : 30
0 The recording time from the current time can
be set.
0 The disc mark on the front display panel
blinks.
0 The recording end time switches each time
REC (R) on the unit is pressed.
• A maximum of up to 6 hours can be set in
30-minute intervals.
• To cancel, press the button a few times until
the set time is cleared.
Basic Operations
WHILE HOLDING
0 When operating from the unit, press REC.
E End recording.
PRESS TWICE
0 In the case of DVD disc, APLEASE WAITB is
displayed. Do not turn off the unit while it is
being displayed.
EN I
33
Page 34

Basic Playback (Library
.
.
HDD DVD
NAVIGAT
R
A
M
/
R
W
P
R
+
C
H
-
P
U
S
H
-
O
P
E
N
D
I
G
I
T
A
L
D
I
R
E
C
T
P
R
O
G
R
E
S
S
I
V
E
Database Navigation)
A Select the playback deck.
ABCDEFGHIJK
9 Play back recorded programmes using
Library Database Navigation. Library
Database Navigation cannot be used for
finalised DVD-RW/-R (Video mode) discs.
Press TOP MENU or MENU to play back.
PREPARATION:
........................................................
0 Switch TV/DVD on the remote control to DVD.
DVD
TV
OPEN/CLOSE
A
MEMO/MARK
TOP MENU
B
MENU
C - E
OR
Playback deck’s LED lights up
0 When HDD is selected, proceed to step B.
When DVD is selected
A Press OPEN/CLOSE on the remote
control, or the unit.
OPEN/CLOSE
B Load the disc to be played.
Face the label side upwards
C Press OPEN/CLOSE to close the disc
tray.
STOP/CLEAR
NOTE:
........................................................
0 When recording in DV mode, playback on the HDD
or DVD is not possible.
0 It takes some time to read the disc.
B Display the Library Database
Navigation screen.
(On-screen display for DVD)
DVD NAVIGATION
ORIGINAL
DVD LIBRARY
DATE
CATEGORY
C Select “ORIGINAL”.
SELECT
ORIGINAL
CONFIRM
PLAY LIST
DISC No.
NAME
34
H EN
Page 35

D Select the programme that you wish
to watch from the thumbnails.
SELECT
CONFIRM
Animated thumbnail
Information on the selected
programme
Thumbnail
0 Thumbnails are arranged in order of recording
date and time.
0 A ANEWB mark is displayed on the thumbnails of
programmes that have not been watched.
0 Pages can be advanced using TOP MENU or
MENU. To return to the beginning page or
advance to the last page, press and hold the
button.
E Select “BEGINNING”.
SELECT
To watch programmes in the desired
order (Programme Playback)
Press MEMO/MARK in step D.
A
0 The number of the playback order will be
displayed on the thumbnail.
0 To cancel the memory, press MEMO/MARK
again.
0 Up to 8 programmes can be selected.
0 To clear the order, press CANCEL.
B Press ENTER to play back.
0 To quit in the process of setting, press STOP/
CLEAR. (The order will also be cleared.)
NOTE:
...................................................
0 Programme playback is not possible if there is a
combination of programmes in DV mode and
other recording modes.
Basic Operations
BEGINNING
CONFIRM
0 Playback begins.
0 If ARESUMEB is selected, playback begins from
the point where it previously stopped.
0 To repeat playback, select AREPEATB.
0 If playing a DVD disc, the playback method
changes with the following setting. Setup Menu
ACONTINUOUS PLAYB [ P86] L
• AONB: Plays back till the last recorded
programme.
• AOFFB: Plays back only the selected
programme.
0 To return to the thumbnail screen, press
RETURN.
EN I
35
Page 36

Usable Buttons during Playback
.
The following buttons can be used during playback.
Playback
Stop
Pause
0 Starts playback.
0
Stops playback and displays the broadcast screen.
0 Memorises the point where playback stops.
(Setup Menu ARESUMEB [ P85] H)
0 Pauses playback and displays a still image.
0 Functions during playback.
HDD
•
Each press of the button switches the playback
Reverse
Search/
Forward
Search
speed in the order of FWD1 - FWD5.
• When not recording, pressing N once
activates playback at 1.5x speed with sound.
• Press O once to reverse playback.
DVD
•
Each press of the button switches the playback
speed in the order of FWD1 - FWD4.
• Press O once to reverse playback.
0 Functions during pause.
•
Frame-ByFrame/
Slow
IMPORTANT:
..................................
Marks
For HDD, DVD -R AM an d
DVD-RW/-R (VR mode)
Motion
Playback
Skip
0 Marks can be set or deleted
during playback.
0 They are automatically inserted
if the audio is switched from
monaural or bilingual broadcast
to stereo broadcast during
recording.
0 ACHAPTERB on the Editing
screen can also be used to
insert marks. [ P61]
For DVD-RW/-R (Video mode)
0 Marks are automatically
inserted approximately every 5
minutes during recording.
The marks will remain even after
finalising.
See AWatching on Other DVD
Players (Finalising)B [ P51].
It is possible to switch between the elapsed time/disc remaining time/programme remaining time display of each programme
by pressing DISPLAY.
Jump
Skip
Search
One
Touch
Replay
Mark
Each press of the button advances or reverses
one frame at a time (frame-by-frame playback).
• Pressing down for 2 or more seconds
activates slow motion playback. Each press
of the button changes the playback speed to
one of 3 stages in the order of 1/16, 1/4 and
1/2 times the original.
0 Moves to the chapter position (mark).
0 Marks can be added during playback using
MEMO/MARK. See AMarkB below.
0 Jumps according to the selected time interval
and resumes playback. (Setup Menu AJUMP
TIMEB [ P87] Y)
0 Functions when the chapter (mark) is not set.
0 Skips forward for approximately 30 seconds
and resumes playback.
Pressing repeatedly skips forward continuously
as many times as pressed.
0 Skips back for approximately 7 seconds and
resumes playback.
Pressing repeatedly skips back continuously as
many times as pressed.
0 Inserts mark at the desired skip position.
• To insert marks: Press at desired positions
during playback. (Screen display: MARK)
• To delete marks: While in pause mode, press
after using skip buttons to locate the marks to
be deleted. (Screen Display: )
MARK
36
H EN
Page 37

Timer Programming Guide
What kind of programming methods are there?
C
JV
AG-
CODEB
[ P38]
Programme
navigation
Calendar timer
programming
[ P40]
Automatic Satellite Programme
Recording [ P43]
3 Ways to Programme
Set recording (programming)
by simply entering the G-CODE
number.
Specify date and time from the
screen calendar to set
recording (programming).
Set recording (programming) on the external satellite receiver.
1
7
Basic Operations
EN I
37
Page 38

G-CODE Timer
.
.
.
Programming
ABCDEFGHIJK
A Display the programme navigation
screen.
9 With G-CODE system, timer programming can
be set simply by entering the number
corresponding to the TV programme.
9 You can programme up to 16 programmes,
including other programmes, within 1
month.
PREPARATION:
........................................................
0 Switch TV/DVD on the remote control to DVD.
0 Load a recordable disc when recording to a DVD
disc. [ P12]
DVD
TV
Number
Keys
A
B - F
B Select “G-CODE”.
SELECT
G-CODE
CONFIRM
C Set G-CODE.
A Enter the G-CODE number.
SELECT
CONFIRM
0 Can also be entered using the Number Keys.
B If necessary, select ARECORD TOB, then
select the recording deck.
C Select ACONFIRMB.
0 When the number is invalid, an error message
will be displayed.
IMPORTANT:
........................................................
0 Timer programming of an external receiver cannot be
set using the programme navigation.
0 When you have moved to other regions, perform
guide channel settings again. AG-
Channel SetB [ P30]
NOTES:
........................................................
CODE Guide
0 If there is inactivity for approximately 1 minute during
setting, the settings will be cancelled and the screen
will return to the broadcast screen.
0 To discontinue programming, press PROG and select
AEXITB.
0 See ATimer RecordingB [ P75].
If the guide channel has not been set
A A warning screen will be displayed.
Pressing ENTER displays the weekly/
daily timer programme’s recordable time
limit.
B Select ATV PROGB, then the receiving
channel.
0 Other items can also be set.
C Select ACONFIRMB.
SELECT
CONFIRM
CONFIRM
0 The guide channel information of the channels
available in ATV PROGB is stored on this unit.
0 See AG-CODE Guide Channel SetB [ P30].
38
H EN
Page 39

D If necessary, set recording options
.
for timer programming.
A Select AINPUT TITLEB to enter the title
name.
0 See ACreating Programme TitleB [ P60].
0 The title can be set later.
B Select ACATEGORYB to set the category.
0 See AModify CategoryB [ P59].
0 The category can be set later.
C Select AW E EK LY / DA I LY B to set the
recording frequency.
0 See AWeekly/Daily Timer ProgrammingB
[ P72].
D Select AREC MODEB to set the recording
mode.
0 See ARecording ModeB [ P70].
E Select “OK”.
SELECT
INPUT TITLE
CATEGORY
CONFIRM
WE EK LY /D AI LY
REC MODE
WEEKLY
SP
OK
When programming content overlaps
0 When completing the setting, if a message on
programme overlap is displayed, cancel the timer
programme, or change the programmed time, etc.
0 See AChecking, Changing or Cancelling a Timer
ProgrammeB [ P42].
(Warning message on
programme overlap)
PROGRAMME NOT COMPLETED
PROGRAMME OVERLAPPED
PLEASE CONFIRM AND MODIFY
OK
NOTE:
........................................................
0 If you do not cancel the timer programme or change
the programmed time, the programme whose start
time is earlier will be recorded first until it ends, then
the next programme will be recorded unless it has
ended.
Basic Operations
0 If timer programmes overlap, a warning message
will be displayed.
F Select “EXIT”.
SELECT
CONFIRM
To continue with other timer programmings, select
ACONTINUEB, then repeat step B-F.
0 Press STANDBY/ON to turn off when not performing
other operations.
EXIT
EN I
39
Page 40

Calendar Timer
.
.
.
8
4
8
9
5
9
6
3
0
6
7
3
0
2
7
3
1
1
8
5
9
2
9
6
3
3
1
0
3
1
Programming
ABCDEFGHIJK
A Display the programme navigation
screen.
9 You can set timer programme by specifying
the date and time.
9 You can programme up to 16 programmes,
including other programmes, within 1 year.
PREPARATION:
........................................................
0 Load a recordable disc when recording to a DVD
disc. [ P12]
STANDBY/ON
A
B - G
IMPORTANT:
........................................................
0 Timer programming of an external receiver cannot be
set using the programme navigation.
NOTES:
........................................................
0 If there is inactivity for approximately 1 minute during
setting, the settings will be cancelled and the screen
will return to the broadcast screen.
0 To discontinue programming, press PROG and select
AEXITB.
0 See ATimer RecordingB [ P75].
B Select “CALENDAR PR.”.
SELECT
CALENDAR PR.
CONFIRM
C Select the date to programme.
SELECT
2
2
28
25
2
CONFIRM
30
0 To display the calendar for the next month, press
the Selection Key (G) from the last week.
0 Dates that cannot be selected will be in black.
D Set recording options (1) for timer
programming.
A Select ARECORD TOB, then select the
recording deck.
B Select ASTARTB, then set the time.
0 For time setting, press and hold the Selection
Keys (FG) to change in 30-minute intervals.
C Select ASTOPB, then set the time.
D Select ATV PROGB, then select the
receiving channel.
E Select ACONFIRMB.
SELECT
CONFIRM
RECORD TO
START
STOP
TV PROG
CONFIRM
HDD
14:00
19:00
BBC1
E If necessary, set recording options
(2) for timer programming.
A Select AINPUT TITLEB to enter the title
name.
0 See ACreating Programme TitleB [ P60].
0 The title can be set later.
H EN
40
Page 41

B Select ACATEGORYB to set the category.
0 See AModifying Thumbnail/CategoryB
[ P58].
0 The category can be set later.
C Select AW E EK LY / DA I LY B to set the
recording frequency.
0 See AWeekly/Daily Timer ProgrammingB
[ P72].
D Select AREC MODEB to set the recording
mode.
0 See ARecording ModeB [ P70].
F Select “OK”.
SELECT
INPUT TITLE
CATEGORY
WE EK LY /D AI LY
REC MODE
CONFIRM
OK
0 If timer programmes overlap, a warning message
will be displayed.
G Select “EXIT”.
WEEKLY
SP
When programming content overlaps
0 When completing the setting, if a message on
programme overlap is displayed, cancel the timer
programme, or change the programmed time, etc.
0 See AChecking, Changing or Cancelling a Timer
ProgrammeB [ P42].
(Warning message on
programme overlap)
PROGRAMME NOT COMPLETED
PROGRAMME OVERLAPPED
PLEASE CONFIRM AND MODIFY
OK
Basic Operations
SELECT
EXIT
CONFIRM
To continue with other timer programmings, select
ACONTINUEB, then repeat step B-G.
0 Press STANDBY/ON to turn off when not performing
other operations.
EN I
41
Page 42

Checking, Changing or Cancelling a Timer Programme
ABCDEFGHIJK
9 Timer programmes can be changed or
cancelled.
A Display the programme navigation
screen.
B Select “PROGRAMME LIST” or
“CALENDAR LIST”.
SELECT
REC LINK
A
B - D
D
CONFIRM
PROGRAMME LIST
C Select a timer programme.
If APROGRAMME LISTB is selected
A Select a programme.
SELECT
CONFIRM
0 Pressing the Selection Key (E) will display the
weekly/daily timer programme’s recordable
time limit. Timer programmes with (!) will
display the recordable time limit. Timer
programmes with (L) cannot be recorded.
If ACALENDAR LISTB is selected
A Select the programmed date.
B Select a programme.
SELECT
CALENDAR LIST
42
CONFIRM
H EN
Page 43

When cancelling the timer programme
.
.
D Select “CANCEL”.
SELECT
CONFIRM
When changing the timer programme
D Select “MODIFY”.
SELECT
MODIFY
CONFIRM
Proceed to change the programmed settings.
Perform ACalendar Timer ProgrammingB [ P40,
41], step D-G.
0 If the weekly/daily timer programme is carried
out at least once, the recording deck, channel,
weekly/daily setting, and the recording mode
cannot be changed.
CANCEL
Automatic Satellite Programme Recording (HDD)
This function allows you to automatically record a
programme which is timer programmed on your
external satellite receiver to the HDD.
IMPORTANT:
........................................................
0 Make sure the satellite receiver is connected to this
unit’s [L-2 IN/DECODER] terminal.
0 Set to the following setting. Setup Menu AL-2
SELECTB = AVIDEO/RGBB [ P89] k
A Perform timer programming on the satellite
receiver.
B Press HDD.
C Press REC MODE repeatedly to set the
recording mode.
D Press and hold REC LINK for about 2 seconds.
E AR-LKB lights up on the front display panel, and
Automatic Satellite Programme Recording
mode is engaged. If AR-LKB blinks quickly on
the front display panel, Automatic Satellite
Programme Recording will not work properly. In
this case, perform ACalendar Timer
ProgrammingB [ P40].
NOTES:
........................................................
0 Refer also to the manual of the satellite receiver.
0 To disengage the Automatic Satellite Programme
Recording mode, press REC LINK.
0 If this unit is off, it is not possible to engage the
Automatic Satellite Programme Recording mode.
0 AR-LKB blinks slowly on the front display panel while
Automatic Satellite Programme Recording is in
progress.
0 The timer programmed recording start time and end
time may deviate slightly.
0 Automatic Satellite Programme Recording and other
timer programming cannot be performed
simultaneously.
Basic Operations
EN I
43
Page 44

Watching While Recording
.
ABCDEFGHIJK
Programme Playback during Recording (HDD & DVD-RAM)
9 While the HDD or DVD-RAM is recording a
programme, you can watch a recorded
portion of a programme even before
recording ends. (Live Memory Playback)
9 During recording, you can watch another
programme that has been recorded.
(Simultaneous Recording and Playback)
A
LIVE
A
B - D
GSLOW
ON SCREEN
PLAY
PAUSE
Example
Recording a programme from 21:00 to 23:00, return
home at 22:00 and watch the programme from the
beginning.
21:00
Recording in
progress
Watch from the beginning
22:00
23:00
A Access the Library Database
Navigation screen during recording.
(On-screen display for DVD)
DVD NAVIGATION
PLAY LISTORIGINAL
DVD LIBRARY
DISC No.DATE
CATEGORY
NAME
B Select “ORIGINAL”.
LIVE CHECK
STOP/CLEAR
IMPORTANT:
........................................................
0 For DVD-RAM, Live Memory Playback cannot be
performed within approximately 30 seconds from the
start of recording.
0 When using Live Memory Playback during timer
recording, the unit remains turned on and playback
continues even after recording ends.
0 If timer recording starts during Live Memory Playback
on DVD-RAM, the recording destination will be the
HDD even if recording on DVD-RAM has ended.
(ARelief RecordingB [ P75])
0 It is impossible to perform ITR during Live Memory
Playback. Stop playback, then perform ITR settings.
(APossible operations during recordingB [ P33])
0 Live Memory Playback and Simultaneous Recording
and Playback cannot be performed while recording
from the DV input or recording in DV mode.
SELECT
ORIGINAL
CONFIRM
C Select the programme that is
currently being recorded.
SELECT
CONFIRM
Programme currently being recorded
(the very last programme)
44
H EN
Page 45

D Select “BEGINNING”.
HDD DVD
SELECT
Live Memory Playback can also be
performed in the following ways
BEGINNING
CONFIRM
0 See AUsable Buttons during PlaybackB [ P36].
To stop Live Memory Playback
0 Exits Live Memory Playback, and the image currently
being recorded is displayed.
Operating status during Live Memory
Playback
To display the operation information, for example, on
the HDD.
FR360
Deck
mode and
recording
mode
PR.12
With HDD/DVD-RAM
0 Press w.
Skips back for approximately 7 seconds and
resumes playback.
0 For DVD-RAM, the initial press skips back for
approximately 30 seconds, then resumes
playback. (One Touch Replay)
With HDD
0 Press SLOWG.
While doing reverse searching, locate the point
to start playback from, then press PLAY.
0 Press PAUSE.
Press PLAY to continue playback.
You can resume playback of a programme you
are watching while recording, from the point
where you have paused. (Resuming Playback)
Play Back Other Programmes While Recording (HDD & DVD-RAM/-RW/-R)
A Select the playback deck during
recording.
Basic Operations
To display the image being recorded.
Image during Live Memory Playback
FR360
Image currently being recorded
To display the broadcast image.
PR.12
12
0 Exits Live Memory Playback, and the image currently
being recorded is displayed.
OR
Playback deck’s LED lights up
0 If the playback deck happens to be the recording
deck, setting is not required.
B Start playback.
0 Perform the same procedures as for AProgramme
Playback during Recording (HDD & DVD-RAM)B
[ P44]. In this case, select the programme that
you wish to watch.
0 Other than DVD-RAM discs, playback on the
DVD is not possible while recording on the DVD.
EN I
45
Page 46

Watching DVD Videos
.
Watching DVD Videos
ABCDEFGHIJK
9 Commercially available DVD Videos can be
played back.
9 Setting the audio, subtitle language and angle
(camera) during playback.
PREPARATION:
........................................................
0 Switch TV/DVD on the remote control to DVD.
DVD
TV
Number
Keys
TOP MENU
Selection
Keys
(FGDE)
MENU
B
A
RETURN
A Select DVD, and load a disc.
B Start playback.
Playback will begin, or the menu screen will be
displayed. Select a menu item if the menu screen
is displayed.
SELECT
CONFIRM
To display the menu screen during playback,
press TOP MENU or MENU.
OR
AUDIO
SUBTITLE
ANGLE
0 See the following pages.
AUsable Buttons during PlaybackB [ P36]
APlayback Setting Menu OperationsB [ P81]
0 For details on menu selection or disc playback
method, refer to the instruction manual of the disc
you are using.
46
H EN
Page 47

Audio, Subtitle and Angle Selection
.
Selecting the audio language
(DVD Video, Video CD)
0 For Video CDs, the audio will be switched.
During playback
SELECT
Watching Video CDs (PBC Function)
Playing back Video CDs that supports PBC
(Playback Control) function.
PREPARATION:
.....................................................
0 Switch TV/DVD on the remote control to DVD.
A Select DVD, and load a disc.
Basic Operations
On-screen Display
ENGLISH
CONFIRM
Selecting the subtitle language
During playback
On-screen Display
ENGLISH
SELECT
CONFIRM
Selecting the image angle (camera) (DVD
Video)
During playback
On-screen Display
SELECT
CONFIRM
0 Depending on the disc, the subtitle or audio language
may not switch even if SUBTITLE (or AUDIO) is
pressed. At times like this, switch using the disc
menu.
0 When 7 appears on the TV screen, either the disc
does not support that function, or the change of
setting is prohibited.
0 Playback may also begin automatically when
the disc is loaded. In this case, press RETURN.
B Display the menu screen.
0 When APREVIOUSB / ANEXTB is displayed on
the menu screen, press S/T to browse the
pages.
C Select and play back the programme that you
wish to watch.
CONFIRM
0 You can also select by pressing PLAY.
0 APBCB will be displayed on the front display
panel when playback begins.
0 You can display the menu screen during
playback by pressing RETURN.
To play back without activating the PBC
function
Press the Number Keys while stopped, select the
track that you wish to play, then press ENTER.
EN I
47
Page 48

Switching the Image
.
.
Output Format
ABCDEFGHIJK
9 Conventional interlaced scan (A576iB) and
progressive scan (A576pB) are available for
the image output selection. Set to the desired
mode when connected to a compatible TV.
Output Format
Format Front Display Panel
A576iB
A576pB
q off
q on
A Switch the output format.
More than 5 seconds
0 q on the front display panel lights up.
0 To return to the original output format, press
OUTPUT FORMAT again for more than 5
seconds. (q lights off.)
NOTE:
........................................................
0 If A576pB is set, you can select a progressive mode
suited to the image being played back. See APlayback
Setting Menu OperationsB, AProgressive Mode
SettingB [ P83].
A
IMPORTANT:
........................................................
0 Use this function if connected to a compatible TV
using the component video terminal.
0 If connected to the TV using the SCART connector, set
to A576iB.
0 It is not possible to change the output format while
the Playback Setting Menu is being displayed. Clear
the Playback Setting Menu, then change the output
format.
48
H EN
Page 49

Playing Back MP3 & JPEG
.
Files
ABCDEFGHIJK
9 Able to play back MP3 audio files recorded
in CD-R discs, etc. and play back JPEG still
images as a slide show.
PREPARATION:
........................................................
0 If a disc contains both MP3 and JPEG files, specify the
file for playback using the following setting. Setup
Menu AMP3/JPEGB [ P86] O
A
A Select DVD, and load a disc.
0 Check the playable file formats. AAbout DiscsB
[ P12]
Basic Operations
B Start playback.
A Display the Library Database Navigation
screen.
B Select AORIGINALB.
SELECT
ORIGINAL
CONFIRM
- B, C
B - A
C Select a file to play back.
SELECT
CONFIRM
File list
0 Plays back from the selected file until the last file.
0 Only those files in the same folder will be played
back continuously.
0 MP3 files will be played back as tracks. The track/
total track number being played back is displayed
on the top left screen.
0 For JPEG files, the display time for slide show can
be set. ADisplay time interval for JPEG or slide
showB [ P83]
0 JPEG files with a resolution of 640 x 480 are
recommended. It takes some time to display for
those with higher resolution.
0 The aspect ratio of the image may appear
differently on the TV and computer.
EN I
49
Page 50

Formatting
.
ABCDEFGHIJK
9 Formatting will erase all the data. As such,
before formatting a recorded disc, make sure
the disc does not contain important
recordings.
9 Brand new DVD-RAM or DVD-RW discs
may also need to be formatted.
9 To use a DVD-R disc in VR mode, format the
new disc in VR mode. (It will be in Video
mode when not formatted.)
B - B
- D
C For DVD-RAM For DVD-RW
Select AEXECUTEB.Select AVR MODEB or
AVIDEO MODEB.
EXECUTE
VIDEO MODEVR MODE
0 This screen will not be displayed in the case of a
DVD-R disc. Proceed to step D.
D Select “EXECUTE”.
SELECT
CONFIRM
0 When formatting a DVD-RW disc, confirm on
the mode to be formatted.
EXECUTE
B -
A,
E
CAUTIONS:
........................................................
0 Never turn off the unit or disconnect the AC power
cord while ANOW FORMATTING...B is displayed on
the TV screen.
0 All the titles on a disc will be deleted once the disc is
formatted even if they are protected titles. [ P66]
0 DVD-R discs can only be formatted once.
A Load a disc.
B Select “FORMAT”.
A Access the setup menu.
B Select AHDD/DVD SET UPBBADISC SET
UPBBAFORMATB.
If a ACOMPLETEDB message is displayed,
0 Press ENTER to return to the setup menu.
E Exit formatting.
Formatting a new disc
DVD-RAM
A When the disc is loaded, the screen in step
D is displayed.
B Select AEXECUTEB to format.
DVD-RW
A When the disc is loaded, the screen in step
C is displayed.
B Select the desired mode and start
formatting.
50
H EN
SELECT
CONFIRM
HDD/DVD SET UP
FORMAT
DISC SET UP
Page 51

Watching on Other DVD Players (Finalising)
ABCDEFGHIJK
9 To play back DVD-R and DVD-RW discs on
other DVD players, perform finalisation.
Finalising a Video mode disc results in a
DVD VIDEO disc with programme menu.
Recording and editing are not possible after
finalising.
C Choose a background image for the
menu. (Video mode only)
SELECT
CONFIRM
0 There are 18 types of background images.
0 This step does not apply to DVD-RW/-R (VR
mode) discs.
Basic Operations
A
TOP MENU
MENU
A Select DVD, and load a disc.
B Select “FINALISE”.
A Access the setup menu.
NAVIGATION
B - B,
D
B -
A,
E
D Perform finalisation.
A Select AOKB.
B Select AOKB again.
SELECT
CONFIRM
If a ACOMPLETEDB message is displayed,
OK
E Exit finalisation.
Playback after finalisation
0 Press TOP MENU or MENU to operate Video mode
discs, as with DVD Videos.
0 Press NAVIGATION to operate VR mode discs.
0 Finalised DVD-RW (VR mode) discs can be played
back on VR mode compatible devices.
0 Finalised DVD-R (VR mode) discs can be played back
on DVD-R (VR mode) compatible devices.
B Select AHDD/DVD SET UPBBADISC SET
UPBBAFINALISEB.
SELECT
CONFIRM
HDD/DVD SET UP
FINALISE
DISC SET UP
To cancel finalisation
A
Load a finalised DVD-RW disc.
0 It is not possible to cancel the finalisation of a
DVD-R disc.
B Access the setup menu, select and confirm
on AHDD/DVD SET UPBBADISC SET
UPBBACANC. FINALIS.B.
C Select and confirm on AEXECUTEB on the
confirmation screen.
D Press SET UP to exit.
EN I
51
Page 52

Dubbing
HDD
DVD
B
D
C
A
9 Two-way dubbing between HDD and DVD disc is possible with this single unit. In addition,
dubbing can be done from an external DV camcorder to the HDD or DVD. Refer to the following
content for reference during dubbing.
Dubbing
source
HDD DVD
DVD HDD 8 3
DV camcorder HDD/DVD All -
Dubbing deck Ty p e
High Speed 8 3 (*2) 33
Just 8 3333
Manual 8 3333
Max. title per
dubbing
Play list
dubbing (*1)
Dubbing
copy-once
titles
Intelligent
dual-pass
encoding (*3)
*1 Play list: Data where only required parts from recorded programmes can be viewed.
0 The play list will be dubbed as one programme.
0 Play lists with copy-once images cannot be dubbed.
*2 When dubbing play list from the HDD to the DVD-RW/-R (Video mode) discs, dubbing will be performed in the
normal speed even if high speed dubbing is selected.
*3 Intelligent Dual-Pass Encoding
Optimises the overall bit rate for recording. Scenes with rapid movement are recorded with high bit rates, while
scenes with slow movement are recorded with low bit rates, thereby resulting in better picture quality.
*4 Recording Information: Thumbnails, recording date and time, and channels.
Copying
recording
information
(*4)
3-Way Dubbing from HDD to DVD
High Speed Dubbing
[ P54]
High speed dubbing in a flash! Be
no longer annoyed with the waiting
time for dubbing.
0 For example, dubbing a 2-hour
programme to a DVD-R disc at 64x
speed.
2-hour
programme
Dubbing time
Approx. 2 mins.
Max 64x speed*
DVD-R
* In FR480 mode, and when using
a 8x high speed compatible
DVD-R disc.
Dubbing from DVD to HDD [ P54] Dubbing from DV camcorder to HDD, DVD [ P56]
Able to copy programmes (titles) from the DVD disc with
ease.
Just Dubbing [ P54] Manual Dubbing [ P54]
Dubbing that fits exactly to the free
space of a DVD disc!
0 For example, dubbing to a DVD
disc with only 20 minutes disc
remaining time.
20 mins
remaining
30-minute
Recording
completed
programme
Just
0 Able to record a 30-minute
programme exactly to a 20-minute
blank space.
Easy connection with the DV camcorder using just one
DV cable! You can even create your very own original
DVD disc with ease.
Set your own desired recording
mode for dubbing!
Priority to
image quality!
A
Pack a lot into
one disc!
A
D
C
B
52
H EN
DVD
HDD
Page 53

Recordable Once Only Programmes (Copy-once)
9 Among digital broadcasts, there are programmes whose recording with digital devices is permitted
only once for the purpose of copyright protection. To record such programmes to a DVD disc, use
a CPRM-compliant disc.
9 CPRM (Content Protection for Recordable Media) refers to the technology that enables the
recording of copyright-protected Acopy-onceB programmes.
External receiver
Recording Recording
Dubbing
Icon displayed on
thumbnail of
programme listing
HDD
0
To record to DVD, use a CPRM-compliant DVD-RAM or DVD-RW/-R (VR mode) disc. Formatting may be necessary
in order to use DVD-RW/-R disc in VR mode. [ P50]
Transfer
DVD
Icon displayed on
thumbnail of
programme listing
(Red circle)
0 When dubbing from HDD to DVD disc, the data will be transferred while the original data is erased. Data will not
be transferred if dubbing is terminated.
0 Unable to dub if the play list contains copy-once programmes.
Media Recording Dubbing
3
HDD
CPRM-compliant DVD-RAM
CPRM non-compliant DVD-RAM
CPRM-compliant DVD-RW (VR
mode)
CPRM non-compliant DVD-RW (VR
mode)
DVD-RW (Video mode)
CPRM-compliant DVD-R (VR mode)
CPRM non-compliant DVD-R (VR
mode)
DVD-R (Video mode)
3
3
3
3
Transfers only to CPRM-compliant DVD-RAM
and CPRM-compliant DVD-RW/-R (VR mode)
disc.
Dubbing programmes recorded in DV mode
0 Cannot be high speed dubbed.
0 Dubbing will be performed using re-encoding. Intelligent Dual-Pass Encoding is not used.
0 Programmes recorded in DV mode and in other recording modes cannot be selected at the same time.
EN I
53
Page 54

Dubbing between HDD and
.
.
DVD Deck
ABCDEFGHIJK
A Load a disc.
0 When dubbing to a DVD disc, load a recordable
disc.
0 When dubbing to the HDD, load a disc for
playback.
9 You can easily dub from the HDD to DVD
disc, and vice versa.
9 There are 3 ways to dub from the HDD to the
DVD disc, so you can choose whichever
matches your purpose.
PREPARATION:
........................................................
0 Switch TV/DVD on the remote control to DVD.
CANCEL
TOP MENU
C - F
MENU
ON SCREEN
IMPORTANT:
........................................................
D B
B
0 For high speed dubbing to the DVD-RW/-R (Video
mode) disc, the following programmes cannot be
high speed dubbed. (They will be dubbed in the
normal speed.)
• Bilingual sound
• Play list
• Programmes that are divided, programmes with
parts deleted or RetroActive recorded programmes
• LP or FR155 - FR240 mode recorded programmes
0 Programmes or play lists recorded in DV mode
cannot be high speed dubbed.
0 With Just dubbing, even if there is recording time to
spare, it is not possible to perform Just dubbing by
raising the recording mode as with changing from SP
mode to XP mode.
0 When dubbing from a DVD-RW/-R (Video mode) disc
recorded on other units to the HDD, finalisation is
required.
0 It is not possible to dub from +R/+RW discs.
B Display the Dubbing screen.
TO DVD
TO HDD
JUST
DV CONN
N DVD
HIGH SPEED
MANUAL
TITLE
DV CONN
N HDD
C Select a dubbing method.
SELECT
CONFIRM
Dubbing from the HDD (hard disk) to a DVD
disc
Select when you wish to shorten
the dubbing time considerably.
DVD-RAM: Max. 3x speed
DVD-RW: Max. 4x speed
AHIGH
SPEEDB
DVD-R: Max. 8x speed
0 Use a high speed compatible
disc.
0 Dubbing may not be performed
in the highest speed as shown
depending on the disc used.
Select when dubbing to fill an
AJUSTB
entire DVD disc, or to fit the
available free space exactly.
AMANUALB
Select when setting the recording
mode for dubbing.
0 Select ATITLEB when dubbing from a DVD disc to
HDD.
HIGH SPEED
MANUAL
TITLE
TO DVD
JUST
TO HDD
D Select the programme to be dubbed.
A Select a programme.
Time bar display
SELECT
0 Programme list screen is displayed in order of
recording date and time. Displays in order of
name if the dubbing source is HDD.
0 Pages can be advanced using TOP MENU or
MENU.
Information display
30%
1
4
2
54
H EN
Page 55

B Enter into memory.
0 Repeat step A and B as necessary. Up to a
maximum of 8 programmes can be selected.
0 To cancel the memory, press MEMO/MARK at
the programme that has been entered into
memory. To cancel all the programmes, press
CANCEL.
0 Programmes recorded in DV mode and in
other recording modes cannot be selected at
the same time.
C Confirm.
CONFIRM
Information display
AHIGH
SPEEDB
AJUSTB
AMANUALB
ATITLEB
Deep Green Used space.
Yellow Size of selected programmes.
Light Green
Red
Remaining capacity display in
percentage (%).
Total time of selected
programmes.
Highest recording mode of
selected programmes.
Total time of selected
programmes.
Time bar display colours
Total size of the programmes
memorised.
Selected programmes that
exceeds the capacity.
E Set the recording mode. (For
“MANUAL” dubbing.)
A Select AREC MODEB to set the desired
mode.
SELECT
F Select “EXECUTE”.
SELECT
CONFIRM
0 The ANOW DUBBINGB display will be displayed
for approximately 5 seconds. (The time duration
displayed is an estimate.)
ANOW DUBBINGB
display
0 The ANOW DUBBINGB display will be displayed
when ON SCREEN is pressed.
0 While dubbing is in progress, you can press
DUBBING to change the setting for the power
status upon completing dubbing.
0 The following button operations are possible
during dubbing.
CH/PR(+/-), AUDIO, HELP
0 The broadcast screen is displayed while dubbing
is in progress.
0 When dubbing coincides with timer recording,
see the following page. ADubbing and timer
recording priorityB [ P75]
To cancel a dubbing that is in progress
Press ON SCREEN to display the ANOW
A
DUBBINGB display.
B Press ENTER.
C Select ACANCELB, then press ENTER.
0 When dubbing is discontinued, information such as
recording date and time; title name will not be
properly recorded.
0 The disc remaining time will not increase even if
you delete the programme that was dubbed before
discontinuing the dubbing to DVD-R.
3MINUTES
EXECUTE
NOW DUBBING
Dubbing
SP
CONFIRM
CONFIRM
0 When setting recording mode, modes with
insufficient capacity will not be displayed.
B Select ACONFIRMB.
EN I
55
Page 56

Dubbing from DV
.
.
Dubbing from DV Camcorder
Camcorder/Video
Cassette Recorder
ABCDEFGHIJK
9 Dubbing can be done from a DV camcorder
that is connected to this unit with a DV
cable. You can also operate the DV
camcorder from this unit’s remote control.
(On-screen display for DV dubbing)
9 Dubbing video tape images to a DVD disc or
the HDD.
PREPARATION:
........................................................
0 Switch TV/DVD on the remote control to DVD.
0 See the following page for the connection. ADubbing
from DV Camcorder/Video Cassette RecorderB
[ P21]
C
B,
D - F
D, E
F -
B
C
B
D -
G
B
A Insert a tape to play on the DV
camcorder.
0 When dubbing to a DVD disc, load a recordable
disc on this unit.
B Display the Dubbing screen to select
the dubbing deck.
TO DVD
SELECT
CONFIRM
DV CONN
N HDD
TO HDD
DV CONN
N DVD
0 Select ADV CONN N HDDB to dub to HDD, or
ADV CONN N DVDB to dub to DVD.
C Select the recording mode.
0 See ARecording ModeB
[ P70].
D Set playback mode on DV camcorder.
A Select ARemote control switchB
( ) to set to .
0 Switches each time ENTER is pressed.
SELECT
IMPORTANT:
........................................................
0 Certain DV camcorders may not be operable.
Operate the camcorder directly.
0 Dubbing copyright guarded programmes is not
possible.
0 It is not possible to operate from the DV camcorder.
0 Original DV information such as the recording date
and time are not recorded. (During MPEG recording.)
0 When a dubbing that is in progress coincides with
timer recording, a confirmation screen asking which
to give priority will be displayed. Select
ACONTINUEB or AEXECUTEB.
0 To dub from the beginning of the DV tape, start
dubbing from the stopped condition in step D -
0 Chapters (marks) can be automatically inserted.
Setup Menu ADV AUTO CHAPTERINGB = AONB
[ P86] S
H EN
56
CONFIRM
0 : Operate this unit.
: Operate the DV camcorder.
B Start playback, then pause at dubbing
start point.
0 You can operate the DV camcorder to play,
pause, perform forward search/reverse search;
slow motion and frame-by-frame playback,
using this unit’s remote control.
B.
For operating instructions, see AUsable Buttons
during PlaybackB [ P36].
0 Set to stop condition at portion with no images
(for example at the beginning of the tape).
0 When dubbing from the pause condition,
accurate dubbing can be done by rewinding
the tape slightly.
Page 57

If switching the DV sound
.
0
0:0
0.0
0
d
v
SOU
ND1
D
V
350
0
C Select ASound monitor switchB
( ), and press ENTER to switch.
SELECT
CONFIRM
SOUND1BSOUND2BMIX
Dubbing from Video Cassette Recorder (VCR)
0 See the following page for the connection. ADubbing
from DV Camcorder/Video Cassette RecorderB
[ P21]
0 This unit’s on-screen display can be disabled. Setup
Menu ASUPERIMPOSEB = AOFFB [ P88] a
Dubbing
0 SOUND1: Record with normal (original) stereo
sound.
0 SOUND2: Record post-recorded sound in
stereo.
0 MIX: Record both normal stereo sound and
post-recording sound.
(Post-recording sound is not available for 16 bit
recording)
E Start dubbing.
A Select and confirm on AAuto capture
buttonB ().
• Select and confirm on to pause and/
or resume dubbing.
F End dubbing.
A Select and confirm on ARemote control
switchB ( ), then set to
.
B Stop dubbing.
PRESS TWICE
Repeat step D - F if you want to continue dubbing.
Dubbing to a DV device
(only programmes recorded in DV mode on
the HDD)
Recommended when, after dubbing videos shot using
a DV camcorder to the HDD and editing the play list,
you wish to store them on a mini DV tape.
A Set the channel to AdvB.
B Select and play back the programme recorded
in DV mode that you wish to dub from the
Library Database Navigation.
C Check if the playback screen appears on the TV
connected from the DV device (recording end).
D Pause playback on this unit (playback end) at
the dubbing start point.
E Pause recording on the DV device (recording
end).
F Start playback on this unit and recording on the
DV device simultaneously.
G When dubbing is finished, stop recording on the
DV device, then stop playback on this unit.
NOTE:
........................................................
0 This operation is not possible when DVD is selected.
A (This unit) Load a recordable disc.
B (VCR) Insert a tape to play.
C (This unit) Switch to the input
connecting the VCR.
0 Select AL-2B or AF-1B.
0 Press 0 on the remote control to
set to AL-2B forcibly.
D (This unit) Select the recording deck.
E (This unit) Select the recording
mode.
F (VCR) Start playback.
G (This unit) Start recording.
WHILE HOLDING
H When dubbing is finished, stop
recording on this unit, then stop
playback on the VCR.
0 Dubbing copyright guarded programmes is not
possible.
0 Recordings made by you, under copyright law,
cannot be used without the consent of the right
holder other than for personal enjoyment.
When dubbing to Video Cassette Recorder
(VCR)
Play back on this unit.
A
B Record with the VCR.
0 For details, refer to the instruction manual of the
VCR.
EN I
57
Page 58

Modifying Thumbnail/
.
Category
ABCDEFGHIJK
9 Thumbnail: The picture on the programme
list can be changed to your preferred picture.
9 Category: Can be used for programme
searching.
9 You can also modify the thumbnails and
category of the play list for HDD as well as
DVD-RAM and DVD-RW/-R (VR mode and
unfinalised Video mode) discs.
A
TOP MENU
B - F B - F
B
B, G
G
B Display the Editing screen.
When DVD is selected
A Load a disc.
B Display the Editing screen, then select
AMODIFYB.
MODIFY
SELECT
CONFIRM
When HDD is selected
ORIGINAL
MODIFY DELETE DEL SCEN
DIVIDE
PLAY LIST
MODIFY DELETE CREATE
MENU
F - A
NOTES:
........................................................
0 To modify the play list, you have to create a play list
first. [ P62]
0 Modification on the DVD discs is not possible in the
following cases.
• Title-protected programmes. [ P66]
• Finalised discs. [ P51]
A Select disc.
OR
C Select “MODIFY” under “ORIGINAL”.
SELECT
MODIFY
CONFIRM
0 In the case of play list, select AMODIFYB under
APLAY LISTB.
D Select the programme to be changed.
SELECT
CONFIRM
0 Pages can be advanced using TOP MENU or
MENU.
BTo modify the thumbnail, proceed to E.
BTo modify the category, proceed to E.
58
H EN
Page 59

Modify Thumbnail
Modify Category
E Select “INDEX”.
SELECT
INDEX
CONFIRM
F Decide on the thumbnail image.
A Start playback, then pause at the desired
scene.
0 Use SLOWG/SLOWF to search for the scene.
B Select AREPLACEB.
SELECT
E Select “CATEGORY”.
SELECT
CONFIRM
F Select the desired category.
SELECT
ANIMATION
CONFIRM
G Exit category modification.
CATEGORY
Editing
CONFIRM
REPLACE
0 The new image will be registered.
G Exit thumbnail modification.
EN I
59
Page 60

Creating Programme Title
.
Perform AModifying Thumbnail/CategoryB, step A -
D [ P58].
ABCDEFGHIJK
9 You can name or modify the titles of recorded
programmes.
9 You can also name or modify the title name
of the play list for HDD as well as DVD-RAM
and DVD-RW/-R (VR mode and unfinalised
Video mode) discs.
H
E - G
E Select “NAME”.
SELECT
CONFIRM
NAME
F Enter the characters.
SELECT
A
CONFIRM
0 Select and enter one character at a time.
0 There are 3 types of character sets. Select
AALPHABETB, ASYMBOL1B, or ASYMBOL2B.
0 Selecting ADELETEB deletes the character before
the cursor.
0 You can also press STOP/CLEAR to delete the
character. Press once to delete one character,
press and hold to delete all the characters.
NOTES:
........................................................
0 To name the play list, you have to create a play list
first. [ P62]
0 Modification on the DVD discs is not possible in the
following cases.
• Title-protected programmes. [ P66]
• Finalised discs. [ P51]
G Select “SAVE”.
SELECT
CONFIRM
SAVE
0 You can also press PAUSE to save.
H Exit title name creation.
To name a DVD disc
0 If you select and confirm on ADISC NAMEB in step B
of AModifying Thumbnail/CategoryB, the title entry
screen will be displayed. Enter the desired title name.
60
H EN
Page 61

Creating/Deleting
.
Chapters (Marks)
ABCDEFGHIJK
9 If chapters (marks) are created in the
recorded programme, a preferred scene in
the programme can be easily located.
F Create or erase the chapters (marks).
To create chapters (marks)
A Start playback, then pause at the scene
where you want to mark.
Editing
0 You can also use SLOWF/SLOWG.
B Select AMARKB.
SELECT
G
E, F
F
NOTE:
........................................................
0 Modification on the DVD discs is not possible in the
following cases.
• Title-protected programmes. [ P66]
• Finalised discs. [ P51]
CONFIRM
MARK
0 If a chapter (mark) is created, a chapter image
will be added below the screen.
0 ARETRYB: Cancels AMARKB or AERASEB.
0 ARETURNB: Returns to the screen in step E.
To delete chapters (marks)
A Pause playback.
B Move to the mark to be deleted.
OR
C Select AERASEB.
SELECT
Perform AModifying Thumbnail/CategoryB, stepA-D
[ P58].
E Select “CHAPTER”.
SELECT
CHAPTER
CONFIRM
CONFIRM
ERASE
0 If a chapter (mark) is deleted, the chapter
image below the screen will be cleared.
G Exit chapter (mark) creation or
deletion.
EN I
61
Page 62

Gathering Favourite
.
Scenes (Play List
Creation)
B Display the Editing screen, then select
AMODIFYB.
ABCDEFGHIJK
9 A play list is a single programme with a
collection of favourite scenes gathered from
multiple original programmes. Up to 99 can
be created.
A
B, I
B - H
STOP/CLEAR
E F -
A,
A
SELECT
CONFIRM
When HDD is selected
C Select “CREATE”.
SELECT
CONFIRM
(On-screen display for DVD)
MODIFY
ORIGINAL
MODIFY DELETE DEL SCEN
DIVIDE
PLAY LIST
MODIFY DELETE CREATE
NOTES:
........................................................
0 Play list cannot be created if there is a mixture of
programmes recorded in DV mode and other
recording modes.
0 There may be slight deviation from the points set.
A Select disc.
OR
B Display the Editing screen.
When DVD is selected
A Load a disc.
CREATE
D Select the programme to be used.
SELECT
CONFIRM
E Decide on the start point of the
scene.
A Start playback, then pause at the scene
where you want the created play list to
begin.
0 You can also use SLOWF/SLOWG to search
for the start and end point.
62
H EN
Page 63

B Confirm on the start point.
.
H Select “EXIT”.
PROG 1 00 : 00: 05
CONFIRM
IN/OUT
0 The image of the start point for the scene will
be displayed on the AINB sub-screen.
F Decide on the end point of the scene.
A Start playback, then pause at the scene
where you want the created play list to
end.
B Confirm on the end point.
CONFIRM
IN/OUT
0 The image of the end point for the scene will
be displayed on the AOUTB sub-screen.
0 Repeat step E and F to add scenes.
0 To add scenes from other programmes, select
ASEL. TITLEB, then repeat step D - F.
0 A maximum of 99 scenes can be registered in a
play list.
G Select “OK”.
SELECT
PROG 1 0 : 12 : 33 - 0 : 13 : 25
PROG 1 0 : 24 : 27 - 0 : 25 : 12
PROG 1 0 : 14 : 42 - 0 : 16 : 34
PROG 2 0 : 14 : 15 - 0 : 16 : 34
PROG 2
CONFIRM
OK
SELECT
CONFIRM
EXIT
I Exit play list creation.
Play back play list
0 Select APLAY LISTB in step C [ P34] of
ABasic Playback (Library Database
Navigation)B.
Delete play list
0 Perform the operations on ADeleting/
Protecting a ProgrammeB. During which,
select ADELETEB under APLAY LISTB in step
C [ P66].
NOTES:
........................................................
If a scene is created, the following menu buttons can
be selected.
0 ASEL. TITLEB: Select scenes from other programmes.
0 AMODIFYB: Modify scenes. [ P64]
0 ADELETEB: Delete scenes.
0 AMOVEB: Can change the playback order when there
are more than 2 scenes. [ P65]
0 ARETRYB: Cancel the last operation.
0 APREVIEWB: Play back from scene 1.
0 AOKB: Confirm scene registration.
Preview Playback
0 Forward search and slow motion playback are
possible.
0 You can move the scenes with S/T.
0 A scene being played back is selected.
0 Press STOP/CLEAR to end preview playback.
0 Enters into pause mode when preview playback ends.
Editing
EN I
63
Page 64

Editing Play List
Modify Scene
ABCDEFGHIJK
9 You can modify or move the scenes of a
created play list. In addition, new scenes can
be added.
A
B
B - G
EDIT
RETURN
G -
A
A Select disc.
OR
B Display the Editing screen.
When DVD is selected
A Load a disc.
B Press EDIT to display the Editing screen.
C Select AMODIFYB.
When HDD is selected
A Press EDIT to display the Editing screen.
C Select “MODIFY” under “PLAY LIST”.
(On-screen display for DVD)
SELECT
CONFIRM
MODIFY
D Select the programme to be modified.
SELECT
CONFIRM
E Select “SCENE”.
SELECT
CONFIRM
SCENE
64
H EN
Page 65

F Select the scene that you want to
modify.
A Select AMODIFYB.
Playback end point
SELECT
CONFIRM
B Select the playback start or end point of
a scene to modify.
SELECT
Playback start point
MODIFY
PROG 1 0 : 12 : 33 - 0 : 13 : 25
PROG 1 0 : 24 : 27 - 0 : 25 : 12
PROG 1 0 : 14 : 42 - 0 : 16 : 34
PROG 2 0 : 14 : 15 - 0 : 16 : 34
PROG 2
Move Scenes
A Perform step A - E.
B Select and confirm on “MOVE” in
step F -
A.
C Select and confirm on the scene to
move at in step F -
B.
D Select and confirm another scene to
which the scene is to be moved.
0 To cancel the move, press RETURN or EDIT.
E Perform “Gathering Favourite
Scenes (Play List Creation)”, step
G - I [ P63].
Add Scenes
Editing
CONFIRM
0 To cancel modification, press RETURN or
EDIT.
G Create new scene.
A Start playback, then pause at the desired
scene.
0 You can also use SLOWF/SLOWG to search
for the scene.
B Confirm on the playback start or end
point.
CONFIRM
0 To modify other scenes, repeat step F and G.
H Perform “Gathering Favourite Scenes
(Play List Creation)”, step G - I
[ P63].
A Perform step A - E.
B Select and confirm on “SEL. TITLE”
in step F -
A.
C Perform “Gathering Favourite Scenes
(Play List Creation)”, step D - I
[ P62, 63].
EN I
65
Page 66

Deleting/Protecting a
.
Programme
ABCDEFGHIJK
9 Deleting unwanted programmes can increase
the disc remaining time. (However, the disc
remaining time does not increase for DVD-R
discs. For DVD-RW (Video mode) discs, the
disc remaining time increases only when the
last programme is deleted.)
9 Protect function to prevent accidental erasure
is available for DVD-RAM and DVD-RW/-R
(VR mode) discs.
When HDD is selected
A Press EDIT to display the Editing screen.
C Select “DELETE” under “ORIGINAL”.
SELECT
CONFIRM
(On-screen display for DVD)
DELETE
D Select the programme to delete.
SELECT
A
B, F
B - E
IMPORTANT:
........................................................
0 If an original programme is deleted, all the related
play list and library information will also be deleted.
0 All the programmes on a disc will be deleted once the
disc is formatted even if they are protected
programmes.
Deleting a Programme
A Select disc.
OR
B Display the Editing screen.
When DVD is selected
A Load a disc.
B Press EDIT to display the Editing screen.
C Select AMODIFYB.
CONFIRM
E Select and confirm on “DELETE”.
To cancel the deletion (HDD only)
0 Be sure to perform before step F.
A After this step, select and confirm on the
folder of the latest created ADELETION
LISTB in the programme list. (Icon: )
B Select and confirm on the programme
you want to cancel deletion.
F Exit programme deletion.
Protect Programme (DVD-RAM/
-RW(VR)/-R(VR))
A
Select and confirm on APROTECTB in step
C.
B Select and confirm on the programme to be
protected.
C Select and confirm on APROTECTB on the
confirmation screen.
0 If protect is set to a programme, a protect
mark ( ) will be placed on the programme
list.
0 To remove the protection, select the
programme that has been protected in B. The
AunprotectB screen is displayed, select
ACANCEL PROTECTB.
D Press EDIT to exit.
66
H EN
Page 67

Deleting Scenes
.
ABCDEFGHIJK
9 You can delete commercial breaks from a
recorded programme.
C Select “DEL SCEN”.
SELECT
CONFIRM
DEL SCEN
Editing
A
B, G
B - F
E -
A, C
IMPORTANT:
........................................................
0 Deleting scenes does not increase remaining capacity
for DVD-R (VR mode).
0 If the time duration to be deleted is below 2 seconds,
deleting may not be possible.
0 It may deviate a little from the desired position set.
0 Deleting scenes on the DVD will cause all related
play lists to be deleted.
0 Deleting scenes on the HDD is not possible if the
programme is used in the play list.
D Select and confirm on a programme
whose unwanted scenes you want to
delete.
E Decide on the unwanted scene to be
deleted.
A Start playback, then pause at the scene
where you want the deletion to begin.
0 You can also use SLOWF/SLOWG.
B Select AINB.
SELECT
CONFIRM
IN OUT
C Start playback, then pause at the scene
where you want the deletion to end.
D Select and confirm on AOUTB.
E Select and confirm on AOKB.
0 Select APREVIEWB, a preview of the scene
approximately 5 seconds before and after the
deleted part is played back.
0 To redo, select ARETRYB.
A Select disc.
OR
B Display the Editing screen.
When DVD is selected
A Load a disc.
B Press EDIT to display the Editing screen.
C Select AMODIFYB.
When HDD is selected
A Press EDIT to display the Editing screen.
F Select and confirm on “DELETE”.
G Press EDIT to exit.
EN I
67
Page 68

Dividing Scenes
.
ABCDEFGHIJK
9 You can divide programmes that are recorded
continuously.
A Press HDD.
B Display the Editing screen.
C Select “DIVIDE” under “ORIGINAL”.
A
B, G
C - F
E -
A
IMPORTANT:
........................................................
It is not possible to divide in the following cases.
0 The programme is currently being recorded.
0 The programme is weekly/daily recorded and is
specified for weekly/daily overwrite.
0 The programme is used in the play list.
0 When the number of registered programmes reaches
500.
SELECT
DIVIDE
CONFIRM
D Select and confirm on a programme
to divide.
E Search for scenes to divide.
A Start playback, then pause at the scene
to divide.
0 You can also use SLOWF/SLOWG.
B Select and confirm on ADIVIDEB.
C Select and confirm on AOKB.
SELECT
CONFIRM
OK
0 Select APREVIEWB, the first 10 seconds of the
later half of the divided programme is played
back.
0 To redo, select ARETRYB.
68
H EN
F Select and confirm on “DIVIDE”.
G Press EDIT to exit.
Page 69

Help Guide
.
1
2
3
4
5
6
7
8
9 When you encounter problems with the
operating procedures, the help guide displays
advices on operations that are closely related
to the current usage condition.
A Access the “HELP” menu.
Useful Features
0 An index containing items relating to the
currently displayed screen appears. If there are
no particular items to relate to, the first page of
the index will be displayed.
0 The index page can be advanced using TOP
MENU or MENU.
B Select an item of interest.
TOP MENU
B
MENU
RETURN
A, C
IMPORTANT:
........................................................
0 While the help guide is being displayed, operations
such as recording and playback is not possible. In
addition, the timer programme setting screen cannot
be displayed.
0 Icons
A: DVD related explanations
B: HDD related explanations
SELECT
6
CONFIRM
0 The explanation page will be displayed.
0 You can browse the explanation page using the
Selection Keys (FG).
0 To return to the AINDEXB screen, press RETURN.
C Exit the “HELP” screen.
EN I
69
Page 70

Recording Mode
FR (Free Rate) Mode
ABCDEFGHIJK
9 The recording mode is the setting for the
compression level when recording images. The
image quality and recording time are related.
Recordable Time According to Recording
Mode
(Hours: The numbers shown are estimates.)
DVD
Recording
mode
DV - 11 11 11 11
XP 1 34 33 32 31
SP 2 69 68 67 64
LP 4 138 136 135 127
EP 6 209 206 203 192
FR480 8 300 297 283 277
(single-
sided
disc)
0 The recording time changes in accordance with the
temporary recording setting. ATemporary RecordingB
[ P74]
0 The shorter the recordable time, the higher the image
quality.
DV m od e
Supports only HDD recording. Records in the same
format as a DV camcorder.
XP/SP mode
Recommended for recording sports programmes and
other fast-action programmes.
LP mode
Recommended for recording dramas and other slowaction programmes with little contrast.
EP/FR480 mode
Recommended when there is no spare recordable time
(disc remaining time), or for programmes with clear
outlines like in animations.
HDD (by temporary recording set-
ting) (160 GB)
OFF 30 MIN 1 HR 3 HR
0 The numbers of the FR mode represent the recordable
time (in minutes, estimated) in a DVD disc.
0 FR60 - FR360 can be set by 5-minute intervals, then
follow by FR420 and FR480. FR60 is almost
equivalent to XP in terms of image quality; the same
goes for FR120 to SP, FR240 to LP, and FR360 to EP.
0 It may not be possible to play back discs recorded in
FR420 or FR480 mode on other units.
0 FR mode can also be set for HDD. (AJUSTB cannot be
set.)
Set using the disc remaining time/recording
mode list
A Press DVD, and load a disc.
B Display the disc remaining time/
recording mode.
2: 30 DV
7: 00 XP
10: 00 SP
20: 00 LP
28: 00
36: 00
Disc remaining time/recording mode list
EP
FR480
C Move to “FR***”, and use the
Selection Keys (DE) to change the FR
mode number.
D Check the disc remaining time.
0 Set to AFR***B which slightly exceeds the desired
recording time.
E Press ENTER.
If recording a 25-minute programme five times
on the same disc
0 25 x 5 = 125, thus record using FR125 mode.
Recording on a blank DVD
In SP mode In FR125 mode
70
H EN
A
(20 mins)
B
D
C
Only four times’
portion can be
recorded.
Blank
A
E
B
D
C
Able to fit recording to
one disc.
Page 71

JUST mode setting
(when timer recording to a DVD disc)
0 The unit automatically sets the appropriate FR mode
depending on the disc remaining time.
0 Set AREC MODEB to AJUSTB at the recording setting
for timer programming.
Example
Automatically sets FR mode for recording a 30-minute
programme, on a disc with 20 minutes remaining time
in XP mode.
Records a 30-minute
programme to fit
exactly to a 20minute blank space.
Blank
(20 mins)
Recording
completed
Recording
completed
0 The maximum recording time for JUST mode is
equivalent to FR480 mode.
DV Mode
Main characteristics
0 High image quality recording mode above XP mode.
0 There is no image deterioration when dubbing from a
DV camcorder to the HDD using the DV terminal.
0 Timer recording in DV mode is possible with the
exception of input from the DV terminal.
0 For programmes recorded in DV mode,
• play lists can be created. (Not possible when there
is a mixture of programmes recorded in other
recording modes.)
• they can be divided by editing.
0 When playing back programmes recorded in DV
mode,
• the same playback operations as other modes are
possible. However, 1.5x speed with sound is not
possible.
• they can also be output from the DV terminal.
(Only when using AdvB channel.)
• temporary recording will be stopped.
0 When recording in DV mode,
• playback on the HDD or DVD is not possible.
• Library Database Navigation, editing, and dubbing
operations cannot be performed.
• there will be no output from the DV terminal.
0 During recording, the following operations are not
possible for programmes recorded in DV mode.
• Playback (AORIGINALB and APLAY LISTB)
• Editing of play list
• Thumbnail modification
• Chapter creation
• Deleting of scenes
• Dividing of scenes
0 When playing back copy-once programmes, there
will be no output from the DV terminal.
0 Post-recording is not possible, as with a DV tape
recorder.
0 See the following page if recording a bilingual
programme using DVD-RW/-R (Video mode).
ASoundB [ P78]
0 Set the channel of this unit to AdvB when connecting
to a DV device.
0 This unit outputs to the DV device only when its
channel is set to AdvB.
Useful Features
EN I
71
Page 72

Weekly/Daily Timer
4
1
2
Programming
ABCDEFGHIJK
9 Programmes can be timer recorded regularly
on a daily or weekly basis.
9 Recorded programmes set for weekly/daily
recording overwrite on the HDD can be kept.
(Overwrite protection)
A
Weekly/daily recording settings
Set when timer programming or when changing the
timer programme.
With HDD as the recording deck
AWEEKLY/DAILYB
AONE TIME RECORDB Once only
AWEEKLYB Weekly
AWEEKLY (KEEP 1)B
AMON-FRIB
AMON-SUNB
AMON-FRI (KEEP 5)B
AMON-SAT (KEEP 6)B
AMON-SUN (KEEP 7)B
AMON-FRI (KEEP 1)B
AMON-SAT (KEEP 1)B
AMON-SUN (KEEP 1)B
Execution of timer
recording
Weekly
(overwrite)
DailyAMON-SATB
Daily (weekly
overwrite)
Daily (daily
overwrite)
Icon
B, H
A, B
B
C - G
With DVD as the recording deck
Only AONE TIME RECORDB, AWEEKLYB, AMON-FRIB,
AMON-SATB, and AMON-SUNB settings are available,
there is no overwrite specification.
Auto title grouping (HDD)
Weekly/daily recorded programmes will be grouped.
Groups will be displayed as folders in the thumbnail list
of the Library Database Navigation, editing, and
dubbing screens.
A list screen of individual recorded programmes will be
displayed when the folder is selected.
Grouping is available only for programmes not set for
overwriting.
A Select a folder.
SELECT
1
4
CONFIRM
2
B Select a programme.
72
H EN
SELECT
CONFIRM
0 To delete a folder, delete all the programmes in it.
Page 73

Simple timer programming for the
following week
A Press PROG when playing back a
recorded programme.
B Select “YES”.
SELECT
0 Icon specifying weekly/daily overwrite ( , ,
) will be attached.
F Select “PROTECT”.
SELECT
Useful Features
CONFIRM
PROTECT
CONFIRM
YES
0 If there is inactivity for approximately 5 seconds,
the programme navigation screen will be
displayed. To cancel, press PROG.
0 If there is inactivity for approximately 1 minute
during setting, the settings will be cancelled and
the screen will return to the broadcast screen.
C Set timer at the programme
navigation screen.
0 For timer setting, perform step E-G on P40, 41.
0 After the timer recording has been set, the
broadcast screen is displayed.
Overwrite protection setting for weekly/
daily recording (HDD)
When you wish to keep programmes specified for
overwriting, set overwrite protection. Or, dub to DVD
disc.
A Set to HDD.
G Press ENTER.
H Exit.
Programme alert message
0 For HDD timer programming, if there is a timer
programme that cannot be recorded within the
duration set due to the remaining capacity of
HDD, a programme alert message will be
display when the unit is turned on.
0 If APROGRAMME LISTB is selected and
confirmed, the APROGRAMME LISTB screen
will be displayed. Verify, cancel or change the
timer programme where necessary. AChecking,
Changing or Cancelling a Timer ProgrammeB
[ P42]
0 The display duration of the programme alert can
be set. Setup Menu APROGRAMME ALERTB
[ P87] Z
B Display the Library Database
Navigation screen.
C Select and confirm on “NAME”.
D Select and confirm on the initial letter
of the programme name.
E Select and confirm on the
programme that you wish to protect.
SELECT
CONFIRM
EN I
73
Page 74

Temporary Recording
ABCDEFGHIJK
9 After turning on this unit, temporary
recording will automatically take place for
only the time duration that has been set while
you are watching TV.
9 You can play back missed scenes
(RetroActive Playback), or record from the
beginning of the programme you are
currently watching (RetroActive Recording).
0 You can also perform Resuming Playback
[ P45] and One Touch Replay [ P45].
To record the previous part of a TV
programme currently watching
(RetroActive Recording)
While watching a TV broadcast,
A Search for the record start point, then set to
pause.
Setting Time Range for Temporary Recording
A Access the setup menu.
B Select “HDD/DVD SET UP”B“HDD
SET UP”B“LIVE MEMORY”.
SELECT
CONFIRM
HDD SET UP
LIVE MEMORY
HDD/DVD SET UP
OFF
30 MIN
1 HR
3 HR
C Select and confirm on other than
“OFF”.
0 Time range AOFFB, A30 MINB, A1 HRB or A3 HRB
can be set.
0 If the time range is exceeded, temporarily
recorded images will be overwritten.
D Exit.
Using the Temporary Recording Function
To play back the previous part of a TV
programme currently watching
(RetroActive Playback)
B Start recording.
WHILE HOLDING
0 You can also use REC (R) on the unit.
0 Returns to the on-air screen after a few seconds.
C End recording.
PRESS TWICE
RetroActive Recording
0 The recording mode is AFR65B.
0 When recording is in progress on the DVD,
temporary recording stops.
0 Temporary recording data will be automatically
erased, in the following instances.
• When the unit is turned off, or after recovering from
a power failure.
• When normal recording, timer recording,
RetroActive Recording or digital timer recording is
performed.
• When the following setting is changed. ALIVE
MEMORYB [ P85] I
• When tuner channel setting is performed.
• When the dubbing screen is displayed.
• When DV input is selected.
• When the image output format is switched.
• When a programme in DV mode is played or
edited.
74
Search for the playback position, then start
A
playback.
H EN
Page 75

Timer Recording
.
ABCDEFGHIJK
9 The following describe the measures and
caution points to note during timer
recording.
DUBBING
B, B
A
A
Relief Recording
A programme that is set for timer recording on the
DVD will be recorded to the HDD in the following
instances. The recording mode will revert to the mode
previously set.
In the case of JUST mode, the recording will be in XP
mode.
0 Disc is not loaded.
0 A non-recordable disc is loaded.
0 The disc remaining time of the DVD disc is
insufficient.
0 DVD disc playback in progress.
Points to take note on timer recording
0 Timer recording is not possible during editing.
0 If a copy prohibited programme is received at the start
of timer recording or during recording, recording will
be paused. Recording starts again when a recordable
programme is received. (For DVD only. For HDD, a
black image is displayed.)
0 With calendar timer programming, the starting
portion of the programme may not be recorded. In
addition, if the stop time of the previous timer
recording coincides with the start time of the next
programme, the last part of the previous programme
may not be recorded.
Useful Features
NOTE:
........................................................
Relief Recording
0 If the remaining capacity of the HDD is insufficient,
relief recording is not possible.
To stop timer recording (cancel)
A Press STOP/CLEAR.
B Select and confirm on “CANCEL” on
the confirmation screen.
To switch from timer recording to normal
recording
A While holding REC, press PLAY.
B Select and confirm on “EXECUTE”
on the confirmation screen.
0 To extend the recording time, activate Instant
Timer Recording after switching to normal
recording. [ P33]
Dubbing and timer recording priority
If a dubbing that has been set coincides with a timer
recording, a warning will be displayed.
0 To prioritise dubbing
Select AEXECUTEB to execute dubbing. Timer
recording will not be performed. However, if the
dubbing ends before the timer recording end time is
reached, timer recording will be performed from the
time where dubbing stops.
0 To prioritise timer recording
Select ACANCELB, then press DUBBING. Dubbing
will not be performed.
0 If the warning screen remain displayed, neither will
be performed.
EN I
75
Page 76

Managing DVDs (Library)
.
R
A
M
/
R
W
P
R
+
C
H
-
P
U
S
H
-
O
P
E
N
D
I
G
I
T
A
L
D
I
R
E
C
T
P
R
O
G
R
E
S
S
I
V
E
To Register to Library
ABCDEFGHIJK
9 Register DVD discs recorded on other units
in the library. A maximum of 600 discs and
2000 titles can be registered.
IMPORTANT:
........................................................
0 The following discs cannot be registered in the library.
• DVD-RAM, DVD-RW
Discs formatted using devices other than JVC DVD
recorders.
• DVD-R
New discs recorded using devices other than JVC
DVD recorders.
Library
0 You can also press NAVIGATION to register.
0 If unable to register, check the following setting.
Setup Menu ASAVE AS LIBRARYB = AONB
[ P86] K
0 Select AREGISTERB, and the Editing screen will
appear. You can then select either AMODIFYB or
ADISC NAMEB. [ P58, 60]
A Load a disc.
Face the label side upwards
B Display the Editing screen.
C Select “REGISTER”.
SELECT
CONFIRM
REGISTER
D Exit.
76
H EN
Page 77

To Delete from Library
A Select DVD.
B Press EDIT.
C Select “DELETE”.
SELECT
CONFIRM
D Select the DISC number to delete.
SELECT
To Search for Recorded Programmes from Library
A Select disc.
OR
B Display the Library Database
Navigation screen.
C Specify method for programme
search.
0 For HDD library, select from ANAMEB or
ACATEGORYB.
0 For DVD library, select from ANAMEB, ADATEB,
ADISC No.B or ACATEGORYB.
SELECT
(On-screen display for DVD)
ORIGINAL PLAY LIST
Useful Features
CONFIRM
E Select “DELETE”.
SELECT
CONFIRM
F Exit.
CONFIRM
DATE DISC No.
NAMECATEGORY
For HDD
D Select the programme to play back
from the list, then select the playback
method.
0 ABasic Playback (Library Database Navigation)B,
step D [ P35]
For DVD
D Check the disc number.
0 Load the relevant disc and play back from the
Library Database Navigation. [ P34]
0 If a disc registered in the library is recorded or
modified on DVD units from other
manufacturers, it may not operate properly.
EN I
77
Page 78

Sound
Sound settings
(HDD, DVD-RAM/-RW(VR)/-R(VR))
This unit can receive A2 and NICAM programmes.
Programme type On-screen display and sound output
A2 STEREO
A2 Bilingual
Regular Monaural
NICAM STEREO
NICAM Bilingual
NICAM Monaural
External Source
IMPORTANT:
......................................................................................................................
0 If receiving NICAM, set Setup Menu AAUDIO RECB = ANICAMB [ P87] W
0 For NICAM Bilingual broadcast, NICAM FM Sound will be output when the following setting is set. Setup Menu
AAUDIO RECB = AMONOB [ P87] W
0 If connected via digital audio, set Setup Menu ADIGITAL AUDIO OUTB = APCM ONLYB [ P84] D. Otherwise,
the audio cannot be switched.
0 DVD-RW/-R (Video mode) disc does not support bilingual sound. When recording or dubbing to these discs, set the
recording sound in advance. Setup Menu AVIDEO MODE RECORDING AUDIOB [ P86] N
0 When stereo or monaural programmes are recorded or dubbed on DVD-RAM or DVD-RW/-R (VR mode) discs, the
display shown will be .
Stereo sound
Main audio Sub audio Main+Sub audio
0 Switches each time AUDIO is pressed.
Normal monaural sound
NICAM stereo sound
NICAM main audio NICAM sub audio
NICAM Main+Sub audio NICAM FM Sound
0 Switches each time AUDIO is pressed. (Excluding NICAM FM Sound.)
NICAM monaural sound
Stereo Left audio Right audio
0 Switches each time AUDIO is pressed.
Relationship between disc type and sound output
Setup Menu ADIGITAL AUDIO OUTB [ P84] D
Disc playback
media
DVD Video
Audio CD
Video CD, Super Video CD
CD-ROM/R/RW MP3 Linear PCM
H EN
78
Sound format
48/96 kHz 16/
20/24 bit
Linear PCM
Dolby Digital Dolby Digital Bitstream 48 kHz 16 bit Linear PCM
MPEG MPEG Bitstream 48 kHz 16 bit Linear PCM
DTS
DTS
CD-DA
STREAM/PCM DOLBY DIGITAL/PCM PCM ONLY
DTS Bitstream (No Output)
DIGITAL AUDIO OUT setting
48 kHz 16 bit Linear PCM
44.1 kHz 16 bit Linear PCM
Page 79

Avoiding Misuse
.
To Disable Operation (Child Lock)
9 Setting the child lock will disable the buttons
on the unit and the remote control.
9 If the tray lock is set, the disc tray will not
function even when OPEN/CLOSE is
pressed.
STANDBY/ON
When the unit is turned on
Press and hold STANDBY/ON on the
remote control for more than 10 seconds.
0 ACLB is displayed on the front display panel.
To cancel the child lock
Perform the same operation.
To Lock the Disc Tray (Tray Lock)
When the unit is turned off
While holding STOP/CLEAR ( o) on the
unit, press OPEN/CLOSE (M).
0 ALOCKB is displayed on the front display panel.
To cancel the tray lock
Perform the same operation.
0 AUNLOCKB is displayed on the front display panel.
OPEN/CLOSE(M)
Useful Features
NOTE:
........................................................
0 Timer recording will be performed even when the
child lock is set.
RAM/RW
F-1
STOP/CLEAR(o)
NAVIGATION
S-VIDEO VIDEO L(MONO) AUDIO R
PR
ENTER
PROG
DV
DV
IN/OUT
EN I
79
Page 80

Changing Remote Control Settings
.
.
.
Operating a TV from Other Manufacturers
9 This unit’s remote control can operate the
basic functions of your TV.
PREPARATION:
........................................................
0 Switch TV/DVD on the remote control to TV.
A While pressing SET UP, enter the
code number using the Number
Keys, then press ENTER.
(Example) For JVC 23
NN
0 Release SET UP after this.
BRAND NAME BRAND CODE
JVC 01, 23, 24, 25
FERGUSON 27
FINLUX 30
FUNAI 32
LG/GOLDSTAR 18
GRUNDIG 19
HITACHI 10
ITT 28
MITSUBISHI 03
MIVAR 29
NEC 20
NOKIA 31
PANASONIC 04, 11
PHILIPS 02
RCA 05
SAMSUNG 12, 33, 34, 35
SANYO 13,16
SHARP 06
SONY 07
THOMSON 26
TOSHIBA 08, 14
B Press STANDBY/ON.
0 If the TV is not on, repeat from step A again. For
brands with more than one code, try entering
another number.
0 If the remote control’s batteries are removed, the
brand code will revert to 01 (JVC). Re-perform
the setting.
NOTE:
........................................................
0 Depending on the TV, some TVs may not be operable
using this unit’s remote control.
Using Multiple JVC Recorders
9 With more than 2 devices, there may be
remote control interference.
PREPARATION:
........................................................
0 Switch TV/DVD on the remote control to DVD.
A While pressing SET UP, enter the
code number using the Number
Keys, then press ENTER.
0 Release SET UP after this.
REMOTE CONTROL
CODE
DVD1 1
DVD2 2
DVD3 3
DVD4 4
CODE
B Press STANDBY/ON on the unit to
turn off the unit.
HDD DVD
STANDBY/ON
STANDBY/ON
RAM/RW
F-1
S-VIDEO VIDEO L(MONO) AUDIO R
PLAY(I)
PR
ENTER
NAVIGATION
PROG
PUSH-OPEN
DV
DVIN
PR
C Press PLAY ( I) on this unit for more
than 5 seconds.
0 The code number currently set will be displayed
on the front display panel.
0 If Setup Menu ADIMMER (DURING POWER
OFF)B is set to AOFFB, the front display panel will
be off. In this case, set this setting to AONB in
advance. [ P88] d
D Press STOP/CLEAR on the remote
control.
0 The new code number will blink on the front
display panel for 5 seconds.
80
H EN
Page 81

Playback Setting Menu
.
Operations
How to Use the Playback Setting Menu
ABCDEFGHIJK
9 During disc playback, use this on-screen bar
to perform settings such as playback mode,
image or audio mode.
PREPARATION:
........................................................
0 Switch TV/DVD on the remote control to DVD.
DVD
TV
Number
Keys
B, C
A
A Press ON SCREEN once or twice to
display the playback setting menu.
When playing back a programme recorded on the
HDD
A-B
When playing back a DVD Video disc or a
programme recorded on DVD
DVD-
VIDEO
Disc type
0 Finalised DVD-RW/-R (Video mode) discs will be
indicated as ADVD-VIDEOB under disc type.
0 DVD-RW and DVD-R formatted in VR mode will
be indicated as ARW-VRB and AR-VRB
respectively.
When playing back Video CDs or audio CDs
VCD
A-B
A-B
DVD Video only
RNDPRGM
Useful Features
When playing back MP3 and JPEG files
JPEG
JPEG only
B Select the target function icon.
0 Depending on the icons, some cannot be
selected while playback is stopped.
C Select the setting from the menu
displayed.
0 Some settings may require entry using the
Number Keys.
BDescription of each setting is available from next
page.
EN I
81
Page 82

Playback Setting Menu Operations (continued)
Description of Each Setting
Repeat Playback
HDD
DVD - RAM
-RW-VR
-RW-VIDEO
-R-VR
-R-VIDEO
-VIDEO
V-CD
CD
JPEG
MP3
0 A CHAPTER REPEATB and ATRACK REPEATB are not available for DVD discs.
0 For HDD, only ATITLE REPEATB is available.
0 In the case of MP3/JPEG, AALL REPEATB becomes AFOLDER REPEATB.
0 When Video CD/Super Video CD is played back with the PBC function, setting is not possible.
For setting the repeat playback mode of titles, chapters, etc.
OFF Plays back normally.
ALL REPEAT The entire disc is played back repeatedly.
TITLE REPEAT The current title is played back repeatedly.
CHAPTER REPEAT The current chapter is played back repeatedly.
TRACK REPEAT The current track is played back repeatedly.
A-B
HDD
DVD - RAM
-RW-VR
-RW-VIDEO
-R-VR
-R-VIDEO
-VIDEO
V-CD
CD
A-B Repeat Playback
For setting the start and end point for repeat playback of a desired segment.
A Start point.
B End point.
After selecting the menu, press ENTER during playback.
Each time you press ENTER, setting is set in order of start point, end point and cancelling repeat
mode.
0 The duration between point A and point B must be more than 3 seconds.
0 Setting is possible only within the same title or track.
0 If the track is changed before the end point is set, the start point will be cancelled.
0 For DVD Video discs that do not contain time information, setting is not possible.
Search Playback
HDD
DVD - RAM
-RW-VR
-RW-VIDEO
-R-VR
-R-VIDEO
-VIDEO
V-CD
CD
JPEG
MP3
Specify the number and play back.
TITLE SEARCH Specify a title number.
CHAPTER SEARCH Specify a chapter number.
GROUP SEARCH Specify a group number.
TRACK SEARCH Specify a track number.
A number entry box appears when the menu is selected. Enter using the Number Keys.
Play back using ENTER.
0 A GROUP SEARCHB and ATRACK SEARCHB are not available for DVD discs.
0 For HDD, only ACHAPTER SEARCHB is available.
0 A TRACK SEARCHB is only available for audio CD, Video CD and Super Video CD.
0 When Video CD/Super Video CD is played back with the PBC function, setting is not possible.
Time Search Playback
HDD
DVD - RAM
-RW-VR
-RW-VIDEO
-R-VR
-R-VIDEO
-VIDEO
V-CD
CD
Starts playback from the specified time.
Specify the elapsed time from the beginning of a programme (HDD and DVD discs) or a disc
(CDs).
TIME Specify the elapsed time.
A time entry box appears when the menu is selected. Enter using the Number Keys. To enter 12
minutes 50 seconds, press the buttons in order of 1, 2, 5 and 0.
Play back using ENTER.
0 With DVD discs, setting is not possible while in stop mode.
0 When Video CD/Super Video CD is played back with the PBC function, setting is not possible.
0 For DVD Video discs that do not contain time information, setting is not possible.
H EN
82
Page 83

V-C D
CD
PRGM
Programme Playback
Play back in order of specified tracks.
If selected during programme playback, normal playback will be activated.
A box for specifying the playback order appears when the
menu is selected. Enter the track number in order from 1
using the Number Keys.
For 1-digit numbers, confirm using ENTER. If you made a
mistake, press CANCEL.
Play back using PLAY.
0 Repeat playback is possible during programme playback.
Useful Features
12345678910
11 12 13 14 15 16 17 18 19 20
21 22 23 24 25 26 27 28 29 30
V-C D
CD
RND
Random Playback
Play back all tracks in random order.
OFF Plays back normally.
ON Plays back randomly.
Adjusting the Picture Quality
HDD
DVD -RAM
-RW-VR
-RW-VIDEO
-R-VR
-R-VIDEO
-VIDEO
V-C D
The picture quality can be adjusted as desired.
NORMAL Adjusts the picture quality automatically.
CINEMA When playing back movies, etc.
SHARP When playing back animation, etc.
SOFT When noise on the image is noticeable.
Progressive Mode Setting
HDD
DVD -RAM
-RW-VR
-RW-VIDEO
-R-VR
-R-VIDEO
-VIDEO
It is possible to set a progressive mode suited to the image.
AUTO
FILM A mode suited to film images (such as movies).
VIDEO
Detects film and video contents automatically. Usually select this
mode.
A mode suited to video images (TV broadcast, etc.). Effective for fastmoving images, animated images, etc.
3D Surround (Simulated Surround Effect) Setting
You can enjoy the surround effect of DVD Videos recorded with multi-channels, even with two
DVD -VIDEO
speakers.
OFF Deactivate the surround effect.
ON Activate the surround effect.
0 Does not work on discs that are not recorded with multi-channels, and does not affect the bitstream of the digital audio output.
0 Cannot set to AONB when playing back DVD Video during recording (including temporary recording).
0 If set to AONB, the following settings will be disabled. Setup Menu AANALOG AUDIO OUTB [ P84] E, Setup Menu
AD.RANGE CONTROLB [ P85] F
Display time interval for JPEG or slide show
JPEG
For setting the display time interval for one image.
5 sec, 10 sec, 15 sec, 20 sec, 25 sec, 30 sec
0 If the file size is large, it may take a little longer than the time set.
EN I
83
Page 84

Setup Menu
9 Performing basic settings that determine the operations of this unit. Press SET UP to access the
setup menu.
(Upper category) > (Lower category)
No. (Setting item)
(Description of setting contents)
(Default setting) (Description of setting contents)
(Other settings) (Description of setting contents)
DVD VIDEO SET UP > LANGUAGE SET
A MEN U LANGUAGE
For setting the menu screen language for DVD Videos. When the selected language is not available on the disc, the disc’s
default menu language will be displayed.
ENGLISH
JAPANESE, GERMAN, FRENCH,
ITALIAN, SPANISH, DUTCH, SWEDISH,
NORWEGIAN, FINNISH, DANISH
AA, AB, ..., ZU Set using language code. [ P90]
B AUDIO LANGUAGE
For setting the audio language to be played on the DVD Videos. When the selected language is not available on the disc, the
disc’s default audio language will be played.
ENGLISH
JAPANESE, GERMAN, FRENCH,
ITALIAN, SPANISH, DUTCH, SWEDISH,
NORWEGIAN, FINNISH, DANISH
AA, AB, ..., ZU Set using language code. [ P90]
C SUBTITLE
For setting the subtitle language to be played on the DVD Videos. When the selected language is not available on the disc, the
disc’s default subtitle language will be displayed.
ENGLISH
JAPANESE, GERMAN, FRENCH,
ITALIAN, SPANISH, DUTCH, SWEDISH,
NORWEGIAN, FINNISH, DANISH
AA, AB, ..., ZU Set using language code. [ P90]
OFF Disables the subtitle display.
Sets the language.
Sets the language.
Sets the language.
DVD VIDEO SET UP > AUDIO OUTPUT
D DIGITAL AUDIO OUT
Set in accordance with the device connected to the digital audio output terminal (digital coaxial). In addition, change the setting
when playing back bilingual sound. [ P78]
DOLBY DIGITAL/PCM
STREAM/PCM
PCM ONLY
E ANALOG AUDIO OUT
Set in accordance with the device connected when playing back DVD Videos.
STEREO When connecting to an audio amplifier or TV.
DOLBY SURROUND When connecting to a Dolby Surround compatible amplifier.
H EN
84
When connecting to a Dolby Digital decoder or an amplifier with built-in
decoder.
When connecting to a DTS, Dolby Digital decoder or an amplifier with built-in
decoder.
When connecting to a device (MD recorder, etc.) that is compatible only with
linear PCM.
Page 85

DVD VIDEO SET UP > AUDIO OUTPUT
F D.RANGE CONTROL
For setting the compression rate of the dynamic range (ratio of the maximum volume and the minimum volume) while playing
back with Dolby Digital.
NORMAL Normal compression rate.
WIDE RANGE
TV MODE High compression rate. (Setting for TV. Even soft sound can be clearly heard.)
G OUTPUT LEVEL
For setting the audio output level.
STANDARD Maintains the output level.
LOW Lowers the output level.
DVD VIDEO SET UP > DISC PLAY SET UP
H RESUME
For setting whether to memorise the position where the disc is stopped during playback. This setting is compatible with DVD
Video, finalised DVD-RW/-R disc, Video CD and Super Video CD. Resume works on other discs (JPEG files not applicable)
and the HDD, regardless of this setting. However, CD-DA format discs do not support ADISC RESUMEB.
OFF Do not memorise.
ON Memorises only the disc loaded.
DISC RESUME Memorises resume points of 30 discs.
HDD/DVD SET UP > HDD SET UP
I LIVE MEMORY
For setting the recording time for temporary recording. [ P74]
OFF Disables temporary recording.
30 MIN Performs temporary recording for 30 minutes.
1 HR Performs temporary recording for 1 hour.
3 HR Performs temporary recording for 3 hours.
J DV RECORD AUDIO
For setting the audio when recording bilingual broadcast in DV mode.
MAIN Records the main audio.
SUB Records the sub audio.
MAIN N L*SUBN R Distributes the main/sub audio to the left and right.
Disables compression. (The effect may not be different from ANORMALB
depending on the discs.)
Useful Features
EN I
85
Page 86

Setup Menu (continued)
HDD/DVD SET UP > DVD SET UP
K SAVE AS LIBRARY
For setting whether to register a recorded or timer recorded programme title to the Library Database Navigation (DVD
Navigation).
OFF Do not register.
ON Register.
L CONTINUOUS PLAY
For setting whether to play back multiple programme titles on a disc continuously.
(For finalised DVD-RW/-R (Video mode), continuous playback will be activated.)
OFF Returns to the broadcast screen after playing back a programme.
ON Plays back programme titles on a disc in sequence.
M VIDEO MODE RECORDING ASPECT
For discs in Video mode, the aspect ratio of the screen is fixed for a programme. For setting the screen mode to be given
priority, when the selected programmes to be dubbed from the HDD consist mix aspect ratio.
PRIORITIZE 4:3 Records in 4:3.
PRIORITIZE 16:9 Records in 16:9.
N VIDEO MODE RECORDING AUDIO
For selecting the audio to be recorded, when recording or dubbing bilingual programmes to Video mode discs.
MAIN Records the main audio.
SUB Records the sub audio.
O MP3/JPEG
For setting which type of file to play back when a disc contains both MP3 and JPEG files.
MP3 Plays back MP3 files.
JPEG Plays back JPEG files.
HDD/DVD SET UP > DISC SET UP
P FINALISE
To finalise DVD-R and DVD-RW discs. This is not a setting item. [ P51]
Q CANC. FINALIS.
Cancels finalisation of DVD-RW discs. This is not a setting item. [ P51]
R FORMAT
To format DVD-RAM, DVD-RW (VR mode, Video mode) and DVD-R (VR mode) discs. This is not a setting item. [ P50]
HDD/DVD SET UP > COMMON SET UP
S DV AUTO CHAPTERING
For setting whether or not to create chapters (marks), when dubbing via the DV input terminal connecting the external DV
camcorder. (Press the START/STOP button on the DV camcorder to detect the screen being recorded. [ P56])
However, marks cannot be created for direct recording to the DVD in Video mode. Record to the HDD, then dub to the DVD.
OFF Do not create chapters (marks).
ON Create chapters (marks).
T DV 12-BIT AUDIO
For setting the audio for dubbing from DV camcorder, etc.
SOUND1 Stereo recording of normal sound.
SOUND2 Stereo recording of post-recorded sound.
MIX Mixes and records both the normal and post-recorded sound.
86
H EN
Page 87

HDD/DVD SET UP > COMMON SET UP
U MOTION INDEX
For setting whether to set the picture on the top left of the Library Database Navigation screen or Editing screen to that of the
selected programme or broadcast screen. If a programme recorded in DV mode is selected during recording or temporary
recording, the broadcast screen will be displayed.
OFF The broadcast screen will be displayed.
ON The selected programme will be displayed.
FUNCTION SET UP > REC/PLAY SET UP
V XP MODE REC AUDIO
For setting the audio mode when recording in XP mode. (This setting is invalid for HDD Y DVD dubbing.)
DOLBY DIGITAL Normal audio mode.
LINEAR PCM High sound quality mode.
W AUDIO REC
Set if recording NICAM bilingual broadcasts.
NICAM Records in bilingual mode.
MONO Records in normal sound mode.
X INPUT COLOUR SYSTEM
For selecting the colour format of the image.
PAL When recording input signals in PAL format.
SECAM When recording input signals in SECAM format.
Y JUMP TIME
For setting the jump interval for S/T. [ P36]
15 MIN Jumps in 15-minute interval.
30 MIN Jumps in 30-minute interval.
1 HR Jumps in 1-hour interval.
Z PROGRAMME ALERT
A function to warn that there are programmes that cannot be recorded for the weekly/daily timer programming due to insufficient
remaining capacity of the HDD. For setting the period where warning is required. (Displayed when the unit is turned on.)
OFF No warning.
WITHIN 1 DAY
^ WITHIN 6 DAYS
WITHIN 1 WEEK
^ WITHIN 5 WEEKS
Warns that there are programmes that cannot be recorded within 1 day, …, within 6
days, within 1 week, …, within 5 weeks.
Useful Features
EN I
87
Page 88

Setup Menu (continued)
FUNCTION SET UP > DISPLAY SET
a SUPERIMPOSE
For setting whether to automatically display the operation details on the TV screen.
OFF Do not display.
AUTO Displays for 5 seconds during operations.
b BLUE BACK
For setting whether to display a blue screen, when broadcast cannot be received or if there are no signals at the external input.
Set to AOFFB when the signals are weak or reception is poor.
OFF Do not change the screen display.
ON Switch to a blue screen.
c DIMMER (DURING POWER ON)
For setting the brightness of the front display panel when the unit is on.
BRIGHT Bright
DIMMED1 Dim
DIMMED2 Dark
OFF Turns off the light.
d DIMMER (DURING POWER OFF)
For setting whether to light up or turn off the light of the front display panel when the unit is off.
OFF Turns off the light of the front display panel when the unit is off.
ON Lights up the front display panel when the unit is off.
e QUICK STARTUP
If set to AONB, the power consumption during standby increases but operations such as playback can be performed more quickly
than when set to AOFFB.
OFF Usually set to AOFFB. (Standby power consumption: 6.4 W)
ON
f ON SCREEN LANGUAGE
For setting the on-screen display language.
ENGLISH
DEUTSCH, FRANCAIS, ESPAÑOL,
ITALIANO, NEDERLANDS, SVENSKA,
NORSK, SUOMI, DANSK
Operations can be performed quickly after turning on the unit. (Standby power
consumption: 20 W)
Sets the language.
FUNCTION SET UP > VIDEO IN/OUT
g MONITOR TYPE
Set in accordance with the TV to be connected.
4:3LB
4:3PS
16:9AUTO When connected with a wide TV (16:9).
16:9FIX
h F-1 INPUT
Set in accordance with the video connectors to be connected, when using the [F-1] input connectors on the front panel.
VIDEO If connecting video signals (yellow connector).
S-VIDEO If connecting S-Video signals (black connector).
H EN
88
When connected with a 4:3 TV. (Black strips are added to the top and bottom
when displaying a 16:9 image.)
When connected with a 4:3 TV. (The left and right are cropped off when
displaying a 16:9 image.)
When connected with a TV fixed at 16:9. (This unit automatically adjust the
screen width when displaying a 4:3 image.)
Page 89

FUNCTION SET UP > VIDEO IN/OUT
i L-1 OUTPUT
For setting the output signal of the connector in accordance with the connecting device, when using the SCART connector [L-1]
on the rear panel.
SCART VIDEO Outputs video signals.
SCART S-VIDEO Outputs S-Video signals.
SCART RGB Outputs RGB signals.
COMPONENT
j L-1 INPUT
For setting the input signal of the connector in accordance with the connecting device, when using the SCART connector [L-1]
on the rear panel as a input connector.
VIDEO If connecting video signals.
S-VIDEO If connecting S-Video signals.
k L-2 SELECT
Setting for the SCART connector [L-2] on the rear panel. Mainly for setting the input signals accordingly when connected. Also,
when this unit is turned off, signals of an external tuner can be set to be output from [L-1]. The items that can be set changes
depending on the AL-1 OUTPUTB setting. [ P26]
VIDEO/RGB If connecting video signals.
S-VIDEO/RGB If connecting S-Video signals.
SAT VIDEO/RGB If connecting video signals with an external tuner.
SAT S-VIDEO/RGB If connecting S-Video signals with an external tuner.
Outputs component video signals. (If connecting to the TV via the component
terminal.)
Useful Features
INITIAL SET UP > TUNER SET
For setting receiving channels. [ P28]
INITIAL SET UP > CLOCK SET
For setting the clock. [ P27]
EN I
89
Page 90

Language Code List
AA Afar IN Indonesian RU Russian
AB Abkhazian IS Icelandic RW Kinyarwanda
AF Afrikaans IW Hebrew SA Sanskrit
AM Ameharic JI Yiddish SD Sindhi
AR Arabic JW Javanese SG Sangho
AS Assamese KA Georgian SH Serbo-Croatian
AY Aymara KK Kazakh SI Singhalese
AZ Azerbaijani KL Greenlandic SK Slovak
BA Bashkir KM Cambodian SL Slovenian
BE Byelorussian KN Kannada SM Samoan
BG Bulgarian KO Korean (KOR) SN Shona
BH Bihari KS Kashmiri SO Somali
BI Bislama KU Kurdish SQ Albanian
BN Bengali, Bangla KY Kirghiz SR Serbian
BO Tibetan LA Latin SS Siswati
BR Breton LN Lingala ST Sesotho
CA Catalan LO Laothian SU Sundanese
CO Corsican LT Lithuanian SW Swahili
CS Czech LV Latvian, Lettish TA Tamil
CY Welsh MG Malagasy TE Telugu
DZ Bhutani MI Maori TG Tajik
EL Greek MK Macedonian TH Thai
EO Esperanto ML Malayalam TI Tigrinya
ET Estonian MN Mongolian TK Turkmen
EU Basque MO Moldavian TL Tagalog
FA Persian MR Marathi TN Setswana
FJ Fiji MS Malay (MAY) TO Tonga
FO Faroese MT Maltese TR Turkish
FY Frisian MY Burmese TS Tsonga
GA Irish NA Nauru TT Tatar
GD Scots Gaelic NE Nepali TW Twi
GL Galician OC Occitan UK Ukrainian
GN Guarani OM (Afan) Oromo UR Urdu
GU Gujarati OR Oriya UZ Uzbek
HA Hausa PA Panjabi VI Vietnamese
HI Hindi PL Polish VO Volapuk
HR Croatian PS Pashto, Pushto WO Wolof
HU Hungarian PT Portuguese XH Xhosa
HY Armenian QU Quechua YO Yoruba
IA Interlingua RM Rhaeto-Romance ZH Chinese
IE Interlingue RN Kirundi ZU Zulu
IK Inupiak RO Rumanian
90
H EN
Page 91

Glossary
Bitstream Digital signals of compressed sounds or images.
Chapter
Decoder A device that reverts compressed signals of sounds and images to their original signals.
Dolby Digital
DTS
Encoding
Finalising
JPEG
Letterbox
Linear PCM A format that digitalises audio signals without compression.
MP3
MPEG
Pan & Scan
PBC
Post-recording
Progressive scan mode
Region number
S-Video terminal
Thumbnails
Title
Tr a ck A unit for segments of music, images, etc. in audio CDs, Video CDs, and Super Video CDs.
Video mode
VR mode
A unit for segments of music and images in the titles of DVD Videos, etc. It can be freely
created for programmes recorded using this unit. (For DVD-RAM and DVD-RW (VR) discs.)
A compression process system for audio signals. A standard system for 5.1-channel
surround on DVD Videos.
An abbreviation for Digital Theater Systems, a sound compression format used on DVD
Videos. With higher sound quality as compared to Dolby Digital.
The compressing and digitalising of sounds and images. Re-encoding refers to using another
system or compression rate to re-digitalise signals that were uncompressed.
A writing process of disc information such that the programmes recorded on the DVD-R
and DVD-RW discs can be played back on other players.
An abbreviation of Joint Photographic Experts Group, an international standard for
compressed still image data files. The data of the 3 primary colours (RGB) is compressed
from a ratio of 10:1 to 100:1.
A method of displaying a wide image (16:9) on a TV with aspect ratio of 4:3 in full screen,
by adding a black band at the top and bottom.
An abbreviation of MPEG-1 Audio Layer-3, an international standard for compressed audio
data files. While minimising the deterioration of sound quality, the audio data of an audio
CD is compressed to a ratio of 10:1.
Pronounced as EHM-pehg, an abbreviation of Moving Picture Experts Group, an
international standard for video and sound compression.
A method of displaying a wide image (16:9) on a TV with aspect ratio of 4:3 in full screen,
by cropping off the left and right of the image.
An abbreviation of Playback Control. A mechanism that controls the playback of data
recorded with Video CD (Ver.2.0). Includes a software with interactive and search function
using a menu screen.
Refers to the adding of narration or background music (BGM) to the sound after recording it
with the camera.
For conventional TV broadcast video signals, a picture is presented by displaying the
vertical resolution of 525 scanning lines alternately in halves. This system is known as
interlace. The system that displays all the scanning lines at one time is known as progressive
scan, and this mode enables high image quality playback of DVD Video movie softwares.
A number that restricts DVD Video playback. The world is divided into 6 regions
distinguished by numbers, and playback is not possible if the number of the player and the
disc do not match.
A type of video terminal that connects the unit and the peripheral devices. Achieves high
image quality as the luminance signal and chrominance signal are connected separately.
Reduced-size version of pictures, for making segments of pictures, programmes or scenes
easily recognisable.
A unit for recorded image of images that can be selected using the main image or menu
screen of DVD Videos, etc. Programmes recorded using this unit are also known as titles.
A recording system for DVD-R and DVD-RW discs, which is compatible with DVD Video
discs.
An abbreviation of Video Recording Mode. A form of recording system for discs including
DVD-RW, it is possible to edit, erase or rewrite.
Useful Features
EN I
91
Page 92

Q&A
Preparations
Which discs are unplayable?
Can I use cartridge-enclosed DVD-RAMs?
See AAbout DiscsB [ P12].
Can I replace the HDD on my own?
No. This unit’s HDD contains software required for operations,
and will not function if replaced with a commercially available
HDD.
My television is not equipped with video inputs, is there
other methods of connection?
Use an RF converter sold separately. For details on connection,
refer to the instruction manual of the RF converter.
Setup
The HDD is functioning although the unit is not on.
The HDD functions in the following instance even if the unit is
off.
0 While HDD is being optimised.
Can I watch programmes via the external receiver even
though the unit is not on?
Yes, this unit outputs signals from the [L-2 IN/DECODER]
terminal to the [L-1 IN/OUT] terminal even if it is off. See
AInput/Output SettingB [ P26].
Images output from this unit are vertically squeezed.
Set Setup Menu AMONITOR TYPEB = A16:9AUTOB
[ P88] g
Recording
The time of the clock seems to deviate.
See AClock SettingB [ P27].
Can I record simultaneously on the HDD and DVD?
No.
If I record to full capacity on the disc, will the old
recordings be erased?
It will not be erased. Recording will stop.
Can I switch the channel while recording is paused?
Yes, on the DVD deck. However, it is not possible to switch to
DV input. Switching is not possible during DV input recording.
Cannot activate pause while HDD is recording.
Unable to pause recording on the HDD. If PAUSE is pressed
while HDD is recording., it will enter into Live Memory
Playback’s pause mode. However, record pause is possible
during external input recording. (By pressing REC and PAUSE
on the remote control simultaneously.)
Cannot switch between the main and sub audio after
recording a bilingual programme onto the DVD-R disc.
DVD-RW/-R (Video mode) recording will be recorded in the
sound as set. Setup Menu AVIDEO MODE RECORDING
AUDIOB [ P86] N
When recording movies and other bilingual programmes, the
use of DVD-RAM or DVD-RW (VR mode) discs is
recommended.
What happens to the chapter (mark) during recording?
92
H EN
During
recording
During
dubbing
HD D, DVD-R AM ,
DVD-RW/-R (VR mode)
Inserted when switched
from monaural or
bilingual broadcast to
stereo broadcast.
Marks will be copied.
DVD-RW/-R
(Video mode)
Automatically
inserted
approximately
every 5 minutes.
Marks will be
copied.
0 Chapters (marks) will not be copied for play list dubbing.
Each scene becomes a chapter.
0 For dubbings to the DVD-RW/-R (Video mode) discs, up to
99 marks per title are copied.
Page 93

Playback
Does not perform as operated when playing a
commercially available DVD Video.
There are some DVD Videos and Video CDs with playback
controls set by the disc maker.
Can I perform reverse playback (-1x speed playback)
on Video CDs?
No. Reverse slow playback is also not possible.
Unable to perform 1.5x speed playback for HDD.
1.5x speed playback cannot be performed while recording on
HDD or DVD.
0 Perform after recording ends.
When does the memory for resume get cancelled?
The memory for resume will be cancelled when any of the
following is performed.
0 Pressing STOP/CLEAR while stopped.
0 Selecting titles from the DVD Video menu screen.
(And when setup menu is set to ADISC RESUMEB.)
0 Turn off this unit.
0 Removing the disc.
Thumbnails on the DVD deck are not displayed.
Set the channel to other than AdvB.
When the channel has been set to AdvB, the thumbnails will
not be displayed when using a disc that is not registered in the
library.
Dubbing
Can I dub commercially available DVD Videos to the
HDD?
Commercially available DVD Video discs are copy-guarded for
copyright protection purposes. Dubbing is not possible in this
case.
Can I control the DV camcorder connected to the DV
terminal?
Yes, but some models cannot be controlled.
Can I change the recording mode when dubbing from
the HDD to DVD?
HIGH SPEED dubbing:
Dubs using the same recording mode as the HDD.
JUST dubbing:
Dubs using the same recording mode as the HDD, but when
the disc remaining time is insufficient, dubbing will be
performed using a lower recording mode.
MANUAL dubbing:
Can change to a mode lower than the recording mode of the
HDD.
What is the shortest dubbing time from the HDD to
DVD?
Theoretical figures during high speed dubbing are as the
numerical values below. (For a 1-hour programme recorded in
XP mode.)
0 DVD-RAM (Ver. 2.1/3x): Approx. 20 mins. (Max. 3x speed)
0 DVD-RW (Ver. 1.2/4x): Approx. 15 mins. (Max. 4x speed)
0 DVD-R (General Ver. 2.0/8x): Approx. 8 mins. (Max. 8x
speed)
During DV dubbing, the image is not output properly
from the camcorder connected to this unit.
Turn off the camcorder, then turn on and try again.
Editing
Recorded programme cannot be edited.
It is not possible to edit if a title protect mark is displayed at the
bottom left of the thumbnail for DVD disc. Edit after removing
title protect. [ P66]
To delete a part of a recorded programme.
Possible with HDD, DVD-RAM and DVD-RW/-R (VR mode)
discs. [ P67]
Operations cannot be performed after deleting
programmes.
When many programmes are deleted at once, wait until the
next operation can be performed.
Troubleshooting/Appendix
During HDD Y DVD dubbing, will the programme
information be copied?
The recording date and time, channel, thumbnail pictures, and
chapter marks will be copied.
EN I
93
Page 94

Troubleshooting
Resetting
APLEASEB and AWAIT B display alternately, or
ARESETTINGB blinks for a long time after the power
plug is inserted. Is it a malfunction?
0 It normally takes about 40 seconds to prepare before you
can start any operations. Operations cannot be performed
during this period.
0 If the display does not seem to disappear, reset the unit.
Press STOP/CLEAR (o) and STANDBY/ON on the unit
simultaneously until ARESETTINGB is displayed on the front
display panel.
Or pull out the power plug, wait around 5 seconds and then
re-insert.
Not functioning while AWAITB blinks on the front
display panel.
The unit is automatically repairing recorded data that is
unusual. Wait until the time display is displayed. Repairing
may take more than 1 hour.
The disc tray does not open.
It can be removed by force using the following method.
A Press STOP/CLEAR (o) and STANDBY/ON on the unit
simultaneously for more than 2 seconds until ARESETTINGB
is displayed on the front display panel.
B Press and hold OPEN/CLOSE (M) on the unit until the disc
tray opens. (Takes about 30 seconds.)
C After removing the disc, press OPEN/CLOSE (M) to close
the disc tray. (The unit will turn off.)
The unit does not operate.
0 Child lock has been set.
Cancel the child lock. [ P79]
0 There are cases when the operation is prohibited, depending
on the disc.
0 If the unit cannot be operated at all, turn off the unit, and
then on again. (Lightning or static electricity may cause
malfunction of the unit.)
ALOCKB is displayed on the front display panel, and
the disc cannot be removed.
Cancel tray lock using the following method.
While holding STOP/CLEAR (o), press OPEN/CLOSE (M) on
the unit when the unit is in standby mode. AUNLOCKB is
displayed on the front display panel when tray lock is released.
Playback
No images on the TV screen.
0 Check if the video input is displayed.
Switch the TV (AV TV) with video/audio input terminals to
the external input connected to this unit.
0 Check the output format of the image. Press OUTPUT
FORMAT for more than 3 seconds and the current format
will be displayed on the front display panel. To revert back
to the standard setting, press OUTPUT FORMAT repeatedly
while the output format is displayed on the front display
panel. Then press ENTER after AOUT 576IB is displayed.
General
No power is supplied to the unit.
The power cord is disconnected from the socket.
The channel cannot be changed.
Channel cannot be changed during recording.
The remote control does not work.
0 The setting of the remote control code (1/2/3/4) is
inappropriate. [ P80]
0 The batteries may be depleted.
0 Remove the batteries, re-insert after more than 5 minutes
and then try again. Alternatively, replace with new batteries.
Dubbing from the Video Cassette Recorder is not
possible.
The external input channel AF-1B setting is inappropriate.
[ P21]
The on-screen text displayed when playing back on
this unit is recorded during dubbing.
Set to the following setting. Setup Menu ASUPERIMPOSEB =
AOFFB [ P88] a
Images do not appear on the TV screen or images are
distorted.
Check the output format of the image. Refer to the above
mentioned for checking method.
0 Playback does not start or stops immediately after
pressing PLAY.
0 ANO DISCB is displayed on the front display panel.
0 Place the disc on the disc tray with the playback surface
facing down.
0 A disc not compatible with this unit is loaded. [ P12]
0 The disc loaded is dirty.
Use a soft cloth to clean. [ P13]
0 The disc loaded is badly warped or scratched.
Images are distorted when you start high speed
search.
Images are distorted at the point where the playback speed
changes. It is not a malfunction.
RetroActive Playback does not start.
For HDD, set Setup Menu ALIVE MEMORYB [ P85] I to
other than AOFFB.
94
H EN
Page 95

Live Memory Playback does not start.
For DVD, Live Memory Playback cannot be performed other
than on DVD-RAM discs. Use a DVD-RAM disc. [ P12]
Playback does not start.
0 The programme has reached its ending portion.
Press ON SCREEN to confirm. [ P31]
0 The recording has just completed.
Wait approximately 30 seconds, then press PLAY.
0 It may not be possible to record, play, edit, or dub discs
recorded or formatted on other players or computers, on this
unit.
In addition, noise may appear on the screen or the sound
may be distorted.
There is no sound from the coaxial output when
performing 1.5x speed playback on the HDD.
To output sound from the coaxial digital sound output terminal
on the rear of this unit, check the following setting.
Setup Menu ADIGITAL AUDIO OUTB = APCM ONLYB
[ P84] D
The main and sub audio cannot be switched when the
coaxial digital sound output terminal on the rear of this
unit is connected.
For multi-channel programmes recorded on the DVD-RAM or
DVD-RW (VR mode) discs, check the following setting when
the main audio and sub audio cannot be switched.
Setup Menu ADIGITAL AUDIO OUTB = APCM ONLYB
[ P84] D
After setting, press AUDIO to select the desired audio.
Recording
The unit does not turn off after completing timer
recording.
The unit will not turn off in the following instances.
0 DVD is selected while HDD is timer recording (and vice
versa).
0 When multiple timer recordings were programmed for
different decks.
Timer programming cannot be made.
0 Confirm the contents of the timer programme. May not
function properly when there is a power failure. [ P42]
0 If timer programming cannot be set or cancelled, wait for
about 1 minute and then try again.
Others
A-- : --B is displayed on the front display panel.
Displays when power failure occurred. Set the date and time.
The disc remaining space does not increase even
though all recorded programmes have been deleted.
The DVD-RAM disc contains data recorded on a computer.
Computer data cannot be deleted on this unit. If the data is
unwanted, format the disc on this unit. [ P50]
DVD discs recorded on this unit cannot be played on
other players.
0 DVD-RAM discs recorded on this unit cannot be played on
incompatible DVD players.
0 Even finalised discs may not be playable, depending on their
recording condition.
Troubleshooting/Appendix
0 The desired programme cannot be recorded.
0 No images on the TV screen.
The channel does not correspond to that in the receiving area.
If you are unable to select the desired channel on this unit, set
the correct channel for the receiving broadcast. [ P23, 28]
Recording cannot be made.
0 No disc is loaded.
Or an incompatible disc is loaded.
Load a recordable disc. [ P12]
0 The disc loaded is not formatted.
Format the disc so that it can be recorded on this unit.
[ P50]
0 A finalised disc is loaded.
Recording cannot be made on finalised discs. [ P51]
0 Discs formatted on other players may not be recordable on
this unit.
0 The disc does not have enough space.
Delete unwanted programmes, or load a new disc. [ P66]
EN I
95
Page 96

On-screen Message
Playback
Message Advice
HDD NO TITLE RECORDED Record a programme first.
UNABLE TO GO FORWARD ANY MORE
UNABLE TO GO BACK ANY MORE Unable to return to a position before the start of recording.
DVD COPY PROHIBITED
CAN NOT PLAY
DISC NOT LOADED Load a disc.
DISC NOT REGISTERED IN THE LIBRARY
REGISTER DISC?
NAVIGATION IS NOT AVAILABLE WITH THIS
DISC
REGION CODE ERROR
UNREADABLE DISC
CHECK THE DISC
Recording
Message Advice
HDD
DVD
HDD/DVD TITLE MEMORY IS FULL, UNABLE TO
CAN NOT MODIFY LIVE MEMORY TIME,
DUE TO SHORTAGE OF CAPACITY
DELETE UNWANTED TITLE THEN RETRY
CAPACITY IS FULL, CAN NOT RECORD
DELETE UNWANTED TITLE
REMAINING CAPACITY IS SMALL
DELETE UNWANTED TITLE
CAPACITY IS FULL
RECORDING STOPPED
COPY PROHIBITED
CAN NOT RECORD
DISC NOT RECORDABLE
INSERT RECORDABLE DISC
RECORD
DELETE UNWANTED TITLE
Unable to advance to the end position of the programme or
a position ahead of the current recording position.
The unit has detected invalid contents of copy restrictions
when reading the disc or in the middle of playback.
A disc that is not registered in the library has been loaded.
Register as necessary. Registering is useful when watching
the disc later on. [ P76]
Library Database Navigation cannot be utilised with DVD
Videos or discs recorded and not finalised on other units.
This unit can play discs with region number A4B or AALLB.
Discs with other region numbers are not playable.
Check if the disc can be play back on this unit. [ P12]
There is no recordable space remaining in the hard disk.
Increase the recordable space by dubbing the currently
recorded programmes to DVD first, then delete the
programmes. [ P66]
Delete unwanted programmes. [ P66]
Delete unwanted programmes. In addition, dub
programmes that you want to the DVD discs and then
delete.
An attempt has been made to record copy-protected
programmes. Use a CPRM compatible disc in VR mode
when recording copy-once (programme that can only be
recorded once) programmes. However, programmes with
copy guard cannot be recorded.
Load a disc that is recordable on this unit. [ P12]
Up to 99 titles can be registered on a DVD, and 500 titles
on the HDD. Delete unwanted programmes. [ P66]
96
H EN
Page 97

Timer Programming
Message Advice
HDD CAN NOT SET TIMER PROGRAMME DUE
HDD/DVD SET CLOCK BEFORE TIMER
TO SHORTAGE OF CAPACITY
DELETE UNWANTED TITLE OR CHANGE
RECORD MODE
CAN NOT PERFORM TIMER RECORDING
CHECK PROGRAMME LIST TO CONFIRM
PROGRAMMING
Dubbing
Message Advice
HDD/DVD CAN NOT DUB DURING RECORDING
STOP RECORDING THEN RETRY
THE i.LINK DEVICE THAT YOU HAVE
CONNECTED IS NOT RECOGNIZED
MAKE SURE THAT DEVICE IS CONNECTED
PROPERLY AND POWERED ON
Disc
Message Advice
DVD COULD NOT CANCEL DISC FINALISATION
CHECK THE DISC
COULD NOT FINALISE THE DISC
CHECK THE DISC
COULD NOT FORMAT THE DISC
CHECK THE DISC
There is no recordable space remaining in the hard disk.
Increase the recordable space by dubbing the currently
recorded programmes to DVD first, then delete the
programmes. [ P66]
For HDD timer programming, there are timer programmes
that cannot be recorded within the duration set due to the
remaining capacity of HDD. Verify, cancel or change the
timer programme from the programme list where necessary.
[ P42]
Set the clock. [ P27]
Dub after recording ends.
Check that the DV device is correctly connected to the DV
input terminal on the unit’s front panel.
The disc may be dirty. Clean the disc and try again.
Troubleshooting/Appendix
EN I
97
Page 98

Specifications
GENERAL
Power requirement
AC 110 V - 240 V H,50Hz/60Hz
Power consumption
Power on: 36 W
Power off: 6.4 W
Temperature
Operating: 5I to 35I
Storage: -20I to 60I
Operating position
Horizontal only
Dimensions (WxHxD)
435 mm x 70 mm x 300 mm
Weight
4.5 kg
VIDEO/AUDIO (DVD Deck)
Recordable disc
DVD-RAM 12 cm (4.7 GB/9.4 GB
DVD-RAM 8 cm (1.4 GB/2.8 GB
DVD-R 12 cm (4.7 GB)
DVD-R 8 cm (1.4 GB)
DVD-RW 12 cm (4.7 GB)
DVD-RW 8 cm (1.4 GB)
*1 9.4 GB double-sided discs
*2 2.8 GB double-sided discs
Recording format
DVD-RAM : DVD Video Recording format
DVD-R : DVD Video format, DVD Video Recording
DVD-RW : DVD Video format, DVD Video Recording
Recording time
Maximum 8 hours (with 4.7 GB disc)
(XP) : Approx. 1 hour
(SP) : Approx. 2 hours
(LP) : Approx. 4 hours
(EP) : Approx. 6 hours
(FR) : Approx. 1 hour - 8 hours
Audio recording system
Dolby Digital (2 ch)
Linear PCM (XP mode only)
Video recording compression system
MPEG2 (CBR/VBR)
format
format
*1
)
*2
)
VIDEO/AUDIO (HDD Deck)
Capacity
160 GB
Recording time
(DV) : Approx. 11 hours
(XP) : Approx. 34 hours
(SP) : Approx. 69 hours
(LP) : Approx. 138 hours
(EP) : Approx. 209 hours
(FR480) : Approx. 300 hours
Audio recording system
Dolby Digital (2 ch)
Linear PCM (XP mode only)
Video recording compression system
MPEG2 (VBR)
INPUT/OUTPUT
21-pin SCART connectors
IN/OUT X 1, IN/DECODER X 1
S-video input
Y : 1.0 Vp-p, 75 K
C : 0.3 Vp-p, 75 K
Video input
1.0 Vp-p, 75 K (pin jack)
Audio input
2 Vrms (pin jack)
i. Link
4-pin for DV Input/Output
Component video output
Y : 1.0 Vp-p, 75 K
Pb/Pr : 0.7 Vp-p, 75 K
Corresponding to copy protection
Digital audio output
Coaxial
Corresponding to Dolby Digital and DTS Digital Surround,
Bitstream
Selectable in digital audio output setting menu
TUNER/TIMER
Tuning system
Frequency synthesised tuner
Signal system
PAL/SECAM colour signal, 625 lines/50 fields
TV channel storage capacity
99 positions (+AUX position)
Channel coverage
VHF : 44 MHz - 89 MHz/
104 MHz - 300 MHz/
302 MHz - 470 MHz
UHF : 470 MHz - 862 MHz
Memory backup time
Approx. 10 minutes.
E. & O.E. Design and specifications subject to change without
notice.
98
H EN
Page 99

List of Terms
A
A-B Repeat Playback ................................... 82
Adjusting the Picture Quality ........................ 83
Angle Selection ........................................... 47
Audio language ..................................... 47, 84
B
Basic Playback
(Library Database Navigation)
Basic Recording .......................................... 32
................. 34
C
Calendar timer programming ........................ 40
Changing or cancelling a timer programme ... 42
Chapter ................................................. 61, 91
Child Lock .................................................. 79
Clock Setting ............................................... 27
Copy-once .................................................. 53
CPRM ......................................................... 53
D
Decoder ..................................................... 91
Dolby Digital ............................ 78, 84, 87, 91
DTS ...................................................... 78, 91
Dubbing ..................................................... 52
Dubbing from DV Camcorder ...................... 56
Dubbing from Video Cassette Recorder
(VCR)
..................................................... 57
DV Auto Chaptering .................................... 86
F
Finalising .............................................. 51, 91
Formatting .................................................. 50
FR (Free Rate) Mode .................................... 70
Frame-by-frame playback ............................. 36
G
G-CODE ............................................... 30, 38
Guide Channel Set ...................................... 30
H
Help Guide ................................................. 69
High speed dubbing .................................... 54
I
Image Output Format ................................... 48
Instant Timer Recording ............................... 33
Intelligent Dual-Pass Encoding ..................... 52
J
JPEG ............................................... 12, 49, 91
Jump ........................................................... 36
Just dubbing ................................................ 54
L
Language code list ....................................... 90
Letterbox .............................................. 25, 91
Library ........................................................ 76
Linear PCM ............................... 78, 84, 87, 91
Live Memory Playback ................................. 44
M
Manual dubbing .......................................... 54
Marks ................................................... 36, 61
Monitor type ............................................... 25
MP3 ............................................... 12, 49, 91
N
NICAM .................................................78, 87
O
One Touch Replay ................................. 36, 45
On-Screen Language .................................... 24
On-screen Message ......................................96
Overwrite protection .................................... 73
P
Pan & Scan ............................................25, 91
PBC (Playback Control) ................................ 47
Playback Setting Menu ................................. 81
Preview Playback ........................................63
Programme alert ..........................................73
Programme overlap ................................ 39, 41
Progressive scan ..........................................91
Q
Quick startup ...............................................88
R
Random Playback ........................................83
Recordable time ..........................................70
Recording Mode ..........................................70
Region number ......................................12, 91
Relief Recording ..........................................75
Remote Control ...........................................16
Repeat Playback ..........................................82
Resetting .....................................................94
Resume .................................................36, 85
Resuming Playback ...................................... 45
RetroActive Playback ................................... 74
RetroActive Recording .................................74
S
Search Playback ..........................................82
Setting Receiving Channels ........................... 28
Simulated Surround Effect ............................ 83
Simultaneous Recording and Playback .......... 44
Skip ............................................................36
Skip Search .................................................36
Slide show .............................................49, 83
Slow Motion Playback ................................. 36
Sound .........................................................78
Subtitle .................................................47, 84
Superimpose ...............................................88
T
Temporary Recording ...................................74
Time Search Playback ..................................82
Tray Lock ....................................................79
V
Video mode .......................... 9, 12, 50, 51, 91
VR mode ............................... 9, 12, 50, 51, 91
W
Weekly/Daily Timer Programming ................ 72
Troubleshooting/Appendix
EN I
99
Page 100

EN
DR-MH300SAA
© 2005 Victor Company of Japan, Limited
Printed in China
AA
1105STH-SW-SC
 Loading...