

Page 1
DLA-NX9, DLA-NX7, DLA-NX5, DLA-N7, DLA-N5, DLA-N11, DLA-N8,
DLA-N6, DLA-RS3000, DLA-RS2000, DLA-RS1000
Firmware Update Procedures
Required Equipment
● Projector
Model: DLA-NX9, DLA-NX7, DLA-NX5, DLA-N7, DLA-N5, DLA-N11, DLA-N8, DLA-N6, DLA-RS3000,
DLA-RS2000, DLA-RS1000
● PC
A PC capable of connecting to the Internet, downloading the firmware for updating from our website and
extracting the zip file.
● USB drive (1 GB or more, FAT32 format)
* Make sure there are no other folders and files in the USB drive.
Firmware Update Procedures
A Downloading the Update File
B Checking the Firmware Version
C Performing the Update
D Checking the Firmware Version after Updating
Downloading the Update File
1 Download the zip file for the update onto the PC.
File name: jkcpj201801v****.zip
* [****] is the version number
2 Unzip the file and copy the "UD_B2A1" folder and its contents to the root directory of the USB drive.
* Placing the copied data in a location other than the root directory, changing the folder name and file name
etc. will prevent the firmware from updating properly.
1
B5K-0674-01
Page 2
Checking the Firmware Version
Remote
Control
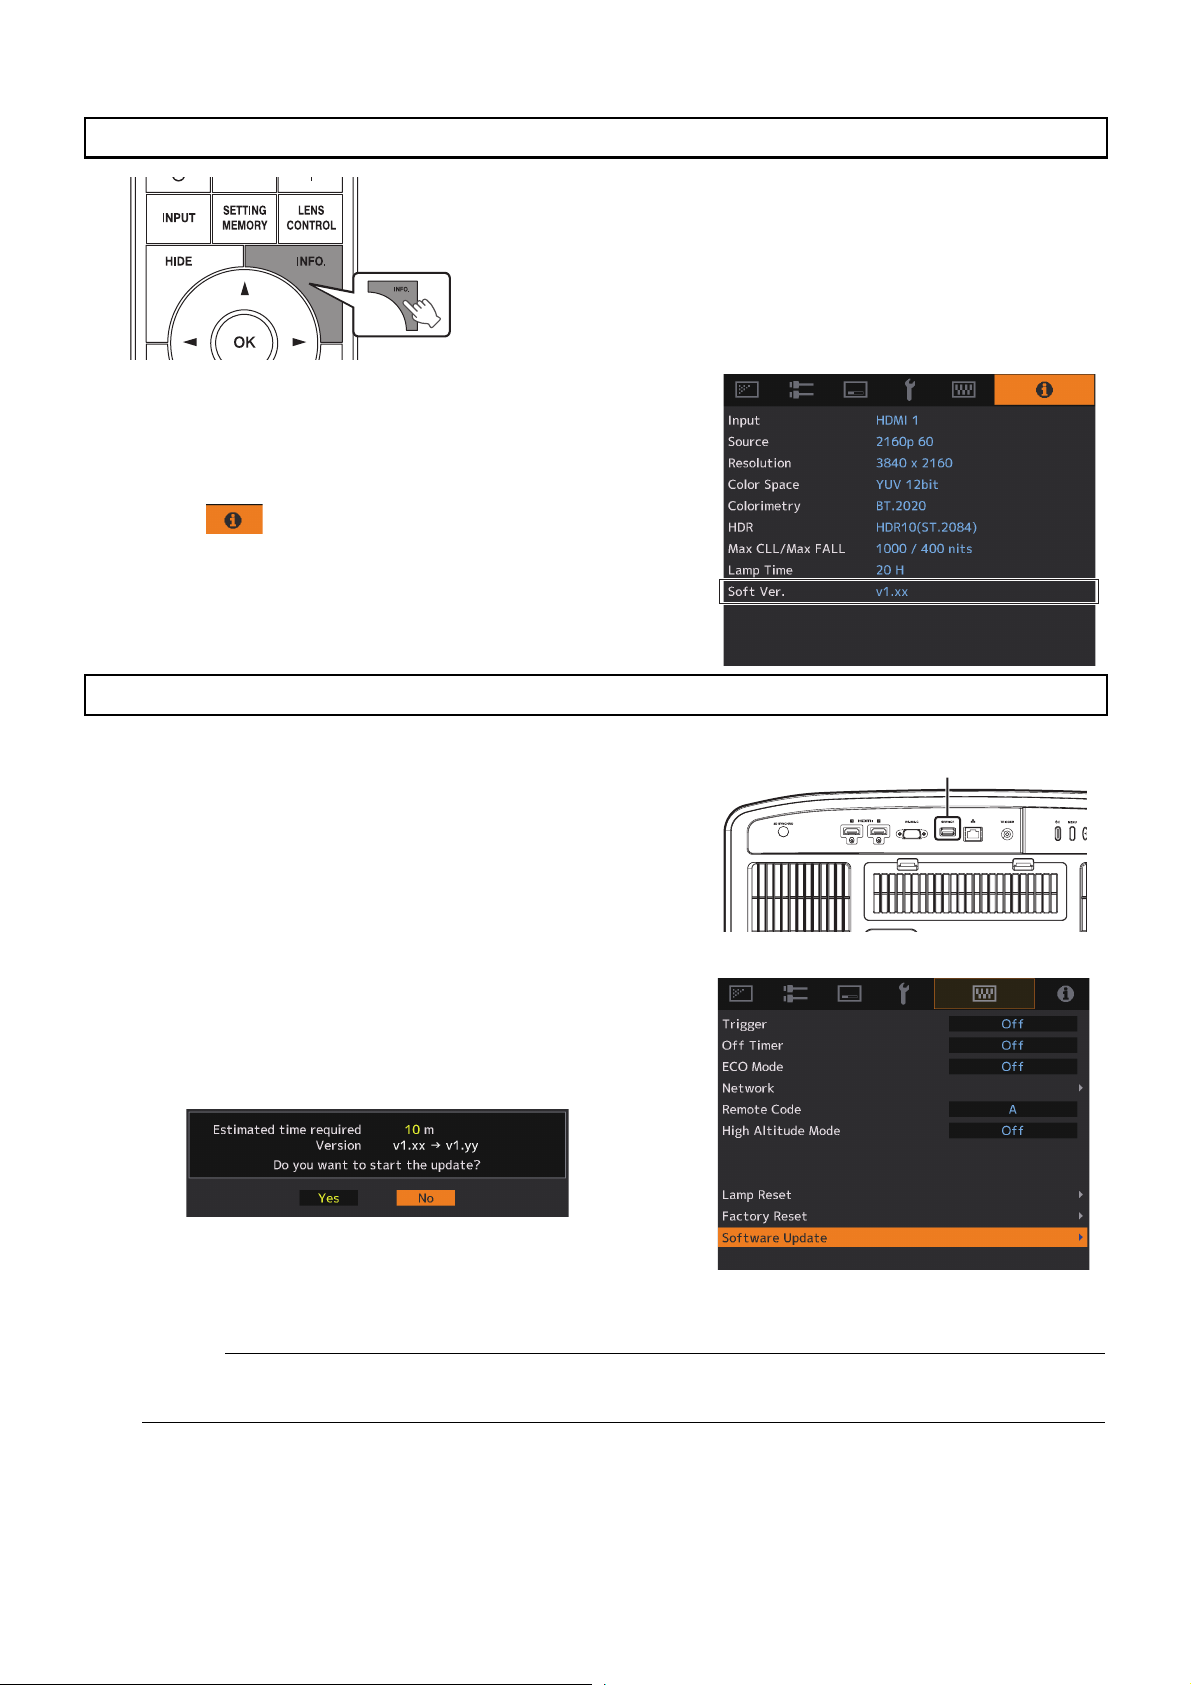
䡵 Checking the Firmware Version
Update will be performed if the version of the update file is newer
than the firmware version of the projector.
1 Turn on the projector.
2 Press the [MENU] button to display the menu.
3 Select (Information) from the menu or press the
[INFO] button on the remote control.
The current firmware version is displayed at the "Soft Ver."
item.
Performing the Update
1 Connect the USB drive to the [SERVICE] terminal located
at the rear side of the projector.
[SERVICE] terminal
2 Turn on the projector.
3 Press the [MENU] button to display the menu.
4 Select "Function" → "Software Update" in the menu.
A confirmation screen asking whether to start the software
update appears.
5 Check the version and required time, select "Yes" and
press OK.
The update is performed.
Caution:
● Do not turn off the projector or remove the USB drive while update is in progress. Interrupting the update
may cause the projector to malfunction.
6 Update completed
When the update is complete, the projector will turn off and all the LED indicators will go out. To turn on the
power again, use the [Power] button on the projector. Alternatively, press any button on the remote control
once to exit the standby state then press the [ON] button on the remote control.
2
Page 3

Checking the Firmware Version after Updating
Turn on the projector and check its firmware version. (A Page 2) If the firmware version of the projector is the same
as the version of the update file, update has been performed properly.
LED Indication during the Update
"STANDBY/ON", "WARNING" and "LIGHT" light up in sequence
LIGHTWARNING
STANDBY/ON
Data writing in progress
(red) (orange) (green)
Light up in sequence
* The speed to sequentially light up the LED increases depending on the
progress of the update.
"STANDBY/ON" and "WARNING" light up simultaneously and blink
USB drive detection in progress
alternately with "LIGHT"
LIGHTWARNING
STANDBY/ON
LIGHTWARNING
STANDBY/ON
(red) (orange)(green)
Blink alternately
"STANDBY/ON", "WARNING" and "LIGHT" blink simultaneously Update error
Request for repair at your
authorized dealer or a nearby
LIGHTWARNING
STANDBY/ON
service center.
(red) (orange) (green)
Blink simultaneously
3
Page 4

Troubleshooting
If the update does not end even after it has long past the estimated required time, there is a possibility that update
has failed. Request for repair at your authorized dealer or a nearby service center.
When the following messages appear...
Check whether the USB drive is correctly
inserted.
Check whether the USB drive is FAT32 formatted.
Check whether the update file is correctly copied
to the USB drive.
Check whether the file name and folder name
have been changed.
© 2019 JVCKENWOOD Corporation 0219KSYH-SW-XX
 Loading...